Embed Size (px)
Citation preview
Learn How to Draw
Land Animals
For the Absolute Beginner
Adrian Sanqui and John Davidson
HOW TO LEARN
Book Series
JD- Biz Publishing
2

All Rights Reserved.No part of this publication may be reproduced in any form or by any means, including
scanning, photocopying, or otherwise without prior written permission from JD-Biz Corp andat http://JD-Biz.com. Copyright © 2013All Images Licensed by Adrian Sanqui
Fotolia and 123RF
Read More “Learn How to Draw” Books
3
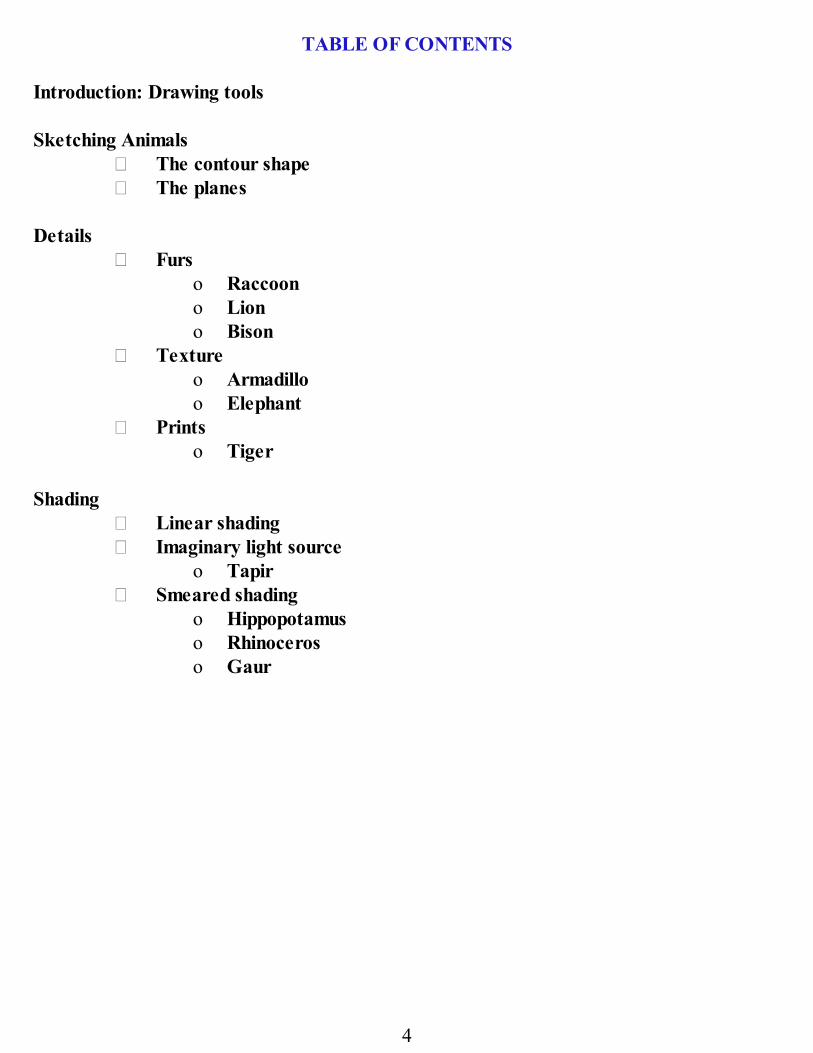
TABLE OF CONTENTS Introduction: Drawing tools Sketching Animals
� The contour shape� The planes
Details
� Furso Raccoono Liono Bison
� Textureo Armadilloo Elephant
� Printso Tiger
Shading
� Linear shading� Imaginary light source
o Tapir� Smeared shading
o Hippopotamuso Rhinoceroso Gaur
4
Drawing tools
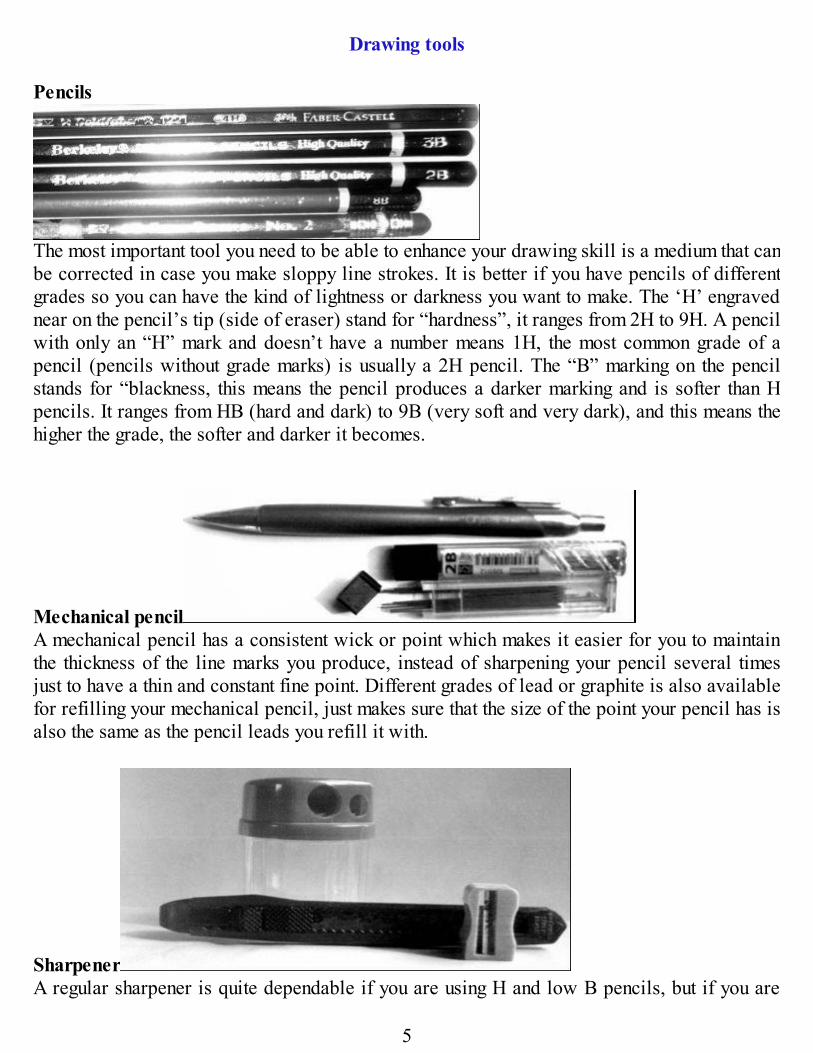
Pencils
The most important tool you need to be able to enhance your drawing skill is a medium that canbe corrected in case you make sloppy line strokes. It is better if you have pencils of differentgrades so you can have the kind of lightness or darkness you want to make. The ‘H’ engravednear on the pencil’s tip (side of eraser) stand for “hardness”, it ranges from 2H to 9H. A pencilwith only an “H” mark and doesn’t have a number means 1H, the most common grade of apencil (pencils without grade marks) is usually a 2H pencil. The “B” marking on the pencilstands for “blackness, this means the pencil produces a darker marking and is softer than Hpencils. It ranges from HB (hard and dark) to 9B (very soft and very dark), and this means thehigher the grade, the softer and darker it becomes.
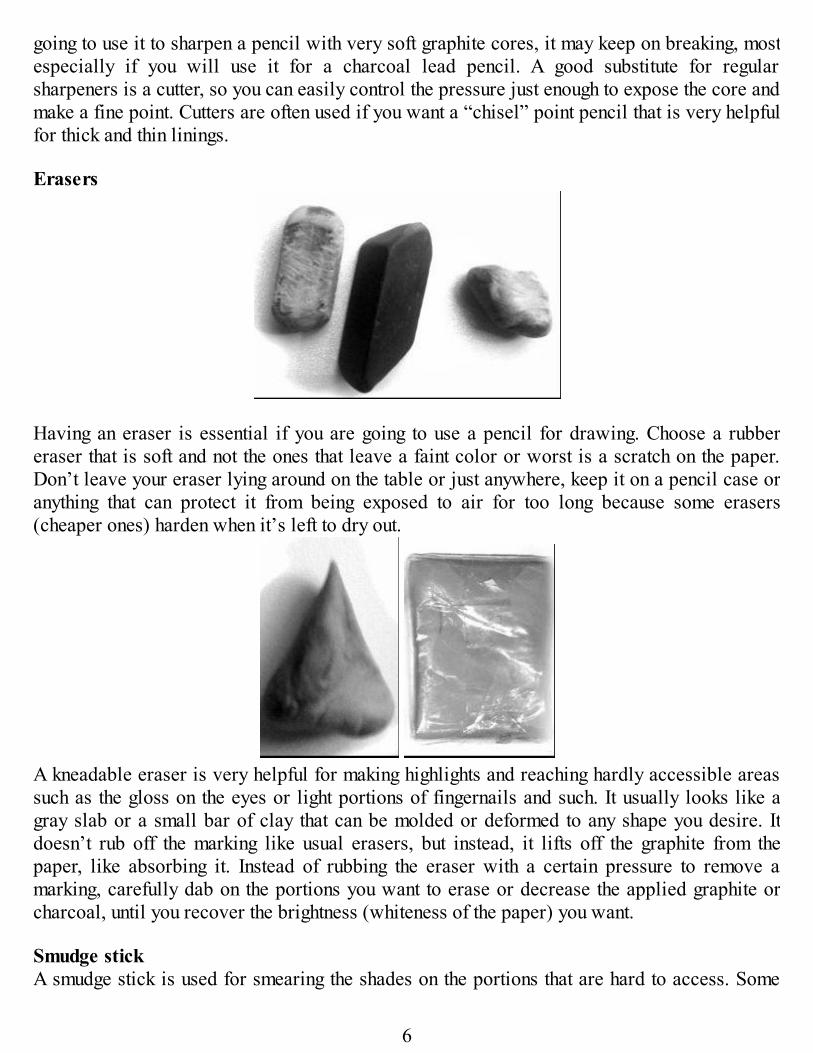
Mechanical pencilA mechanical pencil has a consistent wick or point which makes it easier for you to maintainthe thickness of the line marks you produce, instead of sharpening your pencil several timesjust to have a thin and constant fine point. Different grades of lead or graphite is also availablefor refilling your mechanical pencil, just makes sure that the size of the point your pencil has isalso the same as the pencil leads you refill it with.
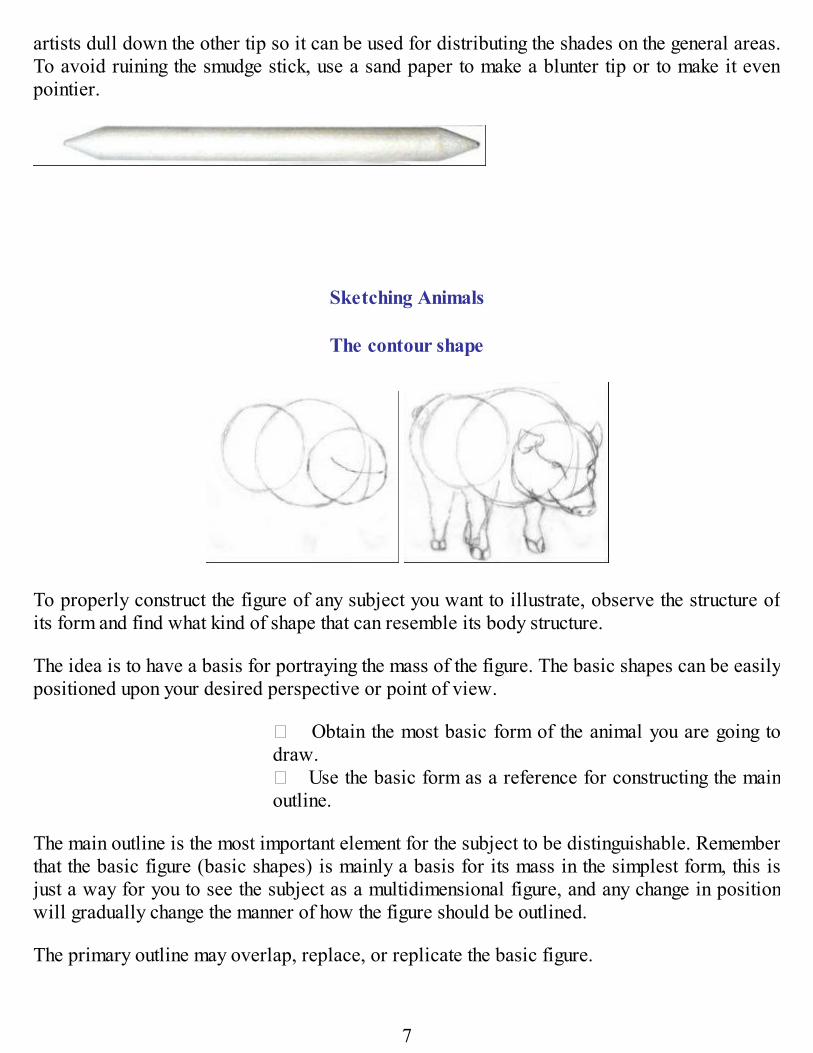
SharpenerA regular sharpener is quite dependable if you are using H and low B pencils, but if you are
5
going to use it to sharpen a pencil with very soft graphite cores, it may keep on breaking, mostespecially if you will use it for a charcoal lead pencil. A good substitute for regularsharpeners is a cutter, so you can easily control the pressure just enough to expose the core andmake a fine point. Cutters are often used if you want a “chisel” point pencil that is very helpfulfor thick and thin linings. Erasers
Having an eraser is essential if you are going to use a pencil for drawing. Choose a rubbereraser that is soft and not the ones that leave a faint color or worst is a scratch on the paper.Don’t leave your eraser lying around on the table or just anywhere, keep it on a pencil case oranything that can protect it from being exposed to air for too long because some erasers(cheaper ones) harden when it’s left to dry out.
A kneadable eraser is very helpful for making highlights and reaching hardly accessible areassuch as the gloss on the eyes or light portions of fingernails and such. It usually looks like agray slab or a small bar of clay that can be molded or deformed to any shape you desire. Itdoesn’t rub off the marking like usual erasers, but instead, it lifts off the graphite from thepaper, like absorbing it. Instead of rubbing the eraser with a certain pressure to remove amarking, carefully dab on the portions you want to erase or decrease the applied graphite orcharcoal, until you recover the brightness (whiteness of the paper) you want. Smudge stickA smudge stick is used for smearing the shades on the portions that are hard to access. Some
6
artists dull down the other tip so it can be used for distributing the shades on the general areas.To avoid ruining the smudge stick, use a sand paper to make a blunter tip or to make it evenpointier.
Sketching Animals
The contour shape
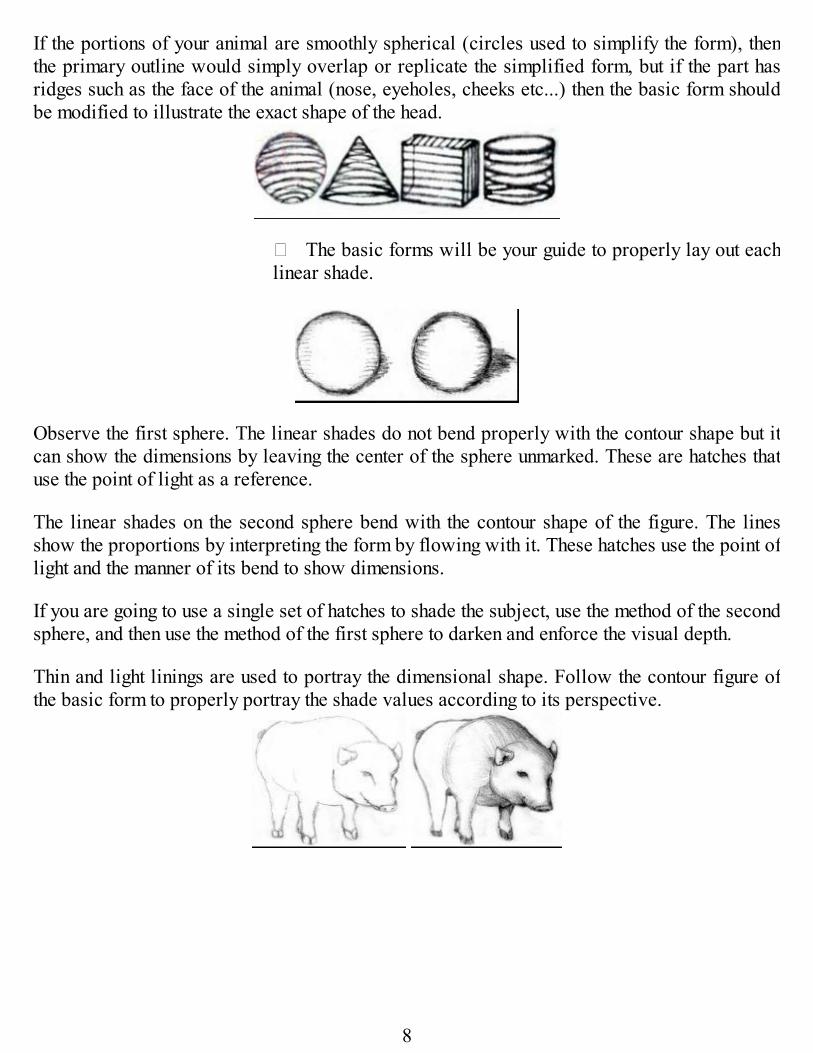
To properly construct the figure of any subject you want to illustrate, observe the structure ofits form and find what kind of shape that can resemble its body structure. The idea is to have a basis for portraying the mass of the figure. The basic shapes can be easilypositioned upon your desired perspective or point of view.
� Obtain the most basic form of the animal you are going todraw.� Use the basic form as a reference for constructing the mainoutline.
The main outline is the most important element for the subject to be distinguishable. Rememberthat the basic figure (basic shapes) is mainly a basis for its mass in the simplest form, this isjust a way for you to see the subject as a multidimensional figure, and any change in positionwill gradually change the manner of how the figure should be outlined. The primary outline may overlap, replace, or replicate the basic figure.
7
If the portions of your animal are smoothly spherical (circles used to simplify the form), thenthe primary outline would simply overlap or replicate the simplified form, but if the part hasridges such as the face of the animal (nose, eyeholes, cheeks etc...) then the basic form shouldbe modified to illustrate the exact shape of the head.
� The basic forms will be your guide to properly lay out eachlinear shade.
Observe the first sphere. The linear shades do not bend properly with the contour shape but itcan show the dimensions by leaving the center of the sphere unmarked. These are hatches thatuse the point of light as a reference. The linear shades on the second sphere bend with the contour shape of the figure. The linesshow the proportions by interpreting the form by flowing with it. These hatches use the point oflight and the manner of its bend to show dimensions. If you are going to use a single set of hatches to shade the subject, use the method of the secondsphere, and then use the method of the first sphere to darken and enforce the visual depth. Thin and light linings are used to portray the dimensional shape. Follow the contour figure ofthe basic form to properly portray the shade values according to its perspective.
8
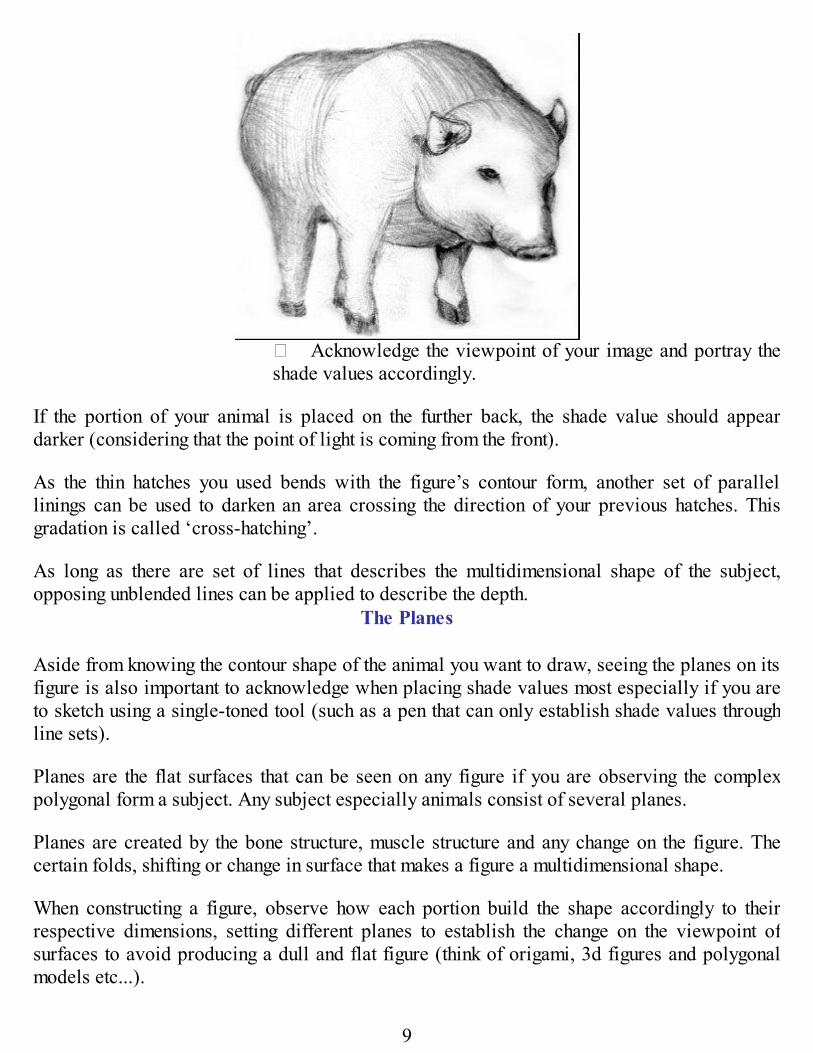
� Acknowledge the viewpoint of your image and portray theshade values accordingly.
If the portion of your animal is placed on the further back, the shade value should appeardarker (considering that the point of light is coming from the front). As the thin hatches you used bends with the figure’s contour form, another set of parallellinings can be used to darken an area crossing the direction of your previous hatches. Thisgradation is called ‘cross-hatching’. As long as there are set of lines that describes the multidimensional shape of the subject,opposing unblended lines can be applied to describe the depth.
The Planes
Aside from knowing the contour shape of the animal you want to draw, seeing the planes on itsfigure is also important to acknowledge when placing shade values most especially if you areto sketch using a single-toned tool (such as a pen that can only establish shade values throughline sets). Planes are the flat surfaces that can be seen on any figure if you are observing the complexpolygonal form a subject. Any subject especially animals consist of several planes. Planes are created by the bone structure, muscle structure and any change on the figure. Thecertain folds, shifting or change in surface that makes a figure a multidimensional shape. When constructing a figure, observe how each portion build the shape accordingly to theirrespective dimensions, setting different planes to establish the change on the viewpoint ofsurfaces to avoid producing a dull and flat figure (think of origami, 3d figures and polygonalmodels etc...).
9
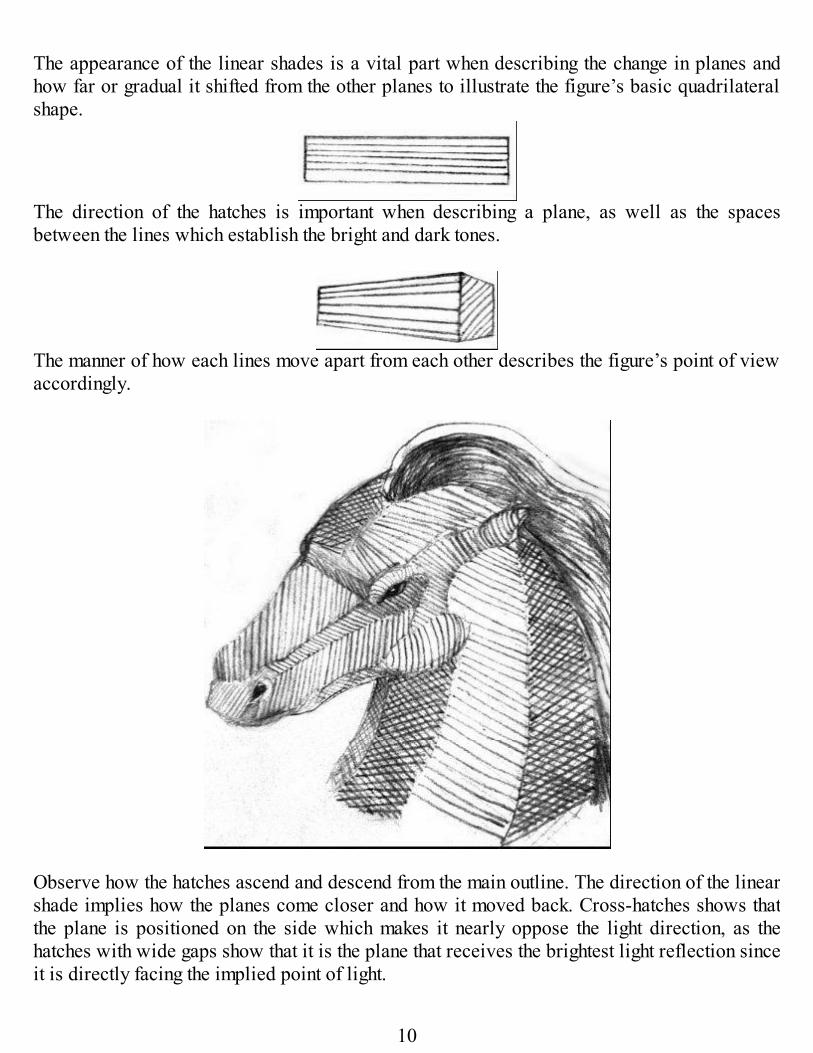
The appearance of the linear shades is a vital part when describing the change in planes andhow far or gradual it shifted from the other planes to illustrate the figure’s basic quadrilateralshape.
The direction of the hatches is important when describing a plane, as well as the spacesbetween the lines which establish the bright and dark tones.
The manner of how each lines move apart from each other describes the figure’s point of viewaccordingly.
Observe how the hatches ascend and descend from the main outline. The direction of the linearshade implies how the planes come closer and how it moved back. Cross-hatches shows thatthe plane is positioned on the side which makes it nearly oppose the light direction, as thehatches with wide gaps show that it is the plane that receives the brightest light reflection sinceit is directly facing the implied point of light.
10

The bending hatches portray a round surface effectively. And thick hatches portray the areawith most depth such as the eyehole. As much as you can, always use slanting lines and avoid using perfectly vertical lines.Effectively portraying the planes of an animal elaborates the actual appearance of the subjectto your drawing dramatically.
Apply the method of linear shading according to its contour figure and combine it by hatchesthat describe the structural planes to give a better impression of the animal’s form and itsgradated appearance as a whole. Always keep in mind that farther portions should be darker(use cross-hatching), and simply use hatches on the nearer portions. Bend the lines accordingto the plane and use hatches of a different angle to portray the difference in its depth andposition (dimension value). In smudged shading, take note of the bright spots that a single planeshould have aside from the respective shade value that it has depending on its angle.
Details
Portraying the detail of an animal’s texture is initiated by using different kinds of lines indifferent tones, sets and manner of curves. They can be easily initiated by choosing what kind of line marking best suites the details youwish to portray on the subject you are drawing. Illustrating the texture of an animal basicallybreaks the solid outlining of a figure, and forming or expressing the details in a set of layers or
11
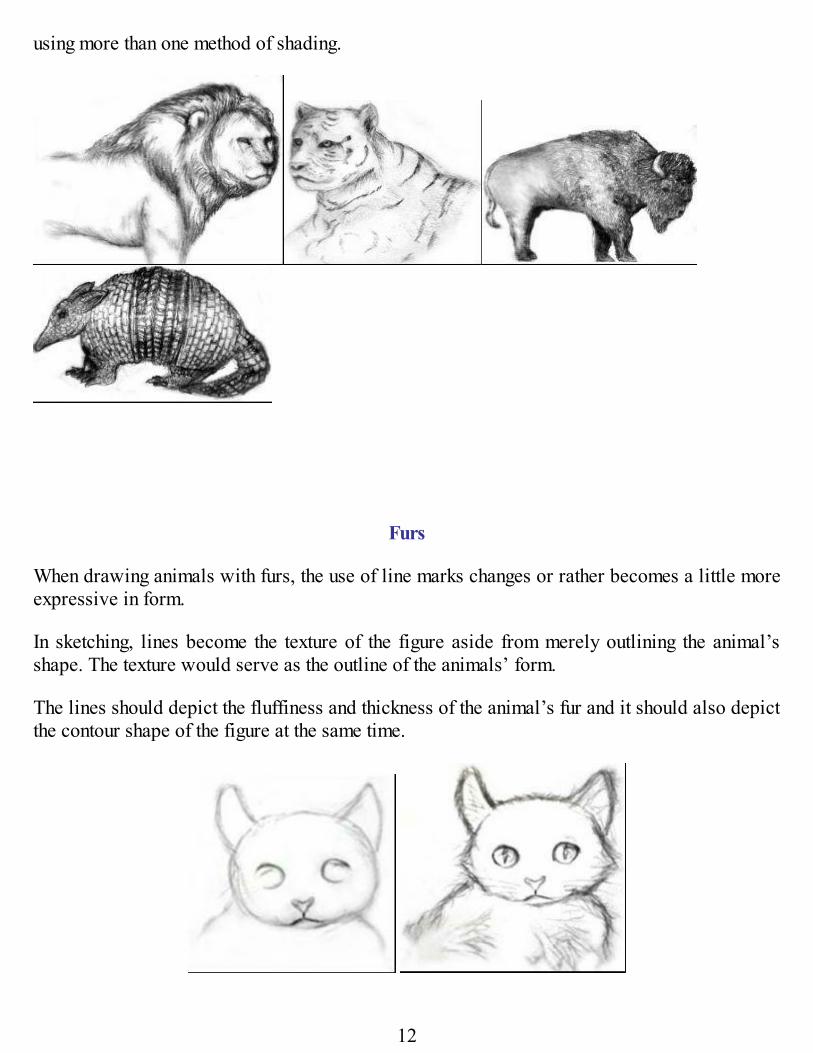
using more than one method of shading.
Furs When drawing animals with furs, the use of line marks changes or rather becomes a little moreexpressive in form. In sketching, lines become the texture of the figure aside from merely outlining the animal’sshape. The texture would serve as the outline of the animals’ form. The lines should depict the fluffiness and thickness of the animal’s fur and it should also depictthe contour shape of the figure at the same time.
12
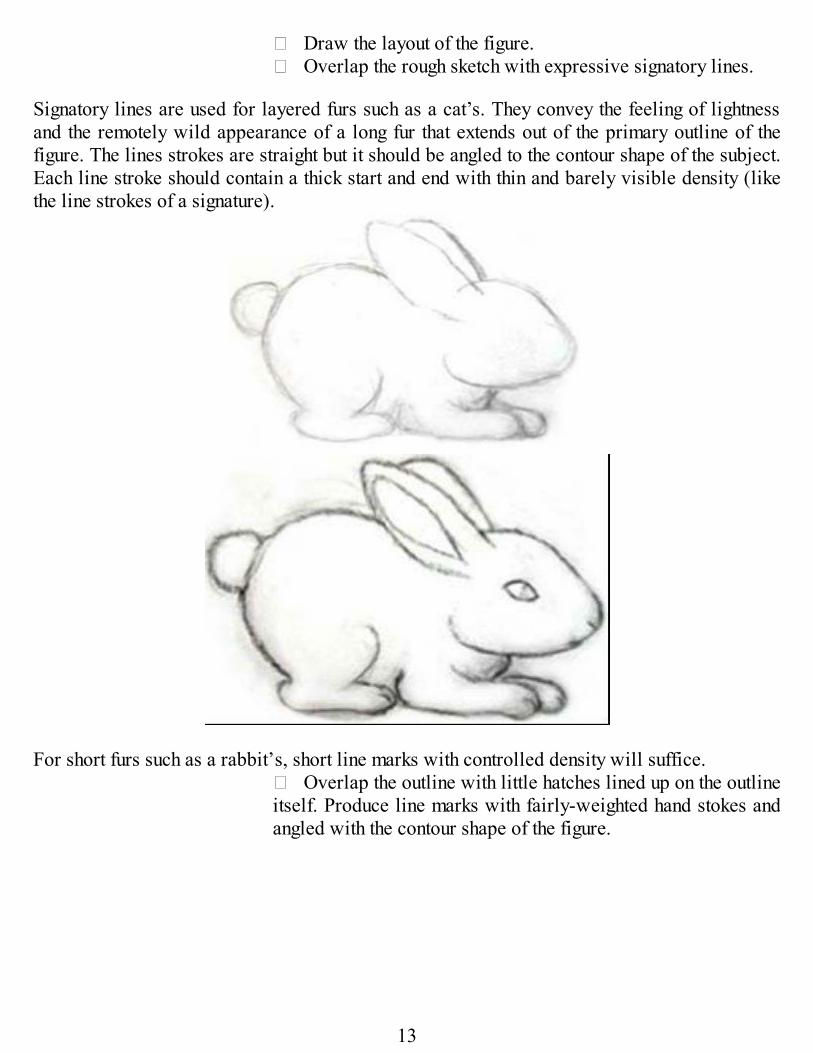
� Draw the layout of the figure.� Overlap the rough sketch with expressive signatory lines.
Signatory lines are used for layered furs such as a cat’s. They convey the feeling of lightnessand the remotely wild appearance of a long fur that extends out of the primary outline of thefigure. The lines strokes are straight but it should be angled to the contour shape of the subject.Each line stroke should contain a thick start and end with thin and barely visible density (likethe line strokes of a signature).
For short furs such as a rabbit’s, short line marks with controlled density will suffice.
� Overlap the outline with little hatches lined up on the outlineitself. Produce line marks with fairly-weighted hand stokes andangled with the contour shape of the figure.
13
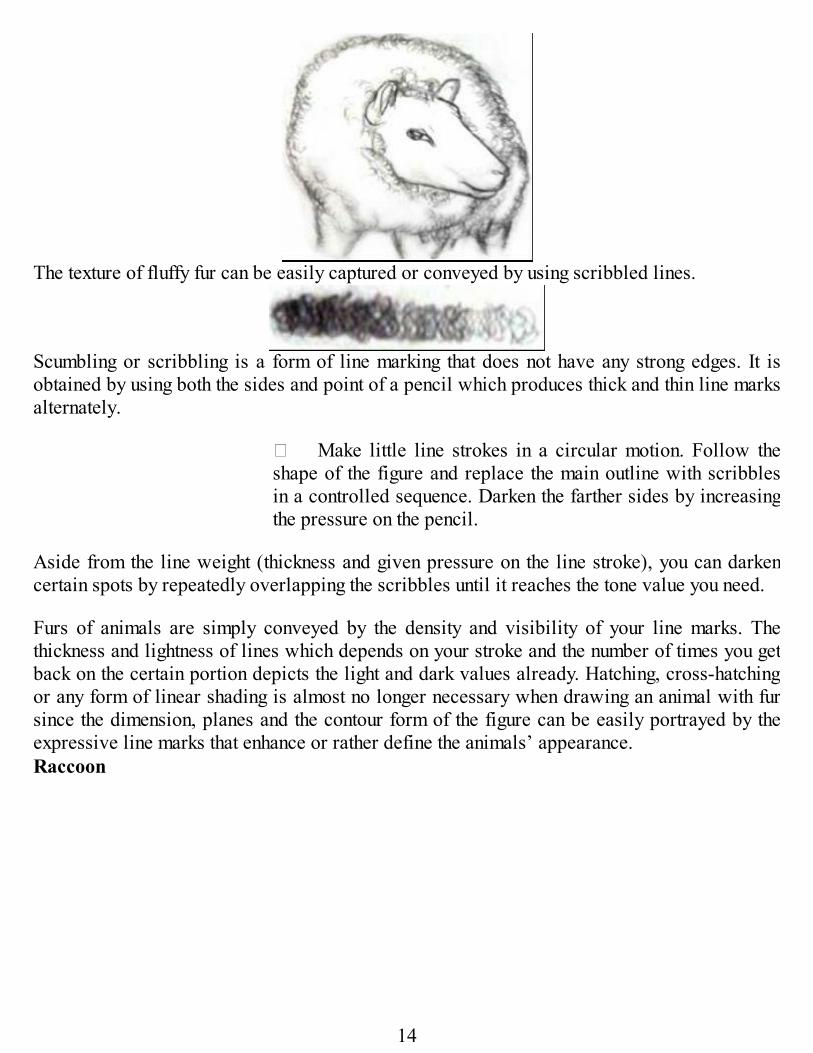
The texture of fluffy fur can be easily captured or conveyed by using scribbled lines.
Scumbling or scribbling is a form of line marking that does not have any strong edges. It isobtained by using both the sides and point of a pencil which produces thick and thin line marksalternately.
� Make little line strokes in a circular motion. Follow theshape of the figure and replace the main outline with scribblesin a controlled sequence. Darken the farther sides by increasingthe pressure on the pencil.
Aside from the line weight (thickness and given pressure on the line stroke), you can darkencertain spots by repeatedly overlapping the scribbles until it reaches the tone value you need. Furs of animals are simply conveyed by the density and visibility of your line marks. Thethickness and lightness of lines which depends on your stroke and the number of times you getback on the certain portion depicts the light and dark values already. Hatching, cross-hatchingor any form of linear shading is almost no longer necessary when drawing an animal with fursince the dimension, planes and the contour form of the figure can be easily portrayed by theexpressive line marks that enhance or rather define the animals’ appearance.Raccoon
14
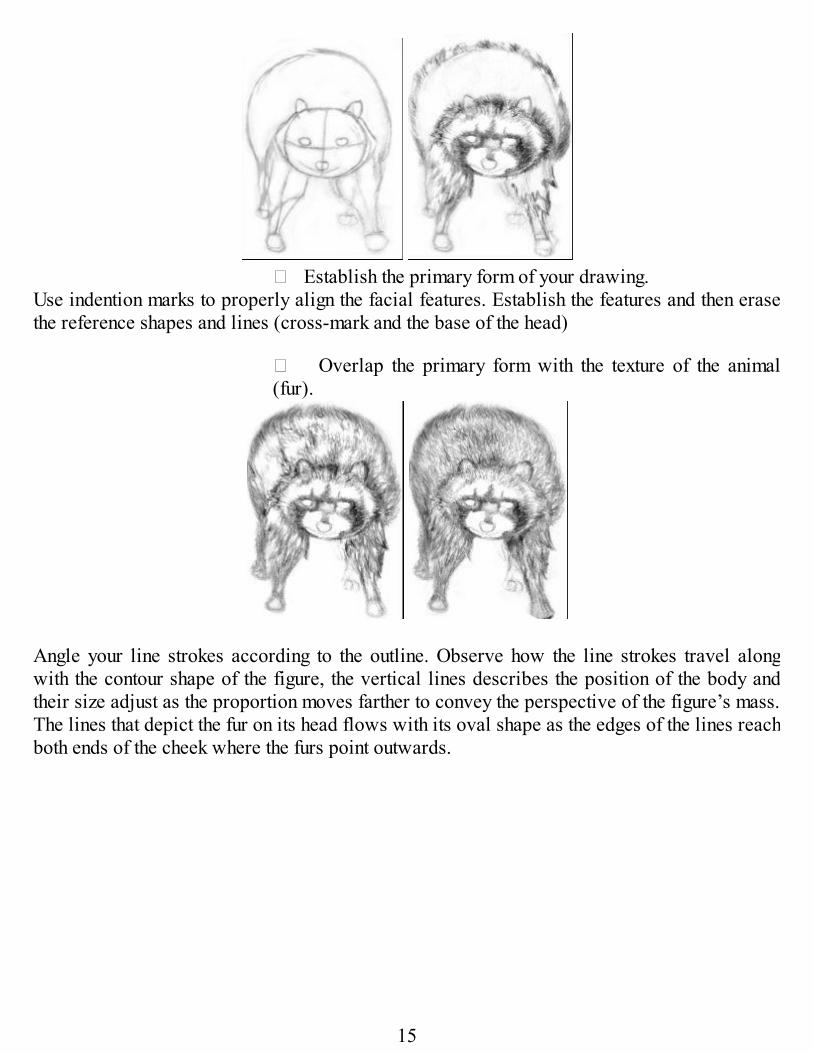
� Establish the primary form of your drawing.
Use indention marks to properly align the facial features. Establish the features and then erasethe reference shapes and lines (cross-mark and the base of the head)
� Overlap the primary form with the texture of the animal(fur).
Angle your line strokes according to the outline. Observe how the line strokes travel alongwith the contour shape of the figure, the vertical lines describes the position of the body andtheir size adjust as the proportion moves farther to convey the perspective of the figure’s mass.The lines that depict the fur on its head flows with its oval shape as the edges of the lines reachboth ends of the cheek where the furs point outwards.
15
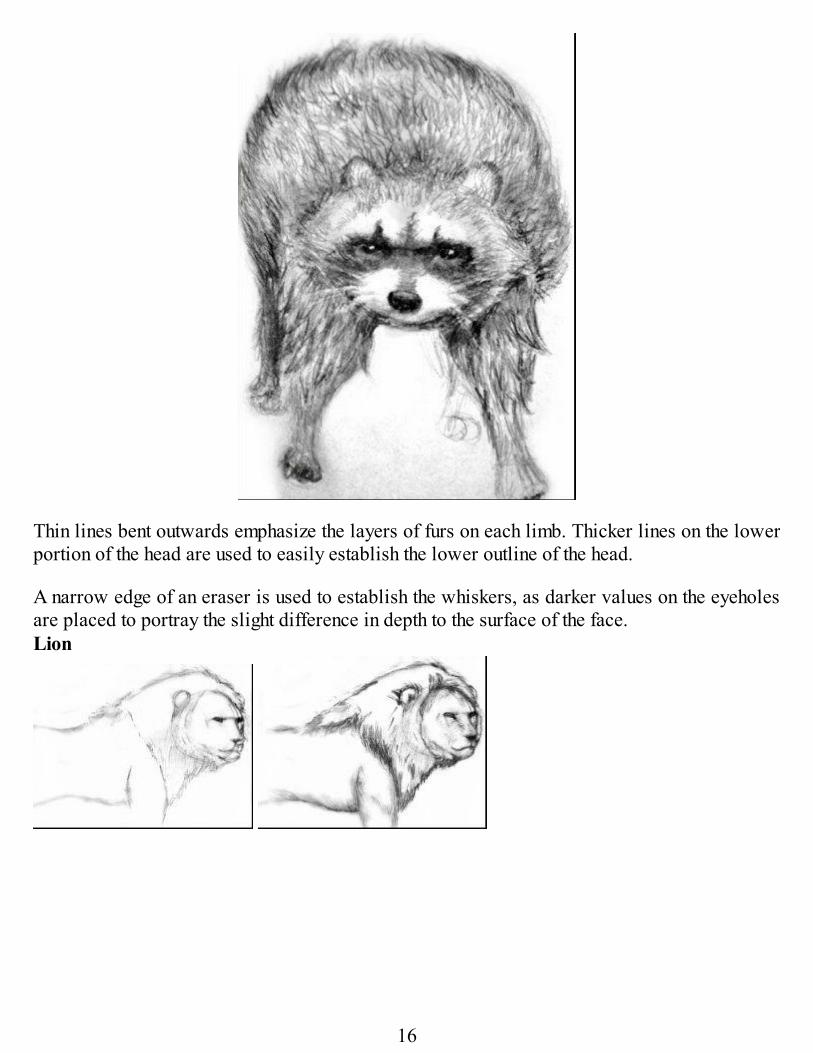
Thin lines bent outwards emphasize the layers of furs on each limb. Thicker lines on the lowerportion of the head are used to easily establish the lower outline of the head. A narrow edge of an eraser is used to establish the whiskers, as darker values on the eyeholesare placed to portray the slight difference in depth to the surface of the face.Lion
16

Short and long furs of an animal can be established by different line values and solidity of themarking (darkness and thickness). Establishing the difference in texture of a fur should beobvious and easily distinguishable.
� The short furs of a lion’s body are portrayed by contourhatches that depict the dimensions of its shape.� The long crowning hair is best portrayed with thicker anddarker line strokes with a set of different waves to depict itsfluffy textures
Bison
17
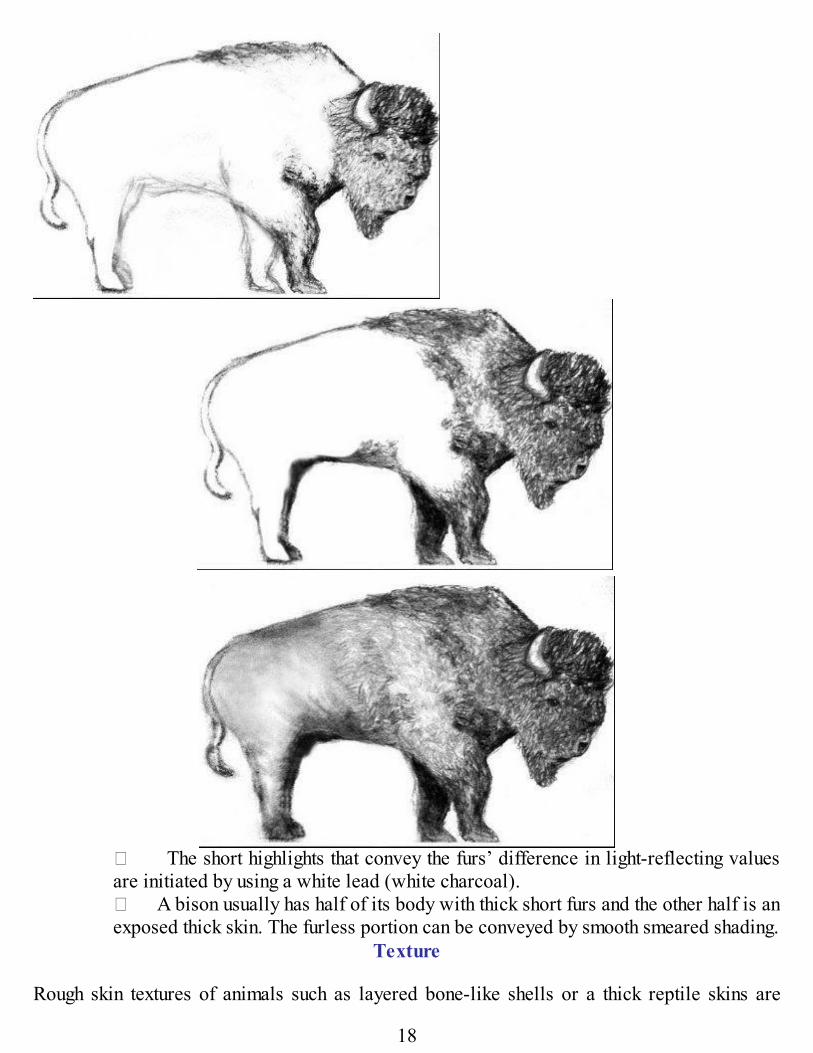
� The short highlights that convey the furs’ difference in light-reflecting valuesare initiated by using a white lead (white charcoal).� A bison usually has half of its body with thick short furs and the other half is anexposed thick skin. The furless portion can be conveyed by smooth smeared shading.
Texture Rough skin textures of animals such as layered bone-like shells or a thick reptile skins are
18
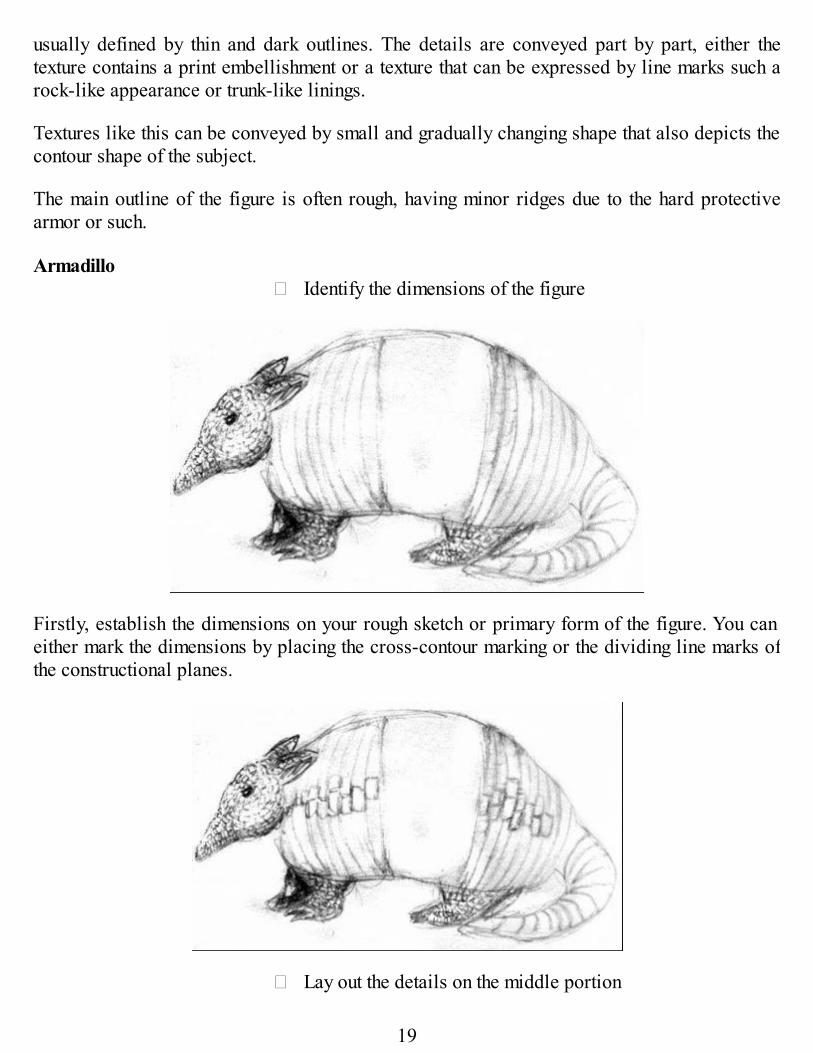
usually defined by thin and dark outlines. The details are conveyed part by part, either thetexture contains a print embellishment or a texture that can be expressed by line marks such arock-like appearance or trunk-like linings. Textures like this can be conveyed by small and gradually changing shape that also depicts thecontour shape of the subject. The main outline of the figure is often rough, having minor ridges due to the hard protectivearmor or such. Armadillo
� Identify the dimensions of the figure
Firstly, establish the dimensions on your rough sketch or primary form of the figure. You caneither mark the dimensions by placing the cross-contour marking or the dividing line marks ofthe constructional planes.
� Lay out the details on the middle portion
19
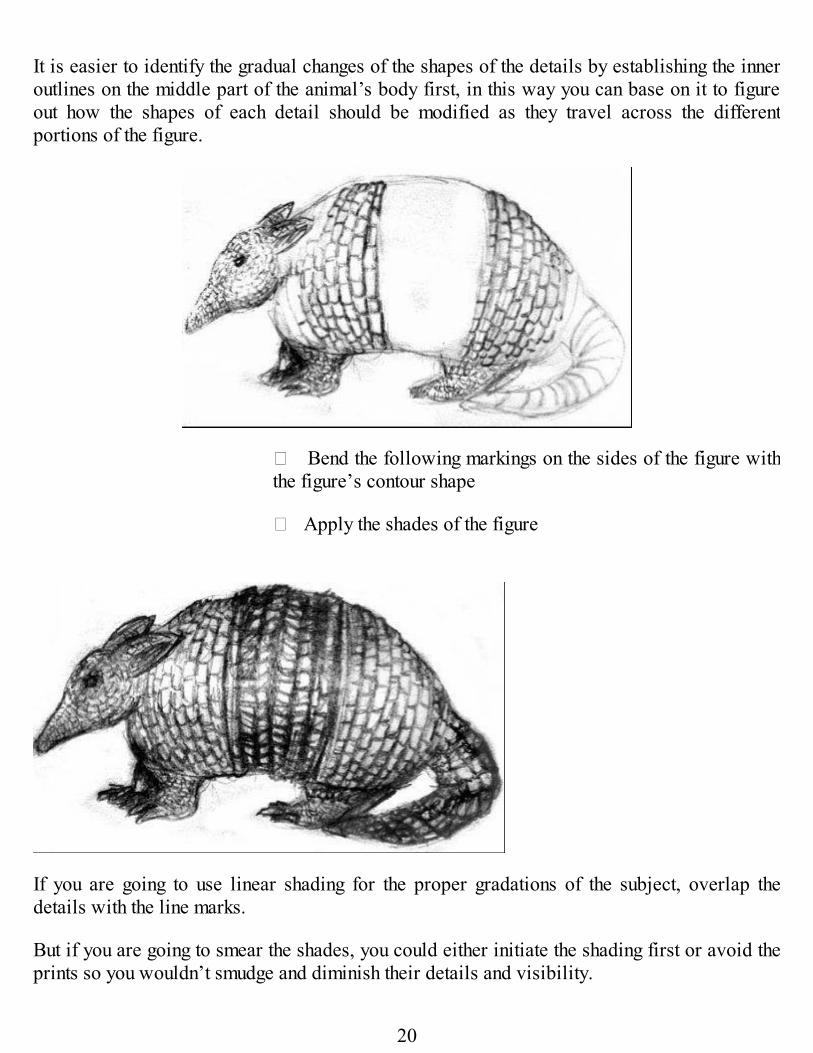
It is easier to identify the gradual changes of the shapes of the details by establishing the inneroutlines on the middle part of the animal’s body first, in this way you can base on it to figureout how the shapes of each detail should be modified as they travel across the differentportions of the figure.
� Bend the following markings on the sides of the figure withthe figure’s contour shape
� Apply the shades of the figure
If you are going to use linear shading for the proper gradations of the subject, overlap thedetails with the line marks. But if you are going to smear the shades, you could either initiate the shading first or avoid theprints so you wouldn’t smudge and diminish their details and visibility.
20
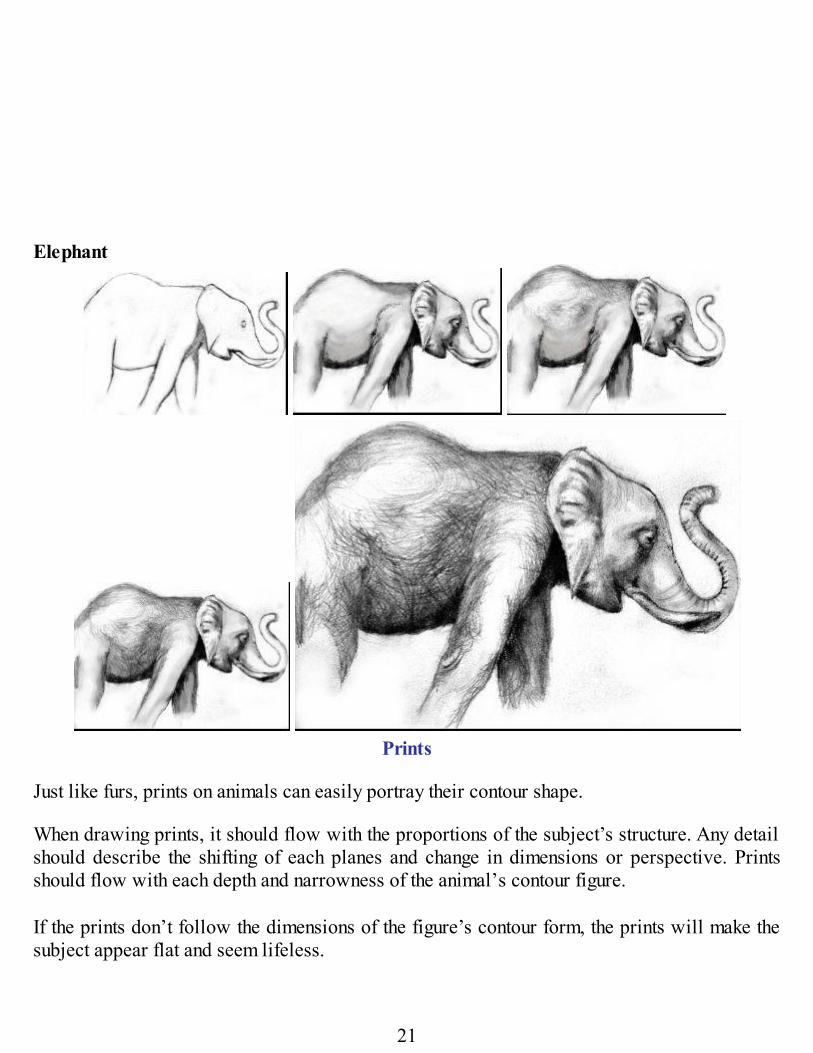
Elephant
Prints
Just like furs, prints on animals can easily portray their contour shape. When drawing prints, it should flow with the proportions of the subject’s structure. Any detailshould describe the shifting of each planes and change in dimensions or perspective. Printsshould flow with each depth and narrowness of the animal’s contour figure. If the prints don’t follow the dimensions of the figure’s contour form, the prints will make thesubject appear flat and seem lifeless.
21
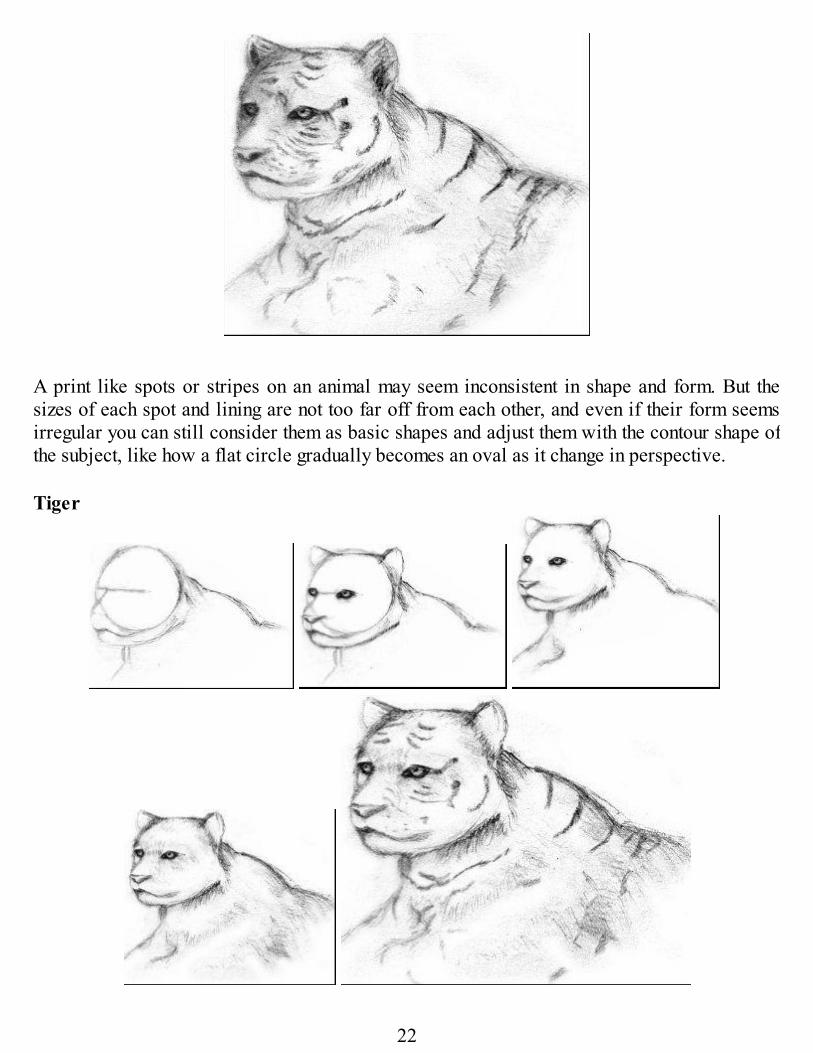
A print like spots or stripes on an animal may seem inconsistent in shape and form. But thesizes of each spot and lining are not too far off from each other, and even if their form seemsirregular you can still consider them as basic shapes and adjust them with the contour shape ofthe subject, like how a flat circle gradually becomes an oval as it change in perspective. Tiger
22
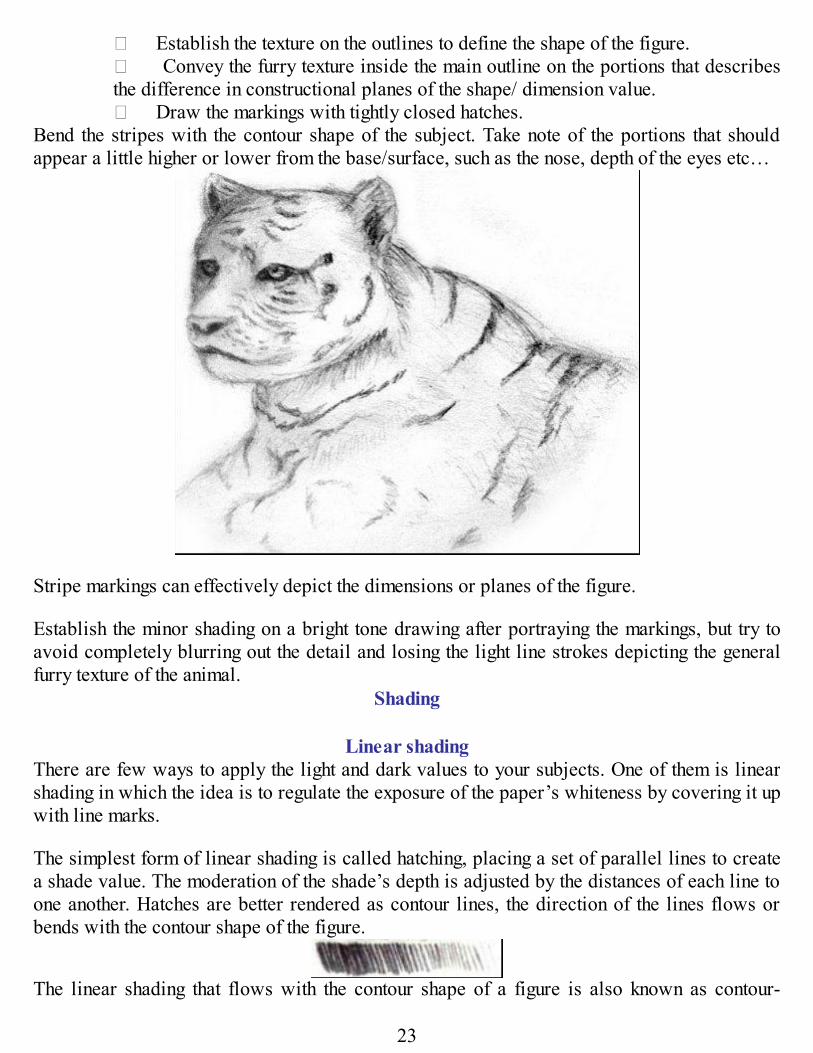
� Establish the texture on the outlines to define the shape of the figure.� Convey the furry texture inside the main outline on the portions that describesthe difference in constructional planes of the shape/ dimension value.� Draw the markings with tightly closed hatches.
Bend the stripes with the contour shape of the subject. Take note of the portions that shouldappear a little higher or lower from the base/surface, such as the nose, depth of the eyes etc…
Stripe markings can effectively depict the dimensions or planes of the figure. Establish the minor shading on a bright tone drawing after portraying the markings, but try toavoid completely blurring out the detail and losing the light line strokes depicting the generalfurry texture of the animal.
Shading
Linear shadingThere are few ways to apply the light and dark values to your subjects. One of them is linearshading in which the idea is to regulate the exposure of the paper’s whiteness by covering it upwith line marks. The simplest form of linear shading is called hatching, placing a set of parallel lines to createa shade value. The moderation of the shade’s depth is adjusted by the distances of each line toone another. Hatches are better rendered as contour lines, the direction of the lines flows orbends with the contour shape of the figure.
The linear shading that flows with the contour shape of a figure is also known as contour-
23
hatches. You should always remember that the shades are used to portray the contour shape of yoursubject. If your hatches do not flow with the contour of the figure properly, the depiction of thesubject’s dimensions will not be effective. If the hatches do not bend with the contour shape ofyour subject, the figure may visually appear flat and lacking in mass. And when the hatches fail to reach the certain depth of dark shade you desire, cross-hatching isthe solution. Cross- hatching is a set of hatches that intersects or overlap one another. The ideais to form a grid to the shaded portion to further minimize the exposure of the paper. The dark value is increased by applying more than two opposing/intersecting hatches. Overlapthe cross-hatch with another line sets that opposes both the previous hatches.
Cross-hatches best suites the near edges of the figure where it could connect or overlap theoutline. Try not to use perfectly vertical and horizontal lines when making hatches, these linesgive impression of a flat surface. Always use diagonal lines when initiating hatching. The onlytime which you can apply vertical or horizontal lines is if you need a third or more layer ofhatches to oppose the direction of the cross-hatch, do not use them as a first layer of hatchingunless you intend the certain area to look flat.
Imaginary light source If you are going to draw without an image or a model to base upon, the easiest way to figureout where the shades should be is to visualize a light source coming from the front and aweaker light source coming from above. These are the ideal points of light and they are the ones easiest to depict, as if your figure isexposed to a flashlight right next to it (like you are holding it) and it is also exposed to the lightof the sun. And since the nearest point of light is at the front, the shadow will be produced bythis light and not by the weaker light source.
� The portion at the center of the figure has the brightest value because thestrongest light source is directly hitting it (center point of light).
� The upper portion of the figure is dim-lighted because of a light source from farabove (light of the sun).
� The dark areas of the figure are the near sides of the main outline since it is thefarthest from center and from the strongest point of light.
24
� The lower portion has a greyish tone value since it’s the farthest portion fromthe weaker light source yet it is still exposed to the strongest point of light.
� The lowest part of the figure is the portion with the darkest shade value since itopposes both light sources.
� There should be shadows casted by the parts that are elevated from the base(body).
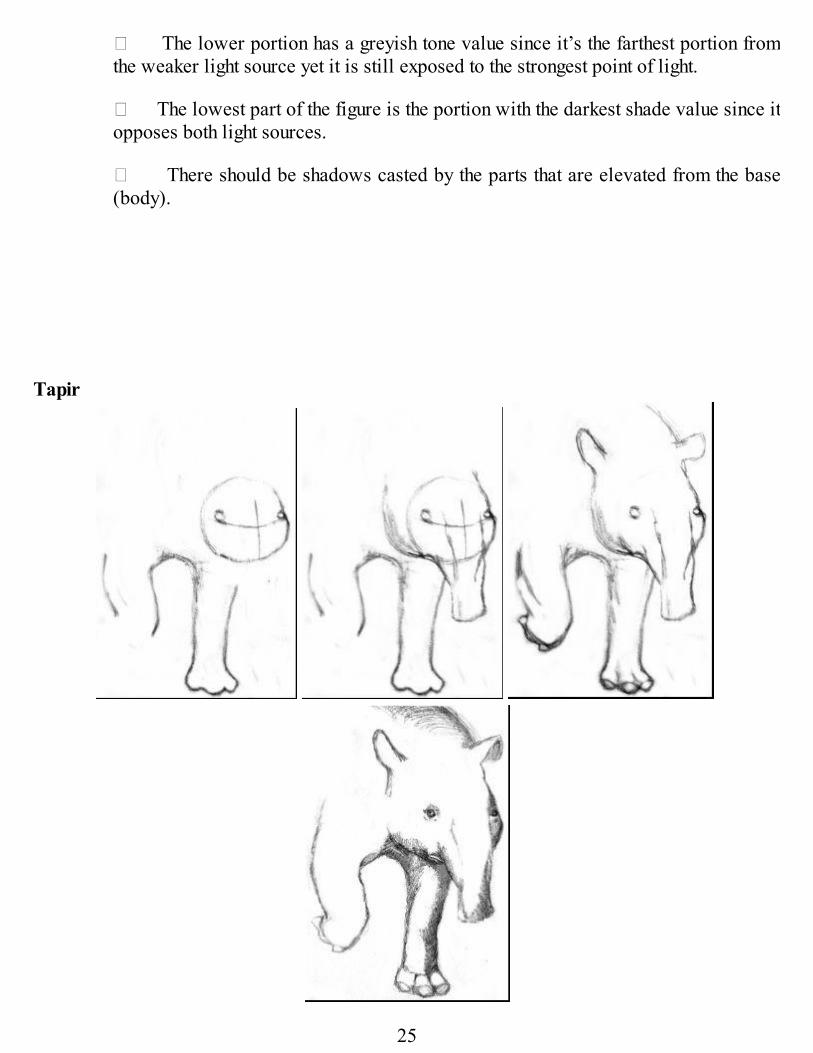
Tapir
25
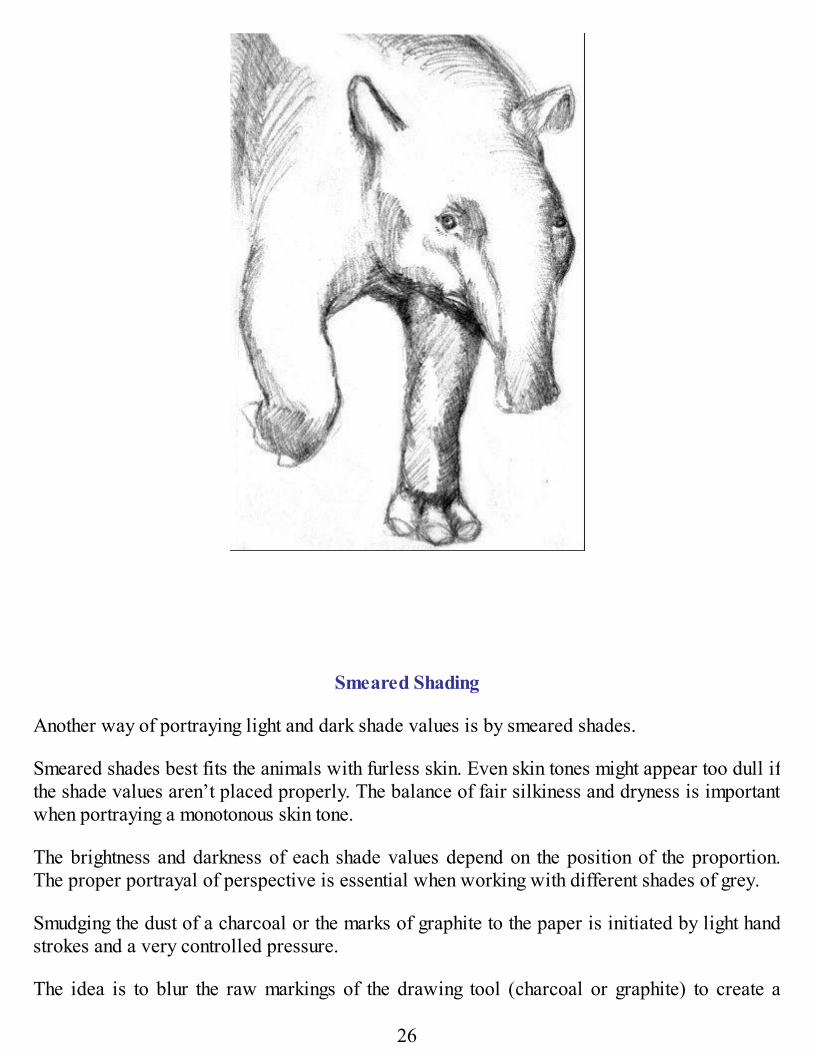
Smeared Shading Another way of portraying light and dark shade values is by smeared shades. Smeared shades best fits the animals with furless skin. Even skin tones might appear too dull ifthe shade values aren’t placed properly. The balance of fair silkiness and dryness is importantwhen portraying a monotonous skin tone. The brightness and darkness of each shade values depend on the position of the proportion.The proper portrayal of perspective is essential when working with different shades of grey. Smudging the dust of a charcoal or the marks of graphite to the paper is initiated by light handstrokes and a very controlled pressure. The idea is to blur the raw markings of the drawing tool (charcoal or graphite) to create a
26
single solid tone. The linear shade and scribbles are merged into a smooth and edgeless shadevalue. The lightness and brightness of each gradation is adjusted by the number of layers you apply. Since linear shading is used to regulate the exposure of the paper’s whiteness in an organizedmanner, it is less-likely needed because the line marks will be smeared anyway. So the mostideal marking to use for a preparation for smudged shades is scribbled lines. Scumbling linesare roughly fixed on the paper so it is easy to smudge the mark and blur it out.
� Apply the linear shade and avoid creating noticeable edges.� Blot out the line marks by gently rubbing a blendingstump/smudge stick or a cotton bud against it in a circular handstroke.
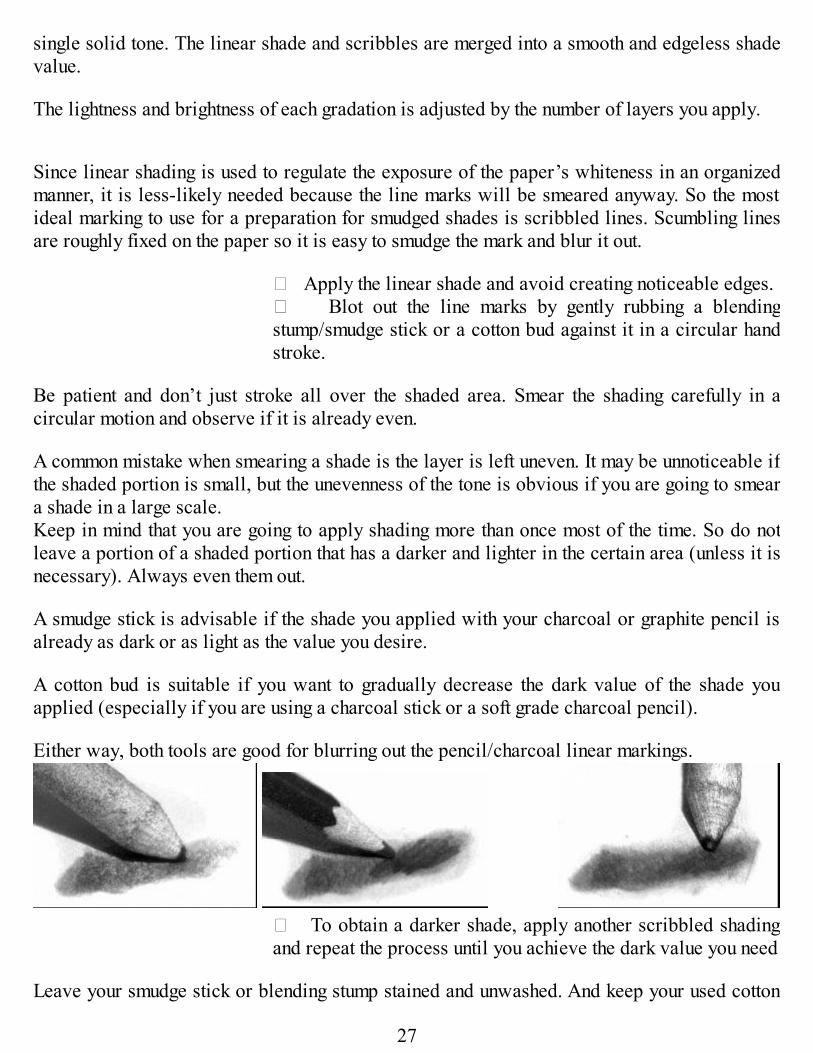
Be patient and don’t just stroke all over the shaded area. Smear the shading carefully in acircular motion and observe if it is already even. A common mistake when smearing a shade is the layer is left uneven. It may be unnoticeable ifthe shaded portion is small, but the unevenness of the tone is obvious if you are going to smeara shade in a large scale.Keep in mind that you are going to apply shading more than once most of the time. So do notleave a portion of a shaded portion that has a darker and lighter in the certain area (unless it isnecessary). Always even them out. A smudge stick is advisable if the shade you applied with your charcoal or graphite pencil isalready as dark or as light as the value you desire. A cotton bud is suitable if you want to gradually decrease the dark value of the shade youapplied (especially if you are using a charcoal stick or a soft grade charcoal pencil). Either way, both tools are good for blurring out the pencil/charcoal linear markings.
� To obtain a darker shade, apply another scribbled shadingand repeat the process until you achieve the dark value you need
Leave your smudge stick or blending stump stained and unwashed. And keep your used cotton
27
bud for a while. They will come in handy if you need to produce some pale shading like brightgrey tones or dirty-white highlights.
Hippopotamus
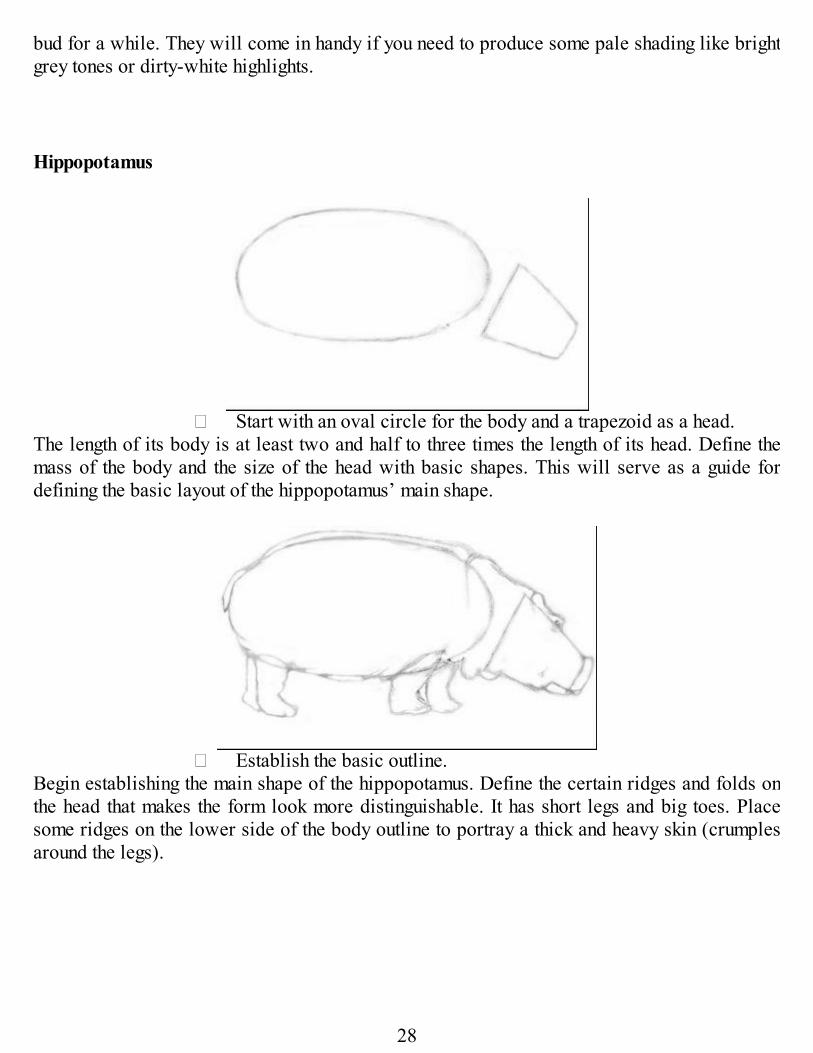
� Start with an oval circle for the body and a trapezoid as a head.The length of its body is at least two and half to three times the length of its head. Define themass of the body and the size of the head with basic shapes. This will serve as a guide fordefining the basic layout of the hippopotamus’ main shape.
� Establish the basic outline.Begin establishing the main shape of the hippopotamus. Define the certain ridges and folds onthe head that makes the form look more distinguishable. It has short legs and big toes. Placesome ridges on the lower side of the body outline to portray a thick and heavy skin (crumplesaround the legs).
28
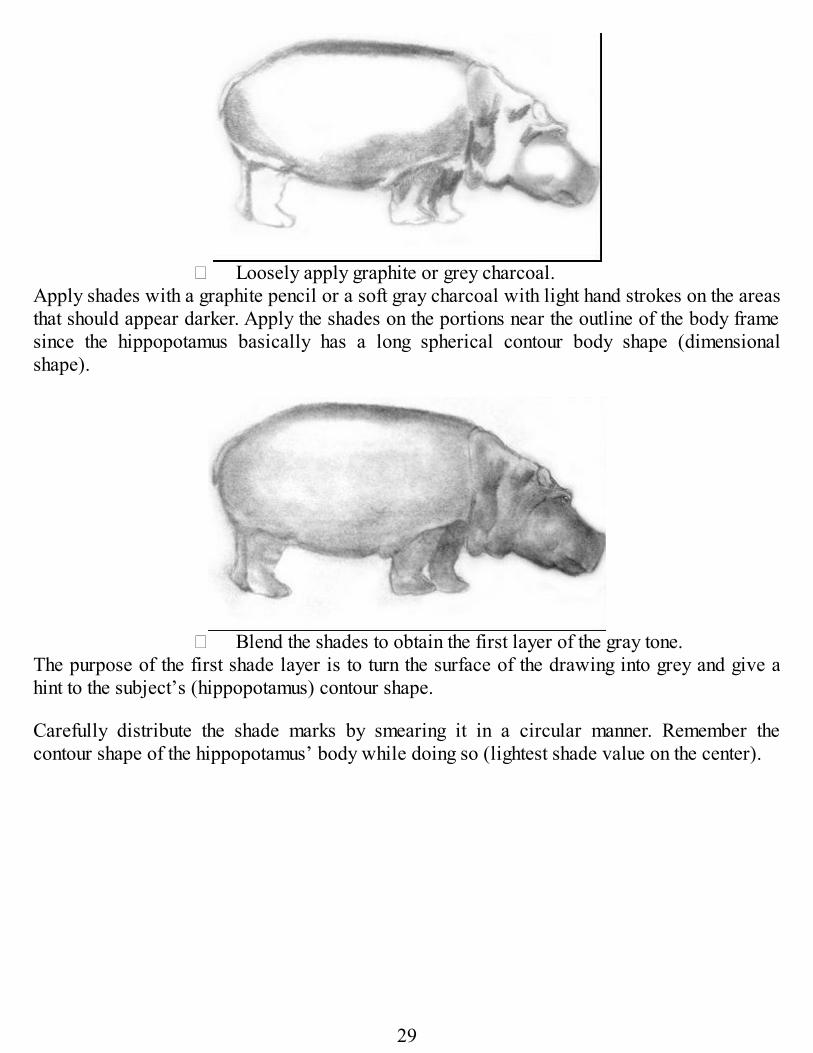
� Loosely apply graphite or grey charcoal.Apply shades with a graphite pencil or a soft gray charcoal with light hand strokes on the areasthat should appear darker. Apply the shades on the portions near the outline of the body framesince the hippopotamus basically has a long spherical contour body shape (dimensionalshape).
� Blend the shades to obtain the first layer of the gray tone.The purpose of the first shade layer is to turn the surface of the drawing into grey and give ahint to the subject’s (hippopotamus) contour shape. Carefully distribute the shade marks by smearing it in a circular manner. Remember thecontour shape of the hippopotamus’ body while doing so (lightest shade value on the center).
29
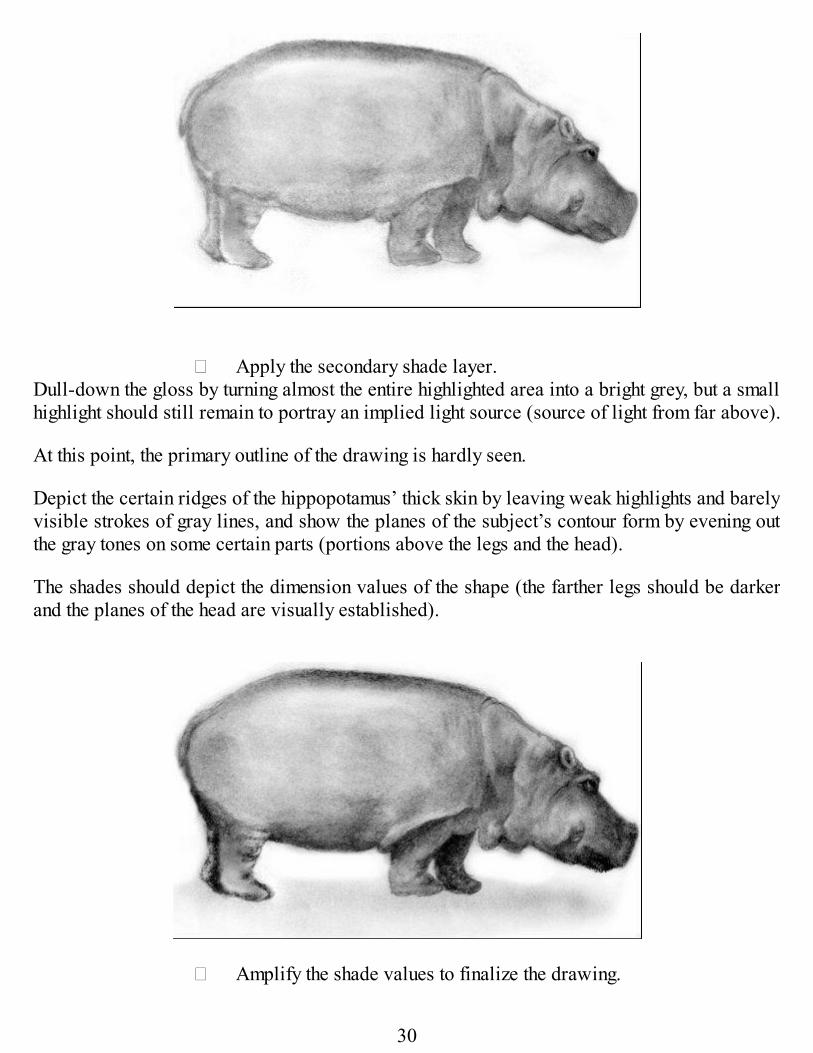
� Apply the secondary shade layer.Dull-down the gloss by turning almost the entire highlighted area into a bright grey, but a smallhighlight should still remain to portray an implied light source (source of light from far above). At this point, the primary outline of the drawing is hardly seen. Depict the certain ridges of the hippopotamus’ thick skin by leaving weak highlights and barelyvisible strokes of gray lines, and show the planes of the subject’s contour form by evening outthe gray tones on some certain parts (portions above the legs and the head). The shades should depict the dimension values of the shape (the farther legs should be darkerand the planes of the head are visually established).
� Amplify the shade values to finalize the drawing.
30
Exaggerate the light and grey tones (increasing the contrast) by applying a third layer on thedarkest areas with strong shades. This will somehow show the actual (realistic) texture of the hippopotamus’ skin and make thesubject look heavy and thick. Convey the minor details on the ripples and apply the shadowscasted by some certain parts (shade behind the shown ear, depth of the eyehole, the castedshadow on the ground, depth of the ripples etc.).
Rhinoceros
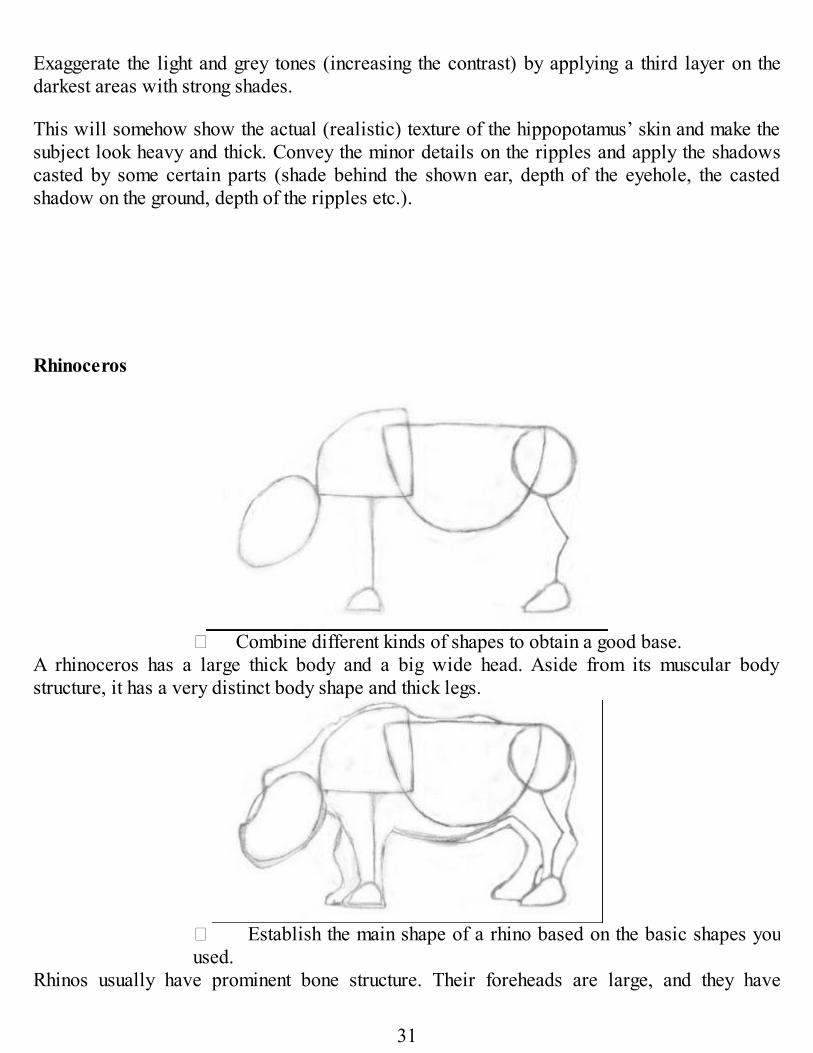
� Combine different kinds of shapes to obtain a good base.A rhinoceros has a large thick body and a big wide head. Aside from its muscular bodystructure, it has a very distinct body shape and thick legs.
� Establish the main shape of a rhino based on the basic shapes youused.
Rhinos usually have prominent bone structure. Their foreheads are large, and they have
31
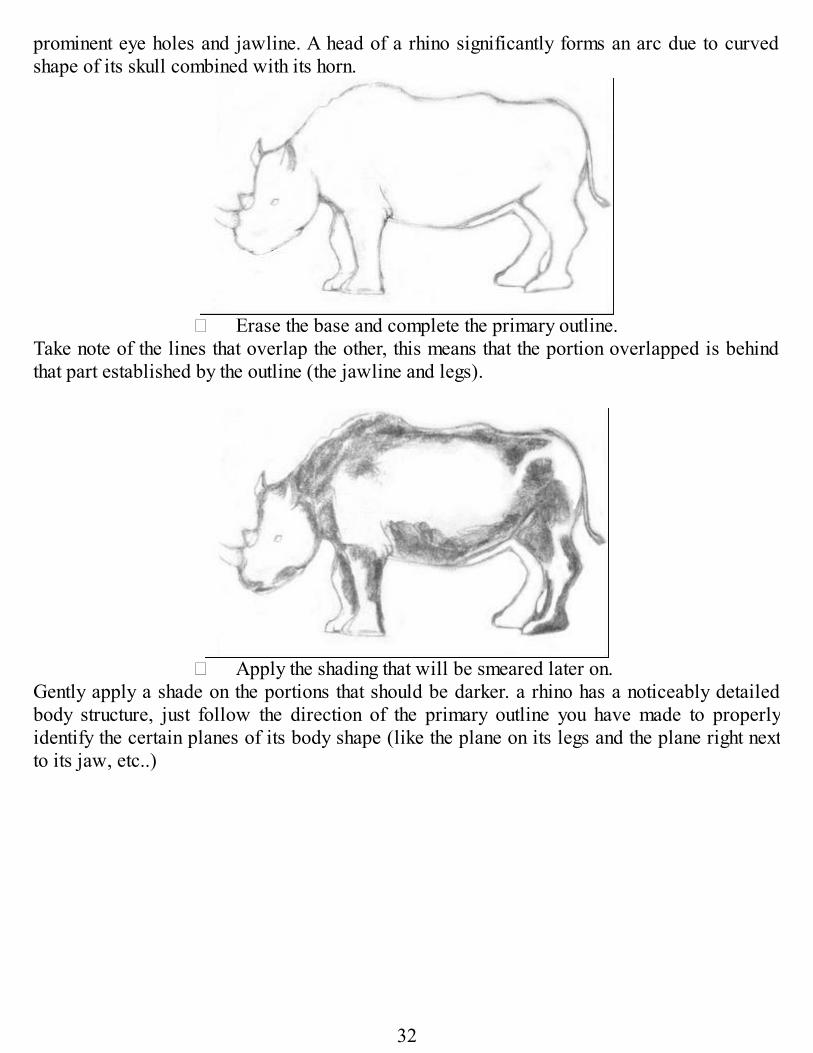
prominent eye holes and jawline. A head of a rhino significantly forms an arc due to curvedshape of its skull combined with its horn.
� Erase the base and complete the primary outline.Take note of the lines that overlap the other, this means that the portion overlapped is behindthat part established by the outline (the jawline and legs).
� Apply the shading that will be smeared later on.Gently apply a shade on the portions that should be darker. a rhino has a noticeably detailedbody structure, just follow the direction of the primary outline you have made to properlyidentify the certain planes of its body shape (like the plane on its legs and the plane right nextto its jaw, etc..)
32
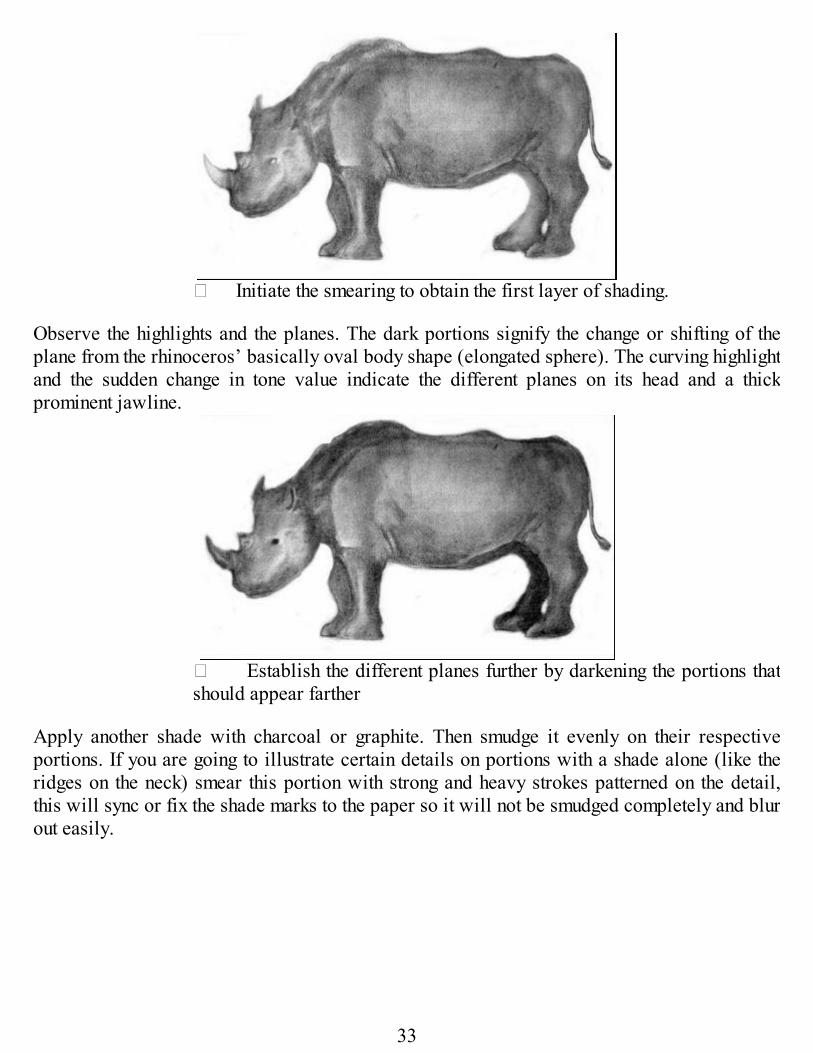
� Initiate the smearing to obtain the first layer of shading. Observe the highlights and the planes. The dark portions signify the change or shifting of theplane from the rhinoceros’ basically oval body shape (elongated sphere). The curving highlightand the sudden change in tone value indicate the different planes on its head and a thickprominent jawline.
� Establish the different planes further by darkening the portions thatshould appear farther
Apply another shade with charcoal or graphite. Then smudge it evenly on their respectiveportions. If you are going to illustrate certain details on portions with a shade alone (like theridges on the neck) smear this portion with strong and heavy strokes patterned on the detail,this will sync or fix the shade marks to the paper so it will not be smudged completely and blurout easily.
33
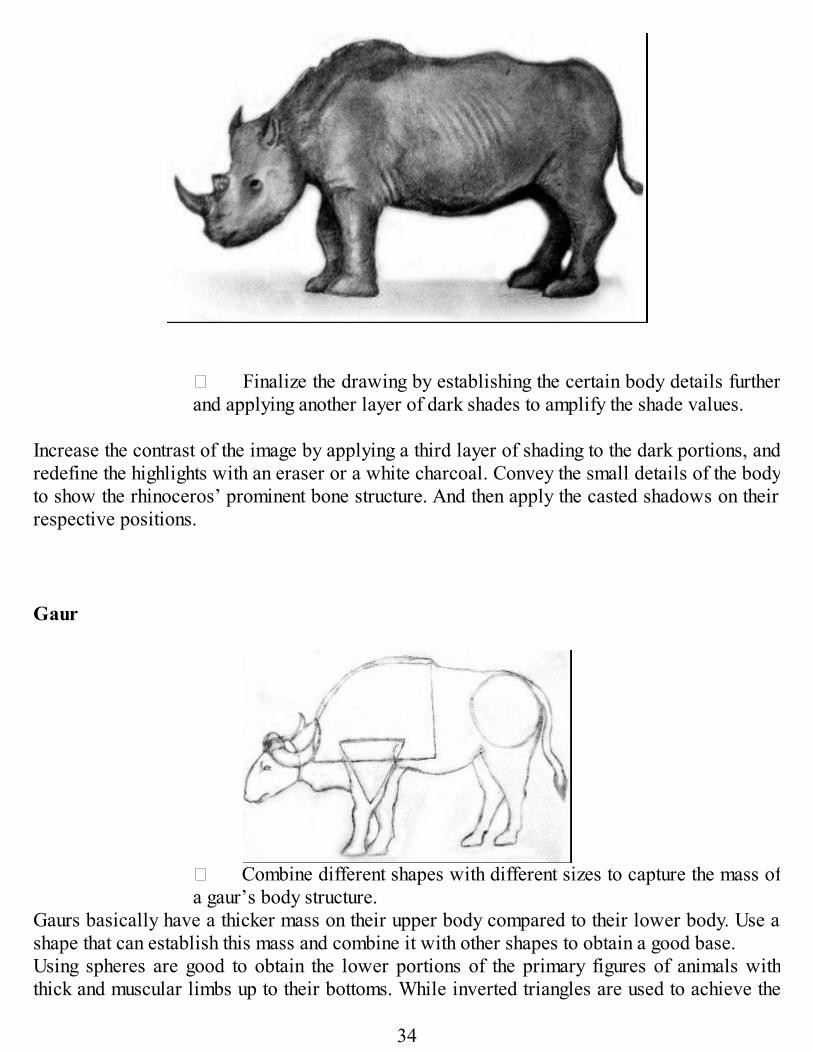
� Finalize the drawing by establishing the certain body details furtherand applying another layer of dark shades to amplify the shade values.
Increase the contrast of the image by applying a third layer of shading to the dark portions, andredefine the highlights with an eraser or a white charcoal. Convey the small details of the bodyto show the rhinoceros’ prominent bone structure. And then apply the casted shadows on theirrespective positions.
Gaur
� Combine different shapes with different sizes to capture the mass ofa gaur’s body structure.
Gaurs basically have a thicker mass on their upper body compared to their lower body. Use ashape that can establish this mass and combine it with other shapes to obtain a good base.Using spheres are good to obtain the lower portions of the primary figures of animals withthick and muscular limbs up to their bottoms. While inverted triangles are used to achieve the
34
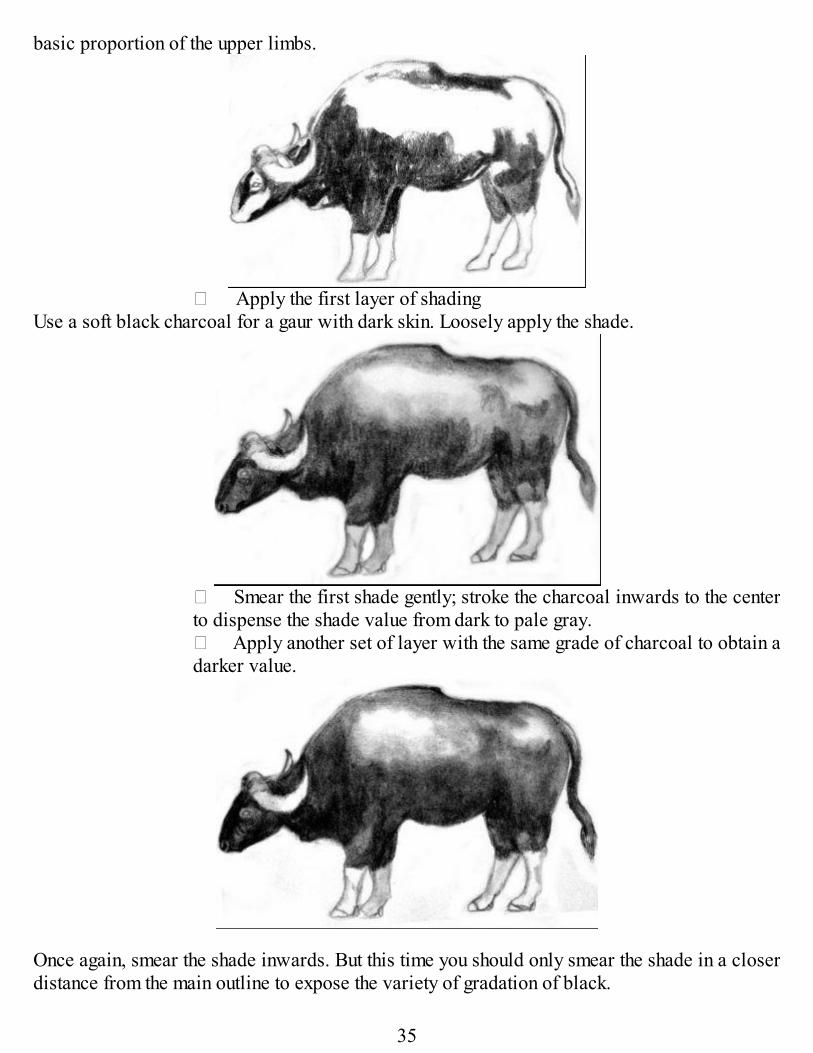
basic proportion of the upper limbs.
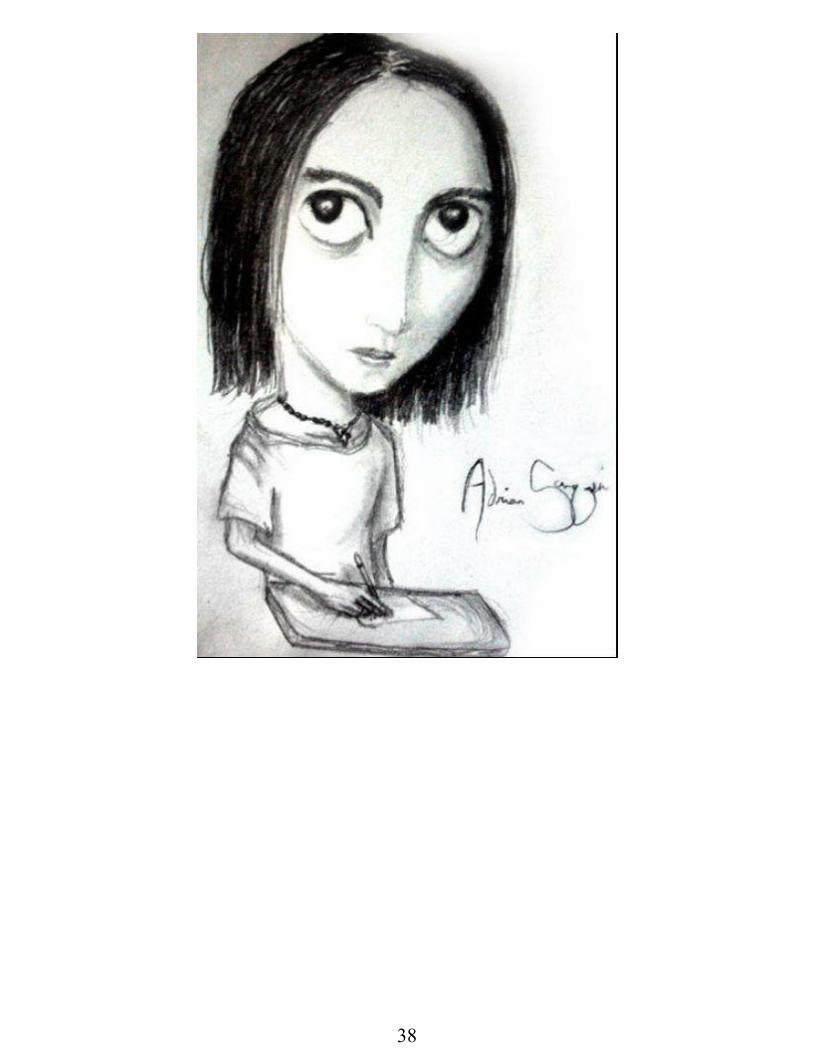
� Apply the first layer of shadingUse a soft black charcoal for a gaur with dark skin. Loosely apply the shade.
� Smear the first shade gently; stroke the charcoal inwards to the centerto dispense the shade value from dark to pale gray.� Apply another set of layer with the same grade of charcoal to obtain adarker value.
Once again, smear the shade inwards. But this time you should only smear the shade in a closerdistance from the main outline to expose the variety of gradation of black.
35

� Show more details of the body figure to finalize thedrawing.
You can either use the tool used to smear the previous layer of shading to apply a dark grayvalue on the certain portions that should appear brighter, or use a soft gray charcoal or agraphite pencil if the blending tool is producing a tone that is too dark. Apply the highlights by using a white charcoal pencil (highlight on the horns)And just simply use an eraser to produce a dirty white tone (highlight on the backbone and theprominent ribcage). Tone values cannot be increased further when the animal has a dark skin tone, so just simplydarken the portions of the contour shape that should appear darker to portray the dimensionvalues.
Thank you for reading!
36

Read our Other Books on Amazon.comhttp://www.amazon.com/s/ref=ntt_athr_dp_sr_2?_encoding=UTF8&field-author=Adrian%20Sanqui&search-alias=books&sort=relevancerank
37
38


![Learn to draw [eDvArDo]](https://img.pdfslide.net/doc/110x75/54828f8db4af9faa0d8b47ce/learn-to-draw-edvardo.jpg)