Embed Size (px)
Citation preview
-- 1 --
-- 2 --
Contents
Index Page
1.0 Legal Notice 7
2.0 Getting Started 8
3.0 know Your Device 9
4.0 Basic knowledge 10
4.1 Introduction 10
4.2 safety Precaution 10
4.3 Safety & Health Precaution 10
4.4 Technical specification 13
5.0 Phone Layout 14
5.1 Keypad Definition & Other definition 15
6.0 Before Starting thr phone 16
6.1 Insert SIM 16
6.2 Use the code 17
6.3 Insert T-Flash card 19
6.4 Battery 20
6.5 Travel Charger 22
6.6 USB cable 22
7.0 Basic operation 23
7.1 Switch On 23
7.2 Switch Off 23
7.4 Connect to network 23
7.5 Touchscreen 29
7.6 Motion sensor 29
7.7 Standby Mode 29
8.0 Phone Icons 33
-- 3 --
8.1 Main menu icons 33
8.2 Screen icons 36
9.0 Input method 30
9.1 Handwriting Input 30
9.2 Basic letter input method icon 31
9.3 Number input 31
9.4 Sign input method 32
9.5 General Operation for English input 32
10.0 Function Menu 35
10.1 Phonebook 35
10.1.1 Quick search 36
10.1.2 Search Contact 37
10.1.3 Add new Contacts 37
10.1.4 Copy All 38
10.1.5 Delete 38
10.1.6 Caller Groups 38
10.1.7 Extra numbers 38
10.1.8 Phonebook setting 38
10.2 Phone 39
10.3 Music 40
10.4 Text(Message) 42
10.4.1 Text message 43
10.4.2 Multimedia Message 46
10.4.3 Chat 49
10.4.4 Voicemail Server 50
10.4.5 Cell Broadcast message 50
10.5 MMS 51
10.6 Mail 54
-- 4 --
10.7 Call Log 56
10.7.1 Call History 56
10.7.2 Call Settings 58
10.8 Settings 61
10.8.1 Dual SIM Settings 61
10.8.2 Carrier 61
10.8.3 Notifications 61
10.8.4 Sounds 62
10.8.5 Brightness 63
10.8.6 Wallpapers 63
10.8.7 General 63
10.8.8 Mail contacts calendar 67
10.8.9 Phone 68
10.8.9.1 Call History 68
10.8.9.2 Call Settings 70
10.8.10 Safari 73
10.8.11 Messages 75
10.8.12 Music 75
10.8.13 Theme Image 77
10.8.14 Burglar tracking 77
10.9 Radio 77
10.10 Camera 79
10.11 Photos 80
10.12 Video Player 81
10.13 Sound Recorder 82
10.14 File Manager 83
10.15 Calendar 85
-- 5 --
10.16 Calculator 86
10.17 Task 86
10.18 TV 86
10.19 Services 87
10.19.1 SIM Tool Kit 87
10.19.2 Internet Service 87
10.19.3 Data Account 89
10.19.4 Common Websites 89
10.19.5 Connection Management 89
10.20 Map 89
10.21 Clock 90
10.21.1 World Clock 90
10.21.2 Alarm 90
10.21.3 Stopwatch 91
10.22 Profiles 92
10.23 Bluetooth 93
10.24Tools 95
10.24.1 Unit Converter 95
10.24.2 Currency Conveter 96
10.25 Ebook 96
10.26 java 98
10.27 Video Recorder 99
10.28 Games 100
10.29 PDF 100
10.30 Office 100
-- 6 --
10.31 Nimbuzz 101
10.32 Snaptu 101
10.33 Lighters 101
10.34 Opera Mini 101
10.35 Google 102
10.36 Skype 102
10.37 Ebuddy 102
11.0 Common Faults & Troubleshooting 103
1. Legal Notice All rights reserved. Reproduction, transfer, distribution or storage of part
or all of the contents in this document in any form without the prior
written permission of TVC ICON is prohibited.
TVC ICON operates on a policy of continuous development. TVC ICON
reserves the right to make changes and improvements to any of the
products described in this document without prior notice.
Under no circumstances shall TVC ICON be responsible for any loss of
data or income or any special, incidental, consequential or indirect
damages howsoever caused.
The contents of this document are provided "as it is". Except as required
by applicable law, no warranties of any kind, either expressed or implied,
including, but not limited to, the implied warranties of merchantability
and fitness for a particular purpose, are made in relation to the accuracy,
reliability or contents of this document. TVC ICON reserves the right to
revise this document or withdraw it at any time without prior notice.
-- 7 --
1. Legal Notice All rights reserved. Reproduction, transfer, distribution or storage of part
or all of the contents in this document in any form without the prior
written permission of TVC ICON is prohibited.
TVC ICON operates on a policy of continuous development. TVC ICON
reserves the right to make changes and improvements to any of the
products described in this document without prior notice.
Under no circumstances shall TVC ICON be responsible for any loss of
data or income or any special, incidental, consequential or indirect
damages howsoever caused.
The contents of this document are provided "as it is". Except as required
by applicable law, no warranties of any kind, either expressed or implied,
including, but not limited to, the implied warranties of merchantability
and fitness for a particular purpose, are made in relation to the accuracy,
reliability or contents of this document. TVC ICON reserves the right to
revise this document or withdraw it at any time without prior notice.
The availability of particular products may vary by region. Please check
with TVC ICON Executive.
-- 8 --
2. Getting Started
Inside the Box
The device package consists of:
Transceiver
Phone
Battery
Charger
USB Data cable
Hands free kit
User Manual
Warranty Card
PC Sync CD /Manual CD
-- 9 --
3. Know your device
Dual SIM Card
Your phone support dual SIM cards, allowing you to use two different
phones numbers on one mobile phone.
Dual mode
To enable the Dual SIM mode:
Press Main Menu > Settings > Dual SIM Settings and press Dual SIM
Open. However, if you wish to be reachable only on one SIM, choose
Only SIM1 Open or Only SIM2 Open. To be able to use your handset
whilst in an aircraft, press Flight Mode to restrict the device’s capacity to
place or receive calls or text messages ; while still permitting use of
other functions that do not require signal transmission, such as Camera,.
-- 10 --
4. Basic knowledge
4.1 Introduction
Thank you for choosing Phone Full-Screen Color-screen Mobile Phone.
Through reading this operation manual, you’ll find out a full range of
functions and learn to operate the phone easily.
Phone Color-screen mobile phone is designed to operate within
GSM/GPRS : 850/900/1800/1900MHz network. In addition to basic call
functions, it also provides associating intelligent Hindi/English input,
name-card contacts, 64 polyphonic ring tones, clock, alarm clock, Task,
unit conversion, currency conversion, calculator, game, Mp3 player,Video
player, incoming call picture, Video Recorder , FM radio and Bluetooth
etc, for the convenience of your work and entertainment. The
personalized interface and multiple functions will meet different
requirements.
Phone Color screen mobile phone is up to GSM technology stand and it
has received certificates from foreign authorized institutions.
Our company keeps the right to make modifications to any of the
content here in this user guide without public announcement in
advance.
4.2 Safety precautions
If your mobile phone is lost or stolen, inform the telecom branch or its
outlet immediately to forbid the use of your mobile phone and SIM card,
which will help you to avoid the economic loss caused by other’s
misuse of your mobile phone.
Please take precautionary measure to avoid abuse of your mobile
phone. Such as
·Set the PIN number of the SIM card,
-- 11 --
·Set the phone code
4.3 Safety and health precautions
Safety warning
Read these provisions carefully, violation of these provisions could cause
danger or break law. Precautions are provided in these manual.
Secure Power-on
Don’t power on where mobile phone is forbidden, so as to avoid
interference and danger.
Traffic Safety
According to recent research, it is danger to use phone during driving
even though hands-free devices (vehicle hands-free device, earphone,
and so on) are adopted. The electromagnetic wave radiating from the
mobile phone will disturb electronic systems, such as ABS and airbag.
For your safety, please:
-Don’t put mobile phone on instrument panel or the installation
area of airbag.
-Check with the dealer or manufacturer of vehicles to ensure that
the electronic systems of vehicle are insulated absolutely.
Interference
The performance of mobile phone could be affected by outside
interference, while the performances of other electrical equipments (Ex.
Television, radio, PC.) could be affected by mobile phone.
-- 12 --
Power-off in medical care places
Power off in medical care places except for designated areas, mobile
phone can disturb the operations of other electrical, electronic and radio
frequency devices near by.
Power off on plane
Please follow any relevant limitation, the phone can interfere the plane,
power off before boarding.
Power off during refueling
Power off in the gas station or in the place where there are dangerous
things of fuel, chemicals, and so on.
Power off in the blasting place
Power off in the place where there are signs of ‚Blasting site‛ or
‚Power off tow-way radio devices‛. Place observe and carry out all the
rules related with mobile phone.
Appropriate use
Use your mobile phone in the proper place, and don’t enter the antenna
area.
Keep child from using the mobile phone when there no adult take care
him. You could move SIM card away, and avoid that child swallow these
small parts.
-- 13 --
Pregnant women shouldn’t use mobile phone too long.
Accessories and Battery
Use attached accessories and battery; don’t use unauthorized
accessories and battery. Before removing the battery, please power off.
Cope with the used battery in a proper way.
Not waterproof
Your mobile phone is not waterproof; don’t expose it to the bad climate
and conditions (such as humidity, rain, leakage, fog, and so on).
Emergency Call
Ensure the mobile phone is power on and in the service area. Press
Hang-up button repeatedly to clear the display and return to standby
mode, or directly press number keys to input the emergency number,
and then press the answer key to tell the answerer your position. Don’t
hang up without permission.
4.4 Technical specifications
Phone: ICON G4
Dimensions (W×D×H): 115X59X9.8mm
Weight: 135g (package)
Lithium battery Rated capacity: Li-Ion 1000 mAh
Continuous standby duration:About 150~170 hrs (Relates to network
status)
Continuous conversation duration:About 3~4 hrs (Relates to network
status)
-- 14 --
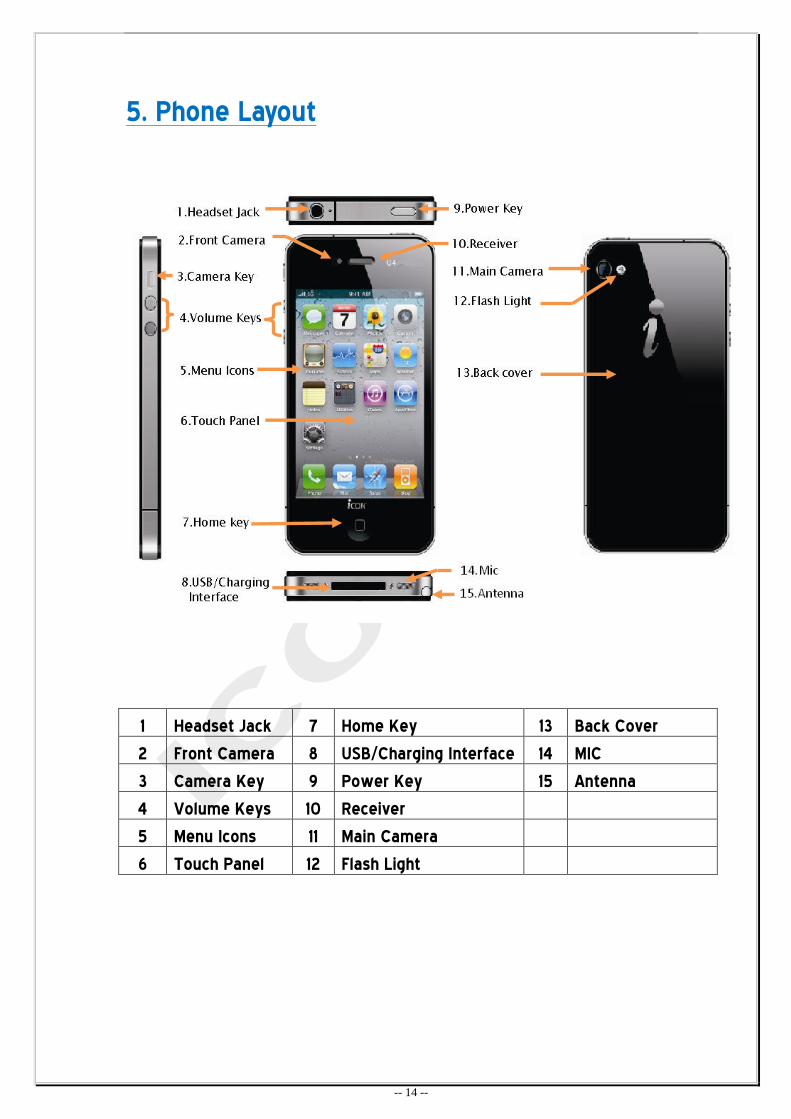
5. Phone Layout
1 Headset Jack 7 Home Key 13 Back Cover
2 Front Camera 8 USB/Charging Interface 14 MIC
3 Camera Key 9 Power Key 15 Antenna
4 Volume Keys 10 Receiver 5 Menu Icons 11 Main Camera
6 Touch Panel 12 Flash Light
-- 15 --
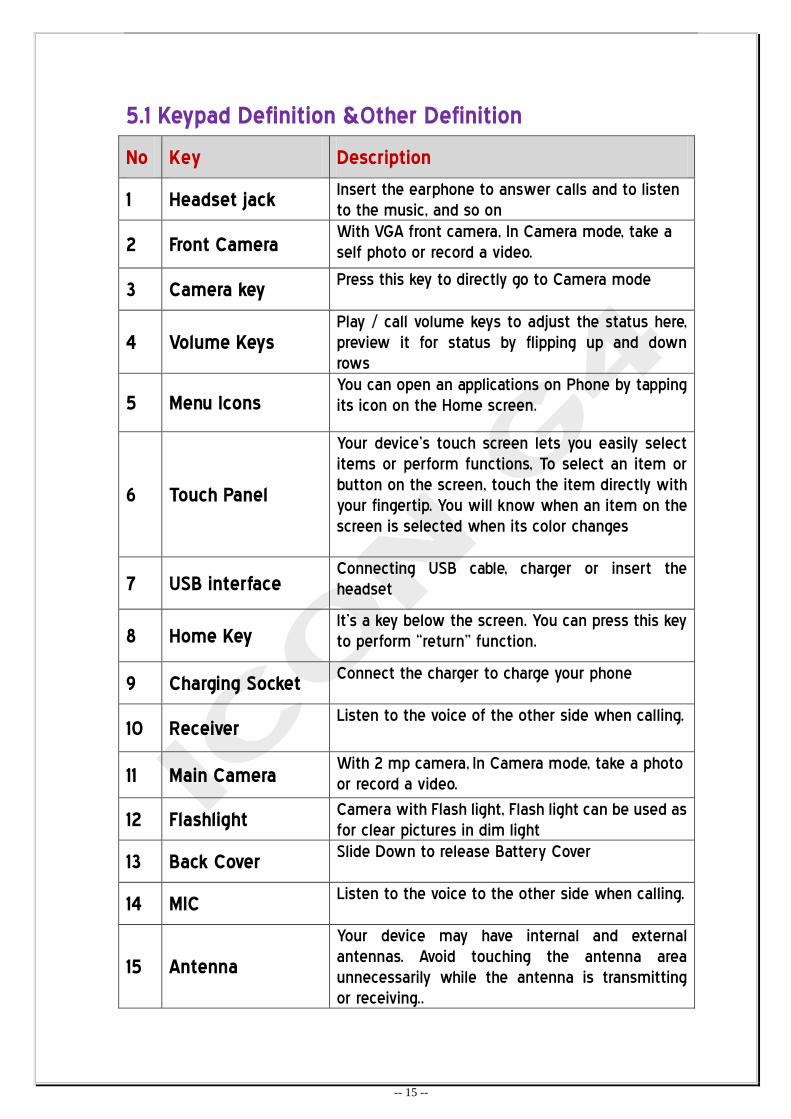
5.1 Keypad Definition &Other Definition
No Key Description
1 Headset jack Insert the earphone to answer calls and to listen
to the music, and so on
2 Front Camera With VGA front camera, In Camera mode, take a
self photo or record a video.
3 Camera key Press this key to directly go to Camera mode
4 Volume Keys Play / call volume keys to adjust the status here,
preview it for status by flipping up and down
rows
5 Menu Icons You can open an applications on Phone by tapping
its icon on the Home screen.
6
Touch Panel
Your device’s touch screen lets you easily select
items or perform functions, To select an item or
button on the screen, touch the item directly with
your fingertip. You will know when an item on the
screen is selected when its color changes
7 USB interface Connecting USB cable, charger or insert the
headset
8 Home Key It’s a key below the screen. You can press this key
to perform ‚return‛ function.
9 Charging Socket Connect the charger to charge your phone
10 Receiver Listen to the voice of the other side when calling.
11 Main Camera With 2 mp camera, In Camera mode, take a photo
or record a video.
12 Flashlight Camera with Flash light, Flash light can be used as
for clear pictures in dim light
13 Back Cover Slide Down to release Battery Cover
14 MIC Listen to the voice to the other side when calling.
15 Antenna
Your device may have internal and external
antennas. Avoid touching the antenna area
unnecessarily while the antenna is transmitting
or receiving..
-- 16 --
6. Before starting the phone 6.1 Insert SIM card
SIM card can save your phone number ,PIN ,PIN2,PUK ,PUK2 and IMSI
number and network data ,phone book data and SMS data
Note:
·Please switch off you phone before you remove or insert SIM card
·The plug-in SIM card and its contacts can be easily damaged by
scratching or bending
·Keep your phone and its accessories away from children
When registering mobile phone number, you will obtain an SIM
(Subscriber Identification Module) card provided by the network
service provider. If you obtain the SIM card with the same size as
credit card, take out the small part and remove the edges.
With this card, you can use various functions the mobile phone
has. All information in relation to network connection is recorded
in the chip of the SIM card, including personal data, such as PIN
(Personal Identification Number) number, phonebook, message
and other extra services.
Use your SIM card carefully. Do not distort or squeeze the SIM
card; do not touch the metal place; keep the SIM card far from
electromagnetic place; always keep the SIM card touching dust
and water. Once the SIM card is broken, you will be unable to use
the mobile phone normally.
Notice: Make sure you turn off the phone before getting the SIM card
out. Inserting the SIM card or getting it out with the power supply
connected is absolutely prohibited.
-- 17 --
Install Your SIM Card
When you register your mobile phone numbers, you can apply for two
different numbers and two different network service providers, you will
have two SIM cards provided by network service providers (user
identification card)
With these two SIM cards, you can use various functions of this mobile
phone, store many parameters needed for communication in SIM card
and store personal information, including PIN code (personal
identification code), telephone directory, short message and other
additional system service.
Note: This phone support dual SIM card,SIM1 is master,SIM2 is slave.
Warning:Do not distort or score on your SIM cards; do not contact it
with static, dust or water. If your SIM card is lost, please contact your
network operator immediately for assistance.
Please turn off your mobile phone before installing SIM card; SIM card is
installed in the back of the phone.
Please install main SIM card into SIM1 card socket, install subsidiary SIM
card into SIM2 card socket.
Note: SIM card is tiny object; please do not make it available to children,
so as to prevent from being swallowed by children!
6.2 Use the code
Your phone and the SIM card have many codes. These codes are helpful
in prevented your mobile phone and the SIM card are embezzled. When
your phone needs the code, please press ‚ok‛ soft key. If inputs wrong
code, please press del key to delete and input right code. You can go
into the using menu ‚setting -> Security setup->change code‛ to
change the PIN code, PIN2 code and phone lock
-- 18 --
6.2.1 Phone code
Phone code is like phone lock .phone password, Used to prevent your
phone be stolen. Passwords are usually associated with phones with
phones provided by the manufacturers. Phone factory preset password
is 1234 or 0000. If the phone has been unlocked, the boot will be asked
to enter the password
6.2.2 PIN code
The network supplier will set a standard PIN (between 4 to 8 digitals)
for your SIM card, You will get the PIN code on same time when you
obtains the SIM card from the network supplier If activated the PIN test
function, then you need input the PIN code when you switch on the
phone, If you input wrong PIN code three times, the SIM card will be
locked, unlock methods:
According to the screen prompts to input the correct PUK code to
unlock the SIM card
Input the new PIN code and press the ‚ok‛ soft key
Input again the new PIN code press ok soft key by the prompts
The SIM card will be unlocked if the PUK code is right, the PIN code
will be Re-instated.
Warning:the SIM card will be locked if you input wrong PIN code three
times, please use the PUK code which provide by network supplier to
unlocking the phone.
6.2.3 PUK code
PUK code (PIN unlocking password ,8 numbers )used to unlocking
the PIN code ,you will get PUK code same time with SIM card from
network supplier , if you input wrong PUK code 10 times , the SIM card
is invalid, you will must associated with the network supplier to
-- 19 --
replace a new card.
6.2.4PIN 2 code
PIN2 code(4-8 numbers)provided with the SIM card, use for the setting
"fixed dial-up" features. Please connect with network supplier, to
determine whether your SIM card supports these features, if you input
wrong PIN2 code three times , the PIN2 code will be locked , please
input the PUK2 code to unlocking
Unlock methods:
1. According to the screen prompts to input the correct PUK2
code to unlock the PIN2 code
2. Input the new PIN2 code and press the ‚ok‛ soft key
3. Input again the new PIN2 code press ok soft key by the prompts
6.2.5 PUK 2 code
PUK2 code (PIN2 code password,8 numbers)used to unlocking PIN2
code 。PUK2 provided with the SIM card from network supplier. Please
contact with network supplier if you don’t have , if you input wrong
PUK2 code 10 times , the PIN code will be invalid, please associated
with the network supplier to replace a new card
6.2.6 Prohibited Password
Used to prohibit password, when you use Restrictions of function call,
you will obtain the password from the network supplier
6.3 Insert T flash card
Because the mobile phone is not provided with adequate memories,
memory card is required for use of some functions (this phone uses
T-FLASH card).
6.3.1 Install T-FLASH Card:
Open the snap close of T-FLASH card, insert T-FLASH card into T-FLASH

-- 20 --
card jack, close up the snap close, the installation is complete.
6.3.2 Uninstall T-FLASH Card:
Open the snap close of T-FLASH card, press the card inward slightly,
T-FLASH will eject out; close up the snap close, uninstalling is complete.
Note: 1.T-FLASH card is tiny object; please do not make it available to
children, so as to prevent from being swallowed by children!.
2. the phone cannot read the T-Flash card if you insert card when
power on, please switch off and switch on the phone again
6.4 Battery
This mobile phone use rechargeable battery. The new battery cannot
have optimal performance until it has 2-3 complete charges and
discharges (at least 14-16h but no more than 24h). It is recommended
to charge the battery until the battery is empty and the mobile
phone switches off automatically.
6.4.1 Install the Battery
1. Align the metal of the battery to the battery contact on the mobile
phone and insert the battery in at 45° angle.
2. Press down the battery until its four sides are level.
4. Restore the back cover of the mobile phone.
6.4.2 Take out the Battery
1. Make sure that the mobile phone is off and the charger and any other
device related are removed from the mobile phone.
2. Keep the mobile phone back upward and press down the back cover
lock to take out the back cover.
3. Look for the release button on the back of the battery and lift the
battery upward to take out the battery.
-- 21 --
6.4.3 Battery level indicator
1.Your mobile phone can monitor and display information about the
battery.
2.In the normal circumstances, you can know the left battery capacity
from the battery icon displayed on the upper right corner of the screen.
3.When the battery is too low, ‚low battery‛ will show on the screen,
also issued a warning alert tone if you choose alert tone in any mode-
a warning tone by profile setup
4.When you charging, the battery icon will change until the battery is
full
In order to enable the battery to achieve the optimum performance,
please observe following rule:
Only use the approved batteries and charger. Avoid any hurt
because of wrong charging.
Please switch off the phone before you remove the battery
Charging the battery until full if it is new battery or not use for
long time. If the battery is too low and can’t switch on the phone,
the battery icon only will be able to change after charging a long
time.
Keep the battery at room temperature or near room temperature
when charging
Do not use the battery if there’s any smell or overheating during
charging, using or storing, or the batteries is discolored or
deformed
Note: For your safety and environment, do not discarded the battery
anywhere
Warning: Any forms battery short circuit has the possibility to create
-- 22 --
explodes, the fire or the person injury
6.5 Travel charger
Insert the battery to the phone before you charging the battery
connect the travel charger adapter and handset charge slot;
Certainly must guarantee inserts well
Connect the travel charger to the plug
It is normal phenomenon that the battery getting a little heat
when you charging
When finish charging, the icon of battery will stop change
Note :
Please ensure the charge plug, USB plug is in right plugging
directions, otherwise it can’t be charged or cause some other
troubles.
Must ensure the voltage and power of your charger match the
local standard frequency and voltage.
6.6 USB Cable
Connect one end of the USB cable into the USB port on the
computer (desktop or laptop).
Connect the other end of the USB cable into the the USB port on
the top of the mobile phone.
The connection of USB can have two functions, i.e. download and
charging.
When connecting the mobile phone and the computer with USB
cable, in switch-on state, ‚Storage unit, network camera and serial
interface‛ will occur on the LCD screen.
-- 23 --
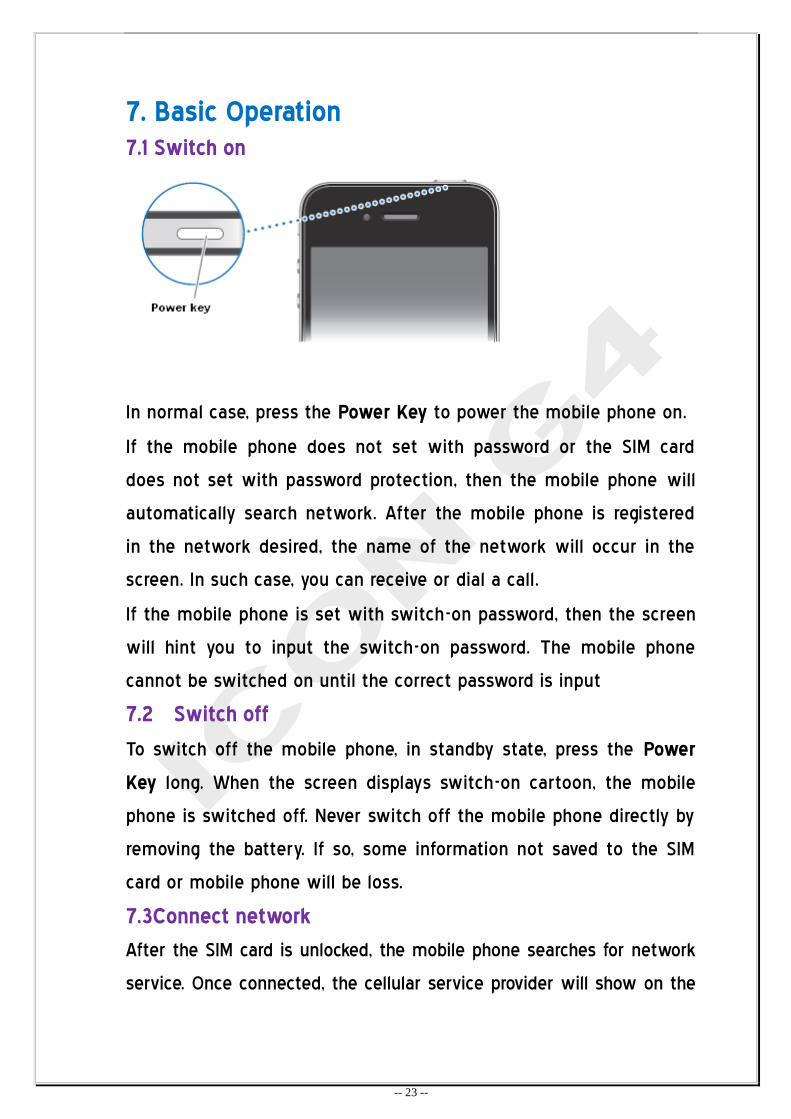
7. Basic Operation 7.1 Switch on
In normal case, press the Power Key to power the mobile phone on.
If the mobile phone does not set with password or the SIM card
does not set with password protection, then the mobile phone will
automatically search network. After the mobile phone is registered
in the network desired, the name of the network will occur in the
screen. In such case, you can receive or dial a call.
If the mobile phone is set with switch-on password, then the screen
will hint you to input the switch-on password. The mobile phone
cannot be switched on until the correct password is input
7.2 Switch off
To switch off the mobile phone, in standby state, press the Power
Key long. When the screen displays switch-on cartoon, the mobile
phone is switched off. Never switch off the mobile phone directly by
removing the battery. If so, some information not saved to the SIM
card or mobile phone will be loss.
7.3Connect network
After the SIM card is unlocked, the mobile phone searches for network
service. Once connected, the cellular service provider will show on the
-- 24 --
centre of the screen. The mobile phone is at idle stage and can make or
receive a call
7.3.1 Dialing a call
You cannot use this function until the network provider name occurs
on the screen.
In standby mode, input phone number with the touch, press the
Phone Soft to dial out number.
Also, you can dial a call by choosing a number from the Phonebook.
In standby mode, press the ‚Contacts‛ Soft Key to enter Phonebook,
choose Quick Search. After finding the contact and its phone number,
press the Phone Soft Key to dial out.
You can dial a call via Messages. If the receive message contains
phone number, you can dial such phone number via inbox message
or send message to such message sender.
In Inbox, choose the desired message, press the ‚OK‛ Soft Key to
enter Options, choose Use Number to extract the numbers or sender
number contained in the message. Press Options again to choose
Dial or Save the extracted number.
When the call is connected, you can set Call Duration as on, then
the screen will display call timer.
After the call is connected, press the ‚H-Free‛ Soft Key to enter the
handfree state. When the hand-free function is activated, please
keep the mobile phone away from you ear, because the amplified
sound may damage your audition. Press the ‚H-Held‛ Soft Key to
turn off the handfree function and return the normal mode.
If the call cannot be connected, the possible reasons include:
‚Busy Line‛: It means that the called party is busy or the
-- 25 --
network is busy. If automatic redial function is set, then the
mobile phone will automatically redial.
‚Refused‛: It means that the call is refused, for example, call
restriction function is set.
If Auto Redial is set as On, when the called party is busy or there is
no answer, automatic redial will be implemented.
If the dialed number has been stored, then the name corresponding
to this phone number will be displayed on the screen.
Press Hang-up Soft Key to end the call. In such case, the screen will
display the call duration.
Press Hang-up Soft Key to cancel the current call.
7.3.2Emergency Call
Emergency calls can be dialed even if the mobile phone is locked or
the SIM card is not inserted (You must be in the area covered by the
network).
Different countries have different emergency call numbers, so the
emergency calls in your mobile phone may not be effective in all
areas. Sometimes, due to the effect from network, environment or
interference, you cannot dial the emergency calls.
‚112‛ is a common GSM emergency call, so it can be effective under
any GSM network.
7.3.3 International call
To dial an international call, please use ‚+‛ to replace ‚00‛. You can
press ‚*‛ character to input ‚+‛.
Input country code.
Input area code and phone number.
Like common international call, please omit ‚0‛ before area code.

-- 26 --
Note: In some regions in a country, the call between them is like
international call (such as the Mainland China and Hong Kong SAR).
7.3.4Dial a Latest Call
Whether the call is connected or not, the mobile phone will save the
latest inward and outward call list, which is ordered from new to old.
After the new number is saved, if the list is full, the oldest number
will be deleted.
In standby state, press the Phone Soft Key>Recent call to display
the latest number. Choose the desired number and press the call
Soft Key to dial out.
7.3.5 Fixed line and extension
After input the operator number, press * three or four times, input ‚p‛
or ‚w‛, input the extension telephone number and press the call key
again.
1) Use phone book to save number and dial a call
Go into the phone book, use the up and down Key to search the
number which you want to dial. Press call key to dial a call
2) Redial the last number
On standby mode, press dialing key, will list the dialing number, use
direction key to choose the number and make a call
7.3.6Adjust Volume of Receiver
-- 27 --
In the process of session, you can press volume adjusting key on the
phone to adjust
7.3.7 Receive a Call
When there is a call in, as per phone settings, it will be alerted by
means of Ring, Vibration, Vibration and Ring, Ring after Vibration
together with Call Image and Call Movie.
Press the Answer Soft Key to receive a call.
Press Hang-up Soft Key to refuse a call.
If you have opened ‚Call Display‛ service, during call, the caller’s
number will be displayed on the screen. If this number has been
stored in phonebook, the name corresponding to this name will be
displayed on the screen.
Press Hang-up Soft Key to end the call.
7.3.8 Rapid dial-up Or Speed Dial
This mobile phone provides 9 shortcut key. You can self-define the
telephone numbers corresponding to these keys (see ‚telephone
directory‛ for detailed description). Only when you press any key from
[2-9] keys under power saving state, you can rapidly dial out; [1] key is set
as rapid dial-up of voice mail box number. After set up voice mail box
number, this key will be available.
Notice: key of rapid dial-up must be pressed for over 2 seconds. If you
press shortcut key and have not defined in setup/mobile phone
setup/rapid dial-up, it is hard to dial out.
7.3.9 Missed Calls
When there is a missed call, the will be ‚Missed call‛ occurring on
the screen. Press View to enter the list to view such missed call.
If Call Transfer option in Call Settings under Settings is chosen,
-- 28 --
the call inward will be transferred to the specified phone number.
7.3.10Connection to Voice Mail
This mobile phone allows you to transfer incoming telephone cal to
voice mail, then you will receive a notice on voice message. (Voice mail
center number must be preset).
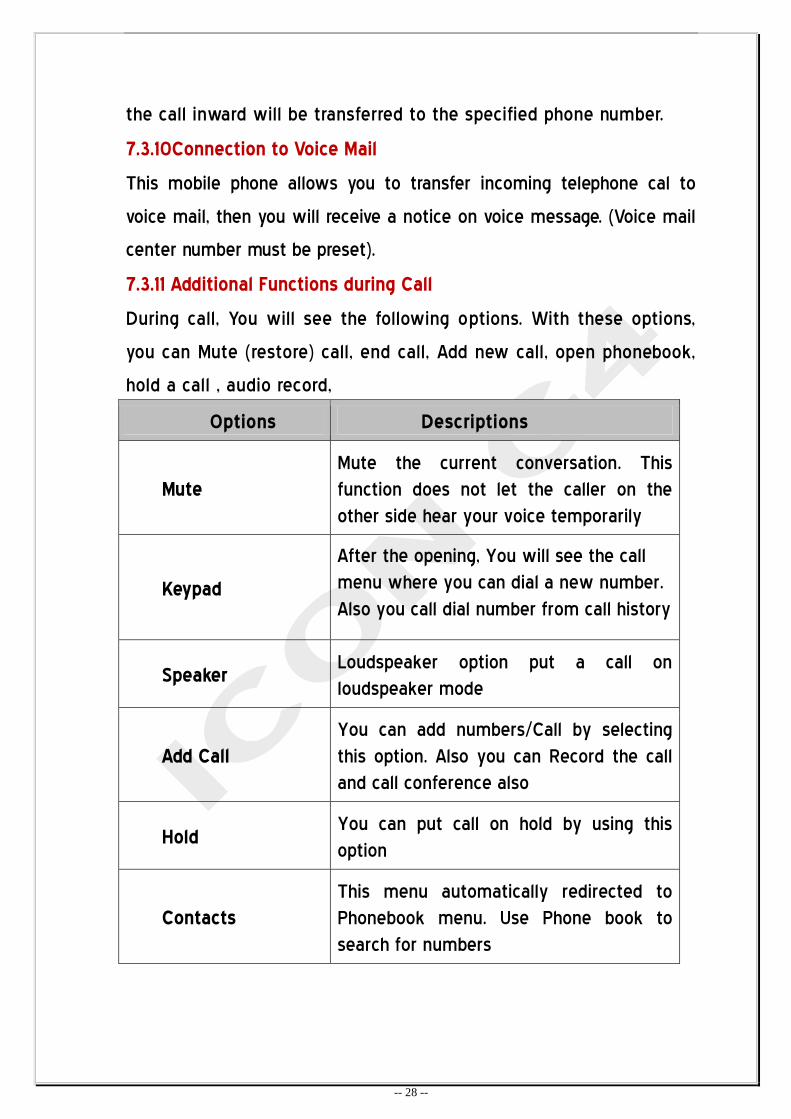
7.3.11 Additional Functions during Call
During call, You will see the following options. With these options,
you can Mute (restore) call, end call, Add new call, open phonebook,
hold a call , audio record,
Options Descriptions
Mute
Mute the current conversation. This
function does not let the caller on the
other side hear your voice temporarily
Keypad
After the opening, You will see the call
menu where you can dial a new number.
Also you call dial number from call history
Speaker Loudspeaker option put a call on
loudspeaker mode
Add Call
You can add numbers/Call by selecting
this option. Also you can Record the call
and call conference also
Hold You can put call on hold by using this
option
Contacts
This menu automatically redirected to
Phonebook menu. Use Phone book to
search for numbers
-- 29 --
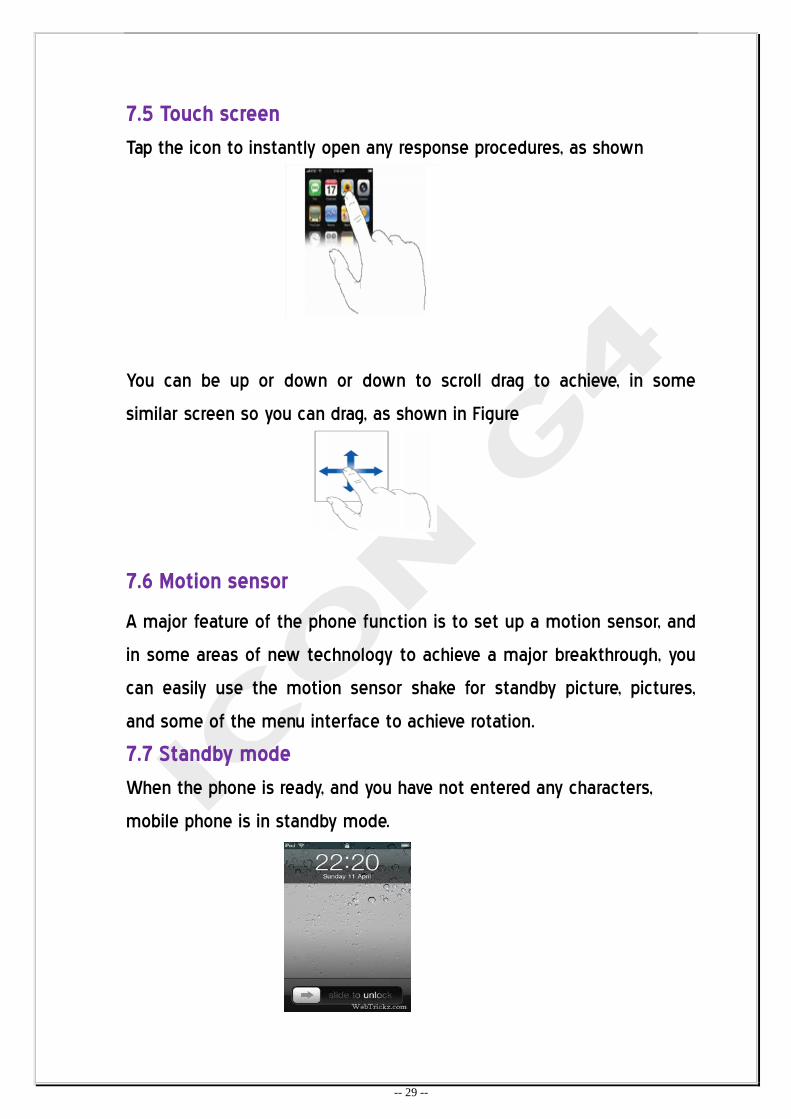
7.5 Touch screen
Tap the icon to instantly open any response procedures, as shown
You can be up or down or down to scroll drag to achieve, in some
similar screen so you can drag, as shown in Figure
7.6 Motion sensor
A major feature of the phone function is to set up a motion sensor, and
in some areas of new technology to achieve a major breakthrough, you
can easily use the motion sensor shake for standby picture, pictures,
and some of the menu interface to achieve rotation.
7.7 Standby mode
When the phone is ready, and you have not entered any characters,
mobile phone is in standby mode.
-- 30 --
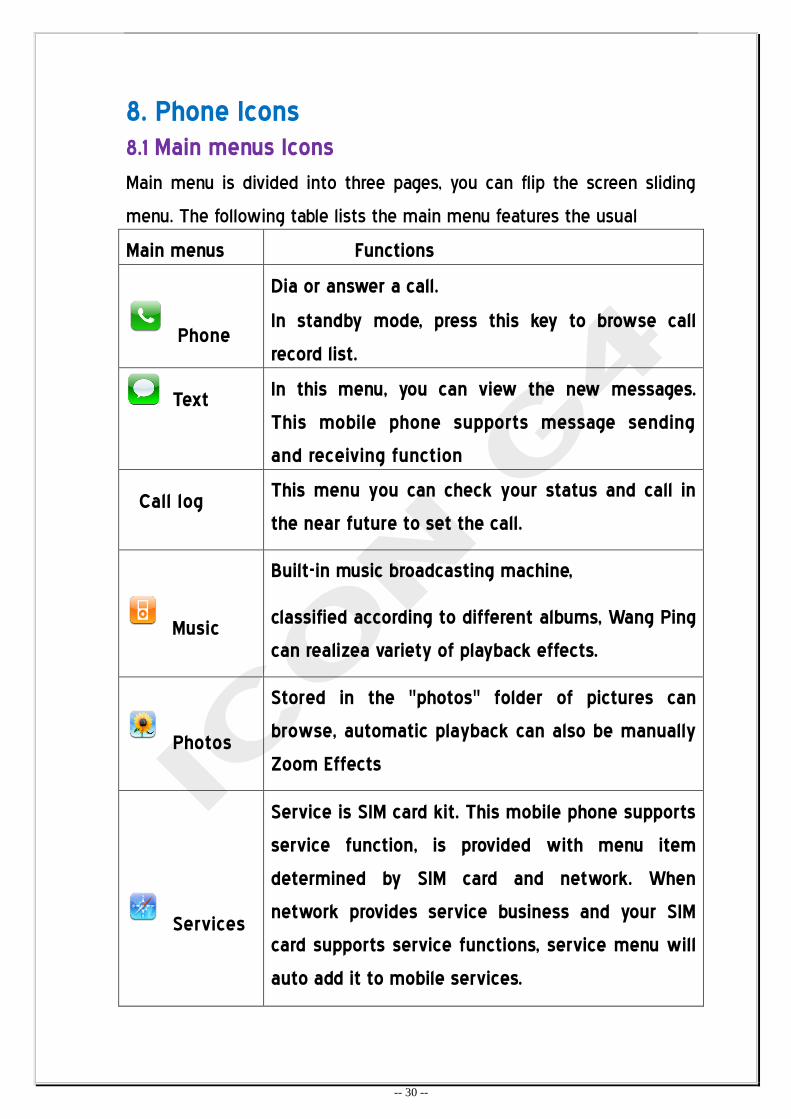
8. Phone Icons
8.1 Main menus Icons
Main menu is divided into three pages, you can flip the screen sliding
menu. The following table lists the main menu features the usual
Main menus Functions
Phone
Dia or answer a call.
In standby mode, press this key to browse call
record list.
Text In this menu, you can view the new messages.
This mobile phone supports message sending
and receiving function
Call log This menu you can check your status and call in
the near future to set the call.
Music
Built-in music broadcasting machine,
classified according to different albums, Wang Ping
can realizea variety of playback effects.
Photos
Stored in the "photos" folder of pictures can
browse, automatic playback can also be manually
Zoom Effects
Services
Service is SIM card kit. This mobile phone supports
service function, is provided with menu item
determined by SIM card and network. When
network provides service business and your SIM
card supports service functions, service menu will
auto add it to mobile services.
-- 31 --
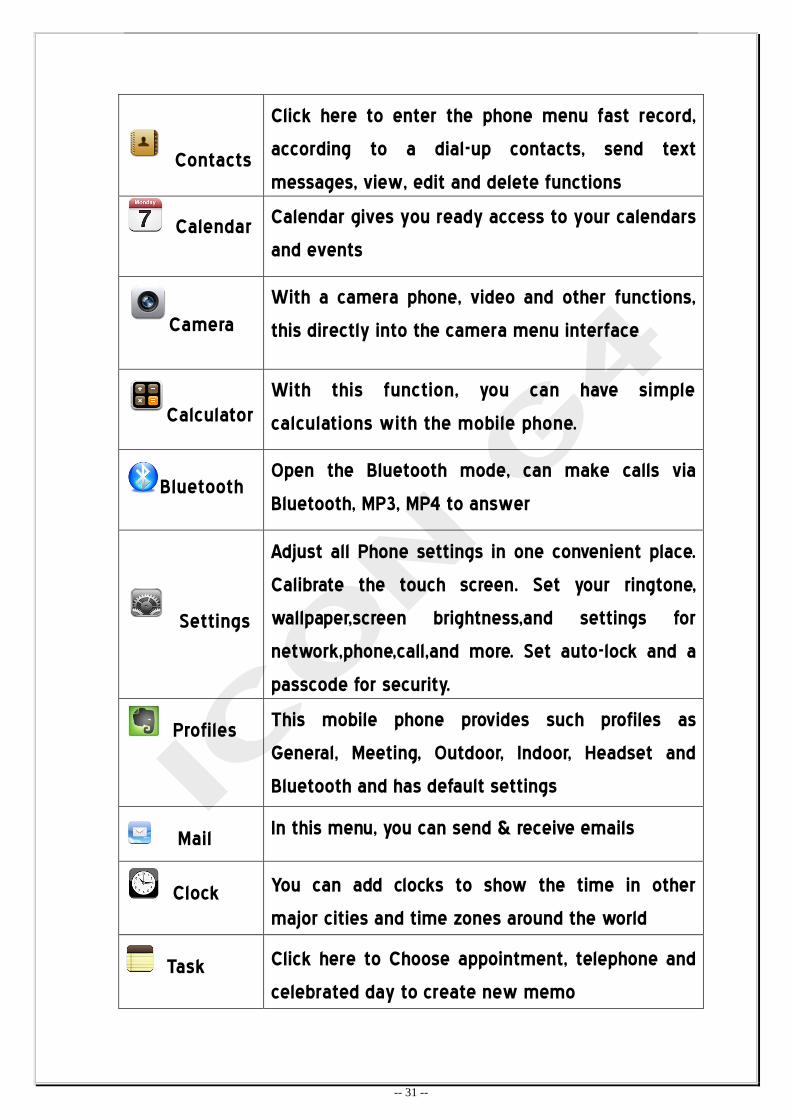
Contacts
Click here to enter the phone menu fast record,
according to a dial-up contacts, send text
messages, view, edit and delete functions
Calendar Calendar gives you ready access to your calendars
and events
Camera
With a camera phone, video and other functions,
this directly into the camera menu interface
Calculator
With this function, you can have simple
calculations with the mobile phone.
Bluetooth Open the Bluetooth mode, can make calls via
Bluetooth, MP3, MP4 to answer
Settings
Adjust all Phone settings in one convenient place.
Calibrate the touch screen. Set your ringtone,
wallpaper,screen brightness,and settings for
network,phone,call,and more. Set auto-lock and a
passcode for security.
Profiles This mobile phone provides such profiles as
General, Meeting, Outdoor, Indoor, Headset and
Bluetooth and has default settings
Mail In this menu, you can send & receive emails
Clock You can add clocks to show the time in other
major cities and time zones around the world
Task Click here to Choose appointment, telephone and
celebrated day to create new memo
-- 32 --
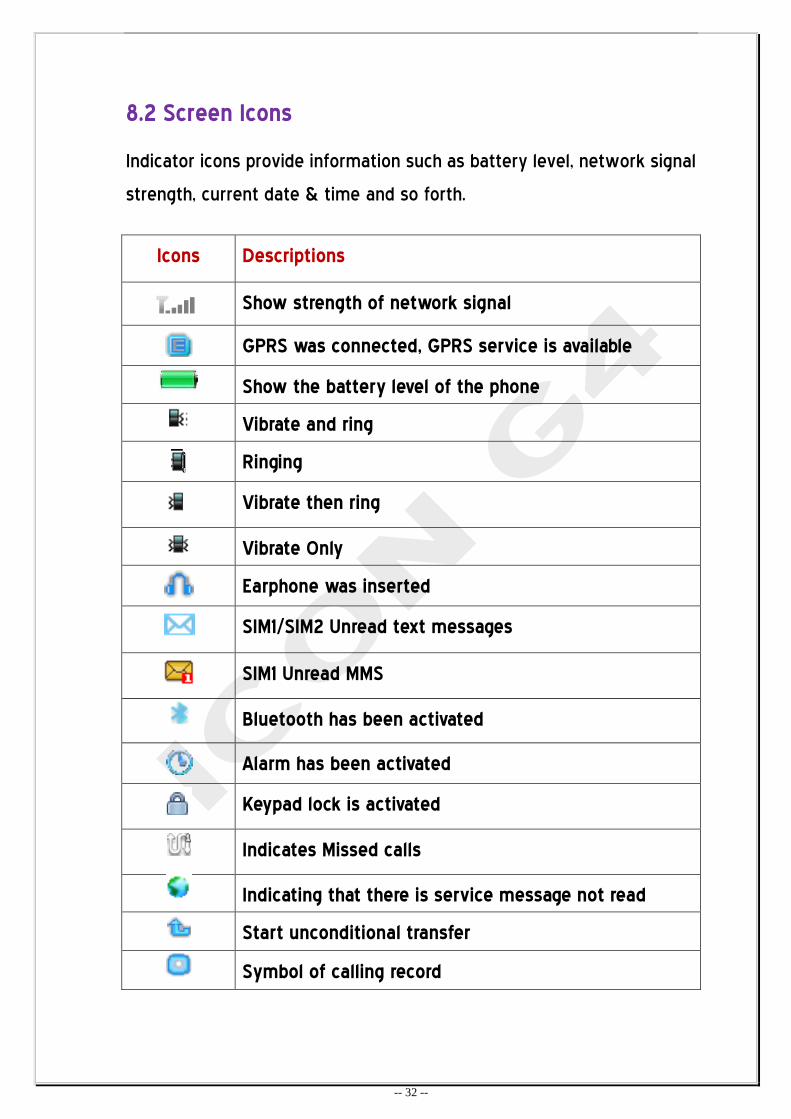
8.2 Screen Icons
Indicator icons provide information such as battery level, network signal
strength, current date & time and so forth.
Icons Descriptions
Show strength of network signal
GPRS was connected, GPRS service is available
Show the battery level of the phone
Vibrate and ring
Ringing
Vibrate then ring
Vibrate Only
Earphone was inserted
SIM1/SIM2 Unread text messages
SIM1 Unread MMS
Bluetooth has been activated
Alarm has been activated
Keypad lock is activated
Indicates Missed calls
Indicating that there is service message not read
Start unconditional transfer
Symbol of calling record
-- 33 --
9.0 Input method It supports normal English input method, smart English input method,
number input method, Hindi input method, and symbols input method.
9.1 Hand-writing input
Hand-writing input mode is the important mode of this mobile phone.
As this mobile phone adopts advanced word identification technology,
you can conveniently and quickly input English and number in the
screen by hand writing. It is applicable for any function requiring word
and number input.
In English input mode, click ABC upper left corner of the edit message
screen to switch between lowercase and highercase, numeric, Hindi etc;
Click switch between upper & lower case letters;
Click 》 to switch between input mode and symbol input;
Click to activate handwriting input method;
Click to delete the character before the cursor;
Click return to make the cursor come to a new line.
Before hand-writing input, confirm the type of the words to be input.
Click the English icon and number icon in the screen to confirm the type
of the words to be input. The cursor will mark the current input position.
Use the touch to write in the hand-writing area, after a halt, the screen
will display the English characters automatically identified and all
candidate English characters in the selection area. If the desired word
does not occur in the screen, click the candidate area to choose a
substitute.
9.2 Basic letter Input method icon
This mobile phone provides highercase and lowercase input modes. In
English input mode, click ABC upper left corner of the edit message

-- 34 --
screen to switch between lowercase and highercase, numeric, Hindi etc;
After go into the edit window (include phonebook edit, message edit,
task ;) input method icon show up :
Number input :‚ 123 ‛
Multitap ABC input :‚ ABC ‛
Multitap abc input :‚ abc ‛
Hindi input : ‚ HI ‛
Arabic input : ‚ AR ‛
9.3Number Input
Click ABC upper left corner of the edit message screen to switch
between ABC>abc >123 or
Click and select Option>Input method>Numeric, and then the screen
will display the number input analogue keyboard, You can press number
key to input corresponding number with the touch pen.
9.4Sign input method
Press‚》‛key to switch to sign input method, press left right upper lower
direction keys to select the sign needed.
9.5 General operation for English input
1. Every key has its corresponding letter, repeat until the letter you are
looking for shows up. After the cursor moved, input next letter.
2. Use Click ABC upper left corner of the edit message screen to
switch between different input method
3. Press SPACE key to input space
4. Use to clear off wrong input
-- 35 --
10.0 Function Menu
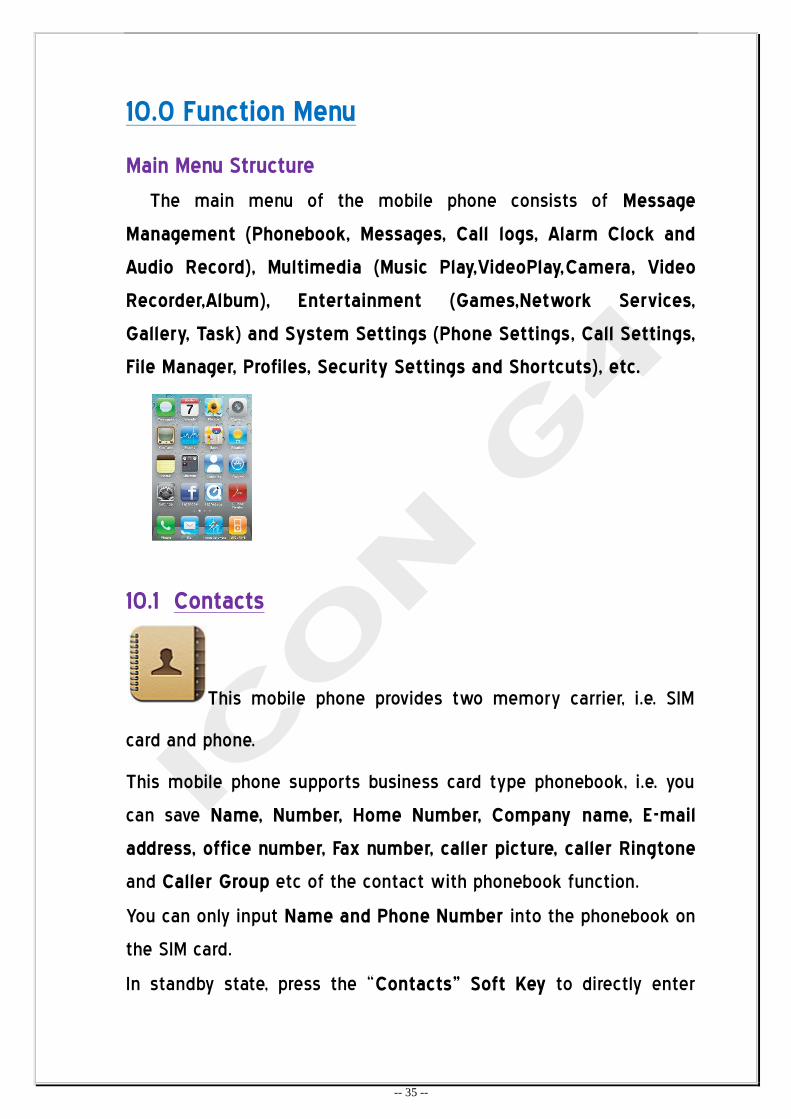
Main Menu Structure
The main menu of the mobile phone consists of Message
Management (Phonebook, Messages, Call logs, Alarm Clock and
Audio Record), Multimedia (Music Play,VideoPlay,Camera, Video
Recorder,Album), Entertainment (Games,Network Services,
Gallery, Task) and System Settings (Phone Settings, Call Settings,
File Manager, Profiles, Security Settings and Shortcuts), etc.
10.1 Contacts
This mobile phone provides two memory carrier, i.e. SIM
card and phone.
This mobile phone supports business card type phonebook, i.e. you
can save Name, Number, Home Number, Company name, E-mail
address, office number, Fax number, caller picture, caller Ringtone
and Caller Group etc of the contact with phonebook function.
You can only input Name and Phone Number into the phonebook on
the SIM card.
In standby state, press the ‚Contacts” Soft Key to directly enter
-- 36 --
and view the phonebook interface.
After entering Phonebook from Menu, you can choose QuickSearch,
Search Name, Add Number, Copy All, Delete, Callers’ Group, Other
Numbers, Settings, Call Ring and Call pictures etc.
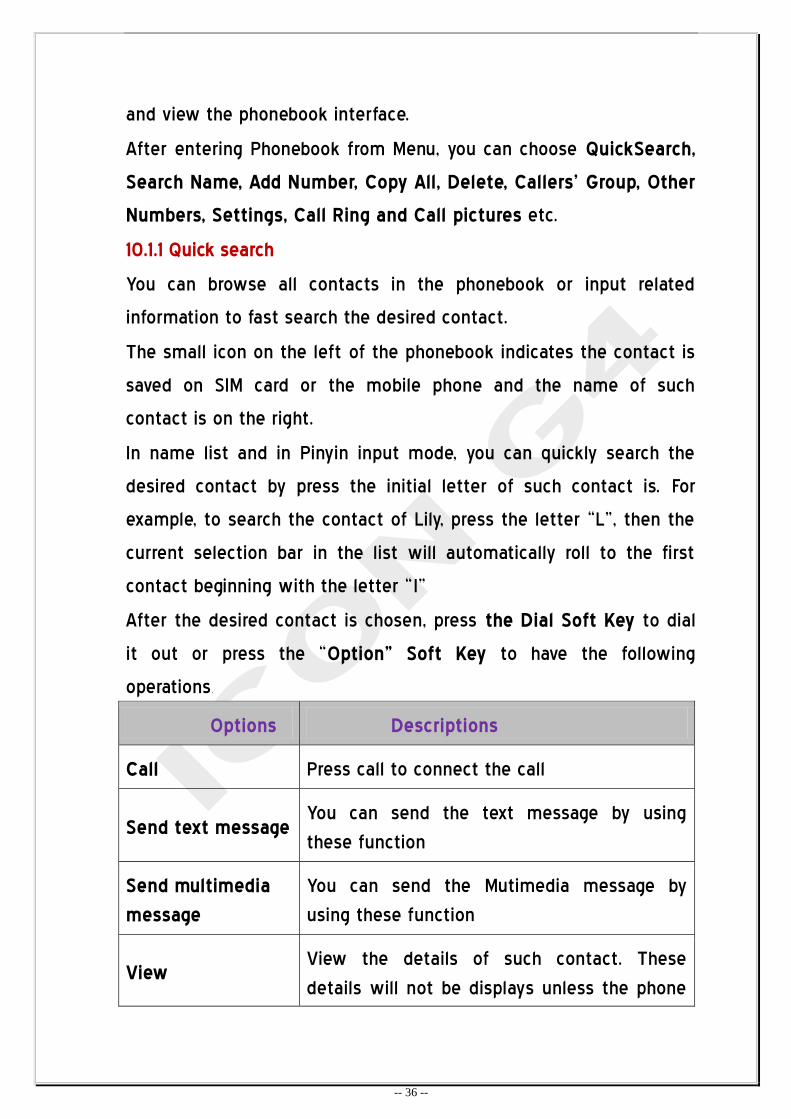
10.1.1 Quick search
You can browse all contacts in the phonebook or input related
information to fast search the desired contact.
The small icon on the left of the phonebook indicates the contact is
saved on SIM card or the mobile phone and the name of such
contact is on the right.
In name list and in Pinyin input mode, you can quickly search the
desired contact by press the initial letter of such contact is. For
example, to search the contact of Lily, press the letter ‚L‛, then the
current selection bar in the list will automatically roll to the first
contact beginning with the letter ‚I‛
After the desired contact is chosen, press the Dial Soft Key to dial
it out or press the ‚Option” Soft Key to have the following
operations.
Options Descriptions
Call Press call to connect the call
Send text message You can send the text message by using
these function
Send multimedia
message
You can send the Mutimedia message by
using these function
View View the details of such contact. These
details will not be displays unless the phone
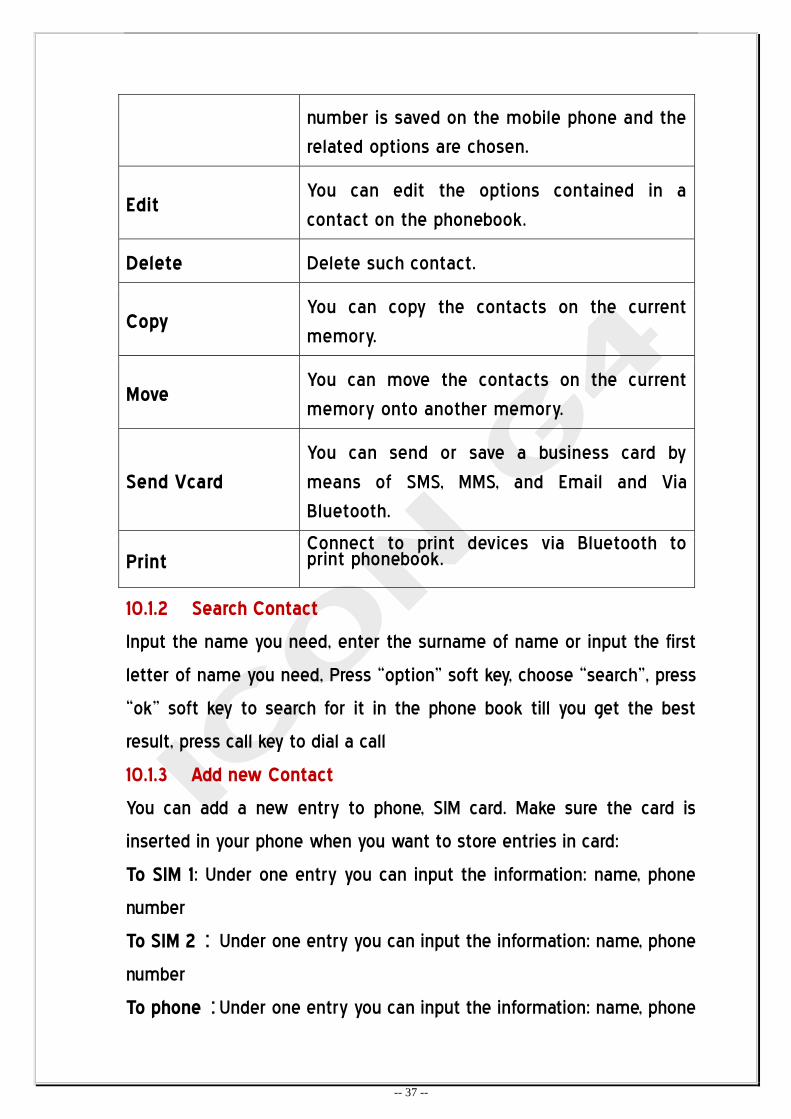
-- 37 --
number is saved on the mobile phone and the
related options are chosen.
Edit You can edit the options contained in a
contact on the phonebook.
Delete Delete such contact.
Copy You can copy the contacts on the current
memory.
Move You can move the contacts on the current
memory onto another memory.
Send Vcard
You can send or save a business card by
means of SMS, MMS, and Email and Via
Bluetooth.
Print Connect to print devices via Bluetooth to print phonebook.
10.1.2 Search Contact
Input the name you need, enter the surname of name or input the first
letter of name you need, Press ‚option‛ soft key, choose ‚search‛, press
‚ok‛ soft key to search for it in the phone book till you get the best
result, press call key to dial a call
10.1.3 Add new Contact
You can add a new entry to phone, SIM card. Make sure the card is
inserted in your phone when you want to store entries in card:
To SIM 1: Under one entry you can input the information: name, phone
number
To SIM 2:Under one entry you can input the information: name, phone
number
To phone:Under one entry you can input the information: name, phone
-- 38 --
number, home number, company name, E-mail, office number, fix number,
birthday, picture, and sound and caller group
10.1.4 Copy All
You can copy all phone numbers on the SIM card to the mobile phone or
vice versa
10.1.5 Delete
You can choose to delete all contacts on the SIM card or on the mobile
phone or delete them one by one. If Delete All is chosen and PIN
number or phone password is set, you must input correct number to
have the operation.
10.1.6 Caller groups
This mobile phone supports 5 callers’ groups. You can choose a group in
the callers’ group list and view and edit callers’ group, including Name,
Caller Ring, Caller picture and Group members.
10.1.7 Extra numbers
Under this menu, you can set My Number, Service Number and
Emergency Call
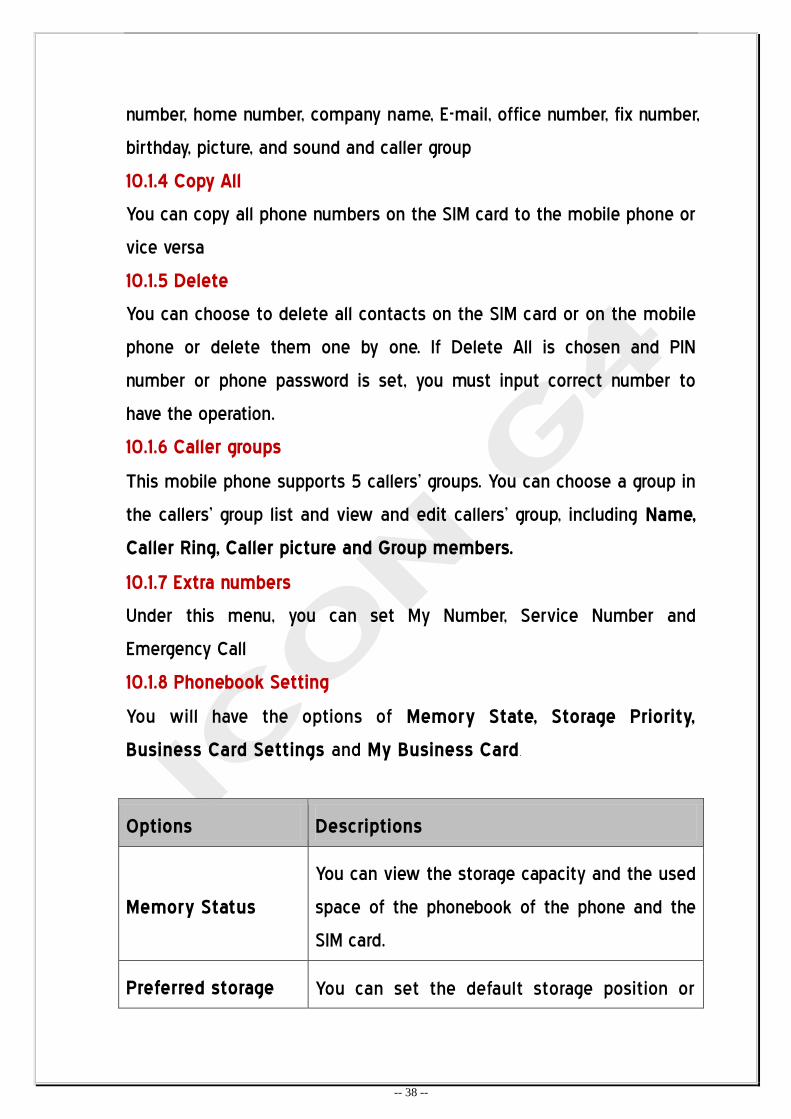
10.1.8 Phonebook Setting
You will have the options of Memory State, Storage Priority,
Business Card Settings and My Business Card.
Options Descriptions
Memory Status
You can view the storage capacity and the used
space of the phonebook of the phone and the
SIM card.
Preferred storage You can set the default storage position or
-- 39 --
choose one during saving.
Fields
You can set whether to display Home
Number, Company name, E-mail address,
Office Number, Fax number ,Caller
picture ,Caller ringtone and Caller Group
etc in the phonebook.
My vCard After setting your business card, you can
send it to others.
vCard version Choose the vCard version 2.1 or 3.0
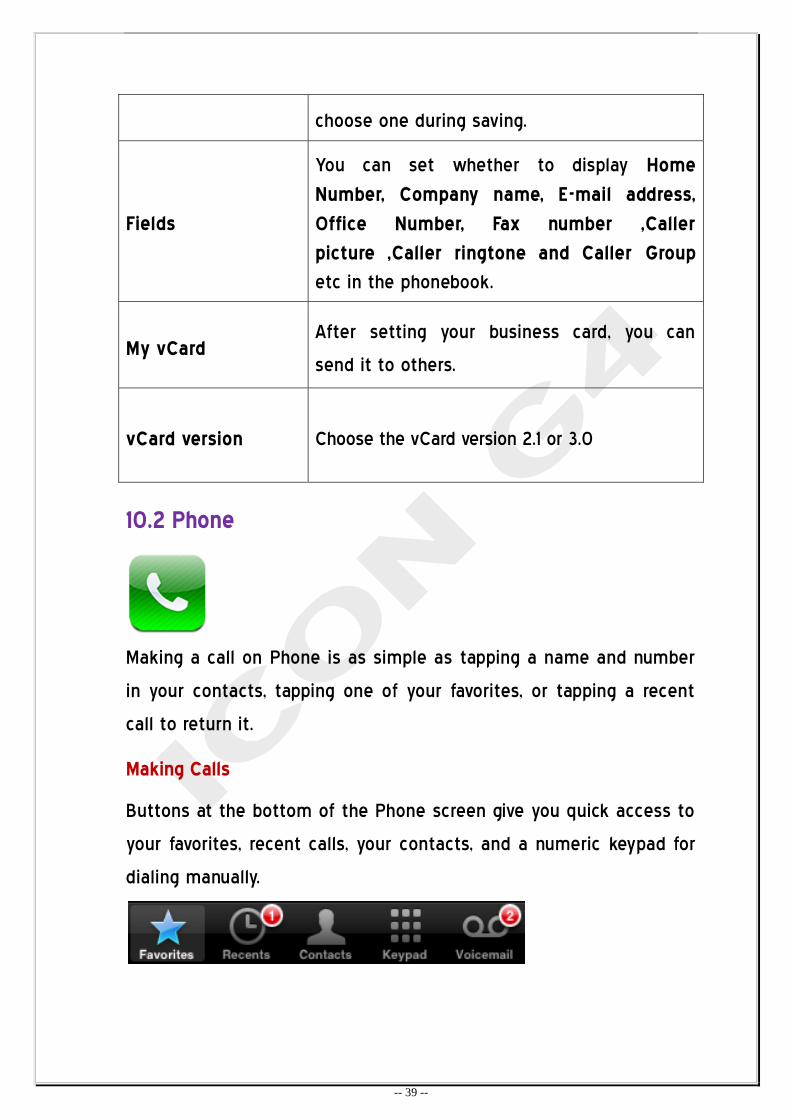
10.2 Phone
Making a call on Phone is as simple as tapping a name and number
in your contacts, tapping one of your favorites, or tapping a recent
call to return it.
Making Calls
Buttons at the bottom of the Phone screen give you quick access to
your favorites, recent calls, your contacts, and a numeric keypad for
dialing manually.
-- 40 --
Option Description
Contacts Tap Contacts, choose a contact, then tap a phone
number.
Favorites Tap Favorites, then choose a contact.
Recent calls Tap Recents, then tap a name or number in the list. If
the call was a FaceTime video call (indicated by ), tap
the item to make a new video call.
Keypad Tap Keypad, enter the number, then tap Call.
10.3 Music
This mobile phone has an inbuilt music player, which is used to play
music in "My music" Or ‘’MP3‛ folder and set music as ring
Note: Local support for the motion detection function, MP3 player, as
long as you can shake a switch on (the first of the next) songs
When enjoying music, choose proper volume. Continuous high
volume may damage your audition.
In Music Player interface, Press icon to Play, icon to
Stop, Left Direction icon I to Previous, Right Direction
icon I to Next.
In the player interface, press the ‚option‛ Soft Key to enter
the track list, after entering Options and then you can have
such options as Play, Details, Add to Ringtones, refresh list
-- 41 --
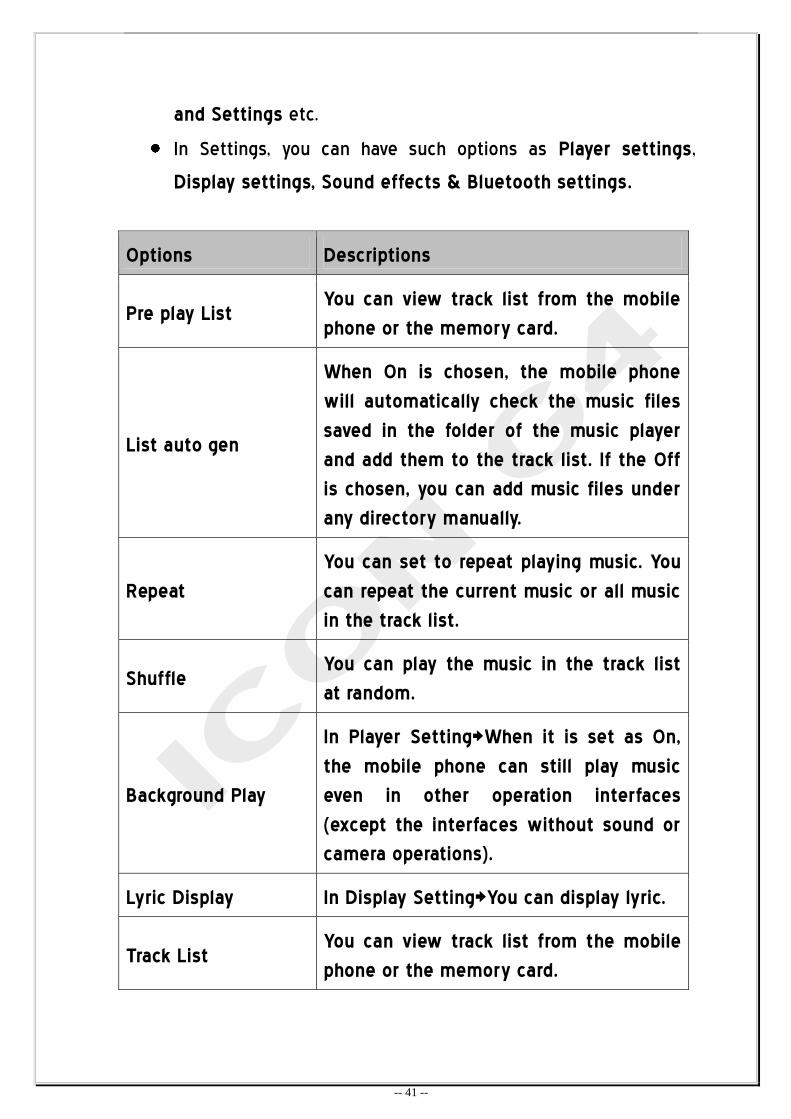
and Settings etc.
In Settings, you can have such options as Player settings,
Display settings, Sound effects & Bluetooth settings.
Options Descriptions
Pre play List You can view track list from the mobile
phone or the memory card.
List auto gen
When On is chosen, the mobile phone
will automatically check the music files
saved in the folder of the music player
and add them to the track list. If the Off
is chosen, you can add music files under
any directory manually.
Repeat
You can set to repeat playing music. You
can repeat the current music or all music
in the track list.
Shuffle You can play the music in the track list
at random.
Background Play
In Player Setting>When it is set as On,
the mobile phone can still play music
even in other operation interfaces
(except the interfaces without sound or
camera operations).
Lyric Display In Display Setting>You can display lyric.
Track List You can view track list from the mobile
phone or the memory card.

-- 42 --
Repeat
In Player Setting>You can set to repeat
playing music. You can repeat the current
music or all music in the track list.
Sound effect
You can choose sound effect. In audio
effect set equalizer,3D surround sound
also set bass enhancement to on or off
Bluetooth Settings When it is set as On, you can choose
stereo headset to listen to MP3 directly.
10.4 Text (Message)
On standby mode, press messaging icons go into the message. This
mobile phone supports message sending function. Messages are
sent to the message center of the network and then to the target
mobile phone. If the target mobile phone is not switched off or
cannot receive messages, the message will be saved in the network
temporarily. The effective period to store the message is determined
by the settings of the user and the service provider.
When there is a new message in, the screen will have corresponding
hint. Press the ‚Read” Soft Key to read the message.
If the receiver has received the message, then you can
receive alert tone from the mobile phone (Message Alert
-- 43 --
Tone and Message Report must be set as on).
If messages are full, you cannot receive any new message.
In Inbox, choose the desired old message and use Delete to
delete it. Once the space allows, the message not received
will be received. Text message function is a network service.
You must subscribe to your network operator.
Multimedia messages (MMS), that is, multimedia message service, with
its most outstanding character supporting multimedia functions, can
transmit multimedia informations in all kinds of forms, such as texts,
images and sounds, etc.
MMS service needs the support of Network operator. Please make sure
that your SIM card supports this service or contact the network
operator for information before use. Your phone supports MMS and can
send and receive MMS after necessary MMS settings.
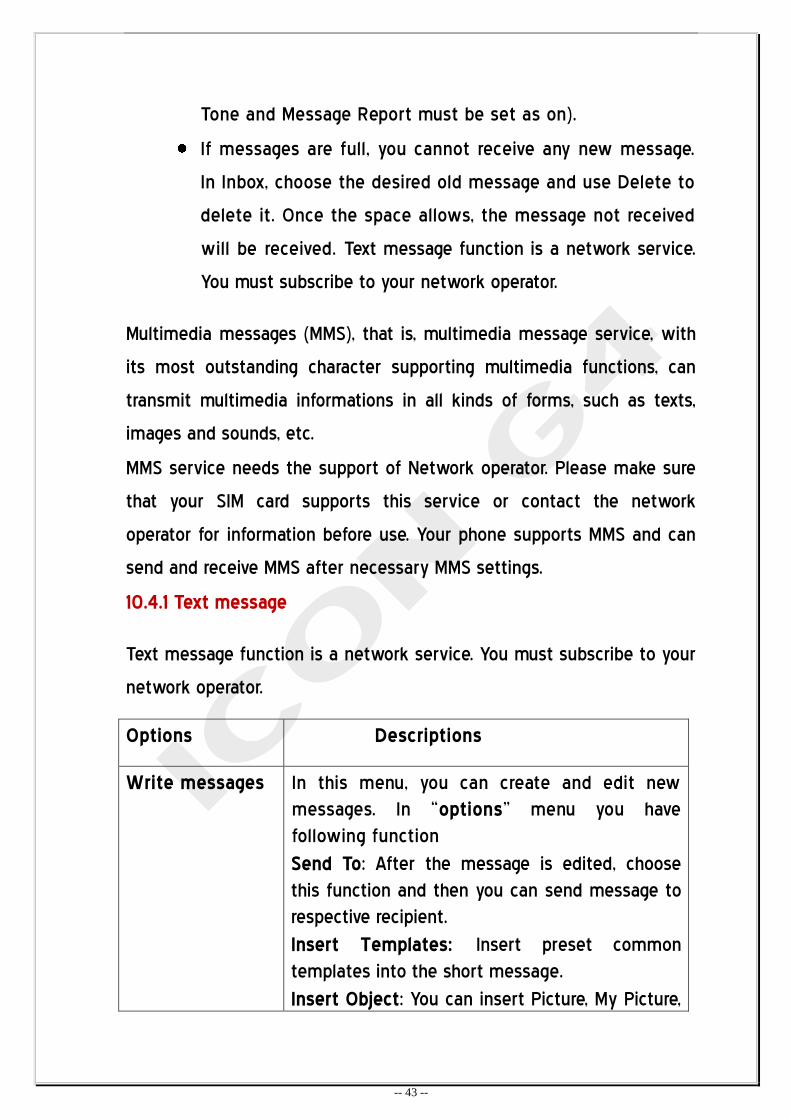
10.4.1 Text message
Text message function is a network service. You must subscribe to your
network operator.
Options Descriptions
Write messages In this menu, you can create and edit new
messages. In ‚options‛ menu you have
following function
Send To: After the message is edited, choose
this function and then you can send message to
respective recipient.
Insert Templates: Insert preset common
templates into the short message.
Insert Object: You can insert Picture, My Picture,
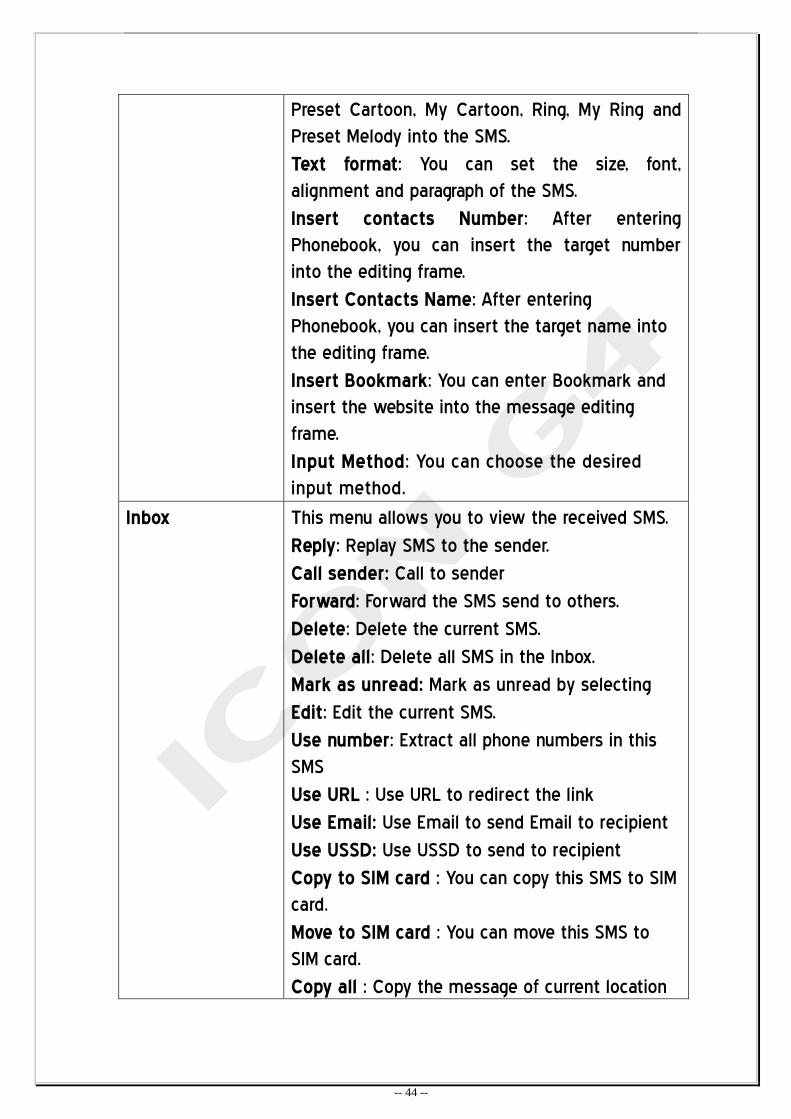
-- 44 --
Preset Cartoon, My Cartoon, Ring, My Ring and
Preset Melody into the SMS.
Text format: You can set the size, font,
alignment and paragraph of the SMS.
Insert contacts Number: After entering
Phonebook, you can insert the target number
into the editing frame.
Insert Contacts Name: After entering
Phonebook, you can insert the target name into
the editing frame.
Insert Bookmark: You can enter Bookmark and
insert the website into the message editing
frame.
Input Method: You can choose the desired
input method.
Inbox This menu allows you to view the received SMS.
Reply: Replay SMS to the sender.
Call sender: Call to sender
Forward: Forward the SMS send to others.
Delete: Delete the current SMS.
Delete all: Delete all SMS in the Inbox.
Mark as unread: Mark as unread by selecting
Edit: Edit the current SMS.
Use number: Extract all phone numbers in this
SMS
Use URL : Use URL to redirect the link
Use Email: Use Email to send Email to recipient
Use USSD: Use USSD to send to recipient
Copy to SIM card : You can copy this SMS to SIM
card.
Move to SIM card : You can move this SMS to
SIM card.
Copy all : Copy the message of current location
-- 45 --
on SIM to phone or phone to SIM.
Move all: Move the message of current location
on SIM to phone or phone to SIM.
Print: Connect to print devices via Bluetooth
to print Message.
Outbox In this menu, you can view all sent and unsent
SMS saved.
Templates Use the available templates from template menu
SMS Settings With this function, you can set the default
information in relation to SMS characteristics.
Profile settings: In SMS Settings, you can have
such operations as profile name, SMS center
number, SMS valid period and Sending format
orderly.
SMS Blacklist : In this settings you can block
unwanted messages,
Scheduled SMS: Scheduled SMS enables the user
to send scheduled text messages to one or
multiple recipients with access to your address
book. The user can send the SMS as soon as the
user schedules it or for a later date. The user also
has a complete control to edit, delete or
re-schedule the SMS at any time
Common Settings: You can set information
report and reply route. After the information
report is activated, SMS center will send status
report, via which you can expediently know
whether the party has received or not, when the
party receives your message or cannot receive
your message for some reason. This function
needs the support of the network operator.
Memory status: You can search the percentage
of the SMS saved in the SIM card and the mobile
-- 46 --
phone to the total capacity.
Preferred Storage: You can set the default
storage position of SMS. Choose To SIM or To
Phone.
10.4.2 Multimedia message
Options Descriptions
Create a messages
In this menu, you can create and edit new
mms messages. In ‚options‛ menu you have
following function
Done: After the message is edited, choose this
function and then you can have such options as
Send, Save and Send, Save, Save to Many and
Send to Group.
You may select Send to, CC, BCC, Subject or
Content while composing.
Press Option key to enter the option menu.
Send to: set receiver’s phone number or e-mail
address.
CC: set CC phone number or e-mail address.
BCC: set BCC phone number or e-mail address.
Subject: set message subject.
Details: view message details.
Content: edit MMS content, the user may
proceed with text, insert, preview, slide time etc.
Insert: Insert option includes following function
Insert Picture: You can insert Picture from
photos menu
Insert Sound: You can insert sound from music
folder
Insert sound from sound Recorder: You can
-- 47 --
also insert sound directly from sound recorder
Insert Templates: Insert preset common
templates into the short message.
Insert Attachment: You can insert attachment
like office document
Insert Number: After entering Phonebook, you
can insert the target number into the editing
frame.
Insert Phonebook Name: After entering
Phonebook, you can insert the target name into
the editing frame.
Insert Bookmark: You can enter Bookmark and
insert the website into the message editing
frame.
Preview: You can see the preview of the
attached files
Slide Option: In this you can adjust the slide
with your preference
Send Option: You can set the time of validity,
sending report, read returns, priority, internal
time, delivery time
Details: You will get the details of size of the
mms
Input Method: You can choose the desired
input method.
Options Descriptions
Inbox This menu allows you to view the received SMS.
View: View the current message
-- 48 --
Reply: Replay SMS to the sender.
Forward: Forward the SMS send to others.
Delete: Delete the current SMS.
Delete all: Delete all SMS in the Inbox.
Mark as unread: Mark as unread by selecting
Edit: Edit the current SMS.
Use number: Extract all phone numbers in this
SMS
Use URL : Use URL to redirect the link
Use USSD: Use USSD to send to recipient
Use Email: Use Email to send Email to recipient
Chat :Chat with number
Copy to SIM card : You can copy this SMS to SIM
card.
Move to SIM card : You can move this SMS to
SIM card.
Copy all : Copy the message of current location
on SIM to phone or phone to SIM.
Move all: Move the message of current location
on SIM to phone or phone to SIM.
Outbox In this menu, you can view all sent and unsent
SMS saved.
Drafts The SMS save in the draft after edit, after press
‚options‛ to choose these options:
View: View the current message
Send: send the current SMS to other
Edit: edit the current SMS
Delete:To delete the current SMS.
Delete All::to delete all messages in drafts
Use number: Extract all phone numbers in this
SMS
Use URL : Use URL to redirect the link
-- 49 --
Use Email: Use Email to send Email to recipient
Use USSD: Use USSD to send to recipient
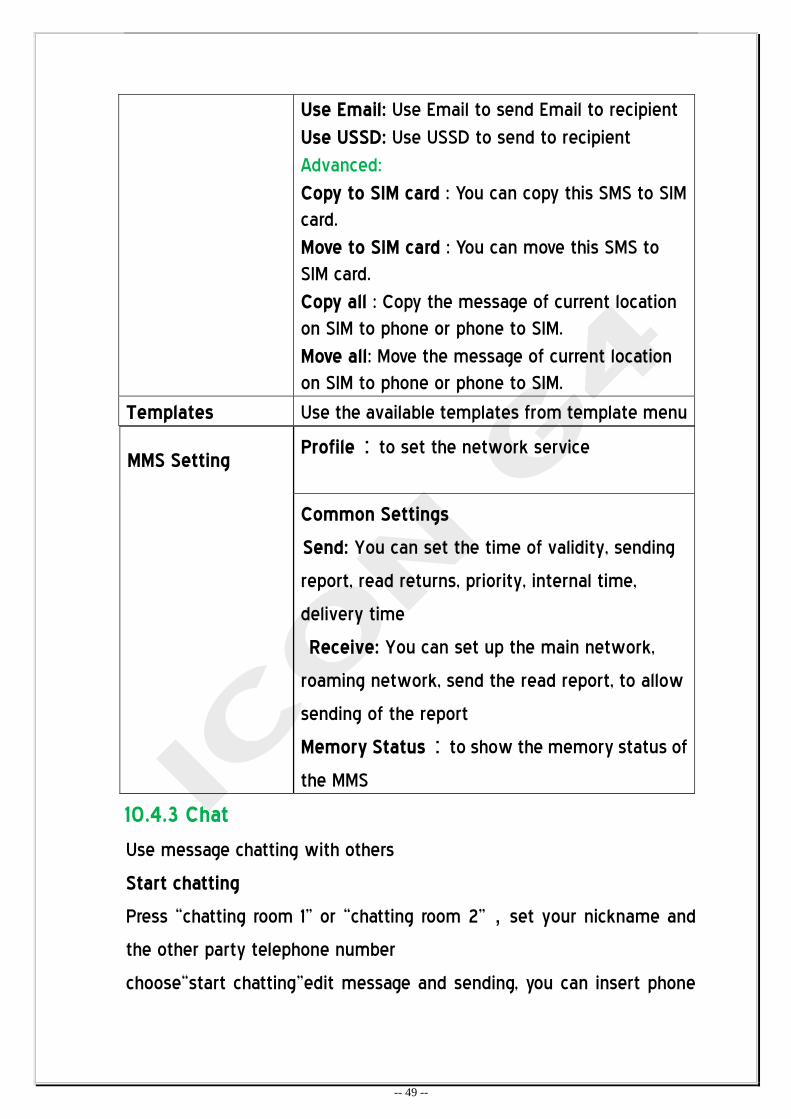
Advanced:
Copy to SIM card : You can copy this SMS to SIM
card.
Move to SIM card : You can move this SMS to
SIM card.
Copy all : Copy the message of current location
on SIM to phone or phone to SIM.
Move all: Move the message of current location
on SIM to phone or phone to SIM.
Templates Use the available templates from template menu
MMS Setting Profile:to set the network service
Common Settings
Send: You can set the time of validity, sending
report, read returns, priority, internal time,
delivery time
Receive: You can set up the main network,
roaming network, send the read report, to allow
sending of the report
Memory Status:to show the memory status of
the MMS
10.4.3 Chat
Use message chatting with others
Start chatting
Press ‚chatting room 1‛ or ‚chatting room 2‛,set your nickname and
the other party telephone number
choose‚start chatting‛edit message and sending, you can insert phone
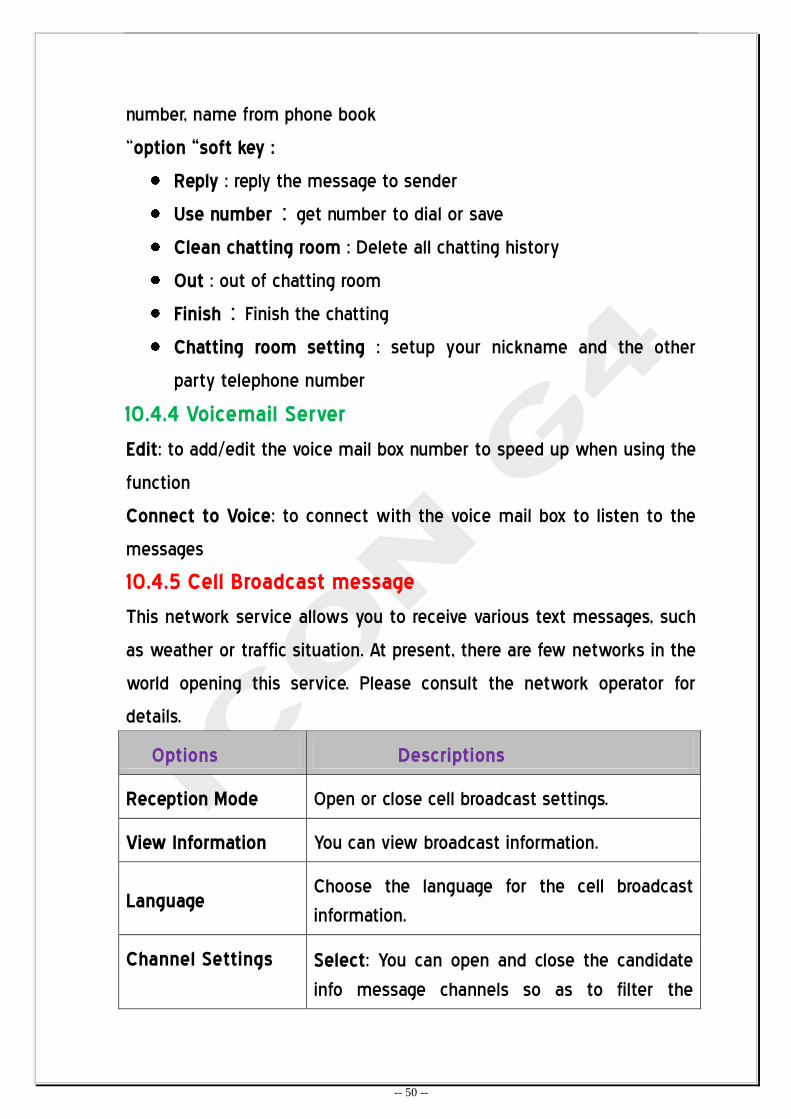
-- 50 --
number, name from phone book
‚option “soft key :
Reply : reply the message to sender
Use number:get number to dial or save
Clean chatting room : Delete all chatting history
Out : out of chatting room
Finish:Finish the chatting
Chatting room setting : setup your nickname and the other
party telephone number
10.4.4 Voicemail Server
Edit: to add/edit the voice mail box number to speed up when using the
function
Connect to Voice: to connect with the voice mail box to listen to the
messages
10.4.5 Cell Broadcast message
This network service allows you to receive various text messages, such
as weather or traffic situation. At present, there are few networks in the
world opening this service. Please consult the network operator for
details.
Options Descriptions
Reception Mode Open or close cell broadcast settings.
View Information You can view broadcast information.
Language Choose the language for the cell broadcast
information.
Channel Settings
Select: You can open and close the candidate
info message channels so as to filter the
-- 51 --
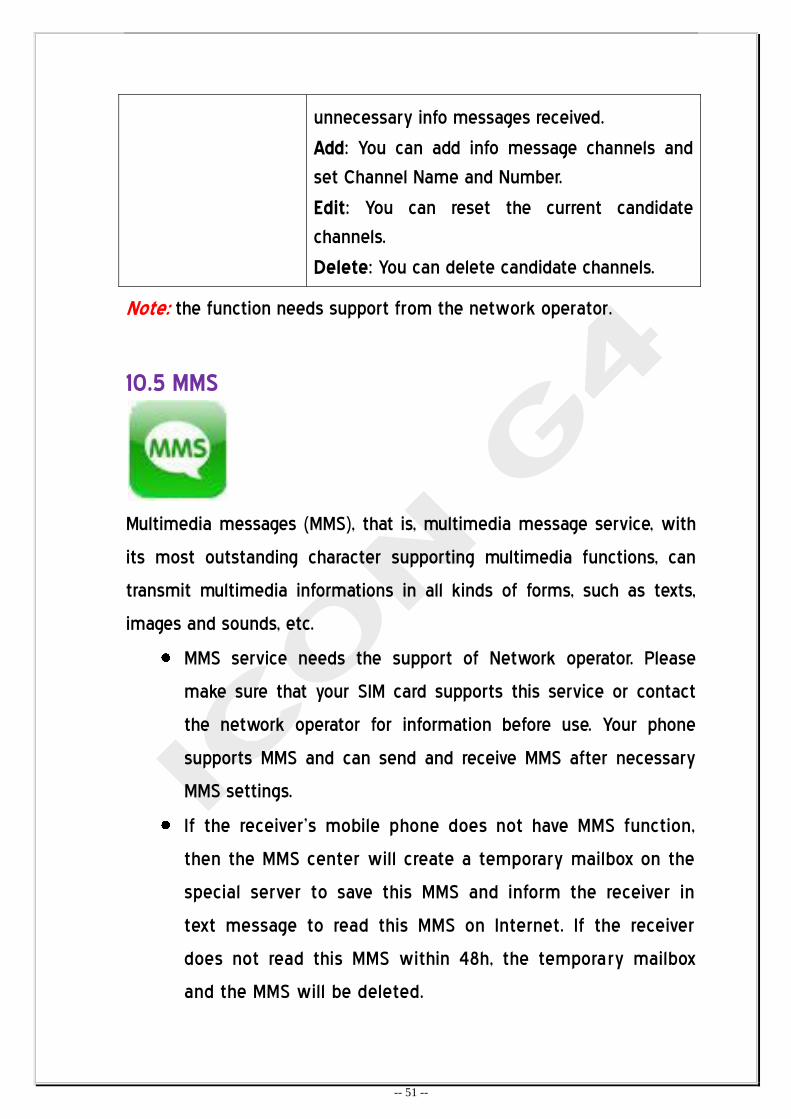
unnecessary info messages received.
Add: You can add info message channels and
set Channel Name and Number.
Edit: You can reset the current candidate
channels.
Delete: You can delete candidate channels.
Note: the function needs support from the network operator.
10.5 MMS
Multimedia messages (MMS), that is, multimedia message service, with
its most outstanding character supporting multimedia functions, can
transmit multimedia informations in all kinds of forms, such as texts,
images and sounds, etc.
MMS service needs the support of Network operator. Please
make sure that your SIM card supports this service or contact
the network operator for information before use. Your phone
supports MMS and can send and receive MMS after necessary
MMS settings.
If the receiver’s mobile phone does not have MMS function,
then the MMS center will create a temporary mailbox on the
special server to save this MMS and inform the receiver in
text message to read this MMS on Internet. If the receiver
does not read this MMS within 48h, the temporary mailbox
and the MMS will be deleted.
-- 52 --
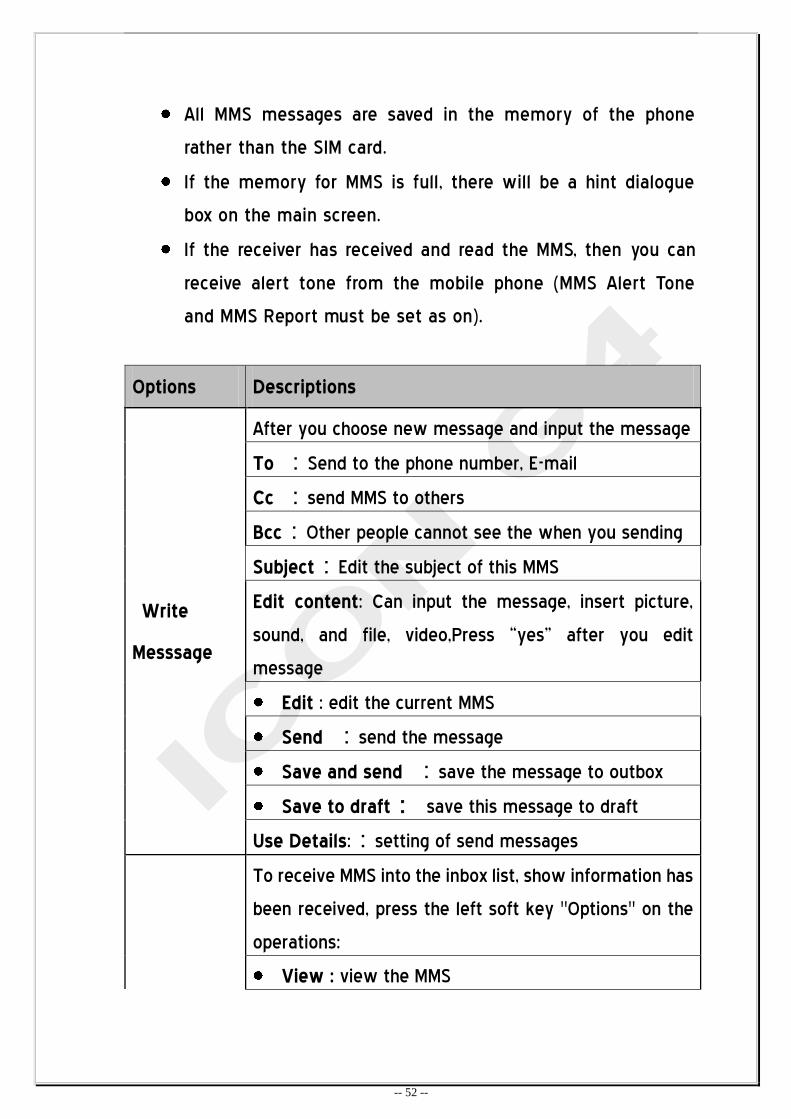
All MMS messages are saved in the memory of the phone
rather than the SIM card.
If the memory for MMS is full, there will be a hint dialogue
box on the main screen.
If the receiver has received and read the MMS, then you can
receive alert tone from the mobile phone (MMS Alert Tone
and MMS Report must be set as on).
Options Descriptions
Write
Messsage
After you choose new message and input the message
To :Send to the phone number, E-mail
Cc :send MMS to others
Bcc:Other people cannot see the when you sending
Subject:Edit the subject of this MMS
Edit content: Can input the message, insert picture,
sound, and file, video,Press ‚yes‛ after you edit
message
Edit : edit the current MMS
Send :send the message
Save and send :save the message to outbox
Save to draft: save this message to draft
Use Details::setting of send messages
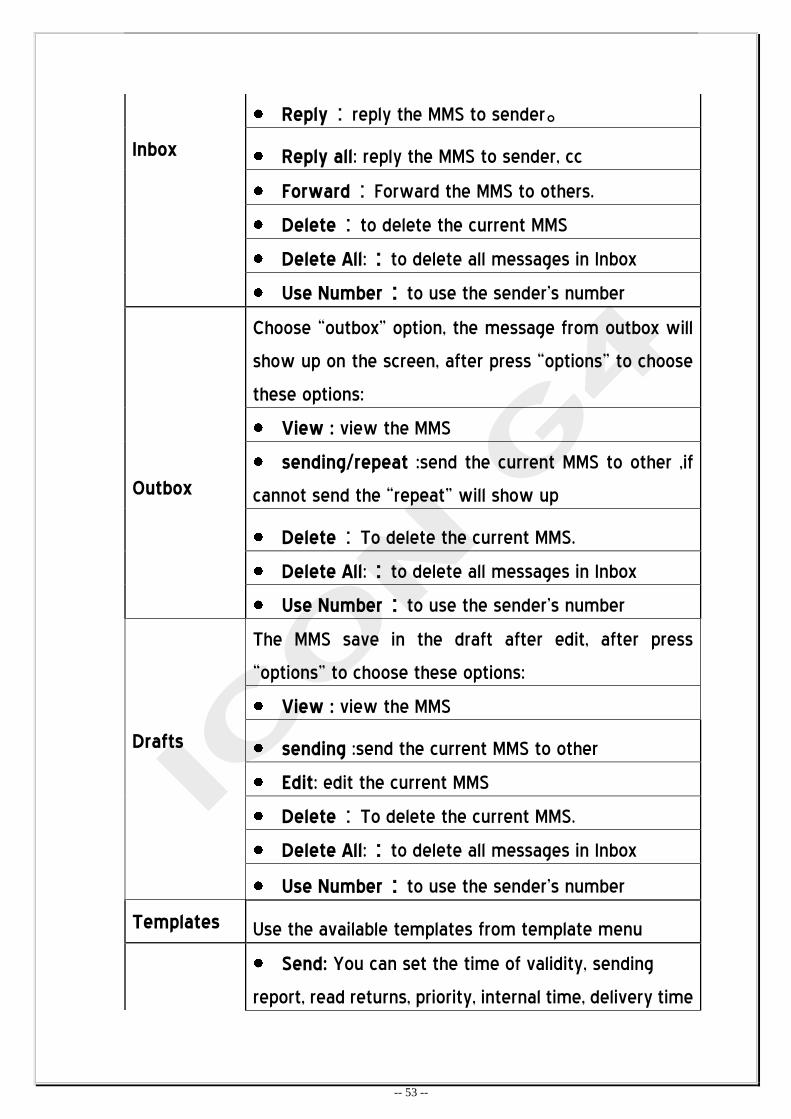
To receive MMS into the inbox list, show information has
been received, press the left soft key "Options" on the
operations:
View : view the MMS
-- 53 --
Reply:reply the MMS to sender。
Inbox Reply all: reply the MMS to sender, cc
Forward:Forward the MMS to others.
Delete:to delete the current MMS
Delete All::to delete all messages in Inbox
Use Number:to use the sender’s number
Choose ‚outbox‛ option, the message from outbox will
show up on the screen, after press ‚options‛ to choose
these options:
View : view the MMS
Outbox
sending/repeat :send the current MMS to other ,if
cannot send the ‚repeat‛ will show up
Delete:To delete the current MMS.
Delete All::to delete all messages in Inbox
Use Number:to use the sender’s number
The MMS save in the draft after edit, after press
‚options‛ to choose these options:
View : view the MMS
Drafts sending :send the current MMS to other
Edit: edit the current MMS
Delete:To delete the current MMS.
Delete All::to delete all messages in Inbox
Use Number:to use the sender’s number
Templates Use the available templates from template menu
Send: You can set the time of validity, sending
report, read returns, priority, internal time, delivery time

-- 54 --
MMS Setting
Receive: You can set up the main network, roaming
network, send the read report, to allow sending of the
report
Filter:to set the filter while receiving。
Server Profile:to set the network service
Memory Status:to show the memory status of
the MMS
10.6 Mail
This function refers to E-mail client end software. After it is
correctly configured, the mobile phone will access the server of the
e-mail service provider and then you can receive and send e-mails
with the mobile phone. (This function needs the support from the
network and will be charged by the network operator providing
such service).
Options Descriptions
Send and Receive Send and receive e-mails.
Write E-mail You can write new e-mails.
Inbox
The received e-mail will automatically be saved
in the inbox. You can view or deal with the
received e-mail in the inbox.
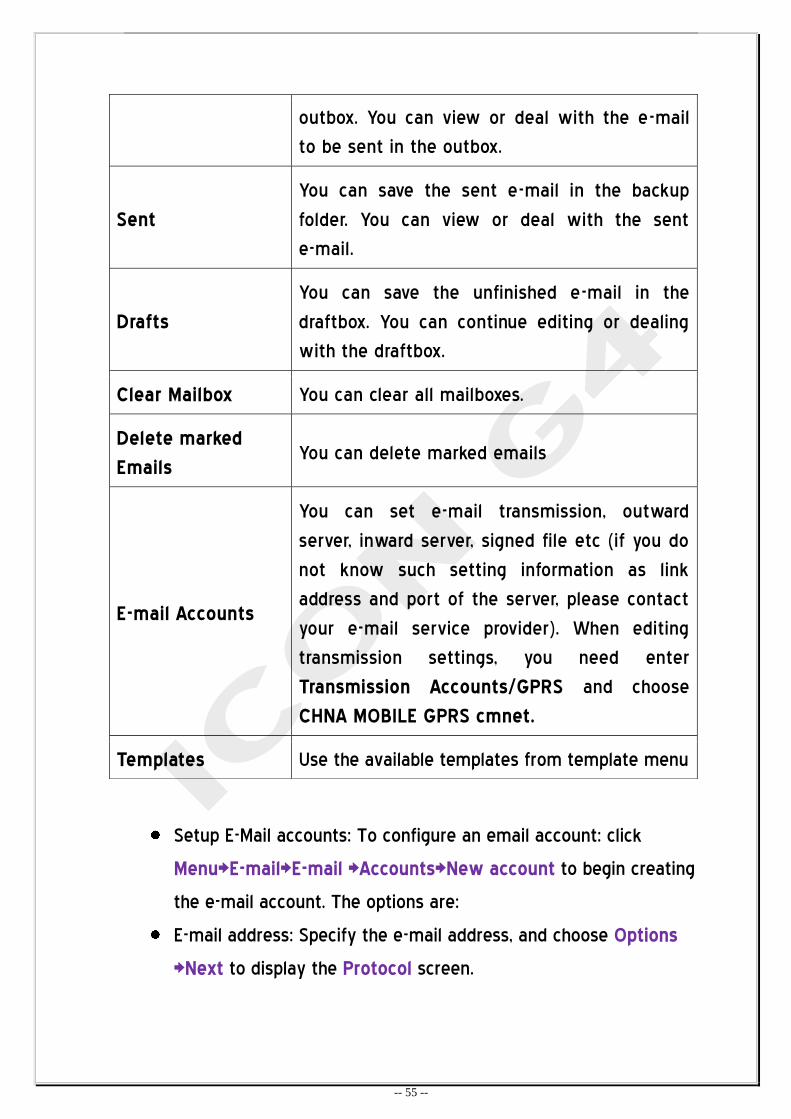
Outbox The e-mail to be sent will be saved in the
-- 55 --
Setup E-Mail accounts: To configure an email account: click
Menu>E-mail>E-mail >Accounts>New account to begin creating
the e-mail account. The options are:
E-mail address: Specify the e-mail address, and choose Options
>Next to display the Protocol screen.
outbox. You can view or deal with the e-mail
to be sent in the outbox.
Sent
You can save the sent e-mail in the backup
folder. You can view or deal with the sent
e-mail.
Drafts
You can save the unfinished e-mail in the
draftbox. You can continue editing or dealing
with the draftbox.
Clear Mailbox You can clear all mailboxes.
Delete marked
Emails You can delete marked emails
E-mail Accounts
You can set e-mail transmission, outward
server, inward server, signed file etc (if you do
not know such setting information as link
address and port of the server, please contact
your e-mail service provider). When editing
transmission settings, you need enter
Transmission Accounts/GPRS and choose
CHNA MOBILE GPRS cmnet.
Templates Use the available templates from template menu
-- 56 --
Choose the protocol your e-mail provider offers, options are POP3 and
IMAP.
Follow the on-screen instructions for either to complete the
configuration.
To successfully configure e-mail on your phone, you will need to know
the server
Names and port address for both Incoming and Outgoing.
You would also require a working GPRS connection that will be used to
connect to your e-mail provider’s servers.
10.7 Call log
10.7.1 Call History
SIM 1/2 call history
SIM 1/2missed calls
Through this menu you can search for all history records
Prompt:When screen show up with missed call icon, press ‚view‛ to
into the miss call list, choose the number youneed ,press call key to
dialed call
SIM 1/2 dialled calls
Use this feature; you can have access to the most recent dialed calls.
Into a feature to choose deleted, save, dialed calls, edit and send
message
SIM1/2 Received calls
Use this feature you can have access to the most recent received
calls .Into a feature to choose deleted, save, dialed calls, edit and send
message

-- 57 --
SIM 1/2 call timers
With this function, you can have such options as Last Call Duration,
Dialed Calls’ Duration, Received Calls’ Duration and Clear All Timers.
SIM 1/2 Call Cost:
With this function, you can view the previous call costs, all calls’ costs,
clear cost counters, limit costs and set rate etc.
Last Call costs: View and clear the previous call units.
Total Call costs: View and revise call upper limit costs.
Reset Cost: View and revise call units. It is necessary to input
PIN2 number to revise.
Max Call cost: View and revise all calls’ costs. It is necessary to
input PIN2 number to revise.
Price per unit: View and revise call cost upper limit. It is
necessary to input PIN2 number to revise.
Note: This function depends on the SIM card. Some SIM cards do not
support this function. PIN2 number is provided by the network
operator. Please contact the network operator to get this number.
SIM 1/2 text msg Counter
From the last reset, you can count the number of the received and
sent messages
1. Sent: to count the messages those have been sent
2. Received: to count the messages those have been
received
Note: This feature has nothing to do with the SIM card, after replace
SIM card sent and receive the number to will not change
-- 58 --
SIM 1/2GPRS counter
To record the GPRS counter for the phone. From the last preset, you
can obtain Last Sent GPRS, Last Received GPRS, All Sent GPRS
and All Received GPRS or Clear GRPS Counter
Attention: some functions need support from network service provider
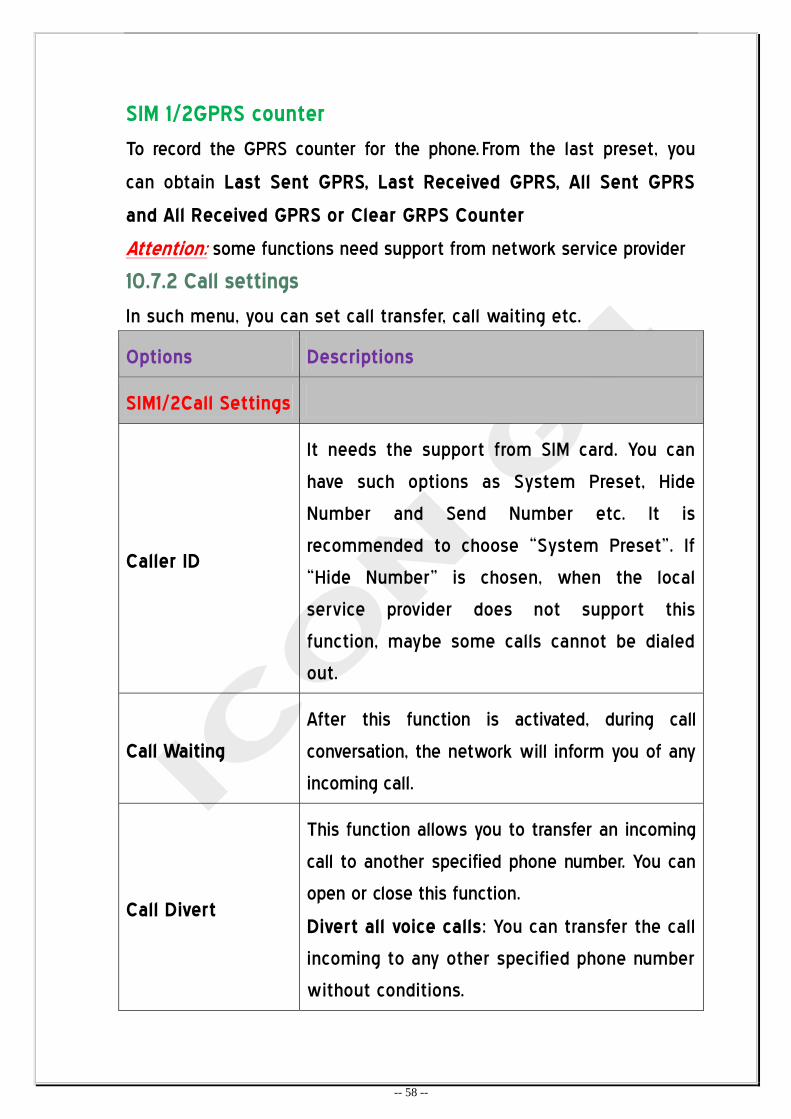
10.7.2 Call settings
In such menu, you can set call transfer, call waiting etc.
Options Descriptions
SIM1/2Call Settings
Caller ID
It needs the support from SIM card. You can
have such options as System Preset, Hide
Number and Send Number etc. It is
recommended to choose ‚System Preset‛. If
‚Hide Number‛ is chosen, when the local
service provider does not support this
function, maybe some calls cannot be dialed
out.
Call Waiting
After this function is activated, during call
conversation, the network will inform you of any
incoming call.
Call Divert
This function allows you to transfer an incoming
call to another specified phone number. You can
open or close this function.
Divert all voice calls: You can transfer the call
incoming to any other specified phone number
without conditions.
-- 59 --
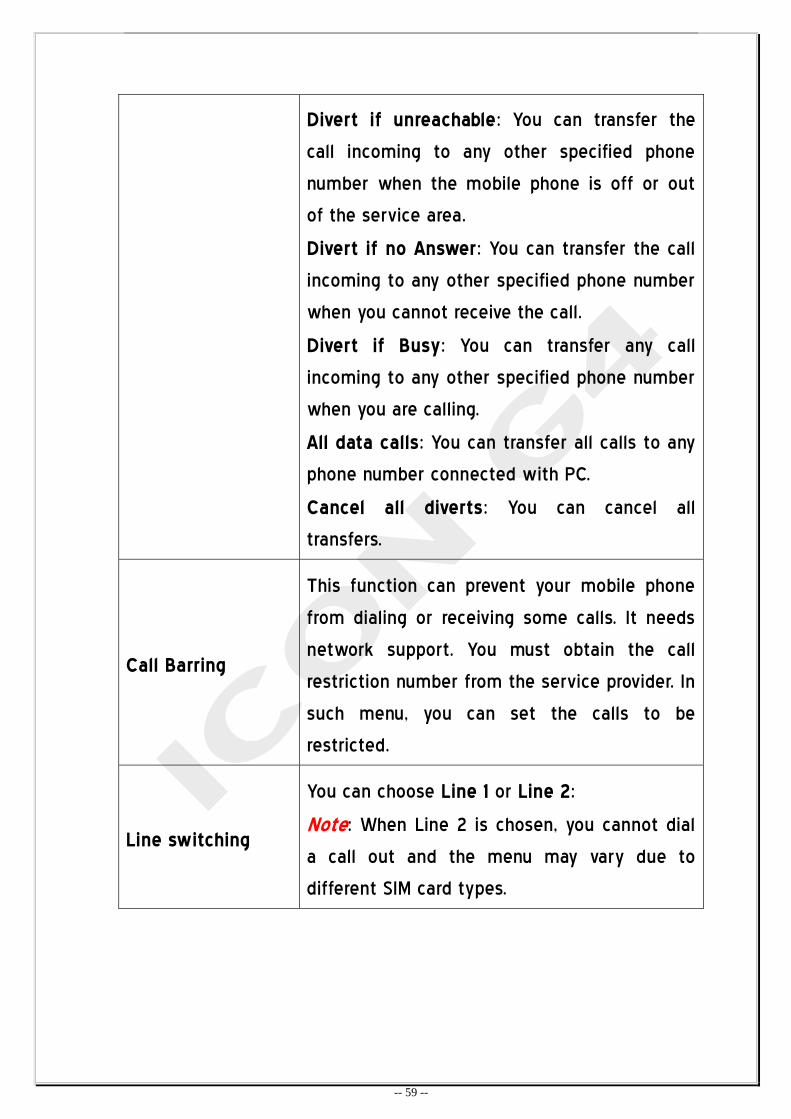
Divert if unreachable: You can transfer the
call incoming to any other specified phone
number when the mobile phone is off or out
of the service area.
Divert if no Answer: You can transfer the call
incoming to any other specified phone number
when you cannot receive the call.
Divert if Busy: You can transfer any call
incoming to any other specified phone number
when you are calling.
All data calls: You can transfer all calls to any
phone number connected with PC.
Cancel all diverts: You can cancel all
transfers.
Call Barring
This function can prevent your mobile phone
from dialing or receiving some calls. It needs
network support. You must obtain the call
restriction number from the service provider. In
such menu, you can set the calls to be
restricted.
Line switching
You can choose Line 1 or Line 2:
Note: When Line 2 is chosen, you cannot dial
a call out and the menu may vary due to
different SIM card types.
-- 60 --
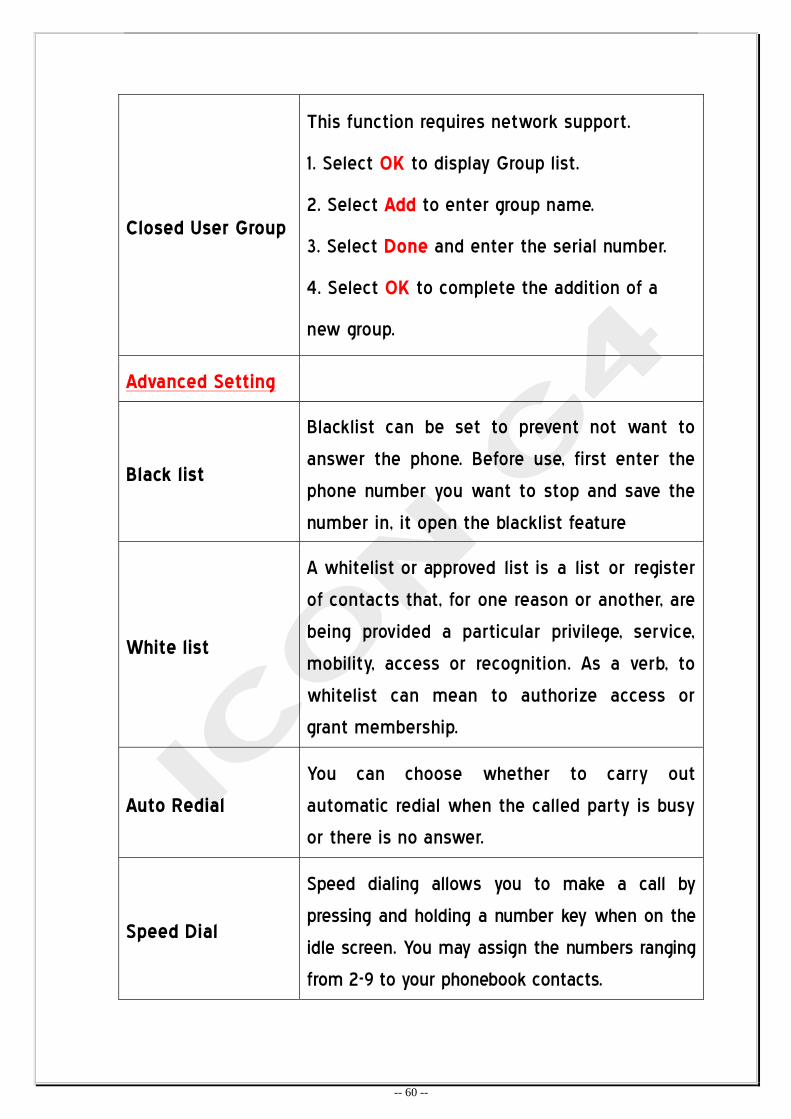
Closed User Group
This function requires network support.
1. Select OK to display Group list.
2. Select Add to enter group name.
3. Select Done and enter the serial number.
4. Select OK to complete the addition of a
new group.
Advanced Setting
Black list
Blacklist can be set to prevent not want to
answer the phone. Before use, first enter the
phone number you want to stop and save the
number in, it open the blacklist feature
White list
A whitelist or approved list is a list or register
of contacts that, for one reason or another, are
being provided a particular privilege, service,
mobility, access or recognition. As a verb, to
whitelist can mean to authorize access or
grant membership.
Auto Redial
You can choose whether to carry out
automatic redial when the called party is busy
or there is no answer.
Speed Dial
Speed dialing allows you to make a call by
pressing and holding a number key when on the
idle screen. You may assign the numbers ranging
from 2-9 to your phonebook contacts.
-- 61 --
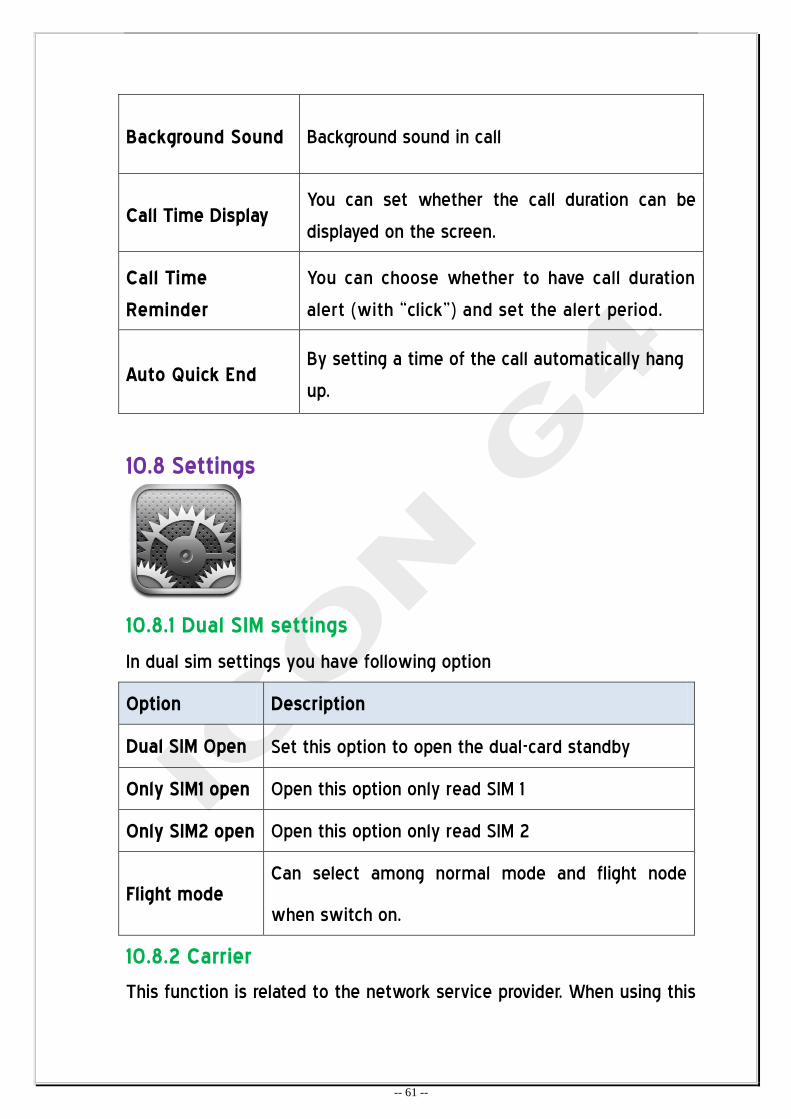
Background Sound Background sound in call
Call Time Display You can set whether the call duration can be
displayed on the screen.
Call Time
Reminder
You can choose whether to have call duration
alert (with ‚click‛) and set the alert period.
Auto Quick End By setting a time of the call automatically hang
up.
10.8 Settings
10.8.1 Dual SIM settings
In dual sim settings you have following option
Option Description
Dual SIM Open Set this option to open the dual-card standby
Only SIM1 open Open this option only read SIM 1
Only SIM2 open Open this option only read SIM 2
Flight mode Can select among normal mode and flight node
when switch on.
10.8.2 Carrier
This function is related to the network service provider. When using this
-- 62 --
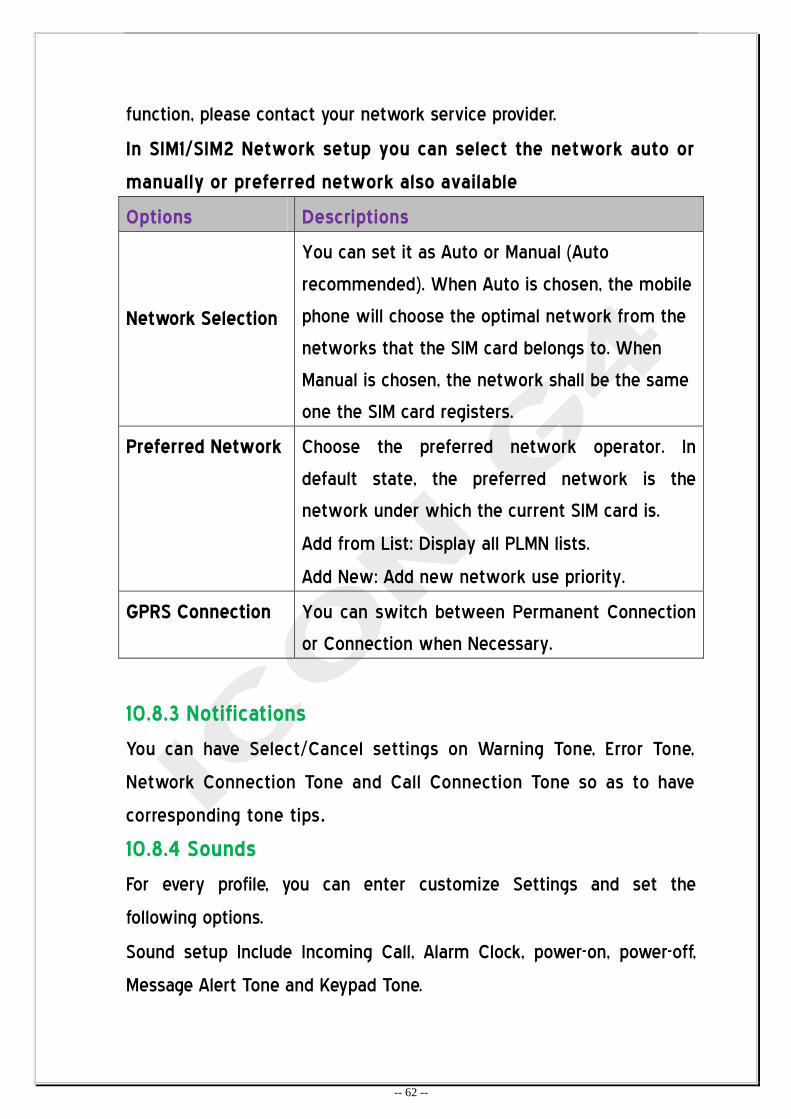
function, please contact your network service provider.
In SIM1/SIM2 Network setup you can select the network auto or
manually or preferred network also available
Options Descriptions
Network Selection
You can set it as Auto or Manual (Auto
recommended). When Auto is chosen, the mobile
phone will choose the optimal network from the
networks that the SIM card belongs to. When
Manual is chosen, the network shall be the same
one the SIM card registers.
Preferred Network
Choose the preferred network operator. In
default state, the preferred network is the
network under which the current SIM card is.
Add from List: Display all PLMN lists.
Add New: Add new network use priority.
GPRS Connection You can switch between Permanent Connection
or Connection when Necessary.
10.8.3 Notifications
You can have Select/Cancel settings on Warning Tone, Error Tone,
Network Connection Tone and Call Connection Tone so as to have
corresponding tone tips.
10.8.4 Sounds
For every profile, you can enter customize Settings and set the
following options.
Sound setup Include Incoming Call, Alarm Clock, power-on, power-off,
Message Alert Tone and Keypad Tone.
-- 63 --
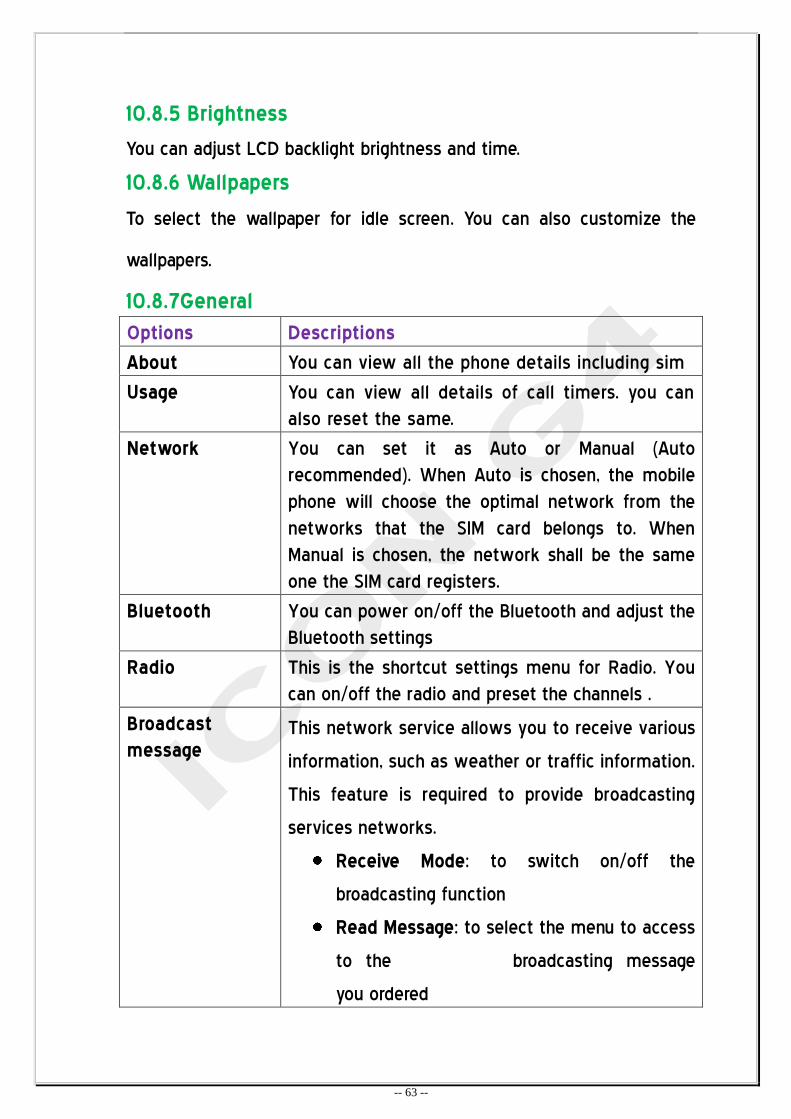
10.8.5 Brightness
You can adjust LCD backlight brightness and time.
10.8.6 Wallpapers
To select the wallpaper for idle screen. You can also customize the
wallpapers.
10.8.7General
Options Descriptions
About You can view all the phone details including sim
Usage You can view all details of call timers. you can
also reset the same.
Network You can set it as Auto or Manual (Auto
recommended). When Auto is chosen, the mobile
phone will choose the optimal network from the
networks that the SIM card belongs to. When
Manual is chosen, the network shall be the same
one the SIM card registers.
Bluetooth You can power on/off the Bluetooth and adjust the
Bluetooth settings
Radio This is the shortcut settings menu for Radio. You
can on/off the radio and preset the channels .
Broadcast
message This network service allows you to receive various
information, such as weather or traffic information.
This feature is required to provide broadcasting
services networks.
Receive Mode: to switch on/off the
broadcasting function
Read Message: to select the menu to access
to the broadcasting message
you ordered
-- 64 --
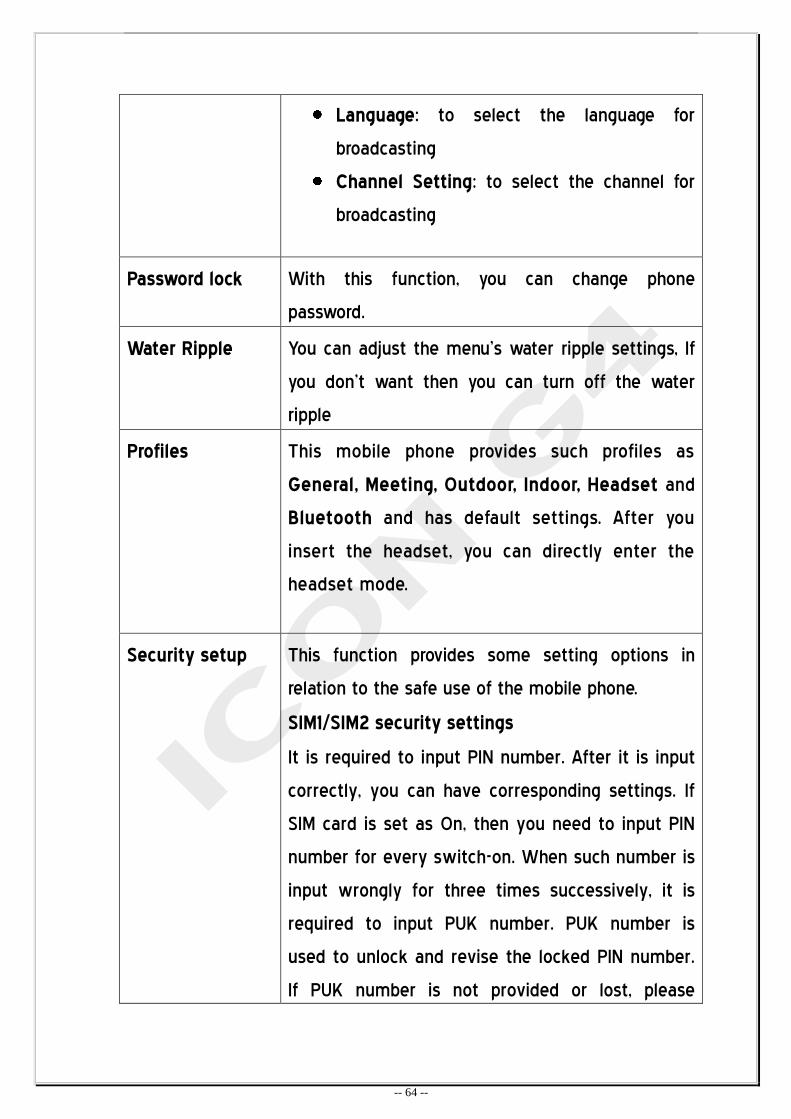
Language: to select the language for
broadcasting
Channel Setting: to select the channel for
broadcasting
Password lock With this function, you can change phone
password.
Water Ripple You can adjust the menu’s water ripple settings, If
you don’t want then you can turn off the water
ripple
Profiles This mobile phone provides such profiles as
General, Meeting, Outdoor, Indoor, Headset and
Bluetooth and has default settings. After you
insert the headset, you can directly enter the
headset mode.
Security setup This function provides some setting options in
relation to the safe use of the mobile phone.
SIM1/SIM2 security settings
It is required to input PIN number. After it is input
correctly, you can have corresponding settings. If
SIM card is set as On, then you need to input PIN
number for every switch-on. When such number is
input wrongly for three times successively, it is
required to input PUK number. PUK number is
used to unlock and revise the locked PIN number.
If PUK number is not provided or lost, please
-- 65 --
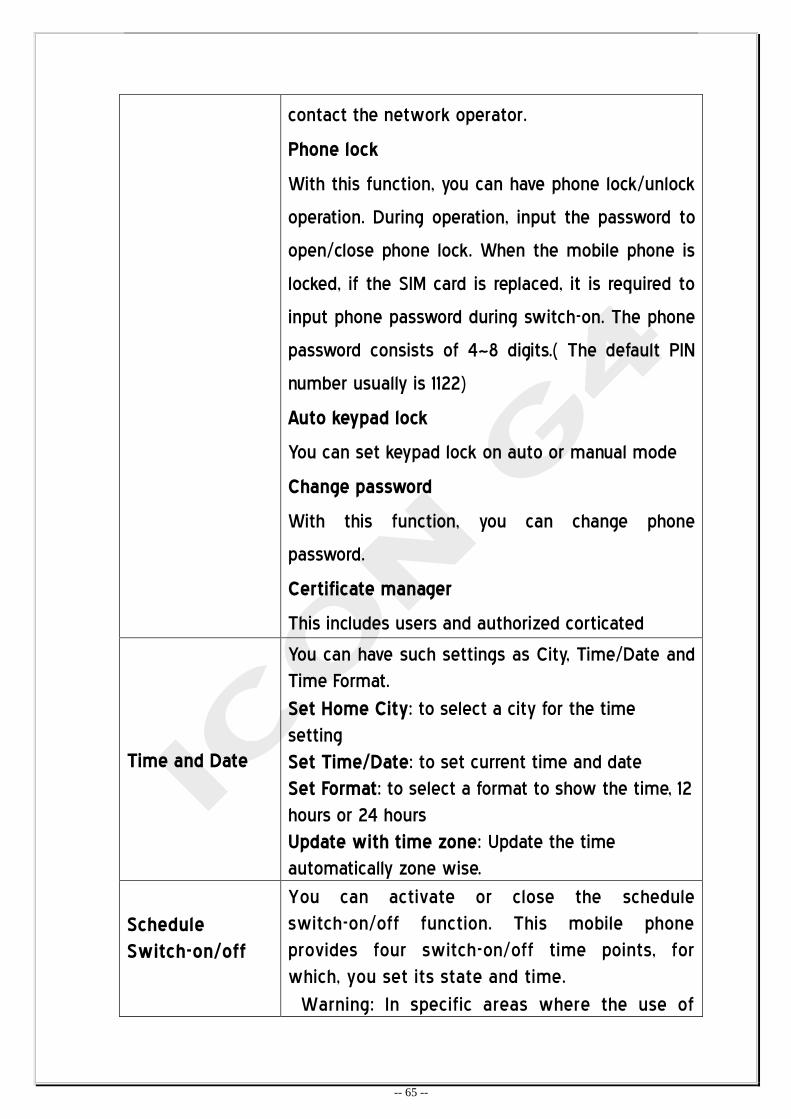
contact the network operator.
Phone lock
With this function, you can have phone lock/unlock
operation. During operation, input the password to
open/close phone lock. When the mobile phone is
locked, if the SIM card is replaced, it is required to
input phone password during switch-on. The phone
password consists of 4~8 digits.( The default PIN
number usually is 1122)
Auto keypad lock
You can set keypad lock on auto or manual mode
Change password
With this function, you can change phone
password.
Certificate manager
This includes users and authorized corticated
Time and Date
You can have such settings as City, Time/Date and
Time Format.
- Set Home City: to select a city for the time
setting
- Set Time/Date: to set current time and date
- Set Format: to select a format to show the time, 12
hours or 24 hours
- Update with time zone: Update the time
automatically zone wise.
Schedule
Switch-on/off
You can activate or close the schedule
switch-on/off function. This mobile phone
provides four switch-on/off time points, for
which, you set its state and time.
Warning: In specific areas where the use of
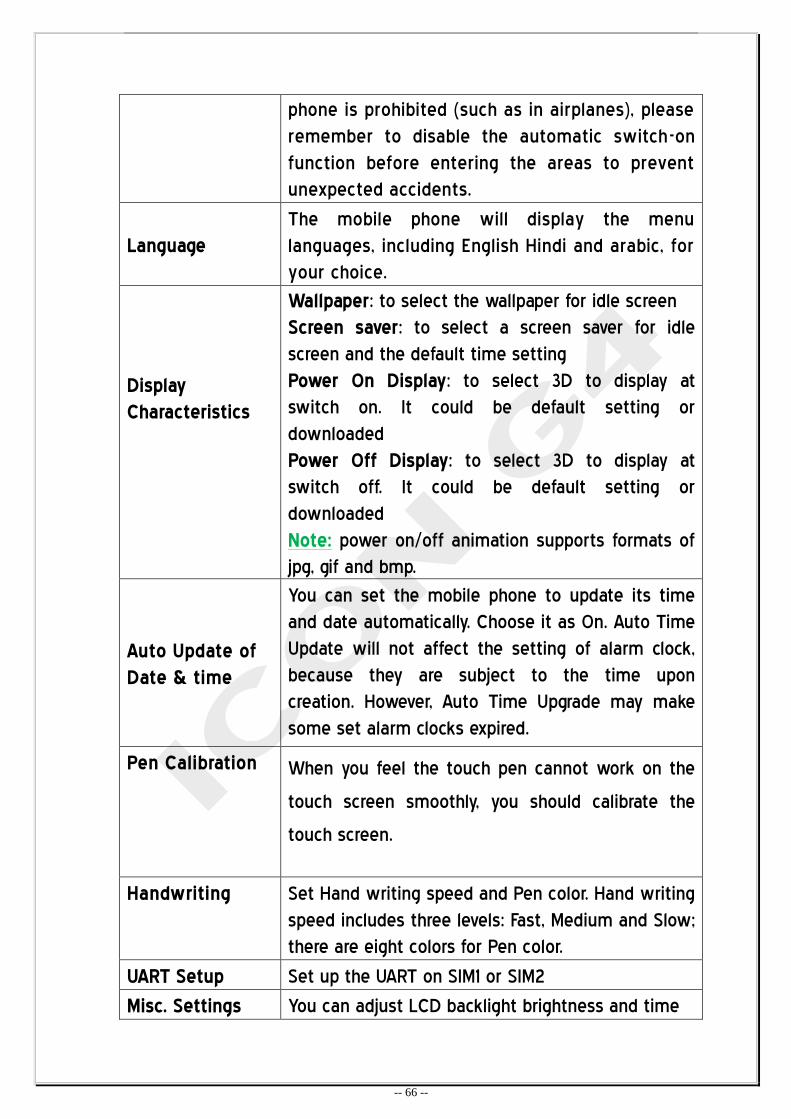
-- 66 --
phone is prohibited (such as in airplanes), please
remember to disable the automatic switch-on
function before entering the areas to prevent
unexpected accidents.
Language
The mobile phone will display the menu
languages, including English Hindi and arabic, for
your choice.
Display
Characteristics
Wallpaper: to select the wallpaper for idle screen
Screen saver: to select a screen saver for idle
screen and the default time setting
Power On Display: to select 3D to display at
switch on. It could be default setting or
downloaded
Power Off Display: to select 3D to display at
switch off. It could be default setting or
downloaded
Note: power on/off animation supports formats of
jpg, gif and bmp.
Auto Update of
Date & time
You can set the mobile phone to update its time
and date automatically. Choose it as On. Auto Time
Update will not affect the setting of alarm clock,
because they are subject to the time upon
creation. However, Auto Time Upgrade may make
some set alarm clocks expired.
Pen Calibration When you feel the touch pen cannot work on the
touch screen smoothly, you should calibrate the
touch screen.
Handwriting
Set Hand writing speed and Pen color. Hand writing
speed includes three levels: Fast, Medium and Slow;
there are eight colors for Pen color.
UART Setup Set up the UART on SIM1 or SIM2
Misc. Settings You can adjust LCD backlight brightness and time
-- 67 --
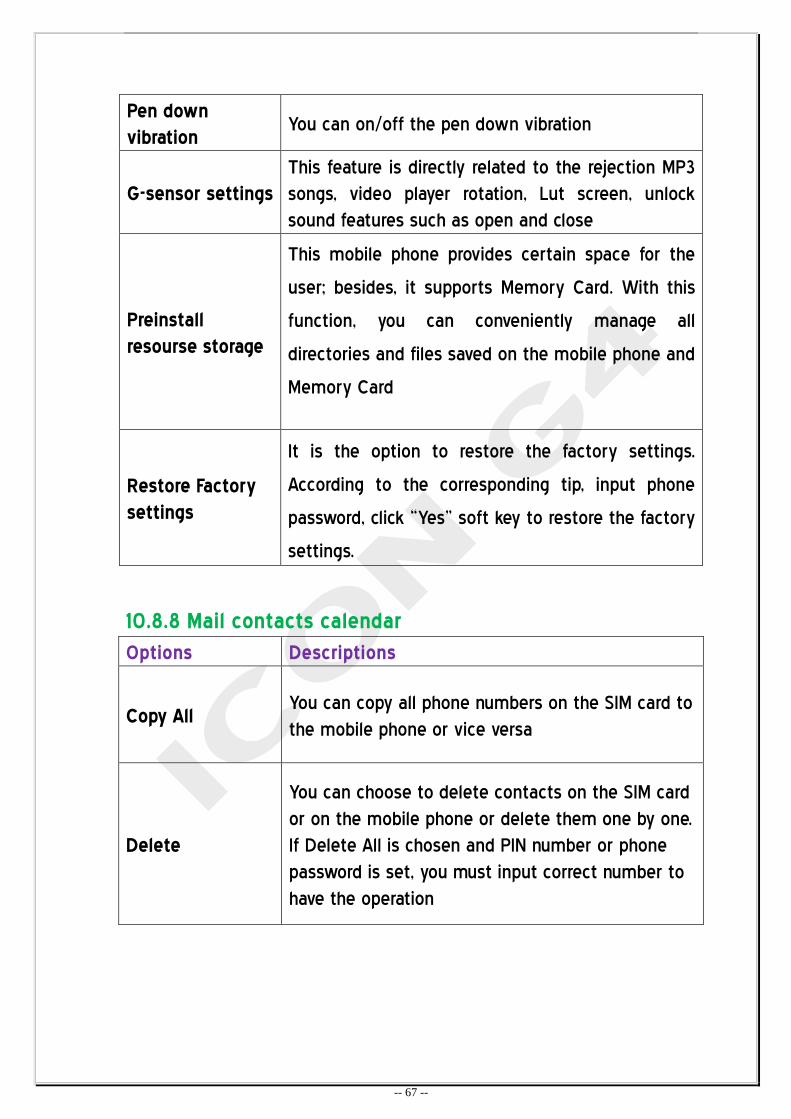
Pen down
vibration You can on/off the pen down vibration
G-sensor settings
This feature is directly related to the rejection MP3
songs, video player rotation, Lut screen, unlock
sound features such as open and close
Preinstall
resourse storage
This mobile phone provides certain space for the
user; besides, it supports Memory Card. With this
function, you can conveniently manage all
directories and files saved on the mobile phone and
Memory Card
Restore Factory
settings
It is the option to restore the factory settings.
According to the corresponding tip, input phone
password, click ‚Yes‛ soft key to restore the factory
settings.
10.8.8 Mail contacts calendar
Options Descriptions
Copy All - You can copy all phone numbers on the SIM card to
the mobile phone or vice versa
Delete
- You can choose to delete contacts on the SIM card
or on the mobile phone or delete them one by one.
If Delete All is chosen and PIN number or phone
password is set, you must input correct number to
have the operation
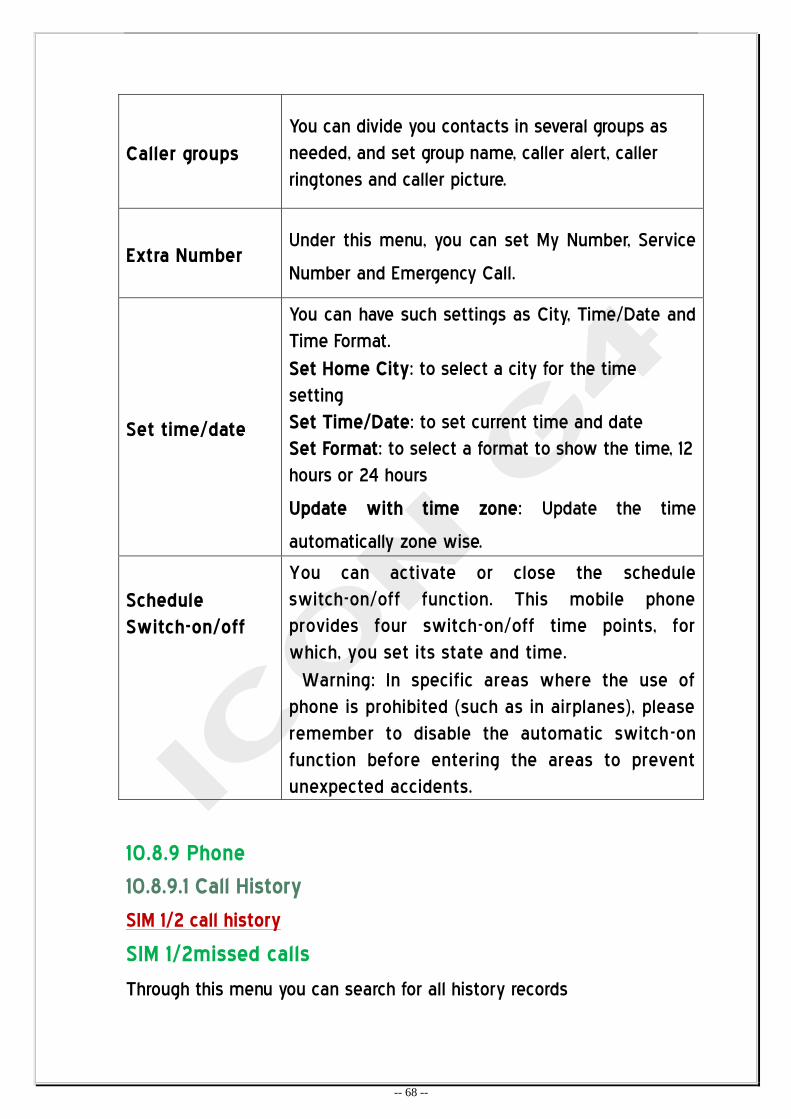
-- 68 --
Caller groups
- You can divide you contacts in several groups as
needed, and set group name, caller alert, caller
ringtones and caller picture.
Extra Number Under this menu, you can set My Number, Service
Number and Emergency Call.
Set time/date
You can have such settings as City, Time/Date and
Time Format.
- Set Home City: to select a city for the time
setting
- Set Time/Date: to set current time and date
- Set Format: to select a format to show the time, 12
hours or 24 hours
Update with time zone: Update the time
automatically zone wise.
Schedule
Switch-on/off
You can activate or close the schedule
switch-on/off function. This mobile phone
provides four switch-on/off time points, for
which, you set its state and time.
Warning: In specific areas where the use of
phone is prohibited (such as in airplanes), please
remember to disable the automatic switch-on
function before entering the areas to prevent
unexpected accidents.
10.8.9 Phone
10.8.9.1 Call History
SIM 1/2 call history
SIM 1/2missed calls
Through this menu you can search for all history records
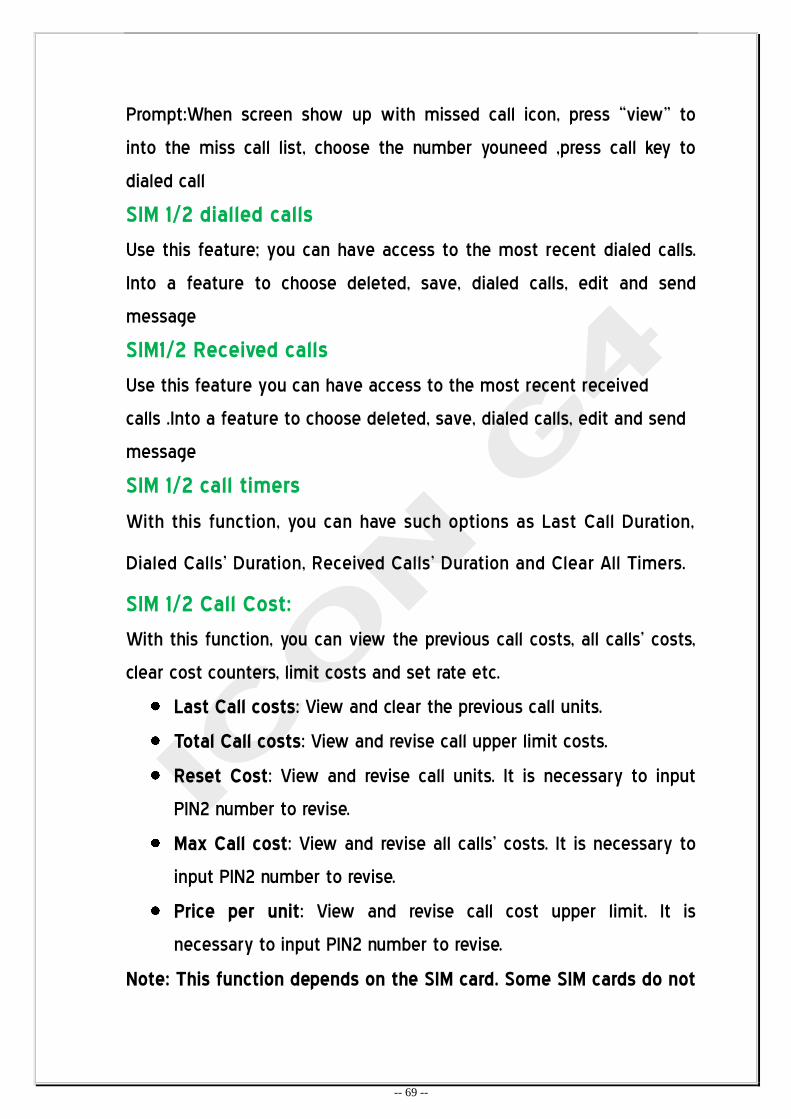
-- 69 --
Prompt:When screen show up with missed call icon, press ‚view‛ to
into the miss call list, choose the number youneed ,press call key to
dialed call
SIM 1/2 dialled calls
Use this feature; you can have access to the most recent dialed calls.
Into a feature to choose deleted, save, dialed calls, edit and send
message
SIM1/2 Received calls
Use this feature you can have access to the most recent received
calls .Into a feature to choose deleted, save, dialed calls, edit and send
message
SIM 1/2 call timers
With this function, you can have such options as Last Call Duration,
Dialed Calls’ Duration, Received Calls’ Duration and Clear All Timers.
SIM 1/2 Call Cost:
With this function, you can view the previous call costs, all calls’ costs,
clear cost counters, limit costs and set rate etc.
Last Call costs: View and clear the previous call units.
Total Call costs: View and revise call upper limit costs.
Reset Cost: View and revise call units. It is necessary to input
PIN2 number to revise.
Max Call cost: View and revise all calls’ costs. It is necessary to
input PIN2 number to revise.
Price per unit: View and revise call cost upper limit. It is
necessary to input PIN2 number to revise.
Note: This function depends on the SIM card. Some SIM cards do not
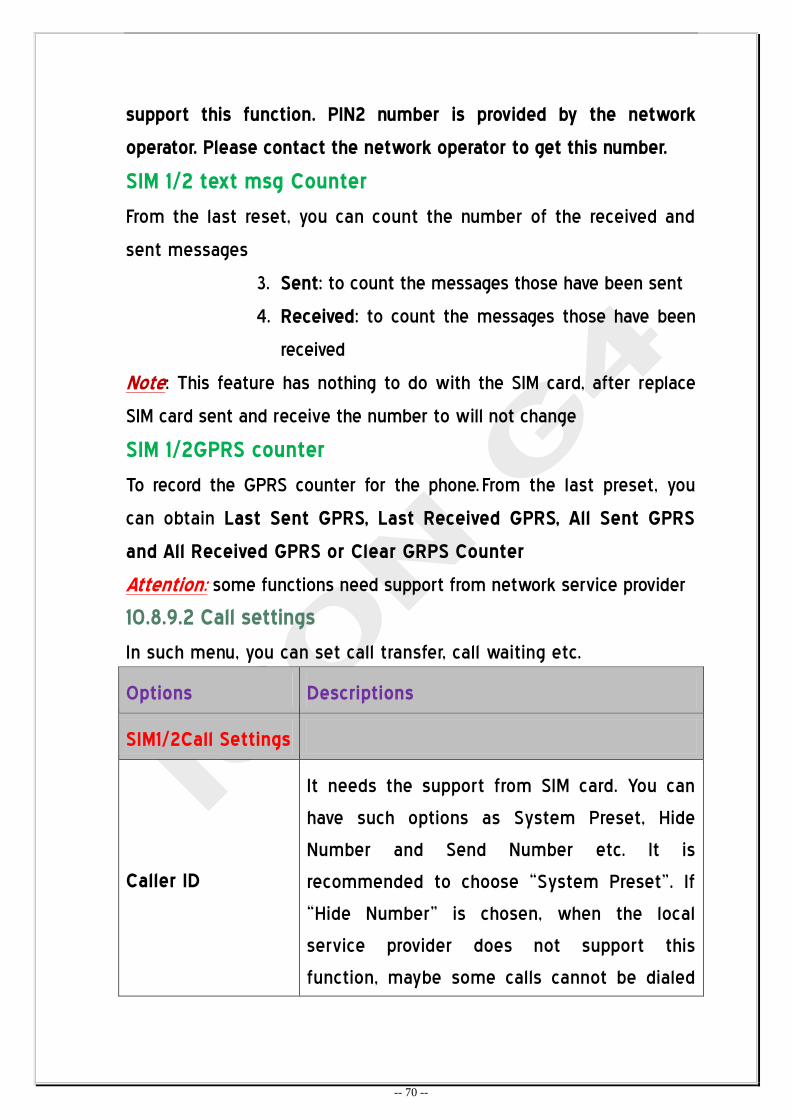
-- 70 --
support this function. PIN2 number is provided by the network
operator. Please contact the network operator to get this number.
SIM 1/2 text msg Counter
From the last reset, you can count the number of the received and
sent messages
3. Sent: to count the messages those have been sent
4. Received: to count the messages those have been
received
Note: This feature has nothing to do with the SIM card, after replace
SIM card sent and receive the number to will not change
SIM 1/2GPRS counter
To record the GPRS counter for the phone. From the last preset, you
can obtain Last Sent GPRS, Last Received GPRS, All Sent GPRS
and All Received GPRS or Clear GRPS Counter
Attention: some functions need support from network service provider
10.8.9.2 Call settings
In such menu, you can set call transfer, call waiting etc.
Options Descriptions
SIM1/2Call Settings
Caller ID
It needs the support from SIM card. You can
have such options as System Preset, Hide
Number and Send Number etc. It is
recommended to choose ‚System Preset‛. If
‚Hide Number‛ is chosen, when the local
service provider does not support this
function, maybe some calls cannot be dialed
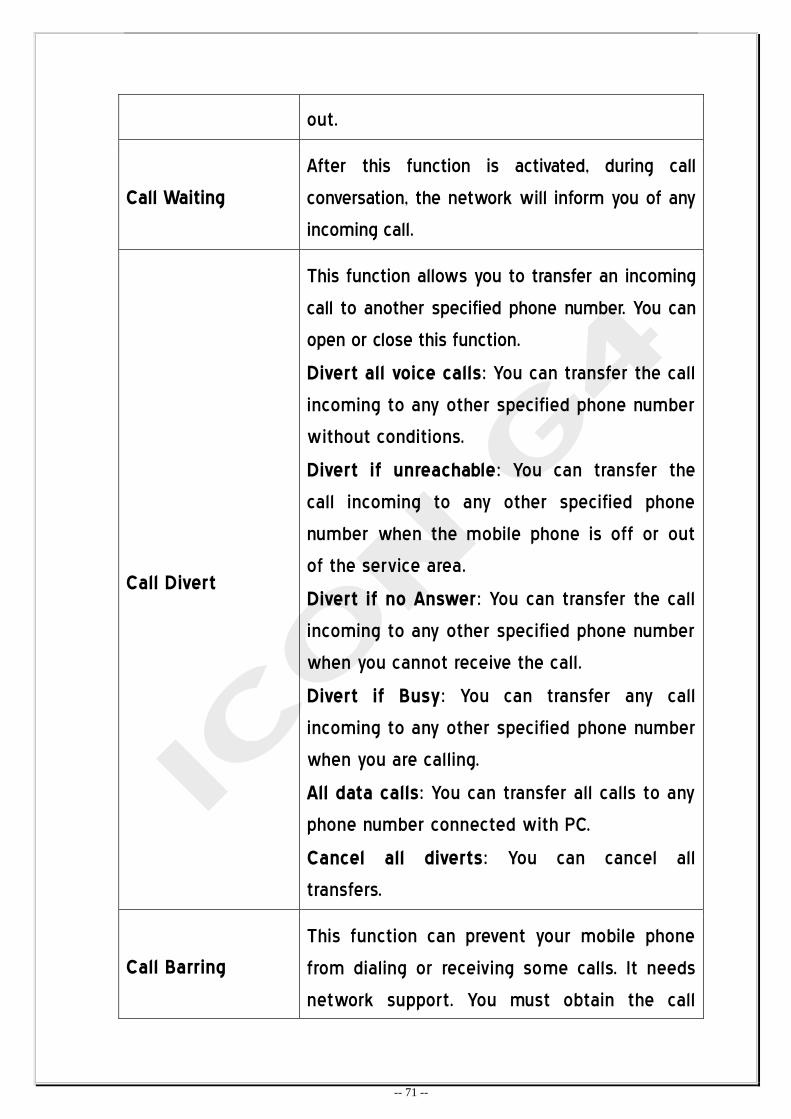
-- 71 --
out.
Call Waiting
After this function is activated, during call
conversation, the network will inform you of any
incoming call.
Call Divert
This function allows you to transfer an incoming
call to another specified phone number. You can
open or close this function.
Divert all voice calls: You can transfer the call
incoming to any other specified phone number
without conditions.
Divert if unreachable: You can transfer the
call incoming to any other specified phone
number when the mobile phone is off or out
of the service area.
Divert if no Answer: You can transfer the call
incoming to any other specified phone number
when you cannot receive the call.
Divert if Busy: You can transfer any call
incoming to any other specified phone number
when you are calling.
All data calls: You can transfer all calls to any
phone number connected with PC.
Cancel all diverts: You can cancel all
transfers.
Call Barring
This function can prevent your mobile phone
from dialing or receiving some calls. It needs
network support. You must obtain the call
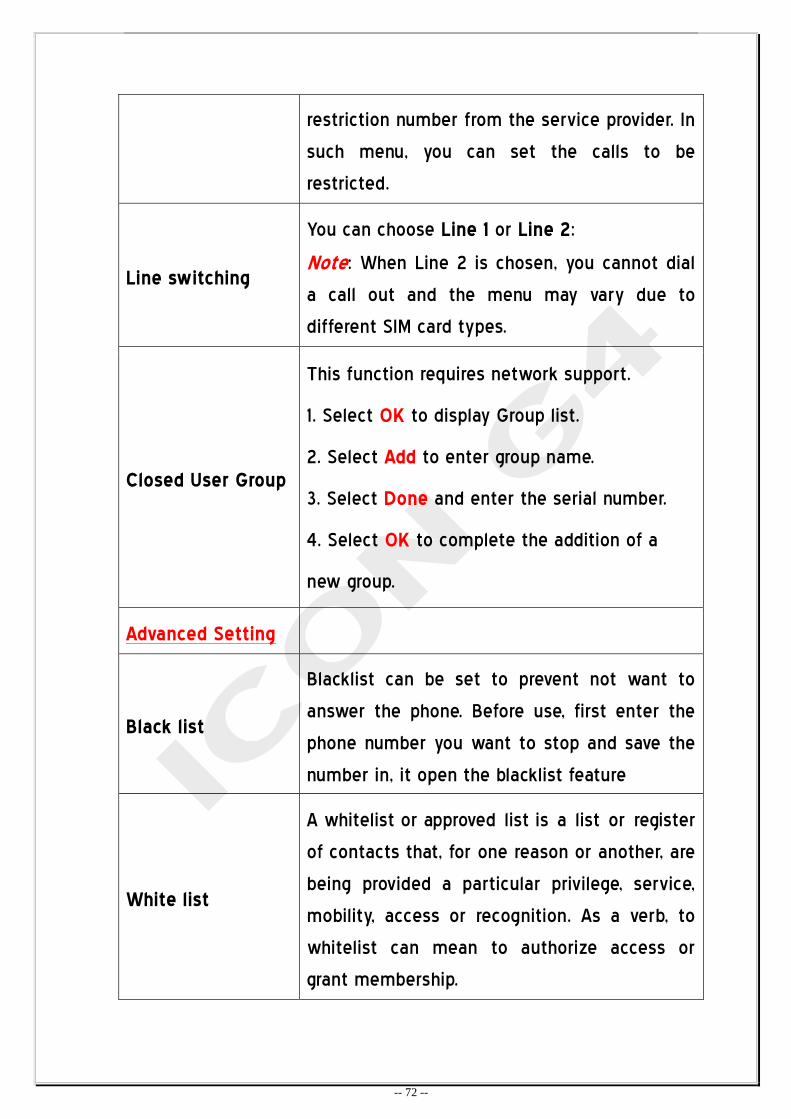
-- 72 --
restriction number from the service provider. In
such menu, you can set the calls to be
restricted.
Line switching
You can choose Line 1 or Line 2:
Note: When Line 2 is chosen, you cannot dial
a call out and the menu may vary due to
different SIM card types.
Closed User Group
This function requires network support.
1. Select OK to display Group list.
2. Select Add to enter group name.
3. Select Done and enter the serial number.
4. Select OK to complete the addition of a
new group.
Advanced Setting
Black list
Blacklist can be set to prevent not want to
answer the phone. Before use, first enter the
phone number you want to stop and save the
number in, it open the blacklist feature
White list
A whitelist or approved list is a list or register
of contacts that, for one reason or another, are
being provided a particular privilege, service,
mobility, access or recognition. As a verb, to
whitelist can mean to authorize access or
grant membership.
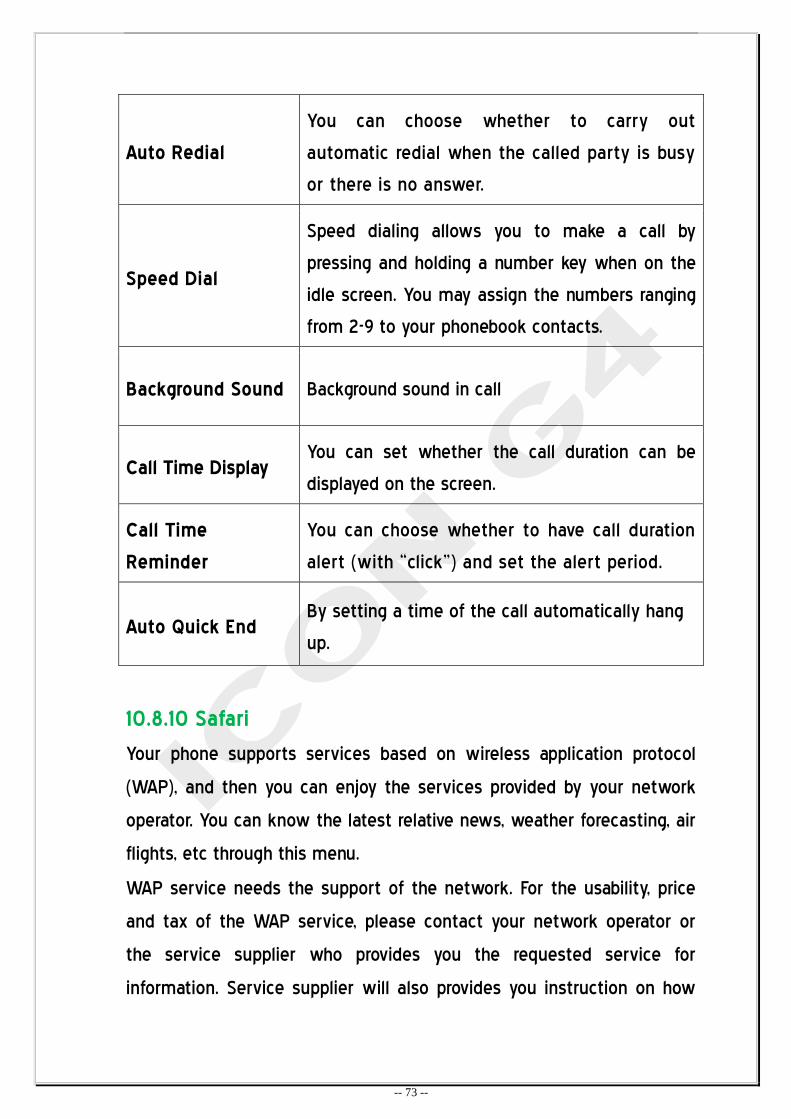
-- 73 --
Auto Redial
You can choose whether to carry out
automatic redial when the called party is busy
or there is no answer.
Speed Dial
Speed dialing allows you to make a call by
pressing and holding a number key when on the
idle screen. You may assign the numbers ranging
from 2-9 to your phonebook contacts.
Background Sound Background sound in call
Call Time Display You can set whether the call duration can be
displayed on the screen.
Call Time
Reminder
You can choose whether to have call duration
alert (with ‚click‛) and set the alert period.
Auto Quick End By setting a time of the call automatically hang
up.
10.8.10 Safari
Your phone supports services based on wireless application protocol
(WAP), and then you can enjoy the services provided by your network
operator. You can know the latest relative news, weather forecasting, air
flights, etc through this menu.
WAP service needs the support of the network. For the usability, price
and tax of the WAP service, please contact your network operator or
the service supplier who provides you the requested service for
information. Service supplier will also provides you instruction on how

-- 74 --
to use its service.
Options Descriptions
Homepage Enter this menu, and then you can directly
access the home page of the set web site.
Bookmarks You can enter the set network bookmark etc to
have network surfing.
Recent pages
The latest web pages latest logged in will be
saved in this menu. You can directly choose the
record in this menu and have network surfing.
Offline pages
The web pages latest logged in will be saved in
this menu. You can directly choose the record in
this menu and have network surfing.
Input address Input the website to be log in and start linking
to web page.
Service Inbox
With this function, the service provider will
send WAP content into the mobile phone and
you need to do nothing. For example, you can
obtain the latest news or WAP settings from
the service provider.
Settings
Select the SIM: Select the sim on which GPRS
working
Profiles: select the appropriate profiles
Browser options: You can set the time to wait
for network link and open or close image
display.
Service message Settings: You can choose to
set it as On/Off.

-- 75 --
10.8.11 Messages
SIM1/2 Message settings
With this function, you can set the default information in relation to
SMS characteristics.
Profile settings: In SMS Settings, you can have such operations as
profile name, SMS center number, SMS valid period and Sending format
orderly.
SMS Blacklist : In this settings you can block unwanted messages,
Scheduled SMS: Scheduled SMS enables the user to send scheduled
text messages to one or multiple recipients with access to your
address book. The user can send the SMS as soon as the user
schedules it or for a later date. The user also has a complete control to
edit, delete or re-schedule the SMS at any time
Common Settings: You can set information report and reply route.
After the information report is activated, SMS center will send status
report, via which you can expediently know whether the party has
received or not, when the party receives your message or cannot
receive your message for some reason. This function needs the
support of the network operator.
Memory status: You can search the percentage of the SMS saved in
the SIM card and the mobile phone to the total capacity.
Preferred Storage: You can set the default storage position of SMS.
Choose To SIM or To Phone.
10.8.12 Music
In music Settings, you can have such options as Player settings,
Display settings, Sound effects & Bluetooth settings.
Clear Cache: You can clear cache.
Clear cookies: You can delete cookies.
Trust certificates: You can view trust voucher.
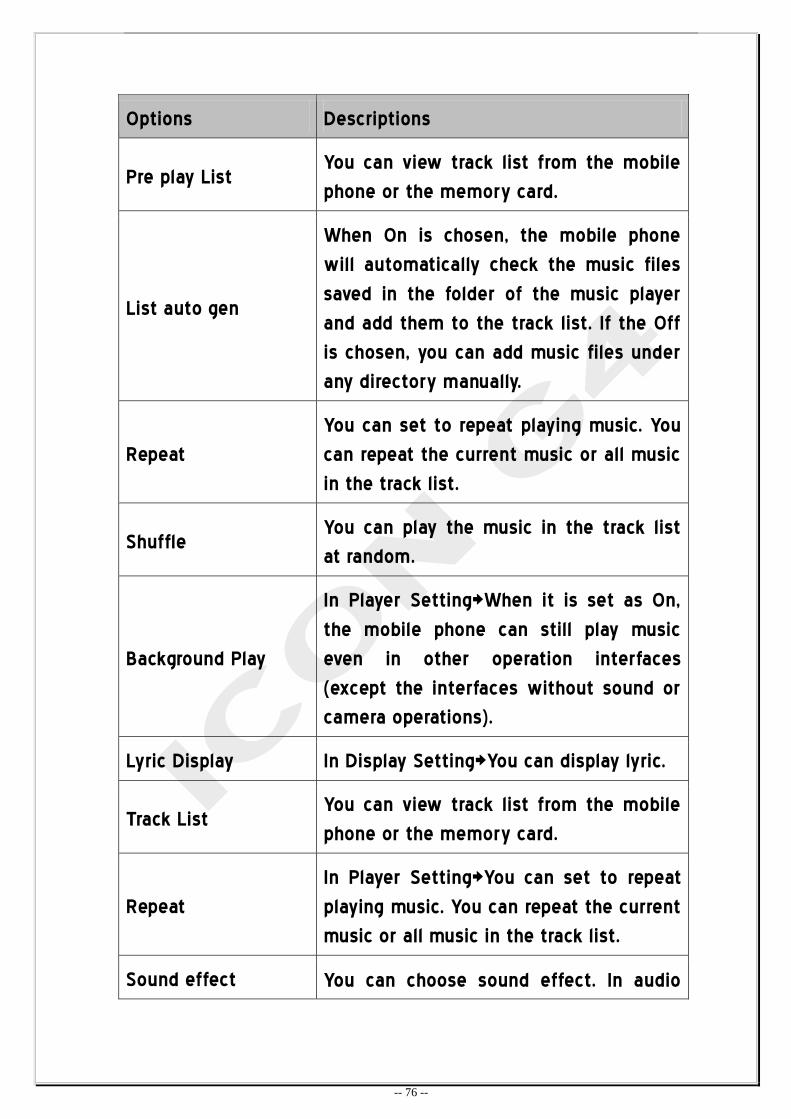
-- 76 --
Options Descriptions
Pre play List You can view track list from the mobile
phone or the memory card.
List auto gen
When On is chosen, the mobile phone
will automatically check the music files
saved in the folder of the music player
and add them to the track list. If the Off
is chosen, you can add music files under
any directory manually.
Repeat
You can set to repeat playing music. You
can repeat the current music or all music
in the track list.
Shuffle You can play the music in the track list
at random.
Background Play
In Player Setting>When it is set as On,
the mobile phone can still play music
even in other operation interfaces
(except the interfaces without sound or
camera operations).
Lyric Display In Display Setting>You can display lyric.
Track List You can view track list from the mobile
phone or the memory card.
Repeat
In Player Setting>You can set to repeat
playing music. You can repeat the current
music or all music in the track list.
Sound effect You can choose sound effect. In audio
-- 77 --
effect set equalizer,3D surround sound
also set bass enhancement to on or off
Bluetooth Settings When it is set as On, you can choose
stereo headset to listen to MP3 directly.
10.8.13 Theme image
Theme Image : set wallpapers on the ideal screen
Choose picture: : set background image of the phone
10.8.14 Burglar tracking
Set the burglar tracking to on /off. You can also change the password of
your choice
10.9 Radio
Select ‚Radio‛ will open the FM tuner. The radio has equipped with
Antenna, so you must listen to the radio without earphone or through
earphone.
When the audio player is on, you must turn off the audio player first
then power on the FM radio.
FM tuner will remember the last channel and set current channel to that
channel. Click‛: ‛ enter the sub menu :
-- 78 --
Options Descriptions
Channel list list 9 channels(the channels auto searched also
save here)
Manual input you can input the channel
auto search auto search the channels
Settings
you can set background play on or off, Loudspeaker
on or off , record format, audio quality, and record
storage, Channel effect
Background playing (on/off)
Loud speaker (on/off)
Record format(AMR/WAV/AWB)
Audio quality(Low/High)
Record storage(Phone/Memory card)
Record Press the red icon on the display screen to record a
programme or songs playing currently.
Append to append record
File list the record files
-- 79 --
10.10 Camera
You can take pictures with the inbuilt camera head in the mobile
phone and adjust its settings. The pictures taken will be saved in
the file system attached to the mobile phone. The format of the
pictures is JPG, gif.
In preview interface, you can choose Options to enter the following
menus.
Options Descriptions
Photos
With this function, you can have such operations
as View, Browse Mode, Send, Rename, Delete,
Delete All, Sort and Storage Route on the
pictures taken.
Self Capture Select the back or the front camera.
Camera Settings Settings for Flash light on/off, shutter sound, Ev,
contrast, anti-flicker, Delay timer
Image settings Set the size and quality of images.
White Balance You can set white balance as Auto, Daylight,
Tungsten, Fluorescent, Cloudy or incandescent.
Scene mode You can set it as Auto or Night.
Effect Settings You can have special effect disposal to
-- 80 --
10.11 Photos
The pictures are saved to the photos (photos folder), when you open
the photos and gently turn around to be able to feel the picture to
bring you different perspectives on the visual effects, at the same time
with more local "Humane" operations, can switch up and down about
sliding pictures. sliding on the diagonal image to customize the size of
picture
Press OK key to select Option and operate:
View: view the photo
Edit: auto resize, main LCD clip, manual clip and clip help.
Print: print via PictBridge or Bluetooth
Use as: you can use the selected photo as wallpaper, power
on/off display or caller picture.
Send: send as multimedia message, send as email or via
Bluetooth.
Rename: rename the photo.
pictures.
Storage You can Save to Phone or Save to Memory Card
Restore Defaults You can restore the camera to factory
settings
-- 81 --
Delete: delete the selected photo.
Delete all files: delete all photos
Sort by: sort by name, type, time, size or unsorted.
Storage: select saving path of the photo.
Note: if the standby image photo is renamed, the standby image
returns to default image.
10.12 Video Player
This mobile phone has an inbuilt Video player, which is used to
browse or process the video files saved in “Phone or Memory
card/Video” folder, including 3gp, AVI and MP4 files etc.
Note: Local support for the motion detection feature, video player, as
long as gently rotating video can feel different visual effects
When enjoying video music, please choose a moderate volume,
because too high volume may damage your audition.
In Video Player interface, Press Right ‚Play‛ Soft Key to Play,
Middle icon / to Play/pause, Press left ‚Stop‛ Soft Key to Stop,
Left Direction icon to Reverse, Right Direction icon to
Forward, Turn the phone horizontal to play in full screen; turn the
phone vertical phone to quit full screen. In full screen mode, frame
capture function is off.
-- 82 --
Choose any option from such options as Play, Send, Rename, Delete,
Delete All, Taxis and Storage Priority to edit the file.
Press ‘’option’’ soft key to have following function
Play: Start playing the current movie.
Send: can be sent to a variety of settings.
Rename: change the current video name.
Delete: delete the current video.
Delete all files: one to delete the list of all the videos.
Sort by: different file attributes can be reordered can be easier
to find.
Storage: Choose the current storage as a phone or memory
card.
10.13 Sound Recorder
Sound record files are saved under ‚Phone/memory card-audio‛ .
In AudioRec File List interface, press Options, then you can have such
options as Record, Play, Attach and Rename, Delete, Delete All,
Settings and Send etc.
Press OK key to enter Option, items in the menu are:
Options Descriptions
New Record Start to record.
Play You can play music selected.
Append continue to record the highlighted recording.
-- 83 --
(The format must be AMR or AWB)
Rename
You can rename of the record. Note: If this
record has been set as call ring etc, once it is
renamed, the call ring will restore to default
one.
Delete Delete the selected file
Delete All files Delete all the recordings from the list.
Use As Send the highlighted record to the ringtone list
for profiles.
Send Send the highlighted record by MMS, Bluetooth
or Email.
Settings
Storage Select the storage phone or memory card
File Format You can select the Different audio format
Audio Quality Select the audio quality
10.14 File Manager
This mobile phone provides certain space for the user; basides, it
supports Memory Card. With this function, you can conveniently
manage all directories and files saved on the mobile phone and Memory
Card
With this function, you can manage all your files.
-- 84 --
Options Descriptions
Open Open a specified folder.
New Folder Create a new folder.
Format You can format files. Note: After formatting,
all data in the file stem will be lost.
10.14.1 Open
With this function, you can enter the root directory of the memory,
which will list system default folders; and you can create folders and
user files (for the first switch-on or when the user does not change
directories, the root directory has system default folders only).
Options Descriptions
Open Open the appointed folder
New Folder You can create a new folder in the appointed folder
Rename You can rename the appointed folder
Delete Delete the appointed folder
Sort by
You can have taxis operation on the files on the
memory and display them in the mode after taxis.
You can sort them by name, type, time, size and
none
The appointed item is files, and have the following operations according
to different file types:
Options Descriptions
View (Play) View or play the appointed file. Change may
occur for files of different types
Send You can send audio files to Profiles and
-- 85 --
Bluetooth and video files to Wallpaper, Screen
Protector, Switch-on Cartoon, Switch-off
Cartoon, Phonebook and Bluetooth
New folder You can create a new folder in the appointed
folder
Rename You can rename the appointed file
Delete Delete the appointed file
Sort by
You can have taxis operation on the files on
the memory and display them in the mode
after taxis.
Mark several You can select the several files
Copy
You can copy the appointed file to the
appointed place. Click ‚Back‛ to cancel this
order. If the space is not sufficient for copy
operation, then the mobile phone will give tip
information
Move You can move the appointed files to the
appointed position
Delete All files You can delete all files under the appointed
directory
Details List the date and size of the appointed file
10.15 Calendar
In Calendar interface, on the top of this interface. The chosen date is
highlighted.
In Calendar interface, the first line is Year and month, the second
-- 86 --
line is week and the middle is the detailed date of a month and the
last line is the alert information.
Enter Settings->Phone Settings to change date, and then the
screen will display the changed date.
10.16 Calculator
With this function, you can have simple calculations with the mobile
phone.
In the calculator interface, input the number and the decimal to be
calculated. Use the touch screen to input and calculate.
10.17 Tasks
You can create new memos and have such operations as View, Add,
Edit, Delete, Delete All and jump to date,Send vcalendar,Save as file
etc. If you set alarm clock for the memo, when the set time is reached,
the mobile phone will ring and display the content of the memo.
10.18 TV
-- 87 --
Select ‚TV‛ will open the TV tuner. TV tuner will remember the last
channel and set current channel to that channel. Click ‛Options‛ enter
the sub menu :
Set region: Search the area and country
Input Chhanel:input the channel you want see
Program List:Store the channel list.You can edit the name of the
channel.
Scan :Search for channels
Full screen: Set the Tv on full screen mode
10.19 Services
10.19.1 SIM Tool Kit
If your SIM card supports STK, you may use the corresponding
value-added services.
Menu > Services>STK
10.19.2 Internet Service
Your phone supports services based on wireless application protocol
(WAP), and then you can enjoy the services provided by your network
operator. You can know the latest relative news, weather forecasting, air
flights, etc through this menu.
WAP service needs the support of the network. For the usability, price
and tax of the WAP service, please contact your network operator or
the service supplier who provides you the requested service for
information. Service supplier will also provides you instruction on how
-- 88 --
to use its service.
Options Descriptions
Homepage Enter this menu, and then you can directly
access the home page of the set web site.
Bookmarks You can enter the set network bookmark etc to
have network surfing.
Recent pages
The latest web pages latest logged in will be
saved in this menu. You can directly choose the
record in this menu and have network surfing.
Offline pages
The web pages latest logged in will be saved in
this menu. You can directly choose the record in
this menu and have network surfing.
Input address Input the website to be log in and start linking
to web page.
Service Inbox
With this function, the service provider will
send WAP content into the mobile phone and
you need to do nothing. For example, you can
obtain the latest news or WAP settings from
the service provider.
Settings
Select the SIM: Select the sim on which GPRS
working
Profiles: select the appropriate profiles
Browser options: You can set the time to wait
for network link and open or close image
display.
Service message Settings: You can choose to
set it as On/Off.
-- 89 --
10.19.3 Data Accounts
Set up WAP configuration.
10.19.4 Common websites
This includes all common websites like yahoo, google, myspace,
MSN, ebay, facebook.
10.19.5 Connection management
Manager and view the connection information.
10.20 Map
With an Intelligent Search & Landmark Based driving directions, Finding
Places, Businesses and Directions in India has never been easier before.
Maps provide street maps, satellite photos, a hybrid view, and street
views of locations in many of the world’s countries and regions. Maps
for mobile to your phone and never carry a paper map again.
A map on your phone makes it easy to:
Determine your current location, with or without GPS
Find driving and transit directions
Find phone numbers and addresses for local businesses
Clear Cache: You can clear cache.
Clear cookies: You can delete cookies.
Trust certificates: You can view trust voucher.
-- 90 --
Note: Maps, directions, and location-based apps depend on data
services.
10.21 Clock
10.21.1 World Clock
With the Left and Right Direction icon , you can view the
GMT time of the major cities in the world. The screen will display
the city name and the current date and time.
Press the Left and Right Direction icon once or multiple
times to choose the city to be viewed, and then the screen will
display the local data and time. You can press the “Option” Soft
Key to have corresponding settings.
10.21.2 Alarm
This mobile phone can set four alarm clocks. You can set alarm clock
on/off, alarm time, alarm mode and alarm period. The time format of
the alarm clock is the time with the format in the clock.
The alarm clock can work even if the phone is switched off as long
as there is enough power in the battery. Alarm time, snooze
time-out and alarm tone can be set independently for every alarm.
The phone will alarm (ring) when the time reaches the set time and
current time and date will be displayed on the screen. Press Stop to
-- 91 --
stop the alarm; press Sleep, the alarm will pause and alarm again at
the snooze time-out.
Note: your phone supports alarm clock when it is switched off. When
your phone is switched off, the alarm clock can still work as long as
there is enough power in the battery.
10.21.3 Stopwatch
The mobile phone provides stopwatch function.
There are general stopwatch and multi-directional stopwatch available.
Please see the following descriptions:
Options Descriptions
Typical Stopwatch
Split Timing: If Split Timing is chosen, press
‚Start‛ to stat timing. To measure Split Timing,
press ‚Split Timing‛, and then the screen will
display ‚Split Timing‛ on the top to the working
time. You can roll to view each time. Press ‚Stop‛
to stop timing; press ‚Continue‛ to continue
timing; press ‚Back‛, then the screen will display
‚Save‛ dialogue box. Press ‚Yes‛ to save time.
Lap Timing: If Lap Timing is chosen, press ‚Start‛
to stat timing. To measure Lap Timing, press ‚Lap
Timing‛. Press ‚Stop‛ to stop timing. Please refer
to the above ‚Split Timing‛.
View Records: The mobile phone will display the
name list of the time sets or the final time list,
you can choose the desired time set or save and
delete it.
nWay stopwatch In the same interface, choose any stopwatch to
have timing operation.
-- 92 --
10.22 Profiles
This mobile phone provides such profiles as General, Meeting,
Outdoor, Indoor, Headset and Bluetooth and has default settings.
After you insert the headset, you can directly enter the headset
mode.
For every profile, you can enter customize Settings and set the
following options.
Options Descriptions
Tone setup Include Incoming Call, Alarm Clock, power-on,
power-off, Message Alert Tone and Keypad Tone.
Volume Set the volume of Ring and Keypad Tone.
Alert type
You can choose any one from Ring, Vibration,
Vibration and Ring ,and Ring after Vibration as the
current alert type.
Ring Type You can choose any one from single, Repeat and
Ascending as the current ring type.
Extra Tone
You can have Select/Cancel settings on Warning
Tone, Error Tone, Network Connection Tone and
Call Connection Tone so as to have corresponding
tone tips.
-- 93 --
10.23 Bluetooth
You may connect the phone to other devices through Bluetooth. The
phone is able to build a wireless connection within the range of ten
meters. Since the signal is transmitted by radio wave, you phone
does not need to face the other devices. However, wireless
Bluetooth connections could be interfered by walls or other
electronic devices.
In certain areas, Bluetooth might be restricted. Please contact the
supervising department or service provider for more information.
Note: using the Bluetooth (or running it in back stage) will consume
more battery power and shorten battery life.
In the Bluetooth submenu including the following submenus, you
may set up relevant Bluetooth service.
Options Descriptions
Power You can open or close the Bluetooth.
Inquiry audio
device
You must perform connection when the Bluetooth
is on and the mobile phone and the Bluetooth
headset search the Bluetooth headset option at
the same time. Input Bluetooth password to have
configuration. After successful configuration,
connection is completed. (Bluetooth subject to
the Bluetooth headset).
Remote control Remote Control will enable the Bluetooth to work
as Remote control of Laptop/PC, while giving
-- 94 --
presentations and listening to Music or watching
a movie
My Device
The mobile phone can display the name of the
searched Bluetooth. Click ‚Options ‛ Soft Key to
have the following operations :
Connect: connect the device, you may choose a
service in service record to connect.
Disconnect: disconnect the device.
Set as handfree earphone: set the earphone as
current default earphone.
Device name: rename the device.
Delete: delete the selected record.
Delete all: delete all records.
Service list: view the service record of the
device.
Search new device: search for new Bluetooth
devices.
Connected device: view connected devices and
their services, press OK key to disconnect the
device.
Active Devices Check the active devices
My name You can see the name of the units of the mobile
phone or rename them
Visibility: press OK key to turn on/off the
visibility of Bluetooth.
Change device name: select an input method to
rename the devices.
-- 95 --
Settings Authentication: press OK key to turn on/off the
function; turn on to allow the phone be
connected with other devices.
Audio path: select to save in the phone or
transmit to hand free devices.
Block list: Select the list of unwanted Bluetooth
Storage: Select the storage path for receiving files
via Bluetooth
File transmission setting: select shared folder of
file transmission and set the access right (free or
read only)
About view device name, Bluetooth device address and
support service.
10.24Tools
10.24.1 Unit Converter
You can have the conversion between multiple weight and length
units.
Options Descriptions
Weight
Choose related function columns; switch
conversion units between ‚Kilogram<->Ounce‛
and ‚Kilogram<->Pound‛; choose conversion unit,
input numbers in any unit column and press
-- 96 --
‚OK‛ soft key to display the result in the other
column.
Length
Choose related function columns; switch
conversion units between ‚Kilometer<->Mile‛,
‚Meter<->Yard‛, ‚Meter<->Foot‛ and
‚Centimeter<->Inch‛ ; choose conversion unit,
input numbers in any unit column and press
‚OK‛ soft key to display the result in the other
column.
Note: Only 8 valid digits including the decimal can be input. The
conversion result contains only 14 valid digits.
10.24.2 Currency converter
After entering the exchange rate conversion interface, input exchange
rate, on the bottom of the interface, Choose related function column;
on the rate switching column, press the Left/Right direction icon to
switch the current exchange rate, i.e. the rate between the local
currency and foreign currency or vice versa. Choose the mode of
exchange rate, input numbers in the local or foreign currency column,
press the ‚OK‛ soft key to display the conversion result on the other
column.
10.25 E-book
With this function, you can read the text with suffixes PDB and TXT etc.
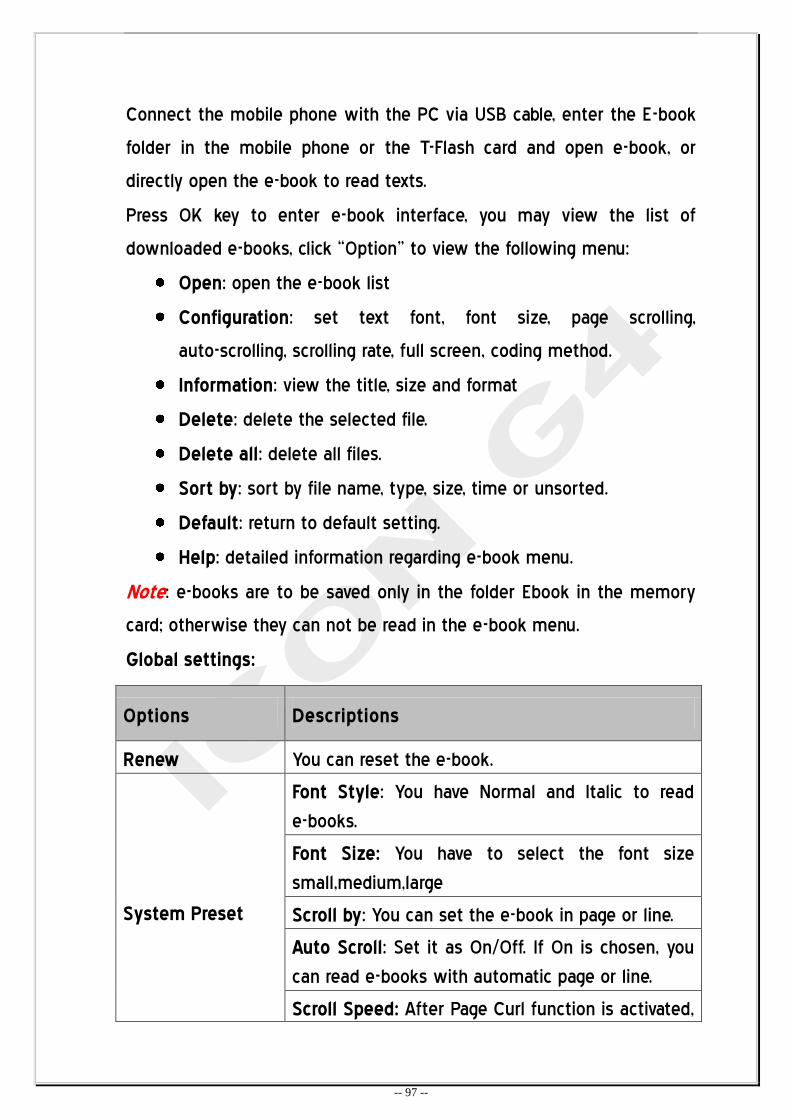
-- 97 --
Connect the mobile phone with the PC via USB cable, enter the E-book
folder in the mobile phone or the T-Flash card and open e-book, or
directly open the e-book to read texts.
Press OK key to enter e-book interface, you may view the list of
downloaded e-books, click ‚Option‛ to view the following menu:
Open: open the e-book list
Configuration: set text font, font size, page scrolling,
auto-scrolling, scrolling rate, full screen, coding method.
Information: view the title, size and format
Delete: delete the selected file.
Delete all: delete all files.
Sort by: sort by file name, type, size, time or unsorted.
Default: return to default setting.
Help: detailed information regarding e-book menu.
Note: e-books are to be saved only in the folder Ebook in the memory
card; otherwise they can not be read in the e-book menu.
Global settings:
Options Descriptions
Renew You can reset the e-book.
System Preset
Font Style: You have Normal and Italic to read
e-books.
Font Size: You have to select the font size
small,medium,large
Scroll by: You can set the e-book in page or line.
Auto Scroll: Set it as On/Off. If On is chosen, you
can read e-books with automatic page or line.
Scroll Speed: After Page Curl function is activated,

-- 98 --
10.26 Java
Menu > Java You can install Java applications to enhance the multimedia
function. Allows you to connect to eMSN and Operamini as well. Several
Java application are provided.
Java: enter to java game And java application such as Google
maps, Opera mini , Ebuddy , Skype (Require service provider
support for these services)
Java setting: you can set java audio, java backlight, java vibration,
select SIM, java SIM1 profile, java SIM2 profile, heap size.
Java default security: JAVA this is the default setting, do not
arbitrarily change the menu
you can set its speed among five levels.
Full Screen: Open or close full-screen to read
e-books.
Coding Mode: English and Simplified Chinese
etc.
Storage Priority: You can choose the phone or the
memory card to save e-books. Note: This option
cannot be available without memory card inserted.
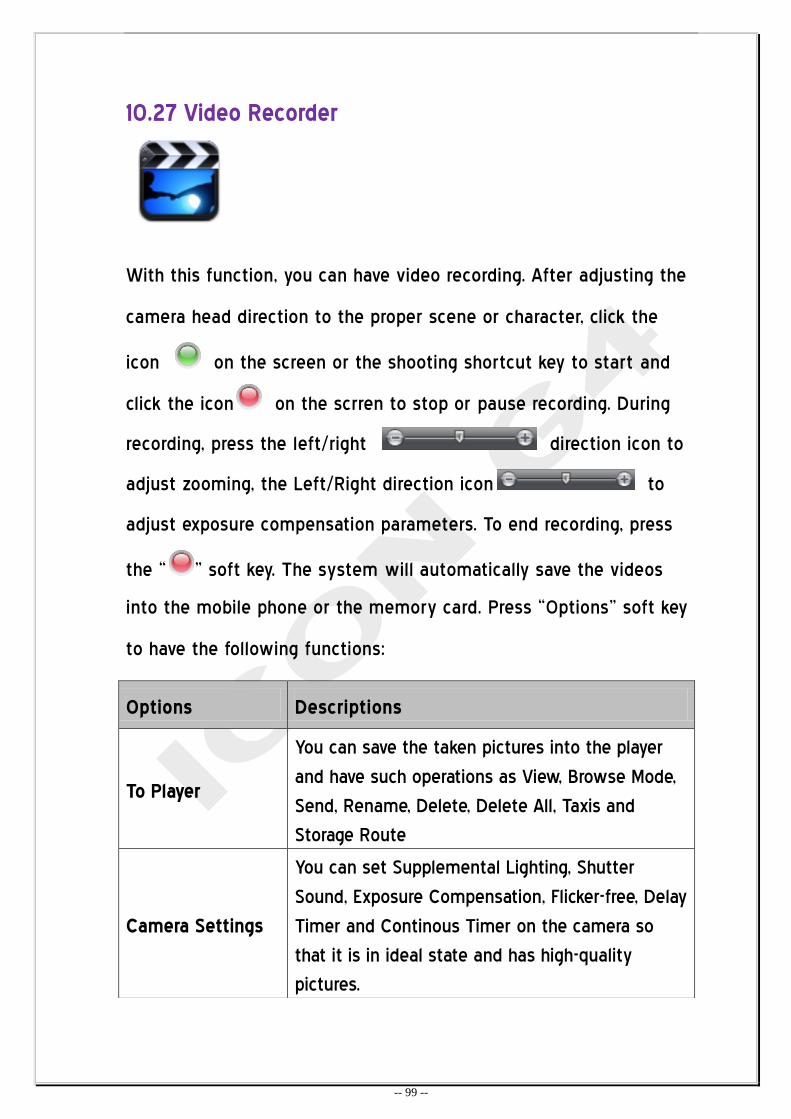
-- 99 --
10.27 Video Recorder
With this function, you can have video recording. After adjusting the
camera head direction to the proper scene or character, click the
icon on the screen or the shooting shortcut key to start and
click the icon on the scrren to stop or pause recording. During
recording, press the left/right direction icon to
adjust zooming, the Left/Right direction icon to
adjust exposure compensation parameters. To end recording, press
the ‚ ‛ soft key. The system will automatically save the videos
into the mobile phone or the memory card. Press ‚Options‛ soft key
to have the following functions:
Options Descriptions
To Player
You can save the taken pictures into the player
and have such operations as View, Browse Mode,
Send, Rename, Delete, Delete All, Taxis and
Storage Route
Camera Settings
You can set Supplemental Lighting, Shutter
Sound, Exposure Compensation, Flicker-free, Delay
Timer and Continous Timer on the camera so
that it is in ideal state and has high-quality
pictures.
-- 100 --
10.28 Games
Three games are embedded in the phone. For specific operation, please
refer to help option of game.
10.29 PDF
PDF viewer is embedded in the phone. You can view adobe reader(PDF)
files in your phone.
10.30 Office
Office viewer is embedded in the phone. You can view word, excel files
in your phone.
Movie Settings You can set the quality, size, record time, record
EQ and compact format of movies.
Special Effect
Settings
You can set movie special effect. There are 14
options for your choice.
Storage Route You can Save to Phone or Save to Memory Card
Restore Settings You can restore the recorder to factory settings
-- 101 --
10.31 Nimbuzz
Nimbuzz is a fast stylish All-in-one Messenger that includes your
mobile essentials in one place: Gtalk,Yahoo messanger,Msn etc
10.32 Snaptu
Snaptu is a fast stylish all-in-one social networks that includes your
mobile essentials in one place: Twitter, Facebook, Flickr etc
10.33 Lighters
Your phone supports lighter function. Touch lighter gear to light a
fire.
10.34 Opera Mini
-- 102 --
This is a quick entry to Opera Mini. Opera has been embedded in the
phone. Opera offers free and easy to download Web browsers for mobile
phones. Try Opera and discover the best web experience on almost any
phone.
10.35 Google
Your phone provides Google search. Google has been embedded in
the phone. Google offers free and easy to search shortcut for mobile
phones. Try Google and discover the best web experience on almost any
phone.
10.36 Skype
Skype has been preloaded in your handset. Calling other people on
Skype is free so you can talk whenever you want to.
10.37 Ebuddy
Ebuddy has been preloaded in your handset. To be touch with your
friends.
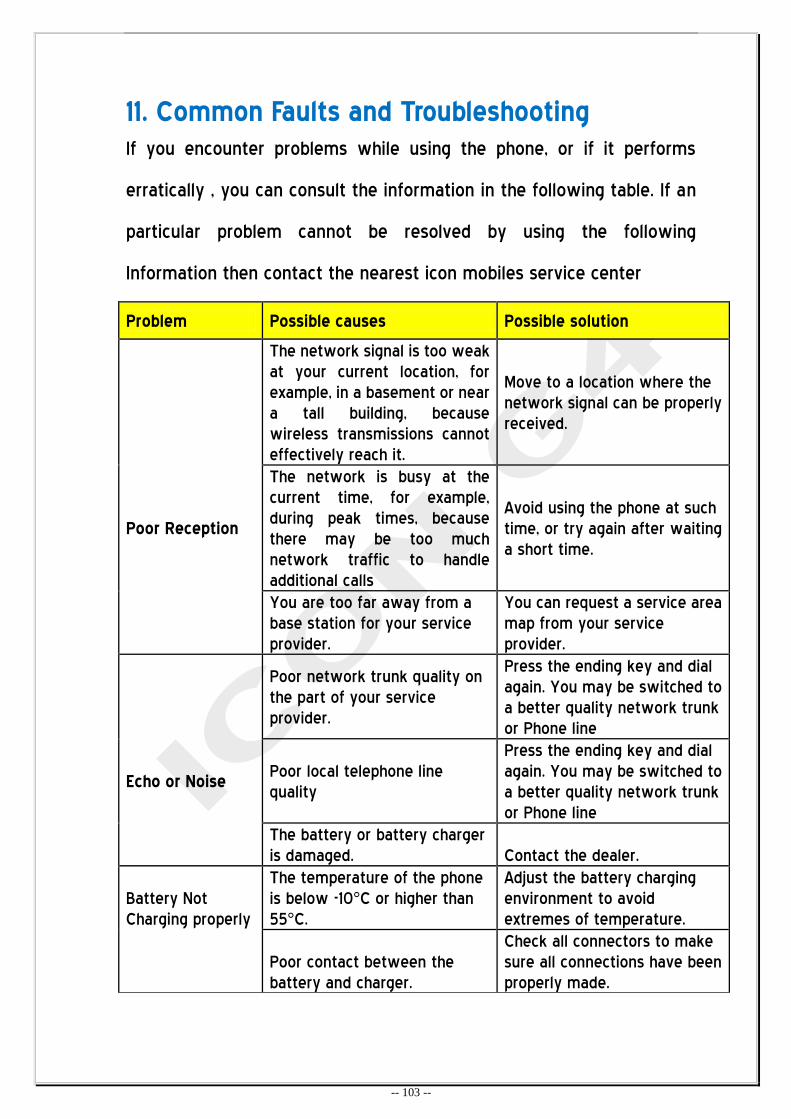
-- 103 --
11. Common Faults and Troubleshooting If you encounter problems while using the phone, or if it performs
erratically , you can consult the information in the following table. If an
particular problem cannot be resolved by using the following
Information then contact the nearest icon mobiles service center
Problem Possible causes Possible solution
The network signal is too weak
at your current location, for
example, in a basement or near
a tall building, because
wireless transmissions cannot
effectively reach it.
Move to a location where the
network signal can be properly
received.
Poor Reception
The network is busy at the
current time, for example,
during peak times, because
there may be too much
network traffic to handle
additional calls
Avoid using the phone at such
time, or try again after waiting
a short time.
You are too far away from a
base station for your service
provider.
You can request a service area
map from your service
provider.
Poor network trunk quality on
the part of your service
provider.
Press the ending key and dial
again. You may be switched to
a better quality network trunk
or Phone line
Echo or Noise Poor local telephone line
quality
Press the ending key and dial
again. You may be switched to
a better quality network trunk
or Phone line
The battery or battery charger
is damaged. Contact the dealer.
Battery Not
Charging properly
The temperature of the phone
is below -10°C or higher than
55°C.
Adjust the battery charging
environment to avoid
extremes of temperature.
Poor contact between the
battery and charger.
Check all connectors to make
sure all connections have been
properly made.

-- 104 --
The standby time is related to
your service provider system
configuration. The same phone
used with different service
providers’ systems will not
provide exactly the same
length of standby time.
If you are located in an area
where signaling is weak,
temporarily switch off the
phone
Shortened Standby time
The battery is depleted. In high
temperature environments,
battery life will be shortened.
Use a new battery.
If you are not able to connect
to the network, the phone
will continue to send out
signals as it attempts to locate
a base station. Doing so
consumes battery power and
will consequently shorten
standby time.
Change your location to one
where the network is
accessible, or temporarily turn
off your phone.
Battery not charged
Check if battery is properly
connected; remove it, reinstall
the battery and then switch on
again.
Phone Not switching ON
Battery power has been
exhausted. Recharge the battery.
On/off key
Hold the On/Off key until
power-on menu appears.
SIM card malfunction or
damage
Take the SIM card to your
service provider for testing.
SIM Card error SIM card is inserted improperly
Insert the SIM card properly
Debris on the SIM card metal
area Use a soft and dry cloth to
clean the SIM card metal area.
SIM card invalid. Contact your service provider.
Unable to Connect to the network
You are not within the service
area of the network.
Check the service area with
your service provider.
Poor signal.
Move to an open space, or if
you are inside a building, move
closer to a window.
PIN Code is Blocked
You have entered an incorrect
PIN code three consecutive
times.
Contact your service provider.
If the service provider provides
the PUK code of the SIM card,
use the PUK code to unlock the
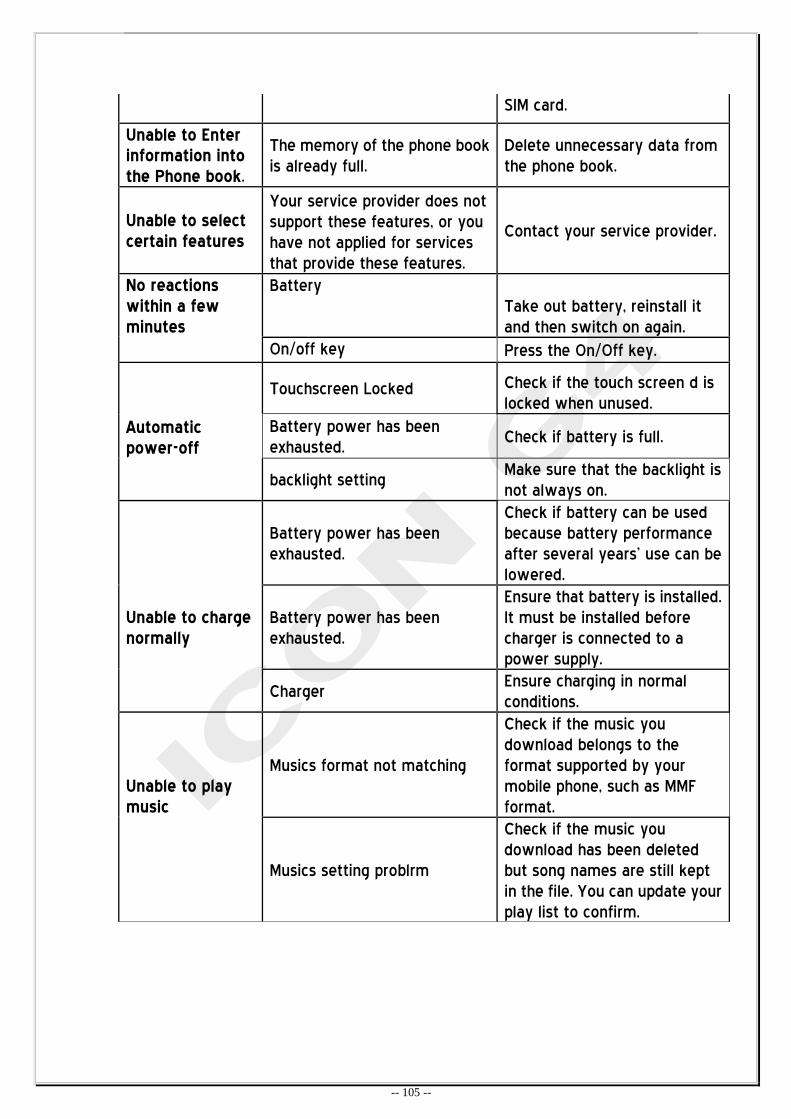
-- 105 --
SIM card.
Unable to Enter information into the Phone book.
The memory of the phone book
is already full.
Delete unnecessary data from
the phone book.
Unable to select certain features
Your service provider does not
support these features, or you
have not applied for services
that provide these features.
Contact your service provider.
No reactions within a few minutes
Battery
Take out battery, reinstall it
and then switch on again.
On/off key Press the On/Off key.
Touchscreen Locked Check if the touch screen d is
locked when unused.
Automatic power-off
Battery power has been
exhausted. Check if battery is full.
backlight setting
Make sure that the backlight is
not always on.
Battery power has been
exhausted.
Check if battery can be used
because battery performance
after several years’ use can be
lowered.
Unable to charge normally
Battery power has been
exhausted.
Ensure that battery is installed.
It must be installed before
charger is connected to a
power supply.
Charger
Ensure charging in normal
conditions.
Unable to play music
Musics format not matching
Check if the music you
download belongs to the
format supported by your
mobile phone, such as MMF
format.
Musics setting problrm
Check if the music you
download has been deleted
but song names are still kept
in the file. You can update your
play list to confirm.