Embed Size (px)
Citation preview


Copyright © 2016 by iSense Ltd.
All rights reserved. No part of this publication text may be uploaded or posted online without
the prior written permission of iSense Ltd.
For permission requests, get in touch with us on
978-0-9966004-5-3

The Definitive Guide to Getting Started with OpenCart 2.x for Beginners
2
Authors:
Index:
Chapter 1: How to Install OpenCart
Chapter 2: How to Remove the Demo Data in OpenCart
Chapter 3: Dashboard
Chapter 4: Catalog
Chapter 5: Extensions
Chapter 6: Design
Chapter 7: Sales
Chapter 8: Customers
Chapter 9: Marketing
Chapter 10: System
Chapter 11: Reports
Chapter 12: How to Uninstall OpenCart

The Definitive Guide to Getting Started with OpenCart 2.x for Beginners
3
The first step is always the hardest.
We are here to break that rule and make it the easiest.
This eBook is written for new users of the free E-Commerce platform OpenCart, which is an
open-source project. The eBook will show you how to start from scratch with the platform
and how to build your way up to a fully running online store.
The beginning of the eBook is about the installation process of OpenCart. Then, we will
move on to clearing the demonstration data from the standard installation. The rest of the
eBook will be all about explaining each of the menus in your Administration panel, how they
work and what they are used for.

The Definitive Guide to Getting Started with OpenCart 2.x for Beginners
4
Chapter 1: How to Install OpenCart
In the first chapter of this eBook, you will learn how to complete the installation of OpenCart
from scratch.
Before we begin, these are the server requirements you need to run a smooth OpenCart
installation:
● Web Server (Apache suggested)
● PHP 5.3+(1.5.x at least 5.2+)
● Database (MySQLi suggested)
Download OpenCart
To begin the installation, you need to download the files from the official website of
OpenCart.
At the time of writing this (May 2016), the latest version of the platform is 2.2.0.0. You will
notice that you can choose to download some of the previous versions of OpenCart.

The Definitive Guide to Getting Started with OpenCart 2.x for Beginners
5
You will download the ZIP file. Unzip it and open the folder.

The Definitive Guide to Getting Started with OpenCart 2.x for Beginners
6
From all the files you will see, the most important one is the upload folder. It contains all the
important files that are used to upload OpenCart to a web server.
By now, you should have an established web server and hosting. We have a post on the
server requirements needed to run an OpenCart store without a hitch - you can view it here.
Setting Up Your FTP Client
We suggest using FileZilla. It’s one of the most popular FTP (FIle Transfer Protocol) Clients
used to transfer files to web servers. You can use it to upload your OpenCart files to the
server you have established. You can download the FileZilla client from here:
Important Note: Some web servers do not have FTP support. If that is your case, use an
alternative method to upload files (SSH, Online web hosting file manager, etc).
After you install FileZilla on your computer, open the application and find the folder you
unzipped with the OpenCart files.

The Definitive Guide to Getting Started with OpenCart 2.x for Beginners
7
Input the details of the account you have configured after setting up your server and hosting.
Input your Host (the URL of your host), Username and Password. Click Quickconnect.

The Definitive Guide to Getting Started with OpenCart 2.x for Beginners
8
After you have logged in and connected to your host, you will see the root directory on the
right - in our example, it’s called public_html. This is the folder where your OpenCart shop
will be located.
Important Note: Not everyone is installing OpenCart in their root, this is just our example.
Uploading OpenCart
The location of your store’s website varies based on whether you want the store to be seen
on the main page, a sub-folder, a subdomain, etc. If you want to make OpenCart the main
page, you will need to upload files to the root folder of the website.
Open the public_html folder and create a new directory for your OpenCart installation. For
example, our directory will be called /public_html/OpenCart22Test.

The Definitive Guide to Getting Started with OpenCart 2.x for Beginners
9
Find the unzipped folder in the Local site field with the OpenCart files and open them. Click
on the upload folder.
These are the files you need to upload to your server.
Select all of the files, right click and then click Upload.
This action may take a few minutes to complete. Be patient.
After the upload is finished, there are two files that you need to manually modify. You have
to rename the config-dist.php file in the root directory as well as the one in the admin folder.
Simply delete the -dist part so the file’s name is config.php.

The Definitive Guide to Getting Started with OpenCart 2.x for Beginners
10
Creating Your Database
You are almost finished. The next thing to do is create the database for your OpenCart
store. To do that, you need to access the control panel of your site (cPanel for example).
The control panel is where your MySQL Databases are managed.
(Not all web hosts have support for cPanel. In these cases, you should contact
your web hosting provider and ask them to set up a new database (or give the
credentials to their existing database is one exists.)
Important Note: The details for your control panel must be delivered by your hosting
provider.
Access the databases and create a new database with a new name by entering a username
and password. By doing that, you create a user that has to be added to the database. While
adding your user to the new database, it’s important to make sure that you add all of the
existing permissions.

The Definitive Guide to Getting Started with OpenCart 2.x for Beginners
11
In the field New Database, input the name you wish for your new database. We will name
our new database the same way we named our directory in FileZilla - opencart22test.
Add your user to the database you just created. In our example, the user’s name is octest.
When you are ready, click Add.

The Definitive Guide to Getting Started with OpenCart 2.x for Beginners
12
This will take you to the privileges (permissions) screen. Select all the privileges and confirm
them by clicking Make Changes.
Your database is ready! You can now install your OpenCart.
Install OpenCart to a Website
Installing OpenCart from here on is very easy. Open a browser of your choice and write the
following in the URL field:
yourdomain.com/TheExactFolderName/install
In our case, the name of our folder is OpenCart22Test, so our URL looks like that:
ourdomain.com/OpenCart22Test/install

The Definitive Guide to Getting Started with OpenCart 2.x for Beginners
13
Hit enter and this screen should appear.
Click Continue.
Make sure that all of the listed files and folders are writable. After that, simply follow the
steps and make sure everything is enabled.

The Definitive Guide to Getting Started with OpenCart 2.x for Beginners
14
When you get to the Configuration step, input the username and password you created for
the database in your Control Panel (cPanel).
Next, input the name of the database you created.
The other fields do not have to be modified.
Finally, configure the credentials you will use for logging into your OpenCart store.
Click Continue.
Congratulations!
Your brand new OpenCart store has been installed!
You can now view the front end of your online shop, or login to the administration and begin
learning the settings.
But before that, do not forget to delete your installation directory from FileZilla for security
purposes.
To do that, go back to the FileZilla application and delete the install folder from the files you
uploaded to the remote server (the right side).

The Definitive Guide to Getting Started with OpenCart 2.x for Beginners
15
Your store is ready and you can start selling!

The Definitive Guide to Getting Started with OpenCart 2.x for Beginners
16
Chapter 2: How to Remove the Demo Data in
OpenCart
If you have paid attention to chapter 1 of our eBook, you would now have a freshly installed
version of OpenCart. This means you are ready to start building your store and filling it with
your products, images, attributes and so on.
However, as you see, the default installation of OpenCart contains demo data with examples
of products, logos, etc. They are there to show you how the basic functions of the platform
work and to test the settings.

The Definitive Guide to Getting Started with OpenCart 2.x for Beginners
17
So, to start building your store, you need to erase all of the demo data and examples that
are currently there.
How to do that? It’s probably one of the simplest things you can do in OpenCart.
Deleting Categories
Go to your admin panel and access the Categories.
Catalog > Categories

The Definitive Guide to Getting Started with OpenCart 2.x for Beginners
18
Next to the Category Name, you will see a box. Check it and it will select all of the existing
categories. Click on the trash icon to delete the categories.
Deleting Products
Next, it’s time to delete the demo products (iPhone, iMac, etc).
Catalog > Products
Deleting Attributes & Attribute Groups
Moving on, the attributes are the next section to delete.
Catalog > Attributes > Attributes

The Definitive Guide to Getting Started with OpenCart 2.x for Beginners
19
Do the same for the Attribute Groups
Catalog > Attributes > Attribute Groups
Deleting Manufacturers
Next, you have to delete all of the manufacturers that are below the demo products.
Catalog > Manufacturers
Deleting Banners
The banners are the big images in the slider at the home page of your default OpenCart
store. Here is how to delete them.
Design > Banners

The Definitive Guide to Getting Started with OpenCart 2.x for Beginners
20
Poof! Now it’s all gone.
Here is how the front end of your store should look like now:
Your store is all empty and ready for a fresh start.
In the next chapters, we will explain how each of the menus in your administration panel
work, and what to use them for.

The Definitive Guide to Getting Started with OpenCart 2.x for Beginners
21
Chapter 3: Dashboard
This tutorial is about a place where you will spend a lot of your time - the OpenCart
Dashboard.
We will walk you through each element you see so you know what all the metrics account for
and what the settings are used for.
Let’s start from the basic sections you see from the beginning.
Show/Hide Admin Panel - You have an option to show or hide the admin panel menus in
order to save space and focus on the task at hand. The menus will still be accessible, just
minimized at the left side of the screen. This setting works both in desktop and tablet mode.
Order Statistics - Below the admin panel, you have three bars showing important statistics
about your orders. They are Orders Completed, Orders Processing, Other Statuses.
Notifications - At the top right, you see a Bell icon. These are the notifications you have for
important things such as orders, customers, products, and affiliates. We will explain a bit
more about them later.

The Definitive Guide to Getting Started with OpenCart 2.x for Beginners
22
Your Store - The circle icon allows you to view the front end of your store and also access
the home page of OpenCart’s website, as well as the official OpenCart Documentation.
Latest Orders - At the bottom, you will see a tab with your most recent orders. It shows the
Order ID, Customer name, Order Status, the Date it was added as well as the Order Total.
Administration Panel Navigation - All the functionality that OpenCart offers can be
accessed from here. The admin panel is where you find all of the settings and adjustments
you can make to your website. This is where you add categories and products, install
extensions, edit orders, modify your store’s design, launch marketing campaigns, and many
more.
The 4 large boxes at the top are where you can quickly view your Total Orders, Total Sales,
Total Customers and all of the people that are currently online in your web store. All of the
boxes also work as links so you can access each of the sections in your admin panel.

The Definitive Guide to Getting Started with OpenCart 2.x for Beginners
23
World Map - this is an interactive map that highlights the countries from which your
customers make their orders. The heavier the color, the more orders come from the country.
If you are running a store that has an international market, keep an eye on this to be aware
of the potential marketing and advertising opportunities you have.
Sales Analytics - This field shows you the timeline of your sales filtered by day, week,
month or year. It’s based on the number of orders and customers you currently have in your
store.

The Definitive Guide to Getting Started with OpenCart 2.x for Beginners
24
Notifications - As you see, you have a comprehensive list showing important data about
Orders, Customers, Products and Affiliates.
This field shows the number of orders that are processing, completed and the number of
returns you have.
You also see the number of customers online, and the customers that you need to approve.
The products that are out of stock are immediately shown, as are those who have received
reviews.
At the bottom, you will see the affiliates that need to be approved.

The Definitive Guide to Getting Started with OpenCart 2.x for Beginners
25
Your Store - This is where you can access the front end of your OpenCart store. Click on
Your Store to see how it looks.

The Definitive Guide to Getting Started with OpenCart 2.x for Beginners
26
Chapter 4: Catalog
To help you understand what OpenCart is, how does it work and what to do with it, we will
guide you through each menu and its submenus in the administration panel. We will start
with the first menu - Catalog. This is where you edit most of the content of your online store,
such as the product categories, products and information pages.
Categories
Your product categories determine how organized your products will be. This is where you
will be spending quite a bit of time when you are setting up your store from scratch.
The categories are listed according to their Sort Order number that you can assign manually
so your list is more structured and easy to work with.

The Definitive Guide to Getting Started with OpenCart 2.x for Beginners
27
Click on Add New to see the category creation fields. They will appear in three separate
tabs - General, Data and Design.
This is where you choose a name for your product category (e.g. Men’s Clothing, Computers
& Laptops). Underneath, you have a rich text editor for writing the category description. Give
some useful information about the products in the category and use that opportunity to
sprinkle some of those magic keywords around.
If you want your product categories to help with SEO (which they can), the category name
and description are the most important fields for that. Consider adding a couple of long-tail
keywords that will help with more specific user searches and smaller competition.
The Data tab allows you to do further improvements to your category such as adding an
image, filters, subcategories and separating them into rows or columns.
Category Columns

The Definitive Guide to Getting Started with OpenCart 2.x for Beginners
28
Category Rows
In Design, you can override any layout you choose to the category you are creating or
editing. This lets you add modules to layouts that can be assigned to only one category,
instead of all of them.
To Learn More, Check the Ultimate Guide to Creating and Editing OpenCart
Categories
Products
Once you are done creating and modifying your categories, it’s time to start adding products
to them. This is the section where you create new products and modify their data.

The Definitive Guide to Getting Started with OpenCart 2.x for Beginners
29
The products in your OpenCart store can be modified on many levels. You can filter and sort
products by name, price, model, quantity or status.
Clicking on the Add New button will lead you to the product creation fields where you will see
a lot of tabs and fields you can fill.
Don’t be overwhelmed by the level of customization you can do, it’s not all necessary. Some
of the settings in the tabs called Recurring, Discount, Special, Reward Points or Design
are not mandatory, and you can use them only if you need them.
The fundamentals of product creation are in the General, Data, Attribute and Option tabs.
It’s where you edit the product name, description, keywords, product images, as well as the
different options and attributes such as colors, sizes, types, etc.

The Definitive Guide to Getting Started with OpenCart 2.x for Beginners
30
Recurring Profiles
Depending on the type of business you are running, you will either use recurring profiles a
lot, or probably not at all. These profiles are used for customers who are subscribed for a
regular product or a service and they need to make recurring payments.
In order to automate these recurring payments for the subscription, you will use the
Recurring Profiles in OpenCart.
Click the Add New button to create a new recurring profile and see how the system works.

The Definitive Guide to Getting Started with OpenCart 2.x for Beginners
31
The first thing you see is a blue notification giving some useful information about how the
recurring amounts are calculated - the payment frequency and cycle.
For example, if you use a weekly frequency and a cycle of 2, the recurring profile will be
billed every 2 weeks.
The price you set is the amount of each recurring payment, and the duration is the number
of times the payment will take place. If this is left at 0, payments will be transferred until they
are cancelled manually.

The Definitive Guide to Getting Started with OpenCart 2.x for Beginners
32
Filters
The OpenCart filters are used to narrow down the results for users and refine their search so
products can be found faster.
To set these filters up, you need create them as separate modules and assign them to the
layouts in OpenCart.
Start by clicking Add New to view the filter creation field.
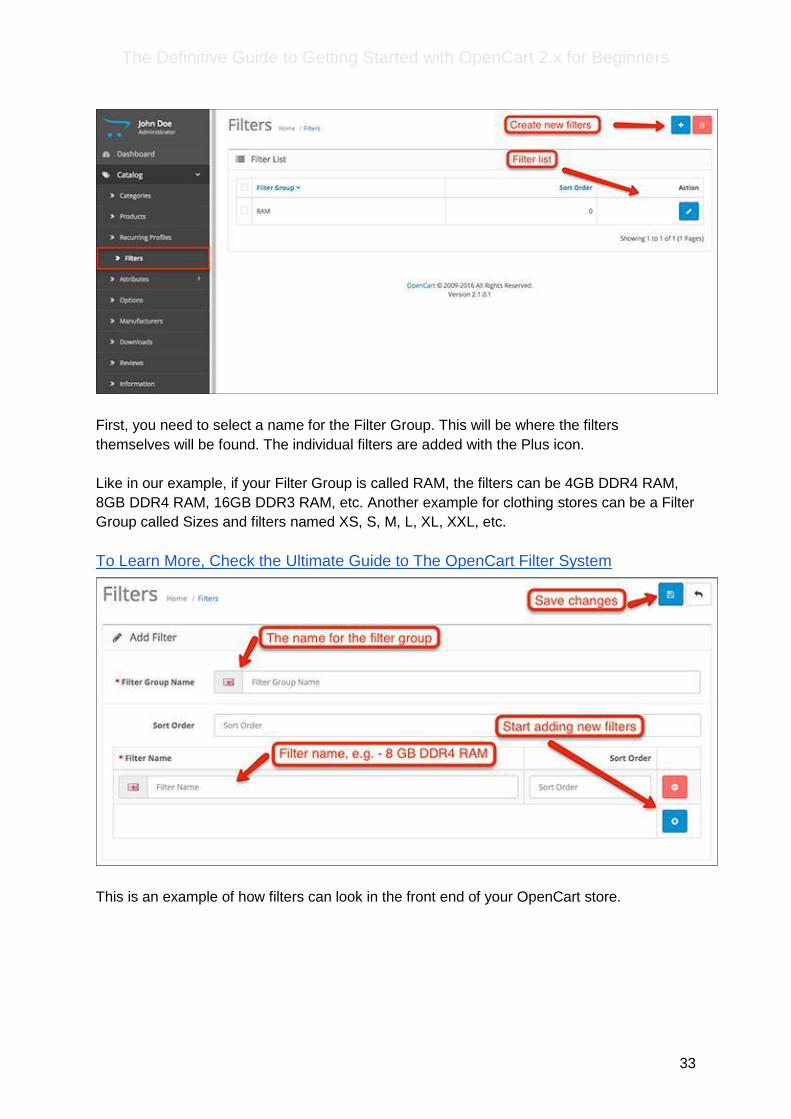
The Definitive Guide to Getting Started with OpenCart 2.x for Beginners
33
First, you need to select a name for the Filter Group. This will be where the filters
themselves will be found. The individual filters are added with the Plus icon.
Like in our example, if your Filter Group is called RAM, the filters can be 4GB DDR4 RAM,
8GB DDR4 RAM, 16GB DDR3 RAM, etc. Another example for clothing stores can be a Filter
Group called Sizes and filters named XS, S, M, L, XL, XXL, etc.
To Learn More, Check the Ultimate Guide to The OpenCart Filter System
This is an example of how filters can look in the front end of your OpenCart store.

The Definitive Guide to Getting Started with OpenCart 2.x for Beginners
34
Attributes
In OpenCart, attributes are part of the product description. Often, they are used for showing
technical specifications, dimensions and other important product details.
Begin adding a new attribute to see what you can do with it.
As you see, below the name you need for the attribute, there is a field where you have to
select an Attribute Group.
Attributes are all sorts of product data such as dimensions, functionalities, requirements,
capabilities and much more. In our example, we have used the size and resolution of a
smartphone display - 5” IPS 1920x1080. This includes the display size, type of display and
the resolution. The attribute group for this type of attribute can be called Monitors, Displays,
etc.

The Definitive Guide to Getting Started with OpenCart 2.x for Beginners
35
This is an example of how attributes look like in the front end of your OpenCart store.
Attribute Groups
To combine the different attributes, you need Attribute Groups. These groups are used to
help you describe your products in more detail.
Create a new attribute group to see what you can do.

The Definitive Guide to Getting Started with OpenCart 2.x for Beginners
36
As you see, it cannot be simpler - you just select a name that is simple and general enough
to fit multiple attributes. Give it a sort order number for better organization and begin adding
attributes for product specifications.
To Learn More, Check the Ultimate Guide to Attributes and Attribute Groups
Options
Product options give you the chance to offer different versions of the same product. An easy
example for clothing is colors - red, white or blue t-shirts.
Add a new option to see the type of options you can add in OpenCart.

The Definitive Guide to Getting Started with OpenCart 2.x for Beginners
37
Below the option name you need to pick, you have a dropdown menu with a few types of
options you can add. For instance, if you choose Select, you will have options that will be
selected from a dropdown menu in the product page. If you choose Checkbox, you will have
options that can be checked and unchecked when viewing the product.
Choose the type of option you want to add and give it an appropriate name. Once you select
the type of option, you also have to add an option value. For example, if you choose Colors
as a new option, you need to add values - Red, White, Blue, etc.

The Definitive Guide to Getting Started with OpenCart 2.x for Beginners
38
To Learn More, Check the Ultimate Guide to Product Options in OpenCart
Manufacturers
The manufacturers in OpenCart are very easy to manage. Once they are setup, you can
assign them to products.
Add a new manufacturer to begin.

The Definitive Guide to Getting Started with OpenCart 2.x for Beginners
39
It’s completely straightforward - the manufacturer has a name, you can assign it to multiple
stores if you have them, give it an SEO keyword for the SEO URLs if they are enabled, and
finally an image with the manufacturer logo.
When this is all done, you can go back to the products, click on the Links tab of the product
you want to edit, and assign the manufacturer there. This way, if a customer clicks on the
name of the manufacturer, your store will show all of the products you have from that brand.
The Definitive Guide to Getting Started with OpenCart 2.x for Beginners
40
Downloads
If you want to add downloadable files to your OpenCart store, this is where to do that.
Click on Add New to see what options you have.

The Definitive Guide to Getting Started with OpenCart 2.x for Beginners
41
After you give a name to the downloadable file, you have to upload the file. This is done from
the field below, named Filename. The file can either be uploaded from here or via FTP into
System > (Storage) > Download.
The Mask is used to give a different name to the uploaded file, so the link will not lead
directly to your downloadable files. This protects any files that you don’t want people to
download unless they have an account in your store for instance.
Reviews
Product reviews can be submitted by customers from the pages of your products, or you can
add them manually from the admin panel.
Let’s begin adding a new review to see the options.
You have the same fields like you have in the front end of your store. Author name, the
review text, and a rating. The only difference is that you can choose the product you want to
leave a review for.

The Definitive Guide to Getting Started with OpenCart 2.x for Beginners
42
Also, any product reviews left by customers will appear in the Reviews section in your admin
panel. This is where you can check what users say and think about your products and
decide whether you want to approve the comments or not.
Important Note: The reviews submitted by customers will be disabled by default and won’t
show up in your store front. To make them visible, you have to enable them. To enable a
review, go to Catalog > Reviews, select the review, click Edit and Enable it from the status.
Information
This is where you configure all of the Information pages in your OpenCart store - About Us,
Delivery Information, Privacy Policy, and Terms & Conditions.
These are the predefined pages that come with the standard OpenCart installation, and you
can either delete them or keep them for further modification.
Let’s begin adding a new page.

The Definitive Guide to Getting Started with OpenCart 2.x for Beginners
43
The title of the page determines how the link to it will be called as well. Choose a title and
description with SEO in mind because this is a great place to put keywords that are related
to your niche.
The rest of the tabs and options allow you to use meta tags and keywords, assign the page
to multiple stores if you have them, choose whether it will be in the footer or not, or assign
different layouts with modules to them.
This is how the footer in OpenCart looks like. It’s where the information pages are found in
the front end of your website.

The Definitive Guide to Getting Started with OpenCart 2.x for Beginners
44
The Definitive Guide to Getting Started with OpenCart 2.x for Beginners
45
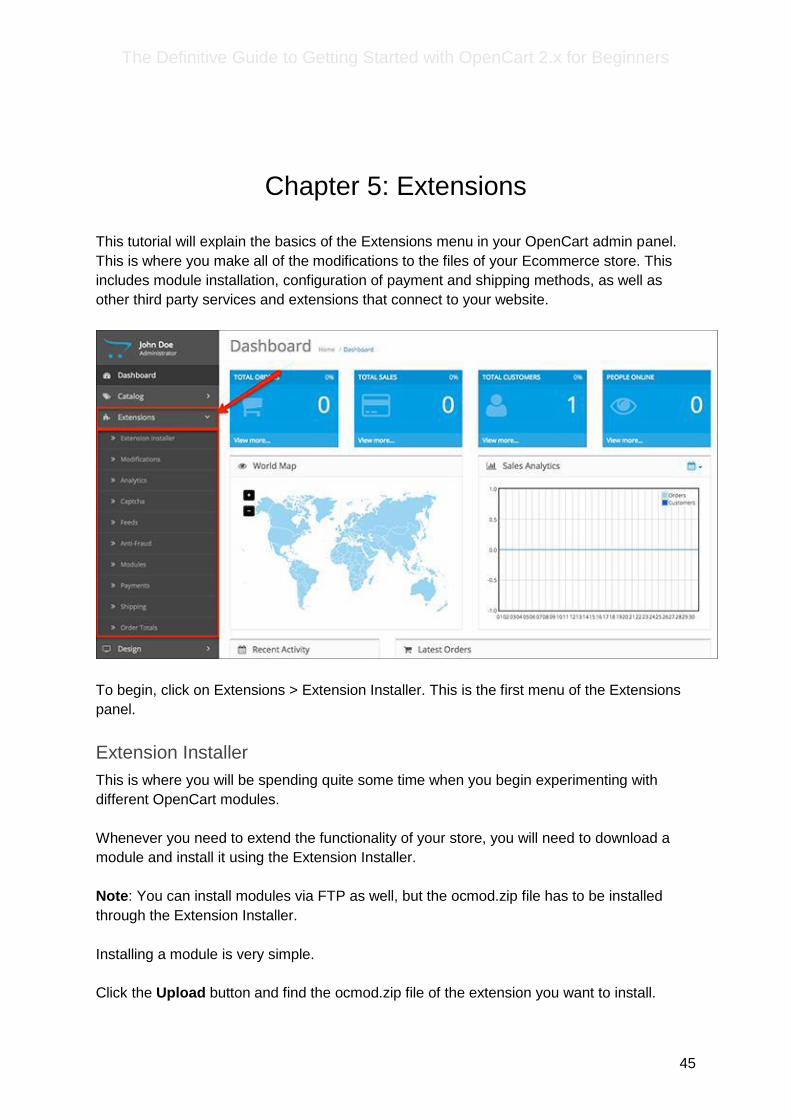
Chapter 5: Extensions
This tutorial will explain the basics of the Extensions menu in your OpenCart admin panel.
This is where you make all of the modifications to the files of your Ecommerce store. This
includes module installation, configuration of payment and shipping methods, as well as
other third party services and extensions that connect to your website.
To begin, click on Extensions > Extension Installer. This is the first menu of the Extensions
panel.
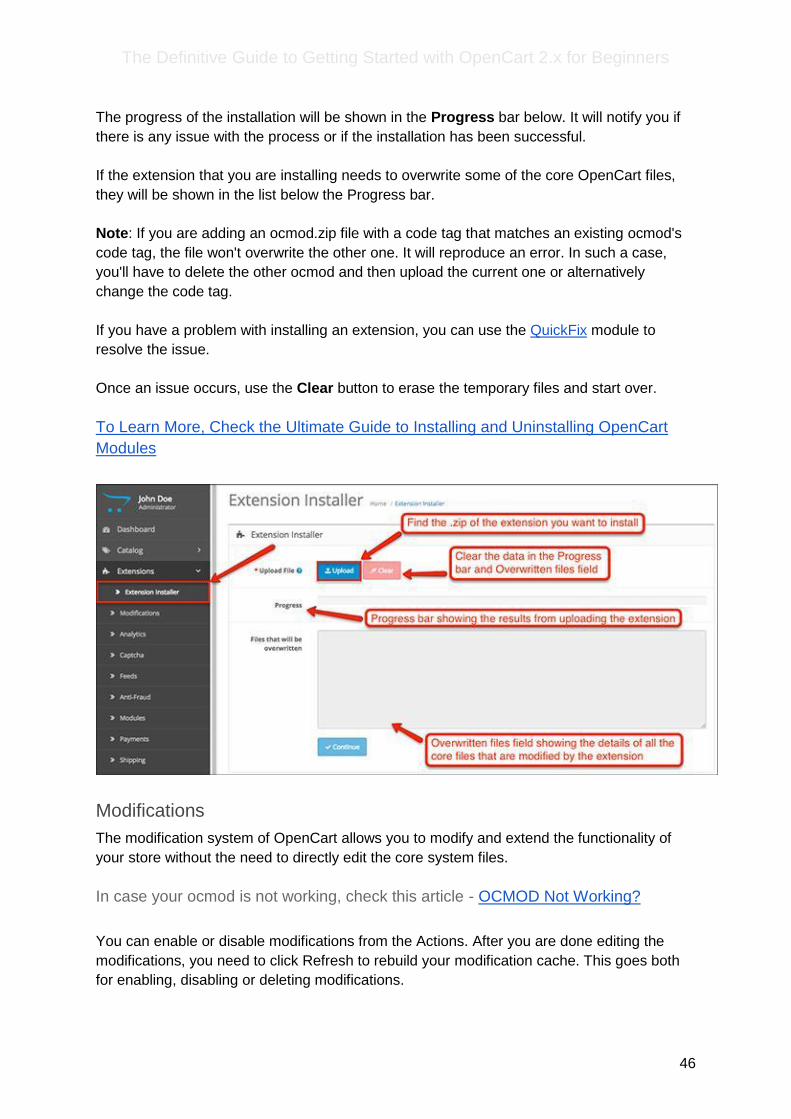
Extension Installer
This is where you will be spending quite some time when you begin experimenting with
different OpenCart modules.
Whenever you need to extend the functionality of your store, you will need to download a
module and install it using the Extension Installer.
Note: You can install modules via FTP as well, but the ocmod.zip file has to be installed
through the Extension Installer.
Installing a module is very simple.
Click the Upload button and find the ocmod.zip file of the extension you want to install.
The Definitive Guide to Getting Started with OpenCart 2.x for Beginners
46
The progress of the installation will be shown in the Progress bar below. It will notify you if
there is any issue with the process or if the installation has been successful.
If the extension that you are installing needs to overwrite some of the core OpenCart files,
they will be shown in the list below the Progress bar.
Note: If you are adding an ocmod.zip file with a code tag that matches an existing ocmod's
code tag, the file won't overwrite the other one. It will reproduce an error. In such a case,
you'll have to delete the other ocmod and then upload the current one or alternatively
change the code tag.
If you have a problem with installing an extension, you can use the QuickFix module to
resolve the issue.
Once an issue occurs, use the Clear button to erase the temporary files and start over.
To Learn More, Check the Ultimate Guide to Installing and Uninstalling OpenCart
Modules
Modifications
The modification system of OpenCart allows you to modify and extend the functionality of
your store without the need to directly edit the core system files.
In case your ocmod is not working, check this article - OCMOD Not Working?
You can enable or disable modifications from the Actions. After you are done editing the
modifications, you need to click Refresh to rebuild your modification cache. This goes both
for enabling, disabling or deleting modifications.

The Definitive Guide to Getting Started with OpenCart 2.x for Beginners
47
The Log in your Modifications shows which modifications have been applied, which have not
been applied, and which line has been modified.
The Definitive Guide to Getting Started with OpenCart 2.x for Beginners
48
To Learn More, Check the Ultimate Guide to the OpenCart 2.x Modification System
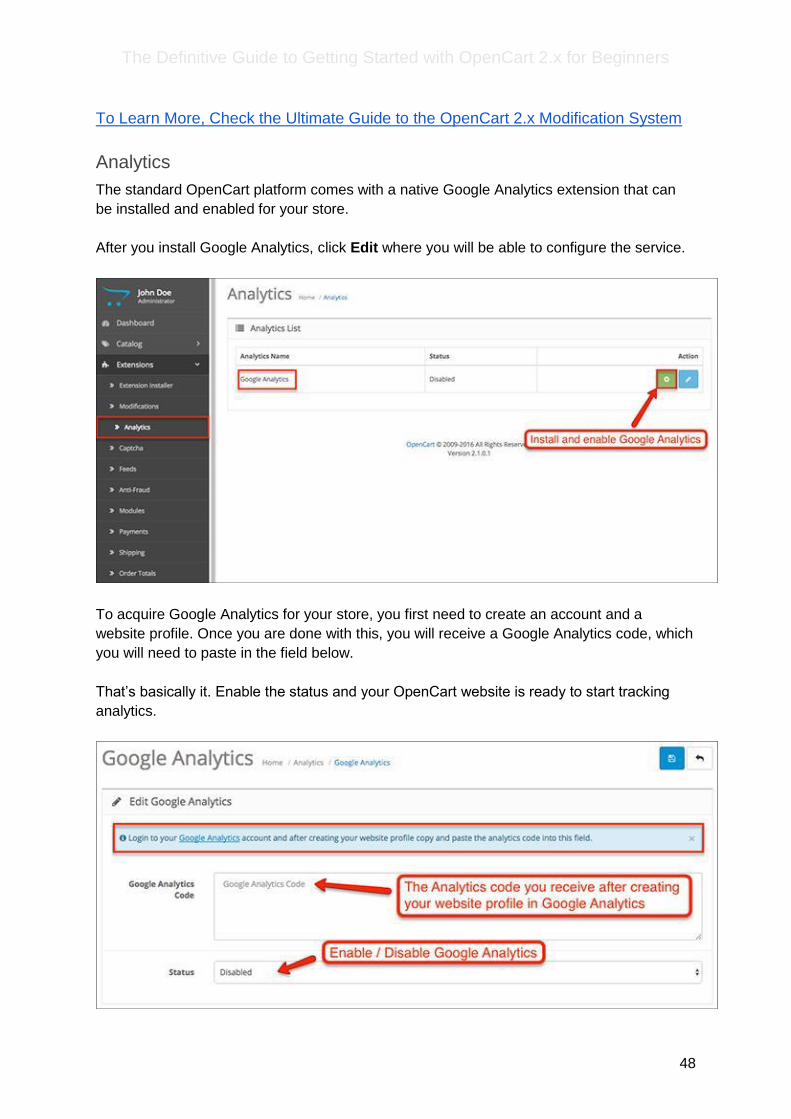
Analytics
The standard OpenCart platform comes with a native Google Analytics extension that can
be installed and enabled for your store.
After you install Google Analytics, click Edit where you will be able to configure the service.
To acquire Google Analytics for your store, you first need to create an account and a
website profile. Once you are done with this, you will receive a Google Analytics code, which
you will need to paste in the field below.
That’s basically it. Enable the status and your OpenCart website is ready to start tracking
analytics.

The Definitive Guide to Getting Started with OpenCart 2.x for Beginners
49
Captcha
Verifying that your visitors are real users and not bots is very important, especially for the
registration page. You have a two options with the native OpenCart installation - Basic
Captcha and Google reCAPTCHA.
Install the Captcha method you prefer and hit Edit to configure it.
To begin using the service, you will need to register your website again with the Google
reCAPTCHA page. There, you will find the site key and secret key that need to be pasted in
their respective fields.
Enable the status and your OpenCart store is Captcha protected.

The Definitive Guide to Getting Started with OpenCart 2.x for Beginners
50
Feeds
The Feeds extension allows you to customize the way your products are viewed and listed
by Google or other search engines. To begin using this feature, you have to compile a
product feed with items from your OpenCart store.
Google Base, Google Sitemap and OpenBay Pro are the three native tools you can use for
your product feeds. Google Base requires the user to upload product information in product
feeds so that they can show up in Google's search engine.
There are specifications that Google has issued for the product feed. They can be viewed in
Google's support FAQ.

The Definitive Guide to Getting Started with OpenCart 2.x for Beginners
51
Anti-Fraud
There are three fraud prevention services you can use with the standard OpenCart
installation.
FraudLabs Pro screens credit card transactions for online fraud. They detect possible
fraudulent orders and help online merchants keep their profits high by preventing false
chargebacks and other malicious attempts.
Anti-Fraud IP allows you to create a list of potentially threatening IP addresses that your
store will detect when users enter the website.
MaxMind is the second third party service you can use to protect your OpenCart shop. They
track, collect, and analyze the information about every user in your store and send back a
risk report.

The Definitive Guide to Getting Started with OpenCart 2.x for Beginners
52
Modules
The Module List is where all of your extensions are found. This is where you select which
modules to install or uninstall, as well as edit and configure.
Core Modules: Account, Affiliate, Banners, Bestsellers, Carousel, Category, Featured,
Google Hangouts, HTML Content, Information, Latest, Slideshow, Specials, Store.
Some OpenCart extensions are used to create additional modules that you can assign to the
different layouts in your store. For instance, the Slideshow extension is used to create
different versions of your slideshow that are listed as separate modules in the Module List.
Third party modules can be installed to alter, extend and improve the functionality of your
OpenCart store.

The Definitive Guide to Getting Started with OpenCart 2.x for Beginners
53
Payments
This is the list with all the payment methods you have available with the default OpenCart
system. You can install, enable and configure them to your preference so that your
customers have multiple options to submit payments.
If you want to install additional payment methods, you can do that by adding them as
extensions from the Extension Installer.

The Definitive Guide to Getting Started with OpenCart 2.x for Beginners
54
Shipping
The default shipping methods you have in OpenCart are listed here. Just like the payment
methods, you can install, enable and configure them however you want. It’s better to have
multiple shipping methods so different customers can use the ones they prefer the most.
Adding new shipping methods is done by installing a new extension with the Extension
Installer.
Order Totals
The Order Totals are extensions that you can use for adding extra fees to the total sum of an
order in your store's shopping cart. Aside from fees, you can also add Coupons and Reward
Points if you have configured them prior to that. To form the final order total, the shipping
and payment method costs are also added to it.

The Definitive Guide to Getting Started with OpenCart 2.x for Beginners
55
The Definitive Guide to Getting Started with OpenCart 2.x for Beginners
56
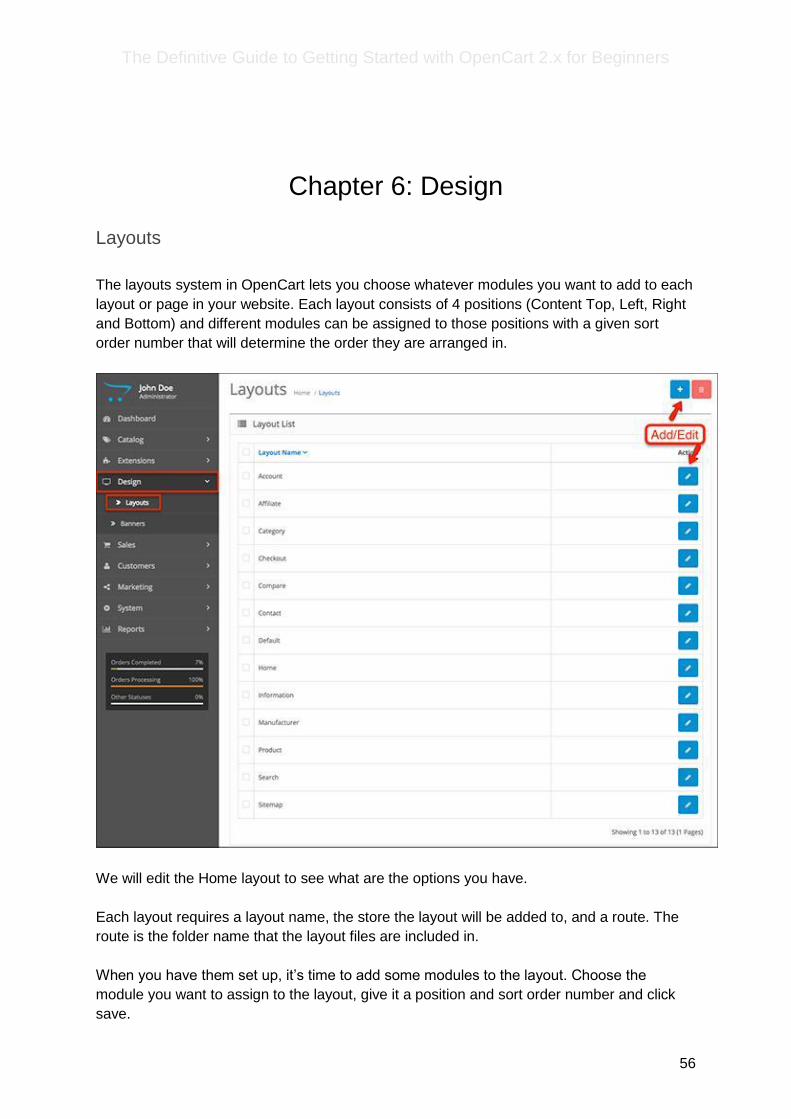
Chapter 6: Design
Layouts
The layouts system in OpenCart lets you choose whatever modules you want to add to each
layout or page in your website. Each layout consists of 4 positions (Content Top, Left, Right
and Bottom) and different modules can be assigned to those positions with a given sort
order number that will determine the order they are arranged in.
We will edit the Home layout to see what are the options you have.
Each layout requires a layout name, the store the layout will be added to, and a route. The
route is the folder name that the layout files are included in.
When you have them set up, it’s time to add some modules to the layout. Choose the
module you want to assign to the layout, give it a position and sort order number and click
save.

The Definitive Guide to Getting Started with OpenCart 2.x for Beginners
57
Banners
The banners in OpenCart are images you can use to link to other pages. These images can
be customized to catch the user’s eye and lead them to certain product pages to increase
conversions.
The banners menu in the admin panel lets you create new banners and modify their image
dimensions as well as their titles and links.
The Definitive Guide to Getting Started with OpenCart 2.x for Beginners
58
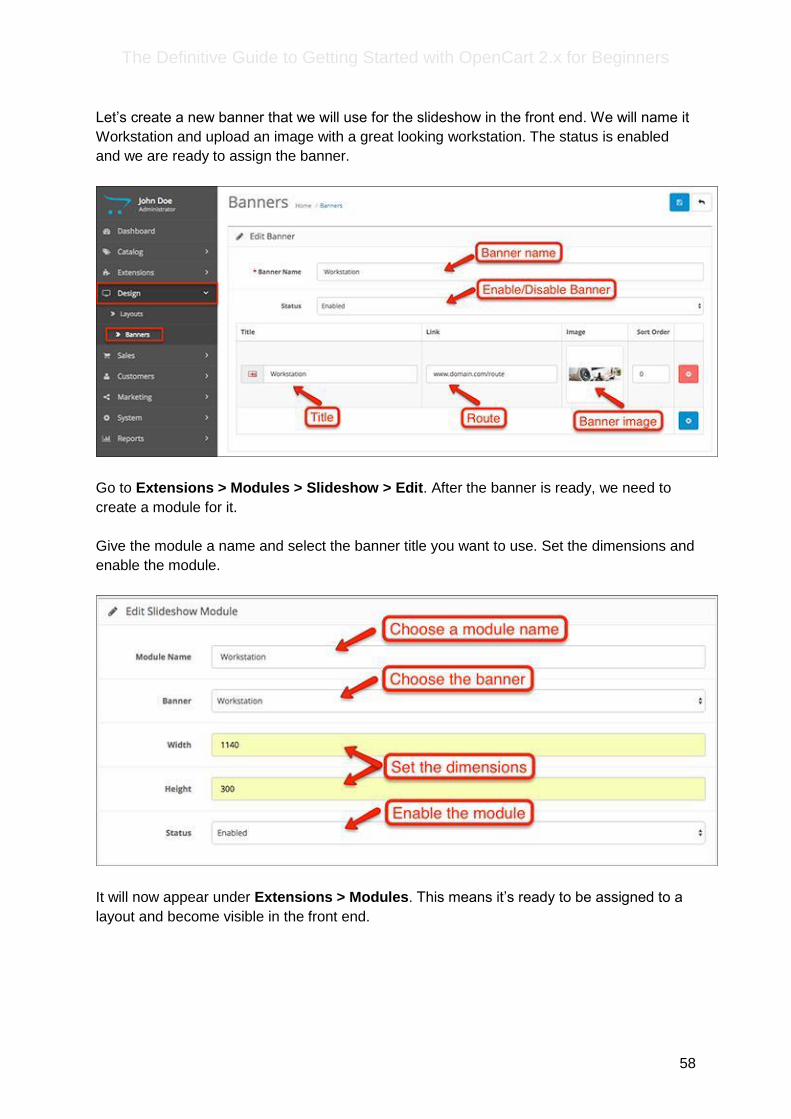
Let’s create a new banner that we will use for the slideshow in the front end. We will name it
Workstation and upload an image with a great looking workstation. The status is enabled
and we are ready to assign the banner.
Go to Extensions > Modules > Slideshow > Edit. After the banner is ready, we need to
create a module for it.
Give the module a name and select the banner title you want to use. Set the dimensions and
enable the module.
It will now appear under Extensions > Modules. This means it’s ready to be assigned to a
layout and become visible in the front end.

The Definitive Guide to Getting Started with OpenCart 2.x for Beginners
59
This is how our brand new slideshow image looks like in our demo OpenCart store.

The Definitive Guide to Getting Started with OpenCart 2.x for Beginners
60
Chapter 7: Sales
As a store admin, one of sections that you’ll be visiting a lot in the OpenCart admin panel is
the Sales.
The Sales section is the 5th one in the default OpenCart admin menu and is situated after
Design and before Customers. The Sales section is the place where you manage your
orders, product returns and other sales-related features of your webstore.
The default Sales section has a total of five submenus and in the following tutorial we will go
through them.
Orders
The first submenu is the Orders one and it’s the most important one in the section. From
here you can manage your orders: view, edit or delete theme, add new ones, print order
invoices, shipping lists, etc.
Order Listing Page

The Definitive Guide to Getting Started with OpenCart 2.x for Beginners
61
Order Listing
Once you open the Sales page, you will see a listing of all orders in your store. The listing
contains some information about each order such as:
● Order ID: The Order ID is the unique number of each order in your webstore.
● Customer: The name of the customer that has made the order.
● Status: The order status. For more information, please check the Order Status
section below.
● Total: The total amount of the order.
● Date Added: The date on which the order was added.
● Date modified: The date on which the order was last modified.
● Actions: View the order, Edit the order and Delete the order.
All of these columns except for the Action one are clickable and the listing can be sorted by
them.

The Definitive Guide to Getting Started with OpenCart 2.x for Beginners
62
Order Listing Filters
Additionally, there are filters at the top of the listing, which help you easily find the orders
that you are looking for:
Additional Order Buttons
There are three more buttons at the top right of the page. The first two are inactive if none of
the orders are selected. If you select at least one order by clicking the checkbox in front of it,
the two buttons will become active.
The first button with the truck icon is used for printing shipping lists. Once you click on it, a
dispatch note will show up with the order information, which can be printed later on.
The second button with the printing machine icon is for invoices. Once you click on it, an
order invoice will be generated.
The third icon is for creating a new order. The view of the new order is similar to the edit
order page, but with the difference that all input fields are empty.
Now let’s see what happens once we click on the order View action button…
Order View Page
The Order View Page contains a detailed information about each order.
Since there are differences in the layout of the order view page in OpenCart 2.0.x and
OpenCart > 2.0.x, we’ll go through both of them.

The Definitive Guide to Getting Started with OpenCart 2.x for Beginners
63
OpenCart 2.0.x
If you are using OpenCart 2.0.x you will see a page with a few tabs.
Order Details
The order details tab is where we see the general details of each order.
Most of the details are quite clear and descriptive so we won’t go through each of them.
What is important to note here is that OpenCart doesn’t automatically generate invoice
numbers and if you would like to generate one for a specific order, you’ll need to come to
this page and click on the green Generate button. Once you click on it, an order invoice
number will be generated and later on added to the invoice.

The Definitive Guide to Getting Started with OpenCart 2.x for Beginners
64
Also, if the order has reward points, you can add them by clicking on the Add Reward Points
Button or remove them if you have already added them.
Payment Details
The payment details tab contains information about the payment.
In this tab you can check what the billing address of the customer’s order, the payment
method, etc.
Shipping Details
The shipping details tab is pretty similar to the payment details one with the difference that
we can see the Shipping address here as well as the Shipping method.
Products
In the product tab we can see the product ordered together with the selected options,
product model, ordered quantity, prices and order totals.

The Definitive Guide to Getting Started with OpenCart 2.x for Beginners
65
History
Every time the order status is changed, it is saved in the order history, which can be seen in
the following tab.
From here we can check when and how the order status was changed. Furthermore, we can
add order history. If we check the Notify Customer checkbox, the customer will receive an
email with the changed order and the added comments if any.
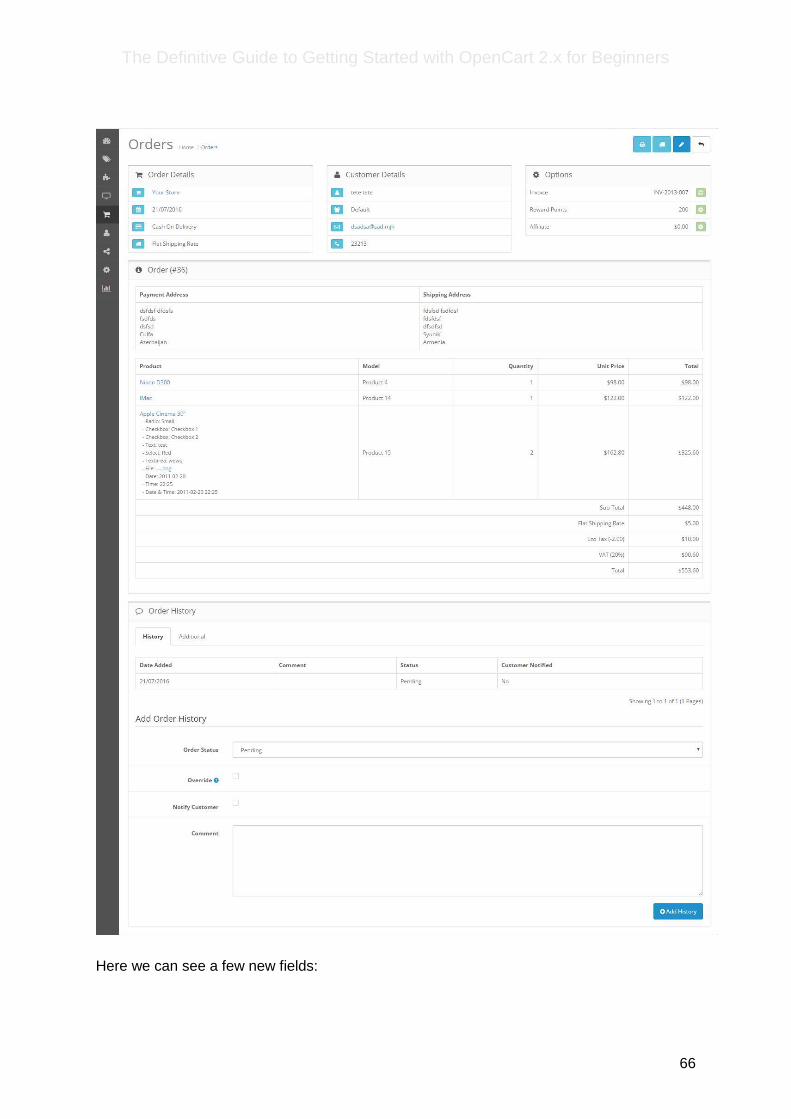
OpenCart > 2.0.x
If you are using OpenCart > 2.0.x, the order view page will be one page containing all of the
already mentioned sections, but with slightly different design.
The Definitive Guide to Getting Started with OpenCart 2.x for Beginners
66
Here we can see a few new fields:

The Definitive Guide to Getting Started with OpenCart 2.x for Beginners
67
Affiliate: In the options container we can see an affiliate field. If the order has generated any
affiliate profit, you can add it to the affiliate’s balance by pressing the plus icon.
Override: In the order history we have a new checkbox Override. If checked, you’ll be able
to override the order’s status in case it has been blocked from status changing by an anti-
fraud extension.
Order Edit Page
It the order edit page, we can edit all of the details that we have already seen in the order
view page. The order edit page is divided in a couple of tabs, each of them enabling us to
modify different order details. It is important to note here that we cannot click on the tabs,
but we can move to the next or the previous one only by clicking on the “Continue” or “Back”
buttons respectively, located at the bottom of each tab.
The first tab would be Customer Details. Here we have all of the information about the
customer: name, email, phone, etc.
The second one would be Products. Here we can change the quantity of the ordered
products, add or delete product, etc.
In the third tab, the payment details tab, we can edit the payment details of the order.
The shipping details tab is pretty similar to the payment details one. Here we can edit the
shipping information.
In the last tab, the totals tab, we can see all of the ordered products in a listing, but here we
cannot edit them. In this tab we can edit the shipping method, the payment method, apply
coupons, vouchers, reward points, etc. Here, you can also change the status of the order.
Order Statuses
The default OpenCart comes with a couple of pre-defined order statuses. These are:
● Canceled
● Canceled reversal
● Chargeback
● Complete
● Denied
● Expired
● Failed
● Pending
● Processed
● Processing
● Refunded
● Reversed
● Shipped
The Definitive Guide to Getting Started with OpenCart 2.x for Beginners
68
● Voided
You can add custom order statuses as well once you go to System > Localisation > Order
Statuses. On this, however, you will learn more in our next tutorial that will go through the
System Section. For now it’s enough to know that OpenCart has both pre-defined order
statuses and an option for adding custom ones.
You can set a default order status (in the default OC installation this would be ‘Pending’),
which will be the one used for new orders. It is also important to note that some payment
methods come with an option for setting an order status. This means that all orders that
have used this payment method will be set to the respective order status. For more
information you can check the Tutorial for the extension section > Payments.
Recurring Orders
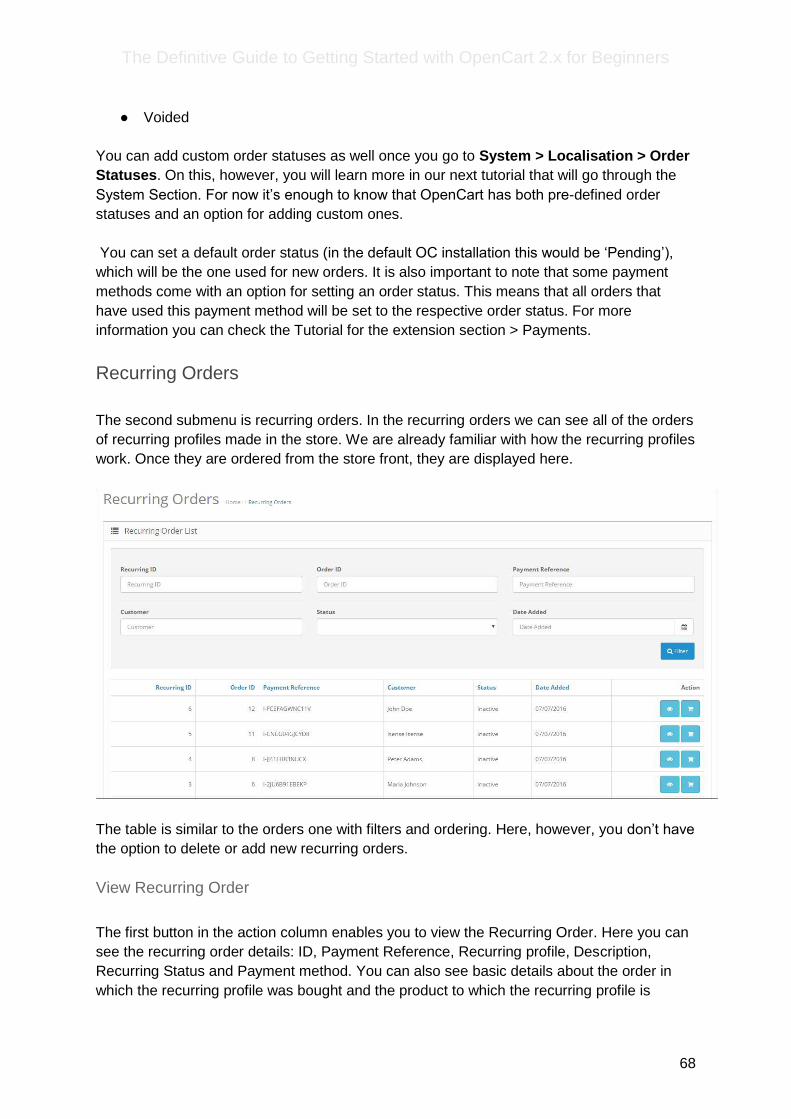
The second submenu is recurring orders. In the recurring orders we can see all of the orders
of recurring profiles made in the store. We are already familiar with how the recurring profiles
work. Once they are ordered from the store front, they are displayed here.
The table is similar to the orders one with filters and ordering. Here, however, you don’t have
the option to delete or add new recurring orders.
View Recurring Order
The first button in the action column enables you to view the Recurring Order. Here you can
see the recurring order details: ID, Payment Reference, Recurring profile, Description,
Recurring Status and Payment method. You can also see basic details about the order in
which the recurring profile was bought and the product to which the recurring profile is

The Definitive Guide to Getting Started with OpenCart 2.x for Beginners
69
assigned. Additionally, you can see a history of the transactions associated to this recurring
order.
A blue button saying Cancel Recurring Payments enables you to cancel the recurring
payment associated with this recurring order.
View Order
The other blue button under the action column enables you to view the order in which the
recurring order was made. The page that opens up is the order view page.
Returns
The third submenu of the Sales section is Returns. OpenCart enables your customers to ask
for a return of the products they have bought from you. Here you can manage these return
requests.
Once you open the tab you will see a listing of all product returns requests.

The Definitive Guide to Getting Started with OpenCart 2.x for Beginners
70
The listing is similar to the one of the orders table. Here, we have one more field, Order ID,
which shows for which order is the requested return. Similarly to the Sales page, we have
sorting and filtering. At the top of the page we have two buttons: we can add a new return
request, or delete an existing one.
Return Edit Page
Once we click on the edit button on a certain return page Return edit page has two tabs and
first we would see the general tab. It gives us information about the order and a reason for
return.
OpenCart comes with a few predefined return reasons. You can manage them by going to
System > Localisation > Returns > Return Reasons. Additionally, you can manage the return
statuses from to System > Localisation > Returns > Return Statuses and the return actions
from System > Localisation > Returns > Return Actions. For more information, you can
check the Returns section in the Sales tutorial.
In the History tab, similarly to the order history tab, you can change the Return status and
add comments. If you check the Notify Customer checkbox, an email will be sent to the
customer including the comments and the changed status. In the history listing, you can see
how and when the return has been modified.
Gift Vouchers
The fourth submenu in the Sales section is the Gift Vouchers.
The gift vouchers functionality in OpenCart enables your customer to buy gift vouchers and
send them to other customers. The given gift vouchers can be later on used in your store by
adding the code from the voucher. The voucher amount will be deducted from the order
The Definitive Guide to Getting Started with OpenCart 2.x for Beginners
71
total. The gift vouchers are specific for the customer they are given to and they can be used
only one time.
Gift Voucher Listing
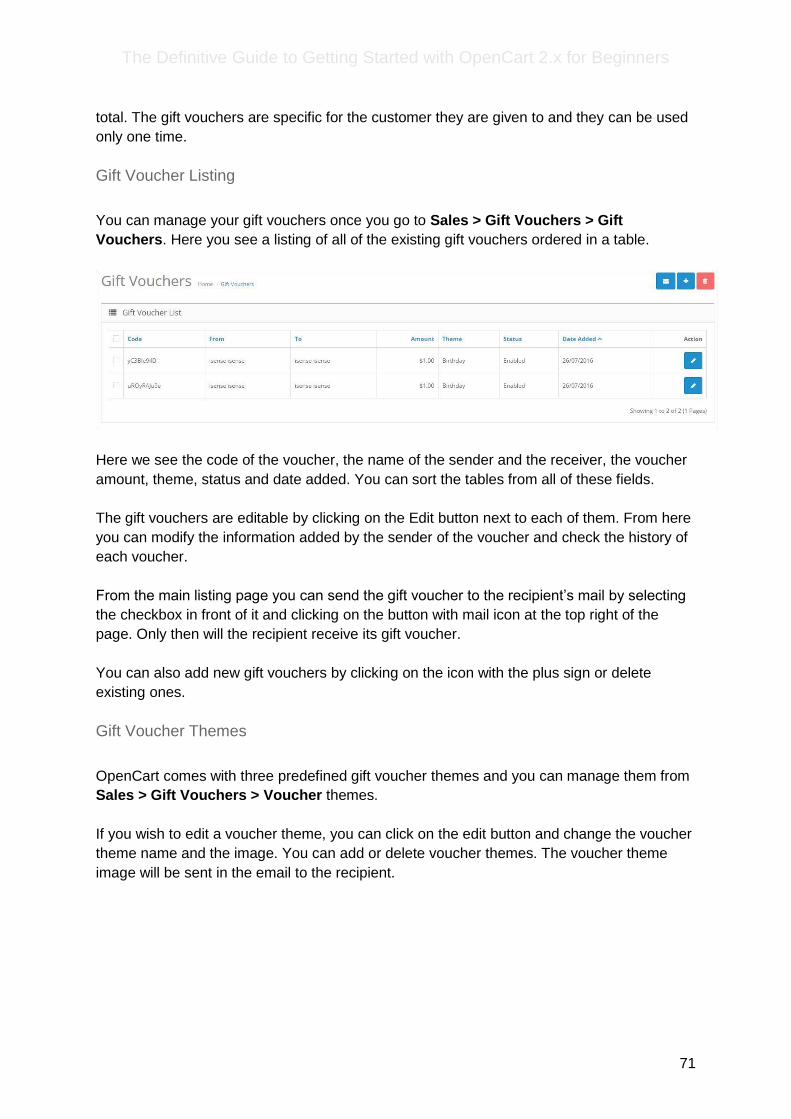
You can manage your gift vouchers once you go to Sales > Gift Vouchers > Gift
Vouchers. Here you see a listing of all of the existing gift vouchers ordered in a table.
Here we see the code of the voucher, the name of the sender and the receiver, the voucher
amount, theme, status and date added. You can sort the tables from all of these fields.
The gift vouchers are editable by clicking on the Edit button next to each of them. From here
you can modify the information added by the sender of the voucher and check the history of
each voucher.
From the main listing page you can send the gift voucher to the recipient’s mail by selecting
the checkbox in front of it and clicking on the button with mail icon at the top right of the
page. Only then will the recipient receive its gift voucher.
You can also add new gift vouchers by clicking on the icon with the plus sign or delete
existing ones.
Gift Voucher Themes
OpenCart comes with three predefined gift voucher themes and you can manage them from
Sales > Gift Vouchers > Voucher themes.
If you wish to edit a voucher theme, you can click on the edit button and change the voucher
theme name and the image. You can add or delete voucher themes. The voucher theme
image will be sent in the email to the recipient.

The Definitive Guide to Getting Started with OpenCart 2.x for Beginners
72
Gift Voucher Purchase
Your customers can buy a gift voucher from your store by going to Extras > Gift Voucher. In
the default OpenCart theme, this is located in the footer.
The customer need to fill in all of the needed information and to agree that the gift vouchers
are non-refundable. The Gift Certificate themes are the ones predefined from the admin.
After pressing the Continue button, the gift voucher is added to the cart as a normal product.
The price is the amount of the gift voucher set by the customer.
PayPal
The Definitive Guide to Getting Started with OpenCart 2.x for Beginners
73
The last submenu is PayPal. From here you can search all of the transactions made to your
PayPal account. It is important to note here that the PayPal search will work only if the
PayPal Express Checkout account is set.
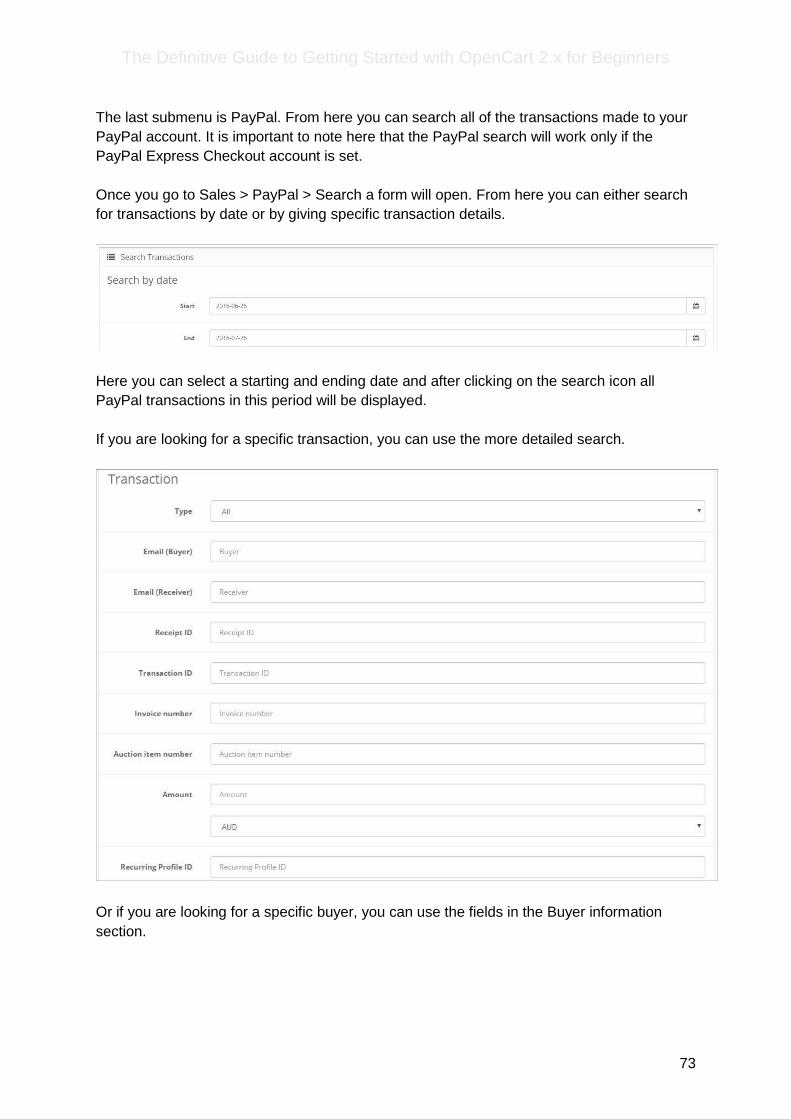
Once you go to Sales > PayPal > Search a form will open. From here you can either search
for transactions by date or by giving specific transaction details.
Here you can select a starting and ending date and after clicking on the search icon all
PayPal transactions in this period will be displayed.
If you are looking for a specific transaction, you can use the more detailed search.
Or if you are looking for a specific buyer, you can use the fields in the Buyer information
section.

The Definitive Guide to Getting Started with OpenCart 2.x for Beginners
74

The Definitive Guide to Getting Started with OpenCart 2.x for Beginners
75
Chapter 8: Customers
This tutorial will shed light on how to manage the customers that visit your store, separate
them by groups and create custom fields to require non-default OpenCart customer
information (e.g. Birthday date).
First, we will take a look at the place you will use to manage your customers.
Customers
This is how an example of the customers table looks like.

The Definitive Guide to Getting Started with OpenCart 2.x for Beginners
76
It is pretty straightforward when it comes to its columns. You have the customer’s name, e-
mail, customer group (which we will discuss in a bit), status (Enabled or Disabled), IP and
the date of registration/addition.
The last column is by the name of ‘Action’ and has 4 buttons in it. The green one is for
approving the customer (if customer approval is set in the store). By default, the account of a
new customer will not work until you approve it from this admin panel menu. The second
(light blue) one is used for logging into your own store as the particular customer. The third
(orange) one is to unlock users that have locked their accounts by too many (a number set
from System > Settings. Check the chapter on that) unsuccessful login attempts. The last
(blue) action is probably the one you will use the most. It allows you to edit the respective
customer’s information.
Up above the table, there is a filtering form, which can be used for finding particular
customer/s.
There are two buttons on the very top of the page. An ‘Add New’ button, which you can use
to add a customer by manually filling all of their details and a ‘Delete’ button which can be
used to delete the customers, whose boxes are checked in the table.
Customer Groups

The Definitive Guide to Getting Started with OpenCart 2.x for Beginners
77
The customer groups are a really useful OpenCart feature. It will allow you to separate the
customers of your website in groups and give them different privileges, set different product
prices for each, etc.
To create a customer group, click on the blue ‘Add New’ button on the top right. You will be
redirected to a simple form requiring you to choose a name, description and set whether
customers from this group will have to be approved by an administrator before they are able
to login. The ‘Sort Order’ field is to help adjust the order in which customer groups are listed
in the table. Deletion of customer groups happens the same way deletion of customers
does.
Custom Fields

The Definitive Guide to Getting Started with OpenCart 2.x for Beginners
78
The custom fields in OpenCart allow you to create additional customer information fields,
which may concern the customer’s account (birthdate, company name, etc.) or address
(specify a block, entrance, etc.) data.
To create a new custom field, repeat the drill of clicking on the ‘Add New’ button on the top
right. The form which you will be redirected to looks like this:
The first field is for choosing the custom field’s label (e.g. Date of Birth).
The second field is a dropdown determining the location of the field. You would choose
‘Address’ if you would like the field to be for information relevant to the customer’s address

The Definitive Guide to Getting Started with OpenCart 2.x for Beginners
79
and ‘Account’ for anything else. Needless to say, from the customer’s point of view, the field
will be located respective to the location you choose.
The third field is the type. It may be anything from a select (dropdown menu) to a file.
The fourth field is for chosing the customer groups you would like to use the custom field for.
All the customer groups in your store are listed here. Check the ones you wish the field to
apply for.
The next field allows you to make the field required. Thus, obliging your customers to
provide the information the field will be for.
The sixth field is nothing more than an on/off switch. Choose between ‘Enabled’ and
‘Disabled’ to toggle it.
The ‘Sort Order’ field is to adjust the exact position the custom field will have. You can enter
values with minus to count backwards from the last field in the default set.
If you have chosen ‘Select’, ‘Radio’ or ‘Checkbox’ for the field’s type, you should have a
table beneath all options. There, you will list the field’s values. To add a row, use the blue ‘+’
button. Add as many values as you wish and give them names and sort order (optional).
If you have chosen any of the others, you will have 2 additional fields between the ‘Type’
and ‘Customer Groups’ fields. The first one is to set a default value for the custom field and
the second one is to validate it. Validation can be done by using regular expressions and
requires some basic regex/development knowledge.
The Definitive Guide to Getting Started with OpenCart 2.x for Beginners
80
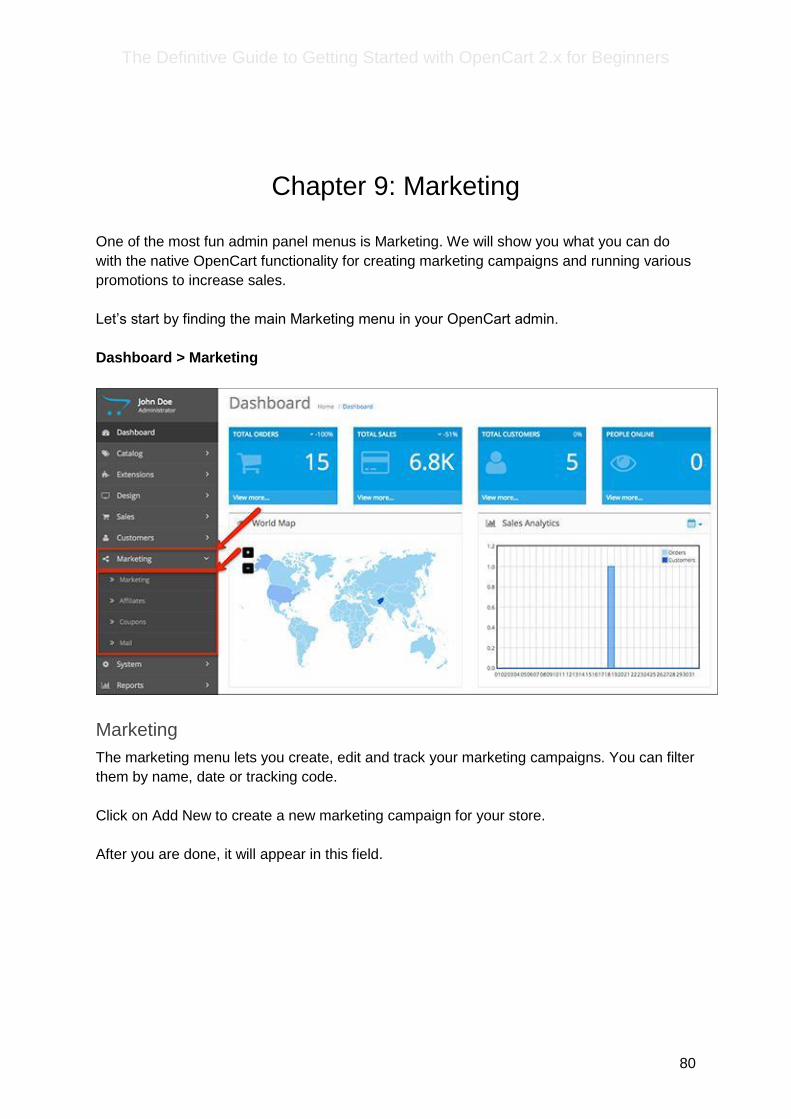
Chapter 9: Marketing
One of the most fun admin panel menus is Marketing. We will show you what you can do
with the native OpenCart functionality for creating marketing campaigns and running various
promotions to increase sales.
Let’s start by finding the main Marketing menu in your OpenCart admin.
Dashboard > Marketing
Marketing
The marketing menu lets you create, edit and track your marketing campaigns. You can filter
them by name, date or tracking code.
Click on Add New to create a new marketing campaign for your store.
After you are done, it will appear in this field.

The Definitive Guide to Getting Started with OpenCart 2.x for Beginners
81
New Marketing Campaign
The campaign creation field is not complicated at all. All you need to do is add a campaign
name and description.
The tracking code is used to track all the activity generated from your campaign.
This code is put at the end of the link that leads to your website.
Affiliates
The affiliate system in OpenCart lets you add affiliate accounts for people you want to help
you generate more sales and traffic. Each affiliate has their own tracking code, just like the
marketing campaigns.

The Definitive Guide to Getting Started with OpenCart 2.x for Beginners
82
This tracking code is used to track the traffic that the affiliate has lead to your website.
The Affiliates field lets you filter affiliates by name, status, date, email and whether the
affiliate has been approved.
New Affiliate
This is the menu for creating a new affiliate account manually.
It’s similar to the one for creating a new customer - you have to fill out personal information
and address, but there are some additions that make things a bit different.
Tracking Code - this is how the referrals that your affiliates generate will be tracked.

The Definitive Guide to Getting Started with OpenCart 2.x for Beginners
83
The second part of the affiliate creation field is where the business details (Company and
website) are added, accompanied by physical address.

The Definitive Guide to Getting Started with OpenCart 2.x for Beginners
84
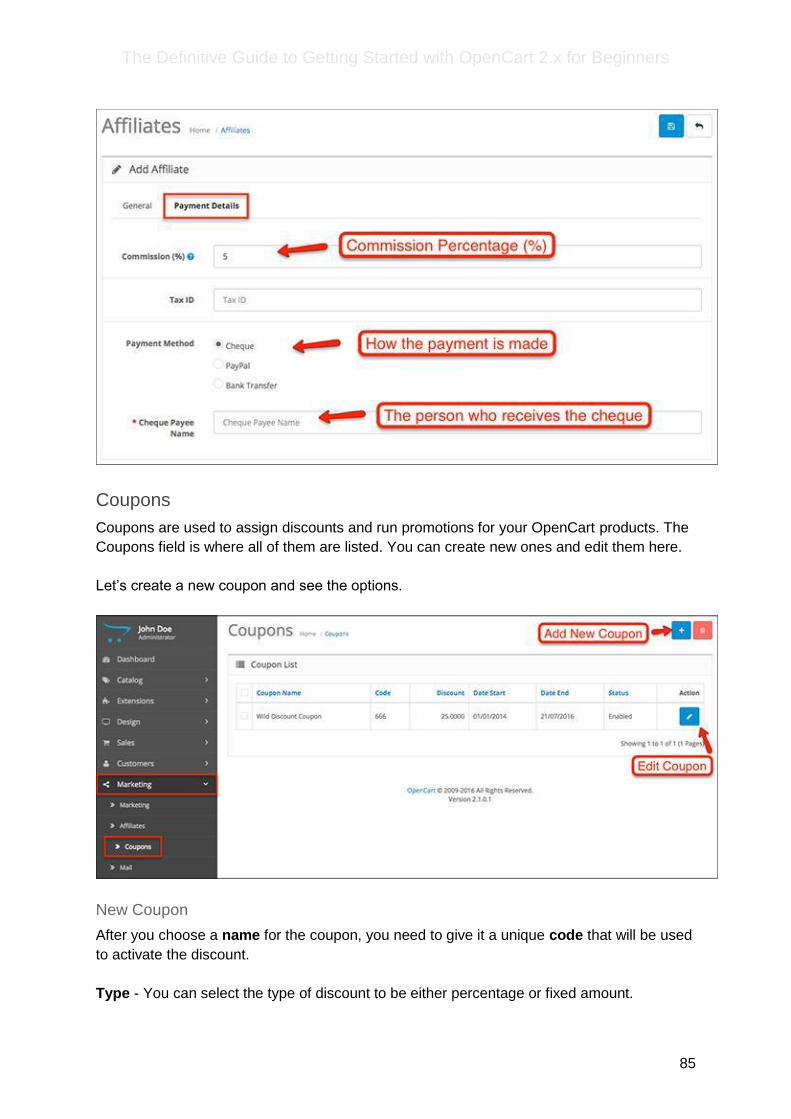
Payment Details
This is the second tab of the affiliate creation menu, where the important stuff happens.
Commission (%) - This is the amount that the affiliate will receive for each purchase made
from their link. It’s up to you to determine how much of the total will go to the affiliate.
Tax ID - Tax Identification Number.
Payment Method - Choose the payment method that you will use to pay your affiliates.
Cheque Payee Name - The name of the cheque recipient.
The Definitive Guide to Getting Started with OpenCart 2.x for Beginners
85
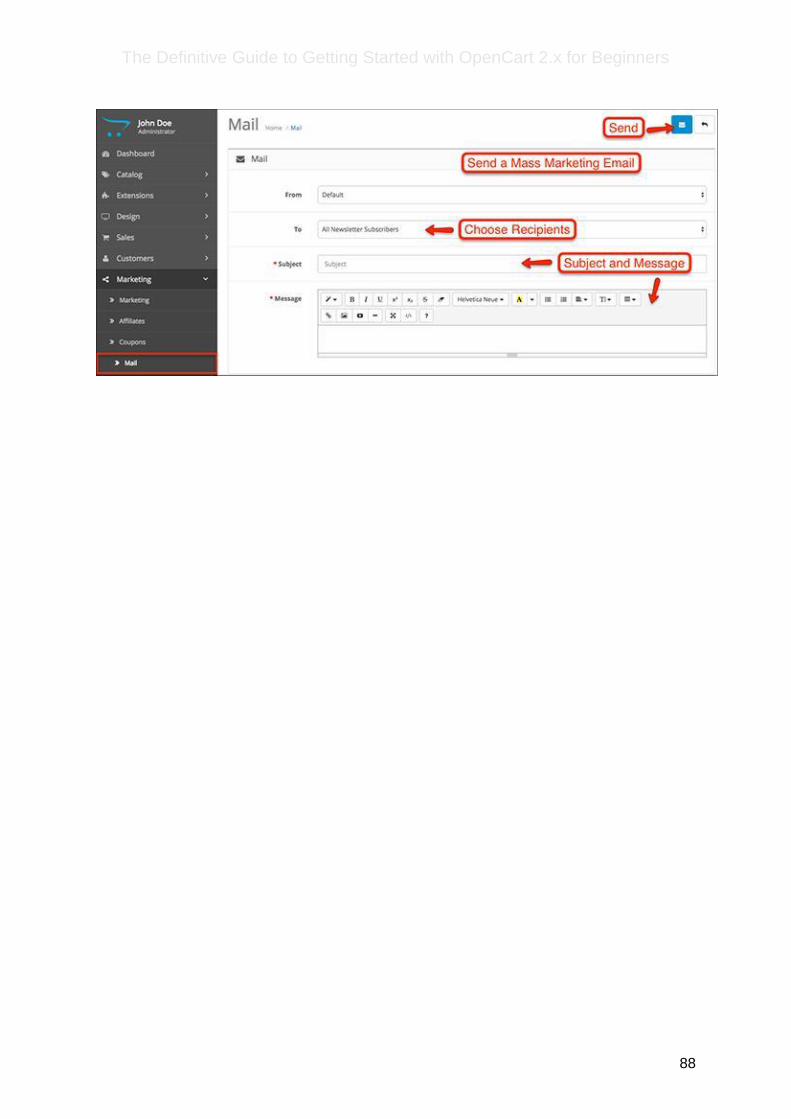
Coupons
Coupons are used to assign discounts and run promotions for your OpenCart products. The
Coupons field is where all of them are listed. You can create new ones and edit them here.
Let’s create a new coupon and see the options.
New Coupon
After you choose a name for the coupon, you need to give it a unique code that will be used
to activate the discount.
Type - You can select the type of discount to be either percentage or fixed amount.

The Definitive Guide to Getting Started with OpenCart 2.x for Beginners
86
Discount - The amount of the discount is input in the Discount field.
Total Amount - Input the total amount that must be reached for the coupon to be valid.
Customer Login - Set whether the customer needs to be logged in to use the coupon.
Free Shipping - Enable or disable free shipping.
Products - Add the products that the discount will be enabled for.
Category - You can assign entire categories that the discount will be enabled for.
Date Start / End - Set a time period for the validity of the coupon.
Uses Per Coupon - Set the number of uses the coupon should be limited to.

The Definitive Guide to Getting Started with OpenCart 2.x for Beginners
87
Uses Per Customer - Set the number of uses the customer should be limited to.
Status - Enable or disable the coupon.
The mail menu is used to contact your customers and send them your marketing campaigns
and messages.
You can use the field to create a mass email to multiple recipients:
To - All Newsletter Subscribers, All Customers, Customer Group, Customers, All Affiliates,
Affiliates
Subject - The title of your mass mail.
Message - write the message you want to send to your recipients using the rich text editor.
The Definitive Guide to Getting Started with OpenCart 2.x for Beginners
88

The Definitive Guide to Getting Started with OpenCart 2.x for Beginners
89
Chapter 10: System
You will see a default store, which is called Your Store. Click on the Edit button to modify
the current store, or delete it and create a new store from the Add New button above.
Settings
General
The first tab of the settings is relatively simple. These are just the basics:
● Meta Title - Add your store name so it appears in the browser tabs of your
customers when they open your website.
● Meta Tag Description - Every result that comes up in the Google search has a
snippet with a short description. This is the field where you can enter this description
- remember that the ideal length is about 160 characters.
● Meta Tag Keywords - This field is not mandatory as the Google algorithm no longer
adds the value of meta tag keywords to the search results. However, you can just
add a few keywords that are related to your industry.
● Theme - If you download and install a theme for your OpenCart website, you can
choose which theme to activate from this setting.
● Default Layout - Select a layout that will remain as a default one.

The Definitive Guide to Getting Started with OpenCart 2.x for Beginners
90
Store
● Store Name - Type the name of your store.
● Store Owner - Type your personal name.
● Address - Input the physical address of your store.
● Geocode - Type the geocode of the area where your store is located.
● E-Mail - Input your admin email address.
● Telephone - Type your phone number.

The Definitive Guide to Getting Started with OpenCart 2.x for Beginners
91
● Fax - Fax.
● Image - Upload the store logo image you want to appear on your Contact Us page.
● Opening Times - List the opening hours of your online store.
● Comment - Add any comments or important notes you want to leave for customers.
For example, “Store does not accept checks.”

The Definitive Guide to Getting Started with OpenCart 2.x for Beginners
92
Local
● Country - Choose the country where your store is located.
● Region / State - Choose your region or state.
● Language - Choose the main language for your OpenCart store.
● Administration Language - Choose the language for your administration panel.
● Currency - Select the main currency you want to use for transactions in your store.
● Auto Update Currency - Enable or disable to update the conversion rate between
currencies each day.
● Length Class - The metric unit for length class.
● Weight Class - The metric unit for weight class.

The Definitive Guide to Getting Started with OpenCart 2.x for Beginners
93
Option
Product and Category Options
● Category Product Count - Enabling this option will display how many items are
available in each product category.
● Default Items Per Page (Admin) - Define the item count for how many products will
be displayed in the admin panel.
Review Options
● Allow Reviews - Product reviews can be enabled or disabled from this setting.
Choose whether you want your customers to be able to submit reviews for your
products.
● Allow Guest Reviews - If product reviews are allowed, you can adjust this additional
setting for reviews from guest users who do not have an account in your store.
● New Review Alert Mail - Select whether you want to receive a notification email
whenever a new product review is submitted in your store.
Voucher Options
The Definitive Guide to Getting Started with OpenCart 2.x for Beginners
94
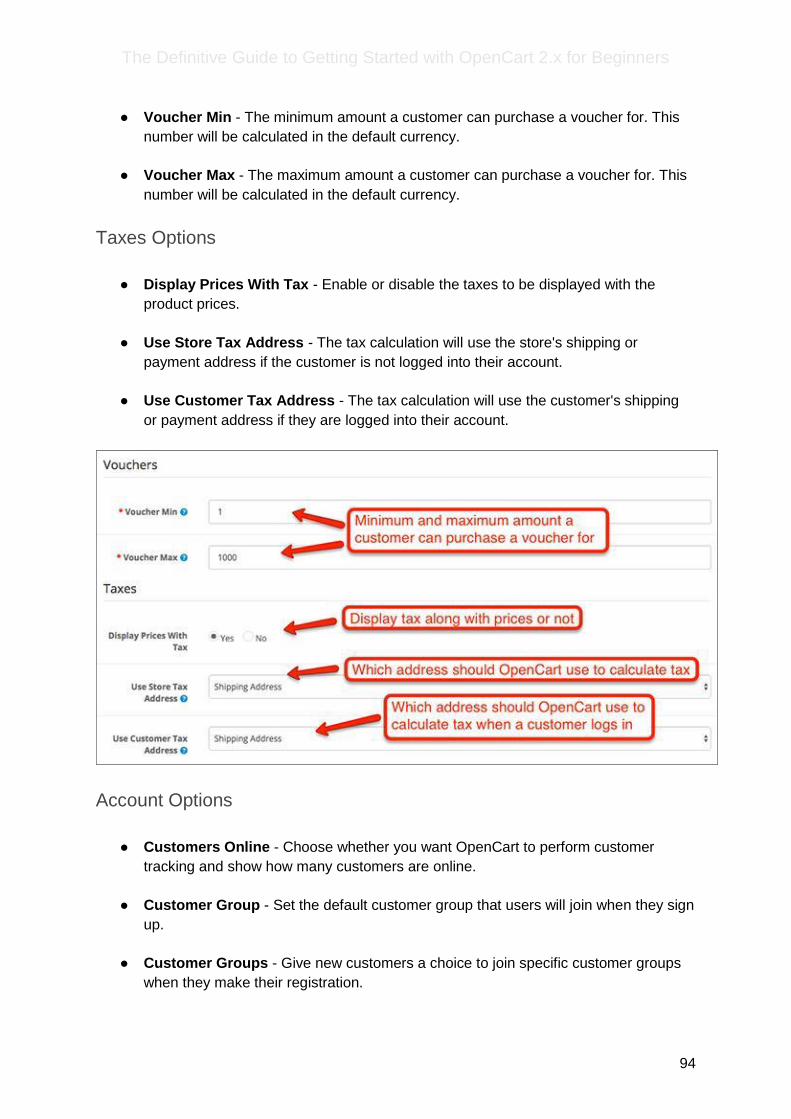
● Voucher Min - The minimum amount a customer can purchase a voucher for. This
number will be calculated in the default currency.
● Voucher Max - The maximum amount a customer can purchase a voucher for. This
number will be calculated in the default currency.
Taxes Options
● Display Prices With Tax - Enable or disable the taxes to be displayed with the
product prices.
● Use Store Tax Address - The tax calculation will use the store's shipping or
payment address if the customer is not logged into their account.
● Use Customer Tax Address - The tax calculation will use the customer's shipping
or payment address if they are logged into their account.
Account Options
● Customers Online - Choose whether you want OpenCart to perform customer
tracking and show how many customers are online.
● Customer Group - Set the default customer group that users will join when they sign
up.
● Customer Groups - Give new customers a choice to join specific customer groups
when they make their registration.

The Definitive Guide to Getting Started with OpenCart 2.x for Beginners
95
● Login Display Prices - Choose whether you want to show prices to users who are
not logged in.
● Max Login Attempts - Set the limit for maximum login attempts.
● Account Terms - Select the page to which new users will be forced to agree before
they are allowed to create an account.
● New Account Alert Mail - Select whether you want to receive an email notification
whenever a new account is created.
Checkout Options
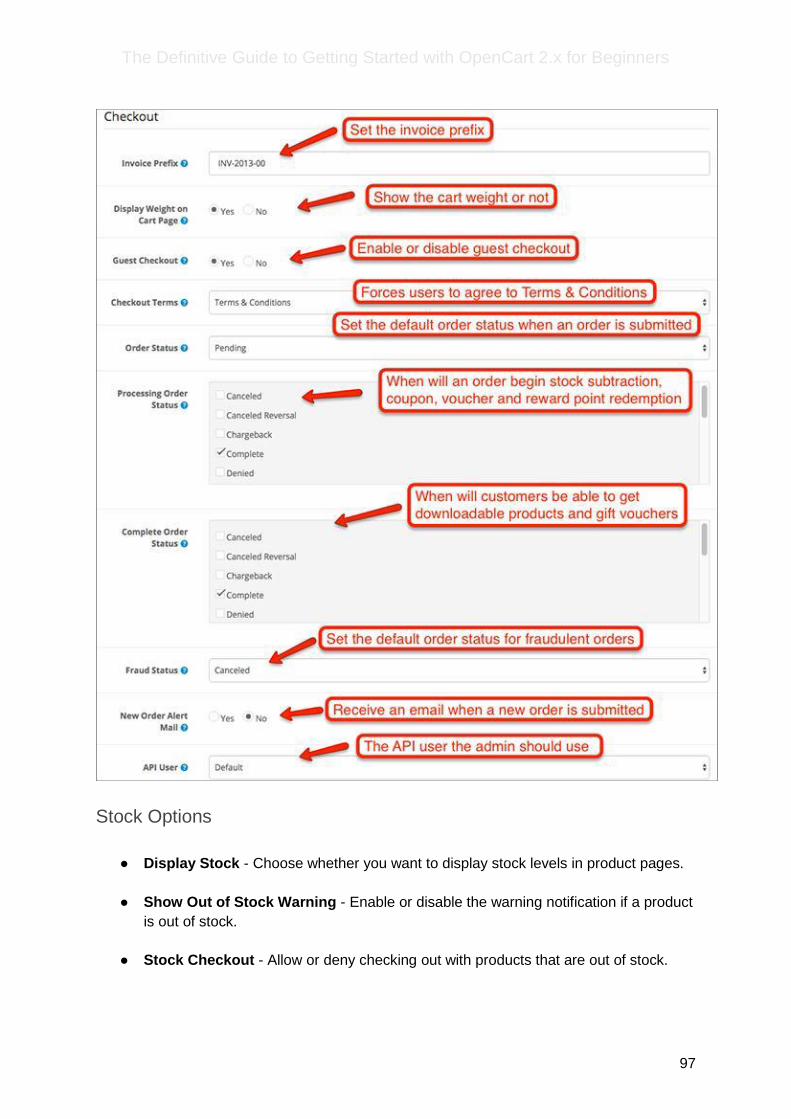
● Invoice Prefix - Set the invoice prefix. Invoice IDs will start at 1 for each unique
prefix.
● Display Weight on Cart Page - Choose whether you want to show the cart weight
on the View Cart page.
● Guest Checkout - Enable or disable checkout for guests who want to complete
orders without having an account in your store.
● Checkout Terms - Choose the page which you want customers to agree to before
they are allowed to complete a purchase.

The Definitive Guide to Getting Started with OpenCart 2.x for Beginners
96
● Order Status - Choose the default order status that will be enabled after an order is
confirmed by the customer.
● Processing Order Status - Define the status that will enable product subtraction,
coupon, voucher or reward point redemption.
● Complete Order Status - Choose the default status for a completed order.
● Fraud Status - Set the status that will appear when an order is suspended due to
suspicious activity.
● New Order Alert Mail - Choose whether you want to receive a notification email on
your admin email address whenever a new order is confirmed.
● API User - Since version 2, OpenCart has an API for integration with third party
services. The same API is also used by OpenCart when editing orders for example.
In order to access the API, a pair of username and API key is used. These pairs are
created from System > Users > API. This option lets you select which pair will
OpenCart use, when it uses the API.
The Definitive Guide to Getting Started with OpenCart 2.x for Beginners
97
Stock Options
● Display Stock - Choose whether you want to display stock levels in product pages.
● Show Out of Stock Warning - Enable or disable the warning notification if a product
is out of stock.
● Stock Checkout - Allow or deny checking out with products that are out of stock.

The Definitive Guide to Getting Started with OpenCart 2.x for Beginners
98
Affiliate Options
● Affiliate Requires Approval - Enable or disable automatic affiliate approval.
● Automatic Commission - Enable or disable automatic commission reward.
● Affiliate Commission (%) - Configure the commission percentage for affiliates.
● Affiliate Terms - Choose the page that you want all new affiliates to agree to before
they complete their registration.
● New Affiliate Alert Mail - Choose whether you want to receive a notification on your
admin email whenever a new affiliate completes their registration.
Return Options
● Return Terms - Select the Terms page that you want customers to agree to when
submitting a product return.
● Return Status - Select the default status of an order when it’s submitted for a return.

The Definitive Guide to Getting Started with OpenCart 2.x for Beginners
99
Captcha Options
● Captcha - Enable Captcha verification. They are configured from Extensions >
Captcha.
● Captcha Page - Check the pages you want the Captcha verification to be enabled
for.
Image
● Store Logo - Upload your store logo.
● Icon - Upload your store icon which will be shown in the browser tab. The
requirements for the icon are PNG 16px by 16px.

The Definitive Guide to Getting Started with OpenCart 2.x for Beginners
100
FTP
All of the fields here should be filled with the FTP details you have from your hosting
provider.
● FTP Host
● FTP Port
● FTP Username
● FTP Password
● FTP Root - Input the directory of the installation of your OpenCart store.
● Enable FTP - Enable or disable FTP.
● Mail Protocol - Choose your mail protocol between Mail or SMTP.
● Mail Parameters - If you select “Mail” for the protocol, you will have to enter an email
address.
● SMTP Hostname - If you are using SMTP, input the address of the SMTP host.
● SMTP Username - Enter the full email address of the SMTP host.

The Definitive Guide to Getting Started with OpenCart 2.x for Beginners
101
● SMTP Password - Choose your password.
● SMTP Port - The SMTP port number is provided by your SMTP host.
● SMTP Timeout - The timeout is also provided by your SMTP host.
● Additional Alert E-Mails - Input any additional email addresses you want to use for
receiving notifications.
Server
General Options
● Maintenance Mode - Enable or disable your website’s maintenance mode. This will
make your OpenCart unreachable for all customers.
● Use SEO URLs - Choose whether you want to use SEO URLs. These URLs use the
SEO Keywords you can select from the different page settings in OpenCart.
● Robots - A list of web crawlers that will be prevented from using shared sessions in
your store.

The Definitive Guide to Getting Started with OpenCart 2.x for Beginners
102
● Output Compression Level - GZIP for more efficient transfers to requesting clients.
The number sets the level of HTTP compression used in your HTTP headers.
Security Options
● Use SSL - Enable or disable SSL certificate.
● Allow Forgotten Password - Choose whether you want to allow using the forgotten
password option for the admin login.
● Use Shared Sessions - Select whether you prefer using session sharing with
multiple OpenCart stores and shopping carts if you have any.
● Encryption Key - This is a secret combination that is used to encrypt private
information. Use both letters and numbers for better protection.
Upload Options
● Max File Size - Define the max file size you want to be uploaded in your store. The
number should be in bytes.
● Allowed File Extensions - Input all of the file extensions you want to be allowed in
your website. For example - TXT, PNG, MP3, PDF, etc.
● Allowed File Mime Types - Input all of the file mime types you want to be allowed in
your website. For example - Image/GIF, Application/ZIP, Text/Plain, etc.

The Definitive Guide to Getting Started with OpenCart 2.x for Beginners
103
Error Handling Options
● Display Errors - Enable or disable error displaying when a problem occurs.
● Log Errors - Choose whether you want to keep a log of all the errors that have
occurred in your store.
● Error Log Filename - Choose the filename where the log will be kept.

The Definitive Guide to Getting Started with OpenCart 2.x for Beginners
104
Users
The Users menus allow you to manage all of your users and user groups. You also have
access to the API settings of your E-Commerce store. You can manually create new ones,
edit existing ones or delete them. User groups are designed to give or take viewing and
modifying permissions to specific users.
Users
Going to the Users menu, you see a list of users with enabled or disabled status as well as
when the user was added. Let’s edit a user and see the fields that need filling.
For our example, we chose to edit the admin user. As you see, the fields are relatively
straightforward - personal information, email address, password.
The interesting part is that you can select a User Group. This helps with the sorting of users
and assigning permissions to each group.

The Definitive Guide to Getting Started with OpenCart 2.x for Beginners
105
User Groups
Here, you can see two predefined User Groups - Administrator and Demonstration. We have
created a third one - Users. These user groups are what allows you to set the permissions
for viewing and modifying between your users.

The Definitive Guide to Getting Started with OpenCart 2.x for Beginners
106
Once you click edit, you see all of the admin panel menus that can be accessed and
modified. Select the ticks on whichever menu you want to allow or deny for your users.
If you decide that one of your user groups should not have modifying permissions, simply
remove the ticks from the categories and click save.
For example, analytics/google_analytics refers to the Analytics section in the Category menu
of your OpenCart Dashboard. The same goes for all the rest - they are the Admin panel
pages of your online store and you can decide which group has the rights to view or modify
each of the pages.

The Definitive Guide to Getting Started with OpenCart 2.x for Beginners
107
The API of your store allows it to connect and integrate with third party services and
applications. Using the API requires you to create a new pair of credentials. Click on Edit on
the Default API name to see how it’s done.
General
First, you select an API Name.
The Definitive Guide to Getting Started with OpenCart 2.x for Beginners
108
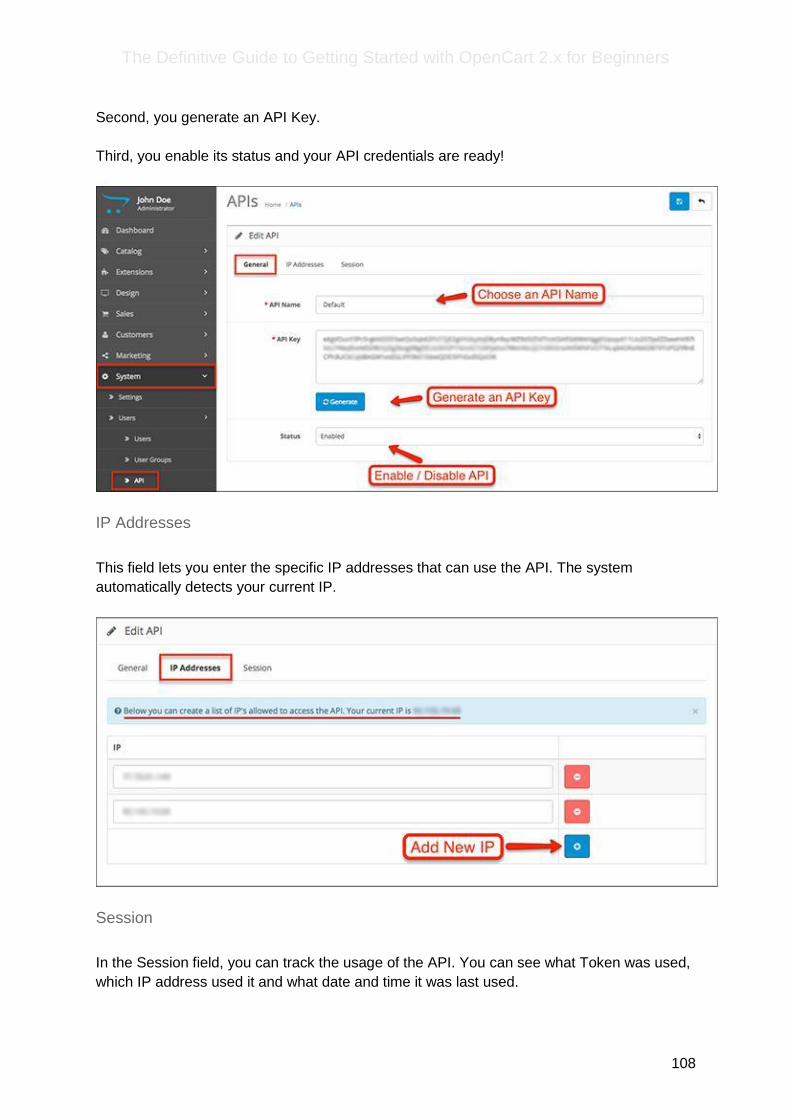
Second, you generate an API Key.
Third, you enable its status and your API credentials are ready!
IP Addresses
This field lets you enter the specific IP addresses that can use the API. The system
automatically detects your current IP.
Session
In the Session field, you can track the usage of the API. You can see what Token was used,
which IP address used it and what date and time it was last used.

The Definitive Guide to Getting Started with OpenCart 2.x for Beginners
109
Localisation
The Localisation sub-menu contains a lot of fields for logistical properties that need to be
setup for smooth order, payment, shipping and returns management.
Store Locations
The first field is Store Locations - it allows you to list all of the physical addresses your store
might have. Click on add new or edit the existing one to view the details.

The Definitive Guide to Getting Started with OpenCart 2.x for Beginners
110
The information fields are fairly standard - store name and address, phone, fax, opening &
closing times. You can add an endless number of physical stores and their addresses.
Languages
Manage your store’s languages from here. Stores with multiple languages are easier to use
on an international level. Click Edit or Add New to see the settings.

The Definitive Guide to Getting Started with OpenCart 2.x for Beginners
111
Language Name: Input the name of the language you want to add.
Code: Language name has their own code (en for English, de for German, etc).
Locale: The Locale is the language code that browsers use to auto-detect the language of
the website. They can be found here.
Image: You need to add the image name for the language you are creating (national flag).
Directory: The directory is the location of the language pack.
Status: Enable or disable the language from the store front.
Sort Order: Set the number that will arrange the position of the language among the others.

The Definitive Guide to Getting Started with OpenCart 2.x for Beginners
112
Currencies
OpenCart allows you to constantly keep an eye on the currency values. You can use the
refresh button and check how the currencies are going at any moment.
Clicking add or edit will show you the currency editing field where you can setup the details
for the currencies you want to use for the transactions in your E-Commerce store.

The Definitive Guide to Getting Started with OpenCart 2.x for Beginners
113
Currency Title: The name of the currency.
Code: The ISO code for the currency you want to add, check all of them in this list.
Symbol Left: Adds the currency symbol to the left of the code.
Symbol Right: Adds the currency symbol to the right of the code.
Decimal Places: The amount of decimal places displayed in the price of the front end of
your site.
Value: The Default currency is set to a value of 1. Every value of currency will be relative to
this value. Since the US Dollar is 1.0 (the default), the Euro is tabulated to .81 for the value
based on its worth. This is the value that OpenCart will use to calculate the prices in the
store front. Your currency values will be automatically updated if you enable Auto Update
Currency in the store settings.
Status: Enables or disables the currency in the front end of the store.
Stock Statuses
These are the statuses that show the availability of your products in the front end:
2-3 Days - It will be available soon.
In Stock - The item can be ordered.

The Definitive Guide to Getting Started with OpenCart 2.x for Beginners
114
Out of Stock - The item is not available.
Pre-Order - The item is only available for preorder and will be delivered when available.
To edit a stock status, simply change its name.
Order Statuses
The field for order statuses lets you manage the many possible statuses an order can have
after it is confirmed by customers. The native options in OpenCart cover a wide range of
potential order statuses.

The Definitive Guide to Getting Started with OpenCart 2.x for Beginners
115
After you are done editing the order status, you can select it under Sales > Orders > View >
Add Order History.
Return Statuses
Just like the order statuses, the return statuses notify customers of the condition of their
return request. The standard options in OpenCart are just three - Awaiting Products,
Complete and Pending.

The Definitive Guide to Getting Started with OpenCart 2.x for Beginners
116
Return Actions
Once a customer submits a return, the store owner must take action. After you take the
decision, you can either issue credit, give a refund or send a replacement. These are the
three native options in OpenCart, however you can create additional actions.
Return Reasons
When customers submit returns, they must select a reason for that. There are 5 options with
the standard OpenCart installation - Dead on Arrival, Faulty, Order Error, Received Wrong
Item, Other.
All of these actions, reasons and statuses are assigned from Sales > Returns > Edit
Return.

The Definitive Guide to Getting Started with OpenCart 2.x for Beginners
117
Countries
The OpenCart admin panel holds 239 countries. They are used to estimate the shipping and
tax for each customer when they log in. You can disable and delete the countries you don’t
need, however once a country is deleted, enabling it again will require its creation from
scratch.

The Definitive Guide to Getting Started with OpenCart 2.x for Beginners
118
Zones
Along with the 239 countries, OpenCart also has 3948 zones. These zones are the regions,
states or provinces of countries. They help with better calculation of shipping and taxes.
Geo Zones
Geo Zones are used for combining different zones into one Geo Zone so it becomes easier
to calculate shipping and taxes for multiple regions at once. The Geo Zones are configured
here and are used in Extensions > Shipping.

The Definitive Guide to Getting Started with OpenCart 2.x for Beginners
119
Geo Zone Name: Select a name for the Geo Zone.
Description: Describe the Geo Zone and its regions.
Country & Zone: Select the country and zones the Geo Zone will include.
Tax Classes
This is where your store’s taxes are created and managed. You can apply these taxes to the
products in your Opencart store.

The Definitive Guide to Getting Started with OpenCart 2.x for Beginners
120
The platform comes with two native tax classes - downloadable products and taxable goods.
Create new ones, edit those or delete them according to your own preference.
Select a tax class, add a description about the products that it’s applicable for and add
multiple tax rates by assigning different priorities.
Tax Rates
This menu lets you configure the tax rates and their value. You can create tax rates for
different regions and Geo Zones.

The Definitive Guide to Getting Started with OpenCart 2.x for Beginners
121
Tax Name: A name for the tax class that will be displayed in the front end when taxes are
added to order total, for example - Eco Tax (-$x,xx).
Tax Rate: How much the tax value will be.
Type: Choose whether the tax will be a percentage of the total or a fixed amount.
Customer Group: If you want the tax rate to be enabled only for a specific set of customers,
add them to a customer group and select it from this option. Multiple customer groups can
be selected.
Geo Zone: Select which Geo Zone you want to apply the tax for.

The Definitive Guide to Getting Started with OpenCart 2.x for Beginners
122
Length Classes
The length classes are used to assign length dimensions to the products in your OpenCart
store.
Length Title: The name of the metric unit, for example Centimeter.
Length Unit: The measurement unit, for example cm.
Value: The Default value must be set to 1. Every other length class will be relative to that
value. You can use this tool to measure the units.
Weight Classes
The length classes are used to assign weight specifications to the products in your
OpenCart store.

The Definitive Guide to Getting Started with OpenCart 2.x for Beginners
123
Weight Title: The name of the weight unit, for example Kilogram.
Weight Unit: The weight unit, for example KG.
Value: The Default value must be set to 1. Every other length class will be relative to that
value. There are 1000 Grams (G) in 1 Kilogram (KG), so the value of G would be set to 1000.
Tools
The Tools section in the Settings contains a tracker for your uploads, a backup / restore
function as well as error logs.
Uploads

The Definitive Guide to Getting Started with OpenCart 2.x for Beginners
124
All of your uploads can be filtered by name or date added. Once you find the uploads you
are looking for, you can either download or delete them.
Backup & Restore
In case of a database emergency - use this field.
Your store’s database is where all of the important customer and product information is kept.
Re-entering all of the information after it’s lost is a very costly task.
OpenCart lets you download a backup of your store's current database or restore the
database in the Backup & Restore section.
If you need to restore a backup file that you have on your computer, click "Choose File",
select the .sql file from the computer and upload it. The database will be restored.

The Definitive Guide to Getting Started with OpenCart 2.x for Beginners
125
Error Logs
The Error log in OpenCart will hold a record of all the errors that have occurred in the code
of the store. Over time, your log might get full, so you can use the clear button to remove the
data.
A recommendation in such cases is to first resolve the errors before clearing them.
These errors are useful for developers who can track issues and fix them.

The Definitive Guide to Getting Started with OpenCart 2.x for Beginners
126
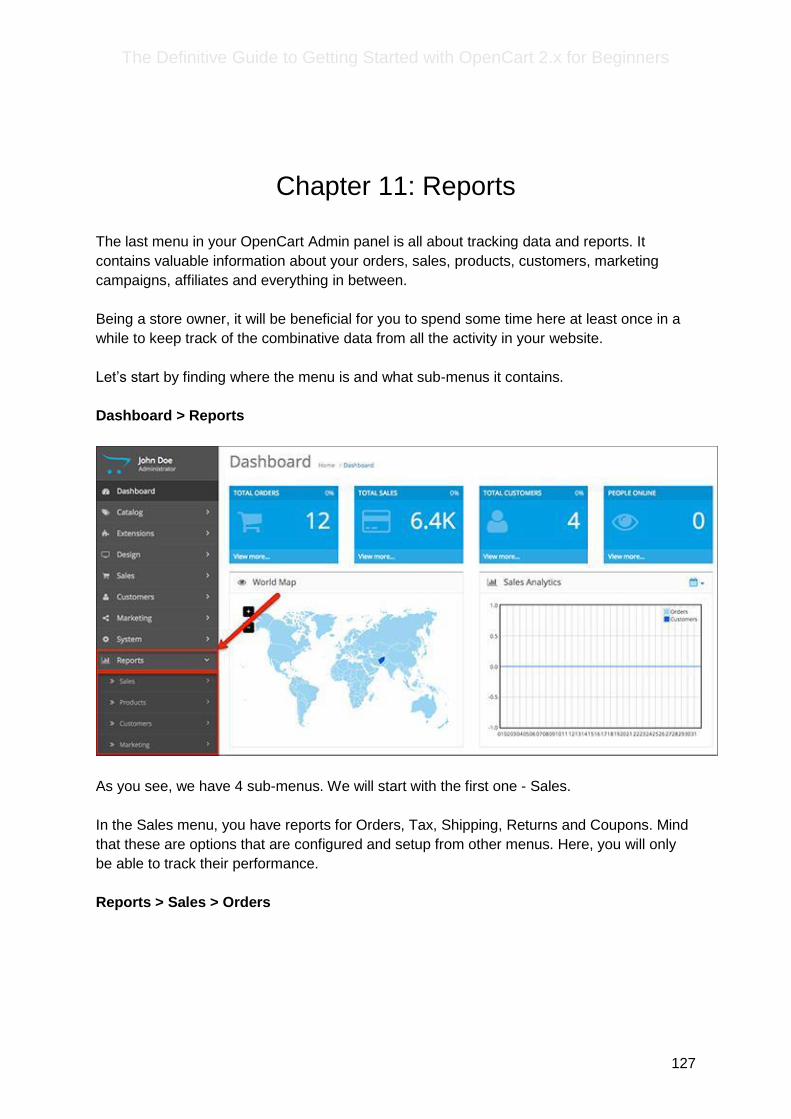
The Definitive Guide to Getting Started with OpenCart 2.x for Beginners
127
Chapter 11: Reports
The last menu in your OpenCart Admin panel is all about tracking data and reports. It
contains valuable information about your orders, sales, products, customers, marketing
campaigns, affiliates and everything in between.
Being a store owner, it will be beneficial for you to spend some time here at least once in a
while to keep track of the combinative data from all the activity in your website.
Let’s start by finding where the menu is and what sub-menus it contains.
Dashboard > Reports
As you see, we have 4 sub-menus. We will start with the first one - Sales.
In the Sales menu, you have reports for Orders, Tax, Shipping, Returns and Coupons. Mind
that these are options that are configured and setup from other menus. Here, you will only
be able to track their performance.
Reports > Sales > Orders

The Definitive Guide to Getting Started with OpenCart 2.x for Beginners
128
Orders
The orders show you how many orders your store has generated over a defined period of
time in the filter fields.
You can sort the results by Days, Weeks, Months or Years from the Group By field. This will
separate the orders in different rows.
You can also filter order by their status.
The type of information you will be able to track here will be the number of orders and
products that have been confirmed, the tax and total revenue from the row of orders.

The Definitive Guide to Getting Started with OpenCart 2.x for Beginners
129
Tax
Each of the orders generated in your store have some tax added to them. The taxes are set
from Catalog > Products > Edit Product > Data > Tax Class.
The tax menu in the reports tracks the types of tax that have been applied to products in the
orders of customers. This includes the number of orders as well as the total accumulated
from the taxes.
Shipping
Shipping costs vary on the shipping methods you have available in your store. You have the
same filtering options for date, sorting and order status.
You will be able to track what shipping method has been used under the Shipping Title tab,
as well as the number of orders and their total.
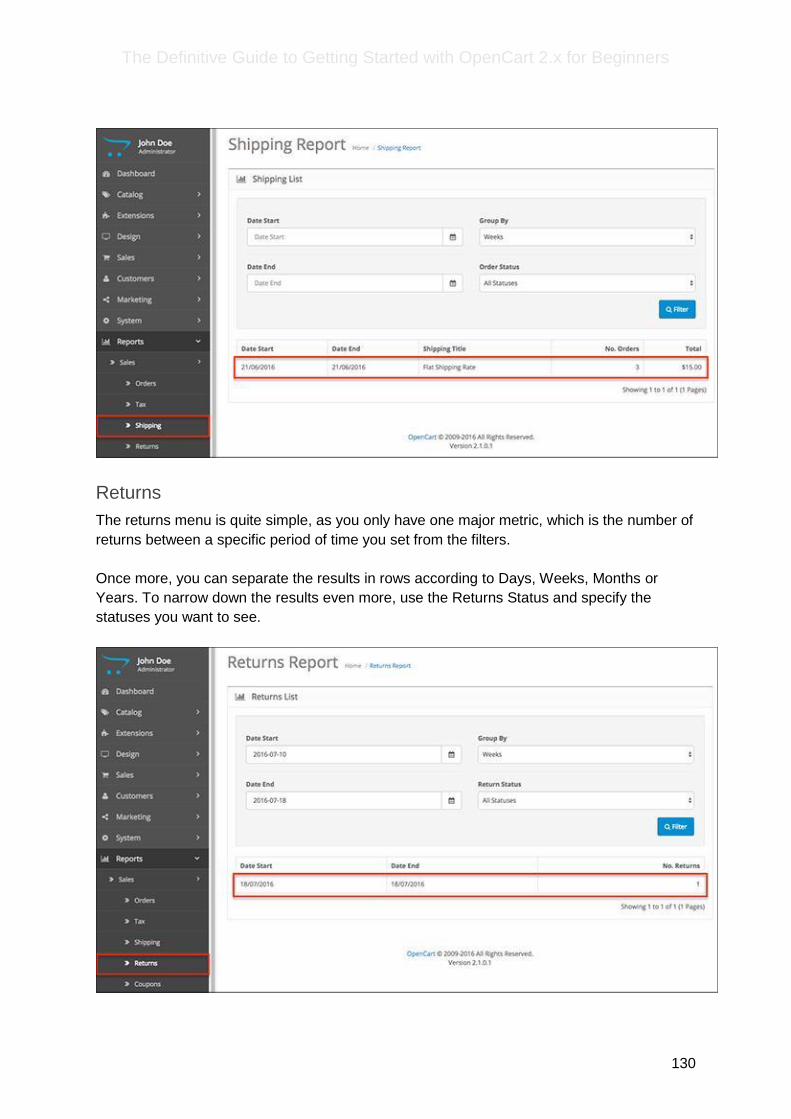
The Definitive Guide to Getting Started with OpenCart 2.x for Beginners
130
Returns
The returns menu is quite simple, as you only have one major metric, which is the number of
returns between a specific period of time you set from the filters.
Once more, you can separate the results in rows according to Days, Weeks, Months or
Years. To narrow down the results even more, use the Returns Status and specify the
statuses you want to see.

The Definitive Guide to Getting Started with OpenCart 2.x for Beginners
131
Coupons
Your coupons are created by going to Extensions > Order Totals. As you see from the
screenshot below, the filtering options for the coupons are limited to dates.
You can see the name of each coupon, the coupon code necessary for customers to enter,
as well as the orders and total generated from using the code.
By clicking the Edit button, you will be redirected to the coupon management field where you
can modify the coupon name, code, type, discount, etc.
The next sub-menu of the Reports is all about the products. You have two fields where you
can track which products were viewed and purchased.
Reports > Products > Viewed
Viewed
This is a list of all your products and the views they got from your customers. The list
includes the product name, model, times viewed and percent, which measures how much a
product has been viewed compared to others.
Your most viewed product will be at the top. You can refresh the list with the red button at
the top right corner, so you can update the data at any time.

The Definitive Guide to Getting Started with OpenCart 2.x for Beginners
132
Purchased
In the list for purchased products, you have a filter where you can narrow down results
based on date and order status.
You can see all of the products that have been purchased from your OpenCart store
separated by product name, model, how many times the product has been purchased, and
the total revenue accumulated from each product.
Reports > Customers > Customers Online
Now it’s time to see what kind of information you can track about your customers.

The Definitive Guide to Getting Started with OpenCart 2.x for Beginners
133
Customers Online
The report for how many customers you have online is based on IP address of the visitor,
which is the last page they viewed, the referrer (the page or website that lead them to the
last viewed page), as well as the last place they clicked.
This type of information is important for knowing the behavior of your users and the potential
improvements you can start making to optimize the customer journey throughout your
OpenCart website.
Customer Activity
The customer activity log lets you track what kind of action each customer has taken at a
particular date and time.
The activities include creating a new order, registering a new account, etc. You will be able
to see the IP address from which the activity has been logged.
You can use the filter to sort customer activity by IP address, customer name as well as
dates.

The Definitive Guide to Getting Started with OpenCart 2.x for Beginners
134
Orders
The orders menu under customer reports is quite useful to prioritize users. It lets you view
how many orders each user has confirmed, including the number of purchased products and
total revenue from the customer.
Each customer also has an Edit option that redirects you to the customer management
menu where you can modify any type of information you need about the specific user.

The Definitive Guide to Getting Started with OpenCart 2.x for Beginners
135
Reward Points
The reward points are managed from Catalog > Products > Edit Product > Reward Points.
This is where you assign reward points to a given product.
As for the Reward Points menu in the Reports, you can track the reward points used by
each customer, accompanied by information about the customer name, email, customer
group, status, number of orders, and total.
Filtering for the customer reward points can be done by date.
Credit
The store credit can be enabled from Extensions > Order Totals > Store Credit.
You can manually assign store credit to customers via the transactions function in
Customers > Customers > Edit Customer > Transactions.
The transactions you modify there will appear in the Credit reports here.

The Definitive Guide to Getting Started with OpenCart 2.x for Beginners
136
Next, marketing reports. These menus will include information about how your marketing
campaigns are going as well as the performance of your affiliate program.
Reports > Marketing > Marketing
Marketing
The marketing campaigns in OpenCart are created from Dashboard > Marketing >
Marketing > Add New.
The tracking in your marketing reports will show the campaign name, its unique code, the
number of clicks it has generated and how many orders they have lead to. At the end, you
have total revenue generated from the marketing campaign you have launched.

The Definitive Guide to Getting Started with OpenCart 2.x for Beginners
137
Affiliates
You can create new affiliates from Dashboard > Marketing > Affiliates. Each affiliate will
have a unique affiliate code. This affiliate tracking code will be used to generate a unique
affiliate link for a specific product, so when a customer purchases the product, the affiliate
receives a commission.
All of this data will appear in the affiliate reports here. You will be able to see the affiliate
name, their email, status, commission, as well as the number of orders and total revenue
generated by their affiliate links.

The Definitive Guide to Getting Started with OpenCart 2.x for Beginners
138
Affiliate Activity
The last menu in the reports logs the activity of your affiliates. This tracks when they logged
in, the IP address they used to login as well as the date of the actions.

The Definitive Guide to Getting Started with OpenCart 2.x for Beginners
139
This is the last part of the OpenCart Admin panel. You now have information about each
section of the back-end of your E-Commerce store and should be ready to start running your
own business.
The last part of the eBook will let you know how to uninstall your OpenCart store.

The Definitive Guide to Getting Started with OpenCart 2.x for Beginners
140
Chapter 12: How to Uninstall OpenCart
To uninstall OpenCart, there are two simple steps you need to take.
First, you delete all of your OpenCart-specific files (be careful if your root directory shares
files with another installation).
Second, you delete your database with all of your product and customer information.
After doing both of these steps, your E-Commerce store will be permanently removed and
the information will be deleted.
Some extra knowledge sources for faster progress:
What Server Do You Need to Run OpenCart
Top 3 Most Popular Marketplaces for OpenCart Themes
OpenCart Communities - A Source of Know-How, Inspiration and Support
7 Of The Best OpenCart Blogs You Don't Want to Miss
8 Best Sources for Elaborate OpenCart Tutorials
Speeding up OpenCart for Free: Image Optimization
Increase Traffic in OpenCart with These 5 Proven Ideas
Starting, Growing and Going Big - The New iSenseLabs Collections


![[Jet-OpenCart Integration] · [Jet-OpenCart Integration] CedCommerce Jet-opencart Integration, an extension by CedCommerce, establishes synchronization of inventory,](https://img.pdfslide.net/doc/110x75/5cf2b31588c99330188b6ed8/jet-opencart-integration-jet-opencart-integration-cedcommerce-jet-opencart.jpg)