Embed Size (px)
Citation preview
http://www.instructables.com/id/Ultimate-Guide-to-Making-a-Cheap-but-Effective-Alu/
Home Sign Up! Explore Community Submit
All Art Craft Food Games Green Home Kids Life Music Offbeat Outdoors Pets Photo Ride Science Tech
Ultimate Guide to Making a Cheap but Effective Aluminium Forge.by Shark500 on December 4, 2007
Table of Contents
License: Attribution Non-commercial Share Alike (by-nc-sa) . . . . . . . . . . . . . . . . . . . . . . . . . . . . . . . . . . . . . . . . . . . . . . . . . . . . . . . . . . . . . . . . . . . . . . . . . . . . . 2
Intro: Ultimate Guide to Making a Cheap but Effective Aluminium Forge. . . . . . . . . . . . . . . . . . . . . . . . . . . . . . . . . . . . . . . . . . . . . . . . . . . . . . . . . . . . . . . . . . . . . 2
step 1: Parts / Tools . . . . . . . . . . . . . . . . . . . . . . . . . . . . . . . . . . . . . . . . . . . . . . . . . . . . . . . . . . . . . . . . . . . . . . . . . . . . . . . . . . . . . . . . . . . . . . . . . . . . . . . . . . . 2
step 2: A Suitable Crucible . . . . . . . . . . . . . . . . . . . . . . . . . . . . . . . . . . . . . . . . . . . . . . . . . . . . . . . . . . . . . . . . . . . . . . . . . . . . . . . . . . . . . . . . . . . . . . . . . . . . . . 4
step 3: The Forge . . . . . . . . . . . . . . . . . . . . . . . . . . . . . . . . . . . . . . . . . . . . . . . . . . . . . . . . . . . . . . . . . . . . . . . . . . . . . . . . . . . . . . . . . . . . . . . . . . . . . . . . . . . . 7
step 4: Melting Aluminium . . . . . . . . . . . . . . . . . . . . . . . . . . . . . . . . . . . . . . . . . . . . . . . . . . . . . . . . . . . . . . . . . . . . . . . . . . . . . . . . . . . . . . . . . . . . . . . . . . . . . . 11
step 5: Now What? . . . . . . . . . . . . . . . . . . . . . . . . . . . . . . . . . . . . . . . . . . . . . . . . . . . . . . . . . . . . . . . . . . . . . . . . . . . . . . . . . . . . . . . . . . . . . . . . . . . . . . . . . . . 15
Related Instructables . . . . . . . . . . . . . . . . . . . . . . . . . . . . . . . . . . . . . . . . . . . . . . . . . . . . . . . . . . . . . . . . . . . . . . . . . . . . . . . . . . . . . . . . . . . . . . . . . . . . . . . . . . . 15
Advertisements . . . . . . . . . . . . . . . . . . . . . . . . . . . . . . . . . . . . . . . . . . . . . . . . . . . . . . . . . . . . . . . . . . . . . . . . . . . . . . . . . . . . . . . . . . . . . . . . . . . . . . . . . . . . . . . 16
Comments . . . . . . . . . . . . . . . . . . . . . . . . . . . . . . . . . . . . . . . . . . . . . . . . . . . . . . . . . . . . . . . . . . . . . . . . . . . . . . . . . . . . . . . . . . . . . . . . . . . . . . . . . . . . . . . . . . . 16
http://www.instructables.com/id/Ultimate-Guide-to-Making-a-Cheap-but-Effective-Alu/
License: Attribution Non-commercial Share Alike (by-nc-sa)
Intro: Ultimate Guide to Making a Cheap but Effective Aluminium Forge.There are many guides and many ideas I've collected and, being that I completed this (the first one... I made a completely new setup just for this instructible... you shouldfeel special.) within two days and most importantly... cheaply.
My cousin /assistant / camera man and I created this instructable so we could share our wonderful smelting smelting experience and win the hearts and minds of theinstructable community.
DISCLAIMER
This instructible includes fire and molten metal.BE CAREFUL and USE SAFETY EQUIPMENT!
Also; If you mortally wound yourself while duplicating this instructible, please delete this from your history internet history before dieing. i don't want to be held liable.
BACK ON TOPIC!
We shall begin.
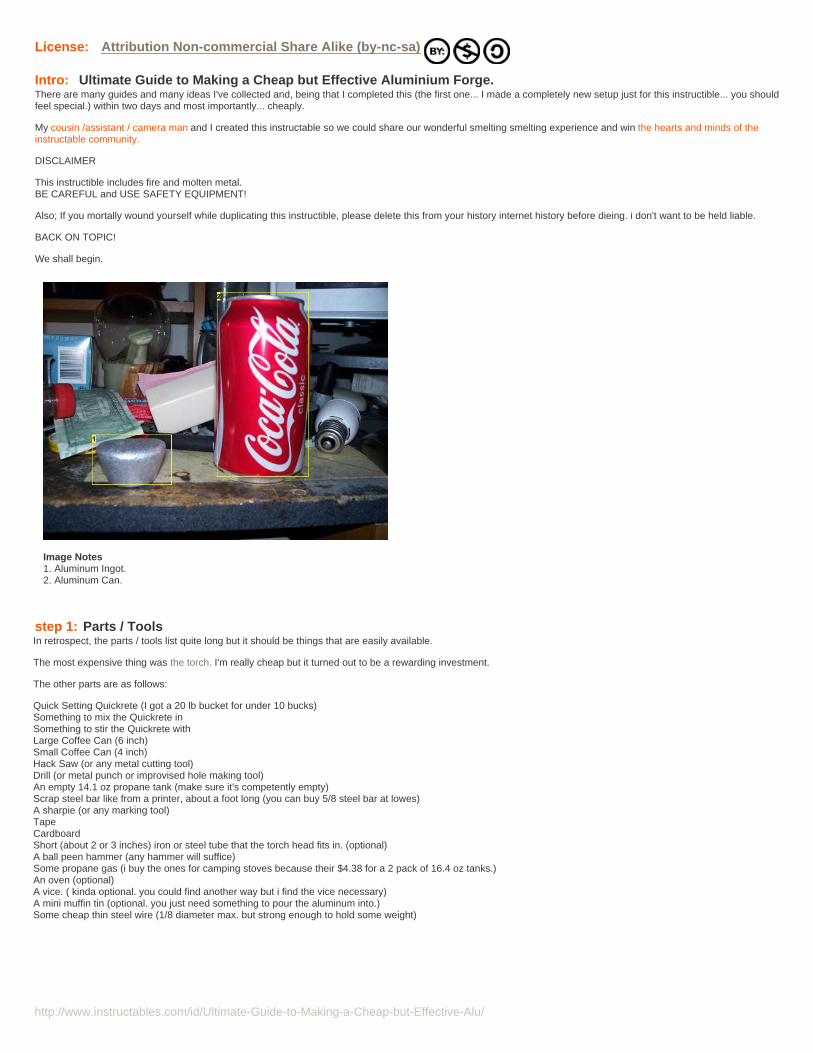
Image Notes1. Aluminum Ingot.2. Aluminum Can.
step 1: Parts / ToolsIn retrospect, the parts / tools list quite long but it should be things that are easily available.
The most expensive thing was the torch. I'm really cheap but it turned out to be a rewarding investment.
The other parts are as follows:
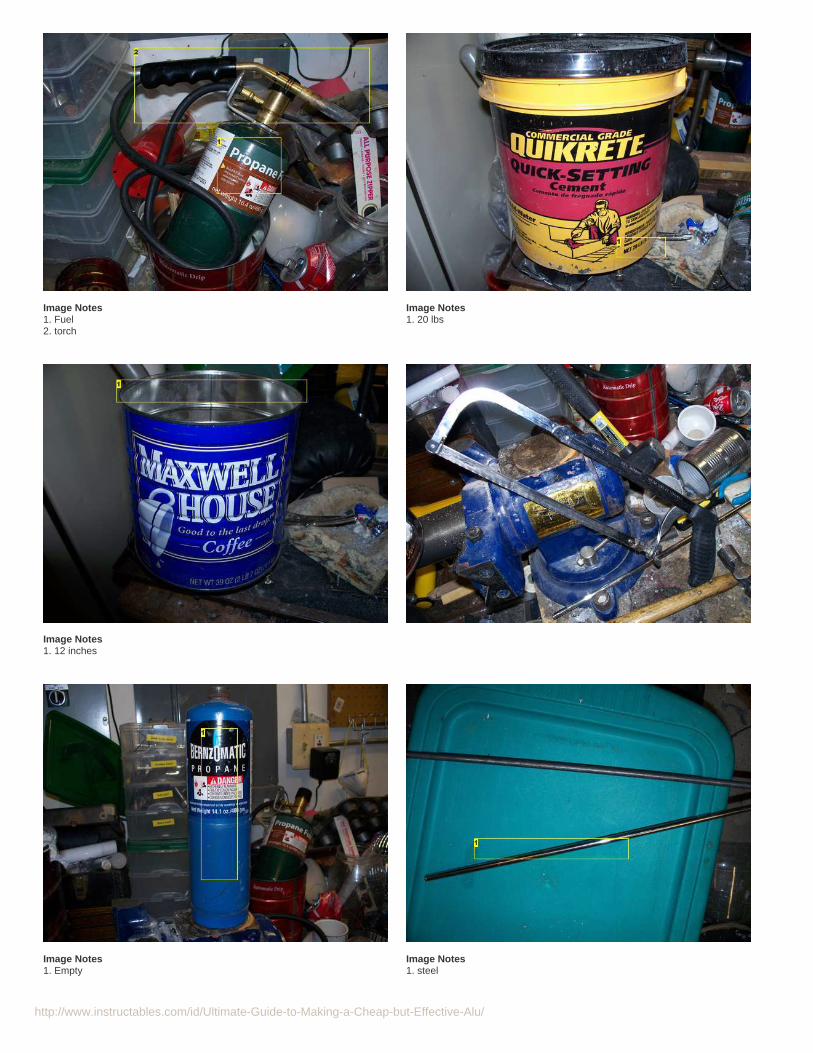
Quick Setting Quickrete (I got a 20 lb bucket for under 10 bucks)Something to mix the Quickrete inSomething to stir the Quickrete withLarge Coffee Can (6 inch)Small Coffee Can (4 inch)Hack Saw (or any metal cutting tool)Drill (or metal punch or improvised hole making tool)An empty 14.1 oz propane tank (make sure it's competently empty)Scrap steel bar like from a printer, about a foot long (you can buy 5/8 steel bar at lowes)A sharpie (or any marking tool)TapeCardboardShort (about 2 or 3 inches) iron or steel tube that the torch head fits in. (optional)A ball peen hammer (any hammer will suffice)Some propane gas (i buy the ones for camping stoves because their $4.38 for a 2 pack of 16.4 oz tanks.)An oven (optional)A vice. ( kinda optional. you could find another way but i find the vice necessary)A mini muffin tin (optional. you just need something to pour the aluminum into.)Some cheap thin steel wire (1/8 diameter max. but strong enough to hold some weight)
http://www.instructables.com/id/Ultimate-Guide-to-Making-a-Cheap-but-Effective-Alu/
Image Notes1. Fuel2. torch
Image Notes1. 20 lbs
Image Notes1. 12 inches
Image Notes1. Empty
Image Notes1. steel
http://www.instructables.com/id/Ultimate-Guide-to-Making-a-Cheap-but-Effective-Alu/
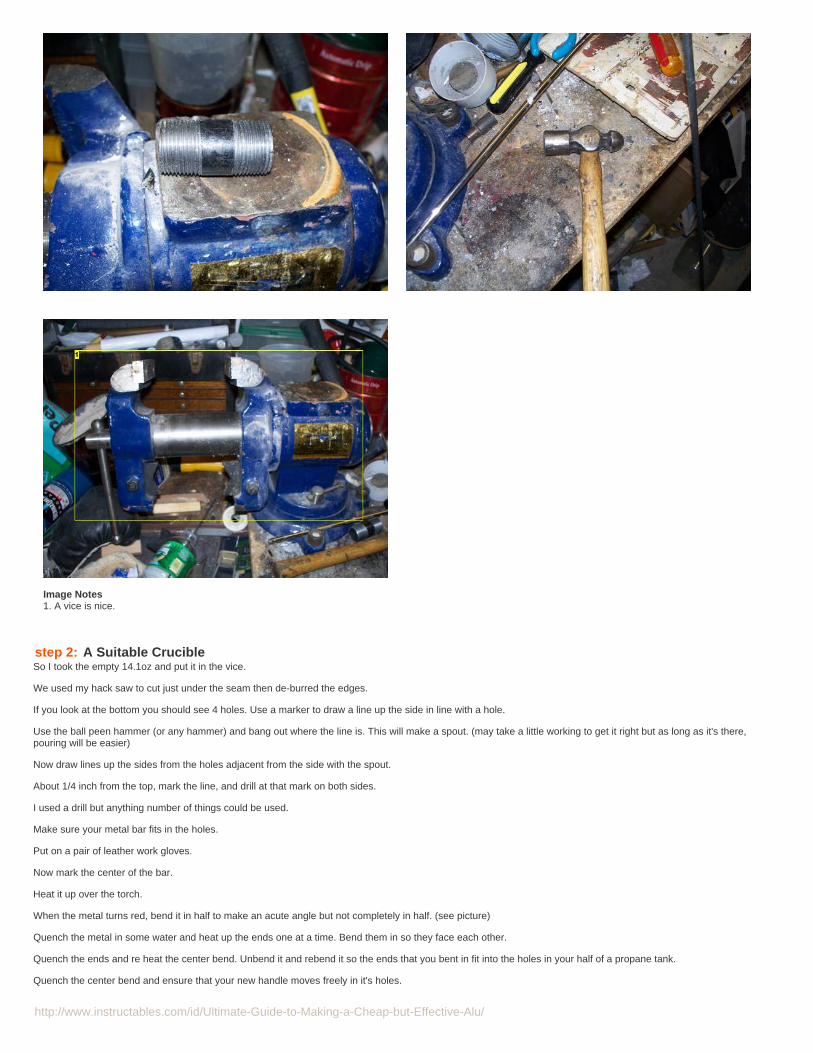
Image Notes1. A vice is nice.
step 2: A Suitable CrucibleSo I took the empty 14.1oz and put it in the vice.
We used my hack saw to cut just under the seam then de-burred the edges.
If you look at the bottom you should see 4 holes. Use a marker to draw a line up the side in line with a hole.
Use the ball peen hammer (or any hammer) and bang out where the line is. This will make a spout. (may take a little working to get it right but as long as it's there,pouring will be easier)
Now draw lines up the sides from the holes adjacent from the side with the spout.
About 1/4 inch from the top, mark the line, and drill at that mark on both sides.
I used a drill but anything number of things could be used.
Make sure your metal bar fits in the holes.
Put on a pair of leather work gloves.
Now mark the center of the bar.
Heat it up over the torch.
When the metal turns red, bend it in half to make an acute angle but not completely in half. (see picture)
Quench the metal in some water and heat up the ends one at a time. Bend them in so they face each other.
Quench the ends and re heat the center bend. Unbend it and rebend it so the ends that you bent in fit into the holes in your half of a propane tank.
Quench the center bend and ensure that your new handle moves freely in it's holes.
http://www.instructables.com/id/Ultimate-Guide-to-Making-a-Cheap-but-Effective-Alu/
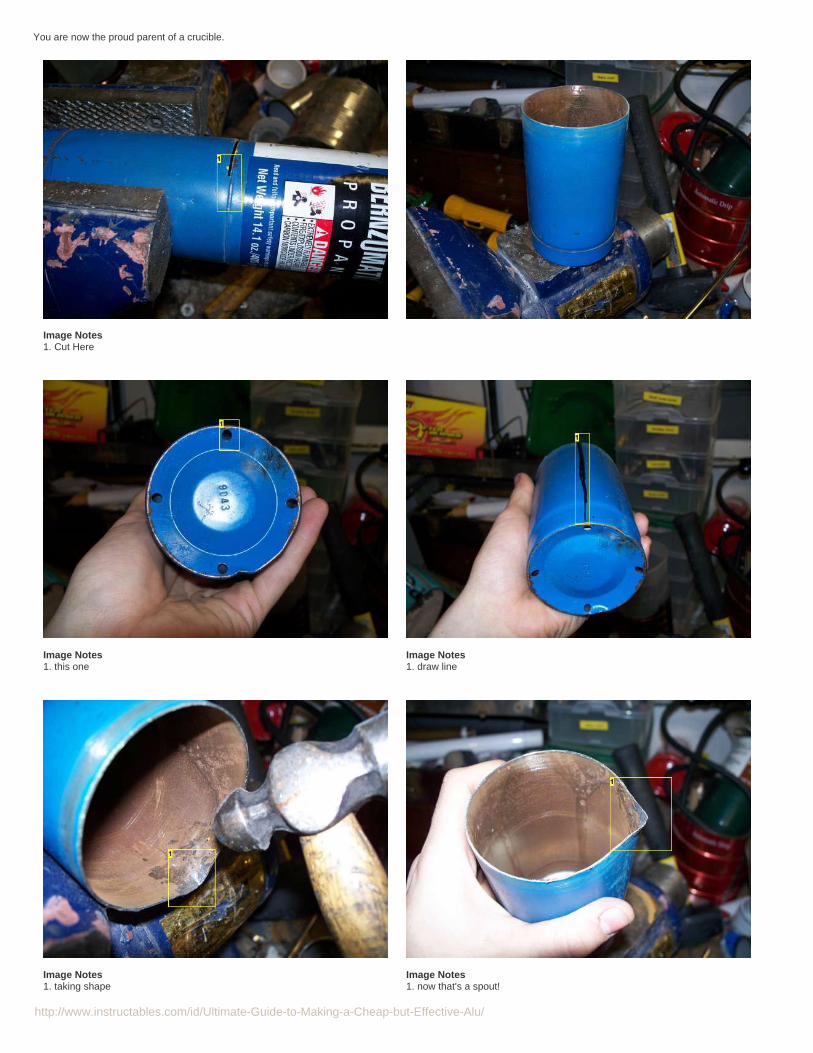
You are now the proud parent of a crucible.
Image Notes1. Cut Here
Image Notes1. this one
Image Notes1. draw line
Image Notes1. taking shape
Image Notes1. now that's a spout!
http://www.instructables.com/id/Ultimate-Guide-to-Making-a-Cheap-but-Effective-Alu/
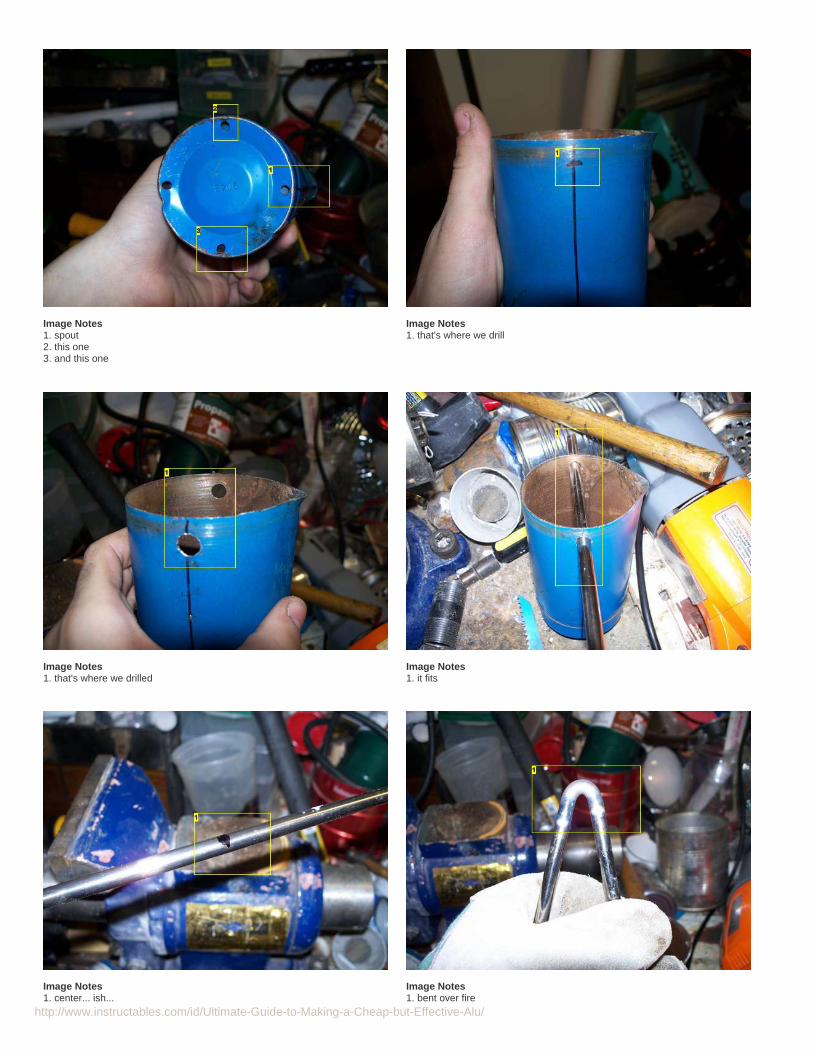
Image Notes1. spout2. this one3. and this one
Image Notes1. that's where we drill
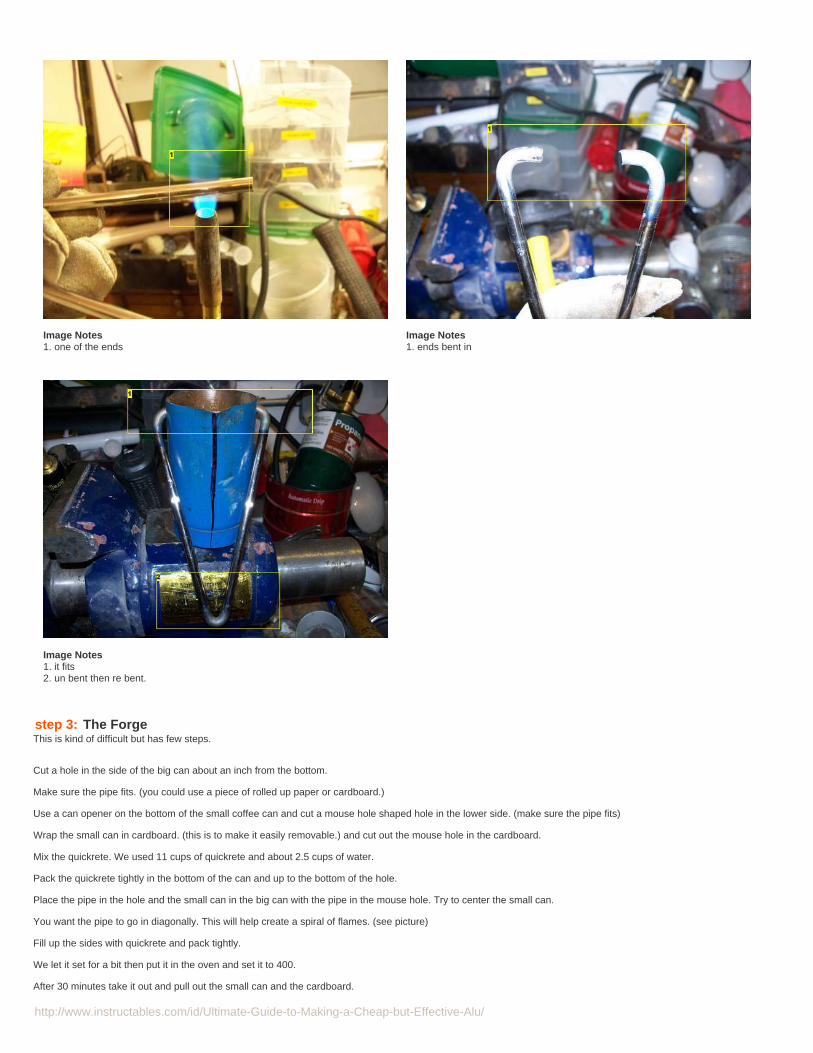
Image Notes1. that's where we drilled
Image Notes1. it fits
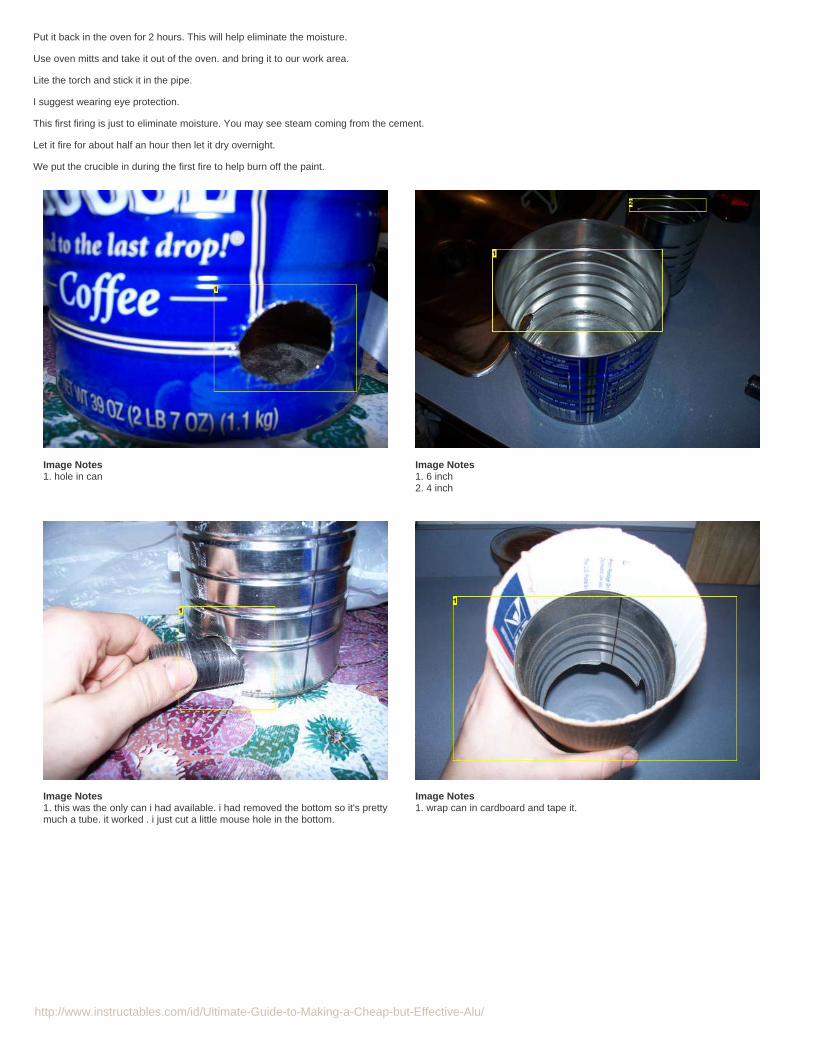
Image Notes1. center... ish...
Image Notes1. bent over fire
http://www.instructables.com/id/Ultimate-Guide-to-Making-a-Cheap-but-Effective-Alu/
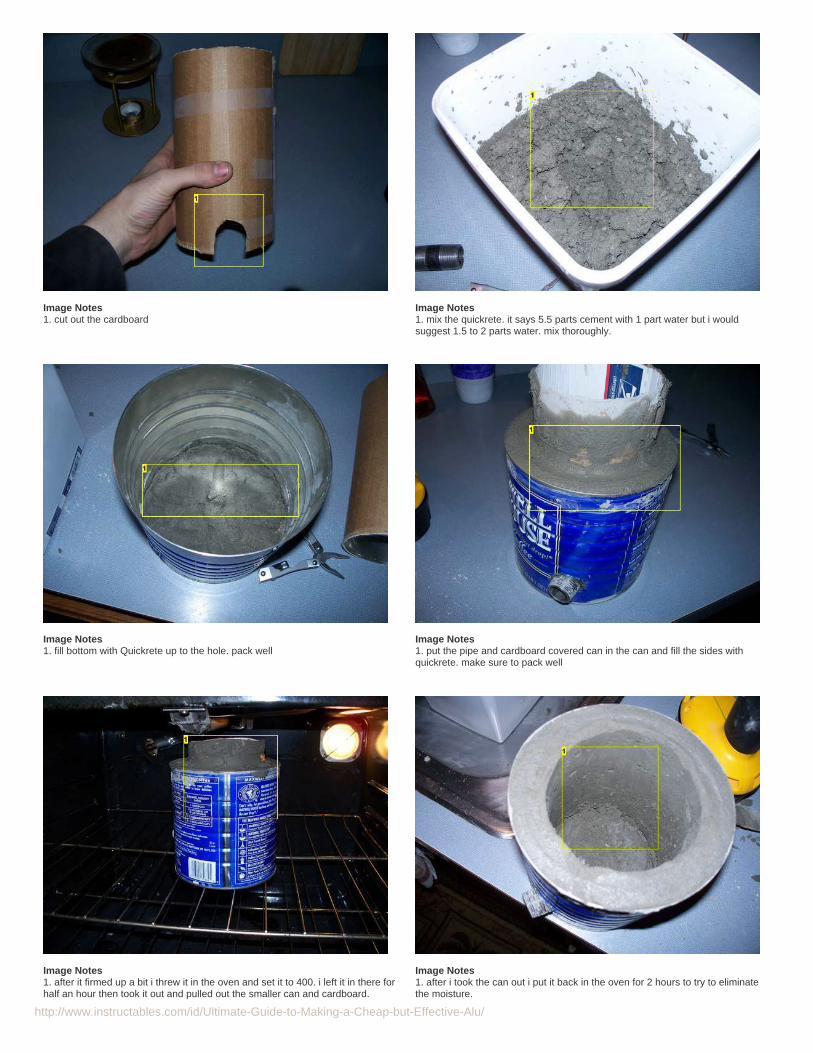
Image Notes1. one of the ends
Image Notes1. ends bent in
Image Notes1. it fits2. un bent then re bent.
step 3: The ForgeThis is kind of difficult but has few steps.
Cut a hole in the side of the big can about an inch from the bottom.
Make sure the pipe fits. (you could use a piece of rolled up paper or cardboard.)
Use a can opener on the bottom of the small coffee can and cut a mouse hole shaped hole in the lower side. (make sure the pipe fits)
Wrap the small can in cardboard. (this is to make it easily removable.) and cut out the mouse hole in the cardboard.
Mix the quickrete. We used 11 cups of quickrete and about 2.5 cups of water.
Pack the quickrete tightly in the bottom of the can and up to the bottom of the hole.
Place the pipe in the hole and the small can in the big can with the pipe in the mouse hole. Try to center the small can.
You want the pipe to go in diagonally. This will help create a spiral of flames. (see picture)
Fill up the sides with quickrete and pack tightly.
We let it set for a bit then put it in the oven and set it to 400.
After 30 minutes take it out and pull out the small can and the cardboard.
http://www.instructables.com/id/Ultimate-Guide-to-Making-a-Cheap-but-Effective-Alu/
Put it back in the oven for 2 hours. This will help eliminate the moisture.
Use oven mitts and take it out of the oven. and bring it to our work area.
Lite the torch and stick it in the pipe.
I suggest wearing eye protection.
This first firing is just to eliminate moisture. You may see steam coming from the cement.
Let it fire for about half an hour then let it dry overnight.
We put the crucible in during the first fire to help burn off the paint.
Image Notes1. hole in can
Image Notes1. 6 inch2. 4 inch
Image Notes1. this was the only can i had available. i had removed the bottom so it's prettymuch a tube. it worked . i just cut a little mouse hole in the bottom.
Image Notes1. wrap can in cardboard and tape it.
http://www.instructables.com/id/Ultimate-Guide-to-Making-a-Cheap-but-Effective-Alu/
Image Notes1. cut out the cardboard
Image Notes1. mix the quickrete. it says 5.5 parts cement with 1 part water but i wouldsuggest 1.5 to 2 parts water. mix thoroughly.
Image Notes1. fill bottom with Quickrete up to the hole. pack well
Image Notes1. put the pipe and cardboard covered can in the can and fill the sides withquickrete. make sure to pack well
Image Notes1. after it firmed up a bit i threw it in the oven and set it to 400. i left it in there forhalf an hour then took it out and pulled out the smaller can and cardboard.
Image Notes1. after i took the can out i put it back in the oven for 2 hours to try to eliminatethe moisture.

http://www.instructables.com/id/Ultimate-Guide-to-Making-a-Cheap-but-Effective-Alu/
Image Notes1. fire up the torch and stick it in the pipe
Image Notes1. fire it up for a test burn. a pair of safety glasses are highly recommended. itmay crack a little but what we're worried about is a small explosion of hot watervapor.
Image Notes1. oven mits2. crucible fits nicely. i let it go for about half an hour. i do this to eliminatemoisture and burn off some paint.
Image Notes1. not perfectly even but suitable. did that after a few minutes.
http://www.instructables.com/id/Ultimate-Guide-to-Making-a-Cheap-but-Effective-Alu/
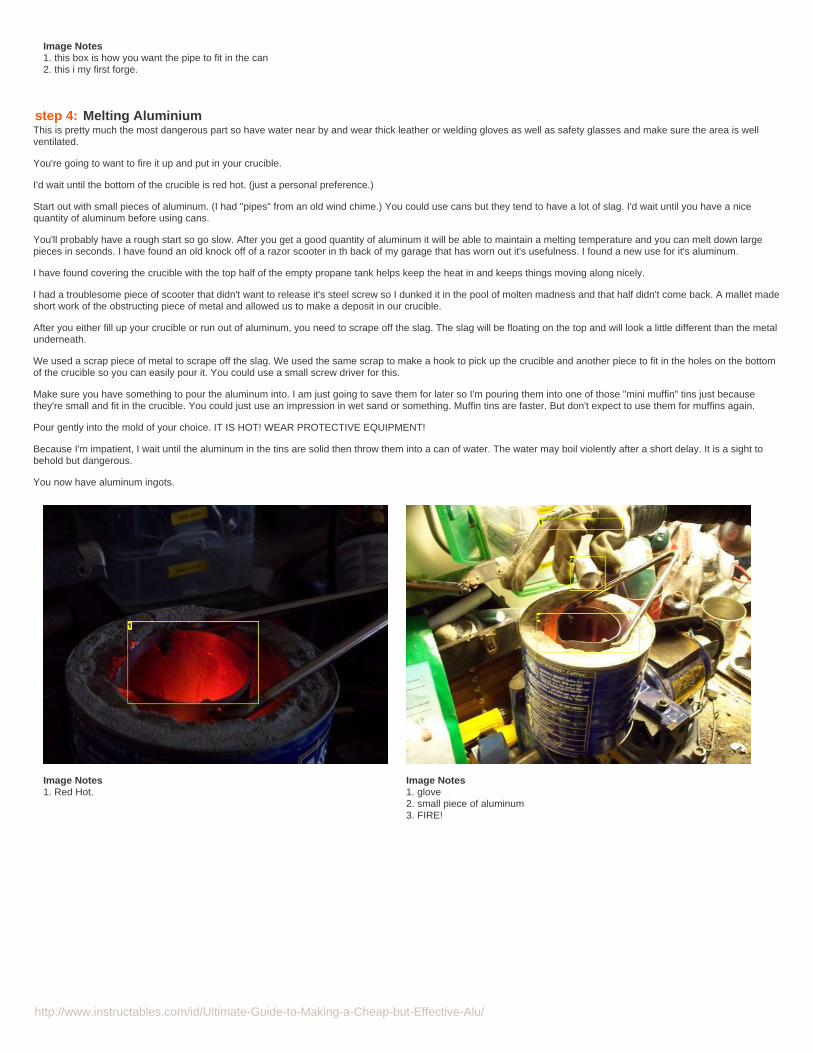
Image Notes1. this box is how you want the pipe to fit in the can2. this i my first forge.
step 4: Melting AluminiumThis is pretty much the most dangerous part so have water near by and wear thick leather or welding gloves as well as safety glasses and make sure the area is wellventilated.
You're going to want to fire it up and put in your crucible.
I'd wait until the bottom of the crucible is red hot. (just a personal preference.)
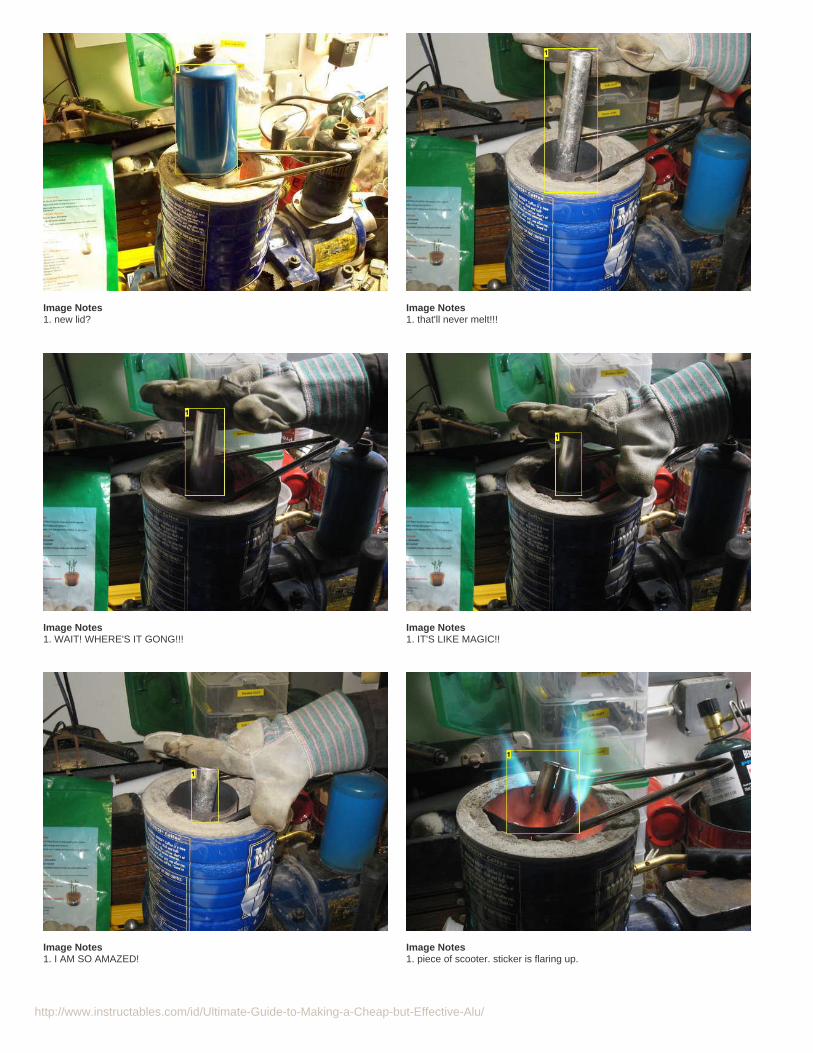
Start out with small pieces of aluminum. (I had "pipes" from an old wind chime.) You could use cans but they tend to have a lot of slag. I'd wait until you have a nicequantity of aluminum before using cans.
You'll probably have a rough start so go slow. After you get a good quantity of aluminum it will be able to maintain a melting temperature and you can melt down largepieces in seconds. I have found an old knock off of a razor scooter in th back of my garage that has worn out it's usefulness. I found a new use for it's aluminum.
I have found covering the crucible with the top half of the empty propane tank helps keep the heat in and keeps things moving along nicely.
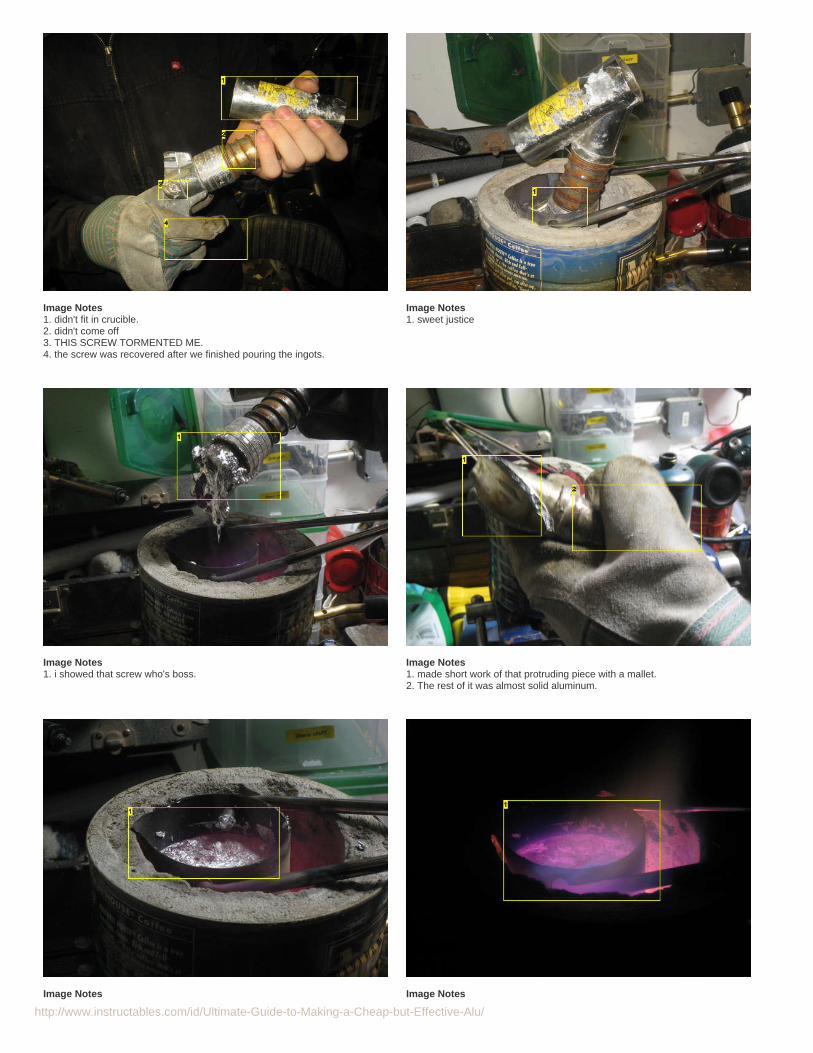
I had a troublesome piece of scooter that didn't want to release it's steel screw so I dunked it in the pool of molten madness and that half didn't come back. A mallet madeshort work of the obstructing piece of metal and allowed us to make a deposit in our crucible.
After you either fill up your crucible or run out of aluminum, you need to scrape off the slag. The slag will be floating on the top and will look a little different than the metalunderneath.
We used a scrap piece of metal to scrape off the slag. We used the same scrap to make a hook to pick up the crucible and another piece to fit in the holes on the bottomof the crucible so you can easily pour it. You could use a small screw driver for this.
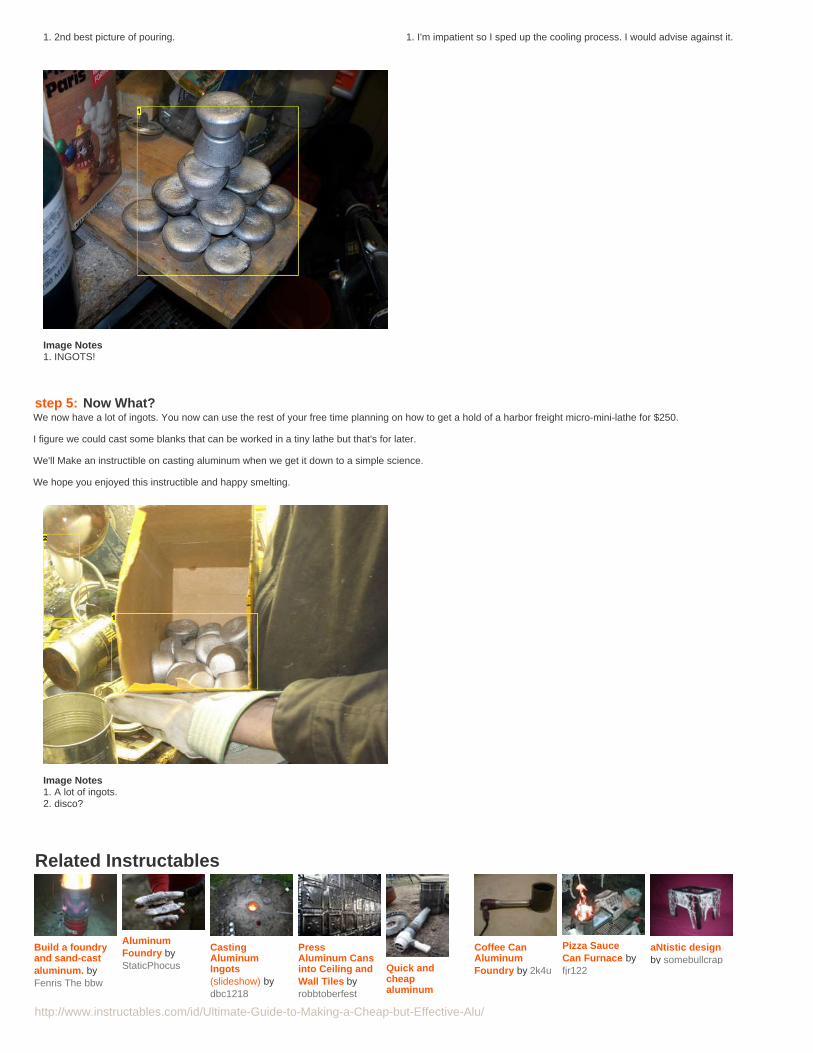
Make sure you have something to pour the aluminum into. I am just going to save them for later so I'm pouring them into one of those "mini muffin" tins just becausethey're small and fit in the crucible. You could just use an impression in wet sand or something. Muffin tins are faster. But don't expect to use them for muffins again.
Pour gently into the mold of your choice. IT IS HOT! WEAR PROTECTIVE EQUIPMENT!
Because I'm impatient, I wait until the aluminum in the tins are solid then throw them into a can of water. The water may boil violently after a short delay. It is a sight tobehold but dangerous.
You now have aluminum ingots.
Image Notes1. Red Hot.
Image Notes1. glove2. small piece of aluminum3. FIRE!
http://www.instructables.com/id/Ultimate-Guide-to-Making-a-Cheap-but-Effective-Alu/
Image Notes1. new lid?
Image Notes1. that'll never melt!!!
Image Notes1. WAIT! WHERE'S IT GONG!!!
Image Notes1. IT'S LIKE MAGIC!!
Image Notes1. I AM SO AMAZED!
Image Notes1. piece of scooter. sticker is flaring up.
http://www.instructables.com/id/Ultimate-Guide-to-Making-a-Cheap-but-Effective-Alu/
Image Notes1. didn't fit in crucible.2. didn't come off3. THIS SCREW TORMENTED ME.4. the screw was recovered after we finished pouring the ingots.
Image Notes1. sweet justice
Image Notes1. i showed that screw who's boss.
Image Notes1. made short work of that protruding piece with a mallet.2. The rest of it was almost solid aluminum.
Image Notes Image Notes

http://www.instructables.com/id/Ultimate-Guide-to-Making-a-Cheap-but-Effective-Alu/
1. that's a lot of aluminum 1. we turned the lights out for this one. Dangerous but awesome.
Image Notes1. scraping slag
Image Notes1. a lot of slag.
Image Notes1. it's actually more red in color.2. hook for pouring
Image Notes1. Best picture of pouring
Image Notes Image Notes
http://www.instructables.com/id/Ultimate-Guide-to-Making-a-Cheap-but-Effective-Alu/
1. 2nd best picture of pouring. 1. I'm impatient so I sped up the cooling process. I would advise against it.
Image Notes1. INGOTS!
step 5: Now What?We now have a lot of ingots. You now can use the rest of your free time planning on how to get a hold of a harbor freight micro-mini-lathe for $250.
I figure we could cast some blanks that can be worked in a tiny lathe but that's for later.
We'll Make an instructible on casting aluminum when we get it down to a simple science.
We hope you enjoyed this instructible and happy smelting.
Image Notes1. A lot of ingots.2. disco?
Related Instructables
Build a foundryand sand-castaluminum. byFenris The bbw
AluminumFoundry byStaticPhocus
CastingAluminumIngots(slideshow) bydbc1218
PressAluminum Cansinto Ceiling andWall Tiles byrobbtoberfest
Quick andcheapaluminum
Coffee CanAluminumFoundry by 2k4u
Pizza SauceCan Furnace byfjr122
aNtistic designby somebullcrap
http://www.instructables.com/id/Ultimate-Guide-to-Making-a-Cheap-but-Effective-Alu/
melting furnacesetup byrobbtoberfest
Advertisements
Comments50 comments Add Comment view all 394 comments
russian5 says: Oct 28, 2009. 4:48 PM REPLYWould this work for gold/silver and pewter?
madscientist167 says: Oct 22, 2009. 5:29 PM REPLYyou will be held responsible partially
tacamaral says: Oct 12, 2009. 5:55 PM REPLYI don't have Quickrete in my country, only plain old concrete. I know I shouldn't use it, so I'd really like some ideas. : ) Do you guys think if I let a thick steelpipe inside the foundry, with a nice layer of sand between the center steel pipe and the outer can (or larger steel pipe, let's say) it would work? If I'm notwork, sand is an insulating substance.
About the scrapyard question: not worth it, guys. It would be better if you just crunched the cans up and took them to the scrapyard - they're sending it to berecycled, which is what you're doing here (except theirs is going to be a bit cleaner, since it's induction melting). : )
Nice instructable. Faved. : )
junits15 says: Sep 27, 2009. 7:12 PM REPLYhow much do you think a scrapmetal yard would pay for these?
cowscankill says: Oct 5, 2009. 6:17 AM REPLYI found that a pound of aluminum i about $1.26 (USD). Is that good? I mean, free cans into money is good enough for me, but I wonder if it is worth theeffort...
junits15 says: Oct 5, 2009. 1:42 PM REPLYwell considering it would take alot of worck and cans to make that, but then again, you might get diffrent rates depending on what scrapmetal yardyou go to. The real thing to do would be to try and forge old copper pipes, thats where the real money is!
cowscankill says: Oct 5, 2009. 2:07 PM REPLYYeah, like 3 times as much for copper! ($3 and something)
pinkhairkid says: Sep 9, 2009. 4:29 PM REPLYquestiondoes it have to be quickrete?could you use just concrete mix?
sharlston says: Sep 30, 2009. 7:41 AM REPLYit has to be quick crete concrete has bubbles and bubbles explode
1up says: Sep 27, 2009. 8:01 PM REPLY"We'll Make an instructible on casting aluminum when we get it down to a simple science."
Here, Make did it for you! :Dhttp://blog.makezine.com/archive/2009/09/make_projects_-_cast_metal_pyramid.html
superhubbardman says: Sep 19, 2009. 4:49 AM REPLYDelicious, delicious alumuffins:Dgood ible, 5 * and faved

http://www.instructables.com/id/Ultimate-Guide-to-Making-a-Cheap-but-Effective-Alu/
Kaiouss says: Sep 11, 2009. 8:31 AM REPLYIn the beginning of step 4, something you might consider mentioning is using a sand pit for safety, as well. While water is good for tools, if your crucible slips,the foundry tips, or any other seemingly unlikely and therefore freak-out-worthy event occurs, it's easier to dash everything in a big tub full of sand and let itcool than try and land it in a bucket of water that could also spill or erupt in to a boil. Nothing makes a stressful event worse than pieces of metal, boilingwater, molten aluminum, and hot metal tools flying everywhere in an environment littered with tripping hazards. I think both sand and water are good to havearound simultaneously. You can never have too many back up plans.
kingcr3b says: Sep 3, 2009. 2:19 PM REPLYa few words, FUN FUN FUN!But with the ingots can you re melt them so you can make valve covers, engine blocks, heads etc. as long as you have the sand castings. because I want tobuild a F1 engine... maybe... I drink a lot of canned drinks and i steal some out of everyones waste management recycle bins. oh or can i just make littleparts out of aluminum?
hodwooker says: Aug 28, 2009. 3:31 PM REPLYYou need to look into a few books on metal casting. The best source I know of is Lindsay publications www.lindsaybks.com/ the best books they have for thebeginner are by Dave Gingery. He has a great book on a charcoal foundry that leads into building a complete home machine shop. Also there are manyother books on foundry skills and practices.
albylovesscience says: Aug 7, 2009. 6:23 PM REPLYsweet ohh can i ask a question do they let some one under 14 buy a soldering iron
history323 says: Aug 18, 2009. 1:16 PM REPLYyeah i bought mine 2 years ago and in 13!
x z i t says: Aug 8, 2009. 2:54 PM REPLYPROLLY NOT. ASK YOUR MOM
albylovesscience says: Aug 8, 2009. 5:16 PM REPLYthanks
qballcat says: Aug 14, 2009. 11:31 AM REPLYof course they can,i was allowed to buy a propane torch and im 13 CANADA FTW
albylovesscience says: Aug 14, 2009. 11:39 AM REPLYmy dad's getting me one on monday
albylovesscience says: Aug 14, 2009. 11:38 AM REPLYgrrrr Canada rocks that's why BACONNNNNNNNY GOOODNESS
qballcat says: Aug 14, 2009. 11:41 AM REPLYHELL YA BACON, also this may be stereotypical but the maple syrup (the real stuff) is amazing!!!!
albylovesscience says: Aug 14, 2009. 12:13 PM REPLYi did not mean to be stereotypical i just prefer Canadian bacon over any type including the pepperd one MMMMMMMMMMMM
JamesRPatrick says: Aug 28, 2009. 12:42 PM REPLYBut Canadian bacon is just smoked ham. It's not crispy or anything special. Oh well, I guess I'm just too used to American style.I'm waiting for my propane tank to run dry.
seltzer10 says: Aug 13, 2009. 12:55 PM REPLYhey alby i really hope you can get a soldering iron ,
hopefully people who read my comment about iron oxide know what im talking about
http://www.instructables.com/id/Ultimate-Guide-to-Making-a-Cheap-but-Effective-Alu/
albylovesscience says: Aug 14, 2009. 12:16 PM REPLYthanks im so exited to enter the world of soldering and burning myself with 500 degree metal
xinx says: Aug 14, 2009. 10:25 AM REPLYunless he is pouring powdered rust into the crucible, I wouldn't be too worried. A bit of iron oxide residue won't hurt anybody. Oh and by the way,EVERYBODY on this site besides the stupid 13 year olds knows what Thermite is and how to make it, so don't act like it's forbidden knowledge.
history323 says: Aug 18, 2009. 1:15 PM REPLYdude im 13 and ive known what thermite is and how to make it since I was like 11! It is a mixture of iron oxide Fe2O3 (rust) and aluminum powder.When it is ignited the aluminum powder reacts with the O3 part of the rust in a highly exothermic reaction, the resulting product is molten iron. duhthe mix is 76.3% iron oxide and 27.3% aluminum powder:)
Sora_1_2 says: Aug 19, 2009. 8:51 AM REPLYHmmm well either someone uses google alot, or really needs to get laid.
seltzer10 says: Aug 13, 2009. 12:52 PM REPLYdear god whatever you do NOT use tools with any IRON OXIDE on them please it will end BADLY
nice instuctable btw
justin55 says: Jan 2, 2008. 6:26 AM REPLYim not sure exactly what the cause was but last weekend i had a propane torch and i decided to heat a penny with it and discovered that it melts, then i did iton my wet carport and it exploded all over my face and it looks like i scraped up my face really bad, i could have been blinded easily and i recommend beingvery careful with water!!!!!!!!!
leebryuk says: Mar 24, 2008. 5:34 PM REPLYIt's the same reason that you don't place water onto a grease fire. The water rapidly (very, very rapidly) turns into a vapor. When it turns to a vapor itexpands and moves outwards. In the case of a very hot liquid, the water turns into water gas and pushes everything outwards. There is no need for achemical reaction. Rather, the physical transition between phases is what causes the explosion.
snowdruid says: Aug 7, 2009. 2:33 PM REPLYactually if the grease or oil is hot enough the water decomposes into hydrogen an oxygen instantly ignites and creates a huge fireball might look coolbut is very dangerous
leebryuk says: Aug 7, 2009. 5:34 PM REPLYWater decomposes into hydrogen and oxygen around 3,000C. Then plasma incineration.
Cooking oil (such as canola) top out around 500F. So it is simply a phase transition. As a solid or liquid transitions to a gas they expand andoccupy much more room. When this transition and expansion happens very quickly it is termed as an explosions.
A bomb undergoes a chemical reaction that gives off heat and gas at the same time which makes it occupy more room very quickly. Gundpowderis a great example. Just a tiny bit can hurl a tank shell for miles.
Water thrown into a 500F fire immediately and rapidly expands into a gas. This transition throws oodles of burning oil into the air. Not a lot of funto be around. But no chemical reaction is necessary.
Jonny Appleseed says: Jan 4, 2008. 3:37 PM REPLYsome pennies melt because at some point they started making them out of zinc (someone correct me if I'm wrong) that explosion was probably theconcrete exploding underneath the molten metal when it was heated, because there is still small amounts of water in the cured concrete...when you heatit, that water turns to steam, creating lots of pressure, eventually it explodes due to built up pressure , thats why you use so little water in the cementwhen you make this furnace, you also have to ram it in to eliminate any air pockets.
jasontimmer says: Apr 1, 2009. 12:42 AM REPLYIn 1982 they switched from basically pure copper pennies to copper coated zinc. In fact, pre-1982 pennies are worth more as scrap copper than theyare as pennies.
morgantheblack says: Mar 24, 2008. 3:33 PM REPLY1944-1982, US pennies were 95% copper. 82 and newer are a zinc blank, with a copper wash.
Wikipedia on Pennies

http://www.instructables.com/id/Ultimate-Guide-to-Making-a-Cheap-but-Effective-Alu/
Shark500 says: Jan 5, 2008. 5:54 PM REPLYwell put
Shark500 says: Jan 2, 2008. 7:12 PM REPLYya probably shouldn't have done that. ; )chicks dig guys with scars.
be safe, be well, and thanks
idon says: Mar 26, 2008. 3:30 PM REPLYhahah true that, Hockey player here. split my chin open 4 times now. 9 stiches each time. funny thing is, i didnt realize i cut it till the EMT came up tome and was like, your going to need stiches. i looked in his mirror and i had blood all the way down my neck. happens evrey time.. i still get some hot*** biznatchesss
K.hall86 says: Dec 10, 2007. 8:19 PM REPLYshark,this is a pretty sweet setup! I have a little bit of experience with melting aluminum and brass in a oxygen blown concrete forge. one thing that i see could helpout would be to make a concrete lid. all the forges that i have used, incorporate a two to three inch thick donut shaped lid that can be lifted and swung awayfrom the combustion chamber. with an insulating lid you will be able to reach melting temp much faster, and also provide a safety feature.
I think that if you produced a forge that used two torches, (one on the opposite side of the can) it would provide even heating and potentially highertemperatures.
Also, in my reading, i am mot sure if i read correctly, but it appeared that you said to preheat the crucible, and then add the metal....this is, in my opinion, abad idea. although it is not commonly heard of, Aluminum can create air pockets that will in essence pop like bacon grease in a hot skillet...all metal that is tobe melted should be placed in the crucible, inside the forge before lighting. i only say this in caution....i have seen a raindrop sized spec of molten Al burnthrough a denim shirt and half an inch into a co-worker's back...1400 deg. F is no laughing matter.
aside from that, i do indeed like your design! and hope to see more from you.
P.S. when you get into the casting phase, be sure to preheat molds as well...hot molds allow for greater details.
Shark500 says: Dec 11, 2007. 4:33 PM REPLYThanks. it's good to hear from people with experience.That's pretty much what instructables is about.
The only reason i preheat is because I'm afraid the aluminum will sink away all the heat especially with large pieces. I didn't know of the potential hazardso thank you for the tip.
My cousin also suggested the twin blower design but they are quite pricey.He also suggested a lid but the handle I put on the crucible gets in the way.If I had a welder I could make a better design but this is pretty much a minimalist (cheap) guide. lolI'll look into other possibilities to better facilitate a lid.
I really appreciate our input.
Thanks for the comment
NewB007 says: Aug 7, 2009. 4:15 PM REPLYI agree with K.hall86 about the preheating. If you want to add more aluminum after you already have a melt, though, you can place the new materialnear the heat and pre-heat the aluminum to drive out any moisture before adding it to the crucible. Give it several minutes, and add it slowly.
aqwiz says: Apr 16, 2009. 7:14 AM REPLYthere's an instructable for an arc welder from three old microwaves you know :p
butthead95 says: Jan 30, 2009. 6:28 PM REPLYyeah just make 2 indents in the lid for the hndles
srilyk says: Dec 14, 2007. 10:37 AM REPLYUse your cardboard method to create "bumps" to put over top of the handles - that will get you the best of both worlds.
You're right about wanting to eliminate moisture -- even one small drop (even, say trapped soda), if it's below the melting aluminum, will most likelycreate a large explosion firing molten aluminum, slag, and most likely bits of forge everywhere.
I've heard of carts being blown to pieces and wheels thrown through/into metal walls. So be careful!
I'm not sure how your speed quench will affect the strength (or weakness) of the aluminum - often times too fast will create metal that's brittle --weakened by the thermal shock. And then there's the possibility for slight explosions - you're right about it being dangerous, but it can also negativelyaffect the metal - I'd do some research on the topic before continuing with my impatience ;)
Great Instructable though!

http://www.instructables.com/id/Ultimate-Guide-to-Making-a-Cheap-but-Effective-Alu/
fgleich says: Apr 23, 2009. 5:03 PM REPLYFrom what I've read, letting the metal cool normally makes it really hard ( Aluminum of course ), and quenching it suddenly like that softens it.This is the opposite of steel
Shark500 says: Dec 14, 2007. 3:19 PM REPLYmeh, it's going to be melted down again anyway.We use full face shields and do cover the crucible so i assume the damage would be minimal. we haven't had a blowout yet but... meh.que serra serra.
thanks for the comment
solidification says: Dec 13, 2007. 8:58 PM REPLY"Smelting" is a little different from what you are doing. Take the "S" off and you've got it. (Smelting is more related to reducing the element from itsmineral compounds.)
Some words of advice:
you can preheat the metal or just stick it into your "crucible", its all the same. (although you might as well just put it into the "crucible" so it retains theheat a little better rather than acting like a heat sink)
dont worry about the Al sucking away heat while its in the crucible. It all needs the same amount of energy to melt.
When I charge a melt in the #30 I use, I place a very small amount of Aluminum(356) into the base of the crucible so its not touching the sides at all. Iallow this to become liquid after about 10-15 min and add the rest of the charge so long as it does not touch both walls at the same time. Theadvantage to letting a small amount become liquid before adding more metal, is the liquid has greater surface contact with the new metal. The liquidAl has much better thermal conductivity than the hot gasses in the crucible, such that it aids in heating the rest of the added charge.
As for adding more metal.. do not drop/plop metal into the crucible. use some longer tongs to feed it in. This will avoid spatter.
Also, the reason for not allowing pieces to touch the walls of the crucible is due to the thermal expansion of the metal. In a ceramic crucible, theadded stress on the walls leads to deterioration of the walls with cracking and eventually failure. (a steel cup might not have as much of an issue withthat).
As for the crucible you have, you might not realize it, but you are transferring iron from the can into the liquid Al. It might seems strange because itsnot hot enough to melt steel, but diffusion happens even at room temperature(just... really really really slowly). At warmer temps like 660C, iron candiffuse quite a bit more rapidly.
for future considerations, you might want to stay away from galvanized steels*. Placing them into the furnace is bad for two reasons: 1. Safety. ZincOxide is pretty bad for you. 2. Zinc diffuses very quickly into the steel (faster than you can burn it off if you tried). there is a degree of LME whichtakes place, but its more about the brittle intermetallics that form and are prone to failure.*you can easily remove the zinc with warm/hot lemon juice or vinegar if you can stomach the smell.
A propane setup is your best bet for DIY home stuff. it is pretty cheap still and create heat quickly. Propane + small blower will get you nicely into thesuperheating range for bronze.
a welding unit (oxy/acet, stick) is a great investment for someone who wants to create and explore science and make stuff. MIG/TIG are nice thingstoo, but perhaps not worth the investment for you just yet. (it is difficult to justify $500 or $1500 on something you might not use very often) (andoxy/acet and stick offer a wide variety of applications... even joining aluminum or bronze castings...)
You could save up and drop money into a manufactured furnace and probably save some $$ in the long run... BUT... nothing beats those evenings ofrunning your own backyard furnace (the fifth or sixth version of that furnace probably), roasting some marshmallows and sitting back listening to thatbaby roar as the sun sets.
Keep it up.
Shark500 says: Dec 13, 2007. 10:54 PM REPLYWow thanks for the info..
How does the iron in the aluminum affect it?How much does a professional furnace cost (about)?
This is a lot of useful information. I've just started my journey into the world of metal smithing so this very valuable to me.This is one of the best things about instructables. That people can share ideas and learn from more experienced people.
Thanks for the info.
view all 394 comments