Embed Size (px)
Citation preview
StorageCraft - Level 11, 53 Walker Street, North Sydney, NSW 2060
Telephone: +61 2 9929 9770 | Facsimile: +61 2 9929 9771 | www.storagecraft.com.au Page 1 of 22
Document ID:00000184 Last Modified:12/12/2008
HOW TO: Perform a Hardware Independent Restore (HIR)
Key Words:
How to, HIR, Hardware independent restore, recovery
Situation:
The purpose of this document is to give you a step by step guide on how to perform a hardware
independent restore from one system to another.
Before reading this document, please read the ShadowProtect Server Edition User Guide that is located
on the Desktop and Server Edition CD under the DOCUMENTATION directory. In particular read the
chapter regarding the StorageCraft Recovery Environment.
NON-Hardware Independent Restores
The steps and options given in this document also relate to restoring to the same hardware, especially
the information at the end of the document relating to the restore of Domain Controllers and SQL
servers. The only difference is that you do not select the Hardware Independent Restore Option on the
screen where you specify restore options.
Solution:
Let’s assume that you have a source system and a target system. We want to move the operating
system and all the applications installed on the source system to the target system. You also have a full
ShadowProtect image of the source system. This can be a single base image, or a base image and
several incremental images. Please note: If you are restoring to a VMware virtual machine, you must use
the Backup Image Tool to collapse the base and incremental files into a single full file (*.spf).
In this situation, the target system has hardware that differs from the source system - for example:
different disks, network cards, display cards, etc – so you cannot do a simple restore (without the HIR
functionality) to the target system and expect it to boot as there will be insufficient driver support.
Driver Requirements
Please refer to the table below to determine the minimum driver support you will need to provide for
this process to work successfully.

StorageCraft - Level 11, 53 Walker Street, North Sydney, NSW 2060
Telephone: +61 2 9929 9770 | Facsimile: +61 2 9929 9771 | www.storagecraft.com.au Page 2 of 22
The ShadowProtect image of the source system has all the correct drivers to match hardware type X for
the source operating system; however the target system has hardware type Y. This means that you will
need to have available, as a minimum, the following drivers:
The Y drivers for the Mass Storage Device Controller for the source operating system.
The Y drivers for the Mass Storage Device Controller for the Windows Pre-Execution
environment that you choose when booting from the StorageCraft CD. During boot up
you will be able to choose between the XP/2003 Legacy or Vista Pre-Execution
environment.
If you are going to restore from an image on a Network Attached Storage (NAS) device, or from a shared
disk on a system on your network, you will also need the driver for the Y Network Interface Card for the
same two environments.
The Table below shows a matrix of what drivers you will need in each of the environments.
Source System StorageCraft CD
Pre-Execution
Environment (PE)
Target System
Operating System Source Operating System
(SOS)
Vista or
XP/2003 Legacy
Source Operating System
Mass Storage Device
Controller (MSDC)
MSDC Type X
MSDC Driver X for SOS
MSDC Driver Y for
Vista or
XP/2003 Legacy
MSDC Type Y
MSDC Driver Y for SOS
Network Interface
Card (NIC)
NIC Type X
NIC Driver X for SOS
NIC Driver Y for
Vista or
XP/2003 Legacy
NIC Type Y
NIC Driver Y for SOS
What drivers do you already have?
The Windows pre-execution environments on the ShadowProtect CD have generic drivers for standard
displays, mouse and keyboards, NIC cards, etc. They also have the required drivers for Mass Storage
Device Controllers which access common IDE, SATA and SCSI disk drives. If you are using these common
types of disk drives, the pre-execution environments will normally have the required drivers for the HIR
process to insert into the operating system laid down onto the target system, which will allow the target
system to boot.
StorageCraft - Level 11, 53 Walker Street, North Sydney, NSW 2060
Telephone: +61 2 9929 9770 | Facsimile: +61 2 9929 9771 | www.storagecraft.com.au Page 3 of 22
Once you have booted up on the target system you may need to fine tune the system by installing exact
drivers to replace the generic drivers. For example, specific drives for video displays, multiprocessor
boards etc.
VERY VERY VERY important.
If you are restoring a Domain Controller or SQL Server you MUST carry out the steps below
regarding the FIRST BOOT UP of the recovered system. (See page 19)
NON GENERIC Mass Storage Device Controllers (such as RAID Systems)
If you are restoring to RAID systems, you will most likely need to get the correct driver for the HIR
process to be successful.
How to determine if you need specific drivers for the pre-execution environment
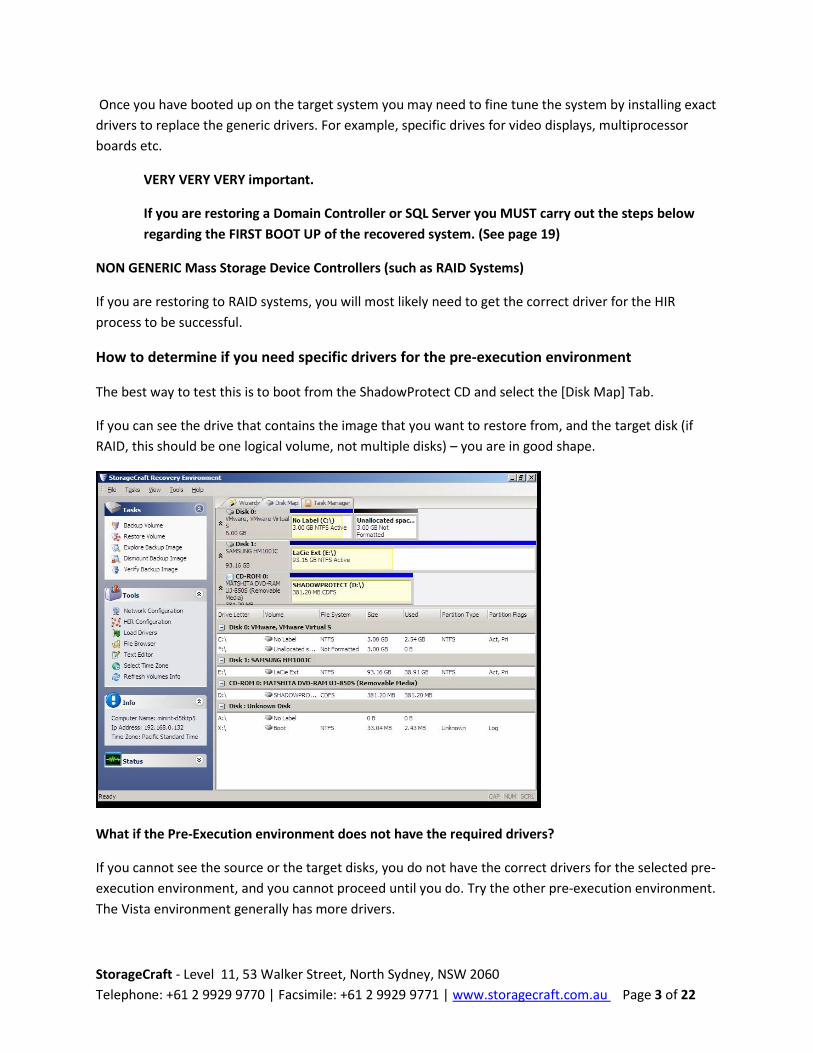
The best way to test this is to boot from the ShadowProtect CD and select the [Disk Map] Tab.
If you can see the drive that contains the image that you want to restore from, and the target disk (if
RAID, this should be one logical volume, not multiple disks) – you are in good shape.
What if the Pre-Execution environment does not have the required drivers?
If you cannot see the source or the target disks, you do not have the correct drivers for the selected pre-
execution environment, and you cannot proceed until you do. Try the other pre-execution environment.
The Vista environment generally has more drivers.

StorageCraft - Level 11, 53 Walker Street, North Sydney, NSW 2060
Telephone: +61 2 9929 9770 | Facsimile: +61 2 9929 9771 | www.storagecraft.com.au Page 4 of 22
Adding Required Drivers to the pre-execution environments
XP/2003 Environment
DURING the early stage of the boot into the XP/2003 pre-execution environment, you may press the
[F6] key to load Mass Storage Device Controller drivers only, NOT network card drivers. These drivers
can only be loaded from a Floppy Drive. These drivers must in the form of a txtsetup.oem file. The [F6]
option will not load drivers in the form of a *.inf and *.sys file.
Vista Environment
AFTER the boot into the Vista pre-execution environment, you may load Mass Storage Device Controller
drivers, or Network Card drivers from a Floppy drive, USB Drive, or a USB Memory stick. These drivers
must be Vista drivers in the form required by Vista, which are *.inf and *.sys files. Thus to recover an
image stored on a NAS drive or on a share on another system, if the NIC drivers of the XP/Legacy
environment are not compatible, you must use the Vista pre-execution environment.
If you can see the source disk and the target disk, and the source operating system is the same as the
pre-execution environment, then the HIR process should have all the drivers it needs to lay down a
bootable operating system on the target disk. The table below summarizes the different scenarios you
may have:
Pre Execution
Environment
Can you see both
source and target
disks?
Source OS is Vista Source OS is
XP/2003
Source OS is
2000
XP/2003 Y Need Vista drivers
for the HIR Process
OK Need 2000
drivers for the
HIR Process
Vista Y OK Need XP/2003
drivers for the
HIR Process
Need 2000
drivers for the
HIR Process
How do you load the drivers required by the HIR Process.
The drivers that are required for hardware other than the Mass Storage Device Controllers can be
loaded during the HIR process, which occurs AFTER the restore process. Please refer to the steps below.
HIR Process Steps
Step 1 Boot for the ShadowProtect CD.
Step 2 Select the pre-execution environment of choice (generally the Vista Environment)
StorageCraft - Level 11, 53 Walker Street, North Sydney, NSW 2060
Telephone: +61 2 9929 9770 | Facsimile: +61 2 9929 9771 | www.storagecraft.com.au Page 5 of 22
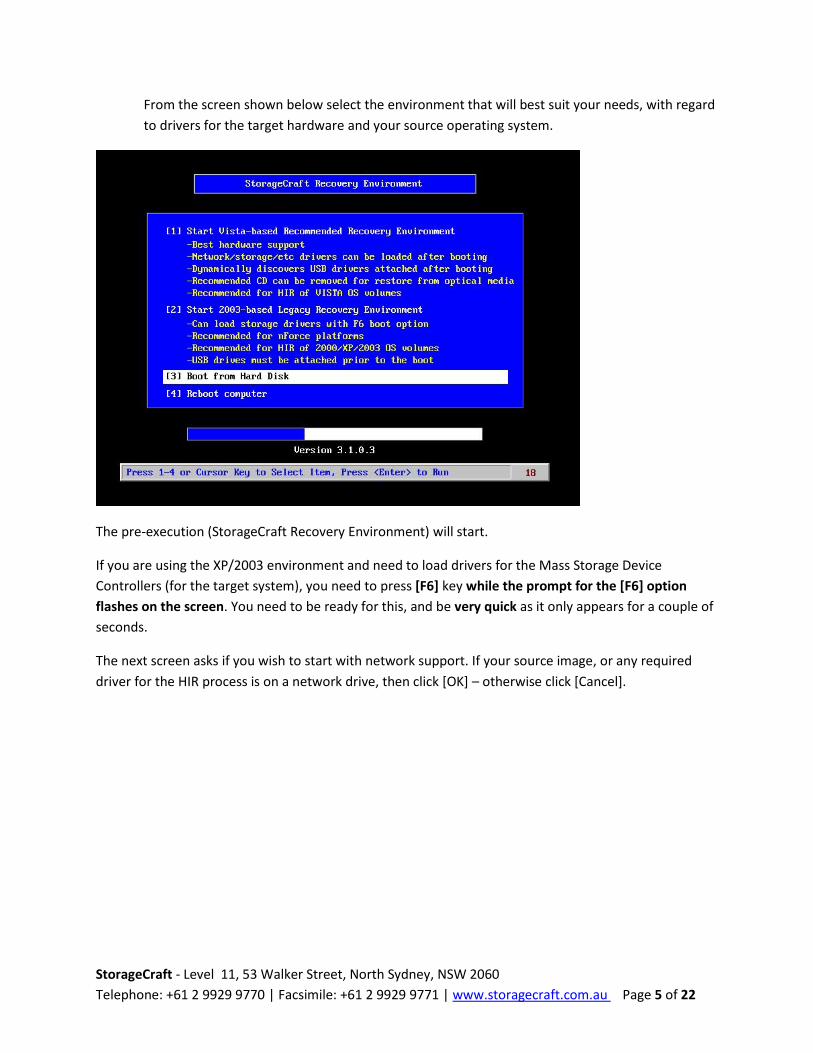
From the screen shown below select the environment that will best suit your needs, with regard
to drivers for the target hardware and your source operating system.
The pre-execution (StorageCraft Recovery Environment) will start.
If you are using the XP/2003 environment and need to load drivers for the Mass Storage Device
Controllers (for the target system), you need to press [F6] key while the prompt for the [F6] option
flashes on the screen. You need to be ready for this, and be very quick as it only appears for a couple of
seconds.
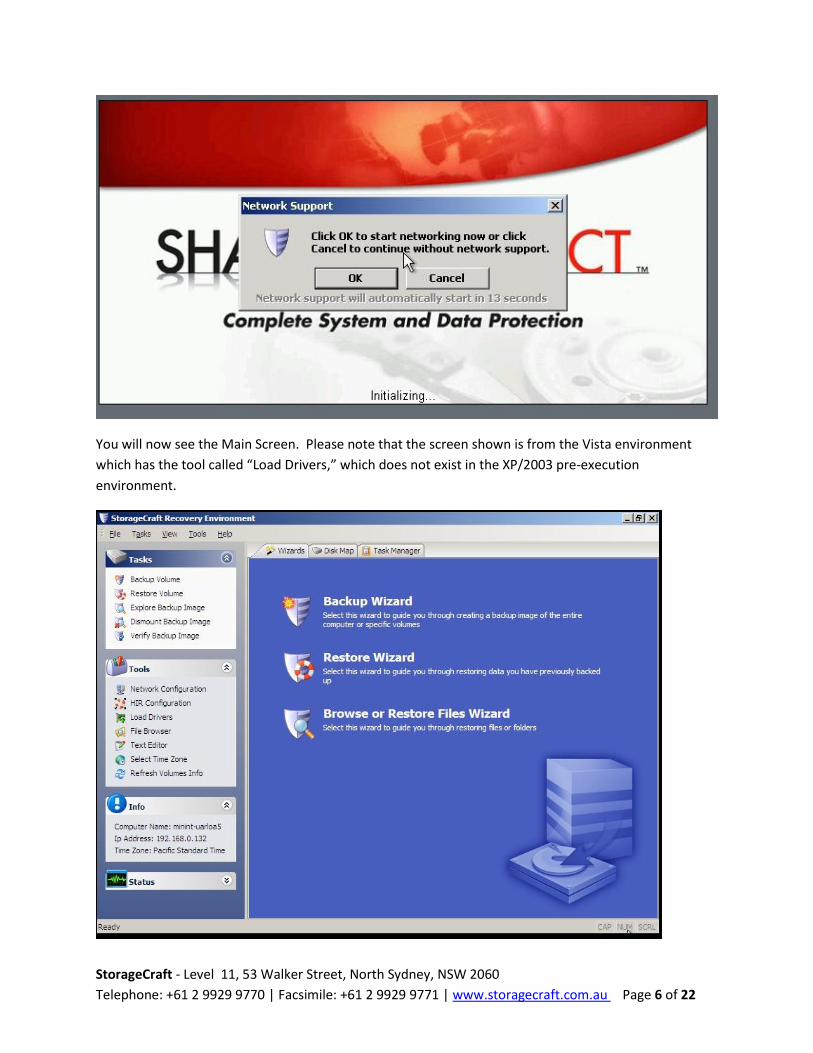
The next screen asks if you wish to start with network support. If your source image, or any required
driver for the HIR process is on a network drive, then click [OK] – otherwise click [Cancel].
StorageCraft - Level 11, 53 Walker Street, North Sydney, NSW 2060
Telephone: +61 2 9929 9770 | Facsimile: +61 2 9929 9771 | www.storagecraft.com.au Page 6 of 22
You will now see the Main Screen. Please note that the screen shown is from the Vista environment
which has the tool called “Load Drivers,” which does not exist in the XP/2003 pre-execution
environment.
StorageCraft - Level 11, 53 Walker Street, North Sydney, NSW 2060
Telephone: +61 2 9929 9770 | Facsimile: +61 2 9929 9771 | www.storagecraft.com.au Page 7 of 22
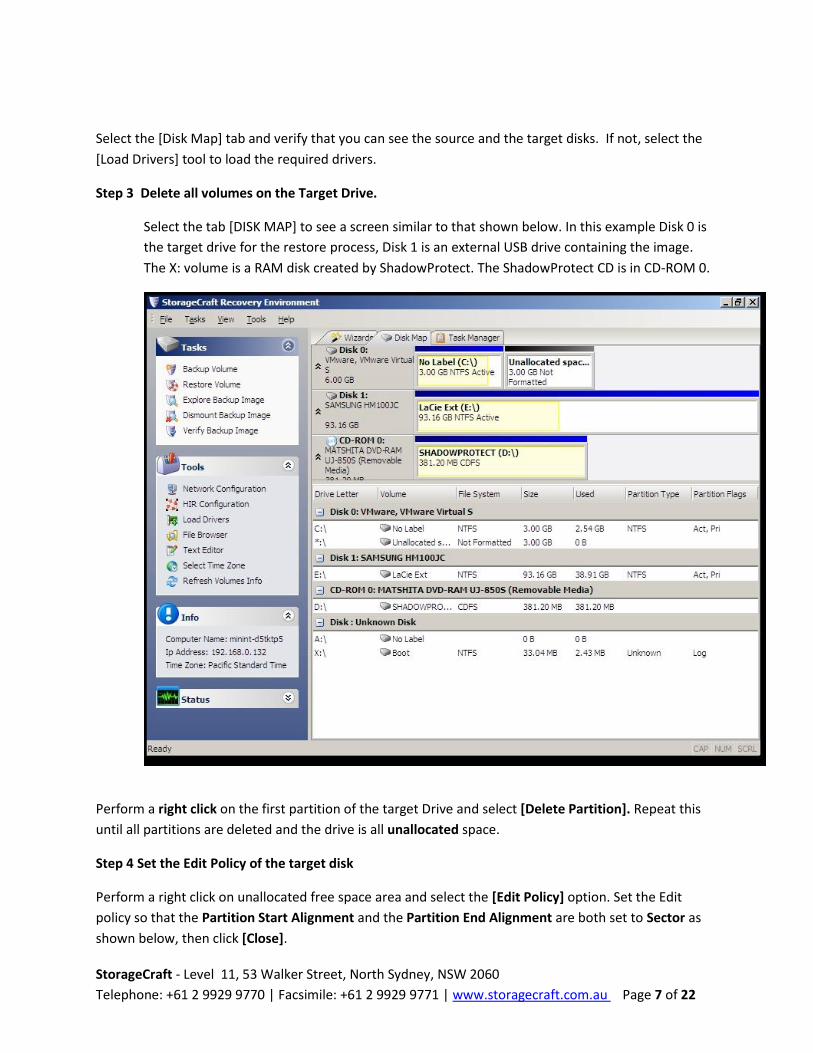
Select the [Disk Map] tab and verify that you can see the source and the target disks. If not, select the
[Load Drivers] tool to load the required drivers.
Step 3 Delete all volumes on the Target Drive.
Select the tab [DISK MAP] to see a screen similar to that shown below. In this example Disk 0 is
the target drive for the restore process, Disk 1 is an external USB drive containing the image.
The X: volume is a RAM disk created by ShadowProtect. The ShadowProtect CD is in CD-ROM 0.
Perform a right click on the first partition of the target Drive and select [Delete Partition]. Repeat this
until all partitions are deleted and the drive is all unallocated space.
Step 4 Set the Edit Policy of the target disk
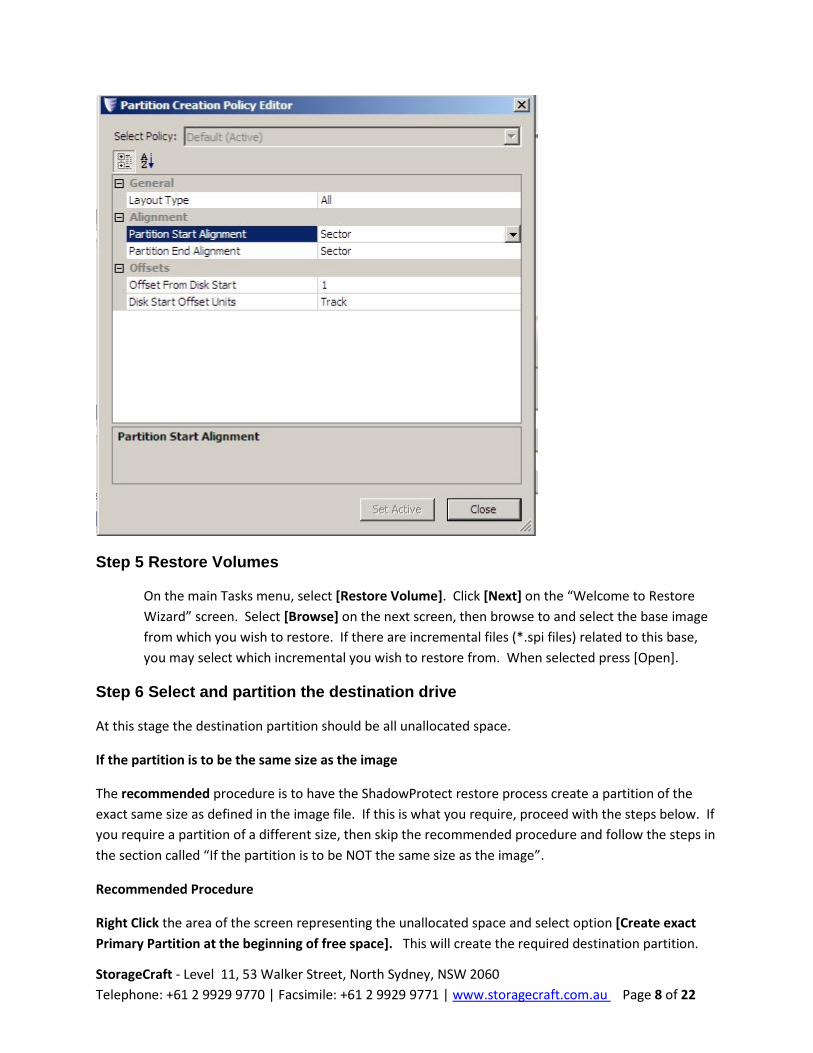
Perform a right click on unallocated free space area and select the [Edit Policy] option. Set the Edit
policy so that the Partition Start Alignment and the Partition End Alignment are both set to Sector as
shown below, then click [Close].
StorageCraft - Level 11, 53 Walker Street, North Sydney, NSW 2060
Telephone: +61 2 9929 9770 | Facsimile: +61 2 9929 9771 | www.storagecraft.com.au Page 8 of 22
Step 5 Restore Volumes
On the main Tasks menu, select [Restore Volume]. Click [Next] on the “Welcome to Restore
Wizard” screen. Select [Browse] on the next screen, then browse to and select the base image
from which you wish to restore. If there are incremental files (*.spi files) related to this base,
you may select which incremental you wish to restore from. When selected press [Open].
Step 6 Select and partition the destination drive
At this stage the destination partition should be all unallocated space.
If the partition is to be the same size as the image
The recommended procedure is to have the ShadowProtect restore process create a partition of the
exact same size as defined in the image file. If this is what you require, proceed with the steps below. If
you require a partition of a different size, then skip the recommended procedure and follow the steps in
the section called “If the partition is to be NOT the same size as the image”.
Recommended Procedure
Right Click the area of the screen representing the unallocated space and select option [Create exact
Primary Partition at the beginning of free space]. This will create the required destination partition.

StorageCraft - Level 11, 53 Walker Street, North Sydney, NSW 2060
Telephone: +61 2 9929 9770 | Facsimile: +61 2 9929 9771 | www.storagecraft.com.au Page 9 of 22
If you wish, you may choose other options to create a partition that is not the same size as the
original partition. You can also create custom partition sizing firstly in the disk map area.
If the partition is to be NOT the same size as the image
Right Click the newly created destination partition, and select the option [Set Active].
Check the box to select the created partition as the target partition for the restore.
You should now have an Active (Act) and Primary Partition (Pri) as shown below.
Click [Next].
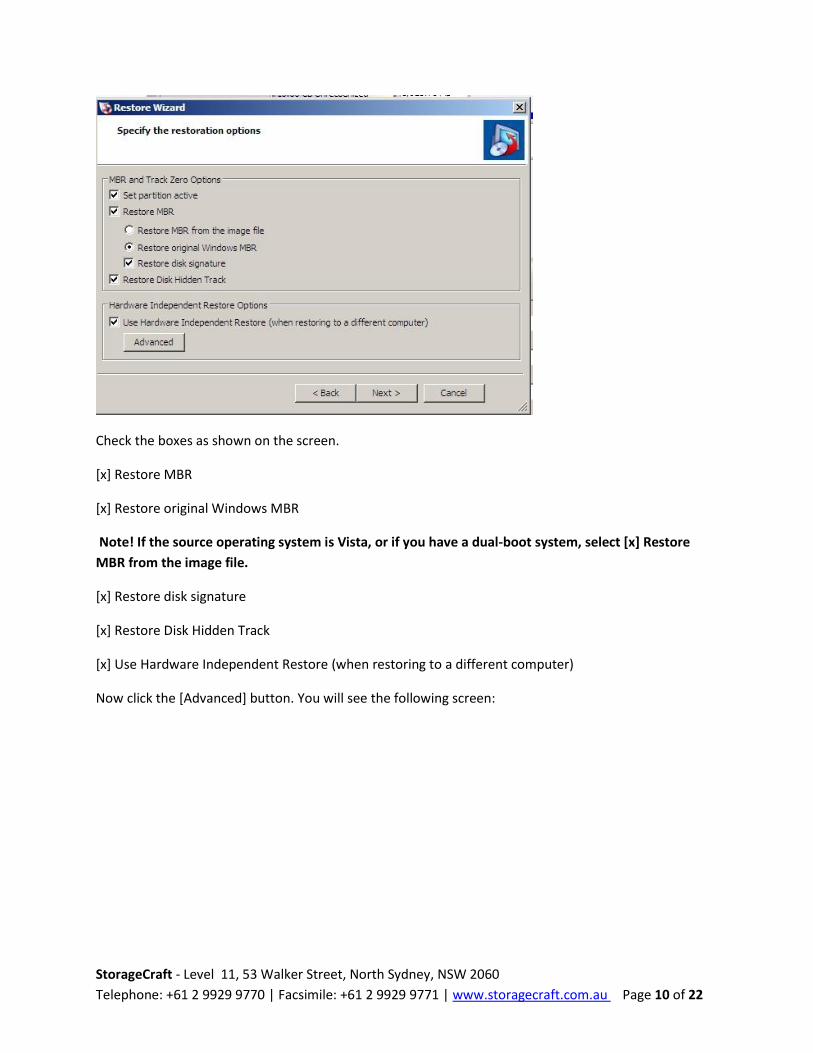
You will now see the Restoration options screen.
StorageCraft - Level 11, 53 Walker Street, North Sydney, NSW 2060
Telephone: +61 2 9929 9770 | Facsimile: +61 2 9929 9771 | www.storagecraft.com.au Page 10 of 22
Check the boxes as shown on the screen.
[x] Restore MBR
[x] Restore original Windows MBR
Note! If the source operating system is Vista, or if you have a dual-boot system, select [x] Restore
MBR from the image file.
[x] Restore disk signature
[x] Restore Disk Hidden Track
[x] Use Hardware Independent Restore (when restoring to a different computer)
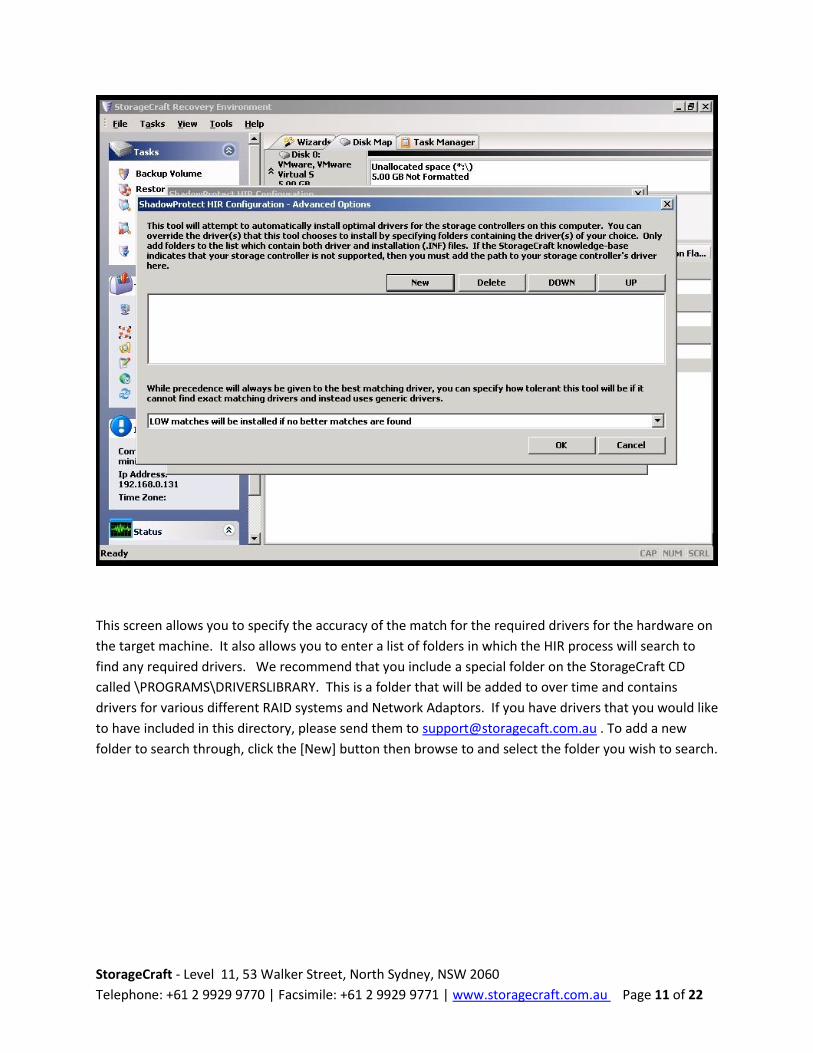
Now click the [Advanced] button. You will see the following screen:
StorageCraft - Level 11, 53 Walker Street, North Sydney, NSW 2060
Telephone: +61 2 9929 9770 | Facsimile: +61 2 9929 9771 | www.storagecraft.com.au Page 11 of 22
This screen allows you to specify the accuracy of the match for the required drivers for the hardware on
the target machine. It also allows you to enter a list of folders in which the HIR process will search to
find any required drivers. We recommend that you include a special folder on the StorageCraft CD
called \PROGRAMS\DRIVERSLIBRARY. This is a folder that will be added to over time and contains
drivers for various different RAID systems and Network Adaptors. If you have drivers that you would like
to have included in this directory, please send them to [email protected] . To add a new
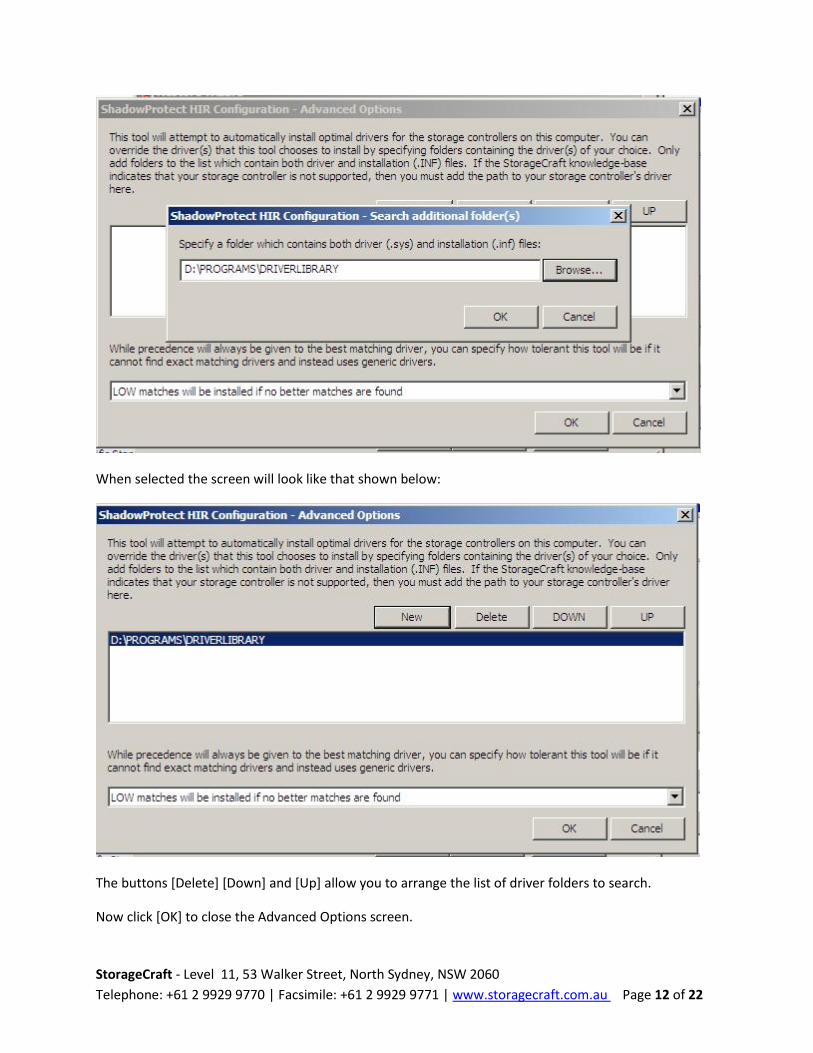
folder to search through, click the [New] button then browse to and select the folder you wish to search.
StorageCraft - Level 11, 53 Walker Street, North Sydney, NSW 2060
Telephone: +61 2 9929 9770 | Facsimile: +61 2 9929 9771 | www.storagecraft.com.au Page 12 of 22
When selected the screen will look like that shown below:
The buttons [Delete] [Down] and [Up] allow you to arrange the list of driver folders to search.
Now click [OK] to close the Advanced Options screen.
StorageCraft - Level 11, 53 Walker Street, North Sydney, NSW 2060
Telephone: +61 2 9929 9770 | Facsimile: +61 2 9929 9771 | www.storagecraft.com.au Page 13 of 22
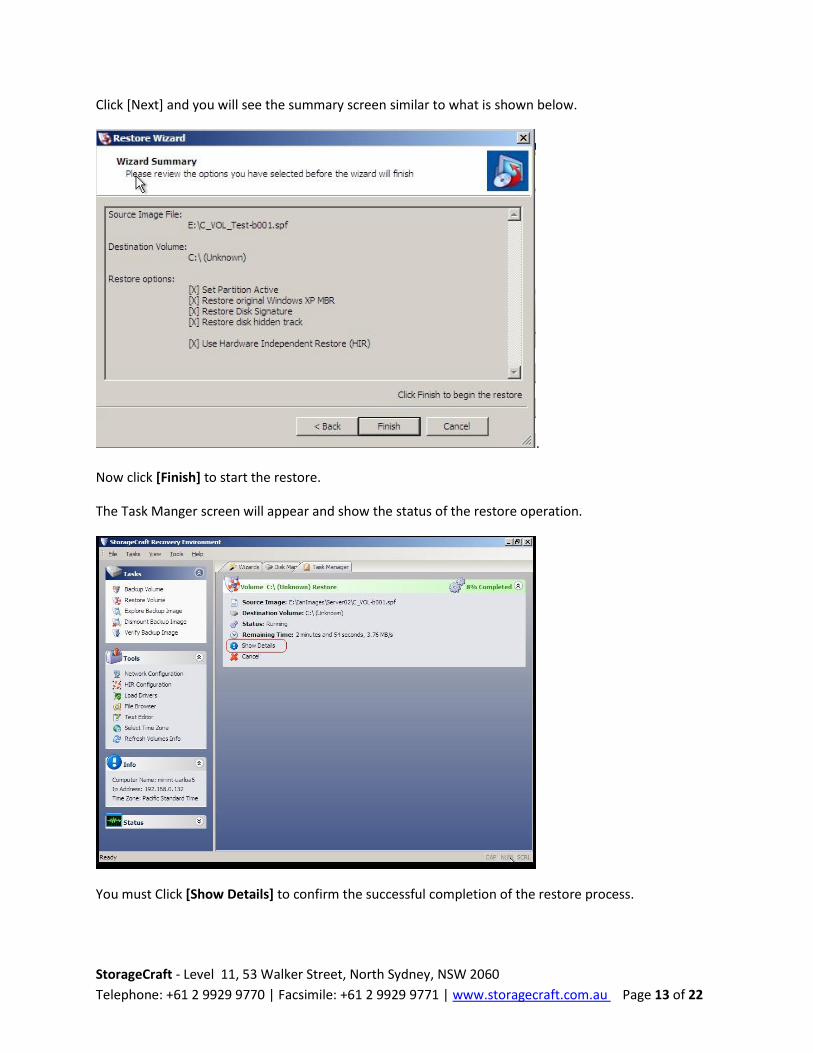
Click [Next] and you will see the summary screen similar to what is shown below.
.
Now click [Finish] to start the restore.
The Task Manger screen will appear and show the status of the restore operation.
You must Click [Show Details] to confirm the successful completion of the restore process.
StorageCraft - Level 11, 53 Walker Street, North Sydney, NSW 2060
Telephone: +61 2 9929 9770 | Facsimile: +61 2 9929 9771 | www.storagecraft.com.au Page 14 of 22
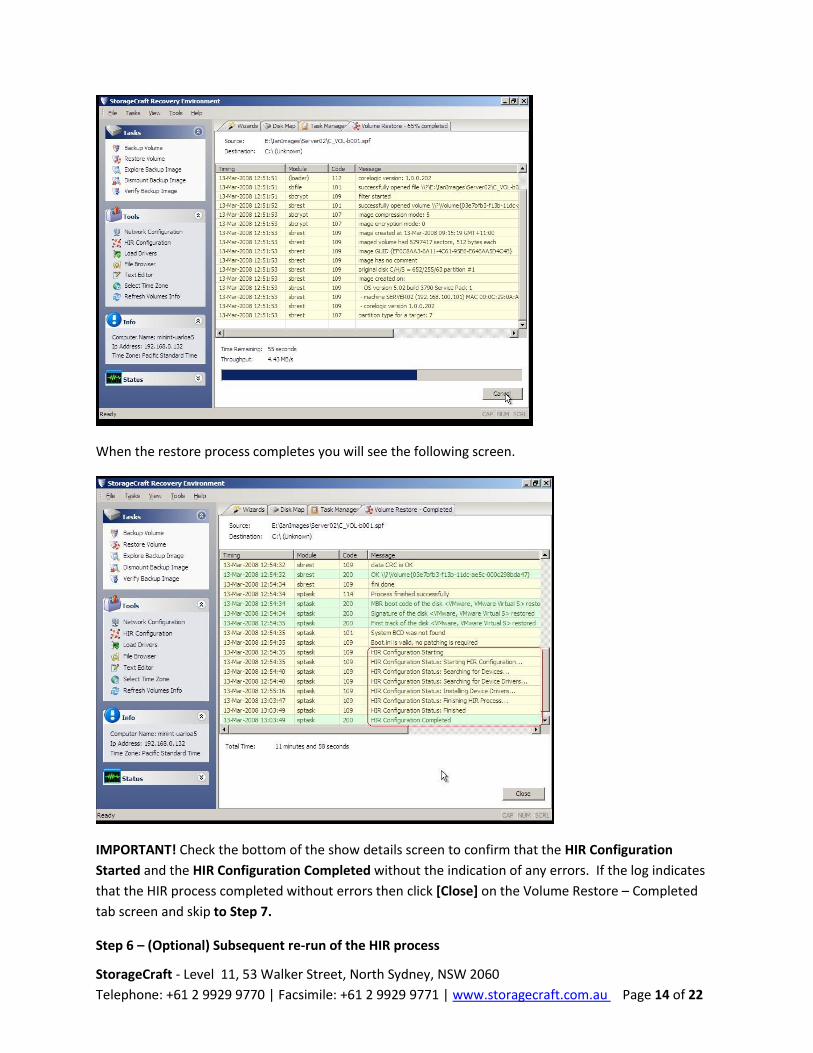
When the restore process completes you will see the following screen.
IMPORTANT! Check the bottom of the show details screen to confirm that the HIR Configuration
Started and the HIR Configuration Completed without the indication of any errors. If the log indicates
that the HIR process completed without errors then click [Close] on the Volume Restore – Completed
tab screen and skip to Step 7.
Step 6 – (Optional) Subsequent re-run of the HIR process
StorageCraft - Level 11, 53 Walker Street, North Sydney, NSW 2060
Telephone: +61 2 9929 9770 | Facsimile: +61 2 9929 9771 | www.storagecraft.com.au Page 15 of 22
NOTE! Only do this optional step if the HIR process did not start, or the system did not boot (after
performing all the other steps listed below) due to an incorrect mass storage driver being loaded. This is
usually indicated by a blue screen and a stop error code of “0x0000007B.”
We have seen in some cases in versions earlier than 3.3.0.16, where the HIR process does not start
because the option to restore hidden tracks was selected, and there were no hidden tracks to restore. It
is not an issue to select the option to restore hidden tracks if there are none to restore. Your system
may not boot if there were hidden tracks to restore, and you did not select the option to restore them,
so the safer option is to select the option to restore hidden tracks.
If the HIR Configuration did not start, or a different mass storage driver is required for the system to
boot, do not be concerned, you do NOT have to repeat the RESTORE PROCESS, just re-run the HIR
process as detailed below. The HIR configuration process can be run as many times as required until
the necessary drivers are inserted into operating system of the target disk. The device driver that must
be correct is the mass storage device driver. After the system has booted you can add the specific
drivers for the rest of your devices. These are often supplied on a Resource CD by the manufacturer of
the hardware, or can be downloaded from their website.
Run the HIR Process (Only if required)
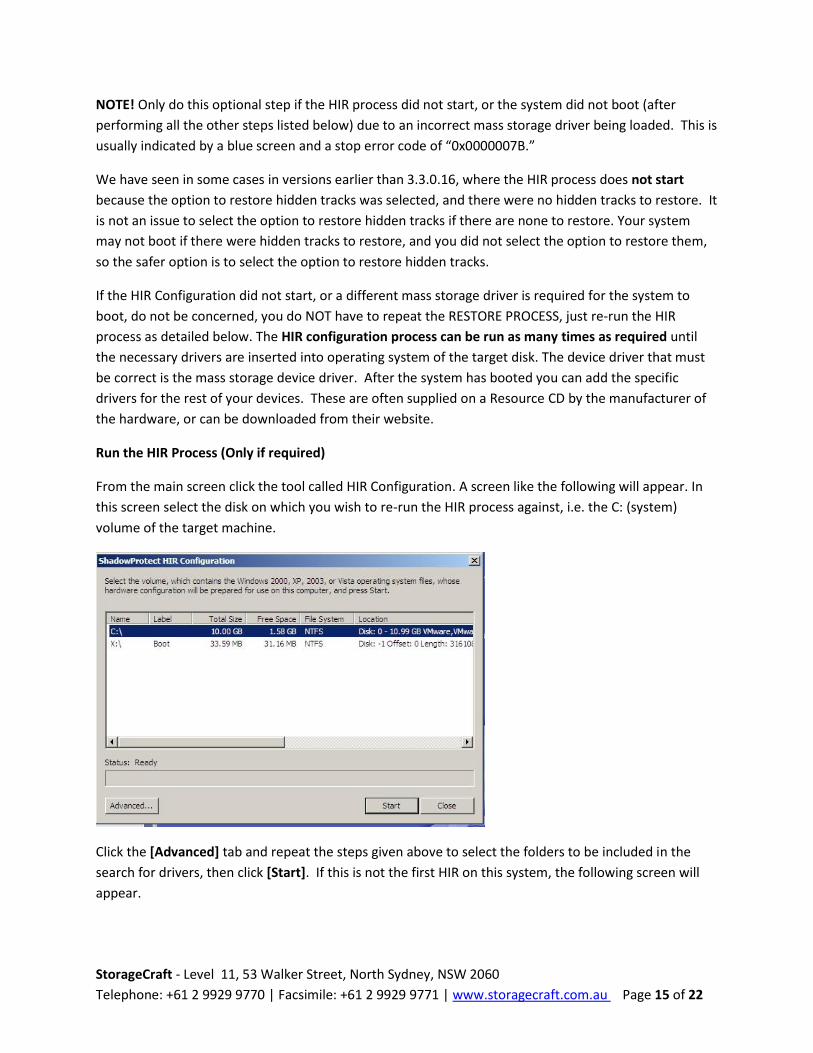
From the main screen click the tool called HIR Configuration. A screen like the following will appear. In
this screen select the disk on which you wish to re-run the HIR process against, i.e. the C: (system)
volume of the target machine.
Click the [Advanced] tab and repeat the steps given above to select the folders to be included in the
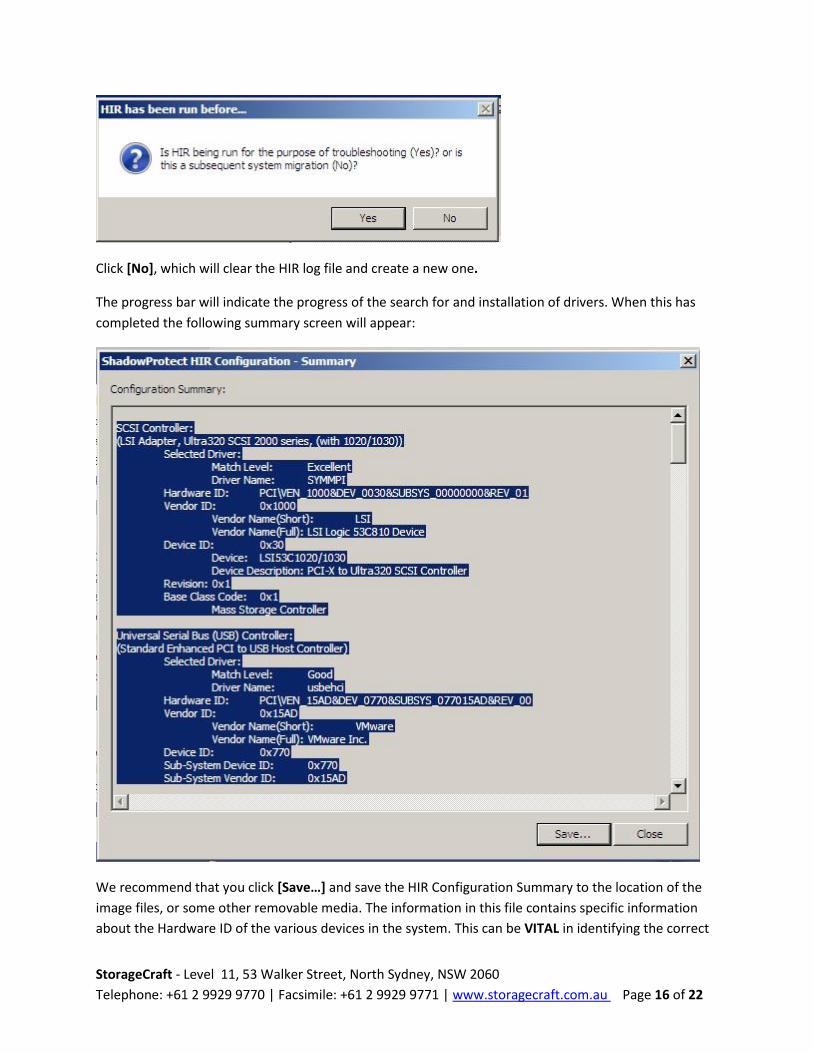
search for drivers, then click [Start]. If this is not the first HIR on this system, the following screen will
appear.
StorageCraft - Level 11, 53 Walker Street, North Sydney, NSW 2060
Telephone: +61 2 9929 9770 | Facsimile: +61 2 9929 9771 | www.storagecraft.com.au Page 16 of 22
Click [No], which will clear the HIR log file and create a new one.
The progress bar will indicate the progress of the search for and installation of drivers. When this has
completed the following summary screen will appear:
We recommend that you click [Save…] and save the HIR Configuration Summary to the location of the
image files, or some other removable media. The information in this file contains specific information
about the Hardware ID of the various devices in the system. This can be VITAL in identifying the correct
StorageCraft - Level 11, 53 Walker Street, North Sydney, NSW 2060
Telephone: +61 2 9929 9770 | Facsimile: +61 2 9929 9771 | www.storagecraft.com.au Page 17 of 22
device driver to use. When you have saved the file, click [Close] and click [Close] on the ShadowProtect
HIR Configuration Screen.
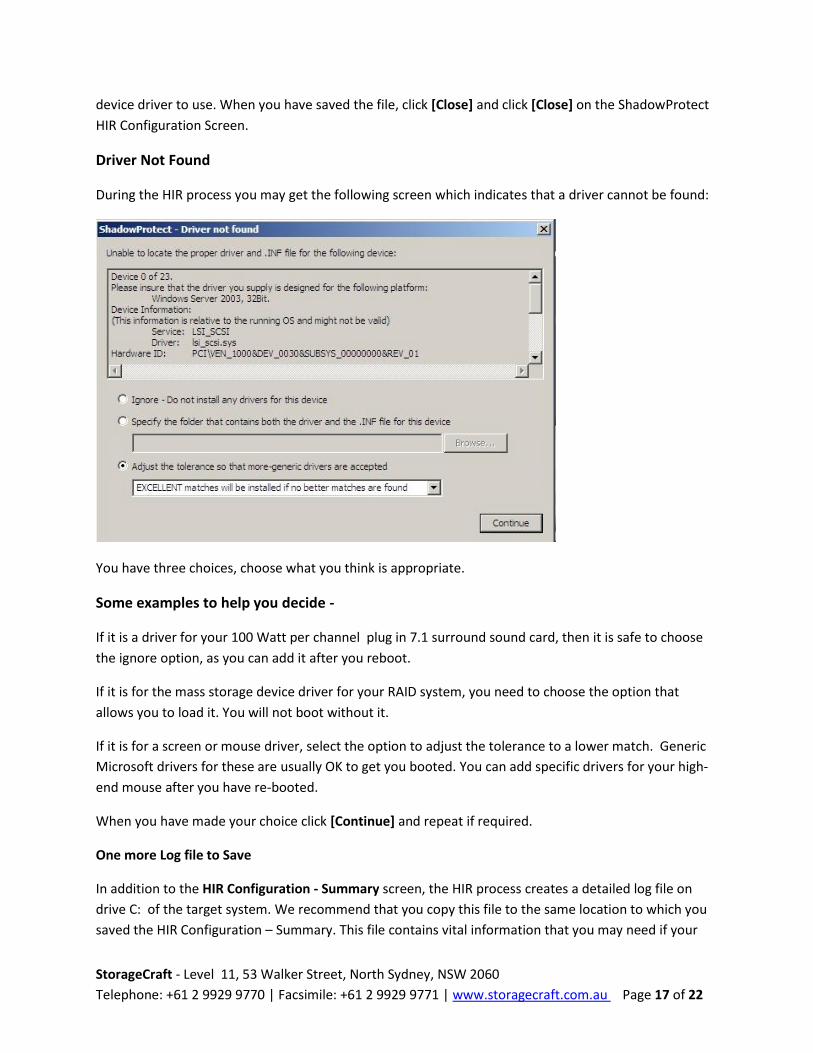
Driver Not Found
During the HIR process you may get the following screen which indicates that a driver cannot be found:
You have three choices, choose what you think is appropriate.
Some examples to help you decide -
If it is a driver for your 100 Watt per channel plug in 7.1 surround sound card, then it is safe to choose
the ignore option, as you can add it after you reboot.
If it is for the mass storage device driver for your RAID system, you need to choose the option that
allows you to load it. You will not boot without it.
If it is for a screen or mouse driver, select the option to adjust the tolerance to a lower match. Generic
Microsoft drivers for these are usually OK to get you booted. You can add specific drivers for your high-
end mouse after you have re-booted.
When you have made your choice click [Continue] and repeat if required.
One more Log file to Save
In addition to the HIR Configuration - Summary screen, the HIR process creates a detailed log file on
drive C: of the target system. We recommend that you copy this file to the same location to which you
saved the HIR Configuration – Summary. This file contains vital information that you may need if your
StorageCraft - Level 11, 53 Walker Street, North Sydney, NSW 2060
Telephone: +61 2 9929 9770 | Facsimile: +61 2 9929 9771 | www.storagecraft.com.au Page 18 of 22
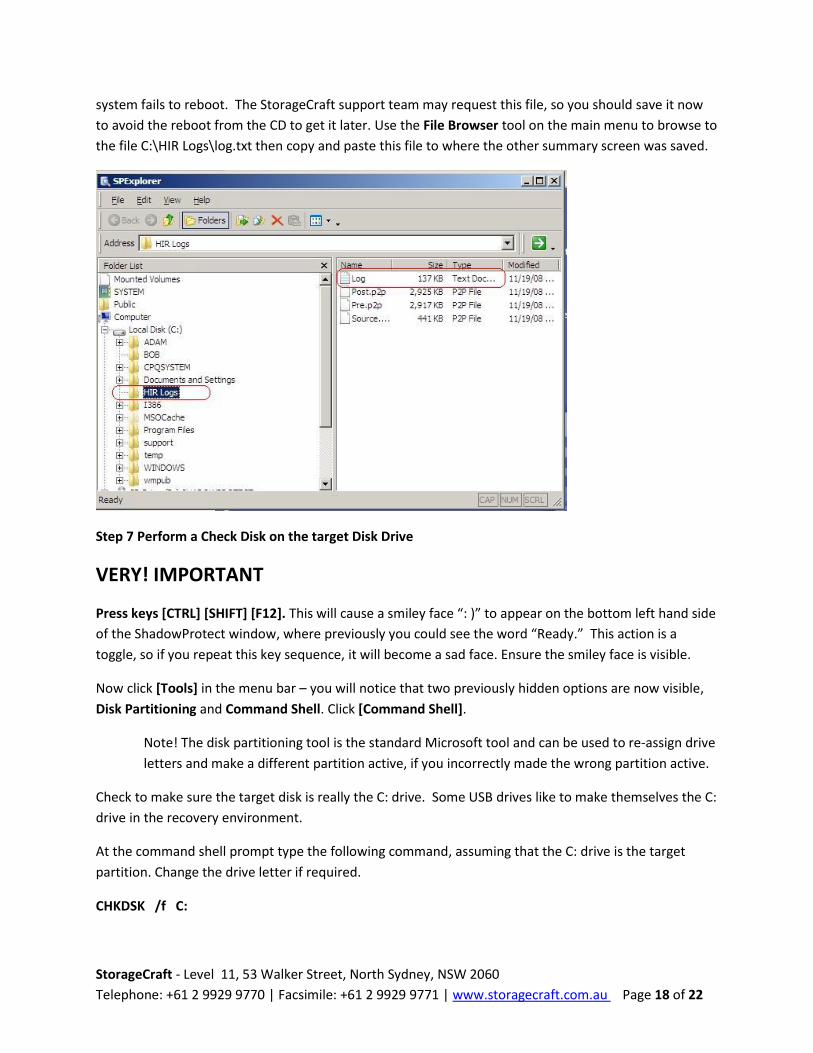
system fails to reboot. The StorageCraft support team may request this file, so you should save it now
to avoid the reboot from the CD to get it later. Use the File Browser tool on the main menu to browse to
the file C:\HIR Logs\log.txt then copy and paste this file to where the other summary screen was saved.
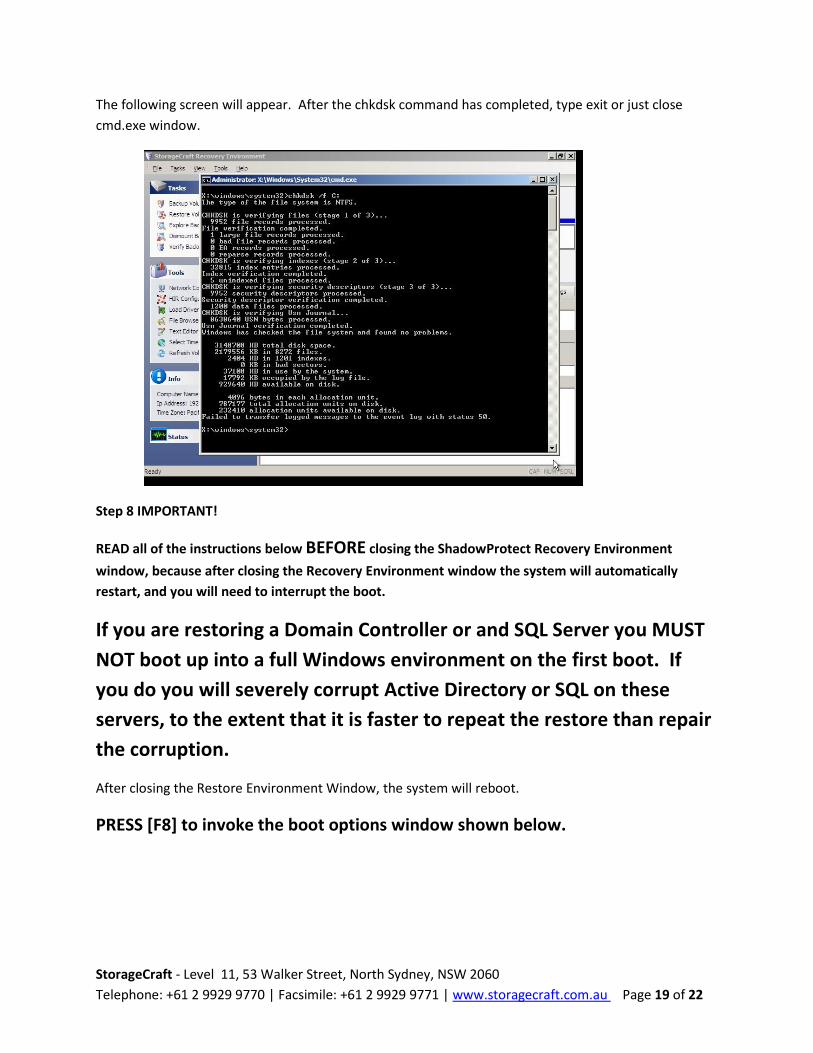
Step 7 Perform a Check Disk on the target Disk Drive
VERY! IMPORTANT
Press keys [CTRL] [SHIFT] [F12]. This will cause a smiley face “: )” to appear on the bottom left hand side
of the ShadowProtect window, where previously you could see the word “Ready.” This action is a
toggle, so if you repeat this key sequence, it will become a sad face. Ensure the smiley face is visible.
Now click [Tools] in the menu bar – you will notice that two previously hidden options are now visible,
Disk Partitioning and Command Shell. Click [Command Shell].
Note! The disk partitioning tool is the standard Microsoft tool and can be used to re-assign drive
letters and make a different partition active, if you incorrectly made the wrong partition active.
Check to make sure the target disk is really the C: drive. Some USB drives like to make themselves the C:
drive in the recovery environment.
At the command shell prompt type the following command, assuming that the C: drive is the target
partition. Change the drive letter if required.
CHKDSK /f C:
StorageCraft - Level 11, 53 Walker Street, North Sydney, NSW 2060
Telephone: +61 2 9929 9770 | Facsimile: +61 2 9929 9771 | www.storagecraft.com.au Page 19 of 22
The following screen will appear. After the chkdsk command has completed, type exit or just close
cmd.exe window.
Step 8 IMPORTANT!
READ all of the instructions below BEFORE closing the ShadowProtect Recovery Environment
window, because after closing the Recovery Environment window the system will automatically
restart, and you will need to interrupt the boot.
If you are restoring a Domain Controller or and SQL Server you MUST
NOT boot up into a full Windows environment on the first boot. If
you do you will severely corrupt Active Directory or SQL on these
servers, to the extent that it is faster to repeat the restore than repair
the corruption.
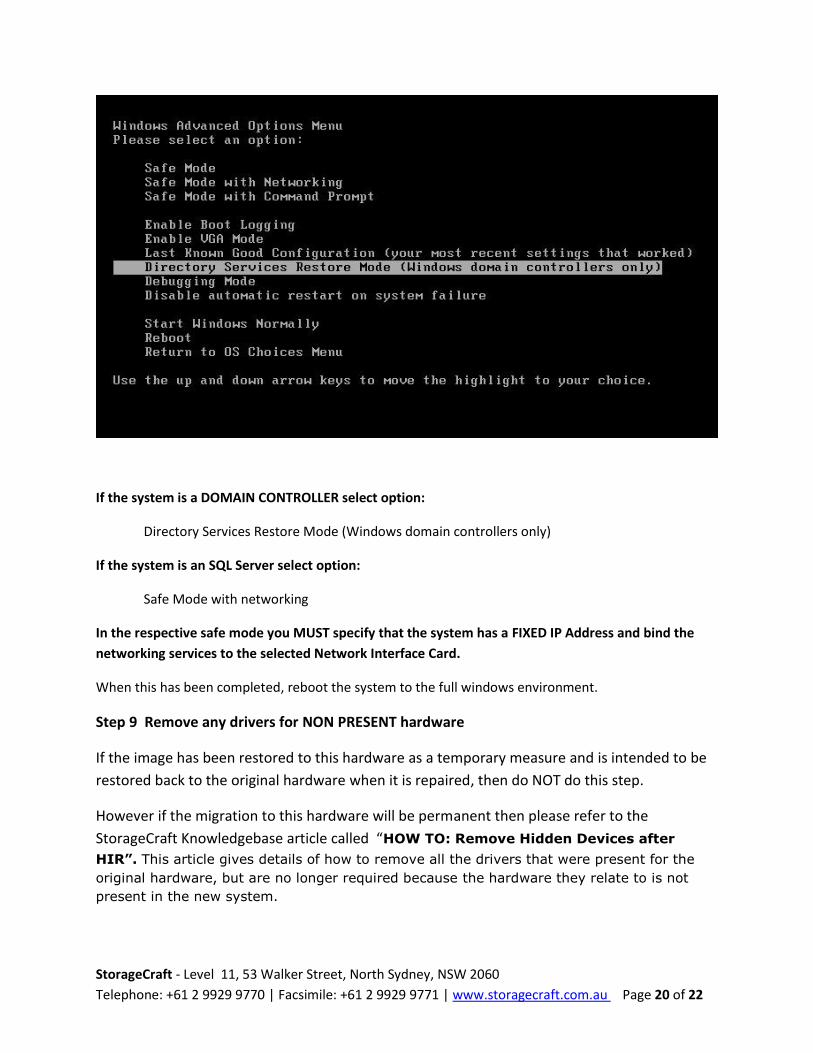
After closing the Restore Environment Window, the system will reboot.
PRESS [F8] to invoke the boot options window shown below.
StorageCraft - Level 11, 53 Walker Street, North Sydney, NSW 2060
Telephone: +61 2 9929 9770 | Facsimile: +61 2 9929 9771 | www.storagecraft.com.au Page 20 of 22
If the system is a DOMAIN CONTROLLER select option:
Directory Services Restore Mode (Windows domain controllers only)
If the system is an SQL Server select option:
Safe Mode with networking
In the respective safe mode you MUST specify that the system has a FIXED IP Address and bind the
networking services to the selected Network Interface Card.
When this has been completed, reboot the system to the full windows environment.
Step 9 Remove any drivers for NON PRESENT hardware
If the image has been restored to this hardware as a temporary measure and is intended to be
restored back to the original hardware when it is repaired, then do NOT do this step.
However if the migration to this hardware will be permanent then please refer to the
StorageCraft Knowledgebase article called “HOW TO: Remove Hidden Devices after
HIR”. This article gives details of how to remove all the drivers that were present for the
original hardware, but are no longer required because the hardware they relate to is not
present in the new system.

StorageCraft - Level 11, 53 Walker Street, North Sydney, NSW 2060
Telephone: +61 2 9929 9770 | Facsimile: +61 2 9929 9771 | www.storagecraft.com.au Page 21 of 22
Step 10 Load any specific device drivers for maximum performance, functionality, and
reliability.
Now that the system is booted, you may fine tune the system for maximum performance, functionality,
and reliability by loading the specific drivers required for the hardware devices on the system.
It is unrealistic to expect the drivers for all devices from all manufacturers to be present on the
StorageCraft CD. This especially relevant for RAID controllers. Sometimes the mass storage device
driver that was on the ShadowProtect CD was good enough to for the system to boot, but may not be
the exact driver required by the combination of hardware, device firmware and system BIOS. For
example, the driver may fail under heavy load if it is not the exact driver required. Usually the drivers are
available on a CD supplied with the system, or can be downloaded from the website of the
manufacturer.
Please help yourself and your customer to avoid grief in the future by checking that the latest BIOS,
device firmware and drivers are installed in the system after the restore. This is especially relevant for
mass storage device drivers, and if you are restoring to older hardware. A few extra minutes doing this
may save you a lot of time and inconvenience in the future.
This is where the HIR Configuration Summary screen that you saved is very useful. Look at this file and
use it to compare the Match Level (FAIR,GOOD, EXCELLEANT) and Hardware ID strings to the Hardware
ID strings in the .INI file of the driver you have obtained. This information will help you determine
whether you have the correct driver.
Example:
In the HIR Configuration Summary file extract below, the match was only FAIR. Note the Hardware ID
String. The vendor code is VEN_8086, the vendor device is DEV_7111, and the device subsystem is
SUBSYS_197615AD, with a revision of REV_01.
IDE Controller:
(Intel(R) 82371AB/EB PCI Bus Master IDE Controller)
Selected Driver:
Match Level: Fair
Driver Name: intelide
Hardware ID: PCI\VEN_8086&DEV_7111&SUBSYS_197615AD&REV_01
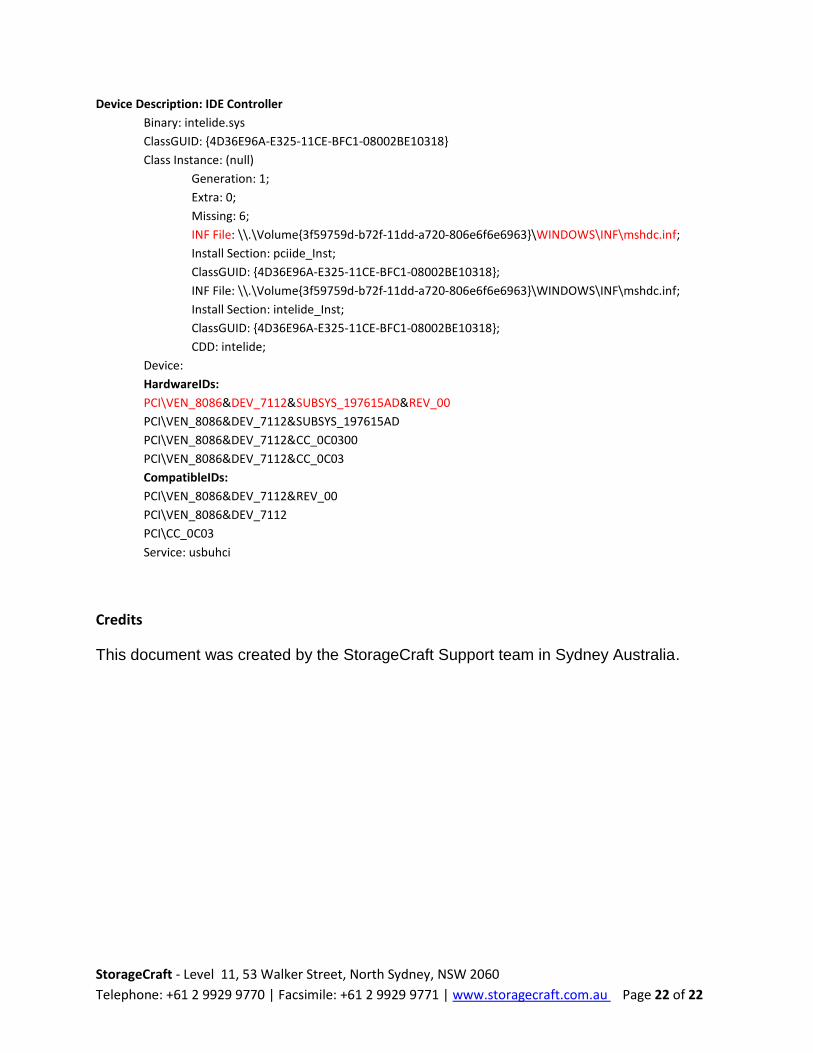
Here is an extract from the C:\HIR Logs\log.txt file.
This shows the .inf file for the .sys file that was used for the HIR. You can see that the vendor
and subsystem match what was returned by the hardware as shown in the file above, but the
device and revision do not match – thus it was only a FAIR match.
StorageCraft - Level 11, 53 Walker Street, North Sydney, NSW 2060
Telephone: +61 2 9929 9770 | Facsimile: +61 2 9929 9771 | www.storagecraft.com.au Page 22 of 22
Device Description: IDE Controller
Binary: intelide.sys
ClassGUID: {4D36E96A-E325-11CE-BFC1-08002BE10318}
Class Instance: (null)
Generation: 1;
Extra: 0;
Missing: 6;
INF File: \\.\Volume{3f59759d-b72f-11dd-a720-806e6f6e6963}\WINDOWS\INF\mshdc.inf;
Install Section: pciide_Inst;
ClassGUID: {4D36E96A-E325-11CE-BFC1-08002BE10318};
INF File: \\.\Volume{3f59759d-b72f-11dd-a720-806e6f6e6963}\WINDOWS\INF\mshdc.inf;
Install Section: intelide_Inst;
ClassGUID: {4D36E96A-E325-11CE-BFC1-08002BE10318};
CDD: intelide;
Device:
HardwareIDs:
PCI\VEN_8086&DEV_7112&SUBSYS_197615AD&REV_00
PCI\VEN_8086&DEV_7112&SUBSYS_197615AD
PCI\VEN_8086&DEV_7112&CC_0C0300
PCI\VEN_8086&DEV_7112&CC_0C03
CompatibleIDs:
PCI\VEN_8086&DEV_7112&REV_00
PCI\VEN_8086&DEV_7112
PCI\CC_0C03
Service: usbuhci
Credits
This document was created by the StorageCraft Support team in Sydney Australia.


![hir jugu jugu Bgq aupwieAw pYj nwmdyau muiK lwieAw ] jn ... - Rehiraas [Gurmukhi].pdf · hir jugu jugu Bgq aupwieAw pYj rKdw AwieAw rwm rwjy ] hrxwKsu dustu hir mwirAw pRhlwdu qrwieAw](https://img.pdfslide.net/doc/110x75/5a754e447f8b9a4b538c60f0/hir-jugu-jugu-bgq-aupwieaw-pyj-nwmdyau-muik-lwieaw-jn-rehiraas-gurmukhipdfaa.jpg)


![02[1].Hir-nega - ASEPSA-ANTISEPSA](https://img.pdfslide.net/doc/110x75/55265c8e550346f36e8b4c69/021hir-nega-asepsa-antisepsa.jpg)