Embed Size (px)
Citation preview
589
18 Custom Windows Forms Controls
As if the controls in the Windows Forms package weren’t enough, you can create yourown controls. As a matter of fact, Visual Studio makes the creation of new controls abreeze. In this chapter, I’ll show how you can create custom controls using one of thefollowing approaches:
■ Inheriting from an existing control
■ Composing multiple controls
■ Creating a control from scratch
You can deploy the control as a private assembly or install it in the GAC. The lattersolution is preferable if the control must be used by many applications, but using pri-vate assemblies is OK in many cases. The control must not be installed in the GAC if itis being displayed from inside Internet Explorer. (See the section “Hosting CustomControls in Internet Explorer” at the end of this chapter.)
Note To keep the code as concise as possible, all the code samples in this section assume that the following Imports statements are used at the file or project level:
Imports System.ComponentModelImports System.ComponentModel.DesignImports System.Text.RegularExpressionsImports System.Drawing.Drawing2DImports System.ThreadingImports System.Drawing.DesignImports System.Windows.Forms.Design
Inheriting from an Existing ControlThe easiest way to author a new Windows Forms control is by inheriting it from anexisting control. This approach is the right one when you want to extend an existingcontrol with new properties, methods, or events but without changing its appearancesignificantly. For example, you can create a ListBox that supports icons by using theowner-draw mode internally and exposing an Images collection to the outside. Hereare other examples: an extended PictureBox control that supports methods for graphiceffects and a TreeView-derived control that automatically displays the file and folderhierarchy for a given path.
C18620598.fm Page 589 Friday, November 21, 2003 11:37 AM
590 Part IV: Win32 Applications
In the example that follows, I use this technique to create an extended TextBox controlnamed TextBoxEx, with several additional properties that perform advanced validationchores. I chose this example because it’s relatively simple without being a toy controland because it’s complete and useful enough to be used in a real application.
The TextBoxEx control has a property named IsRequired, which you set to True if thecontrol must be filled before moving to another control, and the ValidateRegex prop-erty, which is a regular expression that the field’s contents must match. There’s also anErrorMessage property and a Validate method, which returns True or False and can dis-play a message box if the validation failed. The control will take advantage of the Val-idating event of the standard TextBox control to cancel the focus shift if the currentvalue can’t be validated.
Creating the Control Project
Create a new Windows Control Library project named CustomControlDemo. A projectof this type is actually a Class Library project (that is, it generates a DLL) and containsa file named UserControl1.vb. Rename the file TextBoxEx.vb, then switch to its codeportion, and replace the template created by Visual Studio with what follows:
Public Class TextBoxExInherits System.Windows.Forms.TextBox
End Class
This is just the skeleton of our new control, but it already has everything it needs tobehave like a TextBox control. Because you want to expand on this control, let’s beginby adding the new IsRequired property:
Public Class TextBoxExInherits System.Windows.Forms.TextBox
Sub New()MyBase.New()
End Sub
’ The IsRequired propertyDim m_IsRequired As Boolean
Property IsRequired() As BooleanGet
Return m_IsRequiredEnd GetSet(ByVal Value As Boolean)
m_IsRequired = ValueEnd Set
End PropertyEnd Class
C18620598.fm Page 590 Friday, November 21, 2003 11:37 AM
Chapter 18: Custom Windows Forms Controls 591
Note that you can’t use a public field to expose a property in the Properties window,so you must use a Property procedure even if you don’t plan to validate the valueentered by the user, as in the preceding case.
The Sub New constructor isn’t strictly required in this demo, but it doesn’t hurt either.In a more complex custom control, you can use this event to initialize a property to adifferent value—for example, you might set the Text property to a null string so thatthe developer who uses this control doesn’t have to do it manually.
The control doesn’t do anything useful yet, but you can compile it by selecting Buildon the Build menu. This action produces a DLL executable file. Take note of the pathof this file because you’ll need it very soon.
Creating the Client Application
On the File menu, point to Add Project and then click New Project to add a WindowsApplication project named CustomControlsTest to the same solution as the existingcontrol. You can also create this test application using another instance of Visual Stu-dio, but having both projects in the same solution has an important advantage, as I’llexplain shortly.
Next make CustomControlsTest the start-up project so that it will start when you pressF5. You can do this by right-clicking the project in the Solution Explorer window andclicking Set As Startup Project on the shortcut menu. Visual Studio confirms the newsetting by displaying the new start-up project in boldface.
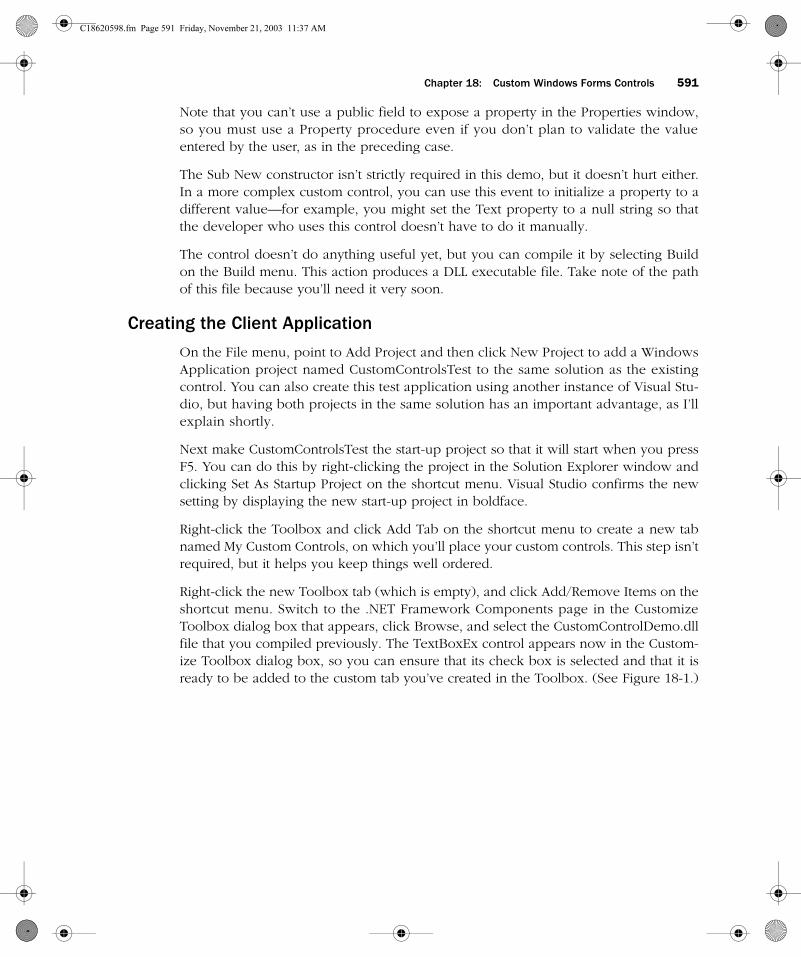
Right-click the Toolbox and click Add Tab on the shortcut menu to create a new tabnamed My Custom Controls, on which you’ll place your custom controls. This step isn’trequired, but it helps you keep things well ordered.
Right-click the new Toolbox tab (which is empty), and click Add/Remove Items on theshortcut menu. Switch to the .NET Framework Components page in the CustomizeToolbox dialog box that appears, click Browse, and select the CustomControlDemo.dllfile that you compiled previously. The TextBoxEx control appears now in the Custom-ize Toolbox dialog box, so you can ensure that its check box is selected and that it isready to be added to the custom tab you’ve created in the Toolbox. (See Figure 18-1.)
C18620598.fm Page 591 Friday, November 21, 2003 11:37 AM
592 Part IV: Win32 Applications
F18LR01.eps
Figure 18-1 Adding a new control to the Toolbox
Drop an instance of the control on the form, and switch to the Properties window.You’ll see all the properties of the TextBox control, which should be no surprisebecause the TextBoxEx control inherits them from its base class. Scroll the Propertieswindow to ensure that the new IsRequired property is also there; the designer hasdetected that it’s a Boolean property, so the designer knows that the property can beset to True or False.
Adding the Validation Logic
Now that you know your control is going to work correctly on a form’s surface, youcan go back to the TextBoxEx code module and add the remaining two properties.Notice that the code checks that the regular expression assigned to the ValidateRegexproperty is correct by attempting a search on a dummy string:
’ The ErrorMessage propertyDim m_ErrorMessage As String
Property ErrorMessage() As StringGet
Return m_ErrorMessageEnd GetSet(ByVal Value As String)
m_ErrorMessage = ValueEnd Set
End Property
’ The ValidateRegex propertyDim m_ValidateRegex As String
C18620598.fm Page 592 Friday, November 21, 2003 11:37 AM
Chapter 18: Custom Windows Forms Controls 593
Property ValidateRegex() As StringGet
Return m_ValidateRegexEnd GetSet(ByVal Value As String)
’ Check that this is a valid regular expression.Try
If Value <> ““ ThenDim dummy As Boolean = Regex.IsMatch(“abcde", Value)
End If’ If no error, value is OK.m_ValidateRegex = Value
Catch ex As ExceptionMessageBox.Show(ex.Message, “Invalid Property", _
MessageBoxButtons.OK, MessageBoxIcon.Error)End Try
End SetEnd Property
You now have all you need to implement the Validate method, which returns False ifthe current value doesn’t pass the validation test. Notice that the code uses theMyBase.Text property to access the control’s contents:
Function Validate() As Boolean’ Assume control passed the validation.Validate = True’ Apply the IsRequired property.If Me.IsRequired And Me.Text = ““ Then
Validate = FalseEnd If’ Apply the ValidateRegex property if specified.If Validate = True And Me.ValidateRegex <> ““ Then
Validate = Regex.IsMatch(Me.Text, Me.ValidateRegex)End If
End Function
The structure of the Validate method permits you to add other validation tests justbefore the End Function statement. Having a single place in which the validationoccurs means that this is the only point to modify when you want to extend the controlwith new properties.
You still need to write the code that actually validates the current value when the usermoves the input focus to a control that has CausesValidation set to True. The innerTextBox control fires a Validating event when this happens, so you can implement thevalidation by using the following naive approach:
Private Sub TextBoxEx_Validating(ByVal sender As Object, _ByVal e As CancelEventArgs) Handles MyBase.Validating’ If the validation fails, cancel the focus shift.If Me.Validate() = False Then e.Cancel = True
End Sub
C18620598.fm Page 593 Friday, November 21, 2003 11:37 AM
594 Part IV: Win32 Applications
This technique works in the sense that it does prevent the focus from leaving the Text-BoxEx control. The problem, however, is that you can’t prevent the Validating eventfrom propagating to your client form. In other words, the developer who uses this con-trol will see a Validating event even if the focus shift is going to be canceled anyway.
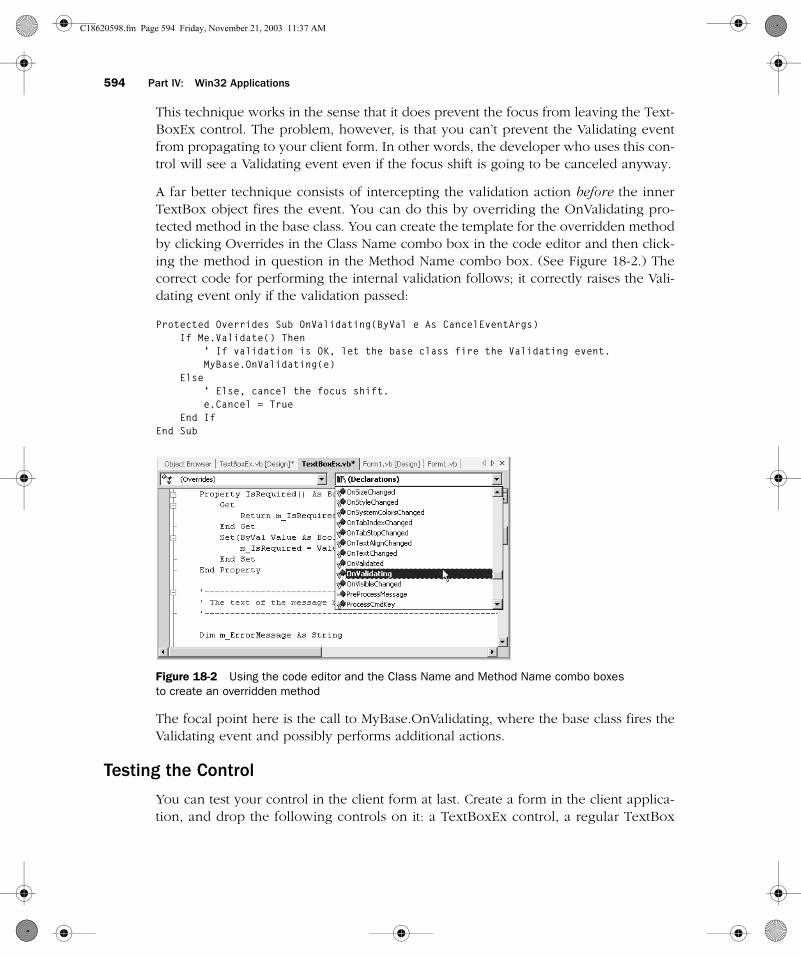
A far better technique consists of intercepting the validation action before the innerTextBox object fires the event. You can do this by overriding the OnValidating pro-tected method in the base class. You can create the template for the overridden methodby clicking Overrides in the Class Name combo box in the code editor and then click-ing the method in question in the Method Name combo box. (See Figure 18-2.) Thecorrect code for performing the internal validation follows; it correctly raises the Vali-dating event only if the validation passed:
Protected Overrides Sub OnValidating(ByVal e As CancelEventArgs)If Me.Validate() Then
’ If validation is OK, let the base class fire the Validating event.MyBase.OnValidating(e)
Else’ Else, cancel the focus shift.e.Cancel = True
End IfEnd Sub
F17LR02.eps
Figure 18-2 Using the code editor and the Class Name and Method Name combo boxesto create an overridden method
The focal point here is the call to MyBase.OnValidating, where the base class fires theValidating event and possibly performs additional actions.
Testing the Control
You can test your control in the client form at last. Create a form in the client applica-tion, and drop the following controls on it: a TextBoxEx control, a regular TextBox
C18620598.fm Page 594 Friday, November 21, 2003 11:37 AM
Chapter 18: Custom Windows Forms Controls 595
control, and a Label control that you’ll use for displaying messages. Next set the Text-BoxEx properties as follows:
‘ A required field that can contain only digitsTextBoxEx1.IsRequired = TrueTextBoxEx1.ValidateRegex = “\d+”
Run the program; you’ll see that you can’t move the focus from the TextBoxEx control tothe TextBox control unless you enter one or more digits (or you set the TextBox control’sCausesValidation property to False). You can also add a Validating event procedure thatproves that the form receives this event only if the internal validation passed:
Private Sub TextBoxEx1_Validating(ByVal sender As Object, _ByVal e As CancelEventArgs) Handles TextBoxEx1.ValidatingMsgBox(“Validating event in form”)
End Sub
Design-Time Debugging
Whenever you set a control’s property from inside the Properties window, Visual Stu-dio .NET invokes the Property Set procedure for that property, so in general design-time property assignments work in much the same way as they work at run time.Sometimes, however, you might see slightly different behaviors at design time and runtime and might like to run the control under a debugger to see what’s going wrong.Alas, you can’t debug a control when Visual Studio .NET is in design time because thedebugger can’t work on an instance of the DLL that isn’t running yet. In this section, I’llshow you a simple technique that lets you run the control under the debugger at runtime and design time.
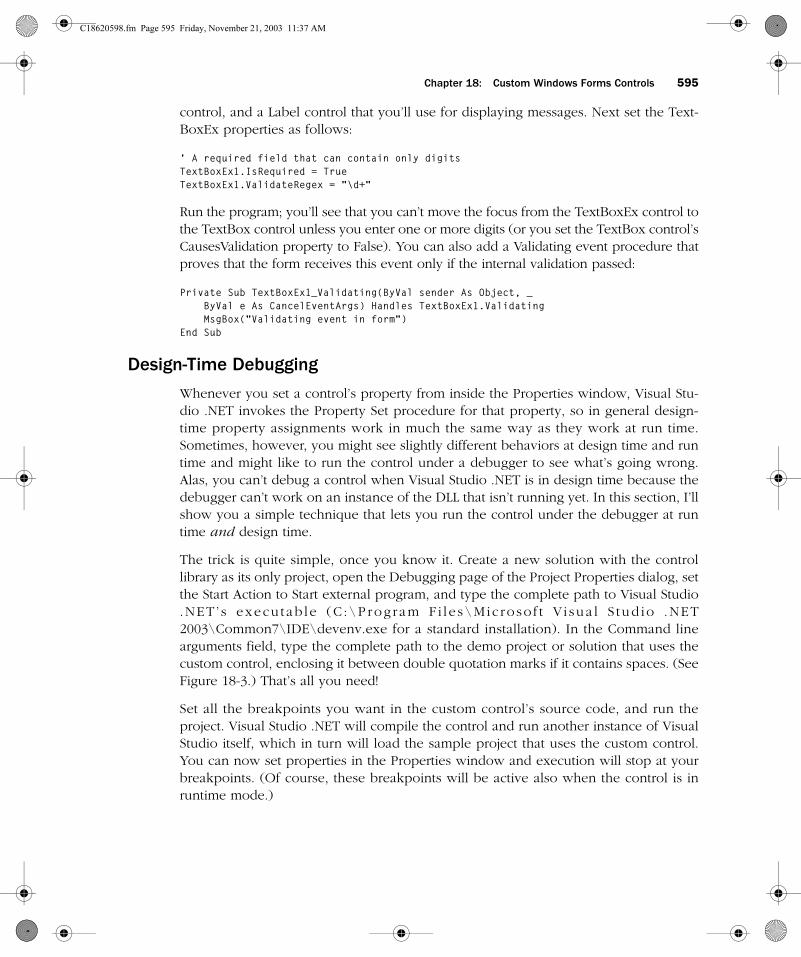
The trick is quite simple, once you know it. Create a new solution with the controllibrary as its only project, open the Debugging page of the Project Properties dialog, setthe Start Action to Start external program, and type the complete path to Visual Studio.NET ’ s execu tab le (C :\Program F i l e s\Mic roso f t V i sua l S tud io .NET2003\Common7\IDE\devenv.exe for a standard installation). In the Command linearguments field, type the complete path to the demo project or solution that uses thecustom control, enclosing it between double quotation marks if it contains spaces. (SeeFigure 18-3.) That’s all you need!
Set all the breakpoints you want in the custom control’s source code, and run theproject. Visual Studio .NET will compile the control and run another instance of VisualStudio itself, which in turn will load the sample project that uses the custom control.You can now set properties in the Properties window and execution will stop at yourbreakpoints. (Of course, these breakpoints will be active also when the control is inruntime mode.)
C18620598.fm Page 595 Friday, November 21, 2003 11:37 AM
596 Part IV: Win32 Applications
F18LR03.eps
Figure 18-3 Setting project properties for testing a custom control at design time with a different instance of Visual Studio .NET
Improving the Custom ControlYou can add many other properties to the TextBoxEx control to increase its usefulnessand flexibility. Each property is an occasion to discuss additional advanced capabilitiesof custom control creation.
Working with Other Types
It is interesting to see how the Properties browser works with properties that aren’tplain numbers or strings. For example, you can add a DisplayControl and an ErrorFore-Color property. The former takes a reference to a control that will be used to displaythe error message, and the latter is the color used for the error message itself. Imple-menting these properties is straightforward:
Dim m_ErrorForeColor As Color = SystemColors.ControlText
Property ErrorForeColor() As ColorGet
Return m_ErrorForeColorEnd GetSet(ByVal Value As Color)
m_ErrorForeColor = ValueEnd Set
End Property
Dim m_DisplayControl As Control
Property DisplayControl() As ControlGet
Return m_DisplayControlEnd Get
C18620598.fm Page 596 Friday, November 21, 2003 11:37 AM
Chapter 18: Custom Windows Forms Controls 597
Set(ByVal Value As Control)m_DisplayControl = Value
End SetEnd Property
You reference these new properties at the end of the Validate method, after the valida-tion code you wrote previously:
§’ If the validation failed but the client defined a display control’ and an error message, show the message in the control.If Not (DisplayControl Is Nothing) And Me.ErrorMessage <> ““ Then
If Validate() Then’ Delete any previous error message.DisplayControl.Text = “"
Else’ Display error message, and enforce color.DisplayControl.Text = Me.ErrorMessageDisplayControl.ForeColor = m_ErrorForeColor
End IfEnd If
End Function
Rebuild the solution, select the TextBoxEx control, and switch to the Properties win-dow, where you’ll see a couple of interesting things. First, the ErrorForeColor propertydisplays the same color palette that all other color properties expose. Second, the Prop-erties window recognizes the nature of the new DisplayControl property and displaysa drop-down list that lets you select one of the controls on the current form. In this par-ticular example, you can set this property to the Label1 control so that all error mes-sages appear there. Also, remember to store a suitable message in the ErrorMessageproperty. Of course, you can do these operations from code as well, which is necessaryif the target control is on another form:
TextBoxEx1.ErrorMessage = “This field must contain a positive number"TextBoxEx1.ErrorForeColor = Color.RedTextBoxEx1.DisplayControl = Label1
You can see another smart behavior of the Properties window if you have an enumer-ated property. For example, you can create a ValueType property that states the typeof variable to which the contents of the field will be assigned:
Enum ValidTypesAnyType = 0ByteTypeShortTypeIntegerTypeLongTypeTypeSingleTypeDoubleTypeDecimalTypeDateTimeType
End Enum
C18620598.fm Page 597 Friday, November 21, 2003 11:37 AM
598 Part IV: Win32 Applications
Dim m_ValidType As ValidTypes = ValidTypes.AnyType
Property ValidType() As ValidTypesGet
Return m_ValidTypeEnd GetSet(ByVal Value As ValidTypes)
m_ValidType = ValueEnd Set
End Property
You can browse the demo application to see how this feature is implemented, but fornow just rebuild the solution and go to the Properties window again to check that theValueType property corresponds to a combo box that lets the user select the valid typeamong those available.
Adding Attributes
You can further affect how your custom control uses and exposes the new propertiesby means of attributes. For example, all public properties are displayed in the Proper-ties window by default. This isn’t desirable for read-only properties (which are visiblebut unavailable by default) or for properties that should be assigned only at run timevia code. You can control the visibility of elements in the Properties window by usingthe Browsable attribute. The default value for this attribute is True, so you must set itto False to hide the element. For example, let’s say that you want to hide a read-onlyproperty that returns True if the control’s current value isn’t valid:
<Browsable(False)> _ReadOnly Property IsInvalid() As Boolean
GetReturn Not Validate()
End GetEnd Property
The EditorBrowsable attribute is similar to Browsable, but it affects the visibility of aproperty, method, or event from inside the code editor, and in practice determineswhether you see a given member in the little window that IntelliSense displays. It takesan EditorBrowsableState enumerated value, which can be Never, Always, or Advanced.The Advanced setting makes a member visible only if you clear the Hide advancedmembers option in the General page under the All languages folder (or the foldernamed after the language you’re using), which in turn is in the Text Editor folder in theOptions dialog box that you reach from the Tools menu:
<EditorBrowsable(EditorBrowsableState.Advanced)> _Sub EnterExpertMode()
§End Sub
C18620598.fm Page 598 Friday, November 21, 2003 11:37 AM
Chapter 18: Custom Windows Forms Controls 599
Another frequently used attribute is Description, which defines the string displayednear the bottom edge of the Properties window:
<Description(“The control that will display the error message”)> _Property DisplayControl() As Control
§End Property
You put a property into a category in the Properties window by using the Categoryattribute. You can specify one of the existing categories—Layout, Behavior, Appear-ance—or define a new one. If a property doesn’t belong to a specific category, itappears in the Misc category:
<Description(“The control that will display the error message”), _Category(“Validation”)> _
Property DisplayControl() As Control§
End Property
By default, properties aren’t localizable and the form designer doesn’t save their valuesin a separate source file when the user selects a language other than the default one.You can change this default behavior by using the Localizable attribute:
<Localizable(True) > _Property HeaderCaption() As String
§End Property
The DefaultProperty attribute tells the environment which property should be selectedwhen the user creates a new instance of the control and then activates the Propertieswindow. Similarly, the DefaultEvent attribute specifies the event handler that’s auto-matically created when you double-click on a control in the designer. (For example,TextChanged is the default event for the TextBox control.) You apply these attributesto the class and pass them the name of the property or the event:
<DefaultProperty(“IsRequired”), DefaultEvent(“InvalidKey”)> _Public Class TextBoxEx
Inherits System.Windows.Forms.TextBox
Event InvalidKey(ByVal sender As Object, ByVal e As EventArgs)§
End Class
The MergableProperty attribute tells whether a property is visible in the Properties win-dow when multiple controls are selected. The default value of this attribute is True, soyou must include it explicitly only if you don’t want to allow the user to modify thisproperty for all the selected controls. In practice, you use this attribute when a propertycan’t have the same value for multiple controls on a form (as in the case of the TabIn-dex or Name property):
C18620598.fm Page 599 Friday, November 21, 2003 11:37 AM
600 Part IV: Win32 Applications
<MergableProperty(False)> _Property ProcessOrder() As Integer
§End Class
The RefreshProperties attribute is useful if a new value assigned to a property canaffect other properties in the Properties window. The default behavior of the Propertieswindow is that only the value of the property being edited is updated, but you canspecify that all properties should be requeried and refreshed by using this attribute:
Dim m_MaxValue As Long = Long.MaxValue
<RefreshProperties(RefreshProperties.All)> _Property MaxValue() As Long
GetReturn m_MaxValue
End GetSet(ByVal Value As Long)
m_MaxValue = Value’ This property can affect the Value property.If Value > m_MaxValue Then Value = m_MaxValue
End SetEnd Property
Working with Icons
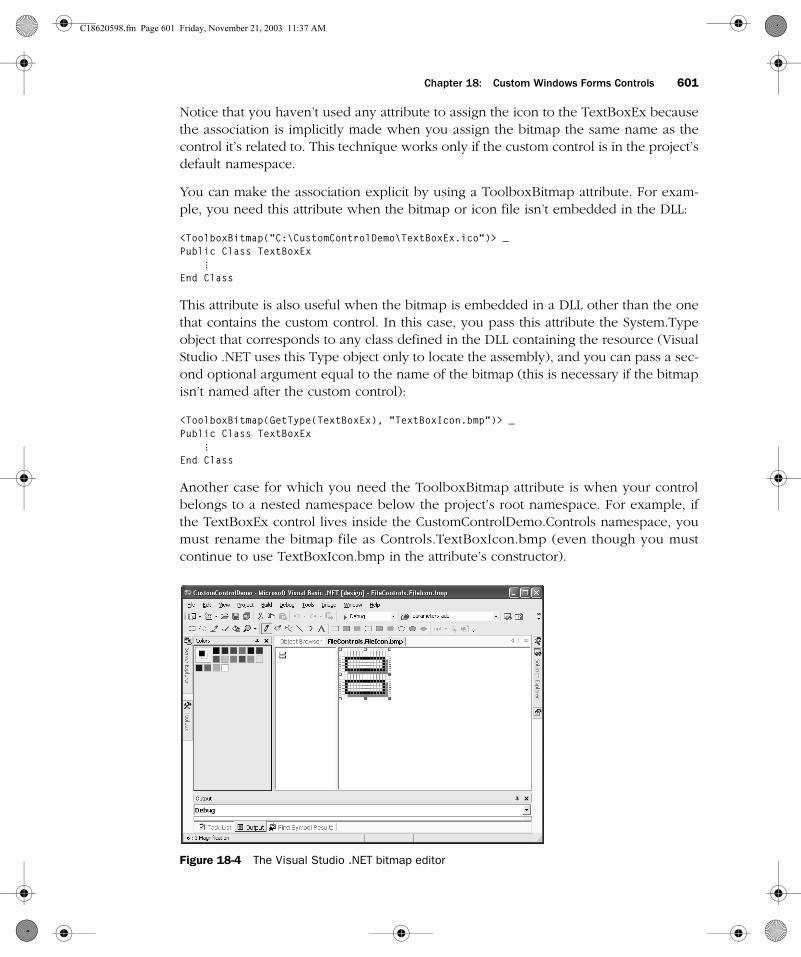
Each of your carefully built custom controls should have a brand-new icon assigned tothem, to replace the default icon that appears in Visual Studio .NET’s control Toolbox.Control icons can be either stand-alone .bmp or .ico files, or bitmaps embedded in aDLL (typically that is the same DLL that contains the custom control, but it can be a dif-ferent DLL as well). The lower left pixel in the bitmap determines the transparent colorfor the icon—for example, use a yellow color for this pixel to make all other yellowpixels in the icon transparent (so they will be shown as unavailable if your currentcolor setting uses gray for the control Toolbox).
The procedure to embed the bitmap in the DLL that contains the control isn’t exactlyintuitive. First, use the Add New Item command from the Project menu to add a bitmapfile to your project and name this bitmap after your control (TextBoxEx.bmp in thisexample). Next, ensure that the bitmap is 16-by-16 pixels by setting its Width andHeight properties in the Properties window and draw the bitmap using your artisticabilities and the tools that Visual Studio .NET gives you. (See Figure 18-4.) Then go tothe Solution Explorer, select the bitmap file, press F4 to display the Properties windowfor the file (as opposed to the Properties window for the bitmap that you used to setthe image’s size), and change the Build Action property to Embedded Resource. If younow recompile the CustomControlDemo.dll assembly, you’ll see that the TextBoxExcontrol uses the new icon you defined. (You must use the Add/Remove Items com-mand twice to see the new icon—once to remove the previous version and once toadd the new one.)
C18620598.fm Page 600 Friday, November 21, 2003 11:37 AM
Chapter 18: Custom Windows Forms Controls 601
Notice that you haven’t used any attribute to assign the icon to the TextBoxEx becausethe association is implicitly made when you assign the bitmap the same name as thecontrol it’s related to. This technique works only if the custom control is in the project’sdefault namespace.
You can make the association explicit by using a ToolboxBitmap attribute. For exam-ple, you need this attribute when the bitmap or icon file isn’t embedded in the DLL:
<ToolboxBitmap(“C:\CustomControlDemo\TextBoxEx.ico”)> _Public Class TextBoxEx
§End Class
This attribute is also useful when the bitmap is embedded in a DLL other than the onethat contains the custom control. In this case, you pass this attribute the System.Typeobject that corresponds to any class defined in the DLL containing the resource (VisualStudio .NET uses this Type object only to locate the assembly), and you can pass a sec-ond optional argument equal to the name of the bitmap (this is necessary if the bitmapisn’t named after the custom control):
<ToolboxBitmap(GetType(TextBoxEx), “TextBoxIcon.bmp”)> _Public Class TextBoxEx
§End Class
Another case for which you need the ToolboxBitmap attribute is when your controlbelongs to a nested namespace below the project’s root namespace. For example, ifthe TextBoxEx control lives inside the CustomControlDemo.Controls namespace, youmust rename the bitmap file as Controls.TextBoxIcon.bmp (even though you mustcontinue to use TextBoxIcon.bmp in the attribute’s constructor).
F18LR04.eps
Figure 18-4 The Visual Studio .NET bitmap editor
C18620598.fm Page 601 Friday, November 21, 2003 11:37 AM
602 Part IV: Win32 Applications
Working with Default Values
You have surely noticed that the Properties window uses boldface to display values dif-ferent from the property’s default value, so you might have wondered where thedefault value is defined. As you might guess, you define the default value with yetanother attribute, appropriately named DefaultValue. This example is taken from thedemo application:
Dim m_BeepOnError As Boolean = True
<Description(“If True, a beep will be emitted if validation fails”), _DefaultValue(True)> _
Property BeepOnError() As BooleanGet
Return m_BeepOnErrorEnd GetSet(ByVal Value As Boolean)
m_BeepOnError = ValueEnd Set
End Property
Note that the DefaultValue attribute is just a directive to the Properties window: itdoesn’t actually initialize the property itself. For that, you must use an initializer or usethe necessary code in the Sub New procedure.
Unfortunately, the DefaultValue attribute has a problem: it can take only constant val-ues, and in several cases the default value isn’t a constant. For example, the value Sys-temColors.ControlText, which is the initial value for the ErrorForeColor property, isn’ta constant, so you can’t pass it to the DefaultValue attribute’s constructor. To resolvethis difficulty, the author of the custom control can create a special Resetxxxx proce-dure, where xxxx is the property name. Here is the code in the TextBoxEx class thatthe form designer implicitly calls to initialize the two color properties:
Sub ResetErrorForeColor()ErrorForeColor = SystemColors.ControlText
End Sub
If a property is associated with a Resetxxxx method, you can reset the property byclicking Reset on the context menu that you bring up by clicking on the property namein the Properties window.
The DefaultValue attribute has another, less obvious, use: if a property is set to its defaultvalue—as specified by this attribute—this property isn’t persisted, and the designer gen-erates no code for it. This behavior is highly desirable because it avoids the generation ofa lot of useless code that would slow down the rendering of the parent form. Alas, youcan’t specify a nonconstant value, a color, a font, or another complex object in theDefaultValue attribute. In this case, you must implement a method named
C18620598.fm Page 602 Friday, November 21, 2003 11:37 AM
Chapter 18: Custom Windows Forms Controls 603
ShouldSerializexxxx (where xxxx is the name of the property) that returns True if theproperty must be serialized and False if its current value is equal to its default value:
Function ShouldSerializeErrorForeColor() As Boolean’ We can’t use the = operators on objects, so we use’ the Equals method.Return Not Me.ErrorForeColor.Equals(SystemColors.ControlText)
End Function
Creating Composed Multiple ControlsMore complex custom controls require that you combine multiple controls. You canthink of several custom controls of this type, such as a control that implements Win-dows Explorer–like functionality by grouping together a TreeView, a ListView, and aSplitter control; or a control made up of two ListBox controls that lets you move itemsfrom one ListBox to the other, using auxiliary buttons or drag-and-drop.
In this section, I build a composite custom control named FileTextBox, which lets theuser enter a filename by typing its name in a field or by selecting it in an OpenFilecommon dialog box.
Creating the UserControl Component
Add a new UserControl module named FileTextBox to the CustomControlDemo projectby selecting the project and then selecting Add UserControl on the Project menu. Ensurethat you’ve selected the CustomControlDemo project before you perform this action—otherwise, the custom control will be added to the test application instead.
The UserControl class derives from the ContainerControl class, so it can work as a con-tainer for other controls. In this respect, the UserControl object behaves very much likethe Form object, and in fact, the programming interface of these classes is very similar,with properties such as Font, ForeColor, AutoScroll, and so on. A few typical formproperties are missing because they don’t make sense in a control—for example, Main-Menu and TopMost—but by and large, you code against a UserControl as if you wereworking with a regular form.
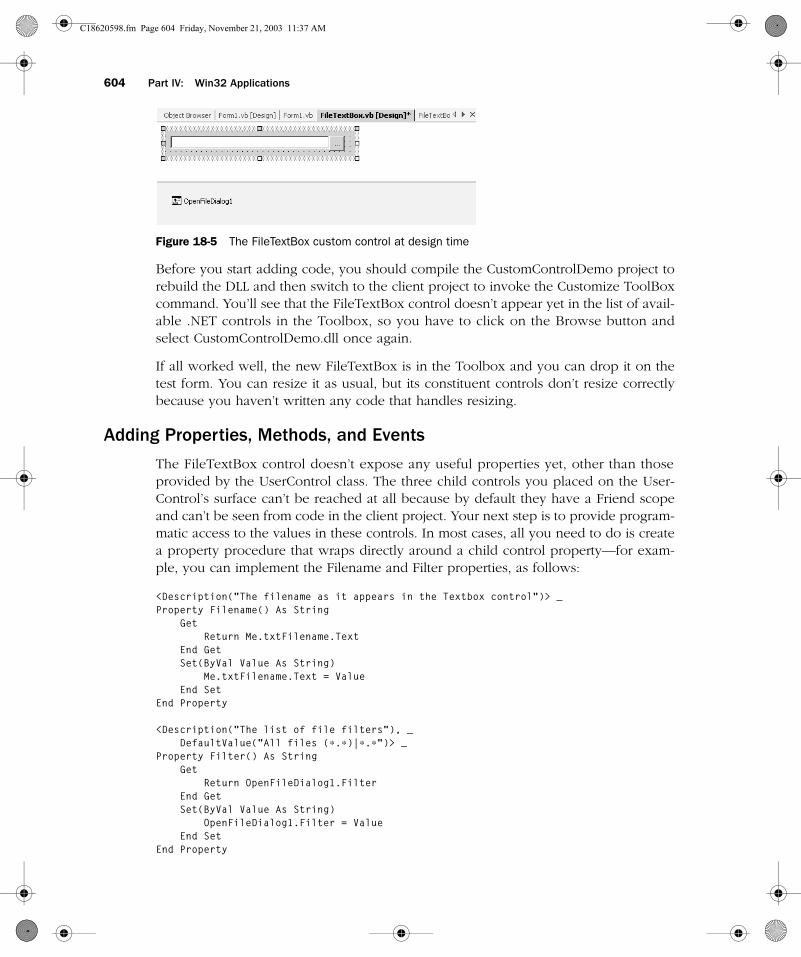
You can therefore drop on the UserControl’s surface the three child controls you needfor the FileTextBox control. These are a TextBox for the filename (named txtFilename,with a blank Text property); an OpenFileDialog control to display the dialog box(named OpenFileDialog1); and a Button control to let the user bring up the commondialog (named btnBrowse, with the Text property set to three dots). You can arrangethese controls in the manner of Figure 18-5. Don’t pay too much attention to theiralignment, however, because you’re going to move them on the UserControl’s surfaceby means of code.
C18620598.fm Page 603 Friday, November 21, 2003 11:37 AM
604 Part IV: Win32 Applications
F18LR05.eps
Figure 18-5 The FileTextBox custom control at design time
Before you start adding code, you should compile the CustomControlDemo project torebuild the DLL and then switch to the client project to invoke the Customize ToolBoxcommand. You’ll see that the FileTextBox control doesn’t appear yet in the list of avail-able .NET controls in the Toolbox, so you have to click on the Browse button andselect CustomControlDemo.dll once again.
If all worked well, the new FileTextBox is in the Toolbox and you can drop it on thetest form. You can resize it as usual, but its constituent controls don’t resize correctlybecause you haven’t written any code that handles resizing.
Adding Properties, Methods, and Events
The FileTextBox control doesn’t expose any useful properties yet, other than thoseprovided by the UserControl class. The three child controls you placed on the User-Control’s surface can’t be reached at all because by default they have a Friend scopeand can’t be seen from code in the client project. Your next step is to provide program-matic access to the values in these controls. In most cases, all you need to do is createa property procedure that wraps directly around a child control property—for exam-ple, you can implement the Filename and Filter properties, as follows:
<Description(“The filename as it appears in the Textbox control”)> _Property Filename() As String
GetReturn Me.txtFilename.Text
End GetSet(ByVal Value As String)
Me.txtFilename.Text = ValueEnd Set
End Property
<Description(“The list of file filters”), _DefaultValue(“All files (*.*)|*.*”)> _
Property Filter() As StringGet
Return OpenFileDialog1.FilterEnd GetSet(ByVal Value As String)
OpenFileDialog1.Filter = ValueEnd Set
End Property
C18620598.fm Page 604 Friday, November 21, 2003 11:37 AM
Chapter 18: Custom Windows Forms Controls 605
If you wrap your property procedures around child control properties, you must becertain that you properly initialize the child controls so that the initial values of theirproperties match the values passed to the DefaultValue attribute. In this case, you mustensure that you set the OpenFileDialog1.Filter property correctly.
You don’t create wrappers around child control properties only. For example, you canimplement a ShowDialog method that wraps around the OpenFileDialog1 controlmethod of the same name:
Function ShowDialog() As DialogResult’ Show the OpenFile dialog, and return the result.ShowDialog = OpenFileDialog1.ShowDialog’ If the result is OK, assign the filename to the TextBox.If ShowDialog = DialogResult.OK Then
txtFilename.Text = OpenFileDialog1.FileNameEnd If
End Function
You can also provide wrappers for events. For example, exposing the FileOk eventgives the client code the ability to reject invalid filenames:
Event FileOk(ByVal sender As Object, ByVal e As CancelEventArgs)
Private Sub OpenFileDialog1_FileOk(ByVal sender As Object, _ByVal e As CancelEventArgs) Handles OpenFileDialog1.FileOkRaiseEvent FileOk(Me, e)
End Sub
Bear in mind that the client will receive the event from the FileTextBox control, notfrom the inner OpenFileDialog control, so you must pass Me as the first argument ofthe RaiseEvent method, as in the preceding code snippet. In some cases, you also needto change the name of the event to meet the client code’s expectations—for example,the TextChanged event from the inner txtFilename should be exposed to the outside asFilenameChanged because Filename is the actual property that will appear as modifiedto clients. In other cases you might need to adjust the properties of the EventArgs-derived object—for example, to convert mouse coordinates so that they refer to theUserControl rather than the constituent control that fired the event.
Not all events should be exposed to the outside, however. The button’s Click event, forexample, is handled internally to automatically fill the txtFilename field when the userselects a file from the common dialog box:
Private Sub btnBrowse_Click(ByVal sender As Object, _ByVal e As EventArgs) Handles btnBrowse.ClickShowDialog()
End Sub
C18620598.fm Page 605 Friday, November 21, 2003 11:37 AM
606 Part IV: Win32 Applications
Shadowing and Overriding UserControl Properties
If you modify the Font property of the FileTextBox control, you’ll notice that the new set-tings are immediately applied to the inner txtFilename control, so you don’t have to man-ually implement the Font property. The custom control behaves this way because younever assign a specific value to txtFilename.Font, so it automatically inherits the parentUserControl’s settings. This feature can save you a lot of code and time. The group ofproperties that you shouldn’t implement explicitly includes Enabled and TabStop becauseall the constituent controls inherit these properties from their UserControl container.
You’re not always that lucky. For example, TextBox controls don’t automatically inheritthe ForeColor of their container, and you have to implement this property manually. Aminor annoyance is that the UserControl already exposes a property of this name, so youreceive a compilation warning. You can get rid of this warning by using the Shadowskeyword. Note that you also must use explicit shadowing with the Resetxxxx procedure:
Shadows Property ForeColor() As ColorGet
Return txtFilename.ForeColorEnd GetSet(ByVal Value As Color)
txtFilename.ForeColor = ValueEnd Set
End Property
Shadows Sub ResetForeColor()Me.ForeColor = SystemColors.ControlText
End Sub
Function ShouldSerializeForeColor() As BooleanReturn Not Me.ForeColor.Equals(SystemColors.ControlText)
End Function
If your custom control exposes a property with the same name, return type, and defaultvalue as a property in the base UserControl, you can override it instead of shadowing it—for example, the FileTextBox control overrides the ContextMenu property so that thepop-up menu also appears when the end user right-clicks on constituent controls:
Overrides Property ContextMenu() As ContextMenuGet
Return MyBase.ContextMenuEnd GetSet(ByVal Value As ContextMenu)
MyBase.ContextMenu = Value’ Propagate the new value to constituent controls.’ (This generic code works with any UserControl.)For Each ctrl As Control In Me.Controls
ctrl.ContextMenu = Me.ContextMenuNext
End SetEnd Property
C18620598.fm Page 606 Friday, November 21, 2003 11:37 AM
Chapter 18: Custom Windows Forms Controls 607
In many cases, however, you really have to go as far as overriding a property in thebase UserControl only if you need to cancel its default behavior. If you just want a noti-fication that a property has changed, you can be satisfied by simply trapping the xxxx-Changed event—for example, the following code displays the btnBrowse buttoncontrol with a flat appearance when the FileTextBox control is disabled:
Private Sub FileTextBox_EnabledChanged(ByVal sender As Object, _ByVal e As EventArgs) Handles MyBase.EnabledChangedIf Me.Enabled Then
btnBrowse.FlatStyle = FlatStyle.StandardElse
btnBrowse.FlatStyle = FlatStyle.FlatEnd If
End Sub
Notice that xxxxChanged events don’t fire at design time, so you can’t use this methodto react to setting changes in the Properties window.
You often need to shadow properties in the base class for the sole purpose of hidingthem in the Properties window. For example, the demo FileTextBox control can’t workas a scrollable container, so it shouldn’t display the AutoScroll, AutoScrollMargins,AutoScrollPosition, and DockPadding items in the Properties window. You can achievethis by shadowing the property and adding a Browsable(False) attribute:
<Browsable(False)> _Shadows Property AutoScroll() As Boolean
Get’ Don’t really need to delegate to inner UserControl.
End GetSet(ByVal Value As Boolean)
’ Don’t really need to delegate to inner UserControl.End Set
End Property
Although you can easily hide a property in the Properties window, inheritance rulesprevent you from completely wiping out a UserControl property from the custom con-trol’s programming interface. However, you can throw an exception when this prop-erty is accessed at run time programmatically so that the developer using this customcontrol learns the lesson more quickly. You can discern whether you’re in design-timeor run-time mode with the DesignMode property, which the UserControl inherits fromthe System.ComponentModel.Component object:
<Browsable(False)> _Shadows Property AutoScroll() As Boolean
GetIf Not Me.DesignMode Then Throw New NotImplementedException()
End GetSet(ByVal Value As Boolean)
If Not Me.DesignMode Then Throw New NotImplementedException()End Set
End Property
C18620598.fm Page 607 Friday, November 21, 2003 11:37 AM
608 Part IV: Win32 Applications
You must check the DesignMode property before throwing the exception—otherwise,the control doesn’t work correctly in design-time mode. You can use this property formany other purposes, such as displaying a slightly different user interface at designtime or run time.
Adding Resize Logic
The code inside your UserControl determines how its constituent controls are arrangedwhen the control is resized. In the simplest cases, you don’t have to write code toachieve the desired effect because you can simply rely on the Anchor and Dock prop-erties of constituent controls. However, this approach is rarely feasible with more com-plex custom controls. For example, the btnBrowse button in FileTextBox alwaysshould be square, and so its height and width depend on the txtFilename control’sheight, which in turn depends on the current font. Besides, the height of the FileText-Box control always should be equal to the height of its inner fields. All these con-straints require that you write custom resize logic in a private RedrawControlsprocedure and call this procedure from the UserControl’s Resize event:
Private Sub FileTextBox_Resize(ByVal sender As Object, _ByVal e As System.EventArgs) Handles MyBase.ResizeRedrawControls()
End Sub
Private Sub RedrawControls()’ This is the inner width of the control.Dim width As Integer = Me.ClientRectangle.Width’ This is the (desired) height of the control.Dim btnSide As Integer = txtFilename.Height
’ Adjust the height of the UserControl if necessary.If Me.ClientRectangle.Height <> btnSide Then
’ Resize the UserControl.Me.SetClientSizeCore(Me.ClientRectangle.Width, btnSide)’ The above statement fires a nested Resize event, so exit right now.Exit Sub
End If
’ Resize the constituent controls.txtFilename.SetBounds(0, 0, width - btnSide, btnSide)btnBrowse.SetBounds(width - btnSide, 0, btnSide, btnSide)
End Sub
Don’t forget that the custom control’s height also should change when its Font propertychanges, so you must override the OnFontChanged method as well. (You can’t simplytrap the FontChanged event because it doesn’t fire at design time.)
Protected Overrides Sub OnFontChanged(ByVal e As EventArgs)’ Let the base control update the TextBox control.MyBase.OnFontChanged(e)’ Now we can redraw controls if necessary.RedrawControls()
End Sub
C18620598.fm Page 608 Friday, November 21, 2003 11:37 AM
Chapter 18: Custom Windows Forms Controls 609
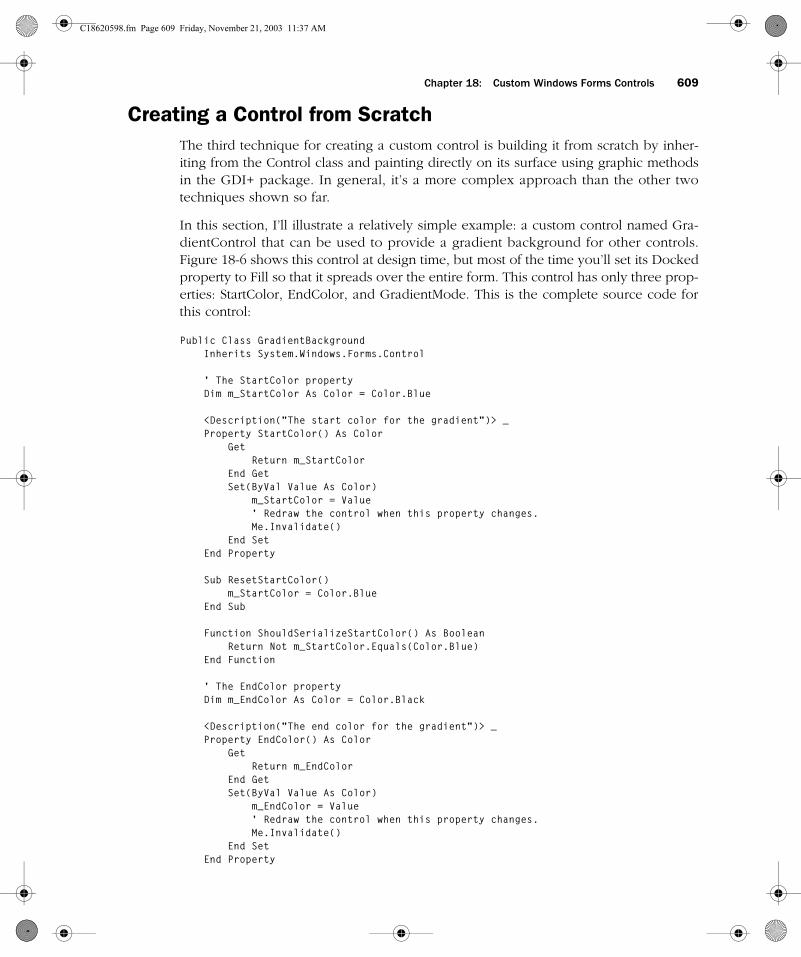
Creating a Control from ScratchThe third technique for creating a custom control is building it from scratch by inher-iting from the Control class and painting directly on its surface using graphic methodsin the GDI+ package. In general, it’s a more complex approach than the other twotechniques shown so far.
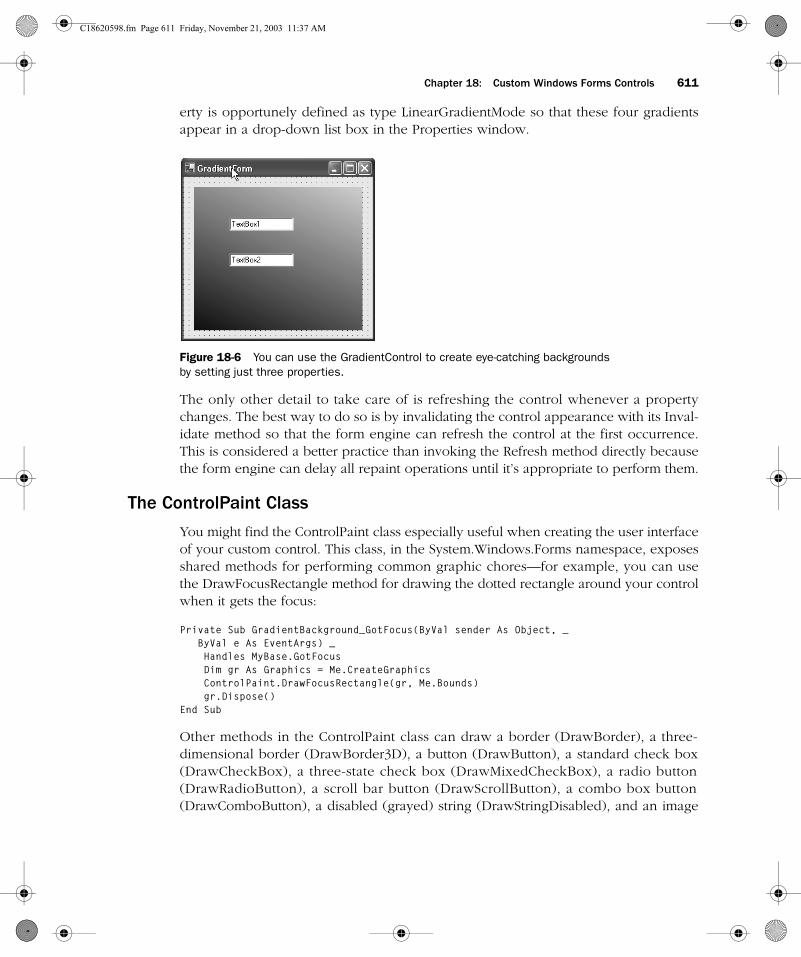
In this section, I’ll illustrate a relatively simple example: a custom control named Gra-dientControl that can be used to provide a gradient background for other controls.Figure 18-6 shows this control at design time, but most of the time you’ll set its Dockedproperty to Fill so that it spreads over the entire form. This control has only three prop-erties: StartColor, EndColor, and GradientMode. This is the complete source code forthis control:
Public Class GradientBackgroundInherits System.Windows.Forms.Control
’ The StartColor propertyDim m_StartColor As Color = Color.Blue
<Description(“The start color for the gradient”)> _Property StartColor() As Color
GetReturn m_StartColor
End GetSet(ByVal Value As Color)
m_StartColor = Value’ Redraw the control when this property changes.Me.Invalidate()
End SetEnd Property
Sub ResetStartColor()m_StartColor = Color.Blue
End Sub
Function ShouldSerializeStartColor() As BooleanReturn Not m_StartColor.Equals(Color.Blue)
End Function
’ The EndColor propertyDim m_EndColor As Color = Color.Black
<Description(“The end color for the gradient”)> _Property EndColor() As Color
GetReturn m_EndColor
End GetSet(ByVal Value As Color)
m_EndColor = Value’ Redraw the control when this property changes.Me.Invalidate()
End SetEnd Property
C18620598.fm Page 609 Friday, November 21, 2003 11:37 AM

610 Part IV: Win32 Applications
Sub ResetEndColor()m_EndColor = Color.Black
End Sub
Function ShouldSerializeEndColor() As BooleanReturn Not m_EndColor.Equals(Color.Black)
End Function
’ The GradientMode propertyDim m_GradientMode As LinearGradientMode = _
LinearGradientMode.ForwardDiagonal
<Description(“The gradient mode”), _DefaultValue(LinearGradientMode.ForwardDiagonal)> _
Property GradientMode() As LinearGradientModeGet
Return m_GradientModeEnd GetSet(ByVal Value As LinearGradientMode)
m_GradientMode = Value’ Redraw the control when this property changes.Me.Invalidate()
End SetEnd Property
’ Render the control background.
Protected Overrides Sub OnPaint(ByVal e As PaintEventArgs)’ Create a gradient brush as large as the client area, with specified’ start/end color and gradient mode.Dim br As New LinearGradientBrush(Me.ClientRectangle, _
m_StartColor, m_EndColor, m_GradientMode)’ Paint the background and destroy the brush.e.Graphics.FillRectangle(br, Me.ClientRectangle)br.Dispose()’ Let the base control do its chores (e.g., raising the Paint event).MyBase.OnPaint(e)
End Sub
Private Sub GradientBackground_Resize(ByVal sender As Object, _ByVal e As EventArgs) Handles MyBase.ResizeMe.Invalidate()
End SubEnd Class
A custom control implemented by inheriting from the Control class must render itselfin the overridden OnPaint method. In this particular case, redrawing the control is triv-ial because the System.Drawing.Drawing2d namespace exposes a LinearGradientBrushobject that does all the work for you. In practice, for this particular control you onlyhave to create a gradient brush as large as the control itself and then use this brush topaint the control’s client rectangle. The last argument you pass to the brush’s construc-tor is the gradient mode, an enumerated value that lets you create horizontal, vertical,forward diagonal (default), and backward diagonal gradients. The GradientMode prop-
C18620598.fm Page 610 Friday, November 21, 2003 11:37 AM
Chapter 18: Custom Windows Forms Controls 611
erty is opportunely defined as type LinearGradientMode so that these four gradientsappear in a drop-down list box in the Properties window.
F18LR06.eps
Figure 18-6 You can use the GradientControl to create eye-catching backgroundsby setting just three properties.
The only other detail to take care of is refreshing the control whenever a propertychanges. The best way to do so is by invalidating the control appearance with its Inval-idate method so that the form engine can refresh the control at the first occurrence.This is considered a better practice than invoking the Refresh method directly becausethe form engine can delay all repaint operations until it’s appropriate to perform them.
The ControlPaint Class
You might find the ControlPaint class especially useful when creating the user interfaceof your custom control. This class, in the System.Windows.Forms namespace, exposesshared methods for performing common graphic chores—for example, you can usethe DrawFocusRectangle method for drawing the dotted rectangle around your controlwhen it gets the focus:
Private Sub GradientBackground_GotFocus(ByVal sender As Object, _ByVal e As EventArgs) _Handles MyBase.GotFocusDim gr As Graphics = Me.CreateGraphicsControlPaint.DrawFocusRectangle(gr, Me.Bounds)gr.Dispose()
End Sub
Other methods in the ControlPaint class can draw a border (DrawBorder), a three-dimensional border (DrawBorder3D), a button (DrawButton), a standard check box(DrawCheckBox), a three-state check box (DrawMixedCheckBox), a radio button(DrawRadioButton), a scroll bar button (DrawScrollButton), a combo box button(DrawComboButton), a disabled (grayed) string (DrawStringDisabled), and an image
C18620598.fm Page 611 Friday, November 21, 2003 11:37 AM

612 Part IV: Win32 Applications
in disabled state (DrawImageDisabled). All these borders and buttons can be renderedin normal, checked, flat, pushed, and inactive states. (See Figure 18-7.)
The DrawReversibleLine method draws a line in such a way that you can make the linedisappear if you invoke the method again. The DrawReversibleFrame and FillRevers-ibleRectangle methods do the same, but draw an empty and a filled rectangle, respec-tively. You can use these methods to implement “rubber band” techniques—forexample, to let users draw lines and rectangles with the mouse. (Notice that you can’timplement rubber banding with GDI+ methods because GDI+ doesn’t support XORdrawing. For drawing any shape other than a line and a rectangle in rubber-bandingmode, you must call the native Windows GDI functions though PInvoke.)
F18LR07.eps
Figure 18-7 The demo application lets you preview the effect you can achieveby invoking some of the methods in the ControlPaint class.
Advanced TopicsWindows Forms control creation is a complex topic, and I don’t have enough space tocover every detail. But what you learned in previous chapters and the techniques I’llcover in this section are more than sufficient to enable you to author useful and com-plex controls with relatively little effort.
The ISupportInitialize Interface
If you create a control or a component that is meant to interact with other controls onthe form, you might have the following problem: the control hasn’t been sited on theform’s surface when its constructor method runs, so you can’t reference the Containerproperty from inside that method. And even if you could, your code couldn’t see anycontrols that are added to the form after it.
C18620598.fm Page 612 Friday, November 21, 2003 11:37 AM
Chapter 18: Custom Windows Forms Controls 613
You can easily solve these and other similar problems simply by having your control orcomponent expose the System.ComponentModel.SupportInitialize interface. WhenVisual Studio .NET adds your control to the form, it will invoke the ISupportInitial-ize.BeginInit method before any control is added to the form, and the ISupportInitial-ize.EndInit method after all controls have been added to the form. Several built-incontrols expose this interface, including the DataGrid, Timer, and NumericUpDowncontrols, and the DataSet, DataTable, and FileSystemWatcher components—for exam-ple, look at the code that Visual Studio .NET generates when you drop a DataGrid con-trol on a form’s surface:
<System.Diagnostics.DebuggerStepThrough()> Private Sub InitializeComponent()Me.TextBox1 = New System.Windows.Forms.TextBoxMe.DataGrid1 = New System.Windows.Forms.DataGridCType(Me.DataGrid1, ISupportInitialize).BeginInit()Me.SuspendLayout()’ ...(Assign properties of all the controls and the form itself)...§’ ...(Add controls to the parent form)...Me.Controls.Add(Me.TextBox1)Me.Controls.Add(Me.DataGrid1)CType(Me.DataGrid1, ISupportInitialize).EndInit()Me.ResumeLayout(False)
End Sub
Here’s how this interface looks when implemented in a component:
Public Sub BeginInit() Implements ISupportInitialize.BeginInit’ Code that runs before any other control is hosted on the form.
End Sub
Public Sub EndInit() Implements ISupportInitialize.EndInit’ Code that runs after any other control is hosted on the form.
End Sub
Multithreaded Controls
Creating a multithreaded control class isn’t different from creating a new thread in aregular application, and you have several options: you can create a new Thread object,use a thread from the thread pool, or just use asynchronous method invocation.(Threading is covered in Chapter 12.) The only potential glitch you should watch for isthat the control you create—whether it’s inherited from a Control, a UserControl, oranother control—must be accessed exclusively from the thread that created it. In fact,all the Windows Forms controls rely on the single-threaded apartment (STA) modelbecause windows and controls are based on the Win32 message architecture, which isinherently apartment-threaded. This means that a control (or a form, for that matter)can be created on any thread, but all the methods of the control must be called fromthe thread that created the control. This constraint can create a serious problembecause other .NET portions use the free-threading model, and carelessly mixing thetwo models isn’t a wise idea.
C18620598.fm Page 613 Friday, November 21, 2003 11:37 AM
614 Part IV: Win32 Applications
The only methods that you can call on a control object from another thread are Invoke,BeginInvoke, and EndInvoke. You already know from Chapter 12 how to use the lattertwo methods for calling a method asynchronously, so in this section I’ll focus on theInvoke method exclusively. This method takes a delegate pointing to a method (Sub orFunction) and can take an Object array as a second argument if the method expectsone or more arguments.
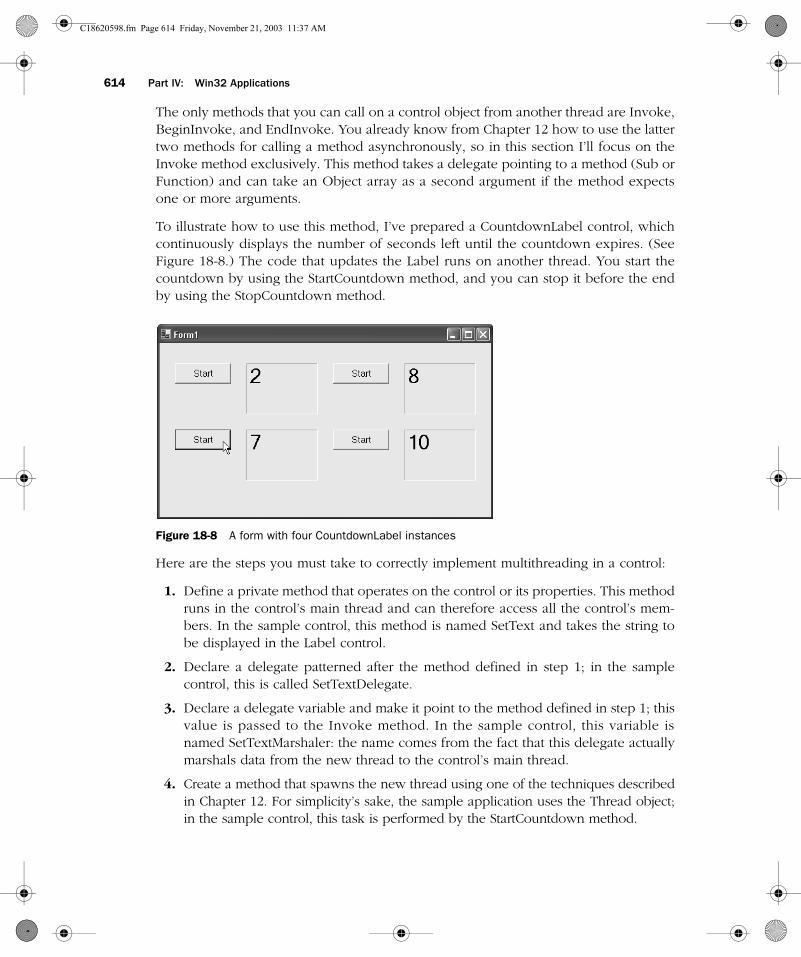
To illustrate how to use this method, I’ve prepared a CountdownLabel control, whichcontinuously displays the number of seconds left until the countdown expires. (SeeFigure 18-8.) The code that updates the Label runs on another thread. You start thecountdown by using the StartCountdown method, and you can stop it before the endby using the StopCountdown method.
F18LR08.eps
Figure 18-8 A form with four CountdownLabel instances
Here are the steps you must take to correctly implement multithreading in a control:
1. Define a private method that operates on the control or its properties. This methodruns in the control’s main thread and can therefore access all the control’s mem-bers. In the sample control, this method is named SetText and takes the string tobe displayed in the Label control.
2. Declare a delegate patterned after the method defined in step 1; in the samplecontrol, this is called SetTextDelegate.
3. Declare a delegate variable and make it point to the method defined in step 1; thisvalue is passed to the Invoke method. In the sample control, this variable isnamed SetTextMarshaler: the name comes from the fact that this delegate actuallymarshals data from the new thread to the control’s main thread.
4. Create a method that spawns the new thread using one of the techniques describedin Chapter 12. For simplicity’s sake, the sample application uses the Thread object;in the sample control, this task is performed by the StartCountdown method.
C18620598.fm Page 614 Friday, November 21, 2003 11:37 AM
Chapter 18: Custom Windows Forms Controls 615
Here’s the complete listing of the CountdownLabel control:
Public Class CountdownLabelInherits System.Windows.Forms.Label
’ A delegate that points to the SetText procedureDelegate Sub SetTextDelegate(ByVal Text As String)’ An instance of this delegate that points to the SetText procedureDim SetTextMarshaler As SetTextDelegate = AddressOf Me.SetText’ The internal counter for number of seconds leftDim secondsLeft As Integer’ The end time for countdownDim endTime As Date’ The thread object: if Nothing, no other thread is running.Dim thr As Thread
Sub StartCountdown(ByVal seconds As Integer)’ Wait until all variables can be accessed safely.SyncLock Me
’ Save values where the other thread can access them.secondsLeft = secondsendTime = Now.AddSeconds(seconds)
’ Create a new thread, and run the procedure on that thread’ only if the thread isn’t running already.If (thr Is Nothing) Then
thr = New Thread(AddressOf CountProc)thr.Start()
End IfEnd SyncLock
’ Display the initial value in the label.SetText(CStr(seconds))
End Sub
Sub StopCountdown()SyncLock Me
’ This statement implicitly causes CountProc to exit.endTime = Now
End SyncLockEnd Sub
’ This procedure is just a wrapper for a simple property set and runs’ on the control’s creation thread. The other thread(s) must call it’ through the control’s Invoke method.Private Sub SetText(ByVal Text As String)
Me.Text = TextEnd Sub
’ This procedure runs on another thread.Private Sub CountProc()
Do’ Ensure that this is the only thread that is accessing variables.SyncLock Me
C18620598.fm Page 615 Friday, November 21, 2003 11:37 AM
616 Part IV: Win32 Applications
’ Calculate the number of seconds left.Dim secs As Integer = CInt(endTime.Subtract(Now).TotalSeconds)’ If different from current value, update the Text property.If secs <> secondsLeft Then
’ Never display negative numbers.secondsLeft = Math.Max(secs, 0)’ Arguments must be passed in an Object array.Dim args() As Object = {CStr(secondsLeft)}’ Update the Text property with current number of seconds.MyBase.Invoke(SetTextMarshaler, args)
’ Terminate the thread if countdown is over.If secondsLeft <= 0 Then
’ Signal that no thread is running, and exit.thr = NothingExit Do
End IfEnd If
End SyncLock’ Wait for 100 milliseconds.Thread.Sleep(100)
LoopEnd Sub
End Class
As usual in multithreaded applications, you must pay a lot of attention to how youaccess variables shared among threads to prevent your control from randomly crashingafter hours of testing. Other problems can arise if the user closes the form while theother thread is running because this extra thread attempts to access a control that nolonger exists and would prevent the application from shutting down correctly. You canwork around this obstacle by killing the other thread when the control is beingdestroyed, which you do by overriding the OnHandleDestroyed method:
’ Kill the other thread if the control is being destroyed.Protected Overrides Sub OnHandleDestroyed(ByVal e As EventArgs)
SyncLock MeIf Not (thr Is Nothing) AndAlso thr.IsAlive Then
thr.Abort()thr.Join()
End IfEnd SyncLockMyBase.OnHandleDestroyed(e)
End Sub
Remember that you can’t use the RaiseEvent statement from another thread. To havethe CountdownLabel control fire an event when the countdown is complete, you mustadopt the same technique described previously. You must create a method that callsRaiseEvent and runs on the main thread, define a delegate that points to it, and useInvoke from the other thread when you want to raise the event.
The techniques described in this section should be used whenever you access a Win-dows Forms control from another thread and not just when you’re creating a customcontrol. If you are unsure whether you must use the Invoke method on a control (in
C18620598.fm Page 616 Friday, November 21, 2003 11:37 AM
Chapter 18: Custom Windows Forms Controls 617
other words, you don’t know whether your code is running in the same thread as thecontrol), just check the InvokeRequired read-only property. If it returns True, you mustuse the technique described in this section.
Extender Provider Controls
You can create property extender controls similar to those provided with the WindowsForms package, such as ToolTip and HelpProvider. In this section, I’ll guide youthrough the creation of a component named UserPropExtender, which adds a propertynamed UserRole to all the visible controls on the form. The developer can assign a userrole to this list, or even a semicolon-separated list of roles, such as Manager;Accoun-tants. At run time, the UserPropExtender control makes invisible those controls that areassociated with a user role different from the current role (information that you assignto the UserPropExtender control’s CurrentUserRole property). Thanks to the User-PropExtender control, you can provide different control layouts for different user roleswithout writing any code. Here are the steps you must follow when creating anextender provider control:
1. You define a class for your extender provider, making it inherit from System.Win-dows.Forms.Control (if the new control has a user interface) or from System.Com-ponentModel.Component (if the new control isn’t visible at run time and shouldbe displayed in the component tray of the form designer).
2. Associate a ProvideProperty attribute with the class you created in the precedingstep. The constructor for this attribute takes the name of the property that’s addedto all the controls on the form and a second System.Type argument that defineswhich type of objects can be extended by this extender provider. In this example,the new property is named UserList and can be applied to Control objects.
3. All extender providers must implement the IExtenderProvider interface, so youmust add a suitable Implements statement. This interface has only one method,CanExtend, which receives an Object and is expected to return True if that objectcan be extended with the new property. The code in the sample control returnsTrue for all control classes except the Form class.
4. Declare and initialize a class-level Hashtable object that stores the value of the User-Name property for all the controls on the form, where the control itself is used as akey in the Hashtable. In the sample project, this collection is named userListValues.
5. Define two methods, Getxxxx and Setxxxx, where xxxx is the name of the prop-erty that the extender provider adds to all other controls. (These methods arenamed GetUserName and SetUserName in the sample control.) These methodscan read and write values in the Hashtable defined in the preceding step andmodify the control’s user interface as necessary. (The Setxxxx method is invokedfrom the code automatically generated by the form designer.)
C18620598.fm Page 617 Friday, November 21, 2003 11:37 AM
618 Part IV: Win32 Applications
Armed with this knowledge, you should be able to decode the complete listing for theUserPropExtender component quite easily:
‘ Let the form know that this control will add the UserRole property.<ProvideProperty(“UserRole", GetType(Control))> _Public Class UserPropExtender
Inherits ComponentImplements IExtenderProvider
’ Return True for all controls that can be extended with’ the UserRole property.Public Function CanExtend(ByVal extendee As Object) As Boolean _
Implements IExtenderProvider.CanExtend’ Extend all controls but not forms.If Not (TypeOf extendee Is Form) Then
Return TrueEnd If
End Function
’ The Hashtable object that associates controls with their UserRoleDim userRoleValues As New Hashtable()
’ These are the Get/Set methods related to the property being added.
Function GetUserRole(ByVal ctrl As Control) As String’ Check whether a property is associated with this control.Dim value As Object = userRoleValues(ctrl)’ Return the value found or an empty string.If value Is Nothing Then value = “"Return value.ToString
End Function
Sub SetUserRole(ByVal ctrl As Control, ByVal value As String)’ In case Nothing is passedIf Value Is Nothing Then Value = “"If Value.Length = 0 And userRoleValues.Contains(ctrl) Then
’ Remove the control from the hash table.userRoleValues.Remove(ctrl)’ Remove event handlers, if any (none in this example).§
ElseIf Value.Length > 0 ThenIf Not userRoleValues.Contains(ctrl) Then
’ Add event handlers here (none in this example).§
End If’ Assign the new value, and refresh the control.userRoleValues.Item(ctrl) = ValueSetControlVisibility(ctrl)
End IfEnd Sub
’ This property is assigned the name of the current user.Dim m_CurrentUserRole As String
C18620598.fm Page 618 Friday, November 21, 2003 11:37 AM
Chapter 18: Custom Windows Forms Controls 619
Property CurrentUserRole() As StringGet
Return m_CurrentUserRoleEnd GetSet(ByVal Value As String)
m_CurrentUserRole = ValueRefreshAllControls() ’ Redraw all controls.
End SetEnd Property
’ Hide/show all controls based on their UserRole property.Sub RefreshAllControls()
For Each ctrl As Control In userRoleValues.KeysSetControlVisibility(ctrl)
NextEnd Sub
’ Hide/show a single control based on its UserRole property.Private Sub SetControlVisibility(ByVal ctrl As Control)
’ Do nothing if no current role or control isn’t in the hash table.If CurrentUserRole = ““ Then Exit SubIf Not userRoleValues.Contains(ctrl) Then Exit Sub
’ Get the value in the hash table.Dim value As String = userRoleValues(ctrl).ToString’ Check whether current role is among the role(s) defined’ for this control.If InStr(“;” & value & “;", “;” & CurrentUserRole & “;", _
CompareMethod.Text) > 0 Thenctrl.Visible = True
Elsectrl.Visible = False
End IfEnd Sub
End Class
The UserPropExtender control is fully functional and uses many of the techniques youshould know about when writing extender providers. But because of its simplicity, itdoesn’t need to trap events coming from other controls on the form, which is often arequirement for extender providers. For example, the ToolTip control intercepts mouseevents for all controls that have a nonempty ToolTip property, and the HelpProvider con-trol intercepts the HelpRequested event to display the associated help page or string.
Intercepting events from controls isn’t difficult; however, when the control is addedto the Hashtable (typically in the Setxxxx method), you use the AddHandler com-mand to have one of its events trapped by a local procedure, and you use Remove-Handler to remove the event added dynamically when the control is removed fromthe Hashtable. Remarks in the preceding listing clearly show where these statementsshould be inserted.
C18620598.fm Page 619 Friday, November 21, 2003 11:37 AM
620 Part IV: Win32 Applications
Custom Property Editors
If you’re familiar with custom control authoring under Visual Basic 6, you might havenoticed that I haven’t mentioned property pages, either when describing built-in con-trols or in this section devoted to custom control creation. Property pages aren’t sup-ported in the .NET architecture and have been replaced by custom property editors.
The most common form of property editor displays a Windows Forms control in adrop-down area inside the Properties window. You can display any control in thedrop-down area, such as a TrackBar, a ListBox, or even a complex control such as aTreeView or a DataGrid, but the limitation is that you can display only one control. Ifyou want to display more controls, you’ll have to create a custom control with multiplechild controls for the sole purpose of using it in the drop-down area—for example, theeditors used by Anchor and Dock properties work in this way.
The Windows Form designer also supports property editors that display modal forms.Because you’re in charge of drawing the appearance of such modal forms, you can dis-play tab pages and multiple controls, and even modify more than one property. Forexample, you can add OK, Cancel, and Apply buttons and have a Visual Basic 6–likeproperty page. Because these forms are modal, the Property window should beupdated only when the user closes them, but you can offer a preview of what the cus-tom control being edited will look like when the property or properties are assigned.As a matter of fact, it’s perfectly legal to use your custom control inside the propertyeditor you create for one of its properties, regardless of whether these editors use thedrop-down area or a modal form.
Implementing a custom property editor isn’t simple. Worse, the MSDN documentationis less than perfect—to use a euphemism—so I had to dig deep in the samples pro-vided with the .NET Framework and use some imagination. The companion sourcecode with this book includes a GradientBackgroundEx control that extends Gradient-Background with a new RotateAngle property, which permits you to rotate the gradientbrush. (I have purposely chosen to extend an existing control so that I don’t need tolead you through all the steps necessary to create a brand-new custom control.) Thenew property is associated with a custom property editor that uses a TrackBar controlin a drop-down area of the Properties window to let the user select the angle with themouse. Thanks to inheritance, the code for the GradientBackgroundEx control is con-cise and includes only the new Property procedure and a redefined OnPaint proce-dure, which differs from the original OnPaint procedure by one statement only, hereshown in boldface:
Public Class GradientBackgroundExInherits GradientBackground
Dim m_RotateAngle As Single
C18620598.fm Page 620 Friday, November 21, 2003 11:37 AM
Chapter 18: Custom Windows Forms Controls 621
<Description(“The rotation angle for the brush”), DefaultValue(0)> _Property RotateAngle() As Single
GetReturn m_RotateAngle
End GetSet(ByVal Value As Single)
m_RotateAngle = ValueMe.Invalidate()
End SetEnd Property
’ Redefine the OnPaint event to account for the new property.Protected Overrides Sub OnPaint(ByVal e As PaintEventArgs)
’ Create a gradient brush as large as the client area, with specified’ start/end color and gradient mode.Dim br As New LinearGradientBrush(Me.ClientRectangle, _
Me.StartColor, Me.EndColor, Me.GradientMode)’ Apply the rotation angle.br.RotateTransform(Me.RotateAngle)’ Paint the background and destroy the brush.e.Graphics.FillRectangle(br, Me.ClientRectangle)br.Dispose()’ Let the base control do its chores (e.g., raising the Paint event).MyBase.OnPaint(e)
End SubEnd Class
The first step in defining a custom editor for a given property is to specify the editoritself in the Editor attribute associated with the property procedure itself. The editorwe’re going to create is named RotateAngleEditor, so the new version of the RotateAn-gle Property procedure becomes:
<Description(“The rotation angle for the brush”), DefaultValue(0), _Editor(GetType(RotateAngleEditor), GetType(UITypeEditor))> _
Property RotateAngle() As Single§
End Property
Note that the attribute’s constructor takes two System.Type arguments, so you must usethe GetType function. The second argument is always GetType(UITypeEditor).
The property editor is a class that you define. If you don’t plan to reuse this propertyeditor for other custom controls, you can avoid namespace pollution by making theeditor a nested class of the custom control class.
The property editor class inherits from System.Drawing.Design.UITypeEditor and mustoverride two methods in its base class, GetEditStyle and EditValue. The form designer callsthe GetEditStyle method when it’s filling the Properties window with the values of all theproperties of the control currently selected. This method must return an enumerated valuethat tells the designer whether your property editor is going to display a single control ina drop-down area or a modal form. In the former case, a down-arrow button is displayednear the property name; in the latter case, a button with an ellipsis is used instead.
C18620598.fm Page 621 Friday, November 21, 2003 11:37 AM
622 Part IV: Win32 Applications
The form designer calls the EditValue method when the user clicks the button besidethe property name. This method is overloaded, but we don’t have to override all theoverloaded versions of the method. In the most general overloaded version—the onlyone I override in the demo program—this method receives three arguments:
■ The first argument is an ITypeDescriptorContext type that can provide additionalinformation about the context in which the editing action is being performed—forexample, Context.Instance returns a reference to the control whose property isbeing edited, and Context.Container returns a reference to the control’s container.
■ The second argument is an IServiceProvider type. You can query the GetServicemethod of this object to get the editor service object that represents the propertieseditor; this is an IWindowsFormEditorService object that exposes the three meth-ods that let you open the drop-down area (DropDownControl), close it (Close-DropDown), or display a modal form (ShowDialog).
■ The third argument is the current value of the property being edited. You shoulduse this value to correctly initialize the control about to appear in the drop-downarea (or the controls on the modal form). The EditValue method is expected toreturn the new value of the property being edited.
Here’s the complete listing of the RotateAngleEditor class. Its many remarks and thedetails already given should suffice for you to understand how it works:
Class RotateAngleEditorInherits UITypeEditor
’ Override the GetEditStyle method to tell that this editor supports’ the DropDown style.Overloads Overrides Function GetEditStyle( _
ByVal context As ITypeDescriptorContext) As UITypeEditorEditStyleIf Not (context Is Nothing) AndAlso _
Not (context.Instance Is Nothing) Then’ Return DropDown if you have a context and a control instance.Return UITypeEditorEditStyle.DropDown
Else’ Otherwise, return the default behavior, whatever it is.Return MyBase.GetEditStyle(context)
End IfEnd Function
’ This is the TrackBar control that is displayed in the editor.Dim WithEvents tb As TrackBar’ This the editor service that creates the drop-down area’ or shows a dialog.Dim wfes As IWindowsFormsEditorService
C18620598.fm Page 622 Friday, November 21, 2003 11:37 AM
Chapter 18: Custom Windows Forms Controls 623
’ Override the EditValue function,’ and return the new value of the property.Overloads Overrides Function EditValue( _
ByVal context As ITypeDescriptorContext, _ByVal provider As IServiceProvider, _ByVal value As Object) As Object
’ Exit if no context, instance, or provider is provided.If (context Is Nothing) OrElse (context.Instance Is Nothing) _
OrElse (provider Is Nothing) ThenReturn value
End If’ Get the Editor Service object; exit if not there.wfes = CType(provider.GetService( _
GetType(IWindowsFormsEditorService)), IWindowsFormsEditorService)If (wfes Is Nothing) Then Return value
’ Create the TrackBar control, and set its properties.tb = New TrackBar()’ Always set Orientation before Size property.tb.Orientation = Orientation.Verticaltb.Size = New Size(50, 150)tb.TickStyle = TickStyle.TopLefttb.TickFrequency = 45tb.SetRange(0, 360)’ Initalize its Value property.tb.Value = CInt(value)
’ Show the control. (It returns when the drop-down area is closed.)wfes.DropDownControl(tb)’ The return value must be of the correct type.EditValue = CSng(tb.Value)’ Destroy the TrackBar control.tb.Dispose()tb = Nothing
End Function
’ Close the drop-down area when the mouse button is released.Private Sub TB_MouseUp(ByVal sender As Object, _
ByVal e As MouseEventArgs) Handles tb.MouseUpIf Not (wfes Is Nothing) Then
wfes.CloseDropDown()End If
End SubEnd Class
The RotateAngleEditor class automatically closes the drop-down area when the userreleases the mouse button, but this isn’t strictly necessary because the Properties win-dow closes the drop-down area when the user clicks somewhere else. I implementedthis detail only to show you how you can react to user selections in the drop-downarea. Figure 18-9 shows the new property editor in action.
C18620598.fm Page 623 Friday, November 21, 2003 11:37 AM
624 Part IV: Win32 Applications
F17LR09.eps
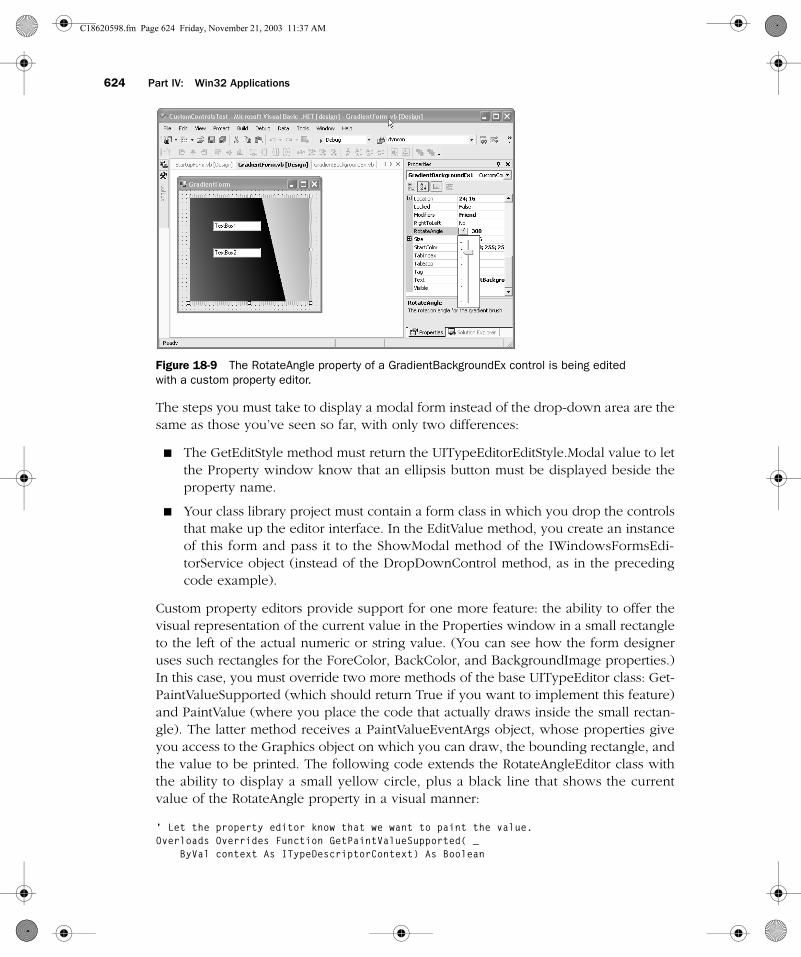
Figure 18-9 The RotateAngle property of a GradientBackgroundEx control is being editedwith a custom property editor.
The steps you must take to display a modal form instead of the drop-down area are thesame as those you’ve seen so far, with only two differences:
■ The GetEditStyle method must return the UITypeEditorEditStyle.Modal value to letthe Property window know that an ellipsis button must be displayed beside theproperty name.
■ Your class library project must contain a form class in which you drop the controlsthat make up the editor interface. In the EditValue method, you create an instanceof this form and pass it to the ShowModal method of the IWindowsFormsEdi-torService object (instead of the DropDownControl method, as in the precedingcode example).
Custom property editors provide support for one more feature: the ability to offer thevisual representation of the current value in the Properties window in a small rectangleto the left of the actual numeric or string value. (You can see how the form designeruses such rectangles for the ForeColor, BackColor, and BackgroundImage properties.)In this case, you must override two more methods of the base UITypeEditor class: Get-PaintValueSupported (which should return True if you want to implement this feature)and PaintValue (where you place the code that actually draws inside the small rectan-gle). The latter method receives a PaintValueEventArgs object, whose properties giveyou access to the Graphics object on which you can draw, the bounding rectangle, andthe value to be printed. The following code extends the RotateAngleEditor class withthe ability to display a small yellow circle, plus a black line that shows the currentvalue of the RotateAngle property in a visual manner:
‘ Let the property editor know that we want to paint the value.Overloads Overrides Function GetPaintValueSupported( _
ByVal context As ITypeDescriptorContext) As Boolean
C18620598.fm Page 624 Friday, November 21, 2003 11:37 AM
Chapter 18: Custom Windows Forms Controls 625
’ In this demo, we return True regardless of the actual editor.Return True
End Function
‘ Display a yellow circle to the left of the value in the Properties window‘ with a line forming the same angle as the value of the RotateAngle property.Overloads Overrides Sub PaintValue(ByVal e As PaintValueEventArgs)
’ Get the angle in radians.Dim a As Single = CSng(e.Value) * CSng(Math.PI) / 180!’ Get the rectangle in which we can draw.Dim rect As Rectangle = e.Bounds’ Evaluate the radius of the circle.Dim r As Single = Math.Min(rect.Width, rect.Height) / 2!’ Get the center point.Dim p1 As New PointF(rect.Width / 2!, rect.Height / 2!)’ Calculate where the line should end.Dim p2 As New PointF(CSng(p1.X + Math.Cos(a) * r), _
CSng(p1.Y + Math.Sin(a) * r))’ Draw the yellow-filled circle.e.Graphics.FillEllipse(Brushes.Yellow, rect.Width / 2! - r, _
rect.Height / 2! - r, r * 2, r * 2)’ Draw the line.e.Graphics.DrawLine(Pens.Black, p1, p2)
End Sub
You can see the effect in Figure 18-9.
Object Properties
A few common properties, such as Font and Location, return objects instead of scalarvalues. These properties are displayed in the Properties window with a plus sign (+) tothe left of each of their names so that you can expand those items to edit the individualproperties of the object. If you implement properties that return objects defined in the.NET Framework (such as Font, Point, and Size objects), your control automaticallyinherits this behavior. However, when your control exposes an object defined in yourapplication, you must implement a custom TypeConverter class to enable this feature.
The companion source code includes an AddressControl custom control, which lets theuser enter information such as street, city, postal code, state, and country. (See theform on the left in Figure 18-10.) Instead of exposing this data as five independentproperties, this control exposes them as a single Address object, which is defined in thesame application:
Public Class Address’ This event fires when a property is changed.Event PropertyChanged(ByVal propertyName As String)
’ Private membersDim m_Street As StringDim m_City As StringDim m_Zip As StringDim m_State As StringDim m_Country As String
C18620598.fm Page 625 Friday, November 21, 2003 11:37 AM
626 Part IV: Win32 Applications
Property Street() As StringGet
Return m_StreetEnd GetSet(ByVal Value As String)
If m_Street <> Value Thenm_Street = ValueRaiseEvent PropertyChanged(“Street”)
End IfEnd Set
End Property
’ ...(Property procedures for City, Zip, State, and Country’ omitted because substantially identical to Street property)...§
Overrides Function ToString() As StringReturn “(Address)"
End FunctionEnd Class
Note that property procedures in the Address class are just wrappers for the five privatevariables and that they raise a PropertyChanged event when any property changes.The ToString method is overridden to provide the text that will appear as a dummyvalue for the Address property in the Properties window. The AddressControl controlhas an Address property that returns an Address object:
Public Class AddressControlInherits System.Windows.Forms.UserControl
#Region “ Windows Form Designer generated code “§
#End Region
Dim WithEvents m_Address As New Address()
<TypeConverter(GetType(AddressTypeConverter)), _DesignerSerializationVisibility(DesignerSerializationVisibility.Content)> _
Property Address() As AddressGet
Return m_AddressEnd GetSet(ByVal Value As Address)
m_Address = ValueRefreshControls()
End SetEnd Property
’ Refresh controls when any property changes.Private Sub Address_PropertyChanged(ByVal propertyName As String) _
Handles m_Address.PropertyChangedRefreshControls()
End Sub
C18620598.fm Page 626 Friday, November 21, 2003 11:37 AM
Chapter 18: Custom Windows Forms Controls 627
’ Display Address properties in the control’s fields.Private Sub RefreshControls()
txtStreet.Text = m_Address.StreettxtCity.Text = m_Address.CitytxtZip.Text = m_Address.ZiptxtState.Text = m_Address.StatetxtCountry.Text = m_Address.Country
End Sub
’ Update a member property when user updates a field.Private Sub Controls_TextChanged(ByVal sender As Object, _ByVal e As EventArgs) Handles txtStreet.TextChanged, txtCity.TextChanged, _
txtZip.TextChanged, txtState.TextChanged, txtCountry.TextChangedDim Text As String = DirectCast(sender, Control).TextIf sender Is txtStreet Then
m_Address.Street = TextElseIf sender Is txtCity Then
m_Address.City = TextElseIf sender Is txtZip Then
m_Address.Zip = TextElseIf sender Is txtState Then
m_Address.State = TextElseIf sender Is txtCountry Then
m_Address.Country = TextEnd If
End SubEnd Class
The key statement in the preceding code is the TypeConverter attribute, which tells theform designer that a custom TypeConverter object is associated with the Address prop-erty. Or you can associate this attribute with the Address class itself, in which case all thecontrols that expose a property of type Address will automatically use the AddressType-Converter class. (The .NET Framework uses this approach for classes such as Point andFont.) The DesignerSerializationVisibility attribute, which is also assigned to the Addressproperty, tells Visual Studio .NET that it must serialize each and every property of theAddress object when it generates the source code for initializing this object.
The AddressTypeConverter class derives from TypeConverter and overrides two meth-ods. The GetPropertiesSupported method must return True to let the editor know thata plus symbol must be displayed to the left of the Address property in the Propertieswindow; the GetProperties method must return a PropertyDescriptorCollection object,which describes the items that will appear when the plus symbol is clicked:
‘ The TypeConverter class for the Address property‘ (It can be a nested class of AddressControl.)
Public Class AddressTypeConverterInherits TypeConverter
Overloads Overrides Function GetPropertiesSupported( _ByVal context As ITypeDescriptorContext) As Boolean’ Tell the editor to display a + symbol near the property name.
C18620598.fm Page 627 Friday, November 21, 2003 11:37 AM
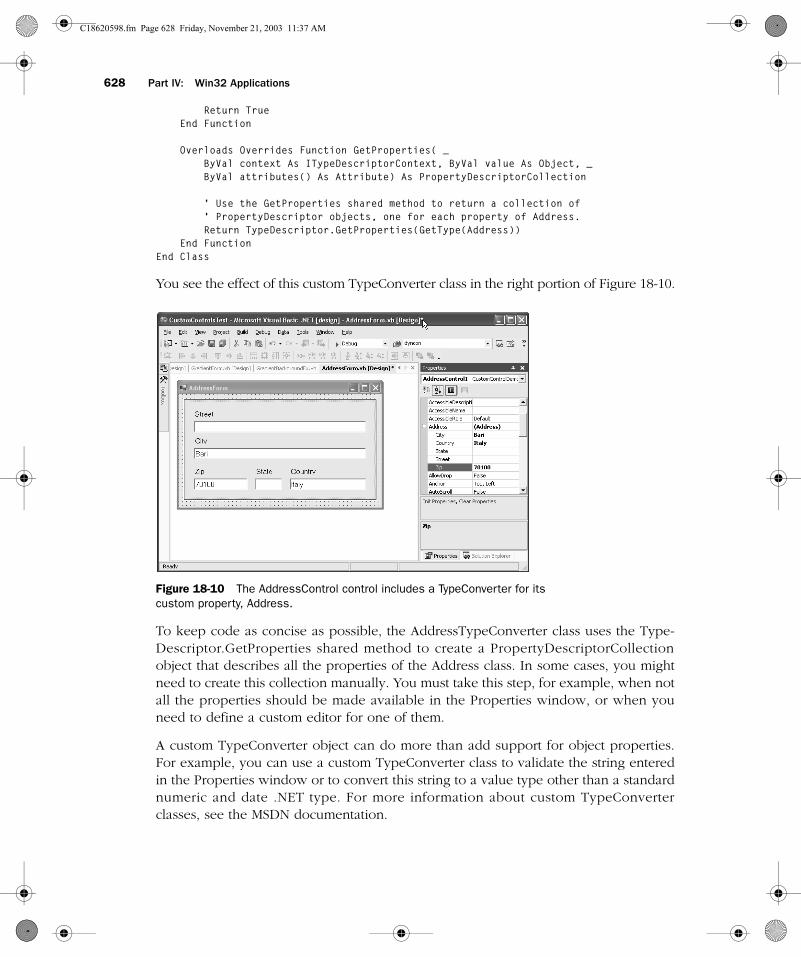
628 Part IV: Win32 Applications
Return TrueEnd Function
Overloads Overrides Function GetProperties( _ByVal context As ITypeDescriptorContext, ByVal value As Object, _ByVal attributes() As Attribute) As PropertyDescriptorCollection
’ Use the GetProperties shared method to return a collection of’ PropertyDescriptor objects, one for each property of Address.Return TypeDescriptor.GetProperties(GetType(Address))
End FunctionEnd Class
You see the effect of this custom TypeConverter class in the right portion of Figure 18-10.
F17LR10.eps
Figure 18-10 The AddressControl control includes a TypeConverter for itscustom property, Address.
To keep code as concise as possible, the AddressTypeConverter class uses the Type-Descriptor.GetProperties shared method to create a PropertyDescriptorCollectionobject that describes all the properties of the Address class. In some cases, you mightneed to create this collection manually. You must take this step, for example, when notall the properties should be made available in the Properties window, or when youneed to define a custom editor for one of them.
A custom TypeConverter object can do more than add support for object properties.For example, you can use a custom TypeConverter class to validate the string enteredin the Properties window or to convert this string to a value type other than a standardnumeric and date .NET type. For more information about custom TypeConverterclasses, see the MSDN documentation.
C18620598.fm Page 628 Friday, November 21, 2003 11:37 AM
Chapter 18: Custom Windows Forms Controls 629
Custom Control Designers
You surely noticed that a few Windows Forms controls display one or more hyperlinksnear the bottom edge of the Properties window, or additional commands on the con-text menu that appears when you right-click on them. Implementing this and a fewother features is relatively simple, and requires that you create a custom controldesigner and associate it with your custom control.
A control designer is a class that inherits from System.Windows.Forms.Design.Con-trolDesigner class, which is defined in the System.Design.dll assembly. (You must adda reference to this assembly because Visual Basic .NET projects don’t reference it bydefault.) Providing one or more commands in the Property window or in the contextmenu requires that you override the Verbs read-only property. In the demo applica-tion, I created a control designer for the AddressControl; my custom designer adds twoverbs to the control, InitProperties and ClearProperties:
Class AddressControlDesignerInherits System.Windows.Forms.Design.ControlDesigner
’ Return a collection of verbs for this controlPublic Overrides ReadOnly Property Verbs() As DesignerVerbCollection
GetDim col As New DesignerVerbCollectioncol.Add(New DesignerVerb(“Init Properties", AddressOf InitProperties))col.Add(New DesignerVerb(“Clear Properties", AddressOf ClearProperties))Return col
End GetEnd Property§
End Class
When the user clicks on the link in the Properties window or selects the verb from thecontext menu, Visual Studio .NET invokes the handler pointed to by the correspondingdelegate. The ClearProperties routine simply resets the control’s Address property, butyou must take additional steps to let Visual Studio .NET know that you assigned a newvalue to a property. I encapsulated these steps in the SetAddressProperty private pro-cedure, so that you can easily adapt my code to other procedures:
Sub ClearProperties (ByVal sender As Object, ByVal e As EventArgs)SetAddressProperty(New Address)
End Sub
’ Assign a new Address property, raise all expected events.Private Sub SetAddressProperty(ByVal newValue As Address)
Dim thisCtrl As AddressControl = CType(Me.Control, AddressControl)’ Let Visual Studio know we’re about to change the Address property.Dim pdCol As PropertyDescriptorCollection = _
TypeDescriptor.GetProperties(thisCtrl)Dim pd As PropertyDescriptor = pdCol.Find(“Address", True)RaiseComponentChanging(pd)’ Assign the value, but remember old value.
C18620598.fm Page 629 Friday, November 21, 2003 11:37 AM
630 Part IV: Win32 Applications
Dim oldValue As Address = thisCtrl.AddressthisCtrl.Address = newValue’ Let Visual Studio know we’ve done the assignment.RaiseComponentChanged(pd, oldValue, thisCtrl.Address)
End Sub
The InitProperties procedure does something more interesting: it creates a form thatdisplays another instance of the AddressControl class so that the programmer canchange the Street, City, Zip, State, and Country properties simply by typing in the con-trol:
Sub InitPropertiesHandler(ByVal sender As Object, ByVal e As EventArgs)’ Create a new control that points to the same Address object.Dim thisCtrl As AddressControl = CType(Me.Control, AddressControl)Dim newCtrl As New AddressControlnewCtrl.Address = thisCtrl.Address’ Display a form that displays the new control.Dim frm As New Formfrm.Text = “Set AddressControl’s Address members"frm.ClientSize = newCtrl.Sizefrm.Controls.Add(newCtrl)frm.ShowDialog()’ Raise all required events.SetAddressProperty(thisCtrl.Address)
End Sub
You complete your job by flagging the AddressControl class with an appropriateDesigner attribute:
<Designer(GetType(AddressControlDesigner))> _Public Class AddressControl§End Class
Figure 18-11 shows what happens when the programmer clicks on the Init Propertiescommand. Interestingly, the AddressControl reacts to the PropertyChanged events ofthe Address class; therefore, the underlying control is immediately updated as you typein the foreground form.
A control designer can do more than provide custom commands. For example, you canreact to the mouse hovering over the control at design time by overriding theOnMouseEnter and OnMouseLeave protected methods of the ControlDesigner class, oryou can limit the way a control can be resized by overriding the SelectionRules prop-erty—for example, the AddressControl doesn’t know how to resize its constituent con-trols, so you might make it visible and moveable, but not resizable:
Public Overrides ReadOnly Property SelectionRules() As SelectionRulesGet
Return SelectionRules.Moveable Or SelectionRules.VisibleEnd Get
End Property
C18620598.fm Page 630 Friday, November 21, 2003 11:37 AM
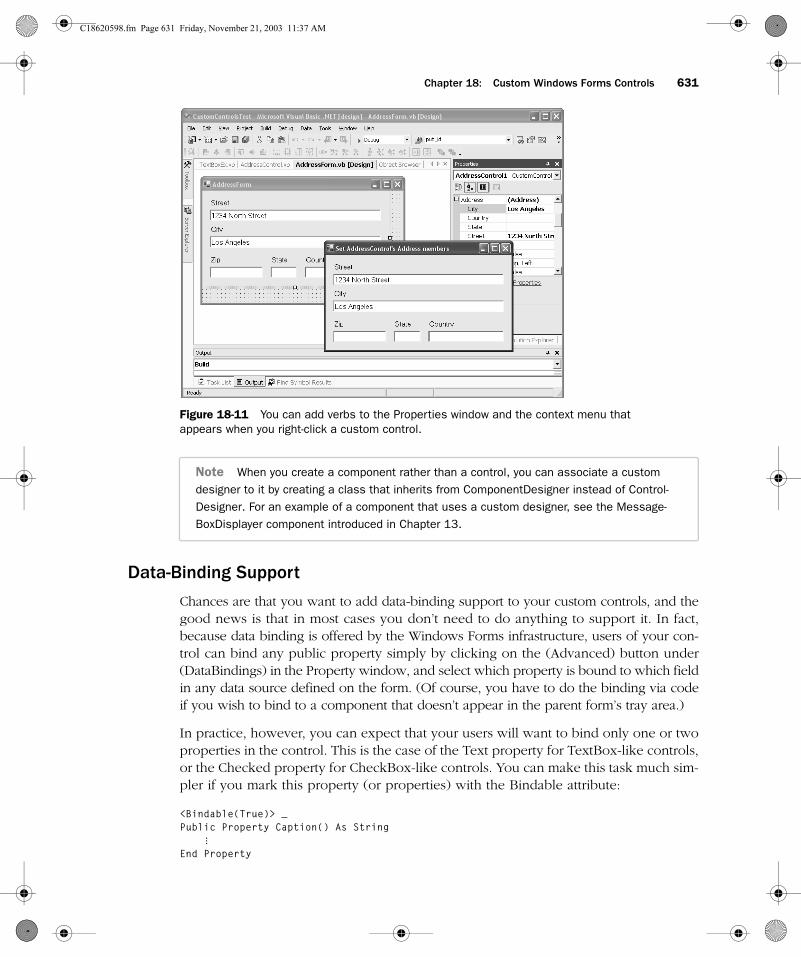
Chapter 18: Custom Windows Forms Controls 631
F18LR11.eps
Figure 18-11 You can add verbs to the Properties window and the context menu thatappears when you right-click a custom control.
Note When you create a component rather than a control, you can associate a custom designer to it by creating a class that inherits from ComponentDesigner instead of Control-Designer. For an example of a component that uses a custom designer, see the Message-BoxDisplayer component introduced in Chapter 13.
Data-Binding Support
Chances are that you want to add data-binding support to your custom controls, and thegood news is that in most cases you don’t need to do anything to support it. In fact,because data binding is offered by the Windows Forms infrastructure, users of your con-trol can bind any public property simply by clicking on the (Advanced) button under(DataBindings) in the Property window, and select which property is bound to which fieldin any data source defined on the form. (Of course, you have to do the binding via codeif you wish to bind to a component that doesn’t appear in the parent form’s tray area.)
In practice, however, you can expect that your users will want to bind only one or twoproperties in the control. This is the case of the Text property for TextBox-like controls,or the Checked property for CheckBox-like controls. You can make this task much sim-pler if you mark this property (or properties) with the Bindable attribute:
<Bindable(True)> _Public Property Caption() As String
§End Property
C18620598.fm Page 631 Friday, November 21, 2003 11:37 AM
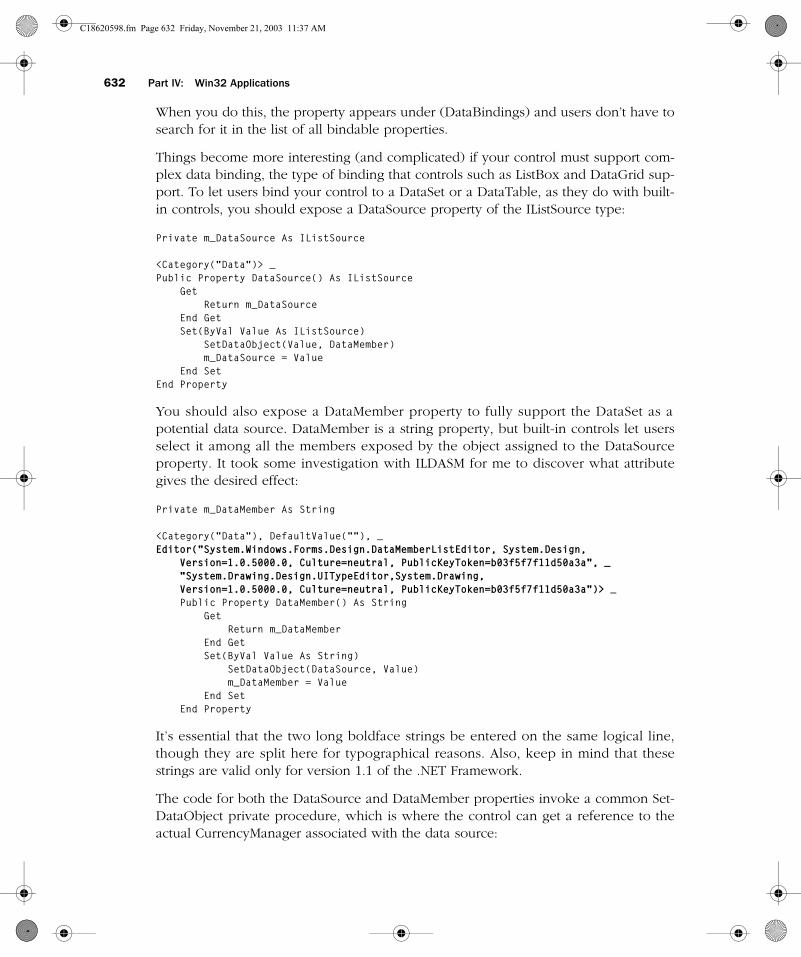
632 Part IV: Win32 Applications
When you do this, the property appears under (DataBindings) and users don’t have tosearch for it in the list of all bindable properties.
Things become more interesting (and complicated) if your control must support com-plex data binding, the type of binding that controls such as ListBox and DataGrid sup-port. To let users bind your control to a DataSet or a DataTable, as they do with built-in controls, you should expose a DataSource property of the IListSource type:
Private m_DataSource As IListSource
<Category(“Data”)> _Public Property DataSource() As IListSource
GetReturn m_DataSource
End GetSet(ByVal Value As IListSource)
SetDataObject(Value, DataMember)m_DataSource = Value
End SetEnd Property
You should also expose a DataMember property to fully support the DataSet as apotential data source. DataMember is a string property, but built-in controls let usersselect it among all the members exposed by the object assigned to the DataSourceproperty. It took some investigation with ILDASM for me to discover what attributegives the desired effect:
Private m_DataMember As String
<Category(“Data”), DefaultValue(““), _Editor(“System.Windows.Forms.Design.DataMemberListEditor, System.Design,
Version=1.0.5000.0, Culture=neutral, PublicKeyToken=b03f5f7f11d50a3a", _“System.Drawing.Design.UITypeEditor,System.Drawing,Version=1.0.5000.0, Culture=neutral, PublicKeyToken=b03f5f7f11d50a3a”)> _Public Property DataMember() As String
GetReturn m_DataMember
End GetSet(ByVal Value As String)
SetDataObject(DataSource, Value)m_DataMember = Value
End SetEnd Property
It’s essential that the two long boldface strings be entered on the same logical line,though they are split here for typographical reasons. Also, keep in mind that thesestrings are valid only for version 1.1 of the .NET Framework.
The code for both the DataSource and DataMember properties invoke a common Set-DataObject private procedure, which is where the control can get a reference to theactual CurrencyManager associated with the data source:
C18620598.fm Page 632 Friday, November 21, 2003 11:37 AM
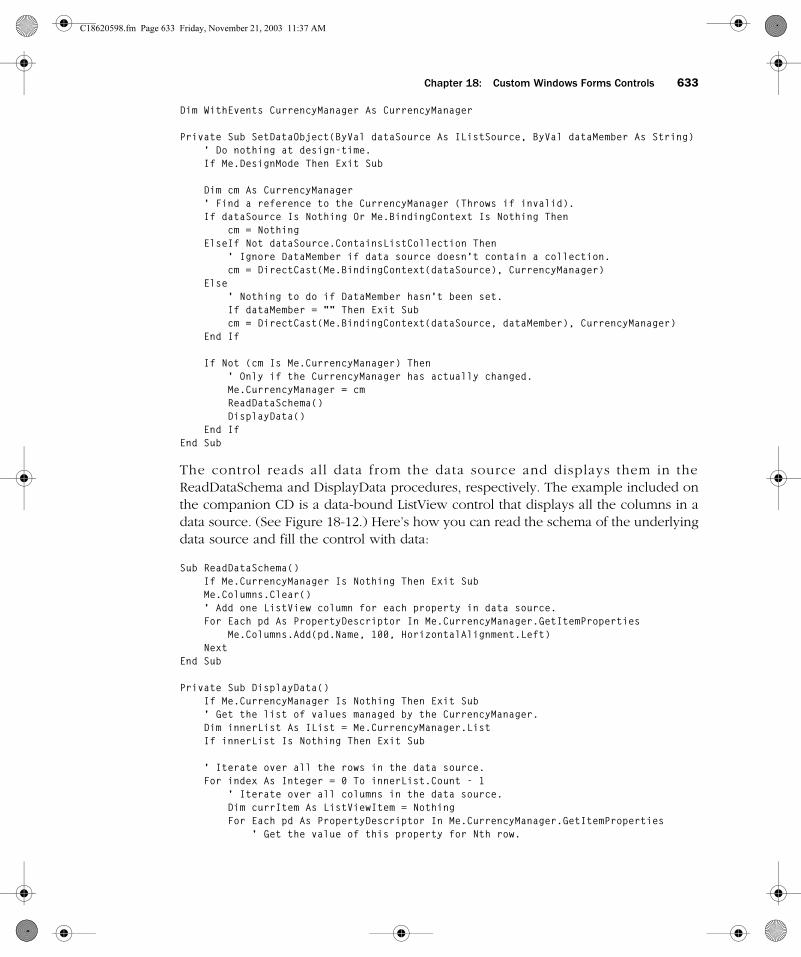
Chapter 18: Custom Windows Forms Controls 633
Dim WithEvents CurrencyManager As CurrencyManager
Private Sub SetDataObject(ByVal dataSource As IListSource, ByVal dataMember As String)’ Do nothing at design-time.If Me.DesignMode Then Exit Sub
Dim cm As CurrencyManager’ Find a reference to the CurrencyManager (Throws if invalid).If dataSource Is Nothing Or Me.BindingContext Is Nothing Then
cm = NothingElseIf Not dataSource.ContainsListCollection Then
’ Ignore DataMember if data source doesn’t contain a collection.cm = DirectCast(Me.BindingContext(dataSource), CurrencyManager)
Else’ Nothing to do if DataMember hasn’t been set.If dataMember = ““ Then Exit Subcm = DirectCast(Me.BindingContext(dataSource, dataMember), CurrencyManager)
End If
If Not (cm Is Me.CurrencyManager) Then’ Only if the CurrencyManager has actually changed.Me.CurrencyManager = cmReadDataSchema()DisplayData()
End IfEnd Sub
The control reads all data from the data source and displays them in theReadDataSchema and DisplayData procedures, respectively. The example included onthe companion CD is a data-bound ListView control that displays all the columns in adata source. (See Figure 18-12.) Here’s how you can read the schema of the underlyingdata source and fill the control with data:
Sub ReadDataSchema()If Me.CurrencyManager Is Nothing Then Exit SubMe.Columns.Clear()’ Add one ListView column for each property in data source.For Each pd As PropertyDescriptor In Me.CurrencyManager.GetItemProperties
Me.Columns.Add(pd.Name, 100, HorizontalAlignment.Left)Next
End Sub
Private Sub DisplayData()If Me.CurrencyManager Is Nothing Then Exit Sub’ Get the list of values managed by the CurrencyManager.Dim innerList As IList = Me.CurrencyManager.ListIf innerList Is Nothing Then Exit Sub
’ Iterate over all the rows in the data source.For index As Integer = 0 To innerList.Count - 1
’ Iterate over all columns in the data source.Dim currItem As ListViewItem = NothingFor Each pd As PropertyDescriptor In Me.CurrencyManager.GetItemProperties
’ Get the value of this property for Nth row.
C18620598.fm Page 633 Friday, November 21, 2003 11:37 AM
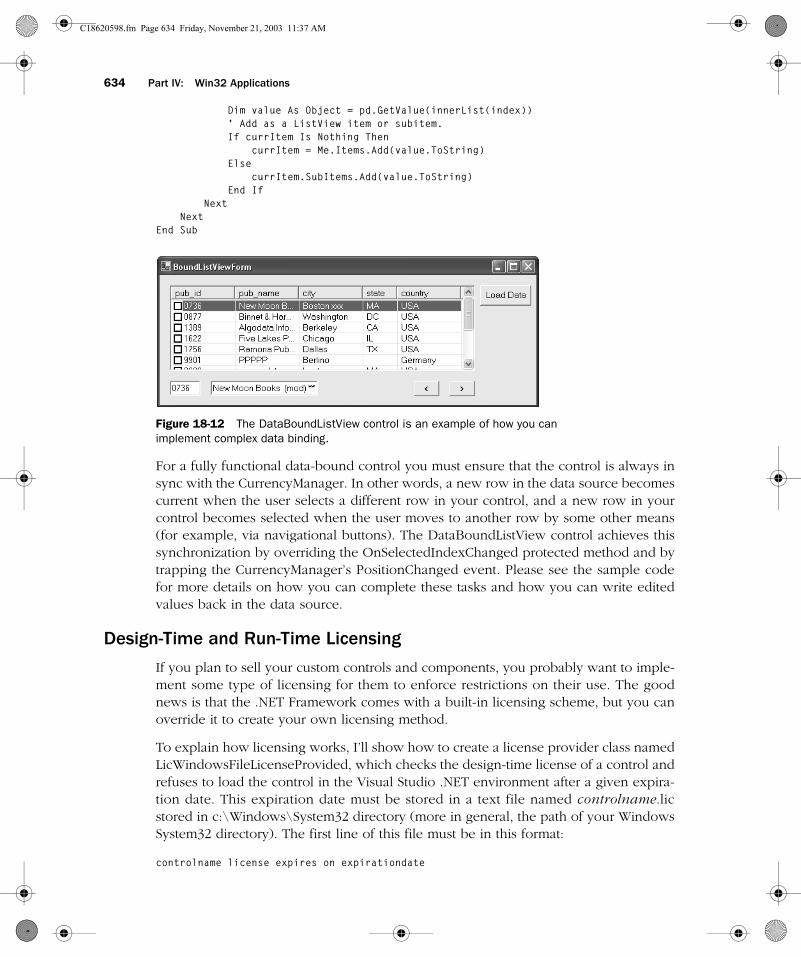
634 Part IV: Win32 Applications
Dim value As Object = pd.GetValue(innerList(index))’ Add as a ListView item or subitem.If currItem Is Nothing Then
currItem = Me.Items.Add(value.ToString)Else
currItem.SubItems.Add(value.ToString)End If
NextNext
End Sub
F18LR12.eps
Figure 18-12 The DataBoundListView control is an example of how you canimplement complex data binding.
For a fully functional data-bound control you must ensure that the control is always insync with the CurrencyManager. In other words, a new row in the data source becomescurrent when the user selects a different row in your control, and a new row in yourcontrol becomes selected when the user moves to another row by some other means(for example, via navigational buttons). The DataBoundListView control achieves thissynchronization by overriding the OnSelectedIndexChanged protected method and bytrapping the CurrencyManager’s PositionChanged event. Please see the sample codefor more details on how you can complete these tasks and how you can write editedvalues back in the data source.
Design-Time and Run-Time Licensing
If you plan to sell your custom controls and components, you probably want to imple-ment some type of licensing for them to enforce restrictions on their use. The goodnews is that the .NET Framework comes with a built-in licensing scheme, but you canoverride it to create your own licensing method.
To explain how licensing works, I’ll show how to create a license provider class namedLicWindowsFileLicenseProvided, which checks the design-time license of a control andrefuses to load the control in the Visual Studio .NET environment after a given expira-tion date. This expiration date must be stored in a text file named controlname.licstored in c:\Windows\System32 directory (more in general, the path of your WindowsSystem32 directory). The first line of this file must be in this format:
controlname license expires on expirationdate
C18620598.fm Page 634 Friday, November 21, 2003 11:37 AM
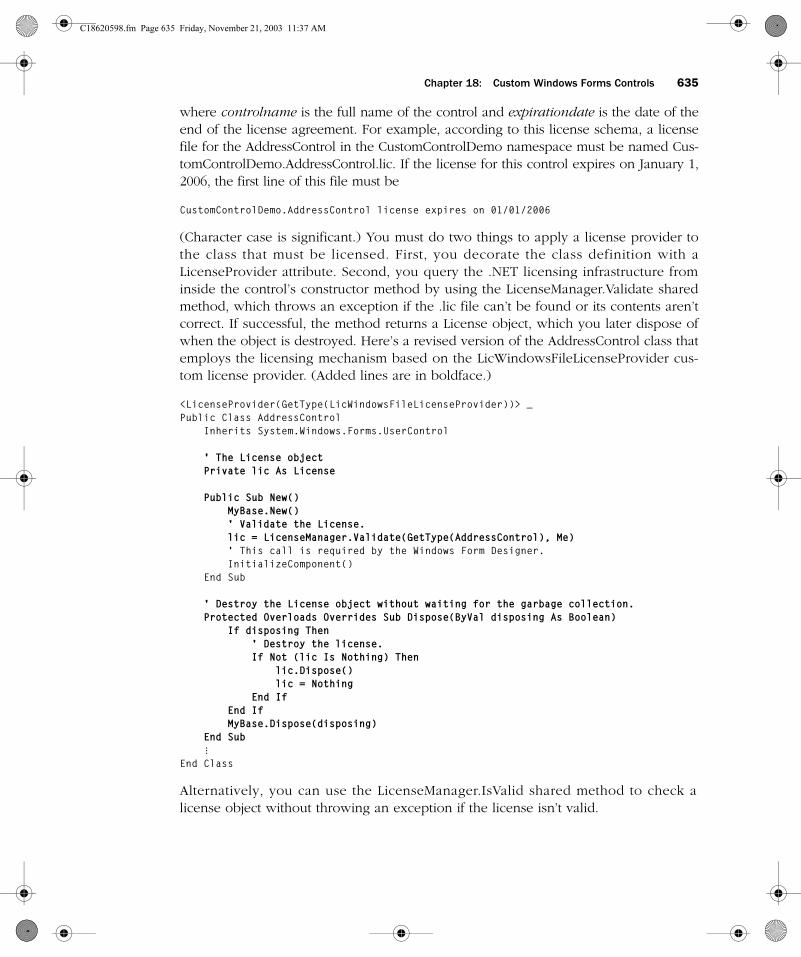
Chapter 18: Custom Windows Forms Controls 635
where controlname is the full name of the control and expirationdate is the date of theend of the license agreement. For example, according to this license schema, a licensefile for the AddressControl in the CustomControlDemo namespace must be named Cus-tomControlDemo.AddressControl.lic. If the license for this control expires on January 1,2006, the first line of this file must be
CustomControlDemo.AddressControl license expires on 01/01/2006
(Character case is significant.) You must do two things to apply a license provider tothe class that must be licensed. First, you decorate the class definition with aLicenseProvider attribute. Second, you query the .NET licensing infrastructure frominside the control’s constructor method by using the LicenseManager.Validate sharedmethod, which throws an exception if the .lic file can’t be found or its contents aren’tcorrect. If successful, the method returns a License object, which you later dispose ofwhen the object is destroyed. Here’s a revised version of the AddressControl class thatemploys the licensing mechanism based on the LicWindowsFileLicenseProvider cus-tom license provider. (Added lines are in boldface.)
<LicenseProvider(GetType(LicWindowsFileLicenseProvider))> _Public Class AddressControl
Inherits System.Windows.Forms.UserControl
’ The License objectPrivate lic As License
Public Sub New()MyBase.New()’ Validate the License.lic = LicenseManager.Validate(GetType(AddressControl), Me)’ This call is required by the Windows Form Designer.InitializeComponent()
End Sub
’ Destroy the License object without waiting for the garbage collection.Protected Overloads Overrides Sub Dispose(ByVal disposing As Boolean)
If disposing Then’ Destroy the license.If Not (lic Is Nothing) Then
lic.Dispose()lic = Nothing
End IfEnd IfMyBase.Dispose(disposing)
End Sub§
End Class
Alternatively, you can use the LicenseManager.IsValid shared method to check alicense object without throwing an exception if the license isn’t valid.
C18620598.fm Page 635 Friday, November 21, 2003 11:37 AM
636 Part IV: Win32 Applications
Obviously, this licensing mechanism is easy to violate, in that a user might change theexpiration date in the .lic file to postpone the license expiration, but you can use thisexample to create a more robust schema. For example, you might encrypt the licensetext and store it in a nonobvious location (including the registry).
A custom license provider is a class that derives from the abstract LicenseProvider classand overrides the virtual GetLicense method. This method is indirectly called by theLicenseManager.Validate method (in the custom control’s constructor method) andreceives several arguments that let you determine the name of the control or compo-nent in question, whether you’re at design time or run time, and other pieces of infor-mation. The Windows Forms infrastructure expects the GetLicense method to return alicense object if it’s OK to use the custom control or component; otherwise, it returnsNothing or throws a LicenseException object. (You decide whether the method shouldreturn Nothing or throw the exception by inspecting the allowException argumentpassed to the GetLicense method.) Here’s the implementation of the LicWindowsFileLi-censeProvided class:
Class LicWindowsFileLicenseProviderInherits LicenseProvider
Public Overrides Function GetLicense(ByVal context As LicenseContext, _ByVal typ As System.Type, ByVal instance As Object, _ByVal allowExceptions As Boolean) As License
’ This is the name of the control.Dim ctrlName As String = typ.FullName
If context.UsageMode = LicenseUsageMode.Designtime Then’ We are in design mode.’ Check that there is a .lic file in Windows system directory.’ Build the full path of the .lic file.Dim filename As String = Environment.SystemDirectory() _
& “\” & ctrlName & “.lic"’ This is the text that we expect at the beginning of file.Dim licenseText As String = ctrlName & “ license expires on “Dim fs As System.IO.StreamReaderTry
’ Open and read the license file (throws exception if not found).fs = New System.IO.StreamReader(filename)’ Read its first line.Dim text As String = fs.ReadLine’ Throw if it doesn’t match the expected text.If Not text.StartsWith(licenseText) Then Throw New Exception’ Parse the expiration date (which follows the expected text).Dim expireDate As Date = _
Date.Parse(text.Substring(licenseText.Length))’ Throw if license has expired.If Now > expireDate Then Throw New Exception
Catch ex As Exception
C18620598.fm Page 636 Friday, November 21, 2003 11:37 AM
Chapter 18: Custom Windows Forms Controls 637
’ Throws a LicenseException or just returns Nothing.If allowExceptions Then
Throw New LicenseException(typ, instance, _ “Can’t find design-time license for “ & ctrlName)
ElseReturn Nothing
End IfFinally
’ In all cases, close the StreamReader.If Not (fs Is Nothing) Then fs.Close()
End Try
’ If we get here, we can return a RuntimeLicense object.Return New DesignTimeLicense(Me, typ)
Else’ We enforce no licensing at run time,’ so we always return a RunTimeLicense.Return New RuntimeLicense(Me, typ)
End IfEnd Function
End Class
In general, you should return two different license objects, depending on whetheryou’re at design time or run time. (Otherwise, a malicious and clever user might usethe run-time license at design time.) A license object is an instance of a class thatderives from System.ComponentModel.License and overrides its LicenseKey and Dis-pose virtual methods. Here’s a simple implementation of the DesignTimeLicense andRuntimeLicense classes referenced by the preceding code snippet. (These classes canbe nested inside the LicWindowsFileLicenseProvider class.)
Class LicWindowsFileLicenseProvider§’ Nested class for design-time license
Public Class DesignTimeLicenseInherits License
Private owner As LicWindowsFileLicenseProviderPrivate typ As Type
Sub New(ByVal owner As LicWindowsFileLicenseProvider, ByVal typ As Type)Me.owner = ownerMe.typ = typ
End Sub
Overrides ReadOnly Property LicenseKey() As StringGet
’ Just return the type name in this demo.Return typ.FullName
End GetEnd Property
C18620598.fm Page 637 Friday, November 21, 2003 11:37 AM
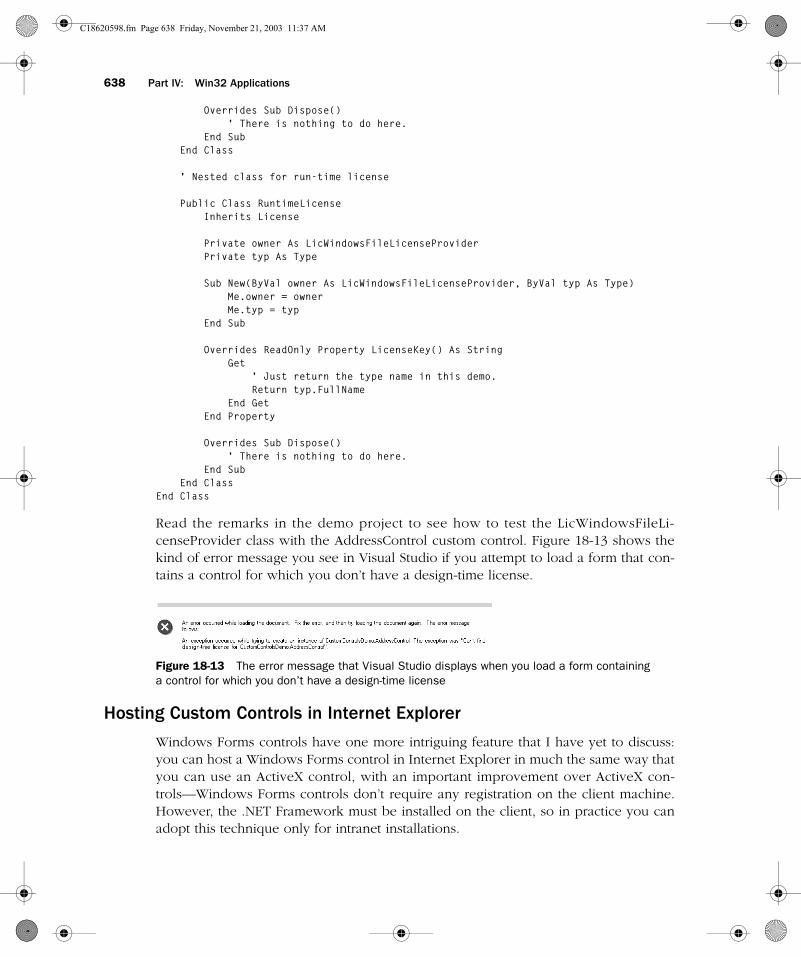
638 Part IV: Win32 Applications
Overrides Sub Dispose()’ There is nothing to do here.
End SubEnd Class
’ Nested class for run-time license
Public Class RuntimeLicenseInherits License
Private owner As LicWindowsFileLicenseProviderPrivate typ As Type
Sub New(ByVal owner As LicWindowsFileLicenseProvider, ByVal typ As Type)Me.owner = ownerMe.typ = typ
End Sub
Overrides ReadOnly Property LicenseKey() As StringGet
’ Just return the type name in this demo.Return typ.FullName
End GetEnd Property
Overrides Sub Dispose()’ There is nothing to do here.
End SubEnd Class
End Class
Read the remarks in the demo project to see how to test the LicWindowsFileLi-censeProvider class with the AddressControl custom control. Figure 18-13 shows thekind of error message you see in Visual Studio if you attempt to load a form that con-tains a control for which you don’t have a design-time license.
F18LR13.eps
Figure 18-13 The error message that Visual Studio displays when you load a form containinga control for which you don’t have a design-time license
Hosting Custom Controls in Internet Explorer
Windows Forms controls have one more intriguing feature that I have yet to discuss:you can host a Windows Forms control in Internet Explorer in much the same way thatyou can use an ActiveX control, with an important improvement over ActiveX con-trols—Windows Forms controls don’t require any registration on the client machine.However, the .NET Framework must be installed on the client, so in practice you canadopt this technique only for intranet installations.
C18620598.fm Page 638 Friday, November 21, 2003 11:37 AM
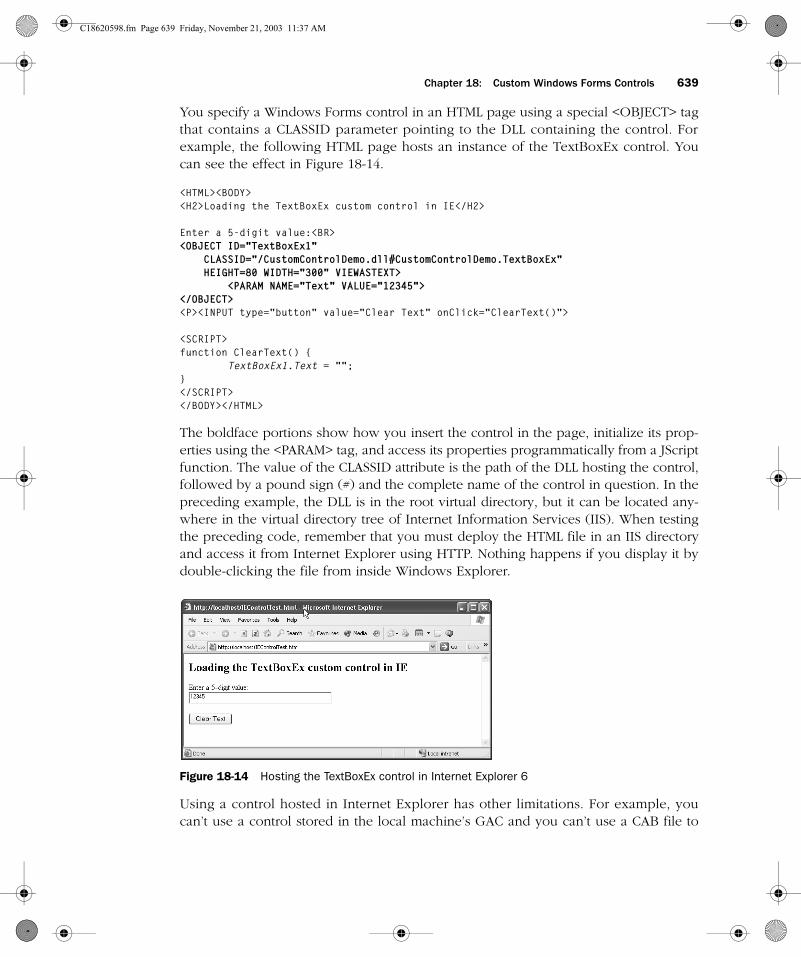
Chapter 18: Custom Windows Forms Controls 639
You specify a Windows Forms control in an HTML page using a special <OBJECT> tagthat contains a CLASSID parameter pointing to the DLL containing the control. Forexample, the following HTML page hosts an instance of the TextBoxEx control. Youcan see the effect in Figure 18-14.
<HTML><BODY><H2>Loading the TextBoxEx custom control in IE</H2>
Enter a 5-digit value:<BR><OBJECT ID="TextBoxEx1"
CLASSID="/CustomControlDemo.dll#CustomControlDemo.TextBoxEx” HEIGHT=80 WIDTH="300” VIEWASTEXT>
<PARAM NAME="Text” VALUE="12345"></OBJECT><P><INPUT type="button” value="Clear Text” onClick="ClearText()">
<SCRIPT>function ClearText() {
TextBoxEx1.Text = “";}</SCRIPT></BODY></HTML>
The boldface portions show how you insert the control in the page, initialize its prop-erties using the <PARAM> tag, and access its properties programmatically from a JScriptfunction. The value of the CLASSID attribute is the path of the DLL hosting the control,followed by a pound sign (#) and the complete name of the control in question. In thepreceding example, the DLL is in the root virtual directory, but it can be located any-where in the virtual directory tree of Internet Information Services (IIS). When testingthe preceding code, remember that you must deploy the HTML file in an IIS directoryand access it from Internet Explorer using HTTP. Nothing happens if you display it bydouble-clicking the file from inside Windows Explorer.
F17LR14.eps
Figure 18-14 Hosting the TextBoxEx control in Internet Explorer 6
Using a control hosted in Internet Explorer has other limitations. For example, youcan’t use a control stored in the local machine’s GAC and you can’t use a CAB file to
C18620598.fm Page 639 Friday, November 21, 2003 11:37 AM
640 Part IV: Win32 Applications
host multiple assemblies because Internet Explorer 6 is able to deal only with CAB filescontaining only one assembly. There are limitations also when accessing the controlprogrammatically. For one, you can’t access object properties (such as the Addressproperty of the AddressControl sample described in this chapter) because the runtimecreates a COM Callable Wrapper (CCW) to make the control visible to the script, but itdoesn’t create a CCW for dependent properties. (Read Chapter 30 for more detailsabout the CCW.)
Finally, the IIS virtual directory containing the control must have its security set toScripts only. Any other value, including Scripts and Executables, will prevent the con-trol from loading. The code running in the control appears to the runtime as havingbeen downloaded from the Internet; therefore, many operations won’t be allowedunless you grant this assembly broader privileges. (You can learn more about thesesecurity-related limitations in Chapter 33.)
Note An ASP.NET page can check whether the client browser supports the .NET runtime by querying the HTTPRequest.Browser.ClrVersion property. A well-behaved ASP.NET application might use ActiveX controls, DHTML, or plain HTML if the browser isn’t able to host Windows Forms controls.
At the end of our exploration of built-in controls, GDI+, and custom Windows Formscontrols, you should be able to create truly functional and eye-catching Win32 appli-cations. In the next chapter, you’ll see how you can create even more powerful Win32programs by coding against a few .NET components that have no user interface.
C18620598.fm Page 640 Friday, November 21, 2003 11:37 AM