Embed Size (px)
Citation preview

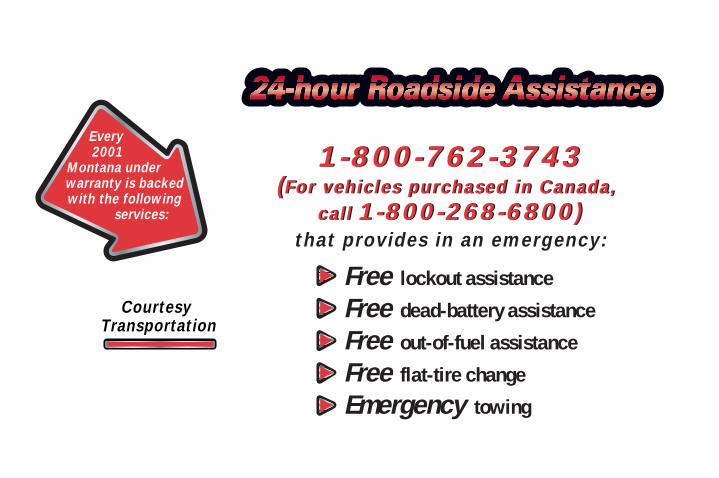
Courtesy Transportation
Every 2001
Montana under warranty is backed with the following
services:
Free lockout assistance
Free dead-battery assistance
Free out-of-fuel assistance
Free flat-tire change
Emergency towing
1-800-762-3743(For vehicles purchased in Canada,
call 1-800-268-6800)that provides in an emergency:
1-800-762-3743(For vehicles purchased in Canada,
call 1-800-268-6800)
2001 Pontiac MontanaOwner's Manual
Litho in U.S.A.Part Number 10423825 A First Edition
© Copyright General Motors Corporation 2000All Rights Reserved
i
Table of Contents
WindowsKeys and Door LocksRemote Keyless Entry SystemAutomatic TransaxleParking BrakeTilt WheelTurn Signal/Multifunction LeverWindshield WipersCruise Control (Option)Exterior and Interior Lamps
MirrorsStorage CompartmentsConvenience Net (Option)Accessory Power OutletsOnStar® System (If Equipped)HomeLink® Transmitter (Option)Instrument Panel, Warning Lights and GagesDriver Information Center (Option)Rear Parking Assist (Option)
Seats and Seat ControlsSafety Belts
Air Bag SystemsRestraint Systems for Children
Section 1
Section 2
Seats and Restraint Systems
Features and Controls
ii
Table of Contents (cont'd)
Defensive DrivingDrunken DrivingControl of a VehicleBrakingSteering
Driving Tips for Various Road ConditionsRecreational Vehicle TowingLoading Your VehicleTowing a Trailer
Heating and Air ConditioningSetting the Radio ClockRadio/Cassette Player/CD Player
Radio Theft-Deterrent FeatureSteering Wheel Controls (If Equipped)
Hazard Warning FlashersJump StartingTowing Your Vehicle
Engine OverheatingChanging a Flat TireIf You're Stuck
Problems on the Road
Section 3
Section 4
Section 5
Your Driving and the Road
Comfort Controls and Audio Systems
iii
Table of Contents (cont'd)
Maintenance Schedule
Service and Appearance Care
Section 7
Section 6
Scheduled MaintenanceOwners Checks and ServicesPeriodic Maintenance Inspections
Recommended Fluids and LubricantsMaintenance Records
FuelChecking Fluids and LubricantsGM Oil Life System™Engine Air Cleaner/FilterPassenger Compartment Air FilterBrakesBulb Replacement
Windshield Wiper Blade ReplacementTires and WheelsAppearance CareElectrical System/Fuses and Circuit BreakersCapacities and SpecificationsNormal Maintenance Replacement Parts
iv
Table of Contents (cont'd)
Customer Assistance Information
In the Index you will find an alphabetical listing of almost every subject in this manual. You can use it to quickly find something you want to read.
Section 8 Customer Satisfaction ProceduresCustomer Assistance OfficesRoadside Assistance and Courtesy Transportation
Warranty InformationReporting Safety Defects on page 8-12Service Publications
IndexSection 9
Please refer to the last page of this manual for your Service Station Guidev
vi
GENERAL MOTORS, GM, the GM Emblem,PONTIAC, the PONTIAC Emblem and the name MONTANA are registered trademarks of General Motors Corporation.
This manual includes the latest information at the time it was printed. We reserve the right to make changesafter that time without further notice. For vehicles firstsold in Canada, substitute the name “General Motors ofCanada Limited” for Pontiac Division whenever itappears in this manual.
Please keep this manual in your vehicle, so it will bethere if you ever need it when you’re on the road. If yousell the vehicle, please leave this manual in it so the newowner can use it.
We support voluntarytechnician certification.
For Canadian Owners Who Prefer aFrench Language Manual:Aux propriétaires canadiens: Vous pouvez vousprocurer un exemplaire de ce guide en français chezvotre concessionaire ou au:
Helm, IncorporatedP.O. Box 07130Detroit, MI 48207
vii
How to Use this ManualMany people read their owner’s manual from beginningto end when they first receive their new vehicle. If youdo this, it will help you learn about the features andcontrols for your vehicle. In this manual, you’ll find that pictures and words work together to explain things quickly.
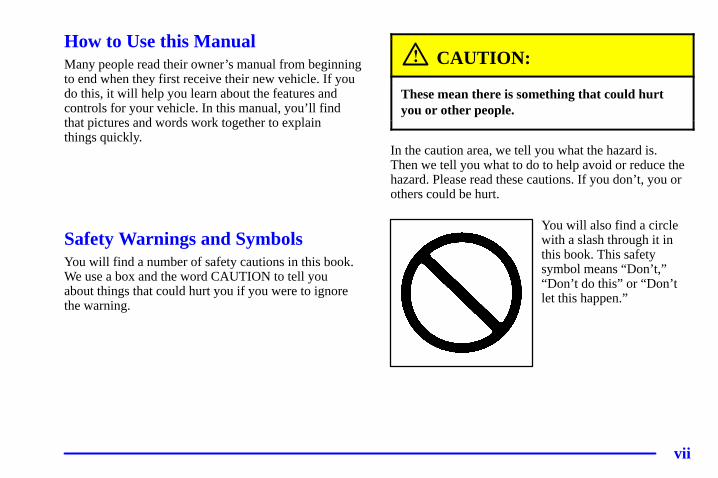
Safety Warnings and SymbolsYou will find a number of safety cautions in this book.We use a box and the word CAUTION to tell you about things that could hurt you if you were to ignorethe warning.
CAUTION:
These mean there is something that could hurtyou or other people.
In the caution area, we tell you what the hazard is. Then we tell you what to do to help avoid or reduce thehazard. Please read these cautions. If you don’t, you orothers could be hurt.
You will also find a circlewith a slash through it inthis book. This safetysymbol means “Don’t,”“Don’t do this” or “Don’tlet this happen.”
viii
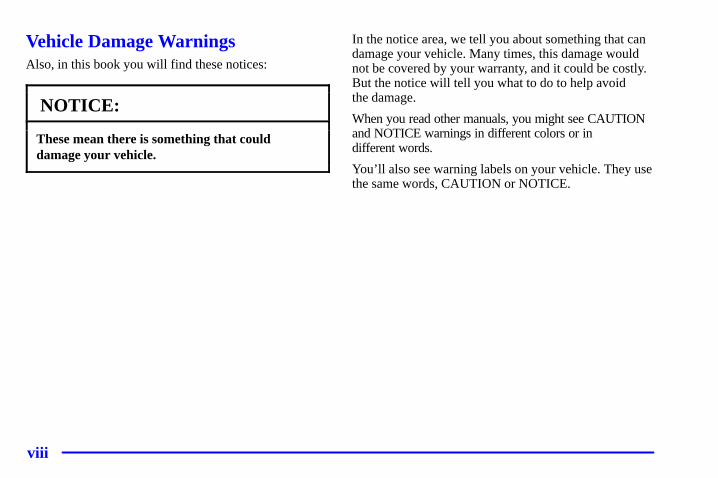
Vehicle Damage WarningsAlso, in this book you will find these notices:
NOTICE:
These mean there is something that coulddamage your vehicle.
In the notice area, we tell you about something that candamage your vehicle. Many times, this damage wouldnot be covered by your warranty, and it could be costly.But the notice will tell you what to do to help avoid the damage.
When you read other manuals, you might see CAUTIONand NOTICE warnings in different colors or in different words.
You’ll also see warning labels on your vehicle. They usethe same words, CAUTION or NOTICE.
ix
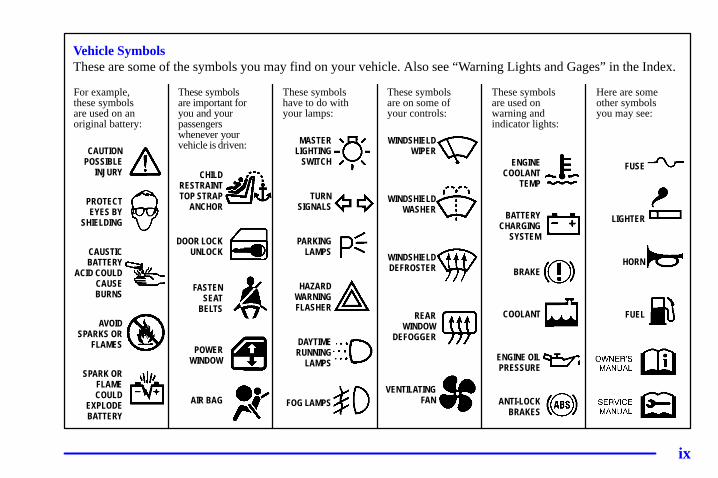
For example,these symbolsare used on anoriginal battery:
CAUTIONPOSSIBLE
INJURY
PROTECTEYES BY
SHIELDING
CAUSTICBATTERY
ACID COULDCAUSEBURNS
AVOIDSPARKS OR
FLAMES
SPARK ORFLAMECOULD
EXPLODEBATTERY
These symbols are important foryou and your passengerswhenever your vehicle is driven:
CHILDRESTRAINTTOP STRAP
ANCHOR
DOOR LOCKUNLOCK
FASTENSEAT
BELTS
POWERWINDOW
AIR BAG
These symbolshave to do withyour lamps:
MASTERLIGHTING
SWITCH
TURNSIGNALS
PARKINGLAMPS
HAZARDWARNINGFLASHER
DAYTIMERUNNING
LAMPS
FOG LAMPS
These symbolsare on some ofyour controls:
WINDSHIELDWIPER
WINDSHIELDWASHER
WINDSHIELDDEFROSTER
REARWINDOW
DEFOGGER
VENTILATINGFAN
These symbolsare used onwarning andindicator lights:
ENGINECOOLANT
TEMP
BATTERYCHARGING
SYSTEM
BRAKE
COOLANT
ENGINE OILPRESSURE
ANTI-LOCKBRAKES
Here are someother symbolsyou may see:
FUSE
LIGHTER
HORN
FUEL
Vehicle SymbolsThese are some of the symbols you may find on your vehicle. Also see “Warning Lights and Gages” in the Index.
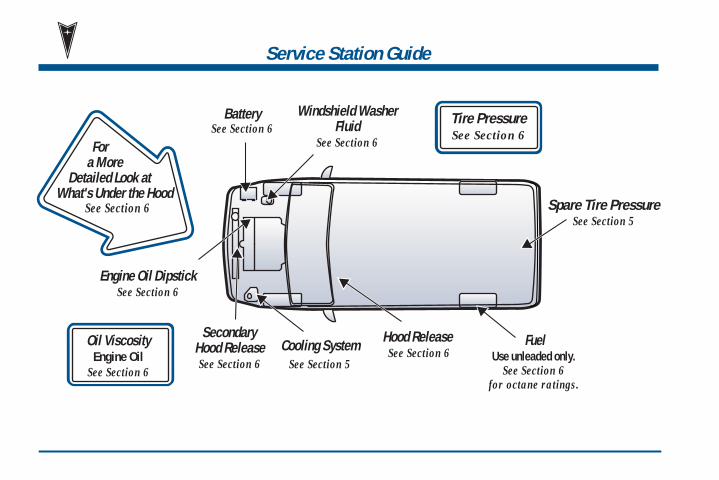
FuelUse unleaded only.
See Section 6for octane ratings.
Service Station Guide
Oil ViscosityEngine Oil
See Section 6
Engine Oil DipstickSee Section 6
Cooling SystemSee Section 5
Secondary Hood ReleaseSee Section 6
Windshield Washer Fluid
See Section 6
Spare Tire PressureSee Section 5
BatterySee Section 6
Hood Release See Section 6
Tire PressureSee Section 6
Fora More
Detailed Look at What's Under the Hood
See Section 6
FuelUse unleaded only.
See Section 6for octane ratings.
1-1-1
Section 1 Seats and Restraint Systems
Here you’ll find information about the seats in your vehicle and how to use your safety belts properly. You can alsolearn about some things you should not do with air bags and safety belts.
1-2 Seats and Seat Controls1-6 Rear Seats1-27 Safety Belts: They’re for Everyone1-31 Here Are Questions Many People Ask About
Safety Belts -- and the Answers1-32 How to Wear Safety Belts Properly1-32 Driver Position1-41 Safety Belt Use During Pregnancy1-42 Right Front Passenger Position1-43 Supplemental Restraint Systems (SRS)1-50 Safety Belt Pretensioners1-50 Rear Seat Passengers
1-55 Rear Safety Belt Comfort Guides for Childrenand Small Adults
1-57 Center Passenger Position (Bench Seat)1-59 Center Passenger Position (Bucket Seat)1-60 Children1-64 Built-in Child Restraint (Option)1-75 Restraint Systems for Children1-96 Older Children1-99 Safety Belt Extender1-100 Checking Your Restraint Systems1-100 Replacing Restraint System Parts After
a Crash
1-2
Seats and Seat ControlsThis section tells you about the seats -- how to adjust them, take them out, put them back in, fold andunfold them.
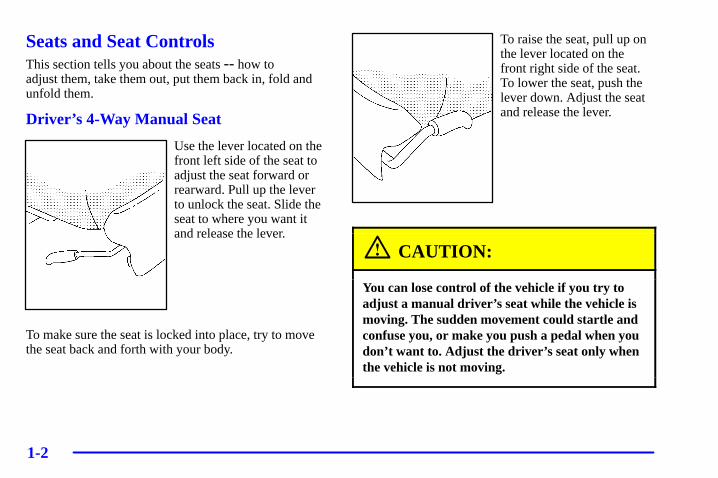
Driver’s 4-Way Manual Seat
Use the lever located on thefront left side of the seat toadjust the seat forward orrearward. Pull up the leverto unlock the seat. Slide theseat to where you want itand release the lever.
To make sure the seat is locked into place, try to movethe seat back and forth with your body.
To raise the seat, pull up onthe lever located on thefront right side of the seat.To lower the seat, push thelever down. Adjust the seatand release the lever.
CAUTION:
You can lose control of the vehicle if you try toadjust a manual driver’s seat while the vehicle ismoving. The sudden movement could startle andconfuse you, or make you push a pedal when youdon’t want to. Adjust the driver’s seat only whenthe vehicle is not moving.

1-3
Manual Front Passenger Seats
To move the seat, pull upthe lever located on thefront of the seat to unlock it.
Slide the seat to where you want it and release the lever.To make sure the seat is locked into place, try to movethe seat back and forth with your body.
6-Way Power Seat (Option)
The six-way power seatcontrols are located on theoutboard sides of both thedriver’s and the frontpassenger’s seats.
� Move the front of the control in the direction of thearrows to adjust the front portion of the cushion upor down.
� Move the rear of the control in the direction of thearrows to adjust the rear portion of the cushion up or down.
� Lift up or push down on both outer arrows at thesame time to move the entire seat up or down.
� To move the whole seat forward or rearward, slidethe control in the direction of the center arrows.

1-4
Heated Front Seats (Option)
The heated seat switch islocated in the instrumentpanel switchbank. Thisfeature will quickly heat thelower cushions and lowerback of the driver’s andfront passenger’s seats foradded comfort.
The left switch is for the driver’s seat and the rightswitch is for the front passenger’s seat. Press the bottomof the switch to turn the heater on. The indicator light onthe switch will glow. Press the top of the switch to turnthe heater off. The heated seat switch will turn off whenthe ignition is turned to OFF and will resume operationwhen the ignition is turned to RUN, unless the switch ismanually turned off.
Reclining Front SeatbacksAll front seats recline.
To adjust the seatback, pull up on the lever located onthe outboard sides of both the driver’s and the frontpassenger’s seats. It is easier to recline the seat if youlean forward, taking your weight off the seatback.
1-5
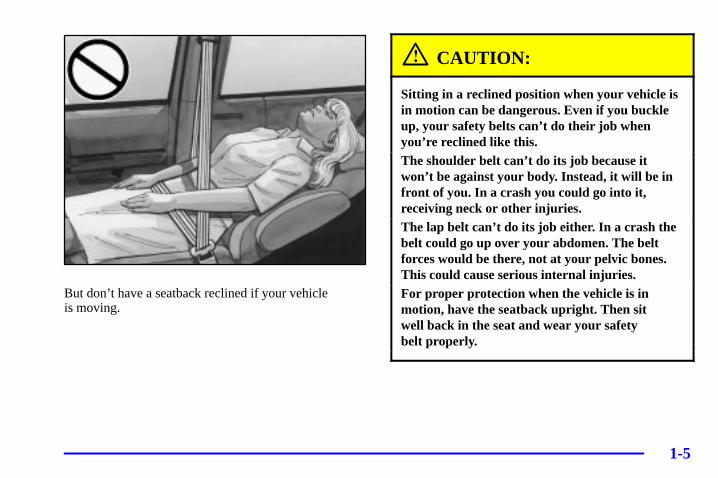
But don’t have a seatback reclined if your vehicle is moving.
CAUTION:
Sitting in a reclined position when your vehicle isin motion can be dangerous. Even if you buckleup, your safety belts can’t do their job whenyou’re reclined like this.The shoulder belt can’t do its job because itwon’t be against your body. Instead, it will be infront of you. In a crash you could go into it,receiving neck or other injuries.The lap belt can’t do its job either. In a crash thebelt could go up over your abdomen. The beltforces would be there, not at your pelvic bones.This could cause serious internal injuries.For proper protection when the vehicle is inmotion, have the seatback upright. Then sit well back in the seat and wear your safety belt properly.
1-6
Head Restraints
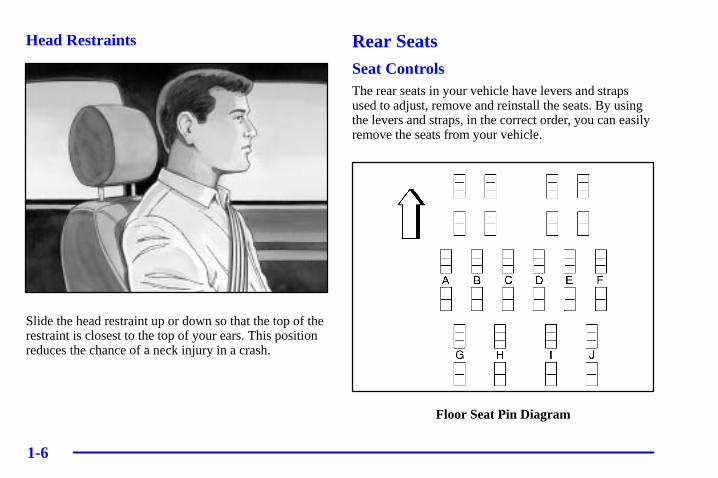
Slide the head restraint up or down so that the top of therestraint is closest to the top of your ears. This positionreduces the chance of a neck injury in a crash.
Rear SeatsSeat ControlsThe rear seats in your vehicle have levers and strapsused to adjust, remove and reinstall the seats. By usingthe levers and straps, in the correct order, you can easilyremove the seats from your vehicle.
Floor Seat Pin Diagram
1-7
When you put the seats back in the vehicle, be sure tofollow the label on the back of the seat for properlocation. Follow the previous diagram when the text inthis manual tells you what sets of floor cups to use foreach seat.
Second Row Safety Belt StowageIf your vehicle has a split bench seat in the second row,use the clip on the safety belt to secure the belt after it isdisconnected from the mini-buckle. When removing thesecond row split bench seat, secure the loose end of thesafety belt in this clip. This will keep the safety beltfrom dangling and possibly striking something.
Do not have the second row outside safety belt stored ifsomeone is sitting in the second row outside position.
Flip and Fold FeatureThe rear seats in your vehicle, except the captain’schairs, can be folded forward. Use this feature forexiting and entering third row seats.
1. If the seats have the adjustable head restraints, pushthem fully down.
2. Fold the seatback flat on the seat, by either pullingon the nylon strap on the rear of the seat or lifting up on the lever located on the front of the seatback.If the seat adjusts forward, slide it all the way back.
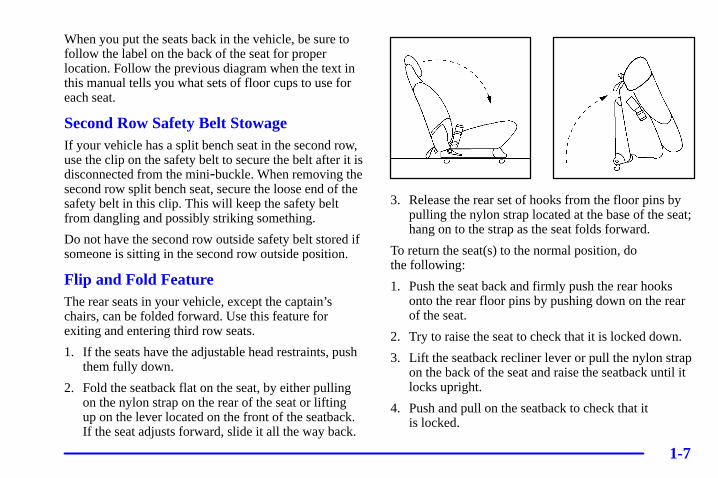
3. Release the rear set of hooks from the floor pins bypulling the nylon strap located at the base of the seat;hang on to the strap as the seat folds forward.
To return the seat(s) to the normal position, do the following:
1. Push the seat back and firmly push the rear hooksonto the rear floor pins by pushing down on the rearof the seat.
2. Try to raise the seat to check that it is locked down.
3. Lift the seatback recliner lever or pull the nylon strapon the back of the seat and raise the seatback until itlocks upright.
4. Push and pull on the seatback to check that it is locked.
1-8
Split Bench SeatsIf you have the split bench seat (50/50 or 40/60), theseatbacks can be folded down individually and thesections can be removed individually. The second row(40/60) sections can also be adjusted forward orrearward individually.
The second row (40/60) split bench may be equippedwith a built-in child restraint. See “Built-In ChildRestraint” in the Index.
Folding or Reclining the Seatbacks
The seatbacks on each section of the split bench seat canbe either folded down or reclined. The followingexplains how to use either the nylon strap or the lever tofold or recline the seatbacks.
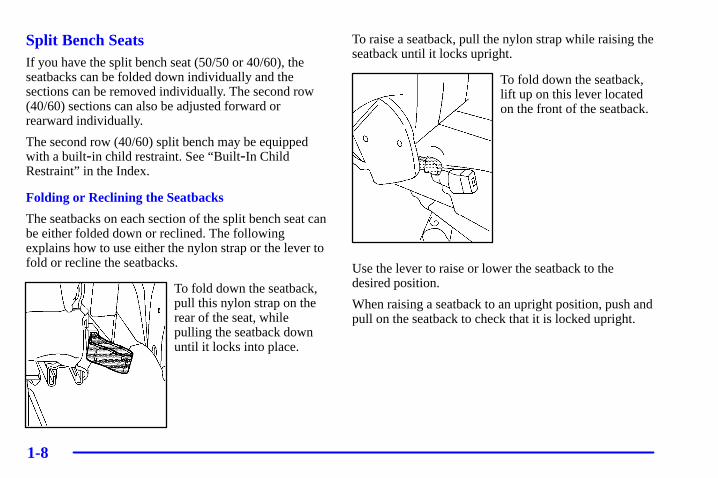
To fold down the seatback,pull this nylon strap on therear of the seat, whilepulling the seatback downuntil it locks into place.
To raise a seatback, pull the nylon strap while raising theseatback until it locks upright.
To fold down the seatback,lift up on this lever locatedon the front of the seatback.
Use the lever to raise or lower the seatback to thedesired position.
When raising a seatback to an upright position, push andpull on the seatback to check that it is locked upright.
1-9
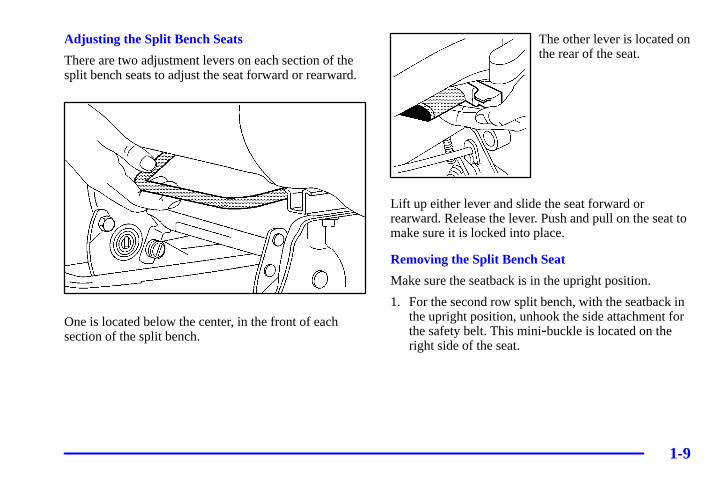
Adjusting the Split Bench Seats
There are two adjustment levers on each section of thesplit bench seats to adjust the seat forward or rearward.
One is located below the center, in the front of eachsection of the split bench.
The other lever is located onthe rear of the seat.
Lift up either lever and slide the seat forward orrearward. Release the lever. Push and pull on the seat tomake sure it is locked into place.
Removing the Split Bench Seat
Make sure the seatback is in the upright position.
1. For the second row split bench, with the seatback inthe upright position, unhook the side attachment forthe safety belt. This mini-buckle is located on theright side of the seat.
1-10
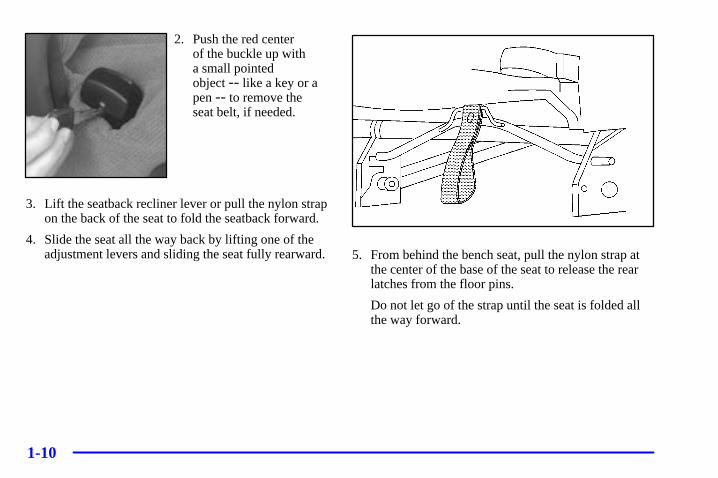
2. Push the red center of the buckle up with a small pointed object -- like a key or apen -- to remove theseat belt, if needed.
3. Lift the seatback recliner lever or pull the nylon strapon the back of the seat to fold the seatback forward.
4. Slide the seat all the way back by lifting one of theadjustment levers and sliding the seat fully rearward.5. From behind the bench seat, pull the nylon strap at
the center of the base of the seat to release the rearlatches from the floor pins.
Do not let go of the strap until the seat is folded allthe way forward.
1-11
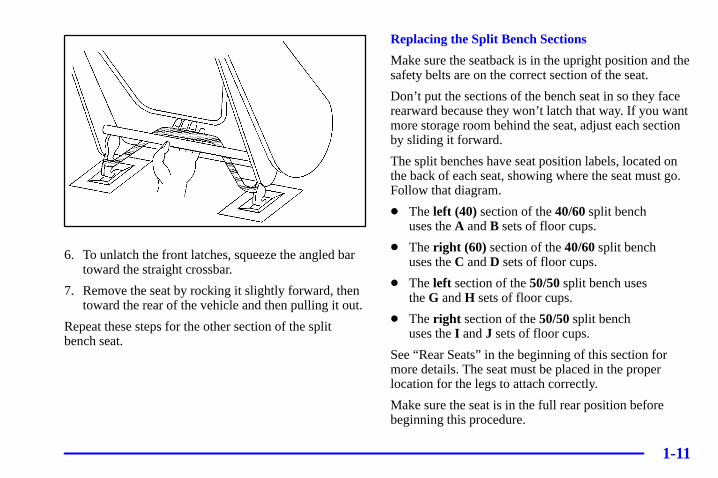
6. To unlatch the front latches, squeeze the angled bartoward the straight crossbar.
7. Remove the seat by rocking it slightly forward, thentoward the rear of the vehicle and then pulling it out.
Repeat these steps for the other section of the split bench seat.
Replacing the Split Bench Sections
Make sure the seatback is in the upright position and thesafety belts are on the correct section of the seat.
Don’t put the sections of the bench seat in so they facerearward because they won’t latch that way. If you wantmore storage room behind the seat, adjust each sectionby sliding it forward.
The split benches have seat position labels, located onthe back of each seat, showing where the seat must go.Follow that diagram.
� The left (40) section of the 40/60 split bench uses the A and B sets of floor cups.
� The right (60) section of the 40/60 split bench uses the C and D sets of floor cups.
� The left section of the 50/50 split bench uses the G and H sets of floor cups.
� The right section of the 50/50 split bench uses the I and J sets of floor cups.
See “Rear Seats” in the beginning of this section formore details. The seat must be placed in the properlocation for the legs to attach correctly.
Make sure the seat is in the full rear position beforebeginning this procedure.
1-12
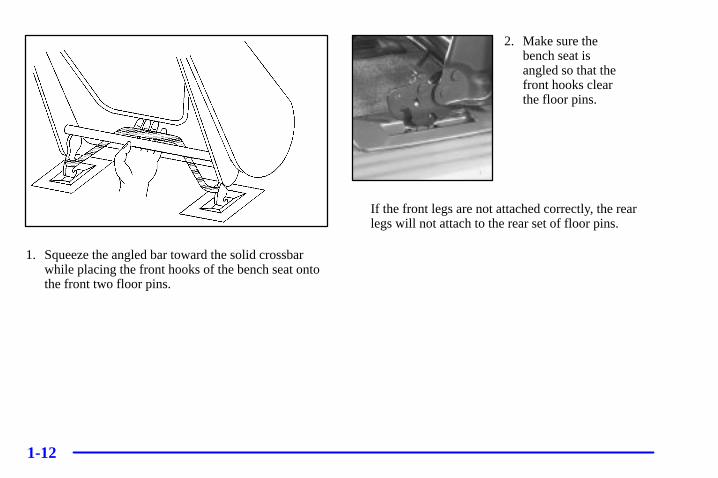
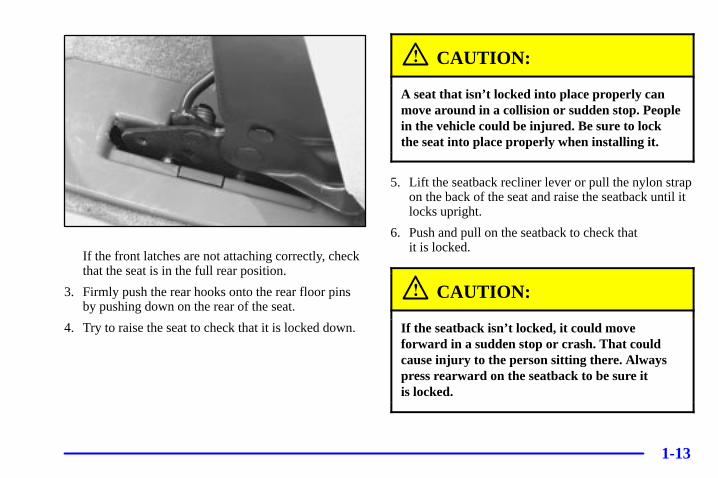
1. Squeeze the angled bar toward the solid crossbarwhile placing the front hooks of the bench seat ontothe front two floor pins.
2. Make sure thebench seat isangled so that thefront hooks clearthe floor pins.
If the front legs are not attached correctly, the rearlegs will not attach to the rear set of floor pins.
1-13
If the front latches are not attaching correctly, checkthat the seat is in the full rear position.
3. Firmly push the rear hooks onto the rear floor pinsby pushing down on the rear of the seat.
4. Try to raise the seat to check that it is locked down.
CAUTION:
A seat that isn’t locked into place properly canmove around in a collision or sudden stop. Peoplein the vehicle could be injured. Be sure to lockthe seat into place properly when installing it.
5. Lift the seatback recliner lever or pull the nylon strapon the back of the seat and raise the seatback until itlocks upright.
6. Push and pull on the seatback to check that it is locked.
CAUTION:
If the seatback isn’t locked, it could moveforward in a sudden stop or crash. That couldcause injury to the person sitting there. Alwayspress rearward on the seatback to be sure it is locked.
1-14
7. If you have the 40/60 seat, attach the mini-buckle sothat the safety belt is ready for use when a passengeruses the seat.
The buckle reattaches by pushing the latch into thebuckle until the red center pops out again.
Repeat these steps for the other section of the splitbench seat.
CAUTION:
A safety belt that is improperly routed, notproperly attached, or twisted won’t provide theprotection needed in a crash. The person wearingthe belt could be seriously injured. Afterinstalling the seat, always check to be sure thatthe safety belts are properly routed and attached,and are not twisted.
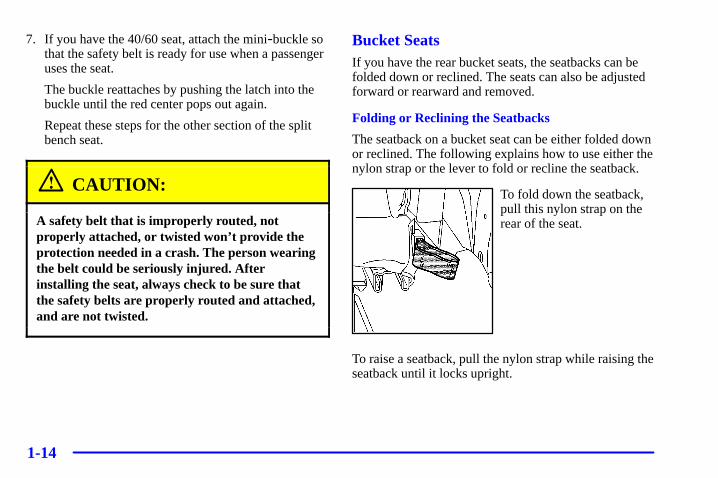
Bucket SeatsIf you have the rear bucket seats, the seatbacks can befolded down or reclined. The seats can also be adjustedforward or rearward and removed.
Folding or Reclining the Seatbacks
The seatback on a bucket seat can be either folded downor reclined. The following explains how to use either thenylon strap or the lever to fold or recline the seatback.
To fold down the seatback,pull this nylon strap on therear of the seat.
To raise a seatback, pull the nylon strap while raising theseatback until it locks upright.
1-15
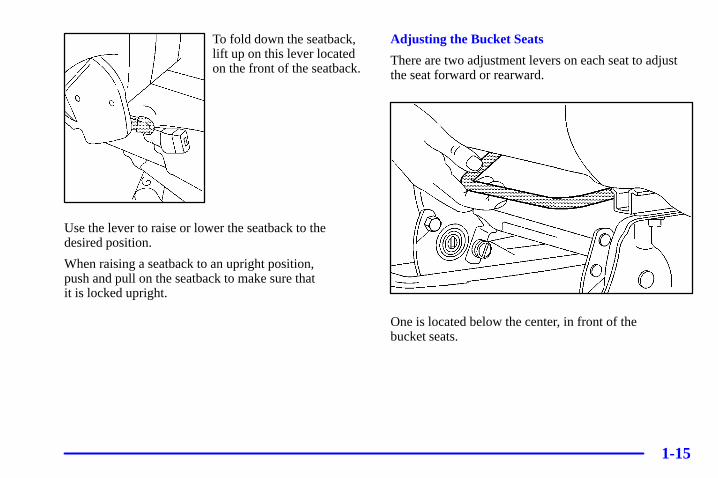
To fold down the seatback,lift up on this lever locatedon the front of the seatback.
Use the lever to raise or lower the seatback to thedesired position.
When raising a seatback to an upright position, push and pull on the seatback to make sure that it is locked upright.
Adjusting the Bucket Seats
There are two adjustment levers on each seat to adjustthe seat forward or rearward.
One is located below the center, in front of the bucket seats.
1-16
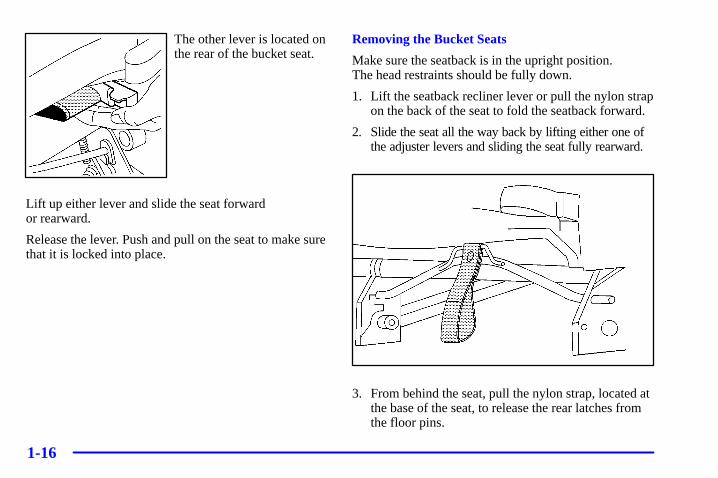
The other lever is located onthe rear of the bucket seat.
Lift up either lever and slide the seat forward or rearward.
Release the lever. Push and pull on the seat to make surethat it is locked into place.
Removing the Bucket Seats
Make sure the seatback is in the upright position. The head restraints should be fully down.
1. Lift the seatback recliner lever or pull the nylon strapon the back of the seat to fold the seatback forward.
2. Slide the seat all the way back by lifting either one ofthe adjuster levers and sliding the seat fully rearward.
3. From behind the seat, pull the nylon strap, located atthe base of the seat, to release the rear latches fromthe floor pins.
1-17
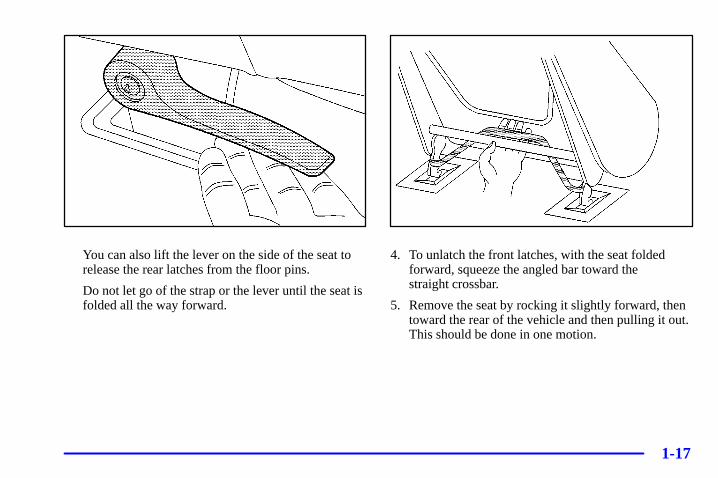
You can also lift the lever on the side of the seat torelease the rear latches from the floor pins.
Do not let go of the strap or the lever until the seat isfolded all the way forward.
4. To unlatch the front latches, with the seat foldedforward, squeeze the angled bar toward the straight crossbar.
5. Remove the seat by rocking it slightly forward, thentoward the rear of the vehicle and then pulling it out.This should be done in one motion.
1-18
Replacing the Bucket Seats
Don’t put the seats in so they face rearward because theywon’t latch that way. If you want more storage roombehind the seat, adjust the seat by sliding it forward.
The bucket seats have seat position labels, located on theback of the seat, showing where the seat must go.Follow that diagram. The seat must be placed in theproper location for the legs to attach correctly. See “RearSeats” in the beginning of this section for more details.
The left bucket seat goes in the A and B sets of floor pins.
The center bucket seat goes in the C and D sets of floor pins.
The right bucket seat goes in the E and F sets of floor pins.
Make sure the seat is in the full rear position beforebeginning this procedure.
1. With the seat folded, squeeze the angled bar towardthe solid crossbar while placing the front hooks ofthe bucket seat onto the front two floor pins.
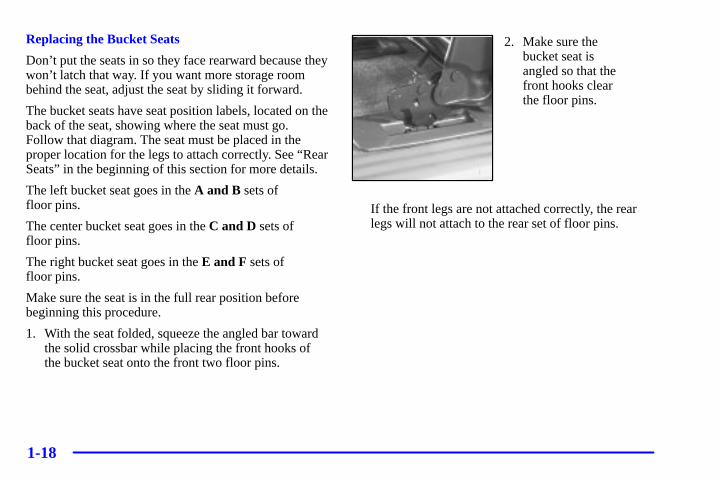
2. Make sure thebucket seat isangled so that thefront hooks clearthe floor pins.
If the front legs are not attached correctly, the rearlegs will not attach to the rear set of floor pins.
1-19
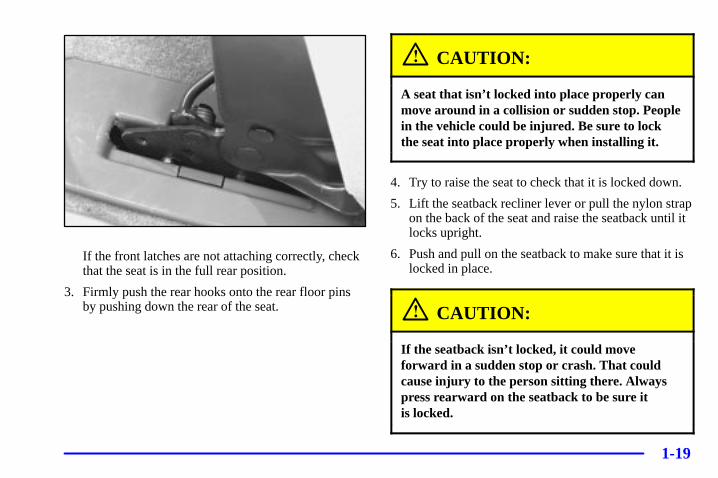
If the front latches are not attaching correctly, checkthat the seat is in the full rear position.
3. Firmly push the rear hooks onto the rear floor pinsby pushing down the rear of the seat.
CAUTION:
A seat that isn’t locked into place properly canmove around in a collision or sudden stop. Peoplein the vehicle could be injured. Be sure to lockthe seat into place properly when installing it.
4. Try to raise the seat to check that it is locked down.
5. Lift the seatback recliner lever or pull the nylon strapon the back of the seat and raise the seatback until itlocks upright.
6. Push and pull on the seatback to make sure that it islocked in place.
CAUTION:
If the seatback isn’t locked, it could moveforward in a sudden stop or crash. That couldcause injury to the person sitting there. Alwayspress rearward on the seatback to be sure it is locked.
1-20
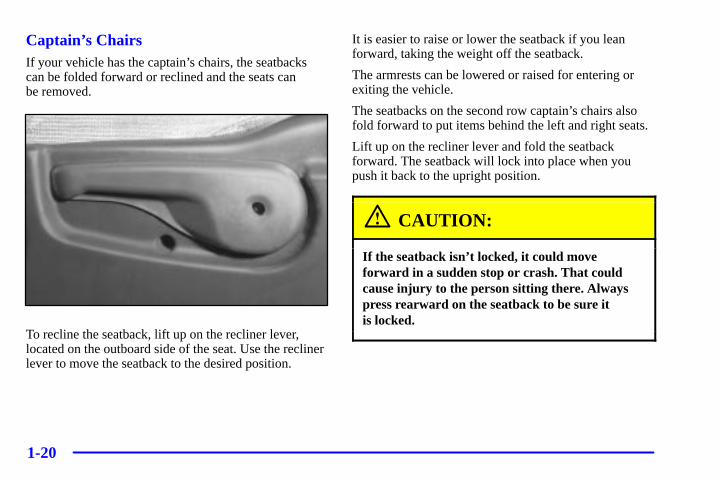
Captain’s ChairsIf your vehicle has the captain’s chairs, the seatbackscan be folded forward or reclined and the seats can be removed.
To recline the seatback, lift up on the recliner lever,located on the outboard side of the seat. Use the reclinerlever to move the seatback to the desired position.
It is easier to raise or lower the seatback if you leanforward, taking the weight off the seatback.
The armrests can be lowered or raised for entering orexiting the vehicle.
The seatbacks on the second row captain’s chairs alsofold forward to put items behind the left and right seats.
Lift up on the recliner lever and fold the seatbackforward. The seatback will lock into place when youpush it back to the upright position.
CAUTION:
If the seatback isn’t locked, it could moveforward in a sudden stop or crash. That couldcause injury to the person sitting there. Alwayspress rearward on the seatback to be sure it is locked.
1-21
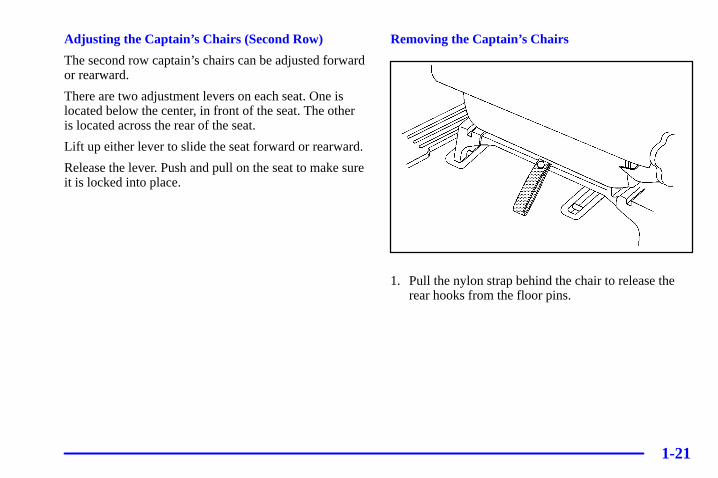
Adjusting the Captain’s Chairs (Second Row)
The second row captain’s chairs can be adjusted forwardor rearward.
There are two adjustment levers on each seat. One islocated below the center, in front of the seat. The otheris located across the rear of the seat.
Lift up either lever to slide the seat forward or rearward.
Release the lever. Push and pull on the seat to make sureit is locked into place.
Removing the Captain’s Chairs
1. Pull the nylon strap behind the chair to release therear hooks from the floor pins.
1-22
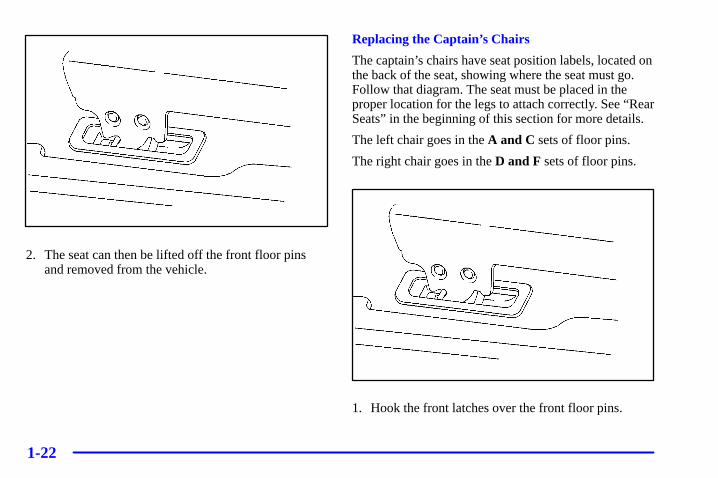
2. The seat can then be lifted off the front floor pinsand removed from the vehicle.
Replacing the Captain’s Chairs
The captain’s chairs have seat position labels, located onthe back of the seat, showing where the seat must go.Follow that diagram. The seat must be placed in theproper location for the legs to attach correctly. See “RearSeats” in the beginning of this section for more details.
The left chair goes in the A and C sets of floor pins.
The right chair goes in the D and F sets of floor pins.
1. Hook the front latches over the front floor pins.
1-23
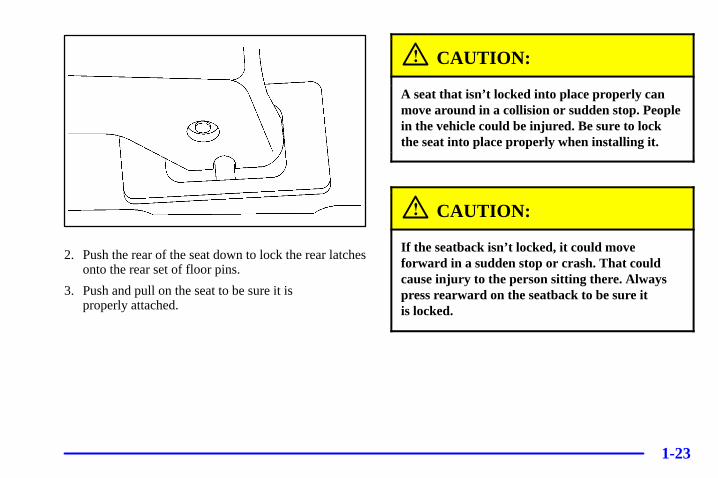
2. Push the rear of the seat down to lock the rear latchesonto the rear set of floor pins.
3. Push and pull on the seat to be sure it is properly attached.
CAUTION:
A seat that isn’t locked into place properly canmove around in a collision or sudden stop. Peoplein the vehicle could be injured. Be sure to lockthe seat into place properly when installing it.
CAUTION:
If the seatback isn’t locked, it could moveforward in a sudden stop or crash. That couldcause injury to the person sitting there. Alwayspress rearward on the seatback to be sure it is locked.
1-24
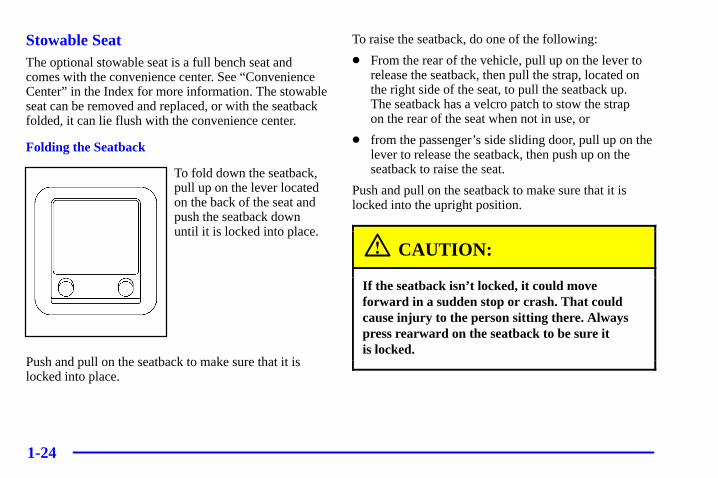
Stowable SeatThe optional stowable seat is a full bench seat andcomes with the convenience center. See “ConvenienceCenter” in the Index for more information. The stowableseat can be removed and replaced, or with the seatbackfolded, it can lie flush with the convenience center.
Folding the Seatback
To fold down the seatback,pull up on the lever locatedon the back of the seat andpush the seatback downuntil it is locked into place.
Push and pull on the seatback to make sure that it islocked into place.
To raise the seatback, do one of the following:
� From the rear of the vehicle, pull up on the lever torelease the seatback, then pull the strap, located onthe right side of the seat, to pull the seatback up. The seatback has a velcro patch to stow the strap on the rear of the seat when not in use, or
� from the passenger’s side sliding door, pull up on thelever to release the seatback, then push up on theseatback to raise the seat.
Push and pull on the seatback to make sure that it islocked into the upright position.
CAUTION:
If the seatback isn’t locked, it could moveforward in a sudden stop or crash. That couldcause injury to the person sitting there. Alwayspress rearward on the seatback to be sure it is locked.
1-25
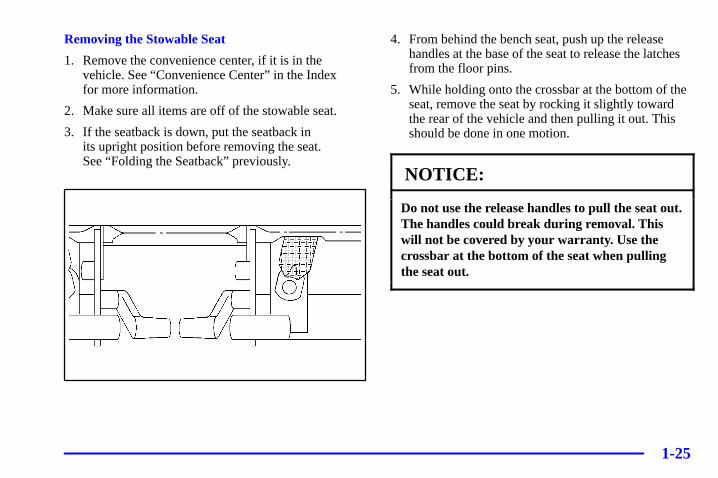
Removing the Stowable Seat
1. Remove the convenience center, if it is in thevehicle. See “Convenience Center” in the Index for more information.
2. Make sure all items are off of the stowable seat.
3. If the seatback is down, put the seatback in its upright position before removing the seat. See “Folding the Seatback” previously.
4. From behind the bench seat, push up the releasehandles at the base of the seat to release the latchesfrom the floor pins.
5. While holding onto the crossbar at the bottom of theseat, remove the seat by rocking it slightly towardthe rear of the vehicle and then pulling it out. Thisshould be done in one motion.
NOTICE:
Do not use the release handles to pull the seat out.The handles could break during removal. Thiswill not be covered by your warranty. Use thecrossbar at the bottom of the seat when pullingthe seat out.
1-26
Replacing the Stowable Seat
Do not put the stowable seat in so it faces rearwardbecause it will not latch that way. The stowable seat has to go in before the convenience center. See “Convenience Center” in the Index for more information.
The stowable seat has seat position labels, located on theback of the seat, showing where the seat must go.Follow the floor pin diagram. Use the front floor pins ofthe floor cups and the rear floor cups in the third row.
Use the G, H, I, and J sets of floor cups.
See “Rear Seats” in the beginning of this section formore information. The seat must be placed in the properlocation for the legs to attach correctly.
Make sure the seat is in its upright position beforebeginning this procedure.
1. Place the front hooks of the seat onto the front floorpins in the third row. To do this, the seat will need tobe angled so the front hooks clear the floor pins.
If the front legs are not attached correctly, the rearlegs will not attach to the rear set of floor pins.
2. Firmly push the rear hooks into the rear floor pins bypushing down on the rear of the seat.
3. Try to raise the seat to make sure that it is locked down.
4. Push and pull on the seatback to make sure that it islocked into place.
CAUTION:
A seat that isn’t locked into place properly canmove around in a collision or sudden stop. Peoplein the vehicle could be injured. Be sure to lockthe seat into place properly when installing it.
CAUTION:
If the seatback isn’t locked, it could moveforward in a sudden stop or crash. That couldcause injury to the person sitting there. Alwayspress rearward on the seatback to be sure it is locked.
1-27
Safety Belts: They’re for EveryoneThis part of the manual tells you how to use safety beltsproperly. It also tells you some things you should not dowith safety belts.
And it explains the Supplemental Restraint System (SRS),or air bag system.
CAUTION:
Don’t let anyone ride where he or she can’t weara safety belt properly. If you are in a crash andyou’re not wearing a safety belt, your injuriescan be much worse. You can hit things inside thevehicle or be ejected from it. You can be seriouslyinjured or killed. In the same crash, you mightnot be if you are buckled up. Always fasten yoursafety belt, and check that your passengers’ beltsare fastened properly too.
CAUTION:
It is extremely dangerous to ride in a cargo area,inside or outside of a vehicle. In a collision,people riding in these areas are more likely to beseriously injured or killed. Do not allow people toride in any area of your vehicle that is notequipped with seats and safety belts. Be sureeveryone in your vehicle is in a seat and using asafety belt properly.
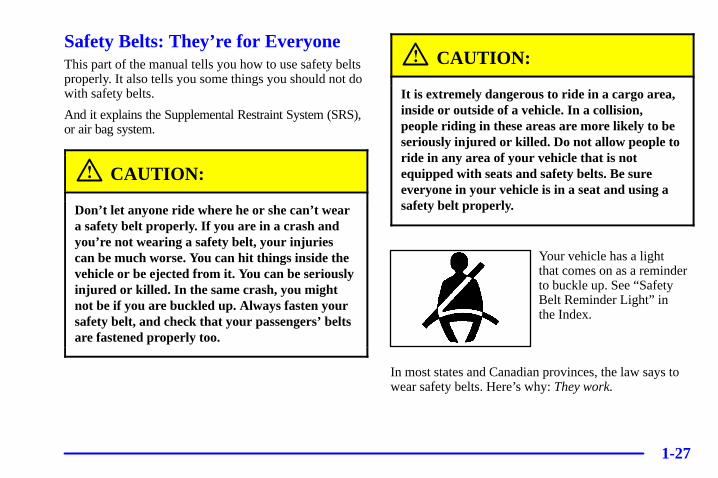
Your vehicle has a light that comes on as a reminderto buckle up. See “SafetyBelt Reminder Light” in the Index.
In most states and Canadian provinces, the law says towear safety belts. Here’s why: They work.
1-28
You never know if you’ll be in a crash. If you do have acrash, you don’t know if it will be a bad one.
A few crashes are mild, and some crashes can be soserious that even buckled up a person wouldn’t survive.But most crashes are in between. In many of them,people who buckle up can survive and sometimes walk away. Without belts they could have been badlyhurt or killed.
After more than 30 years of safety belts in vehicles, the facts are clear. In most crashes buckling up doesmatter ... a lot!
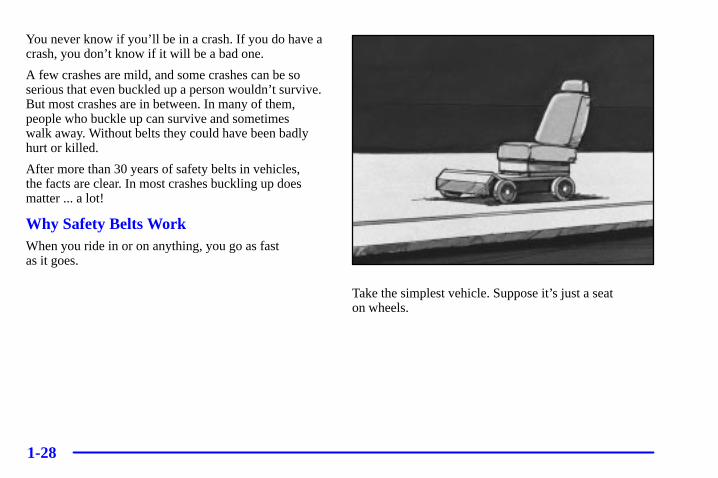
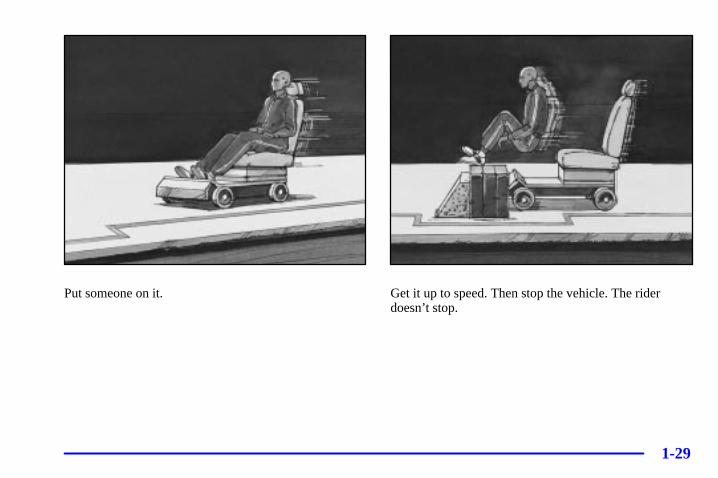
Why Safety Belts WorkWhen you ride in or on anything, you go as fast as it goes.
Take the simplest vehicle. Suppose it’s just a seat on wheels.
1-29
Put someone on it. Get it up to speed. Then stop the vehicle. The riderdoesn’t stop.
1-30
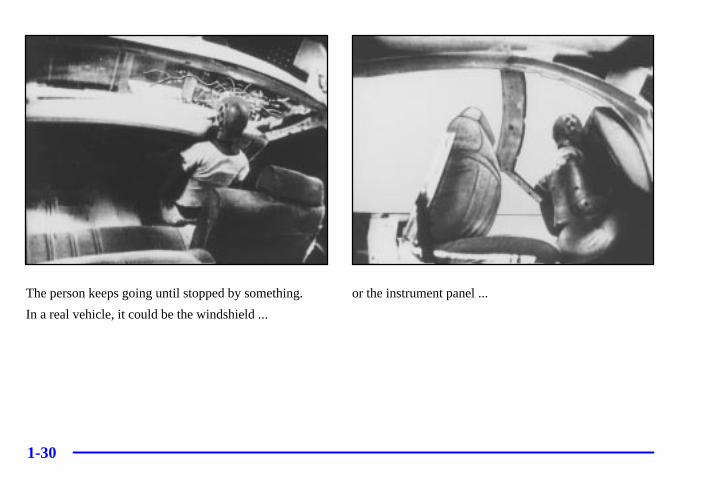
The person keeps going until stopped by something.
In a real vehicle, it could be the windshield ...
or the instrument panel ...
1-31
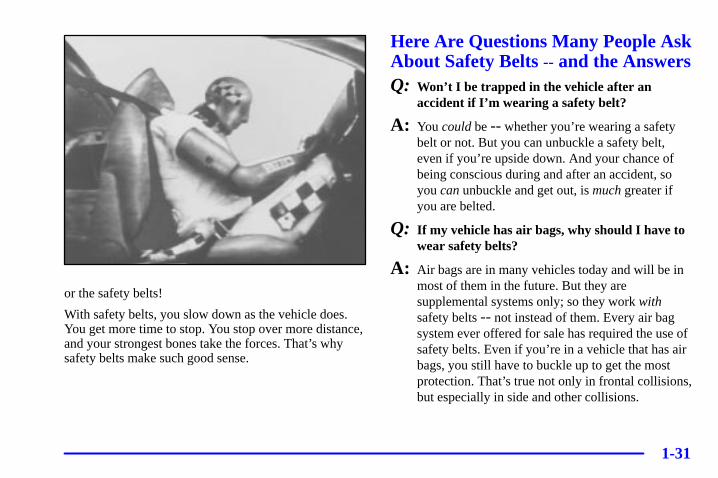
or the safety belts!
With safety belts, you slow down as the vehicle does.You get more time to stop. You stop over more distance,and your strongest bones take the forces. That’s whysafety belts make such good sense.
Here Are Questions Many People AskAbout Safety Belts -- and the AnswersQ: Won’t I be trapped in the vehicle after an
accident if I’m wearing a safety belt?
A: You could be -- whether you’re wearing a safetybelt or not. But you can unbuckle a safety belt,even if you’re upside down. And your chance ofbeing conscious during and after an accident, soyou can unbuckle and get out, is much greater ifyou are belted.
Q: If my vehicle has air bags, why should I have towear safety belts?
A: Air bags are in many vehicles today and will be inmost of them in the future. But they aresupplemental systems only; so they work withsafety belts -- not instead of them. Every air bagsystem ever offered for sale has required the use ofsafety belts. Even if you’re in a vehicle that has airbags, you still have to buckle up to get the mostprotection. That’s true not only in frontal collisions,but especially in side and other collisions.
1-32
Q: If I’m a good driver, and I never drive far fromhome, why should I wear safety belts?
A: You may be an excellent driver, but if you’re in anaccident -- even one that isn’t your fault -- you andyour passengers can be hurt. Being a good driverdoesn’t protect you from things beyond yourcontrol, such as bad drivers.
Most accidents occur within 25 miles (40 km) of home. And the greatest number of seriousinjuries and deaths occur at speeds of less than 40 mph (65 km/h).
Safety belts are for everyone.
How to Wear Safety Belts ProperlyAdultsThis part is only for people of adult size.
Be aware that there are special things to know aboutsafety belts and children. And there are different rules for smaller children and babies. If a child will be riding in your vehicle, see the part of this manualcalled “Children.” Follow those rules for everyone’s protection.
First, you’ll want to know which restraint systems yourvehicle has.
We’ll start with the driver position.
Driver PositionThis part describes the driver’s restraint system.
Lap-Shoulder BeltThe driver has a lap-shoulder belt. Here’s how to wear it properly.
1. Close and lock the door.
2. Adjust the seat so you can sit up straight. To see how, see “Seats” in the Index.
1-33
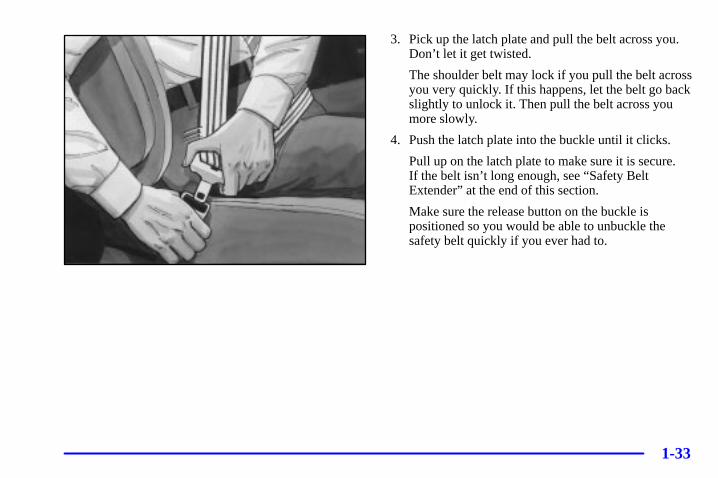
3. Pick up the latch plate and pull the belt across you.Don’t let it get twisted.
The shoulder belt may lock if you pull the belt acrossyou very quickly. If this happens, let the belt go backslightly to unlock it. Then pull the belt across youmore slowly.
4. Push the latch plate into the buckle until it clicks.
Pull up on the latch plate to make sure it is secure. If the belt isn’t long enough, see “Safety BeltExtender” at the end of this section.
Make sure the release button on the buckle ispositioned so you would be able to unbuckle thesafety belt quickly if you ever had to.
1-34
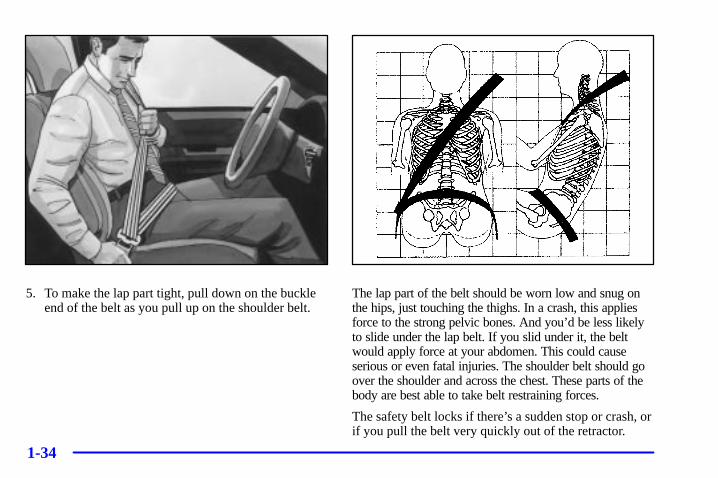
5. To make the lap part tight, pull down on the buckleend of the belt as you pull up on the shoulder belt.
The lap part of the belt should be worn low and snug onthe hips, just touching the thighs. In a crash, this appliesforce to the strong pelvic bones. And you’d be less likelyto slide under the lap belt. If you slid under it, the beltwould apply force at your abdomen. This could causeserious or even fatal injuries. The shoulder belt should goover the shoulder and across the chest. These parts of thebody are best able to take belt restraining forces.
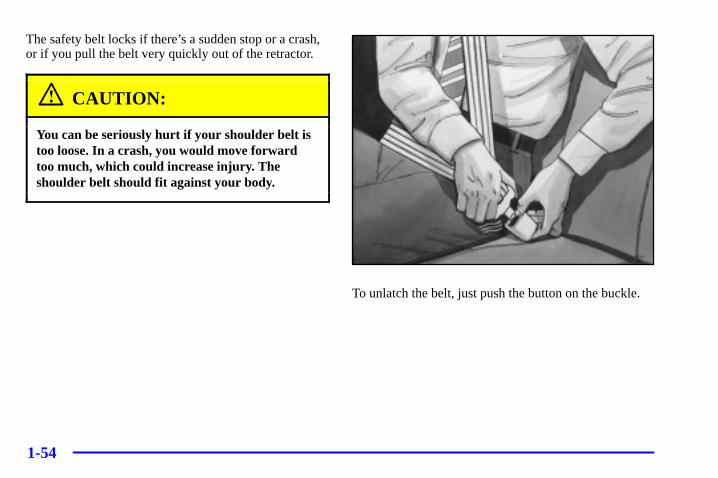
The safety belt locks if there’s a sudden stop or crash, orif you pull the belt very quickly out of the retractor.
1-35
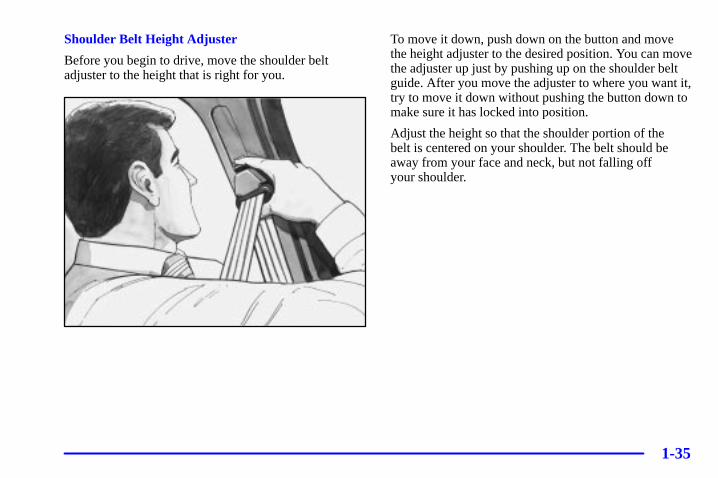
Shoulder Belt Height Adjuster
Before you begin to drive, move the shoulder beltadjuster to the height that is right for you.
To move it down, push down on the button and movethe height adjuster to the desired position. You can movethe adjuster up just by pushing up on the shoulder beltguide. After you move the adjuster to where you want it,try to move it down without pushing the button down tomake sure it has locked into position.
Adjust the height so that the shoulder portion of the belt is centered on your shoulder. The belt should beaway from your face and neck, but not falling off your shoulder.
1-36
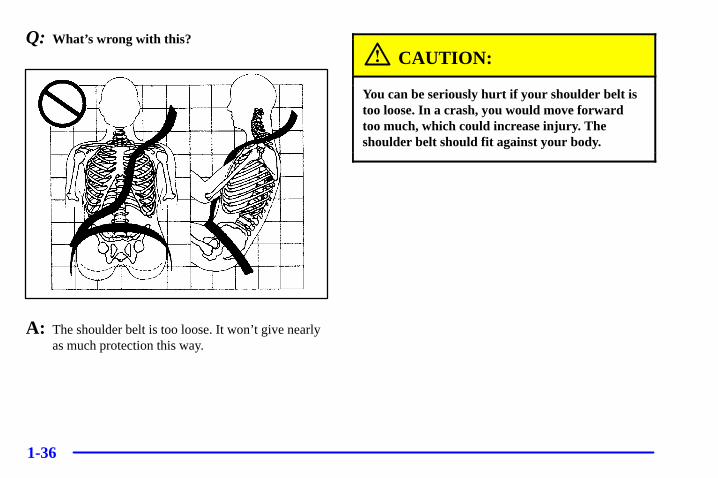
Q: What’s wrong with this?
A: The shoulder belt is too loose. It won’t give nearlyas much protection this way.
CAUTION:
You can be seriously hurt if your shoulder belt istoo loose. In a crash, you would move forwardtoo much, which could increase injury. Theshoulder belt should fit against your body.
1-37
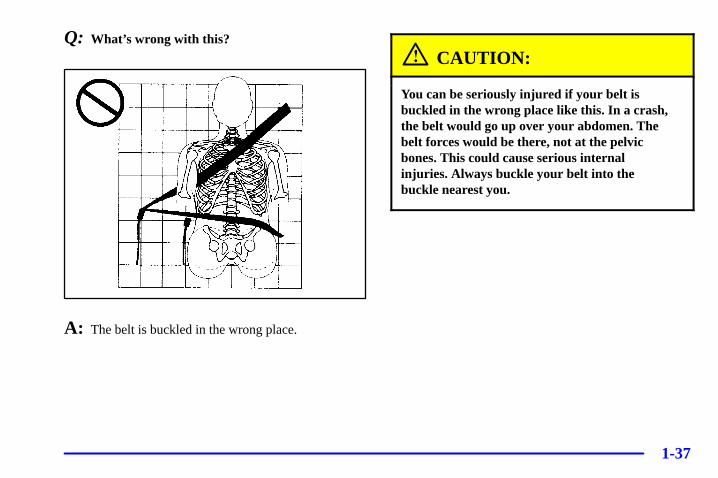
Q: What’s wrong with this?
A: The belt is buckled in the wrong place.
CAUTION:
You can be seriously injured if your belt isbuckled in the wrong place like this. In a crash,the belt would go up over your abdomen. Thebelt forces would be there, not at the pelvicbones. This could cause serious internal injuries. Always buckle your belt into the buckle nearest you.
1-38
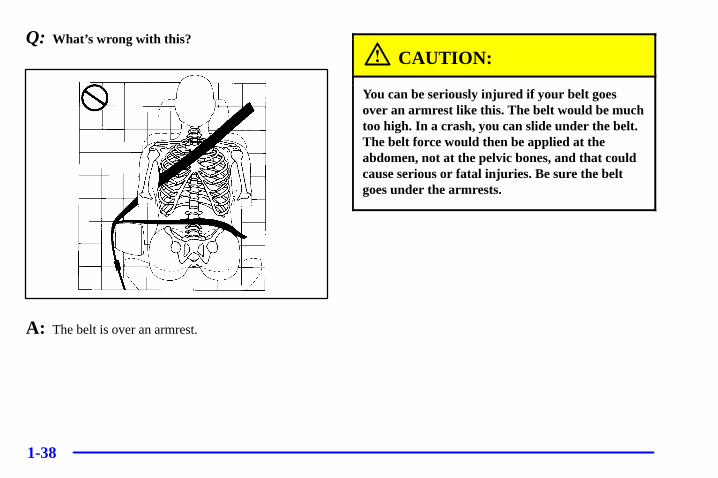
Q: What’s wrong with this?
A: The belt is over an armrest.
CAUTION:
You can be seriously injured if your belt goesover an armrest like this. The belt would be muchtoo high. In a crash, you can slide under the belt.The belt force would then be applied at theabdomen, not at the pelvic bones, and that couldcause serious or fatal injuries. Be sure the beltgoes under the armrests.
1-39
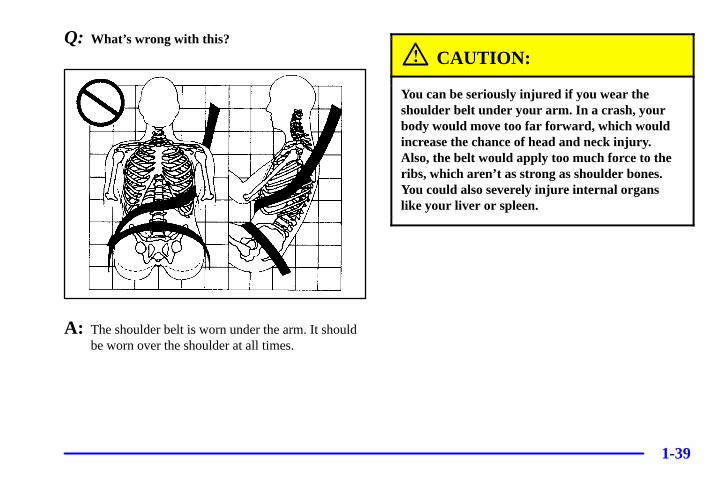
Q: What’s wrong with this?
A: The shoulder belt is worn under the arm. It shouldbe worn over the shoulder at all times.
CAUTION:
You can be seriously injured if you wear theshoulder belt under your arm. In a crash, yourbody would move too far forward, which wouldincrease the chance of head and neck injury.Also, the belt would apply too much force to theribs, which aren’t as strong as shoulder bones.You could also severely injure internal organslike your liver or spleen.
1-40
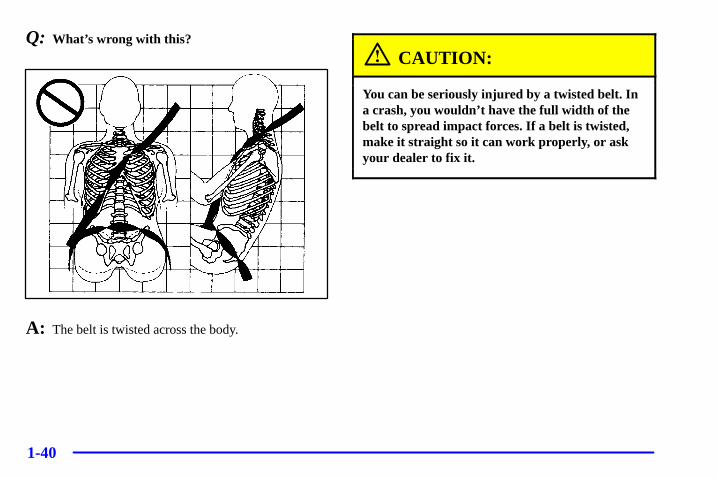
Q: What’s wrong with this?
A: The belt is twisted across the body.
CAUTION:
You can be seriously injured by a twisted belt. Ina crash, you wouldn’t have the full width of thebelt to spread impact forces. If a belt is twisted,make it straight so it can work properly, or askyour dealer to fix it.
1-41
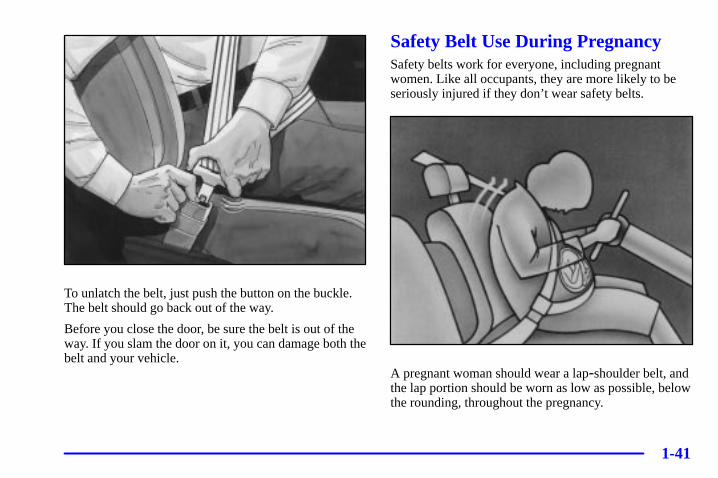
To unlatch the belt, just push the button on the buckle.The belt should go back out of the way.
Before you close the door, be sure the belt is out of theway. If you slam the door on it, you can damage both thebelt and your vehicle.
Safety Belt Use During PregnancySafety belts work for everyone, including pregnantwomen. Like all occupants, they are more likely to beseriously injured if they don’t wear safety belts.
A pregnant woman should wear a lap-shoulder belt, andthe lap portion should be worn as low as possible, belowthe rounding, throughout the pregnancy.
1-42
The best way to protect the fetus is to protect themother. When a safety belt is worn properly, it’s morelikely that the fetus won’t be hurt in a crash. Forpregnant women, as for anyone, the key to makingsafety belts effective is wearing them properly.
Right Front Passenger PositionTo learn how to wear the right front passenger’s safety belt properly, see “Driver Position” earlier in this section.
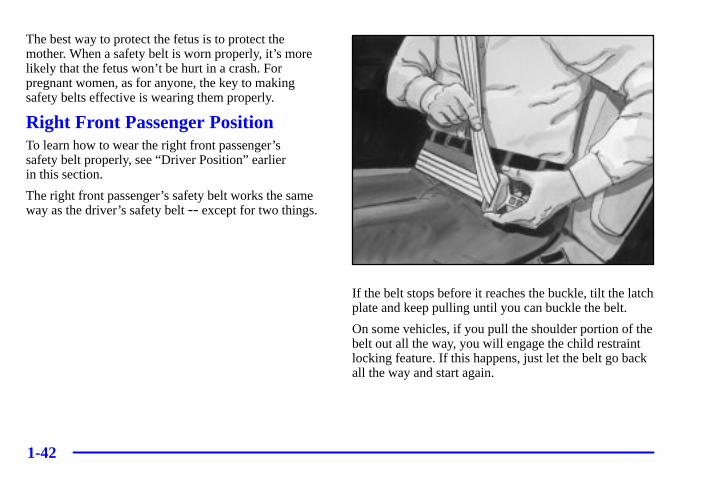
The right front passenger’s safety belt works the sameway as the driver’s safety belt -- except for two things.
If the belt stops before it reaches the buckle, tilt the latchplate and keep pulling until you can buckle the belt.
On some vehicles, if you pull the shoulder portion of thebelt out all the way, you will engage the child restraintlocking feature. If this happens, just let the belt go backall the way and start again.
1-43
Supplemental Restraint Systems (SRS)This part explains the frontal and side impactSupplemental Restraint Systems (SRS) or air bag systems.
Your vehicle has four air bags -- a frontal air bag for thedriver, another frontal air bag for the right frontpassenger, a side impact air bag for the driver, andanother side impact air bag for the right front passenger.Frontal air bags are designed to help reduce the risk ofinjury from the force of an inflating frontal air bag. Butthese air bags must inflate very quickly to do their joband comply with federal regulations.Here are the most important things to know about the airbag systems:
CAUTION:
You can be severely injured or killed in a crash ifyou aren’t wearing your safety belt -- even if youhave air bags. Wearing your safety belt during acrash helps reduce your chance of hitting thingsinside the vehicle or being ejected from it.
CAUTION: (Continued)
CAUTION: (Continued)
Air bags are “supplemental restraints” to thesafety belts. All air bags are designed to workwith safety belts but don’t replace them.
Frontal air bags for the driver and right frontpassenger are designed to work only in moderateto severe crashes where the front of your vehiclehits something. They aren’t designed to inflate atall in rollover, rear, side or low-speed frontalcrashes. And, for unrestrained occupants, frontalair bags may provide less protection in frontalcrashes than more forceful air bags haveprovided in the past. The side impact air bags for the driver and right front passenger aredesigned to inflate only in moderate to severecrashes where something hits the side of yourvehicle. They aren’t designed to inflate in frontal, in rollover or in rear crashes. Everyonein your vehicle should wear a safety belt properly -- whether or not there’s an air bag forthat person.
1-44
CAUTION:
Both frontal and side impact air bags inflate withgreat force, faster than the blink of an eye. Ifyou’re too close to an inflating air bag, as youwould be if you were leaning forward, it couldseriously injure you. Safety belts help keep you inposition for air bag inflation before and during acrash. Always wear your safety belt, even withfrontal air bags. The driver should sit as far backas possible while still maintaining control of thevehicle. Front occupants should not lean on orsleep against the door.
CAUTION:
Anyone who is up against, or very close to, anyair bag when it inflates can be seriously injuredor killed. Air bags plus lap-shoulder belts offerthe best protection for adults, but not for youngchildren and infants. Neither the vehicle’s safetybelt system nor its air bag system is designed forthem. Young children and infants need theprotection that a child restraint system canprovide. Always secure children properly in yourvehicle. To read how, see the part of this manualcalled “Children.”
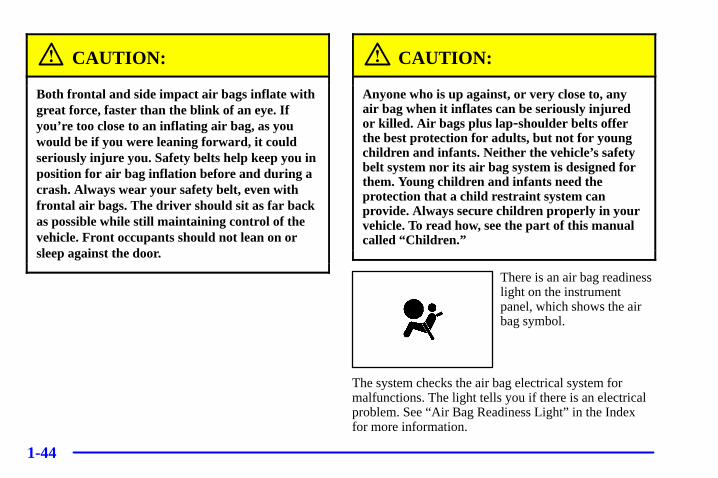
There is an air bag readinesslight on the instrumentpanel, which shows the airbag symbol.
The system checks the air bag electrical system formalfunctions. The light tells you if there is an electricalproblem. See “Air Bag Readiness Light” in the Indexfor more information.
1-45
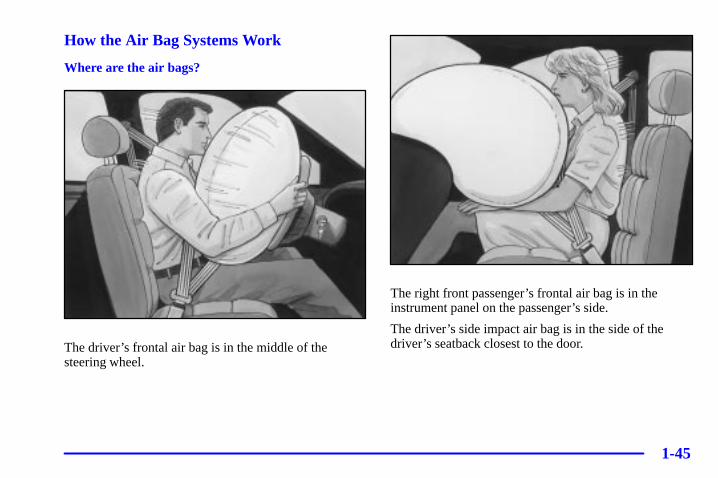
How the Air Bag Systems Work
Where are the air bags?
The driver’s frontal air bag is in the middle of thesteering wheel.
The right front passenger’s frontal air bag is in theinstrument panel on the passenger’s side.
The driver’s side impact air bag is in the side of thedriver’s seatback closest to the door.
1-46
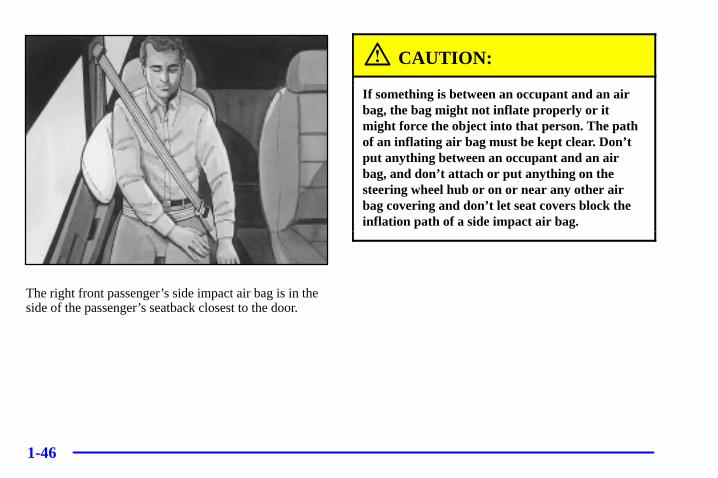
The right front passenger’s side impact air bag is in theside of the passenger’s seatback closest to the door.
CAUTION:
If something is between an occupant and an airbag, the bag might not inflate properly or itmight force the object into that person. The pathof an inflating air bag must be kept clear. Don’tput anything between an occupant and an airbag, and don’t attach or put anything on thesteering wheel hub or on or near any other airbag covering and don’t let seat covers block theinflation path of a side impact air bag.

1-47
When should an air bag inflate?
The driver’s and right front passenger’s frontal air bagsare designed to inflate in moderate to severe frontal ornear-frontal crashes. But they are designed to inflateonly if the impact speed is above the system’s designed “threshold level.”
If your vehicle goes straight into a wall that doesn’tmove or deform, the threshold level is about 12 to 19 mph (19 to 31 km/h). The threshold level can vary,however, with specific vehicle design, so that it can besomewhat above or below this range.
If your vehicle strikes something that will move ordeform, such as a parked car, the threshold level will behigher. The driver’s and right front passenger’s frontalair bags are not designed to inflate in rollovers, sideimpacts, or rear impacts, because inflation would nothelp the occupant.
The side impact air bags are designed to inflate inmoderate to severe side crashes. A side impact air bagwill inflate if the crash severity is above the system’sdesigned “threshold level.” The threshold level can varywith specific vehicle design. Side impact air bags are notdesigned to inflate in frontal or near-frontal impacts,rollovers or rear impacts, because inflation would nothelp the occupant. A side impact air bag will onlydeploy on the side of the vehicle that is struck.
In any particular crash, no one can say whether an airbag should have inflated simply because of the damageto a vehicle or because of what the repair costs were. For frontal air bags, inflation is determined by the angleof the impact and how quickly the vehicle slows downin frontal and near-frontal impacts. For side impact airbags, inflation is determined by the location and severityof the impact.
What makes an air bag inflate?
In an impact of sufficient severity, the air bag sensingsystem detects that the vehicle is in a crash. For bothfrontal and side impact air bags, the sensing systemtriggers a release of gas from the inflator, which inflatesthe air bag. The inflator, air bag and related hardwareare all part of the air bag modules inside the steeringwheel, instrument panel and the side of the frontseatbacks closest to the door.
1-48
How does an air bag restrain?
In moderate to severe frontal or near frontal collisions,even belted occupants can contact the steering wheel orthe instrument panel. In moderate to severe sidecollisions, even belted occupants can contact the insideof the vehicle. The air bag supplements the protectionprovided by safety belts. Air bags distribute the force ofthe impact more evenly over the occupant’s upper body,stopping the occupant more gradually. But the frontal airbags would not help you in many types of collisions,including rollovers, rear impacts, and side impacts,primarily because an occupant’s motion is not towardthe air bag. Side impact air bags would not help you inmany types of collisions, including frontal or nearfrontal collisions, rollovers, and rear impacts, primarilybecause an occupant’s motion is not toward those airbags. Air bags should never be regarded as anythingmore than a supplement to safety belts, and then only inmoderate to severe frontal or near-frontal collisions forthe driver’s and right front passenger’s frontal air bags,and only in moderate to severe side collisions for thedriver’s and right front passenger’s side impact air bags.
What will you see after an air bag inflates?
After an air bag inflates, it quickly deflates, so quicklythat some people may not even realize the air baginflated. Some components of the air bag module -- thesteering wheel hub for the driver’s air bag, theinstrument panel for the right front passenger’s bag, theside of the seatback closest to the door for the driver andright front passenger’s side impact air bags -- will behot for a short time. The parts of the bag that come intocontact with you may be warm, but not too hot to touch.There will be some smoke and dust coming from thevents in the deflated air bags. Air bag inflation doesn’tprevent the driver from seeing or being able to steer thevehicle, nor does it stop people from leaving the vehicle.
CAUTION:
When an air bag inflates, there is dust in the air.This dust could cause breathing problems forpeople with a history of asthma or otherbreathing trouble. To avoid this, everyone in thevehicle should get out as soon as it is safe to do so.If you have breathing problems but can’t get outof the vehicle after an air bag inflates, then getfresh air by opening a window or a door.
1-49
In many crashes severe enough to inflate an air bag,windshields are broken by vehicle deformation.Additional windshield breakage may also occur from theright front passenger air bag.
� Air bags are designed to inflate only once. After anair bag inflates, you’ll need some new parts for yourair bag system. If you don’t get them, the air bagsystem won’t be there to help protect you in anothercrash. A new system will include air bag modulesand possibly other parts. The service manual for yourvehicle covers the need to replace other parts.
� Your vehicle is equipped with a crash sensing anddiagnostic module, which records information aboutthe frontal air bag system. The module recordsinformation about the readiness of the system, whenthe system commands air bag inflation and driver’ssafety belt usage at deployment. The module alsorecords speed, engine rpm, brake and throttle data.
� Let only qualified technicians work on your air bag systems. Improper service can mean that an air bag system won’t work properly. See your dealerfor service.
NOTICE:
If you damage the covering for the driver’s or theright front passenger’s air bag, or the air bagcovering on the driver’s and right frontpassenger’s seatback, the bag may not workproperly. You may have to replace the air bagmodule in the steering wheel, both the air bagmodule and the instrument panel for the rightfront passenger’s air bag, or both the air bagmodule and seatback for the driver’s and rightfront passenger’s side impact air bag. Do notopen or break the air bag coverings.
1-50
Servicing Your Air Bag-Equipped VehicleAir bags affect how your vehicle should be serviced.There are parts of the air bag systems in several placesaround your vehicle. Your dealer and the service manualhave information about servicing your vehicle and theair bag systems. To purchase a service manual, see“Service and Owner Publications” in the Index.
CAUTION:
For up to 10 seconds after the ignition key isturned off and the battery is disconnected, an airbag can still inflate during improper service. Youcan be injured if you are close to an air bag whenit inflates. Avoid yellow connectors. They areprobably part of the air bag systems. Be sure tofollow proper service procedures, and make surethe person performing work for you is qualifiedto do so.
The air bag systems do not need regular maintenance.
Safety Belt PretensionersYour vehicle has safety belt pretensioners. You’ll findthem on the buckle end of the safety belts for the driver and right front passenger. They help the safetybelts reduce a person’s forward movement in a moderate to severe crash in which the front of thevehicle hits something.
Pretensioners work only once. If they activate in a crash,you’ll need to get new ones, and probably other newparts for your safety belt system. See “ReplacingRestraint System Parts After a Crash” in the Index.
Rear Seat PassengersIt’s very important for rear seat passengers to buckle up!Accident statistics show that unbelted people in the rearseat are hurt more often in crashes than those who arewearing safety belts.
Rear passengers who aren’t safety belted can be thrownout of the vehicle in a crash. And they can strike othersin the vehicle who are wearing safety belts.
1-51
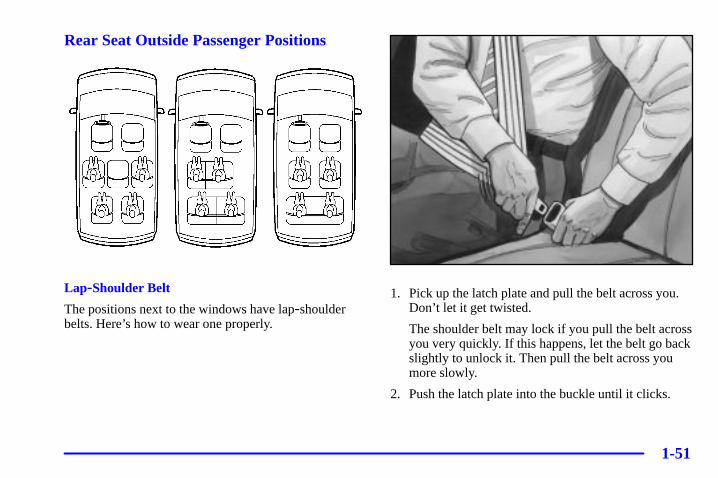
Rear Seat Outside Passenger Positions
Lap-Shoulder Belt
The positions next to the windows have lap-shoulderbelts. Here’s how to wear one properly.
1. Pick up the latch plate and pull the belt across you.Don’t let it get twisted.
The shoulder belt may lock if you pull the belt acrossyou very quickly. If this happens, let the belt go backslightly to unlock it. Then pull the belt across youmore slowly.
2. Push the latch plate into the buckle until it clicks.
1-52
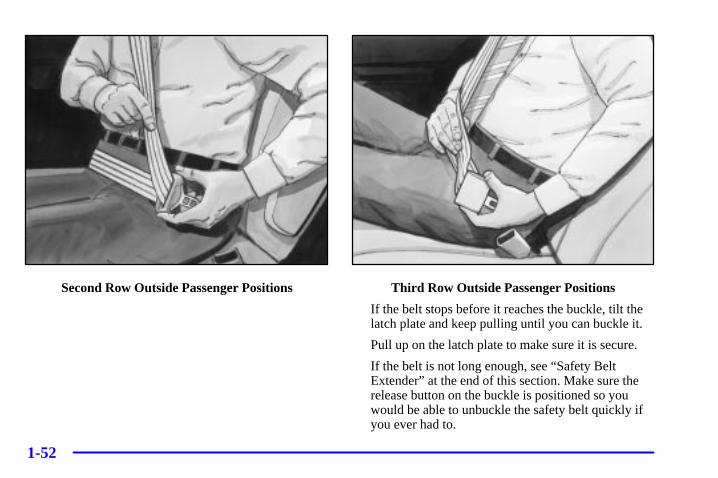
Second Row Outside Passenger Positions Third Row Outside Passenger Positions
If the belt stops before it reaches the buckle, tilt thelatch plate and keep pulling until you can buckle it.
Pull up on the latch plate to make sure it is secure.
If the belt is not long enough, see “Safety BeltExtender” at the end of this section. Make sure therelease button on the buckle is positioned so youwould be able to unbuckle the safety belt quickly ifyou ever had to.
1-53
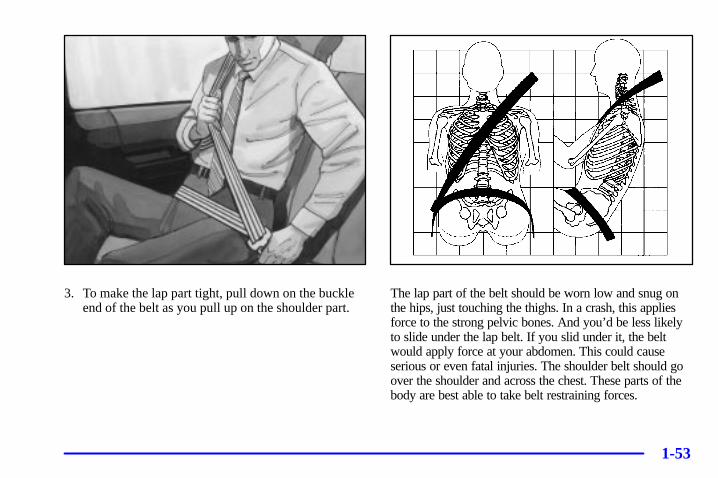
3. To make the lap part tight, pull down on the buckleend of the belt as you pull up on the shoulder part.
The lap part of the belt should be worn low and snug onthe hips, just touching the thighs. In a crash, this appliesforce to the strong pelvic bones. And you’d be less likelyto slide under the lap belt. If you slid under it, the beltwould apply force at your abdomen. This could causeserious or even fatal injuries. The shoulder belt should goover the shoulder and across the chest. These parts of thebody are best able to take belt restraining forces.
1-54
The safety belt locks if there’s a sudden stop or a crash,or if you pull the belt very quickly out of the retractor.
CAUTION:
You can be seriously hurt if your shoulder belt istoo loose. In a crash, you would move forwardtoo much, which could increase injury. Theshoulder belt should fit against your body.
To unlatch the belt, just push the button on the buckle.
1-55
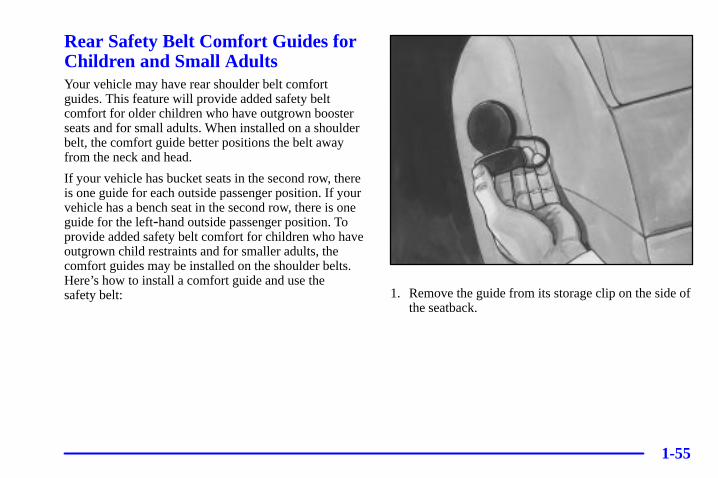
Rear Safety Belt Comfort Guides forChildren and Small AdultsYour vehicle may have rear shoulder belt comfortguides. This feature will provide added safety beltcomfort for older children who have outgrown boosterseats and for small adults. When installed on a shoulderbelt, the comfort guide better positions the belt awayfrom the neck and head.
If your vehicle has bucket seats in the second row, thereis one guide for each outside passenger position. If yourvehicle has a bench seat in the second row, there is oneguide for the left-hand outside passenger position. Toprovide added safety belt comfort for children who haveoutgrown child restraints and for smaller adults, thecomfort guides may be installed on the shoulder belts.Here’s how to install a comfort guide and use the safety belt: 1. Remove the guide from its storage clip on the side of
the seatback.
1-56
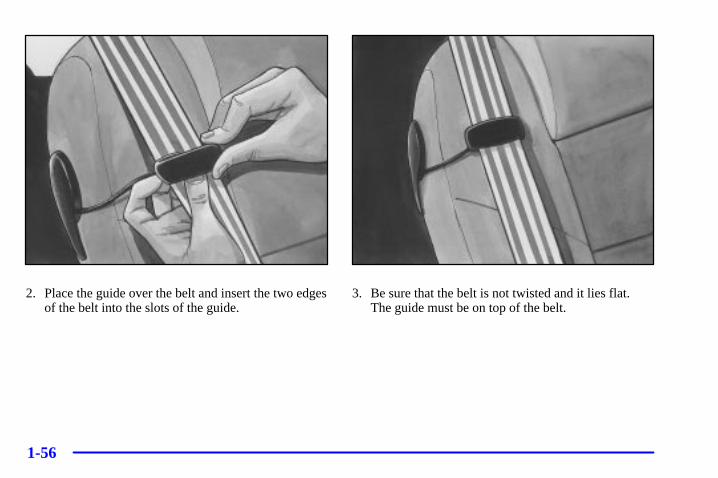
2. Place the guide over the belt and insert the two edgesof the belt into the slots of the guide.
3. Be sure that the belt is not twisted and it lies flat. The guide must be on top of the belt.
1-57
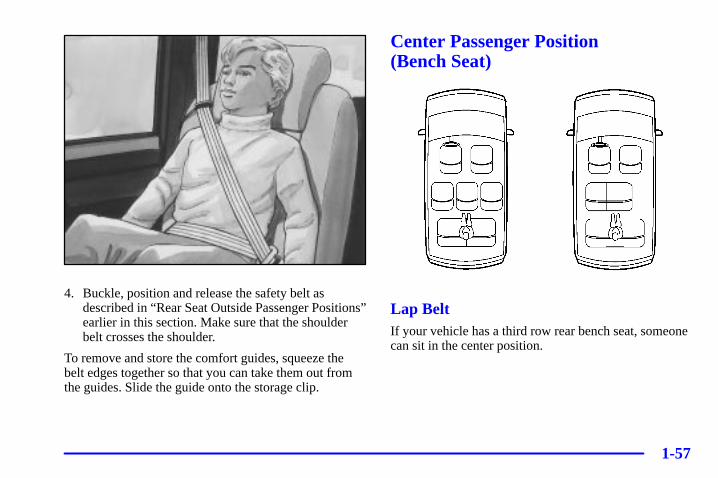
4. Buckle, position and release the safety belt asdescribed in “Rear Seat Outside Passenger Positions”earlier in this section. Make sure that the shoulderbelt crosses the shoulder.
To remove and store the comfort guides, squeeze thebelt edges together so that you can take them out fromthe guides. Slide the guide onto the storage clip.
Center Passenger Position (Bench Seat)
Lap BeltIf your vehicle has a third row rear bench seat, someonecan sit in the center position.
1-58
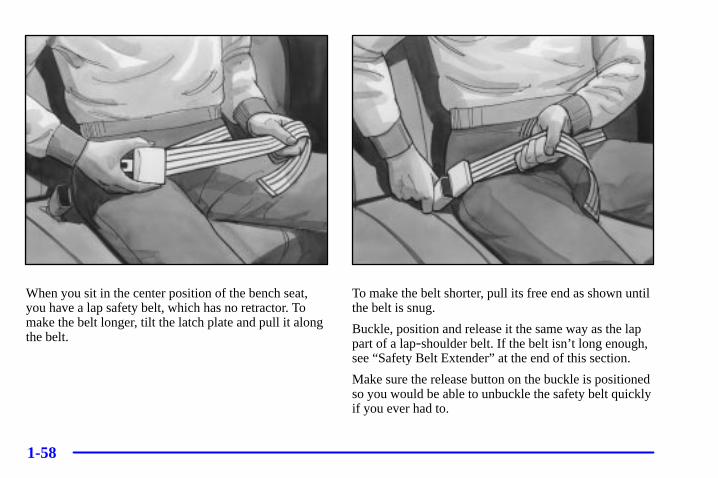
When you sit in the center position of the bench seat,you have a lap safety belt, which has no retractor. Tomake the belt longer, tilt the latch plate and pull it alongthe belt.
To make the belt shorter, pull its free end as shown untilthe belt is snug.
Buckle, position and release it the same way as the lappart of a lap-shoulder belt. If the belt isn’t long enough,see “Safety Belt Extender” at the end of this section.
Make sure the release button on the buckle is positionedso you would be able to unbuckle the safety belt quicklyif you ever had to.
1-59
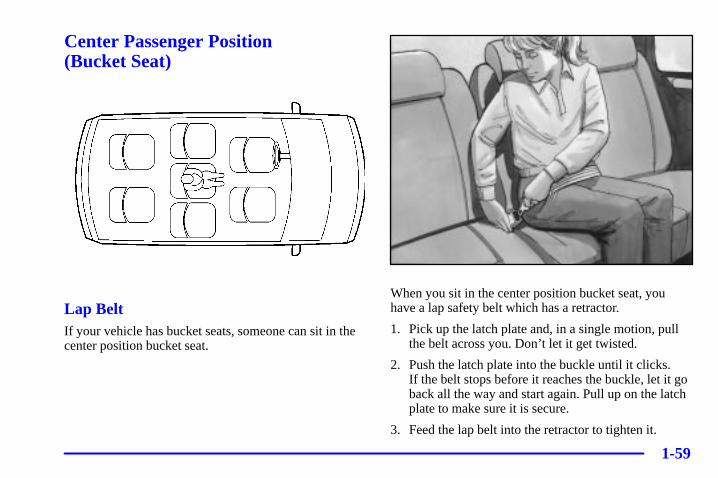
Center Passenger Position (Bucket Seat)
Lap BeltIf your vehicle has bucket seats, someone can sit in thecenter position bucket seat.
When you sit in the center position bucket seat, youhave a lap safety belt which has a retractor.
1. Pick up the latch plate and, in a single motion, pullthe belt across you. Don’t let it get twisted.
2. Push the latch plate into the buckle until it clicks. If the belt stops before it reaches the buckle, let it goback all the way and start again. Pull up on the latchplate to make sure it is secure.
3. Feed the lap belt into the retractor to tighten it.
1-60
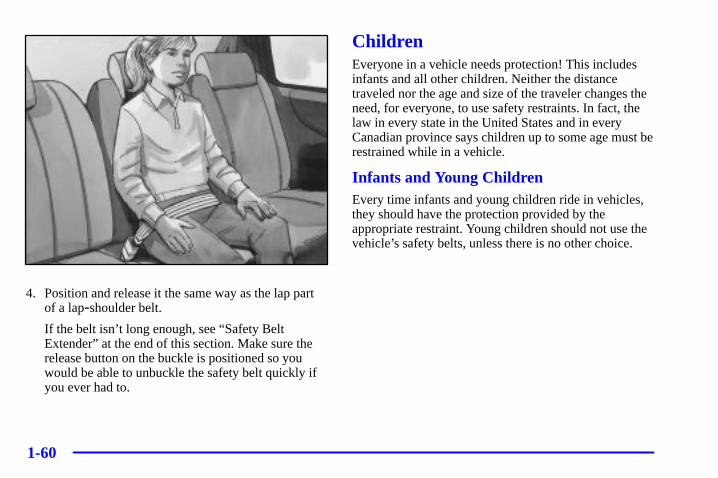
4. Position and release it the same way as the lap partof a lap-shoulder belt.
If the belt isn’t long enough, see “Safety BeltExtender” at the end of this section. Make sure therelease button on the buckle is positioned so youwould be able to unbuckle the safety belt quickly ifyou ever had to.
ChildrenEveryone in a vehicle needs protection! This includesinfants and all other children. Neither the distancetraveled nor the age and size of the traveler changes theneed, for everyone, to use safety restraints. In fact, thelaw in every state in the United States and in everyCanadian province says children up to some age must berestrained while in a vehicle.
Infants and Young ChildrenEvery time infants and young children ride in vehicles,they should have the protection provided by theappropriate restraint. Young children should not use thevehicle’s safety belts, unless there is no other choice.
1-61
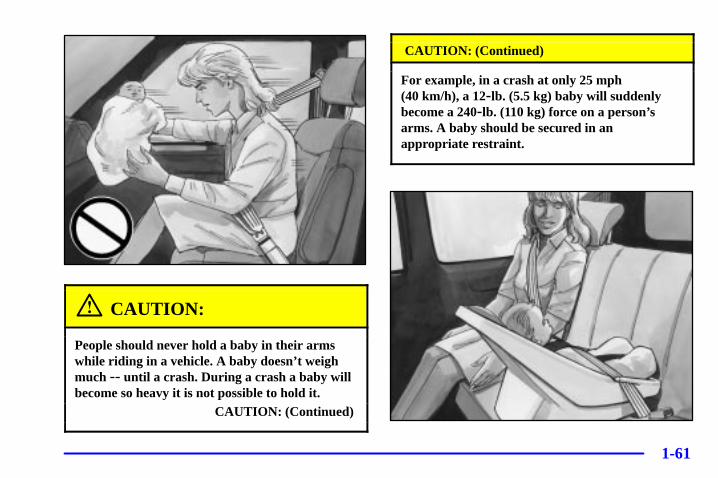
CAUTION:
People should never hold a baby in their armswhile riding in a vehicle. A baby doesn’t weighmuch -- until a crash. During a crash a baby willbecome so heavy it is not possible to hold it.
CAUTION: (Continued)
CAUTION: (Continued)
For example, in a crash at only 25 mph (40 km/h), a 12-lb. (5.5 kg) baby will suddenlybecome a 240-lb. (110 kg) force on a person’sarms. A baby should be secured in anappropriate restraint.

1-62
CAUTION:
Children who are up against, or very close to, anyair bag when it inflates can be seriously injuredor killed. Air bags plus lap-shoulder belts offeroutstanding protection for adults and olderchildren, but not for young children and infants.Neither the vehicle’s safety belt system nor its airbag system is designed for them. Young childrenand infants need the protection that a childrestraint system can provide.
Q: What are the different types of add-on child restraints?
A: Add-on child restraints, which are purchased by the vehicle’s owner, are available in four basictypes. Selection of a particular restraint should takeinto consideration not only the child’s weight,height and age but also whether or not the restraintwill be compatible with the motor vehicle in whichit will be used.
For most basic types of child restraints, there aremany different models available. When purchasinga child restraint, be sure it is designed to be used ina motor vehicle. If it is, the restraint will have alabel saying that it meets federal motor vehiclesafety standards.
The restraint manufacturer’s instructions that comewith the restraint state the weight and heightlimitations for a particular child restraint. Inaddition, there are many kinds of restraintsavailable for children with special needs.
1-63
CAUTION:
Newborn infants need complete support,including support for the head and neck. This isnecessary because a newborn infant’s neck isweak and its head weighs so much compared withthe rest of its body. In a crash, an infant in arear-facing seat settles into the restraint, so thecrash forces can be distributed across thestrongest part of an infant’s body, the back andshoulders. Infants always should be secured inappropriate infant restraints.
CAUTION:
The body structure of a young child is quiteunlike that of an adult or older child, for whomthe safety belts are designed. A young child’s hipbones are still so small that vehicle’s regularsafety belt may not remain low on the hip bones,as it should. Instead, it may settle up around thechild’s abdomen. In a crash, the belt would applyforce on a body area that’s unprotected by anybony structure. This alone could cause serious orfatal injuries. Young children always should besecured in appropriate child restraints.
1-64
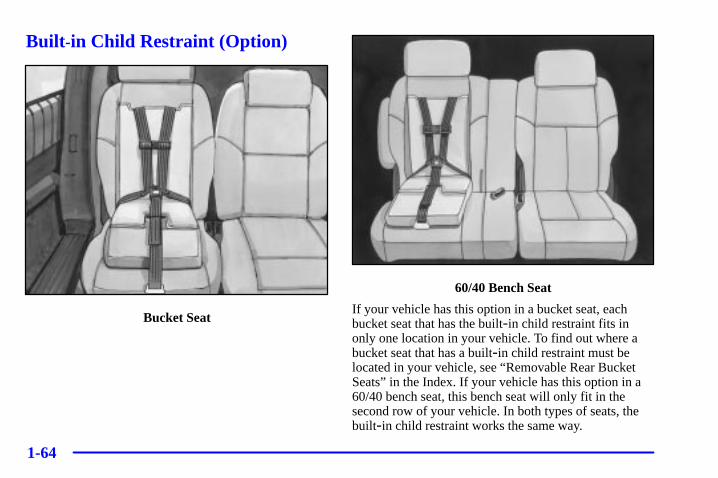
Built -in Child Restraint (Option)
Bucket Seat
60/40 Bench Seat
If your vehicle has this option in a bucket seat, eachbucket seat that has the built-in child restraint fits inonly one location in your vehicle. To find out where abucket seat that has a built-in child restraint must belocated in your vehicle, see “Removable Rear BucketSeats” in the Index. If your vehicle has this option in a60/40 bench seat, this bench seat will only fit in thesecond row of your vehicle. In both types of seats, thebuilt-in child restraint works the same way.
1-65
This child restraint system conforms to all applicableFederal Motor Vehicle Safety Standards.
Each child restraint is designed for use only by childrenwho weigh between 22 and 40 pounds (10 and 18 kg)and whose height is between 33.5 and 40 inches (850 and 1 016 mm) and who are capable of sittingupright alone.
The child should also be at least one year old. It isimportant to use a rear-facing infant restraint until thechild is about a year old. A rear-facing restraint givesthe infant’s head, neck and body the support they wouldneed in a crash. See “Child Restraints” later in thissection for more information.
Q: What if the top of my child’s shoulders is abovethe shoulder belt slots for the five-point childrestraint harness system?
A: A child whose shoulders are above the shoulderbelt slots for the five-point child restraint harnesssystem shouldn’t use this child restraint. Instead,the child should sit on the vehicle’s regular seatcushion and use the vehicle’s adult safety belts.
CAUTION:
BEFORE YOU USE THIS CHILD RESTRAINT,BE SURE THE TOP OF THE CHILD’SSHOULDERS IS BELOW THE SLOTS THATTHE HARNESS GOES THROUGH. A CHILDWHOSE SHOULDERS ARE ABOVE THOSESLOTS COULD BE INJURED DURING ASUDDEN STOP OR CRASH. IF THE TOP OFTHE CHILD’S SHOULDERS IS ABOVE THESLOTS, DON’T USE THIS CHILD RESTRAINTWHILE THE VEHICLE IS IN MOTION.
1-66
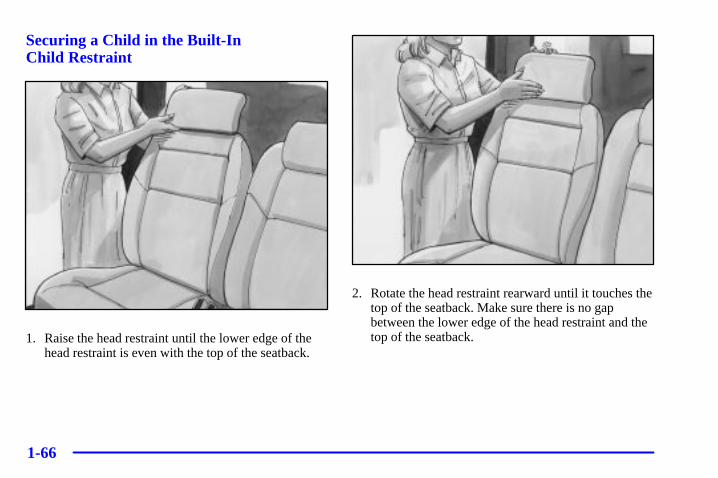
Securing a Child in the Built-In Child Restraint
1. Raise the head restraint until the lower edge of thehead restraint is even with the top of the seatback.
2. Rotate the head restraint rearward until it touches thetop of the seatback. Make sure there is no gapbetween the lower edge of the head restraint and thetop of the seatback.
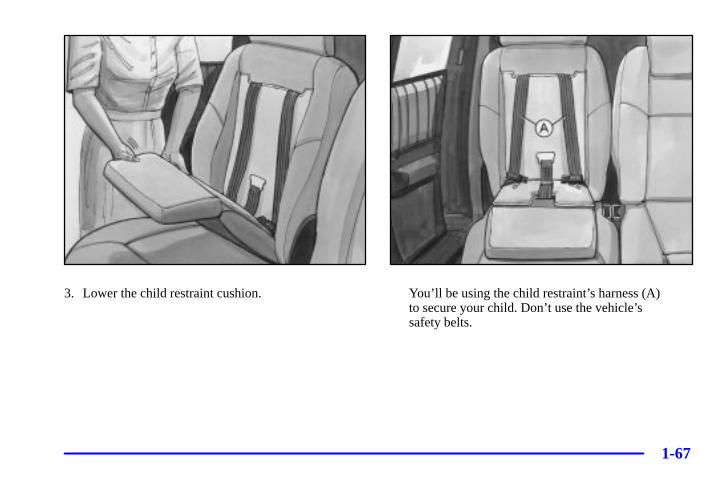
1-67
3. Lower the child restraint cushion. You’ll be using the child restraint’s harness (A) to secure your child. Don’t use the vehicle’s safety belts.

1-68
CAUTION:
Using the vehicle’s regular safety belts on a childseated on the child restraint cushion can causeserious injury to the child in a sudden stop orcrash. If a child is the proper size for the built-inchild restraint, secure the child using the childrestraint’s harness. But children who are toolarge for the built-in child restraint should sit onthe vehicle’s regular seat and use the vehicle’sadult safety belts.
WARNING! FAILURE TO FOLLOW THEMANUFACTURER’S INSTRUCTIONS ON THEUSE OF THIS CHILD RESTRAINT SYSTEMCAN RESULT IN YOUR CHILD STRIKING THEVEHICLE’S INTERIOR DURING A SUDDENSTOP OR CRASH. SNUGLY ADJUST THEBELTS PROVIDED WITH THIS CHILDRESTRAINT AROUND YOUR CHILD.
4. Before placing the child in the child restraint, addslack to the shoulder harness. Pull the black shoulderharness release strap firmly. At the same time pullboth shoulder harness straps through the slots in theseatback as shown.
5. Place the child on the child restraint cushion.
1-69
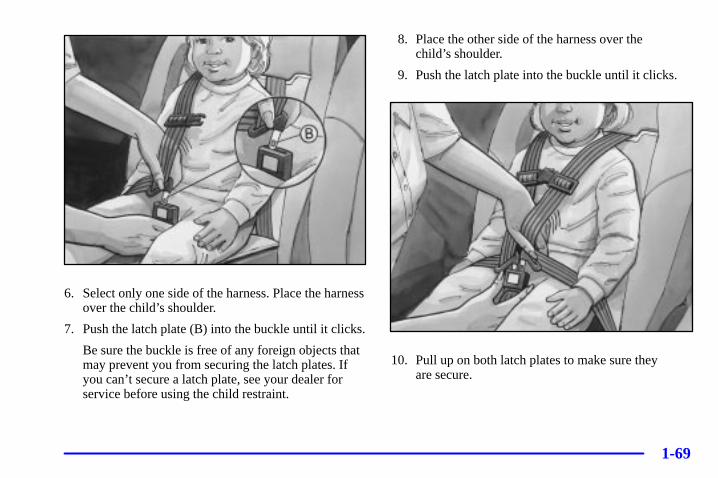
6. Select only one side of the harness. Place the harnessover the child’s shoulder.
7. Push the latch plate (B) into the buckle until it clicks.
Be sure the buckle is free of any foreign objects thatmay prevent you from securing the latch plates. Ifyou can’t secure a latch plate, see your dealer forservice before using the child restraint.
8. Place the other side of the harness over the child’s shoulder.
9. Push the latch plate into the buckle until it clicks.
10. Pull up on both latch plates to make sure they are secure.
1-70
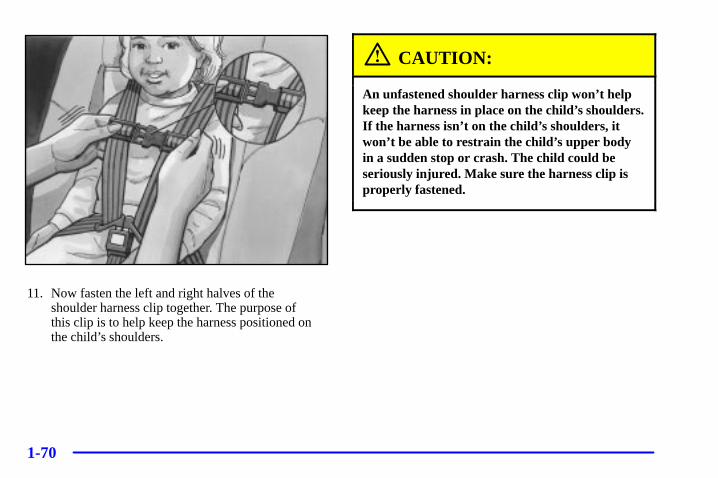
11. Now fasten the left and right halves of the shoulder harness clip together. The purpose of this clip is to help keep the harness positioned onthe child’s shoulders.
CAUTION:
An unfastened shoulder harness clip won’t helpkeep the harness in place on the child’s shoulders.If the harness isn’t on the child’s shoulders, itwon’t be able to restrain the child’s upper bodyin a sudden stop or crash. The child could beseriously injured. Make sure the harness clip isproperly fastened.
1-71
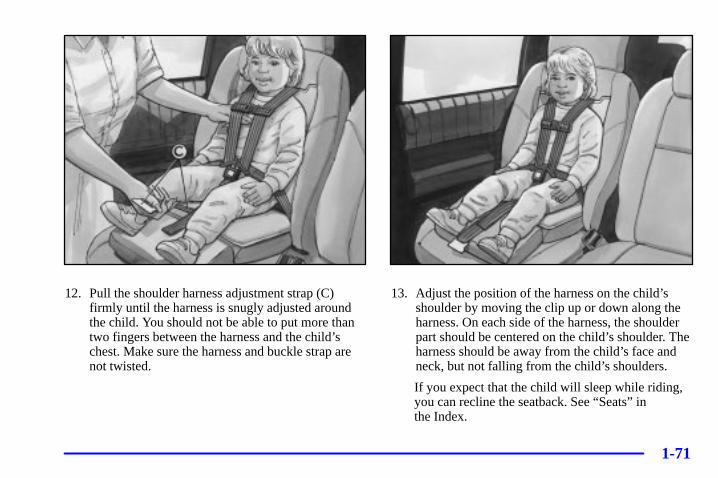
12. Pull the shoulder harness adjustment strap (C)firmly until the harness is snugly adjusted aroundthe child. You should not be able to put more thantwo fingers between the harness and the child’schest. Make sure the harness and buckle strap arenot twisted.
13. Adjust the position of the harness on the child’sshoulder by moving the clip up or down along theharness. On each side of the harness, the shoulderpart should be centered on the child’s shoulder. Theharness should be away from the child’s face andneck, but not falling from the child’s shoulders.
If you expect that the child will sleep while riding,you can recline the seatback. See “Seats” in the Index.
1-72
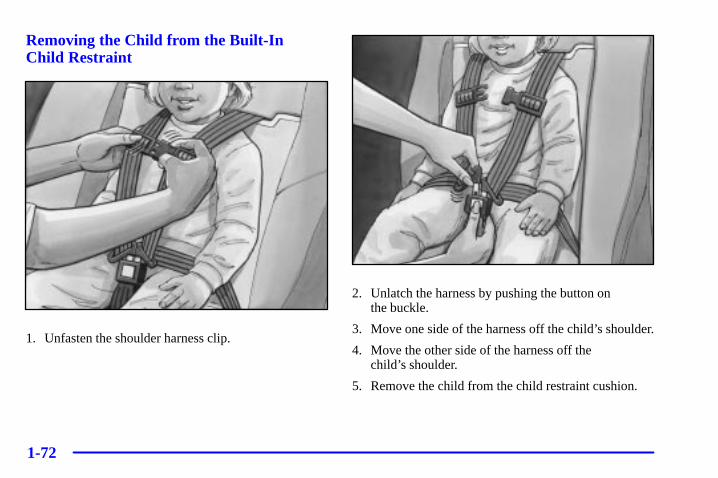
Removing the Child from the Built-In Child Restraint
1. Unfasten the shoulder harness clip.
2. Unlatch the harness by pushing the button on the buckle.
3. Move one side of the harness off the child’s shoulder.
4. Move the other side of the harness off the child’s shoulder.
5. Remove the child from the child restraint cushion.
1-73
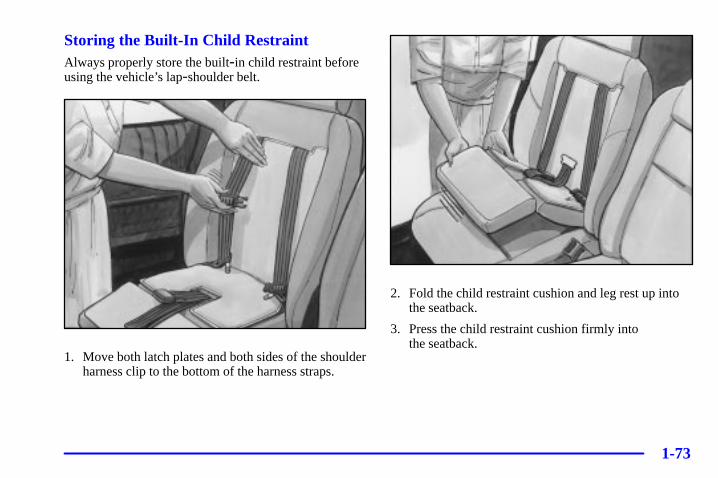
Storing the Built-In Child RestraintAlways properly store the built-in child restraint beforeusing the vehicle’s lap-shoulder belt.
1. Move both latch plates and both sides of the shoulderharness clip to the bottom of the harness straps.
2. Fold the child restraint cushion and leg rest up intothe seatback.
3. Press the child restraint cushion firmly into the seatback.
1-74
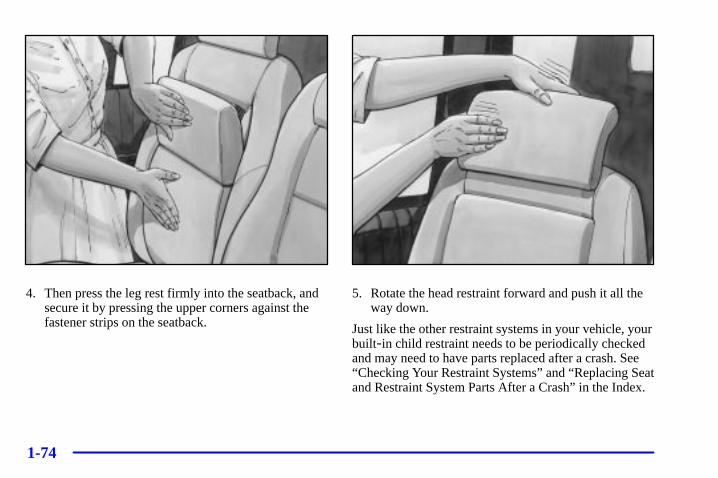
4. Then press the leg rest firmly into the seatback, andsecure it by pressing the upper corners against thefastener strips on the seatback.
5. Rotate the head restraint forward and push it all theway down.
Just like the other restraint systems in your vehicle, yourbuilt-in child restraint needs to be periodically checkedand may need to have parts replaced after a crash. See“Checking Your Restraint Systems” and “Replacing Seatand Restraint System Parts After a Crash” in the Index.

1-75
Restraint Systems for Children
An infant car bed (A), a special bed made for use in amotor vehicle, is an infant restraint system designed torestrain or position a child on a continuous flat surface.Make sure that the infant’s head rests toward the centerof the vehicle.
A rear-facing infant seat (B) provides restraint with theseating surface against the back of the infant. Theharness system holds the infant in place and, in a crash,acts to keep the infant positioned in the restraint.
1-76
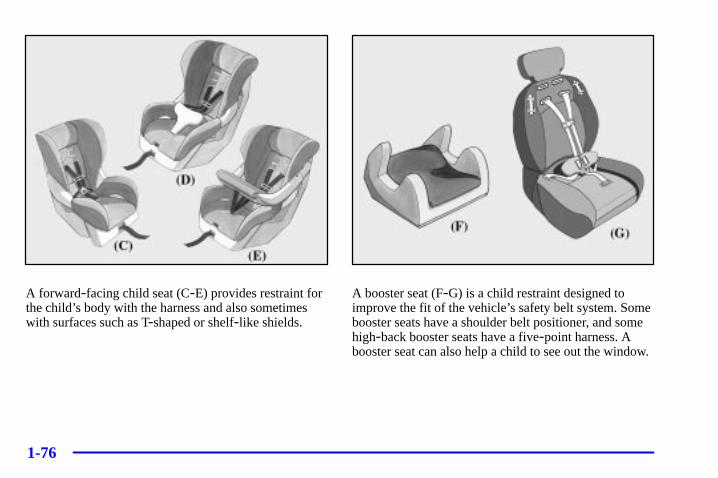
A forward-facing child seat (C-E) provides restraint forthe child’s body with the harness and also sometimeswith surfaces such as T-shaped or shelf-like shields.
A booster seat (F-G) is a child restraint designed toimprove the fit of the vehicle’s safety belt system. Somebooster seats have a shoulder belt positioner, and somehigh-back booster seats have a five-point harness. Abooster seat can also help a child to see out the window.
1-77
Q: How do child restraints work?
A: A child restraint system is any device designed foruse in a motor vehicle to restrain, seat, or positionchildren. A built-in child restraint system is apermanent part of the motor vehicle. An add-onchild restraint system is a portable one, which ispurchased by the vehicle’s owner.
For many years, add-on child restraints have usedthe adult belt system in the vehicle. To help reducethe chance of injury, the child also has to besecured within the restraint. The vehicle’s beltsystem secures the add-on child restraint in thevehicle, and the add-on child restraint’s harnesssystem holds the child in place within the restraint.
One system, the three-point harness, has straps thatcome down over each of the infant’s shoulders andbuckle together at the crotch. The five-pointharness system has two shoulder straps, two hipstraps and a crotch strap. A shield may take theplace of hip straps. A T-shaped shield has shoulderstraps that are attached to a flat pad which rests lowagainst the child’s body. A shelf- or armrest-typeshield has straps that are attached to a wide,shelf-like shield that swings up or to the side.
When choosing a child restraint, be sure the childrestraint is designed to be used in a vehicle. If it is, it will have a label saying that it meets federal motorvehicle safety standards.
Then follow the instructions for the restraint. You mayfind these instructions on the restraint itself or in abooklet, or both. These restraints use the belt system inyour vehicle, but the child also has to be secured withinthe restraint to help reduce the chance of personal injury.When securing an add-on child restraint, refer to theinstructions that come with the restraint which may beon the restraint itself or in a booklet, or both, and to thismanual. The child restraint instructions are important, soif they are not available, obtain a replacement copy fromthe manufacturer.
Q: When securing an aftermarket child seat in abucket seat, I am unable to get the seat fastenedin snugly enough. What should I do?
A: With some child seats, it may be difficult to tightenthe vehicle belts so that there is less side-to-side orfront-to-back movement of the child seat. Areplacement buckle, which makes it easier to secureyour child seat, is available from your dealer at nocharge to you.
1-78
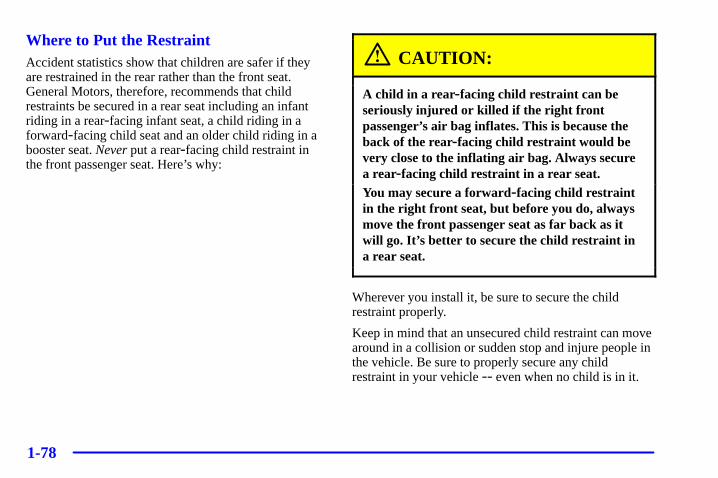
Where to Put the RestraintAccident statistics show that children are safer if theyare restrained in the rear rather than the front seat.General Motors, therefore, recommends that childrestraints be secured in a rear seat including an infantriding in a rear-facing infant seat, a child riding in aforward-facing child seat and an older child riding in abooster seat. Never put a rear-facing child restraint inthe front passenger seat. Here’s why:
CAUTION:
A child in a rear-facing child restraint can beseriously injured or killed if the right frontpassenger’s air bag inflates. This is because theback of the rear-facing child restraint would bevery close to the inflating air bag. Always securea rear-facing child restraint in a rear seat.You may secure a forward-facing child restraintin the right front seat, but before you do, alwaysmove the front passenger seat as far back as itwill go. It’s better to secure the child restraint ina rear seat.
Wherever you install it, be sure to secure the childrestraint properly.
Keep in mind that an unsecured child restraint can movearound in a collision or sudden stop and injure people inthe vehicle. Be sure to properly secure any childrestraint in your vehicle -- even when no child is in it.
1-79
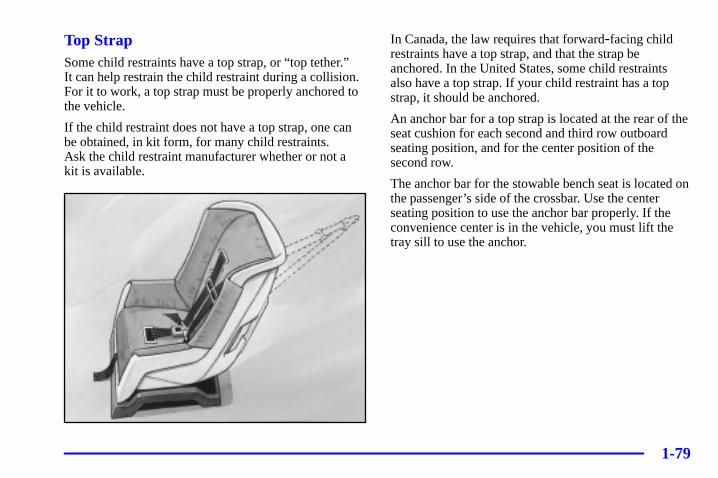
Top StrapSome child restraints have a top strap, or “top tether.” It can help restrain the child restraint during a collision.For it to work, a top strap must be properly anchored tothe vehicle.
If the child restraint does not have a top strap, one canbe obtained, in kit form, for many child restraints. Ask the child restraint manufacturer whether or not a kit is available.
In Canada, the law requires that forward-facing childrestraints have a top strap, and that the strap beanchored. In the United States, some child restraints also have a top strap. If your child restraint has a topstrap, it should be anchored.
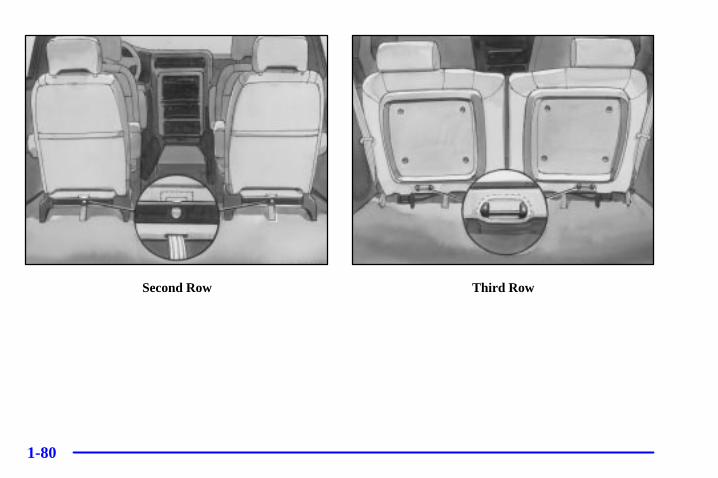
An anchor bar for a top strap is located at the rear of theseat cushion for each second and third row outboardseating position, and for the center position of thesecond row.
The anchor bar for the stowable bench seat is located onthe passenger’s side of the crossbar. Use the centerseating position to use the anchor bar properly. If theconvenience center is in the vehicle, you must lift thetray sill to use the anchor.
1-80
Second Row Third Row

1-81
Third Row (Stowable Seat)
Don’t use a child restraint with a top strap in the rightfront passenger’s position because there’s no place toanchor the top strap.
Anchor the top strap to one of these anchor points. Be sure to use an anchor point located on the same sideof the vehicle as the seating position where the childrestraint will be placed. Raise the head restraint androute the top strap under it.
Once you have the top strap anchored, you’ll be ready tosecure the child restraint itself. Tighten the top strapwhen and as the child restraint manufacturer’sinstructions say.
1-82
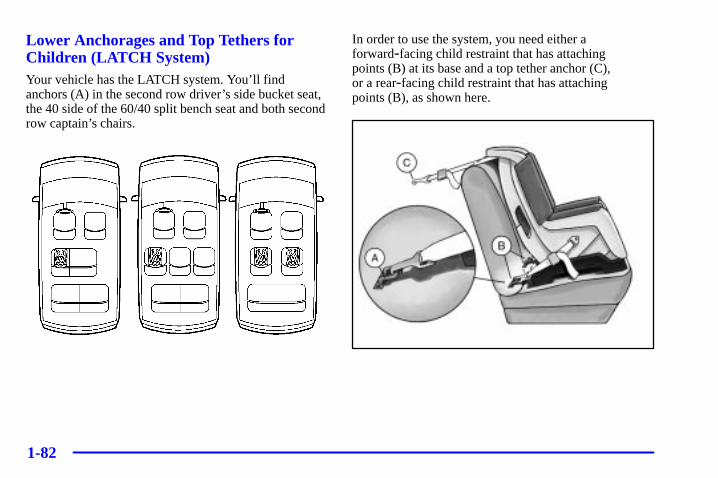
Lower Anchorages and Top Tethers forChildren (LATCH System)Your vehicle has the LATCH system. You’ll findanchors (A) in the second row driver’s side bucket seat,the 40 side of the 60/40 split bench seat and both secondrow captain’s chairs.
In order to use the system, you need either aforward-facing child restraint that has attaching points (B) at its base and a top tether anchor (C), or a rear-facing child restraint that has attaching points (B), as shown here.
1-83
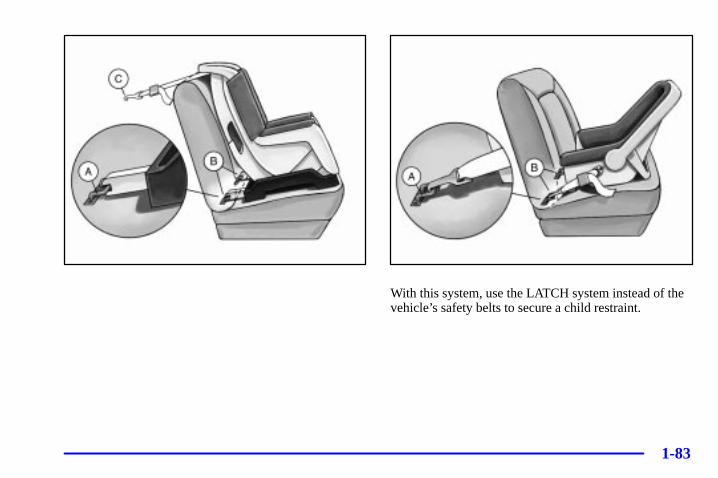
With this system, use the LATCH system instead of thevehicle’s safety belts to secure a child restraint.
1-84
CAUTION:
If a LATCH -type child restraint isn’t attached toits anchorage points, the restraint won’t be ableto protect a child sitting there. In a crash, thechild could be seriously injured or killed. Makesure that a LATCH-type child restraint isproperly installed using the anchorage points, oruse the vehicle’s safety belts to secure therestraint. See “Securing a Child Restraint in theRear Outside Seat Position” in the Index forinformation on how to secure a child restraint inyour vehicle using the vehicle’s safety belts.
Securing a Child Restraint Designed for the LATCH System
1. Find the anchors for the seating position you want touse, where the bottom of the seatback meets the backof the seat cushion.
2. Put the child restraint on the seat.
3. If the child restraint is forward-facing, attach theanchor points on the child restraint to the anchors inthe vehicle. The child restraint instructions will showyou how.
4. Attach the top strap to the top strap anchor. See “TopStrap” in the Index. Tighten the top strap accordingto the child restraint instructions.
5. Push and pull the child restraint in differentdirections to be sure it is secure.
To remove the child restraint, simply unhook the topstrap from the top tether anchor and then disconnect theanchor points.
1-85
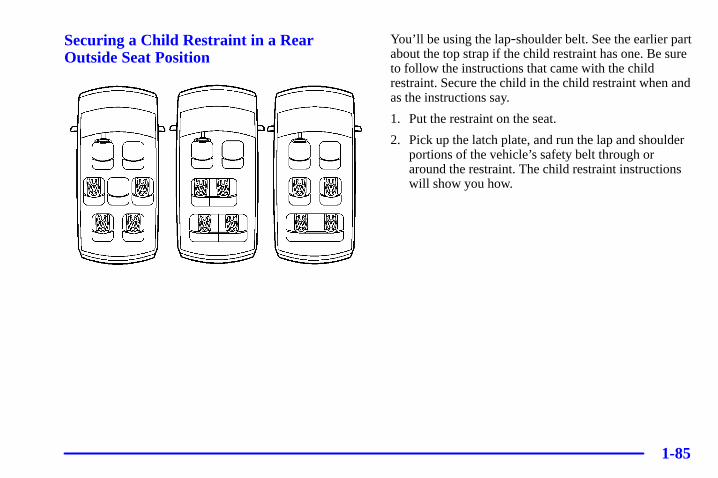
Securing a Child Restraint in a RearOutside Seat Position
You’ll be using the lap-shoulder belt. See the earlier partabout the top strap if the child restraint has one. Be sureto follow the instructions that came with the childrestraint. Secure the child in the child restraint when andas the instructions say.
1. Put the restraint on the seat.
2. Pick up the latch plate, and run the lap and shoulderportions of the vehicle’s safety belt through oraround the restraint. The child restraint instructionswill show you how.
1-86
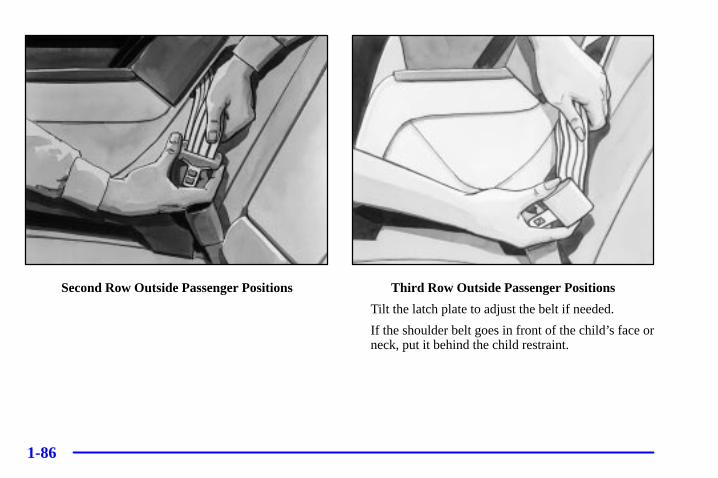
Second Row Outside Passenger Positions Third Row Outside Passenger Positions
Tilt the latch plate to adjust the belt if needed.
If the shoulder belt goes in front of the child’s face orneck, put it behind the child restraint.
1-87
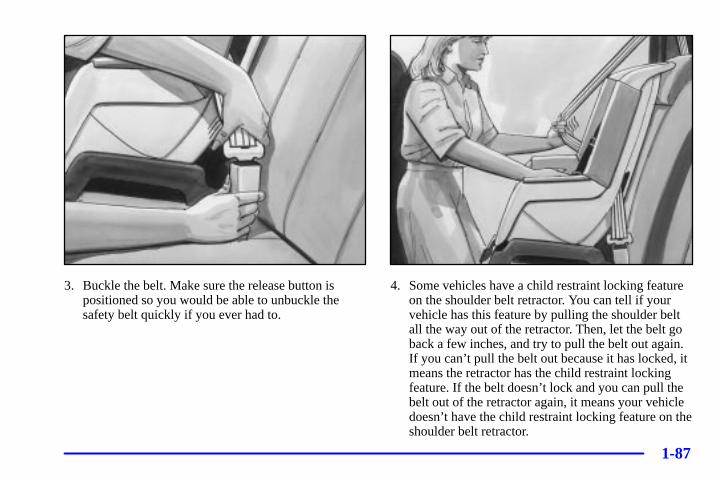
3. Buckle the belt. Make sure the release button ispositioned so you would be able to unbuckle thesafety belt quickly if you ever had to.
4. Some vehicles have a child restraint locking featureon the shoulder belt retractor. You can tell if yourvehicle has this feature by pulling the shoulder beltall the way out of the retractor. Then, let the belt goback a few inches, and try to pull the belt out again.If you can’t pull the belt out because it has locked, itmeans the retractor has the child restraint lockingfeature. If the belt doesn’t lock and you can pull thebelt out of the retractor again, it means your vehicledoesn’t have the child restraint locking feature on theshoulder belt retractor.
1-88
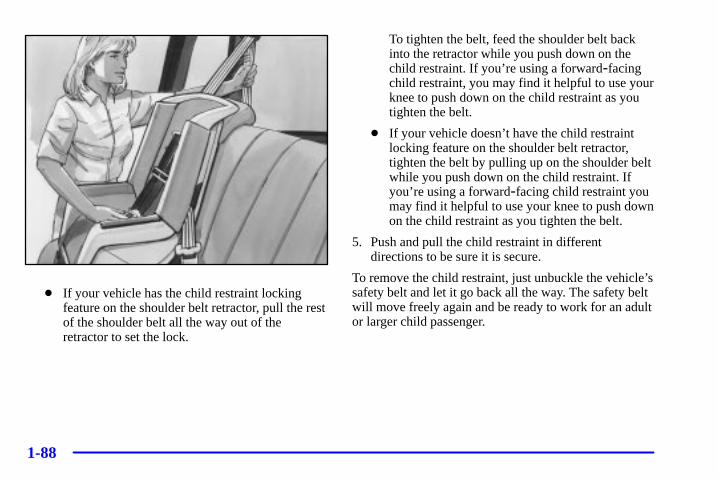
� If your vehicle has the child restraint lockingfeature on the shoulder belt retractor, pull the restof the shoulder belt all the way out of theretractor to set the lock.
To tighten the belt, feed the shoulder belt backinto the retractor while you push down on thechild restraint. If you’re using a forward-facingchild restraint, you may find it helpful to use yourknee to push down on the child restraint as youtighten the belt.
� If your vehicle doesn’t have the child restraintlocking feature on the shoulder belt retractor,tighten the belt by pulling up on the shoulder beltwhile you push down on the child restraint. Ifyou’re using a forward-facing child restraint youmay find it helpful to use your knee to push downon the child restraint as you tighten the belt.
5. Push and pull the child restraint in differentdirections to be sure it is secure.
To remove the child restraint, just unbuckle the vehicle’ssafety belt and let it go back all the way. The safety beltwill move freely again and be ready to work for an adultor larger child passenger.
1-89
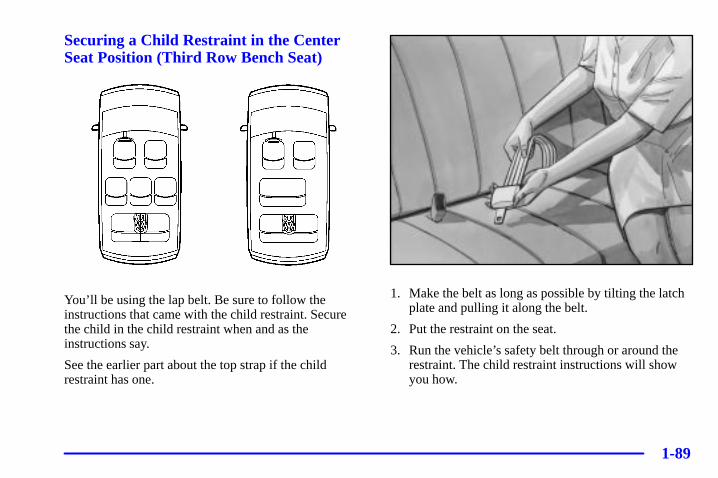
Securing a Child Restraint in the CenterSeat Position (Third Row Bench Seat)
You’ll be using the lap belt. Be sure to follow theinstructions that came with the child restraint. Secure the child in the child restraint when and as theinstructions say.
See the earlier part about the top strap if the childrestraint has one.
1. Make the belt as long as possible by tilting the latchplate and pulling it along the belt.
2. Put the restraint on the seat.
3. Run the vehicle’s safety belt through or around therestraint. The child restraint instructions will showyou how.
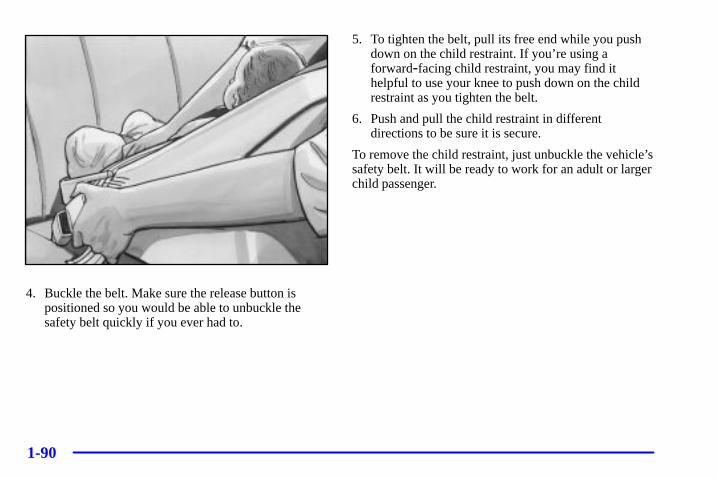
1-90
4. Buckle the belt. Make sure the release button ispositioned so you would be able to unbuckle thesafety belt quickly if you ever had to.
5. To tighten the belt, pull its free end while you pushdown on the child restraint. If you’re using aforward-facing child restraint, you may find ithelpful to use your knee to push down on the childrestraint as you tighten the belt.
6. Push and pull the child restraint in differentdirections to be sure it is secure.
To remove the child restraint, just unbuckle the vehicle’ssafety belt. It will be ready to work for an adult or largerchild passenger.
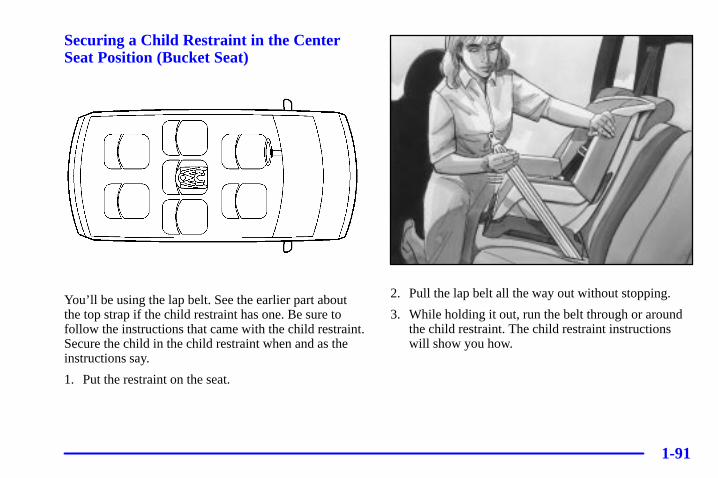
1-91
Securing a Child Restraint in the CenterSeat Position (Bucket Seat)
You’ll be using the lap belt. See the earlier part aboutthe top strap if the child restraint has one. Be sure tofollow the instructions that came with the child restraint.Secure the child in the child restraint when and as theinstructions say.
1. Put the restraint on the seat.
2. Pull the lap belt all the way out without stopping.
3. While holding it out, run the belt through or aroundthe child restraint. The child restraint instructionswill show you how.
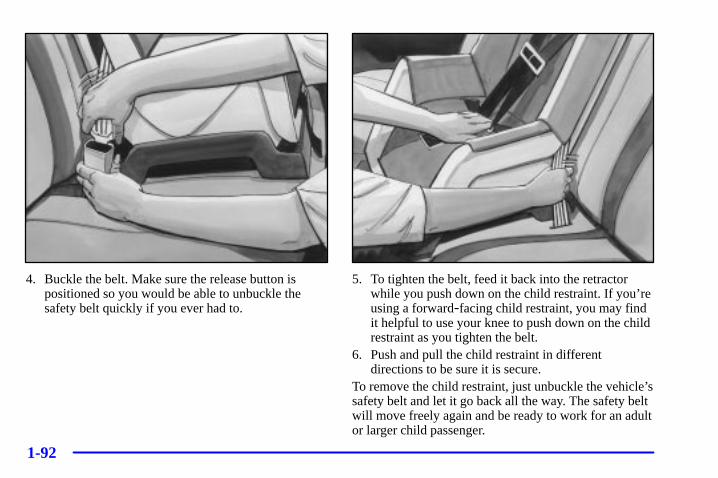
1-92
4. Buckle the belt. Make sure the release button ispositioned so you would be able to unbuckle thesafety belt quickly if you ever had to.
5. To tighten the belt, feed it back into the retractorwhile you push down on the child restraint. If you’reusing a forward-facing child restraint, you may findit helpful to use your knee to push down on the childrestraint as you tighten the belt.
6. Push and pull the child restraint in differentdirections to be sure it is secure.
To remove the child restraint, just unbuckle the vehicle’ssafety belt and let it go back all the way. The safety beltwill move freely again and be ready to work for an adultor larger child passenger.

1-93
Securing a Child Restraint in the RightFront Seat Position
Your vehicle has a front passenger air bag. Never put arear-facing child restraint in this seat. Here’s why:
CAUTION:
A child in a rear-facing child restraint can beseriously injured or killed if the front passenger’sair bag inflates. This is because the back of therear-facing child restraint would be very close tothe inflating air bag. Always secure a rear-facingchild restraint in a rear seat.
Although a rear seat is a safer place, you can secure aforward-facing child restraint in the right front seat.
You’ll be using the lap-shoulder belt. See the earlier partabout the top strap if the child restraint has one. Be sureto follow the instructions that came with the childrestraint. Secure the child in the child restraint when andas the instructions say.
1. Because your vehicle has a right front passenger airbag, always move the seat as far back as it will gobefore securing a forward-facing child restraint. See “Seats” in the Index.
2. Put the restraint on the seat.
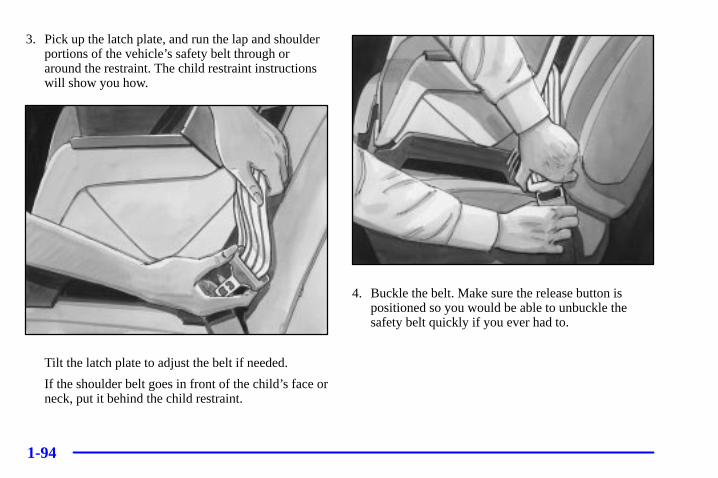
1-94
3. Pick up the latch plate, and run the lap and shoulderportions of the vehicle’s safety belt through oraround the restraint. The child restraint instructionswill show you how.
Tilt the latch plate to adjust the belt if needed.
If the shoulder belt goes in front of the child’s face orneck, put it behind the child restraint.
4. Buckle the belt. Make sure the release button ispositioned so you would be able to unbuckle thesafety belt quickly if you ever had to.
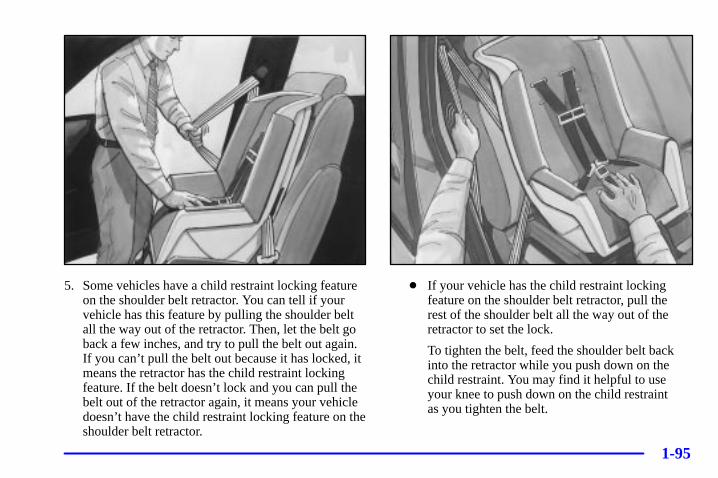
1-95
5. Some vehicles have a child restraint locking featureon the shoulder belt retractor. You can tell if yourvehicle has this feature by pulling the shoulder beltall the way out of the retractor. Then, let the belt goback a few inches, and try to pull the belt out again.If you can’t pull the belt out because it has locked, itmeans the retractor has the child restraint lockingfeature. If the belt doesn’t lock and you can pull thebelt out of the retractor again, it means your vehicledoesn’t have the child restraint locking feature on theshoulder belt retractor.
� If your vehicle has the child restraint lockingfeature on the shoulder belt retractor, pull the rest of the shoulder belt all the way out of theretractor to set the lock.
To tighten the belt, feed the shoulder belt backinto the retractor while you push down on thechild restraint. You may find it helpful to useyour knee to push down on the child restraint as you tighten the belt.
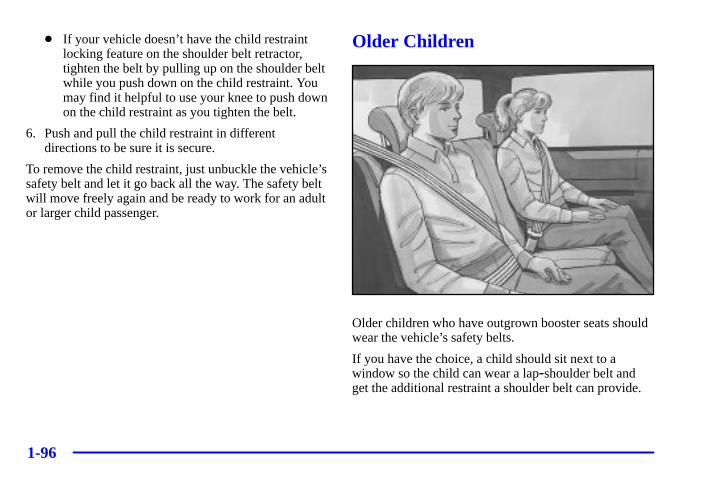
1-96
� If your vehicle doesn’t have the child restraintlocking feature on the shoulder belt retractor,tighten the belt by pulling up on the shoulder beltwhile you push down on the child restraint. Youmay find it helpful to use your knee to push downon the child restraint as you tighten the belt.
6. Push and pull the child restraint in differentdirections to be sure it is secure.
To remove the child restraint, just unbuckle the vehicle’ssafety belt and let it go back all the way. The safety beltwill move freely again and be ready to work for an adultor larger child passenger.
Older Children
Older children who have outgrown booster seats shouldwear the vehicle’s safety belts.
If you have the choice, a child should sit next to awindow so the child can wear a lap-shoulder belt andget the additional restraint a shoulder belt can provide.
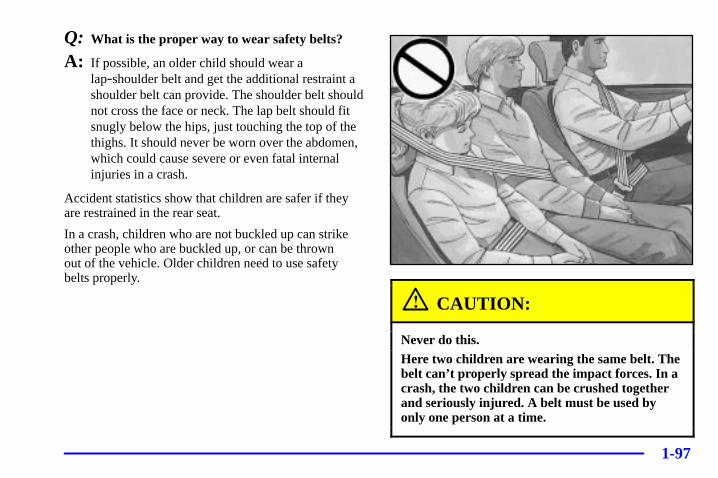
1-97
Q: What is the proper way to wear safety belts?
A: If possible, an older child should wear alap-shoulder belt and get the additional restraint ashoulder belt can provide. The shoulder belt shouldnot cross the face or neck. The lap belt should fitsnugly below the hips, just touching the top of thethighs. It should never be worn over the abdomen,which could cause severe or even fatal internalinjuries in a crash.
Accident statistics show that children are safer if theyare restrained in the rear seat.
In a crash, children who are not buckled up can strikeother people who are buckled up, or can be thrown out of the vehicle. Older children need to use safetybelts properly.
CAUTION:
Never do this.Here two children are wearing the same belt. Thebelt can’t properly spread the impact forces. In acrash, the two children can be crushed togetherand seriously injured. A belt must be used byonly one person at a time.
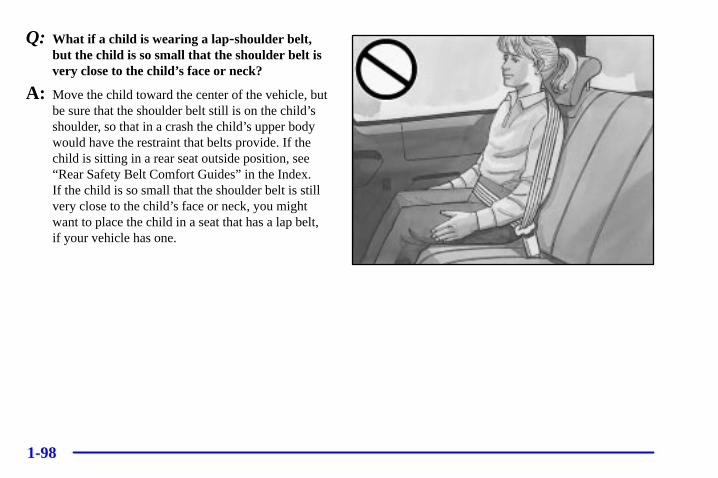
1-98
Q: What if a child is wearing a lap-shoulder belt,but the child is so small that the shoulder belt isvery close to the child’s face or neck?
A: Move the child toward the center of the vehicle, butbe sure that the shoulder belt still is on the child’sshoulder, so that in a crash the child’s upper bodywould have the restraint that belts provide. If thechild is sitting in a rear seat outside position, see“Rear Safety Belt Comfort Guides” in the Index. If the child is so small that the shoulder belt is stillvery close to the child’s face or neck, you mightwant to place the child in a seat that has a lap belt,if your vehicle has one.
1-99
CAUTION:
Never do this.Here a child is sitting in a seat that has alap-shoulder belt, but the shoulder part is behindthe child. If the child wears the belt in this way, ina crash the child might slide under the belt. Thebelt’s force would then be applied right on thechild’s abdomen. That could cause serious orfatal injuries.
Wherever the child sits, the lap portion of the beltshould be worn low and snug on the hips, just touchingthe child’s thighs. This applies belt force to the child’spelvic bones in a crash.
Safety Belt ExtenderIf the vehicle’s safety belt will fasten around you, youshould use it.
But if a safety belt isn’t long enough to fasten, yourdealer will order you an extender. It’s free. When you goin to order it, take the heaviest coat you will wear, so theextender will be long enough for you. The extender willbe just for you, and just for the seat in your vehicle thatyou choose. Don’t let someone else use it, and use itonly for the seat it is made to fit. To wear it, just attach itto the regular safety belt.
1-100
Checking Your Restraint SystemsNow and then, make sure the safety belt reminder lightand all your belts, buckles, latch plates, retractors andanchorages are working properly. If your vehicle has abuilt-in child restraint, also periodically make sure theharness straps, latch plates, buckle, clip, child headrestraint and anchorages are working properly. Look forany other loose or damaged safety belt and built-in childrestraint system parts. If you see anything that mightkeep a safety belt or built-in child restraint system fromdoing its job, have it repaired.
Torn or frayed safety belts may not protect you in acrash. They can rip apart under impact forces. If a belt istorn or frayed, get a new one right away.
If your vehicle has the built-in child restraint, torn orfrayed harness straps can rip apart under impact forcesjust like torn or frayed safety belts can. They may notprotect a child in a crash. If a harness strap is torn orfrayed, get a new harness right away.
Also look for any opened or broken air bag covers, andhave them repaired or replaced. (The air bag systemdoes not need regular maintenance.)
Replacing Restraint System PartsAfter a CrashIf you’ve had a crash, do you need new safety belts orbuilt-in child restraint parts?
After a very minor collision, nothing may be necessary.But if the safety belts or built-in child restraint harnessstraps were stretched, as they would be if worn during amore severe crash, then you need new safety belts orharness straps.
If the frontal air bags inflate, you’ll also need to replacethe driver’s and right front passenger’s safety beltbuckle assembly. Be sure to do so. Then the new buckleassembly will be there to help protect you in a collision.
If safety belts or built-in child restraint harness strapsare cut or damaged, replace them. Collision damage alsomay mean you will need to have safety belt, built-inchild restraint or seat parts repaired or replaced. Newparts and repairs may be necessary even if the safety beltor built-in child restraint wasn’t being used at the timeof the collision.
If an air bag inflates, you’ll need to replace air bagsystem parts. See the part on the air bag system earlier inthis section.
2-2-1
Section 2 Features and Controls
Here you can learn about the many standard and optional features on your vehicle, and information on starting,shifting and braking. Also explained are the instrument panel and the warning systems that tell you if everything isworking properly -- and what to do if you have a problem.
2-2 Windows2-5 Keys2-7 Door Locks2-10 Remote Keyless Entry System2-16 Multifunction Alarm Locks and Lighting Choices2-26 Dual Sliding Doors2-28 Power Sliding Door (Option)2-35 Liftgate2-36 Theft2-37 Content Theft-Deterrent2-40 PASS-Key� III2-42 New Vehicle “Break-In”2-42 Ignition Positions2-44 Starting Your Engine2-45 Engine Coolant Heater (If Equipped)2-47 Automatic Transaxle Operation2-51 Parking Brake2-52 Shifting Into PARK (P)
2-55 Shifting Out of PARK (P)2-55 Parking Over Things That Burn2-56 Engine Exhaust2-56 Running Your Engine While You’re Parked2-58 Turn Signal/Multifunction Lever2-64 Exterior Lamps2-66 Interior Lamps2-72 Storage Compartments2-84 Accessory Inflator System (Option)2-86 Accessory Power Outlets2-87 OnStar� System (If Equipped)2-90 HomeLink� Transmitter (Option)2-94 The Instrument Panel -- Your
Information System2-99 Warning Lights, Gages, Messages and Indicators2-108 Message Center2-115 Driver Information Center (DIC) (Option)2-118 Rear Parking Assist (Option)
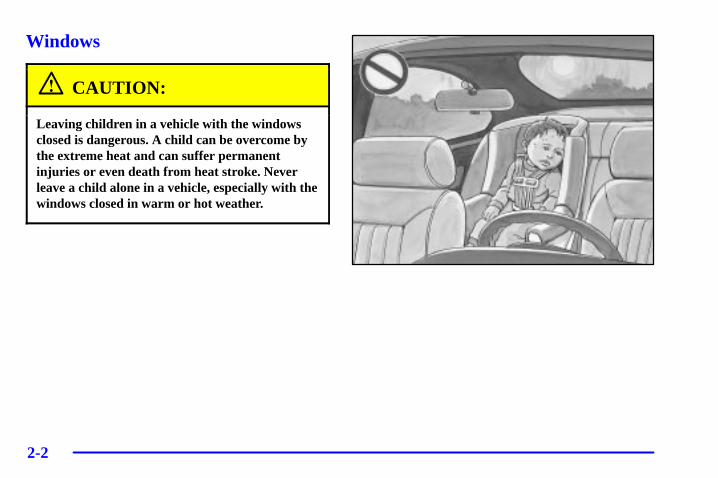
2-2
Windows
CAUTION:
Leaving children in a vehicle with the windowsclosed is dangerous. A child can be overcome bythe extreme heat and can suffer permanentinjuries or even death from heat stroke. Neverleave a child alone in a vehicle, especially with thewindows closed in warm or hot weather.
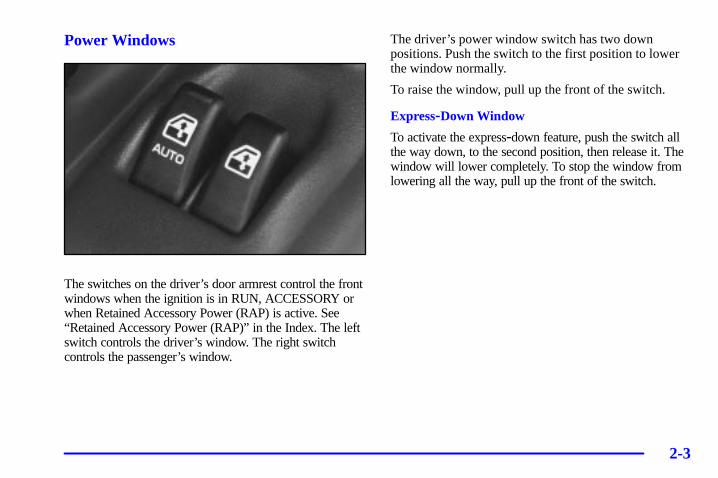
2-3
Power Windows
The switches on the driver’s door armrest control the frontwindows when the ignition is in RUN, ACCESSORY orwhen Retained Accessory Power (RAP) is active. See“Retained Accessory Power (RAP)” in the Index. The leftswitch controls the driver’s window. The right switchcontrols the passenger’s window.
The driver’s power window switch has two downpositions. Push the switch to the first position to lowerthe window normally.
To raise the window, pull up the front of the switch.
Express-Down Window
To activate the express-down feature, push the switch allthe way down, to the second position, then release it. Thewindow will lower completely. To stop the window fromlowering all the way, pull up the front of the switch.
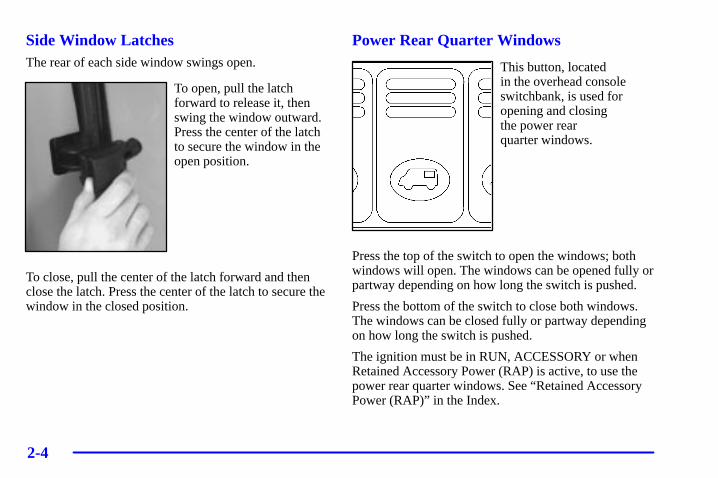
2-4
Side Window LatchesThe rear of each side window swings open.
To open, pull the latchforward to release it, thenswing the window outward.Press the center of the latchto secure the window in theopen position.
To close, pull the center of the latch forward and thenclose the latch. Press the center of the latch to secure thewindow in the closed position.
Power Rear Quarter Windows
This button, located in the overhead consoleswitchbank, is used foropening and closing the power rear quarter windows.
Press the top of the switch to open the windows; bothwindows will open. The windows can be opened fully orpartway depending on how long the switch is pushed.
Press the bottom of the switch to close both windows.The windows can be closed fully or partway dependingon how long the switch is pushed.
The ignition must be in RUN, ACCESSORY or whenRetained Accessory Power (RAP) is active, to use thepower rear quarter windows. See “Retained AccessoryPower (RAP)” in the Index.
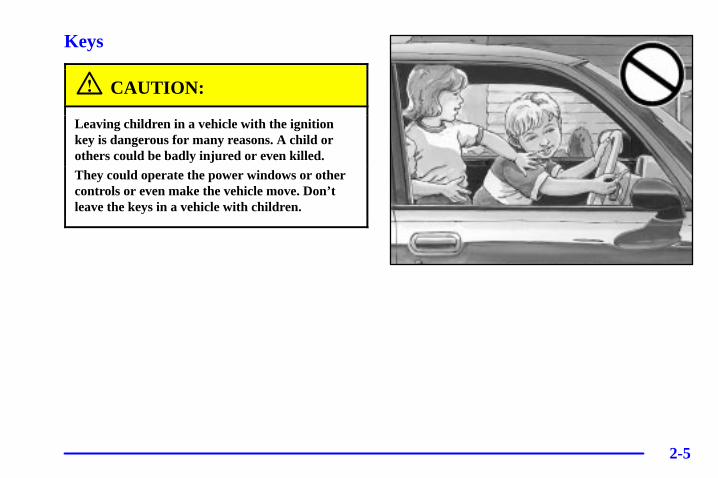
2-5
Keys
CAUTION:
Leaving children in a vehicle with the ignitionkey is dangerous for many reasons. A child orothers could be badly injured or even killed.
They could operate the power windows or othercontrols or even make the vehicle move. Don’tleave the keys in a vehicle with children.
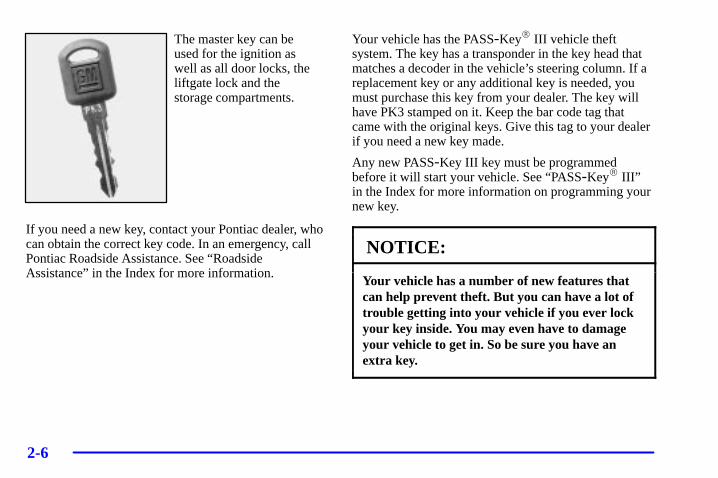
2-6
The master key can be used for the ignition as well as all door locks, theliftgate lock and the storage compartments.
If you need a new key, contact your Pontiac dealer, whocan obtain the correct key code. In an emergency, callPontiac Roadside Assistance. See “RoadsideAssistance” in the Index for more information.
Your vehicle has the PASS-Key� III vehicle theftsystem. The key has a transponder in the key head thatmatches a decoder in the vehicle’s steering column. If areplacement key or any additional key is needed, youmust purchase this key from your dealer. The key willhave PK3 stamped on it. Keep the bar code tag thatcame with the original keys. Give this tag to your dealerif you need a new key made.
Any new PASS-Key III key must be programmed before it will start your vehicle. See “PASS-Key� III”in the Index for more information on programming yournew key.
NOTICE:
Your vehicle has a number of new features thatcan help prevent theft. But you can have a lot oftrouble getting into your vehicle if you ever lockyour key inside. You may even have to damageyour vehicle to get in. So be sure you have anextra key.
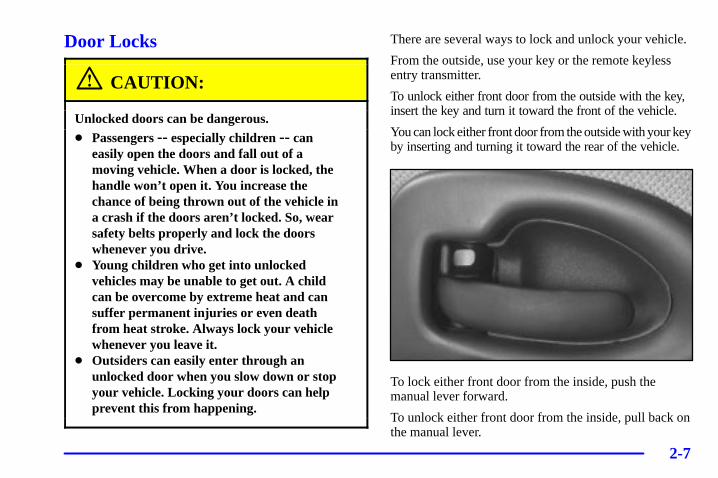
2-7
Door Locks
CAUTION:
Unlocked doors can be dangerous.� Passengers -- especially children -- can
easily open the doors and fall out of amoving vehicle. When a door is locked, thehandle won’t open it. You increase thechance of being thrown out of the vehicle ina crash if the doors aren’t locked. So, wearsafety belts properly and lock the doorswhenever you drive.
� Young children who get into unlockedvehicles may be unable to get out. A childcan be overcome by extreme heat and cansuffer permanent injuries or even deathfrom heat stroke. Always lock your vehiclewhenever you leave it.
� Outsiders can easily enter through anunlocked door when you slow down or stopyour vehicle. Locking your doors can helpprevent this from happening.
There are several ways to lock and unlock your vehicle.
From the outside, use your key or the remote keylessentry transmitter.
To unlock either front door from the outside with the key, insert the key and turn it toward the front of the vehicle.
You can lock either front door from the outside with your key by inserting and turning it toward the rear of the vehicle.
To lock either front door from the inside, push themanual lever forward.
To unlock either front door from the inside, pull back onthe manual lever.
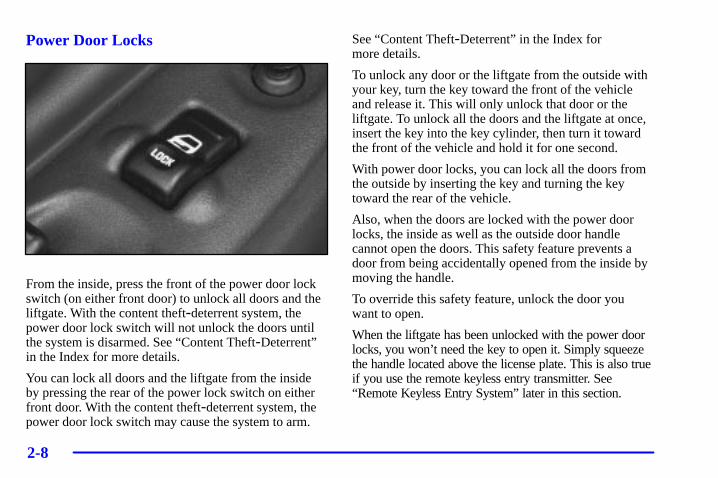
2-8
Power Door Locks
From the inside, press the front of the power door lockswitch (on either front door) to unlock all doors and theliftgate. With the content theft-deterrent system, thepower door lock switch will not unlock the doors untilthe system is disarmed. See “Content Theft-Deterrent”in the Index for more details.
You can lock all doors and the liftgate from the inside by pressing the rear of the power lock switch on eitherfront door. With the content theft-deterrent system, thepower door lock switch may cause the system to arm.
See “Content Theft-Deterrent” in the Index for more details.
To unlock any door or the liftgate from the outside withyour key, turn the key toward the front of the vehicleand release it. This will only unlock that door or theliftgate. To unlock all the doors and the liftgate at once,insert the key into the key cylinder, then turn it towardthe front of the vehicle and hold it for one second.
With power door locks, you can lock all the doors fromthe outside by inserting the key and turning the keytoward the rear of the vehicle.
Also, when the doors are locked with the power doorlocks, the inside as well as the outside door handlecannot open the doors. This safety feature prevents adoor from being accidentally opened from the inside bymoving the handle.
To override this safety feature, unlock the door you want to open.
When the liftgate has been unlocked with the power doorlocks, you won’t need the key to open it. Simply squeezethe handle located above the license plate. This is also trueif you use the remote keyless entry transmitter. See“Remote Keyless Entry System” later in this section.
2-9
Last Door Closed LockingThe last door closed locking feature makes it easier touse your power door locks to lock all the doors and theliftgate when leaving your vehicle.
The first time you attempt to lock the doors using the power lock switch or the remote keyless entrytransmitter, three chimes will signal that last door closedlocking is being used when any door or the liftgate isopen. All doors and the liftgate can be re-opened for upto five seconds from the time the last door is closed.
Five seconds after the last door is closed, all the doorswill lock. You can lock the doors immediately using thepower door lock switch or the remote keyless entrytransmitter a second time.
If the ignition is in RUN or ACCESSORY, this featurewill not lock the doors.
To turn the last door closed locking feature off or on, see“Multifunction Alarm Locks and Lighting Choices” inthe Index.
Automatic Door LocksAll of the doors will lock automatically when you moveyour shift lever out of PARK (P). All doors will unlockautomatically when the ignition is turned off while theshift lever is in PARK (P).
If someone needs to get out while you’re not in PARK (P),have that person use the manual lever or the power door lock switch. When the door is closed again, it will not lockautomatically. Use the manual lever or the power doorlock switch to lock the door.
To change the way automatic door locks operate, see“Multifunction Alarm Locks and Lighting Choices” inthe Index.
With the automatic door locks feature, you can lock orunlock the doors at any time, either manually or usingthe power door lock switches.
Sliding Door Delayed LockingIf either sliding door is open when you use the powerdoor locks to lock the vehicle, the sliding door that isopen will not lock. Normally the last door closedlocking feature will be used to lock the sliding door afterit has been closed.
When the ignition is on or if the last door closed lockingfeature has been overridden or programmed to be off,the sliding door delayed locking feature will lock yoursliding door for you. Three seconds after a sliding dooris closed, all the doors will lock.
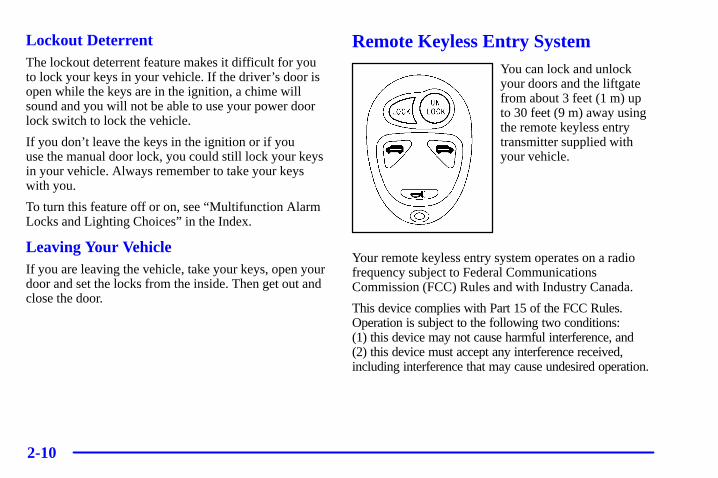
2-10
Lockout DeterrentThe lockout deterrent feature makes it difficult for youto lock your keys in your vehicle. If the driver’s door isopen while the keys are in the ignition, a chime willsound and you will not be able to use your power doorlock switch to lock the vehicle.
If you don’t leave the keys in the ignition or if you use the manual door lock, you could still lock your keysin your vehicle. Always remember to take your keyswith you.
To turn this feature off or on, see “Multifunction AlarmLocks and Lighting Choices” in the Index.
Leaving Your VehicleIf you are leaving the vehicle, take your keys, open yourdoor and set the locks from the inside. Then get out andclose the door.
Remote Keyless Entry SystemYou can lock and unlockyour doors and the liftgatefrom about 3 feet (1 m) upto 30 feet (9 m) away usingthe remote keyless entrytransmitter supplied withyour vehicle.
Your remote keyless entry system operates on a radiofrequency subject to Federal CommunicationsCommission (FCC) Rules and with Industry Canada.
This device complies with Part 15 of the FCC Rules.Operation is subject to the following two conditions: (1) this device may not cause harmful interference, and (2) this device must accept any interference received,including interference that may cause undesired operation.
2-11
This device complies with RSS-210 of Industry Canada.Operation is subject to the following two conditions: (1) this device may not cause interference, and (2) thisdevice must accept any interference received, includinginterference that may cause undesired operation of the device.
Changes or modifications to this system by other than anauthorized service facility could void authorization touse this equipment.
At times you may notice a decrease in range. This isnormal for any remote keyless entry system. If thetransmitter does not work or if you have to stand closerto your vehicle for the transmitter to work, try this:
� Check the distance. You may be too far from yourvehicle. You may need to stand closer during rainyor snowy weather.
� Check the location. Other vehicles or objects may beblocking the signal. Take a few steps to the left orright, hold the transmitter higher, and try again.
� Check to determine if battery replacement isnecessary. See the instructions that follow.
� If you’re still having trouble, see your dealer or aqualified technician for service.
Operation
Remote Driver’s Door and All Door Unlock
When you press UNLOCK on the remote keyless entrytransmitter, only the driver’s door will unlock. If youpress UNLOCK again within five seconds, all the doorsand the liftgate will unlock. If you would like all thedoors to unlock the first time you press UNLOCK, see“Multifunction Alarm Locks and Lighting Choices” inthe Index.
With the content theft-deterrent system, the UNLOCKbutton on the remote keyless entry transmitter willdisarm the system. See “Content Theft-Deterrent” in the Index for more details.
Remote All Door Lock
To lock all doors, press LOCK on the remote keylessentry transmitter. See “Power Door Locks” in the Indexfor more details on the power door lock features. Withthe content theft-deterrent system, the LOCK buttonmay arm the system. See “Content Theft-Deterrent” inthe Index for more details.
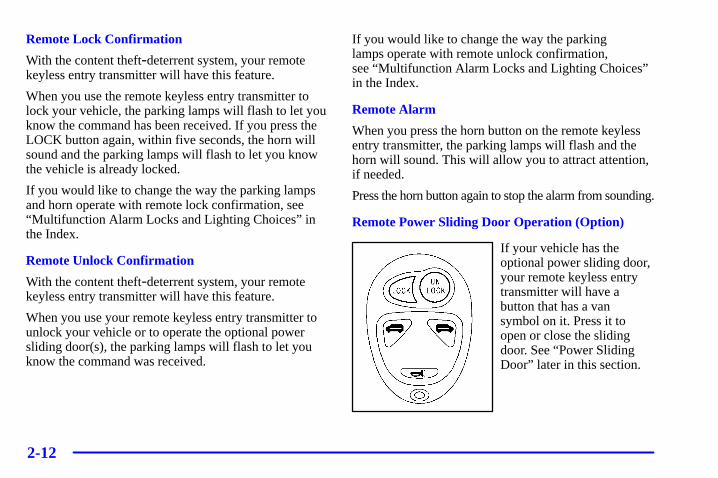
2-12
Remote Lock Confirmation
With the content theft-deterrent system, your remotekeyless entry transmitter will have this feature.
When you use the remote keyless entry transmitter tolock your vehicle, the parking lamps will flash to let youknow the command has been received. If you press theLOCK button again, within five seconds, the horn willsound and the parking lamps will flash to let you knowthe vehicle is already locked.
If you would like to change the way the parking lampsand horn operate with remote lock confirmation, see“Multifunction Alarm Locks and Lighting Choices” inthe Index.
Remote Unlock Confirmation
With the content theft-deterrent system, your remotekeyless entry transmitter will have this feature.
When you use your remote keyless entry transmitter tounlock your vehicle or to operate the optional powersliding door(s), the parking lamps will flash to let youknow the command was received.
If you would like to change the way the parking lamps operate with remote unlock confirmation, see “Multifunction Alarm Locks and Lighting Choices”in the Index.
Remote Alarm
When you press the horn button on the remote keylessentry transmitter, the parking lamps will flash and thehorn will sound. This will allow you to attract attention,if needed.
Press the horn button again to stop the alarm from sounding.
Remote Power Sliding Door Operation (Option)
If your vehicle has theoptional power sliding door,your remote keyless entrytransmitter will have abutton that has a vansymbol on it. Press it toopen or close the slidingdoor. See “Power SlidingDoor” later in this section.
2-13
If your vehicle has the optional dual power sliding doorsyour remote keyless entry transmitter will have twobuttons that have a van symbol on it. The van symbol onthe left is for the driver’s side sliding door and the vansymbol on the right is for the passenger’s side slidingdoor. See “Power Sliding Door” later in this section.
If the power sliding door(s) is locked, first unlock alldoors, then press the van symbol to open the powersliding door(s). Press the van symbol again to close thesliding door(s). See “Remote Driver’s Door and AllDoor Unlock” earlier in this section and “Power SlidingDoor” later in this section.
You can operate the power sliding door(s) with theremote keyless entry transmitter only when the powersliding door override switch(es) on the overhead consoleis turned off. See “Power Sliding Door” later in this section.
If your vehicle’s fuel filler door is opened, the driver’sside power sliding door will not open completely. Do not try to force the door. Once the fuel filler door is closed, the driver’s side sliding door can be opened normally.
Matching Transmitter(s) to Your VehicleEach remote keyless entry transmitter is coded toprevent another transmitter from unlocking your vehicle.If a transmitter is lost or stolen, a replacement can bepurchased through your dealer. Remember to bring anyremaining transmitters with you when you go to yourdealer. When the dealer matches the replacementtransmitter to your vehicle, any remaining transmittersmust also be matched. Once your dealer has coded thenew transmitter, the lost transmitter will not unlock yourvehicle. Each vehicle can have only four transmittersmatched to it.
See your dealer to match transmitters to another vehicle.
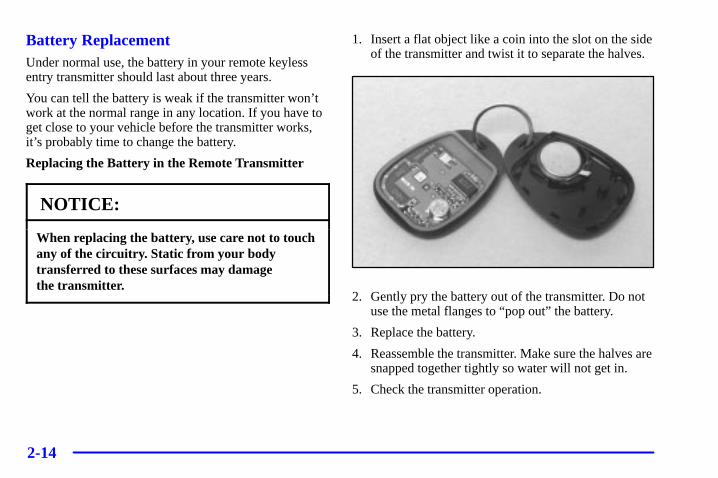
2-14
Battery ReplacementUnder normal use, the battery in your remote keylessentry transmitter should last about three years.
You can tell the battery is weak if the transmitter won’twork at the normal range in any location. If you have toget close to your vehicle before the transmitter works,it’s probably time to change the battery.
Replacing the Battery in the Remote Transmitter
NOTICE:
When replacing the battery, use care not to touchany of the circuitry. Static from your bodytransferred to these surfaces may damage the transmitter.
1. Insert a flat object like a coin into the slot on the sideof the transmitter and twist it to separate the halves.
2. Gently pry the battery out of the transmitter. Do notuse the metal flanges to “pop out” the battery.
3. Replace the battery.
4. Reassemble the transmitter. Make sure the halves aresnapped together tightly so water will not get in.
5. Check the transmitter operation.
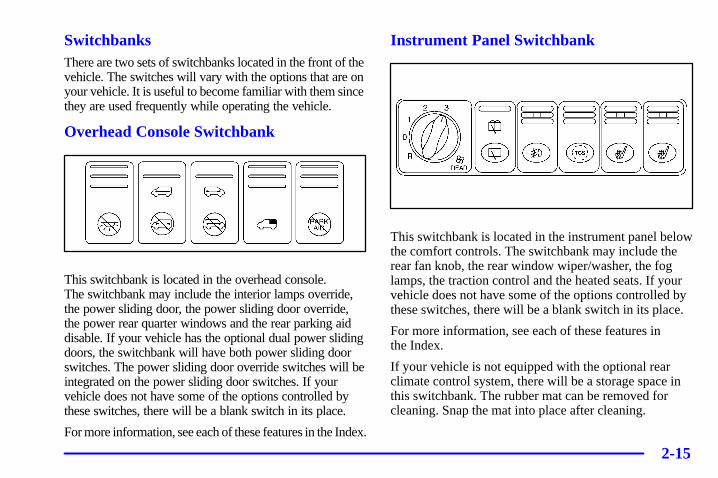
2-15
SwitchbanksThere are two sets of switchbanks located in the front of the vehicle. The switches will vary with the options that are on your vehicle. It is useful to become familiar with them since they are used frequently while operating the vehicle.
Overhead Console Switchbank
This switchbank is located in the overhead console. The switchbank may include the interior lamps override,the power sliding door, the power sliding door override,the power rear quarter windows and the rear parking aiddisable. If your vehicle has the optional dual power slidingdoors, the switchbank will have both power sliding doorswitches. The power sliding door override switches will beintegrated on the power sliding door switches. If yourvehicle does not have some of the options controlled bythese switches, there will be a blank switch in its place.
For more information, see each of these features in the Index.
Instrument Panel Switchbank
This switchbank is located in the instrument panel belowthe comfort controls. The switchbank may include therear fan knob, the rear window wiper/washer, the foglamps, the traction control and the heated seats. If yourvehicle does not have some of the options controlled bythese switches, there will be a blank switch in its place.
For more information, see each of these features in the Index.
If your vehicle is not equipped with the optional rearclimate control system, there will be a storage space inthis switchbank. The rubber mat can be removed forcleaning. Snap the mat into place after cleaning.
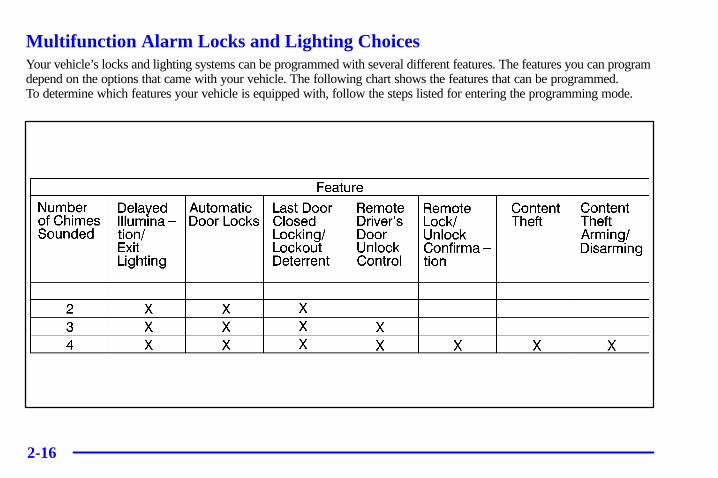
2-16
Multifunction Alarm Locks and Lighting ChoicesYour vehicle’s locks and lighting systems can be programmed with several different features. The features you can program depend on the options that came with your vehicle. The following chart shows the features that can be programmed. To determine which features your vehicle is equipped with, follow the steps listed for entering the programming mode.
2-17
Entering Programming ModeTo program features, your vehicle must be in theprogramming mode. Follow these steps:
1. The content theft-deterrent system must be disarmed.See “Content Theft-Deterrent System” in this section.
2. Remove fuse 47 from the instrument panel fuseblock, located to the right of the glove box. See “Fuses and Circuit Breakers” in the Index.
3. Close the driver’s door.
4. Turn the ignition key towards you to ACCESSORY.
5. Count the number of chimes you hear. You will hear two to four chimes depending on the featuresyour vehicle is equipped with. Refer to the chartshown previously.
You can now program your choices.
To exit the programming mode, follow the steps listedunder “Exiting Programming Mode” later in this section.
Delayed Illumination and Exit LightingWith delayed illumination, the interior lamps will stayon for about 25 seconds after all the doors and theliftgate are closed.
With exit lighting, the interior lamps will come on andstay on for about 25 seconds whenever you remove thekey from the ignition.
Programmable Modes
Mode 1: Both Features Off (The interior lamps will turn onor off at the same instant that a door is opened or closed.)
Mode 2: Delayed Illumination Only (The interior lampswill stay on for about 25 seconds after all the doors andliftgate are closed, or until you lock the doors.)
Mode 3: Exit Lighting Only (The interior lamps will come on whenever you remove the key from the ignition and stay on for about 25 seconds, or until you lock the doors.)
Mode 4: Both Features On (This combines Modes 2 and 3.)
2-18
When your vehicle was shipped from the factory, it wasprogrammed in Mode 4. The mode to which the vehiclehas been programmed may have been changed since itleft the factory. To determine the mode to which yourvehicle is programmed or to program your vehicle to adifferent mode, do the following:
1. Follow the instructions for “Entering ProgrammingMode” listed previously.
2. Turn the interior lamps on by turning the instrumentpanel brightness control all the way up.
3. Count the number of chimes you hear. The number ofchimes indicates the vehicle’s current programmedmode. (If you do not wish to change the current mode,you can either exit the programming mode byfollowing the instructions later in this section orprogram the next feature available on your vehicle.)
4. Turn the interior lamps off to change the current mode.
5. Turn the interior lamps from on to off until you hearthe number of chimes corresponding to the modeselection you want.
The mode you selected is now set. You can either exitthe programming mode by following the instructionslater in this section or program the next feature availableon your vehicle.
Automatic Door LocksWith automatic door locks, all doors will automaticallylock when you shift out of PARK (P) and automaticallyunlock when the ignition is turned to OFF.
Programmable Modes
Mode 1: Both Features Off (Automatic door locking andunlocking is disabled. You will always need to lock yourdoors manually before driving to increase occupant safety.)
Mode 2: Automatic Door Locking Only
� The automatic door unlock feature is turned off.
� Shift out of PARK (P) with the ignition on and thedriver’s door closed; all doors will lock automatically.
Mode 3: Automatic Unlocking with the Ignition Off
� Turn off the ignition with the transaxle in PARK (P);all doors will unlock automatically.
� Shift out of PARK (P) with the ignition on and thedriver’s door closed; all doors will lock automatically.
2-19
Mode 4: Automatic Unlocking with Transaxle in PARK (P)
� Shift into PARK (P) with the ignition on; all doorswill unlock automatically.
� Shift out of PARK (P) with the ignition on and thedriver’s door closed; all doors will lock automatically.
When your vehicle was shipped from the factory, it wasprogrammed in Mode 3. The mode to which the vehiclehas been programmed may have been changed since itleft the factory. To determine the mode to which yourvehicle is programmed or to program your vehicle to adifferent mode, do the following:
1. Follow the instructions for “Entering ProgrammingMode” listed previously.
2. Press LOCK on the power door lock switch.
3. Count the number of chimes you hear. The number ofchimes indicates the vehicle’s current programmedmode. (If you do not wish to change the current mode,you can either exit the programming mode byfollowing the instructions later in this section orprogram the next feature available on your vehicle.)
4. Press LOCK to change the current mode.
5. Press LOCK until you hear the number of chimescorresponding to the mode selection you want.
The mode you selected is now set. You can either exitthe programming mode by following the instructionslater in this section or program the next feature availableon your vehicle.
Last Door Closed Locking and Lockout PreventionWith the last door closed locking and lockout preventionfeatures, your vehicle will do the following:
� If you leave your key in the ignition and leave thedriver’s door open, you won’t be able to lock thedoors using the power door lock switch.
� When you press LOCK on the power door lockswitch or the remote keyless entry transmitter whileany door or the liftgate is open, the doors will notlock. Instead you will hear three chimes, that will letyou know that the last door closed locking feature isin operation. Five seconds after all the doors and theliftgate are closed, all the doors and the liftgate willautomatically lock.
2-20
Programmable Modes
Mode 1: Both Features Off (Doors will always lockimmediately when you press LOCK on the power doorlock switch or the remote keyless entry transmitter.)
Mode 2: Lockout Deterrent Only (If you leave your keyin the ignition with the driver’s door open, you won’t beable to lock the doors with the power door locks.)
Mode 3: Last Door Closed Locking Only (If the powerdoor lock switch or the remote keyless entry transmitteris used to lock the vehicle while any door or the liftgateis open, you will hear three chimes. The doors will notlock. Five seconds after the last door is closed, all doorsand the liftgate will lock.)
Mode 4: Both Features On (This combines Modes 2 and 3.)
When your vehicle was shipped from the factory, it wasprogrammed in Mode 4. The mode to which the vehiclehas been programmed may have been changed since itleft the factory.
To determine the mode to which your vehicle isprogrammed or to program your vehicle to a differentmode, do the following:
1. Follow the instructions for “Entering ProgrammingMode” listed previously.
2. Press UNLOCK on the power door lock switch.
3. Count the number of chimes you hear. The number ofchimes indicates the vehicle’s current programmedmode. (If you do not wish to change the current mode,you can either exit the programming mode byfollowing the instructions later in this section orprogram the next feature available on your vehicle.)
4. Press UNLOCK to change the current mode.
5. Press UNLOCK until you hear the number of chimescorresponding to the mode selection you want.
The mode you selected is now set. You can either exitthe programming mode by following the instructionslater in this section or program the next feature availableon your vehicle.
2-21
Remote Driver’s Unlock ControlWith the remote driver’s unlock control feature, you canprogram your vehicle to do the following:
� When you press UNLOCK on your remote keylessentry transmitter, the driver’s door will unlock, and
� when you press UNLOCK on your remote keylessentry transmitter again within five seconds, all doorsand the liftgate will unlock.
Programmable Modes
Mode 1: Remote All Doors Unlock (When you pressUNLOCK on your remote keyless entry transmitter, alldoors and the liftgate will unlock.)
Mode 2: Remote Driver’s Door Unlock Only (When youpress UNLOCK on your remote keyless entry transmitteronce, the driver’s door will unlock. When you pressUNLOCK on your remote keyless entry transmitter againwithin five seconds, all doors and the liftgate will unlock.)
When your vehicle was shipped from the factory, it wasprogrammed in Mode 2. The mode to which the vehiclehas been programmed may have been changed since itleft the factory.
To determine the mode to which your vehicle isprogrammed or to program your vehicle to a differentmode, do the following:
1. Follow the instructions for “Entering ProgrammingMode” listed previously.
2. Press UNLOCK on the remote keyless entry transmitter.
3. Count the number of chimes you hear. The number ofchimes indicates the vehicle’s current programmedmode. (If you do not wish to change the current mode,you can either exit the programming mode byfollowing the instructions later in this section orprogram the next feature available on your vehicle.)
4. Press UNLOCK to change the current mode.
5. Press UNLOCK until you hear the number of chimescorresponding to the mode selection you want.
The mode you selected is now set. You can either exitthe programming mode by following the instructionslater in this section or program the next feature availableon your vehicle.
2-22
Remote Lock and Unlock ConfirmationWith the remote lock and unlock confirmation feature,your vehicle can do the following:
� When you use the remote keyless entry transmitter tolock your vehicle, your parking lamps will flash tolet you know the command has been received. If youpress LOCK on the remote keyless entry transmitteragain, the horn will sound and the parking lamps willflash to let you know your vehicle is locked, and
� when you use the remote keyless entry transmitter tounlock your vehicle or operate your optional powersliding door(s), your parking lamps will flash.
Programmable Modes
Mode 1: Both Features Off (Remote lock and unlockconfirmation are disabled.)
Mode 2: Exterior Lamps Flash Only
� When you use the remote keyless entry transmitter tolock your vehicle, your parking lamps will flash tolet you know the command has been received.
� When you use the remote keyless entry transmitter tounlock your vehicle or operate your optional powersliding door(s), your parking lamps will flash to letyou know the command has been received.
Mode 3: Exterior Lamps Flash and Horn Sound
� When you use the remote keyless entry transmitter tolock your vehicle, the horn will sound and yourparking lamps will flash to let you know thecommand has been received.
� When you use the remote keyless entry transmitter tounlock your vehicle or operate your optional powersliding door(s), your parking lamps will flash to letyou know the command has been received.
Mode 4: Exterior Lamps Flash and Horn Sound (on second LOCK Press)
� When you use the remote keyless entry transmitter tolock your vehicle, your parking lamps will flash to letyou know the command has been received. The hornwill sound and your parking lamps will flash if youpress the LOCK button again within five seconds.
� When you use the remote keyless entry transmitter tounlock your vehicle or operate your optional powersliding door(s), your parking lamps will flash to letyou know the command has been received.
2-23
When your vehicle was shipped from the factory, it wasprogrammed in Mode 4. The mode to which the vehiclehas been programmed may have been changed since itleft the factory. To determine the mode to which yourvehicle is programmed or to program your vehicle to adifferent mode, do the following:
1. Follow the instructions for “Entering ProgrammingMode” listed previously.
2. Press LOCK on the remote keyless entry transmitter.
3. Count the number of chimes you hear. The number ofchimes indicates the vehicle’s current programmedmode. (If you do not wish to change the current mode,you can either exit the programming mode byfollowing the instructions later in this section orprogram the next feature available on your vehicle.)
4. Press LOCK to change the current mode.
5. Press LOCK until you hear the number of chimescorresponding to the mode selection you want.
The mode you selected is now set. You can either exitthe programming mode by following the instructionslater in this section or program the next feature availableon your vehicle.
Content Theft-Deterrent SystemWith the content theft-deterrent system, if anyonedamages or enters your vehicle while the system isarmed, the horn will sound and your parking lamps willflash for two minutes. The content theft shock sensordetects if anyone damages your vehicle. The shocksensors sensitivity can be adjusted, by your Pontiac dealer, if more or less sensitivity is desired.
Programmable Modes
Mode 1: Damage Detection with Reduced Sensitivity(If anyone seriously damages your vehicle or opens adoor or the liftgate while your content theft-deterrentsystem is armed, an alarm will sound and your parkinglamps will flash for up to two minutes.)
Mode 2: Damage Detection Off (If anyone opens a dooror the liftgate while your content theft-deterrent systemis armed, an alarm will sound and your parking lampswill flash for up to two minutes.)
Mode 3: Feature Off (Your content theft-deterrentsystem is always disarmed.)
Mode 4: Damage Detection with Normal Sensitivity (If anyone damages or enters your vehicle while your contenttheft-deterrent system is armed, an alarm will sound and yourparking lamps will flash for up to two minutes.)
2-24
When your vehicle was shipped from the factory, it wasprogrammed in Mode 4. The mode to which the vehiclehas been programmed may have been changed since itleft the factory. To determine the mode to which yourvehicle is programmed or to program your vehicle to adifferent mode, do the following:
1. Follow the instructions for “Entering ProgrammingMode” listed previously.
2. Turn the parking lamps on, then off.
3. Count the number of chimes you hear. The number ofchimes indicates the vehicle’s current programmedmode. (If you do not wish to change the current mode,you can either exit the programming mode by followingthe instructions later in this section or program the nextfeature available on your vehicle.)
4. Turn the parking lamps on, then off to change thecurrent mode.
5. Turn the parking lamps on, then off until you hearthe number of chimes corresponding to the modeselection you want.
The mode you selected is now set. You can either exitthe programming mode by following the instructionslater in this section or program the next feature availableon your vehicle.
Arming and Disarming the ContentTheft-Deterrent SystemTo arm and disarm the content theft-deterrent system,the system must be turned on by using Modes 1, 2 or 4 listed previously in this section under “ContentTheft-Deterrent System.”
With the arming and disarming feature, you can programthe vehicle to do the following:
� Arm the system when you lock the doors using eitherpower door lock switch while any door or the liftgateis open and the key is removed from the ignition.
� Arm the system when you lock the doors with yourkey or remote keyless entry transmitter and the keyis removed from the ignition.
� Disarm the system when you unlock the doors withyour key or remote keyless entry transmitter.
Programmable Modes
Mode 1: Power Door Lock Switch Arming Off
� The system will arm when you lock the doors withyour key or remote keyless entry transmitter. Thekey must be removed from the ignition when youlock the doors or the content theft-deterrent systemwill not arm.

2-25
� The system will disarm when you unlock the doorswith your key or remote keyless entry transmitter.
Mode 2: Remote Keyless Entry TransmitterArm/Disarm Only
� The system will arm when you lock the doors withyour remote keyless entry transmitter. The key mustbe removed from the ignition when you lock thedoors or the content theft-deterrent system will not arm.
� The system will disarm when you unlock the doorswith your remote keyless entry transmitter.
While this mode provides increased security, it can be aproblem if your remote keyless entry transmitter isdamaged, lost or if it fails to operate for any reasonwhile the content theft-deterrent system is armed. Thecontent theft-deterrent system must be disarmed for theengine to run while in Mode 2; your key can no longerdisarm the system.
If your vehicle is equipped with the OnStar� system,OnStar will not be able to remotely unlock your vehicleif it has been programmed to Mode 2.
Mode 3: Standard Arming and Disarming
� The system will arm when you lock the doors using eitherpower door lock switch while any door or the liftgate is open and the key is removed from the ignition.
� The system will arm when you lock the doors withyour key or remote keyless entry transmitter and thekey is removed from the ignition.
� The system will disarm when you unlock the doorswith your key or remote keyless entry transmitter.
When your vehicle was shipped from the factory, it wasprogrammed in Mode 1. The mode to which the vehiclehas been programmed may have been changed since itleft the factory. To determine the mode to which yourvehicle is programmed or to program your vehicle to adifferent mode, do the following:
1. Follow the instructions for “Entering ProgrammingMode” listed previously.
2. Insert your spare key fully into any door key cylinderand turn it to the unlock position.
This step is necessary to prevent accidentalprogramming of this feature to Mode 2. Do notprogram this feature to Mode 2 without first readingMode 2 entirely. The door key cylinder must remainin the unlock position during Steps 2 through 4.
2-26
3. Press the horn symbol on the remote keyless entry transmitter.
4. Count the number of chimes you hear. The number ofchimes indicates the vehicle’s current programmedmode. (If you do not wish to change the current mode,you can either exit the programming mode byfollowing the instructions later in this section orprogram the next feature available on your vehicle.)
5. Press the horn symbol to change the current mode.
6. Press the horn symbol until you hear the numberof chimes corresponding to the mode selection you want.
7. Remove your key from the door key cylinder.
The mode you selected is now set. You can either exitthe programming mode by following the instructionsnext in this section or program the next feature availableon your vehicle.
Exiting Programming ModeTo exit programming mode, turn the key fromACCESSORY to OFF and put fuse 47 back into theinstrument panel fuse block.
After programming a feature, you can exit theprogramming mode at anytime. Also, if your vehicle isequipped with the content theft-deterrent system,remember to arm the system before exiting.
Dual Sliding DoorsTo open either sliding door from outside the vehicle,pull the handle out and then pull the door toward therear. If you slide the door all the way back, the door willrest in a detent position. The door must overcome thisdetent when closing.
To move the door forward, you must first pull the doorpast the open detent position.
The driver’s side sliding door is designed to open only alittle if the fuel door is open. If this ever happens, don’ttry to force the sliding door. Just close the driver’s sidesliding door. Then when the fuel filler door is closed, thedriver’s side sliding door can be opened normally.
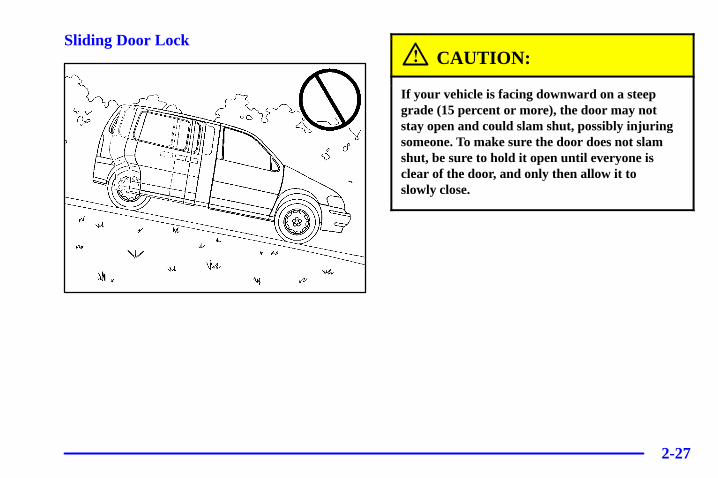
2-27
Sliding Door LockCAUTION:
If your vehicle is facing downward on a steepgrade (15 percent or more), the door may notstay open and could slam shut, possibly injuringsomeone. To make sure the door does not slamshut, be sure to hold it open until everyone isclear of the door, and only then allow it to slowly close.
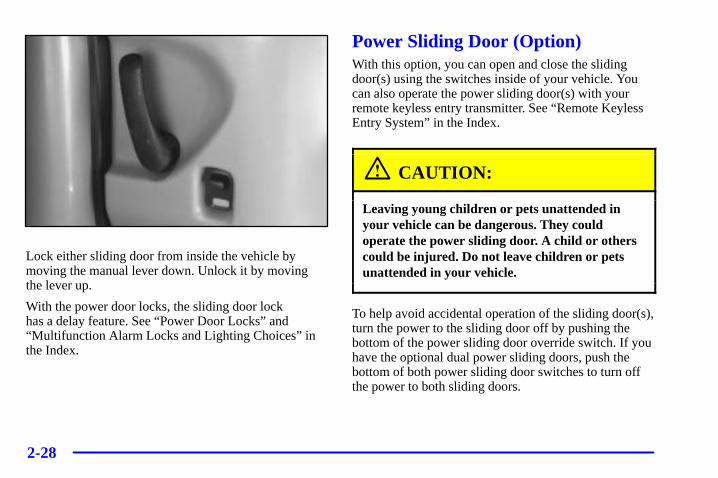
2-28
Lock either sliding door from inside the vehicle bymoving the manual lever down. Unlock it by moving the lever up.
With the power door locks, the sliding door lock has a delay feature. See “Power Door Locks” and“Multifunction Alarm Locks and Lighting Choices” inthe Index.
Power Sliding Door (Option)With this option, you can open and close the slidingdoor(s) using the switches inside of your vehicle. Youcan also operate the power sliding door(s) with yourremote keyless entry transmitter. See “Remote KeylessEntry System” in the Index.
CAUTION:
Leaving young children or pets unattended inyour vehicle can be dangerous. They couldoperate the power sliding door. A child or otherscould be injured. Do not leave children or petsunattended in your vehicle.
To help avoid accidental operation of the sliding door(s),turn the power to the sliding door off by pushing thebottom of the power sliding door override switch. If youhave the optional dual power sliding doors, push thebottom of both power sliding door switches to turn offthe power to both sliding doors.
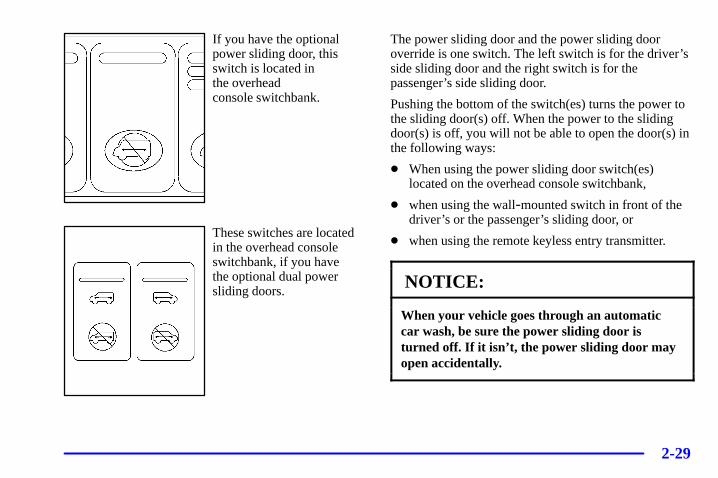
2-29
If you have the optionalpower sliding door, thisswitch is located in the overhead console switchbank.
These switches are locatedin the overhead consoleswitchbank, if you have the optional dual powersliding doors.
The power sliding door and the power sliding dooroverride is one switch. The left switch is for the driver’sside sliding door and the right switch is for thepassenger’s side sliding door.
Pushing the bottom of the switch(es) turns the power tothe sliding door(s) off. When the power to the slidingdoor(s) is off, you will not be able to open the door(s) inthe following ways:
� When using the power sliding door switch(es)located on the overhead console switchbank,
� when using the wall-mounted switch in front of thedriver’s or the passenger’s sliding door, or
� when using the remote keyless entry transmitter.
NOTICE:
When your vehicle goes through an automaticcar wash, be sure the power sliding door isturned off. If it isn’t, the power sliding door mayopen accidentally.
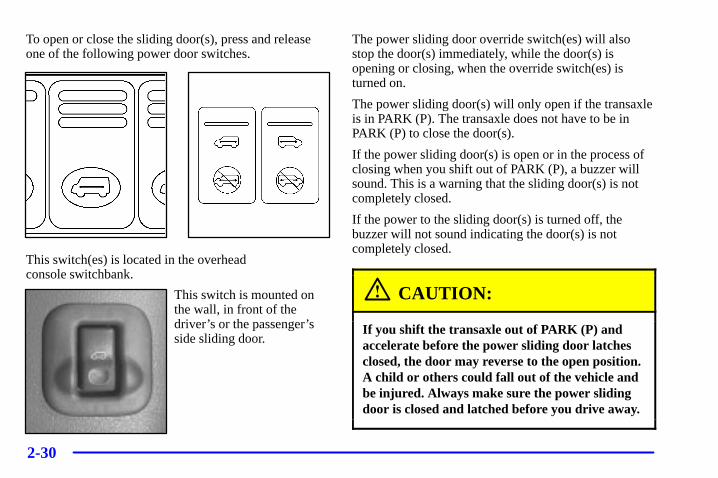
2-30
To open or close the sliding door(s), press and releaseone of the following power door switches.
This switch(es) is located in the overhead console switchbank.
This switch is mounted onthe wall, in front of thedriver’s or the passenger’sside sliding door.
The power sliding door override switch(es) will alsostop the door(s) immediately, while the door(s) isopening or closing, when the override switch(es) isturned on.
The power sliding door(s) will only open if the transaxleis in PARK (P). The transaxle does not have to be inPARK (P) to close the door(s).
If the power sliding door(s) is open or in the process ofclosing when you shift out of PARK (P), a buzzer willsound. This is a warning that the sliding door(s) is notcompletely closed.
If the power to the sliding door(s) is turned off, thebuzzer will not sound indicating the door(s) is notcompletely closed.
CAUTION:
If you shift the transaxle out of PARK (P) andaccelerate before the power sliding door latchesclosed, the door may reverse to the open position.A child or others could fall out of the vehicle andbe injured. Always make sure the power slidingdoor is closed and latched before you drive away.
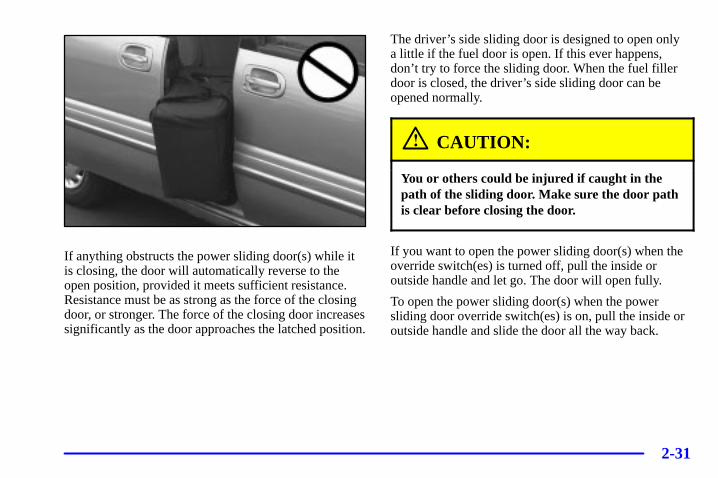
2-31
If anything obstructs the power sliding door(s) while itis closing, the door will automatically reverse to theopen position, provided it meets sufficient resistance.Resistance must be as strong as the force of the closingdoor, or stronger. The force of the closing door increasessignificantly as the door approaches the latched position.
The driver’s side sliding door is designed to open only a little if the fuel door is open. If this ever happens,don’t try to force the sliding door. When the fuel fillerdoor is closed, the driver’s side sliding door can beopened normally.
CAUTION:
You or others could be injured if caught in thepath of the sliding door. Make sure the door pathis clear before closing the door.
If you want to open the power sliding door(s) when theoverride switch(es) is turned off, pull the inside oroutside handle and let go. The door will open fully.
To open the power sliding door(s) when the powersliding door override switch(es) is on, pull the inside oroutside handle and slide the door all the way back.
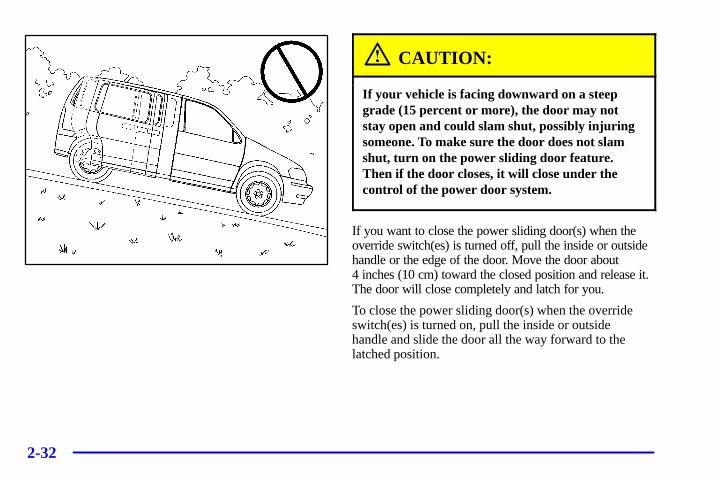
2-32
CAUTION:
If your vehicle is facing downward on a steepgrade (15 percent or more), the door may notstay open and could slam shut, possibly injuringsomeone. To make sure the door does not slamshut, turn on the power sliding door feature.Then if the door closes, it will close under thecontrol of the power door system.
If you want to close the power sliding door(s) when theoverride switch(es) is turned off, pull the inside or outsidehandle or the edge of the door. Move the door about 4 inches (10 cm) toward the closed position and release it.The door will close completely and latch for you.
To close the power sliding door(s) when the overrideswitch(es) is turned on, pull the inside or outside handle and slide the door all the way forward to the latched position.
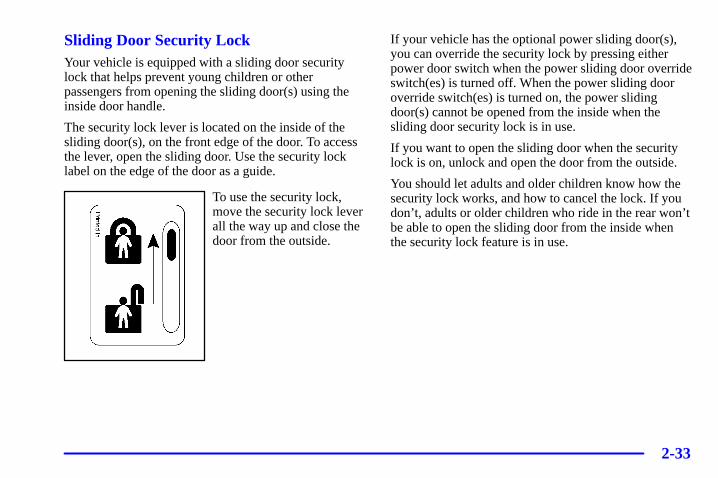
2-33
Sliding Door Security LockYour vehicle is equipped with a sliding door securitylock that helps prevent young children or otherpassengers from opening the sliding door(s) using theinside door handle.
The security lock lever is located on the inside of thesliding door(s), on the front edge of the door. To accessthe lever, open the sliding door. Use the security locklabel on the edge of the door as a guide.
To use the security lock,move the security lock leverall the way up and close thedoor from the outside.
If your vehicle has the optional power sliding door(s),you can override the security lock by pressing eitherpower door switch when the power sliding door overrideswitch(es) is turned off. When the power sliding dooroverride switch(es) is turned on, the power slidingdoor(s) cannot be opened from the inside when thesliding door security lock is in use.
If you want to open the sliding door when the securitylock is on, unlock and open the door from the outside.
You should let adults and older children know how thesecurity lock works, and how to cancel the lock. If youdon’t, adults or older children who ride in the rear won’tbe able to open the sliding door from the inside whenthe security lock feature is in use.
2-34
Resetting the Power Sliding DoorThe power sliding door may operate incorrectly or not atall because of the following conditions:
� A low voltage or dead battery,
� disconnecting the battery, or
� if the instrument panel fuse 4 or the underhood fuse 5, 27 or 29 are removed or blown.
See “Fuses and Circuit Breakers” in the Index for moreinformation about your fuse panel.
If any of these conditions occur, the power sliding doorwill need to be reset. If your vehicle has the optionaldual power sliding doors, both doors will have to bereset. To do this, follow the directions listed here. It will be easier if you read through them once beforebeginning this procedure.
1. Check to be sure the power sliding door is unlockedand securely closed.
2. Turn the ignition key to OFF.
3. If on, turn the power sliding door override switch off.
4. Remove fuse 29 from the underhood fuse and relaycenter. Leave it out for 30 seconds.
5. Reinstall the fuse and wait 10 seconds.
6. Turn the power sliding door override switch on.
7. Push either of the power door buttons to open thepower sliding door.
8. Open the door.
9. Wait five seconds and close the door by pushingeither power door button.
10. Wait five seconds and repeat Steps 7 through 9.
If the door does not rest in the fully open position after repeating Step 7, repeat Steps 7 through 9 again. If the door still does not operate correctly, see yourdealer for service.
Canceling the Sliding Door Security Lock1. Unlock the sliding door and open the door from
the outside.
2. Move the security lock lever all the way down.
The sliding door lock will now work normally.
2-35
LiftgateTo unlock the liftgate from the outside, turn the key inthe cylinder clockwise. To lock the liftgate using thekey, turn the key counterclockwise.
Open the liftgate using the handle located above thelicense plate. Once slightly opened, the liftgate will riseby itself. Lamps in the rear of the vehicle will come on,illuminating the rear cargo area. See “Interior Lamps” inthe Index.
NOTICE:
Be sure there are no overhead obstructions, suchas a garage door, before you open the liftgate.You could slam the liftgate into something andbreak the glass.
CAUTION:
It can be dangerous to drive with the liftgateopen because carbon monoxide (CO) gas cancome into your vehicle. You can’t see or smellCO. It can cause unconsciousness and even death.If you must drive with the liftgate open or ifelectrical wiring or other cable connections must pass through the seal between the body and the liftgate:� Make sure all other windows are shut.� Turn the fan on your heating or cooling
system to its highest speed with the settingon bi-level (outside air button is pressed).That will force outside air into your vehicle.See “Comfort Controls” in the Index.
� If you have air outlets on or under theinstrument panel, open them all the way.
See “Engine Exhaust” in the Index.
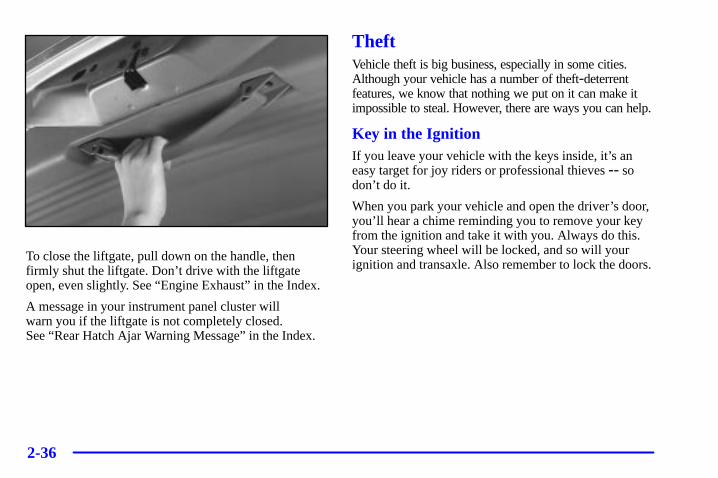
2-36
To close the liftgate, pull down on the handle, thenfirmly shut the liftgate. Don’t drive with the liftgateopen, even slightly. See “Engine Exhaust” in the Index.
A message in your instrument panel cluster will warn you if the liftgate is not completely closed. See “Rear Hatch Ajar Warning Message” in the Index.
TheftVehicle theft is big business, especially in some cities.Although your vehicle has a number of theft-deterrentfeatures, we know that nothing we put on it can make itimpossible to steal. However, there are ways you can help.
Key in the IgnitionIf you leave your vehicle with the keys inside, it’s aneasy target for joy riders or professional thieves -- sodon’t do it.
When you park your vehicle and open the driver’s door,you’ll hear a chime reminding you to remove your keyfrom the ignition and take it with you. Always do this.Your steering wheel will be locked, and so will yourignition and transaxle. Also remember to lock the doors.
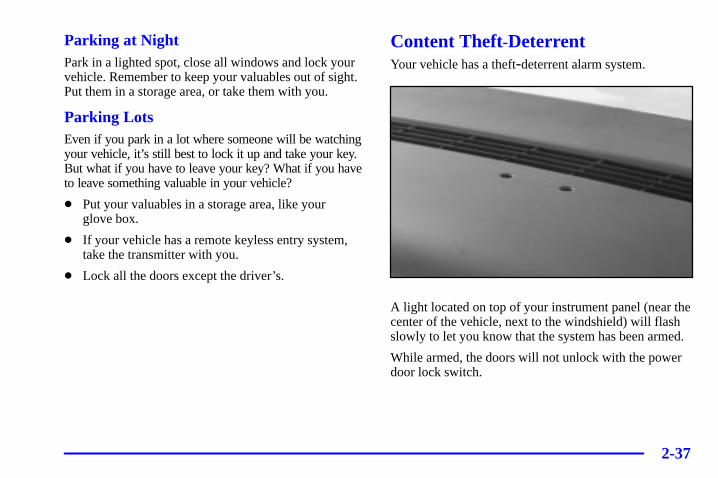
2-37
Parking at NightPark in a lighted spot, close all windows and lock yourvehicle. Remember to keep your valuables out of sight.Put them in a storage area, or take them with you.
Parking LotsEven if you park in a lot where someone will be watchingyour vehicle, it’s still best to lock it up and take your key.But what if you have to leave your key? What if you haveto leave something valuable in your vehicle?
� Put your valuables in a storage area, like your glove box.
� If your vehicle has a remote keyless entry system,take the transmitter with you.
� Lock all the doors except the driver’s.
Content Theft-DeterrentYour vehicle has a theft-deterrent alarm system.
A light located on top of your instrument panel (near thecenter of the vehicle, next to the windshield) will flashslowly to let you know that the system has been armed.
While armed, the doors will not unlock with the powerdoor lock switch.
2-38
Once armed, the alarm will go off if someone tries toenter the vehicle (without using the remote keyless entrytransmitter or a key), breaks a window, tries to damagethe vehicle or turns the ignition to ON. The horn willsound and the parking lamps will flash for up to two minutes.
When the alarm is armed, the liftgate may be openedwith the remote keyless entry transmitter or with a key.
Arming with the Power Lock SwitchYour alarm system will arm when you use either powerdoor lock switch to lock the doors while any door or theliftgate is open and the key is removed from the ignition.If you would like to turn on power door lock switcharming, see “Multifunction Alarm Locks and LightingChoices” in the Index.
The security light flashes quickly to let you know whenthe system is ready to arm with the power door lockswitches. The security light will stop flashing and stayon when you press the rear of the power door lockswitch, to let you know the system is arming. After alldoors and the liftgate are closed and locked, the securitylight will begin flashing at a very slow rate to let youknow the system is armed.
Arming with the Remote Keyless Entry TransmitterYour alarm system will arm when you use your remotekeyless entry transmitter to lock the doors, if the key isnot in the ignition. The security light will turn on to letyou know the system is arming. After all doors and theliftgate are closed and locked, the security light willbegin flashing at a very slow rate to let you know thesystem is armed.
Arming with Your KeyYour alarm system will arm when you use your key tolock the doors. The security light will turn on to let youknow the system is arming. After all doors and theliftgate are closed and locked, the security light willbegin flashing at a very slow rate to let you know thesystem is armed. If you would like your key not to armthe system, see “Multifunction Alarm Locks andLighting Choices” in the Index.
2-39
Arming ConfirmationIf remote unlock confirmation is on, your parking lampswill flash briefly to let you know when your alarmsystem has disarmed. If you would not like the parkinglamps to flash, see “Multifunction Alarm Locks andLighting Choices” in the Index.
Disarming with the Remote Keyless Entry TransmitterYour alarm system will disarm when you use yourremote keyless entry transmitter to unlock the doors.The security light will stop flashing to let you know thesystem is no longer armed.
Disarming with Your KeyYour alarm system will disarm when you use your keyto unlock the doors. The security light will stop flashingto let you know the system is no longer armed. If youwould like your key not to disarm the alarm system, see“Multifunction Alarm Locks and Lighting Choices” inthe Index.
Nuisance AlarmsIf you experience nuisance alarms (alarms which are notcaused by the opening of a door or the liftgate and arenot desirable), you may need to reduce the damagedetection sensitivity. Try programming the contenttheft-deterrent to Mode 1.
If you continue to experience nuisance alarms, you may want to try turning off damage detection byprogramming your content theft-deterrent to Mode 2.
If you are still having trouble with nuisance alarms, youcan turn off the content theft-deterrent system byprogramming your content theft-deterrent to Mode 3.See “Multifunction Alarm Locks and Lighting Choices”in the Index for more information. See your dealer orqualified technician for service.
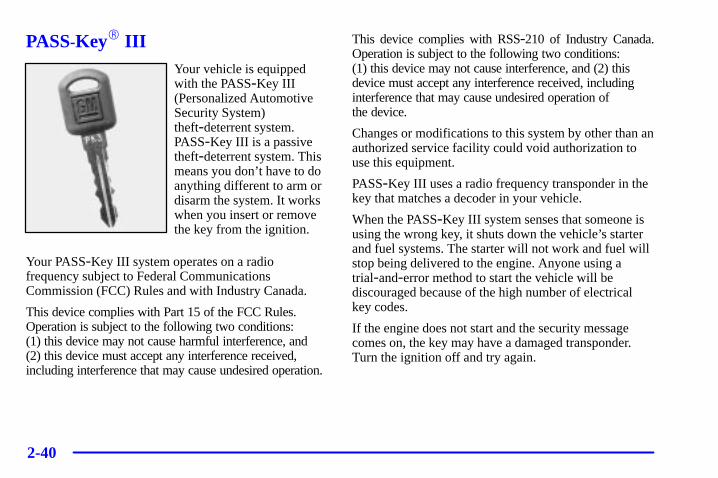
2-40
PASS-Key� IIIYour vehicle is equippedwith the PASS-Key III(Personalized AutomotiveSecurity System)theft-deterrent system.PASS-Key III is a passivetheft-deterrent system. Thismeans you don’t have to doanything different to arm ordisarm the system. It workswhen you insert or removethe key from the ignition.
Your PASS-Key III system operates on a radiofrequency subject to Federal CommunicationsCommission (FCC) Rules and with Industry Canada.
This device complies with Part 15 of the FCC Rules.Operation is subject to the following two conditions: (1) this device may not cause harmful interference, and (2) this device must accept any interference received,including interference that may cause undesired operation.
This device complies with RSS-210 of Industry Canada.Operation is subject to the following two conditions: (1) this device may not cause interference, and (2) this device must accept any interference received, including interference that may cause undesired operation of the device.
Changes or modifications to this system by other than anauthorized service facility could void authorization touse this equipment.
PASS-Key III uses a radio frequency transponder in thekey that matches a decoder in your vehicle.
When the PASS-Key III system senses that someone isusing the wrong key, it shuts down the vehicle’s starterand fuel systems. The starter will not work and fuel willstop being delivered to the engine. Anyone using atrial-and-error method to start the vehicle will bediscouraged because of the high number of electricalkey codes.
If the engine does not start and the security messagecomes on, the key may have a damaged transponder.Turn the ignition off and try again.
2-41
If the engine still does not start, and the key appears to be undamaged, try another ignition key. At this time, you may also want to check the instrument panel fuse 12.If the engine still does not start with the other key, yourvehicle needs service. If your vehicle does start, the firstkey may be faulty. See your dealer or a locksmith whocan service the PASS-Key III to have a new key made.See “Fuses and Circuit Breakers” in the Index.
It is possible for the PASS-Key III decoder to learn the transponder value of a new or replacement key. Up to 10 additional keys may be programmed for thevehicle. This procedure is for learning additional keysonly. If all the currently programmed keys are lost or do not operate, you must see your dealer or a locksmithwho can service PASS-Key III to have keys made andprogrammed to the system.
See your dealer or a locksmith who can servicePASS-Key III to get a new key blank that is cut exactlyas the ignition key that operates the system.
To program the new key:
1. Verify the new key has “PK3” stamped on it.
2. Insert the ignition key in the ignition and start the engine. If the engine will not start see your dealer for service.
3. After the engine has started, turn the key to OFF andremove the key.
4. Insert the key to be programmed and turn it to RUNwithin 10 seconds of removing the previous key.
5. The security message will turn off once the key hasbeen programmed. It may not be apparent that thesecurity message went on due to how quickly the keyis programmed.
6. Repeat Steps 1 through 4 if additional keys are to be programmed.
If you are ever driving and the security message comeson and stays on, you will be able to restart your engine if you turn it off. Your PASS-Key III system, however, is not working properly and must be serviced by yourdealer. Your vehicle is not protected by the PASS-Key IIIsystem at this time.
If you lose or damage a PASS-Key III key, see yourdealer or a locksmith who can service PASS-Key III tohave a new key made. In an emergency, call PontiacRoadside Assistance. See “Roadside Assistance” in theIndex for more information.
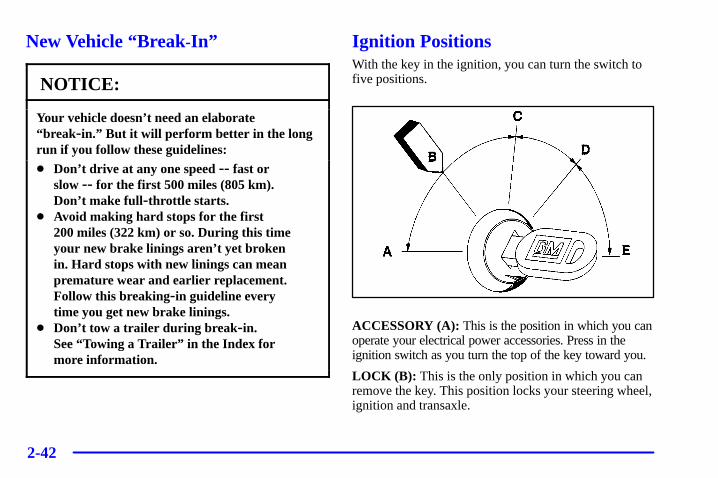
2-42
New Vehicle “Break-In”
NOTICE:
Your vehicle doesn’t need an elaborate“break -in.” But it will perform better in the longrun if you follow these guidelines:
� Don’t drive at any one speed -- fast or slow -- for the first 500 miles (805 km).Don’t make full -throttle starts.
� Avoid making hard stops for the first 200 miles (322 km) or so. During this timeyour new brake linings aren’t yet brokenin. Hard stops with new linings can meanpremature wear and earlier replacement.Follow this breaking-in guideline everytime you get new brake linings.
� Don’t tow a trailer during break -in. See “Towing a Trailer” in the Index formore information.
Ignition PositionsWith the key in the ignition, you can turn the switch tofive positions.
ACCESSORY (A): This is the position in which you canoperate your electrical power accessories. Press in theignition switch as you turn the top of the key toward you.
LOCK (B): This is the only position in which you canremove the key. This position locks your steering wheel,ignition and transaxle.

2-43
NOTICE:
If your key seems stuck in LOCK and you can’tturn it, be sure you are using the correct key; if so, is it all the way in? If it is, then turn thesteering wheel left and right while you turn thekey hard. But turn the key only with your hand.Using a tool to force it could break the key or theignition switch. If none of this works, then yourvehicle needs service.
OFF (C): This position unlocks the steering wheel,ignition and transaxle, but does not send electricalpower to any accessories. Use this position if yourvehicle must be pushed or towed, but never try topush-start your vehicle. A warning chime will sound if you open the driver’s door when the ignition is off and the key is in the ignition.
RUN (D): This is the position to which the switch returnsafter you start your engine and release the switch. Theswitch stays in RUN when the engine is running. But evenwhen the engine is not running, you can use RUN tooperate your electrical power accessories, and to displaysome instrument panel warning lights.
START (E): This position starts the engine. When theengine starts, release the key. The ignition switch willreturn to RUN for normal driving.
If the engine is not running, ACCESSORY and RUN are positions that allow you to operate your electricalaccessories, such as the radio.
Retained Accessory Power (RAP)With RAP, the power windows, the power rear quarterwindows, the audio system and the optional electroniclevel control (ELC) will continue to work up to 10 minutes after the ignition key is turned to OFF and none of the doors are opened.
2-44
Starting Your EngineMove your shift lever to PARK (P) or NEUTRAL (N).Your engine won’t start in any other position -- that’s asafety feature. To restart when you’re already moving,use NEUTRAL (N) only.
NOTICE:
Don’t try to shift to PARK (P) if your vehicle ismoving. If you do, you could damage thetransaxle. Shift to PARK (P) only when yourvehicle is stopped.
1. With your foot off the accelerator pedal, turn yourignition key to START. When the engine starts, letgo of the key. The idle speed will go down as yourengine warms up.
NOTICE:
Holding your key in START for longer than 15 seconds at a time will cause your battery to be drained much sooner. And the excessive heatcan damage your starter motor. Wait about 15 seconds between each try to help avoiddraining your battery or damaging your starter.
2. If the engine doesn’t start in 10 seconds, push theaccelerator pedal about one-quarter of the way downwhile you turn the key to START. Do this until theengine starts. As soon as it does, let go of the key.

2-45
3. If your engine still won’t start (or starts but then stops),it could be flooded with too much gasoline. Trypushing your accelerator pedal all the way to the floorand holding it there as you hold the key in START fora maximum of 15 seconds. This clears the extragasoline from the engine. If the engine still won’t startor starts briefly but then stops again, repeat Step 1 or 2,depending on temperature. When the engine starts,release the key and the accelerator pedal.
NOTICE:
Your engine is designed to work with theelectronics in your vehicle. If you add electricalparts or accessories, you could change the waythe engine operates. Before adding electricalequipment, check with your dealer. If you don’t,your engine might not perform properly.
Engine Coolant Heater (If Equipped)
In very cold weather, 0�F (-18�C) or colder, the enginecoolant heater can help. You’ll get easier starting andbetter fuel economy during engine warm-up. Usually,the coolant heater should be plugged in a minimum offour hours prior to starting your vehicle.
2-46
To Use the Engine Coolant Heater1. Turn off the engine.
2. Open the hood and unwrap the electrical cord. The electrical cord is located on the driver’s side ofthe engine compartment.
3. Plug it into a normal, grounded 110-volt AC outlet.
CAUTION:
Plugging the cord into an ungrounded outletcould cause an electrical shock. Also, the wrongkind of extension cord could overheat and causea fire. You could be seriously injured. Plug thecord into a properly grounded three-prong110-volt AC outlet. If the cord won’t reach, use aheavy-duty three-prong extension cord rated forat least 15 amps.
4. Before starting the engine, be sure to unplug and storethe cord as it was before to keep it away from movingengine parts. If you don’t, it could be damaged.
How long should you keep the coolant heater pluggedin? The answer depends on the outside temperature, thekind of oil you have, and some other things. Instead oftrying to list everything here, we ask that you contactyour dealer in the area where you’ll be parking yourvehicle. The dealer can give you the best advice for that particular area.
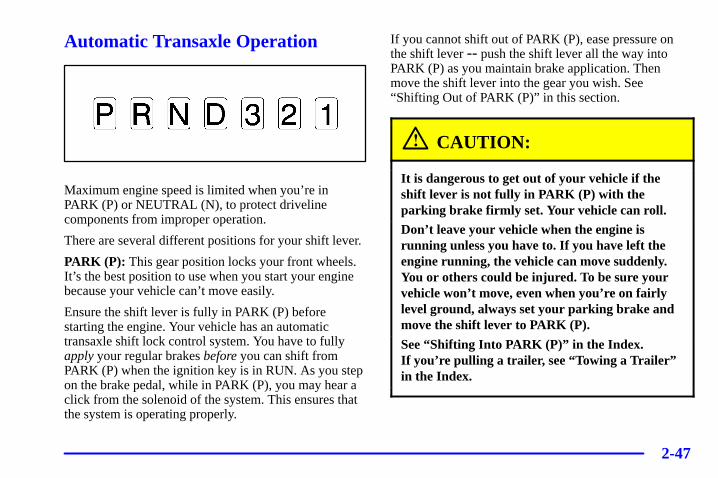
2-47
Automatic Transaxle Operation
Maximum engine speed is limited when you’re in PARK (P) or NEUTRAL (N), to protect drivelinecomponents from improper operation.
There are several different positions for your shift lever.
PARK (P): This gear position locks your front wheels.It’s the best position to use when you start your enginebecause your vehicle can’t move easily.
Ensure the shift lever is fully in PARK (P) beforestarting the engine. Your vehicle has an automatictransaxle shift lock control system. You have to fullyapply your regular brakes before you can shift fromPARK (P) when the ignition key is in RUN. As you stepon the brake pedal, while in PARK (P), you may hear aclick from the solenoid of the system. This ensures thatthe system is operating properly.
If you cannot shift out of PARK (P), ease pressure onthe shift lever -- push the shift lever all the way intoPARK (P) as you maintain brake application. Thenmove the shift lever into the gear you wish. See“Shifting Out of PARK (P)” in this section.
CAUTION:
It is dangerous to get out of your vehicle if theshift lever is not fully in PARK (P) with theparking brake firmly set. Your vehicle can roll.
Don’t leave your vehicle when the engine isrunning unless you have to. If you have left theengine running, the vehicle can move suddenly.You or others could be injured. To be sure yourvehicle won’t move, even when you’re on fairlylevel ground, always set your parking brake andmove the shift lever to PARK (P).
See “Shifting Into PARK (P)” in the Index. If you’re pulling a trailer, see “Towing a Trailer”in the Index.

2-48
REVERSE (R): Use this gear to back up.
NOTICE:
Shifting to REVERSE (R) while your vehicle ismoving forward could damage your transaxle.Shift to REVERSE (R) only after your vehicle is stopped.
To rock your vehicle back and forth to get out of snow,ice or sand without damaging your transaxle, see“Stuck: In Sand, Mud, Ice or Snow” in the Index.
NEUTRAL (N): In this position, your engine doesn’t connect with the wheels. To restart when you’realready moving, use NEUTRAL (N) only. Also, use NEUTRAL (N) when your vehicle is being towed.
CAUTION:
Shifting out of PARK (P) or NEUTRAL (N) whileyour engine is “racing” (running at high speed) is dangerous. Unless your foot is firmly on thebrake pedal, your vehicle could move veryrapidly. You could lose control and hit people or objects. Don’t shift out of PARK (P) orNEUTRAL (N) while your engine is racing.
NOTICE:
Damage to your transaxle caused by shifting outof PARK (P) or NEUTRAL (N) with the engineracing isn’t covered by your warranty.
2-49
AUTOMATIC OVERDRIVE (D): This position is for normal driving. If you need more power for passing,and you’re:
� Going less than 35 mph (55 km/h), push youraccelerator pedal about halfway down.
� Going about 35 mph (55 km/h) or more, push theaccelerator all the way down.
You’ll shift down to the next gear and have more power.
NOTICE:
If your vehicle seems to start up rather slowly, or if it seems not to shift gears as you go faster,something may be wrong with a transaxle systemsensor. If you drive very far that way, yourvehicle can be damaged. So, if this happens, haveyour vehicle serviced right away. Until then, youcan use SECOND (2) when you are driving lessthan 35 mph (55 km/h) and AUTOMATICOVERDRIVE (D) for higher speeds.
Warm-Up Shift
Your vehicle has a computer controlled transaxledesigned to warm up the engine faster when the outside temperature is 35�F (2�C) or colder. You may notice that the transaxle will shift at a highervehicle speed until the engine is warmed up. This is a normal condition designed to provide heat to thepassenger compartment and defrost the windows more quickly. See “Comfort Controls, Heating” in the Index for more information.
THIRD (3): This position is also used for normaldriving, but it offers more power and lower fueleconomy than AUTOMATIC OVERDRIVE (D).
Here are some times you might choose THIRD (3)instead of AUTOMATIC OVERDRIVE (D):
� When driving on hilly, winding roads.
� When towing a trailer (so there is less shiftingbetween gears).
� When going down a steep hill.
2-50
SECOND (2): This position gives you more power, butlower fuel economy. You can use SECOND (2) on hills.It can help control your speed as you go down steepmountain roads, but then you would also want to useyour brakes off and on.
NOTICE:
Don’t drive in SECOND (2) for more than 25 miles(40 km), or at speeds over 55 mph (90 km/h), oryou can damage your transaxle. Use THIRD (3) orAUTOMATIC OVERDRIVE (D) as much aspossible. Don’t shift into SECOND (2) unless youare going slower than 65 mph (105 km/h) or youcan damage your engine.
NOTICE:
If your vehicle seems to start up rather slowly, orif it seems not to shift gears as you go faster,something may be wrong with a transaxle systemsensor. If you drive very far that way, yourvehicle can be damaged. So, if this happens, haveyour vehicle serviced right away. Until then, youcan use SECOND (2) when you are driving lessthan 35 mph (55 km/h) and THIRD (3) for higher speeds.
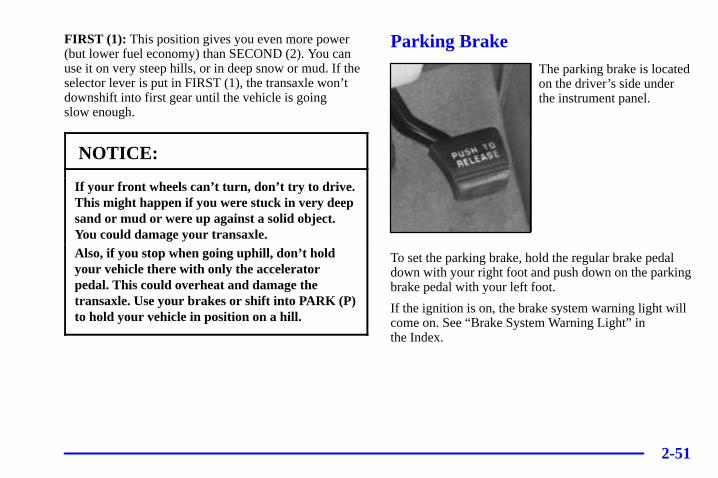
2-51
FIRST (1): This position gives you even more power(but lower fuel economy) than SECOND (2). You canuse it on very steep hills, or in deep snow or mud. If theselector lever is put in FIRST (1), the transaxle won’tdownshift into first gear until the vehicle is going slow enough.
NOTICE:
If your front wheels can’t turn, don’t try to drive.This might happen if you were stuck in very deepsand or mud or were up against a solid object.You could damage your transaxle.Also, if you stop when going uphill, don’t holdyour vehicle there with only the acceleratorpedal. This could overheat and damage thetransaxle. Use your brakes or shift into PARK (P)to hold your vehicle in position on a hill.
Parking BrakeThe parking brake is locatedon the driver’s side underthe instrument panel.
To set the parking brake, hold the regular brake pedaldown with your right foot and push down on the parkingbrake pedal with your left foot.
If the ignition is on, the brake system warning light willcome on. See “Brake System Warning Light” in the Index.
2-52
To release the parking brake, hold the regular brake pedaldown with your right foot while you push down on theparking brake pedal with your left foot. (To release thetension on the parking brake cable, you will need to applyabout the same amount of pressure to the parking brakepedal as you did when you set the parking brake.) Whenyou remove your foot from the parking brake pedal, it willpop up to the released position.
NOTICE:
Driving with the parking brake on can causeyour rear brakes to overheat. You may have toreplace them, and you could also damage otherparts of your vehicle.
If you are towing a trailer and are parking on any hill,see “Towing a Trailer” in the Index. That section showswhat to do first to keep the trailer from moving.
Shifting Into PARK (P)
CAUTION:
It can be dangerous to get out of your vehicle ifthe shift lever is not fully in PARK (P) with theparking brake firmly set. Your vehicle can roll. If you have left the engine running, the vehiclecan move suddenly. You or others could beinjured. To be sure your vehicle won’t move, evenwhen you’re on fairly level ground, use the stepsthat follow. If you’re pulling a trailer, see“Towing a Trailer” in the Index.

2-53
1. Hold the brake pedal down with your right foot andset the parking brake with your left foot.
2. Move the shift lever into PARK (P) like this:
� Pull the lever toward you.
� Move the lever up as far as it will go.
3. Turn the ignition key to LOCK.
4. Remove the key and take it with you. If you canleave your vehicle with the ignition key in yourhand, your vehicle is in PARK (P).
2-54
Leaving Your Vehicle With the Engine Running
CAUTION:
It can be dangerous to leave your vehicle with the engine running. Your vehicle could movesuddenly if the shift lever is not fully in PARK (P)with the parking brake firmly set. And, if youleave the vehicle with the engine running, it couldoverheat and even catch fire. You or others couldbe injured. Don’t leave your vehicle with theengine running unless you have to.
If you have to leave your vehicle with the enginerunning, be sure your vehicle is in PARK (P) and yourparking brake is firmly set before you leave it. Afteryou’ve moved the shift lever into PARK (P), hold theregular brake pedal down. Then, see if you can move theshift lever away from PARK (P) without first pulling ittoward you. If you can, it means that the shift leverwasn’t fully locked into PARK (P).
Torque LockIf you are parking on a hill and you don’t shift yourtransaxle into PARK (P) properly, the weight of thevehicle may put too much force on the parking pawl inthe transaxle. You may find it difficult to pull the shiftlever out of PARK (P). This is called “torque lock.” To prevent torque lock, set the parking brake and thenshift into PARK (P) properly before you leave thedriver’s seat. To find out how, see “Shifting Into PARK (P)” in the Index.
When you are ready to drive, move the shift lever out ofPARK (P) before you release the parking brake.
If torque lock does occur, you may need to have anothervehicle push yours a little uphill to take some of thepressure from the parking pawl in the transaxle, so youcan pull the shift lever out of PARK (P).
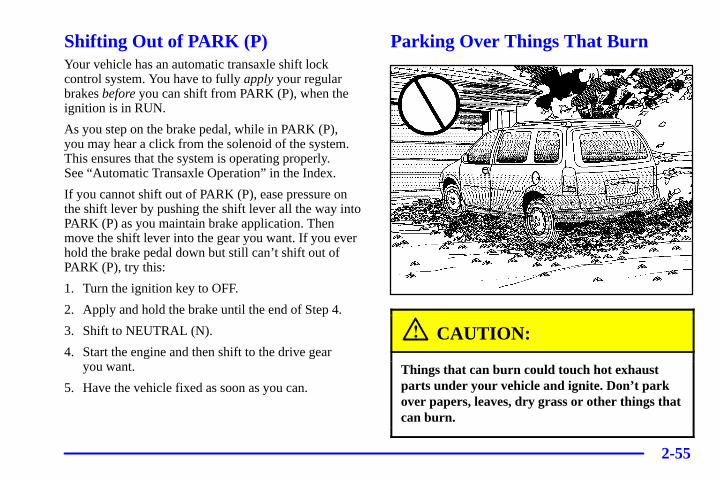
2-55
Shifting Out of PARK (P)Your vehicle has an automatic transaxle shift lockcontrol system. You have to fully apply your regularbrakes before you can shift from PARK (P), when theignition is in RUN.
As you step on the brake pedal, while in PARK (P), you may hear a click from the solenoid of the system. This ensures that the system is operating properly. See “Automatic Transaxle Operation” in the Index.
If you cannot shift out of PARK (P), ease pressure onthe shift lever by pushing the shift lever all the way intoPARK (P) as you maintain brake application. Thenmove the shift lever into the gear you want. If you everhold the brake pedal down but still can’t shift out ofPARK (P), try this:
1. Turn the ignition key to OFF.
2. Apply and hold the brake until the end of Step 4.
3. Shift to NEUTRAL (N).
4. Start the engine and then shift to the drive gear you want.
5. Have the vehicle fixed as soon as you can.
Parking Over Things That Burn
CAUTION:
Things that can burn could touch hot exhaustparts under your vehicle and ignite. Don’t parkover papers, leaves, dry grass or other things thatcan burn.
2-56
Engine Exhaust
CAUTION:
Engine exhaust can kill. It contains the gascarbon monoxide (CO), which you can’t see orsmell. It can cause unconsciousness and death.
You might have exhaust coming in if:� Your exhaust system sounds strange
or different.� Your vehicle gets rusty underneath.� Your vehicle was damaged in a collision.� Your vehicle was damaged when driving over
high points on the road or over road debris.� Repairs weren’t done correctly.� Your vehicle or exhaust system had been
modified improperly.If you ever suspect exhaust is coming into your vehicle:� Drive it only with all the windows down to
blow out any CO; and� Have your vehicle fixed immediately.
Running Your Engine While You’re ParkedIt’s better not to park with the engine running. But if youever have to, here are some things to know.
CAUTION:
Idling the engine with the climate control systemoff could allow dangerous exhaust into yourvehicle. See the earlier Caution under “Engine Exhaust.”Also, idling in a closed-in place can let deadlycarbon monoxide (CO) into your vehicle even ifthe fan switch is at the highest setting. One placethis can happen is a garage. Exhaust -- with CO -- can come in easily. NEVER park in agarage with the engine running.Another closed-in place can be a blizzard. See “Blizzard” in the Index.
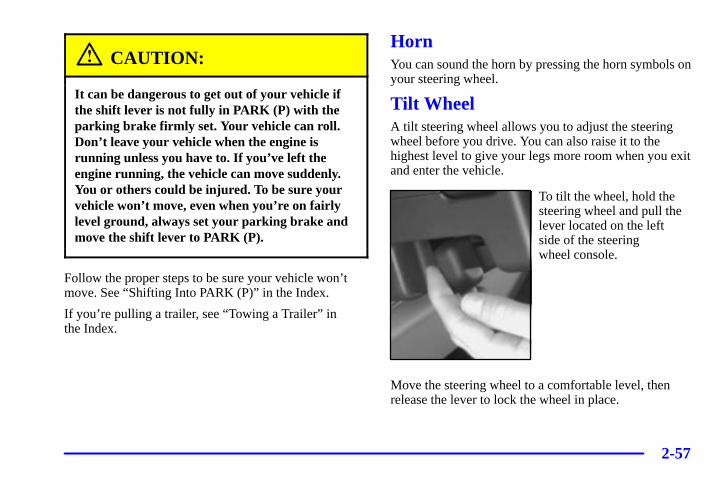
2-57
CAUTION:
It can be dangerous to get out of your vehicle ifthe shift lever is not fully in PARK (P) with theparking brake firmly set. Your vehicle can roll.Don’t leave your vehicle when the engine isrunning unless you have to. If you’ve left theengine running, the vehicle can move suddenly.You or others could be injured. To be sure yourvehicle won’t move, even when you’re on fairlylevel ground, always set your parking brake andmove the shift lever to PARK (P).
Follow the proper steps to be sure your vehicle won’tmove. See “Shifting Into PARK (P)” in the Index.
If you’re pulling a trailer, see “Towing a Trailer” in the Index.
HornYou can sound the horn by pressing the horn symbols onyour steering wheel.
Tilt WheelA tilt steering wheel allows you to adjust the steeringwheel before you drive. You can also raise it to thehighest level to give your legs more room when you exitand enter the vehicle.
To tilt the wheel, hold thesteering wheel and pull thelever located on the left side of the steering wheel console.
Move the steering wheel to a comfortable level, thenrelease the lever to lock the wheel in place.
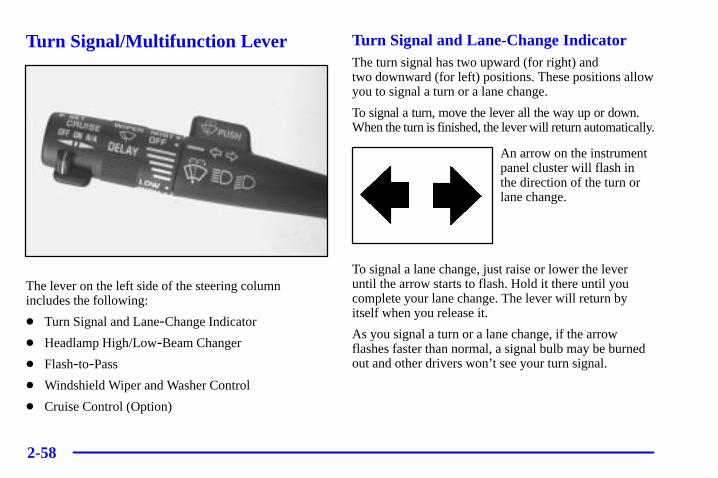
2-58
Turn Signal/Multifunction Lever
The lever on the left side of the steering columnincludes the following:
� Turn Signal and Lane-Change Indicator
� Headlamp High/Low-Beam Changer
� Flash-to-Pass
� Windshield Wiper and Washer Control
� Cruise Control (Option)
Turn Signal and Lane-Change IndicatorThe turn signal has two upward (for right) and two downward (for left) positions. These positions allowyou to signal a turn or a lane change.
To signal a turn, move the lever all the way up or down. When the turn is finished, the lever will return automatically.
An arrow on the instrumentpanel cluster will flash inthe direction of the turn orlane change.
To signal a lane change, just raise or lower the leveruntil the arrow starts to flash. Hold it there until youcomplete your lane change. The lever will return byitself when you release it.
As you signal a turn or a lane change, if the arrowflashes faster than normal, a signal bulb may be burnedout and other drivers won’t see your turn signal.
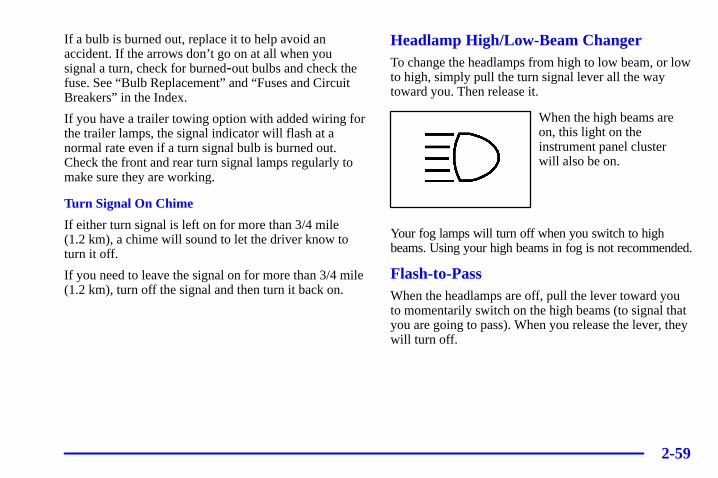
2-59
If a bulb is burned out, replace it to help avoid anaccident. If the arrows don’t go on at all when yousignal a turn, check for burned-out bulbs and check thefuse. See “Bulb Replacement” and “Fuses and CircuitBreakers” in the Index.
If you have a trailer towing option with added wiring forthe trailer lamps, the signal indicator will flash at anormal rate even if a turn signal bulb is burned out.Check the front and rear turn signal lamps regularly tomake sure they are working.
Turn Signal On Chime
If either turn signal is left on for more than 3/4 mile (1.2 km), a chime will sound to let the driver know toturn it off.
If you need to leave the signal on for more than 3/4 mile(1.2 km), turn off the signal and then turn it back on.
Headlamp High/Low-Beam ChangerTo change the headlamps from high to low beam, or lowto high, simply pull the turn signal lever all the waytoward you. Then release it.
When the high beams areon, this light on theinstrument panel cluster will also be on.
Your fog lamps will turn off when you switch to highbeams. Using your high beams in fog is not recommended.
Flash-to-PassWhen the headlamps are off, pull the lever toward youto momentarily switch on the high beams (to signal thatyou are going to pass). When you release the lever, theywill turn off.
2-60
Windshield WipersYou control the windshield wipers by turning the bandmarked WIPER.
For a single wiping cycle, turn the band to MIST. Holdit there until the wipers start, then let go. The wipers willstop after one cycle. If you want more cycles, hold theband on mist longer.
For delayed wiping cycles, you can set the wiper speedfor a long or short delay between wipes. This can bevery useful in light rain or snow. Turn the band tochoose the delay time. The closer to LOW, the shorterthe delay time.
For steady wiping cycles, at low speed, turn the bandaway from you to the LOW position. For high-speedwiping, turn the band further to HIGH. To stop thewipers, turn the band to OFF.
Remember that damaged wiper blades may prevent youfrom seeing well enough to drive safely. To avoiddamage, be sure to clear ice and snow from the wiperblades before using them. If they’re frozen to thewindshield, carefully loosen or thaw them. If yourblades do become damaged, get new blades or blade inserts.
Heavy snow or ice can overload your wipers. A circuitbreaker will stop them until the motor cools. Clear awaysnow or ice to prevent an overload.
Windshield WasherTo wash your windshield, press and hold the windshieldwasher paddle. The washers and wipers will operate.When you release the paddle, the washers will stop, andthe wipers will continue to operate for two cycles, unlessyour wipers had already been on. In that case, the wiperswill resume the wiper speed you had selected earlier.
CAUTION:
In freezing weather, don’t use your washer untilthe windshield is warmed. Otherwise the washerfluid can form ice on the windshield, blockingyour vision.
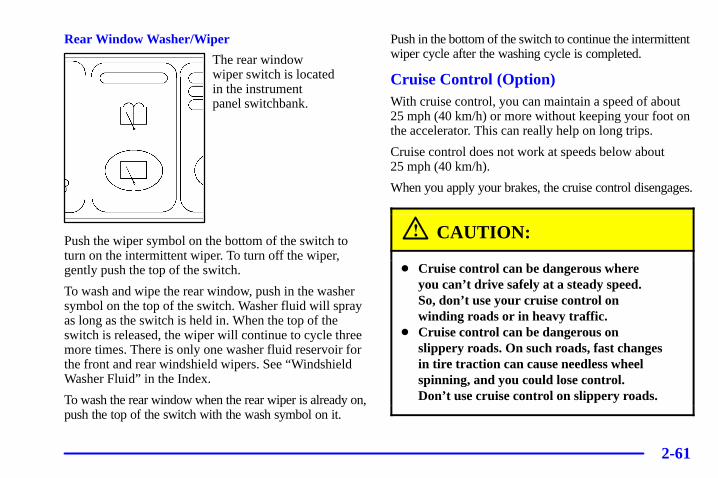
2-61
Rear Window Washer/Wiper
The rear window wiper switch is located in the instrument panel switchbank.
Push the wiper symbol on the bottom of the switch toturn on the intermittent wiper. To turn off the wiper,gently push the top of the switch.
To wash and wipe the rear window, push in the washersymbol on the top of the switch. Washer fluid will sprayas long as the switch is held in. When the top of theswitch is released, the wiper will continue to cycle threemore times. There is only one washer fluid reservoir forthe front and rear windshield wipers. See “WindshieldWasher Fluid” in the Index.
To wash the rear window when the rear wiper is already on,push the top of the switch with the wash symbol on it.
Push in the bottom of the switch to continue the intermittent wiper cycle after the washing cycle is completed.
Cruise Control (Option)With cruise control, you can maintain a speed of about25 mph (40 km/h) or more without keeping your foot onthe accelerator. This can really help on long trips.
Cruise control does not work at speeds below about 25 mph (40 km/h).
When you apply your brakes, the cruise control disengages.
CAUTION:
� Cruise control can be dangerous where you can’t drive safely at a steady speed. So, don’t use your cruise control onwinding roads or in heavy traffic.
� Cruise control can be dangerous onslippery roads. On such roads, fast changesin tire traction can cause needless wheelspinning, and you could lose control. Don’t use cruise control on slippery roads.
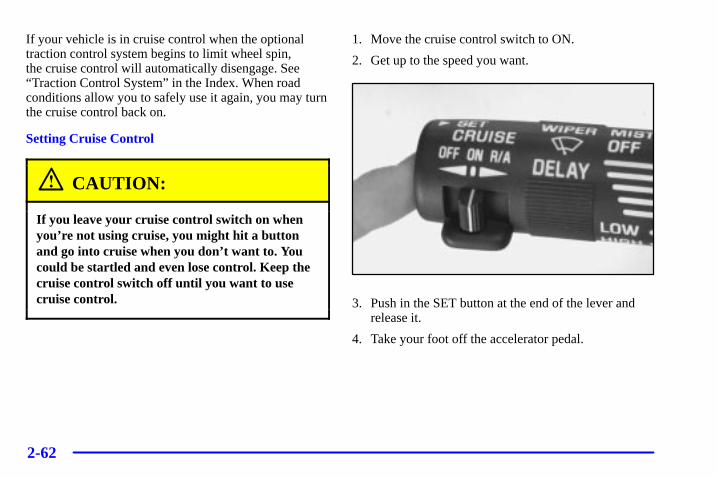
2-62
If your vehicle is in cruise control when the optionaltraction control system begins to limit wheel spin, the cruise control will automatically disengage. See“Traction Control System” in the Index. When roadconditions allow you to safely use it again, you may turnthe cruise control back on.
Setting Cruise Control
CAUTION:
If you leave your cruise control switch on whenyou’re not using cruise, you might hit a buttonand go into cruise when you don’t want to. Youcould be startled and even lose control. Keep thecruise control switch off until you want to usecruise control.
1. Move the cruise control switch to ON.
2. Get up to the speed you want.
3. Push in the SET button at the end of the lever andrelease it.
4. Take your foot off the accelerator pedal.
2-63
Resuming a Set Speed
Suppose you set your cruise control at a desired speed and then you apply the brake. This, of course, shuts off the cruise control. But you don’t need to reset it. Once you’re going about 25 mph (40 km/h) or more, you can move the cruise control switch from ON to R/A (resume/accel) briefly.
You’ll go right back up to your chosen speed and stay there.
If you hold the switch at R/A, the vehicle will keepgoing faster until you release the switch or apply thebrake. So unless you want to go faster, don’t hold the switch at R/A.
Increasing Speed While Using Cruise Control
There are two ways to go to a higher speed:
� Use the accelerator pedal to get to the higher speed.Push the SET button at the end of the lever, thenrelease the button and the accelerator pedal. You’ll now cruise at the higher speed.
� Move the cruise switch from ON to R/A. Hold itthere until you get up to the speed you want, andthen release the switch. (To increase your speed invery small amounts, move the switch to R/A brieflyand then release it. Each time you do this, yourvehicle will go about 1 mph (1.6 km/h) faster.)
The accelerate feature will work whether or not youhave set an initial cruise control speed.
Reducing Speed While Using Cruise Control
There are two ways to reduce speed while using cruise control:
� Push in the SET button at the end of the lever untilyou reach the lower speed you want, then release it.
� To slow down in very small amounts, push the SET button briefly. Each time you do this, you’ll go1 mph (1.6 km/h) slower.
Passing Another Vehicle While Using Cruise Control
Use the accelerator pedal to increase your speed. Whenyou take your foot off the pedal, your vehicle will slowdown to the cruise control speed you set earlier.
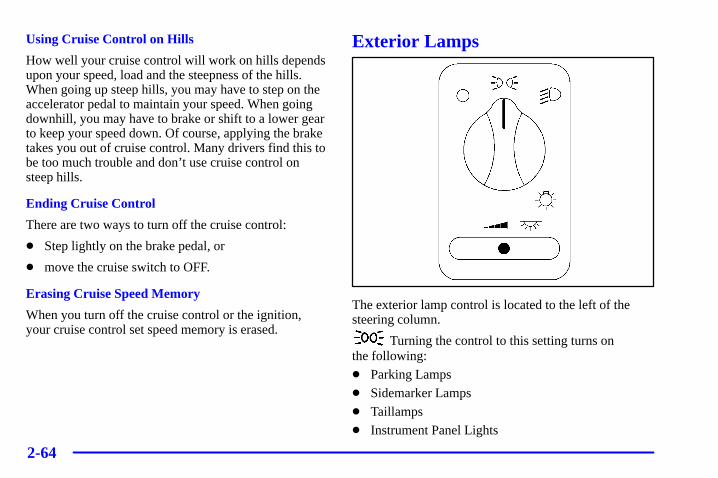
2-64
Using Cruise Control on Hills
How well your cruise control will work on hills dependsupon your speed, load and the steepness of the hills.When going up steep hills, you may have to step on theaccelerator pedal to maintain your speed. When goingdownhill, you may have to brake or shift to a lower gearto keep your speed down. Of course, applying the braketakes you out of cruise control. Many drivers find this tobe too much trouble and don’t use cruise control onsteep hills.
Ending Cruise Control
There are two ways to turn off the cruise control:
� Step lightly on the brake pedal, or
� move the cruise switch to OFF.
Erasing Cruise Speed Memory
When you turn off the cruise control or the ignition,your cruise control set speed memory is erased.
Exterior Lamps
The exterior lamp control is located to the left of thesteering column.
Turning the control to this setting turns on the following:
� Parking Lamps� Sidemarker Lamps
� Taillamps
� Instrument Panel Lights
2-65
Turning the control to this setting turns on theheadlamps, together with the following:
� Parking Lamps
� Sidemarker Lamps
� Taillamps
� Instrument Panel Lights
Turning the control to this setting turns off all thelamps and lights.
Lamps on ReminderIf the driver’s door is opened and you turn the ignitionto OFF or LOCK while leaving the lamps on, you willhear a warning chime.
Daytime Running LampsDaytime Running Lamps (DRL) can make it easier forothers to see the front of your vehicle during the day.DRL can be helpful in many different drivingconditions, but they can be especially helpful in theshort periods after dawn and before sunset. Fullyfunctional daytime running lights are required on allvehicles first sold in Canada.
A light sensor on top of the instrument panel makes theDRL work, so be sure it isn’t covered. The DRL systemwill make your front parking and turn signal lampscome on in daylight when the following conditions are met:
� The ignition is on,
� the headlamp control is off, and
� the parking brake is released.
When the DRL are on, only your front parking and turnsignal lamps will be on. Your instrument panel won’t belit up.
When it’s dark enough outside, the exterior lamps willcome on automatically. When it’s bright enough outside,the exterior lamps will turn off and the DRL will turnon. Of course, you may still turn on the headlamps anytime you need to.
To idle your vehicle with the DRL, set the parking brakewhile the ignition is in OFF or LOCK. Then start thevehicle. The DRL will stay off until you release theparking brake.
As with any vehicle, you should turn on the regularheadlamp system when you need it.
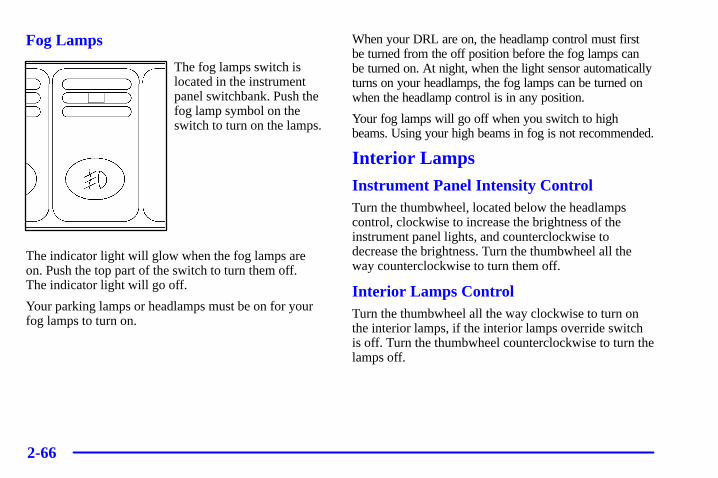
2-66
Fog Lamps
The fog lamps switch islocated in the instrumentpanel switchbank. Push thefog lamp symbol on theswitch to turn on the lamps.
The indicator light will glow when the fog lamps are on. Push the top part of the switch to turn them off. The indicator light will go off.
Your parking lamps or headlamps must be on for yourfog lamps to turn on.
When your DRL are on, the headlamp control must firstbe turned from the off position before the fog lamps canbe turned on. At night, when the light sensor automaticallyturns on your headlamps, the fog lamps can be turned onwhen the headlamp control is in any position.
Your fog lamps will go off when you switch to highbeams. Using your high beams in fog is not recommended.
Interior LampsInstrument Panel Intensity ControlTurn the thumbwheel, located below the headlampscontrol, clockwise to increase the brightness of theinstrument panel lights, and counterclockwise todecrease the brightness. Turn the thumbwheel all theway counterclockwise to turn them off.
Interior Lamps ControlTurn the thumbwheel all the way clockwise to turn onthe interior lamps, if the interior lamps override switchis off. Turn the thumbwheel counterclockwise to turn thelamps off.

2-67
Interior Lamps Override Switch
This switch is located in the overhead console switchbank.
Press the symbol on the bottom of the switch to overridecontrol of the interior lamps and turn off power to thecourtesy lamps, reading lamps, visor vanity lamps (if equipped) and glove box lamp. This feature allowsyou to have the lamps off when any door is open.
Press the top of the interior lamps override switch toturn power back on to the interior lamps. This will allowthe lamps to stay on when any door is open.
Illuminated EntryWith illuminated entry, the interior of your vehicle isilluminated so that you can see inside before you enteryour vehicle. The lamps will come on for 40 seconds ifyou unlock your door using your key or the remotekeyless entry transmitter and the ignition is in LOCK orOFF. After 40 seconds have passed, the interior lampswill slowly fade out. The lamps will turn off before the40 seconds if you do one of the following:
� Lock all the doors using the key,
� press LOCK on the power door lock switch, or
� press LOCK on the remote keyless entry transmitter.
When any door is opened, illuminated entry is cancelled.The interior lamps will stay on while any door or liftgateis open, and slowly fade out when all doors and theliftgate are closed.
The interior lamps may stay on for up to 25 secondsafter all doors have been closed if they have not beenlocked. See “Delayed Illumination” next in this section.
To turn the exit lighting feature off or on, see“Multifunction Alarm Locks and Lighting Choices” inthe Index.
2-68
Delayed IlluminationThe delayed illumination feature will continue toilluminate the interior for 25 seconds after all doors havebeen closed so that you can find your ignition andbuckle your safety belt at night. Delayed illuminationwill not occur while the ignition is in RUN orACCESSORY. After 25 seconds have passed, theinterior lamps will slowly fade out. The lamps will fadeout before the 25 seconds have passed if you do one ofthe following:
� Turn the ignition to RUN or ACCESSORY,
� lock all doors using the remote keyless entrytransmitter, or
� lock all the doors using the power door lock switchor the key.
To turn the delayed illumination feature off or on, see“Multifunction Alarm Locks and Lighting Choices” inthe Index.
Exit LightingWith exit lighting, the interior lamps will come on forabout 25 seconds whenever you remove the key fromthe ignition. If you turn the ignition key to RUN orACCESSORY, the lamps will fade out. The lamps willalso fade out if you lock the doors with the power doorlock switch or the remote keyless entry transmitter.
When any door is opened, exit lighting is cancelled. Theinterior lamps will stay on while any door or the liftgateis open, and slowly fade out when all doors and theliftgate are closed.
The interior lamps may stay on for up to 25 seconds afterall doors have been closed if they have not been locked,see “Delayed Illumination” earlier in this section.
To turn the exit lighting feature off or on, see“Multifunction Alarm Locks and Lighting Choices” inthe Index.
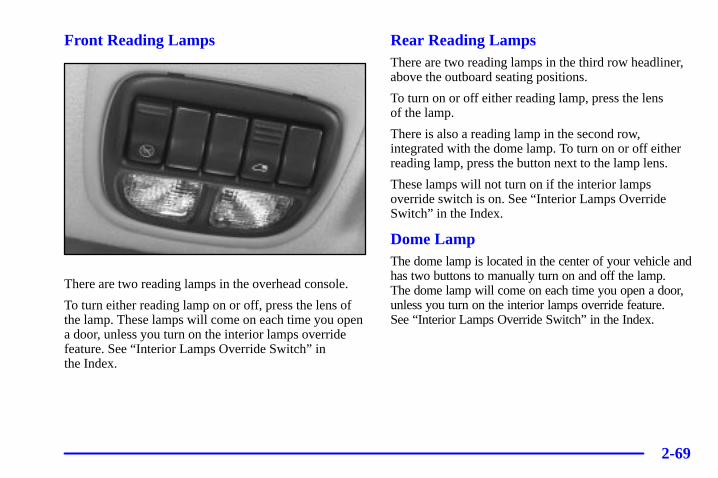
2-69
Front Reading Lamps
There are two reading lamps in the overhead console.
To turn either reading lamp on or off, press the lens ofthe lamp. These lamps will come on each time you opena door, unless you turn on the interior lamps overridefeature. See “Interior Lamps Override Switch” in the Index.
Rear Reading LampsThere are two reading lamps in the third row headliner,above the outboard seating positions.
To turn on or off either reading lamp, press the lens of the lamp.
There is also a reading lamp in the second row,integrated with the dome lamp. To turn on or off eitherreading lamp, press the button next to the lamp lens.
These lamps will not turn on if the interior lampsoverride switch is on. See “Interior Lamps OverrideSwitch” in the Index.
Dome LampThe dome lamp is located in the center of your vehicle andhas two buttons to manually turn on and off the lamp. The dome lamp will come on each time you open a door,unless you turn on the interior lamps override feature. See “Interior Lamps Override Switch” in the Index.

2-70
Cargo LampThe cargo lamp is located in the rear of your vehicle,above the liftgate opening, and does not have a switch.The cargo lamp will come on each time you open adoor, unless you turn on the interior lamps override. See “Interior Lamps Override Switch” in the Index.
Battery SaverYour vehicle has a feature to help prevent you fromdraining the battery, in case you accidentally leave theinterior lamps on. If you leave any interior lamps onwhile the ignition is in LOCK or OFF, they willautomatically turn off after 10 minutes. The lamps won’tcome back on again until you do one of the following:
� Turn the ignition to RUN or ACCESSORY,
� turn the interior lamps thumbwheel all the wayclockwise, then slightly back counterclockwise, or
� open (or close and reopen) a door that is closed.
If your vehicle has less than 15 miles (25 km) on theodometer, the battery saver will turn off the lamps afteronly three minutes.
MirrorsInside Day/Night Rearview MirrorTo reduce glare from lights behind you, pull the levertoward you (to the night position). To return the mirrorto the day position, push the lever away from you.
Power Remote Control Mirrors
The control located on thedriver’s door operates bothoutside rearview mirrors.
2-71
Turn the control counterclockwise to select the driver’s side rearview mirror, or clockwise to select thepassenger’s side rearview mirror. Then use the control toadjust each mirror so that you can see a little of the sideof your vehicle when you are sitting in a comfortabledriving position.
If you are not adjusting either mirror, leave the controlin the center off position. This prevents moving themirrors accidentally once you have them adjusted.
Both outside mirrors can be folded forward or rearward.In the rearward position, they will fold almost flush withthe vehicle. This feature is particularly useful inautomatic car washes.
Your mirrors have a blue tint to reduce glare whiledriving at night.
Convex Outside MirrorYour passenger’s side mirror is convex. A convexmirror’s surface is curved so you can see more from thedriver’s seat.
CAUTION:
A convex mirror can make things (like othervehicles) look farther away than they really are.If you cut too sharply into the right lane, youcould hit a vehicle on your right. Check yourinside mirror or glance over your shoulder beforechanging lanes.
Heated Outside MirrorsThe outside rearview mirrors are heated when youactivate the rear window defogger. See “Rear WindowDefogger” in the Index.
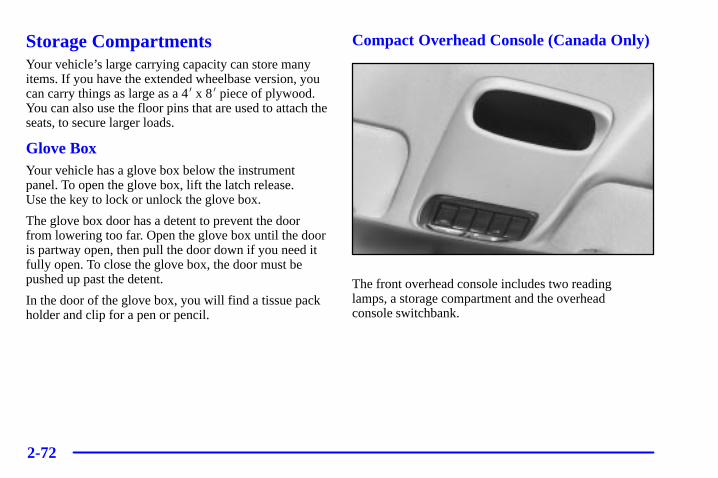
2-72
Storage CompartmentsYour vehicle’s large carrying capacity can store manyitems. If you have the extended wheelbase version, youcan carry things as large as a 4� x 8� piece of plywood.You can also use the floor pins that are used to attach theseats, to secure larger loads.
Glove BoxYour vehicle has a glove box below the instrumentpanel. To open the glove box, lift the latch release. Use the key to lock or unlock the glove box.
The glove box door has a detent to prevent the doorfrom lowering too far. Open the glove box until the dooris partway open, then pull the door down if you need itfully open. To close the glove box, the door must bepushed up past the detent.
In the door of the glove box, you will find a tissue packholder and clip for a pen or pencil.
Compact Overhead Console (Canada Only)
The front overhead console includes two reading lamps, a storage compartment and the overhead console switchbank.
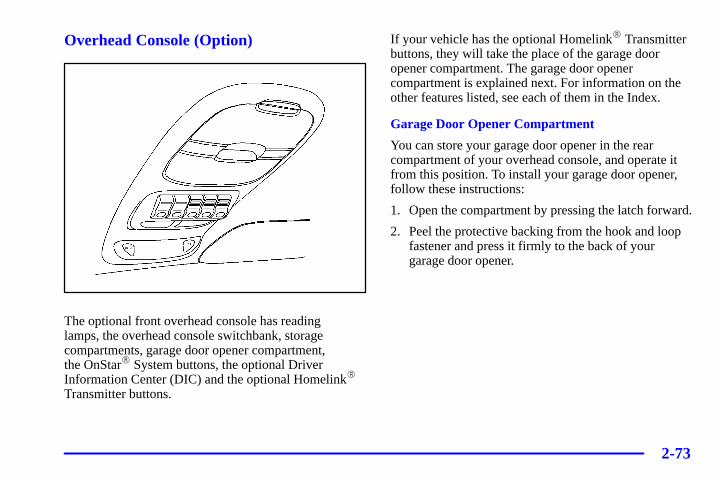
2-73
Overhead Console (Option)
The optional front overhead console has reading lamps, the overhead console switchbank, storagecompartments, garage door opener compartment, the OnStar� System buttons, the optional DriverInformation Center (DIC) and the optional Homelink�
Transmitter buttons.
If your vehicle has the optional Homelink� Transmitterbuttons, they will take the place of the garage dooropener compartment. The garage door openercompartment is explained next. For information on theother features listed, see each of them in the Index.
Garage Door Opener Compartment
You can store your garage door opener in the rearcompartment of your overhead console, and operate itfrom this position. To install your garage door opener,follow these instructions:
1. Open the compartment by pressing the latch forward.
2. Peel the protective backing from the hook and loopfastener and press it firmly to the back of yourgarage door opener.
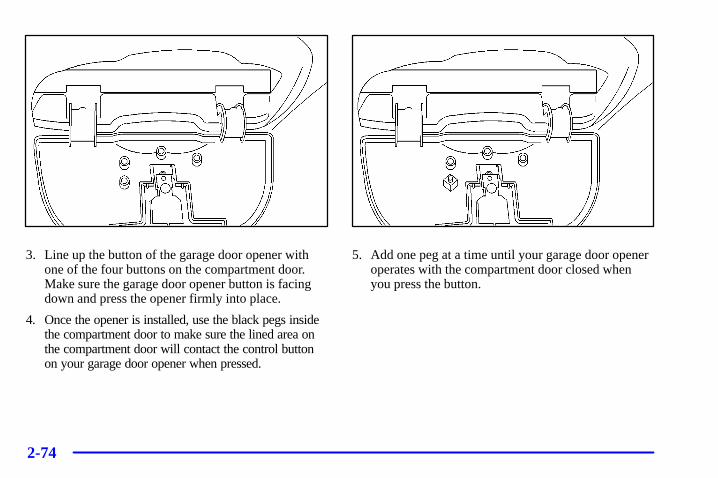
2-74
3. Line up the button of the garage door opener withone of the four buttons on the compartment door.Make sure the garage door opener button is facingdown and press the opener firmly into place.
4. Once the opener is installed, use the black pegs insidethe compartment door to make sure the lined area onthe compartment door will contact the control buttonon your garage door opener when pressed.
5. Add one peg at a time until your garage door openeroperates with the compartment door closed whenyou press the button.
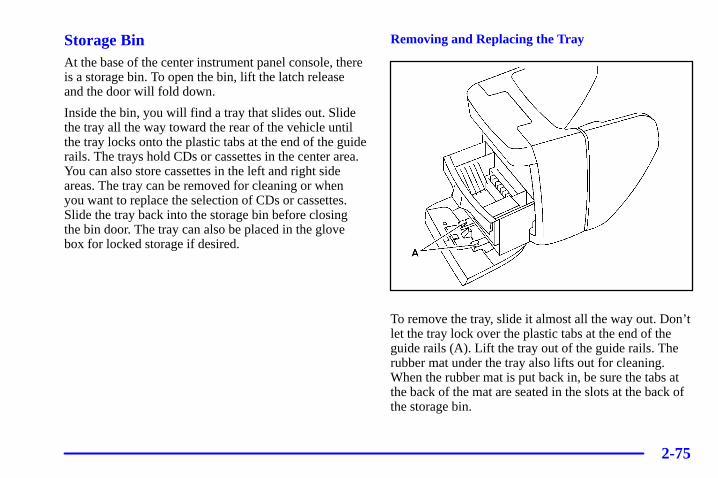
2-75
Storage BinAt the base of the center instrument panel console, thereis a storage bin. To open the bin, lift the latch releaseand the door will fold down.
Inside the bin, you will find a tray that slides out. Slidethe tray all the way toward the rear of the vehicle untilthe tray locks onto the plastic tabs at the end of the guiderails. The trays hold CDs or cassettes in the center area.You can also store cassettes in the left and right sideareas. The tray can be removed for cleaning or whenyou want to replace the selection of CDs or cassettes.Slide the tray back into the storage bin before closingthe bin door. The tray can also be placed in the glovebox for locked storage if desired.
Removing and Replacing the Tray
To remove the tray, slide it almost all the way out. Don’tlet the tray lock over the plastic tabs at the end of theguide rails (A). Lift the tray out of the guide rails. Therubber mat under the tray also lifts out for cleaning.When the rubber mat is put back in, be sure the tabs atthe back of the mat are seated in the slots at the back ofthe storage bin.
2-76
The dividers in the tray can be removed by squeezingthe plastic tabs on the bottom of the dividers, whilepulling up. Put the dividers back in by sliding themdown until the tabs click into place.
To reinstall the tray, line up the guides on the bottom of the tray with the guide rails in the storage bin door.Slide the tray back in.
Front Seat Storage BinThe storage bin is located under the manual frontpassenger’s seat. To open the bin, lift the handle andslide the drawer out.
CupholdersThere are cupholders located below the center consoleswitchbank. The cupholders have a removeable liner forlarger size cups and for cleaning the cupholders.
To use the cupholders, simply pull out the tray. Keep thetray in when not in use.
Saddlebag (If Equipped)If your vehicle has the saddlebag, it provides extrastorage space. It is found in the rear of your vehicle. It is designed to be stored in the side convenience netsand contains the inflator hose and valve stems/adaptorsfor the optional accessory inflator system.
Rear Storage Compartments and CupholdersYour vehicle has a storage compartment and may have a cupholder on the driver’s side of the vehicle, next tothe third row seat(s).
Your vehicle also has cupholders on the bottom inboardside of the second row driver’s side captain’s chairs (if equipped) and the seatbacks have cupholders that can be used when the seatbacks are folded forward.
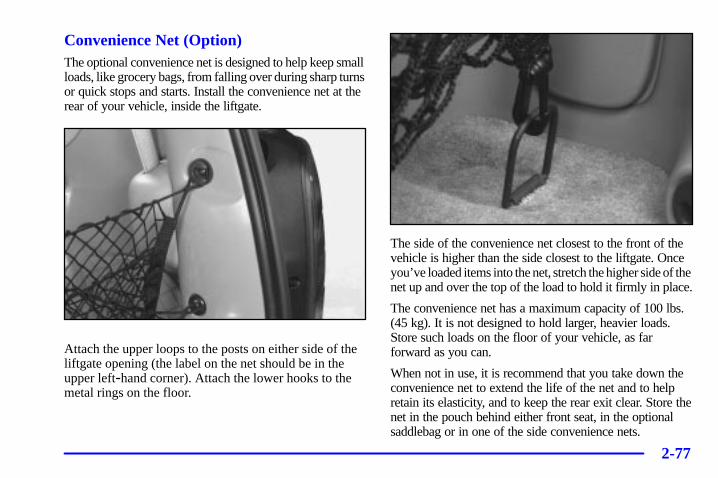
2-77
Convenience Net (Option)The optional convenience net is designed to help keep small loads, like grocery bags, from falling over during sharp turns or quick stops and starts. Install the convenience net at the rear of your vehicle, inside the liftgate.
Attach the upper loops to the posts on either side of theliftgate opening (the label on the net should be in theupper left-hand corner). Attach the lower hooks to themetal rings on the floor.
The side of the convenience net closest to the front of the vehicle is higher than the side closest to the liftgate. Once you’ve loaded items into the net, stretch the higher side of the net up and over the top of the load to hold it firmly in place.
The convenience net has a maximum capacity of 100 lbs. (45 kg). It is not designed to hold larger, heavier loads. Store such loads on the floor of your vehicle, as farforward as you can.
When not in use, it is recommend that you take down theconvenience net to extend the life of the net and to helpretain its elasticity, and to keep the rear exit clear. Store thenet in the pouch behind either front seat, in the optionalsaddlebag or in one of the side convenience nets.
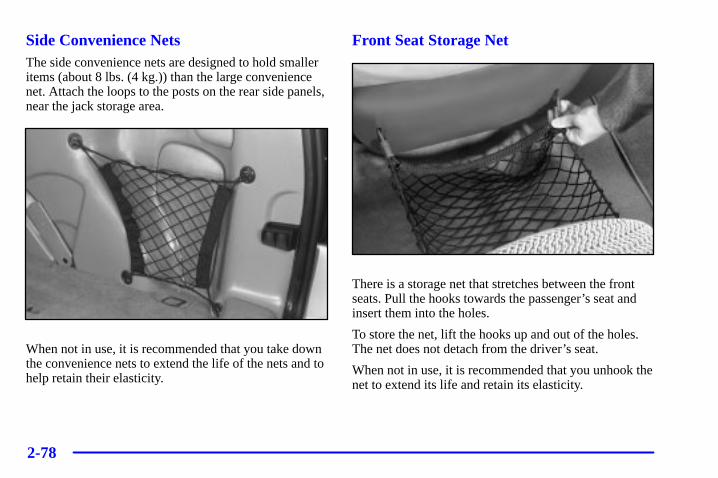
2-78
Side Convenience NetsThe side convenience nets are designed to hold smalleritems (about 8 lbs. (4 kg.)) than the large conveniencenet. Attach the loops to the posts on the rear side panels,near the jack storage area.
When not in use, it is recommended that you take downthe convenience nets to extend the life of the nets and tohelp retain their elasticity.
Front Seat Storage Net
There is a storage net that stretches between the frontseats. Pull the hooks towards the passenger’s seat andinsert them into the holes.
To store the net, lift the hooks up and out of the holes.The net does not detach from the driver’s seat.
When not in use, it is recommended that you unhook thenet to extend its life and retain its elasticity.
2-79
Convenience Center (Option)
CAUTION:
If the convenience center isn’t secured properly,it can move around in a collision or sudden stop.People in the vehicle could be injured. Be sure tosecure the convenience center properly.
The convenience center comes with the optionalstowable seat. It provides extra storage space for the rearof the vehicle.
To open the convenience center, pull up on the doorlatch located in the front. The convenience center coverhas two automatic prop rods to hold it up and in place.
To close the convenience center cover you must pull one of the prop rod linkages toward you while holdingonto the door latch and lower the convenience centercover to close it.
Removing the Convenience Center
1. Make sure that all items are off of the conveniencecenter and that it is empty.
2. Turn the hand knob counterclockwise until the knobis loose.
3. Lift up on the hand knob to grab a hold of theconvenience center.
4. Lift up on the convenience center while pulling ittoward you and pull it out.
Replacing the Convenience Center
1. The stowable seat must be properly installed in the vehicle. See “Stowable Seat” in the Index for more information. If the stowable seat is not in the vehicle with the convenience center, the convenience center will not be locked into the correct position in the vehicle.
2. Make sure that the convenience center is closed.
3. Lift the convenience center up and into the rear ofthe vehicle.
2-80
4. Put the tray sill, located on the back of theconvenience center, in the upright position.
5. Slide the convenience center in and align it so thatthe forks, located on the bottom rear of theconvenience center, slide into the seat anchors.
6. Press down on the front of the convenience center sothe center locates on the sill mounting bracket.
7. Turn the hand knob clockwise until it is tight.
8. Pull up on the convenience center to make sure it islocked into place.
The tray sill can be folded down onto the stowable seatto close the space between the two when the stowableseat is folded down. To do this, flip the sill plate up andover toward the stowable seat.
The cover of the convenience center can be left in itsupright position while the vehicle is moving.
The convenience center has six hooks on the insidecover for hanging items on. The prop rods can hold upto 49 lbs. (21.8 kg) on the cover of the conveniencecenter while in its upright position.
The convenience center and the stowable seat both havea maximum weight capacity of 400 lbs. (181.6 kg).
NOTICE:
Your warranty does not cover parts orcomponents that fail because of overloading.
2-81
Luggage Carrier (Option)
CAUTION:
If you try to carry something on top of yourvehicle that is longer or wider than the luggagecarrier -- like paneling, plywood, a mattress, andso forth -- the wind can catch it as you drivealong. This can cause you to lose control. Whatyou are carrying could be violently torn off, andthis could cause you or other drivers to have acollision, and of course damage your vehicle. Youmay be able to carry something like this inside.But, never carry something longer or wider thanthe luggage carrier on top of your vehicle.
If you have the optional luggage carrier, you can loadthings on top of your vehicle. The luggage carrier hasslats and side rails attached to the roof, as well as slidingcrossrails and places to use for tying things down. Theselet you load some things on top of your vehicle, as longas they are not wider or longer than the luggage carrier.

2-82
NOTICE:
Loading cargo that weighs more than 150 lbs. (68 kg)on the luggage carrier may damage your vehicle.When you carry cargo on the luggage carrier of aproper size and weight, put it on the slats, as farforward as you can. Then slide the crossrail upagainst the rear of the load, to help keep it frommoving. You can then tie it down.
Don’t exceed the maximum vehicle capacity whenloading your vehicle. For more information on vehiclecapacity and loading, see “Loading Your Vehicle” in the Index.
To prevent damage or loss of cargo as you’re driving,check now and then to make sure the luggage carrier andcargo are still securely fastened.
Your luggage carrier hasrelease knobs set in the endsof each crossrail.
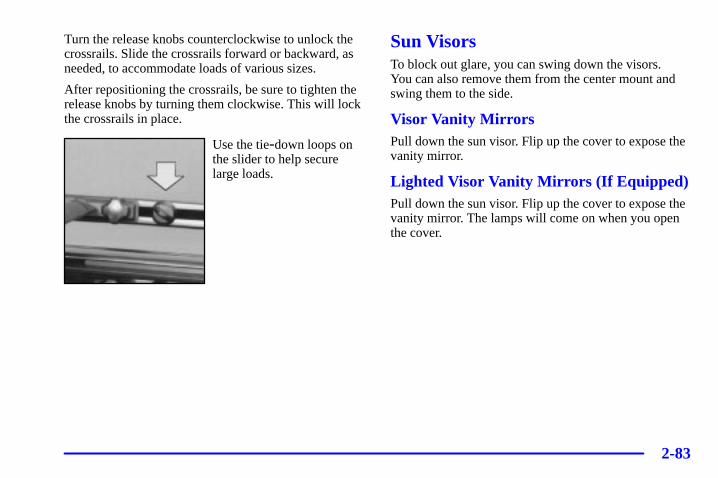
2-83
Turn the release knobs counterclockwise to unlock thecrossrails. Slide the crossrails forward or backward, asneeded, to accommodate loads of various sizes.
After repositioning the crossrails, be sure to tighten therelease knobs by turning them clockwise. This will lockthe crossrails in place.
Use the tie-down loops onthe slider to help securelarge loads.
Sun VisorsTo block out glare, you can swing down the visors. You can also remove them from the center mount andswing them to the side.
Visor Vanity MirrorsPull down the sun visor. Flip up the cover to expose thevanity mirror.
Lighted Visor Vanity Mirrors (If Equipped)Pull down the sun visor. Flip up the cover to expose thevanity mirror. The lamps will come on when you openthe cover.
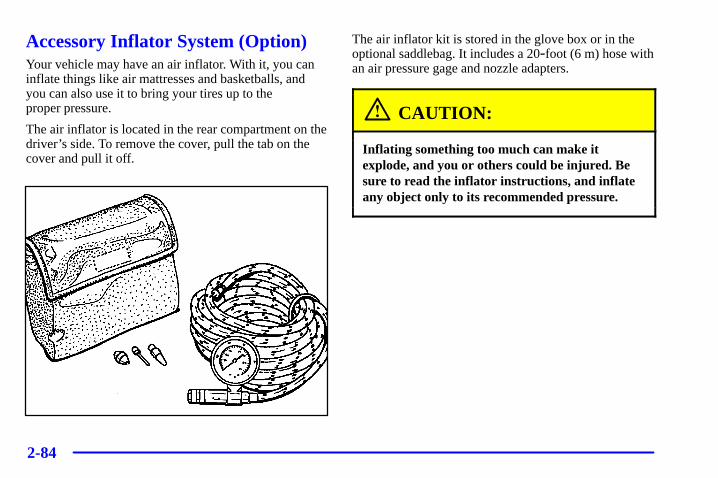
2-84
Accessory Inflator System (Option)Your vehicle may have an air inflator. With it, you caninflate things like air mattresses and basketballs, andyou can also use it to bring your tires up to the proper pressure.
The air inflator is located in the rear compartment on thedriver’s side. To remove the cover, pull the tab on thecover and pull it off.
The air inflator kit is stored in the glove box or in theoptional saddlebag. It includes a 20-foot (6 m) hose withan air pressure gage and nozzle adapters.
CAUTION:
Inflating something too much can make itexplode, and you or others could be injured. Besure to read the inflator instructions, and inflateany object only to its recommended pressure.
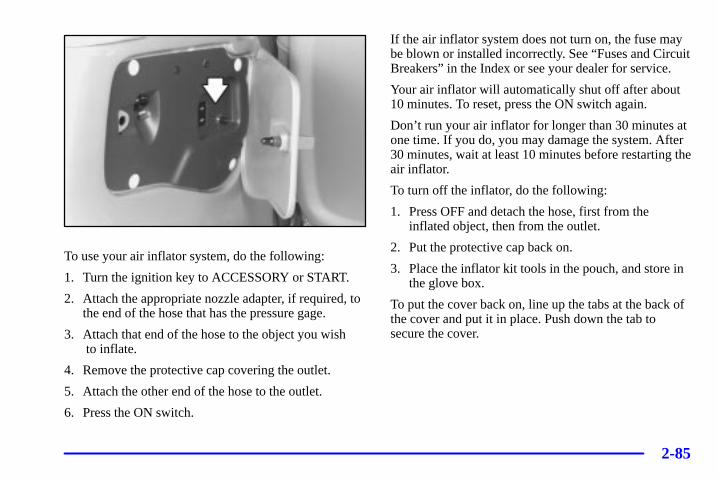
2-85
To use your air inflator system, do the following:
1. Turn the ignition key to ACCESSORY or START.
2. Attach the appropriate nozzle adapter, if required, tothe end of the hose that has the pressure gage.
3. Attach that end of the hose to the object you wish to inflate.
4. Remove the protective cap covering the outlet.
5. Attach the other end of the hose to the outlet.
6. Press the ON switch.
If the air inflator system does not turn on, the fuse maybe blown or installed incorrectly. See “Fuses and CircuitBreakers” in the Index or see your dealer for service.
Your air inflator will automatically shut off after about10 minutes. To reset, press the ON switch again.
Don’t run your air inflator for longer than 30 minutes atone time. If you do, you may damage the system. After30 minutes, wait at least 10 minutes before restarting theair inflator.
To turn off the inflator, do the following:
1. Press OFF and detach the hose, first from theinflated object, then from the outlet.
2. Put the protective cap back on.
3. Place the inflator kit tools in the pouch, and store inthe glove box.
To put the cover back on, line up the tabs at the back ofthe cover and put it in place. Push down the tab tosecure the cover.
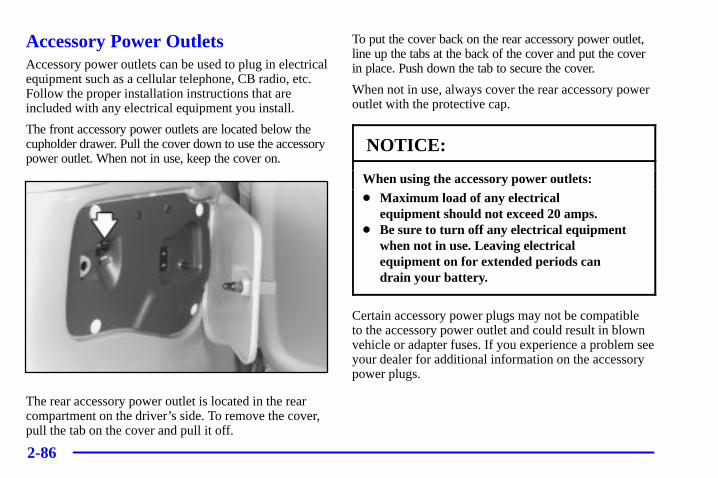
2-86
Accessory Power OutletsAccessory power outlets can be used to plug in electricalequipment such as a cellular telephone, CB radio, etc.Follow the proper installation instructions that areincluded with any electrical equipment you install.
The front accessory power outlets are located below the cupholder drawer. Pull the cover down to use the accessory power outlet. When not in use, keep the cover on.
The rear accessory power outlet is located in the rearcompartment on the driver’s side. To remove the cover,pull the tab on the cover and pull it off.
To put the cover back on the rear accessory power outlet,line up the tabs at the back of the cover and put the coverin place. Push down the tab to secure the cover.
When not in use, always cover the rear accessory poweroutlet with the protective cap.
NOTICE:
When using the accessory power outlets:� Maximum load of any electrical
equipment should not exceed 20 amps.� Be sure to turn off any electrical equipment
when not in use. Leaving electricalequipment on for extended periods candrain your battery.
Certain accessory power plugs may not be compatible to the accessory power outlet and could result in blownvehicle or adapter fuses. If you experience a problem seeyour dealer for additional information on the accessorypower plugs.
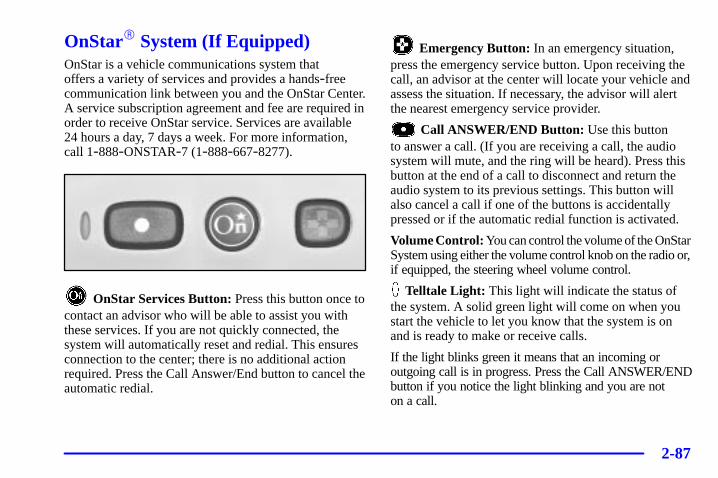
2-87
OnStar� System (If Equipped)OnStar is a vehicle communications system that offers a variety of services and provides a hands-freecommunication link between you and the OnStar Center.A service subscription agreement and fee are required inorder to receive OnStar service. Services are available24 hours a day, 7 days a week. For more information,call 1-888-ONSTAR-7 (1-888-667-8277).
OnStar Services Button: Press this button once tocontact an advisor who will be able to assist you withthese services. If you are not quickly connected, thesystem will automatically reset and redial. This ensuresconnection to the center; there is no additional actionrequired. Press the Call Answer/End button to cancel theautomatic redial.
Emergency Button: In an emergency situation,press the emergency service button. Upon receiving thecall, an advisor at the center will locate your vehicle andassess the situation. If necessary, the advisor will alertthe nearest emergency service provider.
Call ANSWER/END Button: Use this button to answer a call. (If you are receiving a call, the audiosystem will mute, and the ring will be heard). Press thisbutton at the end of a call to disconnect and return theaudio system to its previous settings. This button willalso cancel a call if one of the buttons is accidentallypressed or if the automatic redial function is activated.
Volume Control: You can control the volume of the OnStar System using either the volume control knob on the radio or, if equipped, the steering wheel volume control.
Telltale Light: This light will indicate the status ofthe system. A solid green light will come on when youstart the vehicle to let you know that the system is onand is ready to make or receive calls.
If the light blinks green it means that an incoming oroutgoing call is in progress. Press the Call ANSWER/ENDbutton if you notice the light blinking and you are not on a call.
2-88
The light will be red in the event of an OnStar systemmalfunction. If this occurs press the OnStar button toattempt to contact an advisor. If the connection is made,the advisor will assist you with steps to take to makesure that the system is functioning properly. If youcannot contact the advisor, take your vehicle to yourdealership as soon as possible for assistance.
Safety and Security Services� Automatic Notification of Air Bag
Deployment -- If an air bag deploys, a priorityemergency signal is automatically sent to the center.An advisor will locate your vehicle’s position, try tocontact you and assist you in the situation. If thecenter is unable to contact you, an emergency serviceprovider will be contacted.
� Stolen Vehicle Tracking -- Call the center at1-888-4-ONSTAR (1-888-466-7827) to report yourvehicle stolen. The system can then locate and trackyour vehicle and the advisor will be able to notifythe proper authorities.
� Roadside Assistance with Location -- For vehiclebreakdowns, press the OnStar button. An advisorwill contact the appropriate help.
� Remote Diagnostics -- If an instrument panel lightcomes on, the center can perform a check of theengine on-board computer. An advisor can thenrecommend what action needs to be taken.
� OnStar MED-NET -- Med-Net can store yourpersonal medical history and provide it to emergencypersonnel if necessary. (Requires activation andadditional fee.)
� Accident Assist -- An advisor can providestep-by-step guidance following an accident.
� Remote Door Unlock -- To contact the center, call1-888-4-ONSTAR. You will be required to provideyour security information. An advisor will send acommand to your vehicle to unlock itself. Theadvisor can delay unlocking your vehicle. RemoteDoor Unlock is disabled 48 hours after the vehicle isparked to maintain the battery charge.
� Vehicle Locator Service -- To contact the center,call 1-888-4-ONSTAR. You will be required toprovide your security information. An advisor willsend a command to your vehicle to sound the hornand/or flash the lamps.
In order to provide you with excellent service, calls withthe OnStar Center may be monitored or recorded.
2-89
Premium Services (Includes Safety andSecurity Services)� Route Support -- An advisor can provide directions
or guidance to anywhere you want to go. In addition,they can help you locate gas stations, rest areas,ATMs, hospitals, hotels, stores, eateries and more.
� Concierge Services -- The concierge advisor canobtain tickets, reservations, or help with vacation/tripplanning and other unique items and services.
� Ride Assist -- An advisor can locate transportationin the event that you are unable to drive.
OnStar System LimitationsComplete limitations can be found on the SubscriberServices Agreement.
OnStar Service is:
� Available in the 48 contiguous United States, Alaska,Hawaii and Canada;
� available when the vehicle is within the operatingrange of a cellular provider;
� subject to limitations caused by atmosphericconditions, such as severe weather or topographicalconditions, such as mountainous terrain;
� subject to cellular carrier equipment limitations.
Global positioning capabilities used to deliver OnStar servicewill not be available if satellite signals are obstructed.
OnStar will not function if the vehicle’s battery isdischarged or disconnected. It may also be inoperative ifthe vehicle is in an accident and the OnStar or vehicleelectrical system components are damaged.
Safety and security services are provided by existinggovernmental emergency service providers. OnStar willuse reasonable efforts to contact the appropriateemergency service provider and request assistance butcannot promise that they will respond to the call in atimely manner or at all.
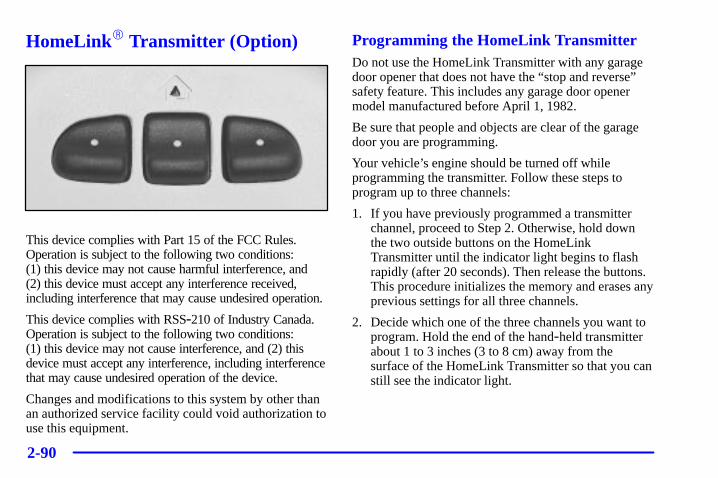
2-90
HomeLink� Transmitter (Option)
This device complies with Part 15 of the FCC Rules.Operation is subject to the following two conditions: (1) this device may not cause harmful interference, and (2) this device must accept any interference received,including interference that may cause undesired operation.
This device complies with RSS-210 of Industry Canada.Operation is subject to the following two conditions: (1) this device may not cause interference, and (2) thisdevice must accept any interference, including interferencethat may cause undesired operation of the device.
Changes and modifications to this system by other thanan authorized service facility could void authorization touse this equipment.
Programming the HomeLink TransmitterDo not use the HomeLink Transmitter with any garagedoor opener that does not have the “stop and reverse”safety feature. This includes any garage door openermodel manufactured before April 1, 1982.
Be sure that people and objects are clear of the garagedoor you are programming.
Your vehicle’s engine should be turned off whileprogramming the transmitter. Follow these steps toprogram up to three channels:
1. If you have previously programmed a transmitterchannel, proceed to Step 2. Otherwise, hold downthe two outside buttons on the HomeLinkTransmitter until the indicator light begins to flashrapidly (after 20 seconds). Then release the buttons.This procedure initializes the memory and erases anyprevious settings for all three channels.
2. Decide which one of the three channels you want toprogram. Hold the end of the hand-held transmitterabout 1 to 3 inches (3 to 8 cm) away from thesurface of the HomeLink Transmitter so that you canstill see the indicator light.
2-91
3. Using both hands, press the hand-held transmitterbutton and the desired button on the HomeLinkTransmitter. Continue to press both buttons through Step 4.
4. Hold down both buttons until you see the indicatorlight on the HomeLink Transmitter flash slowly andthen rapidly. The rapid flashing indicates that theHomeLink Transmitter has been programmed.Release both buttons once the indicator light starts toflash rapidly.
If you have trouble programming the HomeLinkTransmitter, make sure that you have followed thedirections exactly as described. The HomeLinkTransmitter may not work with older garage dooropeners that do not meet current Federal ConsumerSafety Standards. If you cannot program the transmitterafter repeated attempts, refer to “Rolling CodeProgramming” later in this section or contact theHomeLink Transmitter manufacturer at 1-800-355-3515.
Be sure to keep the original hand-held transmitter incase you need to erase and reprogram the HomeLink Transmitter.
Canadian Owners: During programming, thehand-held transmitter may automatically stoptransmitting after one or two seconds. In this case, youshould press and re-press the button on the hand-heldtransmitter every two seconds without ever releasing thebutton on the HomeLink Transmitter. Release bothbuttons when the indicator light on the HomeLinkTransmitter begins to flash rapidly.
2-92
Operating the HomeLink TransmitterPress and release the appropriate button on theHomeLink Transmitter. The indicator light comes onwhile the signal is being transmitted.
If the hand-held transmitter appears to program theHomeLink Transmitter but does not open your garagedoor, and if the garage door opener was manufacturedafter 1996, the garage door opener may have a “rollingcode” system. A rolling code system changes the codeof the garage door opener every time you open or closethe garage door.
To determine if you have this system, press the button onthe HomeLink Transmitter that you have programmedalready. If the indicator light on the HomeLink Transmitterflashes rapidly for two seconds and then turns solid, thegarage door opener has a rolling code system. In a rollingcode system, the garage door motor head unit must betrained to the HomeLink Transmitter.
“Rolling Code” ProgrammingIf you have not previously programmed the hand-heldtransmitter to the HomeLink Transmitter, see“Programming the HomeLink Transmitter” listedpreviously. If you have completed this programmingalready, you now need to train the garage door openermotor head unit to recognize the HomeLink Transmitter.
1. Find the training button on the garage door openermotor head unit. The exact location and color of thebutton may vary by garage door opener brand. If youhave difficulty finding the training button, refer toyour garage door opener owner’s manual.
Because of the steps involved, it may be helpful tohave another person available to assist you inprogramming the transmitter.
2-93
2. Press the training button on the garage door openermotor head unit.
Following this step, you have 30 seconds to start Step 3.
3. Return to the HomeLink Transmitter in your vehicleand firmly press and release the HomeLinkTransmitter button you have already programmed fortwo to three seconds. Press and release the buttonagain (you may need to do this step up to threetimes) to make sure that the HomeLink Transmitterhas been trained to the garage door opener motorhead unit. Check that the training was successful.
The garage door opener should now recognize theHomeLink Transmitter. You may either use theHomeLink Transmitter or the hand-held transmitter toopen the garage door.
If after following these instructions, you still haveproblems training the garage door opener, contact theHomeLink Transmitter manufacturer at 1-800-355-3515.
Erasing ChannelsTo erase all three programmed channels, hold down thetwo outside buttons until the indicator light begins toflash (after 20 seconds). Release both buttons.
AccessoriesAccessories for the HomeLink Transmitter are availablefrom the manufacturer of the unit. If you would likeadditional information, please call 1-800-355-3515.
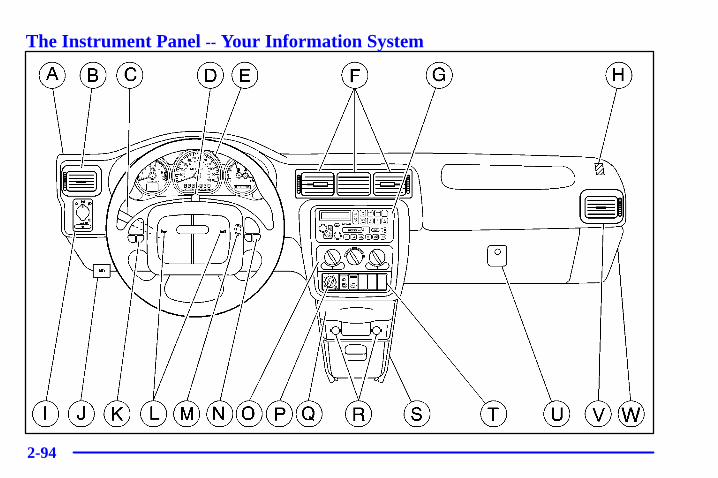
2-94
The Instrument Panel -- Your Information System
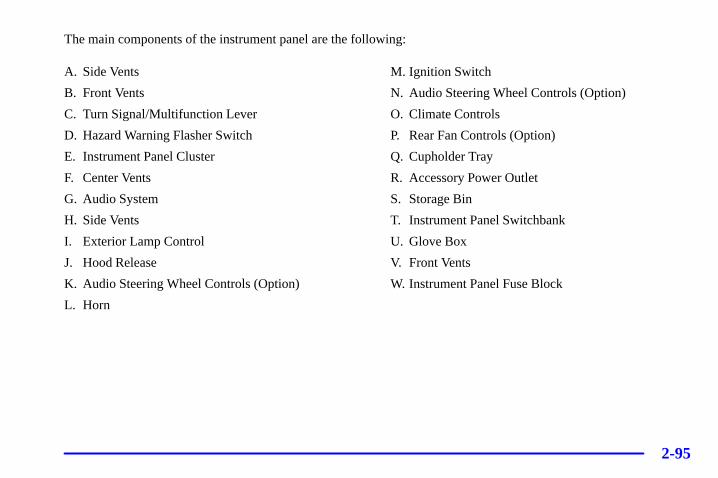
2-95
The main components of the instrument panel are the following:
A. Side Vents
B. Front Vents
C. Turn Signal/Multifunction Lever
D. Hazard Warning Flasher Switch
E. Instrument Panel Cluster
F. Center Vents
G. Audio System
H. Side Vents
I. Exterior Lamp Control
J. Hood Release
K. Audio Steering Wheel Controls (Option)
L. Horn
M. Ignition Switch
N. Audio Steering Wheel Controls (Option)
O. Climate Controls
P. Rear Fan Controls (Option)
Q. Cupholder Tray
R. Accessory Power Outlet
S. Storage Bin
T. Instrument Panel Switchbank
U. Glove Box
V. Front Vents
W. Instrument Panel Fuse Block
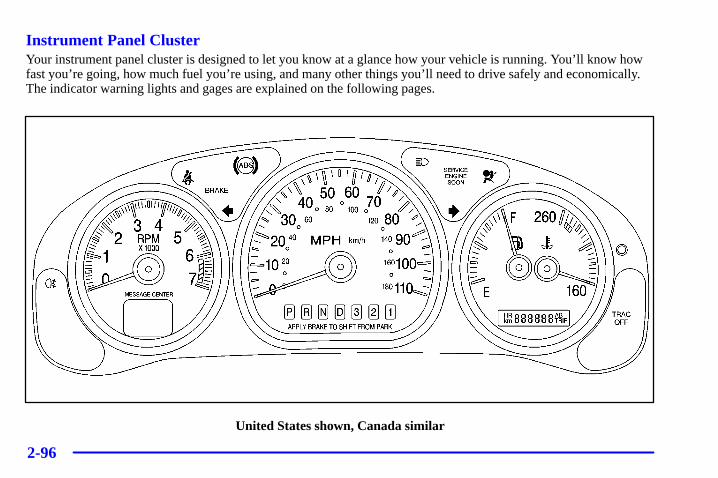
2-96
Instrument Panel ClusterYour instrument panel cluster is designed to let you know at a glance how your vehicle is running. You’ll know howfast you’re going, how much fuel you’re using, and many other things you’ll need to drive safely and economically.The indicator warning lights and gages are explained on the following pages.
United States shown, Canada similar
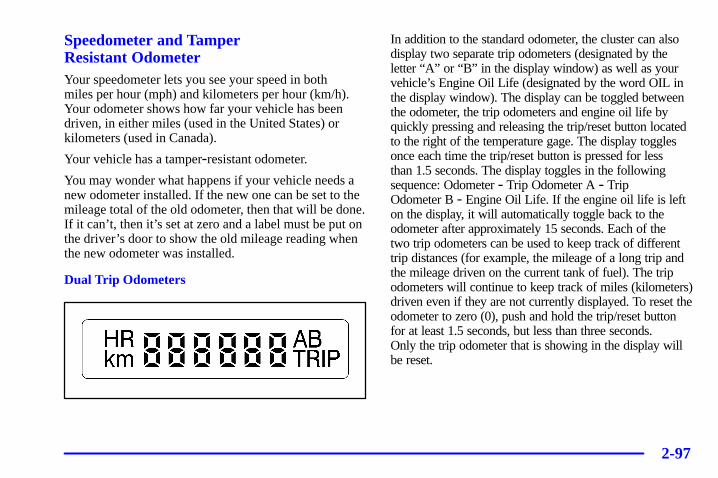
2-97
Speedometer and Tamper Resistant OdometerYour speedometer lets you see your speed in both miles per hour (mph) and kilometers per hour (km/h).Your odometer shows how far your vehicle has beendriven, in either miles (used in the United States) or kilometers (used in Canada).
Your vehicle has a tamper-resistant odometer.
You may wonder what happens if your vehicle needs anew odometer installed. If the new one can be set to themileage total of the old odometer, then that will be done.If it can’t, then it’s set at zero and a label must be put onthe driver’s door to show the old mileage reading whenthe new odometer was installed.
Dual Trip Odometers
In addition to the standard odometer, the cluster can alsodisplay two separate trip odometers (designated by theletter “A” or “B” in the display window) as well as yourvehicle’s Engine Oil Life (designated by the word OIL inthe display window). The display can be toggled betweenthe odometer, the trip odometers and engine oil life byquickly pressing and releasing the trip/reset button locatedto the right of the temperature gage. The display togglesonce each time the trip/reset button is pressed for less than 1.5 seconds. The display toggles in the followingsequence: Odometer - Trip Odometer A - Trip Odometer B - Engine Oil Life. If the engine oil life is lefton the display, it will automatically toggle back to theodometer after approximately 15 seconds. Each of the two trip odometers can be used to keep track of differenttrip distances (for example, the mileage of a long trip andthe mileage driven on the current tank of fuel). The tripodometers will continue to keep track of miles (kilometers)driven even if they are not currently displayed. To reset theodometer to zero (0), push and hold the trip/reset buttonfor at least 1.5 seconds, but less than three seconds. Only the trip odometer that is showing in the display willbe reset.
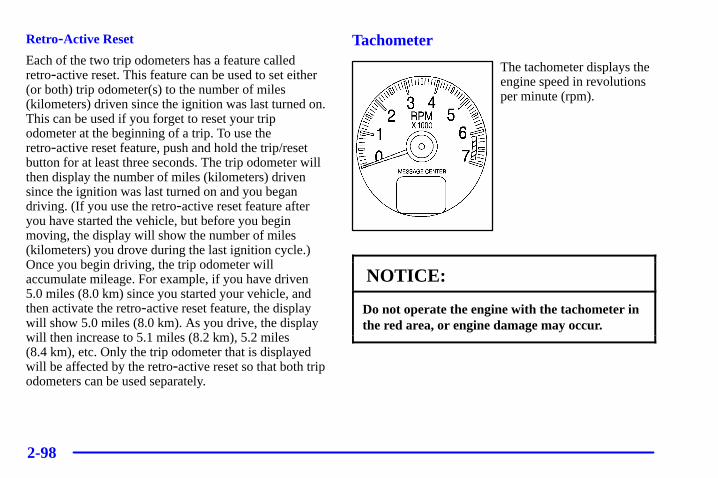
2-98
Retro-Active Reset
Each of the two trip odometers has a feature calledretro-active reset. This feature can be used to set either(or both) trip odometer(s) to the number of miles(kilometers) driven since the ignition was last turned on.This can be used if you forget to reset your tripodometer at the beginning of a trip. To use theretro-active reset feature, push and hold the trip/resetbutton for at least three seconds. The trip odometer willthen display the number of miles (kilometers) drivensince the ignition was last turned on and you begandriving. (If you use the retro-active reset feature afteryou have started the vehicle, but before you beginmoving, the display will show the number of miles(kilometers) you drove during the last ignition cycle.)Once you begin driving, the trip odometer willaccumulate mileage. For example, if you have driven5.0 miles (8.0 km) since you started your vehicle, andthen activate the retro-active reset feature, the displaywill show 5.0 miles (8.0 km). As you drive, the displaywill then increase to 5.1 miles (8.2 km), 5.2 miles (8.4 km), etc. Only the trip odometer that is displayedwill be affected by the retro-active reset so that both tripodometers can be used separately.
Tachometer
The tachometer displays theengine speed in revolutionsper minute (rpm).
NOTICE:
Do not operate the engine with the tachometer inthe red area, or engine damage may occur.

2-99
Warning Lights, Gages, Messagesand IndicatorsThis part describes the warning lights and gages thatmay be on your vehicle. The pictures will help youlocate them.
Warning lights and gages can signal that something iswrong before it becomes serious enough to cause anexpensive repair or replacement. Paying attention toyour warning lights and gages could also save you orothers from injury.
Warning lights come on when there may be or is aproblem with one of your vehicle’s functions. As youwill see in the details on the next few pages, somewarning lights come on briefly when you start theengine just to let you know they’re working. If you arefamiliar with this section, you should not be alarmedwhen this happens.
Gages can indicate when there may be or is a problemwith one of your vehicle’s functions. Often gages andwarning lights work together to let you know whenthere’s a problem with your vehicle.
When one of the warning lights comes on and stays onwhen you are driving, or when one of the gages showsthere may be a problem, check the section that tells youwhat to do about it. Please follow this manual’s advice.Waiting to do repairs can be costly -- and evendangerous. So please get to know your warning lightsand gages. They’re a big help.
Your vehicle also has a message center that works alongwith the warning lights and gages. See “MessageCenter” in the Index.
Safety Belt Reminder LightWhen the key is turned to RUN or START, a chime willcome on for about eight seconds to remind people tofasten their safety belts.
The safety belt light willalso come on and stay onfor about 70 seconds. If thedriver’s belt is alreadybuckled, neither the chimenor the light will come on.
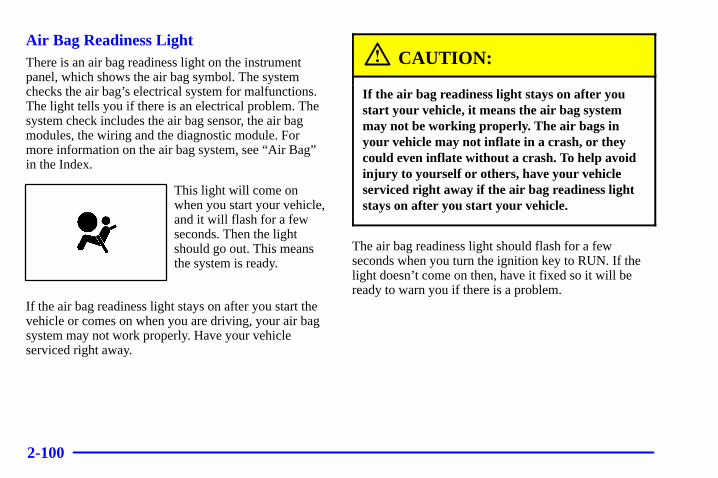
2-100
Air Bag Readiness LightThere is an air bag readiness light on the instrumentpanel, which shows the air bag symbol. The systemchecks the air bag’s electrical system for malfunctions.The light tells you if there is an electrical problem. Thesystem check includes the air bag sensor, the air bagmodules, the wiring and the diagnostic module. Formore information on the air bag system, see “Air Bag”in the Index.
This light will come onwhen you start your vehicle,and it will flash for a fewseconds. Then the lightshould go out. This meansthe system is ready.
If the air bag readiness light stays on after you start thevehicle or comes on when you are driving, your air bagsystem may not work properly. Have your vehicleserviced right away.
CAUTION:
If the air bag readiness light stays on after youstart your vehicle, it means the air bag systemmay not be working properly. The air bags inyour vehicle may not inflate in a crash, or theycould even inflate without a crash. To help avoidinjury to yourself or others, have your vehicleserviced right away if the air bag readiness lightstays on after you start your vehicle.
The air bag readiness light should flash for a fewseconds when you turn the ignition key to RUN. If thelight doesn’t come on then, have it fixed so it will beready to warn you if there is a problem.
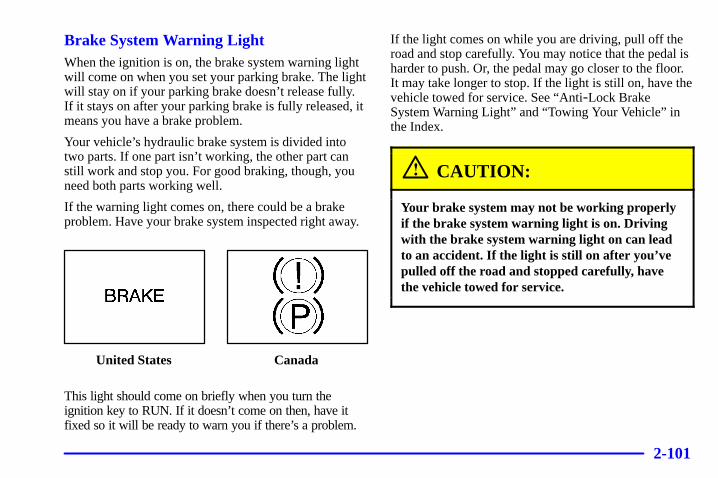
2-101
Brake System Warning LightWhen the ignition is on, the brake system warning lightwill come on when you set your parking brake. The lightwill stay on if your parking brake doesn’t release fully.If it stays on after your parking brake is fully released, itmeans you have a brake problem.
Your vehicle’s hydraulic brake system is divided intotwo parts. If one part isn’t working, the other part canstill work and stop you. For good braking, though, youneed both parts working well.
If the warning light comes on, there could be a brakeproblem. Have your brake system inspected right away.
United States Canada
This light should come on briefly when you turn theignition key to RUN. If it doesn’t come on then, have itfixed so it will be ready to warn you if there’s a problem.
If the light comes on while you are driving, pull off theroad and stop carefully. You may notice that the pedal isharder to push. Or, the pedal may go closer to the floor.It may take longer to stop. If the light is still on, have thevehicle towed for service. See “Anti-Lock BrakeSystem Warning Light” and “Towing Your Vehicle” inthe Index.
CAUTION:
Your brake system may not be working properlyif the brake system warning light is on. Drivingwith the brake system warning light on can leadto an accident. If the light is still on after you’vepulled off the road and stopped carefully, havethe vehicle towed for service.

2-102
Anti-Lock Brake System Warning Light
The anti-lock brakesystem warning lightshould come on for afew seconds when youturn the ignition key to RUN.
If the anti-lock brake system warning light stays on longerthan normal after you’ve started your engine, turn theignition off. Or, if the light comes on and stays on whenyou’re driving, stop as soon as possible and turn theignition off. Then start the engine again to reset thesystem. If the light still stays on, or comes on again whileyou’re driving, the anti-lock brake system needs serviceand you don’t have anti-lock brakes. The brake pedal may be harder to push, or it may go to the floor. It maytake longer to stop. Adjust your driving accordingly.
The anti-lock brake system warning light should comeon briefly when you turn the ignition key to RUN. If the light doesn’t come on then, have it fixed so it will be ready to warn you if there is a problem.
Traction Control System Warning Light (Option)
United States Canada
The traction control system warning light may come onfor the following reasons:
� If you turn the system off by pressing the TCSbutton located in the center console switchbank thewarning light will come on and stay on. To turn thesystem back on, press the button again. The warninglight should go off. See “Traction Control System” in the Index for more information.
� If there’s a brake system problem that is specificallyrelated to traction control, the traction control systemwill turn off and the warning light will come on. If your brakes begin to overheat, the traction controlsystem will turn off and the warning light will comeon until your brakes cool down.
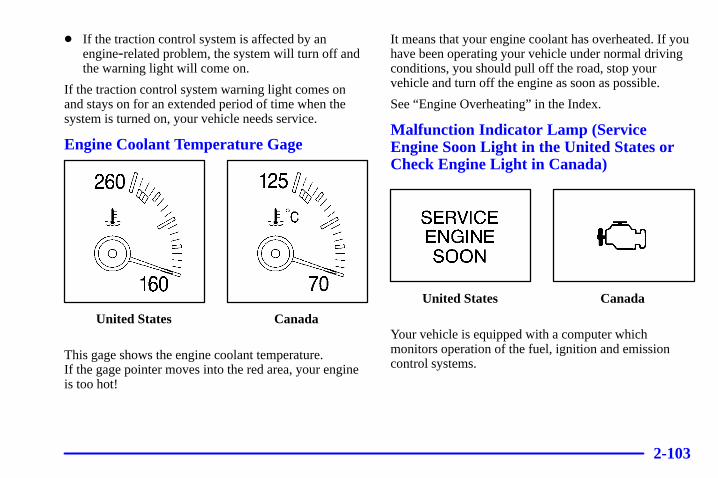
2-103
� If the traction control system is affected by anengine-related problem, the system will turn off andthe warning light will come on.
If the traction control system warning light comes onand stays on for an extended period of time when thesystem is turned on, your vehicle needs service.
Engine Coolant Temperature Gage
United States Canada
This gage shows the engine coolant temperature. If the gage pointer moves into the red area, your engineis too hot!
It means that your engine coolant has overheated. If youhave been operating your vehicle under normal drivingconditions, you should pull off the road, stop yourvehicle and turn off the engine as soon as possible.
See “Engine Overheating” in the Index.
Malfunction Indicator Lamp (ServiceEngine Soon Light in the United States orCheck Engine Light in Canada)
United States Canada
Your vehicle is equipped with a computer whichmonitors operation of the fuel, ignition and emissioncontrol systems.
2-104
This system is called OBD II (On-BoardDiagnostics-Second Generation) and is intended to assure that emissions are at acceptable levels for the life of the vehicle, helping to produce a cleanerenvironment. The SERVICE ENGINE SOON orCHECK ENGINE light comes on to indicate that thereis a problem and service is required. Malfunctions oftenwill be indicated by the system before any problem isapparent. This may prevent more serious damage to your vehicle. This system is also designed to assist your service technician in correctly diagnosingany malfunction.
NOTICE:
If you keep driving your vehicle with this lighton, after a while, your emission controls may notwork as well, your fuel economy may not be asgood and your engine may not run as smoothly.This could lead to costly repairs that may not becovered by your warranty.
NOTICE:
Modifications made to the engine, transaxle,exhaust, intake or fuel system of your vehicle orthe replacement of the original tires with otherthan those of the same Tire Performance Criteria(TPC) can affect your vehicle’s emission controlsand may cause the SERVICE ENGINE SOON orCHECK ENGINE light to come on.Modifications to these systems could lead tocostly repairs not covered by your warranty. This may also result in a failure to pass arequired Emission Inspection/Maintenance test.
2-105
This light should come on, as a check to show you it isworking, when the ignition is on and the engine is notrunning. If the light doesn’t come on, have it repaired.This light will also come on during a malfunction in one of two ways:
� Light Flashing -- A misfire condition has beendetected. A misfire increases vehicle emissions andmay damage the emission control system on yourvehicle. Dealer or qualified service center diagnosisand service may be required.
� Light On Steady -- An emission control systemmalfunction has been detected on your vehicle.Dealer or qualified service center diagnosis andservice may be required.
If the Light Is Flashing
The following may prevent more serious damage toyour vehicle:
� Reducing vehicle speed.
� Avoiding hard accelerations.
� Avoiding steep uphill grades.
� If you are towing a trailer, reduce the amount ofcargo being hauled as soon as it is possible.
If the light stops flashing and remains on steady, see “If the Light Is On Steady” following.
If the light continues to flash, when it is safe to do so,stop the vehicle. Find a safe place to park your vehicle.Turn the key off, wait at least 10 seconds and restart theengine. If the light remains on steady, see “If the LightIs On Steady” following. If the light is still flashing,follow the previous steps, and drive the vehicle to yourdealer or qualified service center for service.
If the Light Is On Steady
You may be able to correct the emission systemmalfunction by considering the following:
Did you recently put fuel into your vehicle?
If so, reinstall the fuel cap, making sure to fully installthe cap. See “Filling Your Tank” in the Index. Thediagnostic system can determine if the fuel cap has beenleft off or improperly installed. A loose or missing fuelcap will allow fuel to evaporate into the atmosphere. A few driving trips with the cap properly installedshould turn the light off.
Did you just drive through a deep puddle of water?
If so, your electrical system may be wet. The conditionwill usually be corrected when the electrical systemdries out. A few driving trips should turn the light off.
2-106
Are you low on fuel?
As your engine starts to run out of fuel, your engine maynot run as efficiently as designed since small amounts ofair are sucked into the fuel line causing a misfire. Thesystem can detect this. Adding fuel should correct thiscondition. Make sure to install the fuel cap properly. See “Filling Your Tank” in the Index. It will take a few driving trips to turn the light off.
Have you recently changed brands of fuel?
If so, be sure to fuel your vehicle with quality fuel. See“Fuel” in the Index. Poor fuel quality will cause yourengine not to run as efficiently as designed. You maynotice this as stalling after start-up, stalling when you putthe vehicle into gear, misfiring, hesitation on accelerationor stumbling on acceleration. (These conditions may goaway once the engine is warmed up.) This will be detectedby the system and cause the light to turn on.
If you experience one or more of these conditions,change the fuel brand you use. It will require at least one full tank of the proper fuel to turn the light off.
If none of the above steps have made the light turn off,have your dealer or qualified service center check thevehicle. Your dealer has the proper test equipment anddiagnostic tools to fix any mechanical or electricalproblems that may have developed.
Emissions Inspection and Maintenance Programs
Some state/provincial and local governments have ormay begin programs to inspect the emission controlequipment on your vehicle. Failure to pass thisinspection could prevent you from getting a vehicle registration.
Here are some things you need to know in order to helpyour vehicle pass an inspection:
Your vehicle will not pass this inspection if the SERVICEENGINE SOON or CHECK ENGINE light is on or notworking properly.
Your vehicle will not pass this inspection if the OBD (on-board diagnostic) system determines that critical emission control systems have not beencompletely diagnosed by the system. The vehicle wouldbe considered not ready for inspection. This can happenif you have recently replaced your battery or if yourbattery has run down. The diagnostic system is designedto evaluate critical emission control systems duringnormal driving. This may take several days of routinedriving. If you have done this and your vehicle still does not pass the inspection for lack of OBD systemreadiness, see your dealer or qualified service center toprepare the vehicle for inspection.
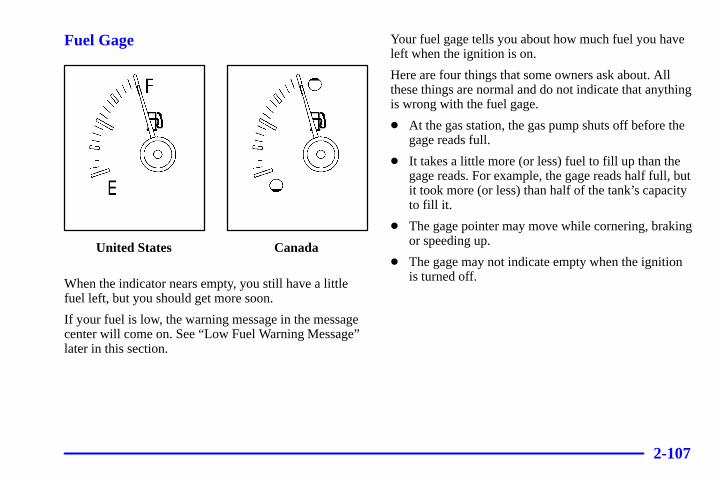
2-107
Fuel Gage
United States Canada
When the indicator nears empty, you still have a littlefuel left, but you should get more soon.
If your fuel is low, the warning message in the messagecenter will come on. See “Low Fuel Warning Message”later in this section.
Your fuel gage tells you about how much fuel you haveleft when the ignition is on.
Here are four things that some owners ask about. Allthese things are normal and do not indicate that anythingis wrong with the fuel gage.
� At the gas station, the gas pump shuts off before thegage reads full.
� It takes a little more (or less) fuel to fill up than thegage reads. For example, the gage reads half full, butit took more (or less) than half of the tank’s capacityto fill it.
� The gage pointer may move while cornering, brakingor speeding up.
� The gage may not indicate empty when the ignitionis turned off.
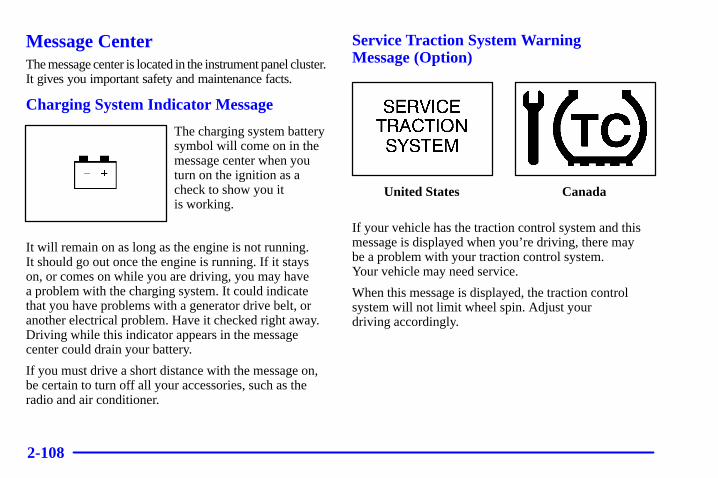
2-108
Message CenterThe message center is located in the instrument panel cluster. It gives you important safety and maintenance facts.
Charging System Indicator Message
The charging system batterysymbol will come on in themessage center when youturn on the ignition as acheck to show you it is working.
It will remain on as long as the engine is not running. It should go out once the engine is running. If it stayson, or comes on while you are driving, you may have a problem with the charging system. It could indicatethat you have problems with a generator drive belt, oranother electrical problem. Have it checked right away.Driving while this indicator appears in the messagecenter could drain your battery.
If you must drive a short distance with the message on,be certain to turn off all your accessories, such as theradio and air conditioner.
Service Traction System Warning Message (Option)
United States Canada
If your vehicle has the traction control system and thismessage is displayed when you’re driving, there may be a problem with your traction control system. Your vehicle may need service.
When this message is displayed, the traction controlsystem will not limit wheel spin. Adjust your driving accordingly.

2-109
The message may appear for the following reasons:
� If there’s a brake system problem that is specificallyrelated to traction control, the traction control systemwill turn off and the warning message will come on.If your brakes begin to overheat, the traction controlsystem will turn off and the warning message willcome on until your brakes cool down.
� If the traction control system is affected by anengine-related problem, the system will turn off andthe warning message will come on.
If the traction control system warning message comes onand stays on for an extended period of time when thesystem is turned on, your vehicle needs service.
Traction Active Message (Option)
United States Canada
If your vehicle has the traction control system, theTRACTION ACTIVE message will appear when thetraction control system is limiting wheel spin. You mayfeel or hear the system working, but this is normal.
Slippery road conditions may exist if this messageappears, so adjust your driving accordingly. Themessage will stay on for a few seconds after the tractioncontrol system stops limiting wheel spin.
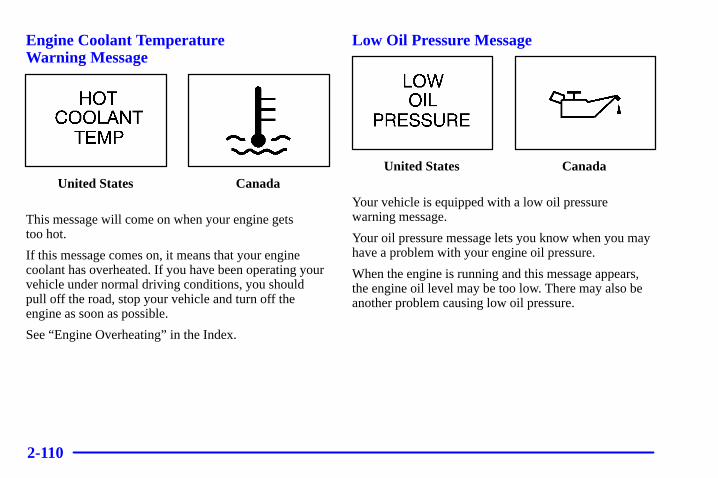
2-110
Engine Coolant Temperature Warning Message
United States Canada
This message will come on when your engine gets too hot.
If this message comes on, it means that your enginecoolant has overheated. If you have been operating yourvehicle under normal driving conditions, you shouldpull off the road, stop your vehicle and turn off theengine as soon as possible.
See “Engine Overheating” in the Index.
Low Oil Pressure Message
United States Canada
Your vehicle is equipped with a low oil pressurewarning message.
Your oil pressure message lets you know when you mayhave a problem with your engine oil pressure.
When the engine is running and this message appears,the engine oil level may be too low. There may also beanother problem causing low oil pressure.
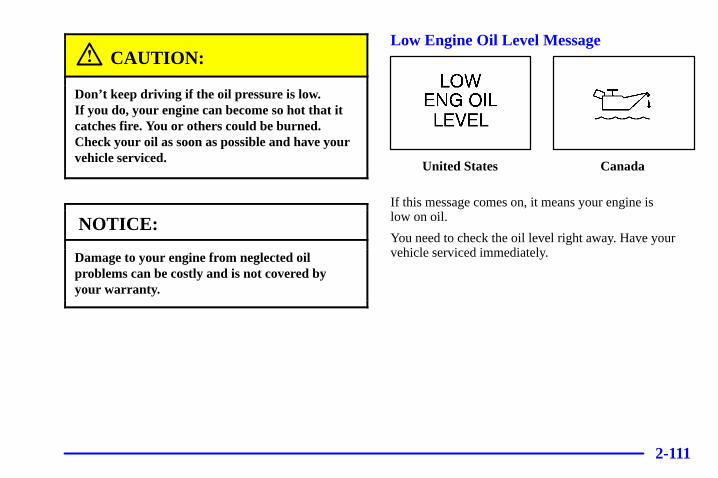
2-111
CAUTION:
Don’t keep driving if the oil pressure is low. If you do, your engine can become so hot that itcatches fire. You or others could be burned.Check your oil as soon as possible and have yourvehicle serviced.
NOTICE:
Damage to your engine from neglected oilproblems can be costly and is not covered by your warranty.
Low Engine Oil Level Message
United States Canada
If this message comes on, it means your engine is low on oil.
You need to check the oil level right away. Have yourvehicle serviced immediately.
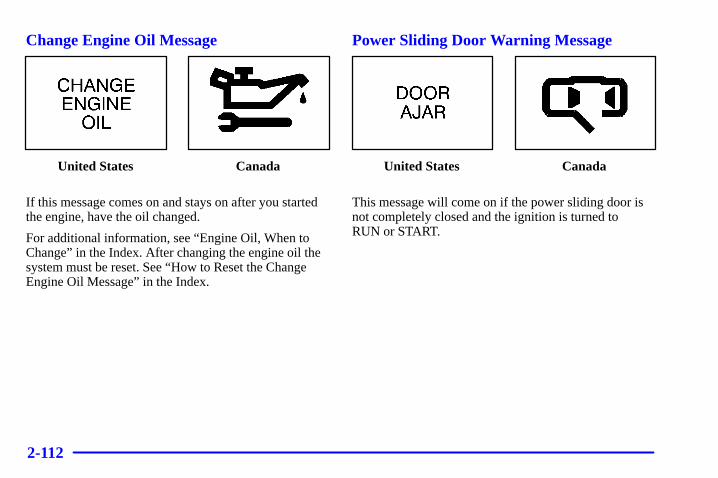
2-112
Change Engine Oil Message
United States Canada
If this message comes on and stays on after you startedthe engine, have the oil changed.
For additional information, see “Engine Oil, When toChange” in the Index. After changing the engine oil thesystem must be reset. See “How to Reset the ChangeEngine Oil Message” in the Index.
Power Sliding Door Warning Message
United States Canada
This message will come on if the power sliding door isnot completely closed and the ignition is turned to RUN or START.
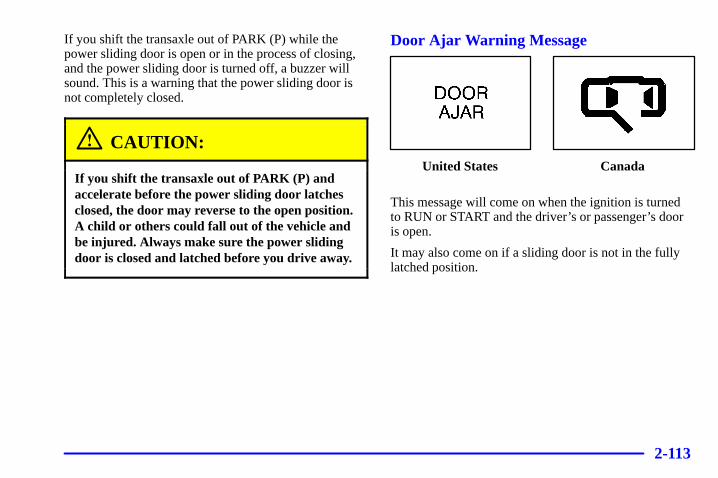
2-113
If you shift the transaxle out of PARK (P) while thepower sliding door is open or in the process of closing,and the power sliding door is turned off, a buzzer willsound. This is a warning that the power sliding door isnot completely closed.
CAUTION:
If you shift the transaxle out of PARK (P) andaccelerate before the power sliding door latchesclosed, the door may reverse to the open position.A child or others could fall out of the vehicle andbe injured. Always make sure the power slidingdoor is closed and latched before you drive away.
Door Ajar Warning Message
United States Canada
This message will come on when the ignition is turnedto RUN or START and the driver’s or passenger’s dooris open.
It may also come on if a sliding door is not in the fullylatched position.
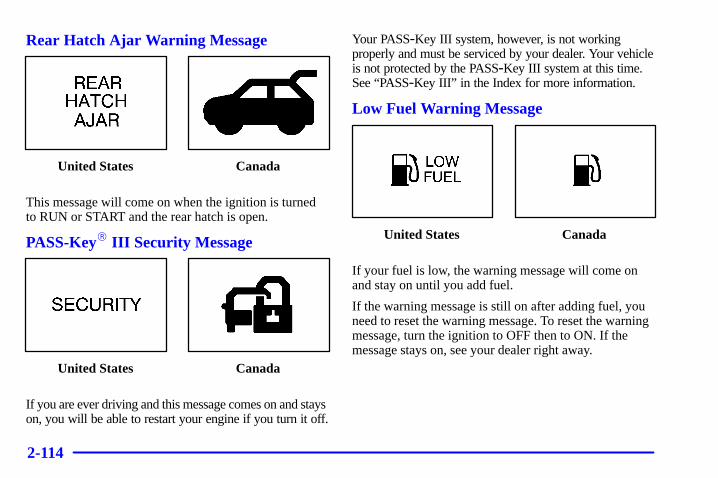
2-114
Rear Hatch Ajar Warning Message
United States Canada
This message will come on when the ignition is turnedto RUN or START and the rear hatch is open.
PASS-Key� III Security Message
United States Canada
If you are ever driving and this message comes on and stays on, you will be able to restart your engine if you turn it off.
Your PASS-Key III system, however, is not workingproperly and must be serviced by your dealer. Your vehicleis not protected by the PASS-Key III system at this time.See “PASS-Key III” in the Index for more information.
Low Fuel Warning Message
United States Canada
If your fuel is low, the warning message will come onand stay on until you add fuel.
If the warning message is still on after adding fuel, youneed to reset the warning message. To reset the warningmessage, turn the ignition to OFF then to ON. If themessage stays on, see your dealer right away.
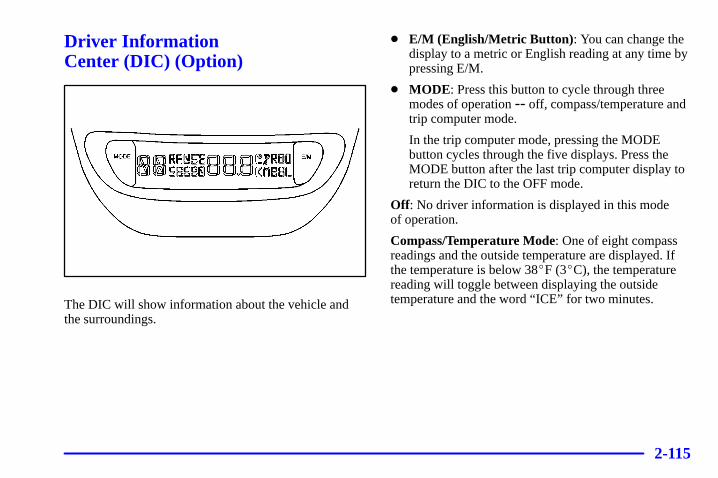
2-115
Driver Information Center (DIC) (Option)
The DIC will show information about the vehicle andthe surroundings.
� E/M (English/Metric Button) : You can change thedisplay to a metric or English reading at any time bypressing E/M.
� MODE : Press this button to cycle through threemodes of operation -- off, compass/temperature andtrip computer mode.
In the trip computer mode, pressing the MODEbutton cycles through the five displays. Press theMODE button after the last trip computer display toreturn the DIC to the OFF mode.
Off : No driver information is displayed in this mode of operation.
Compass/Temperature Mode: One of eight compassreadings and the outside temperature are displayed. Ifthe temperature is below 38�F (3�C), the temperaturereading will toggle between displaying the outsidetemperature and the word “ICE” for two minutes.
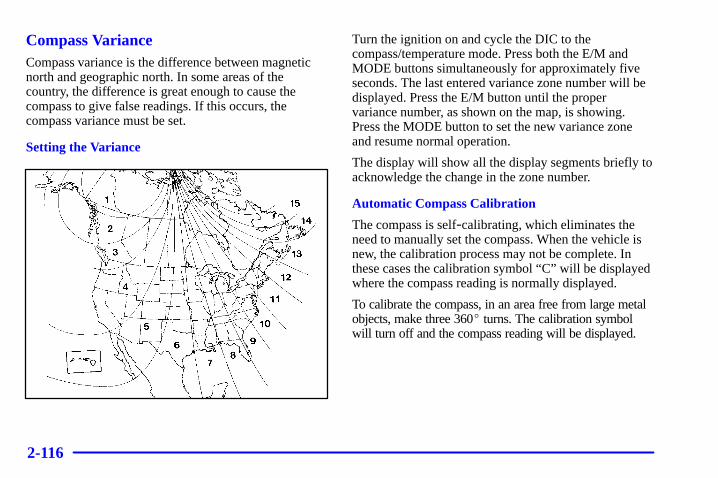
2-116
Compass VarianceCompass variance is the difference between magneticnorth and geographic north. In some areas of thecountry, the difference is great enough to cause thecompass to give false readings. If this occurs, thecompass variance must be set.
Setting the Variance
Turn the ignition on and cycle the DIC to thecompass/temperature mode. Press both the E/M andMODE buttons simultaneously for approximately fiveseconds. The last entered variance zone number will bedisplayed. Press the E/M button until the propervariance number, as shown on the map, is showing.Press the MODE button to set the new variance zoneand resume normal operation.
The display will show all the display segments briefly toacknowledge the change in the zone number.
Automatic Compass Calibration
The compass is self-calibrating, which eliminates theneed to manually set the compass. When the vehicle isnew, the calibration process may not be complete. Inthese cases the calibration symbol “C” will be displayedwhere the compass reading is normally displayed.
To calibrate the compass, in an area free from large metalobjects, make three 360� turns. The calibration symbolwill turn off and the compass reading will be displayed.
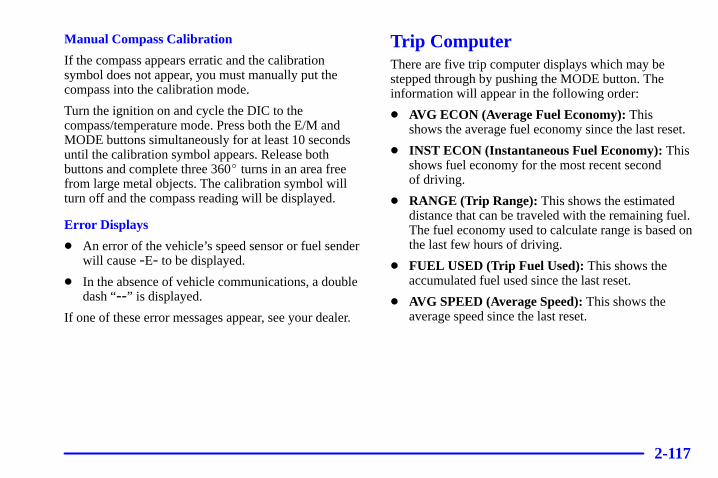
2-117
Manual Compass Calibration
If the compass appears erratic and the calibrationsymbol does not appear, you must manually put thecompass into the calibration mode.
Turn the ignition on and cycle the DIC to thecompass/temperature mode. Press both the E/M andMODE buttons simultaneously for at least 10 secondsuntil the calibration symbol appears. Release bothbuttons and complete three 360� turns in an area freefrom large metal objects. The calibration symbol willturn off and the compass reading will be displayed.
Error Displays
� An error of the vehicle’s speed sensor or fuel senderwill cause -E- to be displayed.
� In the absence of vehicle communications, a doubledash “--” is displayed.
If one of these error messages appear, see your dealer.
Trip ComputerThere are five trip computer displays which may bestepped through by pushing the MODE button. Theinformation will appear in the following order:
� AVG ECON (Average Fuel Economy): This shows the average fuel economy since the last reset.
� INST ECON (Instantaneous Fuel Economy): Thisshows fuel economy for the most recent second of driving.
� RANGE (Trip Range): This shows the estimateddistance that can be traveled with the remaining fuel.The fuel economy used to calculate range is based onthe last few hours of driving.
� FUEL USED (Trip Fuel Used): This shows theaccumulated fuel used since the last reset.
� AVG SPEED (Average Speed): This shows theaverage speed since the last reset.
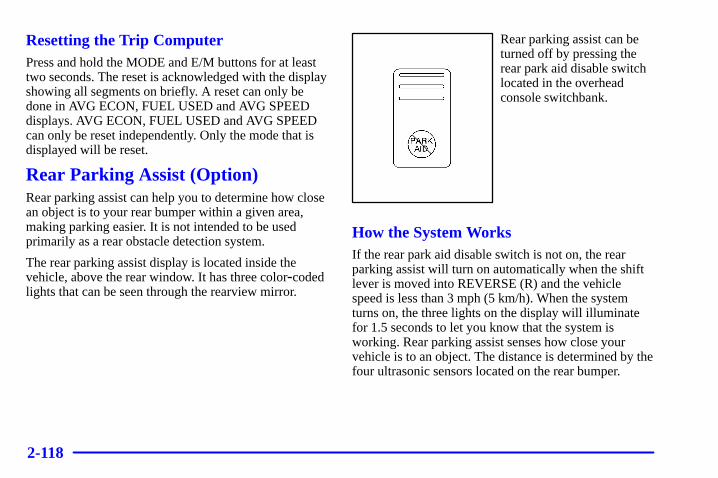
2-118
Resetting the Trip ComputerPress and hold the MODE and E/M buttons for at leasttwo seconds. The reset is acknowledged with the displayshowing all segments on briefly. A reset can only bedone in AVG ECON, FUEL USED and AVG SPEEDdisplays. AVG ECON, FUEL USED and AVG SPEEDcan only be reset independently. Only the mode that isdisplayed will be reset.
Rear Parking Assist (Option)Rear parking assist can help you to determine how closean object is to your rear bumper within a given area,making parking easier. It is not intended to be usedprimarily as a rear obstacle detection system.
The rear parking assist display is located inside thevehicle, above the rear window. It has three color-codedlights that can be seen through the rearview mirror.
Rear parking assist can beturned off by pressing therear park aid disable switchlocated in the overheadconsole switchbank.
How the System WorksIf the rear park aid disable switch is not on, the rearparking assist will turn on automatically when the shiftlever is moved into REVERSE (R) and the vehiclespeed is less than 3 mph (5 km/h). When the systemturns on, the three lights on the display will illuminatefor 1.5 seconds to let you know that the system isworking. Rear parking assist senses how close yourvehicle is to an object. The distance is determined by thefour ultrasonic sensors located on the rear bumper.
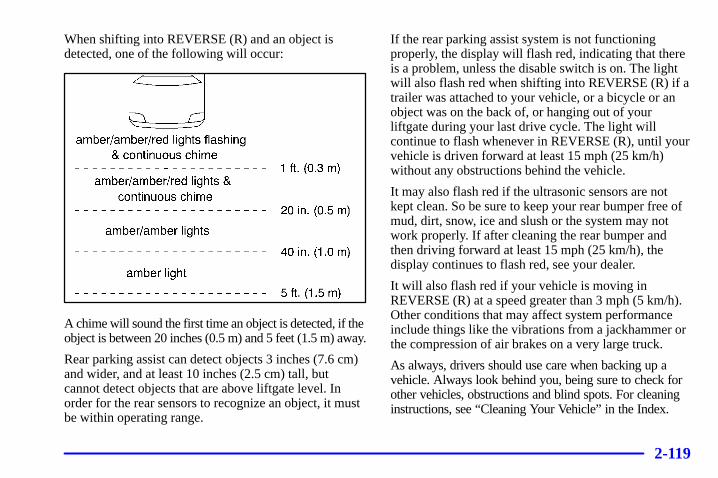
2-119
When shifting into REVERSE (R) and an object isdetected, one of the following will occur:
A chime will sound the first time an object is detected, if the object is between 20 inches (0.5 m) and 5 feet (1.5 m) away.
Rear parking assist can detect objects 3 inches (7.6 cm)and wider, and at least 10 inches (2.5 cm) tall, butcannot detect objects that are above liftgate level. Inorder for the rear sensors to recognize an object, it mustbe within operating range.
If the rear parking assist system is not functioningproperly, the display will flash red, indicating that thereis a problem, unless the disable switch is on. The lightwill also flash red when shifting into REVERSE (R) if atrailer was attached to your vehicle, or a bicycle or anobject was on the back of, or hanging out of yourliftgate during your last drive cycle. The light willcontinue to flash whenever in REVERSE (R), until yourvehicle is driven forward at least 15 mph (25 km/h)without any obstructions behind the vehicle.
It may also flash red if the ultrasonic sensors are notkept clean. So be sure to keep your rear bumper free ofmud, dirt, snow, ice and slush or the system may notwork properly. If after cleaning the rear bumper andthen driving forward at least 15 mph (25 km/h), thedisplay continues to flash red, see your dealer.
It will also flash red if your vehicle is moving inREVERSE (R) at a speed greater than 3 mph (5 km/h).Other conditions that may affect system performanceinclude things like the vibrations from a jackhammer orthe compression of air brakes on a very large truck.
As always, drivers should use care when backing up avehicle. Always look behind you, being sure to check forother vehicles, obstructions and blind spots. For cleaninginstructions, see “Cleaning Your Vehicle” in the Index.
3-3-1
Section 3 Comfort Controls and Audio Systems
In this section, you’ll find out how to operate the comfort control and audio systems offered with your vehicle. Be sure to read about the particular systems supplied with your vehicle.
3-2 Comfort Controls3-2 Air Conditioning with Temperature Control3-4 Heating3-4 Defogging and Defrosting3-5 Rear Window Defogger3-6 Rear Climate Control (Option)3-8 Ventilation System3-9 Audio Systems3-10 Setting the Clock3-10 AM-FM Stereo with Compact Disc Player
with Programmable Equalization and RadioData System (RDS)
3-17 AM-FM Stereo with Cassette Tape andCompact Disc Player with ProgrammableEqualization and Radio Data System (RDS)(If Equipped)
3-26 AM-FM Stereo with 6-Disc Compact DiscPlayer with Programmable Equalization andRadio Data System (RDS) (Option)
3-37 Rear Seat Audio (If Equipped)3-39 Theft-Deterrent Feature3-40 Audio Steering Wheel Controls (If Equipped)3-40 Understanding Radio Reception3-41 Tips About Your Audio System3-42 Care of Your Cassette Tape Player3-43 Care of Your Compact Discs3-43 Care of Your Compact Disc Player3-43 Integrated Windshield Antenna
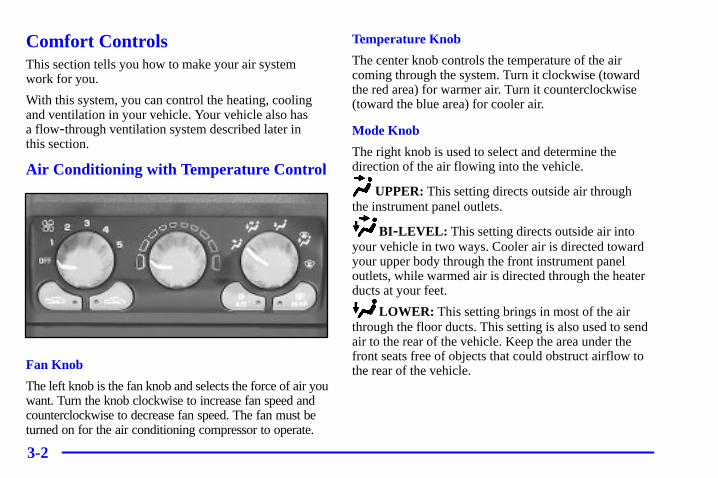
3-2
Comfort ControlsThis section tells you how to make your air system work for you.
With this system, you can control the heating, coolingand ventilation in your vehicle. Your vehicle also has a flow-through ventilation system described later in this section.
Air Conditioning with Temperature Control
Fan Knob
The left knob is the fan knob and selects the force of air youwant. Turn the knob clockwise to increase fan speed andcounterclockwise to decrease fan speed. The fan must beturned on for the air conditioning compressor to operate.
Temperature Knob
The center knob controls the temperature of the aircoming through the system. Turn it clockwise (towardthe red area) for warmer air. Turn it counterclockwise(toward the blue area) for cooler air.
Mode Knob
The right knob is used to select and determine thedirection of the air flowing into the vehicle.
UPPER: This setting directs outside air through the instrument panel outlets.
BI-LEVEL: This setting directs outside air intoyour vehicle in two ways. Cooler air is directed towardyour upper body through the front instrument paneloutlets, while warmed air is directed through the heaterducts at your feet.
LOWER: This setting brings in most of the airthrough the floor ducts. This setting is also used to sendair to the rear of the vehicle. Keep the area under thefront seats free of objects that could obstruct airflow tothe rear of the vehicle.
3-3
DEFOG: This setting directs air to the windshieldand through the floor ducts. This mode is particularlyuseful during cold or inclement weather because of yourvehicle’s larger windshield area.
DEFROST: This setting directs most of the air tothe windshield and side window vents.
Mode Buttons
OUTSIDE AIR: Press this button (the light will glow) to send outside air into your vehicle. Using this setting while trying to defrost or defog thewindows will help clear the vents of moisture. Press theRECIRCULATION button (the light on the OUTSIDEAIR button will go off) to limit outside air entering thevehicle. When the LOWER, DEFOG or DEFROSTsetting is selected, the system will automatically go toOUTSIDE AIR mode.
RECIRCULATION: Press this button (the lightwill glow) to limit the amount of outside air enteringyour vehicle by recirculating much of the air inside yourvehicle. You may use this setting to limit odors enteringyour vehicle. Press the OUTSIDE AIR button (the lighton the RECIRCULATION button will go off) to letoutside air circulate into the vehicle.
Operating the Heating/Ventilation/Air Conditioning(HVAC) system in the RECIRCULATION mode may cause fogging of the vehicle’s windows when theweather is cold and damp. To clear the fog, switch theHVAC system to either the DEFOG or DEFROST mode and increase the fan speed. To avoid re-fogging of the windows, operate the HVAC system in theOUTSIDE AIR mode.
Air ConditioningOn very hot days, your vehicle will cool down morequickly and economically if you open the windows long enough to let hot, inside air escape. For all settings, adjust the temperature control knob and fan speed as desired.
To get maximum cooling or a quick cool-down on veryhot days, press the A/C and RECIRCULATION buttons(the lights will glow) and turn the temperature knobcounterclockwise (toward the blue area). Adjust themode knob to direct the air to the desired location. This setting should not be used for long periods of timebecause the air may become too cold and dry. Push theA/C button again (the light will go off) to turn off the air conditioning.
3-4
When the air conditioner compressor is on, you maysometimes notice slight changes in your vehicle’s engineperformance and power. This is normal. The system isdesigned to help fuel economy while it maintains thedesired cooling level.
The air conditioner removes moisture from the air, soyou may sometimes notice water dripping from underyour vehicle’s engine compartment when it is idling orafter it has been turned off. This is normal.
HeatingTurn the temperature knob clockwise (toward the redarea) to warm the air.
In the LOWER mode, outside air will be brought in andsent through the floor outlets. The heater works best ifyou keep your windows closed while using it.
The BI-LEVEL setting is designed for use on sunnydays when the air is only moderately warm or cool. Ondays like these, the sun may adequately warm yourupper body, but your lower body may not be warmenough. For the best results, turn the temperature knobto the middle position, and then adjust it for comfort.
Your vehicle has a computer controlled transaxledesigned to warm up the engine faster when the outsidetemperature is 35�F (2�C) or colder. You may noticethat the transaxle will shift at a higher vehicle speeduntil the engine is warmed up. This is a normalcondition designed to provide heat to the passengercompartment and defrost the windows more quickly.
If you have the optional engine coolant heater and use itduring cold weather, 0�F (-18�C) or lower, your heatingsystem will provide heat more quickly because theengine coolant is already warmed. See “Engine CoolantHeater” in the Index.
Defogging and DefrostingTo rapidly defrost the windshield, turn the temperatureknob all the way clockwise (to the red area) and turn the mode knob to DEFROST. Adjust the fan to thehighest speed.
To keep the windshield clear and bring in heated air through the heater ducts, turn the mode knob to DEFOG.
When the temperature outside is above freezing, the airconditioner compressor will run in these settings to helpremove moisture from the air.
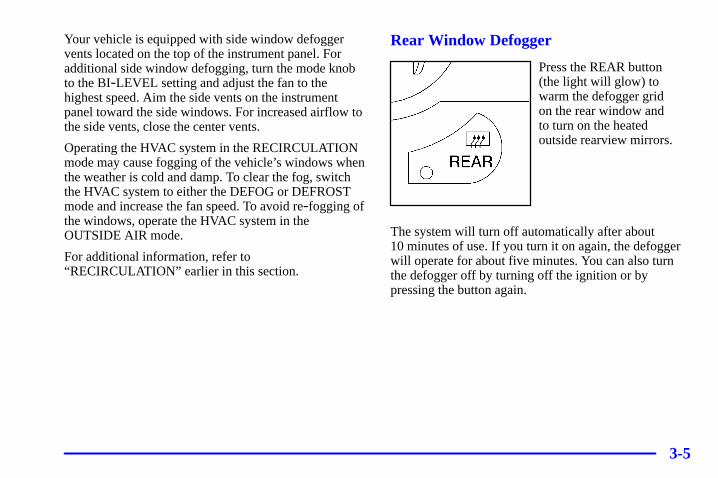
3-5
Your vehicle is equipped with side window defoggervents located on the top of the instrument panel. Foradditional side window defogging, turn the mode knobto the BI-LEVEL setting and adjust the fan to thehighest speed. Aim the side vents on the instrumentpanel toward the side windows. For increased airflow tothe side vents, close the center vents.
Operating the HVAC system in the RECIRCULATIONmode may cause fogging of the vehicle’s windows whenthe weather is cold and damp. To clear the fog, switchthe HVAC system to either the DEFOG or DEFROSTmode and increase the fan speed. To avoid re-fogging ofthe windows, operate the HVAC system in theOUTSIDE AIR mode.
For additional information, refer to“RECIRCULATION” earlier in this section.
Rear Window Defogger
Press the REAR button (the light will glow) towarm the defogger grid on the rear window and to turn on the heated outside rearview mirrors.
The system will turn off automatically after about10 minutes of use. If you turn it on again, the defoggerwill operate for about five minutes. You can also turnthe defogger off by turning off the ignition or bypressing the button again.
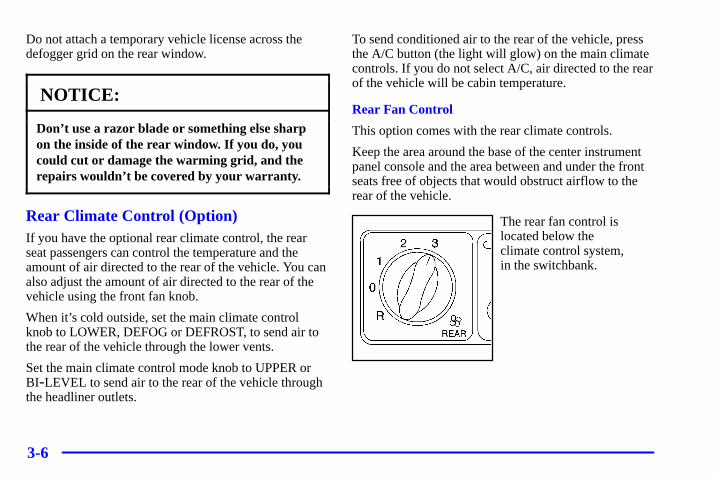
3-6
Do not attach a temporary vehicle license across thedefogger grid on the rear window.
NOTICE:
Don’t use a razor blade or something else sharpon the inside of the rear window. If you do, youcould cut or damage the warming grid, and therepairs wouldn’t be covered by your warranty.
Rear Climate Control (Option)If you have the optional rear climate control, the rearseat passengers can control the temperature and theamount of air directed to the rear of the vehicle. You canalso adjust the amount of air directed to the rear of thevehicle using the front fan knob.
When it’s cold outside, set the main climate controlknob to LOWER, DEFOG or DEFROST, to send air tothe rear of the vehicle through the lower vents.
Set the main climate control mode knob to UPPER orBI-LEVEL to send air to the rear of the vehicle throughthe headliner outlets.
To send conditioned air to the rear of the vehicle, pressthe A/C button (the light will glow) on the main climatecontrols. If you do not select A/C, air directed to the rearof the vehicle will be cabin temperature.
Rear Fan Control
This option comes with the rear climate controls.
Keep the area around the base of the center instrumentpanel console and the area between and under the frontseats free of objects that would obstruct airflow to therear of the vehicle.
The rear fan control islocated below the climate control system, in the switchbank.
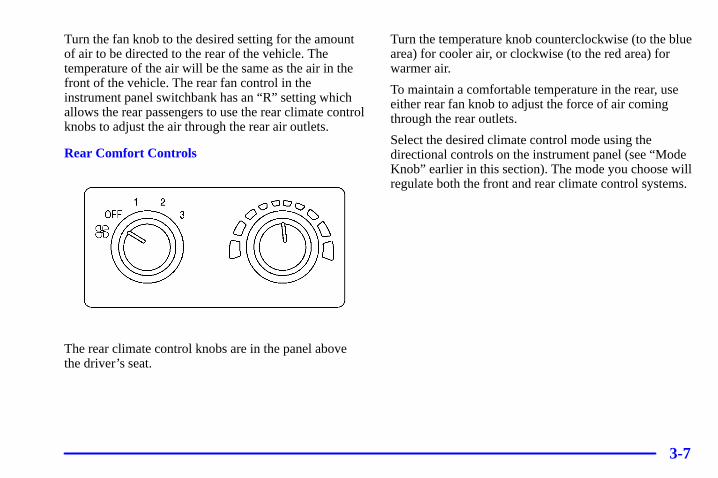
3-7
Turn the fan knob to the desired setting for the amountof air to be directed to the rear of the vehicle. Thetemperature of the air will be the same as the air in thefront of the vehicle. The rear fan control in theinstrument panel switchbank has an “R” setting whichallows the rear passengers to use the rear climate controlknobs to adjust the air through the rear air outlets.
Rear Comfort Controls
The rear climate control knobs are in the panel abovethe driver’s seat.
Turn the temperature knob counterclockwise (to the bluearea) for cooler air, or clockwise (to the red area) forwarmer air.
To maintain a comfortable temperature in the rear, useeither rear fan knob to adjust the force of air comingthrough the rear outlets.
Select the desired climate control mode using thedirectional controls on the instrument panel (see “ModeKnob” earlier in this section). The mode you choose willregulate both the front and rear climate control systems.
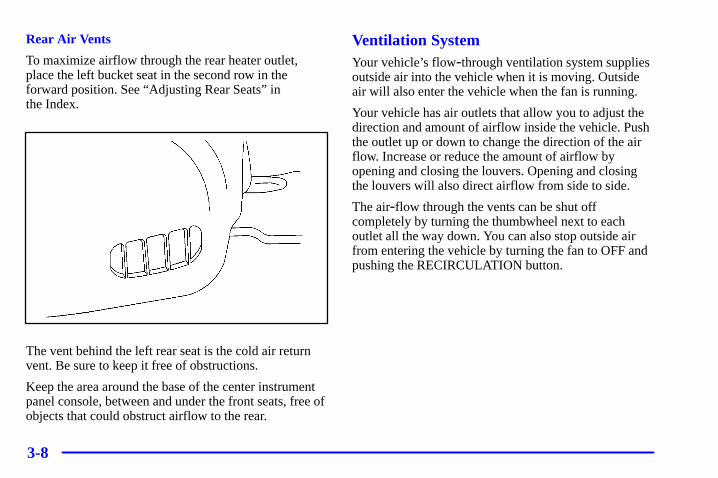
3-8
Rear Air Vents
To maximize airflow through the rear heater outlet,place the left bucket seat in the second row in theforward position. See “Adjusting Rear Seats” in the Index.
The vent behind the left rear seat is the cold air returnvent. Be sure to keep it free of obstructions.
Keep the area around the base of the center instrumentpanel console, between and under the front seats, free ofobjects that could obstruct airflow to the rear.
Ventilation SystemYour vehicle’s flow-through ventilation system suppliesoutside air into the vehicle when it is moving. Outsideair will also enter the vehicle when the fan is running.
Your vehicle has air outlets that allow you to adjust thedirection and amount of airflow inside the vehicle. Pushthe outlet up or down to change the direction of the airflow. Increase or reduce the amount of airflow byopening and closing the louvers. Opening and closingthe louvers will also direct airflow from side to side.
The air-flow through the vents can be shut offcompletely by turning the thumbwheel next to eachoutlet all the way down. You can also stop outside airfrom entering the vehicle by turning the fan to OFF andpushing the RECIRCULATION button.
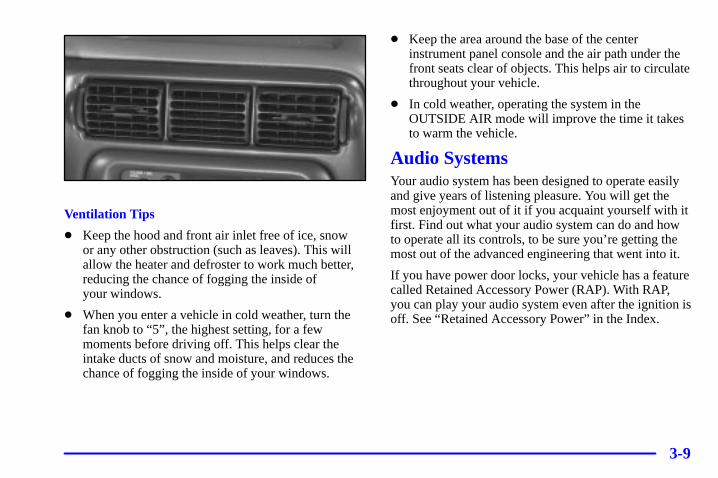
3-9
Ventilation Tips
� Keep the hood and front air inlet free of ice, snow or any other obstruction (such as leaves). This willallow the heater and defroster to work much better,reducing the chance of fogging the inside of your windows.
� When you enter a vehicle in cold weather, turn thefan knob to “5”, the highest setting, for a fewmoments before driving off. This helps clear theintake ducts of snow and moisture, and reduces thechance of fogging the inside of your windows.
� Keep the area around the base of the centerinstrument panel console and the air path under thefront seats clear of objects. This helps air to circulatethroughout your vehicle.
� In cold weather, operating the system in theOUTSIDE AIR mode will improve the time it takesto warm the vehicle.
Audio SystemsYour audio system has been designed to operate easilyand give years of listening pleasure. You will get themost enjoyment out of it if you acquaint yourself with itfirst. Find out what your audio system can do and howto operate all its controls, to be sure you’re getting themost out of the advanced engineering that went into it.
If you have power door locks, your vehicle has a featurecalled Retained Accessory Power (RAP). With RAP,you can play your audio system even after the ignition isoff. See “Retained Accessory Power” in the Index.
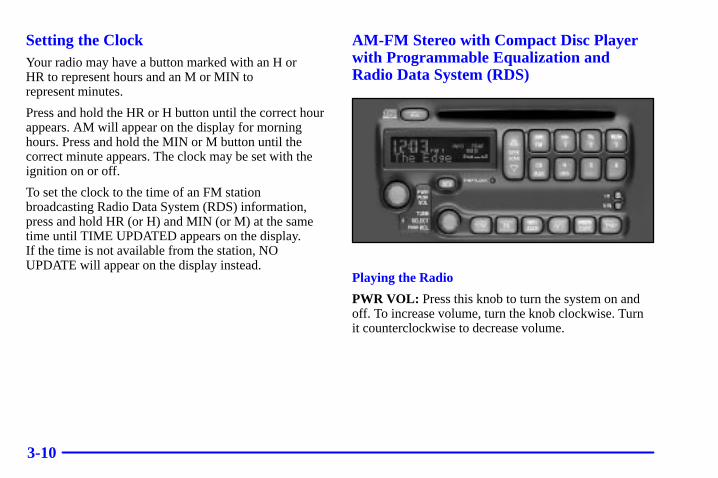
3-10
Setting the ClockYour radio may have a button marked with an H or HR to represent hours and an M or MIN to represent minutes.
Press and hold the HR or H button until the correct hourappears. AM will appear on the display for morninghours. Press and hold the MIN or M button until thecorrect minute appears. The clock may be set with theignition on or off.
To set the clock to the time of an FM stationbroadcasting Radio Data System (RDS) information,press and hold HR (or H) and MIN (or M) at the sametime until TIME UPDATED appears on the display. If the time is not available from the station, NOUPDATE will appear on the display instead.
AM-FM Stereo with Compact Disc Playerwith Programmable Equalization andRadio Data System (RDS)
Playing the Radio
PWR VOL: Press this knob to turn the system on andoff. To increase volume, turn the knob clockwise. Turnit counterclockwise to decrease volume.
3-11
SCV: Your system has a feature calledSpeed-Compensated Volume (SCV). With SCV, youraudio system adjusts automatically to make up for roadand wind noise as you drive. Set the volume at thedesired level. Press this button to select MIN, MED orMAX. Each choice allows for more volumecompensation at faster vehicle speeds. Then, as youdrive, SCV automatically increases the volume, asnecessary, to overcome noise at any particular speed.The volume level should always sound the same to youas you drive. If you don’t want to use SCV, select OFF.
Finding a Station
AM FM: Press this button to switch between AM, FM1and FM2. The display shows your selection.
TUNE: Turn this button to choose radio stations.
SEEK: Press the up or down arrow to go to the nexthigher or lower station and stay there. The sound willmute while seeking.
SCAN: Press and hold one of the SEEK arrows for two seconds until the scan icon appears on the displayand you hear a beep. Use SCAN to listen to stations fora few seconds. The radio will go to a station, stop for afew seconds, then go on to the next station. Press one ofthe SEEK arrows again to stop scanning. The sound willmute while scanning.
PUSHBUTTONS: The six numbered pushbuttons letyou return to your favorite stations. You can set up to18 stations (six AM, six FM1 and six FM2) byperforming the following steps:
1. Turn the radio on.
2. Press AM FM to select the band.
3. Tune in the desired station.
4. Press EQ to select the equalization.
5. Press and hold one of the six numbered buttons untilyou hear a beep. Whenever you press that numberedbutton, the station you set will return and theequalization that you selected will also beautomatically selected for that button.
6. Repeat the steps for each pushbutton.
3-12
PRESET SCAN: Press and hold one of the SEEKarrows for more than four seconds until the preset scanicon and the preset number appear on the display. Youwill hear a double beep. Use PRESET SCAN to listen to each of your preset stations for a few seconds. Theradio will go to the first preset station stored on yourpushbuttons, stop for a few seconds, then go on to thenext preset station. Preset scan will only scan thesix presets that are in the band selected. Press one of the SEEK arrows again to stop scanning presets.
PRESET SCAN will skip over presets where no stationis being received at that time to prevent hearing static.
Setting the Tone
TONE: Press and release this button until the desiredtone control (BASS, MID or TREB) is found. TheSELECT LED indicator will light to show that the tonecontrol can be adjusted. When using BASS or MID, turnthe SELECT knob clockwise to increase bass. Turn itcounterclockwise to decrease bass. When using TREB,turn the SELECT knob clockwise to increase treble.Turn it counterclockwise to decrease treble. If a stationis weak or noisy, you may want to decrease the treble.
To set all of the tone controls to the middle position,press and hold TONE until FLAT appears on the display.
EQ: This feature allows you to choose preset bass, midand treble equalization settings designed for differentindividual listening tastes. Press EQ to select the desiredpreset equalization setting. Each time you press EQ,another setting will appear on the display.
You can preset up to six equalization settings byperforming the following steps:
1. Turn the radio on.
2. Use the TONE button and the SELECT knob toselect the desired equalization.
3. Press and hold EQ for two seconds. SELECT EQ #will appear on the display. The EQ icon will flash.
4. Press EQ or turn the SELECT knob to select thedesired EQ number. Each time you press EQ or turnthe SELECT knob, another EQ setting will appear onthe display.
5. Press and hold the EQ button or push the SELECTknob to store the equalization preset. You will hear abeep and EQ SAVED will appear on the display.
6. Repeat the steps for each EQ setting. EQ 5 has beenprogrammed at the factory for use with talk radio,but it can be preset to a different tone.
3-13
Using RDS Mode
Your audio system is equipped with a Radio DataSystem (RDS). RDS mode gives you many useful newfeatures. With RDS, the radio can:
� Seek only to stations with the types of programs youwant to listen to,
� seek to stations with traffic announcements,
� receive announcements concerning local andnational emergencies, and
� receive and display messages from radio stations.
RDS features are only available for use on FM stationswhich broadcast RDS information. The RDS features ofyour radio rely upon receiving specific RDS informationfrom these stations. These features will only work whenthe RDS information is available. In rare cases, a radiostation may broadcast incorrect information that willcause the radio features to work improperly. If thishappens, please contact the radio station.
When you are tuned to an RDS station, the station name will appear on the display, instead of thefrequency. Most RDS stations provide their stationname, the time of day and a Program Type (PTY) for their current programming.
TRAF: Press this button to receive trafficannouncements. The traffic announcement brackets willappear on the display. TRAF will appear on the displayif the tuned station broadcasts traffic announcements. If the current tuned station does not broadcast trafficannouncements, the radio will seek to a station thatdoes. When the radio finds a station that broadcaststraffic announcements, it will stop. If no station is found,NO TRAFFIC will appear on the display.
When a traffic announcement comes on the tuned radiostation or a related network station, you will hear it,even if the volume is muted or a compact disc isplaying. If the compact disc player was being used, thecompact disc will stay in the player and resume play atthe point where it stopped.
INFO: If the current station has a message, INFO willappear on the display. Press this button to see themessage. If the whole message does not appear on thedisplay, parts of the message will appear every threeseconds until the message is completed. To see the partsof the message faster than every three seconds, press thisbutton again. A new group of words will appear on thedisplay. Once the complete message has been displayed,INFO will disappear from the display until another newmessage is received.
3-14
PROG TYPE: This button is used to turn on and offProgram Type (PTY) select. The PTY icon will appearon the display and the SELECT LED indicator next tothe SELECT knob will light. The last selected PTY willappear on the display for five seconds. Turn theSELECT knob to select the PTY you want to listen to.Press the SEEK SCAN arrows to find radio stations ofthe PTY you want to listen to. The last PTY selectedwill be used for seek or scan modes. If a station with theselected PTY is not found, NOT FOUND will appear onthe display. If both PROG TYPE and TRAF are on, theradio will search for stations with traffic announcementsand the selected PTY.
To use the PROG TYPE interrupt feature, press and holdthis button until you hear a beep on the PTY you want tointerrupt. An asterisk (*) will appear next to the PTYname, example (CLASSICAL*). When you are listeningto a compact disc, the last selected RDS FM station willinterrupt play if that selected PTY format is broadcast.
PUSHBUTTONS: The six numbered pushbuttons letyou return to your favorite Program Types (PTYs).These buttons have factory PTY presets. You can set upto 12 PTYs (six FM1 and six FM2) by performing thefollowing steps:
1. Press PROG TYPE, if it is not already on.
2. Press AM FM to select FM1 or FM2.
3. Turn the SELECT knob to select a PTY.
4. Press and hold one of the six numbered buttons untilyou hear a beep. Whenever you press that numberedbutton, the PTY you set will return.
5. Repeat the steps for each pushbutton.
ALERT!: This type of announcement warns of nationalor local emergencies. You will not be able to turn offalert announcements. ALERT! appears on the displaywhen an alert announcement plays. When an alertannouncement comes on the tuned radio station, youwill hear it, even if the volume is muted or a compactdisc is playing. If the compact disc player is playing,play will stop for the announcement and resume whenthe announcement is finished.
3-15
ALTERNATE FREQUENCY: This feature allows the radio to switch to a stronger station with the sameprogram type. Press and hold AM FM for two secondsto turn alternate frequency on. AF ON will appear on thedisplay. The radio may switch to stronger stations. Pressand hold AM FM again for two seconds to turn alternatefrequency off. AF OFF will appear on the display. Theradio will not switch to other stations.
Adjusting the Speakers
BAL FADE: This button adjusts balance and fade. Toadjust balance, press this button until BAL appears onthe display. Turn the SELECT knob clockwise for theright speakers and counterclockwise for the leftspeakers. The middle position balances the soundbetween the speakers. To adjust fade, press this buttonuntil FAD appears on the display. Turn the SELECTknob clockwise to adjust the sound to the front speakersand counterclockwise for the rear speakers. The middleposition balances the sound between the speakers. Pressand hold this button for two seconds to return both fadeand balance to the middle position.
Playing a Compact Disc
With the ignition on, insert a disc partway into the slot, label side up. The player will pull it in and the discshould begin playing. If you want to insert a CD whenthe ignition is off, first press the eject button or the RCL knob.
Inserting a CD with the radio off and the ignition on will start auto play.
When the disc is inserted, the CD symbol will bedisplayed. If you select an EQ setting for your CD, itwill be activated each time you play a CD.
As each new track starts to play, the track number willappear on the display.
If CHECK CD appears on the radio display and the disccomes out, it could be that one of the following:
� The road is too rough. The disc should play when theroad is smoother.
� The disc is dirty, scratched, wet or upside down.
� The air is very humid. If so, wait about an hour andtry again.
3-16
If any error occurs repeatedly or if an error can’t becorrected, please contact your dealer. If your radiodisplays an error message, write it down and provide itto your dealer when reporting the problem.
�� (1): Press and hold this button to advance quicklywithin a track. Release it to play the passage. You willhear sound at a reduced volume. The display will showelapsed time.
RDM (3): Press this button to hear the tracks in random,rather than sequential, order. RDM and the track numberwill appear on the display.
�� (4): Press and hold this button to reverse quicklywithin a track. Release it to play the passage. You willhear sound at a reduced volume. The display will showelapsed time.
EQ: Press EQ to select the desired preset equalizationsetting while playing a compact disc. The equalizationwill be automatically set whenever you play a compact disc.
SEEK: Press the down arrow while playing a CD to go to the start of the current track if more thaneight seconds have played. Press the up arrow to go tothe next track. If you hold the button or press it morethan once, the player will continue moving backward orforward through the disc.
SCAN: Press and hold one of the SEEK arrows formore than two seconds until SCAN appears on thedisplay and you hear a beep. Use SCAN to listen to eachselection for a few seconds. The disc will go to the nextselection, stop for a few seconds, then go on to the nextselection. Press this button again to stop scanning. Thesound will mute while scanning. SCAN and the tracknumber will appear on the display.
RCL: Press this button to see how long the current trackhas been playing. To change what is normally shown onthe display (track or elapsed time), press the button untilyou see the display you want, then hold the button untilthe display flashes. While elapsed time is showing, CD TIME will appear on the display.
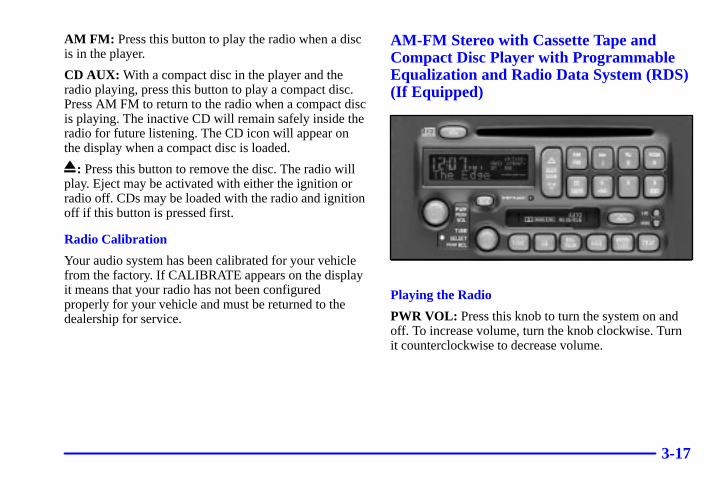
3-17
AM FM: Press this button to play the radio when a discis in the player.
CD AUX: With a compact disc in the player and theradio playing, press this button to play a compact disc.Press AM FM to return to the radio when a compact discis playing. The inactive CD will remain safely inside theradio for future listening. The CD icon will appear onthe display when a compact disc is loaded.
: Press this button to remove the disc. The radio willplay. Eject may be activated with either the ignition orradio off. CDs may be loaded with the radio and ignitionoff if this button is pressed first.
Radio Calibration
Your audio system has been calibrated for your vehiclefrom the factory. If CALIBRATE appears on the displayit means that your radio has not been configuredproperly for your vehicle and must be returned to thedealership for service.
AM-FM Stereo with Cassette Tape andCompact Disc Player with ProgrammableEqualization and Radio Data System (RDS)(If Equipped)
Playing the Radio
PWR VOL: Press this knob to turn the system on andoff. To increase volume, turn the knob clockwise. Turnit counterclockwise to decrease volume.
3-18
SCV: Your system has a feature calledSpeed-Compensated Volume (SCV). With SCV, youraudio system adjusts automatically to make up for roadand wind noise as you drive. Set the volume at thedesired level. Press this button to select MIN, MED orMAX. Each choice allows for more volumecompensation at faster vehicle speeds. Then, as youdrive, SCV automatically increases the volume, asnecessary, to overcome noise at any particular speed.The volume level should always sound the same to youas you drive. If you don’t want to use SCV, select OFF.
Finding a Station
AM FM: Press this button to switch between AM, FM1and FM2. The display shows your selection.
TUNE: Turn this knob to choose radio stations.
SEEK: Press the up or down arrow to go to the nexthigher or lower station and stay there. The sound willmute while seeking.
SCAN: Press and hold one of the SEEK arrows for two seconds until the scan icon appears on the displayand you hear a beep. Use SCAN to listen to stations fora few seconds. The radio will go to a station, stop for afew seconds, then go on to the next station. Press one ofthe SEEK arrows again to stop scanning. The sound willmute while scanning.
PUSHBUTTONS: The six numbered pushbuttons letyou return to your favorite stations. You can set up to18 stations (six AM, six FM1 and six FM2) byperforming the following steps:
1. Turn the radio on.
2. Press AM FM to select the band.
3. Tune in the desired station.
4. Press EQ to select the equalization.
5. Press and hold one of the six numbered buttons until youhear a beep. Whenever you press that numbered button,the station you set will return and the equalization that youselected will also be automatically selected for that button.
6. Repeat the steps for each pushbutton.
PRESET SCAN: Press and hold one of the SEEKarrows for more than four seconds until the preset scanicon and the preset number appear on the display. You will hear a double beep. Use PRESET SCAN tolisten to each of your preset stations for a few seconds.The radio will go to the first preset station stored onyour pushbuttons, stop for a few seconds, then go on tothe next preset station. Press one of the SEEK arrowsagain to stop scanning presets.
Preset scan will skip over presets where no station isbeing received at that time to prevent hearing static.
3-19
Setting the Tone
TONE: Press and release this button until the desiredtone control (BASS, MID or TREB) is found. TheSELECT LED indicator will light to show that the tonecontrol can be adjusted. When using BASS or MID, turnthe SELECT knob clockwise to increase bass. Turn itcounterclockwise to decrease bass. When using TREB,turn the SELECT knob clockwise to increase treble.Turn it counterclockwise to decrease treble. If a stationis weak or noisy, you may want to decrease the treble.
To set all of the tone controls to the middle position,press and hold TONE until FLAT appears on the display.
EQ: This feature allows you to choose preset bass, midand treble equalization settings designed for differentindividual listening tastes. Press EQ to select the desiredpreset equalization setting. Each time you press EQ,another setting will appear on the display.
You can preset up to six equalization settings byperforming the following steps:
1. Turn the radio on.
2. Use the TONE button and the SELECT knob toselect the desired equalization.
3. Press and hold EQ for two seconds. SELECT EQ #will appear on the display. The EQ icon will flash.
4. Press EQ or turn the SELECT knob to select thedesired EQ number. Each time you press EQ or turnthe SELECT knob, another EQ setting will appear onthe display.
5. Press and hold the EQ button or push the SELECTknob to store the equalization preset. You will hear abeep and EQ SAVED will appear on the display.
6. Repeat the steps for each EQ setting. EQ 5 has beenprogrammed for use with talk radio, but it can bepreset to a different tone.
3-20
Using RDS Mode
Your audio system is equipped with a Radio DataSystem (RDS). RDS mode gives you many useful newfeatures. With RDS, the radio can do the following:
� Seek only to stations with the types of programs youwant to listen to,
� seek to stations with traffic announcements,
� receive announcements concerning local andnational emergencies, and
� receive and display messages from radio stations.
RDS features are only available for use on FM stationswhich broadcast RDS information. The RDS features ofyour radio rely upon receiving specific RDS informationfrom these stations. These features will only work whenthe RDS information is available. In rare cases, a radiostation may broadcast incorrect information that willcause the radio features to work improperly. If thishappens, please contact the radio station.
When you are tuned to an RDS station, the station name will appear on the display, instead of thefrequency. Most RDS stations provide their stationname, the time of day and a Program Type (PTY) for their current programming.
TRAF: Press this button to receive trafficannouncements. The traffic announcement brackets willappear on the display. TRAF will appear on the displayif the tuned station broadcasts traffic announcements. If the current tuned station does not broadcast trafficannouncements, the radio will seek to a station thatdoes. When the radio finds a station that broadcaststraffic announcements, it will stop. If no station is found,NO TRAFFIC will appear on the display.
When a traffic announcement comes on the tuned radiostation or a related network station, you will hear it, evenif the volume is muted or a cassette tape or compact disc isplaying. If the cassette tape or compact disc player wasbeing used, the tape or compact disc will stay in the playerand resume play at the point where it stopped.
INFO: If the current station has a message, INFO willappear on the display. Press this button to see themessage. If the whole message does not appear on thedisplay, parts of the message will appear every threeseconds until the message is completed. To see the partsof the message faster than every three seconds, press thisbutton again. A new group of words will appear on thedisplay. Once the complete message has been displayed,INFO will disappear from the display until another newmessage is received.
3-21
PROG TYPE: This button is used to turn on and offProgram Type (PTY) select. The PTY icon will appearon the display and the SELECT LED indicator next tothe SELECT knob will light. The last selected PTY willappear on the display for five seconds. Turn theSELECT knob to select the PTY you want to listen to.Press the SEEK SCAN arrows to find radio stations ofthe PTY you want to listen to. The last PTY selectedwill be used for seek or scan modes. If a station with theselected PTY is not found, NOT FOUND will appear onthe display. If both PROG TYPE and TRAF are on, theradio will search for stations with traffic announcementsand the selected PTY.
To use the PROG TYPE interrupt feature, press and holdthis button until you hear a beep on the PTY you want tointerrupt. An asterisk (*) will appear next to the PTYname, example (CLASSICAL*). When you are listeningto a cassette or compact disc, the last selected RDS FMstation will interrupt play if that selected PTY format is broadcast.
PUSHBUTTONS: The six numbered pushbuttons letyou return to your favorite Program Types (PTYs).These buttons have factory PTY presets. You can set upto 12 PTYs (six FM1 and six FM2) by performing thefollowing steps:
1. Press PROG TYPE, if it is not already on.
2. Press AM FM to select FM1 or FM2.
3. Turn the SELECT knob to select a PTY.
4. Press and hold one of the six numbered buttons untilyou hear a beep. Whenever you press that numberedbutton, the PTY you set will return.
5. Repeat the steps for each pushbutton.
ALERT!: This type of announcement warns of nationalor local emergencies. You will not be able to turn offalert announcements. ALERT! appears on the displaywhen an alert announcement plays. When an alertannouncement comes on the tuned radio station, youwill hear it, even if the volume is muted or a cassettetape or compact disc is playing. If the cassette tape orcompact disc player is playing, play will stop for theannouncement and resume when the announcement is finished.
3-22
ALTERNATE FREQUENCY: This feature allows theradio to switch to a stronger station with the sameprogram type. Press and hold AM FM for two secondsto turn alternate frequency on. AF ON will appear on thedisplay. The radio may switch to stronger stations. Pressand hold AM FM again for two seconds to turn alternatefrequency off. AF OFF will appear on the display. The radio will not switch to other stations.
Adjusting the Speakers
BAL FADE: This button adjusts balance and fade. To adjust balance, press this button until BAL appearson the display. Turn the SELECT knob clockwise for the right speakers and counterclockwise for the leftspeakers. The middle position balances the soundbetween the speakers. To adjust fade, press this buttonuntil FAD appears on the display. Turn the SELECTknob clockwise to adjust the sound to the front speakersand counterclockwise for the rear speakers. The middleposition balances the sound between the speakers. Pressand hold this button for two seconds to return both fadeand balance to the middle position.
Playing a Cassette Tape
Your tape player is built to work best with tapes that areup to 30 to 45 minutes long on each side. Tapes longerthan that are so thin they may not work well in thisplayer. The longer side with the tape visible should faceto the right. If the ignition is on, but the radio is off, thetape can be inserted and will begin playing. If you hearnothing but a garbled sound, the tape may not be insquarely. Press the eject button to remove the tape andstart over.
While the tape is playing, use the VOL, BAL FADE,TONE, EQ, SEEK and SCAN controls just as you do for the radio. The display will show TAPE and an arrowshowing which side of the tape is playing. The tapeplayer automatically begins playing the other side whenit reaches the end of the tape.
Your tape bias is set automatically when a metal orchrome tape is inserted. If you want to insert a tapewhen the ignition is off, first press the eject button or the RCL knob.
If an error appears on the radio display, the tape won’tplay because of an error.
3-23
TIGHT TAPE is displayed when the tape is tight and theplayer can’t turn the tape hubs. Remove the tape. Holdthe tape with the open end down and try to turn the righthub counterclockwise with a pencil. Turn the tape overand repeat. If the hubs do not turn easily, your tape maybe damaged and should not be used in the player. Try anew tape to make sure your player is working properly.
BROKEN TAPE is displayed when the tape is broken.Try a new tape.
WRAPPED TAPE is displayed when the tape iswrapped around the tape head. Attempt to get thecassette out. Try a new tape.
If any error occurs repeatedly or if an error can’t becorrected, please contact your dealer. If your radiodisplays an error message, write it down and provide itto your dealer when reporting the problem.
�� (1): Press this button to advance quickly to anotherpart of the tape. Press the button again to return toplaying speed. The radio will play the last selectedstation while the tape advances. You may select stationsduring FWD operation by using TUNE.
While in FWD mode the display will show FREQ andFWD and two right arrows. If the radio is playing aRDS station the display will only show FREQ.
�� (2): Press this button to play the other side of the tape.
�� (4): Press this button to reverse the tape rapidly.Press it again to return to playing speed. The radio willplay the last selected station while the tape reverses. You may select stations during REV operation by using TUNE.
� (6): Press this button to reduce background noise.DOLBY NR ON will appear on the display. Press itagain to turn Dolby NR off.
Dolby Noise Reduction is manufactured under a licensefrom Dolby Laboratories Licensing Corporation. Dolbyand the double-D symbol are trademarks of DolbyLaboratories Licensing Corporation.
EQ: Press EQ to select the desired preset equalizationsetting while playing a cassette. The equalization will beautomatically set whenever you play a cassette tape.
SEEK: Press the up or down arrow to search for thenext or previous selection on the tape. Your tape musthave at least three seconds of silence between eachselection for SEEK to work. You can skip nineselections up or down on the tape. Choose how manyselections you want to skip. Press the SEEK arrow thatmany times. The number of selections to be skipped willappear on the display.
3-24
SCAN: Press and hold one of the SEEK arrows formore than two seconds until SCAN appears on thedisplay and you hear a beep. Use SCAN to listen to eachselection for a few seconds. The tape will go to the nextselection, stop for a few seconds, then go on to the nextselection. Press this button again to stop scanning. Thesound will mute and SCAN will appear on the displaywhile scanning. The tape will scan in forward only.
AM FM: Press this button to play the radio when a tape is in the player. The tape will stop but remain in the player.
CD TAPE: With a compact disc in the player and theradio playing, press this button to play a compact disc.Press AM FM to return to the radio when a compact discis playing. Press CD TAPE to switch between the tapeand compact disc if both are loaded. The inactive tape orCD will remain safely inside the radio for futurelistening. The display will show tape and CD icons.
: Press this button to remove the tape. The radio willplay. Eject may be activated with either the ignition orradio off. Cassettes may be loaded with the radio andignition off if this button is pressed first.
CLEAN PLAYER: If this message appears on thedisplay, the cassette tape player needs to be cleaned. Itwill still play tapes, but you should clean it as soon aspossible to prevent damage to the tapes and player. See“Care of Your Cassette Tape Player” in the Index. Afteryou clean the player, press and hold the eject button forfive seconds to reset the CLEAN PLAYER indicator.The radio will display CLEANED to show the indicatorwas reset.
Playing a Compact Disc
With the ignition on, insert a disc partway into the slot,label side up. The player will pull it in and the discshould begin playing. If you want to insert a CD whenthe ignition is off, first press the eject button or the RCL knob.
Inserting a CD with the radio off and the ignition on willstart auto play.
When the disc is inserted, the CD symbol will bedisplayed. If you select an EQ setting for your CD, itwill be activated each time you play a CD.
3-25
As each new track starts to play, the track number willappear on the display.
If CHECK CD appears on the radio display and the disccomes out, it could be one of the following:
� The road is too rough. The disc should play when theroad is smoother.
� The disc is dirty, scratched, wet or upside down.
� The air is very humid. If so, wait about an hour andtry again.
If any error occurs repeatedly or if an error can’t becorrected, please contact your dealer. If your radiodisplays an error message, write it down and provide itto your dealer when reporting the problem.
�� (1): Press and hold this button to advance quicklywithin a track. Release it to play the passage. You willhear sound at a reduced volume. The display will showelapsed time.
RDM (3): Press this button to hear the tracks in random,rather than sequential, order. RDM and the track numberwill appear on the display.
�� (4): Press and hold this button to reverse quicklywithin a track. Release it to play the passage. You willhear sound at a reduced volume. The display will showelapsed time.
EQ: Press EQ to select the desired preset equalizationsetting while playing a compact disc. The equalizationwill be automatically set whenever you play a compact disc.
SEEK: Press the down arrow while playing a CD to go to the start of the current track if more than eightseconds have played. Press the up arrow to go to thenext track. If you hold the button or press it more thanonce, the player will continue moving backward orforward through the disc.
SCAN: Press and hold one of the SEEK arrows formore than two seconds until SCAN appears on thedisplay and you hear a beep. Use SCAN to listen to eachselection for a few seconds. The disc will go to the nextselection, stop for a few seconds, then go on to the next selection. Press this button again to stop scanning.The sound will mute while scanning. SCAN and thetrack number will appear on the display.
RCL: Press this button to see how long the current trackhas been playing. To change what is normally shown onthe display (track or elapsed time), press the button untilyou see the display you want, then hold the button untilthe display flashes. While elapsed time is showing, CD TIME will appear on the display.
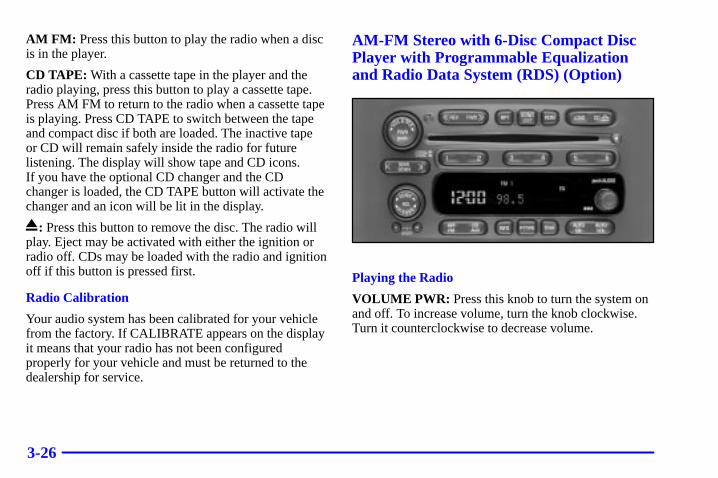
3-26
AM FM: Press this button to play the radio when a discis in the player.
CD TAPE: With a cassette tape in the player and theradio playing, press this button to play a cassette tape.Press AM FM to return to the radio when a cassette tapeis playing. Press CD TAPE to switch between the tapeand compact disc if both are loaded. The inactive tape or CD will remain safely inside the radio for futurelistening. The display will show tape and CD icons. If you have the optional CD changer and the CDchanger is loaded, the CD TAPE button will activate thechanger and an icon will be lit in the display.
: Press this button to remove the disc. The radio willplay. Eject may be activated with either the ignition orradio off. CDs may be loaded with the radio and ignitionoff if this button is pressed first.
Radio Calibration
Your audio system has been calibrated for your vehiclefrom the factory. If CALIBRATE appears on the displayit means that your radio has not been configuredproperly for your vehicle and must be returned to thedealership for service.
AM-FM Stereo with 6-Disc Compact DiscPlayer with Programmable Equalizationand Radio Data System (RDS) (Option)
Playing the Radio
VOLUME PWR: Press this knob to turn the system onand off. To increase volume, turn the knob clockwise.Turn it counterclockwise to decrease volume.
3-27
AUTO VOL: Your system has a feature calledautomatic volume. With this feature, your audio systemadjusts automatically to make up for road and windnoise as you drive. Set the volume at the desired level.Press this button to select MIN, MED or MAX. Eachchoice allows for more volume compensation at fastervehicle speeds. Then, as you drive, automatic volumeautomatically increases the volume, as necessary, toovercome noise at any particular speed. The volumelevel should always sound the same to you as you drive.If you don’t want to use automatic volume, select OFF.
Finding a Station
AM FM: Press this button to switch between AM, FM1and FM2. The display shows your selection.
TUNE: Turn this knob to select radio stations.
SEEK: Press the right or left arrow to go to the nexthigher or lower station and stay there. The sound willmute while seeking.
SCAN: Press and hold either SEEK SCAN arrow fortwo seconds until SC appears on the display and youhear a beep. Use SCAN to listen to stations for a fewseconds. The radio will go to a station, stop for a fewseconds, then go on to the next station. Press eitherSEEK SCAN arrow again to stop scanning. If you press SEEK SCAN for more than four seconds, theradio will change to preset scan mode. The sound willmute while scanning.
PUSHBUTTONS: The six numbered pushbuttons letyou return to your favorite stations. You can set up to18 stations (six AM, six FM1 and six FM2) byperforming the following steps:
1. Turn the radio on.
2. Press AM FM to select the band.
3. Tune in the desired station.
4. Press AUTO EQ to select the equalization that bestsuits the type of station selected.
5. Press and hold one of the six numbered buttons untilyou hear a beep. Whenever you press that numberedbutton, the station you set will return and theequalization that you selected will also beautomatically selected for that button.
6. Repeat the steps for each pushbutton.
3-28
PRESET SCAN: Press and hold either SEEK SCANarrow for more than four seconds, PRESET SCAN willappear on the display. You will hear a double beep andthe “P” will blink with the preset number. Use PRESETSCAN to listen to each of your preset stations for a fewseconds. The radio will go to a preset station stored onyour pushbuttons, stop for a few seconds, then go on tothe next preset station. Press either SEEK SCAN arrowagain to stop scanning presets.
Setting the Tone
BASS: Press the AUDIO knob until BASS appears onthe display. Turn the knob to increase or decrease bass.When you use this control, the radio’s tone setting willswitch to custom.
To set the bass to the middle position, select BASS andpress and hold the AUDIO knob. The radio will produceone beep and set the display level to zero. To set all toneand speaker controls to the middle position, press andhold the AUDIO knob when no tone or speaker controlis active. The radio will produce one beep andCENTERED will appear on the display.
MID: Press the AUDIO knob until MID appears on thedisplay. Turn the knob to increase or decrease mid.When you use this control, the radio’s tone setting willswitch to custom.
To set the mid to the middle position, select MID andpress and hold the AUDIO knob. The radio will produceone beep and set the display level to zero. To set all toneand speaker controls to the middle position, press andhold the AUDIO knob when no tone or speaker controlis active. The radio will produce one beep andCENTERED will appear on the display.
TREB: Press the AUDIO knob until TREB appears onthe display. Turn the knob to increase or decrease treble.When you use this control, the radio’s tone setting willswitch to custom. If a station is weak or noisy, you maywant to decrease the treble.
To set treble to the middle position, select TREB andpress and hold the AUDIO knob. The radio will produceone beep and set the display level to zero. To set all toneand speaker controls to the middle position, press andhold the AUDIO knob when no tone or speaker controlis active. The radio will produce one beep andCENTERED will appear on the display.
3-29
AUTO EQ: This feature allows you to choose presetbass, mid and treble equalization settings designed forcountry, jazz, talk, pop, rock and classical stations. Thelast setting will appear on the display when you firstpress AUTO EQ. Each time you press AUTO EQ,another setting will appear on the display. Press AUTOEQ again after TALK appears and CUSTOM willappear. Tone control will return to the BASS, MID andTREB. Also, if you alter BASS, MID, or TREB while inan auto EQ setting, the radio will return to CUSTOM.CUSTOM will appear on the display.
Using RDS Mode
Your audio system is equipped with a Radio DataSystem (RDS). RDS mode gives you many useful newfeatures. With RDS, the radio can do the following:
� Seek only to stations with the types of programs youwant to listen to,
� seek to stations with traffic announcements,
� receive announcements concerning local andnational emergencies, and
� receive and display messages from radio stations.
RDS features are only available for use on FM stationswhich broadcast RDS information. The RDS features ofyour radio rely upon receiving specific RDS informationfrom these stations. These features will only work whenthe RDS information is available. In rare cases, a radiostation may broadcast incorrect information that willcause the radio features to work improperly. If thishappens, please contact the radio station.
When you are tuned to an RDS station, the station name will appear on the display, instead of thefrequency. Most RDS stations provide their stationname, the time of day and a Program Type (PTY) fortheir current programming.
3-30
TRAF: Press this button to receive trafficannouncements. The traffic announcement brackets willappear on the display. TRAF will appear on the displayif the tuned station broadcasts traffic announcements. Ifthe current tuned station does not broadcast trafficannouncements, the radio will seek to a station thatdoes. When the radio finds a station that broadcaststraffic announcements, it will stop. If no station is found,NONE FOUND will appear on the display.
When a traffic announcement comes on the tuned radiostation or a related network station, you will hear it,even if the volume is muted or a compact disc isplaying. If the compact disc player was being used, thecompact disc will stay in the player and resume play atthe point where it stopped.
INFO: If the current station has a message, INFO willappear on the display. Press this button to see themessage. If the whole message does not appear on thedisplay, parts of the message will appear every threeseconds until the message is completed. To see the partsof the message faster than every three seconds, press thisbutton again. A new group of words will appear on thedisplay. Once the complete message has been displayed,INFO will disappear from the display until another newmessage is received.
P-TYPE: This button is used to turn on and offProgram Type (PTY) selections. PTY and the light nextto the button will turn on. The last selected PTY willappear on the display for five seconds. Turn the P-TYPEknob to select the PTY you want to listen to. Press theSEEK SCAN arrows to find radio stations of the PTYyou want to listen to. The last PTY selected will be usedfor seek or scan modes. If a station with the selectedPTY is not found, NONE FOUND will appear on thedisplay. If both P-TYPE and TRAF are on, the radiowill search for stations with traffic announcements andthe selected PTY.
To use the P-TYPE interrupt feature, press and hold theP-TYPE button until you hear a beep on the PTY youwant to interrupt on. When you are listening to acompact disc, the last selected RDS FM station willinterrupt play if that selected PTY format is broadcast.
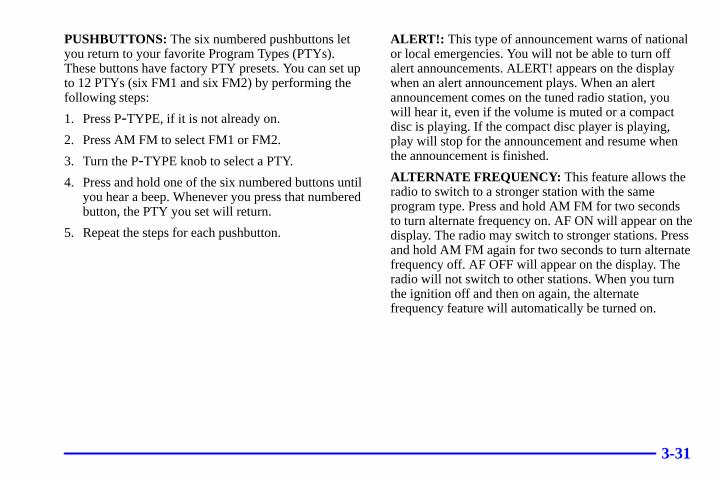
3-31
PUSHBUTTONS: The six numbered pushbuttons letyou return to your favorite Program Types (PTYs).These buttons have factory PTY presets. You can set upto 12 PTYs (six FM1 and six FM2) by performing thefollowing steps:
1. Press P-TYPE, if it is not already on.
2. Press AM FM to select FM1 or FM2.
3. Turn the P-TYPE knob to select a PTY.
4. Press and hold one of the six numbered buttons untilyou hear a beep. Whenever you press that numberedbutton, the PTY you set will return.
5. Repeat the steps for each pushbutton.
ALERT!: This type of announcement warns of nationalor local emergencies. You will not be able to turn offalert announcements. ALERT! appears on the displaywhen an alert announcement plays. When an alertannouncement comes on the tuned radio station, youwill hear it, even if the volume is muted or a compactdisc is playing. If the compact disc player is playing,play will stop for the announcement and resume whenthe announcement is finished.
ALTERNATE FREQUENCY: This feature allows theradio to switch to a stronger station with the sameprogram type. Press and hold AM FM for two secondsto turn alternate frequency on. AF ON will appear on thedisplay. The radio may switch to stronger stations. Pressand hold AM FM again for two seconds to turn alternatefrequency off. AF OFF will appear on the display. Theradio will not switch to other stations. When you turnthe ignition off and then on again, the alternatefrequency feature will automatically be turned on.
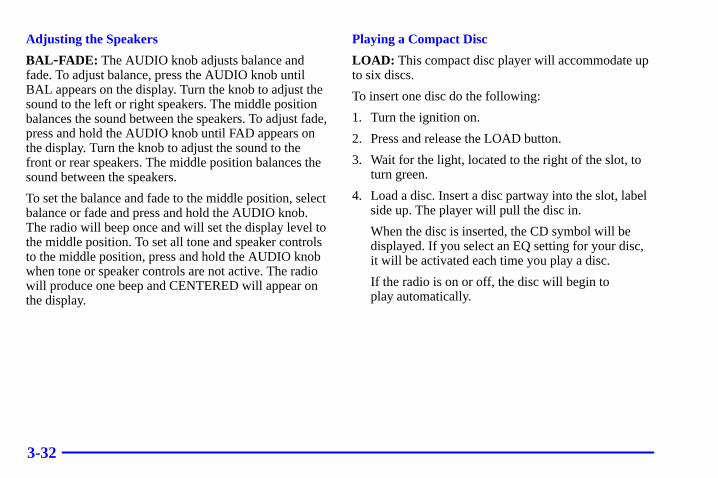
3-32
Adjusting the Speakers
BAL -FADE: The AUDIO knob adjusts balance andfade. To adjust balance, press the AUDIO knob untilBAL appears on the display. Turn the knob to adjust thesound to the left or right speakers. The middle positionbalances the sound between the speakers. To adjust fade,press and hold the AUDIO knob until FAD appears onthe display. Turn the knob to adjust the sound to thefront or rear speakers. The middle position balances thesound between the speakers.
To set the balance and fade to the middle position, selectbalance or fade and press and hold the AUDIO knob.The radio will beep once and will set the display level tothe middle position. To set all tone and speaker controlsto the middle position, press and hold the AUDIO knobwhen tone or speaker controls are not active. The radiowill produce one beep and CENTERED will appear onthe display.
Playing a Compact Disc
LOAD: This compact disc player will accommodate upto six discs.
To insert one disc do the following:
1. Turn the ignition on.
2. Press and release the LOAD button.
3. Wait for the light, located to the right of the slot, toturn green.
4. Load a disc. Insert a disc partway into the slot, labelside up. The player will pull the disc in.
When the disc is inserted, the CD symbol will bedisplayed. If you select an EQ setting for your disc,it will be activated each time you play a disc.
If the radio is on or off, the disc will begin to play automatically.
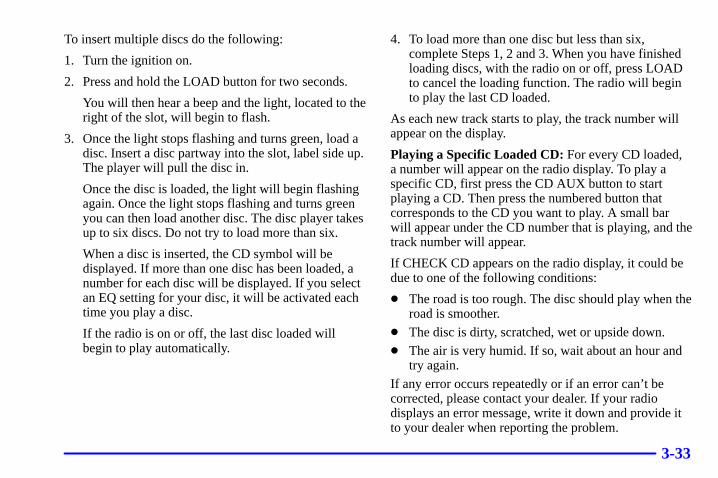
3-33
To insert multiple discs do the following:
1. Turn the ignition on.
2. Press and hold the LOAD button for two seconds.
You will then hear a beep and the light, located to theright of the slot, will begin to flash.
3. Once the light stops flashing and turns green, load adisc. Insert a disc partway into the slot, label side up.The player will pull the disc in.
Once the disc is loaded, the light will begin flashingagain. Once the light stops flashing and turns greenyou can then load another disc. The disc player takesup to six discs. Do not try to load more than six.
When a disc is inserted, the CD symbol will bedisplayed. If more than one disc has been loaded, anumber for each disc will be displayed. If you selectan EQ setting for your disc, it will be activated eachtime you play a disc.
If the radio is on or off, the last disc loaded willbegin to play automatically.
4. To load more than one disc but less than six,complete Steps 1, 2 and 3. When you have finishedloading discs, with the radio on or off, press LOADto cancel the loading function. The radio will beginto play the last CD loaded.
As each new track starts to play, the track number willappear on the display.
Playing a Specific Loaded CD: For every CD loaded, a number will appear on the radio display. To play aspecific CD, first press the CD AUX button to startplaying a CD. Then press the numbered button thatcorresponds to the CD you want to play. A small barwill appear under the CD number that is playing, and thetrack number will appear.
If CHECK CD appears on the radio display, it could bedue to one of the following conditions:
� The road is too rough. The disc should play when theroad is smoother.
� The disc is dirty, scratched, wet or upside down.� The air is very humid. If so, wait about an hour and
try again.If any error occurs repeatedly or if an error can’t becorrected, please contact your dealer. If your radiodisplays an error message, write it down and provide itto your dealer when reporting the problem.
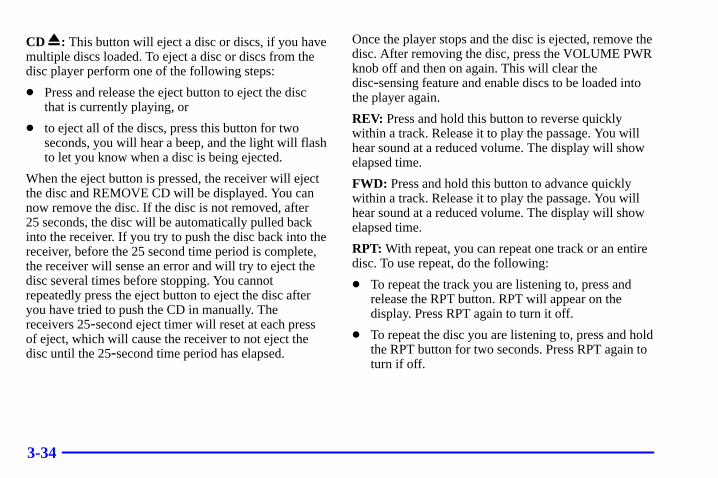
3-34
CD : This button will eject a disc or discs, if you havemultiple discs loaded. To eject a disc or discs from thedisc player perform one of the following steps:
� Press and release the eject button to eject the discthat is currently playing, or
� to eject all of the discs, press this button for twoseconds, you will hear a beep, and the light will flashto let you know when a disc is being ejected.
When the eject button is pressed, the receiver will ejectthe disc and REMOVE CD will be displayed. You cannow remove the disc. If the disc is not removed, after25 seconds, the disc will be automatically pulled backinto the receiver. If you try to push the disc back into thereceiver, before the 25 second time period is complete,the receiver will sense an error and will try to eject thedisc several times before stopping. You cannotrepeatedly press the eject button to eject the disc afteryou have tried to push the CD in manually. Thereceivers 25-second eject timer will reset at each pressof eject, which will cause the receiver to not eject thedisc until the 25-second time period has elapsed.
Once the player stops and the disc is ejected, remove thedisc. After removing the disc, press the VOLUME PWRknob off and then on again. This will clear thedisc-sensing feature and enable discs to be loaded intothe player again.
REV: Press and hold this button to reverse quicklywithin a track. Release it to play the passage. You willhear sound at a reduced volume. The display will showelapsed time.
FWD: Press and hold this button to advance quicklywithin a track. Release it to play the passage. You willhear sound at a reduced volume. The display will showelapsed time.
RPT: With repeat, you can repeat one track or an entiredisc. To use repeat, do the following:
� To repeat the track you are listening to, press andrelease the RPT button. RPT will appear on thedisplay. Press RPT again to turn it off.
� To repeat the disc you are listening to, press and holdthe RPT button for two seconds. Press RPT again toturn if off.

3-35
RDM: With random, you can listen to the tracks inrandom, rather than sequential order, on all of the discsor on one disc. To use random, do the following:
� Press and release the RDM button to play the trackson all of the discs that are loaded, in random order.RDM will appear in the display. Press RDM to turnit off.
� To play the tracks on the disc you are listening to in random order, press and hold RDM for more than two seconds. You will hear a beep and RDMwill appear on the display. Press RDM again to turn if off.
AUTO EQ: Press AUTO EQ to select the desired presetequalization setting while playing a compact disc. Theequalization will be automatically set whenever youplay a compact disc.
SEEK: Press the left arrow while playing a CD to go tothe start of the current track, if more than ten secondshave played. Press the right arrow to go to the nexttrack. If you press the button more than once, the player will continue moving backward or forwardthrough the disc.
SCAN: Press and hold either SEEK SCAN arrow formore than two seconds until SCAN appears on thedisplay and you hear a beep. Use SEEK SCAN to listento each track for a few seconds. The sound will mutewhile scanning. SCAN will appear on the display. Presseither SEEK SCAN arrow again, to stop scanning.
DISC SCAN: Press and hold either SEEK SCAN arrowfor more than four seconds until DISC SCAN appearson the display and you hear a beep. Use DISC SCAN tolisten to the first track, for ten seconds of each discloaded. The sound will mute while scanning to the nexttrack. DISC SCAN will appear on the display. Presseither SEEK SCAN arrow again, to stop scanning.
RCL: Press this button to see how long the current trackhas been playing. To change what is normally shown onthe display (track or elapsed time), press the button untilyou see the display you want, then hold the button untilthe display flashes.
AM FM: Press this button to play the radio when a discis in the player.
3-36
Using Song List Mode
The integrated 6-disc CD changer has a feature called song list. This feature is capable of saving20 track selections.
To save tracks into SONG LIST perform the following steps:
1. The disc player must be on with at least one discloaded. See “LOAD/EJECT” previously for more information.
2. The disc changer must not be in song list mode.S-LIST should not appear in the display. If S-LISTis present, press SONG LIST to turn it off.
3. Select the desired disc by pressing the numberedpushbutton and then use the SEEK SCAN rightarrow button to locate the track that you want tosave. The track will begin to play.
4. Press and hold SONG LIST for two or more secondsto save the track into memory. When SONG LIST is pressed a beep will be heard immediately. Aftertwo seconds of pressing SONG LIST continuously,two beeps will sound, to confirm that the track hasbeen saved.
5. Repeat Steps 3 and 4 for saving other selections.
To play the song list, press SONG LIST. One beep willbe heard and S-LIST will appear on the display.
The recorded tracks will begin to play in the order thatthey were saved.
You may seek through the song list by using the SEEKSCAN arrows. Seeking past the last saved track willreturn you to the first saved track.
To delete tracks from SONG LIST perform thefollowing steps:
1. The disc player must be turned on.
2. Press SONG LIST to turn song list on. S-LIST willappear on the display.
3. Press the SEEK SCAN arrows to select the desiredtrack to be deleted.
4. Press and hold the SONG LIST button for twoseconds. When pressing SONG LIST one beep willbe heard immediately. After two seconds of pressingthe SONG LIST button continuously, two beeps willbe heard, to confirm that the track has been deleted.
After a track has been deleted, the remaining tracks aremoved up the list. When another track is added to thesong list, the tracks will be added to the end of the list.
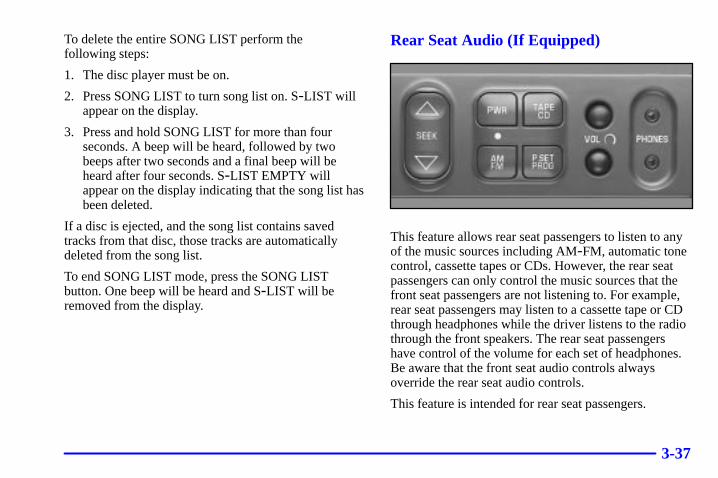
3-37
To delete the entire SONG LIST perform the following steps:
1. The disc player must be on.
2. Press SONG LIST to turn song list on. S-LIST willappear on the display.
3. Press and hold SONG LIST for more than fourseconds. A beep will be heard, followed by twobeeps after two seconds and a final beep will beheard after four seconds. S-LIST EMPTY willappear on the display indicating that the song list hasbeen deleted.
If a disc is ejected, and the song list contains savedtracks from that disc, those tracks are automaticallydeleted from the song list.
To end SONG LIST mode, press the SONG LISTbutton. One beep will be heard and S-LIST will beremoved from the display.
Rear Seat Audio (If Equipped)
This feature allows rear seat passengers to listen to anyof the music sources including AM-FM, automatic tonecontrol, cassette tapes or CDs. However, the rear seatpassengers can only control the music sources that thefront seat passengers are not listening to. For example,rear seat passengers may listen to a cassette tape or CDthrough headphones while the driver listens to the radiothrough the front speakers. The rear seat passengershave control of the volume for each set of headphones.Be aware that the front seat audio controls alwaysoverride the rear seat audio controls.
This feature is intended for rear seat passengers.
3-38
The following function is controlled by the primaryradio knob:
POWER-VOL: Push this knob twice to turn the rearseat audio system on or off. ON or OFF will bedisplayed for five seconds. The rear speakers will bemuted when the power is turned on. You may operatethe rear seat audio functions when the primary radiopower is off if the ignition is on.
The following functions are controlled by the rear seataudio system buttons:
PWR: Press this button to turn the rear seat audiosystem on or off. The rear speakers will be muted when the power is turned on. You may operate the rear seat audio functions even when the primary radiopower is off.
VOL: Press this knob lightly so it extends. Turn theknob clockwise to increase volume andcounterclockwise to decrease volume. Push the knobback into its stored position when you’re not using it.The upper VOL knob controls the upper headphone andthe lower VOL knob controls the lower headphone.
AM FM: Press this button to switch between AM, FM1and FM2. The display will show your frequencyselection. If the front passengers are already listening toAM-FM, the rear seat audio controller will not switchbetween the bands and cannot change the frequency.
SEEK: Press the up arrow to tune to the next higherstation and stay there. Press the down arrow to tune tothe next lower station and stay there. The display willshow your selection. The sound will mute while seeking.The SEEK button is inactive if the AM FM mode on thefront radio is in use.
While listening to a cassette tape, press the up arrow tohear the next selection on the tape. Press the down arrowto go back to the previous selection. The SEEK button isinactive if the tape mode on the front radio is in use.
While listening to a CD, press the up arrow to hear thenext selection on the CD. Press the down arrow to goback to the start of the current selection (if more thaneight seconds have played). The SEEK button is inactiveif the CD mode on the front radio (if equipped) or theCD changer is in use.
3-39
P.SET PROG: The front passengers must be listening to something different for each of thesefunctions to work:
� Press this button to seek through your preset radiostations set on your primary radio pushbuttons. Thedisplay will show your selections.
� When a cassette tape is playing, press this button togo to the other side of the tape.
TAPE CD: With a cassette tape in the player and theradio playing, press this button to play a cassette tape.Press TAPE CD to switch between the tape and compactdisc if both are loaded. Press AM FM to return to theradio when a cassette tape or compact disc is playing.The inactive tape or CD will remain safely inside theradio for future listening.
Theft-Deterrent FeatureTHEFTLOCK� is designed to discourage theft of yourradio. The feature works automatically by learning aportion of the Vehicle Identification Number (VIN). If the radio is moved to a different vehicle, it will notoperate and LOCKED will be displayed.
When the radio and vehicle are turned off, the blinkingred light indicates that THEFTLOCK is armed.
With THEFTLOCK activated, your radio will notoperate if stolen.
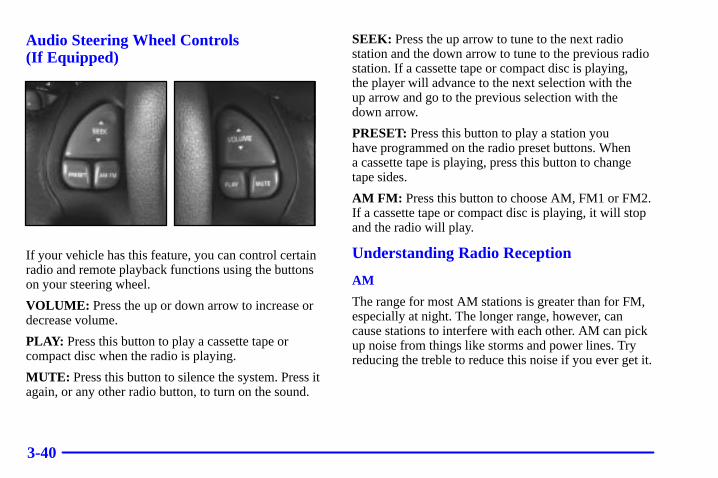
3-40
Audio Steering Wheel Controls (If Equipped)
If your vehicle has this feature, you can control certainradio and remote playback functions using the buttonson your steering wheel.
VOLUME: Press the up or down arrow to increase ordecrease volume.
PLAY: Press this button to play a cassette tape orcompact disc when the radio is playing.
MUTE: Press this button to silence the system. Press itagain, or any other radio button, to turn on the sound.
SEEK: Press the up arrow to tune to the next radiostation and the down arrow to tune to the previous radiostation. If a cassette tape or compact disc is playing, the player will advance to the next selection with the up arrow and go to the previous selection with the down arrow.
PRESET: Press this button to play a station you have programmed on the radio preset buttons. When a cassette tape is playing, press this button to changetape sides.
AM FM: Press this button to choose AM, FM1 or FM2.If a cassette tape or compact disc is playing, it will stopand the radio will play.
Understanding Radio Reception
AM
The range for most AM stations is greater than for FM,especially at night. The longer range, however, cancause stations to interfere with each other. AM can pickup noise from things like storms and power lines. Tryreducing the treble to reduce this noise if you ever get it.
3-41
FM Stereo
FM stereo will give you the best sound, but FM signalswill reach only about 10 to 40 miles (16 to 65 km). Tallbuildings or hills can interfere with FM signals, causingthe sound to come and go.
Tips About Your Audio SystemHearing damage from loud noise is almost undetectableuntil it is too late. Your hearing can adapt to highervolumes of sound. Sound that seems normal can be loudand harmful to your hearing. Take precautions byadjusting the volume control on your radio to a safesound level before your hearing adapts to it.
To help avoid hearing loss or damage:
� Adjust the volume control to the lowest setting.
� Increase volume slowly until you hear comfortablyand clearly.
NOTICE:
Before you add any sound equipment to yourvehicle -- like a tape player, CB radio, mobiletelephone or two-way radio -- be sure you canadd what you want. If you can, it’s veryimportant to do it properly. Added soundequipment may interfere with the operation ofyour vehicle’s engine, Delphi Delco Electronicsradio or other systems, and even damage them.Your vehicle’s systems may interfere with theoperation of sound equipment that has beenadded improperly.So, before adding sound equipment, check withyour dealer and be sure to check Federal rulescovering mobile radio and telephone units.
3-42
Care of Your Cassette Tape PlayerA tape player that is not cleaned regularly can causereduced sound quality, ruined cassettes or a damagedmechanism. Cassette tapes should be stored in theircases away from contaminants, direct sunlight andextreme heat. If they aren’t, they may not operateproperly or may cause failure of the tape player.
Your tape player should be cleaned regularly after every50 hours of use. Your radio may display CLN to indicatethat you have used your tape player for 50 hours withoutresetting the tape clean timer. If this message appears onthe display, your cassette tape player needs to becleaned. It will still play tapes, but you should clean it assoon as possible to prevent damage to your tapes andplayer. If you notice a reduction in sound quality, try aknown good cassette to see if it is the tape or the tapeplayer at fault. If this other cassette has no improvementin sound quality, clean the tape player.
The recommended cleaning method for your cassettetape player is the use of a scrubbing action,non-abrasive cleaning cassette with pads which scrubthe tape head as the hubs of the cleaner cassette turn.The recommended cleaning cassette is available throughyour dealer (GM Part No. 12344789).
When using a scrubbing action, non-abrasive cleaningcassette, it is normal for the cassette to eject becauseyour unit is equipped with a cut tape detection featureand a cleaning cassette may appear as a broken tape. To prevent the cleaning cassette from being ejected, usethe following steps.
1. Turn the ignition to RUN or ACCESSORY.
2. Turn the radio off.
3. Press and hold the TAPE button for five seconds.The tape symbol on the display will flash for two seconds.
4. Insert the scrubbing action cleaning cassette.
5. Eject the cleaning cassette after the manufacturer’srecommended cleaning time.
When the cleaning cassette has been ejected, the cut tapedetection feature is active again.
You may also choose a non-scrubbing action, wet-typecleaner which uses a cassette with a fabric belt to cleanthe tape head. This type of cleaning cassette will noteject on its own. A non-scrubbing action cleaner maynot clean as thoroughly as the scrubbing type cleaner.The use of a non-scrubbing action, dry-type cleaningcassette is not recommended.
3-43
After you clean the player, press and hold EJECT forfive seconds to reset the CLN indicator. The radio willdisplay --- to show the indicator was reset.
Cassettes are subject to wear and the sound quality may degrade over time. Always make sure the cassettetape is in good condition before you have your tapeplayer serviced.
Care of Your Compact DiscsHandle discs carefully. Store them in their original casesor other protective cases and away from direct sunlightand dust. If the surface of a disc is soiled, dampen aclean, soft cloth in a mild, neutral detergent solution andclean it, wiping from the center to the edge.
Be sure never to touch the side without writing whenhandling discs. Pick up discs by grasping the outer edgesor the edge of the hole and the outer edge.
Care of Your Compact Disc PlayerThe use of CD lens cleaner discs is not advised, due tothe risk of contaminating the lens of the CD optics withlubricants internal to the CD mechanism.
Integrated Windshield AntennaThe antenna in your vehicle is a very thin, metal layer in the windshield. If you look near the edges of thewindshield, you can see the outline of the antenna. The connector is at the top of the windshield, where the headliner ends.
If you experience difficulty with remote transmitters,such as a garage door opener, try pointing the devicethrough the very top of the windshield.

4-4-1
Section 4 Your Driving and the Road
Here you’ll find information about driving on different kinds of roads and in varying weather conditions. We’ve alsoincluded many other useful tips on driving.
4-2 Defensive Driving4-3 Drunken Driving4-6 Control of a Vehicle4-6 Braking4-9 Traction Control System (Option)4-11 Steering4-13 Off-Road Recovery4-13 Passing4-15 Loss of Control4-16 Driving at Night
4-17 Driving in Rain and on Wet Roads4-20 City Driving4-21 Freeway Driving4-22 Before Leaving on a Long Trip4-23 Highway Hypnosis4-23 Hill and Mountain Roads4-25 Winter Driving4-29 Recreational Vehicle Towing4-29 Loading Your Vehicle4-32 Towing a Trailer
4-2
Defensive DrivingThe best advice anyone can give about driving is: Drive defensively.
Please start with a very important safety device in yourvehicle: Buckle up. See “Safety Belts” in the Index.
Defensive driving really means “be ready for anything.”On city streets, rural roads or freeways, it means“always expect the unexpected.”
Assume that pedestrians or other drivers are going to becareless and make mistakes. Anticipate what they mightdo. Be ready for their mistakes.
Rear-end collisions are about the most preventable ofaccidents. Yet they are common. Allow enoughfollowing distance. It’s the best defensive drivingmaneuver, in both city and rural driving. You neverknow when the vehicle in front of you is going to brakeor turn suddenly.
Defensive driving requires that a driver concentrate onthe driving task. Anything that distracts from the driving task -- such as concentrating on a cellulartelephone call, reading, or reaching for something on thefloor -- makes proper defensive driving more difficultand can even cause a collision, with resulting injury.Ask a passenger to help do things like this, or pull off the road in a safe place to do them yourself. These simple defensive driving techniques could saveyour life.
4-3
Drunken DrivingDeath and injury associated with drinking and driving isa national tragedy. It’s the number one contributor to the highway death toll, claiming thousands of victimsevery year.
Alcohol affects four things that anyone needs to drive a vehicle:
� Judgment
� Muscular Coordination
� Vision
� Attentiveness.
Police records show that almost half of all motorvehicle-related deaths involve alcohol. In most cases,these deaths are the result of someone who was drinkingand driving. In recent years, about 16,000 annual motorvehicle-related deaths have been associated with the useof alcohol, with more than 300,000 people injured.
Many adults -- by some estimates, nearly half the adultpopulation -- choose never to drink alcohol, so theynever drive after drinking. For persons under 21, it’sagainst the law in every U.S. state to drink alcohol.There are good medical, psychological anddevelopmental reasons for these laws.
The obvious way to solve the leading highway safetyproblem is for people never to drink alcohol and thendrive. But what if people do? How much is “too much”if the driver plans to drive? It’s a lot less than manymight think. Although it depends on each person and situation, here is some general information on the problem.
The Blood Alcohol Concentration (BAC) of someonewho is drinking depends upon four things:
� The amount of alcohol consumed
� The drinker’s body weight
� The amount of food that is consumed before andduring drinking
� The length of time it has taken the drinker toconsume the alcohol.
According to the American Medical Association, a180-lb. (82 kg) person who drinks three 12-ounce (355 ml) bottles of beer in an hour will end up with aBAC of about 0.06 percent. The person would reach thesame BAC by drinking three 4-ounce (120 ml) glassesof wine or three mixed drinks if each had 1-1/2 ounces(45 ml) of a liquor like whiskey, gin or vodka.
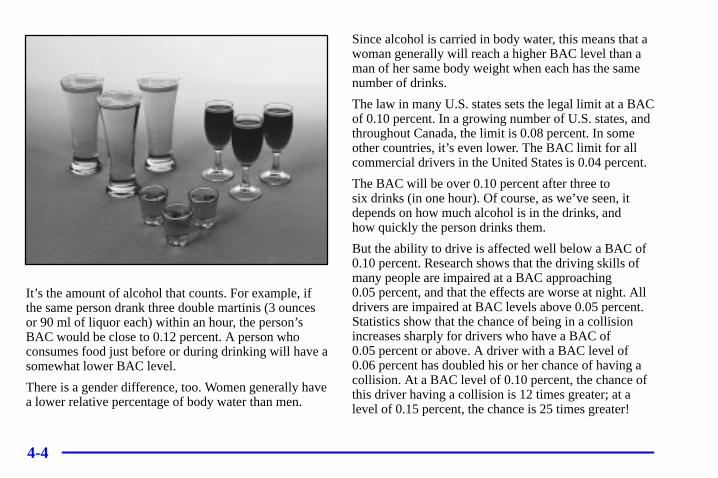
4-4
It’s the amount of alcohol that counts. For example, ifthe same person drank three double martinis (3 ouncesor 90 ml of liquor each) within an hour, the person’sBAC would be close to 0.12 percent. A person whoconsumes food just before or during drinking will have asomewhat lower BAC level.
There is a gender difference, too. Women generally havea lower relative percentage of body water than men.
Since alcohol is carried in body water, this means that awoman generally will reach a higher BAC level than aman of her same body weight when each has the samenumber of drinks.
The law in many U.S. states sets the legal limit at a BACof 0.10 percent. In a growing number of U.S. states, andthroughout Canada, the limit is 0.08 percent. In someother countries, it’s even lower. The BAC limit for allcommercial drivers in the United States is 0.04 percent.
The BAC will be over 0.10 percent after three tosix drinks (in one hour). Of course, as we’ve seen, itdepends on how much alcohol is in the drinks, and how quickly the person drinks them.
But the ability to drive is affected well below a BAC of0.10 percent. Research shows that the driving skills ofmany people are impaired at a BAC approaching0.05 percent, and that the effects are worse at night. Alldrivers are impaired at BAC levels above 0.05 percent.Statistics show that the chance of being in a collisionincreases sharply for drivers who have a BAC of0.05 percent or above. A driver with a BAC level of0.06 percent has doubled his or her chance of having acollision. At a BAC level of 0.10 percent, the chance ofthis driver having a collision is 12 times greater; at alevel of 0.15 percent, the chance is 25 times greater!
4-5
The body takes about an hour to rid itself of the alcoholin one drink. No amount of coffee or number of coldshowers will speed that up. “I’ll be careful” isn’t theright answer. What if there’s an emergency, a need totake sudden action, as when a child darts into the street?A person with even a moderate BAC might not be ableto react quickly enough to avoid the collision.
There’s something else about drinking and driving thatmany people don’t know. Medical research shows thatalcohol in a person’s system can make crash injuriesworse, especially injuries to the brain, spinal cord orheart. This means that when anyone who has beendrinking -- driver or passenger -- is in a crash, thatperson’s chance of being killed or permanently disabledis higher than if the person had not been drinking.
CAUTION:
Drinking and then driving is very dangerous.Your reflexes, perceptions, attentiveness andjudgment can be affected by even a small amountof alcohol. You can have a serious -- or even fatal -- collision if you drive after drinking.Please don’t drink and drive or ride with a driverwho has been drinking. Ride home in a cab; or ifyou’re with a group, designate a driver who willnot drink.
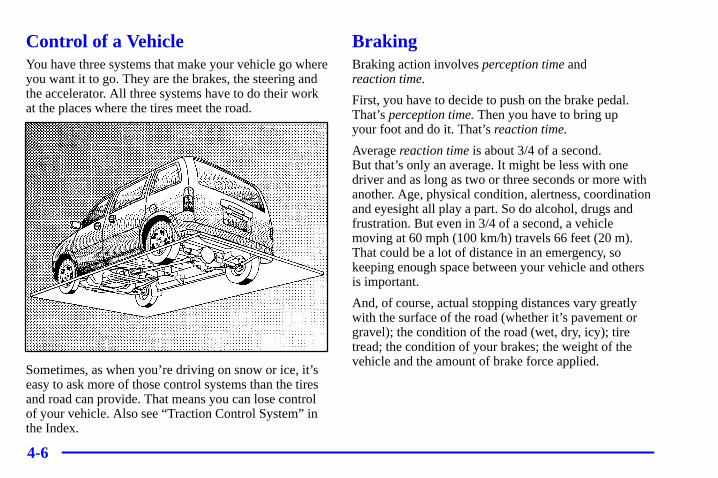
4-6
Control of a VehicleYou have three systems that make your vehicle go whereyou want it to go. They are the brakes, the steering andthe accelerator. All three systems have to do their workat the places where the tires meet the road.
Sometimes, as when you’re driving on snow or ice, it’seasy to ask more of those control systems than the tiresand road can provide. That means you can lose controlof your vehicle. Also see “Traction Control System” inthe Index.
BrakingBraking action involves perception time and reaction time.
First, you have to decide to push on the brake pedal.That’s perception time. Then you have to bring up your foot and do it. That’s reaction time.
Average reaction time is about 3/4 of a second. But that’s only an average. It might be less with onedriver and as long as two or three seconds or more withanother. Age, physical condition, alertness, coordinationand eyesight all play a part. So do alcohol, drugs andfrustration. But even in 3/4 of a second, a vehiclemoving at 60 mph (100 km/h) travels 66 feet (20 m).That could be a lot of distance in an emergency, sokeeping enough space between your vehicle and othersis important.
And, of course, actual stopping distances vary greatlywith the surface of the road (whether it’s pavement orgravel); the condition of the road (wet, dry, icy); tiretread; the condition of your brakes; the weight of thevehicle and the amount of brake force applied.
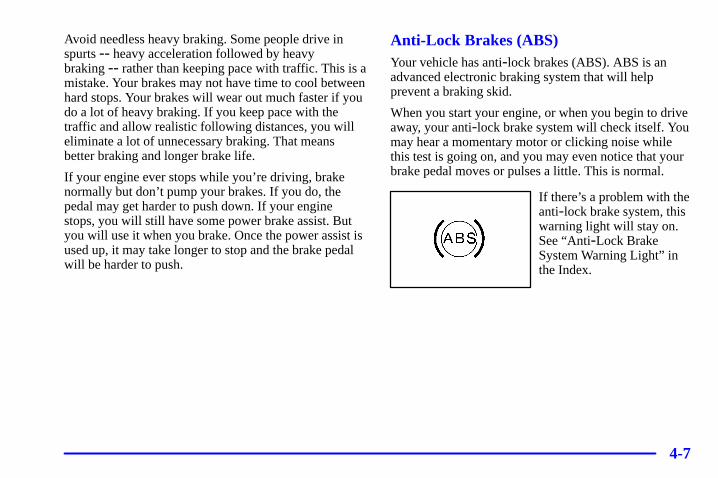
4-7
Avoid needless heavy braking. Some people drive inspurts -- heavy acceleration followed by heavy braking -- rather than keeping pace with traffic. This is amistake. Your brakes may not have time to cool betweenhard stops. Your brakes will wear out much faster if youdo a lot of heavy braking. If you keep pace with thetraffic and allow realistic following distances, you willeliminate a lot of unnecessary braking. That meansbetter braking and longer brake life.
If your engine ever stops while you’re driving, brakenormally but don’t pump your brakes. If you do, thepedal may get harder to push down. If your enginestops, you will still have some power brake assist. Butyou will use it when you brake. Once the power assist isused up, it may take longer to stop and the brake pedalwill be harder to push.
Anti-Lock Brakes (ABS)Your vehicle has anti-lock brakes (ABS). ABS is anadvanced electronic braking system that will helpprevent a braking skid.
When you start your engine, or when you begin to driveaway, your anti-lock brake system will check itself. Youmay hear a momentary motor or clicking noise whilethis test is going on, and you may even notice that yourbrake pedal moves or pulses a little. This is normal.
If there’s a problem with theanti-lock brake system, thiswarning light will stay on.See “Anti-Lock BrakeSystem Warning Light” inthe Index.
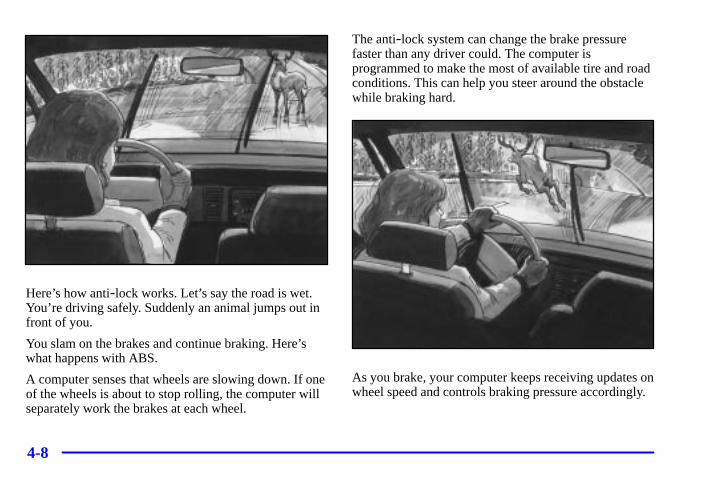
4-8
Here’s how anti-lock works. Let’s say the road is wet.You’re driving safely. Suddenly an animal jumps out infront of you.
You slam on the brakes and continue braking. Here’swhat happens with ABS.
A computer senses that wheels are slowing down. If oneof the wheels is about to stop rolling, the computer willseparately work the brakes at each wheel.
The anti-lock system can change the brake pressurefaster than any driver could. The computer isprogrammed to make the most of available tire and roadconditions. This can help you steer around the obstaclewhile braking hard.
As you brake, your computer keeps receiving updates onwheel speed and controls braking pressure accordingly.
4-9
Remember: Anti-lock doesn’t change the time you needto get your foot up to the brake pedal or always decreasestopping distance. If you get too close to the vehicle infront of you, you won’t have time to apply your brakesif that vehicle suddenly slows or stops. Always leaveenough room up ahead to stop, even though you haveanti-lock brakes.
Using Anti-Lock
Don’t pump the brakes. Just hold the brake pedal downfirmly and let anti-lock work for you. You may feel aslight brake pedal pulsation or notice some noise, butthis is normal.
Braking in EmergenciesWith anti-lock, you can steer and brake at the sametime. In many emergencies, steering can help you more than even the very best braking.
Traction Control System (Option)Your vehicle may have a traction control system thatlimits wheel spin. This is especially useful in slipperyroad conditions. The system operates only if it sensesthat one or both of the front wheels are spinning orbeginning to lose traction. When this happens, thesystem works the front brakes and reduces engine power to limit wheel spin.
The TRACTION ACTIVE message will come on when the traction control system is limiting wheel spin.See “TRACTION ACTIVE Message” in the Index. You may feel or hear the system working, but this is normal.
If your vehicle is in cruise control when the tractioncontrol system begins to limit wheel spin, the cruisecontrol will automatically disengage. When roadconditions allow you to safely use it again, you mayreengage the cruise control. See “Cruise Control” in the Index.
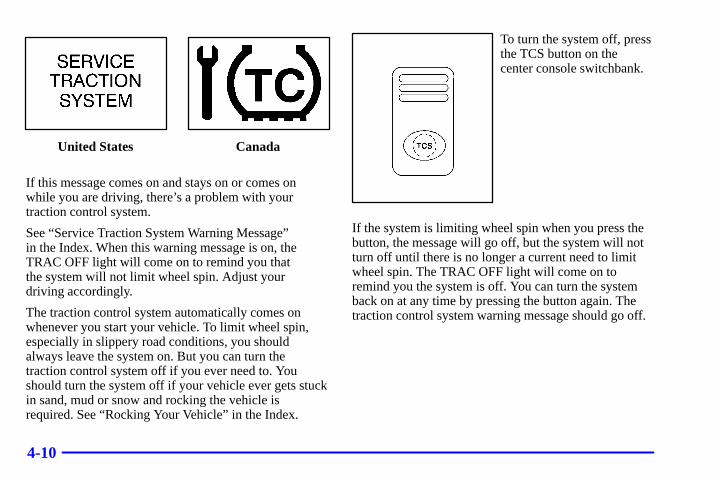
4-10
United States Canada
If this message comes on and stays on or comes onwhile you are driving, there’s a problem with yourtraction control system.
See “Service Traction System Warning Message” in the Index. When this warning message is on, theTRAC OFF light will come on to remind you that the system will not limit wheel spin. Adjust your driving accordingly.
The traction control system automatically comes onwhenever you start your vehicle. To limit wheel spin,especially in slippery road conditions, you shouldalways leave the system on. But you can turn thetraction control system off if you ever need to. Youshould turn the system off if your vehicle ever gets stuckin sand, mud or snow and rocking the vehicle isrequired. See “Rocking Your Vehicle” in the Index.
To turn the system off, pressthe TCS button on thecenter console switchbank.
If the system is limiting wheel spin when you press thebutton, the message will go off, but the system will notturn off until there is no longer a current need to limitwheel spin. The TRAC OFF light will come on toremind you the system is off. You can turn the systemback on at any time by pressing the button again. Thetraction control system warning message should go off.
4-11
SteeringPower SteeringIf you lose power steering assist because the enginestops or the system is not functioning, you can steer but it will take much more effort.
Steering Tips
Driving on Curves
It’s important to take curves at a reasonable speed.
A lot of the “driver lost control” accidents mentioned onthe news happen on curves. Here’s why:
Experienced driver or beginner, each of us is subject tothe same laws of physics when driving on curves. Thetraction of the tires against the road surface makes itpossible for the vehicle to change its path when you turnthe front wheels. If there’s no traction, inertia will keepthe vehicle going in the same direction. If you’ve evertried to steer a vehicle on wet ice, you’ll understand this.
The traction you can get in a curve depends on thecondition of your tires and the road surface, the angle at which the curve is banked, and your speed.While you’re in a curve, speed is the one factor you can control.
Suppose you’re steering through a sharp curve. Then you suddenly accelerate. Both control systems -- steering and acceleration -- have to do theirwork where the tires meet the road. Adding the suddenacceleration can demand too much of those places. Youcan lose control. Refer to “Traction Control System” inthe Index.
What should you do if this ever happens? Ease up on theaccelerator pedal, steer the vehicle the way you want itto go, and slow down.
Speed limit signs near curves warn that you shouldadjust your speed. Of course, the posted speeds arebased on good weather and road conditions. Under less favorable conditions you’ll want to go slower.
If you need to reduce your speed as you approach acurve, do it before you enter the curve, while your frontwheels are straight ahead.
Try to adjust your speed so you can “drive” through thecurve. Maintain a reasonable, steady speed. Wait toaccelerate until you are out of the curve, and thenaccelerate gently into the straightaway.
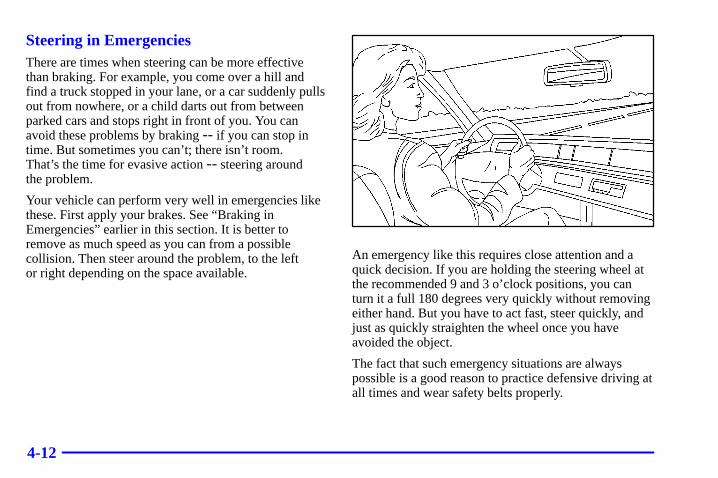
4-12
Steering in EmergenciesThere are times when steering can be more effectivethan braking. For example, you come over a hill andfind a truck stopped in your lane, or a car suddenly pullsout from nowhere, or a child darts out from betweenparked cars and stops right in front of you. You canavoid these problems by braking -- if you can stop intime. But sometimes you can’t; there isn’t room. That’s the time for evasive action -- steering around the problem.
Your vehicle can perform very well in emergencies likethese. First apply your brakes. See “Braking inEmergencies” earlier in this section. It is better toremove as much speed as you can from a possiblecollision. Then steer around the problem, to the left or right depending on the space available.
An emergency like this requires close attention and aquick decision. If you are holding the steering wheel atthe recommended 9 and 3 o’clock positions, you canturn it a full 180 degrees very quickly without removingeither hand. But you have to act fast, steer quickly, andjust as quickly straighten the wheel once you haveavoided the object.
The fact that such emergency situations are alwayspossible is a good reason to practice defensive driving atall times and wear safety belts properly.
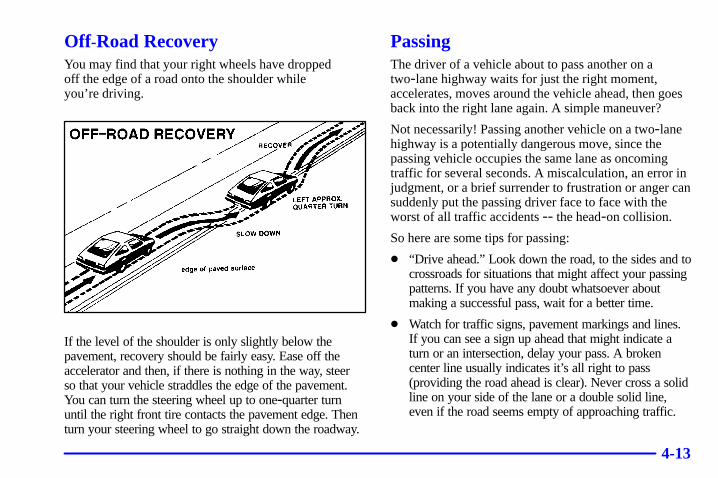
4-13
Off -Road RecoveryYou may find that your right wheels have dropped off the edge of a road onto the shoulder while you’re driving.
If the level of the shoulder is only slightly below thepavement, recovery should be fairly easy. Ease off theaccelerator and then, if there is nothing in the way, steer so that your vehicle straddles the edge of the pavement.You can turn the steering wheel up to one-quarter turnuntil the right front tire contacts the pavement edge. Thenturn your steering wheel to go straight down the roadway.
PassingThe driver of a vehicle about to pass another on atwo-lane highway waits for just the right moment,accelerates, moves around the vehicle ahead, then goesback into the right lane again. A simple maneuver?
Not necessarily! Passing another vehicle on a two-lanehighway is a potentially dangerous move, since thepassing vehicle occupies the same lane as oncomingtraffic for several seconds. A miscalculation, an error injudgment, or a brief surrender to frustration or anger cansuddenly put the passing driver face to face with theworst of all traffic accidents -- the head-on collision.
So here are some tips for passing:
� “Drive ahead.” Look down the road, to the sides and tocrossroads for situations that might affect your passingpatterns. If you have any doubt whatsoever aboutmaking a successful pass, wait for a better time.
� Watch for traffic signs, pavement markings and lines.If you can see a sign up ahead that might indicate aturn or an intersection, delay your pass. A brokencenter line usually indicates it’s all right to pass(providing the road ahead is clear). Never cross a solidline on your side of the lane or a double solid line,even if the road seems empty of approaching traffic.
4-14
� Do not get too close to the vehicle you want to passwhile you’re awaiting an opportunity. For one thing,following too closely reduces your area of vision,especially if you’re following a larger vehicle. Also, you won’t have adequate space if the vehicleahead suddenly slows or stops. Keep back areasonable distance.
� When it looks like a chance to pass is coming up,start to accelerate but stay in the right lane and don’tget too close. Time your move so you will beincreasing speed as the time comes to move into theother lane. If the way is clear to pass, you will have a“running start” that more than makes up for thedistance you would lose by dropping back. And ifsomething happens to cause you to cancel your pass,you need only slow down and drop back again andwait for another opportunity.
� If other cars are lined up to pass a slow vehicle, waityour turn. But take care that someone isn’t trying topass you as you pull out to pass the slow vehicle.Remember to glance over your shoulder and checkthe blind spot.
� Check your mirrors, glance over your shoulder andstart your left lane change signal before moving outof the right lane to pass. When you are far enoughahead of the passed vehicle to see its front in yourinside mirror, activate your right lane change signaland move back into the right lane. (Remember thatyour right outside mirror is convex. The vehicle youjust passed may seem to be farther away from youthan it really is.)
� Try not to pass more than one vehicle at a time on two-lane roads. Reconsider before passing thenext vehicle.
� Don’t overtake a slowly moving vehicle too rapidly.Even though the brake lamps are not flashing, it maybe slowing down or starting to turn.
� If you’re being passed, make it easy for thefollowing driver to get ahead of you. Perhaps youcan ease a little to the right.
4-15
Loss of ControlLet’s review what driving experts say about whathappens when the three control systems (brakes, steeringand acceleration) don’t have enough friction where thetires meet the road to do what the driver has asked.
In any emergency, don’t give up. Keep trying to steer andconstantly seek an escape route or area of less danger.
SkiddingIn a skid, a driver can lose control of the vehicle.Defensive drivers avoid most skids by taking reasonablecare suited to existing conditions, and by not “overdriving”those conditions. But skids are always possible.
The three types of skids correspond to your vehicle’sthree control systems. In the braking skid, your wheelsaren’t rolling. In the steering or cornering skid, toomuch speed or steering in a curve causes tires to slip andlose cornering force. And in the acceleration skid, toomuch throttle causes the driving wheels to spin.
A cornering skid is best handled by easing your foot offthe accelerator pedal. If you have the “Traction ControlSystem,” remember: It helps avoid only the accelerationskid. If you do not have this system, or if the system isoff, then an acceleration skid is also best handled byeasing your foot off the accelerator pedal.
If your vehicle starts to slide, ease your foot off theaccelerator pedal and quickly steer the way you want thevehicle to go. If you start steering quickly enough, yourvehicle may straighten out. Always be ready for asecond skid if it occurs.
Of course, traction is reduced when water, snow, ice,gravel or other material is on the road. For safety, you’llwant to slow down and adjust your driving to theseconditions. It is important to slow down on slipperysurfaces because stopping distance will be longer andvehicle control more limited.
While driving on a surface with reduced traction, tryyour best to avoid sudden steering, acceleration orbraking (including engine braking by shifting to a lowergear). Any sudden changes could cause the tires to slide.You may not realize the surface is slippery until yourvehicle is skidding. Learn to recognize warning clues -- such as enough water, ice or packed snow onthe road to make a “mirrored surface” -- and slow down when you have any doubt.
Remember: Any anti-lock brake system (ABS) helpsavoid only the braking skid.
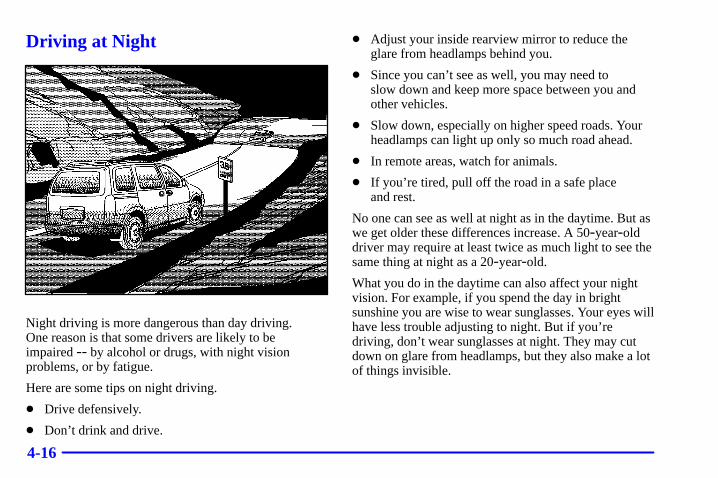
4-16
Driving at Night
Night driving is more dangerous than day driving. One reason is that some drivers are likely to be impaired -- by alcohol or drugs, with night visionproblems, or by fatigue.
Here are some tips on night driving.
� Drive defensively.
� Don’t drink and drive.
� Adjust your inside rearview mirror to reduce theglare from headlamps behind you.
� Since you can’t see as well, you may need to slow down and keep more space between you andother vehicles.
� Slow down, especially on higher speed roads. Yourheadlamps can light up only so much road ahead.
� In remote areas, watch for animals.
� If you’re tired, pull off the road in a safe place and rest.
No one can see as well at night as in the daytime. But aswe get older these differences increase. A 50-year-olddriver may require at least twice as much light to see thesame thing at night as a 20-year-old.
What you do in the daytime can also affect your nightvision. For example, if you spend the day in brightsunshine you are wise to wear sunglasses. Your eyes willhave less trouble adjusting to night. But if you’redriving, don’t wear sunglasses at night. They may cutdown on glare from headlamps, but they also make a lotof things invisible.
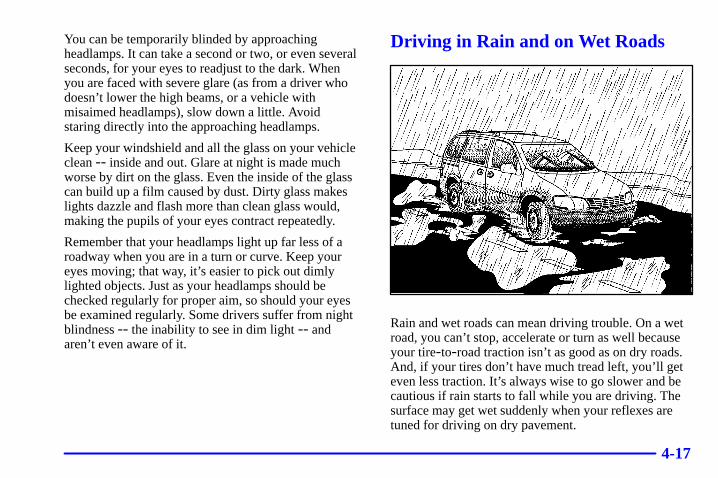
4-17
You can be temporarily blinded by approachingheadlamps. It can take a second or two, or even severalseconds, for your eyes to readjust to the dark. When you are faced with severe glare (as from a driver whodoesn’t lower the high beams, or a vehicle withmisaimed headlamps), slow down a little. Avoid staring directly into the approaching headlamps.
Keep your windshield and all the glass on your vehicleclean -- inside and out. Glare at night is made muchworse by dirt on the glass. Even the inside of the glasscan build up a film caused by dust. Dirty glass makeslights dazzle and flash more than clean glass would,making the pupils of your eyes contract repeatedly.
Remember that your headlamps light up far less of aroadway when you are in a turn or curve. Keep youreyes moving; that way, it’s easier to pick out dimlylighted objects. Just as your headlamps should bechecked regularly for proper aim, so should your eyesbe examined regularly. Some drivers suffer from nightblindness -- the inability to see in dim light -- and aren’t even aware of it.
Driving in Rain and on Wet Roads
Rain and wet roads can mean driving trouble. On a wetroad, you can’t stop, accelerate or turn as well becauseyour tire-to-road traction isn’t as good as on dry roads.And, if your tires don’t have much tread left, you’ll geteven less traction. It’s always wise to go slower and becautious if rain starts to fall while you are driving. Thesurface may get wet suddenly when your reflexes aretuned for driving on dry pavement.
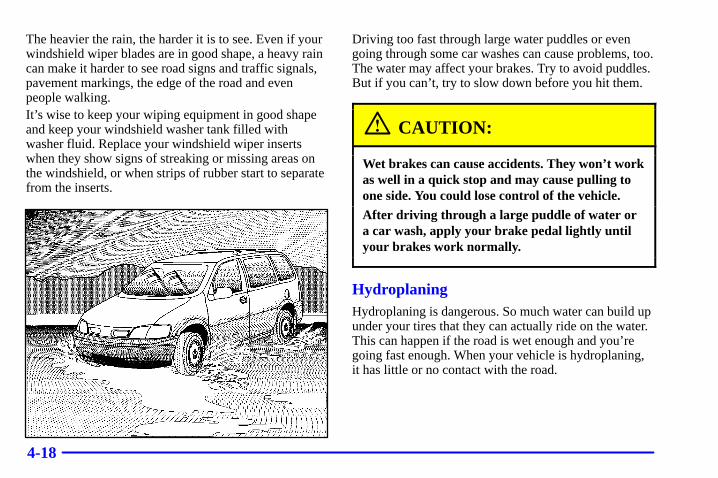
4-18
The heavier the rain, the harder it is to see. Even if yourwindshield wiper blades are in good shape, a heavy raincan make it harder to see road signs and traffic signals,pavement markings, the edge of the road and evenpeople walking.It’s wise to keep your wiping equipment in good shapeand keep your windshield washer tank filled withwasher fluid. Replace your windshield wiper insertswhen they show signs of streaking or missing areas onthe windshield, or when strips of rubber start to separatefrom the inserts.
Driving too fast through large water puddles or evengoing through some car washes can cause problems, too.The water may affect your brakes. Try to avoid puddles.But if you can’t, try to slow down before you hit them.
CAUTION:
Wet brakes can cause accidents. They won’t workas well in a quick stop and may cause pulling toone side. You could lose control of the vehicle.
After driving through a large puddle of water ora car wash, apply your brake pedal lightly untilyour brakes work normally.
HydroplaningHydroplaning is dangerous. So much water can build upunder your tires that they can actually ride on the water.This can happen if the road is wet enough and you’regoing fast enough. When your vehicle is hydroplaning,it has little or no contact with the road.
4-19
Hydroplaning doesn’t happen often. But it can if yourtires do not have much tread or if the pressure in one ormore is low. It can happen if a lot of water is standing onthe road. If you can see reflections from trees, telephonepoles or other vehicles, and raindrops “dimple” thewater’s surface, there could be hydroplaning.
Hydroplaning usually happens at higher speeds. Therejust isn’t a hard and fast rule about hydroplaning. Thebest advice is to slow down when it is raining.
Driving Through Deep Standing Water
NOTICE:
If you drive too quickly through deep puddles orstanding water, water can come in through yourengine’s air intake and badly damage yourengine. Never drive through water that is slightlylower than the underbody of your vehicle. If youcan’t avoid deep puddles or standing water, drivethrough them very slowly.
Driving Through Flowing Water
CAUTION:
Flowing or rushing water creates strong forces. If you try to drive through flowing water, as youmight at a low water crossing, your vehicle can be carried away. As little as six inches of flowingwater can carry away a smaller vehicle. If thishappens, you and the other vehicle occupantscould drown. Don’t ignore police warning signs,and otherwise be very cautious about trying todrive through flowing water.
Some Other Rainy Weather Tips� Besides slowing down, allow some extra following
distance. And be especially careful when you passanother vehicle. Allow yourself more clear roomahead, and be prepared to have your view restrictedby road spray.
� Have good tires with proper tread depth. See “Tires”in the Index.
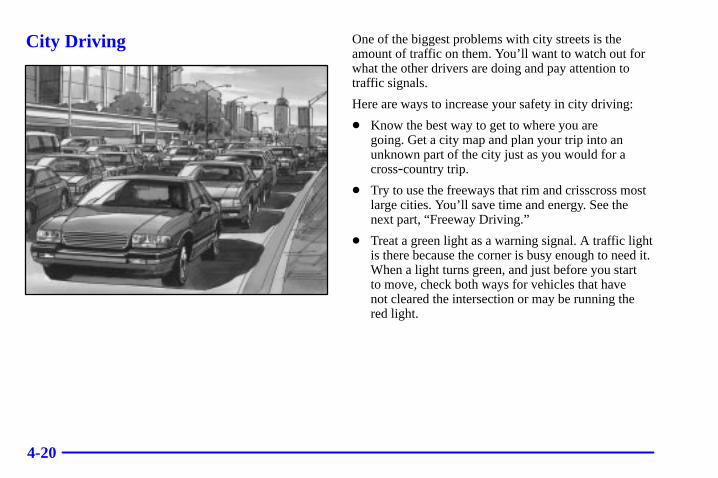
4-20
City Driving One of the biggest problems with city streets is theamount of traffic on them. You’ll want to watch out forwhat the other drivers are doing and pay attention totraffic signals.
Here are ways to increase your safety in city driving:
� Know the best way to get to where you are going. Get a city map and plan your trip into anunknown part of the city just as you would for across-country trip.
� Try to use the freeways that rim and crisscross mostlarge cities. You’ll save time and energy. See thenext part, “Freeway Driving.”
� Treat a green light as a warning signal. A traffic lightis there because the corner is busy enough to need it.When a light turns green, and just before you start to move, check both ways for vehicles that have not cleared the intersection or may be running thered light.
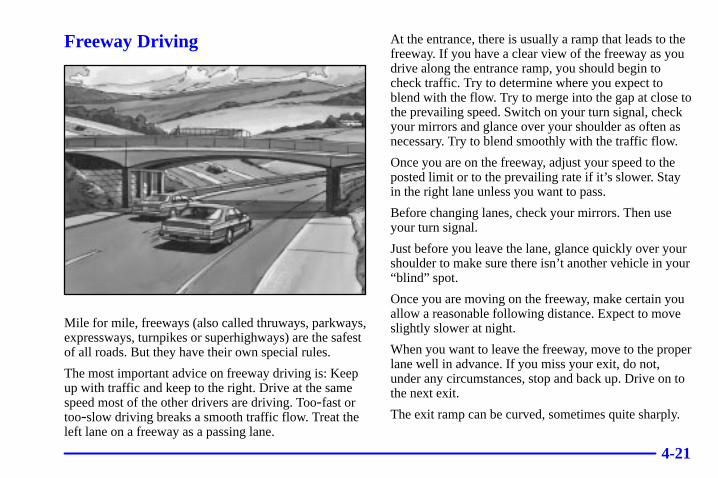
4-21
Freeway Driving
Mile for mile, freeways (also called thruways, parkways,expressways, turnpikes or superhighways) are the safestof all roads. But they have their own special rules.
The most important advice on freeway driving is: Keepup with traffic and keep to the right. Drive at the samespeed most of the other drivers are driving. Too-fast ortoo-slow driving breaks a smooth traffic flow. Treat theleft lane on a freeway as a passing lane.
At the entrance, there is usually a ramp that leads to thefreeway. If you have a clear view of the freeway as youdrive along the entrance ramp, you should begin tocheck traffic. Try to determine where you expect toblend with the flow. Try to merge into the gap at close tothe prevailing speed. Switch on your turn signal, checkyour mirrors and glance over your shoulder as often asnecessary. Try to blend smoothly with the traffic flow.
Once you are on the freeway, adjust your speed to theposted limit or to the prevailing rate if it’s slower. Stayin the right lane unless you want to pass.
Before changing lanes, check your mirrors. Then useyour turn signal.
Just before you leave the lane, glance quickly over yourshoulder to make sure there isn’t another vehicle in your“blind” spot.
Once you are moving on the freeway, make certain youallow a reasonable following distance. Expect to moveslightly slower at night.
When you want to leave the freeway, move to the properlane well in advance. If you miss your exit, do not,under any circumstances, stop and back up. Drive on tothe next exit.
The exit ramp can be curved, sometimes quite sharply.
4-22
The exit speed is usually posted.
Reduce your speed according to your speedometer, notto your sense of motion. After driving for any distanceat higher speeds, you may tend to think you are goingslower than you actually are.
Before Leaving on a Long TripMake sure you’re ready. Try to be well rested. If youmust start when you’re not fresh -- such as after a day’swork -- don’t plan to make too many miles that first partof the journey. Wear comfortable clothing and shoes youcan easily drive in.
Is your vehicle ready for a long trip? If you keep itserviced and maintained, it’s ready to go. If it needsservice, have it done before starting out. Of course,you’ll find experienced and able service experts inPontiac dealerships all across North America. They’ll be ready and willing to help if you need it.
Here are some things you can check before a trip:
� Windshield Washer Fluid: Is the reservoir full? Are all windows clean inside and outside?
� Wiper Blades: Are they in good shape?
� Fuel, Engine Oil, Other Fluids: Have you checkedall levels?
� Lamps: Are they all working? Are the lenses clean?
� Tires: They are vitally important to a safe,trouble-free trip. Is the tread good enough forlong-distance driving? Are the tires all inflated to therecommended pressure?
� Weather Forecasts: What’s the weather outlookalong your route? Should you delay your trip a shorttime to avoid a major storm system?
� Maps: Do you have up-to-date maps?
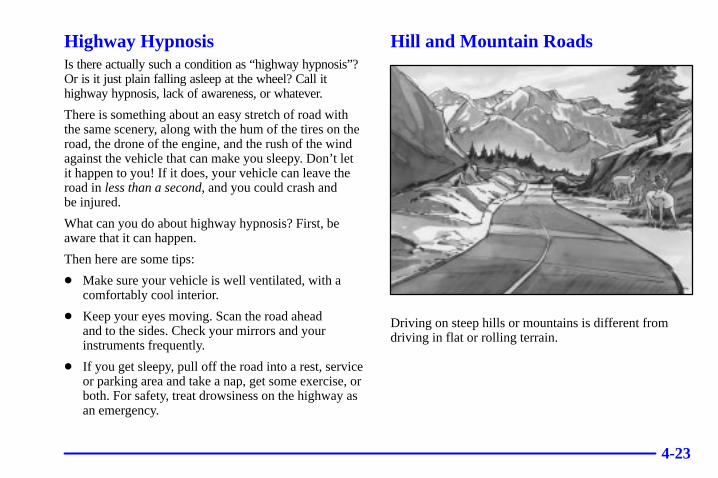
4-23
Highway HypnosisIs there actually such a condition as “highway hypnosis”?Or is it just plain falling asleep at the wheel? Call ithighway hypnosis, lack of awareness, or whatever.
There is something about an easy stretch of road withthe same scenery, along with the hum of the tires on theroad, the drone of the engine, and the rush of the windagainst the vehicle that can make you sleepy. Don’t let it happen to you! If it does, your vehicle can leave theroad in less than a second, and you could crash and be injured.
What can you do about highway hypnosis? First, beaware that it can happen.
Then here are some tips:
� Make sure your vehicle is well ventilated, with acomfortably cool interior.
� Keep your eyes moving. Scan the road ahead and to the sides. Check your mirrors and yourinstruments frequently.
� If you get sleepy, pull off the road into a rest, serviceor parking area and take a nap, get some exercise, orboth. For safety, treat drowsiness on the highway asan emergency.
Hill and Mountain Roads
Driving on steep hills or mountains is different fromdriving in flat or rolling terrain.
4-24
If you drive regularly in steep country, or if you’replanning to visit there, here are some tips that can makeyour trips safer and more enjoyable.
� Keep your vehicle in good shape. Check all fluidlevels and also the brakes, tires, cooling system and transaxle. These parts can work hard onmountain roads.
� Know how to go down hills. The most importantthing to know is this: let your engine do some of theslowing down. Shift to a lower gear when you godown a steep or long hill.
CAUTION:
If you don’t shift down, your brakes could get sohot that they wouldn’t work well. You would thenhave poor braking or even none going down a hill.You could crash. Shift down to let your engineassist your brakes on a steep downhill slope.
CAUTION:
Coasting downhill in NEUTRAL (N) or with theignition off is dangerous. Your brakes will have todo all the work of slowing down. They could getso hot that they wouldn’t work well. You wouldthen have poor braking or even none going downa hill. You could crash. Always have your enginerunning and your vehicle in gear when you go downhill.
� Know how to go uphill. You may want to shift downto a lower gear. The lower gears help cool your engineand transaxle, and you can climb the hill better.
� Stay in your own lane when driving on two-laneroads in hills or mountains. Don’t swing wide or cutacross the center of the road. Drive at speeds that letyou stay in your own lane.
� As you go over the top of a hill, be alert. There could besomething in your lane, like a stalled car or an accident.
� You may see highway signs on mountains that warn ofspecial problems. Examples are long grades, passing orno-passing zones, a falling rocks area or windingroads. Be alert to these and take appropriate action.
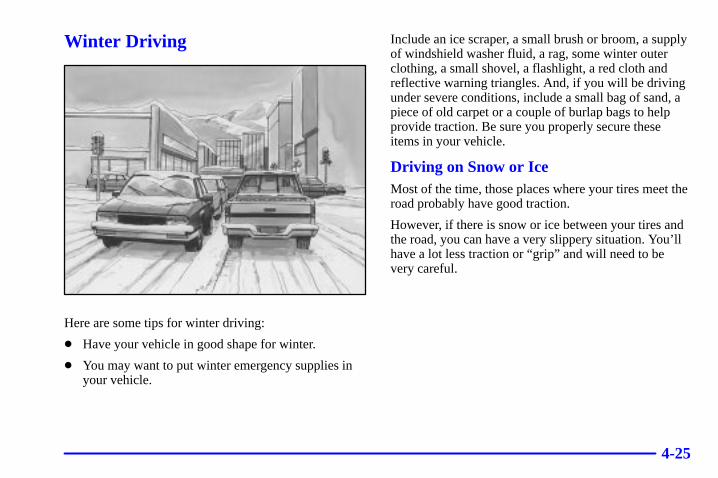
4-25
Winter Driving
Here are some tips for winter driving:
� Have your vehicle in good shape for winter.
� You may want to put winter emergency supplies inyour vehicle.
Include an ice scraper, a small brush or broom, a supplyof windshield washer fluid, a rag, some winter outerclothing, a small shovel, a flashlight, a red cloth andreflective warning triangles. And, if you will be drivingunder severe conditions, include a small bag of sand, apiece of old carpet or a couple of burlap bags to helpprovide traction. Be sure you properly secure theseitems in your vehicle.
Driving on Snow or IceMost of the time, those places where your tires meet theroad probably have good traction.
However, if there is snow or ice between your tires andthe road, you can have a very slippery situation. You’llhave a lot less traction or “grip” and will need to be very careful.
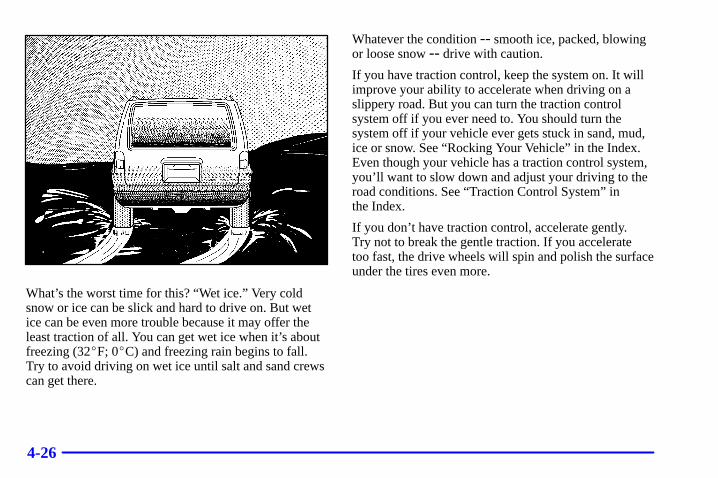
4-26
What’s the worst time for this? “Wet ice.” Very coldsnow or ice can be slick and hard to drive on. But wetice can be even more trouble because it may offer theleast traction of all. You can get wet ice when it’s aboutfreezing (32�F; 0�C) and freezing rain begins to fall.Try to avoid driving on wet ice until salt and sand crewscan get there.
Whatever the condition -- smooth ice, packed, blowingor loose snow -- drive with caution.
If you have traction control, keep the system on. It willimprove your ability to accelerate when driving on aslippery road. But you can turn the traction controlsystem off if you ever need to. You should turn thesystem off if your vehicle ever gets stuck in sand, mud,ice or snow. See “Rocking Your Vehicle” in the Index.Even though your vehicle has a traction control system,you’ll want to slow down and adjust your driving to theroad conditions. See “Traction Control System” in the Index.
If you don’t have traction control, accelerate gently. Try not to break the gentle traction. If you accelerate too fast, the drive wheels will spin and polish the surfaceunder the tires even more.
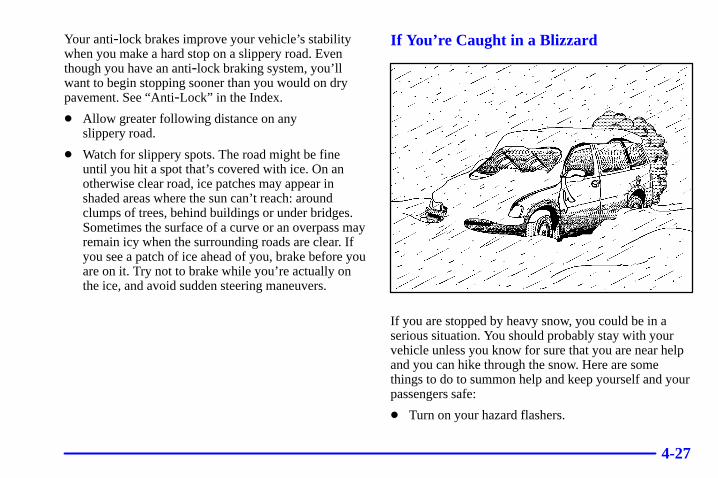
4-27
Your anti-lock brakes improve your vehicle’s stabilitywhen you make a hard stop on a slippery road. Eventhough you have an anti-lock braking system, you’llwant to begin stopping sooner than you would on drypavement. See “Anti-Lock” in the Index.
� Allow greater following distance on any slippery road.
� Watch for slippery spots. The road might be fineuntil you hit a spot that’s covered with ice. On anotherwise clear road, ice patches may appear inshaded areas where the sun can’t reach: aroundclumps of trees, behind buildings or under bridges.Sometimes the surface of a curve or an overpass mayremain icy when the surrounding roads are clear. Ifyou see a patch of ice ahead of you, brake before youare on it. Try not to brake while you’re actually onthe ice, and avoid sudden steering maneuvers.
If You’re Caught in a Blizzard
If you are stopped by heavy snow, you could be in aserious situation. You should probably stay with yourvehicle unless you know for sure that you are near helpand you can hike through the snow. Here are somethings to do to summon help and keep yourself and yourpassengers safe:
� Turn on your hazard flashers.
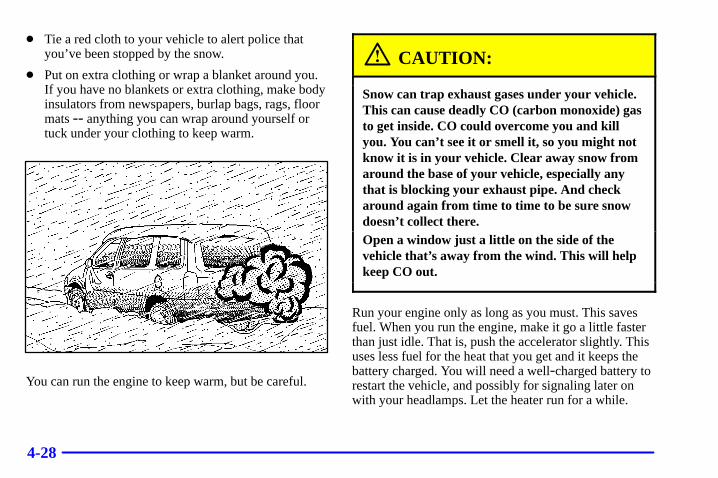
4-28
� Tie a red cloth to your vehicle to alert police thatyou’ve been stopped by the snow.
� Put on extra clothing or wrap a blanket around you.If you have no blankets or extra clothing, make bodyinsulators from newspapers, burlap bags, rags, floormats -- anything you can wrap around yourself ortuck under your clothing to keep warm.
You can run the engine to keep warm, but be careful.
CAUTION:
Snow can trap exhaust gases under your vehicle.This can cause deadly CO (carbon monoxide) gasto get inside. CO could overcome you and killyou. You can’t see it or smell it, so you might notknow it is in your vehicle. Clear away snow fromaround the base of your vehicle, especially anythat is blocking your exhaust pipe. And checkaround again from time to time to be sure snowdoesn’t collect there.Open a window just a little on the side of thevehicle that’s away from the wind. This will helpkeep CO out.
Run your engine only as long as you must. This savesfuel. When you run the engine, make it go a little fasterthan just idle. That is, push the accelerator slightly. Thisuses less fuel for the heat that you get and it keeps thebattery charged. You will need a well-charged battery torestart the vehicle, and possibly for signaling later onwith your headlamps. Let the heater run for a while.
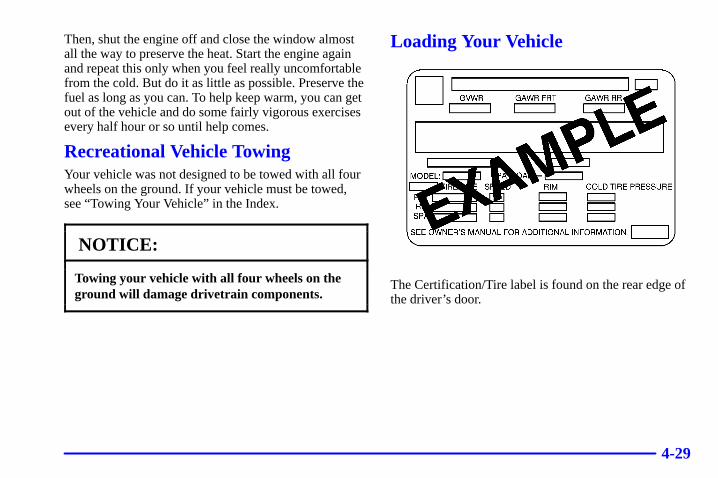
4-29
Then, shut the engine off and close the window almostall the way to preserve the heat. Start the engine againand repeat this only when you feel really uncomfortablefrom the cold. But do it as little as possible. Preserve thefuel as long as you can. To help keep warm, you can getout of the vehicle and do some fairly vigorous exercisesevery half hour or so until help comes.
Recreational Vehicle TowingYour vehicle was not designed to be towed with all fourwheels on the ground. If your vehicle must be towed,see “Towing Your Vehicle” in the Index.
NOTICE:
Towing your vehicle with all four wheels on theground will damage drivetrain components.
Loading Your Vehicle
The Certification/Tire label is found on the rear edge ofthe driver’s door.
4-30
The label shows the size of your original tires and theinflation pressures needed to obtain the gross weightcapacity of your vehicle. This is called the Gross VehicleWeight Rating (GVWR). The GVWR includes theweight of the vehicle, all occupants, fuel and cargo.
The Certification/Tire label also tells you the maximumweights for the front and rear axles, called the GrossAxle Weight Rating (GAWR). To find out the actualloads on your front and rear axles, you need to go to aweigh station and weigh your vehicle. Your dealer canhelp you with this. Be sure to spread out your loadequally on both sides of the centerline.
Never exceed the GVWR for your vehicle or the GAWRfor either the front or rear axle.
CAUTION:
Do not load your vehicle any heavier than theGVWR, or either the maximum front or rearGAWR. If you do, parts on your vehicle canbreak, and it can change the way your vehiclehandles. These could cause you to lose controland crash. Also, overloading can shorten the lifeof your vehicle.
NOTICE:
Your warranty does not cover parts orcomponents that fail because of overloading.
If you put things inside your vehicle -- like suitcases,tools, packages, or anything else -- they will go as fastas the vehicle goes. If you have to stop or turn quickly,or if there is a crash, they’ll keep going.
4-31
CAUTION:
Things you put inside your vehicle can strike and injure people in a sudden stop or turn, or in a crash.
� Put things in the cargo area of your vehicle.Try to spread the weight evenly.
� Never stack heavier things, like suitcases,inside the vehicle so that some of them areabove the tops of the seats.
� Don’t leave an unsecured child restraint inyour vehicle.
� When you carry something inside thevehicle, secure it whenever you can.
� Don’t leave a seat folded down unless youneed to.
Electronic Level Control (Option)On vehicles equipped with the optional electronic levelcontrol, the rear of the vehicle is automatically keptlevel as you load or unload your vehicle. However, youshould still not exceed the GVWR or the GAWR.
If the engine is running or the ignition key is inACCESSORY or when Retained Accessory Power(RAP) is active, you may hear the compressor operating when you load or unload your vehicle, andperiodically as the system self-adjusts. This is normal.See “Retained Accessory Power” in the Index.
The compressor should operate for brief periods of time.If the sound continues for an extended period of time,your vehicle needs service.
Using heavier suspension components to get addeddurability might not change your weight ratings. Askyour dealer to help you load your vehicle the right way.
4-32
Towing a Trailer
CAUTION:
If you don’t use the correct equipment and driveproperly, you can lose control when you pull atrailer. For example, if the trailer is too heavy, thebrakes may not work well -- or even at all. Youand your passengers could be seriously injured.Pull a trailer only if you have followed all thesteps in this section. Ask your dealer for adviceand information about towing a trailer with your vehicle.
NOTICE:
Pulling a trailer improperly can damage yourvehicle and result in costly repairs not covered byyour warranty. To pull a trailer correctly, followthe advice in this part, and see your dealer forimportant information about towing a trailerwith your vehicle.
Your vehicle can tow a trailer. To identify what thevehicle trailering capacity is for your vehicle, youshould read the information in “Weight of the Trailer”that appears later in this section. But trailering isdifferent than just driving your vehicle by itself.Trailering means changes in handling, durability andfuel economy. Successful, safe trailering takes correctequipment, and it has to be used properly.
That’s the reason for this section. In it are manytime-tested, important trailering tips and safety rules.Many of these are important for your safety and that ofyour passengers. So please read this section carefullybefore you pull a trailer.
Load-pulling components such as the engine, transaxle,wheel assemblies and tires are forced to work harderagainst the drag of the added weight. The engine isrequired to operate at relatively higher speeds and undergreater loads, generating extra heat. What’s more, thetrailer adds considerably to wind resistance, increasingthe pulling requirements.
4-33
If You Do Decide To Pull A TrailerIf you do, here are some important points:
� There are many different laws, including speed limitrestrictions, having to do with trailering. Make sureyour rig will be legal, not only where you live butalso where you’ll be driving. A good source for thisinformation can be state or provincial police.
� Consider using a sway control if your trailer willweigh 2,000 lbs. (900 kg) or less. You should alwaysuse a sway control if your trailer will weigh morethan 2,000 lbs. (900 kg). You can ask a hitch dealerabout sway controls.
� Don’t tow a trailer at all during the first 500 miles(800 km) your new vehicle is driven. Your engine,axle or other parts could be damaged.
� Then, during the first 500 miles (800 km) that youtow a trailer, don’t drive over 50 mph (80 km/h) anddon’t make starts at full throttle. This helps yourengine and other parts of your vehicle wear in at theheavier loads.
� You should use THIRD (3) (or, as you need to, a lower gear) when towing a trailer. Operating yourvehicle in THIRD (3) when towing a trailer willminimize heat buildup and extend the life of your transaxle.
Three important considerations have to do with weight:
� the weight of the trailer,
� the weight of the trailer tongue
� and the weight on your vehicle’s tires.
Weight of the TrailerHow heavy can a trailer safely be?
It should never weigh more than 1,400 lbs. (630 kg)with up to six occupants in the vehicle or more than2,000 lbs. (900 kg) with up to two occupants. If youhave the optional trailer towing package, your vehiclecan tow up to 2,900 lbs. (1 300 kg) with up tosix occupants or up to 3,500 lbs. (1 575 kg) with up to two occupants. But even that can be too heavy.
It depends on how you plan to use your rig. For example, speed, altitude, road grades, outsidetemperature and how much your vehicle is used to pull a trailer are all important. And, it can also depend onany special equipment that you have on your vehicle.
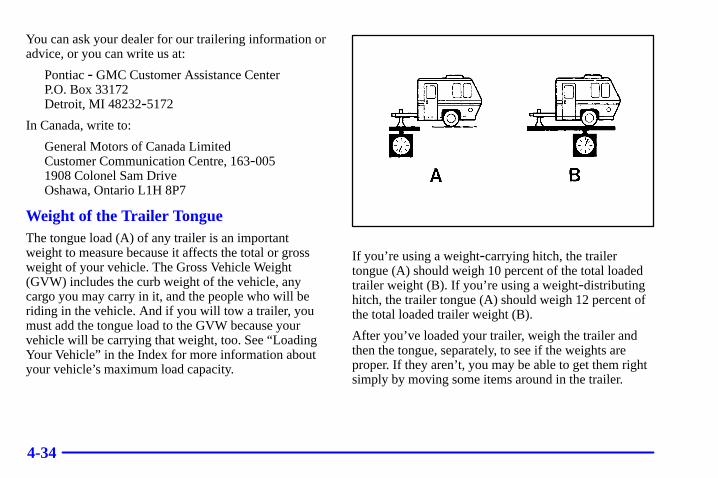
4-34
You can ask your dealer for our trailering information oradvice, or you can write us at:
Pontiac - GMC Customer Assistance CenterP.O. Box 33172Detroit, MI 48232-5172
In Canada, write to:
General Motors of Canada LimitedCustomer Communication Centre, 163-0051908 Colonel Sam DriveOshawa, Ontario L1H 8P7
Weight of the Trailer TongueThe tongue load (A) of any trailer is an importantweight to measure because it affects the total or grossweight of your vehicle. The Gross Vehicle Weight(GVW) includes the curb weight of the vehicle, anycargo you may carry in it, and the people who will beriding in the vehicle. And if you will tow a trailer, youmust add the tongue load to the GVW because yourvehicle will be carrying that weight, too. See “LoadingYour Vehicle” in the Index for more information aboutyour vehicle’s maximum load capacity.
If you’re using a weight-carrying hitch, the trailertongue (A) should weigh 10 percent of the total loadedtrailer weight (B). If you’re using a weight-distributinghitch, the trailer tongue (A) should weigh 12 percent ofthe total loaded trailer weight (B).
After you’ve loaded your trailer, weigh the trailer andthen the tongue, separately, to see if the weights areproper. If they aren’t, you may be able to get them rightsimply by moving some items around in the trailer.
4-35
Total Weight on Your Vehicle’s TiresBe sure your vehicle’s tires are inflated to the upperlimit for cold tires. You’ll find these numbers on theCertification/Tire Label at the rear edge of the driver’sdoor, or see “Tire Loading” in the Index. Then be sureyou don’t go over the GVW limit for your vehicle,including the weight of the trailer tongue.
HitchesIt’s important to have the correct hitch equipment.Crosswinds, large trucks going by and rough roads are afew reasons why you’ll need the right hitch. Here aresome rules to follow:
� The bumpers on your vehicle are not intended for hitches. Do not attach rental hitches or otherbumper-type hitches to them. Use only aframe-mounted hitch that does not attach to the bumper.
� If you’ll be pulling a trailer that, when loaded, willweigh more than 2,000 lbs. (900 kg), be sure to use aproperly mounted, weight-carrying hitch and swaycontrol of the proper size. This equipment is veryimportant for proper vehicle loading and goodhandling when you’re driving.
� Will you have to make any holes in the body of yourvehicle when you install a trailer hitch?
If you do, then be sure to seal the holes later whenyou remove the hitch. If you don’t seal them, deadlycarbon monoxide (CO) from your exhaust can getinto your vehicle. See “Carbon Monoxide” in theIndex. Dirt and water can, too.
4-36
Safety ChainsYou should always attach chains between your vehicle andyour trailer. Cross the safety chains under the tongue of thetrailer to help prevent the tongue from contacting the roadif it becomes separated from the hitch. Instructions aboutsafety chains may be provided by the hitch manufactureror by the trailer manufacturer. Follow the manufacturer’srecommendation for attaching safety chains and do notattach them to the bumper. Always leave just enough slackso you can turn with your rig. Never allow safety chains todrag on the ground.
Trailer BrakesIf your trailer weighs more than 1,000 lbs. (450 kg)loaded, then it needs its own brakes -- and they must beadequate. Be sure to read and follow the instructions forthe trailer brakes so you’ll be able to install, adjust andmaintain them properly.
Because you have anti-lock brakes, do not try to tap intoyour vehicle’s brake system. If you do, both brakesystems won’t work well, or at all.
Driving with a Trailer
CAUTION:
If you have a rear-most window open and youpull a trailer with your vehicle, carbon monoxide(CO) could come into your vehicle. You can’t seeor smell CO. It can cause unconsciousness ordeath. See “Engine Exhaust” in the Index. Tomaximize your safety when towing a trailer:� Have your exhaust system inspected for
leaks, and make necessary repairs beforestarting on your trip.
� Keep the rear-most windows closed.� If exhaust does come into your vehicle
through a window in the rear or anotheropening, drive with your front, mainheating or cooling system on and with thefan on any speed. This will bring fresh,outside air into your vehicle. Do not useRECIRCULATION because it onlyrecirculates the air inside your vehicle. See “Comfort Controls” in the Index.
4-37
Towing a trailer requires a certain amount of experience.Before setting out for the open road, you’ll want to getto know your rig. Acquaint yourself with the feel ofhandling and braking with the added weight of thetrailer. And always keep in mind that the vehicle you aredriving is now a good deal longer and not nearly asresponsive as your vehicle is by itself.
Before you start, check the trailer hitch and platform(and attachments), safety chains, electrical connector,lamps, tires and mirror adjustment. If the trailer haselectric brakes, start your vehicle and trailer moving andthen apply the trailer brake controller by hand to be surethe brakes are working. This lets you check yourelectrical connection at the same time.
During your trip, check occasionally to be sure that theload is secure, and that the lamps and any trailer brakesare still working.
Following DistanceStay at least twice as far behind the vehicle ahead as youwould when driving your vehicle without a trailer. Thiscan help you avoid situations that require heavy brakingand sudden turns.
PassingYou’ll need more passing distance up ahead whenyou’re towing a trailer. And, because you’re a good deallonger, you’ll need to go much farther beyond thepassed vehicle before you can return to your lane.
Backing UpHold the bottom of the steering wheel with one hand.Then, to move the trailer to the left, just move that handto the left. To move the trailer to the right, move yourhand to the right. Always back up slowly and, ifpossible, have someone guide you.
4-38
Making Turns
NOTICE:
Making very sharp turns while trailering couldcause the trailer to come in contact with thevehicle. Your vehicle could be damaged. Avoidmaking very sharp turns while trailering.
When you’re turning with a trailer, make wider turnsthan normal. Do this so your trailer won’t strike soft shoulders, curbs, road signs, trees or other objects. Avoid jerky or sudden maneuvers. Signal wellin advance.
Turn Signals When Towing a TrailerWhen you tow a trailer, your vehicle has to have extra wiring.
The arrows on your instrument panel will flashwhenever you signal a turn or lane change. Properlyhooked up, the trailer lamps will also flash, telling otherdrivers you’re about to turn, change lanes or stop.
When towing a trailer, the arrows on your instrumentpanel will flash for turns even if the bulbs on the trailerare burned out. Thus, you may think drivers behind you are seeing your signal when they are not. It’simportant to check occasionally to be sure the trailerbulbs are still working.
Driving On GradesReduce speed and shift to a lower gear before you startdown a long or steep downgrade. If you don’t shiftdown, you might have to use your brakes so much thatthey would get hot and no longer work well.
If you are towing a trailer that weighs more than1,000 lbs. (450 kg), you may prefer to drive in THIRD (3) instead of AUTOMATIC OVERDRIVE (D)(or, as you need to, a lower gear). This will minimizeheat build-up and extend the life of your transaxle.
4-39
Parking on Hills
CAUTION:
You really should not park your vehicle, with atrailer attached, on a hill. If something goeswrong, your rig could start to move. People canbe injured, and both your vehicle and the trailercan be damaged.
But if you ever have to park your rig on a hill, here’show to do it:
1. Apply your regular brakes, but don’t shift into PARK (P) yet.
2. Have someone place chocks under the trailer wheels.
3. When the wheel chocks are in place, release theregular brakes until the chocks absorb the load.
4. Reapply the regular brakes. Then apply your parkingbrake, and then shift to PARK (P).
5. Release the regular brakes.
When You Are Ready to Leave AfterParking on a Hill1. Apply your regular brakes and hold the pedal down
while you:
� Start your engine;
� Shift into a gear; and
� Release the parking brake.
2. Let up on the brake pedal.
3. Drive slowly until the trailer is clear of the chocks.
4. Stop and have someone pick up and store the chocks.
Maintenance When Trailer TowingYour vehicle will need service more often when you’repulling a trailer. See the Maintenance Schedule for moreon this. Things that are especially important in traileroperation are automatic transaxle fluid (don’t overfill),engine oil, belts, cooling system and brake system. Each of these is covered in this manual, and the Index will helpyou find them quickly. If you’re trailering, it’s a good ideato review these sections before you start your trip.
Check periodically to see that all hitch nuts and bolts are tight.
5-5-1
Section 5 Problems on the Road
Here you’ll find what to do about some problems that can occur on the road.
5-2 Hazard Warning Flashers5-2 Other Warning Devices5-3 Jump Starting5-8 Towing Your Vehicle5-9 Engine Overheating
5-12 Cooling System5-20 If a Tire Goes Flat5-21 Changing a Flat Tire5-32 Compact Spare Tire5-33 If You’re Stuck: In Sand, Mud, Ice or Snow
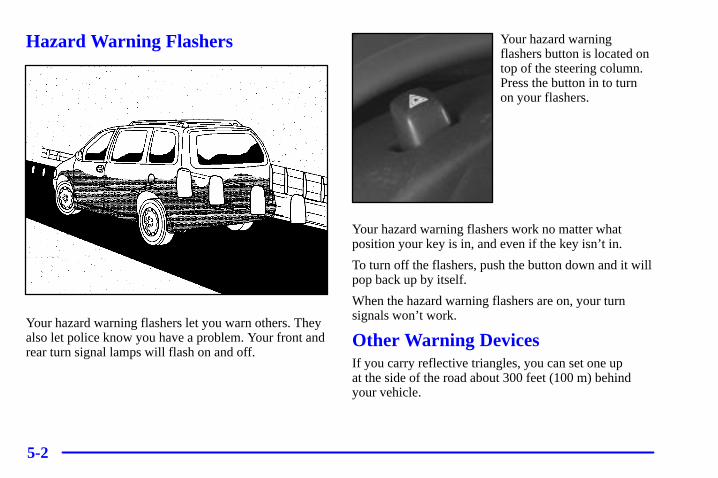
5-2
Hazard Warning Flashers
Your hazard warning flashers let you warn others. Theyalso let police know you have a problem. Your front andrear turn signal lamps will flash on and off.
Your hazard warningflashers button is located ontop of the steering column.Press the button in to turnon your flashers.
Your hazard warning flashers work no matter whatposition your key is in, and even if the key isn’t in.
To turn off the flashers, push the button down and it willpop back up by itself.
When the hazard warning flashers are on, your turnsignals won’t work.
Other Warning DevicesIf you carry reflective triangles, you can set one up at the side of the road about 300 feet (100 m) behindyour vehicle.
5-3
Jump StartingIf your battery has run down, you may want to useanother vehicle and some jumper cables to start yourvehicle. But please use the following steps listed to do it safely.
On vehicles equipped with the optional power slidingdoor, a low-voltage battery or replacing a battery maycause the system to become inoperative. See “PowerSliding Door” in the Index for more information.
CAUTION:
Batteries can hurt you. They can be dangerous because:� They contain acid that can burn you.� They contain gas that can explode or ignite.� They contain enough electricity to burn you.
If you don’t follow these steps exactly, some or allof these things can hurt you.
NOTICE:
Ignoring these steps could result in costly damageto your vehicle that wouldn’t be covered by your warranty.
The ACDelco� battery in your vehicle has abuilt -in hydrometer. Do not charge, test or jumpstart the battery if the hydrometer looks clear orlight yellow. Replace the battery when there is a clear or light yellow hydrometer and a cranking complaint.Trying to start your vehicle by pushing or pullingit won’t work, and it could damage your vehicle.
1. Check the other vehicle. It must have a 12-voltbattery with a negative ground system.
NOTICE:
If the other system isn’t a 12-volt system with anegative ground, both vehicles can be damaged.
5-4
2. Get the vehicles close enough so the jumper cablescan reach, but be sure the vehicles aren’t touchingeach other. If they are, it could cause a groundconnection you don’t want. You wouldn’t be able tostart your vehicle, and the bad grounding coulddamage the electrical systems.
To avoid the possibility of the vehicles rolling, setthe parking brake firmly on both vehicles involved inthe jump start procedure. Put an automatic transaxlein PARK (P) or a manual transaxle in NEUTRALbefore setting the parking brake.
3. Turn off the ignition on both vehicles. Unplugunnecessary accessories plugged into the cigarettelighter or the accessory power outlet. Turn off alllamps that aren’t needed, as well as radios. This will avoid sparks and help save both batteries.In addition, it could save your radio!
NOTICE:
If you leave your radio on, it could be badlydamaged. The repairs wouldn’t be covered byyour warranty.
4. Open the hoods and locate the batteries. Find thepositive (+) and negative (-) terminals on each battery.
CAUTION:
An electric fan can start up even when the engineis not running and can injure you. Keep hands,clothing and tools away from any underhoodelectric fan.
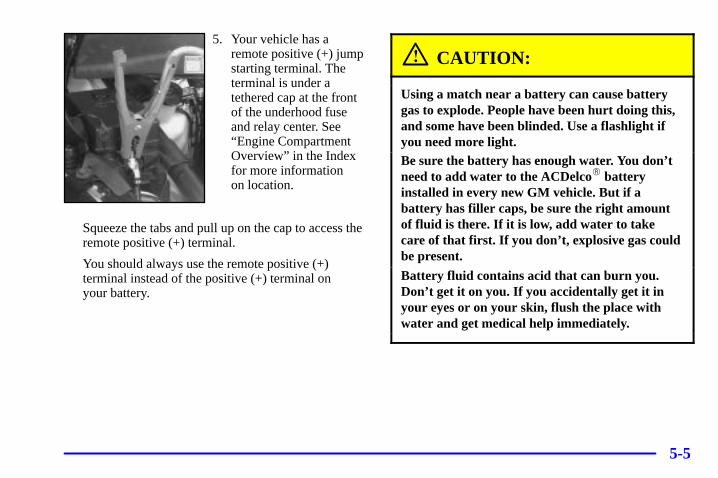
5-5
5. Your vehicle has aremote positive (+) jumpstarting terminal. Theterminal is under atethered cap at the frontof the underhood fuseand relay center. See“Engine CompartmentOverview” in the Indexfor more information on location.
Squeeze the tabs and pull up on the cap to access theremote positive (+) terminal.
You should always use the remote positive (+)terminal instead of the positive (+) terminal on your battery.
CAUTION:
Using a match near a battery can cause batterygas to explode. People have been hurt doing this,and some have been blinded. Use a flashlight ifyou need more light.Be sure the battery has enough water. You don’tneed to add water to the ACDelco� batteryinstalled in every new GM vehicle. But if abattery has filler caps, be sure the right amountof fluid is there. If it is low, add water to take care of that first. If you don’t, explosive gas couldbe present.
Battery fluid contains acid that can burn you.Don’t get it on you. If you accidentally get it inyour eyes or on your skin, flush the place withwater and get medical help immediately.
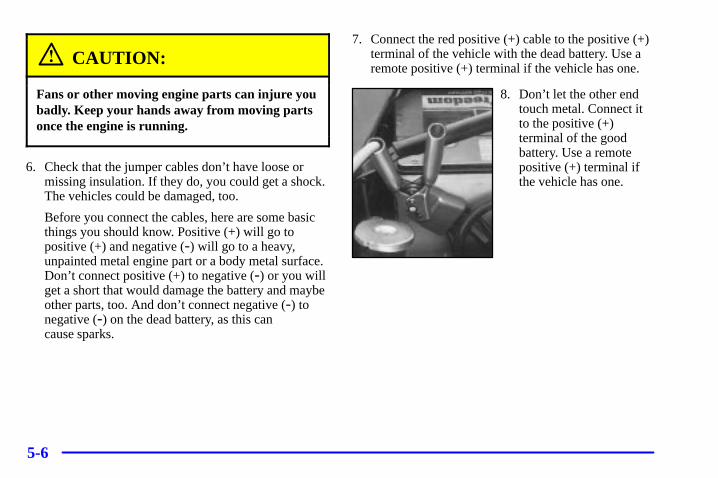
5-6
CAUTION:
Fans or other moving engine parts can injure youbadly. Keep your hands away from moving partsonce the engine is running.
6. Check that the jumper cables don’t have loose ormissing insulation. If they do, you could get a shock.The vehicles could be damaged, too.
Before you connect the cables, here are some basicthings you should know. Positive (+) will go topositive (+) and negative (-) will go to a heavy,unpainted metal engine part or a body metal surface.Don’t connect positive (+) to negative (-) or you willget a short that would damage the battery and maybeother parts, too. And don’t connect negative (-) tonegative (-) on the dead battery, as this can cause sparks.
7. Connect the red positive (+) cable to the positive (+)terminal of the vehicle with the dead battery. Use aremote positive (+) terminal if the vehicle has one.
8. Don’t let the other endtouch metal. Connect itto the positive (+)terminal of the goodbattery. Use a remotepositive (+) terminal ifthe vehicle has one.
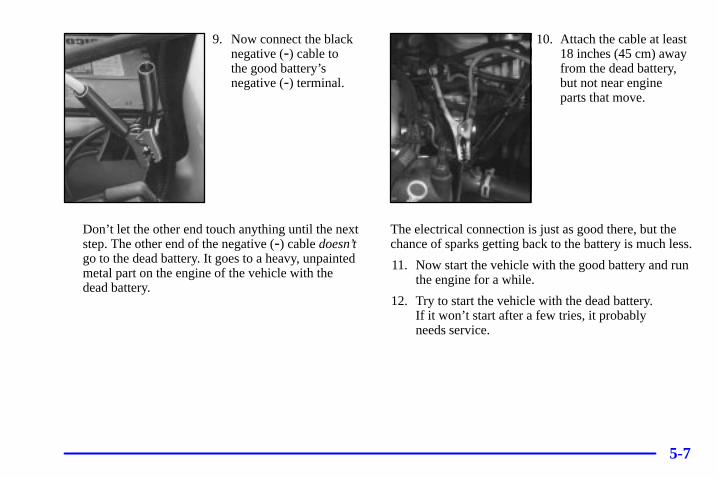
5-7
9. Now connect the blacknegative (-) cable to the good battery’snegative (-) terminal.
Don’t let the other end touch anything until the nextstep. The other end of the negative (-) cable doesn’tgo to the dead battery. It goes to a heavy, unpaintedmetal part on the engine of the vehicle with the dead battery.
10. Attach the cable at least18 inches (45 cm) awayfrom the dead battery,but not near engineparts that move.
The electrical connection is just as good there, but thechance of sparks getting back to the battery is much less.
11. Now start the vehicle with the good battery and runthe engine for a while.
12. Try to start the vehicle with the dead battery. If it won’t start after a few tries, it probably needs service.
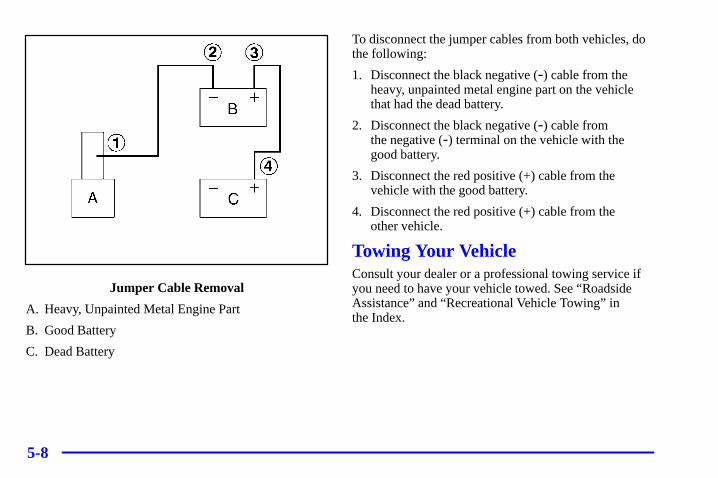
5-8
Jumper Cable Removal
A. Heavy, Unpainted Metal Engine Part
B. Good Battery
C. Dead Battery
To disconnect the jumper cables from both vehicles, dothe following:
1. Disconnect the black negative (-) cable from theheavy, unpainted metal engine part on the vehiclethat had the dead battery.
2. Disconnect the black negative (-) cable from the negative (-) terminal on the vehicle with thegood battery.
3. Disconnect the red positive (+) cable from thevehicle with the good battery.
4. Disconnect the red positive (+) cable from the other vehicle.
Towing Your VehicleConsult your dealer or a professional towing service ifyou need to have your vehicle towed. See “RoadsideAssistance” and “Recreational Vehicle Towing” in the Index.
5-9
Engine OverheatingYou will find an engine coolant temperature gage onyour vehicle’s instrument panel cluster. See “EngineCoolant Temperature Gage” in the Index. You also havean engine coolant temperature warning message on yourinstrument panel. See “Engine Coolant TemperatureWarning Message” in the Index.
Overheated Engine Protection Operating ModeThis emergency operating mode allows your vehicle tobe driven to a safe place in an emergency situation.Should an overheated engine condition exist, anoverheat protection mode which alternates firing groupsof cylinders helps prevent engine damage. In this mode,you will notice a significant loss in power and engineperformance. The temperature gage will indicate anoverheat condition exists. Towing a trailer in theoverheat protection mode should be avoided.
NOTICE:
After driving in the overheated engine protectionoperating mode, to avoid engine damage, allowthe engine to cool before attempting any repair.The engine oil will be severely degraded. Repairthe cause of coolant loss and change the oil. See “Engine Oil” in the Index.
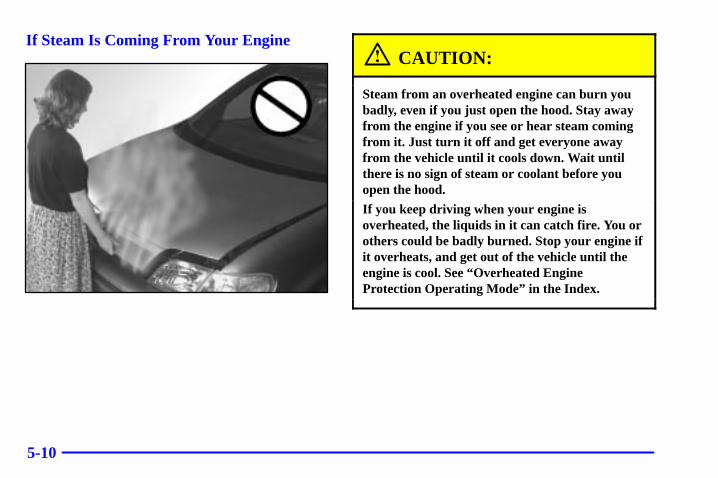
5-10
If Steam Is Coming From Your EngineCAUTION:
Steam from an overheated engine can burn youbadly, even if you just open the hood. Stay awayfrom the engine if you see or hear steam comingfrom it. Just turn it off and get everyone awayfrom the vehicle until it cools down. Wait untilthere is no sign of steam or coolant before youopen the hood.
If you keep driving when your engine isoverheated, the liquids in it can catch fire. You orothers could be badly burned. Stop your engine ifit overheats, and get out of the vehicle until theengine is cool. See “Overheated EngineProtection Operating Mode” in the Index.
5-11
NOTICE:
If your engine catches fire because you keepdriving with no coolant, your vehicle can bebadly damaged. The costly repairs would not becovered by your warranty. See “OverheatedEngine Protection Operating Mode” in the Index.
If No Steam Is Coming From Your EngineIf you get an engine overheat warning but see or hear nosteam, the problem may not be too serious. Sometimesthe engine can get a little too hot when you:
� Climb a long hill on a hot day.
� Stop after high-speed driving.
� Idle for long periods in traffic.
� Tow a trailer.
If you get the overheat warning with no sign of steam,try this for a minute or so:
1. If your air conditioner is on, turn it off.
2. Turn on your heater to full hot at the highest fanspeed and open the window as necessary.
3. If you’re in a traffic jam, shift to NEUTRAL (N);otherwise, shift to the highest gear while driving -- AUTOMATIC OVERDRIVE (D) or THIRD (3).
If you no longer have the overheat warning, you candrive. Just to be safe, drive slower for about 10 minutes.If the warning doesn’t come back on, you can drive normally.
If the warning continues, pull over, stop, and park yourvehicle right away.
If there’s still no sign of steam, idle the engine for threeminutes while you’re parked. If you still have thewarning, turn off the engine and get everyone out of thevehicle until it cools down. Also, see “OverheatedEngine Protection Operating Mode” listed previously inthis section.
You may decide not to lift the hood but to get servicehelp right away.
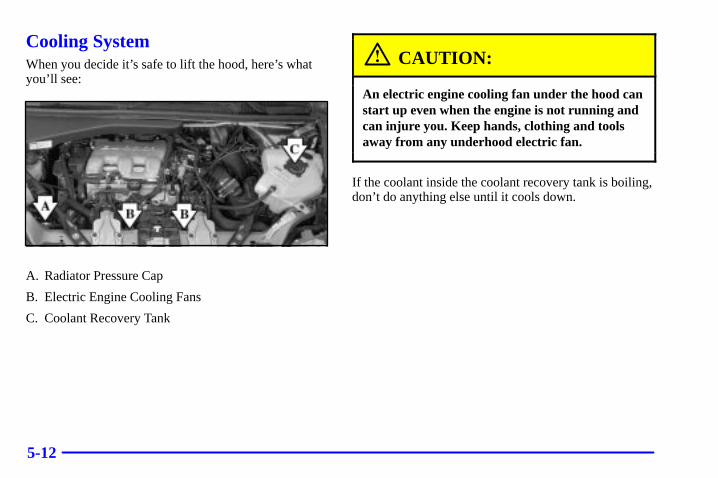
5-12
Cooling SystemWhen you decide it’s safe to lift the hood, here’s whatyou’ll see:
A. Radiator Pressure Cap
B. Electric Engine Cooling Fans
C. Coolant Recovery Tank
CAUTION:
An electric engine cooling fan under the hood canstart up even when the engine is not running andcan injure you. Keep hands, clothing and toolsaway from any underhood electric fan.
If the coolant inside the coolant recovery tank is boiling,don’t do anything else until it cools down.

5-13
When the engine is cold, the coolant level should be ator above the FULL COLD mark. If it isn’t, you mayhave a leak in the radiator hoses, heater hoses, radiator,water pump or somewhere else in the cooling system.
CAUTION:
Heater and radiator hoses, and other engineparts, can be very hot. Don’t touch them. If youdo, you can be burned.
Don’t run the engine if there is a leak. If you runthe engine, it could lose all coolant. That couldcause an engine fire, and you could be burned.Get any leak fixed before you drive the vehicle.
NOTICE:
Engine damage from running your enginewithout coolant isn’t covered by your warranty.See “Overheated Engine Protection OperatingMode” in the Index.
5-14
NOTICE:
When adding coolant, it is important that you useonly DEX-COOL� (silicate-free) coolant.If coolant other than DEX-COOL is added to the system, premature engine, heater core orradiator corrosion may result. In addition, theengine coolant will require change sooner -- at30,000 miles (50 000 km) or 24 months,whichever occurs first. Damage caused by the use of coolant other than DEX-COOL� is notcovered by your new vehicle warranty.
If there seems to be no leak, with the engine on, check to see if the electric engine cooling fans are running. If the engine is overheating, both fans should berunning. If they aren’t, your vehicle needs service.
How to Add Coolant to the CoolantRecovery TankIf you haven’t found a problem yet, but the coolant levelisn’t at or above the FULL COLD mark, add a 50/50mixture of clean, drinkable water and DEX-COOL�
engine coolant at the coolant recovery tank. See “EngineCoolant” in the Index for more information.
CAUTION:
Adding only plain water to your cooling systemcan be dangerous. Plain water, or some otherliquid like alcohol, can boil before the propercoolant mixture will. Your vehicle’s coolantwarning system is set for the proper coolantmixture. With plain water or the wrong mixture,your engine could get too hot but you wouldn’tget the overheat warning. Your engine couldcatch fire and you or others could be burned. Use a 50/50 mixture of clean, drinkable waterand DEX-COOL� coolant.
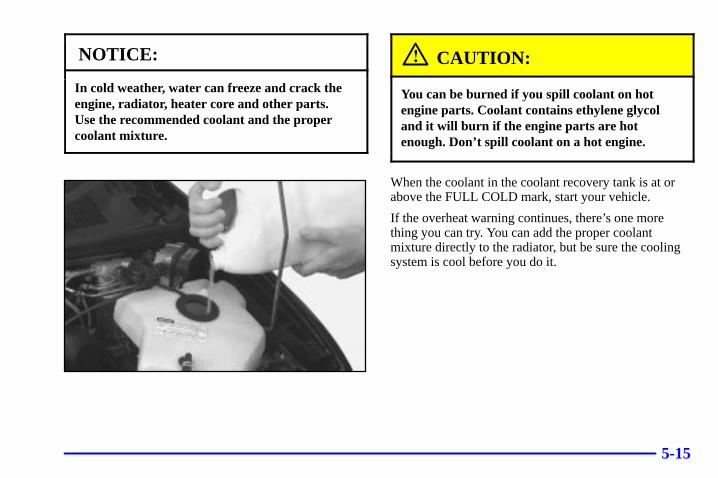
5-15
NOTICE:
In cold weather, water can freeze and crack theengine, radiator, heater core and other parts. Use the recommended coolant and the propercoolant mixture.
CAUTION:
You can be burned if you spill coolant on hotengine parts. Coolant contains ethylene glycoland it will burn if the engine parts are hotenough. Don’t spill coolant on a hot engine.
When the coolant in the coolant recovery tank is at orabove the FULL COLD mark, start your vehicle.
If the overheat warning continues, there’s one morething you can try. You can add the proper coolantmixture directly to the radiator, but be sure the coolingsystem is cool before you do it.
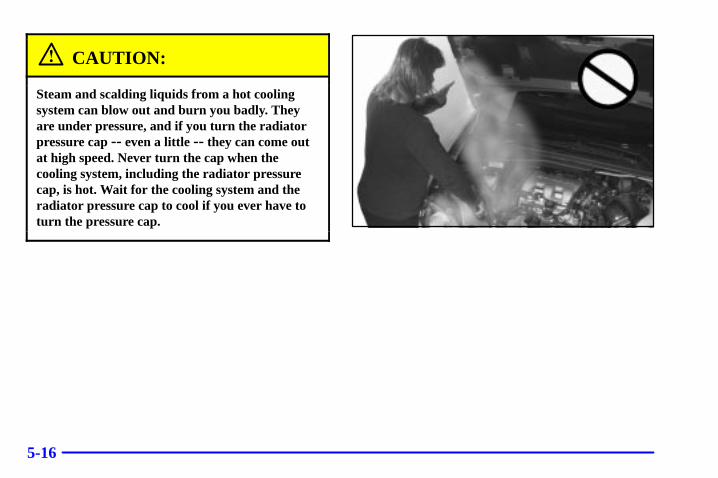
5-16
CAUTION:
Steam and scalding liquids from a hot coolingsystem can blow out and burn you badly. Theyare under pressure, and if you turn the radiatorpressure cap -- even a little -- they can come outat high speed. Never turn the cap when thecooling system, including the radiator pressurecap, is hot. Wait for the cooling system and theradiator pressure cap to cool if you ever have toturn the pressure cap.
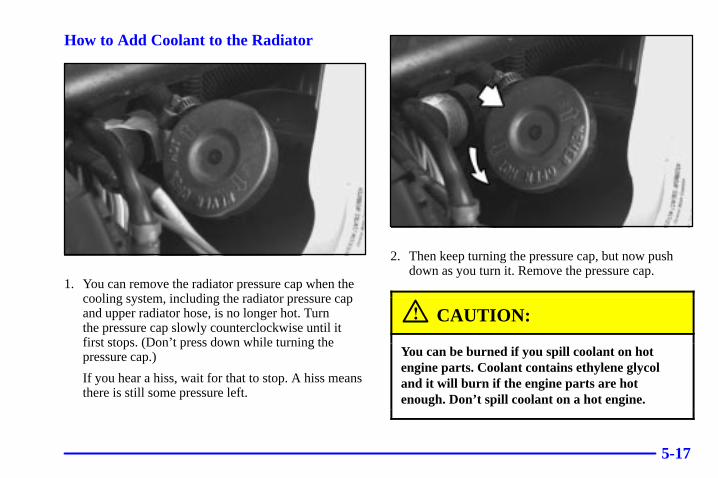
5-17
How to Add Coolant to the Radiator
1. You can remove the radiator pressure cap when thecooling system, including the radiator pressure capand upper radiator hose, is no longer hot. Turn the pressure cap slowly counterclockwise until it first stops. (Don’t press down while turning thepressure cap.)
If you hear a hiss, wait for that to stop. A hiss meansthere is still some pressure left.
2. Then keep turning the pressure cap, but now pushdown as you turn it. Remove the pressure cap.
CAUTION:
You can be burned if you spill coolant on hotengine parts. Coolant contains ethylene glycoland it will burn if the engine parts are hotenough. Don’t spill coolant on a hot engine.
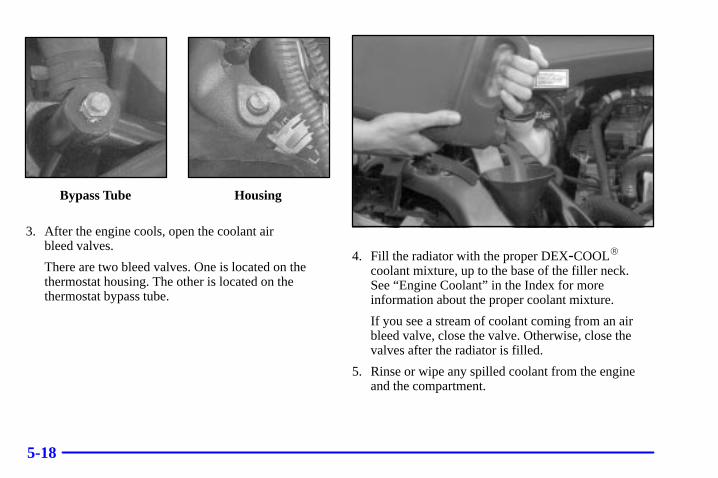
5-18
Bypass Tube Housing
3. After the engine cools, open the coolant air bleed valves.
There are two bleed valves. One is located on thethermostat housing. The other is located on thethermostat bypass tube.
4. Fill the radiator with the proper DEX-COOL�
coolant mixture, up to the base of the filler neck. See “Engine Coolant” in the Index for moreinformation about the proper coolant mixture.
If you see a stream of coolant coming from an airbleed valve, close the valve. Otherwise, close thevalves after the radiator is filled.
5. Rinse or wipe any spilled coolant from the engineand the compartment.
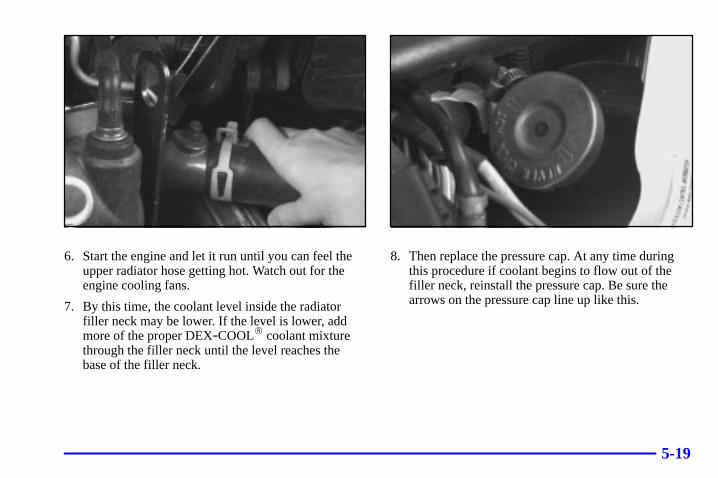
5-19
6. Start the engine and let it run until you can feel theupper radiator hose getting hot. Watch out for theengine cooling fans.
7. By this time, the coolant level inside the radiatorfiller neck may be lower. If the level is lower, addmore of the proper DEX-COOL� coolant mixturethrough the filler neck until the level reaches thebase of the filler neck.
8. Then replace the pressure cap. At any time duringthis procedure if coolant begins to flow out of thefiller neck, reinstall the pressure cap. Be sure thearrows on the pressure cap line up like this.
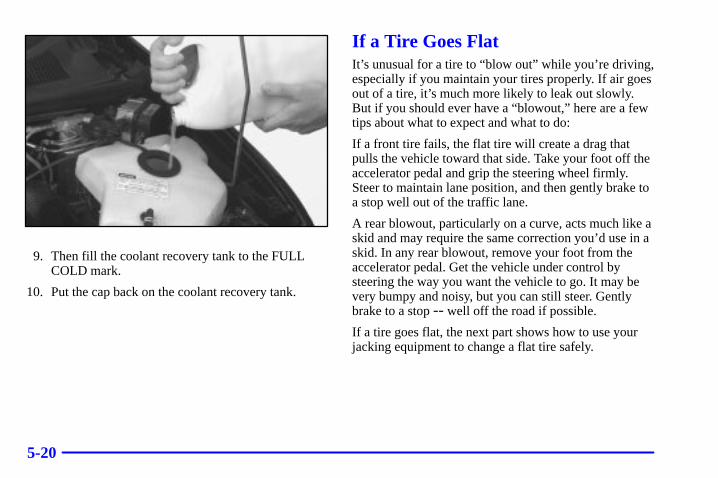
5-20
9. Then fill the coolant recovery tank to the FULLCOLD mark.
10. Put the cap back on the coolant recovery tank.
If a Tire Goes FlatIt’s unusual for a tire to “blow out” while you’re driving,especially if you maintain your tires properly. If air goesout of a tire, it’s much more likely to leak out slowly.But if you should ever have a “blowout,” here are a fewtips about what to expect and what to do:
If a front tire fails, the flat tire will create a drag thatpulls the vehicle toward that side. Take your foot off theaccelerator pedal and grip the steering wheel firmly.Steer to maintain lane position, and then gently brake toa stop well out of the traffic lane.
A rear blowout, particularly on a curve, acts much like askid and may require the same correction you’d use in askid. In any rear blowout, remove your foot from theaccelerator pedal. Get the vehicle under control bysteering the way you want the vehicle to go. It may bevery bumpy and noisy, but you can still steer. Gentlybrake to a stop -- well off the road if possible.
If a tire goes flat, the next part shows how to use yourjacking equipment to change a flat tire safely.
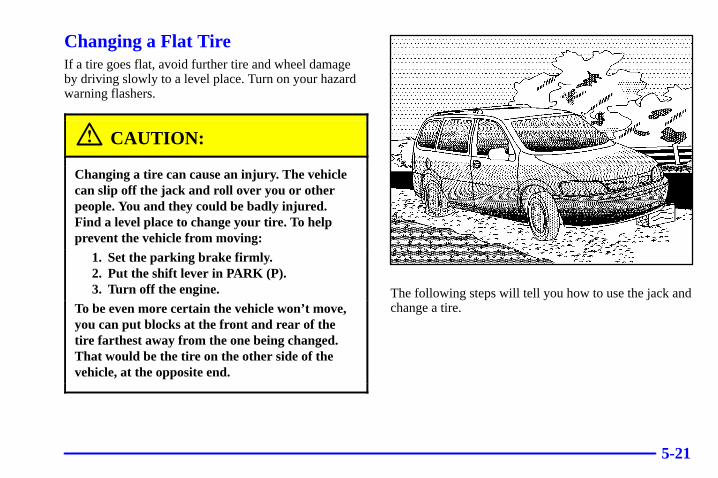
5-21
Changing a Flat TireIf a tire goes flat, avoid further tire and wheel damageby driving slowly to a level place. Turn on your hazardwarning flashers.
CAUTION:
Changing a tire can cause an injury. The vehiclecan slip off the jack and roll over you or otherpeople. You and they could be badly injured.Find a level place to change your tire. To helpprevent the vehicle from moving:
1. Set the parking brake firmly.2. Put the shift lever in PARK (P).3. Turn off the engine.
To be even more certain the vehicle won’t move,you can put blocks at the front and rear of thetire farthest away from the one being changed.That would be the tire on the other side of thevehicle, at the opposite end.
The following steps will tell you how to use the jack andchange a tire.
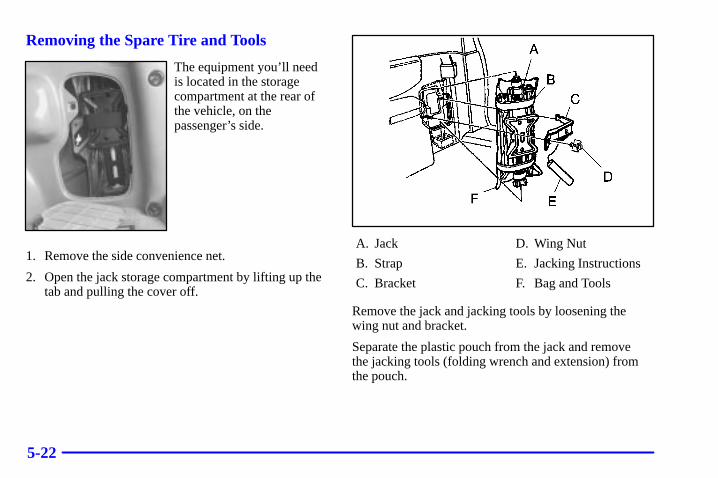
5-22
Removing the Spare Tire and Tools
The equipment you’ll needis located in the storagecompartment at the rear ofthe vehicle, on thepassenger’s side.
1. Remove the side convenience net.
2. Open the jack storage compartment by lifting up thetab and pulling the cover off.
A. Jack
B. Strap
C. Bracket
D. Wing Nut
E. Jacking Instructions
F. Bag and Tools
Remove the jack and jacking tools by loosening thewing nut and bracket.
Separate the plastic pouch from the jack and remove the jacking tools (folding wrench and extension) fromthe pouch.
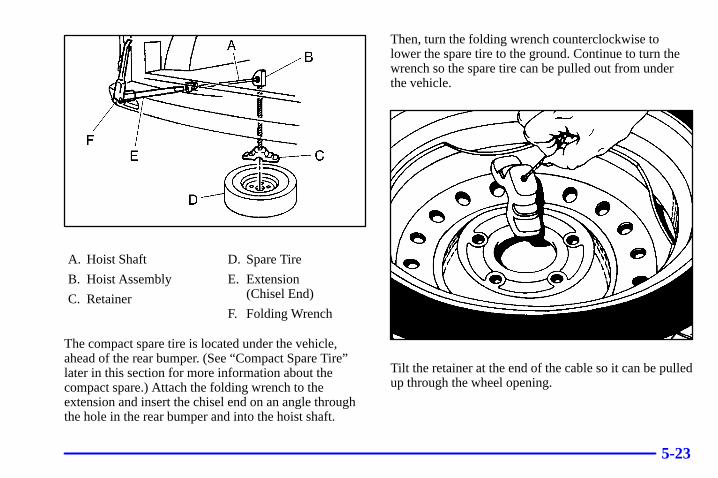
5-23
A. Hoist Shaft
B. Hoist Assembly
C. Retainer
D. Spare Tire
E. Extension (Chisel End)
F. Folding Wrench
The compact spare tire is located under the vehicle,ahead of the rear bumper. (See “Compact Spare Tire”later in this section for more information about thecompact spare.) Attach the folding wrench to theextension and insert the chisel end on an angle throughthe hole in the rear bumper and into the hoist shaft.
Then, turn the folding wrench counterclockwise tolower the spare tire to the ground. Continue to turn thewrench so the spare tire can be pulled out from underthe vehicle.
Tilt the retainer at the end of the cable so it can be pulledup through the wheel opening.
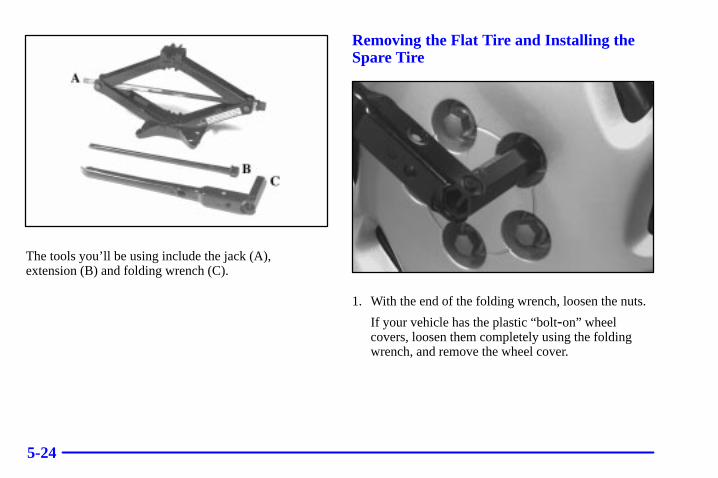
5-24
The tools you’ll be using include the jack (A), extension (B) and folding wrench (C).
Removing the Flat Tire and Installing theSpare Tire
1. With the end of the folding wrench, loosen the nuts.
If your vehicle has the plastic “bolt-on” wheelcovers, loosen them completely using the foldingwrench, and remove the wheel cover.
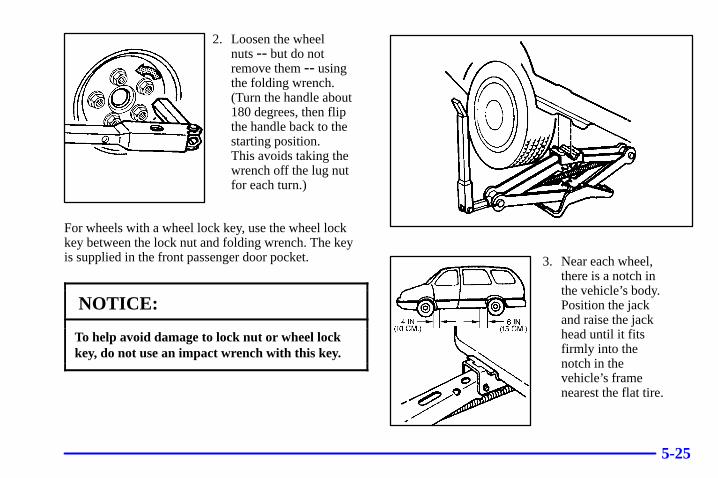
5-25
2. Loosen the wheel nuts -- but do notremove them -- usingthe folding wrench.(Turn the handle about180 degrees, then flipthe handle back to thestarting position. This avoids taking thewrench off the lug nutfor each turn.)
For wheels with a wheel lock key, use the wheel lockkey between the lock nut and folding wrench. The key is supplied in the front passenger door pocket.
NOTICE:
To help avoid damage to lock nut or wheel lockkey, do not use an impact wrench with this key.
3. Near each wheel,there is a notch inthe vehicle’s body.Position the jackand raise the jackhead until it fitsfirmly into thenotch in thevehicle’s framenearest the flat tire.

5-26
NOTICE:
Do not place the jack under the rear axle control arms. Only use the areas shown forproper jack location.
Do not raise the vehicle yet. Put the compact sparetire near you.
CAUTION:
Getting under a vehicle when it is jacked up isdangerous. If the vehicle slips off the jack, youcould be badly injured or killed. Never get undera vehicle when it is supported only by a jack.
CAUTION:
Raising your vehicle with the jack improperlypositioned can damage the vehicle and even make the vehicle fall. To help avoid personalinjury and vehicle damage, be sure to fit the jacklift head into the proper location before raisingthe vehicle.
4. Attach the foldingwrench to the jack, andturn the wrenchclockwise to raise thejack head a few inches.
5. Raise the vehicle by turning the folding wrenchclockwise in the jack. Raise the vehicle far enoughoff the ground so there is enough room for the sparetire to fit under the wheel well.
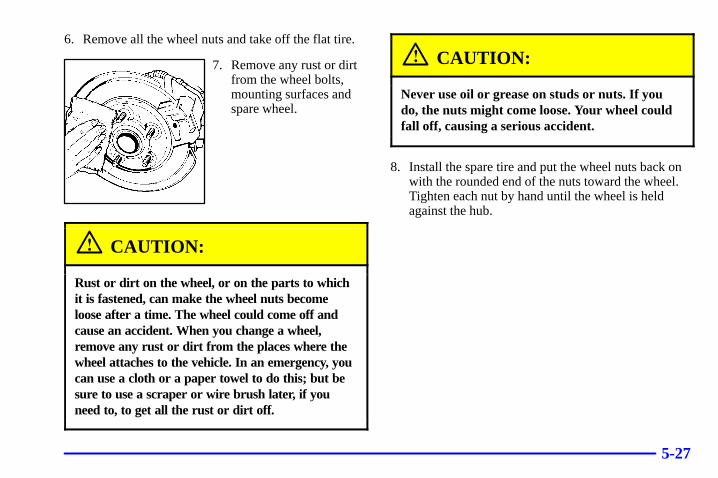
5-27
6. Remove all the wheel nuts and take off the flat tire.
7. Remove any rust or dirtfrom the wheel bolts,mounting surfaces andspare wheel.
CAUTION:
Rust or dirt on the wheel, or on the parts to whichit is fastened, can make the wheel nuts becomeloose after a time. The wheel could come off andcause an accident. When you change a wheel,remove any rust or dirt from the places where thewheel attaches to the vehicle. In an emergency, youcan use a cloth or a paper towel to do this; but besure to use a scraper or wire brush later, if youneed to, to get all the rust or dirt off.
CAUTION:
Never use oil or grease on studs or nuts. If youdo, the nuts might come loose. Your wheel couldfall off, causing a serious accident.
8. Install the spare tire and put the wheel nuts back onwith the rounded end of the nuts toward the wheel.Tighten each nut by hand until the wheel is heldagainst the hub.
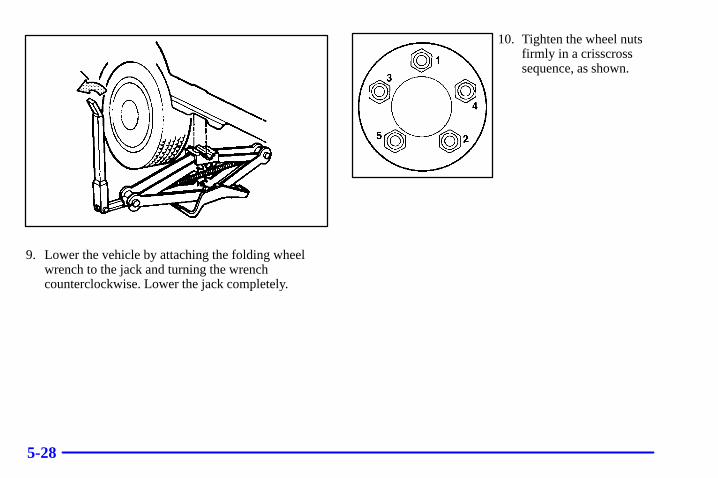
5-28
9. Lower the vehicle by attaching the folding wheelwrench to the jack and turning the wrenchcounterclockwise. Lower the jack completely.
10. Tighten the wheel nutsfirmly in a crisscrosssequence, as shown.
5-29
CAUTION:
Incorrect wheel nuts or improperly tightenedwheel nuts can cause the wheel to become looseand even come off. This could lead to an accident.Be sure to use the correct wheel nuts. If you haveto replace them, be sure to get new GM originalequipment wheel nuts.Stop somewhere as soon as you can and have the nuts tightened with a torque wrench to 100 lb-ft (140 N·m).
NOTICE:
Improperly tightened wheel nuts can lead tobrake pulsation and rotor damage. To avoidexpensive brake repairs, evenly tighten the wheelnuts in the proper sequence and to the propertorque specification.
11. Don’t try to put a wheel cover on the compact sparetire. It won’t fit. Store the wheel cover securely inthe rear of the vehicle until you have the flat tirerepaired or replaced.
NOTICE:
Wheel covers won’t fit on your compact spare. If you try to put a wheel cover on your compactspare, you could damage the cover or the spare.
5-30
Storing a Flat or Spare Tire and Tools
CAUTION:
Storing a jack, a tire or other equipment in thepassenger compartment of the vehicle couldcause injury. In a sudden stop or collision, looseequipment could strike someone. Store all thesein the proper place.
1. Lay the tire near the rear of the vehicle with thevalve stem down.
2. Slide the cable retainer through the center of thewheel and start to raise the tire.
Make sure the retainer is fully seated across theunderside of the wheel.
3. When the tire is almost in the stored position, turn the tire so the valve is towards the rear of the vehicle.
This will help when you check and maintain tirepressure in the spare.
4. Raise the tire fully against the underside of thevehicle. Continue turning the folding wrench untilthe tire is secure and the cable is tight. The spare tirehoist cannot be overtightened.
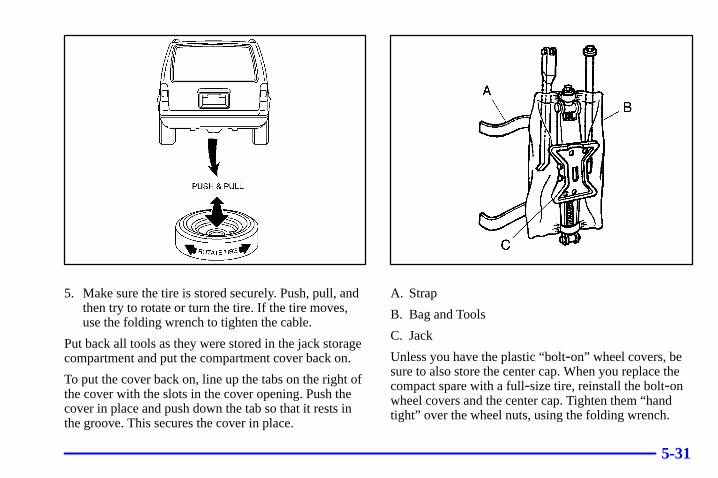
5-31
5. Make sure the tire is stored securely. Push, pull, andthen try to rotate or turn the tire. If the tire moves,use the folding wrench to tighten the cable.
Put back all tools as they were stored in the jack storagecompartment and put the compartment cover back on.
To put the cover back on, line up the tabs on the right ofthe cover with the slots in the cover opening. Push thecover in place and push down the tab so that it rests inthe groove. This secures the cover in place.
A. Strap
B. Bag and Tools
C. Jack
Unless you have the plastic “bolt-on” wheel covers, besure to also store the center cap. When you replace thecompact spare with a full-size tire, reinstall the bolt-onwheel covers and the center cap. Tighten them “handtight” over the wheel nuts, using the folding wrench.
5-32
Compact Spare TireAlthough the compact spare tire was fully inflated when your vehicle was new, it can lose air after a time.Check the inflation pressure regularly. It should be 60 psi (420 kPa).
After installing the compact spare on your vehicle, youshould stop as soon as possible and make sure yourspare tire is correctly inflated. The compact spare ismade to perform well at speeds up to 65 mph (105 km/h) for distances up to 3,000 miles (5 000 km),so you can finish your trip and have your full-size tirerepaired or replaced where you want. Of course, it’s bestto replace your spare with a full-size tire as soon as youcan. Your spare will last longer and be in good shape incase you need it again.
NOTICE:
When the compact spare is installed, don’t takeyour vehicle through an automatic car wash withguide rails. The compact spare can get caught onthe rails. That can damage the tire and wheel,and maybe other parts of your vehicle.
Don’t use your compact spare on other vehicles.
And don’t mix your compact spare tire or wheel withother wheels or tires. They won’t fit. Keep your sparetire and its wheel together.
NOTICE:
Tire chains won’t fit your compact spare. Usingthem can damage your vehicle and can damagethe chains too. Don’t use tire chains on yourcompact spare.
5-33
If You’re Stuck: In Sand, Mud, Ice or SnowIn order to free your vehicle when it is stuck, you willneed to spin the wheels, but you don’t want to spin your wheels too fast. The method known as “rocking”can help you get out when you’re stuck, but you mustuse caution.
CAUTION:
If you let your tires spin at high speed, they canexplode, and you or others could be injured. And,the transaxle or other parts of the vehicle canoverheat. That could cause an enginecompartment fire or other damage. When you’restuck, spin the wheels as little as possible. Don’tspin the wheels above 35 mph (55 km/h) as shownon the speedometer.
NOTICE:
Spinning your wheels can destroy parts of yourvehicle as well as the tires. If you spin the wheelstoo fast while shifting your transaxle back andforth, you can destroy your transaxle.
For information about using tire chains on your vehicle,see “Tire Chains” in the Index.
Rocking Your Vehicle To Get It OutFirst, turn your steering wheel left and right. That willclear the area around your front wheels. If your vehiclehas traction control, you should turn your tractioncontrol system off. See “Traction Control System” in theIndex. Then shift back and forth between REVERSE (R)and a forward gear, spinning the wheels as little aspossible. Release the accelerator pedal while you shift,and press lightly on the accelerator pedal when thetransaxle is in gear. By slowly spinning your wheels inthe forward and reverse directions, you will cause arocking motion that may free your vehicle. If thatdoesn’t get you out after a few tries, you may need to betowed out. If you do need to be towed out, see “TowingYour Vehicle” in the Index.
6-6-1
Section 6 Service and Appearance Care
Here you will find information about the care of your vehicle. This section begins with service and fuel information,and then it shows how to check important fluid and lubricant levels. There is also technical information about yourvehicle, and a part devoted to its appearance care.
6-2 Service6-3 Fuel6-5 Fuels in Foreign Countries6-6 Filling Your Tank6-8 Filling a Portable Fuel Container6-9 Checking Things Under the Hood6-12 Engine Oil6-17 Engine Air Cleaner/Filter6-18 Passenger Compartment Air
Filter Replacement6-19 Automatic Transaxle Fluid6-22 Engine Coolant6-26 Radiator Pressure Cap6-26 Power Steering Fluid6-27 Windshield Washer Fluid6-28 Brakes
6-32 Battery6-32 Bulb Replacement6-39 Windshield Wiper Blade Replacement6-41 Tires6-50 Appearance Care6-50 Cleaning the Inside of Your Vehicle6-54 Cleaning the Outside of Your Vehicle6-56 Underbody Maintenance6-56 Chemical Paint Spotting6-57 GM Vehicle Care/Appearance Materials6-58 Vehicle Identification Number (VIN)6-59 Electrical System6-66 Replacement Bulbs6-67 Capacities and Specifications6-68 Normal Maintenance Replacement Parts
6-2
ServiceYour dealer knows your vehicle best and wants you tobe happy with it. We hope you’ll go to your dealer forall your service needs. You’ll get genuine GM parts andGM-trained and supported service people.
We hope you’ll want to keep your GM vehicle all GM.Genuine GM parts have one of these marks:
Doing Your Own Service WorkIf you want to do some of your own service work, you’llwant to use the proper service manual. It tells you muchmore about how to service your vehicle than this manualcan. To order the proper service manual, see “Serviceand Owner Publications” in the Index.
Your vehicle has an air bag system. Before attempting todo your own service work, see “Servicing Your AirBag-Equipped Vehicle” in the Index.
You should keep a record with all parts receipts and listthe mileage and the date of any service work youperform. See “Maintenance Record” in the Index.
6-3
CAUTION:
You can be injured and your vehicle could bedamaged if you try to do service work on avehicle without knowing enough about it.
� Be sure you have sufficient knowledge,experience, the proper replacement partsand tools before you attempt any vehiclemaintenance task.
� Be sure to use the proper nuts, bolts andother fasteners. “English” and “metric”fasteners can be easily confused. If you usethe wrong fasteners, parts can later breakor fall off. You could be hurt.
Adding Equipment to the Outside of Your VehicleThings you might add to the outside of your vehicle canaffect the airflow around it. This may cause wind noiseand affect windshield washer performance. Check withyour dealer before adding equipment to the outside ofyour vehicle.
FuelUse regular unleaded gasoline rated at 87 octane orhigher. It is recommended that the gasoline meetspecifications which were developed by the AmericanAutomobile Manufacturers Association (AAMA) andendorsed by the Canadian Motor Vehicle ManufacturersAssociation for better vehicle performance and engineprotection. Gasolines meeting the AAMA specificationcould provide improved driveability and emission controlsystem performance compared to other gasolines.
6-4
In Canada, look for the“Auto Makers’ Choice”label on the fuel pump.
Canada Only
Be sure the posted octane is at least 87. If the octane isless than 87, you may get a heavy knocking noise whenyou drive. If it’s bad enough, it can damage your engine.
If you’re using fuel rated at 87 octane or higher and you hear heavy knocking, your engine needs service.But don’t worry if you hear a little pinging noise whenyou’re accelerating or driving up a hill. That’s normal,and you don’t have to buy a higher octane fuel to get rid of pinging. It’s the heavy, constant knock that means you have a problem.
If your vehicle is certified to meet California EmissionStandards (indicated on the underhood emission controllabel), it is designed to operate on fuels that meetCalifornia specifications. If such fuels are not availablein states adopting California emissions standards, your vehicle will operate satisfactorily on fuels meetingfederal specifications, but emission control systemperformance may be affected. The malfunction indicatorlamp on your instrument panel may turn on and/or yourvehicle may fail a smog-check test. See “MalfunctionIndicator Lamp” in the Index. If this occurs, return to your authorized Pontiac dealer for diagnosis todetermine the cause of failure. In the event it isdetermined that the cause of the condition is the type offuels used, repairs may not be covered by your warranty.
Some gasolines that are not reformulated for lowemissions may contain an octane-enhancing additivecalled methylcyclopentadienyl manganese tricarbonyl(MMT); ask your service station operator whether or not the fuel contains MMT. General Motors does notrecommend the use of such gasolines. If fuels containingMMT are used, spark plug life may be reduced and youremission control system performance may be affected.The malfunction indicator lamp on your instrumentpanel may turn on. If this occurs, return to yourauthorized Pontiac dealer for service.
6-5
To provide cleaner air, all gasolines in the United Statesare now required to contain additives that will helpprevent deposits from forming in your engine and fuel system, allowing your emission control system to function properly. Therefore, you should not have to add anything to the fuel. In addition, gasolinescontaining oxygenates, such as ethers and ethanol, and reformulated gasolines may be available in yourarea to contribute to clean air. General Motorsrecommends that you use these gasolines, particularly if they comply with the specifications described earlier.
NOTICE:
Your vehicle was not designed for fuel thatcontains methanol. Don’t use it. It can corrodemetal parts in your fuel system and also damageplastic and rubber parts. That damage wouldn’tbe covered under your warranty.
Fuels in Foreign CountriesIf you plan on driving in another country outside theUnited States or Canada, the proper fuel may be hard to find. Never use leaded gasoline or any other fuel notrecommended in the previous text on fuel. Costly repairscaused by use of improper fuel wouldn’t be covered byyour warranty.
To check on fuel availability, ask an auto club, or contacta major oil company that does business in the countrywhere you’ll be driving.
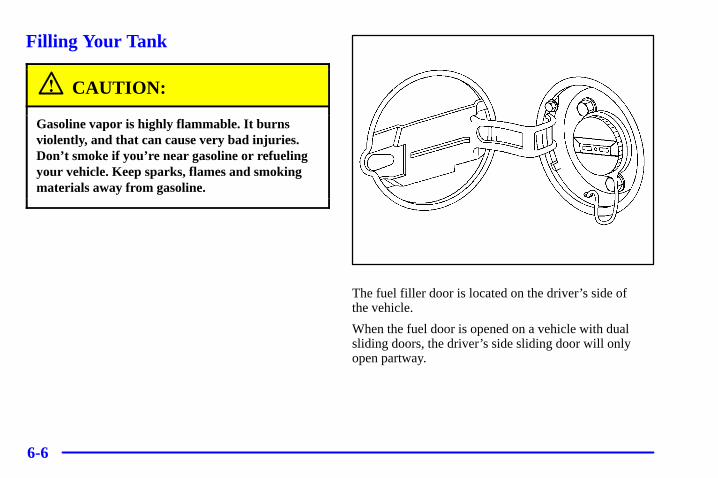
6-6
Filling Your Tank
CAUTION:
Gasoline vapor is highly flammable. It burnsviolently, and that can cause very bad injuries.Don’t smoke if you’re near gasoline or refuelingyour vehicle. Keep sparks, flames and smokingmaterials away from gasoline.
The fuel filler door is located on the driver’s side of the vehicle.
When the fuel door is opened on a vehicle with dualsliding doors, the driver’s side sliding door will onlyopen partway.
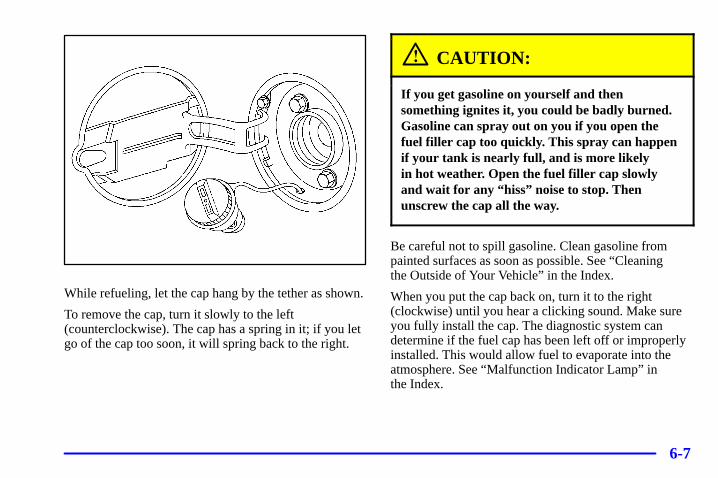
6-7
While refueling, let the cap hang by the tether as shown.
To remove the cap, turn it slowly to the left(counterclockwise). The cap has a spring in it; if you letgo of the cap too soon, it will spring back to the right.
CAUTION:
If you get gasoline on yourself and thensomething ignites it, you could be badly burned.Gasoline can spray out on you if you open thefuel filler cap too quickly. This spray can happenif your tank is nearly full, and is more likely in hot weather. Open the fuel filler cap slowly and wait for any “hiss” noise to stop. Thenunscrew the cap all the way.
Be careful not to spill gasoline. Clean gasoline frompainted surfaces as soon as possible. See “Cleaning the Outside of Your Vehicle” in the Index.
When you put the cap back on, turn it to the right(clockwise) until you hear a clicking sound. Make sureyou fully install the cap. The diagnostic system candetermine if the fuel cap has been left off or improperlyinstalled. This would allow fuel to evaporate into theatmosphere. See “Malfunction Indicator Lamp” in the Index.
6-8
The malfunction indicator lamp (SERVICE ENGINESOON or CHECK ENGINE light) will come on if thefuel cap is not properly installed.
NOTICE:
If you need a new cap, be sure to get the righttype. Your dealer can get one for you. If you getthe wrong type, it may not fit properly. This maycause your malfunction indicator lamp to lightand your fuel tank and emissions system may bedamaged. See “Malfunction Indicator Lamp” inthe Index.
Filling a Portable Fuel Container
CAUTION:
Never fill a portable fuel container while it is inyour vehicle. Static electricity discharge from thecontainer can ignite the gasoline vapor. You canbe badly burned and your vehicle damaged if thisoccurs. To help avoid injury to you and others:
� Dispense gasoline only into approved containers.
� Do not fill a container while it is inside avehicle, in a vehicle’s trunk, pickup bed or on any surface other than the ground.
� Bring the fill nozzle in contact with theinside of the fill opening before operatingthe nozzle. Contact should be maintaineduntil the filling is complete.
� Don’t smoke while pumping gasoline.
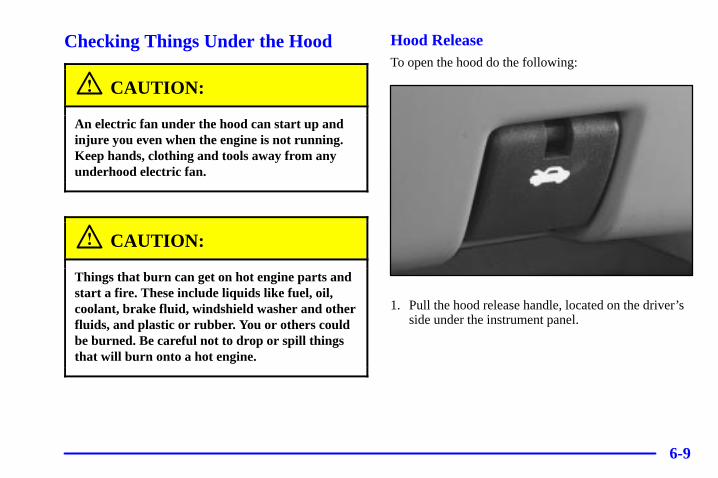
6-9
Checking Things Under the Hood
CAUTION:
An electric fan under the hood can start up andinjure you even when the engine is not running.Keep hands, clothing and tools away from anyunderhood electric fan.
CAUTION:
Things that burn can get on hot engine parts andstart a fire. These include liquids like fuel, oil,coolant, brake fluid, windshield washer and otherfluids, and plastic or rubber. You or others couldbe burned. Be careful not to drop or spill thingsthat will burn onto a hot engine.
Hood ReleaseTo open the hood do the following:
1. Pull the hood release handle, located on the driver’sside under the instrument panel.
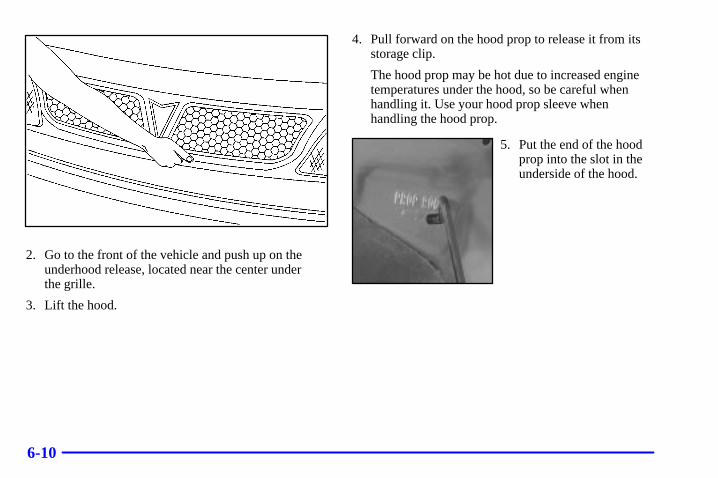
6-10
2. Go to the front of the vehicle and push up on theunderhood release, located near the center under the grille.
3. Lift the hood.
4. Pull forward on the hood prop to release it from itsstorage clip.
The hood prop may be hot due to increased enginetemperatures under the hood, so be careful whenhandling it. Use your hood prop sleeve whenhandling the hood prop.
5. Put the end of the hoodprop into the slot in theunderside of the hood.
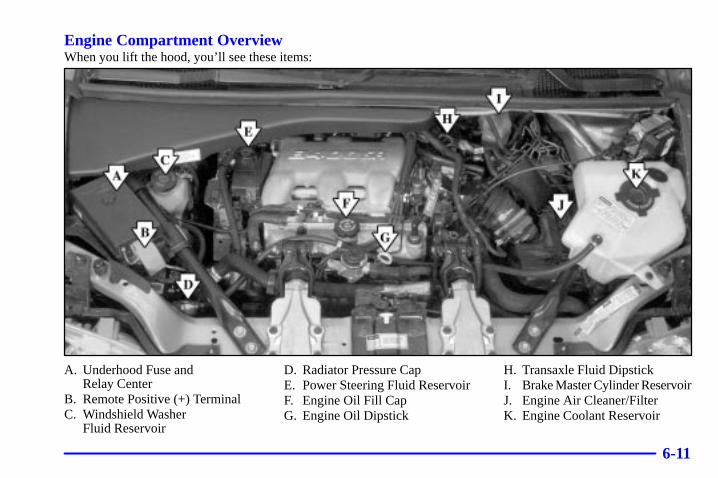
6-11
Engine Compartment OverviewWhen you lift the hood, you’ll see these items:
A. Underhood Fuse and Relay Center
B. Remote Positive (+) TerminalC. Windshield Washer
Fluid Reservoir
D. Radiator Pressure CapE. Power Steering Fluid ReservoirF. Engine Oil Fill CapG. Engine Oil Dipstick
H. Transaxle Fluid DipstickI. Brake Master Cylinder ReservoirJ. Engine Air Cleaner/FilterK. Engine Coolant Reservoir
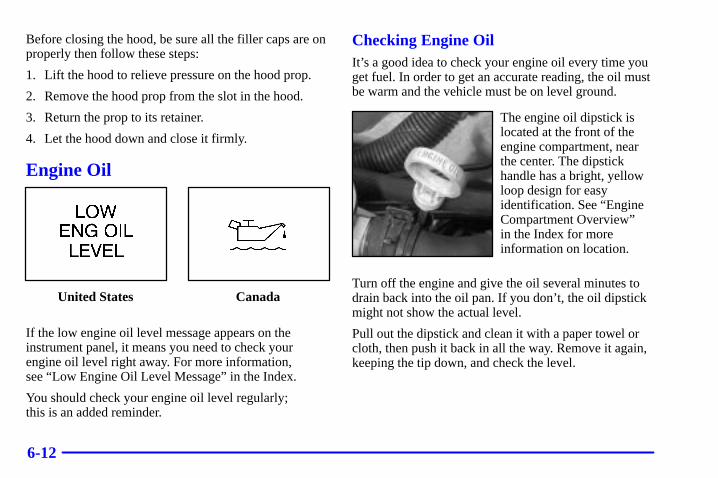
6-12
Before closing the hood, be sure all the filler caps are onproperly then follow these steps:
1. Lift the hood to relieve pressure on the hood prop.
2. Remove the hood prop from the slot in the hood.
3. Return the prop to its retainer.
4. Let the hood down and close it firmly.
Engine Oil
United States Canada
If the low engine oil level message appears on theinstrument panel, it means you need to check yourengine oil level right away. For more information, see “Low Engine Oil Level Message” in the Index.
You should check your engine oil level regularly; this is an added reminder.
Checking Engine OilIt’s a good idea to check your engine oil every time youget fuel. In order to get an accurate reading, the oil mustbe warm and the vehicle must be on level ground.
The engine oil dipstick islocated at the front of theengine compartment, nearthe center. The dipstickhandle has a bright, yellowloop design for easyidentification. See “EngineCompartment Overview” in the Index for moreinformation on location.
Turn off the engine and give the oil several minutes todrain back into the oil pan. If you don’t, the oil dipstickmight not show the actual level.
Pull out the dipstick and clean it with a paper towel orcloth, then push it back in all the way. Remove it again,keeping the tip down, and check the level.

6-13
When to Add Engine OilIf the oil is at or below the ADD mark, then you’ll needto add at least one quart of oil. But you must use theright kind. This part explains what kind of oil to use. Forcrankcase capacity, see “Capacities and Specifications”in the Index.
NOTICE:
Don’t add too much oil. If your engine has so much oil that the oil level gets above thecross-hatched area that shows the properoperating range, your engine could be damaged.
The engine oil fill cap islocated behind the engineoil dipstick. See “EngineCompartment Overview” in the Index for moreinformation on location.
Be sure to fill it enough to put the level somewhere inthe proper operating range. Push the dipstick all the wayback in when you’re through.
6-14
What Kind of Engine Oil to UseOils recommended for your vehicle can be identified bylooking for the starburst symbol.
This symbol indicates that the oil has been certified bythe American Petroleum Institute (API). Do not use anyoil which does not carry this starburst symbol.
If you change your own oil,be sure you use oil that hasthe starburst symbol on thefront of the oil container. If you have your oilchanged for you, be sure the oil put into your engineis American PetroleumInstitute certified forgasoline engines.
You should also use the proper viscosity oil for yourvehicle, as shown in the following chart:
6-15
As in the chart shown previously, SAE 5W-30 is best foryour vehicle. However, you can use SAE 10W-30 if it’sgoing to be 0�F (-18�C) or above. These numbers on an oil container show its viscosity, or thickness. Do not use other viscosity oils, such as SAE 20W-50.
NOTICE:
Use only engine oil with the American PetroleumInstitute Certified For Gasoline Engines starburstsymbol. Failure to use the recommended oil can result in engine damage not covered by your warranty.
GM Goodwrench� oil meets all the requirements foryour vehicle.
If you are in an area where the temperature falls below-20�F (-29�C), consider using either an SAE 5W-30synthetic oil or an SAE 0W-30 oil. Both will provideeasier cold starting and better protection for your engineat extremely low temperatures.
Engine Oil AdditivesDon’t add anything to your oil. The recommended oilswith the starburst symbol are all you will need for goodperformance and engine protection.
When to Change Engine OilYour vehicle has a computer that lets you know when tochange your engine oil. This is not based on mileage,but on engine revolutions and engine operatingtemperature. When the computer has calculated that the oil needs changing, the GM Oil Life System� will indicate that a change is necessary. The mileagebetween oil and filter changes will vary depending on how you drive your vehicle -- usually between 3,000 miles (5 000 km) and 10,000 miles (16 000 km)since your last oil and filter change. Under severeconditions, the system may come on before 3,000 miles(5 000 km). Never drive your vehicle more than 10,000miles (16 000 km) or 12 months (whichever occurs first)without an oil change.
The system won’t detect dust in the oil. So, if you drive in a dusty area, be sure to change your oil and filter every 3,000 miles (5 000 km) or sooner.Remember to reset the change engine oil messagewhenever the oil is changed.
6-16
How to Reset the Change Engine Oil Message
1. With the ignition key in RUN but the engine off,repeatedly push the trip/reset button until OIL is displayed.
2. Once OIL is displayed, push and hold the trip/resetbutton for five seconds. The number will disappearand be replaced by 100 (indicating 100% oil life remaining).
3. Turn the key to OFF.
If the change engine oil message comes back on, the engine oil life monitor has not reset. Repeat the procedure.
What to Do with Used OilDid you know that used engine oil contains certainelements that may be unhealthy for your skin and couldeven cause cancer? Don’t let used oil stay on your skinfor very long. Clean your skin and nails with soap andwater, or a good hand cleaner. Wash or properly throwaway clothing or rags containing used engine oil. Seethe manufacturer’s warnings about the use and disposalof oil products.
Used oil can be a real threat to the environment. If youchange your own oil, be sure to drain all free-flowing oil from the filter before disposal. Don’t ever dispose ofoil by putting it in the trash, pouring it on the ground, into sewers, or into streams or bodies of water. Instead, recycle it by taking it to a place that collectsused oil. If you have a problem properly disposing of your used oil, ask your dealer, a service station or a local recycling center for help.
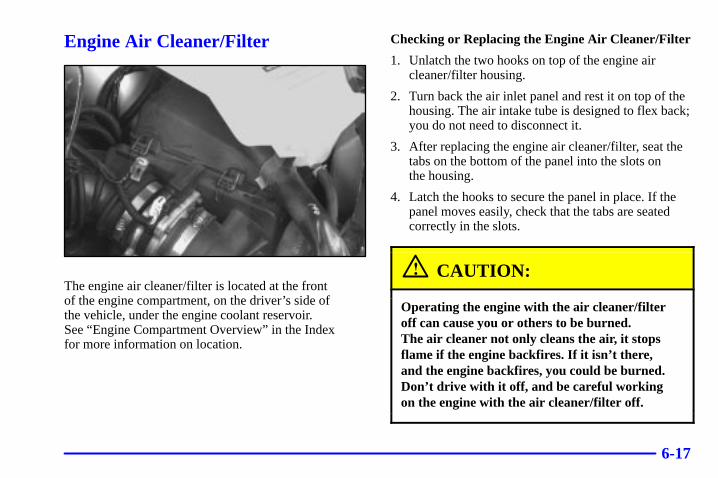
6-17
Engine Air Cleaner/Filter
The engine air cleaner/filter is located at the front of the engine compartment, on the driver’s side of the vehicle, under the engine coolant reservoir. See “Engine Compartment Overview” in the Index for more information on location.
Checking or Replacing the Engine Air Cleaner/Filter
1. Unlatch the two hooks on top of the engine aircleaner/filter housing.
2. Turn back the air inlet panel and rest it on top of thehousing. The air intake tube is designed to flex back;you do not need to disconnect it.
3. After replacing the engine air cleaner/filter, seat thetabs on the bottom of the panel into the slots on the housing.
4. Latch the hooks to secure the panel in place. If thepanel moves easily, check that the tabs are seatedcorrectly in the slots.
CAUTION:
Operating the engine with the air cleaner/filteroff can cause you or others to be burned. The air cleaner not only cleans the air, it stopsflame if the engine backfires. If it isn’t there, and the engine backfires, you could be burned.Don’t drive with it off, and be careful working on the engine with the air cleaner/filter off.
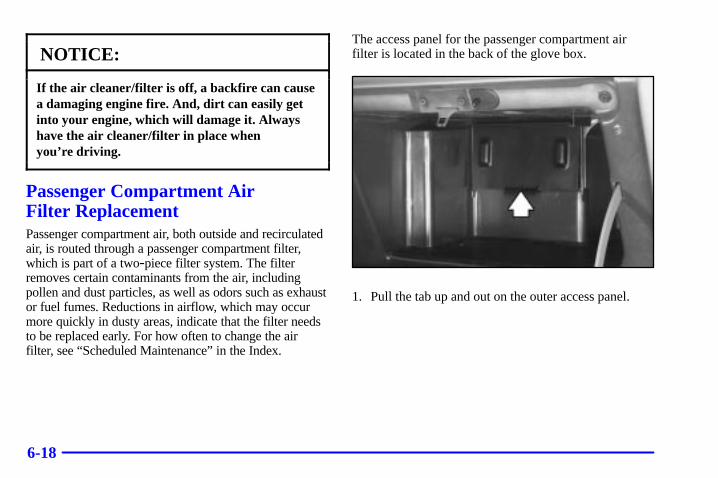
6-18
NOTICE:
If the air cleaner/filter is off, a backfire can causea damaging engine fire. And, dirt can easily getinto your engine, which will damage it. Alwayshave the air cleaner/filter in place whenyou’re driving.
Passenger Compartment Air Filter ReplacementPassenger compartment air, both outside and recirculatedair, is routed through a passenger compartment filter,which is part of a two-piece filter system. The filterremoves certain contaminants from the air, includingpollen and dust particles, as well as odors such as exhaustor fuel fumes. Reductions in airflow, which may occurmore quickly in dusty areas, indicate that the filter needsto be replaced early. For how often to change the airfilter, see “Scheduled Maintenance” in the Index.
The access panel for the passenger compartment airfilter is located in the back of the glove box.
1. Pull the tab up and out on the outer access panel.
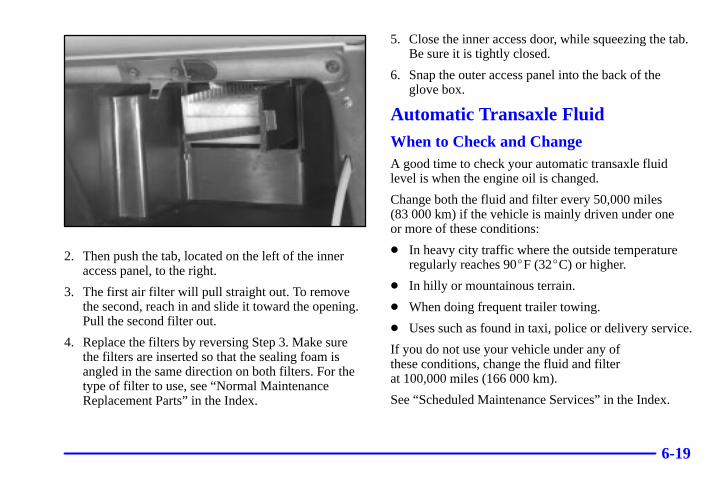
6-19
2. Then push the tab, located on the left of the inneraccess panel, to the right.
3. The first air filter will pull straight out. To removethe second, reach in and slide it toward the opening.Pull the second filter out.
4. Replace the filters by reversing Step 3. Make surethe filters are inserted so that the sealing foam isangled in the same direction on both filters. For thetype of filter to use, see “Normal MaintenanceReplacement Parts” in the Index.
5. Close the inner access door, while squeezing the tab.Be sure it is tightly closed.
6. Snap the outer access panel into the back of theglove box.
Automatic Transaxle FluidWhen to Check and ChangeA good time to check your automatic transaxle fluidlevel is when the engine oil is changed.
Change both the fluid and filter every 50,000 miles (83 000 km) if the vehicle is mainly driven under one or more of these conditions:
� In heavy city traffic where the outside temperatureregularly reaches 90�F (32�C) or higher.
� In hilly or mountainous terrain.
� When doing frequent trailer towing.
� Uses such as found in taxi, police or delivery service.
If you do not use your vehicle under any of these conditions, change the fluid and filter at 100,000 miles (166 000 km).
See “Scheduled Maintenance Services” in the Index.
6-20
How to CheckBecause this operation can be a little difficult, you may choose to have this done at the dealership service department.
If you do it yourself, be sure to follow all the instructionshere, or you could get a false reading on the dipstick.
NOTICE:
Too much or too little fluid can damage yourtransaxle. Too much can mean that some of thefluid could come out and fall on hot engine partsor exhaust system parts, starting a fire. Be sure to get an accurate reading if you check yourtransaxle fluid.
Wait at least 30 minutes before checking the transaxlefluid level if you have been driving:
� When outside temperatures are above 90�F (32�C).
� At high speed for quite a while.
� In heavy traffic -- especially in hot weather.
� While pulling a trailer.
To get the right reading, the fluid should be at normaloperating temperature, which is 180�F to 200�F (82�C to 93�C).
Get the vehicle warmed up by driving about 15 miles(24 km) when outside temperatures are above 50�F(10�C). If it’s colder than 50�F (10�C), you may have to drive longer.
Checking the Fluid Level
Prepare your vehicle as follows:
� Park your vehicle on a level place. Keep the engine running.
� With the parking brake applied, place the shift leverin PARK (P).
� With your foot on the brake pedal, move the shiftlever through each gear range, pausing for aboutthree seconds in each range. Then, position the shift lever in PARK (P).
� Let the engine run at idle for three to five minutes.
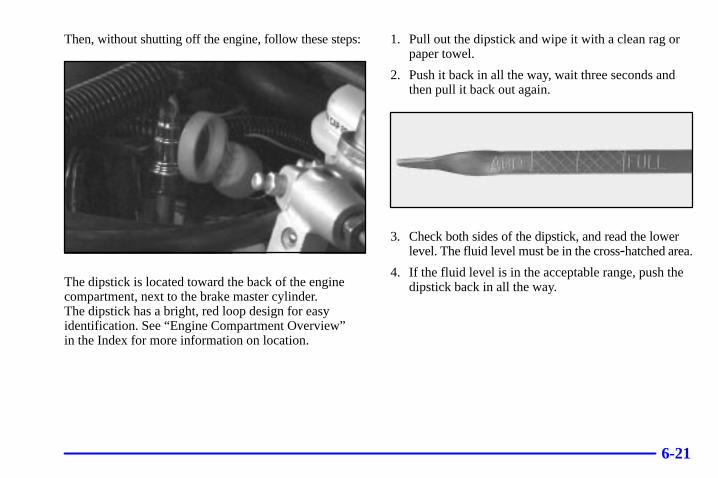
6-21
Then, without shutting off the engine, follow these steps:
The dipstick is located toward the back of the enginecompartment, next to the brake master cylinder. The dipstick has a bright, red loop design for easyidentification. See “Engine Compartment Overview” in the Index for more information on location.
1. Pull out the dipstick and wipe it with a clean rag orpaper towel.
2. Push it back in all the way, wait three seconds andthen pull it back out again.
3. Check both sides of the dipstick, and read the lowerlevel. The fluid level must be in the cross-hatched area.
4. If the fluid level is in the acceptable range, push thedipstick back in all the way.
6-22
How to Add FluidRefer to the Maintenance Schedule to determine whatkind of transaxle fluid to use. See “RecommendedFluids and Lubricants” in the Index.
If the fluid level is low, add only enough of the properfluid to bring the level into the cross-hatched area on the dipstick.
1. Pull out the dipstick.
2. Using a long-neck funnel, add enough fluid at thedipstick hole to bring it to the proper level.
It doesn’t take much fluid, generally less than one pint (0.5 L). Don’t overfill.
NOTICE:
We recommend you use only fluid labeledDEXRON�-III, because fluid with that label ismade especially for your automatic transaxle.Damage caused by fluid other than DEXRON�-IIIis not covered by your new vehicle warranty.
3. After adding fluid, recheck the fluid level asdescribed under “How to Check.”
4. When the correct fluid level is obtained, push thedipstick back in all the way.
Engine CoolantThe cooling system in your vehicle is filled withDEX-COOL� engine coolant. This coolant is designedto remain in your vehicle for 5 years or 150,000 miles(240 000 km), whichever occurs first, if you add onlyDEX-COOL� extended life coolant.
The following explains your cooling system and how to add coolant when it is low. If you have a problemwith engine overheating, see “Engine Overheating” in the Index.
A 50/50 mixture of clean, drinkable water andDEX-COOL� coolant will:
� Give freezing protection down to -34�F (-37�C).
� Give boiling protection up to 265�F (129�C).
� Protect against rust and corrosion.
� Help keep the proper engine temperature.
� Let the warning messages and gages work as they should.
6-23
NOTICE:
When adding coolant, it is important that you use only DEX-COOL� (silicate-free) coolant.If coolant other than DEX-COOL is added to the system, premature engine, heater core orradiator corrosion may result. In addition, theengine coolant will require change sooner -- at30,000 miles (50 000 km) or 24 months,whichever occurs first. Damage caused by the use of coolant other than DEX-COOL� is not covered by your new vehicle warranty.
What to UseUse a mixture of one-half clean, drinkable water andone-half DEX-COOL� coolant which won’t damagealuminum parts. If you use this coolant mixture, youdon’t need to add anything else.
CAUTION:
Adding only plain water to your cooling systemcan be dangerous. Plain water, or some otherliquid like alcohol, can boil before the propercoolant mixture will. Your vehicle’s coolantwarning system is set for the proper coolantmixture. With plain water or the wrong mixture,your engine could get too hot but you wouldn’tget the overheat warning. Your engine couldcatch fire and you or others could be burned. Use a 50/50 mixture of clean, drinkable waterand DEX-COOL� coolant.
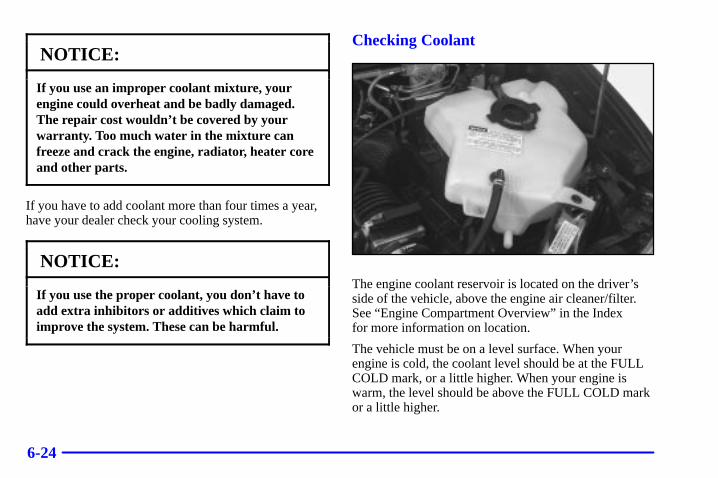
6-24
NOTICE:
If you use an improper coolant mixture, yourengine could overheat and be badly damaged.The repair cost wouldn’t be covered by yourwarranty. Too much water in the mixture canfreeze and crack the engine, radiator, heater coreand other parts.
If you have to add coolant more than four times a year,have your dealer check your cooling system.
NOTICE:
If you use the proper coolant, you don’t have toadd extra inhibitors or additives which claim toimprove the system. These can be harmful.
Checking Coolant
The engine coolant reservoir is located on the driver’sside of the vehicle, above the engine air cleaner/filter.See “Engine Compartment Overview” in the Index for more information on location.
The vehicle must be on a level surface. When yourengine is cold, the coolant level should be at the FULLCOLD mark, or a little higher. When your engine iswarm, the level should be above the FULL COLD markor a little higher.
6-25
Adding Coolant
If you need more coolant, add the proper DEX-COOL�
coolant mixture at the coolant recovery tank.
CAUTION:
Turning the radiator pressure cap when theengine and radiator are hot can allow steam and scalding liquids to blow out and burn youbadly. With the coolant recovery tank, you willalmost never have to add coolant at the radiator.Never turn the radiator pressure cap -- even alittle -- when the engine and radiator are hot.
Add coolant mixture at the recovery tank, but be carefulnot to spill it.
CAUTION:
You can be burned if you spill coolant on hotengine parts. Coolant contains ethylene glycol,and it will burn if the engine parts are hotenough. Don’t spill coolant on a hot engine.
Occasionally check the coolant level in the radiator. For information on how to add coolant to the radiator,see “Cooling System” in the Index.
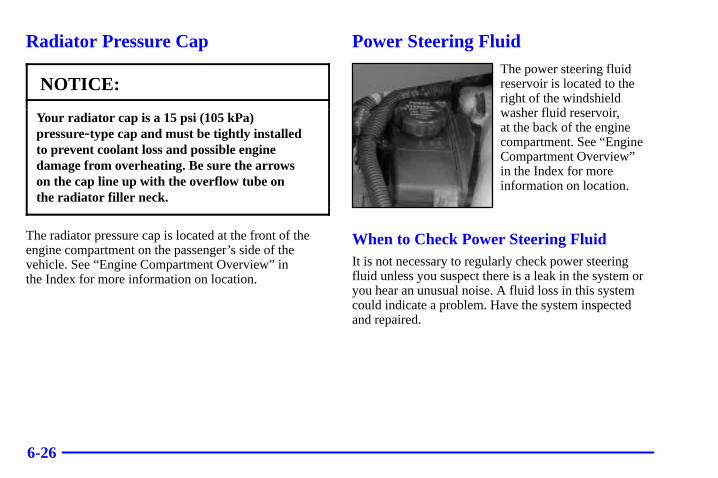
6-26
Radiator Pressure Cap
NOTICE:
Your radiator cap is a 15 psi (105 kPa)pressure-type cap and must be tightly installed to prevent coolant loss and possible enginedamage from overheating. Be sure the arrows on the cap line up with the overflow tube on the radiator filler neck.
The radiator pressure cap is located at the front of theengine compartment on the passenger’s side of thevehicle. See “Engine Compartment Overview” in the Index for more information on location.
Power Steering FluidThe power steering fluidreservoir is located to theright of the windshieldwasher fluid reservoir, at the back of the enginecompartment. See “EngineCompartment Overview” in the Index for moreinformation on location.
When to Check Power Steering FluidIt is not necessary to regularly check power steeringfluid unless you suspect there is a leak in the system oryou hear an unusual noise. A fluid loss in this systemcould indicate a problem. Have the system inspected and repaired.
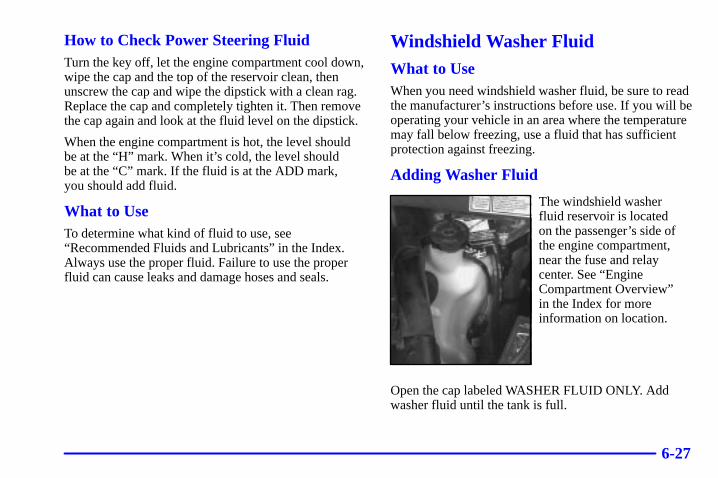
6-27
How to Check Power Steering FluidTurn the key off, let the engine compartment cool down,wipe the cap and the top of the reservoir clean, thenunscrew the cap and wipe the dipstick with a clean rag.Replace the cap and completely tighten it. Then removethe cap again and look at the fluid level on the dipstick.
When the engine compartment is hot, the level should be at the “H” mark. When it’s cold, the level should be at the “C” mark. If the fluid is at the ADD mark, you should add fluid.
What to UseTo determine what kind of fluid to use, see“Recommended Fluids and Lubricants” in the Index.Always use the proper fluid. Failure to use the properfluid can cause leaks and damage hoses and seals.
Windshield Washer FluidWhat to UseWhen you need windshield washer fluid, be sure to readthe manufacturer’s instructions before use. If you will beoperating your vehicle in an area where the temperaturemay fall below freezing, use a fluid that has sufficientprotection against freezing.
Adding Washer Fluid
The windshield washer fluid reservoir is located on the passenger’s side ofthe engine compartment,near the fuse and relaycenter. See “EngineCompartment Overview” in the Index for moreinformation on location.
Open the cap labeled WASHER FLUID ONLY. Addwasher fluid until the tank is full.

6-28
NOTICE:
� When using concentrated washer fluid,follow the manufacturer’s instructions foradding water.
� Don’t mix water with ready-to-use washerfluid. Water can cause the solution to freezeand damage your washer fluid tank andother parts of the washer system. Also,water doesn’t clean as well as washer fluid.
� Fill your washer fluid tank onlythree-quarters full when it’s very cold. This allows for expansion if freezing occurs, which could damage the tank if it is completely full.
� Don’t use engine coolant (antifreeze) inyour windshield washer. It can damageyour washer system and paint.
BrakesBrake Fluid
Your brake master cylinder reservoir is filled withDOT-3 brake fluid. See “Engine CompartmentOverview” in the Index for the location of the reservoir.
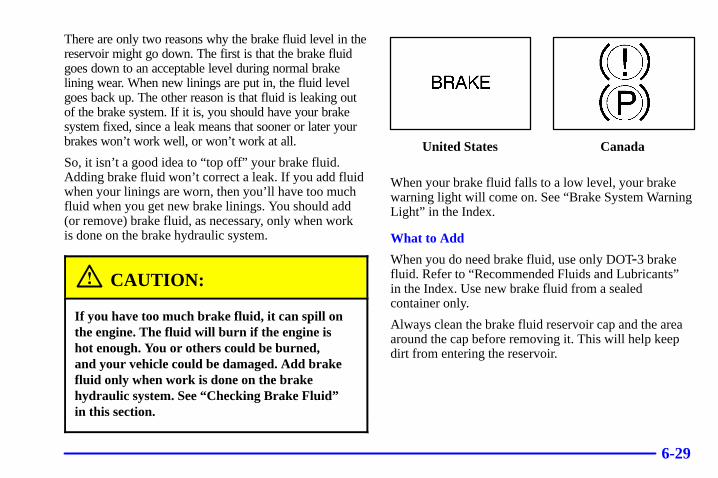
6-29
There are only two reasons why the brake fluid level in thereservoir might go down. The first is that the brake fluidgoes down to an acceptable level during normal brakelining wear. When new linings are put in, the fluid levelgoes back up. The other reason is that fluid is leaking outof the brake system. If it is, you should have your brakesystem fixed, since a leak means that sooner or later yourbrakes won’t work well, or won’t work at all.
So, it isn’t a good idea to “top off” your brake fluid.Adding brake fluid won’t correct a leak. If you add fluidwhen your linings are worn, then you’ll have too muchfluid when you get new brake linings. You should add(or remove) brake fluid, as necessary, only when work is done on the brake hydraulic system.
CAUTION:
If you have too much brake fluid, it can spill onthe engine. The fluid will burn if the engine is hot enough. You or others could be burned, and your vehicle could be damaged. Add brakefluid only when work is done on the brakehydraulic system. See “Checking Brake Fluid” in this section.
United States Canada
When your brake fluid falls to a low level, your brakewarning light will come on. See “Brake System WarningLight” in the Index.
What to Add
When you do need brake fluid, use only DOT-3 brakefluid. Refer to “Recommended Fluids and Lubricants”in the Index. Use new brake fluid from a sealedcontainer only.
Always clean the brake fluid reservoir cap and the areaaround the cap before removing it. This will help keepdirt from entering the reservoir.
6-30
CAUTION:
With the wrong kind of fluid in your brakesystem, your brakes may not work well, or theymay not even work at all. This could cause acrash. Always use the proper brake fluid.
NOTICE:
� Using the wrong fluid can badly damagebrake system parts. For example, just a fewdrops of mineral-based oil, such as engineoil, in your brake system can damage brakesystem parts so badly that they’ll have to be replaced. Don’t let someone put in thewrong kind of fluid.
� If you spill brake fluid on your vehicle’spainted surfaces, the paint finish can bedamaged. Be careful not to spill brake fluidon your vehicle. If you do, wash it offimmediately. See “Appearance Care” in the Index.
Brake WearYour vehicle has front disc brakes and rear drum brakes.
Disc brake pads have built-in wear indicators that makea high-pitched warning sound when the brake pads are worn and new pads are needed. The sound maycome and go or be heard all the time your vehicle ismoving (except when you are pushing on the brakepedal firmly).
CAUTION:
The brake wear warning sound means that soonyour brakes won’t work well. That could lead to an accident. When you hear the brake wearwarning sound, have your vehicle serviced.
NOTICE:
Continuing to drive with worn -out brake padscould result in costly brake repair.
6-31
Some driving conditions or climates may cause a brakesqueal when the brakes are first applied or lightlyapplied. This does not mean something is wrong with your brakes.
Properly torqued wheel nuts are necessary to helpprevent brake pulsation. When tires are rotated, inspectbrake pads for wear and evenly tighten wheel nuts in the proper sequence to GM torque specifications.
Your rear drum brakes don’t have wear indicators, but if you ever hear a rear brake rubbing noise, have the rear brake linings inspected immediately. Also, therear brake drums should be removed and inspected eachtime the tires are removed for rotation or changing.When you have the front brake pads replaced, have the rear brakes inspected, too.
Brake linings should always be replaced as completeaxle sets.
See “Brake System Inspection” in Section 7 of thismanual under Part C “Periodic Maintenance Inspections.”
Brake Pedal TravelSee your dealer if the brake pedal does not return tonormal height, or if there is a rapid increase in pedaltravel. This could be a sign of brake trouble.
Brake AdjustmentEvery time you apply the brakes, with or without thevehicle moving, your brakes adjust for wear.
Replacing Brake System PartsThe braking system on a vehicle is complex. Its manyparts have to be of top quality and work well together ifthe vehicle is to have really good braking. Your vehiclewas designed and tested with top-quality GM brake parts.When you replace parts of your braking system -- forexample, when your brake linings wear down and youhave to have new ones put in -- be sure you get newapproved GM replacement parts. If you don’t, yourbrakes may no longer work properly. For example, if someone puts in brake linings that are wrong for yourvehicle, the balance between your front and rear brakescan change -- for the worse. The braking performanceyou’ve come to expect can change in many other ways if someone puts in the wrong replacement brake parts.
6-32
BatteryYour new vehicle comes with a maintenance freeACDelco� battery. When it’s time for a new battery, get one that has the replacement number shown on theoriginal battery’s label. We recommend an ACDelcobattery. See “Engine Compartment Overview” in the Index for battery location.WARNING: Battery posts, terminals and relatedaccessories contain lead and lead compounds, chemicalsknown to the State of California to cause cancer andreproductive harm. Wash hands after handling.
Vehicle StorageIf you’re not going to drive your vehicle for 25 days ormore, remove the black, negative (-) cable from the battery.This will help keep your battery from running down.
CAUTION:
Batteries have acid that can burn you and gasthat can explode. You can be badly hurt if youaren’t careful. See “Jump Starting” in the Indexfor tips on working around a battery withoutgetting hurt.
Contact your dealer to learn how to prepare your vehiclefor longer storage periods.
Also, for your audio system, see “Theft-DeterrentFeature” in the Index.
Bulb ReplacementFor the type of bulbs, see “Replacement Bulbs” in the Index.
For any bulb changing procedure not listed in thissection, contact your dealer’s service department.
Halogen Bulbs
CAUTION:
Halogen bulbs have pressurized gas inside andcan burst if you drop or scratch the bulb. You orothers could be injured. Be sure to read andfollow the instructions on the bulb package.
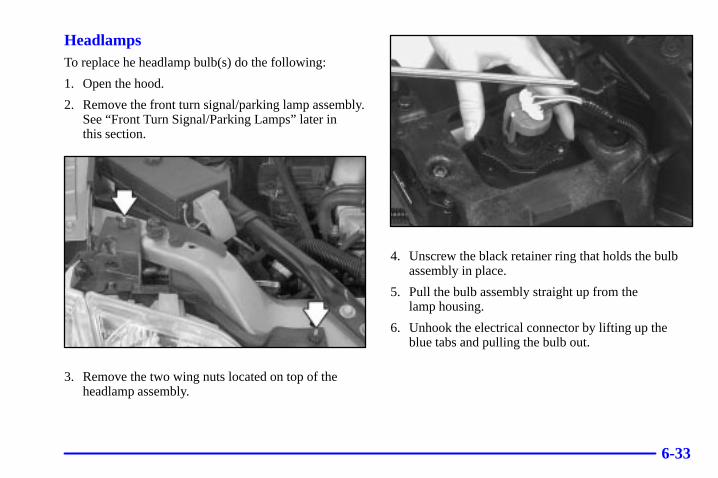
6-33
HeadlampsTo replace he headlamp bulb(s) do the following:
1. Open the hood.
2. Remove the front turn signal/parking lamp assembly.See “Front Turn Signal/Parking Lamps” later in this section.
3. Remove the two wing nuts located on top of theheadlamp assembly.
4. Unscrew the black retainer ring that holds the bulbassembly in place.
5. Pull the bulb assembly straight up from the lamp housing.
6. Unhook the electrical connector by lifting up theblue tabs and pulling the bulb out.
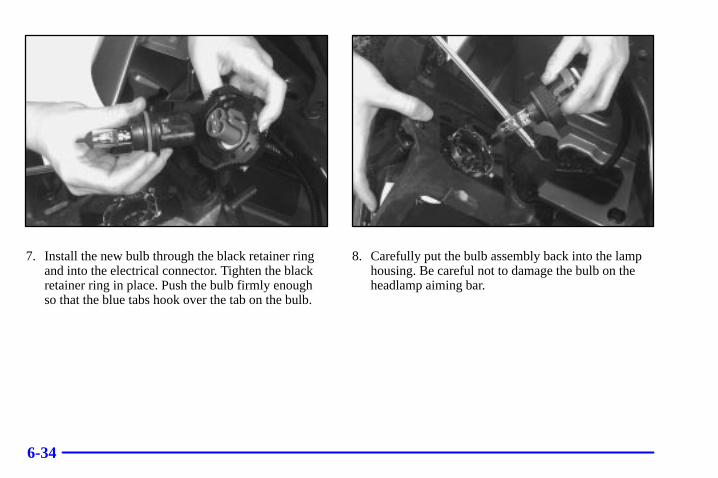
6-34
7. Install the new bulb through the black retainer ringand into the electrical connector. Tighten the blackretainer ring in place. Push the bulb firmly enough so that the blue tabs hook over the tab on the bulb.
8. Carefully put the bulb assembly back into the lamphousing. Be careful not to damage the bulb on theheadlamp aiming bar.
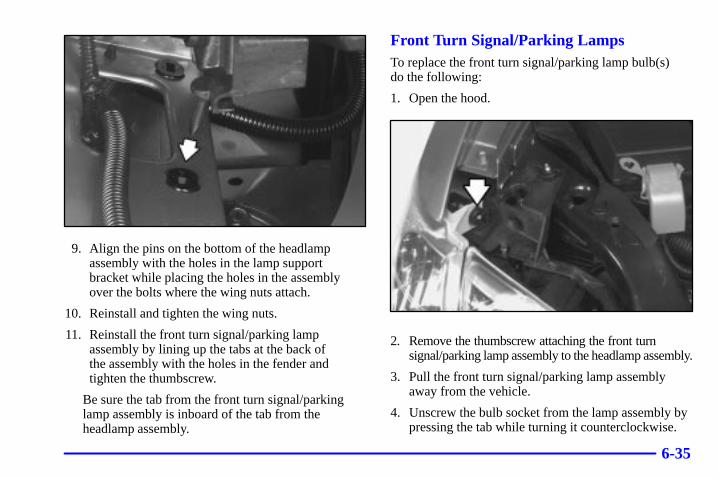
6-35
9. Align the pins on the bottom of the headlampassembly with the holes in the lamp support bracket while placing the holes in the assemblyover the bolts where the wing nuts attach.
10. Reinstall and tighten the wing nuts.
11. Reinstall the front turn signal/parking lampassembly by lining up the tabs at the back of the assembly with the holes in the fender andtighten the thumbscrew.
Be sure the tab from the front turn signal/parkinglamp assembly is inboard of the tab from theheadlamp assembly.
Front Turn Signal/Parking LampsTo replace the front turn signal/parking lamp bulb(s) do the following:
1. Open the hood.
2. Remove the thumbscrew attaching the front turnsignal/parking lamp assembly to the headlamp assembly.
3. Pull the front turn signal/parking lamp assemblyaway from the vehicle.
4. Unscrew the bulb socket from the lamp assembly bypressing the tab while turning it counterclockwise.
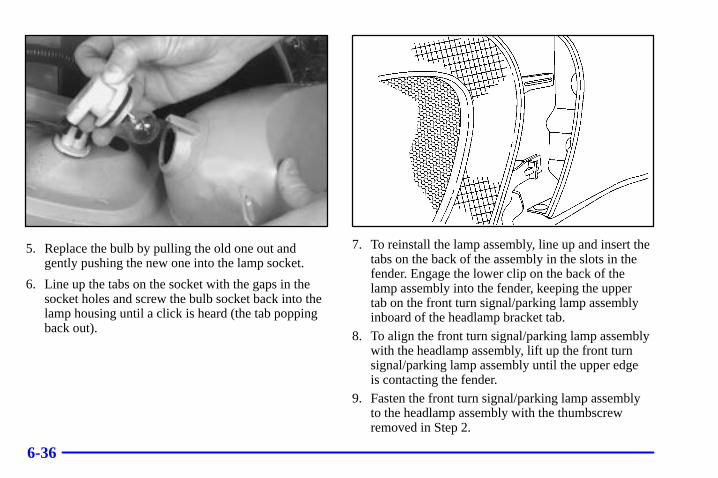
6-36
5. Replace the bulb by pulling the old one out andgently pushing the new one into the lamp socket.
6. Line up the tabs on the socket with the gaps in thesocket holes and screw the bulb socket back into thelamp housing until a click is heard (the tab poppingback out).
7. To reinstall the lamp assembly, line up and insert thetabs on the back of the assembly in the slots in thefender. Engage the lower clip on the back of thelamp assembly into the fender, keeping the upper tab on the front turn signal/parking lamp assemblyinboard of the headlamp bracket tab.
8. To align the front turn signal/parking lamp assemblywith the headlamp assembly, lift up the front turnsignal/parking lamp assembly until the upper edge is contacting the fender.
9. Fasten the front turn signal/parking lamp assembly to the headlamp assembly with the thumbscrewremoved in Step 2.
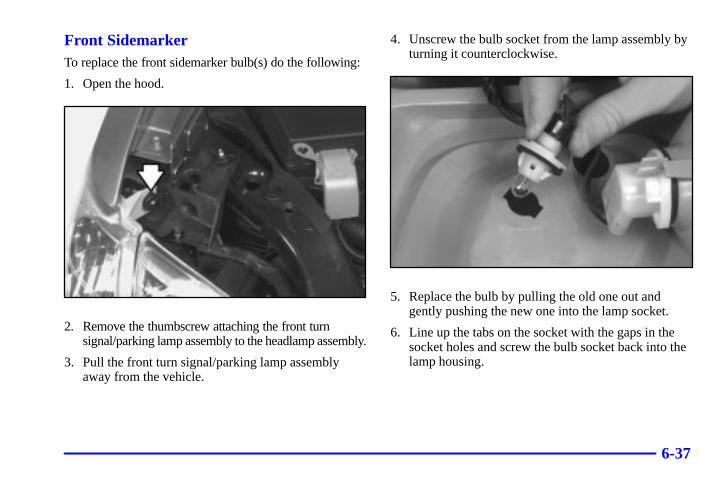
6-37
Front SidemarkerTo replace the front sidemarker bulb(s) do the following:
1. Open the hood.
2. Remove the thumbscrew attaching the front turnsignal/parking lamp assembly to the headlamp assembly.
3. Pull the front turn signal/parking lamp assemblyaway from the vehicle.
4. Unscrew the bulb socket from the lamp assembly byturning it counterclockwise.
5. Replace the bulb by pulling the old one out andgently pushing the new one into the lamp socket.
6. Line up the tabs on the socket with the gaps in thesocket holes and screw the bulb socket back into thelamp housing.
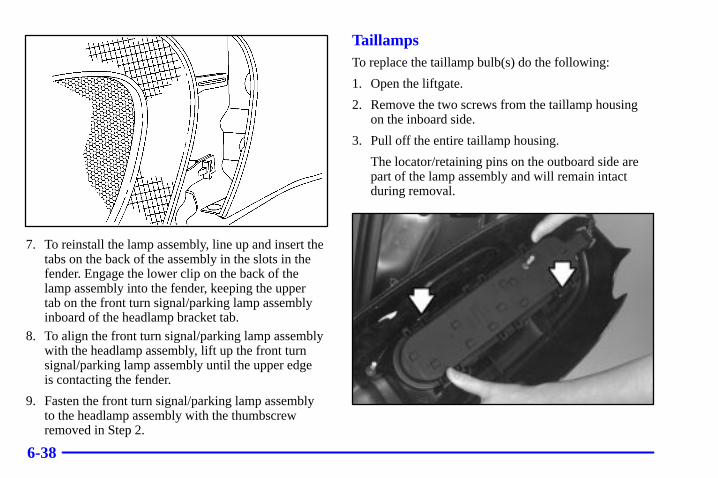
6-38
7. To reinstall the lamp assembly, line up and insert thetabs on the back of the assembly in the slots in thefender. Engage the lower clip on the back of thelamp assembly into the fender, keeping the upper tab on the front turn signal/parking lamp assemblyinboard of the headlamp bracket tab.
8. To align the front turn signal/parking lamp assemblywith the headlamp assembly, lift up the front turnsignal/parking lamp assembly until the upper edge is contacting the fender.
9. Fasten the front turn signal/parking lamp assembly to the headlamp assembly with the thumbscrewremoved in Step 2.
TaillampsTo replace the taillamp bulb(s) do the following:
1. Open the liftgate.
2. Remove the two screws from the taillamp housingon the inboard side.
3. Pull off the entire taillamp housing.
The locator/retaining pins on the outboard side arepart of the lamp assembly and will remain intactduring removal.
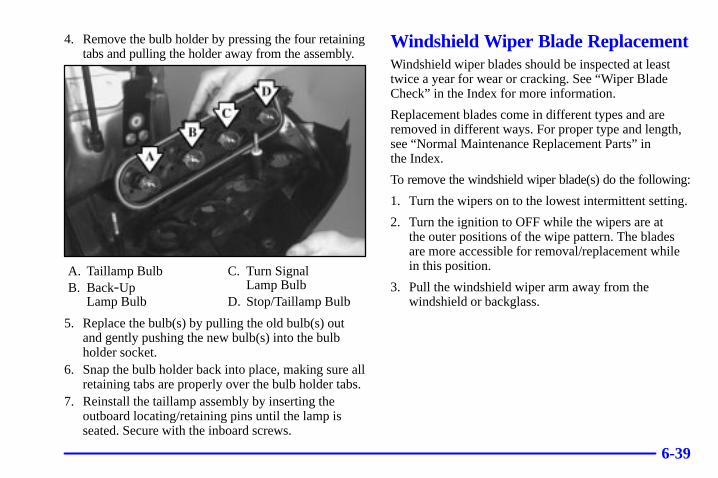
6-39
4. Remove the bulb holder by pressing the four retainingtabs and pulling the holder away from the assembly.
A. Taillamp BulbB. Back-Up
Lamp Bulb
C. Turn Signal Lamp Bulb
D. Stop/Taillamp Bulb
5. Replace the bulb(s) by pulling the old bulb(s) outand gently pushing the new bulb(s) into the bulbholder socket.
6. Snap the bulb holder back into place, making sure allretaining tabs are properly over the bulb holder tabs.
7. Reinstall the taillamp assembly by inserting theoutboard locating/retaining pins until the lamp isseated. Secure with the inboard screws.
Windshield Wiper Blade ReplacementWindshield wiper blades should be inspected at leasttwice a year for wear or cracking. See “Wiper BladeCheck” in the Index for more information.
Replacement blades come in different types and areremoved in different ways. For proper type and length,see “Normal Maintenance Replacement Parts” in the Index.
To remove the windshield wiper blade(s) do the following:
1. Turn the wipers on to the lowest intermittent setting.
2. Turn the ignition to OFF while the wipers are at the outer positions of the wipe pattern. The bladesare more accessible for removal/replacement whilein this position.
3. Pull the windshield wiper arm away from thewindshield or backglass.

6-40
4. While holding the wiper arm away fromthe glass, push therelease clip from under the blade.
5. Push the release clip at the connecting point of theblade and the arm up and pull the blade assemblydown toward the glass to remove it from the wiper arm.
6. Push the new wiper blade securely on the wiper armuntil you hear the release clip “click” into place.
7. Push the release clip, from Step 4, down to securethe wiper blade into place.
6-41
TiresYour new vehicle comes with high-quality tires made bya leading tire manufacturer. If you ever have questionsabout your tire warranty and where to obtain service, see your Pontiac Warranty booklet for details.
CAUTION:
Poorly maintained and improperly used tires are dangerous.� Overloading your tires can cause
overheating as a result of too much friction.You could have an air-out and a seriousaccident. See “Loading Your Vehicle” in the Index.
CAUTION: (Continued)
CAUTION: (Continued)
� Underinflated tires pose the same danger as overloaded tires. The resulting accidentcould cause serious injury. Check all tiresfrequently to maintain the recommendedpressure. Tire pressure should be checkedwhen your tires are cold.
� Overinflated tires are more likely to be cut, punctured or broken by a suddenimpact -- such as when you hit a pothole.Keep tires at the recommended pressure.
� Worn, old tires can cause accidents. If yourtread is badly worn, or if your tires havebeen damaged, replace them.
6-42
Inflation -- Tire PressureThe Certification/Tire label, which is on the rear edge ofthe driver’s door, shows the correct inflation pressuresfor your tires when they’re cold. “Cold” means yourvehicle has been sitting for at least three hours or drivenno more than 1 mile (1.6 km).
NOTICE:
Don’t let anyone tell you that underinflation oroverinflation is all right. It’s not. If your tiresdon’t have enough air (underinflation), you canget the following:� Too much flexing� Too much heat� Tire overloading� Bad wear� Bad handling� Bad fuel economy.
NOTICE: (Continued)
NOTICE: (Continued)
If your tires have too much air (overinflation),you can get the following:� Unusual wear� Bad handling� Rough ride� Needless damage from road hazards.
When to Check
Check your tires once a month or more.
Don’t forget your compact spare tire. It should be at 60 psi (420 kPa).
How to Check
Use a good quality pocket-type gage to check tirepressure. You can’t tell if your tires are properly inflatedsimply by looking at them. Radial tires may lookproperly inflated even when they’re underinflated.
Be sure to put the valve caps back on the valve stems.They help prevent leaks by keeping out dirt and moisture.
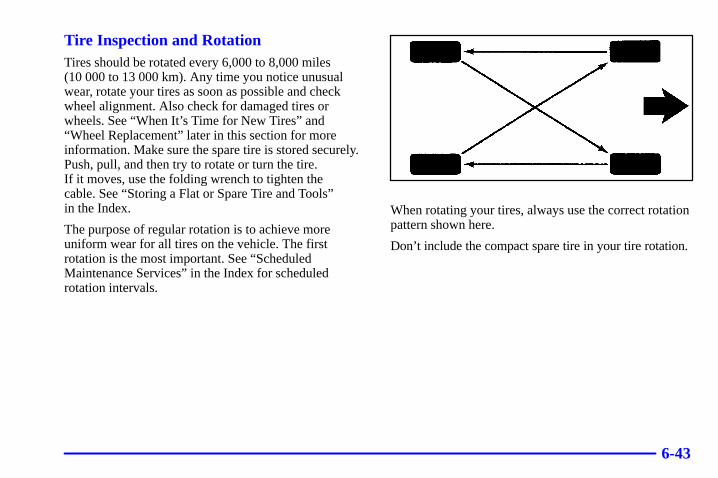
6-43
Tire Inspection and RotationTires should be rotated every 6,000 to 8,000 miles (10 000 to 13 000 km). Any time you notice unusualwear, rotate your tires as soon as possible and checkwheel alignment. Also check for damaged tires orwheels. See “When It’s Time for New Tires” and“Wheel Replacement” later in this section for moreinformation. Make sure the spare tire is stored securely.Push, pull, and then try to rotate or turn the tire. If it moves, use the folding wrench to tighten the cable. See “Storing a Flat or Spare Tire and Tools” in the Index.
The purpose of regular rotation is to achieve moreuniform wear for all tires on the vehicle. The firstrotation is the most important. See “ScheduledMaintenance Services” in the Index for scheduledrotation intervals.
When rotating your tires, always use the correct rotationpattern shown here.
Don’t include the compact spare tire in your tire rotation.
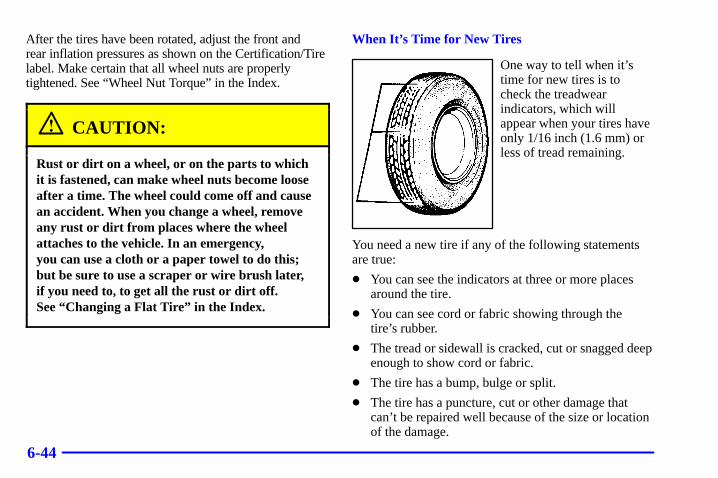
6-44
After the tires have been rotated, adjust the front and rear inflation pressures as shown on the Certification/Tirelabel. Make certain that all wheel nuts are properlytightened. See “Wheel Nut Torque” in the Index.
CAUTION:
Rust or dirt on a wheel, or on the parts to whichit is fastened, can make wheel nuts become looseafter a time. The wheel could come off and causean accident. When you change a wheel, removeany rust or dirt from places where the wheelattaches to the vehicle. In an emergency, you can use a cloth or a paper towel to do this;but be sure to use a scraper or wire brush later, if you need to, to get all the rust or dirt off. See “Changing a Flat Tire” in the Index.
When It’s Time for New Tires
One way to tell when it’stime for new tires is tocheck the treadwearindicators, which willappear when your tires haveonly 1/16 inch (1.6 mm) orless of tread remaining.
You need a new tire if any of the following statementsare true:
� You can see the indicators at three or more placesaround the tire.
� You can see cord or fabric showing through the tire’s rubber.
� The tread or sidewall is cracked, cut or snagged deepenough to show cord or fabric.
� The tire has a bump, bulge or split.
� The tire has a puncture, cut or other damage thatcan’t be repaired well because of the size or locationof the damage.
6-45
Buying New TiresTo find out what kind and size of tires you need, look atthe Certification/Tire label.
The tires installed on your vehicle when it was new hada Tire Performance Criteria Specification (TPC Spec)number on each tire’s sidewall. When you get new tires,get ones with that same TPC Spec number. That wayyour vehicle will continue to have tires that are designedto give proper endurance, handling, speed rating,traction, ride and other things during normal service on your vehicle. If your tires have an all-season treaddesign, the TPC number will be followed by an “MS”(for mud and snow).
If you ever replace your tires with those not having a TPC Spec number, make sure they are the same size, load range, speed rating and construction type(bias, bias-belted or radial) as your original tires.
CAUTION:
Mixing tires could cause you to lose control whiledriving. If you mix tires of different sizes or types(radial and bias-belted tires), the vehicle may not handle properly, and you could have a crash.Using tires of different sizes may also causedamage to your vehicle. Be sure to use the same size and type tires on all wheels.
It’s all right to drive with your compact spare,though. It was developed for use on your vehicle.
CAUTION:
If you use bias-ply tires on your vehicle, thewheel rim flanges could develop cracks aftermany miles of driving. A tire and/or wheel couldfail suddenly, causing a crash. Use only radial-plytires with the wheels on your vehicle.
6-46
Uniform Tire Quality GradingQuality grades can be found where applicable on the tiresidewall between tread shoulder and maximum sectionwidth. For example:
Treadwear 200 Traction AA Temperature A
The following information relates to the systemdeveloped by the United States National HighwayTraffic Safety Administration, which grades tires bytreadwear, traction and temperature performance. (This applies only to vehicles sold in the United States.)The grades are molded on the sidewalls of mostpassenger car tires. The Uniform Tire Quality Gradingsystem does not apply to deep tread, winter-type snowtires, space-saver or temporary use spare tires, tires withnominal rim diameters of 10 to 12 inches (25 to 30 cm),or to some limited-production tires.
While the tires available on General Motors passenger carsand light trucks may vary with respect to these grades,they must also conform to federal safety requirements and additional General Motors Tire Performance Criteria(TPC) standards.
Treadwear
The treadwear grade is a comparative rating based onthe wear rate of the tire when tested under controlledconditions on a specified government test course. For example, a tire graded 150 would wear one and a half (1 1/2) times as well on the government course as a tire graded 100. The relative performance of tiresdepends upon the actual conditions of their use,however, and may depart significantly from the normdue to variations in driving habits, service practices anddifferences in road characteristics and climate.
Traction -- AA, A, B, C
The traction grades, from highest to lowest, are AA, A, B, and C. Those grades represent the tire’s ability to stop on wet pavement as measured under controlledconditions on specified government test surfaces ofasphalt and concrete. A tire marked C may have poortraction performance. Warning: The traction gradeassigned to this tire is based on straight-ahead brakingtraction tests, and does not include acceleration,cornering, hydroplaning, or peak traction characteristics.
6-47
Temperature -- A, B, C
The temperature grades are A (the highest), B, and C,representing the tire’s resistance to the generation ofheat and its ability to dissipate heat when tested undercontrolled conditions on a specified indoor laboratorytest wheel. Sustained high temperature can cause thematerial of the tire to degenerate and reduce tire life, and excessive temperature can lead to sudden tirefailure. The grade C corresponds to a level ofperformance which all passenger car tires must meetunder the Federal Motor Vehicle Safety Standard No. 109. Grades B and A represent higher levels of performance on the laboratory test wheel than the minimum required by law.
Warning: The temperature grade for this tire isestablished for a tire that is properly inflated and not overloaded. Excessive speed, underinflation, orexcessive loading, either separately or in combination,can cause heat buildup and possible tire failure.
Wheel Alignment and Tire BalanceThe wheels on your vehicle were aligned and balancedcarefully at the factory to give you the longest tire lifeand best overall performance.
Scheduled wheel alignment and wheel balancing are not needed. However, if you notice unusual tire wear or your vehicle pulling one way or the other, thealignment may need to be reset. If you notice yourvehicle vibrating when driving on a smooth road, yourwheels may need to be rebalanced.
Wheel ReplacementReplace any wheel that is bent, cracked, or badly rusted or corroded. If wheel nuts keep coming loose, the wheel, wheel bolts and wheel nuts should bereplaced. If the wheel leaks air, replace it (except somealuminum wheels, which can sometimes be repaired).See your dealer if any of these conditions exist.
Your dealer will know the kind of wheel you need.
6-48
Each new wheel should have the same load-carryingcapacity, diameter, width, offset and be mounted thesame way as the one it replaces.
If you need to replace any of your wheels, wheel boltsor wheel nuts, replace them only with new GM originalequipment parts. This way, you will be sure to have theright wheel, wheel bolts and wheel nuts for your vehicle.
CAUTION:
Using the wrong replacement wheels, wheel boltsor wheel nuts on your vehicle can be dangerous.It could affect the braking and handling of yourvehicle, make your tires lose air and make youlose control. You could have a collision in whichyou or others could be injured. Always use thecorrect wheel, wheel bolts and wheel nuts for replacement.
NOTICE:
The wrong wheel can also cause problems withbearing life, brake cooling, speedometer orodometer calibration, headlamp aim, bumperheight, vehicle ground clearance and tire or tirechain clearance to the body and chassis.
See “Changing a Flat Tire” in the Index for more information.
Used Replacement Wheels
CAUTION:
Putting a used wheel on your vehicle isdangerous. You can’t know how it’s been used orhow far it’s been driven. It could fail suddenlyand cause an accident. If you have to replace awheel, use a new GM original equipment wheel.
6-49
Tire Chains
NOTICE:
If your vehicle has P225/60R16 size tires, don’tuse tire chains. They can damage your vehiclebecause there’s not enough clearance.
Use another type of traction device only if its manufacturer recommends it for use on your vehicle and tire size combination and road conditions. Follow that manufacturer’sinstructions. To help avoid damage to yourvehicle, drive slowly, readjust or remove thedevice if it’s contacting your vehicle, and don’tspin your wheels.
NOTICE: (Continued)
NOTICE: (Continued)
If you do find traction devices that will fit, installthem on the front tires.If you have other tires, use tire chains only wherelegal and only when you must. Use only SAEClass “S” type chains that are the proper size for your tires. Install them on the front tires andtighten them as tightly as possible with the endssecurely fastened. Drive slowly and follow thechain manufacturer’s instructions. If you canhear the chains contacting your vehicle, stop and retighten them. If the contact continues, slow down until it stops. Driving too fast orspinning the wheels with chains on will damageyour vehicle.
6-50
Appearance CareRemember, cleaning products can be hazardous. Someare toxic. Others can burst into flame if you strike amatch or get them on a hot part of the vehicle. Some aredangerous if you breathe their fumes in a closed space.When you use anything from a container to clean yourvehicle, be sure to follow the manufacturer’s warningsand instructions. And always open your doors orwindows when you’re cleaning the inside.
Never use these to clean your vehicle:
� Gasoline
� Benzene
� Naphtha
� Carbon Tetrachloride
� Acetone
� Paint Thinner
� Turpentine
� Lacquer Thinner
� Nail Polish Remover
They can all be hazardous -- some more than others -- and they can all damage your vehicle, too.
Don’t use any of these unless this manual says you can.In many uses, these will damage your vehicle:
� Alcohol
� Laundry Soap
� Bleach
� Reducing Agents
Cleaning the Inside of Your VehicleUse a vacuum cleaner often to get rid of dust and loosedirt. Wipe vinyl, leather, plastic and painted surfaceswith a clean, damp cloth.
Cleaning of Fabric/CarpetYour dealer has two cleaners, Multi-Purpose InteriorCleaner and Capture Non-Solvent Dry Spot and SoilRemover for cleaning fabric and carpet. They will cleannormal spots and stains very well. You can getGM-approved cleaning products from your dealer. See “Appearance Care and Materials” in the Index.

6-51
Here are some cleaning tips:
� Always read the instructions on the cleaner label.
� Clean up stains as soon as you can -- before they set.
� Carefully scrape off any excess stain.
� Use a clean cloth or sponge, and change to a clean area often. A soft brush may be used if stains are stubborn.
� If a ring forms on fabric after spot cleaning, clean theentire area immediately or it will set.
Using Multi-Purpose Interior Cleaner on Fabric1. Vacuum and brush the area to remove any loose dirt.
2. Always clean a whole trim panel or section. Mask surrounding trim along stitch or welt lines.
3. Mix powdered cleaner following the directions onthe container label to form thick suds.
4. Use suds only and apply with a clean sponge. Don’t saturate the material and don’t rub it roughly.
5. As soon as you’ve cleaned the section, use a spongeto remove the suds.
6. Wipe cleaned area with a clean, damp towel or cloth.
7. Wipe with a clean cloth and let dry.
Special Fabric Cleaning ProblemsStains caused by such things as catsup, coffee (black),egg, fruit, fruit juice, milk, soft drinks, vomit, urine andblood can be removed as follows:
1. Carefully scrape off excess stain, then sponge thesoiled area with cool water.
2. If a stain remains, follow the Multi-Purpose InteriorCleaner instructions described earlier.
3. If an odor lingers after cleaning vomit or urine, treat the area with a water/baking soda solution: 1 teaspoon (5 ml) of baking soda to 1 cup (250 ml)of lukewarm water.
4. Let dry.
Stains caused by candy, ice cream, mayonnaise, chilisauce and unknown stains can be removed as follows:
1. Carefully scrape off excess stain.
2. First, clean with cool water and allow to dry completely.
3. If a stain remains, follow instructions forMulti -Purpose Interior Cleaner.
6-52
Cleaning VinylUse warm water and a clean cloth.
� Rub with a clean, damp cloth to remove dirt. You may have to do it more than once.
� Things like tar, asphalt and shoe polish will stain if you don’t get them off quickly. Use a clean clothand a vinyl/leather cleaner. See your dealer for this product.
Cleaning LeatherUse a soft cloth with lukewarm water and a mild soap orsaddle soap and wipe dry with a soft cloth. Then, let theleather dry naturally. Do not use heat to dry.
� For stubborn stains, use a leather cleaner. See yourdealer for this product.
� Never use oils, varnishes, solvent-based or abrasivecleaners, furniture polish or shoe polish on leather.
� Soiled or stained leather should be cleanedimmediately. If dirt is allowed to work into thefinish, it can harm the leather.
Cleaning the Top of the Instrument PanelUse only mild soap and water to clean the top surfacesof the instrument panel. Sprays containing silicones orwaxes may cause annoying reflections in the windshieldand even make it difficult to see through the windshieldunder certain conditions.
Cleaning Interior Plastic ComponentsUse only a mild soap and water solution on a soft cloth or sponge. Commercial cleaners may affect thesurface finish.
Cleaning the Built-in Child Restraint PadThe built-in child restraint pad is attached to the seatframe with fastener strips. You can remove the pad andhand wash it with mild soap and water.
6-53
Care of Safety Belts and Built-inChild Restraint HarnessKeep the safety belts and the built-in child restraintharness clean and dry.
CAUTION:
Do not bleach or dye safety belts or the built-inchild restraint harness. If you do, they may beseverely weakened. In a crash, they might not beable to provide adequate protection. Clean thesafety belts and the child restraint harness onlywith mild soap and lukewarm water.
Cleaning Glass SurfacesGlass should be cleaned often. GM Glass Cleaner or a liquid household glass cleaner will remove normaltobacco smoke and dust films on interior glass. See “Appearance Care and Materials” in the Index.
Don’t use abrasive cleaners on glass, because they maycause scratches. Avoid placing decals on the inside rearwindow, since they may have to be scraped off later.
If abrasive cleaners are used on the inside of the rearwindow, an electric defogger element may be damaged.Any temporary license should not be attached across the defogger grid.
Cleaning the Outside of theWindshield, Backglass and Wiper BladesIf the windshield is not clear after using the windshieldwasher, or if the wiper blade chatters when running, wax,sap or other material may be on the blade or windshield.
Clean the outside of the windshield with GM WindshieldCleaner, Bon Ami� Powder (non-scratching glasscleaning powder), GM Part No. 1050011. The windshieldis clean if beads do not form when you rinse it with water.
Grime from the windshield will stick to the wiper blades and affect their performance. Clean the blade bywiping vigorously with a cloth soaked in full-strengthwindshield washer solvent. Then rinse the blade with water.
Check the wiper blades and clean them as necessary;replace blades that look worn.
6-54
WeatherstripsSilicone grease on weatherstrips will make them lastlonger, seal better, and not stick or squeak. Apply siliconegrease with a clean cloth at least every six months. Duringvery cold, damp weather more frequent application may berequired. See “Recommended Fluids and Lubricants” inthe Index.
Cleaning the Outside of Your VehicleThe paint finish on your vehicle provides beauty, depthof color, gloss retention and durability.
Washing Your VehicleThe best way to preserve your vehicle’s finish is to keep it clean by washing it often with lukewarm or cold water.
Don’t wash your vehicle in the direct rays of the sun.Use a car washing soap. Don’t use strong soaps orchemical detergents. Be sure to rinse the vehicle well,removing all soap residue completely. You can getGM-approved cleaning products from your dealer. See “Appearance Care and Materials” in the Index. Don’t use cleaning agents that are petroleum based, or that contain acid or abrasives. All cleaning agentsshould be flushed promptly and not allowed to dry on the surface, or they could stain.
Dry the finish with a soft, clean chamois or an all-cottontowel to avoid surface scratches and water spotting.
Before you enter an automatic car wash, if your vehicleis equipped with the optional power sliding door, be sureto have the switch for the power sliding door overridefeature enabled. See “Power Sliding Door” in the Index.
High pressure car washes may cause water to enter your vehicle.
Cleaning Exterior Lamps/LensesUse only lukewarm or cold water, a soft cloth and a car washing soap to clean exterior lamps and lenses.Follow instructions under “Washing Your Vehicle.”
Finish CareOccasional waxing or mild polishing of your vehicle byhand may be necessary to remove residue from the paintfinish. You can get GM-approved cleaning productsfrom your dealer. See “Appearance Care and Materials”in the Index.
Your vehicle has a “basecoat/clearcoat” paint finish. The clearcoat gives more depth and gloss to the coloredbasecoat. Always use waxes and polishes that arenon-abrasive and made for a basecoat/clearcoat paint finish.
6-55
NOTICE:
Machine compounding or aggressive polishing on a basecoat/clearcoat paint finish may dull thefinish or leave swirl marks.
Foreign materials such as calcium chloride and othersalts, ice melting agents, road oil and tar, tree sap, birddroppings, chemicals from industrial chimneys, etc., can damage your vehicle’s finish if they remain onpainted surfaces. Wash the vehicle as soon as possible. If necessary, use non-abrasive cleaners that are markedsafe for painted surfaces to remove foreign matter.Exterior painted surfaces are subject to aging, weatherand chemical fallout that can take their toll over a periodof years. You can help to keep the paint finish lookingnew by keeping your vehicle garaged or coveredwhenever possible.
Cleaning Aluminum Wheels (If Equipped)Keep your wheels clean using a soft clean cloth with mild soap and water. Rinse with clean water. After rinsing thoroughly, dry with a soft clean towel. A wax may then be applied.
The surface of these wheels is similar to the paintedsurface of your vehicle. Don’t use strong soaps,chemicals, abrasive polishes, abrasive cleaners, cleanerswith acid or abrasive cleaning brushes on them becauseyou could damage the surface. Do not use chrome polishon aluminum wheels.
Don’t take your vehicle through an automatic car washthat has silicon carbide tire cleaning brushes. Thesebrushes can also damage the surface of these wheels.
Cleaning TiresTo clean your tires, use a stiff brush with a tire cleaner.
NOTICE:
When applying a tire dressing always take care towipe off any overspray or splash from all paintedsurfaces on the body or wheels of the vehicle.Petroleum-based products may damage the paint finish and tires.
6-56
Sheet Metal DamageIf your vehicle is damaged and requires sheet metalrepair or replacement, make sure the body repair shopapplies anti-corrosion material to the parts repaired orreplaced to restore corrosion protection.
Original manufacturer replacement parts will providethe corrosion protection while maintaining the warranty.
Finish DamageAny stone chips, fractures or deep scratches in the finishshould be repaired right away. Bare metal will corrodequickly and may develop into a major repair expense.
Minor chips and scratches can be repaired with touch-upmaterials available from your dealer or other serviceoutlets. Larger areas of finish damage can be correctedin your dealer’s body and paint shop.
Underbody MaintenanceChemicals used for ice and snow removal and dust controlcan collect on the underbody. If these are not removed,accelerated corrosion (rust) can occur on the underbodyparts such as fuel lines, frame, floor pan and exhaustsystem even though they have corrosion protection.At least every spring, flush these materials from theunderbody with plain water. Clean any areas where mudand other debris can collect. Dirt packed in closed areasof the frame should be loosened before being flushed.Your dealer or an underbody car washing system can do this for you.
Chemical Paint SpottingSome weather and atmospheric conditions can create achemical fallout. Airborne pollutants can fall upon andattack painted surfaces on your vehicle. This damage cantake two forms: blotchy, ringlet-shaped discolorations, and small irregular dark spots etched into the paint surface.Although no defect in the paint job causes this, Pontiacwill repair, at no charge to the owner, the surfaces ofnew vehicles damaged by this fallout condition within12 months or 12,000 miles (20 000 km) of purchase,whichever occurs first.
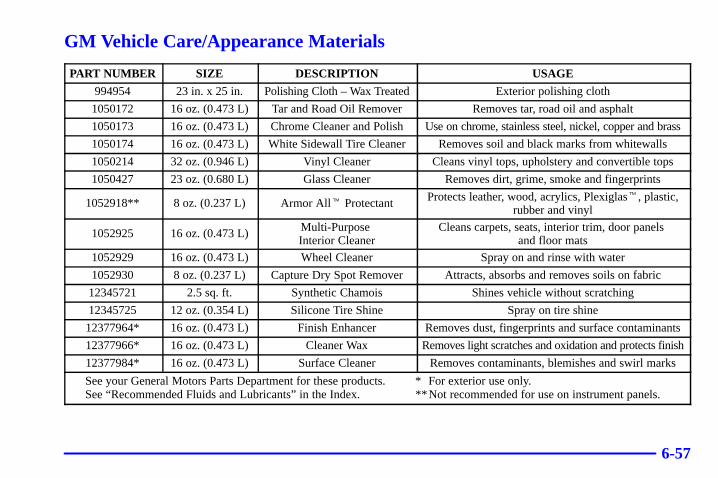
6-57
GM Vehicle Care/Appearance Materials
PART NUMBER SIZE DESCRIPTION USAGE
994954 23 in. x 25 in. Polishing Cloth – Wax Treated Exterior polishing cloth
1050172 16 oz. (0.473 L) Tar and Road Oil Remover Removes tar, road oil and asphalt
1050173 16 oz. (0.473 L) Chrome Cleaner and Polish Use on chrome, stainless steel, nickel, copper and brass
1050174 16 oz. (0.473 L) White Sidewall Tire Cleaner Removes soil and black marks from whitewalls
1050214 32 oz. (0.946 L) Vinyl Cleaner Cleans vinyl tops, upholstery and convertible tops
1050427 23 oz. (0.680 L) Glass Cleaner Removes dirt, grime, smoke and fingerprints
1052918** 8 oz. (0.237 L) Armor All� Protectant Protects leather, wood, acrylics, Plexiglas�, plastic,rubber and vinyl
1052925 16 oz. (0.473 L) Multi-Purpose Interior Cleaner
Cleans carpets, seats, interior trim, door panels and floor mats
1052929 16 oz. (0.473 L) Wheel Cleaner Spray on and rinse with water
1052930 8 oz. (0.237 L) Capture Dry Spot Remover Attracts, absorbs and removes soils on fabric
12345721 2.5 sq. ft. Synthetic Chamois Shines vehicle without scratching
12345725 12 oz. (0.354 L) Silicone Tire Shine Spray on tire shine
12377964* 16 oz. (0.473 L) Finish Enhancer Removes dust, fingerprints and surface contaminants
12377966* 16 oz. (0.473 L) Cleaner Wax Removes light scratches and oxidation and protects finish
12377984* 16 oz. (0.473 L) Surface Cleaner Removes contaminants, blemishes and swirl marks
See your General Motors Parts Department for these products. * For exterior use only.See “Recommended Fluids and Lubricants” in the Index. **Not recommended for use on instrument panels.
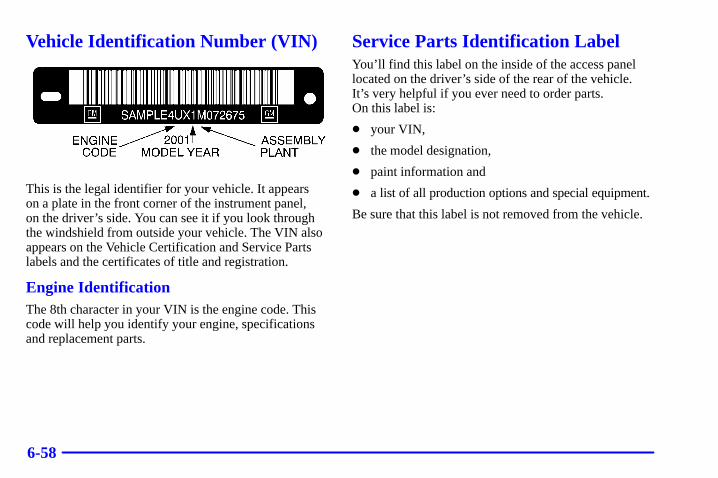
6-58
Vehicle Identification Number (VIN)
This is the legal identifier for your vehicle. It appears on a plate in the front corner of the instrument panel, on the driver’s side. You can see it if you look throughthe windshield from outside your vehicle. The VIN alsoappears on the Vehicle Certification and Service Partslabels and the certificates of title and registration.
Engine IdentificationThe 8th character in your VIN is the engine code. Thiscode will help you identify your engine, specificationsand replacement parts.
Service Parts Identification LabelYou’ll find this label on the inside of the access panellocated on the driver’s side of the rear of the vehicle. It’s very helpful if you ever need to order parts. On this label is:
� your VIN,
� the model designation,
� paint information and
� a list of all production options and special equipment.
Be sure that this label is not removed from the vehicle.
6-59
Electrical SystemAdd-On Electrical Equipment
NOTICE:
Don’t add anything electrical to your vehicleunless you check with your dealer first. Someelectrical equipment can damage your vehicleand the damage wouldn’t be covered by yourwarranty. Some add-on electrical equipment can keep other components from working as they should.
Your vehicle has an air bag system. Before attempting toadd anything electrical to your vehicle, see “ServicingYour Air Bag-Equipped Vehicle” in the Index.
Headlamp WiringThe headlamp wiring is protected by an internal circuitbreaker in the instrument panel fuse panel. An electricaloverload will cause the lamps to go on and off, or insome cases to remain off. If this happens, have yourheadlamp wiring checked right away.
Windshield WipersThe windshield wiper motor is protected by an internalcircuit breaker and a fuse. If the motor overheats due to heavy snow, etc., the wiper will stop until the motorcools. If the overload is caused by some electricalproblem, be sure to get it fixed.
Power Windows and Other Power OptionsCircuit breakers in the instrument panel fuse panelprotect the power windows and other power accessories.When the current load is too heavy, the circuit breakeropens and closes, protecting the circuit until the problemis fixed.
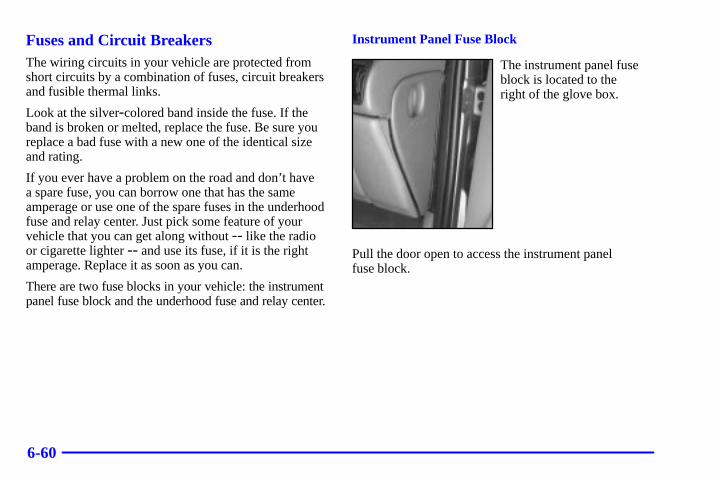
6-60
Fuses and Circuit BreakersThe wiring circuits in your vehicle are protected fromshort circuits by a combination of fuses, circuit breakersand fusible thermal links.
Look at the silver-colored band inside the fuse. If theband is broken or melted, replace the fuse. Be sure youreplace a bad fuse with a new one of the identical sizeand rating.
If you ever have a problem on the road and don’t have a spare fuse, you can borrow one that has the sameamperage or use one of the spare fuses in the underhoodfuse and relay center. Just pick some feature of yourvehicle that you can get along without -- like the radioor cigarette lighter -- and use its fuse, if it is the rightamperage. Replace it as soon as you can.
There are two fuse blocks in your vehicle: the instrumentpanel fuse block and the underhood fuse and relay center.
Instrument Panel Fuse Block
The instrument panel fuseblock is located to the right of the glove box.
Pull the door open to access the instrument panel fuse block.
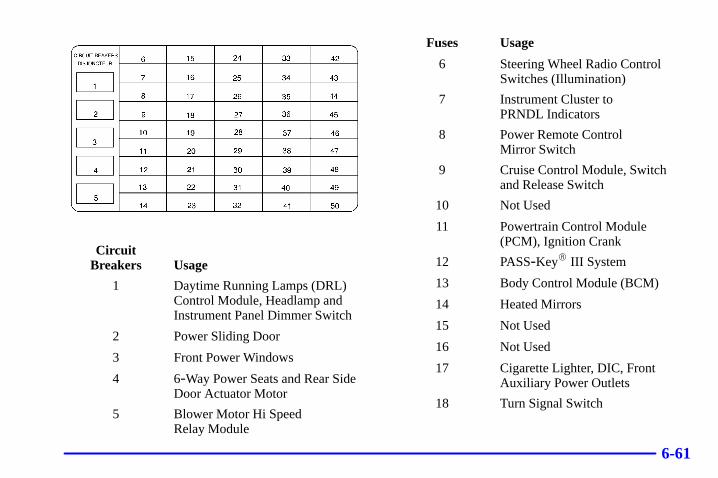
6-61
CircuitBreakers Usage
1 Daytime Running Lamps (DRL)Control Module, Headlamp andInstrument Panel Dimmer Switch
2 Power Sliding Door
3 Front Power Windows
4 6-Way Power Seats and Rear SideDoor Actuator Motor
5 Blower Motor Hi Speed Relay Module
Fuses Usage
6 Steering Wheel Radio ControlSwitches (Illumination)
7 Instrument Cluster to PRNDL Indicators
8 Power Remote Control Mirror Switch
9 Cruise Control Module, Switchand Release Switch
10 Not Used
11 Powertrain Control Module(PCM), Ignition Crank
12 PASS-Key� III System
13 Body Control Module (BCM)
14 Heated Mirrors
15 Not Used
16 Not Used
17 Cigarette Lighter, DIC, FrontAuxiliary Power Outlets
18 Turn Signal Switch
6-62
Fuses Usage
19 Interior Lamp and MultifunctionSwitch (Power Vent Switch)
20 Windshield Wiper/Washer Motorand Switch
21 Turn Signal Switch
22 Rear Electric Accessory Plug Housing
23 DRL Control Module
24 Not Used
25 Rear Window Defogger Relay,Heated Mirrors
26 OnStar�
27 Inflatable Restraint Control Module
28 Heater-A/C Control
29 Instrument Cluster, BCM,Electronic Level Control (ELC)Sensor and Relay
30 Stoplamp Switch
Fuses Usage
31 Module/Electronic Brake ControlModule/Electronic Brake TractionControl Module (EBCM/EBTCM)
32 Evaporative Emissions (EVAP)Canister Vent Solenoid Valve
33 Not Used
34 ELC Air Compressor and ELCRelay, Trailer Harness
35 Courtesy Lamp
36 BCM, Electronic Brake ControlIndicator Lamp Driver Module,Instrument Panel Cluster, RearSide Door Actuator ControlModule, Rear Windows
37 Rear HVAC-A/C Control
38 Rear Window Wiper Motor, Rear Window Wiper/Washer and Multifunction Switch (RearWindow Wiper/Washer Switch)
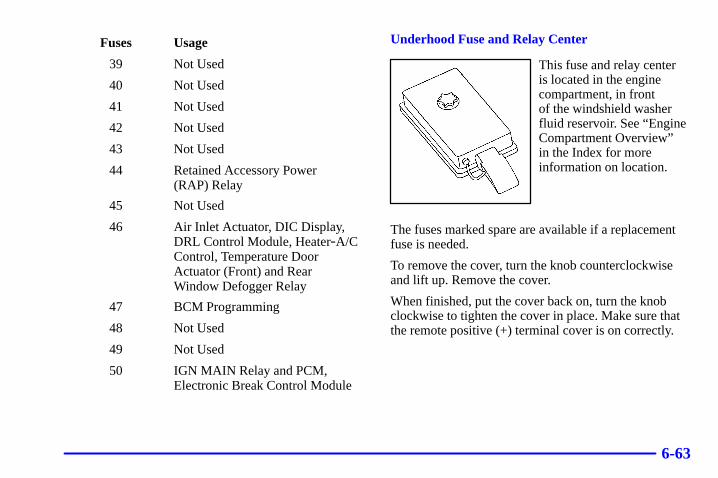
6-63
Fuses Usage
39 Not Used
40 Not Used
41 Not Used
42 Not Used
43 Not Used
44 Retained Accessory Power (RAP) Relay
45 Not Used
46 Air Inlet Actuator, DIC Display,DRL Control Module, Heater-A/CControl, Temperature DoorActuator (Front) and RearWindow Defogger Relay
47 BCM Programming
48 Not Used
49 Not Used
50 IGN MAIN Relay and PCM,Electronic Break Control Module
Underhood Fuse and Relay Center
This fuse and relay center is located in the enginecompartment, in front of the windshield washerfluid reservoir. See “EngineCompartment Overview” in the Index for moreinformation on location.
The fuses marked spare are available if a replacementfuse is needed.
To remove the cover, turn the knob counterclockwiseand lift up. Remove the cover.
When finished, put the cover back on, turn the knobclockwise to tighten the cover in place. Make sure thatthe remote positive (+) terminal cover is on correctly.
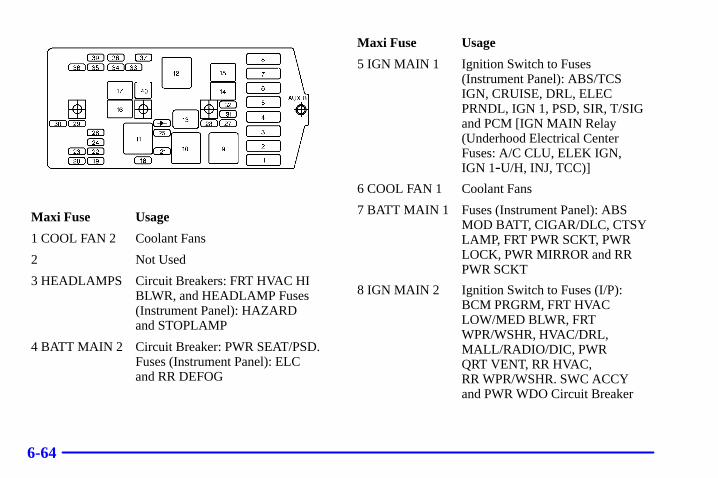
6-64
Maxi Fuse Usage
1 COOL FAN 2 Coolant Fans
2 Not Used
3 HEADLAMPS Circuit Breakers: FRT HVAC HIBLWR, and HEADLAMP Fuses(Instrument Panel): HAZARD and STOPLAMP
4 BATT MAIN 2 Circuit Breaker: PWR SEAT/PSD.Fuses (Instrument Panel): ELCand RR DEFOG
Maxi Fuse Usage
5 IGN MAIN 1 Ignition Switch to Fuses(Instrument Panel): ABS/TCSIGN, CRUISE, DRL, ELECPRNDL, IGN 1, PSD, SIR, T/SIGand PCM [IGN MAIN Relay(Underhood Electrical CenterFuses: A/C CLU, ELEK IGN,IGN 1-U/H, INJ, TCC)]
6 COOL FAN 1 Coolant Fans
7 BATT MAIN 1 Fuses (Instrument Panel): ABSMOD BATT, CIGAR/DLC, CTSYLAMP, FRT PWR SCKT, PWRLOCK, PWR MIRROR and RRPWR SCKT
8 IGN MAIN 2 Ignition Switch to Fuses (I/P):BCM PRGRM, FRT HVACLOW/MED BLWR, FRTWPR/WSHR, HVAC/DRL,MALL/RADIO/DIC, PWR QRT VENT, RR HVAC, RR WPR/WSHR. SWC ACCYand PWR WDO Circuit Breaker
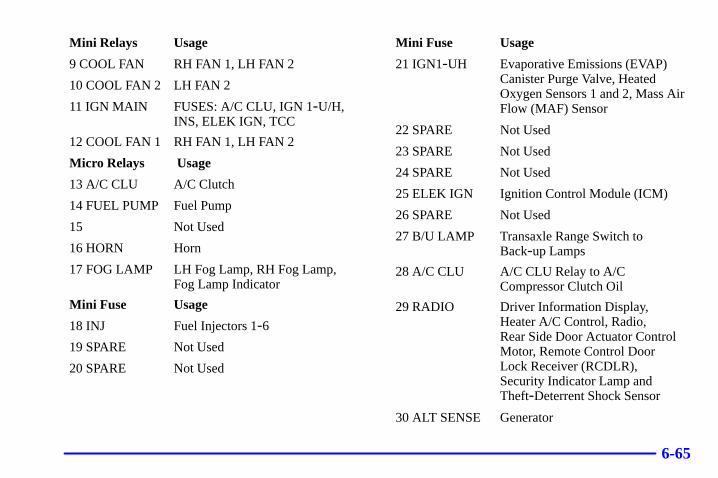
6-65
Mini Relays Usage
9 COOL FAN RH FAN 1, LH FAN 2
10 COOL FAN 2 LH FAN 2
11 IGN MAIN FUSES: A/C CLU, IGN 1-U/H,INS, ELEK IGN, TCC
12 COOL FAN 1 RH FAN 1, LH FAN 2
Micro Relays Usage
13 A/C CLU A/C Clutch
14 FUEL PUMP Fuel Pump
15 Not Used
16 HORN Horn
17 FOG LAMP LH Fog Lamp, RH Fog Lamp,Fog Lamp Indicator
Mini Fuse Usage
18 INJ Fuel Injectors 1-619 SPARE Not Used
20 SPARE Not Used
Mini Fuse Usage
21 IGN1-UH Evaporative Emissions (EVAP)Canister Purge Valve, HeatedOxygen Sensors 1 and 2, Mass AirFlow (MAF) Sensor
22 SPARE Not Used
23 SPARE Not Used
24 SPARE Not Used
25 ELEK IGN Ignition Control Module (ICM)
26 SPARE Not Used
27 B/U LAMP Transaxle Range Switch toBack-up Lamps
28 A/C CLU A/C CLU Relay to A/CCompressor Clutch Oil
29 RADIO Driver Information Display,Heater A/C Control, Radio, Rear Side Door Actuator ControlMotor, Remote Control Door Lock Receiver (RCDLR), Security Indicator Lamp andTheft-Deterrent Shock Sensor
30 ALT SENSE Generator
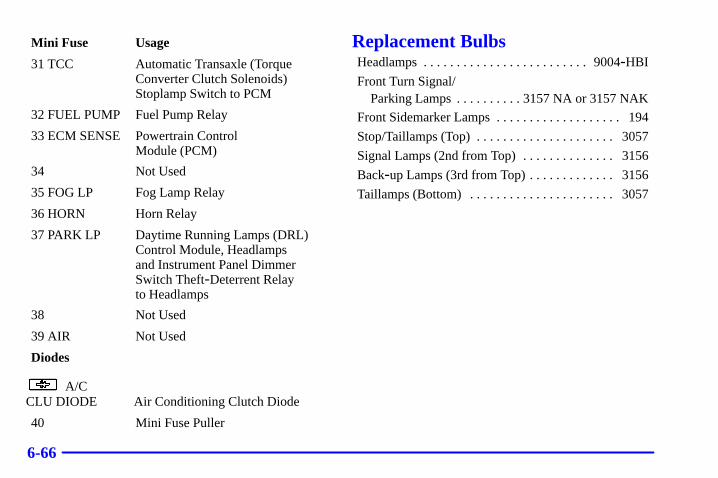
6-66
Mini Fuse Usage
31 TCC Automatic Transaxle (TorqueConverter Clutch Solenoids)Stoplamp Switch to PCM
32 FUEL PUMP Fuel Pump Relay
33 ECM SENSE Powertrain Control Module (PCM)
34 Not Used
35 FOG LP Fog Lamp Relay
36 HORN Horn Relay
37 PARK LP Daytime Running Lamps (DRL)Control Module, Headlamps and Instrument Panel DimmerSwitch Theft-Deterrent Relay to Headlamps
38 Not Used
39 AIR Not Used
Diodes
A/C CLU DIODE Air Conditioning Clutch Diode
40 Mini Fuse Puller
Replacement BulbsHeadlamps 9004-HBI. . . . . . . . . . . . . . . . . . . . . . . . .
Front Turn Signal/Parking Lamps 3157 NA or 3157 NAK. . . . . . . . . .
Front Sidemarker Lamps 194. . . . . . . . . . . . . . . . . . .
Stop/Taillamps (Top) 3057. . . . . . . . . . . . . . . . . . . . .
Signal Lamps (2nd from Top) 3156. . . . . . . . . . . . . .
Back-up Lamps (3rd from Top) 3156. . . . . . . . . . . . .
Taillamps (Bottom) 3057. . . . . . . . . . . . . . . . . . . . . .
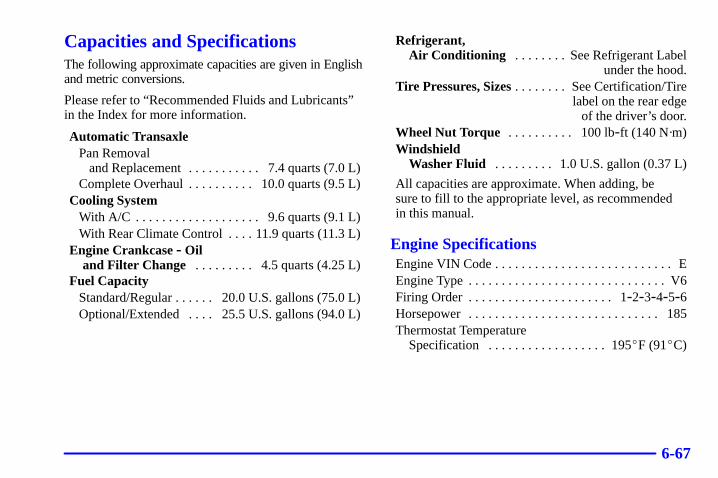
6-67
Capacities and SpecificationsThe following approximate capacities are given in Englishand metric conversions.
Please refer to “Recommended Fluids and Lubricants”in the Index for more information.
Automatic TransaxlePan Removal and Replacement 7.4 quarts (7.0 L). . . . . . . . . . .
Complete Overhaul 10.0 quarts (9.5 L). . . . . . . . . . Cooling System
With A/C 9.6 quarts (9.1 L). . . . . . . . . . . . . . . . . . . With Rear Climate Control 11.9 quarts (11.3 L). . . .
Engine Crankcase - Oil and Filter Change 4.5 quarts (4.25 L). . . . . . . . .
Fuel CapacityStandard/Regular 20.0 U.S. gallons (75.0 L). . . . . . Optional/Extended 25.5 U.S. gallons (94.0 L). . . .
Refrigerant, Air Conditioning See Refrigerant Label. . . . . . . .
under the hood.Tire Pressures, Sizes See Certification/Tire. . . . . . . .
label on the rear edge of the driver’s door.
Wheel Nut Torque 100 lb-ft (140 N·m). . . . . . . . . . Windshield
Washer Fluid 1.0 U.S. gallon (0.37 L). . . . . . . . .
All capacities are approximate. When adding, be sure to fill to the appropriate level, as recommended in this manual.
Engine SpecificationsEngine VIN Code E. . . . . . . . . . . . . . . . . . . . . . . . . . . Engine Type V6. . . . . . . . . . . . . . . . . . . . . . . . . . . . . . Firing Order 1-2-3-4-5-6. . . . . . . . . . . . . . . . . . . . . . Horsepower 185. . . . . . . . . . . . . . . . . . . . . . . . . . . . . Thermostat Temperature
Specification 195�F (91�C). . . . . . . . . . . . . . . . . .
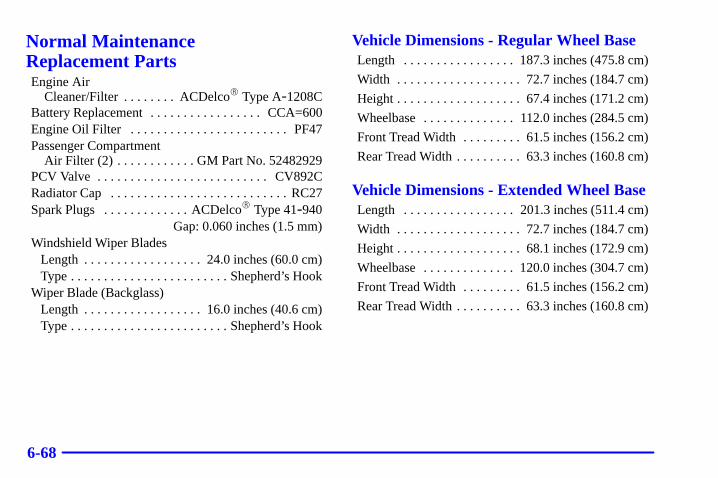
6-68
Normal Maintenance Replacement PartsEngine Air
Cleaner/Filter ACDelco� Type A-1208C. . . . . . . . Battery Replacement CCA=600. . . . . . . . . . . . . . . . . Engine Oil Filter PF47. . . . . . . . . . . . . . . . . . . . . . . . Passenger Compartment
Air Filter (2) GM Part No. 52482929. . . . . . . . . . . . PCV Valve CV892C. . . . . . . . . . . . . . . . . . . . . . . . . . Radiator Cap RC27. . . . . . . . . . . . . . . . . . . . . . . . . . . Spark Plugs ACDelco� Type 41-940. . . . . . . . . . . . .
Gap: 0.060 inches (1.5 mm)Windshield Wiper Blades
Length 24.0 inches (60.0 cm). . . . . . . . . . . . . . . . . . Type Shepherd’s Hook. . . . . . . . . . . . . . . . . . . . . . . .
Wiper Blade (Backglass)Length 16.0 inches (40.6 cm). . . . . . . . . . . . . . . . . . Type Shepherd’s Hook. . . . . . . . . . . . . . . . . . . . . . . .
Vehicle Dimensions - Regular Wheel BaseLength 187.3 inches (475.8 cm). . . . . . . . . . . . . . . . .
Width 72.7 inches (184.7 cm). . . . . . . . . . . . . . . . . . .
Height 67.4 inches (171.2 cm). . . . . . . . . . . . . . . . . . .
Wheelbase 112.0 inches (284.5 cm). . . . . . . . . . . . . .
Front Tread Width 61.5 inches (156.2 cm). . . . . . . . .
Rear Tread Width 63.3 inches (160.8 cm). . . . . . . . . .
Vehicle Dimensions - Extended Wheel BaseLength 201.3 inches (511.4 cm). . . . . . . . . . . . . . . . .
Width 72.7 inches (184.7 cm). . . . . . . . . . . . . . . . . . .
Height 68.1 inches (172.9 cm). . . . . . . . . . . . . . . . . . .
Wheelbase 120.0 inches (304.7 cm). . . . . . . . . . . . . .
Front Tread Width 61.5 inches (156.2 cm). . . . . . . . .
Rear Tread Width 63.3 inches (160.8 cm). . . . . . . . . .
7-7-1
Section 7 Maintenance Schedule
This section covers the maintenance required for your vehicle. Your vehicle needs these services to retain its safety,dependability and emission control performance.
7-2 Introduction7-4 Part A: Scheduled Maintenance Services7-15 Part B: Owner Checks and Services
7-20 Part C: Periodic Maintenance Inspections7-22 Part D: Recommended Fluids and Lubricants7-24 Part E: Maintenance Record
7-2
Have you purchased the GM Protection Plan? The Plansupplements your new vehicle warranties. See yourWarranty and Owner Assistance booklet or your dealerfor details.
IntroductionYour Vehicle and the EnvironmentProper vehicle maintenance not only helps to keep yourvehicle in good working condition, but also helps theenvironment. All recommended maintenance proceduresare important. Improper vehicle maintenance can evenaffect the quality of the air we breathe. Improper fluidlevels or the wrong tire inflation can increase the levelof emissions from your vehicle. To help protect ourenvironment, and to keep your vehicle in goodcondition, please maintain your vehicle properly.
Maintenance RequirementsMaintenance intervals, checks, inspections andrecommended fluids and lubricants as prescribed in thismanual are necessary to keep your vehicle in goodworking condition. Any damage caused by failure tofollow recommended maintenance may not be coveredby warranty.
7-3
How This Section is OrganizedThis maintenance schedule is divided into five parts:
“Part A: Scheduled Maintenance Services” showswhat to have done and how often. Some of theseservices can be complex, so unless you are technicallyqualified and have the necessary equipment, you shouldlet your dealer’s service department or another qualifiedservice center do these jobs.
CAUTION:
Performing maintenance work on a vehicle canbe dangerous. In trying to do some jobs, you canbe seriously injured. Do your own maintenancework only if you have the required know-howand the proper tools and equipment for the job.If you have any doubt, have a qualifiedtechnician do the work.
If you want to get the service information, see “Serviceand Owner Publications” in the Index.
“Part B: Owner Checks and Services” tells you what should be checked and when. It also explains what you can easily do to help keep your vehicle ingood condition.
“Part C: Periodic Maintenance Inspections” explainsimportant inspections that your dealer’s servicedepartment or another qualified service center should perform.
“Part D: Recommended Fluids and Lubricants” listssome recommended products necessary to help keepyour vehicle properly maintained. These products, ortheir equivalents, should be used whether you do thework yourself or have it done.
“Part E: Maintenance Record” is a place for you to record and keep track of the maintenanceperformed on your vehicle. Keep your maintenancereceipts. They may be needed to qualify your vehicle for warranty repairs.
7-4
Part A: Scheduled Maintenance ServicesUsing Your Maintenance ScheduleWe at General Motors want to help you keep yourvehicle in good working condition. But we don’t knowexactly how you’ll drive it. You may drive very shortdistances only a few times a week. Or you may drivelong distances all the time in very hot, dusty weather.You may use your vehicle in making deliveries. Or you may drive it to work, to do errands or in many other ways.
Because of all the different ways people use theirvehicles, maintenance needs vary. You may need morefrequent checks and replacements. So please read thefollowing and note how you drive. If you have anyquestions on how to keep your vehicle in goodcondition, see your dealer.
This part tells you the maintenance services you shouldhave done and when you should schedule them. If yougo to your dealer for your service needs, you’ll knowthat GM-trained and supported service people willperform the work using genuine GM parts.
The proper fluids and lubricants to use are listed inPart D. Make sure whoever services your vehicle uses these. All parts should be replaced and allnecessary repairs done before you or anyone else drives the vehicle.
This schedule is for vehicles that:
� carry passengers and cargo within recommendedlimits. You will find these limits on your vehicle’sCertification/Tire label. See “Loading Your Vehicle”in the Index.
� are driven on reasonable road surfaces within legaldriving limits.
� use the recommended fuel. See “Fuel” in the Index.
Scheduled Maintenance
7-5
The services shown in this schedule up to 100,000 miles(166 000 km) should be performed after 100,000 miles(166 000 km) at the same intervals. The services shownat 150,000 miles (240 000 km) should be performed atthe same interval after 150,000 miles (240 000 km).
See “Owner Checks and Services” and “PeriodicMaintenance Inspections” following.
Footnotes� The U.S. Environmental Protection Agency or theCalifornia Air Resources Board has determined that thefailure to perform this maintenance item will not nullifythe emission warranty or limit recall liability prior tothe completion of the vehicle’s useful life. We, however,urge that all recommended maintenance services beperformed at the indicated intervals and themaintenance be recorded.
+ A good time to check your brakes is during tirerotation. See “Brake System Inspection” under“Periodic Maintenance Inspections” in Part C of this schedule.
Scheduled Maintenance
7-6
Engine Oil and Chassis LubricationScheduled MaintenanceChange engine oil and filter as indicated by the GM Oil Life System� (or every 12 months,whichever occurs first). Reset the system. The systemwill show you when to change the oil -- usually between3,000 miles (5 000 km) and 10,000 miles (16 000 km)since your last oil change. Under severe conditions, theindicator may come on before 3,000 miles (5 000 km).Never drive your vehicle more than 10,000 miles (16 000 km) or 12 months without an oil and filter change.
The system won’t detect dust in the oil. So if you drivein a dusty area, be sure to change your oil and filterevery 3,000 miles (5 000 km) or sooner if the changeengine oil message appears. Remember to reset the Oil Life System when the oil and filter have beenchanged. See “Oil Life System” in the Index forinformation on resetting.
An Emission Control Service.
Lubricate chassis components with each engine oil andfilter change. Lubricate the suspension, steering linkage,transaxle shift linkage, parking brake cable guides andthe underbody contact points and linkage.
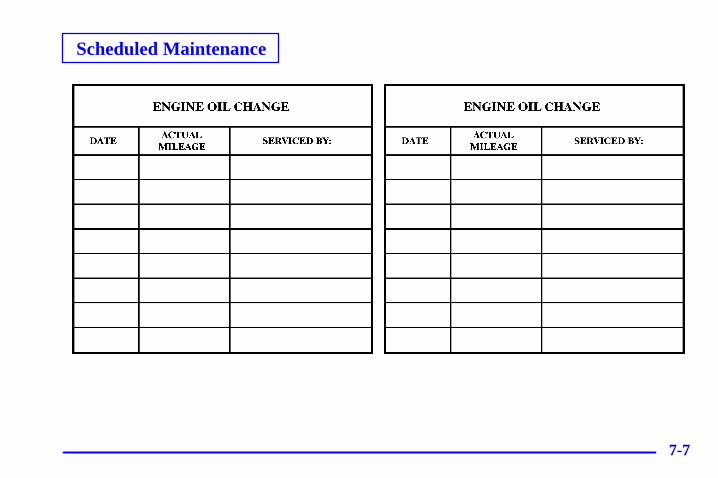
Scheduled Maintenance
7-7
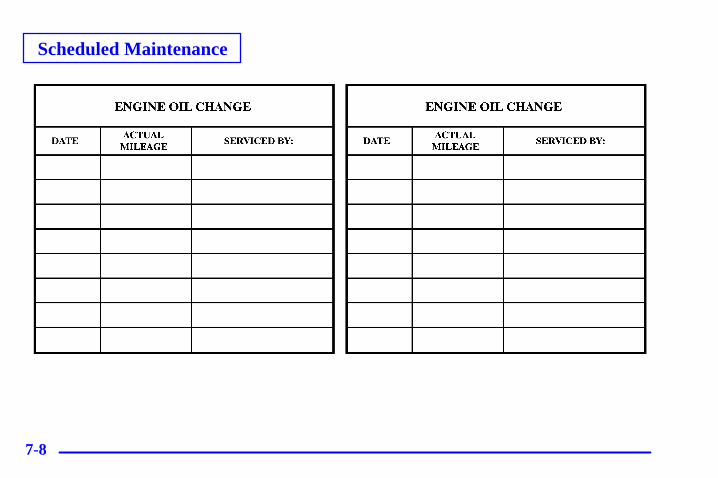
Scheduled Maintenance
7-8
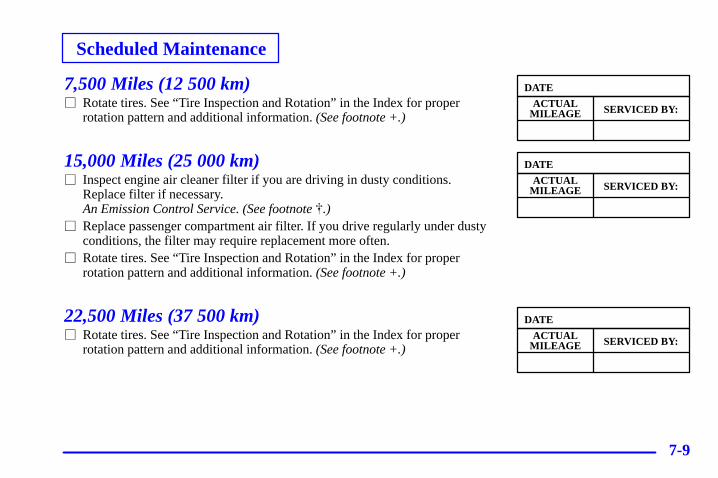
Scheduled Maintenance
7-9
7,500 Miles (12 500 km)� Rotate tires. See “Tire Inspection and Rotation” in the Index for proper
rotation pattern and additional information. (See footnote +.)
15,000 Miles (25 000 km)� Inspect engine air cleaner filter if you are driving in dusty conditions.
Replace filter if necessary. An Emission Control Service. (See footnote �.)
� Replace passenger compartment air filter. If you drive regularly under dustyconditions, the filter may require replacement more often.
� Rotate tires. See “Tire Inspection and Rotation” in the Index for properrotation pattern and additional information. (See footnote +.)
22,500 Miles (37 500 km)� Rotate tires. See “Tire Inspection and Rotation” in the Index for proper
rotation pattern and additional information. (See footnote +.)
ACTUAL SERVICED BY:MILEAGE
DATE
ACTUAL SERVICED BY:MILEAGE
DATE
ACTUAL SERVICED BY:MILEAGE
DATE
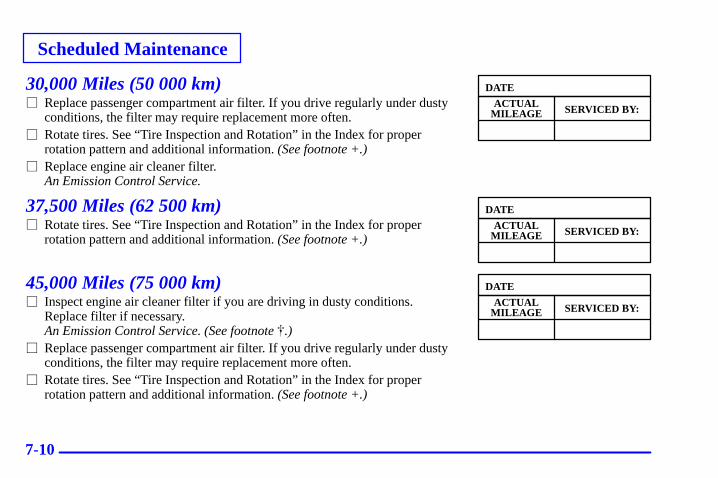
Scheduled Maintenance
7-10
30,000 Miles (50 000 km)� Replace passenger compartment air filter. If you drive regularly under dusty
conditions, the filter may require replacement more often.� Rotate tires. See “Tire Inspection and Rotation” in the Index for proper
rotation pattern and additional information. (See footnote +.) � Replace engine air cleaner filter.
An Emission Control Service.
37,500 Miles (62 500 km)� Rotate tires. See “Tire Inspection and Rotation” in the Index for proper
rotation pattern and additional information. (See footnote +.)
45,000 Miles (75 000 km)� Inspect engine air cleaner filter if you are driving in dusty conditions.
Replace filter if necessary. An Emission Control Service. (See footnote �.)
� Replace passenger compartment air filter. If you drive regularly under dustyconditions, the filter may require replacement more often.
� Rotate tires. See “Tire Inspection and Rotation” in the Index for properrotation pattern and additional information. (See footnote +.)
ACTUAL SERVICED BY:MILEAGE
DATE
ACTUAL SERVICED BY:MILEAGE
DATE
ACTUAL SERVICED BY:MILEAGE
DATE
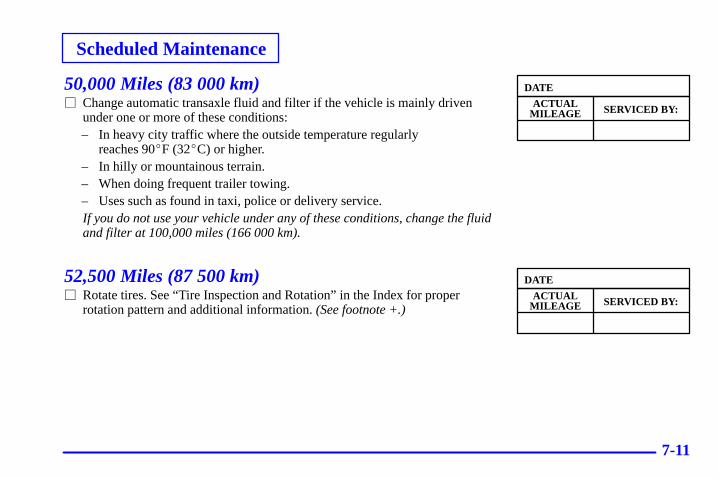
Scheduled Maintenance
7-11
50,000 Miles (83 000 km)� Change automatic transaxle fluid and filter if the vehicle is mainly driven
under one or more of these conditions:– In heavy city traffic where the outside temperature regularly
reaches 90�F (32�C) or higher.– In hilly or mountainous terrain.– When doing frequent trailer towing.– Uses such as found in taxi, police or delivery service.If you do not use your vehicle under any of these conditions, change the fluidand filter at 100,000 miles (166 000 km).
52,500 Miles (87 500 km)� Rotate tires. See “Tire Inspection and Rotation” in the Index for proper
rotation pattern and additional information. (See footnote +.)
ACTUAL SERVICED BY:MILEAGE
DATE
ACTUAL SERVICED BY:MILEAGE
DATE

Scheduled Maintenance
7-12
60,000 Miles (100 000 km)� Replace passenger compartment air filter. If you drive regularly under dusty
conditions, the filter may require replacement more often.� Rotate tires. See “Tire Inspection and Rotation” in the Index for proper
rotation pattern and additional information. (See footnote +.) � Inspect engine accessory drive belt.
An Emission Control Service. � Replace engine air cleaner filter.
An Emission Control Service.
67,500 Miles (112 500 km)� Rotate tires. See “Tire Inspection and Rotation” in the Index for proper
rotation pattern and additional information. (See footnote +.)
75,000 Miles (125 000 km)� Inspect engine air cleaner filter if you are driving in dusty conditions.
Replace filter if necessary. An Emission Control Service. (See footnote �.)
� Replace passenger compartment air filter. If you drive regularly under dustyconditions, the filter may require replacement more often.
� Rotate tires. See “Tire Inspection and Rotation” in the Index for properrotation pattern and additional information. (See footnote +.)
ACTUAL SERVICED BY:MILEAGE
DATE
ACTUAL SERVICED BY:MILEAGE
DATE
ACTUAL SERVICED BY:MILEAGE
DATE
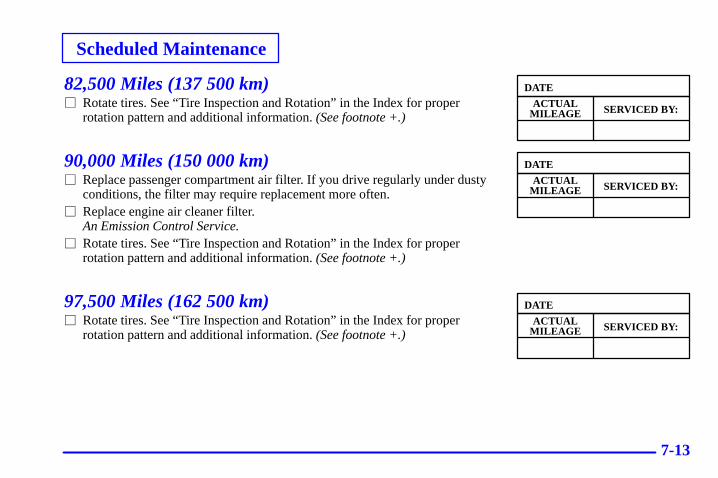
Scheduled Maintenance
7-13
82,500 Miles (137 500 km)� Rotate tires. See “Tire Inspection and Rotation” in the Index for proper
rotation pattern and additional information. (See footnote +.)
90,000 Miles (150 000 km)� Replace passenger compartment air filter. If you drive regularly under dusty
conditions, the filter may require replacement more often.� Replace engine air cleaner filter.
An Emission Control Service. � Rotate tires. See “Tire Inspection and Rotation” in the Index for proper
rotation pattern and additional information. (See footnote +.)
97,500 Miles (162 500 km)� Rotate tires. See “Tire Inspection and Rotation” in the Index for proper
rotation pattern and additional information. (See footnote +.)
ACTUAL SERVICED BY:MILEAGE
DATE
ACTUAL SERVICED BY:MILEAGE
DATE
ACTUAL SERVICED BY:MILEAGE
DATE
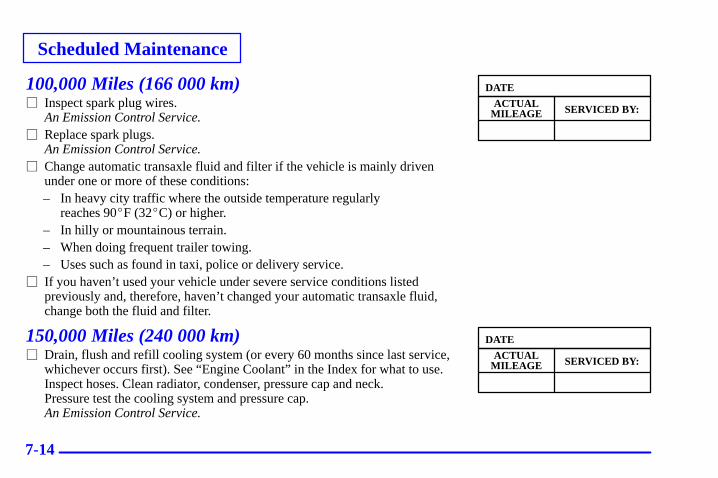
Scheduled Maintenance
7-14
100,000 Miles (166 000 km)� Inspect spark plug wires.
An Emission Control Service. � Replace spark plugs.
An Emission Control Service.� Change automatic transaxle fluid and filter if the vehicle is mainly driven
under one or more of these conditions:– In heavy city traffic where the outside temperature regularly
reaches 90�F (32�C) or higher.– In hilly or mountainous terrain.– When doing frequent trailer towing.– Uses such as found in taxi, police or delivery service.
� If you haven’t used your vehicle under severe service conditions listedpreviously and, therefore, haven’t changed your automatic transaxle fluid,change both the fluid and filter.
150,000 Miles (240 000 km)� Drain, flush and refill cooling system (or every 60 months since last service,
whichever occurs first). See “Engine Coolant” in the Index for what to use.Inspect hoses. Clean radiator, condenser, pressure cap and neck. Pressure test the cooling system and pressure cap. An Emission Control Service.
ACTUAL SERVICED BY:MILEAGE
DATE
ACTUAL SERVICED BY:MILEAGE
DATE
7-15
Part B: Owner Checks and ServicesListed in this part are owner checks and services whichshould be performed at the intervals specified to helpensure the safety, dependability and emission controlperformance of your vehicle.
Be sure any necessary repairs are completed at once.Whenever any fluids or lubricants are added to yourvehicle, make sure they are the proper ones, as shown in Part D.
At Each Fuel FillIt is important for you or a service station attendant toperform these underhood checks at each fuel fill.
Engine Oil Level Check
Check the engine oil level and add the proper oil ifnecessary. See “Engine Oil” in the Index for further details.
Engine Coolant Level Check
Check the engine coolant level and add DEX-COOL�
coolant mixture if necessary. See “Engine Coolant” inthe Index for further details.
Windshield Washer Fluid Level Check
Check the windshield washer fluid level in thewindshield washer tank and add the proper fluid ifnecessary. See “Windshield Washer Fluid” in the Indexfor further details.
At Least Once a Month
Tire Inflation Check
Make sure tires are inflated to the correct pressures.Don’t forget to check your spare tire. See “Tires” in the Index for further details.
Cassette Deck Service
Clean cassette deck. Cleaning should be done every50 hours of tape play. See “Audio Systems” in the Index for further details.
7-16
At Least Twice a Year
Restraint System Check
Make sure the safety belt reminder light and all yourbelts, buckles, latch plates, retractors and anchorages areworking properly. If your vehicle has a built-in childrestraint, also periodically make sure the harness straps,latch plates, buckle, clip, child head restraint andanchorages are working properly. Look for any otherloose or damaged safety belt and built-in child restraintsystem parts. If you see anything that might keep asafety belt or built-in child restraint system from doingits job, have it repaired. Have any torn or frayed safetybelts or harness straps replaced.
Also look for any opened or broken air bag coverings,and have them repaired or replaced. (The air bag systemdoes not need regular maintenance.)
Wiper Blade Check
Inspect wiper blades for wear or cracking. Replace bladeinserts that appear worn or damaged or that streak ormiss areas of the windshield. Also see “Wiper Blades,Cleaning” in the Index.
Spare Tire Check
At least twice a year, after the monthly inflation checkof the spare tire determines that the spare is inflated tothe correct tire inflation pressure, make sure that thespare tire is stored securely. Push, pull, and then try torotate or turn the tire. If it moves, use the folding wrenchto tighten the cable. See “Storing the Spare Tire andTools” in the Index.
Weatherstrip Lubrication
Silicone grease on weatherstrips will make them lastlonger, seal better, and not stick or squeak. Applysilicone grease with a clean cloth. During very cold,damp weather more frequent application may berequired. See “Recommended Fluids and Lubricants” in the Index.
Automatic Transaxle Check
Check the transaxle fluid level; add if needed. See “Automatic Transaxle Fluid” in the Index. A fluid loss may indicate a problem. Check the systemand repair if needed.
7-17
At Least Once a Year
Key Lock Cylinders Service
Lubricate the key lock cylinders with the lubricantspecified in Part D.
Body Lubrication Service
Lubricate all key lock cylinders, hood latch assemblies,secondary latches, pivots, spring anchor and releasepawl, hood and door hinges, rear folding seats, fuel doorhinge, liftgate hinges, power sliding door cable andsliding door track(s). Part D tells you what to use. More frequent lubrication may be required whenexposed to a corrosive environment.
Starter Switch Check
CAUTION:
When you are doing this check, the vehicle couldmove suddenly. If it does, you or others could beinjured. Follow the steps below.
1. Before you start, be sure you have enough roomaround the vehicle.
2. Firmly apply both the parking brake and the regularbrake. See “Parking Brake” in the Index if necessary.
NOTE: Do not use the accelerator pedal, and beready to turn off the engine immediately if it starts.
3. Try to start the engine in each gear. The startershould work only in PARK (P) or NEUTRAL (N). If the starter works in any other position, yourvehicle needs service.
7-18
Automatic Transaxle Shift Lock Control System Check
CAUTION:
When you are doing this check, the vehicle couldmove suddenly. If it does, you or others could beinjured. Follow the steps below.
1. Before you start, be sure you have enough room around the vehicle. It should be parked on a level surface.
2. Firmly apply the parking brake. See “Parking Brake”in the Index if necessary.
NOTE: Be ready to apply the regular brakeimmediately if the vehicle begins to move.
3. With the engine off, turn the key to the RUNposition, but don’t start the engine. Without applyingthe regular brake, try to move the shift lever out ofPARK (P) with normal effort. If the shift levermoves out of PARK (P), your vehicle needs service.
Ignition Transaxle Lock Check
While parked, and with the parking brake set, try to turnthe ignition key to LOCK in each shift lever position.
� The key should turn to LOCK only when the shiftlever is in PARK (P).
� The key should come out only in LOCK.
7-19
Parking Brake and Automatic Transaxle PARK (P)Mechanism Check
CAUTION:
When you are doing this check, your vehiclecould begin to move. You or others could beinjured and property could be damaged. Makesure there is room in front of your vehicle in caseit begins to roll. Be ready to apply the regularbrake at once should the vehicle begin to move.
Park on a fairly steep hill, with the vehicle facingdownhill. Keeping your foot on the regular brake, set the parking brake.
� To check the parking brake’s holding ability: Withthe engine running and transaxle in NEUTRAL (N),slowly remove foot pressure from the regular brakepedal. Do this until the vehicle is held by the parkingbrake only.
� To check the PARK (P) mechanism’s holding ability:With the engine running, shift to PARK (P). Then release the parking brake followed by theregular brake.
Underbody Flushing Service
At least every spring, use plain water to flush anycorrosive materials from the underbody. Take care toclean thoroughly any areas where mud and other debriscan collect.
7-20
Part C: Periodic Maintenance InspectionsListed in this part are inspections and services whichshould be performed at least twice a year (for instance,each spring and fall). You should let your dealer’sservice department or other qualified service center do these jobs. Make sure any necessary repairs arecompleted at once.
Proper procedures to perform these services may befound in a service manual. See “Service and OwnerPublications” in the Index.
Steering, Suspension and Front Drive Axle Boot and Seal InspectionInspect the front and rear suspension and steeringsystem for damaged, loose or missing parts, signs ofwear or lack of lubrication. Inspect the power steeringlines and hoses for proper hook-up, binding, leaks,cracks, chafing, etc. Clean and then inspect the driveaxle boot seals for damage, tears or leakage. Replaceseals if necessary.
Exhaust System InspectionInspect the complete exhaust system. Inspect the bodynear the exhaust system. Look for broken, damaged,missing or out-of-position parts as well as open seams,holes, loose connections or other conditions which couldcause a heat build-up in the floor pan or could letexhaust fumes into the vehicle. See “Engine Exhaust” in the Index.
7-21
Engine Cooling System InspectionInspect the hoses and have them replaced if they arecracked, swollen or deteriorated. Inspect all pipes,fittings and clamps; replace as needed. Clean the outsideof the radiator and air conditioning condenser. To helpensure proper operation, a pressure test of the coolingsystem and pressure cap is recommended at least once a year.
Throttle System InspectionInspect the throttle system for interference or binding,and for damaged or missing parts. Replace parts asneeded. Replace any components that have high effortor excessive wear. Do not lubricate accelerator andcruise control cables.
Brake System InspectionInspect the complete system. Inspect brake lines andhoses for proper hook-up, binding, leaks, cracks,chafing, etc. Inspect disc brake pads for wear and rotorsfor surface condition. Also inspect drum brake liningsfor wear and cracks. Inspect other brake parts, includingdrums, wheel cylinders, calipers, parking brake, etc.Check parking brake adjustment. You may need to haveyour brakes inspected more often if your driving habitsor conditions result in frequent braking.
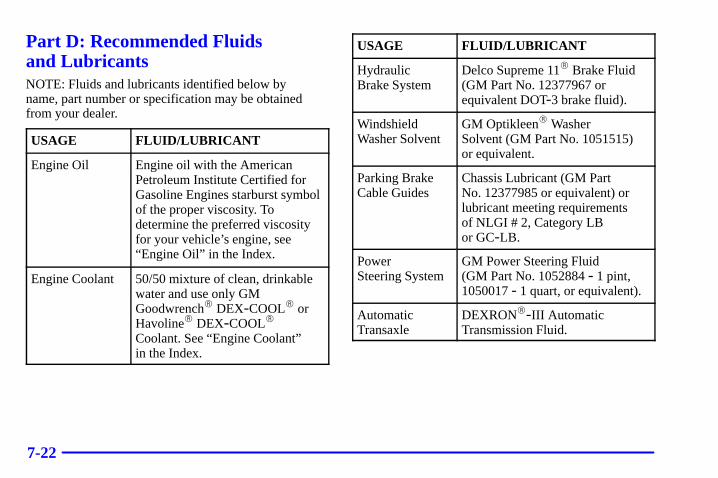
7-22
Part D: Recommended Fluids and LubricantsNOTE: Fluids and lubricants identified below by name, part number or specification may be obtainedfrom your dealer.
USAGE FLUID/LUBRICANT
Engine Oil Engine oil with the AmericanPetroleum Institute Certified forGasoline Engines starburst symbolof the proper viscosity. Todetermine the preferred viscosityfor your vehicle’s engine, see“Engine Oil” in the Index.
Engine Coolant 50/50 mixture of clean, drinkablewater and use only GMGoodwrench� DEX-COOL� orHavoline� DEX-COOL�
Coolant. See “Engine Coolant” in the Index.
USAGE FLUID/LUBRICANT
Hydraulic Brake System
Delco Supreme 11� Brake Fluid(GM Part No. 12377967 orequivalent DOT-3 brake fluid).
WindshieldWasher Solvent
GM Optikleen� Washer Solvent (GM Part No. 1051515) or equivalent.
Parking BrakeCable Guides
Chassis Lubricant (GM Part No. 12377985 or equivalent) orlubricant meeting requirements of NLGI # 2, Category LB or GC-LB.
Power Steering System
GM Power Steering Fluid (GM Part No. 1052884 - 1 pint,1050017 - 1 quart, or equivalent).
AutomaticTransaxle
DEXRON�-III AutomaticTransmission Fluid.
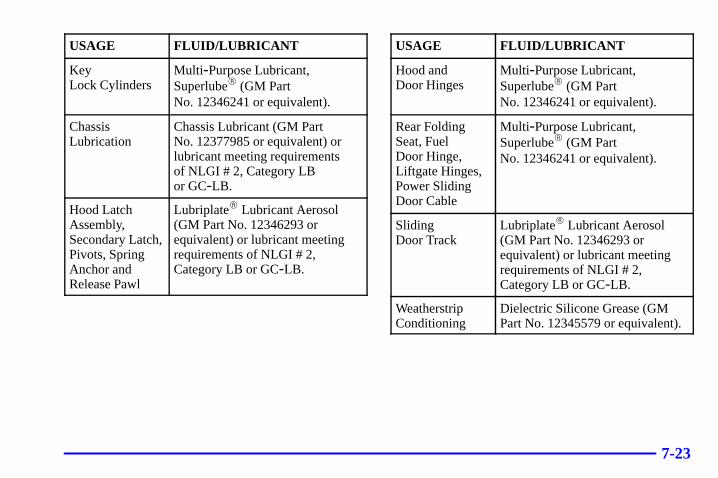
7-23
USAGE FLUID/LUBRICANT
Key Lock Cylinders
Multi -Purpose Lubricant,Superlube� (GM Part No. 12346241 or equivalent).
ChassisLubrication
Chassis Lubricant (GM Part No. 12377985 or equivalent) orlubricant meeting requirements of NLGI # 2, Category LB or GC-LB.
Hood LatchAssembly,Secondary Latch,Pivots, SpringAnchor andRelease Pawl
Lubriplate� Lubricant Aerosol(GM Part No. 12346293 orequivalent) or lubricant meetingrequirements of NLGI # 2,Category LB or GC-LB.
USAGE FLUID/LUBRICANT
Hood and Door Hinges
Multi -Purpose Lubricant,Superlube� (GM Part No. 12346241 or equivalent).
Rear FoldingSeat, Fuel Door Hinge,Liftgate Hinges,Power Sliding Door Cable
Multi -Purpose Lubricant,Superlube� (GM Part No. 12346241 or equivalent).
Sliding Door Track
Lubriplate� Lubricant Aerosol(GM Part No. 12346293 orequivalent) or lubricant meetingrequirements of NLGI # 2,Category LB or GC-LB.
WeatherstripConditioning
Dielectric Silicone Grease (GMPart No. 12345579 or equivalent).
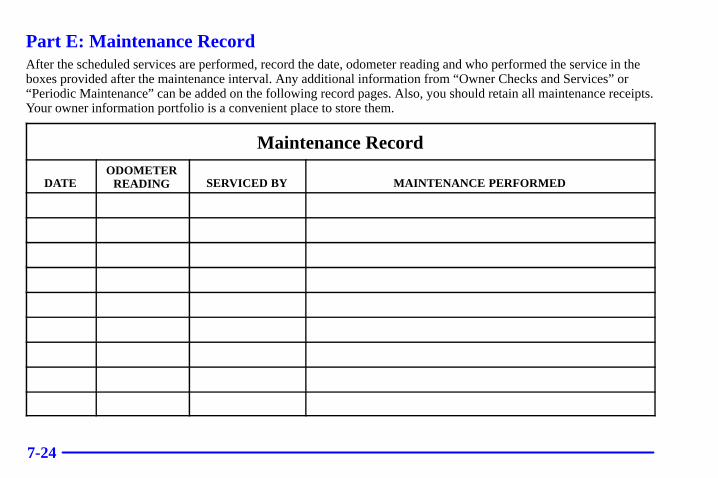
7-24
Part E: Maintenance RecordAfter the scheduled services are performed, record the date, odometer reading and who performed the service in theboxes provided after the maintenance interval. Any additional information from “Owner Checks and Services” or“Periodic Maintenance” can be added on the following record pages. Also, you should retain all maintenance receipts.Your owner information portfolio is a convenient place to store them.
Maintenance Record
DATEODOMETER
READING SERVICED BY MAINTENANCE PERFORMED
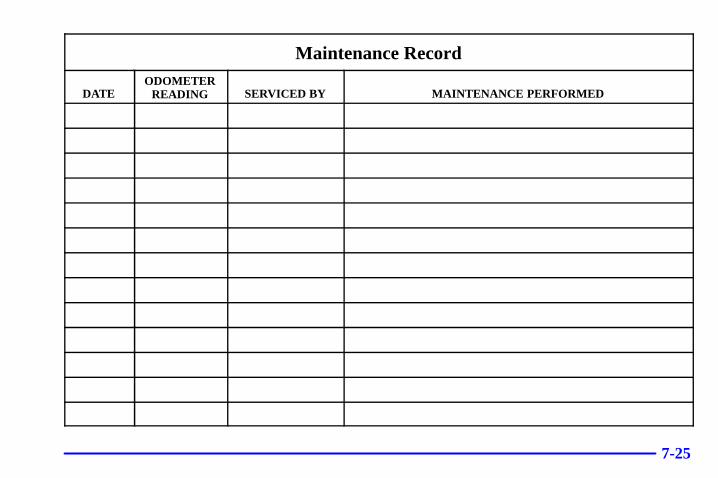
7-25
Maintenance Record
DATEODOMETER
READING SERVICED BY MAINTENANCE PERFORMED

7-26
Maintenance Record
DATEODOMETER
READING SERVICED BY MAINTENANCE PERFORMED
8-8-1
Section 8 Customer Assistance Information
Here you will find out how to contact Pontiac if you need assistance. This section also tells you how to obtain servicepublications and how to report any safety defects.
8-2 Pontiac Cares8-3 What Makes Up Pontiac Cares?8-3 Customer Satisfaction Procedure8-5 Customer Assistance for Text Telephone
(TTY) Users8-5 Customer Assistance Offices8-7 GM Mobility Program for Persons
with Disabilities8-8 Pontiac Roadside Assistance Program
8-9 Canadian Roadside Assistance8-10 Courtesy Transportation8-11 Warranty Information8-12 Reporting Safety Defects to the United
States Government8-12 Reporting Safety Defects to the
Canadian Government8-13 Reporting Safety Defects to General Motors
8-2
Pontiac Cares
With PONTIAC CARES, you are never more than a phone call away from having your concern taken care of.
The PONTIAC CARES philosophy and elements aredesigned to make you realize that Pontiac recognizesyou as a valuable customer, appreciates your purchasedecision, and is dedicated to taking care of the mostimportant person ... YOU! PONTIAC CARES is: Avaluable feature that comes with every Pontiac, a featurethat offers a multitude of benefits that can give yousafety, security, comfort and convenience.
8-3
What Makes Up Pontiac Cares?� A 3 year/36,000 mile (60 000 km)
Bumper-to-Bumper Warranty
� Customer Assistance
� Roadside Assistance
� Courtesy Transportation
All of these elements combine to make your drivingexperience an enjoyable one and are discussed in greaterdetail in your owner’s manual. Pontiac is focusing onthe changing needs of our customers and is committedto giving you an exceptional level of customer carethroughout your ownership experience. Our goal is to create total customer enthusiasm in our product andour services and make you the most satisfied customerin the world.
Customer Satisfaction Procedure
8-4
Your satisfaction and goodwill are important to yourdealer and to Pontiac. Normally, any concerns with thesales transaction or the operation of your vehicle will beresolved by your dealer’s sales or service departments.Sometimes, however, despite the best intentions of all concerned, misunderstandings can occur. If yourconcern has not been resolved to your satisfaction, the following steps should be taken:
STEP ONE -- Discuss your concern with a member ofdealership management. Normally, concerns can bequickly resolved at that level. If the matter has already been reviewed with the sales, service or partsmanager, contact the owner of the dealership or the general manager.
STEP TWO -- If after contacting a member of dealership management, it appears your concern cannot be resolved by the dealership without further help, contact the Pontiac Customer Assistance Center by calling1-800-762-2737. In Canada, contact GM of CanadaCustomer Communication Centre in Oshawa by calling1-800-263-3777 (English) or 1-800-263-7854 (French).
We encourage you to call the toll-free number in orderto give your inquiry prompt attention. Please have thefollowing information available to give the CustomerAssistance Representative:
� Vehicle Identification Number (This is availablefrom the vehicle registration or title, or the plate at the top left of the instrument panel and visiblethrough the windshield.)
� Dealership name and location
� Vehicle delivery date and present mileage
When contacting Pontiac, please remember that your concern will likely be resolved at a dealer’s facility.That is why we suggest you follow Step One first if you have a concern.
STEP THREE -- Both General Motors and your dealerare committed to making sure you are completelysatisfied with your new vehicle. However, if youcontinue to remain unsatisfied after following theprocedure outlined in Steps One and Two, you shouldfile with the GM/BBB Auto Line Program to enforceany additional rights you may have. Canadian ownersrefer to your Warranty and Owner AssistanceInformation booklet for information on the CanadianMotor Vehicle Arbitration Plan (CAMVAP).
8-5
The BBB Auto Line Program is an out of court programadministered by the Council of Better Business Bureaus to settle automotive disputes regarding vehicle repairs orthe interpretation of the New Vehicle Limited Warranty.Although you may be required to resort to this informaldispute resolution program prior to filing a court action,use of the program is free of charge and your case will generally be heard within 40 days. If you do notagree with the decision given in your case, you mayreject it and proceed with any other venue for reliefavailable to you.
You may contact the BBB using the toll-free telephonenumber or write them at the following address:
BBB Auto LineCouncil of Better Business Bureaus, Inc.4200 Wilson BoulevardSuite 800Arlington, VA 22203-1804
Telephone: 1-800-955-5100
This program is available in all 50 states and the Districtof Columbia. Eligibility is limited by vehicle age,mileage and other factors. General Motors reserves theright to change eligibility limitations and/or discontinueits participation in this program.
Customer Assistance for TextTelephone (TTY) UsersTo assist customers who are deaf, hard of hearing, orspeech-impaired and who use Text Telephones (TTYs),Pontiac has TTY equipment available at its CustomerAssistance Center. Any TTY user can communicate withPontiac by dialing: 1-800-833-PONT (7668). (TTY users in Canada can dial 1-800-263-3830.)
Customer Assistance OfficesPontiac encourages customers to call the toll-free numberfor assistance. If a U.S. customer wishes to write to Pontiac,the letter should be addressed to Pontiac’s CustomerAssistance Center.
United StatesPontiac-GMC Customer Assistance CenterP.O. Box 33172Detroit, MI 48232-51721-800-762-2737 or 1-800-833-7668 (For Text Telephone devices (TTYs))Roadside Assistance: 1-800-ROADSIDE (762-3743)From:Puerto Rico: 1-800-496-9992 (English)
1-800-496-9993 (Spanish)
U.S. Virgin Islands: 1-800-496-9994Fax Number: 313-381-0022
8-6
CanadaGeneral Motors of Canada LimitedCustomer Communication Centre, 163-0051908 Colonel Sam DriveOshawa, Ontario L1H 8P7
1-800-263-3777 (English)1-800-263-7854 (French)1-800-263-3830 (For Text Telephone devices (TTYs))Roadside Assistance: 1-800-268-6800
Mexico, Central America and CaribbeanIslands/Countries (Except Puerto Rico andU.S. Virgin Islands)
General Motors de Mexico, S. de R.L. de C.V. Customer Assistance CenterPaseo de la Reforma # 2740Col. Lomas de BezaresC.P. 11910, Mexico, D.F.
01-800-508-0000Long Distance: 011-52 - 53 29 0 800
8-7
GM Mobility Program for Personswith Disabilities
This program, available toqualified applicants, canreimburse you up to $1,000toward aftermarket driver or passenger adaptiveequipment you may requirefor your vehicle (handcontrols, wheelchair/scooterlifts, etc.).
This program can also provide you with free resourceinformation, such as area driver assessment centers andmobility equipment installers. The program is availablefor a limited period of time from the date of vehiclepurchase/lease. See your dealer for more details or callthe GM Mobility Assistance Center at 1-800-323-9935.Text telephone (TTY) users, call 1-800-833-9935.
GM of Canada also has a Mobility Program. Call1-800-GM-DRIVE (463-7483) for details. When calling from outside Canada, please dial 1-905-644-3063.All TTY users call 1-800-263-3830.
8-8
Pontiac Roadside Assistance Program
Security While You Travel1-800-ROADSIDE (1-800-762-3743)
As the proud owner of a new Pontiac vehicle, you areautomatically enrolled in the Pontiac Roadside
Assistance program. This value-added service isintended to provide you with peace of mind as you drive in the city or travel the open road.
Pontiac’s Roadside Assistance toll-free number isstaffed by a team of technically trained advisors, whoare available 24 hours a day, 365 days a year.
We take anxiety out of uncertain situations by providingminor repair information over the phone or makingarrangements to tow your vehicle to the nearest Pontiac dealer.
We will provide the following services for 3 years/36,000 miles (60 000 km), at no expense to you:
� Fuel delivery
� Lock-out service (identification required)
� Tow to nearest dealership for warranty service
� Change a flat tire
� Jump starts
8-9
We have quick, easy access to telephone numbers of thefollowing additional services depending on your needs:
� Hotels
� Glass replacement
� Tire repair facilities
� Rental vehicle or taxis
� Airports or train stations
� Police, fire department or hospitals
In many instances, mechanical failures are coveredunder Pontiac’s comprehensive warranty. However,when other services are utilized, our advisors willexplain any payment obligations you might incur.
For prompt and efficient assistance when calling, pleaseprovide the following information to give the advisor:
� Location of vehicle
� Telephone number of your location
� Vehicle model, year and color
� Mileage of vehicle
� Vehicle Identification Number (VIN)
� Vehicle license plate number
Pontiac reserves the right to limit services orreimbursement to an owner or driver when, in Pontiac’sjudgement, the claims become excessive in frequency ortype of occurrence.
While we hope you never have the occasion to use ourservice, it is added security while traveling for you andyour family. Remember, we’re only a phone call away.Pontiac Roadside Assistance -- 1-800-ROADSIDE or 1-800-762-3743, text telephone (TTY) users, call 1-888-889-2438.
Canadian Roadside AssistanceVehicles purchased in Canada have an extensiveRoadside Assistance program accessible from anywherein Canada or the United States. Please refer to theseparate brochure provided by the dealer or call1-800-268-6800 for emergency services.
8-10
Courtesy TransportationPontiac has always exemplified quality and value in itsoffering of motor vehicles. To enhance your ownershipexperience, we and our participating dealers are proud to offer Courtesy Transportation, a customer supportprogram for new vehicles.
The Courtesy Transportation program is offered to retail purchase/lease customers in conjunction with the Bumper-to-Bumper coverage provided by the New Vehicle Limited Warranty. Several transportationoptions are available when warranty repairs arerequired. This will reduce your inconvenience duringwarranty repairs.
Plan Ahead When PossibleWhen your vehicle requires warranty service, youshould contact your dealer and request an appointment.By scheduling a service appointment and advising yourservice consultant of your transportation needs, yourdealer can help minimize your inconvenience. If yourvehicle cannot be scheduled into the service departmentimmediately, keep driving it until it can be scheduled forservice, unless, of course, the problem is safety-related.If it is, please call your dealership, let them know this,and ask for instructions.
If the dealer requests that you simply drop the vehicleoff for service, you are urged to do so as early in thework day as possible to allow for same day repair.
Transportation OptionsWarranty service can generally be completed while youwait. However, if you are unable to wait Pontiac helpsminimize your inconvenience by providing severaltransportation options. Depending on the circumstances,your dealer can offer you one of the following:
Shuttle Service
Participating dealers can provide you with shuttle serviceto get you to your destination with minimal interruption ofyour daily schedule. This includes a one way shuttle rideto a destination up to 10 miles from the dealership.
Public Transportation or Fuel Reimbursement
If your vehicle requires overnight warranty repairs,reimbursement up to $30 per day (five days maximum)may be available for the use of public transportationsuch as taxi or bus. In addition, should you arrange transportation through a friend or relative,reimbursement for reasonable fuel expenses up to $10 per day (five day maximum) may be available.Claim amounts should reflect actual costs and besupported by original receipts.
8-11
Courtesy Rental Vehicle
When your vehicle is unavailable due to overnightwarranty repairs, your dealer may arrange to provideyou with a courtesy rental vehicle or reimburse you for’a rental vehicle you obtained, at actual cost, up to amaximum of $30.00 per day supported by receipts. This requires that you sign and complete a rentalagreement and meet state, local and rental vehicleprovider requirements. Requirements vary and mayinclude minimum age requirements, insurance coverage,credit card, etc. You are responsible for fuel usagecharges and may also be responsible for taxes, levies,usage fees, excessive mileage or rental usage beyond thecompletion of the repair.
Generally it is not possible to provide a like-vehicle as a courtesy rental.
Additional Program InformationCourtesy Transportation is available during theBumper-to-Bumper warranty coverage period, but it is notpart of the New Vehicle Limited Warranty. A separatebooklet entitled “Warranty and Owner AssistanceInformation” furnished with each new vehicle providesdetailed warranty coverage information.
Courtesy Transportation is available only atparticipating dealers and all program options, such asshuttle service, may not be available at every dealer.Please contact your dealer for specific information aboutavailability. All Courtesy Transportation arrangementswill be administered by appropriate dealer personnel.
Canadian Vehicles: For warranty repairs during theComplete Vehicle Coverage period of the GeneralMotors of Canada New Vehicle Limited Warranty,alternative transportation may be available under theCourtesy Transportation Program. Please consult yourdealer for details.
General Motors reserves the right to unilaterally modify,change or discontinue Courtesy Transportation at anytime and to resolve all questions of claim eligibilitypursuant to the terms and conditions described herein at its sole discretion.
Warranty InformationYour vehicle comes with a separate warranty bookletthat contains detailed warranty information.
8-12
REPORTING SAFETY DEFECTS TO THE UNITEDSTATES GOVERNMENTIf you believe that your vehicle has a defect which could cause a crash or could cause injury or death, you should immediately inform the National HighwayTraffic Safety Administration (NHTSA), in addition tonotifying General Motors.
If NHTSA receives similar complaints, it may open aninvestigation, and if it finds that a safety defect exists ina group of vehicles, it may order a recall and remedycampaign. However, NHTSA cannot become involvedin individual problems between you, your dealer orGeneral Motors.
To contact NHTSA, you may either call the Auto SafetyHotline toll-free at 1-800-424-9393 (or 366-0123 in the Washington, D.C. area) or write to:
NHTSA, U.S. Department of TransportationWashington, D.C. 20590
You can also obtain other information about motorvehicle safety from the hotline.
REPORTING SAFETY DEFECTS TO THE CANADIAN GOVERNMENTIf you live in Canada, and you believe that your vehiclehas a safety defect, you should immediately notifyTransport Canada, in addition to notifying GeneralMotors of Canada Limited. You may write to:
Transport Canada330 Sparks StreetTower COttawa, Ontario K1A 0N5

8-13
REPORTING SAFETY DEFECTSTO GENERAL MOTORSIn addition to notifying NHTSA (or Transport Canada)in a situation like this, we certainly hope you’ll notifyus. Please call us at 1–800–762-2737, or write:
Pontiac-GMC Customer Assistance CenterP.O. Box 33172Detroit, MI 48232-5172
In Canada, please call us at 1-800-263-3777 (English)or 1-800-263-7854 (French). Or, write:
General Motors of Canada LimitedCustomer Communication Centre, 163-0051908 Colonel Sam DriveOshawa, Ontario L1H 8P7

8-14
2001 PONTIAC SERVICE PUBLICATIONS ORDERING INFORMATION
The following publications covering the operation and servicing of your vehicle can be purchased by filling outthe Service Publication Order Form in this book and mailing it in with your check, money order,
or credit card information to Helm, Incorporated (address below.)
CURRENT PUBLICATIONS FOR 2001 PONTIACSERVICE MANUALSService Manuals have the diagnosis and repair informationon engines, transmission, axle, suspension, brakes,electrical, steering, body, etc.RETAIL SELL PRICE: $120.00
TRANSMISSION, TRANSAXLE, TRANSFER CASEUNIT REPAIR MANUALThis manual provides information on unit repair serviceprocedures, adjustments and specifications for the 2001 GM transmissions, transaxles and transfer cases.RETAIL SELL PRICE: $50.00
SERVICE BULLETINSService Bulletins give technical service information neededto knowledgeably service General Motors cars and trucks.Each bulletin contains instructions to assist in thediagnosis and service of your vehicle.
OWNER’S INFORMATIONOwner publications are written directly for Owners andintended to provide basic operational information about thevehicle. The owner’s manual will include the MaintenanceSchedule for all models.
In-Portfolio: Includes a Portfolio, Owner’s Manual andWarranty Booklet.RETAIL SELL PRICE: $20.00
Without Portfolio: Owner’s Manual only.RETAIL SELL PRICE: $15.00
CURRENT & PAST MODEL ORDER FORMSService Publications are available for current and pastmodel GM vehicles. To request an order form, pleasespecify year and model name of the vehicle.
PLEASE COMPLETE THE ORDER FORM SHOWN ONTHE FOLLOWING PAGE AND MAIL TO:
Helm, Incorporated � P.O. Box 07130 � Detroit, MI 48207
OR ORDER TOLL FREE: 1-800-551-4123Monday-Friday 8:00 AM – 6:00 PM Eastern Time
Visit Helm, Inc. on the World Wide Web at: www.helminc.com
For Credit Card Orders Only (VISA–MasterCard–Discover)
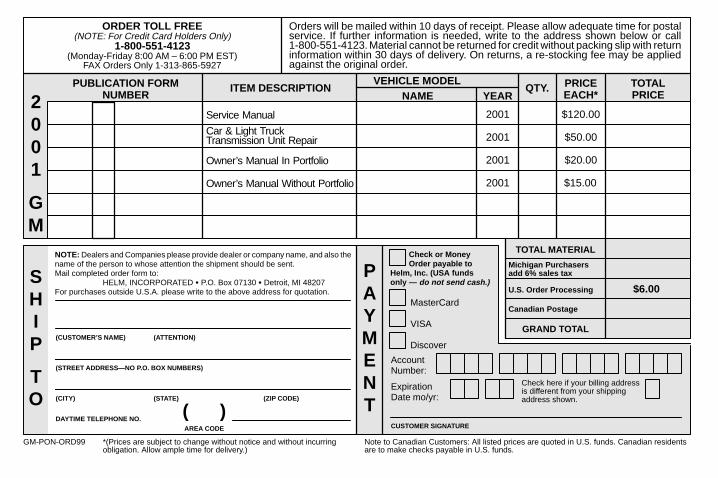
8-15
PUBLICATION FORMNUMBER
Orders will be mailed within 10 days of receipt. Please allow adequate time for postalservice. If further information is needed, write to the address shown below or call1-800-551-4123. Material cannot be returned for credit without packing slip with returninformation within 30 days of delivery. On returns, a re-stocking fee may be appliedagainst the original order.
ORDER TOLL FREE(NOTE: For Credit Card Holders Only)
1-800-551-4123(Monday-Friday 8:00 AM – 6:00 PM EST)
FAX Orders Only 1-313-865-5927
Service Manual
NOTE: Dealers and Companies please provide dealer or company name, and also thename of the person to whose attention the shipment should be sent. Mail completed order form to:
HELM, INCORPORATED � P.O. Box 07130 � Detroit, MI 48207For purchases outside U.S.A. please write to the above address for quotation.
2001 $120.00
2001 $50.00
2001 $20.00
2001 $15.00
TOTAL MATERIAL
Michigan Purchasers
U.S. Order Processing $6.00
Canadian Postage
GRAND TOTAL
add 6% sales tax
GM-PON-ORD99 *(Prices are subject to change without notice and without incurringobligation. Allow ample time for delivery.)
Note to Canadian Customers: All listed prices are quoted in U.S. funds. Canadian residentsare to make checks payable in U.S. funds.
(CUSTOMER’S NAME) (ATTENTION)
(STREET ADDRESS—NO P.O. BOX NUMBERS)
(CITY) (ZIP CODE)
DAYTIME TELEPHONE NO.
(STATE)
AREA CODE
( )
PCheck or Money Order payable to
Helm, Inc. (USA fundsonly — do not send cash.)
VISA
Discover
AccountNumber:
ExpirationDate mo/yr:
CUSTOMER SIGNATURE
S
ITEM DESCRIPTIONNAME YEAR
VEHICLE MODELQTY. PRICE
EACH*TOTALPRICE2
001
GM
HIP TO
AYMENT
Owner’s Manual Without Portfolio
Owner’s Manual In Portfolio
Car & Light TruckTransmission Unit Repair
MasterCard
Check here if your billing address is different from your shipping address shown.
PUBLICATION FORMNUMBER

8-16
✍ NOTES