Embed Size (px)
Citation preview
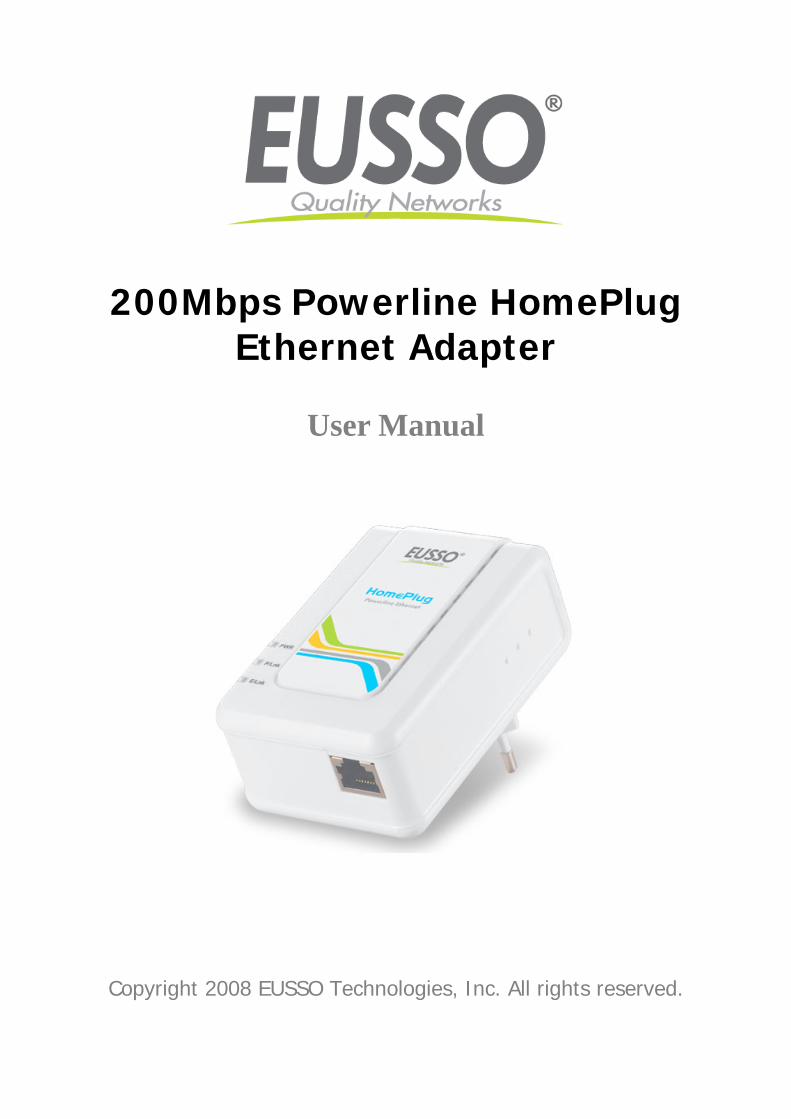
200Mbps Powerline HomePlug Ethernet Adapter
User Manual
Copyright 2008 EUSSO Technologies, Inc. All rights reserved.

About This Manual The 200Mbps Powerline HomePlug Ethernet Adapter User Manual describes how to install, configure, and troubleshoot the 200Mbps Powerline HomePlug Ethernet Adapter.
Chapter 1
Installing the 200Mbps Powerline HomePlug Ethernet Adapter This chapter describes how to set up the 200Mbps Powerline HomePlug Ethernet Adapter on your local area network (LAN) and connect to the Internet.
Package Contents The product package should contain the following items:
One or Two 200Mbps Powerline HomePlug Ethernet Adapter
200Mbps Powerline HomePlug Ethernet Adapter CD, including:
— This User Manual. — Management Utility
If any of the parts are incorrect, missing, or damaged, contact your dealer. Keep the carton, including the original packing materials, in case you need to return the 200Mbps Powerline HomePlug Ethernet Adapter for repair.
Status Lights and Label Information The 200Mbps Powerline HomePlug Ethernet Adapter has status indicators and a label with important information. Familiarize yourself with these features of your product.
Front Panel Status Lights The front panel of the 200Mbps Powerline HomePlug Ethernet Adapter contains status lights. You can use them to verify connections. The table below describes the lights on the front panel.
Status Lights on Front Panel Description
Power Off – Power Off Solid Blue – Power On
Powerline Link/ACT LED Off – No Link Solid Blue – Link Blinking Blue – Activity
Ethernet Link/ACT LED Off – No Link Solid Blue – Link Blinking Blue – Activity
How the Powerline Adapter Fits in Your Network You can use the 200Mbps Powerline HomePlug Ethernet Adapter to implement or extend an Ethernet local area network (LAN) anywhere in your house using your existing electrical power line in place of a dedicated LAN wiring infrastructure. An example is illustrated in the following diagram:
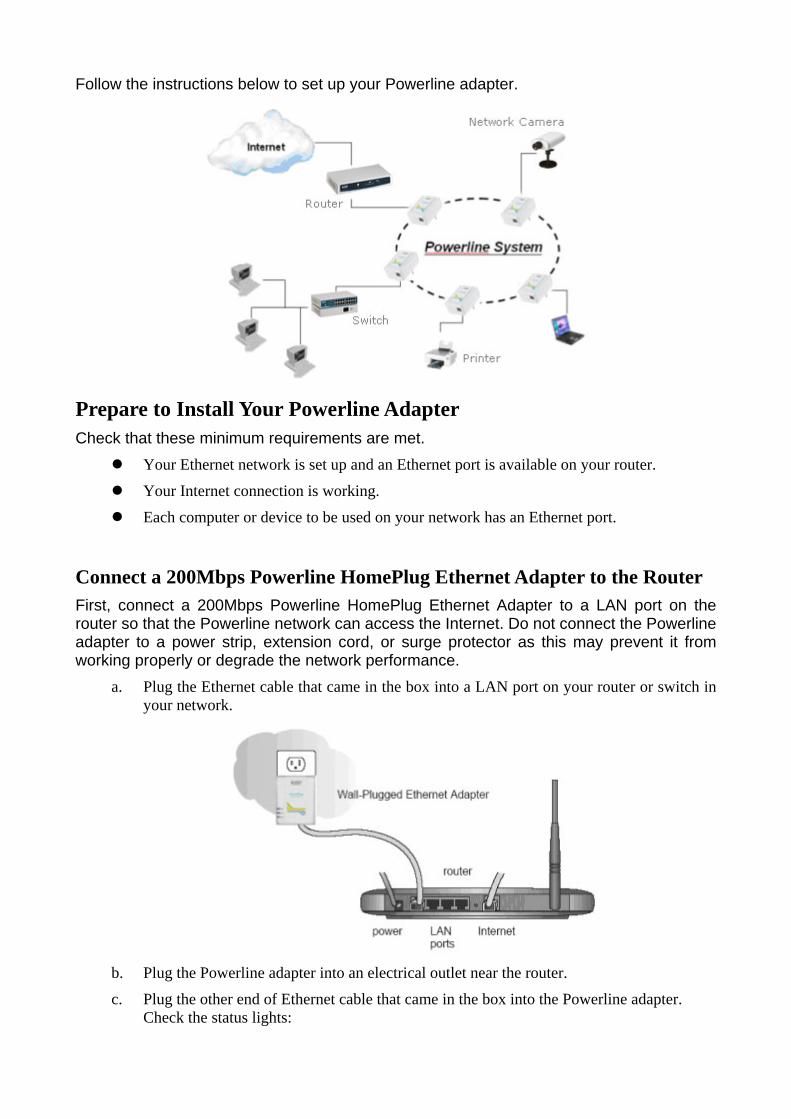
Follow the instructions below to set up your Powerline adapter.
Prepare to Install Your Powerline Adapter Check that these minimum requirements are met.
Your Ethernet network is set up and an Ethernet port is available on your router.
Your Internet connection is working.
Each computer or device to be used on your network has an Ethernet port.
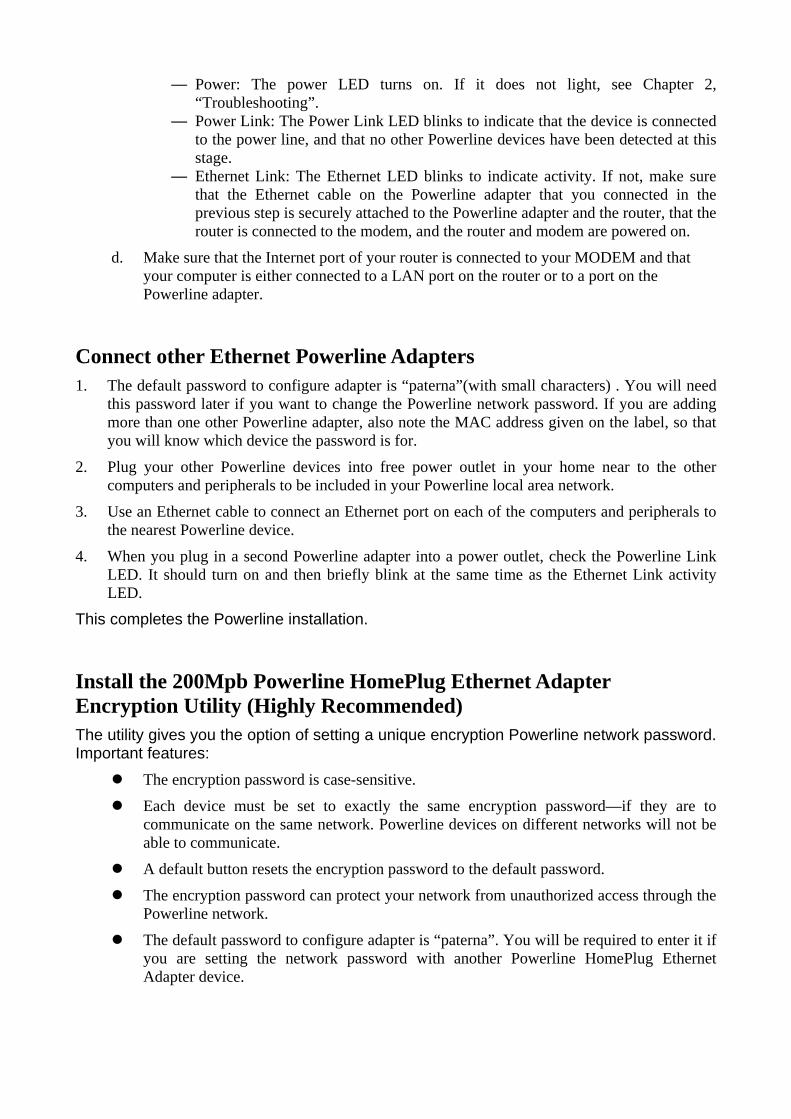
Connect a 200Mbps Powerline HomePlug Ethernet Adapter to the Router First, connect a 200Mbps Powerline HomePlug Ethernet Adapter to a LAN port on the router so that the Powerline network can access the Internet. Do not connect the Powerline adapter to a power strip, extension cord, or surge protector as this may prevent it from working properly or degrade the network performance.
a. Plug the Ethernet cable that came in the box into a LAN port on your router or switch in your network.
b. Plug the Powerline adapter into an electrical outlet near the router.
c. Plug the other end of Ethernet cable that came in the box into the Powerline adapter. Check the status lights:
— Power: The power LED turns on. If it does not light, see Chapter 2, “Troubleshooting”.
— Power Link: The Power Link LED blinks to indicate that the device is connected to the power line, and that no other Powerline devices have been detected at this stage.
— Ethernet Link: The Ethernet LED blinks to indicate activity. If not, make sure that the Ethernet cable on the Powerline adapter that you connected in the previous step is securely attached to the Powerline adapter and the router, that the router is connected to the modem, and the router and modem are powered on.
d. Make sure that the Internet port of your router is connected to your MODEM and that your computer is either connected to a LAN port on the router or to a port on the Powerline adapter.
Connect other Ethernet Powerline Adapters 1. The default password to configure adapter is “paterna”(with small characters) . You will need
this password later if you want to change the Powerline network password. If you are adding more than one other Powerline adapter, also note the MAC address given on the label, so that you will know which device the password is for.
2. Plug your other Powerline devices into free power outlet in your home near to the other computers and peripherals to be included in your Powerline local area network.
3. Use an Ethernet cable to connect an Ethernet port on each of the computers and peripherals to the nearest Powerline device.
4. When you plug in a second Powerline adapter into a power outlet, check the Powerline Link LED. It should turn on and then briefly blink at the same time as the Ethernet Link activity LED.
This completes the Powerline installation.
Install the 200Mpb Powerline HomePlug Ethernet Adapter Encryption Utility (Highly Recommended) The utility gives you the option of setting a unique encryption Powerline network password. Important features:
The encryption password is case-sensitive.
Each device must be set to exactly the same encryption password—if they are to communicate on the same network. Powerline devices on different networks will not be able to communicate.
A default button resets the encryption password to the default password.
The encryption password can protect your network from unauthorized access through the Powerline network.
The default password to configure adapter is “paterna”. You will be required to enter it if you are setting the network password with another Powerline HomePlug Ethernet Adapter device.
To install the Powerline Encryption Utility, follow these steps: 5. Insert the Powerline HomePlug Ethernet Adapter Resource CD into a CD drive on the
computer that is connected to your router. The CD starts automatically.
If the CD does not start automatically:
— Go to My Computer on the Windows Start menu, and double-click the drive that contains the 200Mbps Powerline HomePlug Ethernet Adapter Resource CD or
— Select the CD drive and click on the Autorun.exe executable file.
All devices on a Powerline network can be managed from one computer. If you add another 200Mbps Powerline HomePlug Ethernet Adapter device to an existing Powerline network, you can install the Powerline encryption utility on the computer connected locally to the new Powerline HomePlug Ethernet Adapter device or on the computer originally used to set up the Powerline network password. You can use any computer to manage the network, but this procedure assumes that you are working from the computer that is connected to your router.
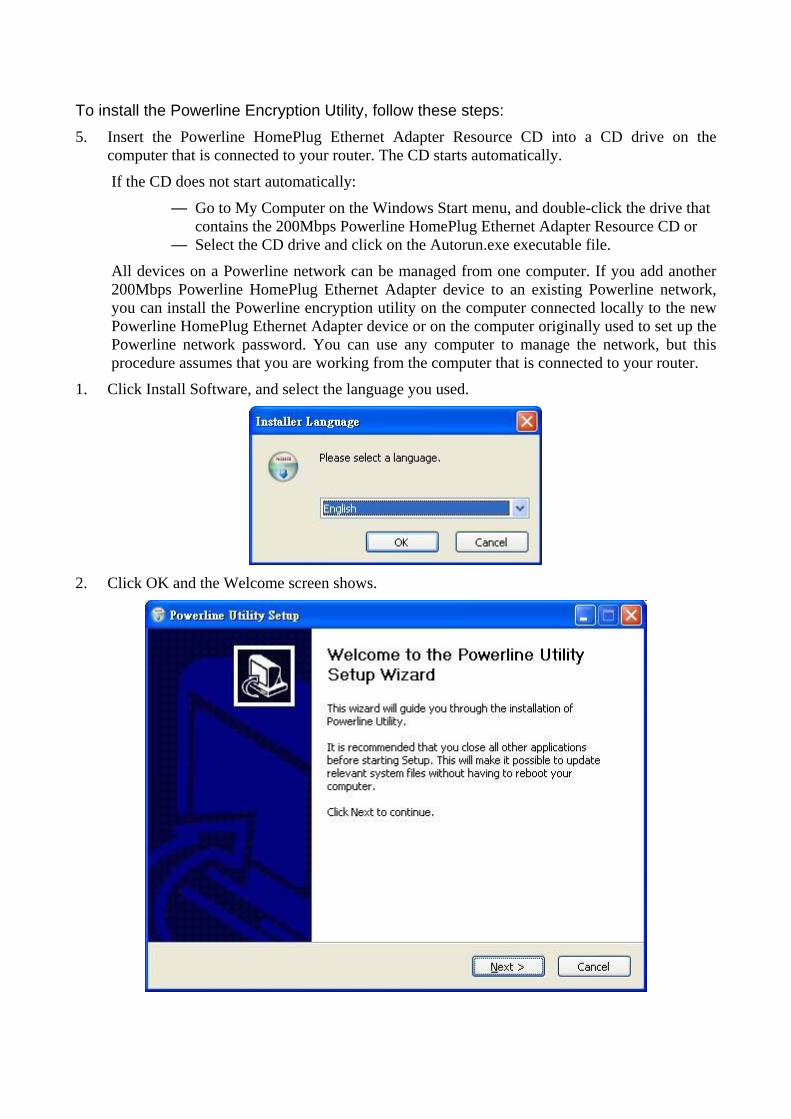
1. Click Install Software, and select the language you used.
2. Click OK and the Welcome screen shows.
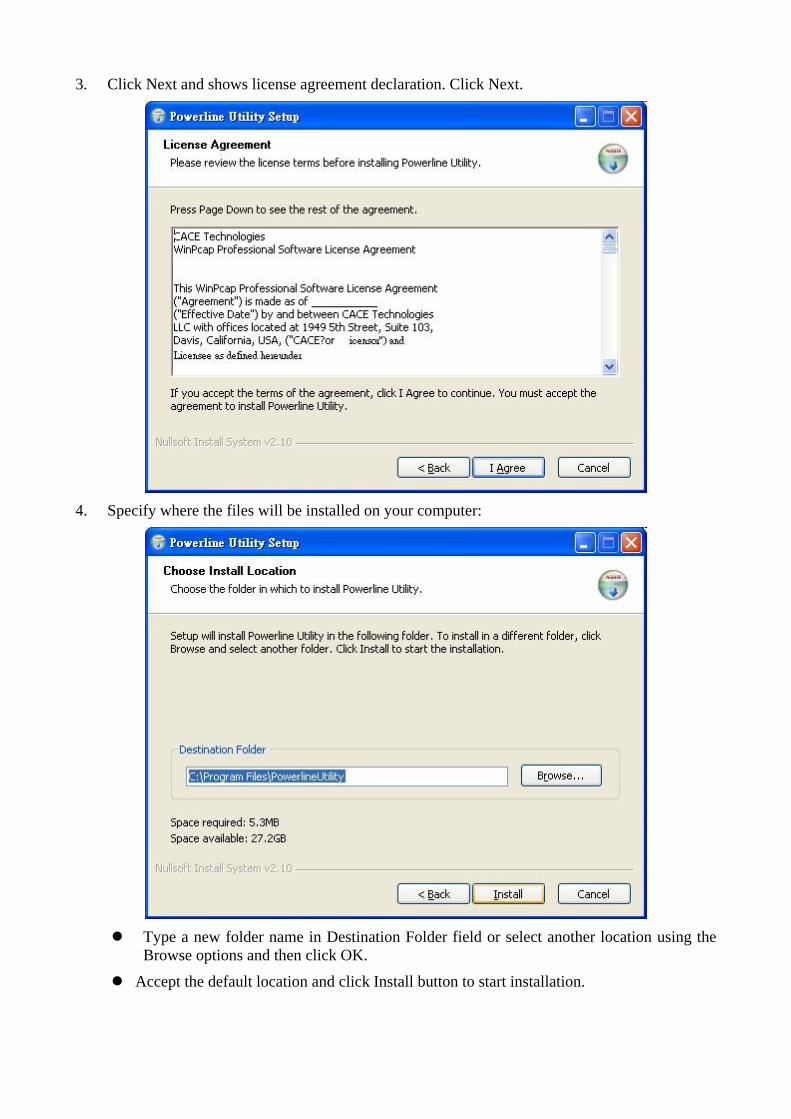
3. Click Next and shows license agreement declaration. Click Next.
4. Specify where the files will be installed on your computer:
Type a new folder name in Destination Folder field or select another location using the
Browse options and then click OK.
Accept the default location and click Install button to start installation.
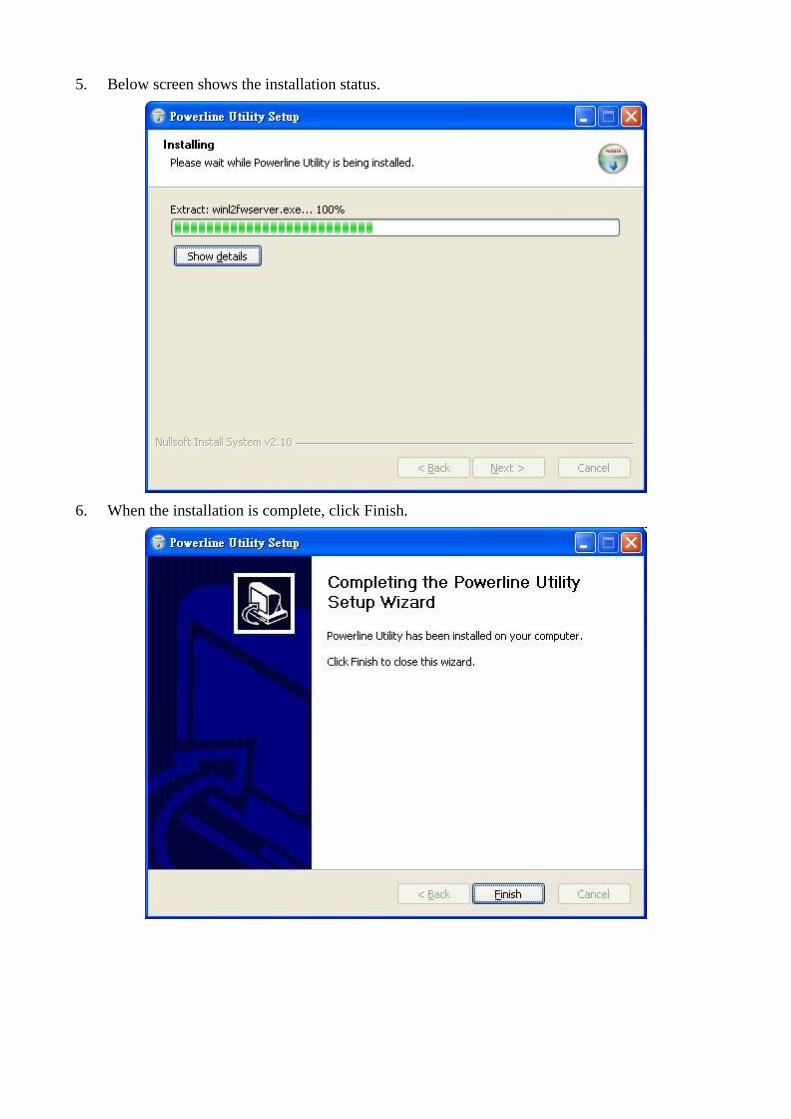
5. Below screen shows the installation status.
6. When the installation is complete, click Finish.
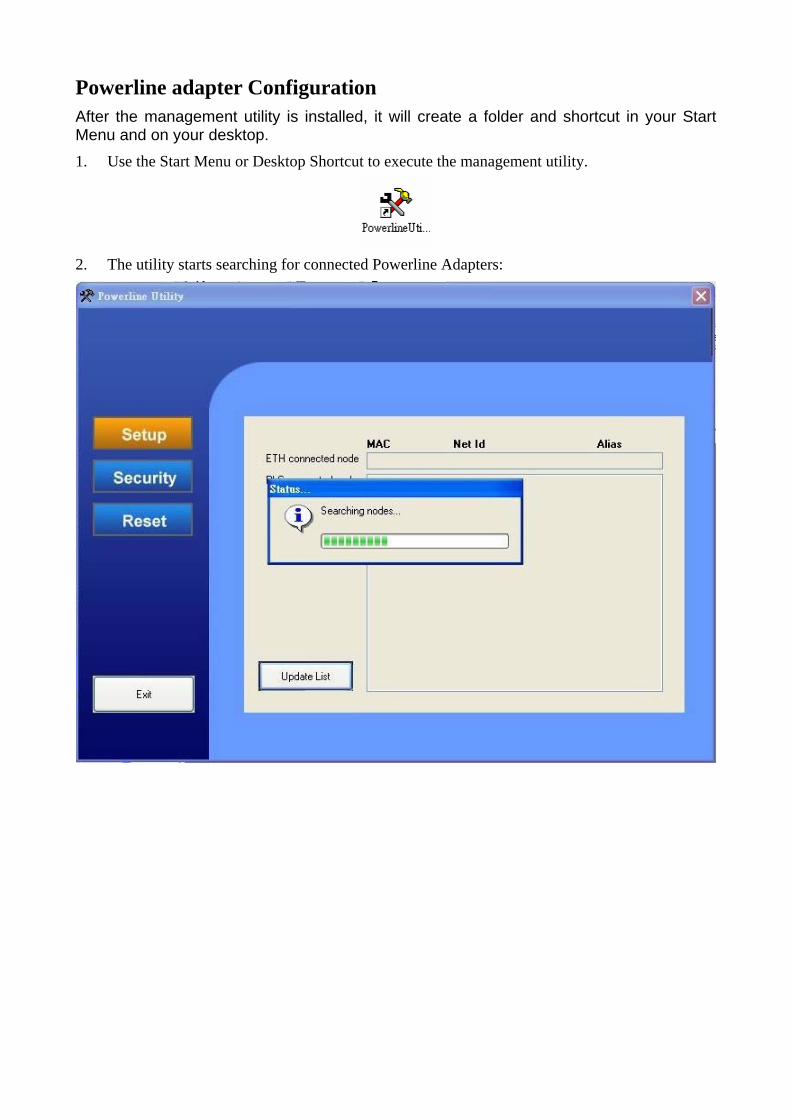
Powerline adapter Configuration After the management utility is installed, it will create a folder and shortcut in your Start Menu and on your desktop. 1. Use the Start Menu or Desktop Shortcut to execute the management utility.
2. The utility starts searching for connected Powerline Adapters:
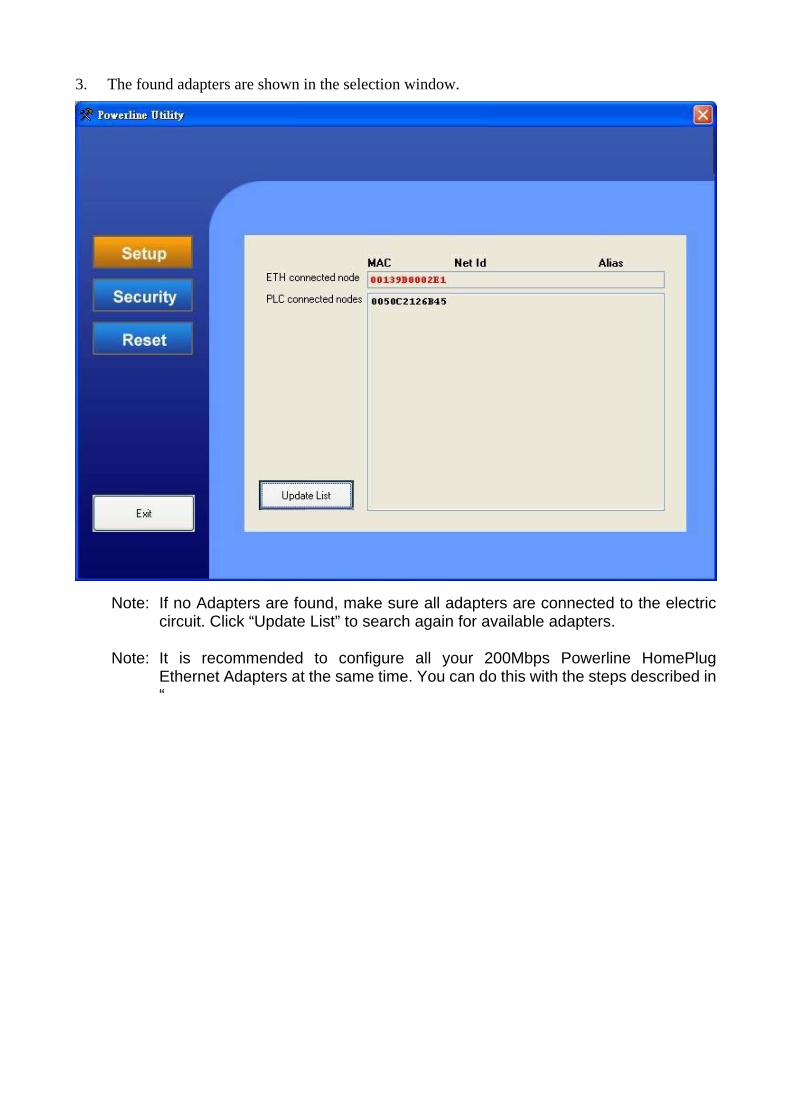
3. The found adapters are shown in the selection window.
Note: If no Adapters are found, make sure all adapters are connected to the electric circuit. Click “Update List” to search again for available adapters.
Note: It is recommended to configure all your 200Mbps Powerline HomePlug
Ethernet Adapters at the same time. You can do this with the steps described in “
Multiple adapters configuration”. If you want to configure all Adapters separately, make sure you start with the adapters in the section “Other Adapters”.
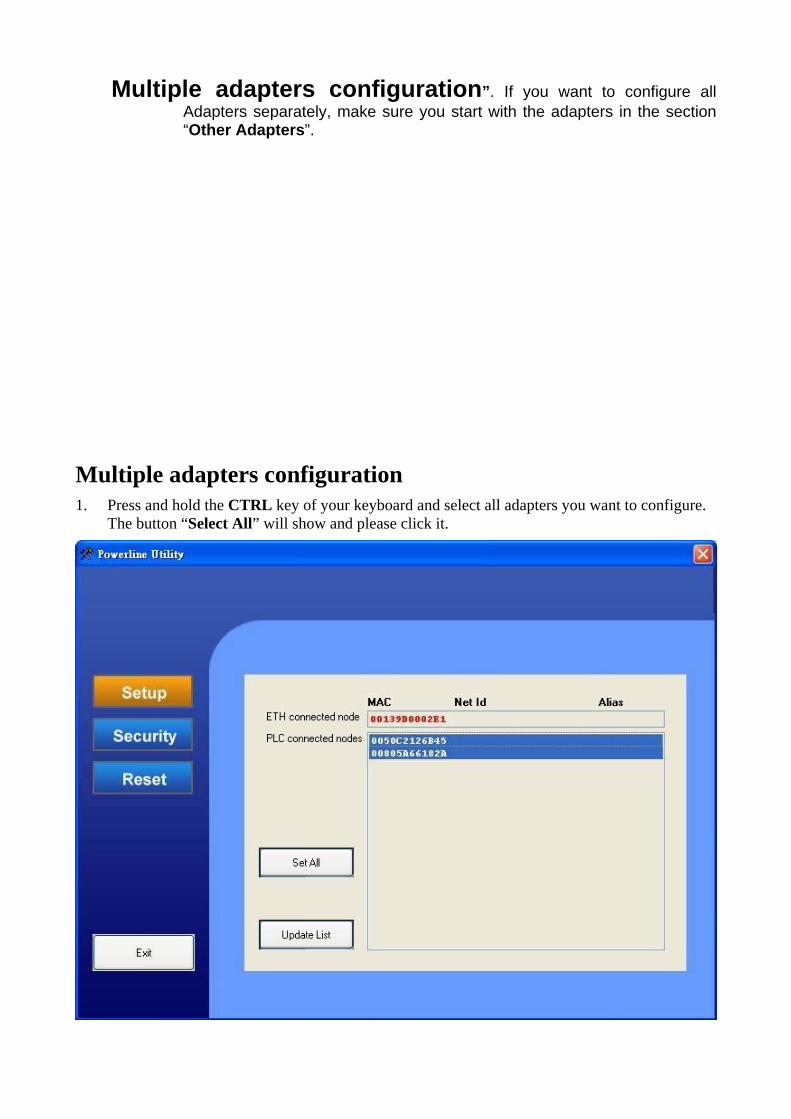
Multiple adapters configuration 1. Press and hold the CTRL key of your keyboard and select all adapters you want to configure.
The button “Select All” will show and please click it.
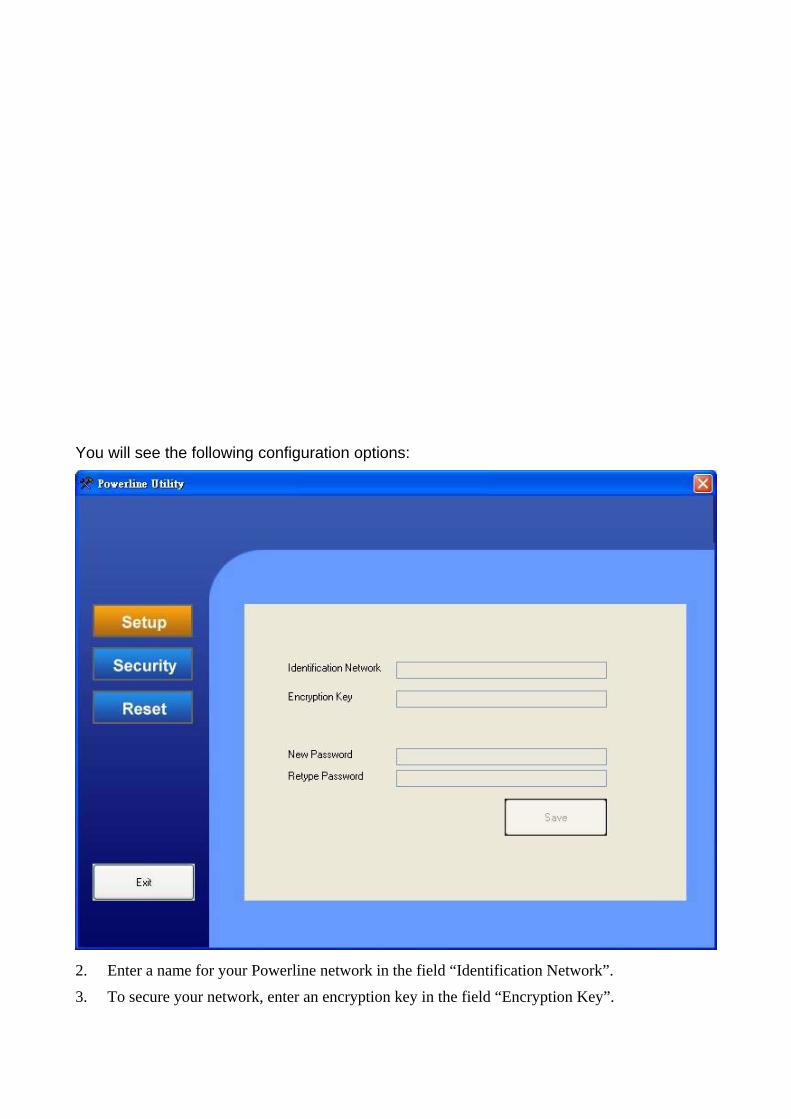
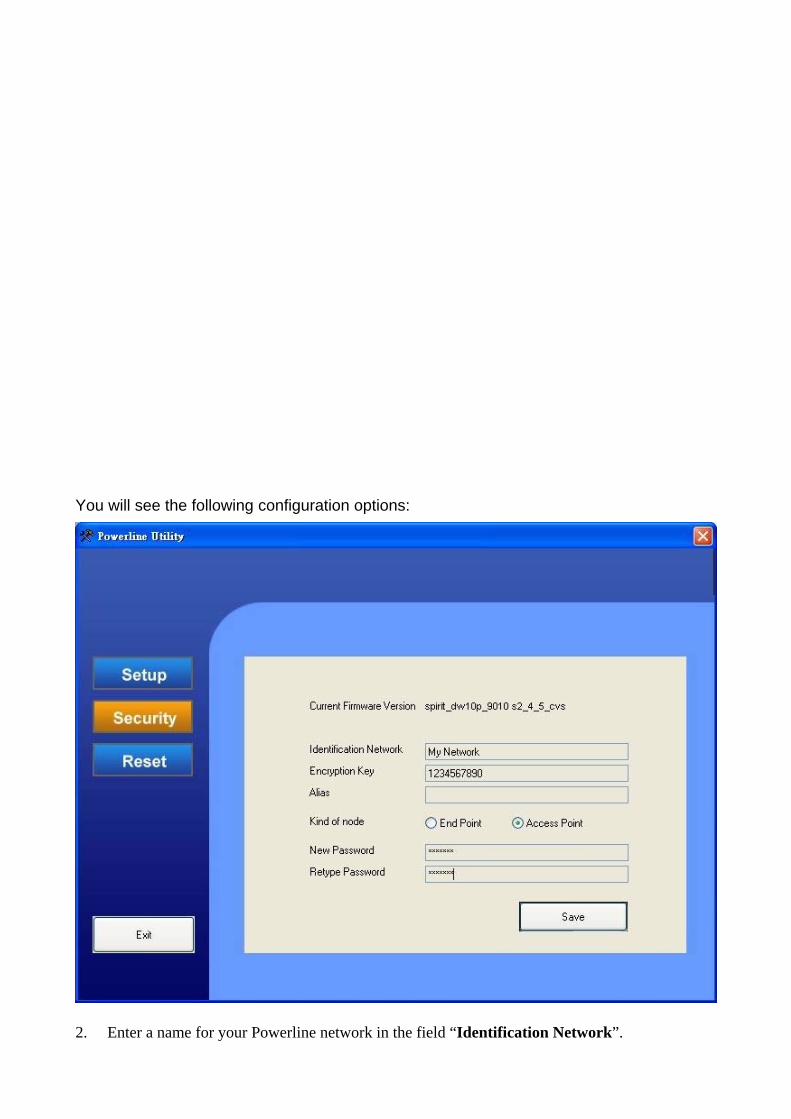
You will see the following configuration options:
2. Enter a name for your Powerline network in the field “Identification Network”.
3. To secure your network, enter an encryption key in the field “Encryption Key”.
Note: If you add more Powerline Adapters to your Powerline network later, make sure that the “Net ID” (Network name) and the “Encryption Key” are the same for all adapters. If one of these settings is different than the other configured Powerline Adapter(s), the new Powerline Adapter will not function!
4. You can secure the configuration of the Powerline Adapter. Enter a password in the field “New Password” and confirm it in the field “Confirm Password”.
Note: The 200Mbps Powerline Adapters are configured with a password by default. This password is programmed in the Adapter Configurator for easy configuration. If you change the password, the Adapter Configurator will ask you for the password when you try to configure it. The default configured password is: “paterna” (with small characters).
5. Click “Save” to apply the settings to the selected Powerline Adapter.
The Powerline Configurator will save the settings to the selected Powerline Adapters. You will be notified when the configuration is saved: 6. Click “OK” to close the notification window. The Powerline Configurator will return to the
selection window.
7. Click “Exit” to close the Powerline Configurator.
When all Powerline Adapters are configured, your Powerline network is ready for use.
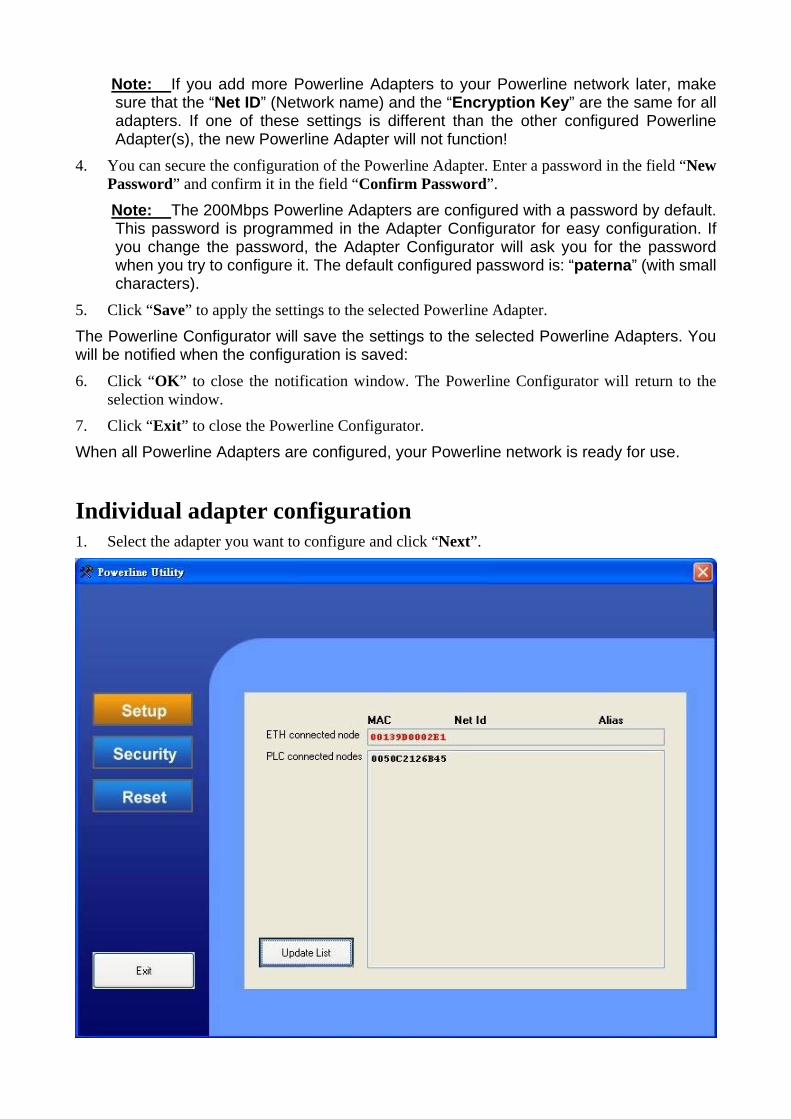
Individual adapter configuration 1. Select the adapter you want to configure and click “Next”.
You will see the following configuration options:
2. Enter a name for your Powerline network in the field “Identification Network”.
3. To secure your network, enter an encryption key in the field “Encryption Key”.
Note: When you configure all Powerline Adapters separately, make sure that the “Identification Network” (Network name) and the “Encryption Key” are the same for all adapters.
If one of these settings is different than the other configured Powerline Adapter(s), the Powerline network will not function! 4. Enter a name for the current Powerline Adapter in the field “Alias”.
5. Select the type of Powerline Adapter. If the Powerline Adapter you are configuring is connected to a router or other gateway device, select “Access point”. If the Powerline Adapter you are configuring is connected to a PC or other client network device on your network, select “End point”.
Note: The type “End Point” is selected by default. It is not required to change this setting, but when your Powerplug is connected to a router or other gateway device, is it advised to select “Access point” so the adapter can handle more data requests.
6. You can secure the configuration of the Powerline Adapter. Enter a password in the field “New Password” and confirm it in the field “Confirm Password”.
Note: The Powerline Adapters are configured with a password by default. This password is programmed in the Powerline Configurator for easy configuration. If you change the password, the Powerline Configurator will ask you for the password when you try to configure it. The default configured password is: “paterna” (with small characters).
7. Click “Save” to apply the settings to the selected Powerline Adapter.
When all Powerline Adapters are configured, your Powerline network is ready for use.
5.3 Factory Reset You can set the Powerline Adapters back to the factory default settings if required. The option “Factory Reset” is protected with a password. The password for a factory reset is: “betera”, with small characters. (This password cannot be changed!) 1. Start the Powerline Configurator with the Desktop shortcut or through the Start Menu. The
main program window will appear.
2. Click “Next” to start searching for connected Powerline Adapters.
3. Select “Reset” to show below screen.
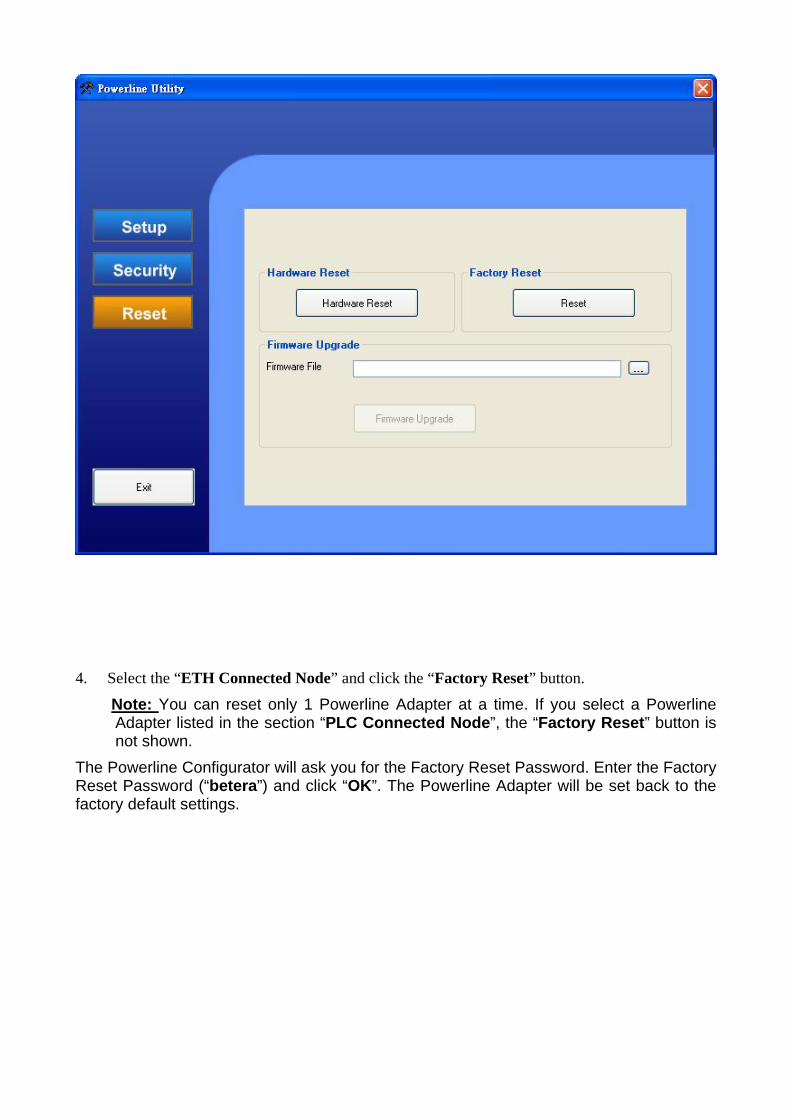
4. Select the “ETH Connected Node” and click the “Factory Reset” button.
Note: You can reset only 1 Powerline Adapter at a time. If you select a Powerline Adapter listed in the section “PLC Connected Node”, the “Factory Reset” button is not shown.
The Powerline Configurator will ask you for the Factory Reset Password. Enter the Factory Reset Password (“betera”) and click “OK”. The Powerline Adapter will be set back to the factory default settings.
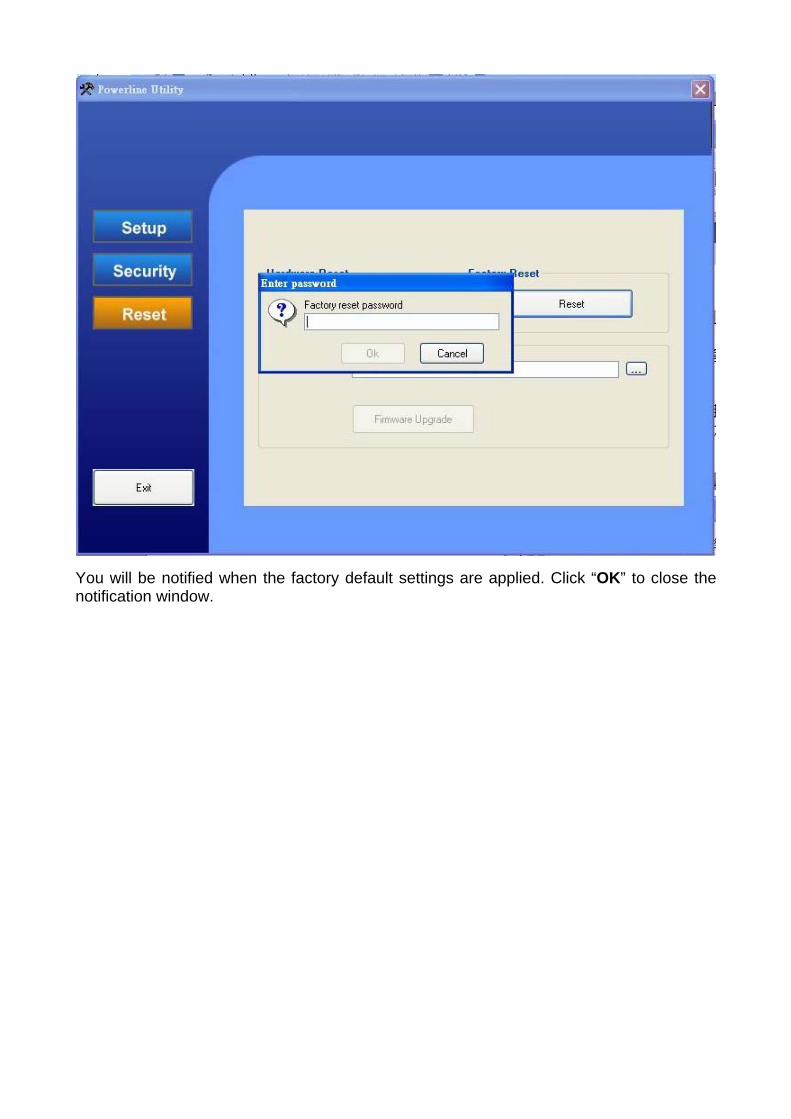
You will be notified when the factory default settings are applied. Click “OK” to close the notification window.
Chapter 2 Troubleshooting This chapter gives information about troubleshooting your 200Mbps Powerline HomePlug Ethernet Adapter. After each problem description, instructions are provided to help you diagnose and solve the problem.
Basic Functioning After you plug in the Powerline adapter, the following sequence of events should occur: 1. When power is first applied, verify that the Power light is on.
2. After approximately 10 seconds, check the LEDs on the Powerline adapter. The following should occur:
e. The power LED is solid green.
a. The Power Link LED is lit.
b. The Ethernet LED blinks.
If any of these conditions does not occur, refer to the appropriate following section. Power Light Not On
Make sure that, if power to the AC power outlet is controlled by a wall switch, the wall switch is in the on position.
Verify that the wall socket is live. To do this, disconnect the Powerline adapter and plug in another electrical product, such as a lamp or a hairdryer.
If the Power LED still does not come on, and you have confirmed the power outlet is live, you have a hardware problem and should contact technical support.
Power Link Light Not On
If the power light is on but the Power Link light is not, check the following:
— Make sure that power is being provided to more than one Powerline device. Another Powerline device must be installed for successful communication across the Powerline.
— Verify that the network password is the same on all devices in the Powerline network.
Ethernet Light is Off
— Make sure that the Ethernet cable is plugged in properly at both ends. — Be sure that you are using the correct cable on the router that the first Powerline
adapter is connected to. When connecting the router’s Internet port to a cable or DSL modem, use the cable that was supplied with the cable or DSL modem. This cable could be a standard straight-through Ethernet cable or an Ethernet crossover cable.
— On the attached Ethernet device or network adapter card, check that the Link light is on.