Embed Size (px)
Citation preview
201Navigation Manual
(Unlinked)
This document does not contain hyperlinks and may be formatted for printing instead ofweb use. This is due to changes in content and specifications of the vehicle that happenthroughout the model year. This manual will be replaced with a hyperlinked version at theend of the model year.
© 2012Honda Motor Co., Ltd. P/N 00X31-TK8-8200
3 Odyssey
The information and specifications included in this publication were in effect at the time of approval for printing. Honda Motor Co., Ltd., reserves the right, however, to discontinue or change specifications or design at any time without notice and without incurring any obligation.
Accessories Precautions
The GPS antenna is located in the dashboard. Metallic front or side window tinting can seriously degrade or obstruct GPS reception.
Signal noise from devices such as radar detectors, vehicle tracking devices, remote starters, and additional amplifiers can disrupt the navigation system. If you install any such item, install it away from the navigation display and antenna.
Important Safety Information
Avoid focusing on the screen or manually operating the system controls while driving.
Enter information before you begin driving or when stopped. As you drive, listen to the audible instructions and use voice commands when possible. Pull to the side of the road if you need more time to look at the screen or operate the controls.
Route guidance may conflict with street closures, road construction, detours, and out-of-date map data.
The system itself may also have limitations. Verify route information by carefully observing roads, signs, and signals. Always use your own judgment and obey traffic laws.2 System Limitations P. 234
NOTICE
Clean the screen with a soft, damp cloth. You may use a mild cleaner intended for use on navigation screens.
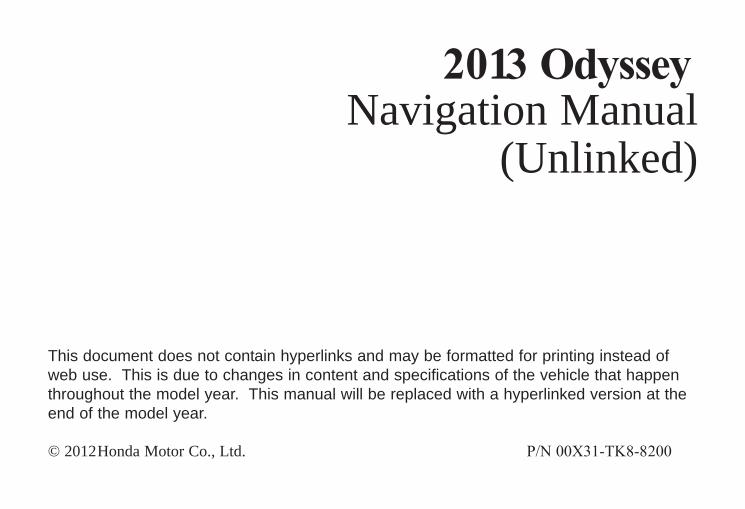
Using the navigation system while driving can take yourattention away from the road, causing a crash in which youcould be seriously injured or killed.
Only operate system controls when the conditions permit you to safely do so.
WARNING

Contents
7
6
15
Quick Reference Guide P.2
System Setup P.19
Navigation P.67
Audio P.129
Bluetooth® HandsFreeLink® P.169
Rear Entertainment System P.189
Other Features P.209
Troubleshooting P.219
Reference Information P.231
Voice Commands P.245
Index P.261
Playing Bluetooth® Audio 164 Adjusting the Sound 166 Audio Remote Controls 167
2 Bluetooth® HandsFreeLink® P. 169Bluetooth® HandsFreeLink® 170
Pairing a Phone 172 Importing Phonebook Data 177
Setting Up Speed Dialing 178
Editing User Name and PIN 180
Making a Call 182 Receiving a Call 185 HFL Menus 186
2 Rear Entertainment System P. 189Rear Entertainment System 190
Rear Control Panel Operation 192
Front Control Panel Operation 203
Wireless Headphones 20
2 Other Features P. 209Trip Computer 210 Calendar 211 Calculator 213 Information Functions 2Multi-view Rear Camera 217
2 Troubleshooting P. 219Troubleshooting 220 Error Messages 227
2 Reference Information P. 231System Initialization 232 System Limitations 234 Client Assistance 236 Legal Information 239
2 Voice Commands P. 245Voice Commands 246
2 System Setup P. 19Start-up 20 Voice Control System 22 Interface Settings 24 Personal Information 3Music Search 45 Routing & Guidance 49 Clock Adjustment 58 Vehicle 61Data Reset 64
2 Navigation P. 67Entering a Destination 68 Calculating the Route 90 Driving to Your Destination 93 Map Menu 98Changing Your Route 116 Changing Your Destination 123 Resuming Your Trip 127
2 Audio P. 129Audio System 130 Playing FM/AM Radio 132 Playing XM® Radio 136 Playing a Disc 141Playing Hard Disc Drive (HDD) Audio 145
Playing an iPod® 155 Searching for Music Using Song By Voice™ (SBV) 159
Playing a USB Flash Drive 160
Qu
ick Referen
ce Gu
ide
2
l or the Interface Dial. The navigation
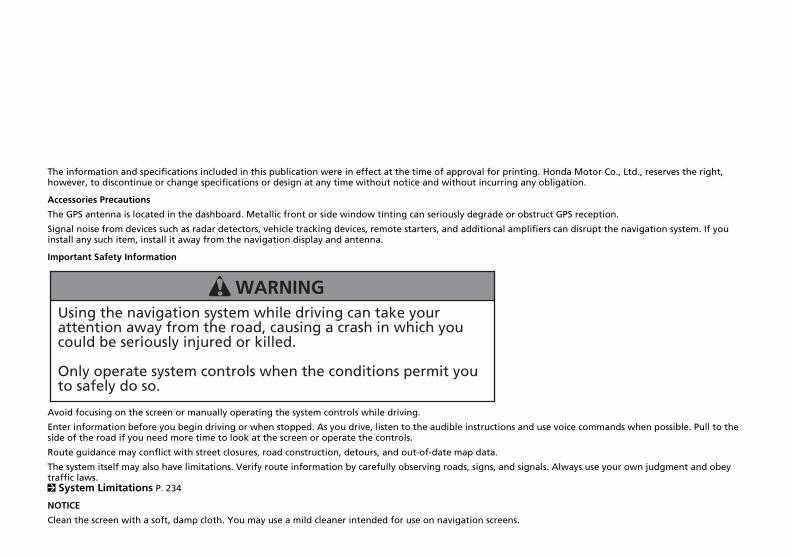
Overview—Functions at a GlanceNavigation You can select any place/landmark as a destination by using voice contro
system gives you turn-by-turn driving directions to your destination.
Store home addresses (P42)
Register 2 home addresses.
Store contacts (P38)
Store up to 200 contacts in 2 address books.
Enter destination (P68)
Select your destination using 12 methods.
Select route (P92)
Set route preferences and select one of 3 routes.
Track route (P93)
Follow your route in real-time with voice guidance.
FM Traffic (P114)
View and avoid congestion and traffic incidents.
Avoid certain areas (P117)
Set streets and areas to detour around.
Add waypoints (P118)
Add up to 4 “pit stops” along your route.
3
Qu
ick Referen
ce Gu
ide
ing.
s the most of your music.
(P155)
ash Drive (P160)
oth® Audio (P164)
ent source than front
g. You can operate all key functions of climate control systems.
170)
ke outgoing calls. You can operate the wheel.
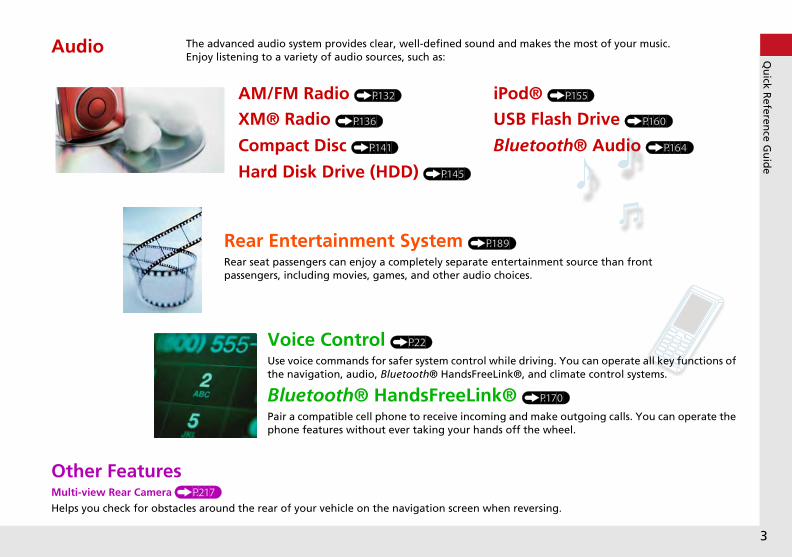
Other FeaturesMulti-view Rear Camera (P217)
Helps you check for obstacles around the rear of your vehicle on the navigation screen when revers
Audio The advanced audio system provides clear, well-defined sound and makeEnjoy listening to a variety of audio sources, such as:
AM/FM Radio (P132)
XM® Radio (P136)
Compact Disc (P141)
iPod®
USB Fl
Blueto
Hard Disk Drive (HDD) (P145)
Rear Entertainment System (P189)
Rear seat passengers can enjoy a completely separate entertainmpassengers, including movies, games, and other audio choices.
Voice Control (P22)
Use voice commands for safer system control while drivinthe navigation, audio, Bluetooth® HandsFreeLink®, and
Bluetooth® HandsFreeLink® (P
Pair a compatible cell phone to receive incoming and maphone features without ever taking your hands off the
4
Qu
ick Referen
ce Gu
ide
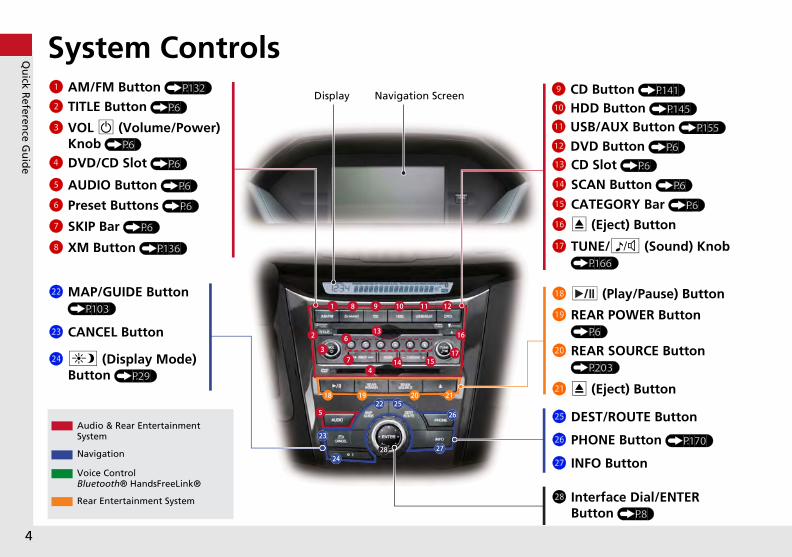
la HDD Button (P145)
lc DVD Button (P6)
lj REAR POWER Button (P6)
lf CATEGORY Bar (P6)
lb USB/AUX Button (P155)
lh TUNE/8 (Sound) Knob (P166)
li (Play/Pause) Button
mi Interface Dial/ENTER Button (P8)
lg E (Eject) Button
9 CD Button (P141)
ma REAR SOURCE Button (P203)
ld CD Slot (P6)
le SCAN Button (P6)
mh INFO Button
mg PHONE Button (P170)
mf DEST/ROUTE Button
mb E (Eject) Button
System ControlsDisplay
1 AM/FM Button (P132)
2 TITLE Button (P6)
4 DVD/CD Slot (P6)
me a (Display Mode) Button (P29)
md CANCEL Button
Navigation Screen
Audio & Rear Entertainment System
Navigation
Voice Control Bluetooth® HandsFreeLink®
mc MAP/GUIDE Button (P103)
3 VOL 9 (Volume/Power) Knob (P6)
5 AUDIO Button (P6)
6 Preset Buttons (P6)
7 SKIP Bar (P6)
8 XM Button (P136)
Rear Entertainment System
5
Qu
ick Referen
ce Gu
ide
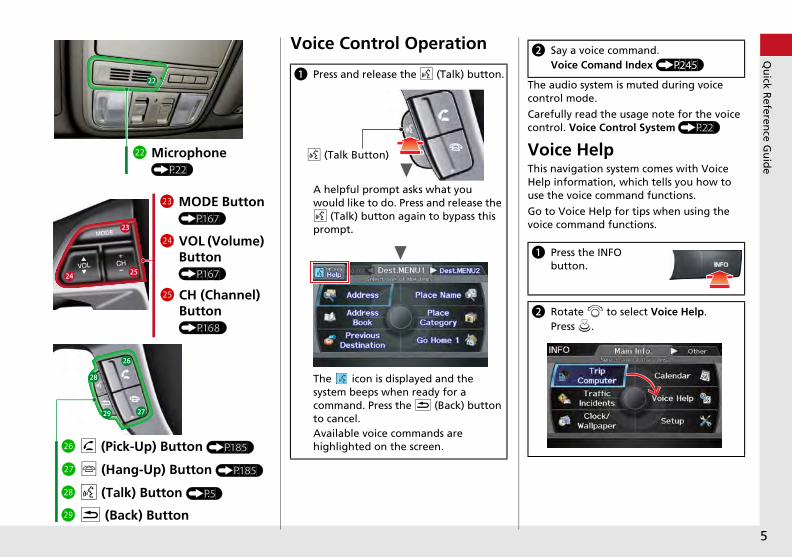
audio system is muted during voice trol mode.
efully read the usage note for the voice trol. Voice Control System (P22)
ice Helps navigation system comes with Voice p information, which tells you how to the voice command functions.
to Voice Help for tips when using the ce command functions.
Say a voice command.Voice Comand Index (P245)
Press the INFO button.
Rotate i to select Voice Help.Press u.
mj K (Back) Button
(P167)
mf CH (Channel) Button (P168)
mi d (Talk) Button (P5)
mh j (Hang-Up) Button (P185)
mg h (Pick-Up) Button (P185)
The icon is displayed and the system beeps when ready for a command. Press the K (Back) button to cancel.Available voice commands are highlighted on the screen.
b
mc Microphone (P22)
md MODE Button (P167)
me VOL (Volume) Button
Voice Control Operation
a Press and release the d (Talk) button.
A helpful prompt asks what you would like to do. Press and release the d (Talk) button again to bypass this prompt.
d (Talk Button)
Thecon
Carcon
VoThiHeluse
Govoi
b
a
6
Qu
ick Referen
ce Gu
ide
oice commands.
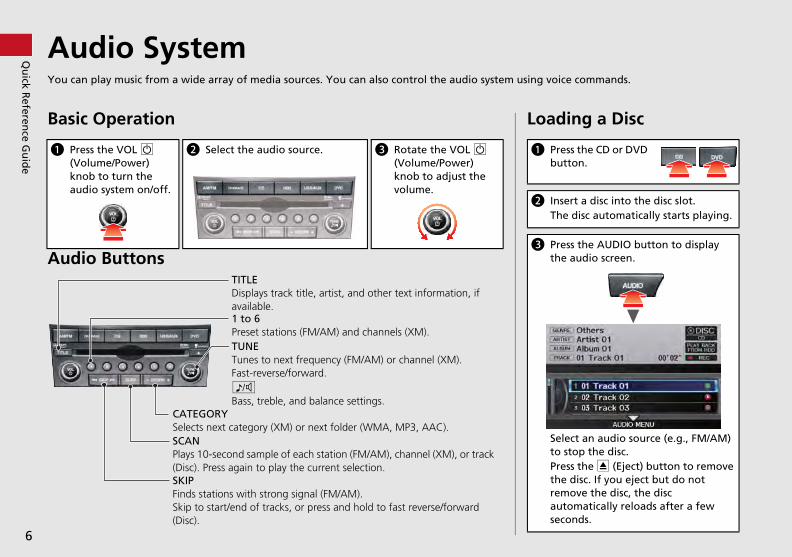
ding a Disc
Press the CD or DVD button.
Insert a disc into the disc slot.The disc automatically starts playing.
Press the AUDIO button to display the audio screen.
Select an audio source (e.g., FM/AM) to stop the disc.Press the E (Eject) button to remove the disc. If you eject but do not remove the disc, the disc automatically reloads after a few seconds.
AudioYou can play m
Basic Op
Audio Bu
a Press the (Volume/Pknob to taudio syst
TITLEDisplays track title, artist, and other text information, if available.
8Bass, treble, and balance settings.
1 to 6Preset stations (FM/AM) and channels (XM).
SKIPFinds stations with strong signal (FM/AM).Skip to start/end of tracks, or press and hold to fast reverse/forward (Disc).
SCANPlays 10-second sample of each station (FM/AM), channel (XM), or track (Disc). Press again to play the current selection.
TUNETunes to next frequency (FM/AM) or channel (XM).Fast-reverse/forward.
CATEGORYSelects next category (XM) or next folder (WMA, MP3, AAC).
Systemusic from a wide array of media sources. You can also control the audio system using v
eration
ttons
VOL 9 ower)
urn the em on/off.
b Select the audio source. c Rotate the VOL 9 (Volume/Power) knob to adjust the volume.
Loa
a
b
c
7
Qu
ick Referen
ce Gu
ide
41)
(P164)
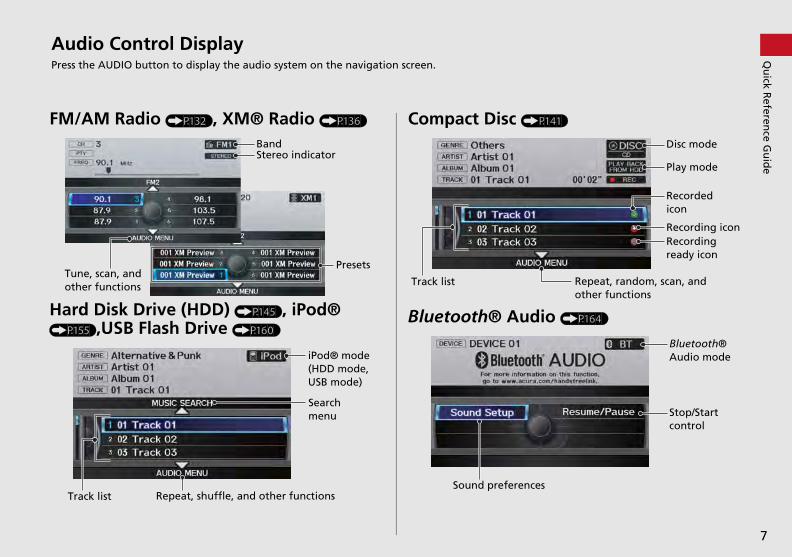
Disc mode
Play mode
Recorded icon
Recording iconRecording ready icon
Repeat, random, scan, and other functions
Bluetooth® Audio mode
Stop/Start control
Audio CPress the AUD
FM/AM R
Hard Dis(P155),US
Tune, scanother func
Track list
Search menu
Repeat, shuffle, and other functionsSound preferences
ontrol DisplayIO button to display the audio system on the navigation screen.
adio (P132), XM® Radio (P136)
k Drive (HDD) (P145), iPod® B Flash Drive (P160)
BandStereo indicator
Presets, and tions
iPod® mode (HDD mode, USB mode)
Compact Disc (P1
Bluetooth® Audio
Track list
8
Qu
ick Referen
ce Gu
ide
tion
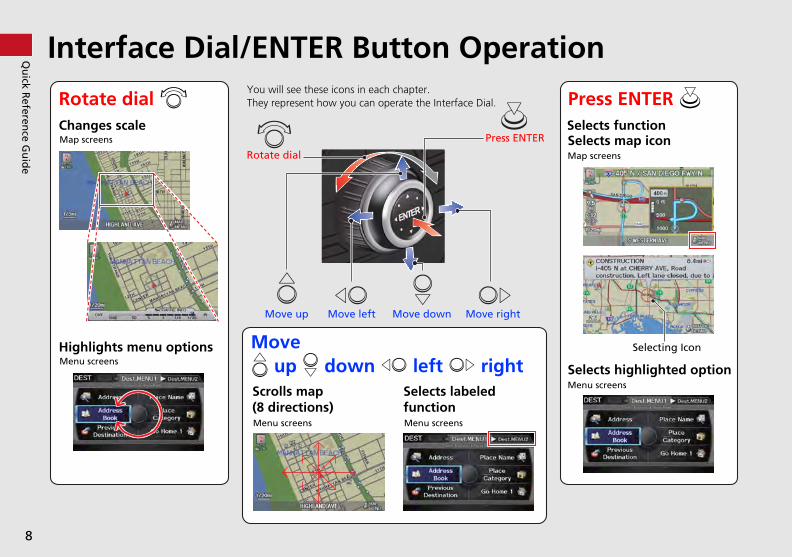
Selects functionSelects map iconMap screens
Selecting Icon
Selects highlighted optionMenu screens
Press ENTER u
Interface Dial/ENTER Button OperaYou will see these icons in each chapter.They represent how you can operate the Interface Dial.
Changes scaleMap screens
Highlights menu optionsMenu screens
Rotate dial
Press ENTER
Move up Move left Move down Move right
Scrolls map (8 directions)Menu screens
Selects labeled functionMenu screens
Rotate dial i
Move e up r down w left y right
9
Qu
ick Referen
ce Gu
ide
rising letters, numbers, and symbols)
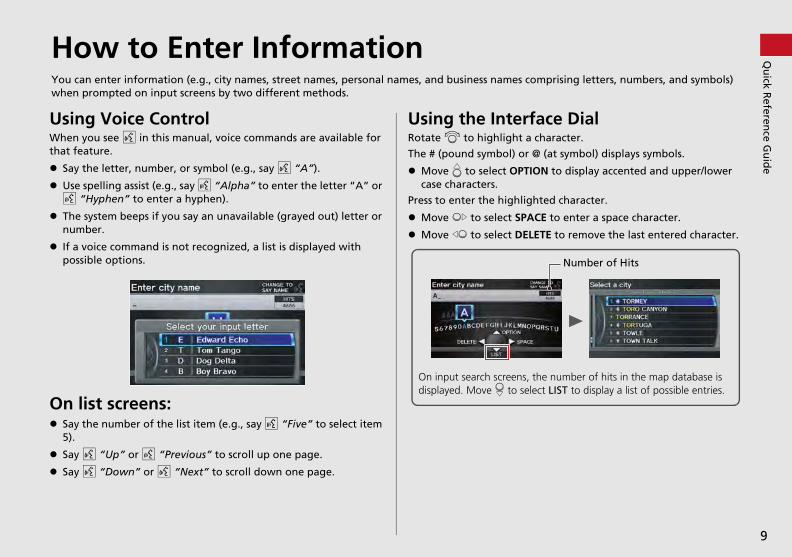
e Dialracter.
at symbol) displays symbols.
to display accented and upper/lower
d character.
to enter a space character.
to remove the last entered character.
Number of Hits
number of hits in the map database is LIST to display a list of possible entries.
HowYou can entewhen prompt
Using VoWhen you seethat feature.
Say the lett
Use spellingd “Hyphe
The systemnumber.
If a voice copossible op
On list sc Say the num
5).
Say d “Up
Say d “Do
reens:ber of the list item (e.g., say d “Five” to select item
” or d “Previous” to scroll up one page.
wn” or d “Next” to scroll down one page.
to Enter Informationr information (e.g., city names, street names, personal names, and business names comped on input screens by two different methods.
ice Control d in this manual, voice commands are available for
er, number, or symbol (e.g., say d “A”).
assist (e.g., say d “Alpha” to enter the letter “A” or n” to enter a hyphen).
beeps if you say an unavailable (grayed out) letter or
mmand is not recognized, a list is displayed with tions.
Using the InterfacRotate i to highlight a cha
The # (pound symbol) or @ (
Move e to select OPTIONcase characters.
Press to enter the highlighte
Move y to select SPACE
Move w to select DELETE
On input search screens, thedisplayed. Move r to select
10
Qu
ick Referen
ce Gu
ide
(P98)
1)
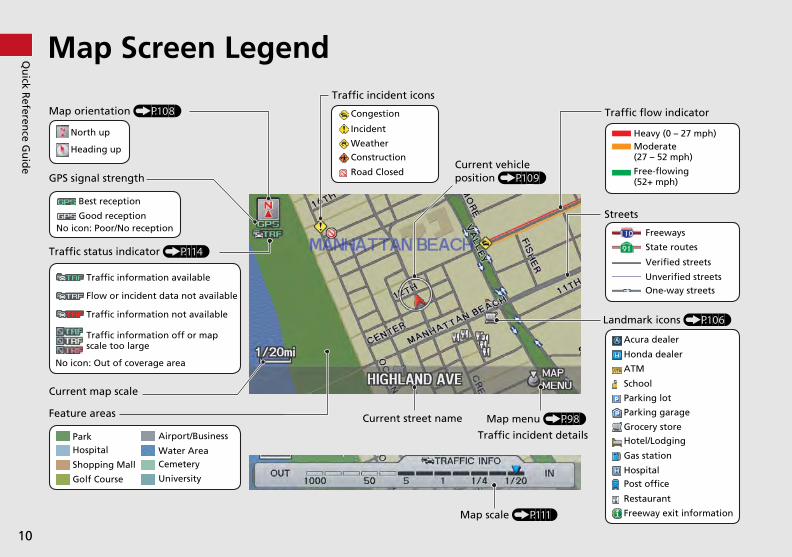
Streets
Landmark icons (P106)
Freeways
State routes
Verified streets
Unverified streetsOne-way streets
Acura dealer
Honda dealer
ATM
School
Parking lot
Parking garage
Grocery store
Hotel/Lodging
Gas station
HospitalPost office
Restaurant
Freeway exit information
Traffic flow indicator
Heavy (0 – 27 mph)Moderate(27 – 52 mph)
Free-flowing (52+ mph)
nt details
Map Screen Legend
Map orientation (P108)
GPS signal strength
North up
Heading up
Best reception
Good receptionNo icon: Poor/No reception
Traffic status indicator (P114)
Traffic information available
Flow or incident data not available
Traffic information not available
Traffic information off or map scale too large
No icon: Out of coverage area
Current street name Map menu
Map scale (P11
Current vehicle position (P109)
ParkHospital
Shopping Mall
Golf Course
Airport/Business
Water AreaCemetery
University
Feature areas
Current map scale
Traffic incident icons
Congestion
Incident
Weather
Construction
Road Closed
Traffic incide
11
Qu
ick Referen
ce Gu
ide
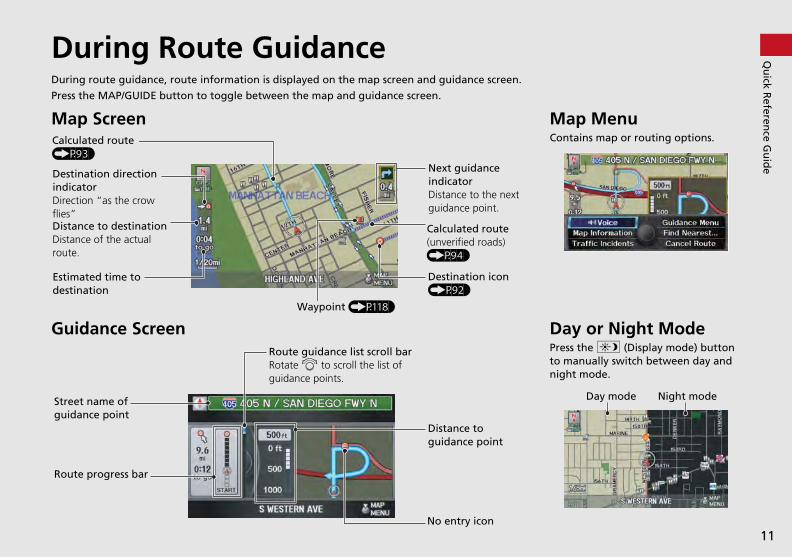
Map MenuContains map or routing options.
Day or Night ModePress the a (Display mode) button to manually switch between day and night mode.
Day mode Night mode
DurinDuring route
Press the MAP
Map Scr
Guidanc
Calculated ro(P93)
Destination dindicatorDirection “as tflies”Distance to dDistance of theroute.
Estimated timdestination
Street name guidance poi
Route progre
e Screen
e to
Waypoint (P118)
Destination icon(P92)
(P94)
of nt
Route guidance list scroll barRotate i to scroll the list of guidance points.
ss bar
Distance to guidance point
No entry icon
g Route Guidanceguidance, route information is displayed on the map screen and guidance screen.
/GUIDE button to toggle between the map and guidance screen.
eenute
irection
he crow
Next guidance indicatorDistance to the next guidance point.
estination actual
Calculated route(unverified roads)
12
Qu
ick Referen
ce Gu
ide
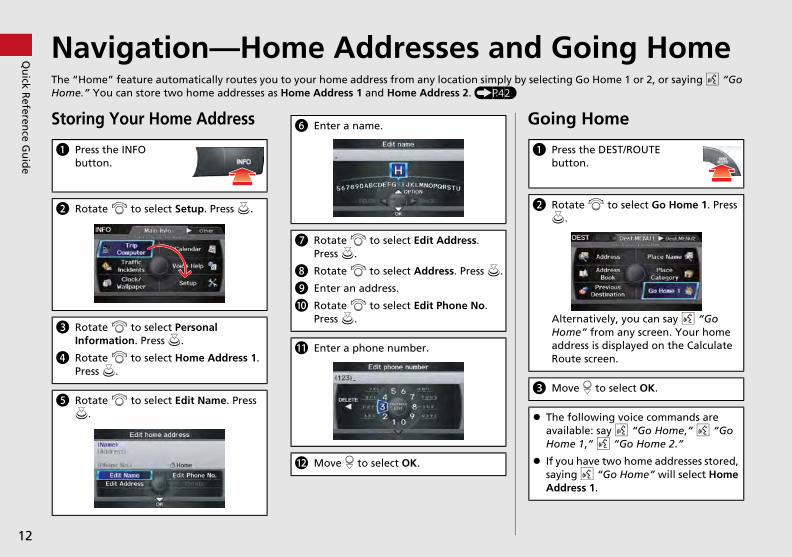
Going Homecting Go Home 1 or 2, or saying d “Go
ing Home
Press the DEST/ROUTE button.
Rotate i to select Go Home 1. Press u.
Alternatively, you can say d “Go Home” from any screen. Your home address is displayed on the Calculate Route screen.
Move r to select OK.
he following voice commands are vailable: say d “Go Home,” d “Go ome 1,” d “Go Home 2.”
f you have two home addresses stored, aying d “Go Home” will select Home ddress 1.
NaviThe “Home” Home.” You
Storing Y
a Press thebutton.
b Rotate i
c Rotate iInformat
d Rotate iPress u.
e Rotate iu.
to select Personal ion. Press u.
to select Home Address 1.
to select Edit Name. Press
h Rotate i to select Address. Press u.
i Enter an address.
j Rotate i to select Edit Phone No. Press u.
k Enter a phone number.
l Move r to select OK.
c T
aH
IsA
gation—Home Addresses and feature automatically routes you to your home address from any location simply by selecan store two home addresses as Home Address 1 and Home Address 2. (P42)
our Home Address
INFO
to select Setup. Press u.
f Enter a name.
g Rotate i to select Edit Address. Press u.
Go
a
b
13
Qu
ick Referen
ce Gu
ide
ance screen to your destination. You
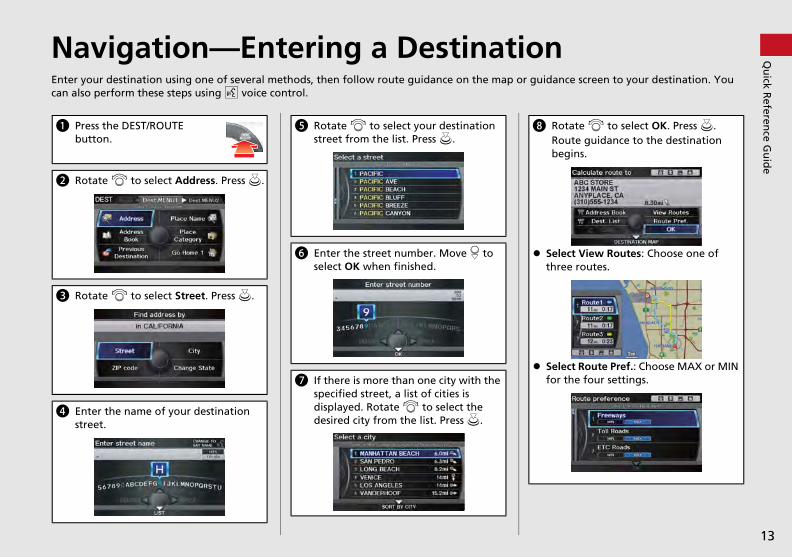
Rotate i to select OK. Press u.Route guidance to the destination begins.
elect View Routes: Choose one of hree routes.
elect Route Pref.: Choose MAX or MIN or the four settings.
NaviEnter your decan also perfo
a Press thebutton.
b Rotate i
c Rotate i
d Enter thestreet.
to select Street. Press u.
name of your destination
g If there is more than one city with the specified street, a list of cities is displayed. Rotate i to select the desired city from the list. Press u.
Sf
gation—Entering a Destinationstination using one of several methods, then follow route guidance on the map or guidrm these steps using d voice control.
DEST/ROUTE
to select Address. Press u.
e Rotate i to select your destination street from the list. Press u.
f Enter the street number. Move r to select OK when finished.
h
St
14
Qu
ick Referen
ce Gu
ide
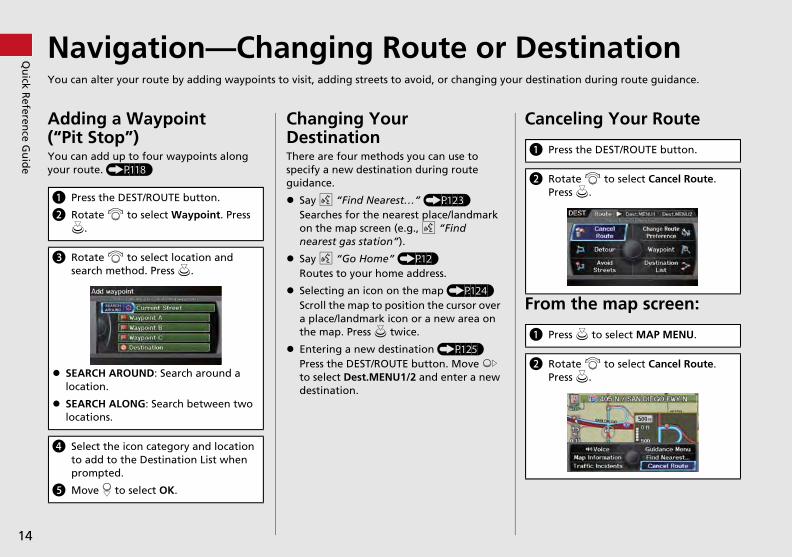
stinationnation during route guidance.
celing Your Route
m the map screen:
Press the DEST/ROUTE button.
Rotate i to select Cancel Route. Press u.
Press u to select MAP MENU.
Rotate i to select Cancel Route. Press u.
NavigYou can alter
Adding a(“Pit StopYou can add uyour route. (
a Press the
b Rotate iu.
c Rotate isearch me
SEARCH Alocation.
SEARCH Alocations.
d Select theto add toprompted
e Move r t
ROUND: Search around a
LONG: Search between two
icon category and location the Destination List when .
o select OK.
Selecting an icon on the map (P124)Scroll the map to position the cursor over a place/landmark icon or a new area on the map. Press u twice.
Entering a new destination (P125)Press the DEST/ROUTE button. Move y to select Dest.MENU1/2 and enter a new destination.
Fro
ab
ation—Changing Route or Deyour route by adding waypoints to visit, adding streets to avoid, or changing your desti
Waypoint ”)
p to four waypoints along P118)
DEST/ROUTE button.
to select Waypoint. Press
to select location and thod. Press u.
Changing Your DestinationThere are four methods you can use to specify a new destination during route guidance.
Say d “Find Nearest…” (P123)Searches for the nearest place/landmark on the map screen (e.g., d “Find nearest gas station”).
Say d “Go Home” (P12)Routes to your home address.
Can
ab
15
Qu
ick Referen
ce Gu
ide
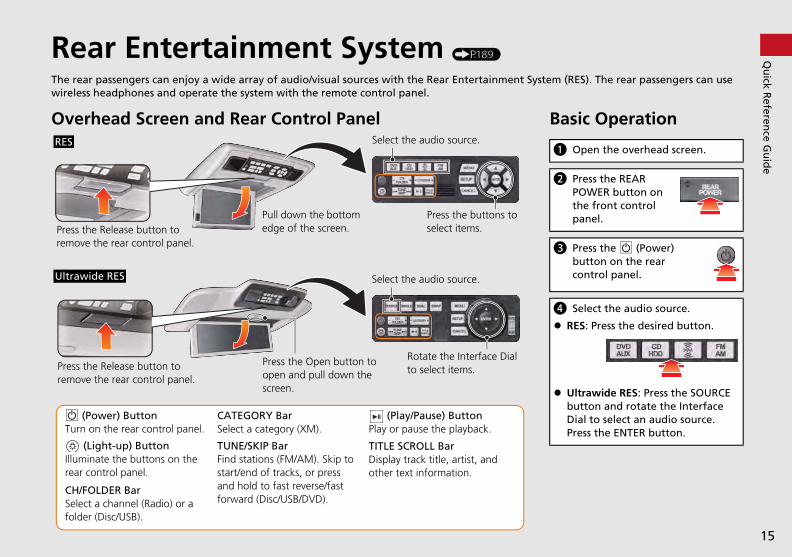
m (RES). The rear passengers can use
Basic Operation
a Open the overhead screen.
b Press the REAR POWER button on the front control panel.
c Press the 9 (Power) button on the rear control panel.
d Select the audio source.
RES: Press the desired button.
Ultrawide RES: Press the SOURCE button and rotate the Interface Dial to select an audio source. Press the ENTER button.
RearThe rear passwireless head
OverheaRES
Press the Releremove the re
(Light-uIlluminate trear control
9 (PowerTurn on the
CH/FOLDERSelect a chafolder (Disc
Ultrawide RE
Press the Releremove the re
p) Buttonhe buttons on the panel.
) Button rear control panel.
Barnnel (Radio) or a /USB).
TUNE/SKIP BarFind stations (FM/AM). Skip to start/end of tracks, or press and hold to fast reverse/fast forward (Disc/USB/DVD).
CATEGORY BarSelect a category (XM).
(Play/Pause) ButtonPlay or pause the playback.
TITLE SCROLL BarDisplay track title, artist, and other text information.
Select the audio source.
Rotate the Interface Dial to select items.
S
Press the Open button to open and pull down the screen.
ase button to ar control panel.
Entertainment System (P189)
engers can enjoy a wide array of audio/visual sources with the Rear Entertainment Systephones and operate the system with the remote control panel.
d Screen and Rear Control Panel
ase button to ar control panel.
Select the audio source.
Press the buttons to select items.
Pull down the bottom edge of the screen.
16
Qu
ick Referen
ce Gu
ide
For more Information (P219)
destination when an entered city or found?
eet first. Some cities are lumped in with . In rural “unverified” areas or new s may be missing or only partially
he navigation system voice guidance?
utton. Rotate i to select Setup and that Volume is not set to OFF.ct Other, rotate i to select Basic
ress u. Set Voice Recognition Tutor nt the system to provide confirmations pts.
connected or went dead, and the s asking for a code. Where do I find it?
with a card in the glove box that security code and serial number. You rd in a safe place outside your vehicle. If contact your dealer.
Troub
Whyshorinte
Thiswidcan
Whyincrdest
Thespeebett
Whyand
TheGPSzonturn2 C
clock setting is automatically updated based on your location. If you normally drive between two time es, the clock may keep adjusting the time. You can this feature off. lock Adjustment P. 58
navigation system i
Your vehicle comesincludes the 5-digitshould keep this cayou cannot find it,
leshooting
does the vehicle position icon on the map “lag” a t distance behind my actual position, especially at rsections?
is normal. The navigation system is unaware of the th of intersections. Large differences in vehicle position indicate a temporary loss of the GPS signal.
does the “time to destination” display sometimes ease even though I am getting closer to my ination?
“time to destination” is based on the posted road d signs and your actual road speed to give you a er estimate of arrival time.
does my clock frequently change the time forward backward by one hour?
How do I specify a street could not be
Try entering the stra major metro areasubdivisions, streetnumbered.
How do I turn on t
1. Press the INFO bpress u. Check
2. Move y to seleSettings, and pto ON if you waand system prom
My battery was dis
17
Go to the Next Page
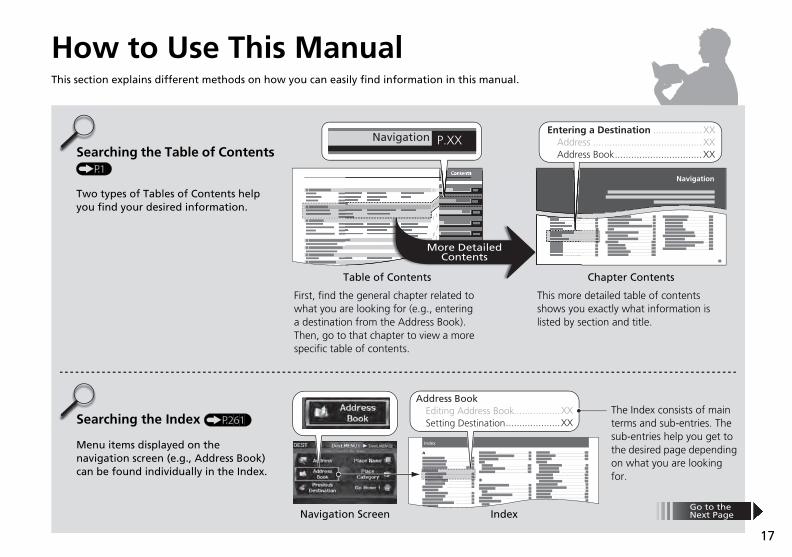
s more detailed table of contents ws you exactly what information is d by section and title.
The Index consists of main terms and sub-entries. The sub-entries help you get to the desired page depending on what you are looking for.
Chapter Contents
How to Use This ManualThis section explains different methods on how you can easily find information in this manual.
ContentsContents
More DetailedContents
Searching the Table of Contents (P1)
Two types of Tables of Contents help you find your desired information.
First, find the general chapter related to what you are looking for (e.g., entering a destination from the Address Book).Then, go to that chapter to view a more specific table of contents.
Searching the Index (P261)
Menu items displayed on the navigation screen (e.g., Address Book) can be found individually in the Index.
Thisholiste
Table of Contents
Navigation Screen Index

18
k
ct the menu option with the rface Dial.
te i to select Address Book.s u.
After following the menu tree, step-by-step instructions explain how to achieve the desired result.
DEST/ROUTE Button Address BooMenu Tree
The menu tree helps guide you through the system’s menu options.To get to your desired function, follow the menu tree in order of the steps shown.
NOTE:All menu options can also be activated with voice commands. Press the hard button on the
system control panel.
Press the DEST/ROUTE button.
SeleInte
RotaPres
* Sample pages and images in this section may differ from the actual ones.
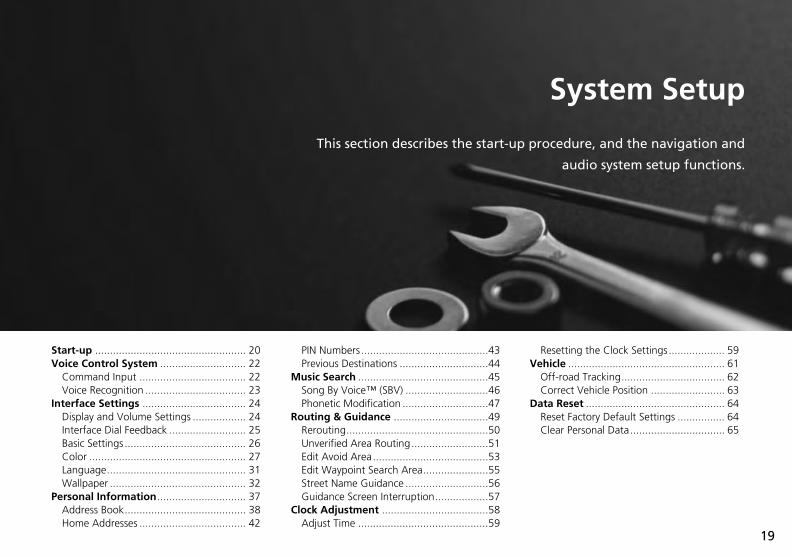
System Setup
Thi cedure, and the navigation and
audio system setup functions.
StaVoi
CV
InteDInBCLW
PerAH
PIN NumPrevious
Music SeaSong ByPhoneti
Routing &ReroutinUnverifiEdit AvoEdit WaStreet NGuidanc
Clock Adj
setting the Clock Settings................... 59cle ..................................................... 61f-road Tracking................................... 62rrect Vehicle Position ......................... 63 Reset ............................................... 64set Factory Default Settings ................ 64ear Personal Data................................ 65
rt-up ................................................... 20ce Control System ............................. 22ommand Input .................................... 22oice Recognition .................................. 23rface Settings ................................... 24isplay and Volume Settings .................. 24terface Dial Feedback .......................... 25asic Settings ......................................... 26olor ..................................................... 27anguage............................................... 31allpaper .............................................. 32
sonal Information.............................. 37ddress Book......................................... 38
19ome Addresses .................................... 42 Adjust T
ime ............................................59bers ...........................................43 Destinations ..............................44rch ............................................45 Voice™ (SBV) ............................46c Modification .............................47 Guidance ................................49g................................................50
ed Area Routing..........................51id Area.......................................53ypoint Search Area......................55ame Guidance ............................56e Screen Interruption..................57ustment ....................................58
ReVehi
OfCo
DataReCl
s section describes the start-up pro
System Setup
Start-up
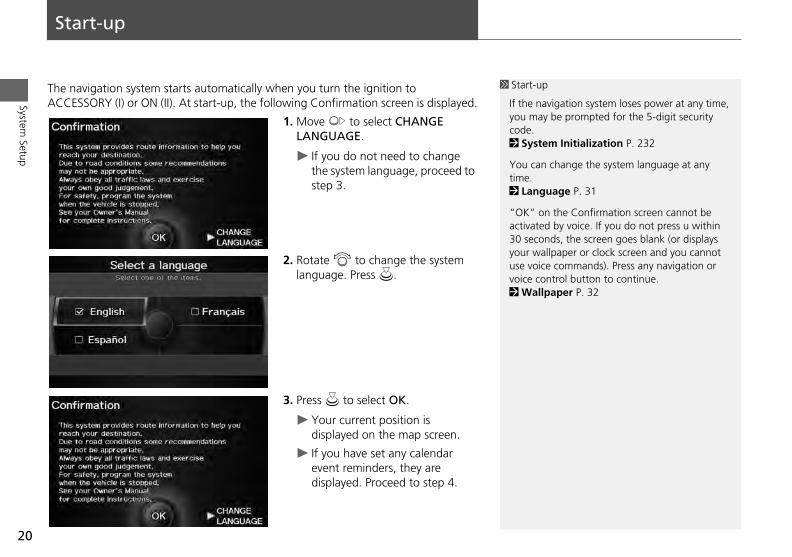
The navigation system starts automatically when you turn the ignition to ACCESSORY (I) or ON (II). At start-up, the following Confirmation screen is displayed.
1. Move y to select CHANGE LANGUAGE.
If you do not need to change the system language, proceed to step 3.
2. Rotate i to change the system language. Press u.
1 Start-up
If the navigation system loses power at any time, you may be prompted for the 5-digit security code. 2 System Initialization P. 232
You can change the system language at any time. 2 Language P. 31
“OK” on the Confirmation screen cannot be activated by voice. If you do not press u within 30 seconds, the screen goes blank (or displays your wallpaper or clock screen and you cannot use voice commands). Press any navigation or voice control button to continue.2 Wallpaper P. 32
20
3. Press u to select OK.
Your current position is displayed on the map screen.
If you have set any calendar event reminders, they are displayed. Proceed to step 4.
21
Start-upSystem
Setup
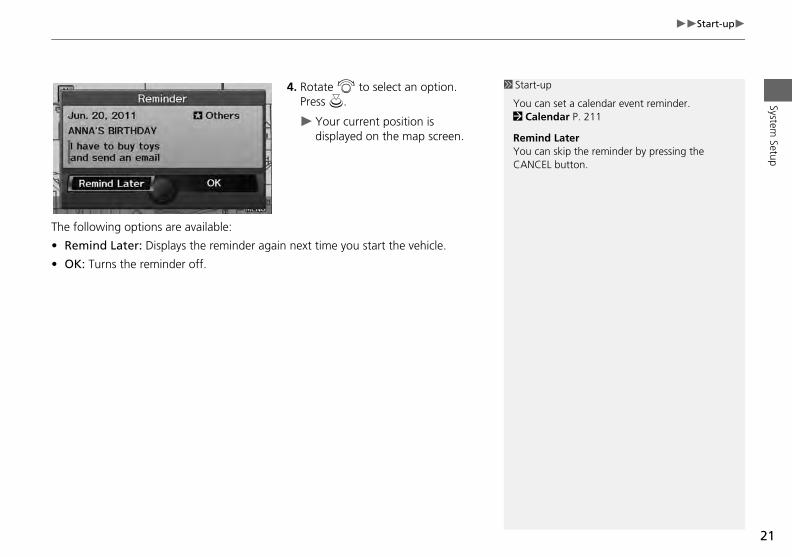
4. Rotate i to select an option. Press u.
Your current position is displayed on the map screen.
The following options are available:
• Remind Later: Displays the reminder again next time you start the vehicle.
• OK: Turns the reminder off.
1 Start-up
You can set a calendar event reminder. 2 Calendar P. 211
Remind LaterYou can skip the reminder by pressing the CANCEL button.
System Setup
Voice Control System
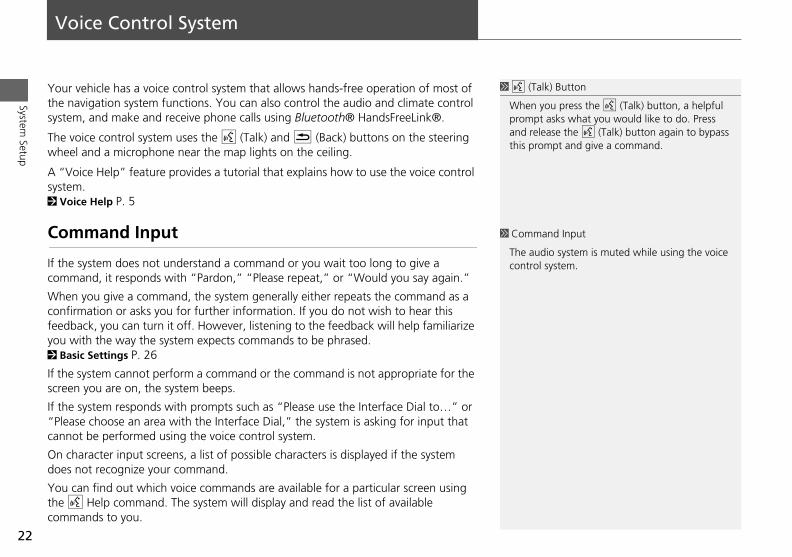
Your vehicle has a voice control system that allows hands-free operation of most of the navigation system functions. You can also control the audio and climate control system, and make and receive phone calls using Bluetooth® HandsFreeLink®.
The voice control system uses the d (Talk) and K (Back) buttons on the steering wheel and a microphone near the map lights on the ceiling.
A “Voice Help” feature provides a tutorial that explains how to use the voice control system.2 Voice Help P. 5
Command Input
If the system does not understand a command or you wait too long to give a command, it responds with “Pardon,” “Please repeat,” or “Would you say again.”
When you give a command, the system generally either repeats the command as a onfed
ou Ba
thcre
thPleann
n coe
oue
om
1 d (Talk) Button
When you press the d (Talk) button, a helpful prompt asks what you would like to do. Press and release the d (Talk) button again to bypass this prompt and give a command.
1 Command Input
The audio system is muted while using the voice control system.
22
cfey2
Ifs
If“c
Od
Ythc
irmation or asks you for further information. If you do not wish to hear this back, you can turn it off. However, listening to the feedback will help familiarize with the way the system expects commands to be phrased. sic Settings P. 26
e system cannot perform a command or the command is not appropriate for the en you are on, the system beeps.
e system responds with prompts such as “Please use the Interface Dial to…” or ase choose an area with the Interface Dial,” the system is asking for input that ot be performed using the voice control system.
haracter input screens, a list of possible characters is displayed if the system s not recognize your command.
can find out which voice commands are available for a particular screen using d Help command. The system will display and read the list of available mands to you.
23
Voice Control SystemVoice RecognitionSystem
Setup
Voice Recognition
To achieve optimum voice recognition when using either the navigation voice control system or Bluetooth® HandsFreeLink®:
• Make sure the correct screen is displayed for the voice command that you are using. 2 Voice Commands P. 246
• Close the windows and moonroof.
• Adjust the dashboard and side vents so air does not blow onto the microphone on the ceiling.
• Speak clearly in a clear, natural speaking voice without pausing between words.
• Reduce any background noise if possible. The system may misinterpret your command if more than one person is speaking at the same time.
• Refer to the Voice Help tutorial.2 Voice Help P. 5
1 Voice Recognition
The voice control system can only be used from the driver’s seat because the microphone unit removes noises from the front passenger’s side.
System Setup
Interface Settings
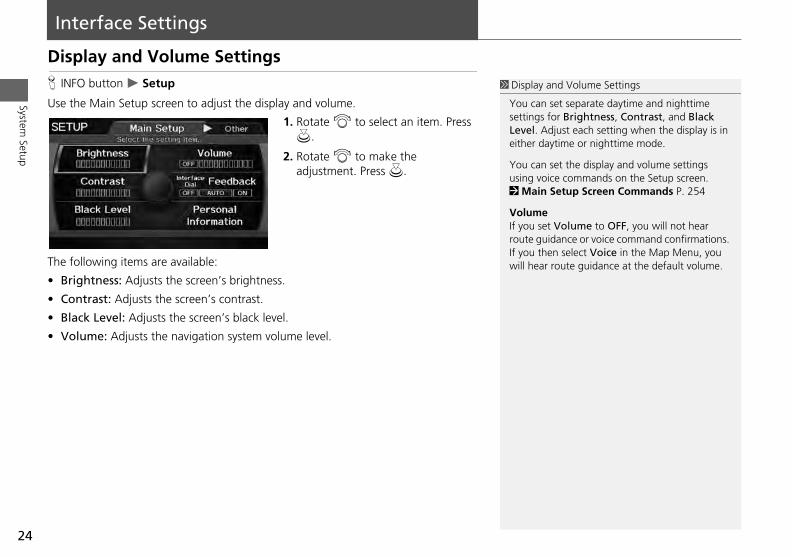
Display and Volume SettingsH INFO button Setup
Use the Main Setup screen to adjust the display and volume.
1. Rotate i to select an item. Press u.
2. Rotate i to make the adjustment. Press u.
The following items are available:
• Brightness: Adjusts the screen’s brightness.
• Contrast: Adjusts the screen’s contrast.
1 Display and Volume Settings
You can set separate daytime and nighttime settings for Brightness, Contrast, and Black Level. Adjust each setting when the display is in either daytime or nighttime mode.
You can set the display and volume settings using voice commands on the Setup screen. 2 Main Setup Screen Commands P. 254
VolumeIf you set Volume to OFF, you will not hear route guidance or voice command confirmations. If you then select Voice in the Map Menu, you will hear route guidance at the default volume.
24
•
•
Black Level: Adjusts the screen’s black level.
Volume: Adjusts the navigation system volume level.
25
Interface SettingsInterface Dial FeedbackSystem
Setup
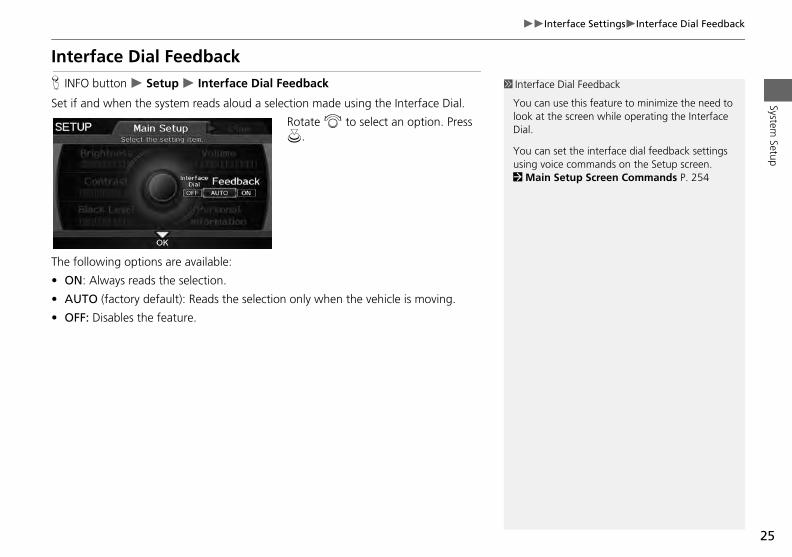
Interface Dial FeedbackH INFO button Setup Interface Dial Feedback
Set if and when the system reads aloud a selection made using the Interface Dial.
Rotate i to select an option. Press u.
The following options are available:
• ON: Always reads the selection.
1 Interface Dial Feedback
You can use this feature to minimize the need to look at the screen while operating the Interface Dial.
You can set the interface dial feedback settings using voice commands on the Setup screen. 2 Main Setup Screen Commands P. 254
• AUTO (factory default): Reads the selection only when the vehicle is moving.
• OFF: Disables the feature.

26
Interface SettingsBasic Settings
System Setup
Basic SettingsH INFO button Setup Other Basic Settings
Set the map units to either miles or kilometers (km), and control the voice feedback from the navigation system.
Rotate i to select an item. Press u.
The following items are available:
• Units: Sets the map units to either miles (factory default) or kilometers (km).
• Voice Recognition Tutor: Turns the voice feedback feature on or off.ON (factory default): Provides voice control system confirmation or prompts.OFF: Disables the feature.

27
Interface SettingsColorSystem
Setup
ColorH INFO button Setup Other Color
Choose the color of the navigation map and system menus.
Rotate i to select an item. Press u.
The following items are available:
• Map Color: Sets the color of the map screen.2 Map Color P. 28
• Menu Color: Sets the color of the menu screens.2 Menu Color P. 28
Continued
28
Interface SettingsColor
System Setup
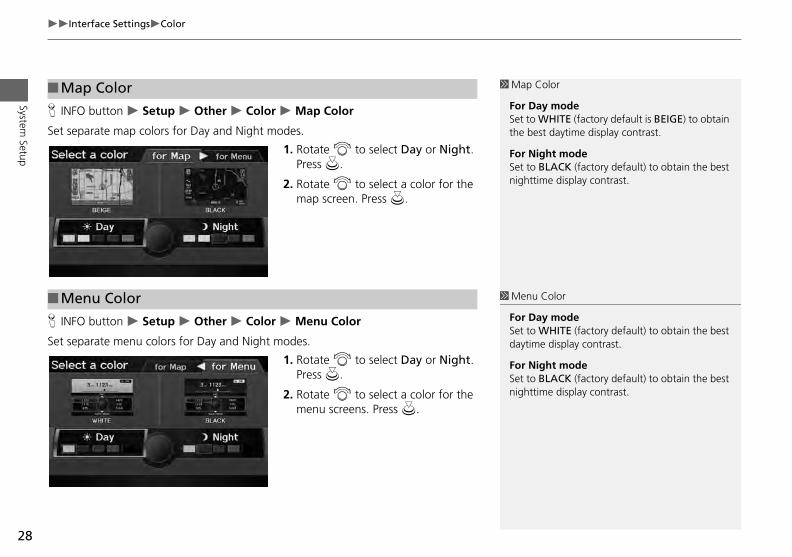
H INFO button Setup Other Color Map Color
Set separate map colors for Day and Night modes.
1. Rotate i to select Day or Night. Press u.
2. Rotate i to select a color for the map screen. Press u.
H IN
Set
■Map Color 1 Map Color
For Day modeSet to WHITE (factory default is BEIGE) to obtain the best daytime display contrast.
For Night modeSet to BLACK (factory default) to obtain the best nighttime display contrast.
■Menu Color 1 Menu Color
y modeHITE (factory default) to obtain the best
display contrast.
ht modeLACK (factory default) to obtain the best e display contrast.
FO button Setup Other Color Menu Color
separate menu colors for Day and Night modes.
1. Rotate i to select Day or Night. Press u.
2. Rotate i to select a color for the menu screens. Press u.
For DaSet to Wdaytime
For NigSet to Bnighttim
29
Interface SettingsColorSystem
Setup
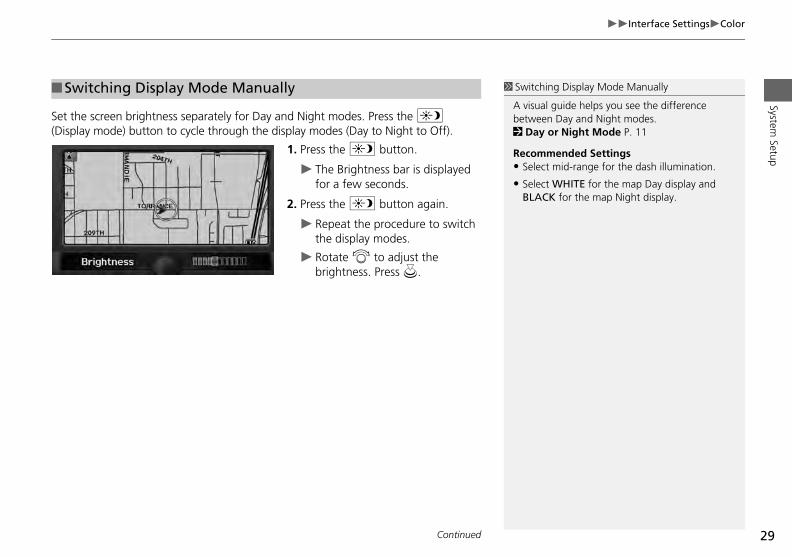
Set the screen brightness separately for Day and Night modes. Press the a (Display mode) button to cycle through the display modes (Day to Night to Off).
1. Press the a button.
The Brightness bar is displayed for a few seconds.
2. Press the a button again.
Repeat the procedure to switch the display modes.
Rotate i to adjust the brightness. Press u.
■Switching Display Mode Manually 1 Switching Display Mode Manually
A visual guide helps you see the difference between Day and Night modes.2 Day or Night Mode P. 11
Recommended Settings• Select mid-range for the dash illumination.
• Select WHITE for the map Day display and BLACK for the map Night display.
Continued
30
Interface SettingsColor
System Setup
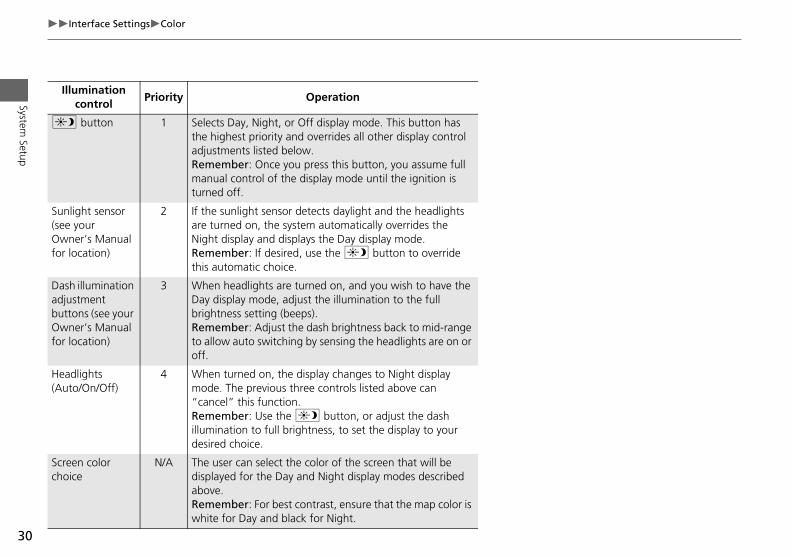
Illumination control
Priority Operation
a button 1 Selects Day, Night, or Off display mode. This button has the highest priority and overrides all other display control adjustments listed below.Remember: Once you press this button, you assume full manual control of the display mode until the ignition is turned off.
Sunlight sensor (see your Owner’s Manual for location)
2 If the sunlight sensor detects daylight and the headlights are turned on, the system automatically overrides the Night display and displays the Day display mode.Remember: If desired, use the a button to override this automatic choice.
Dash illumination adjubutOwfor
3 When headlights are turned on, and you wish to have the
Hea(Au
Screcho
stment tons (see your ner’s Manual location)
Day display mode, adjust the illumination to the full brightness setting (beeps).Remember: Adjust the dash brightness back to mid-range to allow auto switching by sensing the headlights are on or off.
dlights to/On/Off)
4 When turned on, the display changes to Night display mode. The previous three controls listed above can “cancel” this function.Remember: Use the a button, or adjust the dash illumination to full brightness, to set the display to your desired choice.
en color ice
N/A The user can select the color of the screen that will be displayed for the Day and Night display modes described above.Remember: For best contrast, ensure that the map color is white for Day and black for Night.
31
Interface SettingsLanguageSystem
Setup
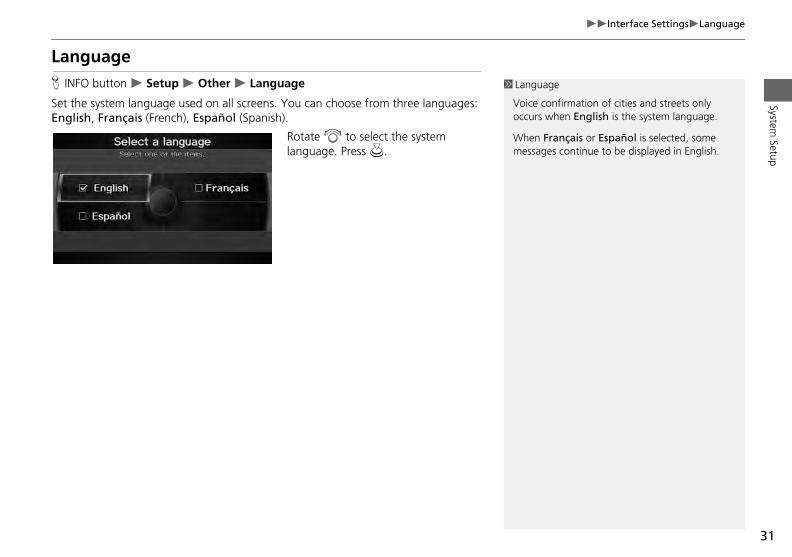
LanguageH INFO button Setup Other Language
Set the system language used on all screens. You can choose from three languages: English, Français (French), Español (Spanish).
Rotate i to select the system language. Press u.
1 Language
Voice confirmation of cities and streets only occurs when English is the system language.
When Français or Español is selected, some messages continue to be displayed in English.
32
Interface SettingsWallpaper
System Setup
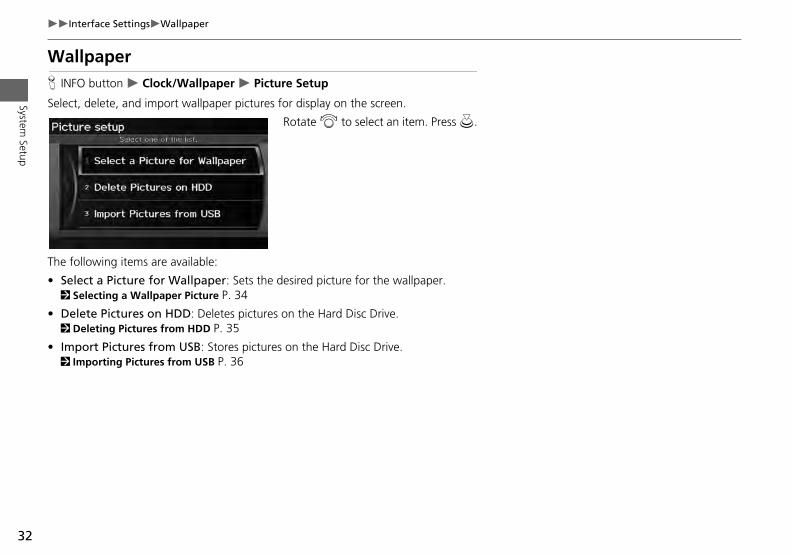
WallpaperH INFO button Clock/Wallpaper Picture Setup
Select, delete, and import wallpaper pictures for display on the screen.
Rotate i to select an item. Press u.
The following items are available:
• Select a Picture for Wallpaper: Sets the desired picture for the wallpaper.2 Selecting a Wallpaper Picture P. 34
• Delete Pictures on HDD: Deletes pictures on the Hard Disc Drive.2 Deleting Pictures from HDD P. 35
• Import Pictures from USB: Stores pictures on the Hard Disc Drive.2 Importing Pictures from USB P. 36
33
Interface SettingsWallpaperSystem
Setup
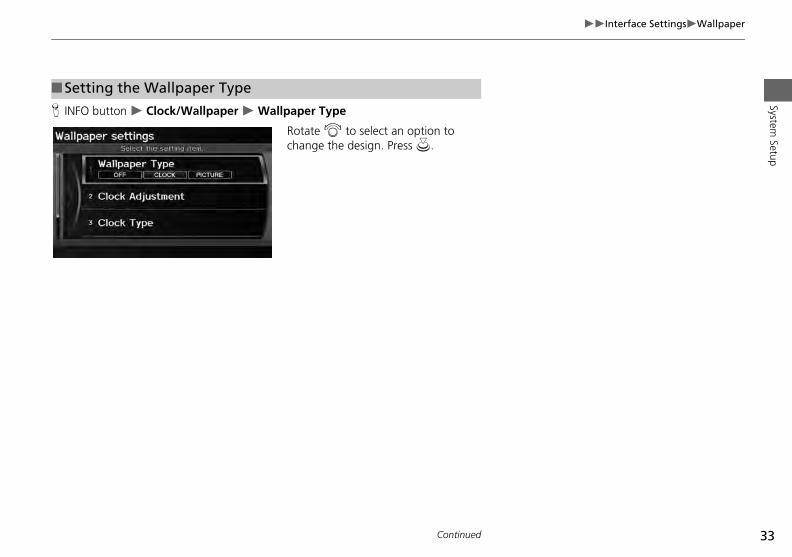
H INFO button Clock/Wallpaper Wallpaper Type
Rotate i to select an option to change the design. Press u.
■Setting the Wallpaper Type
Continued
34
Interface SettingsWallpaper
System Setup
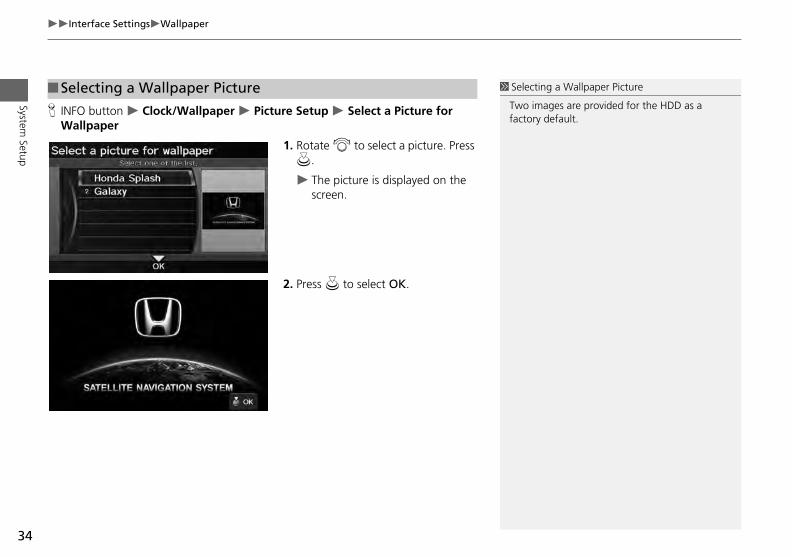
H INFO button Clock/Wallpaper Picture Setup Select a Picture for Wallpaper
1. Rotate i to select a picture. Press u.
The picture is displayed on the screen.
2. Press u to select OK.
■Selecting a Wallpaper Picture 1 Selecting a Wallpaper Picture
Two images are provided for the HDD as a factory default.

35
Interface SettingsWallpaperSystem
Setup
H INFO button Clock/Wallpaper Picture Setup Delete Pictures on HDD
1. Rotate i to select a picture. Press u.
The picture is displayed on the screen.
2. Press u to select OK.
Repeat step 1 and 2 to delete other pictures.
Items to be deleted are indicated with a trash icon.
3. Move r to select OK.
■Deleting Pictures from HDD 1 Deleting Pictures from HDD
If there are no pictures on the HDD, “No Entries Exist” is displayed.
You can only delete pictures when the vehicle is in Park.
You can only delete pictures that have been fully uploaded from a USB flash drive.
4. Rotate i to select Yes. Press u to delete the picture(s).
Trash icon
Continued
36
Interface SettingsWallpaper
System Setup
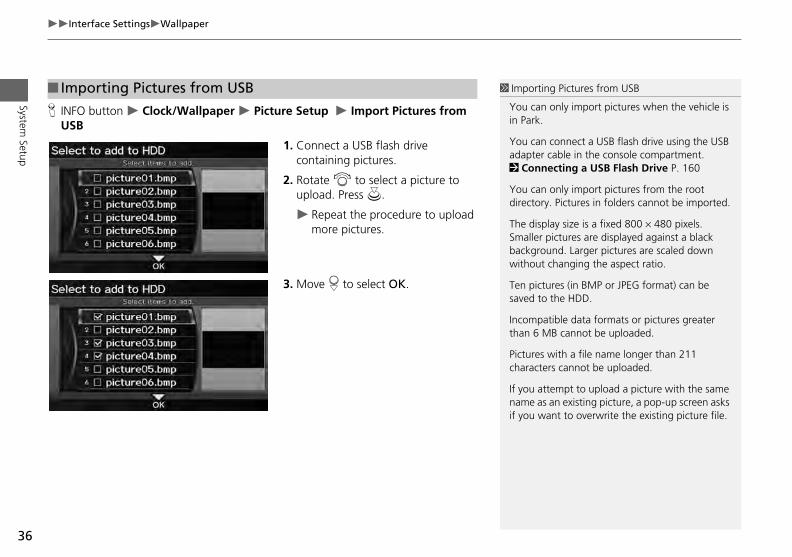
H INFO button Clock/Wallpaper Picture Setup Import Pictures from USB
1. Connect a USB flash drive containing pictures.
2. Rotate i to select a picture to upload. Press u.
Repeat the procedure to upload more pictures.
3. Move r to select OK.
■ Importing Pictures from USB 1 Importing Pictures from USB
You can only import pictures when the vehicle is in Park.
You can connect a USB flash drive using the USB adapter cable in the console compartment. 2 Connecting a USB Flash Drive P. 160
You can only import pictures from the root directory. Pictures in folders cannot be imported.
The display size is a fixed 800 480 pixels. Smaller pictures are displayed against a black background. Larger pictures are scaled down without changing the aspect ratio.
Ten pictures (in BMP or JPEG format) can be saved to the HDD.
atible data formats or pictures greater MB cannot be uploaded.
with a file name longer than 211 ers cannot be uploaded.
ttempt to upload a picture with the same s an existing picture, a pop-up screen asks ant to overwrite the existing picture file.
Incompthan 6
Picturescharact
If you aname aif you w
37
System Setup
Personal Information
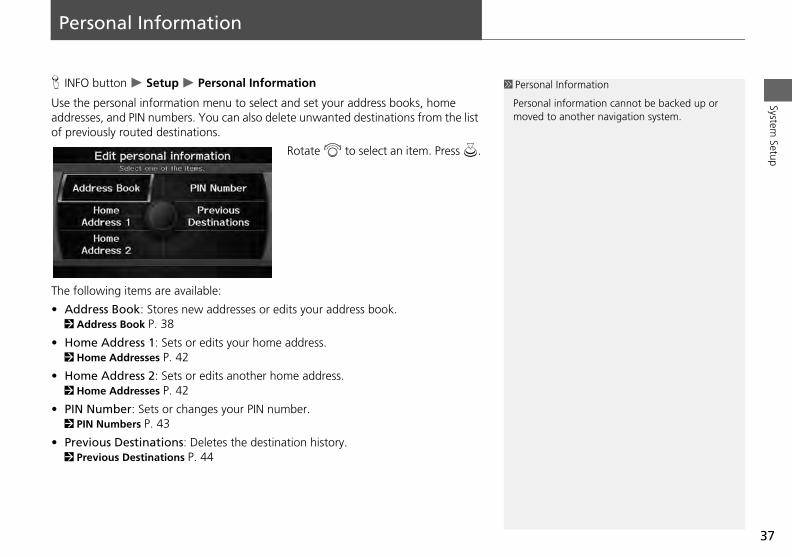
H INFO button Setup Personal Information
Use the personal information menu to select and set your address books, home addresses, and PIN numbers. You can also delete unwanted destinations from the list of previously routed destinations.
Rotate i to select an item. Press u.
The following items are available:
A2
H2
H2
P2
P2
1 Personal Information
Personal information cannot be backed up or moved to another navigation system.
•
•
•
•
•
ddress Book: Stores new addresses or edits your address book.Address Book P. 38
ome Address 1: Sets or edits your home address.Home Addresses P. 42
ome Address 2: Sets or edits another home address.Home Addresses P. 42
IN Number: Sets or changes your PIN number.PIN Numbers P. 43
revious Destinations: Deletes the destination history.Previous Destinations P. 44
38
Personal InformationAddress Book
System Setup
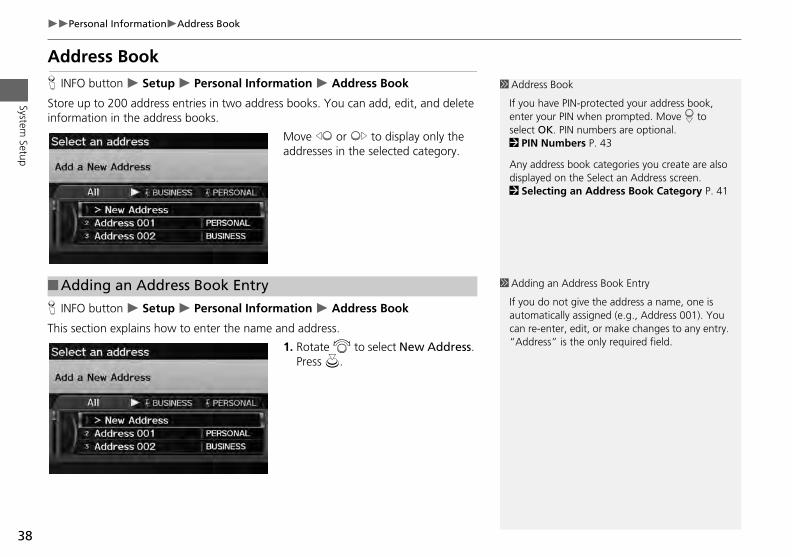
Address BookH INFO button Setup Personal Information Address Book
Store up to 200 address entries in two address books. You can add, edit, and delete information in the address books.
Move w or y to display only the addresses in the selected category.
1 Address Book
If you have PIN-protected your address book, enter your PIN when prompted. Move r to select OK. PIN numbers are optional. 2 PIN Numbers P. 43
Any address book categories you create are also displayed on the Select an Address screen. 2 Selecting an Address Book Category P. 41
■Adding an Address Book Entry 1 Adding an Address Book Entry
o not give the address a name, one is tically assigned (e.g., Address 001). You nter, edit, or make changes to any entry. ss” is the only required field.
H INFO button Setup Personal Information Address Book
This section explains how to enter the name and address.
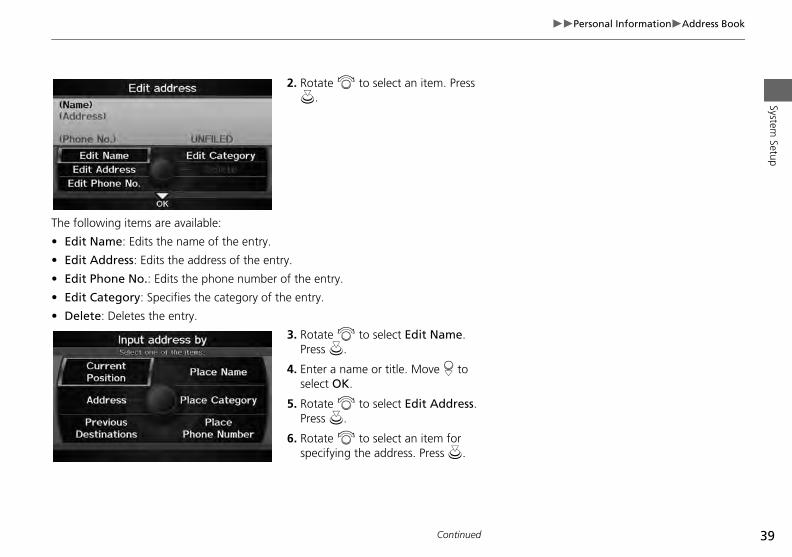
1. Rotate i to select New Address. Press u.
If you dautomacan re-e“Addre
39
Personal InformationAddress BookSystem
Setup
2. Rotate i to select an item. Press u.
The following items are available:
• Edit Name: Edits the name of the entry.
• Edit Address: Edits the address of the entry.
• Edit Phone No.: Edits the phone number of the entry.
• E
• D
dit Category: Specifies the category of the entry.
elete: Deletes the entry.
3. Rotate i to select Edit Name. Press u.
4. Enter a name or title. Move r to select OK.
5. Rotate i to select Edit Address. Press u.
6. Rotate i to select an item for specifying the address. Press u.
Continued
40
Personal InformationAddress Book
System Setup
The following items are available:
• Current Position: Select your current position.
• Address: Enter an address on the character input screen when prompted.2 Address P. 70
• Previous Destinations: Select a previous destination.2 Previous Destination P. 76
• Place Name: Enter the name of a place/landmark.2 Place Name P. 77
• Place Category: Select a category to search for a place/landmark (e.g., Banking, Lodging).2 Place Category P. 80
• Place Phone Number: Enter the phone number of a place/landmark.2 Place Phone Number P. 84
H IN
■E
1 Adding an Address Book Entry
When you use Place Name or Place Category, the phone number is automatically entered.
an Address Book Entry
ered contents are displayed on the Edit screen.
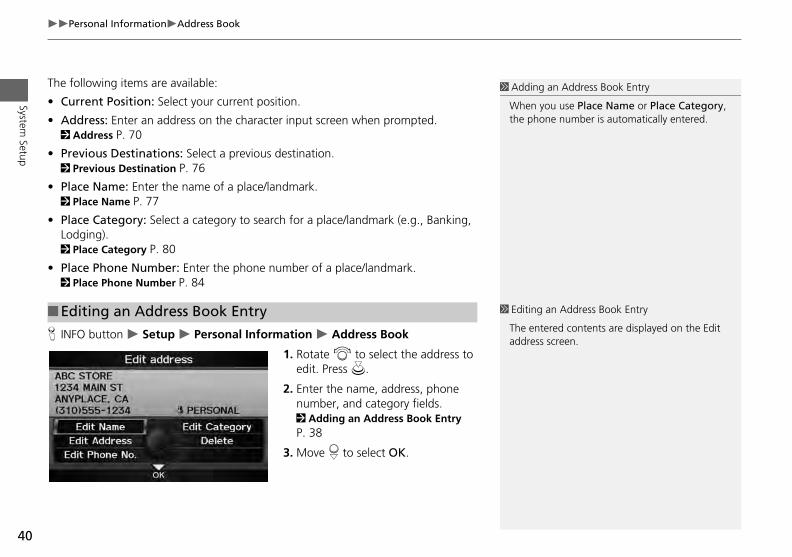
FO button Setup Personal Information Address Book
1. Rotate i to select the address to edit. Press u.
2. Enter the name, address, phone number, and category fields.2 Adding an Address Book Entry P. 38
3. Move r to select OK.
diting an Address Book Entry 1 Editing
The entaddress
41
Personal InformationAddress BookSystem
Setup
H INFO button Setup Personal Information Address Book
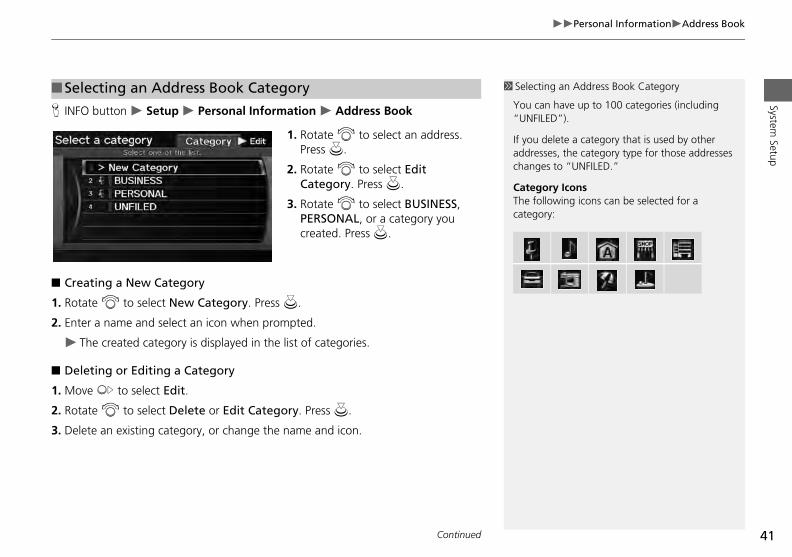
1. Rotate i to select an address. Press u.
2. Rotate i to select Edit Category. Press u.
3. Rotate i to select BUSINESS, PERSONAL, or a category you created. Press u.
■ Creating a New Category
1. R
2. E
■ D
1. M
2. R
3. D
■Selecting an Address Book Category 1 Selecting an Address Book Category
You can have up to 100 categories (including “UNFILED”).
If you delete a category that is used by other addresses, the category type for those addresses changes to “UNFILED.”
Category IconsThe following icons can be selected for a category:
otate i to select New Category. Press u.
nter a name and select an icon when prompted.
The created category is displayed in the list of categories.
eleting or Editing a Category
ove y to select Edit.
otate i to select Delete or Edit Category. Press u.
elete an existing category, or change the name and icon.
Continued
42
Personal InformationHome Addresses
System Setup
H INFO button Setup Personal Information Address Book
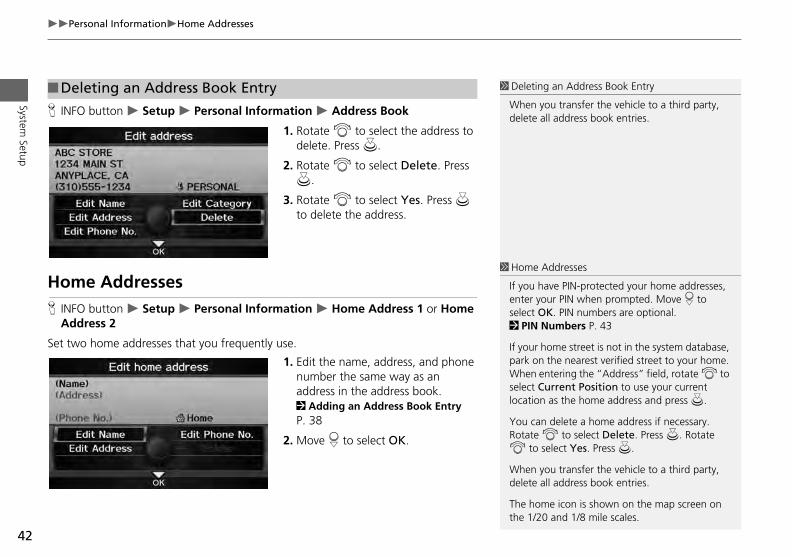
1. Rotate i to select the address to delete. Press u.
2. Rotate i to select Delete. Press u.
3. Rotate i to select Yes. Press u to delete the address.
Home AddressesH IN
A
Set
■Deleting an Address Book Entry 1 Deleting an Address Book Entry
When you transfer the vehicle to a third party, delete all address book entries.
1 Home Addresses
If you have PIN-protected your home addresses, enter your PIN when prompted. Move r to
K. PIN numbers are optional.umbers P. 43
ome street is not in the system database, the nearest verified street to your home. ntering the “Address” field, rotate i to urrent Position to use your current as the home address and press u.
delete a home address if necessary. i to select Delete. Press u. Rotate select Yes. Press u.
ou transfer the vehicle to a third party, ll address book entries.
e icon is shown on the map screen on 0 and 1/8 mile scales.
FO button Setup Personal Information Home Address 1 or Home ddress 2
two home addresses that you frequently use.
1. Edit the name, address, and phone number the same way as an address in the address book.2 Adding an Address Book Entry P. 38
2. Move r to select OK.
select O2 PIN N
If your hpark onWhen eselect Clocation
You canRotate i to
When ydelete a
The homthe 1/2
43
Personal InformationPIN NumbersSystem
Setup
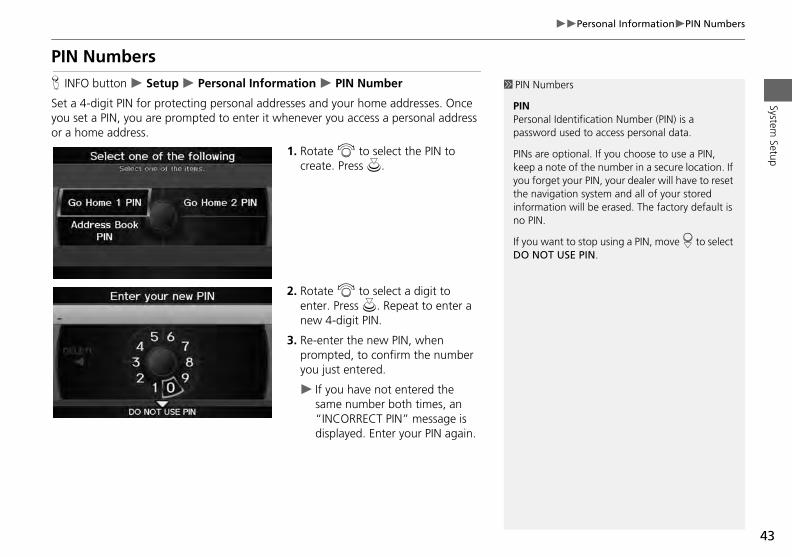
PIN NumbersH INFO button Setup Personal Information PIN Number
Set a 4-digit PIN for protecting personal addresses and your home addresses. Once you set a PIN, you are prompted to enter it whenever you access a personal address or a home address.
1. Rotate i to select the PIN to create. Press u.
2. Rotate i to select a digit to
1 PIN Numbers
PINPersonal Identification Number (PIN) is a password used to access personal data.
PINs are optional. If you choose to use a PIN, keep a note of the number in a secure location. If you forget your PIN, your dealer will have to reset the navigation system and all of your stored information will be erased. The factory default is no PIN.
If you want to stop using a PIN, move r to select DO NOT USE PIN.
enter. Press u. Repeat to enter a new 4-digit PIN.
3. Re-enter the new PIN, when prompted, to confirm the number you just entered.
If you have not entered the same number both times, an “INCORRECT PIN” message is displayed. Enter your PIN again.
44
Personal InformationPrevious Destinations
System Setup
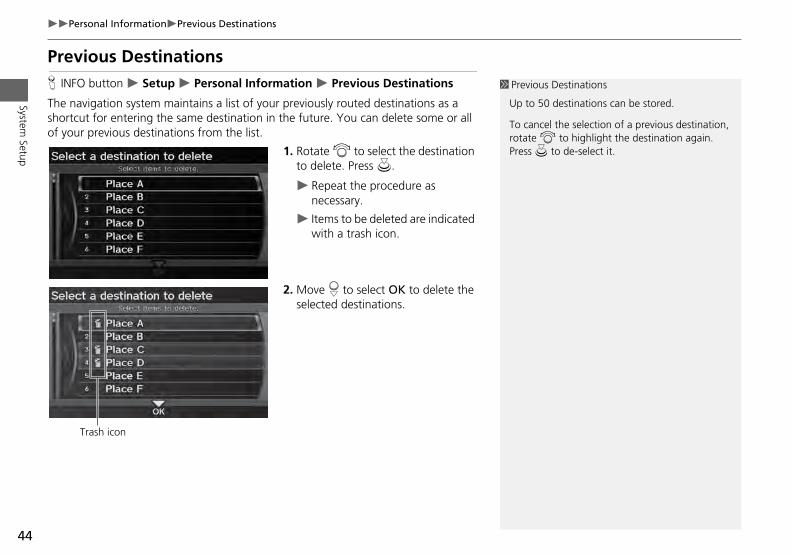
Previous DestinationsH INFO button Setup Personal Information Previous Destinations
The navigation system maintains a list of your previously routed destinations as a shortcut for entering the same destination in the future. You can delete some or all of your previous destinations from the list.
1. Rotate i to select the destination to delete. Press u.
Repeat the procedure as necessary.
Items to be deleted are indicated with a trash icon.
2. Move r to select OK to delete the
1 Previous Destinations
Up to 50 destinations can be stored.
To cancel the selection of a previous destination, rotate i to highlight the destination again. Press u to de-select it.
selected destinations.
Trash icon
45
System Setup
Music Search
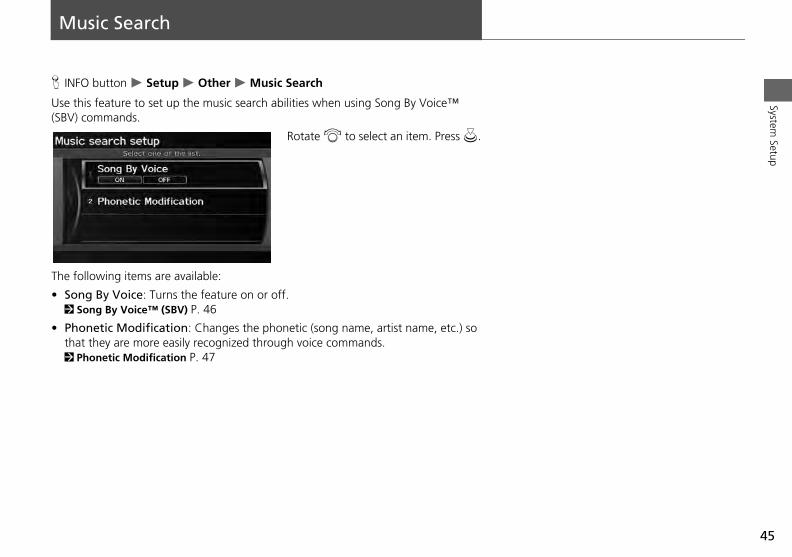
H INFO button Setup Other Music Search
Use this feature to set up the music search abilities when using Song By Voice™ (SBV) commands.
Rotate i to select an item. Press u.
The following items are available:
• Song By Voice: Turns the feature on or off.2
Pt2
•
Song By Voice™ (SBV) P. 46
honetic Modification: Changes the phonetic (song name, artist name, etc.) so hat they are more easily recognized through voice commands.
Phonetic Modification P. 47
46
Music SearchSong By Voice™ (SBV)
System Setup
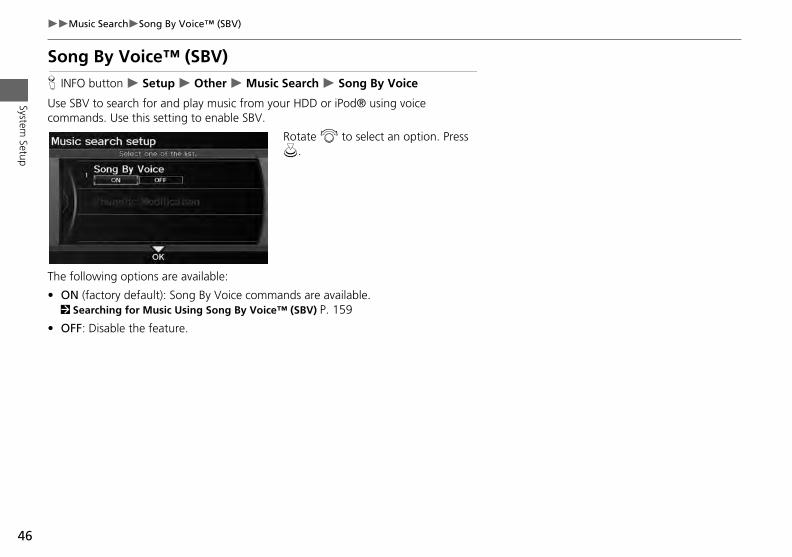
Song By Voice™ (SBV)H INFO button Setup Other Music Search Song By Voice
Use SBV to search for and play music from your HDD or iPod® using voice commands. Use this setting to enable SBV.
Rotate i to select an option. Press u.
The following options are available:
• ON (factory default): Song By Voice commands are available.
2 Searching for Music Using Song By Voice™ (SBV) P. 159• OFF: Disable the feature.
47
Music SearchPhonetic ModificationSystem
Setup
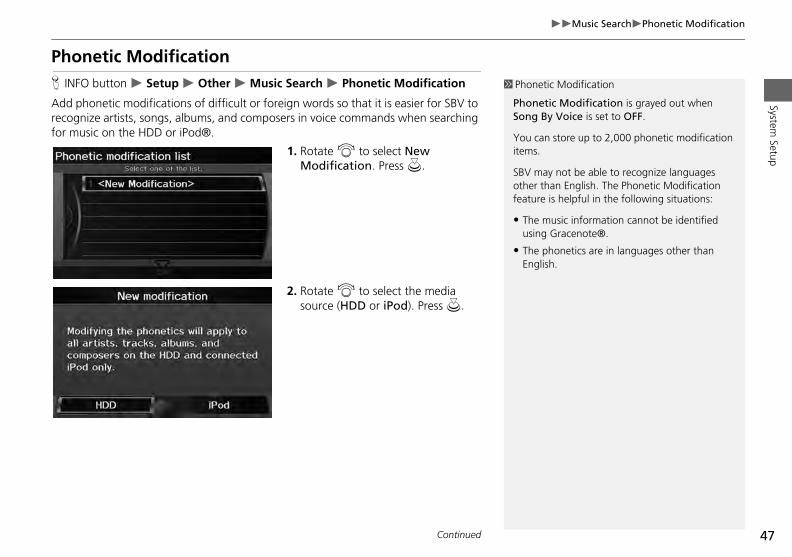
Phonetic ModificationH INFO button Setup Other Music Search Phonetic Modification
Add phonetic modifications of difficult or foreign words so that it is easier for SBV to recognize artists, songs, albums, and composers in voice commands when searching for music on the HDD or iPod®.
1. Rotate i to select New Modification. Press u.
2. Rotate i to select the media
1 Phonetic Modification
Phonetic Modification is grayed out when Song By Voice is set to OFF.
You can store up to 2,000 phonetic modification items.
SBV may not be able to recognize languages other than English. The Phonetic Modification feature is helpful in the following situations:
• The music information cannot be identified using Gracenote®.
• The phonetics are in languages other than English.
source (HDD or iPod). Press u.
Continued
48
Music SearchPhonetic Modification
System Setup
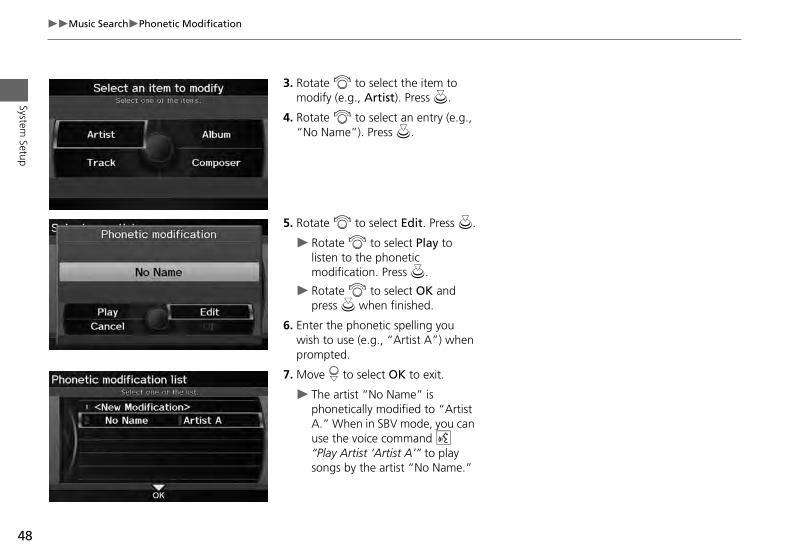
3. Rotate i to select the item to modify (e.g., Artist). Press u.
4. Rotate i to select an entry (e.g., “No Name”). Press u.
5. Rotate i to select Edit. Press u.
Rotate i to select Play to listen to the phonetic modification. Press u.
Rotate i to select OK and
press u when finished.6. Enter the phonetic spelling you wish to use (e.g., “Artist A”) when prompted.
7. Move r to select OK to exit.
The artist “No Name” is phonetically modified to “Artist A.” When in SBV mode, you can use the voice command d “Play Artist ‘Artist A’” to play songs by the artist “No Name.”
49
System Setup
Routing & Guidance
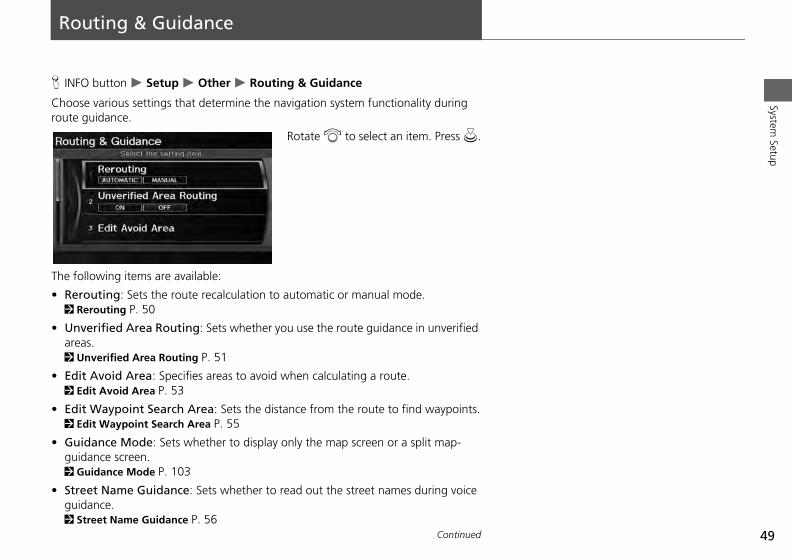
H INFO button Setup Other Routing & Guidance
Choose various settings that determine the navigation system functionality during route guidance.
Rotate i to select an item. Press u.
The following items are available:
• Rerouting: Sets the route recalculation to automatic or manual mode.2
Ua2
E2
E2
Gg2
Sg2
•
•
•
•
•
Rerouting P. 50
nverified Area Routing: Sets whether you use the route guidance in unverified reas.
Unverified Area Routing P. 51
dit Avoid Area: Specifies areas to avoid when calculating a route.Edit Avoid Area P. 53
dit Waypoint Search Area: Sets the distance from the route to find waypoints.Edit Waypoint Search Area P. 55
uidance Mode: Sets whether to display only the map screen or a split map-uidance screen.Guidance Mode P. 103
treet Name Guidance: Sets whether to read out the street names during voice uidance. Street Name Guidance P. 56
Continued
50
Routing & GuidanceRerouting
System Setup
• Guidance Screen Interruption: Sets whether the guidance screen interrupts the audio screen display. 2 Guidance Screen Interruption P. 57
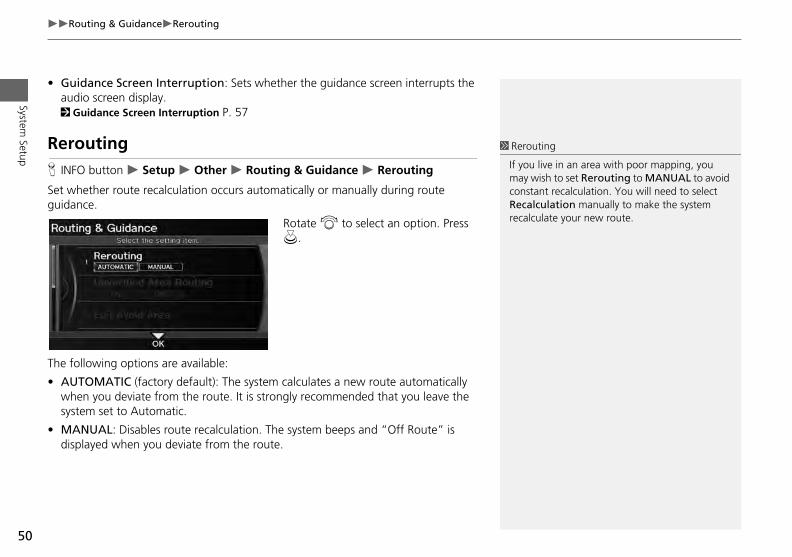
ReroutingH INFO button Setup Other Routing & Guidance Rerouting
Set whether route recalculation occurs automatically or manually during route guidance.
Rotate i to select an option. Press u.
The
• Awsy
• Md
1 Rerouting
If you live in an area with poor mapping, you may wish to set Rerouting to MANUAL to avoid constant recalculation. You will need to select Recalculation manually to make the system recalculate your new route.
following options are available:
UTOMATIC (factory default): The system calculates a new route automatically hen you deviate from the route. It is strongly recommended that you leave the stem set to Automatic.
ANUAL: Disables route recalculation. The system beeps and “Off Route” is isplayed when you deviate from the route.
51
Routing & GuidanceUnverified Area RoutingSystem
Setup
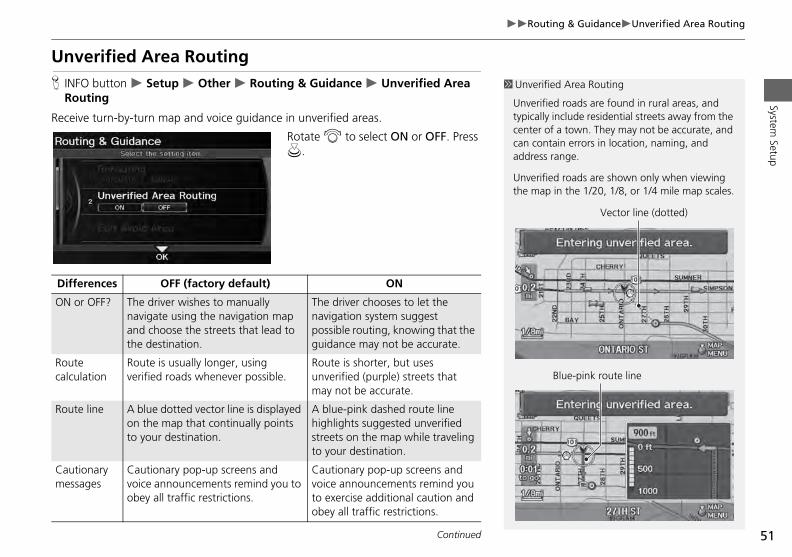
Unverified Area RoutingH INFO button Setup Other Routing & Guidance Unverified Area
Routing
Receive turn-by-turn map and voice guidance in unverified areas.
Rotate i to select ON or OFF. Press u.
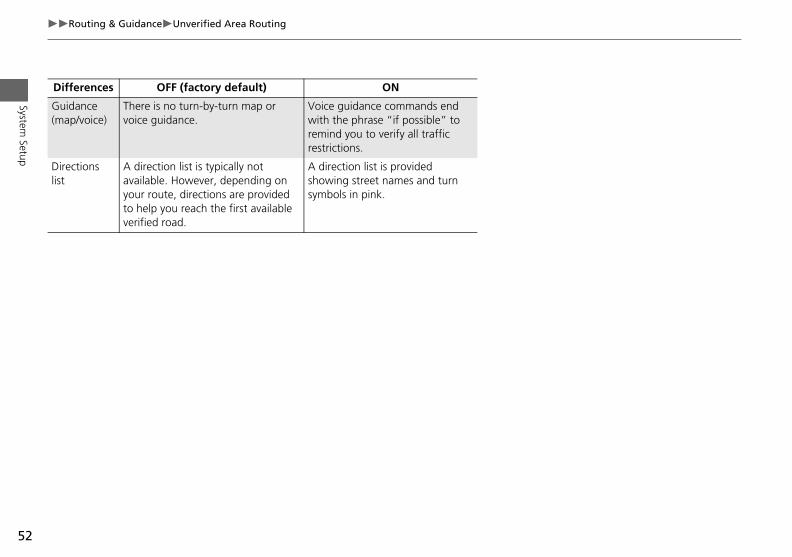
1 Unverified Area Routing
Unverified roads are found in rural areas, and typically include residential streets away from the center of a town. They may not be accurate, and can contain errors in location, naming, and address range.
Unverified roads are shown only when viewing the map in the 1/20, 1/8, or 1/4 mile map scales.
Vector line (dotted)
Blue-pink route line
Differences OFF (factory default) ON
ON or OFF? The driver wishes to manually navigate using the navigation map and choose the streets that lead to the destination.
The driver chooses to let the navigation system suggest possible routing, knowing that the guidance may not be accurate.
Route calculation
Route is usually longer, using verified roads whenever possible.
Route is shorter, but uses unverified (purple) streets that may not be accurate.
Route line A blue dotted vector line is displayed on the map that continually points to your destination.
A blue-pink dashed route line highlights suggested unverified streets on the map while traveling to your destination.
Cautionary messages
Cautionary pop-up screens and voice announcements remind you to obey all traffic restrictions.
Cautionary pop-up screens and voice announcements remind you to exercise additional caution and obey all traffic restrictions.
Continued
52
Routing & GuidanceUnverified Area Routing
System Setup
Guidance (map/voice)
There is no turn-by-turn map or voice guidance.
Voice guidance commands end with the phrase “if possible” to remind you to verify all traffic restrictions.
Directions list
A direction list is typically not available. However, depending on your route, directions are provided to help you reach the first available verified road.
A direction list is provided showing street names and turn symbols in pink.
Differences OFF (factory default) ON
53
Routing & GuidanceEdit Avoid AreaSystem
Setup
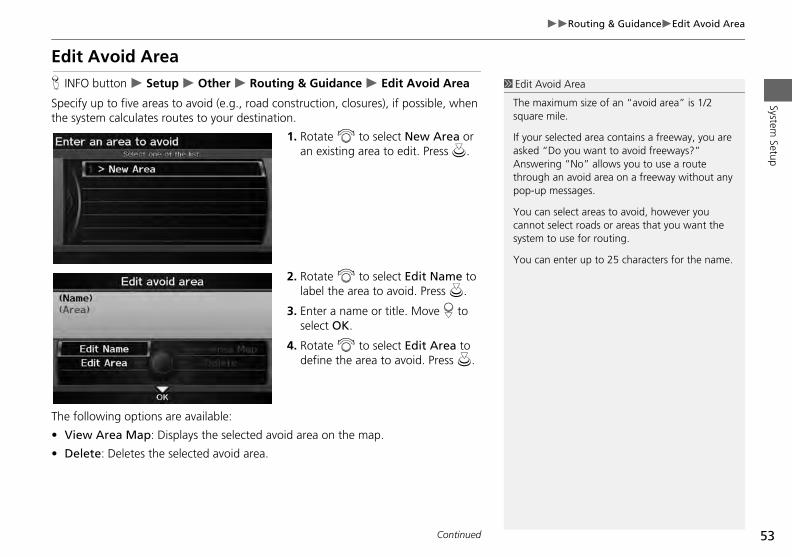
Edit Avoid AreaH INFO button Setup Other Routing & Guidance Edit Avoid Area
Specify up to five areas to avoid (e.g., road construction, closures), if possible, when the system calculates routes to your destination.
1. Rotate i to select New Area or an existing area to edit. Press u.
2. Rotate i to select Edit Name to label the area to avoid. Press u.
1 Edit Avoid Area
The maximum size of an “avoid area” is 1/2 square mile.
If your selected area contains a freeway, you are asked “Do you want to avoid freeways?” Answering “No” allows you to use a route through an avoid area on a freeway without any pop-up messages.
You can select areas to avoid, however you cannot select roads or areas that you want the system to use for routing.
You can enter up to 25 characters for the name.
3. Enter a name or title. Move r to select OK.
4. Rotate i to select Edit Area to define the area to avoid. Press u.
The following options are available:
• View Area Map: Displays the selected avoid area on the map.
• Delete: Deletes the selected avoid area.
Continued
54
Routing & GuidanceEdit Avoid Area
System Setup
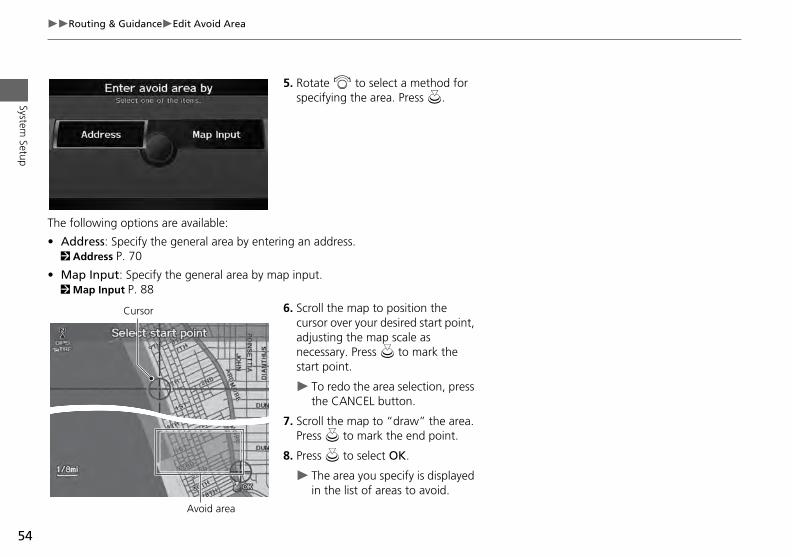
5. Rotate i to select a method for specifying the area. Press u.
The following options are available:
• Address: Specify the general area by entering an address. 2 Address P. 70
• Map Input: Specify the general area by map input. 2 Map Input P. 88
6. Scroll the map to position the cursor over your desired start point, adjusting the map scale as necessary. Press u to mark the start point.
To redo the area selection, press the CANCEL button.
7. Scroll the map to “draw” the area. Press u to mark the end point.
8. Press u to select OK.
The area you specify is displayed in the list of areas to avoid.
Cursor
Avoid area
55
Routing & GuidanceEdit Waypoint Search AreaSystem
Setup
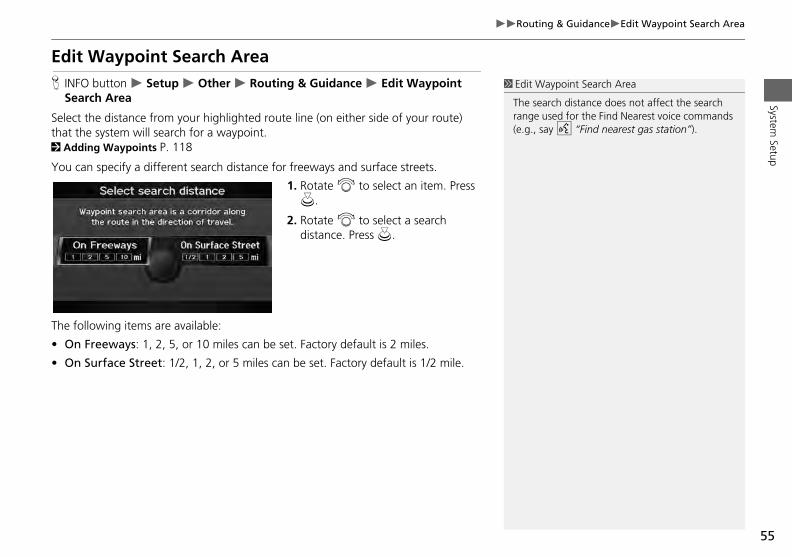
Edit Waypoint Search AreaH INFO button Setup Other Routing & Guidance Edit Waypoint
Search Area
Select the distance from your highlighted route line (on either side of your route) that the system will search for a waypoint. 2 Adding Waypoints P. 118
You can specify a different search distance for freeways and surface streets.
1. Rotate i to select an item. Press u.
2. Rotate i to select a search distance. Press u.
1 Edit Waypoint Search Area
The search distance does not affect the search range used for the Find Nearest voice commands (e.g., say d “Find nearest gas station”).
The following items are available:
• On Freeways: 1, 2, 5, or 10 miles can be set. Factory default is 2 miles.
• On Surface Street: 1/2, 1, 2, or 5 miles can be set. Factory default is 1/2 mile.
56
Routing & GuidanceStreet Name Guidance
System Setup
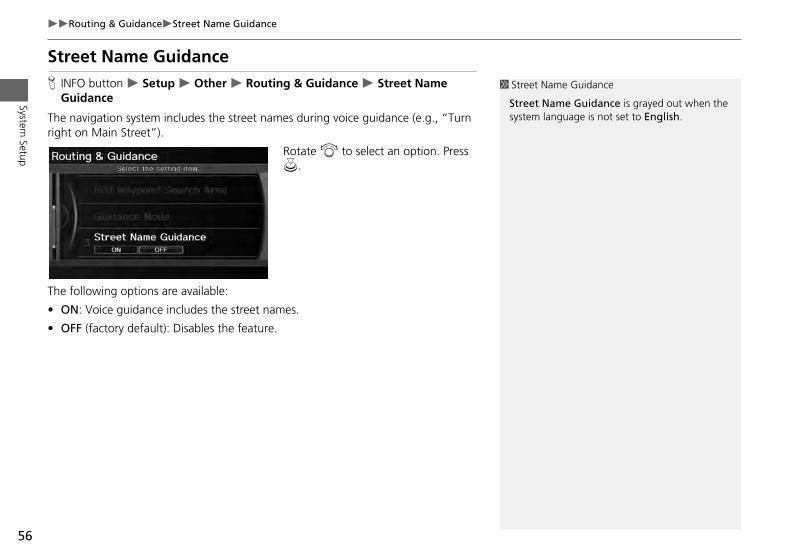
Street Name GuidanceH INFO button Setup Other Routing & Guidance Street Name
Guidance
The navigation system includes the street names during voice guidance (e.g., “Turn right on Main Street”).
Rotate i to select an option. Press u.
The following options are available:
1 Street Name Guidance
Street Name Guidance is grayed out when the system language is not set to English.
• ON: Voice guidance includes the street names.
• OFF (factory default): Disables the feature.
57
Routing & GuidanceGuidance Screen InterruptionSystem
Setup
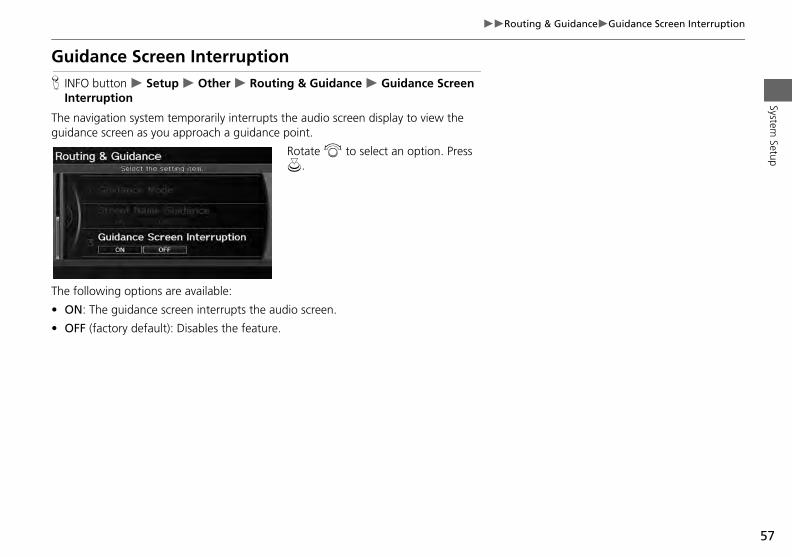
Guidance Screen InterruptionH INFO button Setup Other Routing & Guidance Guidance Screen
Interruption
The navigation system temporarily interrupts the audio screen display to view the guidance screen as you approach a guidance point.
Rotate i to select an option. Press u.
The following options are available:
• ON: The guidance screen interrupts the audio screen.
• OFF (factory default): Disables the feature.

System Setup
Clock Adjustment
H INFO button Clock/Wallpaper Clock Adjustment
Set the automatic adjustment of the system clock for daylight saving and international time zones.
Rotate i to select an item. Press u.
The following items are available:
• Auto Daylight: The navigation system automatically adjusts the clock (“spring aOO
AdOO
A2
R2
Cd
1 Clock Adjustment
You can check the time and date from any screen using voice commands. 2 Global Commands P. 246
Auto DaylightThis function is not activated in areas that have not adopted daylight saving time, even if you have set Auto Daylight to ON.
Auto Time ZoneIf you live and work in two different time zones, you may want to turn Auto Time Zone to OFF. When driving near a time zone boundary, the displayed time zone may fluctuate between the two zone times.
58
•
•
•
•
head” or “fall back” by one hour) when a daylight saving time change occurs.N (factory default): Adjusts the clock automatically.FF: Disables the feature.
uto Time Zone: The navigation system automatically adjusts the clock when riving through different time zones.N (factory default): Adjusts the clock automatically.FF: Disables the feature.
DJUST TIME: Adjust the current time manually. Adjust Time P. 59
eset: Reset the clock settings to the factory default. Resetting the Clock Settings P. 59
lock Format: Sets the time notation to either 12-hour clock (12H, factory efault) or 24-hour clock (24H).
59
Clock AdjustmentAdjust TimeSystem
Setup
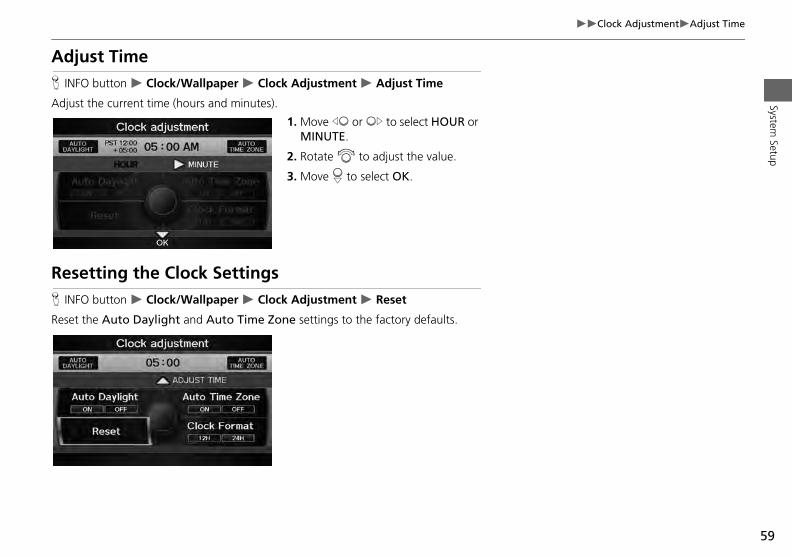
Adjust TimeH INFO button Clock/Wallpaper Clock Adjustment Adjust Time
Adjust the current time (hours and minutes).
1. Move w or y to select HOUR or MINUTE.
2. Rotate i to adjust the value.
3. Move r to select OK.
Resetting the Clock Settings
H INFO button Clock/Wallpaper Clock Adjustment ResetReset the Auto Daylight and Auto Time Zone settings to the factory defaults.
60
Clock AdjustmentSetting the Clock Type
System Setup
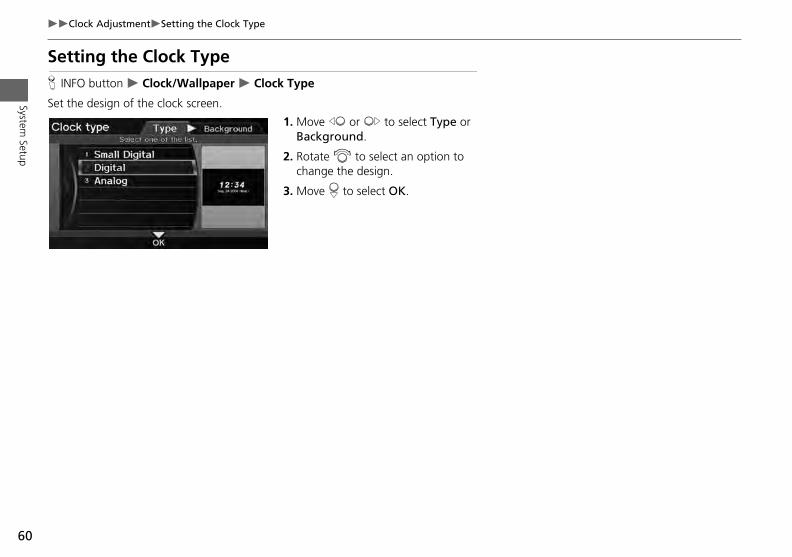
Setting the Clock TypeH INFO button Clock/Wallpaper Clock Type
Set the design of the clock screen.
1. Move w or y to select Type or Background.
2. Rotate i to select an option to change the design.
3. Move r to select OK.

61
System Setup
Vehicle
H INFO button Setup Other Vehicle
Set the off-road tracking feature and correct the vehicle position displayed on the map.
Rotate i to select an item. Press u.
The following items are available:
• Off-road Tracking: Set whether to display the tracking dots on the map. 2
C2
•
Off-road Tracking P. 62
orrect Vehicle Position: Adjust the position of the vehicle on the map. Correct Vehicle Position P. 63

62
VehicleOff-road Tracking
System Setup
Off-road TrackingH INFO button Setup Other Vehicle Off-road Tracking
The navigation system displays white off-road tracking dots (“breadcrumbs”) on the map screen whenever you drive into an area approximately 1/2 mile away from a mapped road.
Rotate i to select an option. Press u.
The following options are available:
1 Off-road Tracking
To clear existing breadcrumbs, set Off-road Tracking to OFF, exit the Setup screen, and then set Off-road Tracking to ON again.
• ON: The system displays the white tracking dots.2 Driving Off-road P. 96
• OFF (factory default): Disables the feature.
63
VehicleCorrect Vehicle PositionSystem
Setup
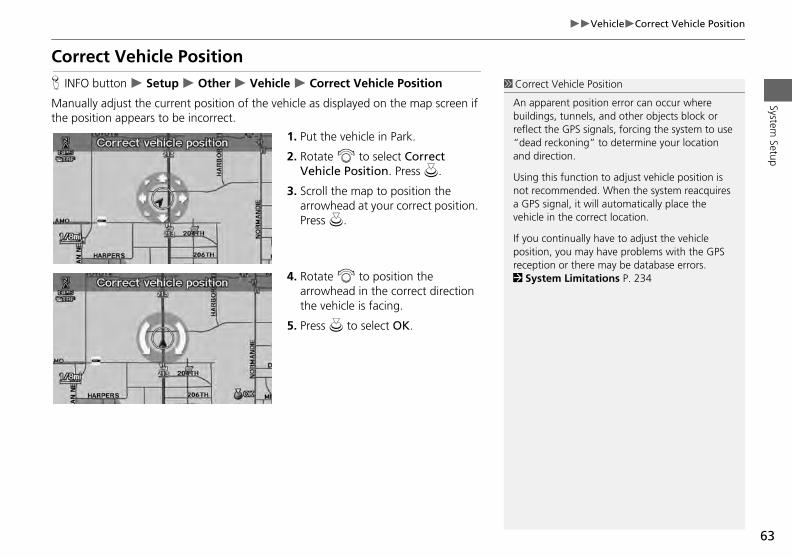
Correct Vehicle PositionH INFO button Setup Other Vehicle Correct Vehicle Position
Manually adjust the current position of the vehicle as displayed on the map screen if the position appears to be incorrect.
1. Put the vehicle in Park.
2. Rotate i to select Correct Vehicle Position. Press u.
3. Scroll the map to position the arrowhead at your correct position. Press u.
4. Rotate i to position the arrowhead in the correct direction
1 Correct Vehicle Position
An apparent position error can occur where buildings, tunnels, and other objects block or reflect the GPS signals, forcing the system to use “dead reckoning” to determine your location and direction.
Using this function to adjust vehicle position is not recommended. When the system reacquires a GPS signal, it will automatically place the vehicle in the correct location.
If you continually have to adjust the vehicle position, you may have problems with the GPS reception or there may be database errors. 2 System Limitations P. 234
the vehicle is facing.
5. Press u to select OK.
System Setup
Data Reset
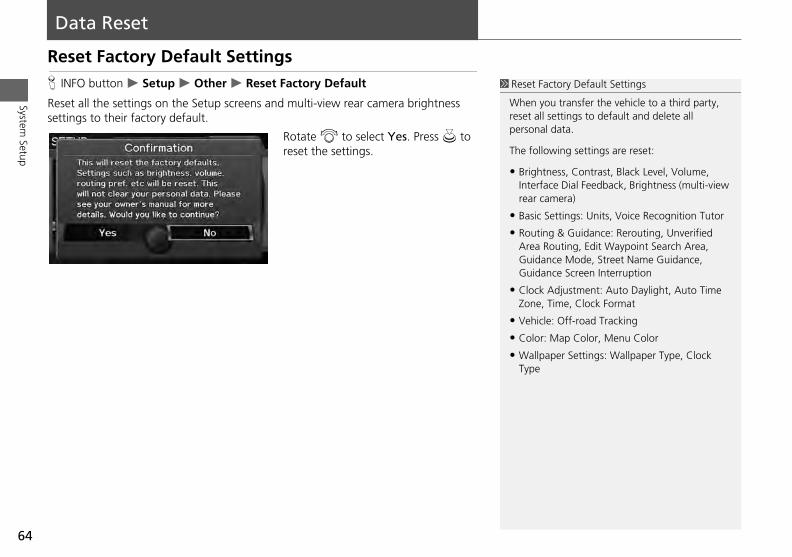
Reset Factory Default SettingsH INFO button Setup Other Reset Factory Default
Reset all the settings on the Setup screens and multi-view rear camera brightness settings to their factory default.
Rotate i to select Yes. Press u to reset the settings.
1 Reset Factory Default Settings
When you transfer the vehicle to a third party, reset all settings to default and delete all personal data.
The following settings are reset:
• Brightness, Contrast, Black Level, Volume, Interface Dial Feedback, Brightness (multi-view rear camera)
• Basic Settings: Units, Voice Recognition Tutor
• Routing & Guidance: Rerouting, Unverified Area Routing, Edit Waypoint Search Area, Guidance Mode, Street Name Guidance, Guidance Screen Interruption
• Clock Adjustment: Auto Daylight, Auto Time Time, Clock Format
le: Off-road Tracking
: Map Color, Menu Color
aper Settings: Wallpaper Type, Clock
64
Zone,
• Vehic
• Color
• WallpType
65
Data ResetClear Personal DataSystem
Setup
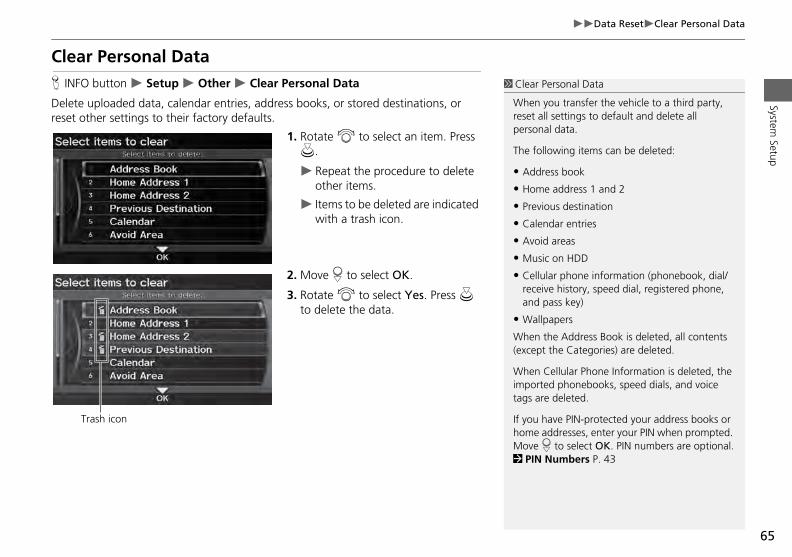
Clear Personal DataH INFO button Setup Other Clear Personal Data
Delete uploaded data, calendar entries, address books, or stored destinations, or reset other settings to their factory defaults.
1. Rotate i to select an item. Press u.
Repeat the procedure to delete other items.
Items to be deleted are indicated with a trash icon.
2. Move r to select OK.
3. Rotate i to select Yes. Press u
1 Clear Personal Data
When you transfer the vehicle to a third party, reset all settings to default and delete all personal data.
The following items can be deleted:
• Address book
• Home address 1 and 2
• Previous destination
• Calendar entries
• Avoid areas
• Music on HDD
• Cellular phone information (phonebook, dial/receive history, speed dial, registered phone,
pass key)
papers
the Address Book is deleted, all contents t the Categories) are deleted.
Cellular Phone Information is deleted, the ed phonebooks, speed dials, and voice e deleted.
have PIN-protected your address books or addresses, enter your PIN when prompted. r to select OK. PIN numbers are optional. Numbers P. 43
to delete the data.and
• Wall
When (excep
When importtags ar
If you home Move 2 PIN
Trash icon

66
Navigation
This se tination, select a route to take,
and fol It also describes how to change
e or destination along the way.
EntAAPPPPZCInM
CalculatinChanginViewingCalculatMap...
Driving toViewingListenin
Map MenDisplayiGuidancMap InfFM Traf
ging Your Route ........................... 116nceling the Route............................. 117king a Detour ................................... 117oiding Streets ................................... 117ding Waypoints ............................... 118iting the Destination List ................... 122ging Your Destination ................. 123d Nearest Place ................................ 123lecting a Destination on the Map...... 124tering a New Destination.................. 125ming Your Trip .............................. 127
ering a Destination ........................... 68ddress ................................................. 70ddress Book......................................... 75revious Destination............................... 76lace Name............................................ 77lace Category ....................................... 80lace Phone Number .............................. 84AGAT................................................... 84oordinate ............................................ 86tersection............................................ 87ap Input.............................................. 88
67
g the Route ..............................90g the Route Preference ..............91 the Routes .................................92ing the Route on the Destination ...................................................92 Your Destination ...................93 the Route ..................................93g to Voice Guidance ....................97u ................................................98
ng the Map Menu .......................98e Menu ....................................100ormation...................................105fic .............................................114
ChanCaTaAvAdEd
ChanFinSeEn
Resu
ction describes how to enter a des
low the route to your destination.
your rout
Navigation
Entering a Destination
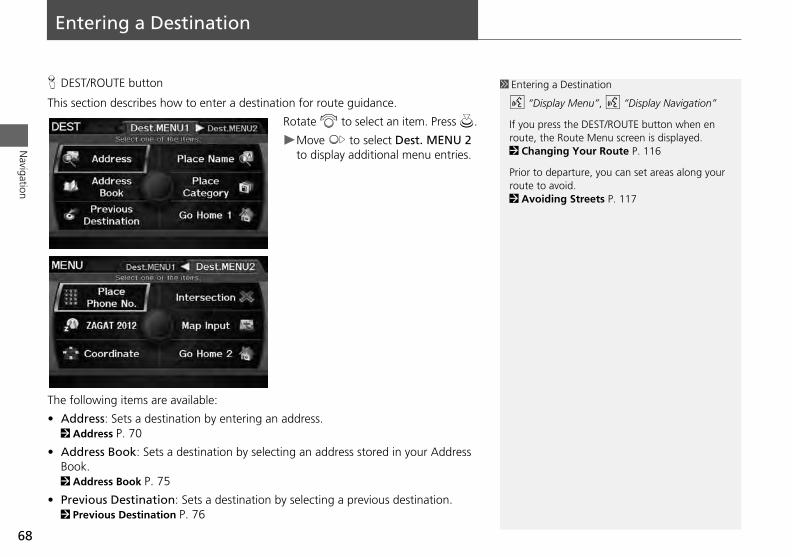
H DEST/ROUTE button
This section describes how to enter a destination for route guidance.
Rotate i to select an item. Press u.
Move y to select Dest. MENU 2 to display additional menu entries.
he
A2
AB2
P2
1 Entering a Destination
d “Display Menu”, d “Display Navigation”
If you press the DEST/ROUTE button when en route, the Route Menu screen is displayed. 2 Changing Your Route P. 116
Prior to departure, you can set areas along your route to avoid. 2 Avoiding Streets P. 117
68
T
•
•
•
following items are available:
ddress: Sets a destination by entering an address. Address P. 70
ddress Book: Sets a destination by selecting an address stored in your Address ook. Address Book P. 75
revious Destination: Sets a destination by selecting a previous destination. Previous Destination P. 76
69
Entering a DestinationN
avigation
• Place Name: Sets a destination by entering a place name. 2 Place Name P. 77
• Place Category: Sets a destination by selecting a place/landmark. 2 Place Category P. 80
• Place Phone No.: Sets a destination by entering the phone number of a place/landmark. 2 Place Phone Number P. 84
• ZAGAT: Sets a destination (restaurant) by using ZAGAT® SURVEY Rating information. 2 ZAGAT P. 84
• Coordinate: Sets a destination by entering latitude and longitude. 2 Coordinate P. 86
• Intersection: Sets a destination (intersection) by entering two streets. 2 Intersection P. 87
• M2
• G2
ap Input: Sets a destination by scrolling through the map. Map Input P. 88
o Home 1 or 2: Sets your home address as a destination. Going Home P. 12
70
Entering a DestinationAddress
Navigation
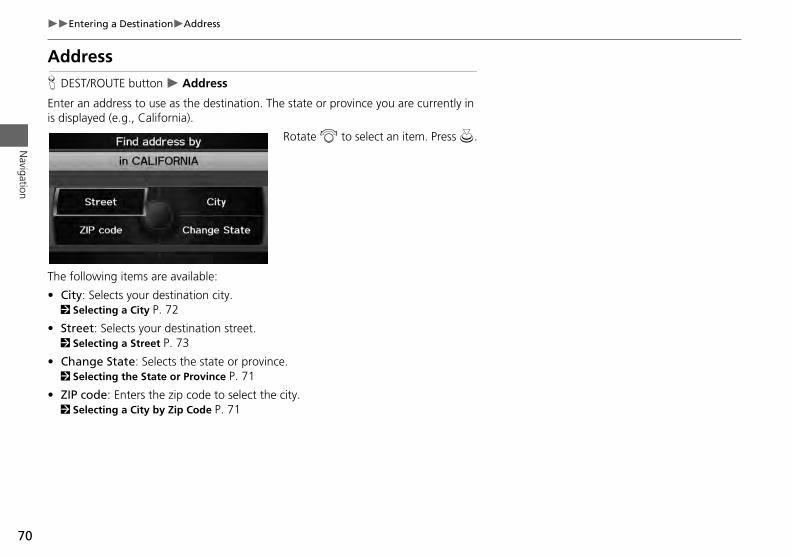
AddressH DEST/ROUTE button Address
Enter an address to use as the destination. The state or province you are currently in is displayed (e.g., California).
Rotate i to select an item. Press u.
The following items are available:
• City: Selects your destination city.
2 Selecting a City P. 72• Street: Selects your destination street. 2 Selecting a Street P. 73
• Change State: Selects the state or province. 2 Selecting the State or Province P. 71
• ZIP code: Enters the zip code to select the city. 2 Selecting a City by Zip Code P. 71
71
Entering a DestinationAddressN
avigation
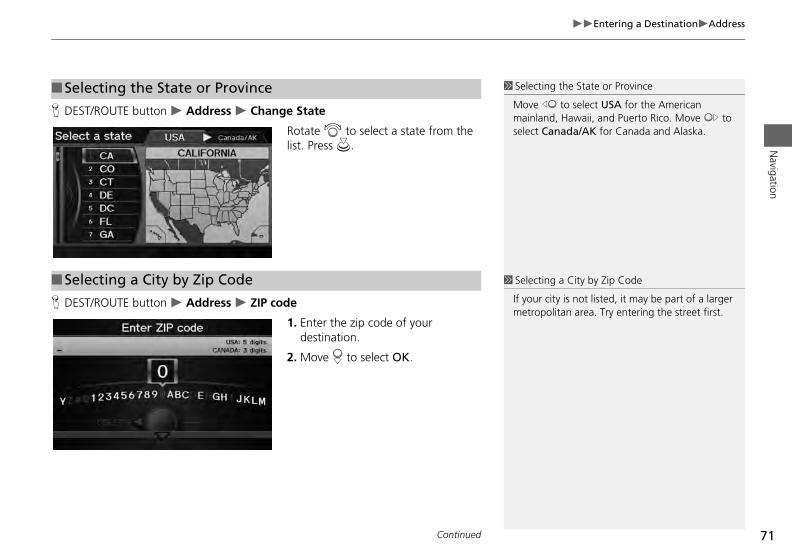
H DEST/ROUTE button Address Change State
Rotate i to select a state from the list. Press u.
H D
■Selecting the State or Province 1 Selecting the State or Province
Move w to select USA for the American mainland, Hawaii, and Puerto Rico. Move y to select Canada/AK for Canada and Alaska.
■Selecting a City by Zip Code 1 Selecting a City by Zip Code
city is not listed, it may be part of a larger olitan area. Try entering the street first.
EST/ROUTE button Address ZIP code
1. Enter the zip code of your destination.
2. Move r to select OK.
If yourmetrop
Continued
72
Entering a DestinationAddress
Navigation
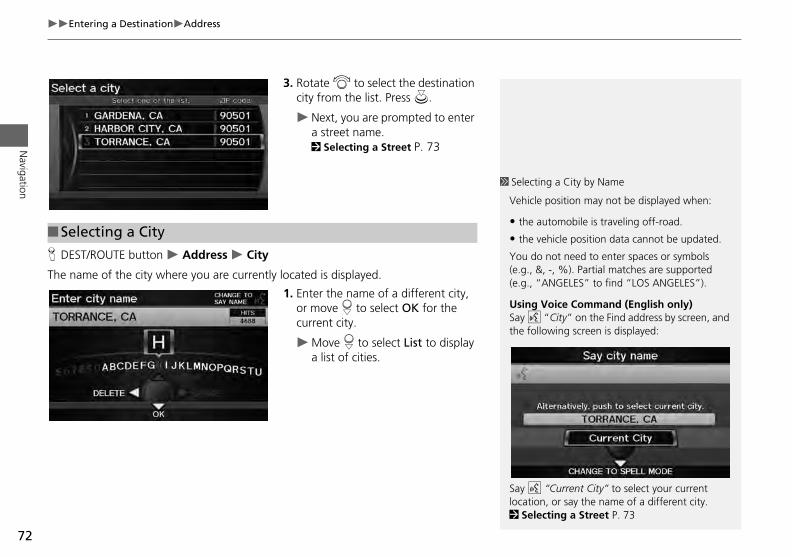
3. Rotate i to select the destination city from the list. Press u.
Next, you are prompted to enter a street name. 2 Selecting a Street P. 73
H DEST/ROUTE button Address City
The name of the city where you are currently located is displayed.
1. Enter the name of a different city,
■Selecting a City
1 Selecting a City by Name
Vehicle position may not be displayed when:
• the automobile is traveling off-road.
• the vehicle position data cannot be updated.
You do not need to enter spaces or symbols (e.g., &, -, %). Partial matches are supported (e.g., “ANGELES” to find “LOS ANGELES”).
oice Command (English only)“City” on the Find address by screen, and wing screen is displayed:
“Current City” to select your current , or say the name of a different city.
cting a Street P. 73
or move r to select OK for the current city.
Move r to select List to display a list of cities.
Using VSay d the follo
Say dlocation2 Sele
73
Entering a DestinationAddressN
avigation
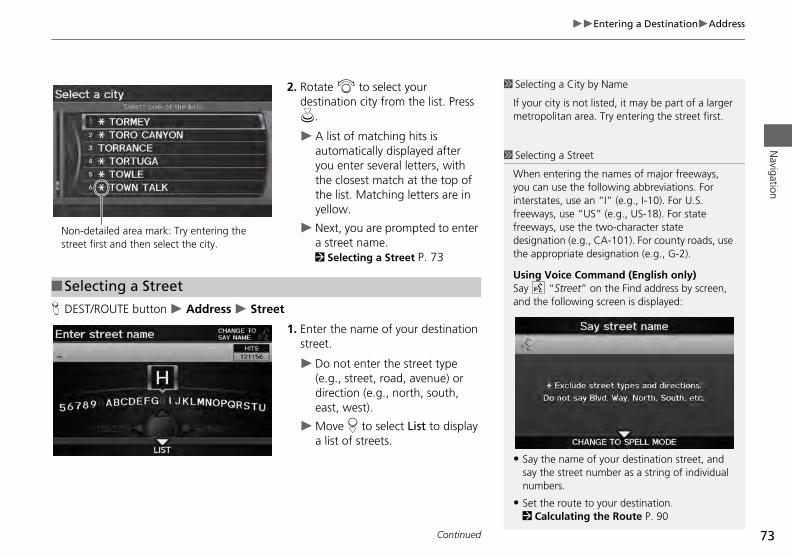
2. Rotate i to select your destination city from the list. Press u.
A list of matching hits is automatically displayed after you enter several letters, with the closest match at the top of the list. Matching letters are in yellow.
Next, you are prompted to enter a street name. 2 Selecting a Street P. 73
H D
1 Selecting a City by Name
If your city is not listed, it may be part of a larger metropolitan area. Try entering the street first.
Non-detailed area mark: Try entering the street first and then select the city.
■Selecting a Street
1 Selecting a Street
When entering the names of major freeways, you can use the following abbreviations. For interstates, use an “I” (e.g., I-10). For U.S. freeways, use “US” (e.g., US-18). For state freeways, use the two-character state designation (e.g., CA-101). For county roads, use the appropriate designation (e.g., G-2).
Using Voice Command (English only)Say d “Street” on the Find address by screen,
e following screen is displayed:
he name of your destination street, and he street number as a string of individual bers.
he route to your destination. lculating the Route P. 90
EST/ROUTE button Address Street
1. Enter the name of your destination street.
Do not enter the street type (e.g., street, road, avenue) or direction (e.g., north, south, east, west).
Move r to select List to display a list of streets.
and th
• Say tsay tnum
• Set t2 Ca
Continued
74
Entering a DestinationAddress
Navigation
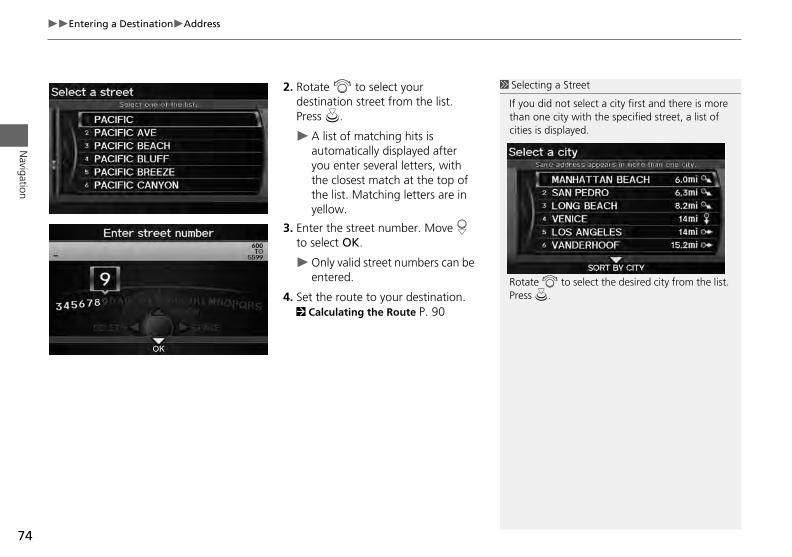
2. Rotate i to select your destination street from the list. Press u.
A list of matching hits is automatically displayed after you enter several letters, with the closest match at the top of the list. Matching letters are in yellow.
3. Enter the street number. Move r to select OK.
Only valid street numbers can be entered.
4. Set the route to your destination.
1 Selecting a Street
If you did not select a city first and there is more than one city with the specified street, a list of cities is displayed.
Rotate i to select the desired city from the list. Press u.
2 Calculating the Route P. 90
75
Entering a DestinationAddress BookN
avigation
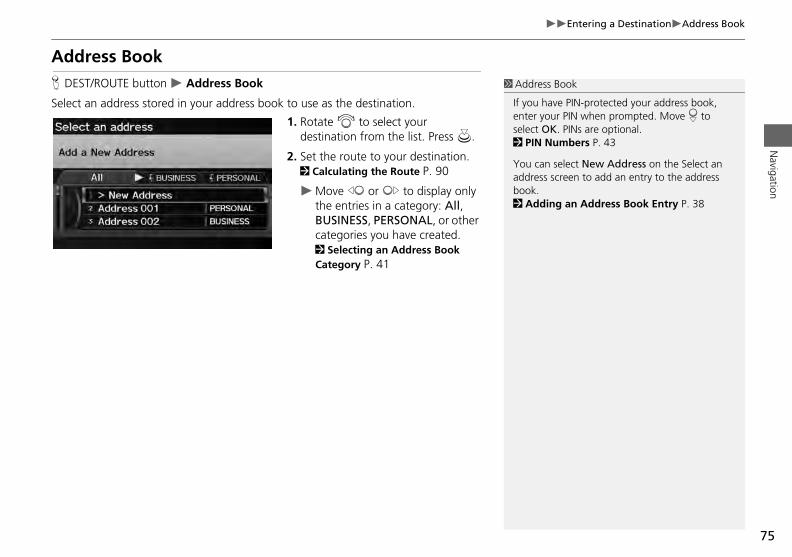
Address BookH DEST/ROUTE button Address Book
Select an address stored in your address book to use as the destination.
1. Rotate i to select your destination from the list. Press u.
2. Set the route to your destination. 2 Calculating the Route P. 90
Move w or y to display only the entries in a category: All, BUSINESS, PERSONAL, or other categories you have created. 2 Selecting an Address Book Category P. 41
1 Address Book
If you have PIN-protected your address book, enter your PIN when prompted. Move r to select OK. PINs are optional. 2 PIN Numbers P. 43
You can select New Address on the Select an address screen to add an entry to the address book. 2 Adding an Address Book Entry P. 38

76
Entering a DestinationPrevious Destination
Navigation
Previous DestinationH DEST/ROUTE button Previous Destination
Select an address from a list of your 50 most recent destinations to use as the destination. The list is displayed with the most recent destination at the top.
1. Rotate i to select a destination from the list. Press u.
2. Set the route to your destination. 2 Calculating the Route P. 90
1 Previous Destination
If Previous Destination is grayed out, there are no previous destinations entered.
Your home addresses and addresses stored in your address book are not added to the list of previous destinations.
You can delete unwanted previous destinations from the list. 2 Previous Destinations P. 44
77
Entering a DestinationPlace NameN
avigation
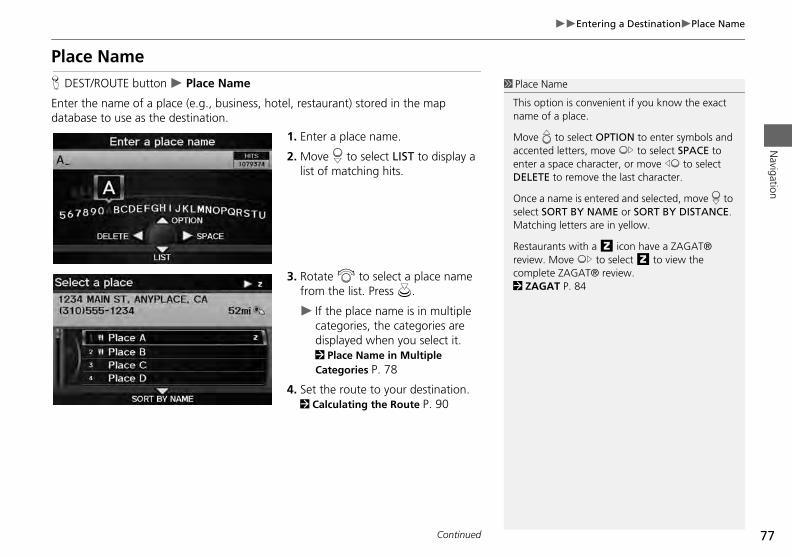
Place NameH DEST/ROUTE button Place Name
Enter the name of a place (e.g., business, hotel, restaurant) stored in the map database to use as the destination.
1. Enter a place name.
2. Move r to select LIST to display a list of matching hits.
3. Rotate i to select a place name from the list. Press u.
1 Place Name
This option is convenient if you know the exact name of a place.
Move e to select OPTION to enter symbols and accented letters, move y to select SPACE to enter a space character, or move w to select DELETE to remove the last character.
Once a name is entered and selected, move r to select SORT BY NAME or SORT BY DISTANCE. Matching letters are in yellow.
Restaurants with a z icon have a ZAGAT® review. Move y to select z to view the complete ZAGAT® review. 2 ZAGAT P. 84
If the place name is in multiple categories, the categories are displayed when you select it. 2 Place Name in Multiple Categories P. 78
4. Set the route to your destination. 2 Calculating the Route P. 90
Continued
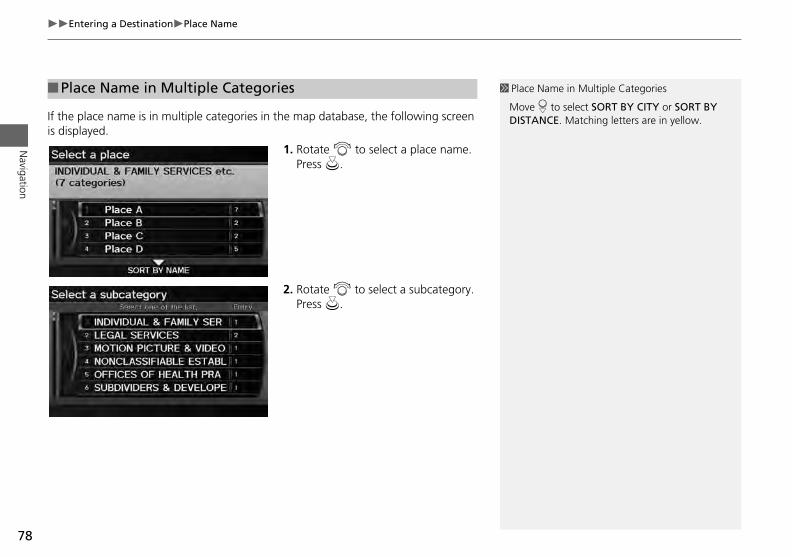
78
Entering a DestinationPlace Name
Navigation
If the place name is in multiple categories in the map database, the following screen is displayed.
1. Rotate i to select a place name. Press u.
2. Rotate i to select a subcategory.
■Place Name in Multiple Categories 1 Place Name in Multiple Categories
Move r to select SORT BY CITY or SORT BY DISTANCE. Matching letters are in yellow.
Press u.
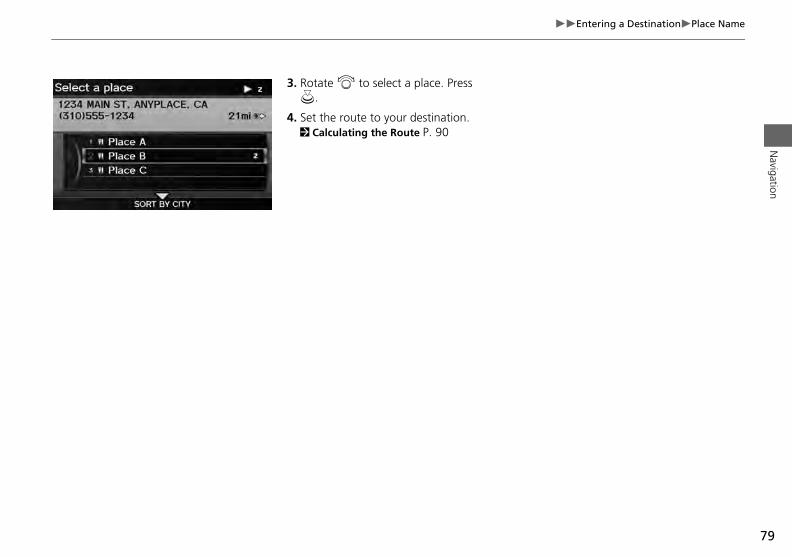
79
Entering a DestinationPlace NameN
avigation
3. Rotate i to select a place. Press u.
4. Set the route to your destination. 2 Calculating the Route P. 90
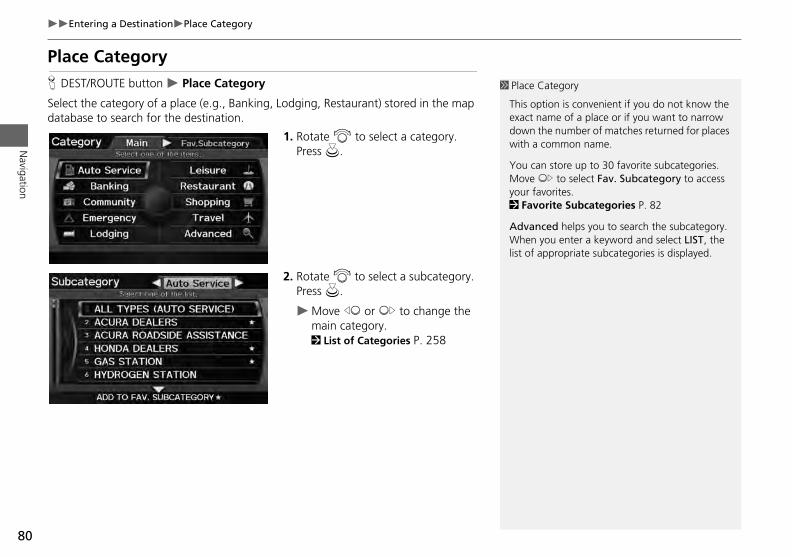
80
Entering a DestinationPlace Category
Navigation
Place CategoryH DEST/ROUTE button Place Category
Select the category of a place (e.g., Banking, Lodging, Restaurant) stored in the map database to search for the destination.
1. Rotate i to select a category. Press u.
2. Rotate i to select a subcategory. Press u.
1 Place Category
This option is convenient if you do not know the exact name of a place or if you want to narrow down the number of matches returned for places with a common name.
You can store up to 30 favorite subcategories. Move y to select Fav. Subcategory to access your favorites. 2 Favorite Subcategories P. 82
Advanced helps you to search the subcategory. When you enter a keyword and select LIST, the list of appropriate subcategories is displayed.
Move w or y to change the main category. 2 List of Categories P. 258
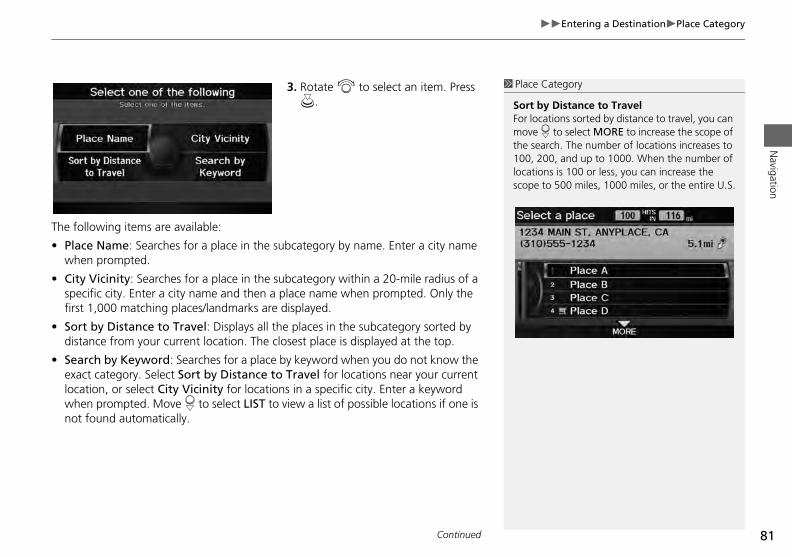
81
Entering a DestinationPlace CategoryN
avigation
3. Rotate i to select an item. Press u.
The following items are available:
• Place Name: Searches for a place in the subcategory by name. Enter a city name when prompted.
• City Vicinity: Searches for a place in the subcategory within a 20-mile radius of a specific city. Enter a city name and then a place name when prompted. Only the f
• Sd
• Selwn
1 Place Category
Sort by Distance to TravelFor locations sorted by distance to travel, you can move r to select MORE to increase the scope of the search. The number of locations increases to 100, 200, and up to 1000. When the number of locations is 100 or less, you can increase the scope to 500 miles, 1000 miles, or the entire U.S.
irst 1,000 matching places/landmarks are displayed.
ort by Distance to Travel: Displays all the places in the subcategory sorted by istance from your current location. The closest place is displayed at the top.
earch by Keyword: Searches for a place by keyword when you do not know the xact category. Select Sort by Distance to Travel for locations near your current
ocation, or select City Vicinity for locations in a specific city. Enter a keyword hen prompted. Move r to select LIST to view a list of possible locations if one is ot found automatically.
Continued
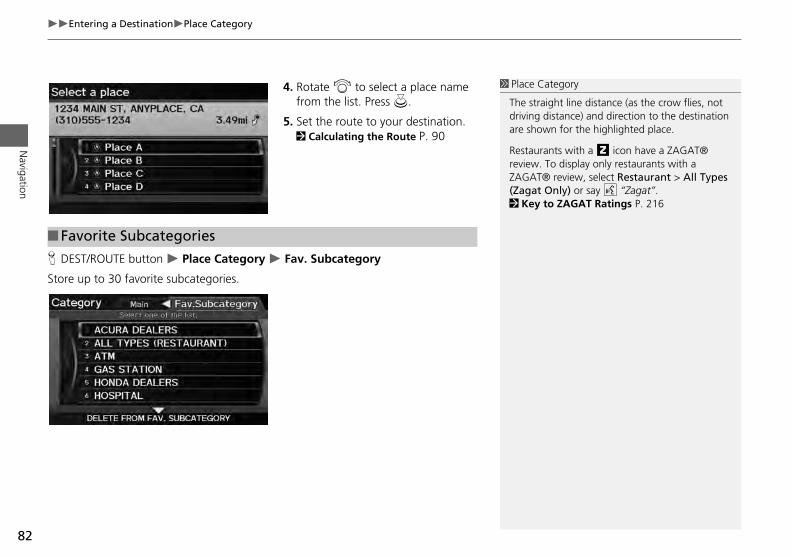
82
Entering a DestinationPlace Category
Navigation
4. Rotate i to select a place name from the list. Press u.
5. Set the route to your destination. 2 Calculating the Route P. 90
H DEST/ROUTE button Place Category Fav. Subcategory
Store up to 30 favorite subcategories.
1 Place Category
The straight line distance (as the crow flies, not driving distance) and direction to the destination are shown for the highlighted place.
Restaurants with a z icon have a ZAGAT® review. To display only restaurants with a ZAGAT® review, select Restaurant > All Types (Zagat Only) or say d “Zagat”. 2 Key to ZAGAT Ratings P. 216
■Favorite Subcategories
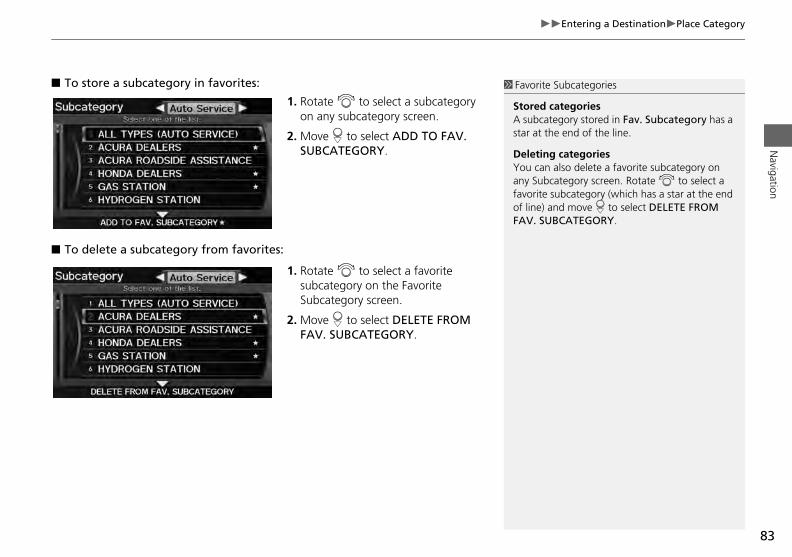
83
Entering a DestinationPlace CategoryN
avigation
■ To store a subcategory in favorites:
1. Rotate i to select a subcategory on any subcategory screen.
2. Move r to select ADD TO FAV. SUBCATEGORY.
■ To delete a subcategory from favorites:
1. Rotate i to select a favorite subcategory on the Favorite
1 Favorite Subcategories
Stored categoriesA subcategory stored in Fav. Subcategory has a star at the end of the line.
Deleting categoriesYou can also delete a favorite subcategory on any Subcategory screen. Rotate i to select a favorite subcategory (which has a star at the end of line) and move r to select DELETE FROM FAV. SUBCATEGORY.
Subcategory screen.
2. Move r to select DELETE FROM FAV. SUBCATEGORY.
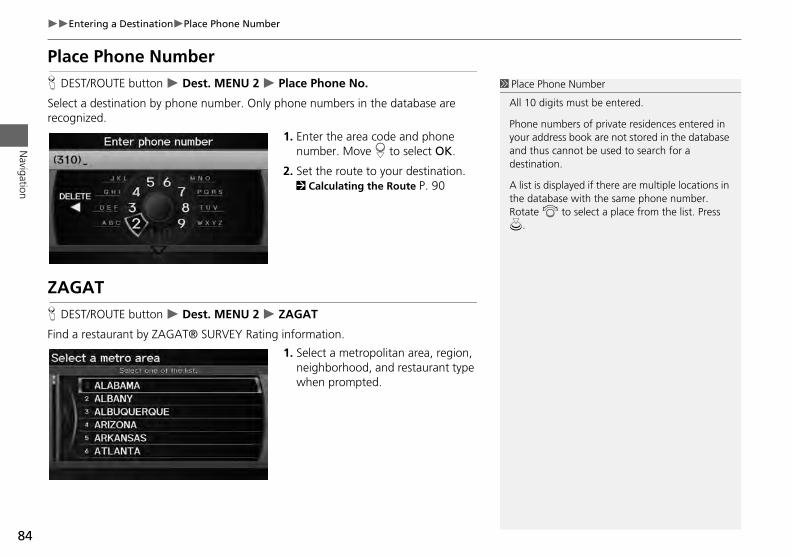
84
Entering a DestinationPlace Phone Number
Navigation
Place Phone NumberH DEST/ROUTE button Dest. MENU 2 Place Phone No.
Select a destination by phone number. Only phone numbers in the database are recognized.
1. Enter the area code and phone number. Move r to select OK.
2. Set the route to your destination. 2 Calculating the Route P. 90
ZAGAT
1 Place Phone Number
All 10 digits must be entered.
Phone numbers of private residences entered in your address book are not stored in the database and thus cannot be used to search for a destination.
A list is displayed if there are multiple locations in the database with the same phone number. Rotate i to select a place from the list. Press u.
H DEST/ROUTE button Dest. MENU 2 ZAGAT
Find a restaurant by ZAGAT® SURVEY Rating information.
1. Select a metropolitan area, region, neighborhood, and restaurant type when prompted.
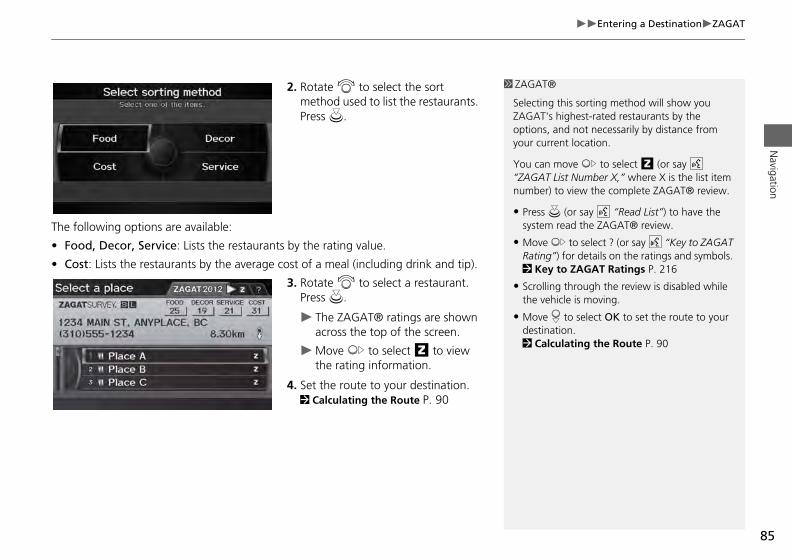
85
Entering a DestinationZAGATN
avigation
2. Rotate i to select the sort method used to list the restaurants. Press u.
The following options are available:
• Food, Decor, Service: Lists the restaurants by the rating value.
• Cost: Lists the restaurants by the average cost of a meal (including drink and tip).
3. Rotate i to select a restaurant.
1 ZAGAT®
Selecting this sorting method will show you ZAGAT's highest-rated restaurants by the options, and not necessarily by distance from your current location.
You can move y to select z (or say d “ZAGAT List Number X,” where X is the list item number) to view the complete ZAGAT® review.
• Press u (or say d “Read List”) to have the system read the ZAGAT® review.
• Move y to select ? (or say d “Key to ZAGAT Rating”) for details on the ratings and symbols. 2 Key to ZAGAT Ratings P. 216
• Scrolling through the review is disabled while ehicle is moving.
e r to select OK to set the route to your ination. lculating the Route P. 90
Press u.
The ZAGAT® ratings are shown across the top of the screen.
Move y to select z to view the rating information.
4. Set the route to your destination. 2 Calculating the Route P. 90
the v
• Movdest2 Ca
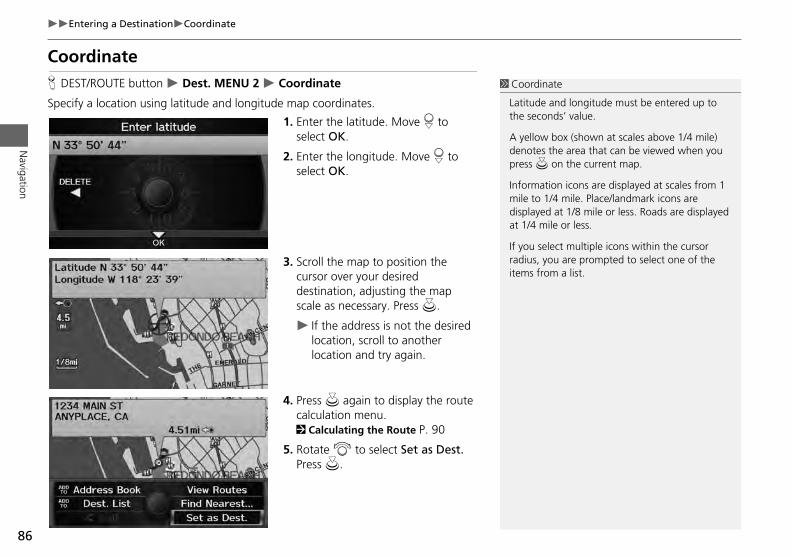
86
Entering a DestinationCoordinate
Navigation
CoordinateH DEST/ROUTE button Dest. MENU 2 Coordinate
Specify a location using latitude and longitude map coordinates.
1. Enter the latitude. Move r to select OK.
2. Enter the longitude. Move r to select OK.
3. Scroll the map to position the cursor over your desired destination, adjusting the map
1 Coordinate
Latitude and longitude must be entered up to the seconds’ value.
A yellow box (shown at scales above 1/4 mile) denotes the area that can be viewed when you press u on the current map.
Information icons are displayed at scales from 1 mile to 1/4 mile. Place/landmark icons are displayed at 1/8 mile or less. Roads are displayed at 1/4 mile or less.
If you select multiple icons within the cursor radius, you are prompted to select one of the items from a list.
scale as necessary. Press u.
If the address is not the desired location, scroll to another location and try again.
4. Press u again to display the route calculation menu. 2 Calculating the Route P. 90
5. Rotate i to select Set as Dest. Press u.
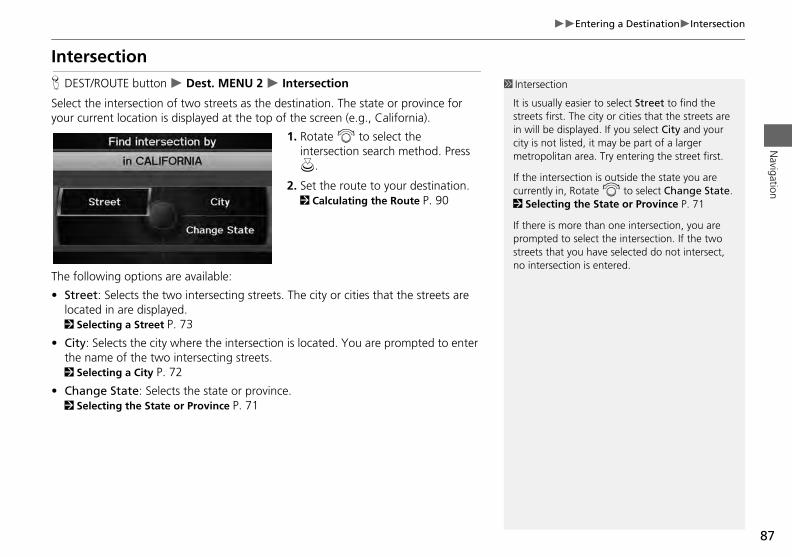
87
Entering a DestinationIntersectionN
avigation
IntersectionH DEST/ROUTE button Dest. MENU 2 Intersection
Select the intersection of two streets as the destination. The state or province for your current location is displayed at the top of the screen (e.g., California).
1. Rotate i to select the intersection search method. Press u.
2. Set the route to your destination. 2 Calculating the Route P. 90
The following options are available:
• Street: Selects the two intersecting streets. The city or cities that the streets are
1 Intersection
It is usually easier to select Street to find the streets first. The city or cities that the streets are in will be displayed. If you select City and your city is not listed, it may be part of a larger metropolitan area. Try entering the street first.
If the intersection is outside the state you are currently in, Rotate i to select Change State. 2 Selecting the State or Province P. 71
If there is more than one intersection, you are prompted to select the intersection. If the two streets that you have selected do not intersect, no intersection is entered.
located in are displayed. 2 Selecting a Street P. 73
• City: Selects the city where the intersection is located. You are prompted to enter the name of the two intersecting streets. 2 Selecting a City P. 72
• Change State: Selects the state or province. 2 Selecting the State or Province P. 71
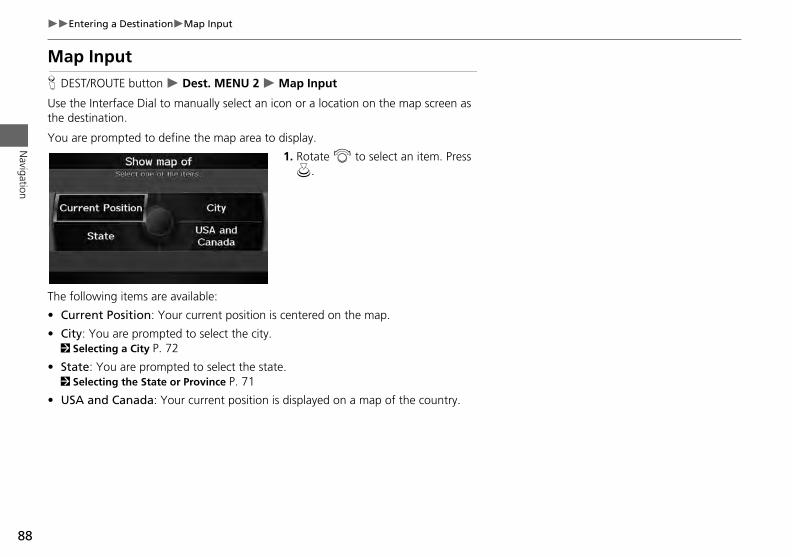
88
Entering a DestinationMap Input
Navigation
Map InputH DEST/ROUTE button Dest. MENU 2 Map Input
Use the Interface Dial to manually select an icon or a location on the map screen as the destination.
You are prompted to define the map area to display.
1. Rotate i to select an item. Press u.
The following items are available:
• Current Position: Your current position is centered on the map.
• City: You are prompted to select the city. 2 Selecting a City P. 72
• State: You are prompted to select the state. 2 Selecting the State or Province P. 71
• USA and Canada: Your current position is displayed on a map of the country.
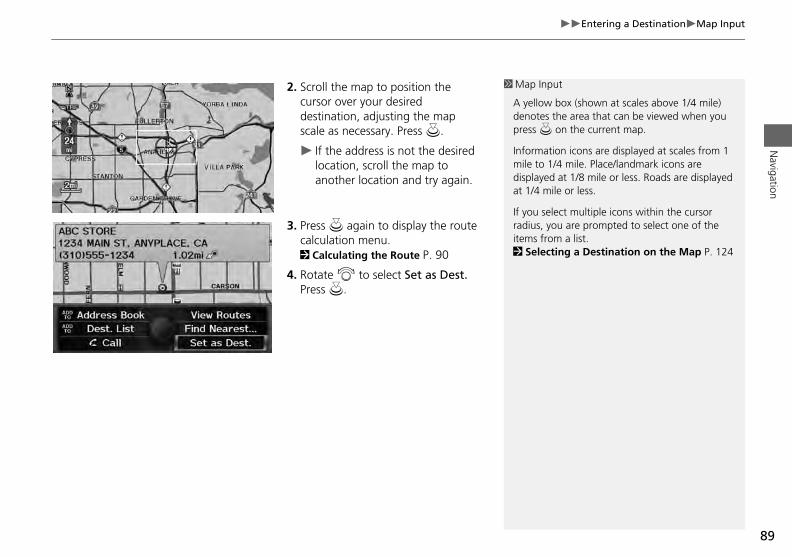
89
Entering a DestinationMap InputN
avigation
2. Scroll the map to position the cursor over your desired destination, adjusting the map scale as necessary. Press u.
If the address is not the desired location, scroll the map to another location and try again.
3. Press u again to display the route calculation menu. 2 Calculating the Route P. 90
4. Rotate i to select Set as Dest. Press u.
1 Map Input
A yellow box (shown at scales above 1/4 mile) denotes the area that can be viewed when you press u on the current map.
Information icons are displayed at scales from 1 mile to 1/4 mile. Place/landmark icons are displayed at 1/8 mile or less. Roads are displayed at 1/4 mile or less.
If you select multiple icons within the cursor radius, you are prompted to select one of the items from a list. 2 Selecting a Destination on the Map P. 124
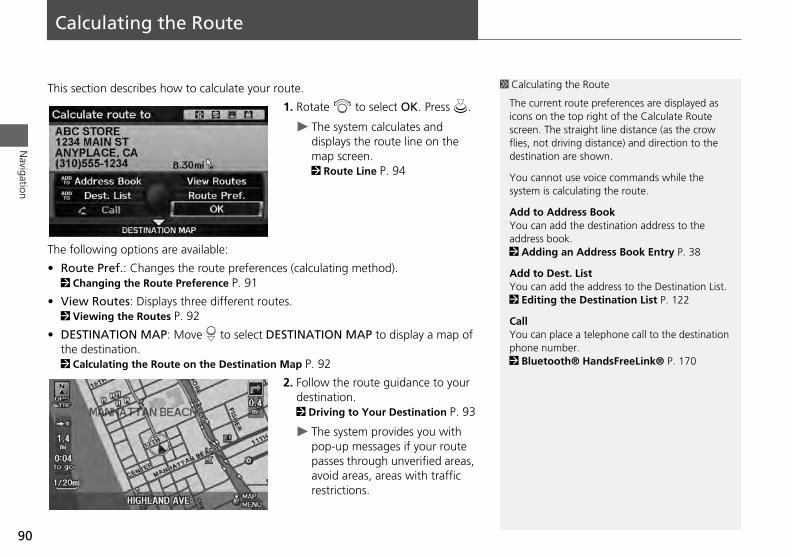
Navigation
Calculating the Route
This section describes how to calculate your route.
1. Rotate i to select OK. Press u.
The system calculates and displays the route line on the map screen. 2 Route Line P. 94
The following options are available:
• Route Pref.: Changes the route preferences (calculating method). 2 Changing the Route Preference P. 91
V2
Dth2
1 Calculating the Route
The current route preferences are displayed as icons on the top right of the Calculate Route screen. The straight line distance (as the crow flies, not driving distance) and direction to the destination are shown.
You cannot use voice commands while the system is calculating the route.
Add to Address BookYou can add the destination address to the address book. 2 Adding an Address Book Entry P. 38
Add to Dest. ListYou can add the address to the Destination List.
ng the Destination List P. 122
place a telephone call to the destination number. tooth® HandsFreeLink® P. 170
90
•
•
iew Routes: Displays three different routes. Viewing the Routes P. 92
ESTINATION MAP: Move r to select DESTINATION MAP to display a map of e destination. Calculating the Route on the Destination Map P. 92
2. Follow the route guidance to your destination. 2 Driving to Your Destination P. 93
The system provides you with pop-up messages if your route passes through unverified areas, avoid areas, areas with traffic restrictions.
2 Editi
CallYou canphone 2 Blue
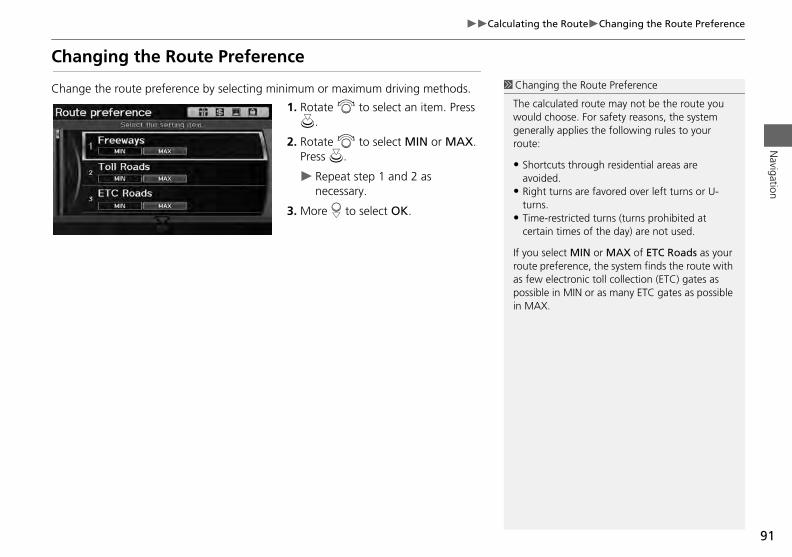
91
Calculating the RouteChanging the Route PreferenceN
avigation
Changing the Route Preference
Change the route preference by selecting minimum or maximum driving methods.
1. Rotate i to select an item. Press u.
2. Rotate i to select MIN or MAX. Press u.
Repeat step 1 and 2 as necessary.
3. More r to select OK.
1 Changing the Route Preference
The calculated route may not be the route you would choose. For safety reasons, the system generally applies the following rules to your route:
• Shortcuts through residential areas are avoided.
• Right turns are favored over left turns or U-turns.
• Time-restricted turns (turns prohibited at certain times of the day) are not used.
If you select MIN or MAX of ETC Roads as your route preference, the system finds the route with as few electronic toll collection (ETC) gates as possible in MIN or as many ETC gates as possible
.
in MAX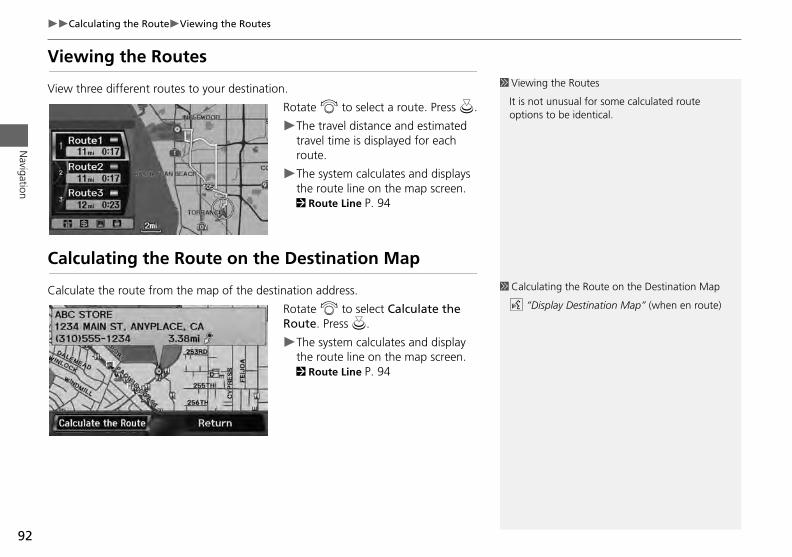
92
Calculating the RouteViewing the Routes
Navigation
Viewing the Routes
View three different routes to your destination.
Rotate i to select a route. Press u.
The travel distance and estimated travel time is displayed for each route.
The system calculates and displays the route line on the map screen. 2 Route Line P. 94
Calculating the Route on the Destination Map
Calculate the route from the map of the destination address.
1 Viewing the Routes
It is not unusual for some calculated route options to be identical.
1 Calculating the Route on the Destination Map
play Destination Map” (when en route)
Rotate i to select Calculate the Route. Press u.The system calculates and display the route line on the map screen. 2 Route Line P. 94
d “Dis
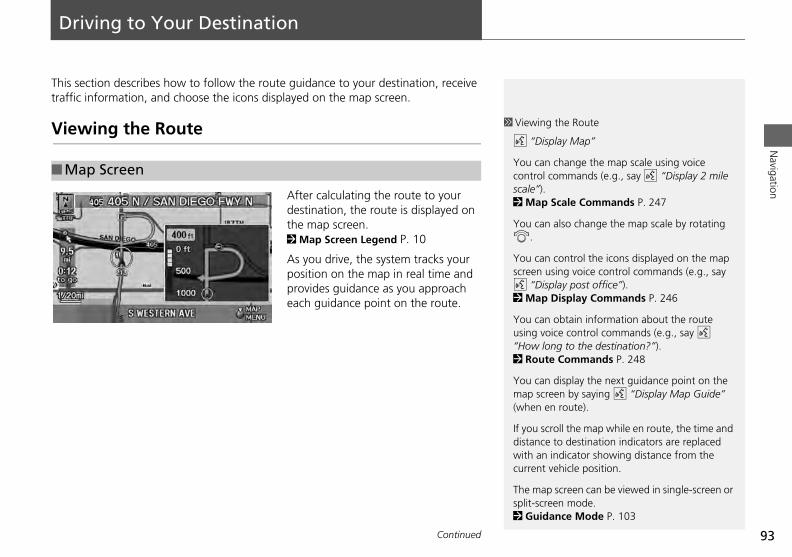
93
Navigation
Driving to Your Destination
This section describes how to follow the route guidance to your destination, receive traffic information, and choose the icons displayed on the map screen.
Viewing the Route
After calculating the route to your destination, the route is displayed on the map screen. 2 Map Screen Legend P. 10
As you drive, the system tracks your position on the map in real time and provides guidance as you approach
■Map Screen
1 Viewing the Route
d “Display Map”
You can change the map scale using voice control commands (e.g., say d “Display 2 mile scale”). 2 Map Scale Commands P. 247
You can also change the map scale by rotating i.
You can control the icons displayed on the map screen using voice control commands (e.g., say d “Display post office”).
Display Commands P. 246
n obtain information about the route oice control commands (e.g., say d
long to the destination?”). te Commands P. 248
n display the next guidance point on the reen by saying d “Display Map Guide”
en route).
croll the map while en route, the time and e to destination indicators are replaced
n indicator showing distance from the t vehicle position.
p screen can be viewed in single-screen or reen mode.dance Mode P. 103
each guidance point on the route. 2 Map
You causing v“How 2 Rou
You camap sc(when
If you sdistancwith acurren
The masplit-sc2 Gui
Continued
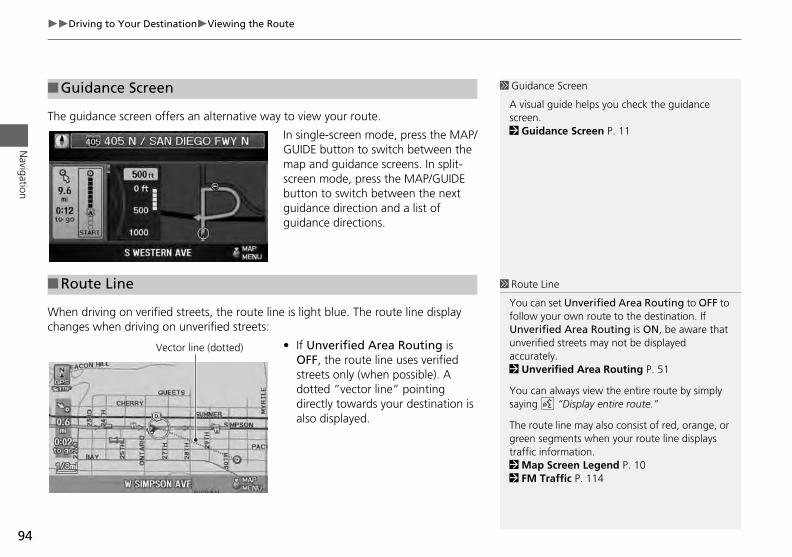
94
Driving to Your DestinationViewing the Route
Navigation
The guidance screen offers an alternative way to view your route.
In single-screen mode, press the MAP/GUIDE button to switch between the map and guidance screens. In split-screen mode, press the MAP/GUIDE button to switch between the next guidance direction and a list of guidance directions.
Whechan
■Guidance Screen 1 Guidance Screen
A visual guide helps you check the guidance screen.2 Guidance Screen P. 11
■Route Line 1 Route Line
set Unverified Area Routing to OFF to our own route to the destination. If
fied Area Routing is ON, be aware that ed streets may not be displayed ely. erified Area Routing P. 51
always view the entire route by simply “Display entire route.”
te line may also consist of red, orange, or egments when your route line displays nformation. Screen Legend P. 10raffic P. 114
n driving on verified streets, the route line is light blue. The route line display ges when driving on unverified streets:
• If Unverified Area Routing is OFF, the route line uses verified streets only (when possible). A dotted “vector line” pointing directly towards your destination is also displayed.
You canfollow yUnveriunverifiaccurat2 Unv
You cansaying d
The rougreen straffic i2 Map2 FM T
Vector line (dotted)
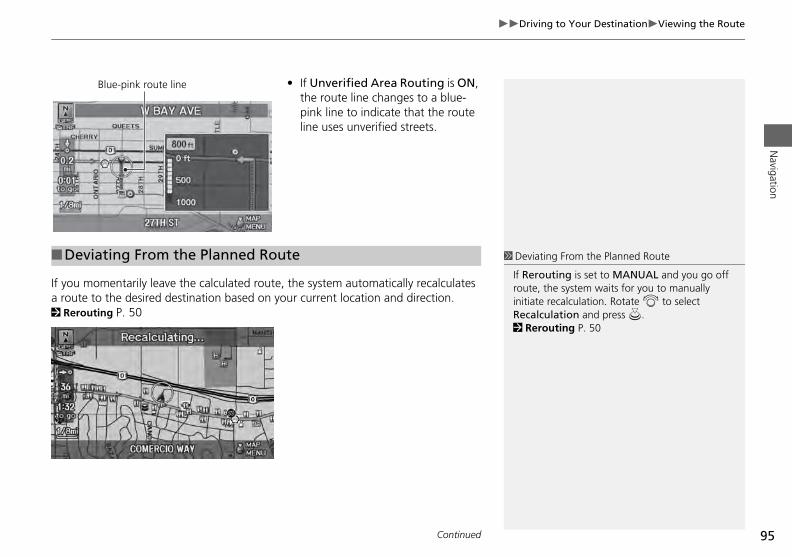
95
Driving to Your DestinationViewing the RouteN
avigation
• If Unverified Area Routing is ON, the route line changes to a blue-pink line to indicate that the route line uses unverified streets.
If you momentarily leave the calculated route, the system automatically recalculates a ro2 R
Blue-pink route line
■Deviating From the Planned Route 1 Deviating From the Planned Route
If Rerouting is set to MANUAL and you go off route, the system waits for you to manually
recalculation. Rotate i to select ulation and press u. outing P. 50
ute to the desired destination based on your current location and direction. erouting P. 50
initiateRecalc2 Rer
Continued
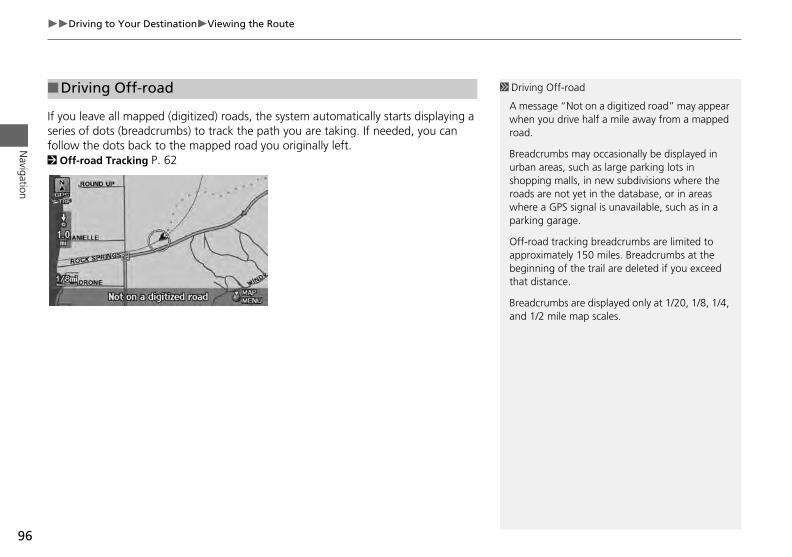
96
Driving to Your DestinationViewing the Route
Navigation
If you leave all mapped (digitized) roads, the system automatically starts displaying a series of dots (breadcrumbs) to track the path you are taking. If needed, you can follow the dots back to the mapped road you originally left. 2 Off-road Tracking P. 62
■Driving Off-road 1 Driving Off-road
A message “Not on a digitized road” may appear when you drive half a mile away from a mapped road.
Breadcrumbs may occasionally be displayed in urban areas, such as large parking lots in shopping malls, in new subdivisions where the roads are not yet in the database, or in areas where a GPS signal is unavailable, such as in a parking garage.
Off-road tracking breadcrumbs are limited to approximately 150 miles. Breadcrumbs at the beginning of the trail are deleted if you exceed that distance.
umbs are displayed only at 1/20, 1/8, 1/4, mile map scales.
Breadcrand 1/2
97
Driving to Your DestinationListening to Voice GuidanceN
avigation
Listening to Voice GuidanceH ENTER button (on map) Voice
As you approach each guidance point, a pop-up window is displayed on the map screen with instructions for you to follow. Voice guidance for each guidance point is also provided.
Typically, you hear three prompts:
• 1/2 mile from the guidance point
• 1/4 mile from the guidance point
• Just before the guidance point
To replay voice guidance, rotate i to select Voice in the Map Menu.
If you select Voice between guidance points, voice guidance for the next guidance point is provided.
1 Listening to Voice Guidance
d “Voice” (on the map screen)
You can turn voice guidance OFF if you prefer. 2 Display and Volume Settings P. 24
When driving in unverified areas, the phrase “if possible” is inserted before each voice guidance prompt.
Voice in the Map Menu may be grayed out if the vehicle is approaching or is in an unverified area.
The timing of voice guidance varies depending on the type of road you are on and the distance to the next guidance point.

Navigation
Map Menu
Displaying the Map Menu
Use the Map Menu to control the icons displayed on the screen, and to display traffic information. You can also use the Map Menu to find locations or to cancel the route.
1. On the map screen, press u to select MAP MENU (if displayed).
The Map Menu is displayed on the map screen.
2. Rotate i to select an item. Press u.
1 Map Menu
If you scroll the map while en route, press the MAP/GUIDE (or CANCEL/BACK) button to return to the current position map screen, then press u to select MAP MENU.
Traffic IncidentsYou must be in or near a traffic-enabled city to receive coverage for that area. FM Traffic is available in the lower 48 states and Hawaii.
The incident icons are displayed on the 5 mile (8 km) or less map scale.2 Map Scale and Functions P. 111
98
T
•
•
he following items are available:
Voice: Select to hear the voice guidance when en route.2 Listening to Voice Guidance P. 97
Traffic Incidents: Displays a list of the traffic incidents around your current location or on your current route.2 FM Traffic P. 114
99
Map MenuDisplaying the Map MenuN
avigation
• Guidance Menu: Allows you to set or confirm the guidance points and freeway exits for your route.2 Guidance Menu P. 100
• Find Nearest…: Allows you to find the nearest place/landmark (e.g., nearest gas station) by specifying a category. You can then add the location to the list of destinations, set as a waypoint, or set as your destination. 2 Changing Your Destination P. 123
• Map Information: Allows you to select the information icons to display on the map, change the orientation of the map, or display your current location. 2 Map Information P. 105
• Cancel Route: Cancels your current route. 2 Canceling the Route P. 117
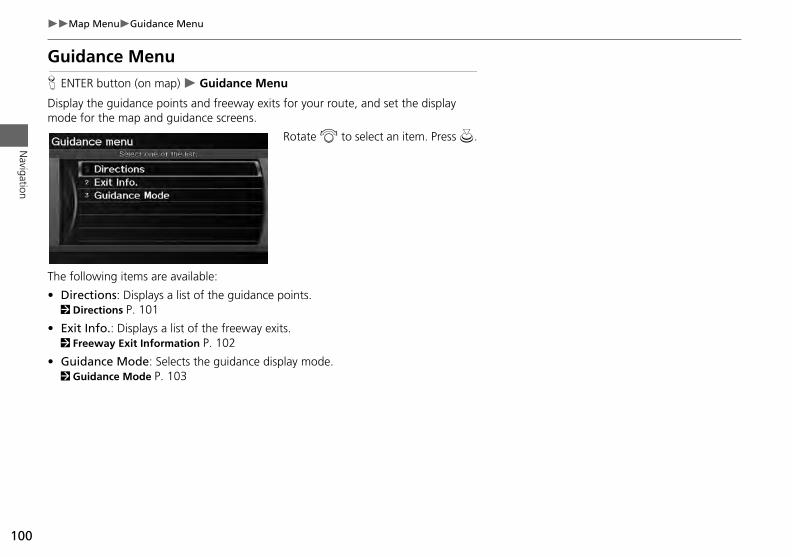
100
Map MenuGuidance Menu
Navigation
Guidance MenuH ENTER button (on map) Guidance Menu
Display the guidance points and freeway exits for your route, and set the display mode for the map and guidance screens.
Rotate i to select an item. Press u.
The following items are available:
• Directions: Displays a list of the guidance points.
2 Directions P. 101• Exit Info.: Displays a list of the freeway exits. 2 Freeway Exit Information P. 102
• Guidance Mode: Selects the guidance display mode. 2 Guidance Mode P. 103
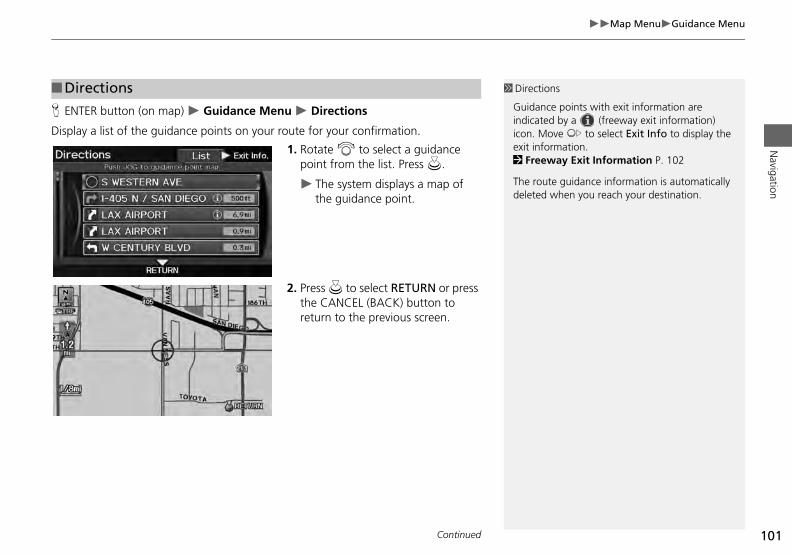
101
Map MenuGuidance MenuN
avigation
H ENTER button (on map) Guidance Menu Directions
Display a list of the guidance points on your route for your confirmation.
1. Rotate i to select a guidance point from the list. Press u.
The system displays a map of the guidance point.
2. Press u to select RETURN or press
■Directions 1 Directions
Guidance points with exit information are indicated by a (freeway exit information) icon. Move y to select Exit Info to display the exit information. 2 Freeway Exit Information P. 102
The route guidance information is automatically deleted when you reach your destination.
the CANCEL (BACK) button to return to the previous screen.
Continued
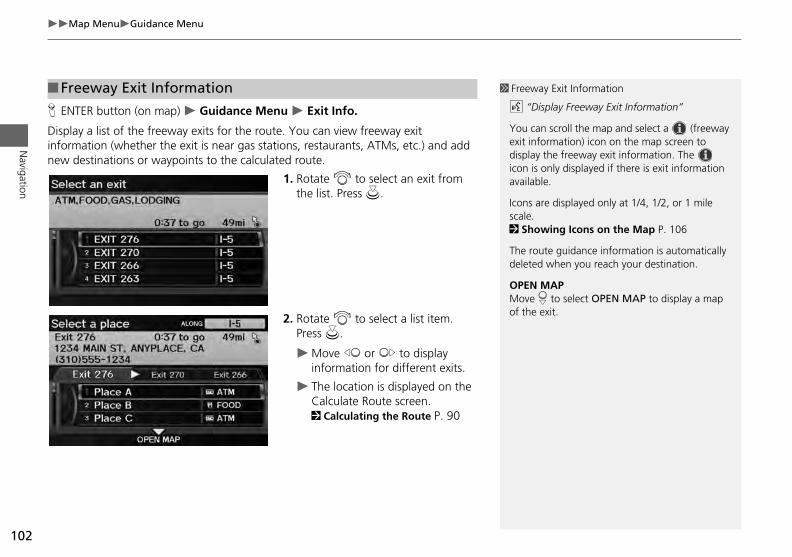
102
Map MenuGuidance Menu
Navigation
H ENTER button (on map) Guidance Menu Exit Info.
Display a list of the freeway exits for the route. You can view freeway exit information (whether the exit is near gas stations, restaurants, ATMs, etc.) and add new destinations or waypoints to the calculated route.
1. Rotate i to select an exit from the list. Press u.
■Freeway Exit Information 1 Freeway Exit Information
d “Display Freeway Exit Information”
You can scroll the map and select a (freeway exit information) icon on the map screen to display the freeway exit information. The icon is only displayed if there is exit information available.
Icons are displayed only at 1/4, 1/2, or 1 mile scale. 2 Showing Icons on the Map P. 106
The route guidance information is automatically deleted when you reach your destination.
OPEN MAPMove r to select OPEN MAP to display a map
xit.
2. Rotate i to select a list item.Press u.
Move w or y to display information for different exits.
The location is displayed on the Calculate Route screen. 2 Calculating the Route P. 90
of the e
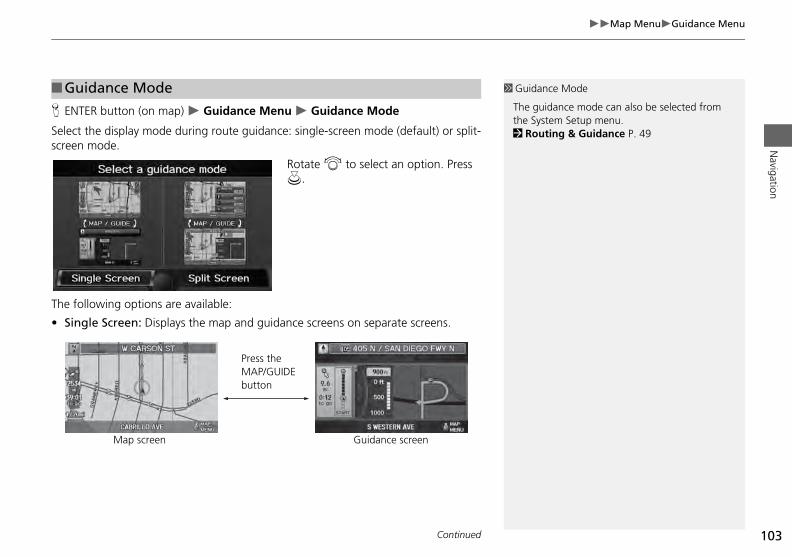
103
Map MenuGuidance MenuN
avigation
H ENTER button (on map) Guidance Menu Guidance Mode
Select the display mode during route guidance: single-screen mode (default) or split-screen mode.
Rotate i to select an option. Press u.
The
• S
■Guidance Mode 1 Guidance Mode
The guidance mode can also be selected from the System Setup menu. 2 Routing & Guidance P. 49
following options are available:
ingle Screen: Displays the map and guidance screens on separate screens.
Map screen
Press the MAP/GUIDE button
Guidance screen
Continued
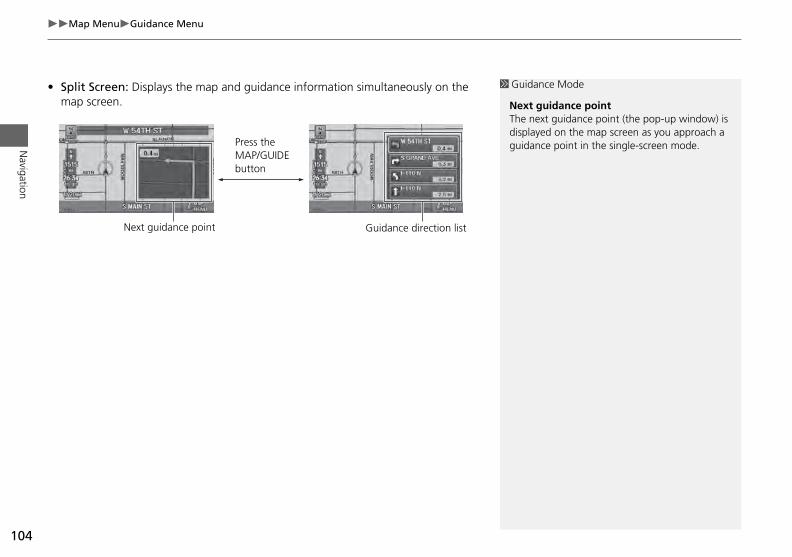
104
Map MenuGuidance Menu
Navigation
• Split Screen: Displays the map and guidance information simultaneously on the map screen.
1 Guidance Mode
Next guidance pointThe next guidance point (the pop-up window) is displayed on the map screen as you approach a guidance point in the single-screen mode.
Next guidance point
Press the MAP/GUIDE button
Guidance direction list
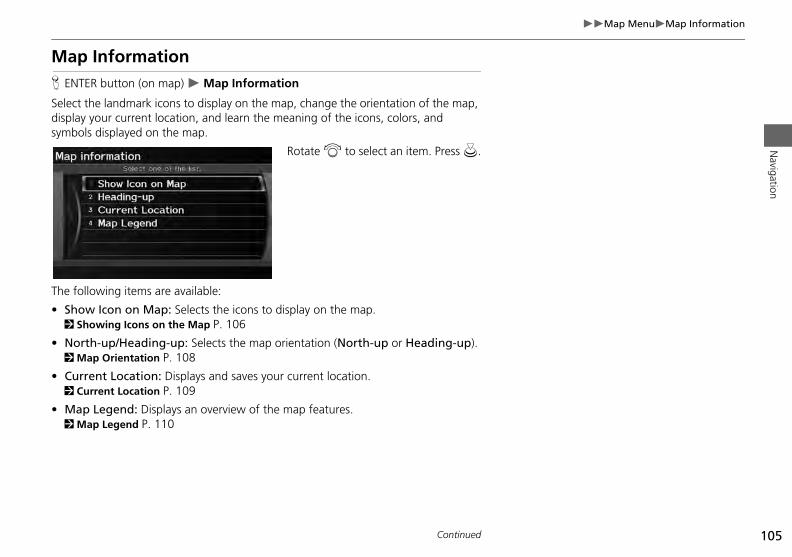
105
Map MenuMap InformationN
avigation
Map InformationH ENTER button (on map) Map Information
Select the landmark icons to display on the map, change the orientation of the map, display your current location, and learn the meaning of the icons, colors, and symbols displayed on the map.
Rotate i to select an item. Press u.
The following items are available:
• Show Icon on Map: Selects the icons to display on the map. 2 Showing Icons on the Map P. 106
• North-up/Heading-up: Selects the map orientation (North-up or Heading-up). 2 Map Orientation P. 108
• Current Location: Displays and saves your current location.2 Current Location P. 109
• Map Legend: Displays an overview of the map features. 2 Map Legend P. 110
Continued
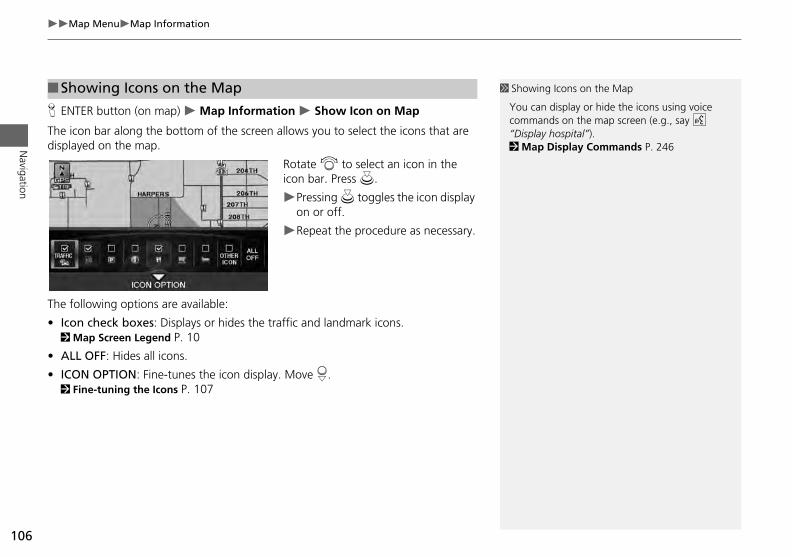
106
Map MenuMap Information
Navigation
H ENTER button (on map) Map Information Show Icon on Map
The icon bar along the bottom of the screen allows you to select the icons that are displayed on the map.
Rotate i to select an icon in the icon bar. Press u.
Pressing u toggles the icon display on or off.
Repeat the procedure as necessary.
The
• Ic2
• A
• IC2
■Showing Icons on the Map 1 Showing Icons on the Map
You can display or hide the icons using voice commands on the map screen (e.g., say d “Display hospital”). 2 Map Display Commands P. 246
following options are available:
on check boxes: Displays or hides the traffic and landmark icons.Map Screen Legend P. 10
LL OFF: Hides all icons.
ON OPTION: Fine-tunes the icon display. Move r.Fine-tuning the Icons P. 107
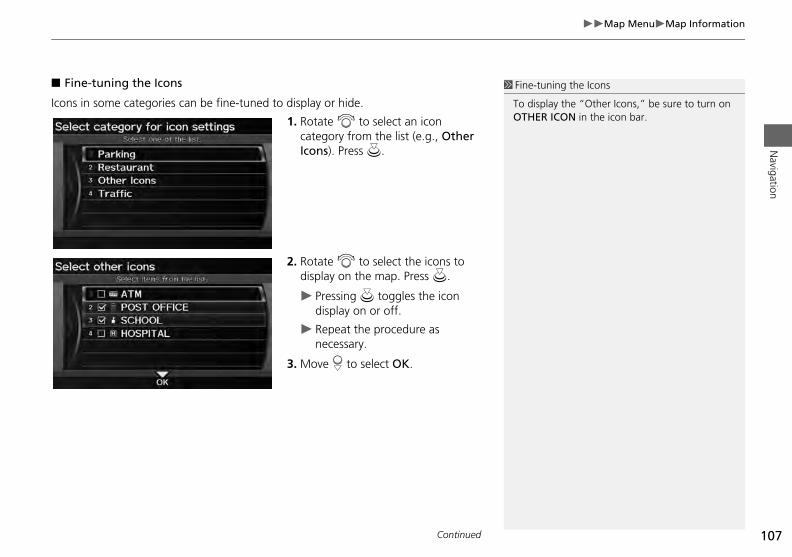
107
Map MenuMap InformationN
avigation
■ Fine-tuning the Icons
Icons in some categories can be fine-tuned to display or hide.
1. Rotate i to select an icon category from the list (e.g., Other Icons). Press u.
2. Rotate i to select the icons to display on the map. Press u.
1 Fine-tuning the Icons
To display the “Other Icons,” be sure to turn on OTHER ICON in the icon bar.
Pressing u toggles the icon display on or off.
Repeat the procedure as necessary.
3. Move r to select OK.
Continued
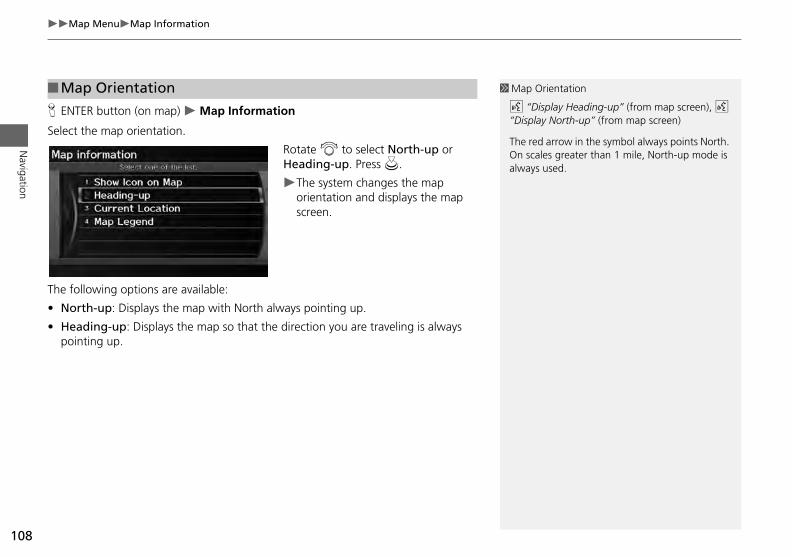
108
Map MenuMap Information
Navigation
H ENTER button (on map) Map Information
Select the map orientation.
Rotate i to select North-up or Heading-up. Press u.
The system changes the map orientation and displays the map screen.
The following options are available:
• N
• Hp
■Map Orientation 1 Map Orientation
d “Display Heading-up” (from map screen), d “Display North-up” (from map screen)
The red arrow in the symbol always points North. On scales greater than 1 mile, North-up mode is always used.
orth-up: Displays the map with North always pointing up.
eading-up: Displays the map so that the direction you are traveling is always ointing up.
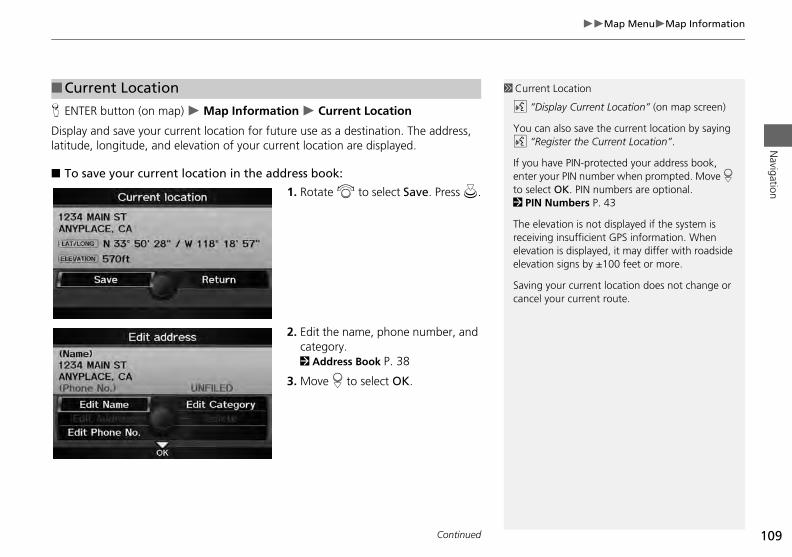
109
Map MenuMap InformationN
avigation
H ENTER button (on map) Map Information Current Location
Display and save your current location for future use as a destination. The address, latitude, longitude, and elevation of your current location are displayed.
■ To save your current location in the address book:
1. Rotate i to select Save. Press u.
■Current Location 1 Current Location
d “Display Current Location” (on map screen)
You can also save the current location by saying d “Register the Current Location”.
If you have PIN-protected your address book, enter your PIN number when prompted. Move r to select OK. PIN numbers are optional. 2 PIN Numbers P. 43
The elevation is not displayed if the system is receiving insufficient GPS information. When elevation is displayed, it may differ with roadside elevation signs by ±100 feet or more.
Saving your current location does not change or your current route.
2. Edit the name, phone number, and category. 2 Address Book P. 38
3. Move r to select OK.
cancel
Continued
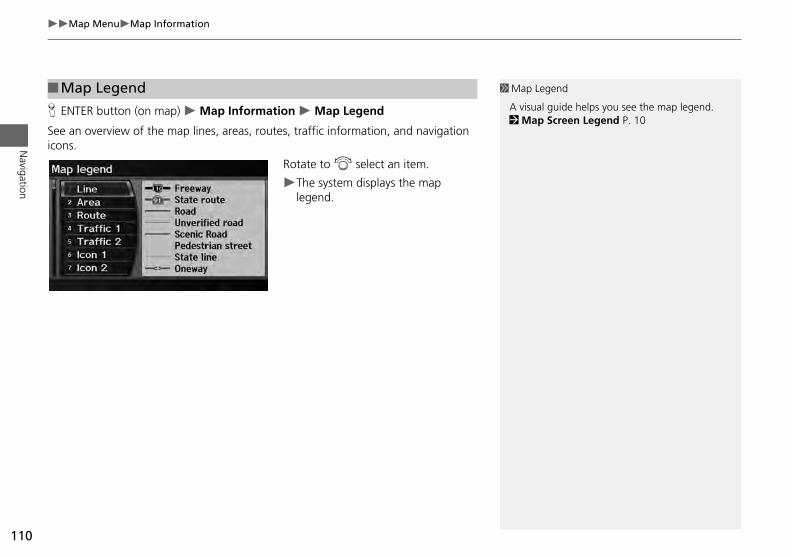
110
Map MenuMap Information
Navigation
H ENTER button (on map) Map Information Map Legend
See an overview of the map lines, areas, routes, traffic information, and navigation icons.
Rotate to i select an item.
The system displays the map legend.
■Map Legend 1 Map Legend
A visual guide helps you see the map legend. 2 Map Screen Legend P. 10
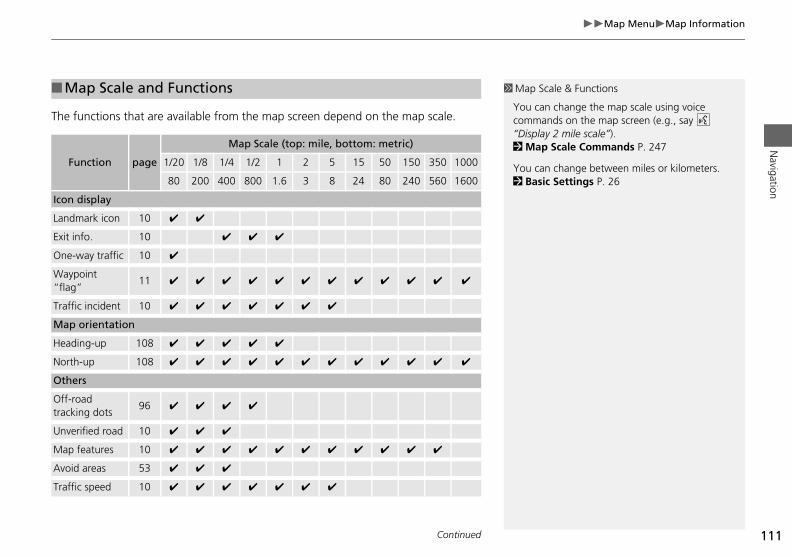
111
Map MenuMap InformationN
avigation
The functions that are available from the map screen depend on the map scale.
■Map Scale and Functions
Function page
Map Scale (top: mile, bottom: metric)
1/20 1/8 1/4 1/2 1 2 5 15 50 150 350 1000
80 200 400 800 1.6 3 8 24 80 240 560 1600
Icon display
Landmark icon 10 ✔ ✔
Exit info. 10 ✔ ✔ ✔
One-way traffic 10 ✔
Waypoint “flag”
11 ✔ ✔ ✔ ✔ ✔ ✔ ✔ ✔ ✔ ✔ ✔ ✔
Tra
Ma
Hea
Nor
Oth
Offtrac
Unv
Ma
Avo
Tra
1 Map Scale & Functions
You can change the map scale using voice commands on the map screen (e.g., say d “Display 2 mile scale”). 2 Map Scale Commands P. 247
You can change between miles or kilometers. 2 Basic Settings P. 26
ffic incident 10 ✔ ✔ ✔ ✔ ✔ ✔ ✔
p orientation
ding-up 108 ✔ ✔ ✔ ✔ ✔
th-up 108 ✔ ✔ ✔ ✔ ✔ ✔ ✔ ✔ ✔ ✔ ✔ ✔
ers
-road king dots
96 ✔ ✔ ✔ ✔
erified road 10 ✔ ✔ ✔
p features 10 ✔ ✔ ✔ ✔ ✔ ✔ ✔ ✔ ✔ ✔ ✔
id areas 53 ✔ ✔ ✔
ffic speed 10 ✔ ✔ ✔ ✔ ✔ ✔ ✔
Continued
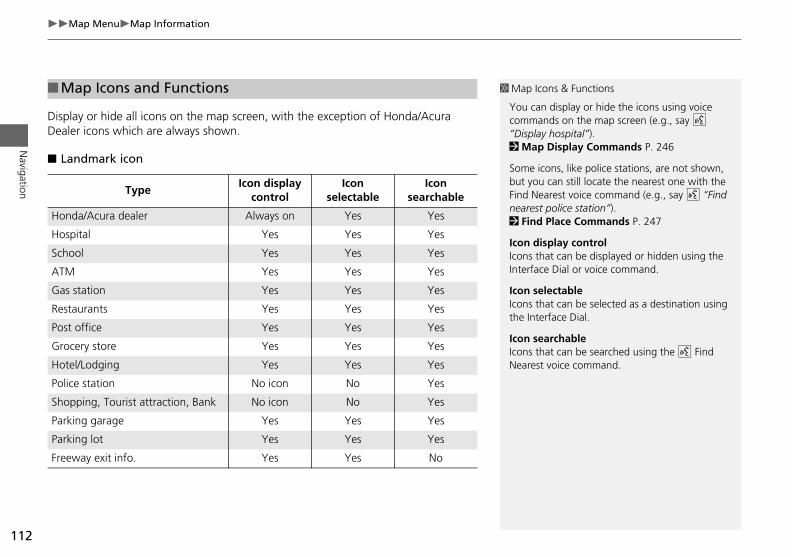
112
Map MenuMap Information
Navigation
Display or hide all icons on the map screen, with the exception of Honda/Acura Dealer icons which are always shown.
■ Landmark icon
■Map Icons and Functions
TypeIcon display
controlIcon
selectableIcon
searchable
Honda/Acura dealer Always on Yes Yes
Hospital Yes Yes Yes
School Yes Yes Yes
ATM Yes Yes Yes
Gas station Yes Yes Yes
Res
Pos
Gro
Hot
Poli
Sho
Par
Par
Free
1 Map Icons & Functions
You can display or hide the icons using voice commands on the map screen (e.g., say d “Display hospital”). 2 Map Display Commands P. 246
Some icons, like police stations, are not shown, but you can still locate the nearest one with the Find Nearest voice command (e.g., say d “Find nearest police station”). 2 Find Place Commands P. 247
Icon display controlIcons that can be displayed or hidden using the Interface Dial or voice command.
Icon selectableat can be selected as a destination using rface Dial.
archableat can be searched using the d Find voice command.
taurants Yes Yes Yes
t office Yes Yes Yes
cery store Yes Yes Yes
el/Lodging Yes Yes Yes
ce station No icon No Yes
pping, Tourist attraction, Bank No icon No Yes
king garage Yes Yes Yes
king lot Yes Yes Yes
way exit info. Yes Yes No
Icons ththe Inte
Icon seIcons thNearest
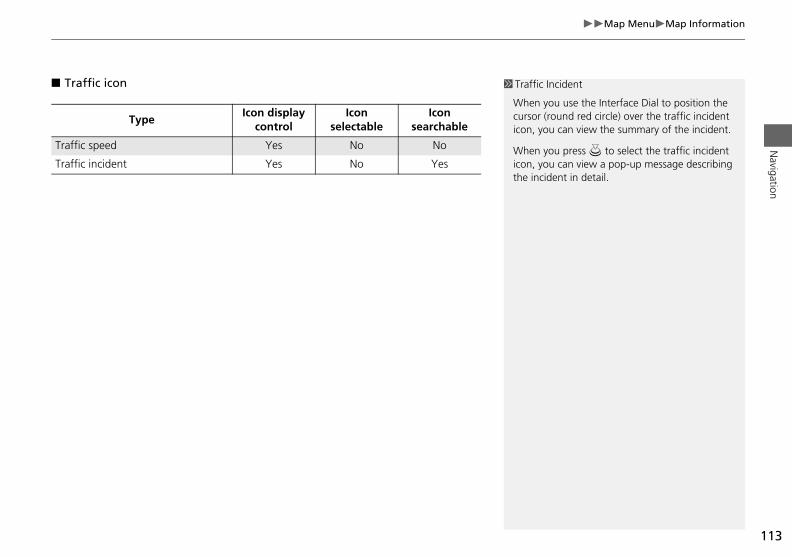
113
Map MenuMap InformationN
avigation
■ Traffic icon
TypeIcon display
controlIcon
selectableIcon
searchable
Traffic speed Yes No No
Traffic incident Yes No Yes
1 Traffic Incident
When you use the Interface Dial to position the cursor (round red circle) over the traffic incident icon, you can view the summary of the incident.
When you press u to select the traffic incident icon, you can view a pop-up message describing the incident in detail.
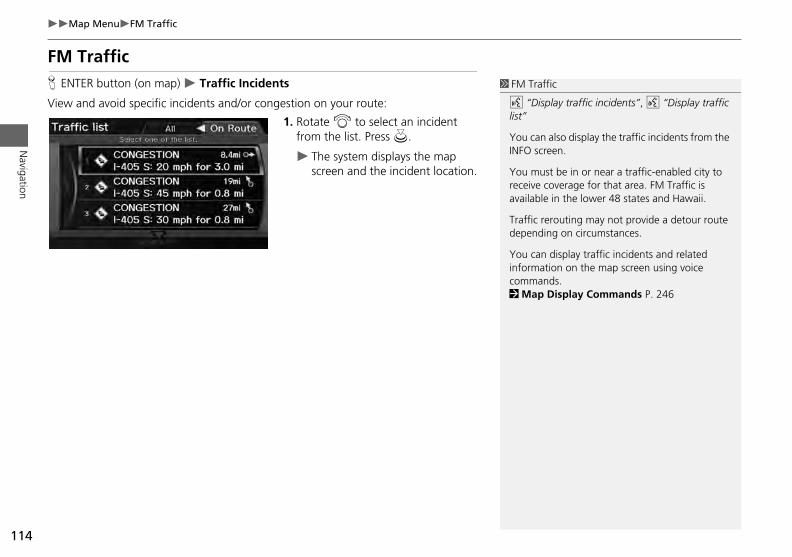
114
Map MenuFM Traffic
Navigation
FM TrafficH ENTER button (on map) Traffic Incidents
View and avoid specific incidents and/or congestion on your route:
1. Rotate i to select an incident from the list. Press u.
The system displays the map screen and the incident location.
1 FM Traffic
d “Display traffic incidents”, d “Display traffic list”
You can also display the traffic incidents from the INFO screen.
You must be in or near a traffic-enabled city to receive coverage for that area. FM Traffic is available in the lower 48 states and Hawaii.
Traffic rerouting may not provide a detour route depending on circumstances.
You can display traffic incidents and related information on the map screen using voice commands. 2 Map Display Commands P. 246
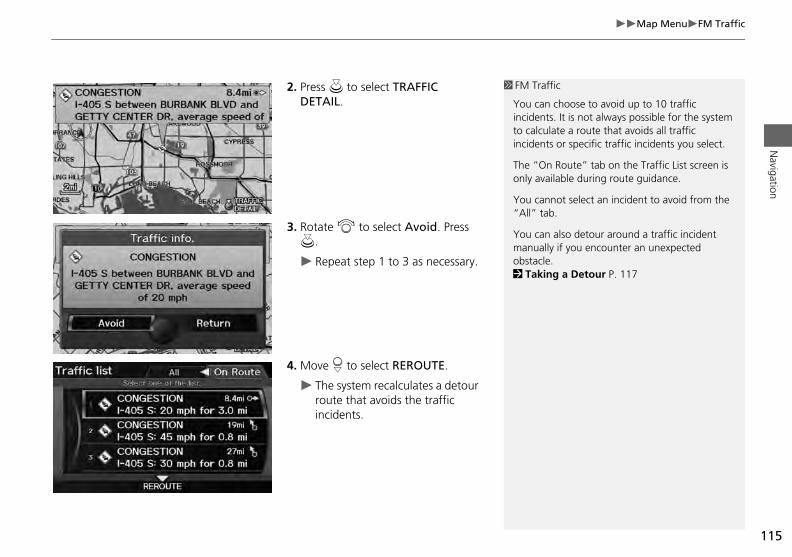
115
Map MenuFM TrafficN
avigation
2. Press u to select TRAFFIC DETAIL.
3. Rotate i to select Avoid. Press u.
Repeat step 1 to 3 as necessary.
1 FM Traffic
You can choose to avoid up to 10 traffic incidents. It is not always possible for the system to calculate a route that avoids all traffic incidents or specific traffic incidents you select.
The “On Route” tab on the Traffic List screen is only available during route guidance.
You cannot select an incident to avoid from the “All” tab.
You can also detour around a traffic incident manually if you encounter an unexpected obstacle. 2 Taking a Detour P. 117
4. Move r to select REROUTE.
The system recalculates a detour route that avoids the traffic incidents.
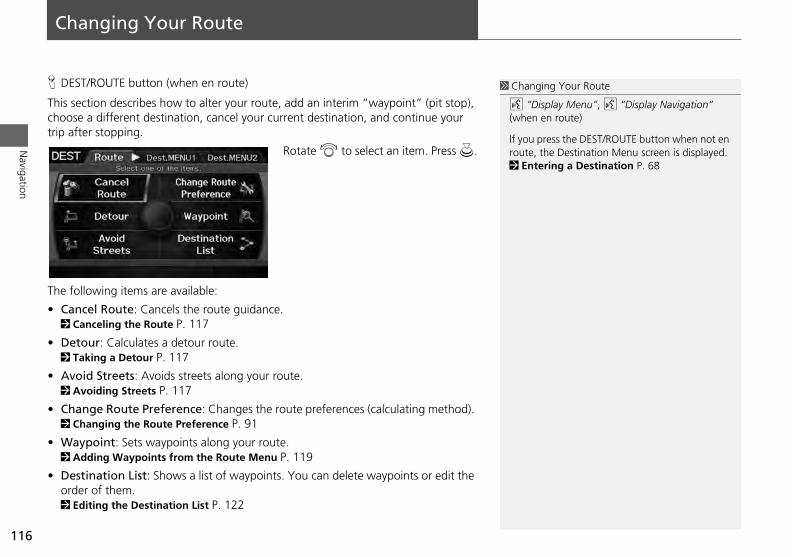
Navigation
Changing Your Route
H DEST/ROUTE button (when en route)
This section describes how to alter your route, add an interim “waypoint” (pit stop), choose a different destination, cancel your current destination, and continue your trip after stopping.
Rotate i to select an item. Press u.
The following items are available:
C2
D2
A2
C2
W2
Do2
1 Changing Your Route
d “Display Menu”, d “Display Navigation” (when en route)
If you press the DEST/ROUTE button when not en route, the Destination Menu screen is displayed.2 Entering a Destination P. 68
116
•
•
•
•
•
•
ancel Route: Cancels the route guidance. Canceling the Route P. 117
etour: Calculates a detour route. Taking a Detour P. 117
void Streets: Avoids streets along your route. Avoiding Streets P. 117
hange Route Preference: Changes the route preferences (calculating method). Changing the Route Preference P. 91
aypoint: Sets waypoints along your route. Adding Waypoints from the Route Menu P. 119
estination List: Shows a list of waypoints. You can delete waypoints or edit the rder of them. Editing the Destination List P. 122
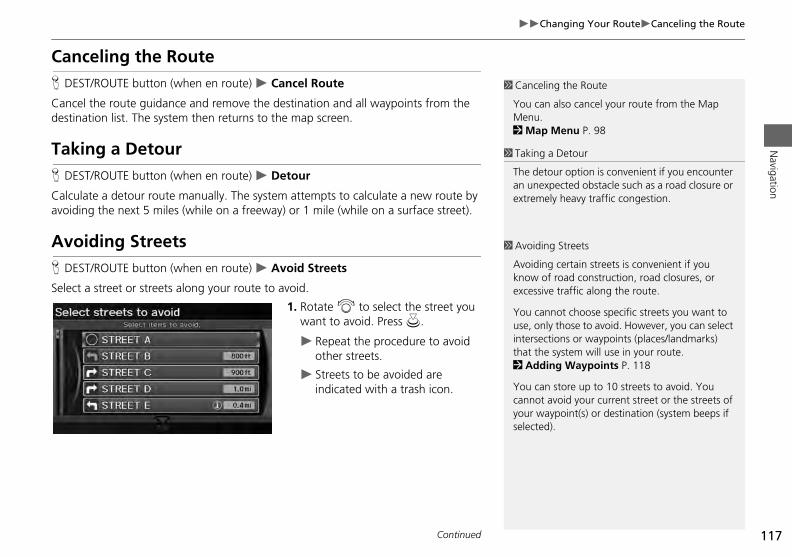
117
Changing Your RouteCanceling the RouteN
avigation
Canceling the RouteH DEST/ROUTE button (when en route) Cancel Route
Cancel the route guidance and remove the destination and all waypoints from the destination list. The system then returns to the map screen.
Taking a DetourH DEST/ROUTE button (when en route) Detour
Calculate a detour route manually. The system attempts to calculate a new route by avoiding the next 5 miles (while on a freeway) or 1 mile (while on a surface street).
Avoiding StreetsH DEST/ROUTE button (when en route) Avoid Streets
Select a street or streets along your route to avoid.
1 Canceling the Route
You can also cancel your route from the Map Menu. 2 Map Menu P. 98
1 Taking a Detour
The detour option is convenient if you encounter an unexpected obstacle such as a road closure or extremely heavy traffic congestion.
1 Avoiding Streets
Avoiding certain streets is convenient if you know of road construction, road closures, or excessive traffic along the route.
nnot choose specific streets you want to ly those to avoid. However, you can select ctions or waypoints (places/landmarks) e system will use in your route.ing Waypoints P. 118
n store up to 10 streets to avoid. You avoid your current street or the streets of aypoint(s) or destination (system beeps if d).
1. Rotate i to select the street you want to avoid. Press u.
Repeat the procedure to avoid other streets.
Streets to be avoided are indicated with a trash icon.
You cause, onintersethat th2 Add
You cacannotyour wselecte
Continued
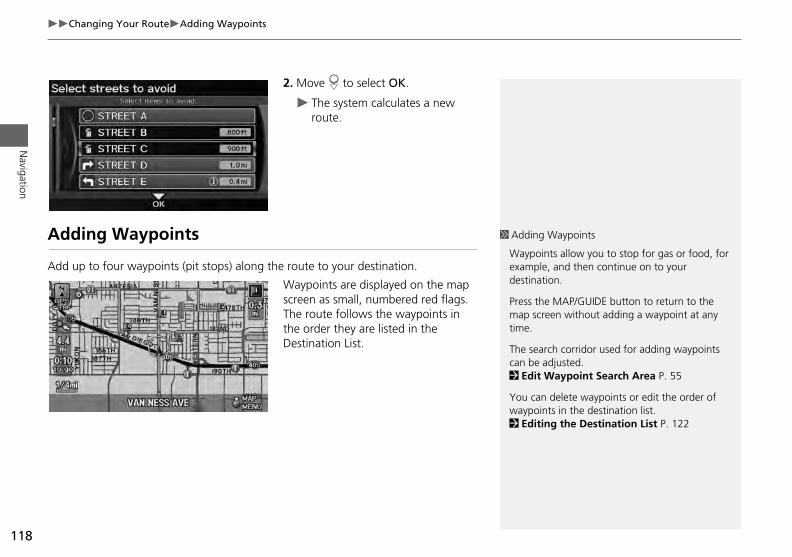
118
Changing Your RouteAdding Waypoints
Navigation
2. Move r to select OK.
The system calculates a new route.
Adding Waypoints
Add up to four waypoints (pit stops) along the route to your destination.
Waypoints are displayed on the map
1 Adding Waypoints
Waypoints allow you to stop for gas or food, for example, and then continue on to your destination.
e MAP/GUIDE button to return to the reen without adding a waypoint at any
rch corridor used for adding waypoints adjusted. Waypoint Search Area P. 55
delete waypoints or edit the order of nts in the destination list.ng the Destination List P. 122
screen as small, numbered red flags. The route follows the waypoints in the order they are listed in the Destination List.
Press thmap sctime.
The seacan be 2 Edit
You canwaypoi2 Editi
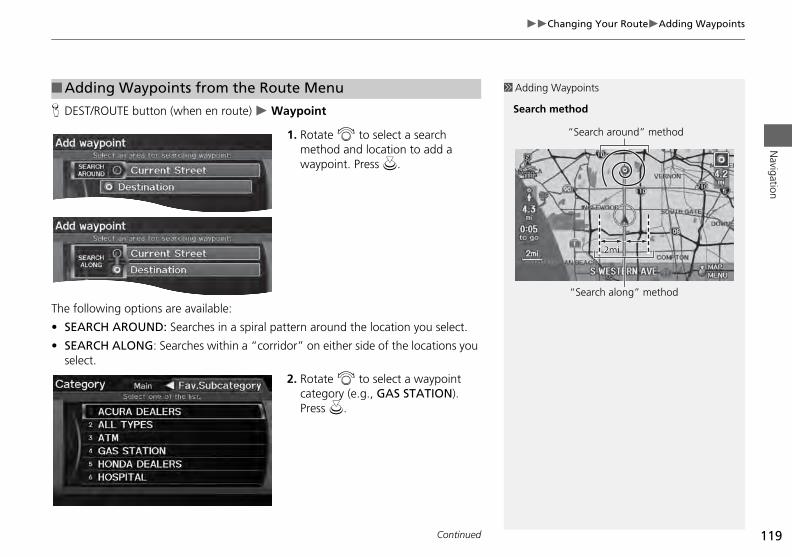
119
Changing Your RouteAdding WaypointsN
avigation
H DEST/ROUTE button (when en route) Waypoint
1. Rotate i to select a search method and location to add a waypoint. Press u.
The
• S
• Ss
■Adding Waypoints from the Route Menu 1 Adding Waypoints
Search method
“Search around” method
“Search along” method
following options are available:
EARCH AROUND: Searches in a spiral pattern around the location you select.
EARCH ALONG: Searches within a “corridor” on either side of the locations you elect.
2. Rotate i to select a waypoint category (e.g., GAS STATION). Press u.
Continued
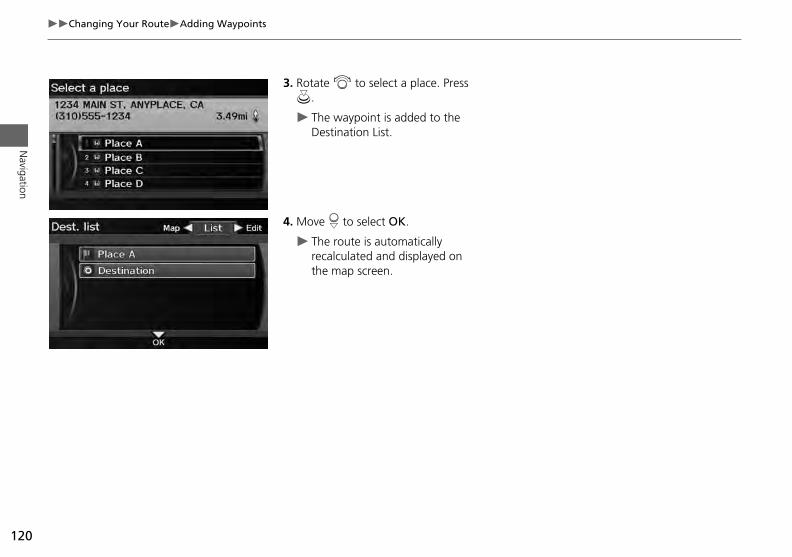
120
Changing Your RouteAdding Waypoints
Navigation
3. Rotate i to select a place. Press u.
The waypoint is added to the Destination List.
4. Move r to select OK.
The route is automatically recalculated and displayed on the map screen.
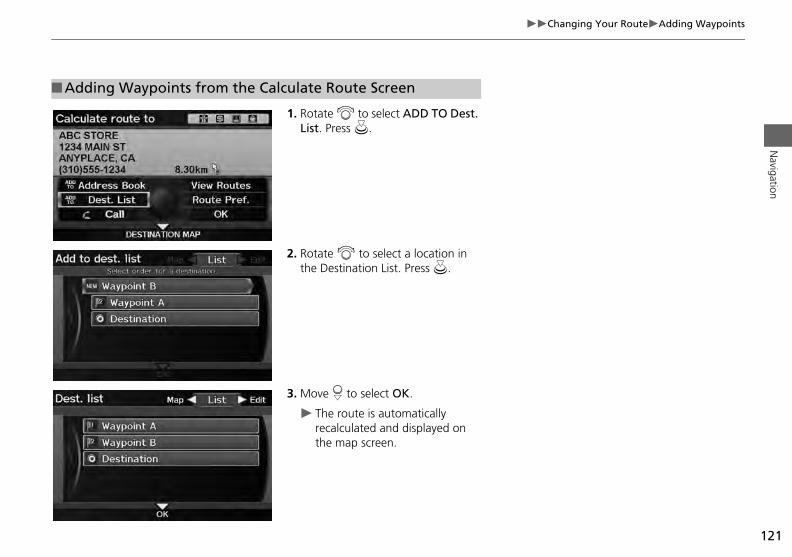
121
Changing Your RouteAdding WaypointsN
avigation
1. Rotate i to select ADD TO Dest. List. Press u.
2. Rotate i to select a location in the Destination List. Press u.
■Adding Waypoints from the Calculate Route Screen
3. Move r to select OK.
The route is automatically recalculated and displayed on the map screen.
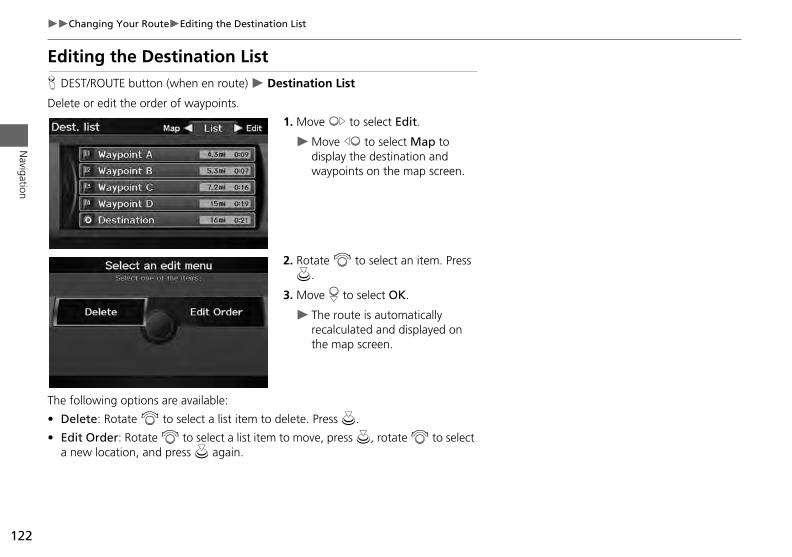
122
Changing Your RouteEditing the Destination List
Navigation
Editing the Destination ListH DEST/ROUTE button (when en route) Destination List
Delete or edit the order of waypoints.
1. Move y to select Edit.
Move w to select Map to display the destination and waypoints on the map screen.
2. Rotate i to select an item. Press u.
3. Move r to select OK.
The route is automatically recalculated and displayed on the map screen.
The following options are available:
• Delete: Rotate i to select a list item to delete. Press u.
• Edit Order: Rotate i to select a list item to move, press u, rotate i to select a new location, and press u again.
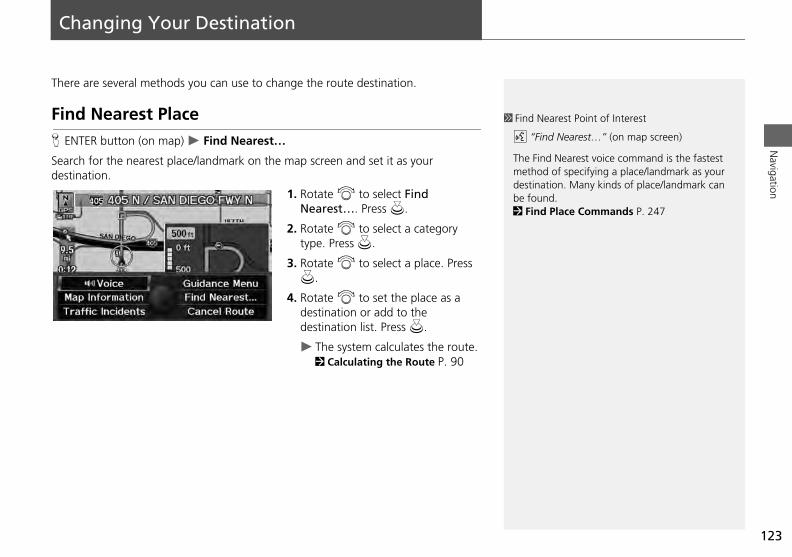
123
Navigation
Changing Your Destination
There are several methods you can use to change the route destination.
Find Nearest PlaceH ENTER button (on map) Find Nearest…
Search for the nearest place/landmark on the map screen and set it as your destination.
1. Rotate i to select Find Nearest…. Press u.
2. Rotate i to select a category type. Press u.
3. Rotate i to select a place. Press u.
1 Find Nearest Point of Interest
d “Find Nearest…” (on map screen)
The Find Nearest voice command is the fastest method of specifying a place/landmark as your destination. Many kinds of place/landmark can be found. 2 Find Place Commands P. 247
4. Rotate i to set the place as a destination or add to the destination list. Press u.
The system calculates the route. 2 Calculating the Route P. 90
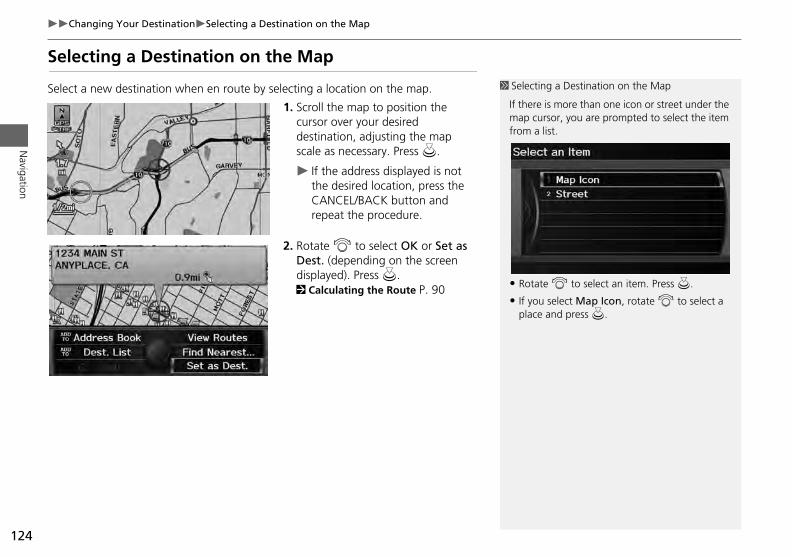
124
Changing Your DestinationSelecting a Destination on the Map
Navigation
Selecting a Destination on the Map
Select a new destination when en route by selecting a location on the map.
1. Scroll the map to position the cursor over your desired destination, adjusting the map scale as necessary. Press u.
If the address displayed is not the desired location, press the CANCEL/BACK button and repeat the procedure.
2. Rotate i to select OK or Set as Dest. (depending on the screen displayed). Press u. 2 Calculating the Route P. 90
1 Selecting a Destination on the Map
If there is more than one icon or street under the map cursor, you are prompted to select the item from a list.
• Rotate i to select an item. Press u.
select Map Icon, rotate i to select a and press u.
• If youplace
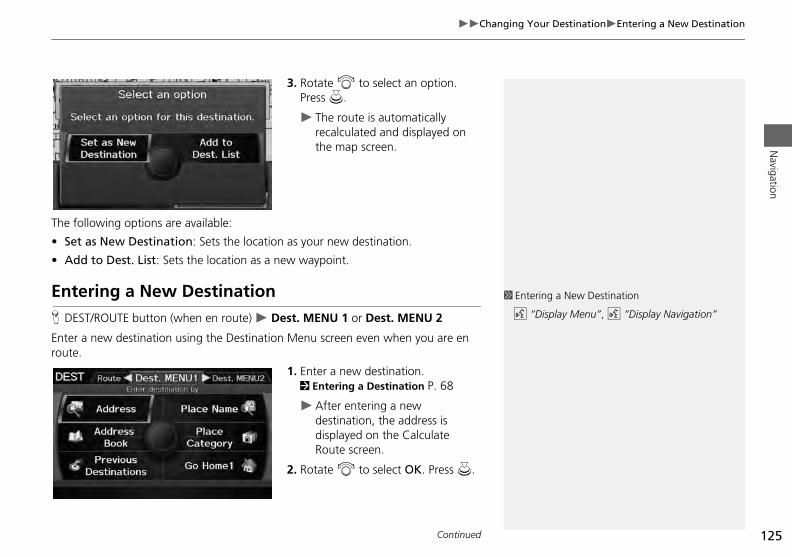
125
Changing Your DestinationEntering a New DestinationN
avigation
3. Rotate i to select an option. Press u.
The route is automatically recalculated and displayed on the map screen.
The following options are available:
• Set as New Destination: Sets the location as your new destination.
• Add to Dest. List: Sets the location as a new waypoint.
Entering a New DestinationH D
Entrou
1 Entering a New Destination
isplay Menu”, d “Display Navigation”
EST/ROUTE button (when en route) Dest. MENU 1 or Dest. MENU 2er a new destination using the Destination Menu screen even when you are en te.
1. Enter a new destination. 2 Entering a Destination P. 68
After entering a new destination, the address is displayed on the Calculate Route screen.
2. Rotate i to select OK. Press u.
d “D
Continued
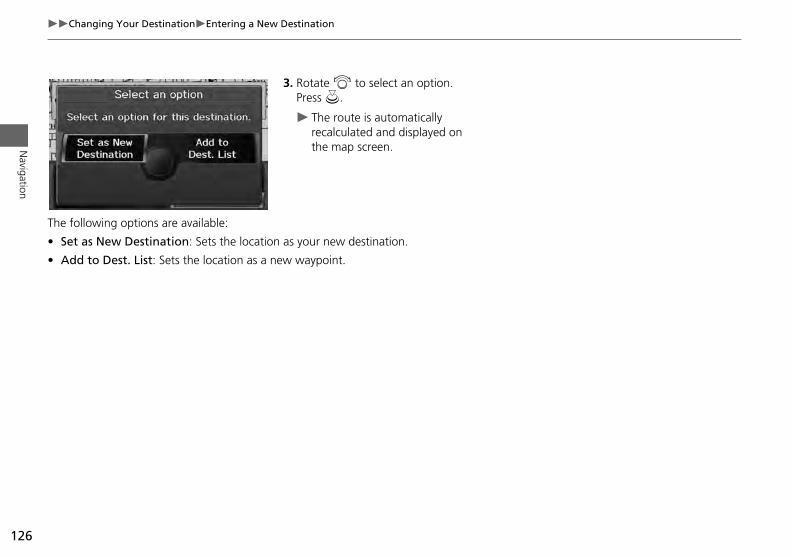
126
Changing Your DestinationEntering a New Destination
Navigation
3. Rotate i to select an option. Press u.
The route is automatically recalculated and displayed on the map screen.
The following options are available:
• Set as New Destination: Sets the location as your new destination.
• Add to Dest. List: Sets the location as a new waypoint.
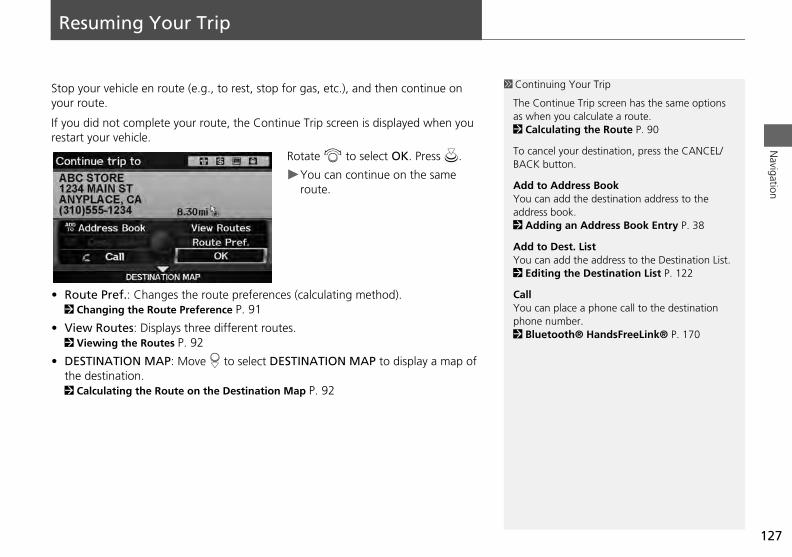
127
Navigation
Resuming Your Trip
Stop your vehicle en route (e.g., to rest, stop for gas, etc.), and then continue on your route.
If you did not complete your route, the Continue Trip screen is displayed when you restart your vehicle.
Rotate i to select OK. Press u.
You can continue on the same route.
• Route Pref.: Changes the route preferences (calculating method). 2
V2
Dt2
1 Continuing Your Trip
The Continue Trip screen has the same options as when you calculate a route. 2 Calculating the Route P. 90
To cancel your destination, press the CANCEL/BACK button.
Add to Address BookYou can add the destination address to the address book. 2 Adding an Address Book Entry P. 38
Add to Dest. ListYou can add the address to the Destination List. 2 Editing the Destination List P. 122
Calln place a phone call to the destination number. tooth® HandsFreeLink® P. 170
••
Changing the Route Preference P. 91
iew Routes: Displays three different routes. Viewing the Routes P. 92
ESTINATION MAP: Move r to select DESTINATION MAP to display a map of he destination.
Calculating the Route on the Destination Map P. 92
You caphone2 Blue

128

Audio
Thi the audio system. You can play
music s, and control the audio system
Interface Dial, or voice control.
AudAAA
PlaySAAR
PlaySAANX
PlaySA
Audio MPlaying MRecomm
Playing HaSelectingAudio ScAudio MRecordinSearchingAdding aEditing aDisplayinUpdating
Playing anSelectingAudio Sc
hing for Music Using Song By Voice™ )............................................................... 159
ng a USB Flash Drive ............................... 160lecting USB Mode....................................... 161dio Screen Control..................................... 161dio Menu .................................................. 162ying Tracks in Folders................................. 163ng Bluetooth® Audio ............................. 164lecting Bluetooth® Audio Mode................. 164itching to HFL Mode.................................. 165dio Screen Control..................................... 165sting the Sound ....................................... 166o Remote Controls .................................. 167ering Wheel Controls ................................ 167
io System .................................................. 130bout Your Audio System.............................. 130uxiliary Input Jack ........................................ 131udio System Theft Protection ....................... 131ing FM/AM Radio ..................................... 132
electing FM/AM Mode.................................. 132udio Screen Control..................................... 132udio Menu .................................................. 133adio Data System (RDS) ................................ 134ing XM® Radio ......................................... 136
electing XM Mode........................................ 136udio Screen Control..................................... 136udio Menu .................................................. 137ote Function ................................................ 138M® Radio Service ........................................ 140ing a Disc................................................... 141
129electing Disc Mode....................................... 141udio Screen Control..................................... 141
Audio MSearching
enu...................................................157 for Music........................................158
enu...................................................142P3/WMA/AAC Discs ........................143
ended Discs ......................................144rd Disc Drive (HDD) Audio ............145 HDD Mode ......................................145reen Control .....................................146enu...................................................146g a Music CD to HDD........................148 for Music........................................150 Track to a User Playlist.....................151 Playlist .............................................151g Music Information .........................153 Gracenote® Album Info..................154 iPod® .............................................155 iPod® Mode....................................156reen Control .....................................156
Searc(SBV
PlayiSeAuAuPla
PlayiSeSwAu
AdjuAudi
Ste
s section describes how to operate
from a wide array of media source
using the audio buttons, the
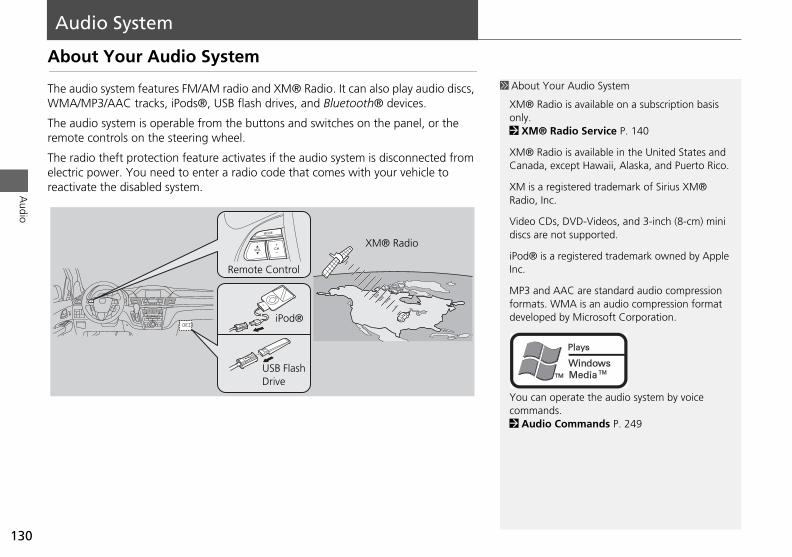
Audio
Audio System
About Your Audio System
The audio system features FM/AM radio and XM® Radio. It can also play audio discs, WMA/MP3/AAC tracks, iPods®, USB flash drives, and Bluetooth® devices.
The audio system is operable from the buttons and switches on the panel, or the remote controls on the steering wheel.
The radio theft protection feature activates if the audio system is disconnected from electric power. You need to enter a radio code that comes with your vehicle to reactivate the disabled system.
1 About Your Audio System
XM® Radio is available on a subscription basis only.2 XM® Radio Service P. 140
XM® Radio is available in the United States and Canada, except Hawaii, Alaska, and Puerto Rico.
XM is a registered trademark of Sirius XM® Radio, Inc.
Video CDs, DVD-Videos, and 3-inch (8-cm) mini discs are not supported.
iPod® is a registered trademark owned by Apple Inc.
MP3 and AAC are standard audio compression . WMA is an audio compression format ed by Microsoft Corporation.
operate the audio system by voice nds. io Commands P. 249
XM® Radio
Remote Control
130
formatsdevelop
You cancomma2 Aud
iPod®
USB Flash Drive
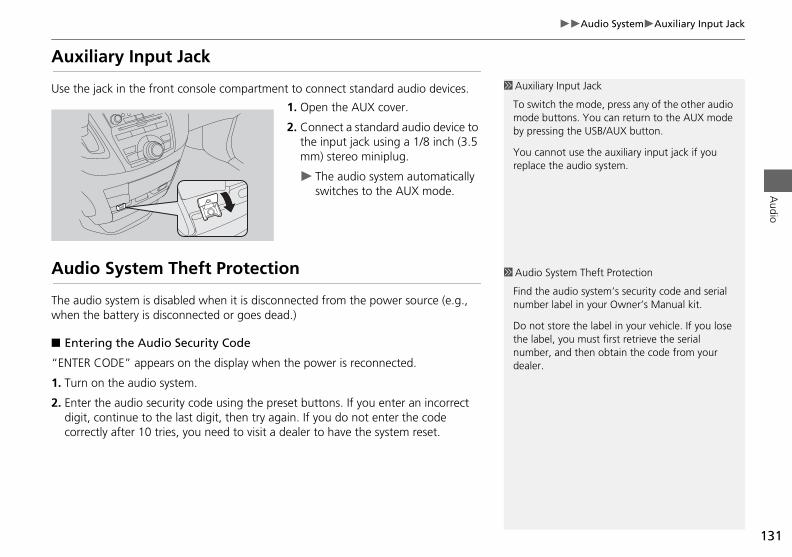
131
Audio SystemAuxiliary Input JackA
udio
Auxiliary Input Jack
Use the jack in the front console compartment to connect standard audio devices.
1. Open the AUX cover.
2. Connect a standard audio device to the input jack using a 1/8 inch (3.5 mm) stereo miniplug.
The audio system automatically switches to the AUX mode.
Audio System Theft Protection
1 Auxiliary Input Jack
To switch the mode, press any of the other audio mode buttons. You can return to the AUX mode by pressing the USB/AUX button.
You cannot use the auxiliary input jack if you replace the audio system.
1 Audio System Theft Protection
Find the audio system’s security code and serial r label in your Owner’s Manual kit.
store the label in your vehicle. If you lose el, you must first retrieve the serial r, and then obtain the code from your
The audio system is disabled when it is disconnected from the power source (e.g., when the battery is disconnected or goes dead.)
■ Entering the Audio Security Code
“ENTER CODE” appears on the display when the power is reconnected.
1. Turn on the audio system.
2. Enter the audio security code using the preset buttons. If you enter an incorrect digit, continue to the last digit, then try again. If you do not enter the code correctly after 10 tries, you need to visit a dealer to have the system reset.
numbe
Do notthe labnumbedealer.
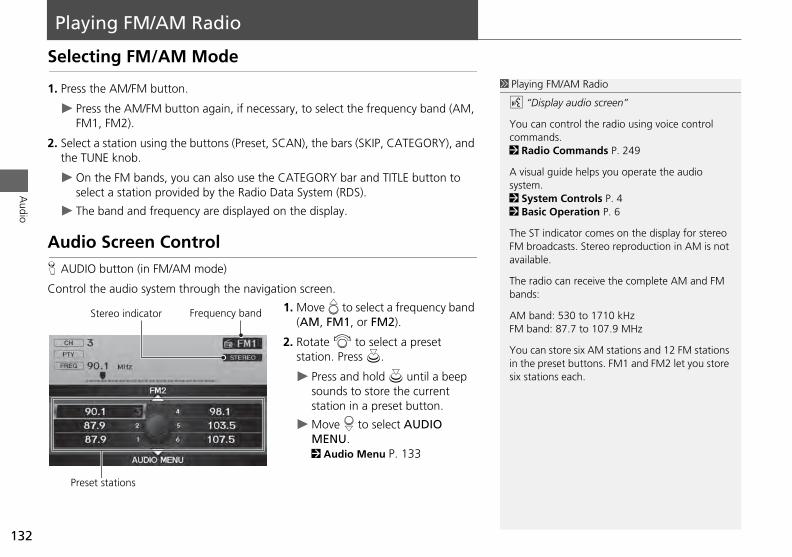
Audio
Playing FM/AM Radio
Selecting FM/AM Mode
1. Press the AM/FM button.
Press the AM/FM button again, if necessary, to select the frequency band (AM, FM1, FM2).
2. Select a station using the buttons (Preset, SCAN), the bars (SKIP, CATEGORY), and the TUNE knob.
On the FM bands, you can also use the CATEGORY bar and TITLE button to select a station provided by the Radio Data System (RDS).
The band and frequency are displayed on the display.
Audio Screen ControlH AUDIO button (in FM/AM mode)
Control the audio system through the navigation screen.
1 Playing FM/AM Radio
d “Display audio screen”
You can control the radio using voice control commands. 2 Radio Commands P. 249
A visual guide helps you operate the audio system. 2 System Controls P. 4 2 Basic Operation P. 6
The ST indicator comes on the display for stereo FM broadcasts. Stereo reproduction in AM is not available.
The radio can receive the complete AM and FM bands:
d: 530 to 1710 kHzd: 87.7 to 107.9 MHz
store six AM stations and 12 FM stations reset buttons. FM1 and FM2 let you store ons each.
132
1. Move e to select a frequency band (AM, FM1, or FM2).
2. Rotate i to select a preset station. Press u.
Press and hold u until a beep sounds to store the current station in a preset button.
Move r to select AUDIO MENU. 2 Audio Menu P. 133
AM banFM ban
You canin the psix stati
Stereo indicator Frequency band
Preset stations

133
Playing FM/AM RadioAudio MenuA
udio
Audio MenuH AUDIO button (in FM/AM mode) AUDIO MENU
Rotate i to select an item. Press u.
The following items are available:
• Sound Setup: Displays the sound preferences screen. 2 Adjusting the Sound P. 166
• Read Radio Text: Displays the text information broadcast by the current RDS
1 Audio Menu
The A.SEL indicator comes on the display when A.SEL is ON. If you do not like the stations Auto Select has stored, you can change the frequencies stored in the preset buttons manually. Set A.SEL to OFF to restore the previous preset button settings.
station. 2 Radio Text Display P. 135
• RDS Search: Searches for programs by RDS category. 2 Searching for Programs by RDS Category P. 134
• Scan: Scans for stations with a strong signal in the current band and plays a 10-second sample. Select Scan again to stop scanning and play the current selection.
• A.SEL (Auto Select): When set to ON, scans and automatically stores up to six AM stations and 12 FM stations with a strong signal in the preset buttons.
• Tune: Tunes the radio to the frequency you select. Rotate i to select a frequency.
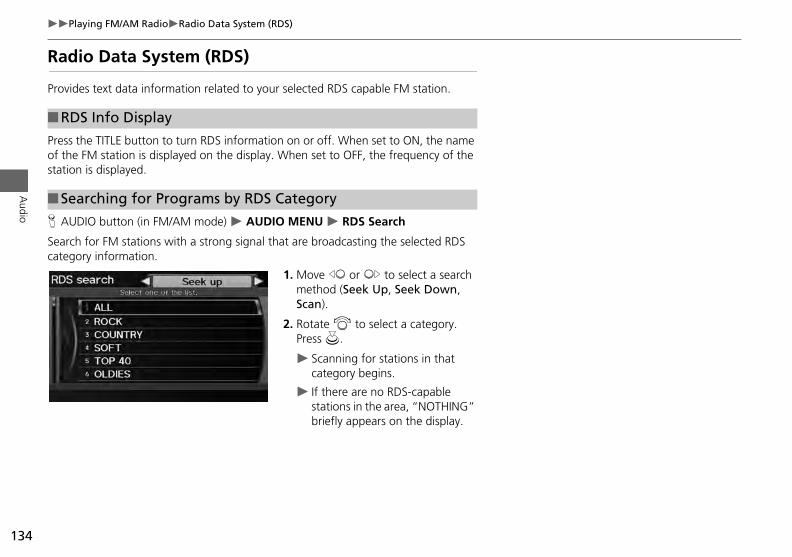
134
Playing FM/AM RadioRadio Data System (RDS)
Audio
Radio Data System (RDS)
Provides text data information related to your selected RDS capable FM station.
Press the TITLE button to turn RDS information on or off. When set to ON, the name of the FM station is displayed on the display. When set to OFF, the frequency of the station is displayed.
H AUDIO button (in FM/AM mode) AUDIO MENU RDS Search
Search for FM stations with a strong signal that are broadcasting the selected RDS category information.
1. Move w or y to select a search method (Seek Up, Seek Down,
■RDS Info Display
■Searching for Programs by RDS Category
Scan).
2. Rotate i to select a category. Press u.
Scanning for stations in that category begins.
If there are no RDS-capable stations in the area, “NOTHING” briefly appears on the display.
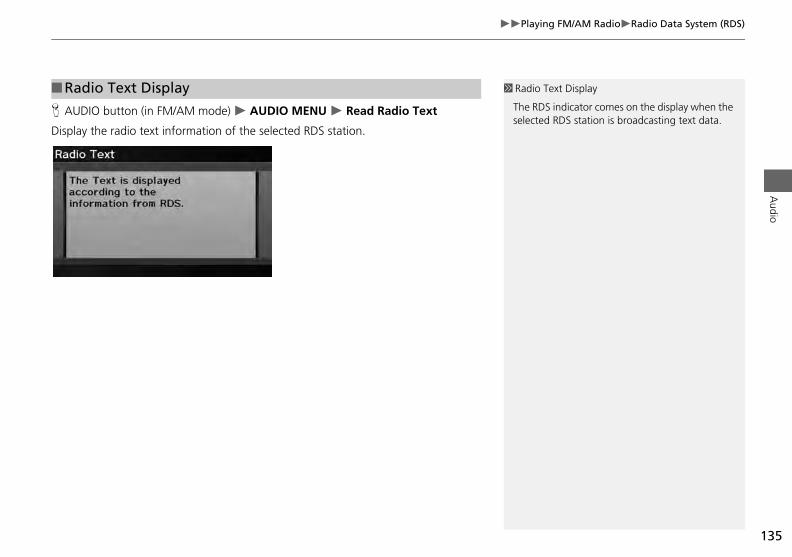
135
Playing FM/AM RadioRadio Data System (RDS)A
udio
H AUDIO button (in FM/AM mode) AUDIO MENU Read Radio Text
Display the radio text information of the selected RDS station.
■Radio Text Display 1 Radio Text Display
The RDS indicator comes on the display when the selected RDS station is broadcasting text data.
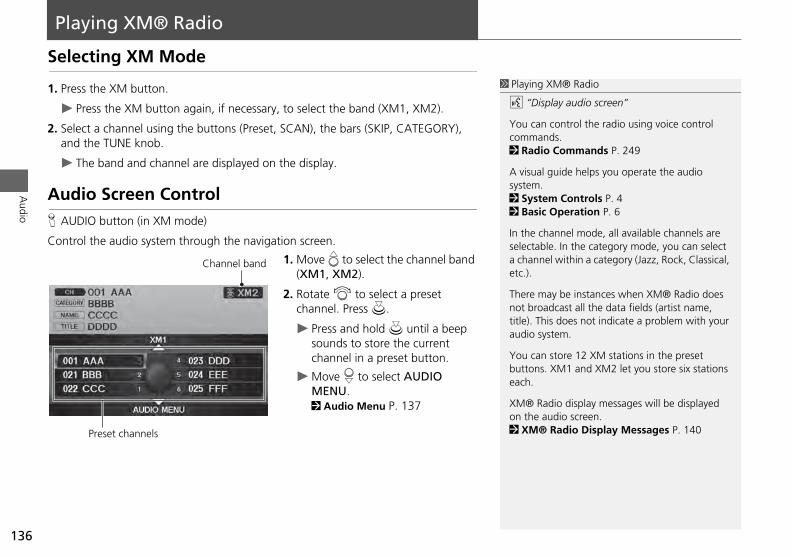
Audio
Playing XM® Radio
Selecting XM Mode
1. Press the XM button.
Press the XM button again, if necessary, to select the band (XM1, XM2).
2. Select a channel using the buttons (Preset, SCAN), the bars (SKIP, CATEGORY), and the TUNE knob.
The band and channel are displayed on the display.
Audio Screen ControlH AUDIO button (in XM mode)
Control the audio system through the navigation screen.
1. Move e to select the channel band (XM1, XM2).
2. Rotate i to select a preset
1 Playing XM® Radio
d “Display audio screen”
You can control the radio using voice control commands. 2 Radio Commands P. 249
A visual guide helps you operate the audio system. 2 System Controls P. 4 2 Basic Operation P. 6
In the channel mode, all available channels are selectable. In the category mode, you can select a channel within a category (Jazz, Rock, Classical, etc.).
There may be instances when XM® Radio does adcast all the data fields (artist name, is does not indicate a problem with your
ystem.
store 12 XM stations in the preset . XM1 and XM2 let you store six stations
adio display messages will be displayed audio screen. Radio Display Messages P. 140
Channel band
136
channel. Press u.
Press and hold u until a beep sounds to store the current channel in a preset button.
Move r to select AUDIO MENU. 2 Audio Menu P. 137
not brotitle). Thaudio s
You canbuttonseach.
XM® Ron the 2 XM®Preset channels

137
Playing XM® RadioAudio MenuA
udio
Audio MenuH AUDIO button (in XM mode) AUDIO MENU
Rotate i to select an item. Press u.
The following items are available:
• Note: Records a 10-second sound file from the current channel. 2 Note Function P. 138
• Sound Setup: Displays the sound preferences screen.
2 Adjusting the Sound P. 166• Tune: Tunes to the channel you select. Rotate i to select a channel.
• Mode: Sets CH (channel mode) or CAT (category mode) scan mode.
• Channel List: Displays the list of available channels. Scroll the list to select a channel.
• Channel Scan: Scans for channels with a strong signal in the current band and plays a 10-second sample. Select Channel Scan again to stop scanning and play the current selection.
• Category Scan: Scans for channels with a strong signal in the selected category in the current band and plays a 10-second sample. Select Category Scan again to stop scanning and play the current selection.
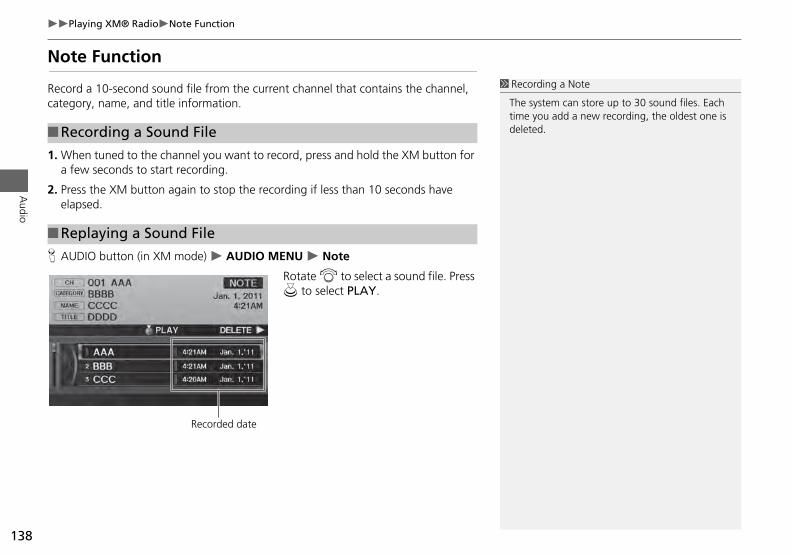
138
Playing XM® RadioNote Function
Audio
Note Function
Record a 10-second sound file from the current channel that contains the channel, category, name, and title information.
1. When tuned to the channel you want to record, press and hold the XM button for a few seconds to start recording.
2. Press the XM button again to stop the recording if less than 10 seconds have elapsed.
H AUDIO button (in XM mode) AUDIO MENU Note
Rotate i to select a sound file. Press u to select PLAY.
■Recording a Sound File
■Replaying a Sound File
1 Recording a Note
The system can store up to 30 sound files. Each time you add a new recording, the oldest one is deleted.
Recorded date

139
Playing XM® RadioNote FunctionA
udio
H AUDIO button (in XM mode) AUDIO MENU Note
1. Rotate i to select a sound file.
2. Move y to select DELETE.
3. Rotate i to select Delete All or Delete Selected Item. Press u.
■Deleting a Sound File
140
Playing XM® RadioXM® Radio Service
Audio
XM® Radio Service
1. You need your radio ID ready before registering for subscription.
To see the ID in the display, rotate the TUNE knob while in XM mode until “0” appears in the center display.
2. Have your radio ID and credit card number ready, and either call XM or visit the XM website to subscribe.
Press the XM button and stay in this mode for about 30 minutes until the service is activated. Make sure your vehicle is in an open area with good reception.
■Subscribing to XM® Radio
■Receiving XM® Radio
■XM® Radio Display Messages
1 Subscribing to XM® Radio
Contact Information for XM® Radio:
U.S.: XM® Radio at www.siriusxm.com, or (800) 852-9696
Canada: XM Canada at www.xmradio.ca, or (877) 209-0079
1 Receiving XM® Radio
The XM satellites are in orbit over the equator; therefore, objects south of the vehicle may cause satellite reception interruptions. Satellite signals are more likely to be blocked by tall buildings and mountains the farther north you travel from
ator.
y experience reception problems under owing circumstances:
cation with an obstruction to the south ur vehicle
nels
e lower level of a multi-tiered road
items are carried on the roof rack
LOADING: XM is loading the audio or program information.
OFF AIR: The channel is not currently broadcasting.
UPDATING: The encryption code is being updated. Channels 0 and 1 still work normally.
NO SIGNAL: The signal is too weak in the current location.
--------: No such channel exists, the channel is not part of your subscription, or the artist or title information is not available.
CHECK ANTENNA: There is a problem with the XM antenna. Contact a dealer.
the equ
You mathe foll
• In a loof yo
• In tun
• On th
• Large
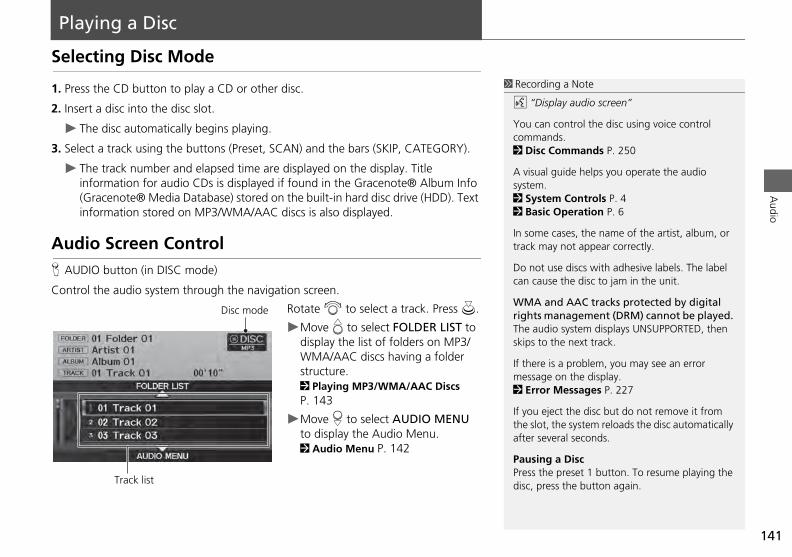
141
Audio
Playing a Disc
Selecting Disc Mode
1. Press the CD button to play a CD or other disc.
2. Insert a disc into the disc slot.
The disc automatically begins playing.
3. Select a track using the buttons (Preset, SCAN) and the bars (SKIP, CATEGORY).
The track number and elapsed time are displayed on the display. Title information for audio CDs is displayed if found in the Gracenote® Album Info (Gracenote® Media Database) stored on the built-in hard disc drive (HDD). Text information stored on MP3/WMA/AAC discs is also displayed.
Audio Screen ControlH AUDIO button (in DISC mode)
Control the audio system through the navigation screen.
1 Recording a Note
d “Display audio screen”
You can control the disc using voice control commands. 2 Disc Commands P. 250
A visual guide helps you operate the audio system. 2 System Controls P. 4 2 Basic Operation P. 6
In some cases, the name of the artist, album, or track may not appear correctly.
Do not use discs with adhesive labels. The label can cause the disc to jam in the unit.
and AAC tracks protected by digital management (DRM) cannot be played. dio system displays UNSUPPORTED, then o the next track.
is a problem, you may see an error e on the display. r Messages P. 227
eject the disc but do not remove it from t, the system reloads the disc automatically everal seconds.
g a Dische preset 1 button. To resume playing the ress the button again.
Rotate i to select a track. Press u.
Move e to select FOLDER LIST to display the list of folders on MP3/WMA/AAC discs having a folder structure. 2 Playing MP3/WMA/AAC Discs P. 143
Move r to select AUDIO MENU to display the Audio Menu. 2 Audio Menu P. 142
WMArightsThe auskips t
If theremessag2 Erro
If you the sloafter s
PausinPress tdisc, p
Disc mode
Track list

142
Playing a DiscAudio Menu
Audio
Audio MenuH AUDIO button (in DISC mode) AUDIO MENU
Rotate i to select an item. Press u.
The following items are available, depending on the type of disc:
• Rec to HDD: Records a music CD onto the HDD for playback using HDD Audio. 2 Recording a Music CD to HDD P. 148
• Sound Setup: Displays the sound preferences screen.
1 Repeat, Random, and Scan Play
1. Rotate i to select Repeat, Random, or Scan. Press u.
2. Rotate i to select an option. Press u.
2 Adjusting the Sound P. 166
• HDD Setup: Displays menu for setting HDD preferences for recording music CDs and for updating Gracenote® information. 2 Recording a Music CD to HDD P. 1482 Updating Gracenote® Album Info P. 154
• Repeat:6: Repeats the current track.7: Repeats all tracks in the current folder.
• Random:3: Plays all tracks on the current disc in random order.4: Plays all tracks in the current folder in random order.
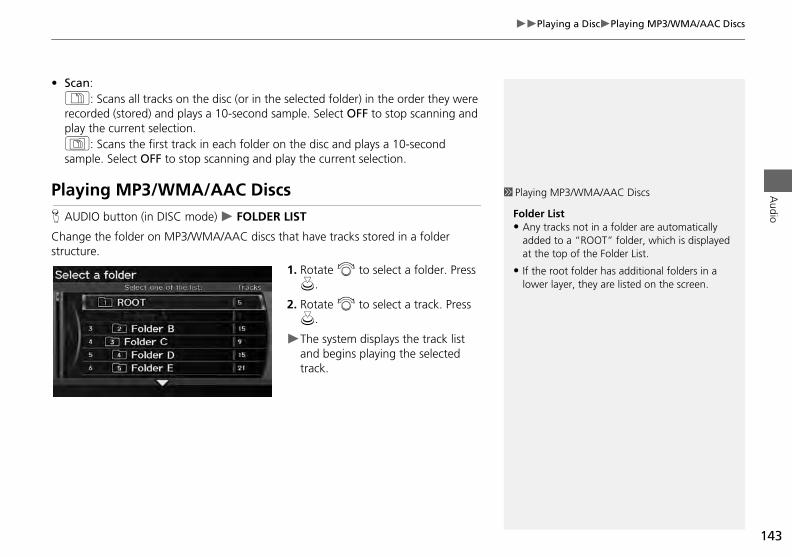
143
Playing a DiscPlaying MP3/WMA/AAC DiscsA
udio
• Scan:1: Scans all tracks on the disc (or in the selected folder) in the order they were recorded (stored) and plays a 10-second sample. Select OFF to stop scanning and play the current selection.2: Scans the first track in each folder on the disc and plays a 10-second sample. Select OFF to stop scanning and play the current selection.
Playing MP3/WMA/AAC DiscsH AUDIO button (in DISC mode) FOLDER LIST
Change the folder on MP3/WMA/AAC discs that have tracks stored in a folder structure.
1. Rotate i to select a folder. Press u.
1 Playing MP3/WMA/AAC Discs
Folder List• Any tracks not in a folder are automatically
added to a “ROOT” folder, which is displayed at the top of the Folder List.
• If the root folder has additional folders in a lower layer, they are listed on the screen.
2. Rotate i to select a track. Press u.
The system displays the track list and begins playing the selected track.
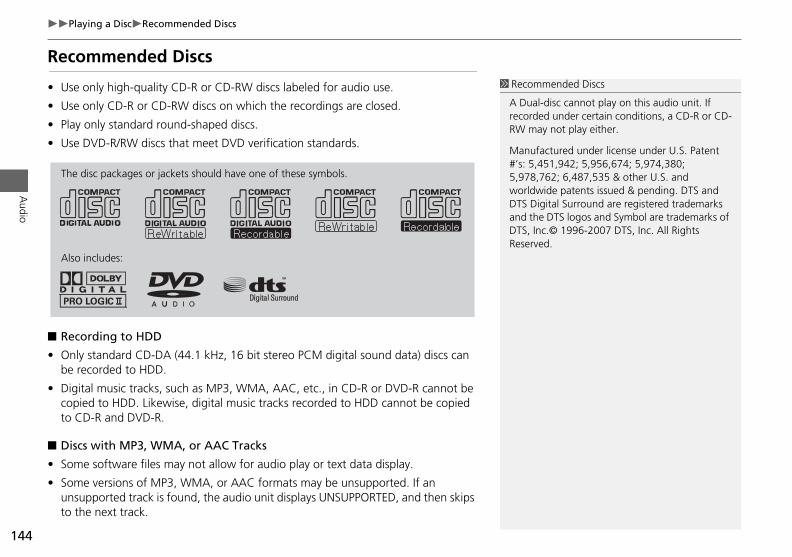
144
Playing a DiscRecommended Discs
Audio
Recommended Discs
• Use only high-quality CD-R or CD-RW discs labeled for audio use.
• Use only CD-R or CD-RW discs on which the recordings are closed.
• Play only standard round-shaped discs.
• Use DVD-R/RW discs that meet DVD verification standards.
1 Recommended Discs
A Dual-disc cannot play on this audio unit. If recorded under certain conditions, a CD-R or CD-RW may not play either.
Manufactured under license under U.S. Patent #’s: 5,451,942; 5,956,674; 5,974,380; 5,978,762; 6,487,535 & other U.S. and worldwide patents issued & pending. DTS and DTS Digital Surround are registered trademarks and the DTS logos and Symbol are trademarks of DTS, Inc.© 1996-2007 DTS, Inc. All Rights Reserved.
The disc packages or jackets should have one of these symbols.
Also includes:
■ Recording to HDD
• Only standard CD-DA (44.1 kHz, 16 bit stereo PCM digital sound data) discs can be recorded to HDD.
• Digital music tracks, such as MP3, WMA, AAC, etc., in CD-R or DVD-R cannot be copied to HDD. Likewise, digital music tracks recorded to HDD cannot be copied to CD-R and DVD-R.
■ Discs with MP3, WMA, or AAC Tracks
• Some software files may not allow for audio play or text data display.
• Some versions of MP3, WMA, or AAC formats may be unsupported. If an unsupported track is found, the audio unit displays UNSUPPORTED, and then skips to the next track.
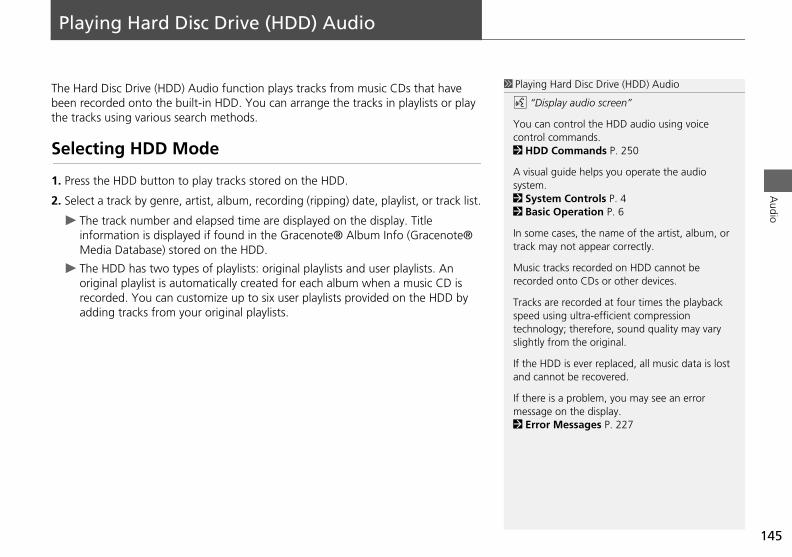
145
Audio
Playing Hard Disc Drive (HDD) Audio
The Hard Disc Drive (HDD) Audio function plays tracks from music CDs that have been recorded onto the built-in HDD. You can arrange the tracks in playlists or play the tracks using various search methods.
Selecting HDD Mode
1. Press the HDD button to play tracks stored on the HDD.
2. Select a track by genre, artist, album, recording (ripping) date, playlist, or track list.
The track number and elapsed time are displayed on the display. Title information is displayed if found in the Gracenote® Album Info (Gracenote® Media Database) stored on the HDD.
The HDD has two types of playlists: original playlists and user playlists. An original playlist is automatically created for each album when a music CD is
1 Playing Hard Disc Drive (HDD) Audio
d “Display audio screen”
You can control the HDD audio using voice control commands. 2 HDD Commands P. 250
A visual guide helps you operate the audio system. 2 System Controls P. 4 2 Basic Operation P. 6
In some cases, the name of the artist, album, or track may not appear correctly.
Music tracks recorded on HDD cannot be recorded onto CDs or other devices.
are recorded at four times the playback using ultra-efficient compression logy; therefore, sound quality may vary from the original.
DD is ever replaced, all music data is lost nnot be recovered.
is a problem, you may see an error e on the display. r Messages P. 227
recorded. You can customize up to six user playlists provided on the HDD by adding tracks from your original playlists.
Tracksspeed technoslightly
If the Hand ca
If theremessag2 Erro
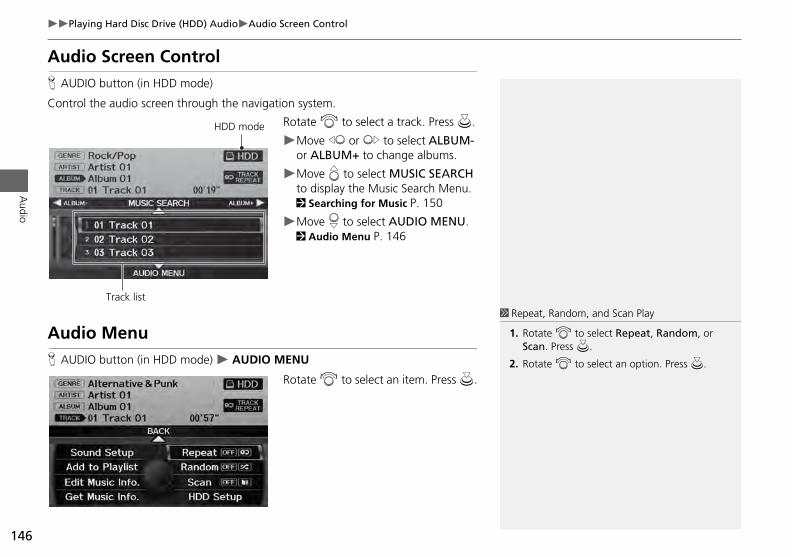
146
Playing Hard Disc Drive (HDD) AudioAudio Screen Control
Audio
Audio Screen ControlH AUDIO button (in HDD mode)
Control the audio screen through the navigation system.
Rotate i to select a track. Press u.
Move w or y to select ALBUM- or ALBUM+ to change albums.
Move e to select MUSIC SEARCH to display the Music Search Menu. 2 Searching for Music P. 150
Move r to select AUDIO MENU. 2 Audio Menu P. 146
HDD mode
Track list
, Random, and Scan Play
te i to select Repeat, Random, or . Press u.
te i to select an option. Press u.
Audio MenuH AUDIO button (in HDD mode) AUDIO MENU
Rotate i to select an item. Press u.
1 Repeat
1. RotaScan
2. Rota
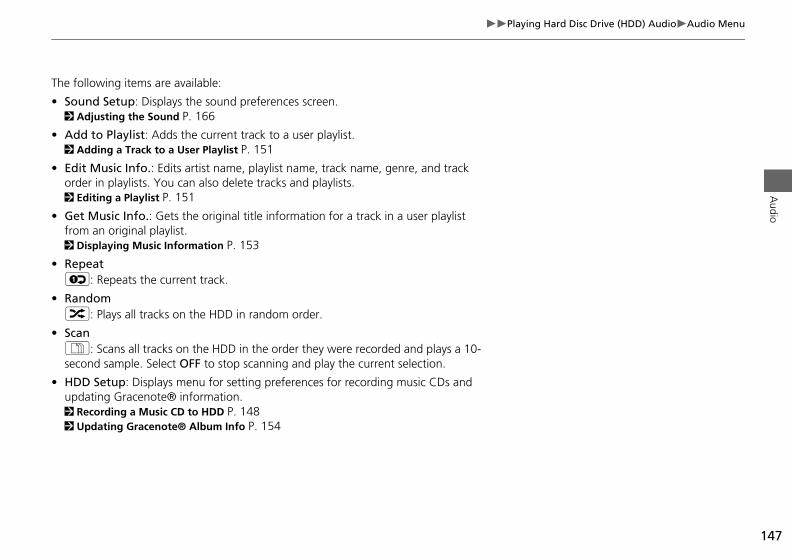
147
Playing Hard Disc Drive (HDD) AudioAudio MenuA
udio
The following items are available:
• Sound Setup: Displays the sound preferences screen. 2 Adjusting the Sound P. 166
• Add to Playlist: Adds the current track to a user playlist. 2 Adding a Track to a User Playlist P. 151
• Edit Music Info.: Edits artist name, playlist name, track name, genre, and track order in playlists. You can also delete tracks and playlists. 2 Editing a Playlist P. 151
• Get Music Info.: Gets the original title information for a track in a user playlist from an original playlist. 2 Displaying Music Information P. 153
• Repeat6: Repeats the current track.
• R3
• S1s
• Hu2
2
andom: Plays all tracks on the HDD in random order.
can: Scans all tracks on the HDD in the order they were recorded and plays a 10-
econd sample. Select OFF to stop scanning and play the current selection.
DD Setup: Displays menu for setting preferences for recording music CDs and pdating Gracenote® information. Recording a Music CD to HDD P. 148Updating Gracenote® Album Info P. 154
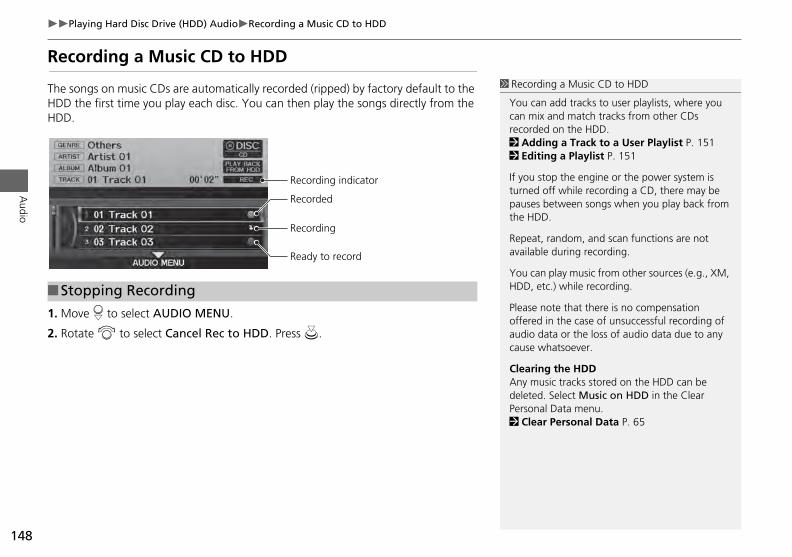
148
Playing Hard Disc Drive (HDD) AudioRecording a Music CD to HDD
Audio
Recording a Music CD to HDD
The songs on music CDs are automatically recorded (ripped) by factory default to the HDD the first time you play each disc. You can then play the songs directly from the HDD.
1 Recording a Music CD to HDD
You can add tracks to user playlists, where you can mix and match tracks from other CDs recorded on the HDD. 2 Adding a Track to a User Playlist P. 1512 Editing a Playlist P. 151
If you stop the engine or the power system is turned off while recording a CD, there may be pauses between songs when you play back from the HDD.
Repeat, random, and scan functions are not available during recording.
You can play music from other sources (e.g., XM, HDD, etc.) while recording.
ote that there is no compensation in the case of unsuccessful recording of ata or the loss of audio data due to any hatsoever.
g the HDDsic tracks stored on the HDD can be . Select Music on HDD in the Clear l Data menu. r Personal Data P. 65
■Stopping Recording
Recording indicator
Recorded
Recording
Ready to record
1. Move r to select AUDIO MENU.
2. Rotate i to select Cancel Rec to HDD. Press u.
Please nofferedaudio dcause w
ClearinAny mudeletedPersona2 Clea
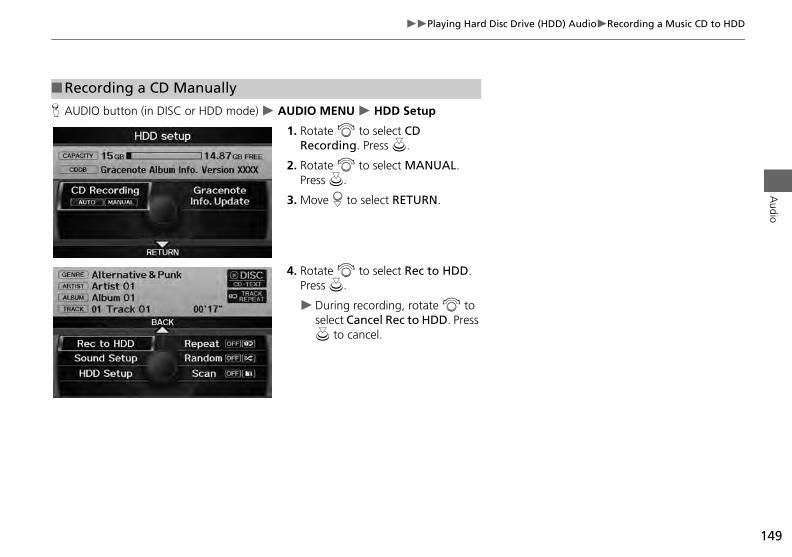
149
Playing Hard Disc Drive (HDD) AudioRecording a Music CD to HDDA
udio
H AUDIO button (in DISC or HDD mode) AUDIO MENU HDD Setup
1. Rotate i to select CD Recording. Press u.
2. Rotate i to select MANUAL. Press u.
3. Move r to select RETURN.
4. Rotate i to select Rec to HDD. Press u.
■Recording a CD Manually
During recording, rotate i to select Cancel Rec to HDD. Press u to cancel.
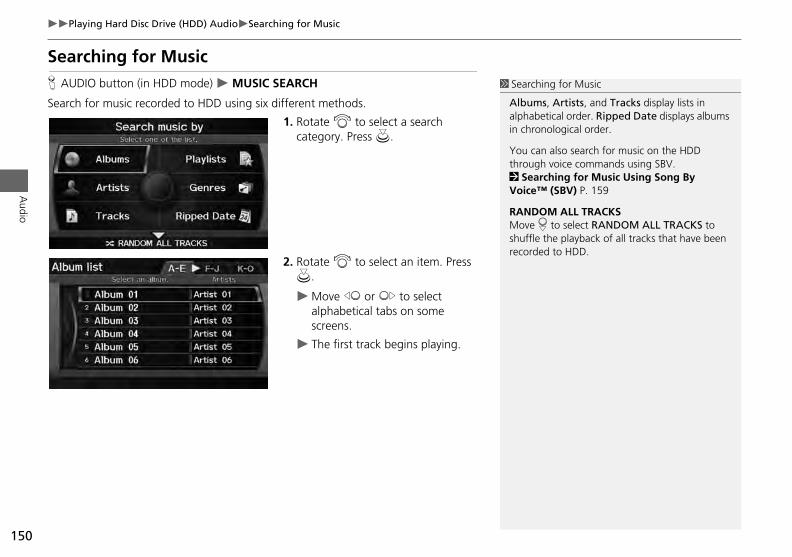
150
Playing Hard Disc Drive (HDD) AudioSearching for Music
Audio
Searching for MusicH AUDIO button (in HDD mode) MUSIC SEARCH
Search for music recorded to HDD using six different methods.
1. Rotate i to select a search category. Press u.
2. Rotate i to select an item. Press u.
Move w or y to select
1 Searching for Music
Albums, Artists, and Tracks display lists in alphabetical order. Ripped Date displays albums in chronological order.
You can also search for music on the HDD through voice commands using SBV. 2 Searching for Music Using Song By Voice™ (SBV) P. 159
RANDOM ALL TRACKSMove r to select RANDOM ALL TRACKS to shuffle the playback of all tracks that have been recorded to HDD.
alphabetical tabs on some screens.
The first track begins playing.
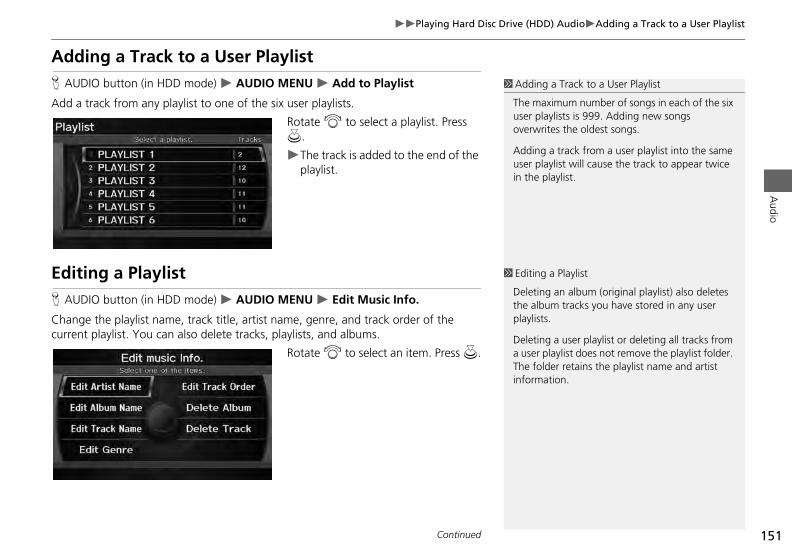
151
Playing Hard Disc Drive (HDD) AudioAdding a Track to a User PlaylistA
udio
Adding a Track to a User PlaylistH AUDIO button (in HDD mode) AUDIO MENU Add to Playlist
Add a track from any playlist to one of the six user playlists.
Rotate i to select a playlist. Press u.
The track is added to the end of the playlist.
Editing a Playlist
1 Adding a Track to a User Playlist
The maximum number of songs in each of the six user playlists is 999. Adding new songs overwrites the oldest songs.
Adding a track from a user playlist into the same user playlist will cause the track to appear twice in the playlist.
1 Editing a Playlist
Deleting an album (original playlist) also deletes um tracks you have stored in any user s.
g a user playlist or deleting all tracks from playlist does not remove the playlist folder. lder retains the playlist name and artist ation.
H AUDIO button (in HDD mode) AUDIO MENU Edit Music Info.
Change the playlist name, track title, artist name, genre, and track order of the current playlist. You can also delete tracks, playlists, and albums.
Rotate i to select an item. Press u.
the albplaylist
Deletina user The foinform
Continued
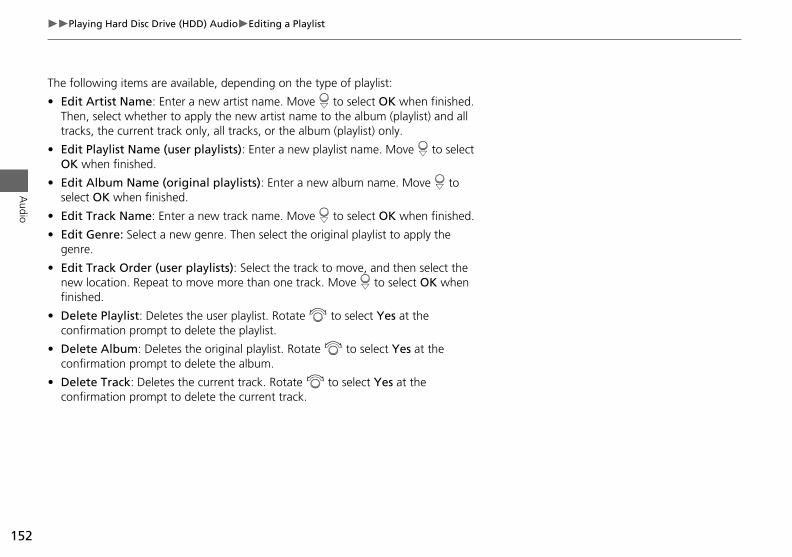
152
Playing Hard Disc Drive (HDD) AudioEditing a Playlist
Audio
The following items are available, depending on the type of playlist:
• Edit Artist Name: Enter a new artist name. Move r to select OK when finished. Then, select whether to apply the new artist name to the album (playlist) and all tracks, the current track only, all tracks, or the album (playlist) only.
• Edit Playlist Name (user playlists): Enter a new playlist name. Move r to select OK when finished.
• Edit Album Name (original playlists): Enter a new album name. Move r to select OK when finished.
• Edit Track Name: Enter a new track name. Move r to select OK when finished.
• Edit Genre: Select a new genre. Then select the original playlist to apply the genre.
• Edit Track Order (user playlists): Select the track to move, and then select the new location. Repeat to move more than one track. Move r to select OK when finished.
• Dco
• Dco
• Dco
elete Playlist: Deletes the user playlist. Rotate i to select Yes at the nfirmation prompt to delete the playlist.
elete Album: Deletes the original playlist. Rotate i to select Yes at the nfirmation prompt to delete the album.
elete Track: Deletes the current track. Rotate i to select Yes at the nfirmation prompt to delete the current track.
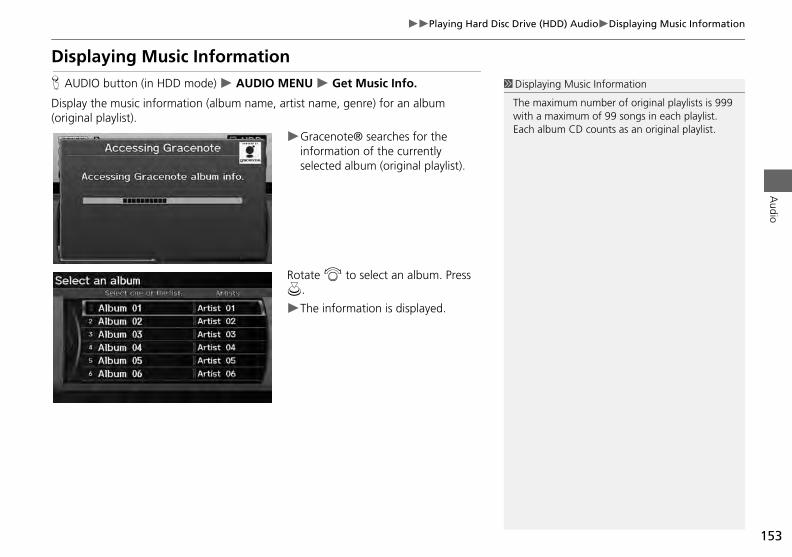
153
Playing Hard Disc Drive (HDD) AudioDisplaying Music InformationA
udio
Displaying Music InformationH AUDIO button (in HDD mode) AUDIO MENU Get Music Info.
Display the music information (album name, artist name, genre) for an album (original playlist).
Gracenote® searches for the information of the currently selected album (original playlist).
Rotate i to select an album. Press u.
1 Displaying Music Information
The maximum number of original playlists is 999 with a maximum of 99 songs in each playlist. Each album CD counts as an original playlist.
The information is displayed.
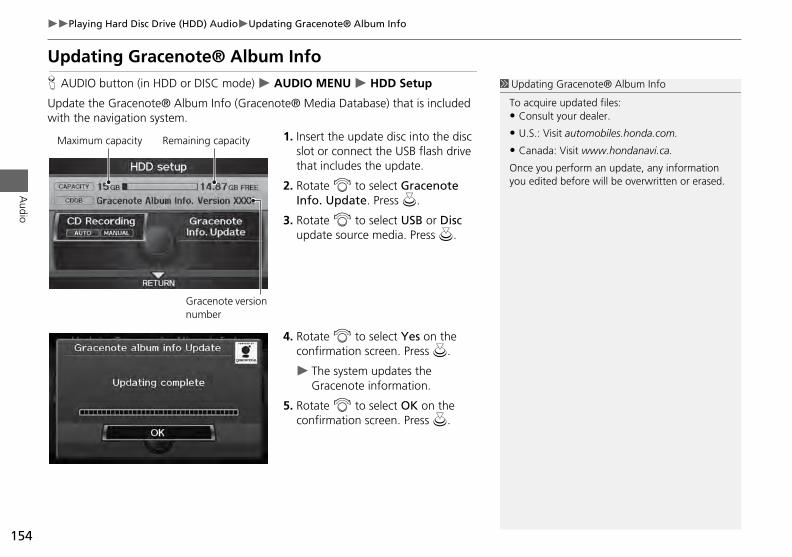
154
Playing Hard Disc Drive (HDD) AudioUpdating Gracenote® Album Info
Audio
Updating Gracenote® Album InfoH AUDIO button (in HDD or DISC mode) AUDIO MENU HDD Setup
Update the Gracenote® Album Info (Gracenote® Media Database) that is included with the navigation system.
1. Insert the update disc into the disc slot or connect the USB flash drive that includes the update.
2. Rotate i to select Gracenote Info. Update. Press u.
3. Rotate i to select USB or Disc update source media. Press u.
1 Updating Gracenote® Album Info
To acquire updated files:• Consult your dealer.
• U.S.: Visit automobiles.honda.com.
• Canada: Visit www.hondanavi.ca.
Once you perform an update, any information you edited before will be overwritten or erased.
Maximum capacity Remaining capacity
4. Rotate i to select Yes on the confirmation screen. Press u.
The system updates the Gracenote information.
5. Rotate i to select OK on the confirmation screen. Press u.
Gracenote version number
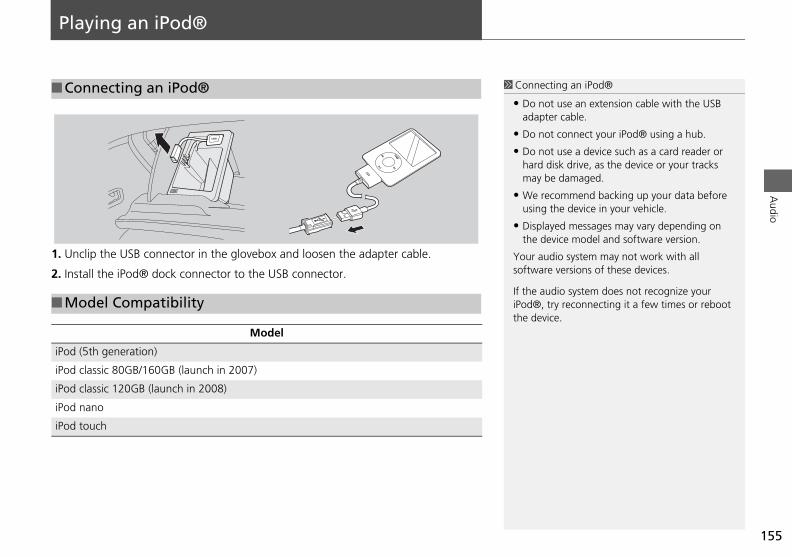
155
Audio
Playing an iPod®
1. Unclip the USB connector in the glovebox and loosen the adapter cable.
2. Install the iPod® dock connector to the USB connector.
■Connecting an iPod® 1 Connecting an iPod®
• Do not use an extension cable with the USB adapter cable.
• Do not connect your iPod® using a hub.
• Do not use a device such as a card reader or hard disk drive, as the device or your tracks may be damaged.
• We recommend backing up your data before using the device in your vehicle.
• Displayed messages may vary depending on the device model and software version.
Your audio system may not work with all software versions of these devices.
If the audio system does not recognize your try reconnecting it a few times or reboot vice.
M
iPo
iPo
iPo
iPo
iPo
■
iPod®,the deodel Compatibility
Model
d (5th generation)
d classic 80GB/160GB (launch in 2007)
d classic 120GB (launch in 2008)
d nano
d touch
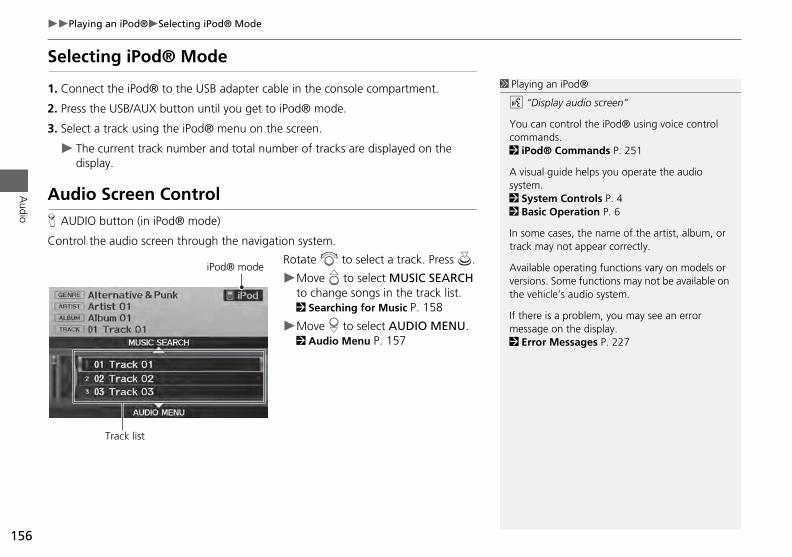
156
Playing an iPod®Selecting iPod® Mode
Audio
Selecting iPod® Mode
1. Connect the iPod® to the USB adapter cable in the console compartment.
2. Press the USB/AUX button until you get to iPod® mode.
3. Select a track using the iPod® menu on the screen.
The current track number and total number of tracks are displayed on the display.
Audio Screen ControlH AUDIO button (in iPod® mode)
Control the audio screen through the navigation system.
Rotate i to select a track. Press u.
Move e to select MUSIC SEARCH to change songs in the track list.
1 Playing an iPod®
d “Display audio screen”
You can control the iPod® using voice control commands.2 iPod® Commands P. 251
A visual guide helps you operate the audio system.2 System Controls P. 42 Basic Operation P. 6
In some cases, the name of the artist, album, or track may not appear correctly.
Available operating functions vary on models or versions. Some functions may not be available on the vehicle’s audio system.
is a problem, you may see an error e on the display. r Messages P. 227
iPod® mode
2 Searching for Music P. 158
Move r to select AUDIO MENU. 2 Audio Menu P. 157
If theremessag2 Erro
Track list
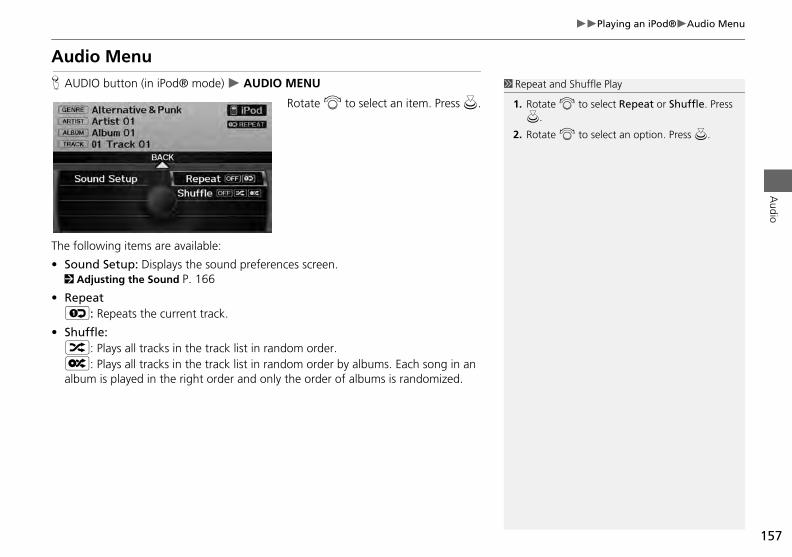
157
Playing an iPod®Audio MenuA
udio
Audio MenuH AUDIO button (in iPod® mode) AUDIO MENU
Rotate i to select an item. Press u.
The following items are available:
• Sound Setup: Displays the sound preferences screen. 2 Adjusting the Sound P. 166
1 Repeat and Shuffle Play
1. Rotate i to select Repeat or Shuffle. Press u.
2. Rotate i to select an option. Press u.
• Repeat 6: Repeats the current track.
• Shuffle:3: Plays all tracks in the track list in random order.5: Plays all tracks in the track list in random order by albums. Each song in an album is played in the right order and only the order of albums is randomized.
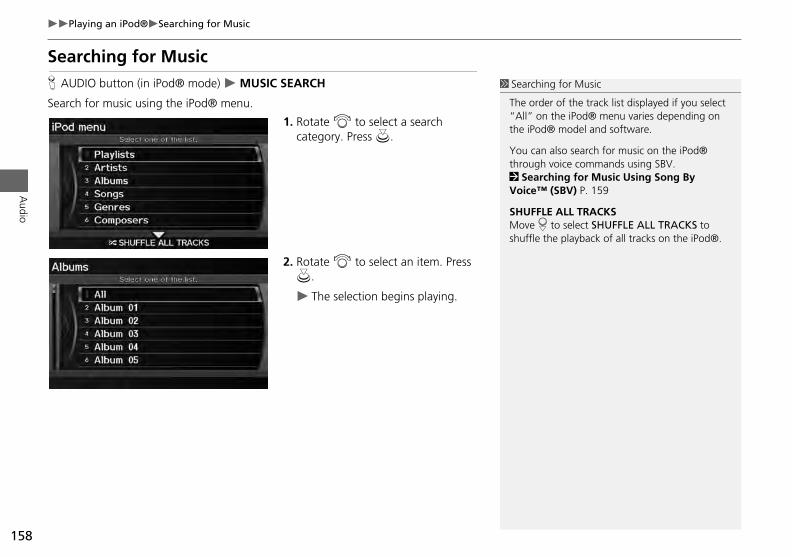
158
Playing an iPod®Searching for Music
Audio
Searching for MusicH AUDIO button (in iPod® mode) MUSIC SEARCH
Search for music using the iPod® menu.
1. Rotate i to select a search category. Press u.
2. Rotate i to select an item. Press u.
The selection begins playing.
1 Searching for Music
The order of the track list displayed if you select “All” on the iPod® menu varies depending on the iPod® model and software.
You can also search for music on the iPod® through voice commands using SBV. 2 Searching for Music Using Song By Voice™ (SBV) P. 159
SHUFFLE ALL TRACKSMove r to select SHUFFLE ALL TRACKS to shuffle the playback of all tracks on the iPod®.

159
Audio
Searching for Music Using Song By Voice™ (SBV)
Use Song By Voice™ (SBV) to search for and play music from your HDD or iPod® device using voice commands.
1. Set Song By Voice to ON in the system setup. 2 Song By Voice™ (SBV) P. 46
2. Say d “Hard Disc Drive Search” or d “iPod Search” to activate the SBV feature for the HDD or iPod®.
The SBV commands that you can use are displayed on the screen.
3. Say a command.
Example 1: Say d “List Artist
1 Searching for Music Using Song By Voice™ (SBV)
The SBV voice commands give you more control over the music than the regular iPod® and HDD voice commands. 2 Song By Voice™ Commands P. 251
You can add phonetic modifications of difficult words so that it is easier for SBV to recognize artists, songs, albums, and composers in voice commands. 2 Phonetic Modification P. 47
SBV may not be able to recognize languages other than English for the artist name, song title, album title, and composers.
Once you have canceled this mode, you need to “Hard Disc Drive Search” or d “iPod ” again to re-activate this mode.
‘Artist A’” to view a list of songs by that artist. Select the desired song to start playing.
Example 2: Say d “Play Artist ‘Artist A’” to start playing songs by that artist.
4. To cancel SBV mode, press the CANCEL (BACK) button on the steering wheel or any button on the navigation system interface. The selected song continues playing.
say dSearch
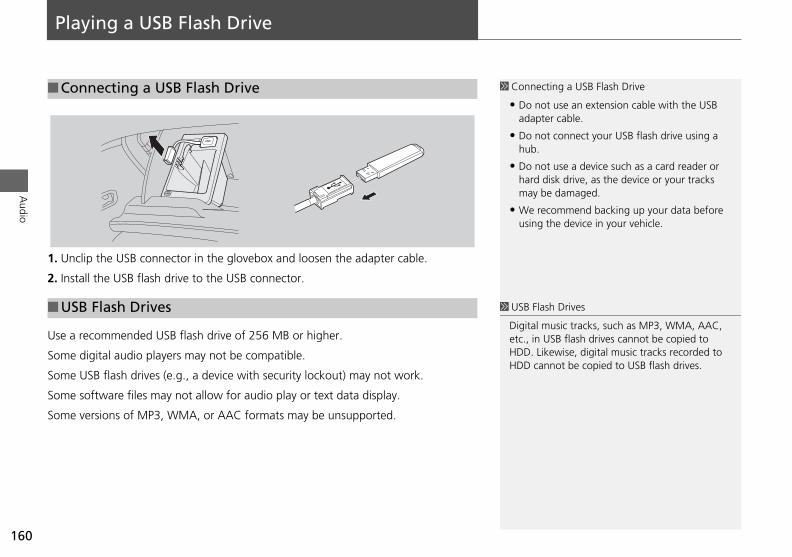
Audio
Playing a USB Flash Drive
1. Unclip the USB connector in the glovebox and loosen the adapter cable.
2. Install the USB flash drive to the USB connector.
se
om
om
om
om
■Connecting a USB Flash Drive 1 Connecting a USB Flash Drive
• Do not use an extension cable with the USB adapter cable.
• Do not connect your USB flash drive using a hub.
• Do not use a device such as a card reader or hard disk drive, as the device or your tracks may be damaged.
• We recommend backing up your data before using the device in your vehicle.
U sh Drives
music tracks, such as MP3, WMA, AAC, USB flash drives cannot be copied to ikewise, digital music tracks recorded to nnot be copied to USB flash drives.
160
U
S
S
S
S
■
a recommended USB flash drive of 256 MB or higher.
e digital audio players may not be compatible.
e USB flash drives (e.g., a device with security lockout) may not work.
e software files may not allow for audio play or text data display.
e versions of MP3, WMA, or AAC formats may be unsupported.
SB Flash Drives 1 USB Fla
Digital etc., in HDD. LHDD ca
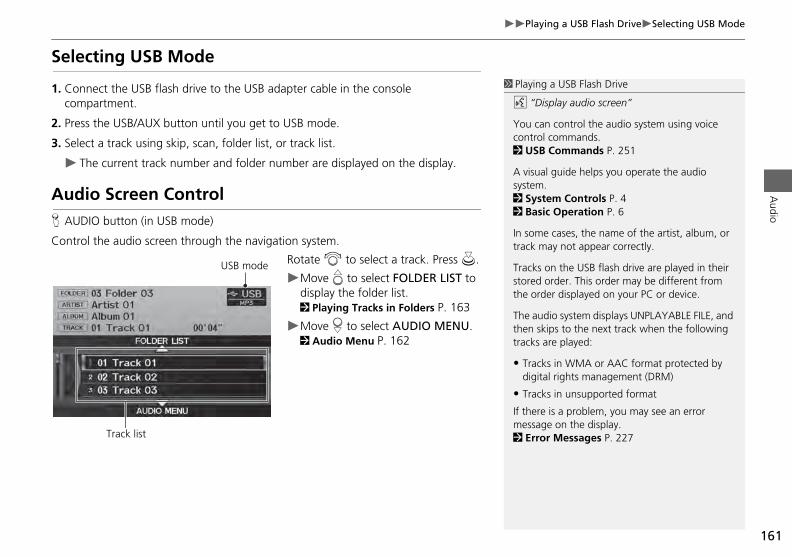
161
Playing a USB Flash DriveSelecting USB ModeA
udio
Selecting USB Mode
1. Connect the USB flash drive to the USB adapter cable in the console compartment.
2. Press the USB/AUX button until you get to USB mode.
3. Select a track using skip, scan, folder list, or track list.
The current track number and folder number are displayed on the display.
Audio Screen ControlH AUDIO button (in USB mode)
Control the audio screen through the navigation system.
Rotate i to select a track. Press u.
Move e to select FOLDER LIST to display the folder list.
1 Playing a USB Flash Drive
d “Display audio screen”
You can control the audio system using voice control commands.2 USB Commands P. 251
A visual guide helps you operate the audio system.2 System Controls P. 42 Basic Operation P. 6
In some cases, the name of the artist, album, or track may not appear correctly.
Tracks on the USB flash drive are played in their stored order. This order may be different from the order displayed on your PC or device.
dio system displays UNPLAYABLE FILE, and ips to the next track when the following
are played:
ks in WMA or AAC format protected by al rights management (DRM)
ks in unsupported format
is a problem, you may see an error e on the display. r Messages P. 227
USB mode
2 Playing Tracks in Folders P. 163
Move r to select AUDIO MENU. 2 Audio Menu P. 162
The authen sktracks
• Tracdigit
• Trac
If theremessag2 ErroTrack list
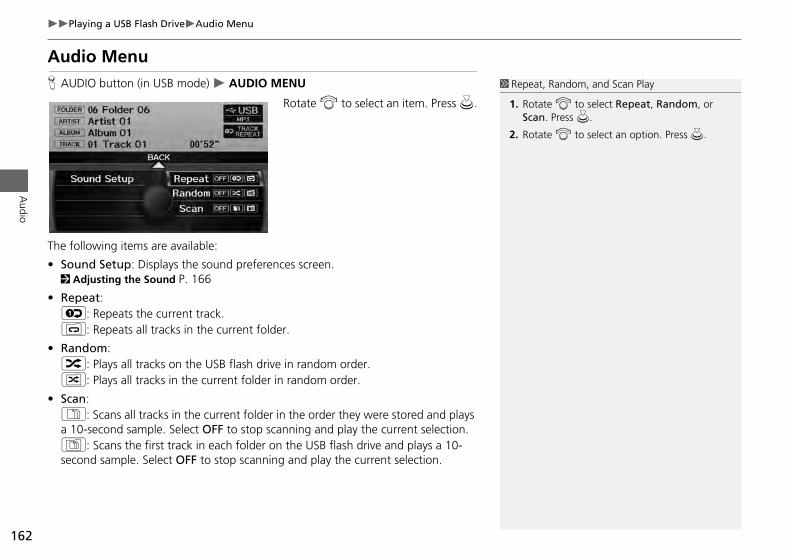
162
Playing a USB Flash DriveAudio Menu
Audio
Audio MenuH AUDIO button (in USB mode) AUDIO MENU
Rotate i to select an item. Press u.
The following items are available:
• Sound Setup: Displays the sound preferences screen. 2 Adjusting the Sound P. 166
• Repeat:
1 Repeat, Random, and Scan Play
1. Rotate i to select Repeat, Random, or Scan. Press u.
2. Rotate i to select an option. Press u.
6: Repeats the current track.7: Repeats all tracks in the current folder.
• Random:3: Plays all tracks on the USB flash drive in random order.4: Plays all tracks in the current folder in random order.
• Scan:1: Scans all tracks in the current folder in the order they were stored and plays a 10-second sample. Select OFF to stop scanning and play the current selection.2: Scans the first track in each folder on the USB flash drive and plays a 10-second sample. Select OFF to stop scanning and play the current selection.

163
Playing a USB Flash DrivePlaying Tracks in FoldersA
udio
Playing Tracks in FoldersH AUDIO button (in USB mode) FOLDER LIST
Change the folder if the tracks are stored in a folder structure.
1. Rotate i to select a folder. Press u.
2. Rotate i to select a track. Press u.
The display returns to the track list menu and the selected track.
1 Playing Tracks in Folders
Folder List• Any music tracks not in a folder are
automatically added to a “ROOT” folder, which is displayed at the top of the Folder List.
• If the root folder has additional folders in a lower layer, they are listed on the screen.
RANDOM ALL TRACKSMove r to select RANDOM ALL TRACKS to shuffle the playback of all tracks on the USB flash drive.
Audio
Playing Bluetooth® Audio
Your audio system allows you to listen to music tracks stored on your Bluetooth-compatible phone.
This function is available when the phone is linked to the vehicle’s Bluetooth® HandsFreeLink® (HFL) system. 2 Bluetooth® HandsFreeLink® P. 169
Selecting Bluetooth® Audio Mode
1. Make sure that your phone is on, paired, and linked to HFL. 2 Pairing a Phone P. 172
2. Press the USB/AUX button to select Bluetooth® Audio mode.
A Bluetooth® message and icon are displayed on the display and screen.
3. If necessary, follow the cell phone operating instructions for playing audio tracks.
he
Aa
1 Playing Bluetooth® Audio
d “Display audio screen”
You can control the audio system using voice control commands. 2 Bluetooth® Audio Commands P. 251
Not all Bluetooth-enabled phones with streaming audio capabilities are compatible. To check if your phone is compatible:
• U.S.: Visit automobiles.honda.com/handsfreelink.
• Canada: Visit www.handsfreelink.ca.
• Call HandsFreeLink customer support at (888) 528-7876.
In some states, it may be illegal to perform some data device functions while driving.
cases, the name of the artist, album, or ay not appear correctly.
e phone can be used with HFL at a time. here are more than two paired phones in icle, the first paired phone the system ill be automatically linked.
the TITLE side of the SCAN/TITLE bar s the center display between the th® Audio message and the device
164
C
•
ck the following if the phone is not recognized:
nother HFL-compatible phone, which is not compatible for Bluetooth® Audio, is lready connected.
In sometrack m
Only onWhen tthe vehfinds w
PressingswitcheBluetoo
name.
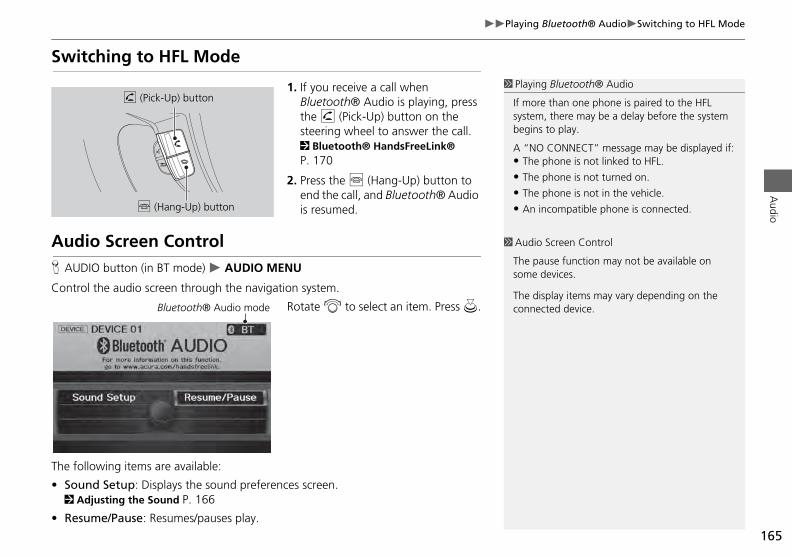
165
Playing Bluetooth® AudioSwitching to HFL ModeA
udio
Switching to HFL Mode
1. If you receive a call when Bluetooth® Audio is playing, press the h (Pick-Up) button on the steering wheel to answer the call. 2 Bluetooth® HandsFreeLink® P. 170
2. Press the j (Hang-Up) button to end the call, and Bluetooth® Audio is resumed.
Audio Screen ControlH AUDIO button (in BT mode) AUDIO MENU
Control the audio screen through the navigation system.
1 Playing Bluetooth® Audio
If more than one phone is paired to the HFL system, there may be a delay before the system begins to play.
A “NO CONNECT” message may be displayed if:• The phone is not linked to HFL.
• The phone is not turned on.
• The phone is not in the vehicle.
• An incompatible phone is connected.
h (Pick-Up) button
j (Hang-Up) button
1 Audio Screen Control
The pause function may not be available on some devices.
The display items may vary depending on the ted device.
Rotate i to select an item. Press u.The following items are available:
• Sound Setup: Displays the sound preferences screen. 2 Adjusting the Sound P. 166
• Resume/Pause: Resumes/pauses play.
connecBluetooth® Audio mode
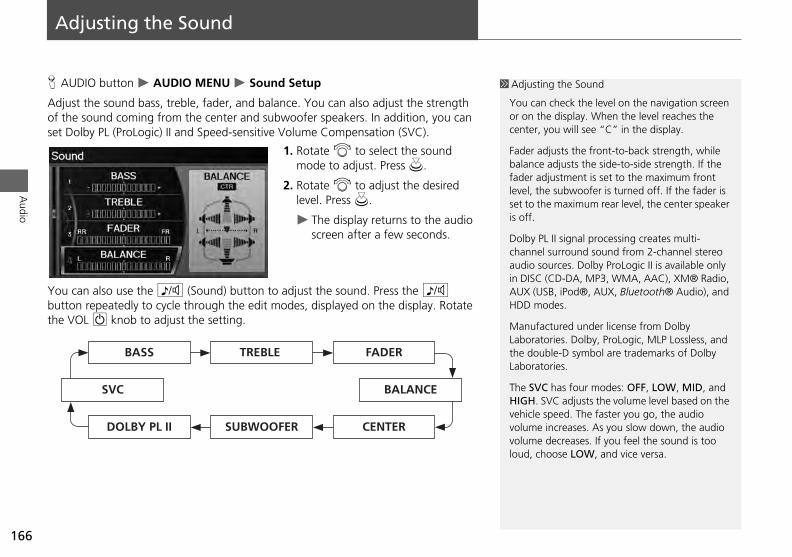
Audio
Adjusting the Sound
H AUDIO button AUDIO MENU Sound Setup
Adjust the sound bass, treble, fader, and balance. You can also adjust the strength of the sound coming from the center and subwoofer speakers. In addition, you can set Dolby PL (ProLogic) II and Speed-sensitive Volume Compensation (SVC).
1. Rotate i to select the sound mode to adjust. Press u.
2. Rotate i to adjust the desired level. Press u.
The display returns to the audio screen after a few seconds.
You can also use the 8 (Sound) button to adjust the sound. Press the 8 utte
1 Adjusting the Sound
You can check the level on the navigation screen or on the display. When the level reaches the center, you will see “C” in the display.
Fader adjusts the front-to-back strength, while balance adjusts the side-to-side strength. If the fader adjustment is set to the maximum front level, the subwoofer is turned off. If the fader is set to the maximum rear level, the center speaker is off.
Dolby PL II signal processing creates multi-channel surround sound from 2-channel stereo audio sources. Dolby ProLogic II is available only in DISC (CD-DA, MP3, WMA, AAC), XM® Radio, AUX (USB, iPod®, AUX, Bluetooth® Audio), and
odes.
ctured under license from Dolby ories. Dolby, ProLogic, MLP Lossless, and ble-D symbol are trademarks of Dolby ories.
C has four modes: OFF, LOW, MID, and VC adjusts the volume level based on the
speed. The faster you go, the audio increases. As you slow down, the audio decreases. If you feel the sound is too oose LOW, and vice versa.
166
bth
on repeatedly to cycle through the edit modes, displayed on the display. Rotate VOL 9 knob to adjust the setting.
HDD m
ManufaLaboratthe douLaborat
The SVHIGH. Svehicle volumevolumeloud, ch
TREBLE BASS
SVC BALANCE
FADER
SUBWOOFERDOLBY PL II CENTER
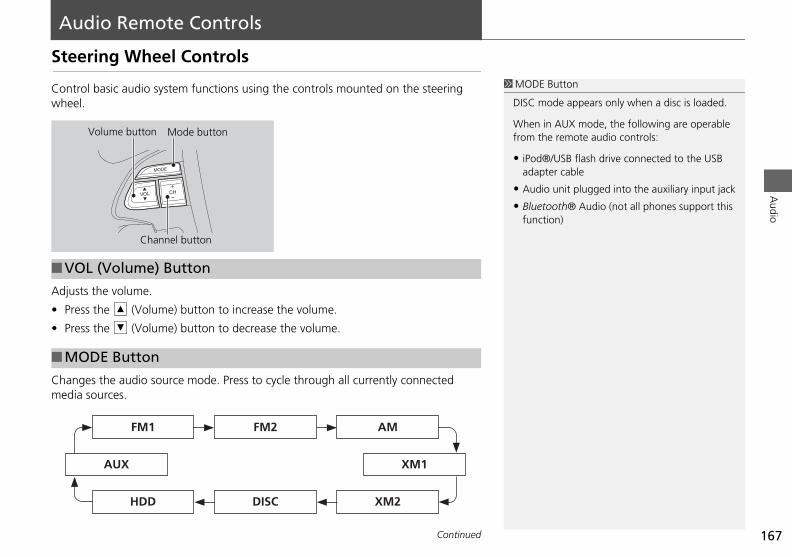
167
Audio
Audio Remote Controls
Steering Wheel Controls
Control basic audio system functions using the controls mounted on the steering wheel.
Adjusts the volume.
1 MODE Button
DISC mode appears only when a disc is loaded.
When in AUX mode, the following are operable from the remote audio controls:
• iPod®/USB flash drive connected to the USB adapter cable
• Audio unit plugged into the auxiliary input jack
• Bluetooth® Audio (not all phones support this function)
Volume button Mode button
Channel button
■VOL (Volume) Button
•
•
Cm
■
Press the R (Volume) button to increase the volume.
Press the U (Volume) button to decrease the volume.
hanges the audio source mode. Press to cycle through all currently connected edia sources.
MODE Button
FM2FM1
AUX XM1
AM
DISCHDD XM2
Continued
168
Audio Remote ControlsSteering Wheel Controls
Audio
FM/AM, XM
• Press the N (Channel) button to change to the next preset station (channel).
• Press the B (Channel) button to go to the previous preset station (channel).
• FM/AM: Press and hold for one second to scan for a station with a strong signal.
• XM: Press and hold for one second to go to the next/previous channel in the current category.
DISC, HDD, iPod®, USB, Bluetooth® Audio (on some phones)
• Press the N button to skip to the end of the current track.
• Press the B button to skip to the beginning of the current track. Press the B button again to go to the beginning of the previous track.
• Press and hold to skip forward/backward to the first track of the next folder.
■CH (Channel) Button
B dsFreeLink®
This se etooth® HandsFreeLink®. You
c ing your vehicle’s audio system
hout handling your cell phone.
tooth® HandsFreeLink® ............... 170iring a Phone .................................... 172porting Phonebook Data .................. 177tting Up Speed Dialing...................... 178iting User Name and PIN................... 180one Setup ........................................ 181aking a Call....................................... 182ceiving a Call .................................... 185L Menus........................................... 186
169
BluePaImSeEdPhMReHF
luetooth® Han
ction describes how to operate Blu
an place and receive phone calls us
wit
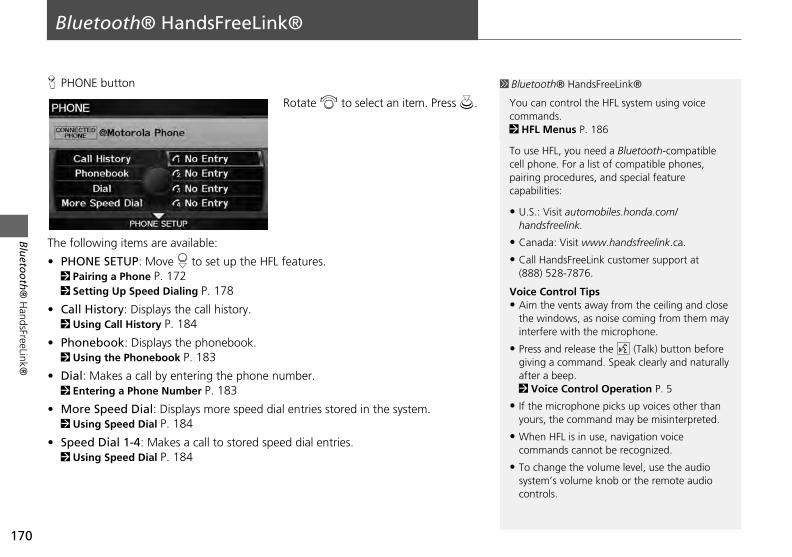
Bluetooth
® H
Bluetooth® HandsFreeLink®
H PHONE button
Rotate i to select an item. Press u.
The following items are available:
• PHONE SETUP: Move r to set up the HFL features.2 Pairing a Phone P. 1722 Setting Up Speed Dialing P. 178
C2
P2
D2
M2
S2
1 Bluetooth® HandsFreeLink®
You can control the HFL system using voice commands.2 HFL Menus P. 186
To use HFL, you need a Bluetooth-compatible cell phone. For a list of compatible phones, pairing procedures, and special feature capabilities:
• U.S.: Visit automobiles.honda.com/handsfreelink.
• Canada: Visit www.handsfreelink.ca.
• Call HandsFreeLink customer support at (888) 528-7876.
Voice Control Tipshe vents away from the ceiling and close indows, as noise coming from them may ere with the microphone.
and release the d (Talk) button before a command. Speak clearly and naturally
a beep. ice Control Operation P. 5
microphone picks up voices other than , the command may be misinterpreted.
HFL is in use, navigation voice ands cannot be recognized.
ange the volume level, use the audio ’s volume knob or the remote audio
ols.
170
andsFreeLink®
•
•
•
•
•
all History: Displays the call history. Using Call History P. 184
honebook: Displays the phonebook. Using the Phonebook P. 183
ial: Makes a call by entering the phone number. Entering a Phone Number P. 183
ore Speed Dial: Displays more speed dial entries stored in the system. Using Speed Dial P. 184
peed Dial 1-4: Makes a call to stored speed dial entries. Using Speed Dial P. 184
• Aim tthe winterf
• Press givingafter 2 Vo
• If theyours
• Whencomm
• To chsystemcontr
171
Bluetooth® HandsFreeLink®Bluetooth
® H
andsFreeLink®
Say d “Hands-free help” or d “Help” any time to get help or hear a list of commands.2 Voice Help P. 5
■Help Features 1 Bluetooth® HandsFreeLink®
Bluetooth® Wireless TechnologyBluetooth® name and logos are registered trademarks owned by Bluetooth SIG, Inc., and any use of such marks by Honda Motors Co., Ltd., is under license. Other trademarks and trade names are those of their respective owners.
HFL LimitationsAn incoming call on HFL will interrupt Bluetooth® Audio when it is playing. Audio will resume when the call is ended.
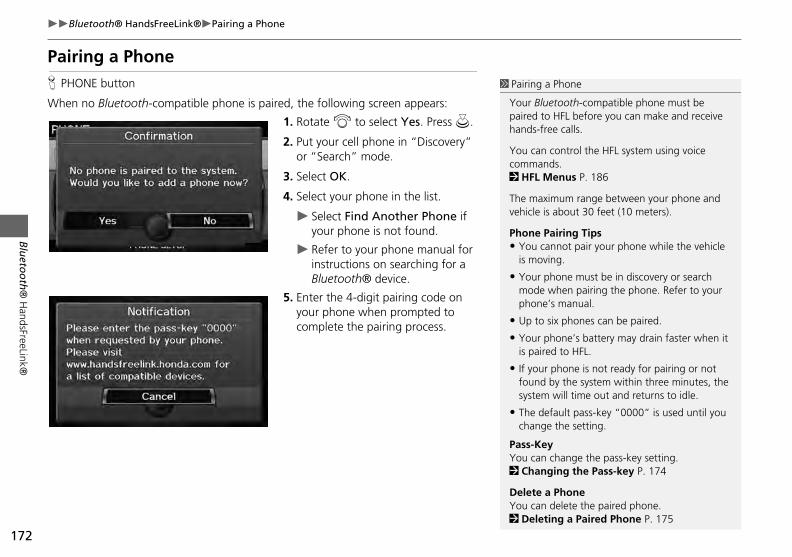
172
Bluetooth® HandsFreeLink®Pairing a Phone
Bluetooth
® H
andsFreeLink®
Pairing a PhoneH PHONE button
When no Bluetooth-compatible phone is paired, the following screen appears:
1. Rotate i to select Yes. Press u.
2. Put your cell phone in “Discovery” or “Search” mode.
3. Select OK.
4. Select your phone in the list.
Select Find Another Phone if your phone is not found.
Refer to your phone manual for instructions on searching for a Bluetooth® device.
5. Enter the 4-digit pairing code on
1 Pairing a Phone
Your Bluetooth-compatible phone must be paired to HFL before you can make and receive hands-free calls.
You can control the HFL system using voice commands.2 HFL Menus P. 186
The maximum range between your phone and vehicle is about 30 feet (10 meters).
Phone Pairing Tips• You cannot pair your phone while the vehicle
is moving.
• Your phone must be in discovery or search mode when pairing the phone. Refer to your
e’s manual.
six phones can be paired.
phone’s battery may drain faster when it red to HFL.
r phone is not ready for pairing or not by the system within three minutes, the will time out and returns to idle.
efault pass-key “0000” is used until you e the setting.
ey change the pass-key setting. ging the Pass-key P. 174
a Phone delete the paired phone. ting a Paired Phone P. 175
your phone when prompted to complete the pairing process.
phon
• Up to
• Your is pai
• If youfoundsystem
• The dchang
Pass-KYou can2 Chan
DeleteYou can2 Dele
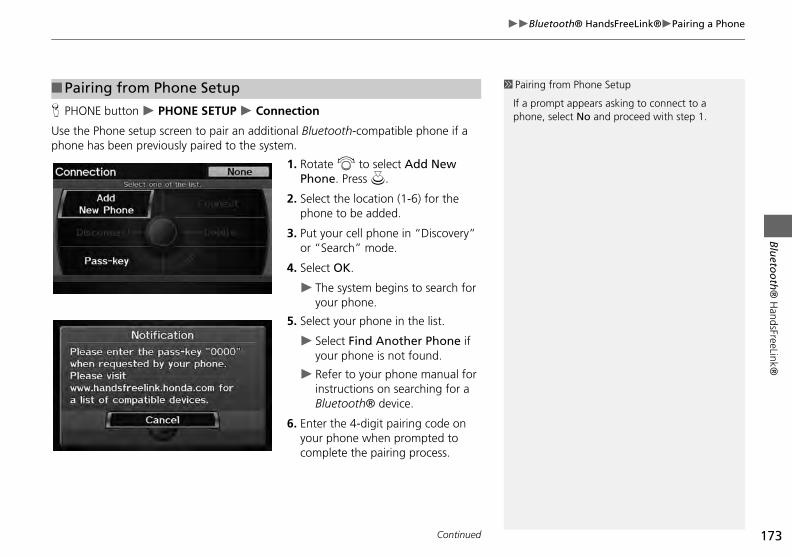
173
Bluetooth® HandsFreeLink®Pairing a PhoneBluetooth
® H
andsFreeLink®
H PHONE button PHONE SETUP Connection
Use the Phone setup screen to pair an additional Bluetooth-compatible phone if a phone has been previously paired to the system.
1. Rotate i to select Add New Phone. Press u.
2. Select the location (1-6) for the phone to be added.
3. Put your cell phone in “Discovery” or “Search” mode.
4. Select OK.
The system begins to search for
■Pairing from Phone Setup 1 Pairing from Phone Setup
If a prompt appears asking to connect to a phone, select No and proceed with step 1.
your phone.
5. Select your phone in the list.
Select Find Another Phone if your phone is not found.
Refer to your phone manual for instructions on searching for a Bluetooth® device.
6. Enter the 4-digit pairing code on your phone when prompted to complete the pairing process.
Continued
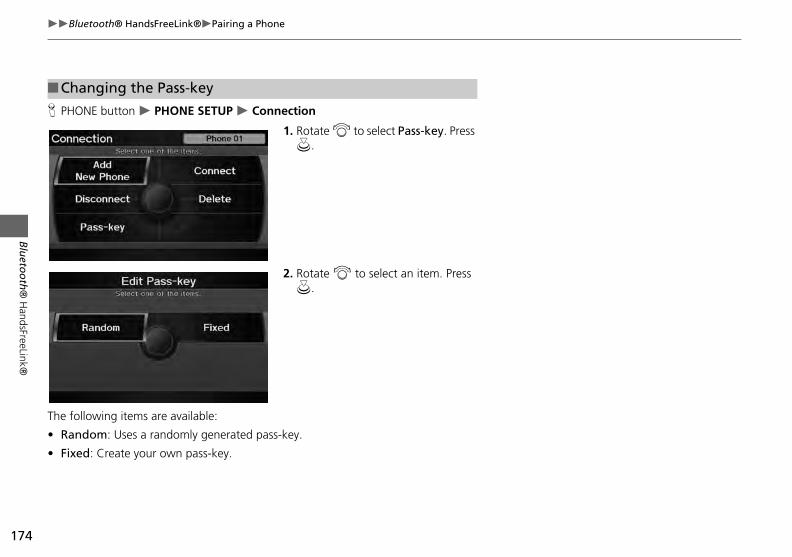
174
Bluetooth® HandsFreeLink®Pairing a Phone
Bluetooth
® H
andsFreeLink®
H PHONE button PHONE SETUP Connection
1. Rotate i to select Pass-key. Press u.
2. Rotate i to select an item. Press u.
The
• R
• F
■Changing the Pass-key
following items are available:
andom: Uses a randomly generated pass-key.
ixed: Create your own pass-key.

175
Bluetooth® HandsFreeLink®Pairing a PhoneBluetooth
® H
andsFreeLink®
3. Move w to select DELETE to remove the current pass-key.
4. Enter a new pass-key. Move r to select OK.
H PHONE button PHONE SETUP Connection
1. Rotate i to select Delete.
■Deleting a Paired Phone
Continued
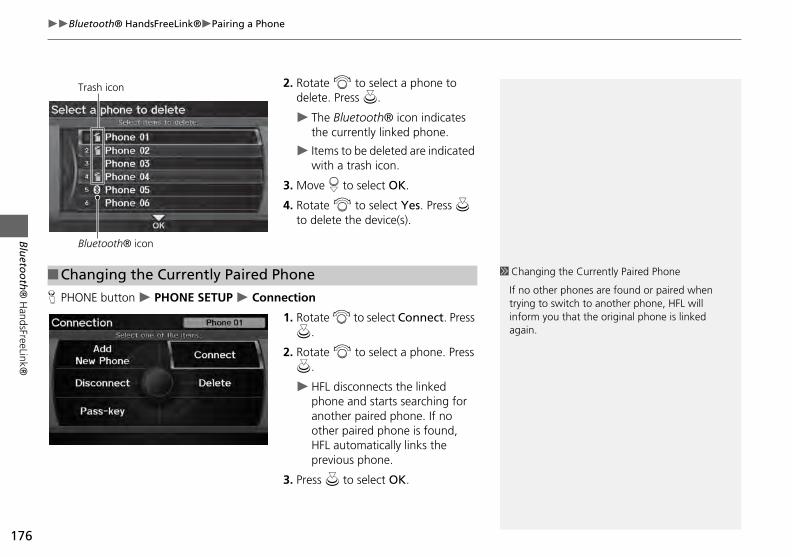
176
Bluetooth® HandsFreeLink®Pairing a Phone
Bluetooth
® H
andsFreeLink®
2. Rotate i to select a phone to delete. Press u.
The Bluetooth® icon indicates the currently linked phone.
Items to be deleted are indicated with a trash icon.
3. Move r to select OK.
4. Rotate i to select Yes. Press u to delete the device(s).
H PHONE button PHONE SETUP Connection
Trash icon
Bluetooth® icon
■Changing the Currently Paired Phone 1 Changing the Currently Paired Phone
If no other phones are found or paired when o switch to another phone, HFL will you that the original phone is linked
1. Rotate i to select Connect. Pressu.
2. Rotate i to select a phone. Press u.
HFL disconnects the linked phone and starts searching for another paired phone. If no other paired phone is found, HFL automatically links the previous phone.
3. Press u to select OK.
trying tinform again.
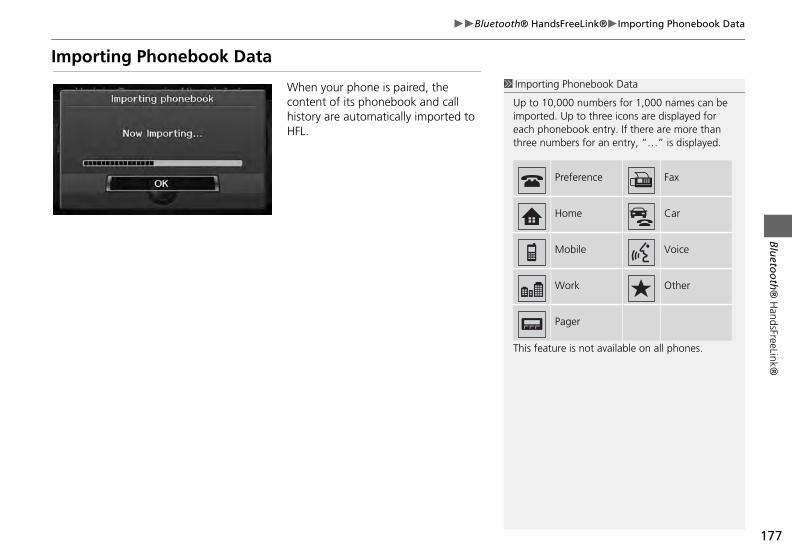
177
Bluetooth® HandsFreeLink®Importing Phonebook DataBluetooth
® H
andsFreeLink®
Importing Phonebook Data
When your phone is paired, the content of its phonebook and call history are automatically imported to HFL.
1 Importing Phonebook Data
Up to 10,000 numbers for 1,000 names can be imported. Up to three icons are displayed for each phonebook entry. If there are more than three numbers for an entry, “…” is displayed.
ature is not available on all phones.
Preference Fax
Home Car
Mobile Voice
Work Other
Pager
This fe
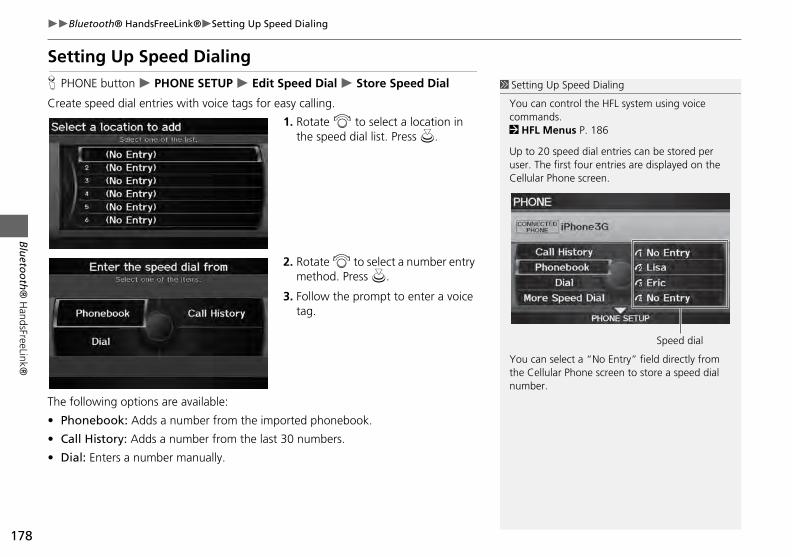
178
Bluetooth® HandsFreeLink®Setting Up Speed Dialing
Bluetooth
® H
andsFreeLink®
Setting Up Speed DialingH PHONE button PHONE SETUP Edit Speed Dial Store Speed Dial
Create speed dial entries with voice tags for easy calling.
1. Rotate i to select a location in the speed dial list. Press u.
2. Rotate i to select a number entry method. Press u.
3. Follow the prompt to enter a voice
1 Setting Up Speed Dialing
You can control the HFL system using voice commands.2 HFL Menus P. 186
Up to 20 speed dial entries can be stored per user. The first four entries are displayed on the Cellular Phone screen.
select a “No Entry” field directly from lular Phone screen to store a speed dial .
Speed dial
tag.
The following options are available:
• Phonebook: Adds a number from the imported phonebook.
• Call History: Adds a number from the last 30 numbers.
• Dial: Enters a number manually.
You canthe Celnumber
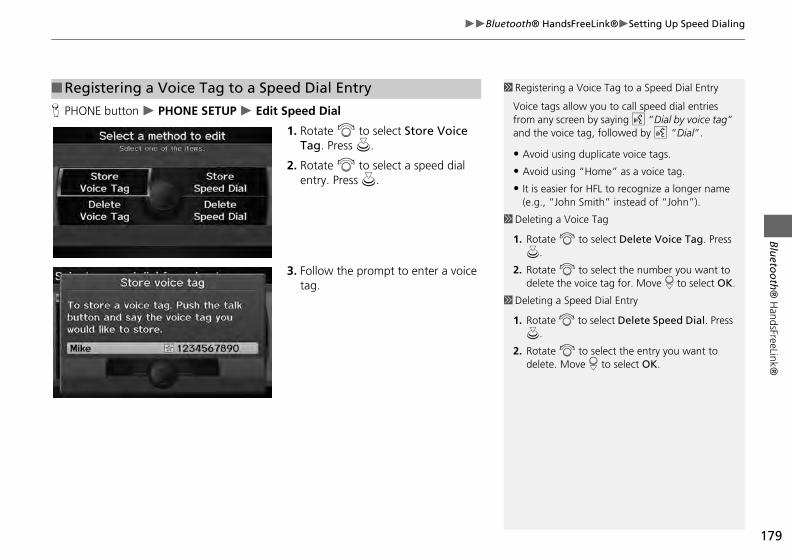
179
Bluetooth® HandsFreeLink®Setting Up Speed DialingBluetooth
® H
andsFreeLink®
H PHONE button PHONE SETUP Edit Speed Dial
1. Rotate i to select Store Voice Tag. Press u.
2. Rotate i to select a speed dial entry. Press u.
3. Follow the prompt to enter a voice tag.
■Registering a Voice Tag to a Speed Dial Entry 1 Registering a Voice Tag to a Speed Dial Entry
Voice tags allow you to call speed dial entries from any screen by saying d “Dial by voice tag” and the voice tag, followed by d “Dial”.
• Avoid using duplicate voice tags.
• Avoid using “Home” as a voice tag.
• It is easier for HFL to recognize a longer name (e.g., “John Smith” instead of “John”).
1 Deleting a Voice Tag
1. Rotate i to select Delete Voice Tag. Press u.
2. Rotate i to select the number you want to delete the voice tag for. Move r to select OK.
g a Speed Dial Entry
ate i to select Delete Speed Dial. Press
ate i to select the entry you want to te. Move r to select OK.
1 Deletin
1. Rotu.
2. Rotdele
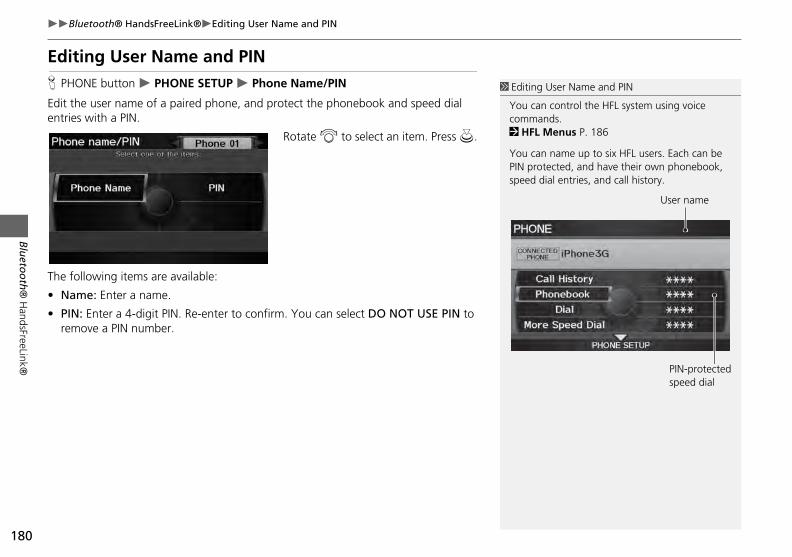
180
Bluetooth® HandsFreeLink®Editing User Name and PIN
Bluetooth
® H
andsFreeLink®
Editing User Name and PINH PHONE button PHONE SETUP Phone Name/PIN
Edit the user name of a paired phone, and protect the phonebook and speed dial entries with a PIN.
Rotate i to select an item. Press u.
The following items are available:
• Name: Enter a name.
1 Editing User Name and PIN
You can control the HFL system using voice commands.2 HFL Menus P. 186
You can name up to six HFL users. Each can be PIN protected, and have their own phonebook, speed dial entries, and call history.
User name
PIN-protected speed dial
• PIN: Enter a 4-digit PIN. Re-enter to confirm. You can select DO NOT USE PIN to remove a PIN number.
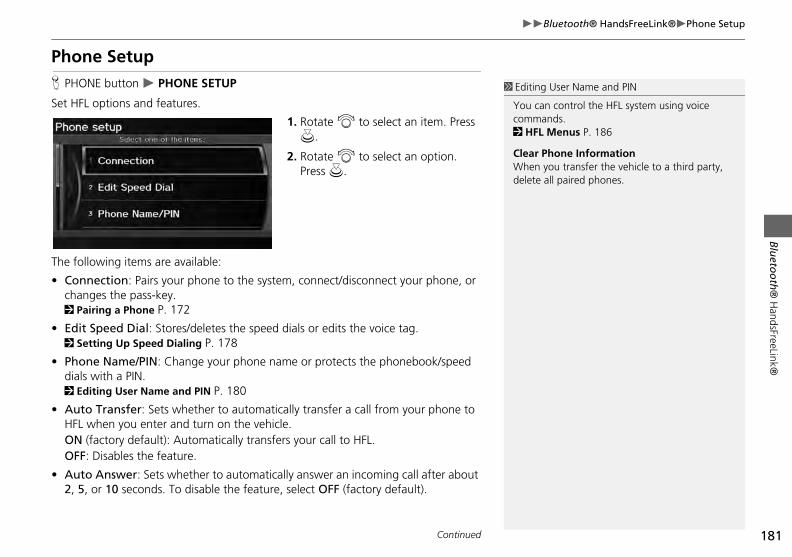
181
Bluetooth® HandsFreeLink®Phone SetupBluetooth
® H
andsFreeLink®
Phone SetupH PHONE button PHONE SETUP
Set HFL options and features.
1. Rotate i to select an item. Press u.
2. Rotate i to select an option. Press u.
The following items are available:
• Connection: Pairs your phone to the system, connect/disconnect your phone, or changes the pass-key.
1 Editing User Name and PIN
You can control the HFL system using voice commands.2 HFL Menus P. 186
Clear Phone InformationWhen you transfer the vehicle to a third party, delete all paired phones.
2 Pairing a Phone P. 172
• Edit Speed Dial: Stores/deletes the speed dials or edits the voice tag.2 Setting Up Speed Dialing P. 178
• Phone Name/PIN: Change your phone name or protects the phonebook/speed dials with a PIN.2 Editing User Name and PIN P. 180
• Auto Transfer: Sets whether to automatically transfer a call from your phone to HFL when you enter and turn on the vehicle.ON (factory default): Automatically transfers your call to HFL.OFF: Disables the feature.
• Auto Answer: Sets whether to automatically answer an incoming call after about 2, 5, or 10 seconds. To disable the feature, select OFF (factory default).
Continued
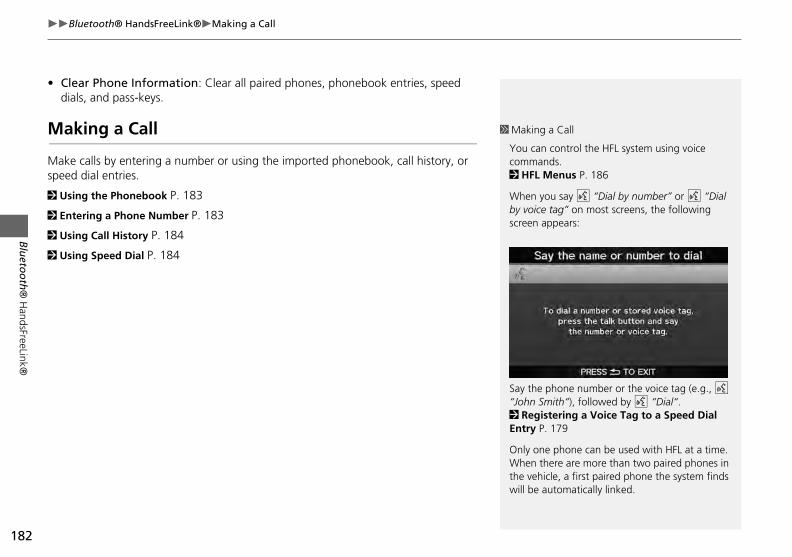
182
Bluetooth® HandsFreeLink®Making a Call
Bluetooth
® H
andsFreeLink®
• Clear Phone Information: Clear all paired phones, phonebook entries, speed dials, and pass-keys.
Making a Call
Make calls by entering a number or using the imported phonebook, call history, or speed dial entries.
2 Using the Phonebook P. 183
2 Entering a Phone Number P. 183
2 Using Call History P. 184
2 Using Speed Dial P. 184
1 Making a Call
You can control the HFL system using voice commands.2 HFL Menus P. 186
When you say d “Dial by number” or d “Dial by voice tag” on most screens, the following screen appears:
phone number or the voice tag (e.g., d mith“), followed by d “Dial“.stering a Voice Tag to a Speed Dial . 179
e phone can be used with HFL at a time. here are more than two paired phones in icle, a first paired phone the system finds automatically linked.
Say the“John S2 RegiEntry P
Only onWhen tthe vehwill be
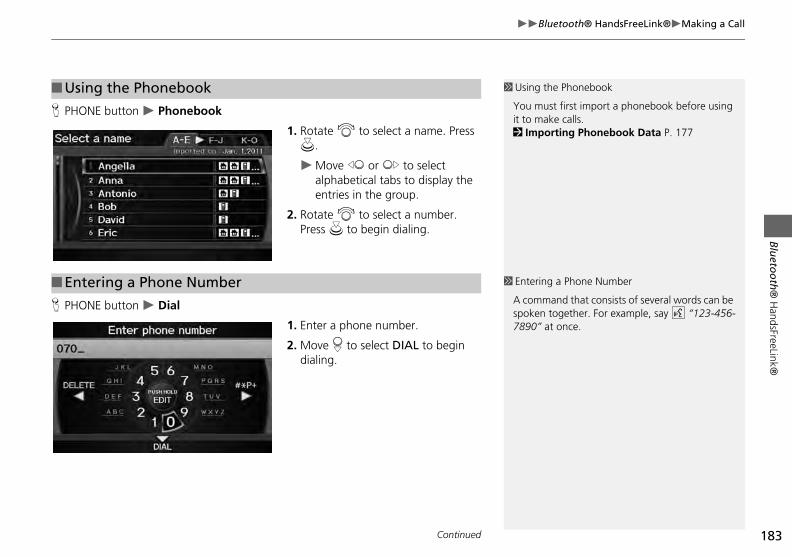
183
Bluetooth® HandsFreeLink®Making a CallBluetooth
® H
andsFreeLink®
H PHONE button Phonebook
1. Rotate i to select a name. Press u.
Move w or y to select alphabetical tabs to display the entries in the group.
2. Rotate i to select a number. Press u to begin dialing.
H P
■Using the Phonebook 1 Using the Phonebook
You must first import a phonebook before using it to make calls. 2 Importing Phonebook Data P. 177
■Entering a Phone Number 1 Entering a Phone Number
mand that consists of several words can be together. For example, say d “123-456-
at once.
HONE button Dial
1. Enter a phone number.
2. Move r to select DIAL to begin dialing.
A comspoken7890”
Continued
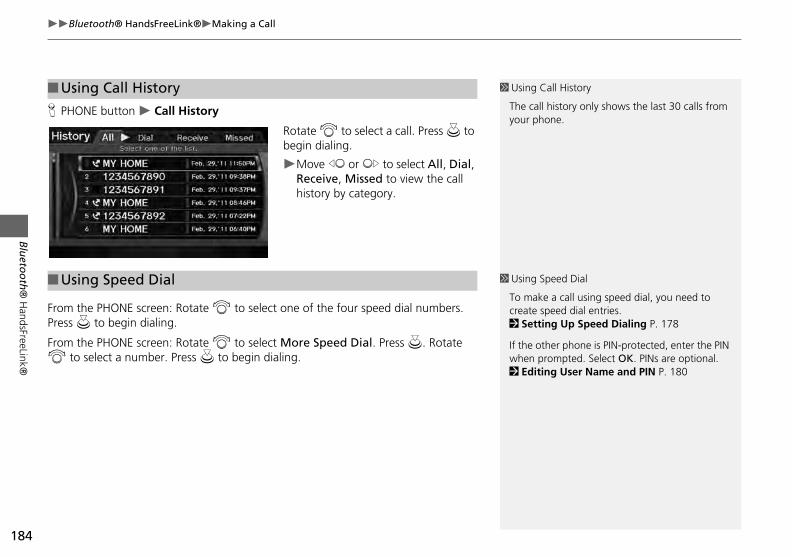
184
Bluetooth® HandsFreeLink®Making a Call
Bluetooth
® H
andsFreeLink®
H PHONE button Call History
Rotate i to select a call. Press u to begin dialing.
Move w or y to select All, Dial, Receive, Missed to view the call history by category.
FromPres
Fromi
■Using Call History 1 Using Call History
The call history only shows the last 30 calls from your phone.
■Using Speed Dial 1 Using Speed Dial
To make a call using speed dial, you need to peed dial entries.ing Up Speed Dialing P. 178
ther phone is PIN-protected, enter the PIN rompted. Select OK. PINs are optional.ng User Name and PIN P. 180
the PHONE screen: Rotate i to select one of the four speed dial numbers. s u to begin dialing.
the PHONE screen: Rotate i to select More Speed Dial. Press u. Rotate to select a number. Press u to begin dialing.
create s2 Sett
If the owhen p2 Editi
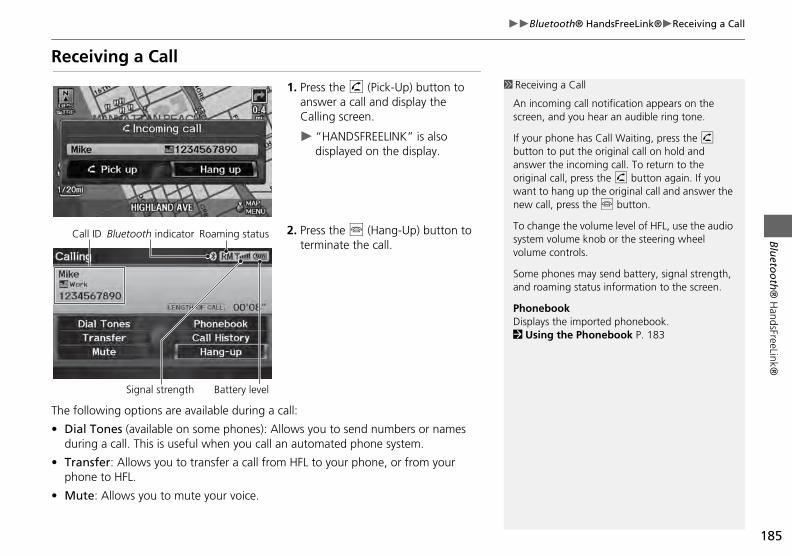
185
Bluetooth® HandsFreeLink®Receiving a CallBluetooth
® H
andsFreeLink®
Receiving a Call
1. Press the h (Pick-Up) button to answer a call and display the Calling screen.
“HANDSFREELINK” is also displayed on the display.
2. Press the j (Hang-Up) button to terminate the call.
1 Receiving a Call
An incoming call notification appears on the screen, and you hear an audible ring tone.
If your phone has Call Waiting, press the h button to put the original call on hold and answer the incoming call. To return to the original call, press the h button again. If you want to hang up the original call and answer the new call, press the j button.
To change the volume level of HFL, use the audio system volume knob or the steering wheel volume controls.
Some phones may send battery, signal strength, and roaming status information to the screen.
books the imported phonebook.g the Phonebook P. 183
Call ID Bluetooth indicator Roaming status
The following options are available during a call:
• Dial Tones (available on some phones): Allows you to send numbers or names during a call. This is useful when you call an automated phone system.
• Transfer: Allows you to transfer a call from HFL to your phone, or from your phone to HFL.
• Mute: Allows you to mute your voice.
PhoneDisplay2 Usin
Signal strength Battery level

186
Bluetooth® HandsFreeLink®HFL Menus
Bluetooth
® H
andsFreeLink®
HFL Menus
Use HFL when the vehicle’s ignition is in the ACCESSORY (I) or ON (II) position.
You can operate HFL by voice when on the PHONE screen. Below is the flow chart showing available voice commands.
1 HFL Menus
To use HFL, you must first pair your Bluetooth-compatible cell phone to the system while the vehicle is parked.
“Add New Phone”
“Connect”
“Phone Setup”
Press the h (Pick-Up) button to display the PHONE screen.
Press the d (Talk) button each time you give a voice command.
Pair your phone to the system. 2 Pairing a Phone P. 172
“random” pass-key code for phone ging the Pass-key P. 174
sly paired phone. aired Phone P. 175
Switch from a currently linked phone to another paired phone. 2 Changing the Currently Paired Phone P. 176
paired phone from the system. e Currently Paired Phone P. 176
ag for a speed dial number. a Voice Tag to a Speed Dial Entry P. 179
g for a speed dial number.
from Call History or Phonebook to dial number.
sly stored speed dial number.
“Pass-Key”
“Connection” “Disconnect”
“Delete”
“Store Voice Tag”
“Delete Voice Tag”
“Store Speed Dial”
“Delete Speed Dial”
“Edit Speed Dial”
Continued
Set a “fixed” orpairing. 2 Chan
Delete a previou2 Deleting a P
Disconnect your2 Changing th
Create a voice t2 Registering
Delete a voice ta
Select a numberstore as a speed
Delete a previou
2 Setting Up Speed Dialing P. 178
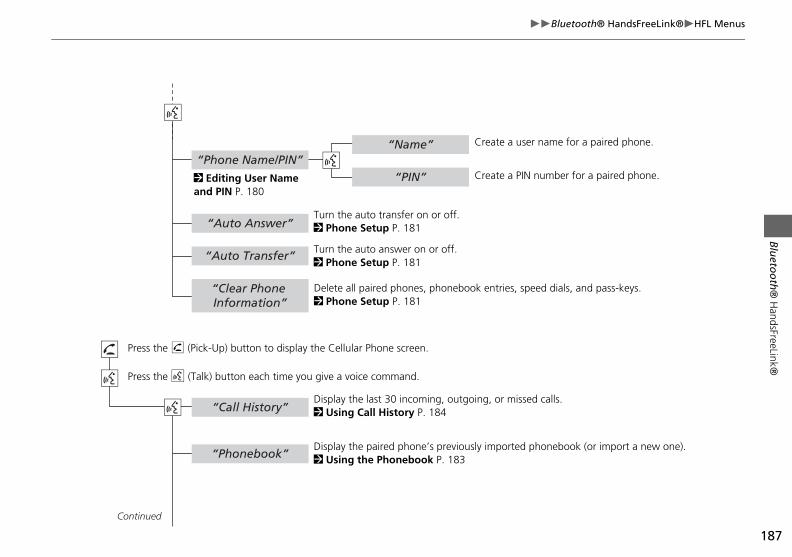
187
Bluetooth® HandsFreeLink®HFL MenusBluetooth
® H
andsFreeLink®
“Clear Phone
“Name”
“PIN”“Phone Name/PIN”
“Auto Answer”
“Auto Transfer”
Delete all paired phones, phonebook entries, speed dials, and pass-keys.
nebook (or import a new one).
alls.
Turn the auto transfer on or off. 2 Phone Setup P. 181
Turn the auto answer on or off.2 Phone Setup P. 181
2 Editing User Name and PIN P. 180
Create a user name for a paired phone.
Create a PIN number for a paired phone.
Information”
“Phonebook”
“Call History”
Continued
Press the h (Pick-Up) button to display the Cellular Phone screen.
Press the d (Talk) button each time you give a voice command.
2 Phone Setup P. 181
Display the paired phone’s previously imported pho2 Using the Phonebook P. 183
Display the last 30 incoming, outgoing, or missed c2 Using Call History P. 184
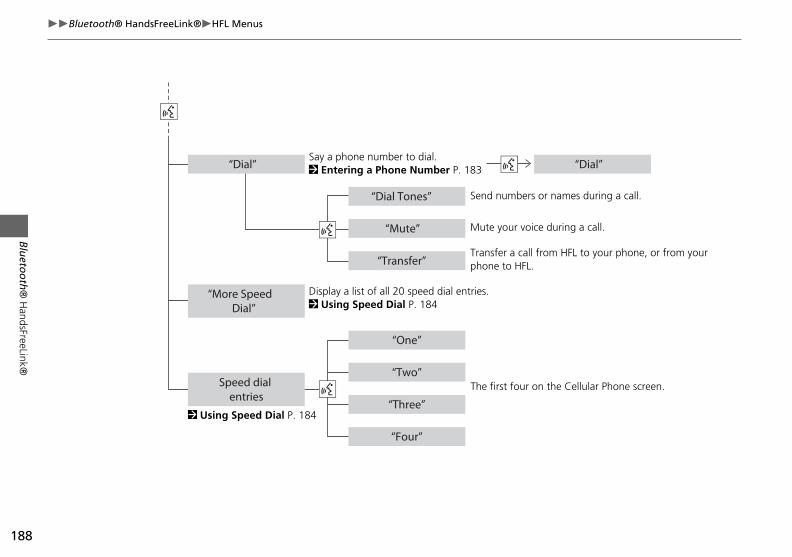
188
Bluetooth® HandsFreeLink®HFL Menus
Bluetooth
® H
andsFreeLink®
“Dial”
the Cellular Phone screen.
r names during a call.
during a call.
om HFL to your phone, or from your
“Dial Tones”
“Mute”
“Transfer”
“One”
“Two”
“Three”
“Four”
“More Speed Dial”
Speed dial entries
“Dial”
The first four on
Display a list of all 20 speed dial entries. 2 Using Speed Dial P. 184
2 Using Speed Dial P. 184
Send numbers o
Say a phone number to dial. 2 Entering a Phone Number P. 183
Mute your voice
Transfer a call frphone to HFL.
ment System
Re pletely separate entertainment
source ovies, games, and other audio
choices.
Rear EnteAuxiliaryHDMI In
Rear ConSelectinRear DVScreen aDVD IniDual ScrReplacin
Front ConSelectinRear Sys
less Headphones ........................... 206ing the Wireless Headphones ........... 206anging the Sound Source (Ultrawide RES nly)................................................... 207placing the Batteries ......................... 208
189Setting
the Rear DVD Menu ..................205rtainment System ..................190 Console Panel .........................190put Jack ...................................191trol Panel Operation...............192g the Audio Source ...................192D Menu....................................193nd Surround Settings ...............196
tial Settings ...............................199een Mode (Ultrawide RES only).200g the Batteries..........................202trol Panel Operation .............203
g the Audio Source ...................203tem Setup ................................204
WireUsCho
Re
Rear Entertain
ar seat passengers can enjoy a com
than front passengers, including m
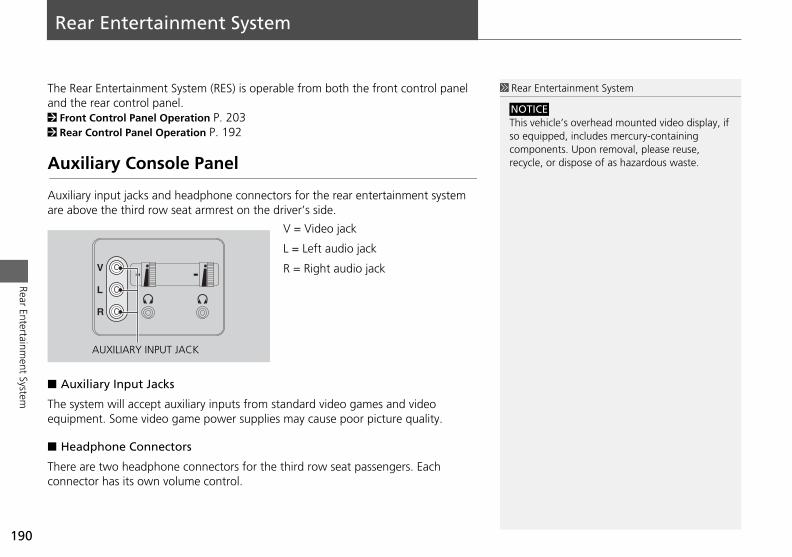
Rear
Rear Entertainment System
The Rear Entertainment System (RES) is operable from both the front control panel and the rear control panel.2 Front Control Panel Operation P. 2032 Rear Control Panel Operation P. 192
Auxiliary Console Panel
Auxiliary input jacks and headphone connectors for the rear entertainment system are above the third row seat armrest on the driver’s side.
V = Video jack
L = Left audio jack
R = Right audio jack
A
he qu
H
heronn
1 Rear Entertainment System
This vehicle’s overhead mounted video display, if so equipped, includes mercury-containing components. Upon removal, please reuse, recycle, or dispose of as hazardous waste.
NOTICE
190
Entertainment System
■
Te
■
Tc
uxiliary Input Jacks
system will accept auxiliary inputs from standard video games and video ipment. Some video game power supplies may cause poor picture quality.
eadphone Connectors
e are two headphone connectors for the third row seat passengers. Each ector has its own volume control.
AUXILIARY INPUT JACK
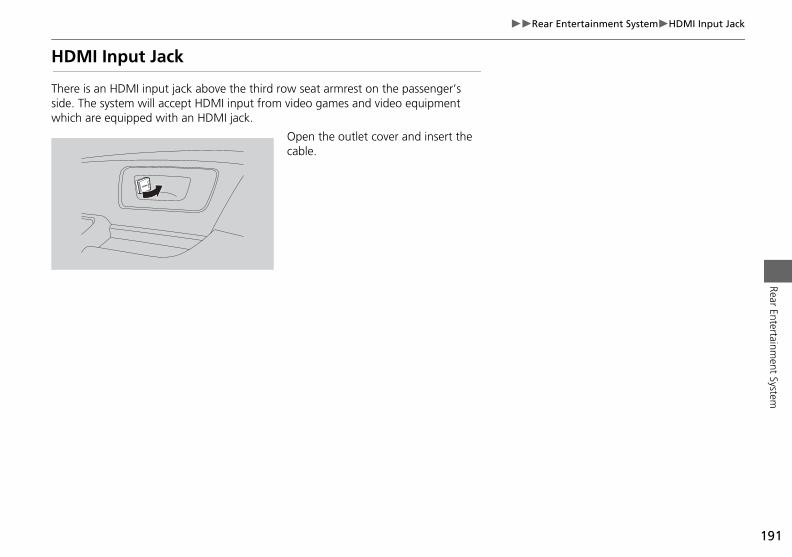
191
Rear Entertainment SystemHDMI Input JackRear Entertainm
ent System
HDMI Input Jack
There is an HDMI input jack above the third row seat armrest on the passenger’s side. The system will accept HDMI input from video games and video equipment which are equipped with an HDMI jack.
Open the outlet cover and insert the cable.
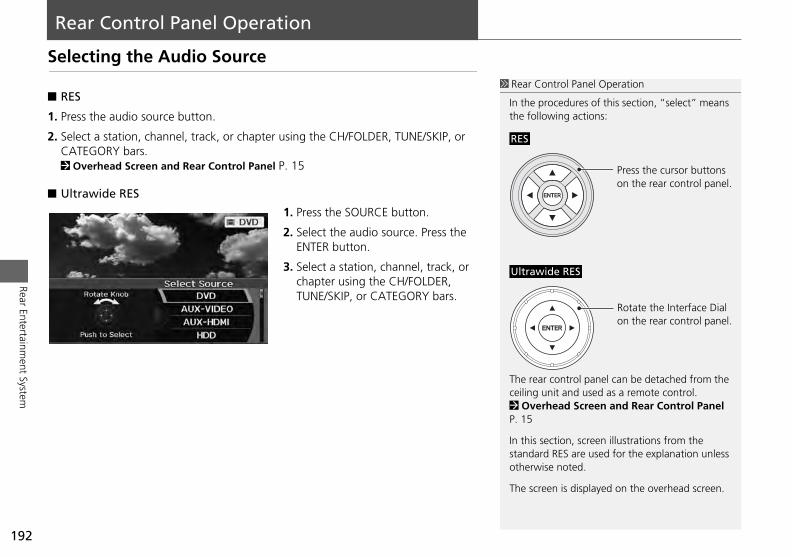
Rear
Rear Control Panel Operation
Selecting the Audio Source
■ RES
1. Press the audio source button.
2. Select a station, channel, track, or chapter using the CH/FOLDER, TUNE/SKIP, or CATEGORY bars.2 Overhead Screen and Rear Control Panel P. 15
■ Ultrawide RES
1. Press the SOURCE button.
2. Select the audio source. Press the ENTER button.
3. Select a station, channel, track, or chapter using the CH/FOLDER, TUNE/SKIP, or CATEGORY bars.
1 Rear Control Panel Operation
In the procedures of this section, “select” means the following actions:
r control panel can be detached from the unit and used as a remote control.rhead Screen and Rear Control Panel
ection, screen illustrations from the d RES are used for the explanation unless ise noted.
een is displayed on the overhead screen.
RES
Press the cursor buttons on the rear control panel.
Ultrawide RES
Rotate the Interface Dial on the rear control panel.
192
Entertainment System
The reaceiling 2 OveP. 15
In this sstandarotherw
The scr
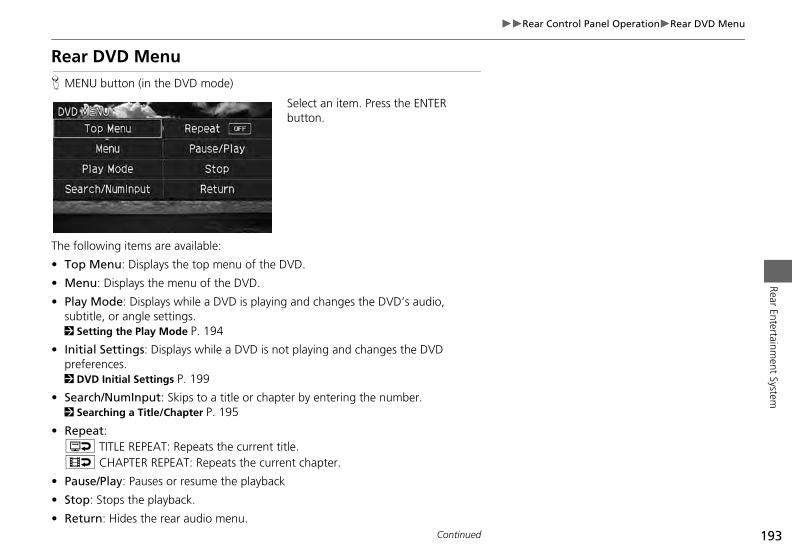
193
Rear Control Panel OperationRear DVD MenuRear Entertainm
ent System
Rear DVD MenuH MENU button (in the DVD mode)
Select an item. Press the ENTER button.
The following items are available:
• Top Menu: Displays the top menu of the DVD.
• Menu: Displays the menu of the DVD.
• Play Mode: Displays while a DVD is playing and changes the DVD’s audio, subtitle, or angle settings.2 Setting the Play Mode P. 194
• Initial Settings: Displays while a DVD is not playing and changes the DVD preferences.2 DVD Initial Settings P. 199
• Search/NumInput: Skips to a title or chapter by entering the number.2 Searching a Title/Chapter P. 195
• Repeat:o TITLE REPEAT: Repeats the current title.p CHAPTER REPEAT: Repeats the current chapter.
• Pause/Play: Pauses or resume the playback
• Stop: Stops the playback.
• Return: Hides the rear audio menu.Continued
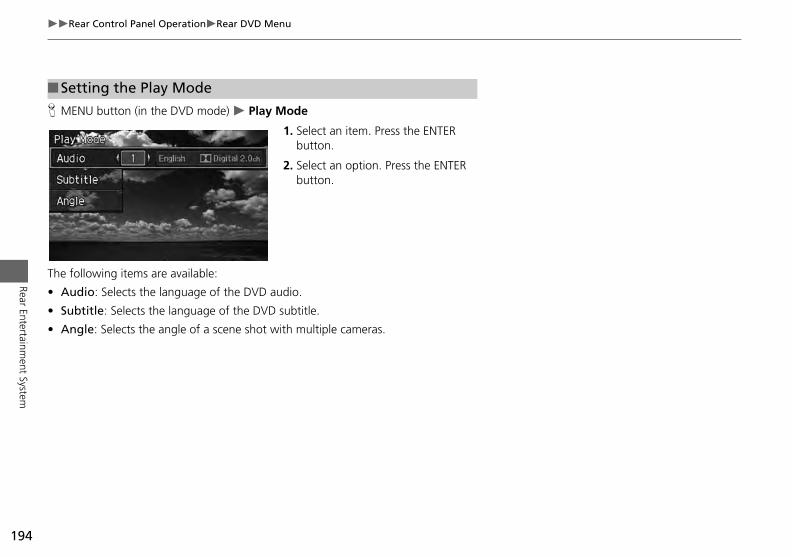
194
Rear Control Panel OperationRear DVD Menu
Rear Entertainment System
H MENU button (in the DVD mode) Play Mode
1. Select an item. Press the ENTER button.
2. Select an option. Press the ENTER button.
The following items are available:
• Audio: Selects the language of the DVD audio.
• S
• A
■Setting the Play Mode
ubtitle: Selects the language of the DVD subtitle.
ngle: Selects the angle of a scene shot with multiple cameras.
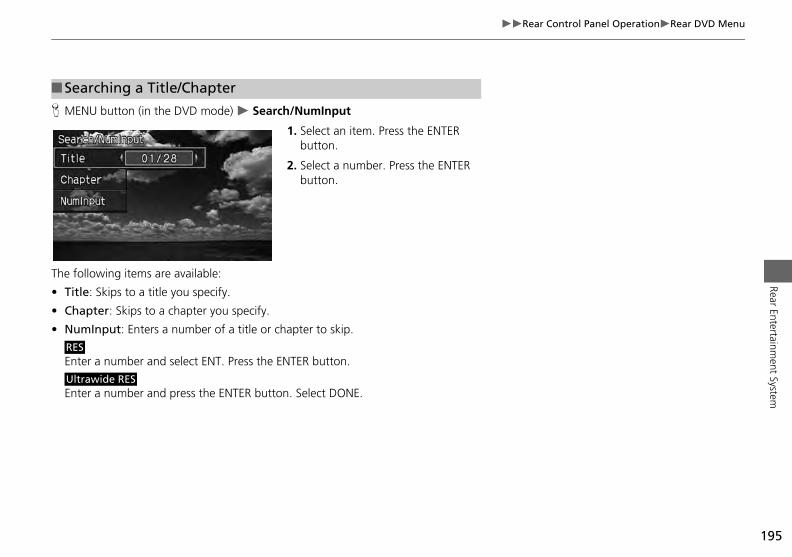
195
Rear Control Panel OperationRear DVD MenuRear Entertainm
ent System
H MENU button (in the DVD mode) Search/NumInput
1. Select an item. Press the ENTER button.
2. Select a number. Press the ENTER button.
The following items are available:
• Title: Skips to a title you specify.
• C
• N
E
E
■Searching a Title/Chapter
R
U
hapter: Skips to a chapter you specify.
umInput: Enters a number of a title or chapter to skip.
nter a number and select ENT. Press the ENTER button.
nter a number and press the ENTER button. Select DONE.
ES
ltrawide RES
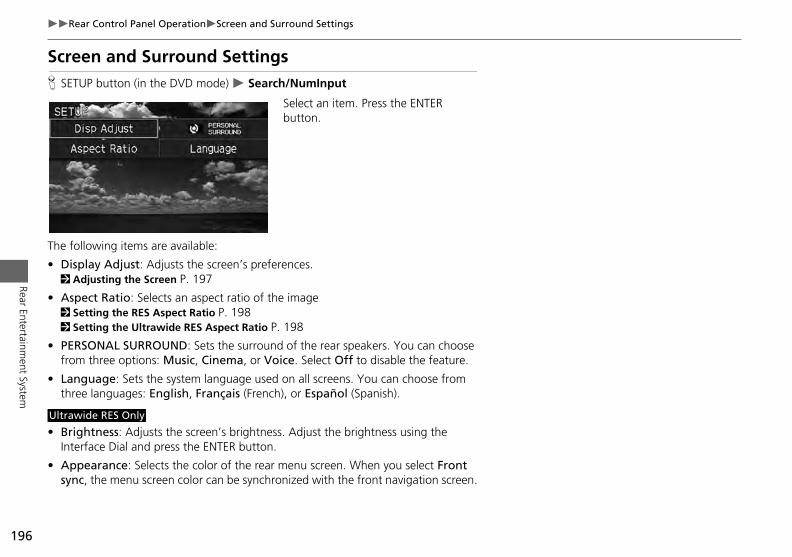
196
Rear Control Panel OperationScreen and Surround Settings
Rear Entertainment System
Screen and Surround SettingsH SETUP button (in the DVD mode) Search/NumInput
Select an item. Press the ENTER button.
The following items are available:
• Display Adjust: Adjusts the screen’s preferences.2 Adjusting the Screen P. 197
• Aspect Ratio: Selects an aspect ratio of the image
2 Setting the RES Aspect Ratio P. 1982 Setting the Ultrawide RES Aspect Ratio P. 198• PERSONAL SURROUND: Sets the surround of the rear speakers. You can choose from three options: Music, Cinema, or Voice. Select Off to disable the feature.
• Language: Sets the system language used on all screens. You can choose from three languages: English, Français (French), or Español (Spanish).
• Brightness: Adjusts the screen’s brightness. Adjust the brightness using the Interface Dial and press the ENTER button.
• Appearance: Selects the color of the rear menu screen. When you select Front sync, the menu screen color can be synchronized with the front navigation screen.
Ultrawide RES Only
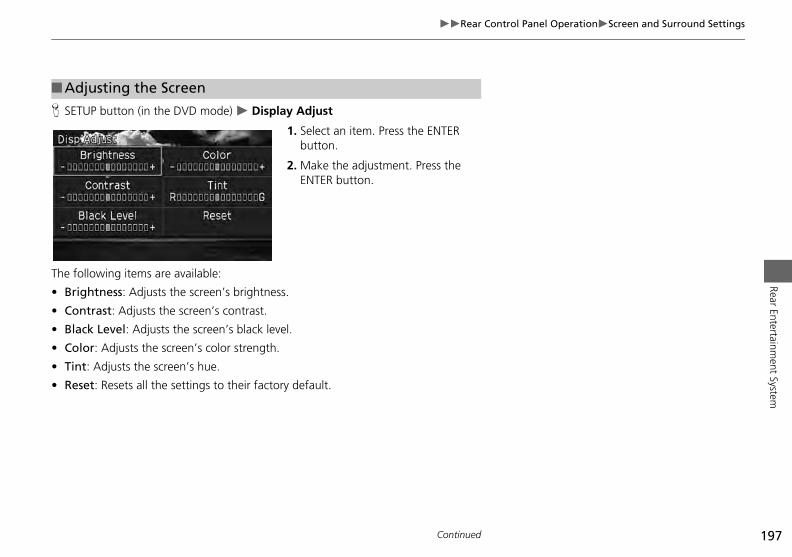
197
Rear Control Panel OperationScreen and Surround SettingsRear Entertainm
ent System
H SETUP button (in the DVD mode) Display Adjust
1. Select an item. Press the ENTER button.
2. Make the adjustment. Press the ENTER button.
The following items are available:
• Brightness: Adjusts the screen’s brightness.
• C
• B
• C
• T
• R
■Adjusting the Screen
ontrast: Adjusts the screen’s contrast.
lack Level: Adjusts the screen’s black level.
olor: Adjusts the screen’s color strength.
int: Adjusts the screen’s hue.
eset: Resets all the settings to their factory default.
Continued
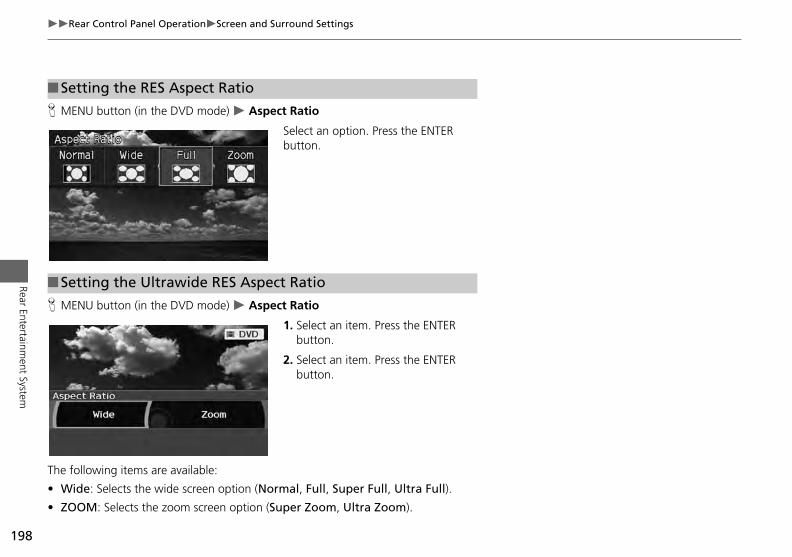
198
Rear Control Panel OperationScreen and Surround Settings
Rear Entertainment System
H MENU button (in the DVD mode) Aspect Ratio
Select an option. Press the ENTER button.
H M
The
• W
• Z
■Setting the RES Aspect Ratio
■Setting the Ultrawide RES Aspect Ratio
ENU button (in the DVD mode) Aspect Ratio
1. Select an item. Press the ENTER button.
2. Select an item. Press the ENTER button.
following items are available:
ide: Selects the wide screen option (Normal, Full, Super Full, Ultra Full).
OOM: Selects the zoom screen option (Super Zoom, Ultra Zoom).
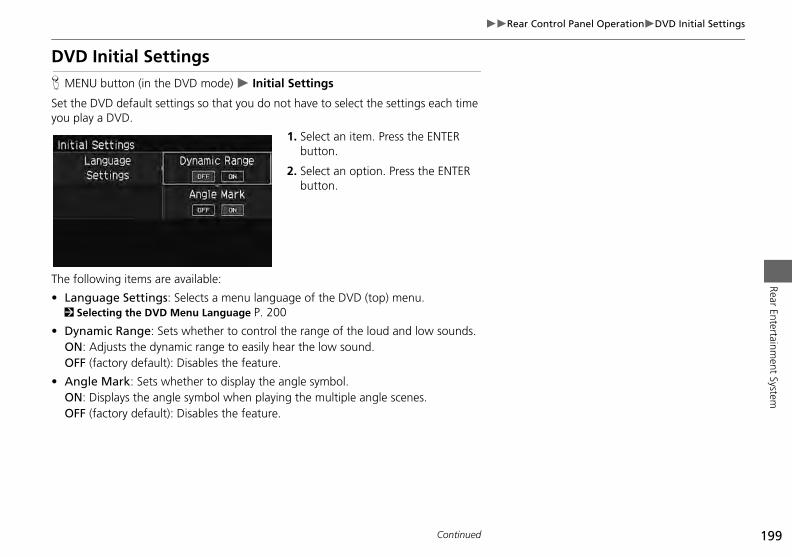
199
Rear Control Panel OperationDVD Initial SettingsRear Entertainm
ent System
DVD Initial SettingsH MENU button (in the DVD mode) Initial Settings
Set the DVD default settings so that you do not have to select the settings each time you play a DVD.
1. Select an item. Press the ENTER button.
2. Select an option. Press the ENTER button.
The following items are available:
• Language Settings: Selects a menu language of the DVD (top) menu.2 Selecting the DVD Menu Language P. 200
• Dynamic Range: Sets whether to control the range of the loud and low sounds.ON: Adjusts the dynamic range to easily hear the low sound.OFF (factory default): Disables the feature.
• Angle Mark: Sets whether to display the angle symbol.ON: Displays the angle symbol when playing the multiple angle scenes.OFF (factory default): Disables the feature.
Continued
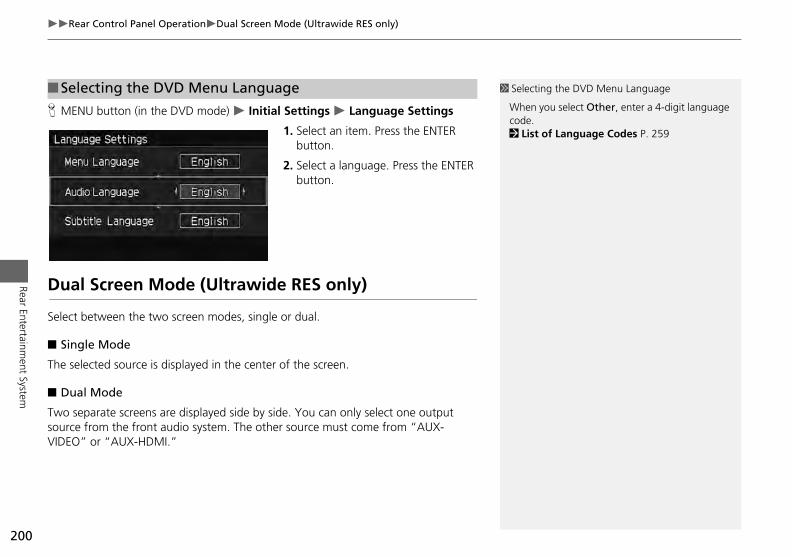
200
Rear Control Panel OperationDual Screen Mode (Ultrawide RES only)
Rear Entertainment System
H MENU button (in the DVD mode) Initial Settings Language Settings
1. Select an item. Press the ENTER button.
2. Select a language. Press the ENTER button.
Dual Screen Mode (Ultrawide RES only)
Sele
■ S
The
■ D
TwosourVIDE
■Selecting the DVD Menu Language 1 Selecting the DVD Menu Language
When you select Other, enter a 4-digit language code.2 List of Language Codes P. 259
ct between the two screen modes, single or dual.
ingle Mode
selected source is displayed in the center of the screen.
ual Mode
separate screens are displayed side by side. You can only select one output ce from the front audio system. The other source must come from “AUX-O” or “AUX-HDMI.”

201
Rear Control Panel OperationDual Screen Mode (Ultrawide RES only)Rear Entertainm
ent System
■ S
■ D
ide ”).
Select a source (e.g., “AUX-VIDEO”).
AP
AUX-VIDEO DVD
rce ”).
DVD
ingle mode to Dual mode
ual mode to Single mode
DVD
Press the DUAL button.
Select the s(e.g., “Left
Press the SWbutton.
DVD AUX-VIDEO
AUX-VIDEO DVD
Press the SINGLE button.
Select a sou(e.g., “DVD
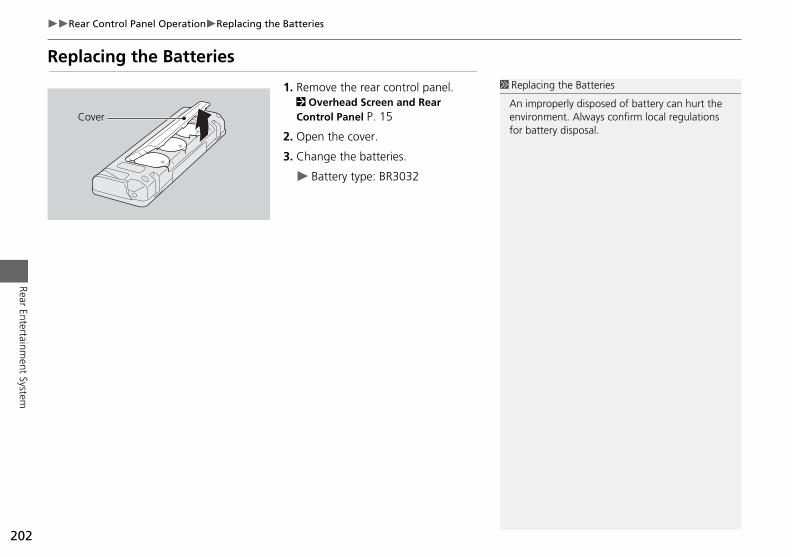
202
Rear Control Panel OperationReplacing the Batteries
Rear Entertainment System
Replacing the Batteries
1. Remove the rear control panel.2 Overhead Screen and Rear Control Panel P. 15
2. Open the cover.
3. Change the batteries.
Battery type: BR3032
1 Replacing the Batteries
An improperly disposed of battery can hurt the environment. Always confirm local regulations for battery disposal.
Cover
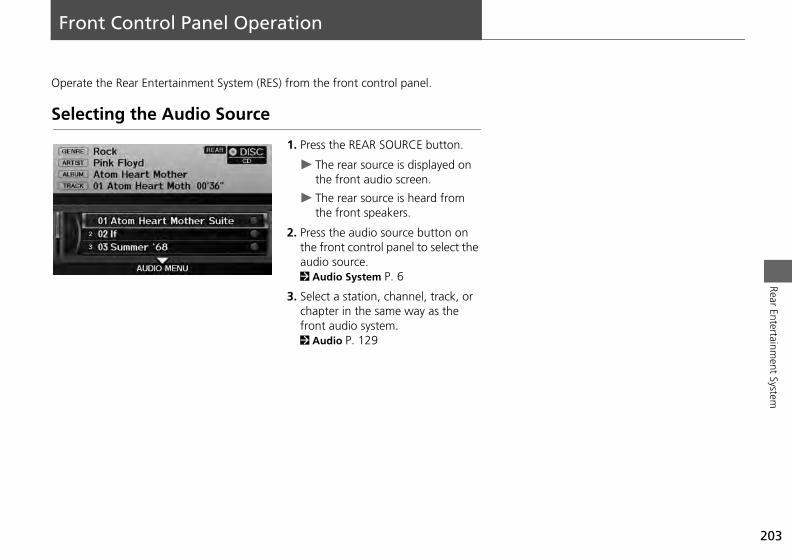
203
Rear Entertainment System
Front Control Panel Operation
Operate the Rear Entertainment System (RES) from the front control panel.
Selecting the Audio Source
1. Press the REAR SOURCE button.
The rear source is displayed on the front audio screen.
The rear source is heard from the front speakers.
2. Press the audio source button on the front control panel to select the audio source.2 Audio System P. 6
3. Select a station, channel, track, or chapter in the same way as the front audio system.2 Audio P. 129
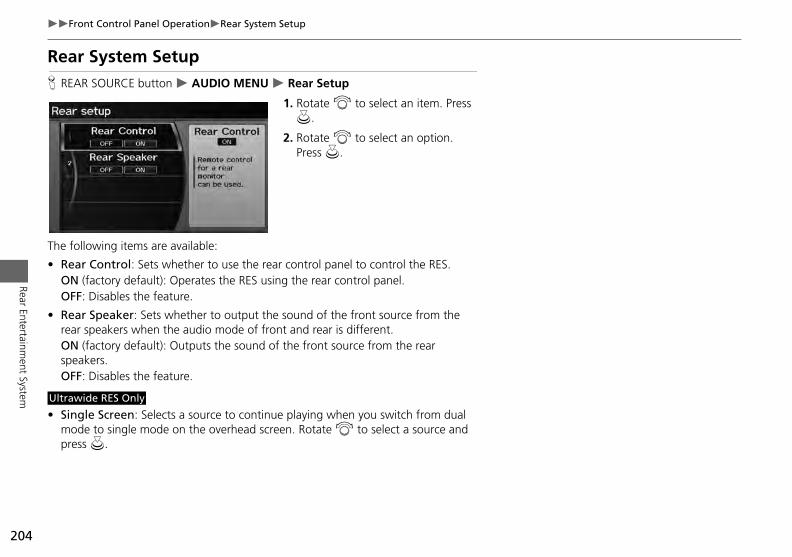
204
Front Control Panel OperationRear System Setup
Rear Entertainment System
Rear System SetupH REAR SOURCE button AUDIO MENU Rear Setup
1. Rotate i to select an item. Press u.
2. Rotate i to select an option. Press u.
The following items are available:
• Rear Control: Sets whether to use the rear control panel to control the RES.ON (factory default): Operates the RES using the rear control panel.OFF: Disables the feature.
• Rear Speaker: Sets whether to output the sound of the front source from the rear speakers when the audio mode of front and rear is different.ON (factory default): Outputs the sound of the front source from the rear speakers.OFF: Disables the feature.
• Single Screen: Selects a source to continue playing when you switch from dual mode to single mode on the overhead screen. Rotate i to select a source and press u.
Ultrawide RES Only
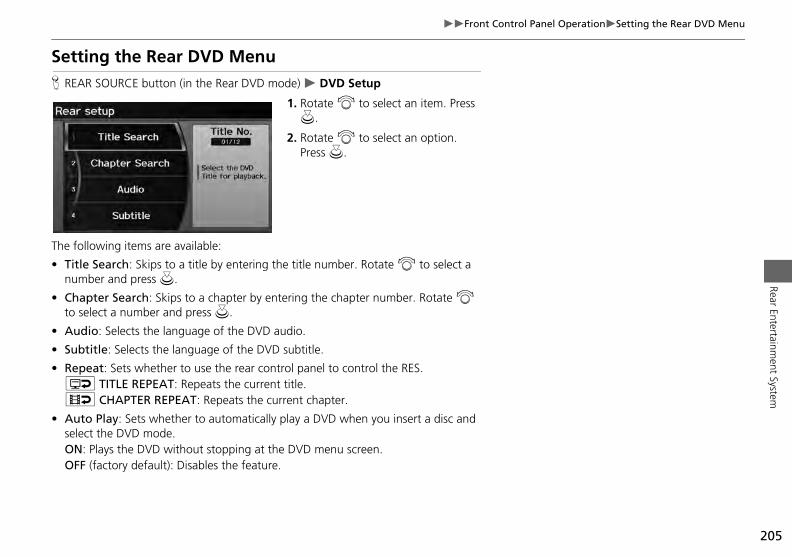
205
Front Control Panel OperationSetting the Rear DVD MenuRear Entertainm
ent System
Setting the Rear DVD MenuH REAR SOURCE button (in the Rear DVD mode) DVD Setup
1. Rotate i to select an item. Press u.
2. Rotate i to select an option. Press u.
The following items are available:
• Title Search: Skips to a title by entering the title number. Rotate i to select a number and press u.
• Chapter Search: Skips to a chapter by entering the chapter number. Rotate i to select a number and press u.
• Audio: Selects the language of the DVD audio.
• Subtitle: Selects the language of the DVD subtitle.
• Repeat: Sets whether to use the rear control panel to control the RES.o TITLE REPEAT: Repeats the current title.p CHAPTER REPEAT: Repeats the current chapter.
• Auto Play: Sets whether to automatically play a DVD when you insert a disc and select the DVD mode.ON: Plays the DVD without stopping at the DVD menu screen.OFF (factory default): Disables the feature.
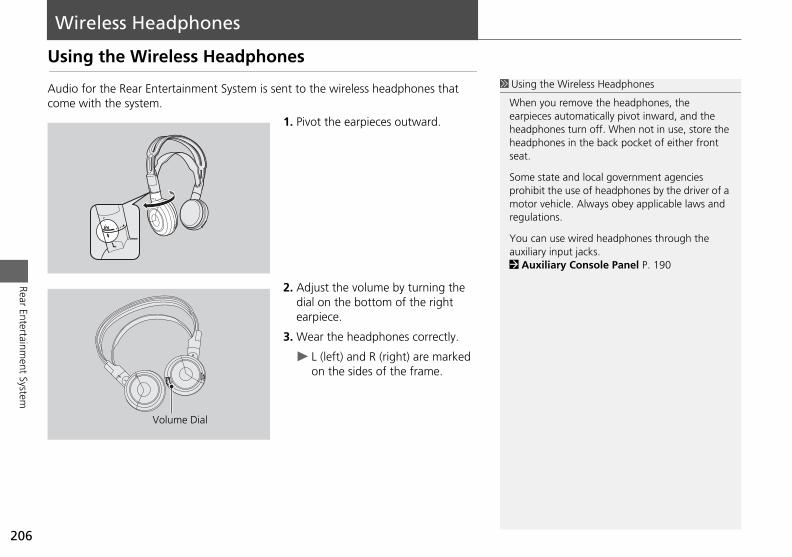
Rear
Wireless Headphones
Using the Wireless Headphones
Audio for the Rear Entertainment System is sent to the wireless headphones that come with the system.
1. Pivot the earpieces outward.
2. Adjust the volume by turning the
1 Using the Wireless Headphones
When you remove the headphones, the earpieces automatically pivot inward, and the headphones turn off. When not in use, store the headphones in the back pocket of either front seat.
Some state and local government agencies prohibit the use of headphones by the driver of a motor vehicle. Always obey applicable laws and regulations.
You can use wired headphones through the auxiliary input jacks.2 Auxiliary Console Panel P. 190
206
Entertainment System
dial on the bottom of the right earpiece.
3. Wear the headphones correctly.
L (left) and R (right) are marked on the sides of the frame.
Volume Dial
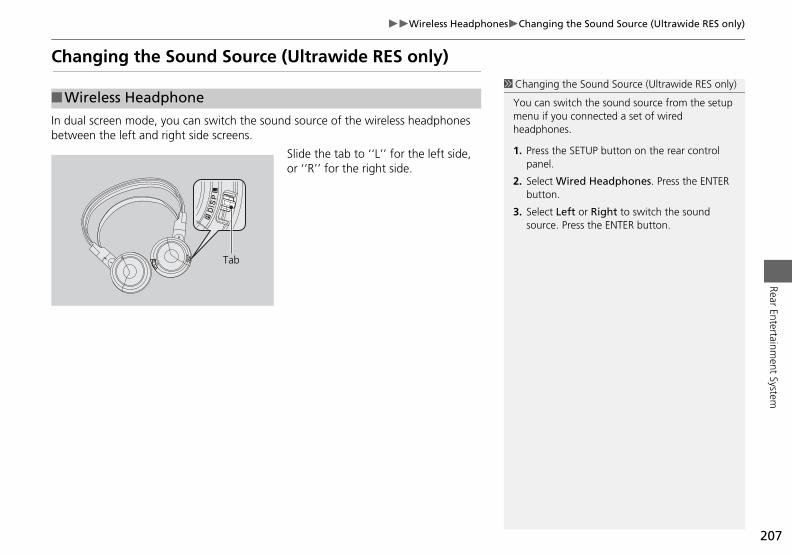
207
Wireless HeadphonesChanging the Sound Source (Ultrawide RES only)Rear Entertainm
ent System
Changing the Sound Source (Ultrawide RES only)
In dual screen mode, you can switch the sound source of the wireless headphones between the left and right side screens.
Slide the tab to ‘‘L’’ for the left side, or ‘‘R’’ for the right side.
■Wireless Headphone1 Changing the Sound Source (Ultrawide RES only)
You can switch the sound source from the setup menu if you connected a set of wired headphones.
1. Press the SETUP button on the rear control panel.
2. Select Wired Headphones. Press the ENTER button.
3. Select Left or Right to switch the sound source. Press the ENTER button.
Tab
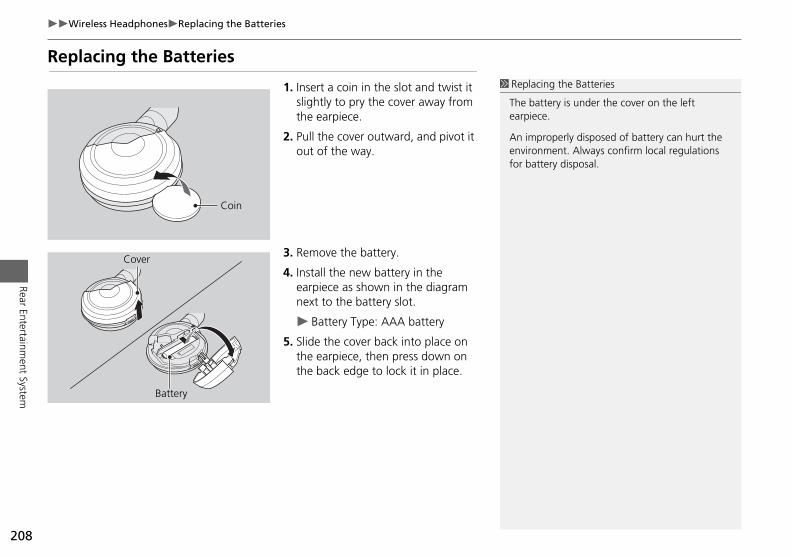
208
Wireless HeadphonesReplacing the Batteries
Rear Entertainment System
Replacing the Batteries
1. Insert a coin in the slot and twist it slightly to pry the cover away from the earpiece.
2. Pull the cover outward, and pivot it out of the way.
3. Remove the battery.
4. Install the new battery in the earpiece as shown in the diagram
1 Replacing the Batteries
The battery is under the cover on the left earpiece.
An improperly disposed of battery can hurt the environment. Always confirm local regulations for battery disposal.
Coin
Cover
next to the battery slot.
Battery Type: AAA battery
5. Slide the cover back into place on the earpiece, then press down on the back edge to lock it in place.
Battery
ther Features
functions incorporated into the
navigat ney easier and more enjoyable.
Computer ....................................... 210ndar ................................................ 211ulator .............................................. 213it Conversion ................................... 213
rmation Functions .......................... 215enic Road Information ...................... 215stem/Device Information ................... 215ap Data Update Status ...................... 216y to ZAGAT Ratings.......................... 216
ti-view Rear Camera....................... 217
209
TripCaleCalc
UnInfo
ScSyMKe
Mul
O
This section describes the useful
ion system to help make your jour
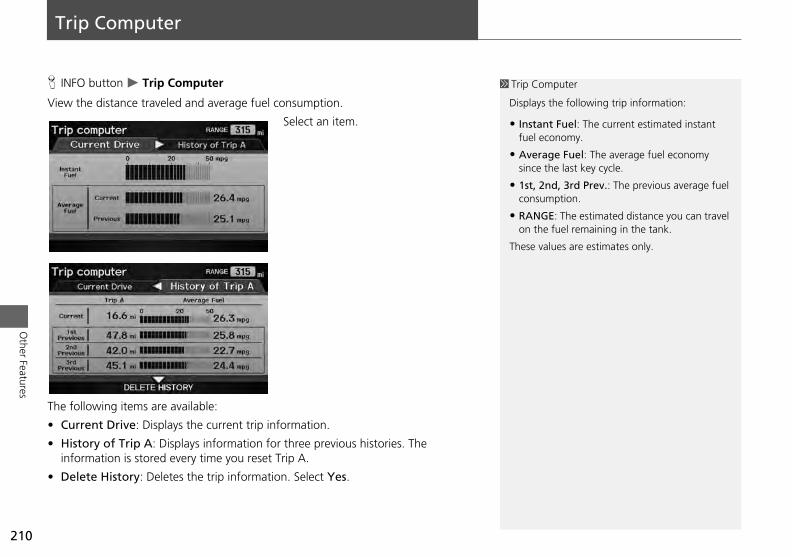
Trip Computer
H INFO button Trip Computer
View the distance traveled and average fuel consumption.
Select an item.
he
C
Hin
D
1 Trip Computer
Displays the following trip information:
• Instant Fuel: The current estimated instant fuel economy.
• Average Fuel: The average fuel economy since the last key cycle.
• 1st, 2nd, 3rd Prev.: The previous average fuel consumption.
• RANGE: The estimated distance you can travel on the fuel remaining in the tank.
These values are estimates only.
210
Other Features
T
•
•
•
following items are available:
urrent Drive: Displays the current trip information.
istory of Trip A: Displays information for three previous histories. The formation is stored every time you reset Trip A.
elete History: Deletes the trip information. Select Yes.
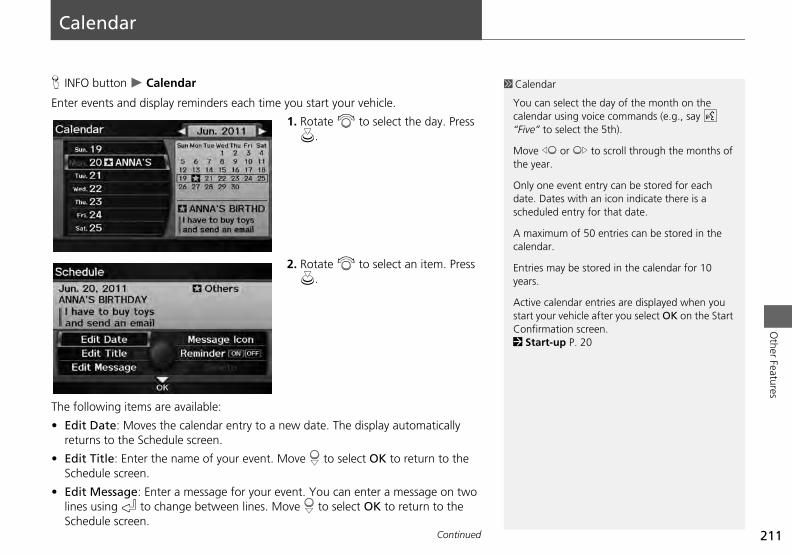
211
Other Features
Calendar
H INFO button Calendar
Enter events and display reminders each time you start your vehicle.
1. Rotate i to select the day. Press u.
2. Rotate i to select an item. Press u.
he
Er
ES
ElS
1 Calendar
You can select the day of the month on the calendar using voice commands (e.g., say d “Five” to select the 5th).
Move w or y to scroll through the months of the year.
Only one event entry can be stored for each date. Dates with an icon indicate there is a scheduled entry for that date.
A maximum of 50 entries can be stored in the calendar.
Entries may be stored in the calendar for 10 years.
calendar entries are displayed when you ur vehicle after you select OK on the Start
mation screen. t-up P. 20
T
•
•
•
following items are available:
dit Date: Moves the calendar entry to a new date. The display automatically eturns to the Schedule screen.
dit Title: Enter the name of your event. Move r to select OK to return to the chedule screen.
dit Message: Enter a message for your event. You can enter a message on two ines using k to change between lines. Move r to select OK to return to the chedule screen.
Active start yoConfir2 Star
Continued
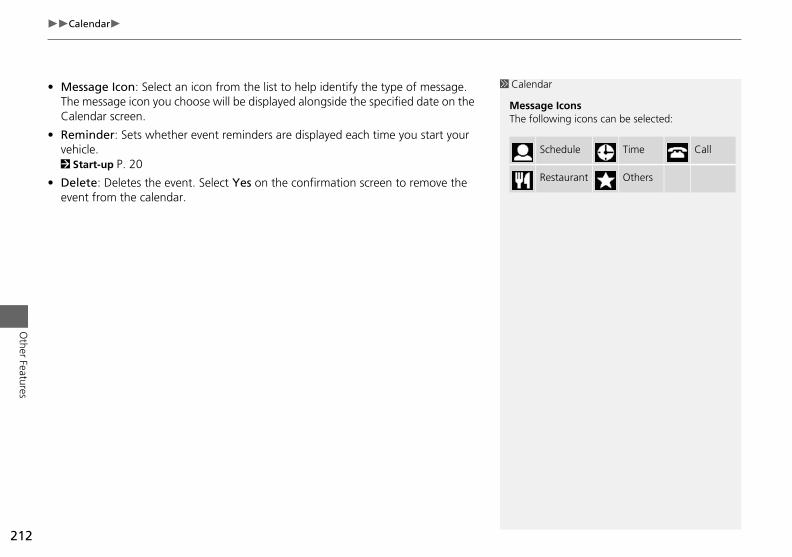
212
Calendar
Other Features
• Message Icon: Select an icon from the list to help identify the type of message. The message icon you choose will be displayed alongside the specified date on the Calendar screen.
• Reminder: Sets whether event reminders are displayed each time you start your vehicle.2 Start-up P. 20
• Delete: Deletes the event. Select Yes on the confirmation screen to remove the event from the calendar.
1 Calendar
Message IconsThe following icons can be selected:
Schedule Time Call
Restaurant Others
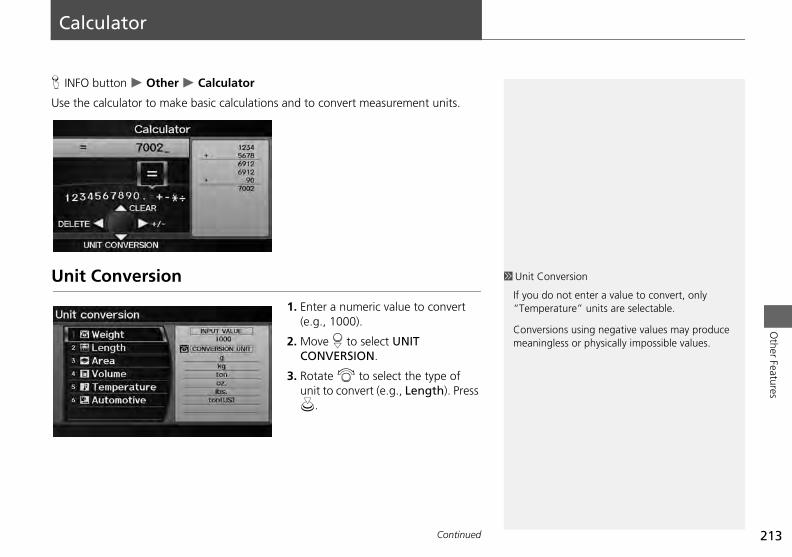
213
Other Features
Calculator
H INFO button Other Calculator
Use the calculator to make basic calculations and to convert measurement units.
Unit Conversion 1 Unit Conversion
If you do not enter a value to convert, only erature” units are selectable.
rsions using negative values may produce gless or physically impossible values.
1. Enter a numeric value to convert (e.g., 1000).
2. Move r to select UNIT CONVERSION.
3. Rotate i to select the type of unit to convert (e.g., Length). Press u.
“Temp
Convemeanin
Continued
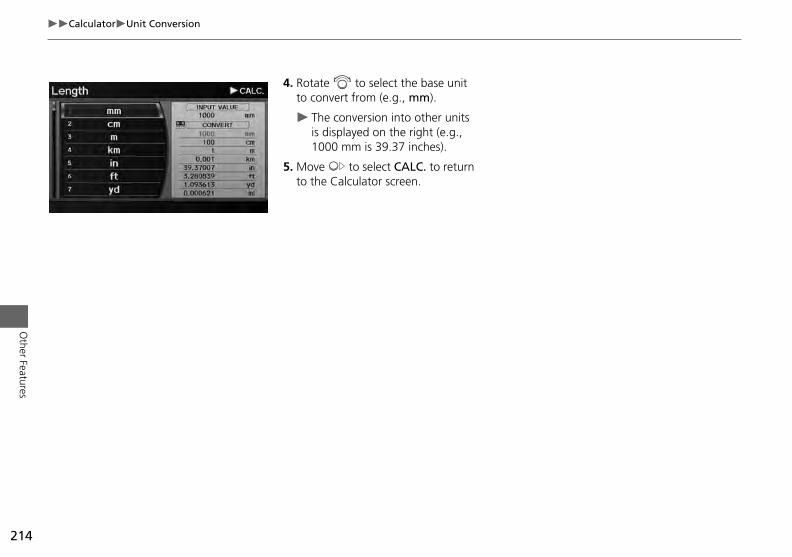
214
CalculatorUnit Conversion
Other Features
4. Rotate i to select the base unit to convert from (e.g., mm).
The conversion into other units is displayed on the right (e.g., 1000 mm is 39.37 inches).
5. Move y to select CALC. to return to the Calculator screen.
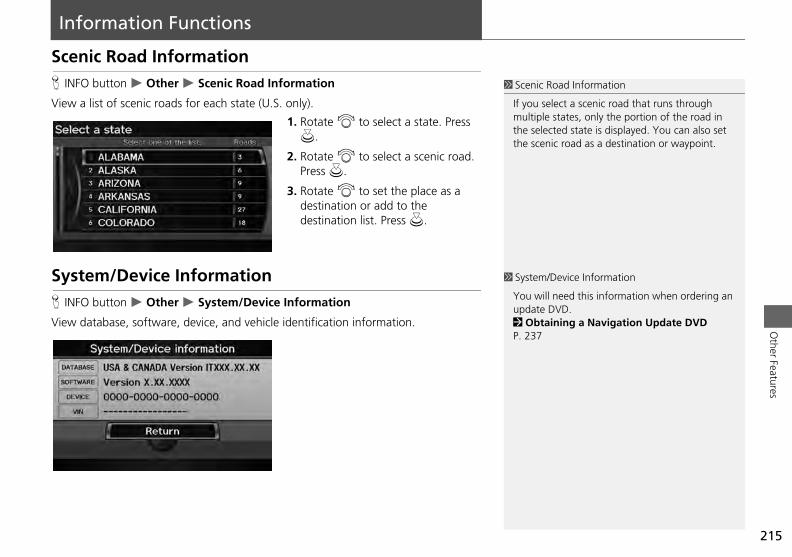
215
Other Features
Information Functions
Scenic Road InformationH INFO button Other Scenic Road Information
View a list of scenic roads for each state (U.S. only).
1. Rotate i to select a state. Press u.
2. Rotate i to select a scenic road. Press u.
3. Rotate i to set the place as a destination or add to the destination list. Press u.
System/Device Information
1 Scenic Road Information
If you select a scenic road that runs through multiple states, only the portion of the road in the selected state is displayed. You can also set the scenic road as a destination or waypoint.
1 System/Device Information
ill need this information when ordering an DVD. aining a Navigation Update DVD
H
V
INFO button Other System/Device Information
iew database, software, device, and vehicle identification information.
You wupdate2 ObtP. 237
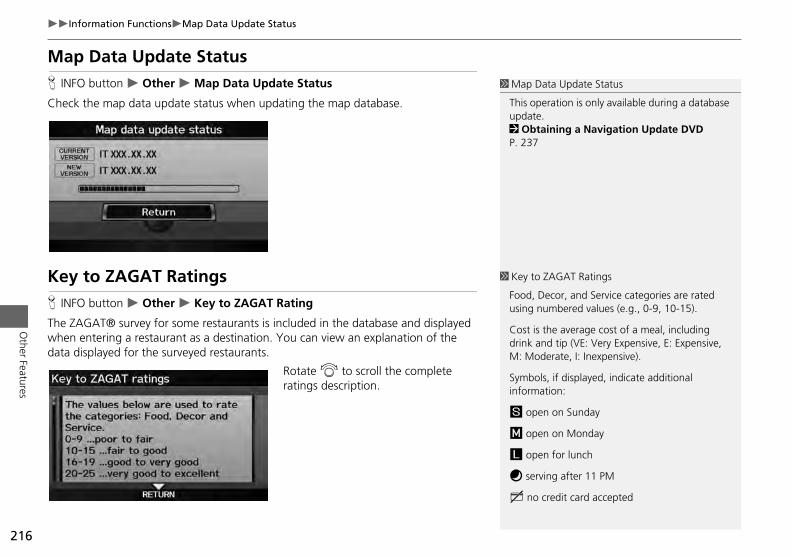
216
Information FunctionsMap Data Update Status
Other Features
Map Data Update StatusH INFO button Other Map Data Update Status
Check the map data update status when updating the map database.
Key to ZAGAT Ratings
1 Map Data Update Status
This operation is only available during a database update.2 Obtaining a Navigation Update DVD P. 237
1 Key to ZAGAT Ratings
Food, Decor, and Service categories are rated umbered values (e.g., 0-9, 10-15).
the average cost of a meal, including d tip (VE: Very Expensive, E: Expensive, erate, I: Inexpensive).
s, if displayed, indicate additional tion:
n on Sunday
n on Monday
n for lunch
ing after 11 PM
credit card accepted
H INFO button Other Key to ZAGAT Rating
The ZAGAT® survey for some restaurants is included in the database and displayed when entering a restaurant as a destination. You can view an explanation of the data displayed for the surveyed restaurants.
Rotate i to scroll the complete ratings description.
using n
Cost is drink anM: Mod
Symbolinforma
s ope
m ope
l ope
f serv
g no
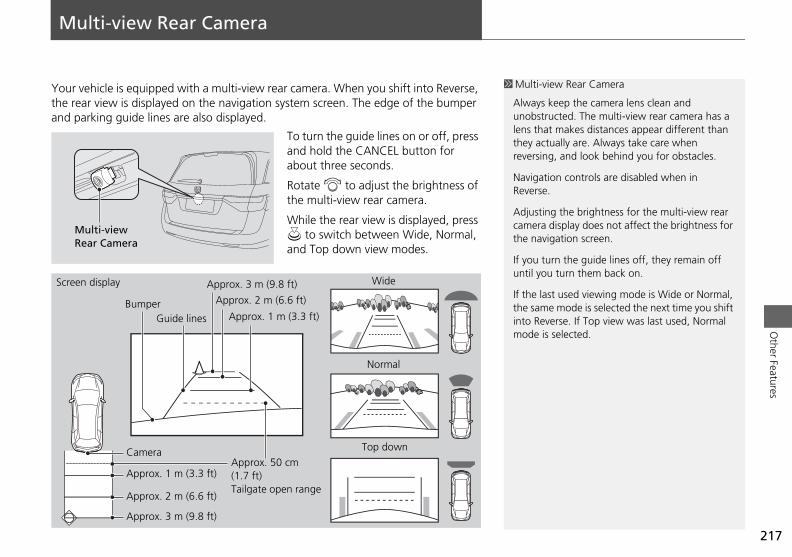
217
Other Features
Multi-view Rear Camera
Your vehicle is equipped with a multi-view rear camera. When you shift into Reverse, the rear view is displayed on the navigation system screen. The edge of the bumper and parking guide lines are also displayed.
To turn the guide lines on or off, press and hold the CANCEL button for about three seconds.
Rotate i to adjust the brightness of the multi-view rear camera.
While the rear view is displayed, press u to switch between Wide, Normal, and Top down view modes.
1 Multi-view Rear Camera
Always keep the camera lens clean and unobstructed. The multi-view rear camera has a lens that makes distances appear different than they actually are. Always take care when reversing, and look behind you for obstacles.
Navigation controls are disabled when in Reverse.
Adjusting the brightness for the multi-view rear camera display does not affect the brightness for the navigation screen.
If you turn the guide lines off, they remain off until you turn them back on.
If the last used viewing mode is Wide or Normal, e mode is selected the next time you shift
verse. If Top view was last used, Normal is selected.
Multi-view Rear Camera
Screen display Approx. 3 m (9.8 ft) Wide
the saminto Remode
BumperGuide lines
Camera
Approx. 1 m (3.3 ft)
Approx. 2 m (6.6 ft)
Approx. 3 m (9.8 ft)
Approx. 50 cm (1.7 ft)Tailgate open range
Approx. 2 m (6.6 ft)
Approx. 1 m (3.3 ft)
Normal
Top down

218

ubleshooting
bleshooting ................................... 220ap, Voice, Entering Destinations........ 220affic .................................................. 222idance, Routing ............................... 223date DVD, Coverage, Map Errors ..... 225
splay, Accessories.............................. 225ar Camera ........................................ 225iscellaneous Questions ...................... 226r Messages...................................... 227vigation System................................ 227
sc Player............................................ 228d® .................................................. 229B Flash Drive .................................... 230
219
TrouMTrGuUpDiReM
ErroNaDiiPoUS
Tro
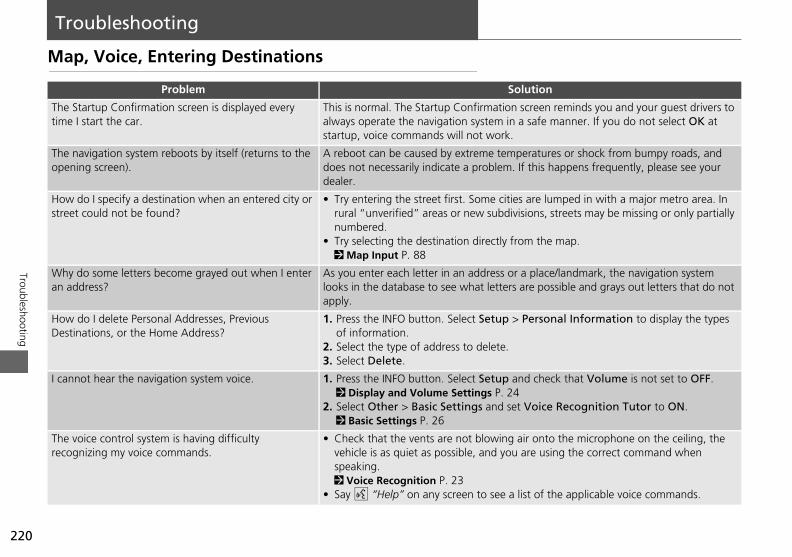
Trouble
Troubleshooting
Ma
n
Thetim
n reminds you and your guest drivers to manner. If you do not select OK at
Theope
res or shock from bumpy roads, and happens frequently, please see your
Howstre
lumped in with a major metro area. In , streets may be missing or only partially
e map.
Whan
ce/landmark, the navigation system ossible and grays out letters that do not
onal Information to display the types
eck that Volume is not set to OFF.
ce Recognition Tutor to ON.
to the microphone on the ceiling, the sing the correct command when
the applicable voice commands.
220
shooting
HD
I
Tr
ow do estinat
cannot
he voicecogniz
p, Voice, Entering Destinations
Problem Solutio
Startup Confirmation screen is displayed every e I start the car.
This is normal. The Startup Confirmation screealways operate the navigation system in a safestartup, voice commands will not work.
navigation system reboots by itself (returns to the ning screen).
A reboot can be caused by extreme temperatudoes not necessarily indicate a problem. If thisdealer.
do I specify a destination when an entered city or et could not be found?
• Try entering the street first. Some cities are rural “unverified” areas or new subdivisionsnumbered.
• Try selecting the destination directly from th2 Map Input P. 88
y do some letters become grayed out when I enter address?
As you enter each letter in an address or a plalooks in the database to see what letters are papply.
I delete Personal Addresses, Previous ions, or the Home Address?
1. Press the INFO button. Select Setup > Persof information.
2. Select the type of address to delete.3. Select Delete.
hear the navigation system voice. 1. Press the INFO button. Select Setup and ch2 Display and Volume Settings P. 24
2. Select Other > Basic Settings and set Voi2 Basic Settings P. 26
e control system is having difficulty ing my voice commands.
• Check that the vents are not blowing air onvehicle is as quiet as possible, and you are uspeaking. 2 Voice Recognition P. 23
• Say d “Help” on any screen to see a list of
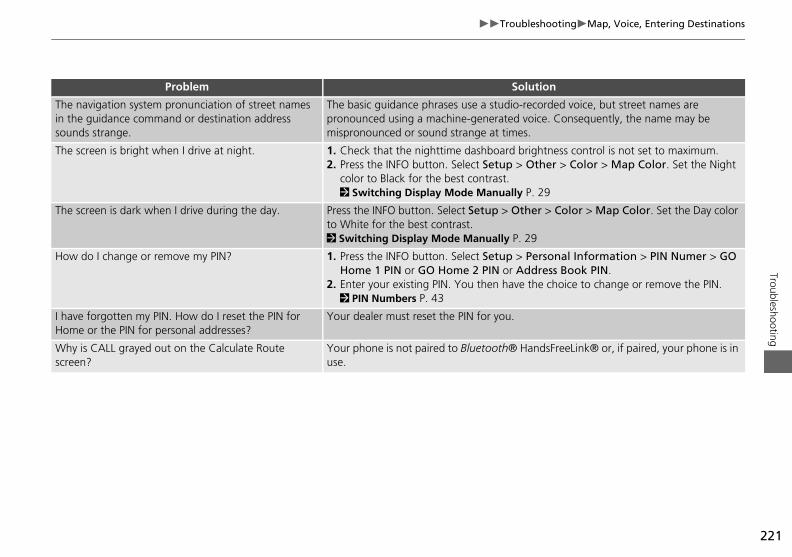
221
TroubleshootingMap, Voice, Entering DestinationsTroubleshooting
Thin sou
rded voice, but street names are e. Consequently, the name may be
Th tness control is not set to maximum.er > Color > Map Color. Set the Night
9
Th > Color > Map Color. Set the Day color
Ho sonal Information > PIN Numer > GO ess Book PIN. choice to change or remove the PIN.
I hHo
Whscr
sFreeLink® or, if paired, your phone is in
on
e navigation system pronunciation of street names the guidance command or destination address nds strange.
The basic guidance phrases use a studio-recopronounced using a machine-generated voicmispronounced or sound strange at times.
e screen is bright when I drive at night. 1. Check that the nighttime dashboard brigh2. Press the INFO button. Select Setup > Oth
color to Black for the best contrast. 2 Switching Display Mode Manually P. 2
e screen is dark when I drive during the day. Press the INFO button. Select Setup > Otherto White for the best contrast. 2 Switching Display Mode Manually P. 29
w do I change or remove my PIN? 1. Press the INFO button. Select Setup > PerHome 1 PIN or GO Home 2 PIN or Addr
2. Enter your existing PIN. You then have the2 PIN Numbers P. 43
ave forgotten my PIN. How do I reset the PIN for me or the PIN for personal addresses?
Your dealer must reset the PIN for you.
y is CALL grayed out on the Calculate Route een?
Your phone is not paired to Bluetooth® Handuse.
Problem Soluti
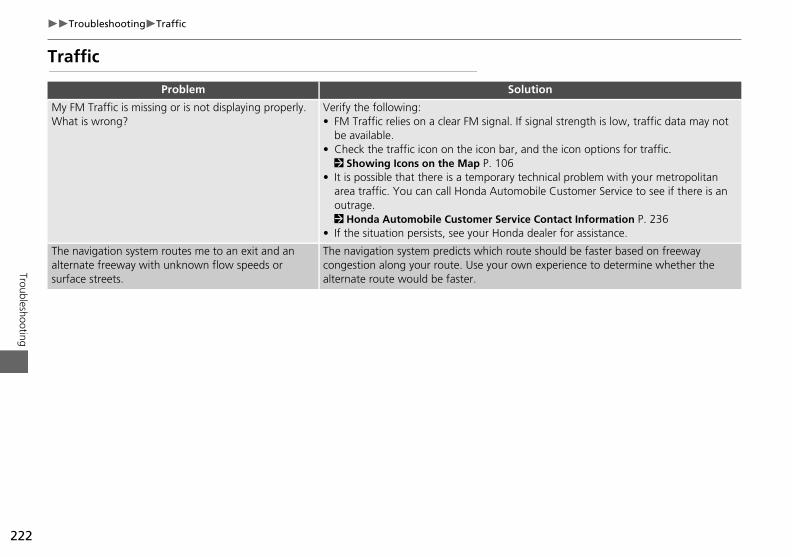
222
TroubleshootingTraffic
Troubleshooting
Tra
n
MyWh al strength is low, traffic data may not
the icon options for traffic.
ical problem with your metropolitan Customer Service to see if there is an
ntact Information P. 236ler for assistance.
Thealtesurf
ould be faster based on freeway perience to determine whether the
ffic
Problem Solutio
FM Traffic is missing or is not displaying properly. at is wrong?
Verify the following:• FM Traffic relies on a clear FM signal. If sign
be available.• Check the traffic icon on the icon bar, and
2 Showing Icons on the Map P. 106• It is possible that there is a temporary techn
area traffic. You can call Honda Automobileoutrage. 2 Honda Automobile Customer Service Co
• If the situation persists, see your Honda dea
navigation system routes me to an exit and an rnate freeway with unknown flow speeds or ace streets.
The navigation system predicts which route shcongestion along your route. Use your own exalternate route would be faster.

223
TroubleshootingGuidance, RoutingTroubleshooting
Gu
on
Thwasys
the optimal route. You can change the ute.
Th ing revision. You can access the most
Ththethe
e dashboard) is not blocked. For best rd, such as radar detectors, cell phones,
s can interfere with the GPS reception.
Th
ormation > North-up, or say d ation.
shown in the lower scales (1/20 - 1 mile
e navigation system updates the “time to to give you a better estimate of arrival
are of the width of intersections. Large temporary loss of the GPS signal.
Continued
stoppedgot to m
How do
SometimHeading
The “timeven th
The vehdistanceintersec
idance, Routing
Problem Soluti
e navigation system does not route me the same y I would go or the same way as other mapping tems.
The navigation system attempts to generate route preferences used when calculating a ro2 Changing the Route Preference P. 91
e street I’m on is not shown on the map screen. The mapping database is constantly undergorecent information on the internet. 2 Map Coverage P. 237
e vehicle position icon is not following the road and “GPS icon” text in the upper left hand corner of screen is white or missing.
• Check that the GPS antenna (located in threception, remove items from the dashboaor loose articles.
• Metallic tinting or other aftermarket devicePlease consult your dealer. 2 GPS System P. 234
e blue highlighted route and voice guidance or turned into a blue/pink dashed line before I y destination.
Your route has entered an unverified area. 2 Unverified Area Routing P. 51
I stop the map from rotating as I drive along? Press the MAP/GUIDE button. Select Map Inf“Display north-up” to change the map orient
es, I cannot select between the North-up and -up map orientations.
The Heading-up map orientation can only bescales). 2 Map Scale and Functions P. 111
e to destination” display sometimes increases ough I am getting closer to my destination.
If your speed reduces due to slower traffic, thdestination” based on your actual road speedtime.
icle position icon on the map “lags” a short behind, especially when I arrive at an tion.
This is normal. The navigation system is unawdifferences in vehicle position can indicate a 2 GPS System P. 234
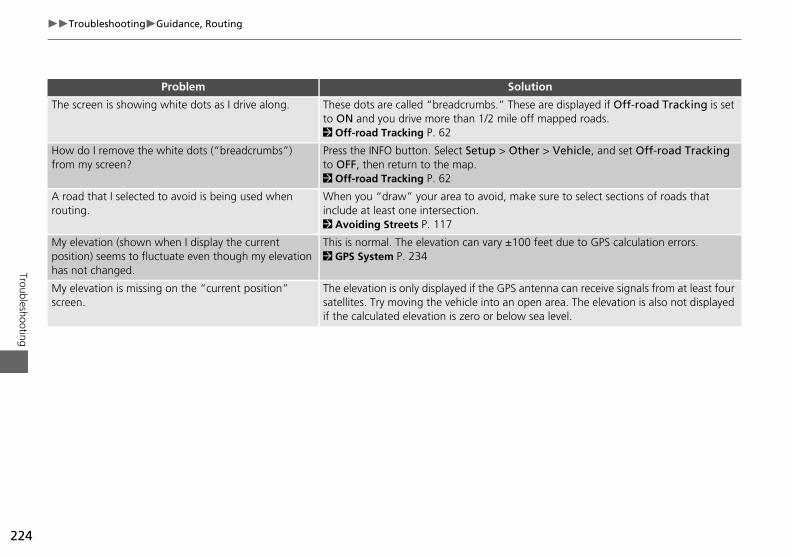
224
TroubleshootingGuidance, Routing
Troubleshooting
The re displayed if Off-road Tracking is set apped roads.
Howfrom
> Vehicle, and set Off-road Tracking
A rorou
ure to select sections of roads that
Myposhas
et due to GPS calculation errors.
Myscre
na can receive signals from at least four area. The elevation is also not displayed level.
n
screen is showing white dots as I drive along. These dots are called “breadcrumbs.” These ato ON and you drive more than 1/2 mile off m2 Off-road Tracking P. 62
do I remove the white dots (“breadcrumbs”) my screen?
Press the INFO button. Select Setup > Other to OFF, then return to the map. 2 Off-road Tracking P. 62
ad that I selected to avoid is being used when ting.
When you “draw” your area to avoid, make sinclude at least one intersection. 2 Avoiding Streets P. 117
elevation (shown when I display the current ition) seems to fluctuate even though my elevation not changed.
This is normal. The elevation can vary ±100 fe2 GPS System P. 234
elevation is missing on the “current position” en.
The elevation is only displayed if the GPS antensatellites. Try moving the vehicle into an openif the calculated elevation is zero or below sea
Problem Solutio

225
TroubleshootingUpdate DVD, Coverage, Map ErrorsTroubleshooting
Up
on
Myare
ing revision. You can access the most
DoAm
50 U.S. states, Canada, and Puerto Rico. o or other countries.
Ca read music discs and the update DVD stem cannot read other mapping ny problems that you cannot resolve,
Ho abase. If you encounter major errors, see
on
ter after a few minutes.
on
everse, you may experience a delay while ation screen and the rear camera image.
he Interface Dial to adjust the brightness. n screen brightness settings.
Displ
Rear
The dispcold we
When I delayed
The reado I adj
date DVD, Coverage, Map Errors
ay, Accessories
Camera
Problem Soluti
city is not part of a fully verified detailed coverage a.
The mapping database is constantly undergorecent information on the internet. 2 Map Coverage P. 237
es the navigation system work outside North erica?
The navigation system contains maps for the The navigation system will not work in Mexic2 Map Coverage P. 237
n I play video DVDs in my navigation system? No. The navigation system is designed only toprovided with your vehicle. The navigation sydatabases or video DVDs. If you experience aplease contact your dealer.
w do I report errors I find in the database? Minor errors are bound to occur in a large dat2 Reporting Errors P. 236
Problem Soluti
lay appears dim when starting the car in really ather.
This is normal. The display will become brigh
Problem Soluti
shift gears, the rear camera image display is .
This is normal. When shifting into or out of Rthe screen image switches between the navig
r camera image is too dark or too bright. How ust the brightness?
While the camera image is displayed, rotate tThis adjustment does not affect the navigatio
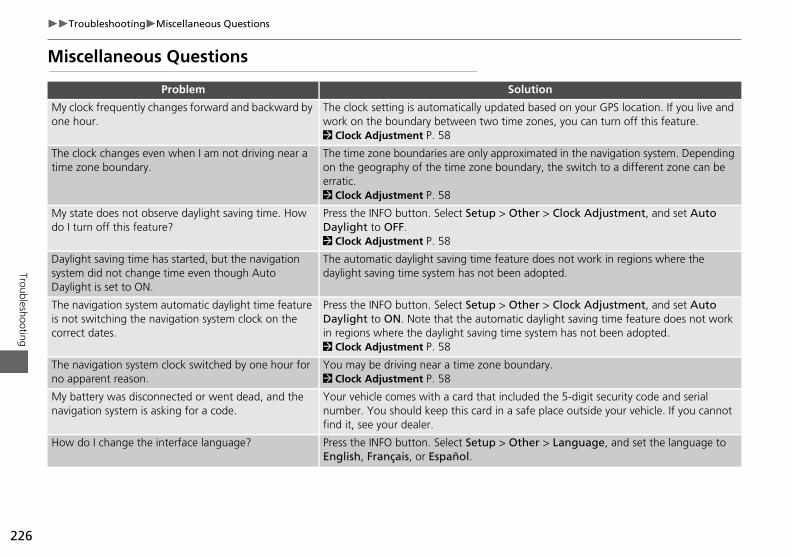
226
TroubleshootingMiscellaneous Questions
Troubleshooting
Mi
n
Myone
ed on your GPS location. If you live and es, you can turn off this feature.
Thetim
ted in the navigation system. Depending the switch to a different zone can be
Mydo
> Clock Adjustment, and set Auto
DaysystDay
es not work in regions where the pted.
> Clock Adjustment, and set Auto light saving time feature does not work em has not been adopted.
y.
the 5-digit security code and serial lace outside your vehicle. If you cannot
> Language, and set the language to
The naviis not swcorrect d
The navino appa
My battenavigatio
How do
scellaneous Questions
Problem Solutio
clock frequently changes forward and backward by hour.
The clock setting is automatically updated baswork on the boundary between two time zon2 Clock Adjustment P. 58
clock changes even when I am not driving near a e zone boundary.
The time zone boundaries are only approximaon the geography of the time zone boundary,erratic. 2 Clock Adjustment P. 58
state does not observe daylight saving time. How I turn off this feature?
Press the INFO button. Select Setup > Other Daylight to OFF. 2 Clock Adjustment P. 58
light saving time has started, but the navigation em did not change time even though Auto light is set to ON.
The automatic daylight saving time feature dodaylight saving time system has not been ado
gation system automatic daylight time feature itching the navigation system clock on the ates.
Press the INFO button. Select Setup > Other Daylight to ON. Note that the automatic dayin regions where the daylight saving time syst2 Clock Adjustment P. 58
gation system clock switched by one hour for rent reason.
You may be driving near a time zone boundar2 Clock Adjustment P. 58
ry was disconnected or went dead, and the n system is asking for a code.
Your vehicle comes with a card that included number. You should keep this card in a safe pfind it, see your dealer.
I change the interface language? Press the INFO button. Select Setup > Other English, Français, or Español.
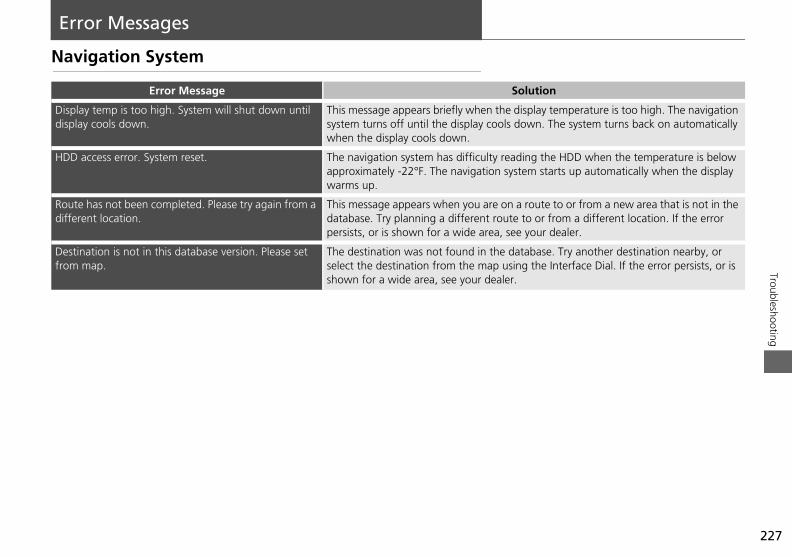
227
TroubleshootingError Messages
Na
on
Disdis
y temperature is too high. The navigation . The system turns back on automatically
HD he HDD when the temperature is below tarts up automatically when the display
Rodif
e to or from a new area that is not in the from a different location. If the error r dealer.
Defro
se. Try another destination nearby, or Interface Dial. If the error persists, or is
vigation System
Error Message Soluti
play temp is too high. System will shut down until play cools down.
This message appears briefly when the displasystem turns off until the display cools downwhen the display cools down.
D access error. System reset. The navigation system has difficulty reading tapproximately -22°F. The navigation system swarms up.
ute has not been completed. Please try again from a ferent location.
This message appears when you are on a routdatabase. Try planning a different route to orpersists, or is shown for a wide area, see you
stination is not in this database version. Please set m map.
The destination was not found in the databaselect the destination from the map using theshown for a wide area, see your dealer.
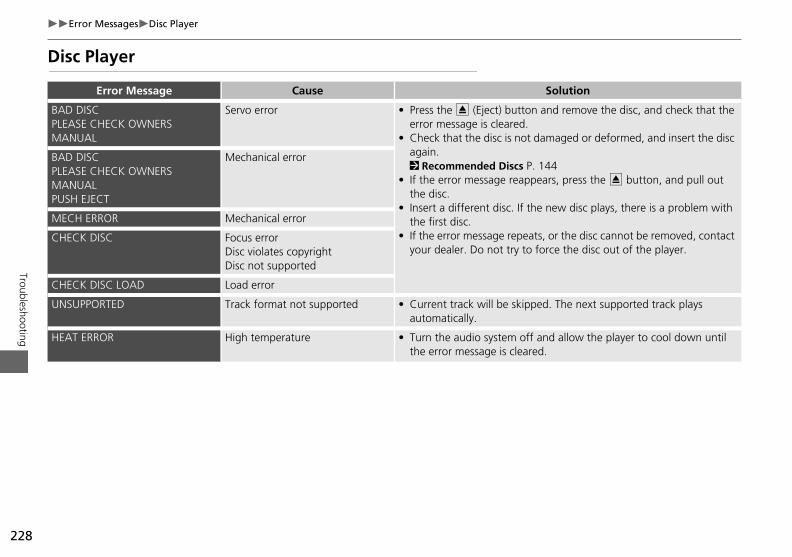
228
Error MessagesDisc Player
Troubleshooting
Dis
Solution
BADPLEMA
nd remove the disc, and check that the
maged or deformed, and insert the disc
44ars, press the E button, and pull out
new disc plays, there is a problem with
, or the disc cannot be removed, contact rce the disc out of the player.
BADPLEMAPUS
ME
CH
CH
d. The next supported track plays
nd allow the player to cool down until .
UNSUPP
HEAT ER
c Player
Error Message Cause
DISCASE CHECK OWNERS NUAL
Servo error • Press the E (Eject) button aerror message is cleared.
• Check that the disc is not daagain. 2 Recommended Discs P. 1
• If the error message reappethe disc.
• Insert a different disc. If thethe first disc.
• If the error message repeatsyour dealer. Do not try to fo
DISCASE CHECK OWNERS NUALH EJECT
Mechanical error
CH ERROR Mechanical error
ECK DISC Focus errorDisc violates copyrightDisc not supported
ECK DISC LOAD Load error
ORTED Track format not supported • Current track will be skippeautomatically.
ROR High temperature • Turn the audio system off athe error message is cleared
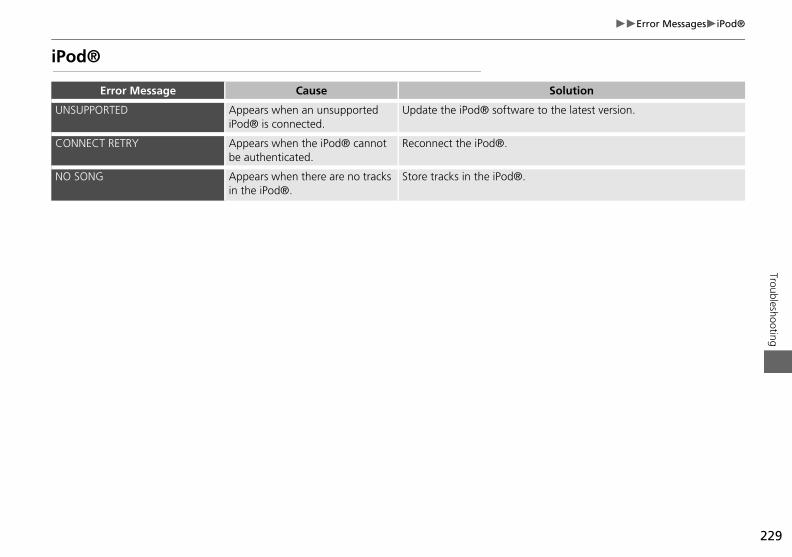
229
Error MessagesiPod®Troubleshooting
iPo
Solution
UN the latest version.
CO
NO
d®
Error Message Cause
SUPPORTED Appears when an unsupported iPod® is connected.
Update the iPod® software to
NNECT RETRY Appears when the iPod® cannot be authenticated.
Reconnect the iPod®.
SONG Appears when there are no tracks in the iPod®.
Store tracks in the iPod®.
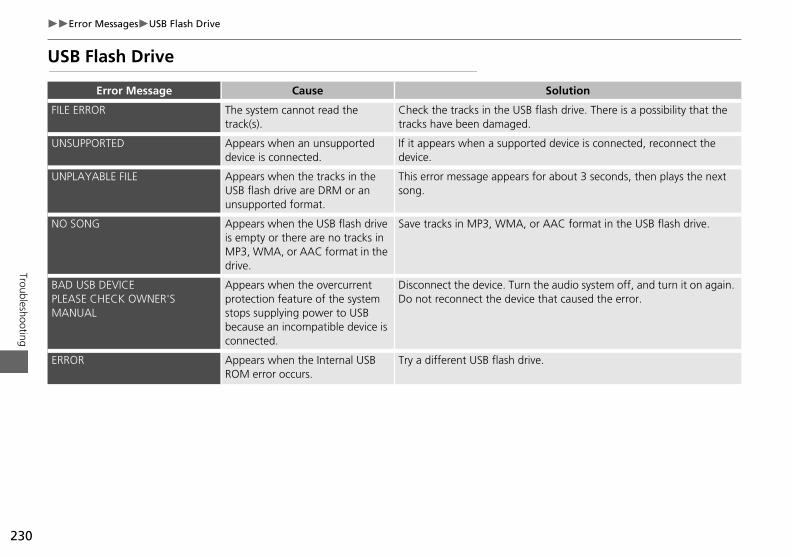
230
Error MessagesUSB Flash Drive
Troubleshooting
US
Solution
FILE ash drive. There is a possibility that the
UN device is connected, reconnect the
UN r about 3 seconds, then plays the next
NO AAC format in the USB flash drive.
BADPLE
e audio system off, and turn it on again. hat caused the error.
MANUA
ERROR
B Flash Drive
Error Message Cause
ERROR The system cannot read the track(s).
Check the tracks in the USB fltracks have been damaged.
SUPPORTED Appears when an unsupported device is connected.
If it appears when a supporteddevice.
PLAYABLE FILE Appears when the tracks in the USB flash drive are DRM or an unsupported format.
This error message appears fosong.
SONG Appears when the USB flash drive is empty or there are no tracks in MP3, WMA, or AAC format in the drive.
Save tracks in MP3, WMA, or
USB DEVICEASE CHECK OWNER'S
L
Appears when the overcurrent protection feature of the system stops supplying power to USB because an incompatible device is connected.
Disconnect the device. Turn thDo not reconnect the device t
Appears when the Internal USB ROM error occurs.
Try a different USB flash drive.

Information
System InEnteringAcquirinStartup Map Ma
System LGPS SysAddressDatabas
Client AssResolvinReportinHonda A
siting Your Dealer ............................. 236ap Coverage ..................................... 237taining a Navigation Update DVD .... 237
affic Information ............................... 238eration in Alaska, Hawaii, Canada, and
uerto Rico......................................... 238ipping a Vehicle to the U.S. Mainland238l Information ................................. 239pyrights ........................................... 239er Agreements ................................. 239 required by the FCC ........................ 244
231Contac
t Information............................236itialization ..............................232 the Security Code....................232g GPS Information....................232Confirmation Screen.................233tching ......................................233
imitations ................................234tem...........................................234 Calculation ..............................234e ..............................................234istance ....................................236g Problems ...............................236g Errors ....................................236utomobile Customer Service
ViMObTrOpP
ShLega
CoUsAs
Reference
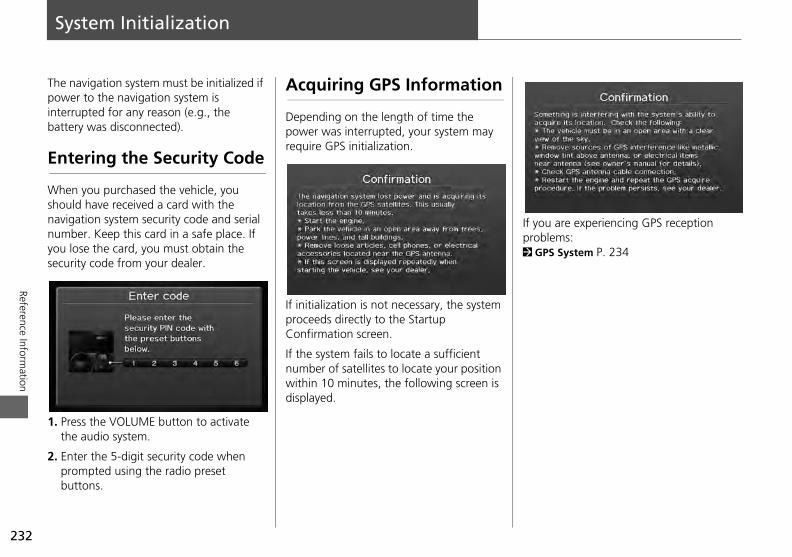
Ref
System Initialization
The powintebatt
En
Wheshounavinumyou secu
. Pth
. Epb
u are experiencing GPS reception lems:
PS System P. 234
232
erence Information
1
2
ress the VOLUME button to activate e audio system.
nter the 5-digit security code when rompted using the radio preset uttons.
If initialization is not necessary, the system proceeds directly to the Startup Confirmation screen.
If the system fails to locate a sufficient number of satellites to locate your position within 10 minutes, the following screen is displayed.
navigation system must be initialized if er to the navigation system is
rrupted for any reason (e.g., the ery was disconnected).
tering the Security Code
n you purchased the vehicle, you ld have received a card with the
gation system security code and serial ber. Keep this card in a safe place. If lose the card, you must obtain the rity code from your dealer.
Acquiring GPS Information
Depending on the length of time the power was interrupted, your system may require GPS initialization.
If yoprob2 G
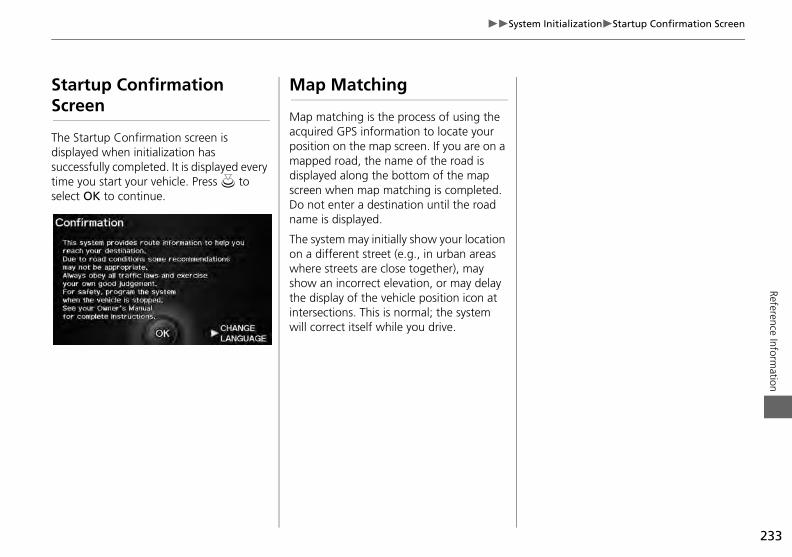
233
System InitializationStartup Confirmation ScreenReference Inform
ation
StSc
Thedispsuctimsele
show an incorrect elevation, or may delay the display of the vehicle position icon at intersections. This is normal; the system will correct itself while you drive.
artup Confirmation reen
Startup Confirmation screen is layed when initialization has
cessfully completed. It is displayed every e you start your vehicle. Press u to ct OK to continue.
Map Matching
Map matching is the process of using the acquired GPS information to locate your position on the map screen. If you are on a mapped road, the name of the road is displayed along the bottom of the map screen when map matching is completed. Do not enter a destination until the road name is displayed.
The system may initially show your location on a different street (e.g., in urban areas where streets are close together), may
Ref
System Limitations
GP
The are of threquGPSThe intefollo
• Mw
• Cdo
Rtrn
Ath
Ttuw
he epasto
yste
tabase
digitized map database reflects ditions as they existed at various points me before production. Accordingly, r database may contain inaccurate or mplete data or information due to the age of time, road construction, ging conditions, or other causes.
example, some places/landmarks may issing when you search the database use the name was misspelled, the e was improperly categorized, or a e/landmark is not yet in the database. is also true for police stations, itals, and other public institutions. Do
rely on the navigation system if you d law enforcement or hospital services. ays check with local information ces.
234
erence Information
•
•
•
TDreins
evices docked in a cradle or lying loose n the dashboard
emote starters or “hidden” vehicle acking systems mounted near the avigation unit
udio electronic devices mounted near e navigation unit
rees, tall buildings, freeway overpasses, nnels, or overhead electrical power ires
GPS is operated by the U.S. artment of Defense. For security ons, there are certain inaccuracies built the GPS for which the navigation m must constantly compensate. This
a quarter of the way down the block by the system. If there are only 25 actual addresses on the block, the actual location of address 1425 would be at the end of the block.
placThishospnot neeAlwsour
S System
signals received from the GPS satellites extremely weak (less than a millionth e strength of a local FM station) and ire an unobstructed view of sky. The antenna is located in the dashboard. signal reception can easily be rrupted or interfered with by the wing:
etallic window tint on the front or side indows
ell phones, PDAs, or other electronic
can cause occasional positioning errors of up to several hundred feet.
Address Calculation
The destination icon shows only the approximate location of a destination address. This occurs if the number of possible addresses is different from the number of actual addresses on a block. e.g., the address 1425 on a 1400 block with 100 possible addresses (because it is followed by the 1500 block) will be shown
Da
Theconin tiyouincopasschan
For be mbecaplac
235
System LimitationsDatabaseReference Inform
ation
In averstrethenamwastredriv
Theprofoll
• N
• P
• Ae
• Ea
• C
• R
• Lwr
• R
• Bl
• T
• S
pecial eventsopulation density
vailability or proximity of law nforcement
mergency, rescue, medical, or other ssistance
onstruction work, zones, or hazards
oad and lane closures
egal restrictions (such as vehicular type, eight, load, height, and speed
estrictions)
oad slope or grade
ridge height, width, weight, or other imits
raffic facilities safety
ddition, the map database contains ified and unverified areas. Unverified ets may be missing from the map, in wrong location, or have an incorrect e or address range. A message will
rn you if your route includes unverified ets. Exercise additional caution when ing in unverified areas.
database does not include, analyze, cess, consider, or reflect any of the owing categories of information:
eighborhood quality or safety
• Pavement characteristics or conditions
Every effort has been made to verify that the database is accurate. The number of inaccuracies you experience increases the longer you go without obtaining an updated map database. 2 Obtaining a Navigation Update DVD P. 237
We assume no liability for any incident that may result from an error in the program, or from changed conditions not noted above.
Ref
Client Assistance
Re
If yocannreso
• Fo2
Ta
• Foaw2
• Fo2
Foo2
CS2
C
nda Automobile stomer Service Contact ormation
da Navi
rican Honda Motor Co., Inc.
da Automobile Customer Servicel Stop 500-2N-7E9 Torrance Blvd.
ance, CA 90501-2746(800) 999-1009 (310) 783-3273
iting Your Dealer
u have a question that you cannot lve using the available help resources, can consult your dealer. Please identify specific issue (e.g., error occurs when enter a specific address, when driving certain road, or just when it’s cold) so the service consultant can refer the e to the factory so that a solution can ound. Be patient, the service sultant may be unfamiliar with your ific issue.
236
erence Information
•
•
r traffic-related issues: Traffic P. 222
r reporting issues with the database r places/landmarks: Reporting Errors P. 236
all Honda Automobile Customer ervice.
Honda Automobile Customer Service ontact Information P. 236
• Please do not report errors in places/landmarks, such as changes in business names. Information about points of interest are constantly being updated. An updated database is available for purchase, usually in the fall of each year. 2 Obtaining a Navigation Update DVD P. 237
• For vehicle position icon errors, screen error messages, or other GPS-related errors: 2 Troubleshooting P. 2202 System Limitations P. 234
Fax:
Vis
If yoresoyouthe youon athatissube fconspec
solving Problems
u run into a specific issue that you ot resolve, consult the following help urces:
r navigation system issues: Troubleshooting P. 220
here are also FAQs available online at utomobiles.honda.com.
r questions regarding HandsFreeLink, udio, or other systems that interact ith the navigation system: Bluetooth® HandsFreeLink® P. 170
Reporting Errors
You can help to improve database accuracy by reporting any errors you encounter.
• Report errors in freeways and main “verified” roads shown in black on the map at http://mapreporter.navteq.com/dur-web-external/.
• Please do not report errors in purple “unverified” roads. Maps for these areas are provided for reference only. 2 Unverified Area Routing P. 51
HoCuInf
Hon
Ame
HonMai191
TorrTel:
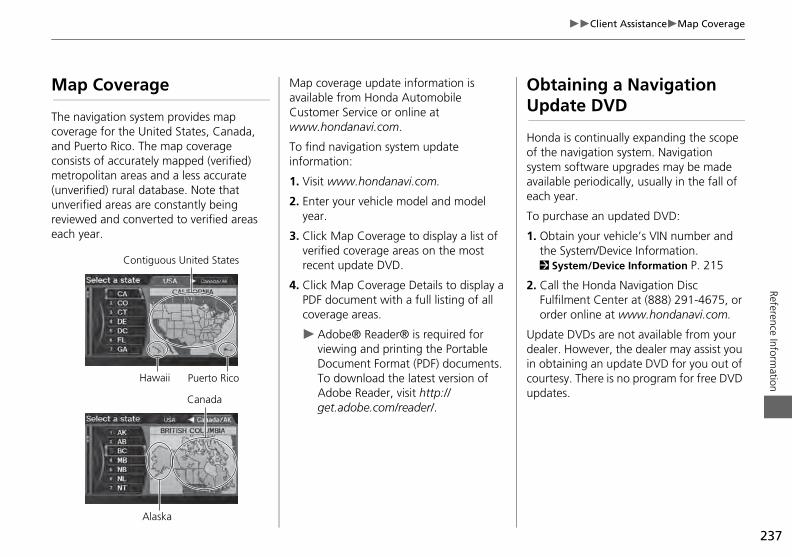
237
Client AssistanceMap CoverageReference Inform
ation
M
Thecovandconme(ununvreveac
taining a Navigation date DVD
da is continually expanding the scope he navigation system. Navigation em software upgrades may be made ilable periodically, usually in the fall of h year.
purchase an updated DVD:
btain your vehicle’s VIN number and he System/Device Information.
System/Device Information P. 215
all the Honda Navigation Disc ulfilment Center at (888) 291-4675, or rder online at www.hondanavi.com.
ate DVDs are not available from your ler. However, the dealer may assist you btaining an update DVD for you out of rtesy. There is no program for free DVD ates.
Alaska
Hawaii Puerto Rico
Canada
4. Click Map Coverage Details to display a PDF document with a full listing of all coverage areas.
Adobe® Reader® is required for viewing and printing the Portable Document Format (PDF) documents. To download the latest version of Adobe Reader, visit http://get.adobe.com/reader/.
2. CFo
Upddeain ocouupd
ap Coverage
navigation system provides map erage for the United States, Canada, Puerto Rico. The map coverage sists of accurately mapped (verified) tropolitan areas and a less accurate verified) rural database. Note that erified areas are constantly being
iewed and converted to verified areas h year.
Contiguous United States
Map coverage update information is available from Honda Automobile Customer Service or online at www.hondanavi.com.
To find navigation system update information:
1. Visit www.hondanavi.com.
2. Enter your vehicle model and model year.
3. Click Map Coverage to display a list of verified coverage areas on the most recent update DVD.
ObUp
Honof tsystavaeac
To
1. Ot2
238
Client AssistanceTraffic Information
Reference Information
Tra
• Cinmco
• Vao
ring a destination address or place/mark on another island may result in a en caution message. This is because e are no ferry routes between islands e database.
reet Name Guidance is set to ON, the et names will not be read out by voice ance. This may change in a future data ate.
ipping a Vehicle to the . Mainland
eceive XM audio, you must call XM set up an account at (800) 852-9696.
ddress and Place Entry creens
uerto Rico
Unavailable menu options will appear gray on the LCD display.
All roads displayed on the map screens are verified roads. Information in this manual relating to “unverified” roads or areas is not applicable.
■Map Coverage
upd
ShU.S
To rand
ffic Information
ontinuously updated traffic formation is available in major etropolitan areas across the 48 ntiguous states and and Hawaii.
isit automobiles.honda.com/traffic for complete listing of coverage areas and ther information.
Operation in Alaska, Hawaii, Canada, and Puerto Rico
Navigation-equipped vehicles delivered to Alaska, Hawaii, Canada, and Puerto Rico are equipped with XM hardware, but XM broadcasting is not available. There are certain functions that rely on XM satellite signal coverage which are not available.
■XM® Radio
Entelandscretherin th
If Ststreguid
■AS
■P

239
Reference Information
Legal Information
Co
• ipC
• EA
• B2
• JI
• ZLt
Bdbmunep
he HDD may not be decompiled, everse engineered or otherwise isassembled, in whole or in part.
he HDD may not be used in a network r by any other manner of simultaneous se in multiple systems.
he HDD is intended solely for personal se (or internal use where the end-user
s a business) by the consumer. The HDD s not to be used for commercial urposes.
he Licensors do not guarantee to the lient that the functions included in the DD meet the specific objectives of the ser.
icensor shall not be responsible for any amages caused by the use of the HDD o the actual user or to any third party.
he warranty on the HDD shall not xtend to an exchange or refund due to isspelling, omission of letters, or any ther cosmetic discrepancy in the ontents of the HDD.
he right to use the HDD shall expire ither when the user destroys the HDD r software, or when any of the terms f this Agreement are violated and the icensors exercise the option to revoke he license to use the HDD or software.
Continued
•
manner. t
LC. Zagat Survey is a registered rademark of Zagat Survey, LLC.
rand icons: The icons for companies isplayed by this product to indicate usiness locations are the registered arks of their respective owners. The
se of such icons in this product does ot imply any sponsorship, approval, or ndorsement by such companies of this roduct.
HDD, you have expressed your Agreement to the terms and conditions of this Agreement. You should, therefore, make sure that you read and understand the following provisions. If for any reason you do not wish to be bound by the terms of this Agreement, please return the HDD to your dealer.
• The HDD may not be copied, duplicated, or otherwise modified, in whole or in part, without the express written permission of the Licensors.
• The HDD may not be transferred or sublicensed to any third party for profit, rent or loan, or licensed for reuse in any
cHu
• Ldt
• Temoc
• TeooL
pyrights
nfoUSA-Data: Certain business data rovided by infoUSA, Inc., Omaha, NE, opyright © 2011, All Rights Reserved.
XIT-Data: © ZENRIN CO., LTD. 2011. ll Rights Reserved.
uilding foot print: © ZENRIN CO., LTD. 011. All Rights Reserved.
unction View Data: © ZENRIN USA, NC. 2011. All rights reserved.
AGAT SURVEY: © 2012 Zagat Survey,
User Agreements
In using this HDD “Satellite Linked Navigation System” (the “HDD”), which includes HONDA MOTOR CO., LTD. software, ALPINE ELECTRONICS, INC. software, and NAVTEQ database contents (hereinafter referred to as “Licensors”), you are bound by the terms and conditions set forth below. By using your copy of the
■Navigation System User Agreement
• Trd
• Tou
• Tuiip
• T
240
Legal InformationUser Agreements
Reference Information
• Ttow
• Tcobinwetho
The the anddemnatuor adamresuposs
Use,by ogoveRighor DManHONAoyJAPA
EULA (OR RATIFICATION OF ANY VIOUS CONSENT).
RANT OF SOFTWARE LICENSEhis EULA grants you the following cense: You may use the SOFTWARE nly on the DEVICE.
OT FAULT TOLERANTHE SOFTWARE IS NOT FAULT OLERANT. ALPINE HAS DEPENDENTLY DETERMINED HOW TO SE THE SOFTWARE IN THE DEVICE, ND MS HAS RELIED UPON ALPINE TO ONDUCT SUFFICIENT TESTING TO ETERMINE THAT THE SOFTWARE IS UITABLE FOR SUCH USE.
O WARRANTIES FOR THE SOFTWAREHE SOFTWARE is provided “AS IS” and ith all faults. THE ENTIRE RISK AS TO
ATISFACTORY QUALITY, ERFORMANCE, ACCURACY, AND FFORT (INCLUDING LACK OF EGLIGENCE) IS WITH YOU. ALSO, HERE IS NO WARRANTY AGAINST TERFERENCE WTH YOUR ENJOYMENT F THE SOFTWARE OR AGAINST FRINGEMENT. IF YOU HAVE RECEIVED NY WARRANTIES REGARDING THE EVICE OR SOFTWARE THOSE
agents, from and against any claim, and or action, irrespective of the re of the cause of the claim, demand
ction, alleging loss, costs, expense, ages or injuries (including injuries lting in death) arising out of the use or ession of the HDD or software.
duplication, or disclosure of this HDD r on behalf of the United States rnment is subject to “Restricted ts” as set forth at FAR 52.227-14, -19 FARS 252.227-7013, as applicable. ufacturers are the Licensors, including DA MOTOR CO., LTD., 2-1-1 Minami
ama Minato-Ku Tokyo 107-8556 N., Alpine Electronics, Inc., 20-1
associated media, printed materials, and “online” or electronic documentation (“SOFTWARE”) are protected by international intellectual property laws and treaties. The SOFTWARE is licensed, not sold. All rights reserved.
IF YOU DO NOT AGREE TO THIS END USER LICENSE AGREEMENT (“EULA”), DO NOT USE THE DEVICE OR COPY THE SOFTWARE INSTEAD, PROMPTLY CONTACT ALPINE FOR INSTRUCTIONS ON RETURN OF THE UNUSED DEVICE(S) FOR A REFUND. ANY USE OF THE SOFTWARE, INCLUDING BUT NOT LIMITED TO USE ON THE DEVICE, WILL CONSTITUTE YOUR AGREEMENT TO
DS
• NTwSPENTINOINAD
he terms and conditions hereof apply all subsequent users and owners as ell as to the original purchaser.
he logos of oil companies, hotels, nvenience stores, and other
usinesses are displayed for your formation and convenience, and in no ay imply any sponsorship, approval or ndorsement of these companies, or eir products. The logos are trademarks
f their respective owners.
user shall indemnify and save harmless Licensors, and their officers, employees
Yoshima Kogyodanchi, Iwaki, Fukushima 970-1192 JAPAN., NAVTEQ Corporation, 425 W Randolph St. Chicago, IL 60606, USA.
You have acquired a device (“DEVICE”) that includes software licensed by Alpine Electronics, Inc. (collectively “ALPINE”) from an affiliate of Microsoft Corporation (collectively “MS”). Those installed software products of MS origin, as well as
■Navigation System END USER LICENSE AGREEMENT
THISPRE
• GTlio
• NTTINUAC
241
Legal InformationUser AgreementsReference Inform
ation
WF
• NESIOFUSAISAH$
• SIruarpsop
the terms of this EULA shall apply, except that MS, Microsoft Corporation or affiliate entity providing the Supplemental Component(s) shall be licensor of the Supplemental Component(s).
ALPINE, MS, Microsoft Corporation and their affiliates reserve the right to discontinue any Internet-based services provided to you or made available to you through the use of the SOFTWARE.
ECOVERY MEDIAf SOFTWARE is provided by ALPINE on eparate media and labeled “Recovery edia” you may use the Recovery edia solely to restore or reinstall the
OFTWARE originally installed on the EVICE.
PGRADESf the SOFTWARE is provided by ALPINE eparate from the DEVICE on separate edia or via web download or other eans, and is labeled “For Upgrade
urposes Only” you may install one (1) opy of such SOFTWARE onto the EVICE as a replacement copy for the xisting SOFTWARE, and use it in ccordance with this EULA, including
Continued
other EULA terms are provided, then a
MOUNT IN EXCESS OF U.S. TWO UNDRED FIFTY DOLLARS (U.S. 250.00).
PEECH RECOGNITIONf the SOFTWARE includes speech ecognition component(s), you should nderstand that speech recognition is n inherently statistical process and that ecognition errors are inherent in the rocess. Neither ALPINE nor its suppliers hall be liable for any damages arising ut of errors in the speech recognition rocess.
SOFTWARE updates, supplements, add-on components, or Internet-base service components of the SOFTWARE after the date you obtain your initial copy of the SOFTWARE (“Supplemental Components”).
If ALPINE provides or makes available to you Supplemental Components and no other EULA terms are provided along with the Supplemental Components, then the terms of this EULA shall apply.
If MS, Microsoft Corporation or their affiliates make available Supplemental Components, and no
IsMMSD
• UIsmmPcDe
ARRANTIES DO NOT ORIGINATE ROM, AND ARE NOT BINDING ON, MS.
O LIABILITY FOR CERTAIN DAMAGES.XCEPT AS PROHIBITED BY LAW, MS HALL HAVE NO LIABILITY FOR ANY NDIRECT, SPECIAL, CONSEQUENTIAL R INCIDENTAL DAMAGES ARISING ROM OR IN CONNECTION WITH THE SE OR PERFORMANCE OF THE OFTWARE. THIS LIMITATION SHALL PPLY EVEN IF ANY REMEDY FAILS OF
TS ESSENTIAL PURPOSE. IN NO EVENT HALL MS BE LIABLE FOR ANY
• LIMITATIONS ON REVERSE ENGINEERING, DECOMPILATION, AND DISASSEMBLYYou may not reverse engineer, decompile, or disassemble the SOFTWARE, except and only to the extent that such activity is expressly permitted by applicable law notwithstanding this limitation.
• ADDITIONAL SOFTWARE/SERVICESThe SOFTWARE may permit ALPINE, MS, Microsoft Corporation or their affiliates to provide or make available to you
• R
242
Legal InformationUser Agreements
Reference Information
aa
• TWAifcoyoSp
• INAinnaaSmSMsunYaaththpoa
lease refer to the address provided in e documentation for the DEVICE.
OFTWARE TRANSFER ALLOWED BUT ITH RESTRICTIONS
ou may permanently transfer rights nder this EULA only as part of a ermanent sale or transfer of the evice, and only if the recipient agrees this EULA. If the SOFTWARE is an
pgrade, any transfer must also include ll prior versions of the SOFTWARE.
XPORT RESTRICTIONSou acknowledge that SOFTWARE is of S-origin. You agree to comply with all pplicable international and national ws that apply to the SOFTWARE, cluding the U.S. Export Administration egulations, as well as end-user, end-se and country destination restrictions sued by U.S. and other governments. or additional information on exporting e SOFTWARE, see http://ww.microsoft.com/exporting/.
pplicable copyright or other intellectual contact ALPINE for any other reason,
ot limited to any images, photographs, nimations, video, audio, music, text nd “applets,” incorporated into the OFTWARE), the accompanying printed aterials, and any copies of the
OFTWARE, are owned by MS, icrosoft Corporation, their affiliates or ppliers. The SOFTWARE is licensed,
ot sold.ou may not copy the printed materials ccompanying the SOFTWARE. All title nd intellectual property rights in and to e content which may be accessed rough use of the SOFTWARE is the
roperty of the respective content wner and may be protected by
electronic documentation.
• TRADEMARKSThis EULA does not grant you any rights in connection with any trademarks or service marks of ALPINE MS, Microsoft Corporation, their affiliates or suppliers.
• PRODUCT SUPPORTProduct support for the SOFTWARE is not provided by MS, its parent corporation Microsoft Corporation, or their affiliates or subsidiaries. For product support, please refer to ALPINE support number provided in the documentation for the DEVICE.Should you have any questions concerning this EULA, or if you desire to
UalainRuisFthw
ny additional EULA terms ccompanying the upgrade SOFTWARE.
ERMINATIONithout prejudice to any other rights, LPINE or MS may terminate this EULA you fail to comply with the terms and nditions of this EULA. In such event, u must destroy all copies of the
OFTWARE and all of its component arts.
TELLECTUAL PROPERTY RIGHTSll title and intellectual property rights and to the SOFTWARE (including but
property laws and treaties. This EULA grants you no rights to use such content. All rights not specifically granted under this EULA are reserved by MS, Microsoft Corporation, their affiliates and suppliers. Use of any on-line services which may be accessed through the SOFTWARE may be governed by the respective terms of use relating to such services. If this SOFTWARE contains documentation that is provided only in electronic form, you may print one copy of such
pth
• SWYupDtoua
• EY
243
Legal InformationUser AgreementsReference Inform
ation
MrGstFwWfrraGfGratGuGaU
■GS
cenote Data only by means of the nded End-User functions or this lication or device.
agree that you will use Gracenote a, the Gracenote Software, and cenote Servers for your own personal -commercial use only.
agree not to assign, copy, transfer, or smit the Gracenote Software or any cenote Data to any third party.
U AGREE NOT TO USE OR EXPLOIT ACENOTE DATA, THE GRACENOTE TWARE, OR GRACENOTE SERVERS, EPT AS EXPRESSLY PERMITTED EIN.
agree that your non-exclusive license se the Gracenote Data, the Gracenote
tware, and Gracenote Servers will inate if you violate these restrictions. If
r license terminates, you agree to cease and all use of the Gracenote Data, the cenote Software, and Gracenote vers.
Continued
.S.) or www.honda.ca (in Canada). perform other functions. You may use
ww.gracenote.com.hen music is recorded to the HDD
rom a CD, information such as the ecording artist and track name are etrieved from the Gracenote Database nd displayed (when available). racenote may not contain information
or all albums.racenote is an internet-based music
ecognition service that allows artist, lbum, and track information from CDs o display on the HDD.racenote users are allowed 4 free pdates a year. More information about racenote, its features, and downloads re available at www.honda.com (in
in the United States and/or other countries.
This application or device contains software from Gracenote, Inc. of Emeryville, California (“Gracenote”). The software from Gracenote (the “Gracenote Software”) enables this application to perform disc and/or file identification and obtain music- related information, including name, artist, track, and title information (“Gracenote Data”) from online servers or embedded databases (collectively, “Gracenote Servers”) and to
■Gracenote® END USER LICENSE AGREEMENT
SOFEXCHER
Youto uSoftermyouanyGraSer
usic recognition technology and elated data are provided by racenote®. Gracenote is the industry
tandard in music recognition echnology and related content delivery. or more information, visit
racenote Music Recognition ervice (CDDB)
CD and music-related data from Gracenote, Inc., copyright © 2000 to present Gracenote. Gracenote Software, copyright © 2000 to present Gracenote. One or more patents owned by Gracenote apply to this product and service. See the Gracenote website for a non-exhaustive list of applicable Gracenote patents. Gracenote, CDDB, MusicID, MediaVOCS, the Gracenote logo and logotype, and the “Powered by Gracenote” logo are either registered trademarks or trademarks of Gracenote
Grainteapp
YouDatGranon
YoutranGra
YOGR
244
Legal InformationAs required by the FCC
Reference Information
GracDataGracrighGracto yprovmayAgrenam
The idenpurpassigGracknomorthe Grac
The GracIS.”
Gracwarthe in threseGraccate
required by the FCC
his device complies with Part 15 of the C Rules and Canadian RSS-210/
SSGen. Operation is subject to the llowing two conditions: (1) this device ay not cause harmful interference, and ) this device must accept any terference received, including terference that may cause undesired peration.
he FCC requires the user to be notified at any changes or modifications made this device that are not expressly
pproved by the party responsible for mpliance may void the user’s
uthority to operate the equipment.
his product emits radio frequency nergy, but the radiated output power f this device is far below the FCC and radio frequency exposure limits. This
quipment complies with FCC and IC RF diation exposure limits set forth for an
ncontrolled environment. Nevertheless, e device should be used in such a anner that the potential for human
ontact with the antenna during normal peration is minimized.
ned numeric identifier is to allow the enote service to count queries without
wing anything about who you are. For e information, see the web page for Gracenote Privacy Policy for the enote service.
Gracenote Software and each item of enote Data are licensed to you “AS
enote makes no representations or ranties, express or implied, regarding accuracy of any Gracenote Data from e Gracenote Servers. Gracenote rves the right to delete data from the enote Servers or to change data gories for any cause that Gracenote
IMPLIED WARRANTIES OF MERCHANTABILITY, FITNESS FOR A PARTICULAR PURPOSE, TITLE, AND NON- INFRINGEMENT. GRACENOTE DOES NOT WARRANT THE RESULTS THAT WILL BE OBTAINED BY YOUR USE OF THE GRACENOTE SOFTWARE OR ANY GRACENOTE SERVER. IN NO CASE WILL GRACENOTE BE LIABLE FOR ANY CONSEQUENTIAL OR INCIDENTAL DAMAGES OR FOR ANY LOST PROFITS OR LOST REVENUES.
copyright © 2000 to present Gracenote
toacoa
3. TeoICerauthmco
enote reserves all rights in Gracenote , the Gracenote Software, and the enote Servers, including all ownership
ts. Under no circumstances will enote become liable for any payment
ou for any information that you ide. You agree that Gracenote, Inc. enforce its rights under this ement against you directly in its own e.
Gracenote service uses a unique tifier to track queries for statistical oses. The purpose of a randomly
deems sufficient. No warranty is made that the Gracenote Software or Gracenote Servers are error-free or that functioning of Gracenote Software or Gracenote Servers will be uninterrupted.
Gracenote is not obligated to provide you with new enhanced or additional data types or categories that Gracenote may provide in the future and is free to discontinue its services at any time.
GRACENOTE DISCLAIMS ALL WARRANTIES EXPRESS OR IMPLIED, INCLUDING, BUT NOT LIMITED TO,
As
1. TFCRfom(2inino
2. Tth
e Commands
e Commands .................................. 246obal Commands ............................... 246vigation Commands......................... 246
imate Control Commands................. 249dio Commands ................................ 249llular Phone Commands ................... 254ain Setup Screen Commands ............ 254-Screen Commands ......................... 254elling Assistance ............................... 254
245
VoicGlNaClAuCeMOnSp
Voic
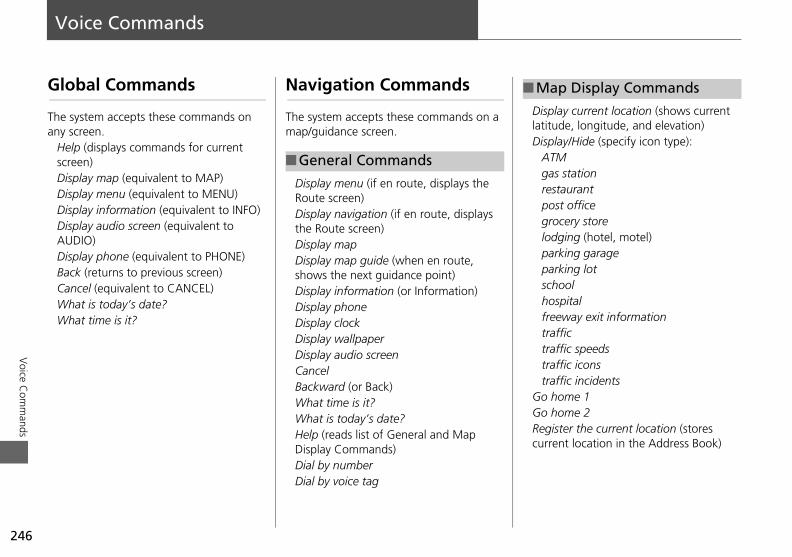
Voice Commands
Glo
The any
HescDiDiDiDiAUDiBaCaWW
splay current location (shows current itude, longitude, and elevation)splay/Hide (specify icon type):ATMgas stationrestaurantpost officegrocery storelodging (hotel, motel)parking garageparking lotschoolhospitalfreeway exit informationtraffictraffic speedstraffic iconstraffic incidents home 1 home 2gister the current location (stores rrent location in the Address Book)
ap Display Commands
246
Voice C
omm
ands
ncel (equivalent to CANCEL)hat is today’s date?hat time is it?
shows the next guidance point)Display information (or Information)Display phoneDisplay clockDisplay wallpaperDisplay audio screenCancelBackward (or Back)What time is it?What is today’s date?Help (reads list of General and Map Display Commands)Dial by numberDial by voice tag
GoGoRecu
bal Commands
system accepts these commands on screen.lp (displays commands for current
reen)splay map (equivalent to MAP)splay menu (equivalent to MENU)splay information (equivalent to INFO)splay audio screen (equivalent to DIO)
splay phone (equivalent to PHONE)ck (returns to previous screen)
Navigation Commands
The system accepts these commands on a map/guidance screen.
Display menu (if en route, displays the Route screen)Display navigation (if en route, displays the Route screen)Display mapDisplay map guide (when en route,
■General Commands
DilatDi
■M
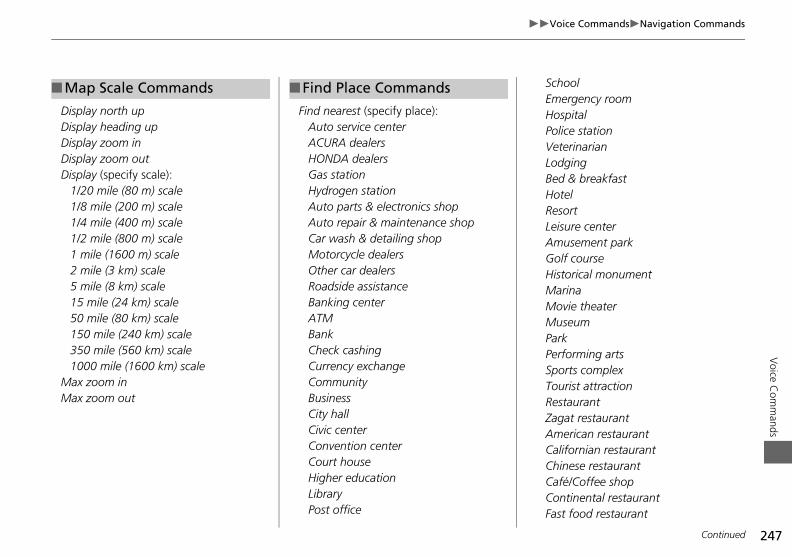
247
Voice CommandsNavigation CommandsV
oice Com
mands
DDDDD
MM
■M SchoolEmergency roomHospitalPolice stationVeterinarianLodgingBed & breakfastHotelResortLeisure centerAmusement parkGolf courseHistorical monumentMarinaMovie theaterMuseumParkPerforming artsSports complexTourist attractionRestaurantZagat restaurantAmerican restaurantCalifornian restaurantChinese restaurantCafé/Coffee shopContinental restaurantFast food restaurant
Continued
Post office
2 mile (3 km) scale5 mile (8 km) scale15 mile (24 km) scale50 mile (80 km) scale150 mile (240 km) scale350 mile (560 km) scale1000 mile (1600 km) scaleax zoom inax zoom out
Other car dealersRoadside assistanceBanking centerATMBankCheck cashingCurrency exchangeCommunityBusinessCity hallCivic centerConvention centerCourt houseHigher educationLibrary
isplay north upisplay heading upisplay zoom inisplay zoom outisplay (specify scale):1/20 mile (80 m) scale1/8 mile (200 m) scale1/4 mile (400 m) scale1/2 mile (800 m) scale1 mile (1600 m) scale
ap Scale Commands
Find nearest (specify place):Auto service centerACURA dealersHONDA dealersGas stationHydrogen stationAuto parts & electronics shopAuto repair & maintenance shopCar wash & detailing shopMotorcycle dealers
■Find Place Commands
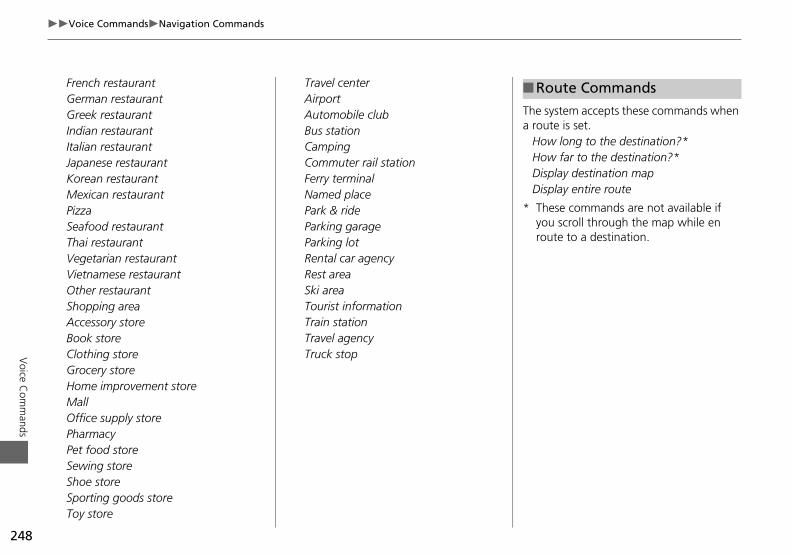
248
Voice CommandsNavigation Commands
Voice C
omm
ands
FGGIIJKMPSTVVOSABCGHMOPPSSST
system accepts these commands when ute is set.w long to the destination?*w far to the destination?*
splay destination mapsplay entire route
hese commands are not available if ou scroll through the map while en ute to a destination.
oute Commands
oy store
ietnamese restaurantther restauranthopping areaccessory storeook storelothing storerocery storeome improvement storeallffice supply storeharmacyet food storeewing storehoe storeporting goods store
Rest areaSki areaTourist informationTrain stationTravel agencyTruck stop
rench restauranterman restaurantreek restaurant
ndian restauranttalian restaurantapanese restaurantorean restaurantexican restaurant
izzaeafood restauranthai restaurantegetarian restaurant
Travel centerAirportAutomobile clubBus stationCampingCommuter rail stationFerry terminalNamed placePark & rideParking garageParking lotRental car agency
Thea ro
HoHoDiDi
* Tyro
■R
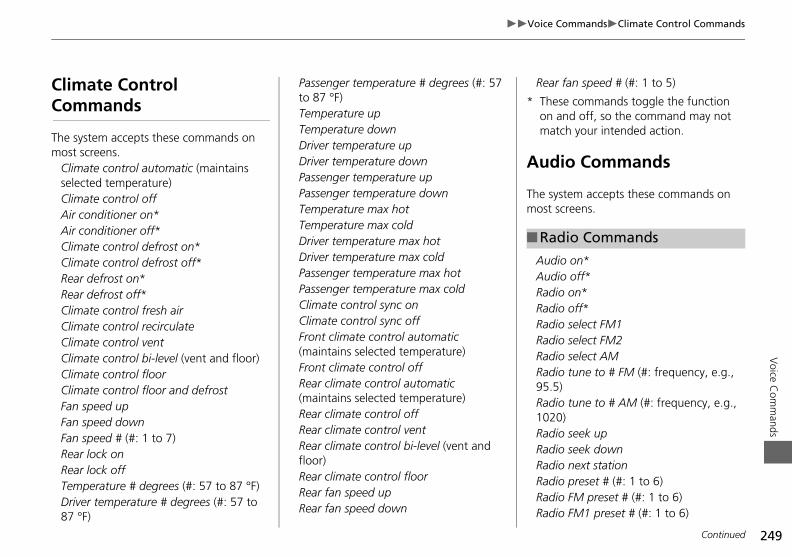
249
Voice CommandsClimate Control CommandsV
oice Com
mands
ClCo
Themo
CseCAACCRRCCCCCCFaFaFaRRTD8
ear fan speed # (#: 1 to 5)
hese commands toggle the function n and off, so the command may not atch your intended action.
dio Commands
system accepts these commands on st screens.
udio on*udio off*adio on*adio off*adio select FM1adio select FM2adio select AMadio tune to # FM (#: frequency, e.g., 5.5)adio tune to # AM (#: frequency, e.g., 020)adio seek upadio seek downadio next stationadio preset # (#: 1 to 6)adio FM preset # (#: 1 to 6)adio FM1 preset # (#: 1 to 6)
adio Commands
Continued
7 °F)Rear fan speed down R
ear defrost on*ear defrost off*limate control fresh airlimate control recirculatelimate control ventlimate control bi-level (vent and floor)limate control floorlimate control floor and defrostn speed upn speed downn speed # (#: 1 to 7)
ear lock onear lock offemperature # degrees (#: 57 to 87 °F)river temperature # degrees (#: 57 to
Passenger temperature max hotPassenger temperature max coldClimate control sync onClimate control sync offFront climate control automatic (maintains selected temperature)Front climate control offRear climate control automatic (maintains selected temperature)Rear climate control offRear climate control ventRear climate control bi-level (vent and floor)Rear climate control floorRear fan speed up
ARRRRRR9R1RRRRR
imate Control mmands
system accepts these commands on st screens.limate control automatic (maintains lected temperature)
limate control offir conditioner on*ir conditioner off*limate control defrost on*limate control defrost off*
Passenger temperature # degrees (#: 57 to 87 °F)Temperature upTemperature downDriver temperature upDriver temperature downPassenger temperature upPassenger temperature downTemperature max hotTemperature max coldDriver temperature max hotDriver temperature max cold
R
* Tom
Au
Themo
A
■R
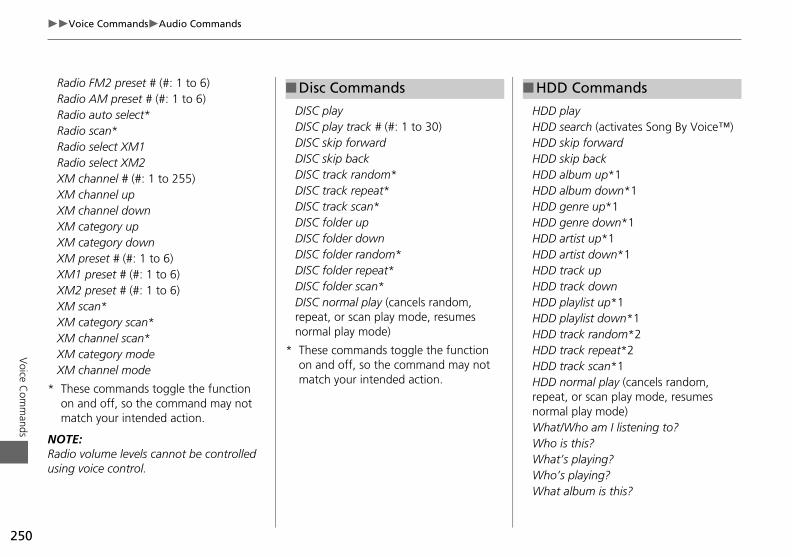
250
Voice CommandsAudio Commands
Voice C
omm
ands
RaRaRaRaRaRaXMXMXMXMXMXMXMXMXMXMXMXMXM
* Tom
NOTRadusin
D playD search (activates Song By Voice™)D skip forwardD skip backD album up*1D album down*1D genre up*1D genre down*1D artist up*1D artist down*1D track upD track downD playlist up*1D playlist down*1D track random*2D track repeat*2D track scan*1D normal play (cancels random,
peat, or scan play mode, resumes rmal play mode)hat/Who am I listening to?ho is this?hat’s playing?ho’s playing?hat album is this?
DD Commands
1 preset # (#: 1 to 6)2 preset # (#: 1 to 6) scan* category scan* channel scan* category mode channel mode
hese commands toggle the function n and off, so the command may not atch your intended action.
E:io volume levels cannot be controlled g voice control.
DISC folder scan*DISC normal play (cancels random, repeat, or scan play mode, resumes normal play mode)
* These commands toggle the function on and off, so the command may not match your intended action.
HDHDHDHDHDHDHDrenoWWWWW
dio FM2 preset # (#: 1 to 6)dio AM preset # (#: 1 to 6)dio auto select*dio scan*dio select XM1dio select XM2 channel # (#: 1 to 255) channel up channel down category up category down preset # (#: 1 to 6)
DISC playDISC play track # (#: 1 to 30)DISC skip forwardDISC skip backDISC track random*DISC track repeat*DISC track scan*DISC folder upDISC folder downDISC folder random*DISC folder repeat*
■Disc Commands
HDHDHDHDHDHDHDHDHDHDHD
■H
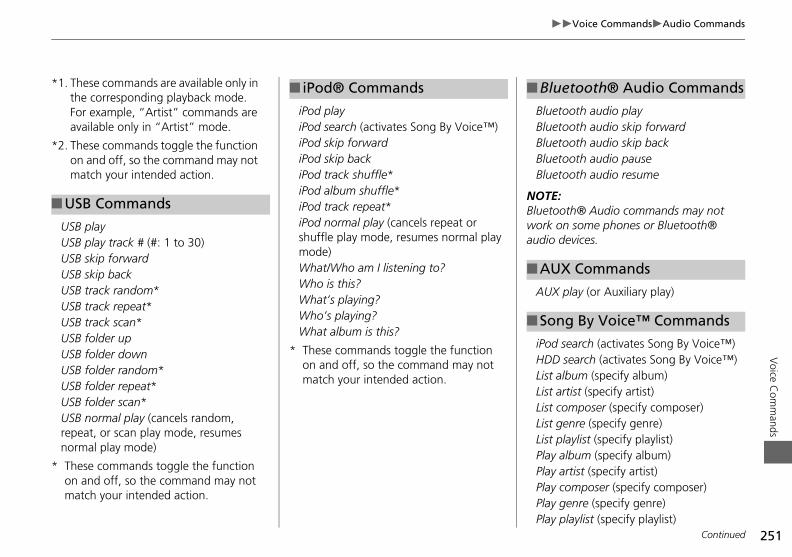
251
Voice CommandsAudio CommandsV
oice Com
mands
*1.
*2.
UUUUUUUUUUUUUren
* Tom
■U
luetooth audio playluetooth audio skip forwardluetooth audio skip backluetooth audio pauseluetooth audio resume
TE:etooth® Audio commands may not rk on some phones or Bluetooth® io devices.
UX play (or Auxiliary play)
od search (activates Song By Voice™)DD search (activates Song By Voice™)st album (specify album)ist artist (specify artist)st composer (specify composer)st genre (specify genre)st playlist (specify playlist)lay album (specify album)lay artist (specify artist)lay composer (specify composer)lay genre (specify genre)lay playlist (specify playlist)
luetooth® Audio Commands
UX Commands
ong By Voice™ Commands
Continued
P
SB skip backSB track random*SB track repeat*SB track scan*SB folder upSB folder downSB folder random*SB folder repeat*SB folder scan*SB normal play (cancels random, peat, or scan play mode, resumes ormal play mode)
hese commands toggle the function n and off, so the command may not atch your intended action.
Who is this?What’s playing?Who’s playing?What album is this?
* These commands toggle the function on and off, so the command may not match your intended action.
A
iPHLiLLiLiLiPPPP
■A
■S
These commands are available only in the corresponding playback mode. For example, “Artist” commands are available only in “Artist” mode.
These commands toggle the function on and off, so the command may not match your intended action.
SB playSB play track # (#: 1 to 30)SB skip forward
SB Commands
iPod playiPod search (activates Song By Voice™)iPod skip forwardiPod skip backiPod track shuffle*iPod album shuffle*iPod track repeat*iPod normal play (cancels repeat or shuffle play mode, resumes normal play mode)What/Who am I listening to?
■ iPod® Commands
B
B
B
B
B
NOBluwoaud
■B
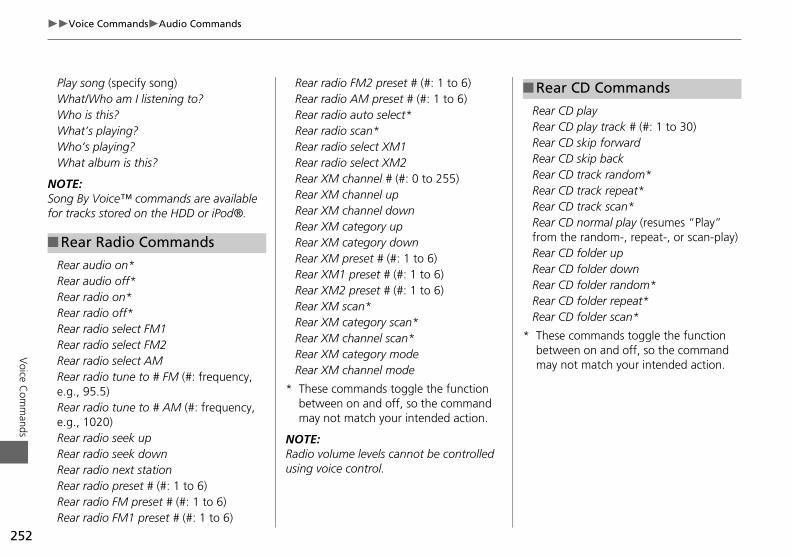
252
Voice CommandsAudio Commands
Voice C
omm
ands
PlaWWWWW
NOTSonfor t
ReReReReReReReRee.gRee.gReReReReReRe
■R
ar CD playar CD play track # (#: 1 to 30)ar CD skip forwardar CD skip backar CD track random*ar CD track repeat*ar CD track scan*ar CD normal play (resumes “Play” m the random-, repeat-, or scan-play)ar CD folder upar CD folder downar CD folder random*ar CD folder repeat*ar CD folder scan*
hese commands toggle the function etween on and off, so the command ay not match your intended action.
ear CD Commands
ar radio FM1 preset # (#: 1 to 6)
ar audio off*ar radio on*ar radio off*ar radio select FM1ar radio select FM2ar radio select AMar radio tune to # FM (#: frequency, ., 95.5)
ar radio tune to # AM (#: frequency, ., 1020)ar radio seek upar radio seek downar radio next stationar radio preset # (#: 1 to 6)ar radio FM preset # (#: 1 to 6)
Rear XM1 preset # (#: 1 to 6)Rear XM2 preset # (#: 1 to 6)Rear XM scan*Rear XM category scan*Rear XM channel scan*Rear XM category modeRear XM channel mode
* These commands toggle the function between on and off, so the command may not match your intended action.
NOTE:Radio volume levels cannot be controlled using voice control.
ReReRe
* Tbm
y song (specify song)hat/Who am I listening to?ho is this?hat’s playing?ho’s playing?hat album is this?
E:g By Voice™ commands are available racks stored on the HDD or iPod®.
ar audio on*
ear Radio Commands
Rear radio FM2 preset # (#: 1 to 6)Rear radio AM preset # (#: 1 to 6)Rear radio auto select*Rear radio scan*Rear radio select XM1Rear radio select XM2Rear XM channel # (#: 0 to 255)Rear XM channel upRear XM channel downRear XM category upRear XM category downRear XM preset # (#: 1 to 6)
ReReReReReReReRefroReRe
■R
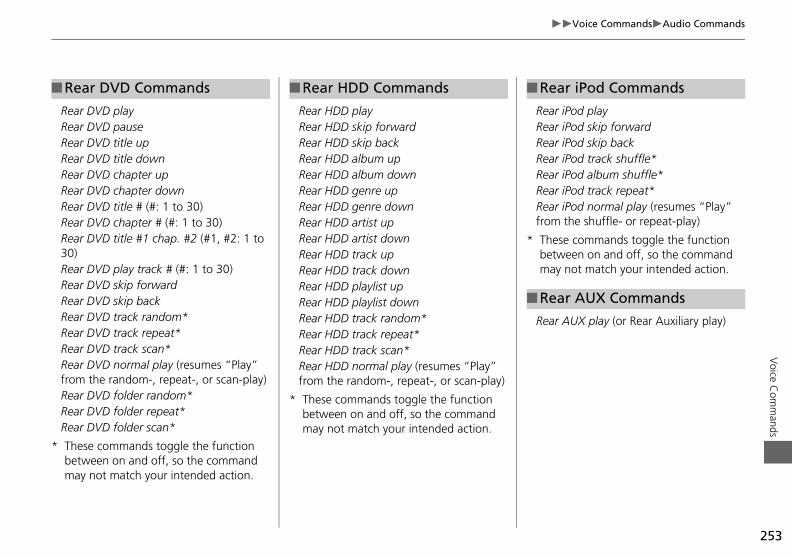
253
Voice CommandsAudio CommandsV
oice Com
mands
RRRRRRRRR3RRRRRRRfrRRR
* Tbm
■R
ear iPod playear iPod skip forwardear iPod skip backear iPod track shuffle*ear iPod album shuffle*ear iPod track repeat*ear iPod normal play (resumes “Play” om the shuffle- or repeat-play)
hese commands toggle the function etween on and off, so the command ay not match your intended action.
ear AUX play (or Rear Auxiliary play)
ear iPod Commands
ear AUX Commands
ear DVD play track # (#: 1 to 30)ear DVD skip forwardear DVD skip backear DVD track random*ear DVD track repeat*ear DVD track scan*ear DVD normal play (resumes “Play” om the random-, repeat-, or scan-play)ear DVD folder random*ear DVD folder repeat*ear DVD folder scan*
hese commands toggle the function etween on and off, so the command ay not match your intended action.
Rear HDD track downRear HDD playlist upRear HDD playlist downRear HDD track random*Rear HDD track repeat*Rear HDD track scan*Rear HDD normal play (resumes “Play” from the random-, repeat-, or scan-play)
* These commands toggle the function between on and off, so the command may not match your intended action.
m
R
■R
ear DVD playear DVD pauseear DVD title upear DVD title downear DVD chapter upear DVD chapter downear DVD title # (#: 1 to 30)ear DVD chapter # (#: 1 to 30)ear DVD title #1 chap. #2 (#1, #2: 1 to 0)
ear DVD Commands
Rear HDD playRear HDD skip forwardRear HDD skip backRear HDD album upRear HDD album downRear HDD genre upRear HDD genre downRear HDD artist upRear HDD artist downRear HDD track up
■Rear HDD Commands
RRRRRRRfr
* Tb
■R
254
Voice CommandsCellular Phone Commands
Voice C
omm
ands
Ce
The on t
DiCaCaPhMPh
Thesscre
DiDi
-Screen Commands
system accepts these commands on screen. There are over 100 on-screen mands. Say what is written on the en to activate that selection. For lists, can say the list item number to select item.xt (or Down)
evious (or Up)turn (excluding Startup Confirmation
reen)lete
elling Assistance
voice control system can also gnize phonetic alphabet input for bers, letters, accented letters,
ctuation marks, and symbols.
E:n selecting letters using the voice
trol system, a confirmation box may up to confirm the entry.
al/call by numberal/call by voice tag
Contrast maximum/max.Black level upBlack level downBlack level minimum/min.Black level maximum/max.Volume upVolume downVolume minimum/min.Volume maximum/max.Volume offInterface dial feedback offInterface dial feedback autoInterface dial feedback on
De
Sp
Thereconumpun
NOTWheconpop
llular Phone Commands
system accepts these commands only he PHONE screen.al #ll (voice tag)ll historyonebookore speed dialone setup
e commands can be made from any en.
Main Setup Screen Commands
The system accepts these commands on the Main Setup screen.
Brightness upBrightness downBrightness minimum/min.Brightness maximum/max.Contrast upContrast downContrast minimum/min.
On
Theany comscreyouthat
NePrReOKsc
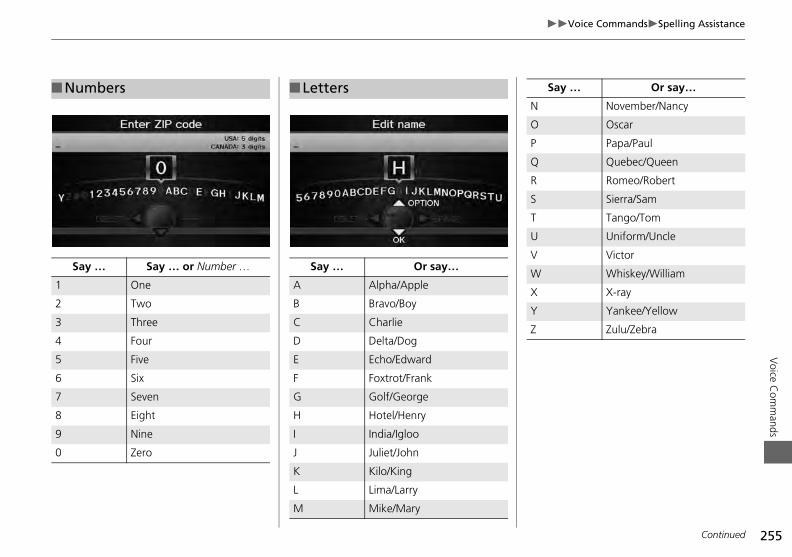
255
Voice CommandsSpelling AssistanceV
oice Com
mands
■N
1
2
3
4
5
6
7
8
9
0
November/Nancy
Oscar
Papa/Paul
Quebec/Queen
Romeo/Robert
Sierra/Sam
Tango/Tom
Uniform/Uncle
Victor
Whiskey/William
X-ray
Yankee/Yellow
Zulu/Zebra
Say … Or say…
Continued
M Mike/Mary
One
Two
Three
Four
Five
Six
Seven
Eight
Nine
Zero
A Alpha/Apple
B Bravo/Boy
C Charlie
D Delta/Dog
E Echo/Edward
F Foxtrot/Frank
G Golf/George
H Hotel/Henry
I India/Igloo
J Juliet/John
K Kilo/King
L Lima/Larry
W
X
Y
Z
umbers
Say … Say … or Number …
■Letters
Say … Or say…
N
O
P
Q
R
S
T
U
V
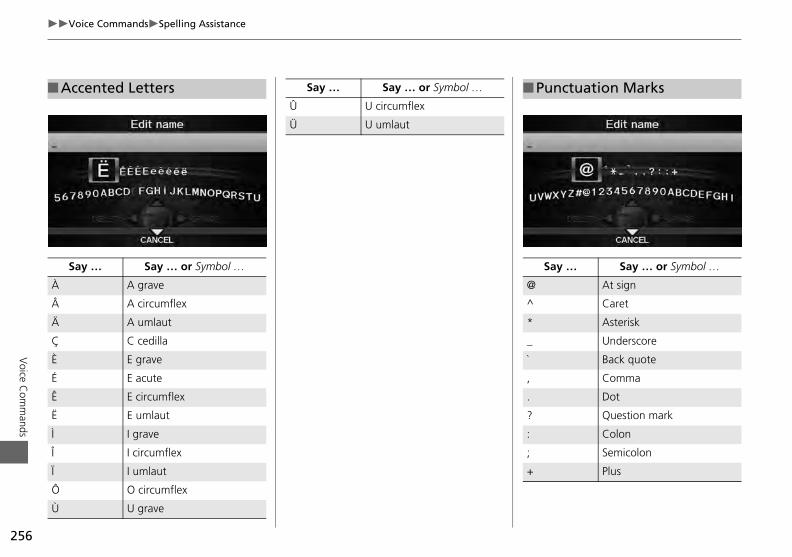
256
Voice CommandsSpelling Assistance
Voice C
omm
ands
■A
À
Â
Ä
Ç
È
É
Ê
Ë
Ì
Î
Ï
Ô
Ù
unctuation Marks
Say … Say … or Symbol …
At sign
Caret
Asterisk
Underscore
Back quote
Comma
Dot
Question mark
Colon
Semicolon
Plus
A grave
A circumflex
A umlaut
C cedilla
E grave
E acute
E circumflex
E umlaut
I grave
I circumflex
I umlaut
O circumflex
U grave
@
^
*
_
`
,
.
?
:
;
+
ccented Letters
Say … Say … or Symbol …
Û U circumflex
Ü U umlaut
Say … Say … or Symbol … ■P
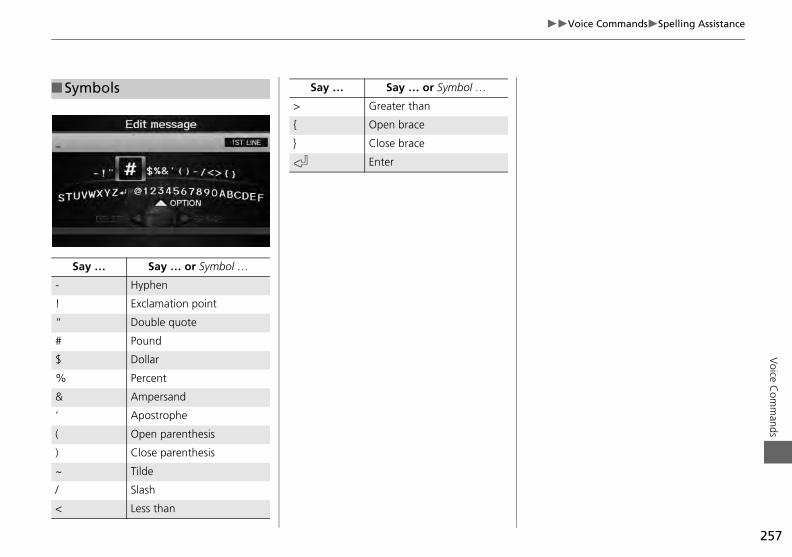
257
Voice CommandsSpelling AssistanceV
oice Com
mands
■S
-
!
“
#
$
%
&
‘
(
)
~
/
<
Less thanHyphen
Exclamation point
Double quote
Pound
Dollar
Percent
Ampersand
Apostrophe
Open parenthesis
Close parenthesis
Tilde
Slash
ymbols
Say … Say … or Symbol …
> Greater than
{ Open brace
} Close brace
k Enter
Say … Say … or Symbol …
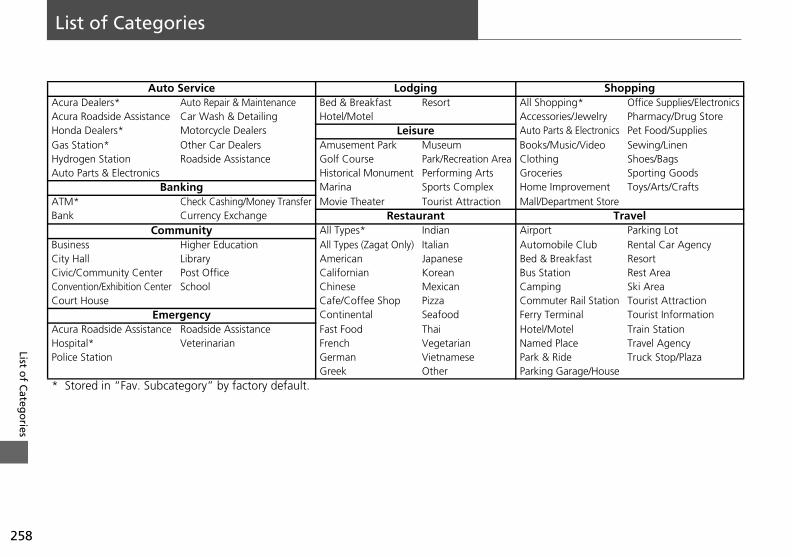
List of Categories
ShoppingAcu opping* Office Supplies/ElectronicsAcu ssories/Jewelry Pharmacy/Drug StoreHon Parts & Electronics Pet Food/SuppliesGas s/Music/Video Sewing/LinenHyd ing Shoes/BagsAut eries Sporting Goods
e Improvement Toys/Arts/CraftsATM epartment StoreBan Travel
rt Parking LotBus mobile Club Rental Car AgencyCity Breakfast ResortCivi tation Rest AreaCon ing Ski Area
ou uter Rail Station Tourist Attraction Terminal Tourist Information
cu l/Motel Train Stationos d Place Travel Agencyoli & Ride Truck Stop/Plaza
g Garage/HouseS
258
List of C
atego
ries
C
AHP
*
Auto Service Lodgingra Dealers* Auto Repair & Maintenance Bed & Breakfast Resort All Shra Roadside Assistance Car Wash & Detailing Hotel/Motel Acceda Dealers* Motorcycle Dealers Leisure Auto Station* Other Car Dealers Amusement Park Museum Bookrogen Station Roadside Assistance Golf Course Park/Recreation Area Clotho Parts & Electronics Historical Monument Performing Arts Groc
Banking Marina Sports Complex Hom* Check Cashing/Money Transfer Movie Theater Tourist Attraction Mall/D
k Currency Exchange RestaurantCommunity All Types* Indian Airpo
iness Higher Education All Types (Zagat Only) Italian Auto Hall Library American Japanese Bed &c/Community Center Post Office Californian Korean Bus Svention/Exhibition Center School Chinese Mexican Camprt House Cafe/Coffee Shop Pizza Comm
Emergency Continental Seafood Ferryra Roadside Assistance Roadside Assistance Fast Food Thai Hotepital* Veterinarian French Vegetarian Namece Station German Vietnamese Park
Greek Other Parkintored in “Fav. Subcategory” by factory default.
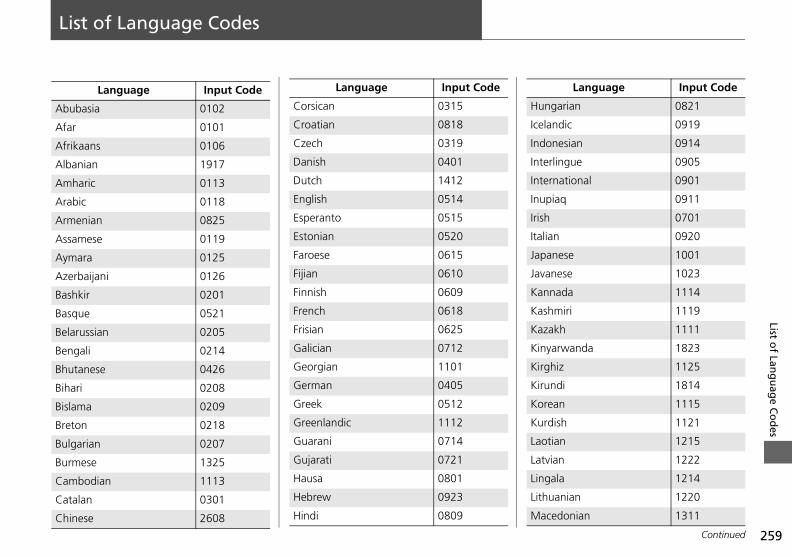
259
List of Lan
gu
age C
od
esList of Language Codes
Ab
Af
Af
Alb
Am
Ar
Ar
As
Ay
Az
Ba
Ba
Be
Be
Bh
Bih
Bis
Bre
Bu
Bu
Ca
Ca
Ch
ngarian 0821
landic 0919
onesian 0914
erlingue 0905
ernational 0901
piaq 0911
h 0701
lian 0920
anese 1001
anese 1023
nnada 1114
shmiri 1119
zakh 1111
yarwanda 1823
ghiz 1125
undi 1814
rean 1115
rdish 1121
tian 1215
vian 1222
gala 1214
huanian 1220
cedonian 1311
Language Input Code
Continued
inese 2608 Hindi 0809 Ma
erbaijani 0126
shkir 0201
sque 0521
larussian 0205
ngali 0214
utanese 0426
ari 0208
lama 0209
ton 0218
lgarian 0207
rmese 1325
mbodian 1113
talan 0301
Fijian 0610
Finnish 0609
French 0618
Frisian 0625
Galician 0712
Georgian 1101
German 0405
Greek 0512
Greenlandic 1112
Guarani 0714
Gujarati 0721
Hausa 0801
Hebrew 0923
Jav
Ka
Ka
Ka
Kin
Kir
Kir
Ko
Ku
Lao
Lat
Lin
Lit
Language Input Code
ubasia 0102
ar 0101
rikaans 0106
anian 1917
haric 0113
abic 0118
menian 0825
samese 0119
mara 0125
Corsican 0315
Croatian 0818
Czech 0319
Danish 0401
Dutch 1412
English 0514
Esperanto 0515
Estonian 0520
Faroese 0615
Language Input Code
Hu
Ice
Ind
Int
Int
Inu
Iris
Ita
Jap
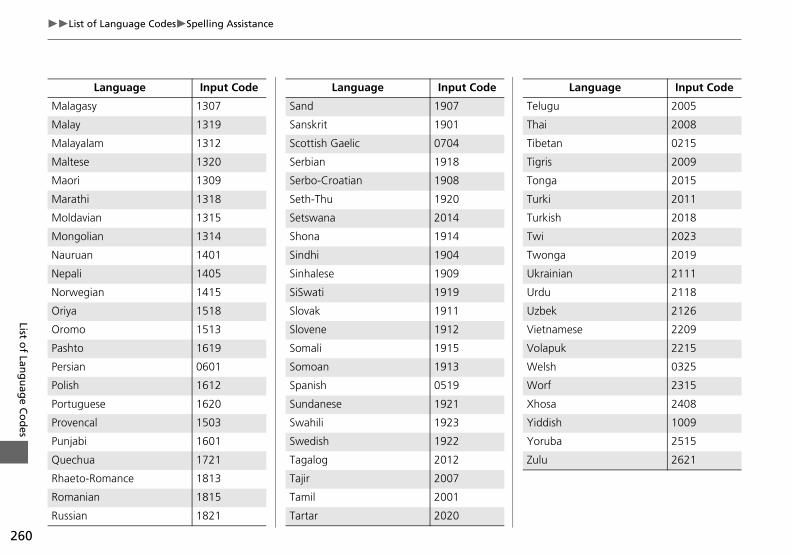
260
List of Language CodesSpelling Assistance
List of Lan
gu
age C
od
es
Ma
Ma
Ma
Ma
Ma
Ma
Mo
Mo
Nau
Nep
Nor
Oriy
Oro
Pas
Per
Poli
Por
Pro
Pun
Que
Rha
Rom
Rus
gu 2005
i 2008
tan 0215
is 2009
ga 2015
ki 2011
kish 2018
2023
nga 2019
ainian 2111
u 2118
ek 2126
tnamese 2209
apuk 2215
lsh 0325
rf 2315
sa 2408
dish 1009
uba 2515
2621
Language Input Code
sian 1821 Tartar 2020
ali 1405
wegian 1415
a 1518
mo 1513
hto 1619
sian 0601
sh 1612
tuguese 1620
vencal 1503
jabi 1601
chua 1721
eto-Romance 1813
anian 1815
Sinhalese 1909
SiSwati 1919
Slovak 1911
Slovene 1912
Somali 1915
Somoan 1913
Spanish 0519
Sundanese 1921
Swahili 1923
Swedish 1922
Tagalog 2012
Tajir 2007
Tamil 2001
Ukr
Urd
Uzb
Vie
Vol
We
Wo
Xho
Yid
Yor
Zulu
lagasy 1307
lay 1319
layalam 1312
ltese 1320
ori 1309
rathi 1318
ldavian 1315
ngolian 1314
ruan 1401
Language Input Code
Sand 1907
Sanskrit 1901
Scottish Gaelic 0704
Serbian 1918
Serbo-Croatian 1908
Seth-Thu 1920
Setswana 2014
Shona 1914
Sindhi 1904
Language Input Code
Telu
Tha
Tibe
Tigr
Ton
Tur
Tur
Twi
Two
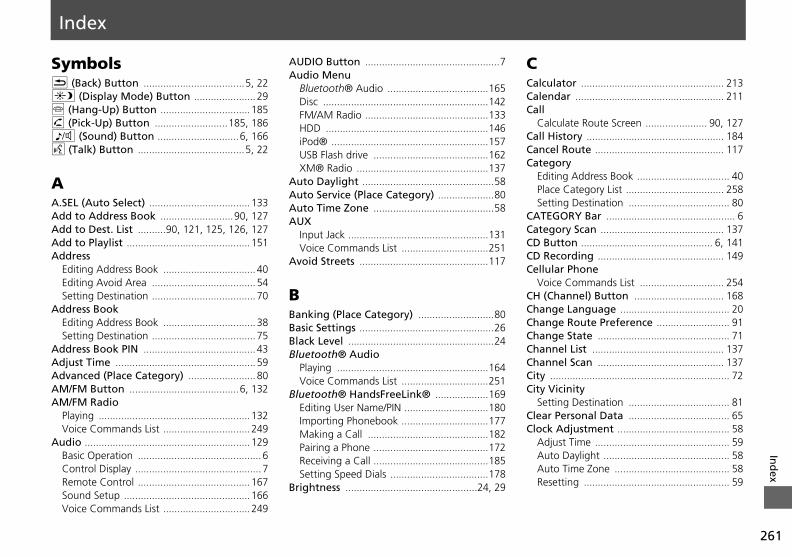
261
Ind
exIndex
lculator ................................................... 213lendar ..................................................... 211llalculate Route Screen ...................... 90, 127
ll History ................................................. 184ncel Route .............................................. 117tegoryditing Address Book ................................. 40lace Category List ................................... 258etting Destination .................................... 80TEGORY Bar .............................................. 6tegory Scan ............................................ 137 Button ............................................... 6, 141 Recording ............................................. 149llular Phoneoice Commands List .............................. 254
(Channel) Button ................................ 168ange Language ....................................... 20ange Route Preference .......................... 91ange State ............................................... 71annel List ............................................... 137annel Scan ............................................. 137y ................................................................ 72y Vicinityetting Destination .................................... 81ar Personal Data .................................... 65ck Adjustment ........................................ 58djust Time ................................................ 59uto Daylight ............................................. 58uto Time Zone ......................................... 58esetting .................................................... 59
A
AAAAA
A
Voice Commands List ...............................249
Editing Address Book ................................. 40Editing Avoid Area ..................................... 54Setting Destination ..................................... 70
ddress BookEditing Address Book ................................. 38Setting Destination ..................................... 75
ddress Book PIN ........................................ 43djust Time .................................................. 59dvanced (Place Category) ........................ 80M/FM Button .......................................6, 132M/FM RadioPlaying ......................................................132Voice Commands List ...............................249
udio ...........................................................129Basic Operation ............................................ 6Control Display .............................................7Remote Control ........................................ 167Sound Setup .............................................166
BBanking (Place Category) ...........................80Basic Settings ................................................26Black Level ....................................................24Bluetooth® Audio
Playing ......................................................164Voice Commands List ...............................251
Bluetooth® HandsFreeLink® ...................169Editing User Name/PIN ..............................180Importing Phonebook ...............................177Making a Call ...........................................182Pairing a Phone .........................................172Receiving a Call .........................................185Setting Speed Dials ...................................178
Brightness ...............................................24, 29
CeV
CHChChChChChCitCit
SCleClo
AAAR
SymbolsK (Back) Button ....................................5, 22a (Display Mode) Button ...................... 29j (Hang-Up) Button ................................185h (Pick-Up) Button ..........................185, 1868 (Sound) Button .............................6, 166d (Talk) Button ......................................5, 22
AA.SEL (Auto Select) ....................................133Add to Address Book ..........................90, 127Add to Dest. List ..........90, 121, 125, 126, 127Add to Playlist ............................................151Address
AUDIO Button ................................................7Audio Menu
Bluetooth® Audio ....................................165Disc ...........................................................142FM/AM Radio ............................................133HDD ..........................................................146iPod® ........................................................157USB Flash drive .........................................162XM® Radio ...............................................137
Auto Daylight ...............................................58Auto Service (Place Category) ....................80Auto Time Zone ...........................................58AUX
Input Jack ..................................................131Voice Commands List ...............................251
Avoid Streets ..............................................117
CCaCaCa
CCaCaCa
EPS
CACaCDCD
262
Index
Ind
ex
dance Menu ......................................... 100irections ................................................. 101xit Info .................................................... 102uidance Mode ........................................ 103dance Mode ......................................... 103dance Screen Interruption ................... 57
Dlaying ...................................................... 145oice Commands List ............................... 250D Button ............................................6, 145D Setupisc ........................................................... 142DD .......................................................... 147ding-up ................................................ 108e Address 1 .....................................12, 42e Address 2 .....................................12, 42da Automobile Customer Service .... 236
Option ................................................ 107ort Cellular Phonebook ..................... 177rface Dial ................................................. 8rface Dial Feedback .............................. 25rsection .................................................. 87
d®onnecting, Disconnecting ..............155, 160laying ...................................................... 155oice Commands List ............................... 251
Map Color ...................................................28Menu Color ................................................28Switching Display Mode .............................29
Delete a Phone ...........................................175Dest. Menu 1 ................................................68Dest. Menu 2 ................................................68Destination List
Adding Waypoint .....................................118Editing .......................................................122
Destination Map ..........................................92Detour .........................................................117Dial ...............................................................183Direct Dial ...................................................185Directions ....................................................101Disc
Playing ......................................................141Voice Commands List ...............................250
FFavorite Subcategory .................................. 82Find Nearest... ............................................ 123Folder List
Disc ........................................................... 143USB Flash Drive ........................................ 163
GGet Music Info. .......................................... 153Go Home 1 ................................................... 12Go Home 1 PIN ............................................ 43Go Home 2 ................................................... 12Go Home 2 PIN ............................................ 43Gracenote Info. Update ........................... 154
HeaHomHomHon
IIconImpInteInteInteiPo
CPV
Color ..............................................................27Map Color ...................................................28Menu Color ................................................28
Community (Place Category) .....................80Continue Trip .............................................127Contrast .........................................................24Coordinate ....................................................86Correct Vehicle Position ..............................63Current Location ........................................109Current Position
Editing Address Book .................................40Setting Destination .....................................88
DDay Mode
EEdit Avoid Area ........................................... 53Edit Music Info. .......................................... 151Edit Speed Dial .......................................... 178Edit User/PIN .............................................. 180Edit Waypoint Search Area ........................ 55Emergency (Place Category) ...................... 80ENT Button ..................................................... 8Error Messages .......................................... 227
Disc Player ................................................ 228iPod® ....................................................... 229Navigation System ................................... 227USB Flash Drive ........................................ 230
Exit Info. ..................................................... 102
GuiDEG
GuiGui
HHD
PV
HDHD
DH
263
IndexIn
dex
Numbers ................................................ 43ce Categoryditing Address Book ................................. 40lace Category List ................................... 258etting Destination .................................... 80ce Namediting Address Book ................................. 40etting Destination .............................. 77, 81ce Phone No.diting Address Book ................................. 40etting Destination .................................... 84set Buttons ............................................... 6vious Destinationeleting ...................................................... 44diting Address Book ................................. 40etting Destination .................................... 76
dioM/AM ..................................................... 132M® ........................................................ 136
ndomisc ........................................................... 142DD ......................................................... 147ass-Key ................................................... 174SB Flash Drive ........................................ 162
S Search ................................................. 134ad Radio Text ........................................ 135arview Camera ...................................... 217c to HDD ................................................. 149calculation ......................................... 50, 95minder .............................................. 21, 212
Menu Color .................................................. 28 Making a Call ...........................................183
Viewing Update Status .............................216Map Information .......................................105Map Input
Editing Avoid Area ..................................... 54Setting Destination ..................................... 88
Map Legend .........................................10, 110Map Menu .................................................... 98Map Screen ................................................... 93
Icon .............................................10, 106, 112Orientation ...............................................108Scale .........................................................111
MAP/GUIDE Button .............................11, 103Menu (Dest. Menu 1) .................................. 68Menu (Dest. Menu 2) .................................. 68Menu (Route) .............................................116MENU Button
Changing Route .......................................116Entering a Destination ................................ 68
North-up .....................................................108Note .............................................................138
OOff-road Tracking
Driving ........................................................96Setting ........................................................62
Open Map ...................................................102
PPair Phone ...................................................172Pass-Key .......................................................174Personal Information ..................................37Phone Setup ...............................................170Phonebook
Importing ..................................................177
RRa
FX
RaDHPU
RDReReReReRe
KKey to ZAGAT Ratings ..............................216
LLanguage ...................................................... 31Leisure (Place Category) ............................. 80Lodging (Place Category) ........................... 80
MMap Color ..................................................... 28Map Data Update
Checking Version .....................................215Obtaining Update DVD ............................237
Mode ...........................................................137MODE Button .............................................167More Speed Dial ........................................170Music Search .................................................45
HDD ..........................................................150iPod® ........................................................158Phonetic Modification ................................47Song By Voice .....................................46, 159
Mute ............................................................185
NNight Mode
Map Color ...................................................28Menu Color ................................................28Switching Display Mode .............................29
PINPla
EPS
PlaES
PlaES
PrePre
DES

264
Index
Ind
ex
Flash Driveonnecting, Disconnecting ..............155, 160laying ...................................................... 160oice Commands List ............................... 251/AUX Button ....................6, 156, 161, 164
icle .......................................................... 61orrect Vehicle Position ............................. 63ff-road Tracking ....................................... 62w Area Map ............................................ 53w Routes ................................................. 91ceap Menu .................................................. 97
ce Commandsasic Operation ............................................ 9elp .............................................................. 5oice Commands List ............................... 246oice Control System ................................. 22ce Control Operationasic Operation ............................................ 5ce Recognition Tutor ............................ 26ce Tag .................................................... 179L (Volume) Button ............................... 167L 9 (Volume/Power) Knob .................... 6ume .......................................................... 24
llpapereleting, Importing, Setting ....................... 32ypointdding ...................................................... 118eleting, Ordering .................................... 122
SKIP Bar ...........................................................6 Obtaining Update DVD ............................ 237 DDisc ...........................................................143FM/AM Radio ............................................133HDD ..........................................................147USB Flash Drive .........................................162
SCAN/TITLE Bar ...............................................6Scenic Road Information ..........................215Schedule
Calendar ...................................................211Search a Next Connected Phone .............176Search Along ..............................................119Search Around ............................................119Search by Keyword ......................................81Search Phonebook .....................................183Security PIN Code .......................................232Shopping (Place Category) .........................80Show Icon on Map .....................................106Shuffle .........................................................157Single Screen ..............................................103
TITLE Button .................................................. 6Traffic Detail .............................................. 115Traffic Rerouting ....................................... 114Transfer ...................................................... 185Travel (Place Category) .............................. 80Trip Computer ........................................... 210Tune
FM/AM Radio ........................................... 133XM® Radio .............................................. 137
TUNE Bar ........................................................ 6
UUnit Conversion ......................................... 213Units (mile or km) ....................................... 26Unverified Area Routing ............................ 51Update System Software
Finding Update Information .................... 237
BHVV
VoiB
VoiVoiVOVOVol
WWa
DWa
A
RepeatDisc ...........................................................142HDD ..........................................................147iPod® ........................................................157USB Flash Drive .........................................162
Rerouting ......................................................50Reset Clock Settings ....................................59Reset Factory Default ..................................64Restaurant (Place Category) .......................80Route (Menu) .............................................116Route Pref. ....................................................91Routing & Guidance ....................................49
SScan
Song By VoiceSearching Music ....................................... 159Setting ........................................................ 46Voice Commands List .............................. 251
Sort by Distance to Travel .......................... 81Sound Setup ............................................... 166Speed Dial
Making a Call ........................................... 184Registering ............................................... 178
Split Screen ................................................ 104Street ............................................................ 73Street Name Guidance ............................... 56System/Device Information ...................... 215
T
USBCPV
USB
VVeh
CO
VieVieVoi
MVoi
265
IndexIn
dex
XXM Button ..............................................6, 136XM® Radio
Playing ......................................................136Voice Commands List ...............................249
ZZAGAT
Displaying Review ...........................77, 82, 85Setting Destination ..................................... 84
Zip Code ........................................................ 71