Embed Size (px)
Citation preview
April
MYOB Training Manual Part 2: April 2006 2-44 Processing Transactions in MYOB
2.1 Entering Transactions You are now ready to start entering transactions. These can be divided into a variety of categories, as detailed below: (a) Sales Sales involve all sales that the organisation makes to the general public, local businesses, and others. At the nonprofit organisation level these can normally involve the sales of specific medical equipment, or books and items of a similar nature, but could also include advertising space in the organisation newsletter if such exists, and client fees and charges. Under the later circumstances, an invoice should be provided by the organisation to the purchaser and preferably, a receipt of some kind when payment is made. For more information, see Section 2.2.2. In the case of government grants, these should be entered as “Sales” in MYOB. Grants are normally subject to GST. Hence, 1/11th of the gross amount of the grant needs to be remitted to the Australian Taxation Office on the Business Activity Statement. In some cases, the Government Department provides a tax invoice to the nonprofit organisation. This is referred to as a “recipient created tax invoice”. This means that the nonprofit organisation does not need to send the Government Department a tax invoice. If the Government Department does not issue the nonprofit organisation with a recipient created tax invoice, then the nonprofit organisation will be required to raise and send the Government Department a tax invoice for the GST-inclusive value of the grant received. Whichever way the tax invoice is achieved, it should still be entered into MYOB as a “sale” and coded to the relevant account (Account Numbers 4-1010 to 4-1000). For more information on grants, refer to Section 3.1.1. (b) Purchases Purchases include all items which involve the organisation paying money and receiving in return an item, or a service. These should always be accompanied by an invoice (more about these later) which will require payment in the future, or a receipt, to show that the item was paid for at the time of purchase. For more information, see Section 2.2.3. (c) Banking Banking includes the depositing of all cash and cheques made out to the organisation on a regular basis (daily, weekly, or in extreme cases, monthly). Banking also includes the spending of money for which no invoice was provided, or the paying of superannuation and GST to the ATO, and bank reconciliations based on the weekly or monthly bank statement from the participating bank. For more information, see Section 2.2.5.
(d) Payroll Payroll looks after all the transactions involved with paying of salaries and wages to all staff that have a permanent or casual nature. Payroll also keeps track of superannuation owing, annual and sick leave accrued, and any leave of any nature taken during the year. Payroll also calculates the appropriate amount of PAYG tax to be withheld and paid to the ATO on the Business Activity Statement (BAS). For more information, see Section 2.5.
2.2.1 Entering Sales Transactions
As previously mentioned, sales will include all goods and services, such as medical equipment, books, advertising space, etc, sold to a wide variety of members of the public and others. There are two ways to deal with sales. The first and preferable way is to issue a tax invoice from the organisation to the person or business to whom the sale is being made. The tax invoice can be generated from within MYOB and printed onto the appropriate letterhead, or an invoice created in a Word or similar document, the information of which is then recorded in MYOB – an electronic copy of the paper. The other method to deal with these sales is simply to take the money collected, and enter it into MYOB through the ‘Banking’, ‘Receive Money’ section. Depending on how the money is generated, both of these methods are appropriate. Generally speaking, street donation collections are simply cash hand overs, sometimes to be issued with a receipt. It is simply not appropriate to issue each of these with a tax invoice, and so using the ‘Receive Money’ option is fine. However, for other sales, such as medical supplies, books or newsletter advertising, or when a local small business wants to put an advertisement in your organisation’s newsletter, a tax invoice must be issued. A tax invoice must have several items present to make it an acceptable and legal document. These are: the words ‘Tax Invoice’ stated prominently; the organisation name or trading name, eg. ABC Limited; the organisation’s ABN. This is vitally important; the name of the recipient of the invoice eg. DEF Pty Ltd; the address or ABN of the recipient; the date of issue of the invoice; a brief description of the goods or services provided; the amount payable for the supply and the amount of GST payable shown
separately OR; an all-inclusive price with the statement that the total price includes GST.
A dummy tax invoice was included at page 2-36 for you to use as a guide. If choosing to create a MYOB generated Invoice, click on the ‘Sales’ icon on the Front Screen. Click on ‘Print/Email Invoices’, and then on ‘Advanced Filters’. Now click on the button ‘Customise’ on the bottom of the window. This will bring up a basic MYOB invoice, which you may rearrange to your heart’s content.
MYOB Training Manual Part 2: April 2006 2-45 Processing Transactions in MYOB
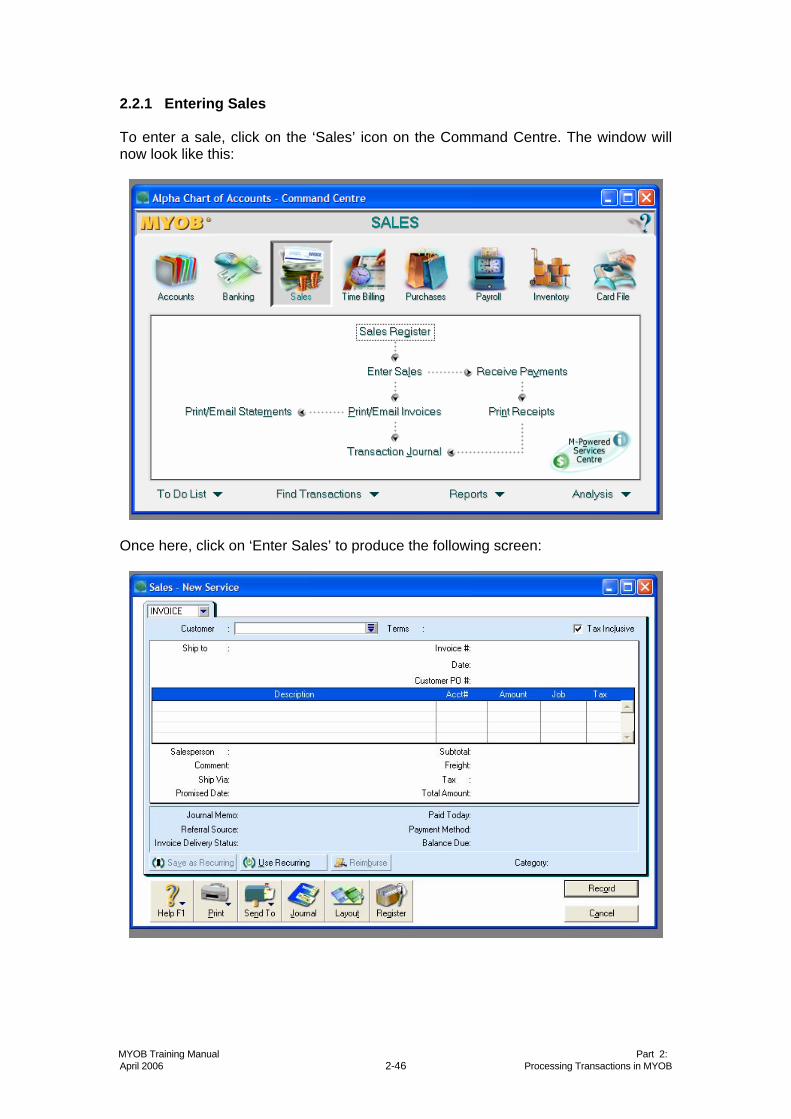
2.2.1 Entering Sales To enter a sale, click on the ‘Sales’ icon on the Command Centre. The window will now look like this:
Once here, click on ‘Enter Sales’ to produce the following screen:
MYOB Training Manual Part 2: April 2006 2-46 Processing Transactions in MYOB
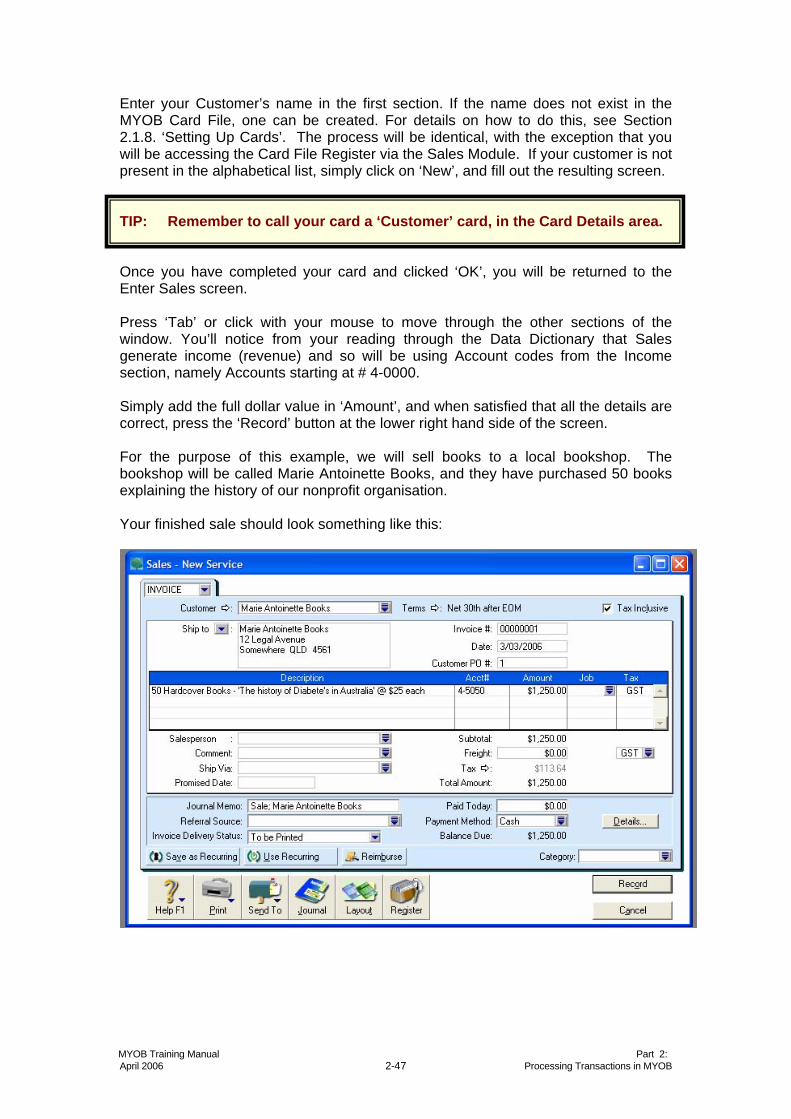
Enter your Customer’s name in the first section. If the name does not exist in the MYOB Card File, one can be created. For details on how to do this, see Section 2.1.8. ‘Setting Up Cards’. The process will be identical, with the exception that you will be accessing the Card File Register via the Sales Module. If your customer is not present in the alphabetical list, simply click on ‘New’, and fill out the resulting screen. TIP: Remember to call your card a ‘Customer’ card, in the Card Details area. Once you have completed your card and clicked ‘OK’, you will be returned to the Enter Sales screen. Press ‘Tab’ or click with your mouse to move through the other sections of the window. You’ll notice from your reading through the Data Dictionary that Sales generate income (revenue) and so will be using Account codes from the Income section, namely Accounts starting at # 4-0000. Simply add the full dollar value in ‘Amount’, and when satisfied that all the details are correct, press the ‘Record’ button at the lower right hand side of the screen. For the purpose of this example, we will sell books to a local bookshop. The bookshop will be called Marie Antoinette Books, and they have purchased 50 books explaining the history of our nonprofit organisation. Your finished sale should look something like this:
MYOB Training Manual Part 2: April 2006 2-47 Processing Transactions in MYOB
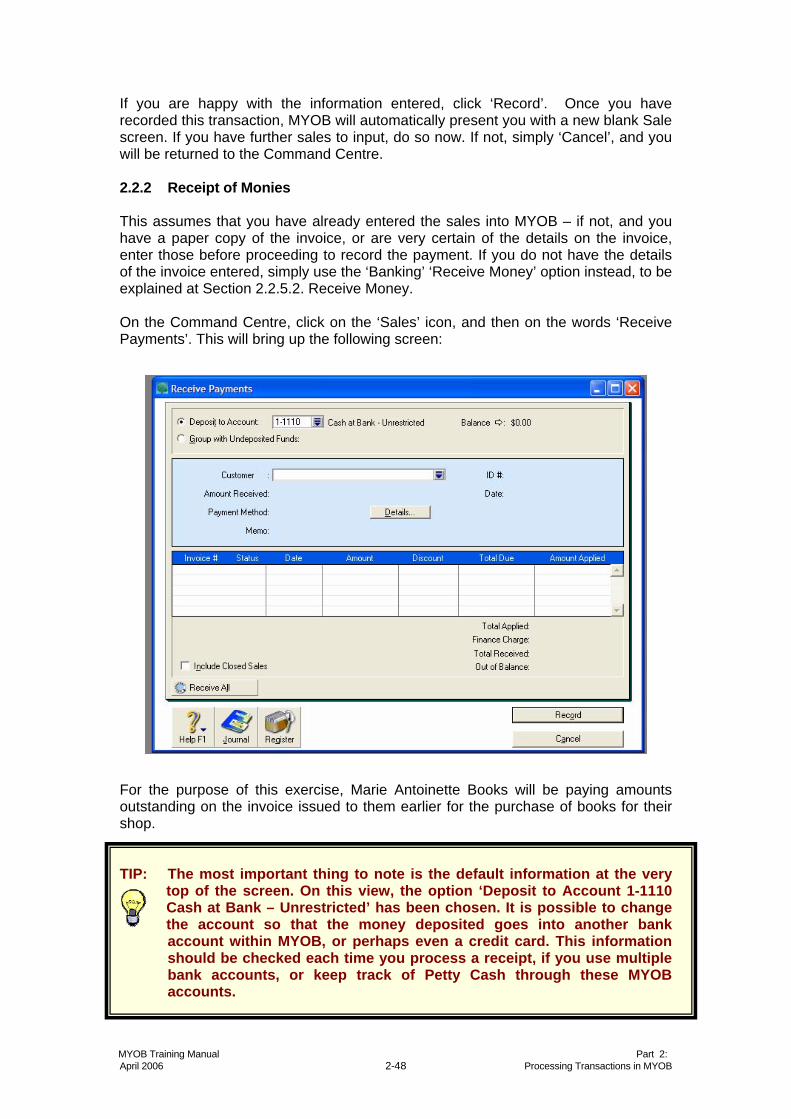
If you are happy with the information entered, click ‘Record’. Once you have recorded this transaction, MYOB will automatically present you with a new blank Sale screen. If you have further sales to input, do so now. If not, simply ‘Cancel’, and you will be returned to the Command Centre. 2.2.2 Receipt of Monies This assumes that you have already entered the sales into MYOB – if not, and you have a paper copy of the invoice, or are very certain of the details on the invoice, enter those before proceeding to record the payment. If you do not have the details of the invoice entered, simply use the ‘Banking’ ‘Receive Money’ option instead, to be explained at Section 2.2.5.2. Receive Money. On the Command Centre, click on the ‘Sales’ icon, and then on the words ‘Receive Payments’. This will bring up the following screen:
For the purpose of this exercise, Marie Antoinette Books will be paying amounts outstanding on the invoice issued to them earlier for the purchase of books for their shop. TIP: The most important thing to note is the default information at the very
top of the screen. On this view, the option ‘Deposit to Account 1-1110 Cash at Bank – Unrestricted’ has been chosen. It is possible to change the account so that the money deposited goes into another bank account within MYOB, or perhaps even a credit card. This information should be checked each time you process a receipt, if you use multiple bank accounts, or keep track of Petty Cash through these MYOB accounts.
MYOB Training Manual Part 2: April 2006 2-48 Processing Transactions in MYOB

TIP: The ‘Group with Undeposited Funds’ feature is useful if you have
several amounts of money received and processed through MYOB on the same day that will be deposited with your bank at the same time. Your bank will show these deposits as a single sum on the bank statement that you are sent, causing time consuming moments for the statement reconcilator whose task it is to make sure that MYOB matches the bank. To have a single sum appear on the MYOB version of your bank statement, simply click the option ‘Group with Undeposited Funds’. More about this will be explained in Section 2.2.5.3. ‘Preparing an Electronic Bank Deposit’.
Enter ‘Marie Antoinette Books’ in the ‘Customer’ section, followed by the Amount Received on this occasion. MYOB will accept part payments (whether you and the organisation will is a different story…). Fill in the other details, resulting in a screen looking like this:
A useful feature of the Receive Payments section is the ‘Receive All’ button to the bottom left of the window. Clicking on this will automatically fill in the ‘Amount Received’ field, and the ‘Amount Applied’ field with the amount outstanding. Use this feature if this is appropriate, as it can prevent typing errors. When satisfied that the information is correct, click on ‘Record’. MYOB will record the payment made by Marie Antoinette Books, and will present you with another blank ‘Receive Payments’ screen. If you have further payments to process, do so now. If not, simply press on ‘Cancel’ to return to the Command Centre.
MYOB Training Manual Part 2: April 2006 2-49 Processing Transactions in MYOB
2.2.3 Entering Purchases and Expenses
Purchases made by your organisation will involve payment of all expenses for which the organisation receives a tax invoice. It will also include the purchase of office and other equipment, hiring of offices or equipment, purchases of services (such as gas, telephone, electricity etc) and expenses such as licenses, dues and subscriptions. Purchases also include one-off payments to volunteer staff or any expense they may have incurred, and other persons who perform a service on an irregular basis. All purchases will come with either an invoice or a tax invoice. An invoice is issued by an entity that is NOT registered for the GST. A tax invoice is issued by an entity that is registered for the GST. Regardless of whether a supplier provides the organisation with an invoice or a tax invoice, it must still include the following details: an Australian Business Number (ABN); and an Invoice Number.
The ABN is an eleven-digit number unique to the organisation. It is NOT the same as the Tax File Number (TFN) or Australian Company Number (ACN) in the case of companies. If the invoice or tax invoice does not have an ABN on it (and they can be hidden in very small writing, so spend a little time checking) then the organisation is required by law to withhold 48.5% of the gross amount, and remit this amount to the ATO on the next Business Activity Statement (BAS). This applies in all cases, unless: payment is for salaries and wages (if this is the case, Payroll should be handling
this payment); payment is for less than $50; or payment is for an individual for a hobby, in which case you must acquire the
appropriate approved declaration. A copy of this form has been included later in this manual. This could be a volunteer collecting money or working in the op shop, and being paid a fee of less than $50, or being reimbursed for travelling expenses or meals.
Once you have established that the piece of paper in front of you is indeed an invoice or tax invoice that either requires payment, or has been paid, take the following steps in MYOB. The same dummy tax invoice, received from Bill’s Repair Shop, is shown on the following page, to show you exactly what information needs to be entered into MYOB. For more information on valid tax invoices, refer to the following ATO weblink:
Web link: http://www.ato.gov.au/content/downloads/gstnat12358022006.pdf
MYOB Training Manual Part 2: April 2006 2-50 Processing Transactions in MYOB
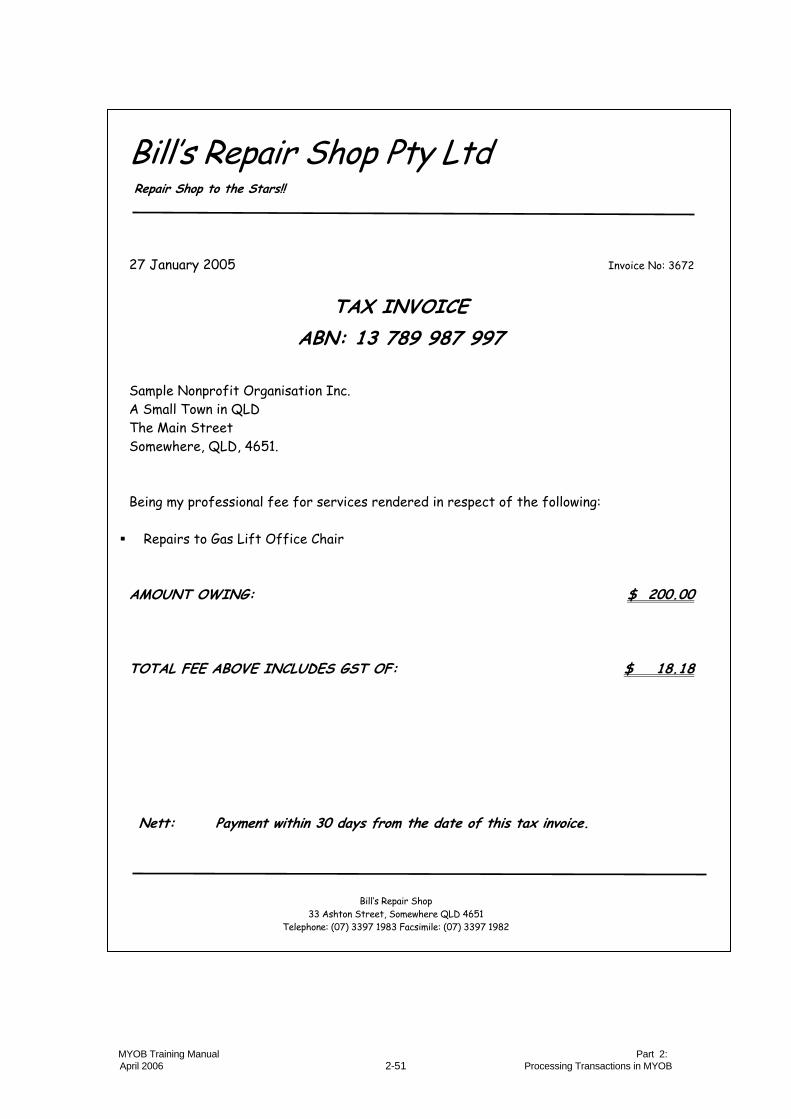
Bill’s Repair Shop Pty Ltd Repair Shop to the Stars!!
27 January 2005 Invoice No: 3672
TAX INVOICE
ABN: 13 789 987 997
Sample Nonprofit Organisation Inc. A Small Town in QLD The Main Street Somewhere, QLD, 4651. Being my professional fee for services rendered in respect of the following: Repairs to Gas Lift Office Chair AMOUNT OWING: $ 200.00 TOTAL FEE ABOVE INCLUDES GST OF: $ 18.18
Nett: Payment within 30 days from the date of this tax invoice.
Bill’s Repair Shop
33 Ashton Street, Somewhere QLD 4651 Telephone: (07) 3397 1983 Facsimile: (07) 3397 1982
MYOB Training Manual Part 2: April 2006 2-51 Processing Transactions in MYOB
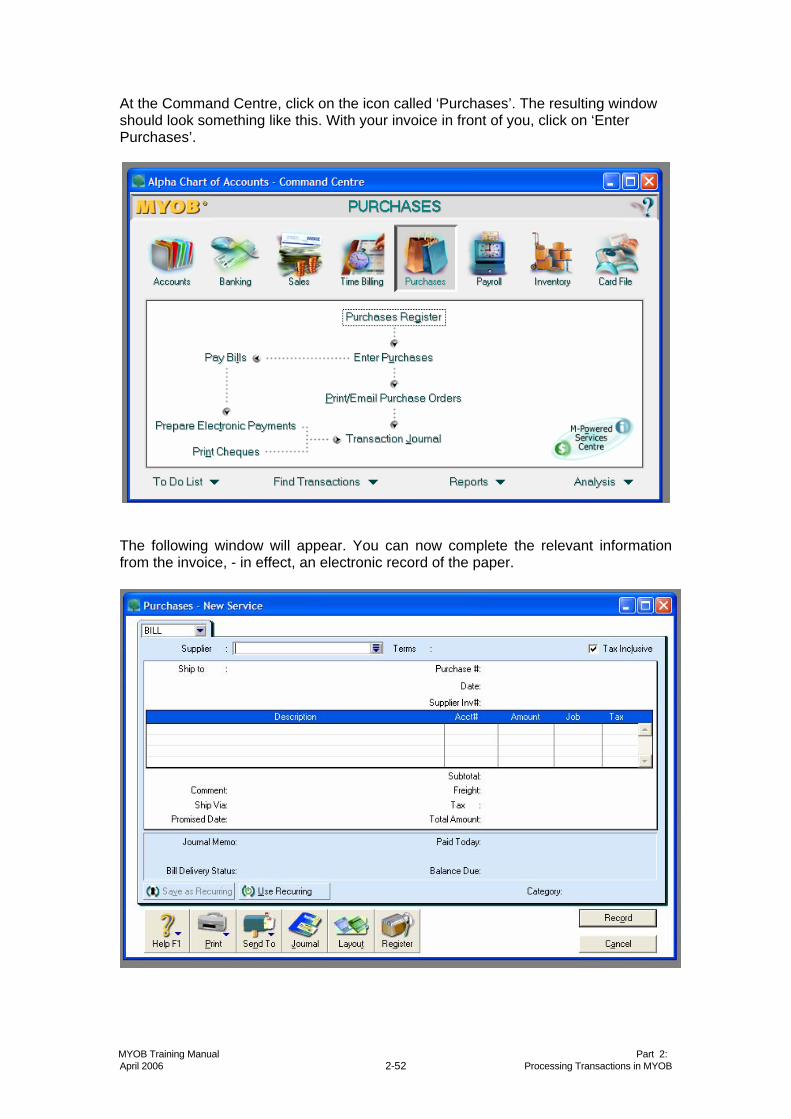
At the Command Centre, click on the icon called ‘Purchases’. The resulting window should look something like this. With your invoice in front of you, click on ‘Enter Purchases’.
The following window will appear. You can now complete the relevant information from the invoice, - in effect, an electronic record of the paper.
MYOB Training Manual Part 2: April 2006 2-52 Processing Transactions in MYOB

Enter the Supplier’s name in the box beside the word ‘Supplier’. If the supplier is new to your MYOB file, or for some reason isn’t there, MYOB will present a drop down menu showing all the suppliers entered, allowing you to either choose one of the options, or create a new card for the supplier. If you need to create a new card, click on ‘New’, and follow the instructions given at Section 2.1.8 ‘Setting up Cards’. When you have finished, click ‘OK’ and you will be returned to your original invoice screen. You will now be able to select ‘Bill’s Repair Shop’ as your supplier. Press ‘Tab’ on your keyboard, or click using your mouse to move around the various parts of the screen. You should end up with something that looks like this:
From looking at this, you can see that the supplier’s invoice (in this case from Bill) was Number 3672, that the invoice was dated 27 January 2005, that the work was for repairs to a gas lift office chair, that it cost $200.00, and that the service was subject to GST, since Bill is registered for the GST. You will notice that MYOB automatically calculates the amount of GST, and has shown it as a separate amount, being $18.18. TIP: The Purchase # is usually a running number created by MYOB, or one
that you have created yourself. Another option is to put the supplier’s invoice number in this section.
When you are satisfied that all the relevant information has been entered, and is correct, click on the ‘Record’ button at the lower right of the screen.
MYOB Training Manual Part 2: April 2006 2-53 Processing Transactions in MYOB
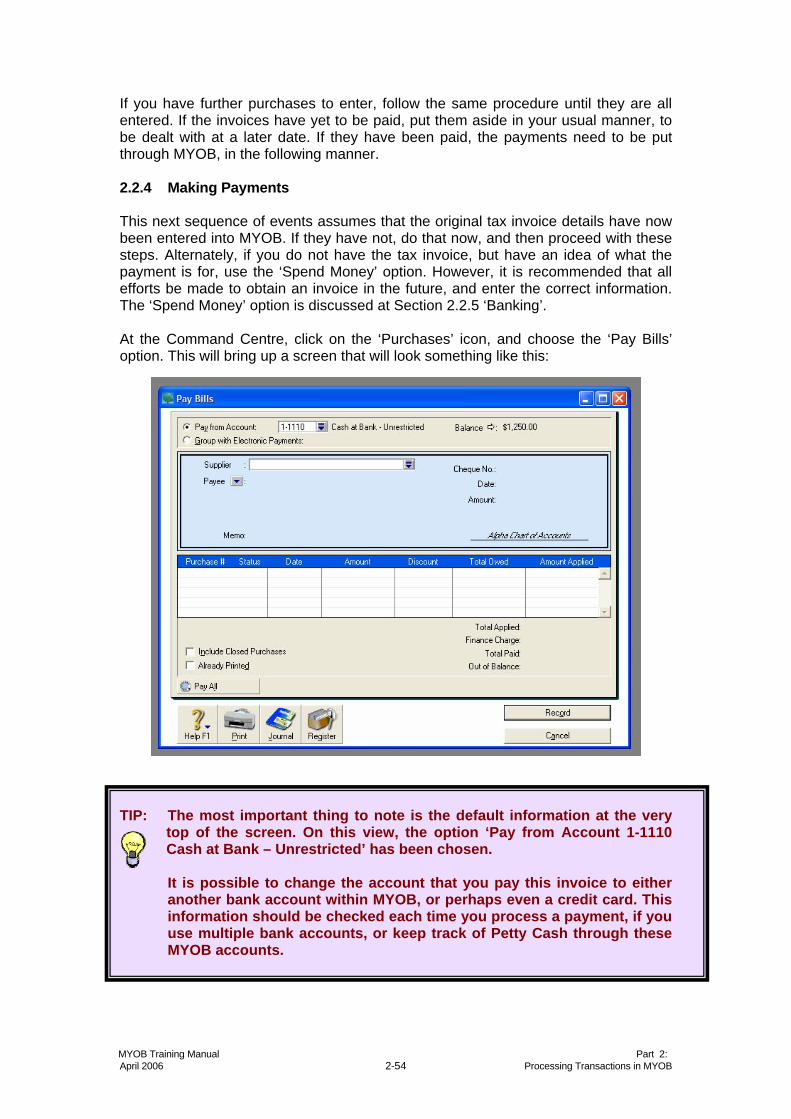
If you have further purchases to enter, follow the same procedure until they are all entered. If the invoices have yet to be paid, put them aside in your usual manner, to be dealt with at a later date. If they have been paid, the payments need to be put through MYOB, in the following manner.
2.2.4 Making Payments This next sequence of events assumes that the original tax invoice details have now been entered into MYOB. If they have not, do that now, and then proceed with these steps. Alternately, if you do not have the tax invoice, but have an idea of what the payment is for, use the ‘Spend Money’ option. However, it is recommended that all efforts be made to obtain an invoice in the future, and enter the correct information. The ‘Spend Money’ option is discussed at Section 2.2.5 ‘Banking’. At the Command Centre, click on the ‘Purchases’ icon, and choose the ‘Pay Bills’ option. This will bring up a screen that will look something like this:
TIP: The most important thing to note is the default information at the very
top of the screen. On this view, the option ‘Pay from Account 1-1110 Cash at Bank – Unrestricted’ has been chosen. It is possible to change the account that you pay this invoice to either another bank account within MYOB, or perhaps even a credit card. This information should be checked each time you process a payment, if you use multiple bank accounts, or keep track of Petty Cash through these MYOB accounts.
MYOB Training Manual Part 2: April 2006 2-54 Processing Transactions in MYOB
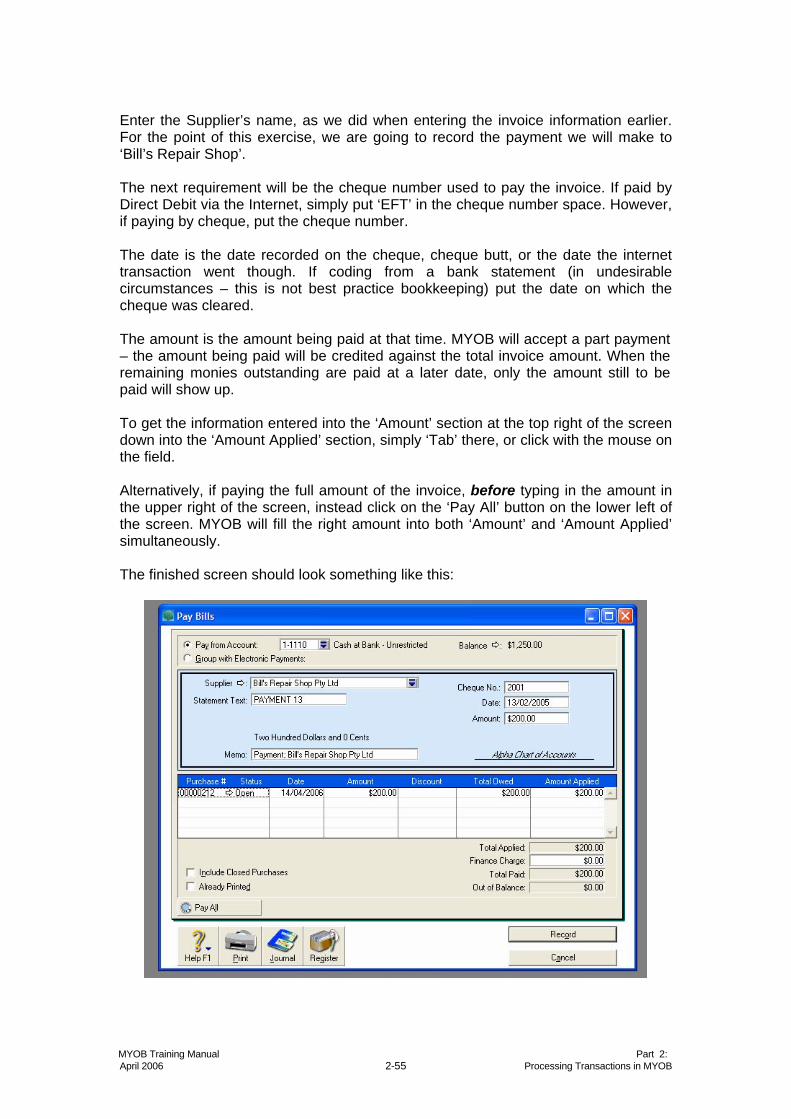
Enter the Supplier’s name, as we did when entering the invoice information earlier. For the point of this exercise, we are going to record the payment we will make to ‘Bill’s Repair Shop’. The next requirement will be the cheque number used to pay the invoice. If paid by Direct Debit via the Internet, simply put ‘EFT’ in the cheque number space. However, if paying by cheque, put the cheque number. The date is the date recorded on the cheque, cheque butt, or the date the internet transaction went though. If coding from a bank statement (in undesirable circumstances – this is not best practice bookkeeping) put the date on which the cheque was cleared. The amount is the amount being paid at that time. MYOB will accept a part payment – the amount being paid will be credited against the total invoice amount. When the remaining monies outstanding are paid at a later date, only the amount still to be paid will show up. To get the information entered into the ‘Amount’ section at the top right of the screen down into the ‘Amount Applied’ section, simply ‘Tab’ there, or click with the mouse on the field. Alternatively, if paying the full amount of the invoice, before typing in the amount in the upper right of the screen, instead click on the ‘Pay All’ button on the lower left of the screen. MYOB will fill the right amount into both ‘Amount’ and ‘Amount Applied’ simultaneously. The finished screen should look something like this:
MYOB Training Manual Part 2: April 2006 2-55 Processing Transactions in MYOB
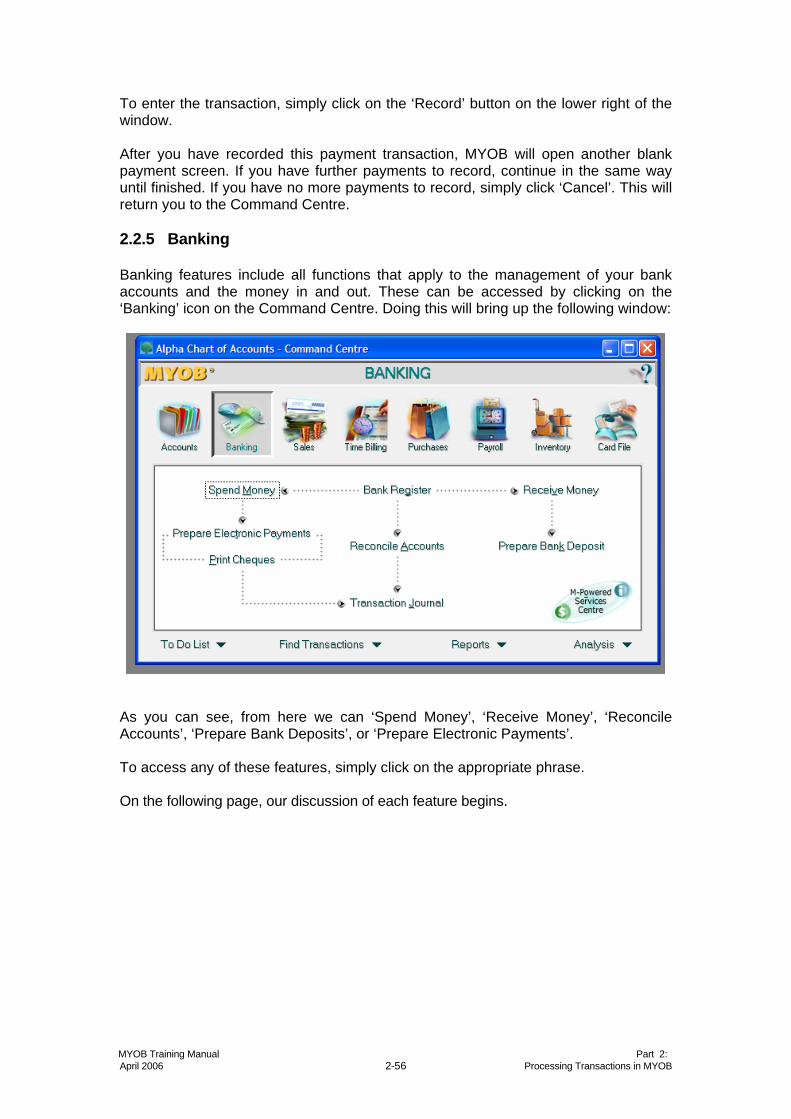
To enter the transaction, simply click on the ‘Record’ button on the lower right of the window. After you have recorded this payment transaction, MYOB will open another blank payment screen. If you have further payments to record, continue in the same way until finished. If you have no more payments to record, simply click ‘Cancel’. This will return you to the Command Centre. 2.2.5 Banking Banking features include all functions that apply to the management of your bank accounts and the money in and out. These can be accessed by clicking on the ‘Banking’ icon on the Command Centre. Doing this will bring up the following window:
As you can see, from here we can ‘Spend Money’, ‘Receive Money’, ‘Reconcile Accounts’, ‘Prepare Bank Deposits’, or ‘Prepare Electronic Payments’. To access any of these features, simply click on the appropriate phrase. On the following page, our discussion of each feature begins.
MYOB Training Manual Part 2: April 2006 2-56 Processing Transactions in MYOB
2.2.5.1 Spend Money
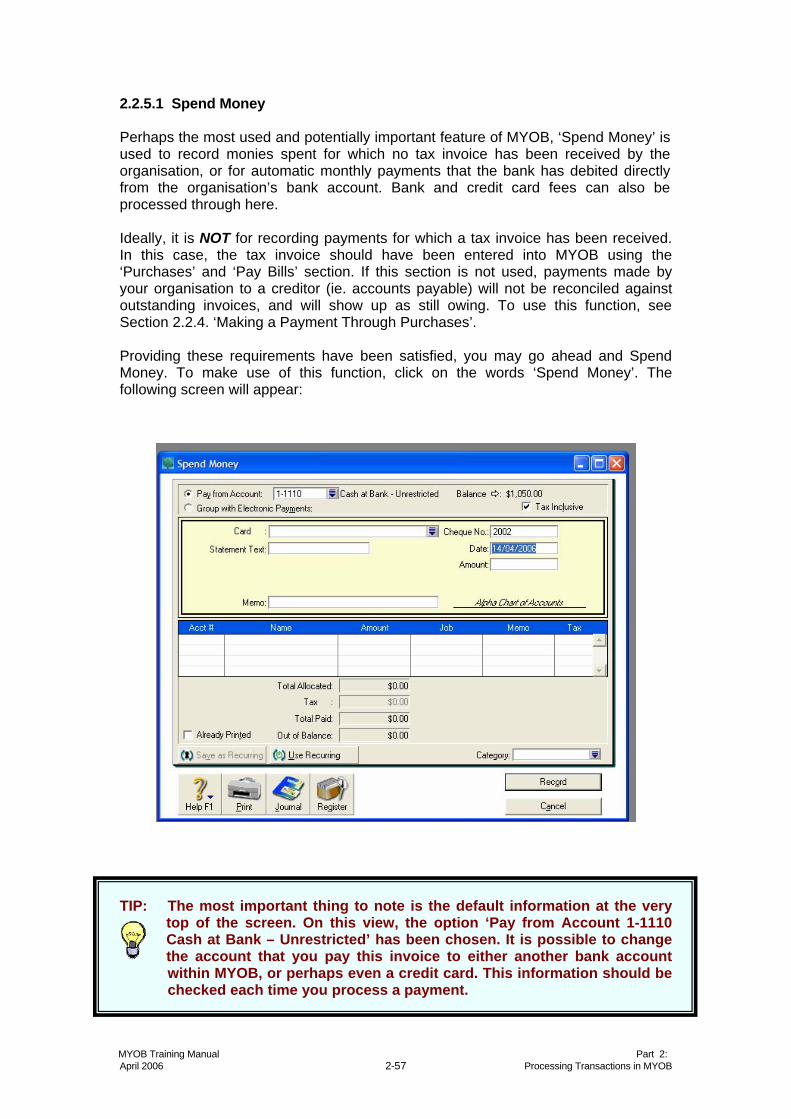
Perhaps the most used and potentially important feature of MYOB, ‘Spend Money’ is used to record monies spent for which no tax invoice has been received by the organisation, or for automatic monthly payments that the bank has debited directly from the organisation’s bank account. Bank and credit card fees can also be processed through here. Ideally, it is NOT for recording payments for which a tax invoice has been received. In this case, the tax invoice should have been entered into MYOB using the ‘Purchases’ and ‘Pay Bills’ section. If this section is not used, payments made by your organisation to a creditor (ie. accounts payable) will not be reconciled against outstanding invoices, and will show up as still owing. To use this function, see Section 2.2.4. ‘Making a Payment Through Purchases’. Providing these requirements have been satisfied, you may go ahead and Spend Money. To make use of this function, click on the words ‘Spend Money’. The following screen will appear:
TIP: The most important thing to note is the default information at the very
top of the screen. On this view, the option ‘Pay from Account 1-1110 Cash at Bank – Unrestricted’ has been chosen. It is possible to change the account that you pay this invoice to either another bank account within MYOB, or perhaps even a credit card. This information should be checked each time you process a payment.
MYOB Training Manual Part 2: April 2006 2-57 Processing Transactions in MYOB
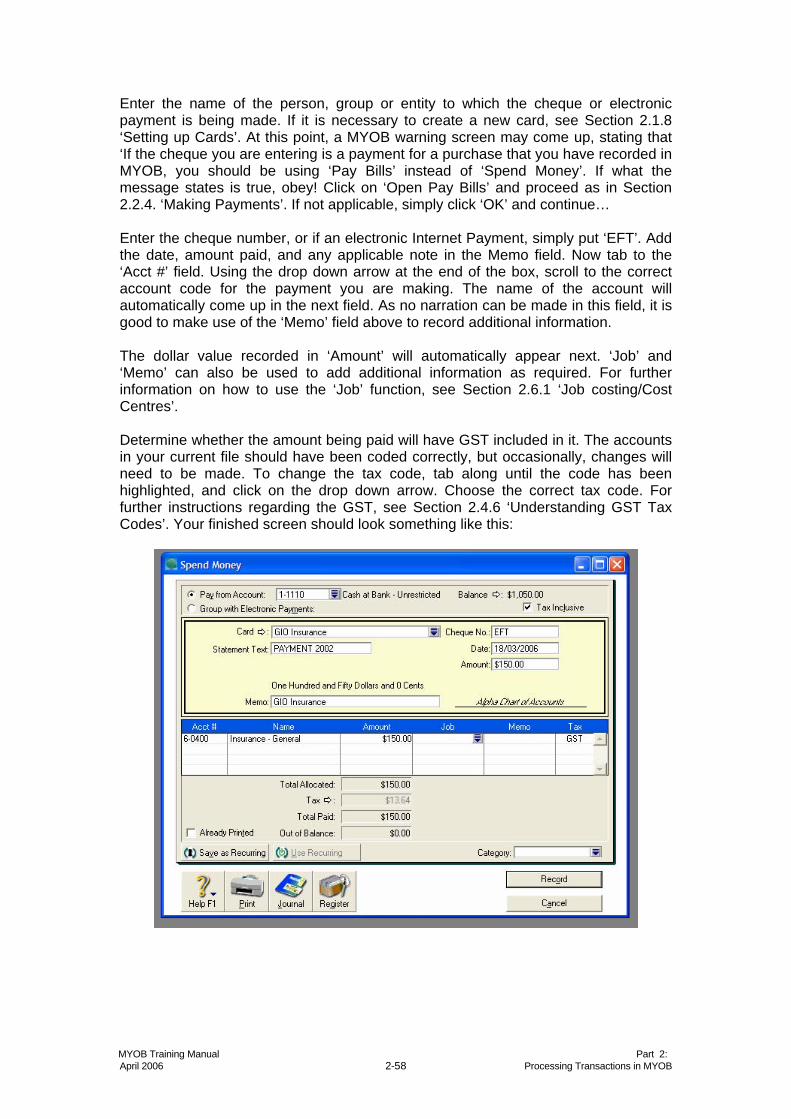
Enter the name of the person, group or entity to which the cheque or electronic payment is being made. If it is necessary to create a new card, see Section 2.1.8 ‘Setting up Cards’. At this point, a MYOB warning screen may come up, stating that ‘If the cheque you are entering is a payment for a purchase that you have recorded in MYOB, you should be using ‘Pay Bills’ instead of ‘Spend Money’. If what the message states is true, obey! Click on ‘Open Pay Bills’ and proceed as in Section 2.2.4. ‘Making Payments’. If not applicable, simply click ‘OK’ and continue… Enter the cheque number, or if an electronic Internet Payment, simply put ‘EFT’. Add the date, amount paid, and any applicable note in the Memo field. Now tab to the ‘Acct #’ field. Using the drop down arrow at the end of the box, scroll to the correct account code for the payment you are making. The name of the account will automatically come up in the next field. As no narration can be made in this field, it is good to make use of the ‘Memo’ field above to record additional information. The dollar value recorded in ‘Amount’ will automatically appear next. ‘Job’ and ‘Memo’ can also be used to add additional information as required. For further information on how to use the ‘Job’ function, see Section 2.6.1 ‘Job costing/Cost Centres’. Determine whether the amount being paid will have GST included in it. The accounts in your current file should have been coded correctly, but occasionally, changes will need to be made. To change the tax code, tab along until the code has been highlighted, and click on the drop down arrow. Choose the correct tax code. For further instructions regarding the GST, see Section 2.4.6 ‘Understanding GST Tax Codes’. Your finished screen should look something like this:
MYOB Training Manual Part 2: April 2006 2-58 Processing Transactions in MYOB
If you are satisfied, click ‘Record’. MYOB will record the information, and bring up another ‘Spend Money’ screen for you to continue with if you require this feature further. If not, simply click ‘Cancel’, and you will be returned to the Command Screen. 2.2.5.2 Receive Money
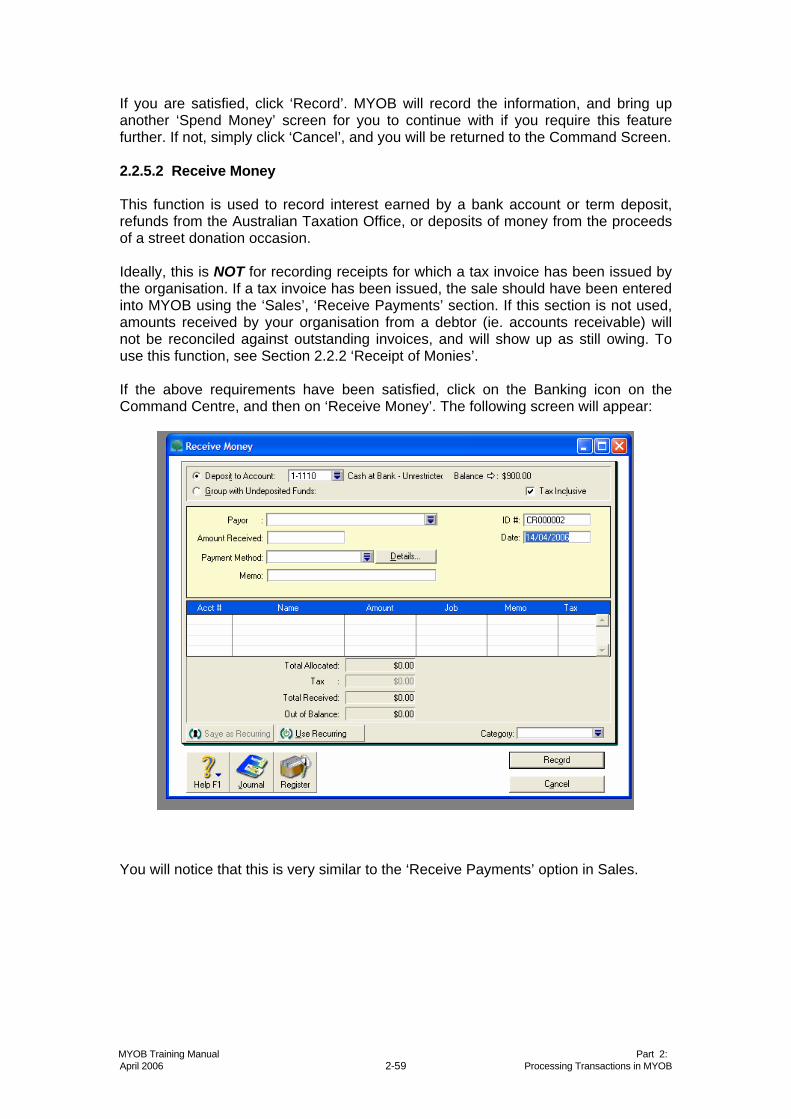
This function is used to record interest earned by a bank account or term deposit, refunds from the Australian Taxation Office, or deposits of money from the proceeds of a street donation occasion. Ideally, this is NOT for recording receipts for which a tax invoice has been issued by the organisation. If a tax invoice has been issued, the sale should have been entered into MYOB using the ‘Sales’, ‘Receive Payments’ section. If this section is not used, amounts received by your organisation from a debtor (ie. accounts receivable) will not be reconciled against outstanding invoices, and will show up as still owing. To use this function, see Section 2.2.2 ‘Receipt of Monies’. If the above requirements have been satisfied, click on the Banking icon on the Command Centre, and then on ‘Receive Money’. The following screen will appear:
You will notice that this is very similar to the ‘Receive Payments’ option in Sales.
MYOB Training Manual Part 2: April 2006 2-59 Processing Transactions in MYOB

TIP: The most important thing to note is the default information at the very
top of the screen. On this view, the option ‘Deposit to Account 1-1110 Cash at Bank – Unrestricted’ has been chosen. It is possible to change the account so that the money deposited goes into another bank account within MYOB, or perhaps even a credit card. This information should be checked each time you process a receipt, if you use multiple bank accounts, or keep track of Petty Cash through these MYOB accounts.
TIP: The function ‘Group with Undeposited Funds’ feature is useful if you
have several amounts of money received and processed through MYOB on the same day, which will be deposited with your bank at the same time.
Your bank will show these deposits as a single sum on the bank statement that you are sent, causing time consuming moments for the statement reconciler whose task it is to make sure that MYOB matches the bank. To have a single sum appear on the MYOB version of your bank statement, simply click the option ‘Group with Undeposited Funds’. More about this will be explained in Section 2.2.5.3. ‘Preparing an Electronic Bank Deposit’.
Having that dealt with, the next step is to enter the payer’s name. If this is your organisation, because you are depositing street donations, you can create a card simply called ‘Street Donations’ or similar. Alternately, you can leave this section blank, and fill in the details in the Memo area. Next, enter the ‘Amount Received’, the ‘Payment Method’, and ‘Date’. ‘Tab’ to the ‘Acct #’ area. Because this is revenue that is being received, the account code will begin with 4-. Once you have chosen the relevant account code, tab along until the information appears. It should look something like this:
MYOB Training Manual Part 2: April 2006 2-60 Processing Transactions in MYOB
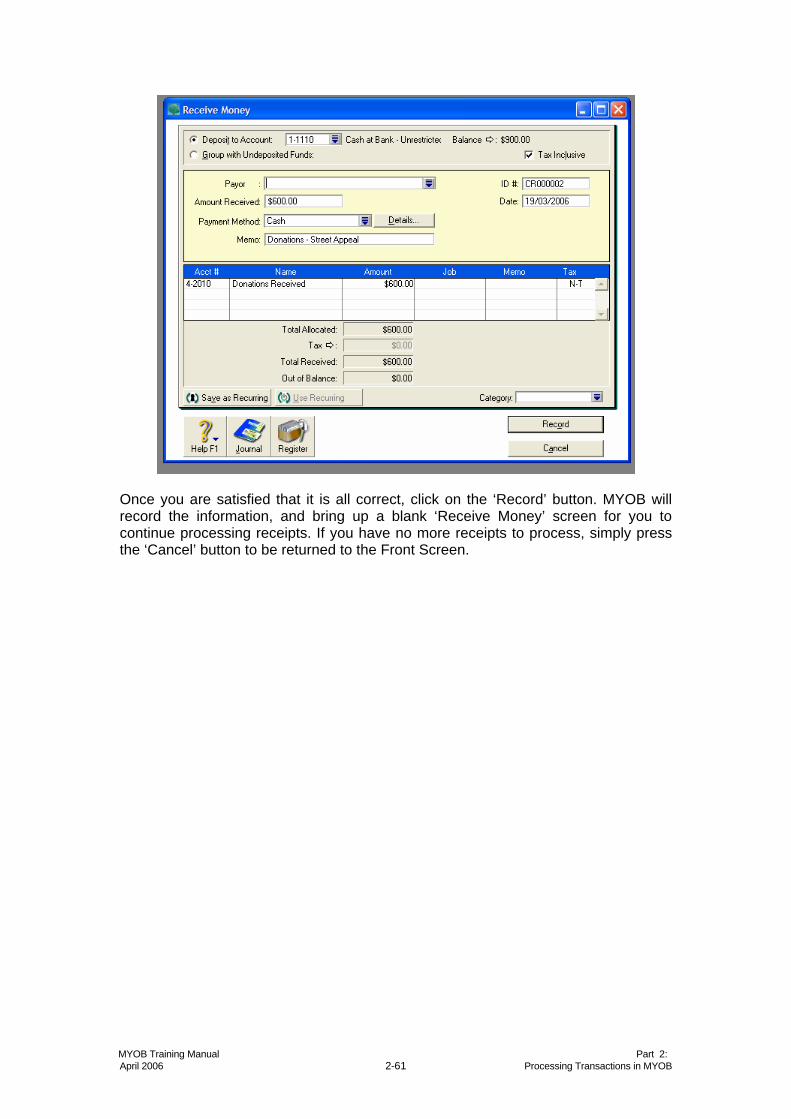
Once you are satisfied that it is all correct, click on the ‘Record’ button. MYOB will record the information, and bring up a blank ‘Receive Money’ screen for you to continue processing receipts. If you have no more receipts to process, simply press the ‘Cancel’ button to be returned to the Front Screen.
MYOB Training Manual Part 2: April 2006 2-61 Processing Transactions in MYOB
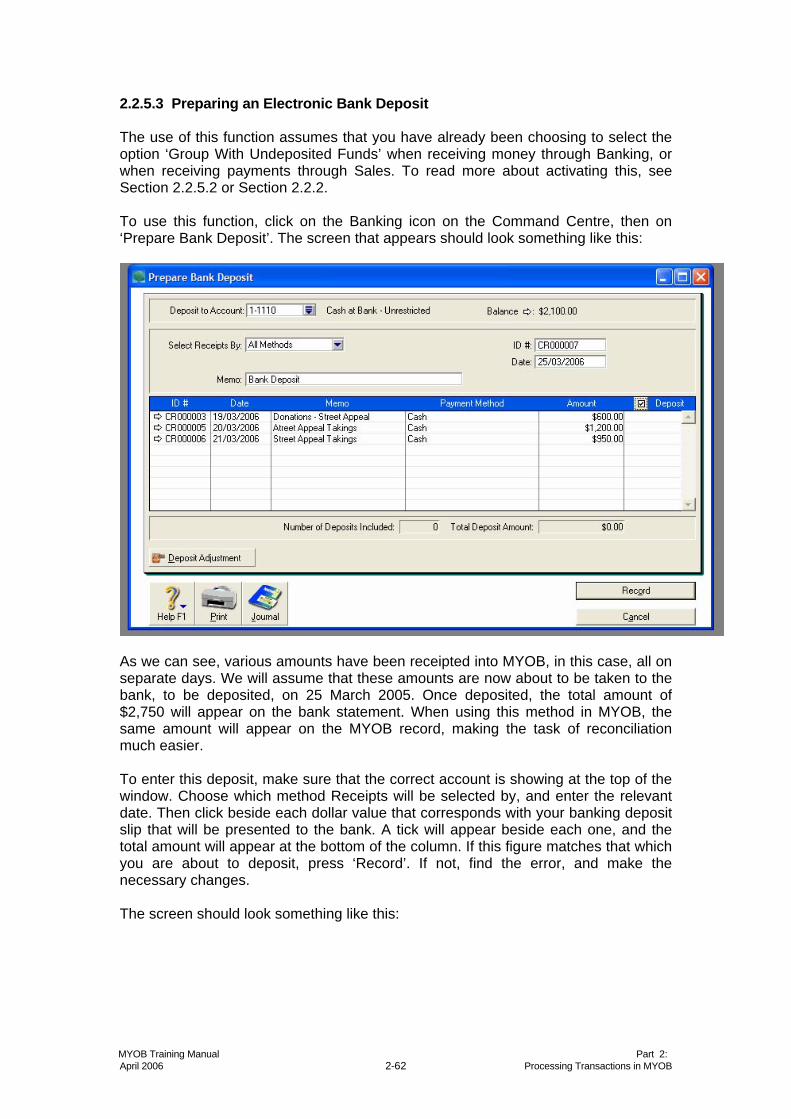
2.2.5.3 Preparing an Electronic Bank Deposit The use of this function assumes that you have already been choosing to select the option ‘Group With Undeposited Funds’ when receiving money through Banking, or when receiving payments through Sales. To read more about activating this, see Section 2.2.5.2 or Section 2.2.2. To use this function, click on the Banking icon on the Command Centre, then on ‘Prepare Bank Deposit’. The screen that appears should look something like this:
As we can see, various amounts have been receipted into MYOB, in this case, all on separate days. We will assume that these amounts are now about to be taken to the bank, to be deposited, on 25 March 2005. Once deposited, the total amount of $2,750 will appear on the bank statement. When using this method in MYOB, the same amount will appear on the MYOB record, making the task of reconciliation much easier. To enter this deposit, make sure that the correct account is showing at the top of the window. Choose which method Receipts will be selected by, and enter the relevant date. Then click beside each dollar value that corresponds with your banking deposit slip that will be presented to the bank. A tick will appear beside each one, and the total amount will appear at the bottom of the column. If this figure matches that which you are about to deposit, press ‘Record’. If not, find the error, and make the necessary changes. The screen should look something like this:
MYOB Training Manual Part 2: April 2006 2-62 Processing Transactions in MYOB

Once ‘Record’ has been chosen, those entries marked with a tick will disappear, leaving room for any others that may be processed at a later stage. The total deposit amount will now show up on the MYOB Reconciliation, ready to be checked against the paper bank statement when the reconciliation is done. For more information on Bank Reconciliations, see Section 2.2.5.4. ’Performing a Bank Reconciliation’.
MYOB Training Manual Part 2: April 2006 2-63 Processing Transactions in MYOB
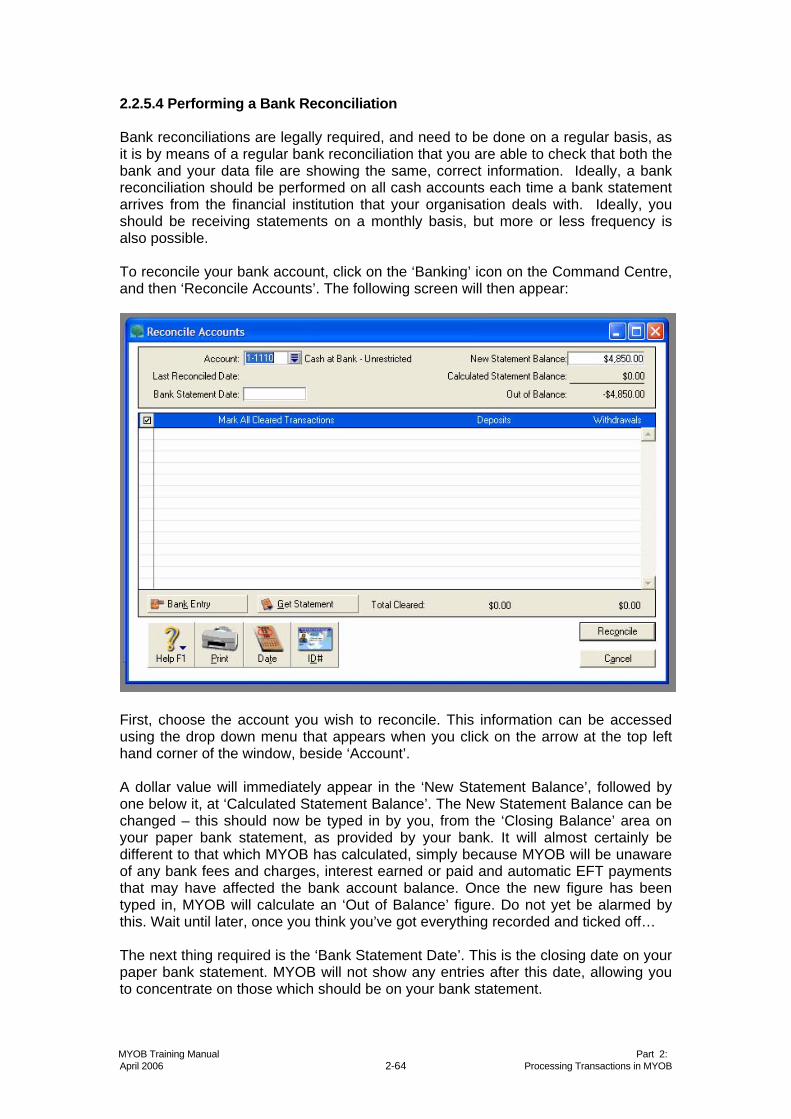
2.2.5.4 Performing a Bank Reconciliation Bank reconciliations are legally required, and need to be done on a regular basis, as it is by means of a regular bank reconciliation that you are able to check that both the bank and your data file are showing the same, correct information. Ideally, a bank reconciliation should be performed on all cash accounts each time a bank statement arrives from the financial institution that your organisation deals with. Ideally, you should be receiving statements on a monthly basis, but more or less frequency is also possible. To reconcile your bank account, click on the ‘Banking’ icon on the Command Centre, and then ‘Reconcile Accounts’. The following screen will then appear:
First, choose the account you wish to reconcile. This information can be accessed using the drop down menu that appears when you click on the arrow at the top left hand corner of the window, beside ‘Account’. A dollar value will immediately appear in the ‘New Statement Balance’, followed by one below it, at ‘Calculated Statement Balance’. The New Statement Balance can be changed – this should now be typed in by you, from the ‘Closing Balance’ area on your paper bank statement, as provided by your bank. It will almost certainly be different to that which MYOB has calculated, simply because MYOB will be unaware of any bank fees and charges, interest earned or paid and automatic EFT payments that may have affected the bank account balance. Once the new figure has been typed in, MYOB will calculate an ‘Out of Balance’ figure. Do not yet be alarmed by this. Wait until later, once you think you’ve got everything recorded and ticked off… The next thing required is the ‘Bank Statement Date’. This is the closing date on your paper bank statement. MYOB will not show any entries after this date, allowing you to concentrate on those which should be on your bank statement.
MYOB Training Manual Part 2: April 2006 2-64 Processing Transactions in MYOB
When you have entered all of this information, enlarge the window by clicking on the middle of the three boxes at the top right hand corner of the window. These operate very much like a Microsoft Word Document. If you’re never played with these before, now is the time! Now you should have all that you need to see in front of you. TIP: If nothing matches, check to make sure that you have selected the right
MYOB account. If you have the right account, it is possible that there are several initial entries that have been left over from earlier reconciliations, which have been incorrectly input and do not need to be showing on the reconciliation, or that an earlier bank statement has not been reconciled.
If all of these possibilities have been checked and discarded, look carefully at all the entries, and try to find something that matches. Then work forward and backward from this point. If this still fails, consider ringing the previous bookkeeper for clarification.
Good luck!
Start at the top of your paper bank statement, and work down the list, one item at a time, ticking the matching dollar values off the paper copy at the same time as you check them off on MYOB. There are several ways to do this in MYOB. You can either click on the box at the left hand side of each line, or on the corresponding line itself. You can also wait till the very end, when you are certain that all the entries are correct, and click on the small box with a tick in it, at the top of the columns at the left. However, most will find it easier to check off each line individually, as this makes it easier to see what has been accounted for and what has not. As you work through, you will come across items that have for some reason not been entered, usually in the form of cheques made out in payment, bank fees and charges, or interest and other monies deposited. Cheques can be input in the usual way, through ‘Purchases’ ‘Pay Bills’ (see Section 2.2.4), or ‘Banking’ ‘Spend Money’ (See Section 2.2.5.1). Deposits can be input using either ‘Sales’ ‘Receive Money’ (See Section 2.2.2) or ‘Banking’ ‘Receive Money’ (See Section 2.2.5.2) TIP: When you are ready to enter these transactions, simply click on the
‘dash’ or ‘minus sign’ at the top of the open window. You will see two of these – one will reduce the whole MYOB window to nothing, the other will simply reduce the reconciliation window.
All you want to do is reduce the reconciliation window. It will sit at the bottom of your screen until you are ready to look at it again, and enlarge by clicking on the symbol that took the place of the ‘dash’.
MYOB Training Manual Part 2: April 2006 2-65 Processing Transactions in MYOB
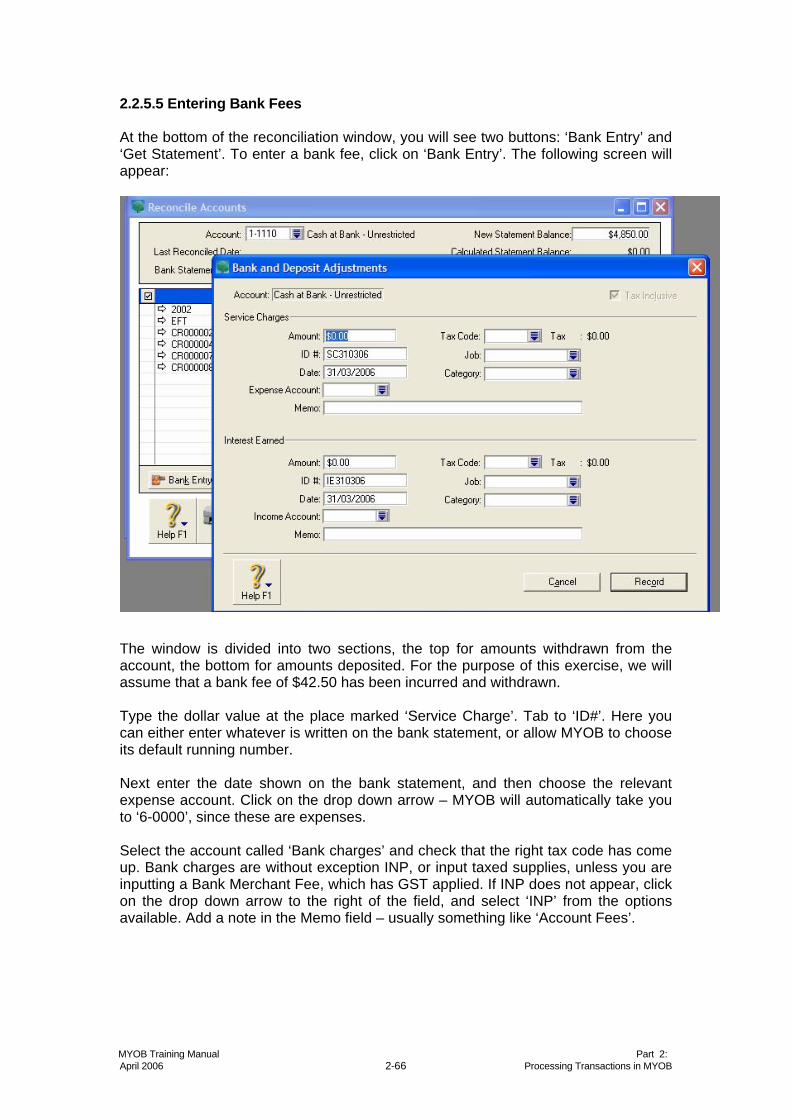
2.2.5.5 Entering Bank Fees At the bottom of the reconciliation window, you will see two buttons: ‘Bank Entry’ and ‘Get Statement’. To enter a bank fee, click on ‘Bank Entry’. The following screen will appear:
The window is divided into two sections, the top for amounts withdrawn from the account, the bottom for amounts deposited. For the purpose of this exercise, we will assume that a bank fee of $42.50 has been incurred and withdrawn. Type the dollar value at the place marked ‘Service Charge’. Tab to ‘ID#’. Here you can either enter whatever is written on the bank statement, or allow MYOB to choose its default running number. Next enter the date shown on the bank statement, and then choose the relevant expense account. Click on the drop down arrow – MYOB will automatically take you to ‘6-0000’, since these are expenses. Select the account called ‘Bank charges’ and check that the right tax code has come up. Bank charges are without exception INP, or input taxed supplies, unless you are inputting a Bank Merchant Fee, which has GST applied. If INP does not appear, click on the drop down arrow to the right of the field, and select ‘INP’ from the options available. Add a note in the Memo field – usually something like ‘Account Fees’.
MYOB Training Manual Part 2: April 2006 2-66 Processing Transactions in MYOB
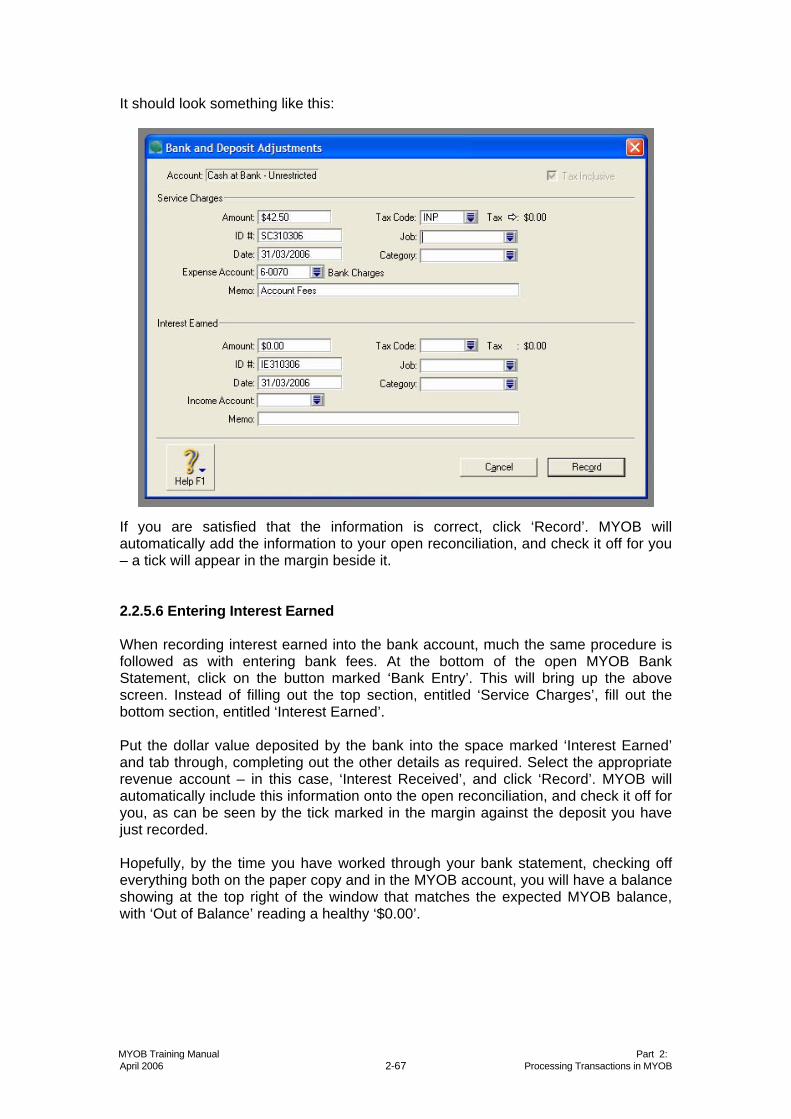
It should look something like this:
If you are satisfied that the information is correct, click ‘Record’. MYOB will automatically add the information to your open reconciliation, and check it off for you – a tick will appear in the margin beside it. 2.2.5.6 Entering Interest Earned When recording interest earned into the bank account, much the same procedure is followed as with entering bank fees. At the bottom of the open MYOB Bank Statement, click on the button marked ‘Bank Entry’. This will bring up the above screen. Instead of filling out the top section, entitled ‘Service Charges’, fill out the bottom section, entitled ‘Interest Earned’. Put the dollar value deposited by the bank into the space marked ‘Interest Earned’ and tab through, completing out the other details as required. Select the appropriate revenue account – in this case, ‘Interest Received’, and click ‘Record’. MYOB will automatically include this information onto the open reconciliation, and check it off for you, as can be seen by the tick marked in the margin against the deposit you have just recorded. Hopefully, by the time you have worked through your bank statement, checking off everything both on the paper copy and in the MYOB account, you will have a balance showing at the top right of the window that matches the expected MYOB balance, with ‘Out of Balance’ reading a healthy ‘$0.00’.
MYOB Training Manual Part 2: April 2006 2-67 Processing Transactions in MYOB
If not, there are a number of things to check. • Make sure that the ‘New Statement Balance’ is correct. • Check that the Bank Statement date is correct – make sure that it is the
‘Closing Statement Date’ that you entered. • Check also that all previous reconciliations have been completed. • Check over the paper statement to make doubly sure that all figures are
checked off. Lastly, go back through the MYOB statement, to make sure that all of them are correct.
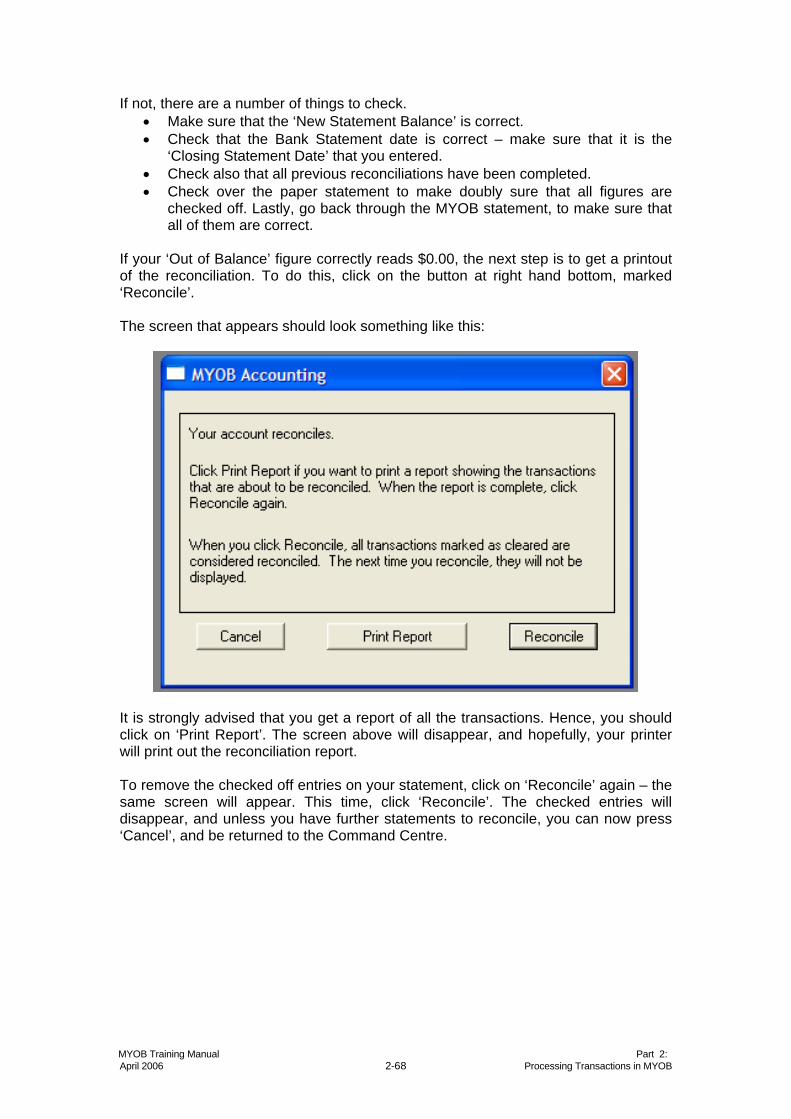
If your ‘Out of Balance’ figure correctly reads $0.00, the next step is to get a printout of the reconciliation. To do this, click on the button at right hand bottom, marked ‘Reconcile’. The screen that appears should look something like this:
It is strongly advised that you get a report of all the transactions. Hence, you should click on ‘Print Report’. The screen above will disappear, and hopefully, your printer will print out the reconciliation report. To remove the checked off entries on your statement, click on ‘Reconcile’ again – the same screen will appear. This time, click ‘Reconcile’. The checked entries will disappear, and unless you have further statements to reconcile, you can now press ‘Cancel’, and be returned to the Command Centre.
MYOB Training Manual Part 2: April 2006 2-68 Processing Transactions in MYOB

2.2.6 Debtors and Creditors 2.2.6.1 Debtors (Accounts Receivable) Analysis ‘Debtors’ is the other name for Accounts Receivable. This represents all monies owed to your organisation by the public, businesses, etc. It is important to keep track of these amounts – action should be taken on anything that has been outstanding for more than 90 days. To see exactly who owes what, and how old the various accounts are, MYOB can produce a report of these, based on information input. To produce this report, go to the Command Centre. Along the bottom, you will find four names, each with an arrow beside: ‘To Do List’, ‘Find Transactions’, ‘Reports’ and ‘Analysis’. We will be focusing on ‘Reports’. Click on the arrow beside the word ‘Reports’ – this will produce a drop down menu. We will be looking at the ‘Sales’ reports, so scroll to it, and click. The following screen will appear:
As you can see, a number of options exist. The ones we are interested in this instance are in the category ‘Receivables’, particularly ‘Ageing Summary’ and ‘Ageing Detail’. ‘Ageing Summary’ will give you a list of everyone owing money, and the total amount they owe, broken down into the various lengths of time the monies have been outstanding. ‘Ageing Detail’ will provide a list showing each customer, how much they owe, and a breakdown that includes invoice numbers, etc. Depending upon the kind of information you require, double click on one or the other.
MYOB Training Manual Part 2: April 2006 2-69 Processing Transactions in MYOB
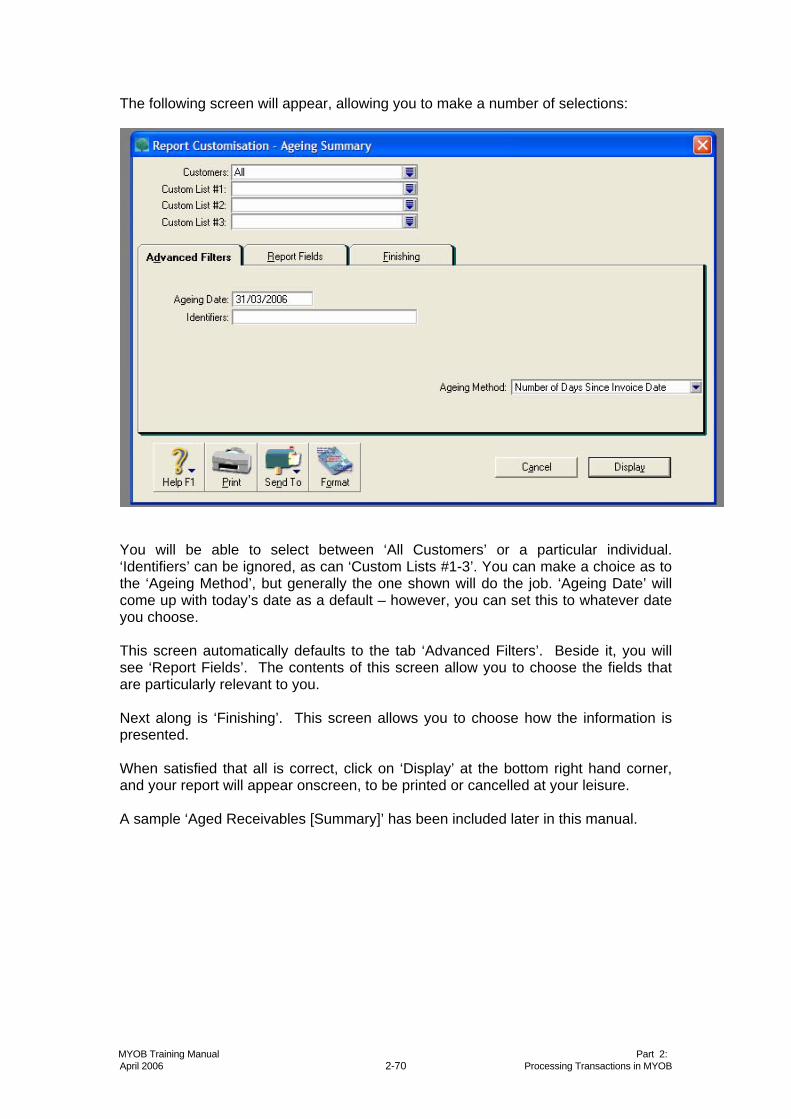
The following screen will appear, allowing you to make a number of selections:
You will be able to select between ‘All Customers’ or a particular individual. ‘Identifiers’ can be ignored, as can ‘Custom Lists #1-3’. You can make a choice as to the ‘Ageing Method’, but generally the one shown will do the job. ‘Ageing Date’ will come up with today’s date as a default – however, you can set this to whatever date you choose. This screen automatically defaults to the tab ‘Advanced Filters’. Beside it, you will see ‘Report Fields’. The contents of this screen allow you to choose the fields that are particularly relevant to you. Next along is ‘Finishing’. This screen allows you to choose how the information is presented. When satisfied that all is correct, click on ‘Display’ at the bottom right hand corner, and your report will appear onscreen, to be printed or cancelled at your leisure. A sample ‘Aged Receivables [Summary]’ has been included later in this manual.
MYOB Training Manual Part 2: April 2006 2-70 Processing Transactions in MYOB
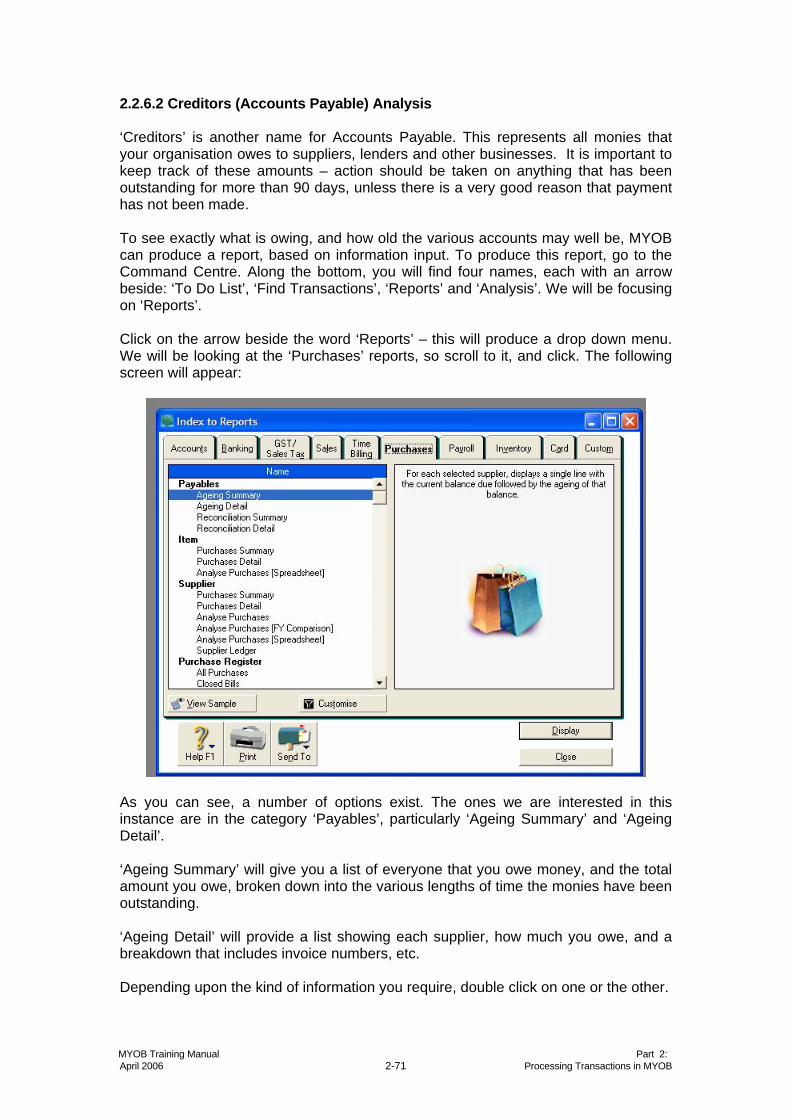
2.2.6.2 Creditors (Accounts Payable) Analysis ‘Creditors’ is another name for Accounts Payable. This represents all monies that your organisation owes to suppliers, lenders and other businesses. It is important to keep track of these amounts – action should be taken on anything that has been outstanding for more than 90 days, unless there is a very good reason that payment has not been made. To see exactly what is owing, and how old the various accounts may well be, MYOB can produce a report, based on information input. To produce this report, go to the Command Centre. Along the bottom, you will find four names, each with an arrow beside: ‘To Do List’, ‘Find Transactions’, ‘Reports’ and ‘Analysis’. We will be focusing on ‘Reports’. Click on the arrow beside the word ‘Reports’ – this will produce a drop down menu. We will be looking at the ‘Purchases’ reports, so scroll to it, and click. The following screen will appear:
As you can see, a number of options exist. The ones we are interested in this instance are in the category ‘Payables’, particularly ‘Ageing Summary’ and ‘Ageing Detail’. ‘Ageing Summary’ will give you a list of everyone that you owe money, and the total amount you owe, broken down into the various lengths of time the monies have been outstanding. ‘Ageing Detail’ will provide a list showing each supplier, how much you owe, and a breakdown that includes invoice numbers, etc. Depending upon the kind of information you require, double click on one or the other.
MYOB Training Manual Part 2: April 2006 2-71 Processing Transactions in MYOB
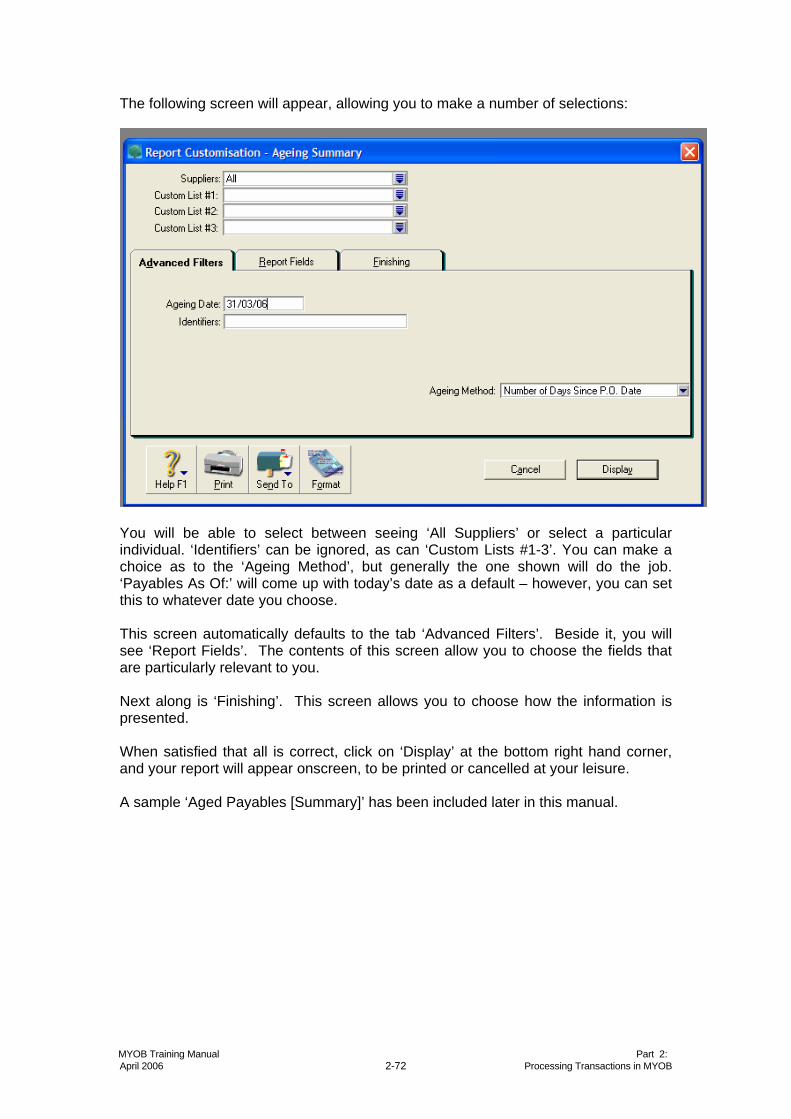
The following screen will appear, allowing you to make a number of selections:
You will be able to select between seeing ‘All Suppliers’ or select a particular individual. ‘Identifiers’ can be ignored, as can ‘Custom Lists #1-3’. You can make a choice as to the ‘Ageing Method’, but generally the one shown will do the job. ‘Payables As Of:’ will come up with today’s date as a default – however, you can set this to whatever date you choose. This screen automatically defaults to the tab ‘Advanced Filters’. Beside it, you will see ‘Report Fields’. The contents of this screen allow you to choose the fields that are particularly relevant to you. Next along is ‘Finishing’. This screen allows you to choose how the information is presented. When satisfied that all is correct, click on ‘Display’ at the bottom right hand corner, and your report will appear onscreen, to be printed or cancelled at your leisure. A sample ‘Aged Payables [Summary]’ has been included later in this manual.
MYOB Training Manual Part 2: April 2006 2-72 Processing Transactions in MYOB