Embed Size (px)
Citation preview
Technical Bulletin July, 2008
3Panel Bonding Procedureusing 3M™ VHB™ Tape
Introduction Since 1980, manufacturers of commercial vehicles have been using 3M™ VHB™Tapes to attach sidewall panels to the framework of commercial vehicles such astrailers, truck bodies, ambulances, fire trucks, busses, and rail cars. The purpose ofthis technical bulletin is to assist with developing a standardized process to assemblesmooth sided trailers or truck bodies with 3M™ VHB™ Tape.
I. Key Factors ForSuccessful Application
• Determine suitability of these tapes for your particular application.
• Use only an approved tape and surface preparation combination for the specificmaterials to be bonded together. Contact your local 3M specialist for assistanceand possible tape adhesion strength testing.
• Design framework and trim pieces such that panels are not constrained, but ratherare allowed to freely expand and contract with temperature differences. See 3Mtechnical bulletin “Design Considerations for Smooth Sided Trailers.” Visitwww.3M.com/vhb.
• Always clean surface properly. Apply tape as soon as possible after cleaning toavoid contaminants.
• If abrading surfaces is required to increase tape adhesion levels or adhesion buildrate, abrade only with a fine abrasive that is not coarser than 3M™ Scotch-Brite™Hand Pad 7447 or 180x grit sandpaper.
• Use an adequate amount of tape.
• Ensure that all materials meet the required minimum tape application temperatureof 60°F (15°C) for 3M™ VHB™ Commercial Vehicle Tapes CV45F and CV62F.
• Allow taped trailer or truck bodies to dwell for a minimum of 4 hours at 60°F(15°C) or higher before exposure to colder temperatures.
• Roll down tape firmly both after tape application and then again after parts arebonded together.
II. Materials Required
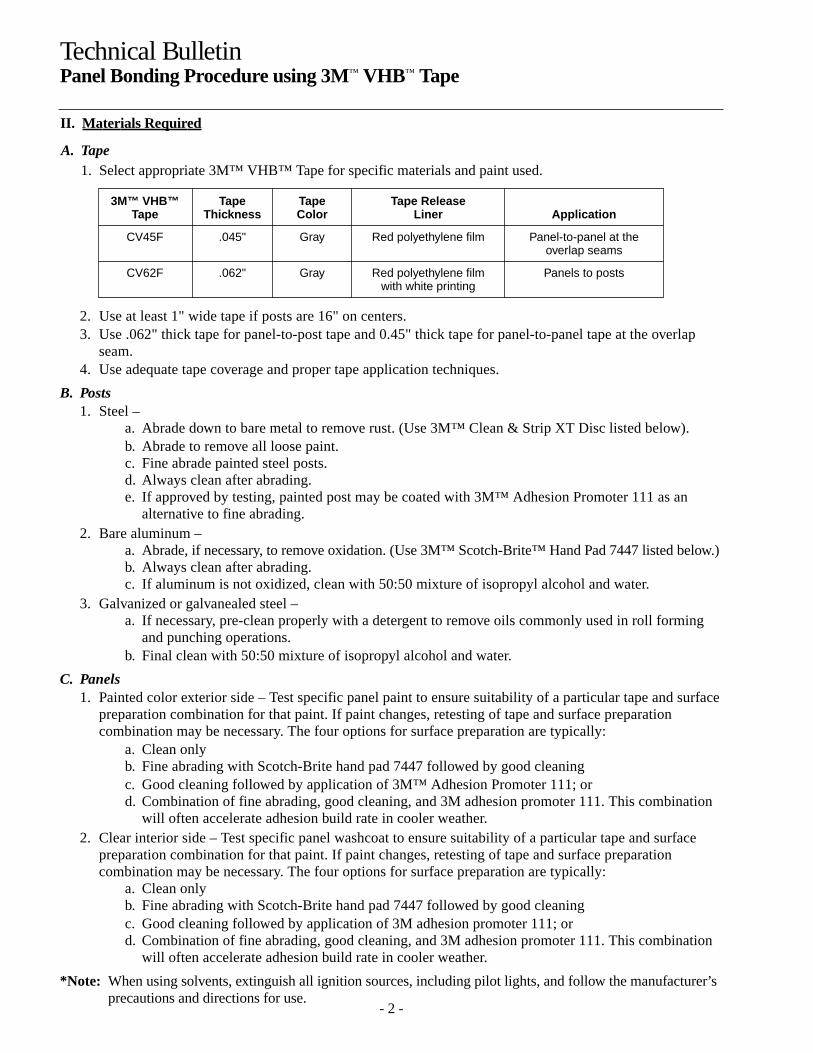
A. Tape1. Select appropriate 3M™ VHB™ Tape for specific materials and paint used.
- 2 -
3M™ VHB™ Tape Tape Tape ReleaseTape Thickness Color Liner Application
CV45F .045" Gray Red polyethylene film Panel-to-panel at theoverlap seams
CV62F .062" Gray Red polyethylene film Panels to postswith white printing
2. Use at least 1" wide tape if posts are 16" on centers.3. Use .062" thick tape for panel-to-post tape and 0.45" thick tape for panel-to-panel tape at the overlap
seam.4. Use adequate tape coverage and proper tape application techniques.
B. Posts1. Steel –
a. Abrade down to bare metal to remove rust. (Use 3M™ Clean & Strip XT Disc listed below).b. Abrade to remove all loose paint.c. Fine abrade painted steel posts.d. Always clean after abrading.e. If approved by testing, painted post may be coated with 3M™ Adhesion Promoter 111 as an
alternative to fine abrading.2. Bare aluminum –
a. Abrade, if necessary, to remove oxidation. (Use 3M™ Scotch-Brite™ Hand Pad 7447 listed below.)b. Always clean after abrading.c. If aluminum is not oxidized, clean with 50:50 mixture of isopropyl alcohol and water.
3. Galvanized or galvanealed steel –a. If necessary, pre-clean properly with a detergent to remove oils commonly used in roll forming
and punching operations.b. Final clean with 50:50 mixture of isopropyl alcohol and water.
C. Panels1. Painted color exterior side – Test specific panel paint to ensure suitability of a particular tape and surface
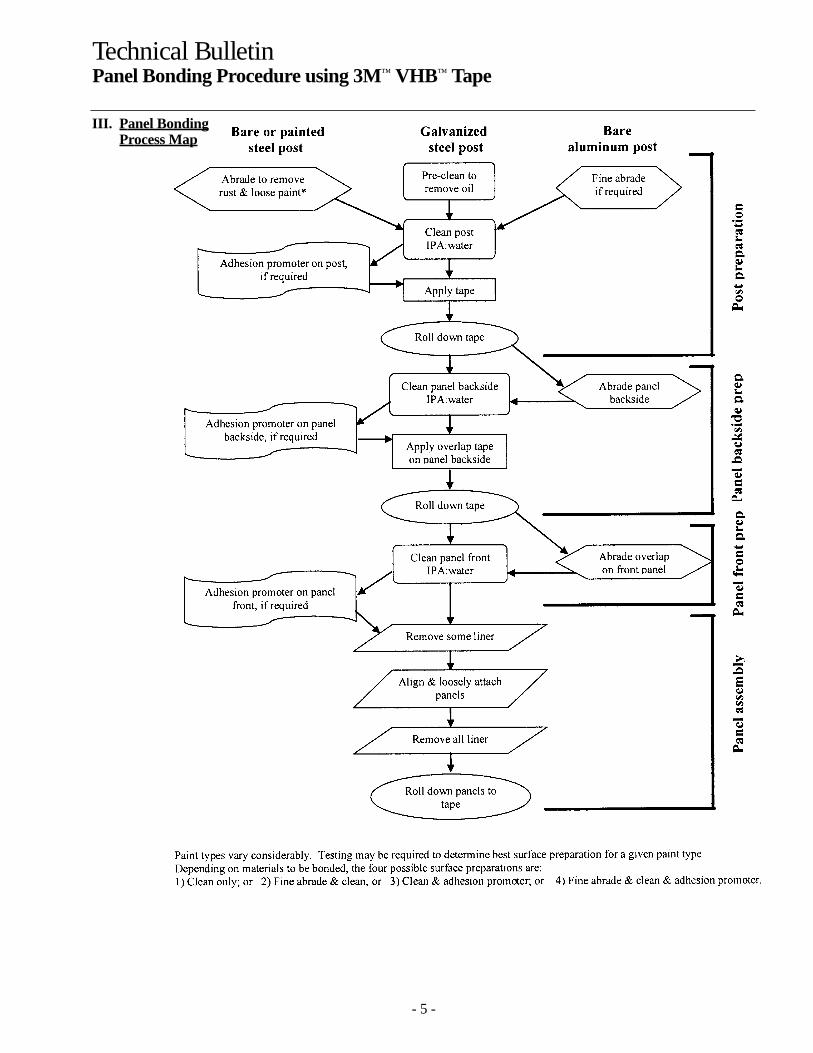
preparation combination for that paint. If paint changes, retesting of tape and surface preparationcombination may be necessary. The four options for surface preparation are typically:
a. Clean onlyb. Fine abrading with Scotch-Brite hand pad 7447 followed by good cleaningc. Good cleaning followed by application of 3M™ Adhesion Promoter 111; ord. Combination of fine abrading, good cleaning, and 3M adhesion promoter 111. This combination
will often accelerate adhesion build rate in cooler weather.2. Clear interior side – Test specific panel washcoat to ensure suitability of a particular tape and surface
preparation combination for that paint. If paint changes, retesting of tape and surface preparationcombination may be necessary. The four options for surface preparation are typically:
a. Clean onlyb. Fine abrading with Scotch-Brite hand pad 7447 followed by good cleaningc. Good cleaning followed by application of 3M adhesion promoter 111; ord. Combination of fine abrading, good cleaning, and 3M adhesion promoter 111. This combination
will often accelerate adhesion build rate in cooler weather.
*Note: When using solvents, extinguish all ignition sources, including pilot lights, and follow the manufacturer’sprecautions and directions for use.
Technical BulletinPanel Bonding Procedure using 3M™ VHB™ Tape
Technical BulletinPanel Bonding Procedure using 3M™ VHB™ Tape
- 3 -
II. Materials Required (continued)
D. Equipment required
1. Surface abrading equipment.
a. Right angle post grinder for 4-1/2" diameter discs; used to prepare rusty or poorly painted posts.
b. 3M™ Abrasive Disc Backup Pad; 3M P/N 60-9801-0501-3; UPC #00-05111-56573-5.
c. 3M™ TN Quick-change Clean and Strip XT disc; 4-1/2" diameter; 3M P/N 61-5001-8756-4; UPC #00-48011-33194-2; used to remove rust and prepare posts for cleaning and taping. If the 3Mclean and strip XT disc is not used for rust and/or paint removal, then final abrading should be donewith 180x grit abrasive or finer. Tape adhesion levels will drop with medium or coarse abrasives.
d. Electric, palm held, finishing sander; used for abrading panel backside with 3M™ Scotch-Brite™ HandPad 7447.
e. Optional, hand held, “L” shaped, custom abrading block with 7/8" wide Scotch-Brite hand pad 7447;used for abrading overlap seam area when panels are abraded on workbench. Available from B&LFabricating (651-484-8225).
f. Optional hand held, “U” shaped, custom abrading block with 7/8" wide Scotch-Brite hand pad 7447;used for abrading overlap seam area when panels are abraded after hung on trailer truck body. Availablefrom B&L Fabricating (651-484-8225).
g. Scotch-Brite hand pad 7447; 6" x 9"; 3M P/N 61-5001-2323-9; UPC #048011-04029-5.
2. Surface cleaning supplies.
a. Mixture of 50:50 isopropyl alcohol and water. Most rubbing alcohol is a 70:30 mixture of isopropylalcohol and water. However, the 50:50 mixture is preferred since it will allow slightly more time, beforedrying, to wipe away dirt and other foreign debris. Many “dollar” stores sell rubbing alcohol that isalready a 50:50 mixture of isopropyl alcohol and water.
b. Spray bottle for mist spraying of IPA and water mixture. Spray the surface to be cleaned and not thecleaning wipe. This will provide better dirt and debris removal.
c. Disposable cleaning wipes.
d. Degreaser; used if surfaces have oil or grease. After pre-cleaning with an appropriate degreaser, finalclean with a 50:50 mixture of isopropyl alcohol* and water.
3. Adhesion promoter application (if required).
a. 3M™ Adhesion Promoter 1111) Available in 250ml bottle; 3M P/N 70-0064-0398-7; UPC 00-048011-58147-7.
2) Available in 1 gallon container; 3M P/N 70-0064-0673-3; UPC 00-048011-58526-0.
*Note: When using solvents, extinguish all ignition sources, including pilot lights, and follow themanufacturer’s precautions and directions for use.
Technical BulletinPanel Bonding Procedure using 3M™ VHB™ Tape
II. Materials Required (continued)
D. Equipment required (continued)
4. Tape application and liner removal equipment.a. Utility knife or scissors; used to cut the tape.b. Two handed tape roller available from Rockler Woodworking and Hardware, 1-800-279-4441, specify
#39463 Pressure J-Roller.c. Optional dual wheel roller available from B&L Fabricating (651-484-8225) to use instead of pressure
J-roller. The rubber coated rollers can roll down two posts spaced up to 16" apart at the same time. On49" wide panels, this large rolling pin is especially helpful for rolling down the panels at the two centerposts on each panel.
d. Optional caulk line or laser light to assist with tape attachment location when either abrading panels orrolling down the panel onto the taped posts. Also may be useful, with the “floating panel” design, toposition panels so that a 1/4" gap exists between panel and nearest constraint at both the top and bottomof the panel.
e. Optional 8" file cleaner brush to assist liner removal; e.g. Nicholson (Cooper Tools) #21455. This verystiff wire brush is normally used to clean metal files but works good to catch and lift corner of liner ontape; readily available from hardware and/or tool stores.
5. Panel removal equipment (if needed for repairs).a. 3M™ SMART Tool (Side Molding and Emblem Removal Tool) P/N 08978; stock #60-9800-2172-3;
UPC #0-00-51135-08978-1; six per case.b. Air chisel.c. Razor blade scraper.d. 3M™ Scotch-Brite™ Bristle Disc; stock #61-5001-3901; UPC #048011-24241-5; 4.5" diameter; green;
grade 50; used to remove tape residue on posts and backside of panels to be reused; 5 per box; 2 boxes per case.
e. Right angle grinder for 4-1/2" diameter bristle discs.f. 3M™ Stripe Off Wheel with hardware; P/N 07498; stock #61-5001-3873-2; UPC #5-00-51131-07498-4;
used to remove tape residue on painted panel surface without damaging the painted surface; five percase; subsequent purchase may be P/N 07499 without mandrel for securing in electric drill.
g. Electric drill; used with stripe off wheel.h. See 3M technical bulletins Removal of 3M™ VHB™ Tape Bonded Panels From Trailers and Truck
Bodies or 3M™ VHB™ Tape Replacement Systems or visit www. 3M.com/vhb.
- 4 -
- 5 -
Technical BulletinPanel Bonding Procedure using 3M™ VHB™ Tape
III. Panel BondingProcess Map
- 6 -
IV. Panel Bonding Procedure
A. Post preparation
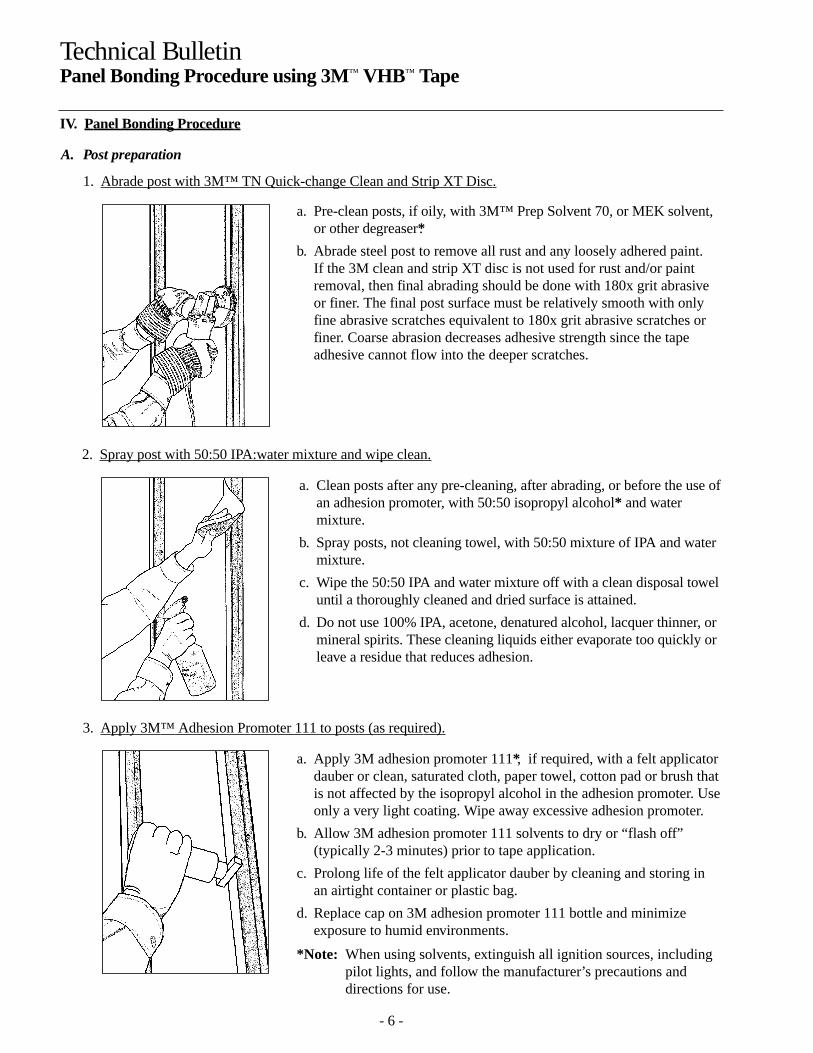
1. Abrade post with 3M™ TN Quick-change Clean and Strip XT Disc.
Technical BulletinPanel Bonding Procedure using 3M™ VHB™ Tape
a. Pre-clean posts, if oily, with 3M™ Prep Solvent 70, or MEK solvent,or other degreaser*.
b. Abrade steel post to remove all rust and any loosely adhered paint. If the 3M clean and strip XT disc is not used for rust and/or paintremoval, then final abrading should be done with 180x grit abrasiveor finer. The final post surface must be relatively smooth with onlyfine abrasive scratches equivalent to 180x grit abrasive scratches orfiner. Coarse abrasion decreases adhesive strength since the tapeadhesive cannot flow into the deeper scratches.
a. Clean posts after any pre-cleaning, after abrading, or before the use ofan adhesion promoter, with 50:50 isopropyl alcohol* and watermixture.
b. Spray posts, not cleaning towel, with 50:50 mixture of IPA and watermixture.
c. Wipe the 50:50 IPA and water mixture off with a clean disposal toweluntil a thoroughly cleaned and dried surface is attained.
d. Do not use 100% IPA, acetone, denatured alcohol, lacquer thinner, ormineral spirits. These cleaning liquids either evaporate too quickly orleave a residue that reduces adhesion.
2. Spray post with 50:50 IPA:water mixture and wipe clean.
a. Apply 3M adhesion promoter 111*, if required, with a felt applicatordauber or clean, saturated cloth, paper towel, cotton pad or brush thatis not affected by the isopropyl alcohol in the adhesion promoter. Useonly a very light coating. Wipe away excessive adhesion promoter.
b. Allow 3M adhesion promoter 111 solvents to dry or “flash off”(typically 2-3 minutes) prior to tape application.
c. Prolong life of the felt applicator dauber by cleaning and storing inan airtight container or plastic bag.
d. Replace cap on 3M adhesion promoter 111 bottle and minimizeexposure to humid environments.
*Note: When using solvents, extinguish all ignition sources, includingpilot lights, and follow the manufacturer’s precautions anddirections for use.
3. Apply 3M™ Adhesion Promoter 111 to posts (as required).
- 7 -
Technical BulletinPanel Bonding Procedure using 3M™ VHB™ Tape
IV. Panel Bonding Procedure (continued)
A. Post preparation (continued)
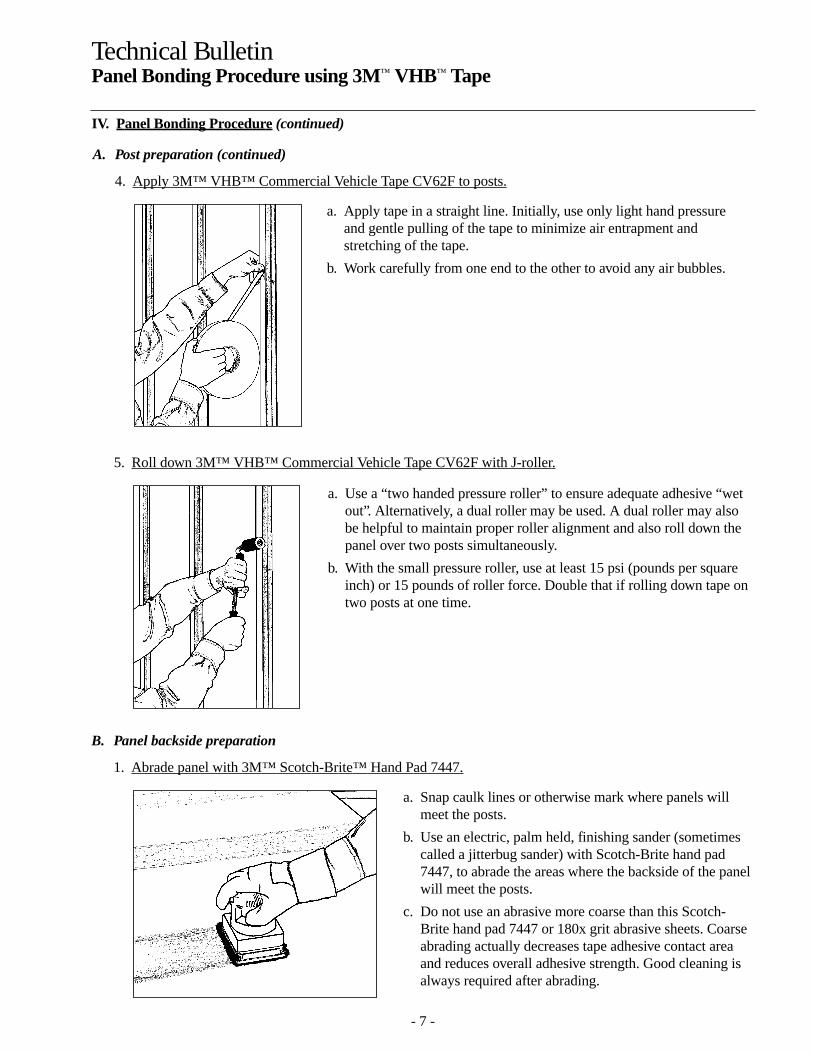
4. Apply 3M™ VHB™ Commercial Vehicle Tape CV62F to posts.
a. Apply tape in a straight line. Initially, use only light hand pressureand gentle pulling of the tape to minimize air entrapment andstretching of the tape.
b. Work carefully from one end to the other to avoid any air bubbles.
a. Use a “two handed pressure roller” to ensure adequate adhesive “wetout”. Alternatively, a dual roller may be used. A dual roller may alsobe helpful to maintain proper roller alignment and also roll down thepanel over two posts simultaneously.
b. With the small pressure roller, use at least 15 psi (pounds per squareinch) or 15 pounds of roller force. Double that if rolling down tape ontwo posts at one time.
5. Roll down 3M™ VHB™ Commercial Vehicle Tape CV62F with J-roller.
B. Panel backside preparation
1. Abrade panel with 3M™ Scotch-Brite™ Hand Pad 7447.
a. Snap caulk lines or otherwise mark where panels willmeet the posts.
b. Use an electric, palm held, finishing sander (sometimescalled a jitterbug sander) with Scotch-Brite hand pad7447, to abrade the areas where the backside of the panelwill meet the posts.
c. Do not use an abrasive more coarse than this Scotch-Brite hand pad 7447 or 180x grit abrasive sheets. Coarseabrading actually decreases tape adhesive contact areaand reduces overall adhesive strength. Good cleaning isalways required after abrading.
- 8 -
Technical BulletinPanel Bonding Procedure using 3M™ VHB™ Tape
IV. Panel Bonding Procedure (continued)
B. Panel backside preparation (continued)
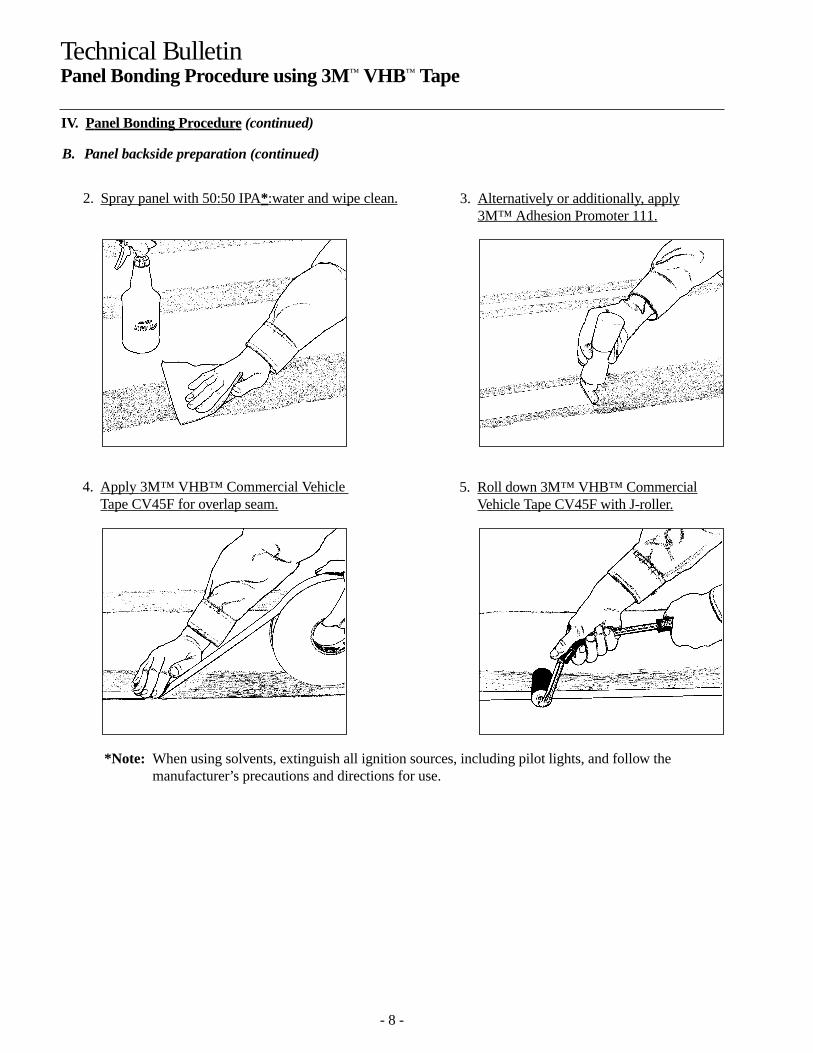
2. Spray panel with 50:50 IPA*:water and wipe clean. 3. Alternatively or additionally, apply3M™ Adhesion Promoter 111.
4. Apply 3M™ VHB™ Commercial Vehicle Tape CV45F for overlap seam.
5. Roll down 3M™ VHB™ CommercialVehicle Tape CV45F with J-roller.
*Note: When using solvents, extinguish all ignition sources, including pilot lights, and follow themanufacturer’s precautions and directions for use.
- 9 -
Technical BulletinPanel Bonding Procedure using 3M™ VHB™ Tape
IV. Panel Bonding Procedure (continued)
C. Panel front preparation – if panel is on a table. (An alternative is to hang the top of the panels and thenabrade underneath the overlap seam. See next section.)
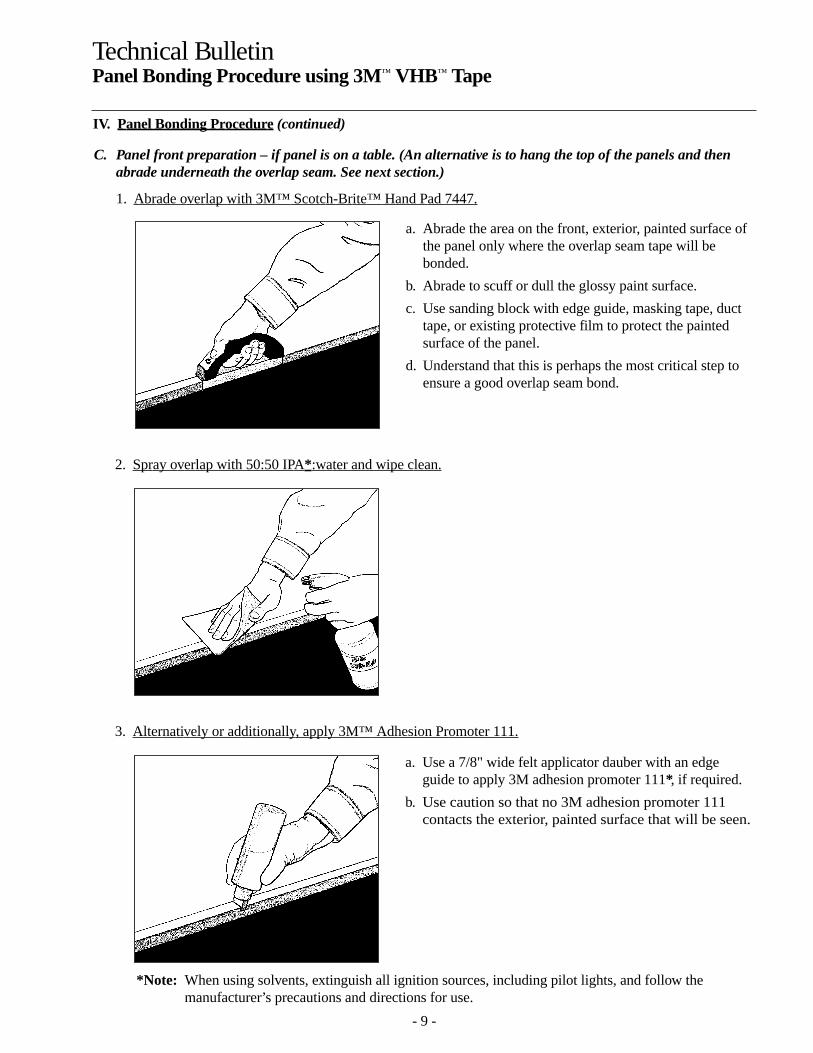
1. Abrade overlap with 3M™ Scotch-Brite™ Hand Pad 7447.
a. Abrade the area on the front, exterior, painted surface ofthe panel only where the overlap seam tape will bebonded.
b. Abrade to scuff or dull the glossy paint surface.
c. Use sanding block with edge guide, masking tape, ducttape, or existing protective film to protect the paintedsurface of the panel.
d. Understand that this is perhaps the most critical step toensure a good overlap seam bond.
2. Spray overlap with 50:50 IPA*:water and wipe clean.
3. Alternatively or additionally, apply 3M™ Adhesion Promoter 111.
a. Use a 7/8" wide felt applicator dauber with an edgeguide to apply 3M adhesion promoter 111*, if required.
b. Use caution so that no 3M adhesion promoter 111contacts the exterior, painted surface that will be seen.
*Note: When using solvents, extinguish all ignition sources, including pilot lights, and follow themanufacturer’s precautions and directions for use.
Technical BulletinPanel Bonding Procedure using 3M™ VHB™ Tape
- 10 -
IV. Panel Bonding Procedure (continued)
D. Panel front preparation – if panel is already hanging. (This is an alternative to previous section whenoverlap seam abrading is done prior to hanging the panel.)
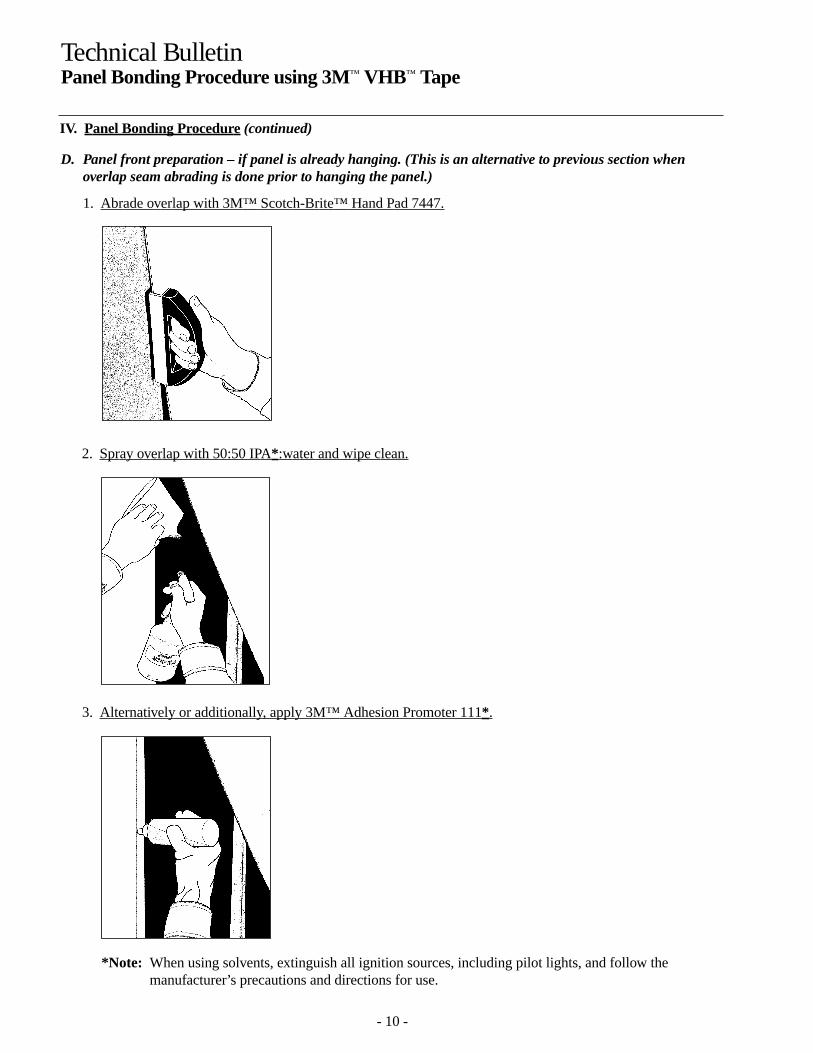
1. Abrade overlap with 3M™ Scotch-Brite™ Hand Pad 7447.
2. Spray overlap with 50:50 IPA*:water and wipe clean.
3. Alternatively or additionally, apply 3M™ Adhesion Promoter 111*.
*Note: When using solvents, extinguish all ignition sources, including pilot lights, and follow themanufacturer’s precautions and directions for use.
Technical BulletinPanel Bonding Procedure using 3M™ VHB™ Tape
- 11 -
IV. Panel Bonding Procedure (continued)
E. Panel assembly
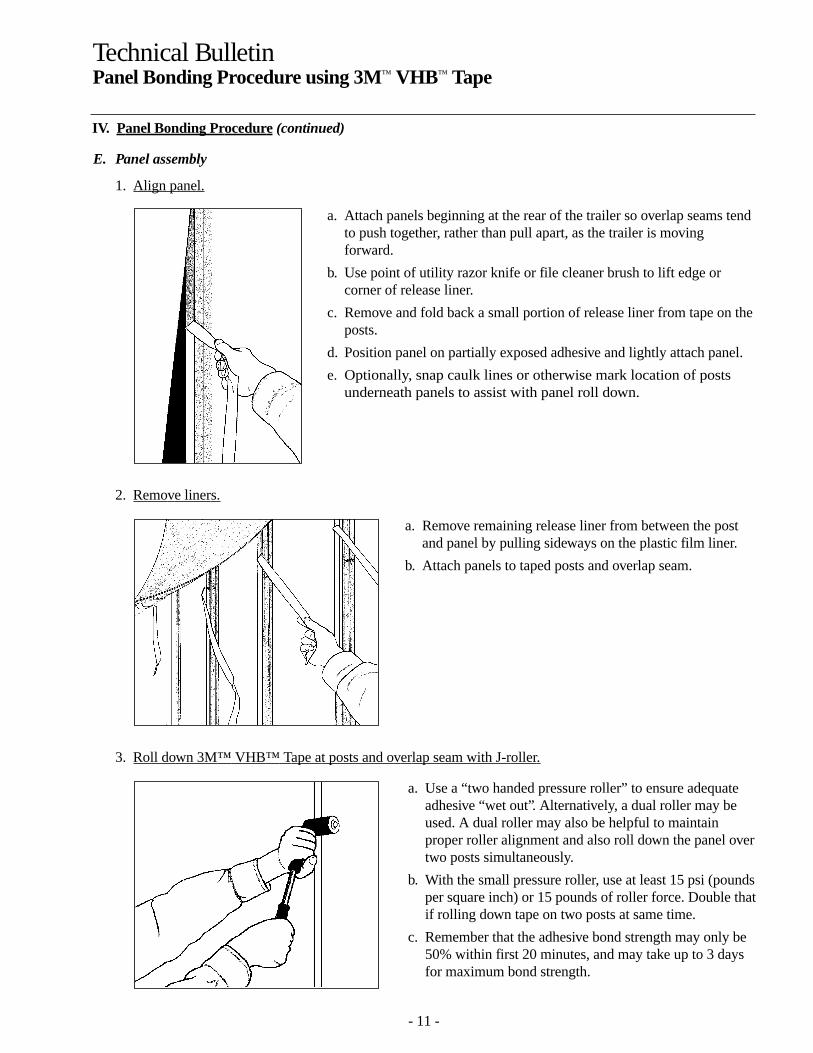
1. Align panel.
a. Attach panels beginning at the rear of the trailer so overlap seams tendto push together, rather than pull apart, as the trailer is movingforward.
b. Use point of utility razor knife or file cleaner brush to lift edge orcorner of release liner.
c. Remove and fold back a small portion of release liner from tape on theposts.
d. Position panel on partially exposed adhesive and lightly attach panel.
e. Optionally, snap caulk lines or otherwise mark location of postsunderneath panels to assist with panel roll down.
2. Remove liners.
3. Roll down 3M™ VHB™ Tape at posts and overlap seam with J-roller.
a. Use a “two handed pressure roller” to ensure adequateadhesive “wet out”. Alternatively, a dual roller may beused. A dual roller may also be helpful to maintainproper roller alignment and also roll down the panel overtwo posts simultaneously.
b. With the small pressure roller, use at least 15 psi (poundsper square inch) or 15 pounds of roller force. Double thatif rolling down tape on two posts at same time.
c. Remember that the adhesive bond strength may only be50% within first 20 minutes, and may take up to 3 daysfor maximum bond strength.
a. Remove remaining release liner from between the postand panel by pulling sideways on the plastic film liner.
b. Attach panels to taped posts and overlap seam.
Technical BulletinPanel Bonding Procedure using 3M™ VHB™ Tape
- 12 -
V. Troubleshooting
A. Overlap Seam Delaminates
1. Note the failure mode(s) of the bond. Some possibilities are listed below. Combinations of the belowmodes may be present.a. Adhesion failure to the backside of the panel. This mode leaves 3M™ VHB™ Tape on the painted
panel.b. Adhesion failure to the front (painted side) of the panel. This mode leaves 3M™ VHB™ Tape on the
backside of the panel.c. Cohesion failure of the 3M™ VHB™ Tape leaving tape residue on both the backside and color painted
front of the panel.
2. Possible causes for 1a. and 1b. above includes, but are not limited to:a. Wrong tape, wrong amount of tape, wrong tape thickness;b. Missed or inadequate surface preparation and cleaning;c. Missed or inadequate tape roll down;d. Tape application at temperature below listed minimums of either 50°F (10°C);e. Change of paint on panel, change of post paint or surface treatment;f. Inadequate rigidity of trailer frame and/or sidewall frame;g. Constrained panels that cannot “float” to compensate for vibration, flexing, or thermal expansion
mismatches.
3. Possible cause for 1c. above is:a. Inadequate internal strength of the tape for that particular application. Cohesive failure of the tape
indicates the adhesive strength of the tape, to both surfaces being bonded, is greater than the internalstrength of the specific 3M™ VHB™ Tape being used.
b. Contact your local 3M specialist to assist in evaluating the design, increasing the amount or width oftape used, or review alternative tape or adhesive solutions.
4. Review compatibility of tape to surfaces being bonded, the entire panel installation steps, and materialsactually being used. If necessary, contact your local 3M specialist for assistance analyzing failures.
B. Panel to Post Delaminates1. Analysis and possible causes of panel-to-post failures are similar to the panel-to-panel failures at the
overlap seam.2. Particular attention should be given to proper rust, oil, dirt and paint overspray removal on the post prior to
tape application.3. Remember that final cleaning with 50:50 mixture of isopropyl alcohol* and water should follow any pre-
cleaning or degreasing.4. Remember that final abrasion of the post should not be coarser than the equivalent of fine, 180x grit
abrasives.
C. Liner is difficult to remove
1. If tape lifts with liner, then tape is not properly adhered to panel or post.
2. If liner is simply difficult to separate from the tape, use the sharp point of a razor utility knife, or a filebrush cleaner (stiff wire brush with short, slightly bent wires.
*Note: When using solvents, extinguish all ignition sources, including pilot lights, and follow the manufacturer’sprecautions and directions for use.
Technical BulletinPanel Bonding Procedure using 3M™ VHB™ Tape
- 13 -
3M warrants for 24 months from the date of manufacture that 3M™ VHB™ Tape will be free of defectsin material and manufacture. 3M MAKES NO OTHER WARRANTIES, EXPRESS OR IMPLIED,INCLUDING BUT NOT LIMITED TO, ANY IMPLIED WARRANTY OF MERCHANTABILITY ORFITNESS FOR A PARTICULAR PURPOSE. This limited warranty does not cover damage resulting fromthe use or inability to use 3M™ VHB™ Tape due to misuse, workmanship in application, or applicationor storage not in accordance with 3M recommended procedures.
Limited Warranty
If the 3M™ VHB™ Tape is proved to be defective within the warranty period stated above. THE EXCLUSIVEREMEDY, AT 3M’S OPTION, SHALL BE TO REFUND THE PURCHASE PRICE OF OR TO REPAIR ORREPLACE THE DEFECTIVE 3M™ VHB™ TAPE. 3M shall not otherwise be liable for loss or damages,whether direct, indirect, special, incidental, or consequential, regardless of the legal theory asserted,including negligence, warranty, or strict liability.
Limitation ofRemedies andLiability
All statements, technical information and recommendations contained in this document are based upontests or experience that 3M believes are reliable. However, many factors beyond 3M’s control can affectthe use and performance of a 3M product in a particular application, including the conditions underwhich the product is used and the time and environmental conditions in which the product is expected toperform. Since these factors are uniquely within the user’s knowledge and control, it is essential that theuser evaluate the 3M product to determine whether it is fit for a particular purpose and suitable for theuser’s method of application.
Product Use
This Industrial Adhesives and Tapes Division product was manufactured under a 3M quality system registered to ISO 9001:2000 standards.
ISO 9001:2000
3M, VHB and Scotch-Brite are trademarks of 3M.Printed in U.S.A.©3M 2008 70-0709-3974-2 (8/07)
Recycled Paper40% pre-consumer10% post-consumer
3Industrial Adhesives and Tapes Division3M Center, Building 21-1W-10, 900 Bush AvenueSt. Paul, MN 55144-1000800-362-3550 • 877-369-2923 (fax)www.3M.com/vhb