Embed Size (px)
Citation preview
GradeSpeed.NET 4.0 - Advanced Teacher Training
Updated 6/12/06
GradeSpeed.NET – Basic Teacher Training Guide
Updated 5/19/06
2
Training Goals:
This training guide will equip teachers to enter grades, record attendance, create simple printed reports,
and finalize their gradebook for progress report and/or report card printing. More advanced gradekeeping
tools are explained in the “Advanced Teacher Training” manual.
This guide was developed using GradeSpeed.NET 4.0. Please keep in mind that while this manual was
developed to help teachers perform all the tasks necessary to record grades and attendance and allow for
reporting, there are many functions of GradeSpeed.NET 4.0 that cannot be covered in a brief training
session. Please see the GradeSpeed.NET User Guide and http://support.gradespeed.net for further
information.
For technical support issues, teachers should always contact their school’s technology support office.
Campusware works closely with specific school personnel to correct any problems or to rectify training
issues promptly, but cannot provide support directly to teachers.
This training guide copyright © Campusware, San Antonio, TX, 2006. All Rights Reserved.
This document may be duplicated only by authorized personnel employed by schools using licensed copies
of GradeSpeed.NET 4.0. Any other duplication or usage rights must be obtained by contacting
Campusware directly.
GradeSpeed.NET – Basic Teacher Training Guide
Updated 5/19/06
3
Getting Started with GradeSpeed.NET 4.0:
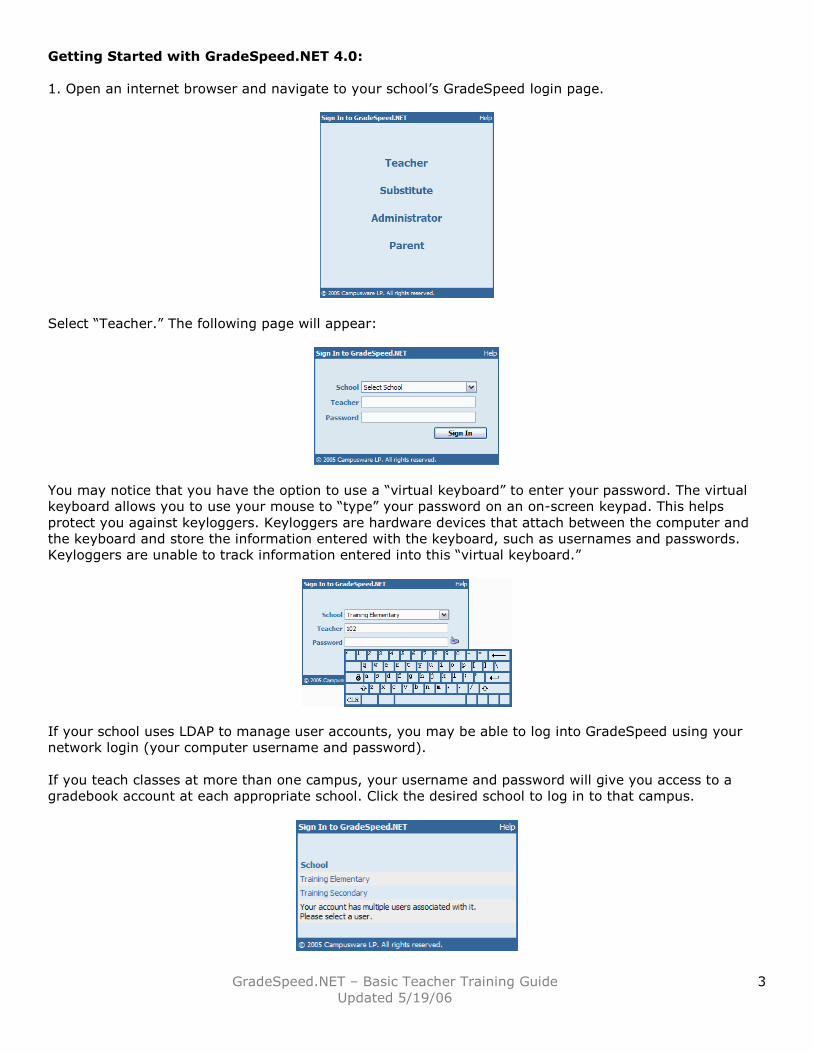
1. Open an internet browser and navigate to your school’s GradeSpeed login page.
Select “Teacher.” The following page will appear:
You may notice that you have the option to use a “virtual keyboard” to enter your password. The virtual
keyboard allows you to use your mouse to “type” your password on an on-screen keypad. This helps
protect you against keyloggers. Keyloggers are hardware devices that attach between the computer and
the keyboard and store the information entered with the keyboard, such as usernames and passwords.
Keyloggers are unable to track information entered into this “virtual keyboard.”
If your school uses LDAP to manage user accounts, you may be able to log into GradeSpeed using your
network login (your computer username and password).
If you teach classes at more than one campus, your username and password will give you access to a
gradebook account at each appropriate school. Click the desired school to log in to that campus.
GradeSpeed.NET – Basic Teacher Training Guide
Updated 5/19/06
4
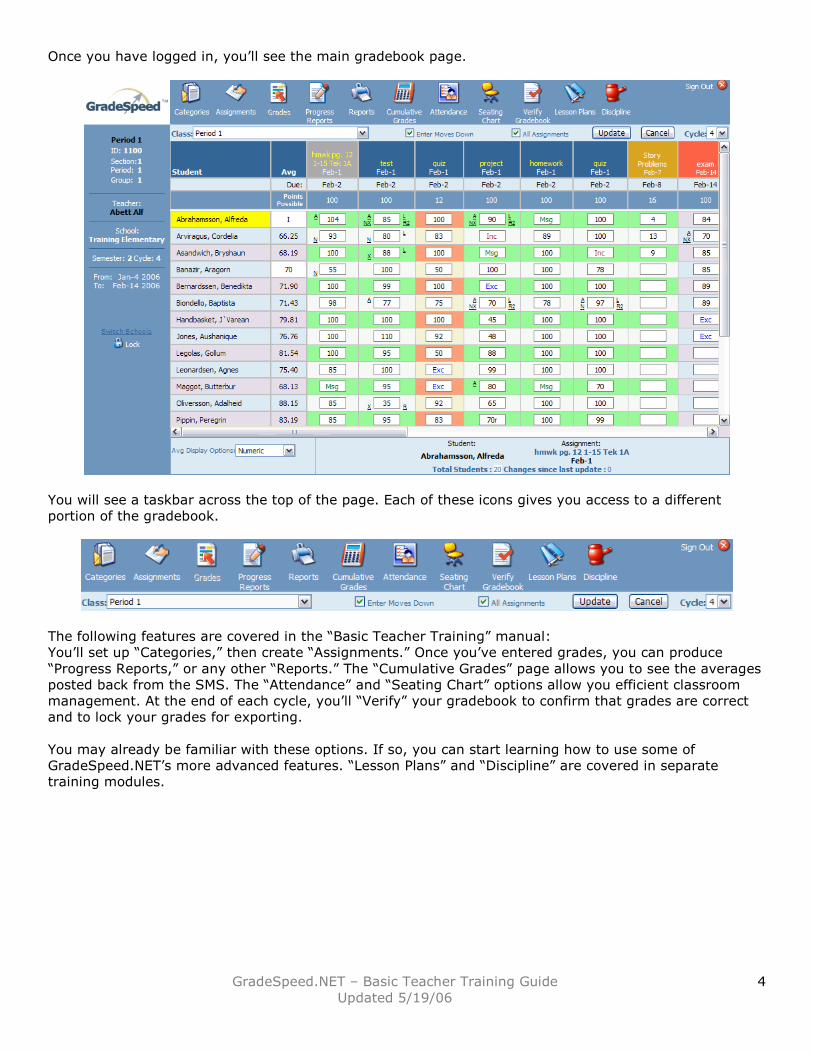
Once you have logged in, you’ll see the main gradebook page.
You will see a taskbar across the top of the page. Each of these icons gives you access to a different
portion of the gradebook.
The following features are covered in the “Basic Teacher Training” manual:
You’ll set up “Categories,” then create “Assignments.” Once you’ve entered grades, you can produce
“Progress Reports,” or any other “Reports.” The “Cumulative Grades” page allows you to see the averages
posted back from the SMS. The “Attendance” and “Seating Chart” options allow you efficient classroom
management. At the end of each cycle, you’ll “Verify” your gradebook to confirm that grades are correct
and to lock your grades for exporting.
You may already be familiar with these options. If so, you can start learning how to use some of
GradeSpeed.NET’s more advanced features. “Lesson Plans” and “Discipline” are covered in separate
training modules.
GradeSpeed.NET – Basic Teacher Training Guide
Updated 5/19/06
5
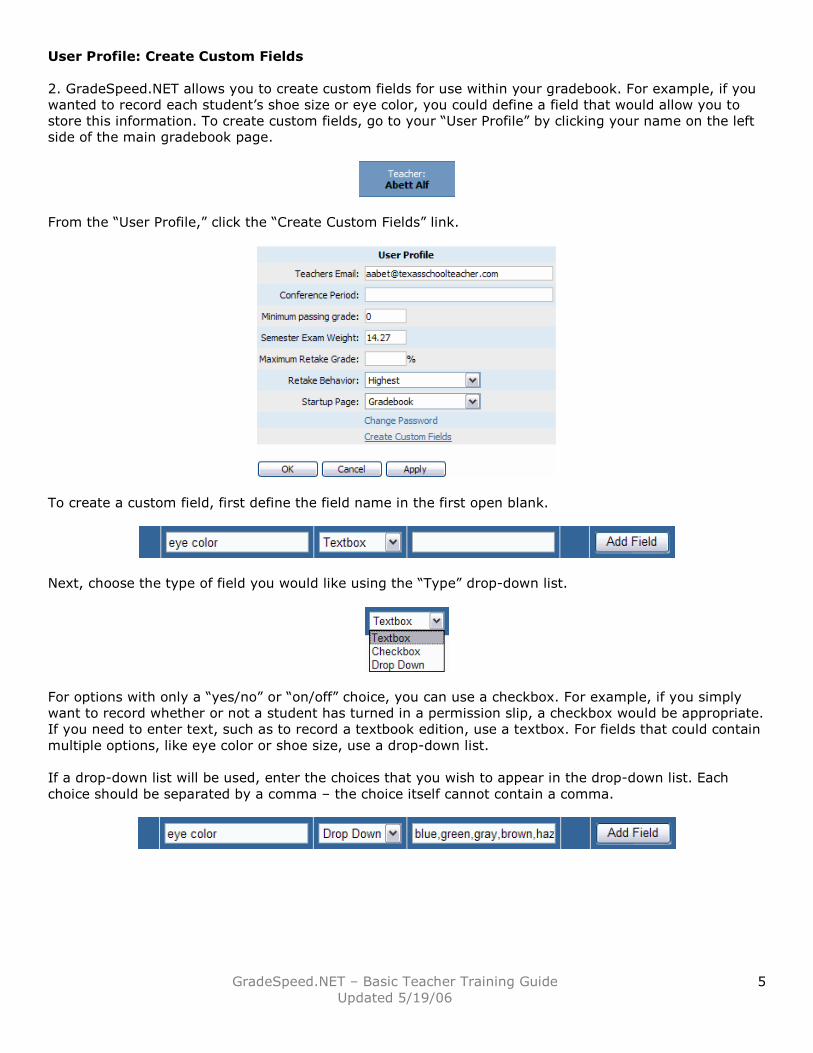
User Profile: Create Custom Fields
2. GradeSpeed.NET allows you to create custom fields for use within your gradebook. For example, if you
wanted to record each student’s shoe size or eye color, you could define a field that would allow you to
store this information. To create custom fields, go to your “User Profile” by clicking your name on the left
side of the main gradebook page.
From the “User Profile,” click the “Create Custom Fields” link.
To create a custom field, first define the field name in the first open blank.
Next, choose the type of field you would like using the “Type” drop-down list.
For options with only a “yes/no” or “on/off” choice, you can use a checkbox. For example, if you simply
want to record whether or not a student has turned in a permission slip, a checkbox would be appropriate.
If you need to enter text, such as to record a textbook edition, use a textbox. For fields that could contain
multiple options, like eye color or shoe size, use a drop-down list.
If a drop-down list will be used, enter the choices that you wish to appear in the drop-down list. Each
choice should be separated by a comma – the choice itself cannot contain a comma.
GradeSpeed.NET – Basic Teacher Training Guide
Updated 5/19/06
6
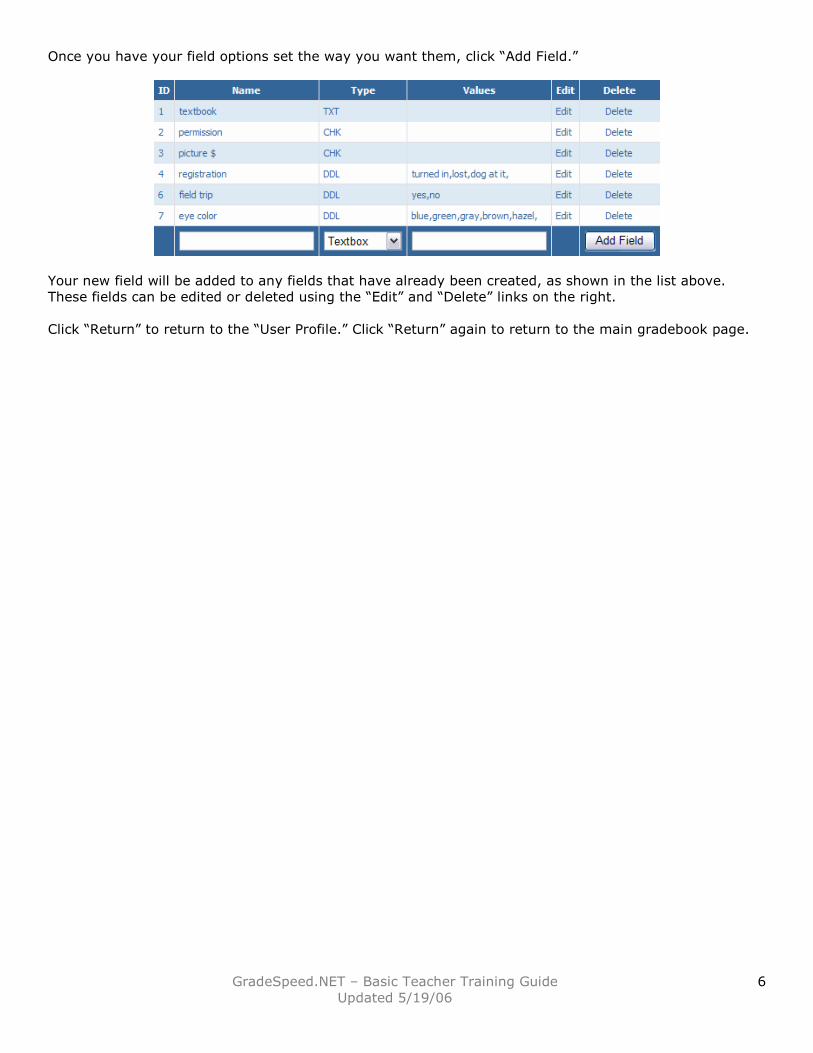
Once you have your field options set the way you want them, click “Add Field.”
Your new field will be added to any fields that have already been created, as shown in the list above.
These fields can be edited or deleted using the “Edit” and “Delete” links on the right.
Click “Return” to return to the “User Profile.” Click “Return” again to return to the main gradebook page.
GradeSpeed.NET – Basic Teacher Training Guide
Updated 5/19/06
7
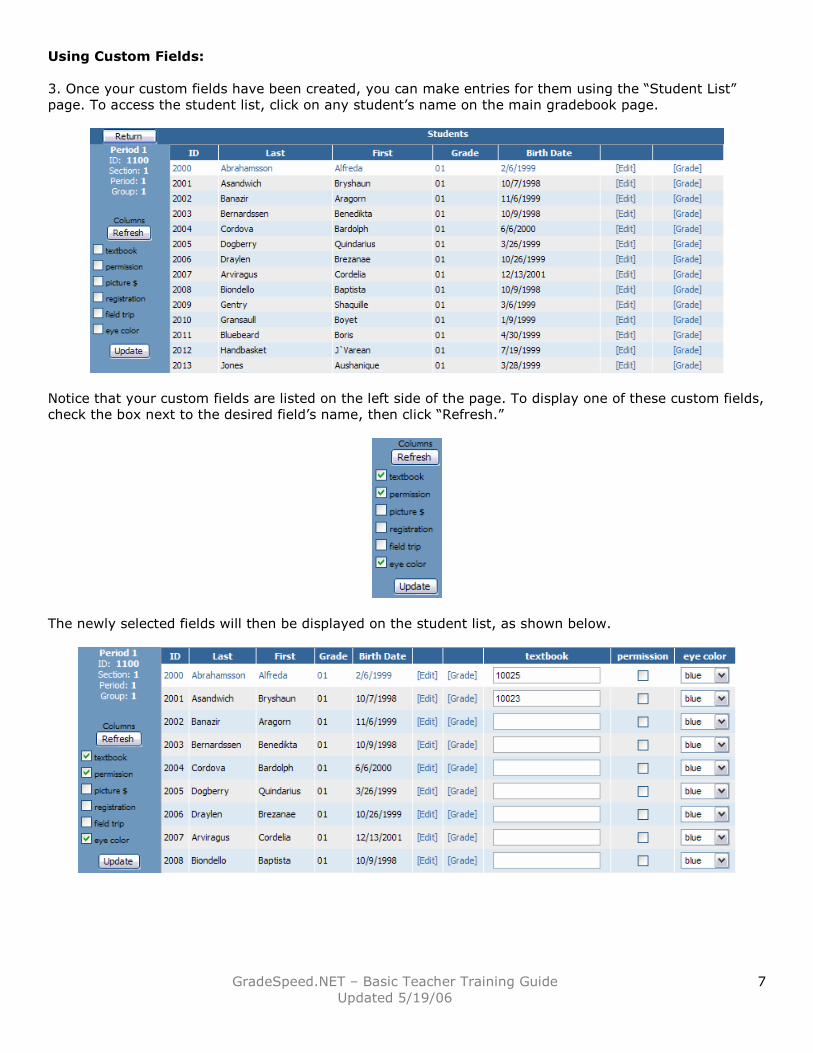
Using Custom Fields:
3. Once your custom fields have been created, you can make entries for them using the “Student List”
page. To access the student list, click on any student’s name on the main gradebook page.
Notice that your custom fields are listed on the left side of the page. To display one of these custom fields,
check the box next to the desired field’s name, then click “Refresh.”
The newly selected fields will then be displayed on the student list, as shown below.
GradeSpeed.NET – Basic Teacher Training Guide
Updated 5/19/06
8
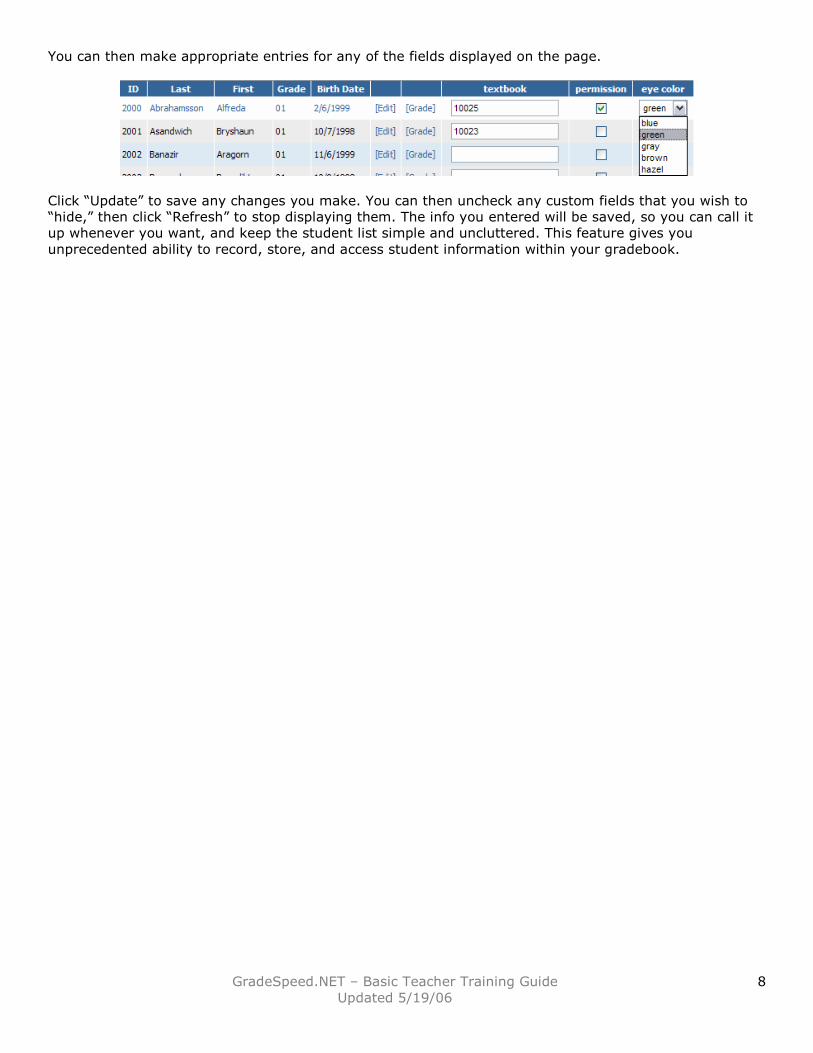
You can then make appropriate entries for any of the fields displayed on the page.
Click “Update” to save any changes you make. You can then uncheck any custom fields that you wish to
“hide,” then click “Refresh” to stop displaying them. The info you entered will be saved, so you can call it
up whenever you want, and keep the student list simple and uncluttered. This feature gives you
unprecedented ability to record, store, and access student information within your gradebook.
GradeSpeed.NET – Basic Teacher Training Guide
Updated 5/19/06
9
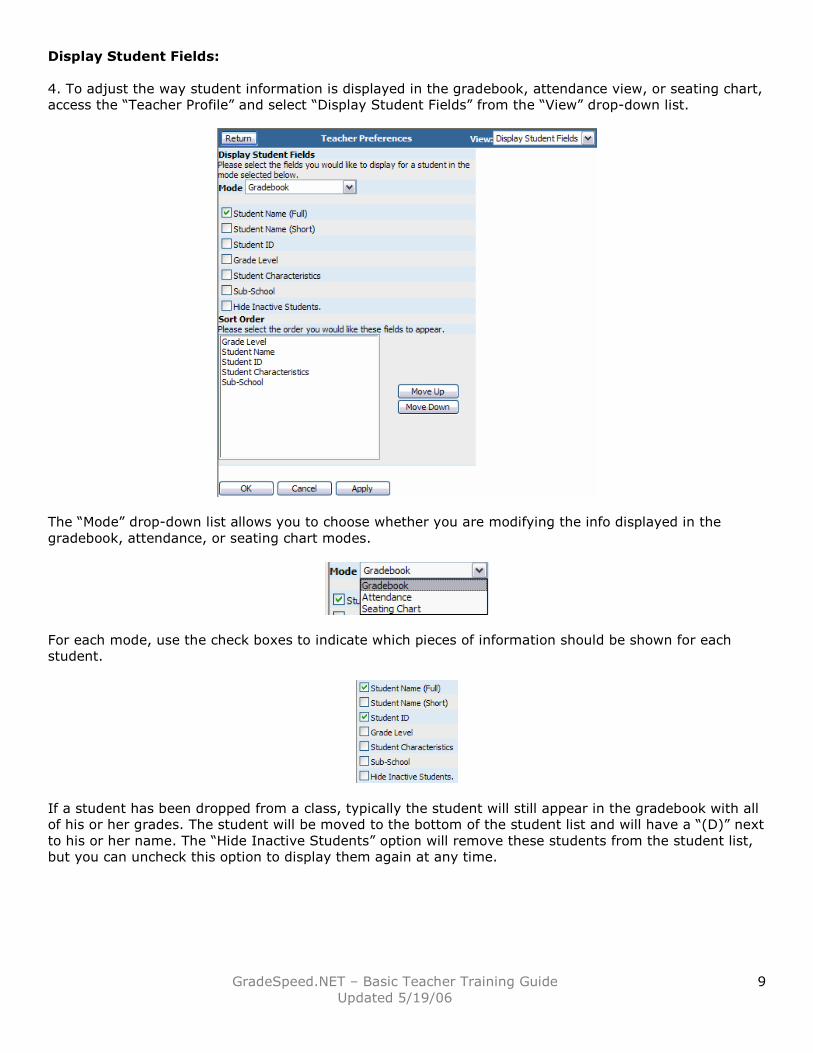
Display Student Fields:
4. To adjust the way student information is displayed in the gradebook, attendance view, or seating chart,
access the “Teacher Profile” and select “Display Student Fields” from the “View” drop-down list.
The “Mode” drop-down list allows you to choose whether you are modifying the info displayed in the
gradebook, attendance, or seating chart modes.
For each mode, use the check boxes to indicate which pieces of information should be shown for each
student.
If a student has been dropped from a class, typically the student will still appear in the gradebook with all
of his or her grades. The student will be moved to the bottom of the student list and will have a “(D)” next
to his or her name. The “Hide Inactive Students” option will remove these students from the student list,
but you can uncheck this option to display them again at any time.
GradeSpeed.NET – Basic Teacher Training Guide
Updated 5/19/06
10
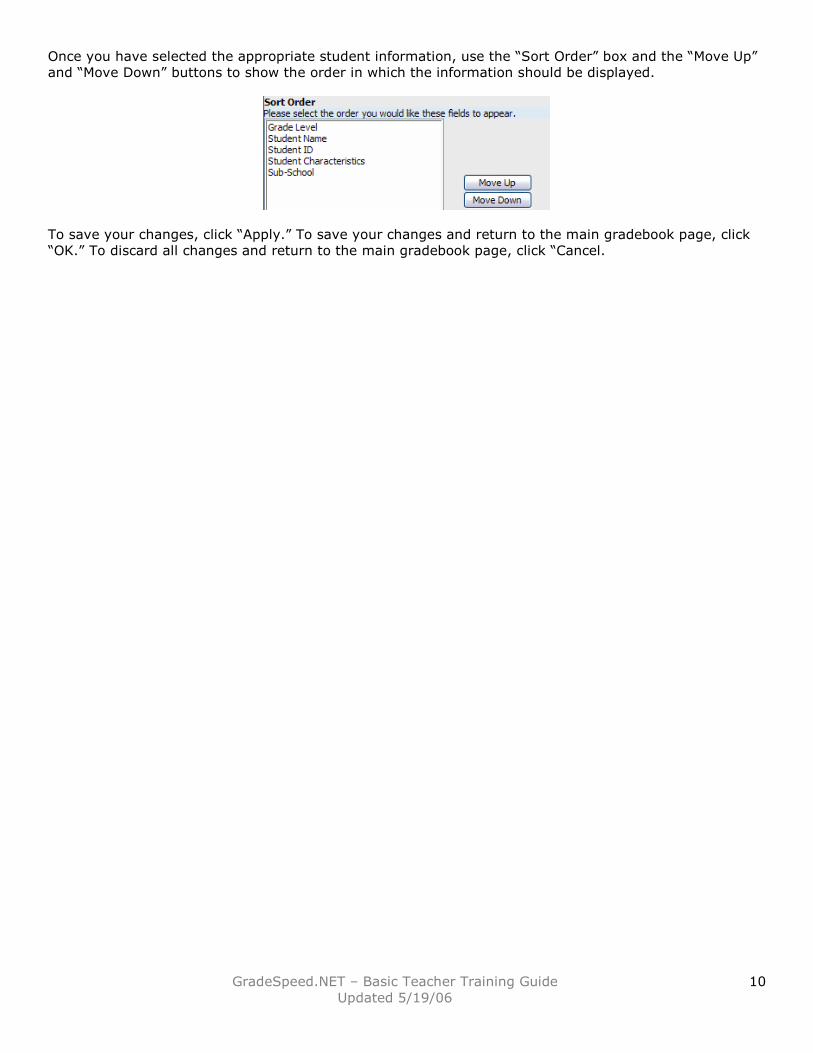
Once you have selected the appropriate student information, use the “Sort Order” box and the “Move Up”
and “Move Down” buttons to show the order in which the information should be displayed.
To save your changes, click “Apply.” To save your changes and return to the main gradebook page, click
“OK.” To discard all changes and return to the main gradebook page, click “Cancel.
GradeSpeed.NET – Basic Teacher Training Guide
Updated 5/19/06
11
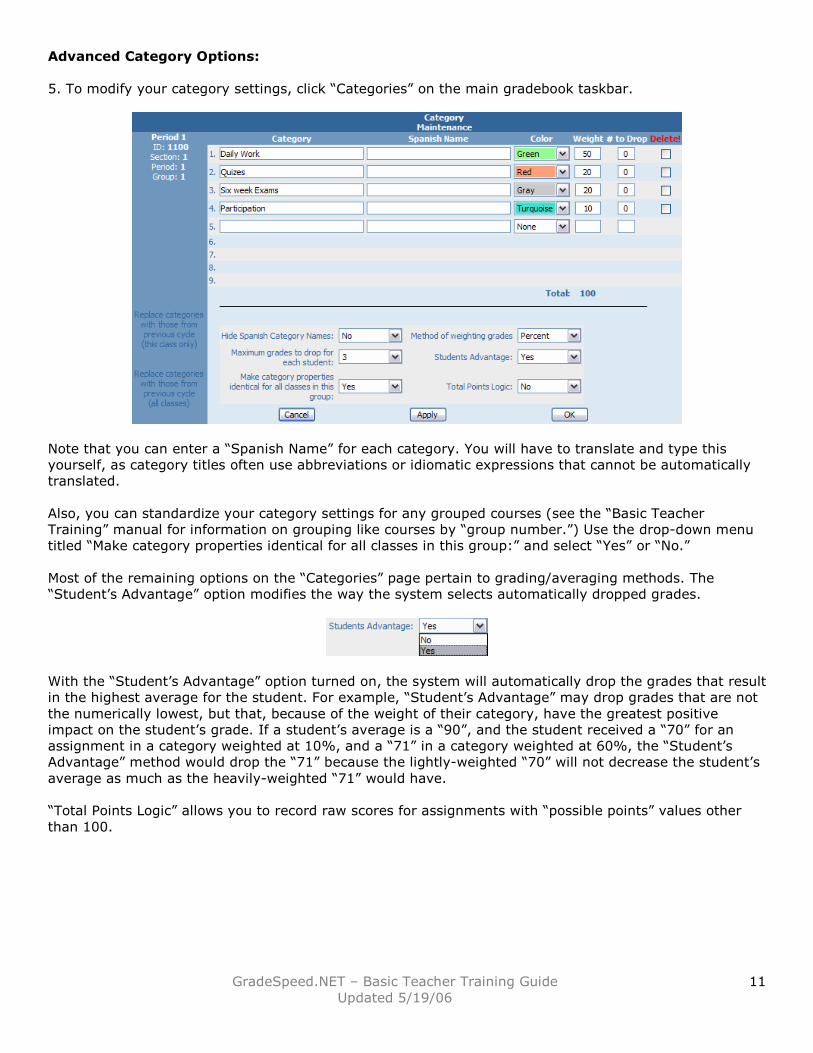
Advanced Category Options:
5. To modify your category settings, click “Categories” on the main gradebook taskbar.
Note that you can enter a “Spanish Name” for each category. You will have to translate and type this
yourself, as category titles often use abbreviations or idiomatic expressions that cannot be automatically
translated.
Also, you can standardize your category settings for any grouped courses (see the “Basic Teacher
Training” manual for information on grouping like courses by “group number.”) Use the drop-down menu
titled “Make category properties identical for all classes in this group:” and select “Yes” or “No.”
Most of the remaining options on the “Categories” page pertain to grading/averaging methods. The
“Student’s Advantage” option modifies the way the system selects automatically dropped grades.
With the “Student’s Advantage” option turned on, the system will automatically drop the grades that result
in the highest average for the student. For example, “Student’s Advantage” may drop grades that are not
the numerically lowest, but that, because of the weight of their category, have the greatest positive
impact on the student’s grade. If a student’s average is a “90”, and the student received a “70” for an
assignment in a category weighted at 10%, and a “71” in a category weighted at 60%, the “Student’s
Advantage” method would drop the “71” because the lightly-weighted “70” will not decrease the student’s
average as much as the heavily-weighted “71” would have.
“Total Points Logic” allows you to record raw scores for assignments with “possible points” values other
than 100.

GradeSpeed.NET – Basic Teacher Training Guide
Updated 5/19/06
12
Click “Update”
With Total Points Logic set to “No,” you can enter a raw score into the gradebook and it will automatically
be converted to a percentage when you click “Update.”
With Total Points Logic set to “Yes,” your raw score entry will be preserved, but calculated as a percentage
so that the average can be displayed properly. This setting should NOT be toggled off and on while grades
are being recorded, as it can result in confusing and invalid grade entries. In the above example, the
initial entry of “38” was appropriately converted to “95” with total points logic turned off. If, however,
Total Points Logic was now turned on, the 95 would be calculated as a raw score – nearly 250% of the
original score.
GradeSpeed.NET – Basic Teacher Training Guide
Updated 5/19/06
13
Advanced Assignment Options:
6. GradeSpeed.NET 4.0 contains several advanced assignment options. You can create rubrics within your
gradebook, import grades directly from a classroom grade scanner, and see if an attendance incident
might have influenced a student’s performance on a specific assignment. Additional assignment options
are covered in the “Basic Teacher Training” manual.
To set up a rubric, add a new assignment, create a “Rubric, and then create the appropriate number of
“Rubric Tasks.” For detailed instructions on creating rubrics, see the “GradeSpeed.NET Rubrics” document.
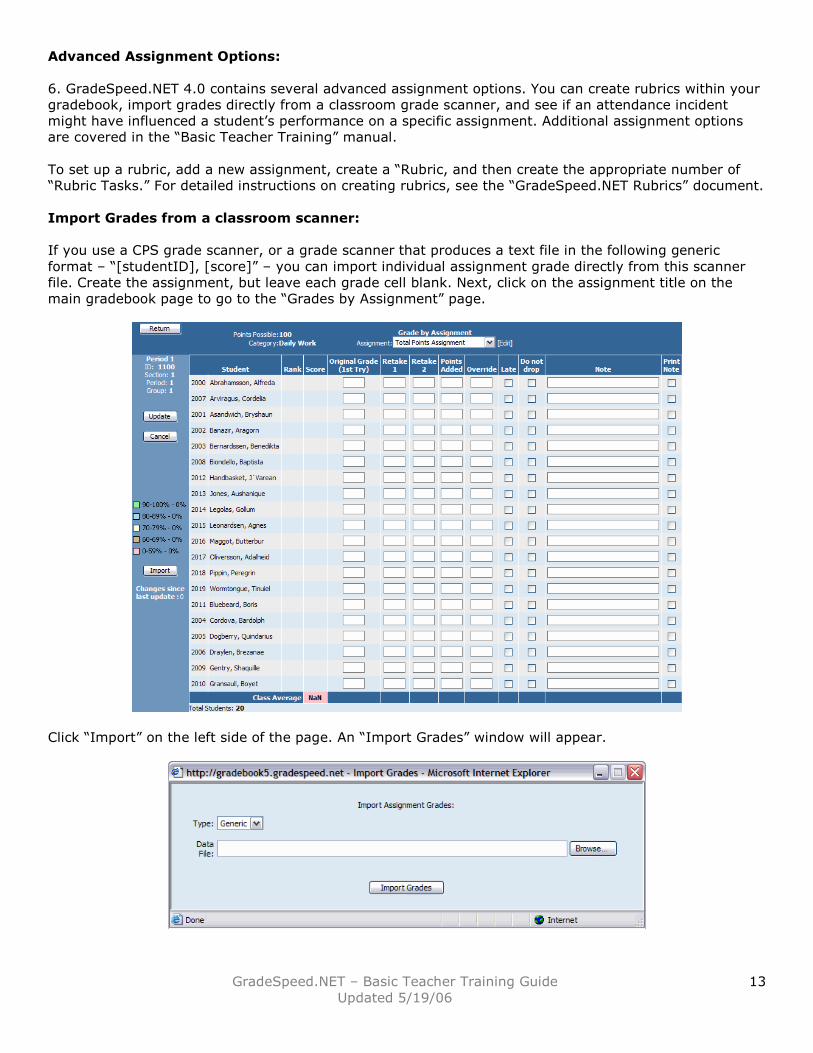
Import Grades from a classroom scanner:
If you use a CPS grade scanner, or a grade scanner that produces a text file in the following generic
format – “[studentID], [score]” – you can import individual assignment grade directly from this scanner
file. Create the assignment, but leave each grade cell blank. Next, click on the assignment title on the
main gradebook page to go to the “Grades by Assignment” page.
Click “Import” on the left side of the page. An “Import Grades” window will appear.
GradeSpeed.NET – Basic Teacher Training Guide
Updated 5/19/06
14
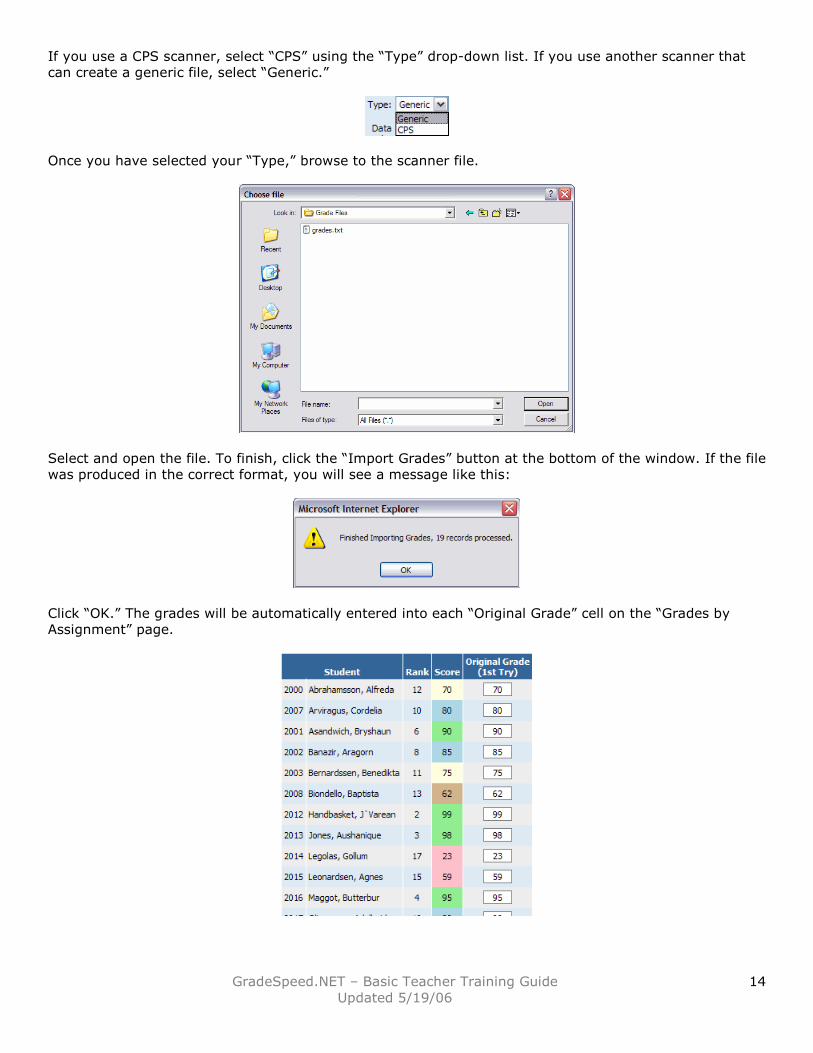
If you use a CPS scanner, select “CPS” using the “Type” drop-down list. If you use another scanner that
can create a generic file, select “Generic.”
Once you have selected your “Type,” browse to the scanner file.
Select and open the file. To finish, click the “Import Grades” button at the bottom of the window. If the file
was produced in the correct format, you will see a message like this:
Click “OK.” The grades will be automatically entered into each “Original Grade” cell on the “Grades by
Assignment” page.
GradeSpeed.NET – Basic Teacher Training Guide
Updated 5/19/06
15
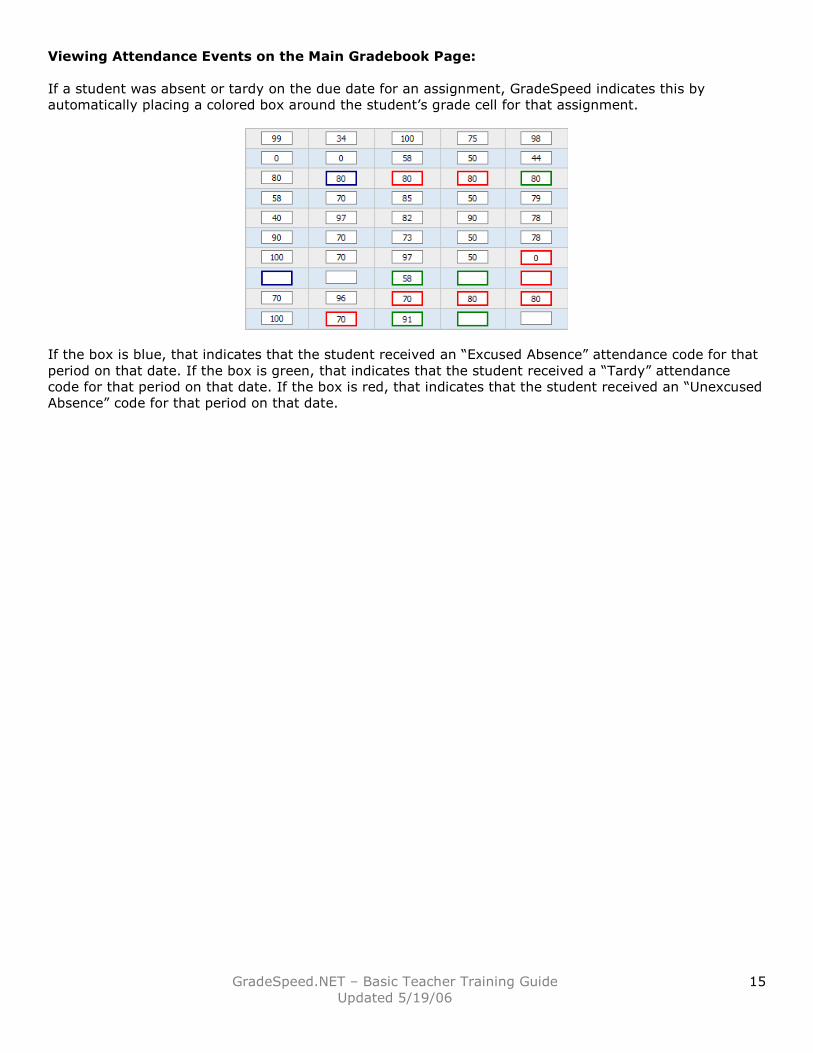
Viewing Attendance Events on the Main Gradebook Page:
If a student was absent or tardy on the due date for an assignment, GradeSpeed indicates this by
automatically placing a colored box around the student’s grade cell for that assignment.
If the box is blue, that indicates that the student received an “Excused Absence” attendance code for that
period on that date. If the box is green, that indicates that the student received a “Tardy” attendance
code for that period on that date. If the box is red, that indicates that the student received an “Unexcused
Absence” code for that period on that date.
GradeSpeed.NET – Basic Teacher Training Guide
Updated 5/19/06
16
Report Options:
7. You can access reports by clicking “Reports” on the main gradebook taskbar. In addition to basic grade
list reports, you can also print attendance or roster reports, reports that detail the comment codes
assigned to each student to date, reports that contain each assignment marked “Msg,” and reports that
summarize each student’s category averages.
Report Options:
You may see the following options next to each report choice:
“Print Student Name/ID” – use the radio buttons to indicate which student info should be printed.
“Print All Classes” – use the radio buttons to indicate whether all classes, or only the current class should
be printed.
“Grade List Options” – use the radio buttons to specify the location of the assignment names.
“Print Grade Level” – use the check box to display the student’s grade level on the printed report.
“Order by Grade Level” – use the check box to order the students on the report by their grade levels.
“Weeks” – use the drop-down list to set the number of weeks that should appear on the “Class Roster.”
“Period” and “Time Code” – use the drop-down list to choose the period and time code for the “Attendance
Roster.”
“Print Detail” – use the check box to select a simple or detailed “Attendance Roster.”
GradeSpeed.NET – Basic Teacher Training Guide
Updated 5/19/06
17
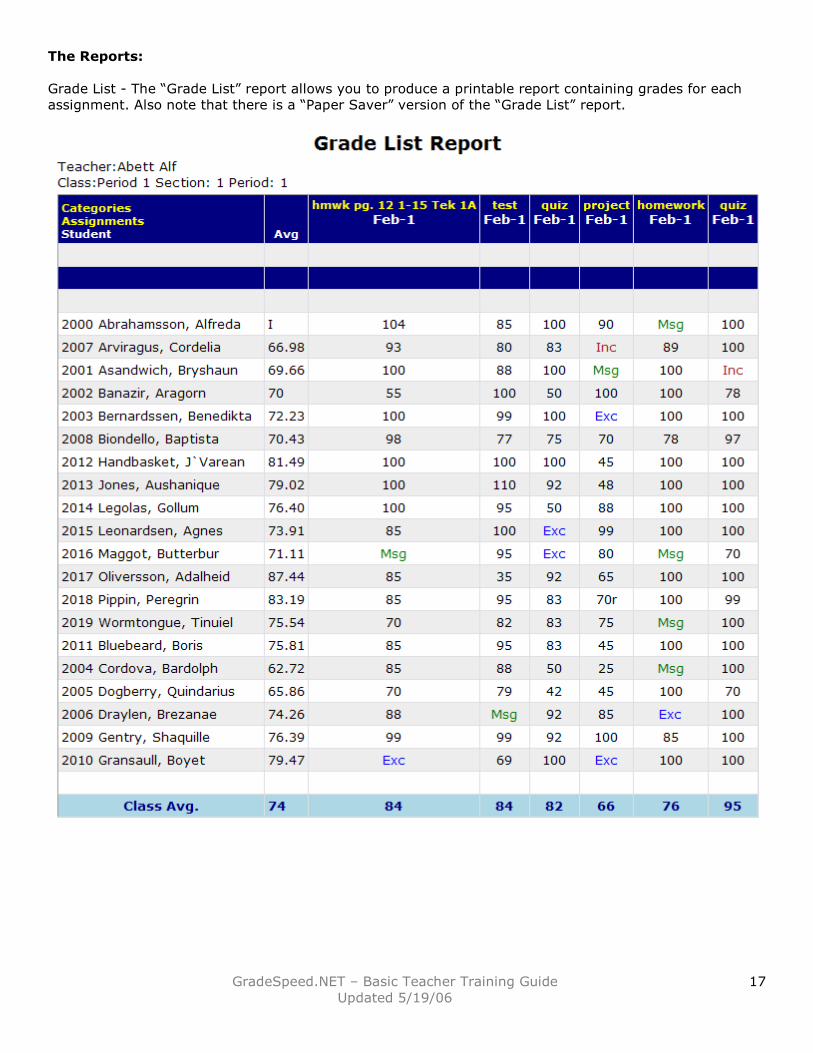
The Reports:
Grade List - The “Grade List” report allows you to produce a printable report containing grades for each
assignment. Also note that there is a “Paper Saver” version of the “Grade List” report.
GradeSpeed.NET – Basic Teacher Training Guide
Updated 5/19/06
18
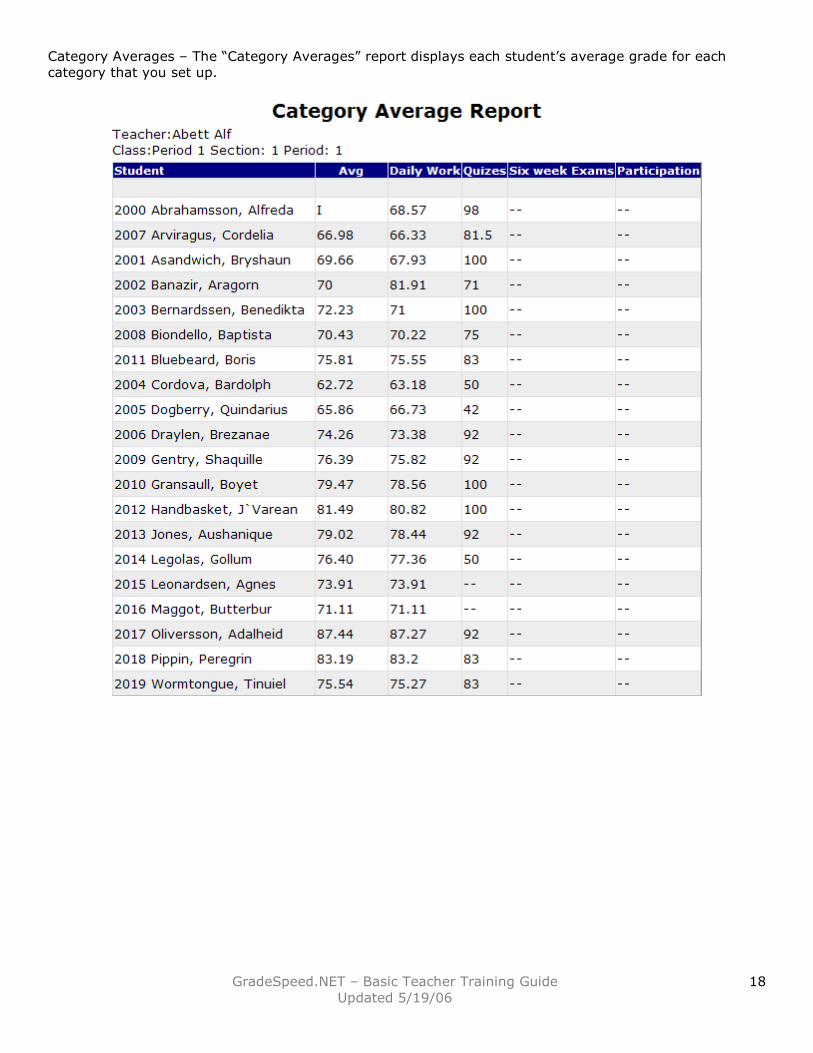
Category Averages – The “Category Averages” report displays each student’s average grade for each
category that you set up.
GradeSpeed.NET – Basic Teacher Training Guide
Updated 5/19/06
19
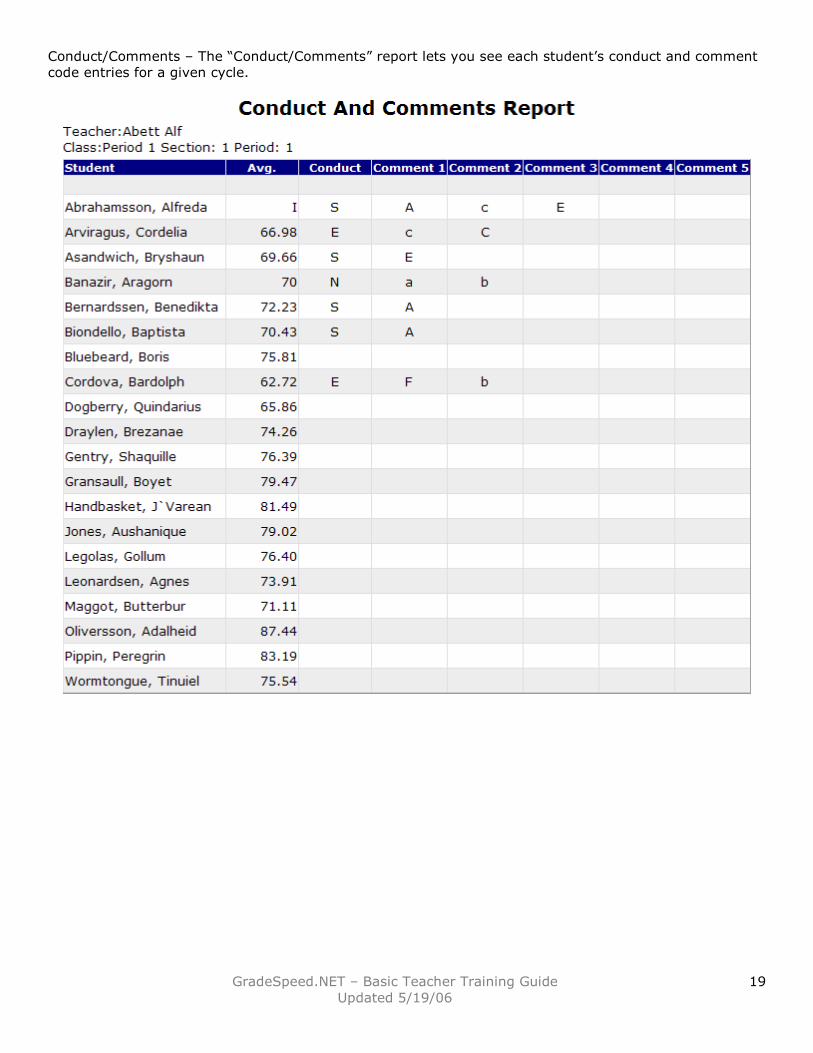
Conduct/Comments – The “Conduct/Comments” report lets you see each student’s conduct and comment
code entries for a given cycle.
GradeSpeed.NET – Basic Teacher Training Guide
Updated 5/19/06
20
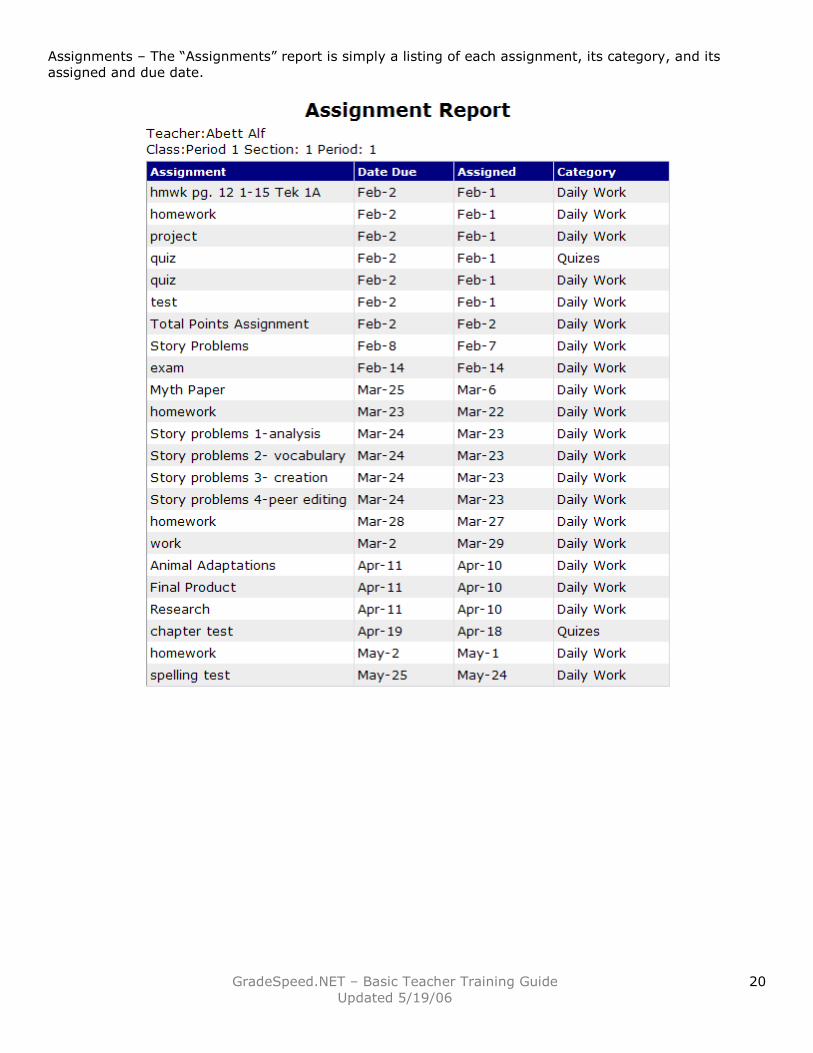
Assignments – The “Assignments” report is simply a listing of each assignment, its category, and its
assigned and due date.
GradeSpeed.NET – Basic Teacher Training Guide
Updated 5/19/06
21
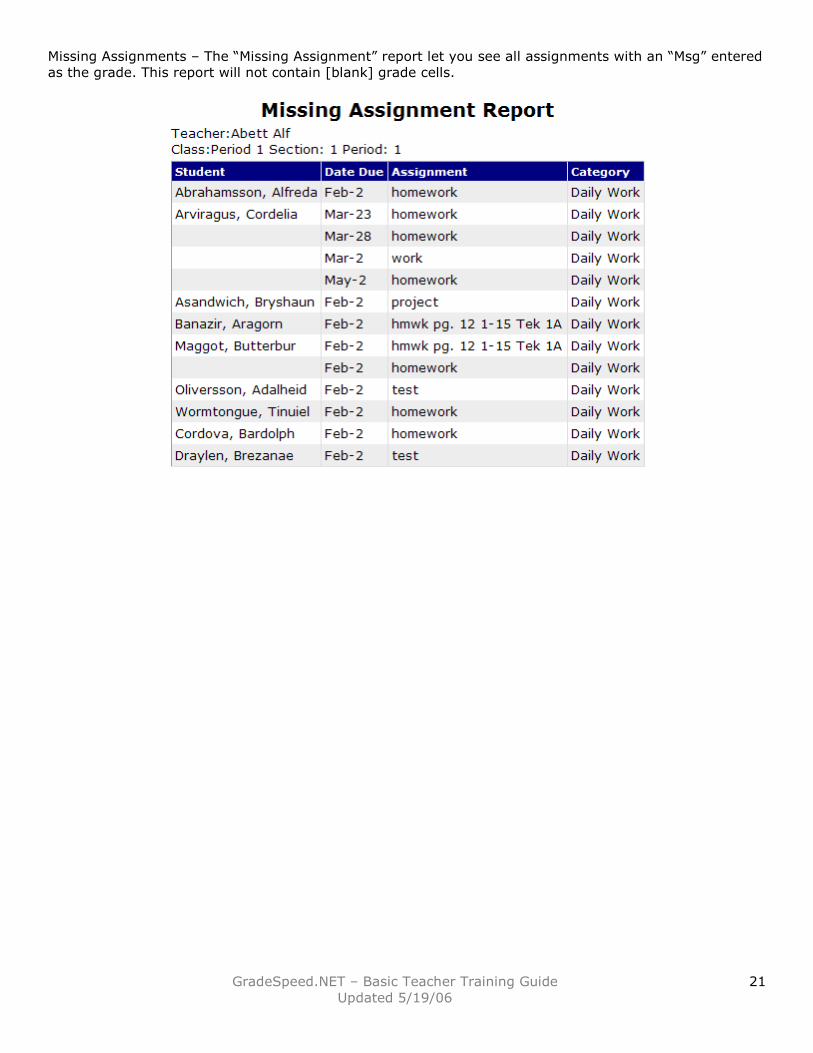
Missing Assignments – The “Missing Assignment” report let you see all assignments with an “Msg” entered
as the grade. This report will not contain [blank] grade cells.
GradeSpeed.NET – Basic Teacher Training Guide
Updated 5/19/06
22
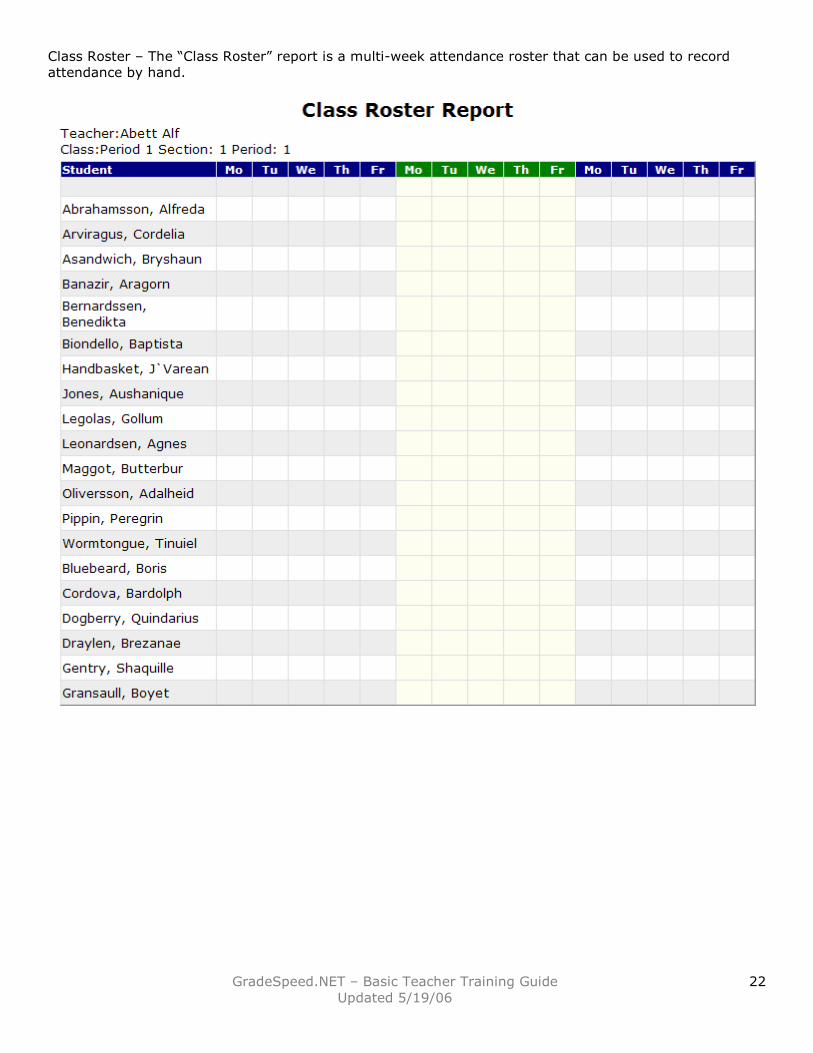
Class Roster – The “Class Roster” report is a multi-week attendance roster that can be used to record
attendance by hand.
GradeSpeed.NET – Basic Teacher Training Guide
Updated 5/19/06
23
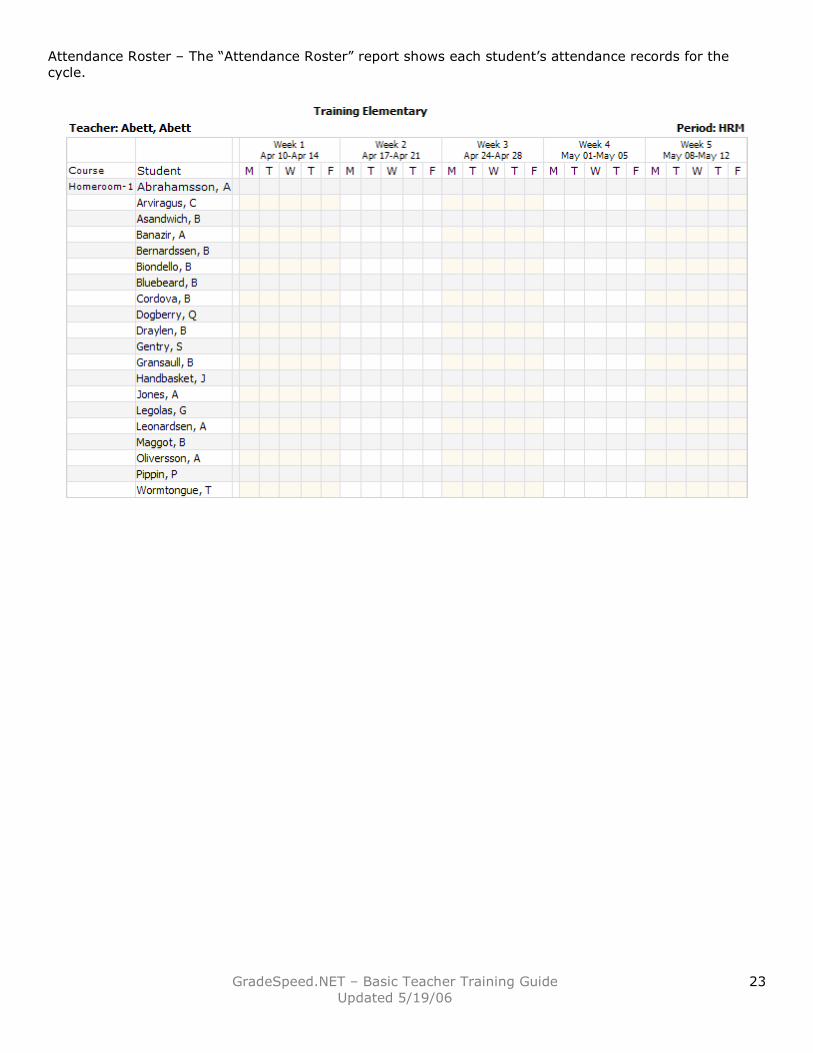
Attendance Roster – The “Attendance Roster” report shows each student’s attendance records for the
cycle.
GradeSpeed.NET – Basic Teacher Training Guide
Updated 5/19/06
24
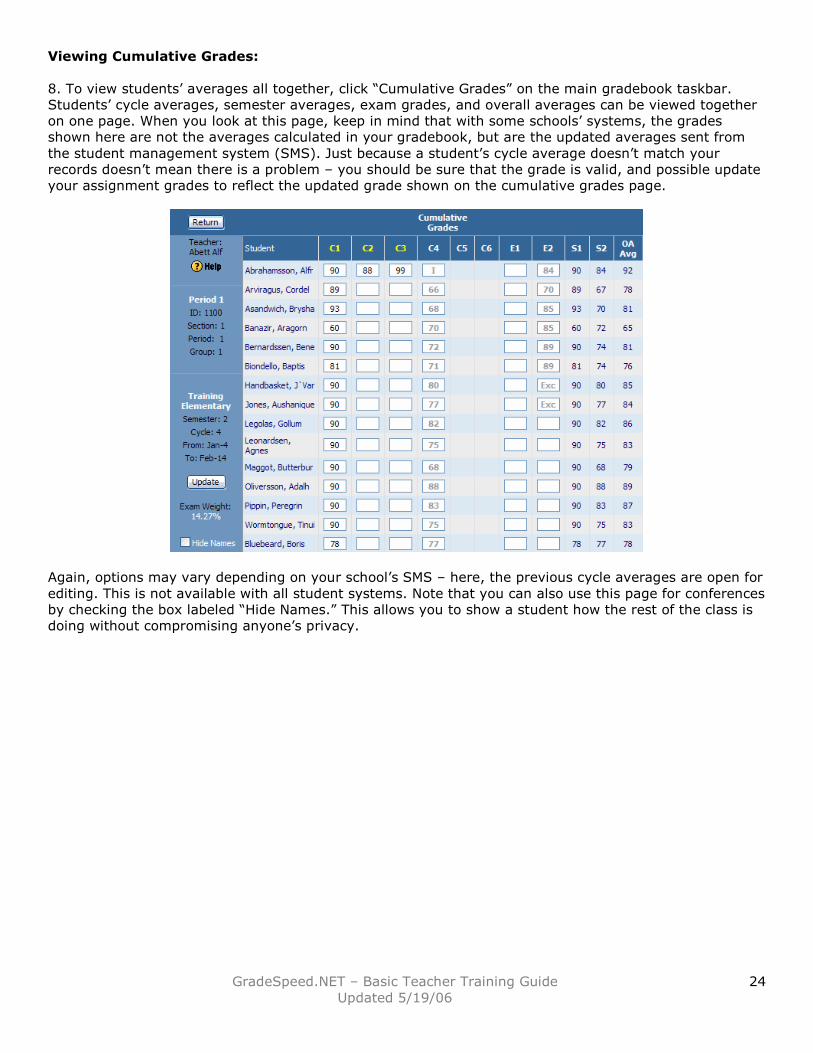
Viewing Cumulative Grades:
8. To view students’ averages all together, click “Cumulative Grades” on the main gradebook taskbar.
Students’ cycle averages, semester averages, exam grades, and overall averages can be viewed together
on one page. When you look at this page, keep in mind that with some schools’ systems, the grades
shown here are not the averages calculated in your gradebook, but are the updated averages sent from
the student management system (SMS). Just because a student’s cycle average doesn’t match your
records doesn’t mean there is a problem – you should be sure that the grade is valid, and possible update
your assignment grades to reflect the updated grade shown on the cumulative grades page.
Again, options may vary depending on your school’s SMS – here, the previous cycle averages are open for
editing. This is not available with all student systems. Note that you can also use this page for conferences
by checking the box labeled “Hide Names.” This allows you to show a student how the rest of the class is
doing without compromising anyone’s privacy.
GradeSpeed.NET – Basic Teacher Training Guide
Updated 5/19/06
25
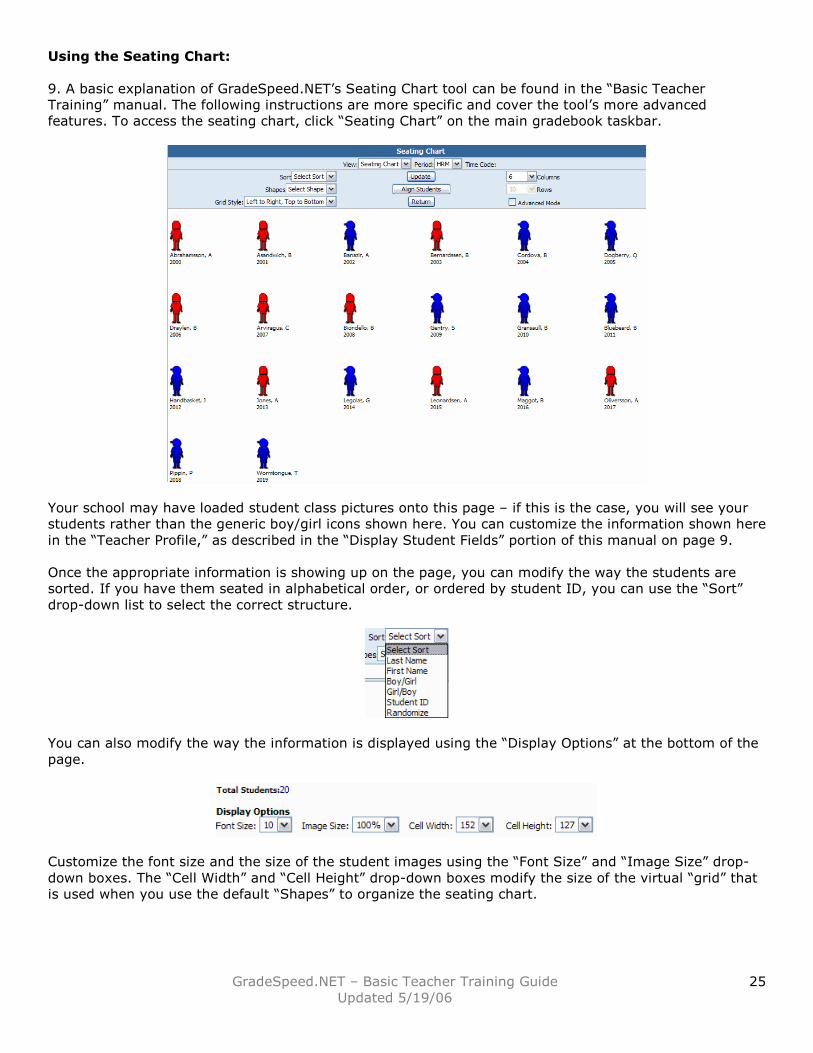
Using the Seating Chart:
9. A basic explanation of GradeSpeed.NET’s Seating Chart tool can be found in the “Basic Teacher
Training” manual. The following instructions are more specific and cover the tool’s more advanced
features. To access the seating chart, click “Seating Chart” on the main gradebook taskbar.
Your school may have loaded student class pictures onto this page – if this is the case, you will see your
students rather than the generic boy/girl icons shown here. You can customize the information shown here
in the “Teacher Profile,” as described in the “Display Student Fields” portion of this manual on page 9.
Once the appropriate information is showing up on the page, you can modify the way the students are
sorted. If you have them seated in alphabetical order, or ordered by student ID, you can use the “Sort”
drop-down list to select the correct structure.
You can also modify the way the information is displayed using the “Display Options” at the bottom of the
page.
Customize the font size and the size of the student images using the “Font Size” and “Image Size” drop-
down boxes. The “Cell Width” and “Cell Height” drop-down boxes modify the size of the virtual “grid” that
is used when you use the default “Shapes” to organize the seating chart.
GradeSpeed.NET – Basic Teacher Training Guide
Updated 5/19/06
26
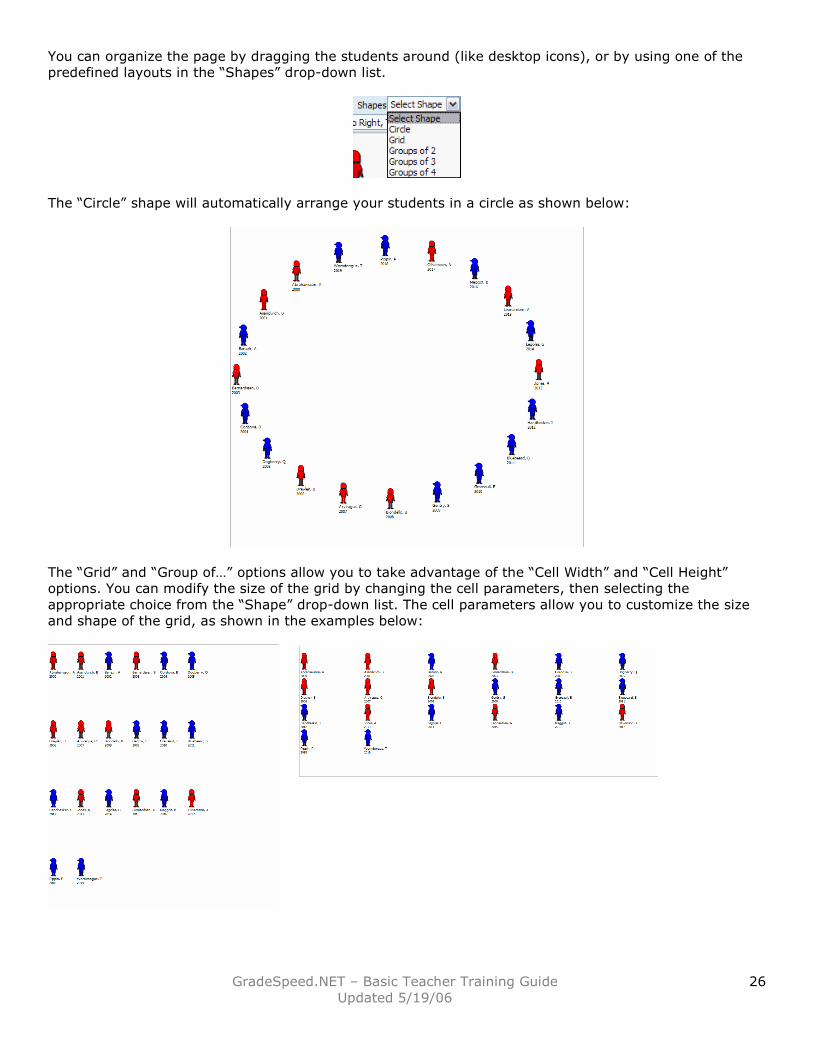
You can organize the page by dragging the students around (like desktop icons), or by using one of the
predefined layouts in the “Shapes” drop-down list.
The “Circle” shape will automatically arrange your students in a circle as shown below:
The “Grid” and “Group of…” options allow you to take advantage of the “Cell Width” and “Cell Height”
options. You can modify the size of the grid by changing the cell parameters, then selecting the
appropriate choice from the “Shape” drop-down list. The cell parameters allow you to customize the size
and shape of the grid, as shown in the examples below:
GradeSpeed.NET – Basic Teacher Training Guide
Updated 5/19/06
27
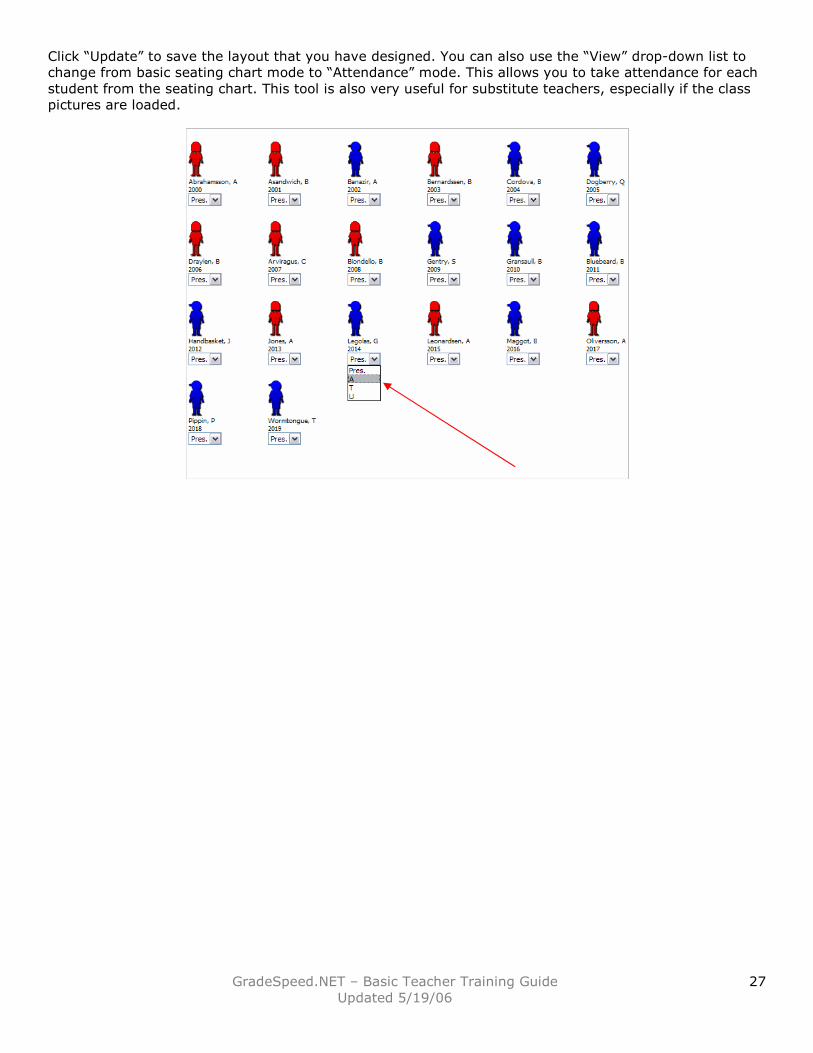
Click “Update” to save the layout that you have designed. You can also use the “View” drop-down list to
change from basic seating chart mode to “Attendance” mode. This allows you to take attendance for each
student from the seating chart. This tool is also very useful for substitute teachers, especially if the class
pictures are loaded.
GradeSpeed.NET – Basic Teacher Training Guide
Updated 5/19/06
28
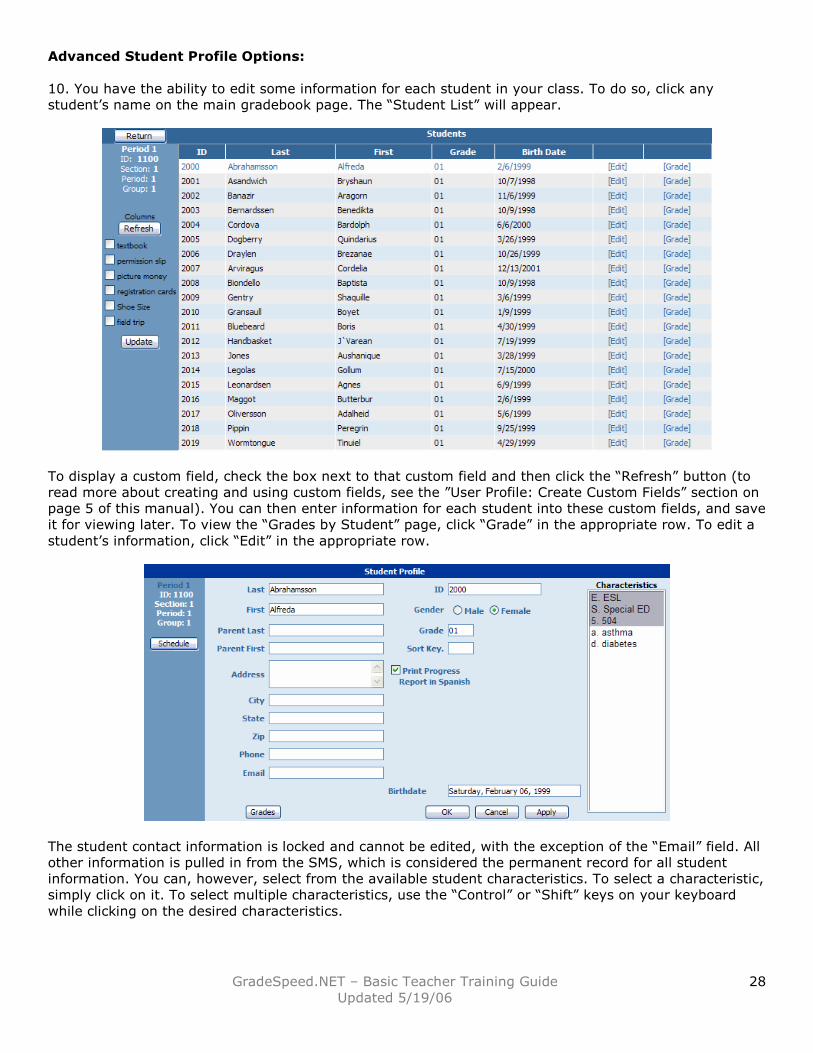
Advanced Student Profile Options:
10. You have the ability to edit some information for each student in your class. To do so, click any
student’s name on the main gradebook page. The “Student List” will appear.
To display a custom field, check the box next to that custom field and then click the “Refresh” button (to
read more about creating and using custom fields, see the ”User Profile: Create Custom Fields” section on
page 5 of this manual). You can then enter information for each student into these custom fields, and save
it for viewing later. To view the “Grades by Student” page, click “Grade” in the appropriate row. To edit a
student’s information, click “Edit” in the appropriate row.
The student contact information is locked and cannot be edited, with the exception of the “Email” field. All
other information is pulled in from the SMS, which is considered the permanent record for all student
information. You can, however, select from the available student characteristics. To select a characteristic,
simply click on it. To select multiple characteristics, use the “Control” or “Shift” keys on your keyboard
while clicking on the desired characteristics.
GradeSpeed.NET – Basic Teacher Training Guide
Updated 5/19/06
29
If you wish to sort the students in your gradebook differently than the default sort order, you can enter
sort keys for each student. If you wish a student to be first in the list, simply enter a “1” in the “Sort Key”
field. If you don’t want to sort all students, but simply want one student to appear at the bottom of the
list, make any entry into the “Sort Key” field for that student and he or she will fall to the bottom of the
list on the main gradebook page.
You can also use this page to access a student’s grades or view their master schedule. The “Grades”
button at the bottom of the student profile will take you to the “Grades by Student” page described in
detail in the “Basic Teacher Training” manual.
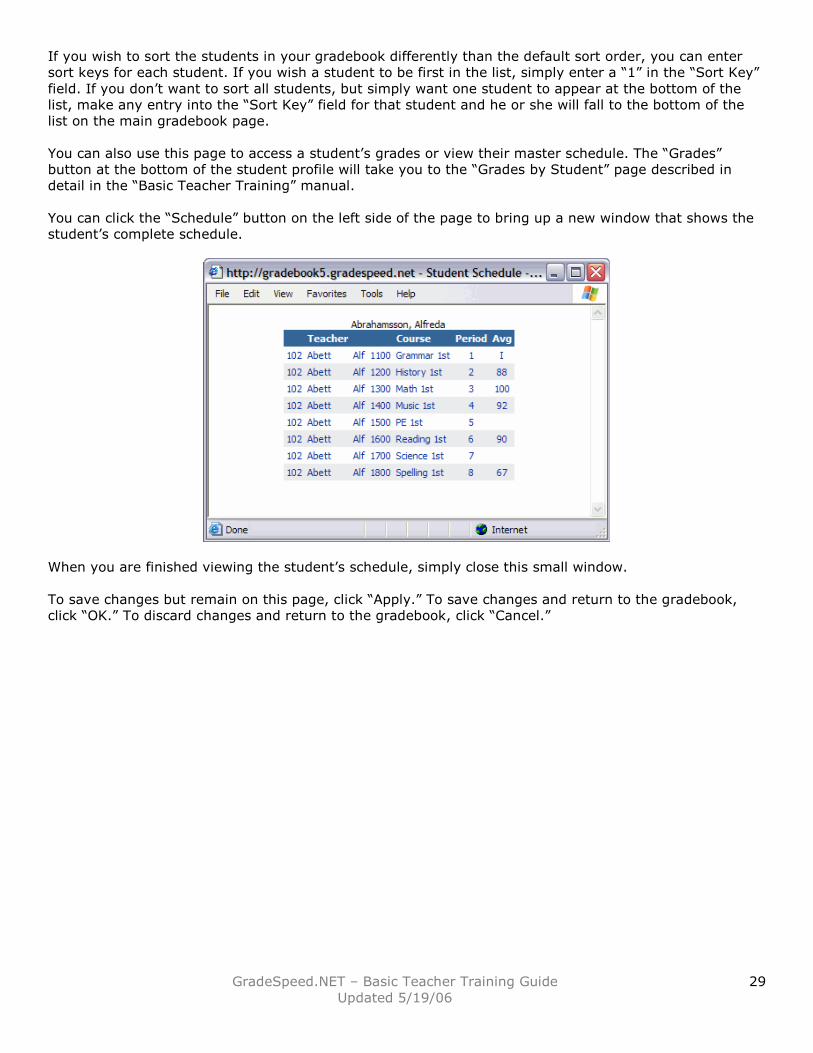
You can click the “Schedule” button on the left side of the page to bring up a new window that shows the
student’s complete schedule.
When you are finished viewing the student’s schedule, simply close this small window.
To save changes but remain on this page, click “Apply.” To save changes and return to the gradebook,
click “OK.” To discard changes and return to the gradebook, click “Cancel.”

GradeSpeed.NET – Basic Teacher Training Guide
Updated 5/19/06
30
Additional Training Materials:
Campusware also offers specific training documents that detail the use of the “Lesson Plans” module of
GradeSpeed.NET. These are available on request from your campus or district administrators.