Embed Size (px)
Citation preview
Sigma SA-300
This camera manual library is for reference and historical purposes, all rights reserved.
This page is copyright by , M. Butkus, NJ. This page may not be sold or distributed without the expressed permission of the producer
If you find this manual useful, how about a donation of $3 to: M. Butkus, 29 Lake Ave., High Bridge, NJ 08829-1701
and send your e-mail address so I can thank you. Most other places would charge you $7.50 for a electronic copy
or $18.00 for a hard to read Xerox copy.
This will allow me to continue to buy new manuals and pay their shipping costs. It'll make you feel better, won't it?
If you use Pay Pal, use the link below. Use the above address for a check, M.O. or cash.
Thank you for purchasing the Sigma SA-300 Autofocus Camera.
This camera is one of the most advanced 35 mm SLR cameras, newly developed using Sigma's latest technology. To add to your enjoyment of photography, the camera has a variety of features.
* Built-in flash with wide angle coverage for lenses with focal length up to 28 mm * 3 different metering systems --8 segment metering --Partial metering --Average metering * Mirror-up and Preview mechanism
To make the most of all these features, and to get the maximum performance and enjoyment from your Sigma SA-300 Camera, please read this instruction booklet before using the camera.
INDEX
CAUTION.. .... :
DESCRIPTION OF PARTS . . . ..
LCD PANEL INDICATION
LCD PANEL ILLUMINATION
VIEWFINDER INDICATION ...........
MODE DIAL
BASIC OPERATION .................
PREPARATION
ATTACHING THE CARRY STRAP ...
HOW TO USE THE FINDER CAP
INSERTING THE BATTERY
CHECKING THE BATTERY
MOUNTING AND REMOVING THE LENS
HOLDING THE CAMERA
SHUTTER BUTTON
INSERT THE FILM
SETTING THE FILM SPEED MANUALLY
PRINTING DATE AND TIME ...
BASIC OPERATION......
TAKING A PICTURE BY * MODE ....
REWIND THE FILM ............................
UNSUITABLE SUBJECT FOR AUTOFOCUS ..........
FOCUS LOCK .....................
FOCUS MANUALLY .................
USING THE BUILT-IN FLASH .............
RED-EYE REDUCTION .........................
PRECAUTIONS FOR USING THE BUILT-IN FLASH ...................
OPERATION OF DRIVE MODE ........................
CONTINUOUS SHOOTING SELF-TIMER ....................
REMOTE CONTROLLER MODE . . .
FIXED AND SELECTABLE FUNCTION IN THE " * " MODE ..............
ADVANCED FUNCTIONS..............
SELECTING THE AF MODE ...................
SELECTING THE EXPOSURE MODE ..
P PROGRAM AE PROGRAM SHIFT . S SHUTTER SPEED PRIORITY AE .............. A APERTURE PRIORITY AE
M MANUAL OPERATION
BULB SETTING
SELECTING THE METERING
AE LOCK...
AUTO BRACKETING ..
EXPOSURE COMPENSATION
BUILT-IN FLASH
MIRROR UP
OPTIONAL ACCESSORIES
REMOTE CONTROLLER RS-11 AND RS-21
PANORAMA ADAPTOR PS-300
EXTERNAL FLASH EF-
PHOTOGRAPHY TIPS ....
SNAPSHOT PHOTOGRAPHY
SCENERY

PORTRAIT
MOVING SUBJECT
CLOSE-UP PHOTOGRAPHY.
NIGHT SCENES
WARNING INDICATIONS
DEPTH OF FIELD
INFRARED PHOTOGRAPHY
REPLACING THE DATA BACK BATTERY
RESETTING THE CALENDAR/CLOCK
PRECAUTION DURING USE
SPECIFICATIONS
** Caution - Read this section before using the camera
* The built-in flash in this camera includes a high voltage circuit. To avoid electric shock or burns, do not attempt to disassemble the camera. If the outside shell of the unit is broken or cracked, do not touch the mechanism inside.
* Do not use this camera with any external flash unit other than the Sigma EF-430, which has special contact pins on the hot shoe. This flash is offered as an optional accessory. Other external flash units may damage the camera's circuitry or may not work properly.
* This camera is not waterproof. When using the camera in the rain on near water, keep it from getting wet. It is often impractical to repair internal electrical components damaged by water.
* To avoid any chance of lithium battery explosion, the battery pack should not be disassembled, recharged, short-circuited or exposed to fire or water.
* As with any camera, it is best to check all functions and shoot a test roll of film before using the camera for a wedding, a trip abroad, or for any irreplaceable photographs.
* Please carry a spare battery when you use the camera in a cold environment, in the field, on a trip, or when taking many pictures at one time.
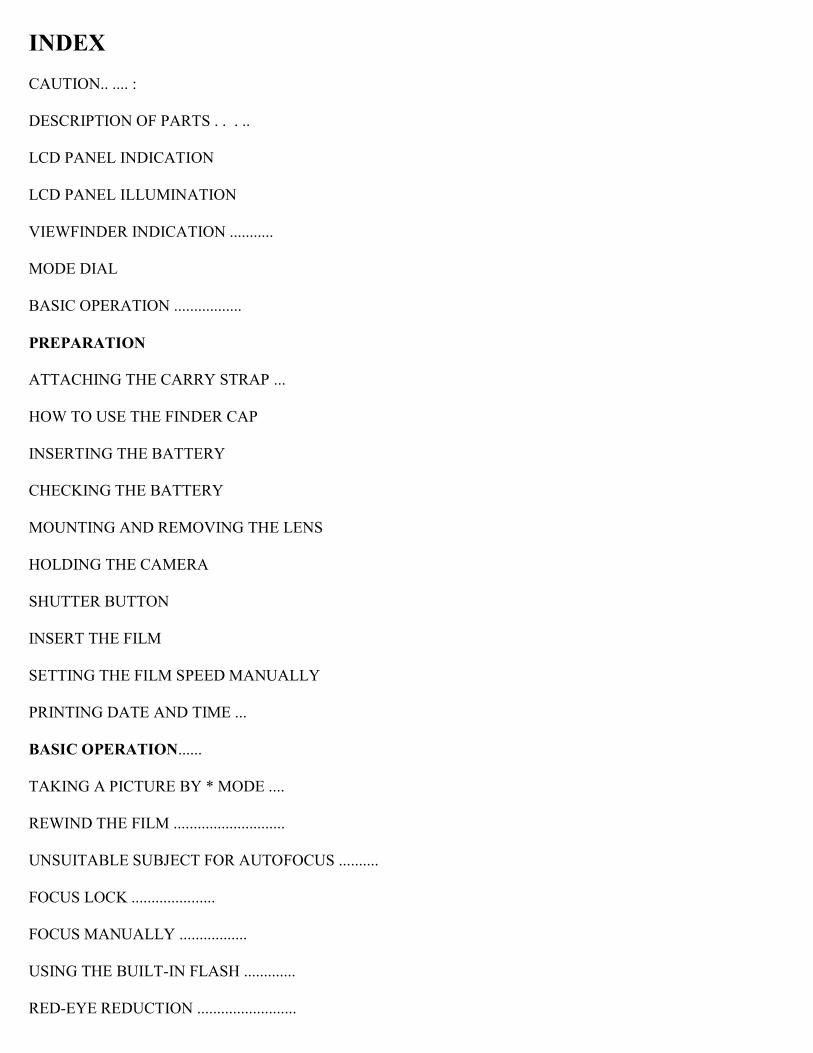
DESCRIPTION OF PARTS
When you press the Exposure Compensation/Drive Mode Button and Flash Mode Metering Mode Button simultaneously, the LCD Panel will illuminate for about seconds.
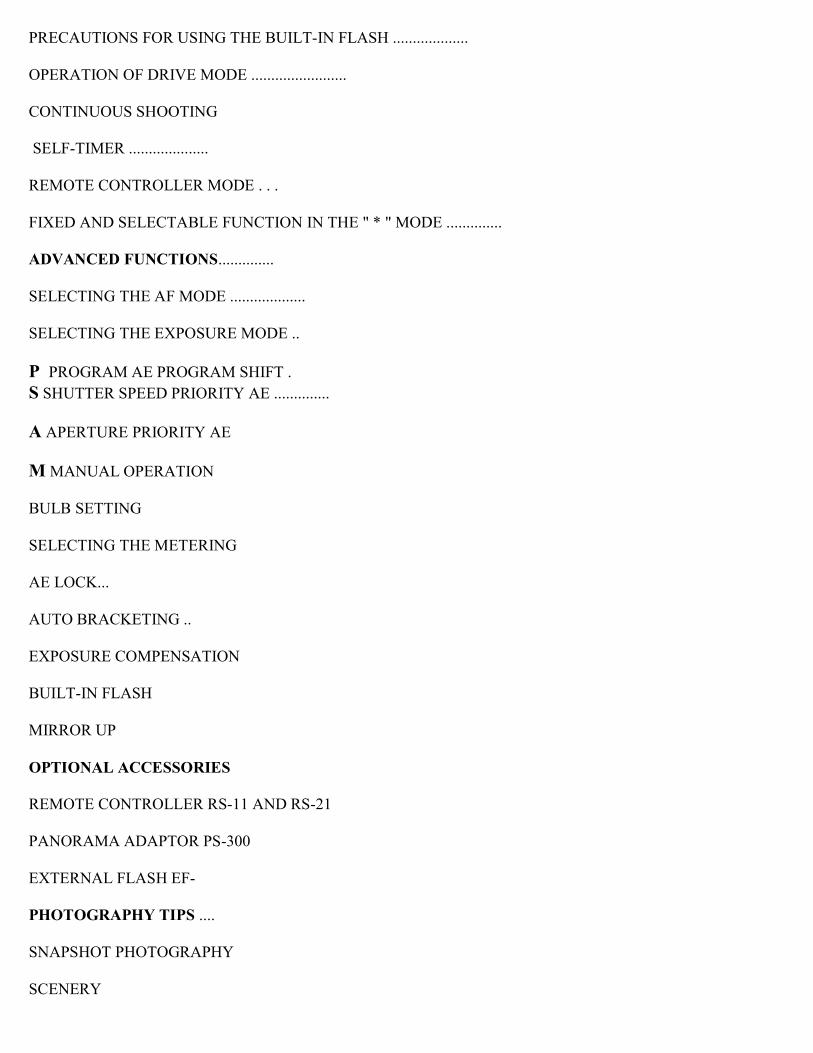
LCD AND VIEWFINDER INFORMATION
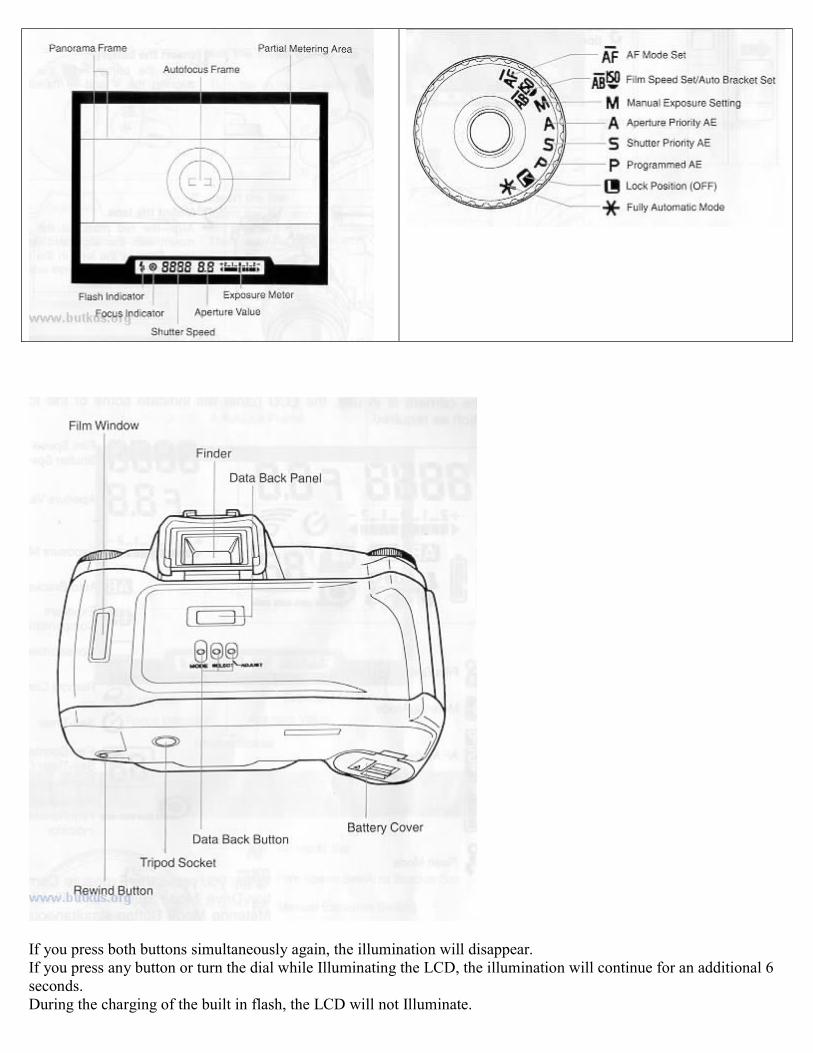
If you press both buttons simultaneously again, the illumination will disappear. If you press any button or turn the dial while Illuminating the LCD, the illumination will continue for an additional 6 seconds. During the charging of the built in flash, the LCD will not Illuminate.
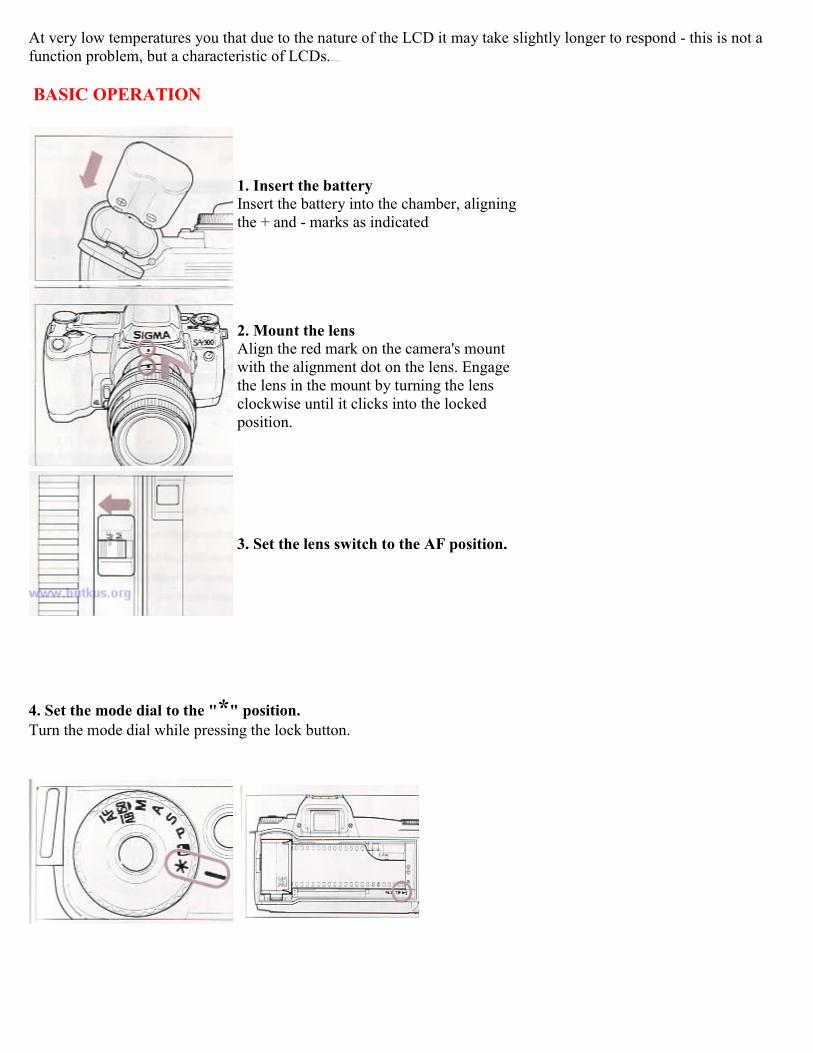
At very low temperatures you that due to the nature of the LCD it may take slightly longer to respond - this is not a function problem, but a characteristic of LCDs. 4www.b utkus.org BASIC OPERATION
1. Insert the battery Insert the battery into the chamber, aligning the + and - marks as indicated
2. Mount the lens Align the red mark on the camera's mount with the alignment dot on the lens. Engage the lens in the mount by turning the lens clockwise until it clicks into the locked position.
3. Set the lens switch to the AF position.
4. Set the mode dial to the "*" position. Turn the mode dial while pressing the lock button.

5. Insert the film Insert the film and align the tip of the film with the Film Position Mark. Then close the back cover.
6. Align the subject in the AF frame
7. Press the shutter button
ATTACHING THE CARRY STRAP
1. Undo the strap end. 2. Thread Finder cap on the strap. 3. Then attach the carry strap as shown.
HOW TO USE THE FINDER CAP
When using the self-timer or remote control, please cover the finder eyepiece with the Finder Cap. Remove the eye cap from the finder.
Insert the finder cap onto the finder. 4www.b utku s.org
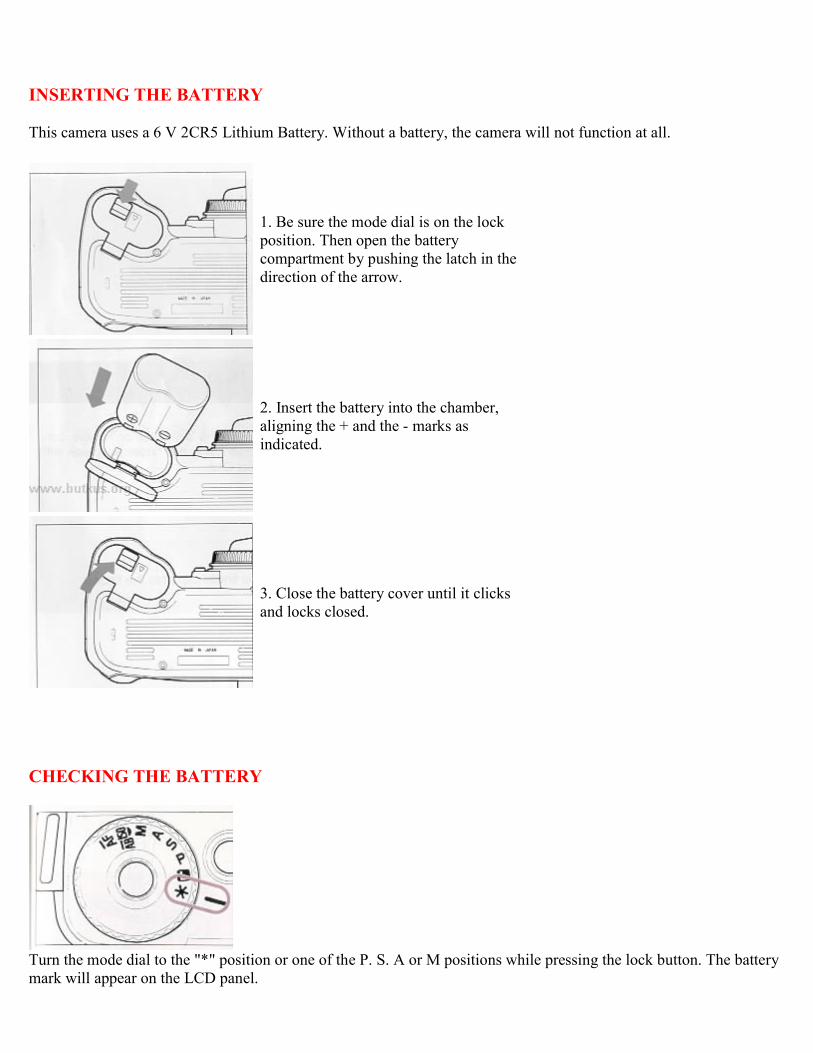
INSERTING THE BATTERY
This camera uses a 6 V 2CR5 Lithium Battery. Without a battery, the camera will not function at all.
1. Be sure the mode dial is on the lock position. Then open the battery compartment by pushing the latch in the direction of the arrow.
2. Insert the battery into the chamber, aligning the + and the - marks as indicated.
3. Close the battery cover until it clicks and locks closed.
CHECKING THE BATTERY
Turn the mode dial to the "*" position or one of the P. S. A or M positions while pressing the lock button. The battery mark will appear on the LCD panel.
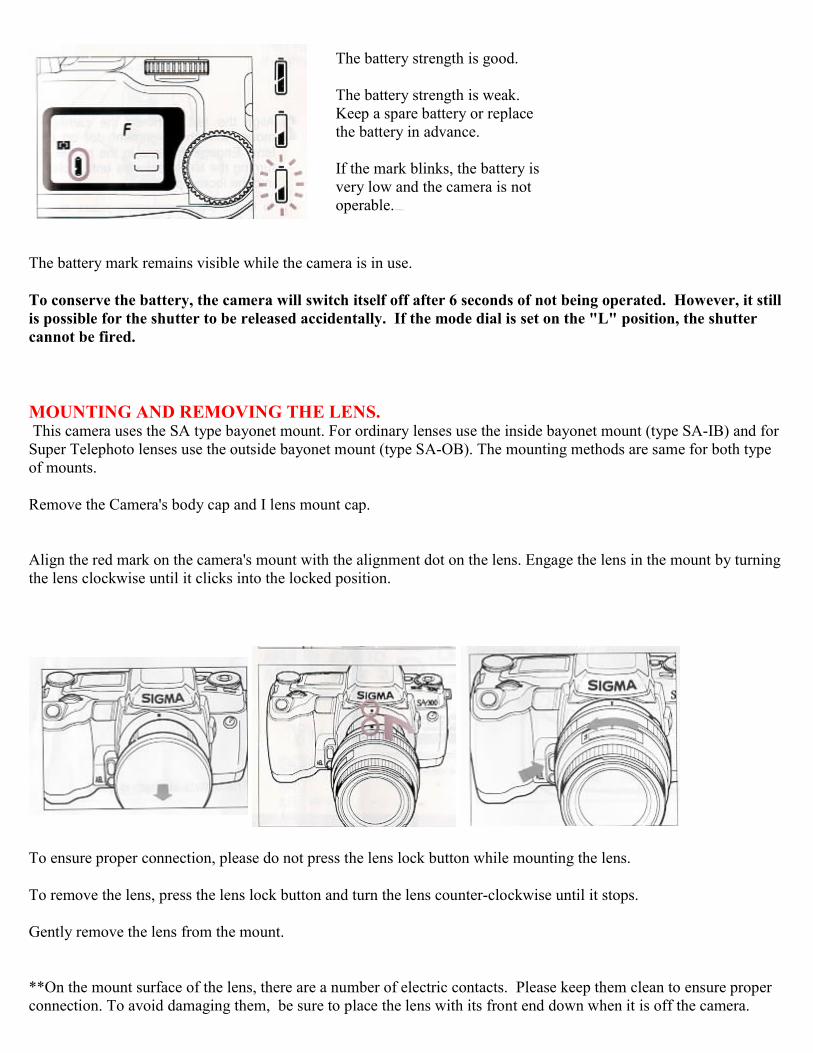
The battery strength is good. The battery strength is weak. Keep a spare battery or replace the battery in advance. If the mark blinks, the battery is very low and the camera is not operable.4www .butkus.org
The battery mark remains visible while the camera is in use.
To conserve the battery, the camera will switch itself off after 6 seconds of not being operated. However, it still is possible for the shutter to be released accidentally. If the mode dial is set on the "L" position, the shutter cannot be fired.
MOUNTING AND REMOVING THE LENS. This camera uses the SA type bayonet mount. For ordinary lenses use the inside bayonet mount (type SA-IB) and for Super Telephoto lenses use the outside bayonet mount (type SA-OB). The mounting methods are same for both type of mounts.
Remove the Camera's body cap and I lens mount cap.
Align the red mark on the camera's mount with the alignment dot on the lens. Engage the lens in the mount by turning the lens clockwise until it clicks into the locked position.
To ensure proper connection, please do not press the lens lock button while mounting the lens.
To remove the lens, press the lens lock button and turn the lens counter-clockwise until it stops.
Gently remove the lens from the mount.
**On the mount surface of the lens, there are a number of electric contacts. Please keep them clean to ensure proper connection. To avoid damaging them, be sure to place the lens with its front end down when it is off the camera.
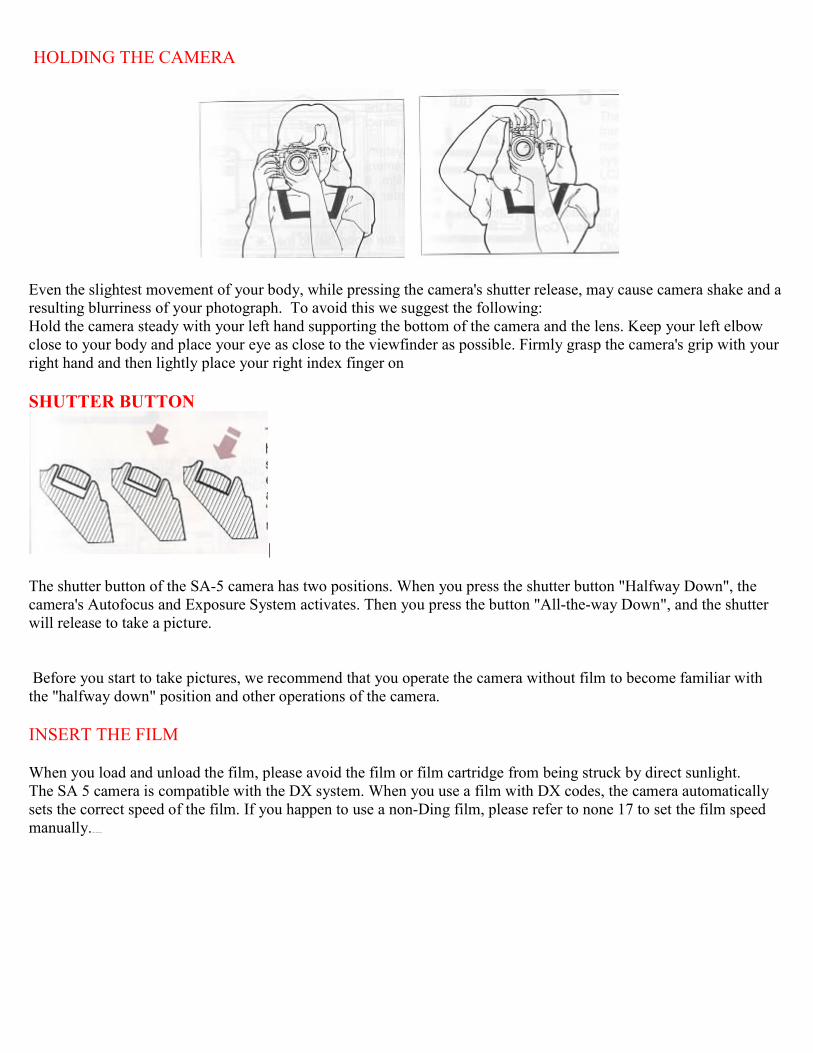
HOLDING THE CAMERA
Even the slightest movement of your body, while pressing the camera's shutter release, may cause camera shake and a resulting blurriness of your photograph. To avoid this we suggest the following: Hold the camera steady with your left hand supporting the bottom of the camera and the lens. Keep your left elbow close to your body and place your eye as close to the viewfinder as possible. Firmly grasp the camera's grip with your right hand and then lightly place your right index finger on
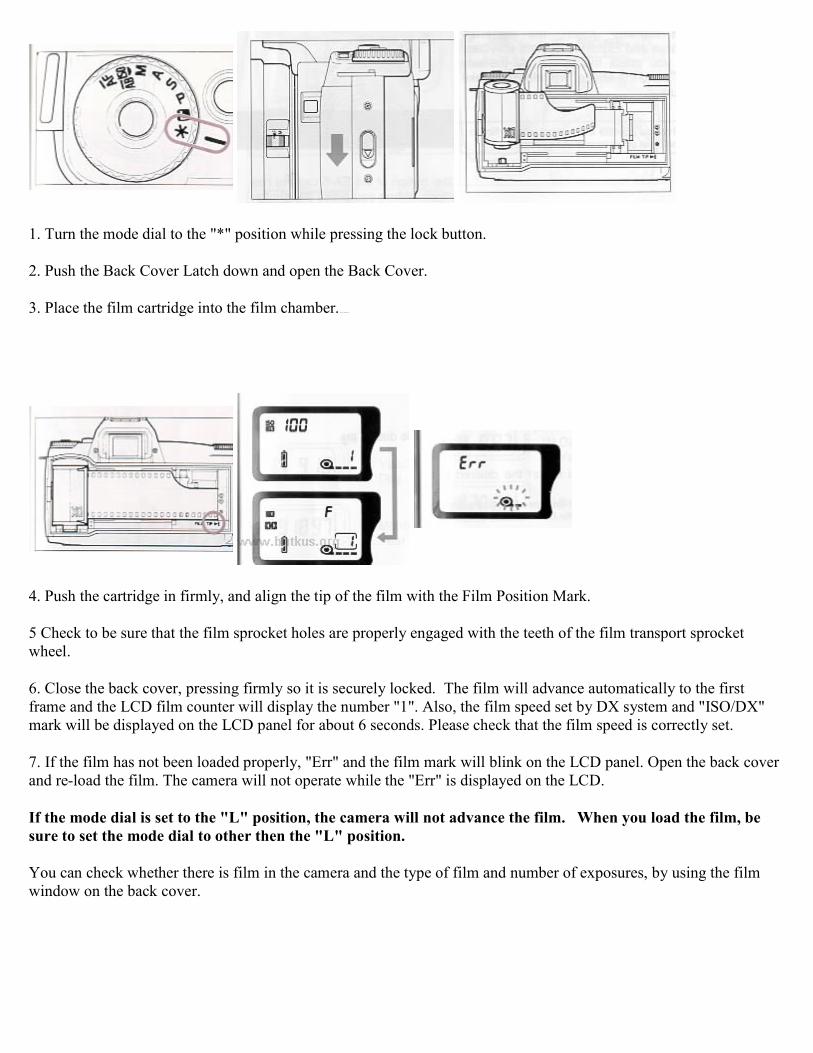
SHUTTER BUTTON
|
The shutter button of the SA-5 camera has two positions. When you press the shutter button "Halfway Down", the camera's Autofocus and Exposure System activates. Then you press the button "All-the-way Down", and the shutter will release to take a picture. Before you start to take pictures, we recommend that you operate the camera without film to become familiar with the "halfway down" position and other operations of the camera.
INSERT THE FILM
When you load and unload the film, please avoid the film or film cartridge from being struck by direct sunlight. The SA 5 camera is compatible with the DX system. When you use a film with DX codes, the camera automatically sets the correct speed of the film. If you happen to use a non-Ding film, please refer to none 17 to set the film speed manually.4www. butku s.org
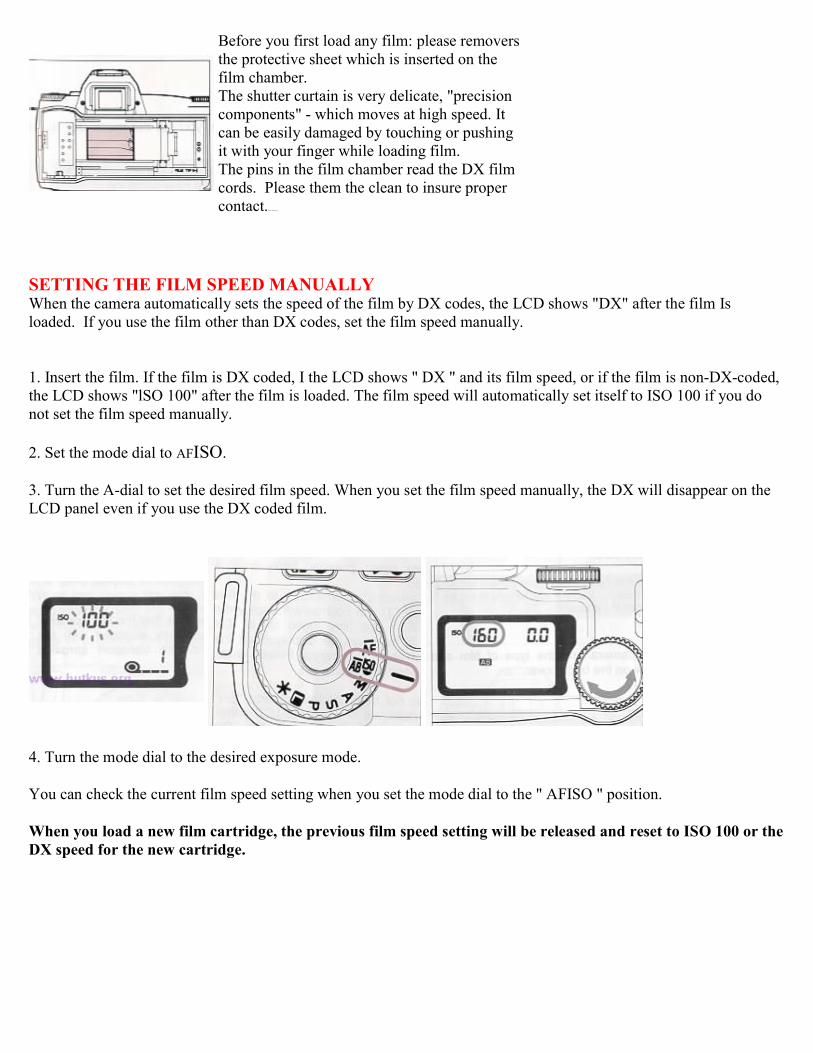
1. Turn the mode dial to the "*" position while pressing the lock button.
2. Push the Back Cover Latch down and open the Back Cover.
3. Place the film cartridge into the film chamber. 4www. butku s.org
4. Push the cartridge in firmly, and align the tip of the film with the Film Position Mark.
5 Check to be sure that the film sprocket holes are properly engaged with the teeth of the film transport sprocket wheel.
6. Close the back cover, pressing firmly so it is securely locked. The film will advance automatically to the first frame and the LCD film counter will display the number "1". Also, the film speed set by DX system and "ISO/DX" mark will be displayed on the LCD panel for about 6 seconds. Please check that the film speed is correctly set.
7. If the film has not been loaded properly, "Err" and the film mark will blink on the LCD panel. Open the back cover and re-load the film. The camera will not operate while the "Err" is displayed on the LCD.
If the mode dial is set to the "L" position, the camera will not advance the film. When you load the film, be sure to set the mode dial to other then the "L" position.
You can check whether there is film in the camera and the type of film and number of exposures, by using the film window on the back cover.
Before you first load any film: please removers the protective sheet which is inserted on the film chamber. The shutter curtain is very delicate, "precision components" - which moves at high speed. It can be easily damaged by touching or pushing it with your finger while loading film. The pins in the film chamber read the DX film cords. Please them the clean to insure proper contact.4www.bu tkus.org
SETTING THE FILM SPEED MANUALLY When the camera automatically sets the speed of the film by DX codes, the LCD shows "DX" after the film Is loaded. If you use the film other than DX codes, set the film speed manually.
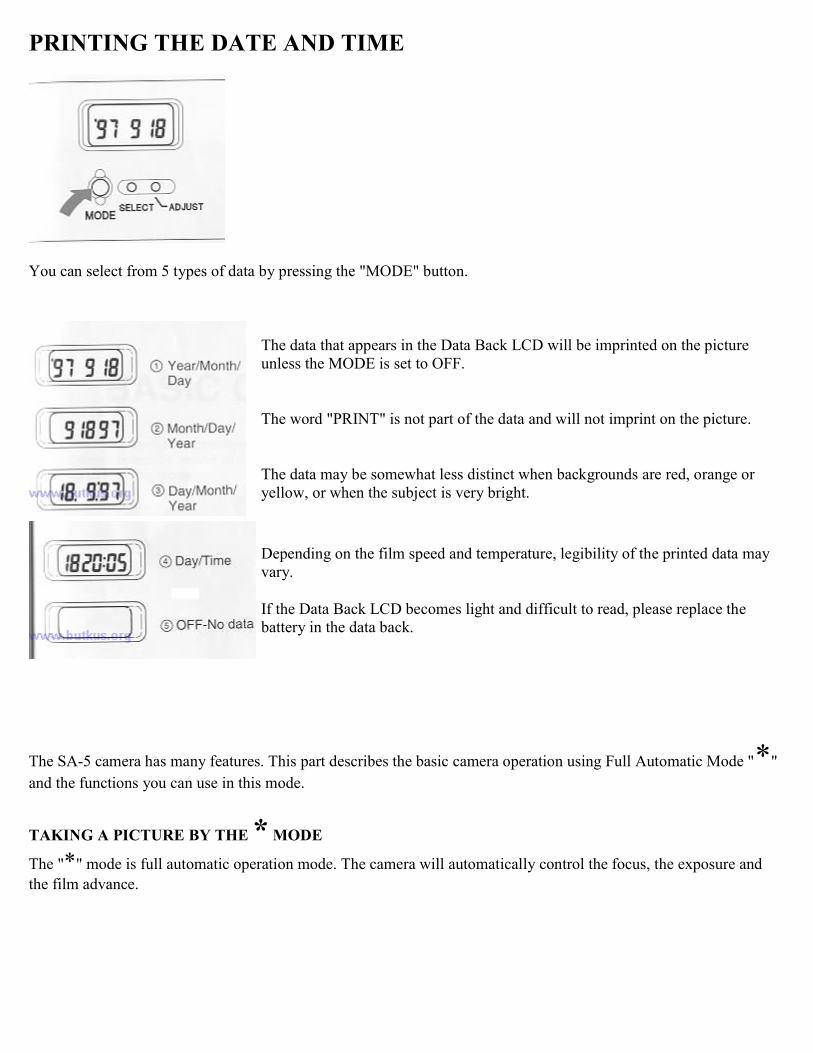
1. Insert the film. If the film is DX coded, I the LCD shows " DX " and its film speed, or if the film is non-DX-coded, the LCD shows "lSO 100" after the film is loaded. The film speed will automatically set itself to ISO 100 if you do not set the film speed manually.
2. Set the mode dial to AFISO.
3. Turn the A-dial to set the desired film speed. When you set the film speed manually, the DX will disappear on the LCD panel even if you use the DX coded film.
4. Turn the mode dial to the desired exposure mode.
You can check the current film speed setting when you set the mode dial to the " AFISO " position.
When you load a new film cartridge, the previous film speed setting will be released and reset to ISO 100 or the DX speed for the new cartridge.
PRINTING THE DATE AND TIME
You can select from 5 types of data by pressing the "MODE" button.
The data that appears in the Data Back LCD will be imprinted on the picture unless the MODE is set to OFF.
The word "PRINT" is not part of the data and will not imprint on the picture.
The data may be somewhat less distinct when backgrounds are red, orange or yellow, or when the subject is very bright.
Depending on the film speed and temperature, legibility of the printed data may vary.
If the Data Back LCD becomes light and difficult to read, please replace the battery in the data back.
The SA-5 camera has many features. This part describes the basic camera operation using Full Automatic Mode "*" and the functions you can use in this mode.
TAKING A PICTURE BY THE * MODE
The "*" mode is full automatic operation mode. The camera will automatically control the focus, the exposure and the film advance.
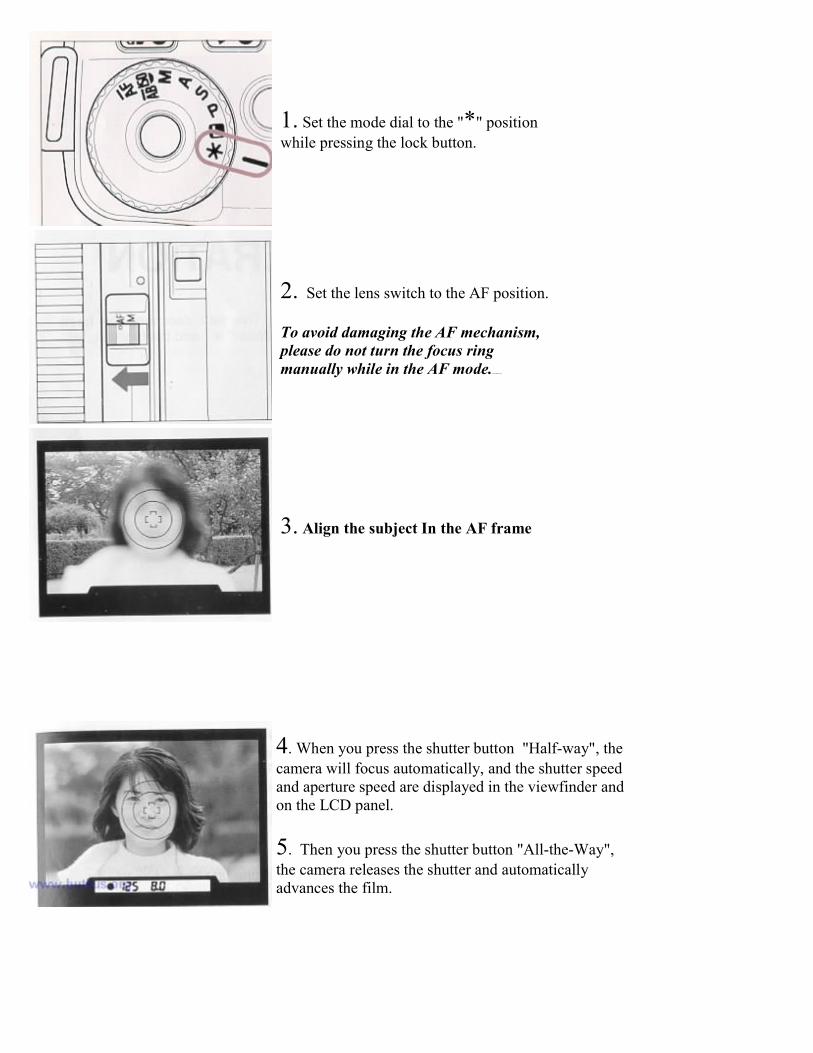
1. Set the mode dial to the "*" position while pressing the lock button.
2. Set the lens switch to the AF position.
To avoid damaging the AF mechanism, please do not turn the focus ring manually while in the AF mode.4www.b utk us.org
3. Align the subject In the AF frame
4. When you press the shutter button "Half-way", the camera will focus automatically, and the shutter speed and aperture speed are displayed in the viewfinder and on the LCD panel.
5. Then you press the shutter button "All-the-Way", the camera releases the shutter and automatically advances the film.
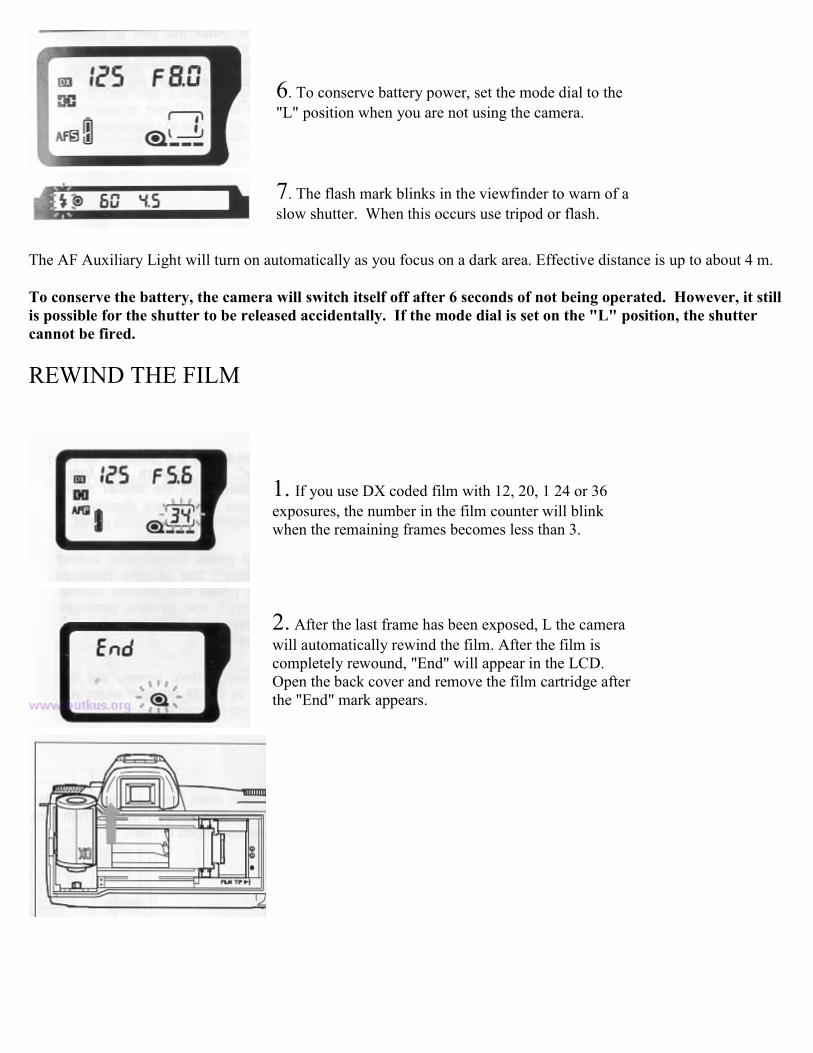
6. To conserve battery power, set the mode dial to the "L" position when you are not using the camera.
7. The flash mark blinks in the viewfinder to warn of a slow shutter. When this occurs use tripod or flash.
The AF Auxiliary Light will turn on automatically as you focus on a dark area. Effective distance is up to about 4 m.
To conserve the battery, the camera will switch itself off after 6 seconds of not being operated. However, it still is possible for the shutter to be released accidentally. If the mode dial is set on the "L" position, the shutter cannot be fired.
REWIND THE FILM
1. If you use DX coded film with 12, 20, 1 24 or 36 exposures, the number in the film counter will blink when the remaining frames becomes less than 3.
2. After the last frame has been exposed, L the camera will automatically rewind the film. After the film is completely rewound, "End" will appear in the LCD. Open the back cover and remove the film cartridge after the "End" mark appears.
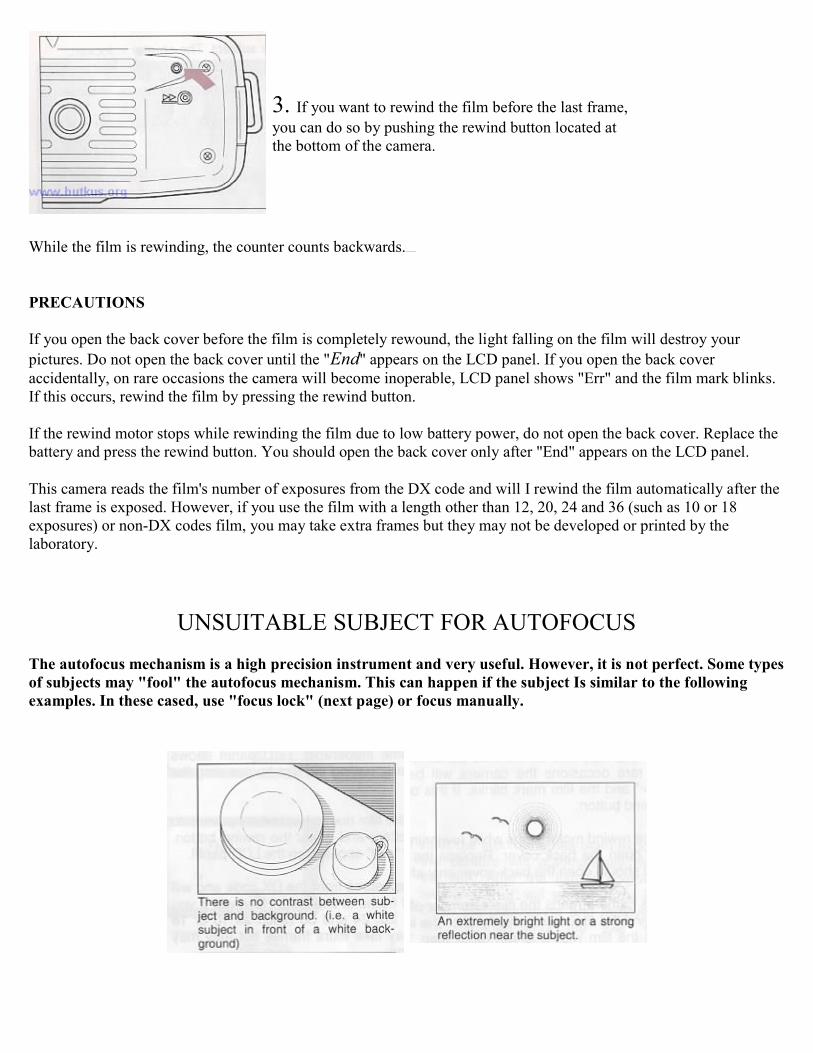
3. If you want to rewind the film before the last frame, you can do so by pushing the rewind button located at the bottom of the camera.
While the film is rewinding, the counter counts backwards. 4www .butkus.org
PRECAUTIONS
If you open the back cover before the film is completely rewound, the light falling on the film will destroy your pictures. Do not open the back cover until the "End" appears on the LCD panel. If you open the back cover accidentally, on rare occasions the camera will become inoperable, LCD panel shows "Err" and the film mark blinks. If this occurs, rewind the film by pressing the rewind button.
If the rewind motor stops while rewinding the film due to low battery power, do not open the back cover. Replace the battery and press the rewind button. You should open the back cover only after "End" appears on the LCD panel.
This camera reads the film's number of exposures from the DX code and will I rewind the film automatically after the last frame is exposed. However, if you use the film with a length other than 12, 20, 24 and 36 (such as 10 or 18 exposures) or non-DX codes film, you may take extra frames but they may not be developed or printed by the laboratory.
UNSUITABLE SUBJECT FOR AUTOFOCUS
The autofocus mechanism is a high precision instrument and very useful. However, it is not perfect. Some types of subjects may "fool" the autofocus mechanism. This can happen if the subject Is similar to the following examples. In these cased, use "focus lock" (next page) or focus manually.
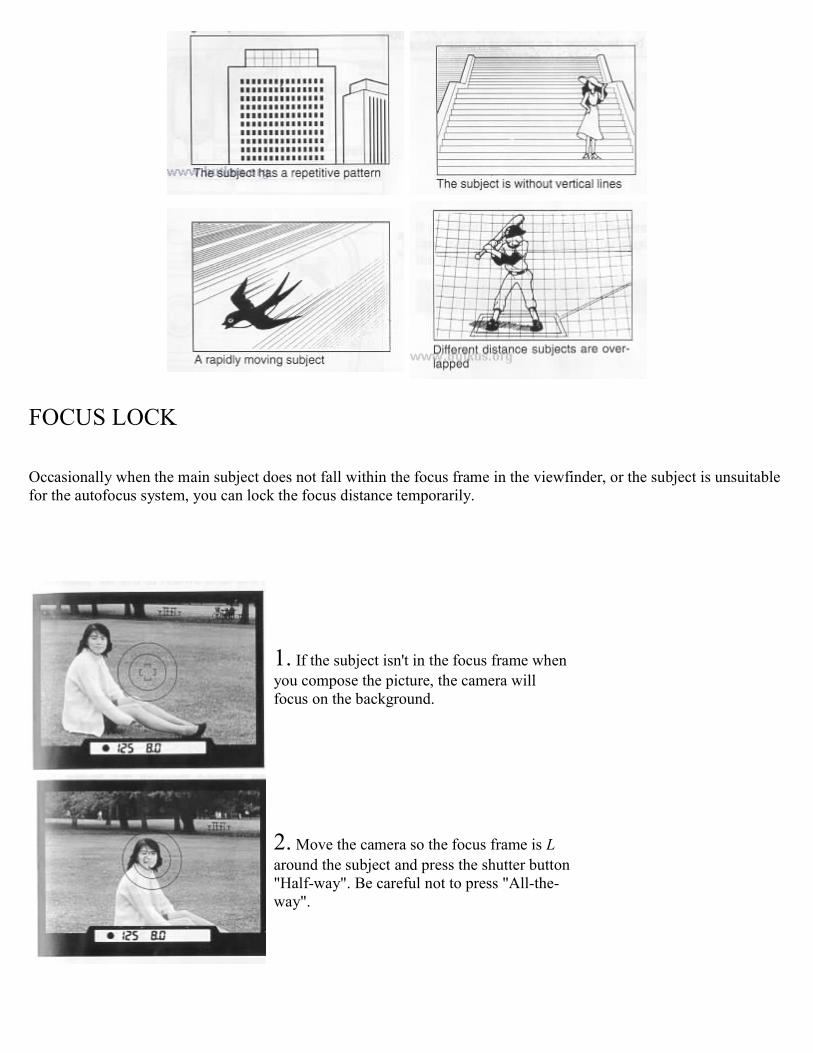
FOCUS LOCK
Occasionally when the main subject does not fall within the focus frame in the viewfinder, or the subject is unsuitable for the autofocus system, you can lock the focus distance temporarily.
1. If the subject isn't in the focus frame when you compose the picture, the camera will focus on the background.
2. Move the camera so the focus frame is L around the subject and press the shutter button "Half-way". Be careful not to press "All-the-way".
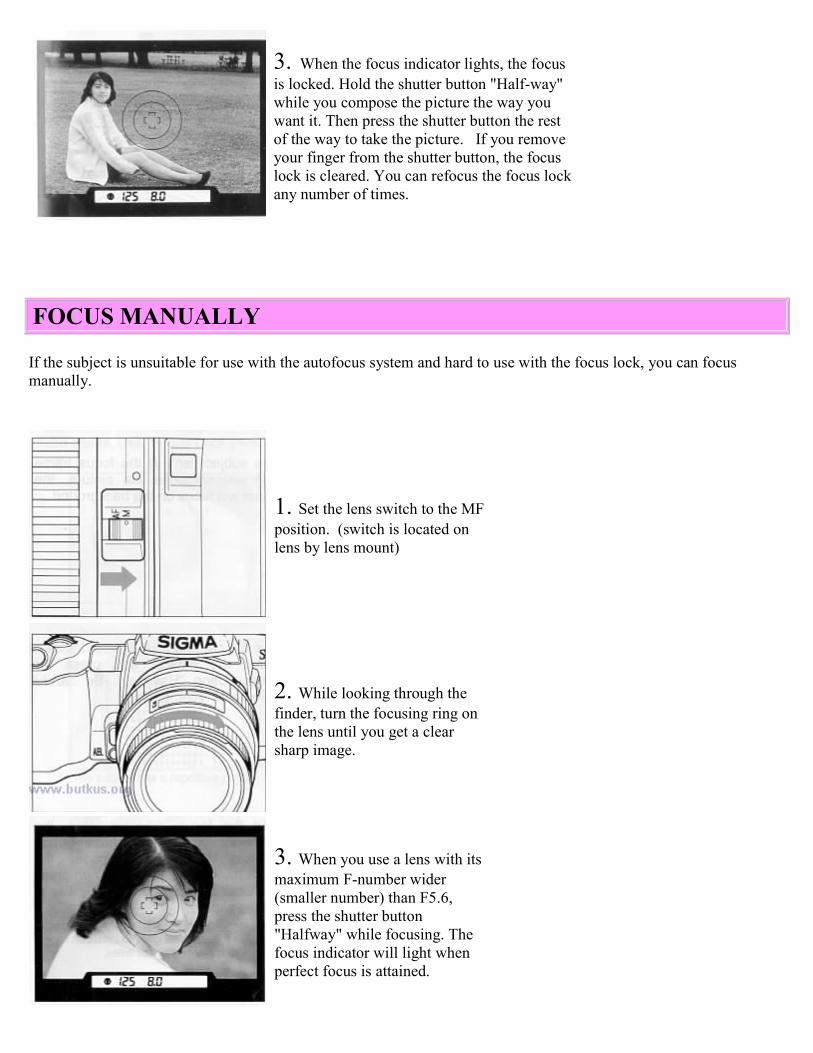
3. When the focus indicator lights, the focus is locked. Hold the shutter button "Half-way" while you compose the picture the way you want it. Then press the shutter button the rest of the way to take the picture. If you remove your finger from the shutter button, the focus lock is cleared. You can refocus the focus lock any number of times.
FOCUS MANUALLY
If the subject is unsuitable for use with the autofocus system and hard to use with the focus lock, you can focus manually.
1. Set the lens switch to the MF position. (switch is located on lens by lens mount)
2. While looking through the finder, turn the focusing ring on the lens until you get a clear sharp image.
3. When you use a lens with its maximum F-number wider (smaller number) than F5.6, press the shutter button "Halfway" while focusing. The focus indicator will light when perfect focus is attained.
USING THE BUILT-IN FLASH
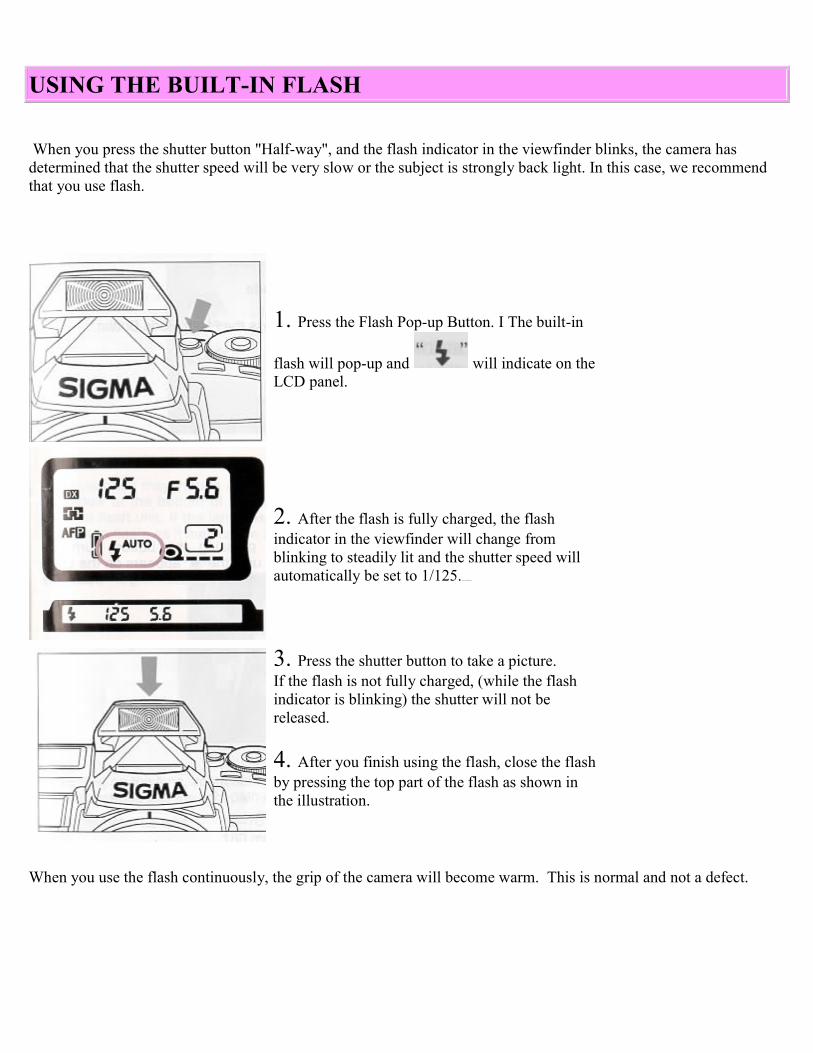
When you press the shutter button "Half-way", and the flash indicator in the viewfinder blinks, the camera has determined that the shutter speed will be very slow or the subject is strongly back light. In this case, we recommend that you use flash.
1. Press the Flash Pop-up Button. I The built-in
flash will pop-up and will indicate on the LCD panel.
2. After the flash is fully charged, the flash indicator in the viewfinder will change from blinking to steadily lit and the shutter speed will automatically be set to 1/125. 4www.butkus.org
3. Press the shutter button to take a picture. If the flash is not fully charged, (while the flash indicator is blinking) the shutter will not be released.
4. After you finish using the flash, close the flash by pressing the top part of the flash as shown in the illustration.
When you use the flash continuously, the grip of the camera will become warm. This is normal and not a defect.
RED EYE REDUCTION
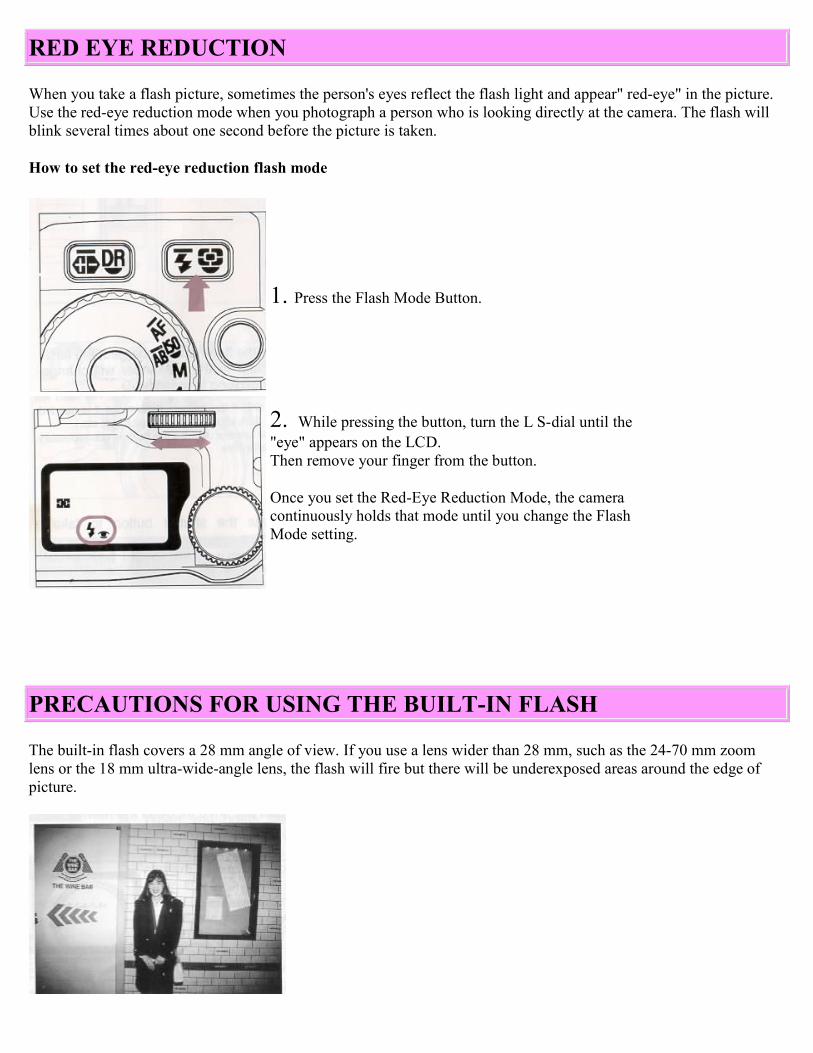
When you take a flash picture, sometimes the person's eyes reflect the flash light and appear" red-eye" in the picture. Use the red-eye reduction mode when you photograph a person who is looking directly at the camera. The flash will blink several times about one second before the picture is taken.
How to set the red-eye reduction flash mode
1. Press the Flash Mode Button.
2. While pressing the button, turn the L S-dial until the "eye" appears on the LCD. Then remove your finger from the button.
Once you set the Red-Eye Reduction Mode, the camera continuously holds that mode until you change the Flash Mode setting.
PRECAUTIONS FOR USING THE BUILT-IN FLASH
The built-in flash covers a 28 mm angle of view. If you use a lens wider than 28 mm, such as the 24-70 mm zoom lens or the 18 mm ultra-wide-angle lens, the flash will fire but there will be underexposed areas around the edge of picture.
The lens hood may intrude into the light path of the built-in flash unit, resulting in a shadow at the bottom of the picture. Either remove the lens hood, or use an external flash unit. If the lens has a built-in lens hood, it should not be used with the built-in flash, as it may cause a shadow in part of the picture.
Depending on the lens, zoom setting, and focusing distance, the following lenses may also intrude into the light path of the flash.4www.b utkus .org
Large Diameter Lenses: 28-70 mm F2.8, 70 - 210 mm F2.8, 180 mm F2.8 etc.
Long Zoom Lenses: 70-300 mm F4-5.6, 28-200 mm F3.8 - 5.6 etc.
Super Telephoto Lenses: 300 mm F2.8, 400 mm F5.6 etc.
Built-in Lens Hood Lens: 21-35 mm F3.5 - 4.2, 14 mm F3.5 etc.
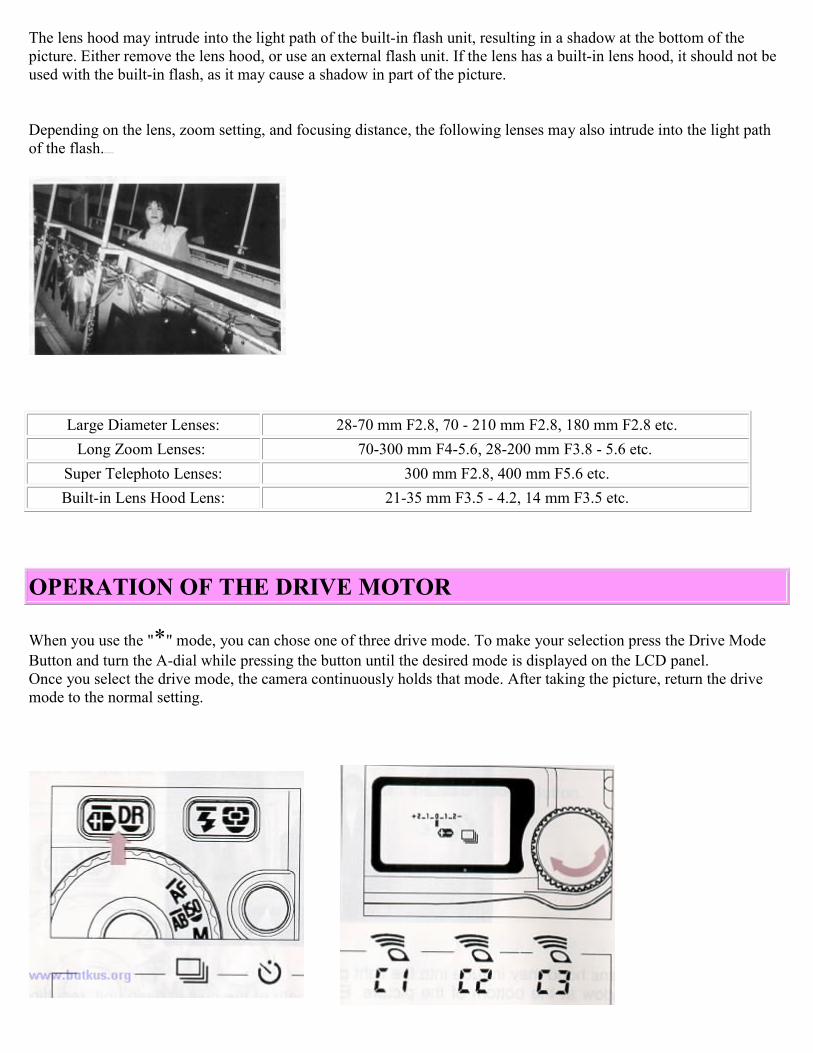
OPERATION OF THE DRIVE MOTOR
When you use the "*" mode, you can chose one of three drive mode. To make your selection press the Drive Mode Button and turn the A-dial while pressing the button until the desired mode is displayed on the LCD panel. Once you select the drive mode, the camera continuously holds that mode. After taking the picture, return the drive mode to the normal setting.

1. CONTINUOUS SHOOTING (C1) While you hold down the shutter button, the camera will take a picture continuously up to three frames per second. If the focus indicator in the viewfinder (green light) is on, focus distance and exposure value is fixed at the settings for the first picture. Note that the picture may be blurry or incorrectly exposed if the subject moves or the brightness changes from the first picture. 4www.butkus.org
When you use the continuous shooting mode with built-in flash, the camera will stop the shooting while the flash is recharging. The interval between pictures becomes much longer.
2. SELF-TIMER (C2) When you want to include yourself in the picture, put the camera on the tripod or other camera support and sue the self timer.
When you press the shutter button, the self-timer ready light will come on, and you will have 10 seconds to get in front of the camera. The LCD panel will also count down the remaining time. Three seconds before the shutter is released, the light will start blinking so every one can be ready for the picture to be taken.
The self-timer will not start if the focus indicator is blinking or the built-in flash is charging.
If you wish to cancel the self-timer, press either one of the mode buttons or turn the mode dial to another position.
The self-timer mode will be cancelled if you set the mode dial to the "L" position.
The focus distance and exposure value is fixed when the self-timer starts. In case of subject movement or brightness change during the count down of the self-timer, pictures may be out of focus or improperly exposed.
* When you start the self-timer and do not look through the viewfinder, please use the finder cap to prevent light from entering the viewfinder and effecting the exposure system.
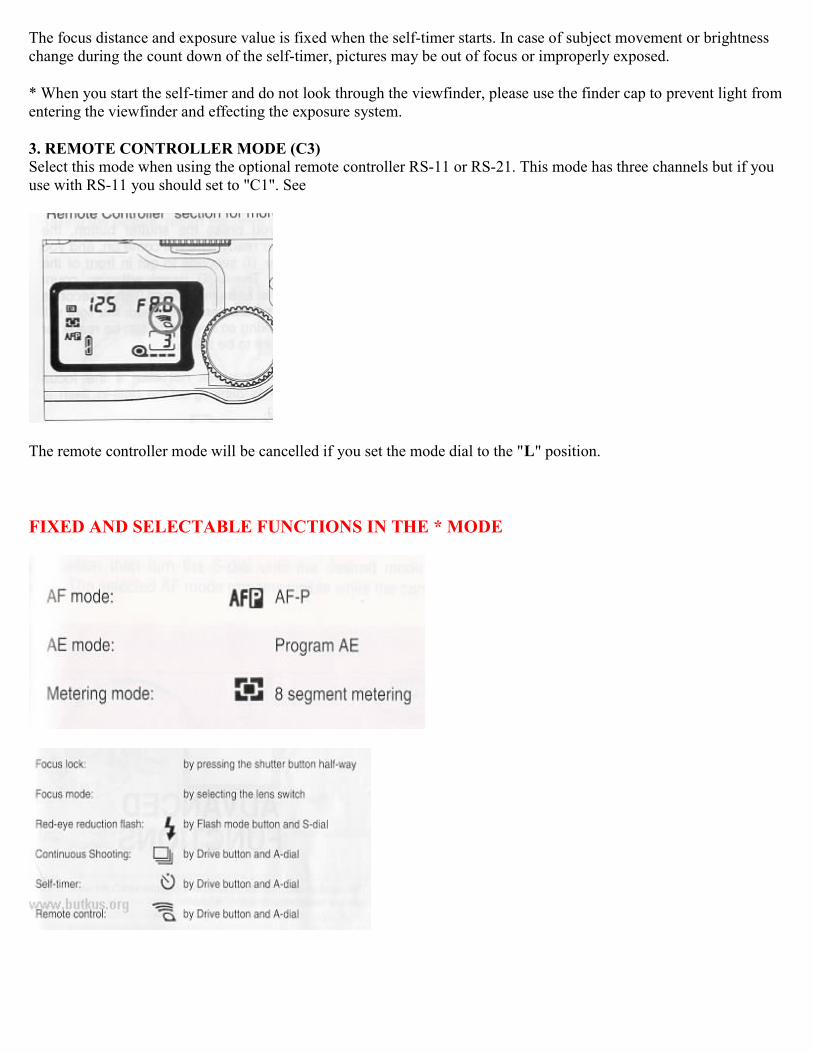
3. REMOTE CONTROLLER MODE (C3) Select this mode when using the optional remote controller RS-11 or RS-21. This mode has three channels but if you use with RS-11 you should set to "C1". See
The remote controller mode will be cancelled if you set the mode dial to the "L" position.
FIXED AND SELECTABLE FUNCTIONS IN THE * MODE
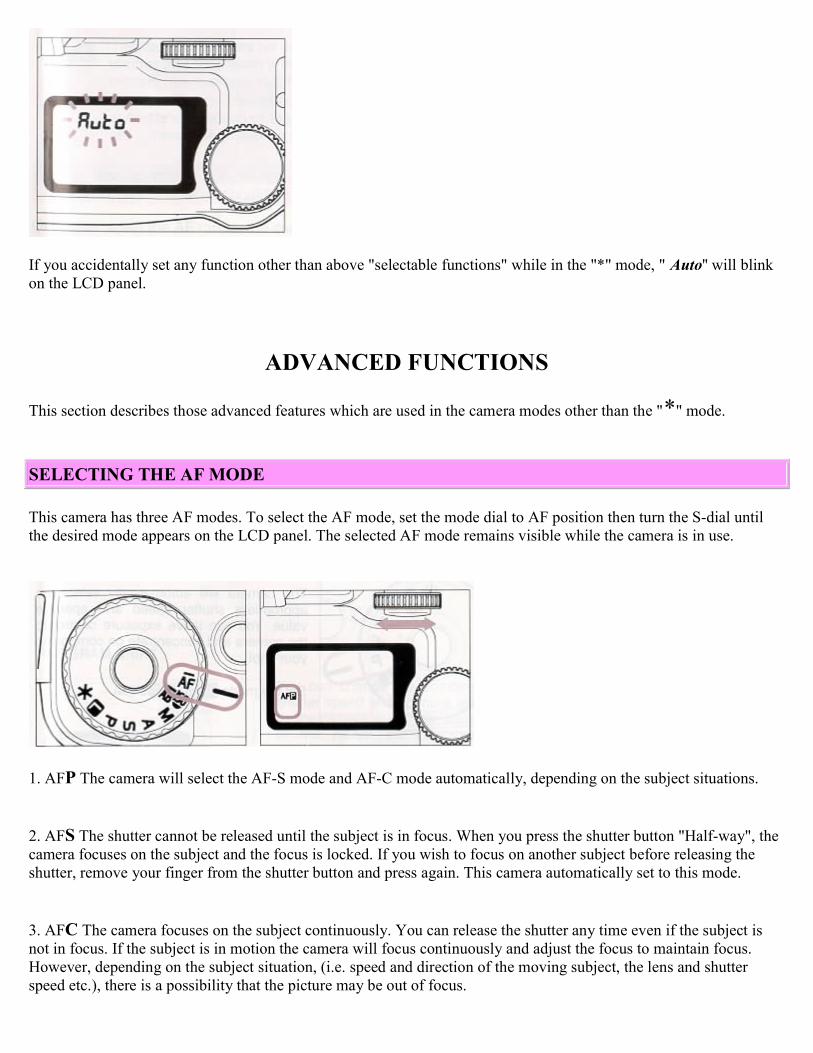
If you accidentally set any function other than above "selectable functions" while in the "*" mode, " Auto'' will blink on the LCD panel.
ADVANCED FUNCTIONS
This section describes those advanced features which are used in the camera modes other than the "*" mode.
SELECTING THE AF MODE
This camera has three AF modes. To select the AF mode, set the mode dial to AF position then turn the S-dial until the desired mode appears on the LCD panel. The selected AF mode remains visible while the camera is in use.
1. AFP The camera will select the AF-S mode and AF-C mode automatically, depending on the subject situations.
2. AFS The shutter cannot be released until the subject is in focus. When you press the shutter button "Half-way", the camera focuses on the subject and the focus is locked. If you wish to focus on another subject before releasing the shutter, remove your finger from the shutter button and press again. This camera automatically set to this mode.
3. AFC The camera focuses on the subject continuously. You can release the shutter any time even if the subject is not in focus. If the subject is in motion the camera will focus continuously and adjust the focus to maintain focus. However, depending on the subject situation, (i.e. speed and direction of the moving subject, the lens and shutter speed etc.), there is a possibility that the picture may be out of focus.
If the lens switch is set on the MF position, the focus mode indication disappears and the focus should be set manually.
Once you select the AF mode, the camera continuously holds that mode until you change the AF mode or set the
mode dial to the * position.4www.butkus.org
SELECTING THE EXPOSURE MODE
This camera has four different exposure modes. To select the exposure mode, turn the mode dial to the desired position. The shutter speed will operate
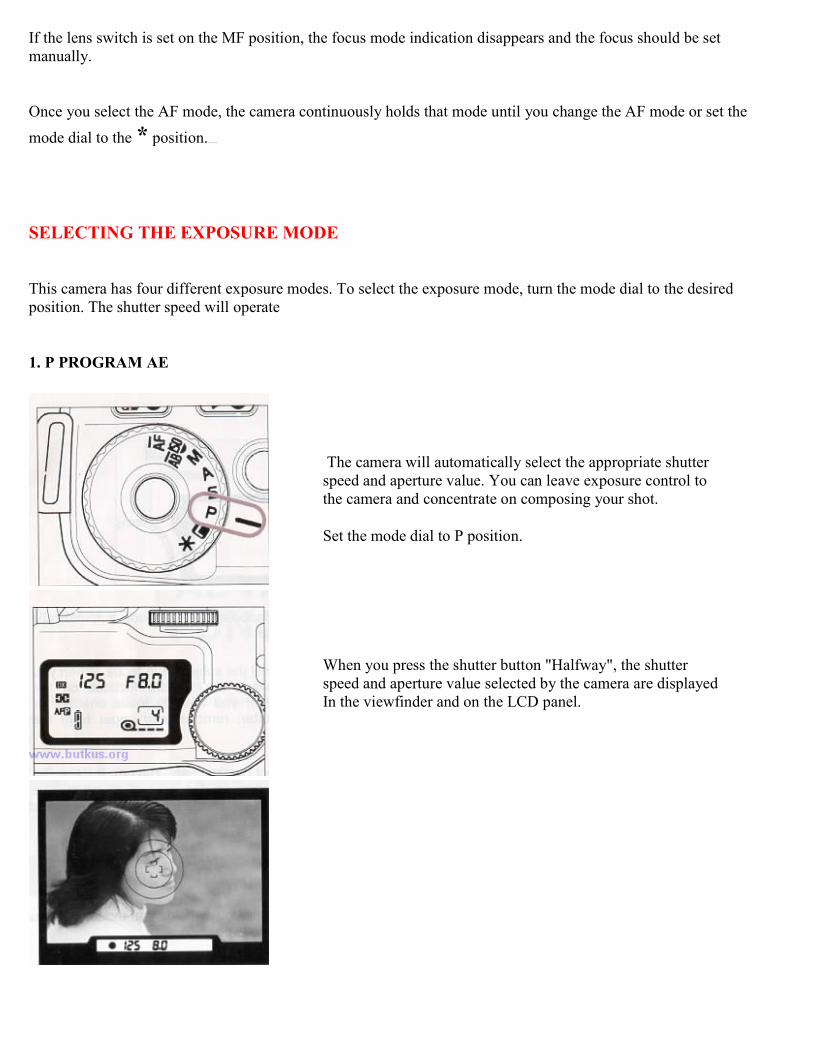
1. P PROGRAM AE
The camera will automatically select the appropriate shutter speed and aperture value. You can leave exposure control to the camera and concentrate on composing your shot.
Set the mode dial to P position.
When you press the shutter button "Halfway", the shutter speed and aperture value selected by the camera are displayed In the viewfinder and on the LCD panel.

If the subject is too bright or too dark, both I shutter speed and aperture value indicators will blink and will show limit values. If the subject is too bright, use an ND filter to reduce the brightness. If the subject is too dark, use the flash.
You can change the combination of the shutter speed and aperture value selected by the camera. If you turn either the S-Dial or the A-Dial, the combination of the shutter speed and aperture value will change within a range of combinations which give the same exposure. The Program Shift will reset the exposure if the camera has switched itself off or if the mode dial is turned away from the P position.
For example, when you use the 28-70 mm F2.8 lens and the camera selects 1!125 and F8, you can shift to any of the following combinations, all of which gives the same exposure.
Shutter Speed
1/1000 1/500 1/250 1/125 1/60 1/30 1/15
Aperture value
F2.8 F4 F5.6 F8 F11 F16 F22
2. S - SHUTTER SPEED PRIORITY AE
When you set the desired shutter speed, the camera will select the appropriate aperture value. You can achieve stop action effects by selecting a fast shutter speed or express the feeling of speed for a moving subject by selecting a slow shutter speed.
Set the mode dial to S position. 4www.butkus.org
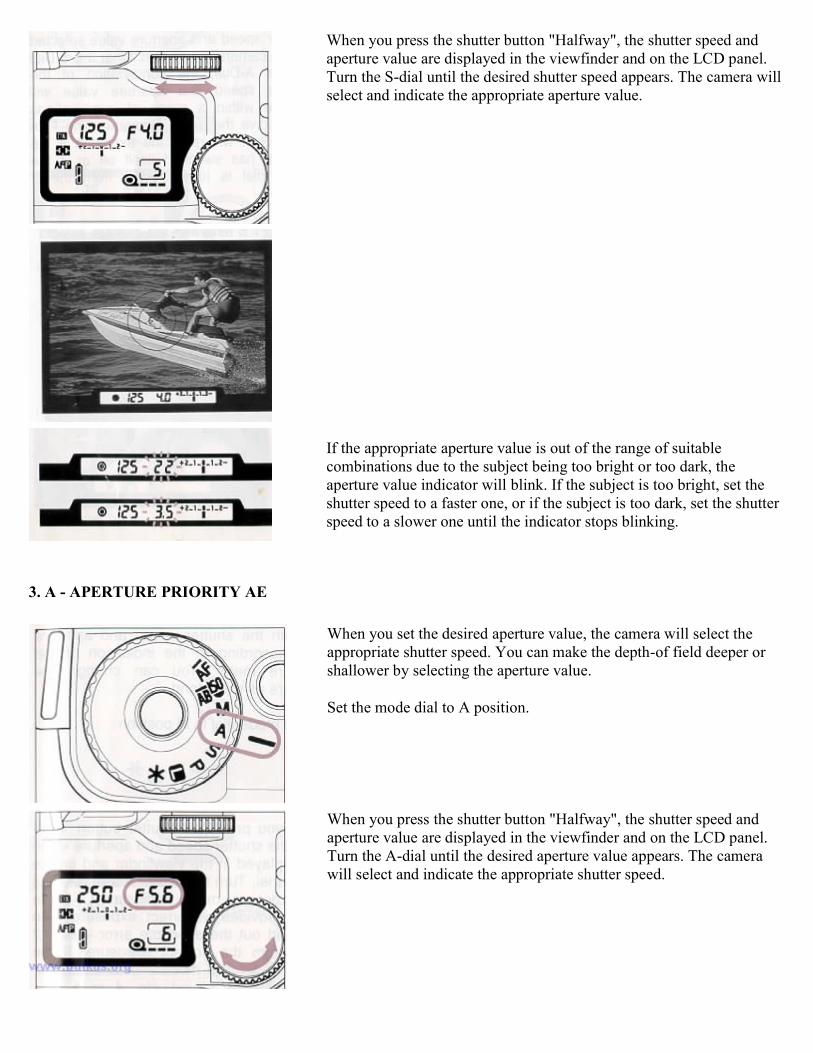
When you press the shutter button "Halfway", the shutter speed and aperture value are displayed in the viewfinder and on the LCD panel. Turn the S-dial until the desired shutter speed appears. The camera will select and indicate the appropriate aperture value.
If the appropriate aperture value is out of the range of suitable combinations due to the subject being too bright or too dark, the aperture value indicator will blink. If the subject is too bright, set the shutter speed to a faster one, or if the subject is too dark, set the shutter speed to a slower one until the indicator stops blinking.
3. A - APERTURE PRIORITY AE
When you set the desired aperture value, the camera will select the appropriate shutter speed. You can make the depth-of field deeper or shallower by selecting the aperture value.
Set the mode dial to A position.
When you press the shutter button "Halfway", the shutter speed and aperture value are displayed in the viewfinder and on the LCD panel. Turn the A-dial until the desired aperture value appears. The camera will select and indicate the appropriate shutter speed.
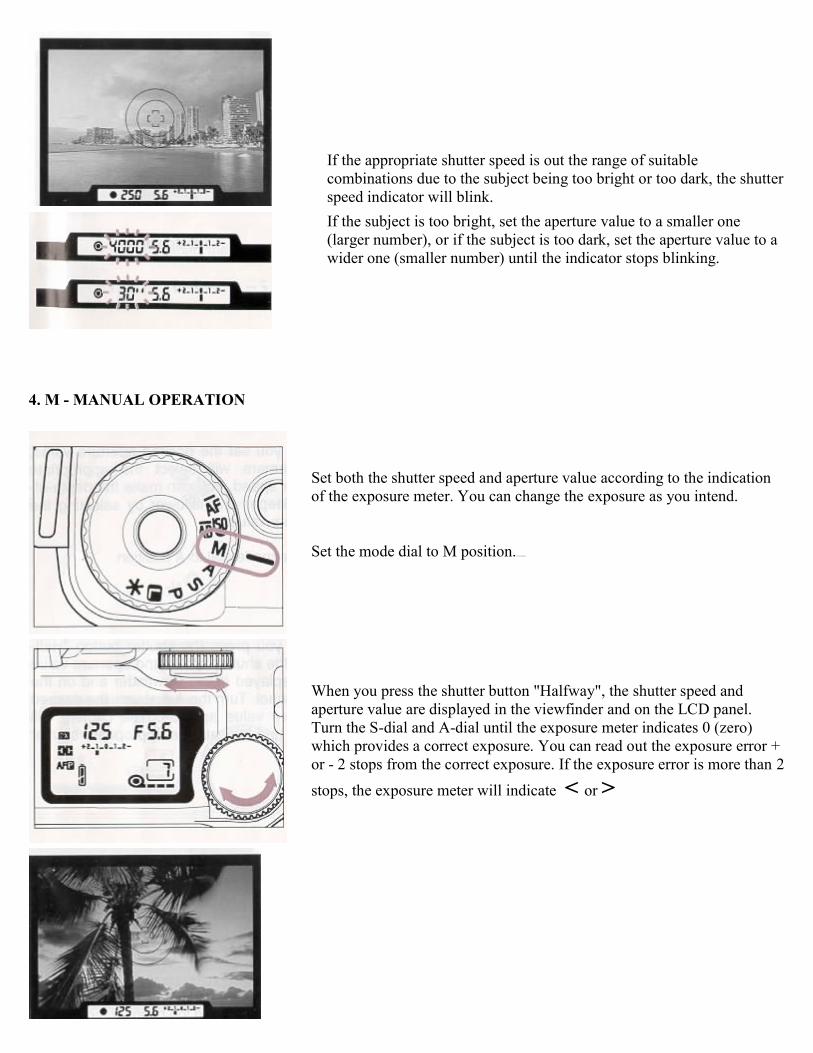
If the appropriate shutter speed is out the range of suitable combinations due to the subject being too bright or too dark, the shutter speed indicator will blink.
If the subject is too bright, set the aperture value to a smaller one (larger number), or if the subject is too dark, set the aperture value to a wider one (smaller number) until the indicator stops blinking.
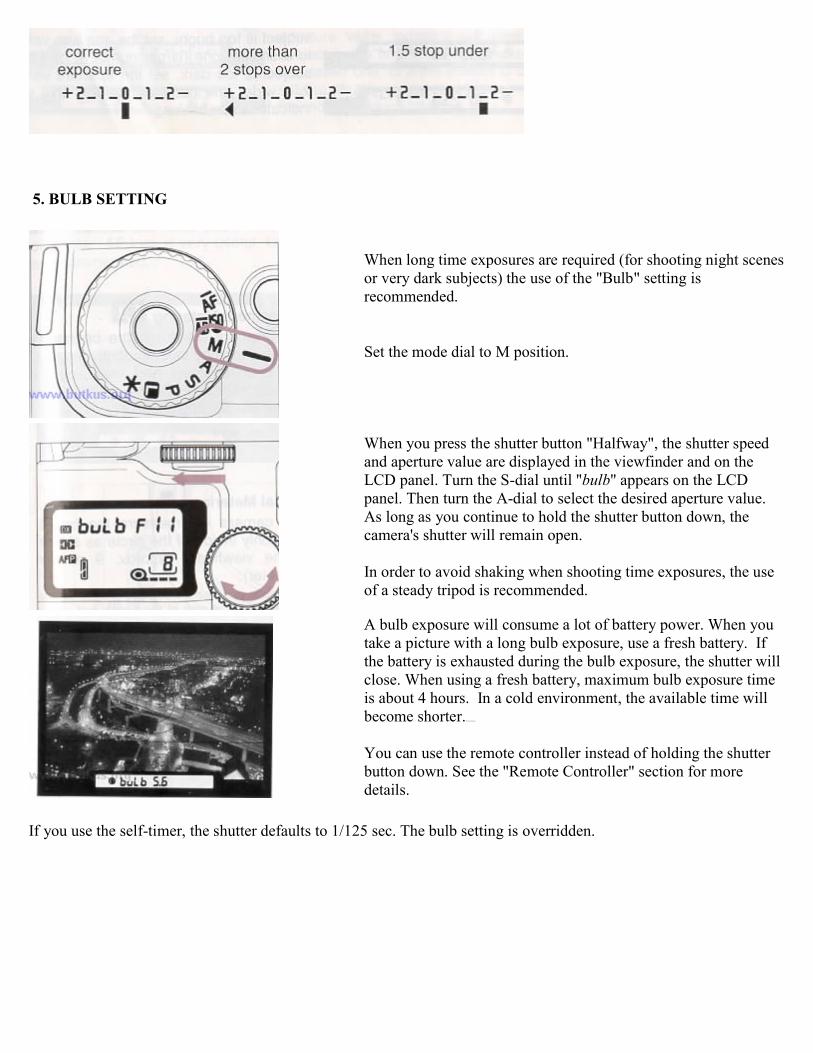
4. M - MANUAL OPERATION
Set both the shutter speed and aperture value according to the indication of the exposure meter. You can change the exposure as you intend.
Set the mode dial to M position. 4www.butkus.org
When you press the shutter button "Halfway", the shutter speed and aperture value are displayed in the viewfinder and on the LCD panel. Turn the S-dial and A-dial until the exposure meter indicates 0 (zero) which provides a correct exposure. You can read out the exposure error + or - 2 stops from the correct exposure. If the exposure error is more than 2
stops, the exposure meter will indicate < or >
5. BULB SETTING
When long time exposures are required (for shooting night scenes or very dark subjects) the use of the "Bulb" setting is recommended.
Set the mode dial to M position.
When you press the shutter button "Halfway", the shutter speed and aperture value are displayed in the viewfinder and on the LCD panel. Turn the S-dial until ''bulb'' appears on the LCD panel. Then turn the A-dial to select the desired aperture value. As long as you continue to hold the shutter button down, the camera's shutter will remain open. In order to avoid shaking when shooting time exposures, the use of a steady tripod is recommended.
A bulb exposure will consume a lot of battery power. When you take a picture with a long bulb exposure, use a fresh battery. If the battery is exhausted during the bulb exposure, the shutter will close. When using a fresh battery, maximum bulb exposure time is about 4 hours. In a cold environment, the available time will become shorter.4www.bu tkus.org You can use the remote controller instead of holding the shutter button down. See the "Remote Controller" section for more details.
If you use the self-timer, the shutter defaults to 1/125 sec. The bulb setting is overridden.
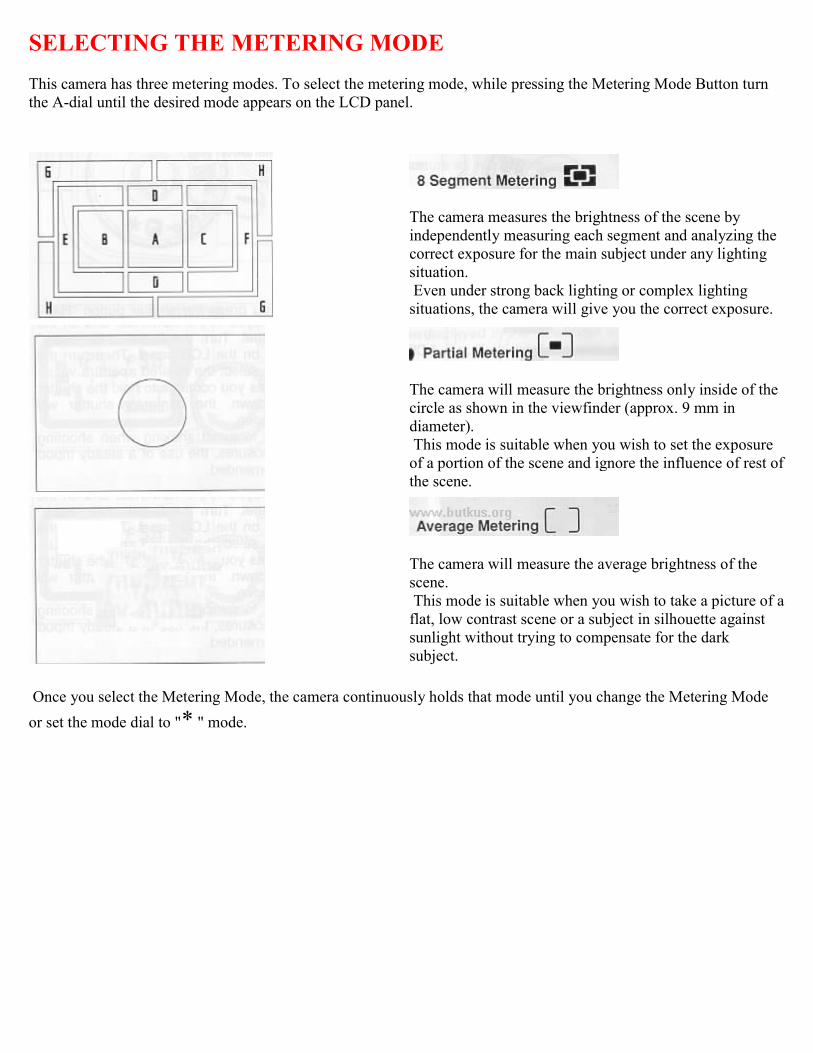
SELECTING THE METERING MODE
This camera has three metering modes. To select the metering mode, while pressing the Metering Mode Button turn the A-dial until the desired mode appears on the LCD panel.
The camera measures the brightness of the scene by independently measuring each segment and analyzing the correct exposure for the main subject under any lighting situation. Even under strong back lighting or complex lighting situations, the camera will give you the correct exposure.
The camera will measure the brightness only inside of the circle as shown in the viewfinder (approx. 9 mm in diameter). This mode is suitable when you wish to set the exposure of a portion of the scene and ignore the influence of rest of the scene.
The camera will measure the average brightness of the scene. This mode is suitable when you wish to take a picture of a flat, low contrast scene or a subject in silhouette against sunlight without trying to compensate for the dark subject.
Once you select the Metering Mode, the camera continuously holds that mode until you change the Metering Mode
or set the mode dial to "* " mode.
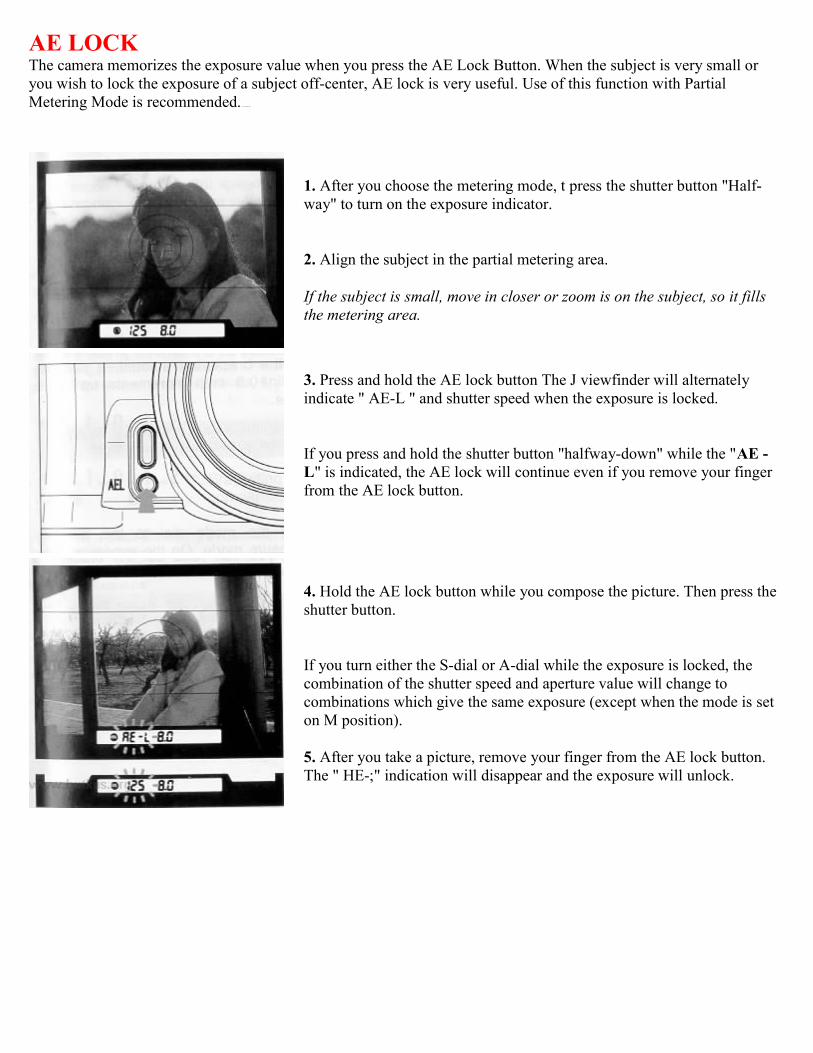
AE LOCK The camera memorizes the exposure value when you press the AE Lock Button. When the subject is very small or you wish to lock the exposure of a subject off-center, AE lock is very useful. Use of this function with Partial Metering Mode is recommended. 4www.bu tkus.org
1. After you choose the metering mode, t press the shutter button "Half-way" to turn on the exposure indicator.
2. Align the subject in the partial metering area.
If the subject is small, move in closer or zoom is on the subject, so it fills the metering area.
3. Press and hold the AE lock button The J viewfinder will alternately indicate " AE-L " and shutter speed when the exposure is locked.
If you press and hold the shutter button "halfway-down" while the "AE -L" is indicated, the AE lock will continue even if you remove your finger from the AE lock button.
4. Hold the AE lock button while you compose the picture. Then press the shutter button.
If you turn either the S-dial or A-dial while the exposure is locked, the combination of the shutter speed and aperture value will change to combinations which give the same exposure (except when the mode is set on M position).
5. After you take a picture, remove your finger from the AE lock button. The " HE-;" indication will disappear and the exposure will unlock.
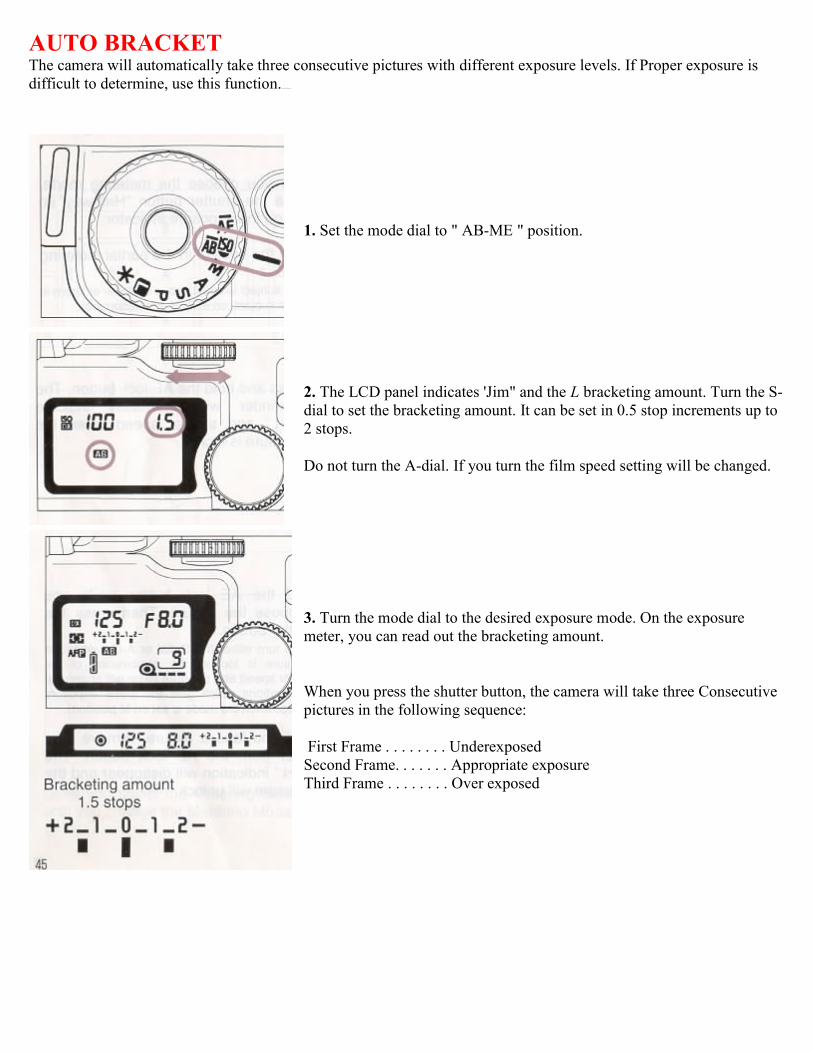
AUTO BRACKET The camera will automatically take three consecutive pictures with different exposure levels. If Proper exposure is difficult to determine, use this function. 4www.butkus.org
1. Set the mode dial to " AB-ME " position.
2. The LCD panel indicates 'Jim" and the L bracketing amount. Turn the S-dial to set the bracketing amount. It can be set in 0.5 stop increments up to 2 stops.
Do not turn the A-dial. If you turn the film speed setting will be changed.
3. Turn the mode dial to the desired exposure mode. On the exposure meter, you can read out the bracketing amount.
When you press the shutter button, the camera will take three Consecutive pictures in the following sequence: First Frame . . . . . . . . Underexposed Second Frame. . . . . . . Appropriate exposure Third Frame . . . . . . . . Over exposed
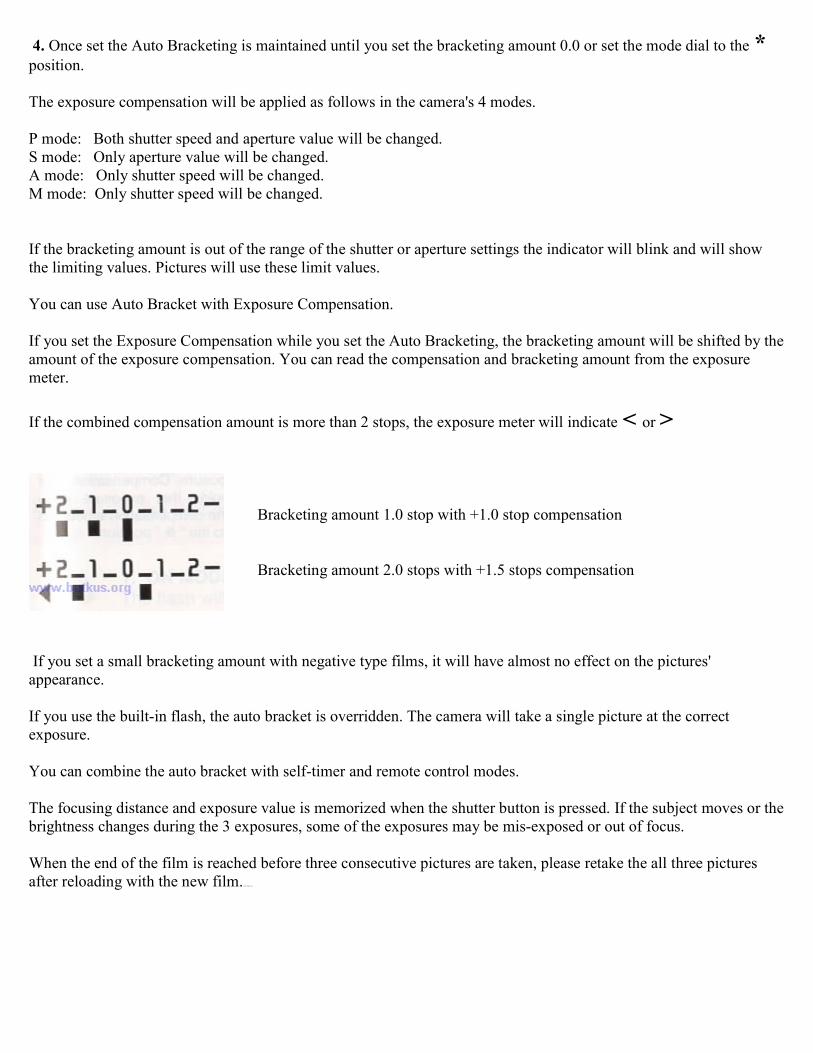
4. Once set the Auto Bracketing is maintained until you set the bracketing amount 0.0 or set the mode dial to the * position. The exposure compensation will be applied as follows in the camera's 4 modes. P mode: Both shutter speed and aperture value will be changed. S mode: Only aperture value will be changed. A mode: Only shutter speed will be changed. M mode: Only shutter speed will be changed.
If the bracketing amount is out of the range of the shutter or aperture settings the indicator will blink and will show the limiting values. Pictures will use these limit values. You can use Auto Bracket with Exposure Compensation. If you set the Exposure Compensation while you set the Auto Bracketing, the bracketing amount will be shifted by the amount of the exposure compensation. You can read the compensation and bracketing amount from the exposure meter.
If the combined compensation amount is more than 2 stops, the exposure meter will indicate < or >
Bracketing amount 1.0 stop with +1.0 stop compensation
Bracketing amount 2.0 stops with +1.5 stops compensation
If you set a small bracketing amount with negative type films, it will have almost no effect on the pictures' appearance. If you use the built-in flash, the auto bracket is overridden. The camera will take a single picture at the correct exposure. You can combine the auto bracket with self-timer and remote control modes. The focusing distance and exposure value is memorized when the shutter button is pressed. If the subject moves or the brightness changes during the 3 exposures, some of the exposures may be mis-exposed or out of focus. When the end of the film is reached before three consecutive pictures are taken, please retake the all three pictures after reloading with the new film.4www.butkus.org
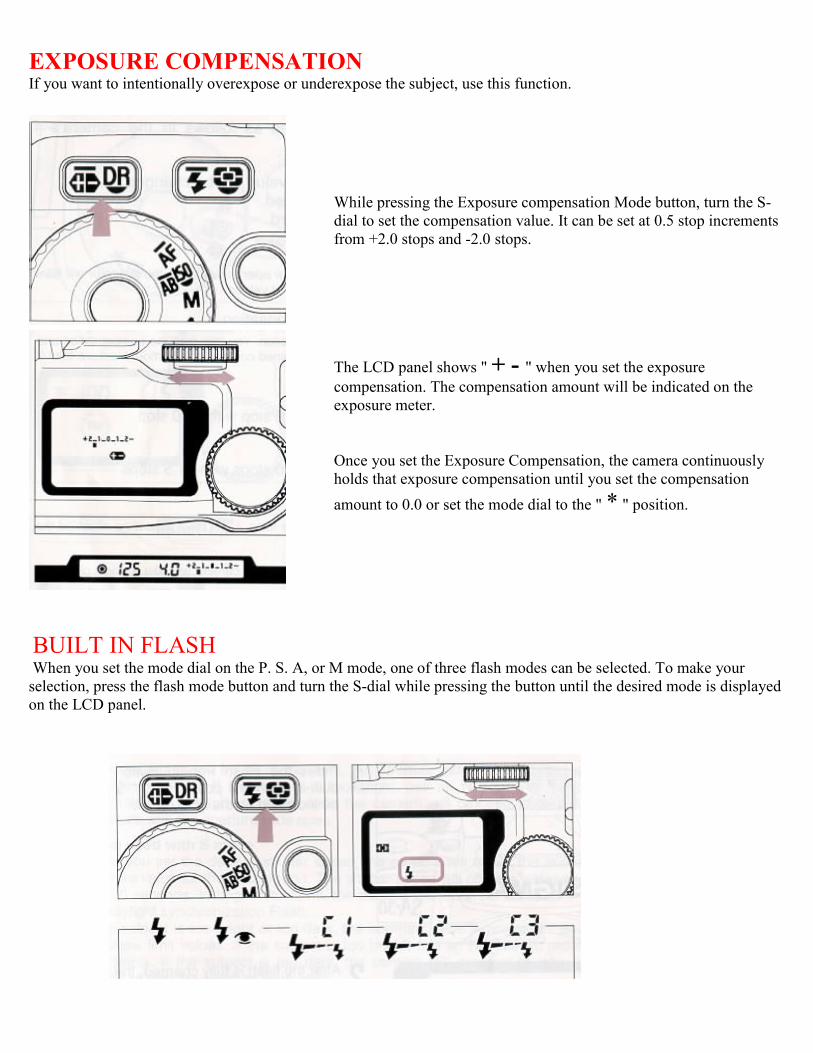
EXPOSURE COMPENSATION If you want to intentionally overexpose or underexpose the subject, use this function.
While pressing the Exposure compensation Mode button, turn the S-dial to set the compensation value. It can be set at 0.5 stop increments from +2.0 stops and -2.0 stops.
The LCD panel shows " + - " when you set the exposure compensation. The compensation amount will be indicated on the exposure meter.
Once you set the Exposure Compensation, the camera continuously holds that exposure compensation until you set the compensation
amount to 0.0 or set the mode dial to the " * " position.
BUILT IN FLASH When you set the mode dial on the P. S. A, or M mode, one of three flash modes can be selected. To make your selection, press the flash mode button and turn the S-dial while pressing the button until the desired mode is displayed on the LCD panel.

Do not use the built-in flash when the external flash is mounted onto the hot shoe.
1. ON MODE The flash will fire normally.
2. RED-EYE REDUCTION FLASH ON mode with Red-Eye reduction flash. See page 29 for more details.
3. WIRELESS FLASH MODE
When you use the optional external flash SIGMA EF-430, wireless flash photography is possible. Please refer to the instruction book of EF-430 for more details.
1. Press the Flash Pop-up Button. The I built-in flash will pop-up and "
" will be indicated on the LCD panel.
2. After the flash is fully charged, the flash indicator in the viewfinder will change from blinking to steady.
3. Press the shutter button to take a picture. If the flash is not fully charged, (the flash indicator is blinking) the shutter can not be released.

4. After you finish using the flash, close the flash head by pressing the top part of the flash as shown in the illustration.
Excessive consecutive firing of the built-in flash may cause impairment to the flash component. Do not fire the flash more than 36 times continuously and, after a significant period of continuous firing, rest the flash at east 10 minutes to allow the component to cool. Also, when you use the flash continuously, the grip of the camera will become warm. This is normal and not a defect.
When used with P mode The camera will select the appropriate aperture value for any background. In bright situations, the camera will calculate the appropriate flash amount to obtain correct exposure for both the subject and background. (Daylight synchronization Flash) If the subject is too bright or too dark, the aperture indicator will blink and will show limit values. If the subject is too bright, use an ND filter to reduce the brightness. If the subject is too dark, the camera will proceed to take a flash exposure with the aperture wide open.
When used with S mode When you set the desired shutter speed, the camera will select the appropriate aperture value for the background. The shutter speed will operate between 1/125 and 30 seconds. In bright situations, the camera will work the same as P mode for Daylight synchronization Flash. If the subject is too bright or too dark, the aperture value indicator will blink and will show limit values. If the subject is too bright, use an ND filter to reduce the brightness. If the subject is too dark, the camera will proceed to take a flash exposure with the aperture wide open. If you adjust the shutter speed until the aperture value indicator stop blinking, you can get an appropriate exposure for both the subject and background. (Slow Synchronization)
When used with A mode When you set the desired aperture value, the camera will select the appropriate shutter speed for the background. The shutter speed will operate between 1/125 and 30 seconds. In bright situations, the camera will work the same as P mode for Daylight synchronization Flash. If the subject is too bright or too dark, the shutter speed indicator will blink and will show limit values. If the subject is too bright, use an ND filter to reduce the brightness. If the subject is too dark, set the aperture value to a wider one. If you adjust the Aperture value until the shutter speed indicator stop blinking, you can get an appropriate exposure for both the subject and background. (Slow Synchronization)
When used with M mode You can set the desired shutter speed and aperture value. The shutter speed will operate between 1/125 and 30 seconds. If you adjust exposure until the exposure meter indicates O (zero), the camera will work as for Daylight synchronization Flash or Slow Synchronization.
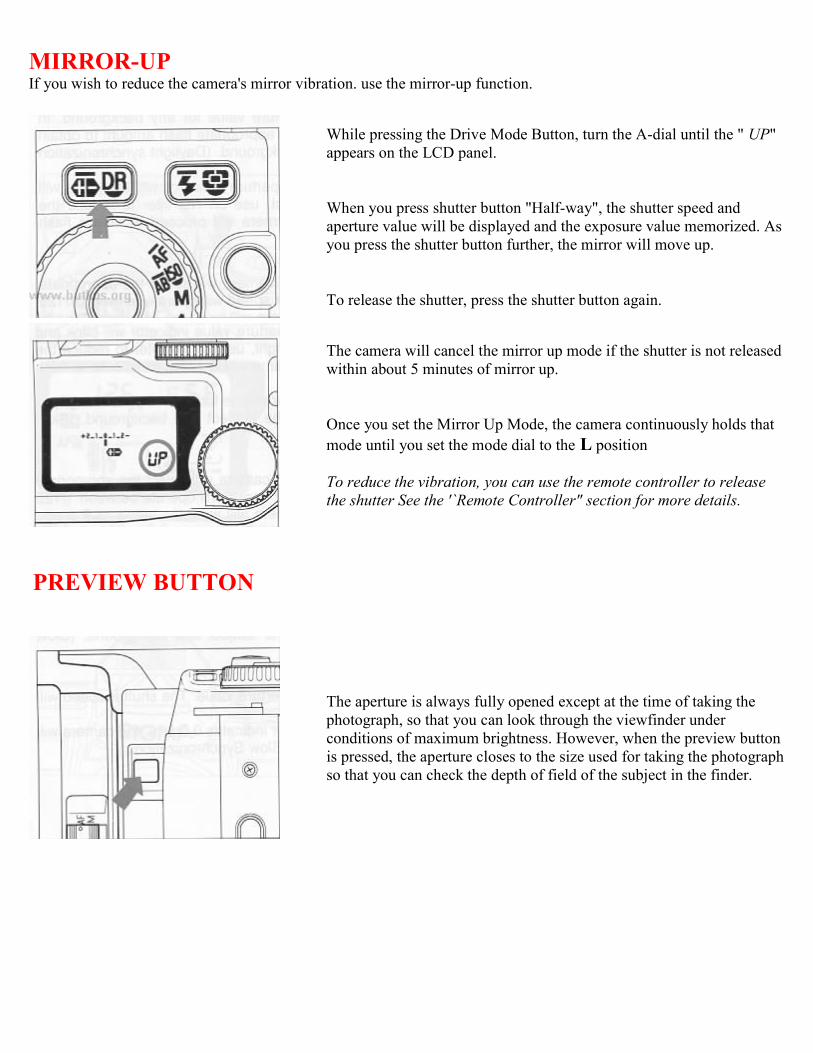
MIRROR-UP If you wish to reduce the camera's mirror vibration. use the mirror-up function.
While pressing the Drive Mode Button, turn the A-dial until the " UP" appears on the LCD panel.
When you press shutter button "Half-way", the shutter speed and aperture value will be displayed and the exposure value memorized. As you press the shutter button further, the mirror will move up.
To release the shutter, press the shutter button again.
The camera will cancel the mirror up mode if the shutter is not released within about 5 minutes of mirror up.
Once you set the Mirror Up Mode, the camera continuously holds that mode until you set the mode dial to the L position
To reduce the vibration, you can use the remote controller to release the shutter See the '`Remote Controller" section for more details.
PREVIEW BUTTON
The aperture is always fully opened except at the time of taking the photograph, so that you can look through the viewfinder under conditions of maximum brightness. However, when the preview button is pressed, the aperture closes to the size used for taking the photograph so that you can check the depth of field of the subject in the finder.
OPTIONAL ACCESSORIES
To expandable theSA-5's photographing ability, we have developed some innovative accessorie swhich are described in this section.
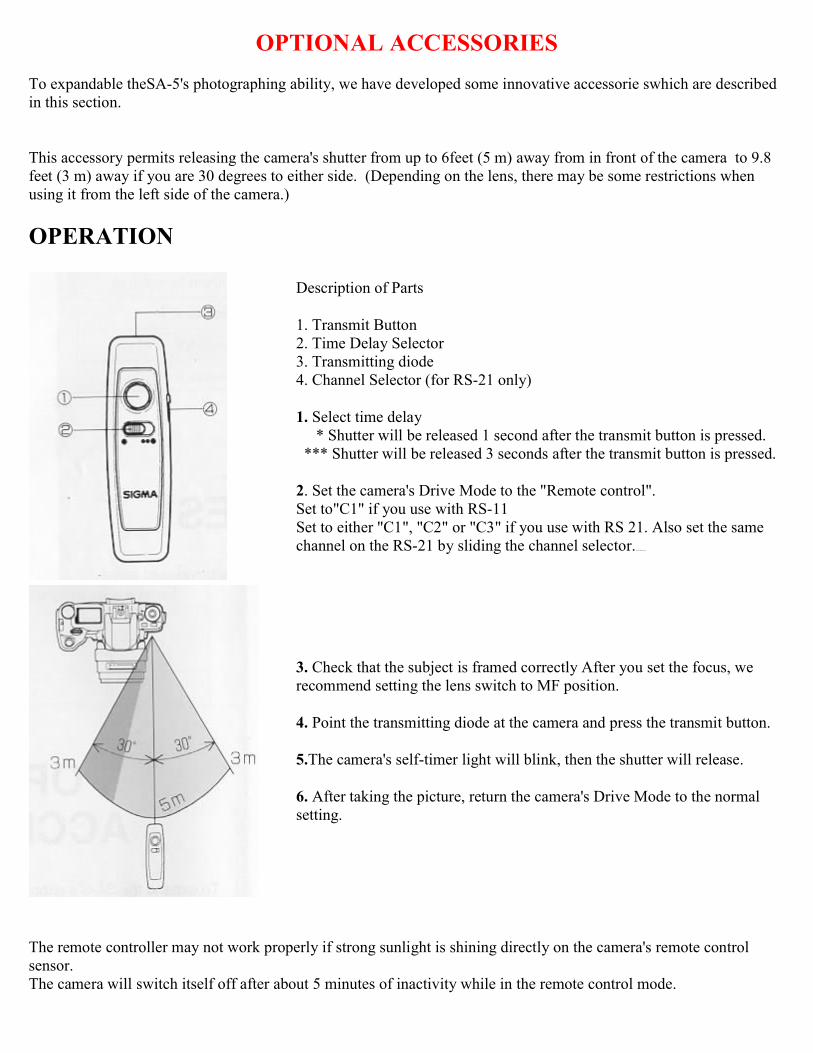
This accessory permits releasing the camera's shutter from up to 6feet (5 m) away from in front of the camera to 9.8 feet (3 m) away if you are 30 degrees to either side. (Depending on the lens, there may be some restrictions when using it from the left side of the camera.)
OPERATION
Description of Parts
1. Transmit Button 2. Time Delay Selector 3. Transmitting diode 4. Channel Selector (for RS-21 only)
1. Select time delay * Shutter will be released 1 second after the transmit button is pressed. *** Shutter will be released 3 seconds after the transmit button is pressed.
2. Set the camera's Drive Mode to the "Remote control". Set to"C1" if you use with RS-11 Set to either "C1", "C2" or "C3" if you use with RS 21. Also set the same channel on the RS-21 by sliding the channel selector. 4www.butkus.org
3. Check that the subject is framed correctly After you set the focus, we recommend setting the lens switch to MF position.
4. Point the transmitting diode at the camera and press the transmit button.
5.The camera's self-timer light will blink, then the shutter will release.
6. After taking the picture, return the camera's Drive Mode to the normal setting.
The remote controller may not work properly if strong sunlight is shining directly on the camera's remote control sensor. The camera will switch itself off after about 5 minutes of inactivity while in the remote control mode.

While the built-in flash is charging, the remote control will not operate.
The light entering the viewfinder will effect the exposure system of the camera. Use the finder cap while using the remote controller.
ADDITIONAL FEATURE OF REMOTE CONTROLLER 1. Use with Bulb Exposure If the camera is set on both Bulb Exposure and Remote Control, the first release of the remote controller will open the camera's shutter, and the second release will close it. While the shutter is open, the "Bulb" indication on the LCD panel will blink. 4www.butkus.org
2. Use with Mirror Up When the camera's mirror is up, the remote control mark will appear on the LCD panel and remote control sensor will turn on automatically. You can release the shutter by using remote controller. In this mode, you can release the shutter at any channel selector position (C1, C2 or C3). 3. Use with bulb Exposure and Mirror Up If the camera is set on both Bulb Exposure and Mirror Up, you can open and close the shutter by using remote controller. Replacing the remote controller battery Use two CR1220 3 V Lithium coin type batteries 1 ) Remove the bottom cover screw with a screwdriver 2) Open the bottom cover and replace batteries 3) Replace the cover and tighten the screw. Be careful not to over tighten. 4) Check controller operation after replacing batteries.
PANORAMA ADAPTOR PS-300 If you attach the Parorama Adaptor PS-300 onto the film guide before you insert the film, Panorama (stretch type) photography is possible.
(Webmaster: This device will REQUIRE YOU to take a whole roll in panoramic mode. Remember, every different processor charges a good deal more for the larger panoramic shots. This is where finding a 12 exposure roll comes in handy.)
1. Open the back cover and attach the PS-300 as shown in the illustration. The shutter curtain is a very delicate, precision component, which moves at high speed. It can be easily damaged by touching or pushing it with your finger or the PS-300 while attaching it. Be careful not to touch it.
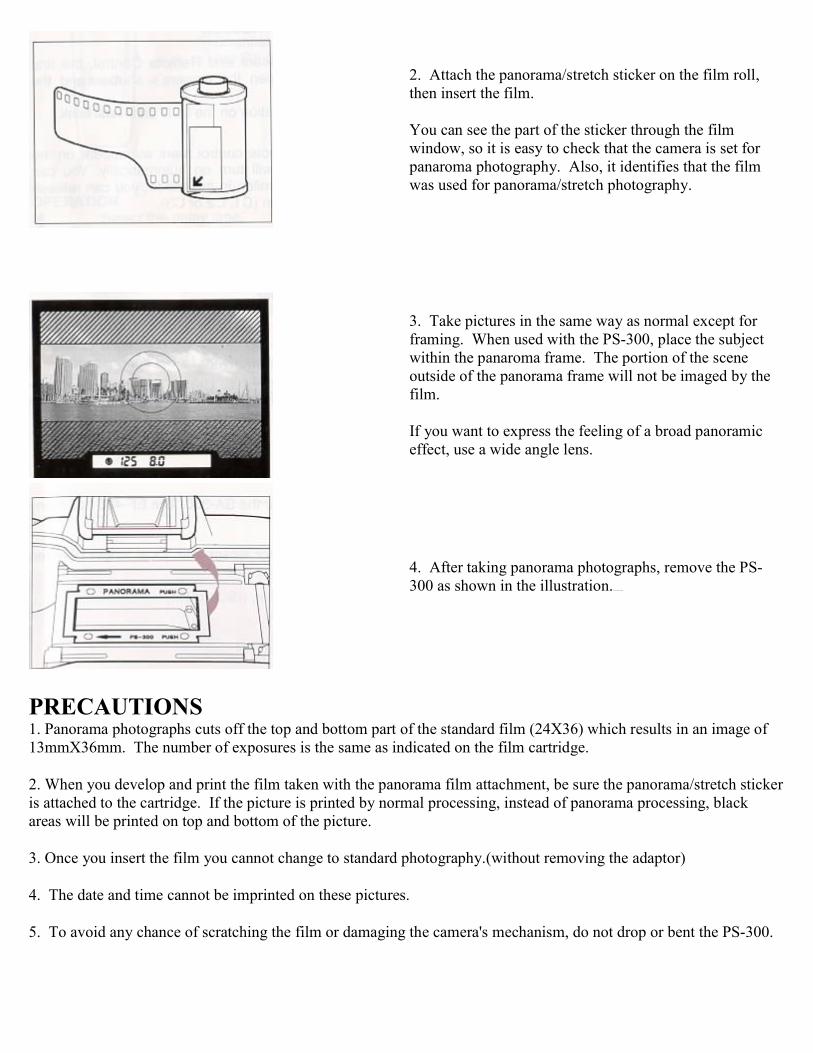
2. Attach the panorama/stretch sticker on the film roll, then insert the film. You can see the part of the sticker through the film window, so it is easy to check that the camera is set for panaroma photography. Also, it identifies that the film was used for panorama/stretch photography.
3. Take pictures in the same way as normal except for framing. When used with the PS-300, place the subject within the panaroma frame. The portion of the scene outside of the panorama frame will not be imaged by the film. If you want to express the feeling of a broad panoramic effect, use a wide angle lens.
4. After taking panorama photographs, remove the PS-300 as shown in the illustration. 4www.butkus.org
PRECAUTIONS 1. Panorama photographs cuts off the top and bottom part of the standard film (24X36) which results in an image of 13mmX36mm. The number of exposures is the same as indicated on the film cartridge.
2. When you develop and print the film taken with the panorama film attachment, be sure the panorama/stretch sticker is attached to the cartridge. If the picture is printed by normal processing, instead of panorama processing, black areas will be printed on top and bottom of the picture.
3. Once you insert the film you cannot change to standard photography.(without removing the adaptor)
4. The date and time cannot be imprinted on these pictures.
5. To avoid any chance of scratching the film or damaging the camera's mechanism, do not drop or bent the PS-300.
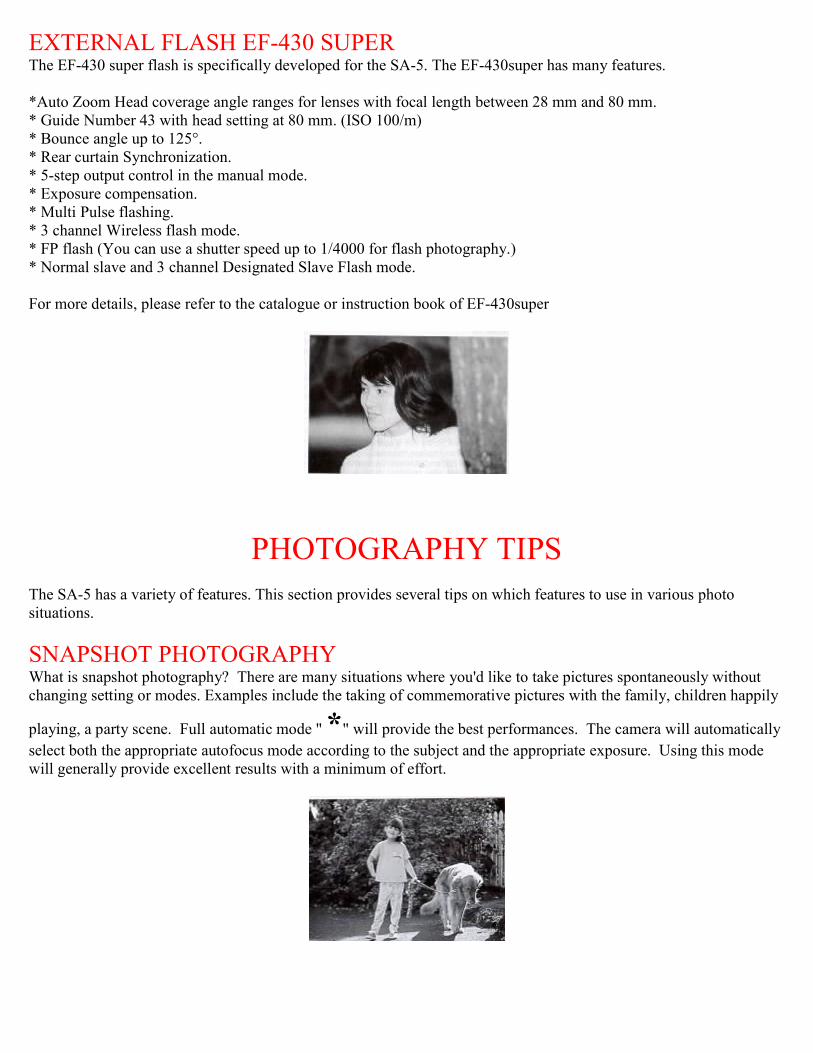
EXTERNAL FLASH EF-430 SUPER The EF-430 super flash is specifically developed for the SA-5. The EF-430super has many features. *Auto Zoom Head coverage angle ranges for lenses with focal length between 28 mm and 80 mm. * Guide Number 43 with head setting at 80 mm. (ISO 100/m) * Bounce angle up to 125°. * Rear curtain Synchronization. * 5-step output control in the manual mode. * Exposure compensation. * Multi Pulse flashing. * 3 channel Wireless flash mode. * FP flash (You can use a shutter speed up to 1/4000 for flash photography.) * Normal slave and 3 channel Designated Slave Flash mode. For more details, please refer to the catalogue or instruction book of EF-430super
PHOTOGRAPHY TIPS
The SA-5 has a variety of features. This section provides several tips on which features to use in various photo situations.
SNAPSHOT PHOTOGRAPHY What is snapshot photography? There are many situations where you'd like to take pictures spontaneously without changing setting or modes. Examples include the taking of commemorative pictures with the family, children happily
playing, a party scene. Full automatic mode " *" will provide the best performances. The camera will automatically select both the appropriate autofocus mode according to the subject and the appropriate exposure. Using this mode will generally provide excellent results with a minimum of effort.
SCENERY Use the wide-angle lens for panoramic landscapes or use the telephoto to select a section from the landscape. In both cases, program AE mode is suitable. You can create any effect you like by using the program shift capability. You can choose to give priority either to the aperture which controls the depth of field when using with the wide-angle lens or the shutter speed which prevents camera shake when using with the telephoto lens. If the lighting situation is complicated the 8 segment metering will give you appropriate exposure. The focusing mode should be the AF-S mode. If the subject has very weak contrast or flat contrast such as wide expanses of blue sky or green mountains, use Average Metering mode and also use manual focusing, as it is difficult to autofocus in these situations. In both cases, you may also want to use Auto Bracketing to insure an exposure with optimum detail. 4www.butkus .org
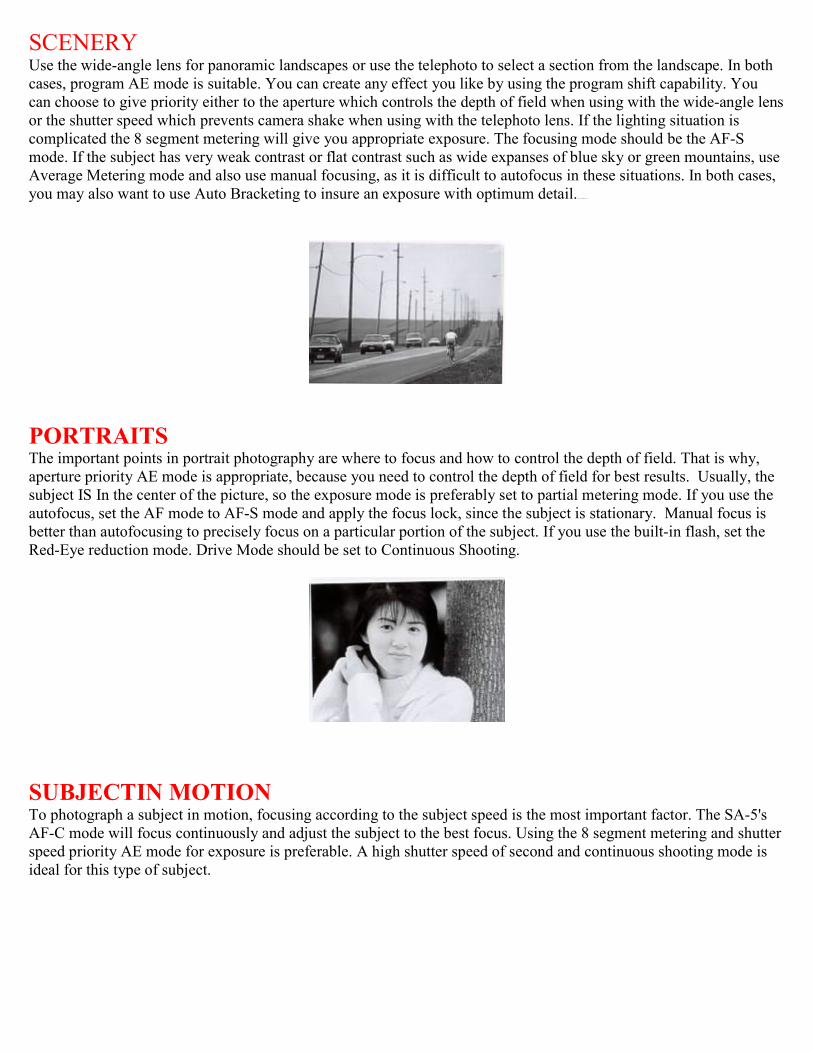
PORTRAITS The important points in portrait photography are where to focus and how to control the depth of field. That is why, aperture priority AE mode is appropriate, because you need to control the depth of field for best results. Usually, the subject IS In the center of the picture, so the exposure mode is preferably set to partial metering mode. If you use the autofocus, set the AF mode to AF-S mode and apply the focus lock, since the subject is stationary. Manual focus is better than autofocusing to precisely focus on a particular portion of the subject. If you use the built-in flash, set the Red-Eye reduction mode. Drive Mode should be set to Continuous Shooting.
SUBJECTIN MOTION To photograph a subject in motion, focusing according to the subject speed is the most important factor. The SA-5's AF-C mode will focus continuously and adjust the subject to the best focus. Using the 8 segment metering and shutter speed priority AE mode for exposure is preferable. A high shutter speed of second and continuous shooting mode is ideal for this type of subject.
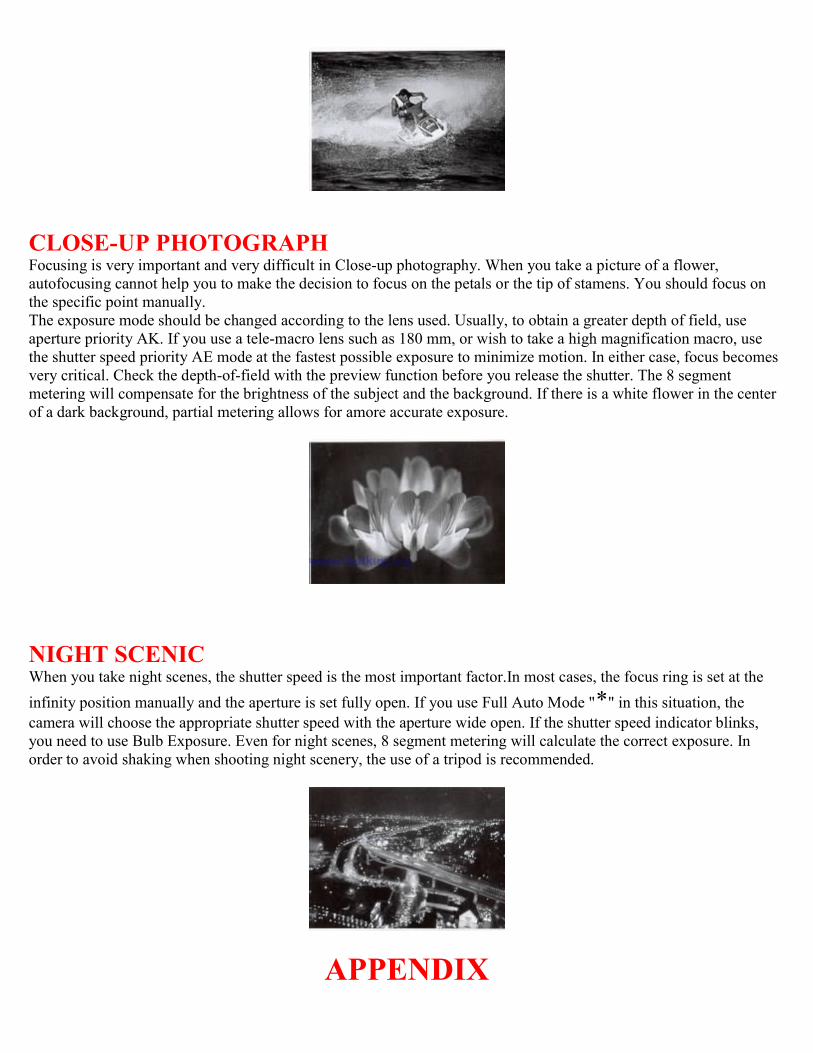
CLOSE-UP PHOTOGRAPH Focusing is very important and very difficult in Close-up photography. When you take a picture of a flower, autofocusing cannot help you to make the decision to focus on the petals or the tip of stamens. You should focus on the specific point manually. The exposure mode should be changed according to the lens used. Usually, to obtain a greater depth of field, use aperture priority AK. If you use a tele-macro lens such as 180 mm, or wish to take a high magnification macro, use the shutter speed priority AE mode at the fastest possible exposure to minimize motion. In either case, focus becomes very critical. Check the depth-of-field with the preview function before you release the shutter. The 8 segment metering will compensate for the brightness of the subject and the background. If there is a white flower in the center of a dark background, partial metering allows for amore accurate exposure.
NIGHT SCENIC When you take night scenes, the shutter speed is the most important factor.In most cases, the focus ring is set at the
infinity position manually and the aperture is set fully open. If you use Full Auto Mode "*" in this situation, the camera will choose the appropriate shutter speed with the aperture wide open. If the shutter speed indicator blinks, you need to use Bulb Exposure. Even for night scenes, 8 segment metering will calculate the correct exposure. In order to avoid shaking when shooting night scenery, the use of a tripod is recommended.
APPENDIX
WARNING INDICATIONS
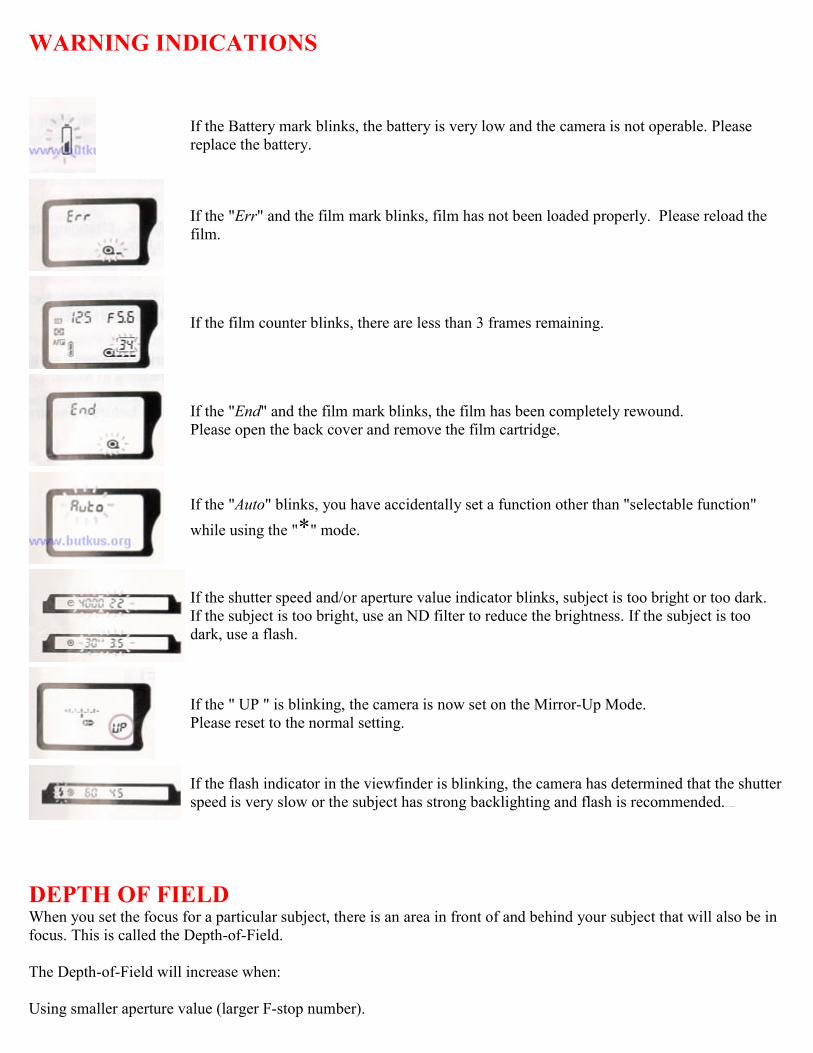
If the Battery mark blinks, the battery is very low and the camera is not operable. Please replace the battery.
If the "Err" and the film mark blinks, film has not been loaded properly. Please reload the film.
If the film counter blinks, there are less than 3 frames remaining.
If the "End" and the film mark blinks, the film has been completely rewound. Please open the back cover and remove the film cartridge.
If the "Auto" blinks, you have accidentally set a function other than "selectable function"
while using the "*" mode.
If the shutter speed and/or aperture value indicator blinks, subject is too bright or too dark. If the subject is too bright, use an ND filter to reduce the brightness. If the subject is too dark, use a flash.
If the " UP " is blinking, the camera is now set on the Mirror-Up Mode. Please reset to the normal setting.
If the flash indicator in the viewfinder is blinking, the camera has determined that the shutter speed is very slow or the subject has strong backlighting and flash is recommended. 4www.bu tkus.org
DEPTH OF FIELD When you set the focus for a particular subject, there is an area in front of and behind your subject that will also be in focus. This is called the Depth-of-Field. The Depth-of-Field will increase when: Using smaller aperture value (larger F-stop number).
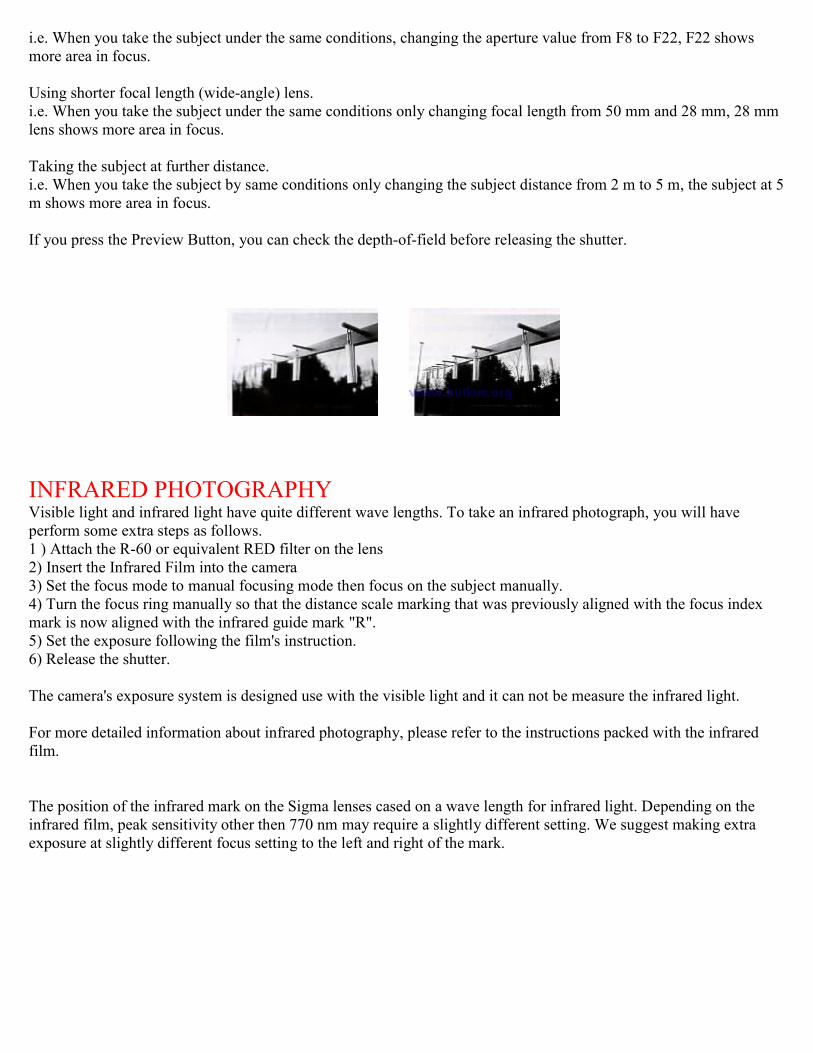
i.e. When you take the subject under the same conditions, changing the aperture value from F8 to F22, F22 shows more area in focus. Using shorter focal length (wide-angle) lens. i.e. When you take the subject under the same conditions only changing focal length from 50 mm and 28 mm, 28 mm lens shows more area in focus. Taking the subject at further distance. i.e. When you take the subject by same conditions only changing the subject distance from 2 m to 5 m, the subject at 5 m shows more area in focus. If you press the Preview Button, you can check the depth-of-field before releasing the shutter.
INFRARED PHOTOGRAPHY Visible light and infrared light have quite different wave lengths. To take an infrared photograph, you will have perform some extra steps as follows. 1 ) Attach the R-60 or equivalent RED filter on the lens 2) Insert the Infrared Film into the camera 3) Set the focus mode to manual focusing mode then focus on the subject manually. 4) Turn the focus ring manually so that the distance scale marking that was previously aligned with the focus index mark is now aligned with the infrared guide mark "R". 5) Set the exposure following the film's instruction. 6) Release the shutter. The camera's exposure system is designed use with the visible light and it can not be measure the infrared light. For more detailed information about infrared photography, please refer to the instructions packed with the infrared film.
The position of the infrared mark on the Sigma lenses cased on a wave length for infrared light. Depending on the infrared film, peak sensitivity other then 770 nm may require a slightly different setting. We suggest making extra exposure at slightly different focus setting to the left and right of the mark.
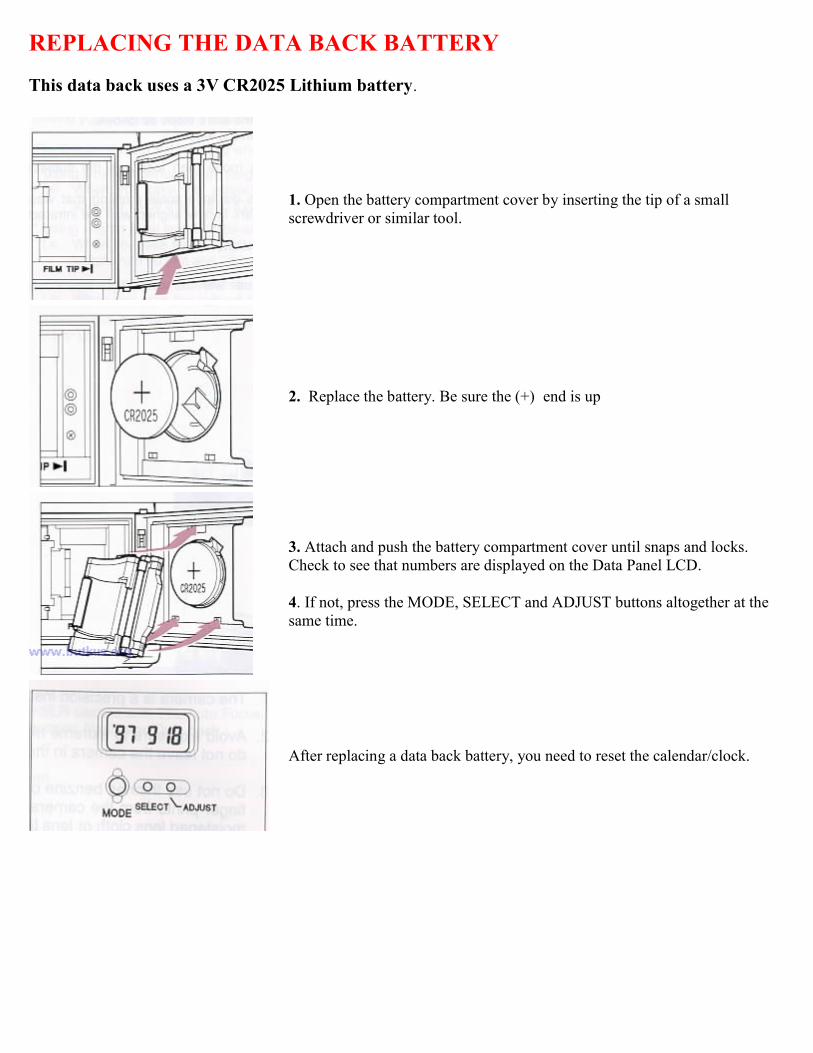
REPLACING THE DATA BACK BATTERY This data back uses a 3V CR2025 Lithium battery.
1. Open the battery compartment cover by inserting the tip of a small screwdriver or similar tool.
2. Replace the battery. Be sure the (+) end is up
3. Attach and push the battery compartment cover until snaps and locks. Check to see that numbers are displayed on the Data Panel LCD.
4. If not, press the MODE, SELECT and ADJUST buttons altogether at the same time.
After replacing a data back battery, you need to reset the calendar/clock.
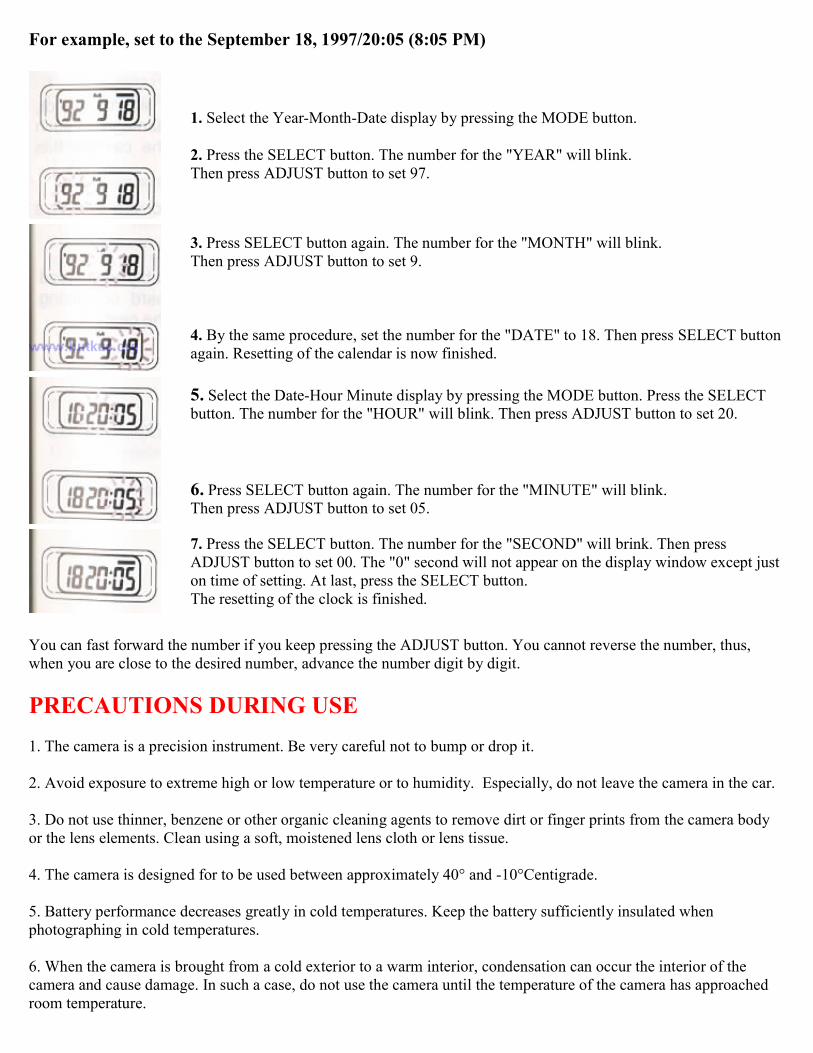
For example, set to the September 18, 1997/20:05 (8:05 PM)
1. Select the Year-Month-Date display by pressing the MODE button.
2. Press the SELECT button. The number for the "YEAR" will blink. Then press ADJUST button to set 97.
3. Press SELECT button again. The number for the "MONTH" will blink. Then press ADJUST button to set 9.
4. By the same procedure, set the number for the "DATE" to 18. Then press SELECT button again. Resetting of the calendar is now finished.
5. Select the Date-Hour Minute display by pressing the MODE button. Press the SELECT button. The number for the "HOUR" will blink. Then press ADJUST button to set 20.
6. Press SELECT button again. The number for the "MINUTE" will blink. Then press ADJUST button to set 05.
7. Press the SELECT button. The number for the "SECOND" will brink. Then press ADJUST button to set 00. The "0" second will not appear on the display window except just on time of setting. At last, press the SELECT button. The resetting of the clock is finished.
You can fast forward the number if you keep pressing the ADJUST button. You cannot reverse the number, thus, when you are close to the desired number, advance the number digit by digit.
PRECAUTIONS DURING USE 1. The camera is a precision instrument. Be very careful not to bump or drop it. 2. Avoid exposure to extreme high or low temperature or to humidity. Especially, do not leave the camera in the car. 3. Do not use thinner, benzene or other organic cleaning agents to remove dirt or finger prints from the camera body or the lens elements. Clean using a soft, moistened lens cloth or lens tissue. 4. The camera is designed for to be used between approximately 40° and -10°Centigrade. 5. Battery performance decreases greatly in cold temperatures. Keep the battery sufficiently insulated when photographing in cold temperatures. 6. When the camera is brought from a cold exterior to a warm interior, condensation can occur the interior of the camera and cause damage. In such a case, do not use the camera until the temperature of the camera has approached room temperature.
7. In rare instance, the strong static or magnetic field may fool the camera's micro computer. In such a case, please remove the battery from the camera and re-insert to reset the camera. 8. For extended storage, choose a cool and dry place, preferably with good ventilation. Never store the camera in a drawer or cupboard containing naphthalene or camphor as these will have negative effects on the camera. 9. Never touch the shutter or mirror.
SPECIFICATIONS OF A SIGMASA-300 TYPE 1 ) Type of camera: 35 mm focal-plane shutter SLR camera with TTL Auto Focus, Auto exposure, Built-in Electronic Flash, and Data back.
2) Usable film: J135 DX type
3) Picture size: 24x36 mm
4) Lens Mount: Sigma SA Mount (Fb44 mm)
5) Usable Lenses: Sigma SA mount lenses
AUTOFOCUS
1) AF System: TTL phase detection system
2) Focus Mode: AF-P Automatically select the AF-S and AF-C mode according to the subject AF-S Single shot AF-C Continuous shot with focus prediction for moving subject ME Manual Focusing
3) AF working Range: EV-1-EV 18
4) AF Auxiliary Light: Automatically projected when necessary peak sensitivity is700nm effective distance range 1m-4 m
FINDER
1 ) Type: Eye level fixed pent mirror with condenser lens
2) Focusing screen: Fixed laser-matte screen with focus frame, spot metering mark and panorama frame
3) Dioptor: -1 dpt (eye point 17 mm)
4) Field of View: 90% (both vertical and horizontal)
5) Magnification: 0.72x (with 50 mm lens at infinity)
6) Viewfinder indication: Displayed at the bottom of the finder by LCD and LED a) Shutter speed b) Aperture value c) Manual exposure level d) Exposure compensation mark e) Auto bracket mark f) Flash ready indication g) Focus information h) AE lock indicator
7) Mirror: Quick-return half-mirror
EXPOSURE CONTROL
1) Light metering: TTL multi (8) segment metering Spot metering and average metering can beset 2) Exposure mode: P Auto shift programmed AE S Shutter speed priority AE A Aperture priority AE M Manual setting * Full auto program AE 3) Metering Range: EV-1-20 (with 50 mm F1.4 lens)
4) Film speed setting range: ISO 25-5000 with DX coded film ISO 6 - 6400 with non-DX coded film both can be set in 1/3 stop increments
5) Compensation: + or - 2 EV in each 1/2 stop increments
6) Auto bracket: + or - 2 EV in each 1/2 stop increments Three consecutive shots are taken in sequence
7) AE lock: by depressing the Button
SHUTTER
1) Type: All speed electrically controlled vertical-run focal-plane shutter
2) Shutter speed: 1/4000-30 sec. step less in auto move 1/4000-30 sec. in 1/2 stop increments in manual setting mode Bulb shutter X-sync is 1/125 sec.
3) Self-timer: Electrically controlled type, 10 sec. delay time
FILM TRANSPORT
1) Film loading: Automatically advances to 1 st frame
2) Film wind: Automatic advance by built-in motor
3) Winding mode: Single and continuous mode, Approx. 3 frames/sec. (continuous mode)
4) Film rewind: Auto rewinding starts at end of the film by built-in motor Mid-roll rewind is possible
BUILT-IN FLASH
1) Type: Built-in, retractable TTL auto flash
2) Guide Number: 11 (ISO 100/meter)
3) Coverage Angle: Covers 28 mm lens angle of view
4) Others: Red-eye reduction Daylight Synchronization Slow Synchronization
POWER SOURCE
1) Battery: One, 6 V lithium battery, Type 2CR5 4www.butkus.org
2) Battery check: Indicator on the LCD panel
OTHERS
1) External flash: Hot-Shoe with Sigma dedicated contacts
2) Back cover: Fixed type with data back module
3) Remote control: By optional remote controller RS-21 and RS-11
4) Mirror up: Possible
5) Preview: By pressing the button
6) LCD illumination: For about 6 seconds after pressing the illumination button
DIMENSIONS
1) WxHxD: 147.1 x 94.9 x 65.4 (mm)
2) Weight: 445 g (without battery)


![Afrasiab Khan LSSGB CL & Resume · 2018-05-24 · , fdq dlg \rx fdvw dvlgh \rxu 2ujdql]dwlrqdo 98&$ vxvwdlqdeo\ $v d +duydug wudlqhg vwudwhjlvw dqg dq dffodlphg /hdq 6l[ 6ljpd %odfn](https://img.pdfslide.net/doc/110x75/5faa38a9f938e609ba377dc7/afrasiab-khan-lssgb-cl-resume-2018-05-24-fdq-dlg-rx-fdvw-dvlgh-rxu-2ujdqldwlrqdo.jpg)
![COMPANY OVERVIEW BROCHURE · 0dunhw 6hjphqwv] 6ljpd riihuv dq h[whqvlyh olqh ri sursulhwdu\ surgxfwv h[whqglqj lqwr ydulrxv pdunhwv dqg lqgxvwulhv 2xu eurdg edvh ri surgxfw whfkqrorjlhv](https://img.pdfslide.net/doc/110x75/5f20453ecf45817a907f47e8/company-overview-brochure-0dunhw-6hjphqwv-6ljpd-riihuv-dq-hwhqvlyh-olqh-ri-sursulhwdu.jpg)