Embed Size (px)
Citation preview
72 Version: 25 February 2011
7. ELECTRONIC DATA COLLECTION The software you will use for data collection is called Pendragon Forms (Forms 5.1). It has been installed and backed up on every Juno. A great deal of effort goes into creating a monitoring database that is a balance between user friendliness and functionality. Cleaner databases could result from implementing complicated constraints and scripts requiring lots of data cross-referencing. However, this would slow down the system, place it at greater risk of freezing up, and potentially to tie your hands in the field, preventing you from collecting data electronically. The more limited data domain constraints and scripts that we have implemented are detailed in the data dictionary (Appendix I). Our less constrained approach means that you can enter non-valid data, so extra care and precision are required on your part to ensure the highest quality data comes in from the field. The goals of Pendragon Forms and Database training are to provide you with the necessary knowledge and practice so that you accurately enter data, and conversely, if you determine that you have incorrectly entered data, to show you how to correct the mistake. The outline below details the individual objectives and standards, as well as the final metric for which you will be held accountable after completing this training. Refer to Appendices I and II for collection database dictionaries and field explanations. Objective 1: Proficient understanding of database structure. Each crew member will know 1) the basic terminology (form, sub-form, record, parent, child) and design of the database and how forms are related as parent and child, 2) what an orphan is, how they are created, and how to avoid and/or fix them, and 3) the purpose and initiation of each form and sub-form Objective 2: Proficiency working with database records. Each crew member will know how to 1) review and edit an already existing record and 2) delete a record (with emphasis on the orphan problem)
73
Objective 3: Proficient data entry and understanding of database fields. Each crew member will know 1) the importance of accurately entering data, 2) how to use the on screen keyboards to enter data. Objective 4: Proficient understanding of how to use the Built-in GPS. Each crew member will know how to 1) take a GPS grab, and 2) check the GPS grab for validity Metrics: Trainees will be expected to maintain their equipment, successfully perform GPS grabs, and accurately record data in their Juno. This will be evaluated based upon successful delivery of complete and valid training line and pre-season LSTS transect data. These demonstrated skills are required by the USFWS in order to participate in monitoring.
74
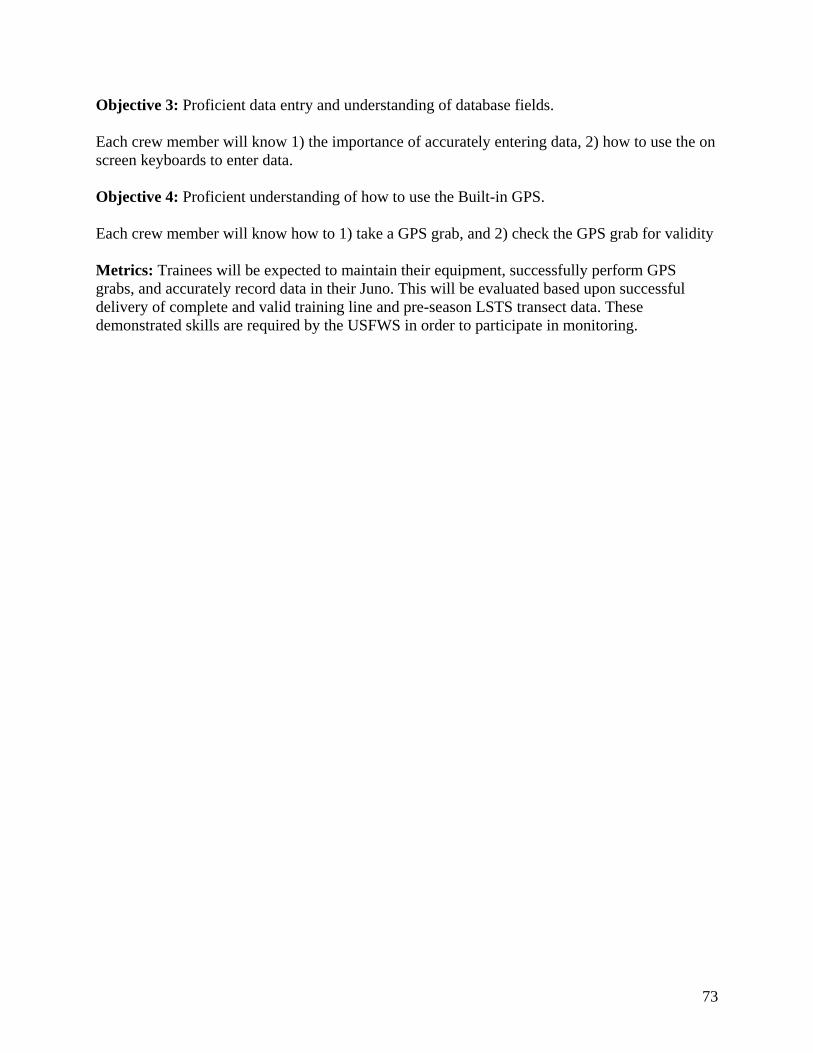
Objective 1: Understanding of Database Structure
1. Basic Terminology and Design of the Pendragon Database – Databases are complex electronic entities that have whole fields of study devoted to them. Below is a very brief and general review of database information and terminology relevant to your monitoring duties.
• Database – The Pendragon database you will be adding to while monitoring is comprised of related electronic data that will be organized to allow easy access and querying once finalized. The final database is accumulated in three stages, described in the diagram above and the steps below. Each stage passes through several iterations of Quality Assurance/Quality Control (QA/QC) to create an accurate database.
i. While you and your crewmate are in the field collecting data on your Juno ii. When the Junos for each field team are sync’d to the computer every few
days so your data are merged with that of other crews and with data collected previously by your group
iii. When data from all field teams are merged at the end of the monitoring season into one complete database.
• Form – Within the Pendragon database on the Juno, a form is an electronic sheet of monitoring questions to be answered by you. Questions within each form relate to one subject and each form is detailed in Standard 3 of this objective. Forms are
75
the building blocks for the database – each time you complete a form, it will become a record in a table within the final database.
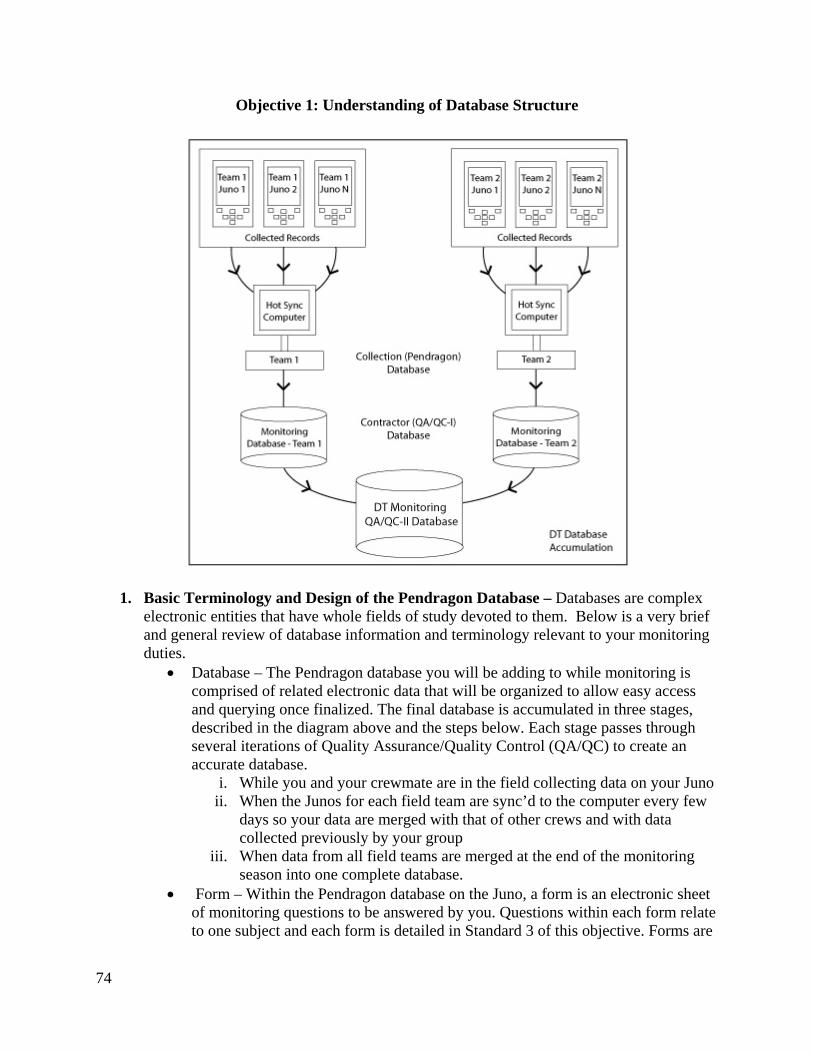
• Sub-form (Parent and Child) – A sub-form is a form that can only be accessed through and is dependent on another form. Another term for this is a Parent and Child relationship. For example, the Transects form is the access point for several other forms. Transects is a Parent form and is the only Parent form for the transects database. The Child forms are the Waypoints, OppLiveObs, OppCarcObs, TranLiveObs, and TranCarcObs forms. A Child form cannot exist until a Parent form is created. This is called a one-to-many relationship; a single transect can have many observations or waypoints, but an individual waypoint or observation can belong to one and only one transect. The figure below diagrams the Parent and Child structure of our transect database.
• Record – A record is a single event within a database table. Each individual transect, waypoint, live or carcass transect tortoise, and live or carcass opportunistic tortoise is a record. Records are related to records in other tables via a primary key, also known as a unique identifier. A transect’s primary key is carried over and recorded in each child form as a means to identify which transect a waypoint or observation belongs to. This primary key is fundamental to creating parent-child relationships, so it also comes into play in the creation of orphan records (Standard 2 of this objective, below).
2. Orphan Records – Diagnosing and correcting orphan records when they occur can be a daunting task for the QAQC I manager, but you, the data collector, can make everyone’s job easier by understanding what orphan records are, how they are created, and how to avoid and/or fix them.
• Orphan Record – An orphan record is a child record whose parent record has been deleted, hence it is an “orphan”. Our database’s integrity depends on the relationship between the parent form (transects) and the child form(s). That relationship is upheld via the transect form’s primary key. When you begin a new
76
transect form, the primary key is automatically generated and propagated to each child record created for that transect, establishing the relationship. Without the transect primary key in the child form, there is no link between parent and child. The transect primary key is a hidden field in both the parent and child forms because it is not something you will need to know or edit, but it is important that you understand its role.
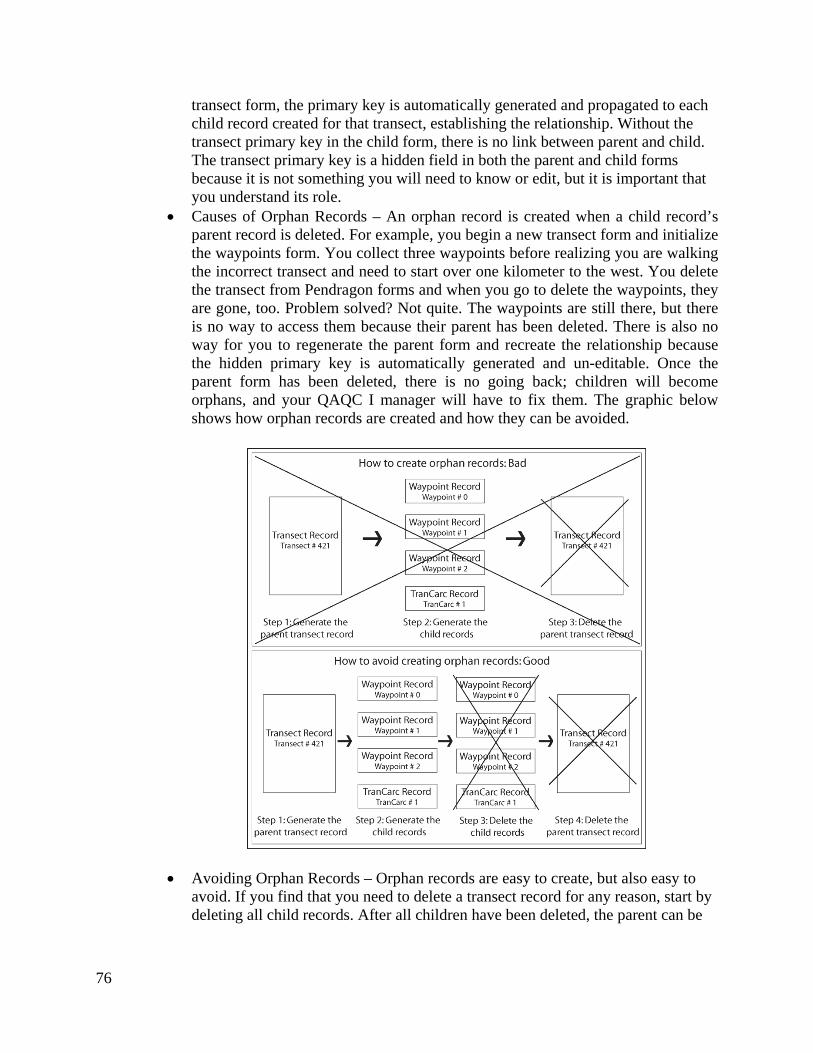
• Causes of Orphan Records – An orphan record is created when a child record’s parent record is deleted. For example, you begin a new transect form and initialize the waypoints form. You collect three waypoints before realizing you are walking the incorrect transect and need to start over one kilometer to the west. You delete the transect from Pendragon forms and when you go to delete the waypoints, they are gone, too. Problem solved? Not quite. The waypoints are still there, but there is no way to access them because their parent has been deleted. There is also no way for you to regenerate the parent form and recreate the relationship because the hidden primary key is automatically generated and un-editable. Once the parent form has been deleted, there is no going back; children will become orphans, and your QAQC I manager will have to fix them. The graphic below shows how orphan records are created and how they can be avoided.
• Avoiding Orphan Records – Orphan records are easy to create, but also easy to avoid. If you find that you need to delete a transect record for any reason, start by deleting all child records. After all children have been deleted, the parent can be
77
deleted without creating orphans. How to delete a record is detailed in Objective 2 (database records), Standard 3 of this module.
• Inadvertent deletion of a parent form – Keep in mind that if you are nearing the end of your transect and somehow accidentally delete the transect form, all the child records you’ve collected are still there, just inaccessible. Start a new transect form, giving it the same transect number, resume where you left off, and leave detailed notes about the problem to help your data specialist resolve the issue. There is no need to reenter the child form records. When your Juno is sync’d, those records will show up in the database as orphan records and your data specialist will re-link them with the new transect record you created.
3. Initiation and Purpose of Pendragon Forms – There are three Parent forms (Transects, G0_Start, Train_Tran) and eight Child forms (Waypoints, OppCarcObs, OppLiveObs, TranCarcObs, TranLiveObs, G0_Obs, G0_OppLiveObs and Train_Obs) that you will use while monitoring. The following outlines some basic information on each form in the transects database and provides a practical guide on how and when to access them on your Juno. Refer to the data dictionary for a detailed explanation of the purpose of each field in a form. Within the parent Transect form, child forms are ordered according to how often you will access and fill them out, so the waypoints form is first.
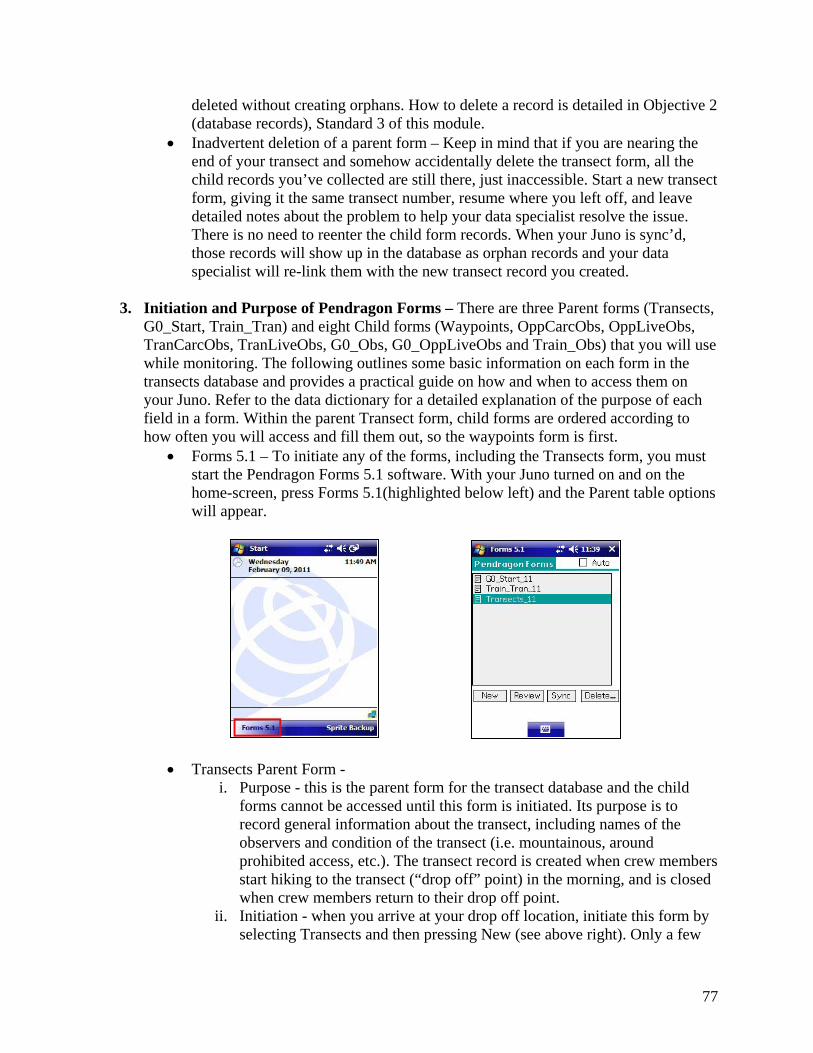
• Forms 5.1 – To initiate any of the forms, including the Transects form, you must start the Pendragon Forms 5.1 software. With your Juno turned on and on the home-screen, press Forms 5.1(highlighted below left) and the Parent table options will appear.
• Transects Parent Form -
i. Purpose - this is the parent form for the transect database and the child forms cannot be accessed until this form is initiated. Its purpose is to record general information about the transect, including names of the observers and condition of the transect (i.e. mountainous, around prohibited access, etc.). The transect record is created when crew members start hiking to the transect (“drop off” point) in the morning, and is closed when crew members return to their drop off point.
ii. Initiation - when you arrive at your drop off location, initiate this form by selecting Transects and then pressing New (see above right). Only a few
78
of the fields are required before moving to the child forms or ending the transect form, so double check that you have correctly completed everything.
• Waypoints Child Form -
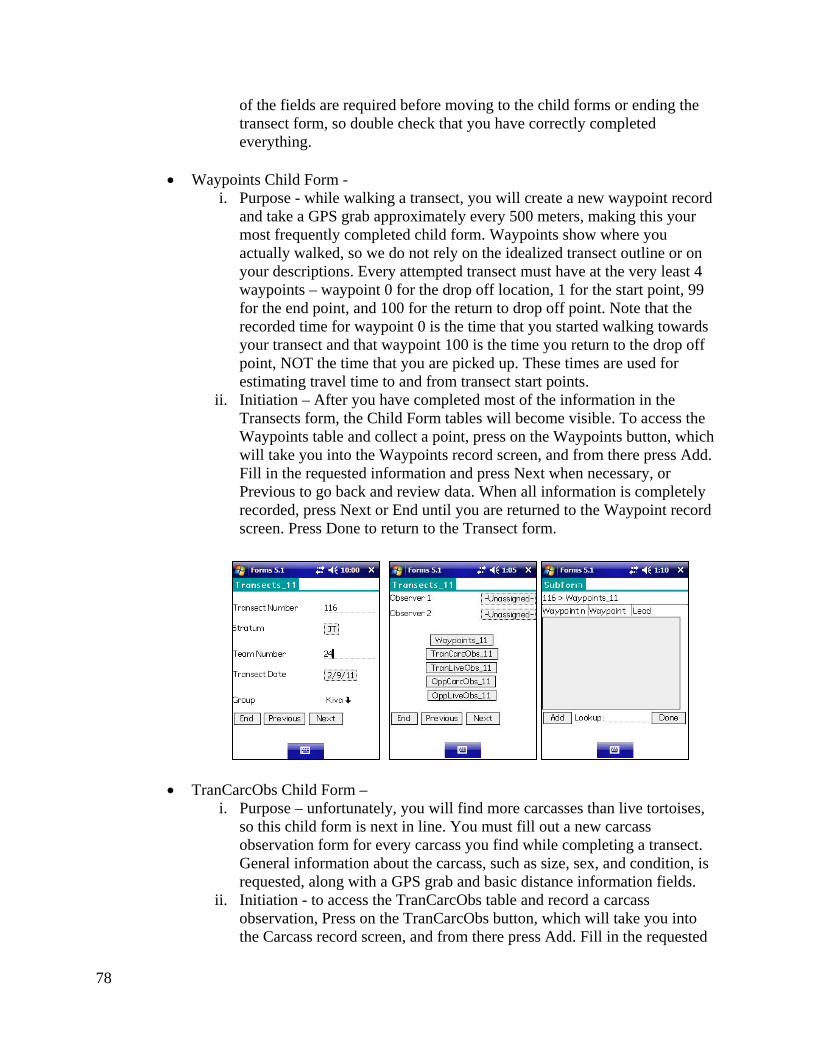
i. Purpose - while walking a transect, you will create a new waypoint record and take a GPS grab approximately every 500 meters, making this your most frequently completed child form. Waypoints show where you actually walked, so we do not rely on the idealized transect outline or on your descriptions. Every attempted transect must have at the very least 4 waypoints – waypoint 0 for the drop off location, 1 for the start point, 99 for the end point, and 100 for the return to drop off point. Note that the recorded time for waypoint 0 is the time that you started walking towards your transect and that waypoint 100 is the time you return to the drop off point, NOT the time that you are picked up. These times are used for estimating travel time to and from transect start points.
ii. Initiation – After you have completed most of the information in the Transects form, the Child Form tables will become visible. To access the Waypoints table and collect a point, press on the Waypoints button, which will take you into the Waypoints record screen, and from there press Add. Fill in the requested information and press Next when necessary, or Previous to go back and review data. When all information is completely recorded, press Next or End until you are returned to the Waypoint record screen. Press Done to return to the Transect form.
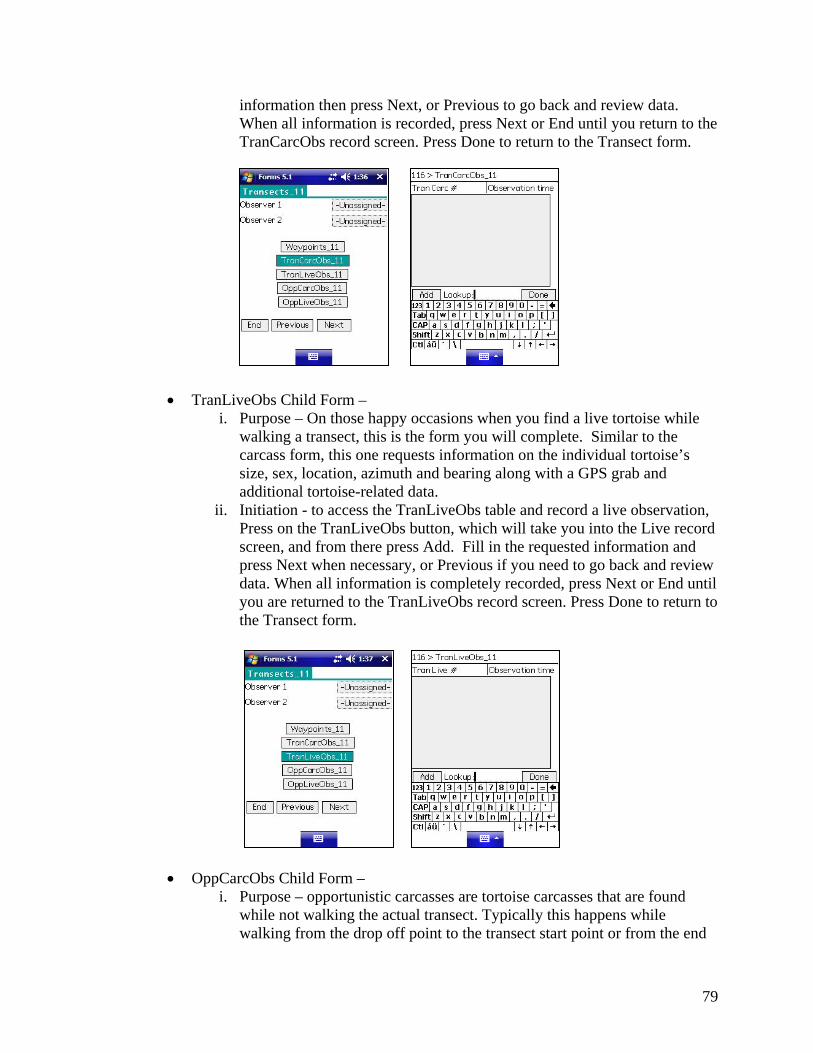
• TranCarcObs Child Form – i. Purpose – unfortunately, you will find more carcasses than live tortoises,
so this child form is next in line. You must fill out a new carcass observation form for every carcass you find while completing a transect. General information about the carcass, such as size, sex, and condition, is requested, along with a GPS grab and basic distance information fields.
ii. Initiation - to access the TranCarcObs table and record a carcass observation, Press on the TranCarcObs button, which will take you into the Carcass record screen, and from there press Add. Fill in the requested
79
information then press Next, or Previous to go back and review data. When all information is recorded, press Next or End until you return to the TranCarcObs record screen. Press Done to return to the Transect form.
• TranLiveObs Child Form –
i. Purpose – On those happy occasions when you find a live tortoise while walking a transect, this is the form you will complete. Similar to the carcass form, this one requests information on the individual tortoise’s size, sex, location, azimuth and bearing along with a GPS grab and additional tortoise-related data.
ii. Initiation - to access the TranLiveObs table and record a live observation, Press on the TranLiveObs button, which will take you into the Live record screen, and from there press Add. Fill in the requested information and press Next when necessary, or Previous if you need to go back and review data. When all information is completely recorded, press Next or End until you are returned to the TranLiveObs record screen. Press Done to return to the Transect form.
• OppCarcObs Child Form –
i. Purpose – opportunistic carcasses are tortoise carcasses that are found while not walking the actual transect. Typically this happens while walking from the drop off point to the transect start point or from the end
80
point to the return to drop off point. Requested information is similar to that on the transect carcass child form, but does not include azimuth and bearing because it was not located using the monitoring search method.
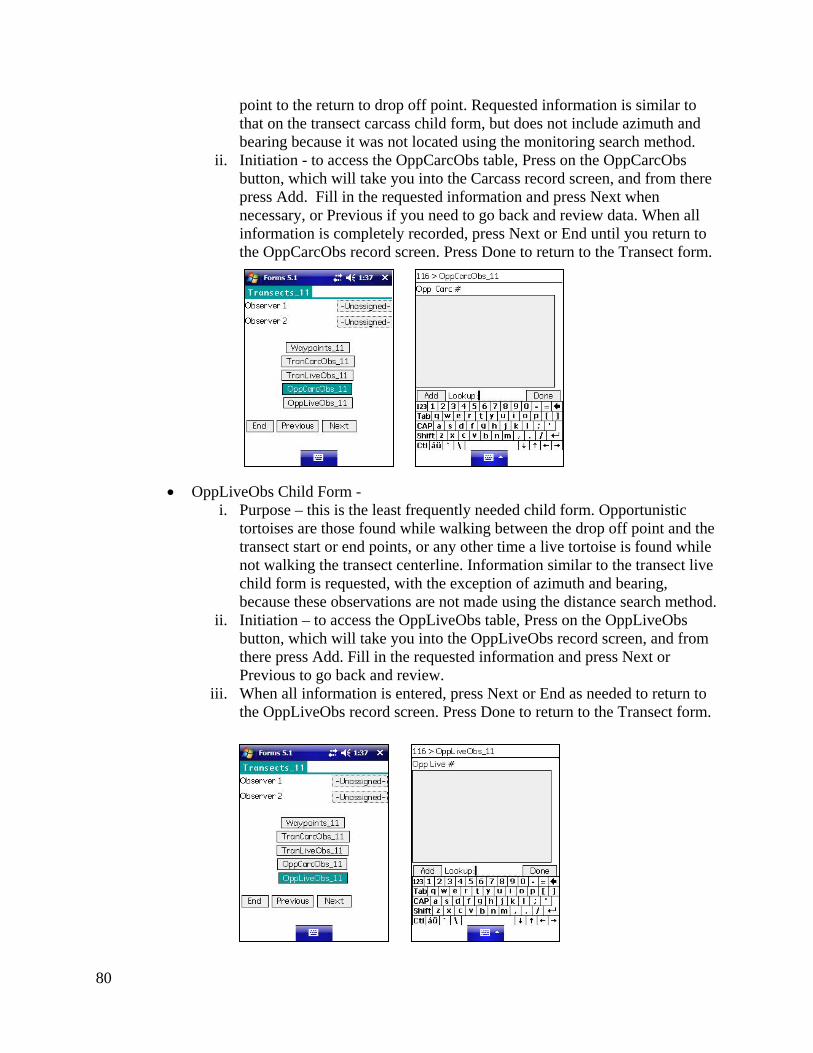
ii. Initiation - to access the OppCarcObs table, Press on the OppCarcObs button, which will take you into the Carcass record screen, and from there press Add. Fill in the requested information and press Next when necessary, or Previous if you need to go back and review data. When all information is completely recorded, press Next or End until you return to the OppCarcObs record screen. Press Done to return to the Transect form.
• OppLiveObs Child Form -
i. Purpose – this is the least frequently needed child form. Opportunistic tortoises are those found while walking between the drop off point and the transect start or end points, or any other time a live tortoise is found while not walking the transect centerline. Information similar to the transect live child form is requested, with the exception of azimuth and bearing, because these observations are not made using the distance search method.
ii. Initiation – to access the OppLiveObs table, Press on the OppLiveObs button, which will take you into the OppLiveObs record screen, and from there press Add. Fill in the requested information and press Next or Previous to go back and review.
iii. When all information is entered, press Next or End as needed to return to the OppLiveObs record screen. Press Done to return to the Transect form.
81
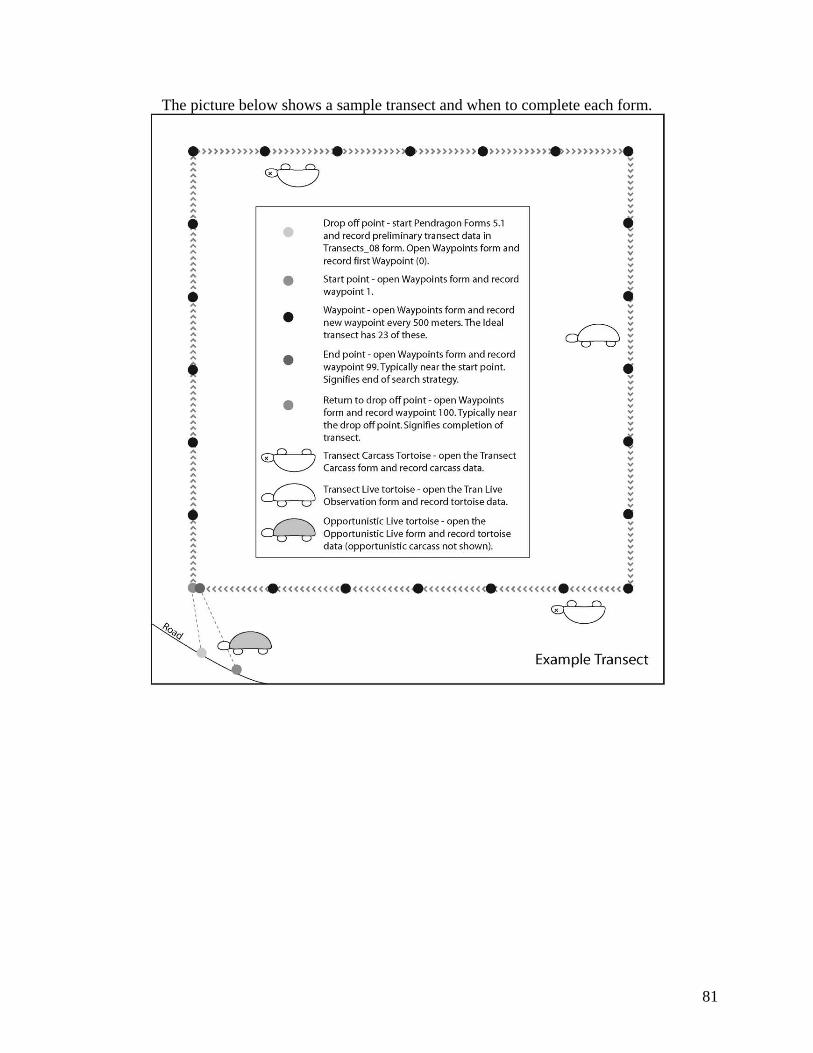
The picture below shows a sample transect and when to complete each form.
~»»»»» 4t»»»»» 4t»»»»» ~»»»»» .. »»»»>)~»»»»» 4!
A ~ V ~ ~ ~ A V A V A V A V
.~ ~ Drop off point - start Pendragon Forms 5.1 ~
~ and record preliminary transect data in : ~ Transects_OS form. Open Waypoints form and ~
~ record first Waypoint (0). ~ A V
~ • Start point - open Waypoints form and record ~
• waypoint 1. •
:: • Waypoint - open Waypoints form and record ~ A V ~ new waypoint every 500 meters. The Idea l ~ :;v:; ~ transect has 23 of these. ~
~ End point - open Waypoints form and record :
t • waypoint 99. Typically near the start point. 4! A Signifies end of search strategy_ v A V A V ~ • Return to drop off point - open Waypoints ~ ~ form and record waypoint 100. Typically near ~
~ the drop off point. Signifies completion of ~
• transect. 4 ~ ~ Transect Carcass Tortoise - open the Transect ~ ~ ~ Carcass form and record carcass data. ~ A V A V
~ ~ Transect live tortoise - open the Tran Live vvv ~ Observation form and record tortoise data. • • "l!' ~ Opportunistic Live tortoise - open the v
: v:; :: _ Opportunistic Live form and record tortoise ~ data (opportunistic carcass not shown). ~ A V A V A v
~««««« ~««««« 4t««««« ~««««<~««««« 4t««««< 4i , '. )< :\ ~ , , , , , ,
Example Transect
82
Objective 2: Working with Database Records
Every desert tortoise monitoring crew is responsible for delivering their Juno containing accurate data, a goal best achieved by reviewing records twice - immediately after collecting them, and then again after the transect is complete. This objective focuses on how to approach the important task of data review and editing, including deletion.
1. Review and Edit an Existing Record – You are able to review and edit a record immediately after collecting it. This reduces the chance of incorrect data because you are not compelled to attempt hours later to correct something that is no longer fresh in your memory. As a further check, you will compare your electronic and paper data after the transect is complete. The steps below outline how to review and edit a record. The steps are essentially the same for every form, so the waypoints form is used for illustration.
a. Reviewing records while collecting data i. While in the process completing a record, you can always press Previous
to review what you have already collected and make changes as necessary. NOTE – It is strongly recommended that as you and your teammate are collecting data, you repeat aloud the information as you either write it down or record it in the Juno. Consider a situation in which your teammate measures a tortoise and deems it to be 200 millimeters, but you hear 300 and record that in the Juno while they record 200 on the paper. At the end of the transect, after 5 hours of walking, neither of you can recall which is correct and are forced to leave the records mismatched. The problem could have been easily resolved by verbally repeating the entries.
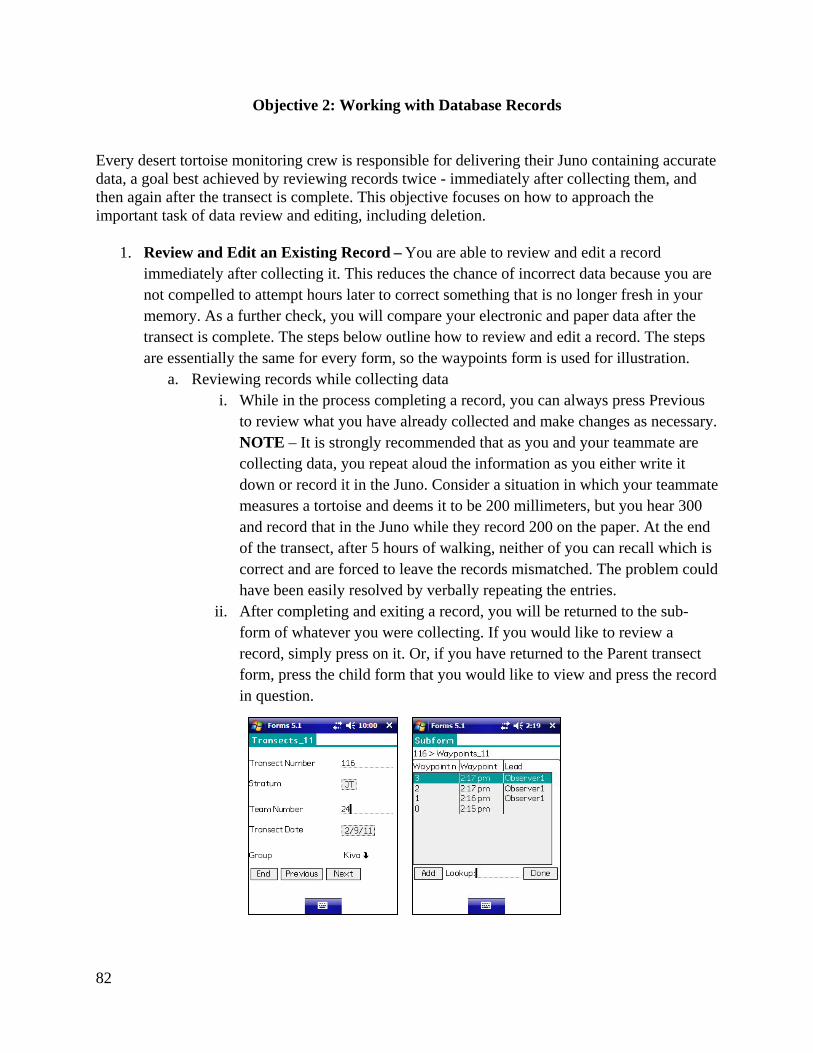
ii. After completing and exiting a record, you will be returned to the sub-form of whatever you were collecting. If you would like to review a record, simply press on it. Or, if you have returned to the Parent transect form, press the child form that you would like to view and press the record in question.
83
iii. Scroll through the screens by pressing Next. If you need to change anything, press on the field and correct it, just as you would when entering data.
iv. After reviewing and correcting the record, either press Next until you are returned to the sub-form screen or press End. Press Done to return to the Parent Transect form.
b. Reviewing records after a transect is complete i. To further ensure your data are correct, you will compare your electronic
data entries to your paper data entries after completing a transect and before turning in your Juno. It is up to you and your teammate to figure out the most efficient method for performing this check. It is common for one team member to read off what is on the paper form while the other compares it to the data on the Juno.
ii. When a discrepancy arises between the paper and the Juno, you must attempt to resolve the issue by either correcting the data on the Juno or correcting the paper data sheet, but if you cannot recall which is correct, do not guess and randomly change one answer to match the other. Instead, let the discrepancy remain and leave an electronic comment for your data specialist so they are aware of the issue. This is why double checking entries while in the field is crucial.
iii. To review a transect after completing and closing all forms, start Forms 5.1 on your Juno by pressing on its icon in the application launcher menu.
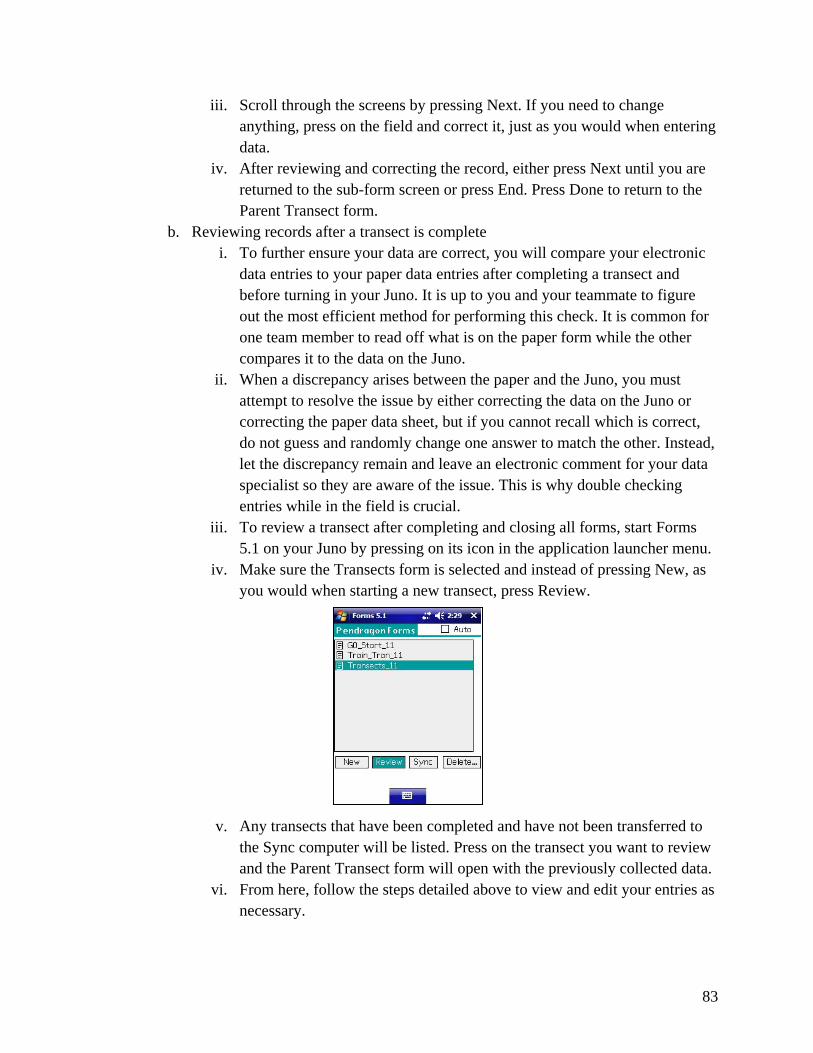
iv. Make sure the Transects form is selected and instead of pressing New, as you would when starting a new transect, press Review.
v. Any transects that have been completed and have not been transferred to the Sync computer will be listed. Press on the transect you want to review and the Parent Transect form will open with the previously collected data.
vi. From here, follow the steps detailed above to view and edit your entries as necessary.
84
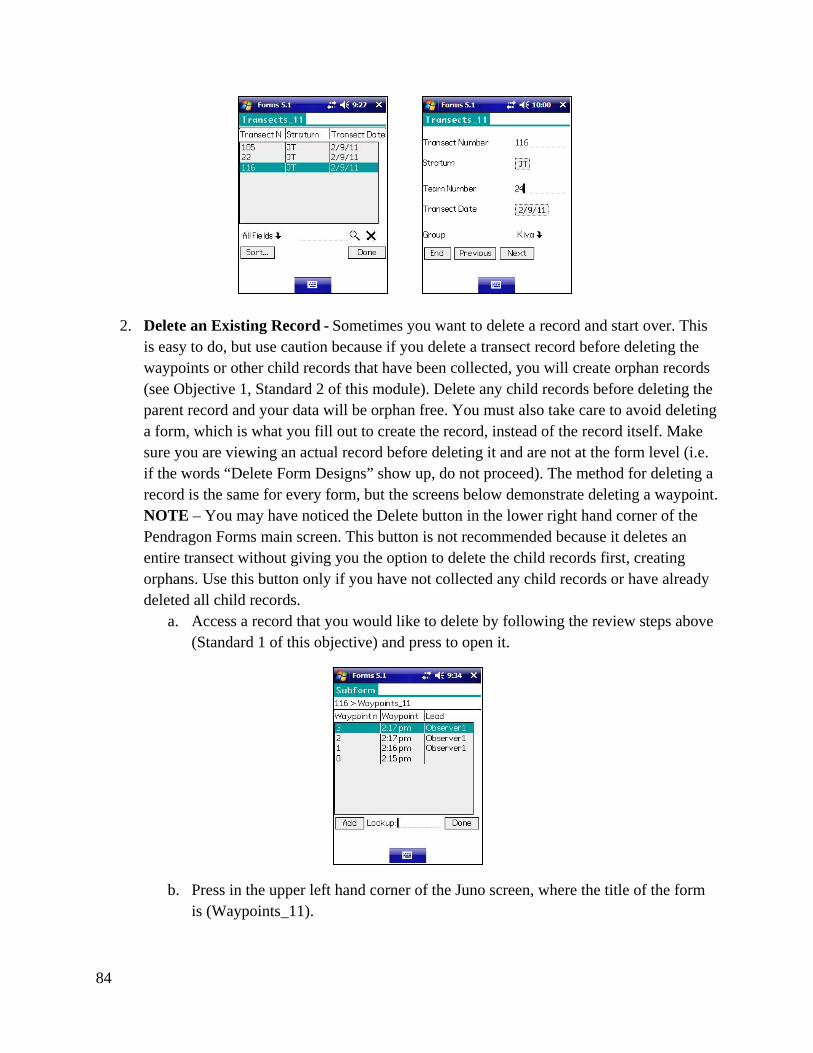
2. Delete an Existing Record - Sometimes you want to delete a record and start over. This
is easy to do, but use caution because if you delete a transect record before deleting the waypoints or other child records that have been collected, you will create orphan records (see Objective 1, Standard 2 of this module). Delete any child records before deleting the parent record and your data will be orphan free. You must also take care to avoid deleting a form, which is what you fill out to create the record, instead of the record itself. Make sure you are viewing an actual record before deleting it and are not at the form level (i.e. if the words “Delete Form Designs” show up, do not proceed). The method for deleting a record is the same for every form, but the screens below demonstrate deleting a waypoint. NOTE – You may have noticed the Delete button in the lower right hand corner of the Pendragon Forms main screen. This button is not recommended because it deletes an entire transect without giving you the option to delete the child records first, creating orphans. Use this button only if you have not collected any child records or have already deleted all child records.
a. Access a record that you would like to delete by following the review steps above (Standard 1 of this objective) and press to open it.
b. Press in the upper left hand corner of the Juno screen, where the title of the form
is (Waypoints_11).

85
c. This opens the Menu Bar, which allows you to access the edit options for the Sub-form.
d. By default, the drop down Edit menu is available, but you want the Record drop
down menu, which will become active if you press on Record.
e. Under the Record menu, press Delete/Cancel.
86
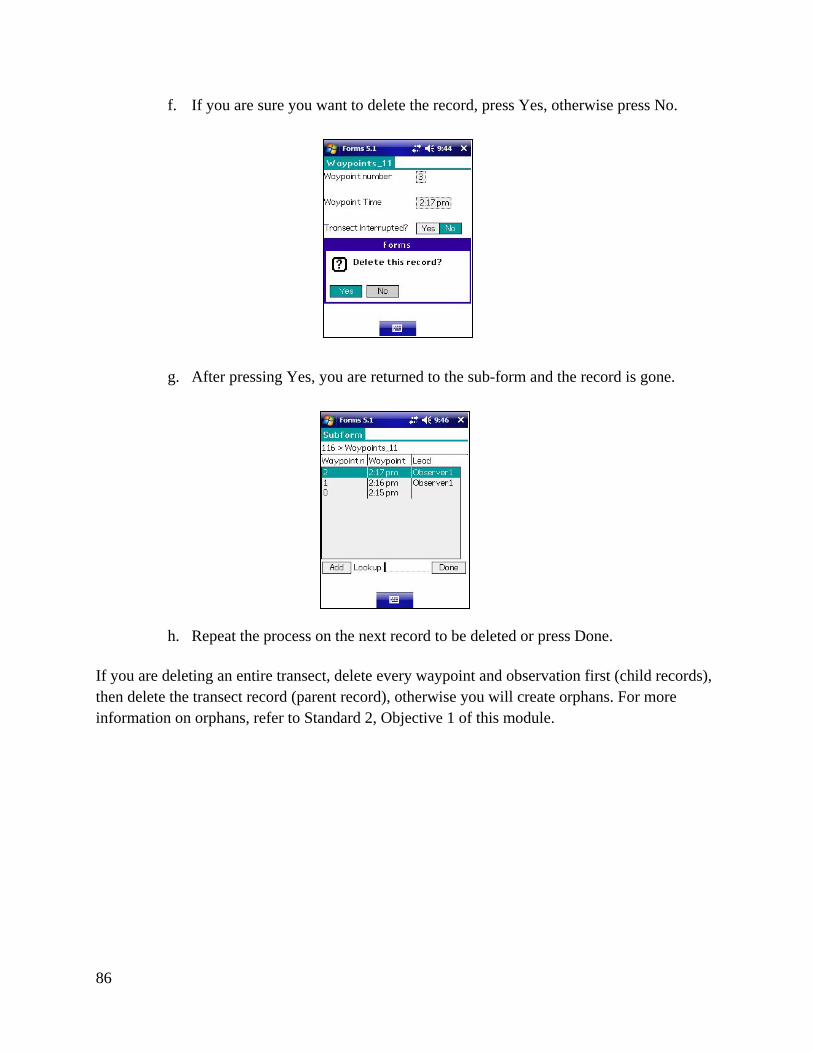
f. If you are sure you want to delete the record, press Yes, otherwise press No.
g. After pressing Yes, you are returned to the sub-form and the record is gone.
h. Repeat the process on the next record to be deleted or press Done.
If you are deleting an entire transect, delete every waypoint and observation first (child records), then delete the transect record (parent record), otherwise you will create orphans. For more information on orphans, refer to Standard 2, Objective 1 of this module.
87
Objective 3: Understanding How to Enter Data on Juno
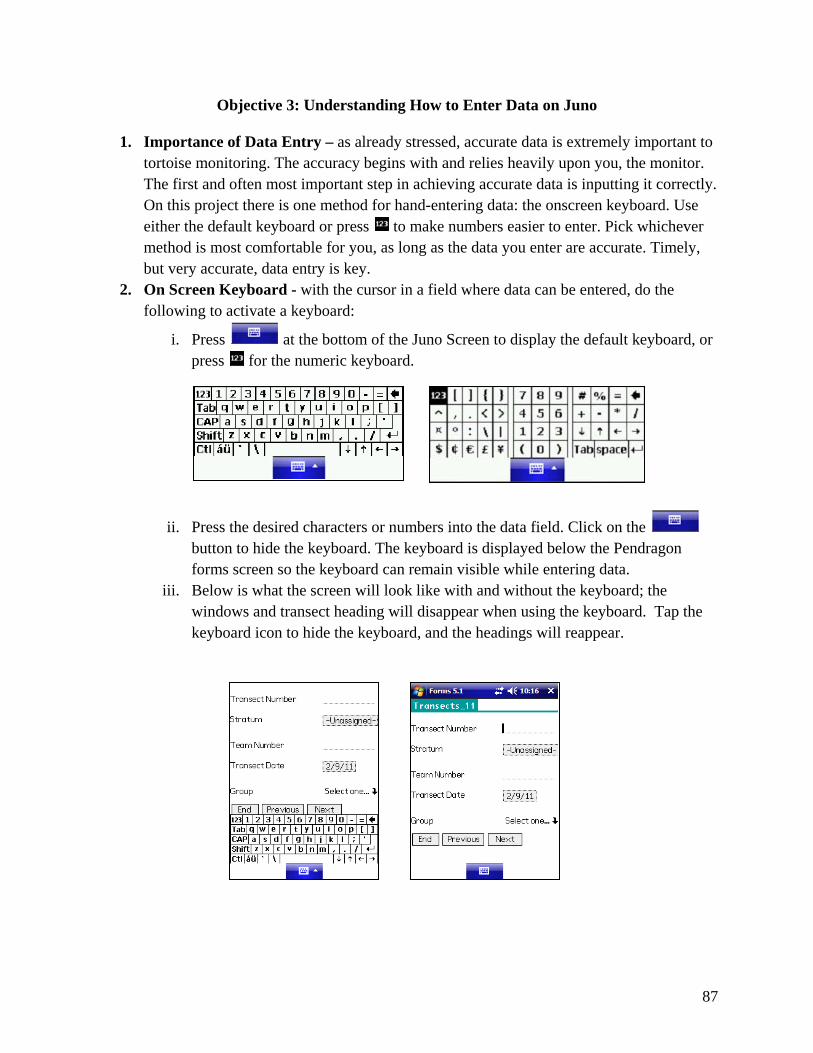
1. Importance of Data Entry – as already stressed, accurate data is extremely important to tortoise monitoring. The accuracy begins with and relies heavily upon you, the monitor. The first and often most important step in achieving accurate data is inputting it correctly. On this project there is one method for hand-entering data: the onscreen keyboard. Use either the default keyboard or press to make numbers easier to enter. Pick whichever method is most comfortable for you, as long as the data you enter are accurate. Timely, but very accurate, data entry is key.
2. On Screen Keyboard - with the cursor in a field where data can be entered, do the following to activate a keyboard:
i. Press at the bottom of the Juno Screen to display the default keyboard, or press for the numeric keyboard.
ii. Press the desired characters or numbers into the data field. Click on the button to hide the keyboard. The keyboard is displayed below the Pendragon forms screen so the keyboard can remain visible while entering data.
iii. Below is what the screen will look like with and without the keyboard; the windows and transect heading will disappear when using the keyboard. Tap the keyboard icon to hide the keyboard, and the headings will reappear.
88
Objective 4: Using Built-In GPS and JUNO Together
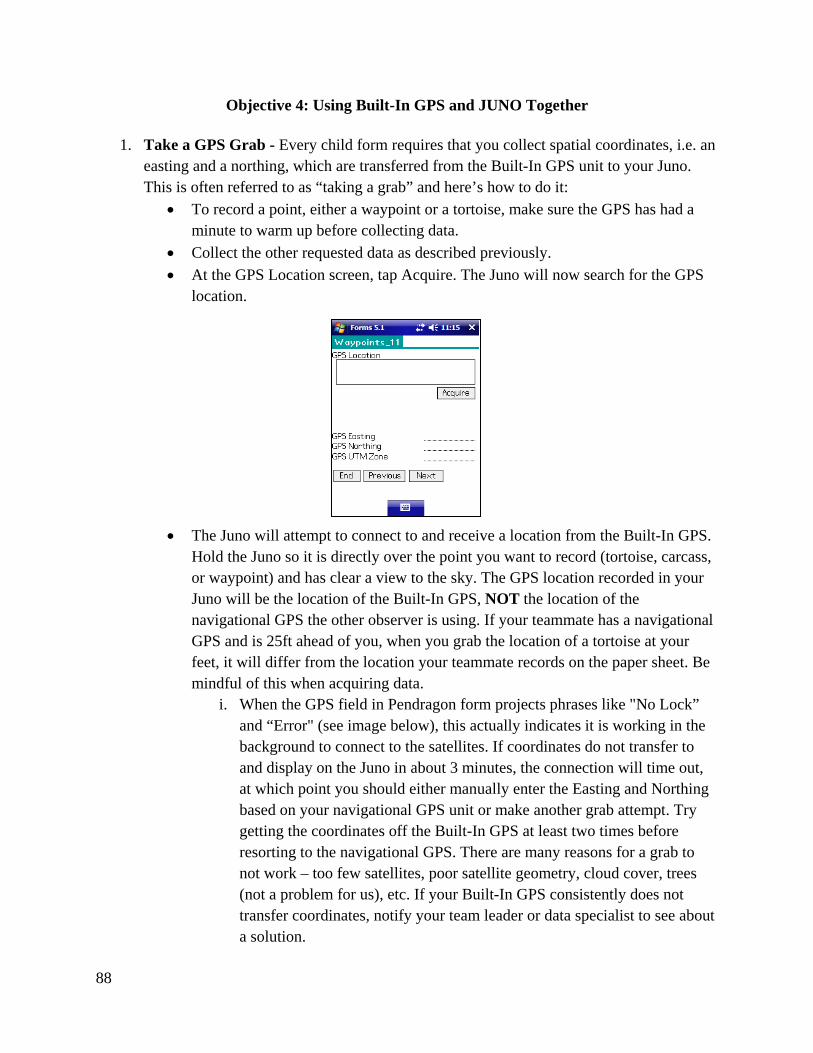
1. Take a GPS Grab - Every child form requires that you collect spatial coordinates, i.e. an easting and a northing, which are transferred from the Built-In GPS unit to your Juno. This is often referred to as “taking a grab” and here’s how to do it:
• To record a point, either a waypoint or a tortoise, make sure the GPS has had a minute to warm up before collecting data.
• Collect the other requested data as described previously. • At the GPS Location screen, tap Acquire. The Juno will now search for the GPS
location.
• The Juno will attempt to connect to and receive a location from the Built-In GPS. Hold the Juno so it is directly over the point you want to record (tortoise, carcass, or waypoint) and has clear a view to the sky. The GPS location recorded in your Juno will be the location of the Built-In GPS, NOT the location of the navigational GPS the other observer is using. If your teammate has a navigational GPS and is 25ft ahead of you, when you grab the location of a tortoise at your feet, it will differ from the location your teammate records on the paper sheet. Be mindful of this when acquiring data.
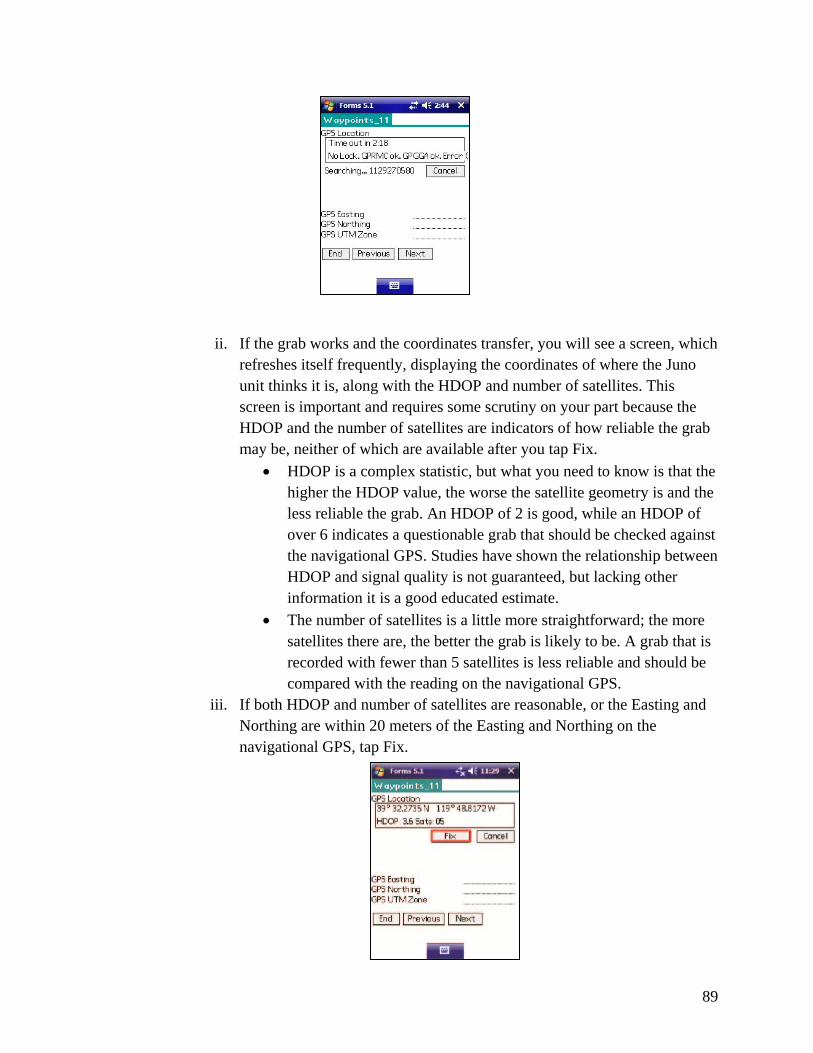
i. When the GPS field in Pendragon form projects phrases like "No Lock” and “Error" (see image below), this actually indicates it is working in the background to connect to the satellites. If coordinates do not transfer to and display on the Juno in about 3 minutes, the connection will time out, at which point you should either manually enter the Easting and Northing based on your navigational GPS unit or make another grab attempt. Try getting the coordinates off the Built-In GPS at least two times before resorting to the navigational GPS. There are many reasons for a grab to not work – too few satellites, poor satellite geometry, cloud cover, trees (not a problem for us), etc. If your Built-In GPS consistently does not transfer coordinates, notify your team leader or data specialist to see about a solution.
89
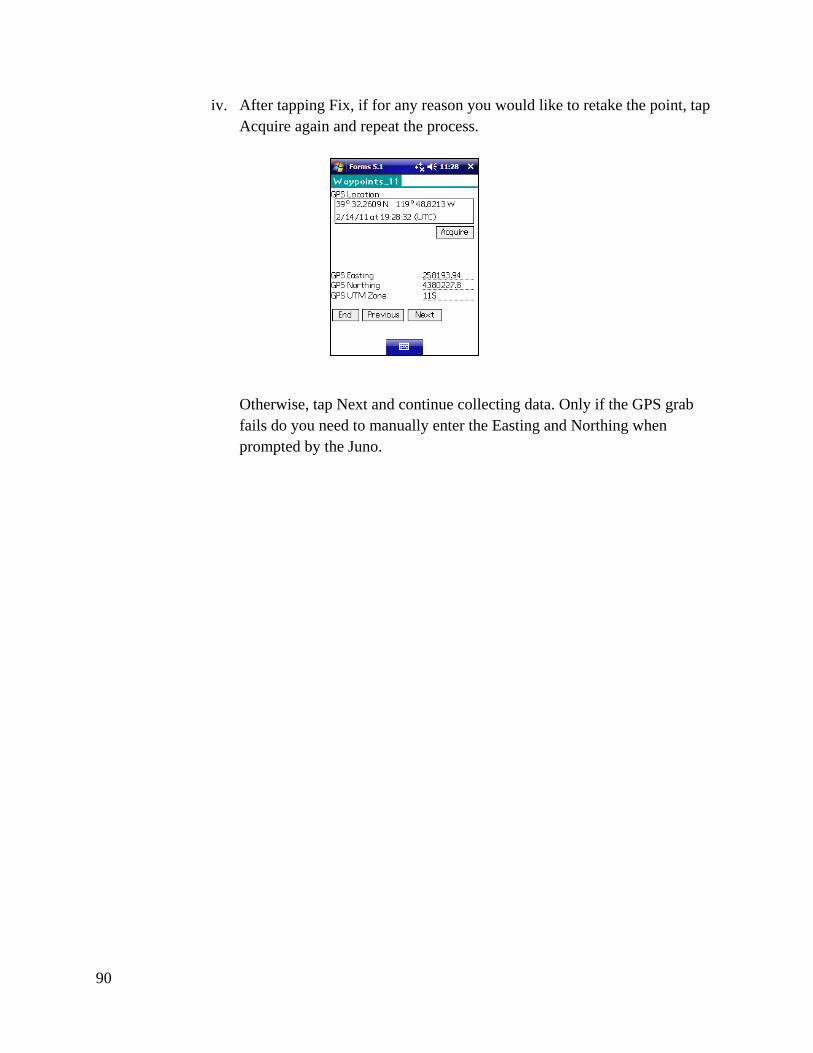
ii. If the grab works and the coordinates transfer, you will see a screen, which refreshes itself frequently, displaying the coordinates of where the Juno unit thinks it is, along with the HDOP and number of satellites. This screen is important and requires some scrutiny on your part because the HDOP and the number of satellites are indicators of how reliable the grab may be, neither of which are available after you tap Fix.
• HDOP is a complex statistic, but what you need to know is that the higher the HDOP value, the worse the satellite geometry is and the less reliable the grab. An HDOP of 2 is good, while an HDOP of over 6 indicates a questionable grab that should be checked against the navigational GPS. Studies have shown the relationship between HDOP and signal quality is not guaranteed, but lacking other information it is a good educated estimate.
• The number of satellites is a little more straightforward; the more satellites there are, the better the grab is likely to be. A grab that is recorded with fewer than 5 satellites is less reliable and should be compared with the reading on the navigational GPS.
iii. If both HDOP and number of satellites are reasonable, or the Easting and Northing are within 20 meters of the Easting and Northing on the navigational GPS, tap Fix.
90
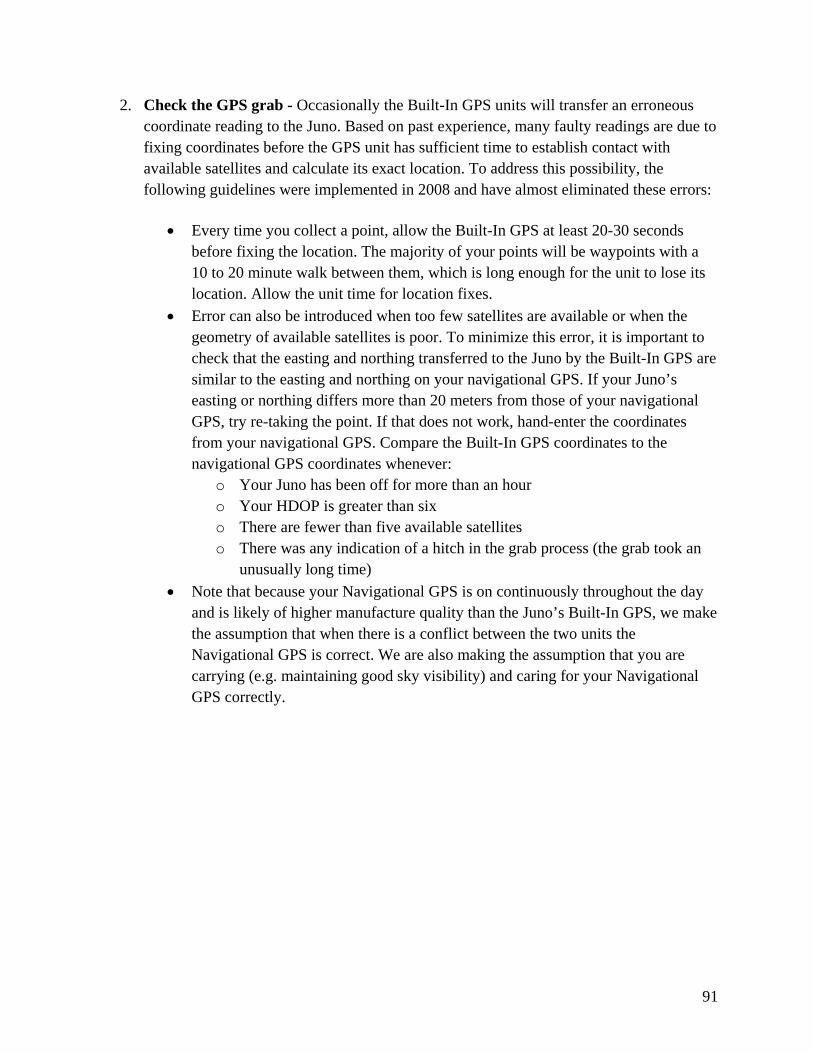
iv. After tapping Fix, if for any reason you would like to retake the point, tap Acquire again and repeat the process.
Otherwise, tap Next and continue collecting data. Only if the GPS grab fails do you need to manually enter the Easting and Northing when prompted by the Juno.
91
2. Check the GPS grab - Occasionally the Built-In GPS units will transfer an erroneous coordinate reading to the Juno. Based on past experience, many faulty readings are due to fixing coordinates before the GPS unit has sufficient time to establish contact with available satellites and calculate its exact location. To address this possibility, the following guidelines were implemented in 2008 and have almost eliminated these errors:
• Every time you collect a point, allow the Built-In GPS at least 20-30 seconds before fixing the location. The majority of your points will be waypoints with a 10 to 20 minute walk between them, which is long enough for the unit to lose its location. Allow the unit time for location fixes.
• Error can also be introduced when too few satellites are available or when the geometry of available satellites is poor. To minimize this error, it is important to check that the easting and northing transferred to the Juno by the Built-In GPS are similar to the easting and northing on your navigational GPS. If your Juno’s easting or northing differs more than 20 meters from those of your navigational GPS, try re-taking the point. If that does not work, hand-enter the coordinates from your navigational GPS. Compare the Built-In GPS coordinates to the navigational GPS coordinates whenever:
o Your Juno has been off for more than an hour o Your HDOP is greater than six o There are fewer than five available satellites o There was any indication of a hitch in the grab process (the grab took an
unusually long time) • Note that because your Navigational GPS is on continuously throughout the day
and is likely of higher manufacture quality than the Juno’s Built-In GPS, we make the assumption that when there is a conflict between the two units the Navigational GPS is correct. We are also making the assumption that you are carrying (e.g. maintaining good sky visibility) and caring for your Navigational GPS correctly.


![Mexican Wolf EIS - United States Fish and Wildlife …...2008/05/22 · [ ii ] Mexican Wolf EIS Th e U.S. Fish and Wildlife Service (FWS) contracted with D. J. Case and Associates](https://img.pdfslide.net/doc/110x75/5f110ba60bc2041abe7eff5d/mexican-wolf-eis-united-states-fish-and-wildlife-20080522-ii-mexican.jpg)
![DEPARTMENT OF THE INTERIOR Fish and Wildlife Service 50 ...€¦ · DEPARTMENT OF THE INTERIOR Fish and Wildlife Service 50 CFR Part 17 [Docket No. FWS–R8–ES–2012–0058] [4500030113]](https://img.pdfslide.net/doc/110x75/5f13c8bd413def3936322f83/department-of-the-interior-fish-and-wildlife-service-50-department-of-the-interior.jpg)


![DEPARTMENT OF THE INTERIOR Fish and Wildlife Service 50 ......DEPARTMENT OF THE INTERIOR . Fish and Wildlife Service . 50 CFR Part 17 [Docket No. FWS-R1-ES-2008-0086] [92210-5008-3922-10-B2]](https://img.pdfslide.net/doc/110x75/5e8adcc50c91851d7963180b/department-of-the-interior-fish-and-wildlife-service-50-department-of-the.jpg)