Embed Size (px)
Citation preview
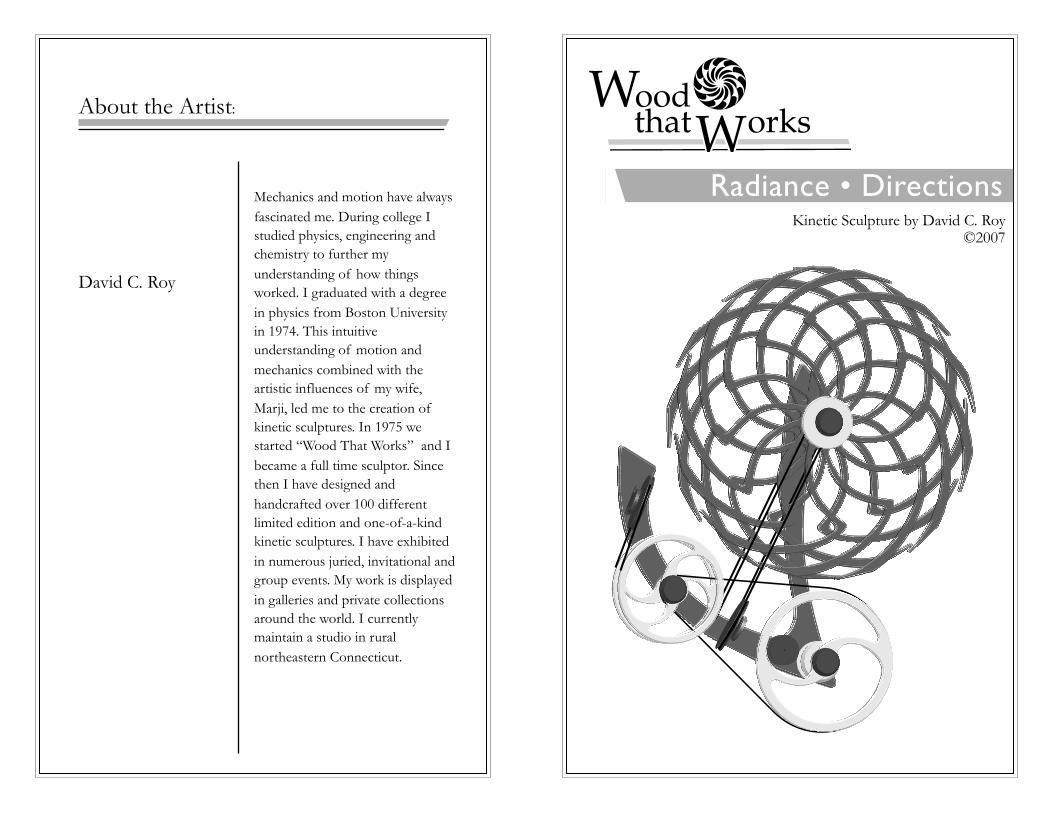
About the Artist:
Mechanics and motion have always fascinated me. During college I studied physics, engineering and chemistry to further my understanding of how things worked. I graduated with a degree in physics from Boston University in 1974. This intuitive understanding of motion and mechanics combined with the artistic influences of my wife, Marji, led me to the creation of kinetic sculptures. In 1975 we started “Wood That Works” and I became a full time sculptor. Since then I have designed and handcrafted over 100 different limited edition and one-of-a-kind kinetic sculptures. I have exhibited in numerous juried, invitational and group events. My work is displayed in galleries and private collections around the world. I currently maintain a studio in rural northeastern Connecticut.
David C. Roy
Radiance • Directions Kinetic Sculpture by David C. Roy
©2007
To the Owner...
Hello,
Welcome to the world of Wood That Works. This Radiance is number ______ out of a possible 75 pieces. It was made by me during the month of _______________ in 2008. I build, test and pack each sculpture myself, doing 6-12 pieces of an edition per month. It takes several years for me to complete an edition and some are never finished as I move on to new designs. Designing and building kinetic sculptures like Radiance has been my full time occupation for more than 30 years. I hope Radiance brings you and other viewers as much enjoyment as I’ve found in making it. Radiance has been mounted on a wall in my shop and running for at least 2 complete windings (several hours) before I pack it. I make every effort in design, construction and packing to make sure the piece will perform problem free for years to come. I use only the finest materials. Of course, problems can still occur no matter how hard I try to prevent them. My answer to this is a lifetime warranty against defects in materials and workmanship. If the sculpture fails to work properly at some time in the future for some reason other than misuse or calamity, I will repair it free of charge. The sculpture needs to be returned to me post paid. After the first year there will be return shipping and packing charges.
It leaves me happy and satisfied to find that my work has made it’s way into new lives. I hope it brings you years of enjoyment.
David C. Roy
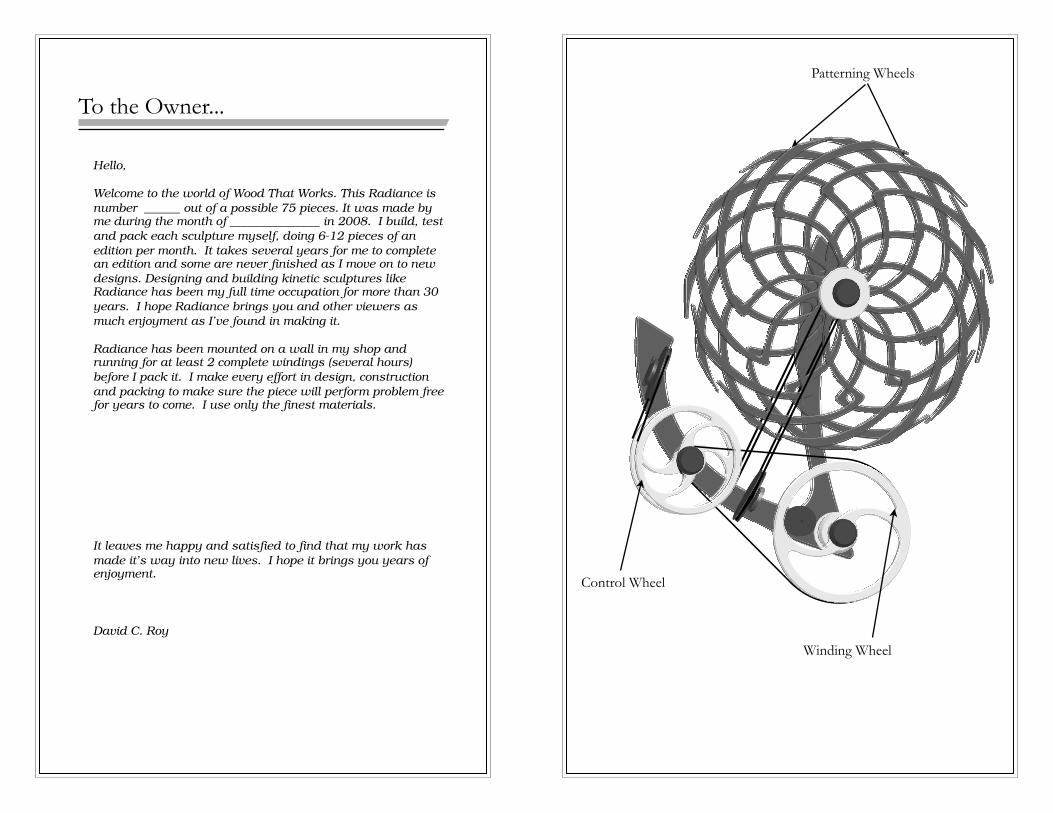
Patterning Wheels
Control Wheel
Winding Wheel

Directions:
Correct Installation of the Spring-Belts:• Two spring-belts power and control the motion of this
sculpture. It is easy to reinstall the small belt if it becomes knocked loose during shipping or installation. The longer belt takes a more involved path and can be a challenge to reinstall without the proper directions.
• Spring-belts tend to have minds of their own and it sometimes helps to have an extra pair of hands to install the long one.
• The first step is to make sure the small one is correctly installed so it is out of the way. It goes from the winding wheel to a small pulley between the two control wheels. Refer to the diagram at the right and install the small belt if necessary. Make sure it rests in the slots of the wheel and pulley.
• Next place the long belt over the small pulley to the rear of the patterning wheels. Bring the right side of this belt down and under the dark reversing pulley on the right side of the control wheels and then up and over, from right to left, the small pulley on the front of the patterning wheels. Keep tension on the belt by gently pulling down on the free loop end with your left hand.
• While keeping tension on the belt by holding the free end in one hand, pass the front and back sides of the belt under the pair of control wheels making sure the belt properly aligns with the slots of the wheels. Hold the belt in place against the control wheels with your right hand. With your left hand stretch the free loop of the belt up and over the dark reversing wheel on the left side of the sculpture.
Guarantee:• Defects in workmanship and materials are unconditionally
guaranteed. I will repair the sculpture without charge if it is returned post paid. Packing and shipping charges will apply after 1 year.
• I will charge a reasonable repair fee if the sculpture was damaged by misuse or needs refurbishment from normal wear and tear.
About Radiance:
Radiance creates a kaleidoscope of shifting patterning effects. The two 12-spoked patterning wheels are off balance so that they accelerate and decelerate with each rotation. They do this at different paces creating an ever-changing array of patterns. Eventually either wheel or both slow down enough, lose momentum, reverse direction, and trigger the drive mechanism. This action gives the wheels new energy and starts the variety of patterning effects all over again.
Specifications:
Limited Edition of 75Size: 34”h x 26”w x 7”dPower Source: negator springApproximate Run Time: 15 hoursMaterials: hardwood plywood, brass, bearings, stringRadiance © 2007Patent No. 4637152
Directions:
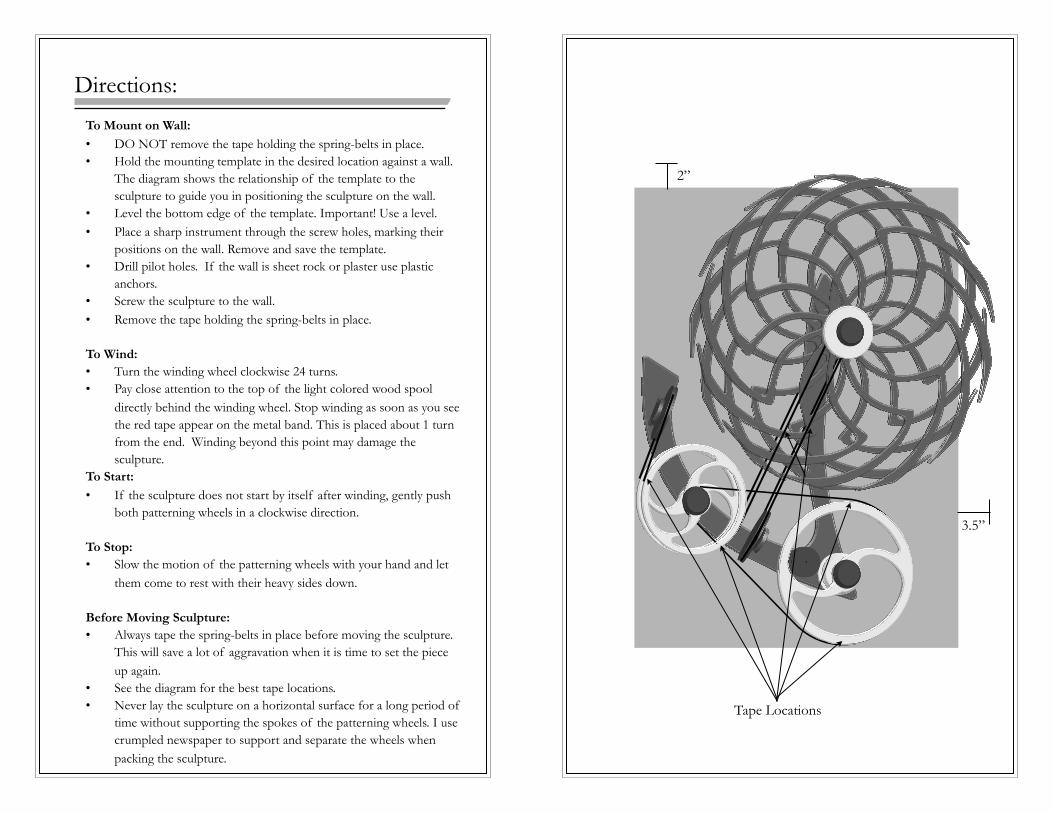
To Mount on Wall: • DO NOT remove the tape holding the spring-belts in place.• Hold the mounting template in the desired location against a wall.
The diagram shows the relationship of the template to the sculpture to guide you in positioning the sculpture on the wall.
• Level the bottom edge of the template. Important! Use a level.• Place a sharp instrument through the screw holes, marking their
positions on the wall. Remove and save the template.• Drill pilot holes. If the wall is sheet rock or plaster use plastic
anchors.• Screw the sculpture to the wall.• Remove the tape holding the spring-belts in place.
To Wind:• Turn the winding wheel clockwise 24 turns.• Pay close attention to the top of the light colored wood spool
directly behind the winding wheel. Stop winding as soon as you see the red tape appear on the metal band. This is placed about 1 turn from the end. Winding beyond this point may damage the sculpture.
To Start:• If the sculpture does not start by itself after winding, gently push
both patterning wheels in a clockwise direction. To Stop:• Slow the motion of the patterning wheels with your hand and let
them come to rest with their heavy sides down.
Before Moving Sculpture: • Always tape the spring-belts in place before moving the sculpture.
This will save a lot of aggravation when it is time to set the piece up again.
• See the diagram for the best tape locations.• Never lay the sculpture on a horizontal surface for a long period of
time without supporting the spokes of the patterning wheels. I use crumpled newspaper to support and separate the wheels when packing the sculpture.
Tape Locations
2”
3.5”