Embed Size (px)
Citation preview
Absolute
Beginner’s
Guide
to
DigitalPhotography
800 East 96th Street,Indianapolis, Indiana 46240
Joseph Ciaglia, Barbara London, John Upton, Ken Kobré, and Betsy Brillwith Peter Kuhns
00 0789731207_fm.qxd 4/6/04 2:16 PM Page i
Absolute Beginner’s Guide to DigitalPhotographyCopyright 2004 by Que PublishingAll rights reserved. No part of this book shall be reproduced, stored in a retrieval
system, or transmitted by any means, electronic, mechanical, photocopying, record-
ing, or otherwise, without written permission from the publisher. No patent liability
is assumed with respect to the use of the information contained herein. Although
every precaution has been taken in the preparation of this book, the publisher and
author assume no responsibility for errors or omissions. Nor is any liability assumed
for damages resulting from the use of the information contained herein.
International Standard Book Number: 0-7897-3120-7
Library of Congress Catalog Card Number: 2004100876
Printed in the United States of America
First Printing: April 2004
07 06 05 04 4 3 2 1
TrademarksAll terms mentioned in this book that are known to be trademarks or service marks
have been appropriately capitalized. Que Publishing cannot attest to the accuracy of
this information. Use of a term in this book should not be regarded as affecting the
validity of any trademark or service mark.
Warning and DisclaimerEvery effort has been made to make this book as complete and as accurate as pos-
sible, but no warranty or fitness is implied. The information provided is on an “as
is” basis. The authors and the publisher shall have neither liability nor responsibility
to any person or entity with respect to any loss or damages arising from the infor-
mation contained in this book.
Bulk SalesQue Publishing offers excellent discounts on this book when ordered in quantity for
bulk purchases or special sales. For more information, please contact
U.S. Corporate and Government Sales
1-800-382-3419
For sales outside of the U.S., please contact
International Sales
1-317-428-3341
Executive EditorCandace Hall
Acquisitions EditorKaren Whitehouse
DevelopmentEditorKaren Whitehouse
Managing EditorCharlotte Clapp
Project EditorGeorge Nedeff
Copy EditorKaren Whitehouse
IndexerMandie Frank
Production EditorSeth Kerney
PublishingCoordinatorSharry Lee Gregory
Interior DesignerAnne Jones
Cover DesignerDan Armstrong
Page LayoutEric S. Miller
00 0789731207_fm.qxd 4/6/04 2:16 PM Page ii
Contents at a Glance
Part I Digital Quickstart . . . . . . . . . . . . . . . . . . . . . . . . . . . . . . . . . . . . . .1
1 Quickstart to Digital: Pix to Print in Seconds . . . . . . . . . . . . . . . . . . . .32 Advantages & Disadvantages of Digital Cameras . . . . . . . . . . . . . . . .113 Film Basics . . . . . . . . . . . . . . . . . . . . . . . . . . . . . . . . . . . . . . . . . . . .29
Part II Digital Basics . . . . . . . . . . . . . . . . . . . . . . . . . . . . . . . . . . . . . . . . .43
4 The Importance of Lenses . . . . . . . . . . . . . . . . . . . . . . . . . . . . . . . .455 Exposure and Focus . . . . . . . . . . . . . . . . . . . . . . . . . . . . . . . . . . . . .636 Getting Your Pix Onscreen . . . . . . . . . . . . . . . . . . . . . . . . . . . . . . . .717 Files & File Formats . . . . . . . . . . . . . . . . . . . . . . . . . . . . . . . . . . . . .818 File Recovery: Finding “Lost” Images . . . . . . . . . . . . . . . . . . . . . . . . .97
Part III Image Editing . . . . . . . . . . . . . . . . . . . . . . . . . . . . . . . . . . . . . . .111
9 Basic Editing with Photoshop Elements and iPhoto . . . . . . . . . . . . .11310 Editing with Selection Tools . . . . . . . . . . . . . . . . . . . . . . . . . . . . . .13311 Advanced Selection Tools . . . . . . . . . . . . . . . . . . . . . . . . . . . . . . . .15112 The Importance of Selections . . . . . . . . . . . . . . . . . . . . . . . . . . . . .17313 The Importance of Filters . . . . . . . . . . . . . . . . . . . . . . . . . . . . . . . .19114 The Importance of Brightness/Contrast . . . . . . . . . . . . . . . . . . . . . .20515 The Importance of Levels & Curves . . . . . . . . . . . . . . . . . . . . . . . . .21916 The Importance of Layers & Masks . . . . . . . . . . . . . . . . . . . . . . . . .23517 The Importance of Channels . . . . . . . . . . . . . . . . . . . . . . . . . . . . . .255
Part IV Digital Output . . . . . . . . . . . . . . . . . . . . . . . . . . . . . . . . . . . . . . .267
18 Printers and Printer Resolution . . . . . . . . . . . . . . . . . . . . . . . . . . . .26919 Preserving Your Images . . . . . . . . . . . . . . . . . . . . . . . . . . . . . . . . .28520 Color Theory . . . . . . . . . . . . . . . . . . . . . . . . . . . . . . . . . . . . . . . . .29321 Lighting . . . . . . . . . . . . . . . . . . . . . . . . . . . . . . . . . . . . . . . . . . . .307
Part V Using Your Digital Pictures . . . . . . . . . . . . . . . . . . . . . . . . . . . . .323
22 The Portrait . . . . . . . . . . . . . . . . . . . . . . . . . . . . . . . . . . . . . . . . . .32523 Digital Photography & the Web . . . . . . . . . . . . . . . . . . . . . . . . . . .337Glossary . . . . . . . . . . . . . . . . . . . . . . . . . . . . . . . . . . . . . . . . . . . . . . .347Index . . . . . . . . . . . . . . . . . . . . . . . . . . . . . . . . . . . . . . . . . . . . . . .353
00 0789731207_fm.qxd 4/6/04 2:16 PM Page iii
Table of Contents
I Digital Quickstart . . . . . . . . . .1
1 Quickstart to Digital: Pix to Print inSeconds . . . . . . . . . . . . . . . . . . 3
What Do You Mean by “DigitalPhotography”? . . . . . . . . . . . . 4
Why Flash Media Is Important . . 5
Photography and the Internet . . 6
Is Digital Photography Expensive? . . . . . . . . . . . . . . . 7
Is Traditional Photography ReallyLess Expensive? . . . . . . . . . . . 7
2 Advantages and Disadvantages of Digital Cameras . . . . . . . . 11
Capture Delays . . . . . . . . . . . . . 13
Sensor Resolution and CrummyLenses . . . . . . . . . . . . . . . . . . 14
The RGB Color Space . . . . . . . . . 15
The CCD Image Sensor . . . . . . . 17CCD and Color: Using a Color Mask . . . . . . . . . . . . . . . . . . . 18CCD Competition: Low-Cost CMOS Image Sensors . . . . . . . . 20What About Foveon? . . . . . . . . 20
Aliasing and Other ImagerProblems . . . . . . . . . . . . . . . . 21
Highlights and CCD Sensitivity . 23
Digital Camera Technologies andStandards . . . . . . . . . . . . . . . 23EXIF 2.2 . . . . . . . . . . . . . . . . . 24Exif Print . . . . . . . . . . . . . . . . . 26PictBridge . . . . . . . . . . . . . . . . 26
Direct Print . . . . . . . . . . . . . . . 27Design Rule for Camera FileSystems . . . . . . . . . . . . . . . . . . 27Digital Print Order Format . . . . 27
3 Film Basics . . . . . . . . . . . . . . . . . 29
Choosing a Color Film . . . . . . . . 30
Types of Color Film . . . . . . . . . . 31Negative Film . . . . . . . . . . . . . . 31Reversal Film (Slide Film,Transparency Film, or “Chromes”) . . . . . . . . . . . . . . 31Professional Film . . . . . . . . . . . 31Films for Specialized Color Balance and Exposure Times . . . 32
Selecting and Using Film . . . . . . 32Color Balance and Film . . . . . . 33Do You Need a Film for a Special Purpose? . . . . . . . . . . . 34Storing Film Properly . . . . . . . . 35Film Speed . . . . . . . . . . . . . . . 35Film Speed Rating Systems . . . . 36Film Speed and Grain . . . . . . . . 37
How Film Responds to Light . . . 41
II Digital Basics . . . . . . . . . . . . .43
4 The Importance of Lenses . . . . . 45
Lens Focal Length . . . . . . . . . . . 46Normal Focal-Length Lenses . . . 47
Focal Length and Digital Cameras . . . . . . . . . . . . . . . . 49Long Focal-Length Lenses . . . . . 49Short Focal-Length Lenses . . . . 51Special-Purpose Lenses . . . . . . . 52
00 0789731207_fm.qxd 4/6/04 2:16 PM Page iv
Automatic Focus . . . . . . . . . . . . 54Types of Autofocus . . . . . . . . . 55Center-Weighted Autofocus Lock . 56
Focus and Depth of Field . . . . . . 58Controlling Depth of Field . . . . 58Lens Focal Length, Aperture, and Light . . . . . . . . . . . . . . . . 60
5 Exposure and Focus . . . . . . . . . . 63
Digital Cameras and Color Balance . . . . . . . . . . . . . . . . . 64Color Balance and Film . . . . . . 66Color Balance and Slide Film . . 66
Exposure Latitude . . . . . . . . . . . 66
Film Latitude . . . . . . . . . . . . . . . 67
6 Getting Your Pix Onscreen . . . . 71Working with Scan Software . . 73
Making a Scan Step by Step . . . 74Determining the Samples per Inch of a Scan . . . . . . . . . . . . . 76Scanning for Internet Output . . 77Scanning for Inkjet and Dye-Sublimation Output . . . . . . . . . 78Scanning for Laser and OffsetPrinting . . . . . . . . . . . . . . . . . . 79
Alternatives to Scanning . . . . . . 79
7 Files and File Formats . . . . . . . . 81
Photoshop Elements andPhotoshop: File FormatCompatibility . . . . . . . . . . . . 84
JPEG File Format . . . . . . . . . . . . 86How JPEG Works . . . . . . . . . . . 88The Replacement for JPEG:JPEG2000 . . . . . . . . . . . . . . . . 90
TIFF File Format . . . . . . . . . . . . . 91
Photoshop File Format . . . . . . . 95
8 File Recovery: Finding “Lost”Images . . . . . . . . . . . . . . . . . . 97
Using PC Inspector File Recovery . . . . . . . . . . . . . . . . 99
Recovering Lost Images from Flash Media . . . . . . . . . . . . . 100Recovering Specific Images . . . 102Partially Corrupt Files . . . . . . . 102
Filesystems at Work: The FileAllocation Table (FAT) . . . . . 103What Happens to Lost Data . . 106
Preventative Maintenance:Defragmenting Flash Media 107Formatting Flash Media . . . . . 108Formatting in the Camera . . . 108
Another Disaster Point: USB . . 109
III Image Editing . . . . . . . . . . .111
9 Basic Editing with PhotoshopElements and iPhoto . . . . . . 113
Finding an Image on YourComputer . . . . . . . . . . . . . . 114
Editing with Photoshop Elements . . . . . . . . . . . . . . . 116Printing Resolution . . . . . . . . . 116Resizing an Image Step by Step . . . . . . . . . . . . . . . . . 116Resampling an Image . . . . . . . 118
Rescan or Resample a Photo . . 119Resampling 101 . . . . . . . . . . . 120
00 0789731207_fm.qxd 4/6/04 2:16 PM Page v

Modifying an Image in Elements . . . . . . . . . . . . . . . 121Perspective Correction in Elements . . . . . . . . . . . . . . . . 121Rotating an Image in Elements . . . . . . . . . . . . . . . . 122Unlimited Transformations inElements . . . . . . . . . . . . . . . . 124
Editing with iPhoto . . . . . . . . . 126Working with the Print Dialog Box in iPhoto . . . . . . . . . . . . . 127Resizing an Image Step by Step . . . . . . . . . . . . . . . . . . . 130
10 Editing with Selection Tools . . 133
Introduction to Selection Tools . . . . . . . . . . . . . . . . . . 136Toolbox Options . . . . . . . . . . . 137Fly-Out Menus . . . . . . . . . . . . 137
The Most Popular Selection Tools . . . . . . . . . . . . . . . . . . 138Using the Magic Wand Tool . . 140Using the Lasso Tool . . . . . . . 142Using the Rectangular MarqueeTool . . . . . . . . . . . . . . . . . . . 143Using the Elliptical Marquee Tool . . . . . . . . . . . . . . . . . . . 144
Introduction to Image Editing . 145
Color Balance 101 . . . . . . . . . . 148
11 Advanced Selection Tools . . . . 151
The Polygonal Lasso Tool . . . . 153
Magnetic Lasso . . . . . . . . . . . . 154
Single Row and Single ColumnMarquees . . . . . . . . . . . . . . 155
Quick Mask Mode . . . . . . . . . . 156
The Amazingly Versatile Pen Tools . . . . . . . . . . . . . . . . . . 157
Saving Selections . . . . . . . . . . . 163
When Your Software Tools QuitWorking . . . . . . . . . . . . . . . 163The Power of the Color RangeCommand . . . . . . . . . . . . . . . 164Modifying Selections . . . . . . . 165Feathering and AntialiasedSelections . . . . . . . . . . . . . . . 168Don’t Forget the Crop Tool . . . 170
Photoshop Elements Workaroundsfor Pen and Quick Mask . . . 170
12 The Importance of Resolution . 173
Understanding Different Terms for Resolution . . . . . . . . . . . 174
Input Resolution . . . . . . . . . . . 176Digital Cameras and Resolution . . . . . . . . . . . . . . . 176Resolution of Film: How ManyPixels? . . . . . . . . . . . . . . . . . . 178Scanner Software and Resolution . . . . . . . . . . . . . . . 180Understanding Bit Depth . . . . 18312- and 16-bit Scan Rates . . . 184How Can a 48-Bit Scan Help Me? . . . . . . . . . . . . . . . . . . . 184Drawbacks to 48-Bit Images . . 185
Output Resolution . . . . . . . . . . 186Digital Methods for IncreasingResolution . . . . . . . . . . . . . . . 186Printing Press Output andResolution . . . . . . . . . . . . . . . 188
13 The Importance of Filters . . . . 191
Sharpening Prints . . . . . . . . . . 192
vi ABSOLUTE BEGINNER’S GUIDE TO DIGITAL PHOTOGRAPHY
00 0789731207_fm.qxd 4/6/04 2:16 PM Page vi
CONTENTS vii
Degrees of Unsharp Masking . 193An Exercise with Unsharp Mask . . . . . . . . . . . . . . . . . . 194
Taking Advantage of Blur . . . . 197Removing Moiré Patterns and Halftone Dots . . . . . . . . . . . . 197Using Blur to Add an Artistic Touch . . . . . . . . . . . . . . . . . . 198Noise Filters: Despeckle and Dust & Scratches . . . . . . . . . . 200
14 The Importance of Brightness/Contrast . . . . . . . . . . . . . . . . 205
Introduction to Histograms . . . 207Correcting Brightness and Contrast for Dark Images . . . . . . . . . . . 207Correcting Brightness and Contrast for Low-Contrast Images . . . . 209
Using Histograms to DiagnoseExposure Problems . . . . . . . 210Setting Brightness and Contrastwith the Black Point and the White Point . . . . . . . . . . . . . . 212Black-Point and White-Point Setup . . . . . . . . . . . . . . . . . . 214Brightness and Contrast Exercise . . . . . . . . . . . . . . . . . 215
15 The Importance of Levels andCurves . . . . . . . . . . . . . . . . . 219
Using Levels to Fix Your Images . . . . . . . . . . . . . . . . . 220Levels Dialog Box . . . . . . . . . . 221How Can Color Images Use GrayValues? . . . . . . . . . . . . . . . . . 222Working with Histograms andLevels . . . . . . . . . . . . . . . . . . 222Fixing an Image . . . . . . . . . . . 223The Purpose of Levels Triangles 224The Output Levels Section . . . 225
Correcting Images with Curves 226Curves for People in a Hurry . . 226Understanding the Curves Dialog Box . . . . . . . . . . . . . . . 227Getting Information About theImage . . . . . . . . . . . . . . . . . . 230Color Corrections with Curves 231
Accessing Levels and CurvesAdjustment Layers . . . . . . . 231
16 The Importance of Layers andMasks . . . . . . . . . . . . . . . . . 235
Adjustment Layers Are a DifferentKind of Layer . . . . . . . . . . . 236
Creating Image Layers . . . . . . . 237Blending and Opacity Experiment . . . . . . . . . . . . . . 238
Harmonizing the Elements of a Collage . . . . . . . . . . . . . 239Scale and Resolution in a Collage . . . . . . . . . . . . . . . . . 240Managing Layers . . . . . . . . . . 240Creating an Extended Family . 241
Preventing Color Banding and Data Loss in Adjustment Layers . . . . . . . . . . . . . . . . . 242
Making a Composite Image Step by Step . . . . . . . . . . . . 244Visualize the Image . . . . . . . . 244Inspect Each Component . . . . 244Adjust All the Components . . 245Select a Component and Copy It . . . . . . . . . . . . . . . . . 246Copy the Selection and Paste It into the Background Image . 247Flatten the Image When Finished . . . . . . . . . . . . . . . . 247
00 0789731207_fm.qxd 4/6/04 2:16 PM Page vii
Advanced Selection Techniques: The Pen Tool . . . . . . . . . . . . 247Drawing a Straight Line . . . . . 248Other Uses for Paths . . . . . . . 249The Purpose of Clipping Paths 252
Layer Masks: Attaching a Mask to a Layer . . . . . . . . . . . . . . 252Masking an Adjustment Layer . 253
17 The Importance of Channels . . 255
Using Masks to Create Selections . . . . . . . . . . . . . . 257
Seeing Through a Mask . . . . . . 259Removing an Object from an Image and Pasting into AnotherImage . . . . . . . . . . . . . . . . . . 260Using a Mask Created from anImage to Create Special Effects in Another Image . . . . . . . . . . 262Alpha Channels: Where Masks Are Stored . . . . . . . . . . . . . . . 263
Troubleshooting: Keeping Track of Layers, Channels, and Masks . . . . . . . . . . . . . . . . . 265The Image-Editing Software Stops Working . . . . . . . . . . . . 265The Last Command Did Not Work the Way It Should HaveWorked . . . . . . . . . . . . . . . . . 265I’m Still Not Getting the Results I Want . . . . . . . . . . . . . . . . . . 265A Command Is Grayed Out or IsMissing from the Menu . . . . . 266
IV Digital Output . . . . . . . . . . .267
18 Printers and Printer Resolution 269
Printer Technology . . . . . . . . . . 270Software Dithering and ErrorDiffusion . . . . . . . . . . . . . . . . 272
The Correct Settings for PrintingImages . . . . . . . . . . . . . . . . . 273
What Resolution Are My Images? . . . . . . . . . . . . . . . . 273Ink and Resolution: Tips for Quality and Saving on Cost . . 275
Third-Party Ink and PrinterResolution . . . . . . . . . . . . . . 276ICC Profiles . . . . . . . . . . . . . . 277Epson Printers and Big Brother 280Paper and Resolution: Tips forQuality and Saving on Cost . . 281
Why Do Images Look so Good on the Monitor? . . . . . . . . . 282
Printing Big Pictures . . . . . . . . 282
19 Preserving Your Images . . . . . . 285
Photo Papers . . . . . . . . . . . . . . 286
Plain Papers . . . . . . . . . . . . . . . 287
Archival Issues with Paper . . . . 288
What About Dye-SublimationPrinters? . . . . . . . . . . . . . . . 288
Saving Your Images on CD-ROM . . . . . . . . . . . . . . . 288The Advantages of a CD-ROM 289Make Your Own Photo Gallery on CD-ROM . . . . . . . . . . . . . 290
20 Color Theory . . . . . . . . . . . . . . 293
Three Image Layers Create Color Images . . . . . . . . . . . . 295Film Development Process . . . 295Printing Process . . . . . . . . . . . 296
Making Your Prints Match theMonitor—Gamuts and Color Management . . . . . . . 297Printing Without ColorManagement . . . . . . . . . . . . . 299
viii ABSOLUTE BEGINNER’S GUIDE TO DIGITAL PHOTOGRAPHY
00 0789731207_fm.qxd 4/6/04 2:16 PM Page viii

CONTENTS ix
Printing in RGB and CMYK . . . 302Multiple Printers: About Paper 305
21 Lighting . . . . . . . . . . . . . . . . . . 307
Degree of Diffusion: From Hard to Soft Light . . . . . . . . . . . . 308
Available Light: Outdoors . . . . 310
Available Light: Indoors . . . . . . 312
Qualities of Artificial Light . . . 313
The Main Light: The Dominant Source . . . . . . . . . . . . . . . . . 315
The Fill Light: To Lighten Shadows . . . . . . . . . . . . . . . 319
V Using Your Digital Pictures .323
22 The Portrait . . . . . . . . . . . . . . . 325
Converting Color to Black andWhite . . . . . . . . . . . . . . . . . 328Color to Black and White: Using Grayscale or Desaturate 328Color to Black and White: Using Channels Plus Grayscale 330Fixing Red Eye . . . . . . . . . . . . 330
23 Digital Photography and the Web . . . . . . . . . . . . . . . . 351
Making Images for the Internet . . . . . . . . . . . . . . . . 352
Creating a Web Photo Gallery . 353Compressing Images for theInternet with JPEG . . . . . . . . . 356
The Internet: Resource and Gallery . . . . . . . . . . . . . . . . . 357Exploring the Web . . . . . . . . . 357Your Own Virtual Gallery . . . . 358
Glossary . . . . . . . . . . . . . . . . . . 361
Index . . . . . . . . . . . . . . . . . . . . . 369
00 0789731207_fm.qxd 4/6/04 2:16 PM Page ix
x ABSOLUTE BEGINNER’S GUIDE TO DIGITAL PHOTOGRAPHY
About the AuthorsJoseph Ciaglia is an educator, landscape photographer, and author of PrenticeHall’s Introduction to Digital Photography. He enjoys shooting panoramic landscapesof the American West using a combination of film and digital techniques.
Peter Kuhns is a validation analyst, technical writer, and aspiring photographer.Mr. Kuhns has co-written game titles and Windows-related books. He is currentlyresearching wireless and handheld computing.
Barbara London and John Upton are the authors of Photography, now in itseighth edition. It is a major college textbook that has dominated introductory col-lege courses in photography since its publication and now in its eighth edition.Barbara London has published many critically acclaimed five-star photographybooks for beginning and intermediate photographers, including A Short Course inPhotography.
00 0789731207_fm.qxd 4/6/04 2:16 PM Page x

CONTENTS xi
We Want to Hear from You!As the reader of this book, you are our most important critic and commentator. Wevalue your opinion and want to know what we’re doing right, what we could do bet-ter, what areas you’d like to see us publish in, and any other words of wisdom you’rewilling to pass our way.
As an executive editor for Que Publishing, I welcome your comments. You can emailor write me directly to let me know what you did or didn’t like about this book—aswell as what we can do to make our books better.
Please note that I cannot help you with technical problems related to the topic of this book.We do have a User Services group, however, where I will forward specific technical questionsrelated to the book.
When you write, please be sure to include this book’s title and author as well as yourname, email address, and phone number. I will carefully review your comments andshare them with the author and editors who worked on the book.
Email: [email protected]
Mail: Candace HallExecutive EditorQue Publishing800 East 96th StreetIndianapolis, IN 46240 USA
For more information about this book or another Que Publishing title, visit our Website at www.quepublishing.com. Type the ISBN (excluding hyphens), or type in the titleof a book in the Search field.
00 0789731207_fm.qxd 4/6/04 2:16 PM Page xi
PrefaceThis book is about digital photography, whichincludes every operation from taking the picture todelivering the print. In 23 chapters you will learnabout cameras, film, scanners, portraiture, print-ing, and presentation.
Did I just say the word “film?” This beginner’sguide is about digital photography, not digitalcameras. A big difference not so apparent to ama-teurs. Most beginners think “digital photography”simply means donating the old instamatic andbuying a digital Canon. This book will show youthat digital cameras are great (because they are soconvenient), but even an old Pentax 35mm filmcamera can get you started.
Digital photography is also known as the “DigitalDarkroom,” because you no longer need to build adarkroom in your basement, and mess aroundwith smelly chemicals. The digital darkroomincludes digital cameras and traditional cameras.Yes that’s right. Digital photography replaces thetraditional darkroom, not necessarily the camerayou’ve been using all these years.
If you have a digital camera, photography is justthat much easier. But if you haven’t broken downand shelled out several hundred (to several thou-sand!) for a new digital camera, not to worry. Youcan be a “digital photographer” too. Editing yourimages, printing pictures, and showing your workto the world has nothing to do with the camerayou use or the medium on which you capturedyour subjects. How your get your pictures on thehard drive is up to you. Fortunately, this bookexplains the entire acquisition and editing process.
xii ABSOLUTE BEGINNER’S GUIDE TO DIGITAL PHOTOGRAPHY
Some printers todaycan “speak” the language
of digital cameras. You no longereven need a computer to movefrom digital images to prints!
Be sure to check outthe full-color online gallery
of digital photographs, includingphotographs featured in this book,at the companion Web sitewww.quepublishing.com. Type theISBN (excluding hyphens), or typein the title of the book in theSearch field and click on the WebResources link.
00 0789731207_fm.qxd 4/6/04 2:16 PM Page xii
Digital Quickstart
IPART
Quickstart to Digital: Pix to Print in Seconds . . . .3
Advantages and Disadvantages of Digital Cameras . . . . . . . . . . . . . . . . . . . . . . . . . . . . .11
Film Basics . . . . . . . . . . . . . . . . . . . . . . . . . . . . .29
01 0789731207_pt01.qxd 4/6/04 2:13 PM Page 1

01 0789731207_pt01.qxd 4/6/04 2:13 PM Page 2
1In this chapter
• What Do You Mean by “Digital Photography”?
• Turning Ideas into Prints Quickly
• Is Digital Photography Really Less Expensive?
• Is Traditional Photography More Expensive?
Quickstart to Digital:
Pix to Print in
Seconds
You are fortunate to be part of a revolution that only began about five
years ago: the digital imaging revolution. This is not some fad that fades
into the background. In fact, on September 10, 2003, Kodak, the largest
film company on the planet, announced it was no longer investing
money in the development of traditional film technologies.
The company that single-handedly invented the business of photogra-
phy acknowledged the shift away from film. Kodak, which profited for
over a hundred years to the tune of tens of billions of dollars, was
admitting in a single statement that film—its cash cow—is no longer a
growing business. Fortunately for us something more exciting is taking
its place: digital!
02 0789731207_ch01.qxd 4/6/04 2:20 PM Page 3

This chapter will introduce the relatively new hobby known as digital photography.Read the next few pages to learn how you can begin taking and printing digital pic-tures almost immediately without burning through your savings account. The rest ofthis book will show you how to take better pictures, import the images, and correctthem before printing.
What Do You Mean by “Digital Photography”?In digital photography, integrated circuits, which are sensitive to light, recordimages as a grid of pixels rather than using the silver and light-sensitive dyes thatfilm use. These integrated circuits are called CMOS (complementary metal oxide semi-conductor) sensors or CCDs (charge-coupled devices). These circuits are the backbone ofdigital cameras. In other words, everything revolves around these “chips,” whichrecord light and then translate them into ones and zeros.
When a CCD is charged with electricity, the sensors in the CCD become sensitive tolight. The CCD chip is made up of millions of sensors that can record light similar toconventional film (see Figure 1.1).
4 ABSOLUTE BEGINNER’S GUIDE TO DIGITAL PHOTOGRAPHY
FIGURE 1.1
From silver to
silicon—digital
photography
relies on grids
of sensors.
Photosensor
Vertical shift
register
Imagingarea
FITTypeCCD
Optical mask
Storagearea
Outputterminal
Horizontal readout register
Two scientists at Bell Labs invented the CCD in 1969. Bell Labs toyed with it, butgave up after a few years. The Japanese (specifically Sony) began experimentingwith the technology early and developed an industry around it. Today most
02 0789731207_ch01.qxd 4/6/04 2:20 PM Page 4
professional photographers have already converted to new chip-based cameras. Ittook more than 30 years for these optimistic researchers to achieve their goals!
If you just purchased your first digital camera or inherited one, you are ready to jointhe digital revolution. If you don’t have a camera yet, fortunately you now can findone below the $100 mark.
The emphasis in digital photography is on speed, which is one of the benefits of dig-ital film. After taking a picture, you can have a print in seconds. Gone are the daysof waiting a week or even an hour for your photos to be ready.
The fastest, least expensive way to get rolling with digital photography doesn’t eveninvolve a PC or a fancy color printer. In some cases, you don’t even need a digitalcamera! The choices for the budding photographer are now greater than ever.
Why Flash Media Is ImportantThe key to joining the “digi” revolution is a digital media card, also called digital film.Digital film is simply flash memory, a special form of memory that isn’t erased whenit’s unplugged.
Digital cameras use one of these types of media:
■ Memory Stick
■ Memory Stick Duo
■ SD (Secure Digital)
■ MMC (MultiMedia Card)
■ CF (Compact Flash)
■ Smartmedia
■ xD (Extreme Digital)
Flash media is important for two reasons: It isn’t fragile and you can use it to printphotos anywhere. This is the secret to ubiquitous, inexpensive digital photography—printers are now everywhere.
Decent digital cameras use SD, CF, Smartmedia, xD, or Memory Sticks to storeimages. You can remove this memory, and then stick it in a commercial digitalprinter at the camera store or your local warehouse club. Fortunately, only thecheapest “toy” cameras have no removable media (they must rely on a cable con-nection to a PC). With these types of flash media, you can take your pictures every-where and print wherever it’s cheapest.
Here are the steps to inexpensive digital photography:
1. If you already have a camera, determine what kind of digital flash media ituses, such as CF, SD, Smartmedia, or a Memory Stick.
CHAPTER 1 QUICKSTART TO DIGITAL: PIX TO PRINT IN SECONDS 5
02 0789731207_ch01.qxd 4/6/04 2:20 PM Page 5
2. Fill up the flash memory by taking some pictures. Be sure to have plenty ofbatteries on hand (rechargeable batteries last longest).
3. Remove the digital media and take it to a camera store. You don’t even needthe camera.
4. At the camera store, insert the flash media into a printer and print away.Most professional store printers will automatically color-correct the image,provide simple editing features, or both.
There are of course many more ways to create and print digital images. This is sim-ply one of the less expensive ways to get in on the act. The rest of this book explorestaking better pictures and also printing and displaying your own digital images.
Photography and the InternetAnother choice for instant photography is the Web. The goal of most photographersis to capture a moment or a memory and display it to others. The Web is perfect forachieving this goal because everyone can access the Web worldwide. If all you haveis a camera and a PC, you can share images immediately after taking them.
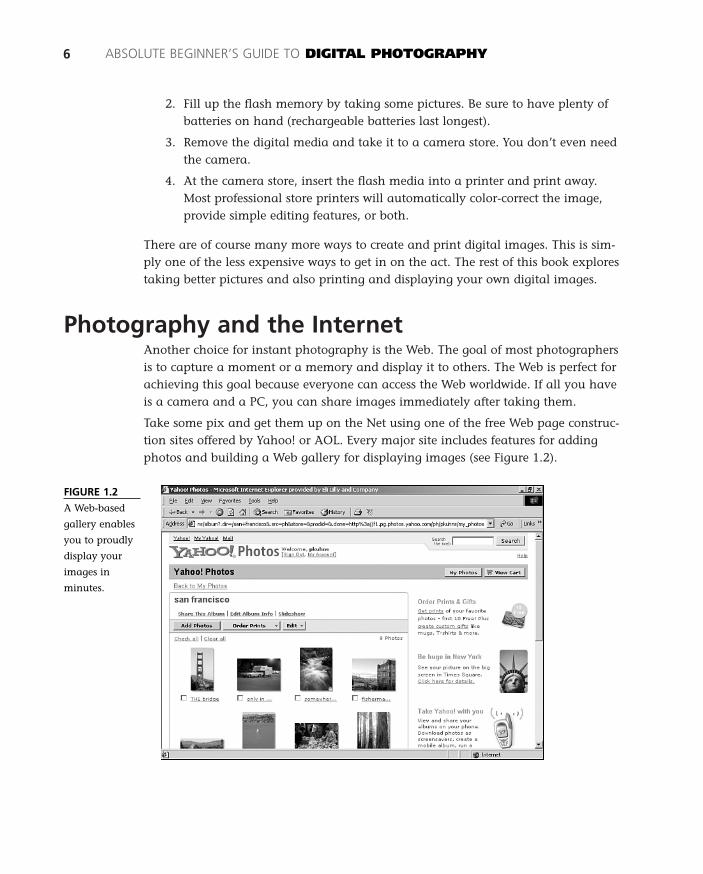
Take some pix and get them up on the Net using one of the free Web page construc-tion sites offered by Yahoo! or AOL. Every major site includes features for addingphotos and building a Web gallery for displaying images (see Figure 1.2).
6 ABSOLUTE BEGINNER’S GUIDE TO DIGITAL PHOTOGRAPHY
FIGURE 1.2
A Web-based
gallery enables
you to proudly
display your
images in
minutes.
02 0789731207_ch01.qxd 4/6/04 2:20 PM Page 6
Is Digital Photography Expensive?Cost is a huge consideration in this hobby/profession. Digital photography is justlike driving—a Mercedes CL500 does exactly what a new Hyundai does. Both travelat highway speeds, have heat and air conditioning, and include seat belts. However,one costs $80,000 U.S.—the other can be had for around $8,000 U.S.
Digital photography is very much the same. You can buy a two-megapixel cameraon eBay for under $100, a closeout Epson printer for $150, and glossy photo paperat the local warehouse club for $25. Or, you can go the high-ticket route by spend-ing $3,000 on a Canon, $1,800 on a wide-format HP printer, and buy only the finestGalerie paper from Ilford (approximately $5 per print). Which raises the question….
Is Traditional Photography Really Less Expensive?Film technology, which has been perfected over the past 100 years, is being overrunby a technology that has only been around for 5 years. Usually a new technologyovertakes a more traditional technology for one of two reasons: cost or convenience.Digital is not necessarily less expensive, but is more convenient.
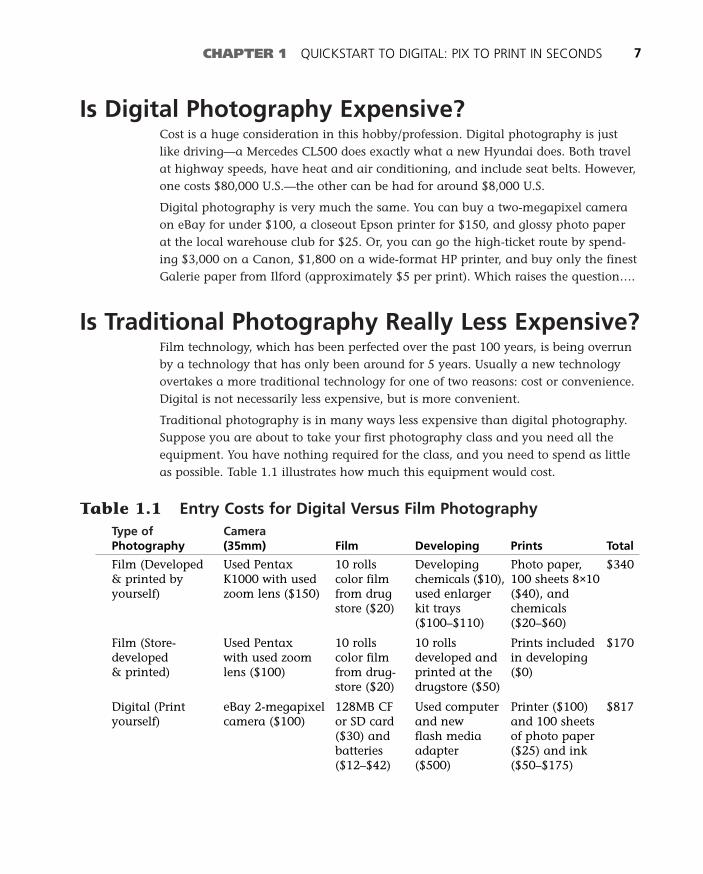
Traditional photography is in many ways less expensive than digital photography.Suppose you are about to take your first photography class and you need all theequipment. You have nothing required for the class, and you need to spend as littleas possible. Table 1.1 illustrates how much this equipment would cost.
Table 1.1 Entry Costs for Digital Versus Film PhotographyType of Camera Photography (35mm) Film Developing Prints Total
Film (Developed Used Pentax 10 rolls Developing Photo paper, $340& printed by K1000 with used color film chemicals ($10), 100 sheets 8×10 yourself) zoom lens ($150) from drug used enlarger ($40), and
store ($20) kit trays chemicals ($100–$110) ($20–$60)
Film (Store- Used Pentax 10 rolls 10 rolls Prints included $170developed with used zoom color film developed and in developing & printed) lens ($100) from drug- printed at the ($0)
store ($20) drugstore ($50)
Digital (Print eBay 2-megapixel 128MB CF Used computer Printer ($100) $817yourself) camera ($100) or SD card and new and 100 sheets
($30) and flash media of photo paper batteries adapter ($25) and ink ($12–$42) ($500) ($50–$175)
CHAPTER 1 QUICKSTART TO DIGITAL: PIX TO PRINT IN SECONDS 7
02 0789731207_ch01.qxd 4/6/04 2:20 PM Page 7
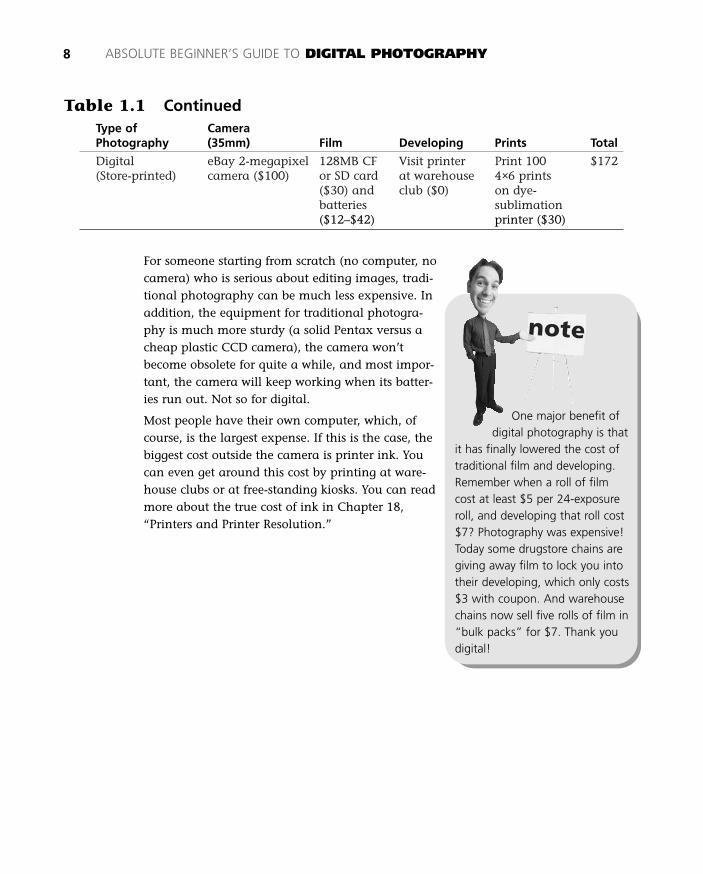
Digital eBay 2-megapixel 128MB CF Visit printer Print 100 $172(Store-printed) camera ($100) or SD card at warehouse 4×6 prints
($30) and club ($0) on dye-batteries sublimation ($12–$42) printer ($30)
For someone starting from scratch (no computer, nocamera) who is serious about editing images, tradi-tional photography can be much less expensive. Inaddition, the equipment for traditional photogra-phy is much more sturdy (a solid Pentax versus acheap plastic CCD camera), the camera won’tbecome obsolete for quite a while, and most impor-tant, the camera will keep working when its batter-ies run out. Not so for digital.
Most people have their own computer, which, ofcourse, is the largest expense. If this is the case, thebiggest cost outside the camera is printer ink. Youcan even get around this cost by printing at ware-house clubs or at free-standing kiosks. You can readmore about the true cost of ink in Chapter 18,“Printers and Printer Resolution.”
8 ABSOLUTE BEGINNER’S GUIDE TO DIGITAL PHOTOGRAPHY
One major benefit ofdigital photography is that
it has finally lowered the cost oftraditional film and developing.Remember when a roll of filmcost at least $5 per 24-exposureroll, and developing that roll cost$7? Photography was expensive!Today some drugstore chains aregiving away film to lock you intotheir developing, which only costs$3 with coupon. And warehousechains now sell five rolls of film in“bulk packs” for $7. Thank youdigital!
Table 1.1 ContinuedType of Camera Photography (35mm) Film Developing Prints Total
02 0789731207_ch01.qxd 4/6/04 2:20 PM Page 8
CHAPTER 1 QUICKSTART TO DIGITAL: PIX TO PRINT IN SECONDS 9
IF YOU LEARN ONLY ONE THING IN THIS BOOK…Get closer. To set yourself apart from the billions of amateur photographers and theircommon full-length portrait snapshots, put yourself in the story by getting closer.
Almost all amateur photos are the same: people smiling at the camera from 6–12 feetaway. All nationalities are guilty of this monotony, but Americans seem to have mastered it.When you take a picture of anything or anyone, move in closer to the subject or theaction. Eighty percent of the time the background doesn’t matter, the person’s legs don’tmatter, and framing the subject in the center doesn’t matter. All that matters is a person’sexpression and what his or her eyes convey. If you can’t get closer, use a telephoto lens.Get closer and see how your images improve.
The Absolute Minimum
This chapter shows you how to jump into the digital photography hobby quicklywithout burning through your savings account. Keep these important points in mindif you’re shopping for a camera or eager to print your first series of images:
■ A digital camera is all you need to “go digital.”
■ The least expensive form factor for “digital film” is Compact Flash (CF).
■ The most prolific form of digital film is Secure Digital (SD).
■ Use in-store printers to print your photos. This is by far the best way to getyour pix in print.
The rest of the book will show you how to take better pictures, import the images,and correct them before printing. You will also learn how to present your images,which is important for those who are serious about photography and the memoriesthey capture.
02 0789731207_ch01.qxd 4/6/04 2:20 PM Page 9

02 0789731207_ch01.qxd 4/6/04 2:20 PM Page 10
2In this chapter
• The Advantages and Disadvantages of DigitalCameras
• The RGB and sRGB Color Space
• CCDs and CMOS Chips: How They Work
• Lens Quality and Resolution
Advantages and
Disadvantages of
Digital Cameras
Convenience and customization are the two most important advan-
tages of digital camera technology—but this new medium does retain
some drawbacks.
Most professional photographers would admit that digital photography
has come far enough in technology and resolution that it matches
film—the dozens of Nikon F5s and Canon EOS1s at the used camera
store is one clue. This means digital photography has reached the qual-
ity most professionals require of their work. The technology itself has
some shortcomings, however:
03 0789731207_ch02.qxd 4/6/04 2:16 PM Page 11
■ Resolution. Consumer-level digital camerasare not capable of higher resolutions thanwhat you would receive from a 35mm cam-era with a third-rate lens.
■ Color space. Digital cameras rely on acolor space, or mathematical representationof all colors. Most cameras use the sRGB(Red, Green, Blue) color space. Other colorspace definitions exist though that often aresuperior.
■ Aliasing. Software and low resolution sen-sors work together to degrade the resolutionof an image by blurring pixelation.
■ Highlight disaster. Some digital camerascannot handle highlights in an image,resulting in bright white streaks.
■ Delays. Forget action or sports photographywith a consumer-level digital camera. Stopping action at the exact momentyou desire is something of a guessing game and a very expensive digital SLR(Single-Lens Reflex) is necessary.
■ Wide-angle lenses. CCDs in digital SLRs are smaller than the standard35mm film frame. The result is a magnification of lenses, so that a 35mmbecomes a 55mm. Wide-angle is difficult unless you buy an exotic (that is,expensive) lens.
■ Prints. Blame it on genetics or culture, but digital prints do not commandthe same respect as regular prints.
■ Battery drain. Digital cameras drain batteries faster than any electronicdevice. With a small LCD screen, constant auto-focus, and flash, normalalkaline batteries barely survive a “roll” of 36 pictures.
■ Price. Low-end digital cameras currently match instamatic cameras in price,but above this consumer level, a serious SLR digital camera body costs two tothree times as much as a traditional camera body.
As you can see, digital cameras aren’t perfect. Fortunately, technology is rapidlyovercoming these drawbacks. You owe it to yourself to research these issues, in caseyour dream camera has a drawback.
12 ABSOLUTE BEGINNER’S GUIDE TO DIGITAL PHOTOGRAPHY
This chapter focuseson the lesser-known
advantages and disadvantages ofdigital cameras. You will learnhow a quality digital cameraimproves a digital suite, and howa low-quality camera hinders yourphotography.
03 0789731207_ch02.qxd 4/6/04 2:16 PM Page 12
Capture DelaysBy far the biggest problem with consumer-level digital cameras is the delay. Unlikemost film cameras, some consumer digital cameras have a significant delay whenyou depress the shutter (see Figure 2.1). When you take a picture with fixed-focus35mm film cameras, the picture is taken immediately. This isn’t always the casewith digital cameras. It may take several seconds before the camera can capture theimage because the camera must perform the following actions:
■ Autofocus on the subject.
■ Open the shutter when autofocus is finished to expose the sensor to light.
■ Accumulate enough charge on the sensor.
■ Close the shutter.
CHAPTER 2 ADVANTAGES AND DISADVANTAGES OF DIGITAL CAMERAS 13
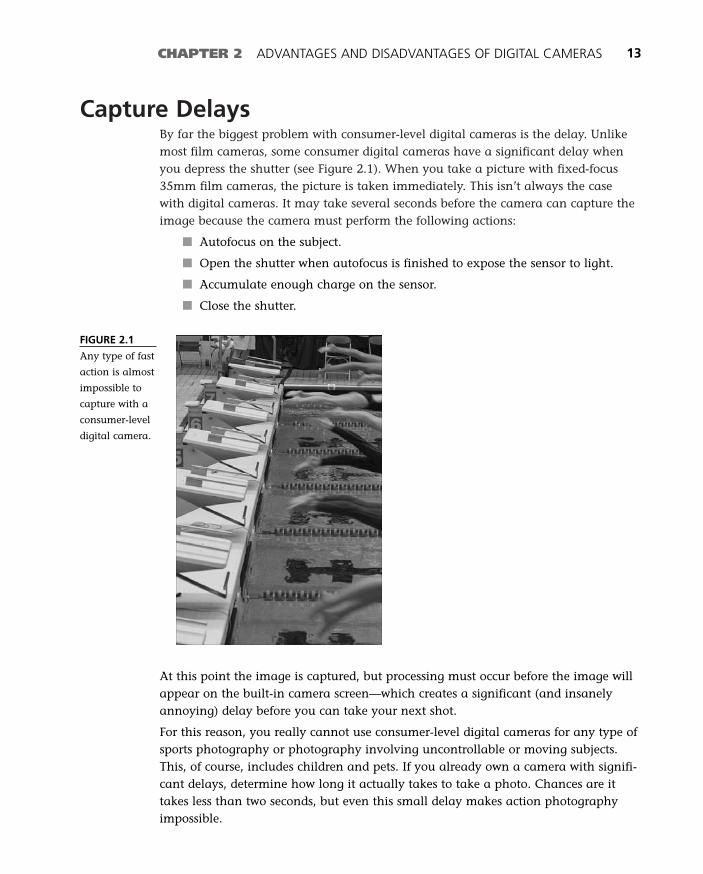
FIGURE 2.1
Any type of fast
action is almost
impossible to
capture with a
consumer-level
digital camera.
At this point the image is captured, but processing must occur before the image willappear on the built-in camera screen—which creates a significant (and insanelyannoying) delay before you can take your next shot.
For this reason, you really cannot use consumer-level digital cameras for any type ofsports photography or photography involving uncontrollable or moving subjects.This, of course, includes children and pets. If you already own a camera with signifi-cant delays, determine how long it actually takes to take a photo. Chances are ittakes less than two seconds, but even this small delay makes action photographyimpossible.
03 0789731207_ch02.qxd 4/6/04 2:16 PM Page 13
The camera should be an extension of you. It should feel as effortless as riding a bike.This is currently only possible with digital SLRs, which fortunately are as fast as filmSLRs. But any delays will affect your photography. Your pictures will not be the same.Your goal should be to find a camera that has no delay, or at least a delay you don’tnotice. With no delay, you will be able to use the camera much more often.
Sensor Resolution and Crummy LensesLens quality and pixel resolution affect the resolution of a digital camera. Four-,five-, six-, and higher megapixel cameras with quality lenses can match the resolu-tion of amateur 35mm photographs. Digital cameras with fewer pixels (such as aCCD of 2–3.2 megapixels) are fine for snapshots, but just don’t have the resolutionof film. If film-like resolution is required, definitely consider a camera with a chip offive or more megapixels.
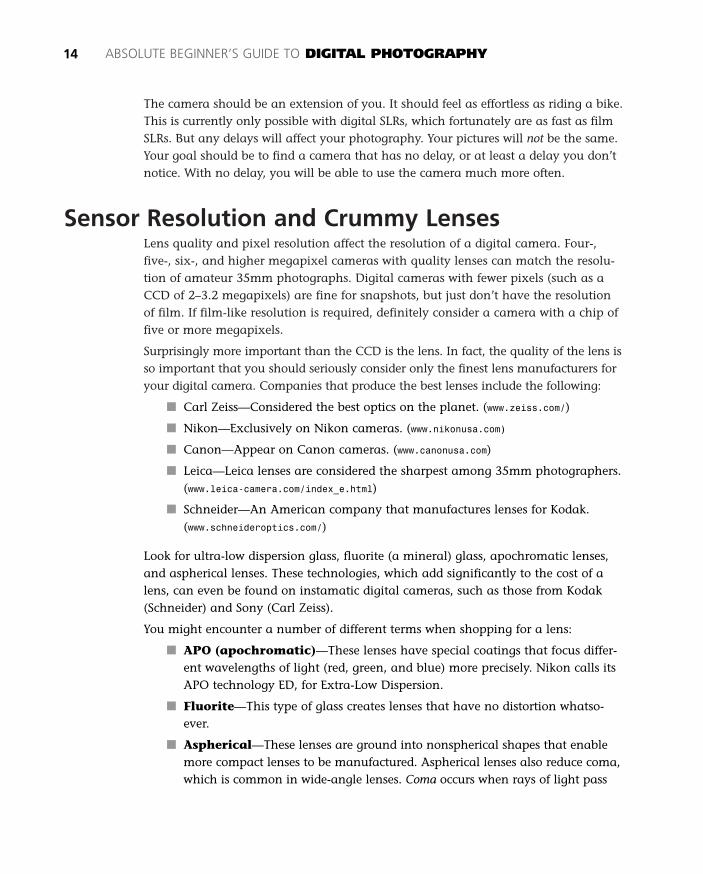
Surprisingly more important than the CCD is the lens. In fact, the quality of the lens isso important that you should seriously consider only the finest lens manufacturers foryour digital camera. Companies that produce the best lenses include the following:
■ Carl Zeiss—Considered the best optics on the planet. (www.zeiss.com/)
■ Nikon—Exclusively on Nikon cameras. (www.nikonusa.com)
■ Canon—Appear on Canon cameras. (www.canonusa.com)
■ Leica—Leica lenses are considered the sharpest among 35mm photographers.(www.leica-camera.com/index_e.html)
■ Schneider—An American company that manufactures lenses for Kodak.(www.schneideroptics.com/)
Look for ultra-low dispersion glass, fluorite (a mineral) glass, apochromatic lenses,and aspherical lenses. These technologies, which add significantly to the cost of alens, can even be found on instamatic digital cameras, such as those from Kodak(Schneider) and Sony (Carl Zeiss).
You might encounter a number of different terms when shopping for a lens:
■ APO (apochromatic)—These lenses have special coatings that focus differ-ent wavelengths of light (red, green, and blue) more precisely. Nikon calls itsAPO technology ED, for Extra-Low Dispersion.
■ Fluorite—This type of glass creates lenses that have no distortion whatso-ever.
■ Aspherical—These lenses are ground into nonspherical shapes that enablemore compact lenses to be manufactured. Aspherical lenses also reduce coma,which is common in wide-angle lenses. Coma occurs when rays of light pass
14 ABSOLUTE BEGINNER’S GUIDE TO DIGITAL PHOTOGRAPHY
03 0789731207_ch02.qxd 4/6/04 2:16 PM Page 14
through a lens far from its center. The rays do not focus on a point inside thecamera, but instead create a cone of light, which looks like a comet tail.
The RGB Color SpaceAll digital cameras rely on a color space definition to capture color. This definition,which is part of a processing algorithm, forces light values captured by the camerasensor into a defined color space. Essentially, the camera can only capture specificcolors, not the entire spectrum of color. Generally, this is not significant because thehuman eye cannot really discern colors accurately.
There are several color space definitions in use today. Each has its advantages anddisadvantages:
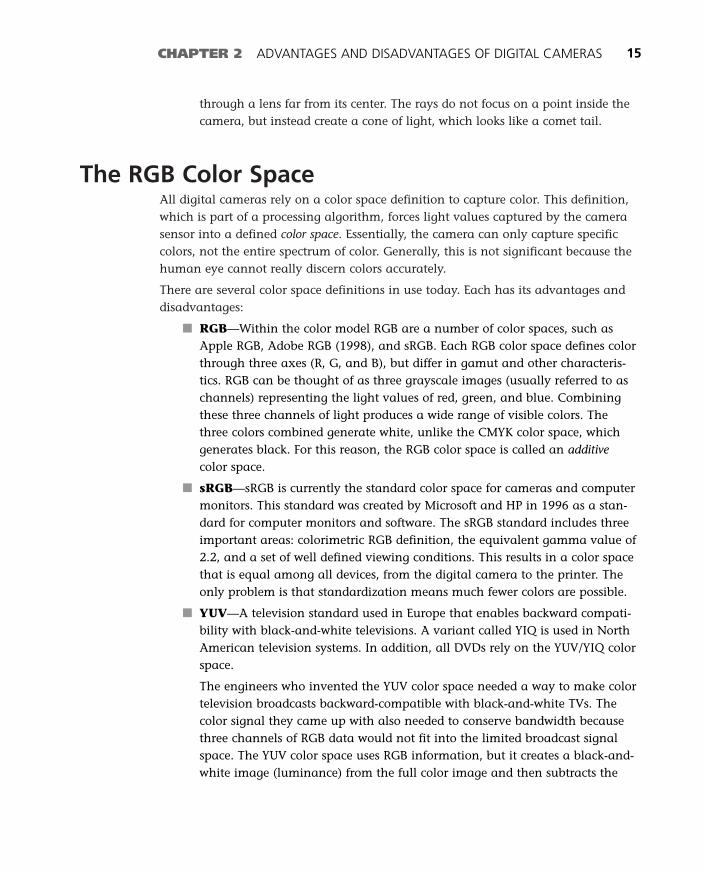
■ RGB—Within the color model RGB are a number of color spaces, such asApple RGB, Adobe RGB (1998), and sRGB. Each RGB color space defines colorthrough three axes (R, G, and B), but differ in gamut and other characteris-tics. RGB can be thought of as three grayscale images (usually referred to aschannels) representing the light values of red, green, and blue. Combiningthese three channels of light produces a wide range of visible colors. Thethree colors combined generate white, unlike the CMYK color space, whichgenerates black. For this reason, the RGB color space is called an additivecolor space.
■ sRGB—sRGB is currently the standard color space for cameras and computermonitors. This standard was created by Microsoft and HP in 1996 as a stan-dard for computer monitors and software. The sRGB standard includes threeimportant areas: colorimetric RGB definition, the equivalent gamma value of2.2, and a set of well defined viewing conditions. This results in a color spacethat is equal among all devices, from the digital camera to the printer. Theonly problem is that standardization means much fewer colors are possible.
■ YUV—A television standard used in Europe that enables backward compati-bility with black-and-white televisions. A variant called YIQ is used in NorthAmerican television systems. In addition, all DVDs rely on the YUV/YIQ colorspace.
The engineers who invented the YUV color space needed a way to make colortelevision broadcasts backward-compatible with black-and-white TVs. Thecolor signal they came up with also needed to conserve bandwidth becausethree channels of RGB data would not fit into the limited broadcast signalspace. The YUV color space uses RGB information, but it creates a black-and-white image (luminance) from the full color image and then subtracts the
CHAPTER 2 ADVANTAGES AND DISADVANTAGES OF DIGITAL CAMERAS 15
03 0789731207_ch02.qxd 4/6/04 2:16 PM Page 15
three primary colors, resulting in two addi-tional signals to describe color. Combining thethree signals back together results in a fullcolor image. Note that in either case, if thechrominance (color information) is ignored,the result is a black-and-white picture.
■ CMYK—Color printers and large offsetprinters rely on the CMYK color space. Thiscolor space matches the color pigmentscyan, magenta, and yellow. The color black(the K in CMYK) is included, but notrequired. The colors C, M, and Y absorb col-ors on paper, creating black. This differsfrom the RGB color space, which reflectswhite when the colors R, G, and B are com-bined. For this reason, the CMY color spaceis called a “subtractive model.” The black(K) component is added so that true blackcan be printed on paper (versus a contrivedblack from the three colors).
As with the RGB color space, every color is represented by three values: C, M,and Y. These values are assumed to be in the 0–255 range.
■ CiéLAB—LAB color mode splits color into three values:
■ L describes relative lightness
■ A represents relative redness-greenness
■ B represents relative yellowness-blueness
Adobe Photoshop software uses LAB color as its native color space becauseLAB color can be converted to another color space without doing damage tothe colors’ intensities or hues. Photoshop is just as talented at working withimages in the other color spaces, of course. The RGB color space is actuallyrelated closely to LAB color. The CiéLAB model was adopted worldwide as themaster color space definition in 1991.
The color models described here are the most common color spaces. Digital camerasrely on the RGB color space, which has a few issues. One is that the RGB color spaceis device-dependent. In other words, when the camera captures an image, it may notappear the same on the monitor (another RGB device). This, of course, could causeproblems for serious color photographers.
16 ABSOLUTE BEGINNER’S GUIDE TO DIGITAL PHOTOGRAPHY
The JPEG compressionscheme relies on YUV,
which is also known as YCbCr.This color space enables the com-pression of the chrominance (col-ors) in an image without affectingthe brightness. The human eye ismore sensitive to brightnesschanges than color changes,which fits with this color model.
03 0789731207_ch02.qxd 4/6/04 2:16 PM Page 16
As you use Photoshop and digital photography more often, you will need to ensurethat you have the most accurate color setup by tweaking Color Settings. Most digitalcameras rely on sRGB. Only the higher-end cameras provide the richer Adobe RGBcolor space. Always try to use Adobe RGB if your camera can capture in that colorspace. These color spaces matter significantly when printing with a high-end inkjetprinter. You can read more about this in Chapter 18, “Printers and PrinterResolution. ”
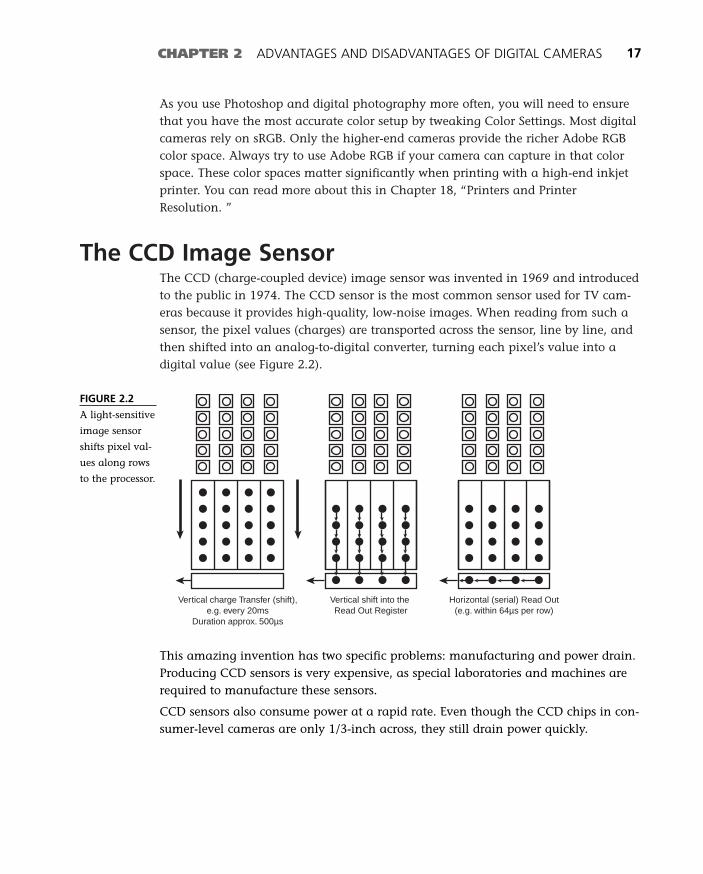
The CCD Image SensorThe CCD (charge-coupled device) image sensor was invented in 1969 and introducedto the public in 1974. The CCD sensor is the most common sensor used for TV cam-eras because it provides high-quality, low-noise images. When reading from such asensor, the pixel values (charges) are transported across the sensor, line by line, andthen shifted into an analog-to-digital converter, turning each pixel’s value into adigital value (see Figure 2.2).
CHAPTER 2 ADVANTAGES AND DISADVANTAGES OF DIGITAL CAMERAS 17
FIGURE 2.2
A light-sensitive
image sensor
shifts pixel val-
ues along rows
to the processor.
Vertical charge Transfer (shift),e.g. every 20ms
Duration approx. 500µs
Vertical shift into the Read Out Register
Horizontal (serial) Read Out(e.g. within 64µs per row)
This amazing invention has two specific problems: manufacturing and power drain.Producing CCD sensors is very expensive, as special laboratories and machines arerequired to manufacture these sensors.
CCD sensors also consume power at a rapid rate. Even though the CCD chips in con-sumer-level cameras are only 1/3-inch across, they still drain power quickly.
03 0789731207_ch02.qxd 4/6/04 2:16 PM Page 17
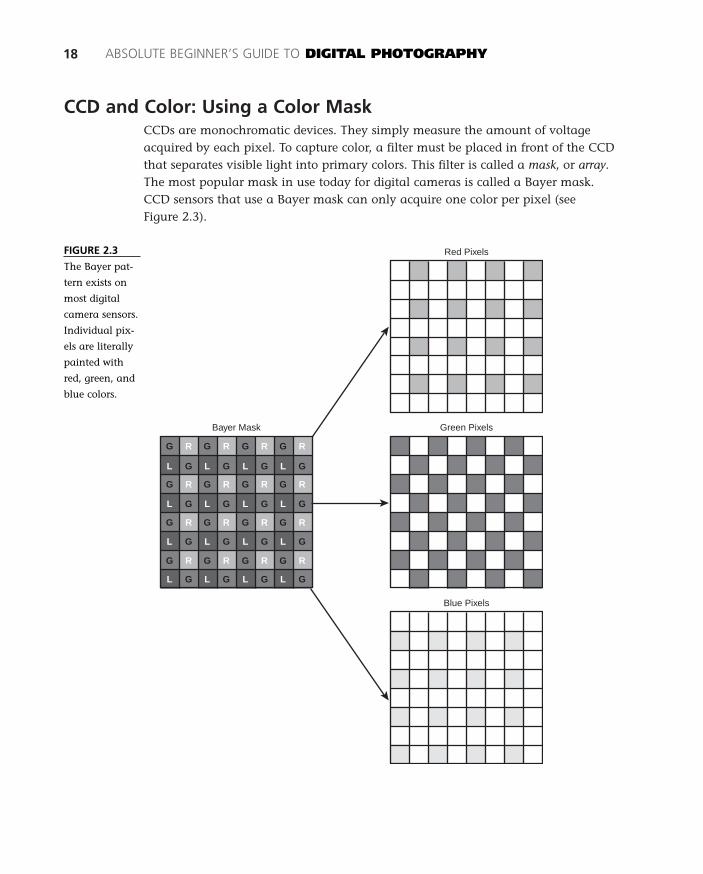
CCD and Color: Using a Color MaskCCDs are monochromatic devices. They simply measure the amount of voltageacquired by each pixel. To capture color, a filter must be placed in front of the CCDthat separates visible light into primary colors. This filter is called a mask, or array.The most popular mask in use today for digital cameras is called a Bayer mask.CCD sensors that use a Bayer mask can only acquire one color per pixel (see Figure 2.3).
18 ABSOLUTE BEGINNER’S GUIDE TO DIGITAL PHOTOGRAPHY
FIGURE 2.3
The Bayer pat-
tern exists on
most digital
camera sensors.
Individual pix-
els are literally
painted with
red, green, and
blue colors.
Red Pixels
Green PixelsBayer Mask
Blue Pixels
G R G R G R G R
G R G R G R G R
G R G R G R G R
G R G R G R G R
L G L G L G L G
L G L G L G L G
L G L G L G L G
L G L G L G L G
03 0789731207_ch02.qxd 4/6/04 2:16 PM Page 18
Green pixels outnumber red and blue by a ratio of 2:1. The reason for this is thathuman vision is most sensitive to green, which is why 50 percent of the pixels in aCCD are dedicated to this color.
A Bayer mask isn’t the most efficient way to capture color for several reasons:
■ Three pixels are required for each ”virtual” pixel. Three separate pixelsdevoted to red, green, and blue are combined in software to create a virtualpixel in the center of these sensors. The end result is a virtual pixel that repre-sents the light and color at that point in the CCD. The problem is that pixelsare wasted in this system, and the space between pixels adds up over thewidth of the CCD. In addition, only a percentage of green is captured. Thelost part of green results in a loss of sharpness.
■ A square shape isn’t the most efficient. By placing three pixels together to cre-ate a virtual pixel in the center, the amount of space between the actual pix-els and the virtual pixel is sizable. Fuji has developed a SuperCCD technologyusing hexagonal pixels to reduce this blank space, but even this technologyresults in a loss of sharpness.
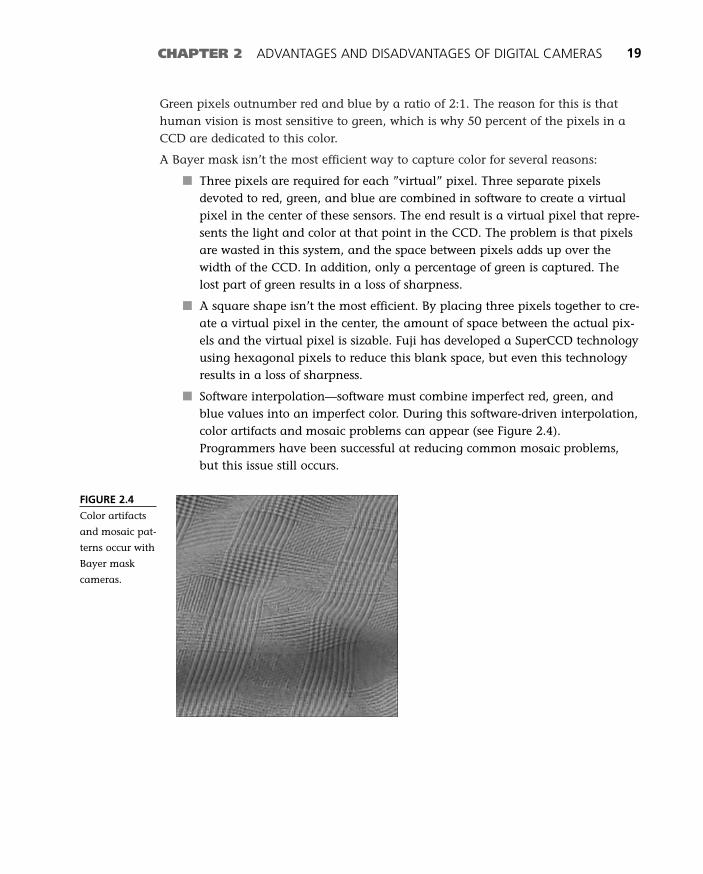
■ Software interpolation—software must combine imperfect red, green, andblue values into an imperfect color. During this software-driven interpolation,color artifacts and mosaic problems can appear (see Figure 2.4).Programmers have been successful at reducing common mosaic problems,but this issue still occurs.
CHAPTER 2 ADVANTAGES AND DISADVANTAGES OF DIGITAL CAMERAS 19
FIGURE 2.4
Color artifacts
and mosaic pat-
terns occur with
Bayer mask
cameras.
03 0789731207_ch02.qxd 4/6/04 2:16 PM Page 19

■ In addition, the inaccurate sensors used with a Bayer mask require ”blur fil-ters” to reduce color artifacts. The random appearance of artifacts and therequisite blur filters force the software to reduce sharpness.
CCD Competition: Low-Cost CMOS Image SensorsThe CMOS (Complementary Metal Oxide Semiconductor) image sensor is an inex-pensive sensor replacement for CCDs that does away with a few disadvantages ofCCDs, but introduces its own issues.
CMOS sensors produce medium-quality images that are more susceptible to noisethan a CCD sensor. Each pixel on a CMOS sensor can be read individually, however,which makes it more flexible in manufacture and cost than CCD sensors.
Another benefit of CMOS sensors: They are built using the same equipment as CPUchips, such as the Pentium 4 chip. Because they use common equipment, CMOS sen-sors are less expensive to manufacture and benefit from innovations in CPU tech-nology.
The flexibility of CMOS sensors is also the reason why they aren’t as precise asCCDs. Each pixel on a CMOS sensor has several transistors located next to it, mak-ing it possible for photons to hit the transistors instead of the photo-diode. Thismakes the CMOS sensor less sensitive to light than the CCD sensor.
CMOS technology consumes much less power than CCD chips: as little as 1/100th ofthe power needed by a CCD sensor. This is why CMOS sensors appear on mobilephones. On professional digital SLRs however, which often have large high-powerbatteries, the CCD sensor is the best choice.
What About Foveon?A CMOS-based technology called Foveon was announced in 2001 that uses layers ofsensors to capture red, green, and blue at every pixel location (see Figure 2.5). Thistechnology relies on a triple-layer CMOS sensor array that captures blue light first,then green, and finally red. The technology takes advantage of light’s penetratingpower. Red light can penetrate silicon much more easily than green or blue. As aresult, the red layer is on the bottom of the three-layer stack.
Blue light, which has the shortest wavelength and combines with electron “holes” insilicon, is captured first. The green layer is in the middle.
Every sensor in the Foveon technology is essentially an eye that captures exactly thecolor and brightness of the light it receives. Currently Sigma makes two cameraswith this technology. By the time you read this, more camera manufacturers mayhave licensed Foveon in their cameras.
20 ABSOLUTE BEGINNER’S GUIDE TO DIGITAL PHOTOGRAPHY
03 0789731207_ch02.qxd 4/6/04 2:16 PM Page 20
CHAPTER 2 ADVANTAGES AND DISADVANTAGES OF DIGITAL CAMERAS 21
FIGURE 2.5
Foveon’s
three-layer
technology.
Aliasing and Other Imager ProblemsThe following images demonstrate problems that occur with low-resolution sensorsand poor camera software. The images have been magnified so that you can see thepixelation and artifacts.
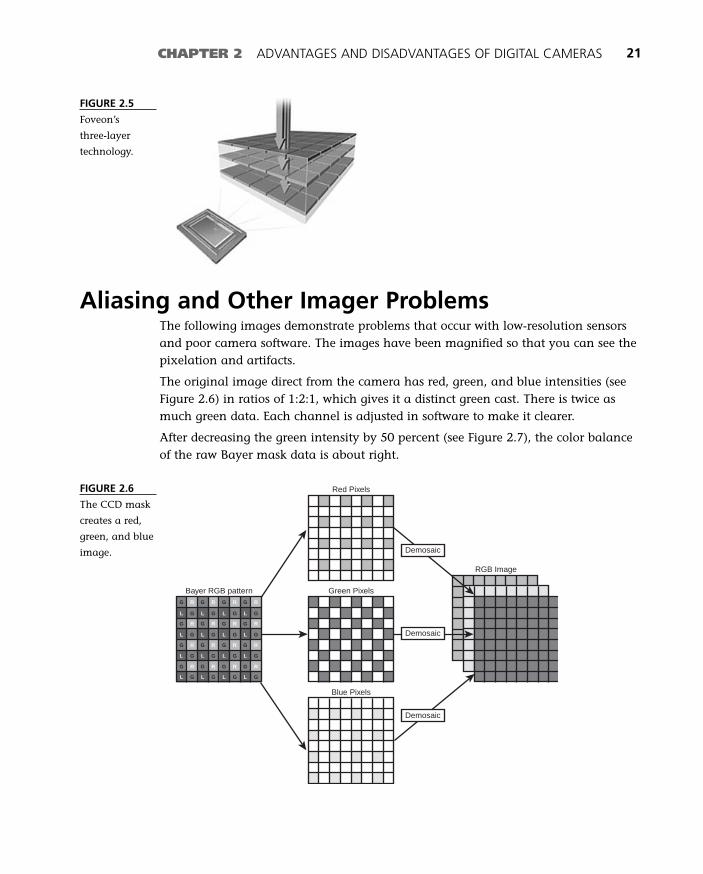
The original image direct from the camera has red, green, and blue intensities (seeFigure 2.6) in ratios of 1:2:1, which gives it a distinct green cast. There is twice asmuch green data. Each channel is adjusted in software to make it clearer.
After decreasing the green intensity by 50 percent (see Figure 2.7), the color balanceof the raw Bayer mask data is about right.
FIGURE 2.6
The CCD mask
creates a red,
green, and blue
image.
Red Pixels
RGB Image
Green PixelsBayer RGB pattern
Blue Pixels
G R G R G R G R
G R G R G R G R
G R G R G R G R
G R G R G R G R
L G L G L G L G
L G L G L G L G
L G L G L G L G
L G L G L G L G
Demosaic
Demosaic
Demosaic
03 0789731207_ch02.qxd 4/6/04 2:16 PM Page 21
22 ABSOLUTE BEGINNER’S GUIDE TO DIGITAL PHOTOGRAPHY
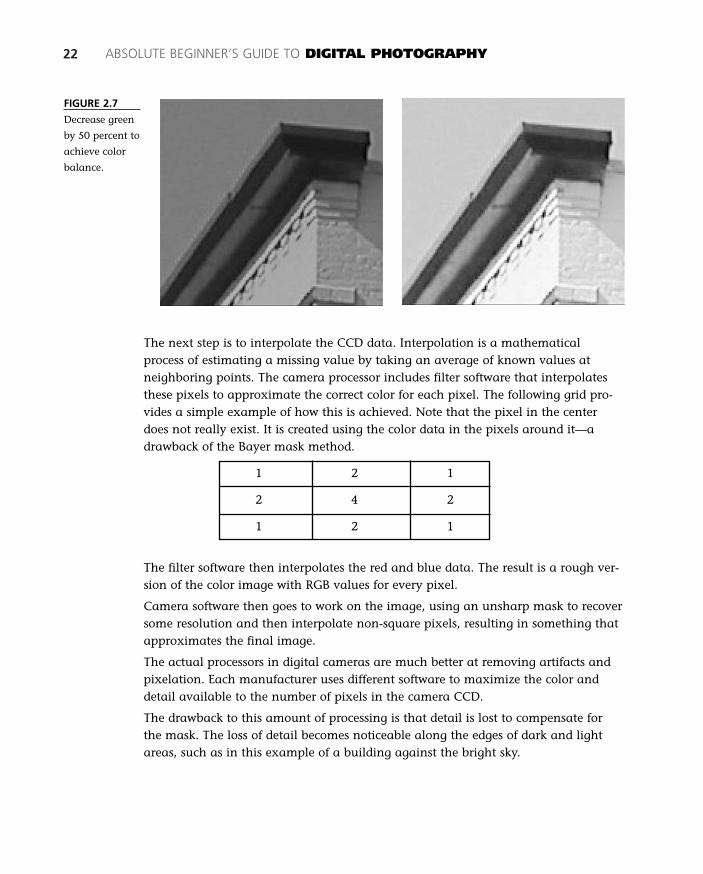
FIGURE 2.7
Decrease green
by 50 percent to
achieve color
balance.
The next step is to interpolate the CCD data. Interpolation is a mathematicalprocess of estimating a missing value by taking an average of known values atneighboring points. The camera processor includes filter software that interpolatesthese pixels to approximate the correct color for each pixel. The following grid pro-vides a simple example of how this is achieved. Note that the pixel in the centerdoes not really exist. It is created using the color data in the pixels around it—adrawback of the Bayer mask method.
1 2 1
2 4 2
1 2 1
The filter software then interpolates the red and blue data. The result is a rough ver-sion of the color image with RGB values for every pixel.
Camera software then goes to work on the image, using an unsharp mask to recoversome resolution and then interpolate non-square pixels, resulting in something thatapproximates the final image.
The actual processors in digital cameras are much better at removing artifacts andpixelation. Each manufacturer uses different software to maximize the color anddetail available to the number of pixels in the camera CCD.
The drawback to this amount of processing is that detail is lost to compensate forthe mask. The loss of detail becomes noticeable along the edges of dark and lightareas, such as in this example of a building against the bright sky.
03 0789731207_ch02.qxd 4/6/04 2:16 PM Page 22
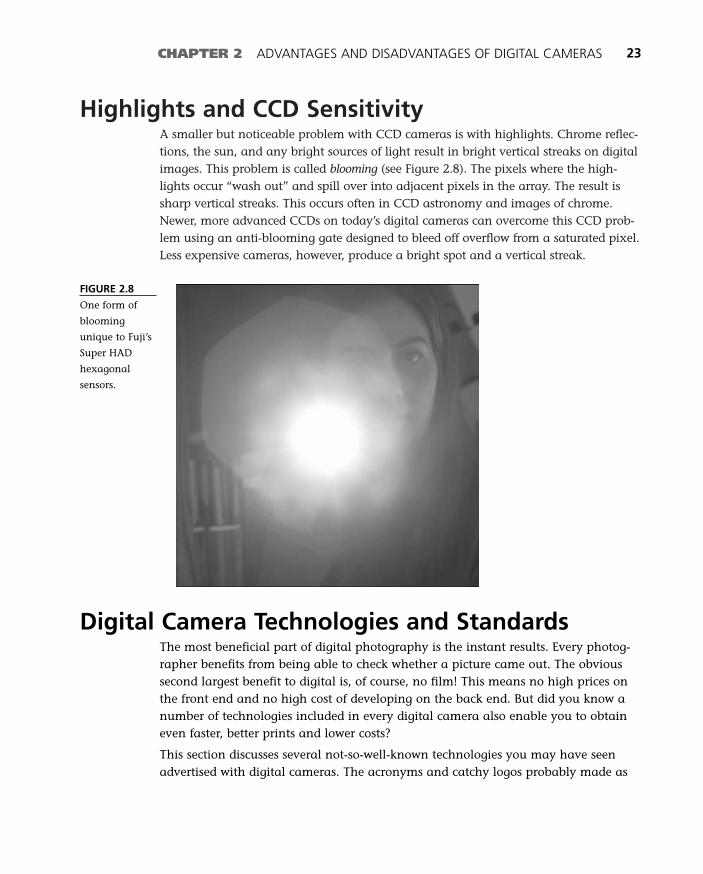
Highlights and CCD SensitivityA smaller but noticeable problem with CCD cameras is with highlights. Chrome reflec-tions, the sun, and any bright sources of light result in bright vertical streaks on digitalimages. This problem is called blooming (see Figure 2.8). The pixels where the high-lights occur “wash out” and spill over into adjacent pixels in the array. The result issharp vertical streaks. This occurs often in CCD astronomy and images of chrome.Newer, more advanced CCDs on today’s digital cameras can overcome this CCD prob-lem using an anti-blooming gate designed to bleed off overflow from a saturated pixel.Less expensive cameras, however, produce a bright spot and a vertical streak.
CHAPTER 2 ADVANTAGES AND DISADVANTAGES OF DIGITAL CAMERAS 23
FIGURE 2.8
One form of
blooming
unique to Fuji’s
Super HAD
hexagonal
sensors.
Digital Camera Technologies and StandardsThe most beneficial part of digital photography is the instant results. Every photog-rapher benefits from being able to check whether a picture came out. The obvioussecond largest benefit to digital is, of course, no film! This means no high prices onthe front end and no high cost of developing on the back end. But did you know anumber of technologies included in every digital camera also enable you to obtaineven faster, better prints and lower costs?
This section discusses several not-so-well-known technologies you may have seenadvertised with digital cameras. The acronyms and catchy logos probably made as
03 0789731207_ch02.qxd 4/6/04 2:16 PM Page 23
much sense to you as instructions for setting your VCR clock. This, of course, meantyou forgot them immediately. However, technologies and standards such as EXIF,DPOF, and DCF come in handy when you need to move images from the camera.
EXIF 2.2The Exchange Image Format is a digital camera standard for recording importantexposure and camera information in JPEG files created when an image is captured.Digital cameras have adopted the EXIF 2.2 (also called the “Exif Print”) standard,which was developed by the Japan Electronics and Information TechnologiesIndustries Association (JEITA).
The EXIF standard creates an image “header” in JPEG images that includes impor-tant exposure information, camera information, and thumbnail images of thephoto that was just created.
Some or all of the following EXIF information is recorded with each picture:
■ White balance
■ Flash
■ Exposure mode (auto, manual, bracket)
■ Exposure time
■ Light source
■ Subject distance
■ Subject area
■ Captured scene type (portrait, landscape,night scene)
■ Digital zoom
■ Custom rendered (special effects)
■ Contrast
■ Saturation
■ Sharpness
■ Gain control
You can view EXIF data in Photoshop or Photoshop Elements in several places:
1. Open Photoshop or Photoshop Elements and choose Window, File Browser.
2. Click once on an image in the file browser and then look at its metadata(data about data) in the left side of the browser window. If you don’t see thefile information in the left side of the file browser, click the double arrows todisplay the other half of the file browser (see Figure 2.9).
24 ABSOLUTE BEGINNER’S GUIDE TO DIGITAL PHOTOGRAPHY
tipThe EXIF 2.2 standard also
uses the sYCC format,which is larger (in colors)than the sRGB standard colorspace. The beauty of this
larger color space is thatEXIF images do not get
“clipped” when an image isedited onscreen in the sRGB for-mat. Instead, smart applicationslike Photoshop ask whether you’dlike to keep the existing color profile.
03 0789731207_ch02.qxd 4/6/04 2:16 PM Page 24
CHAPTER 2 ADVANTAGES AND DISADVANTAGES OF DIGITAL CAMERAS 25
FIGURE 2.9
Click the double
arrows in
Photoshop
Elements or
Photoshop to
display the
directory tree
and EXIF data.
FIGURE 2.10
Select EXIF in
the image
browser to view
image data.
3. Click All at the bottom of the browser window and select EXIF (see Figure2.10). The EXIF information will appear in the browser window.
4. You can also view an images EXIF metadata by choosing File, File Info inElements or Photoshop. Click and choose EXIF in the Section drop-down list.
The most helpful information is probably the date the image was created and the Xand Y sizes, which tell you how large the image is in pixels.
Exif PrintExif Print is another name for the EXIF 2.2 standard, but it’s a little snazzier! TheExif Print standard records exposure information and information about the cameraand thumbnails in a JPEG image when it is created.
The Exif Print standard ensures cameras include the following data in every JPEG, inthe following order:
■ Number of pixels
■ Compression mode
■ Date taken
■ Device name
■ Color space
■ Thumbnail image (160×120)
■ Image data
03 0789731207_ch02.qxd 4/6/04 2:16 PM Page 25
For a more detailed list of data included in an EXIF image, see the preceding sectionon EXIF 2.2.
PictBridgePictBridge is a printer standard that enables cameras to connect directly to printerswith no PC necessary. This standard relies on Exif Print information, which includesdetailed information about the camera that captured the image. A camera can con-nect directly to a PictBridge printer using a USB cable and then print an accuratecolor print of the image with no need for a PC.
Direct PrintDirect Print is a Canon corporation standard similar to PictBridge that enablesCanon cameras and Direct Print-compatible cameras to connect to Canon printersdirectly via USB cables.
Design Rule for Camera File SystemsThe Design Rule for Camera File Systems (DCF) is a standard for file naming and thestorage of digital camera images. DCF created a file structure and file-naming sys-tem for cameras. The result is the confusing DCIM directory (folder) name on yourdigital camera media. The DCF standard also dictates how images are named whena picture is taken, resulting in the somewhat confusing naming convention for digi-tal images. Most likely you’ve seen files named something like DSCF0026.JPG—thisis because of the DCF naming standard.
The good thing about the DCF standard is that all cameras use it. You can pop anSD card out of your Kodak digital camera and put it in a Nikon digital camera andcontinue shooting. Nothing will be overwritten because each camera stores imagesin its own folder.
Digital Print Order FormatDigital Print Order Format (DPOF) is a standard created by Panasonic, Kodak, andFuji that enables cameras to store edited photo information and printing informa-tion on the camera prior to printing. A simple text file is stored on the camera’s stor-age media that travels with the images and provides additional details about theimage, such as cropping, color correction, and the number of prints the user wouldlike to make. DPOF-enabled cameras can even attach an email to an image thatcan be sent automatically when the camera is synced to the computer.
26 ABSOLUTE BEGINNER’S GUIDE TO DIGITAL PHOTOGRAPHY
03 0789731207_ch02.qxd 4/6/04 2:16 PM Page 26

CHAPTER 2 ADVANTAGES AND DISADVANTAGES OF DIGITAL CAMERAS 27
The Absolute Minimum
Now you know what some disadvantages are to this relatively new medium. Thetwo you’ll notice first and most often are battery drain and shutter delay. For thisreason remember this: Research and read reviews before purchasing!
Do your homework before buying your next digital camera. Research and alwayslook at battery life and shutter delay. The Web has a number of wonderful camerareview sites that you can rely on (They haven’t sold out yet). Sites such as the follow-ing are just a few:
■ www.dpreview.com
■ www.steves-digicams.com
■ www.photo.net
In addition, magazines such as Popular Photography and Shutterbug are excellentresources.
03 0789731207_ch02.qxd 4/6/04 2:16 PM Page 27

03 0789731207_ch02.qxd 4/6/04 2:16 PM Page 28
3In this chapter
• Selecting and Using Film
• Special-Purpose Film
• Film Speed and Grain
• How Film Responds to Light
Film Basics
Today’s digital cameras evolved from film cameras and require the same
understanding of sensitivity, color, and resolution. Many of the same
rules that apply to traditional photography also govern digital. In addi-
tion, a number of “digital photographers” still use film. They just rely
on scanners to get their images onto the hard drive.
If you leapfrogged traditional film photography entirely, you will under-
stand digital better by learning the history of film. If you inherited or
purchased traditional film equipment, the more you know about film,
the better your scans and edits will be on the computer.
This chapter discusses negative and positive film and the terms that are
used to measure and describe film technology.
04 0789731207_ch03.qxd 4/6/04 2:13 PM Page 29
Choosing a Color FilmFilm speed influences the appearance of prints and slides. Like black-and-whitefilms, color films are available in a range of ISO ratings, which is a standard fordetermining film speed. ISO films are graded on a scale. By doubling the number,you double the sensitivity. Film with an ISO rating of 50 is twice as sensitive as ISO25 speed film.
Color films with low ISO ratings are sharper, more vivid, and less grainy than high-speed films. Slow films also often have lower contrast, which reduces the undesirableeffects of overexposure.
Even within the same speed range, different films produce different color effects.Some films have a warm or red-yellow overall color tint, whereas others look cool orbluish. You can make a comparison by exposing two films under identical condi-tions.
Comparison testing is important with slide film. When slide film is projected on ascreen, color problems are obvious, so it is important to know how the film willrespond to your subject matter. Magazines such as Popular Photography regularly feature comparisons between films. In addition, film manufacturers publish techni-cal data sheets for their film.
Data sheets can be found at camera stores that cater to professional photographers.You can also find these data sheets on the manufacturers’ Web sites, usually in theProfessional section.
The best resource, though, is the forums. Photographers post messages in online dis-cussion groups (forums) in which they describe their experience with films they havetried. Some of these excellent forums for digital and film photographers are listedhere:
■ www.photo.net
■ www.imaging-resource.com
30 ABSOLUTE BEGINNER’S GUIDE TO DIGITAL PHOTOGRAPHY
I THOUGHT THIS WAS A BOOK ABOUT DIGITAL…Film photographers can be digital photographers, too. Just get the image from the nega-tive sleeve onto the hard drive or on screen.
The digital darkroom is just that: a place where images are developed and prints are made.Once the image is onscreen, the digital experience begins. Digital cameras just make imagetransfer that much easier. Traditional photographers with a decent scanner or images on aCD can accomplish the same magic onscreen and in print.
04 0789731207_ch03.qxd 4/6/04 2:13 PM Page 30
■ www.dpreview.com
■ www.pcphotoreview.com
■ www.largeformatphotography.info
Types of Color FilmIn digital photography, there is essentially only one kind of film. You could say thatfile formats differ widely, such as RAW, JPEG, and TIFF, but this is just a softwareissue.
You could also say that high-speed CF cards are much different from memory stickmedia. However, they both store the same information, so again, it’s not a real dif-ference. Slide film, however, works much differently from negative film. The differ-ences reveal advantages and disadvantages to each format.
Negative FilmNegative film produces an image that is the opposite of the original scene in colorand density. It can be printed on paper in a darkroom to make a positive or scannedinto a computer for editing and printing. It is usually easier to work with negativefilm if the final medium is a print. Color negative film has a considerable tolerancefor under- and overexposure (exposure latitude), and, when scanned, is superior toreversal film for photographs of very contrast-laden scenes.
Reversal Film (Slide Film, Transparency Film, or “Chromes”)Reversal film can be projected for viewing, printed on reversal paper in a darkroom,or scanned into a computer for editing and printing. Reversal film requires more precise exposure than negative film because it has less exposure latitude; errors inexposure or color balance may be difficult or impossible to correct in printing.
However, reversal film has advantages in cost and convenience over negative film,and images can be viewed directly. Reversal film, especially in large format sizes, isalmost universally preferred by professionals because its images will be reproducedby offset printing presses. Reversal film often has “chrome” in its name(Agfachrome, Ektachrome, Fujichrome).
Professional FilmSometimes the word “professional” in a film name is merely a marketing strategy.For color film, however, the word bears a little more weight. Professional films, forexample, have exposure latitude—the amount of underexposure or overexposurethey’re capable of handling—that is much smaller than consumer-type film.
CHAPTER 3 FILM BASICS 31
04 0789731207_ch03.qxd 4/6/04 2:13 PM Page 31
In addition, they are much more sensitive to temperature shifts. If you decide toexperiment with professional film, store it in a refrigerator to retard aging and keepthe color fidelity constant.
Negative or reversal “professional” film also is designed and manufactured for pro-fessionals who demand accurate color balance. A film’s age and its ISO rating andcolor balance change during storage. Professional film is shipped with its qualitiesnear their peak, and is refrigerated by camera stores to ensure that it is in the bestcondition.
Professionals usually buy large quantities of film, preferably all from the same man-ufacturing batch, and they shoot test rolls to determine its precise ISO and color bal-ance. Professionals keep film refrigerated until it is used, and develop it as soon aspossible. Conversely, amateur film may be shipped before it is ready, as the manu-facturers anticipate that it will not be used immediately. It often improves after afew months of room-temperature storage.
The useful life of unopened film can be extended by refrigeration or freezing.However, once film is opened (you take it out of its plastic container), it is better keptat room temperature and should be exposed and developed promptly.
Films for Specialized Color Balance and Exposure TimesEach type of color film is intended for a specific type of light. Ordinary daylight filmis color balanced for daylight and electronic flash. Type B tungsten film is balancedfor 3,200° Kelvin (or K) studio quartz-halogen lights, although ordinary incandescentlight bulbs are acceptable. There are a few films for special situations: Type A film ismade for 3,400° K lights. Type L (for long) negative films are designed for long expo-sures (60 to 120 seconds) under tungsten light.
Selecting and Using FilmIf you already own a 35mm film camera or a medium-format camera and aren’tready to invest in digital, you might want to stick with film. You can always pur-chase a decent flatbed scanner with a negative insert for less than $300 and scanyour negatives. Fortunately, your choices for film are extensive, even after five yearsof creeping digital.
This section discusses black and white and color. Thanks to Photoshop and scanners,converting color to black and white has become child’s play. However, black andwhite still has a place in the photographer’s portfolio because of its latitude, con-trast, saturation, and artistic element (see Figure 3.1). Most of the information onthese two pages applies to both black and white and color.
32 ABSOLUTE BEGINNER’S GUIDE TO DIGITAL PHOTOGRAPHY
04 0789731207_ch03.qxd 4/6/04 2:13 PM Page 32
Color Balance and FilmDaylight-balanced color films produce the most natural colors in the relativelybluish light of daylight or electronic flash. Tungsten-balanced color films give thebest results in the relatively reddish light from incandescent light bulbs. Digital cam-eras must deal with lighting colors as well, but often their automatic white balancefeature overcomes any color cast.
Thirty-five millimeter cameras use 35mm film, which is packaged in cassettes of 12,24, or 36 exposures per roll. Some 35mm films can be purchased in 50- or 100-footrolls, then bulk loaded into separately purchased cas-settes. This reduces the cost per exposure and, if youuse a great deal of film, can be worthwhile.
Medium-format cameras use roll film. Roll film iswound around a spool and is backed with a sepa-rate strip of opaque paper to protect the film fromlight. Depending on the camera, 120 roll filmmakes 16 6×4.5cm, 12 6×6cm, 10 6×7cm, or 86×8cm images. Each size applies to different cam-eras. Fuji makes a popular studio camera thattakes 6×8cm images. Mamiya is the leader in6×7cm cameras, Hasselblad leads with 6×6 cmcameras, and Pentax and Bronica make excellent6×4.5cm cameras.
CHAPTER 3 FILM BASICS 33
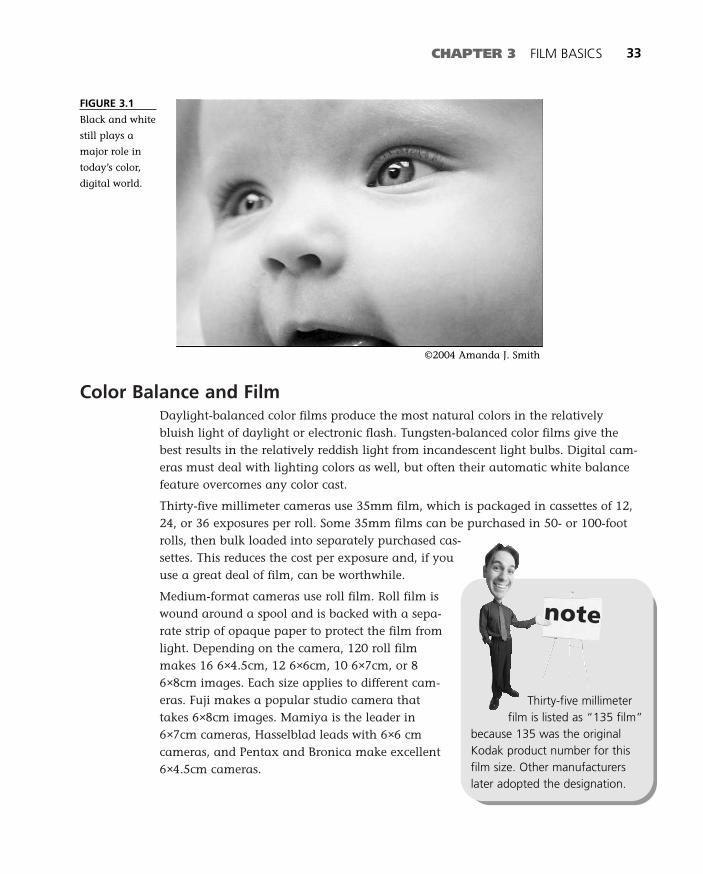
FIGURE 3.1
Black and white
still plays a
major role in
today’s color,
digital world.
©2004 Amanda J. Smith
Thirty-five millimeterfilm is listed as “135 film”
because 135 was the originalKodak product number for thisfilm size. Other manufacturerslater adopted the designation.
04 0789731207_ch03.qxd 4/6/04 2:13 PM Page 33
Do You Need a Film for a Special Purpose?Aside from Polaroid film, which contains developing chemicals in each picture, anumber of unusual film technologies exist.
■ High-contrast films produce only two tones: the clear film base and black,without intermediate tones of gray.
■ Infrared films respond to infrared wavelengths that the human eye cannotsee. These are available in black and white and color.
■ Chromogenic black-and-white films, such as Ilford XP2, produce a dye imagerather than a silver one. They have excellent exposure latitude, which meansyou can expose individual frames at different film speeds. Frames exposed atabout ISO 100 will have finer grain, but frames on the same roll of film canbe exposed at speeds as high as ISO 800 and still produce printable nega-tives. This differs from conventional films, which require you to expose thewhole roll at a single film speed. Chromogenic film must be developed as if itwere a color negative (in Kodak’s C-41 chemistry or Ilford’s version of thesame process), which is available at your corner drugstore.
Most of these cameras accept another type of roll film called 220, which has paperonly on the end; this reduces the thickness of the roll so that more film can bewound on the spool and more exposures made.
Sheet films, or cut films, are designed for large-format cameras, such as 4×5-inchand 8×10-inch cameras (also called view cameras). Sheet film is packaged 10 or moresheets to a box. Some film must be loaded in film holders before use, although younow can buy sheet film in disposable holders.
34 ABSOLUTE BEGINNER’S GUIDE TO DIGITAL PHOTOGRAPHY
WHAT ABOUT APS FILM?Advanced Photo System (APS) films were released a short time before digital photographytook off. This red-headed stepchild of film is actually highly advanced. Every roll of APS filmcontains a magnetic layer that records the format in which you want the print, the date,frame number, and other data.
04 0789731207_ch03.qxd 4/6/04 2:13 PM Page 34
CHAPTER 3 FILM BASICS 35
Storing Film ProperlyStore film away from heat. Heat affects any film badly, so don’t leave it where tem-peratures might be high, such as in the glove compartment of a car on a hot day ornear a heater in winter.
For long-term storage, refrigerate film. Refrigeration extends the life of film. Roomtemperature is fine for short-term storage, but for longer storage, especially in warmweather, a refrigerator or freezer is better for most films. Make surethat the dealer has refrigerated film if that is what the manufac-turer recommends.
Protect film from moisture. The original filmpackaging should be moisture-proof, but if yourefrigerate the film after opening the box, put thefilm in a moisture-proof container like a tightlyclosed plastic bag.
Let refrigerated film warm to room temperaturebefore using it to prevent moisture from condens-ing on the film surface. One roll of film (or a 10-sheet box of sheet film) needs about an hour towarm up; a 100-foot roll of bulk-loaded 35mmfilm or a 100-sheet box of sheet film needs aboutfour hours to warm up.
Film SpeedThe faster the film speed, the less light required to produce an image. Therefore,faster film can be used in dimmer light, with faster shutter speeds, or with smallerapertures. A fast film is useful indoors, for example, especially if you use only theexisting light in the room and do not supplement it with electronic flash orphotofloods. A slower film is good for brightly lit scenes, such as outdoors in brightsun. The faster the film, the higher its film speed number.
What film speed should you use? Faster films tend to produce grainier pictures, sotheoretically you will get the best results by selecting the slowest film usable in eachsituation. In practice, however, it is inconvenient and unnecessary to work with sev-eral film speeds. Some photographers use a relatively fast ISO 400 film for almost alltheir work. One type of film might not be enough, but a fast ISO-rated film and aslower, finer-grain film are enough for most situations (see Figure 3.2).
Do not freeze or refriger-ate Polaroid instant-picture film. In thefreezer, the film’s devel-oping chemicals couldseparate or burst. In the fridge,even unopened Polaroid film can failbecause of moisture.
caution
04 0789731207_ch03.qxd 4/6/04 2:13 PM Page 35
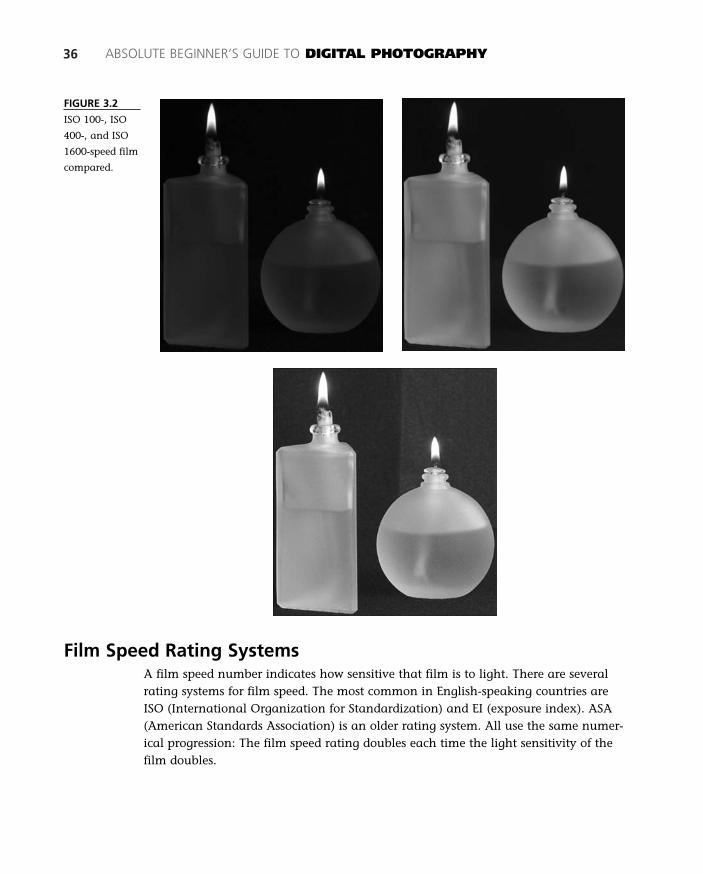
36 ABSOLUTE BEGINNER’S GUIDE TO DIGITAL PHOTOGRAPHY
FIGURE 3.2
ISO 100-, ISO
400-, and ISO
1600-speed film
compared.
Film Speed Rating SystemsA film speed number indicates how sensitive that film is to light. There are severalrating systems for film speed. The most common in English-speaking countries areISO (International Organization for Standardization) and EI (exposure index). ASA(American Standards Association) is an older rating system. All use the same numer-ical progression: The film speed rating doubles each time the light sensitivity of thefilm doubles.
04 0789731207_ch03.qxd 4/6/04 2:13 PM Page 36
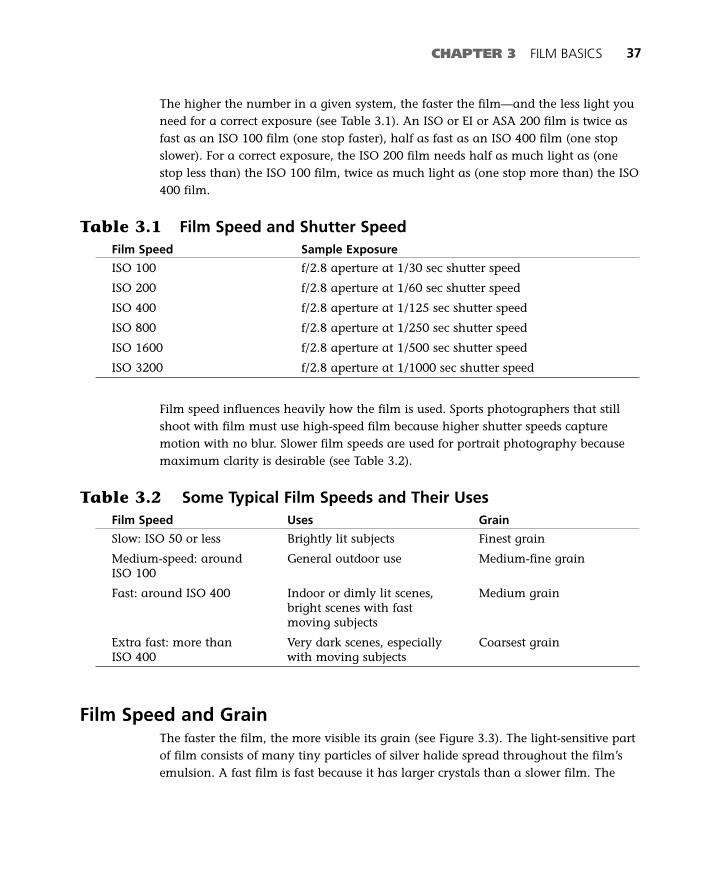
CHAPTER 3 FILM BASICS 37
The higher the number in a given system, the faster the film—and the less light youneed for a correct exposure (see Table 3.1). An ISO or EI or ASA 200 film is twice asfast as an ISO 100 film (one stop faster), half as fast as an ISO 400 film (one stopslower). For a correct exposure, the ISO 200 film needs half as much light as (onestop less than) the ISO 100 film, twice as much light as (one stop more than) the ISO400 film.
Table 3.1 Film Speed and Shutter SpeedFilm Speed Sample Exposure
ISO 100 f/2.8 aperture at 1/30 sec shutter speed
ISO 200 f/2.8 aperture at 1/60 sec shutter speed
ISO 400 f/2.8 aperture at 1/125 sec shutter speed
ISO 800 f/2.8 aperture at 1/250 sec shutter speed
ISO 1600 f/2.8 aperture at 1/500 sec shutter speed
ISO 3200 f/2.8 aperture at 1/1000 sec shutter speed
Film speed influences heavily how the film is used. Sports photographers that stillshoot with film must use high-speed film because higher shutter speeds capturemotion with no blur. Slower film speeds are used for portrait photography becausemaximum clarity is desirable (see Table 3.2).
Table 3.2 Some Typical Film Speeds and Their UsesFilm Speed Uses Grain
Slow: ISO 50 or less Brightly lit subjects Finest grain
Medium-speed: around General outdoor use Medium-fine grain ISO 100
Fast: around ISO 400 Indoor or dimly lit scenes, Medium grain bright scenes with fast moving subjects
Extra fast: more than Very dark scenes, especially Coarsest grain ISO 400 with moving subjects
Film Speed and GrainThe faster the film, the more visible its grain (see Figure 3.3). The light-sensitive partof film consists of many tiny particles of silver halide spread throughout the film’semulsion. A fast film is fast because it has larger crystals than a slower film. The
04 0789731207_ch03.qxd 4/6/04 2:13 PM Page 37
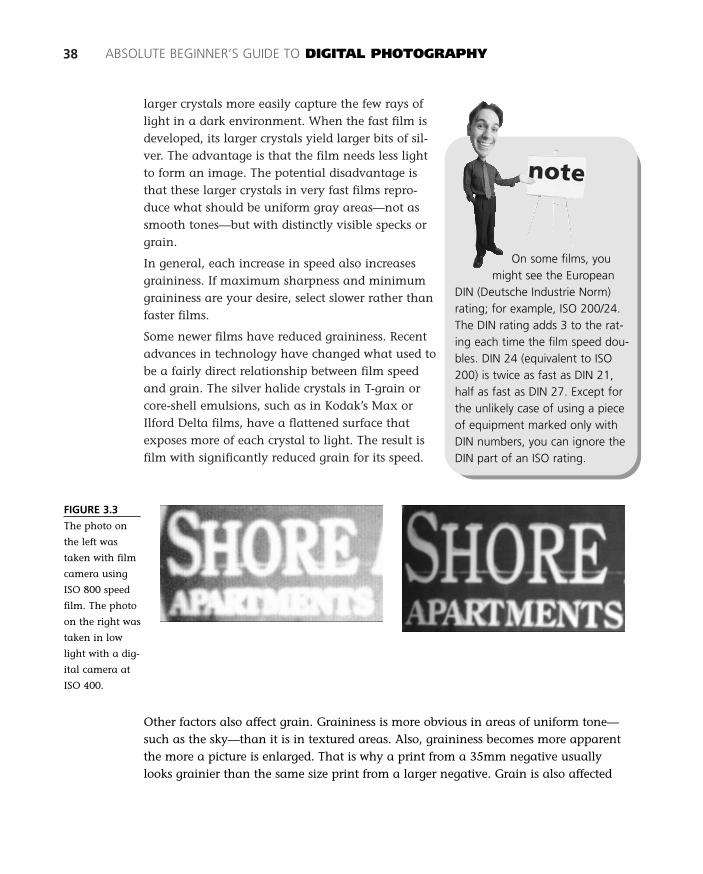
larger crystals more easily capture the few rays oflight in a dark environment. When the fast film isdeveloped, its larger crystals yield larger bits of sil-ver. The advantage is that the film needs less lightto form an image. The potential disadvantage isthat these larger crystals in very fast films repro-duce what should be uniform gray areas—not assmooth tones—but with distinctly visible specks orgrain.
In general, each increase in speed also increasesgraininess. If maximum sharpness and minimumgraininess are your desire, select slower rather thanfaster films.
Some newer films have reduced graininess. Recentadvances in technology have changed what used tobe a fairly direct relationship between film speedand grain. The silver halide crystals in T-grain orcore-shell emulsions, such as in Kodak’s Max orIlford Delta films, have a flattened surface thatexposes more of each crystal to light. The result isfilm with significantly reduced grain for its speed.
38 ABSOLUTE BEGINNER’S GUIDE TO DIGITAL PHOTOGRAPHY
On some films, youmight see the European
DIN (Deutsche Industrie Norm)rating; for example, ISO 200/24.The DIN rating adds 3 to the rat-ing each time the film speed dou-bles. DIN 24 (equivalent to ISO200) is twice as fast as DIN 21,half as fast as DIN 27. Except forthe unlikely case of using a pieceof equipment marked only withDIN numbers, you can ignore theDIN part of an ISO rating.
FIGURE 3.3
The photo on
the left was
taken with film
camera using
ISO 800 speed
film. The photo
on the right was
taken in low
light with a dig-
ital camera at
ISO 400.
Other factors also affect grain. Graininess is more obvious in areas of uniform tone—such as the sky—than it is in textured areas. Also, graininess becomes more apparentthe more a picture is enlarged. That is why a print from a 35mm negative usuallylooks grainier than the same size print from a larger negative. Grain is also affected
04 0789731207_ch03.qxd 4/6/04 2:13 PM Page 38
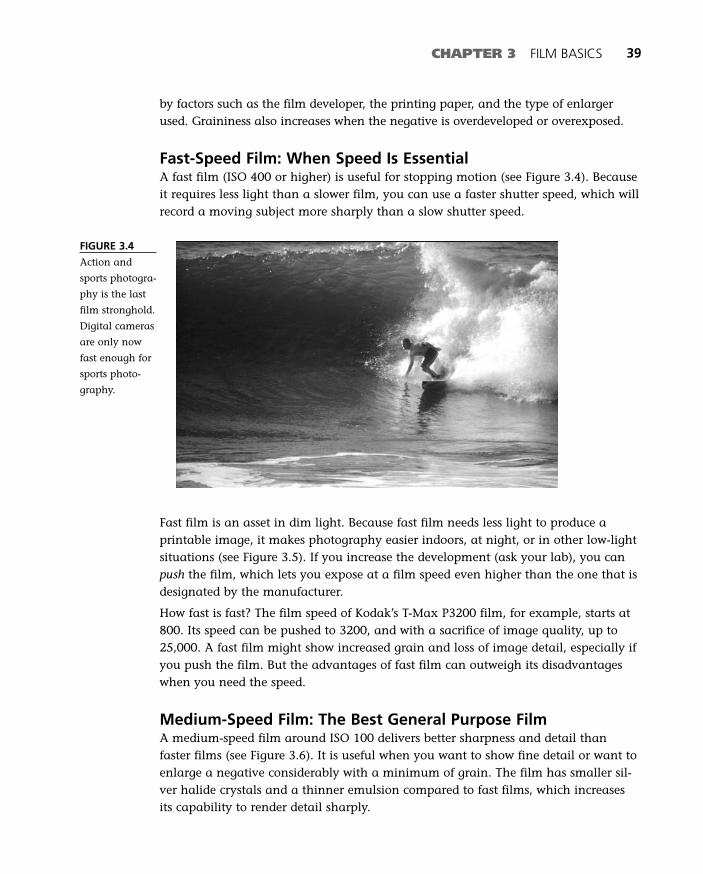
CHAPTER 3 FILM BASICS 39
by factors such as the film developer, the printing paper, and the type of enlargerused. Graininess also increases when the negative is overdeveloped or overexposed.
Fast-Speed Film: When Speed Is EssentialA fast film (ISO 400 or higher) is useful for stopping motion (see Figure 3.4). Becauseit requires less light than a slower film, you can use a faster shutter speed, which willrecord a moving subject more sharply than a slow shutter speed.
FIGURE 3.4
Action and
sports photogra-
phy is the last
film stronghold.
Digital cameras
are only now
fast enough for
sports photo-
graphy.
Fast film is an asset in dim light. Because fast film needs less light to produce aprintable image, it makes photography easier indoors, at night, or in other low-lightsituations (see Figure 3.5). If you increase the development (ask your lab), you canpush the film, which lets you expose at a film speed even higher than the one that isdesignated by the manufacturer.
How fast is fast? The film speed of Kodak’s T-Max P3200 film, for example, starts at800. Its speed can be pushed to 3200, and with a sacrifice of image quality, up to25,000. A fast film might show increased grain and loss of image detail, especially ifyou push the film. But the advantages of fast film can outweigh its disadvantageswhen you need the speed.
Medium-Speed Film: The Best General Purpose FilmA medium-speed film around ISO 100 delivers better sharpness and detail thanfaster films (see Figure 3.6). It is useful when you want to show fine detail or want toenlarge a negative considerably with a minimum of grain. The film has smaller sil-ver halide crystals and a thinner emulsion compared to fast films, which increasesits capability to render detail sharply.
04 0789731207_ch03.qxd 4/6/04 2:13 PM Page 39
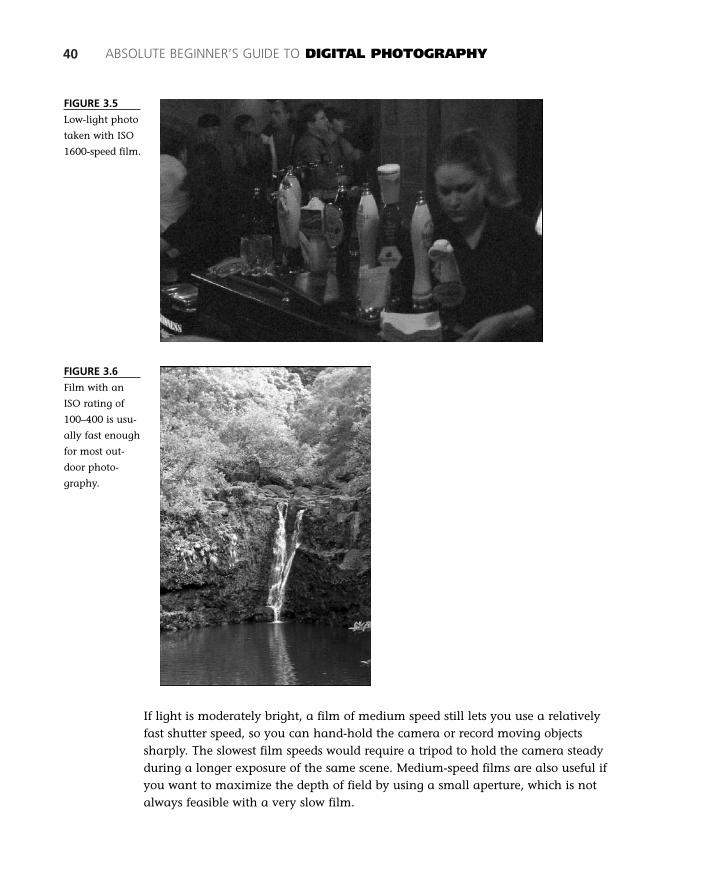
40 ABSOLUTE BEGINNER’S GUIDE TO DIGITAL PHOTOGRAPHY
FIGURE 3.5
Low-light photo
taken with ISO
1600-speed film.
FIGURE 3.6
Film with an
ISO rating of
100–400 is usu-
ally fast enough
for most out-
door photo-
graphy.
If light is moderately bright, a film of medium speed still lets you use a relativelyfast shutter speed, so you can hand-hold the camera or record moving objectssharply. The slowest film speeds would require a tripod to hold the camera steadyduring a longer exposure of the same scene. Medium-speed films are also useful ifyou want to maximize the depth of field by using a small aperture, which is notalways feasible with a very slow film.
04 0789731207_ch03.qxd 4/6/04 2:13 PM Page 40

CHAPTER 3 FILM BASICS 41
Slow-Speed Film: Maximum DetailSlow-speed films of ISO 50 or less are mostly color. The reason is that grain has beenreduced so much in black-and-white films that few are still available at speeds underISO 100.
A slow-speed color film produces brighter colors and a crisper image than fastercolor films. The original Kodachrome film was rated at ISO 25; Fuji’s hugely success-ful Velvia film is rated at ISO 50.
One exception to color-dominating, slow-speed films is the black-and-white record-ing film called Technical Pan 2415. Normally this ISO 25-rated film is used forrecording text and other high-contrast applications. Develop this film with a specialTechnidol developer, however, and normal photographs are possible. The extremelyfine grain and high resolution of this film enable you to blow up 35mm negatives to20×30 inches with no apparent grain.
How Film Responds to LightRecording an image on film involves a reaction between light and silver halide crys-tals (see Figure 3.7). The crystals, spread through the gelatin of the emulsion, are acompound of silver plus a halogen such as bromine, iodine, or chlorine. If a crystalwere a perfect structure lacking any irregularities, it would not react to light.However, a number of electrically charged silver ions are also in the structure andmove about when light strikes the emulsion, eventually forming an image. The crys-tal also contains impurities, such as silver sulfide, which play a role in the trappingof light energy.
An impurity (called a sensitivity speck) and the free-moving silver ions build a smallcollection of uncharged atoms of silver metal when the crystal is struck by light. Thisbit of metallic silver, too small to be visible even under a microscope, is the begin-ning of a latent image. The developing chemicals use the latent image specks tobuild up density, or the metallic silver required to create a visible image.
FIGURE 3.7
Black-and-white
film construc-
tion illustrated. Thin protective coating
Emulsion (60% gelatin and 40% crystals)
Adhesive
Plastic base
Antihalation coating prevents light reflection
Light sensitive crystals
04 0789731207_ch03.qxd 4/6/04 2:13 PM Page 41

Chromogenic film is somewhat different from conven-tional silver halide film. A chromogenic emulsioncontains dye couplers as well as silver halides.During development, the presence of silver that hasbeen exposed to light leads to a proportionalbuildup of dyes. The original silver is then bleachedout, leaving the dyes to form the visible image.Most color materials use chromogenic developmentto produce the final color image, as do severaltypes of black-and-white film.
In Figure 3.8, notice the darker parts of the originalscene: Receive less light, develop less silver density,and show less detail.
42 ABSOLUTE BEGINNER’S GUIDE TO DIGITAL PHOTOGRAPHY
You probably are famil-iar with the C-41 process,
common at all 1-hour photomatsand pharmacies. The C in C-41means chromogenic.
FIGURE 3.8
Each of these
images received
one stop less
light.
Eventually those parts of the negative become clear of silver and print as black.When a highlight area, like the sky, gets too much light, it blocks up with solid silverdensity, appears dark in the negative, and prints as white.
The Absolute Minimum
This chapter focused on film, which you might not have expected to see in a digitalphotography book. However, film can easily become part of your digital work-stream. If you have any doubts about its lifespan, film will survive the digitalonslaught, just as theater survived radio, cinema survived television, and bookstoressurvived Amazon.
Whether you choose digital or film, keep in mind these important points when tak-ing pictures:
■ The speed of digital and film is measured using an ISO rating.
■ Double the ISO speed and you double the film’s sensitivity.
■ ISO 800 film is recommended for indoor, low-light photography.
■ Slide film has less perceptible grain and is better for scanning.
04 0789731207_ch03.qxd 4/6/04 2:13 PM Page 42
Digital Basics
IIPART
The Importance of Lenses . . . . . . . . . . . . . . . . .45
Exposure and Focus . . . . . . . . . . . . . . . . . . . . . .63
Getting Your Pix Onscreen . . . . . . . . . . . . . . . . .71
Files and File Formats . . . . . . . . . . . . . . . . . . . . .81
File Recovery: Finding “Lost” Images . . . . . . . . .97
05 0789731207_pt02.qxd 4/6/04 2:19 PM Page 43

05 0789731207_pt02.qxd 4/6/04 2:19 PM Page 44
4In this chapter
• Lenses & Focal Length
• Focal Length & Digital Cameras
• Autofocus & Manual Focus
• Controlling Depth of Field
The Importance
of Lenses
Good photographers know their cameras and how they work. This
chapter explains the science behind the most important part of that
equipment: lenses. The more you know how to work with lenses, the
better a photographer you will be. Fortunately, even beginners have
been exposed to what this chapter covers:
■ Focal length. You probably have heard the numbers surround-
ing lenses, such as a 28mm lens and a 400mm lens. You might
have heard the terms wide-angle and telephoto used instead of
these numbers.
■ Aperture and depth of field. Open the lens to f2.8 and see
depth of field disappear.
06 0789731207_ch04.qxd 4/6/04 2:19 PM Page 45
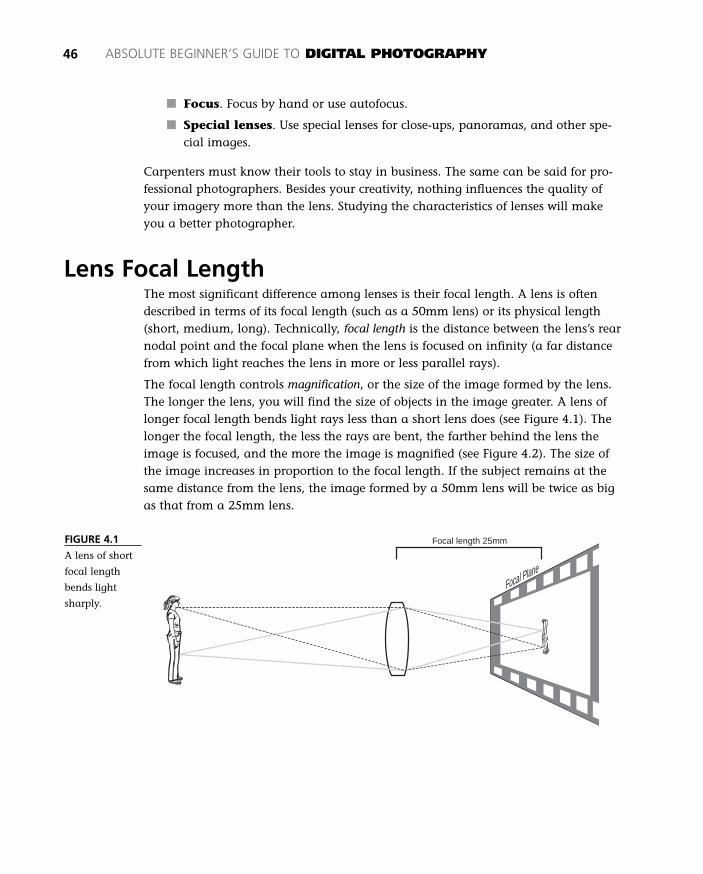
■ Focus. Focus by hand or use autofocus.
■ Special lenses. Use special lenses for close-ups, panoramas, and other spe-cial images.
Carpenters must know their tools to stay in business. The same can be said for pro-fessional photographers. Besides your creativity, nothing influences the quality ofyour imagery more than the lens. Studying the characteristics of lenses will makeyou a better photographer.
Lens Focal LengthThe most significant difference among lenses is their focal length. A lens is oftendescribed in terms of its focal length (such as a 50mm lens) or its physical length(short, medium, long). Technically, focal length is the distance between the lens’s rearnodal point and the focal plane when the lens is focused on infinity (a far distancefrom which light reaches the lens in more or less parallel rays).
The focal length controls magnification, or the size of the image formed by the lens.The longer the lens, you will find the size of objects in the image greater. A lens oflonger focal length bends light rays less than a short lens does (see Figure 4.1). Thelonger the focal length, the less the rays are bent, the farther behind the lens theimage is focused, and the more the image is magnified (see Figure 4.2). The size ofthe image increases in proportion to the focal length. If the subject remains at thesame distance from the lens, the image formed by a 50mm lens will be twice as bigas that from a 25mm lens.
46 ABSOLUTE BEGINNER’S GUIDE TO DIGITAL PHOTOGRAPHY
FIGURE 4.1
A lens of short
focal length
bends light
sharply.
Focal length 25mm
Focal Plane
06 0789731207_ch04.qxd 4/6/04 2:19 PM Page 46
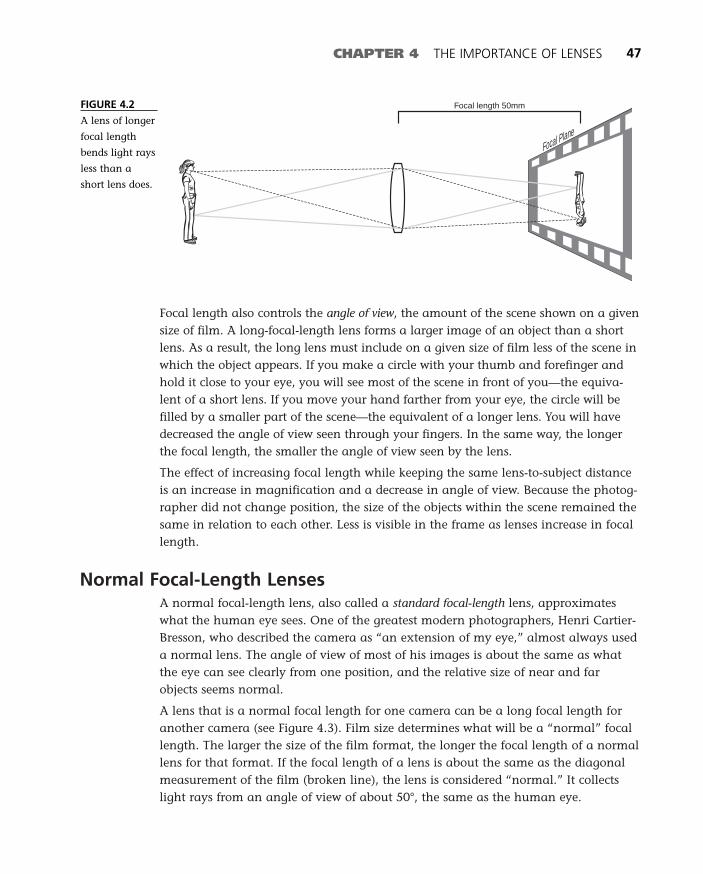
Focal length also controls the angle of view, the amount of the scene shown on a givensize of film. A long-focal-length lens forms a larger image of an object than a shortlens. As a result, the long lens must include on a given size of film less of the scene inwhich the object appears. If you make a circle with your thumb and forefinger andhold it close to your eye, you will see most of the scene in front of you—the equiva-lent of a short lens. If you move your hand farther from your eye, the circle will befilled by a smaller part of the scene—the equivalent of a longer lens. You will havedecreased the angle of view seen through your fingers. In the same way, the longerthe focal length, the smaller the angle of view seen by the lens.
The effect of increasing focal length while keeping the same lens-to-subject distanceis an increase in magnification and a decrease in angle of view. Because the photog-rapher did not change position, the size of the objects within the scene remained thesame in relation to each other. Less is visible in the frame as lenses increase in focallength.
Normal Focal-Length LensesA normal focal-length lens, also called a standard focal-length lens, approximateswhat the human eye sees. One of the greatest modern photographers, Henri Cartier-Bresson, who described the camera as “an extension of my eye,” almost always useda normal lens. The angle of view of most of his images is about the same as whatthe eye can see clearly from one position, and the relative size of near and farobjects seems normal.
A lens that is a normal focal length for one camera can be a long focal length foranother camera (see Figure 4.3). Film size determines what will be a “normal” focallength. The larger the size of the film format, the longer the focal length of a normallens for that format. If the focal length of a lens is about the same as the diagonalmeasurement of the film (broken line), the lens is considered “normal.” It collectslight rays from an angle of view of about 50°, the same as the human eye.
CHAPTER 4 THE IMPORTANCE OF LENSES 47
FIGURE 4.2
A lens of longer
focal length
bends light rays
less than a
short lens does.
Focal length 50mm
Focal Plane
06 0789731207_ch04.qxd 4/6/04 2:19 PM Page 47
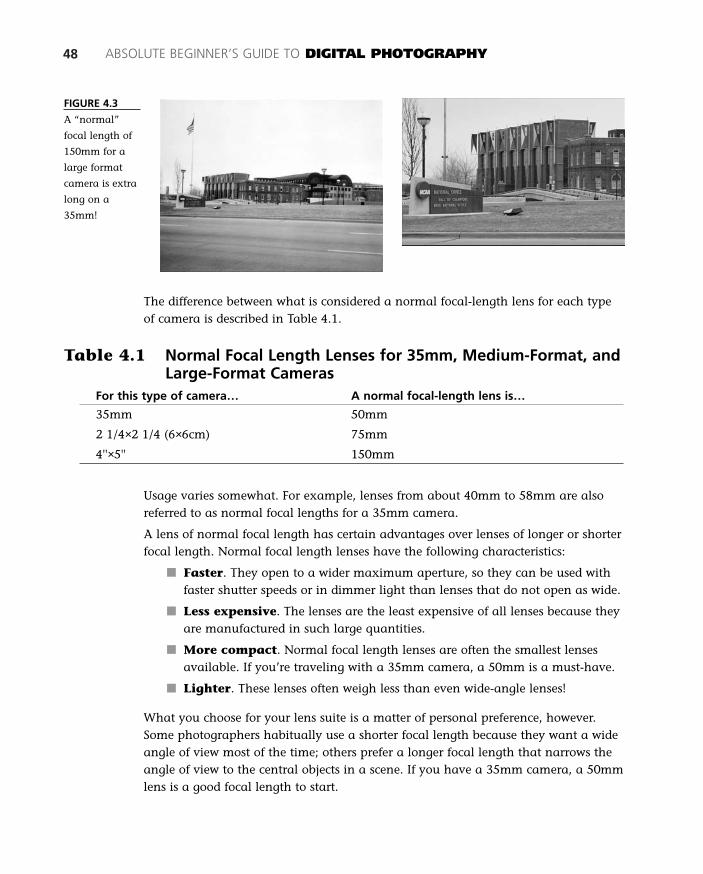
48 ABSOLUTE BEGINNER’S GUIDE TO DIGITAL PHOTOGRAPHY
FIGURE 4.3
A “normal”
focal length of
150mm for a
large format
camera is extra
long on a
35mm!
The difference between what is considered a normal focal-length lens for each typeof camera is described in Table 4.1.
Table 4.1 Normal Focal Length Lenses for 35mm, Medium-Format, andLarge-Format Cameras
For this type of camera… A normal focal-length lens is…
35mm 50mm
2 1/4×2 1/4 (6×6cm) 75mm
4''×5'' 150mm
Usage varies somewhat. For example, lenses from about 40mm to 58mm are alsoreferred to as normal focal lengths for a 35mm camera.
A lens of normal focal length has certain advantages over lenses of longer or shorterfocal length. Normal focal length lenses have the following characteristics:
■ Faster. They open to a wider maximum aperture, so they can be used withfaster shutter speeds or in dimmer light than lenses that do not open as wide.
■ Less expensive. The lenses are the least expensive of all lenses because theyare manufactured in such large quantities.
■ More compact. Normal focal length lenses are often the smallest lensesavailable. If you’re traveling with a 35mm camera, a 50mm is a must-have.
■ Lighter. These lenses often weigh less than even wide-angle lenses!
What you choose for your lens suite is a matter of personal preference, however.Some photographers habitually use a shorter focal length because they want a wideangle of view most of the time; others prefer a longer focal length that narrows theangle of view to the central objects in a scene. If you have a 35mm camera, a 50mmlens is a good focal length to start.
06 0789731207_ch04.qxd 4/6/04 2:19 PM Page 48
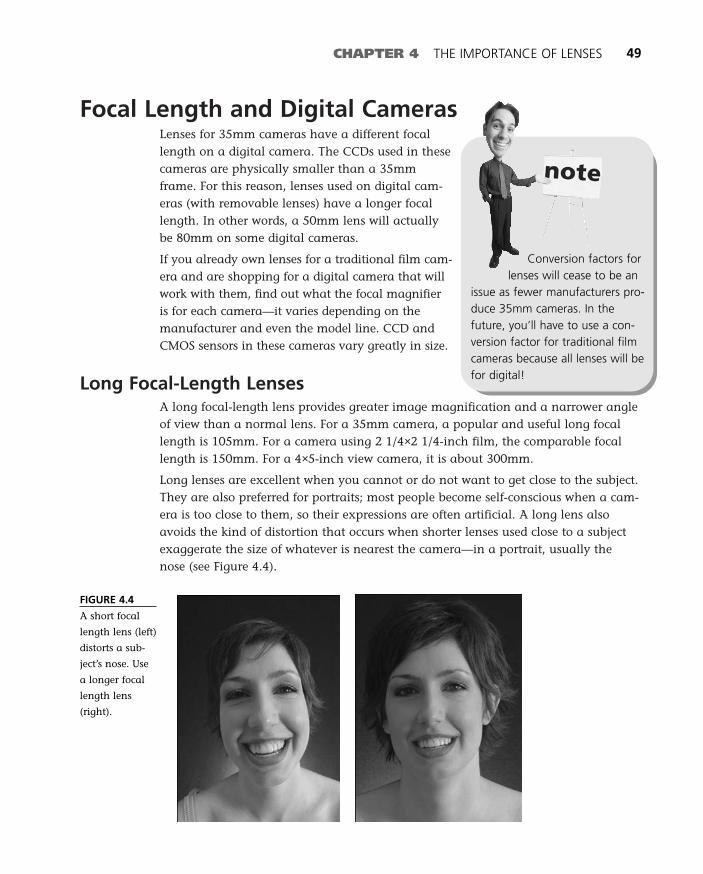
Focal Length and Digital CamerasLenses for 35mm cameras have a different focallength on a digital camera. The CCDs used in thesecameras are physically smaller than a 35mmframe. For this reason, lenses used on digital cam-eras (with removable lenses) have a longer focallength. In other words, a 50mm lens will actuallybe 80mm on some digital cameras.
If you already own lenses for a traditional film cam-era and are shopping for a digital camera that willwork with them, find out what the focal magnifieris for each camera—it varies depending on themanufacturer and even the model line. CCD andCMOS sensors in these cameras vary greatly in size.
Long Focal-Length LensesA long focal-length lens provides greater image magnification and a narrower angleof view than a normal lens. For a 35mm camera, a popular and useful long focallength is 105mm. For a camera using 2 1/4×2 1/4-inch film, the comparable focallength is 150mm. For a 4×5-inch view camera, it is about 300mm.
Long lenses are excellent when you cannot or do not want to get close to the subject.They are also preferred for portraits; most people become self-conscious when a cam-era is too close to them, so their expressions are often artificial. A long lens alsoavoids the kind of distortion that occurs when shorter lenses used close to a subjectexaggerate the size of whatever is nearest the camera—in a portrait, usually thenose (see Figure 4.4).
CHAPTER 4 THE IMPORTANCE OF LENSES 49
Conversion factors forlenses will cease to be an
issue as fewer manufacturers pro-duce 35mm cameras. In thefuture, you’ll have to use a con-version factor for traditional filmcameras because all lenses will befor digital!
FIGURE 4.4
A short focal
length lens (left)
distorts a sub-
ject’s nose. Use
a longer focal
length lens
(right).
06 0789731207_ch04.qxd 4/6/04 2:19 PM Page 49
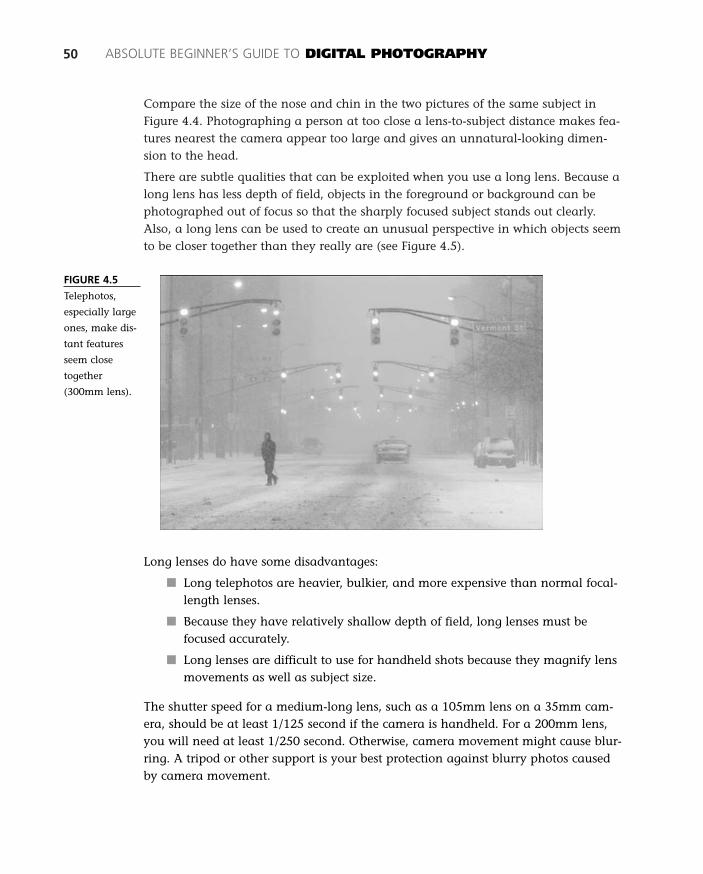
Compare the size of the nose and chin in the two pictures of the same subject inFigure 4.4. Photographing a person at too close a lens-to-subject distance makes fea-tures nearest the camera appear too large and gives an unnatural-looking dimen-sion to the head.
There are subtle qualities that can be exploited when you use a long lens. Because along lens has less depth of field, objects in the foreground or background can bephotographed out of focus so that the sharply focused subject stands out clearly.Also, a long lens can be used to create an unusual perspective in which objects seemto be closer together than they really are (see Figure 4.5).
50 ABSOLUTE BEGINNER’S GUIDE TO DIGITAL PHOTOGRAPHY
FIGURE 4.5
Telephotos,
especially large
ones, make dis-
tant features
seem close
together
(300mm lens).
Long lenses do have some disadvantages:
■ Long telephotos are heavier, bulkier, and more expensive than normal focal-length lenses.
■ Because they have relatively shallow depth of field, long lenses must befocused accurately.
■ Long lenses are difficult to use for handheld shots because they magnify lensmovements as well as subject size.
The shutter speed for a medium-long lens, such as a 105mm lens on a 35mm cam-era, should be at least 1/125 second if the camera is handheld. For a 200mm lens,you will need at least 1/250 second. Otherwise, camera movement might cause blur-ring. A tripod or other support is your best protection against blurry photos causedby camera movement.
06 0789731207_ch04.qxd 4/6/04 2:19 PM Page 50
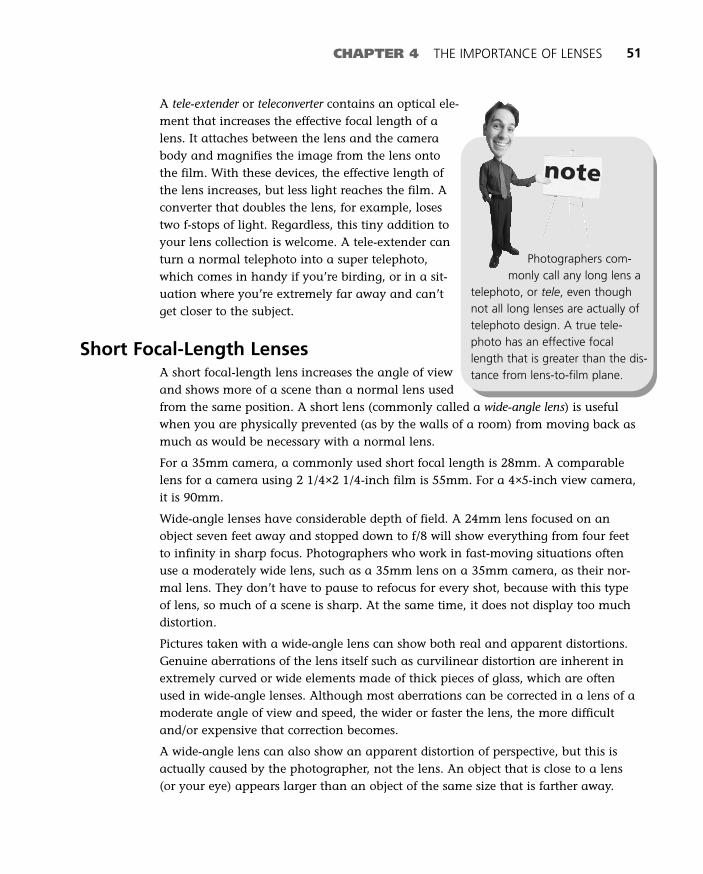
CHAPTER 4 THE IMPORTANCE OF LENSES 51
A tele-extender or teleconverter contains an optical ele-ment that increases the effective focal length of alens. It attaches between the lens and the camerabody and magnifies the image from the lens ontothe film. With these devices, the effective length ofthe lens increases, but less light reaches the film. Aconverter that doubles the lens, for example, losestwo f-stops of light. Regardless, this tiny addition toyour lens collection is welcome. A tele-extender canturn a normal telephoto into a super telephoto,which comes in handy if you’re birding, or in a sit-uation where you’re extremely far away and can’tget closer to the subject.
Short Focal-Length LensesA short focal-length lens increases the angle of viewand shows more of a scene than a normal lens usedfrom the same position. A short lens (commonly called a wide-angle lens) is usefulwhen you are physically prevented (as by the walls of a room) from moving back asmuch as would be necessary with a normal lens.
For a 35mm camera, a commonly used short focal length is 28mm. A comparablelens for a camera using 2 1/4×2 1/4-inch film is 55mm. For a 4×5-inch view camera,it is 90mm.
Wide-angle lenses have considerable depth of field. A 24mm lens focused on anobject seven feet away and stopped down to f/8 will show everything from four feetto infinity in sharp focus. Photographers who work in fast-moving situations oftenuse a moderately wide lens, such as a 35mm lens on a 35mm camera, as their nor-mal lens. They don’t have to pause to refocus for every shot, because with this typeof lens, so much of a scene is sharp. At the same time, it does not display too muchdistortion.
Pictures taken with a wide-angle lens can show both real and apparent distortions.Genuine aberrations of the lens itself such as curvilinear distortion are inherent inextremely curved or wide elements made of thick pieces of glass, which are oftenused in wide-angle lenses. Although most aberrations can be corrected in a lens of amoderate angle of view and speed, the wider or faster the lens, the more difficultand/or expensive that correction becomes.
A wide-angle lens can also show an apparent distortion of perspective, but this isactually caused by the photographer, not the lens. An object that is close to a lens(or your eye) appears larger than an object of the same size that is farther away.
Photographers com-monly call any long lens a
telephoto, or tele, even thoughnot all long lenses are actually oftelephoto design. A true tele-photo has an effective focallength that is greater than the dis-tance from lens-to-film plane.
06 0789731207_ch04.qxd 4/6/04 2:19 PM Page 51
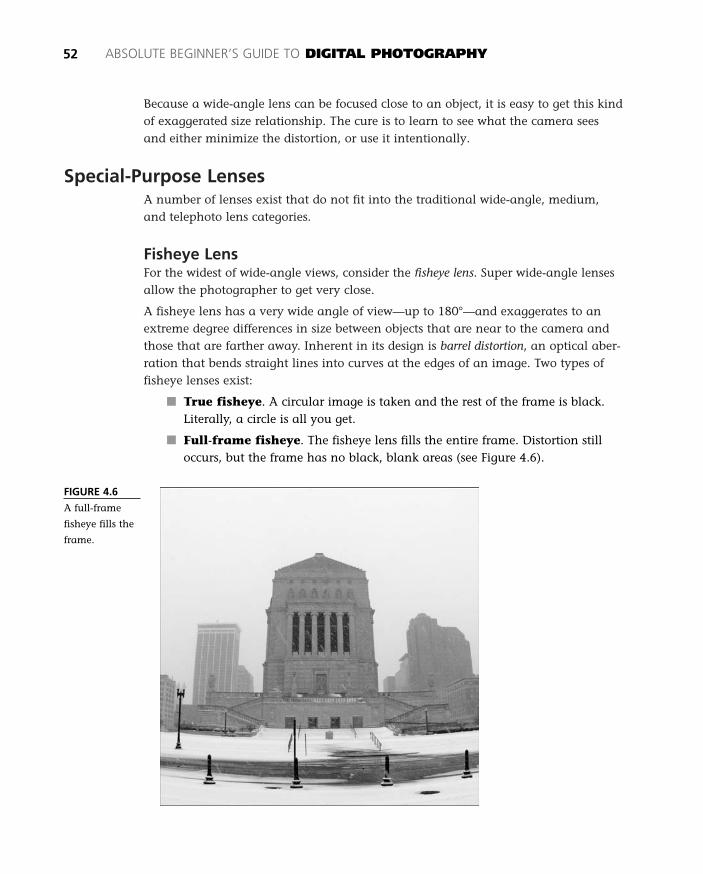
Because a wide-angle lens can be focused close to an object, it is easy to get this kindof exaggerated size relationship. The cure is to learn to see what the camera seesand either minimize the distortion, or use it intentionally.
Special-Purpose LensesA number of lenses exist that do not fit into the traditional wide-angle, medium,and telephoto lens categories.
Fisheye LensFor the widest of wide-angle views, consider the fisheye lens. Super wide-angle lensesallow the photographer to get very close.
A fisheye lens has a very wide angle of view—up to 180°—and exaggerates to anextreme degree differences in size between objects that are near to the camera andthose that are farther away. Inherent in its design is barrel distortion, an optical aber-ration that bends straight lines into curves at the edges of an image. Two types offisheye lenses exist:
■ True fisheye. A circular image is taken and the rest of the frame is black.Literally, a circle is all you get.
■ Full-frame fisheye. The fisheye lens fills the entire frame. Distortion stilloccurs, but the frame has no black, blank areas (see Figure 4.6).
52 ABSOLUTE BEGINNER’S GUIDE TO DIGITAL PHOTOGRAPHY
FIGURE 4.6
A full-frame
fisheye fills the
frame.
06 0789731207_ch04.qxd 4/6/04 2:19 PM Page 52
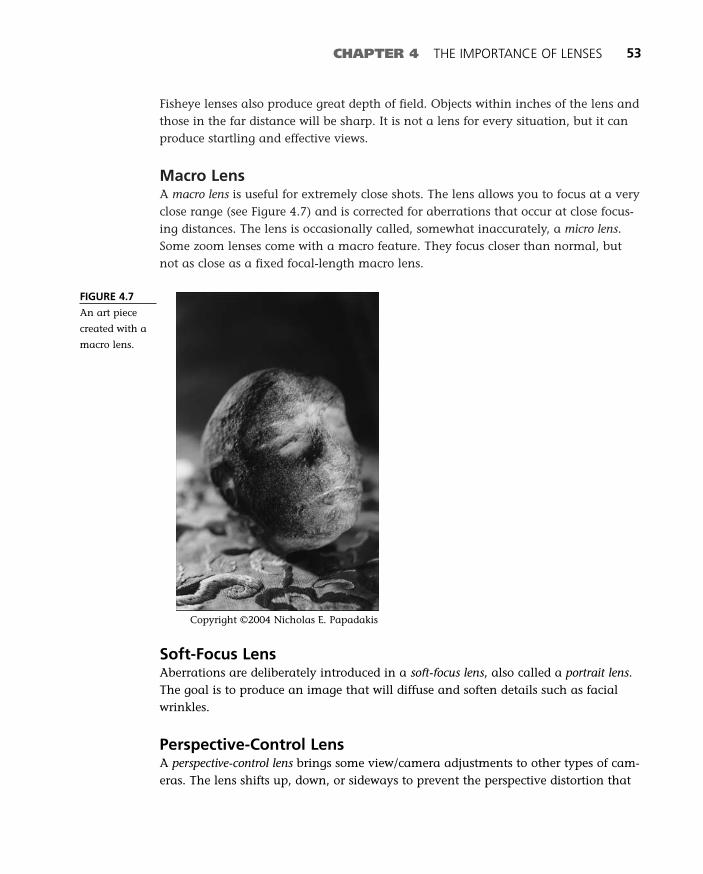
Fisheye lenses also produce great depth of field. Objects within inches of the lens andthose in the far distance will be sharp. It is not a lens for every situation, but it canproduce startling and effective views.
Macro LensA macro lens is useful for extremely close shots. The lens allows you to focus at a veryclose range (see Figure 4.7) and is corrected for aberrations that occur at close focus-ing distances. The lens is occasionally called, somewhat inaccurately, a micro lens.Some zoom lenses come with a macro feature. They focus closer than normal, butnot as close as a fixed focal-length macro lens.
CHAPTER 4 THE IMPORTANCE OF LENSES 53
FIGURE 4.7
An art piece
created with a
macro lens.
Copyright ©2004 Nicholas E. Papadakis
Soft-Focus LensAberrations are deliberately introduced in a soft-focus lens, also called a portrait lens.The goal is to produce an image that will diffuse and soften details such as facialwrinkles.
Perspective-Control LensA perspective-control lens brings some view/camera adjustments to other types of cam-eras. The lens shifts up, down, or sideways to prevent the perspective distortion that
06 0789731207_ch04.qxd 4/6/04 2:19 PM Page 53

causes parallel lines to tilt towards each other if the camera is tilted. BeforePhotoshop, these lenses were the only way 35mm and medium-format architecturalphotographers fixed the distortion of buildings. These lenses are now essentiallyobsolete because you can fix the problem in Photoshop.
Catadioptric (Mirror) LensA catadioptric lens (also called a mirror lens) is similarin design to a telescope. It incorporates curved mirrorsas well as glass elements within the lens. The result isa very long focal length that is smaller and lighterthan a typical lens of equivalent focal length.
These mirrors come into vogue and then fall backout again every few years. These lenses are thesmallest telephoto lenses you can buy, but theyhave some issues. The front mirror in the lens hasthe unusual effect of causing out-of-focus high-lights to take on a donut shape, rather than theusual disk shape produced by an ordinary lens.Mirror lenses are also slow because of a fixed aper-ture. The aperture is usually f/8 or f/11.
Automatic FocusAutomatic focus (AF) does the focusing for you. In the simplest designs, you pushthe shutter-release button and the lens snaps the image into focus. The cameraadjusts the lens to focus sharply on whatever object is at the center of the viewfinderwithin the focusing brackets. This type of autofocus works well in situations wherethe main subject is—and stays—in the middle of the picture. The camera will dis-play a confirmation light when it has focused, but the light does not assure that thepicture will be sharp overall.
If your subject is not within the focusing brackets, you can use autofocus lock tomake it sharp:
1. Frame the subject within the focusing brackets.
2. To temporarily lock in the focus, press the shutter release button halfway down.
3. Keeping the shutter partially pressed, reframe the scene (move the subject outof the center), then press the shutter release button all the way down.
Wide-area focus systems provide more elaborate electronics. The viewfinder displaysseveral focusing brackets. By rotating a dial or thumbwheel on the camera, you select
54 ABSOLUTE BEGINNER’S GUIDE TO DIGITAL PHOTOGRAPHY
Catadioptrics aren’t assharp as high-quality tele-
photos. Most professionals use atelephoto and a tele-extenderwhen they need extreme tele-photo capabilities.
06 0789731207_ch04.qxd 4/6/04 2:19 PM Page 54
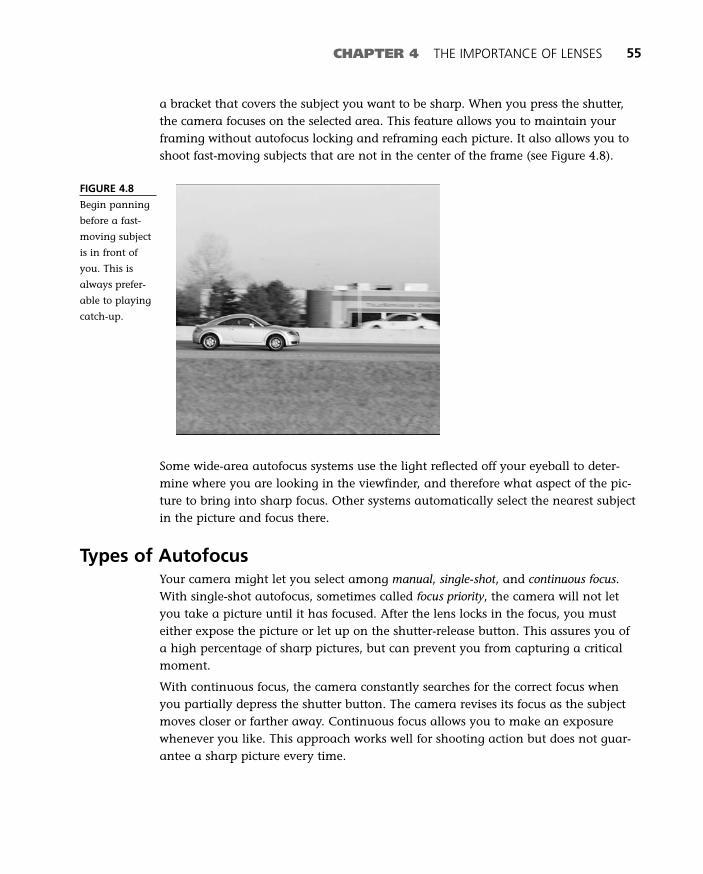
CHAPTER 4 THE IMPORTANCE OF LENSES 55
FIGURE 4.8
Begin panning
before a fast-
moving subject
is in front of
you. This is
always prefer-
able to playing
catch-up.
a bracket that covers the subject you want to be sharp. When you press the shutter,the camera focuses on the selected area. This feature allows you to maintain yourframing without autofocus locking and reframing each picture. It also allows you toshoot fast-moving subjects that are not in the center of the frame (see Figure 4.8).
Some wide-area autofocus systems use the light reflected off your eyeball to deter-mine where you are looking in the viewfinder, and therefore what aspect of the pic-ture to bring into sharp focus. Other systems automatically select the nearest subjectin the picture and focus there.
Types of AutofocusYour camera might let you select among manual, single-shot, and continuous focus.With single-shot autofocus, sometimes called focus priority, the camera will not letyou take a picture until it has focused. After the lens locks in the focus, you musteither expose the picture or let up on the shutter-release button. This assures you ofa high percentage of sharp pictures, but can prevent you from capturing a criticalmoment.
With continuous focus, the camera constantly searches for the correct focus whenyou partially depress the shutter button. The camera revises its focus as the subjectmoves closer or farther away. Continuous focus allows you to make an exposurewhenever you like. This approach works well for shooting action but does not guar-antee a sharp picture every time.
06 0789731207_ch04.qxd 4/6/04 2:19 PM Page 55
After you lock onto a subject, some cameras predict where the sub-ject is likely to be next, keeping the subject in focus even if it movesacross the frame. These focus tracking systems canlock onto a subject, adjusting the focus as thesubject moves closer to, or farther from, the cam-era. The system works especially well if the sub-ject, like a race car, is traveling at a constantspeed toward or away from the camera.
Some cameras have two autofocus systems.Active autofocus sends out a beam of red lightthat the camera uses to measure the distance tothe subject. Passive autofocus uses the contrast in thescene to determine when the subject is sharp.
Autofocus systems are not infallible. Active autofo-cus is limited to subjects fairly close to the camera.Passive autofocus is limited by the brightness andcontrast of the subject. A camera might fail to focusor miss the focus if a subject has very low contrast,is in very dim light, or consists of a repetitive pat-tern like window blinds or a complex pattern, likea plaid. Some cameras employ both systems formaximum sharpness under most conditions.
Read your camera’s instructions to know how itsautofocus mechanism operates and when youwould be better off focusing manually.
Center-Weighted Autofocus LockAutofocus cameras often focus on the center of a scene. This can make an off-centermain subject out of focus if it is at a different distance from whatever is at the center(see Figure 4.9). To focus properly on the subject of your picture if he/she/it is not inthe center of the image:
1. In autofocus mode, first focus by placing the autofocus brackets on the mainsubject. With many cameras, you partially press the shutter button down.Keep partial pressure on the release to lock focus (Figure 4.10).
2. Reframe your picture (see Figure 4.11) while keeping partial pressure on theshutter release.
3. Push the shutter button all the way down to make the exposure.
56 ABSOLUTE BEGINNER’S GUIDE TO DIGITAL PHOTOGRAPHY
Continuous focus killsbatteries. If you’re out inthe field, curb your useof this type of focusingto preserve battery levels.
caution
Some autofocus sys-tems can take a long time
to adjust, as the lens “hunts”back and forth, unable to focus.
06 0789731207_ch04.qxd 4/6/04 2:19 PM Page 56

CHAPTER 4 THE IMPORTANCE OF LENSES 57
FIGURE 4.9
Most autofocus
cameras by
default focus on
the center of the
image.
FIGURE 4.11
Reframe the
image before
pressing the
shutter all the
way down.
FIGURE 4.10
Place the sub-
ject in the cen-
ter, press down
halfway on the
shutter to focus,
and hold the
shutter release
down.
06 0789731207_ch04.qxd 4/6/04 2:20 PM Page 57
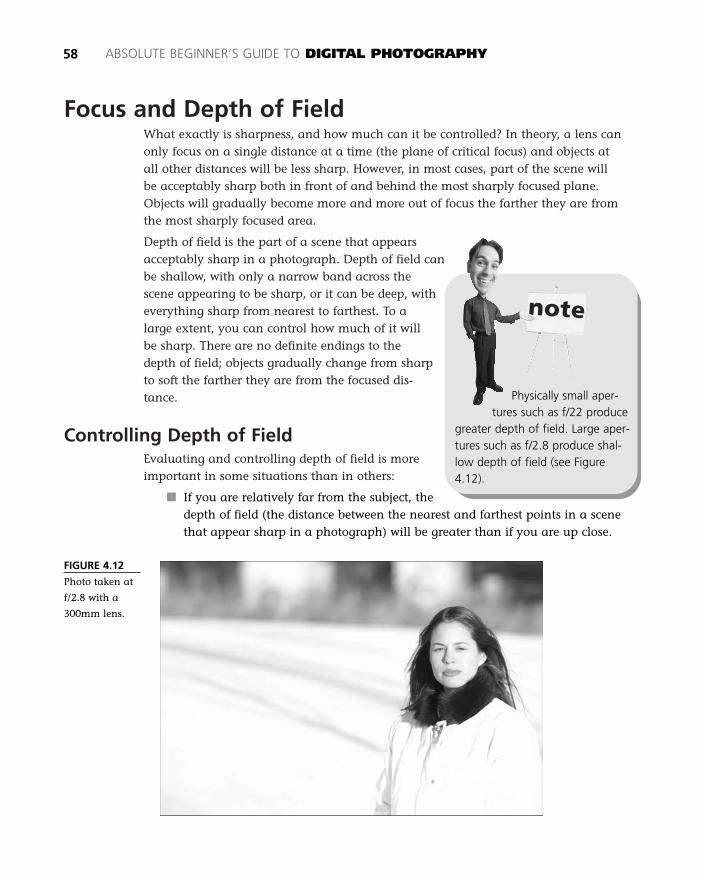
Focus and Depth of FieldWhat exactly is sharpness, and how much can it be controlled? In theory, a lens canonly focus on a single distance at a time (the plane of critical focus) and objects atall other distances will be less sharp. However, in most cases, part of the scene willbe acceptably sharp both in front of and behind the most sharply focused plane.Objects will gradually become more and more out of focus the farther they are fromthe most sharply focused area.
Depth of field is the part of a scene that appearsacceptably sharp in a photograph. Depth of field canbe shallow, with only a narrow band across thescene appearing to be sharp, or it can be deep, witheverything sharp from nearest to farthest. To alarge extent, you can control how much of it willbe sharp. There are no definite endings to thedepth of field; objects gradually change from sharpto soft the farther they are from the focused dis-tance.
Controlling Depth of FieldEvaluating and controlling depth of field is moreimportant in some situations than in others:
■ If you are relatively far from the subject, thedepth of field (the distance between the nearest and farthest points in a scenethat appear sharp in a photograph) will be greater than if you are up close.
58 ABSOLUTE BEGINNER’S GUIDE TO DIGITAL PHOTOGRAPHY
Physically small aper-tures such as f/22 produce
greater depth of field. Large aper-tures such as f/2.8 produce shal-low depth of field (see Figure4.12).
FIGURE 4.12
Photo taken at
f/2.8 with a
300mm lens.
06 0789731207_ch04.qxd 4/6/04 2:20 PM Page 58
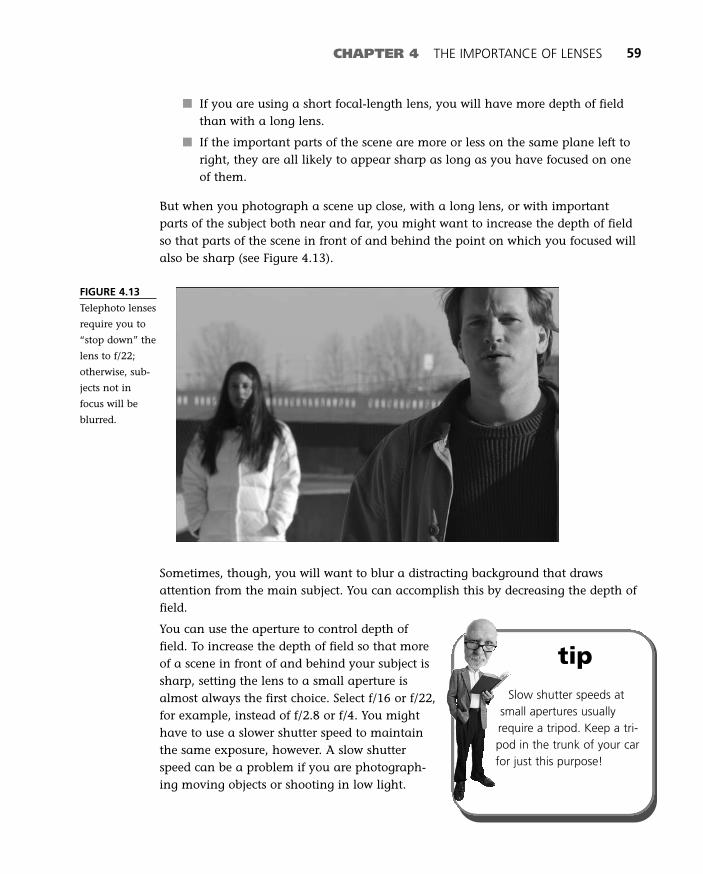
CHAPTER 4 THE IMPORTANCE OF LENSES 59
■ If you are using a short focal-length lens, you will have more depth of fieldthan with a long lens.
■ If the important parts of the scene are more or less on the same plane left toright, they are all likely to appear sharp as long as you have focused on oneof them.
But when you photograph a scene up close, with a long lens, or with importantparts of the subject both near and far, you might want to increase the depth of fieldso that parts of the scene in front of and behind the point on which you focused willalso be sharp (see Figure 4.13).
FIGURE 4.13
Telephoto lenses
require you to
“stop down” the
lens to f/22;
otherwise, sub-
jects not in
focus will be
blurred.
Sometimes, though, you will want to blur a distracting background that drawsattention from the main subject. You can accomplish this by decreasing the depth offield.
You can use the aperture to control depth offield. To increase the depth of field so that moreof a scene in front of and behind your subject issharp, setting the lens to a small aperture isalmost always the first choice. Select f/16 or f/22,for example, instead of f/2.8 or f/4. You mighthave to use a slower shutter speed to maintainthe same exposure, however. A slow shutterspeed can be a problem if you are photograph-ing moving objects or shooting in low light.
tipSlow shutter speeds at
small apertures usuallyrequire a tripod. Keep a tri-pod in the trunk of your carfor just this purpose!
06 0789731207_ch04.qxd 4/6/04 2:20 PM Page 59
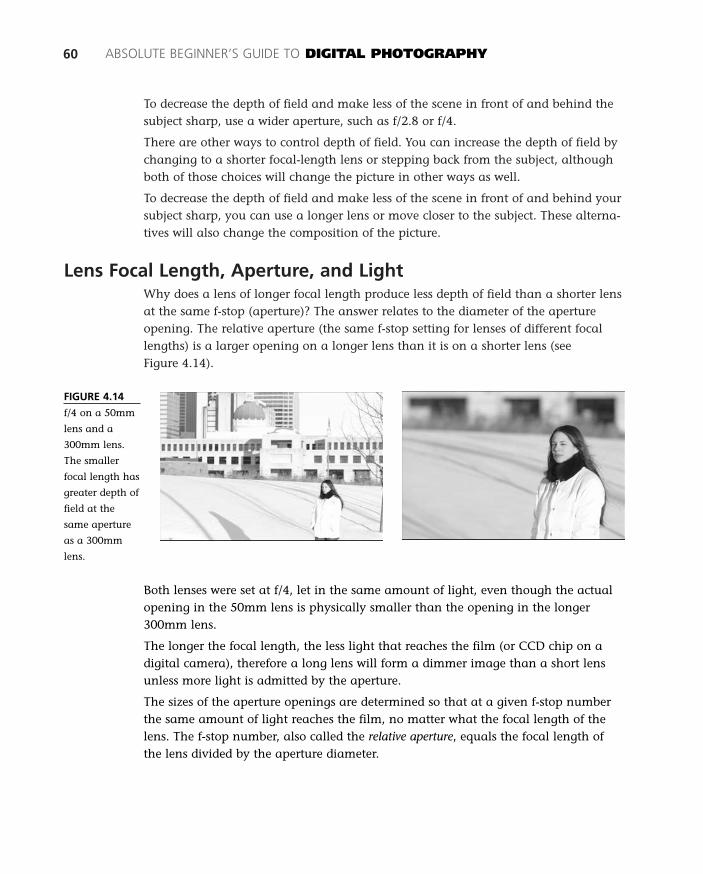
To decrease the depth of field and make less of the scene in front of and behind thesubject sharp, use a wider aperture, such as f/2.8 or f/4.
There are other ways to control depth of field. You can increase the depth of field bychanging to a shorter focal-length lens or stepping back from the subject, althoughboth of those choices will change the picture in other ways as well.
To decrease the depth of field and make less of the scene in front of and behind yoursubject sharp, you can use a longer lens or move closer to the subject. These alterna-tives will also change the composition of the picture.
Lens Focal Length, Aperture, and LightWhy does a lens of longer focal length produce less depth of field than a shorter lensat the same f-stop (aperture)? The answer relates to the diameter of the apertureopening. The relative aperture (the same f-stop setting for lenses of different focallengths) is a larger opening on a longer lens than it is on a shorter lens (see Figure 4.14).
60 ABSOLUTE BEGINNER’S GUIDE TO DIGITAL PHOTOGRAPHY
FIGURE 4.14
f/4 on a 50mm
lens and a
300mm lens.
The smaller
focal length has
greater depth of
field at the
same aperture
as a 300mm
lens.
Both lenses were set at f/4, let in the same amount of light, even though the actualopening in the 50mm lens is physically smaller than the opening in the longer300mm lens.
The longer the focal length, the less light that reaches the film (or CCD chip on adigital camera), therefore a long lens will form a dimmer image than a short lensunless more light is admitted by the aperture.
The sizes of the aperture openings are determined so that at a given f-stop numberthe same amount of light reaches the film, no matter what the focal length of thelens. The f-stop number, also called the relative aperture, equals the focal length ofthe lens divided by the aperture diameter.
06 0789731207_ch04.qxd 4/6/04 2:20 PM Page 60
CHAPTER 4 THE IMPORTANCE OF LENSES 61
lens focal length
aperture diameterf-stop =
If the focal length of the lens is 50mm, you need a lens opening of 12.5mm to pro-duce an f/4 aperture.
If the focal length of the lens is 300mm, you need a lens opening of 75mm to pro-duce an f/4 aperture.
50mm lens
12.5mm lens opening
50
12.5= f/4=
300mm lens
75mm lens opening
300
75= f/4=
The Absolute Minimum
Lenses are the most important part of a camera system. The quality of your imagesdepends entirely on the glass between the subject and the film or CCD. If you own anon-SLR digital or film camera, you’re stuck with a specific lens. If you own an SLR,however, your choices are much greater. Keep these tips in mind when consideringthe cost or purpose of a lens:
■ Buy the best lens or lenses you can afford. For SLR owners, used lenses arefine as long as they are high quality.
■ A “normal” focal length lens, in the 35–85mm range, is by far the most valu-able lens you can own.
■ Digital camera sensors are physically smaller than a 35mm film frame. Thiscauses regular lenses to have a longer focal length. A 35mm lens for examplemight actually be 50mm on a digital camera SLR.
■ Fixed-focal length lenses on consumer-level digital cameras are often not thatlarge. This results in slower shutter speeds or more noise in low-light situa-tions.
■ Telephoto lenses require you use a monopod or tripod. Invest in one and useit whenever you take pictures with a telephoto.
■ Fisheye lenses are fun, but full-frame fisheye lenses are much more useful.
06 0789731207_ch04.qxd 4/6/04 2:20 PM Page 61

06 0789731207_ch04.qxd 4/6/04 2:20 PM Page 62
5In this chapter
• Digital Cameras & Color Balance
• Film & Color Balance
• Exposure Latitude & Film Latitude
• Film Latitude
Exposure and Focus
Color balance and latitude are two important characteristics of film and
digital media. Color balance is the film or CCD’s response to colors in a
scene. Latitude is the amount film or a CCD can be under- or overex-
posed and still deliver a decent picture. Digital cameras are capable of
overexposure and underexposure but actually have no more latitude
than print film! For this reason, your images must be technically accu-
rate for both types of media.
By comparing film and film technologies to the capabilities of digital
cameras, you will certainly learn new techniques to try in digital. This
chapter explains color balance and then examines the capability of both
mediums to handle extreme exposure situations.
07 0789731207_ch05.qxd 4/6/04 2:16 PM Page 63
Digital Cameras and Color BalanceDigital cameras are not immune to color balance issues, although white-balancefeatures in most cameras help to reduce problems when used properly. White-bal-ance enables photographers to set the “white point” for a camera before pictures aretaken. This forces a camera to consider a specific color of lighting as purely whitelight.
The purpose of a white point (white balance) is to force the camera sensor to see thecolor you designate as pure white. To avoid off-color images taken indoors with fluo-rescent bulbs or zenon bulbs, you might need to point the camera at a white object(such as a piece of cardboard or a white wall), and then set the white balance on thecamera. By setting a white point, the camera will not have color-cast issues later on.Television news crews, for example, avoid strange colors and skin tones by settingthe white point of their video cameras prior to every shoot.
Most digital cameras can accurately compensate for lighting color and overcomeunusual lighting conditions. However, occasionally their automatic adjustment sys-tems get confused. This often happens indoors, where lighting systems can varygreatly. If you’re shooting indoors under unusual lighting, set the white balance onthe camera before taking pictures.
To set the white balance for your camera, follow these general steps:
1. Access the menu on your camera. Usually there is a dedicated Menu buttonsomewhere on the back of the camera.
2. Scroll through the menus until you find a setting for WB, White Bal, or WhiteBalance.
3. There might be a few more choices, such as Presets. Continue through themenus until you reach choices that resemble the following:
■ Auto. Automatically corrects white balance. This setting is often theonly one you need, especially if you photograph outdoors.
■ Daylight. Set the white balance to daylight if you’re shooting outside.
■ Tungsten. Set white balance to tungsten, if you’re shooting indoorswith incandescent bulbs (the screw-in type from GE). These bulbs emit alot of yellow light. The tungsten setting will compensate by reducingyellow and increasing blue.
■ Fluorescent. Set to fluorescent to compensate for the excessive greenoutput by these tubes.
4. Highlight one of these choices and then press OK. The camera is ready forunusual lighting.
64 ABSOLUTE BEGINNER’S GUIDE TO DIGITAL PHOTOGRAPHY
07 0789731207_ch05.qxd 4/6/04 2:16 PM Page 64
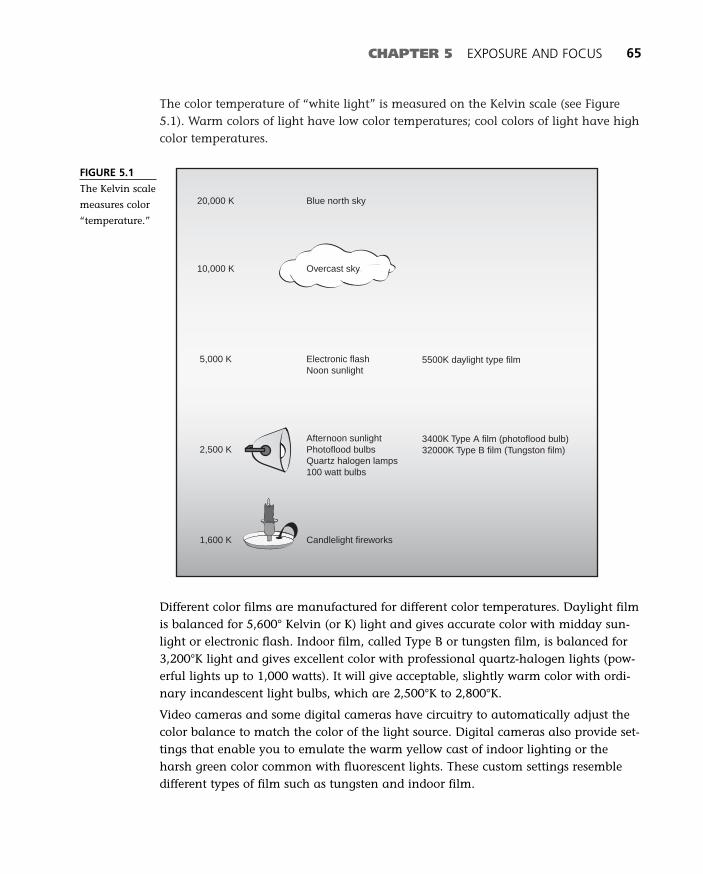
The color temperature of “white light” is measured on the Kelvin scale (see Figure5.1). Warm colors of light have low color temperatures; cool colors of light have highcolor temperatures.
CHAPTER 5 EXPOSURE AND FOCUS 65
FIGURE 5.1
The Kelvin scale
measures color
“temperature.”
20,000 K
10,000 K
5,000 K
2,500 K
1,600 K
5500K daylight type film
3400K Type A film (photoflood bulb)32000K Type B film (Tungston film)
Blue north sky
Overcast sky
Electronic flashNoon sunlight
Afternoon sunlightPhotoflood bulbsQuartz halogen lamps100 watt bulbs
Candlelight fireworks
Different color films are manufactured for different color temperatures. Daylight filmis balanced for 5,600° Kelvin (or K) light and gives accurate color with midday sun-light or electronic flash. Indoor film, called Type B or tungsten film, is balanced for3,200°K light and gives excellent color with professional quartz-halogen lights (pow-erful lights up to 1,000 watts). It will give acceptable, slightly warm color with ordi-nary incandescent light bulbs, which are 2,500°K to 2,800°K.
Video cameras and some digital cameras have circuitry to automatically adjust thecolor balance to match the color of the light source. Digital cameras also provide set-tings that enable you to emulate the warm yellow cast of indoor lighting or theharsh green color common with fluorescent lights. These custom settings resembledifferent types of film such as tungsten and indoor film.
07 0789731207_ch05.qxd 4/6/04 2:16 PM Page 65
Color Balance and FilmColor film can record colors that your eye does notsee when the picture is made. This is because film ismanufactured to reproduce color accurately underspecific lighting conditions. If the picture is madeunder the wrong lighting, colors in the photographbecome unbalanced, which means that there is anunwanted color tint (or color cast) over the entirephotograph.
For example, if daylight-balanced film is usedindoors under incandescent light bulbs, objects thatare supposed to look white, such as a white shirt,will be rendered with a red tint. This is becauseincandescent light bulbs produce more light in thered wavelengths than daylight does.
Color Balance and Slide FilmColor balance is more important with reversal filmthan with negative film. Because reversal film is viewed directly, any minor colorcast will be noticed. The colors in negative films can be corrected in printing, so neg-ative films produce acceptable results under a wider range of lighting. Even so, youget the best colors if film is shot under correctly balanced lighting or if color correc-tion filters are placed on the lens to correct the color of the light.
The color of daylight changes depending on the weather and the time of day.Daylight color film is color balanced for average noon sunlight. An hour or twobefore sunset, the light becomes very red or yellow. On cloudy days, the color of day-light becomes much bluer. Color filters can be used to eliminate the bluish color if itis undesirable.
Exposure LatitudeColor transparency film and most consumer digital cameras have little exposure lat-itude. Even slight overexposure or underexposure is readily visible, especially in con-trasting lighting. Consumer-level digital cameras blow out highlights in overexposedprints (see Figure 5.2). A blowout is a dead giveaway the image was taken with a dig-ital camera.
66 ABSOLUTE BEGINNER’S GUIDE TO DIGITAL PHOTOGRAPHY
Fluorescent lamps donot produce a continuous
color spectrum of light like anincandescent bulb. Instead, fluo-rescent bulbs generate spikes oflight at certain wavelengthswithin the spectrum, especiallygreen light. They are generallyconsidered to be at a temperatureof 4500°K.
07 0789731207_ch05.qxd 4/6/04 2:16 PM Page 66
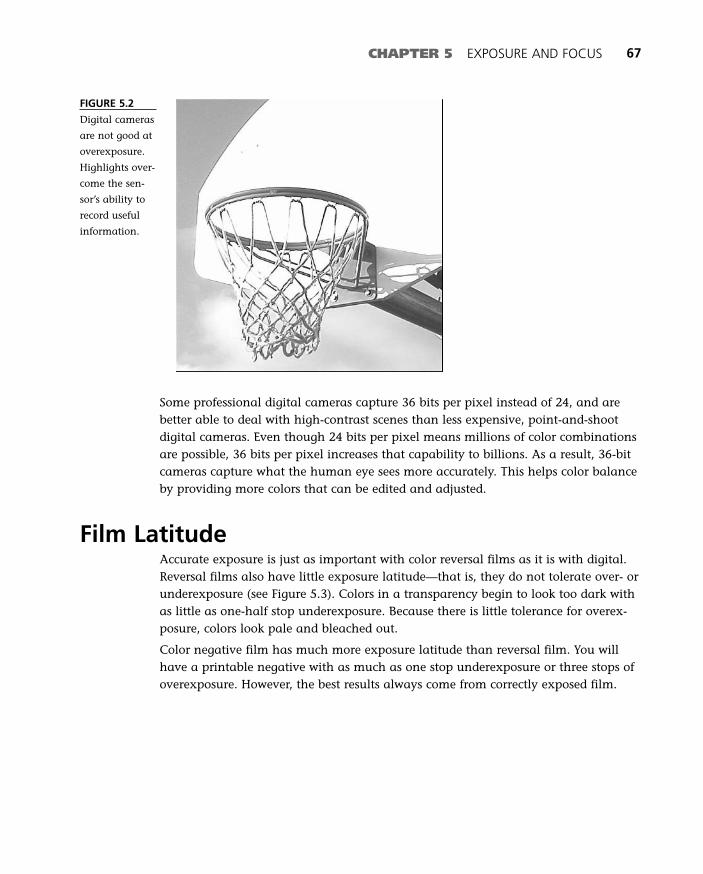
CHAPTER 5 EXPOSURE AND FOCUS 67
FIGURE 5.2
Digital cameras
are not good at
overexposure.
Highlights over-
come the sen-
sor’s ability to
record useful
information.
Some professional digital cameras capture 36 bits per pixel instead of 24, and arebetter able to deal with high-contrast scenes than less expensive, point-and-shootdigital cameras. Even though 24 bits per pixel means millions of color combinationsare possible, 36 bits per pixel increases that capability to billions. As a result, 36-bitcameras capture what the human eye sees more accurately. This helps color balanceby providing more colors that can be edited and adjusted.
Film LatitudeAccurate exposure is just as important with color reversal films as it is with digital.Reversal films also have little exposure latitude—that is, they do not tolerate over- orunderexposure (see Figure 5.3). Colors in a transparency begin to look too dark withas little as one-half stop underexposure. Because there is little tolerance for overex-posure, colors look pale and bleached out.
Color negative film has much more exposure latitude than reversal film. You willhave a printable negative with as much as one stop underexposure or three stops ofoverexposure. However, the best results always come from correctly exposed film.
07 0789731207_ch05.qxd 4/6/04 2:16 PM Page 67
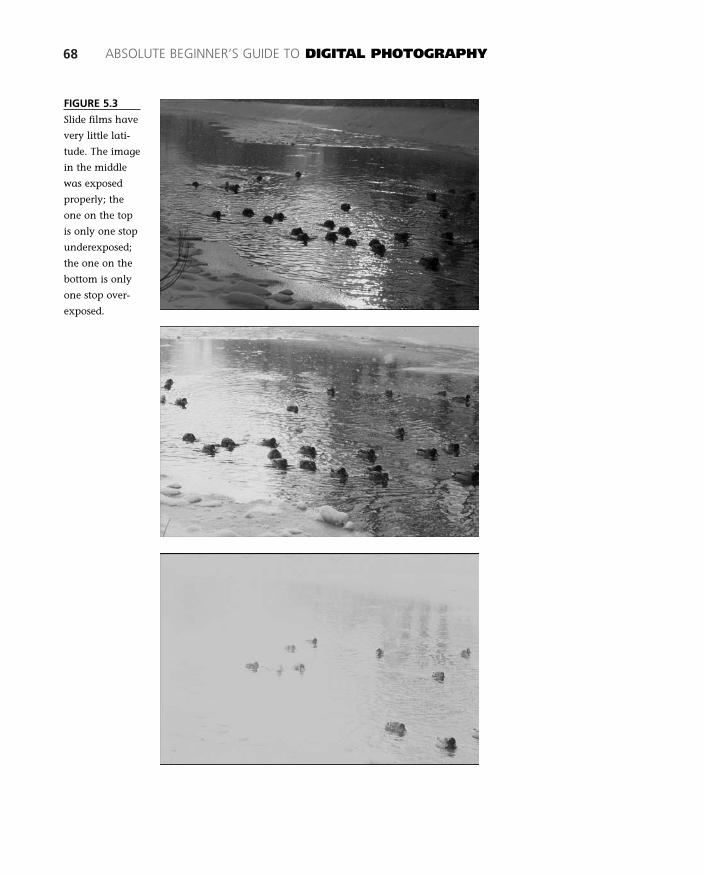
68 ABSOLUTE BEGINNER’S GUIDE TO DIGITAL PHOTOGRAPHY
FIGURE 5.3
Slide films have
very little lati-
tude. The image
in the middle
was exposed
properly; the
one on the top
is only one stop
underexposed;
the one on the
bottom is only
one stop over-
exposed.
07 0789731207_ch05.qxd 4/6/04 2:16 PM Page 68
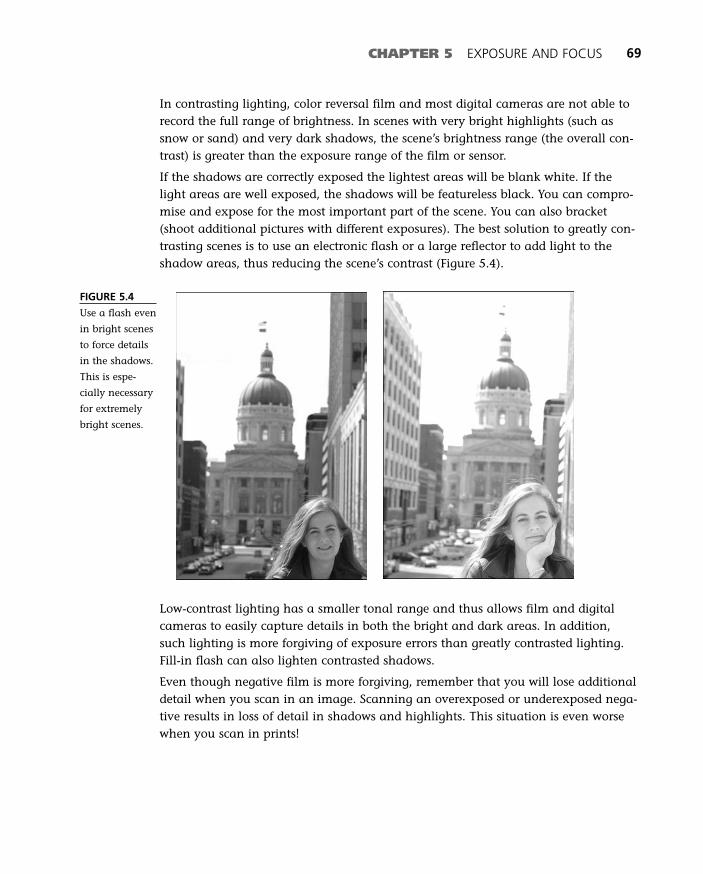
CHAPTER 5 EXPOSURE AND FOCUS 69
In contrasting lighting, color reversal film and most digital cameras are not able torecord the full range of brightness. In scenes with very bright highlights (such assnow or sand) and very dark shadows, the scene’s brightness range (the overall con-trast) is greater than the exposure range of the film or sensor.
If the shadows are correctly exposed the lightest areas will be blank white. If thelight areas are well exposed, the shadows will be featureless black. You can compro-mise and expose for the most important part of the scene. You can also bracket(shoot additional pictures with different exposures). The best solution to greatly con-trasting scenes is to use an electronic flash or a large reflector to add light to theshadow areas, thus reducing the scene’s contrast (Figure 5.4).
FIGURE 5.4
Use a flash even
in bright scenes
to force details
in the shadows.
This is espe-
cially necessary
for extremely
bright scenes.
Low-contrast lighting has a smaller tonal range and thus allows film and digitalcameras to easily capture details in both the bright and dark areas. In addition,such lighting is more forgiving of exposure errors than greatly contrasted lighting.Fill-in flash can also lighten contrasted shadows.
Even though negative film is more forgiving, remember that you will lose additionaldetail when you scan in an image. Scanning an overexposed or underexposed nega-tive results in loss of detail in shadows and highlights. This situation is even worsewhen you scan in prints!
07 0789731207_ch05.qxd 4/6/04 2:16 PM Page 69

70 ABSOLUTE BEGINNER’S GUIDE TO DIGITAL PHOTOGRAPHY
The Absolute Minimum
Photoshop and Photoshop Elements can correct many color balance issues by settingthe white point using the Image, Adjustment, Levels option. For the best images,however, you should always set the correct white balance on your digital camera, oruse the correct type of film. Keep these important points in mind when you photo-graph with either medium:
■ Daylight has a color temperature of 5600° Kelvin.
■ Indoor incandescent light bulbs have a color temperature of 2850° Kelvin.Look for indoor film at this temperature if you plan to shoot under theselights.
■ Fluorescent light bulbs come in many different “colors” of light. The mostcommon fluorescent bulbs have a color temperature of 4000–4500° Kelvin.The color emitted is often called “cool white,” but it actually shows up asgreen on daylight-balanced film.
■ Filters are available that adjust indoor lighting to work with daylight-balanced film. Check out filters by such companies as Hoya(www.thkphoto.com/products/hoya/index.html) and black and white (www.schneiderkreuznach.com/).
■ Slide film is much more sensitive to exposure and color “casts.”
07 0789731207_ch05.qxd 4/6/04 2:16 PM Page 70
6In this chapter
• Using a Scanner
• Making a Scan Step-by-Step
• Keeping Dust Out of the Picture
• Determining the Samples Per Inch of a Scan
Getting Your Pix
Onscreen
Scanning creates digital images from negatives, transparencies, or prints
(see Figure 6.1). When images are scanned, their tones and colors are
converted into numbers that the software can edit. A scanner captures
samples of brightness and color in a regular grid pattern. The more
samples the scanner takes, the more detailed the scanned image is.
Image quality depends on the quality of the scan. Just as you can’t get
a good darkroom print from a poor negative, you can’t get a good
image from a bad scan, or even a good scan from a bad negative or
print. Scans made from poorly exposed or badly scratched film require
extra time to edit and rarely produce acceptable results.
08 0789731207_ch06.qxd 4/6/04 2:13 PM Page 71
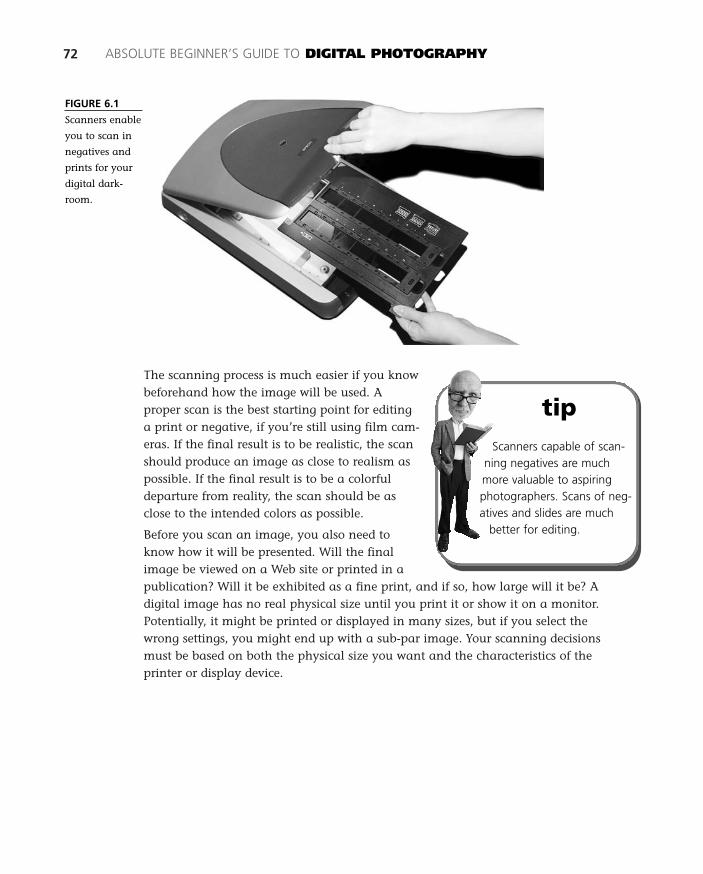
The scanning process is much easier if you knowbeforehand how the image will be used. Aproper scan is the best starting point for editinga print or negative, if you’re still using film cam-eras. If the final result is to be realistic, the scanshould produce an image as close to realism aspossible. If the final result is to be a colorfuldeparture from reality, the scan should be asclose to the intended colors as possible.
Before you scan an image, you also need toknow how it will be presented. Will the finalimage be viewed on a Web site or printed in apublication? Will it be exhibited as a fine print, and if so, how large will it be? Adigital image has no real physical size until you print it or show it on a monitor.Potentially, it might be printed or displayed in many sizes, but if you select thewrong settings, you might end up with a sub-par image. Your scanning decisionsmust be based on both the physical size you want and the characteristics of theprinter or display device.
72 ABSOLUTE BEGINNER’S GUIDE TO DIGITAL PHOTOGRAPHY
FIGURE 6.1
Scanners enable
you to scan in
negatives and
prints for your
digital dark-
room.
tipScanners capable of scan-
ning negatives are muchmore valuable to aspiringphotographers. Scans of neg-atives and slides are much
better for editing.
08 0789731207_ch06.qxd 4/6/04 2:13 PM Page 72
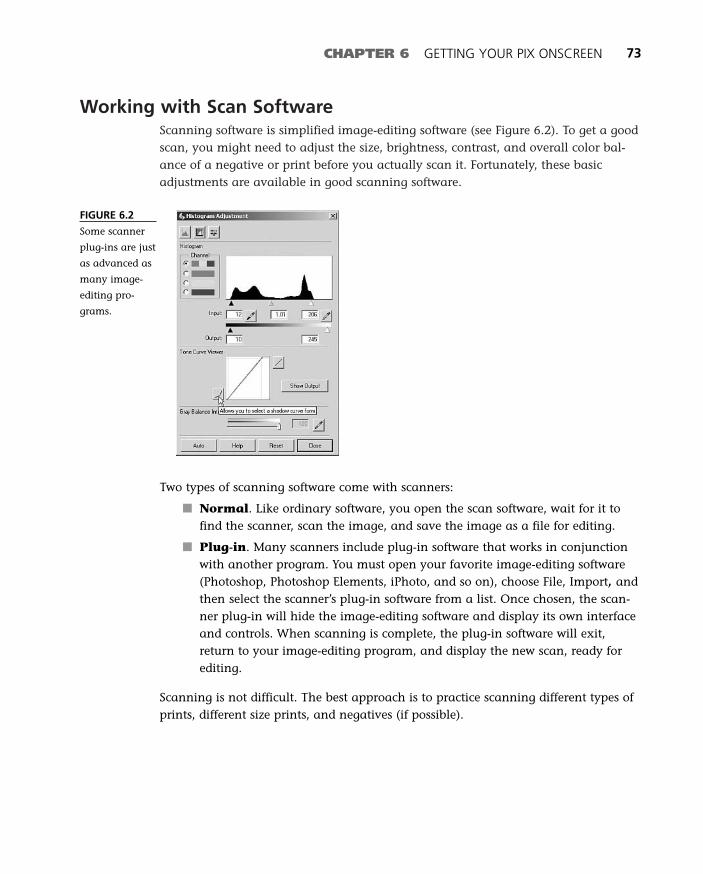
Working with Scan SoftwareScanning software is simplified image-editing software (see Figure 6.2). To get a goodscan, you might need to adjust the size, brightness, contrast, and overall color bal-ance of a negative or print before you actually scan it. Fortunately, these basicadjustments are available in good scanning software.
CHAPTER 6 GETTING YOUR PIX ONSCREEN 73
FIGURE 6.2
Some scanner
plug-ins are just
as advanced as
many image-
editing pro-
grams.
Two types of scanning software come with scanners:
■ Normal. Like ordinary software, you open the scan software, wait for it tofind the scanner, scan the image, and save the image as a file for editing.
■ Plug-in. Many scanners include plug-in software that works in conjunctionwith another program. You must open your favorite image-editing software(Photoshop, Photoshop Elements, iPhoto, and so on), choose File, Import, andthen select the scanner’s plug-in software from a list. Once chosen, the scan-ner plug-in will hide the image-editing software and display its own interfaceand controls. When scanning is complete, the plug-in software will exit,return to your image-editing program, and display the new scan, ready forediting.
Scanning is not difficult. The best approach is to practice scanning different types ofprints, different size prints, and negatives (if possible).
08 0789731207_ch06.qxd 4/6/04 2:13 PM Page 73
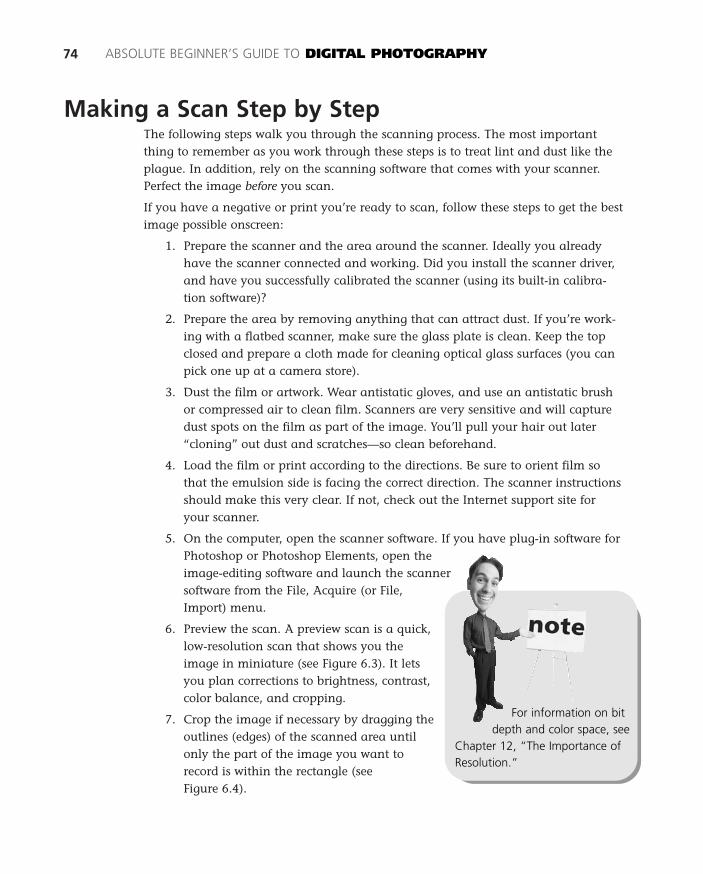
Making a Scan Step by StepThe following steps walk you through the scanning process. The most importantthing to remember as you work through these steps is to treat lint and dust like theplague. In addition, rely on the scanning software that comes with your scanner.Perfect the image before you scan.
If you have a negative or print you’re ready to scan, follow these steps to get the bestimage possible onscreen:
1. Prepare the scanner and the area around the scanner. Ideally you alreadyhave the scanner connected and working. Did you install the scanner driver,and have you successfully calibrated the scanner (using its built-in calibra-tion software)?
2. Prepare the area by removing anything that can attract dust. If you’re work-ing with a flatbed scanner, make sure the glass plate is clean. Keep the topclosed and prepare a cloth made for cleaning optical glass surfaces (you canpick one up at a camera store).
3. Dust the film or artwork. Wear antistatic gloves, and use an antistatic brushor compressed air to clean film. Scanners are very sensitive and will capturedust spots on the film as part of the image. You’ll pull your hair out later“cloning” out dust and scratches—so clean beforehand.
4. Load the film or print according to the directions. Be sure to orient film sothat the emulsion side is facing the correct direction. The scanner instructionsshould make this very clear. If not, check out the Internet support site foryour scanner.
5. On the computer, open the scanner software. If you have plug-in software forPhotoshop or Photoshop Elements, open theimage-editing software and launch the scannersoftware from the File, Acquire (or File,Import) menu.
6. Preview the scan. A preview scan is a quick,low-resolution scan that shows you theimage in miniature (see Figure 6.3). It letsyou plan corrections to brightness, contrast,color balance, and cropping.
7. Crop the image if necessary by dragging theoutlines (edges) of the scanned area untilonly the part of the image you want torecord is within the rectangle (see Figure 6.4).
74 ABSOLUTE BEGINNER’S GUIDE TO DIGITAL PHOTOGRAPHY
For information on bitdepth and color space, see
Chapter 12, “The Importance ofResolution.”
08 0789731207_ch06.qxd 4/6/04 2:13 PM Page 74
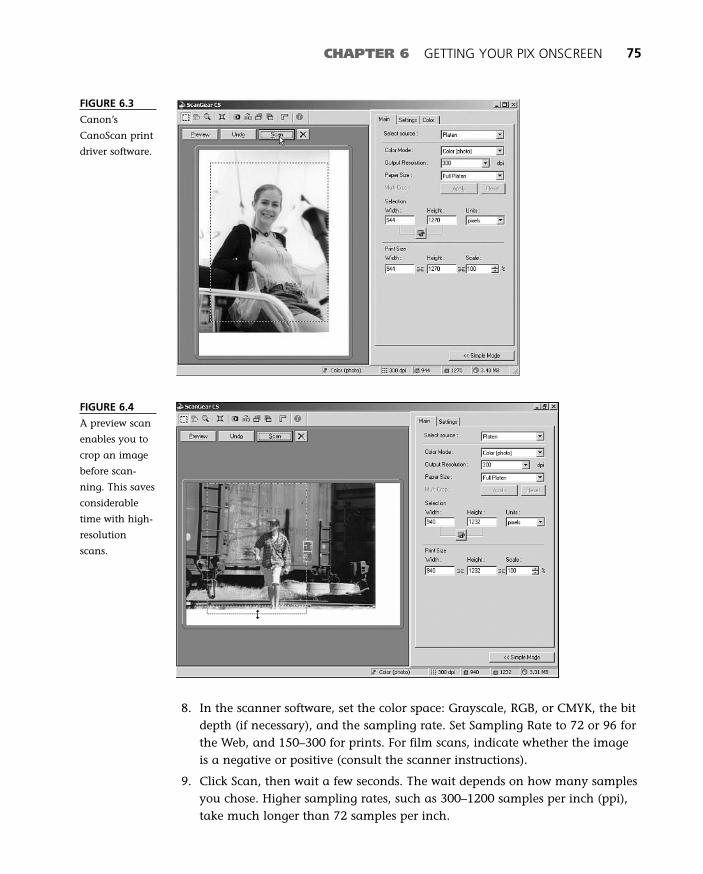
CHAPTER 6 GETTING YOUR PIX ONSCREEN 75
8. In the scanner software, set the color space: Grayscale, RGB, or CMYK, the bitdepth (if necessary), and the sampling rate. Set Sampling Rate to 72 or 96 forthe Web, and 150–300 for prints. For film scans, indicate whether the imageis a negative or positive (consult the scanner instructions).
9. Click Scan, then wait a few seconds. The wait depends on how many samplesyou chose. Higher sampling rates, such as 300–1200 samples per inch (ppi),take much longer than 72 samples per inch.
FIGURE 6.3
Canon’s
CanoScan print
driver software.
FIGURE 6.4
A preview scan
enables you to
crop an image
before scan-
ning. This saves
considerable
time with high-
resolution
scans.
08 0789731207_ch06.qxd 4/6/04 2:13 PM Page 75
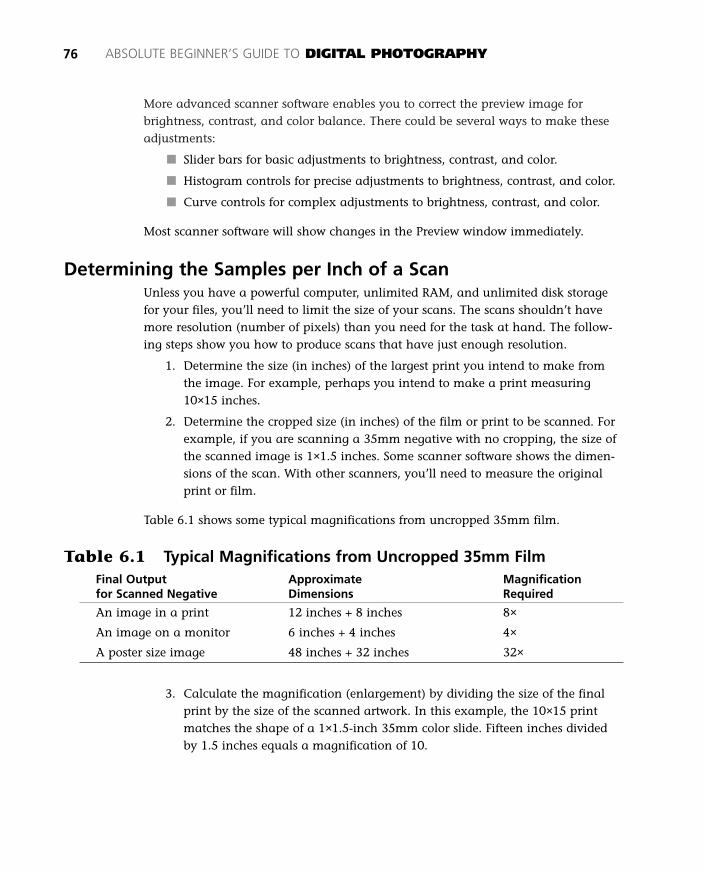
More advanced scanner software enables you to correct the preview image forbrightness, contrast, and color balance. There could be several ways to make theseadjustments:
■ Slider bars for basic adjustments to brightness, contrast, and color.
■ Histogram controls for precise adjustments to brightness, contrast, and color.
■ Curve controls for complex adjustments to brightness, contrast, and color.
Most scanner software will show changes in the Preview window immediately.
Determining the Samples per Inch of a ScanUnless you have a powerful computer, unlimited RAM, and unlimited disk storagefor your files, you’ll need to limit the size of your scans. The scans shouldn’t havemore resolution (number of pixels) than you need for the task at hand. The follow-ing steps show you how to produce scans that have just enough resolution.
1. Determine the size (in inches) of the largest print you intend to make fromthe image. For example, perhaps you intend to make a print measuring10×15 inches.
2. Determine the cropped size (in inches) of the film or print to be scanned. Forexample, if you are scanning a 35mm negative with no cropping, the size ofthe scanned image is 1×1.5 inches. Some scanner software shows the dimen-sions of the scan. With other scanners, you’ll need to measure the originalprint or film.
Table 6.1 shows some typical magnifications from uncropped 35mm film.
Table 6.1 Typical Magnifications from Uncropped 35mm FilmFinal Output Approximate Magnificationfor Scanned Negative Dimensions Required
An image in a print 12 inches + 8 inches 8×
An image on a monitor 6 inches + 4 inches 4×
A poster size image 48 inches + 32 inches 32×
3. Calculate the magnification (enlargement) by dividing the size of the finalprint by the size of the scanned artwork. In this example, the 10×15 printmatches the shape of a 1×1.5-inch 35mm color slide. Fifteen inches dividedby 1.5 inches equals a magnification of 10.
76 ABSOLUTE BEGINNER’S GUIDE TO DIGITAL PHOTOGRAPHY
08 0789731207_ch06.qxd 4/6/04 2:13 PM Page 76
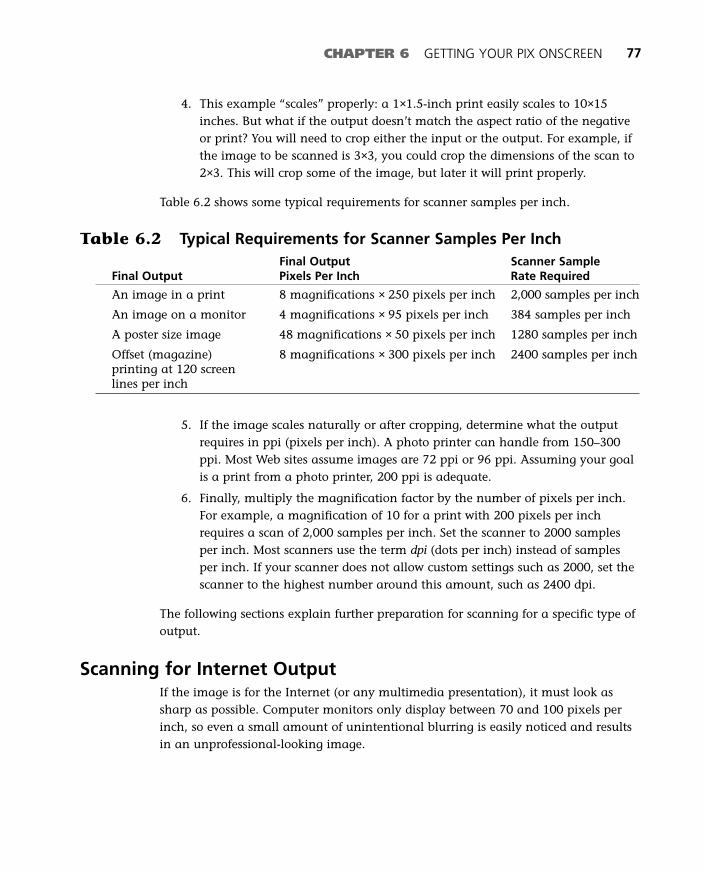
CHAPTER 6 GETTING YOUR PIX ONSCREEN 77
4. This example “scales” properly: a 1×1.5-inch print easily scales to 10×15inches. But what if the output doesn’t match the aspect ratio of the negativeor print? You will need to crop either the input or the output. For example, ifthe image to be scanned is 3×3, you could crop the dimensions of the scan to2×3. This will crop some of the image, but later it will print properly.
Table 6.2 shows some typical requirements for scanner samples per inch.
Table 6.2 Typical Requirements for Scanner Samples Per InchFinal Output Scanner Sample
Final Output Pixels Per Inch Rate Required
An image in a print 8 magnifications × 250 pixels per inch 2,000 samples per inch
An image on a monitor 4 magnifications × 95 pixels per inch 384 samples per inch
A poster size image 48 magnifications × 50 pixels per inch 1280 samples per inch
Offset (magazine) 8 magnifications × 300 pixels per inch 2400 samples per inchprinting at 120 screen lines per inch
5. If the image scales naturally or after cropping, determine what the outputrequires in ppi (pixels per inch). A photo printer can handle from 150–300ppi. Most Web sites assume images are 72 ppi or 96 ppi. Assuming your goalis a print from a photo printer, 200 ppi is adequate.
6. Finally, multiply the magnification factor by the number of pixels per inch.For example, a magnification of 10 for a print with 200 pixels per inchrequires a scan of 2,000 samples per inch. Set the scanner to 2000 samplesper inch. Most scanners use the term dpi (dots per inch) instead of samplesper inch. If your scanner does not allow custom settings such as 2000, set thescanner to the highest number around this amount, such as 2400 dpi.
The following sections explain further preparation for scanning for a specific type ofoutput.
Scanning for Internet OutputIf the image is for the Internet (or any multimedia presentation), it must look assharp as possible. Computer monitors only display between 70 and 100 pixels perinch, so even a small amount of unintentional blurring is easily noticed and resultsin an unprofessional-looking image.
08 0789731207_ch06.qxd 4/6/04 2:13 PM Page 77
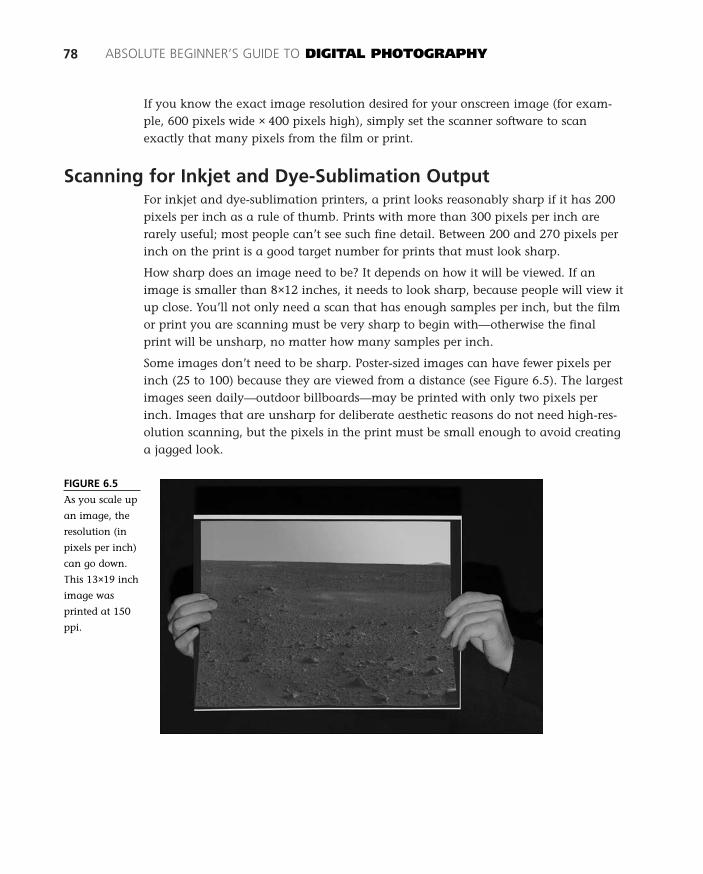
If you know the exact image resolution desired for your onscreen image (for exam-ple, 600 pixels wide × 400 pixels high), simply set the scanner software to scanexactly that many pixels from the film or print.
Scanning for Inkjet and Dye-Sublimation OutputFor inkjet and dye-sublimation printers, a print looks reasonably sharp if it has 200pixels per inch as a rule of thumb. Prints with more than 300 pixels per inch arerarely useful; most people can’t see such fine detail. Between 200 and 270 pixels perinch on the print is a good target number for prints that must look sharp.
How sharp does an image need to be? It depends on how it will be viewed. If animage is smaller than 8×12 inches, it needs to look sharp, because people will view itup close. You’ll not only need a scan that has enough samples per inch, but the filmor print you are scanning must be very sharp to begin with—otherwise the finalprint will be unsharp, no matter how many samples per inch.
Some images don’t need to be sharp. Poster-sized images can have fewer pixels perinch (25 to 100) because they are viewed from a distance (see Figure 6.5). The largestimages seen daily—outdoor billboards—may be printed with only two pixels perinch. Images that are unsharp for deliberate aesthetic reasons do not need high-res-olution scanning, but the pixels in the print must be small enough to avoid creatinga jagged look.
78 ABSOLUTE BEGINNER’S GUIDE TO DIGITAL PHOTOGRAPHY
FIGURE 6.5
As you scale up
an image, the
resolution (in
pixels per inch)
can go down.
This 13×19 inch
image was
printed at 150
ppi.
08 0789731207_ch06.qxd 4/6/04 2:13 PM Page 78
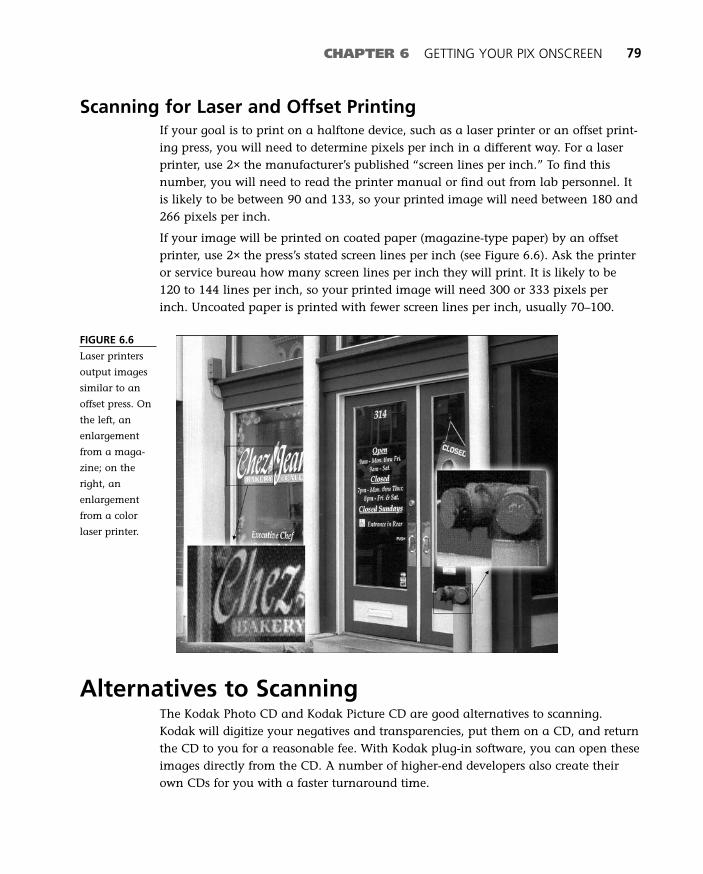
CHAPTER 6 GETTING YOUR PIX ONSCREEN 79
Scanning for Laser and Offset PrintingIf your goal is to print on a halftone device, such as a laser printer or an offset print-ing press, you will need to determine pixels per inch in a different way. For a laserprinter, use 2× the manufacturer’s published “screen lines per inch.” To find thisnumber, you will need to read the printer manual or find out from lab personnel. Itis likely to be between 90 and 133, so your printed image will need between 180 and266 pixels per inch.
If your image will be printed on coated paper (magazine-type paper) by an offsetprinter, use 2× the press’s stated screen lines per inch (see Figure 6.6). Ask the printeror service bureau how many screen lines per inch they will print. It is likely to be120 to 144 lines per inch, so your printed image will need 300 or 333 pixels perinch. Uncoated paper is printed with fewer screen lines per inch, usually 70–100.
FIGURE 6.6
Laser printers
output images
similar to an
offset press. On
the left, an
enlargement
from a maga-
zine; on the
right, an
enlargement
from a color
laser printer.
Alternatives to ScanningThe Kodak Photo CD and Kodak Picture CD are good alternatives to scanning.Kodak will digitize your negatives and transparencies, put them on a CD, and returnthe CD to you for a reasonable fee. With Kodak plug-in software, you can open theseimages directly from the CD. A number of higher-end developers also create theirown CDs for you with a faster turnaround time.
08 0789731207_ch06.qxd 4/6/04 2:13 PM Page 79
Another alternative is to use service bureaus, shops where professional photographers,advertising agencies, and artists have film developed, images scanned, and otherhigh-end work. Service bureaus will scan 35mm film and store the images on a CD-ROM-type disc. Some companies that offer film developing and prints by mail alsooffer scans on CD-ROM. The images are not as high-resolution as Kodak Photo CDs,but might be satisfactory for small prints or for Internet use. You can find thesemail-order service bureaus in the back of most photography magazines.
The Absolute Minimum
Scanners enable traditional film photographers to become digital photographers. Ifyou are a film photographer and would like to edit your images onscreen, keepthese tips in mind:
■ Scanners range in price from $40–$40,000. Research and then buy the bestscanner you can afford. The difference in quality is significant.
■ If you are serious about digital photography and will continue to use film,invest in a good negative scanner or flatbed scanner that can scan negatives.
■ Dust is a serious pain when scanning. Keep your scanner clean and invest ingloves, an antistatic brush, and a can of compressed air.
■ Scans of slides include the most tonal information, followed by negatives,and then prints.
■ 48-bit depth scans are much larger in size than 24-bit scans, but they containmuch more color and tonal information.
■ It is always better to scan at the correct resolution than to resize the imageafterward. Determine the output size before you scan.
■ If you want to make copies of a print, scan at 300 samples per inch, thenprint at 300 ppi on your printer. This ensures that the print stays the samesize.
80 ABSOLUTE BEGINNER’S GUIDE TO DIGITAL PHOTOGRAPHY
08 0789731207_ch06.qxd 4/6/04 2:13 PM Page 80
7In this chapter
• Photoshop Elements and Photoshop: FileFormat Compatibility
• JPEG File Format
• How JPEG Works
• The Replacement for JPEG: JPEG2000
• TIFF File Format
• Photoshop File Format
Files and File Formats
Most modern image editing software on the Mac and PC save images
in a number of different formats. Photoshop and Photoshop Elements
for either platform enable you to save images in 14 formats! Table 7.1
defines the purpose of each of these formats and when they should be
used.
09 0789731207_ch07.qxd 4/6/04 2:19 PM Page 81
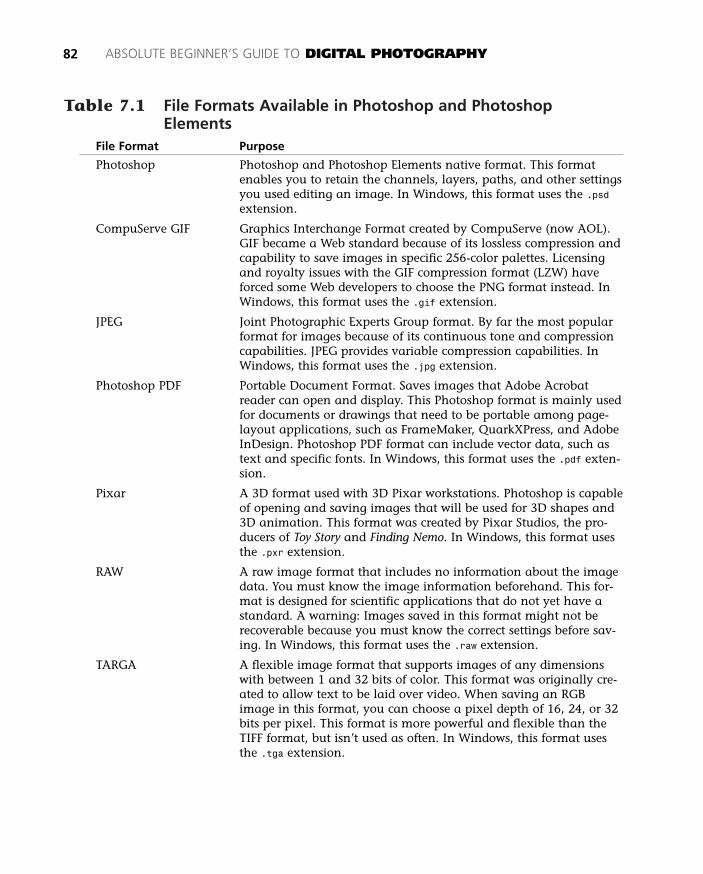
Table 7.1 File Formats Available in Photoshop and PhotoshopElements
File Format Purpose
Photoshop Photoshop and Photoshop Elements native format. This formatenables you to retain the channels, layers, paths, and other settingsyou used editing an image. In Windows, this format uses the .psdextension.
CompuServe GIF Graphics Interchange Format created by CompuServe (now AOL).GIF became a Web standard because of its lossless compression andcapability to save images in specific 256-color palettes. Licensingand royalty issues with the GIF compression format (LZW) haveforced some Web developers to choose the PNG format instead. InWindows, this format uses the .gif extension.
JPEG Joint Photographic Experts Group format. By far the most popularformat for images because of its continuous tone and compressioncapabilities. JPEG provides variable compression capabilities. InWindows, this format uses the .jpg extension.
Photoshop PDF Portable Document Format. Saves images that Adobe Acrobatreader can open and display. This Photoshop format is mainly usedfor documents or drawings that need to be portable among page-layout applications, such as FrameMaker, QuarkXPress, and AdobeInDesign. Photoshop PDF format can include vector data, such astext and specific fonts. In Windows, this format uses the .pdf exten-sion.
Pixar A 3D format used with 3D Pixar workstations. Photoshop is capableof opening and saving images that will be used for 3D shapes and3D animation. This format was created by Pixar Studios, the pro-ducers of Toy Story and Finding Nemo. In Windows, this format usesthe .pxr extension.
RAW A raw image format that includes no information about the imagedata. You must know the image information beforehand. This for-mat is designed for scientific applications that do not yet have astandard. A warning: Images saved in this format might not berecoverable because you must know the correct settings before sav-ing. In Windows, this format uses the .raw extension.
TARGA A flexible image format that supports images of any dimensionswith between 1 and 32 bits of color. This format was originally cre-ated to allow text to be laid over video. When saving an RGBimage in this format, you can choose a pixel depth of 16, 24, or 32bits per pixel. This format is more powerful and flexible than theTIFF format, but isn’t used as often. In Windows, this format usesthe .tga extension.
82 ABSOLUTE BEGINNER’S GUIDE TO DIGITAL PHOTOGRAPHY
09 0789731207_ch07.qxd 4/6/04 2:19 PM Page 82
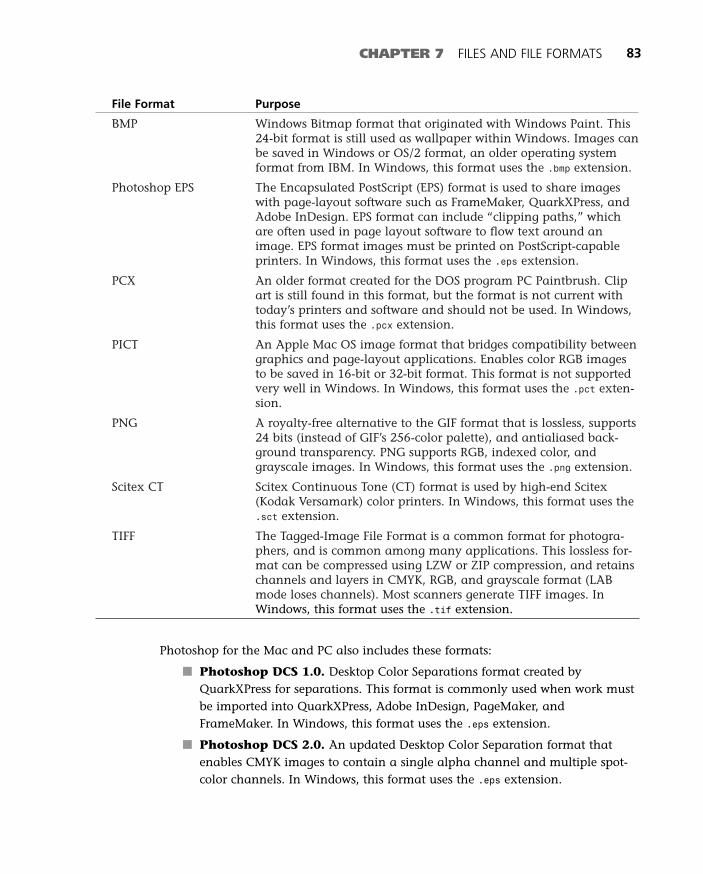
BMP Windows Bitmap format that originated with Windows Paint. This24-bit format is still used as wallpaper within Windows. Images canbe saved in Windows or OS/2 format, an older operating systemformat from IBM. In Windows, this format uses the .bmp extension.
Photoshop EPS The Encapsulated PostScript (EPS) format is used to share imageswith page-layout software such as FrameMaker, QuarkXPress, andAdobe InDesign. EPS format can include “clipping paths,” whichare often used in page layout software to flow text around animage. EPS format images must be printed on PostScript-capableprinters. In Windows, this format uses the .eps extension.
PCX An older format created for the DOS program PC Paintbrush. Clipart is still found in this format, but the format is not current withtoday’s printers and software and should not be used. In Windows,this format uses the .pcx extension.
PICT An Apple Mac OS image format that bridges compatibility betweengraphics and page-layout applications. Enables color RGB imagesto be saved in 16-bit or 32-bit format. This format is not supportedvery well in Windows. In Windows, this format uses the .pct exten-sion.
PNG A royalty-free alternative to the GIF format that is lossless, supports24 bits (instead of GIF’s 256-color palette), and antialiased back-ground transparency. PNG supports RGB, indexed color, andgrayscale images. In Windows, this format uses the .png extension.
Scitex CT Scitex Continuous Tone (CT) format is used by high-end Scitex(Kodak Versamark) color printers. In Windows, this format uses the.sct extension.
TIFF The Tagged-Image File Format is a common format for photogra-phers, and is common among many applications. This lossless for-mat can be compressed using LZW or ZIP compression, and retainschannels and layers in CMYK, RGB, and grayscale format (LABmode loses channels). Most scanners generate TIFF images. InWindows, this format uses the .tif extension.
Photoshop for the Mac and PC also includes these formats:
■ Photoshop DCS 1.0. Desktop Color Separations format created byQuarkXPress for separations. This format is commonly used when work mustbe imported into QuarkXPress, Adobe InDesign, PageMaker, andFrameMaker. In Windows, this format uses the .eps extension.
■ Photoshop DCS 2.0. An updated Desktop Color Separation format thatenables CMYK images to contain a single alpha channel and multiple spot-color channels. In Windows, this format uses the .eps extension.
CHAPTER 7 FILES AND FILE FORMATS 83
File Format Purpose
09 0789731207_ch07.qxd 4/6/04 2:19 PM Page 83

Photoshop Elements and Photoshop: File FormatCompatibility
Photoshop Elements includes the same file formats as Photoshop, except for DCS 1and DCS 2. The JPEG formats in these two programs are identical--An image savedin one program can be opened in the other. The Photoshop PSD and TIFF formatsdiffer, however.
Photoshop Elements has no Channels or Paths palette and cannot create annota-tions or layer sets. No matter what format you save an image as in Photoshop,Elements will not display channels or paths. Annotations appear and can be movedand closed, but not edited. Aside from these differences, the following list explainscompatibility regarding the PSD and TIFF file formats:
■ Layers. Interchangeable between programs. Save an image with layers inPSD or TIFF format in either program; the other program will provide access.
■ Adjustment layers. Partial compatibility in PSD and TIFF formats.Photoshop Elements displays adjustment layers created in Photoshop, butthey are locked. You can turn them off, move them, and paint on the layer’smask, but you cannot double-click on the layer to edit it. Adjustment layerscreated in Elements can be edited in Photoshop however.
84 ABSOLUTE BEGINNER’S GUIDE TO DIGITAL PHOTOGRAPHY
RAW FORMAT AND DIGITAL CAMERASThe RAW format available in Photoshop and Photoshop Elements is similar to theRAW format you will see advertised with digital cameras, but you must import(using File, Import) raw camera images with a special plug-in available fromAdobe. This plug-in is available with Photoshop 7 and Photoshop CS, but doesnot work in Photoshop Elements. (Elements only supports RGB-based plug-ins.)Most high-end digital cameras that support the RAW format include their ownimport software that enables you to modify the raw image, output it as a TIFF file,then open it in Photoshop.
The raw file output available in high-end digital cameras is preferred by photogra-phers because brightness values for each pixel are imported with no modificationinto the plug-in (or the camera software).
09 0789731207_ch07.qxd 4/6/04 2:19 PM Page 84
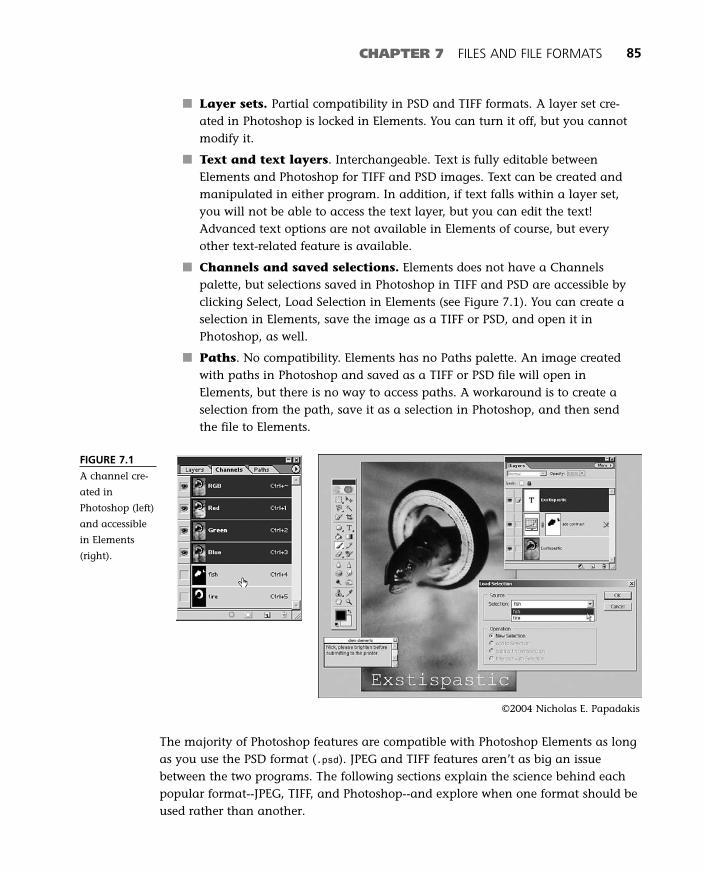
■ Layer sets. Partial compatibility in PSD and TIFF formats. A layer set cre-ated in Photoshop is locked in Elements. You can turn it off, but you cannotmodify it.
■ Text and text layers. Interchangeable. Text is fully editable betweenElements and Photoshop for TIFF and PSD images. Text can be created andmanipulated in either program. In addition, if text falls within a layer set,you will not be able to access the text layer, but you can edit the text!Advanced text options are not available in Elements of course, but everyother text-related feature is available.
■ Channels and saved selections. Elements does not have a Channelspalette, but selections saved in Photoshop in TIFF and PSD are accessible byclicking Select, Load Selection in Elements (see Figure 7.1). You can create aselection in Elements, save the image as a TIFF or PSD, and open it inPhotoshop, as well.
■ Paths. No compatibility. Elements has no Paths palette. An image createdwith paths in Photoshop and saved as a TIFF or PSD file will open inElements, but there is no way to access paths. A workaround is to create aselection from the path, save it as a selection in Photoshop, and then sendthe file to Elements.
CHAPTER 7 FILES AND FILE FORMATS 85
FIGURE 7.1
A channel cre-
ated in
Photoshop (left)
and accessible
in Elements
(right).
©2004 Nicholas E. Papadakis
The majority of Photoshop features are compatible with Photoshop Elements as longas you use the PSD format (.psd). JPEG and TIFF features aren’t as big an issuebetween the two programs. The following sections explain the science behind eachpopular format--JPEG, TIFF, and Photoshop--and explore when one format should beused rather than another.
09 0789731207_ch07.qxd 4/6/04 2:19 PM Page 85
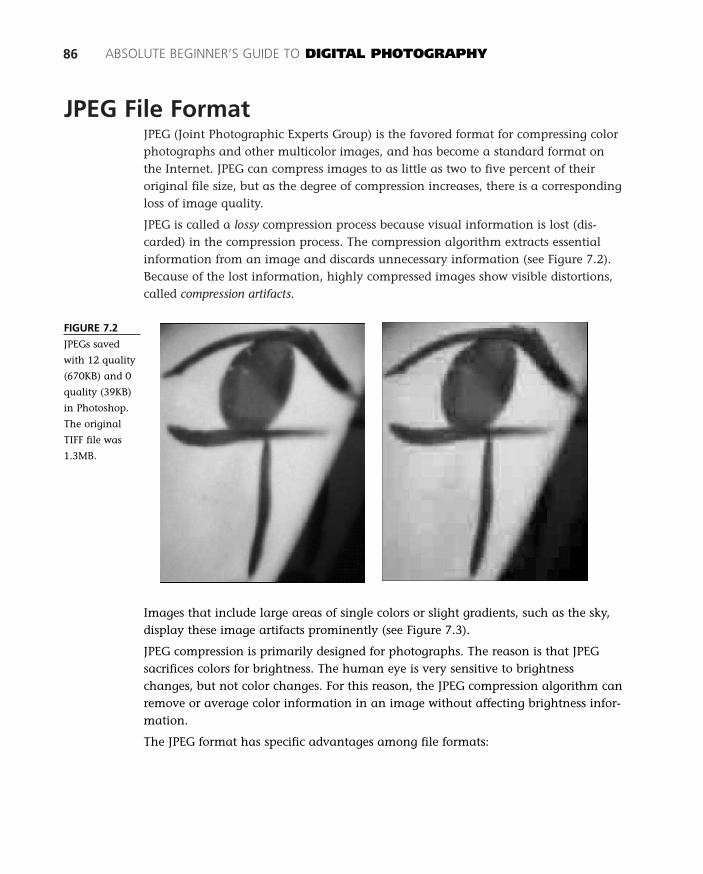
JPEG File FormatJPEG (Joint Photographic Experts Group) is the favored format for compressing colorphotographs and other multicolor images, and has become a standard format onthe Internet. JPEG can compress images to as little as two to five percent of theiroriginal file size, but as the degree of compression increases, there is a correspondingloss of image quality.
JPEG is called a lossy compression process because visual information is lost (dis-carded) in the compression process. The compression algorithm extracts essentialinformation from an image and discards unnecessary information (see Figure 7.2).Because of the lost information, highly compressed images show visible distortions,called compression artifacts.
86 ABSOLUTE BEGINNER’S GUIDE TO DIGITAL PHOTOGRAPHY
FIGURE 7.2
JPEGs saved
with 12 quality
(670KB) and 0
quality (39KB)
in Photoshop.
The original
TIFF file was
1.3MB.
Images that include large areas of single colors or slight gradients, such as the sky,display these image artifacts prominently (see Figure 7.3).
JPEG compression is primarily designed for photographs. The reason is that JPEGsacrifices colors for brightness. The human eye is very sensitive to brightnesschanges, but not color changes. For this reason, the JPEG compression algorithm canremove or average color information in an image without affecting brightness infor-mation.
The JPEG format has specific advantages among file formats:
09 0789731207_ch07.qxd 4/6/04 2:19 PM Page 86
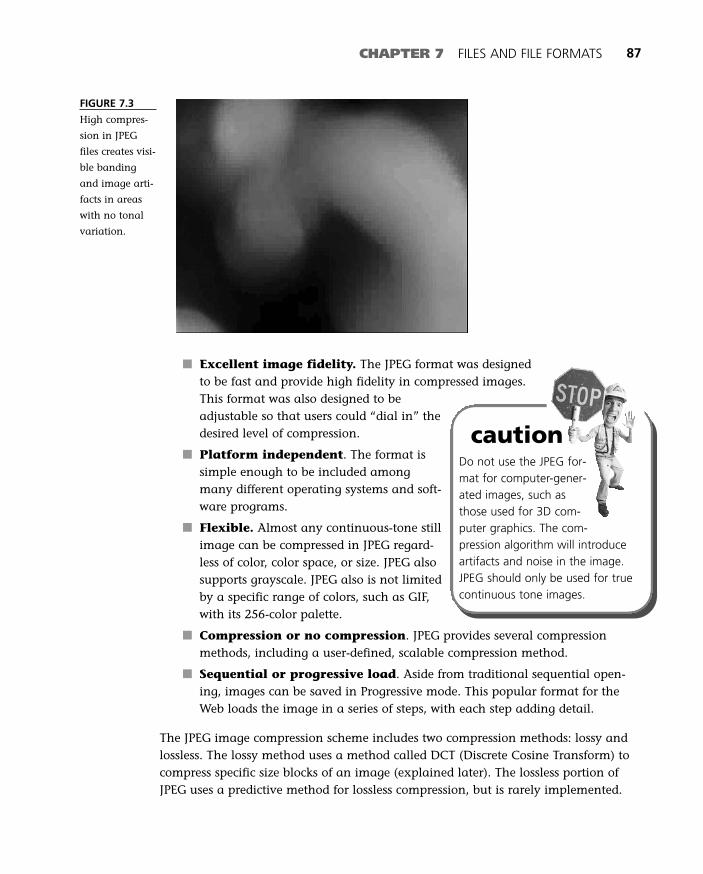
CHAPTER 7 FILES AND FILE FORMATS 87
FIGURE 7.3
High compres-
sion in JPEG
files creates visi-
ble banding
and image arti-
facts in areas
with no tonal
variation.
■ Excellent image fidelity. The JPEG format was designedto be fast and provide high fidelity in compressed images.This format was also designed to beadjustable so that users could “dial in” thedesired level of compression.
■ Platform independent. The format issimple enough to be included amongmany different operating systems and soft-ware programs.
■ Flexible. Almost any continuous-tone stillimage can be compressed in JPEG regard-less of color, color space, or size. JPEG alsosupports grayscale. JPEG also is not limitedby a specific range of colors, such as GIF,with its 256-color palette.
■ Compression or no compression. JPEG provides several compressionmethods, including a user-defined, scalable compression method.
■ Sequential or progressive load. Aside from traditional sequential open-ing, images can be saved in Progressive mode. This popular format for theWeb loads the image in a series of steps, with each step adding detail.
The JPEG image compression scheme includes two compression methods: lossy andlossless. The lossy method uses a method called DCT (Discrete Cosine Transform) tocompress specific size blocks of an image (explained later). The lossless portion ofJPEG uses a predictive method for lossless compression, but is rarely implemented.
Do not use the JPEG for-mat for computer-gener-ated images, such asthose used for 3D com-puter graphics. The com-pression algorithm will introduceartifacts and noise in the image.JPEG should only be used for truecontinuous tone images.
caution
09 0789731207_ch07.qxd 4/6/04 2:19 PM Page 87

88 ABSOLUTE BEGINNER’S GUIDE TO DIGITAL PHOTOGRAPHY
The lossy portion of JPEG includes several compression methods:
■ Baseline sequential. The standard JPEG compression method and thefastest. This method is supported by all applications, but the optimizedmethod is recommended for your images.
■ Baseline optimized. This encoding uses an improved compression algo-rithm that results in better compression with the same quality as baselinesequential. File sizes should be around five percent smaller.
The following section explains how the JPEG compression algorithm works. You willquickly learn some new terms, such as luminance, chrominance, and YUV color.
How JPEG WorksAn RGB image is comprised of three channels. The JPEG compression algorithm per-forms the following steps on the image to reduce file size without affecting quality:
1. Converts the RGB image to Y'CBC
R, a different color space that defines each
pixel based on brightness (Y) and chrominance (CBC
R). This color space is also
known as the YUV color space and was created for video processing. The Y'value represents the brightness of the pixel, C
Brepresents one component of
the chrominance (blue), and CR
represents another component of chromi-nance (red). The C
BC
Rvalues represent the hue or color information in the
file.
2. Immediately reduces the file size by up to 50 percent by sampling the entireimage and cutting the chrominance information in half. The luminancecomponent is left alone. (Remember–our eyes are sensitive to changes inbrightness.) The chroma information will be reduced 2:1 horizontally, andeither 2:1 or 1:1 (no change) vertically (see Figure 7.4). This process is called4:2:2 sampling, and is a standard in the television industry. This step reducesthe data volume by one-half or more. It seems lossy, but actually it has littleor no visual impact.
3. Scans the image starting at the top left and creates blocks of pixels (see Figure7.5) 8×8 pixels in size (64 pixels total).
4. Converts brightness values in each block from 0–255 to -128 to +127.Processes each block through the DCT (Discrete Cosine Transform) function tocreate a frequency map of values.
09 0789731207_ch07.qxd 4/6/04 2:19 PM Page 88
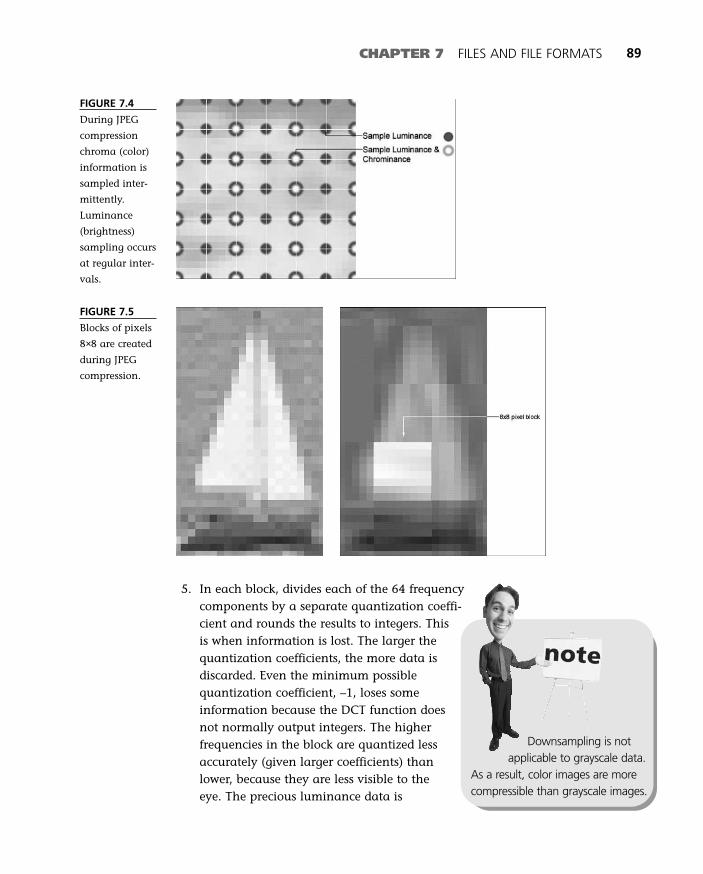
CHAPTER 7 FILES AND FILE FORMATS 89
5. In each block, divides each of the 64 frequencycomponents by a separate quantization coeffi-cient and rounds the results to integers. Thisis when information is lost. The larger thequantization coefficients, the more data isdiscarded. Even the minimum possiblequantization coefficient, –1, loses someinformation because the DCT function doesnot normally output integers. The higherfrequencies in the block are quantized lessaccurately (given larger coefficients) thanlower, because they are less visible to theeye. The precious luminance data is
FIGURE 7.4
During JPEG
compression
chroma (color)
information is
sampled inter-
mittently.
Luminance
(brightness)
sampling occurs
at regular inter-
vals.
Downsampling is notapplicable to grayscale data.
As a result, color images are morecompressible than grayscale images.
FIGURE 7.5
Blocks of pixels
8×8 are created
during JPEG
compression.
09 0789731207_ch07.qxd 4/6/04 2:19 PM Page 89
quantized more accurately than the chroma data by using separate 64-ele-ment quantization tables. These tables were provided by the JointPhotographic Experts Group and provide a scaling multiplier that the user(you!) can adjust—the Quality slider bar in Photoshop.
6. Encodes the reduced coefficients using the Huffman method, which is a loss-less mathematical model for compression.
7. Outputs the file with the appropriate header information, including the com-pression information.
When the JPEG file is opened, it is decompressed based on the header information ofthe file.
The Replacement for JPEG: JPEG2000New developments in the JPEG file format--specifically the JPEG2000 format--prom-ise improved quality and greater compression. This format has been approved bythe JPEG group, but is not supported yet by many applications. Photoshop CSincludes a JPEG2000 plug-in and many high-end digital cameras support this for-mat, but you need to install a plug-in for most browsers. The company Lura pro-duces these plug-ins, which can be found at www.luratech.com.
Key advantages of JPEG2000 over JPEG include the following:
■ Scalable by resolution, color channel, or quality. By organizing thecodestream in different ways, the compression can generate multiple levels ofcompression.
■ 38-bit depth. Up to 38-bit depth is available in addition to the standard 24-bit depth. This standard also allows for big images (up to 232 rows andcolumns), 16,384 components, and different bit depths for each channel.
■ Wavelet-based compression. JPEG2000 uses the CWT (Cosine WaveletTransform) algorithm to compress images. Unlike the existing JPEG format,the wavelet algorithm does not divide image into blocks. Instead, it analyzesthe entire image by treating it as three separate continuous waves (R, G, B),centered along a zero axis. JPEG2000 images can be compressed more tightly,preserve detail, and avoid the blockiness common in highly compressed JPEGimages.
An unusual benefit to wavelet compression is decomposition. Decompositioncreates a number of less detailed or smaller images. When you open this file,the image is reconstructed and grows in pixel size and detail.
■ Lossless encoding. Lossless encoding is available in this format. The JPEGformat allowed for it as well, but few developers integrated it into their JPEGformat.
90 ABSOLUTE BEGINNER’S GUIDE TO DIGITAL PHOTOGRAPHY
09 0789731207_ch07.qxd 4/6/04 2:19 PM Page 90
CHAPTER 7 FILES AND FILE FORMATS 91
■ Area-specific encoding. You can select which regions should receive ahigher-quality compression. The process is taken care of during compression;no requirements are placed on the decoder.
■ Error resilience. JPEG2000 uses a packet-type codestream, resync markers,table of content markers, and start-of-packet and end-of-packet markers thatadd more error resilience.
The JPEG2000 format hasn’t really taken off yet, and many wonder whether it will.As of this writing, Internet Explorer, Mozilla, Opera, and Apple’s Safari browser donot include the capability to open JPEG2000 images (QuickTime does, however).ActiveX plug-ins are available for both Internet Explorer and Mozilla that enableyou to view these files.
When the browser manufacturers finally put this standard in their browsers, the out-look for JPEG2000 may improve. However, this was predicted for the PortableNetwork Graphics (PNG) format, and it still hasn’t caught the attention of most pro-fessional Web developers.
TIFF File FormatTIFF (Tagged Image File Format) comes closest to a universal file format for photog-raphers--most imaging software can read it. TIFF stores images in a variety of bitdepths in both RGB and CMYK. It includes losslesscompression, and is designed into most imaging hard-ware, such as digital cameras and scanners.
The TIFF format supports the Grayscale, IndexedColor, RGB, YcbCr, CMYK, and CIELab (LAB) colorspaces.
One minor drawback to TIFF is that it cannot storevector graphics, such as Photoshop text or paths.Also, there is no progressive load option, as withGIF and JPEG images.
When you click File, Save As and choose the TIFFformat, the somewhat intimidating TIFF Optionsdialog box appears. Read through these options toovercome any fears:
■ Image Compression: None. Save the filewith no compression. TIFF files have a four-gigabyte file size limit. Ideally none of yourimages will be that large!
Photoshop TIFF filescan store annotations.
Photoshop Elements can openand display these annotations,but they cannot be edited (seeFigure 7.6). Other software pro-grams, including older versions ofPhotoshop, do not display theseannotations, however.
09 0789731207_ch07.qxd 4/6/04 2:19 PM Page 91
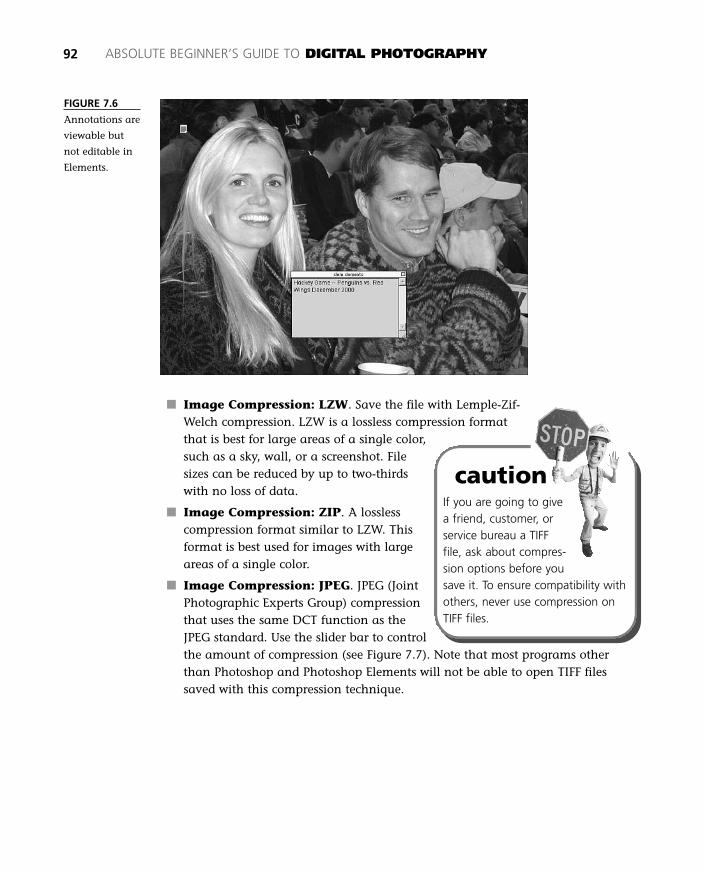
■ Image Compression: LZW. Save the file with Lemple-Zif-Welch compression. LZW is a lossless compression formatthat is best for large areas of a single color,such as a sky, wall, or a screenshot. Filesizes can be reduced by up to two-thirdswith no loss of data.
■ Image Compression: ZIP. A losslesscompression format similar to LZW. Thisformat is best used for images with largeareas of a single color.
■ Image Compression: JPEG. JPEG (JointPhotographic Experts Group) compressionthat uses the same DCT function as theJPEG standard. Use the slider bar to controlthe amount of compression (see Figure 7.7). Note that most programs otherthan Photoshop and Photoshop Elements will not be able to open TIFF filessaved with this compression technique.
92 ABSOLUTE BEGINNER’S GUIDE TO DIGITAL PHOTOGRAPHY
FIGURE 7.6
Annotations are
viewable but
not editable in
Elements.
If you are going to givea friend, customer, orservice bureau a TIFFfile, ask about compres-sion options before yousave it. To ensure compatibility withothers, never use compression onTIFF files.
caution
09 0789731207_ch07.qxd 4/6/04 2:19 PM Page 92

CHAPTER 7 FILES AND FILE FORMATS 93
■ Byte Order: IBM PC. Determines how the TIFF file is saved. This setting andthe Macintosh setting are no longer an issue unless you are working witholder software. Most new image-editing software can accommodate both fileformats. For example, you can save an image as a TIFF file in iPhoto andopen it in Photoshop Elements on a PC with no problems. Older versions ofPhotoshop would ask for the correct byte order before opening.
■ Byte Order: Macintosh. Determines how the TIFF file is saved. This settingisn’t necessary any longer; most modern image-editing software can accom-modate TIFF files saved in Macintosh or PC format. Leave the setting as PCfor images.
■ Save Image Pyramid. Creates or preserves multiresolution versions of thefile. This option is designed for page-layout software such as FrameMaker,InDesign, and QuarkXPress. Page layout designers often want to place a low-resolution version of an image so that page updates do not slow to a crawlevery time you change layout or text. Photoshop, Photoshop Elements, andmost image-editing software always open the largest version of a TIFF filesaved with an image pyramid.
■ Save Transparency. Preserves transparency as an additional alpha chan-nel when the file is opened in another application. (Transparency is alwayspreserved when the file is reopened in Photoshop Elements or ImageReady.)
FIGURE 7.7
JPEG compres-
sion in the TIFF
Options dialog
box can lead to
the same pixi-
lated mess if
you choose too
much compres-
sion.
09 0789731207_ch07.qxd 4/6/04 2:19 PM Page 93
Photoshop and Photoshop Elements 2 included new Layer capabilities in TIFF files. Ifyour image contains layers, the following options will be available in the TIFFOptions dialog box:
■ Layer Compression: RLE. Run-Length Encoding. A lossless compressionmethod. This format, like ZIP compression, is most effective on large areas ofa single color.
■ Layer Compression: ZIP. A lossless compression format similar to LZW.Use this compression format for layers that contain large areas of a singlecolor.
■ Discard Layers and Save a Copy. Flattens the layers in the image andthen saves the file as one layer. Annotations remain separate, however.
Photoshop and Elements are capable of opening layer-embedded TIFF files, but otherprograms might not. In addition, older versions of Photoshop prior to Version 7 can-not open multilayered TIFF files.
94 ABSOLUTE BEGINNER’S GUIDE TO DIGITAL PHOTOGRAPHY
RUN-LENGTH ENCODING EXPLAINEDRun Length Encoding (RLE) is a simple compression format that searches for strings of data(called a run) and encodes the string in two bytes. The first byte (the run count) representsthe number of characters in the run. An encoded run can contain from 1 to 128 or 256characters. The amount is usually the number minus 1 (0–127 or 255). The second byte(the run value) is the value of the character in the run, which is in the range of 0 to 255.
For example, assume a string of 20 Xs appears in a document. This would normally require20 bytes to store:
XXXXXXXXXXXXXXXXXXXX
After run-length encoding the file, the string would be represented by two bytes:
20X
The first byte is 20, which represents the number of Xs it found in the file. The second byterepresents the actual character that appeared in the run.
One confusing setting in the TIFF Options dialog box is Byte Order. In the 1990s, theMac and Windows platforms were compatible in disk formats, but software still hadto know how and on which platform TIFF files were saved. TIFF files saved on theMac used the Mac byte order (obviously). If you opened a TIFF file saved on the Macor PC, you had to tell Photoshop where or how the file was saved (IBM PC or Mac).
09 0789731207_ch07.qxd 4/6/04 2:19 PM Page 94
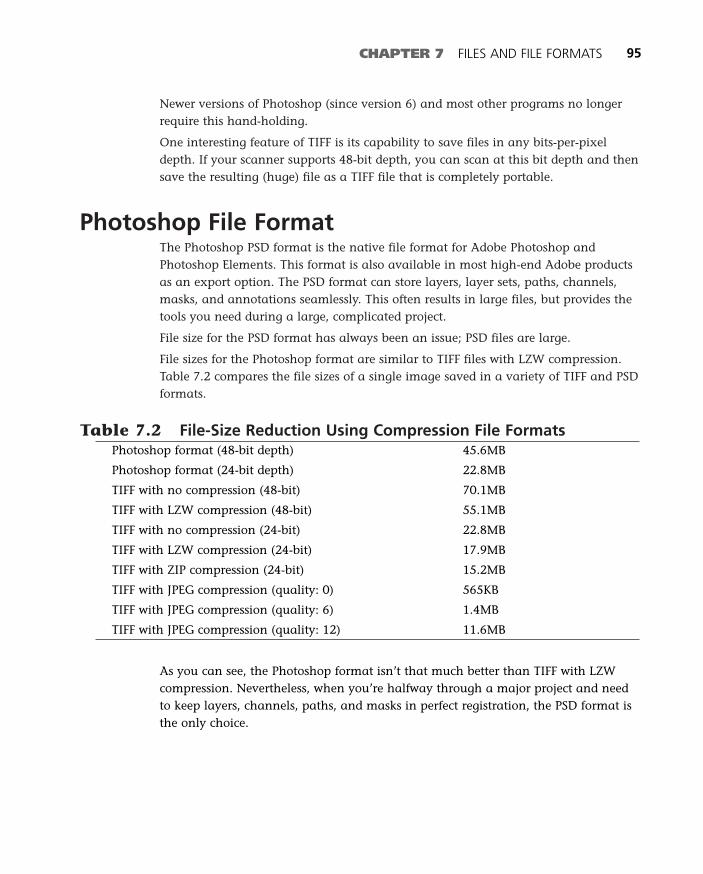
Newer versions of Photoshop (since version 6) and most other programs no longerrequire this hand-holding.
One interesting feature of TIFF is its capability to save files in any bits-per-pixeldepth. If your scanner supports 48-bit depth, you can scan at this bit depth and thensave the resulting (huge) file as a TIFF file that is completely portable.
Photoshop File FormatThe Photoshop PSD format is the native file format for Adobe Photoshop andPhotoshop Elements. This format is also available in most high-end Adobe productsas an export option. The PSD format can store layers, layer sets, paths, channels,masks, and annotations seamlessly. This often results in large files, but provides thetools you need during a large, complicated project.
File size for the PSD format has always been an issue; PSD files are large.
File sizes for the Photoshop format are similar to TIFF files with LZW compression.Table 7.2 compares the file sizes of a single image saved in a variety of TIFF and PSDformats.
Table 7.2 File-Size Reduction Using Compression File FormatsPhotoshop format (48-bit depth) 45.6MB
Photoshop format (24-bit depth) 22.8MB
TIFF with no compression (48-bit) 70.1MB
TIFF with LZW compression (48-bit) 55.1MB
TIFF with no compression (24-bit) 22.8MB
TIFF with LZW compression (24-bit) 17.9MB
TIFF with ZIP compression (24-bit) 15.2MB
TIFF with JPEG compression (quality: 0) 565KB
TIFF with JPEG compression (quality: 6) 1.4MB
TIFF with JPEG compression (quality: 12) 11.6MB
As you can see, the Photoshop format isn’t that much better than TIFF with LZWcompression. Nevertheless, when you’re halfway through a major project and needto keep layers, channels, paths, and masks in perfect registration, the PSD format isthe only choice.
CHAPTER 7 FILES AND FILE FORMATS 95
09 0789731207_ch07.qxd 4/6/04 2:19 PM Page 95

96 ABSOLUTE BEGINNER’S GUIDE TO DIGITAL PHOTOGRAPHY
The Absolute Minimum
Most image editors provide numerous choices when saving files. The most popularfile formats are GIF, JPEG, and TIFF. The TIFF format is the photographer’s format;use it to save and transport files between applications. Here are some other tipsrelated to file formats:
■ Photoshop Elements can open files created in Photoshop and vice versa.
■ Web browsers can only open and display GIF, JPEG, and PNG files, and noth-ing else.
■ The GIF file format is used for the Web almost exclusively because it has alimited color palette of 256 colors.
■ JPEG compresses images using a “lossy” compression technique. Each timethe file is saved, data disappears.
■ Open and then save the best images taken with your digital camera as TIFFfiles after importing them from your camera.
■ If you are doing substantial work on an image and use a Photoshop product,save it in the Photoshop format. You can later convert it to TIFF format if nec-essary.
■ JPEG2000 is a superior file format that hasn’t yet taken off.
09 0789731207_ch07.qxd 4/6/04 2:19 PM Page 96

8In this chapter
• File Recovery: Finding “Lost” Images
• Using PC Inspector File Recovery
• Recovering Lost Images from Flash Media
• Partially Corrupt Files
• Filesystems at Work: The File Allocation Table(FAT)
• What Happens to Lost Data
• Preventative Maintenance: DefragmentingFlash Media
• Formatting Flash Media
• Another Disaster Point: USB
File Recovery: Finding
“Lost” Images
If you haven’t run out of batteries during your trip to Belize, then you’ve
probably dropped, frozen, dunked, or deleted the media that goes in
your camera. Usually this happens after the best photos are taken, but
a few hours before they were backed up on your laptop. The result: lost
images! Don’t panic yet—you can still save these “lost” files.
Today’s digital photographers face potential disaster that could result in
lost images or corrupt flash media cards:
■ Nature’s elements. Including dirt, wind, dust, or oily potato
chips.
■ Electrostatic energy. Nothing like static to ruin a perfectly for-
matted disk.
10 0789731207_ch08.qxd 4/6/04 2:18 PM Page 97
■ Fahrenheit/Celsius. Flash media is designedto operate between 5°C and 55°C. Industrialflash media is designed to operate between–40°C and 85°C.
■ H2O. Water is a hazard to media. Liquids ingeneral, including Jolt Cola and every othersugary-sweet soda, are even worse.
■ Extraction. Pulling out the media from thecamera while it’s writing to disk, or pullingout media from the USB flash reader whileit’s writing.
■ Read failure. Media readers that areincompatible with the operating system orthe drivers on the operating system.
■ Old age. Even though flash media aresolid-state, the contact surfaces do wear off.In addition, they become covered in finger-print oil. This won’t kill a card, however.
Physical damage to a flash media card, such as thatfrom water, soda, or exposure, is difficult or impossi-ble to recover from; however, formatting or deletionerrors, electrostatics, or a corrupt (or virus-riddled)computer can be reversed. Software is availablefor every operating system to help you recoverfrom these seemingly irreversible errors.
Recovering files from flash media does not requireany technical skills thanks to today’s easy-to-usesoftware. You will need to know a little about filestructure and the way files are stored on a diskdrive; aside from that, you are steps away fromrecovering lost files.
The most powerful software programs for digitalphotographers aside from Photoshop are, surpris-ingly, freeware applications: PC Inspector’s FileRecovery and the more advanced WinHex. Thischapter shows you how to use the File Recovery application to restore files. WinHexis very powerful, but also confusing for those who do not understand hexadecimaland binary storage.
98 ABSOLUTE BEGINNER’S GUIDE TO DIGITAL PHOTOGRAPHY
If you’ve been fortu-nate to this point and
haven’t had any media failures,you might be in the minority. Theauthor had his Smartmedia giveup the ghost with 120 images,thanks to a USB card reader witha firmware issue. Ninety imageswere recovered successfully—therest went down with the Titanic.
This chapter focuseson using a file recovery
tool for Windows. Mac usersshould investigate Image Rescuefrom Lexar Media, PhotoRescueby DataRescue, or Recovery PROby CompuApps.
10 0789731207_ch08.qxd 4/6/04 2:18 PM Page 98
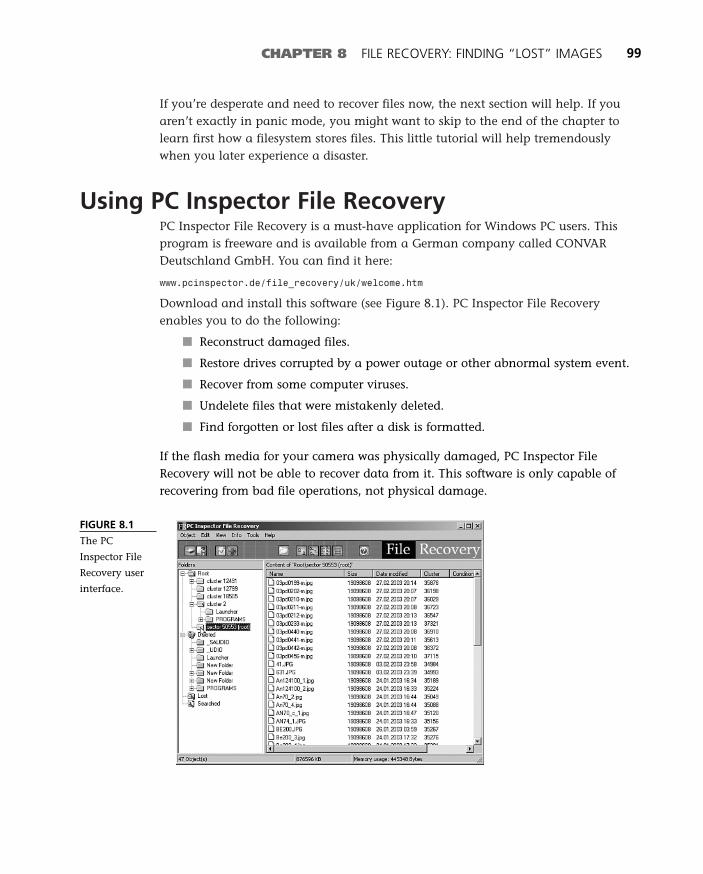
If you’re desperate and need to recover files now, the next section will help. If youaren’t exactly in panic mode, you might want to skip to the end of the chapter tolearn first how a filesystem stores files. This little tutorial will help tremendouslywhen you later experience a disaster.
Using PC Inspector File RecoveryPC Inspector File Recovery is a must-have application for Windows PC users. Thisprogram is freeware and is available from a German company called CONVARDeutschland GmbH. You can find it here:
www.pcinspector.de/file_recovery/uk/welcome.htm
Download and install this software (see Figure 8.1). PC Inspector File Recoveryenables you to do the following:
■ Reconstruct damaged files.
■ Restore drives corrupted by a power outage or other abnormal system event.
■ Recover from some computer viruses.
■ Undelete files that were mistakenly deleted.
■ Find forgotten or lost files after a disk is formatted.
If the flash media for your camera was physically damaged, PC Inspector FileRecovery will not be able to recover data from it. This software is only capable ofrecovering from bad file operations, not physical damage.
CHAPTER 8 FILE RECOVERY: FINDING “LOST” IMAGES 99
FIGURE 8.1
The PC
Inspector File
Recovery user
interface.
10 0789731207_ch08.qxd 4/6/04 2:18 PM Page 99
Recovering Lost Images fromFlash Media
PC Inspector File Recovery provides a number ofsettings for accessing files on damaged drives. Thefollowing steps will scan flash media and displayfiles on the media that can be recovered.
1. If you have a flash card reader, connect it toyour computer and insert the damaged flashmedia card. Windows should at the veryleast recognize the flash card reader.Windows should also “see” the damagedcard, but it might not know what to do withit. If you do not have a flash card reader,you might also be able to connect your cam-era to your PC. If Windows recognizes your camera as another drive, youmay proceed.
2. Open the PC Inspector File Recovery software. You will first see an introduc-tory screen that explains what the software does. Click Close to move pastthis intro window. The main screen will appear with nothing in it.
3. Click the Open Drive icon or choose Object, Drive. The system will scan yourcomputer, looking for all possible physical and logical drives, and then it willdisplay the Select Drive dialog box.
4. When the Select Drive dialog box appears, make sure the Logical Drive tab isselected. Select the drive letter that represents your flash media. Make sure itis highlighted.
Any external flash media will usuallyappear near the bottom of this list. Theflash media drive might be listed as driveF: or G:, for example, and say 117MB ifthe flash media is a 128MB card. You canalso select a specific directory. This will beexplained later.
5. Click on the Preview button to review thecontents of this logical drive (see Figure8.2). If the contents or file structure looksfamiliar (you see either a DCIM folder or .jpg images), choose the correct driveletter.
100 ABSOLUTE BEGINNER’S GUIDE TO DIGITAL PHOTOGRAPHY
If the settings sug-gested here do not work,
experiment. The software cannotcorrupt the damaged media anyfurther.
tipIf you formatted the card
by mistake, select the UseFAT drop-down box on theSelect Drive window andchoose No before continuing.
10 0789731207_ch08.qxd 4/6/04 2:18 PM Page 100

CHAPTER 8 FILE RECOVERY: FINDING “LOST” IMAGES 101
FIGURE 8.2
If you have
selected the
correct drive,
Preview should
show the files
you’re trying to
recover.
6. Click OK to close Preview and then click the OK button on the Select Drivewindow.
7. The Select Sector Range dialog box will appear with two slider bars. Slide theEnd Sector (the bottom) slider bar all the way to the right.
These slider bars are preset to half the capacity of the flash media unless themedia is small (smaller than 32MB). Sliding the bottom slider to the right willforce the software to scan the entire flash media card.
8. Click OK to begin scanning the media. Be patient while the software scansthe drive—this could take a few minutes.
You’re halfway through recovery. When the main File Recovery windowappears, you will see a File Manager (Windows Explorer) representation ofthe medium (see Figure 8.3). The software was able to find the files listed inthis window. In the following section, you will see how you can recover spe-cific images or entire directories.
FIGURE 8.3
The recovered
drive shown in
a Windows
Explorer-type
window.
10 0789731207_ch08.qxd 4/6/04 2:18 PM Page 101
Recovering Specific ImagesAfter PC Inspector File Recovery scans bad media, it lists the files it found in a FileRecovery window. You can select a specific image and have PC Inspector FileRecovery copy the image from the corrupt media to a healthy hard drive or disk.
The following steps walk you through the process of selecting and recovering filesfrom the File Recovery window:
1. The File Recovery window should be onscreen. If it isn’t, follow the steps inthe preceding section. The File Recovery window will display three main fold-ers: Root, Deleted, and Lost. Expand all the folders. You should see a DCIMdirectory under Root or Deleted. Continue expanding until files appear. If thedrive is especially corrupt, you might see garbage filenames. These files areprobably history, although something might be salvageable.
2. Select a file and right-click on it. Only select one file—do not select multiplefiles just yet. The right-click menu will appear. Click Save To.
Do not select multiple files in the right window until you ensure that you canrecover one file. If you select multiple files and the software can’t recover oneof them, the software will hang and it will be difficult to close it. A hang isoften worse than a crash because your system slows down so much you can’tclose an application.
3. In the Select Directory dialog box, select where you want to save the file.
4. If the drive was formatted, make sure you select No Fat (Consecutive) in thedrop-down list. Otherwise, it should say FAT 1. If you experience problems,try FAT 2.
5. Click OK. The file will appear in the directory.
If no files appear, it’s possible the flash media drive was formatted or a logical drivewasn’t detected. Return to step 3 and change settings in the Select Drive dialog box,such as Use FAT and Skip Bad Clusters. If a logical drive wasn’t detected, highlightthe drive and click Find Logical Drives.
Partially Corrupt FilesImages recovered from badly corrupted flash media will occasionally be partiallymissing. This happens when newer files have overwritten the image’s data, orbecause the recovery software doesn’t know how large the file is. The latter can beremedied. To determine whether the entire image can be restored, try the following:
1. Choose Object, Options, Files. Make sure the Find Lost Files check box ischecked.
102 ABSOLUTE BEGINNER’S GUIDE TO DIGITAL PHOTOGRAPHY
10 0789731207_ch08.qxd 4/6/04 2:18 PM Page 102
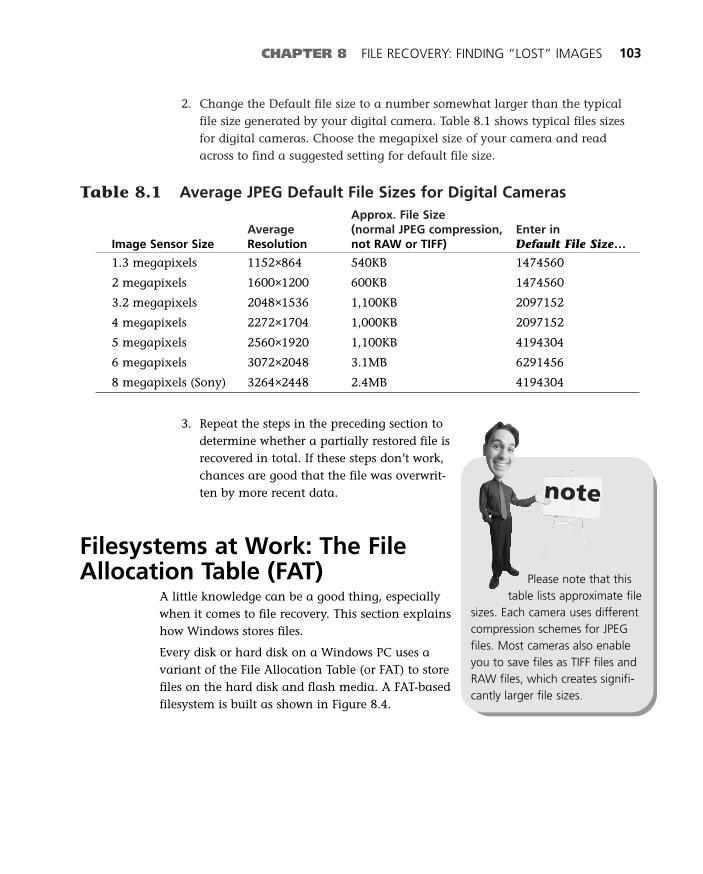
2. Change the Default file size to a number somewhat larger than the typicalfile size generated by your digital camera. Table 8.1 shows typical files sizesfor digital cameras. Choose the megapixel size of your camera and readacross to find a suggested setting for default file size.
Table 8.1 Average JPEG Default File Sizes for Digital CamerasApprox. File Size
Average (normal JPEG compression, Enter inImage Sensor Size Resolution not RAW or TIFF) Default File Size…
1.3 megapixels 1152×864 540KB 1474560
2 megapixels 1600×1200 600KB 1474560
3.2 megapixels 2048×1536 1,100KB 2097152
4 megapixels 2272×1704 1,000KB 2097152
5 megapixels 2560×1920 1,100KB 4194304
6 megapixels 3072×2048 3.1MB 6291456
8 megapixels (Sony) 3264×2448 2.4MB 4194304
3. Repeat the steps in the preceding section todetermine whether a partially restored file isrecovered in total. If these steps don’t work,chances are good that the file was overwrit-ten by more recent data.
Filesystems at Work: The FileAllocation Table (FAT)
A little knowledge can be a good thing, especiallywhen it comes to file recovery. This section explainshow Windows stores files.
Every disk or hard disk on a Windows PC uses avariant of the File Allocation Table (or FAT) to storefiles on the hard disk and flash media. A FAT-basedfilesystem is built as shown in Figure 8.4.
CHAPTER 8 FILE RECOVERY: FINDING “LOST” IMAGES 103
Please note that thistable lists approximate file
sizes. Each camera uses differentcompression schemes for JPEGfiles. Most cameras also enableyou to save files as TIFF files andRAW files, which creates signifi-cantly larger file sizes.
10 0789731207_ch08.qxd 4/6/04 2:18 PM Page 103
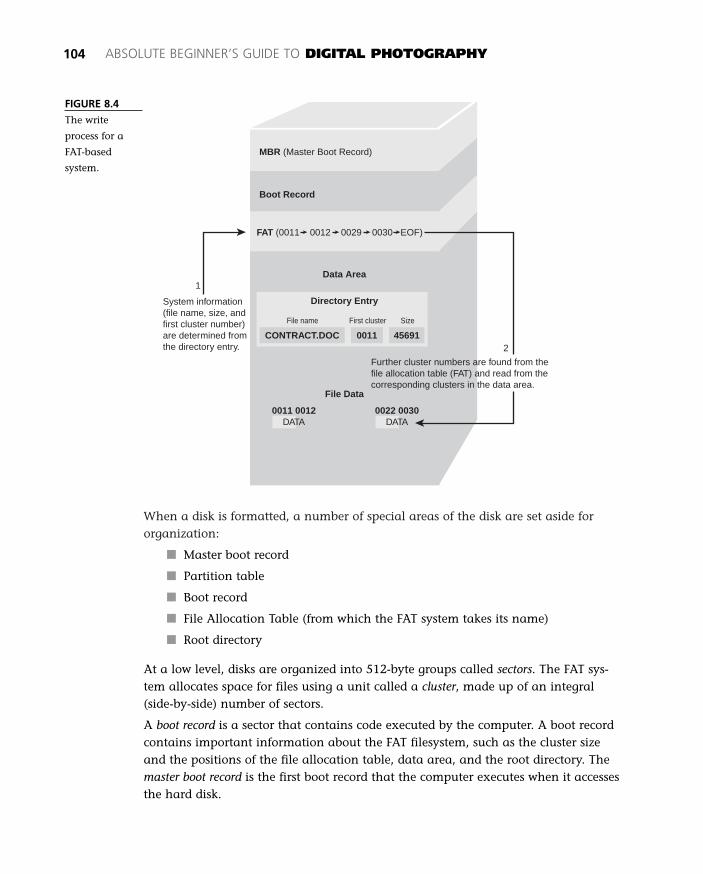
When a disk is formatted, a number of special areas of the disk are set aside fororganization:
■ Master boot record
■ Partition table
■ Boot record
■ File Allocation Table (from which the FAT system takes its name)
■ Root directory
At a low level, disks are organized into 512-byte groups called sectors. The FAT sys-tem allocates space for files using a unit called a cluster, made up of an integral(side-by-side) number of sectors.
A boot record is a sector that contains code executed by the computer. A boot recordcontains important information about the FAT filesystem, such as the cluster sizeand the positions of the file allocation table, data area, and the root directory. Themaster boot record is the first boot record that the computer executes when it accessesthe hard disk.
104 ABSOLUTE BEGINNER’S GUIDE TO DIGITAL PHOTOGRAPHY
FIGURE 8.4
The write
process for a
FAT-based
system.
MBR (Master Boot Record)
FAT (0011 0012 0029 0030 EOF)
Boot Record
Data Area
Directory Entry
File Data
0011 0012DATA
0022 0030DATA
CONTRACT.DOC 0011 45691
File name First cluster Size
Further cluster numbers are found from thefile allocation table (FAT) and read from the corresponding clusters in the data area.
System information(file name, size, andfirst cluster number)are determined fromthe directory entry.
1
2
10 0789731207_ch08.qxd 4/6/04 2:18 PM Page 104
CHAPTER 8 FILE RECOVERY: FINDING “LOST” IMAGES 105
The file allocation table, located next to the boot record, is a database that associ-ates clusters of disk space with files. For each cluster the FAT stores an entry of 12,16, or 32 bits. Because the first two entries are reserved for the filesystem, the thirdentry and those following are assigned to clusters of disk space, which catalog theentire data area.
This complex system is designed to know where files are located that are not storedsuccessively; in other words, some files are often split into pieces and stored in sepa-rate, noncontiguous clusters in the data area. The operating system must knowwhere a file’s pieces are located in the data area. This is the task of the FileAllocation Table (FAT).
For any cluster used by a file that is not the file’s last cluster, the FAT entry will con-tain the number (that is, the location) of the next cluster used by the file. When aprogram asks the operating system (OS) to provide the content of a file, the OS readsthe first cluster of a file. It then looks at the corresponding first cluster entry in theFAT and finds where the file continues (the file’s next cluster number). Now the OSreads the associated cluster in the data area. After this cluster is read, the OS repeatsthe entry check until the whole file is read. This process is called “reading the FATchain.”
FAT entries may contain special values called flags, which indicate whether the clus-ter is occupied, free, or some other condition. Here are some examples of flags for aFAT16 system:
■ 0000H. The cluster contains one or more sectors that are physically damagedand should not be used.
■ FFF7H. This cluster is the final cluster in the file.
■ FFF8-FFFFH. End of File (EOF).
But how does the OS know what files are on the disk and where to find the first clus-ter of a file? This is the reason for the directory entries, which are also stored in thedata area. Each directory entry has a size of 32 bytes and includes informationabout the file or directory name, size, first cluster number, and its attributes.
At a higher level, operating systems such as DOS and Windows allow for two types ofdrives: physical drives and logical drives. Physical drives are the actual physical diskdrives installed on your computer. Logical drives are sections on the physical drive. Aphysical drive can have multiple logical drives. For example, you can install a physi-cal drive on your machine, then partition it into three logical drives, if necessary.
Flash media rarely requires partitions or logical drives. It is basically used for onething, so multiple logical drives aren’t required. You will usually see only one driveletter listed as a drive.
10 0789731207_ch08.qxd 4/6/04 2:18 PM Page 105
What Happens to Lost DataDeleted data from flash media cards is not really lost, but simply ignored by theoperating system. If you delete a file, the first letter of a directory entry is replacedwith a special character. In addition, information about the order of the clusters isremoved.
If the directory entries or the FAT or both areincorrect or deleted, the operating system cannotread anything. This is the reason why end-usersthink data is gone. The data is still in the dataarea, however. Finding this data can be difficultbecause the entire drive must be examined.
If the file was not fragmented (that is, every clus-ter for the file was stored successively), this lossof sector information doesn’t really matter. If thefile was fragmented by frequent writing anderasing, the chances for recovery are relativelyslim. Fortunately, file fragmentation on a flashmedia card rarely occurs unless you have been using a card for months and selec-tively remove images while retaining others.
If missing files are visible under the Deleted folder in PC Inspector File Recovery, youcan try to recover them, but you might be out of luck. File Recovery will assume thefiles are not fragmented and try to recover them based on the maximum file size setin Object, Options, Files. The end result is the recovery file might contain a lot ofgarbage, especially if the drive was fragmented (the file’s information was spread allover the disk).
Data is completely lost whenever content is damaged or overwritten. In this situa-tion, the file was not lost because of incorrect information in the FAT or the directoryentries, but rather from one of the following causes:
■ The flash media is physically damaged.
■ Viruses or something else have destroyed the data.
■ Files have overwritten the disk.
If files are to blame, only a portion of the image is recoverable. Believe it or not, halfan image can be recovered!
106 ABSOLUTE BEGINNER’S GUIDE TO DIGITAL PHOTOGRAPHY
tipIf you’re up to it, defrag-
ment your flash media. Readthe section “PreventativeMaintenance: DefragmentingFlash Media” in this chapter
for tips.
10 0789731207_ch08.qxd 4/6/04 2:18 PM Page 106
CHAPTER 8 FILE RECOVERY: FINDING “LOST” IMAGES 107
Preventative Maintenance: Defragmenting FlashMedia
A defragmented hard disk drive can speed up disk writes and reads because files willbe stored contiguously (next to each other). As flash media increases in size, defrag-mentation will become more of an issue. Currently, flash media is not large enoughto warrant defragmentation.
If you would like to experiment with defragging a large flash media device (any-thing over 512MB), you will need a Windows PC. All flash media uses the FAT 16 orFAT 32 filesystem, a byproduct of DOS and Windows. If you are a Mac user, bother afriend with a PC and ask to defrag your camera’s flash media. The read and writeprocess on flash media is much slower than on a hard disk, so be prepared to waitwhile this operation takes place.
The following steps are Windows-specific because only Windows is capable of defrag-ging a flash media device (FAT 16 or FAT 32 filesystem). If you are a Mac user, usethe digital camera to reformat the flash drive, which will erase images and clean upthe flash drive in one operation. Follow these simple steps to defragment a flashmedia card:
1. Plug the flash media into your PC. You can do this using a flash mediareader that plugs into a USB port or FireWire port.
2. In Windows, double-click on My Computer.
3. Find the flash media drive and right-click on it, then select Properties.
4. When the Properties menu appears, click the Tools tab, then chooseDefragment Now.
5. When the Disk Defragmenter appears, click Analyze to determine whetherthe disk needs to be defragmented. If a pop-up with the message “You do notneed to defragment this volume” appears, you can either close the applica-tion or defragment anyway.
6. If you analyzed the media and still need to defragment, click Defragment.Depending on the size of the media card, you should be finished in a minuteor two.
7. When the defragmentation finishes, you can view a report of the defragmentoperation, or click Close and then choose File, Exit to exit the application.
8. Remove the flash media card from your PC. For Windows 2000 users, remem-ber to detach it properly by clicking the Remove Hardware icon in the systemtray in the lower-right corner of the Start bar (next to the clock).
10 0789731207_ch08.qxd 4/6/04 2:18 PM Page 107
108 ABSOLUTE BEGINNER’S GUIDE TO DIGITAL PHOTOGRAPHY
Formatting Flash MediaEvery version of Windows since Windows 98 uses the FAT32 filesystem. This is a 32-bit filesystem in which the File Allocation Table stores cluster addresses as 32 bits,resulting in smaller cluster sizes (4KB versus FAT16’s 16–32KB).
Here are a few different versions of the FAT family:
■ FAT12 File System—The oldest type of FAT uses a 12-bit binary number tohold the cluster number. This filesystem can hold a maximum of 4,086 clus-ters, which is common on flash media smaller than about 16MB and floppydisks. This filesystem isn’t too common anymore because even flash mediaare larger than 16MB.
■ FAT16—The filesystem used for almost all flash media relies on a 16-bitbinary number to hold cluster numbers. A flash media card using FAT16 canhold a maximum of 65,526 clusters, which is 16MB–2,048MB. Today’s CFcards are already over 2GB—therefore the need for FAT32.
■ FAT32—Today’s flash media larger than 2GB require formatting using theFAT32 filesystem. FAT32-formatted media can theoretically handle 268 mil-lion clusters, and will support drives up to two terabytes in size!
Almost no flash media is formatted with the FAT32 filesystem, even with theseadvantages (smaller file size, greater capacity, and so on). The reason is that accesstimes are long with 32-bit addresses. FAT32 tables must be accessed much moreoften because they contain so many more clusters. This matters when you are a pro-fessional photographer and have to shoot dozens of rolls in an hour. The time ittakes to write each image to a FAT32 card is much longer than with FAT16.
Rather, most digital cameras rely on FAT16, or even FAT12. Flash media up to 16MBuse FAT12; media between 16MB and 2GB use FAT16, and some media above 2GBuse FAT32.
Formatting in the CameraYou usually should not format a flash media card in a Windows XP machine. Usethe camera to format the card instead. Most cameras and portable devices will notaccept media that has been formatted with the FAT32 filesystem, which is thedefault format for Windows XP. If a flash media card is formatted in Windows XP asFAT32 and you place it in a camera, you might see the following error messages:
■ Error message asking to reformat the flash card.
■ Error message that the flash card is not formatted.
■ Error message indicating that the card is anomalous.
10 0789731207_ch08.qxd 4/6/04 2:18 PM Page 108
You can change the formatting utility in Windows XPto FAT16 using a drop-down list under WindowsExplorer, but even this is dicey. Some cameras willnot accept cards that have been formatted with thissetting, either.
If you inherit a flash card that won’t work and yoususpect it was formatted in Windows, reformat thecard in the camera. Ensure that the camera is notconnected to the PC when you perform this opera-tion. Every camera has a slightly different operat-ing system, so check your user manual forformatting steps.
An interesting irony of FAT32 versus FAT16 is thatyou can now purchase high-speed flash media thatstores pictures much more quickly than oldermedia. These media usually are high-capacity andexpensive. Today’s high-speed flash media soon will surpass 2GB. Because the mediamust be formatted using FAT32, the flash media will actually be slower than flashmedia formatted as FAT16.
Another Disaster Point: USBUSB is the universal way to connect Flash Media readers to your PC. Two standardsnow exist that apparently are backward-/forward-compatible: USB 1.1 and USB 2.0.Some USB 2.0 multitype flash card readers do not function properly in USB 1.1 ports,however. As such, this is a potential trouble spot in Windows. The author recentlylost data on an MMC card thanks to a faulty USB 2.0 card reader.
If you have a computer manufactured before 2002, it most likely has USB 1.1 ports;newer machines sport USB 2.0 ports. Check the manufacturer’s Web site to ensurethat USB 2.0 readers will work in USB 1.1 drivers, and that you don’t need anyfirmware or operating system upgrades.
Another USB pitfall is in pulling a USB flash media reader out of its USB port whilethe operating system is trying to write data to it. Windows XP can safely recoverfrom this surprise, but the media might not. In other words, improper removal offlash media will destroy the file structure on a disk!
The correct and safe way to remove flash media from Windows 98 2nd Edition, Me,2000, and XP is to use the Remove Hardware button located in the system tray.Follow these steps to protect data on a flash media device:
1. Double-click the Remove Hardware icon.
CHAPTER 8 FILE RECOVERY: FINDING “LOST” IMAGES 109
If you cannot format aflash card in a camera,
either the card is physically locked(look for a lock), the card is cor-rupted and essentially useless, oryour camera does not haveenough battery power.
10 0789731207_ch08.qxd 4/6/04 2:18 PM Page 109
2. In the Safely Remove Hardware dialog box, click on the flash media reader tohighlight it. It might be listed simply as USB Mass Storage Device.
3. Click Stop. The Stop a Hardware Device dialog box will appear. Click on theUSB device to highlight it and then click OK.
If a message appears saying it is safe to remove the hardware, you’re fin-ished. If a message appears stating the media is in use and to try again later,you might want to close all applications you think might be accessing themedia, or shut down/reboot and remove the media.
The Absolute Minimum
In January 2004, the Mars robot Spirit stopped operating because of corrupted flashmemory. Engineers at NASA spent 10 days diagnosing and recovering the robot’sflash memory before science operations could begin. At some point you might findyourself in the same situation, courtesy of your digital camera’s flash memory.Fortunately, a number of tools exist for the Mac and PC to recover images that youmight have written off as corrupted or lost. Keep in mind these points when recover-ing or working with files on flash media:
■ Consumer-level digital cameras use the FAT16 filesystem, and high-end SLRdigital cameras now use FAT16 and FAT32 filesystems.
■ Filesystems use sectors to store file information. Sectors are grouped togetherto form clusters.
■ Clusters in a FAT16 filesystem are 16KB in size, regardless of the data storedtherein. A 1KB file, for example, will occupy one cluster and take up 16KB.
■ Disk defragmentation is healthy maintenance you should perform on yourcomputer every few months. It isn’t necessary for flash media, however.
■ Windows users have a built-in disk defragmenter; Mac users should check outDiskWarrior.
110 ABSOLUTE BEGINNER’S GUIDE TO DIGITAL PHOTOGRAPHY
10 0789731207_ch08.qxd 4/6/04 2:18 PM Page 110
Image Editing
IIIPART
Basic Editing with Photoshop Elements and iPhoto . . . . . . . . . . . . . . . . . . . . . . . . . .113
Editing with Selection Tools . . . . . . . . . . . . . . .133
Advanced Selection Tools . . . . . . . . . . . . . . . . .151
The Importance of Selections . . . . . . . . . . . . . .173
The Importance of Filters . . . . . . . . . . . . . . . . .191
The Importance of Brightness/Contrast . . . . . .205
The Importance of Levels and Curves . . . . . . .219
The Importance of Layers and Masks . . . . . . . .235
The Importance of Channels . . . . . . . . . . . . . .255
11 0789731207_pt03.qxd 4/6/04 2:17 PM Page 111

11 0789731207_pt03.qxd 4/6/04 2:17 PM Page 112

9In this chapter
• Finding an Image on Your Computer
• Editing with Photoshop Elements
• Resizing an Image in Photoshop Elements
• Editing with iPhoto
• Working with the Print Dialog Box in iPhoto
• Resizing an Image in iPhoto
Basic Editing with
Photoshop Elements
and iPhoto
This chapter introduces two common, easy-to-learn image editing appli-
cations for today’s new digital photographers: Adobe’s Photoshop
Elements 2 and Apple’s iPhoto. Elements is much more powerful than
iPhoto, but the latter is much better at organizing images on your com-
puter. Both are excellent programs for importing, storyboarding, organ-
izing, and printing your images.
You don’t need Photoshop to manage your images unless you plan to
make a career as a photographer, writer, Web developer, or graphic
artist. As the industry standard, Photoshop includes numerous features
that you will never need, such as offset printing and registration tools,
Web development and animated GIF tools, and color profiles and modes
such as CMYK.
12 0789731207_ch09.qxd 4/6/04 2:14 PM Page 113
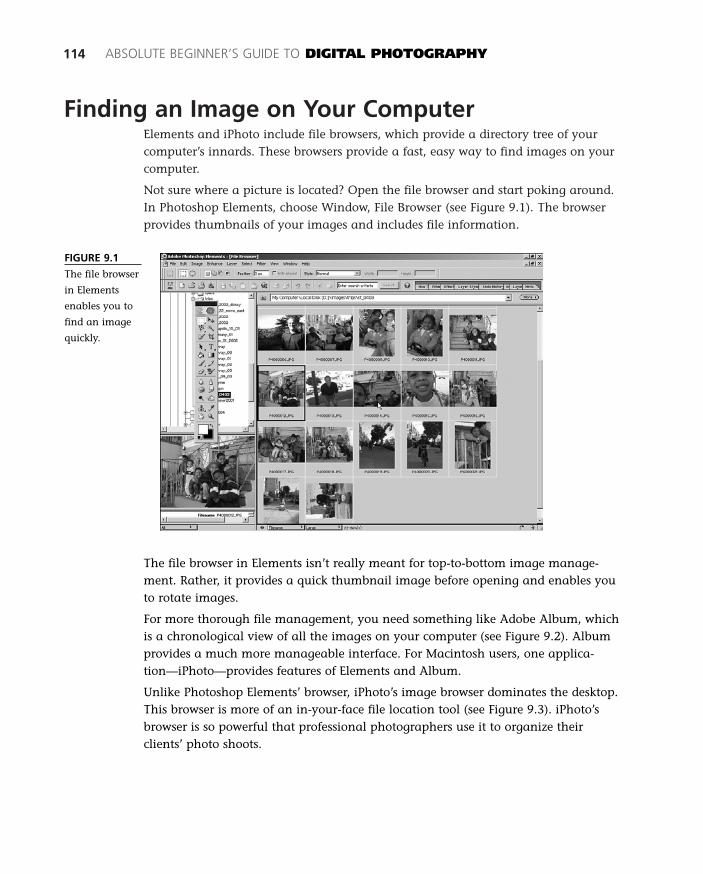
Finding an Image on Your ComputerElements and iPhoto include file browsers, which provide a directory tree of yourcomputer’s innards. These browsers provide a fast, easy way to find images on yourcomputer.
Not sure where a picture is located? Open the file browser and start poking around.In Photoshop Elements, choose Window, File Browser (see Figure 9.1). The browserprovides thumbnails of your images and includes file information.
114 ABSOLUTE BEGINNER’S GUIDE TO DIGITAL PHOTOGRAPHY
FIGURE 9.1
The file browser
in Elements
enables you to
find an image
quickly.
The file browser in Elements isn’t really meant for top-to-bottom image manage-ment. Rather, it provides a quick thumbnail image before opening and enables youto rotate images.
For more thorough file management, you need something like Adobe Album, whichis a chronological view of all the images on your computer (see Figure 9.2). Albumprovides a much more manageable interface. For Macintosh users, one applica-tion—iPhoto—provides features of Elements and Album.
Unlike Photoshop Elements’ browser, iPhoto’s image browser dominates the desktop.This browser is more of an in-your-face file location tool (see Figure 9.3). iPhoto’sbrowser is so powerful that professional photographers use it to organize theirclients’ photo shoots.
12 0789731207_ch09.qxd 4/6/04 2:14 PM Page 114
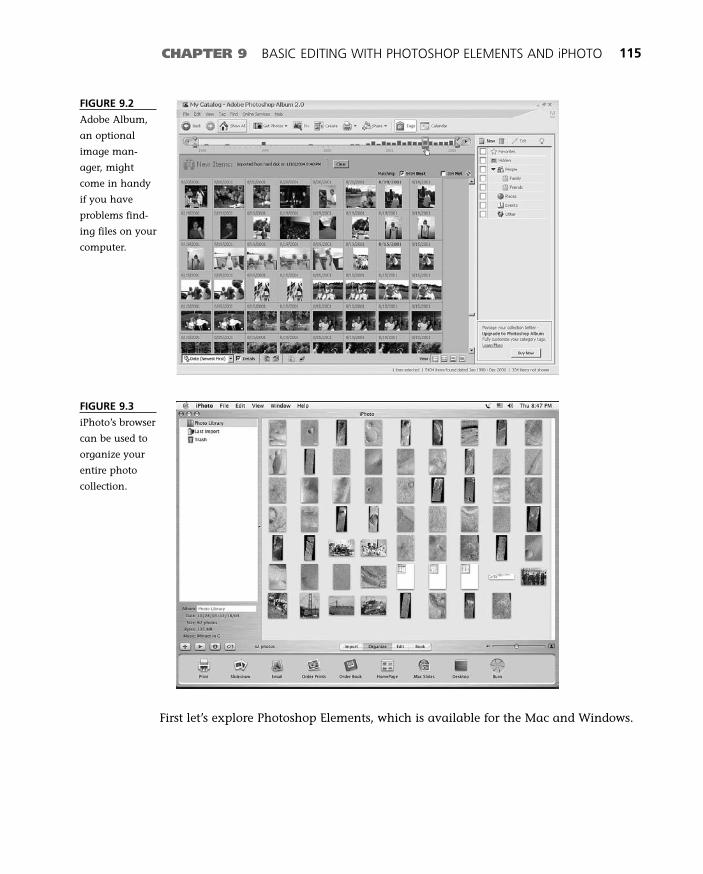
CHAPTER 9 BASIC EDITING WITH PHOTOSHOP ELEMENTS AND iPHOTO 115
FIGURE 9.2
Adobe Album,
an optional
image man-
ager, might
come in handy
if you have
problems find-
ing files on your
computer.
FIGURE 9.3
iPhoto’s browser
can be used to
organize your
entire photo
collection.
First let’s explore Photoshop Elements, which is available for the Mac and Windows.
12 0789731207_ch09.qxd 4/6/04 2:14 PM Page 115

Editing with Photoshop ElementsPhotoshop Elements is available for Mac and PC computers and includes featuresdesigned specifically for amateur photographers. Table 9.1 highlights several fea-tures found only in Photoshop Elements by comparing it with the industry-standardPhotoshop, the most powerful image editor available for non-Unix systems.
Table 9.1 Features Present in Photoshop CS Versus Photoshop Elements 2In Photoshop CS, But Not In Photoshop Elements 2, in Photoshop Elements 2 But Not in Photoshop CS
Paths Auto import of digital camera images
Actions Palette and Recordable Actions Auto conversion of photos for the Web andemail distribution
CYMK Support Quick Fix window, Adjust Lighting, and AutoColor Correction
Channels, Curves, and Guides Better menu bar and simplified toolbar
Masking Palette Well & PhotoMerge, a panoramic stitch-ing program
Editable Vector Shapes Visual representation of filters and effects
Photoshop CS retail price: $649 Photoshop Elements retail Price: $99
Many of these features might sound like marketing-speak at the moment, but stickwith this chapter and you’ll learn the purpose of each. The bottom line is that forthe price, Photoshop Elements is pretty powerful!
Printing ResolutionOne of the most confusing parts of digital photography to a beginner is printing res-olution. The act of scanning in a picture or taking a picture with a digital camera atone resolution and printing at another causes endless headaches for most amateurs.Fortunately, today’s entry-level digital imaging software—Elements and iPhoto—makes this process easier than ever.
Resizing an Image Step by StepIf you use an image more than once, you’ll probably need to change its size. In digi-tal imaging, changing the dimensions of an image is called resizing. In AdobePhotoshop Elements 2.0, resizing is performed via the Image, Resize, Image Sizecommand.
116 ABSOLUTE BEGINNER’S GUIDE TO DIGITAL PHOTOGRAPHY
12 0789731207_ch09.qxd 4/6/04 2:14 PM Page 116
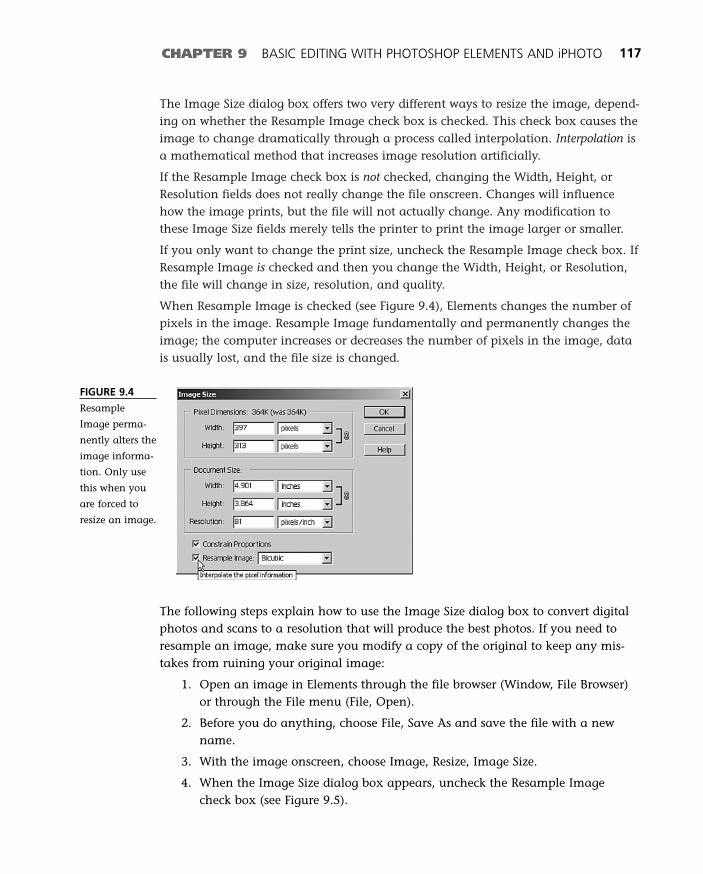
The Image Size dialog box offers two very different ways to resize the image, depend-ing on whether the Resample Image check box is checked. This check box causes theimage to change dramatically through a process called interpolation. Interpolation isa mathematical method that increases image resolution artificially.
If the Resample Image check box is not checked, changing the Width, Height, orResolution fields does not really change the file onscreen. Changes will influencehow the image prints, but the file will not actually change. Any modification tothese Image Size fields merely tells the printer to print the image larger or smaller.
If you only want to change the print size, uncheck the Resample Image check box. IfResample Image is checked and then you change the Width, Height, or Resolution,the file will change in size, resolution, and quality.
When Resample Image is checked (see Figure 9.4), Elements changes the number ofpixels in the image. Resample Image fundamentally and permanently changes theimage; the computer increases or decreases the number of pixels in the image, datais usually lost, and the file size is changed.
CHAPTER 9 BASIC EDITING WITH PHOTOSHOP ELEMENTS AND iPHOTO 117
FIGURE 9.4
Resample
Image perma-
nently alters the
image informa-
tion. Only use
this when you
are forced to
resize an image.
The following steps explain how to use the Image Size dialog box to convert digitalphotos and scans to a resolution that will produce the best photos. If you need toresample an image, make sure you modify a copy of the original to keep any mis-takes from ruining your original image:
1. Open an image in Elements through the file browser (Window, File Browser)or through the File menu (File, Open).
2. Before you do anything, choose File, Save As and save the file with a newname.
3. With the image onscreen, choose Image, Resize, Image Size.
4. When the Image Size dialog box appears, uncheck the Resample Imagecheck box (see Figure 9.5).
12 0789731207_ch09.qxd 4/6/04 2:14 PM Page 117

5. Change the printing size of the image by typing a number in the Width,Height, or Resolution (pixels per inch) field. A change to any one of thesefields will update the values in the other fields. For example, if the currentprint width is 15 inches and you want a 10-inch-wide print, type 10 in theWidth field.
The Resolution value is helpful, as it tells you how many pixels per inch will appearin the print, so you can estimate how sharp it will look. Most color inkjet printers arevery happy printing images at 150–300 pixels per inch (ppi). If you enter a numberin this range in the Resolution box, the image will print well on the printer.
The following section continues with this exercise after explaining the purpose ofresampling.
Resampling an ImageSometimes you must change the number of pixels in an image by resampling. Thisoften happens when you need to reduce (downsample) a large image for a Web site,or enlarge (upsample) a low-res image for a large-format printer. For these situations,you must resample the image.
An image that begins its life as a print 2,400×1,600 pixels in resolution must bemade much smaller to be viewed on the Web, anywhere from 90×60 to 800×600.Resampling down is usually not a problem if there is more information than youneed (see Figure 9.6). Let Elements use fancy math to remove this data properly.
118 ABSOLUTE BEGINNER’S GUIDE TO DIGITAL PHOTOGRAPHY
FIGURE 9.5
Uncheck
Resample
Image to pro-
tect the file.
12 0789731207_ch09.qxd 4/6/04 2:14 PM Page 118
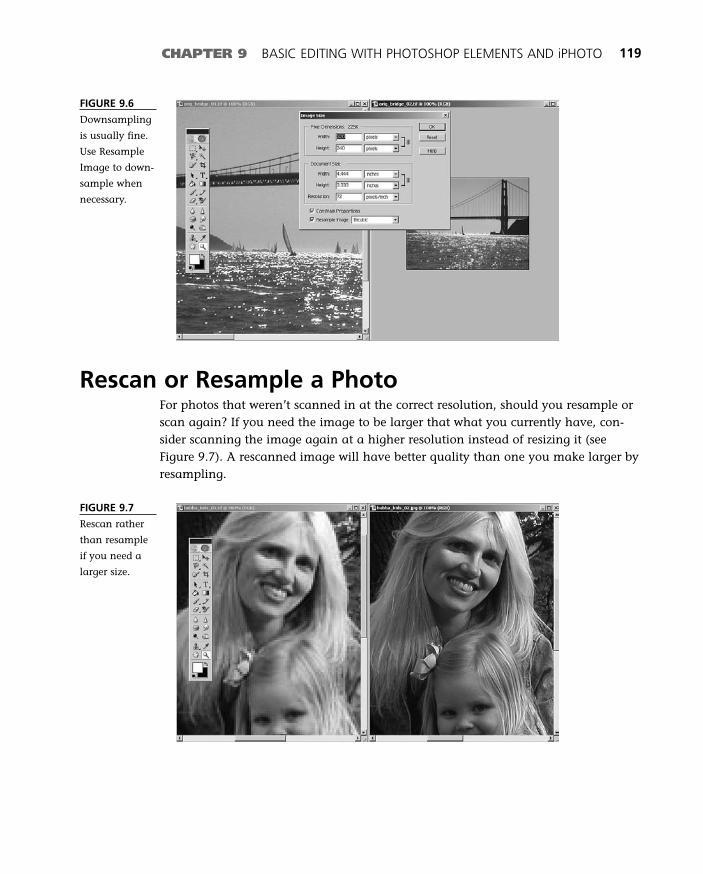
CHAPTER 9 BASIC EDITING WITH PHOTOSHOP ELEMENTS AND iPHOTO 119
Rescan or Resample a PhotoFor photos that weren’t scanned in at the correct resolution, should you resample orscan again? If you need the image to be larger that what you currently have, con-sider scanning the image again at a higher resolution instead of resizing it (seeFigure 9.7). A rescanned image will have better quality than one you make larger byresampling.
FIGURE 9.6
Downsampling
is usually fine.
Use Resample
Image to down-
sample when
necessary.
FIGURE 9.7
Rescan rather
than resample
if you need a
larger size.
12 0789731207_ch09.qxd 4/6/04 2:14 PM Page 119
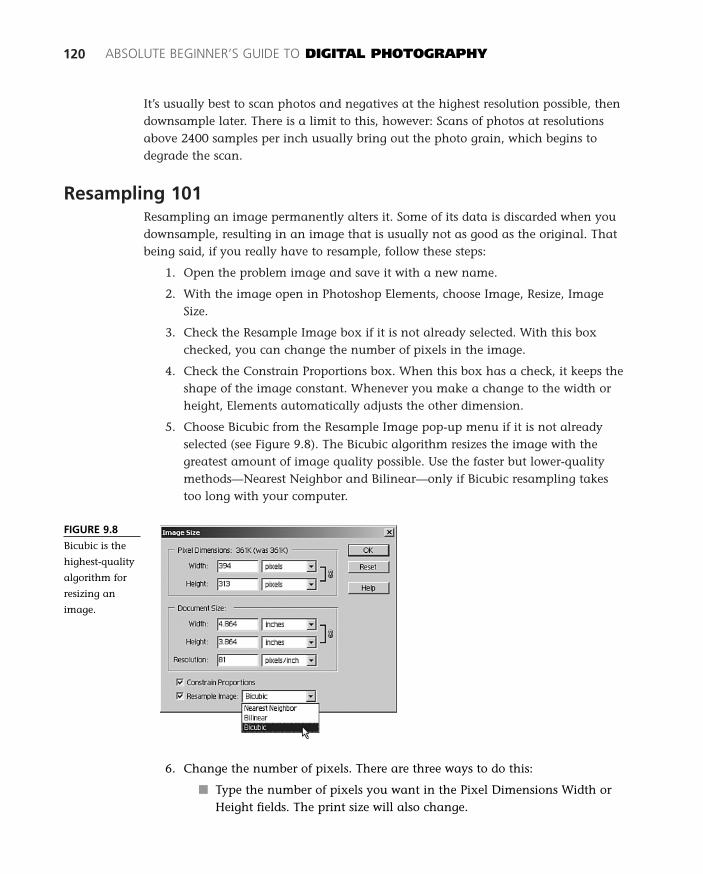
It’s usually best to scan photos and negatives at the highest resolution possible, thendownsample later. There is a limit to this, however: Scans of photos at resolutionsabove 2400 samples per inch usually bring out the photo grain, which begins todegrade the scan.
Resampling 101Resampling an image permanently alters it. Some of its data is discarded when youdownsample, resulting in an image that is usually not as good as the original. Thatbeing said, if you really have to resample, follow these steps:
1. Open the problem image and save it with a new name.
2. With the image open in Photoshop Elements, choose Image, Resize, ImageSize.
3. Check the Resample Image box if it is not already selected. With this boxchecked, you can change the number of pixels in the image.
4. Check the Constrain Proportions box. When this box has a check, it keeps theshape of the image constant. Whenever you make a change to the width orheight, Elements automatically adjusts the other dimension.
5. Choose Bicubic from the Resample Image pop-up menu if it is not alreadyselected (see Figure 9.8). The Bicubic algorithm resizes the image with thegreatest amount of image quality possible. Use the faster but lower-qualitymethods—Nearest Neighbor and Bilinear—only if Bicubic resampling takestoo long with your computer.
120 ABSOLUTE BEGINNER’S GUIDE TO DIGITAL PHOTOGRAPHY
FIGURE 9.8
Bicubic is the
highest-quality
algorithm for
resizing an
image.
6. Change the number of pixels. There are three ways to do this:
■ Type the number of pixels you want in the Pixel Dimensions Width orHeight fields. The print size will also change.
12 0789731207_ch09.qxd 4/6/04 2:14 PM Page 120
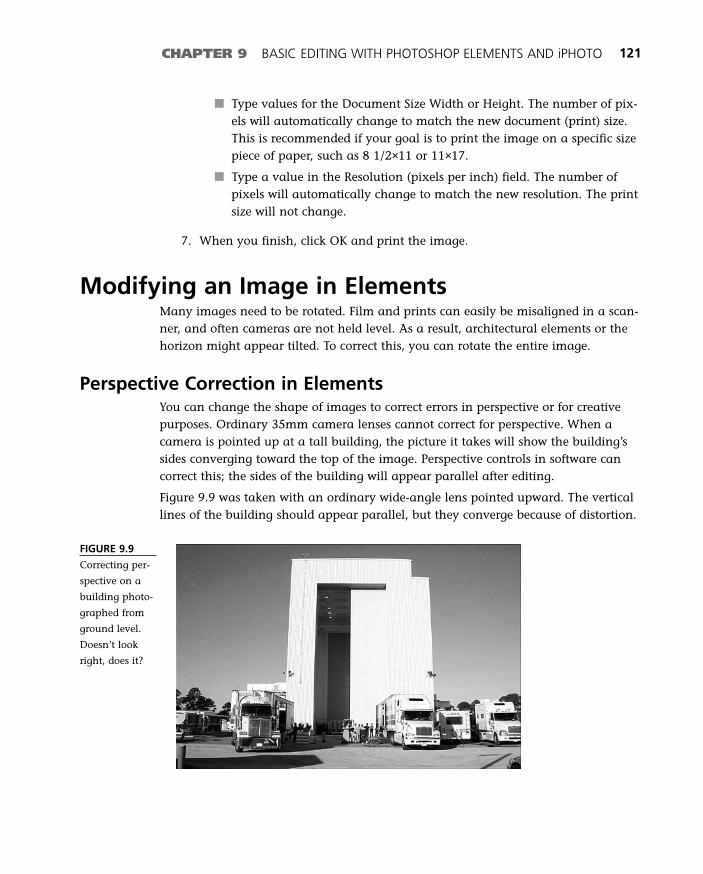
CHAPTER 9 BASIC EDITING WITH PHOTOSHOP ELEMENTS AND iPHOTO 121
■ Type values for the Document Size Width or Height. The number of pix-els will automatically change to match the new document (print) size.This is recommended if your goal is to print the image on a specific sizepiece of paper, such as 8 1/2×11 or 11×17.
■ Type a value in the Resolution (pixels per inch) field. The number ofpixels will automatically change to match the new resolution. The printsize will not change.
7. When you finish, click OK and print the image.
Modifying an Image in ElementsMany images need to be rotated. Film and prints can easily be misaligned in a scan-ner, and often cameras are not held level. As a result, architectural elements or thehorizon might appear tilted. To correct this, you can rotate the entire image.
Perspective Correction in ElementsYou can change the shape of images to correct errors in perspective or for creativepurposes. Ordinary 35mm camera lenses cannot correct for perspective. When acamera is pointed up at a tall building, the picture it takes will show the building’ssides converging toward the top of the image. Perspective controls in software cancorrect this; the sides of the building will appear parallel after editing.
Figure 9.9 was taken with an ordinary wide-angle lens pointed upward. The verticallines of the building should appear parallel, but they converge because of distortion.
FIGURE 9.9
Correcting per-
spective on a
building photo-
graphed from
ground level.
Doesn’t look
right, does it?
12 0789731207_ch09.qxd 4/6/04 2:14 PM Page 121
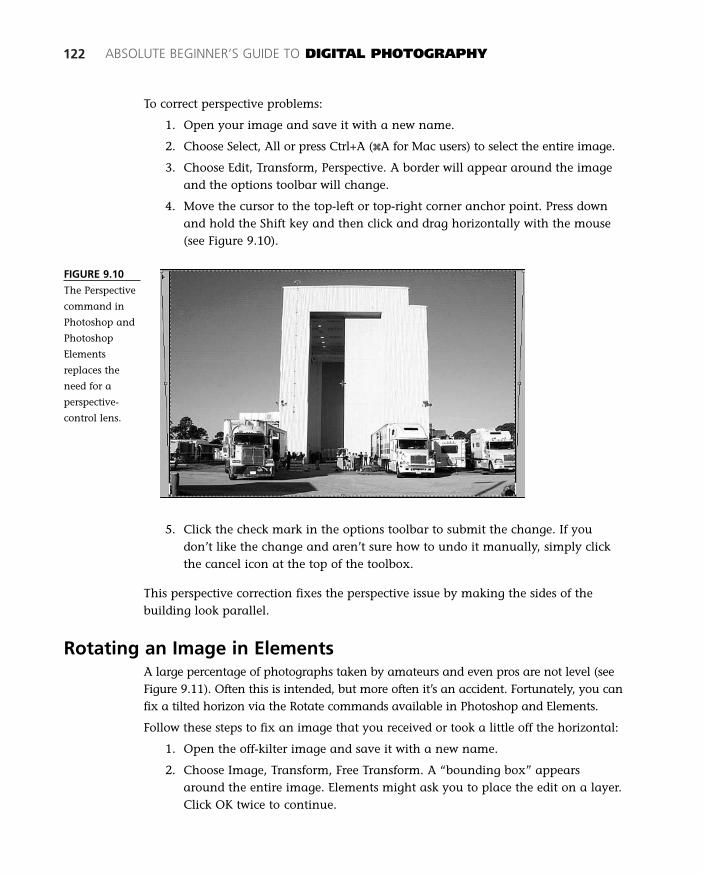
122 ABSOLUTE BEGINNER’S GUIDE TO DIGITAL PHOTOGRAPHY
To correct perspective problems:
1. Open your image and save it with a new name.
2. Choose Select, All or press Ctrl+A (xA for Mac users) to select the entire image.
3. Choose Edit, Transform, Perspective. A border will appear around the imageand the options toolbar will change.
4. Move the cursor to the top-left or top-right corner anchor point. Press downand hold the Shift key and then click and drag horizontally with the mouse (see Figure 9.10).
5. Click the check mark in the options toolbar to submit the change. If youdon’t like the change and aren’t sure how to undo it manually, simply clickthe cancel icon at the top of the toolbox.
This perspective correction fixes the perspective issue by making the sides of thebuilding look parallel.
Rotating an Image in ElementsA large percentage of photographs taken by amateurs and even pros are not level (seeFigure 9.11). Often this is intended, but more often it’s an accident. Fortunately, you canfix a tilted horizon via the Rotate commands available in Photoshop and Elements.
Follow these steps to fix an image that you received or took a little off the horizontal:
1. Open the off-kilter image and save it with a new name.
2. Choose Image, Transform, Free Transform. A “bounding box” appearsaround the entire image. Elements might ask you to place the edit on a layer.Click OK twice to continue.
FIGURE 9.10
The Perspective
command in
Photoshop and
Photoshop
Elements
replaces the
need for a
perspective-
control lens.
12 0789731207_ch09.qxd 4/6/04 2:14 PM Page 122
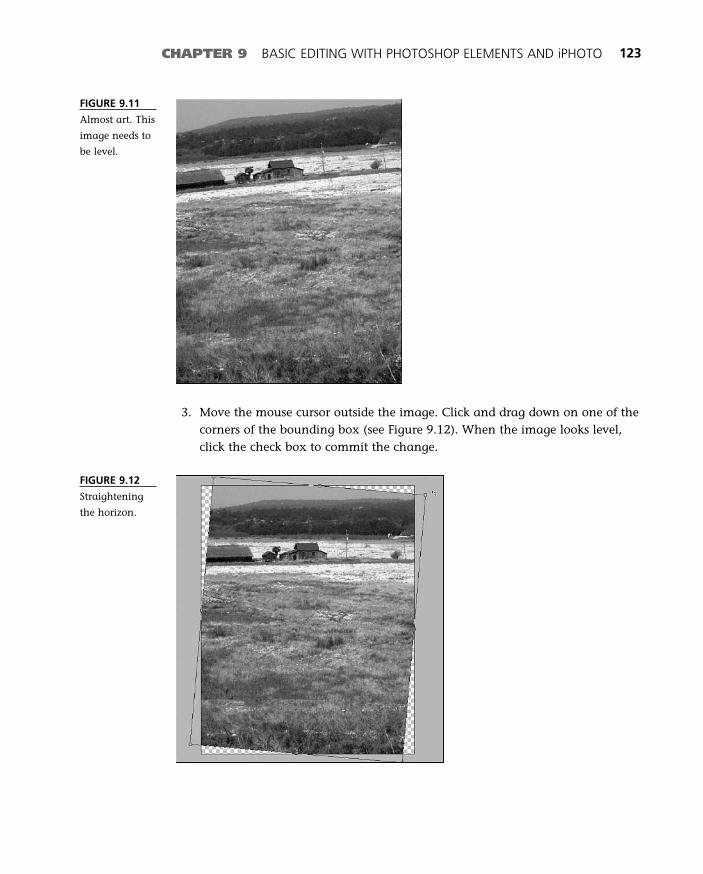
CHAPTER 9 BASIC EDITING WITH PHOTOSHOP ELEMENTS AND iPHOTO 123
FIGURE 9.11
Almost art. This
image needs to
be level.
FIGURE 9.12
Straightening
the horizon.
3. Move the mouse cursor outside the image. Click and drag down on one of thecorners of the bounding box (see Figure 9.12). When the image looks level,click the check box to commit the change.
12 0789731207_ch09.qxd 4/6/04 2:14 PM Page 123

You probably will need to crop the image a little to remove the empty, blankareas in the corners.
4. Click the Crop tool (see Figure 9.13). Click and drag from one corner to theother to select the entire image. A bounding box will appear around the image.
124 ABSOLUTE BEGINNER’S GUIDE TO DIGITAL PHOTOGRAPHY
FIGURE 9.13
The Crop tool
as it appears in
Photoshop
Elements.
5. Press down and hold the Shift key, then click a corner of the bounding boxand drag with your mouse (see Figure 9.14). Adjust each edge until theempty, blank areas aren’t visible.
6. Commit to the change by clicking the check mark icon in the toolbar.
FIGURE 9.14
Using the Crop
tool to remove
blank, empty
areas caused by
the Rotate com-
mand.
Unlimited Transformations in ElementsPhotoshop and Photoshop Elements include the Free Transform tool, which enablesyou to scale, add or remove perspective, rotate, and distort an image. You can accessthe Free Transform command by choosing Edit, Free Transform or Image, Transform,Free Transform.
12 0789731207_ch09.qxd 4/6/04 2:14 PM Page 124
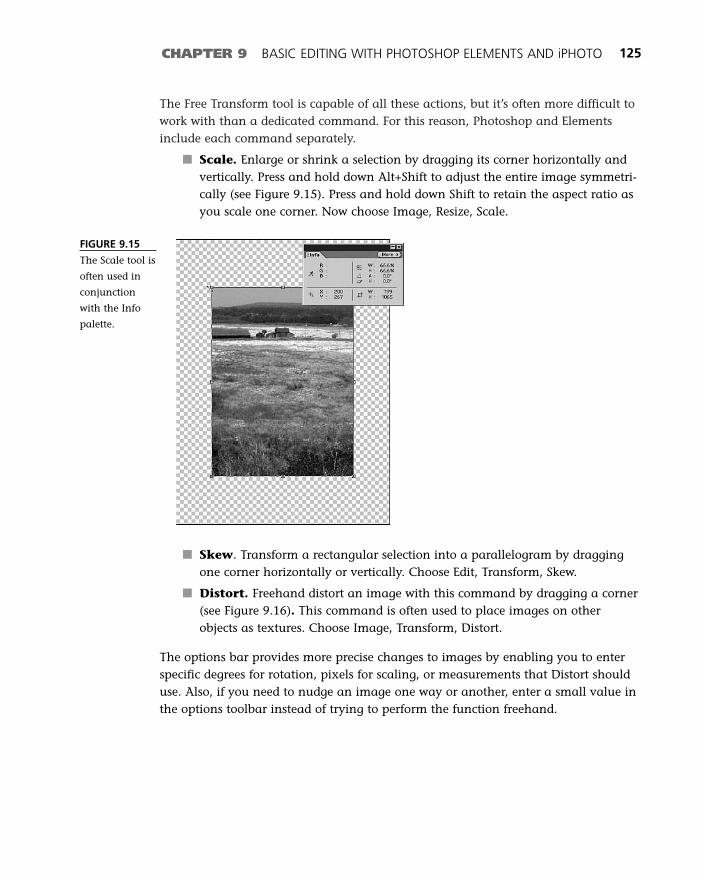
The Free Transform tool is capable of all these actions, but it’s often more difficult towork with than a dedicated command. For this reason, Photoshop and Elementsinclude each command separately.
■ Scale. Enlarge or shrink a selection by dragging its corner horizontally andvertically. Press and hold down Alt+Shift to adjust the entire image symmetri-cally (see Figure 9.15). Press and hold down Shift to retain the aspect ratio asyou scale one corner. Now choose Image, Resize, Scale.
CHAPTER 9 BASIC EDITING WITH PHOTOSHOP ELEMENTS AND iPHOTO 125
FIGURE 9.15
The Scale tool is
often used in
conjunction
with the Info
palette.
■ Skew. Transform a rectangular selection into a parallelogram by draggingone corner horizontally or vertically. Choose Edit, Transform, Skew.
■ Distort. Freehand distort an image with this command by dragging a corner(see Figure 9.16). This command is often used to place images on otherobjects as textures. Choose Image, Transform, Distort.
The options bar provides more precise changes to images by enabling you to enterspecific degrees for rotation, pixels for scaling, or measurements that Distort shoulduse. Also, if you need to nudge an image one way or another, enter a small value inthe options toolbar instead of trying to perform the function freehand.
12 0789731207_ch09.qxd 4/6/04 2:14 PM Page 125
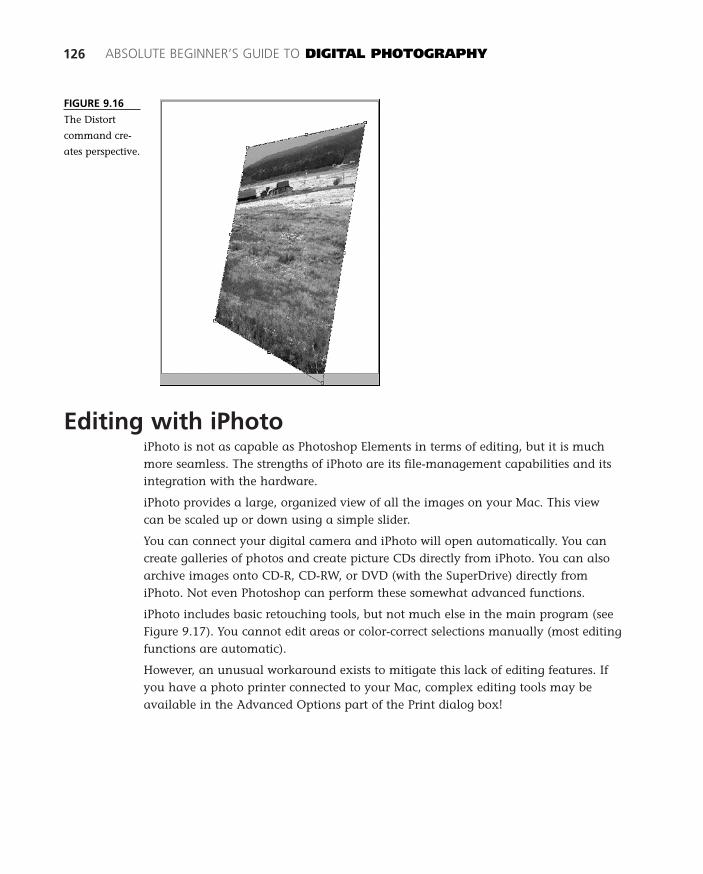
Editing with iPhotoiPhoto is not as capable as Photoshop Elements in terms of editing, but it is muchmore seamless. The strengths of iPhoto are its file-management capabilities and itsintegration with the hardware.
iPhoto provides a large, organized view of all the images on your Mac. This viewcan be scaled up or down using a simple slider.
You can connect your digital camera and iPhoto will open automatically. You cancreate galleries of photos and create picture CDs directly from iPhoto. You can alsoarchive images onto CD-R, CD-RW, or DVD (with the SuperDrive) directly fromiPhoto. Not even Photoshop can perform these somewhat advanced functions.
iPhoto includes basic retouching tools, but not much else in the main program (seeFigure 9.17). You cannot edit areas or color-correct selections manually (most editingfunctions are automatic).
However, an unusual workaround exists to mitigate this lack of editing features. Ifyou have a photo printer connected to your Mac, complex editing tools may beavailable in the Advanced Options part of the Print dialog box!
126 ABSOLUTE BEGINNER’S GUIDE TO DIGITAL PHOTOGRAPHY
FIGURE 9.16
The Distort
command cre-
ates perspective.
12 0789731207_ch09.qxd 4/6/04 2:14 PM Page 126
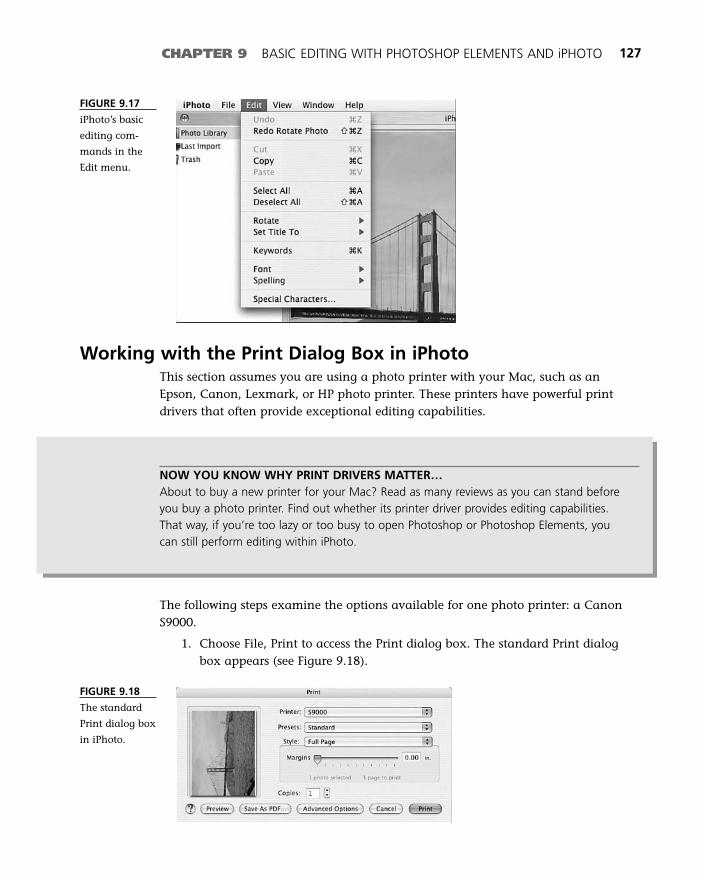
CHAPTER 9 BASIC EDITING WITH PHOTOSHOP ELEMENTS AND iPHOTO 127
FIGURE 9.17
iPhoto’s basic
editing com-
mands in the
Edit menu.
Working with the Print Dialog Box in iPhotoThis section assumes you are using a photo printer with your Mac, such as anEpson, Canon, Lexmark, or HP photo printer. These printers have powerful printdrivers that often provide exceptional editing capabilities.
The following steps examine the options available for one photo printer: a CanonS9000.
1. Choose File, Print to access the Print dialog box. The standard Print dialogbox appears (see Figure 9.18).
NOW YOU KNOW WHY PRINT DRIVERS MATTER…About to buy a new printer for your Mac? Read as many reviews as you can stand beforeyou buy a photo printer. Find out whether its printer driver provides editing capabilities.That way, if you’re too lazy or too busy to open Photoshop or Photoshop Elements, youcan still perform editing within iPhoto.
FIGURE 9.18
The standard
Print dialog box
in iPhoto.
12 0789731207_ch09.qxd 4/6/04 2:14 PM Page 127
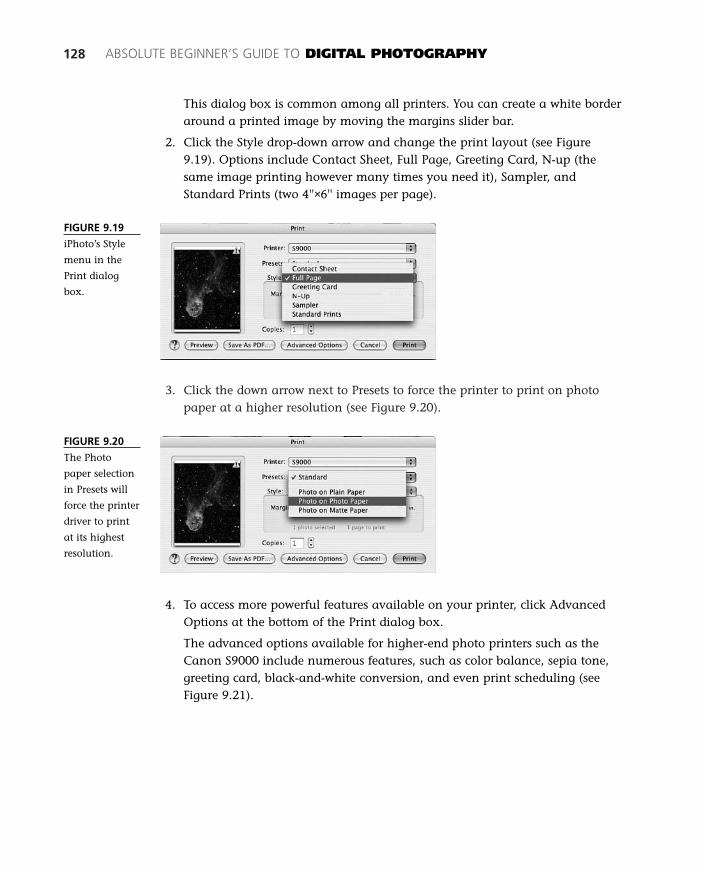
3. Click the down arrow next to Presets to force the printer to print on photopaper at a higher resolution (see Figure 9.20).
128 ABSOLUTE BEGINNER’S GUIDE TO DIGITAL PHOTOGRAPHY
This dialog box is common among all printers. You can create a white borderaround a printed image by moving the margins slider bar.
2. Click the Style drop-down arrow and change the print layout (see Figure9.19). Options include Contact Sheet, Full Page, Greeting Card, N-up (thesame image printing however many times you need it), Sampler, andStandard Prints (two 4''×6'' images per page).
FIGURE 9.19
iPhoto’s Style
menu in the
Print dialog
box.
FIGURE 9.20
The Photo
paper selection
in Presets will
force the printer
driver to print
at its highest
resolution.
4. To access more powerful features available on your printer, click AdvancedOptions at the bottom of the Print dialog box.
The advanced options available for higher-end photo printers such as theCanon S9000 include numerous features, such as color balance, sepia tone,greeting card, black-and-white conversion, and even print scheduling (seeFigure 9.21).
12 0789731207_ch09.qxd 4/6/04 2:14 PM Page 128
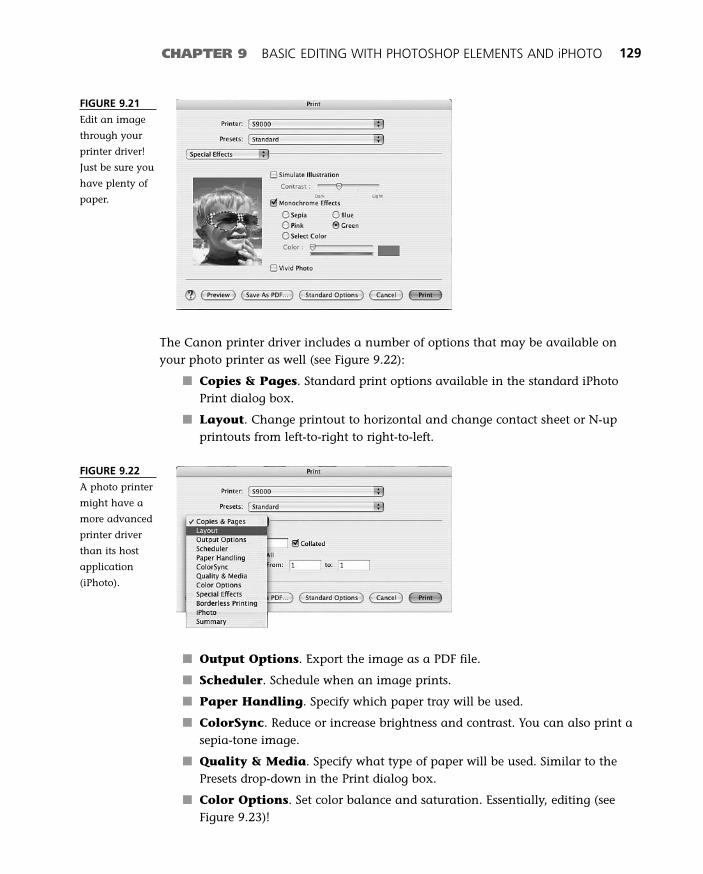
CHAPTER 9 BASIC EDITING WITH PHOTOSHOP ELEMENTS AND iPHOTO 129
FIGURE 9.21
Edit an image
through your
printer driver!
Just be sure you
have plenty of
paper.
The Canon printer driver includes a number of options that may be available onyour photo printer as well (see Figure 9.22):
■ Copies & Pages. Standard print options available in the standard iPhotoPrint dialog box.
■ Layout. Change printout to horizontal and change contact sheet or N-upprintouts from left-to-right to right-to-left.
■ Output Options. Export the image as a PDF file.
■ Scheduler. Schedule when an image prints.
■ Paper Handling. Specify which paper tray will be used.
■ ColorSync. Reduce or increase brightness and contrast. You can also print asepia-tone image.
■ Quality & Media. Specify what type of paper will be used. Similar to thePresets drop-down in the Print dialog box.
■ Color Options. Set color balance and saturation. Essentially, editing (seeFigure 9.23)!
FIGURE 9.22
A photo printer
might have a
more advanced
printer driver
than its host
application
(iPhoto).
12 0789731207_ch09.qxd 4/6/04 2:14 PM Page 129
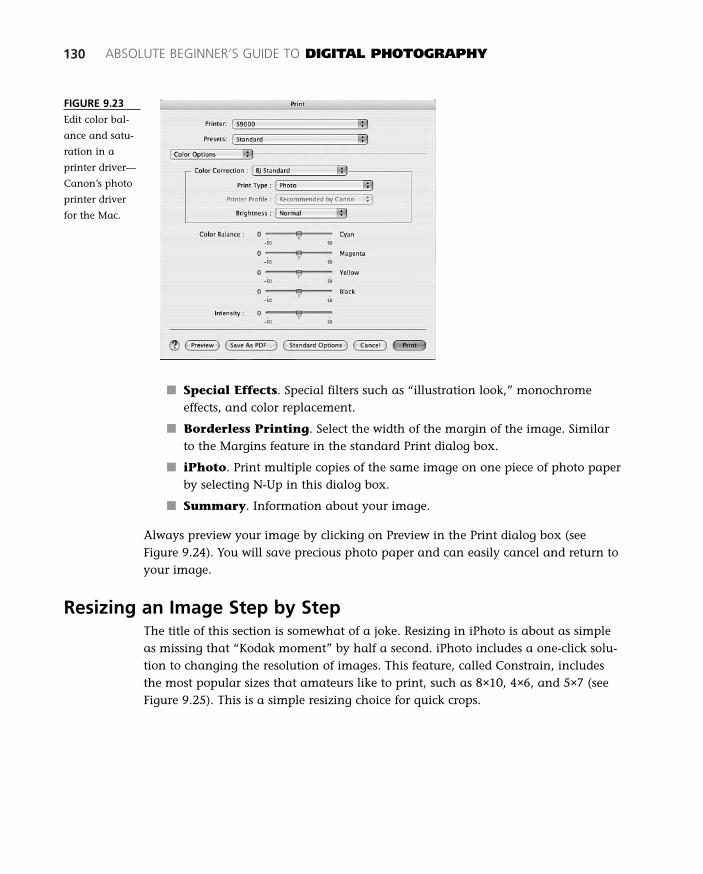
130 ABSOLUTE BEGINNER’S GUIDE TO DIGITAL PHOTOGRAPHY
■ Special Effects. Special filters such as “illustration look,” monochromeeffects, and color replacement.
■ Borderless Printing. Select the width of the margin of the image. Similarto the Margins feature in the standard Print dialog box.
■ iPhoto. Print multiple copies of the same image on one piece of photo paperby selecting N-Up in this dialog box.
■ Summary. Information about your image.
Always preview your image by clicking on Preview in the Print dialog box (seeFigure 9.24). You will save precious photo paper and can easily cancel and return toyour image.
Resizing an Image Step by StepThe title of this section is somewhat of a joke. Resizing in iPhoto is about as simpleas missing that “Kodak moment” by half a second. iPhoto includes a one-click solu-tion to changing the resolution of images. This feature, called Constrain, includesthe most popular sizes that amateurs like to print, such as 8×10, 4×6, and 5×7 (seeFigure 9.25). This is a simple resizing choice for quick crops.
FIGURE 9.23
Edit color bal-
ance and satu-
ration in a
printer driver—
Canon’s photo
printer driver
for the Mac.
12 0789731207_ch09.qxd 4/6/04 2:14 PM Page 130
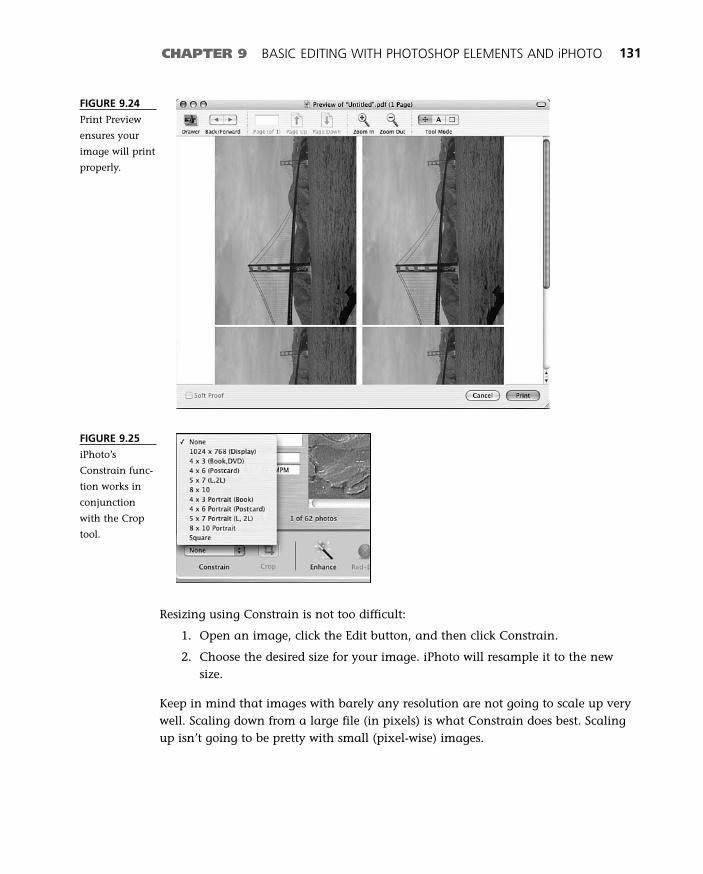
CHAPTER 9 BASIC EDITING WITH PHOTOSHOP ELEMENTS AND iPHOTO 131
FIGURE 9.24
Print Preview
ensures your
image will print
properly.
FIGURE 9.25
iPhoto’s
Constrain func-
tion works in
conjunction
with the Crop
tool.
Resizing using Constrain is not too difficult:
1. Open an image, click the Edit button, and then click Constrain.
2. Choose the desired size for your image. iPhoto will resample it to the newsize.
Keep in mind that images with barely any resolution are not going to scale up verywell. Scaling down from a large file (in pixels) is what Constrain does best. Scalingup isn’t going to be pretty with small (pixel-wise) images.
12 0789731207_ch09.qxd 4/6/04 2:15 PM Page 131

132 ABSOLUTE BEGINNER’S GUIDE TO DIGITAL PHOTOGRAPHY
The Absolute Minimum
Comparing Photoshop Elements and iPhoto is somewhat like comparing apples tooranges. Both applications enable you to adjust photos, but Photoshop Elements is amuch more advanced tool. Elements includes resizing tools and transformation toolsthat enable you to scale, rotate, and adjust perspective for distorted images. iPhoto isessentially an image manager with basic retouching tools.
Regardless of which tool you use, keep these ideas in mind:
■ Image management is a necessary evil in digital photography. Images arenow easier to lose than they were when we used shoeboxes and three-ringbinders.
■ Photoshop Elements includes the same transformation tools as Photoshop,which are Scale, Rotate, Skew, Distort, and Perspective.
■ All cameras import at 72 ppi. Images should be printed at 150–300 ppi. Youmust resize the image after importing it.
■ Resampling an image should always be a last resort, especially if you need toincrease the image’s size. Rescan or reshoot if possible.
12 0789731207_ch09.qxd 4/6/04 2:15 PM Page 132
10In this chapter
• Introduction to Selection Tools
• The Photoshop Toolbox
• Introduction to Image Editing
• Color Balance 101
Editing with Selection
Tools
Have you ever cut out parts of several pictures and pasted them together
into one image? Or have you ever had a portrait in which you wished
you could somehow eliminate the background? Ever receive or take a
photo and wish you could lighten a shadow on the face of a friend?
The first step to making changes like these is to tell the imaging soft-
ware what parts of the image you want to work with. This process is
called selecting an area of the image, or simply making a selection (see
Figure 10.1). This chapter explains in depth all the selection tools avail-
able in Photoshop to budding digital photographers.
13 0789731207_ch10.qxd 4/6/04 2:22 PM Page 133
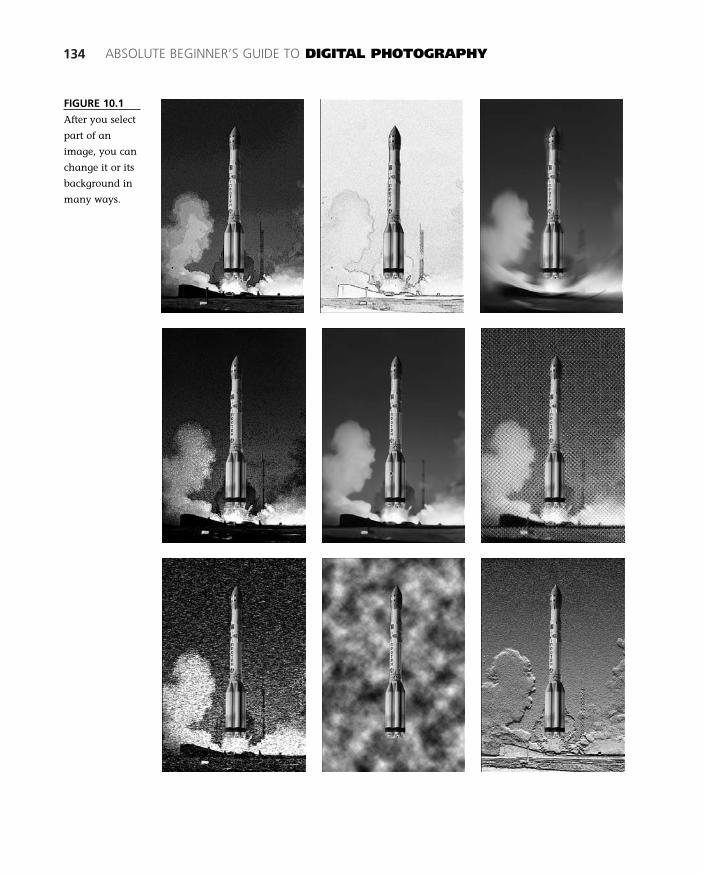
134 ABSOLUTE BEGINNER’S GUIDE TO DIGITAL PHOTOGRAPHY
FIGURE 10.1
After you select
part of an
image, you can
change it or its
background in
many ways.
13 0789731207_ch10.qxd 4/6/04 2:22 PM Page 134
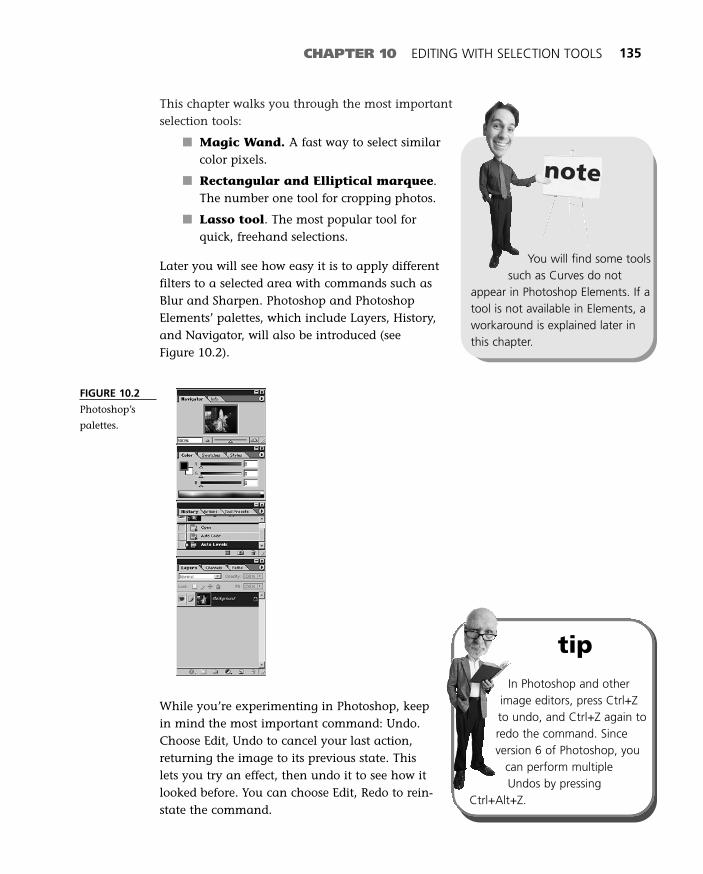
This chapter walks you through the most importantselection tools:
■ Magic Wand. A fast way to select similarcolor pixels.
■ Rectangular and Elliptical marquee.The number one tool for cropping photos.
■ Lasso tool. The most popular tool forquick, freehand selections.
Later you will see how easy it is to apply differentfilters to a selected area with commands such asBlur and Sharpen. Photoshop and PhotoshopElements’ palettes, which include Layers, History,and Navigator, will also be introduced (see Figure 10.2).
CHAPTER 10 EDITING WITH SELECTION TOOLS 135
You will find some toolssuch as Curves do not
appear in Photoshop Elements. If atool is not available in Elements, aworkaround is explained later inthis chapter.
FIGURE 10.2
Photoshop’s
palettes.
While you’re experimenting in Photoshop, keepin mind the most important command: Undo.Choose Edit, Undo to cancel your last action,returning the image to its previous state. Thislets you try an effect, then undo it to see how itlooked before. You can choose Edit, Redo to rein-state the command.
tipIn Photoshop and other
image editors, press Ctrl+Zto undo, and Ctrl+Z again toredo the command. Sinceversion 6 of Photoshop, you
can perform multipleUndos by pressing
Ctrl+Alt+Z.
13 0789731207_ch10.qxd 4/6/04 2:22 PM Page 135
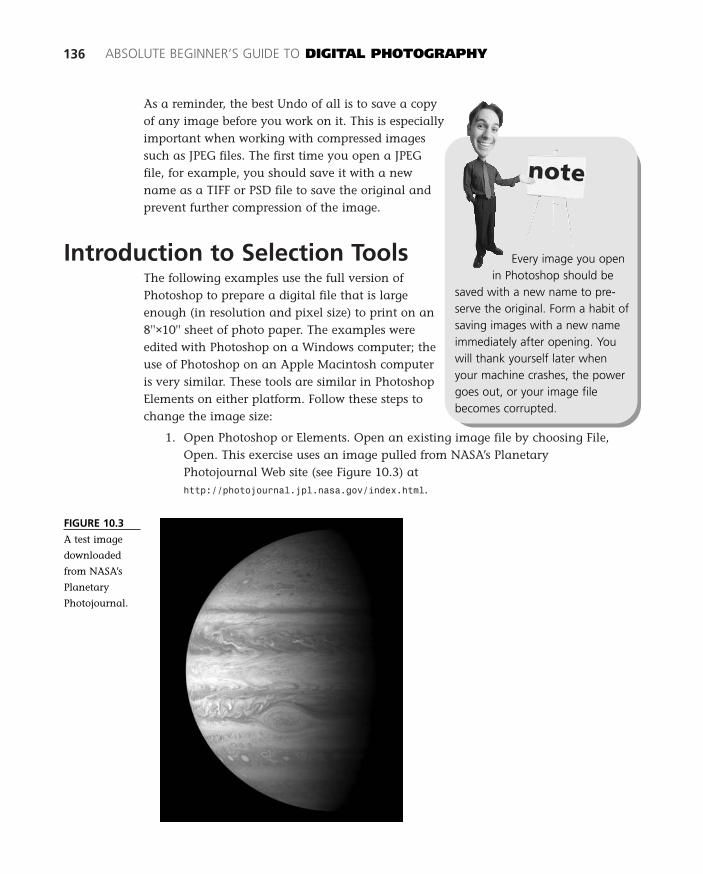
As a reminder, the best Undo of all is to save a copyof any image before you work on it. This is especiallyimportant when working with compressed imagessuch as JPEG files. The first time you open a JPEGfile, for example, you should save it with a newname as a TIFF or PSD file to save the original andprevent further compression of the image.
Introduction to Selection ToolsThe following examples use the full version ofPhotoshop to prepare a digital file that is largeenough (in resolution and pixel size) to print on an8''×10'' sheet of photo paper. The examples wereedited with Photoshop on a Windows computer; theuse of Photoshop on an Apple Macintosh computeris very similar. These tools are similar in PhotoshopElements on either platform. Follow these steps tochange the image size:
1. Open Photoshop or Elements. Open an existing image file by choosing File,Open. This exercise uses an image pulled from NASA’s PlanetaryPhotojournal Web site (see Figure 10.3) athttp://photojournal.jpl.nasa.gov/index.html.
136 ABSOLUTE BEGINNER’S GUIDE TO DIGITAL PHOTOGRAPHY
Every image you openin Photoshop should be
saved with a new name to pre-serve the original. Form a habit ofsaving images with a new nameimmediately after opening. Youwill thank yourself later whenyour machine crashes, the powergoes out, or your image filebecomes corrupted.
FIGURE 10.3
A test image
downloaded
from NASA’s
Planetary
Photojournal.
13 0789731207_ch10.qxd 4/6/04 2:22 PM Page 136
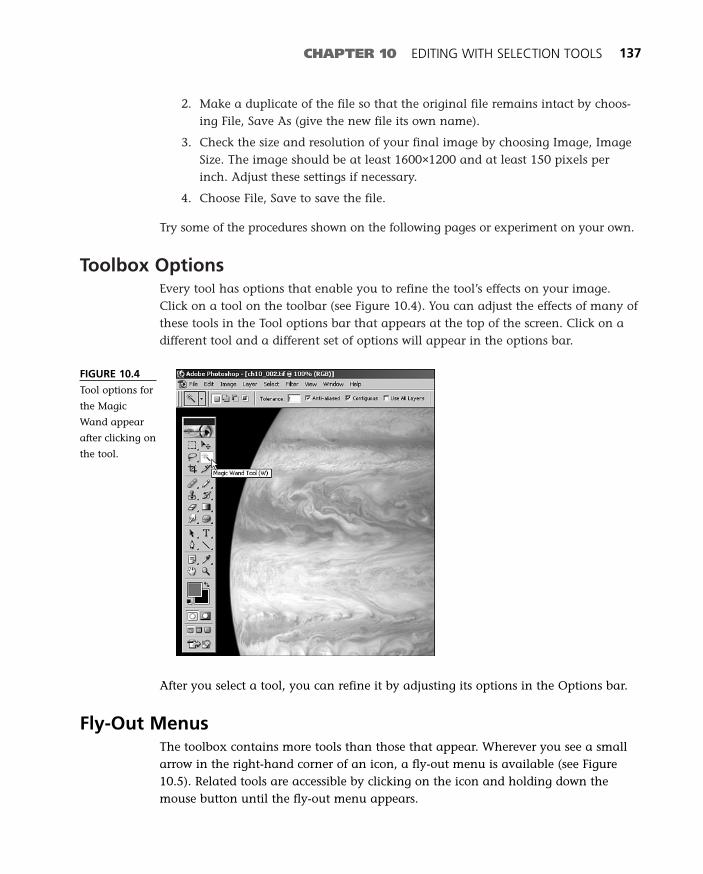
2. Make a duplicate of the file so that the original file remains intact by choos-ing File, Save As (give the new file its own name).
3. Check the size and resolution of your final image by choosing Image, ImageSize. The image should be at least 1600×1200 and at least 150 pixels perinch. Adjust these settings if necessary.
4. Choose File, Save to save the file.
Try some of the procedures shown on the following pages or experiment on your own.
Toolbox OptionsEvery tool has options that enable you to refine the tool’s effects on your image.Click on a tool on the toolbar (see Figure 10.4). You can adjust the effects of many ofthese tools in the Tool options bar that appears at the top of the screen. Click on adifferent tool and a different set of options will appear in the options bar.
CHAPTER 10 EDITING WITH SELECTION TOOLS 137
FIGURE 10.4
Tool options for
the Magic
Wand appear
after clicking on
the tool.
After you select a tool, you can refine it by adjusting its options in the Options bar.
Fly-Out MenusThe toolbox contains more tools than those that appear. Wherever you see a smallarrow in the right-hand corner of an icon, a fly-out menu is available (see Figure10.5). Related tools are accessible by clicking on the icon and holding down themouse button until the fly-out menu appears.
13 0789731207_ch10.qxd 4/6/04 2:22 PM Page 137
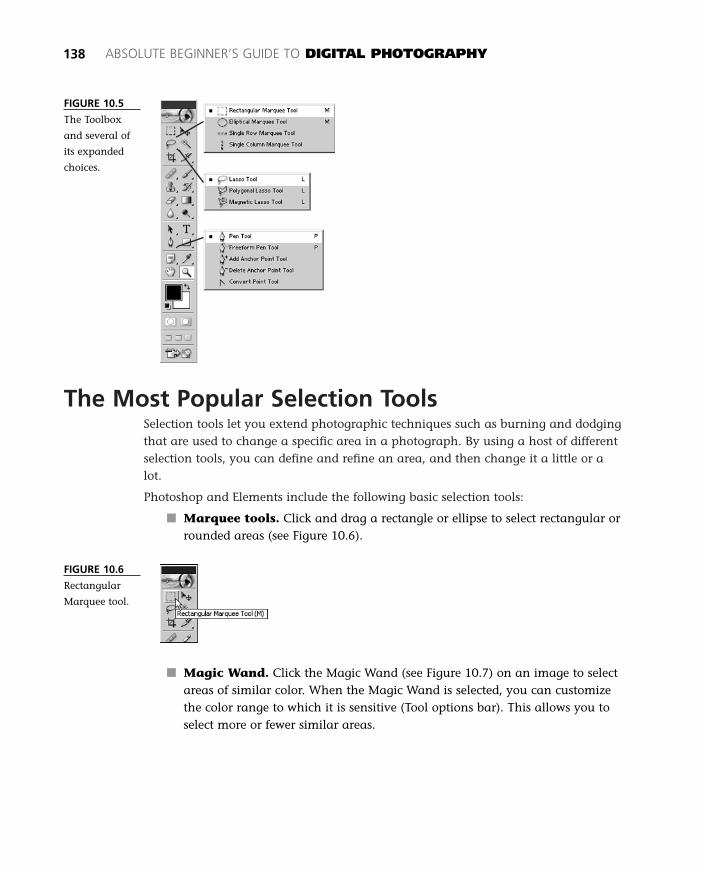
The Most Popular Selection ToolsSelection tools let you extend photographic techniques such as burning and dodgingthat are used to change a specific area in a photograph. By using a host of differentselection tools, you can define and refine an area, and then change it a little or alot.
Photoshop and Elements include the following basic selection tools:
■ Marquee tools. Click and drag a rectangle or ellipse to select rectangular orrounded areas (see Figure 10.6).
138 ABSOLUTE BEGINNER’S GUIDE TO DIGITAL PHOTOGRAPHY
FIGURE 10.5
The Toolbox
and several of
its expanded
choices.
FIGURE 10.6
Rectangular
Marquee tool.
■ Magic Wand. Click the Magic Wand (see Figure 10.7) on an image to selectareas of similar color. When the Magic Wand is selected, you can customizethe color range to which it is sensitive (Tool options bar). This allows you toselect more or fewer similar areas.
13 0789731207_ch10.qxd 4/6/04 2:22 PM Page 138
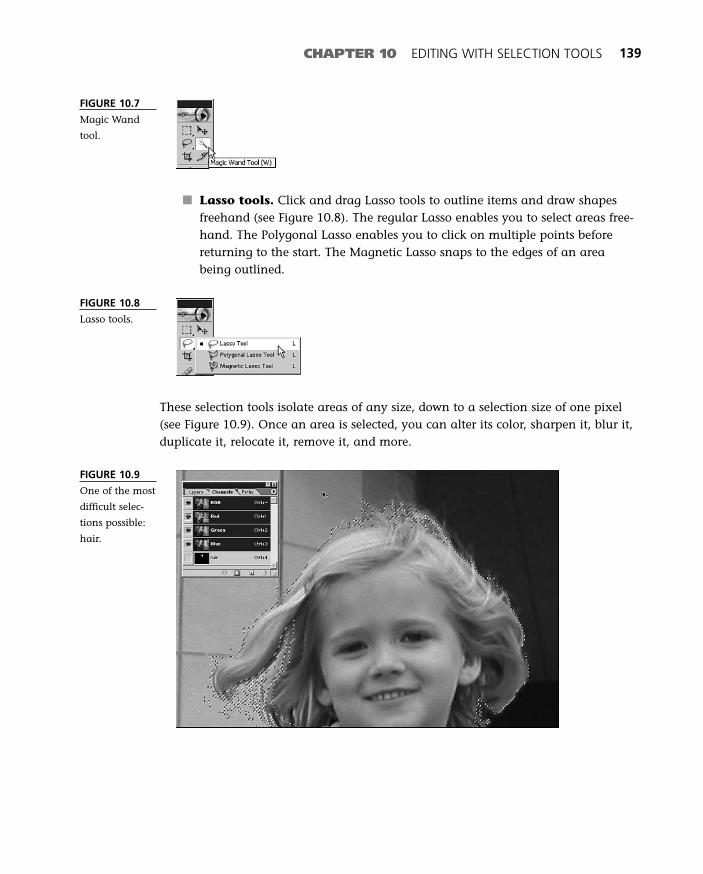
■ Lasso tools. Click and drag Lasso tools to outline items and draw shapesfreehand (see Figure 10.8). The regular Lasso enables you to select areas free-hand. The Polygonal Lasso enables you to click on multiple points beforereturning to the start. The Magnetic Lasso snaps to the edges of an areabeing outlined.
CHAPTER 10 EDITING WITH SELECTION TOOLS 139
FIGURE 10.7
Magic Wand
tool.
FIGURE 10.8
Lasso tools.
These selection tools isolate areas of any size, down to a selection size of one pixel(see Figure 10.9). Once an area is selected, you can alter its color, sharpen it, blur it,duplicate it, relocate it, remove it, and more.
FIGURE 10.9
One of the most
difficult selec-
tions possible:
hair.
13 0789731207_ch10.qxd 4/6/04 2:22 PM Page 139
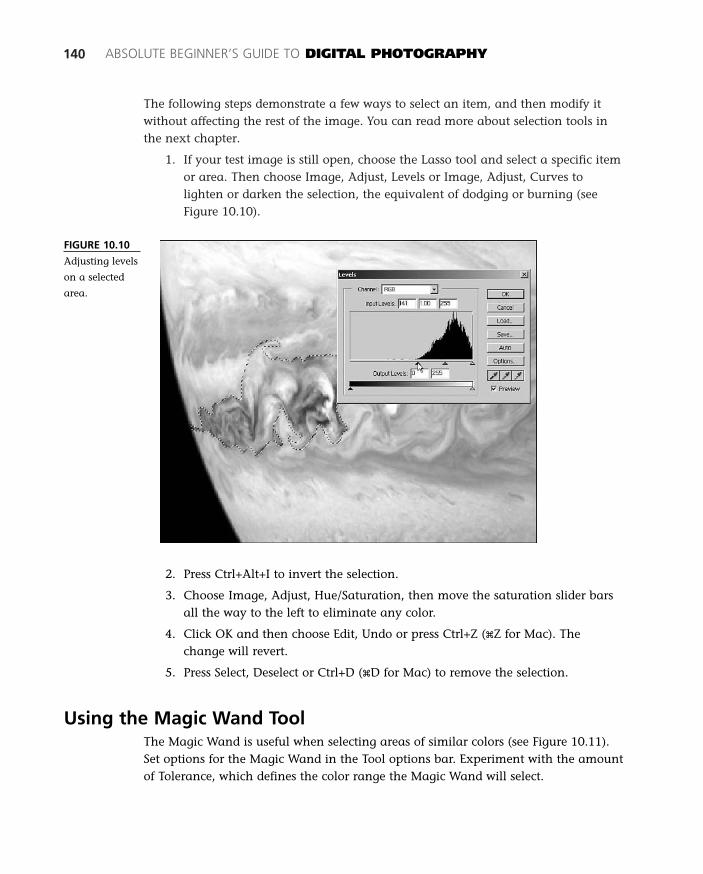
The following steps demonstrate a few ways to select an item, and then modify itwithout affecting the rest of the image. You can read more about selection tools inthe next chapter.
1. If your test image is still open, choose the Lasso tool and select a specific itemor area. Then choose Image, Adjust, Levels or Image, Adjust, Curves tolighten or darken the selection, the equivalent of dodging or burning (seeFigure 10.10).
140 ABSOLUTE BEGINNER’S GUIDE TO DIGITAL PHOTOGRAPHY
FIGURE 10.10
Adjusting levels
on a selected
area.
2. Press Ctrl+Alt+I to invert the selection.
3. Choose Image, Adjust, Hue/Saturation, then move the saturation slider barsall the way to the left to eliminate any color.
4. Click OK and then choose Edit, Undo or press Ctrl+Z (xZ for Mac). Thechange will revert.
5. Press Select, Deselect or Ctrl+D (xD for Mac) to remove the selection.
Using the Magic Wand ToolThe Magic Wand is useful when selecting areas of similar colors (see Figure 10.11).Set options for the Magic Wand in the Tool options bar. Experiment with the amountof Tolerance, which defines the color range the Magic Wand will select.
13 0789731207_ch10.qxd 4/6/04 2:22 PM Page 140
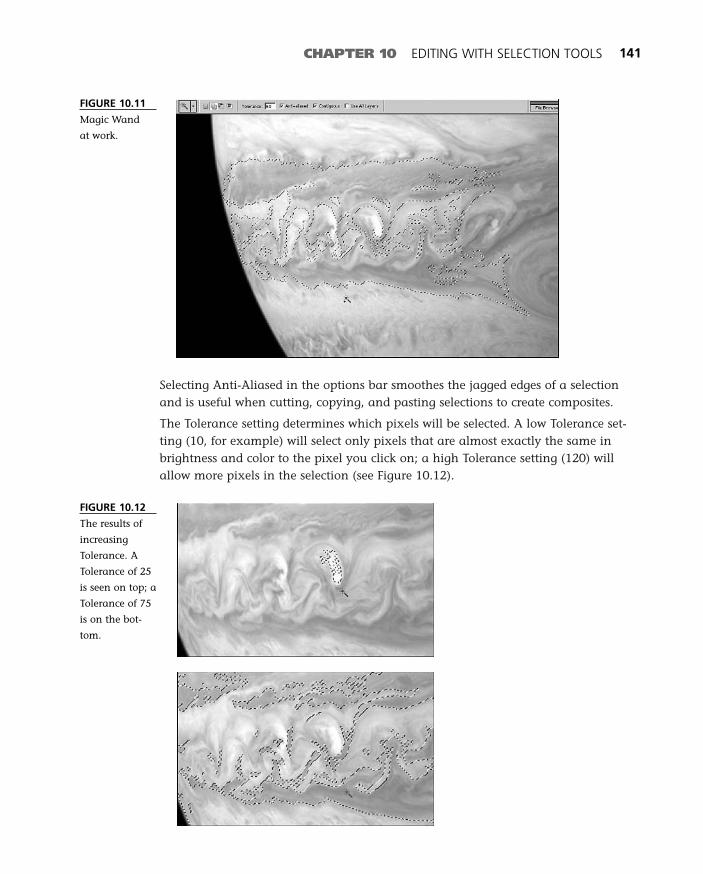
Selecting Anti-Aliased in the options bar smoothes the jagged edges of a selectionand is useful when cutting, copying, and pasting selections to create composites.
The Tolerance setting determines which pixels will be selected. A low Tolerance set-ting (10, for example) will select only pixels that are almost exactly the same inbrightness and color to the pixel you click on; a high Tolerance setting (120) willallow more pixels in the selection (see Figure 10.12).
CHAPTER 10 EDITING WITH SELECTION TOOLS 141
FIGURE 10.11
Magic Wand
at work.
FIGURE 10.12
The results of
increasing
Tolerance. A
Tolerance of 25
is seen on top; a
Tolerance of 75
is on the bot-
tom.
13 0789731207_ch10.qxd 4/6/04 2:22 PM Page 141
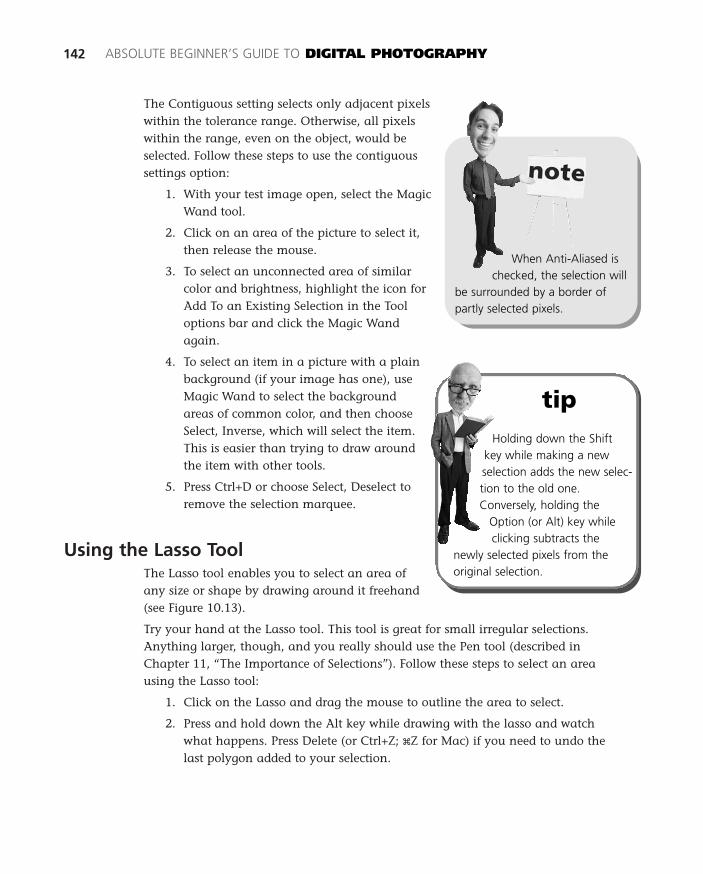
The Contiguous setting selects only adjacent pixelswithin the tolerance range. Otherwise, all pixelswithin the range, even on the object, would beselected. Follow these steps to use the contiguoussettings option:
1. With your test image open, select the MagicWand tool.
2. Click on an area of the picture to select it,then release the mouse.
3. To select an unconnected area of similarcolor and brightness, highlight the icon forAdd To an Existing Selection in the Tooloptions bar and click the Magic Wandagain.
4. To select an item in a picture with a plainbackground (if your image has one), useMagic Wand to select the backgroundareas of common color, and then chooseSelect, Inverse, which will select the item.This is easier than trying to draw aroundthe item with other tools.
5. Press Ctrl+D or choose Select, Deselect toremove the selection marquee.
Using the Lasso ToolThe Lasso tool enables you to select an area ofany size or shape by drawing around it freehand(see Figure 10.13).
Try your hand at the Lasso tool. This tool is great for small irregular selections.Anything larger, though, and you really should use the Pen tool (described inChapter 11, “The Importance of Selections”). Follow these steps to select an areausing the Lasso tool:
1. Click on the Lasso and drag the mouse to outline the area to select.
2. Press and hold down the Alt key while drawing with the lasso and watchwhat happens. Press Delete (or Ctrl+Z; xZ for Mac) if you need to undo thelast polygon added to your selection.
142 ABSOLUTE BEGINNER’S GUIDE TO DIGITAL PHOTOGRAPHY
When Anti-Aliased ischecked, the selection will
be surrounded by a border ofpartly selected pixels.
tipHolding down the Shift
key while making a newselection adds the new selec-tion to the old one.Conversely, holding the
Option (or Alt) key whileclicking subtracts the
newly selected pixels from theoriginal selection.
13 0789731207_ch10.qxd 4/6/04 2:22 PM Page 142

3. Complete the loop to select the item and then release the mouse.
4. To add more, click on the Add symbol in the Tool options bar and outline theadditional area. You can also press and hold down the Shift key to add to anexisting selection.
5. After the areas have been selected, release the mouse.
6. Choose Select, Inverse if you want to deselect the object and alter the back-ground.
7. Make whatever changes you want to the selected area.
8. Choose Select, Deselect or press Ctrl+D to remove the selection marquee.
Using the Rectangular Marquee ToolThe Rectangular Marquee tool is pretty straightforward. The important part to knowabout this tool is that keyboard shortcuts are available. Follow these steps to use theRectangular Marquee tool:
1. Click on the Rectangular Marquee tool.
2. Before you draw a selection, press down and hold the Alt key. Now draw aselection. The marquee tool will draw from the center of the rectangle insteadof the edge.
3. Press down and hold the Alt and the Shift keys and draw another selection(see Figure 10.14). Now the marquee is restricted to a square.
CHAPTER 10 EDITING WITH SELECTION TOOLS 143
FIGURE 10.13
Using the Lasso
tool.
13 0789731207_ch10.qxd 4/6/04 2:22 PM Page 143
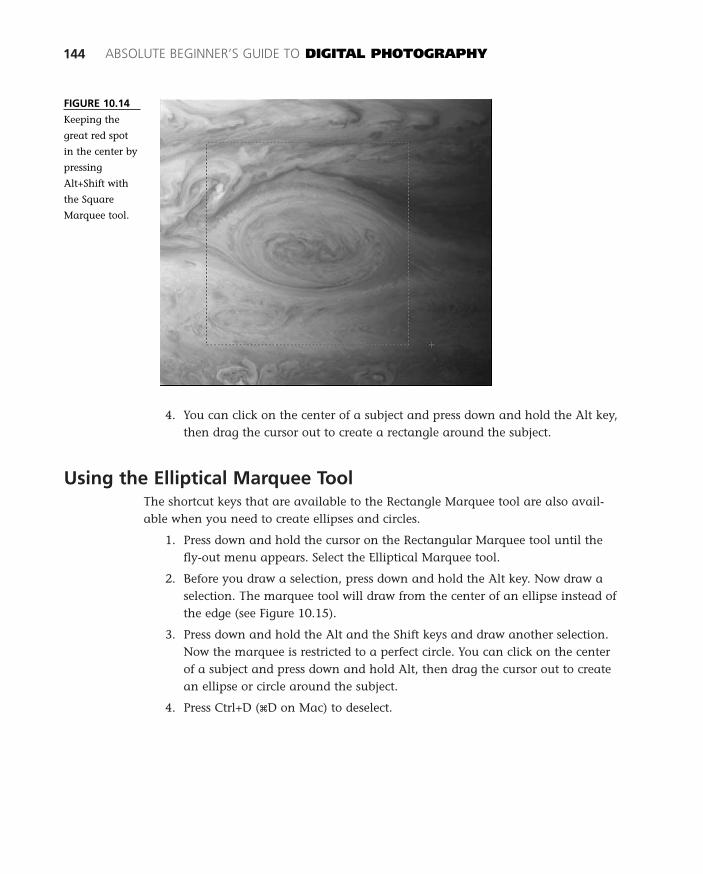
4. You can click on the center of a subject and press down and hold the Alt key,then drag the cursor out to create a rectangle around the subject.
Using the Elliptical Marquee ToolThe shortcut keys that are available to the Rectangle Marquee tool are also avail-able when you need to create ellipses and circles.
1. Press down and hold the cursor on the Rectangular Marquee tool until thefly-out menu appears. Select the Elliptical Marquee tool.
2. Before you draw a selection, press down and hold the Alt key. Now draw aselection. The marquee tool will draw from the center of an ellipse instead ofthe edge (see Figure 10.15).
3. Press down and hold the Alt and the Shift keys and draw another selection.Now the marquee is restricted to a perfect circle. You can click on the centerof a subject and press down and hold Alt, then drag the cursor out to createan ellipse or circle around the subject.
4. Press Ctrl+D (xD on Mac) to deselect.
144 ABSOLUTE BEGINNER’S GUIDE TO DIGITAL PHOTOGRAPHY
FIGURE 10.14
Keeping the
great red spot
in the center by
pressing
Alt+Shift with
the Square
Marquee tool.
13 0789731207_ch10.qxd 4/6/04 2:22 PM Page 144

Introduction to Image EditingNow that you have some idea how to select specificitems in an image, why not edit something? Therest of this chapter throws you into the most impor-tant elements of editing: Levels, Curves, and HSB(Hue, Saturation, and Brightness). Later chapterswill explore each editing feature in depth.
If you have an image you can experiment with,open it in the image editor of your choice and fol-low these steps:
1. Evaluate the image’s brightness and con-trast. Is the image too light or too dark? Isthe contrast too high or too low? Our sam-ple image here is too dark (see Figure 10.16).Other defects may be revealed once theimage is made lighter.
CHAPTER 10 EDITING WITH SELECTION TOOLS 145
FIGURE 10.15
The Elliptical
Marquee tool.
The editing functionsdiscussed on the next few
pages are available in Photoshopand advanced editors such asCorel Photopaint and PaintshopPro. Photoshop Elements lacksCurves, but does include Levels,which is used more often by pho-tographers.
13 0789731207_ch10.qxd 4/6/04 2:22 PM Page 145
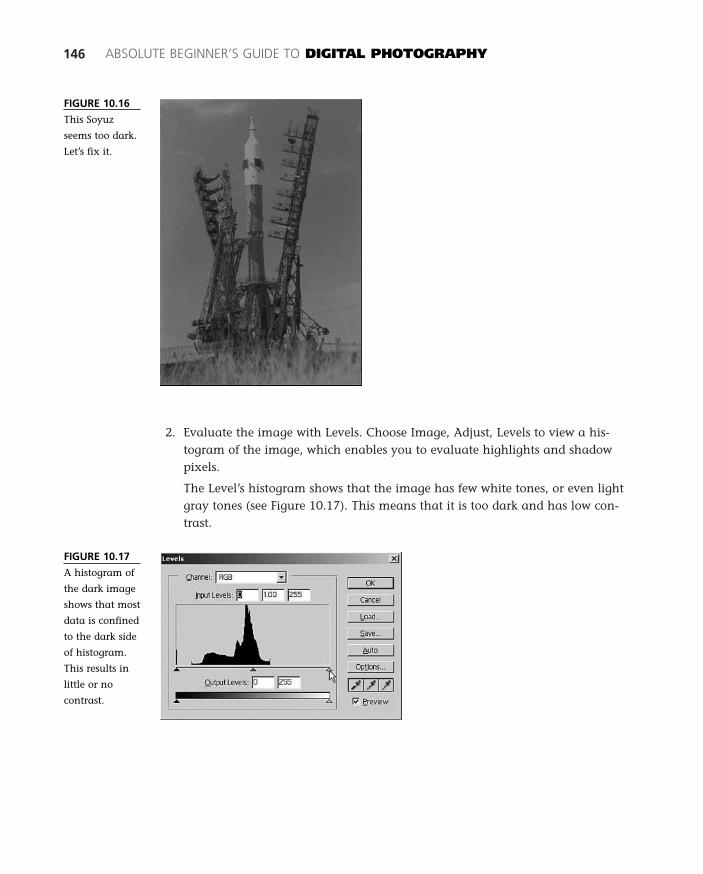
2. Evaluate the image with Levels. Choose Image, Adjust, Levels to view a his-togram of the image, which enables you to evaluate highlights and shadowpixels.
The Level’s histogram shows that the image has few white tones, or even lightgray tones (see Figure 10.17). This means that it is too dark and has low con-trast.
146 ABSOLUTE BEGINNER’S GUIDE TO DIGITAL PHOTOGRAPHY
FIGURE 10.16
This Soyuz
seems too dark.
Let’s fix it.
FIGURE 10.17
A histogram of
the dark image
shows that most
data is confined
to the dark side
of histogram.
This results in
little or no
contrast.
13 0789731207_ch10.qxd 4/6/04 2:22 PM Page 146
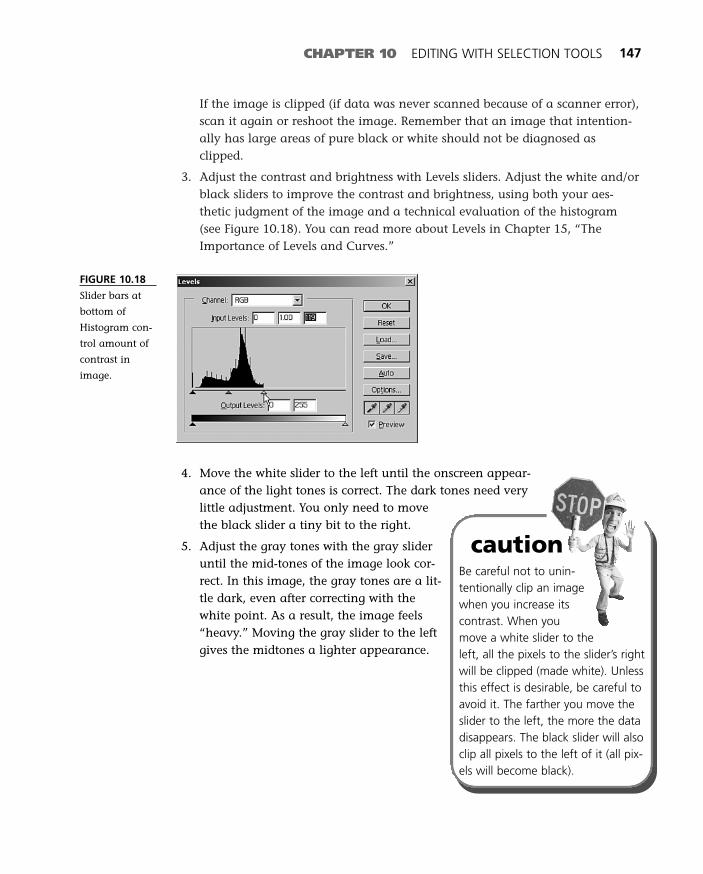
If the image is clipped (if data was never scanned because of a scanner error),scan it again or reshoot the image. Remember that an image that intention-ally has large areas of pure black or white should not be diagnosed asclipped.
3. Adjust the contrast and brightness with Levels sliders. Adjust the white and/orblack sliders to improve the contrast and brightness, using both your aes-thetic judgment of the image and a technical evaluation of the histogram(see Figure 10.18). You can read more about Levels in Chapter 15, “TheImportance of Levels and Curves.”
CHAPTER 10 EDITING WITH SELECTION TOOLS 147
FIGURE 10.18
Slider bars at
bottom of
Histogram con-
trol amount of
contrast in
image.
4. Move the white slider to the left until the onscreen appear-ance of the light tones is correct. The dark tones need verylittle adjustment. You only need to movethe black slider a tiny bit to the right.
5. Adjust the gray tones with the gray slideruntil the mid-tones of the image look cor-rect. In this image, the gray tones are a lit-tle dark, even after correcting with thewhite point. As a result, the image feels“heavy.” Moving the gray slider to the leftgives the midtones a lighter appearance.
Be careful not to unin-tentionally clip an imagewhen you increase itscontrast. When youmove a white slider to theleft, all the pixels to the slider’s rightwill be clipped (made white). Unlessthis effect is desirable, be careful toavoid it. The farther you move theslider to the left, the more the datadisappears. The black slider will alsoclip all pixels to the left of it (all pix-els will become black).
caution
13 0789731207_ch10.qxd 4/6/04 2:22 PM Page 147
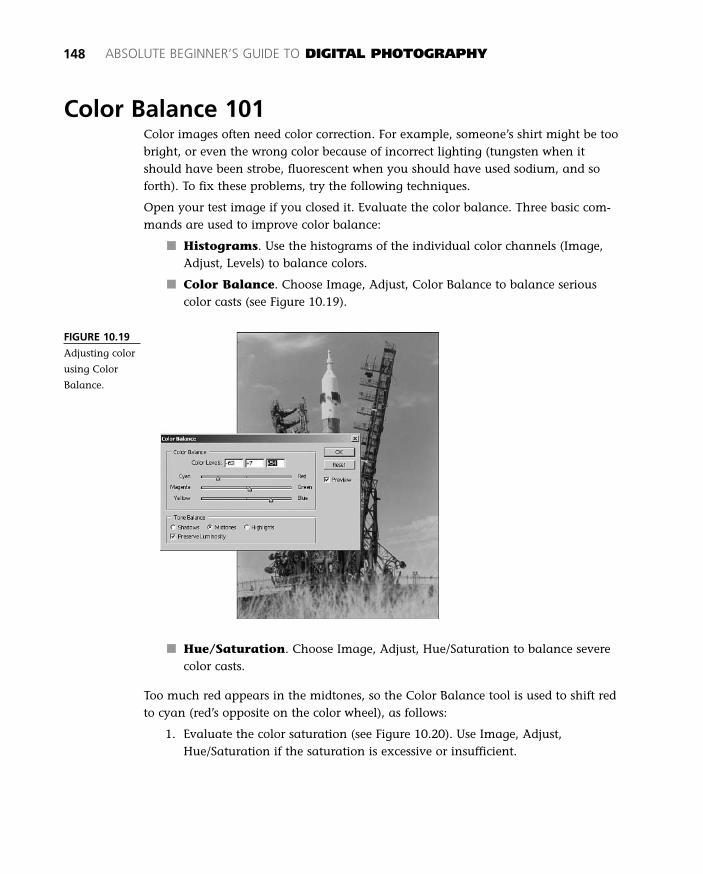
■ Hue/Saturation. Choose Image, Adjust, Hue/Saturation to balance severecolor casts.
Too much red appears in the midtones, so the Color Balance tool is used to shift redto cyan (red’s opposite on the color wheel), as follows:
1. Evaluate the color saturation (see Figure 10.20). Use Image, Adjust,Hue/Saturation if the saturation is excessive or insufficient.
Color Balance 101Color images often need color correction. For example, someone’s shirt might be toobright, or even the wrong color because of incorrect lighting (tungsten when itshould have been strobe, fluorescent when you should have used sodium, and soforth). To fix these problems, try the following techniques.
Open your test image if you closed it. Evaluate the color balance. Three basic com-mands are used to improve color balance:
■ Histograms. Use the histograms of the individual color channels (Image,Adjust, Levels) to balance colors.
■ Color Balance. Choose Image, Adjust, Color Balance to balance seriouscolor casts (see Figure 10.19).
148 ABSOLUTE BEGINNER’S GUIDE TO DIGITAL PHOTOGRAPHY
FIGURE 10.19
Adjusting color
using Color
Balance.
13 0789731207_ch10.qxd 4/6/04 2:22 PM Page 148
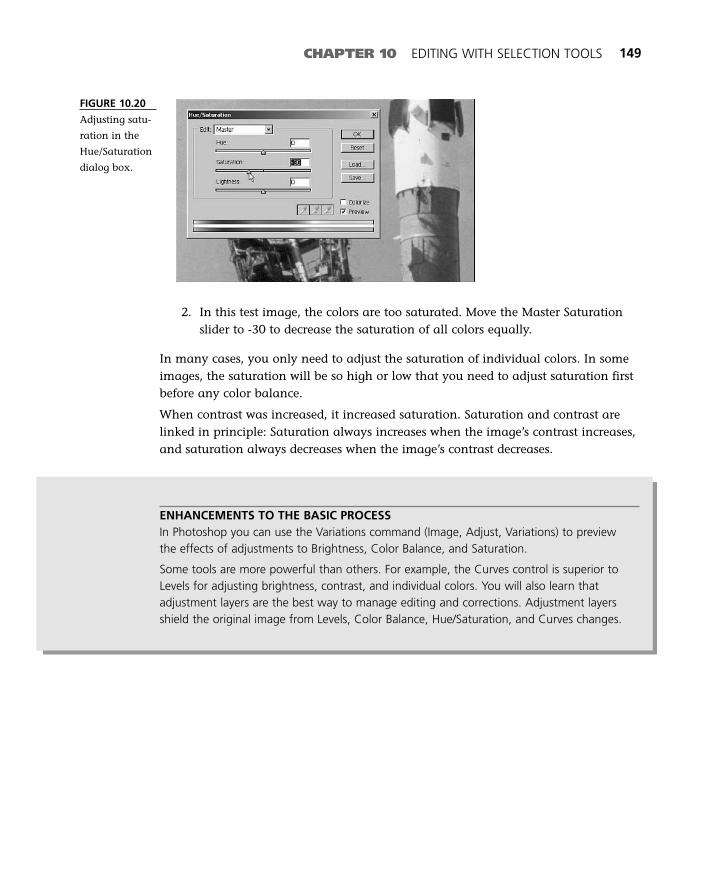
CHAPTER 10 EDITING WITH SELECTION TOOLS 149
FIGURE 10.20
Adjusting satu-
ration in the
Hue/Saturation
dialog box.
2. In this test image, the colors are too saturated. Move the Master Saturationslider to -30 to decrease the saturation of all colors equally.
In many cases, you only need to adjust the saturation of individual colors. In someimages, the saturation will be so high or low that you need to adjust saturation firstbefore any color balance.
When contrast was increased, it increased saturation. Saturation and contrast arelinked in principle: Saturation always increases when the image’s contrast increases,and saturation always decreases when the image’s contrast decreases.
ENHANCEMENTS TO THE BASIC PROCESSIn Photoshop you can use the Variations command (Image, Adjust, Variations) to previewthe effects of adjustments to Brightness, Color Balance, and Saturation.
Some tools are more powerful than others. For example, the Curves control is superior toLevels for adjusting brightness, contrast, and individual colors. You will also learn thatadjustment layers are the best way to manage editing and corrections. Adjustment layersshield the original image from Levels, Color Balance, Hue/Saturation, and Curves changes.
13 0789731207_ch10.qxd 4/6/04 2:22 PM Page 149
150 ABSOLUTE BEGINNER’S GUIDE TO DIGITAL PHOTOGRAPHY
The Absolute Minimum
The full version of Photoshop includes valuable tools for selecting parts of an image,such as the Path/Pen and Lasso tools. Photoshop Elements includes the MagneticLasso, which performs a similar function depending on the sensitivity you set in theoptions toolbar. The bottom line is this:
■ Photoshop’s most powerful selection tool is the Pen tool. Learn how to use itby following the exercises in this book.
■ Photoshop Elements’ most powerful selection tool is the Magnetic Lasso.Adjust Frequency and Edge Contrast to control its sensitivity.
■ If an image looks faint or washed out, try increasing its saturation.
■ Enter a value between 0–25 in the Magic Wand’s Tolerance box if the wand isselecting too many pixels.
■ When using the marquee tools, press and hold down Alt+Shift (xShift) to cre-ate perfect square or circular selections.
■ Selecting hair is difficult. See Chapter 17, “The Importance of Channels,” fortips.
13 0789731207_ch10.qxd 4/6/04 2:22 PM Page 150
11In this chapter
• Quick Mask in Photoshop and PhotoshopElements
• The Amazingly Versatile Pen Tools
• When Your Software Tools Quit Working
• The Power of the Color Range Command
• Feathering and Antialiased Selections
• Photoshop Elements Workarounds for Pen and Quick Mask
Advanced Selection
Tools
In the last chapter, you were introduced to the most common selection
tools in Photoshop through a short exercise. This chapter expands on
that walkthrough by drilling down into all the selection tools available.
A number of these selection tools will remain a mystery or be forgotten
unless you experiment heavily with them. Eventually you will develop
your own method for selecting complex areas. Photoshop and Elements
are so flexible that you can choose from a host of powerful selection
tools besides the traditional Rectangle and Lasso:
■ Advanced Lasso tools. Polygonal Lasso and Magnetic Lasso.
■ Specialized Marquee tools. Single Row and Single Column.
14 0789731207_ch11.qxd 4/6/04 2:18 PM Page 151
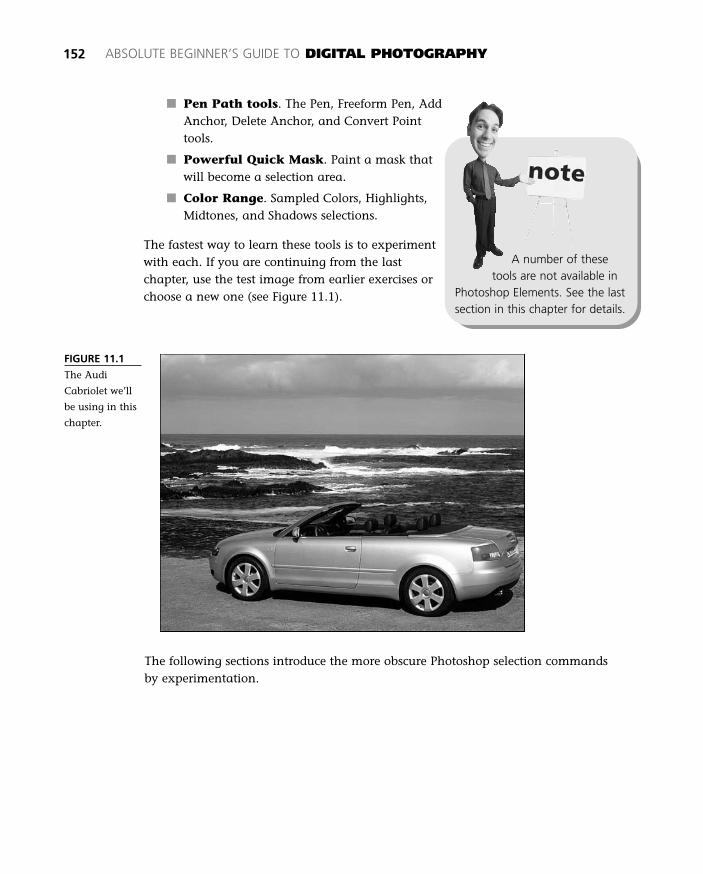
■ Pen Path tools. The Pen, Freeform Pen, AddAnchor, Delete Anchor, and Convert Pointtools.
■ Powerful Quick Mask. Paint a mask thatwill become a selection area.
■ Color Range. Sampled Colors, Highlights,Midtones, and Shadows selections.
The fastest way to learn these tools is to experimentwith each. If you are continuing from the lastchapter, use the test image from earlier exercises orchoose a new one (see Figure 11.1).
152 ABSOLUTE BEGINNER’S GUIDE TO DIGITAL PHOTOGRAPHY
A number of thesetools are not available in
Photoshop Elements. See the lastsection in this chapter for details.
FIGURE 11.1
The Audi
Cabriolet we’ll
be using in this
chapter.
The following sections introduce the more obscure Photoshop selection commandsby experimentation.
14 0789731207_ch11.qxd 4/6/04 2:18 PM Page 152
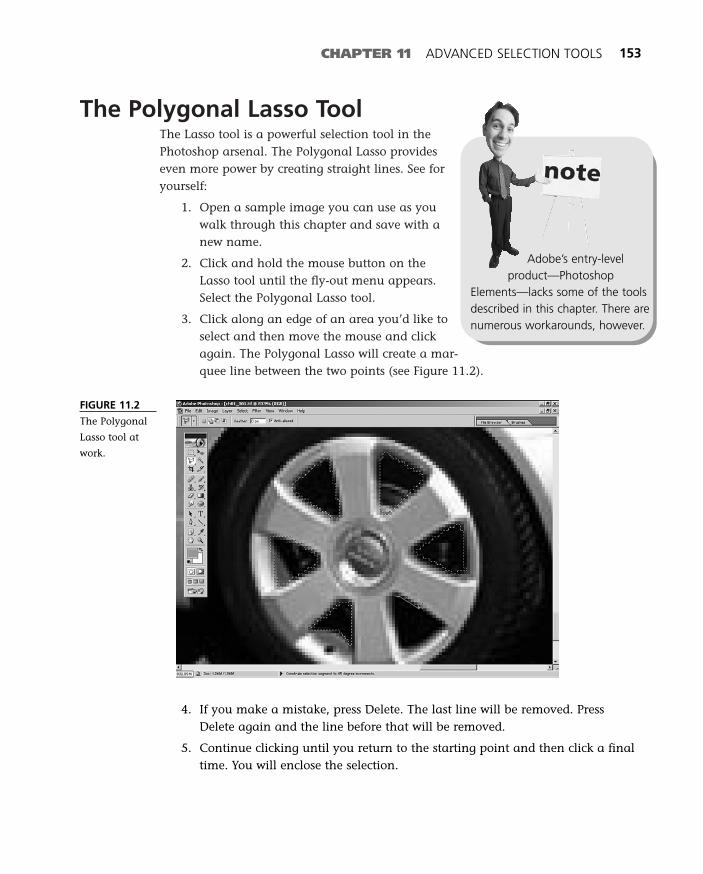
The Polygonal Lasso ToolThe Lasso tool is a powerful selection tool in thePhotoshop arsenal. The Polygonal Lasso provideseven more power by creating straight lines. See foryourself:
1. Open a sample image you can use as youwalk through this chapter and save with anew name.
2. Click and hold the mouse button on theLasso tool until the fly-out menu appears.Select the Polygonal Lasso tool.
3. Click along an edge of an area you’d like toselect and then move the mouse and clickagain. The Polygonal Lasso will create a mar-quee line between the two points (see Figure 11.2).
CHAPTER 11 ADVANCED SELECTION TOOLS 153
Adobe’s entry-levelproduct—Photoshop
Elements—lacks some of the toolsdescribed in this chapter. There arenumerous workarounds, however.
FIGURE 11.2
The Polygonal
Lasso tool at
work.
4. If you make a mistake, press Delete. The last line will be removed. PressDelete again and the line before that will be removed.
5. Continue clicking until you return to the starting point and then click a finaltime. You will enclose the selection.
14 0789731207_ch11.qxd 4/6/04 2:18 PM Page 153
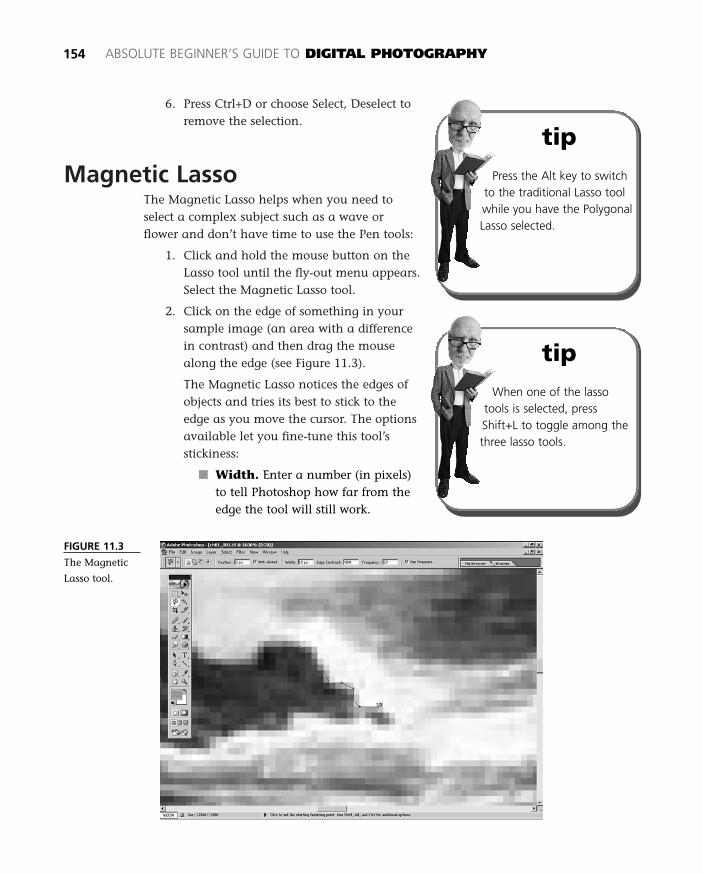
6. Press Ctrl+D or choose Select, Deselect toremove the selection.
Magnetic LassoThe Magnetic Lasso helps when you need toselect a complex subject such as a wave orflower and don’t have time to use the Pen tools:
1. Click and hold the mouse button on theLasso tool until the fly-out menu appears.Select the Magnetic Lasso tool.
2. Click on the edge of something in yoursample image (an area with a differencein contrast) and then drag the mousealong the edge (see Figure 11.3).
The Magnetic Lasso notices the edges ofobjects and tries its best to stick to theedge as you move the cursor. The optionsavailable let you fine-tune this tool’sstickiness:
■ Width. Enter a number (in pixels)to tell Photoshop how far from theedge the tool will still work.
154 ABSOLUTE BEGINNER’S GUIDE TO DIGITAL PHOTOGRAPHY
tipPress the Alt key to switch
to the traditional Lasso toolwhile you have the PolygonalLasso selected.
tipWhen one of the lasso
tools is selected, pressShift+L to toggle among thethree lasso tools.
FIGURE 11.3
The Magnetic
Lasso tool.
14 0789731207_ch11.qxd 4/6/04 2:18 PM Page 154
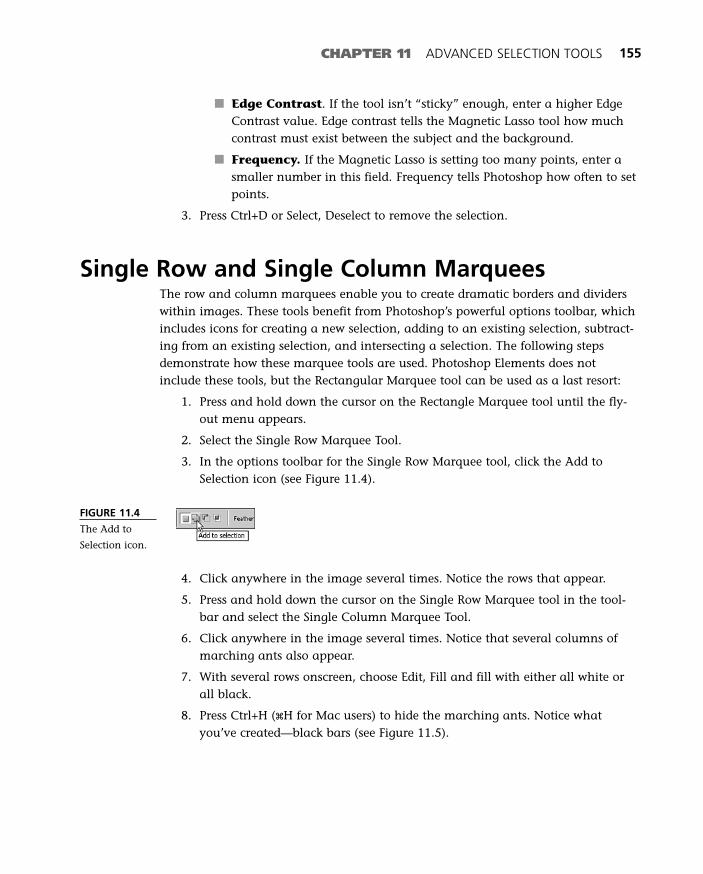
■ Edge Contrast. If the tool isn’t “sticky” enough, enter a higher EdgeContrast value. Edge contrast tells the Magnetic Lasso tool how muchcontrast must exist between the subject and the background.
■ Frequency. If the Magnetic Lasso is setting too many points, enter asmaller number in this field. Frequency tells Photoshop how often to setpoints.
3. Press Ctrl+D or Select, Deselect to remove the selection.
Single Row and Single Column MarqueesThe row and column marquees enable you to create dramatic borders and dividerswithin images. These tools benefit from Photoshop’s powerful options toolbar, whichincludes icons for creating a new selection, adding to an existing selection, subtract-ing from an existing selection, and intersecting a selection. The following stepsdemonstrate how these marquee tools are used. Photoshop Elements does notinclude these tools, but the Rectangular Marquee tool can be used as a last resort:
1. Press and hold down the cursor on the Rectangle Marquee tool until the fly-out menu appears.
2. Select the Single Row Marquee Tool.
3. In the options toolbar for the Single Row Marquee tool, click the Add toSelection icon (see Figure 11.4).
CHAPTER 11 ADVANCED SELECTION TOOLS 155
FIGURE 11.4
The Add to
Selection icon.
4. Click anywhere in the image several times. Notice the rows that appear.
5. Press and hold down the cursor on the Single Row Marquee tool in the tool-bar and select the Single Column Marquee Tool.
6. Click anywhere in the image several times. Notice that several columns ofmarching ants also appear.
7. With several rows onscreen, choose Edit, Fill and fill with either all white orall black.
8. Press Ctrl+H (xH for Mac users) to hide the marching ants. Notice whatyou’ve created—black bars (see Figure 11.5).
14 0789731207_ch11.qxd 4/6/04 2:18 PM Page 155

Quick Mask ModeQuick Mask mode enables you to paint or draw amask that will protect part of an image while youmake changes to other areas. Quick Mask modeis not available in Photoshop Elements; you mustuse the standard Marquee tools to create a selec-tion in this program.
To become better acquainted with Quick Maskmode, keep your test image open and followthese steps:
1. Choose the Lasso tool and create a selec-tion around some object in the image (seeFigure 11.6).
2. Click Quick Mask on, and select the Brush(or other painting tool) from the Toolbox.
3. Select white as the foreground color by clicking the arrow above the black-and-white swatches.
4. In the Tool Options Bar, set the Brush to 100 percent opacity and Normalmode.
5. Paint over the area you want to turn into a selection. The white appears as atransparent overlay. If you paint beyond the area you want to select, switchthe foreground color to black by clicking on the inverse arrows. Paint whiteon the parts you want to remove from the selection.
156 ABSOLUTE BEGINNER’S GUIDE TO DIGITAL PHOTOGRAPHY
FIGURE 11.5
The Single
Column and
Single Row
Marquee tools
are primarily
used to create
black horizontal
and vertical
lines.
If you change thefeather amount for rowor column, you mightsee a warning and thennot be able to see theselected area. The selection is stillthere. Zoom out, then choose Edit,Fill and you’ll see that the selectionis still real. Choose Edit, Undo torevert back.
caution
14 0789731207_ch11.qxd 4/6/04 2:18 PM Page 156
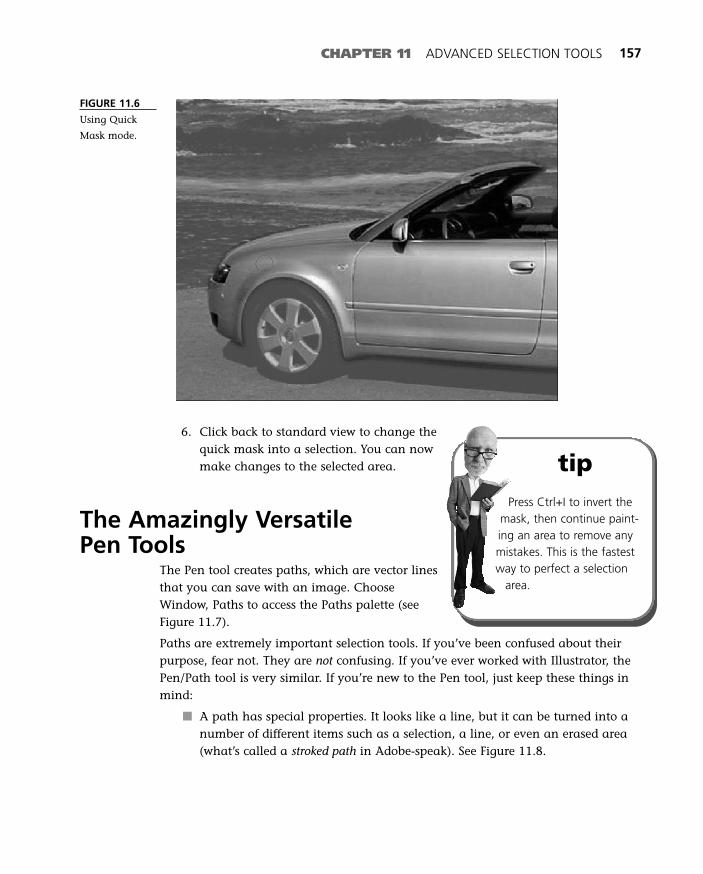
CHAPTER 11 ADVANCED SELECTION TOOLS 157
FIGURE 11.6
Using Quick
Mask mode.
6. Click back to standard view to change thequick mask into a selection. You can nowmake changes to the selected area.
The Amazingly Versatile Pen Tools
The Pen tool creates paths, which are vector linesthat you can save with an image. ChooseWindow, Paths to access the Paths palette (seeFigure 11.7).
Paths are extremely important selection tools. If you’ve been confused about theirpurpose, fear not. They are not confusing. If you’ve ever worked with Illustrator, thePen/Path tool is very similar. If you’re new to the Pen tool, just keep these things inmind:
■ A path has special properties. It looks like a line, but it can be turned into anumber of different items such as a selection, a line, or even an erased area(what’s called a stroked path in Adobe-speak). See Figure 11.8.
tipPress Ctrl+I to invert the
mask, then continue paint-ing an area to remove anymistakes. This is the fastestway to perfect a selection
area.
14 0789731207_ch11.qxd 4/6/04 2:18 PM Page 157
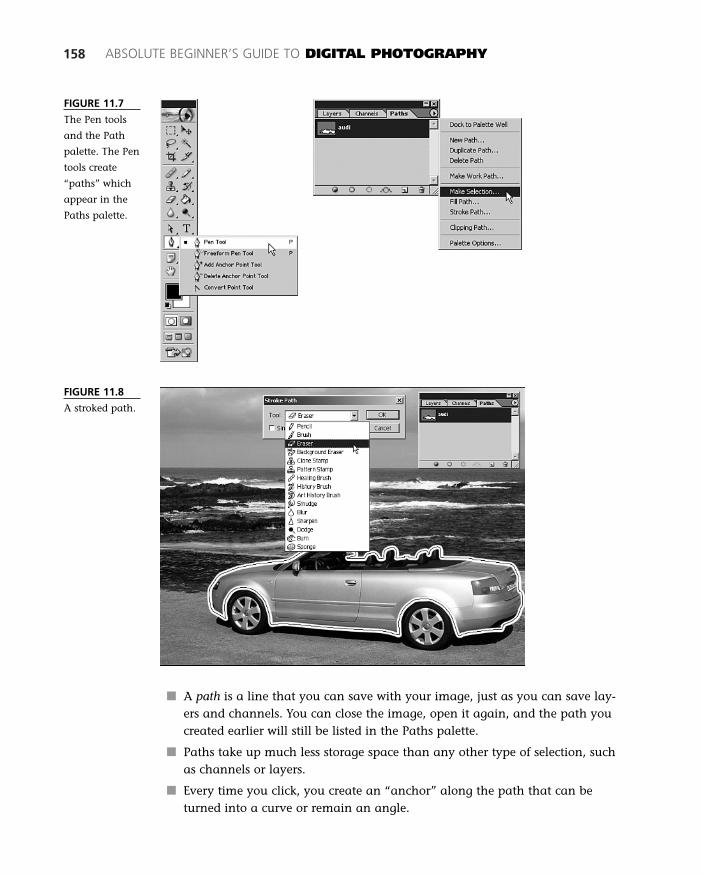
158 ABSOLUTE BEGINNER’S GUIDE TO DIGITAL PHOTOGRAPHY
FIGURE 11.7
The Pen tools
and the Path
palette. The Pen
tools create
“paths” which
appear in the
Paths palette.
FIGURE 11.8
A stroked path.
■ A path is a line that you can save with your image, just as you can save lay-ers and channels. You can close the image, open it again, and the path youcreated earlier will still be listed in the Paths palette.
■ Paths take up much less storage space than any other type of selection, suchas channels or layers.
■ Every time you click, you create an “anchor” along the path that can beturned into a curve or remain an angle.
14 0789731207_ch11.qxd 4/6/04 2:18 PM Page 158
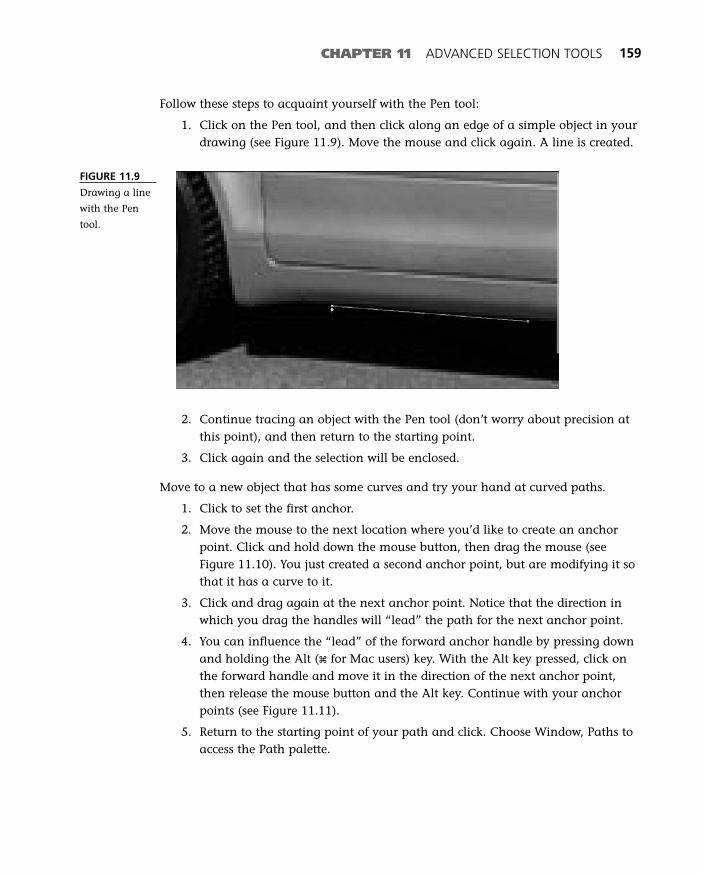
CHAPTER 11 ADVANCED SELECTION TOOLS 159
Follow these steps to acquaint yourself with the Pen tool:
1. Click on the Pen tool, and then click along an edge of a simple object in yourdrawing (see Figure 11.9). Move the mouse and click again. A line is created.
2. Continue tracing an object with the Pen tool (don’t worry about precision atthis point), and then return to the starting point.
3. Click again and the selection will be enclosed.
Move to a new object that has some curves and try your hand at curved paths.
1. Click to set the first anchor.
2. Move the mouse to the next location where you’d like to create an anchorpoint. Click and hold down the mouse button, then drag the mouse (seeFigure 11.10). You just created a second anchor point, but are modifying it sothat it has a curve to it.
3. Click and drag again at the next anchor point. Notice that the direction inwhich you drag the handles will “lead” the path for the next anchor point.
4. You can influence the “lead” of the forward anchor handle by pressing downand holding the Alt (x for Mac users) key. With the Alt key pressed, click onthe forward handle and move it in the direction of the next anchor point,then release the mouse button and the Alt key. Continue with your anchorpoints (see Figure 11.11).
5. Return to the starting point of your path and click. Choose Window, Paths toaccess the Path palette.
FIGURE 11.9
Drawing a line
with the Pen
tool.
14 0789731207_ch11.qxd 4/6/04 2:18 PM Page 159

160 ABSOLUTE BEGINNER’S GUIDE TO DIGITAL PHOTOGRAPHY
FIGURE 11.10
Creating anchor
points.
FIGURE 11.11
Press down and
hold the Alt key
to access the
Pen’s Convert
Point tool.
6. Turn the path into a selection by clicking on the Paths palette (Window,Paths), and then Ctrl+click (x-click) on the path entry listed in this palette.This will turn it into a selection. You can also click the palette’s menu bar,then select Make Selection.
7. Press Ctrl+D to remove the selection. Load the path by clicking on it in thePaths palette.
Click and hold down the cursor on the Pen tool until the Pen fly-out menu appears.Experiment with each command in the fly-out toolbar:
■ Freeform Pen tool. Click and drag much as you would with the Lasso tool(freehand). The cursor can be used to create any shape. When you release themouse, the path turns into straight polygonal lines that mimic the freehandpath you just drew (see Figure 11.12).
14 0789731207_ch11.qxd 4/6/04 2:18 PM Page 160
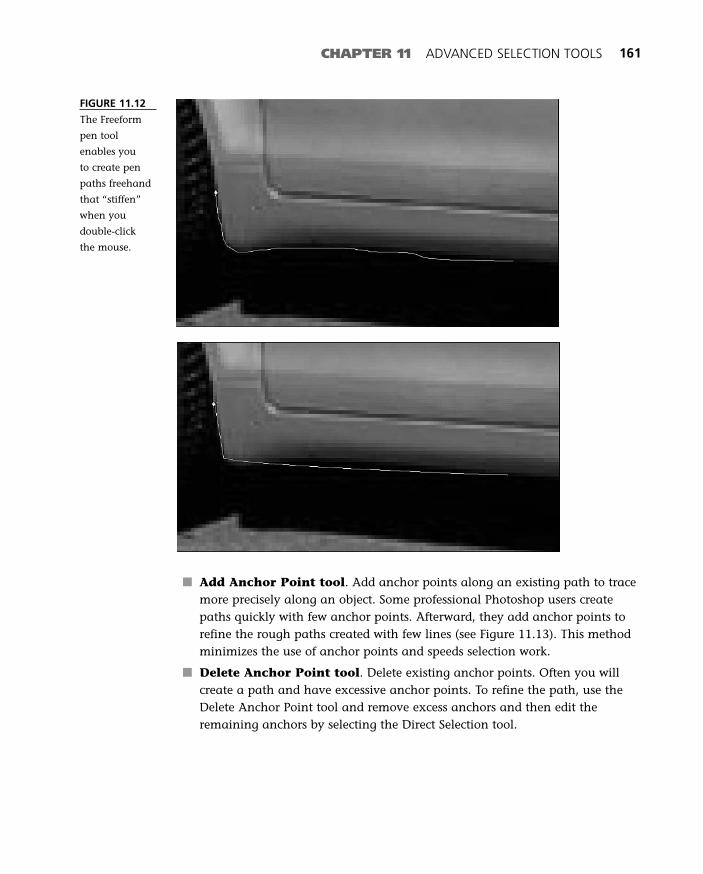
CHAPTER 11 ADVANCED SELECTION TOOLS 161
FIGURE 11.12
The Freeform
pen tool
enables you
to create pen
paths freehand
that “stiffen”
when you
double-click
the mouse.
■ Add Anchor Point tool. Add anchor points along an existing path to tracemore precisely along an object. Some professional Photoshop users createpaths quickly with few anchor points. Afterward, they add anchor points torefine the rough paths created with few lines (see Figure 11.13). This methodminimizes the use of anchor points and speeds selection work.
■ Delete Anchor Point tool. Delete existing anchor points. Often you willcreate a path and have excessive anchor points. To refine the path, use theDelete Anchor Point tool and remove excess anchors and then edit theremaining anchors by selecting the Direct Selection tool.
14 0789731207_ch11.qxd 4/6/04 2:19 PM Page 161
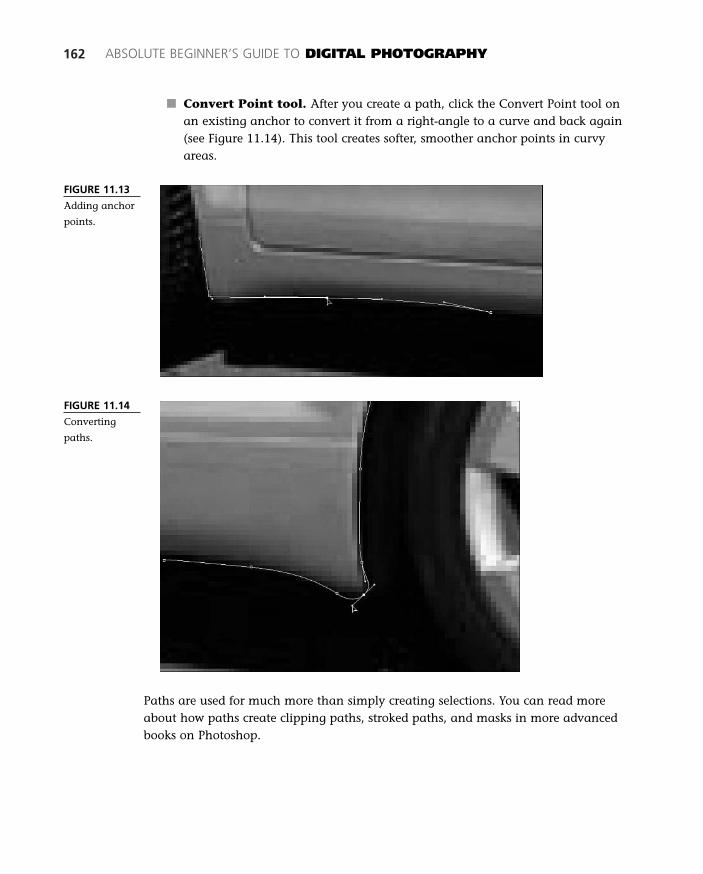
162 ABSOLUTE BEGINNER’S GUIDE TO DIGITAL PHOTOGRAPHY
FIGURE 11.13
Adding anchor
points.
FIGURE 11.14
Converting
paths.
■ Convert Point tool. After you create a path, click the Convert Point tool onan existing anchor to convert it from a right-angle to a curve and back again(see Figure 11.14). This tool creates softer, smoother anchor points in curvyareas.
Paths are used for much more than simply creating selections. You can read moreabout how paths create clipping paths, stroked paths, and masks in more advancedbooks on Photoshop.
14 0789731207_ch11.qxd 4/6/04 2:19 PM Page 162
CHAPTER 11 ADVANCED SELECTION TOOLS 163
Saving SelectionsSelections disappear if you try to select some-thing else. You can fortunately save a selectionby choosing Selection, Save Selection. Selectionsare saved as alpha channels in the Channelspalette (Window, Channels).
The capability to save selections can save youimmense amounts of time. Some selections takehours to create, such as selecting a person in acrowd.
You can read more about selections and workingwith channels in Chapter 17, “The Importance of Channels.”
When Your Software Tools Quit WorkingWhen you begin working with selections, you mayexperience moments when the software suddenlystops functioning. For example, you might try to usea Brush tool to paint on the image, but the brushrefuses to paint. The software might be ignoring theBrush tool because you are painting outside a selec-tion—a selection you created by accident, or oneyou forgot about. The brush will only work insidethe selection.
Another cause is a hidden selection. First look care-fully at the image to see whether a selection is visi-ble (look for the moving marquee). If you don’t seeone, pull down the View menu. Is the commandView, Show, Selection Edges check marked? Whenthere is no check mark beside the commandSelection Edges (a minus sign appears instead), itmeans that there is a hidden selection in the image.Choose View, Show, Selection Edges to make the selection visible.
To deselect a selection, use the command Select, Deselect or just press Ctrl+D (xD forMac). Your brush will now work anywhere in the image.
tipIf you are using Adobe
Photoshop and you acciden-tally erase a selection, thecommand Select, Reselectrestores the last selection you
made.
Another cause ofuncooperative selection
tools is that the image might bein 16-bit format. Choose Image,Mode and make sure it says 8 Bits/Channel.
14 0789731207_ch11.qxd 4/6/04 2:19 PM Page 163
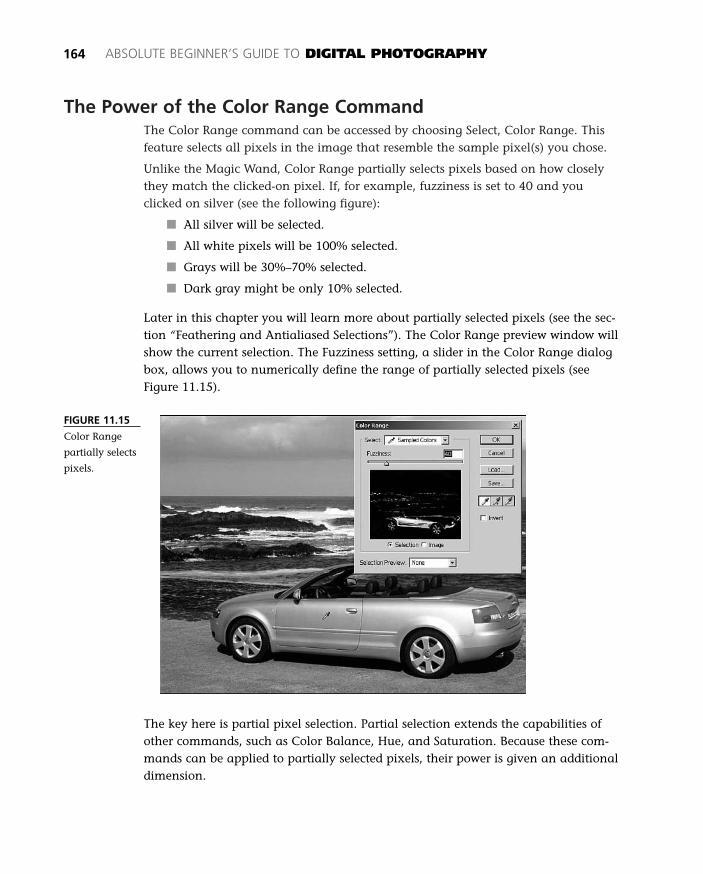
The Power of the Color Range CommandThe Color Range command can be accessed by choosing Select, Color Range. Thisfeature selects all pixels in the image that resemble the sample pixel(s) you chose.
Unlike the Magic Wand, Color Range partially selects pixels based on how closelythey match the clicked-on pixel. If, for example, fuzziness is set to 40 and youclicked on silver (see the following figure):
■ All silver will be selected.
■ All white pixels will be 100% selected.
■ Grays will be 30%–70% selected.
■ Dark gray might be only 10% selected.
Later in this chapter you will learn more about partially selected pixels (see the sec-tion “Feathering and Antialiased Selections”). The Color Range preview window willshow the current selection. The Fuzziness setting, a slider in the Color Range dialogbox, allows you to numerically define the range of partially selected pixels (seeFigure 11.15).
164 ABSOLUTE BEGINNER’S GUIDE TO DIGITAL PHOTOGRAPHY
FIGURE 11.15
Color Range
partially selects
pixels.
The key here is partial pixel selection. Partial selection extends the capabilities ofother commands, such as Color Balance, Hue, and Saturation. Because these com-mands can be applied to partially selected pixels, their power is given an additionaldimension.
14 0789731207_ch11.qxd 4/6/04 2:19 PM Page 164
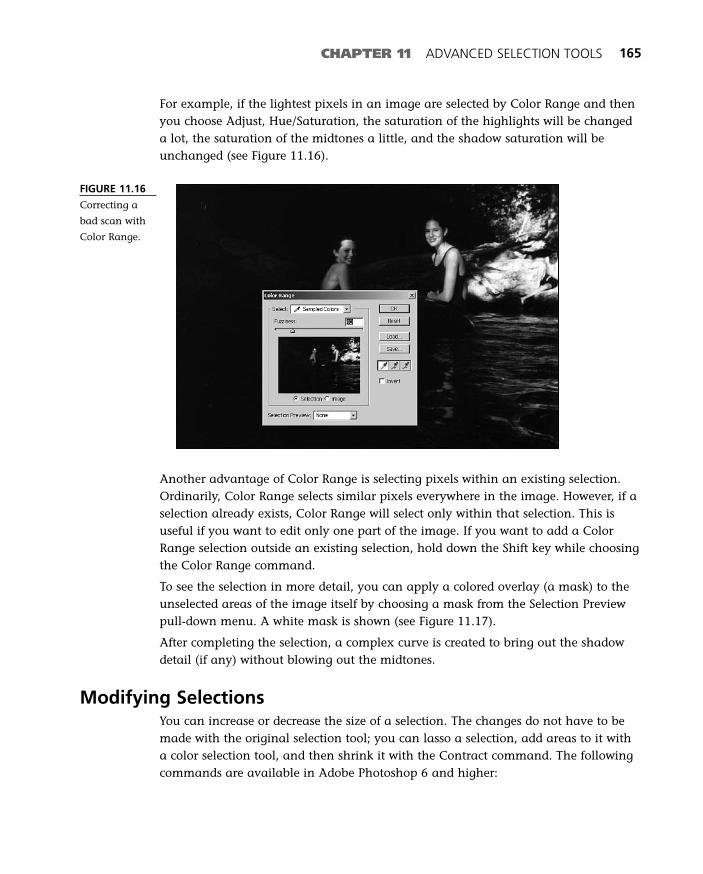
CHAPTER 11 ADVANCED SELECTION TOOLS 165
For example, if the lightest pixels in an image are selected by Color Range and thenyou choose Adjust, Hue/Saturation, the saturation of the highlights will be changeda lot, the saturation of the midtones a little, and the shadow saturation will beunchanged (see Figure 11.16).
FIGURE 11.16
Correcting a
bad scan with
Color Range.
Another advantage of Color Range is selecting pixels within an existing selection.Ordinarily, Color Range selects similar pixels everywhere in the image. However, if aselection already exists, Color Range will select only within that selection. This isuseful if you want to edit only one part of the image. If you want to add a ColorRange selection outside an existing selection, hold down the Shift key while choosingthe Color Range command.
To see the selection in more detail, you can apply a colored overlay (a mask) to theunselected areas of the image itself by choosing a mask from the Selection Previewpull-down menu. A white mask is shown (see Figure 11.17).
After completing the selection, a complex curve is created to bring out the shadowdetail (if any) without blowing out the midtones.
Modifying SelectionsYou can increase or decrease the size of a selection. The changes do not have to bemade with the original selection tool; you can lasso a selection, add areas to it witha color selection tool, and then shrink it with the Contract command. The followingcommands are available in Adobe Photoshop 6 and higher:
14 0789731207_ch11.qxd 4/6/04 2:19 PM Page 165

1. Choose Select, Modify, Expand or Select, Modify, Contract to make the selec-tion grow or shrink in every direction by the number of pixels you specify ina dialog box (see Figure 11.18).
166 ABSOLUTE BEGINNER’S GUIDE TO DIGITAL PHOTOGRAPHY
FIGURE 11.17
The White
Matte Selection
Preview high-
lights areas that
will be selected.
FIGURE 11.18
The Expand
command
expands by the
specified num-
ber of pixels.
2. Expand with the options in the Select menu:
■ Select, Grow operates like a magic wand. It selects neighboring pixels inthe image that resemble those in the existing selection. Tolerances aretaken from the Magic Wand options bar.
14 0789731207_ch11.qxd 4/6/04 2:19 PM Page 166
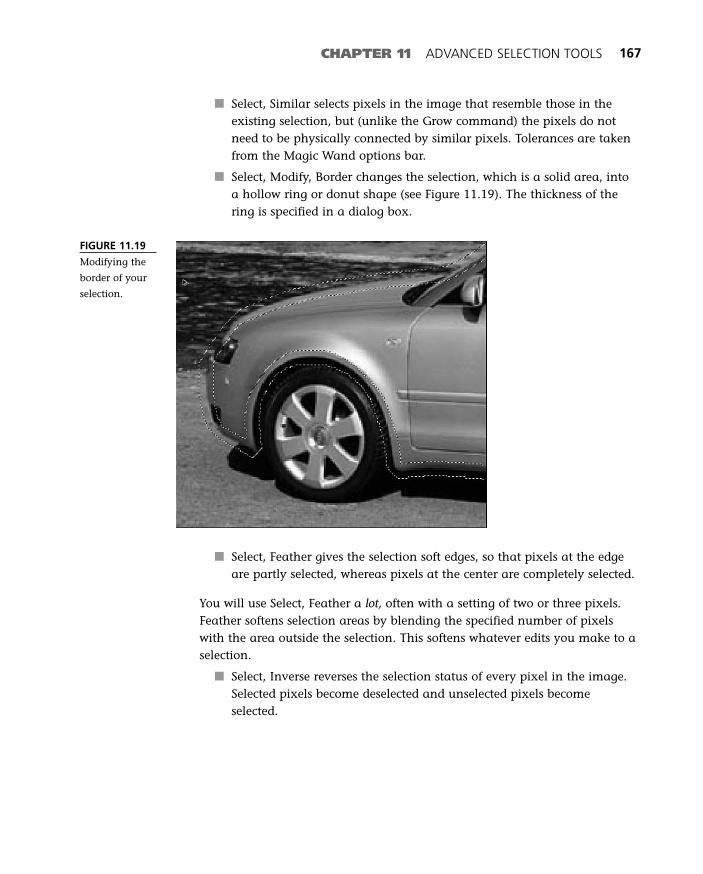
■ Select, Similar selects pixels in the image that resemble those in theexisting selection, but (unlike the Grow command) the pixels do notneed to be physically connected by similar pixels. Tolerances are takenfrom the Magic Wand options bar.
■ Select, Modify, Border changes the selection, which is a solid area, intoa hollow ring or donut shape (see Figure 11.19). The thickness of thering is specified in a dialog box.
CHAPTER 11 ADVANCED SELECTION TOOLS 167
FIGURE 11.19
Modifying the
border of your
selection.
■ Select, Feather gives the selection soft edges, so that pixels at the edgeare partly selected, whereas pixels at the center are completely selected.
You will use Select, Feather a lot, often with a setting of two or three pixels.Feather softens selection areas by blending the specified number of pixelswith the area outside the selection. This softens whatever edits you make to aselection.
■ Select, Inverse reverses the selection status of every pixel in the image.Selected pixels become deselected and unselected pixels becomeselected.
14 0789731207_ch11.qxd 4/6/04 2:19 PM Page 167
■ View, Show, Selection Edges. Thiscommand hides the “marchingants” selection marquee; the selec-tion is still there but hidden. This isuseful when you need to comparethe selection to the surroundingarea while making changes.Remember to restore the marqueeby choosing View, Show, SelectionEdges again or you might forgetthat there is a hidden selection.
168 ABSOLUTE BEGINNER’S GUIDE TO DIGITAL PHOTOGRAPHY
tipPress Ctrl+Shift+I to
invert the selection. Thisshortcut will come in handyas you gain more experi-ence.
HIDING THE CRAWLING ANTSAt times the selection marquee can be a distraction, and you might prefer to work withoutit. You can temporarily hide the selection marquee by choosing View, Show, SelectionEdges, or just press Ctrl+H (xH for Mac). You can make the marquee reappear by choosingView, Show, Selection Edges again.
Feathering and Antialiased SelectionsOrdinarily, pixels are either completely selected or completely unselected. A fewselection tools, however, create partially selected pixels. Partially selected pixels areextremely useful in editing. For example, a narrow zone of partially selected pixelsat the edge of selection will create soft gradations between the edited and uneditedareas. Soft gradations make your edits appear to be a natural part of the picture.The following exercise will show you how feathering blends edited areas into animage. Figure 11.20 is the subject.
Feathering and antialiasing are available options. In the Feather box, you enter anumber; the width of the feathered zone will be several times this number. Otherselection tools offer similar options. You can also feather any selection after it is cre-ated.
Images with no antialiasing and no feathering stand out immediately after anychanges are made (see Figure 11.21). Antialiased selections are surrounded by a one-pixel-wide ring of partially selected pixels. Feathered selections have a border fromone pixel to whatever value you enter for the partially selected pixels (see Figure11.22). The width of the border can even be big enough to let you create such fea-tures as vignettes.
14 0789731207_ch11.qxd 4/6/04 2:19 PM Page 168
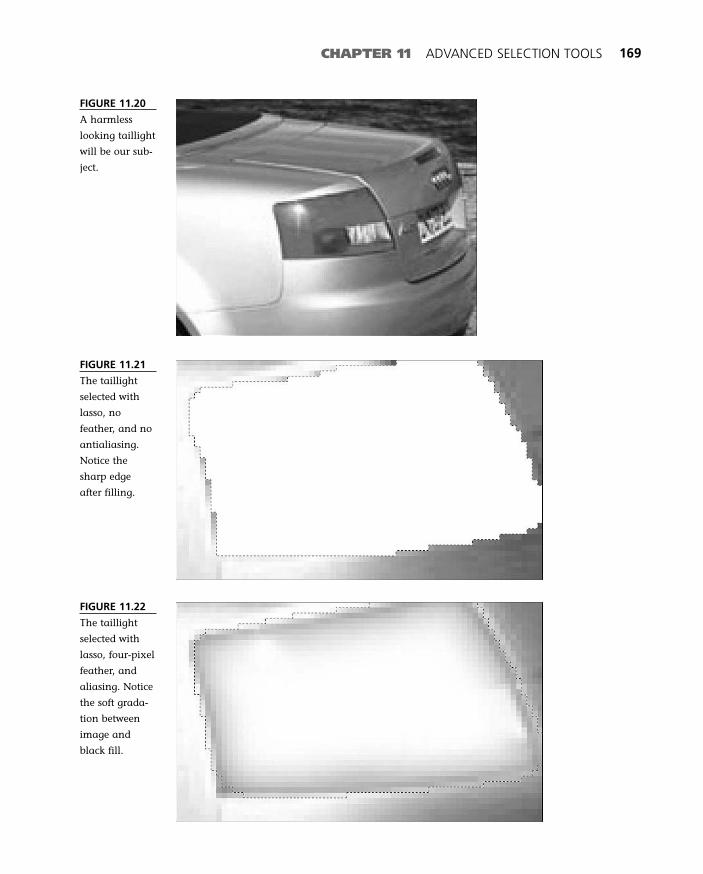
CHAPTER 11 ADVANCED SELECTION TOOLS 169
FIGURE 11.21
The taillight
selected with
lasso, no
feather, and no
antialiasing.
Notice the
sharp edge
after filling.
FIGURE 11.22
The taillight
selected with
lasso, four-pixel
feather, and
aliasing. Notice
the soft grada-
tion between
image and
black fill.
FIGURE 11.20
A harmless
looking taillight
will be our sub-
ject.
14 0789731207_ch11.qxd 4/6/04 2:19 PM Page 169
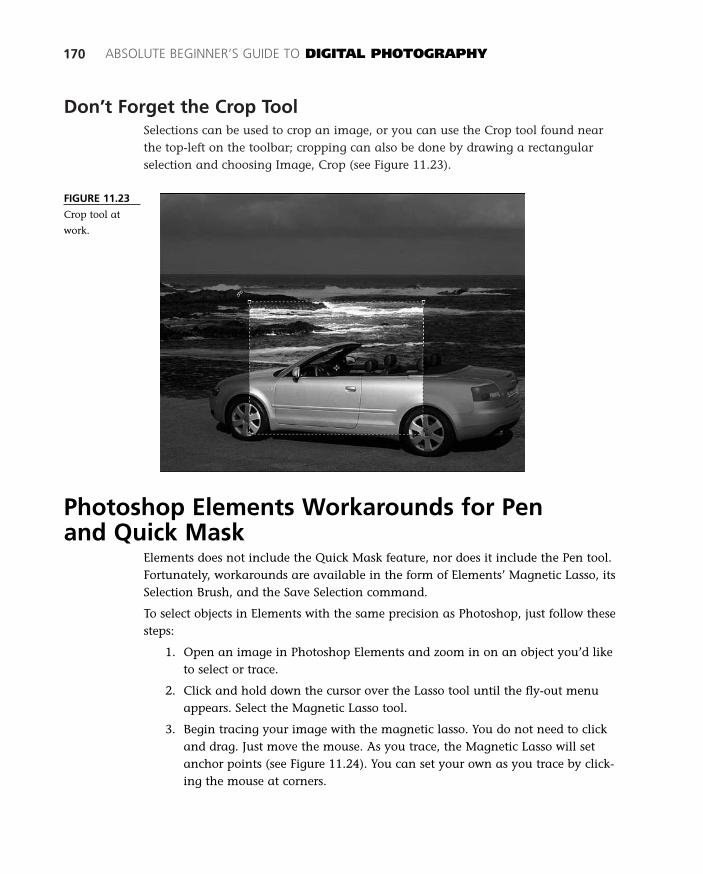
Don’t Forget the Crop ToolSelections can be used to crop an image, or you can use the Crop tool found nearthe top-left on the toolbar; cropping can also be done by drawing a rectangularselection and choosing Image, Crop (see Figure 11.23).
170 ABSOLUTE BEGINNER’S GUIDE TO DIGITAL PHOTOGRAPHY
FIGURE 11.23
Crop tool at
work.
Photoshop Elements Workarounds for Pen and Quick Mask
Elements does not include the Quick Mask feature, nor does it include the Pen tool.Fortunately, workarounds are available in the form of Elements’ Magnetic Lasso, itsSelection Brush, and the Save Selection command.
To select objects in Elements with the same precision as Photoshop, just follow thesesteps:
1. Open an image in Photoshop Elements and zoom in on an object you’d liketo select or trace.
2. Click and hold down the cursor over the Lasso tool until the fly-out menuappears. Select the Magnetic Lasso tool.
3. Begin tracing your image with the magnetic lasso. You do not need to clickand drag. Just move the mouse. As you trace, the Magnetic Lasso will setanchor points (see Figure 11.24). You can set your own as you trace by click-ing the mouse at corners.
14 0789731207_ch11.qxd 4/6/04 2:19 PM Page 170

To move the image while you trace, press and hold down the spacebar onyour keyboard. Move the mouse and then release the spacebar. The MagneticLasso tool reappears.
If you have problems keeping the Magnetic Lasso from jumping all over theimage, increase the Edge Contrast in the toolbar.
If an unwanted anchor appears, or if you jerk the mouse by mistake, simplypress the Delete key on the keyboard. The anchor will be deleted. Press Deleteagain to delete the preceding anchor. Continue pressing Delete as far back asnecessary and then continue tracing.
4. Return to the starting point and the selection will be enclosed.
5. Click the Selection Brush tool. The image changes to a quick mask! Now youcan see how well you did and even correct mistakes.
6. Zoom in and examine the selection. Press and hold down the spacebar andmove the mouse to see how the selection went. Select a small brush size inthe toolbar, such as five pixels, and fix mistakes (see Figure 11.25). You canreverse the quick mask by pressing Ctrl+Alt+I (Ctrl-I in Photoshop).
If you need to come back to the image later and aren’t finished, you can savethe selection.
7. Click Select, Save Selection and then give the selection a name.
8. When you return to the image, choose Select, Load Selection and then con-tinue working with the image. If you need to use the Magnetic Lasso to addto the existing selection, click the Add to Selection icon in the Lasso’s toolbar.
CHAPTER 11 ADVANCED SELECTION TOOLS 171
FIGURE 11.24
Tracing with the
Magnetic Lasso
in Elements.
14 0789731207_ch11.qxd 4/6/04 2:19 PM Page 171
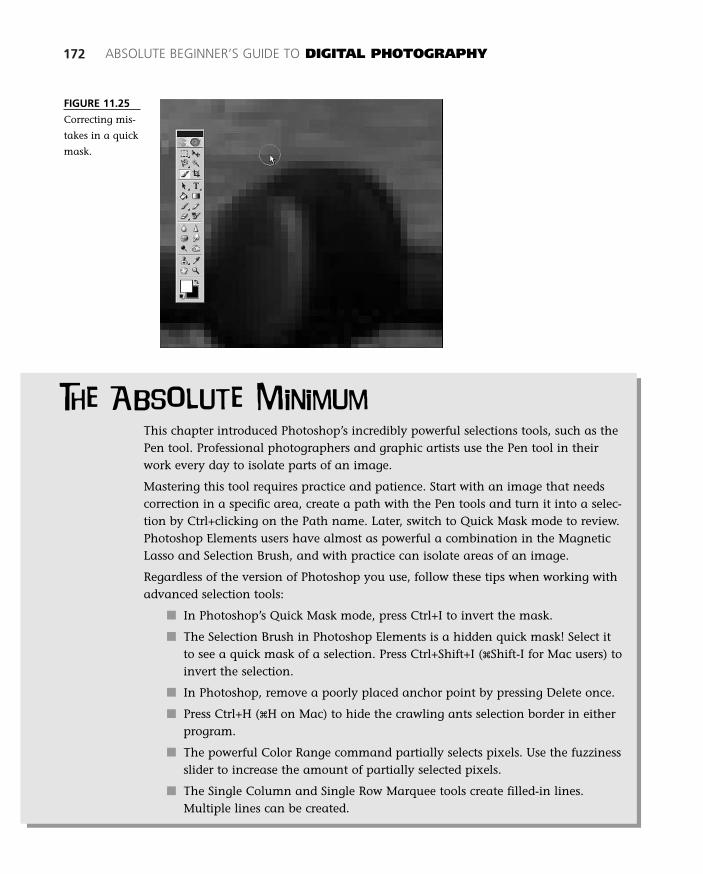
172 ABSOLUTE BEGINNER’S GUIDE TO DIGITAL PHOTOGRAPHY
FIGURE 11.25
Correcting mis-
takes in a quick
mask.
The Absolute Minimum
This chapter introduced Photoshop’s incredibly powerful selections tools, such as thePen tool. Professional photographers and graphic artists use the Pen tool in theirwork every day to isolate parts of an image.
Mastering this tool requires practice and patience. Start with an image that needscorrection in a specific area, create a path with the Pen tools and turn it into a selec-tion by Ctrl+clicking on the Path name. Later, switch to Quick Mask mode to review.Photoshop Elements users have almost as powerful a combination in the MagneticLasso and Selection Brush, and with practice can isolate areas of an image.
Regardless of the version of Photoshop you use, follow these tips when working withadvanced selection tools:
■ In Photoshop’s Quick Mask mode, press Ctrl+I to invert the mask.
■ The Selection Brush in Photoshop Elements is a hidden quick mask! Select itto see a quick mask of a selection. Press Ctrl+Shift+I (xShift-I for Mac users) toinvert the selection.
■ In Photoshop, remove a poorly placed anchor point by pressing Delete once.
■ Press Ctrl+H (xH on Mac) to hide the crawling ants selection border in eitherprogram.
■ The powerful Color Range command partially selects pixels. Use the fuzzinessslider to increase the amount of partially selected pixels.
■ The Single Column and Single Row Marquee tools create filled-in lines.Multiple lines can be created.
14 0789731207_ch11.qxd 4/6/04 2:19 PM Page 172
12In this chapter
• Understanding Different Terms for Resolution
• Digital Cameras and Resolution
• Resolution of Film: How Many Pixels?
• Scanner Software and Resolution
• Understanding Bit Depth
The Importance
of Resolution
In a few pages, you will encounter a table that you should photocopy
and stick on your wall. It contains the final solution for resolution con-
fusion. The one subject in digital photography that is most difficult for
beginners will be explained as clearly as possible.
The Sunday paper usually includes a 16-page color ad from your local
electronics store filled with gadgets. The descriptions use terms few of
us really understand. Surely you’ve encountered the terms dpi, ppi, lpi,
cpi, 24-bit, megapixel, Mb, MB, Kb, and KB. How comfortable are you
with them?
15 0789731207_ch12.qxd 4/6/04 2:15 PM Page 173
Individually, these terms might make sense (on an alert day), but when these termsand their associated technologies are used together to edit or output a digital image,only experienced graphic artists and photographers really understand what is going on.
Here is an example:
Sarah, an ambitious beginning photographer, is asked to photograph her best friendCynthia’s graduation party. She arrives at the party with her 4-megapixel digitalcamera and fills up her memory card with dozens of images. At home, Sarah copiesthe images to her computer. Cynthia calls and asks Sarah to put the best images onSarah’s Web site for review. Sarah picks the 10 best images and begins to upload.
Even with her fast DSL connection, the upload takes 20 minutes, far longer thanSarah expected. Cynthia gets online, sees the images, calls, and says the images areso big she can’t really see them on her screen. So, Cynthia asks Sarah to simply printout the images and bring them to her house. Frustrated, Sarah opens each image inPhotoshop, reduces its size, and then uses the File, Print Command.
The images print out, but are pixelated and a mess. She takes them to Cynthia, whopromptly decides none of them were good enough to keep. Distraught, Sarah throwsup her arms, runs out the door, and munches on cupcakes for the rest of the week.
The images were fine, but Sarah used the wrong resolution twice: online and inprint. She took perfectly acceptable photos, but her presentation failed because shedidn’t understand when to use the appropriate resolution.
Understanding Different Terms for ResolutionThe term resolution is formally defined as follows: The process or capability of mak-ing distinguishable the individual parts of an object, closely adjacent optical images,or sources of light.
In simpler terms, resolution is a measure of elements or pixels in an image. Thenumber of pixels in a digital image or dots in an inkjet printout, for example.Cameras currently use the term megapixel to define their resolution; printers use dpi,and scanners use ppi. Let’s sort out the terms used by digital photographers that referto resolution.
Photographers and printers use the following terms when discussing resolution:
■ ppi. Pixels per inch measures how many pixels that are lined up side by sidethat fit within a one-inch square. A computer screen varies between 72 ppiand 96 ppi. Scanners will scan anywhere from 300 ppi to 2400 ppi or more.In other words, the number of pixels it creates within an inch as it scans animage.
174 ABSOLUTE BEGINNER’S GUIDE TO DIGITAL PHOTOGRAPHY
15 0789731207_ch12.qxd 4/6/04 2:15 PM Page 174
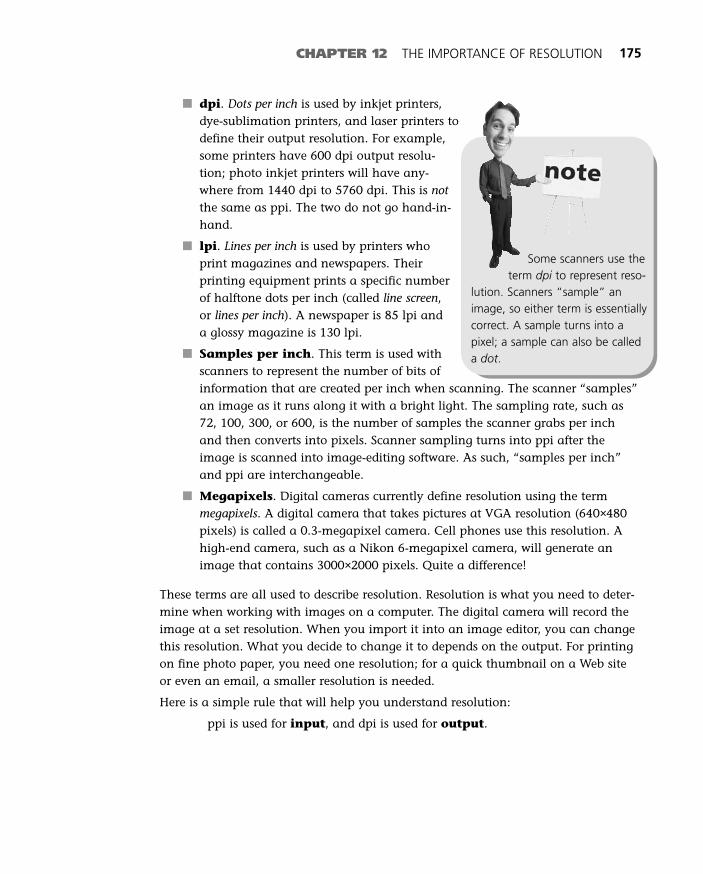
■ dpi. Dots per inch is used by inkjet printers,dye-sublimation printers, and laser printers todefine their output resolution. For example,some printers have 600 dpi output resolu-tion; photo inkjet printers will have any-where from 1440 dpi to 5760 dpi. This is notthe same as ppi. The two do not go hand-in-hand.
■ lpi. Lines per inch is used by printers whoprint magazines and newspapers. Theirprinting equipment prints a specific numberof halftone dots per inch (called line screen,or lines per inch). A newspaper is 85 lpi anda glossy magazine is 130 lpi.
■ Samples per inch. This term is used withscanners to represent the number of bits ofinformation that are created per inch when scanning. The scanner “samples”an image as it runs along it with a bright light. The sampling rate, such as72, 100, 300, or 600, is the number of samples the scanner grabs per inchand then converts into pixels. Scanner sampling turns into ppi after theimage is scanned into image-editing software. As such, “samples per inch”and ppi are interchangeable.
■ Megapixels. Digital cameras currently define resolution using the termmegapixels. A digital camera that takes pictures at VGA resolution (640×480pixels) is called a 0.3-megapixel camera. Cell phones use this resolution. Ahigh-end camera, such as a Nikon 6-megapixel camera, will generate animage that contains 3000×2000 pixels. Quite a difference!
These terms are all used to describe resolution. Resolution is what you need to deter-mine when working with images on a computer. The digital camera will record theimage at a set resolution. When you import it into an image editor, you can changethis resolution. What you decide to change it to depends on the output. For printingon fine photo paper, you need one resolution; for a quick thumbnail on a Web siteor even an email, a smaller resolution is needed.
Here is a simple rule that will help you understand resolution:
ppi is used for input, and dpi is used for output.
CHAPTER 12 THE IMPORTANCE OF RESOLUTION 175
Some scanners use theterm dpi to represent reso-
lution. Scanners “sample” animage, so either term is essentiallycorrect. A sample turns into apixel; a sample can also be calleda dot.
15 0789731207_ch12.qxd 4/6/04 2:15 PM Page 175

Images taken with digital cameras and photographs or negatives scanned into thecomputer use the term pixels per inch (ppi) to represent resolution; printed imagesthat are output from printers use the term dots per inch (dpi) to represent resolution.You can only control one: ppi. The output—dpi—is fixed by your printer. We’llexplore these terms in the next section.
Input ResolutionScans from a scanner and images from a digital camera come into your computer atdifferent resolutions. Cameras import images at 72 ppi and scanners import imagesat whatever resolution you specify in the scanner software.
The resolution you use to input images into your computer might not be the best res-olution for output to a printer or the Web. The next few sections discuss input resolu-tion and how you can change it in your favorite image editor.
Digital Cameras and ResolutionResolution for digital cameras is simple because only two numbers apply—sensorresolution and output resolution.
Sensor resolution is the size in pixels of the sensor (for example, 2-megapixel, 4-megapixel, 5-megapixel, 6-megapixel, 8-megapixel, and so on). This is the bignumber you see advertised in the paper. The larger the sensor, the higher the resolu-tion of the image when it’s taken. Table 12.1 contains the approximate resolution ofsome digital cameras.
Table 12.1 Digital Camera Sensor ResolutionsSensor Size Approximate Image Size
22-megapixel (for medium-format cameras) 4056×5356
13.7-megapixel 4536×3024
11-megapixel 4064×2704
8-megapixel 3264×2448
6-megapixel 3072×2048
5-megapixel 2608×1952
4-megapixel 2272×1704
3.3-megapixel 2048×1536
2.1-megapixel 1600×1200
1.3-megapixel 1280×960
0.3-megapixel 640×480
176 ABSOLUTE BEGINNER’S GUIDE TO DIGITAL PHOTOGRAPHY
15 0789731207_ch12.qxd 4/6/04 2:15 PM Page 176

One term that cannot be used with digital cameras ispixels per inch. The reason is that CCD sensors come indifferent sizes. A 2.1-megapixel sensor might betwice the size of a 4-megapixel sensor, for example.This why you only hear about cameras in terms of total pixels (megapixels) or output reso-lution (1600×1200 pixels, for example).
Every type of digital camera—from a low-endphone camera to the latest Nikon or Canon—out-puts at 72 pixels per inch.
When you import an image from a digital camerato your computer, it is not ready to print. Why? Itcomes in at a screen resolution (72 ppi) that wouldgenerate an enormous print. To print it, you needto change its resolution from 72 ppi to somethinguseful on your printer—300 ppi, for example. Ifyou try to print a photo immediately after import-ing it, either your image editor will state that theimage is larger than the paper size, or you willprint only a portion of the image on paper.
Today’s newer technologies, such as EXIF printingand print scaling in software, enable digital picturesto be printed correctly without changes. (You can read about EXIF printing inChapter 2, “Advantages and Disadvantages of Digital Cameras.”) For example, youcan connect an HP camera directly to an HP photo printer and print a picture at thehighest resolution possible.
If you are more interested in editing images, however, you will need to change theresolution of your images after you’ve imported them. This is pretty simple:
1. Connect your digital camera to your computer and import the images.
2. Once they are on the hard drive, open Photoshop or your favorite image edi-tor and open the first image.
3. Change the resolution. In Photoshop for example, choose Image, Image Sizeand then change Resolution to 200, 300, or 600 depending on the quality ofyour printer. Click OK when finished. Photo printers with high-quality glossyphoto paper can accommodate 300–600 ppi. Traditional color inkjet printerscan accommodate 200–300 ppi.
4. Put glossy or matte photo paper in your printer, make sure you have the cor-rect physical size of the image (use Image, Image Size again if necessary),and print your photo.
CHAPTER 12 THE IMPORTANCE OF RESOLUTION 177
The difference in sizeof CCD sensors versus film
actually leads to other annoy-ances, such as the ”focal lengthmultiplier.” On digital SLRs (sin-gle-lens reflex cameras), the focallength of a lens must be multi-plied by a number to determinethe actual focal length. On a FujiS3 SLR, for example, the focallength multiplier is 1.5×. A 50mmlens actually is working at 75mm,for example.
15 0789731207_ch12.qxd 4/6/04 2:15 PM Page 177
Resolution of Film: How Many Pixels?The first high-end consumer cameras in 1998 were 1-megapixel or less, and couldcreate digital images up to 1280×960 resolution. Since 1998, the digital cameraindustry has continually released better cameras. Cameras producing images of3000×2000 pixels are now under the $1,000 mark. To the untrained eye, imagesfrom these advanced third-generation cameras are the same as a regular filmimage.
If today’s cameras are that good, have they finally caught up with traditional film interms of resolution? Essentially, no. The resolution of film—negative and positive(slide) film—is much, much higher. Film has a resolution of between 20 and 27 mil-lion pixels!
Film is an analog medium and is affected greatly by the lens, film speed, type offilm, lighting conditions, handheld stability of the photographer, and scanner. Acompromise in quality in any of these areas will lower this resolution dramaticallyto that of a 6-megapixel camera or less.
The most significant disadvantage to film is that it must be scanned. Digital imagesare made up of ones and zeros that can be imported into your image editor with noloss. Film must be scanned, and scanner quality varies dramatically, with drumscanners being the best at capturing detail. As you increase the resolution of thescanner however, you reach a threshold where further detail becomes noise. The scanner then becomes the limiting factor in this film/digital comparison.
The scanner forces film to about a 20-million pixel limit. This means that a digitalcamera that can produce images at 5000×4000 pixels will equal the quality of ascanned negative. Today’s 11-megapixel cameras, which feature 4064×2704-pixelresolution, are closing in. Digital film “backs” (extensions that fit onto the back ofthe camera) for medium-format cameras already surpass this resolution, but areincredibly expensive ($10,000 and up, minus the camera) and slow (shutter speedsof one second or longer).
The pictures produced from disposable cameras equal the resolution of a 2- to 4-megapixel camera because of their plastic lenses, fixed shutter speed, fast film, andamateur hands (see Figure 12.1).
So, if anyone asks whether digital cameras are available that equal the quality offilm, the answer is yes…and no. The “yes” part means that cameras and lenses areavailable that equal film-camera quality. The “no” part is that these tools rely onthe photographer.
178 ABSOLUTE BEGINNER’S GUIDE TO DIGITAL PHOTOGRAPHY
15 0789731207_ch12.qxd 4/6/04 2:15 PM Page 178
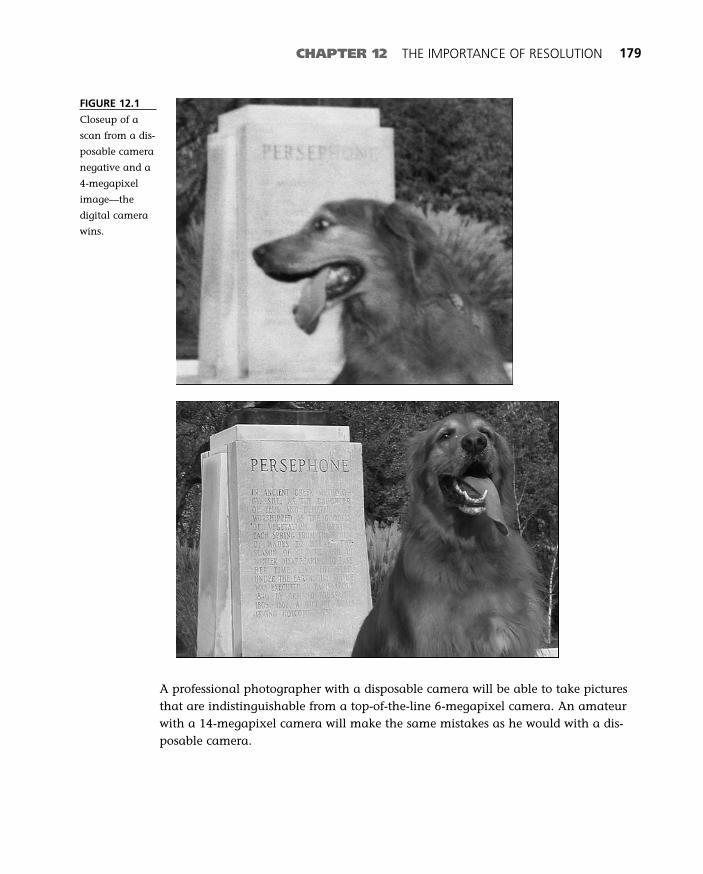
CHAPTER 12 THE IMPORTANCE OF RESOLUTION 179
FIGURE 12.1
Closeup of a
scan from a dis-
posable camera
negative and a
4-megapixel
image—the
digital camera
wins.
A professional photographer with a disposable camera will be able to take picturesthat are indistinguishable from a top-of-the-line 6-megapixel camera. An amateurwith a 14-megapixel camera will make the same mistakes as he would with a dis-posable camera.
15 0789731207_ch12.qxd 4/6/04 2:15 PM Page 179
Scanner Software and ResolutionIf you have a scanner, you probably will be scan-ning negatives or photos. The resolution you wouldlike to use when scanning is measured in pixels perinch (or samples per inch).
Today’s scanner software includes numerous set-tings that can help you get the best scan resolutiononto your hard drive. Follow these steps to scan animage at the appropriate resolution:
1. Install the scanner software before you con-nect the scanner, if you haven’t done soalready. Reboot your computer if this is yourfirst time using it.
2. Connect the scanner.
3. Open Photoshop and choose File, Import, name_of_scanner_software. You canalso access the scanner software through the Start, Programs menu, but thesoftware may differ and not be as robust. The driver that interfaces withPhotoshop (or your favorite image editor) usually is best.
4. When the scanner software appears, you might see a beginning interfacewith few settings, or a more advanced interface (see Figure 12.2). Try to accessthe Advanced settings.
5. Dust off the scanner glass and your print or negative and place it on thescanner flatbed.
6. Click Preview to preview the image.
When the print or negative appears in the preview window, the scanner softwaremight detect its borders automatically. If not, click and drag with the mouse to selectthe area to be scanned. You might have to click on a Marquee tool before selectingthis area (depends on your scanner software). By setting the area to be scanned, youalso tell the scanner what area to adjust automatically for color and sharpness.
Choose the appropriate settings in the scanner software. You might see settings likethose in Table 12.2.
180 ABSOLUTE BEGINNER’S GUIDE TO DIGITAL PHOTOGRAPHY
See Chapter 6,“Getting Your Pix
Onscreen” for a detailed descrip-tion of scanners.
15 0789731207_ch12.qxd 4/6/04 2:15 PM Page 180
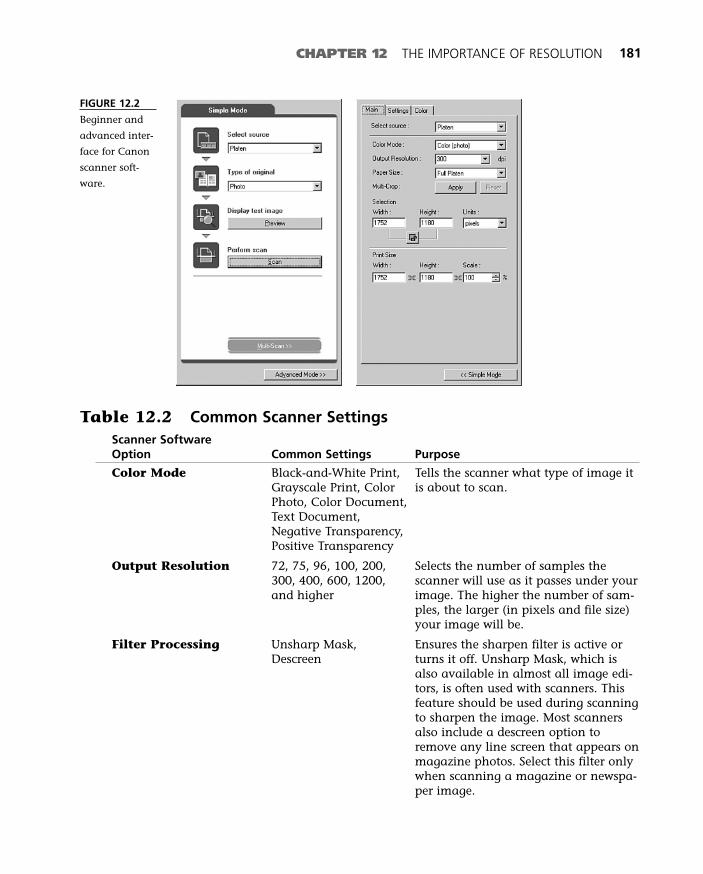
CHAPTER 12 THE IMPORTANCE OF RESOLUTION 181
Table 12.2 Common Scanner SettingsScanner Software Option Common Settings Purpose
Color Mode Black-and-White Print, Tells the scanner what type of image it Grayscale Print, Color is about to scan.Photo, Color Document, Text Document, Negative Transparency, Positive Transparency
Output Resolution 72, 75, 96, 100, 200, Selects the number of samples the 300, 400, 600, 1200, scanner will use as it passes under yourand higher image. The higher the number of sam-
ples, the larger (in pixels and file size)your image will be.
Filter Processing Unsharp Mask, Ensures the sharpen filter is active or Descreen turns it off. Unsharp Mask, which is
also available in almost all image edi-tors, is often used with scanners. Thisfeature should be used during scanningto sharpen the image. Most scannersalso include a descreen option toremove any line screen that appears onmagazine photos. Select this filter onlywhen scanning a magazine or newspa-per image.
FIGURE 12.2
Beginner and
advanced inter-
face for Canon
scanner soft-
ware.
15 0789731207_ch12.qxd 4/6/04 2:15 PM Page 181
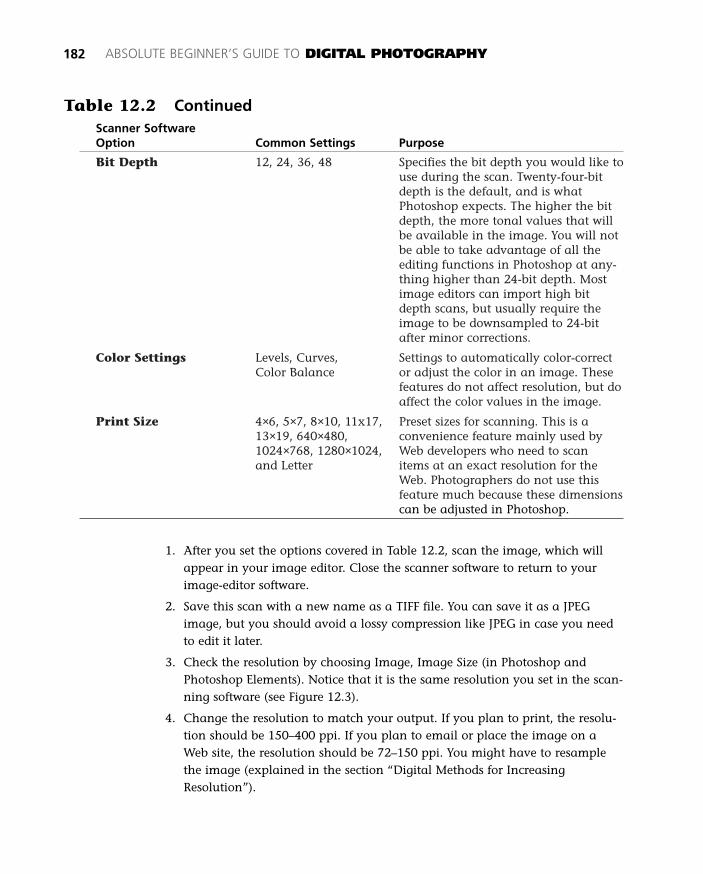
Bit Depth 12, 24, 36, 48 Specifies the bit depth you would like touse during the scan. Twenty-four-bitdepth is the default, and is whatPhotoshop expects. The higher the bitdepth, the more tonal values that willbe available in the image. You will notbe able to take advantage of all theediting functions in Photoshop at any-thing higher than 24-bit depth. Mostimage editors can import high bitdepth scans, but usually require theimage to be downsampled to 24-bitafter minor corrections.
Color Settings Levels, Curves, Settings to automatically color-correct Color Balance or adjust the color in an image. These
features do not affect resolution, but doaffect the color values in the image.
Print Size 4×6, 5×7, 8×10, 11x17, Preset sizes for scanning. This is a 13×19, 640×480, convenience feature mainly used by1024×768, 1280×1024, Web developers who need to scanand Letter items at an exact resolution for the
Web. Photographers do not use thisfeature much because these dimensionscan be adjusted in Photoshop.
1. After you set the options covered in Table 12.2, scan the image, which willappear in your image editor. Close the scanner software to return to yourimage-editor software.
2. Save this scan with a new name as a TIFF file. You can save it as a JPEGimage, but you should avoid a lossy compression like JPEG in case you needto edit it later.
3. Check the resolution by choosing Image, Image Size (in Photoshop andPhotoshop Elements). Notice that it is the same resolution you set in the scan-ning software (see Figure 12.3).
4. Change the resolution to match your output. If you plan to print, the resolu-tion should be 150–400 ppi. If you plan to email or place the image on aWeb site, the resolution should be 72–150 ppi. You might have to resamplethe image (explained in the section “Digital Methods for IncreasingResolution”).
182 ABSOLUTE BEGINNER’S GUIDE TO DIGITAL PHOTOGRAPHY
Table 12.2 ContinuedScanner Software Option Common Settings Purpose
15 0789731207_ch12.qxd 4/6/04 2:15 PM Page 182
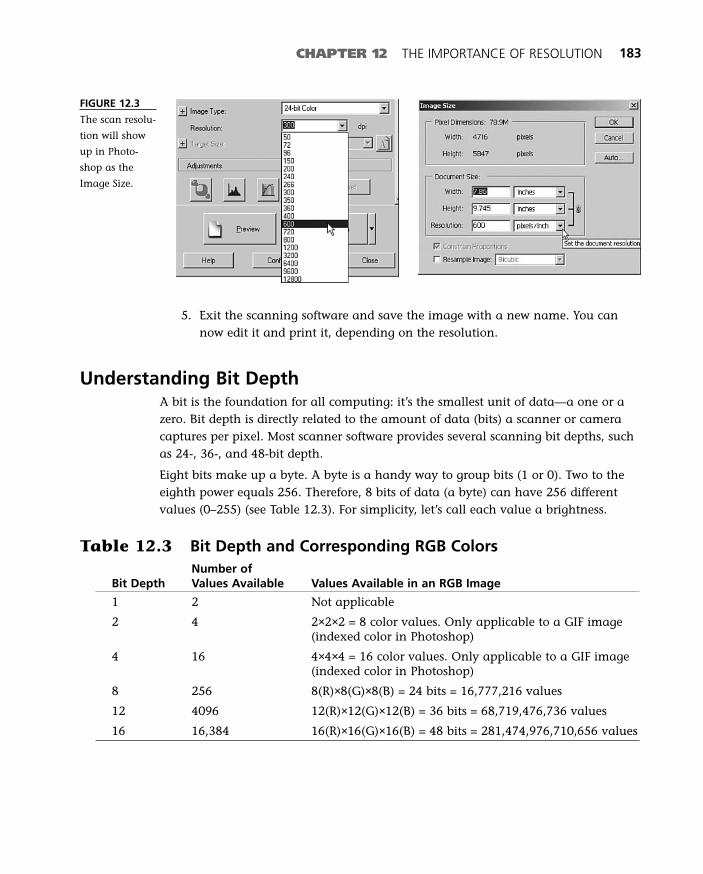
CHAPTER 12 THE IMPORTANCE OF RESOLUTION 183
5. Exit the scanning software and save the image with a new name. You cannow edit it and print it, depending on the resolution.
Understanding Bit DepthA bit is the foundation for all computing: it’s the smallest unit of data—a one or azero. Bit depth is directly related to the amount of data (bits) a scanner or cameracaptures per pixel. Most scanner software provides several scanning bit depths, suchas 24-, 36-, and 48-bit depth.
Eight bits make up a byte. A byte is a handy way to group bits (1 or 0). Two to theeighth power equals 256. Therefore, 8 bits of data (a byte) can have 256 differentvalues (0–255) (see Table 12.3). For simplicity, let’s call each value a brightness.
Table 12.3 Bit Depth and Corresponding RGB ColorsNumber of
Bit Depth Values Available Values Available in an RGB Image
1 2 Not applicable
2 4 2×2×2 = 8 color values. Only applicable to a GIF image(indexed color in Photoshop)
4 16 4×4×4 = 16 color values. Only applicable to a GIF image(indexed color in Photoshop)
8 256 8(R)×8(G)×8(B) = 24 bits = 16,777,216 values
12 4096 12(R)×12(G)×12(B) = 36 bits = 68,719,476,736 values
16 16,384 16(R)×16(G)×16(B) = 48 bits = 281,474,976,710,656 values
FIGURE 12.3
The scan resolu-
tion will show
up in Photo-
shop as the
Image Size.
15 0789731207_ch12.qxd 4/6/04 2:15 PM Page 183
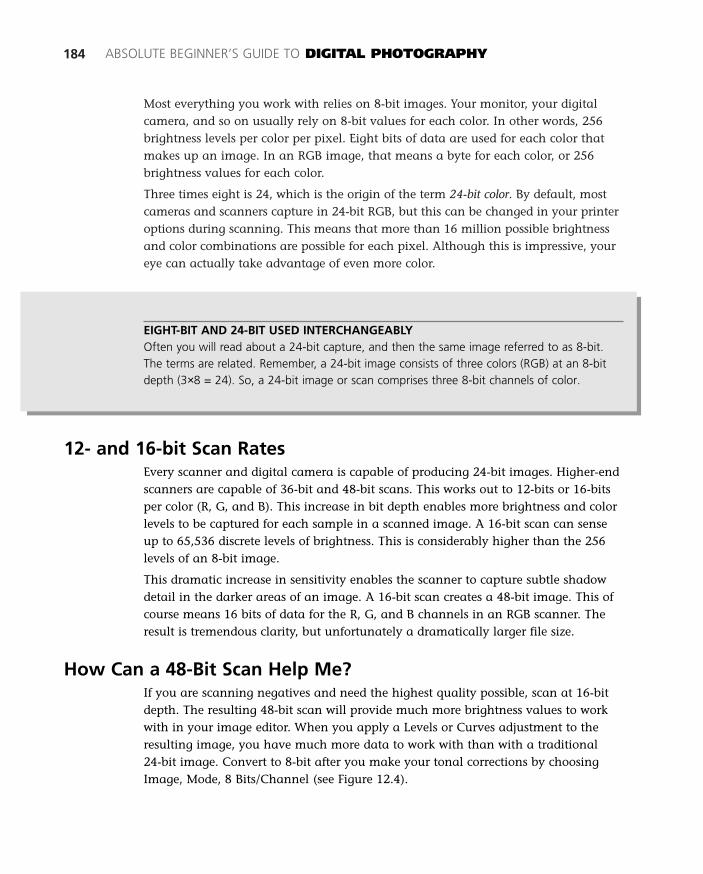
Most everything you work with relies on 8-bit images. Your monitor, your digitalcamera, and so on usually rely on 8-bit values for each color. In other words, 256brightness levels per color per pixel. Eight bits of data are used for each color thatmakes up an image. In an RGB image, that means a byte for each color, or 256brightness values for each color.
Three times eight is 24, which is the origin of the term 24-bit color. By default, mostcameras and scanners capture in 24-bit RGB, but this can be changed in your printeroptions during scanning. This means that more than 16 million possible brightnessand color combinations are possible for each pixel. Although this is impressive, youreye can actually take advantage of even more color.
184 ABSOLUTE BEGINNER’S GUIDE TO DIGITAL PHOTOGRAPHY
EIGHT-BIT AND 24-BIT USED INTERCHANGEABLYOften you will read about a 24-bit capture, and then the same image referred to as 8-bit.The terms are related. Remember, a 24-bit image consists of three colors (RGB) at an 8-bitdepth (3×8 = 24). So, a 24-bit image or scan comprises three 8-bit channels of color.
12- and 16-bit Scan RatesEvery scanner and digital camera is capable of producing 24-bit images. Higher-endscanners are capable of 36-bit and 48-bit scans. This works out to 12-bits or 16-bitsper color (R, G, and B). This increase in bit depth enables more brightness and colorlevels to be captured for each sample in a scanned image. A 16-bit scan can senseup to 65,536 discrete levels of brightness. This is considerably higher than the 256levels of an 8-bit image.
This dramatic increase in sensitivity enables the scanner to capture subtle shadowdetail in the darker areas of an image. A 16-bit scan creates a 48-bit image. This ofcourse means 16 bits of data for the R, G, and B channels in an RGB scanner. Theresult is tremendous clarity, but unfortunately a dramatically larger file size.
How Can a 48-Bit Scan Help Me?If you are scanning negatives and need the highest quality possible, scan at 16-bitdepth. The resulting 48-bit scan will provide much more brightness values to workwith in your image editor. When you apply a Levels or Curves adjustment to theresulting image, you have much more data to work with than with a traditional 24-bit image. Convert to 8-bit after you make your tonal corrections by choosingImage, Mode, 8 Bits/Channel (see Figure 12.4).
15 0789731207_ch12.qxd 4/6/04 2:15 PM Page 184
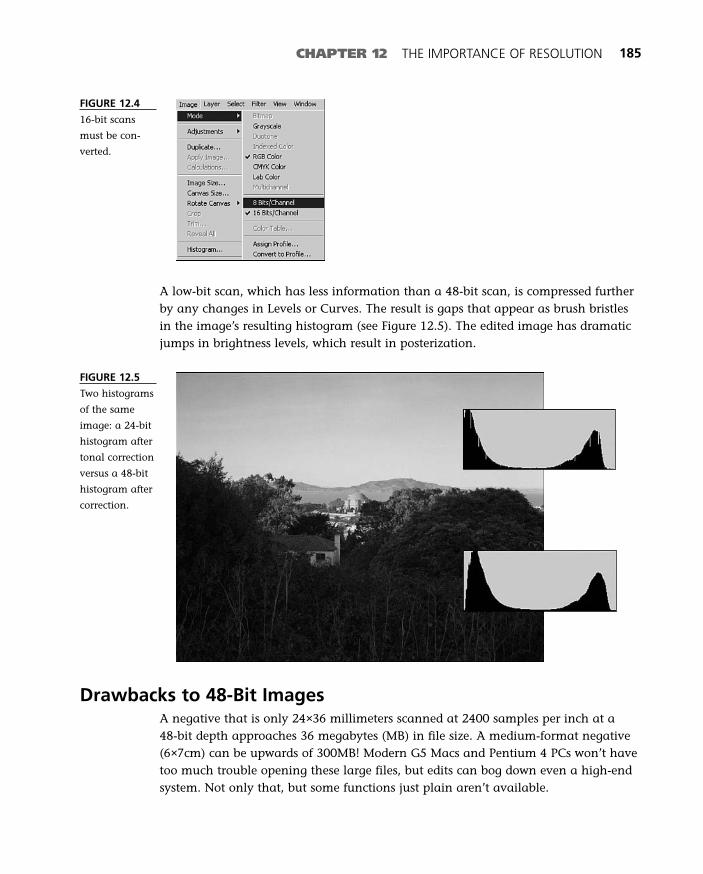
CHAPTER 12 THE IMPORTANCE OF RESOLUTION 185
FIGURE 12.4
16-bit scans
must be con-
verted.
A low-bit scan, which has less information than a 48-bit scan, is compressed furtherby any changes in Levels or Curves. The result is gaps that appear as brush bristlesin the image’s resulting histogram (see Figure 12.5). The edited image has dramaticjumps in brightness levels, which result in posterization.
FIGURE 12.5
Two histograms
of the same
image: a 24-bit
histogram after
tonal correction
versus a 48-bit
histogram after
correction.
Drawbacks to 48-Bit ImagesA negative that is only 24×36 millimeters scanned at 2400 samples per inch at a 48-bit depth approaches 36 megabytes (MB) in file size. A medium-format negative(6×7cm) can be upwards of 300MB! Modern G5 Macs and Pentium 4 PCs won’t havetoo much trouble opening these large files, but edits can bog down even a high-endsystem. Not only that, but some functions just plain aren’t available.
15 0789731207_ch12.qxd 4/6/04 2:15 PM Page 185
You cannot use adjustment layers on 48-bit images because Adobe wants you tomake your tonal corrections with Curves or Levels and then convert the image to 24-bit. For this reason, you should use Levels or Curves (or both) to adjust and thenconvert the file to 8-bits per channel using Image, Mode, 8 Bits/Channel. Later, youcan edit the file with Photoshop’s tools. Follow these steps to convert from 48-bit to24-bit:
1. Scan your negative, slide, or photo at 48-bit depth. Use a realistic scan resolu-tion: 1200 samples per inch on a 8''×10'' print will not even open inPhotoshop. Stick to 300 samples on prints, and 1200 samples on medium-for-mat negatives, and a maximum of 3200 samples per inch for 35mm nega-tives.
2. When the image appears in Photoshop, save it to your computer’s hard diskbefore you make any changes as a TIFF file. Make sure the filename includeswording like _48bit or _16bit.
3. Make your adjustments in Image, Adjust, Levels or Image, Adjust, Curves.
4. When you’re satisfied with the look of the image, convert to 24-bit usingImage, Mode, 8 Bits/Channel.
5. Save the new 24-bit image on the hard drive with a new name and thendelete the massive 48-bit file, or burn it onto a CD/DVD-RW as a backup.
You really do not need to work with every image at 48-bit depth; only with the mostimportant images in your collection. For casual photography, 24-bit depth is fine.After sitting through (actually, sleeping through) a 48-bit scan, you will see why thisfeature is only worthwhile on your most important images.
Output ResolutionImages that output (print) on a printer use dpi for their resolution. This includeslaser printers, inkjet printers, dye-sublimation printers, and even offset printers. Thelatter are used to print magazines, newspapers, and books.
You can read more about printer resolution and dots in Chapter 18, “Printers andPrinter Resolution.” The next section will explain how you can upsize an image thatmight not be at a resolution you can use. This process of interpolation is not fool-proof, and is often a last-resort method for salvaging an image.
Digital Methods for Increasing ResolutionPhotoshop and other image editors are capable of increasing the resolution of animage using interpolation. Interpolation is a software technique that uses mathemati-cal algorithms to increase the number of pixels in an image (see Figure 12.6). This
186 ABSOLUTE BEGINNER’S GUIDE TO DIGITAL PHOTOGRAPHY
15 0789731207_ch12.qxd 4/6/04 2:15 PM Page 186

CHAPTER 12 THE IMPORTANCE OF RESOLUTION 187
technique is essentially JPEG technology in reverse. JPEG compression performs aseries of steps to compress an image: initial input, discrete cosine transform, quanti-zation, and encoding.
FIGURE 12.6
Interpolation
options in
Photoshop.
Cameras, scanners, and image editors provide interpolation technology to increasethe resolution of an image. For example, Photoshop includes several algorithms thatenable you to increase the resolution or physical size of an image. To access theseoptions (listed here), choose Image, Image Size:
■ Nearest neighbor. Nearest neighbor interpolation is a simple interpolationmethod. Each interpolated pixel is assigned the value of the nearest pixel ofthe input image. If more than one pixel has the same distance to the pixel tobe interpolated, one of these is chosen. The drawback to this method is thepoor quality of the interpolated image.
■ Bilinear. Uses four adjacent pixels to calculate the interpolated pixel value.Bilinear interpolation is a relatively simple interpolation method. However,image quality is better than if you use nearest neighbor interpolation.
■ Cubic. Cubic convolution uses adjacent pixels to determine the value of theinterpolated pixel. The number of adjacent pixels the cubic algorithm uses isnot fixed. Instead, the algorithm approximates and optimizes the sine/cosinefunction.
Cubic convolution provides the highest-quality interpolated image, but requires themost processing power (and time). For image processing, the bilinear interpolation isa fine compromise between quality and time. Avoid the nearest neighbor interpola-tion method unless you’re in a hurry.
15 0789731207_ch12.qxd 4/6/04 2:15 PM Page 187

These techniques should only be used if you’re in a bind. For example, if you’vescanned or downloaded a small image and need to increase its resolution so thatyou can print it at a much larger size.
Printing Press Output and ResolutionAt some point, your images might end up in the printing press. Printing presses usea plate containing a special screen to print images. This system relies on dots aswell, but the term used for printing presses is line screen, or lines per inch (lpi).
Lines per inch is the number of dots that appear on a halftone screen (see Figure12.7). A halftone screen is a plate containing a uniform pattern of transparent holesin an opaque background. The plate is usually metal, and is etched by a laser andchemicals. The plate is put on a massive roller and coated with ink on every revolu-tion. The paper travels through at high speed and receives the ink. This line screenenables printing presses, which use solid colors of ink, to produce continuous toneimages.
188 ABSOLUTE BEGINNER’S GUIDE TO DIGITAL PHOTOGRAPHY
FIGURE 12.7
A photo from a
magazine show-
ing the line
screen used by
the printer.
15 0789731207_ch12.qxd 4/6/04 2:15 PM Page 188
CHAPTER 12 THE IMPORTANCE OF RESOLUTION 189
Converting pixels in a digital image to dots that make up the screen requires adevice known as a RIP (Raster Image Processor). You might have seen one of thesedevices next to a color laser printer at your office, or even at Kinko’s.
Imagesetters, which are used to make the plates that go in printing presses, can onlycreate one size of dot. However, if you combine the dots to make larger ones, youcan create these continuous tones.
A halftone dot is created from a grid of laser spots known as a halftone cell. Thegreater the number of cells filled with spots, the larger the halftone dot will appear,and the darker the dot will seem.
The human eye cannot distinguish dots from a distance if the dots are smallenough. Because printing presses cannot create continuous tones (like a dye-subli-mation printer), trickery must be employed to create the perception of a continuoustone. If you vary the size of dots across a grid of dots, and if the dots are smallenough, the eye will see only a gradation, not separate dots.
The Absolute Minimum
An accurate understanding of resolution is difficult even for experienced photogra-phers. Wade through the terms and differences among hardware devices and youmight find yourself thoroughly confused. Experiment with scanning, printing, andonscreen editing to understand how images flow through the chain of resolution.The following tips might help, as well:
■ Digital cameras capture images at 72 pixels per inch. You need to changethis resolution prior to printing.
■ Disposable cameras have about the same resolution as a 3-megapixel camera.
■ Because of scanner limitations, 35mm slides taken with the highest qualityoptics contain as much resolution as an equivalent 20-megapixel sensor.
■ The common accepted term for input resolution is pixels-per-inch (ppi).
■ The common, accepted term for printer resolution is dots per inch (dpi).
■ Most digital cameras capture at 8 bits per color (24-bit) resolution. High-endSLRs can capture at higher 12-bit and 14-bit resolution in RAW mode.
■ Editing in Photoshop and Photoshop Elements is done at 8-bits per pixel reso-lution. Only a few editing options are available at 16-bits per pixel.
■ Most professionals scan negatives and slides at 48-bit resolution (16 bits perpixel), which must be converted to 8 bits per pixel after importing intoPhotoshop and Photoshop Elements.
15 0789731207_ch12.qxd 4/6/04 2:15 PM Page 189

15 0789731207_ch12.qxd 4/6/04 2:15 PM Page 190
13In this chapter
• Sharpening Prints with Unsharp Mask
• Taking Advantage of Blur
• Getting Rid of Noise
The Importance
of Filters
Photoshop and Photoshop Elements include a number of filters that
range from functional to artistic. The most commonly used filters by
photographers are in these categories:
■ Sharpen. The Unsharp Mask filter is commonly used to increase
the apparent sharpness of images.
■ Blur. Gaussian Blur is often used to blur corrections made to an
image.
■ Noise. Despeckle is used to fix grainy scans.
16 0789731207_ch13.qxd 4/6/04 2:22 PM Page 191
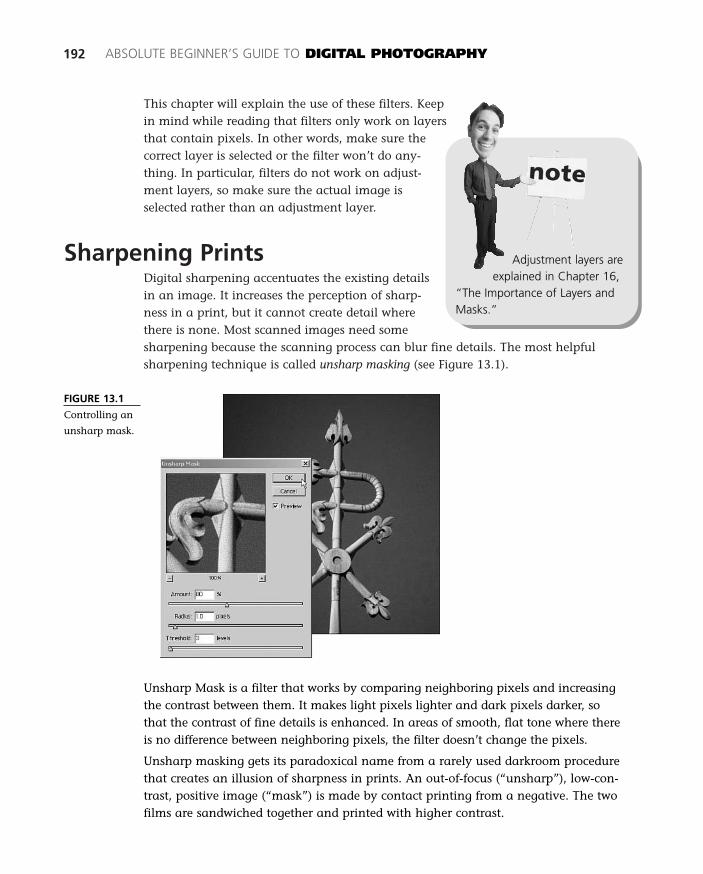
This chapter will explain the use of these filters. Keepin mind while reading that filters only work on layersthat contain pixels. In other words, make sure thecorrect layer is selected or the filter won’t do any-thing. In particular, filters do not work on adjust-ment layers, so make sure the actual image isselected rather than an adjustment layer.
Sharpening PrintsDigital sharpening accentuates the existing detailsin an image. It increases the perception of sharp-ness in a print, but it cannot create detail wherethere is none. Most scanned images need somesharpening because the scanning process can blur fine details. The most helpfulsharpening technique is called unsharp masking (see Figure 13.1).
192 ABSOLUTE BEGINNER’S GUIDE TO DIGITAL PHOTOGRAPHY
Adjustment layers areexplained in Chapter 16,
“The Importance of Layers andMasks.”
FIGURE 13.1
Controlling an
unsharp mask.
Unsharp Mask is a filter that works by comparing neighboring pixels and increasingthe contrast between them. It makes light pixels lighter and dark pixels darker, sothat the contrast of fine details is enhanced. In areas of smooth, flat tone where thereis no difference between neighboring pixels, the filter doesn’t change the pixels.
Unsharp masking gets its paradoxical name from a rarely used darkroom procedurethat creates an illusion of sharpness in prints. An out-of-focus (“unsharp”), low-con-trast, positive image (“mask”) is made by contact printing from a negative. The twofilms are sandwiched together and printed with higher contrast.
16 0789731207_ch13.qxd 4/6/04 2:22 PM Page 192
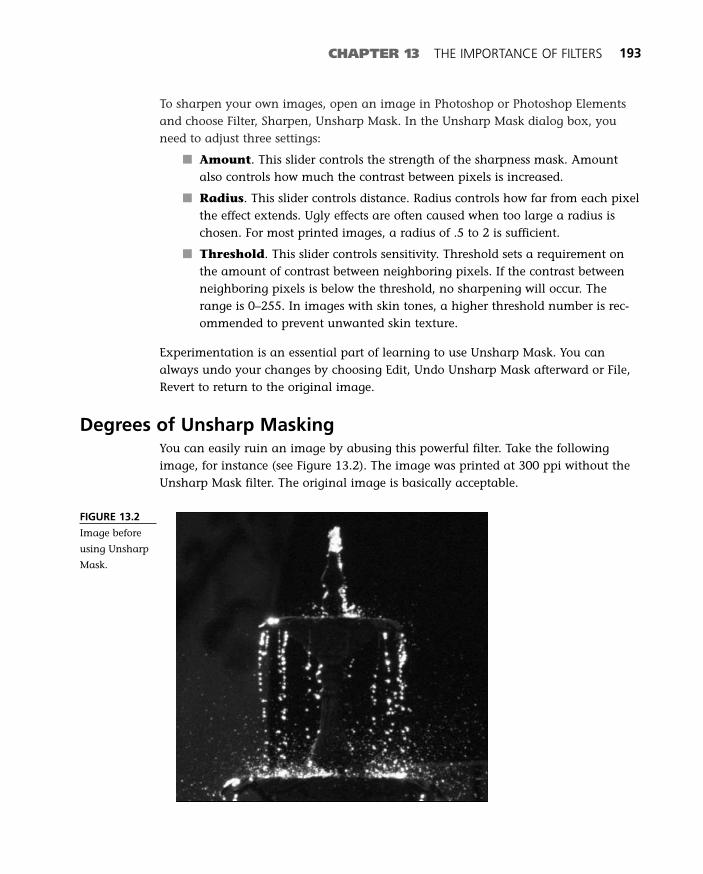
To sharpen your own images, open an image in Photoshop or Photoshop Elementsand choose Filter, Sharpen, Unsharp Mask. In the Unsharp Mask dialog box, youneed to adjust three settings:
■ Amount. This slider controls the strength of the sharpness mask. Amountalso controls how much the contrast between pixels is increased.
■ Radius. This slider controls distance. Radius controls how far from each pixelthe effect extends. Ugly effects are often caused when too large a radius ischosen. For most printed images, a radius of .5 to 2 is sufficient.
■ Threshold. This slider controls sensitivity. Threshold sets a requirement onthe amount of contrast between neighboring pixels. If the contrast betweenneighboring pixels is below the threshold, no sharpening will occur. Therange is 0–255. In images with skin tones, a higher threshold number is rec-ommended to prevent unwanted skin texture.
Experimentation is an essential part of learning to use Unsharp Mask. You canalways undo your changes by choosing Edit, Undo Unsharp Mask afterward or File,Revert to return to the original image.
Degrees of Unsharp MaskingYou can easily ruin an image by abusing this powerful filter. Take the followingimage, for instance (see Figure 13.2). The image was printed at 300 ppi without theUnsharp Mask filter. The original image is basically acceptable.
CHAPTER 13 THE IMPORTANCE OF FILTERS 193
FIGURE 13.2
Image before
using Unsharp
Mask.
16 0789731207_ch13.qxd 4/6/04 2:22 PM Page 193
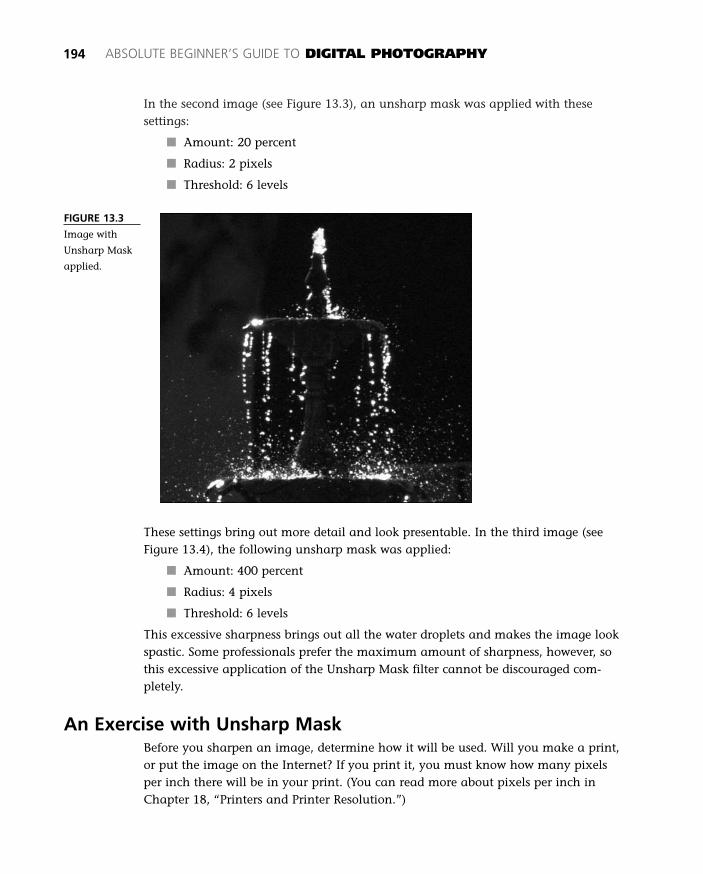
In the second image (see Figure 13.3), an unsharp mask was applied with these settings:
■ Amount: 20 percent
■ Radius: 2 pixels
■ Threshold: 6 levels
194 ABSOLUTE BEGINNER’S GUIDE TO DIGITAL PHOTOGRAPHY
FIGURE 13.3
Image with
Unsharp Mask
applied.
These settings bring out more detail and look presentable. In the third image (seeFigure 13.4), the following unsharp mask was applied:
■ Amount: 400 percent
■ Radius: 4 pixels
■ Threshold: 6 levels
This excessive sharpness brings out all the water droplets and makes the image lookspastic. Some professionals prefer the maximum amount of sharpness, however, sothis excessive application of the Unsharp Mask filter cannot be discouraged com-pletely.
An Exercise with Unsharp MaskBefore you sharpen an image, determine how it will be used. Will you make a print,or put the image on the Internet? If you print it, you must know how many pixelsper inch there will be in your print. (You can read more about pixels per inch inChapter 18, “Printers and Printer Resolution.”)
16 0789731207_ch13.qxd 4/6/04 2:22 PM Page 194
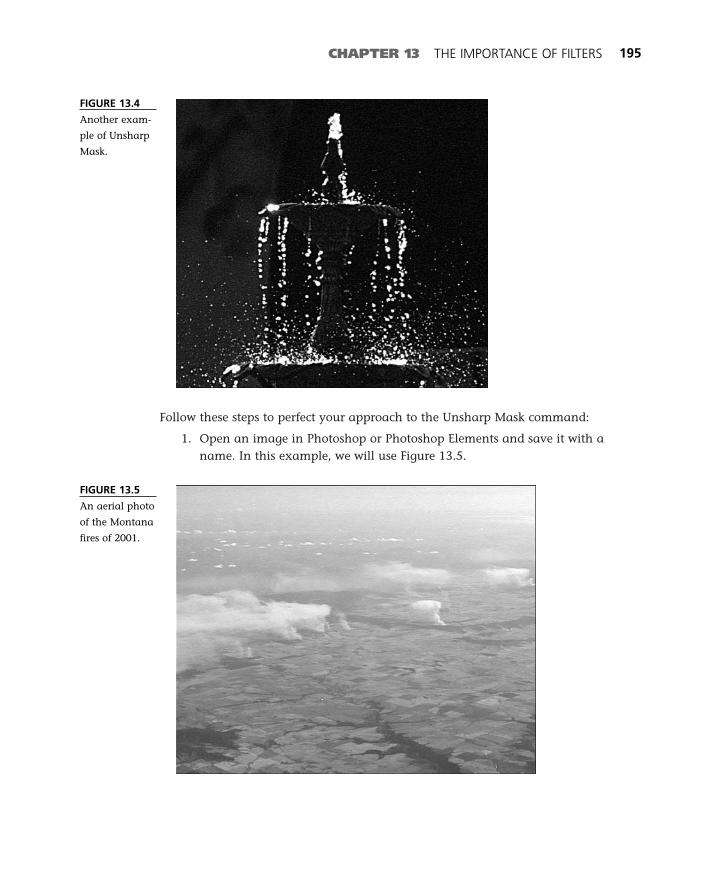
Follow these steps to perfect your approach to the Unsharp Mask command:
1. Open an image in Photoshop or Photoshop Elements and save it with aname. In this example, we will use Figure 13.5.
CHAPTER 13 THE IMPORTANCE OF FILTERS 195
FIGURE 13.4
Another exam-
ple of Unsharp
Mask.
FIGURE 13.5
An aerial photo
of the Montana
fires of 2001.
16 0789731207_ch13.qxd 4/6/04 2:22 PM Page 195
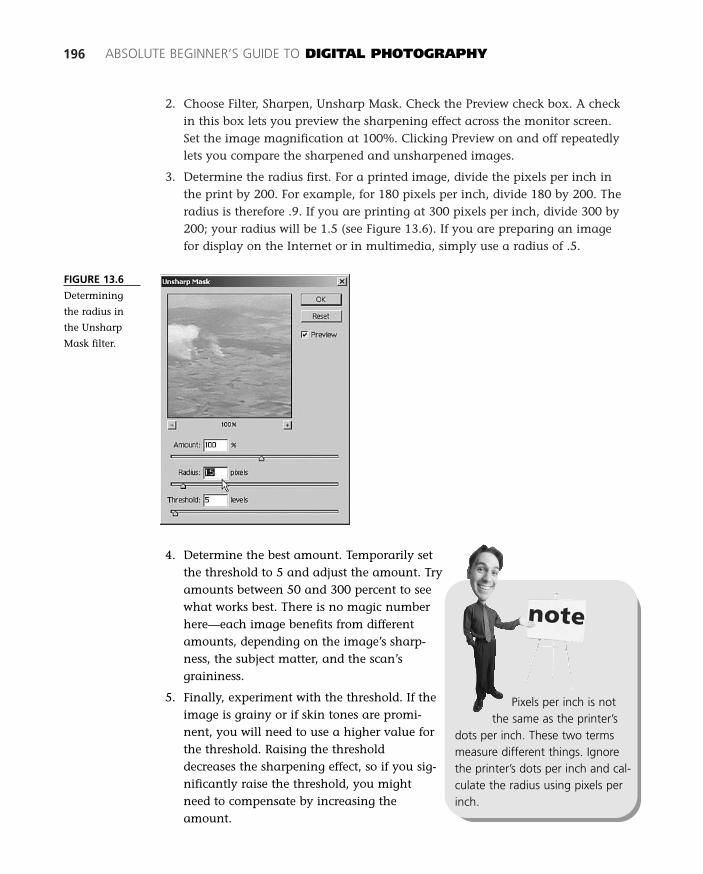
2. Choose Filter, Sharpen, Unsharp Mask. Check the Preview check box. A checkin this box lets you preview the sharpening effect across the monitor screen.Set the image magnification at 100%. Clicking Preview on and off repeatedlylets you compare the sharpened and unsharpened images.
3. Determine the radius first. For a printed image, divide the pixels per inch inthe print by 200. For example, for 180 pixels per inch, divide 180 by 200. Theradius is therefore .9. If you are printing at 300 pixels per inch, divide 300 by200; your radius will be 1.5 (see Figure 13.6). If you are preparing an imagefor display on the Internet or in multimedia, simply use a radius of .5.
196 ABSOLUTE BEGINNER’S GUIDE TO DIGITAL PHOTOGRAPHY
FIGURE 13.6
Determining
the radius in
the Unsharp
Mask filter.
4. Determine the best amount. Temporarily setthe threshold to 5 and adjust the amount. Tryamounts between 50 and 300 percent to seewhat works best. There is no magic numberhere—each image benefits from differentamounts, depending on the image’s sharp-ness, the subject matter, and the scan’sgraininess.
5. Finally, experiment with the threshold. If theimage is grainy or if skin tones are promi-nent, you will need to use a higher value forthe threshold. Raising the thresholddecreases the sharpening effect, so if you sig-nificantly raise the threshold, you mightneed to compensate by increasing theamount.
Pixels per inch is notthe same as the printer’s
dots per inch. These two termsmeasure different things. Ignorethe printer’s dots per inch and cal-culate the radius using pixels perinch.
16 0789731207_ch13.qxd 4/6/04 2:22 PM Page 196
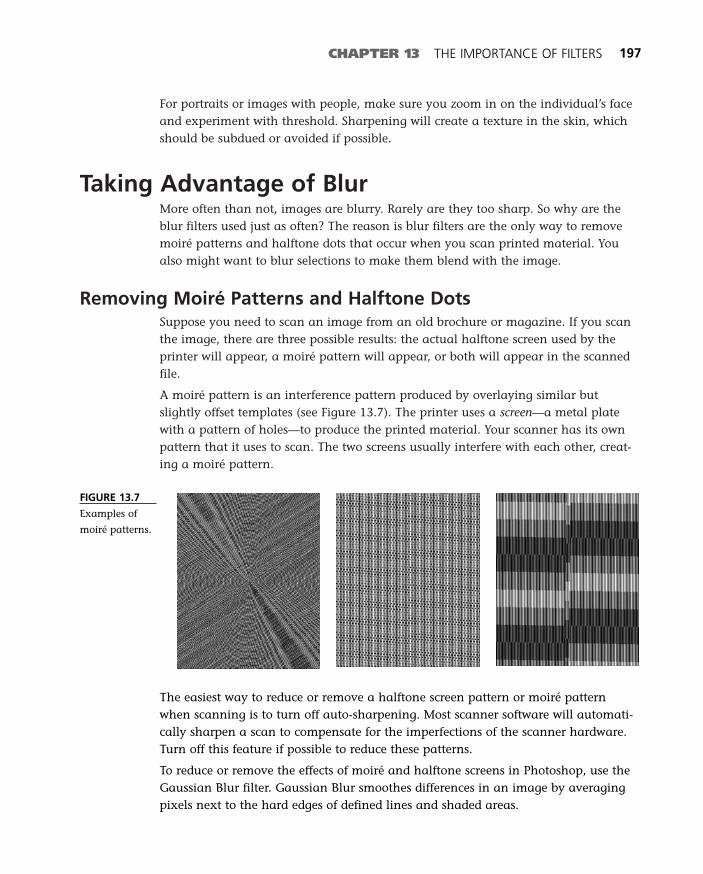
For portraits or images with people, make sure you zoom in on the individual’s faceand experiment with threshold. Sharpening will create a texture in the skin, whichshould be subdued or avoided if possible.
Taking Advantage of BlurMore often than not, images are blurry. Rarely are they too sharp. So why are theblur filters used just as often? The reason is blur filters are the only way to removemoiré patterns and halftone dots that occur when you scan printed material. Youalso might want to blur selections to make them blend with the image.
Removing Moiré Patterns and Halftone DotsSuppose you need to scan an image from an old brochure or magazine. If you scanthe image, there are three possible results: the actual halftone screen used by theprinter will appear, a moiré pattern will appear, or both will appear in the scannedfile.
A moiré pattern is an interference pattern produced by overlaying similar butslightly offset templates (see Figure 13.7). The printer uses a screen—a metal platewith a pattern of holes—to produce the printed material. Your scanner has its ownpattern that it uses to scan. The two screens usually interfere with each other, creat-ing a moiré pattern.
CHAPTER 13 THE IMPORTANCE OF FILTERS 197
FIGURE 13.7
Examples of
moiré patterns.
The easiest way to reduce or remove a halftone screen pattern or moiré patternwhen scanning is to turn off auto-sharpening. Most scanner software will automati-cally sharpen a scan to compensate for the imperfections of the scanner hardware.Turn off this feature if possible to reduce these patterns.
To reduce or remove the effects of moiré and halftone screens in Photoshop, use theGaussian Blur filter. Gaussian Blur smoothes differences in an image by averagingpixels next to the hard edges of defined lines and shaded areas.
16 0789731207_ch13.qxd 4/6/04 2:22 PM Page 197

By applying the correct amount of blur, you can remove these unwanted patternsand still retain some sharpness in the image. Follow these steps to apply theGaussian Blur filter to a scanned image with moiré or halftone screen patterns:
1. After scanning an image, save it with a new name as a TIFF file.
2. Make sure you are viewing the image at 50% or 100%. Zoom in (View, ZoomIn) if you aren’t viewing it at one of these resolutions. Moiré patterns candevelop when viewing at other resolutions.
3. Choose Filter, Blur, Gaussian Blur (see Figure 13.8). Click the Preview checkbox in the dialog box if it isn’t already checked.
198 ABSOLUTE BEGINNER’S GUIDE TO DIGITAL PHOTOGRAPHY
FIGURE 13.8
Gaussian Blur.
4. Drag the slider bar or enter a number to see the effect on the image. Try 1.0,then 2.0, and 3.0 to start and see what value removes the halftone dot pat-tern but retains some sharpness in the image.
5. Click OK to close the dialog box and view the blur. You can always undo thechange by choosing Edit, Undo or pressing Ctrl+Z (xZ for Mac users).
Using Blur to Add an Artistic TouchSome images weren’t meant to be “tack sharp.” Artistic images for example, mightlook better out of focus or with a small amount of blur added, such as in Figure13.9, for example.
This image looks more appropriate for its use as a Christmas card after someGaussian Blur has been added (see Figure 13.10). In this case, a value of 1.0 wasapplied, then green and blue highlights were reduced using Image, Adjustments,Color Balance.
16 0789731207_ch13.qxd 4/6/04 2:22 PM Page 198
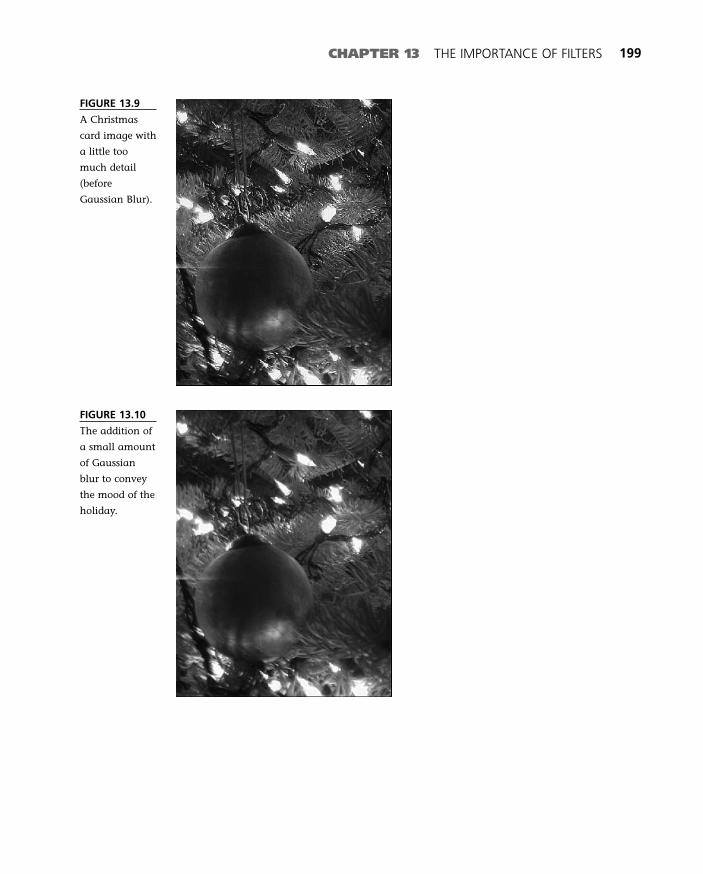
CHAPTER 13 THE IMPORTANCE OF FILTERS 199
FIGURE 13.9
A Christmas
card image with
a little too
much detail
(before
Gaussian Blur).
FIGURE 13.10
The addition of
a small amount
of Gaussian
blur to convey
the mood of the
holiday.
16 0789731207_ch13.qxd 4/6/04 2:22 PM Page 199
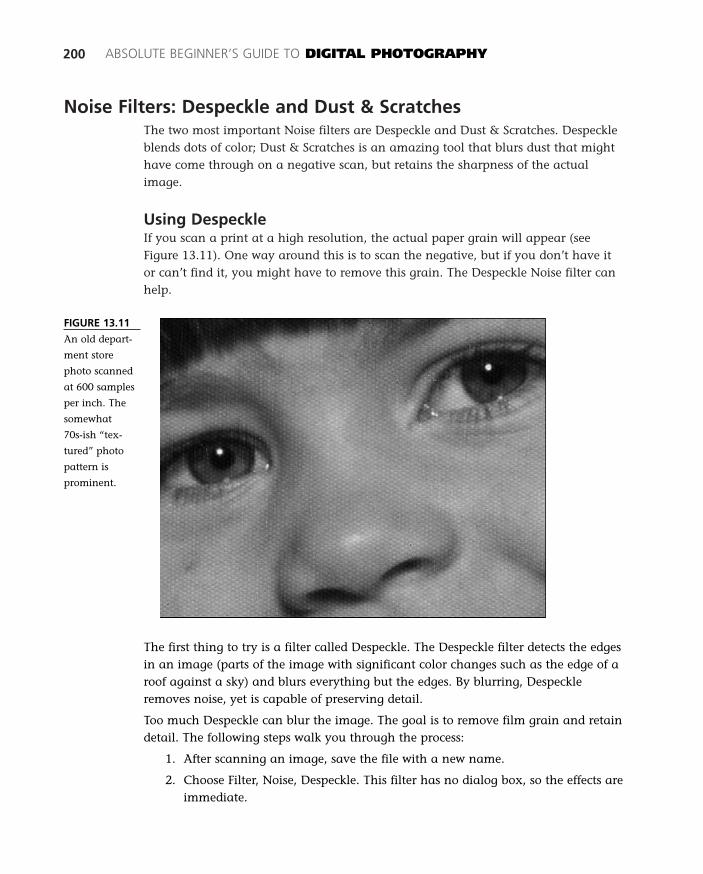
Noise Filters: Despeckle and Dust & ScratchesThe two most important Noise filters are Despeckle and Dust & Scratches. Despeckleblends dots of color; Dust & Scratches is an amazing tool that blurs dust that mighthave come through on a negative scan, but retains the sharpness of the actualimage.
Using DespeckleIf you scan a print at a high resolution, the actual paper grain will appear (seeFigure 13.11). One way around this is to scan the negative, but if you don’t have itor can’t find it, you might have to remove this grain. The Despeckle Noise filter canhelp.
200 ABSOLUTE BEGINNER’S GUIDE TO DIGITAL PHOTOGRAPHY
FIGURE 13.11
An old depart-
ment store
photo scanned
at 600 samples
per inch. The
somewhat
70s-ish “tex-
tured” photo
pattern is
prominent.
The first thing to try is a filter called Despeckle. The Despeckle filter detects the edgesin an image (parts of the image with significant color changes such as the edge of aroof against a sky) and blurs everything but the edges. By blurring, Despeckleremoves noise, yet is capable of preserving detail.
Too much Despeckle can blur the image. The goal is to remove film grain and retaindetail. The following steps walk you through the process:
1. After scanning an image, save the file with a new name.
2. Choose Filter, Noise, Despeckle. This filter has no dialog box, so the effects areimmediate.
16 0789731207_ch13.qxd 4/6/04 2:22 PM Page 200
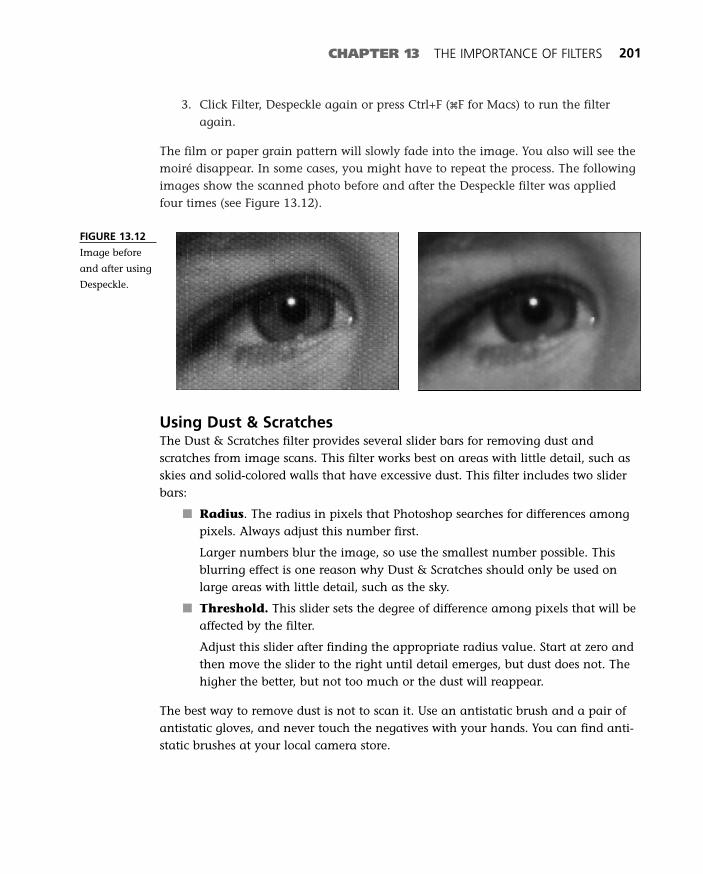
3. Click Filter, Despeckle again or press Ctrl+F (xF for Macs) to run the filteragain.
The film or paper grain pattern will slowly fade into the image. You also will see themoiré disappear. In some cases, you might have to repeat the process. The followingimages show the scanned photo before and after the Despeckle filter was appliedfour times (see Figure 13.12).
CHAPTER 13 THE IMPORTANCE OF FILTERS 201
FIGURE 13.12
Image before
and after using
Despeckle.
Using Dust & ScratchesThe Dust & Scratches filter provides several slider bars for removing dust andscratches from image scans. This filter works best on areas with little detail, such asskies and solid-colored walls that have excessive dust. This filter includes two sliderbars:
■ Radius. The radius in pixels that Photoshop searches for differences amongpixels. Always adjust this number first.
Larger numbers blur the image, so use the smallest number possible. Thisblurring effect is one reason why Dust & Scratches should only be used onlarge areas with little detail, such as the sky.
■ Threshold. This slider sets the degree of difference among pixels that will beaffected by the filter.
Adjust this slider after finding the appropriate radius value. Start at zero andthen move the slider to the right until detail emerges, but dust does not. Thehigher the better, but not too much or the dust will reappear.
The best way to remove dust is not to scan it. Use an antistatic brush and a pair ofantistatic gloves, and never touch the negatives with your hands. You can find anti-static brushes at your local camera store.
16 0789731207_ch13.qxd 4/6/04 2:22 PM Page 201
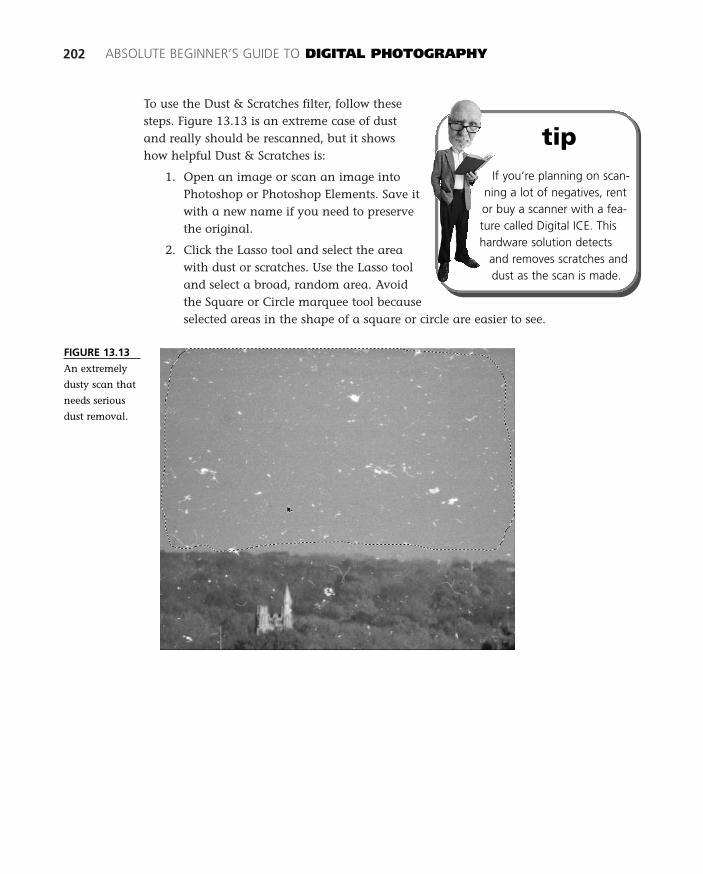
To use the Dust & Scratches filter, follow thesesteps. Figure 13.13 is an extreme case of dustand really should be rescanned, but it showshow helpful Dust & Scratches is:
1. Open an image or scan an image intoPhotoshop or Photoshop Elements. Save itwith a new name if you need to preservethe original.
2. Click the Lasso tool and select the areawith dust or scratches. Use the Lasso tooland select a broad, random area. Avoidthe Square or Circle marquee tool becauseselected areas in the shape of a square or circle are easier to see.
202 ABSOLUTE BEGINNER’S GUIDE TO DIGITAL PHOTOGRAPHY
tipIf you’re planning on scan-
ning a lot of negatives, rentor buy a scanner with a fea-ture called Digital ICE. Thishardware solution detects
and removes scratches anddust as the scan is made.
FIGURE 13.13
An extremely
dusty scan that
needs serious
dust removal.
16 0789731207_ch13.qxd 4/6/04 2:22 PM Page 202

3. With the dusty area selected, choose Filters, Noise, Dust & Scratches.
4. Move both sliders to the far left: 1 for Radius and 0 for Threshold.
5. Radius needs to be adjusted first. Move the slider to the right until a majorityof the dust disappears. The goal is to remove most of the dust. Large areaswill be removed later with the Clone Stamp tool.
6. Threshold is adjusted after you find the best Radius for the dust. When youfind the correct Radius value, move the Threshold slider to the right as far aspossible until the dust begins to emerge. Back down a little. Click OK toaccept the settings.
If dust and scratches remain in the image, use the Clone Stamp tool. Follow thesesteps to use the Clone Stamp tool to remove any remaining dust and scratches:
1. Find some spots that still have dust and zoom in (Window, Zoom In).
2. Click the Clone Stamp tool and then select a brush size appropriate for thedust. The smaller the better, because you have more control and the changesaren’t as easy to spot.
3. Before you can use Clone Stamp, you need to tell the tool what area to use asa guide. Move the cursor somewhere acceptable (an area with no dust), pressdown and hold the Alt (x for Mac users) key. The cursor will change to a tar-get. Now click the mouse once. You’ve setthe clone point.
4. Move the mouse over any remaining dustand then click and drag. The CloneStamp tool will copy the area you selectedearlier over the dust.
The area you selected should be free of dust. Thebottom line is that even the worst scans can besaved. Removing dust and scratches from areaswith people and other subjects is more difficult,and requires more than the Dust & Scratches filter.
CHAPTER 13 THE IMPORTANCE OF FILTERS 203
tipFor an advanced treatment
of dust and scratch removalon complex subjects such aspeople, pick up KatrinEismann’s Photoshop
Restoration & Retouchingfrom Que Publishing.
16 0789731207_ch13.qxd 4/6/04 2:22 PM Page 203

The Absolute Minimum
Photoshop and Photoshop Elements provide the same filters. The most common fil-ters you will use are Blur, Dust & Scratches, and Unsharp Mask. Keep these tips inmind while working with images that require the use of these tools:
■ The best sharpening tool is Unsharp Mask. Use it instead of the otherSharpen commands.
■ In Unsharp Mask, Threshold is adjusted last. Set it to zero until you are fin-ished adjusting Amount and Radius.
■ The Dust & Scratches tool can work wonders, but isn’t foolproof. Try to keepdust off your images using a brush and antistatic gloves.
■ With the Dust & Scratches filter, Threshold is adjusted last. Set it to zero untilyou’ve adjusted Radius.
■ Use the Clone Stamp tool to remove a few scratches or pieces of dust. Use theDust & Scratches filter to remove a large amount of dust from a selected area.
■ Gaussian Blur is often used to soften skin, especially close-ups. Use it sparingly.
204 ABSOLUTE BEGINNER’S GUIDE TO DIGITAL PHOTOGRAPHY
16 0789731207_ch13.qxd 4/6/04 2:22 PM Page 204
14In this chapter
• Introduction to Histograms
• Correcting Brightness and Contrast
• Setting and Using Black Points and WhitePoints
The Importance of
Brightness/Contrast
When you print a photograph in a darkroom, you make decisions about
changing brightness and contrast after looking at test prints.
For example, you’d evaluate brightness by making several exposures on
a test strip, then develop and examine the results. You’d change con-
trast by using a different grade of printing paper or by changing a poly-
contrast filter after examining the developed test print.
With digital imaging, you make changes using various commands as
you look at the image on a computer’s monitor screen. Your changes
are immediately visible. You of course don’t need to make a print until
you are satisfied with the onscreen image.
17 0789731207_ch14.qxd 4/6/04 2:18 PM Page 205
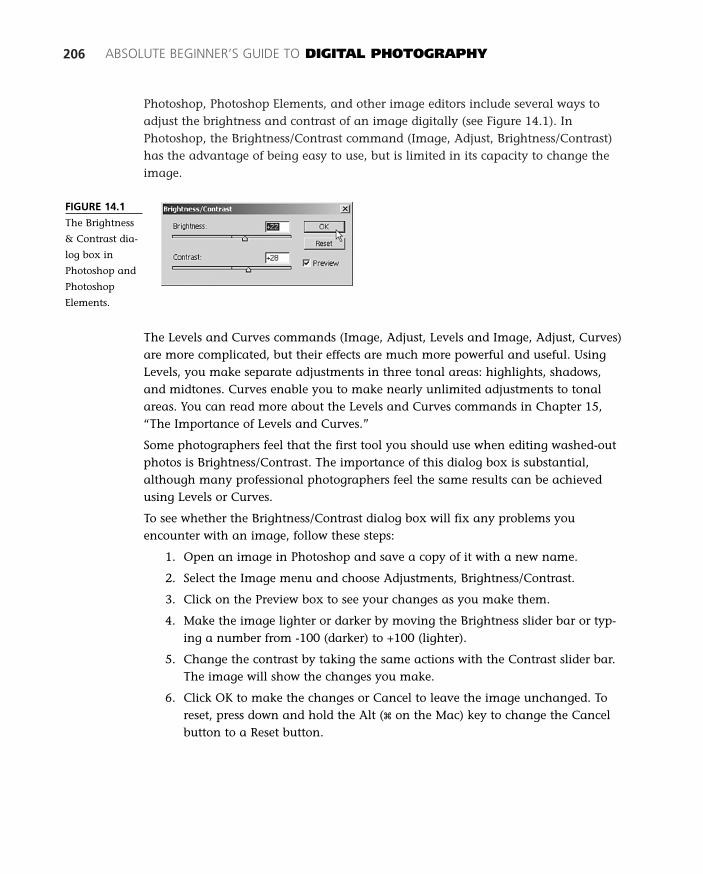
Photoshop, Photoshop Elements, and other image editors include several ways toadjust the brightness and contrast of an image digitally (see Figure 14.1). InPhotoshop, the Brightness/Contrast command (Image, Adjust, Brightness/Contrast)has the advantage of being easy to use, but is limited in its capacity to change theimage.
206 ABSOLUTE BEGINNER’S GUIDE TO DIGITAL PHOTOGRAPHY
FIGURE 14.1
The Brightness
& Contrast dia-
log box in
Photoshop and
Photoshop
Elements.
The Levels and Curves commands (Image, Adjust, Levels and Image, Adjust, Curves)are more complicated, but their effects are much more powerful and useful. UsingLevels, you make separate adjustments in three tonal areas: highlights, shadows,and midtones. Curves enable you to make nearly unlimited adjustments to tonalareas. You can read more about the Levels and Curves commands in Chapter 15,“The Importance of Levels and Curves.”
Some photographers feel that the first tool you should use when editing washed-outphotos is Brightness/Contrast. The importance of this dialog box is substantial,although many professional photographers feel the same results can be achievedusing Levels or Curves.
To see whether the Brightness/Contrast dialog box will fix any problems youencounter with an image, follow these steps:
1. Open an image in Photoshop and save a copy of it with a new name.
2. Select the Image menu and choose Adjustments, Brightness/Contrast.
3. Click on the Preview box to see your changes as you make them.
4. Make the image lighter or darker by moving the Brightness slider bar or typ-ing a number from -100 (darker) to +100 (lighter).
5. Change the contrast by taking the same actions with the Contrast slider bar.The image will show the changes you make.
6. Click OK to make the changes or Cancel to leave the image unchanged. Toreset, press down and hold the Alt (x on the Mac) key to change the Cancelbutton to a Reset button.
17 0789731207_ch14.qxd 4/6/04 2:18 PM Page 206
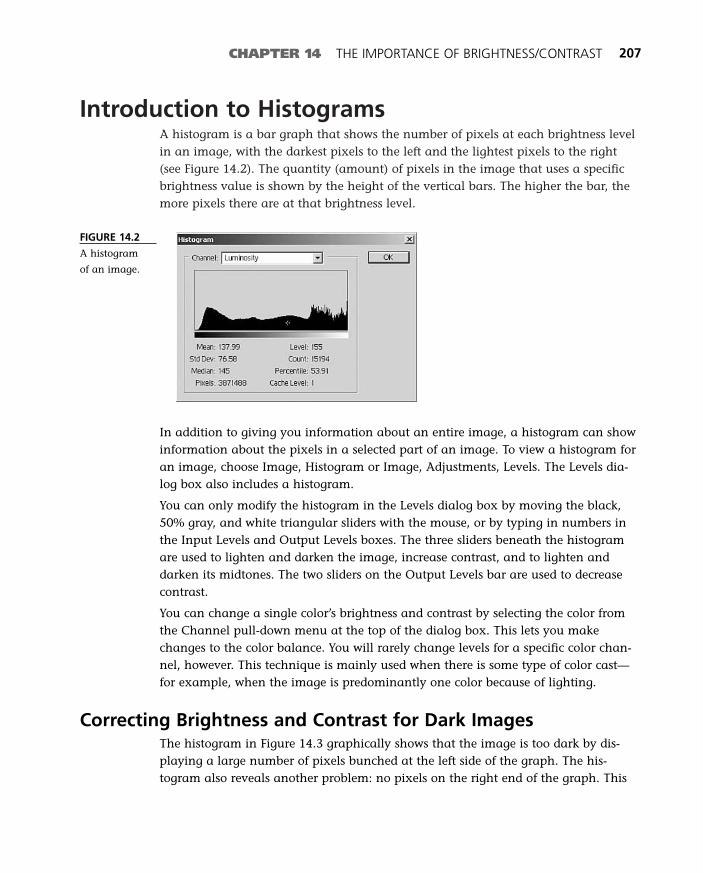
Introduction to HistogramsA histogram is a bar graph that shows the number of pixels at each brightness levelin an image, with the darkest pixels to the left and the lightest pixels to the right(see Figure 14.2). The quantity (amount) of pixels in the image that uses a specificbrightness value is shown by the height of the vertical bars. The higher the bar, themore pixels there are at that brightness level.
CHAPTER 14 THE IMPORTANCE OF BRIGHTNESS/CONTRAST 207
FIGURE 14.2
A histogram
of an image.
In addition to giving you information about an entire image, a histogram can showinformation about the pixels in a selected part of an image. To view a histogram foran image, choose Image, Histogram or Image, Adjustments, Levels. The Levels dia-log box also includes a histogram.
You can only modify the histogram in the Levels dialog box by moving the black,50% gray, and white triangular sliders with the mouse, or by typing in numbers inthe Input Levels and Output Levels boxes. The three sliders beneath the histogramare used to lighten and darken the image, increase contrast, and to lighten anddarken its midtones. The two sliders on the Output Levels bar are used to decreasecontrast.
You can change a single color’s brightness and contrast by selecting the color fromthe Channel pull-down menu at the top of the dialog box. This lets you makechanges to the color balance. You will rarely change levels for a specific color chan-nel, however. This technique is mainly used when there is some type of color cast—for example, when the image is predominantly one color because of lighting.
Correcting Brightness and Contrast for Dark ImagesThe histogram in Figure 14.3 graphically shows that the image is too dark by dis-playing a large number of pixels bunched at the left side of the graph. The his-togram also reveals another problem: no pixels on the right end of the graph. This
17 0789731207_ch14.qxd 4/6/04 2:18 PM Page 207
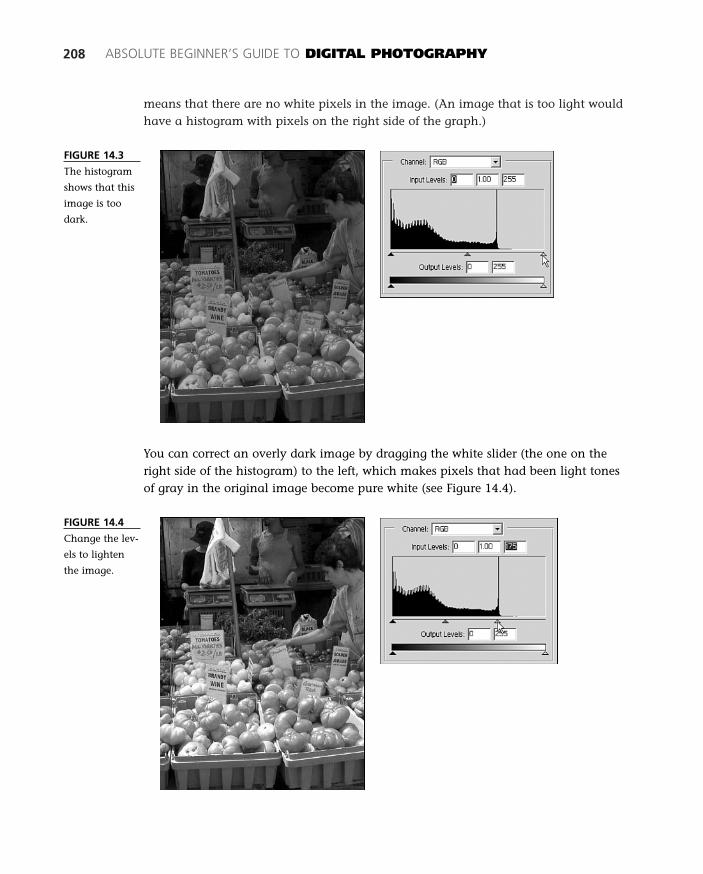
means that there are no white pixels in the image. (An image that is too light wouldhave a histogram with pixels on the right side of the graph.)
208 ABSOLUTE BEGINNER’S GUIDE TO DIGITAL PHOTOGRAPHY
FIGURE 14.3
The histogram
shows that this
image is too
dark.
You can correct an overly dark image by dragging the white slider (the one on theright side of the histogram) to the left, which makes pixels that had been light tonesof gray in the original image become pure white (see Figure 14.4).
FIGURE 14.4
Change the lev-
els to lighten
the image.
17 0789731207_ch14.qxd 4/6/04 2:18 PM Page 208
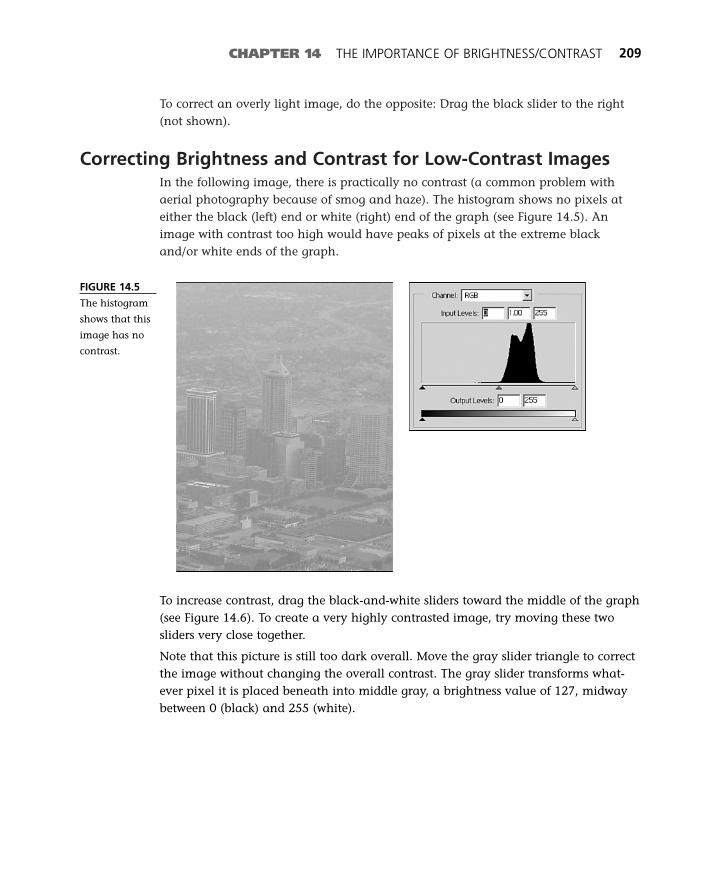
To correct an overly light image, do the opposite: Drag the black slider to the right(not shown).
Correcting Brightness and Contrast for Low-Contrast ImagesIn the following image, there is practically no contrast (a common problem withaerial photography because of smog and haze). The histogram shows no pixels ateither the black (left) end or white (right) end of the graph (see Figure 14.5). Animage with contrast too high would have peaks of pixels at the extreme blackand/or white ends of the graph.
CHAPTER 14 THE IMPORTANCE OF BRIGHTNESS/CONTRAST 209
FIGURE 14.5
The histogram
shows that this
image has no
contrast.
To increase contrast, drag the black-and-white sliders toward the middle of the graph(see Figure 14.6). To create a very highly contrasted image, try moving these twosliders very close together.
Note that this picture is still too dark overall. Move the gray slider triangle to correctthe image without changing the overall contrast. The gray slider transforms what-ever pixel it is placed beneath into middle gray, a brightness value of 127, midwaybetween 0 (black) and 255 (white).
17 0789731207_ch14.qxd 4/6/04 2:18 PM Page 209
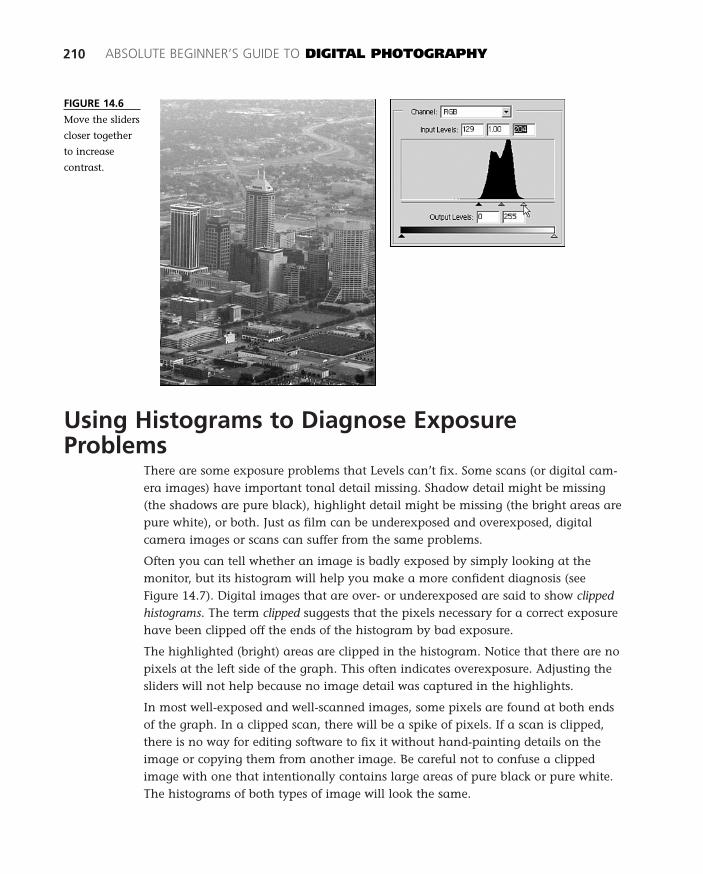
Using Histograms to Diagnose ExposureProblems
There are some exposure problems that Levels can’t fix. Some scans (or digital cam-era images) have important tonal detail missing. Shadow detail might be missing(the shadows are pure black), highlight detail might be missing (the bright areas arepure white), or both. Just as film can be underexposed and overexposed, digitalcamera images or scans can suffer from the same problems.
Often you can tell whether an image is badly exposed by simply looking at themonitor, but its histogram will help you make a more confident diagnosis (seeFigure 14.7). Digital images that are over- or underexposed are said to show clippedhistograms. The term clipped suggests that the pixels necessary for a correct exposurehave been clipped off the ends of the histogram by bad exposure.
The highlighted (bright) areas are clipped in the histogram. Notice that there are nopixels at the left side of the graph. This often indicates overexposure. Adjusting thesliders will not help because no image detail was captured in the highlights.
In most well-exposed and well-scanned images, some pixels are found at both endsof the graph. In a clipped scan, there will be a spike of pixels. If a scan is clipped,there is no way for editing software to fix it without hand-painting details on theimage or copying them from another image. Be careful not to confuse a clippedimage with one that intentionally contains large areas of pure black or pure white.The histograms of both types of image will look the same.
210 ABSOLUTE BEGINNER’S GUIDE TO DIGITAL PHOTOGRAPHY
FIGURE 14.6
Move the sliders
closer together
to increase
contrast.
17 0789731207_ch14.qxd 4/6/04 2:18 PM Page 210
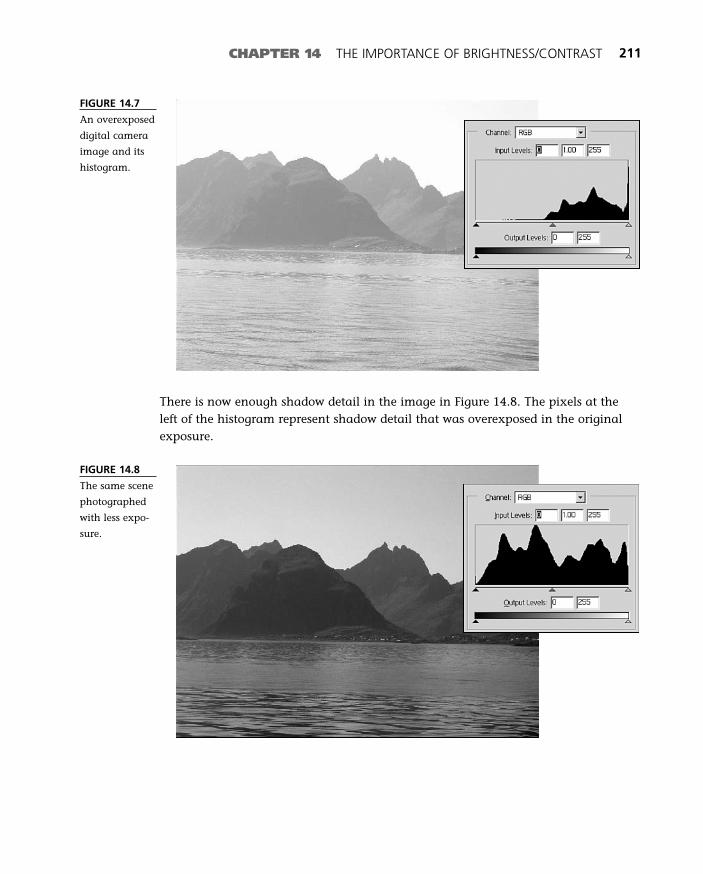
CHAPTER 14 THE IMPORTANCE OF BRIGHTNESS/CONTRAST 211
FIGURE 14.7
An overexposed
digital camera
image and its
histogram.
There is now enough shadow detail in the image in Figure 14.8. The pixels at theleft of the histogram represent shadow detail that was overexposed in the originalexposure.
FIGURE 14.8
The same scene
photographed
with less expo-
sure.
17 0789731207_ch14.qxd 4/6/04 2:18 PM Page 211
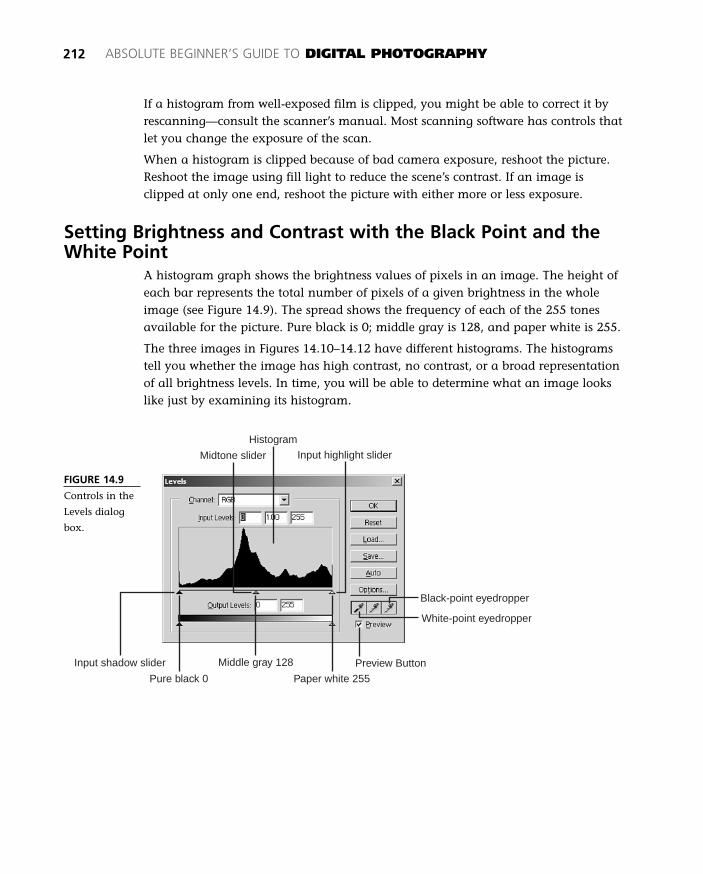
Black-point eyedropper
White-point eyedropper
Histogram
Midtone slider Input highlight slider
Preview Button
Pure black 0
Input shadow slider
Paper white 255
Middle gray 128
212 ABSOLUTE BEGINNER’S GUIDE TO DIGITAL PHOTOGRAPHY
If a histogram from well-exposed film is clipped, you might be able to correct it byrescanning—consult the scanner’s manual. Most scanning software has controls thatlet you change the exposure of the scan.
When a histogram is clipped because of bad camera exposure, reshoot the picture.Reshoot the image using fill light to reduce the scene’s contrast. If an image isclipped at only one end, reshoot the picture with either more or less exposure.
Setting Brightness and Contrast with the Black Point and theWhite Point
A histogram graph shows the brightness values of pixels in an image. The height ofeach bar represents the total number of pixels of a given brightness in the wholeimage (see Figure 14.9). The spread shows the frequency of each of the 255 tonesavailable for the picture. Pure black is 0; middle gray is 128, and paper white is 255.
The three images in Figures 14.10–14.12 have different histograms. The histogramstell you whether the image has high contrast, no contrast, or a broad representationof all brightness levels. In time, you will be able to determine what an image lookslike just by examining its histogram.
FIGURE 14.9
Controls in the
Levels dialog
box.
17 0789731207_ch14.qxd 4/6/04 2:18 PM Page 212
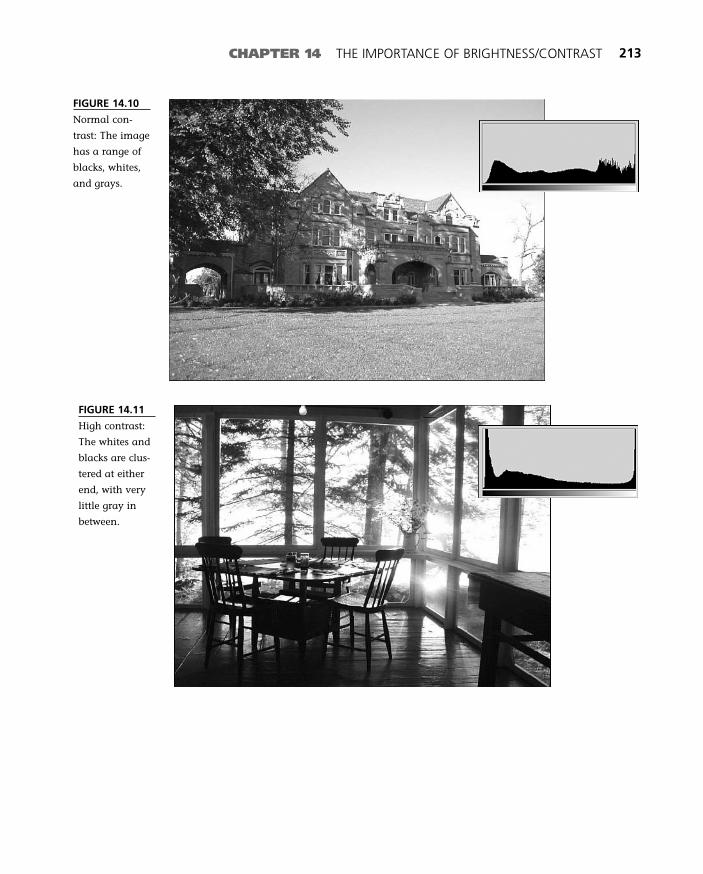
CHAPTER 14 THE IMPORTANCE OF BRIGHTNESS/CONTRAST 213
FIGURE 14.10
Normal con-
trast: The image
has a range of
blacks, whites,
and grays.
FIGURE 14.11
High contrast:
The whites and
blacks are clus-
tered at either
end, with very
little gray in
between.
17 0789731207_ch14.qxd 4/6/04 2:18 PM Page 213
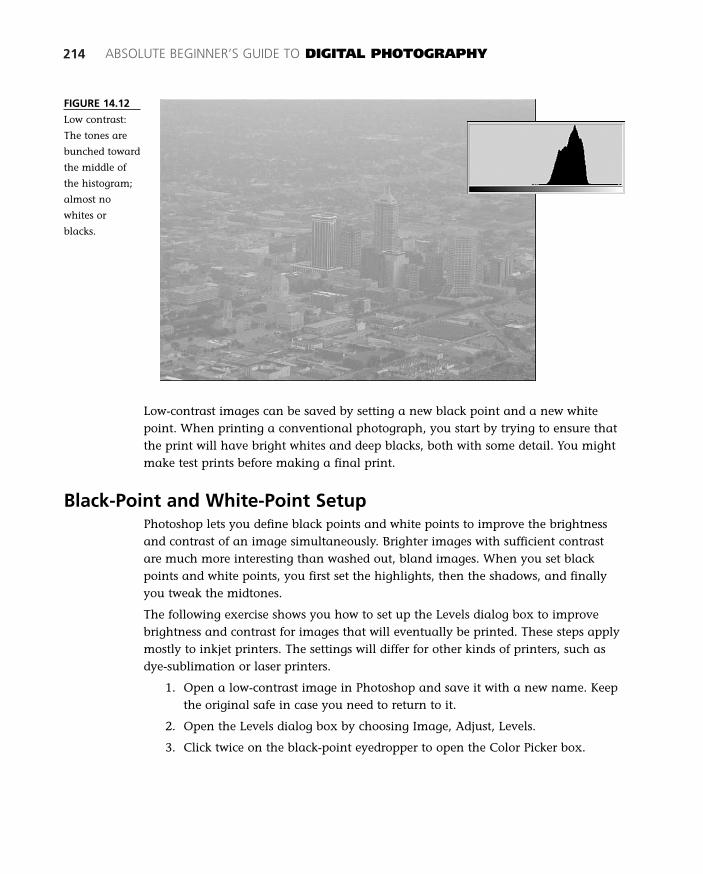
214 ABSOLUTE BEGINNER’S GUIDE TO DIGITAL PHOTOGRAPHY
FIGURE 14.12
Low contrast:
The tones are
bunched toward
the middle of
the histogram;
almost no
whites or
blacks.
Low-contrast images can be saved by setting a new black point and a new whitepoint. When printing a conventional photograph, you start by trying to ensure thatthe print will have bright whites and deep blacks, both with some detail. You mightmake test prints before making a final print.
Black-Point and White-Point SetupPhotoshop lets you define black points and white points to improve the brightnessand contrast of an image simultaneously. Brighter images with sufficient contrastare much more interesting than washed out, bland images. When you set blackpoints and white points, you first set the highlights, then the shadows, and finallyyou tweak the midtones.
The following exercise shows you how to set up the Levels dialog box to improvebrightness and contrast for images that will eventually be printed. These steps applymostly to inkjet printers. The settings will differ for other kinds of printers, such asdye-sublimation or laser printers.
1. Open a low-contrast image in Photoshop and save it with a new name. Keepthe original safe in case you need to return to it.
2. Open the Levels dialog box by choosing Image, Adjust, Levels.
3. Click twice on the black-point eyedropper to open the Color Picker box.
17 0789731207_ch14.qxd 4/6/04 2:18 PM Page 214
4. Set the Red, Green, and Blue values to 2 to define the darkest black with somedetail. (A zero in each color would produce a black with no detail at all.)Click OK.
5. Click twice on the white-point eyedropper to open the Color Picker box again.
6. Set the Red, Green, and Blue values at 244 to define the brightest white withdetail in a photograph. (The number 255 in each color would produce paperwhite with no detail.) Click OK.
7. When the Levels box appears, click OK and then click Yes when the defaultdialog box question appears.
Brightness and Contrast ExerciseIn the last exercise, you’ll set up the ColorPickers for printing. Now Photoshop (orPhotoshop Elements) is ready to save underex-posed, washed-out, backlit, or just plain lifelessimages.
1. Open a poorly exposed image and save itwith a new name, such as a TIFF file or aPSD file.
2. Choose Image, Adjustments, Levels. Thebell shape of the histogram confirms thatthis photo has very low contrast, without much black or white (see Figure 14.13).
3. Use Threshold to find the extremes. Threshold is great to use immediatelybefore Levels. Choose Image, Adjustments, Threshold to find the blackest andwhitest part of the image (see Figure 14.14). Open the Threshold window andthen move the slider all the way to the left. Slowly move it to the right untilyou see black appear in areas you recognize. Those areas are the darkest partof the image. Move the slider to the right and then slowly move it left to seewhere the brightest areas are in the image. Remember these locations in theimage and then select them with the black and white eyedroppers in theLevels dialog box later.
4. Click on the black-point eyedropper and find the darkest part of the imagethat should have detail. In this image, it is the eye (unfortunately). Click toset the black point.
CHAPTER 14 THE IMPORTANCE OF BRIGHTNESS/CONTRAST 215
tipThe Info palette might
help you find the white andblack points if you’re havingtrouble. Choose Window,Info to see the brightness
values.
17 0789731207_ch14.qxd 4/6/04 2:18 PM Page 215

216 ABSOLUTE BEGINNER’S GUIDE TO DIGITAL PHOTOGRAPHY
FIGURE 14.13
White underex-
poses, especially
on a bright
sunny July
afternoon.
FIGURE 14.14
Threshold
shows you the
darkest and
lightest parts of
an image.
17 0789731207_ch14.qxd 4/6/04 2:18 PM Page 216
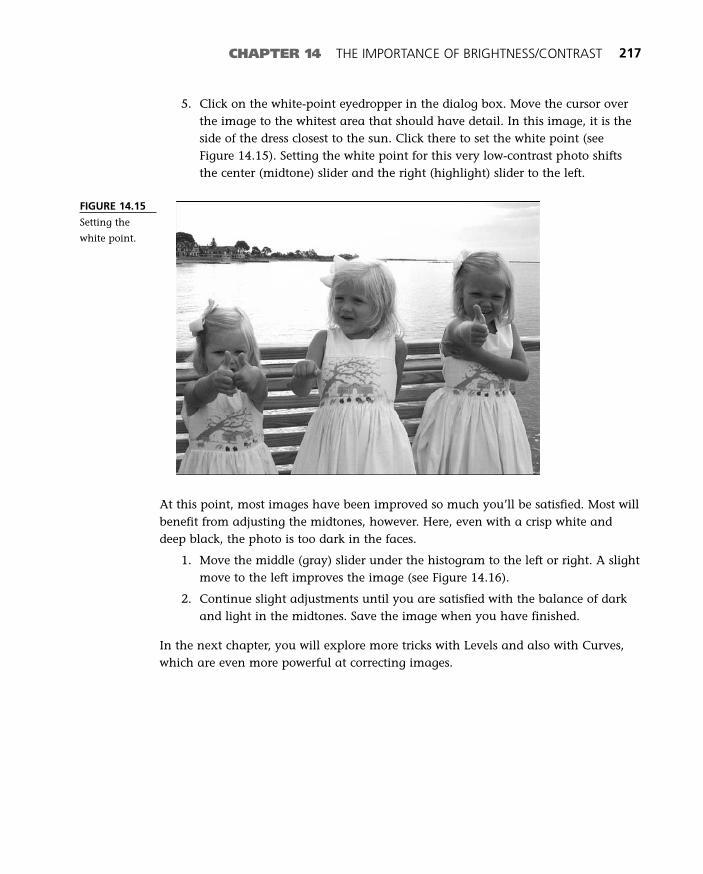
CHAPTER 14 THE IMPORTANCE OF BRIGHTNESS/CONTRAST 217
5. Click on the white-point eyedropper in the dialog box. Move the cursor overthe image to the whitest area that should have detail. In this image, it is theside of the dress closest to the sun. Click there to set the white point (seeFigure 14.15). Setting the white point for this very low-contrast photo shiftsthe center (midtone) slider and the right (highlight) slider to the left.
FIGURE 14.15
Setting the
white point.
At this point, most images have been improved so much you’ll be satisfied. Most willbenefit from adjusting the midtones, however. Here, even with a crisp white anddeep black, the photo is too dark in the faces.
1. Move the middle (gray) slider under the histogram to the left or right. A slightmove to the left improves the image (see Figure 14.16).
2. Continue slight adjustments until you are satisfied with the balance of darkand light in the midtones. Save the image when you have finished.
In the next chapter, you will explore more tricks with Levels and also with Curves,which are even more powerful at correcting images.
17 0789731207_ch14.qxd 4/6/04 2:18 PM Page 217

218 ABSOLUTE BEGINNER’S GUIDE TO DIGITAL PHOTOGRAPHY
FIGURE 14.16
Adjust the mid-
tones as the fin-
ishing touch,
and now the
underexposed
image is cor-
rected.
The Absolute Minimum
A few point regarding histograms and adjusting brightness and contrast in images:
■ Histograms show the distribution of pixels in an image across 256 brightnessvalues. Pure black is on the left; pure white is on the right.
■ Use histograms to see whether your image is lacking brightness and contrast.Empty, blank areas in the histogram indicate missing values.
■ Use the black and white sliders in the Levels dialog box to adjust brightnessand contrast.
■ Double-click on the black-point and white-point eyedroppers in the Levelsdialog box to set baseline black and white values.
17 0789731207_ch14.qxd 4/6/04 2:18 PM Page 218
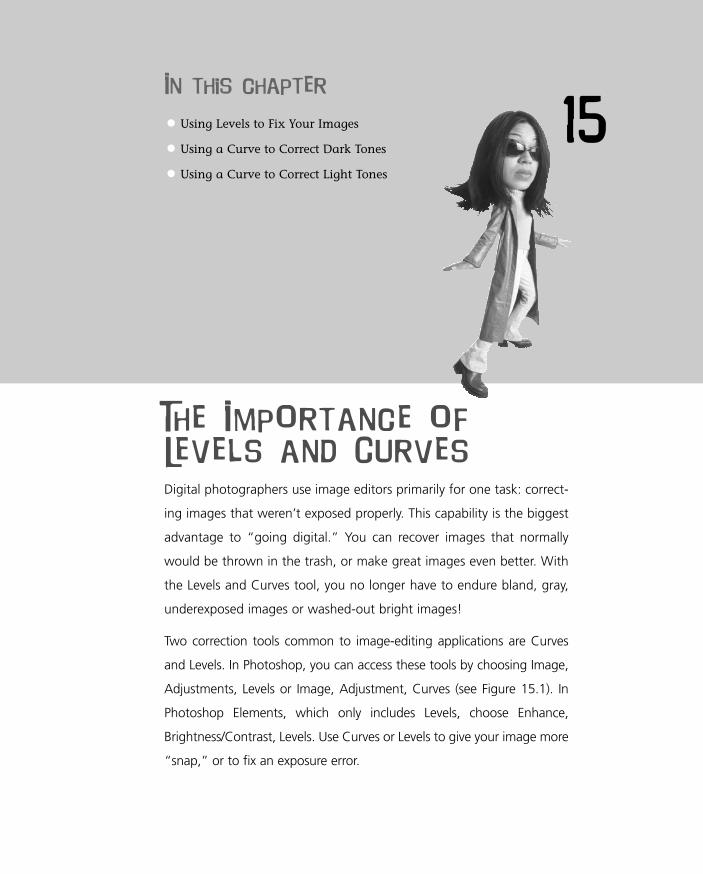
15In this chapter
• Using Levels to Fix Your Images
• Using a Curve to Correct Dark Tones
• Using a Curve to Correct Light Tones
The Importance of
Levels and Curves
Digital photographers use image editors primarily for one task: correct-
ing images that weren’t exposed properly. This capability is the biggest
advantage to “going digital.” You can recover images that normally
would be thrown in the trash, or make great images even better. With
the Levels and Curves tool, you no longer have to endure bland, gray,
underexposed images or washed-out bright images!
Two correction tools common to image-editing applications are Curves
and Levels. In Photoshop, you can access these tools by choosing Image,
Adjustments, Levels or Image, Adjustment, Curves (see Figure 15.1). In
Photoshop Elements, which only includes Levels, choose Enhance,
Brightness/Contrast, Levels. Use Curves or Levels to give your image more
“snap,” or to fix an exposure error.
18 0789731207_ch15.qxd 4/6/04 2:15 PM Page 219

This chapter will show you how to use Levels and Curves. The Levels tool is a littleeasier to understand and is powerful enough for most photographers. Curves pro-vide tremendous editing capabilities for specific luminance values, but can belearned quickly, so anyone can use it. This chapter explains the use of each tool indetail and also provides tips on how to leverage these tools when you’re in a hurry.
Using Levels to Fix Your ImagesMost image editors include a fast fix for bland images. In Photoshop for example,you can take the following steps:
1. Open your image.
2. Select Image, Adjustments, Auto Levels.
3. The image will adjust to improve contrast and correct the distribution oftones in the image.
4. Save your image as a JPEG, GIF, or TIFF file.
The Auto Levels feature is for those in a hurry. You can fix an image in seconds andthen email or print it. This automated feature comes in handy when you are in ahurry, but often it doesn’t fix an image properly. For example, look at Figure 15.2.
The goal in Figure 15.2—to convey the calm stage set before the big show—doesn’tfall in line with Photoshop’s goal: adjusting tones to take advantage of all the tonalvalues. Auto Levels simply pulls out all the brightness it can muster and ruins theimage. For this reason, you should learn more about the Levels dialog box.
220 ABSOLUTE BEGINNER’S GUIDE TO DIGITAL PHOTOGRAPHY
FIGURE 15.1
Photoshop’s
Levels and
Curves tools for
a black-and-
white image.
18 0789731207_ch15.qxd 4/6/04 2:15 PM Page 220
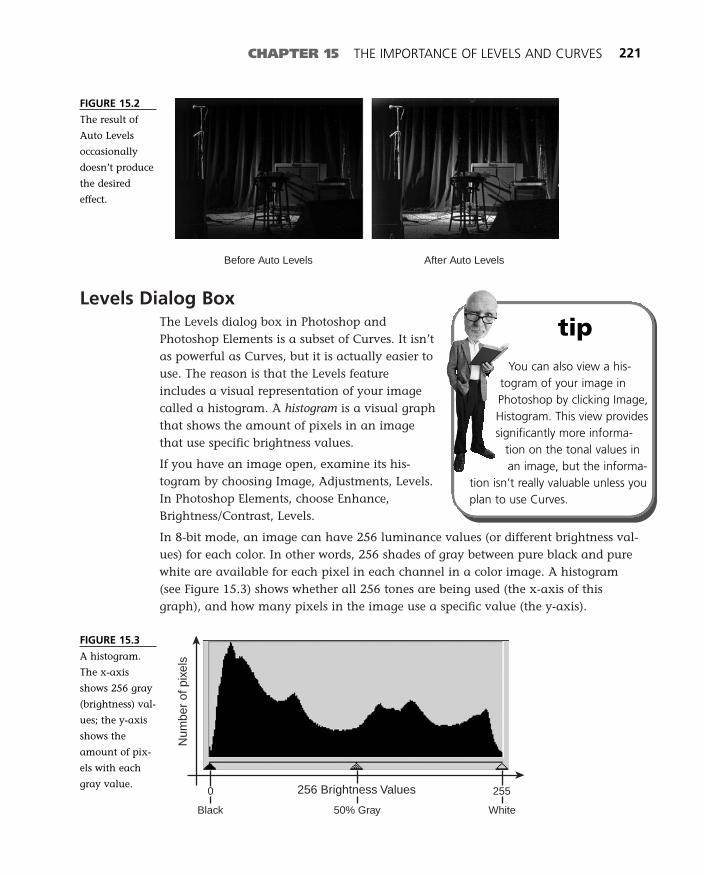
Levels Dialog BoxThe Levels dialog box in Photoshop andPhotoshop Elements is a subset of Curves. It isn’tas powerful as Curves, but it is actually easier touse. The reason is that the Levels featureincludes a visual representation of your imagecalled a histogram. A histogram is a visual graphthat shows the amount of pixels in an imagethat use specific brightness values.
If you have an image open, examine its his-togram by choosing Image, Adjustments, Levels.In Photoshop Elements, choose Enhance,Brightness/Contrast, Levels.
In 8-bit mode, an image can have 256 luminance values (or different brightness val-ues) for each color. In other words, 256 shades of gray between pure black and purewhite are available for each pixel in each channel in a color image. A histogram(see Figure 15.3) shows whether all 256 tones are being used (the x-axis of thisgraph), and how many pixels in the image use a specific value (the y-axis).
CHAPTER 15 THE IMPORTANCE OF LEVELS AND CURVES 221
FIGURE 15.2
The result of
Auto Levels
occasionally
doesn’t produce
the desired
effect.
Before Auto Levels After Auto Levels
tipYou can also view a his-
togram of your image inPhotoshop by clicking Image,Histogram. This view providessignificantly more informa-
tion on the tonal values inan image, but the informa-
tion isn’t really valuable unless youplan to use Curves.
FIGURE 15.3
A histogram.
The x-axis
shows 256 gray
(brightness) val-
ues; the y-axis
shows the
amount of pix-
els with each
gray value.
Black 50% Gray White
Num
ber
of p
ixel
s
256 Brightness Values0 255
18 0789731207_ch15.qxd 4/6/04 2:15 PM Page 221
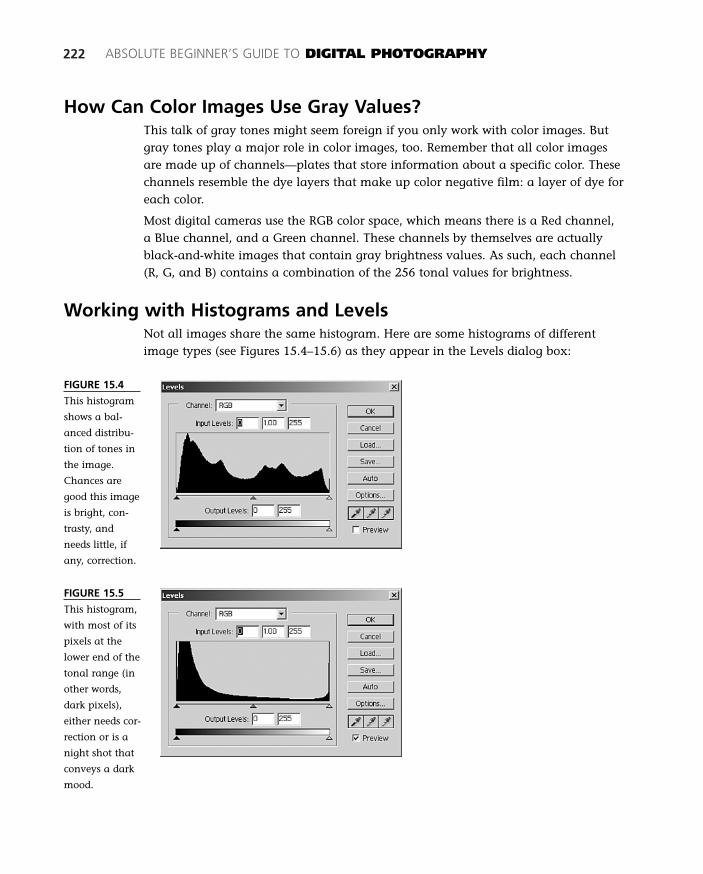
222 ABSOLUTE BEGINNER’S GUIDE TO DIGITAL PHOTOGRAPHY
How Can Color Images Use Gray Values?This talk of gray tones might seem foreign if you only work with color images. Butgray tones play a major role in color images, too. Remember that all color imagesare made up of channels—plates that store information about a specific color. Thesechannels resemble the dye layers that make up color negative film: a layer of dye foreach color.
Most digital cameras use the RGB color space, which means there is a Red channel,a Blue channel, and a Green channel. These channels by themselves are actuallyblack-and-white images that contain gray brightness values. As such, each channel(R, G, and B) contains a combination of the 256 tonal values for brightness.
Working with Histograms and LevelsNot all images share the same histogram. Here are some histograms of differentimage types (see Figures 15.4–15.6) as they appear in the Levels dialog box:
FIGURE 15.4
This histogram
shows a bal-
anced distribu-
tion of tones in
the image.
Chances are
good this image
is bright, con-
trasty, and
needs little, if
any, correction.
FIGURE 15.5
This histogram,
with most of its
pixels at the
lower end of the
tonal range (in
other words,
dark pixels),
either needs cor-
rection or is a
night shot that
conveys a dark
mood.
18 0789731207_ch15.qxd 4/6/04 2:15 PM Page 222
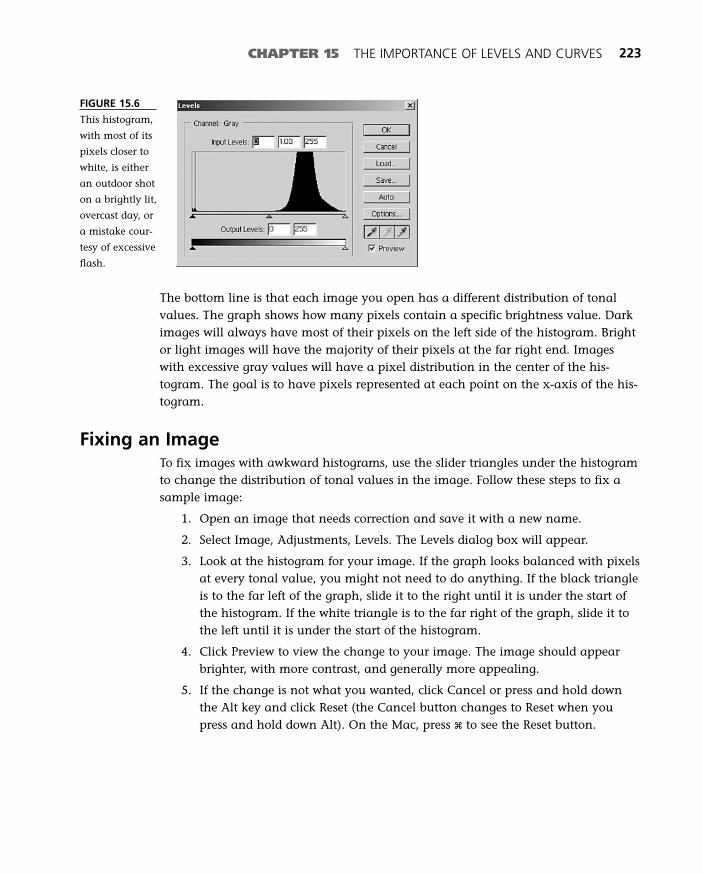
CHAPTER 15 THE IMPORTANCE OF LEVELS AND CURVES 223
FIGURE 15.6
This histogram,
with most of its
pixels closer to
white, is either
an outdoor shot
on a brightly lit,
overcast day, or
a mistake cour-
tesy of excessive
flash.
The bottom line is that each image you open has a different distribution of tonalvalues. The graph shows how many pixels contain a specific brightness value. Darkimages will always have most of their pixels on the left side of the histogram. Brightor light images will have the majority of their pixels at the far right end. Imageswith excessive gray values will have a pixel distribution in the center of the his-togram. The goal is to have pixels represented at each point on the x-axis of the his-togram.
Fixing an ImageTo fix images with awkward histograms, use the slider triangles under the histogramto change the distribution of tonal values in the image. Follow these steps to fix asample image:
1. Open an image that needs correction and save it with a new name.
2. Select Image, Adjustments, Levels. The Levels dialog box will appear.
3. Look at the histogram for your image. If the graph looks balanced with pixelsat every tonal value, you might not need to do anything. If the black triangleis to the far left of the graph, slide it to the right until it is under the start ofthe histogram. If the white triangle is to the far right of the graph, slide it tothe left until it is under the start of the histogram.
4. Click Preview to view the change to your image. The image should appearbrighter, with more contrast, and generally more appealing.
5. If the change is not what you wanted, click Cancel or press and hold downthe Alt key and click Reset (the Cancel button changes to Reset when youpress and hold down Alt). On the Mac, press x to see the Reset button.
18 0789731207_ch15.qxd 4/6/04 2:15 PM Page 223
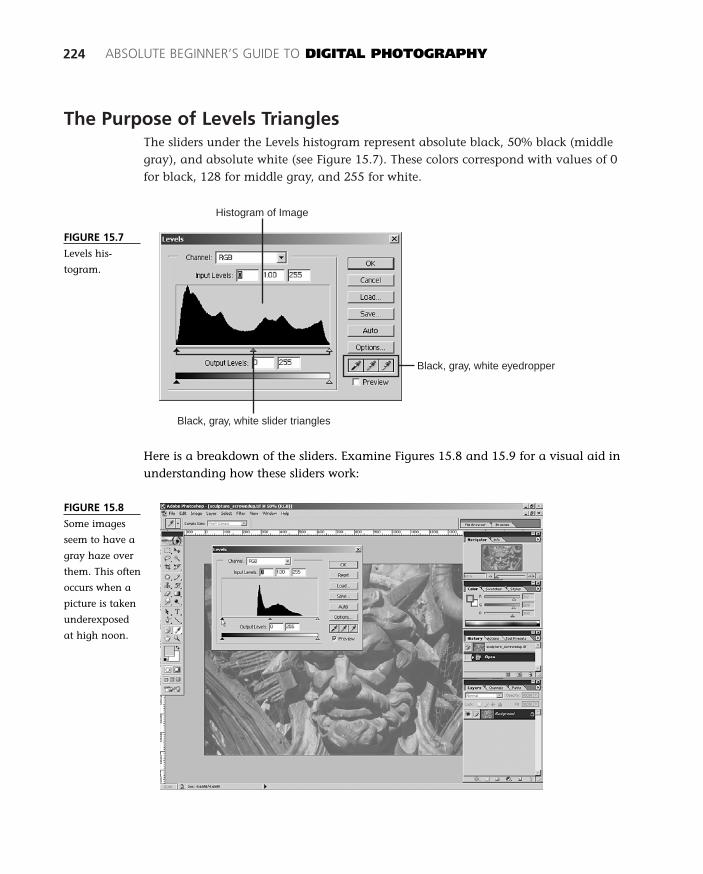
The Purpose of Levels TrianglesThe sliders under the Levels histogram represent absolute black, 50% black (middlegray), and absolute white (see Figure 15.7). These colors correspond with values of 0for black, 128 for middle gray, and 255 for white.
224 ABSOLUTE BEGINNER’S GUIDE TO DIGITAL PHOTOGRAPHY
FIGURE 15.7
Levels his-
togram.
Black, gray, white slider triangles
Black, gray, white eyedropper
Histogram of Image
Here is a breakdown of the sliders. Examine Figures 15.8 and 15.9 for a visual aid inunderstanding how these sliders work:
FIGURE 15.8
Some images
seem to have a
gray haze over
them. This often
occurs when a
picture is taken
underexposed
at high noon.
18 0789731207_ch15.qxd 4/6/04 2:15 PM Page 224
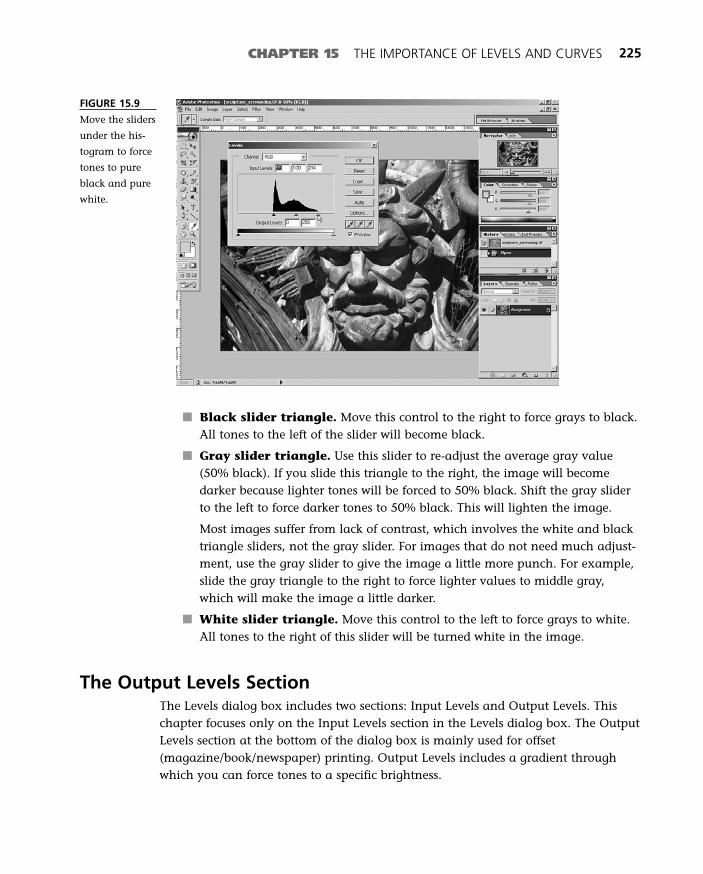
CHAPTER 15 THE IMPORTANCE OF LEVELS AND CURVES 225
■ Black slider triangle. Move this control to the right to force grays to black.All tones to the left of the slider will become black.
■ Gray slider triangle. Use this slider to re-adjust the average gray value(50% black). If you slide this triangle to the right, the image will becomedarker because lighter tones will be forced to 50% black. Shift the gray sliderto the left to force darker tones to 50% black. This will lighten the image.
Most images suffer from lack of contrast, which involves the white and blacktriangle sliders, not the gray slider. For images that do not need much adjust-ment, use the gray slider to give the image a little more punch. For example,slide the gray triangle to the right to force lighter values to middle gray,which will make the image a little darker.
■ White slider triangle. Move this control to the left to force grays to white.All tones to the right of this slider will be turned white in the image.
The Output Levels SectionThe Levels dialog box includes two sections: Input Levels and Output Levels. Thischapter focuses only on the Input Levels section in the Levels dialog box. The OutputLevels section at the bottom of the dialog box is mainly used for offset(magazine/book/newspaper) printing. Output Levels includes a gradient throughwhich you can force tones to a specific brightness.
FIGURE 15.9
Move the sliders
under the his-
togram to force
tones to pure
black and pure
white.
18 0789731207_ch15.qxd 4/6/04 2:15 PM Page 225
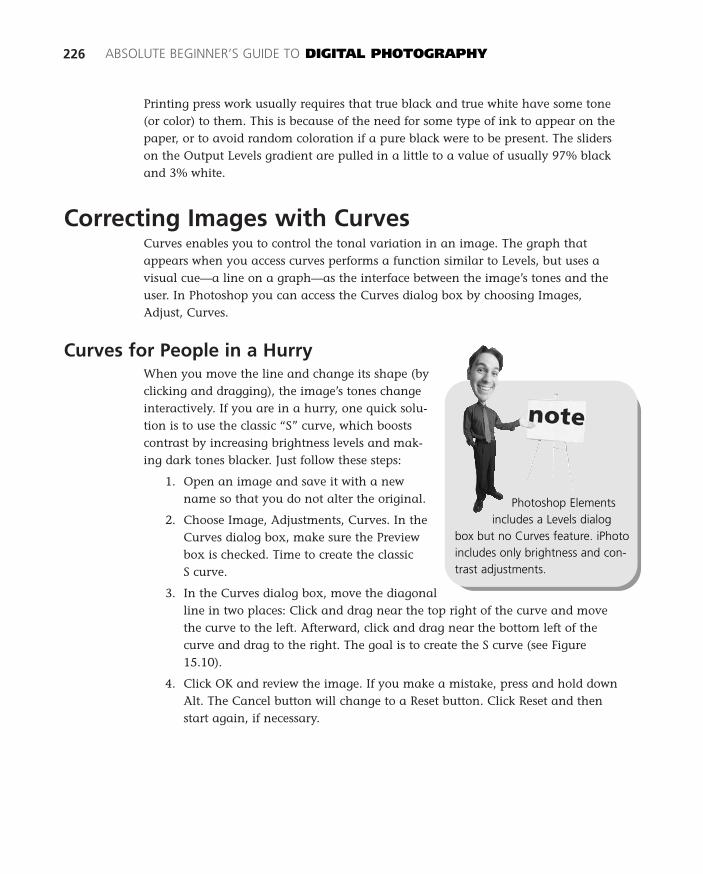
Printing press work usually requires that true black and true white have some tone(or color) to them. This is because of the need for some type of ink to appear on thepaper, or to avoid random coloration if a pure black were to be present. The sliderson the Output Levels gradient are pulled in a little to a value of usually 97% blackand 3% white.
Correcting Images with CurvesCurves enables you to control the tonal variation in an image. The graph thatappears when you access curves performs a function similar to Levels, but uses avisual cue—a line on a graph—as the interface between the image’s tones and theuser. In Photoshop you can access the Curves dialog box by choosing Images,Adjust, Curves.
Curves for People in a HurryWhen you move the line and change its shape (byclicking and dragging), the image’s tones changeinteractively. If you are in a hurry, one quick solu-tion is to use the classic “S” curve, which boostscontrast by increasing brightness levels and mak-ing dark tones blacker. Just follow these steps:
1. Open an image and save it with a newname so that you do not alter the original.
2. Choose Image, Adjustments, Curves. In theCurves dialog box, make sure the Previewbox is checked. Time to create the classic S curve.
3. In the Curves dialog box, move the diagonalline in two places: Click and drag near the top right of the curve and movethe curve to the left. Afterward, click and drag near the bottom left of thecurve and drag to the right. The goal is to create the S curve (see Figure15.10).
4. Click OK and review the image. If you make a mistake, press and hold downAlt. The Cancel button will change to a Reset button. Click Reset and thenstart again, if necessary.
226 ABSOLUTE BEGINNER’S GUIDE TO DIGITAL PHOTOGRAPHY
Photoshop Elementsincludes a Levels dialog
box but no Curves feature. iPhotoincludes only brightness and con-trast adjustments.
18 0789731207_ch15.qxd 4/6/04 2:15 PM Page 226
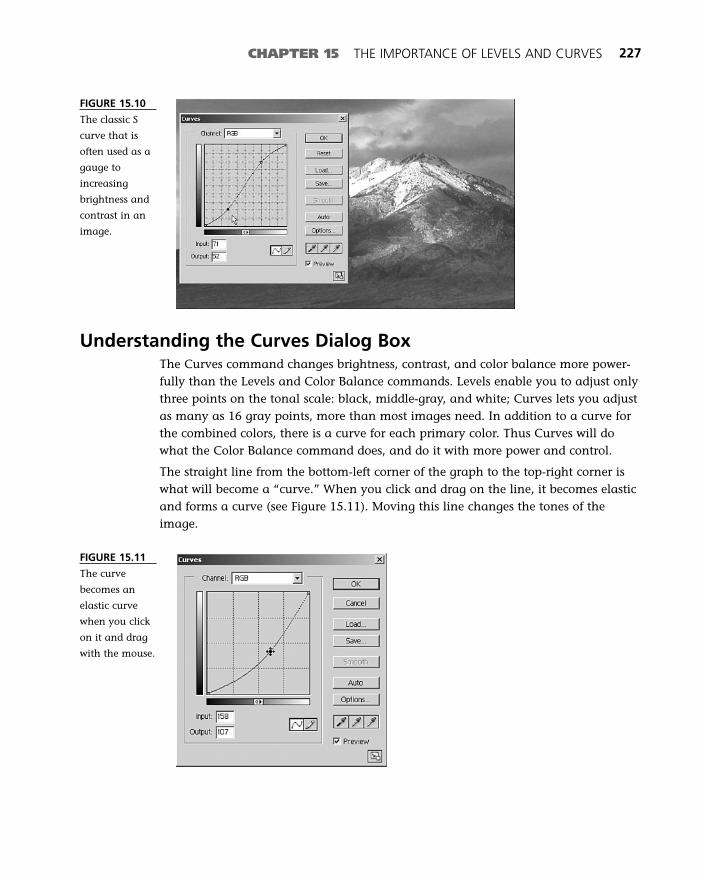
CHAPTER 15 THE IMPORTANCE OF LEVELS AND CURVES 227
FIGURE 15.10
The classic S
curve that is
often used as a
gauge to
increasing
brightness and
contrast in an
image.
Understanding the Curves Dialog BoxThe Curves command changes brightness, contrast, and color balance more power-fully than the Levels and Color Balance commands. Levels enable you to adjust onlythree points on the tonal scale: black, middle-gray, and white; Curves lets you adjustas many as 16 gray points, more than most images need. In addition to a curve forthe combined colors, there is a curve for each primary color. Thus Curves will dowhat the Color Balance command does, and do it with more power and control.
The straight line from the bottom-left corner of the graph to the top-right corner iswhat will become a “curve.” When you click and drag on the line, it becomes elasticand forms a curve (see Figure 15.11). Moving this line changes the tones of theimage.
FIGURE 15.11
The curve
becomes an
elastic curve
when you click
on it and drag
with the mouse.
18 0789731207_ch15.qxd 4/6/04 2:15 PM Page 227
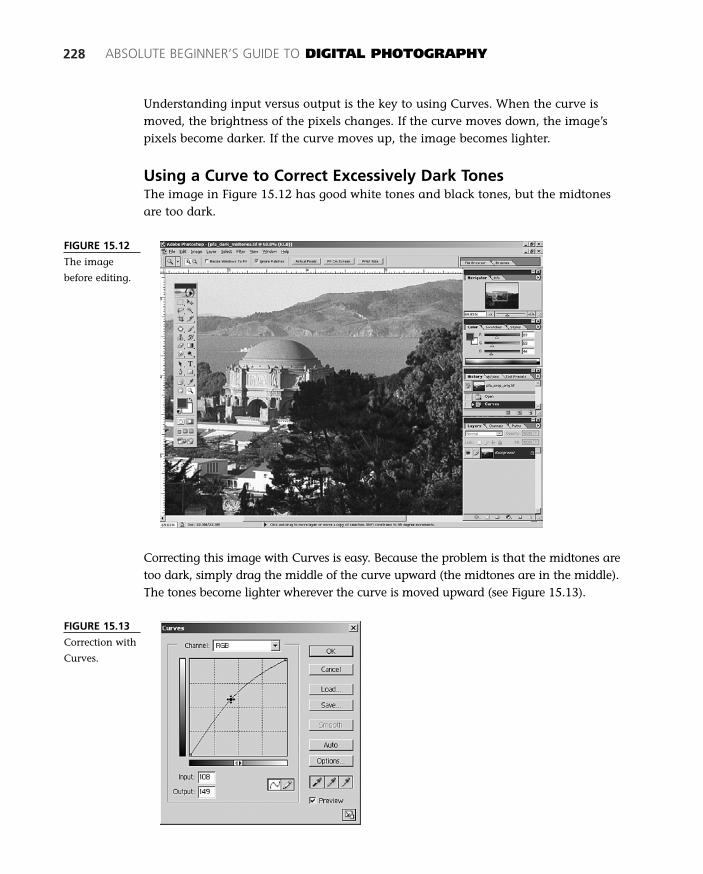
228 ABSOLUTE BEGINNER’S GUIDE TO DIGITAL PHOTOGRAPHY
FIGURE 15.12
The image
before editing.
Understanding input versus output is the key to using Curves. When the curve ismoved, the brightness of the pixels changes. If the curve moves down, the image’spixels become darker. If the curve moves up, the image becomes lighter.
Using a Curve to Correct Excessively Dark TonesThe image in Figure 15.12 has good white tones and black tones, but the midtonesare too dark.
Correcting this image with Curves is easy. Because the problem is that the midtones aretoo dark, simply drag the middle of the curve upward (the midtones are in the middle).The tones become lighter wherever the curve is moved upward (see Figure 15.13).
FIGURE 15.13
Correction with
Curves.
18 0789731207_ch15.qxd 4/6/04 2:15 PM Page 228
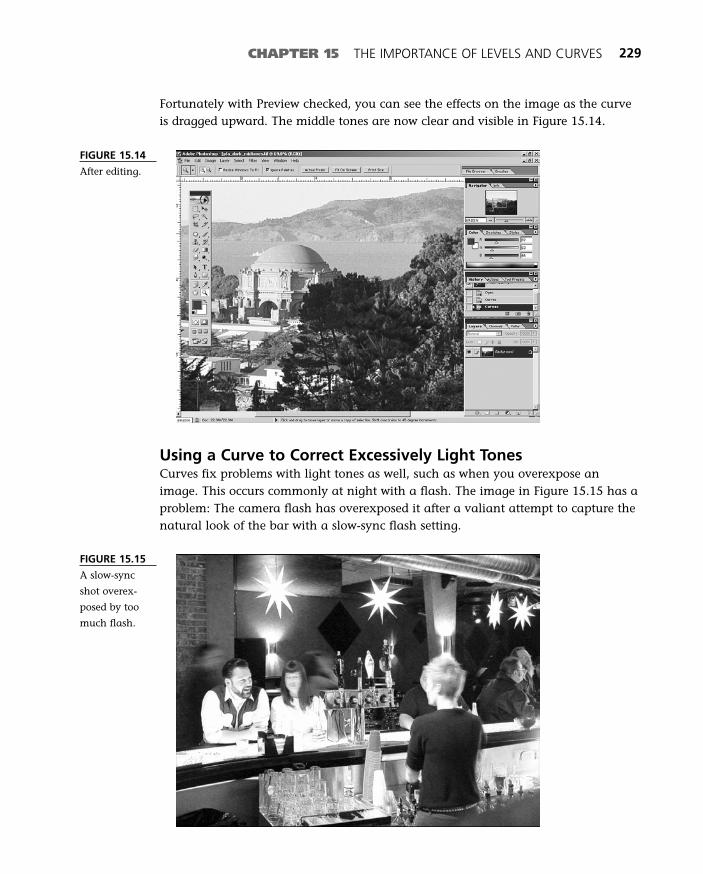
CHAPTER 15 THE IMPORTANCE OF LEVELS AND CURVES 229
Fortunately with Preview checked, you can see the effects on the image as the curveis dragged upward. The middle tones are now clear and visible in Figure 15.14.
FIGURE 15.14
After editing.
Using a Curve to Correct Excessively Light TonesCurves fix problems with light tones as well, such as when you overexpose animage. This occurs commonly at night with a flash. The image in Figure 15.15 has aproblem: The camera flash has overexposed it after a valiant attempt to capture thenatural look of the bar with a slow-sync flash setting.
FIGURE 15.15
A slow-sync
shot overex-
posed by too
much flash.
18 0789731207_ch15.qxd 4/6/04 2:15 PM Page 229
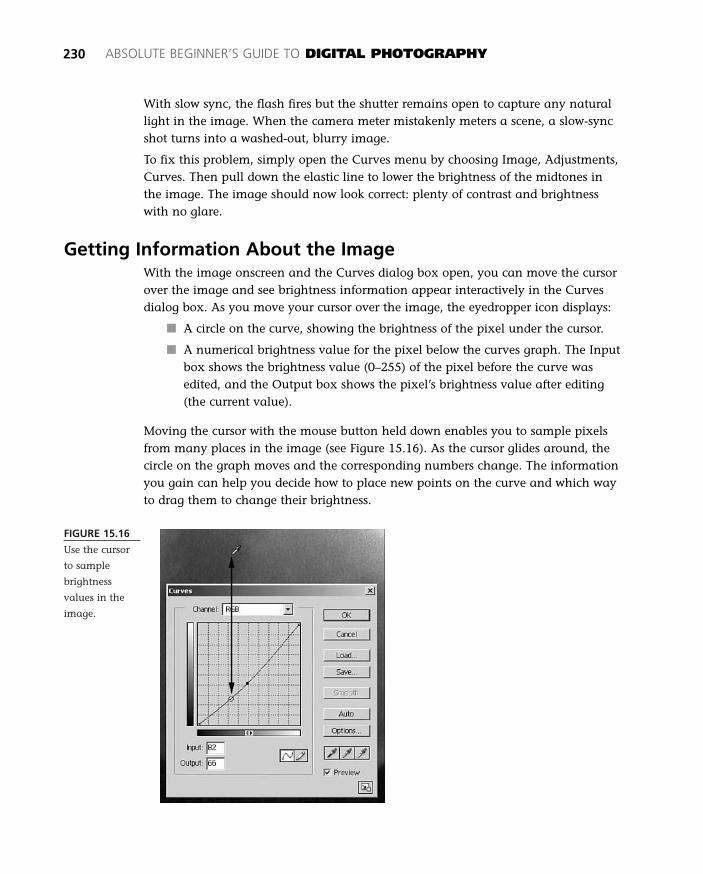
FIGURE 15.16
Use the cursor
to sample
brightness
values in the
image.
230 ABSOLUTE BEGINNER’S GUIDE TO DIGITAL PHOTOGRAPHY
With slow sync, the flash fires but the shutter remains open to capture any naturallight in the image. When the camera meter mistakenly meters a scene, a slow-syncshot turns into a washed-out, blurry image.
To fix this problem, simply open the Curves menu by choosing Image, Adjustments,Curves. Then pull down the elastic line to lower the brightness of the midtones inthe image. The image should now look correct: plenty of contrast and brightnesswith no glare.
Getting Information About the ImageWith the image onscreen and the Curves dialog box open, you can move the cursorover the image and see brightness information appear interactively in the Curvesdialog box. As you move your cursor over the image, the eyedropper icon displays:
■ A circle on the curve, showing the brightness of the pixel under the cursor.
■ A numerical brightness value for the pixel below the curves graph. The Inputbox shows the brightness value (0–255) of the pixel before the curve wasedited, and the Output box shows the pixel’s brightness value after editing(the current value).
Moving the cursor with the mouse button held down enables you to sample pixelsfrom many places in the image (see Figure 15.16). As the cursor glides around, thecircle on the graph moves and the corresponding numbers change. The informationyou gain can help you decide how to place new points on the curve and which wayto drag them to change their brightness.
18 0789731207_ch15.qxd 4/6/04 2:15 PM Page 230
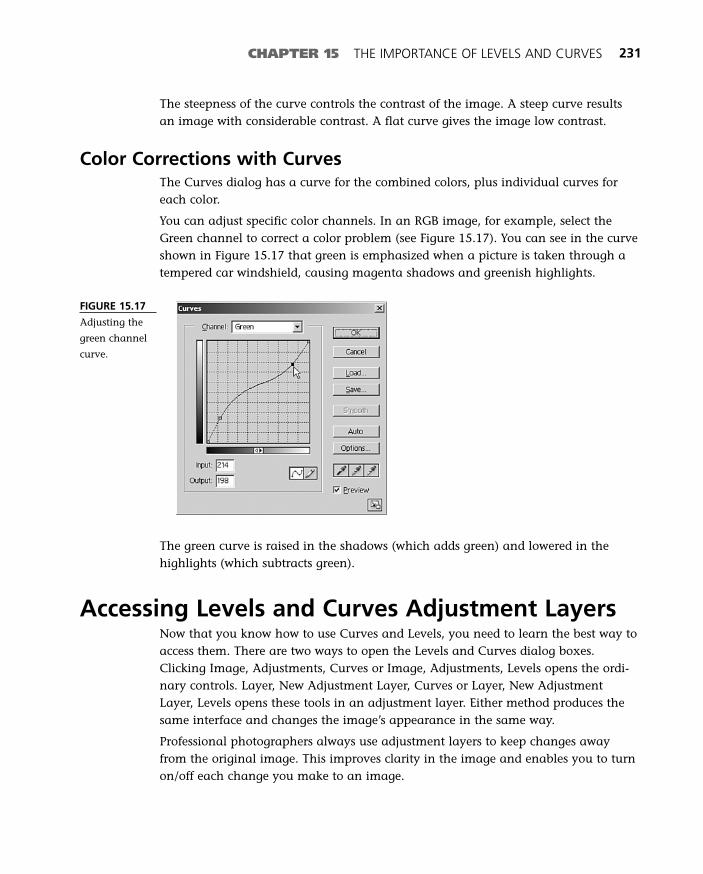
CHAPTER 15 THE IMPORTANCE OF LEVELS AND CURVES 231
The steepness of the curve controls the contrast of the image. A steep curve resultsan image with considerable contrast. A flat curve gives the image low contrast.
Color Corrections with CurvesThe Curves dialog has a curve for the combined colors, plus individual curves foreach color.
You can adjust specific color channels. In an RGB image, for example, select theGreen channel to correct a color problem (see Figure 15.17). You can see in the curveshown in Figure 15.17 that green is emphasized when a picture is taken through atempered car windshield, causing magenta shadows and greenish highlights.
FIGURE 15.17
Adjusting the
green channel
curve.
The green curve is raised in the shadows (which adds green) and lowered in thehighlights (which subtracts green).
Accessing Levels and Curves Adjustment LayersNow that you know how to use Curves and Levels, you need to learn the best way toaccess them. There are two ways to open the Levels and Curves dialog boxes.Clicking Image, Adjustments, Curves or Image, Adjustments, Levels opens the ordi-nary controls. Layer, New Adjustment Layer, Curves or Layer, New AdjustmentLayer, Levels opens these tools in an adjustment layer. Either method produces thesame interface and changes the image’s appearance in the same way.
Professional photographers always use adjustment layers to keep changes awayfrom the original image. This improves clarity in the image and enables you to turnon/off each change you make to an image.
18 0789731207_ch15.qxd 4/6/04 2:15 PM Page 231
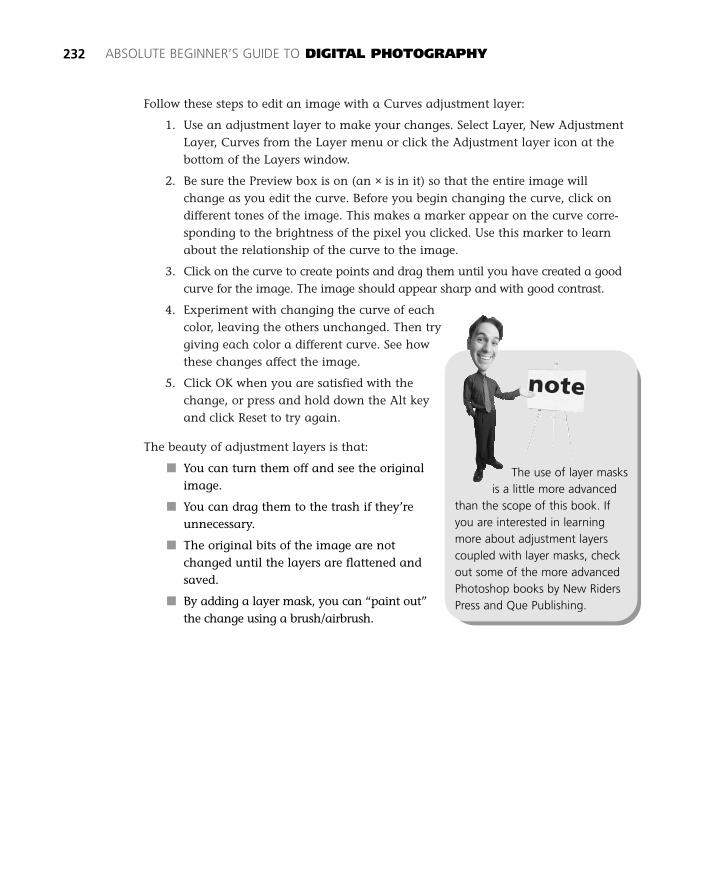
Follow these steps to edit an image with a Curves adjustment layer:
1. Use an adjustment layer to make your changes. Select Layer, New AdjustmentLayer, Curves from the Layer menu or click the Adjustment layer icon at thebottom of the Layers window.
2. Be sure the Preview box is on (an × is in it) so that the entire image willchange as you edit the curve. Before you begin changing the curve, click ondifferent tones of the image. This makes a marker appear on the curve corre-sponding to the brightness of the pixel you clicked. Use this marker to learnabout the relationship of the curve to the image.
3. Click on the curve to create points and drag them until you have created a goodcurve for the image. The image should appear sharp and with good contrast.
4. Experiment with changing the curve of eachcolor, leaving the others unchanged. Then trygiving each color a different curve. See howthese changes affect the image.
5. Click OK when you are satisfied with thechange, or press and hold down the Alt keyand click Reset to try again.
The beauty of adjustment layers is that:
■ You can turn them off and see the originalimage.
■ You can drag them to the trash if they’reunnecessary.
■ The original bits of the image are notchanged until the layers are flattened andsaved.
■ By adding a layer mask, you can “paint out”the change using a brush/airbrush.
232 ABSOLUTE BEGINNER’S GUIDE TO DIGITAL PHOTOGRAPHY
The use of layer masksis a little more advanced
than the scope of this book. Ifyou are interested in learningmore about adjustment layerscoupled with layer masks, checkout some of the more advancedPhotoshop books by New RidersPress and Que Publishing.
18 0789731207_ch15.qxd 4/6/04 2:15 PM Page 232

CHAPTER 15 THE IMPORTANCE OF LEVELS AND CURVES 233
The Absolute Minimum
Even the most washed-out images contain valuable information. Photoshop andElements are capable of pulling this information out of an image using Levels andCurves. By using Threshold and histograms, you can see where information lies andadjust brightness values appropriately. Keep these tips in mind when experimenting:
■ Histograms of an image are available in three places: Image, Histogram,Image, Adjustments, Threshold, and Image, Adjustments, Levels.
■ Choose Image, Histogram and then move your mouse over the histogram tosee the number of pixels that use a specific brightness value.
■ Choose Image, Adjustments, Threshold in Photoshop or Photoshop Elementsto view a histogram of an image. Move the slider to the left to see the darkestparts of the image; move to the right to see the lightest parts of the image.
■ The x-axis of the histogram maps the 256 brightness values available foreach pixel; the y-axis maps the total number of pixels in the image at a spe-cific brightness value.
■ A common repair technique using Curves is to use the “S” shape. ChooseImage, Adjustments, Curves and create an S shape to increase brightness andcontrast in the image.
18 0789731207_ch15.qxd 4/6/04 2:15 PM Page 233

18 0789731207_ch15.qxd 4/6/04 2:15 PM Page 234

16In this chapter
• Creating Image Layers
• Adjustment Layers: Preventing Color Bandingand Data Loss
• Advanced Selection Techniques: The Pen Tool
• Layers Masks: Attaching a Mask to a Layer
The Importance
of Layers and Masks
Using layers is the most reliable and quickest way to combine images.
Layers are images within the image. They appear stacked on top of each
other, like layers in a cake or cards in a deck. Unlike cards, images in lay-
ers do not have to be the same size. Photoshop and Photoshop
Elements provide the same layer tools and layer palette.
An image composed of layers is like a stack of glass plates with a pho-
tograph glued to each plate. The transparent areas outside each pho-
tograph let you view photographs on the layers below. You can move
the pictures from side to side, or change the order of pictures in the
stack.
19 0789731207_ch16.qxd 4/6/04 2:21 PM Page 235
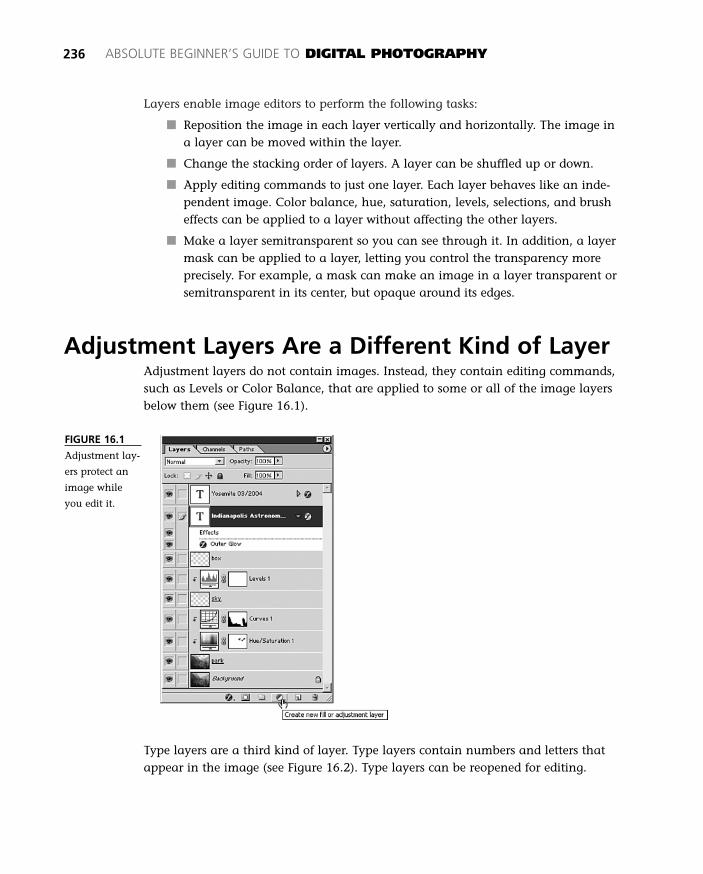
Layers enable image editors to perform the following tasks:
■ Reposition the image in each layer vertically and horizontally. The image ina layer can be moved within the layer.
■ Change the stacking order of layers. A layer can be shuffled up or down.
■ Apply editing commands to just one layer. Each layer behaves like an inde-pendent image. Color balance, hue, saturation, levels, selections, and brusheffects can be applied to a layer without affecting the other layers.
■ Make a layer semitransparent so you can see through it. In addition, a layermask can be applied to a layer, letting you control the transparency moreprecisely. For example, a mask can make an image in a layer transparent orsemitransparent in its center, but opaque around its edges.
Adjustment Layers Are a Different Kind of LayerAdjustment layers do not contain images. Instead, they contain editing commands,such as Levels or Color Balance, that are applied to some or all of the image layersbelow them (see Figure 16.1).
236 ABSOLUTE BEGINNER’S GUIDE TO DIGITAL PHOTOGRAPHY
FIGURE 16.1
Adjustment lay-
ers protect an
image while
you edit it.
Type layers are a third kind of layer. Type layers contain numbers and letters thatappear in the image (see Figure 16.2). Type layers can be reopened for editing.
19 0789731207_ch16.qxd 4/6/04 2:21 PM Page 236
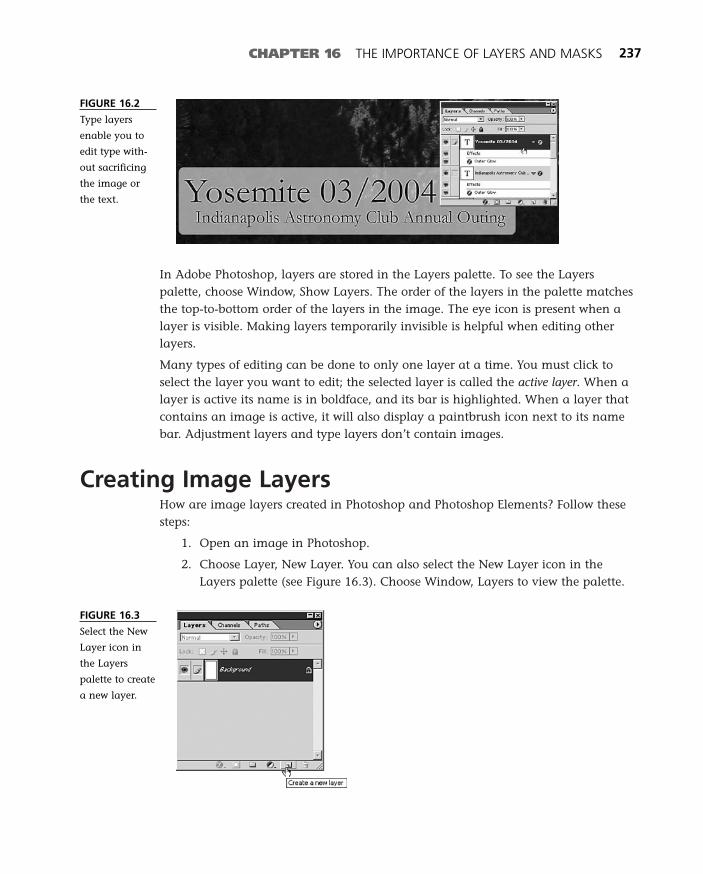
In Adobe Photoshop, layers are stored in the Layers palette. To see the Layerspalette, choose Window, Show Layers. The order of the layers in the palette matchesthe top-to-bottom order of the layers in the image. The eye icon is present when alayer is visible. Making layers temporarily invisible is helpful when editing other layers.
Many types of editing can be done to only one layer at a time. You must click toselect the layer you want to edit; the selected layer is called the active layer. When alayer is active its name is in boldface, and its bar is highlighted. When a layer thatcontains an image is active, it will also display a paintbrush icon next to its namebar. Adjustment layers and type layers don’t contain images.
Creating Image LayersHow are image layers created in Photoshop and Photoshop Elements? Follow thesesteps:
1. Open an image in Photoshop.
2. Choose Layer, New Layer. You can also select the New Layer icon in theLayers palette (see Figure 16.3). Choose Window, Layers to view the palette.
CHAPTER 16 THE IMPORTANCE OF LAYERS AND MASKS 237
FIGURE 16.2
Type layers
enable you to
edit type with-
out sacrificing
the image or
the text.
FIGURE 16.3
Select the New
Layer icon in
the Layers
palette to create
a new layer.
19 0789731207_ch16.qxd 4/6/04 2:21 PM Page 237
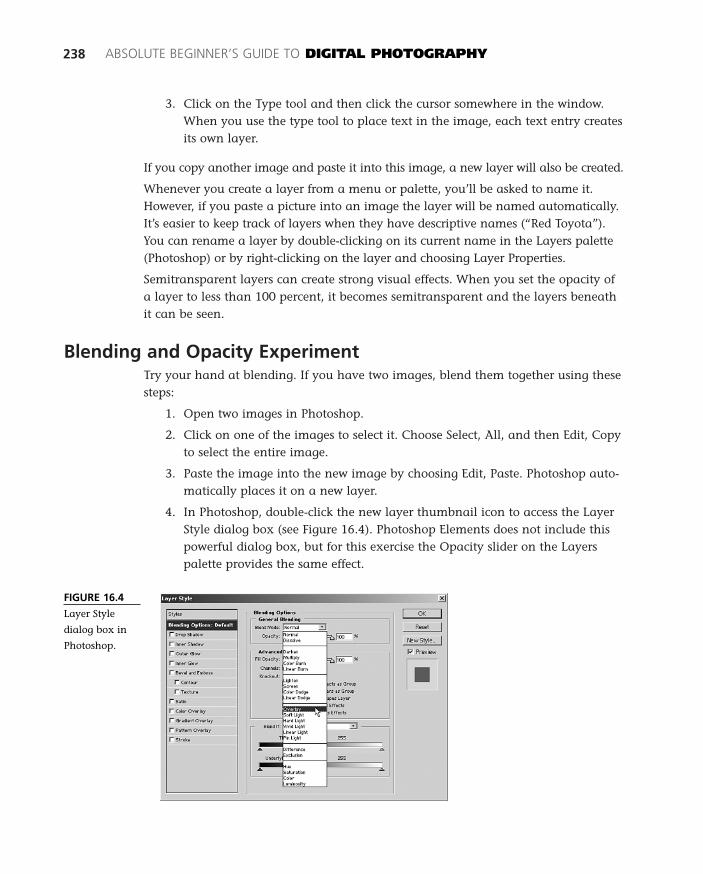
3. Click on the Type tool and then click the cursor somewhere in the window.When you use the type tool to place text in the image, each text entry createsits own layer.
If you copy another image and paste it into this image, a new layer will also be created.
Whenever you create a layer from a menu or palette, you’ll be asked to name it.However, if you paste a picture into an image the layer will be named automatically.It’s easier to keep track of layers when they have descriptive names (“Red Toyota”).You can rename a layer by double-clicking on its current name in the Layers palette(Photoshop) or by right-clicking on the layer and choosing Layer Properties.
Semitransparent layers can create strong visual effects. When you set the opacity ofa layer to less than 100 percent, it becomes semitransparent and the layers beneathit can be seen.
Blending and Opacity ExperimentTry your hand at blending. If you have two images, blend them together using thesesteps:
1. Open two images in Photoshop.
2. Click on one of the images to select it. Choose Select, All, and then Edit, Copyto select the entire image.
3. Paste the image into the new image by choosing Edit, Paste. Photoshop auto-matically places it on a new layer.
4. In Photoshop, double-click the new layer thumbnail icon to access the LayerStyle dialog box (see Figure 16.4). Photoshop Elements does not include thispowerful dialog box, but for this exercise the Opacity slider on the Layerspalette provides the same effect.
238 ABSOLUTE BEGINNER’S GUIDE TO DIGITAL PHOTOGRAPHY
FIGURE 16.4
Layer Style
dialog box in
Photoshop.
19 0789731207_ch16.qxd 4/6/04 2:21 PM Page 238
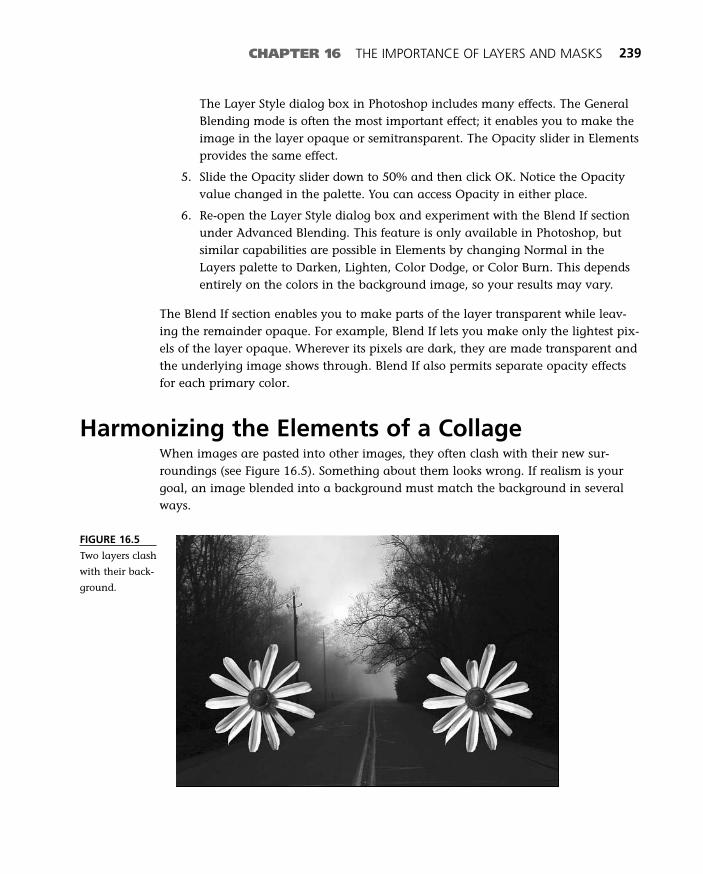
CHAPTER 16 THE IMPORTANCE OF LAYERS AND MASKS 239
The Layer Style dialog box in Photoshop includes many effects. The GeneralBlending mode is often the most important effect; it enables you to make theimage in the layer opaque or semitransparent. The Opacity slider in Elementsprovides the same effect.
5. Slide the Opacity slider down to 50% and then click OK. Notice the Opacityvalue changed in the palette. You can access Opacity in either place.
6. Re-open the Layer Style dialog box and experiment with the Blend If sectionunder Advanced Blending. This feature is only available in Photoshop, butsimilar capabilities are possible in Elements by changing Normal in theLayers palette to Darken, Lighten, Color Dodge, or Color Burn. This dependsentirely on the colors in the background image, so your results may vary.
The Blend If section enables you to make parts of the layer transparent while leav-ing the remainder opaque. For example, Blend If lets you make only the lightest pix-els of the layer opaque. Wherever its pixels are dark, they are made transparent andthe underlying image shows through. Blend If also permits separate opacity effectsfor each primary color.
Harmonizing the Elements of a CollageWhen images are pasted into other images, they often clash with their new sur-roundings (see Figure 16.5). Something about them looks wrong. If realism is yourgoal, an image blended into a background must match the background in severalways.
FIGURE 16.5
Two layers clash
with their back-
ground.
19 0789731207_ch16.qxd 4/6/04 2:21 PM Page 239
Matching color balance and saturation is important to making realistic collages. Inthe preceding image, one layer has a cyan-blue color cast, which can be correctedwith the Image, Adjust, Color Balance command or with Levels or Curves.
The other layer is balanced, but it has too much color saturation. The Saturationcommand via Image, Adjust, Hue/Saturation could remedy this.
Scale and Resolution in a CollageAn object’s size must harmonize with its background. If an object is placed any-where that gives clues as to its spatial relationship with the background, it is easy tosee whether it looks too large or too small. It’s also easy to see a clash between anobject and the background if they differ in sharpness or graininess.
A conflict of perspective can occur when two images taken by lenses of differentfocal length are combined. For example, imagine two people shown talking face toface. The result will look peculiar if one person was photographed with a wide-anglelens and the other was photographed with a telephoto lens.
The quality of the light on an object can make that object look like it doesn’t belongin the picture. Sunlight casts shadows and creates sharp boundaries between thesunlit and shadowed parts of an object, whereas light from a cloudy sky is smoothand without shadows. Make sure your subjects are all lit from the same angle beforeblending.
The direction of light is important, too. If the background light appears to comefrom the right, it will be distracting when the light on a foreground object comesfrom the left. Contrast often needs to be adjusted if an object is to blend into thebackground; it’s distracting when several shadows don’t look equally dark. Note thatindoor light often comes from several directions—each light source may have a dif-ferent color tint.
Managing LayersAn image with many layers can use up all the memory (RAM) on your computer.This will slow your computer down and make it difficult for you to work produc-tively. Images with fewer layers also print more quickly; in some cases, an imagewith too many layers might fail to print or cause the computer to freeze.
Speed up your computer by reducing the number of layers. You can merge layerstogether. In Photoshop and Elements you can merge layers using several options:
■ Layer, Merge Down merges the active layer into the layer shown below itin the Layers palette.
240 ABSOLUTE BEGINNER’S GUIDE TO DIGITAL PHOTOGRAPHY
19 0789731207_ch16.qxd 4/6/04 2:21 PM Page 240
CHAPTER 16 THE IMPORTANCE OF LAYERS AND MASKS 241
■ Layer, Merge Visible merges all the visible layers (those with their eyeicons visible in the Layers palette). The active layer must be visible or thiscommand will not work.
■ Layer, Flatten Image merges all the layers into one layer.
If you work with TIFF or PSD files, you might see the error message “Layers willincrease file size” when saving, even though you only have one layer in your image.Usually this means you haven’t flattened the image. Cancel out of the save, andthen choose Layer, Flatten Image.
Layers are saved only when the file is saved in Photoshop (PSD) format or TIFF for-mat. Layers are not saved in JPEG or GIF formats. Save an archival copy of yourimage in Photoshop format if you believe you might work on it again in the future.
Creating an Extended FamilyFollow these steps to add people to an image using layers:
1. Find several digitized images of your family or friends. Your artistic goal is tocombine people from the separate images so they seem to belong together, orto make the image obviously artificial but acceptably plausible.
2. Use the selection tools (Lasso, Rectangle Marquee, and Pen) to copy images ofpeople (with or without their surroundings) from two or more sources andpaste them into a third image. Consider whether you want realism or an arti-ficial look. Realism requires much more work. You’ll be combining imagesfrom several sources, so you’ll need to plan ahead to ensure that the people’simages are the right size relative to each other.
3. Choose one image as the “master.” Choose Image, Image Size in Photoshopor Image, Resize, Image Size in Elements. Note the Resolution in the ImageSize dialog box. All the other images should have a similar resolution.
4. Check the resolution in the other images to be copied and ensure they havethe same resolution. If they do not, you can change their resolution in theImage Size dialog box.
5. Copy and paste each image into the master by selecting the image (or a por-tion of it) using Select, All and then Edit, Copy and Edit, Paste. Each pastedimage will appear on a new layer. Use the Lasso tool or the Pen tool if youwant to select only a portion of an image.
6. Apply color and tonal corrections to each layer to make it match the masterimage. Layers enable you to make tonal corrections without affecting theother images (layers). You can also move the layer’s image until you have asatisfactory composition.
19 0789731207_ch16.qxd 4/6/04 2:21 PM Page 241
242 ABSOLUTE BEGINNER’S GUIDE TO DIGITAL PHOTOGRAPHY
7. Keep file size in mind while you work. If youare pasting a large number of images, youmight need to “merge down” some layers tokeep the computer/RAM happy. The onlyindication that things are out of control(RAM-wise) is that Photoshop will slow to acrawl. Use the Layer, Merge Down commandto keep layers organized.
8. Adjust the tones and colors of each individ-ual layer using adjustment layers. If yourcomposition works, you will create an artifi-cial but interesting group portrait, or a com-plete joke!
This general exercise is just a guide to help youconsider the issues common to photographers andartists who merge images together.
Preventing Color Banding andData Loss in Adjustment Layers
Normally, as you edit an image, its data is altered forever. For example, if youchange gray pixels into pure white pixels, the changed pixels are given new valuesof red 255, green 255, and blue 255. If you cannot Undo the change, all records ofthe original values are lost forever. Often, after a series of edits, the original data isso altered that only a few thousand of the original 16 million colors remain. Theresult is that banding is visible (see Figure 16.6).
The image on the right in Figure 16.6 has gaps that look like the teeth of a comb.These gaps represent brightness levels where data was lost during editing. At the leftis the histogram box for an image that has had the same editing done with adjust-ment layers. The image has smooth gradations, and all of its original tones are pres-ent in the histogram.
Without adjustment layers, colors can show bands. A histogram can be used to diag-nose banding. This image was previously edited with Curves, Color Balance, Hue,and Saturation commands. Banding is visible; the tonal gradation has an abruptstaircase appearance instead of a smooth, normal transition.
If you paste in animage and it is dramati-
cally larger or smaller than theother images, the file resolutionmight need to be changed. Deletethe new layer or choose Edit,Undo and then return to theimage and change its resolutionby choosing Image, Image Size(Photoshop) or Image, Resize,Image Size (Elements).
19 0789731207_ch16.qxd 4/6/04 2:21 PM Page 242
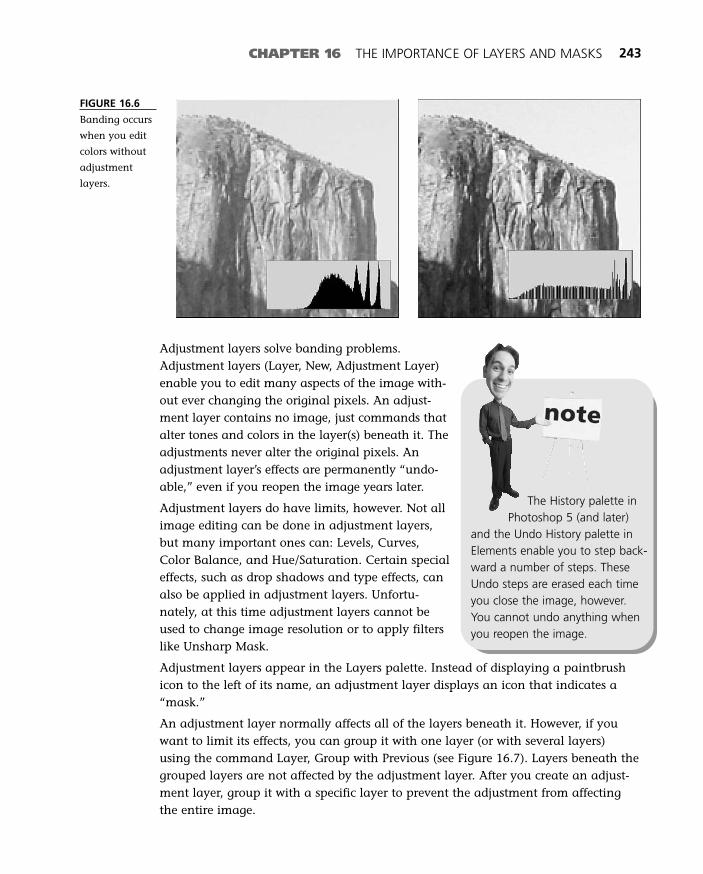
CHAPTER 16 THE IMPORTANCE OF LAYERS AND MASKS 243
FIGURE 16.6
Banding occurs
when you edit
colors without
adjustment
layers.
Adjustment layers solve banding problems.Adjustment layers (Layer, New, Adjustment Layer)enable you to edit many aspects of the image with-out ever changing the original pixels. An adjust-ment layer contains no image, just commands thatalter tones and colors in the layer(s) beneath it. Theadjustments never alter the original pixels. Anadjustment layer’s effects are permanently “undo-able,” even if you reopen the image years later.
Adjustment layers do have limits, however. Not allimage editing can be done in adjustment layers,but many important ones can: Levels, Curves,Color Balance, and Hue/Saturation. Certain specialeffects, such as drop shadows and type effects, canalso be applied in adjustment layers. Unfortu-nately, at this time adjustment layers cannot beused to change image resolution or to apply filterslike Unsharp Mask.
Adjustment layers appear in the Layers palette. Instead of displaying a paintbrushicon to the left of its name, an adjustment layer displays an icon that indicates a“mask.”
An adjustment layer normally affects all of the layers beneath it. However, if youwant to limit its effects, you can group it with one layer (or with several layers)using the command Layer, Group with Previous (see Figure 16.7). Layers beneath thegrouped layers are not affected by the adjustment layer. After you create an adjust-ment layer, group it with a specific layer to prevent the adjustment from affectingthe entire image.
The History palette inPhotoshop 5 (and later)
and the Undo History palette inElements enable you to step back-ward a number of steps. TheseUndo steps are erased each timeyou close the image, however.You cannot undo anything whenyou reopen the image.
19 0789731207_ch16.qxd 4/6/04 2:21 PM Page 243
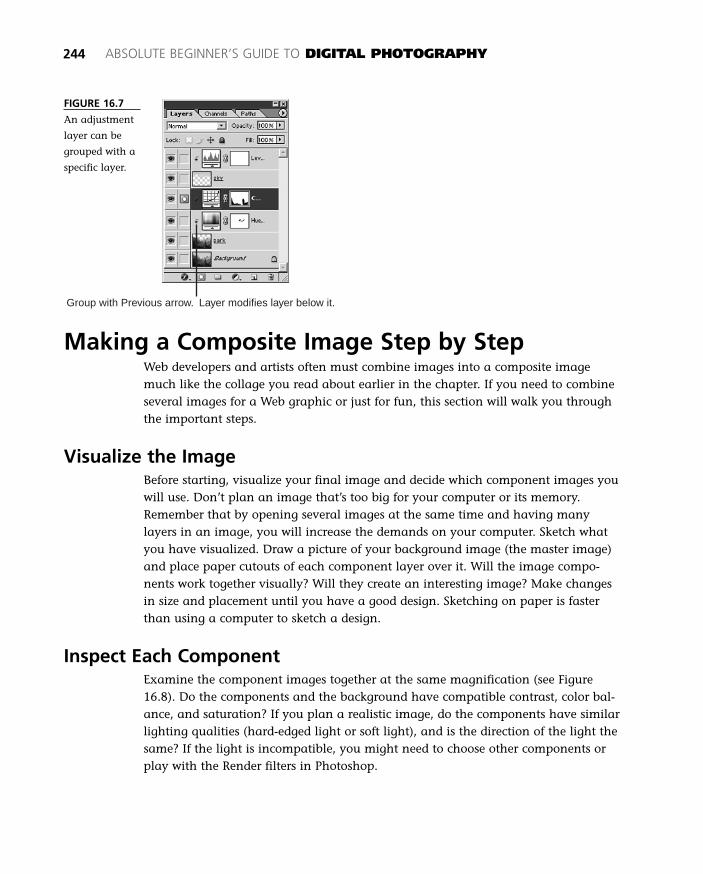
Group with Previous arrow. Layer modifies layer below it.
244 ABSOLUTE BEGINNER’S GUIDE TO DIGITAL PHOTOGRAPHY
FIGURE 16.7
An adjustment
layer can be
grouped with a
specific layer.
Making a Composite Image Step by StepWeb developers and artists often must combine images into a composite imagemuch like the collage you read about earlier in the chapter. If you need to combineseveral images for a Web graphic or just for fun, this section will walk you throughthe important steps.
Visualize the ImageBefore starting, visualize your final image and decide which component images youwill use. Don’t plan an image that’s too big for your computer or its memory.Remember that by opening several images at the same time and having many layers in an image, you will increase the demands on your computer. Sketch whatyou have visualized. Draw a picture of your background image (the master image)and place paper cutouts of each component layer over it. Will the image compo-nents work together visually? Will they create an interesting image? Make changesin size and placement until you have a good design. Sketching on paper is fasterthan using a computer to sketch a design.
Inspect Each ComponentExamine the component images together at the same magnification (see Figure16.8). Do the components and the background have compatible contrast, color bal-ance, and saturation? If you plan a realistic image, do the components have similarlighting qualities (hard-edged light or soft light), and is the direction of the light thesame? If the light is incompatible, you might need to choose other components orplay with the Render filters in Photoshop.
19 0789731207_ch16.qxd 4/6/04 2:21 PM Page 244
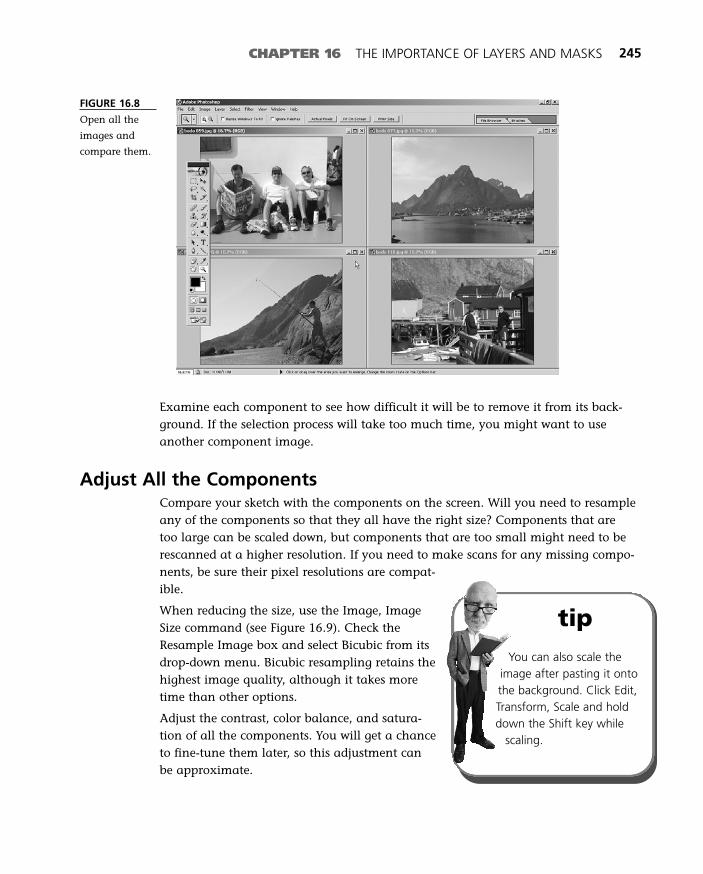
CHAPTER 16 THE IMPORTANCE OF LAYERS AND MASKS 245
FIGURE 16.8
Open all the
images and
compare them.
Examine each component to see how difficult it will be to remove it from its back-ground. If the selection process will take too much time, you might want to useanother component image.
Adjust All the ComponentsCompare your sketch with the components on the screen. Will you need to resampleany of the components so that they all have the right size? Components that are too large can be scaled down, but components that are too small might need to berescanned at a higher resolution. If you need to make scans for any missing compo-nents, be sure their pixel resolutions are compat-ible.
When reducing the size, use the Image, ImageSize command (see Figure 16.9). Check theResample Image box and select Bicubic from itsdrop-down menu. Bicubic resampling retains thehighest image quality, although it takes moretime than other options.
Adjust the contrast, color balance, and satura-tion of all the components. You will get a chanceto fine-tune them later, so this adjustment canbe approximate.
tipYou can also scale the
image after pasting it ontothe background. Click Edit,Transform, Scale and holddown the Shift key while
scaling.
19 0789731207_ch16.qxd 4/6/04 2:21 PM Page 245

246 ABSOLUTE BEGINNER’S GUIDE TO DIGITAL PHOTOGRAPHY
FIGURE 16.9
Changing your
image size
using the Image
Size dialog box.
Select a Component and Copy ItThe proper selection process will make component images blend into the back-ground image more easily. Almost all selection procedures are easier and more pre-cise if you zoom the monitor image to 200 to 400 percent magnification.
Keep these tips in mind when selecting complex objects in an image:
■ If the colors of the background image and the component image are identi-cal, select the area you want to copy with the Lasso tool. Feather the selectionand draw the selection far enough away from the subject so that it isn’t inthe feathered area.
■ If the background must be removed around the edges of the subject, tryselecting the background with the Magic Wand or the Color Range com-mand. Then use Select, Inverse command to deselect the background andselect the subject.
■ If the background must be removed, but the edges of the subject are out offocus or difficult to work with (such as hair), make selections with a Pen toolbecause pens are precise and allow selection boundaries to be changed laterif they are not perfect. Many experienced users prefer to use masking,another process for creating editable selections. You can read more aboutmasks in Chapter 17, “The Importance of Channels.”
■ Dedicated masking software such as Extensis Mask Pro works in conjunctionwith Adobe Photoshop. These tools and plug-ins offer sophisticated featuresthat simplify creating selections.
After making the selection, save the selection by choosing Select, Save Selection incase you need to redo it.
19 0789731207_ch16.qxd 4/6/04 2:21 PM Page 246
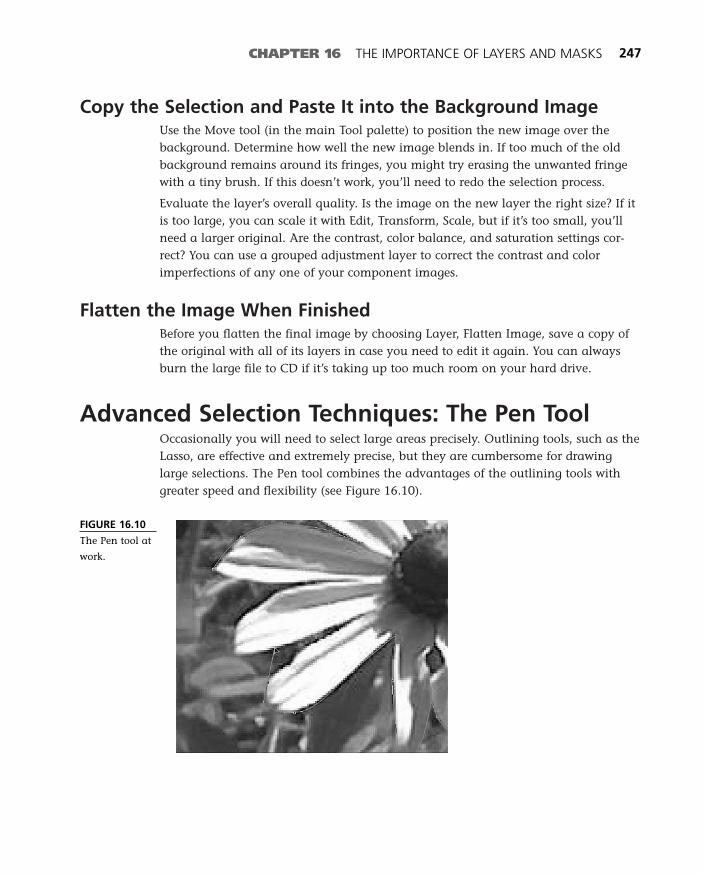
Copy the Selection and Paste It into the Background ImageUse the Move tool (in the main Tool palette) to position the new image over thebackground. Determine how well the new image blends in. If too much of the oldbackground remains around its fringes, you might try erasing the unwanted fringewith a tiny brush. If this doesn’t work, you’ll need to redo the selection process.
Evaluate the layer’s overall quality. Is the image on the new layer the right size? If itis too large, you can scale it with Edit, Transform, Scale, but if it’s too small, you’llneed a larger original. Are the contrast, color balance, and saturation settings cor-rect? You can use a grouped adjustment layer to correct the contrast and colorimperfections of any one of your component images.
Flatten the Image When FinishedBefore you flatten the final image by choosing Layer, Flatten Image, save a copy ofthe original with all of its layers in case you need to edit it again. You can alwaysburn the large file to CD if it’s taking up too much room on your hard drive.
Advanced Selection Techniques: The Pen ToolOccasionally you will need to select large areas precisely. Outlining tools, such as theLasso, are effective and extremely precise, but they are cumbersome for drawinglarge selections. The Pen tool combines the advantages of the outlining tools withgreater speed and flexibility (see Figure 16.10).
CHAPTER 16 THE IMPORTANCE OF LAYERS AND MASKS 247
FIGURE 16.10
The Pen tool at
work.
19 0789731207_ch16.qxd 4/6/04 2:21 PM Page 247
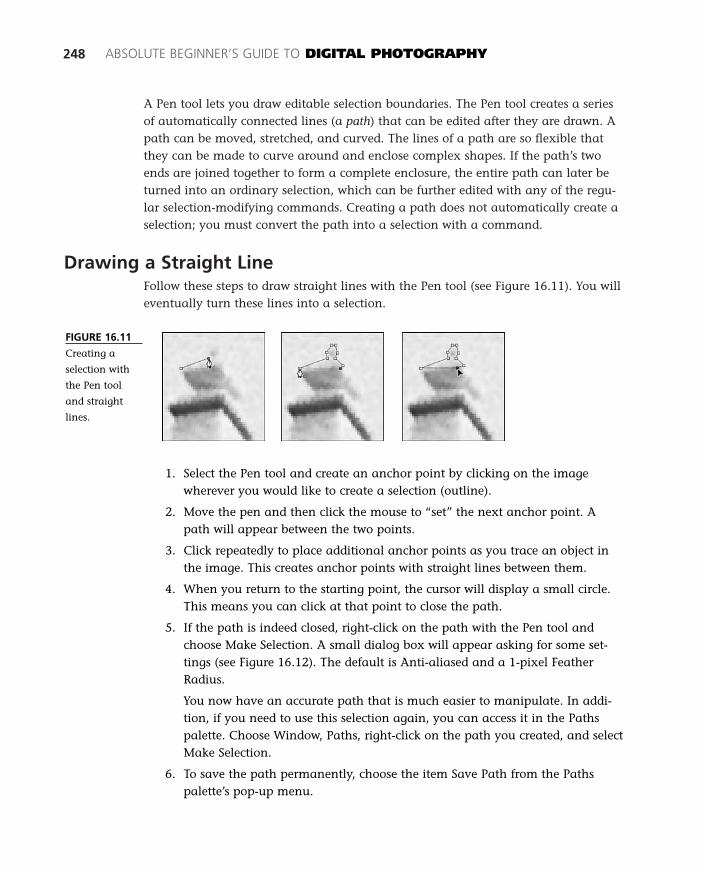
A Pen tool lets you draw editable selection boundaries. The Pen tool creates a seriesof automatically connected lines (a path) that can be edited after they are drawn. Apath can be moved, stretched, and curved. The lines of a path are so flexible thatthey can be made to curve around and enclose complex shapes. If the path’s twoends are joined together to form a complete enclosure, the entire path can later beturned into an ordinary selection, which can be further edited with any of the regu-lar selection-modifying commands. Creating a path does not automatically create aselection; you must convert the path into a selection with a command.
Drawing a Straight LineFollow these steps to draw straight lines with the Pen tool (see Figure 16.11). You willeventually turn these lines into a selection.
248 ABSOLUTE BEGINNER’S GUIDE TO DIGITAL PHOTOGRAPHY
FIGURE 16.11
Creating a
selection with
the Pen tool
and straight
lines.
1. Select the Pen tool and create an anchor point by clicking on the imagewherever you would like to create a selection (outline).
2. Move the pen and then click the mouse to “set” the next anchor point. Apath will appear between the two points.
3. Click repeatedly to place additional anchor points as you trace an object inthe image. This creates anchor points with straight lines between them.
4. When you return to the starting point, the cursor will display a small circle.This means you can click at that point to close the path.
5. If the path is indeed closed, right-click on the path with the Pen tool andchoose Make Selection. A small dialog box will appear asking for some set-tings (see Figure 16.12). The default is Anti-aliased and a 1-pixel FeatherRadius.
You now have an accurate path that is much easier to manipulate. In addi-tion, if you need to use this selection again, you can access it in the Pathspalette. Choose Window, Paths, right-click on the path you created, and selectMake Selection.
6. To save the path permanently, choose the item Save Path from the Pathspalette’s pop-up menu.
19 0789731207_ch16.qxd 4/6/04 2:21 PM Page 248
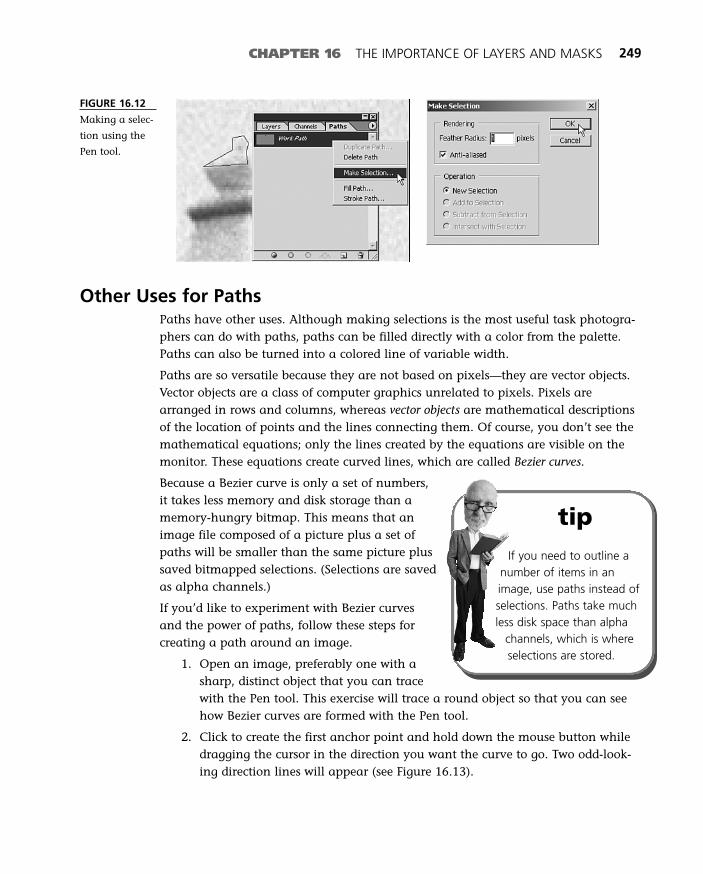
CHAPTER 16 THE IMPORTANCE OF LAYERS AND MASKS 249
Other Uses for PathsPaths have other uses. Although making selections is the most useful task photogra-phers can do with paths, paths can be filled directly with a color from the palette.Paths can also be turned into a colored line of variable width.
Paths are so versatile because they are not based on pixels—they are vector objects.Vector objects are a class of computer graphics unrelated to pixels. Pixels arearranged in rows and columns, whereas vector objects are mathematical descriptionsof the location of points and the lines connecting them. Of course, you don’t see themathematical equations; only the lines created by the equations are visible on themonitor. These equations create curved lines, which are called Bezier curves.
Because a Bezier curve is only a set of numbers,it takes less memory and disk storage than amemory-hungry bitmap. This means that animage file composed of a picture plus a set ofpaths will be smaller than the same picture plussaved bitmapped selections. (Selections are savedas alpha channels.)
If you’d like to experiment with Bezier curvesand the power of paths, follow these steps forcreating a path around an image.
1. Open an image, preferably one with asharp, distinct object that you can tracewith the Pen tool. This exercise will trace a round object so that you can seehow Bezier curves are formed with the Pen tool.
2. Click to create the first anchor point and hold down the mouse button whiledragging the cursor in the direction you want the curve to go. Two odd-look-ing direction lines will appear (see Figure 16.13).
FIGURE 16.12
Making a selec-
tion using the
Pen tool.
tipIf you need to outline a
number of items in animage, use paths instead ofselections. Paths take muchless disk space than alpha
channels, which is whereselections are stored.
19 0789731207_ch16.qxd 4/6/04 2:21 PM Page 249
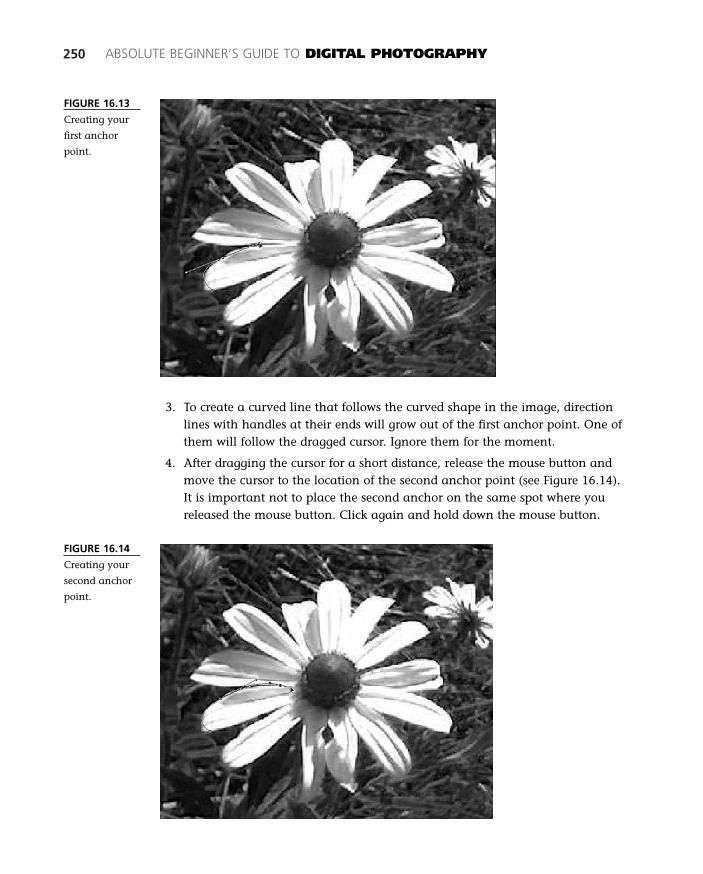
250 ABSOLUTE BEGINNER’S GUIDE TO DIGITAL PHOTOGRAPHY
FIGURE 16.13
Creating your
first anchor
point.
3. To create a curved line that follows the curved shape in the image, directionlines with handles at their ends will grow out of the first anchor point. One ofthem will follow the dragged cursor. Ignore them for the moment.
4. After dragging the cursor for a short distance, release the mouse button andmove the cursor to the location of the second anchor point (see Figure 16.14).It is important not to place the second anchor on the same spot where youreleased the mouse button. Click again and hold down the mouse button.
FIGURE 16.14
Creating your
second anchor
point.
19 0789731207_ch16.qxd 4/6/04 2:21 PM Page 250
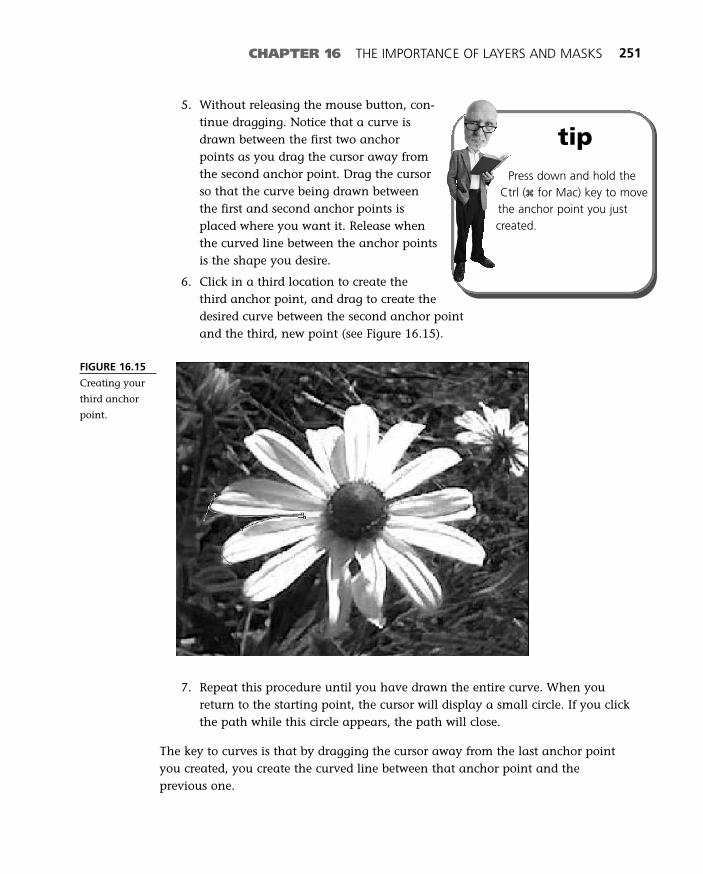
CHAPTER 16 THE IMPORTANCE OF LAYERS AND MASKS 251
5. Without releasing the mouse button, con-tinue dragging. Notice that a curve isdrawn between the first two anchorpoints as you drag the cursor away fromthe second anchor point. Drag the cursorso that the curve being drawn betweenthe first and second anchor points isplaced where you want it. Release whenthe curved line between the anchor pointsis the shape you desire.
6. Click in a third location to create thethird anchor point, and drag to create thedesired curve between the second anchor point and the third, new point (see Figure 16.15).
tipPress down and hold the
Ctrl (x for Mac) key to movethe anchor point you justcreated.
7. Repeat this procedure until you have drawn the entire curve. When youreturn to the starting point, the cursor will display a small circle. If you clickthe path while this circle appears, the path will close.
The key to curves is that by dragging the cursor away from the last anchor pointyou created, you create the curved line between that anchor point and the previous one.
FIGURE 16.15
Creating your
third anchor
point.
19 0789731207_ch16.qxd 4/6/04 2:21 PM Page 251
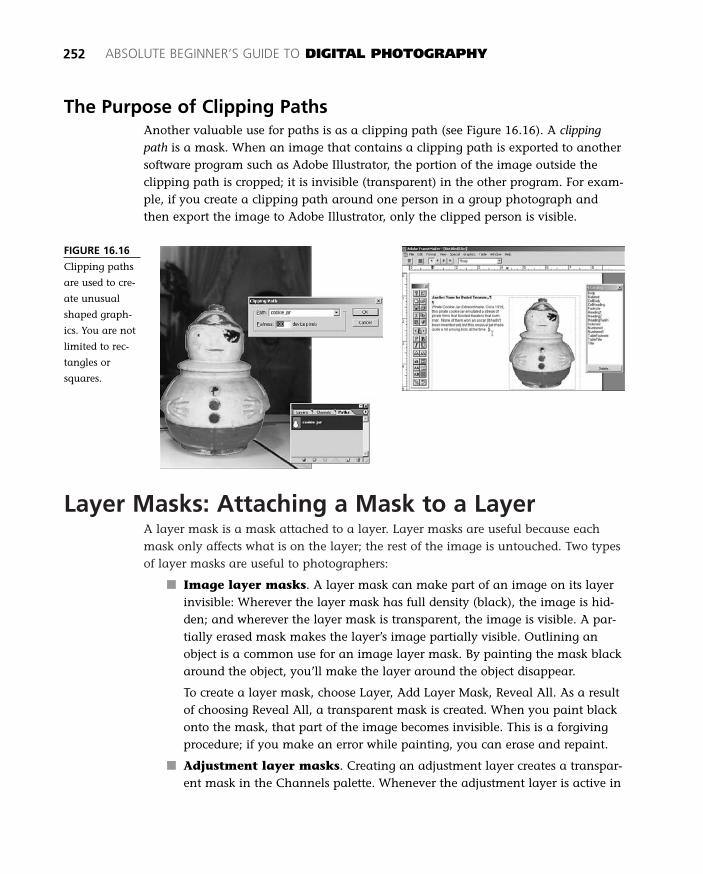
Layer Masks: Attaching a Mask to a LayerA layer mask is a mask attached to a layer. Layer masks are useful because eachmask only affects what is on the layer; the rest of the image is untouched. Two typesof layer masks are useful to photographers:
■ Image layer masks. A layer mask can make part of an image on its layerinvisible: Wherever the layer mask has full density (black), the image is hid-den; and wherever the layer mask is transparent, the image is visible. A par-tially erased mask makes the layer’s image partially visible. Outlining anobject is a common use for an image layer mask. By painting the mask blackaround the object, you’ll make the layer around the object disappear.
To create a layer mask, choose Layer, Add Layer Mask, Reveal All. As a resultof choosing Reveal All, a transparent mask is created. When you paint blackonto the mask, that part of the image becomes invisible. This is a forgivingprocedure; if you make an error while painting, you can erase and repaint.
■ Adjustment layer masks. Creating an adjustment layer creates a transpar-ent mask in the Channels palette. Whenever the adjustment layer is active in
252 ABSOLUTE BEGINNER’S GUIDE TO DIGITAL PHOTOGRAPHY
FIGURE 16.16
Clipping paths
are used to cre-
ate unusual
shaped graph-
ics. You are not
limited to rec-
tangles or
squares.
The Purpose of Clipping PathsAnother valuable use for paths is as a clipping path (see Figure 16.16). A clippingpath is a mask. When an image that contains a clipping path is exported to anothersoftware program such as Adobe Illustrator, the portion of the image outside theclipping path is cropped; it is invisible (transparent) in the other program. For exam-ple, if you create a clipping path around one person in a group photograph andthen export the image to Adobe Illustrator, only the clipped person is visible.
19 0789731207_ch16.qxd 4/6/04 2:21 PM Page 252
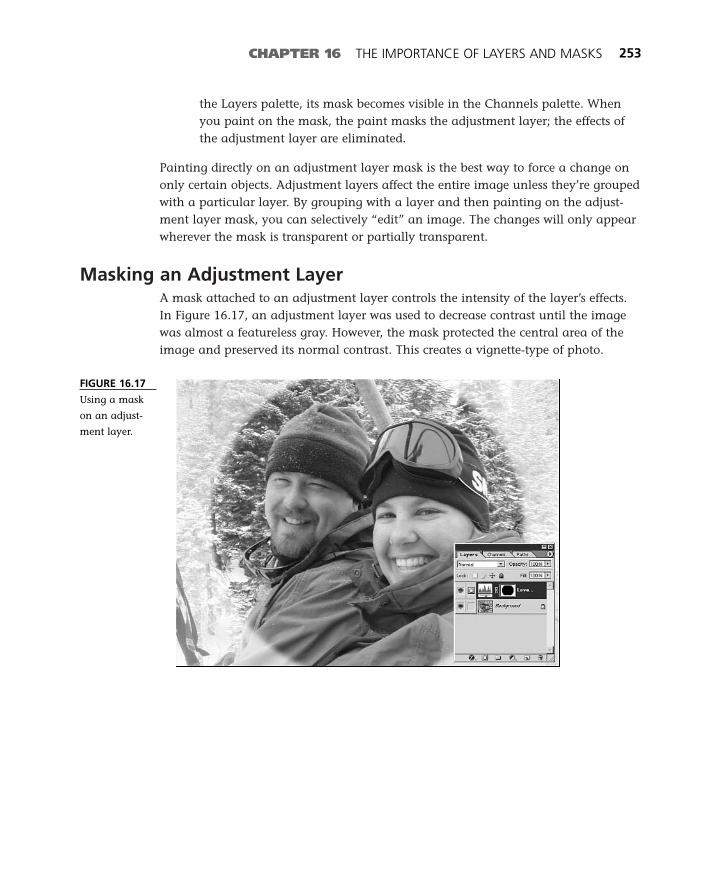
the Layers palette, its mask becomes visible in the Channels palette. Whenyou paint on the mask, the paint masks the adjustment layer; the effects ofthe adjustment layer are eliminated.
Painting directly on an adjustment layer mask is the best way to force a change ononly certain objects. Adjustment layers affect the entire image unless they’re groupedwith a particular layer. By grouping with a layer and then painting on the adjust-ment layer mask, you can selectively “edit” an image. The changes will only appearwherever the mask is transparent or partially transparent.
Masking an Adjustment LayerA mask attached to an adjustment layer controls the intensity of the layer’s effects.In Figure 16.17, an adjustment layer was used to decrease contrast until the imagewas almost a featureless gray. However, the mask protected the central area of theimage and preserved its normal contrast. This creates a vignette-type of photo.
CHAPTER 16 THE IMPORTANCE OF LAYERS AND MASKS 253
FIGURE 16.17
Using a mask
on an adjust-
ment layer.
19 0789731207_ch16.qxd 4/6/04 2:21 PM Page 253

254 ABSOLUTE BEGINNER’S GUIDE TO DIGITAL PHOTOGRAPHY
The Absolute Minimum
Layers enable you to protect parts of an image that do not require changes. Keep ele-ments in an image on separate layers so that you can easily move or resize objects.
■ Photoshop Elements does not include the Curves command or Curves adjust-ment layer.
■ JPEG images cannot store layers. You must flatten an image before saving asa JPEG. Choose Layer, Flatten Image prior to saving as a JPEG file.
■ Give each layer a distinct name when working on an image. Don’t settle forthe default names or you will get confused.
■ Adjustment layers include a mask when they are created. Click on the layermask and then paint with the Paintbrush tool to isolate portions of the image.
■ Paint white on an adjustment layer mask to reveal the effects of the mask;paint black on a mask to hide the mask’s effects.
19 0789731207_ch16.qxd 4/6/04 2:21 PM Page 254
17In this chapter
• Understanding Channels
• Keeping Track of Layers, Channels, and Masks
• Using Masks to Create Selections
• Alpha Channels: Where Masks Are Stored
The Importance
of Channels
Information about colors in an image is stored in channels. An RGB
image has four color channels: red, green, blue, and a composite chan-
nel of every color. A CMYK image has five color channels: cyan,
magenta, yellow, black, and a composite channel of every color. Each
channel is a grayscale image of brightness values for that color.
Like the dye layers in slide film, these channels blend together when the
image is viewed normally and the appropriate colors are applied. The
power of Photoshop and Photoshop Elements lies in the capability to
view and manipulate these channels separately or in combination with
more than one channel.
20 0789731207_ch17.qxd 4/6/04 2:13 PM Page 255

With Photoshop, you have the capability to view andedit channels; however, in Photoshop Elements, youcan save only selections; iPhoto does not allow youto save channels or selections. Because color chan-nels are more advanced and more complex thanlayers, it’s important to know the differencebetween a layer and a color channel:
■ A layer is an individual, full-color image.Layers can be stacked to create a compositeimage.
■ Color channels are the color components ofa layer. Each RGB layer has three colorchannels.
■ When you edit color channels, you edit thecolor channels of one layer at a time. Theactive layer (the one selected in the Layers palette) is the only layer on whichthe color channel editing is happening.
Sometimes it can help to edit only one color channel. On occasion, one channelmay be less sharp than the others, or it may appear too grainy (see Figure 17.1). Tofix this, you might remove grain in one color channel by blurring it with a filter,while you sharpen another color channel with a different filter. If you’d like to trythis yourself and have a copy of Photoshop, just follow these steps:
256 ABSOLUTE BEGINNER’S GUIDE TO DIGITAL PHOTOGRAPHY
Photoshop Elementsdoes not include channels
or the Channels palette. Any ver-sion of Photoshop more recentthan Photoshop 3 includes chan-nels, however.
FIGURE 17.1
Removing grain
using the
Despeckle filter
in one color
channel.
20 0789731207_ch17.qxd 4/6/04 2:13 PM Page 256
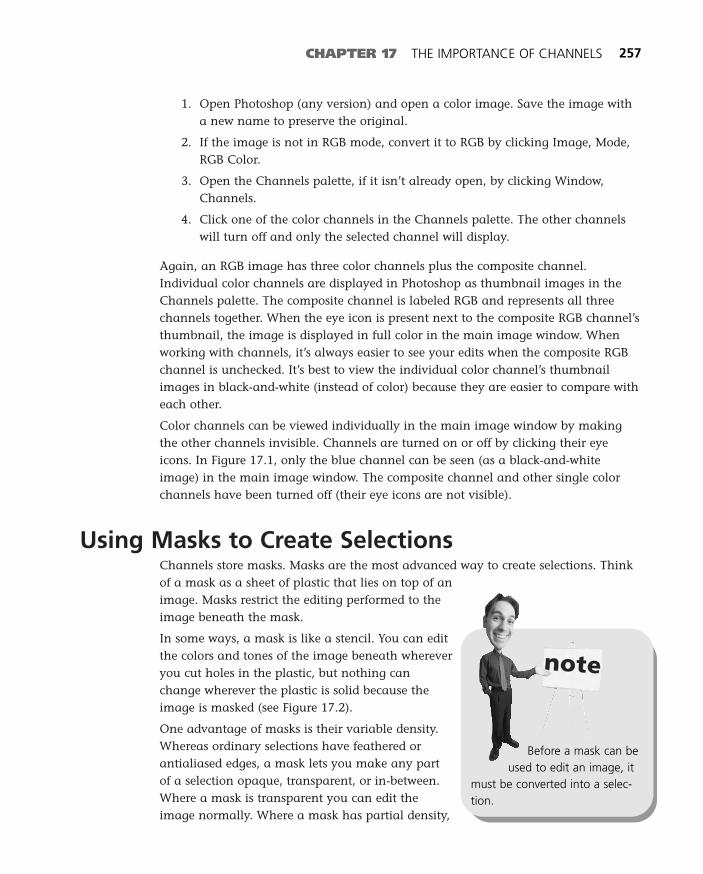
1. Open Photoshop (any version) and open a color image. Save the image witha new name to preserve the original.
2. If the image is not in RGB mode, convert it to RGB by clicking Image, Mode,RGB Color.
3. Open the Channels palette, if it isn’t already open, by clicking Window,Channels.
4. Click one of the color channels in the Channels palette. The other channelswill turn off and only the selected channel will display.
Again, an RGB image has three color channels plus the composite channel.Individual color channels are displayed in Photoshop as thumbnail images in theChannels palette. The composite channel is labeled RGB and represents all threechannels together. When the eye icon is present next to the composite RGB channel’sthumbnail, the image is displayed in full color in the main image window. Whenworking with channels, it’s always easier to see your edits when the composite RGBchannel is unchecked. It’s best to view the individual color channel’s thumbnailimages in black-and-white (instead of color) because they are easier to compare witheach other.
Color channels can be viewed individually in the main image window by makingthe other channels invisible. Channels are turned on or off by clicking their eyeicons. In Figure 17.1, only the blue channel can be seen (as a black-and-whiteimage) in the main image window. The composite channel and other single colorchannels have been turned off (their eye icons are not visible).
Using Masks to Create SelectionsChannels store masks. Masks are the most advanced way to create selections. Thinkof a mask as a sheet of plastic that lies on top of animage. Masks restrict the editing performed to theimage beneath the mask.
In some ways, a mask is like a stencil. You can editthe colors and tones of the image beneath whereveryou cut holes in the plastic, but nothing canchange wherever the plastic is solid because theimage is masked (see Figure 17.2).
One advantage of masks is their variable density.Whereas ordinary selections have feathered orantialiased edges, a mask lets you make any partof a selection opaque, transparent, or in-between.Where a mask is transparent you can edit theimage normally. Where a mask has partial density,
CHAPTER 17 THE IMPORTANCE OF CHANNELS 257
Before a mask can beused to edit an image, it
must be converted into a selec-tion.
20 0789731207_ch17.qxd 4/6/04 2:13 PM Page 257
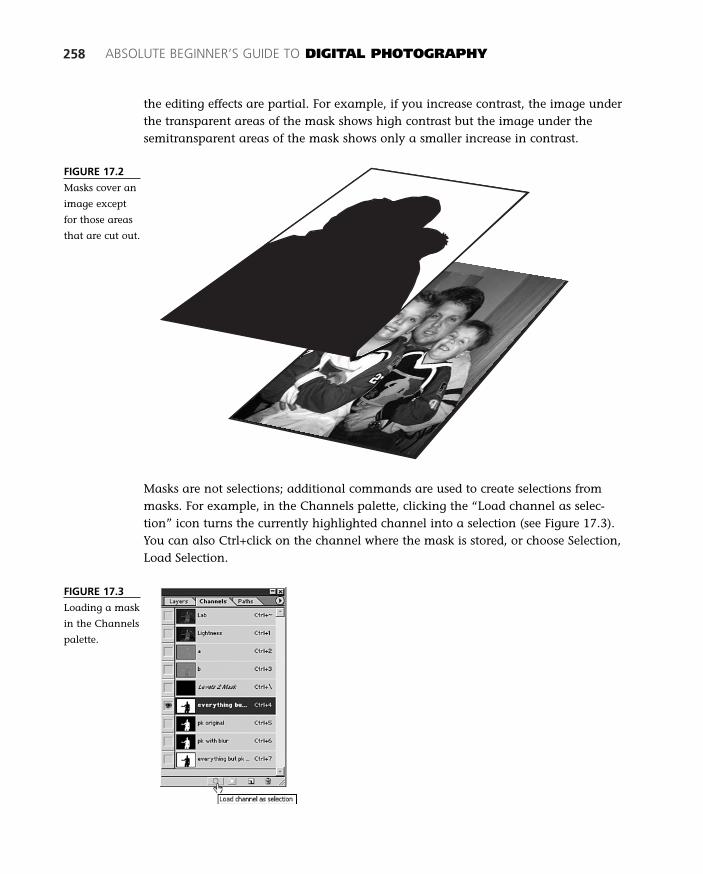
258 ABSOLUTE BEGINNER’S GUIDE TO DIGITAL PHOTOGRAPHY
FIGURE 17.2
Masks cover an
image except
for those areas
that are cut out.
Masks are not selections; additional commands are used to create selections frommasks. For example, in the Channels palette, clicking the “Load channel as selec-tion” icon turns the currently highlighted channel into a selection (see Figure 17.3).You can also Ctrl+click on the channel where the mask is stored, or choose Selection,Load Selection.
FIGURE 17.3
Loading a mask
in the Channels
palette.
the editing effects are partial. For example, if you increase contrast, the image underthe transparent areas of the mask shows high contrast but the image under thesemitransparent areas of the mask shows only a smaller increase in contrast.
20 0789731207_ch17.qxd 4/6/04 2:13 PM Page 258
CHAPTER 17 THE IMPORTANCE OF CHANNELS 259
Seeing Through a MaskA mask can be easier to use than an ordinary selection because of its visibility.Ordinary selections are visible because their edges are marked by a moving marquee(the marching ants). But if it’s a feathered selection, the marquee doesn’t showexactly where its edges are. A mask is better; you can see all of it.
A mask appears on the monitor as a blanket of colorover the image. The colored blanket is most densewhere the mask is fully opaque and is transparentwhere the mask is transparent. You choose both thecolor of the mask and how opaque you want it toappear on the monitor. (Usually you don’t want amask to be so opaque that you can’t see the imagebeneath it.) You can also temporarily make themask invisible if it blocks your view of what you’redoing.
Adobe Photoshop treats masks as grayscale (8-bit)images. This has significant consequences. Becausethe software treats masks like images, you can editthem like images. This means you can use a brushto paint on a mask, making the mask either moreopaque (blacker) or more transparent (whiter).
Because masks are treated as images, you can also paste shapes and other imagesinto masks. For example, you can put type into a mask; the shapes of the letters canthen be transformed into colors or effects (see Figure 17.4). You can paste imagesinto masks (but only 8-bit grayscale images).
Selections also can be turned into masks. Clicking the Save Selection As Channelicon in the Channels palette turns the selection into a mask. Why do this? Mostcomplex selections start with a simple selection, as you might make with the Lassotool or the Magic Wand; by turning them into masks, you can edit them more pre-cisely. Finally they are turned back into selections. This might sound roundabout,but it is a powerful technique. For example, it is helpful when creating extremelycomplex selections, such as around someone’s hair.
A feathered selectionblends into the area out-
side the selection. In Photoshopmake a selection, then clickSelect, Feather.
20 0789731207_ch17.qxd 4/6/04 2:13 PM Page 259
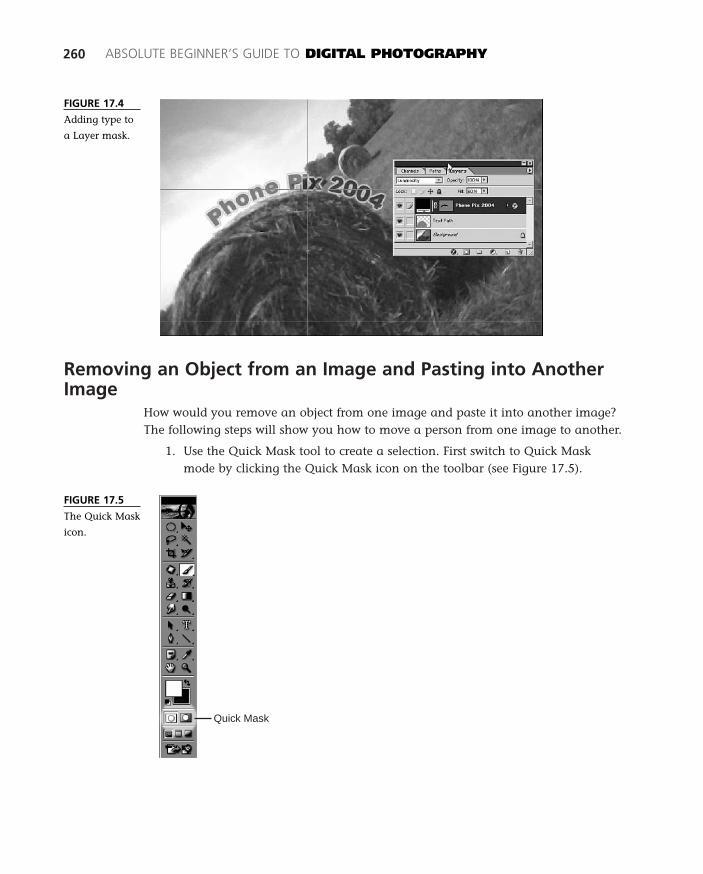
Removing an Object from an Image and Pasting into AnotherImage
How would you remove an object from one image and paste it into another image?The following steps will show you how to move a person from one image to another.
1. Use the Quick Mask tool to create a selection. First switch to Quick Maskmode by clicking the Quick Mask icon on the toolbar (see Figure 17.5).
260 ABSOLUTE BEGINNER’S GUIDE TO DIGITAL PHOTOGRAPHY
FIGURE 17.4
Adding type to
a Layer mask.
FIGURE 17.5
The Quick Mask
icon.
Quick Mask
20 0789731207_ch17.qxd 4/6/04 2:13 PM Page 260
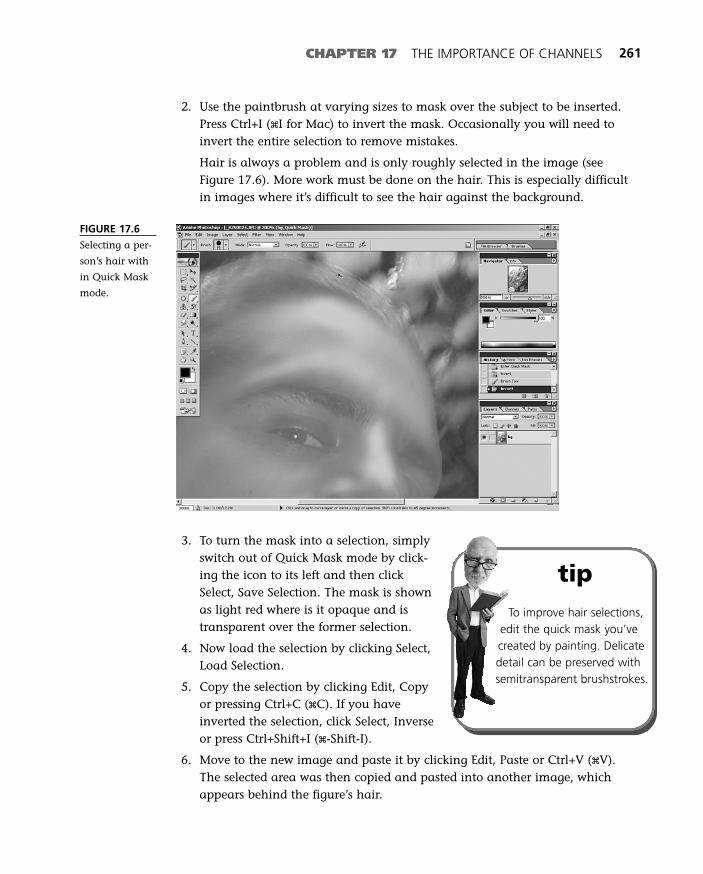
CHAPTER 17 THE IMPORTANCE OF CHANNELS 261
2. Use the paintbrush at varying sizes to mask over the subject to be inserted.Press Ctrl+I (xI for Mac) to invert the mask. Occasionally you will need toinvert the entire selection to remove mistakes.
Hair is always a problem and is only roughly selected in the image (seeFigure 17.6). More work must be done on the hair. This is especially difficultin images where it’s difficult to see the hair against the background.
FIGURE 17.6
Selecting a per-
son’s hair with
in Quick Mask
mode.
3. To turn the mask into a selection, simplyswitch out of Quick Mask mode by click-ing the icon to its left and then clickSelect, Save Selection. The mask is shownas light red where is it opaque and istransparent over the former selection.
4. Now load the selection by clicking Select,Load Selection.
5. Copy the selection by clicking Edit, Copyor pressing Ctrl+C (xC). If you haveinverted the selection, click Select, Inverseor press Ctrl+Shift+I (x-Shift-I).
6. Move to the new image and paste it by clicking Edit, Paste or Ctrl+V (xV).The selected area was then copied and pasted into another image, whichappears behind the figure’s hair.
tipTo improve hair selections,
edit the quick mask you’vecreated by painting. Delicatedetail can be preserved withsemitransparent brushstrokes.
20 0789731207_ch17.qxd 4/6/04 2:13 PM Page 261
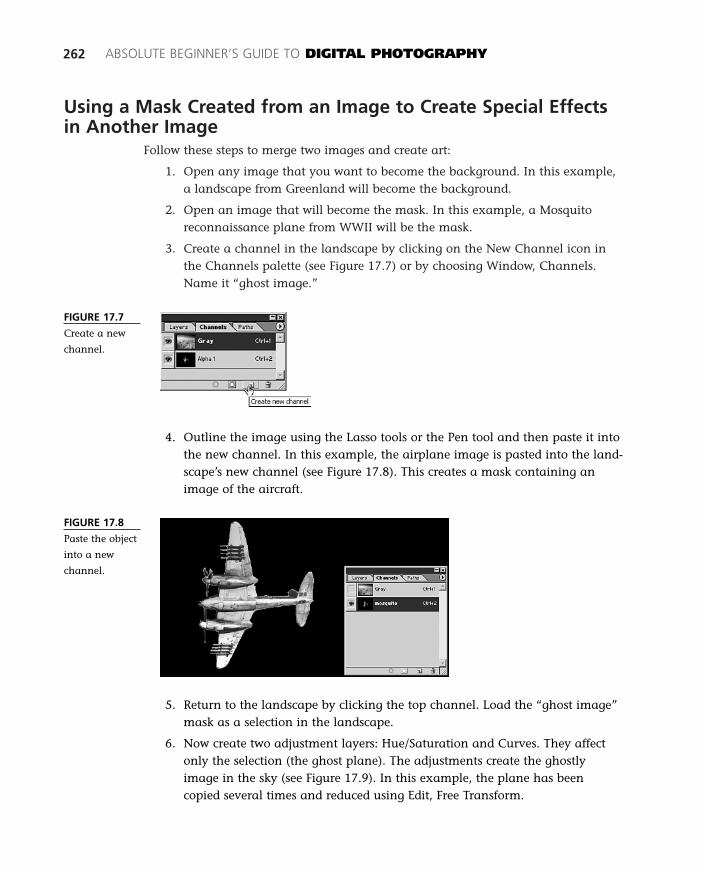
Using a Mask Created from an Image to Create Special Effectsin Another Image
Follow these steps to merge two images and create art:
1. Open any image that you want to become the background. In this example,a landscape from Greenland will become the background.
2. Open an image that will become the mask. In this example, a Mosquitoreconnaissance plane from WWII will be the mask.
3. Create a channel in the landscape by clicking on the New Channel icon inthe Channels palette (see Figure 17.7) or by choosing Window, Channels.Name it “ghost image.”
262 ABSOLUTE BEGINNER’S GUIDE TO DIGITAL PHOTOGRAPHY
FIGURE 17.7
Create a new
channel.
4. Outline the image using the Lasso tools or the Pen tool and then paste it intothe new channel. In this example, the airplane image is pasted into the land-scape’s new channel (see Figure 17.8). This creates a mask containing animage of the aircraft.
FIGURE 17.8
Paste the object
into a new
channel.
5. Return to the landscape by clicking the top channel. Load the “ghost image”mask as a selection in the landscape.
6. Now create two adjustment layers: Hue/Saturation and Curves. They affectonly the selection (the ghost plane). The adjustments create the ghostlyimage in the sky (see Figure 17.9). In this example, the plane has beencopied several times and reduced using Edit, Free Transform.
20 0789731207_ch17.qxd 4/6/04 2:13 PM Page 262
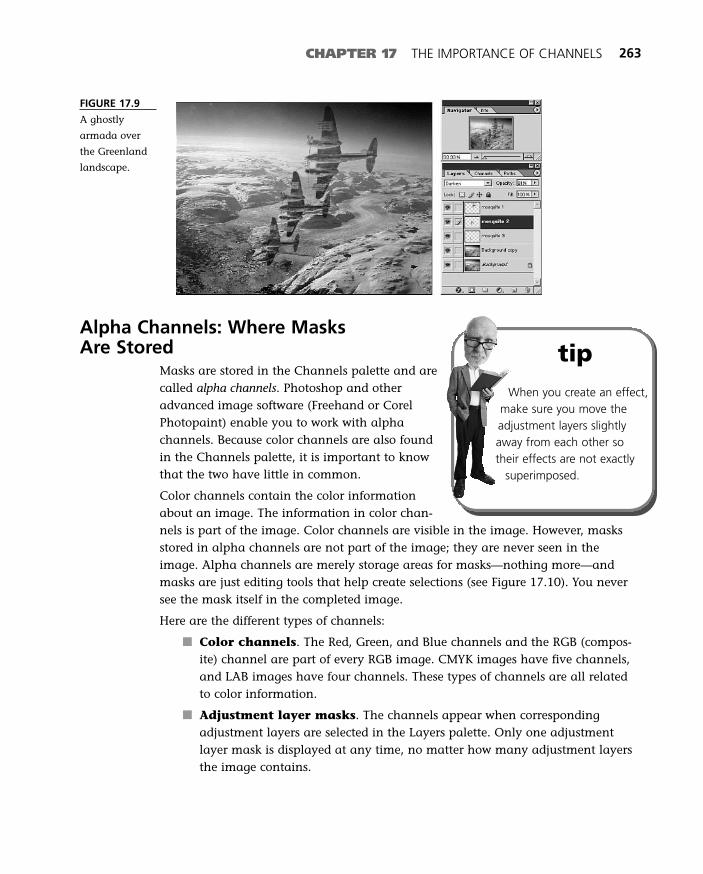
CHAPTER 17 THE IMPORTANCE OF CHANNELS 263
FIGURE 17.9
A ghostly
armada over
the Greenland
landscape.
Alpha Channels: Where Masks Are Stored
Masks are stored in the Channels palette and arecalled alpha channels. Photoshop and otheradvanced image software (Freehand or CorelPhotopaint) enable you to work with alphachannels. Because color channels are also foundin the Channels palette, it is important to knowthat the two have little in common.
Color channels contain the color informationabout an image. The information in color chan-nels is part of the image. Color channels are visible in the image. However, masksstored in alpha channels are not part of the image; they are never seen in theimage. Alpha channels are merely storage areas for masks—nothing more—andmasks are just editing tools that help create selections (see Figure 17.10). You neversee the mask itself in the completed image.
Here are the different types of channels:
■ Color channels. The Red, Green, and Blue channels and the RGB (compos-ite) channel are part of every RGB image. CMYK images have five channels,and LAB images have four channels. These types of channels are all relatedto color information.
■ Adjustment layer masks. The channels appear when correspondingadjustment layers are selected in the Layers palette. Only one adjustmentlayer mask is displayed at any time, no matter how many adjustment layersthe image contains.
tipWhen you create an effect,
make sure you move theadjustment layers slightlyaway from each other sotheir effects are not exactly
superimposed.
20 0789731207_ch17.qxd 4/6/04 2:13 PM Page 263
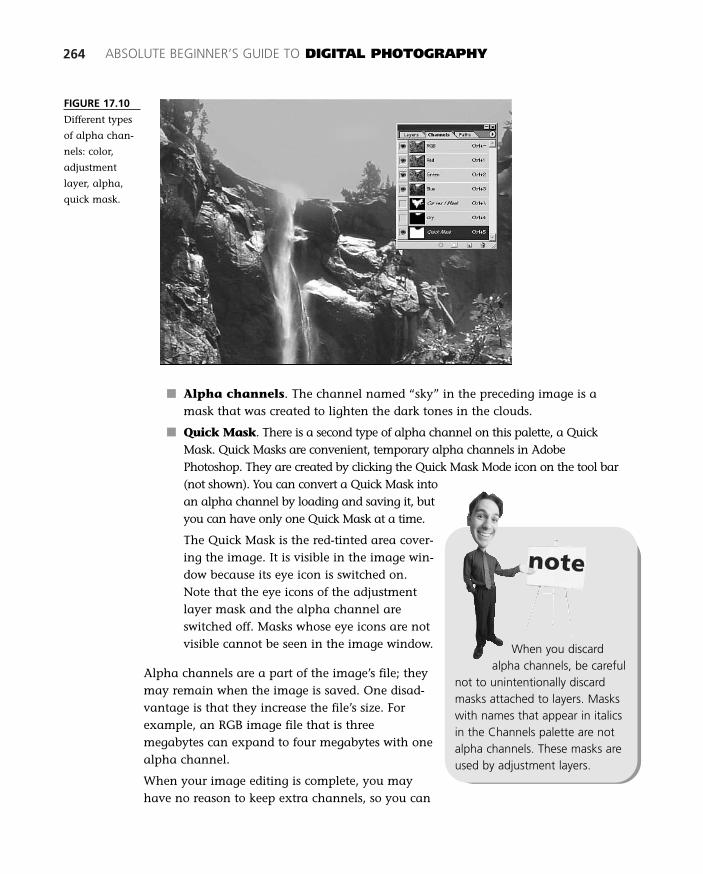
264 ABSOLUTE BEGINNER’S GUIDE TO DIGITAL PHOTOGRAPHY
FIGURE 17.10
Different types
of alpha chan-
nels: color,
adjustment
layer, alpha,
quick mask.
■ Alpha channels. The channel named “sky” in the preceding image is amask that was created to lighten the dark tones in the clouds.
■ Quick Mask. There is a second type of alpha channel on this palette, a QuickMask. Quick Masks are convenient, temporary alpha channels in AdobePhotoshop. They are created by clicking the Quick Mask Mode icon on the tool bar(not shown). You can convert a Quick Mask intoan alpha channel by loading and saving it, butyou can have only one Quick Mask at a time.
The Quick Mask is the red-tinted area cover-ing the image. It is visible in the image win-dow because its eye icon is switched on.Note that the eye icons of the adjustmentlayer mask and the alpha channel areswitched off. Masks whose eye icons are notvisible cannot be seen in the image window.
Alpha channels are a part of the image’s file; theymay remain when the image is saved. One disad-vantage is that they increase the file’s size. Forexample, an RGB image file that is threemegabytes can expand to four megabytes with onealpha channel.
When your image editing is complete, you mayhave no reason to keep extra channels, so you can
When you discardalpha channels, be careful
not to unintentionally discardmasks attached to layers. Maskswith names that appear in italicsin the Channels palette are notalpha channels. These masks areused by adjustment layers.
20 0789731207_ch17.qxd 4/6/04 2:13 PM Page 264
CHAPTER 17 THE IMPORTANCE OF CHANNELS 265
drag the alpha channels to the trash can in the Channels palette. Don’t discardthem if you expect to rework the image later. If you want to keep channels, saveyour files in Adobe Photoshop format. Some formats, such as JPEG, cannot savealpha channels.
Troubleshooting: Keeping Track of Layers,Channels, and Masks
Selections, layers, channels, and masks make image-editing software the tool ofchoice for thousands of artists, but such power also brings complexity and the poten-tial for confusion. You might be stumped when the software does not do what youexpect it to do. In such an event, the following troubleshooting tips might help.
The Image-Editing Software Stops WorkingTry closing a palette to see whether the computer is frozen.
■ If a palette won’t close, try switching from the image-editing software toMicrosoft Windows or the Macintosh Finder. If you can do this, the computeris okay, and your problem is with the image-editing software.
■ Is your image so large that the computer is still working on your last com-mand? If not, you might need to exit and restart the image-editing software.
■ If the computer is frozen, restart the computer or get help from a supporttechnician or a geeky friend.
The Last Command Did Not Work the Way It Should Have WorkedStop. Do not issue new commands, as you could accidentally edit the image. As aprecaution, use the software’s Undo command to undo your last known successfulcommand.
■ Does Undo work the way you expect? If it does, cancel the Undo command.
■ If Undo does not work, something you weren’t aware of occurred after yourlast successful command. Don’t cancel the Undo command, as it might undoan action you do not want to undo.
I’m Still Not Getting the Results I WantSo you’ve tried the suggestions and still no luck. You have no idea what’s going on.Back up and ask yourself a few questions:
■ Are you are trying to perform an edit outside of the selection? If more thanone image is open, are you confused about which image is active?
20 0789731207_ch17.qxd 4/6/04 2:13 PM Page 265
■ Is an invisible layer selected, such as a text layer? Are you trying to edit thewrong layer? Only the active layer can be edited, but it is possible for theactive layer to be invisible, so your edits are happening but you can’t seethem! Be sure that you have the desired layer active and that it is visible.
■ Are you trying to edit a channel or mask that isn’t visible or isn’t active? It ispossible for the active channel to be invisible, so your edits are happeningbut you can’t see them happening. Be sure that the channel you want to editis active and visible. Also, you might have the right channel, but you mightbe working in the wrong layer.
A Command Is Grayed Out or Is Missing from the MenuSome commands are not available at certain times. For example, when an adjust-ment layer is active, many menu options are grayed out or dimmed. They becomeavailable only when an image layer is active. Problems like this are best solved byreading the software manual.
I Can’t Save My FileAre you trying to save a file but can’t?
■ You might be trying to save the file in a format that won’t accept the featuresin your image. For example, you can’t save a layered image in JPEG format.
■ You might be trying to save the file to a disk that can’t accept new files, suchas a locked disk or a CD-ROM.
The Absolute Minimum
Channels are a more advanced selection and editing tool than layers. Most begin-ners do not need to use channels for simple editing and adjustment to images.
■ Alpha channels are merely storage areas for masks.
■ To turn a mask into a selection, Ctrl+click on the channel name or selectSelection, Load Selection.
■ Channel names in italics are adjustment layer masks, not alpha channels. Donot delete them.
■ If something doesn’t work, make sure a selection isn’t hidden. Press Ctrl+H tounhide the selection marquee.
■ Still stumped as to why a command won’t work? Make sure you don’t havethe wrong layer selected, such as a text layer.
266 ABSOLUTE BEGINNER’S GUIDE TO DIGITAL PHOTOGRAPHY
20 0789731207_ch17.qxd 4/6/04 2:13 PM Page 266
Digital Output
IVPART
Printers and Printer Resolution . . . . . . . . . . . .269
Preserving Your Images . . . . . . . . . . . . . . . . . .285
Color Theory . . . . . . . . . . . . . . . . . . . . . . . . . . .293
Lighting . . . . . . . . . . . . . . . . . . . . . . . . . . . . . .307
21 0789731207_pt04.qxd 4/6/04 2:20 PM Page 267

21 0789731207_pt04.qxd 4/6/04 2:20 PM Page 268

18In this chapter
• The Correct Settings for Printing Images
• What Resolution are My Images?
• Ink and Resolution: Tips for Quality andSaving on Cost
• ICC Profiles
• Paper and Resolution: Tips for Quality and Saving on Cost
Printers and Printer
Resolution
Understanding what a printer is really capable of in terms of resolution
has become something of a science. Today’s printer brochures say 1200
dpi for one thing and 4800 dpi for another (see Figure 18.1). In truth,
all inkjet printers are pretty much capable of the same output resolution
because of limitations with inkjet printer technology.
Some color laser printers and all dye-sublimation printers print higher
resolution images than today’s top-of-the-line inkjet printers. However,
these printers still are beyond the reach of most consumers.
This chapter will sort out the terms used by inkjet printer manufactur-
ers and provide a realistic, reasonable assessment of today’s printer
capabilities. More important, we’ll examine the least expensive way to
get the best prints and highest resolution possible.
22 0789731207_ch18.qxd 4/6/04 2:20 PM Page 269
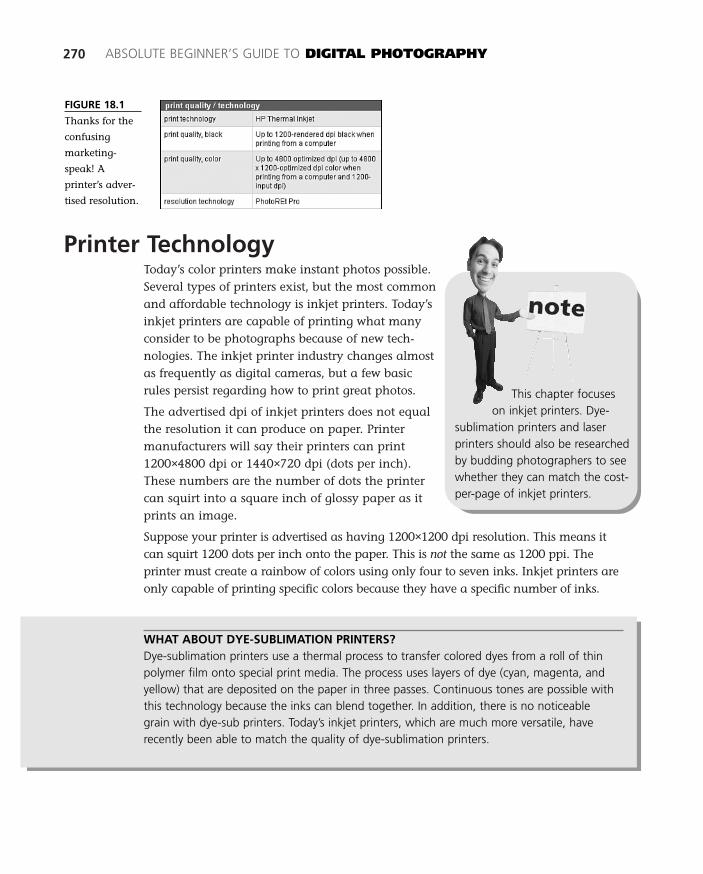
Printer TechnologyToday’s color printers make instant photos possible.Several types of printers exist, but the most commonand affordable technology is inkjet printers. Today’sinkjet printers are capable of printing what manyconsider to be photographs because of new tech-nologies. The inkjet printer industry changes almostas frequently as digital cameras, but a few basicrules persist regarding how to print great photos.
The advertised dpi of inkjet printers does not equalthe resolution it can produce on paper. Printermanufacturers will say their printers can print1200×4800 dpi or 1440×720 dpi (dots per inch).These numbers are the number of dots the printercan squirt into a square inch of glossy paper as itprints an image.
Suppose your printer is advertised as having 1200×1200 dpi resolution. This means itcan squirt 1200 dots per inch onto the paper. This is not the same as 1200 ppi. Theprinter must create a rainbow of colors using only four to seven inks. Inkjet printers areonly capable of printing specific colors because they have a specific number of inks.
270 ABSOLUTE BEGINNER’S GUIDE TO DIGITAL PHOTOGRAPHY
FIGURE 18.1
Thanks for the
confusing
marketing-
speak! A
printer’s adver-
tised resolution.
This chapter focuseson inkjet printers. Dye-
sublimation printers and laserprinters should also be researchedby budding photographers to seewhether they can match the cost-per-page of inkjet printers.
WHAT ABOUT DYE-SUBLIMATION PRINTERS?Dye-sublimation printers use a thermal process to transfer colored dyes from a roll of thinpolymer film onto special print media. The process uses layers of dye (cyan, magenta, andyellow) that are deposited on the paper in three passes. Continuous tones are possible withthis technology because the inks can blend together. In addition, there is no noticeablegrain with dye-sub printers. Today’s inkjet printers, which are much more versatile, haverecently been able to match the quality of dye-sublimation printers.
22 0789731207_ch18.qxd 4/6/04 2:20 PM Page 270
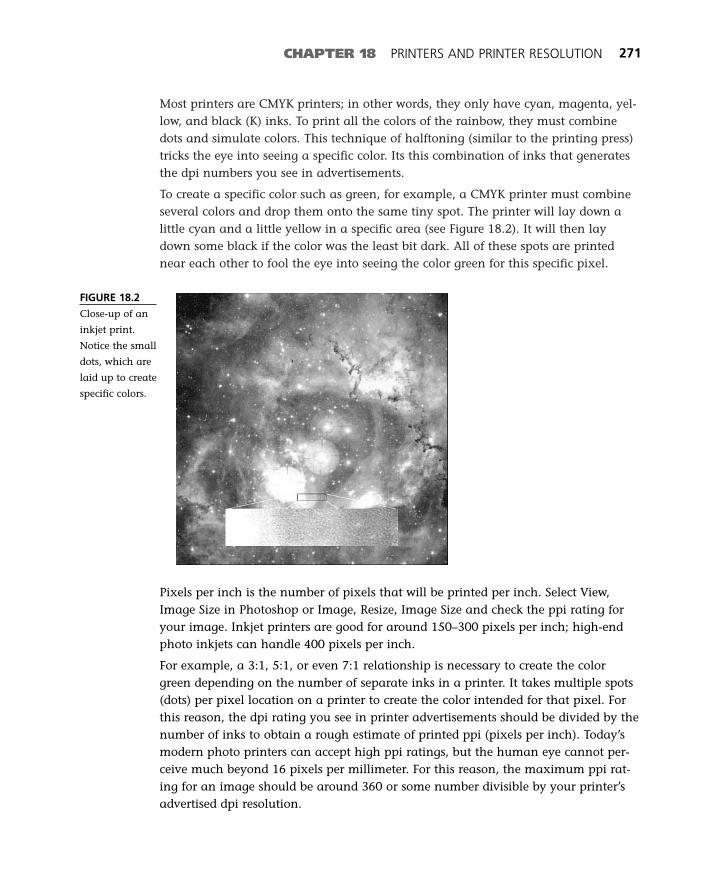
Most printers are CMYK printers; in other words, they only have cyan, magenta, yel-low, and black (K) inks. To print all the colors of the rainbow, they must combinedots and simulate colors. This technique of halftoning (similar to the printing press)tricks the eye into seeing a specific color. Its this combination of inks that generatesthe dpi numbers you see in advertisements.
To create a specific color such as green, for example, a CMYK printer must combineseveral colors and drop them onto the same tiny spot. The printer will lay down alittle cyan and a little yellow in a specific area (see Figure 18.2). It will then laydown some black if the color was the least bit dark. All of these spots are printednear each other to fool the eye into seeing the color green for this specific pixel.
CHAPTER 18 PRINTERS AND PRINTER RESOLUTION 271
FIGURE 18.2
Close-up of an
inkjet print.
Notice the small
dots, which are
laid up to create
specific colors.
Pixels per inch is the number of pixels that will be printed per inch. Select View,Image Size in Photoshop or Image, Resize, Image Size and check the ppi rating foryour image. Inkjet printers are good for around 150–300 pixels per inch; high-endphoto inkjets can handle 400 pixels per inch.
For example, a 3:1, 5:1, or even 7:1 relationship is necessary to create the colorgreen depending on the number of separate inks in a printer. It takes multiple spots(dots) per pixel location on a printer to create the color intended for that pixel. Forthis reason, the dpi rating you see in printer advertisements should be divided by thenumber of inks to obtain a rough estimate of printed ppi (pixels per inch). Today’smodern photo printers can accept high ppi ratings, but the human eye cannot per-ceive much beyond 16 pixels per millimeter. For this reason, the maximum ppi rat-ing for an image should be around 360 or some number divisible by your printer’sadvertised dpi resolution.
22 0789731207_ch18.qxd 4/6/04 2:20 PM Page 271
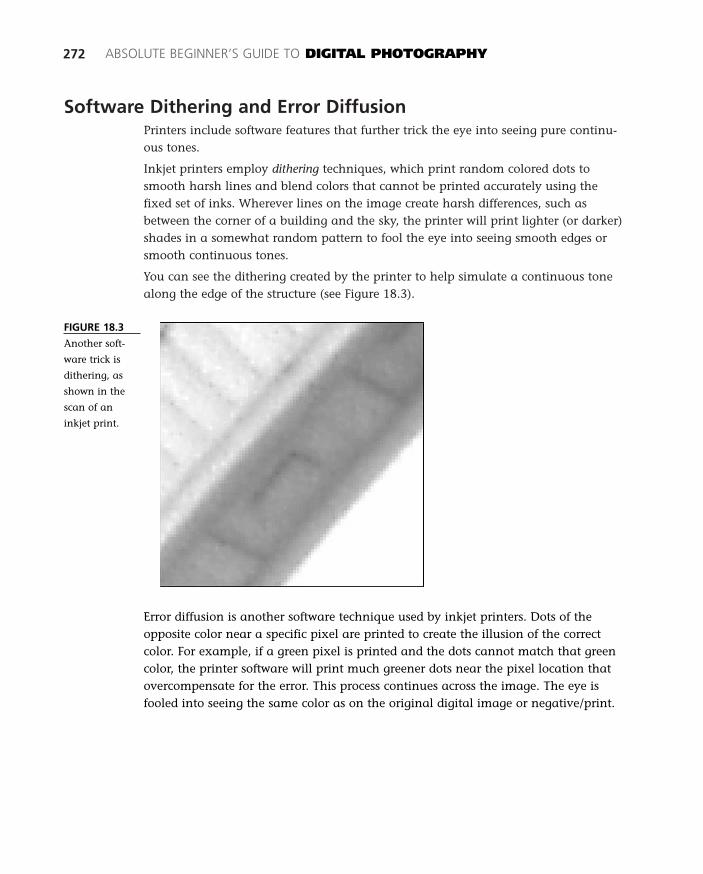
Software Dithering and Error DiffusionPrinters include software features that further trick the eye into seeing pure continu-ous tones.
Inkjet printers employ dithering techniques, which print random colored dots tosmooth harsh lines and blend colors that cannot be printed accurately using thefixed set of inks. Wherever lines on the image create harsh differences, such asbetween the corner of a building and the sky, the printer will print lighter (or darker)shades in a somewhat random pattern to fool the eye into seeing smooth edges orsmooth continuous tones.
You can see the dithering created by the printer to help simulate a continuous tonealong the edge of the structure (see Figure 18.3).
272 ABSOLUTE BEGINNER’S GUIDE TO DIGITAL PHOTOGRAPHY
FIGURE 18.3
Another soft-
ware trick is
dithering, as
shown in the
scan of an
inkjet print.
Error diffusion is another software technique used by inkjet printers. Dots of theopposite color near a specific pixel are printed to create the illusion of the correctcolor. For example, if a green pixel is printed and the dots cannot match that greencolor, the printer software will print much greener dots near the pixel location thatovercompensate for the error. This process continues across the image. The eye isfooled into seeing the same color as on the original digital image or negative/print.
22 0789731207_ch18.qxd 4/6/04 2:20 PM Page 272
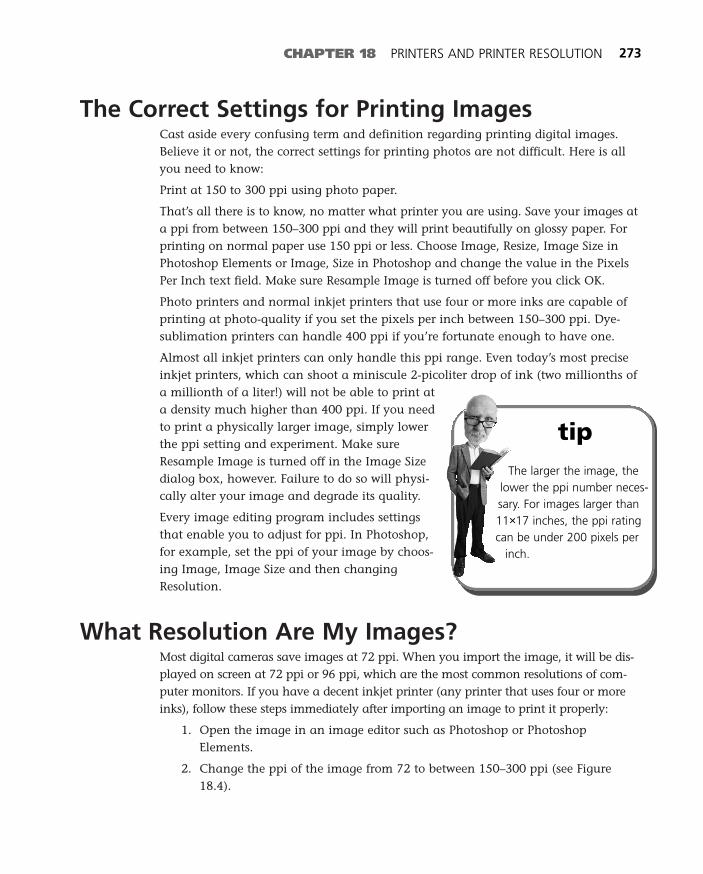
The Correct Settings for Printing ImagesCast aside every confusing term and definition regarding printing digital images.Believe it or not, the correct settings for printing photos are not difficult. Here is allyou need to know:
Print at 150 to 300 ppi using photo paper.
That’s all there is to know, no matter what printer you are using. Save your images ata ppi from between 150–300 ppi and they will print beautifully on glossy paper. Forprinting on normal paper use 150 ppi or less. Choose Image, Resize, Image Size inPhotoshop Elements or Image, Size in Photoshop and change the value in the PixelsPer Inch text field. Make sure Resample Image is turned off before you click OK.
Photo printers and normal inkjet printers that use four or more inks are capable ofprinting at photo-quality if you set the pixels per inch between 150–300 ppi. Dye-sublimation printers can handle 400 ppi if you’re fortunate enough to have one.
Almost all inkjet printers can only handle this ppi range. Even today’s most preciseinkjet printers, which can shoot a miniscule 2-picoliter drop of ink (two millionths ofa millionth of a liter!) will not be able to print ata density much higher than 400 ppi. If you needto print a physically larger image, simply lowerthe ppi setting and experiment. Make sureResample Image is turned off in the Image Sizedialog box, however. Failure to do so will physi-cally alter your image and degrade its quality.
Every image editing program includes settingsthat enable you to adjust for ppi. In Photoshop,for example, set the ppi of your image by choos-ing Image, Image Size and then changingResolution.
What Resolution Are My Images?Most digital cameras save images at 72 ppi. When you import the image, it will be dis-played on screen at 72 ppi or 96 ppi, which are the most common resolutions of com-puter monitors. If you have a decent inkjet printer (any printer that uses four or moreinks), follow these steps immediately after importing an image to print it properly:
1. Open the image in an image editor such as Photoshop or PhotoshopElements.
2. Change the ppi of the image from 72 to between 150–300 ppi (see Figure18.4).
CHAPTER 18 PRINTERS AND PRINTER RESOLUTION 273
tipThe larger the image, the
lower the ppi number neces-sary. For images larger than11×17 inches, the ppi ratingcan be under 200 pixels per
inch.
22 0789731207_ch18.qxd 4/6/04 2:20 PM Page 273
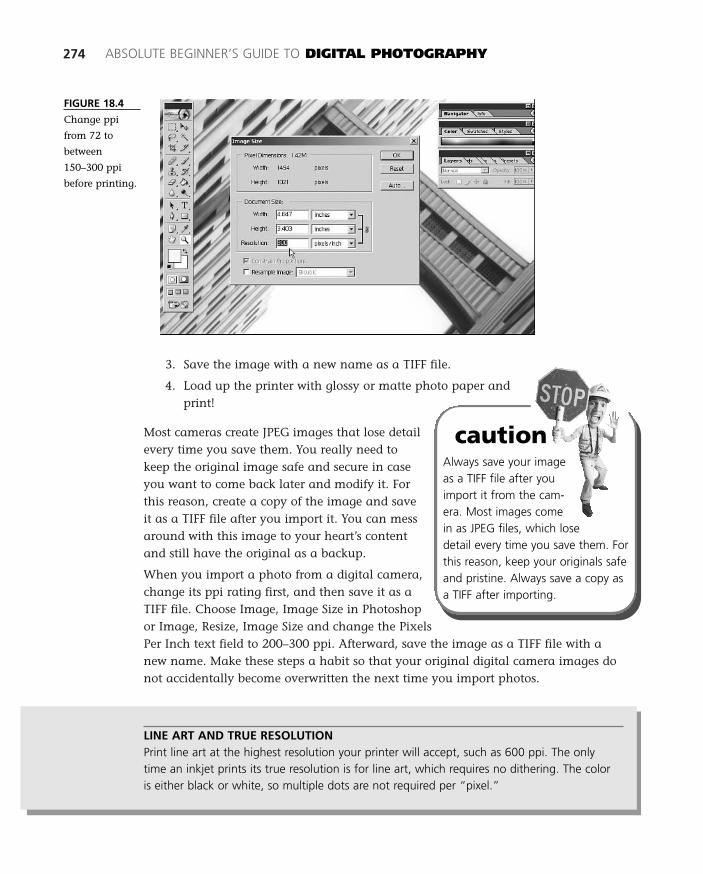
3. Save the image with a new name as a TIFF file.
4. Load up the printer with glossy or matte photo paper andprint!
Most cameras create JPEG images that lose detailevery time you save them. You really need tokeep the original image safe and secure in caseyou want to come back later and modify it. Forthis reason, create a copy of the image and saveit as a TIFF file after you import it. You can messaround with this image to your heart’s contentand still have the original as a backup.
When you import a photo from a digital camera,change its ppi rating first, and then save it as aTIFF file. Choose Image, Image Size in Photoshopor Image, Resize, Image Size and change the PixelsPer Inch text field to 200–300 ppi. Afterward, save the image as a TIFF file with anew name. Make these steps a habit so that your original digital camera images donot accidentally become overwritten the next time you import photos.
274 ABSOLUTE BEGINNER’S GUIDE TO DIGITAL PHOTOGRAPHY
FIGURE 18.4
Change ppi
from 72 to
between
150–300 ppi
before printing.
Always save your imageas a TIFF file after youimport it from the cam-era. Most images comein as JPEG files, which losedetail every time you save them. Forthis reason, keep your originals safeand pristine. Always save a copy asa TIFF after importing.
caution
LINE ART AND TRUE RESOLUTIONPrint line art at the highest resolution your printer will accept, such as 600 ppi. The onlytime an inkjet prints its true resolution is for line art, which requires no dithering. The coloris either black or white, so multiple dots are not required per “pixel.”
22 0789731207_ch18.qxd 4/6/04 2:20 PM Page 274
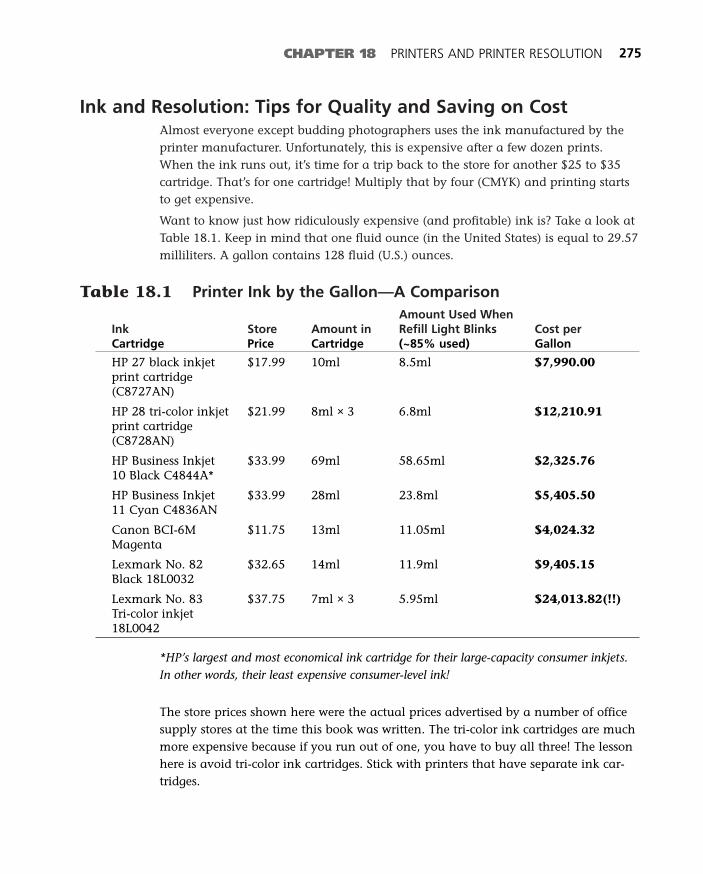
Ink and Resolution: Tips for Quality and Saving on CostAlmost everyone except budding photographers uses the ink manufactured by theprinter manufacturer. Unfortunately, this is expensive after a few dozen prints.When the ink runs out, it’s time for a trip back to the store for another $25 to $35cartridge. That’s for one cartridge! Multiply that by four (CMYK) and printing startsto get expensive.
Want to know just how ridiculously expensive (and profitable) ink is? Take a look atTable 18.1. Keep in mind that one fluid ounce (in the United States) is equal to 29.57milliliters. A gallon contains 128 fluid (U.S.) ounces.
Table 18.1 Printer Ink by the Gallon—A ComparisonAmount Used When
Ink Store Amount in Refill Light Blinks Cost perCartridge Price Cartridge (~85% used) Gallon
HP 27 black inkjet $17.99 10ml 8.5ml $7,990.00print cartridge (C8727AN)
HP 28 tri-color inkjet $21.99 8ml × 3 6.8ml $12,210.91print cartridge (C8728AN)
HP Business Inkjet $33.99 69ml 58.65ml $2,325.7610 Black C4844A*
HP Business Inkjet $33.99 28ml 23.8ml $5,405.5011 Cyan C4836AN
Canon BCI-6M $11.75 13ml 11.05ml $4,024.32Magenta
Lexmark No. 82 $32.65 14ml 11.9ml $9,405.15Black 18L0032
Lexmark No. 83 $37.75 7ml × 3 5.95ml $24,013.82(!!)Tri-color inkjet 18L0042
*HP’s largest and most economical ink cartridge for their large-capacity consumer inkjets.In other words, their least expensive consumer-level ink!
The store prices shown here were the actual prices advertised by a number of officesupply stores at the time this book was written. The tri-color ink cartridges are muchmore expensive because if you run out of one, you have to buy all three! The lessonhere is avoid tri-color ink cartridges. Stick with printers that have separate ink car-tridges.
CHAPTER 18 PRINTERS AND PRINTER RESOLUTION 275
22 0789731207_ch18.qxd 4/6/04 2:20 PM Page 275
Some printers are less than $80 retail. However, if you were to print only five pages aday for a year, your cost in supplies would be $360.45. Most people will hold onto aprinter for three years, so the total cost to operate the printer comes to $1,081.35.The first two ink purchases would exceed the cost of the printer!
Just for comparison…
■ Milk—$1.99 per gallon
■ High-end interior acrylic high-gloss enamel paint—$22.97 per gallon
■ Gourmet ice cream—$35 per gallon
■ Dom Perignon Champagne Brut ‘92 (1.5 liter)—$681.15 per gallon
Printer ink costs four to seven times as much as Dom Perignon! Highway robbery? Well,yes. For this reason, you might want to consider refills and third-party ink. However,does it affect resolution?
Third-Party Ink and Printer ResolutionIf you have a printer and love it, save your empties! Don’t ever throw away anempty cartridge. You might want to reuse it some day soon. Even Epson users maybe able to benefit from old cartridges (read the section “Epson Printers and BigBrother” for details).
Companies on the Internet and local companies now sell their own ink, ink refillkits, and paper. Here are some examples:
■ Economy ink. Web companies now contract with third-party ink companiesand manufacture ink cartridges that fit into your printer. These cartridges costhalf to three-quarters the cost of OEM cartridges. One line of cartridges useshigh-end ink that runs IRIS printers, which are used at prepress facilities.
■ Store brand ink cartridges. Office supply stores now sell cartridges for themost popular (or oldest, most popular) printers. This is similar to generic cerealin the cereal aisle at your local supermarket. Generics are usually less expen-sive, but often do not use the same quality ink.
276 ABSOLUTE BEGINNER’S GUIDE TO DIGITAL PHOTOGRAPHY
HOW MUCH IS TOO MUCH?In the first fiscal quarter of 2001, HP reportedly had an operating loss of U.S. $1 billion inits hardware business, which included printers and PCs. However, its net income in ink car-tridge sales was U.S. $5 billion—that’s in three months!
22 0789731207_ch18.qxd 4/6/04 2:20 PM Page 276
■ Ink refill kits for empty cartridges.
■ Remanufactured ink cartridges. Old,spent cartridges are cleaned and refilledwith third-party ink—nothing fancy here,just recycling at work.
■ Continuous-ink systems. A few compa-nies sell simple external ink supply sys-tems that snake PVC tubing to theprintheads in the printer. Instead ofinstalling a small 15ml cartridge, youattach a hose with a four-ounce or morebottle of ink. The savings are tremendousif you are a frequent printer.
How do these third-party ink cartridges and refillinks affect printer resolution? They don’t, but they can affect color. For this reason,small software plug-ins—called ICC profiles—have been invented that overcome anumber of color issues.
ICC ProfilesICC profiles are plug-ins to image-editing programs that describe the exact color pro-file of an output device, such as a printer or monitor. If you are serious about printingphotographs, make sure the printer or software youuse can support ICC profiling. Photoshop Elements hasa much simpler color space system (see Figure 18.5).
If you have Photoshop, follow these steps for a tourof color profiles. Let’s create an image, save it with-out color profile information, and then open it tosee what happens.
1. Open Photoshop, choose File, New, and cre-ate a new image. Don’t worry about the set-tings. Just click OK in the New dialog box.
2. Now save this blank image. Choose File,Save As. In the Save As dialog box, uncheckthe ICC Profile check box (see Figure 18.6)and then save this temporary file some-where.
CHAPTER 18 PRINTERS AND PRINTER RESOLUTION 277
tipSave your empties! When
an ink cartridge runs out ofink, do not throw it away.You might need it later if youdecide to refill the cartridge
with third-party ink. Trustme, ink is so expensive
that all digital photographerseventually consider this cost-savings technique.
You can read moreabout ICC profiles at the
International Color Consortiumhome page at www.color.org.
22 0789731207_ch18.qxd 4/6/04 2:20 PM Page 277
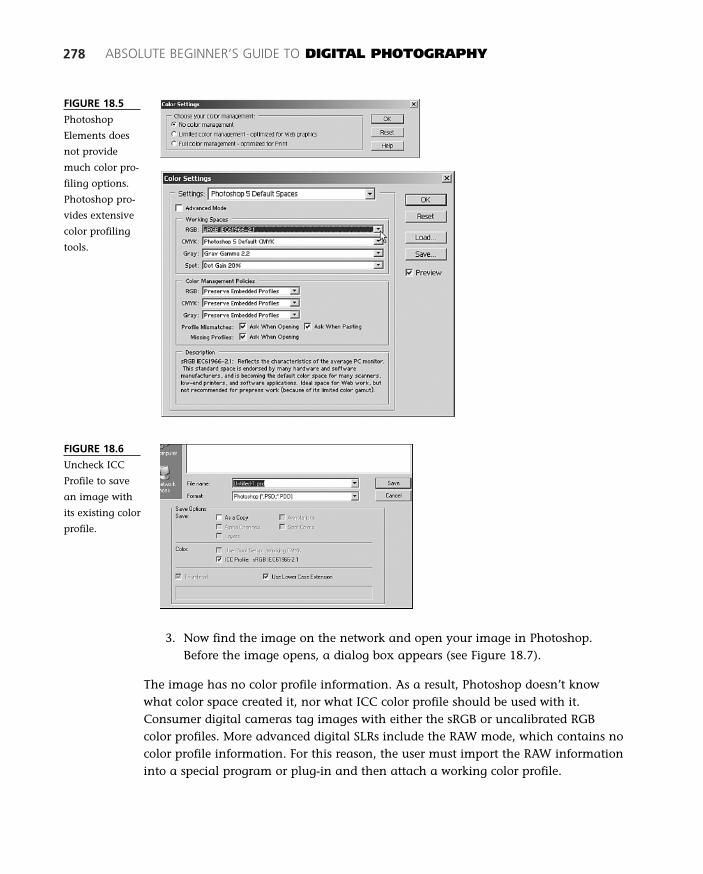
278 ABSOLUTE BEGINNER’S GUIDE TO DIGITAL PHOTOGRAPHY
FIGURE 18.5
Photoshop
Elements does
not provide
much color pro-
filing options.
Photoshop pro-
vides extensive
color profiling
tools.
FIGURE 18.6
Uncheck ICC
Profile to save
an image with
its existing color
profile.
3. Now find the image on the network and open your image in Photoshop.Before the image opens, a dialog box appears (see Figure 18.7).
The image has no color profile information. As a result, Photoshop doesn’t knowwhat color space created it, nor what ICC color profile should be used with it.Consumer digital cameras tag images with either the sRGB or uncalibrated RGBcolor profiles. More advanced digital SLRs include the RAW mode, which contains nocolor profile information. For this reason, the user must import the RAW informationinto a special program or plug-in and then attach a working color profile.
22 0789731207_ch18.qxd 4/6/04 2:20 PM Page 278
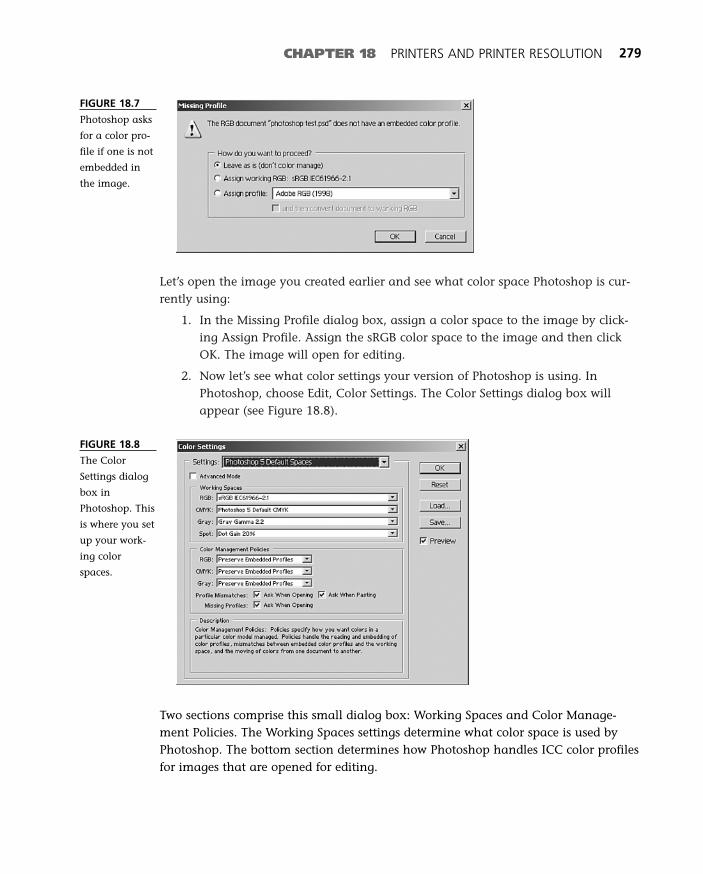
Let’s open the image you created earlier and see what color space Photoshop is cur-rently using:
1. In the Missing Profile dialog box, assign a color space to the image by click-ing Assign Profile. Assign the sRGB color space to the image and then clickOK. The image will open for editing.
2. Now let’s see what color settings your version of Photoshop is using. InPhotoshop, choose Edit, Color Settings. The Color Settings dialog box willappear (see Figure 18.8).
CHAPTER 18 PRINTERS AND PRINTER RESOLUTION 279
FIGURE 18.7
Photoshop asks
for a color pro-
file if one is not
embedded in
the image.
FIGURE 18.8
The Color
Settings dialog
box in
Photoshop. This
is where you set
up your work-
ing color
spaces.
Two sections comprise this small dialog box: Working Spaces and Color Manage-ment Policies. The Working Spaces settings determine what color space is used byPhotoshop. The bottom section determines how Photoshop handles ICC color profilesfor images that are opened for editing.
22 0789731207_ch18.qxd 4/6/04 2:20 PM Page 279
Epson Printers and Big BrotherEpson currently makes the best inkjet printers for digital photographers. Epson inks,which are archival, and Epson paper are by far the best media for budding digitalphotographers. However, the dark side is that Epson printer ink cartridges includeBig Brother technology that forces you to spend more on printing.
Epson includes hardware and software in its printers that monitors exactly howmuch ink has been used and then issues a warning before the ink cartridge runs out.This sounds helpful, but actually it is a clever way to force users to buy more ink.The print cartridge does not issue a warning when the ink is completely empty;instead it warns you that the ink will run out soon. This leaves a sizeable amount ofink in the cartridge, which will go to waste if you follow the rules.
In addition, when a warning is issued for a specific cartridge, the Epson softwareflips a switch in the ink cartridge and renders the cartridge useless. In other words,when the warning goes off, the ink cartridge no longer squirts ink!
These “chipped” ink cartridges are unusable if you would like to refill them withthird-party printer ink. Small companies, however, have found ways to fool thesechipped cartridges into thinking ink remains. These technologies include the following:
■ Hardware chips. A chip resetter is a small punch that pulls the old Epsonchip and replaces it with one that fools the printer into thinking the cartridgeis full.
■ Software. A small program is available in Europe that fools Epson printersinto thinking a new ink cartridge has been placed in the printer. This smallsoftware program bypasses the chip in the inkjet cartridges with a FULLnotice.
■ Continuous-ink supplies. As mentioned in the last section, a few compa-nies sell simple external ink supply systems that snake PVC tubing to theprintheads in the printer. Instead of installing a small 15ml cartridge, youattach a hose with a four-ounce or more bottle of ink. The savings aretremendous if you are a frequent printer.
Ink refill kits are almost mandatory for digital photographers. Fortunately these kitsare available over the Internet from a number of companies, through eBay, and atyour favorite warehouse club. Warehouse clubs also have finally started selling inkrefill kits.
280 ABSOLUTE BEGINNER’S GUIDE TO DIGITAL PHOTOGRAPHY
22 0789731207_ch18.qxd 4/6/04 2:20 PM Page 280

Paper and Resolution: Tips for Quality and Saving on CostOften the paper is more important than the printer. If your color printer already pro-duces halfway decent images on plain paper, photo-grade paper, such as that fromIlford, Legion, and Epson, can create amazing images.
The most vivid photo papers contain no paper in them at all. They are simply plasticand are called photo film. They usually provide the most “pop” and will make imageslook much more professional. Here are your choices of papers for printing images:
■ Film. Pure plastic with no actual paper in it. Film is often used when rearprojection is required. Prints look great on this “paper.”
■ Glossy or Super glossy. The most common photo paper and what worksbest when printing photos on an inkjet.
■ Pearl. A smooth, medium-glossy paper that is often used for presentation. Ithas the softness of matte paper but still shines. A common paper among fine-art photographers.
■ Matte. The best archival paper. If longevity is an issue, try matte paper. Thispaper is also used for business graphics and scientific/engineering work,where gloss is not necessary.
■ Plain. Common printer/copier paper. Even this paper has become high-end,with different brightness formulations. Usually this paper is only used foreveryday work.
Most of these papers are available at your local photography store and online atmajor photography sites. Compare your printer manufacturer’s paper to genericbrands, or third-party brands such as Kodak. Experiment with a number of papersand figure out the cost per page.
Use Table 18.2 as a starting point for determining resolution for printing your images.All photo papers are engineered to prevent color bleed, so the resolution of the imagedoesn’t matter much as long as the paper you’re using is termed “photo paper.” Theonly paper that might bleed is matte paper. Perform some tests on this type of paperat a low resolution (150 ppi, for example) before trying higher ppi settings.
Table 18.2 Printing Resolution for Specific PapersType of Paper Recommended Maximum ppi Setting
Film 300–400 ppi
Glossy or Ultra Glossy Paper 300–400 ppi
Pearl Paper (semi-gloss) 300 ppi
Matte-Finish Photo Paper 150–300 ppi
Plain Paper 100–150 ppi
CHAPTER 18 PRINTERS AND PRINTER RESOLUTION 281
22 0789731207_ch18.qxd 4/6/04 2:20 PM Page 281
The best photo papers for longevity are made of 100% cotton and are acid-free.Cotton papers can last decades, but don’t have the “pop” plastic papers contain.
The two most important factors that affect the quality of paper are the presence ofimpurities and an acidic pH. Finished papers may contain natural impurities, suchas lignins (glues that hold plant cells together) that have not been removed duringprocessing, and unnatural impurities such as residual chemicals like sulfites, whichare not washed out during final processing.
Why Do Images Look So Good on the Monitor?The monitor has the lowest resolution of any device in your computer system. Anolder monitor is only 72 ppi (pixels per inch); Sony monitors and other more mod-ern monitors use a shadow mask of 96 ppi. Even LCD screens are up to 100 ppi. Sowhy do images look so good on a monitor? Two reasons:
■ Backlit illumination. Have you ever seen an illuminated billboard on thehighway? Notice how much better it looks than a front-lit billboard?
■ Phosphor intensity. Every phosphor onscreen can produce the intensity ofevery pixel in an image. This differs from an inkjet printer, which can onlyproduce a dot or leave the area blank. Basically, the monitor can generate255 intensity values (0–255), whereas a printer can only generate two (ablank or a dot).
Printing Big PicturesA good scanner will enable you to scan in animage and print it much larger than its originalsize, but only a few times larger. If you really needto print large images, a film scanner is required.
Film scanners can scan at a much higher resolu-tion. A Nikon scanner, for example, can scan at4000 samples per inch. Granted, a 35mm nega-tive is much smaller than a print, but even thissize will enable you to print images up to 16×20inches with no noticeable grain. The big prob-lem is the cost.
Some scanner manufacturers have created moreadvanced flatbed scanners that include negativeand slide “sleeves.” You place the negative in thesleeve and place it on the flatbed scanner (see
282 ABSOLUTE BEGINNER’S GUIDE TO DIGITAL PHOTOGRAPHY
tipFilm scanners have a much
higher “dynamic range,”which is the capability topick up details in the shad-ows. When you scan a print,
detail is lost considerably inshadow areas. Scan film
negatives and slides for maximumquality and dynamic range.
22 0789731207_ch18.qxd 4/6/04 2:20 PM Page 282
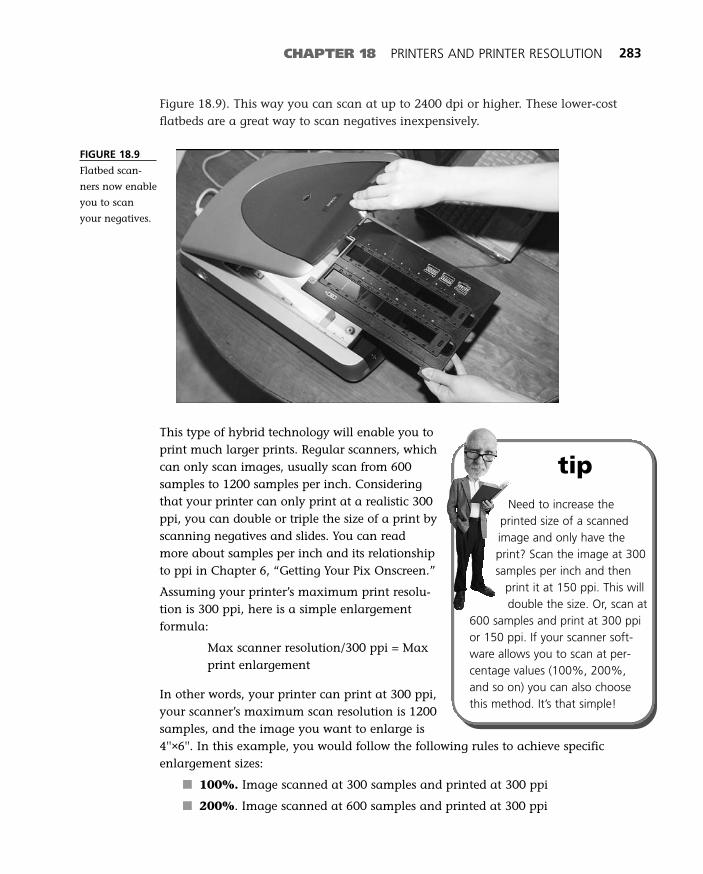
Figure 18.9). This way you can scan at up to 2400 dpi or higher. These lower-costflatbeds are a great way to scan negatives inexpensively.
CHAPTER 18 PRINTERS AND PRINTER RESOLUTION 283
FIGURE 18.9
Flatbed scan-
ners now enable
you to scan
your negatives.
This type of hybrid technology will enable you toprint much larger prints. Regular scanners, whichcan only scan images, usually scan from 600samples to 1200 samples per inch. Consideringthat your printer can only print at a realistic 300ppi, you can double or triple the size of a print byscanning negatives and slides. You can readmore about samples per inch and its relationshipto ppi in Chapter 6, “Getting Your Pix Onscreen.”
Assuming your printer’s maximum print resolu-tion is 300 ppi, here is a simple enlargement formula:
Max scanner resolution/300 ppi = Maxprint enlargement
In other words, your printer can print at 300 ppi,your scanner’s maximum scan resolution is 1200samples, and the image you want to enlarge is4''×6''. In this example, you would follow the following rules to achieve specificenlargement sizes:
■ 100%. Image scanned at 300 samples and printed at 300 ppi
■ 200%. Image scanned at 600 samples and printed at 300 ppi
tipNeed to increase the
printed size of a scannedimage and only have theprint? Scan the image at 300samples per inch and then
print it at 150 ppi. This willdouble the size. Or, scan at
600 samples and print at 300 ppior 150 ppi. If your scanner soft-ware allows you to scan at per-centage values (100%, 200%,and so on) you can also choosethis method. It’s that simple!
22 0789731207_ch18.qxd 4/6/04 2:20 PM Page 283
■ 400%. Image scanned at 1200 samples andprinted at 300 ppi
■ 800%. Image scanned at 1200 samples andprinted at 150 ppi
If you scan a 4''×6'' image at 300 samples and thenprint at 300 ppi on your printer, the image shouldprint at 100%. If you scan the image at 600 sam-ples and print at 300 ppi, the print will be doubledat 8''×12''. If you scan at 1200 samples and print at300 ppi, the print will be four times the size.
Keep in mind that most prints cannot be scannedvery well beyond 600 samples per inch—there justisn’t enough information in the print. For this rea-son, the effective maximum enlargement is around4×. To do this, you would scan at 600 samples andprint at 150 ppi.
284 ABSOLUTE BEGINNER’S GUIDE TO DIGITAL PHOTOGRAPHY
The effective maximumyou can enlarge a print is
4× for most scanners. Scan at 600samples and print at 150 ppi. Film(negatives and slides) can bescanned at much higher resolu-tions using film scanners.
The Absolute Minimum
High-resolution color printers are available for under $100, and advanced colorprinting papers are available for much less. Experiment with printing to see whatquality you can produce. The goal should be to print an image that a friend or rela-tive won’t recognize as a computer printout. Keep these tips in mind as well:
■ Inkjet printers print dots of color that fool the eye into seeing continuous col-ors, just as a magazine uses dots of color.
■ Ink is extremely expensive per gallon, but not per cartridge. To avoid theinsane costs of ink, buy a printer with the largest inkjet cartridges you canjustify for printing photos. The larger the cartridge, the less expensive the ink.
■ Inkjet cartridges now have “intelligent” chips that shut off the cartridgebefore ink runs out. Unfortunately, they shut off the cartridge when there isstill usable ink in it. This waste of resources adds up when you must returnagain and again for new ink cartridges.
■ The most vivid photographic “paper” for printing images is called film—it ispure plastic.
■ If you plan to print a considerable number of prints, look into a bulk inkdelivery system. Search the Internet for the phrase “bulk ink.”
22 0789731207_ch18.qxd 4/6/04 2:20 PM Page 284

19In this chapter
• The Importance of Paper
• Archival Paper
• Advantages of CD-ROMs
• Archiving Your Own Photo Gallery
Preserving Your Images
Today’s inkjet printers rival machine prints from your local drugstore or
photo lab. However, these printers will only print to the quality of the
media you put in them. In other words, don’t skimp on paper! Use the
best paper you can afford when printing images on your printer.
The amazing thing about today’s inkjet printers is that the technology
powering the $25,000 machines is exactly the same as the little inkjet
printhead in a $100 printer (see Figure 19.1). The only difference is the
amount of ink each can hold and the printing width. The quality you see
on billboards is available on a consumer-level Epson or HP printer.
This chapter will outline the different types of papers available for inkjet
printers. A mini-renaissance in paper science, technology, and manufac-
turing has occurred in the past 10 years thanks to inkjet printers.
Companies such as HP, Kodak, Epson, Ilford, Agfa, and Fuji have research-
and-development dollars and salaries working on brighter, faster-drying,
and better priced papers.
23 0789731207_ch19.qxd 4/6/04 2:17 PM Page 285
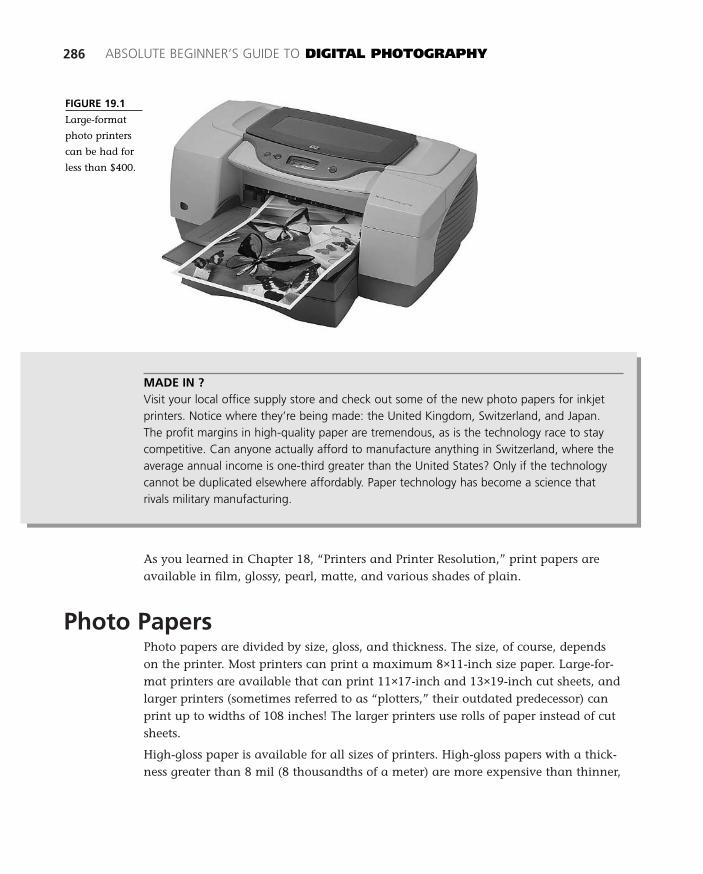
As you learned in Chapter 18, “Printers and Printer Resolution,” print papers areavailable in film, glossy, pearl, matte, and various shades of plain.
Photo PapersPhoto papers are divided by size, gloss, and thickness. The size, of course, dependson the printer. Most printers can print a maximum 8×11-inch size paper. Large-for-mat printers are available that can print 11×17-inch and 13×19-inch cut sheets, andlarger printers (sometimes referred to as “plotters,” their outdated predecessor) canprint up to widths of 108 inches! The larger printers use rolls of paper instead of cutsheets.
High-gloss paper is available for all sizes of printers. High-gloss papers with a thick-ness greater than 8 mil (8 thousandths of a meter) are more expensive than thinner,
286 ABSOLUTE BEGINNER’S GUIDE TO DIGITAL PHOTOGRAPHY
FIGURE 19.1
Large-format
photo printers
can be had for
less than $400.
MADE IN ?Visit your local office supply store and check out some of the new photo papers for inkjetprinters. Notice where they’re being made: the United Kingdom, Switzerland, and Japan.The profit margins in high-quality paper are tremendous, as is the technology race to staycompetitive. Can anyone actually afford to manufacture anything in Switzerland, where theaverage annual income is one-third greater than the United States? Only if the technologycannot be duplicated elsewhere affordably. Paper technology has become a science thatrivals military manufacturing.
23 0789731207_ch19.qxd 4/6/04 2:17 PM Page 286
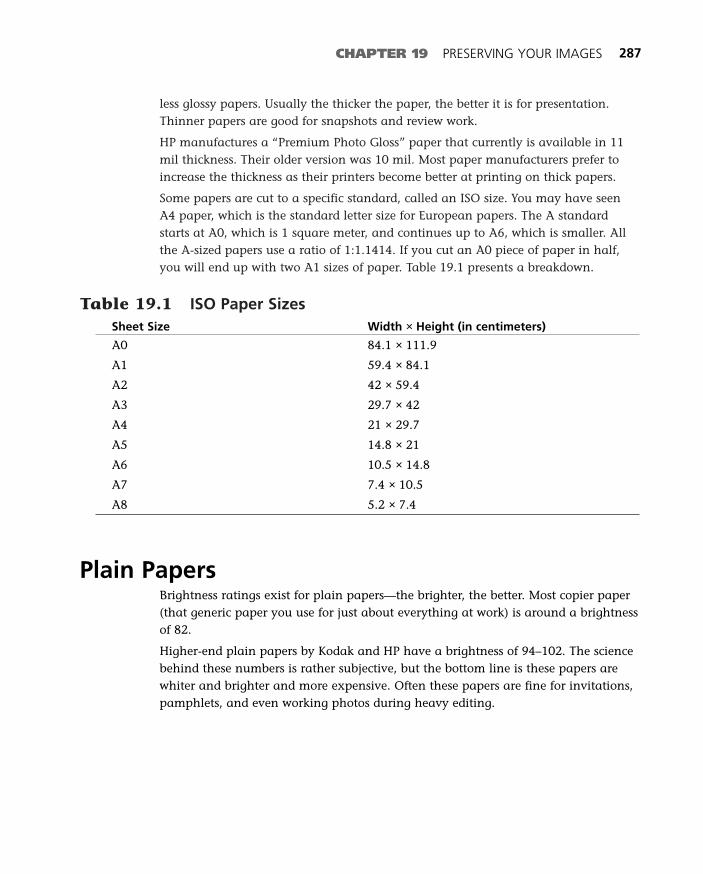
less glossy papers. Usually the thicker the paper, the better it is for presentation.Thinner papers are good for snapshots and review work.
HP manufactures a “Premium Photo Gloss” paper that currently is available in 11mil thickness. Their older version was 10 mil. Most paper manufacturers prefer toincrease the thickness as their printers become better at printing on thick papers.
Some papers are cut to a specific standard, called an ISO size. You may have seenA4 paper, which is the standard letter size for European papers. The A standardstarts at A0, which is 1 square meter, and continues up to A6, which is smaller. Allthe A-sized papers use a ratio of 1:1.1414. If you cut an A0 piece of paper in half,you will end up with two A1 sizes of paper. Table 19.1 presents a breakdown.
Table 19.1 ISO Paper SizesSheet Size Width × Height (in centimeters)
A0 84.1 × 111.9
A1 59.4 × 84.1
A2 42 × 59.4
A3 29.7 × 42
A4 21 × 29.7
A5 14.8 × 21
A6 10.5 × 14.8
A7 7.4 × 10.5
A8 5.2 × 7.4
Plain PapersBrightness ratings exist for plain papers—the brighter, the better. Most copier paper(that generic paper you use for just about everything at work) is around a brightnessof 82.
Higher-end plain papers by Kodak and HP have a brightness of 94–102. The sciencebehind these numbers is rather subjective, but the bottom line is these papers arewhiter and brighter and more expensive. Often these papers are fine for invitations,pamphlets, and even working photos during heavy editing.
CHAPTER 19 PRESERVING YOUR IMAGES 287
23 0789731207_ch19.qxd 4/6/04 2:17 PM Page 287
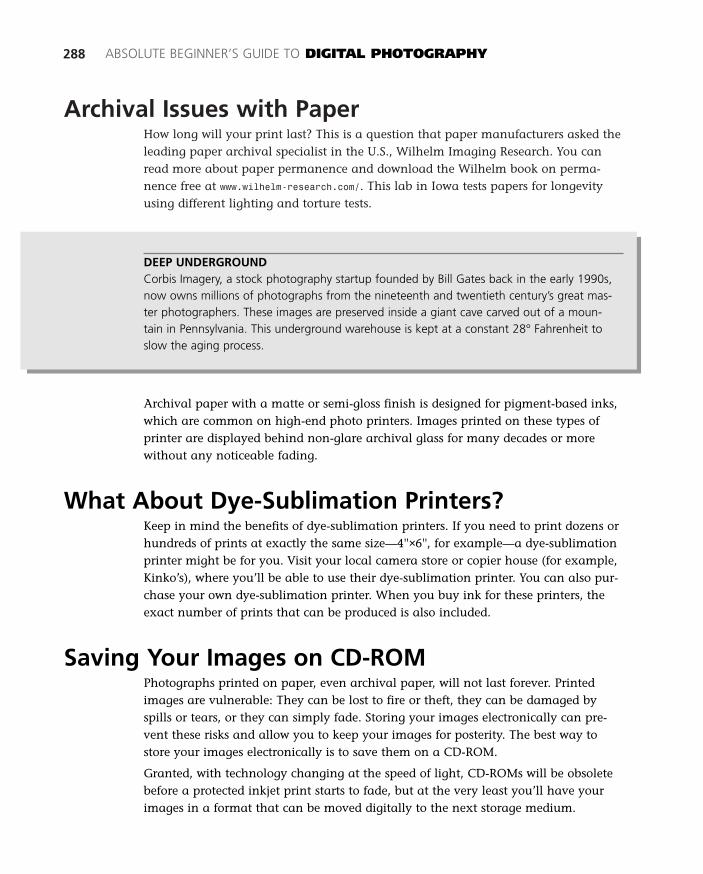
Archival Issues with PaperHow long will your print last? This is a question that paper manufacturers asked theleading paper archival specialist in the U.S., Wilhelm Imaging Research. You canread more about paper permanence and download the Wilhelm book on perma-nence free at www.wilhelm-research.com/. This lab in Iowa tests papers for longevityusing different lighting and torture tests.
288 ABSOLUTE BEGINNER’S GUIDE TO DIGITAL PHOTOGRAPHY
DEEP UNDERGROUNDCorbis Imagery, a stock photography startup founded by Bill Gates back in the early 1990s,now owns millions of photographs from the nineteenth and twentieth century’s great mas-ter photographers. These images are preserved inside a giant cave carved out of a moun-tain in Pennsylvania. This underground warehouse is kept at a constant 28° Fahrenheit toslow the aging process.
Archival paper with a matte or semi-gloss finish is designed for pigment-based inks,which are common on high-end photo printers. Images printed on these types ofprinter are displayed behind non-glare archival glass for many decades or morewithout any noticeable fading.
What About Dye-Sublimation Printers?Keep in mind the benefits of dye-sublimation printers. If you need to print dozens orhundreds of prints at exactly the same size—4''×6'', for example—a dye-sublimationprinter might be for you. Visit your local camera store or copier house (for example,Kinko’s), where you’ll be able to use their dye-sublimation printer. You can also pur-chase your own dye-sublimation printer. When you buy ink for these printers, theexact number of prints that can be produced is also included.
Saving Your Images on CD-ROMPhotographs printed on paper, even archival paper, will not last forever. Printedimages are vulnerable: They can be lost to fire or theft, they can be damaged byspills or tears, or they can simply fade. Storing your images electronically can pre-vent these risks and allow you to keep your images for posterity. The best way tostore your images electronically is to save them on a CD-ROM.
Granted, with technology changing at the speed of light, CD-ROMs will be obsoletebefore a protected inkjet print starts to fade, but at the very least you’ll have yourimages in a format that can be moved digitally to the next storage medium.
23 0789731207_ch19.qxd 4/6/04 2:17 PM Page 288
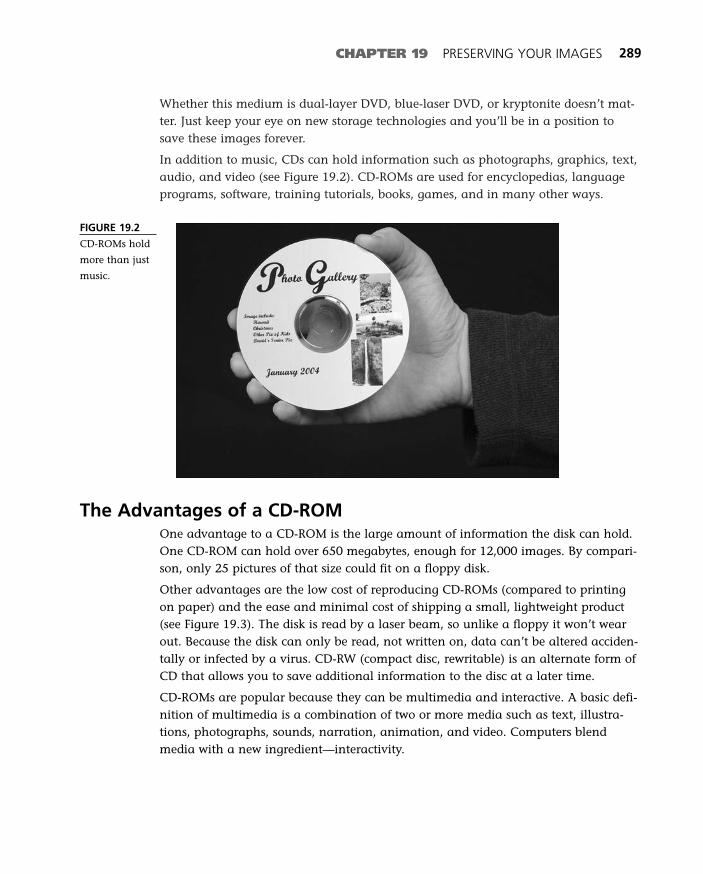
Whether this medium is dual-layer DVD, blue-laser DVD, or kryptonite doesn’t mat-ter. Just keep your eye on new storage technologies and you’ll be in a position tosave these images forever.
In addition to music, CDs can hold information such as photographs, graphics, text,audio, and video (see Figure 19.2). CD-ROMs are used for encyclopedias, languageprograms, software, training tutorials, books, games, and in many other ways.
CHAPTER 19 PRESERVING YOUR IMAGES 289
FIGURE 19.2
CD-ROMs hold
more than just
music.
The Advantages of a CD-ROMOne advantage to a CD-ROM is the large amount of information the disk can hold.One CD-ROM can hold over 650 megabytes, enough for 12,000 images. By compari-son, only 25 pictures of that size could fit on a floppy disk.
Other advantages are the low cost of reproducing CD-ROMs (compared to printingon paper) and the ease and minimal cost of shipping a small, lightweight product(see Figure 19.3). The disk is read by a laser beam, so unlike a floppy it won’t wearout. Because the disk can only be read, not written on, data can’t be altered acciden-tally or infected by a virus. CD-RW (compact disc, rewritable) is an alternate form ofCD that allows you to save additional information to the disc at a later time.
CD-ROMs are popular because they can be multimedia and interactive. A basic defi-nition of multimedia is a combination of two or more media such as text, illustra-tions, photographs, sounds, narration, animation, and video. Computers blendmedia with a new ingredient—interactivity.
23 0789731207_ch19.qxd 4/6/04 2:17 PM Page 289
Interactivity can range from simple to complex. A simple multimedia CD caninclude onscreen buttons that the viewer uses to move forward or back through aseries of pictures, or to activate events such as audio narration or video. With morecomplex programming, a CD can be personalized, with the content presented in dif-ferent ways, as the viewer chooses.
Make Your Own Photo Gallery on CD-ROMYou can create your own CD-ROM title. All you need are basic computer skills andthe time to learn the techniques. How you want people to view your disk will deter-mine how many software programs you must learn.
If this is your first project, start with the basics. Suppose you have 30 photographsthat you would like in CD-ROM form so you can send the disk to an editor orgallery. A relatively simple project could also include text (your resumé) and videonarration about your work.
1. Begin with a storyboard. First decide what you want people to see, hear, andbe able to do. List or sketch each component of the CD, and how you plan topresent it. If you want the user to be able to skip around the material, youneed to map out the different routes the user will be able to take.
2. Decide whether you want your CD to play on either Macintosh or IBM(Windows) computers, or both. This affects your choice of authoring softwareand the way the material is assembled by the software. Fortunately, Macs canread Windows CDs with no problem.
3. Prepare your photographs. You will need an image-editing program such as Adobe Photoshop or Photoshop Elements to crop and resize your
290 ABSOLUTE BEGINNER’S GUIDE TO DIGITAL PHOTOGRAPHY
FIGURE 19.3
The average
cost of a CD at
retail is around
four cents. This
is by far the
least expensive
way to store
data.
23 0789731207_ch19.qxd 4/6/04 2:17 PM Page 290
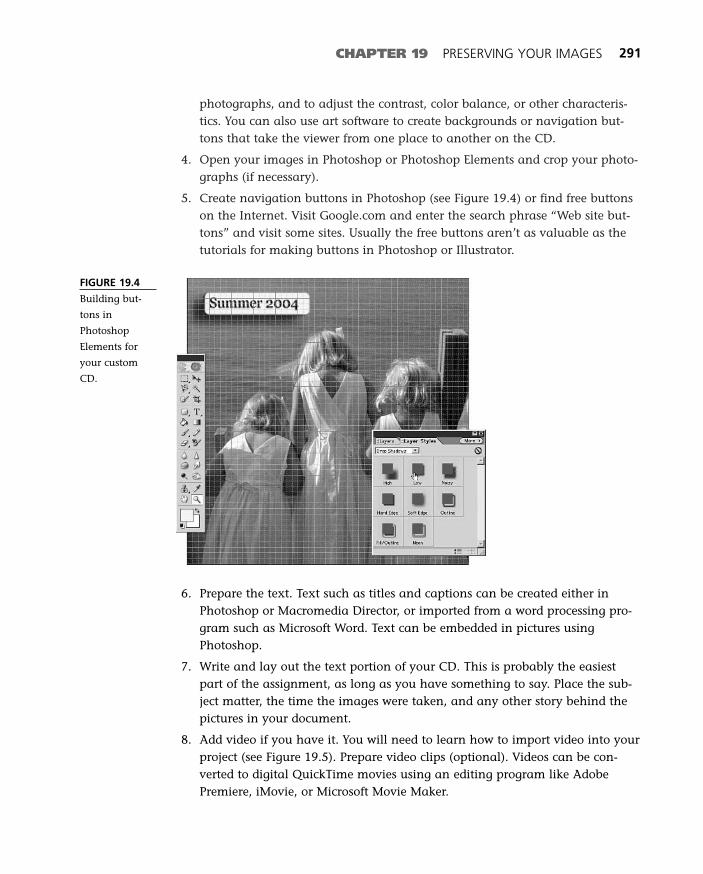
photographs, and to adjust the contrast, color balance, or other characteris-tics. You can also use art software to create backgrounds or navigation but-tons that take the viewer from one place to another on the CD.
4. Open your images in Photoshop or Photoshop Elements and crop your photo-graphs (if necessary).
5. Create navigation buttons in Photoshop (see Figure 19.4) or find free buttonson the Internet. Visit Google.com and enter the search phrase “Web site but-tons” and visit some sites. Usually the free buttons aren’t as valuable as thetutorials for making buttons in Photoshop or Illustrator.
CHAPTER 19 PRESERVING YOUR IMAGES 291
FIGURE 19.4
Building but-
tons in
Photoshop
Elements for
your custom
CD.
6. Prepare the text. Text such as titles and captions can be created either inPhotoshop or Macromedia Director, or imported from a word processing pro-gram such as Microsoft Word. Text can be embedded in pictures usingPhotoshop.
7. Write and lay out the text portion of your CD. This is probably the easiestpart of the assignment, as long as you have something to say. Place the sub-ject matter, the time the images were taken, and any other story behind thepictures in your document.
8. Add video if you have it. You will need to learn how to import video into yourproject (see Figure 19.5). Prepare video clips (optional). Videos can be con-verted to digital QuickTime movies using an editing program like AdobePremiere, iMovie, or Microsoft Movie Maker.
23 0789731207_ch19.qxd 4/6/04 2:17 PM Page 291
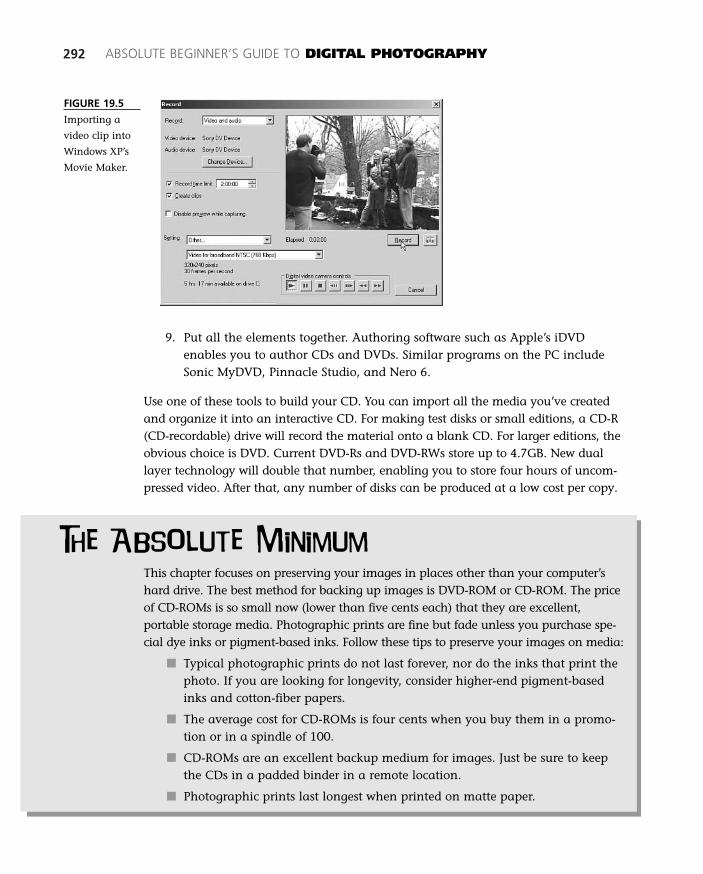
292 ABSOLUTE BEGINNER’S GUIDE TO DIGITAL PHOTOGRAPHY
FIGURE 19.5
Importing a
video clip into
Windows XP’s
Movie Maker.
9. Put all the elements together. Authoring software such as Apple’s iDVDenables you to author CDs and DVDs. Similar programs on the PC includeSonic MyDVD, Pinnacle Studio, and Nero 6.
Use one of these tools to build your CD. You can import all the media you’ve createdand organize it into an interactive CD. For making test disks or small editions, a CD-R(CD-recordable) drive will record the material onto a blank CD. For larger editions, theobvious choice is DVD. Current DVD-Rs and DVD-RWs store up to 4.7GB. New duallayer technology will double that number, enabling you to store four hours of uncom-pressed video. After that, any number of disks can be produced at a low cost per copy.
The Absolute Minimum
This chapter focuses on preserving your images in places other than your computer’shard drive. The best method for backing up images is DVD-ROM or CD-ROM. The priceof CD-ROMs is so small now (lower than five cents each) that they are excellent,portable storage media. Photographic prints are fine but fade unless you purchase spe-cial dye inks or pigment-based inks. Follow these tips to preserve your images on media:
■ Typical photographic prints do not last forever, nor do the inks that print thephoto. If you are looking for longevity, consider higher-end pigment-basedinks and cotton-fiber papers.
■ The average cost for CD-ROMs is four cents when you buy them in a promo-tion or in a spindle of 100.
■ CD-ROMs are an excellent backup medium for images. Just be sure to keepthe CDs in a padded binder in a remote location.
■ Photographic prints last longest when printed on matte paper.
23 0789731207_ch19.qxd 4/6/04 2:17 PM Page 292

20In this chapter
• Color Processes
• Color Image Layers
• Making Your Prints Match the Monitor
Color Theory
Color images can be created by adding primary colors together or by
subtracting primary colors from white light. The first color photographic
processes made use of additive color, but for the past 60 years subtrac-
tive processes have been the choice of photographers and printers.
The additive color process mixes the light of the primary colors red,
green, and blue (known as the RGB colors) to create all possible colors.
When equal amounts of red, green, and blue light are mixed, the result
appears white. Television tubes and computer monitors are the most
common examples of additive color systems.
The subtractive color process uses the inks or dyes of the primary colors
cyan (blue-green), magenta (a purplish pink), and yellow (known as the
CMY colors). The three CMY colors are complementary to, or opposite,
the RGB colors used on the color wheel shown in Figure 20.1.
24 0789731207_ch20.qxd 4/6/04 2:14 PM Page 293
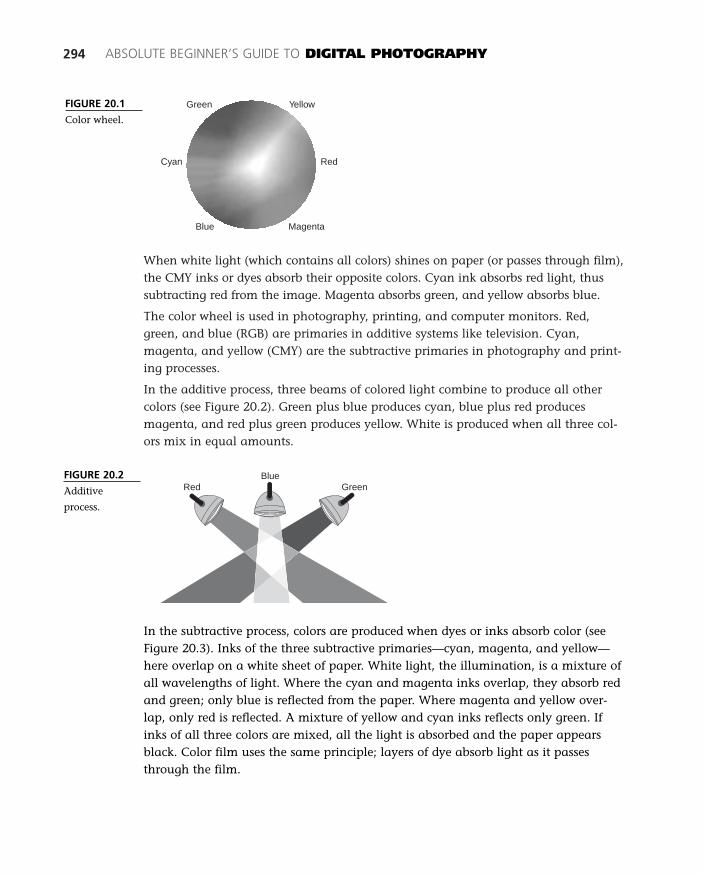
When white light (which contains all colors) shines on paper (or passes through film),the CMY inks or dyes absorb their opposite colors. Cyan ink absorbs red light, thussubtracting red from the image. Magenta absorbs green, and yellow absorbs blue.
The color wheel is used in photography, printing, and computer monitors. Red,green, and blue (RGB) are primaries in additive systems like television. Cyan,magenta, and yellow (CMY) are the subtractive primaries in photography and print-ing processes.
In the additive process, three beams of colored light combine to produce all othercolors (see Figure 20.2). Green plus blue produces cyan, blue plus red producesmagenta, and red plus green produces yellow. White is produced when all three col-ors mix in equal amounts.
294 ABSOLUTE BEGINNER’S GUIDE TO DIGITAL PHOTOGRAPHY
FIGURE 20.1
Color wheel.
Green
Cyan
Blue
Yellow
Red
Magenta
FIGURE 20.2
Additive
process.
Red GreenBlue
In the subtractive process, colors are produced when dyes or inks absorb color (seeFigure 20.3). Inks of the three subtractive primaries—cyan, magenta, and yellow—here overlap on a white sheet of paper. White light, the illumination, is a mixture ofall wavelengths of light. Where the cyan and magenta inks overlap, they absorb redand green; only blue is reflected from the paper. Where magenta and yellow over-lap, only red is reflected. A mixture of yellow and cyan inks reflects only green. Ifinks of all three colors are mixed, all the light is absorbed and the paper appearsblack. Color film uses the same principle; layers of dye absorb light as it passesthrough the film.
24 0789731207_ch20.qxd 4/6/04 2:14 PM Page 294
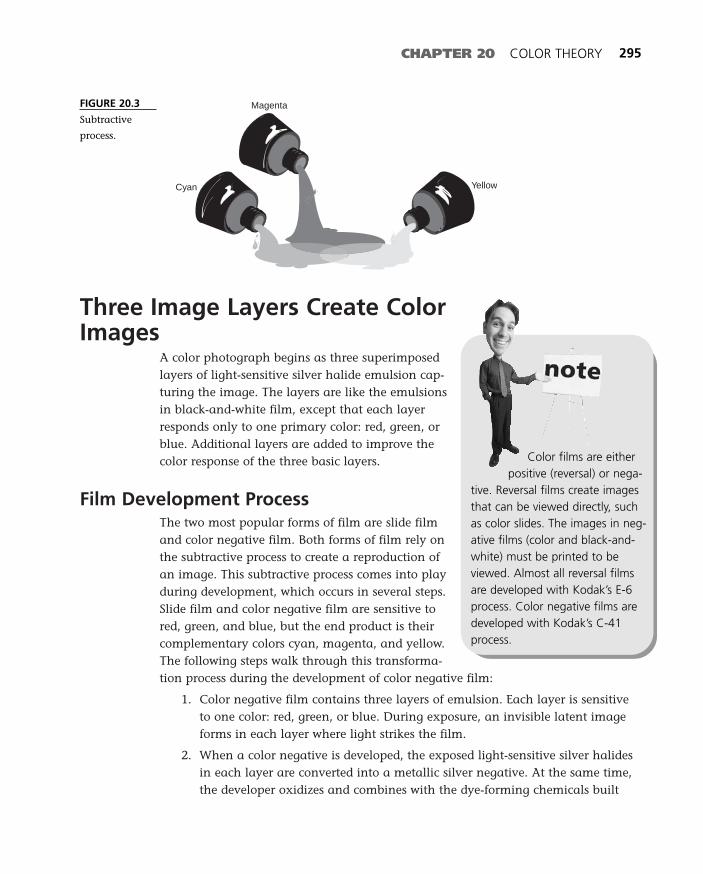
Three Image Layers Create ColorImages
A color photograph begins as three superimposedlayers of light-sensitive silver halide emulsion cap-turing the image. The layers are like the emulsionsin black-and-white film, except that each layerresponds only to one primary color: red, green, orblue. Additional layers are added to improve thecolor response of the three basic layers.
Film Development ProcessThe two most popular forms of film are slide filmand color negative film. Both forms of film rely onthe subtractive process to create a reproduction ofan image. This subtractive process comes into playduring development, which occurs in several steps.Slide film and color negative film are sensitive tored, green, and blue, but the end product is theircomplementary colors cyan, magenta, and yellow.The following steps walk through this transforma-tion process during the development of color negative film:
1. Color negative film contains three layers of emulsion. Each layer is sensitiveto one color: red, green, or blue. During exposure, an invisible latent imageforms in each layer where light strikes the film.
2. When a color negative is developed, the exposed light-sensitive silver halidesin each layer are converted into a metallic silver negative. At the same time,the developer oxidizes and combines with the dye-forming chemicals built
CHAPTER 20 COLOR THEORY 295
FIGURE 20.3
Subtractive
process.
Cyan
Magenta
Yellow
Color films are eitherpositive (reversal) or nega-
tive. Reversal films create imagesthat can be viewed directly, suchas color slides. The images in neg-ative films (color and black-and-white) must be printed to beviewed. Almost all reversal filmsare developed with Kodak’s E-6process. Color negative films aredeveloped with Kodak’s C-41process.
24 0789731207_ch20.qxd 4/6/04 2:14 PM Page 295
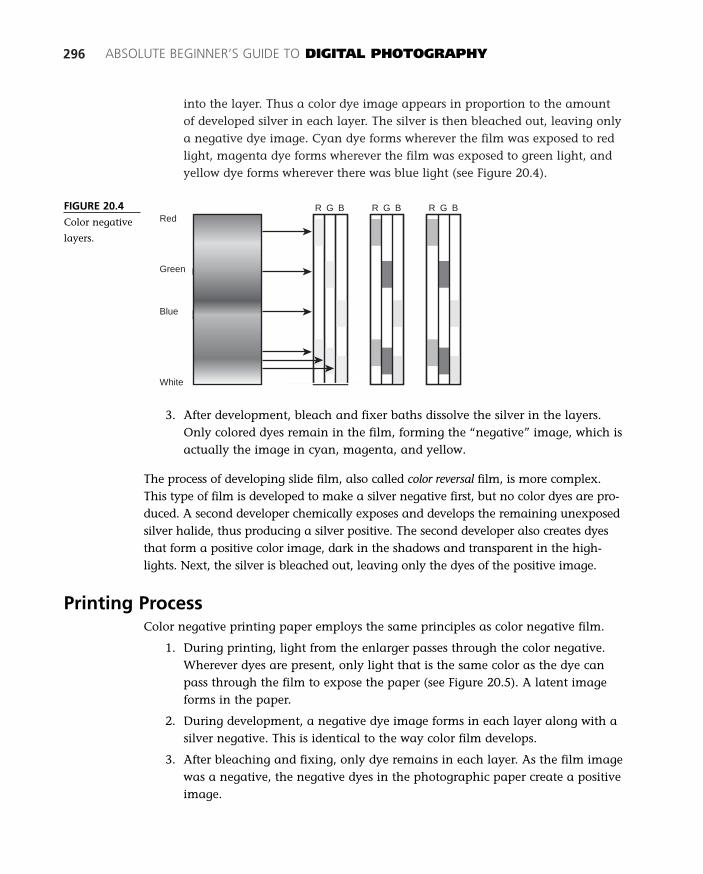
into the layer. Thus a color dye image appears in proportion to the amountof developed silver in each layer. The silver is then bleached out, leaving onlya negative dye image. Cyan dye forms wherever the film was exposed to redlight, magenta dye forms wherever the film was exposed to green light, andyellow dye forms wherever there was blue light (see Figure 20.4).
296 ABSOLUTE BEGINNER’S GUIDE TO DIGITAL PHOTOGRAPHY
FIGURE 20.4
Color negative
layers.
Red
Green
Blue
White
R G B R G B R G B
3. After development, bleach and fixer baths dissolve the silver in the layers.Only colored dyes remain in the film, forming the “negative” image, which isactually the image in cyan, magenta, and yellow.
The process of developing slide film, also called color reversal film, is more complex.This type of film is developed to make a silver negative first, but no color dyes are pro-duced. A second developer chemically exposes and develops the remaining unexposedsilver halide, thus producing a silver positive. The second developer also creates dyesthat form a positive color image, dark in the shadows and transparent in the high-lights. Next, the silver is bleached out, leaving only the dyes of the positive image.
Printing ProcessColor negative printing paper employs the same principles as color negative film.
1. During printing, light from the enlarger passes through the color negative.Wherever dyes are present, only light that is the same color as the dye canpass through the film to expose the paper (see Figure 20.5). A latent imageforms in the paper.
2. During development, a negative dye image forms in each layer along with asilver negative. This is identical to the way color film develops.
3. After bleaching and fixing, only dye remains in each layer. As the film imagewas a negative, the negative dyes in the photographic paper create a positiveimage.
24 0789731207_ch20.qxd 4/6/04 2:14 PM Page 296
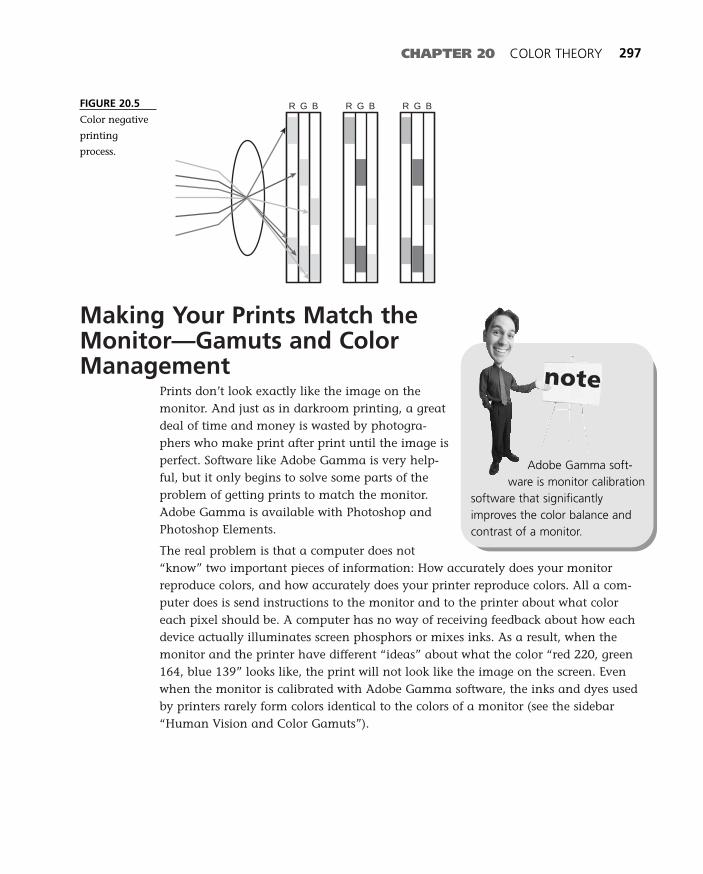
Making Your Prints Match theMonitor—Gamuts and ColorManagement
Prints don’t look exactly like the image on themonitor. And just as in darkroom printing, a greatdeal of time and money is wasted by photogra-phers who make print after print until the image isperfect. Software like Adobe Gamma is very help-ful, but it only begins to solve some parts of theproblem of getting prints to match the monitor.Adobe Gamma is available with Photoshop andPhotoshop Elements.
The real problem is that a computer does not“know” two important pieces of information: How accurately does your monitorreproduce colors, and how accurately does your printer reproduce colors. All a com-puter does is send instructions to the monitor and to the printer about what coloreach pixel should be. A computer has no way of receiving feedback about how eachdevice actually illuminates screen phosphors or mixes inks. As a result, when themonitor and the printer have different “ideas” about what the color “red 220, green164, blue 139” looks like, the print will not look like the image on the screen. Evenwhen the monitor is calibrated with Adobe Gamma software, the inks and dyes usedby printers rarely form colors identical to the colors of a monitor (see the sidebar“Human Vision and Color Gamuts”).
CHAPTER 20 COLOR THEORY 297
FIGURE 20.5
Color negative
printing
process.
R G B R G B R G B
Adobe Gamma soft-ware is monitor calibration
software that significantlyimproves the color balance andcontrast of a monitor.
24 0789731207_ch20.qxd 4/6/04 2:14 PM Page 297
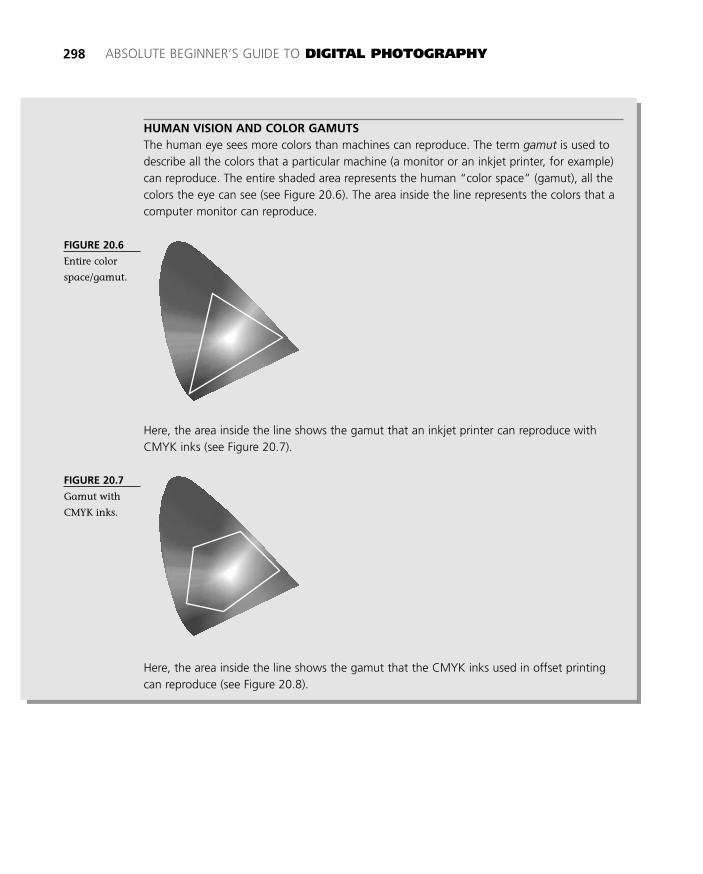
HUMAN VISION AND COLOR GAMUTSThe human eye sees more colors than machines can reproduce. The term gamut is used todescribe all the colors that a particular machine (a monitor or an inkjet printer, for example)can reproduce. The entire shaded area represents the human “color space” (gamut), all thecolors the eye can see (see Figure 20.6). The area inside the line represents the colors that acomputer monitor can reproduce.
298 ABSOLUTE BEGINNER’S GUIDE TO DIGITAL PHOTOGRAPHY
FIGURE 20.6
Entire color
space/gamut.
Here, the area inside the line shows the gamut that an inkjet printer can reproduce withCMYK inks (see Figure 20.7).
FIGURE 20.7
Gamut with
CMYK inks.
Here, the area inside the line shows the gamut that the CMYK inks used in offset printingcan reproduce (see Figure 20.8).
24 0789731207_ch20.qxd 4/6/04 2:14 PM Page 298
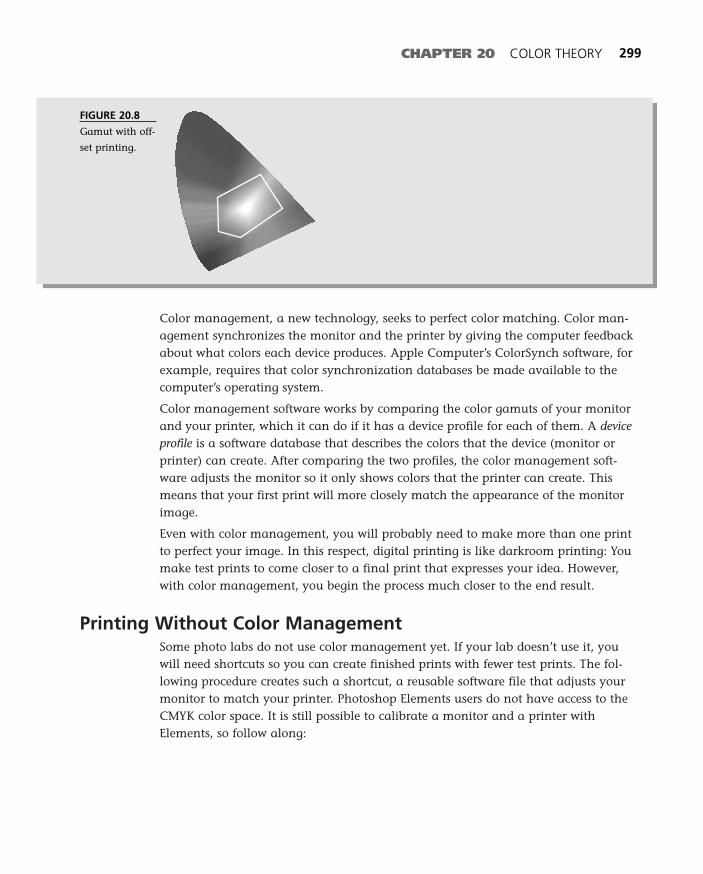
Color management, a new technology, seeks to perfect color matching. Color man-agement synchronizes the monitor and the printer by giving the computer feedbackabout what colors each device produces. Apple Computer’s ColorSynch software, forexample, requires that color synchronization databases be made available to thecomputer’s operating system.
Color management software works by comparing the color gamuts of your monitorand your printer, which it can do if it has a device profile for each of them. A deviceprofile is a software database that describes the colors that the device (monitor orprinter) can create. After comparing the two profiles, the color management soft-ware adjusts the monitor so it only shows colors that the printer can create. Thismeans that your first print will more closely match the appearance of the monitorimage.
Even with color management, you will probably need to make more than one printto perfect your image. In this respect, digital printing is like darkroom printing: Youmake test prints to come closer to a final print that expresses your idea. However,with color management, you begin the process much closer to the end result.
Printing Without Color ManagementSome photo labs do not use color management yet. If your lab doesn’t use it, youwill need shortcuts so you can create finished prints with fewer test prints. The fol-lowing procedure creates such a shortcut, a reusable software file that adjusts yourmonitor to match your printer. Photoshop Elements users do not have access to theCMYK color space. It is still possible to calibrate a monitor and a printer withElements, so follow along:
CHAPTER 20 COLOR THEORY 299
FIGURE 20.8
Gamut with off-
set printing.
24 0789731207_ch20.qxd 4/6/04 2:14 PM Page 299
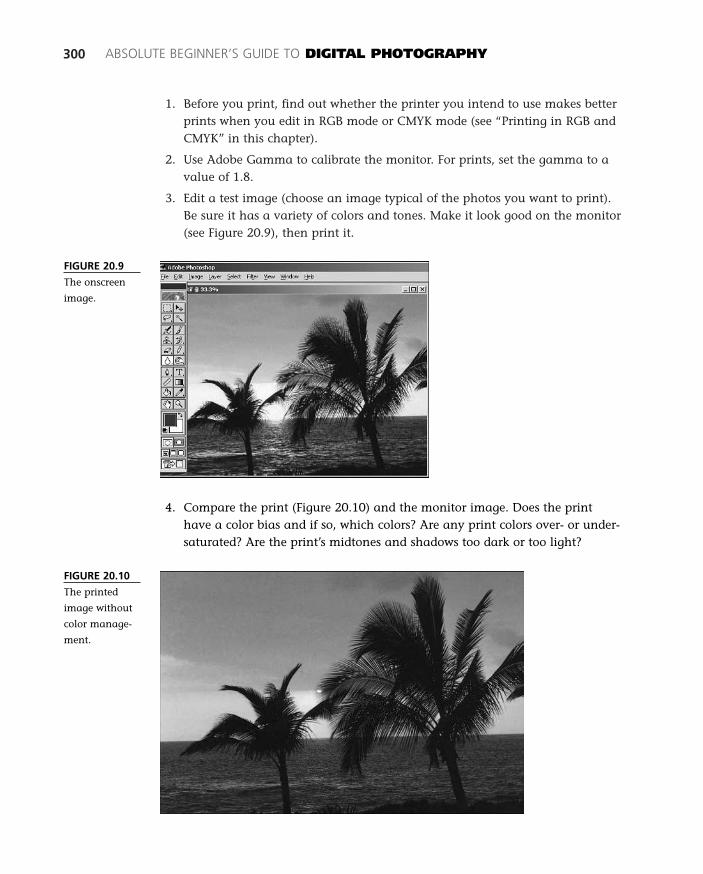
1. Before you print, find out whether the printer you intend to use makes betterprints when you edit in RGB mode or CMYK mode (see “Printing in RGB andCMYK” in this chapter).
2. Use Adobe Gamma to calibrate the monitor. For prints, set the gamma to avalue of 1.8.
3. Edit a test image (choose an image typical of the photos you want to print).Be sure it has a variety of colors and tones. Make it look good on the monitor(see Figure 20.9), then print it.
300 ABSOLUTE BEGINNER’S GUIDE TO DIGITAL PHOTOGRAPHY
FIGURE 20.9
The onscreen
image.
4. Compare the print (Figure 20.10) and the monitor image. Does the printhave a color bias and if so, which colors? Are any print colors over- or under-saturated? Are the print’s midtones and shadows too dark or too light?
FIGURE 20.10
The printed
image without
color manage-
ment.
24 0789731207_ch20.qxd 4/6/04 2:14 PM Page 300
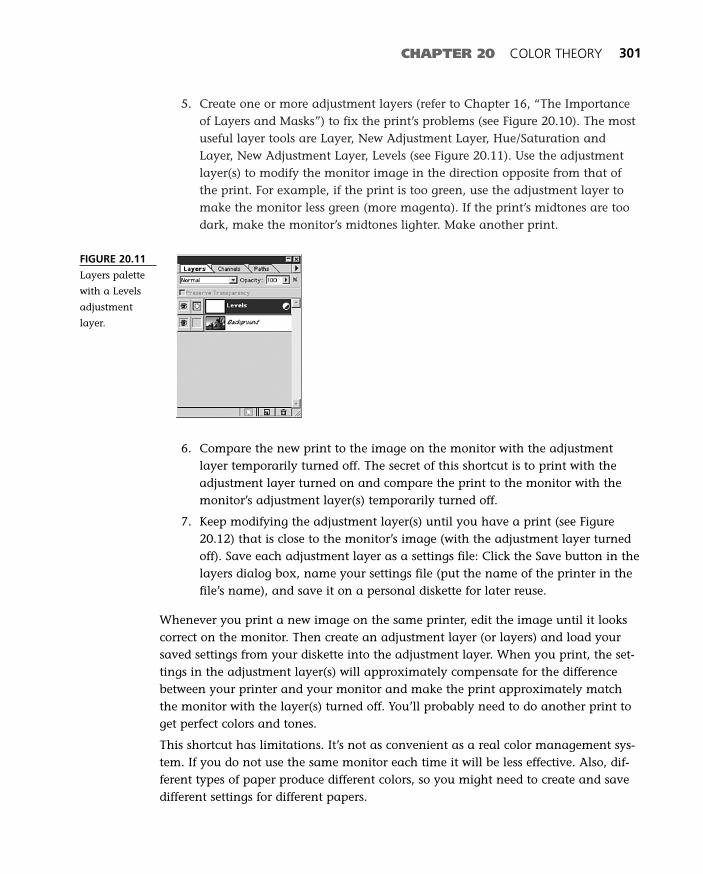
5. Create one or more adjustment layers (refer to Chapter 16, “The Importanceof Layers and Masks”) to fix the print’s problems (see Figure 20.10). The mostuseful layer tools are Layer, New Adjustment Layer, Hue/Saturation andLayer, New Adjustment Layer, Levels (see Figure 20.11). Use the adjustmentlayer(s) to modify the monitor image in the direction opposite from that ofthe print. For example, if the print is too green, use the adjustment layer tomake the monitor less green (more magenta). If the print’s midtones are toodark, make the monitor’s midtones lighter. Make another print.
CHAPTER 20 COLOR THEORY 301
FIGURE 20.11
Layers palette
with a Levels
adjustment
layer.
6. Compare the new print to the image on the monitor with the adjustmentlayer temporarily turned off. The secret of this shortcut is to print with theadjustment layer turned on and compare the print to the monitor with themonitor’s adjustment layer(s) temporarily turned off.
7. Keep modifying the adjustment layer(s) until you have a print (see Figure20.12) that is close to the monitor’s image (with the adjustment layer turnedoff). Save each adjustment layer as a settings file: Click the Save button in thelayers dialog box, name your settings file (put the name of the printer in thefile’s name), and save it on a personal diskette for later reuse.
Whenever you print a new image on the same printer, edit the image until it lookscorrect on the monitor. Then create an adjustment layer (or layers) and load yoursaved settings from your diskette into the adjustment layer. When you print, the set-tings in the adjustment layer(s) will approximately compensate for the differencebetween your printer and your monitor and make the print approximately matchthe monitor with the layer(s) turned off. You’ll probably need to do another print toget perfect colors and tones.
This shortcut has limitations. It’s not as convenient as a real color management sys-tem. If you do not use the same monitor each time it will be less effective. Also, dif-ferent types of paper produce different colors, so you might need to create and savedifferent settings for different papers.
24 0789731207_ch20.qxd 4/6/04 2:14 PM Page 301

Printing in RGB and CMYKRGB and CMYK are the two modes commonly used to edit color images. Some print-ers, especially inexpensive inkjet printers, work better if your image is edited andprinted in RGB mode. These printers’ built-in automatic RGB-to-CMYK conversionsoftware produces better looking prints than you will get if you edit in CMYK mode.Other printers produce better quality output from CMYK mode images. If yourprinter makes better prints in one particular mode, always use that mode.
When you edit an image in RGB mode without color management, you can useGamut Warning to locate and adjust colors that the printer cannot reproduce.Unfortunately Photoshop Elements does not have this feature. If you use Photoshop,follow these steps:
1. Open an image in Photoshop. Select an image with a rich range of colors (see Figure 20.13).
2. Before you can check your image for gamut problems, ensure that you havethe correct printer profile installed. To see whether the profile for your printeris installed, choose Edit, Color Settings, Working Spaces, CMYK in Photoshop.Without the correct profile, Gamut Warning is not accurate.
3. Edit the image as you normally would, and then prior to printing chooseView, Gamut Warning. When the Gamut Warning is turned on, any colorsthat your printer cannot properly reproduce will be concealed behind a maskof flat color (see Figure 20.14). The underlying colors are not altered—theyare simply hidden from view. The hidden colors are those that cannot beaccurately reproduced by CMYK printing devices such as your inkjet printer(your printer actually prints in CMYK, not RGB).
302 ABSOLUTE BEGINNER’S GUIDE TO DIGITAL PHOTOGRAPHY
FIGURE 20.12
The resulting
adjusted image.
24 0789731207_ch20.qxd 4/6/04 2:14 PM Page 302
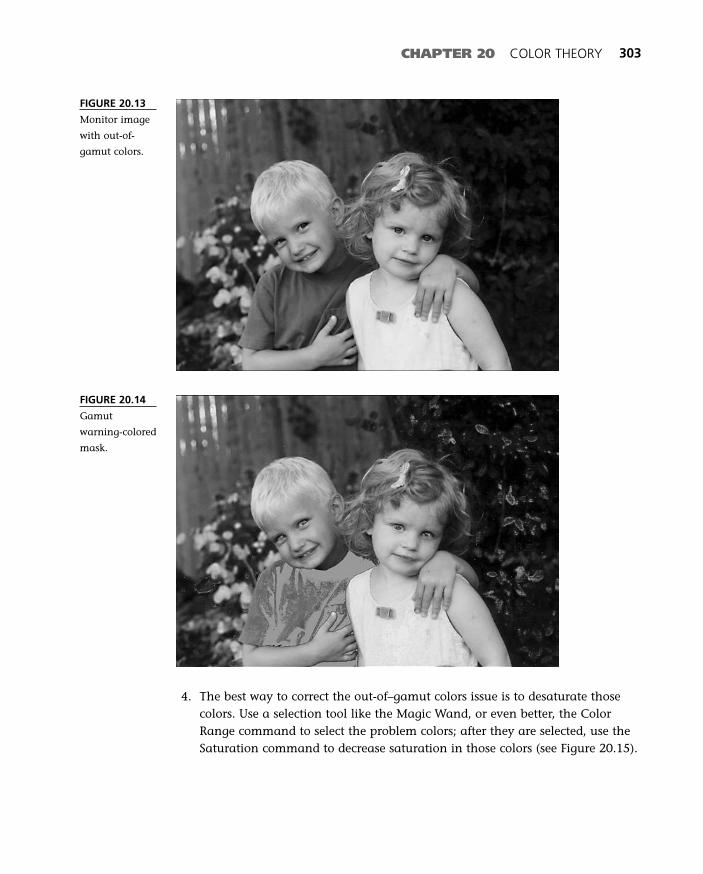
CHAPTER 20 COLOR THEORY 303
FIGURE 20.13
Monitor image
with out-of-
gamut colors.
FIGURE 20.14
Gamut
warning-colored
mask.
4. The best way to correct the out-of–gamut colors issue is to desaturate thosecolors. Use a selection tool like the Magic Wand, or even better, the ColorRange command to select the problem colors; after they are selected, use theSaturation command to decrease saturation in those colors (see Figure 20.15).
24 0789731207_ch20.qxd 4/6/04 2:14 PM Page 303
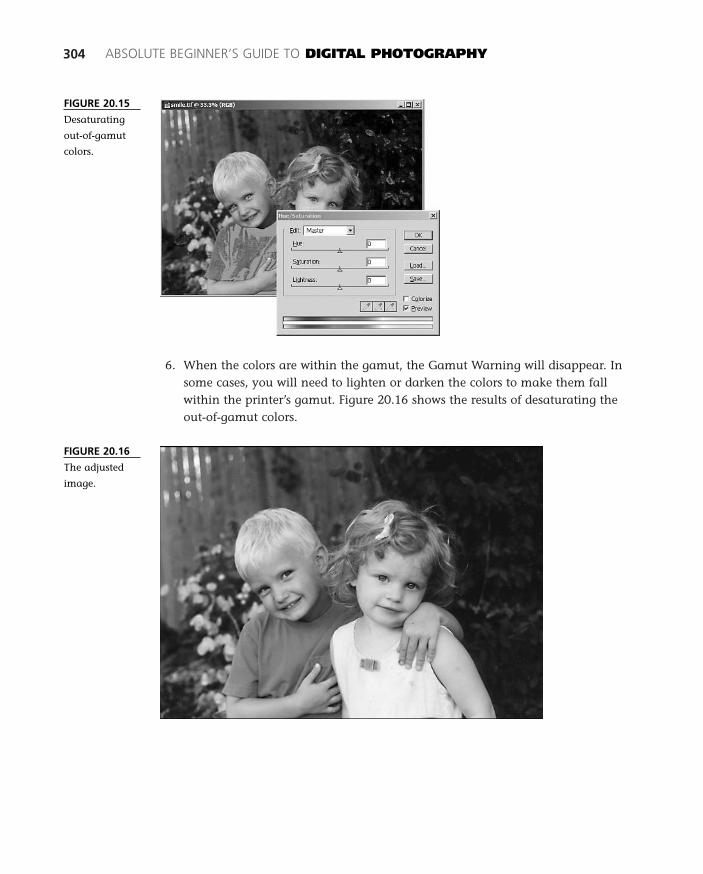
6. When the colors are within the gamut, the Gamut Warning will disappear. Insome cases, you will need to lighten or darken the colors to make them fallwithin the printer’s gamut. Figure 20.16 shows the results of desaturating theout-of-gamut colors.
304 ABSOLUTE BEGINNER’S GUIDE TO DIGITAL PHOTOGRAPHY
FIGURE 20.15
Desaturating
out-of-gamut
colors.
FIGURE 20.16
The adjusted
image.
24 0789731207_ch20.qxd 4/6/04 2:14 PM Page 304
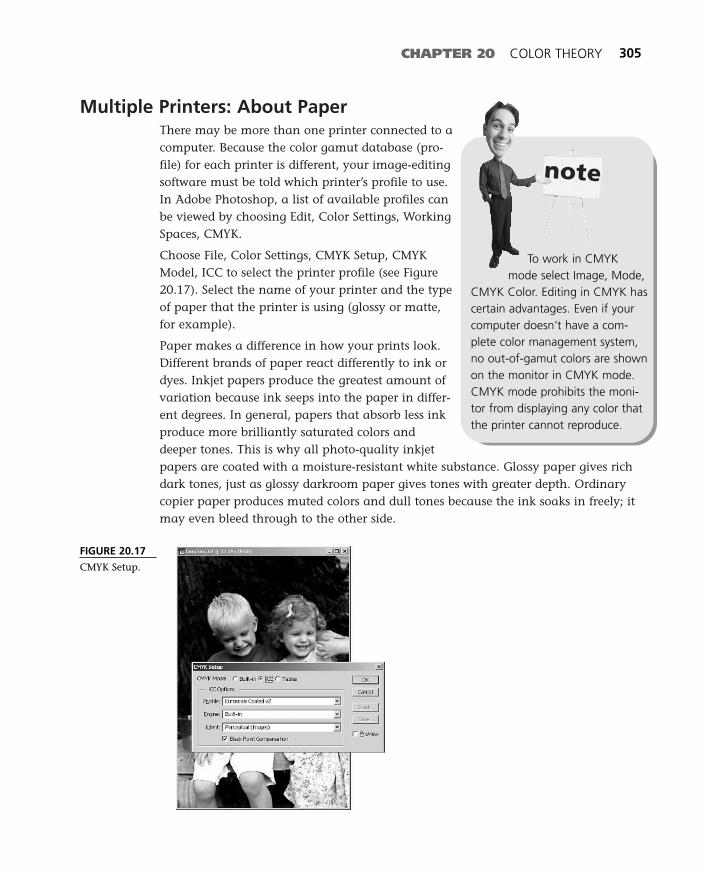
Multiple Printers: About PaperThere may be more than one printer connected to acomputer. Because the color gamut database (pro-file) for each printer is different, your image-editingsoftware must be told which printer’s profile to use.In Adobe Photoshop, a list of available profiles canbe viewed by choosing Edit, Color Settings, WorkingSpaces, CMYK.
Choose File, Color Settings, CMYK Setup, CMYKModel, ICC to select the printer profile (see Figure20.17). Select the name of your printer and the typeof paper that the printer is using (glossy or matte,for example).
Paper makes a difference in how your prints look.Different brands of paper react differently to ink ordyes. Inkjet papers produce the greatest amount ofvariation because ink seeps into the paper in differ-ent degrees. In general, papers that absorb less inkproduce more brilliantly saturated colors anddeeper tones. This is why all photo-quality inkjetpapers are coated with a moisture-resistant white substance. Glossy paper gives richdark tones, just as glossy darkroom paper gives tones with greater depth. Ordinarycopier paper produces muted colors and dull tones because the ink soaks in freely; itmay even bleed through to the other side.
CHAPTER 20 COLOR THEORY 305
To work in CMYKmode select Image, Mode,
CMYK Color. Editing in CMYK hascertain advantages. Even if yourcomputer doesn’t have a com-plete color management system,no out-of-gamut colors are shownon the monitor in CMYK mode.CMYK mode prohibits the moni-tor from displaying any color thatthe printer cannot reproduce.
FIGURE 20.17
CMYK Setup.
24 0789731207_ch20.qxd 4/6/04 2:14 PM Page 305

Choosing the wrong paper can reduce the effectiveness of color management sys-tems. At this time, most printer manufacturers supply color management data (pro-files) only for the papers they sell. If you print on another brand of paper the colormanagement software may not have the data profile it needs to match the monitorand the printer.
306 ABSOLUTE BEGINNER’S GUIDE TO DIGITAL PHOTOGRAPHY
The Absolute Minimum
Digital cameras and computer monitors use the additive color process. Color filmand inkjet printers use the subtractive color process, which relies on variations ofcyan, magenta, and yellow inks. Follow these steps when working with coloronscreen and in print:
■ Color negative film and slide film are sensitive to red, green, and blue light,but form their complement (cyan, magenta, yellow) during development.
■ You can save an adjustment layer as a settings file that can be loaded intoother images when you are ready to print. This is a poor man’s color calibra-tion method.
■ Select View, Gamut Warning in Photoshop to see which colors in the imagewon’t print on your printer. You must have the correct printer profile installedto use this command successfully.
■ You can adjust gamut issues by desaturating areas that are out of the gamut.Choose Select, Color Range and then select the out-of-gamut colors.
24 0789731207_ch20.qxd 4/6/04 2:14 PM Page 306
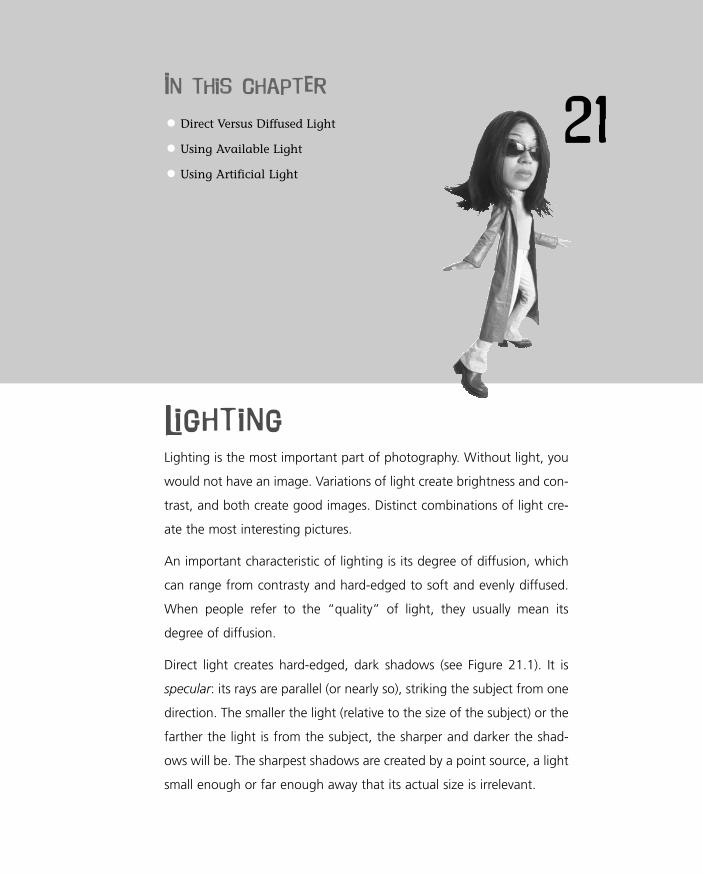
21In this chapter
• Direct Versus Diffused Light
• Using Available Light
• Using Artificial Light
Lighting
Lighting is the most important part of photography. Without light, you
would not have an image. Variations of light create brightness and con-
trast, and both create good images. Distinct combinations of light cre-
ate the most interesting pictures.
An important characteristic of lighting is its degree of diffusion, which
can range from contrasty and hard-edged to soft and evenly diffused.
When people refer to the “quality” of light, they usually mean its
degree of diffusion.
Direct light creates hard-edged, dark shadows (see Figure 21.1). It is
specular: its rays are parallel (or nearly so), striking the subject from one
direction. The smaller the light (relative to the size of the subject) or the
farther the light is from the subject, the sharper and darker the shad-
ows will be. The sharpest shadows are created by a point source, a light
small enough or far enough away that its actual size is irrelevant.
25 0789731207_ch21.qxd 4/6/04 2:21 PM Page 307
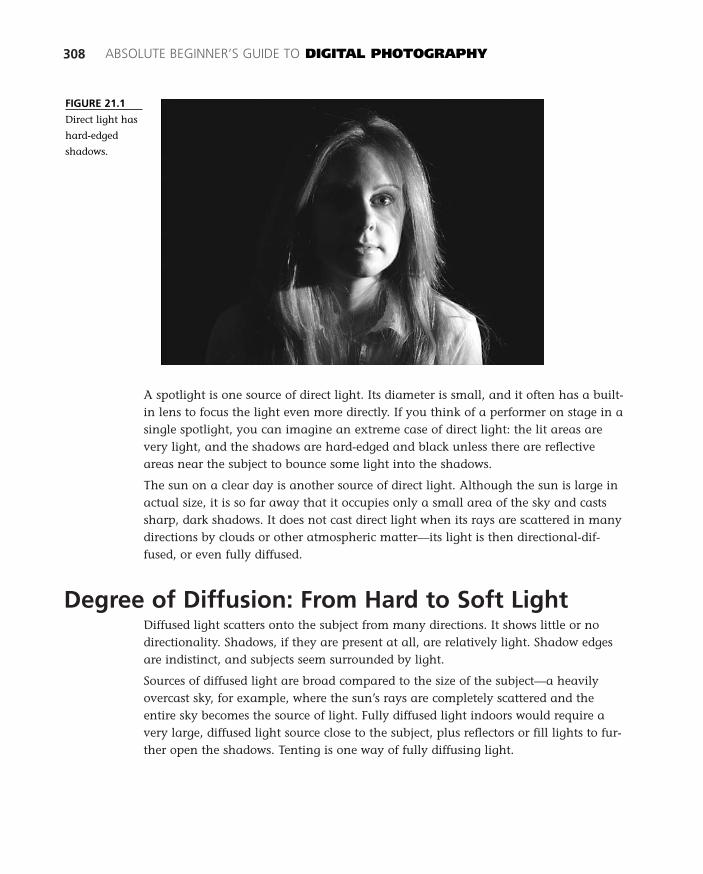
A spotlight is one source of direct light. Its diameter is small, and it often has a built-in lens to focus the light even more directly. If you think of a performer on stage in asingle spotlight, you can imagine an extreme case of direct light: the lit areas arevery light, and the shadows are hard-edged and black unless there are reflectiveareas near the subject to bounce some light into the shadows.
The sun on a clear day is another source of direct light. Although the sun is large inactual size, it is so far away that it occupies only a small area of the sky and castssharp, dark shadows. It does not cast direct light when its rays are scattered in manydirections by clouds or other atmospheric matter—its light is then directional-dif-fused, or even fully diffused.
Degree of Diffusion: From Hard to Soft LightDiffused light scatters onto the subject from many directions. It shows little or nodirectionality. Shadows, if they are present at all, are relatively light. Shadow edgesare indistinct, and subjects seem surrounded by light.
Sources of diffused light are broad compared to the size of the subject—a heavilyovercast sky, for example, where the sun’s rays are completely scattered and theentire sky becomes the source of light. Fully diffused light indoors would require avery large, diffused light source close to the subject, plus reflectors or fill lights to fur-ther open the shadows. Tenting is one way of fully diffusing light.
308 ABSOLUTE BEGINNER’S GUIDE TO DIGITAL PHOTOGRAPHY
FIGURE 21.1
Direct light has
hard-edged
shadows.
25 0789731207_ch21.qxd 4/6/04 2:21 PM Page 308
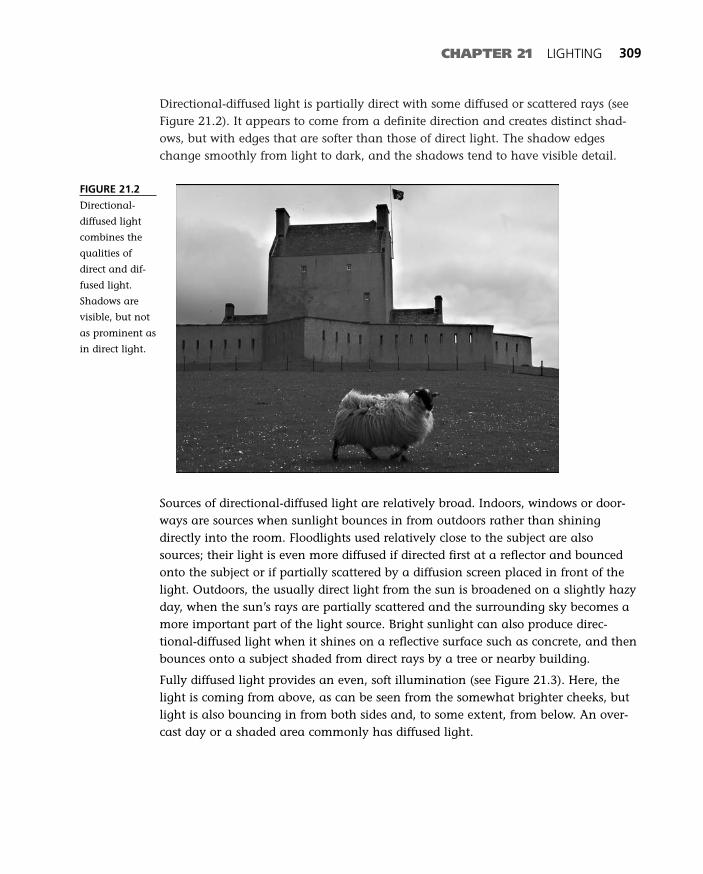
Directional-diffused light is partially direct with some diffused or scattered rays (seeFigure 21.2). It appears to come from a definite direction and creates distinct shad-ows, but with edges that are softer than those of direct light. The shadow edgeschange smoothly from light to dark, and the shadows tend to have visible detail.
CHAPTER 21 LIGHTING 309
FIGURE 21.2
Directional-
diffused light
combines the
qualities of
direct and dif-
fused light.
Shadows are
visible, but not
as prominent as
in direct light.
Sources of directional-diffused light are relatively broad. Indoors, windows or door-ways are sources when sunlight bounces in from outdoors rather than shiningdirectly into the room. Floodlights used relatively close to the subject are alsosources; their light is even more diffused if directed first at a reflector and bouncedonto the subject or if partially scattered by a diffusion screen placed in front of thelight. Outdoors, the usually direct light from the sun is broadened on a slightly hazyday, when the sun’s rays are partially scattered and the surrounding sky becomes amore important part of the light source. Bright sunlight can also produce direc-tional-diffused light when it shines on a reflective surface such as concrete, and thenbounces onto a subject shaded from direct rays by a tree or nearby building.
Fully diffused light provides an even, soft illumination (see Figure 21.3). Here, thelight is coming from above, as can be seen from the somewhat brighter cheeks, butlight is also bouncing in from both sides and, to some extent, from below. An over-cast day or a shaded area commonly has diffused light.
25 0789731207_ch21.qxd 4/6/04 2:21 PM Page 309
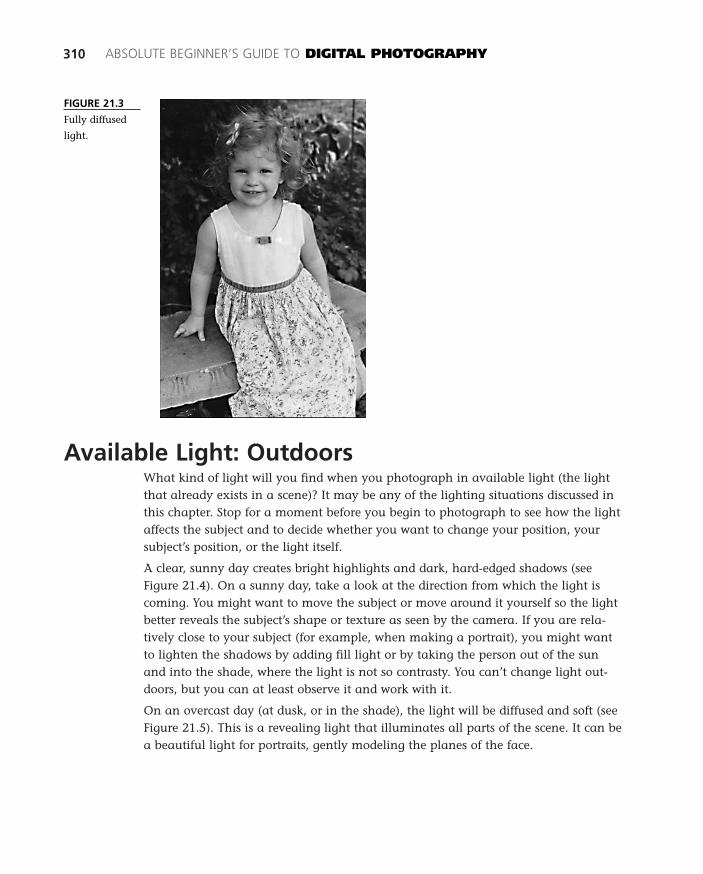
Available Light: OutdoorsWhat kind of light will you find when you photograph in available light (the lightthat already exists in a scene)? It may be any of the lighting situations discussed inthis chapter. Stop for a moment before you begin to photograph to see how the lightaffects the subject and to decide whether you want to change your position, yoursubject’s position, or the light itself.
A clear, sunny day creates bright highlights and dark, hard-edged shadows (seeFigure 21.4). On a sunny day, take a look at the direction from which the light iscoming. You might want to move the subject or move around it yourself so the lightbetter reveals the subject’s shape or texture as seen by the camera. If you are rela-tively close to your subject (for example, when making a portrait), you might wantto lighten the shadows by adding fill light or by taking the person out of the sunand into the shade, where the light is not so contrasty. You can’t change light out-doors, but you can at least observe it and work with it.
On an overcast day (at dusk, or in the shade), the light will be diffused and soft (seeFigure 21.5). This is a revealing light that illuminates all parts of the scene. It can bea beautiful light for portraits, gently modeling the planes of the face.
310 ABSOLUTE BEGINNER’S GUIDE TO DIGITAL PHOTOGRAPHY
FIGURE 21.3
Fully diffused
light.
25 0789731207_ch21.qxd 4/6/04 2:21 PM Page 310
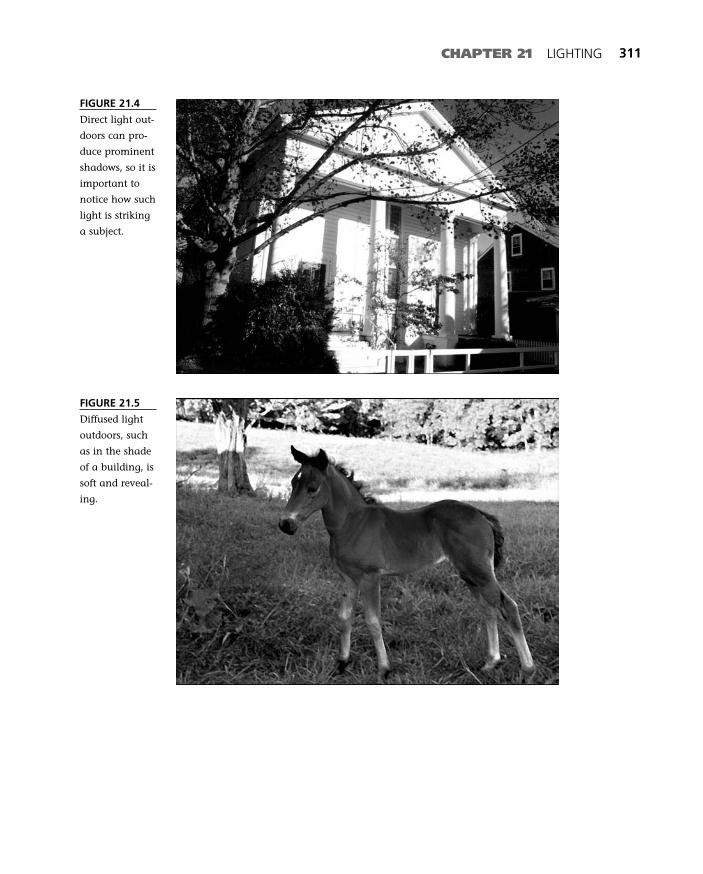
CHAPTER 21 LIGHTING 311
FIGURE 21.4
Direct light out-
doors can pro-
duce prominent
shadows, so it is
important to
notice how such
light is striking
a subject.
FIGURE 21.5
Diffused light
outdoors, such
as in the shade
of a building, is
soft and reveal-
ing.
25 0789731207_ch21.qxd 4/6/04 2:21 PM Page 311
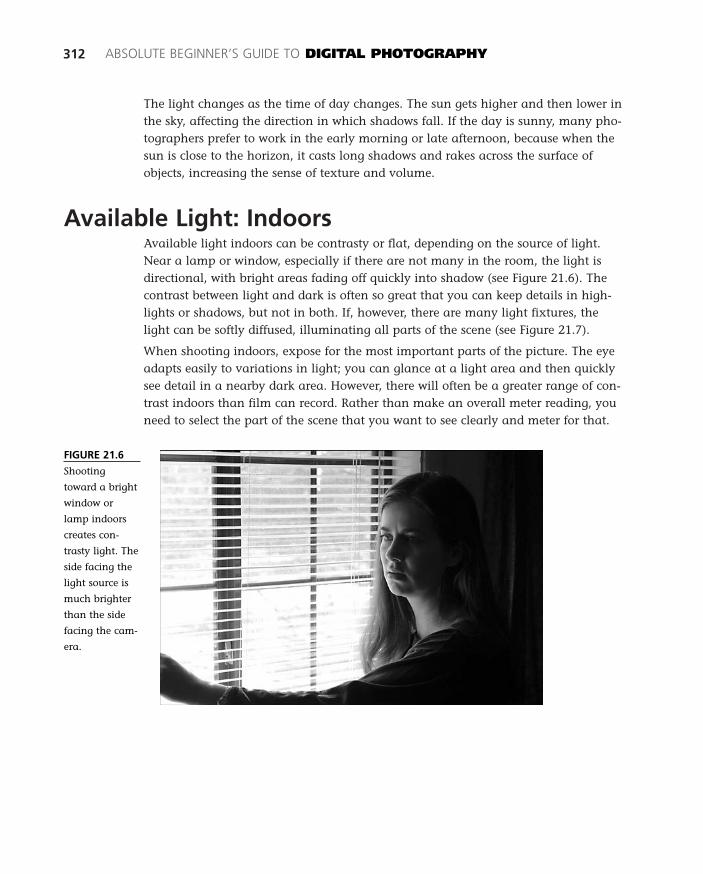
The light changes as the time of day changes. The sun gets higher and then lower inthe sky, affecting the direction in which shadows fall. If the day is sunny, many pho-tographers prefer to work in the early morning or late afternoon, because when thesun is close to the horizon, it casts long shadows and rakes across the surface ofobjects, increasing the sense of texture and volume.
Available Light: IndoorsAvailable light indoors can be contrasty or flat, depending on the source of light.Near a lamp or window, especially if there are not many in the room, the light isdirectional, with bright areas fading off quickly into shadow (see Figure 21.6). Thecontrast between light and dark is often so great that you can keep details in high-lights or shadows, but not in both. If, however, there are many light fixtures, thelight can be softly diffused, illuminating all parts of the scene (see Figure 21.7).
When shooting indoors, expose for the most important parts of the picture. The eyeadapts easily to variations in light; you can glance at a light area and then quicklysee detail in a nearby dark area. However, there will often be a greater range of con-trast indoors than film can record. Rather than make an overall meter reading, youneed to select the part of the scene that you want to see clearly and meter for that.
312 ABSOLUTE BEGINNER’S GUIDE TO DIGITAL PHOTOGRAPHY
FIGURE 21.6
Shooting
toward a bright
window or
lamp indoors
creates con-
trasty light. The
side facing the
light source is
much brighter
than the side
facing the cam-
era.
25 0789731207_ch21.qxd 4/6/04 2:21 PM Page 312
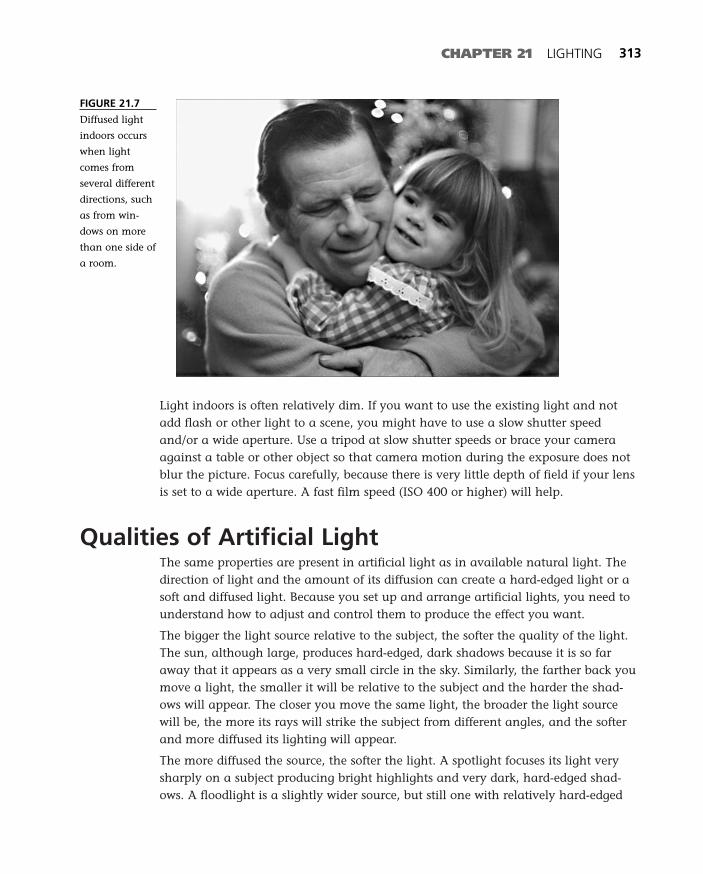
Light indoors is often relatively dim. If you want to use the existing light and notadd flash or other light to a scene, you might have to use a slow shutter speedand/or a wide aperture. Use a tripod at slow shutter speeds or brace your cameraagainst a table or other object so that camera motion during the exposure does notblur the picture. Focus carefully, because there is very little depth of field if your lensis set to a wide aperture. A fast film speed (ISO 400 or higher) will help.
Qualities of Artificial LightThe same properties are present in artificial light as in available natural light. Thedirection of light and the amount of its diffusion can create a hard-edged light or asoft and diffused light. Because you set up and arrange artificial lights, you need tounderstand how to adjust and control them to produce the effect you want.
The bigger the light source relative to the subject, the softer the quality of the light.The sun, although large, produces hard-edged, dark shadows because it is so faraway that it appears as a very small circle in the sky. Similarly, the farther back youmove a light, the smaller it will be relative to the subject and the harder the shad-ows will appear. The closer you move the same light, the broader the light sourcewill be, the more its rays will strike the subject from different angles, and the softerand more diffused its lighting will appear.
The more diffused the source, the softer the light. A spotlight focuses its light verysharply on a subject producing bright highlights and very dark, hard-edged shad-ows. A floodlight is a slightly wider source, but still one with relatively hard-edged
CHAPTER 21 LIGHTING 313
FIGURE 21.7
Diffused light
indoors occurs
when light
comes from
several different
directions, such
as from win-
dows on more
than one side of
a room.
25 0789731207_ch21.qxd 4/6/04 2:21 PM Page 313
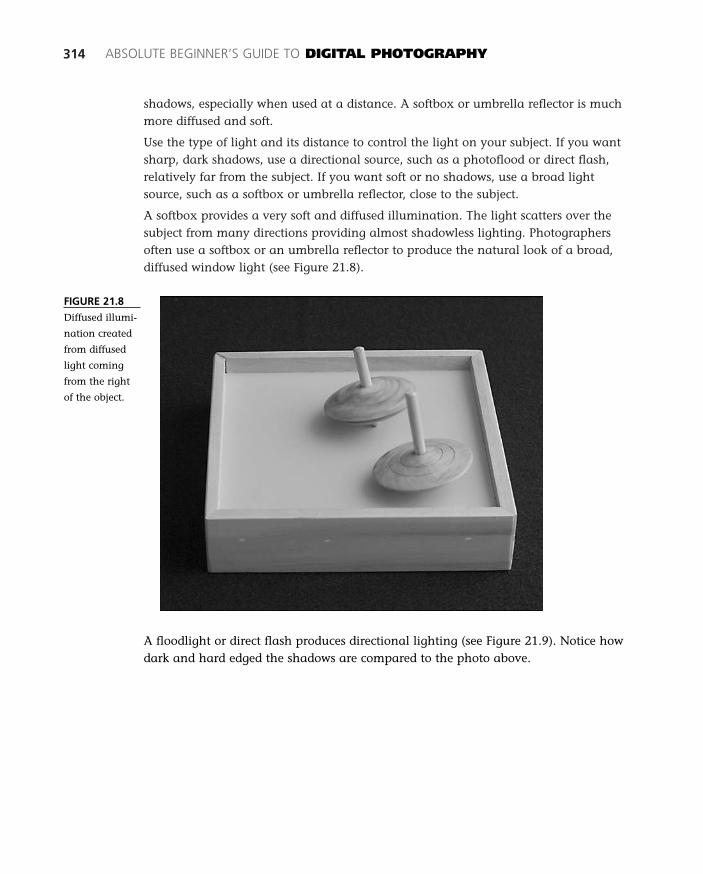
shadows, especially when used at a distance. A softbox or umbrella reflector is muchmore diffused and soft.
Use the type of light and its distance to control the light on your subject. If you wantsharp, dark shadows, use a directional source, such as a photoflood or direct flash,relatively far from the subject. If you want soft or no shadows, use a broad lightsource, such as a softbox or umbrella reflector, close to the subject.
A softbox provides a very soft and diffused illumination. The light scatters over thesubject from many directions providing almost shadowless lighting. Photographersoften use a softbox or an umbrella reflector to produce the natural look of a broad,diffused window light (see Figure 21.8).
314 ABSOLUTE BEGINNER’S GUIDE TO DIGITAL PHOTOGRAPHY
FIGURE 21.8
Diffused illumi-
nation created
from diffused
light coming
from the right
of the object.
A floodlight or direct flash produces directional lighting (see Figure 21.9). Notice howdark and hard edged the shadows are compared to the photo above.
25 0789731207_ch21.qxd 4/6/04 2:21 PM Page 314
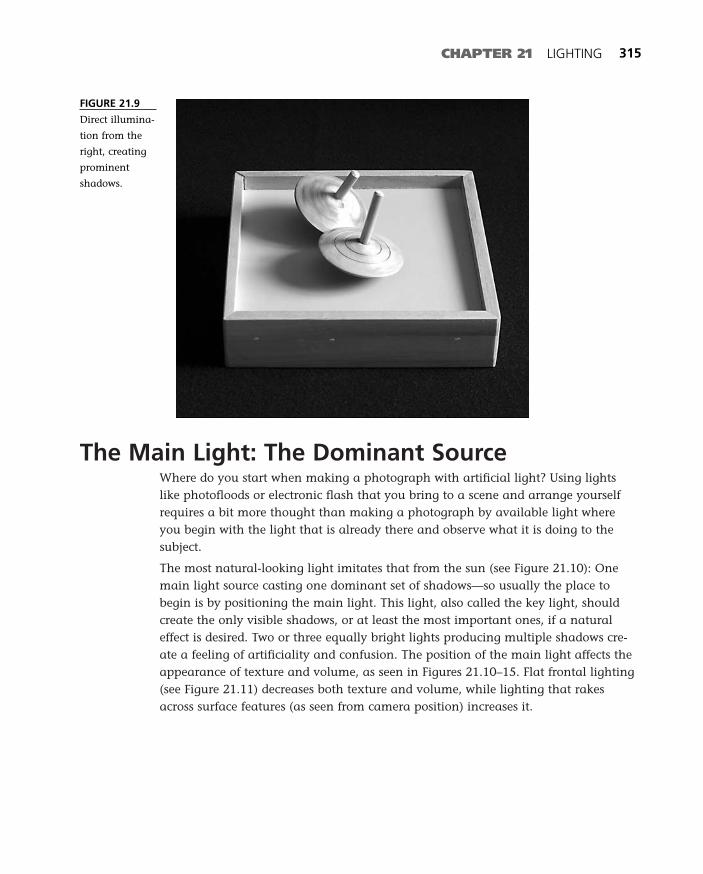
The Main Light: The Dominant SourceWhere do you start when making a photograph with artificial light? Using lightslike photofloods or electronic flash that you bring to a scene and arrange yourselfrequires a bit more thought than making a photograph by available light whereyou begin with the light that is already there and observe what it is doing to thesubject.
The most natural-looking light imitates that from the sun (see Figure 21.10): Onemain light source casting one dominant set of shadows—so usually the place tobegin is by positioning the main light. This light, also called the key light, shouldcreate the only visible shadows, or at least the most important ones, if a naturaleffect is desired. Two or three equally bright lights producing multiple shadows cre-ate a feeling of artificiality and confusion. The position of the main light affects theappearance of texture and volume, as seen in Figures 21.10–15. Flat frontal lighting(see Figure 21.11) decreases both texture and volume, while lighting that rakesacross surface features (as seen from camera position) increases it.
CHAPTER 21 LIGHTING 315
FIGURE 21.9
Direct illumina-
tion from the
right, creating
prominent
shadows.
25 0789731207_ch21.qxd 4/6/04 2:21 PM Page 315
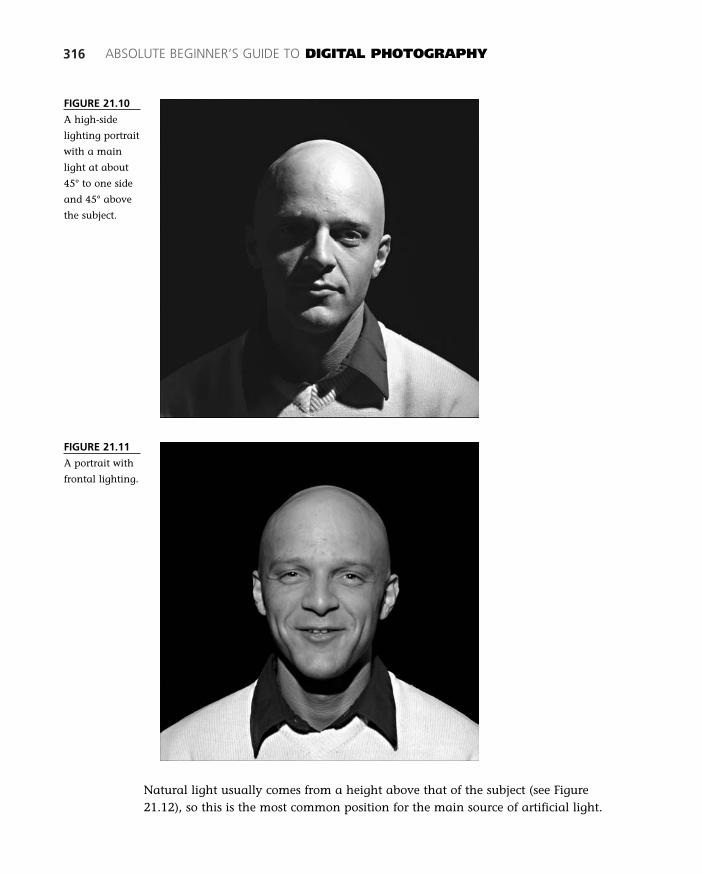
316 ABSOLUTE BEGINNER’S GUIDE TO DIGITAL PHOTOGRAPHY
FIGURE 21.10
A high-side
lighting portrait
with a main
light at about
45° to one side
and 45° above
the subject.
FIGURE 21.11
A portrait with
frontal lighting.
Natural light usually comes from a height above that of the subject (see Figure21.12), so this is the most common position for the main source of artificial light.
25 0789731207_ch21.qxd 4/6/04 2:21 PM Page 316
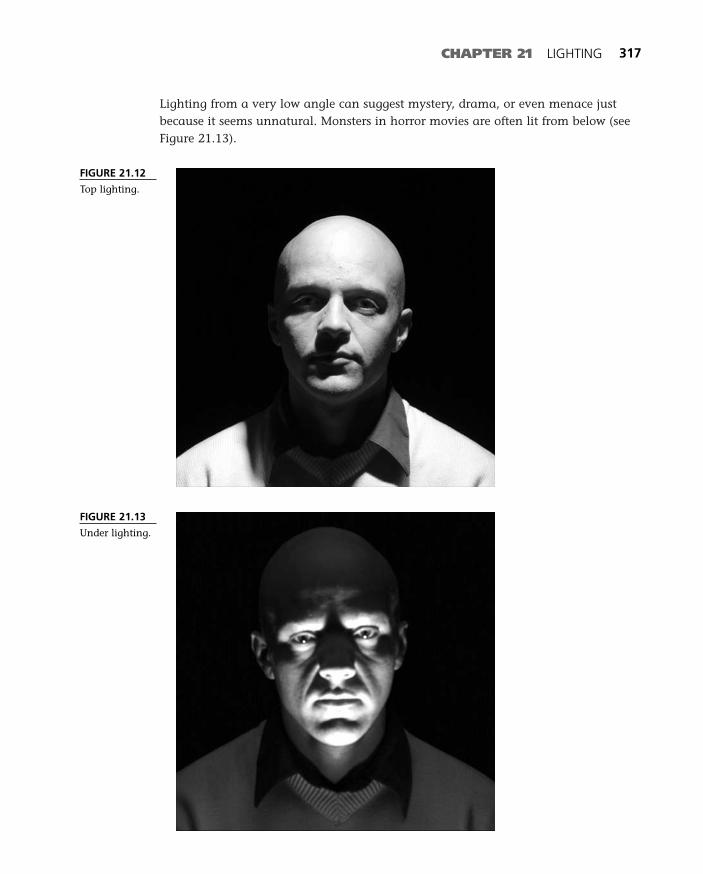
Lighting from a very low angle can suggest mystery, drama, or even menace justbecause it seems unnatural. Monsters in horror movies are often lit from below (seeFigure 21.13).
CHAPTER 21 LIGHTING 317
FIGURE 21.12
Top lighting.
FIGURE 21.13
Under lighting.
25 0789731207_ch21.qxd 4/6/04 2:21 PM Page 317
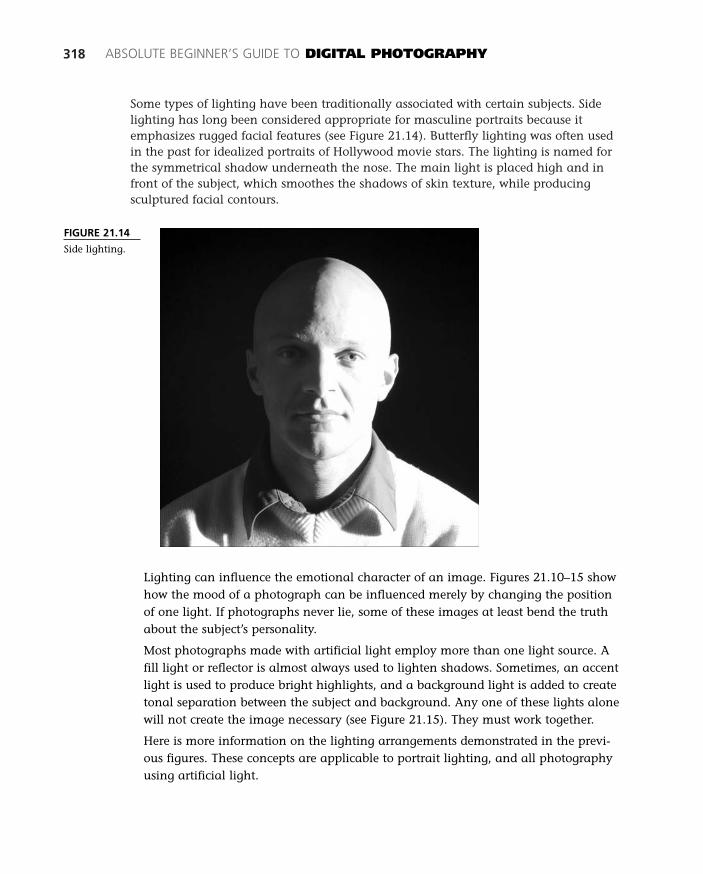
Some types of lighting have been traditionally associated with certain subjects. Sidelighting has long been considered appropriate for masculine portraits because itemphasizes rugged facial features (see Figure 21.14). Butterfly lighting was often usedin the past for idealized portraits of Hollywood movie stars. The lighting is named forthe symmetrical shadow underneath the nose. The main light is placed high and infront of the subject, which smoothes the shadows of skin texture, while producingsculptured facial contours.
318 ABSOLUTE BEGINNER’S GUIDE TO DIGITAL PHOTOGRAPHY
FIGURE 21.14
Side lighting.
Lighting can influence the emotional character of an image. Figures 21.10–15 showhow the mood of a photograph can be influenced merely by changing the positionof one light. If photographs never lie, some of these images at least bend the truthabout the subject’s personality.
Most photographs made with artificial light employ more than one light source. Afill light or reflector is almost always used to lighten shadows. Sometimes, an accentlight is used to produce bright highlights, and a background light is added to createtonal separation between the subject and background. Any one of these lights alonewill not create the image necessary (see Figure 21.15). They must work together.
Here is more information on the lighting arrangements demonstrated in the previ-ous figures. These concepts are applicable to portrait lighting, and all photographyusing artificial light.
25 0789731207_ch21.qxd 4/6/04 2:21 PM Page 318
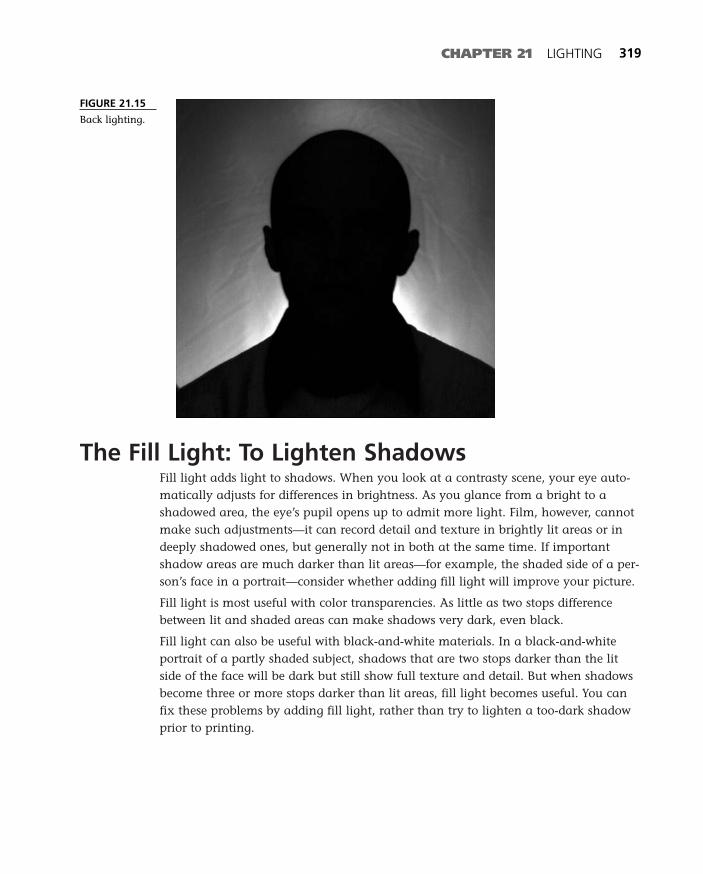
The Fill Light: To Lighten ShadowsFill light adds light to shadows. When you look at a contrasty scene, your eye auto-matically adjusts for differences in brightness. As you glance from a bright to ashadowed area, the eye’s pupil opens up to admit more light. Film, however, cannotmake such adjustments—it can record detail and texture in brightly lit areas or indeeply shadowed ones, but generally not in both at the same time. If importantshadow areas are much darker than lit areas—for example, the shaded side of a per-son’s face in a portrait—consider whether adding fill light will improve your picture.
Fill light is most useful with color transparencies. As little as two stops differencebetween lit and shaded areas can make shadows very dark, even black.
Fill light can also be useful with black-and-white materials. In a black-and-whiteportrait of a partly shaded subject, shadows that are two stops darker than the litside of the face will be dark but still show full texture and detail. But when shadowsbecome three or more stops darker than lit areas, fill light becomes useful. You canfix these problems by adding fill light, rather than try to lighten a too-dark shadowprior to printing.
CHAPTER 21 LIGHTING 319
FIGURE 21.15
Back lighting.
25 0789731207_ch21.qxd 4/6/04 2:21 PM Page 319
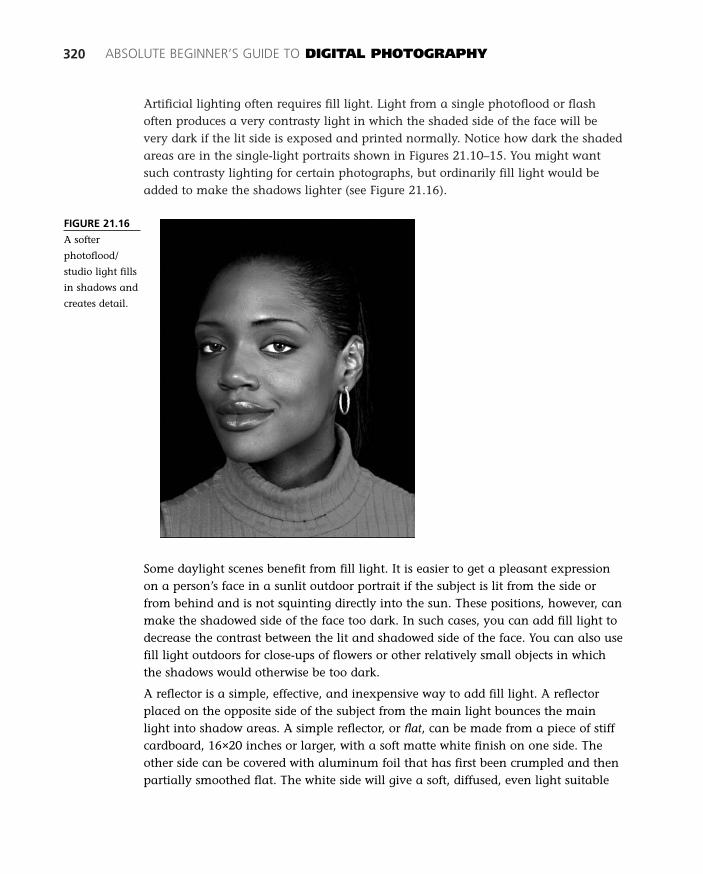
Artificial lighting often requires fill light. Light from a single photoflood or flashoften produces a very contrasty light in which the shaded side of the face will bevery dark if the lit side is exposed and printed normally. Notice how dark the shadedareas are in the single-light portraits shown in Figures 21.10–15. You might wantsuch contrasty lighting for certain photographs, but ordinarily fill light would beadded to make the shadows lighter (see Figure 21.16).
320 ABSOLUTE BEGINNER’S GUIDE TO DIGITAL PHOTOGRAPHY
FIGURE 21.16
A softer
photoflood/
studio light fills
in shadows and
creates detail.
Some daylight scenes benefit from fill light. It is easier to get a pleasant expressionon a person’s face in a sunlit outdoor portrait if the subject is lit from the side orfrom behind and is not squinting directly into the sun. These positions, however, canmake the shadowed side of the face too dark. In such cases, you can add fill light todecrease the contrast between the lit and shadowed side of the face. You can also usefill light outdoors for close-ups of flowers or other relatively small objects in whichthe shadows would otherwise be too dark.
A reflector is a simple, effective, and inexpensive way to add fill light. A reflectorplaced on the opposite side of the subject from the main light bounces the mainlight into shadow areas. A simple reflector, or flat, can be made from a piece of stiffcardboard, 16×20 inches or larger, with a soft matte white finish on one side. Theother side can be covered with aluminum foil that has first been crumpled and thenpartially smoothed flat. The white side will give a soft, diffused, even light suitable
25 0789731207_ch21.qxd 4/6/04 2:21 PM Page 320

for lightening shadows in portraits, still lifes, and other subjects. The foil side reflectsa more brilliant, harder light.
A floodlight or flash can also be used for fill lighting. A light source used as a fill isgenerally placed close to the lens so that any secondary shadows will not be visible.The fill is usually not intended to eliminate the shadow altogether, so it is normallyof less intensity than the main light. It can have lower output than the main light, itcan be placed farther away from the subject, or have a translucent diffusing screenplaced in front of it.
A black “reflector” is useful at times. It is a sort of anti-fill that absorbs light andprevents it from reaching the subject. If you want to darken a shadow, a black clothor card placed on the opposite side of the subject from the main light will remove filllight by absorbing light from the main light.
The Absolute Minimum
■ Proper lighting is an acquired skill that can only be learned by trial anderror. Rent strobes and experiment, or just go to the hardware store and buytwo halogen lamps. Whatever you do, keep these tips in mind:
■ When two strobes are used to illuminate a subject, they need to be differentstrengths or different distances from the subject. Different intensities createshadows and depth, avoiding the washed-out, flat look common with on-camera flash.
■ Side lighting is preferable for photographing men or masculine-looking shots.Butterfly lighting is preferable for women’s portraits.
■ Experiment with unusual forms of lighting. Combine colored gels, a balanceof strobes with ambient light, and under-lighting or side-lighting to differenti-ate your images.
■ Always bring a large reflector with you on photo shoots. It can be somethingas simple as a car windshield blind or a large piece of crumpled aluminumfoil. Reflectors often are the best form of fill light, and fortunately are inex-pensive.
CHAPTER 21 LIGHTING 321
25 0789731207_ch21.qxd 4/6/04 2:21 PM Page 321

25 0789731207_ch21.qxd 4/6/04 2:21 PM Page 322
Using Your Digital
Pictures
VPART
The Portrait . . . . . . . . . . . . . . . . . . . . . . . . . . .336
Digital Photography and the Web . . . . . . . . . .346
26 0789731207_pt05.qxd 4/6/04 2:17 PM Page 323

26 0789731207_pt05.qxd 4/6/04 2:17 PM Page 324
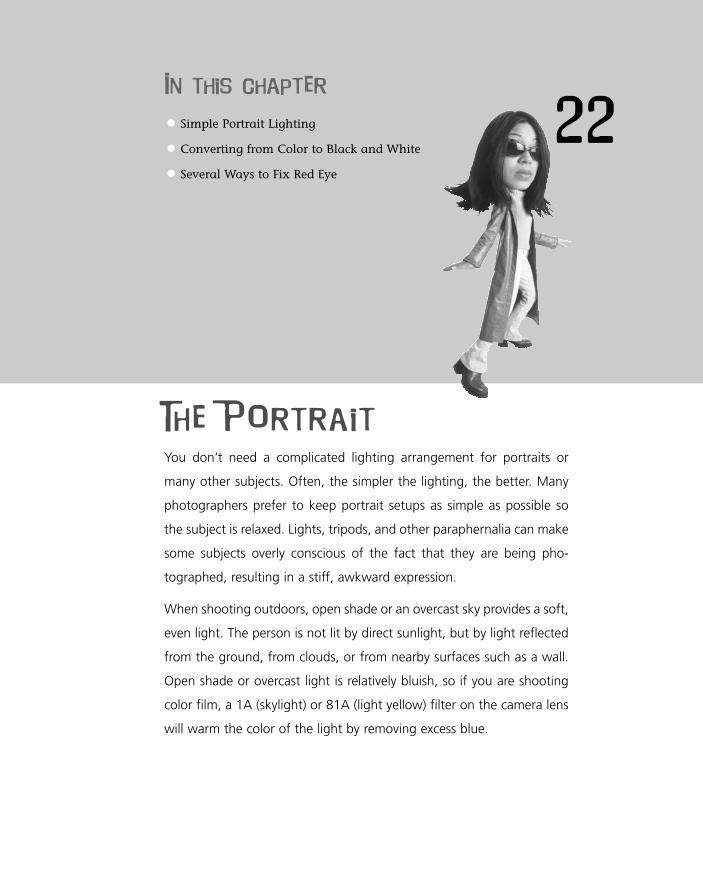
22In this chapter
• Simple Portrait Lighting
• Converting from Color to Black and White
• Several Ways to Fix Red Eye
The Portrait
You don’t need a complicated lighting arrangement for portraits or
many other subjects. Often, the simpler the lighting, the better. Many
photographers prefer to keep portrait setups as simple as possible so
the subject is relaxed. Lights, tripods, and other paraphernalia can make
some subjects overly conscious of the fact that they are being pho-
tographed, resulting in a stiff, awkward expression.
When shooting outdoors, open shade or an overcast sky provides a soft,
even light. The person is not lit by direct sunlight, but by light reflected
from the ground, from clouds, or from nearby surfaces such as a wall.
Open shade or overcast light is relatively bluish, so if you are shooting
color film, a 1A (skylight) or 81A (light yellow) filter on the camera lens
will warm the color of the light by removing excess blue.
27 0789731207_ch22.qxd 4/6/04 2:17 PM Page 325
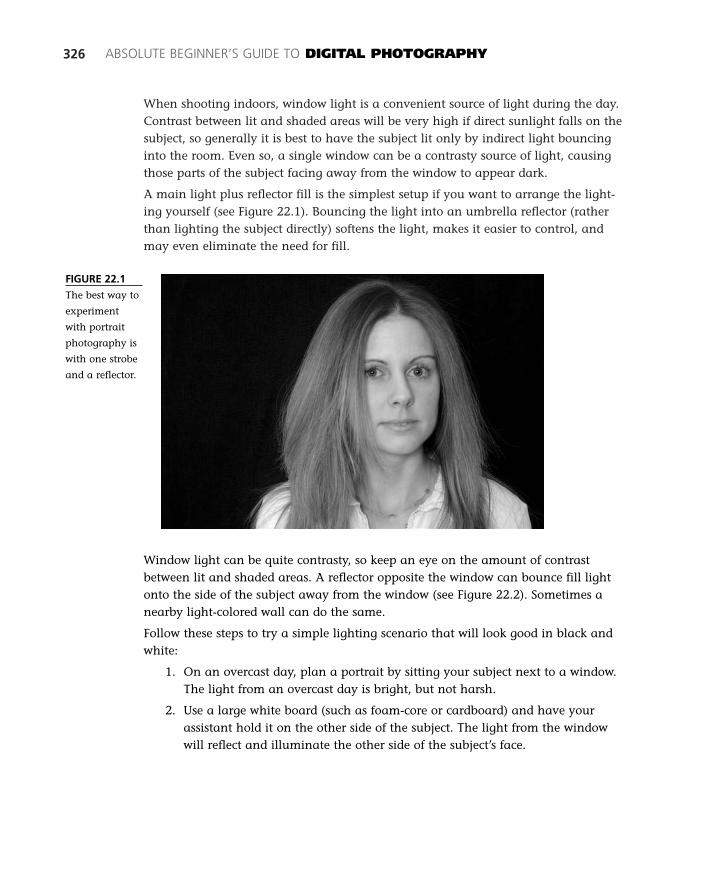
When shooting indoors, window light is a convenient source of light during the day.Contrast between lit and shaded areas will be very high if direct sunlight falls on thesubject, so generally it is best to have the subject lit only by indirect light bouncinginto the room. Even so, a single window can be a contrasty source of light, causingthose parts of the subject facing away from the window to appear dark.
A main light plus reflector fill is the simplest setup if you want to arrange the light-ing yourself (see Figure 22.1). Bouncing the light into an umbrella reflector (ratherthan lighting the subject directly) softens the light, makes it easier to control, andmay even eliminate the need for fill.
326 ABSOLUTE BEGINNER’S GUIDE TO DIGITAL PHOTOGRAPHY
FIGURE 22.1
The best way to
experiment
with portrait
photography is
with one strobe
and a reflector.
Window light can be quite contrasty, so keep an eye on the amount of contrastbetween lit and shaded areas. A reflector opposite the window can bounce fill lightonto the side of the subject away from the window (see Figure 22.2). Sometimes anearby light-colored wall can do the same.
Follow these steps to try a simple lighting scenario that will look good in black andwhite:
1. On an overcast day, plan a portrait by sitting your subject next to a window.The light from an overcast day is bright, but not harsh.
2. Use a large white board (such as foam-core or cardboard) and have yourassistant hold it on the other side of the subject. The light from the windowwill reflect and illuminate the other side of the subject’s face.
27 0789731207_ch22.qxd 4/6/04 2:17 PM Page 326

3. Take a series of pictures at different exposures. If your camera has a lightmeter, take a photo using its value, then take another picture that is overex-posed. Open up the aperture or decrease the shutter speed and then snap apic. Afterward, underexpose by closing down the aperture or giving the cam-era less light and then snapping another picture. This is called bracketing.
If your camera’s meter says 1/60 of a second at f8, take a picture at that exposureand then overexpose by taking another picture at 1/60 of a second at f5.6 (openingup the lens one “stop”). Afterward, expose at 1/125 of a second at f8 (increasingshutter speed one “stop”). Keep in mind that camera meters are not very good atmetering correctly, especially if the subject is bright (white) or dark (black). Take aseries of pictures at different exposures to compensate.
Overexposure and underexposure are tough to keep straight, so remember theacronym WUBO—White Underexposes and Black Overexposes (see Figure 22.3). Thereason is that all camera meters think you are metering a subject that is a neutral(called 18%) gray color. The camera meter cannot tell whether it is metering a sub-ject that is any other color, such as black or white.
If the subject is close to white or is very bright, check the camera meter reading andthen add a few stops by lengthening the shutter speed (from 1/250 to 1/60, forexample) or “opening up” the lens (from f11 to f5.6 equals two stops). If the subjectis very dark, check the camera meter and then shorten the shutter speed (from 1/125to 1/500, two stops), or make the aperture smaller (from f5.6 to f8, one stop).
CHAPTER 22 THE PORTRAIT 327
FIGURE 22.2
Window light
on a cloudy day
used with a
reflector can
often be the
best light for
portraits.
27 0789731207_ch22.qxd 4/6/04 2:17 PM Page 327
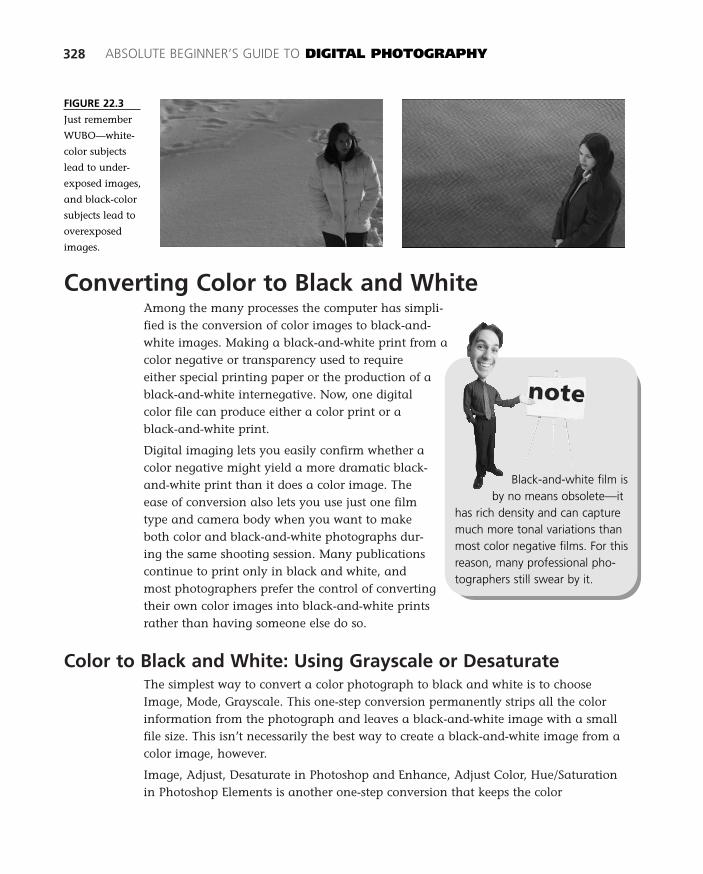
Converting Color to Black and WhiteAmong the many processes the computer has simpli-fied is the conversion of color images to black-and-white images. Making a black-and-white print from acolor negative or transparency used to requireeither special printing paper or the production of ablack-and-white internegative. Now, one digitalcolor file can produce either a color print or ablack-and-white print.
Digital imaging lets you easily confirm whether acolor negative might yield a more dramatic black-and-white print than it does a color image. Theease of conversion also lets you use just one filmtype and camera body when you want to makeboth color and black-and-white photographs dur-ing the same shooting session. Many publicationscontinue to print only in black and white, andmost photographers prefer the control of convertingtheir own color images into black-and-white printsrather than having someone else do so.
Color to Black and White: Using Grayscale or DesaturateThe simplest way to convert a color photograph to black and white is to chooseImage, Mode, Grayscale. This one-step conversion permanently strips all the colorinformation from the photograph and leaves a black-and-white image with a smallfile size. This isn’t necessarily the best way to create a black-and-white image from acolor image, however.
Image, Adjust, Desaturate in Photoshop and Enhance, Adjust Color, Hue/Saturationin Photoshop Elements is another one-step conversion that keeps the color
328 ABSOLUTE BEGINNER’S GUIDE TO DIGITAL PHOTOGRAPHY
FIGURE 22.3
Just remember
WUBO—white-
color subjects
lead to under-
exposed images,
and black-color
subjects lead to
overexposed
images.
Black-and-white film isby no means obsolete—it
has rich density and can capturemuch more tonal variations thanmost color negative films. For thisreason, many professional pho-tographers still swear by it.
27 0789731207_ch22.qxd 4/6/04 2:17 PM Page 328
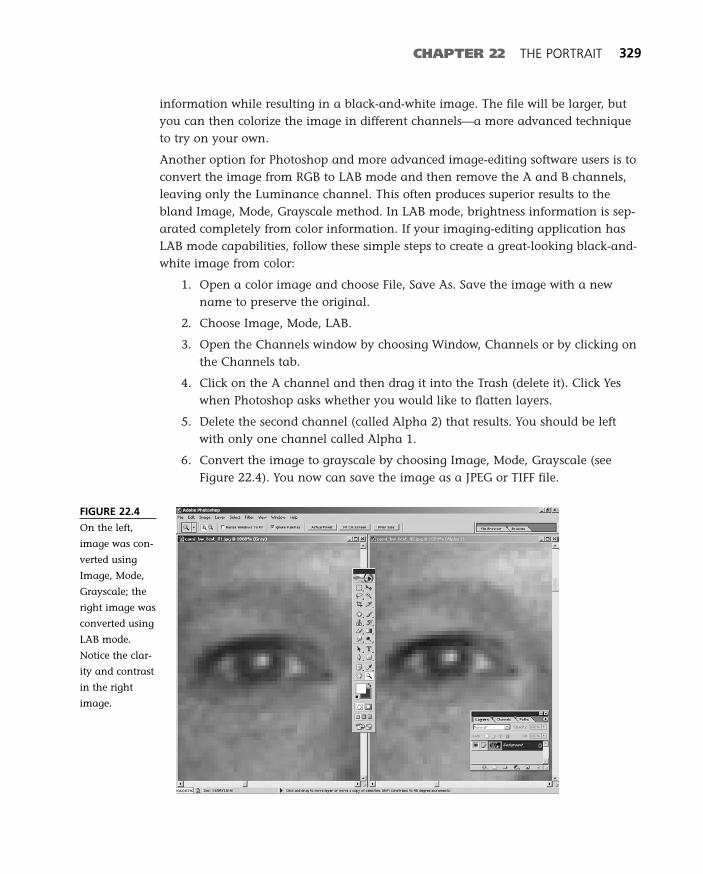
information while resulting in a black-and-white image. The file will be larger, butyou can then colorize the image in different channels—a more advanced techniqueto try on your own.
Another option for Photoshop and more advanced image-editing software users is toconvert the image from RGB to LAB mode and then remove the A and B channels,leaving only the Luminance channel. This often produces superior results to thebland Image, Mode, Grayscale method. In LAB mode, brightness information is sep-arated completely from color information. If your imaging-editing application hasLAB mode capabilities, follow these simple steps to create a great-looking black-and-white image from color:
1. Open a color image and choose File, Save As. Save the image with a newname to preserve the original.
2. Choose Image, Mode, LAB.
3. Open the Channels window by choosing Window, Channels or by clicking onthe Channels tab.
4. Click on the A channel and then drag it into the Trash (delete it). Click Yeswhen Photoshop asks whether you would like to flatten layers.
5. Delete the second channel (called Alpha 2) that results. You should be leftwith only one channel called Alpha 1.
6. Convert the image to grayscale by choosing Image, Mode, Grayscale (seeFigure 22.4). You now can save the image as a JPEG or TIFF file.
CHAPTER 22 THE PORTRAIT 329
FIGURE 22.4
On the left,
image was con-
verted using
Image, Mode,
Grayscale; the
right image was
converted using
LAB mode.
Notice the clar-
ity and contrast
in the right
image.
27 0789731207_ch22.qxd 4/6/04 2:17 PM Page 329
Color to Black and White: Using Channels Plus GrayscaleAnother way to convert images to black and white in Photoshop is to use channels.Like a color film image, a digital color image in RGB mode is composed of three pri-mary colors: red, green, and blue. Each of those colors can have different contrastlevels and may convert to black and white differently as a result.
To see how each of the three colors converts to blackand white, choose Window, Show Channels. By look-ing at the image in each channel—red, green, andblue—you may find a black-and-white version thatalready looks close to what you want in your finalprint.
Converting to black and white using this methodinvolves deleting two channels. Converting toGrayscale while in the remaining channel strips itscolor but retains its contrast information. This oftentranslates to fewer contrast adjustments followingthe conversion.
When you open the Channels Palette, three black-and-white thumbnails appearbelow the color composite channel. An eye icon shows which image is selected.
Click on each thumbnail to see its effect on the image. Usually the green channel isbest because it contains the most brightness information (closest to black and white).With your final choice highlighted in the palette, choose Image, Mode, Grayscale todiscard the other channels and convert the image to black and white, and thenchoose Save.
Fixing Red EyeAnother common fix for portraits is the dreaded red eye (see Figure 22.5). This isn’treally an issue in black-and-white photography, but is so common in snapshot pho-tography that everyone needs to know how to resolve this issue—beginners and pro-fessionals! Photoshop and Photoshop Elements provide a number of ways to fix redeye. Today’s automated red-eye reduction features in cameras are usually annoyingand don’t work that well—the manual method is usually best.
This section shows you a few ways to reduce or eliminate red eye. There are proba-bly 10 or 12 different ways to fix red eye, so don’t despair. If you experiment withthe steps in this section, you might find an even better way.
330 ABSOLUTE BEGINNER’S GUIDE TO DIGITAL PHOTOGRAPHY
Photoshop Elementsdoes not include channels,
so this technique is not possible.
27 0789731207_ch22.qxd 4/6/04 2:17 PM Page 330
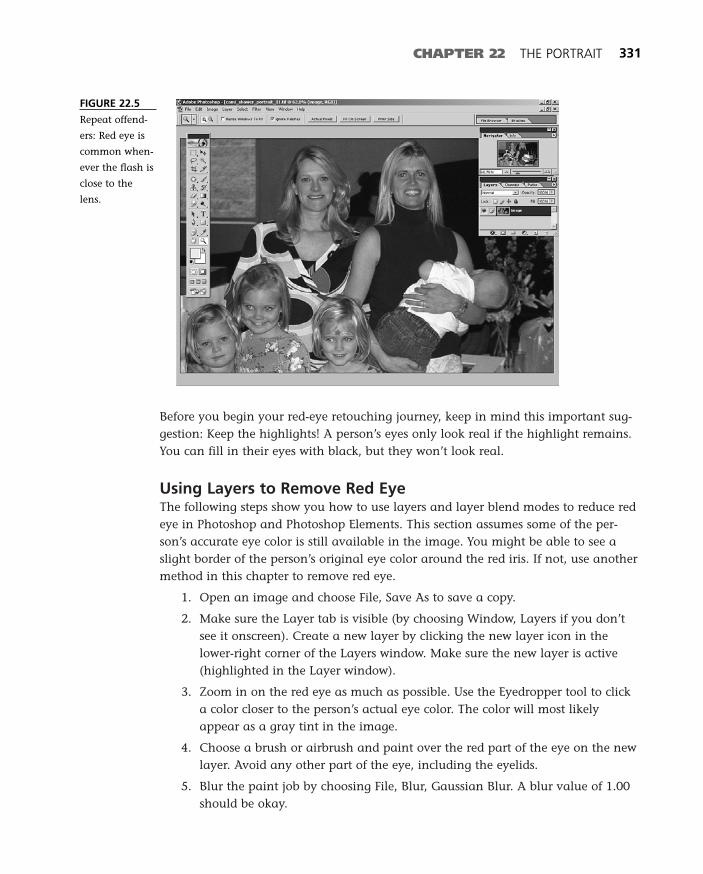
Before you begin your red-eye retouching journey, keep in mind this important sug-gestion: Keep the highlights! A person’s eyes only look real if the highlight remains.You can fill in their eyes with black, but they won’t look real.
Using Layers to Remove Red EyeThe following steps show you how to use layers and layer blend modes to reduce redeye in Photoshop and Photoshop Elements. This section assumes some of the per-son’s accurate eye color is still available in the image. You might be able to see aslight border of the person’s original eye color around the red iris. If not, use anothermethod in this chapter to remove red eye.
1. Open an image and choose File, Save As to save a copy.
2. Make sure the Layer tab is visible (by choosing Window, Layers if you don’tsee it onscreen). Create a new layer by clicking the new layer icon in thelower-right corner of the Layers window. Make sure the new layer is active(highlighted in the Layer window).
3. Zoom in on the red eye as much as possible. Use the Eyedropper tool to clicka color closer to the person’s actual eye color. The color will most likelyappear as a gray tint in the image.
4. Choose a brush or airbrush and paint over the red part of the eye on the newlayer. Avoid any other part of the eye, including the eyelids.
5. Blur the paint job by choosing File, Blur, Gaussian Blur. A blur value of 1.00should be okay.
CHAPTER 22 THE PORTRAIT 331
FIGURE 22.5
Repeat offend-
ers: Red eye is
common when-
ever the flash is
close to the
lens.
27 0789731207_ch22.qxd 4/6/04 2:17 PM Page 331
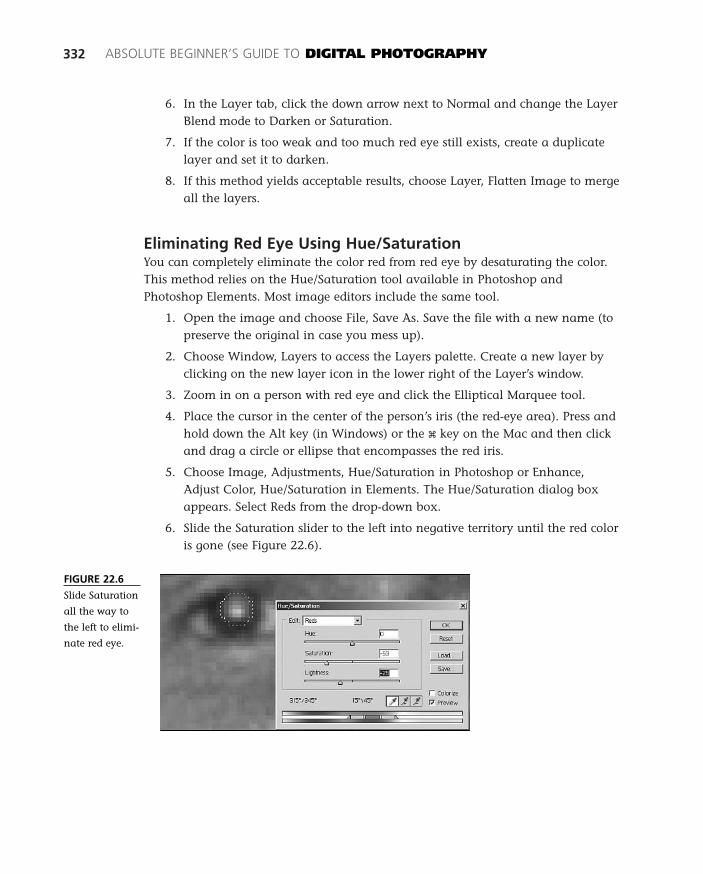
6. In the Layer tab, click the down arrow next to Normal and change the LayerBlend mode to Darken or Saturation.
7. If the color is too weak and too much red eye still exists, create a duplicatelayer and set it to darken.
8. If this method yields acceptable results, choose Layer, Flatten Image to mergeall the layers.
Eliminating Red Eye Using Hue/SaturationYou can completely eliminate the color red from red eye by desaturating the color.This method relies on the Hue/Saturation tool available in Photoshop andPhotoshop Elements. Most image editors include the same tool.
1. Open the image and choose File, Save As. Save the file with a new name (topreserve the original in case you mess up).
2. Choose Window, Layers to access the Layers palette. Create a new layer byclicking on the new layer icon in the lower right of the Layer’s window.
3. Zoom in on a person with red eye and click the Elliptical Marquee tool.
4. Place the cursor in the center of the person’s iris (the red-eye area). Press andhold down the Alt key (in Windows) or the x key on the Mac and then clickand drag a circle or ellipse that encompasses the red iris.
5. Choose Image, Adjustments, Hue/Saturation in Photoshop or Enhance,Adjust Color, Hue/Saturation in Elements. The Hue/Saturation dialog boxappears. Select Reds from the drop-down box.
6. Slide the Saturation slider to the left into negative territory until the red coloris gone (see Figure 22.6).
332 ABSOLUTE BEGINNER’S GUIDE TO DIGITAL PHOTOGRAPHY
FIGURE 22.6
Slide Saturation
all the way to
the left to elimi-
nate red eye.
27 0789731207_ch22.qxd 4/6/04 2:17 PM Page 332
CHAPTER 22 THE PORTRAIT 333
7. Slide the Lightness slider to the left to reducethe highlight and brightness.
8. If the iris is too gray, change the colors fromReds to Master in the drop-down and shiftthe Hue and Saturation sliders to add a littlecolor.
This method is preferred by most photographers.The problem is that selecting the red portion of theeye with the elliptical marquee isn’t always easy. Besure you press down and hold the Alt key so thatthe marquee expands outward. Another aid is tochoose Select, Modify, Expand and expand theselection by a few pixels.
Using Channels to Reduce Red EyeA fast, quick, and dirty way to reduce red eye in Photoshop is to use channels. Thismethod is so simple that even beginners can get acceptable results in minutes andkeep family members happy.
Follow these steps in any version of Photoshop to reduce red eye using channels:
1. Open an image and choose File, Save As to save the original from any mis-takes you might make. Name the new image.
2. Make sure the image is in RGB mode by choosing Image, Mode. If the file isin CMYK or LAB, change it to RGB mode by choosing Image, Mode, RGB.
3. Zoom in as much as possible on any red eye.
4. The easiest way to select only the red eye is to use the red channel of theimage. Click the Channels tab to access the image’s red, green, and bluechannels (choose Window, Channels if Channels isn’t onscreen).
5. Click on the red channel (see Figure 22.7). The other channels should be de-selected and only the red channel should be highlighted/checked. The colorimage will become black and white.
The red channel provides the most tonal separation from the eyes and the face,making it easier to select the entire eyeball. If you cannot access the Channels tab oraren’t sure what a channel is, you can still select the red eye using the ellipse selec-tion tool.
Channels aren’t avail-able in Photoshop
Elements. Use the layer methoddescribed in the section “UsingLayers to Reduce Red Eye”instead.
27 0789731207_ch22.qxd 4/6/04 2:17 PM Page 333
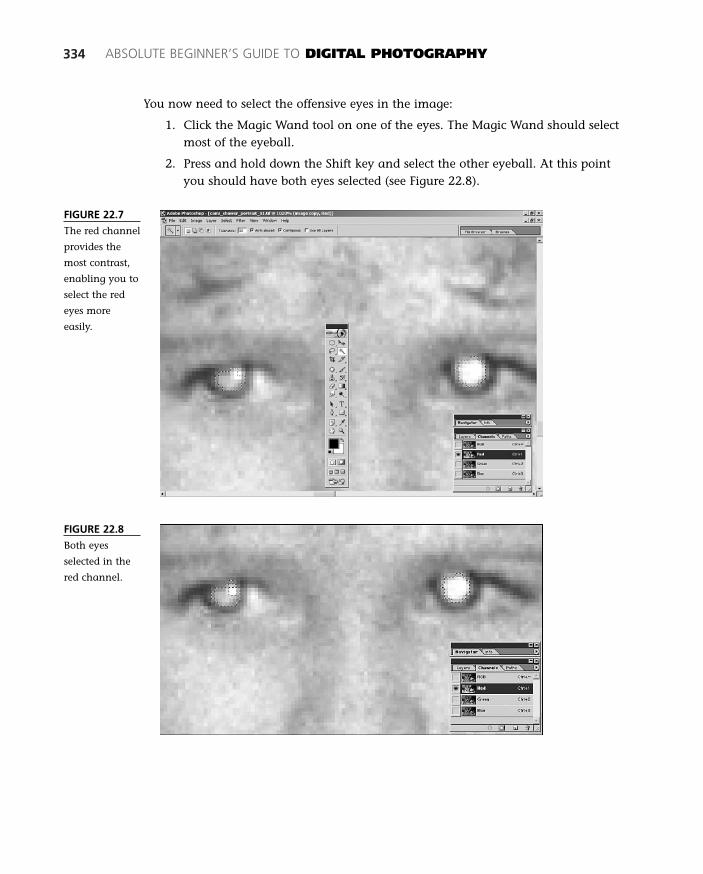
334 ABSOLUTE BEGINNER’S GUIDE TO DIGITAL PHOTOGRAPHY
FIGURE 22.7
The red channel
provides the
most contrast,
enabling you to
select the red
eyes more
easily.
FIGURE 22.8
Both eyes
selected in the
red channel.
You now need to select the offensive eyes in the image:
1. Click the Magic Wand tool on one of the eyes. The Magic Wand should selectmost of the eyeball.
2. Press and hold down the Shift key and select the other eyeball. At this pointyou should have both eyes selected (see Figure 22.8).
27 0789731207_ch22.qxd 4/6/04 2:17 PM Page 334
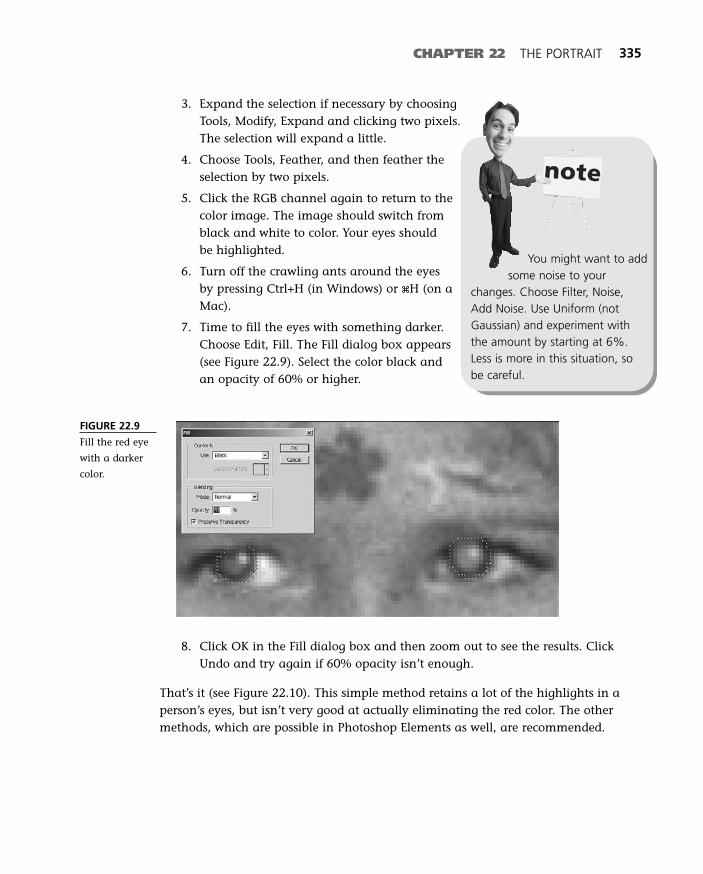
CHAPTER 22 THE PORTRAIT 335
3. Expand the selection if necessary by choosingTools, Modify, Expand and clicking two pixels.The selection will expand a little.
4. Choose Tools, Feather, and then feather theselection by two pixels.
5. Click the RGB channel again to return to thecolor image. The image should switch fromblack and white to color. Your eyes shouldbe highlighted.
6. Turn off the crawling ants around the eyesby pressing Ctrl+H (in Windows) or xH (on aMac).
7. Time to fill the eyes with something darker.Choose Edit, Fill. The Fill dialog box appears(see Figure 22.9). Select the color black andan opacity of 60% or higher.
You might want to addsome noise to your
changes. Choose Filter, Noise,Add Noise. Use Uniform (notGaussian) and experiment withthe amount by starting at 6%.Less is more in this situation, sobe careful.
8. Click OK in the Fill dialog box and then zoom out to see the results. ClickUndo and try again if 60% opacity isn’t enough.
That’s it (see Figure 22.10). This simple method retains a lot of the highlights in aperson’s eyes, but isn’t very good at actually eliminating the red color. The othermethods, which are possible in Photoshop Elements as well, are recommended.
FIGURE 22.9
Fill the red eye
with a darker
color.
27 0789731207_ch22.qxd 4/6/04 2:17 PM Page 335
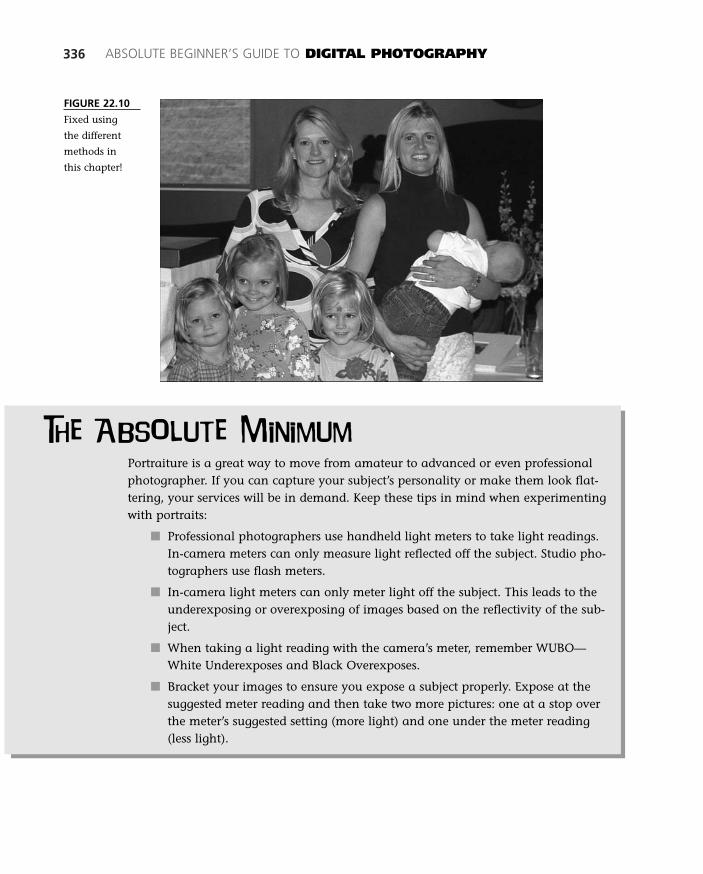
336 ABSOLUTE BEGINNER’S GUIDE TO DIGITAL PHOTOGRAPHY
FIGURE 22.10
Fixed using
the different
methods in
this chapter!
The Absolute Minimum
Portraiture is a great way to move from amateur to advanced or even professionalphotographer. If you can capture your subject’s personality or make them look flat-tering, your services will be in demand. Keep these tips in mind when experimentingwith portraits:
■ Professional photographers use handheld light meters to take light readings.In-camera meters can only measure light reflected off the subject. Studio pho-tographers use flash meters.
■ In-camera light meters can only meter light off the subject. This leads to theunderexposing or overexposing of images based on the reflectivity of the sub-ject.
■ When taking a light reading with the camera’s meter, remember WUBO—White Underexposes and Black Overexposes.
■ Bracket your images to ensure you expose a subject properly. Expose at thesuggested meter reading and then take two more pictures: one at a stop overthe meter’s suggested setting (more light) and one under the meter reading(less light).
27 0789731207_ch22.qxd 4/6/04 2:17 PM Page 336
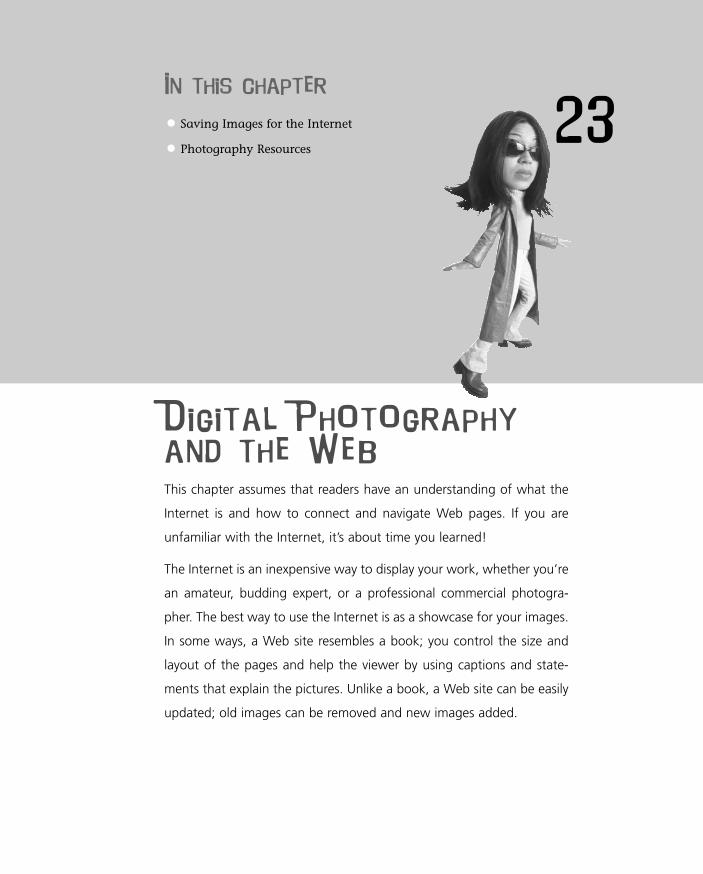
23In this chapter
• Saving Images for the Internet
• Photography Resources
Digital Photography
and the Web
This chapter assumes that readers have an understanding of what the
Internet is and how to connect and navigate Web pages. If you are
unfamiliar with the Internet, it’s about time you learned!
The Internet is an inexpensive way to display your work, whether you’re
an amateur, budding expert, or a professional commercial photogra-
pher. The best way to use the Internet is as a showcase for your images.
In some ways, a Web site resembles a book; you control the size and
layout of the pages and help the viewer by using captions and state-
ments that explain the pictures. Unlike a book, a Web site can be easily
updated; old images can be removed and new images added.
28 0789731207_ch23.qxd 4/6/04 2:14 PM Page 337
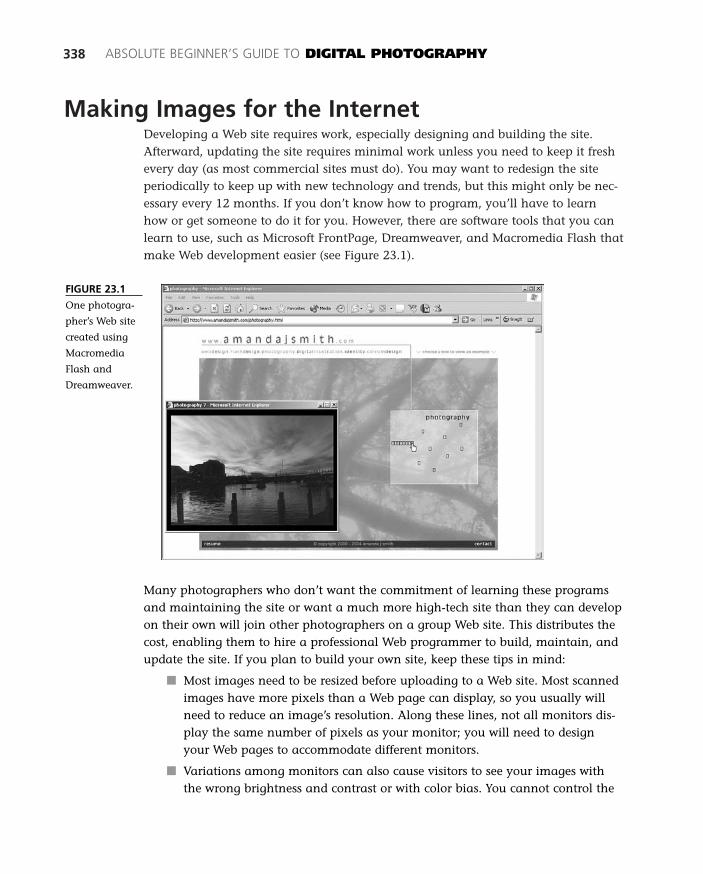
Making Images for the InternetDeveloping a Web site requires work, especially designing and building the site.Afterward, updating the site requires minimal work unless you need to keep it freshevery day (as most commercial sites must do). You may want to redesign the siteperiodically to keep up with new technology and trends, but this might only be nec-essary every 12 months. If you don’t know how to program, you’ll have to learnhow or get someone to do it for you. However, there are software tools that you canlearn to use, such as Microsoft FrontPage, Dreamweaver, and Macromedia Flash thatmake Web development easier (see Figure 23.1).
338 ABSOLUTE BEGINNER’S GUIDE TO DIGITAL PHOTOGRAPHY
FIGURE 23.1
One photogra-
pher’s Web site
created using
Macromedia
Flash and
Dreamweaver.
Many photographers who don’t want the commitment of learning these programsand maintaining the site or want a much more high-tech site than they can developon their own will join other photographers on a group Web site. This distributes thecost, enabling them to hire a professional Web programmer to build, maintain, andupdate the site. If you plan to build your own site, keep these tips in mind:
■ Most images need to be resized before uploading to a Web site. Most scannedimages have more pixels than a Web page can display, so you usually willneed to reduce an image’s resolution. Along these lines, not all monitors dis-play the same number of pixels as your monitor; you will need to designyour Web pages to accommodate different monitors.
■ Variations among monitors can also cause visitors to see your images withthe wrong brightness and contrast or with color bias. You cannot control the
28 0789731207_ch23.qxd 4/6/04 2:14 PM Page 338

way other people’s monitors display color, but you can reduce the problem.Make sure the monitor on which you develop your Web images is calibratedwith Adobe Gamma or equivalent software.
■ Most computers receive information sent over the Internet at a very lowspeed. Under typical conditions, it takes a fast modem more than four min-utes to deliver a full-screen, 16 million-color image. Very few Web site visitorswill tolerate that sort of wait. File compression formats have been developedto speed up the transmission of images, and new formats are being devel-oped.
■ JPEG is the only universally accepted 24-bit photographic compression format(see Chapter 7, “Files and File Formats”) for the Web. JPEG is designed to min-imize the visible irregularities of brightness while allowing large color errors.The success of the design is impressive; JPEG images compressed to 25 percentof their original size rarely show signs of compression.
You should plan for compression. It’s a good idea to make sure your Web pages(images plus text) are received by viewers in fewer than 30 seconds. You can esti-mate this by adding together the sizes of all the files on the page and dividing thetotal by the speed of your visitors’ modems. For example, if a page totals 75 kilo-bytes and an average modem downloads data at 3 kilobytes per second, the down-load time will be about 25 seconds. If your page takes too long to download, reducethe file size of your photos by compressing them at a lower quality level or maketheir pixel dimensions smaller.
Creating a Web Photo GalleryPhotoshop and Elements include the same powerful tool for building a Web site ofimages, complete with navigation and separate pages. The Web Photo Gallery toolcreates a complete Web site of a directory of images. Ifyou have a number of images stored in a directory,follow these steps to create a photo gallery:
1. In Photoshop Elements, choose File, CreateWeb Photo Gallery to display the Web PhotoGallery dialog box. In Photoshop, chooseFile, Automate, Web Photo Gallery. The Web Photo Gallery dialog box appears (seeFigure 23.2).
2. Select a Web site style, such as HorizontalDark or Simple. A thumbnail of the site willappear on the right side of the dialog box.
CHAPTER 23 DIGITAL PHOTOGRAPHY AND THE WEB 339
Be sure to uncheckInclude All Subfolders if
the images you’d like to use areonly in one directory.
28 0789731207_ch23.qxd 4/6/04 2:14 PM Page 339
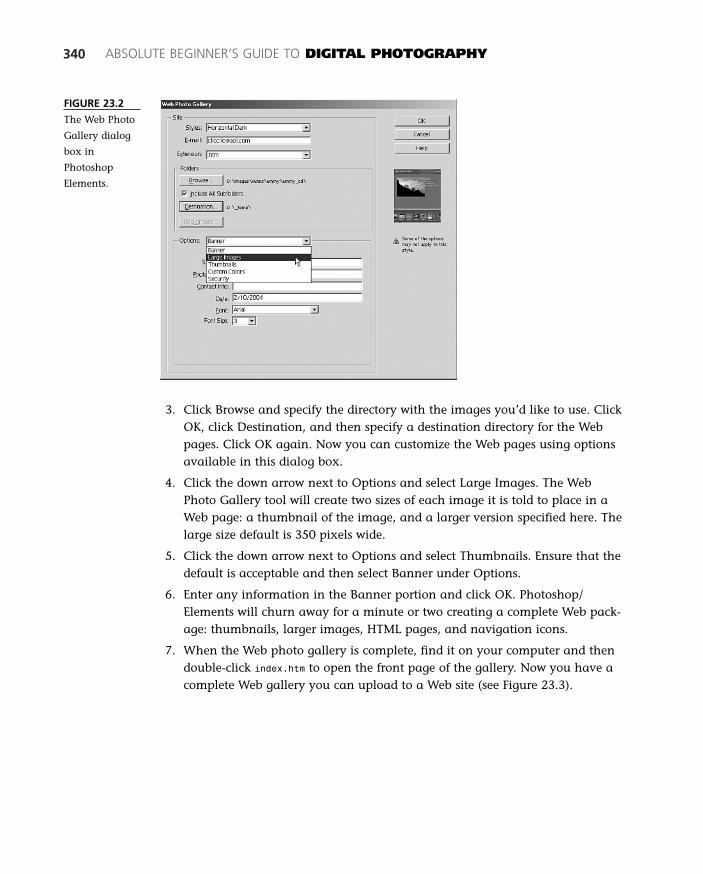
340 ABSOLUTE BEGINNER’S GUIDE TO DIGITAL PHOTOGRAPHY
FIGURE 23.2
The Web Photo
Gallery dialog
box in
Photoshop
Elements.
3. Click Browse and specify the directory with the images you’d like to use. ClickOK, click Destination, and then specify a destination directory for the Webpages. Click OK again. Now you can customize the Web pages using optionsavailable in this dialog box.
4. Click the down arrow next to Options and select Large Images. The WebPhoto Gallery tool will create two sizes of each image it is told to place in aWeb page: a thumbnail of the image, and a larger version specified here. Thelarge size default is 350 pixels wide.
5. Click the down arrow next to Options and select Thumbnails. Ensure that thedefault is acceptable and then select Banner under Options.
6. Enter any information in the Banner portion and click OK. Photoshop/Elements will churn away for a minute or two creating a complete Web pack-age: thumbnails, larger images, HTML pages, and navigation icons.
7. When the Web photo gallery is complete, find it on your computer and thendouble-click index.htm to open the front page of the gallery. Now you have acomplete Web gallery you can upload to a Web site (see Figure 23.3).
28 0789731207_ch23.qxd 4/6/04 2:14 PM Page 340
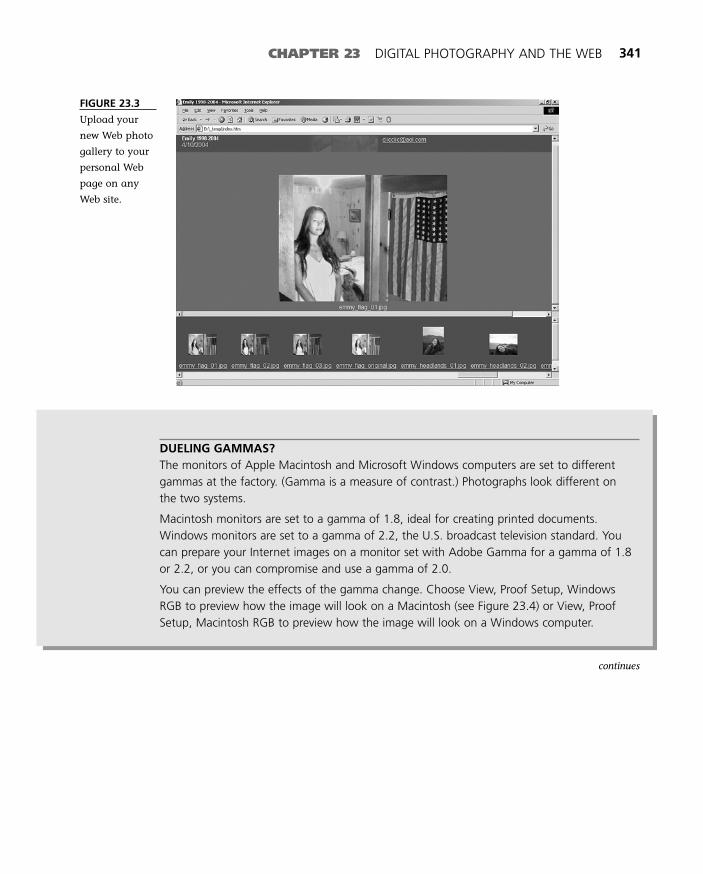
CHAPTER 23 DIGITAL PHOTOGRAPHY AND THE WEB 341
FIGURE 23.3
Upload your
new Web photo
gallery to your
personal Web
page on any
Web site.
DUELING GAMMAS?The monitors of Apple Macintosh and Microsoft Windows computers are set to differentgammas at the factory. (Gamma is a measure of contrast.) Photographs look different onthe two systems.
Macintosh monitors are set to a gamma of 1.8, ideal for creating printed documents.Windows monitors are set to a gamma of 2.2, the U.S. broadcast television standard. Youcan prepare your Internet images on a monitor set with Adobe Gamma for a gamma of 1.8or 2.2, or you can compromise and use a gamma of 2.0.
You can preview the effects of the gamma change. Choose View, Proof Setup, WindowsRGB to preview how the image will look on a Macintosh (see Figure 23.4) or View, ProofSetup, Macintosh RGB to preview how the image will look on a Windows computer.
continues
28 0789731207_ch23.qxd 4/6/04 2:14 PM Page 341
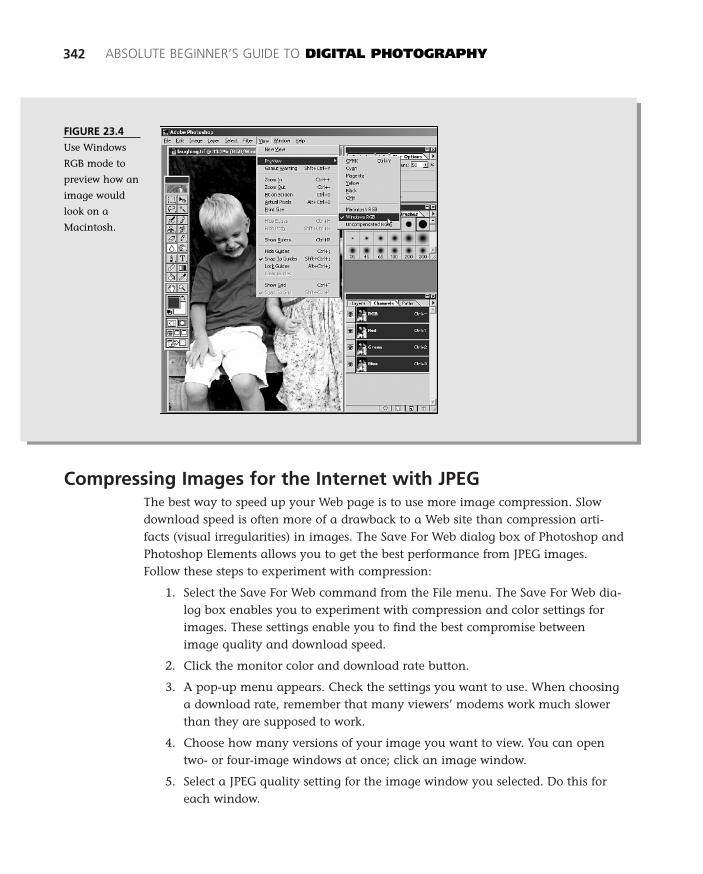
Compressing Images for the Internet with JPEGThe best way to speed up your Web page is to use more image compression. Slowdownload speed is often more of a drawback to a Web site than compression arti-facts (visual irregularities) in images. The Save For Web dialog box of Photoshop andPhotoshop Elements allows you to get the best performance from JPEG images.Follow these steps to experiment with compression:
1. Select the Save For Web command from the File menu. The Save For Web dia-log box enables you to experiment with compression and color settings forimages. These settings enable you to find the best compromise betweenimage quality and download speed.
2. Click the monitor color and download rate button.
3. A pop-up menu appears. Check the settings you want to use. When choosinga download rate, remember that many viewers’ modems work much slowerthan they are supposed to work.
4. Choose how many versions of your image you want to view. You can opentwo- or four-image windows at once; click an image window.
5. Select a JPEG quality setting for the image window you selected. Do this foreach window.
342 ABSOLUTE BEGINNER’S GUIDE TO DIGITAL PHOTOGRAPHY
FIGURE 23.4
Use Windows
RGB mode to
preview how an
image would
look on a
Macintosh.
28 0789731207_ch23.qxd 4/6/04 2:14 PM Page 342
CHAPTER 23 DIGITAL PHOTOGRAPHY AND THE WEB 343
6. Compare the quality of the images. To approximate what you see on a moni-tor, compare these two images from twice your normal reading distance. Anestimate of the time it requires to download appears under each image.
The Internet: Resource and GalleryPhotographers are increasingly using the Internet. There are two good reasons why:There are interesting places to visit, and you can show your own work there. Manygroups, companies and individuals have created sites that provide material such asonline magazines, product advertising, educational information, and more.Newsgroups let you post and receive material about photography. Some groups letyou participate in online discussions with people interested in topics like the historyof photography and photographic techniques and equipment.
The Web displays pages with text, graphics, photographs, sound, and video. You canview photographs from individuals, stock agencies, and museums. You can put yourown work up for display. If you have a site on the Web, you don’t need to convince acurator or gallery owner that your work should be shown. At a low cost, you can cre-ate your own electronic gallery for people around the world to visit, where you canshow what you want.
Exploring the WebHow do you find photography sites on the Web? You’ll find some addresses listed inbooks and magazines, and you can link to many sites from other Web pages.
Suppose you are interested in a topic, but don’t know the exact address of a relatedWeb site. Try using search engines like Yahoo! (www.yahoo.com) or Google(www.google.com). Using these sites is like doing a subject search in a library catalog.Type in a subject or keywords, and a list of sites related to that topic is displayed.
Photography Sources■ The site for the book Photography, 7th edition by Sherry London features simu-
lations and, chat rooms demonstrations of various photographic processes, astudy guide, and links to other sites (www.prenhall.com/london).
■ The Web site for the magazine Photo District News features commercial pho-tography and digital imaging (www.pdn-pix.com).
■ The National Press Photographers Association has issues of interest to newsphotographers, including information about NPPA workshops (www.nppa.org).
28 0789731207_ch23.qxd 4/6/04 2:14 PM Page 343
MuseumsMany museums have Web sites. The following are only a few of the highlights:
■ California Museum of Photography, Riverside, California (www.cmp.ucr.edu).
■ Friends of Photography, San Francisco, California(www.friendsofphotography.org).
■ George Eastman House, Rochester, New York (www.eastman.org).
■ International Center for Photography, New York, New York (www.icp.org).
■ Library of Congress Prints and Photographs Reading Room, Washington, D.C.(www.loc.gov/rr/print).
■ Museum of Contemporary Art, Los Angeles, California (www.moca.org).
ManufacturersManufacturers have Web sites that provide product information and often other fea-tures that can be helpful. For example:
■ Nikon provides considerable technical information, such as their introductionto digital cameras, “Who’s Afraid of Digital Cameras?”(www.nikon.co.jp/main/index_e.htm).
■ Polaroid’s Artist’s Studio has an extensive collection of work by artists usingPolaroid materials. (www.polaroid.com)
Other SitesIndividuals and organizations have Web sites large and small, dealing with every-thing from the art of pinhole photography (www.pinhole.com) to all about Kirlian pho-tography (www.kirlian.com).
Your Own Virtual GalleryYou can create your own Web page. Do you have photographs you’d like to show toa wider audience?
A personal Web page is one way to do so. Most Internet service providers let theirsubscribers have their own Web page—that part is easy. Now all you have to do iscreate your own page or pay someone else to do so. The simplest pages contain textplus photographs and graphics (see Figure 23.5). More advanced designs can includemusic, video, and animation. You will want to investigate different software pro-grams that are available for building Web sites, such as Microsoft FrontPage,Macromedia Flash and Dreamweaver.
344 ABSOLUTE BEGINNER’S GUIDE TO DIGITAL PHOTOGRAPHY
28 0789731207_ch23.qxd 4/6/04 2:14 PM Page 344
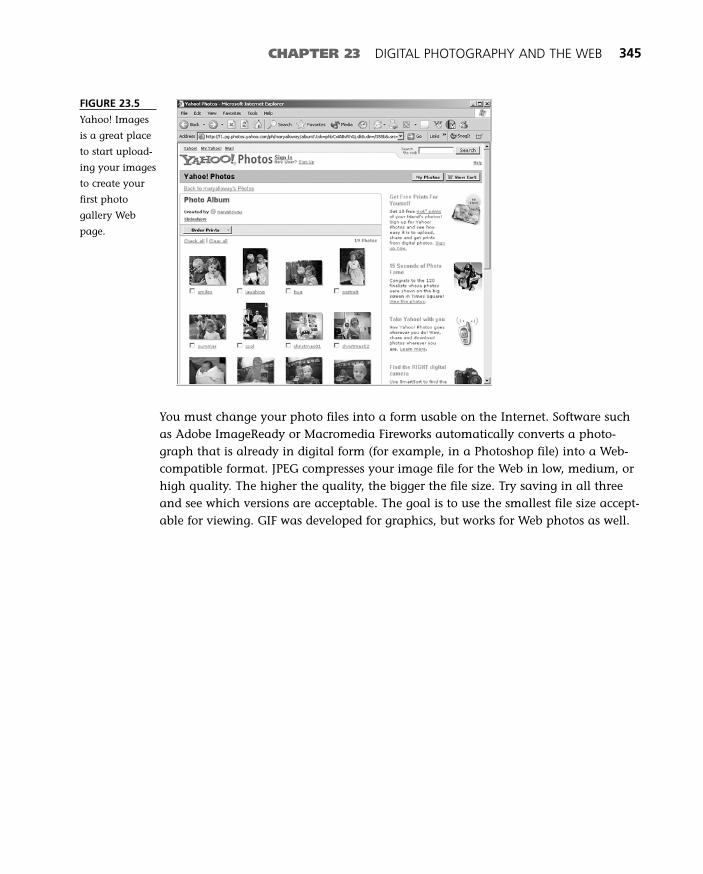
CHAPTER 23 DIGITAL PHOTOGRAPHY AND THE WEB 345
FIGURE 23.5
Yahoo! Images
is a great place
to start upload-
ing your images
to create your
first photo
gallery Web
page.
You must change your photo files into a form usable on the Internet. Software suchas Adobe ImageReady or Macromedia Fireworks automatically converts a photo-graph that is already in digital form (for example, in a Photoshop file) into a Web-compatible format. JPEG compresses your image file for the Web in low, medium, orhigh quality. The higher the quality, the bigger the file size. Try saving in all threeand see which versions are acceptable. The goal is to use the smallest file size accept-able for viewing. GIF was developed for graphics, but works for Web photos as well.
28 0789731207_ch23.qxd 4/6/04 2:14 PM Page 345

346 ABSOLUTE BEGINNER’S GUIDE TO DIGITAL PHOTOGRAPHY
The Absolute Minimum
This chapter barely scratched the surface of possible uses of the Internet for photog-raphers. If you don’t have your images up on the Net yet, consider a simple photosite, such as at Yahoo! or MSN.
■ Use Elements or Photoshop to create your Web galleries. In Photoshop, chooseFile, Automate, Web Photo Gallery. In Elements, choose File, Create WebPhoto Gallery.
■ After developing a Web site that has a number of graphics, focus on reducingthe size of files. Use JPEG compression to see how much compression is feasi-ble without destroying an image.
■ Promote yourself using a Web site. Register your name or a catchy companyname through www.register.com, www.yahoo.com, or www.networksolutions.com.
■ GIF files are mainly used for graphics, such as company logos and banners.This format only stores 256 colors and is called Indexed Color mode inPhotoshop and Elements.
28 0789731207_ch23.qxd 4/6/04 2:14 PM Page 346
Glossary
1-bit color A system for creating raster (bit map) images
on a computer in which each pixel uses only one bit of
memory and disk storage. In 1-bit color, a pixel is either
black or white.
24-bit color A system for creating raster images in which
each pixel uses three bytes of memory and disk storage. In
RGB color, one byte is used by each of the red, green, and
blue components (channels) of a pixel.
8-bit color or 8-bit grayscale A system for creating
raster images in which each pixel uses one byte of memory
and disk storage. This produces 256 colors or shades of
gray, which is enough for a high-quality black-and-white
image or a low-quality color image.
additive colors Red, green, and blue are the additive
colors of film-based photography and digital imaging.
When red, green, and blue lights are mixed in equal
amounts, the result is white light.
aliasing In a digital image, the appearance of jagged,
“staircase” effects along lines and edges, especially diago-
nal lines. Aliasing is accentuated when the pixels in the
image are highly enlarged and visible to the viewer.
alpha channel In Adobe Photoshop software, the
palette where masks are stored.
analog-to-digital conversion The process of convert-
ing the analog information captured by a scanner or cam-
era into computer-readable form. The analog signal is
translated into digital numbers by a computer chip.
antialiasing The process of reducing jagged, aliased
edges by smoothing (gently blurring) pixels along the
edges.
archival paper A high-quality inkjet paper, usually
with a matte or semi-gloss finish, designed for pigment-
based inks. Images on this paper can be displayed behind
non-glare archival glass for many decades or more without
any noticeable fading.
artifact Any visible degradation of the details of a digi-
tal image caused by the methods used to capture, store, or
compress the image. A common form of artifact occurs dur-
ing lossy compression when bogus details appear near the
edges of objects. In other artifacts, bands of solid colors
appear in places that should exhibit subtle gradations.
banding An artifact that spoils the appearance of an
image’s subtle gradations of color and tone. In banding,
bands or blocks of solid color appear in place of gradations.
binary number A number that is the result of changing
information into computer-readable form. A binary num-
ber is composed of one or more single digits, each of which
can represent either one or zero. All information in a com-
puter is stored as binary numbers.
bit A single digit of a binary number, a quantity repre-
senting either 0 or 1.
bit depth The number of bits used to represent the color
of each pixel.
bitmap An image made up of rows and columns of pix-
els. Also called a raster image. Each pixel represents a spot
of solid color.
brightness (value) In digital images, numerical value
of a pixel that represents its brightness level from black to
white. In gray scale images it ranges in value from 0
(black) to 255 (white). In color images, it is a combination
of the values of each color channel. Brightness is one of the
three terms that are used to exactly describe a color (the
others are saturation and hue).
Brush An imaging software tool that paints colors or spe-
cial effects on a layer.
byte In a computer, an organized grouping of eight bits
of memory or storage. A byte is often used to represent the
29 0789731207_glossary.qxd 4/6/04 2:16 PM Page 347
brightness value of a single pixel in a gray scale image or a
single character (number or letter) in word processing.
calibration The act of adjusting the brightness and col-
ors of one device, such as a monitor, to match those of
another, such as a printer. Calibration may also be used to
simply adjust a device to some standard of performance.
CCD (charge-coupled device) In a digital camera, a
charged-coupled device is a light-sensitive silicon computer
chip that converts the light from the camera lens into elec-
trical current. The chip may have millions of separate sen-
sors, each of whose current reading is translated (by an
analog to digital converter) into a digital brightness value.
CD-ROM (Compact Disc, Read-Only Memory) A
nonrewritable compact disc used as a storage medium for
digital data.
CD-RW (Compact Disc, Rewritable) A rewritable
compact disc.
clipping In image capture with a scanner or digital cam-
era, an exposure error that causes a loss of information at
the highest and/or lowest brightness levels.
CMY Cyan, magenta, and yellow are three subtractive
color primaries. Used by some printing processes, notably
color photographic paper.
CMYK Cyan, magenta, yellow, and black are the colors
used in offset printing. Although CMY ideally would be a
better set of inks for printing, adding K (black) is a practical
necessity because CMY inks do not produce satisfactory
black tones by themselves.
color cast An unwanted color tint to an image caused
by exposure of the film or digital capture under inappropri-
ate lighting conditions.
color channel One of the ways information is organized
within an image. Color channels store the brightness values
of the pixels in each of the primary colors. Contrast with
alpha channels.
Color Management A software system designed to
deliver accurate color calibration and consistent color
matching among computer monitors, scanners, and any
output devices such as printers and offset presses.
color space A scientific description of a set of colors. A
color space numerically describes all the colors that can be
created by a device, such as a camera or a printer.
compression A software process in which image data is
“squeezed” to reduce the size of the image file. Compression
348 ABSOLUTE BEGINNER’S GUIDE TO DIGITAL PHOTOGRAPHY
methods can be lossless, as in compressed TIFF images, or
lossy, as in JPEG compression.
continuous tone printer A color printer whose smallest
color markings can be any of millions of distinct colors. Dye
sublimation printers are the most common type of continu-
ous tone printer.
data Anything put into, processed by, or stored in a com-
puter. Data can also be the input from a camera or scanner
or the output to a computer accessory, such as a printer or
modem.
default A predetermined setting in a computer program
that will be used unless the user chooses another.
device profile A database used by color management
software. It contains information about the actual colors
that a device (such as a monitor or printer) produces. The
color management software uses the information to ensure
that the device produces the desired colors.
digital camera A camera that captures an image on a
CCD chip and digitizes it so that it can be downloaded to a
computer or a digital printer.
digital image An image created by a digital camera or
a computer scanner. Digital images are composed of pixels.
digitization The process of converting analog informa-
tion into digital data that a computer can use.
disc or disk Terms used to describe computer media that
store data on a revolving platter. Magnetic storage media
are called disks (floppy disks, Zip disks and hard disks),
while media that use lasers (CDs and DVDs) are called
discs.
dithering A process used by some types of printers to cre-
ate the appearance of millions of distinct colors from as few
as four basic (CMYK) colors. In dithering, nearly invisible
dots of each basic color are placed so close together (and
the basic colors mixed without any visible pattern) that the
eye is fooled into seeing a solid distinct color at that spot.
Inkjet printers are the most common dithering printer.
download To transfer files or other data from one piece
of computer equipment to another.
dpi (dots per inch) Originally, a measurement of the
resolution of a printer or monitor. A printer that can print
1,440 dots in a row in a single inch is a 1440 dpi printer.
dpi is often used interchangeably with other more accurate
terms: pixels per inch (ppi) is a measure of the number of
pixels (lined up in a row) per inch that appears on a moni-
tor or in a print. An image may have only 200 pixels per
29 0789731207_glossary.qxd 4/6/04 2:16 PM Page 348
GLOSSARY 349
inch, but the printer may use 1,440 dots per inch to repre-
sent those 200 pixels per inch. Thus, the resolution of the
printer (1440 dpi) is not the same as that of the image that
it prints (200 ppi). Confusion results when dpi is used inter-
changeably with pixels per inch.
DVD, DVR, DV-RAM, DVD-RW A family of optical
storage discs that offer higher capacities (many gigabytes)
than the CD-ROM.
dye-sublimation printer A high-quality, continuous-
tone color printer. Each multicolored dot is created when
dyes of the basic colors are vaporized and then condensed
on a precise location on the printing paper or plastic sheet.
Because the amount of vaporization is highly changeable,
each condensed dot can be any one of 16 million colors,
and is thus called a continuous tone.
dynamic range A measurement of image density for a
scanner from 0 (pure white) to 4 (very black). The dynamic
range scale is logarithmic; a value of 3.0 is 10 times greater
than a value of 2.0. This scale is valuable when measuring
a scanner’s ability to capture detail in shadows on slides
and detail in highlights on negatives. The greater the
dynamic range, the greater the capability to capture detail
and not electronic noise. You may see the terms Dmin and
Dmax for the minimum and maximum values of density
that a scanner can detect. If a scanner has a Dmin of .3
and a Dmax of 3.3, the total dynamic range would be 3.0.
emulsion The dye or silver halide layer on the plastic
(acetate) base that captures the light and image you shoot
through the camera. Emulsion is also the name used for
chemicals applied to photographic paper used in the dark-
room.
export The process of transferring data from one pro-
gram (for example, Adobe Photoshop) to another (for
example, Adobe Illustrator).
exposure latitude The capability of films or digital
cameras to accurately record a range of brightness values
in the scene being photographed. A film that can accu-
rately record scenes with extremely large brightness ranges
(for example, very bright highlights and very dark shad-
ows) is said to have a wide exposure latitude.
file format The unique and systematic way in which
information is organized in a file. Formats differentiate one
kind of file from another. Some common image file formats
include TIFF, JPEG, and PSD (Photoshop file).
file A collection of data, such as an individual image,
saved on a computer storage device, and given a name to
assist in retrieval.
film recorder A device that records a digital image onto
photographic film.
film scanner A device that converts images from photo-
graphic film into digital form so they can be stored in a
computer and edited by software.
filter In imaging software, a filter is a command that
will produce special effects in an image. There are hundreds
of filters available as plug-in software for Adobe Photoshop.
flatbed scanner A digital scanner in which the object to
be scanned is held flat on a glass plate while the imaging
sensor (usually three CCDs) moves under it. A flatbed scan-
ner can be used as a camera to record three-dimensional
objects placed on its glass plate.
gamut The entire range of colors that a device (for exam-
ple, a digital camera or a printer) can record or reproduce.
GIF (Graphic Interchange Format) an image file for-
mat. GIF is an older bitmap file format. It is an 8-bit for-
mat, so GIF images have only 256 colors. It is the standard
format for creating non-photographic graphics for use on
the Internet.
gigabyte (GB) A measure of computer memory, disk
storage, or file size consisting of approximately one billion
bytes (a thousand megabytes). The actual value is
1,073,741,824 bytes.
grayscale image A digital image containing only black,
white, and shades of gray.
halftone A method of creating images on paper using a
grid of ink dots of various sizes to simulate shades of gray
in a photograph. For color printing, four grids of colored
dots (using the colors CMYK) are printed. Newspapers and
magazines use the halftone process to reproduce images.
hue One of the three terms used to exactly describe a
color (the others are brightness or value and saturation).
Informally, hue is the name of the color, such as red or
green-yellow. In a 360° color wheel, the hue can be exactly
specified as one of the points on the outside of the wheel.
import The process of bringing data into a program
from another program. For example, the images created by
many kinds of scanner software are imported into Adobe
Photoshop.
29 0789731207_glossary.qxd 4/6/04 2:16 PM Page 349
inkjet printer An inkjet printer creates images out of
millions of nearly invisible colored dots. The dots are cre-
ated by squirting ink through extremely small nozzles. See
also dithering.
JPEG (Joint Photographic Experts Group) A software
procedure that compresses files. JPEG is a “lossy” compres-
sion algorithm that degrades image quality, although the
apparent effect is small unless the image is highly com-
pressed.
JPEG 2000 A revision of the JPEG image compression
standard. Along with slightly improved image quality, new
features permit images to be viewed with greater color
accuracy and allow encoded copyright protection, as well as
embedded keywords to assist Internet searches.
kilobyte (KB) A measure of computer memory, disk stor-
age, or file size consisting of approximately one thousand
bytes. The actual value is 1,024 bytes.
laser printer A computer printer that uses laser copier
technology to print from computer data. Printing is much
faster than with inkjet and dye sublimation printers, but
image quality is often compromised by banding.
layer A software feature that permits an image to con-
tain a number of separate images, viewed as though they
are stacked upon each another. Some software allows spe-
cialized layers such as adjustment layers, which contain no
visible images but contain commands that change the
tones and colors of the layers below, or type layers, which
contain editable letters and numbers.
LCD panel (liquid crystal diode) Many digital cam-
eras have illuminated LCD screens that are used as
viewfinders. They also permit the editing of pictures after
they have been captured.
lossless compression A file compression technology
that reduces the size of files in ways that result in the origi-
nal file being intact after decompression. There is no loss of
the original data. TIFF compression is lossless.
lossy compression A file compression technology that
reduces the size of files in ways that result in permanent
changes to the original file after decompression. Depending
on the degree of compression used, the image may exhibit
noticeable artifacts. JPEG compression is lossy.
marquee An outline of moving dashes that appears on
the monitor to show the boundaries of selected areas within
an image. See also selection.
mask An image-editing tool used to limit the effects of
image editing to certain areas of the image. Masks appear
350 ABSOLUTE BEGINNER’S GUIDE TO DIGITAL PHOTOGRAPHY
on the monitor as overlays of color. Unlike a selection,
masks can be stored and can be edited for later reuse.
Masks are stored in the channels palette of Adobe
Photoshop.
megabyte (MB) A measure of computer memory, disk
storage, or file size consisting of approximately one million
bytes. The actual value is 1,048,576 bytes.
megapixel camera A digital camera whose CCD chip
has over one million individual sensors. Each sensor usu-
ally creates one pixel in the camera’s images.
metadata Data about data. EXIF information included
in digital camera images is one example. The EXIF stan-
dard states what information is stored in a JPEG image and
in what order. This data describes the image itself.
modem (modulator/demodulator) A device that con-
verts outgoing digital data into analog signals for transmis-
sion over telephone lines, and digitizes incoming analog
signals.
network A group of computers connected electronically
so they can exchange data and share peripheral devices,
such as printers and modems.
palette On a computer monitor, a software component
that appears as a box containing icons of tools and controls
that modify the way tools operate (options). A command
center for image-editing tools.
PhotoCD and PictureCD Kodak scanning services
available from many photography stores and mini-labs.
PhotoCD Master scans offer high-quality images from
35mm film with resolutions up to 3072×2048 pixels. Less
expensive PictureCD scans of 1536×1024 pixels are saved as
JPEG files.
pixel (picture element) The smallest visible component
of a digitized image. The basic dot that contains a single
color.
plug-in A small, specialized software program that is
opened and operated by image-editing software, and closed
when its task is finished. For example, scanner software is
used to capture and import images, and filters are used to
modify the image. Plug-ins may be manufactured by com-
panies unconnected with the manufacturer of the imaging
software.
ppi (pixels per inch) See dpi.
quantization coefficient A variable number related to
the Quality setting used when a JPEG file is saved. The
quantization coefficient is used with JPEG quantization
tables in the compression process.
29 0789731207_glossary.qxd 4/6/04 2:16 PM Page 350
GLOSSARY 351
RAM (random access memory) The silicon chips that
are used to contain the computer’s memory. The memory is
used to hold and process the software programs, data files,
and commands that the computer is currently using.
Generally, the more RAM that a computer has for image
processing, the more quickly the editing can be accom-
plished.
raster image Raster images (also called bitmaps) are
made up of rows and columns of pixels.
resample To change the pixel dimensions of an image.
For example, to downsample an image from 2000×1000
pixels to 500×250 pixels, or to upsample an image from
400×600 to 800×1200 pixels. Resampling permanently
alters the image.
resize To alter the physical size of an image (how big it is
printed or how large it appears on the monitor) without
resampling its pixels.
resolution Resolution determines the apparent sharpness
of an image. Resolution is the number of pixels per inch (or
other measure, like millimeters) in an image. For example,
an image printed 8×10 inches with 200 pixels per inch will
appear much sharper than an 8×10 print printed with 30
pixels per inch. When the capabilities of printers are dis-
cussed, the resolution of the printer is described as the num-
ber of dots per inch that the printer can put on the paper.
See dpi.
RGB Red, green, and blue; the primary additive colors of
photography and digital imaging. Computer monitors cre-
ate images using the RGB colors.
samples per inch The number of times per inch that a
scanner samples an image. Note, however, that if a scanner
records 2,000 samples per inch, but its software enlarges the
image by 10 times, the final image will have only 200 pix-
els per inch. See dpi for related information.
saturation The degree to which a color is pure and undi-
luted by light of a different hue. If a color is 100% satu-
rated, it contains no light of another hue. If a color has no
saturation, it appears gray, with no apparent hue. One of
the three terms used to exactly describe a color (the others
are brightness or value and hue).
scanner A device that converts photographs (on film or
on paper) into digital form so they can be stored in a com-
puter and edited by software.
screen lines per inch Also referred to as lines per inch.
Used in the offset printing industry, lines per inch refers to
the number of rows or columns of halftone dots (a “screen”)
appearing in each inch of the printed matter. Do not con-
fuse screen lines per inch with dots per inch (see dpi).
selection A part of the area of a digital image that has
been isolated from the rest of the image for the purposes of
editing operations, such as changes to color or tones. A
variety of software tools are used to indicate to the com-
puter which area is to be selected.
service bureau A retail business that offers a variety of
computer-related services. Many have extensive imaging
capabilities, such as scanning, printing, and rental comput-
ers with imaging software. Some offer offset printing serv-
ices that may include the production of large negatives.
subtractive colors Cyan, magenta, and yellow are the
subtractive colors of photography and digital imaging.
When equal amounts of cyan, magenta, and yellow inks
are mixed on a sheet of white paper, a gray or black tone
results.
TIFF (Tagged Image File Format) A file format for
bitmap images that is readable by all major imaging soft-
ware programs. TIFF allows moderate amounts of lossless
compression.
unsharp masking A software process that increases the
apparent sharpness of an image. Actual image detail is not
increased.
vector image An image formed without pixels. Lines
and solid-filled areas are created by specifying the location
of line endpoints and the positions of lines (straight or
curved) between them. Adobe Illustrator creates vector
graphics, and there are some vector elements (such as
paths) in Adobe Photoshop that coexist with the bitmap
features.
virtual memory disk Space on a hard drive that is used
as a substitute for RAM by image-editing software when the
software runs out of real RAM. Because hard disks operate
more slowly than RAM, using virtual memory slows the
computer down.
29 0789731207_glossary.qxd 4/6/04 2:16 PM Page 351

29 0789731207_glossary.qxd 4/6/04 2:16 PM Page 352
Numbers0000H flag, FAT (File
Allocation Table), 105
12-bit scan rates, 184
16-bit scan rates, 184
35mm film, 33, 76
38-bit depth, JPEG2000 fileformat, 90
48-bit scan rates, 184-186
220 film, 34
AAcquire command (File
menu), 74
active tracking system, AF(autofocus), 56
Add Anchor Point tool, 161
additive color processes, 293-294
Adjust Color, Hue/Saturationcommand (Enhance menu),328, 332
Adjust Levels command(Image menu), 146
Adjust, Brightness/Contrastcommand (Image menu),206
Adjust, Color Balance com-mand (Image menu), 148,240
Adjust, Curves command(Image menu), 140, 186,206, 226
Adjust, Desaturate command(Image menu), 328
Adjust, Hue/Saturation com-mand (Image menu), 140,148, 240
Adjust, Levels command(Image menu), 140, 148,186, 206, 214
Adjust, Variations command(Image menu), 149
adjustment layer masks, 252-253, 263
adjustment layers, 236-237color banding, 242-243compatibility, Photoshop file
formats, 84curves/levels, 231-232data loss, 242-243images, printing without
color management, 301
Adjustments, Auto Levelscommand (Image menu),220
Adjustments, Color Balancecommand (Image menu),198
Adjustments, Curves com-mand (Image menu), 219,231
Adjustments, Hue/Saturationcommand (Image menu),332
Adjustments, Levels com-mand (Image menu), 207,219, 231
Adobe Gamma, 297
Adobe ImageReady, creatingWeb images, 345
Advanced Photo System(APS) film, 34
AF (automatic focus), 54-56
aliasingantialiasing, selections, 168digital camera limitations,
21-22
allocation, FAT (FileAllocation Table), 103-106
alpha channels, 163, 263-264
American StandardsAssociation (ASA) film rat-ing system, 36
Amount option (UnsharpMask dialog box), 193, 196
angles, view, 47
annotations, TIFF (TaggedImage File Format), 91
Anti-aliased option (MagicWand), 141
antialiasing, selections, 168
aperture, 59-61
APO (Apochromatic) lenses,14
Apple iPhotoimages, 128-131launching, 126locating images, 114-115Print dialog box, 127-130
Apple Macintosh, gammas(Internet images), 341
applicationsApple iPhoto
images, 128-131launching, 126
Index
30 0789731207_index.qxd 4/6/04 2:16 PM Page 353
354 APPLICATIONS
locating images, 114-115Print dialog box, 127-130
Photoshop Elements, 116resampling, 118-121rescanning, 119
images, 114-118, 121-125
printing resolution, 116
APS (Advanced PhotoSystem) film, 34
archival paper, 288
area-specific encoding,JPEG2000 file format, 91
art, line art, 274
artifacts, adjusting, 21-22
artificial lighting, 313-314,320
ASA (American StandardsAssociation) film rating sys-tem, 36
aspherical lenses, 14
authoring software, 292
Auto Levels feature, 220
Auto option (white balancesettings), 64
auto-sharpening, turning off,197
Automate, Web PhotoGallery command (Filemenu), 339
automatic focus (AF), 54-56
available light, 310-313, 320
axis lighting (front lighting),316
Bback lighting, 319
background images, compo-nent image selections, 247
backgrounds, blurring, 59
balancecolor, 32-34, 63-66white, setting, 64
bar graphs, histograms, 221adjusting pixels, 207-209exposure problems, 210-217levels, 222-223
baseline optimized compres-sion method, JPEG (JointPhotographics ExpertsGroup), 88
baseline sequential compres-sion method, JPEG (JointPhotographics ExpertsGroup), 88
battery life, continuous auto-focus, 56
Bayer mask, limitations, 18-20
Bezier curves, 249-251
bicubic resampling, 245
Bilinear option (interpola-tion), 187
bit depthinput resolution, 183-186TIFF (Tagged Image File
Format), 91, 95
Bit Depth option (scanners),182
black points, setting, 212-214
black reflectors, adding filllight, 321
black-and-whiteconverting to color, 32fill light, 319film, 34images, converting color
images to, 328-330
black slider triangle, 225
Blend If option (Layer Styledialog box), 239
blending image layers, 238-239
blooming, adjusting, 23
blur filters, Bayer masks, 20
Blur, Gaussian Blur command(Filter menu), 198, 331
blurring backgrounds, 59
blurs, 197-198
BMP (Windows Bitmap) fileformat, 83
boot records, FAT (FileAllocation Table), 104
Borderless Printing option(Print dialog box), 130
borders, images (AppleiPhoto), 128
bracketing, portraits, 327
brightnessimage editing, 145-147information (Curves dialog
box), 230-231plain paper, 287
brightness/contrast, his-tograms, 205-206
adjusting pixels, 207-209exposure problems, 210-217
Brightness/Contrast dialogbox, 206
Brightness/Contrast, Levelscommand (Enhance menu),219
browsers, locating images,114-115
brushes, Selection Brush, 170-171
buttons, navigation or Website, 291
Byte Order: IBM PC option(TIFF Options dialog box),93
Byte Order: Macintosh option(TIFF Options dialog box),93
bytes, 183
30 0789731207_index.qxd 4/6/04 2:16 PM Page 354
COLOR TEMPERATURES 355
CC-41 process (chromogenic),
42
California Museum ofPhotography Web site, 344
cameras. See digital cameras
Canon Web site, 14
capture delays, digital cam-era limitations, 13-14
catadioptric lenses, 54
CCD (charge-coupled device)image sensor, 4-5, 17-20
CD-ROMs, saving images to,80, 288-292
CDs, saving images to, 79
cells, halftone, 189
center-weighted autofocuslocks, 56
channels, 255alpha, 163, 263-264color, 255-257, 263color images, converting to
black-and-white, 330composite, 257creating, 262masks, 257-263red-eye, fixing, 333-335
Channels command (Windowmenu), 163, 257
Channels palette, accessing,163, 257
charge-coupled device (CCD)image sensor, 4-5, 17-20
chromes, 31
chromogenic film, lightresponses, 42
CiéLAB color space definition,16
clipping paths, 252
Clone Stamp tool, removingdust & scratches, 203
clusters, FAT (File AllocationTable), 104-105
CMOS (Complementary MetalOxide Semiconductors), 4,20
CMY (cyan, magenta, andyellow), subtractive colorprocesses, 293-296
CMYK (cyan, magenta, yel-low and black)
color channels, 255color space definition, 16printers, 271printing, color management,
302-304
collages, 239-241
colorconverting to black-and-
white, 32device profiles, 299gamut, troubleshooting, 303masks, 259reproducing (monitors/
printers), color manage-ment, 297-306
YUV color space, 88
color balance, 63, 148-149color film, 32digital cameras, 64-65film, 33-34, 66slide film, 66
color banding, adjustmentlayers, 242-243
color channels, 255adjusting, 231versus alpha channels, 263editing, 256-257RGB, 257thumbnails, 257turning on/off, 257viewing, 256-257
color film, 30-32, 295
color gamutscolor management, 297-306human vision, 298
color imagesconverting to black-and-
white (portraits), 328-330creating, three image layers,
295-296gray tones, 222
color management, colorgamuts, 297-298
multiple printers, 305-306printing, 299-301printing RGB/CMYK,
302-304
Color Management Policiesoption, 279
color masks, CCD (charge-coupled device) image sen-sor, 18-20
Color Mode option (scan-ners), 181
color negative film, develop-ment process, 295-296
color negative printing paper,printing process, 296
Color Options option (Printdialog box), 129
color processes, 293-296
Color Range command (Selectmenu), 164-165
Color Range dialog box, 164
color reversal film, develop-ing, 296
Color Settings command (Editmenu), 279
Color Settings option (scan-ners), 182
Color Settings, CMYK Setupcommand (File menu), 305
Color Settings, WorkingSpaces command (Editmenu), 302
color space. See gamuts
color temperatures, measur-ing, 65
How can we make this index more useful? Email us at [email protected]
30 0789731207_index.qxd 4/6/04 2:16 PM Page 355
356 COLOR TRANSPARENCIES
color transparencies, fill light,319
ColorSync option (Print dia-log box), 129
columns, Single ColumnMarquee tool, 155-156
compatibility, Photoshop fileformats, 84-85
Complementary Metal OxideSemiconductor (CMOS), 4,20
component images, compos-ite images, 244-247
composite channels, 257
composite images, 244-247
compressionfile formats, 95Internet images, 339JPEG, YUV color space defini-
tion, 16JPEG2000 format, 90-91lossless, 87, 91lossy, JPEG (Joint
Photographics ExpertsGroup) file format, 86-88
RLE (Run Length Encoding)file format, 94
step by step, 88-90wavelet-based, JPEG2000 file
format, 90Web Photo Gallery, 342-343
compression artifacts, 86
CompuServe, GIF file format,82
Constrain feature, resizingimages (Apple iPhoto), 130-131
Contiguous option (MagicWand), 142
continuous autofocus, 55
contrast, image editing, 145-147
contrast/brightness, his-tograms, 205-217
conversion factors, lenses, 49
Convert Point tool, 162
converting pixels, RIP (RasterImage Processor), 189
Copies & Pages option (Printdialog box), 129
costs, digital versus film pho-tography, 7-9
crawling ants, turning off,335
Create Web Photo Gallerycommand (File menu), 339
Crop command (Imagemenu), 170
Crop tool, 170
cropping scanned images, 74
Cubic option (interpolation),187
curved paths, creating, 159-160
curves, 219-220adjustment layers, 231-232Bezier, 249-251S curves, 226
Curves dialog box, 226-231
cut film, 34
cyan, magenta, and yellow(CMY), subtractive colorprocesses, 293-296
cyan, magenta, yellow andblack. See CMYK
Ddark tones, correcting with
curves, 228-229
data loss, 106, 242-243
Daylight option (white bal-ance settings), 64
DCF (Design Rule for CameraFile Systems), 26
DCS (Desktop ColorSeparations) file formats, 83
DCT (Discrete CosineTransform), 88
defragmentation, 107-109
delays, capture delays, 13-14
Delete Anchor Point tool, 161
depth of field, 58-61
desaturation, convertingcolor images to black-and-white, 328-329
Deselect command (Selectmenu), 142-143, 154
Design Rule for Camera FileSystems (DCF), 27
Desktop Color Separations(DCS) file formats, 83
Despeckle filter, 200-201
Deutsche Industrie Norm(DIN) film rating system, 38
developing film, 295-296
device profiles, 299
devices, CCD (charge-coupleddevice), 4-5
diffused lighting, 307-309
digital camerascolor balance, 64-65color masks, 18-20DCF (Design Rule for Camera
File Systems), 26Direct Print, 26DPOF (Digital Print Order
Format), 27EXIF 2.2 (Exchange Image
Format), 24-26Exif Print, 26focal length lenses, 49-52formatting flash media,
108-109Foveon, 20limitations, 11-14, 17, 21-22media types, 5PictBridge, 26resolution, 176-177
30 0789731207_index.qxd 4/6/04 2:16 PM Page 356
FILE RECOVERY 357
versus CMOS(Complementary MetalOxide Semiconductor), 14-17, 20, 23-24
Digital ICE, 202
Digital Print Order Format(DPOF), 27
DIN (Deutsche IndustrieNorm) film rating system,38
direct lighting, 307-308
Direct Print, 26
directional lighting, 314
directional-diffused light, 309
Discard Layers and Save aCopy option (TIFF Optionsdialog box), 94
Discrete Consine Transform(DCT), 88
discussion groups (forums),film, 30-31
displays, viewing images, 282
distorting images, PhotoshopElements, 125
dithering, printers, 272
dots, halftone, 189
dots per inch (dpi), 175inkjet printers, 270output resolution, 176,
186-189
downloading PC InspectorFile Recovery, 99
dpi (dots per inch), 175inkjet printers, 270output resolution, 176,
186-189
DPOF (Digital Print OrderFormat), 27
drawing straight lines, Pentool, 248
Drive command (Objectmenu), 100
drivers, printers, 127
drives, 100-105
dust, removing, 201-203
Dust & Scratches filter, 201-203
DVDs, saving images to, 292
dye-sublimation printers, 270paper, 288scanning images for, 78settings, 273
EEdge Contrast option
(Magnetic Lasso tool), 155
EI (exposure index) film rat-ing system, 36
Elliptical Marquee tool, 144
Encapsulated PostScript (EPS)file format, 83
encoding, JPEG2000 file for-mat, 90-91
EPS (Encapsulated PostScript)file format, 83
Epson ink cartridges, 280
error diffusion, printers, 272
error resilience, JPEG2000 fileformat, 91
EXIF 2.2 (Exchange ImageFormat), 24-26
Exif Print, 26
expanding selections, 165-168, 335
exposurecolor film, 32portraits, 327troubleshooting, 210-217
exposure index (EI) film rat-ing system, 36
Ff-stop. See aperture
fast film speed, 39
FAT (File Allocation Table),103-108
FAT12 file system, 108
FAT16 file system, 108
FAT32 file system, 108
feathering selections, 168,259, 335
FFF7H flag, FAT (FileAllocation Table), 105
FFF8-FFFFH flag, FAT (FileAllocation Table), 105
File Allocation Table. See FAT
File Browser command(Window menu), 114
file formatsBMP, 82-83compression, 88-90, 95CT, 82-83DPOF (Digital Print Order
Format), 27EXIF 2.2 (Exchange Image
Format), 24-26GIF, 82-83JPEG, 339, 342-343JPEG2000 format, 90-95Photoshop, 82-83
compatibility, 84-85JPEG (Joint Photographics
Experts Group), 86-91PSD, 95TIFF (Tagged Image File
Format), 91-95Photoshop Elements, 82-88PNG, 82-83PST, 82-83PXR, 82-83RLE (Run Length Encoding),
94
file recovery, 97-98defragmentation, 107-109FAT (File Allocation Table),
103-106
How can we make this index more useful? Email us at [email protected]
30 0789731207_index.qxd 4/6/04 2:16 PM Page 357

358 FILES
PC Inspectory File Recovery,99-103
USB (Universal Serial Bus),109-110
filesstoring. See FAT (File
Allocation Table)TIFF, saving images as, 274
Fill command (Edit menu),155-156
fill lighting, 319-321
film35mm, 33, 76220, 34APS (Advanced Photo
System), 34black-and-white, 34color, 30-32color balance, 33-34, 66exposure latitude, 67-69forums (discussion groups),
30-31high-contrast, 34infrared, 34ISO ratings, 30light, responding to, 41-42overview, 29pixels, resolution, 178-179roll, 33scanning images, 178sheet, 34slide, color balance, 66speed, 35-41storing, 35technologies, 34
film development process,295-296
film photography versus digi-tal, 7-9
film scanners, printing largeimages, 282-284
Filter Processing option (scan-ners), 181
filters, 191blurs
adding, 198Bayer masks, 20
Gaussian Blur, 197-198halftone dots, removing,
197-198moiré patterns, removing,
197-198dust & scratches, 201Noise, 200-203unsharp mask, 192-197
Fireworks (Macromedia), creating Web images, 345
fisheye lenses, 52-53
flags, FAT (File AllocationTable), 105
flashfill light, adding, 321media, formatting, 108-109memory, 6
Flatten Image command(Layer menu), 241, 247, 332
flattening composite images,247
floodlights, adding fill light,321
Fluorescent option (whitebalance settings), 64
fluorite lenses, 14
fly-out menus, Selectiontools, 137
focal length, lenses, 46depth of field, 60-61digital cameras, 49-52normal, 47-48
focal length multiplier, 177
focusAF (automatic focus), 54-56depth of field, 58-61wide-area, 54
focus priority, 55
formats. See file formats
formatting flash media, 108-109
forums (discussion groups),film, 30-31
Foveon, CCD (charge-coupleddevice) image sensor, 20
Free Tranform tool, 124-125
Free Transform command(Edit menu), 124, 262
Freeform Pen tool, 160
Frequency option (MagneticLasso tool), 155
Friends of Photography Website, 344
front lighting, 316
full diffused light, 309
full-frame fisheye lenses, 52
Fuzziness setting (ColorRange dialog box), 164
Ggalleries
online, 343-345photo, creating, 290-292Web Photo Gallery, 339-343
gammas, monitors (Internetimages), 341
Gamut Warning feature, 302-304
gamutscolor management, 297-306determining, Photoshop, 279definition, digital camera lim-
itations, 15-17human vision, 298troubleshooting, 303
Gaussian Blur filter, 197-198
General Blending option(Layer Style dialog box),239
George Eastman House Website, 344
GIF (Graphics InterchangeFormat) file format, 82
Google Web site, 343
grainfilm speed, 37-39removing, 200-201
30 0789731207_index.qxd 4/6/04 2:16 PM Page 358
IMAGES 359
Graphics Interchange Format(GIF) file format, 82
graphics. See also images;photos
graphs, bar (histograms),207-217, 221-223
gray tones, color images, 222
gray slider triangle, 225
grayscale imagesconverting to black-and-
white, 328-329masks, 259
Group with Previous com-mand (Layer menu), 243
grouping layers, 243
Grow command (Selectmenu), 166
Hhalftone cells, 189
halftone dots, 189, 197-198
halftone screens, lines perinch (lpi), 188
hiding selections, 163
high-contract film, 34
high-side lighting, 316
highlighting digital cameralimitations, 23-24
Histogram command (Imagemenu), 207, 221
histograms, 221exposure problems, 210-217fixing, images, 223image editing, 148levels, 222-223pixels, adjusting, 207-209
hue/saturationimage editing, 148red-eye, fixing, 332-333
Hue/Saturation command(Adjust menu), 165
IICC profiles, third-party ink,
277-279
iDVD authoring software,292
Image CompressionJPEG option (TIFF Options
dialog box), 92LZW option (TIFF Options dia-
log box), 92None option (TIFF Options
dialog box), 91ZIP option (TIFF Options dia-
log box), 92
image editingbrightness/contrast, 145-147color balance, 148-149Selection tools, 133-136,
151-152fly-out menus, 137Lasso tools, 139, 142-143Magic Wand, 138-140Magnetic Lasso tool,
154-155Marquee tools, 138,
143-144modifying images, 140Pen tools, 157-162Polygonal Lasso tool,
153-154Quick Mask, 156-157resizing images, 136-137saving selections, 163Single Column Marquee
tool, 155-156Single Row Marquee tool,
155-156toolbox, 137troubleshooting, 163-170
image-editing applicationsApple iPhoto
launching, 126locating, 114-115Print dialog box, 127-130
resizing, 130-131white borders, 128
Photoshop Elementsfeatures, 116Free Transform tool,
124-125locating, 114Magnetic Lasso tool,
170-171perspective corrections,
121-122printing resolution, 116resampling images,
118-121rescanning images, 119resizing, 116-118rotation, 122-124Save Selection command,
170-171Selection Brush, 170-171
troubleshooting, 265-266
image layer masks, 252
image layersblending, 238-239color images, creating,
295-296creating, 237-238opacity, 238-239
Image Size dialog box, 117-118
ImageReady (Adobe), creat-ing Web images, 345
images. See also photosadding people via layers,
241-242background, component
image selections, 247black-and-white, converting
color images to, 328-330color
converting to black-and-white, 328-330
creating, three image layers, 295-296
gray tones, 222component, composite
images, 244-247
How can we make this index more useful? Email us at [email protected]
30 0789731207_index.qxd 4/6/04 2:16 PM Page 359
360 IMAGES
composite, 244-247creating, Internet, 338-339editing, 136, 177fixing histograms, 223grayscale, masks, 259importing, 274large, printing, 282-284locating, 114-115merging, 262-263pixels, selecting, 164-165printer settings, 273printing, resolution, 177resizing, Selection tools,
136-137saving
CD-ROM, 288-292DVDs, 292TIFF files, 274
saving to CD-ROMs, 80saving to CDs, 79scaling, 245scanned, cropping, 74scanning, 71-72
film, 178step by step, 74-79
viewing, monitors, 282
Import command (File menu),73, 84
importingimages, 274plug-ins, scanning software,
73RAW file formats, 84
indoor available light, 312-313
Info command (Windowmenu), 215
Info palette, accessing, 215
infrared film, 34
ink, printer resolution, 275-276
Epson, 280ICC profiles, 277-279photo paper, 281-282
inkjet printersdpi (dots per inch), 270error diffusion, 272
scanning images for, 78settings, 273
Input levels, 225
input resolutionbit depth, 183-186digital cameras, 176-177film pixels, 178-179scanner software, 180-183
inspectors, PC Inspector FileRecovery, 99-103
interactivity, CD-ROMs, 290
International Center forPhotography Web site, 344
International ColorConsortium Web site, 277
International Organizationfor Standardization (ISO)film rating system, 36
Internet, 337displaying photos, 6images, creating, 338-339online galleries, 343-345resources, 343-344scanning images for, 77Web Photo Gallery, 339-343
interpolation, 117output resolution, 186-188software, Bayer masks, 19
Inverse command (Selectmenu), 142-143, 167
inverting masks, 261
iPhoto (Apple)images
locating, 114-115resizing, 130-131white borders, 128
launching, 126Print dialog box, 127-130
iPhoto option (Print dialogbox), 130
ISO (InternationalOrganization forStandardization) film ratingsystem, 36
ratings, 30size (paper), 287
JJEITA (Japan Electronics and
Information TechnologiesIndustries Association), 24
JPEG (Joint PhotographicsExperts Group) file format,82, 86-88
compressionstep by step, 88-90Web Photo Gallery,
342-343YUV color space defini-
tion, 16Internet images, 339JPEG2000 format, 90-91
JPEG2000 file format, 90-91
KKelvin scales, measuring
color temperatures, 65
key lights, 315-318
Kirlian Web site, 344
Kodak Photo CD, 79
Kodak Picture CD, 79
LLAB mode, converting color
images to black-and-white,329
laser printers, scanningimages for, 79
Lasso tools, 139, 142-143
latitude, 63, 66-69
Layer Compression: RLEoption (TIFF Options dialogbox), 94
Layer Compression: ZIPoption (TIFF Options dialogbox), 94
layer masks, 252-253
30 0789731207_index.qxd 4/6/04 2:16 PM Page 360

MANUFACTURERS 361
layer sets, compatibility(Photoshop file formats), 85
Layer Style dialog box, 238-239
layers, 235adjustment, 236-237
color banding, 242-243curves/levels, 231-232data loss, 242-243images, printing without
color management, 301adjustment layer masks, 263collages, 239-241compatibility, Photoshop file
formats, 84-85composite images, 244-247creating, 331grouping, 243image
adding people, 241-242blending, 238-239color images, 295-296creating, 237-238opacity, 238-239
merging, 240naming, 238opacity, 238red-eye, fixing, 331-332resolution, 241-242saving, 241selecting, Pen tool, 247-252semitransparent, 238storing, 237type, 236
Layers command (Windowmenu), 331
Layers palette, accessing, 237
Layers tab, 331
Layout option (Print dialogbox), 129
Leica Web site, 14
lensesAF (automatic focus), 54-56catadioptric, 54conversion factors, 49depth of field, 58-61
digital camera limitations, 14-15
fisheye, 52-53focal length, 46
depth of field, 60-61digital cameras, 49-52normal, 47-48
macro, 53perspective-control, 53soft-focus, 53tele-extenders, 51telephoto, 51terminology, 14
levels, 219adjustment layers, 231-232Auto Levels feature, 220color images, gray tones, 222histograms, 222-223images, fixing histograms,
223Input, 225Output, 225slider triangles, 224-225
Levels dialog box, 207, 214,221, 225
Library of Congress Printsand Photographs ReadingRoom Web site, 344
light tones, correcting withcurves, 229
lightingartificial, 313-314, 320available, 310-313, 320back, 319depth of field, 60-61diffusion, 307-309directional, 314fill light, 319-321film responses, 41-42film speed, 35-41frontal, 316high-side, 316key lights, 315-318portraits, 325-327side, 318specular (direct), 307-308
top, 317under, 317
line art, printing, 274
line screen, printing presses,188
lines, drawing, 248
lines per inch (lpi), 175, 188
Load Selection command(Select menu), 171, 261
logical drives, 105
long focal-length lenses, digital cameras, 49-51
lossless compression, 87, 91
lossless encoding, JPEG2000file format, 90
lossy compression, JPEG(Joint Photographics ExpertsGroup) file format, 86-91
lpi (lines per inch), 175, 188
Lura Tech Web site, 90
MMacintosh, gammas (Internet
images), 341
macro lenses, 53
Macromedia Fireworks, creat-ing Web images, 345
Magic Wand, 138-140
Magnetic Lasso tool, 139,154-155, 170-171
magnificationlens focal length, 46-47uncropped 35mm film, 76
main lights. See key lights
managing colors, colorgamuts, 297-299
multiple printers, 305-306printing, 299-304
managing layers, 240-241
manufacturers, Internetresources, 344
How can we make this index more useful? Email us at [email protected]
30 0789731207_index.qxd 4/6/04 2:16 PM Page 361
362 MARQUEE TOOLS
Marquee tools, 138Elliptical Marquee tool, 144Rectangular Marquee tool,
143
masksadjustment layer masks, 263color, 18-20, 259grayscale images, 259inverting, 157, 261layer, 252-253opacity, 259Quick Mask, 156-157, 264selections, 257-259storing. See alpha channelsunsharp mask filter, 192-197visibility, 259-263
master boot records, FAT (FileAllocation Table), 104
mediadigital cameras, 5flash memory, 6
medium film speed, 39
megapixels, 175
memory, flash, 6
Merge Down command(Layer menu), 240
Merge Visible command(Layer menu), 241
mergingimages, 262-263layers, 240
micro lenses (macro lenses),53
Microsoft Windows, gammas(Internet images), 341
mirror lenses, 54
Mode command (Imagemenu), 163
Mode8 bits/channel command
(Image menu), 184-186
CMYK Color command(Image menu), 305
Grayscale command (Imagemenu), 328-329
LAB command (Image menu),329
RGB Color command (Imagemenu), 257
modesLAB mode, converting color
images to black-and-white,329
Quick Mask, 260-261
Modify, Border command(Select menu), 167
Modify, Contract command(Select menu), 166
moiré patterns, removing,197-198
monitorscolor reproduction, color
management, 297-306gammas (Internet images),
341images, viewing, 282
multimedia, CD-ROMs, 289
multiple printers, color man-agement, 305-306
Museum of ContemporaryArt Web site, 344
museums, Internet resources,344
Nnaming layers, 238
National Press PhotographersAssociation (NPPA) Website, 343
navigation buttons, creating,291
Nearest neighbor option(interpolation), 187
negative color films, 295
negative film, 31color balance, 66exposure latitude, 67professional, 32
New Adjustment Layer,Curves command (Layermenu), 231-232
New Adjustment Layer,Levels command (Layermenu), 231
New Channel icon, 262
New dialog box, 277
New Layer command (Layermenu), 237
New Layer icon, 237
Nikon Web site, 14, 344
noise, adding, 335
Noise filters, 200-203
Noise, Add Noise command(Filter menu), 335
Noise, Despeckle command(Filter menu), 200
Noise, Dust & Scratches com-mand (Filter menu), 203
normal focal-length lenses,47-48
NPPA (National PressPhotographers Association)Web site, 343
Oobjects, vector, 249
offset printers, scanningimages for, 79
online galleries, 343-345
opacitylayers, 238-239masks, 259
Open Drive icon, 100
Options, Files command(Object menu), 102, 106
outdoor available light, 310-312, 320
Output levels, 225
Output Options option (Printdialog box), 129
30 0789731207_index.qxd 4/6/04 2:16 PM Page 362
PIXELS 363
output resolution, 176digital cameras, 177interpolation, 186-188printing presses, 188-189
Output Resolution option(scanners), 181
overexposure, portraits, 327
Ppalettes
Channels, accessing, 163,257
Info, accessing, 215Layers, accessing, 237Paths, accessing, 157, 248
paper, 285archival paper, 288dye-sublimation printers, 288ISO size, 287multiple printers, color man-
agement, 305-306photo paper, 281-282,
286-287plain paper, 287
Paper Handling option (Printdialog box), 129
passive tracking system, AF(autofocus), 56
pathsclipping, 252compatibility, Photoshop file
formats, 85creating, 157-162, 247-251curved, creating, 159-160saving, 248
Paths command (Windowmenu), 157
Paths palette, accessing, 157,248
patterns, moiré, 197-198
PC Inspector File Recovery,99-103
PCX file format, 83
PDF (Portable DocumentFormat) file format, 82
Pen tool, layer selections, 247drawing straight lines, 248paths, 249-252
people, adding to images,241-242
perspective, correcting(Photoshop Elements), 121-122
perspective-control lenses, 53
Photo District News Web site,343
photo galleries, creating, 290-292
photo paper, 281-282, 286-287
photography, Internetresources, 343
photos. See also imagescolor, converting to black-
and-white, 328-330displaying, Internet, 6exposure, 327lighting, 325-327red-eye, fixing, 330-335
Photoshopcolor space, determining,
279EPS file format, 83EXIF 2.2 (Exchange Image
Format), 24-26file formats, 82-83
compatibility, 84-85JPEG (Joint Photographic
Experts Group), 86-91PSD, 95TIFF (Tagged Image File
Format), 91-95navigation buttons, creating,
291PDF file format, 82
Photoshop DCS 1.0 file format, 83
Photoshop DCS 2.0 file format, 83
Photoshop Elementsfeatures, 116file formats, 82-83
compatibility, 84-85JPEG (Joint Photographic
Experts Group), 86-91PSD, 95TIFF (Tagged Image File
Format), 91-95images
Free Transform tool, 124-125
locating, 114perspective corrections,
121-122resampling, 118-121rescanning, 119resizing, 116-118rotating, 122-124
Magnetic Lasso tool, 170-171
printing resolution, 116Save Selection command,
170-171Selection Brush, 170-171
physical drives, 105
PICT file format, 83
PictBridge, 26
pictures. See also images;photos
Pinhole Visions, The Art ofPinhole Photography Website, 344
Pixar file format, 82
pixels. See also resolutionadjusting, 21-22, 207-209converting, RIP (Raster Image
Processor), 189film, resolution, 178-179interpolation, output resolu-
tion, 186-188megapixels, 175samples per inch, 175selecting, 164-165virtual, Bayer masks, 19
How can we make this index more useful? Email us at [email protected]
30 0789731207_index.qxd 4/6/04 2:16 PM Page 363
364 PIXELS PER INCH (PPI)
pixels per inch (ppi), 174, 271input resolution
bit depth, 183-186digital cameras, 176-177film pixels, 178-179scanner software,
180-183resolution, 273-274
film scanners, 282-284ink, 275-282monitors, 282
settings, 273
plain paper, 287
plug-insICC profiles, third-party ink,
277-279software, scanning, 73
PNG file format, 83
Polaroid Web site, 344
Polygonal Lasso tool, 139,153-154
Portable Document Format(PDF) file format, 82
portrait lenses, 53
portraits. See also images;photos
positive (reversal) color films,295
ppi (pixels per inch), 174, 271input resolution
bit depth, 183-186digital cameras, 176-177film pixels, 178-179scanner software,
180-183resolution, 273-274
film scanners, 282-284ink, 275-282monitors, 282
settings, 273
Print command (File menu),127
Print dialog box, 127-130
Print Size option (scanners),182
printersCMYK, 271color reproduction, color
management, 297-306dithering, 272drivers, 127dye-sublimation, 78, 270,
288error diffusion, 272inkjet, 78, 270laser, scanning images for, 79multiple, color management,
305-306offset, scanning images for,
79ppi (pixels per inch) ratings,
271-284resolution, 269, 273-282settings, 273
printingimages, resolution, 177large images, 282-284line art, 274paper, 285-288resolution, Photoshop
Elements, 116
printing presses, output reso-lution, 188-189
printing process, 296
professional film, 31-32
profiles, device profiles, 299
Proof Setup, Macintosh RGBcommand (View menu), 341
Proof Setup, Windows RGBcommand (View menu), 341
PSD Photoshop file format,95
Q-RQuality & Media option (Print
dialog box), 129
Quick Mask, 156-157, 260-261, 264
Radius option, 193, 196, 201-203
Raster Image Processor (RIP),189
rating systems, film speed,36-38
RAW file format, 82, 84
recovering files, 97-98defragmentation, 107-109FAT (File Allocation Table),
103-106PC Inspector File Recovery,
99-103USB (Universal Serial Bus),
109-110
Rectangular Marquee tool,143
red, green, and blue. See RGB
red eye, fixing, 330channels, 333-335layers, 331-333
Redo feature, 135
reflectors, adding fill light,320-321
relative aperture, 60
Remove Hardware button,109
resamplingbicubic, 245images, Photoshop Elements,
118-121
rescanning images,Photoshop Elements, 119
Reselect command (Selectmenu), 163
Resize, Image command(Image menu), 117, 120
Resize, Scale command(Image menu), 125
resizing imagesApple iPhoto, 130-131Photoshop Elements,
116-118Selection tools, 136-137
30 0789731207_index.qxd 4/6/04 2:16 PM Page 364
SELECTION TOOLS 365
resolution, 173collages, 240defined, 174digital camera limitations,
14-15dpi (dots per inch), 175dye-sublimation printers, 78images, 177inkjet printers, 78input
bit depth, 183-186digital cameras, 176-177film pixels, 178-179scanner software,
180-183large images, printing,
282-284laser printers, 79layers, 241-242line art, printing, 274lpi (lines per inch), 175megapixels, 175monitors, 282offset printers, 79output, 176, 186-189ppi (pixels per inch), 174printers, 269, 273-282printing, Photoshop Element,
116samples per inch, 76-77, 175
resources, Internet, 343-344
reversal (positive) color films,295
reversal film, 31color balance, 66exposure latitude, 67-69professional, 32
Revert command (File menu),193
RGB (red, green, and blue)additive color processes,
293-294bit depth, 183color channels, 255-257color space definition, 15-16printing, color management,
302-304
RIP (Raster Image Processor),189
RLE (Run Length Encoding)file format, 94
roll film, 33
rotating images, PhotoshopElements, 122-124
rows, Single Row Marqueetool, 155-156
Run Length Encoding (RLE)file format, 94
SS curves, 226
Safely Remove Hardware dia-log box, 110
samples per inch, 76-77, 175
saturation/hue, image edit-ing, 148, 332-333
Save As command (Filemenu), 277
Save As dialog box, 277
Save for Web command (Filemenu), 342
Save for Web dialog box, 342
Save Image Pyramid option(TIFF Options dialog box),93
Save Selection command(Select menu), 163, 170-171,246, 261
Save Transparency option(TIFF Options dialog box),93
saved selections, compatibili-ty (Photoshop file formats),85
savingediting images, 136images
CD-ROM, 80, 288-292CDs, 79
DVDs, 292TIFF files, 274
layers, 241paths, 248selections, 163, 259
scalabilitycollages, 240images, 125, 245JPEG2000 file format, 90
scanners, 71-72large images, printing,
282-284options, 181-182software, 73, 180-186step-by-step scans, 74-79
scanning drives, PC InspectorFile Recovery, 100-103
scanning imagescropping, 74film, 178
Scheduler option (Print dia-log box), 129
Schneider Web site, 14
Scitex CT (Continuous Tone)file format, 83
scratches, removing, 201-203
screens, halftone, 188
search engines, Internetresource, 343
sectors, FAT (File AllocationTable), 104
Select Directory dialog box,102
Select Drive dialog box, 100
Select Sector Range dialogbox, 101
Selection Brush, 170-171
Selection tools, 133, 135, 151-152
fly-out menus, 137Lasso tools, 139, 142-143Magic Wand, 138-140Magnetic Lasso tool,
154-155
How can we make this index more useful? Email us at [email protected]
30 0789731207_index.qxd 4/6/04 2:16 PM Page 365
366 SELECTION TOOLS
Marquee tools, 138, 143-144modifying images, 140Pen tools, 157-162Polygonal Lasso tool,
153-154Quick Mask, 156-157resizing images, 136-137saving selections, 163Single Column Marquee tool,
155-156Single Row Marquee tool,
155-156toolbox, 137troubleshooting, 163
antialiasing selections, 168Color Range command,
164-165Crop tool, 170feathering selections, 168selection modifications,
165-168
selectionscompatibility, Photoshop file
formats, 85creating, masks, 257-258expanding, 335expanding/shrinking,
165-168feathering, 259, 335hiding/showing, 163layers, Pen tool, 247-252restoring, 163saving as masks, 259
semitransparent layers, 238
sensitivity specks, 41
sensor resolution, digitalcameras, 176-177
sensors, CCD (charge-coupleddevice), 17-20
shadows, fill light, 319-321
Sharpen, Unsharp Mask com-mand (Filter menu), 193,196
sheet film, 34
short focal-length lenses, digital cameras, 51-52
Show Channels command(Window menu), 330
Show Layers command(Window menu), 237
Show, Selection Edges com-mand (Select menu), 168
Show, Selection Edges com-mand (View menu), 163
showing selections, 163
shrinking selections, 165-168
side lighting, 318
silver halide crystals, 41
Similar command (Selectmenu), 167
Single Column Marquee tool,155-156
Single Row Marquee tool,155-156
single-shot autofocus, 55
sites. See Web sites
skewing images, PhotoshopElements, 125
slide film, 31color balance, 66developing, 296
sliders triangles (levels), 224-225
slow film speed, 41
soft-focus lenses, 53
softboxes, artificial light, 314
softwareAdobe Gamma, 297Adobe ImageReady, creating
Web images, 345authoring, 292image-editing, troubleshoot-
ing, 265-266interpolation, Bayer masks,
19Macromedia Fireworks, creat-
ing Web images, 345scanners, 73, 180-186
Special Effects option (Printdialog box), 130
specular lighting (direct), 307-308
speed, film, 30, 35-41
sRGB color space definition,15
standard focal-length lenses,47-48
Stop a Hardware Device dialog box, 110
storingfiles. See FAT (File Allocation
Table)film, 35layers, 237masks. See alpha channels
subtractive color processes,293-296
Summary option (Print dialogbox), 130
TTagged Image File Format
(TIFF), 83, 91-95
TARGA file format, 82
tele-extenders, 51
teleconverters, lenses, 51
telephoto lenses, 51
tenting, diffused light, 308
text layers, compatibility(Photoshop file formats), 85
third-party ink, printer reso-lution, 276
Epson, 280ICC profiles, 277-279photo paper, 281-282
Threshold option, 193, 196,201-203
thumbnails, color channels,257
30 0789731207_index.qxd 4/6/04 2:16 PM Page 366
WEB SITE BUTTONS 367
TIFF (Tagged Image FileFormat), 83, 91-95, 274
TIFF Options dialog box, 91-94
Tolerance option (MagicWand), 141
tones, correcting with curves,228-229
toolbox, Selection tools, 137
toolsAdd Anchor Point, 161Clone Stamp, removing dust
& scratches, 203Convert Point, 162Delete Anchor Point, 161Free Transform, 124-125Freeform Pen, 160Magnetic Lasso, 170-171Marquee, 138, 143-144Pen, layer selections,
247-525Selection, 133-135, 151-152
fly-out menus, 137Lasso tools, 139, 142-143Magic Wand, 138-140Magnetic Lasso tool,
154-155Marquee tools, 138,
143-144modifying images, 140Pen tools, 157-162Polygonal Lasso tool,
153-154Quick Mask, 156-157resizing images, 136-137saving selections, 163Single Column Marquee
tool, 155-156Single Row Marquee tool,
155-156toolbox, 137troubleshooting, 163-170
top lighting, 317
tracking system, AF (autofo-cus), 56
Transform, Distort command(Edit menu), 125
Transform, Free Transformcommand (Image menu),122-124
Transform, Perspective com-mand (Edit menu), 122
Transform, Scale command(Edit menu), 247
Transform, Skew command(Edit menu), 125
transparencies, color, 319
transparency film, 31
triangles, sliders (levels), 224-225
troubleshootingexposure, 210-217gamut, 303image-editing software,
265-266images, histograms, 223red eye, fixing, 330-335Selection tools, 163
antialiasing selections, 168Color Range command,
164-165Crop tool, 170feathering selections, 168selection modifications,
165-168
true fisheye lenses, 52
Tungsten option (white bal-ance settings), 64
type layers, 236
Uumbrella reflectors, artificial
light, 314
under lighting, 317
underexposure, portraits, 327
Undo feature, 135-136
Universal Serial Bus (USB),file recovery, 109-110
Unsharp Mask filter, 192-197
USB (Universal Serial Bus),file recovery, 109-110
Vvector objects, paths, 249
view angles, lens focallength, 47
viewingcolor channels, 256-257images, monitors, 282
virtual pixels, Bayer masks,19
visibility, masks, 259-263
Wwavelet-based compression,
JPEG2000 file format, 90
Web browsers, locatingimages, 114-115
Web Photo Gallery, 339-343
Web sitesCanon, 14Google, 343International Color
Consortium, 277Kirlian, 344Leica, 14Lura Tech, 90museums, 344Nikon, 14, 344PC Inspector File Recovery, 99Photo District News, 343Pinhole Visions, The Art of
Pinhole Photography, 344Polaroid, 344Schneider, 14tips for creating, 338-339Wilhelm Imaging Research,
288Yahoo!, 343Zeiss, 14
Web site buttons, 291
How can we make this index more useful? Email us at [email protected]
30 0789731207_index.qxd 4/6/04 2:16 PM Page 367

368 WHITE BALANCE
white balance, setting, 64
white borders, images (AppleiPhoto), 128
white points, setting, 212-214
white slider triangle, 225
wide-angle lenses, 51-52
wide-area focus, 54
Width option (MagneticLasso tool), 154
Wilhelm Imaging ResearchWeb site, 288
Windowsdefragmentation, 107gammas (Internet images),
341
Windows Bitmap (BMP) fileformat, 83
Working Spaces option, 279
X-ZYahoo! Web site, 343
YUV color space (YCbCr), 15-16, 88
Zeiss Web site, 14
Zoom In command (Viewmenu), 198
zooming, 198
30 0789731207_index.qxd 4/6/04 2:16 PM Page 368