Embed Size (px)
Citation preview
Learning Administration Introduction Access, navigate, and search for information
within SuccessFactors Learning.
Learning Administration Introduction: Personalize Your Admin Experience
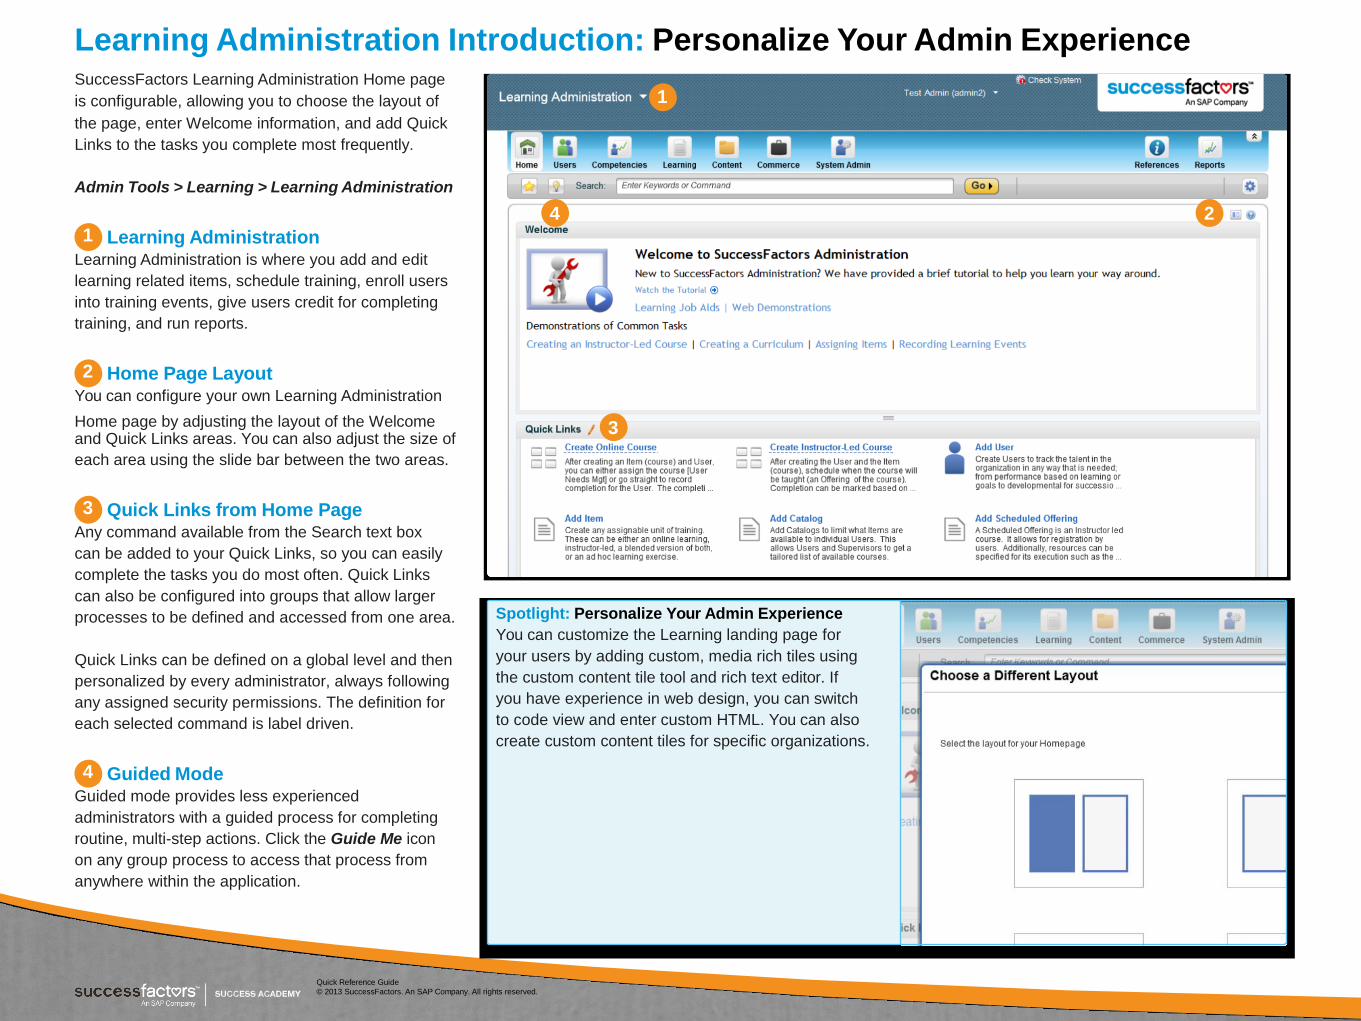
SuccessFactors Learning Administration Home page
is configurable, allowing you to choose the layout of 1
the page, enter Welcome information, and add Quick
Links to the tasks you complete most frequently.
Admin Tools > Learning > Learning Administration
4 2 1 Learning Administration
Learning Administration is where you add and edit
learning related items, schedule training, enroll users
into training events, give users credit for completing
training, and run reports.
2 Home Page Layout You can configure your own Learning Administration
Home page by adjusting the layout of the Welcome 3 and Quick Links areas. You can also adjust the size of
each area using the slide bar between the two areas.
3 Quick Links from Home Page
Any command available from the Search text box
can be added to your Quick Links, so you can easily
complete the tasks you do most often. Quick Links
can also be configured into groups that allow larger
processes to be defined and accessed from one area.
Quick Links can be defined on a global level and then
personalized by every administrator, always following
any assigned security permissions. The definition for
each selected command is label driven.
4 Guided Mode Guided mode provides less experienced
administrators with a guided process for completing
routine, multi-step actions. Click the Guide Me icon
on any group process to access that process from
anywhere within the application.
Spotlight: Personalize Your Admin Experience
You can customize the Learning landing page for
your users by adding custom, media rich tiles using
the custom content tile tool and rich text editor. If
you have experience in web design, you can switch
to code view and enter custom HTML. You can also
create custom content tiles for specific organizations.
Quick Reference Guide
© 2013 SuccessFactors. An SAP Company. All rights reserved.
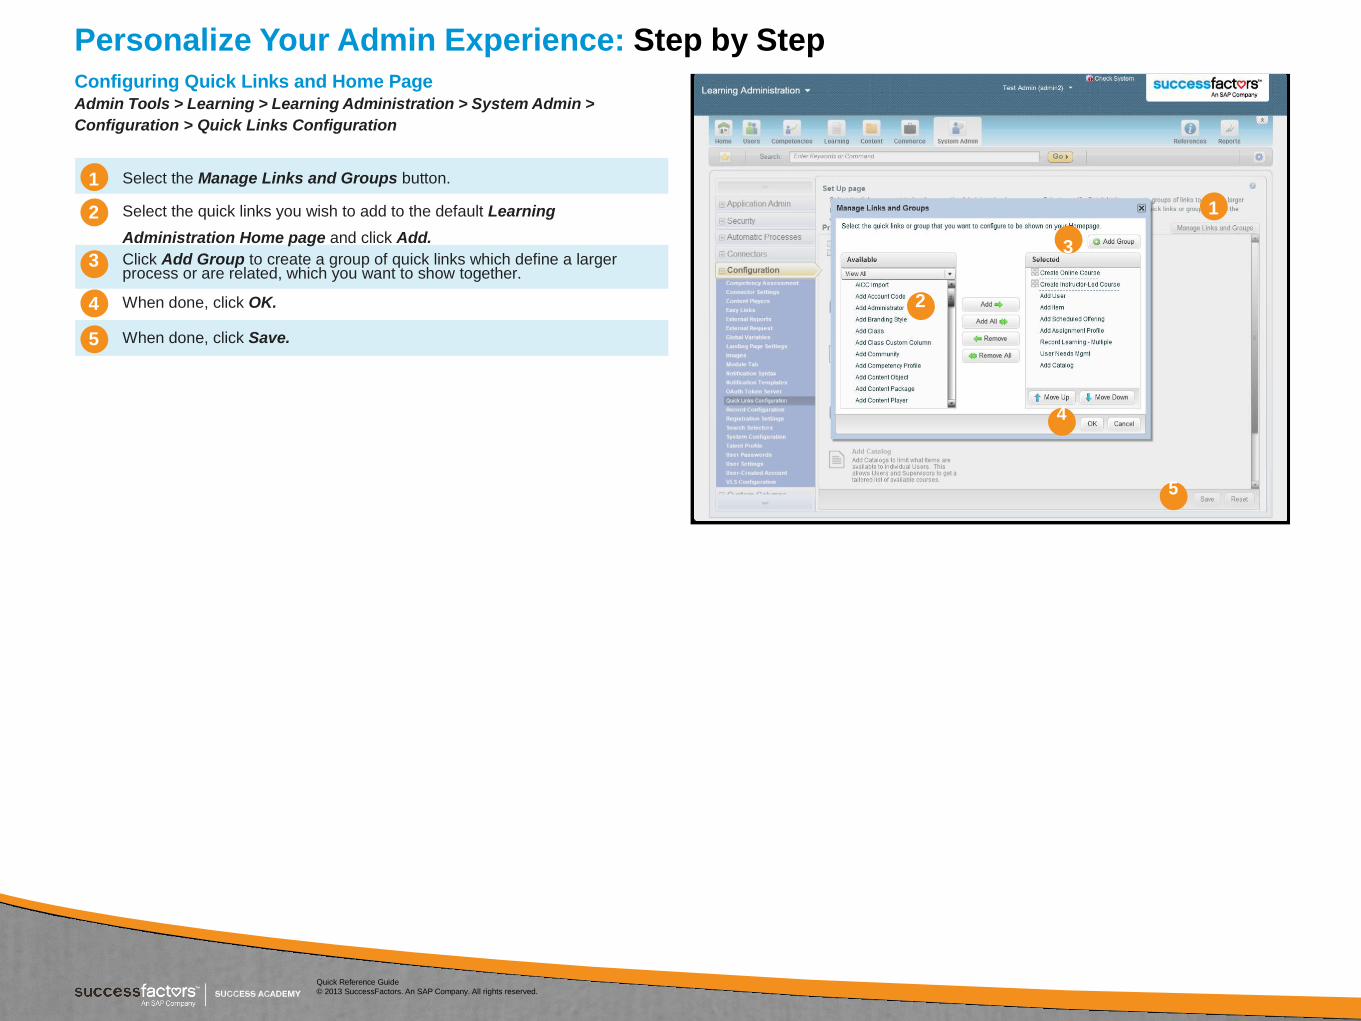
Personalize Your Admin Experience: Step by Step
Configuring Quick Links and Home Page Admin Tools > Learning > Learning Administration > System Admin >
Configuration > Quick Links Configuration
1 Select the Manage Links and Groups button.
2 Select the quick links you wish to add to the default Learning 1
Administration Home page and click Add. 3
3 Click Add Group to create a group of quick links which define a larger process or are related, which you want to show together.
4 When done, click OK. 2
5 When done, click Save.
4
5
Quick Reference Guide
© 2013 SuccessFactors. An SAP Company. All rights reserved.
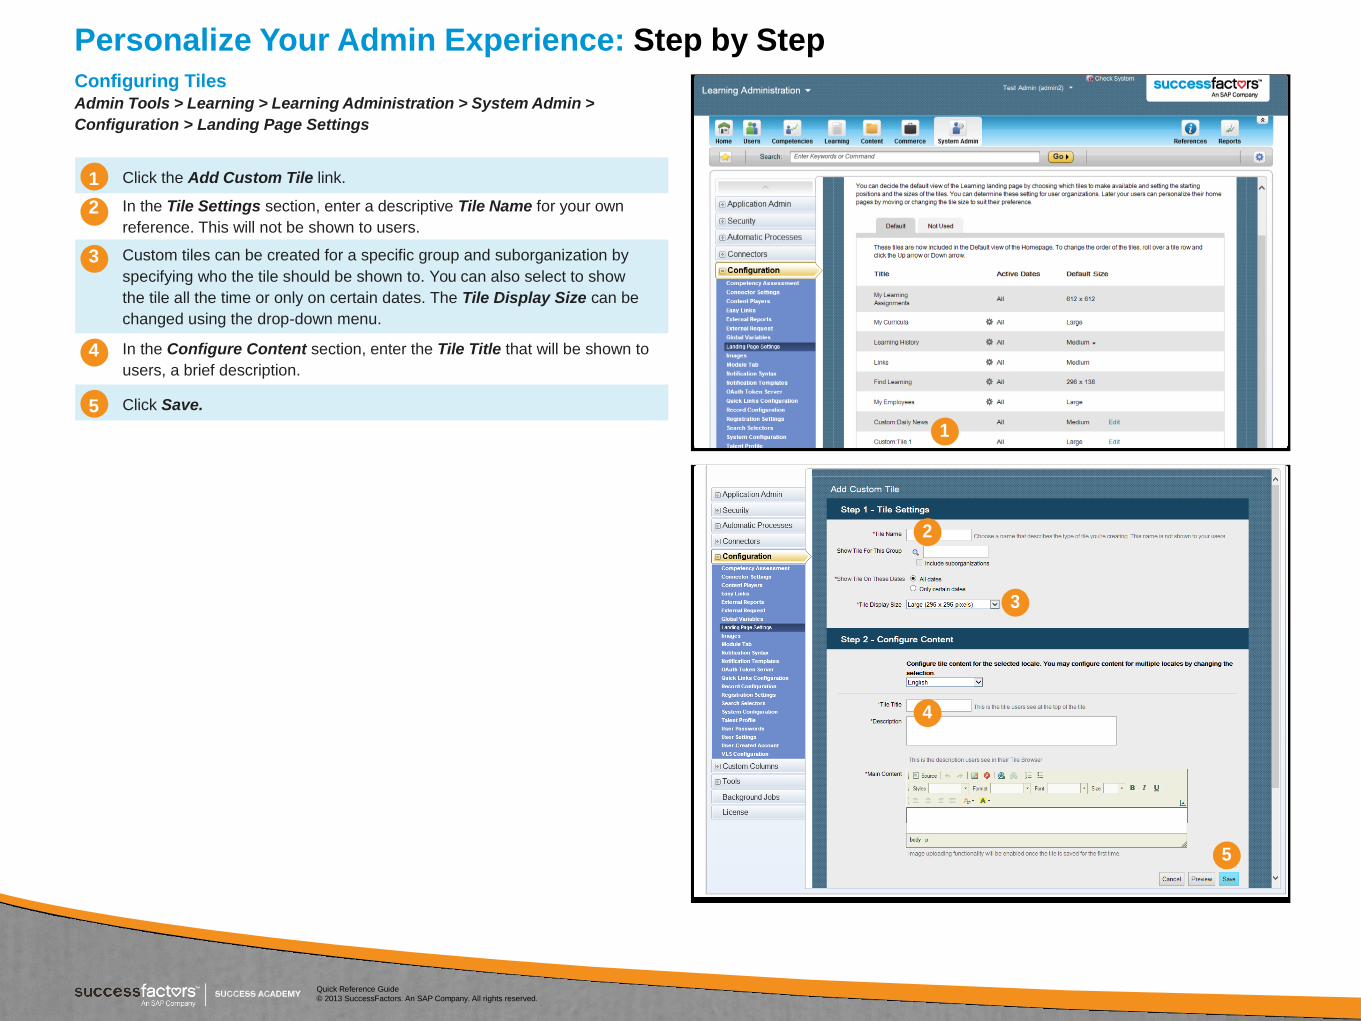
Personalize Your Admin Experience: Step by Step
Configuring Tiles Admin Tools > Learning > Learning Administration > System Admin >
Configuration > Landing Page Settings
1 Click the Add Custom Tile link.
2 In the Tile Settings section, enter a descriptive Tile Name for your own
reference. This will not be shown to users.
3 Custom tiles can be created for a specific group and suborganization by
specifying who the tile should be shown to. You can also select to show
the tile all the time or only on certain dates. The Tile Display Size can be
changed using the drop-down menu.
4 In the Configure Content section, enter the Tile Title that will be shown to
users, a brief description.
5 Click Save.
1
2
3
4
5
Quick Reference Guide
© 2013 SuccessFactors. An SAP Company. All rights reserved.
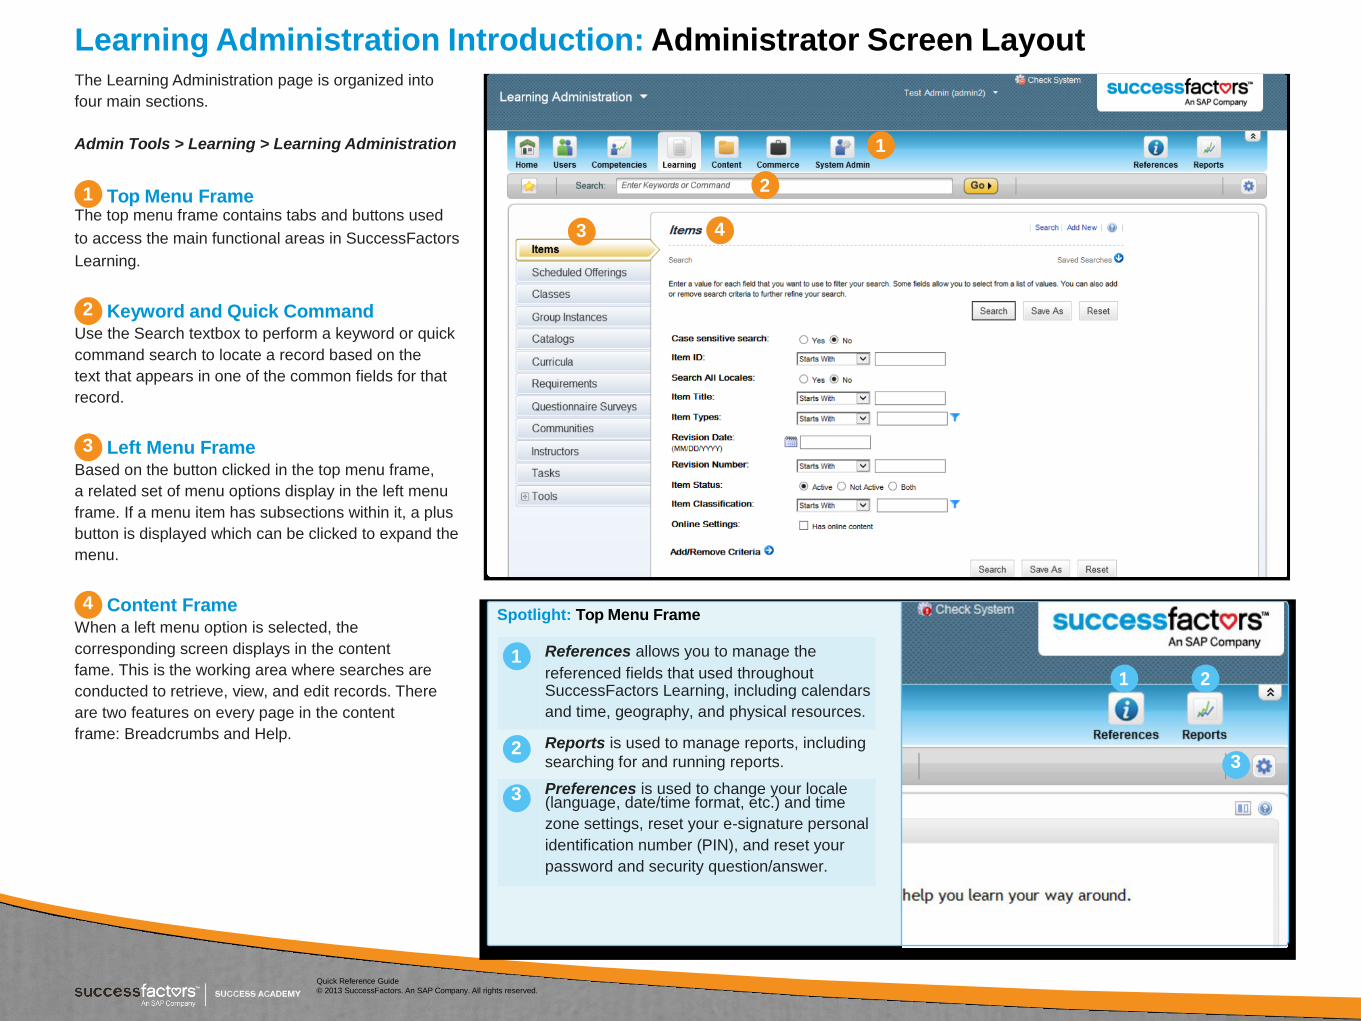
Learning Administration Introduction: Administrator Screen Layout The Learning Administration page is organized into
four main sections.
Admin Tools > Learning > Learning Administration 1
1 Top Menu Frame 2
The top menu frame contains tabs and buttons used
to access the main functional areas in SuccessFactors 3 4
Learning.
2 Keyword and Quick Command
Use the Search textbox to perform a keyword or quick
command search to locate a record based on the
text that appears in one of the common fields for that
record.
3 Left Menu Frame Based on the button clicked in the top menu frame,
a related set of menu options display in the left menu
frame. If a menu item has subsections within it, a plus
button is displayed which can be clicked to expand the
menu.
4 Content Frame When a left menu option is selected, the
corresponding screen displays in the content
fame. This is the working area where searches are
conducted to retrieve, view, and edit records. There
are two features on every page in the content
frame: Breadcrumbs and Help.
Spotlight: Top Menu Frame
1 References allows you to manage the
referenced fields that used throughout 1 2 SuccessFactors Learning, including calendars
and time, geography, and physical resources.
2 Reports is used to manage reports, including
searching for and running reports. 3
3 Preferences is used to change your locale (language, date/time format, etc.) and time
zone settings, reset your e-signature personal
identification number (PIN), and reset your
password and security question/answer.
Quick Reference Guide
© 2013 SuccessFactors. An SAP Company. All rights reserved.
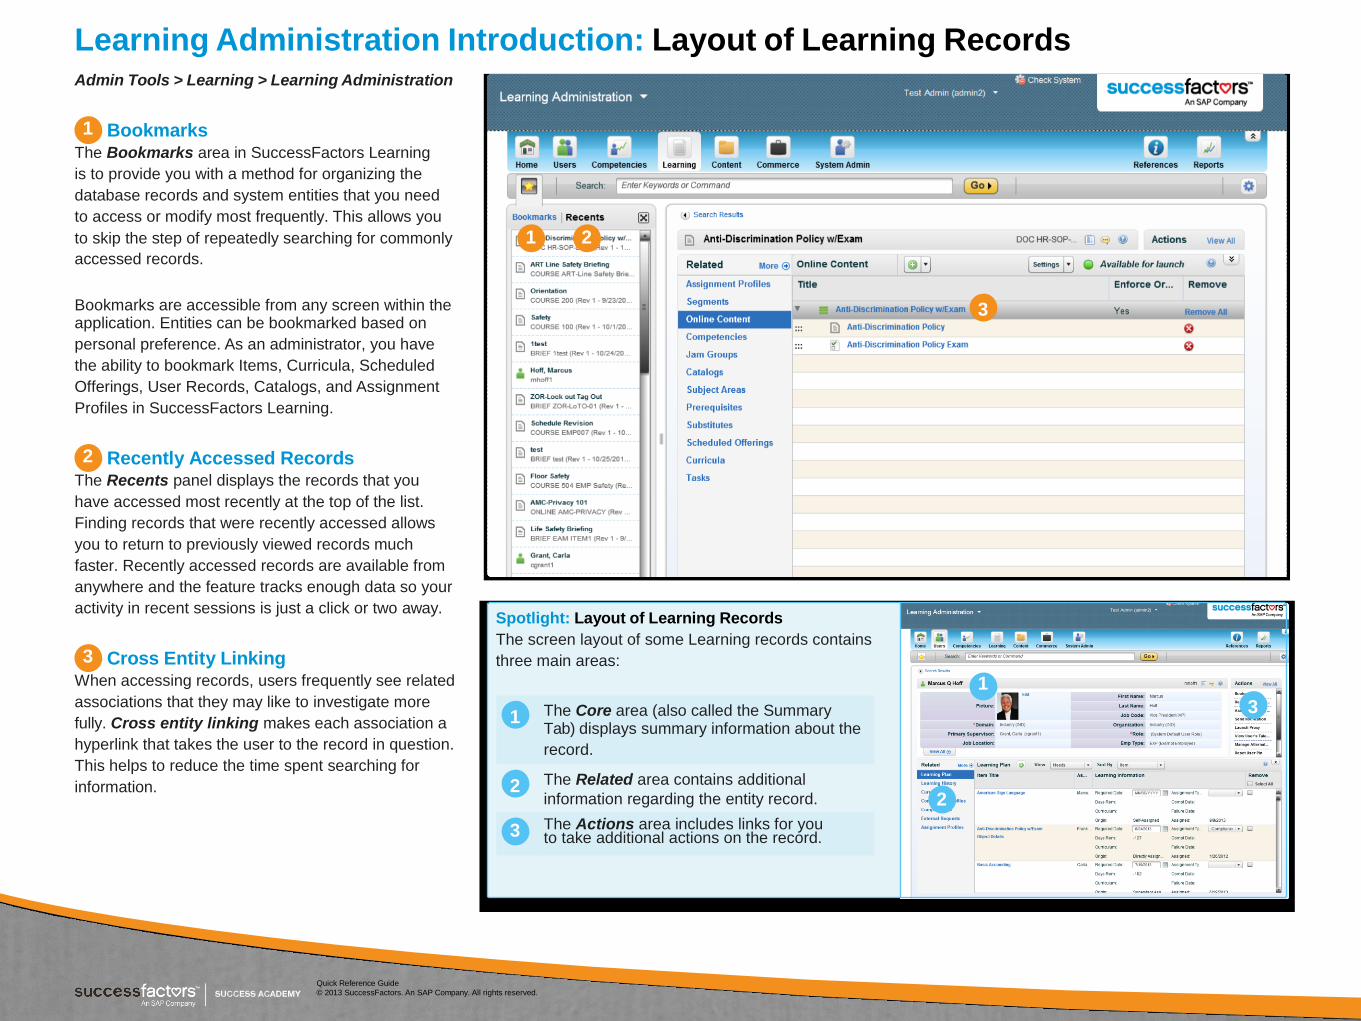
Learning Administration Introduction: Layout of Learning Records Admin Tools > Learning > Learning Administration
1 Bookmarks The Bookmarks area in SuccessFactors Learning
is to provide you with a method for organizing the
database records and system entities that you need
to access or modify most frequently. This allows you
to skip the step of repeatedly searching for commonly 1 2 accessed records.
Bookmarks are accessible from any screen within the 3 application. Entities can be bookmarked based on
personal preference. As an administrator, you have
the ability to bookmark Items, Curricula, Scheduled
Offerings, User Records, Catalogs, and Assignment
Profiles in SuccessFactors Learning.
2 Recently Accessed Records
The Recents panel displays the records that you
have accessed most recently at the top of the list.
Finding records that were recently accessed allows
you to return to previously viewed records much
faster. Recently accessed records are available from
anywhere and the feature tracks enough data so your
activity in recent sessions is just a click or two away.
3 Cross Entity Linking When accessing records, users frequently see related
associations that they may like to investigate more
fully. Cross entity linking makes each association a
hyperlink that takes the user to the record in question.
This helps to reduce the time spent searching for
information.
Spotlight: Layout of Learning Records
The screen layout of some Learning records contains
three main areas:
1
1 The Core area (also called the Summary 3 Tab) displays summary information about the
record.
2 The Related area contains additional
information regarding the entity record. 2
3 The Actions area includes links for you to take additional actions on the record.
Quick Reference Guide
© 2013 SuccessFactors. An SAP Company. All rights reserved.
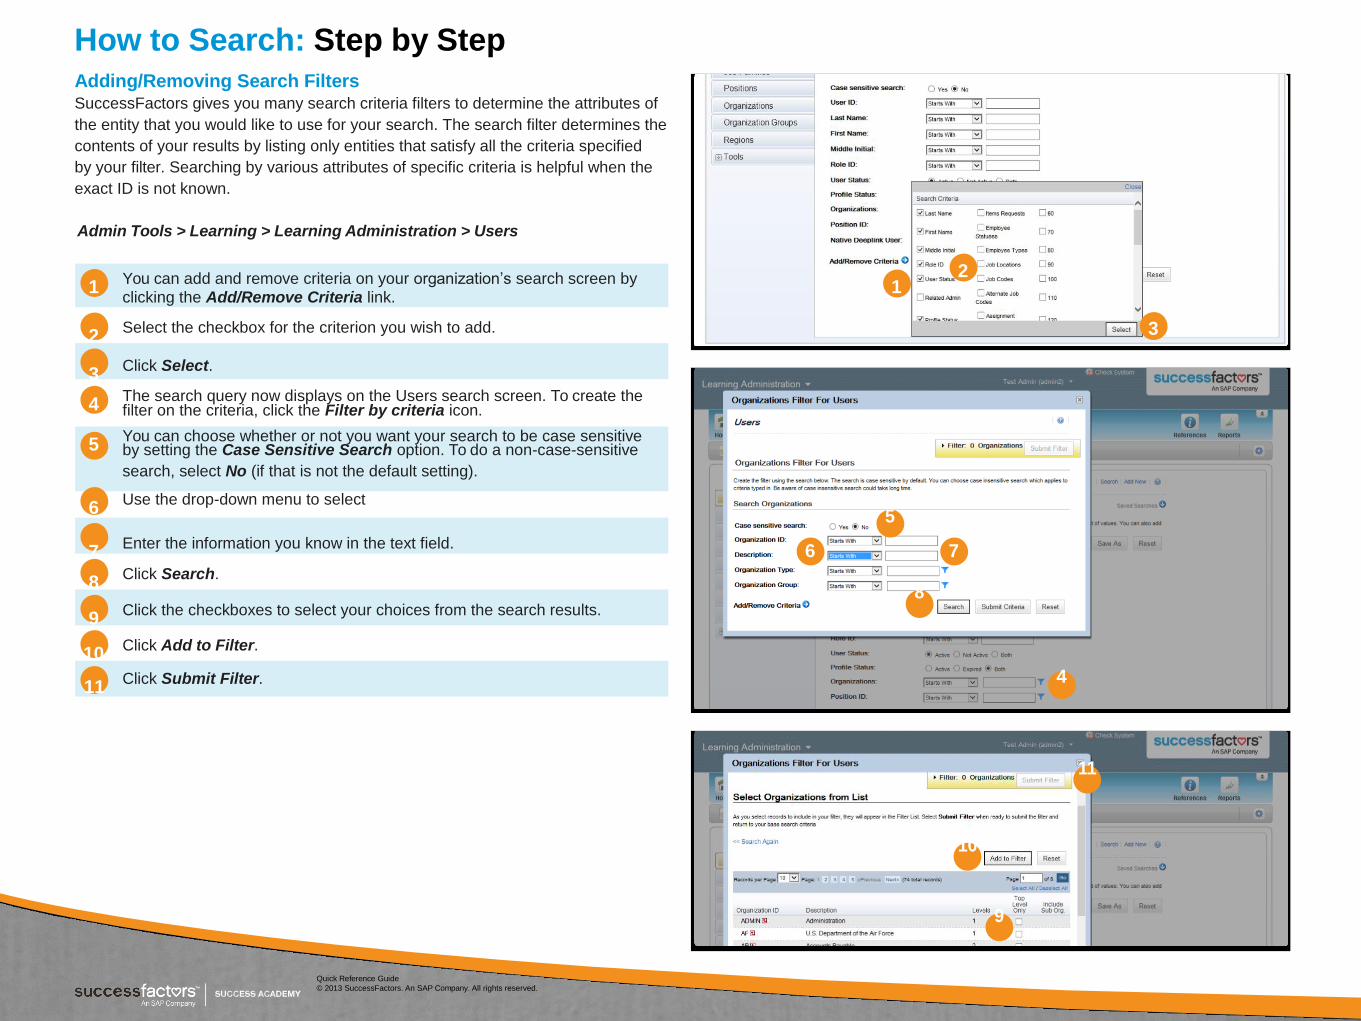
How to Search: Step by Step
Adding/Removing Search Filters SuccessFactors gives you many search criteria filters to determine the attributes of
the entity that you would like to use for your search. The search filter determines the
contents of your results by listing only entities that satisfy all the criteria specified
by your filter. Searching by various attributes of specific criteria is helpful when the
exact ID is not known.
Admin Tools > Learning > Learning Administration > Users
1 You can add and remove criteria on your organization’s search screen by
1 2
clicking the Add/Remove Criteria link.
2 Select the checkbox for the criterion you wish to add. 3
3 Click Select.
4 The search query now displays on the Users search screen. To create the filter on the criteria, click the Filter by criteria icon.
5 You can choose whether or not you want your search to be case sensitive by setting the Case Sensitive Search option. To do a non-case-sensitive
search, select No (if that is not the default setting).
6 Use the drop-down menu to select
5
7 Enter the information you know in the text field. 6 7
8 Click Search.
8
9 Click the checkboxes to select your choices from the search results.
10 Click Add to Filter.
11 Click Submit Filter. 4
11
10
9
Quick Reference Guide
© 2013 SuccessFactors. An SAP Company. All rights reserved.
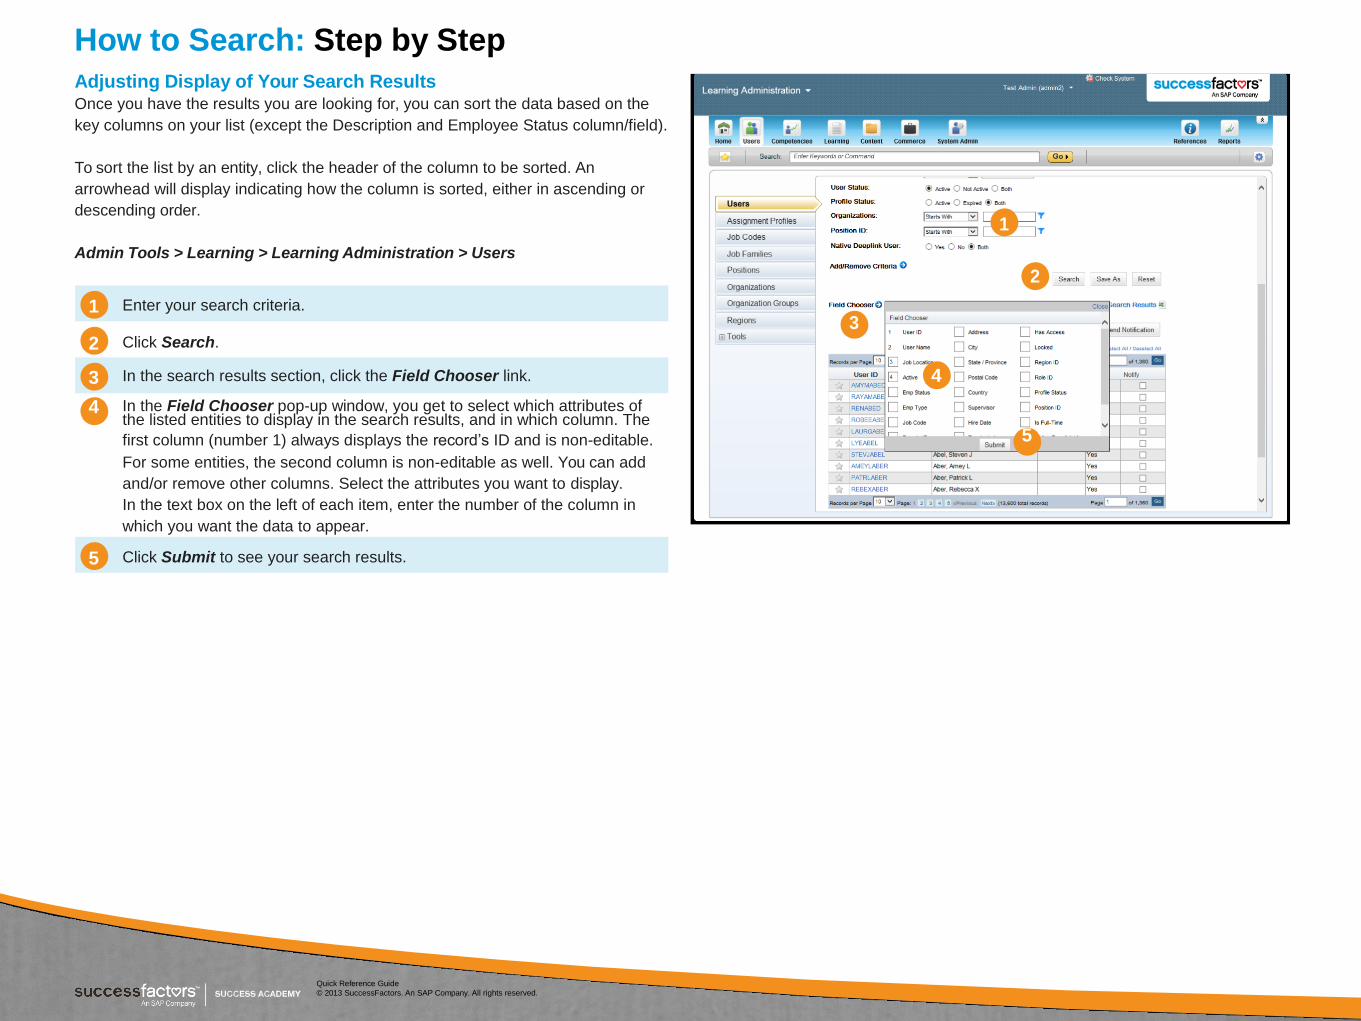
How to Search: Step by Step
Adjusting Display of Your Search Results Once you have the results you are looking for, you can sort the data based on the
key columns on your list (except the Description and Employee Status column/field).
To sort the list by an entity, click the header of the column to be sorted. An
arrowhead will display indicating how the column is sorted, either in ascending or
descending order. 1
Admin Tools > Learning > Learning Administration > Users
2
1 Enter your search criteria. 3
2 Click Search.
3 In the search results section, click the Field Chooser link. 4
4 In the Field Chooser pop-up window, you get to select which attributes of the listed entities to display in the search results, and in which column. The
first column (number 1) always displays the record’s ID and is non-editable. 5
For some entities, the second column is non-editable as well. You can add
and/or remove other columns. Select the attributes you want to display.
In the text box on the left of each item, enter the number of the column in
which you want the data to appear.
5 Click Submit to see your search results.
Quick Reference Guide
© 2013 SuccessFactors. An SAP Company. All rights reserved.
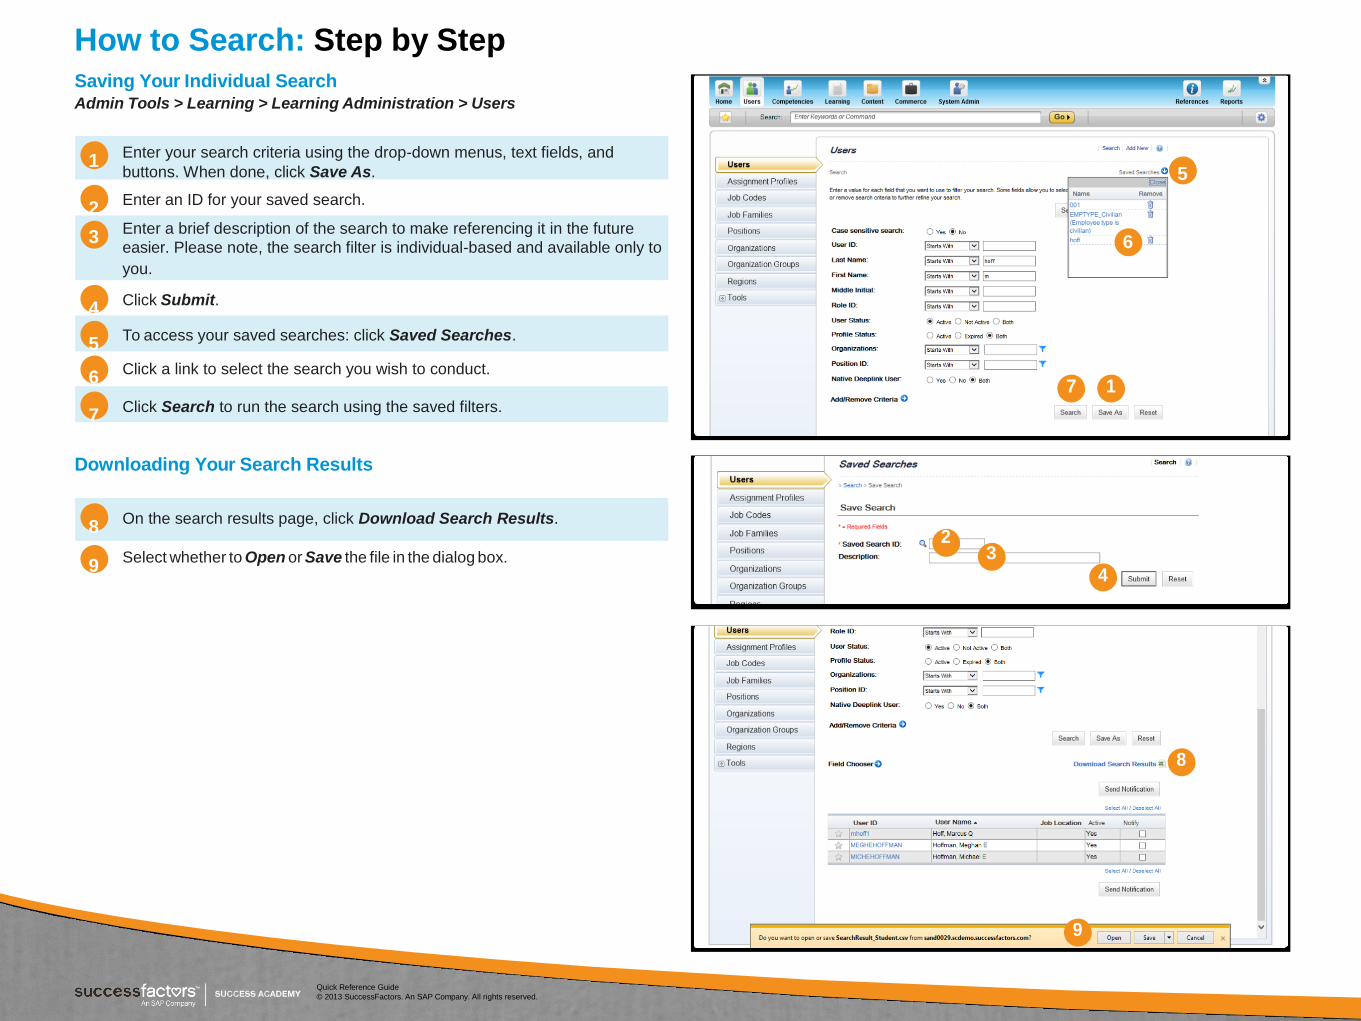
How to Search: Step by Step
Saving Your Individual Search Admin Tools > Learning > Learning Administration > Users
1 Enter your search criteria using the drop-down menus, text fields, and
buttons. When done, click Save As. 5
2 Enter an ID for your saved search.
3 Enter a brief description of the search to make referencing it in the future
easier. Please note, the search filter is individual-based and available only to 6 you.
4 Click Submit.
5 To access your saved searches: click Saved Searches.
6 Click a link to select the search you wish to conduct.
7 1
7 Click Search to run the search using the saved filters.
Downloading Your Search Results
8 On the search results page, click Download Search Results.
2
9 Select whether to Open or Save the file in the dialog box. 3
4
8
9
Quick Reference Guide
© 2013 SuccessFactors. An SAP Company. All rights reserved.