Embed Size (px)
Citation preview
8C H A P T E R
IN T
HIS
CHAP
TER ■ Accessing Shared Network
Resources
■ Mapping a Network Folder to aLocal Drive Letter
■ Creating a Network Location fora Remote Folder
■ Accessing a Shared Printer
■ Sharing Resources with theNetwork
Accessing and SharingNetwork Resources
Many home and small office networks exist for no
other reason than to share a broadband Internet
connection. The administrators of those networks
attach a broadband modem to a router, configure the router,
run some ethernet cable (or set up wireless connections),
and then they never think about the network again.
There’s nothing wrong with this scenario, of course, but
there’s something that just feels, well, incomplete about such
a network. Sharing an Internet connection is a must for any
modern network, but networking should be about sharing
so much more: disk drives, folders, documents, music, pho-
tos, videos, recorded TV shows, printers, scanners, CD and
DVD burners, projectors, and more.
This expanded view of networking is about working, play-
ing, and connecting with your fellow network users. It is, in
short, about sharing, and sharing is the subject of this chap-
ter. You learn how to access those network resources that
others have shared, and you learn how to share your own
resources with the network.
11_0789737779_ch08.qxd 11/16/07 10:16 AM Page 171
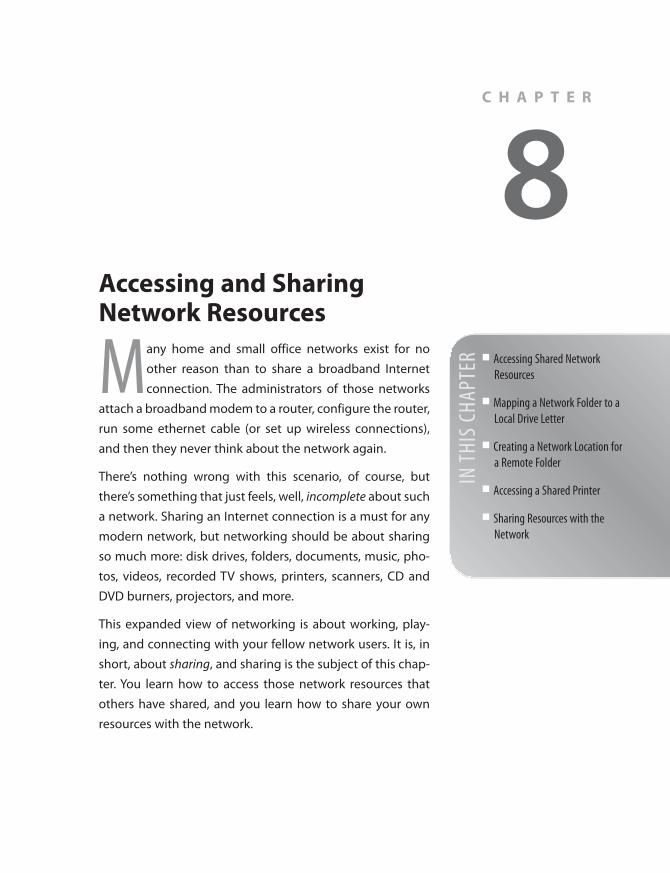
Accessing Shared Network ResourcesAfter you connect to the network, the first thing you’ll likely want to do is seewhat’s on the network and access the available resources. Vista gives you twoways to get started:
■ Select Start, Network.
■ In the Network and Sharing Center, click View Network Computers andDevices.
Either way, you see the Network window, which lists the main networkresources, such as the computers and media devices in your workgroup. Asyou can see in Figure 8.1, Details view shows you the resource name, category,workgroup or domain name, and the name of the network profile.
172 Networking with Microsoft® Windows Vista™
8
FIGURE 8.1Vista’s Network window displays the main resources on your network.
➔ For a more detailed look at the types of items you see in the Network window, see “ViewingNetwork Computers and Devices,” p. 130.
Viewing a Computer’s Shared ResourcesYour Network window will likely show mostly computers, and those are thenetwork items you’ll work with most often. (The computers display an iconthat shows a monitor and mini tower computer; if you’re not sure, select View,Details and look for the objects that have Computer in the Category column.)If you don’t see a particular computer, it likely means that the machine is
11_0789737779_ch08.qxd 11/16/07 10:16 AM Page 172
either turned off or is currently in Sleep mode. You need to either turn on orwake up the computer.
➔ You may be able to remotely wake up a computer that’s in Sleep mode; see “Using a Net-work Connection to Wake Up a Sleeping Computer,” p. 151.
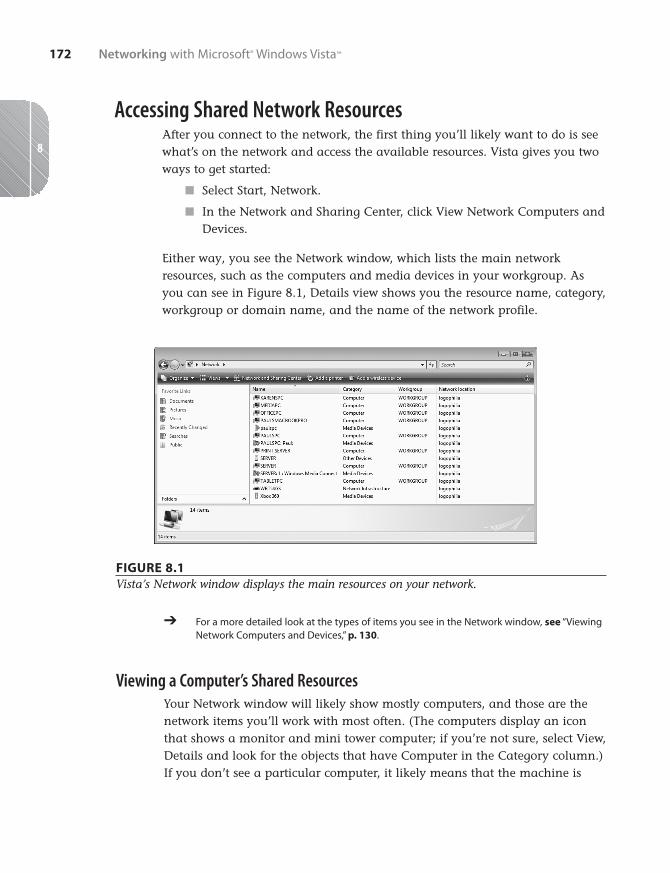
If you see the computer you want to work with, double-click the computer’sicon. One of two things will happen:
■ If your user account is also a user account on the remote computer,Windows Vista displays the computer’s shared resources.
■ If your user account is not a user account on the remote computer, andthe remote computer has activated password protected sharing (see“Using Password Protected Sharing,” later in this chapter), WindowsVista displays the Connect to Computer dialog box (where Computer isthe name of the remote computer). You need to type the username and password of an account on the remote computer, as shown inFigure 8.2.
C H A P T E R 8 Accessing and Sharing Network Resources 173
8
FIGURE 8.2You may need to log on to the remote computer to see its shared resources.
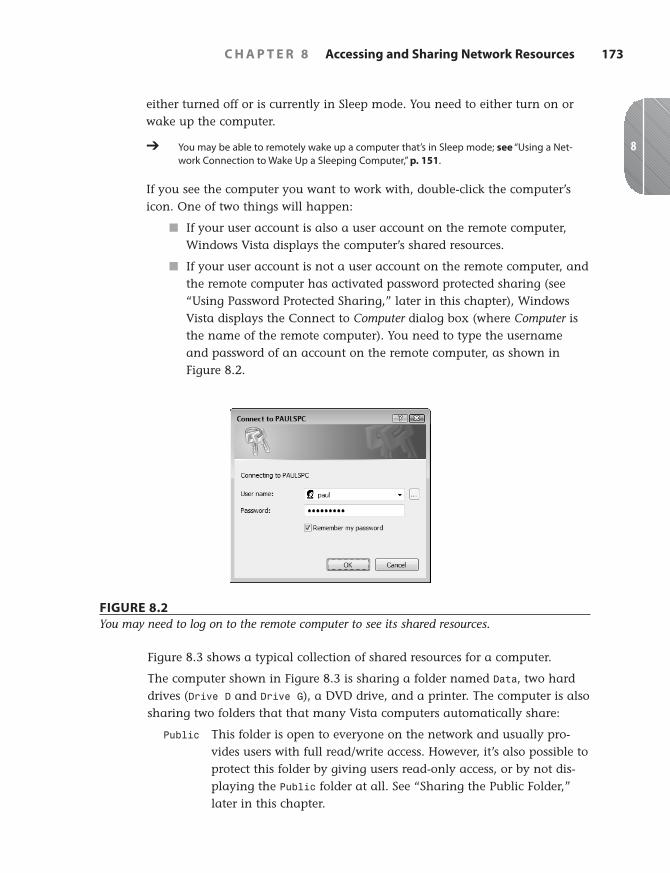
Figure 8.3 shows a typical collection of shared resources for a computer.
The computer shown in Figure 8.3 is sharing a folder named Data, two harddrives (Drive D and Drive G), a DVD drive, and a printer. The computer is alsosharing two folders that that many Vista computers automatically share:
Public This folder is open to everyone on the network and usually pro-vides users with full read/write access. However, it’s also possible toprotect this folder by giving users read-only access, or by not dis-playing the Public folder at all. See “Sharing the Public Folder,”later in this chapter.
11_0789737779_ch08.qxd 11/16/07 10:16 AM Page 173
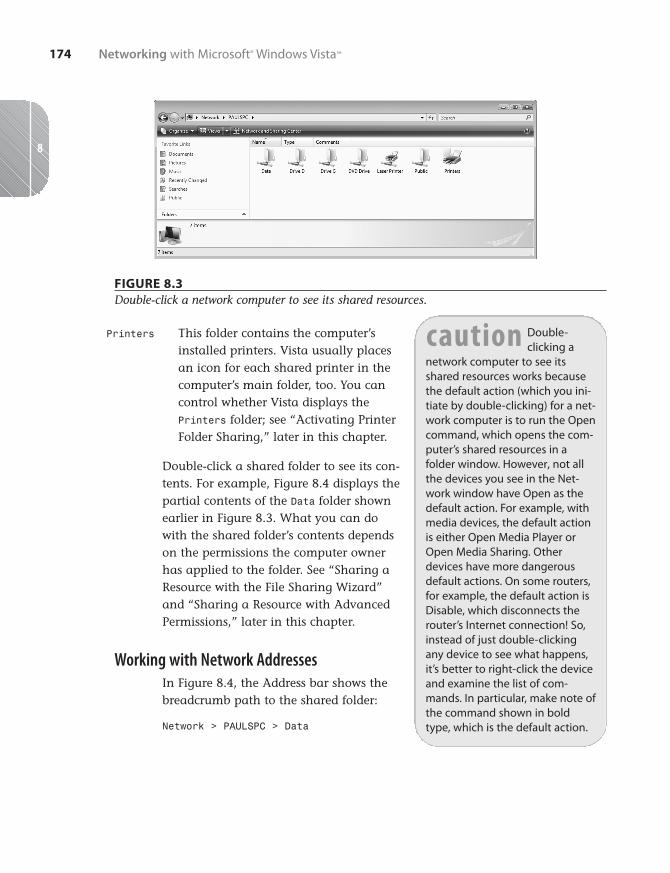
FIGURE 8.3Double-click a network computer to see its shared resources.
Printers This folder contains the computer’sinstalled printers. Vista usually placesan icon for each shared printer in thecomputer’s main folder, too. You cancontrol whether Vista displays thePrinters folder; see “Activating PrinterFolder Sharing,” later in this chapter.
Double-click a shared folder to see its con-tents. For example, Figure 8.4 displays thepartial contents of the Data folder shownearlier in Figure 8.3. What you can dowith the shared folder’s contents dependson the permissions the computer ownerhas applied to the folder. See “Sharing aResource with the File Sharing Wizard”and “Sharing a Resource with AdvancedPermissions,” later in this chapter.
Working with Network AddressesIn Figure 8.4, the Address bar shows thebreadcrumb path to the shared folder:
Network > PAULSPC > Data
174 Networking with Microsoft® Windows Vista™
8
Double-clicking a
network computer to see itsshared resources works becausethe default action (which you ini-tiate by double-clicking) for a net-work computer is to run the Opencommand, which opens the com-puter’s shared resources in afolder window. However, not allthe devices you see in the Net-work window have Open as thedefault action. For example, withmedia devices, the default actionis either Open Media Player orOpen Media Sharing. Otherdevices have more dangerousdefault actions. On some routers,for example, the default action isDisable, which disconnects therouter’s Internet connection! So,instead of just double-clickingany device to see what happens,it’s better to right-click the deviceand examine the list of com-mands. In particular, make note ofthe command shown in boldtype, which is the default action.
caution
11_0789737779_ch08.qxd 11/16/07 10:16 AM Page 174
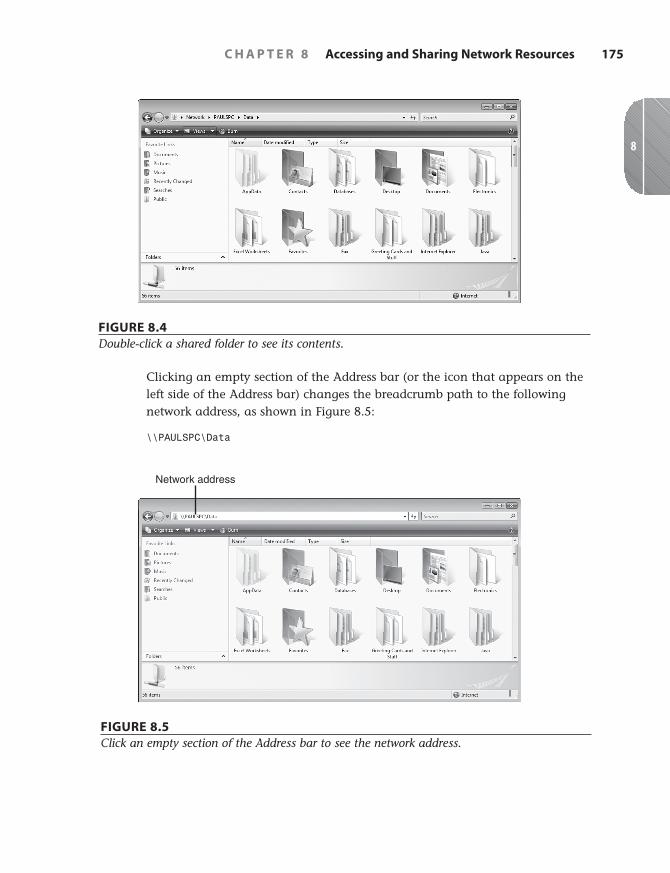
FIGURE 8.4Double-click a shared folder to see its contents.
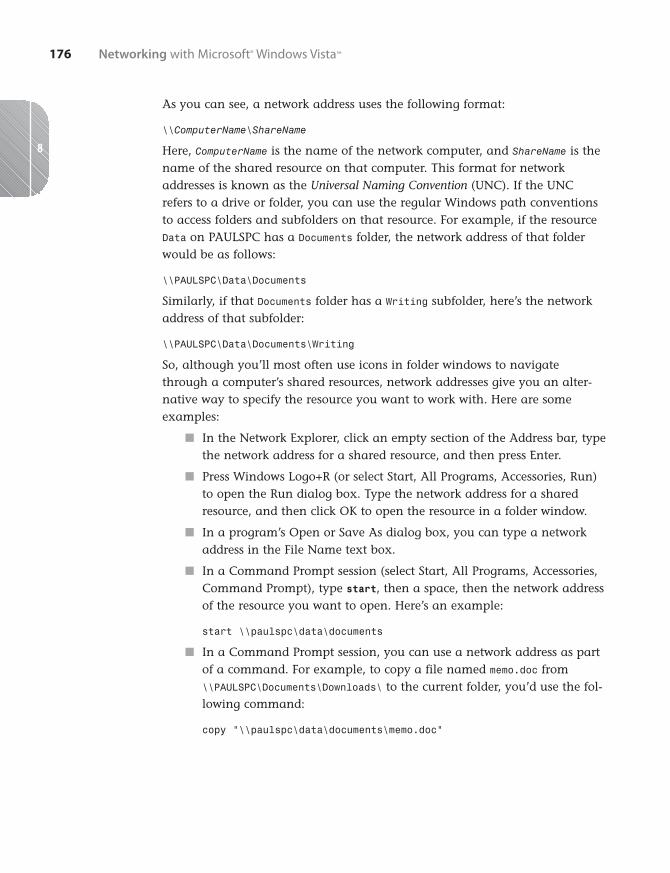
Clicking an empty section of the Address bar (or the icon that appears on theleft side of the Address bar) changes the breadcrumb path to the followingnetwork address, as shown in Figure 8.5:
\\PAULSPC\Data
C H A P T E R 8 Accessing and Sharing Network Resources 175
8
Network address
FIGURE 8.5Click an empty section of the Address bar to see the network address.
11_0789737779_ch08.qxd 11/16/07 10:17 AM Page 175
As you can see, a network address uses the following format:
\\ComputerName\ShareName
Here, ComputerName is the name of the network computer, and ShareName is thename of the shared resource on that computer. This format for networkaddresses is known as the Universal Naming Convention (UNC). If the UNCrefers to a drive or folder, you can use the regular Windows path conventionsto access folders and subfolders on that resource. For example, if the resourceData on PAULSPC has a Documents folder, the network address of that folderwould be as follows:
\\PAULSPC\Data\Documents
Similarly, if that Documents folder has a Writing subfolder, here’s the networkaddress of that subfolder:
\\PAULSPC\Data\Documents\Writing
So, although you’ll most often use icons in folder windows to navigatethrough a computer’s shared resources, network addresses give you an alter-native way to specify the resource you want to work with. Here are someexamples:
■ In the Network Explorer, click an empty section of the Address bar, typethe network address for a shared resource, and then press Enter.
■ Press Windows Logo+R (or select Start, All Programs, Accessories, Run)to open the Run dialog box. Type the network address for a sharedresource, and then click OK to open the resource in a folder window.
■ In a program’s Open or Save As dialog box, you can type a networkaddress in the File Name text box.
■ In a Command Prompt session (select Start, All Programs, Accessories,Command Prompt), type start, then a space, then the network addressof the resource you want to open. Here’s an example:
start \\paulspc\data\documents
■ In a Command Prompt session, you can use a network address as partof a command. For example, to copy a file named memo.doc from\\PAULSPC\Documents\Downloads\ to the current folder, you’d use the fol-lowing command:
copy “\\paulspc\data\documents\memo.doc”
176 Networking with Microsoft® Windows Vista™
8
11_0789737779_ch08.qxd 11/16/07 10:17 AM Page 176
Mapping a Network Folder to a LocalDrive Letter
Navigating a computer’s shared folders isstraightforward, and is no different fromnavigating the folders on your own com-puter. However, you might find that youneed to access a particular folder on ashared resource quite often. That’s not aproblem if the folder is shared directly—see, for example, the shared Data folder inFigure 8.3. However, the folder you wantmight be buried several layers down. Forexample, you may need to open the Datafolder, then the Documents folder, thenWriting, then Articles, and so on. That’s alot of double-clicking. You could use thenetwork address, instead, but even thatcould get quite long and unwieldy. (And,with Murphy’s law still in force, the longerthe address, the greater the chance of atypo slipping in.)
You can avoid the hassle of navigating innumerable network folders and typ-ing lengthy network addresses by mapping the network folder to your owncomputer. Mapping means that Windows assigns a drive letter to the networkfolder, such as G: or Z:. The advantage here is that now the network foldershows up as just another disk drive on your machine, enabling you to accessthe resource quickly by selecting Start, Computer.
Creating the Mapped Network FolderTo map a network folder to a local driveletter, follow these steps:
1. Select Start, right-click Network, andthen click Map Network Drive. (Inany folder window, you can alsopress Alt to display the menu bar,and then select Tools, Map NetworkDrive.) Windows Vista displays theMap Network Drive dialog box.
C H A P T E R 8 Accessing and Sharing Network Resources 177
8
You might also findthat mapping a net-
work folder to a local drive letterhelps with some older programsthat aren’t meant to operate overa network connection. For exam-ple, I have a screen-capture pro-gram that I need to use from timeto time. If I capture a screen onanother computer and then try tosave the image over the networkto my own computer, the pro-gram throws up an error messagetelling me that the destinationdrive is out of disk space (despitehaving, in fact, 100GB or so of freespace on the drive). I solve thisproblem by mapping the folderon my computer to a drive letteron the other computer, whichfools the program into thinkingit’s dealing with a local driveinstead of a network folder.
note
If you use aremovable
drive, such as a memory card orflash drive, Windows Vista assignsthe first available drive letter tothat drive. This can cause prob-lems if you have a mapped net-work drive that uses a lower driveletter. Therefore, it’s good practiceto use higher drive letters (suchas X, Y, and Z) for your mappedresources.
caution
11_0789737779_ch08.qxd 11/16/07 10:17 AM Page 177
2. The Drive drop-down list displays the last available drive letter on yoursystem, but you can pull down the list and select any available letter.
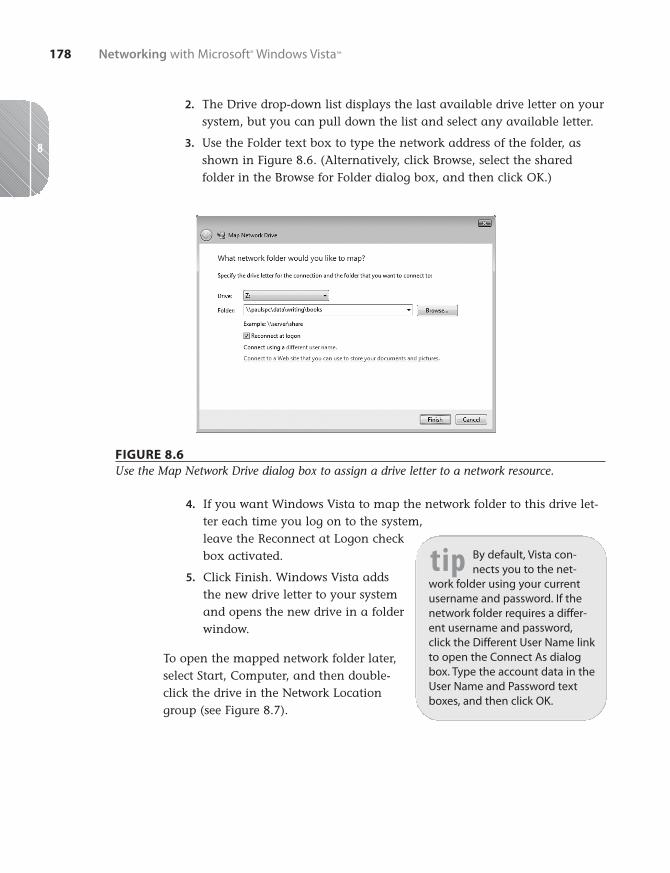
3. Use the Folder text box to type the network address of the folder, asshown in Figure 8.6. (Alternatively, click Browse, select the sharedfolder in the Browse for Folder dialog box, and then click OK.)
178 Networking with Microsoft® Windows Vista™
8
FIGURE 8.6Use the Map Network Drive dialog box to assign a drive letter to a network resource.
4. If you want Windows Vista to map the network folder to this drive let-ter each time you log on to the system,leave the Reconnect at Logon checkbox activated.
5. Click Finish. Windows Vista addsthe new drive letter to your systemand opens the new drive in a folderwindow.
To open the mapped network folder later,select Start, Computer, and then double-click the drive in the Network Locationgroup (see Figure 8.7).
By default, Vista con-nects you to the net-
work folder using your currentusername and password. If thenetwork folder requires a differ-ent username and password,click the Different User Name linkto open the Connect As dialogbox. Type the account data in theUser Name and Password textboxes, and then click OK.
tip
11_0789737779_ch08.qxd 11/16/07 10:17 AM Page 178
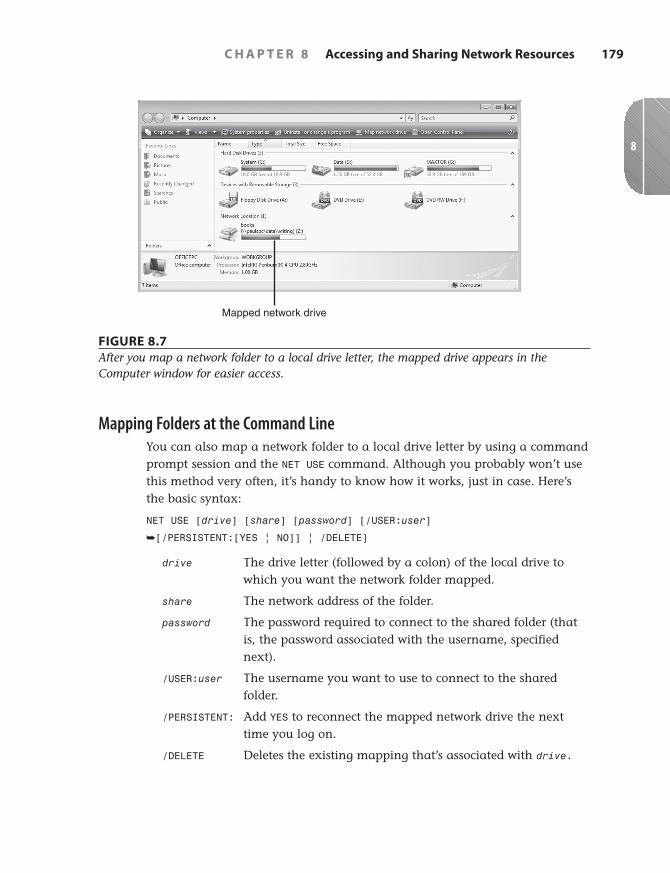
FIGURE 8.7After you map a network folder to a local drive letter, the mapped drive appears in theComputer window for easier access.
Mapping Folders at the Command LineYou can also map a network folder to a local drive letter by using a commandprompt session and the NET USE command. Although you probably won’t usethis method very often, it’s handy to know how it works, just in case. Here’sthe basic syntax:
NET USE [drive] [share] [password] [/USER:user]
➥[/PERSISTENT:[YES | NO]] | /DELETE]
drive The drive letter (followed by a colon) of the local drive towhich you want the network folder mapped.
share The network address of the folder.
password The password required to connect to the shared folder (thatis, the password associated with the username, specifiednext).
/USER:user The username you want to use to connect to the sharedfolder.
/PERSISTENT: Add YES to reconnect the mapped network drive the nexttime you log on.
/DELETE Deletes the existing mapping that’s associated with drive.
C H A P T E R 8 Accessing and Sharing Network Resources 179
8
Mapped network drive
11_0789737779_ch08.qxd 11/16/07 10:17 AM Page 179
For example, the following command maps the shared folder\\PAULSPC\Data\Writing\Books to the Z: drive:
net use z: \\paulspc\data\writing\books \persistent:yes
Disconnecting a Mapped Network FolderIf you no longer need to map a network resource, you should disconnect it byfollowing these steps:
1. Select Start, Computer to open the Computer window.
2. Right-click the mapped drive, and then click Disconnect.
3. If there are files open from the resource, Windows Vista displays awarning to let you know that it’s unsafe to disconnect the resource. Youhave two choices:
■ Click No, close all open files from the mapped resource, and thenrepeat steps 1 and 2.
■ If you’re sure there are no open files, click Yes to disconnect theresource.
Creating a Network Location for a Remote FolderWhen you map a network folder to a drive on your computer, Vista creates anicon for the mapped drive in the Computer folder’s Network Locations group.However, you may find that the supply of available drive letters is getting lowif your computer has multiple hard drives, multiple CD or DVD drives, amemory card reader, a flash drive or two, and so on.
To work around this problem, you can add your own icons to the Computerfolder’s Network Locations group. These icons are called, appropriatelyenough, network locations, and each one is associated with a particular net-work folder. (They’re similar to the network places you could create inWindows XP.) That is, after you create a network location, you can access thenetwork folder associated with that location by double-clicking the icon. Thisis usually a lot faster than drilling down through several layers of folders onthe network computer, so create network locations for those network foldersyou access most often.
Follow these steps to create a network location:
1. Select Start, Computer to open the Computer folder.
180 Networking with Microsoft® Windows Vista™
8
11_0789737779_ch08.qxd 11/16/07 10:17 AM Page 180
2. Right-click an empty section of the Computer folder, and then click Adda Network Location. Vista launches the Add Network Location Wizard.
3. Click Next in the initial wizard dialog box.
4. Select Choose a Custom Network Location, and then click Next.
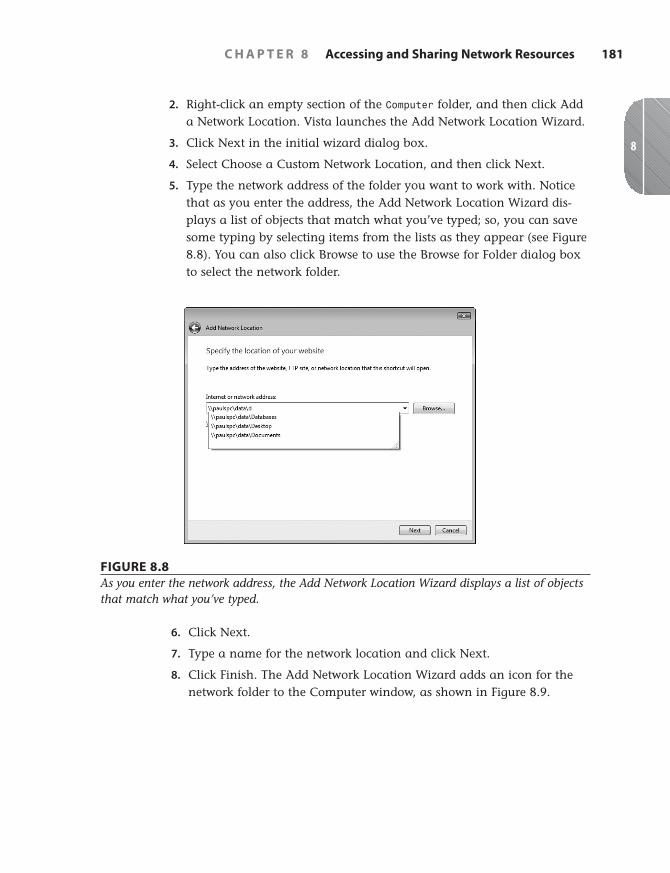
5. Type the network address of the folder you want to work with. Noticethat as you enter the address, the Add Network Location Wizard dis-plays a list of objects that match what you’ve typed; so, you can savesome typing by selecting items from the lists as they appear (see Figure8.8). You can also click Browse to use the Browse for Folder dialog boxto select the network folder.
C H A P T E R 8 Accessing and Sharing Network Resources 181
8
FIGURE 8.8As you enter the network address, the Add Network Location Wizard displays a list of objectsthat match what you’ve typed.
6. Click Next.
7. Type a name for the network location and click Next.
8. Click Finish. The Add Network Location Wizard adds an icon for thenetwork folder to the Computer window, as shown in Figure 8.9.
11_0789737779_ch08.qxd 11/16/07 10:17 AM Page 181
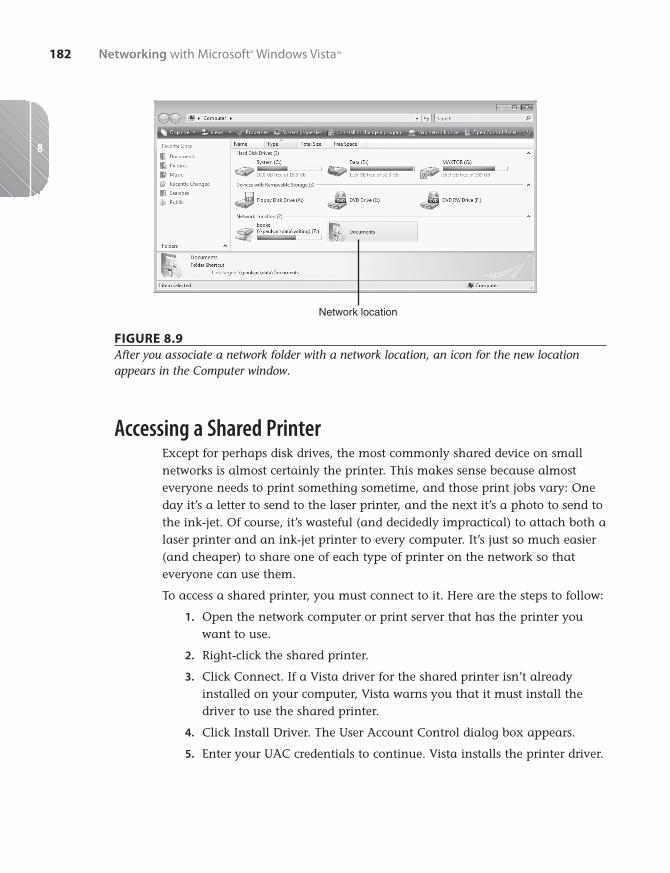
FIGURE 8.9After you associate a network folder with a network location, an icon for the new locationappears in the Computer window.
Accessing a Shared PrinterExcept for perhaps disk drives, the most commonly shared device on smallnetworks is almost certainly the printer. This makes sense because almosteveryone needs to print something sometime, and those print jobs vary: Oneday it’s a letter to send to the laser printer, and the next it’s a photo to send tothe ink-jet. Of course, it’s wasteful (and decidedly impractical) to attach both alaser printer and an ink-jet printer to every computer. It’s just so much easier(and cheaper) to share one of each type of printer on the network so thateveryone can use them.
To access a shared printer, you must connect to it. Here are the steps to follow:
1. Open the network computer or print server that has the printer youwant to use.
2. Right-click the shared printer.
3. Click Connect. If a Vista driver for the shared printer isn’t alreadyinstalled on your computer, Vista warns you that it must install thedriver to use the shared printer.
4. Click Install Driver. The User Account Control dialog box appears.
5. Enter your UAC credentials to continue. Vista installs the printer driver.
182 Networking with Microsoft® Windows Vista™
8
Network location
11_0789737779_ch08.qxd 11/16/07 10:17 AM Page 182
You can also add a shared network printer using Vista’s Add Printer Wizard.Follow these steps:
1. Select Start, Control Panel to open the Control Panel window.
2. Click the Printer link under the Hardware and Sound icon. Vista opensthe Printers window.
3. Click Add a Printer in the task pane to open the Add Printer Wizard.
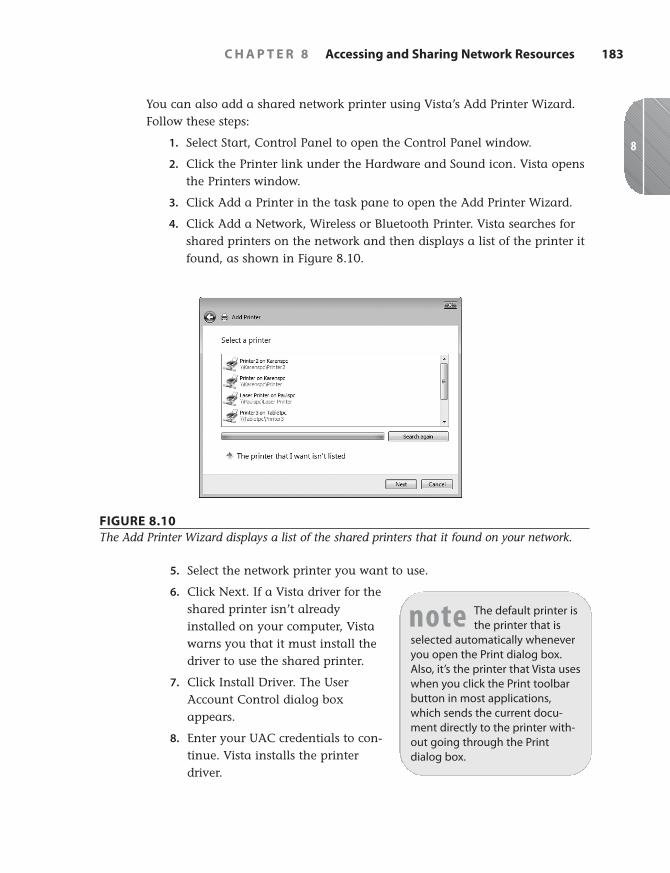
4. Click Add a Network, Wireless or Bluetooth Printer. Vista searches forshared printers on the network and then displays a list of the printer itfound, as shown in Figure 8.10.
C H A P T E R 8 Accessing and Sharing Network Resources 183
8
FIGURE 8.10The Add Printer Wizard displays a list of the shared printers that it found on your network.
5. Select the network printer you want to use.
6. Click Next. If a Vista driver for theshared printer isn’t alreadyinstalled on your computer, Vistawarns you that it must install thedriver to use the shared printer.
7. Click Install Driver. The UserAccount Control dialog boxappears.
8. Enter your UAC credentials to con-tinue. Vista installs the printerdriver.
The default printer isthe printer that is
selected automatically wheneveryou open the Print dialog box.Also, it’s the printer that Vista useswhen you click the Print toolbarbutton in most applications,which sends the current docu-ment directly to the printer with-out going through the Printdialog box.
note
11_0789737779_ch08.qxd 11/16/07 10:17 AM Page 183
9. If you want to use the shared printer as your default printer, leave theSet as Default Printer check box activated and click Next.
10. Click Finish.
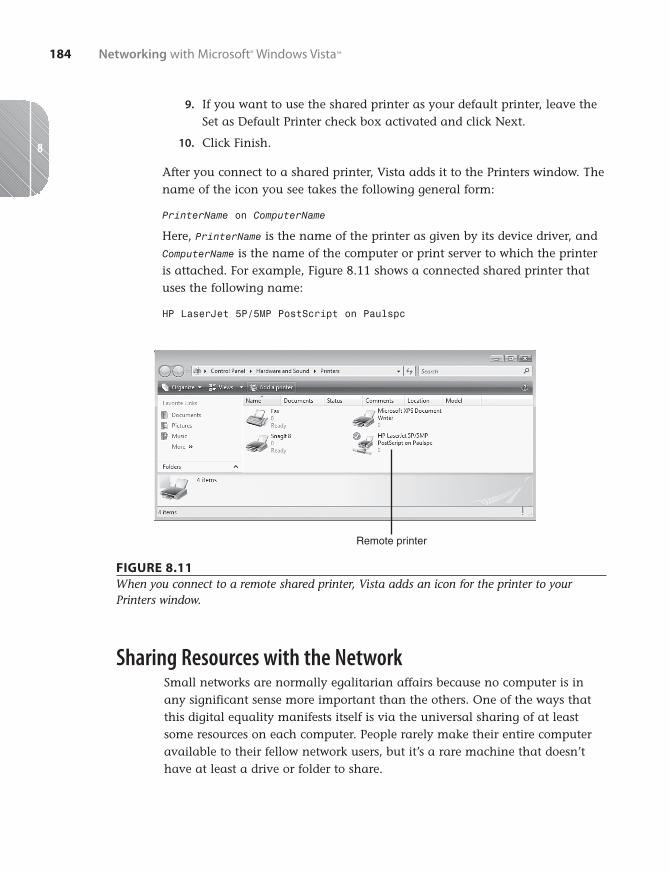
After you connect to a shared printer, Vista adds it to the Printers window. Thename of the icon you see takes the following general form:
PrinterName on ComputerName
Here, PrinterName is the name of the printer as given by its device driver, andComputerName is the name of the computer or print server to which the printeris attached. For example, Figure 8.11 shows a connected shared printer thatuses the following name:
HP LaserJet 5P/5MP PostScript on Paulspc
184 Networking with Microsoft® Windows Vista™
8
Remote printer
FIGURE 8.11When you connect to a remote shared printer, Vista adds an icon for the printer to yourPrinters window.
Sharing Resources with the NetworkSmall networks are normally egalitarian affairs because no computer is inany significant sense more important than the others. One of the ways thatthis digital equality manifests itself is via the universal sharing of at leastsome resources on each computer. People rarely make their entire computeravailable to their fellow network users, but it’s a rare machine that doesn’thave at least a drive or folder to share.
11_0789737779_ch08.qxd 11/16/07 10:17 AM Page 184
Fortunately, when it comes to sharing resources on the network, WindowsVista come with quite a few options that enable you to share what resourcesyou want and to control how others can access those resources. Network shar-ing in Vista begins by configuring the basic sharing options, of which thereare five in all: general file sharing, Public folder sharing, printer sharing,password-protected sharing, and media sharing.
The next four sections cover the first four of these options; I’ll leave mediasharing to Chapter 9, “Setting Up Vista as a Digital Media Hub.” To view andwork with these options, you need to open the Network and Sharing Center(as described in Chapter 5, “Working with Vista’s Basic Network Tools andTasks,” in the section “Working with Vista’s Basic Network Tools and Tasks”).
➔ For the details about media sharing, see “Sharing Your Media Player Library,” p. 207.
➔ To learn how to open the Network and Sharing Center, see “Accessing the Network and Shar-ing Center,” p. 125.
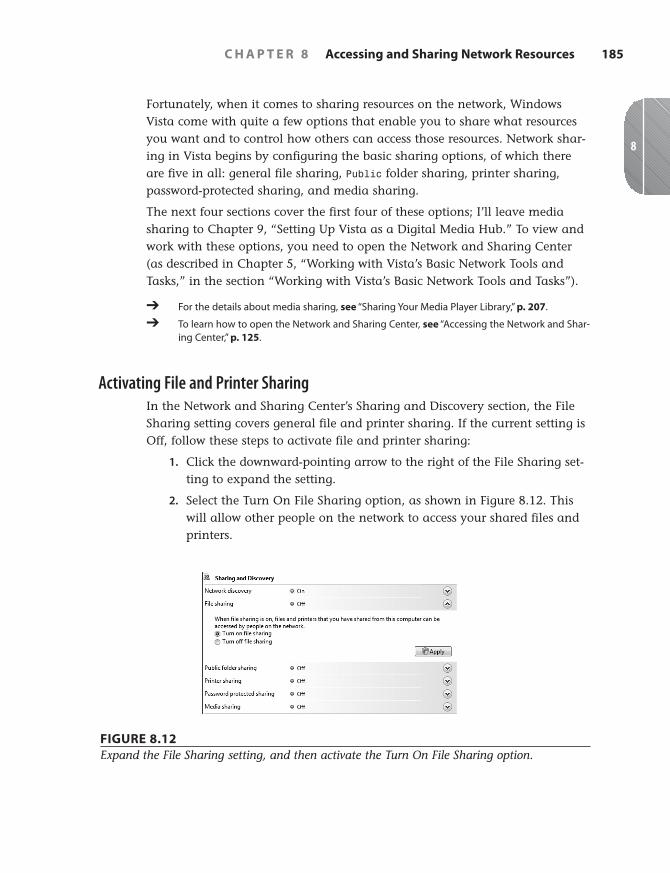
Activating File and Printer SharingIn the Network and Sharing Center’s Sharing and Discovery section, the FileSharing setting covers general file and printer sharing. If the current setting isOff, follow these steps to activate file and printer sharing:
1. Click the downward-pointing arrow to the right of the File Sharing set-ting to expand the setting.
2. Select the Turn On File Sharing option, as shown in Figure 8.12. Thiswill allow other people on the network to access your shared files andprinters.
C H A P T E R 8 Accessing and Sharing Network Resources 185
8
FIGURE 8.12Expand the File Sharing setting, and then activate the Turn On File Sharing option.
11_0789737779_ch08.qxd 11/16/07 10:17 AM Page 185
3. Click Apply. The User Account Control dialog box appears.
4. Enter your UAC credentials to put the new setting into effect.
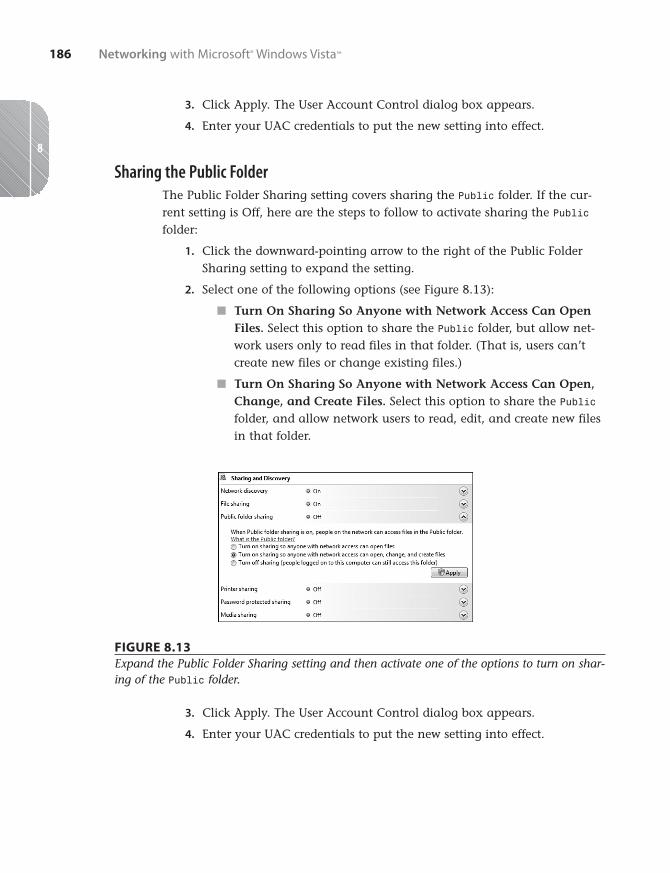
Sharing the Public FolderThe Public Folder Sharing setting covers sharing the Public folder. If the cur-rent setting is Off, here are the steps to follow to activate sharing the Publicfolder:
1. Click the downward-pointing arrow to the right of the Public FolderSharing setting to expand the setting.
2. Select one of the following options (see Figure 8.13):
■ Turn On Sharing So Anyone with Network Access Can OpenFiles. Select this option to share the Public folder, but allow net-work users only to read files in that folder. (That is, users can’tcreate new files or change existing files.)
■ Turn On Sharing So Anyone with Network Access Can Open,Change, and Create Files. Select this option to share the Publicfolder, and allow network users to read, edit, and create new filesin that folder.
186 Networking with Microsoft® Windows Vista™
8
FIGURE 8.13Expand the Public Folder Sharing setting and then activate one of the options to turn on shar-ing of the Public folder.
3. Click Apply. The User Account Control dialog box appears.
4. Enter your UAC credentials to put the new setting into effect.
11_0789737779_ch08.qxd 11/16/07 10:17 AM Page 186
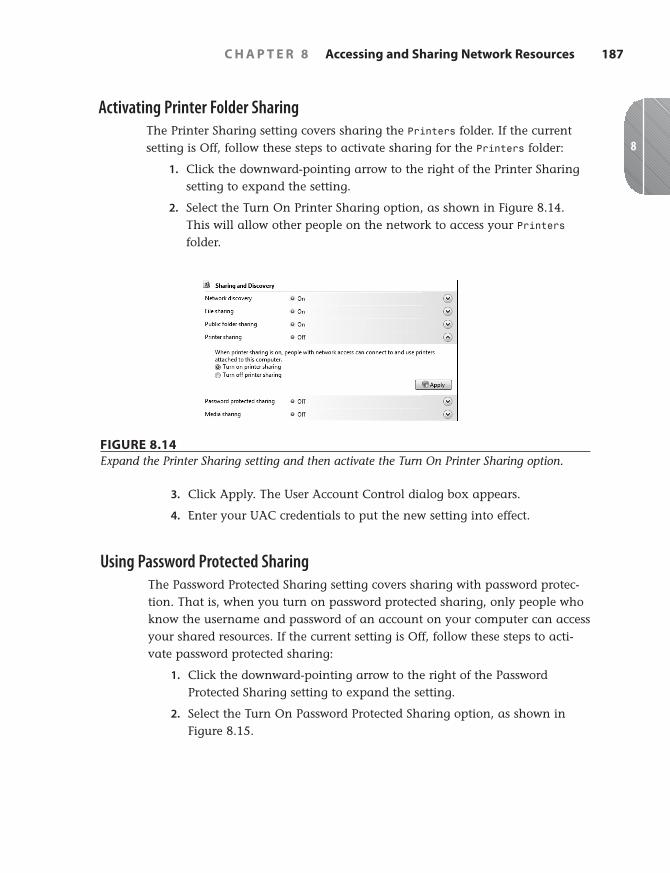
Activating Printer Folder SharingThe Printer Sharing setting covers sharing the Printers folder. If the currentsetting is Off, follow these steps to activate sharing for the Printers folder:
1. Click the downward-pointing arrow to the right of the Printer Sharingsetting to expand the setting.
2. Select the Turn On Printer Sharing option, as shown in Figure 8.14.This will allow other people on the network to access your Printersfolder.
C H A P T E R 8 Accessing and Sharing Network Resources 187
8
FIGURE 8.14Expand the Printer Sharing setting and then activate the Turn On Printer Sharing option.
3. Click Apply. The User Account Control dialog box appears.
4. Enter your UAC credentials to put the new setting into effect.
Using Password Protected SharingThe Password Protected Sharing setting covers sharing with password protec-tion. That is, when you turn on password protected sharing, only people whoknow the username and password of an account on your computer can accessyour shared resources. If the current setting is Off, follow these steps to acti-vate password protected sharing:
1. Click the downward-pointing arrow to the right of the PasswordProtected Sharing setting to expand the setting.
2. Select the Turn On Password Protected Sharing option, as shown inFigure 8.15.
11_0789737779_ch08.qxd 11/16/07 10:17 AM Page 187
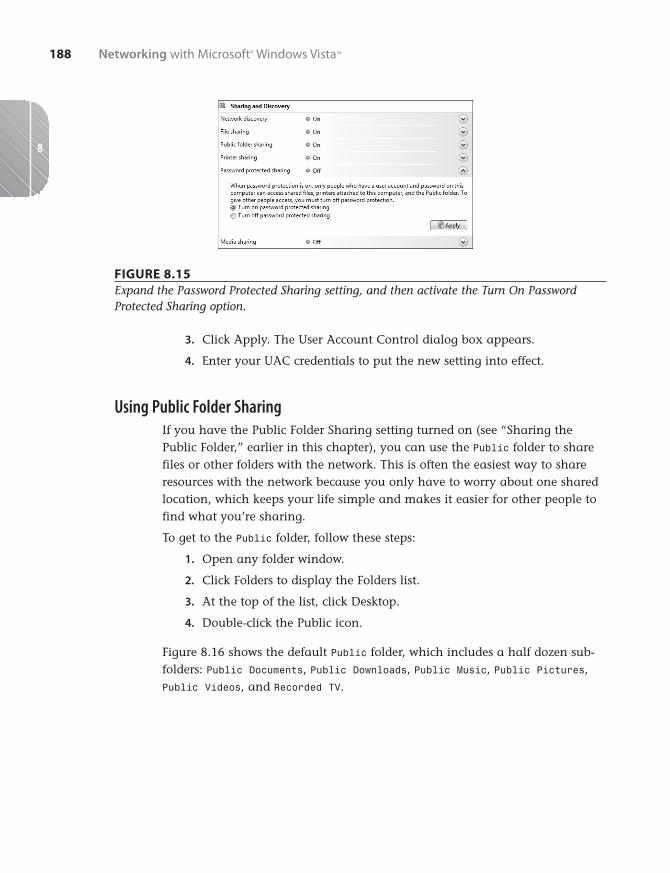
FIGURE 8.15Expand the Password Protected Sharing setting, and then activate the Turn On PasswordProtected Sharing option.
3. Click Apply. The User Account Control dialog box appears.
4. Enter your UAC credentials to put the new setting into effect.
Using Public Folder SharingIf you have the Public Folder Sharing setting turned on (see “Sharing thePublic Folder,” earlier in this chapter), you can use the Public folder to sharefiles or other folders with the network. This is often the easiest way to shareresources with the network because you only have to worry about one sharedlocation, which keeps your life simple and makes it easier for other people tofind what you’re sharing.
To get to the Public folder, follow these steps:
1. Open any folder window.
2. Click Folders to display the Folders list.
3. At the top of the list, click Desktop.
4. Double-click the Public icon.
Figure 8.16 shows the default Public folder, which includes a half dozen sub-folders: Public Documents, Public Downloads, Public Music, Public Pictures,Public Videos, and Recorded TV.
188 Networking with Microsoft® Windows Vista™
8
11_0789737779_ch08.qxd 11/16/07 10:17 AM Page 188
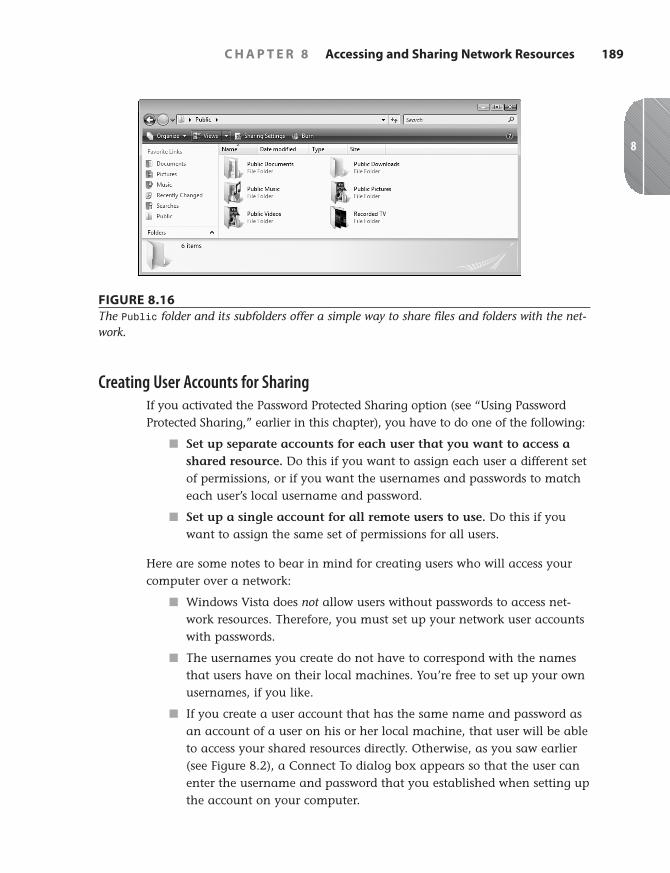
FIGURE 8.16The Public folder and its subfolders offer a simple way to share files and folders with the net-work.
Creating User Accounts for SharingIf you activated the Password Protected Sharing option (see “Using PasswordProtected Sharing,” earlier in this chapter), you have to do one of the following:
■ Set up separate accounts for each user that you want to access ashared resource. Do this if you want to assign each user a different setof permissions, or if you want the usernames and passwords to matcheach user’s local username and password.
■ Set up a single account for all remote users to use. Do this if youwant to assign the same set of permissions for all users.
Here are some notes to bear in mind for creating users who will access yourcomputer over a network:
■ Windows Vista does not allow users without passwords to access net-work resources. Therefore, you must set up your network user accountswith passwords.
■ The usernames you create do not have to correspond with the namesthat users have on their local machines. You’re free to set up your ownusernames, if you like.
■ If you create a user account that has the same name and password asan account of a user on his or her local machine, that user will be ableto access your shared resources directly. Otherwise, as you saw earlier(see Figure 8.2), a Connect To dialog box appears so that the user canenter the username and password that you established when setting upthe account on your computer.
C H A P T E R 8 Accessing and Sharing Network Resources 189
8
11_0789737779_ch08.qxd 11/16/07 10:17 AM Page 189
You create a new user account in Windows Vista by following these steps:
1. Select Start, Control Panel to open the Control Panel window.
2. Under the User Accounts and Family Safety icon, click the Add orRemove User Accounts link. The User Account Control dialog boxappears.
3. Enter your UAC credentials to continue. Vista displays the ManageAccounts window.
4. Click Create a New Account. The Create New Account window appears.
5. Type the name for the account. The name can be up to 20 charactersand must be unique on the system.
6. Activate either Administrator (to add the user to the Administratorsgroup) or Standard User (to add the user to the Users group).
7. Click Create Account. Vista creates the new account and returns you tothe Manage Accounts window.
8. Click the account you just created. The Change An Account windowappears.
9. Click the Create a Password link. Vista displays the Create Passwordwindow.
10. Type the user’s password in the New Password and Confirm NewPassword text boxes.
11. Use the Type a Password Hint text box to type a reminder for the userin case he forgets the password.
12. Click Create Password.
Sharing a Resource with the File Sharing WizardBy default, Windows Vista comes with the File Sharing Wizard activated. Thisis a simplified sharing feature that removes some of the complexity from shar-ing folders and files. However, it also removes much of the power and flexibil-ity of sharing, so Vista also enables you to turn off the File Sharing Wizard. Ishow you how to do that in the next section. So that you can compare the twomethods, here are the steps to follow to use the File Sharing Wizard to share afolder or file:
1. Select Start, and then click your username to open your user profilefolder.
2. Click the folder you want to share. If you want to share a subfolder orfile, instead, open its folder, and then click the subfolder or file.
190 Networking with Microsoft® Windows Vista™
8
11_0789737779_ch08.qxd 11/16/07 10:17 AM Page 190
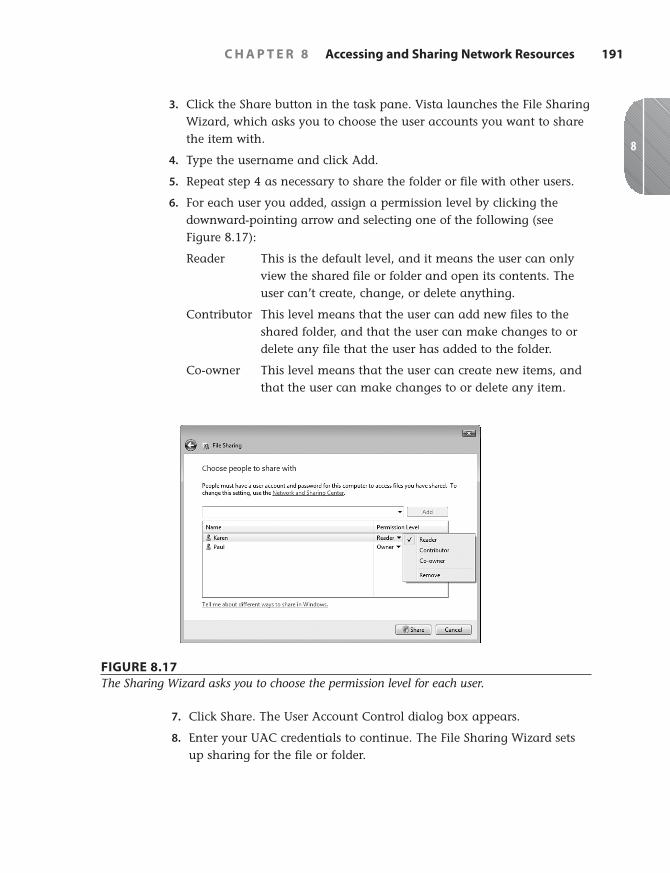
3. Click the Share button in the task pane. Vista launches the File SharingWizard, which asks you to choose the user accounts you want to sharethe item with.
4. Type the username and click Add.
5. Repeat step 4 as necessary to share the folder or file with other users.
6. For each user you added, assign a permission level by clicking thedownward-pointing arrow and selecting one of the following (seeFigure 8.17):
Reader This is the default level, and it means the user can onlyview the shared file or folder and open its contents. Theuser can’t create, change, or delete anything.
Contributor This level means that the user can add new files to theshared folder, and that the user can make changes to ordelete any file that the user has added to the folder.
Co-owner This level means that the user can create new items, andthat the user can make changes to or delete any item.
C H A P T E R 8 Accessing and Sharing Network Resources 191
8
FIGURE 8.17The Sharing Wizard asks you to choose the permission level for each user.
7. Click Share. The User Account Control dialog box appears.
8. Enter your UAC credentials to continue. The File Sharing Wizard setsup sharing for the file or folder.
11_0789737779_ch08.qxd 11/16/07 10:17 AM Page 191
9. If you want to send an email to the users to let them know the folder orfile is shared, click the E-mail link; otherwise, click Done.
If you no longer want to share a folder or file, you can change the sharingusing either of the following methods:
■ To remove a user from the sharing. Follow steps 1 through 3 in thissection, and then click Change Sharing Permissions to display the listof shared users. Click the permission level for the user you want towork with, and then click Remove.
■ To stop sharing the folder or file entirely. Follow steps 1 through 3 inthis section, and then click Stop Sharing.
➔ To learn how to share a folder using advanced permissions, see “Setting Sharing Permissionson Shared Folders,” p. 315.
Viewing Your Shared ResourcesAfter a while, you might lose track of which folders you’ve shared. You couldlook through all your folders to look for those that have the Shared iconattached, but that’s too much work, and you could easily miss some sharedfolder. Fortunately, Windows Vista offers a couple of easier methods. Open theNetwork and Sharing Center and then use the following two links at the bot-tom of the window:
■ Show Me All the Files and Folders I Am Sharing. Click this link toopen the Shared By Me search folder.
■ Show Me All the Shared Network Folders on This Computer. Clickthis link to open a folder window showing your computer’s shared fold-ers and printers.
From Here■ For the steps required to connect to a standard wireless network, see
“Making Wireless Network Connections,” p. 113.
■ To learn how to open the Network and Sharing Center, see “Accessingthe Network and Sharing Center,” p. 125.
■ For a more detailed look at the types of items you see in the Networkwindow, see “Viewing Network Computers and Devices,” p. 130.
192 Networking with Microsoft® Windows Vista™
8
11_0789737779_ch08.qxd 11/16/07 10:17 AM Page 192
■ To learn more about wired connections, see Chapter 6, “ManagingNetwork Connections,” p. 139.
■ For information about how to remotely wake up a computer that’s inSleep mode, see “Using a Network Connection to Wake Up a SleepingComputer,” p. 151.
■ To learn more about wireless connections, see Chapter 7, “ManagingWireless Network Connections,” p. 157.
■ For the details about media sharing, see “Sharing Your Media PlayerLibrary,” p. 207.
■ To learn how to share a folder using advanced permissions, see“Setting Sharing Permissions on Shared Folders,” p. 315.
C H A P T E R 8 Accessing and Sharing Network Resources 193
8
11_0789737779_ch08.qxd 11/16/07 10:17 AM Page 193