Embed Size (px)
Citation preview
ACS Version 10.6 - Accounts Payable

iii
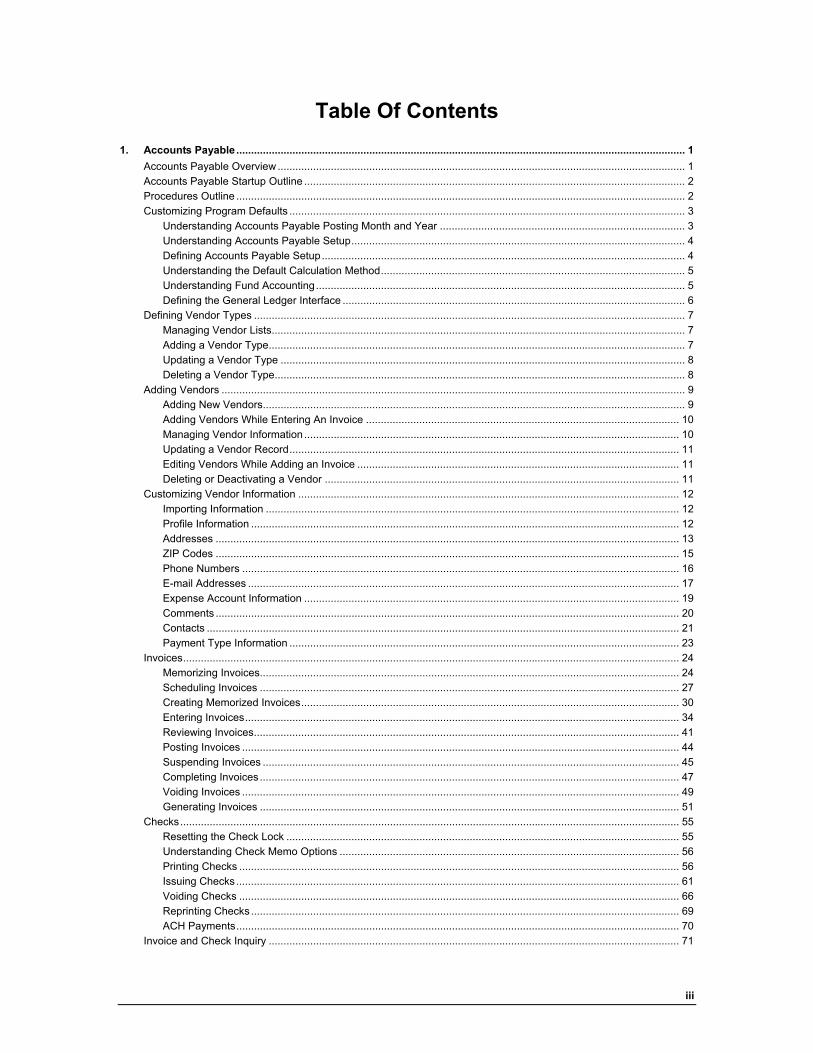
Table Of Contents 1. Accounts Payable ........................................................................................................................................................ 1
Accounts Payable Overview .......................................................................................................................................... 1 Accounts Payable Startup Outline ................................................................................................................................. 2 Procedures Outline ........................................................................................................................................................ 2 Customizing Program Defaults ...................................................................................................................................... 3
Understanding Accounts Payable Posting Month and Year ................................................................................... 3 Understanding Accounts Payable Setup................................................................................................................. 4 Defining Accounts Payable Setup........................................................................................................................... 4 Understanding the Default Calculation Method....................................................................................................... 5 Understanding Fund Accounting............................................................................................................................. 5 Defining the General Ledger Interface .................................................................................................................... 6
Defining Vendor Types .................................................................................................................................................. 7 Managing Vendor Lists............................................................................................................................................ 7 Adding a Vendor Type............................................................................................................................................. 7 Updating a Vendor Type ......................................................................................................................................... 8 Deleting a Vendor Type........................................................................................................................................... 8
Adding Vendors ............................................................................................................................................................. 9 Adding New Vendors............................................................................................................................................... 9 Adding Vendors While Entering An Invoice .......................................................................................................... 10 Managing Vendor Information ............................................................................................................................... 10 Updating a Vendor Record.................................................................................................................................... 11 Editing Vendors While Adding an Invoice ............................................................................................................. 11 Deleting or Deactivating a Vendor ........................................................................................................................ 11
Customizing Vendor Information ................................................................................................................................. 12 Importing Information ............................................................................................................................................ 12 Profile Information ................................................................................................................................................. 12 Addresses ............................................................................................................................................................. 13 ZIP Codes ............................................................................................................................................................. 15 Phone Numbers .................................................................................................................................................... 16 E-mail Addresses .................................................................................................................................................. 17 Expense Account Information ............................................................................................................................... 19 Comments ............................................................................................................................................................. 20 Contacts ................................................................................................................................................................ 21 Payment Type Information .................................................................................................................................... 23
Invoices........................................................................................................................................................................ 24 Memorizing Invoices.............................................................................................................................................. 24 Scheduling Invoices .............................................................................................................................................. 27 Creating Memorized Invoices................................................................................................................................ 30 Entering Invoices................................................................................................................................................... 34 Reviewing Invoices................................................................................................................................................ 41 Posting Invoices .................................................................................................................................................... 44 Suspending Invoices ............................................................................................................................................. 45 Completing Invoices .............................................................................................................................................. 47 Voiding Invoices .................................................................................................................................................... 49 Generating Invoices .............................................................................................................................................. 51
Checks......................................................................................................................................................................... 55 Resetting the Check Lock ..................................................................................................................................... 55 Understanding Check Memo Options ................................................................................................................... 56 Printing Checks ..................................................................................................................................................... 56 Issuing Checks...................................................................................................................................................... 61 Voiding Checks ..................................................................................................................................................... 66 Reprinting Checks................................................................................................................................................. 69 ACH Payments...................................................................................................................................................... 70
Invoice and Check Inquiry ........................................................................................................................................... 71
ACS Version 10.6 - Accounts Payable
iv
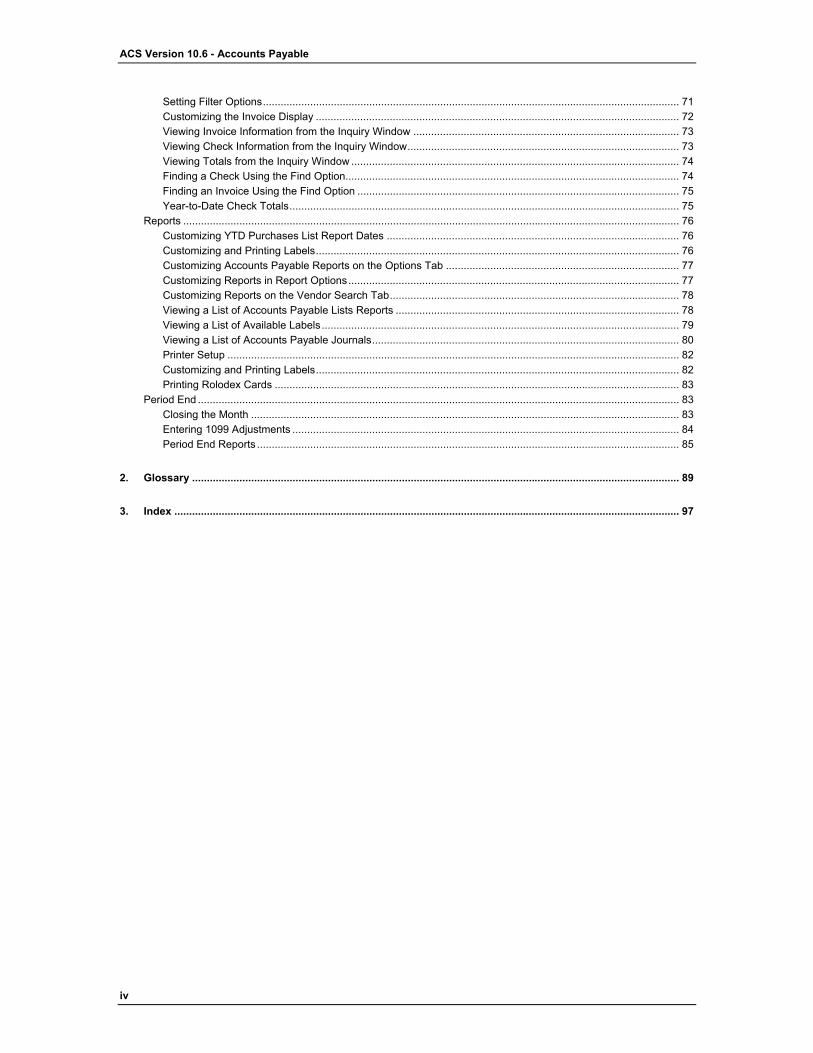
Setting Filter Options............................................................................................................................................. 71 Customizing the Invoice Display ........................................................................................................................... 72 Viewing Invoice Information from the Inquiry Window .......................................................................................... 73 Viewing Check Information from the Inquiry Window............................................................................................ 73 Viewing Totals from the Inquiry Window ............................................................................................................... 74 Finding a Check Using the Find Option................................................................................................................. 74 Finding an Invoice Using the Find Option ............................................................................................................. 75 Year-to-Date Check Totals.................................................................................................................................... 75
Reports ........................................................................................................................................................................ 76 Customizing YTD Purchases List Report Dates ................................................................................................... 76 Customizing and Printing Labels........................................................................................................................... 76 Customizing Accounts Payable Reports on the Options Tab ............................................................................... 77 Customizing Reports in Report Options................................................................................................................ 77 Customizing Reports on the Vendor Search Tab.................................................................................................. 78 Viewing a List of Accounts Payable Lists Reports ................................................................................................ 78 Viewing a List of Available Labels......................................................................................................................... 79 Viewing a List of Accounts Payable Journals........................................................................................................ 80 Printer Setup ......................................................................................................................................................... 82 Customizing and Printing Labels........................................................................................................................... 82 Printing Rolodex Cards ......................................................................................................................................... 83
Period End ................................................................................................................................................................... 83 Closing the Month ................................................................................................................................................. 83 Entering 1099 Adjustments ................................................................................................................................... 84 Period End Reports ............................................................................................................................................... 85
2. Glossary ..................................................................................................................................................................... 89
3. Index ........................................................................................................................................................................... 97
1
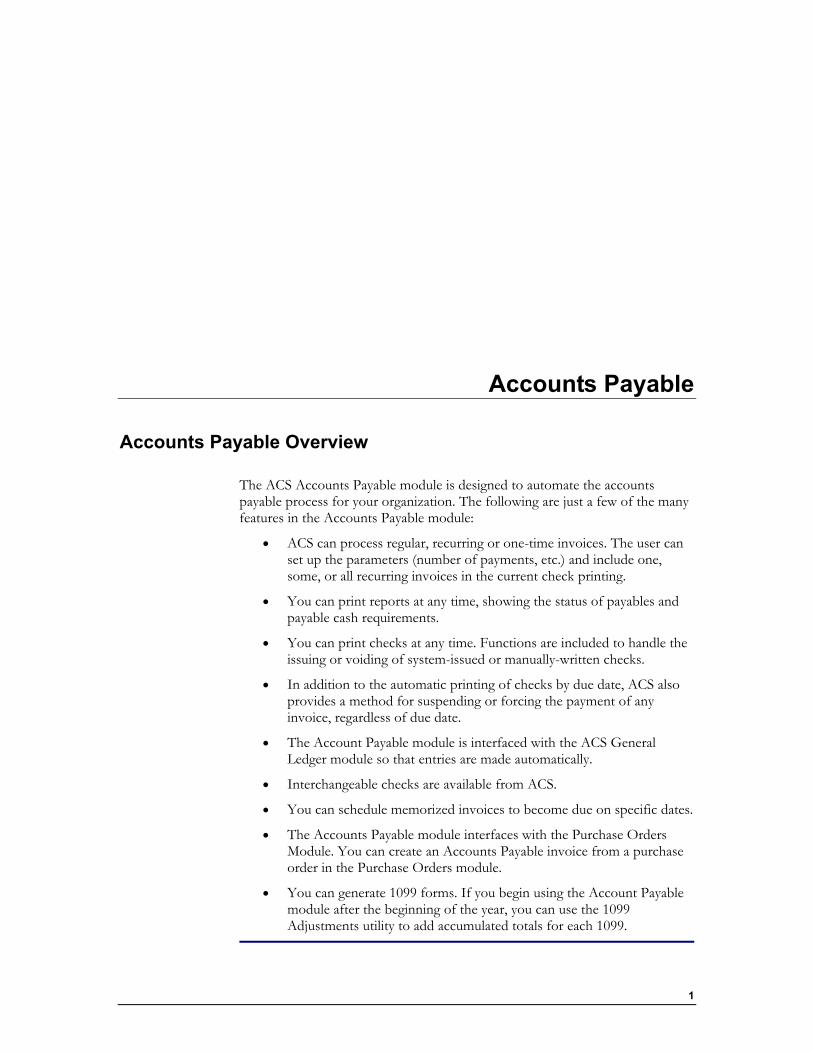
Accounts Payable
Accounts Payable Overview
The ACS Accounts Payable module is designed to automate the accounts payable process for your organization. The following are just a few of the many features in the Accounts Payable module:
• ACS can process regular, recurring or one-time invoices. The user can set up the parameters (number of payments, etc.) and include one, some, or all recurring invoices in the current check printing.
• You can print reports at any time, showing the status of payables and payable cash requirements.
• You can print checks at any time. Functions are included to handle the issuing or voiding of system-issued or manually-written checks.
• In addition to the automatic printing of checks by due date, ACS also provides a method for suspending or forcing the payment of any invoice, regardless of due date.
• The Account Payable module is interfaced with the ACS General Ledger module so that entries are made automatically.
• Interchangeable checks are available from ACS.
• You can schedule memorized invoices to become due on specific dates.
• The Accounts Payable module interfaces with the Purchase Orders Module. You can create an Accounts Payable invoice from a purchase order in the Purchase Orders module.
• You can generate 1099 forms. If you begin using the Account Payable module after the beginning of the year, you can use the 1099 Adjustments utility to add accumulated totals for each 1099.
ACS Version 10.6 - Accounts Payable
2
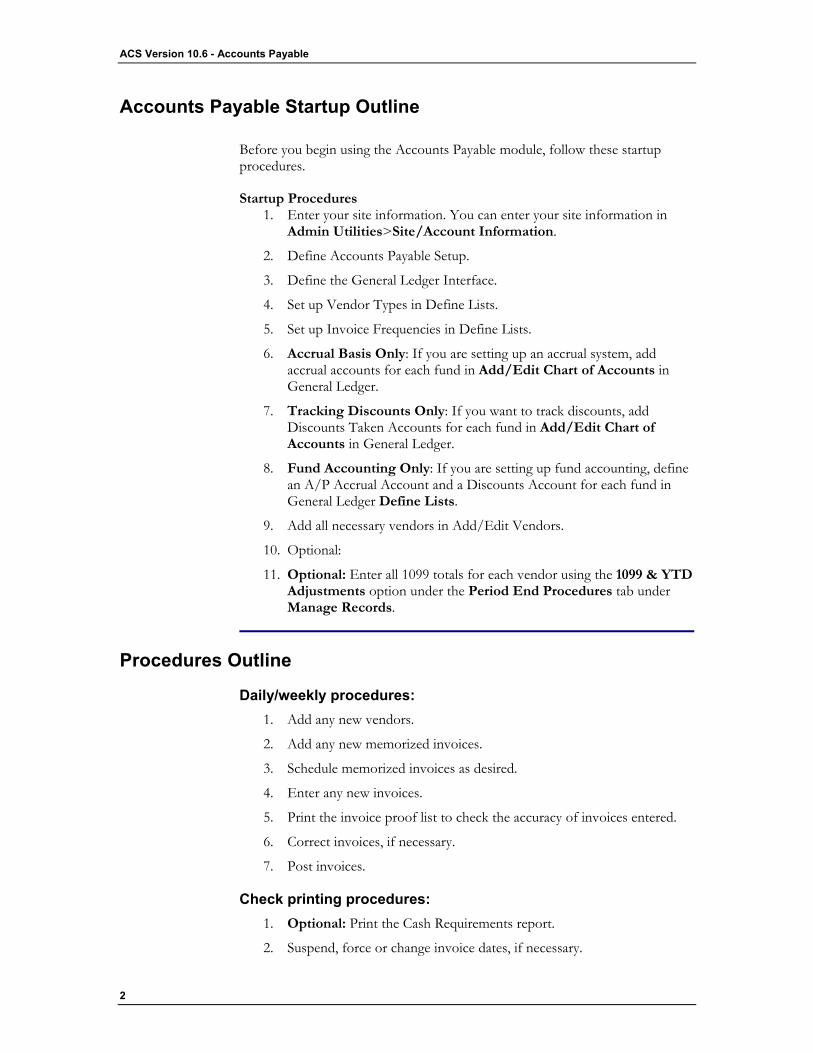
Accounts Payable Startup Outline
Before you begin using the Accounts Payable module, follow these startup procedures.
Startup Procedures 1. Enter your site information. You can enter your site information in
Admin Utilities>Site/Account Information.
2. Define Accounts Payable Setup.
3. Define the General Ledger Interface.
4. Set up Vendor Types in Define Lists.
5. Set up Invoice Frequencies in Define Lists.
6. Accrual Basis Only: If you are setting up an accrual system, add accrual accounts for each fund in Add/Edit Chart of Accounts in General Ledger.
7. Tracking Discounts Only: If you want to track discounts, add Discounts Taken Accounts for each fund in Add/Edit Chart of Accounts in General Ledger.
8. Fund Accounting Only: If you are setting up fund accounting, define an A/P Accrual Account and a Discounts Account for each fund in General Ledger Define Lists.
9. Add all necessary vendors in Add/Edit Vendors.
10. Optional:
11. Optional: Enter all 1099 totals for each vendor using the 1099 & YTD Adjustments option under the Period End Procedures tab under Manage Records.
Procedures Outline
Daily/weekly procedures: 1. Add any new vendors.
2. Add any new memorized invoices.
3. Schedule memorized invoices as desired.
4. Enter any new invoices.
5. Print the invoice proof list to check the accuracy of invoices entered.
6. Correct invoices, if necessary.
7. Post invoices.
Check printing procedures: 1. Optional: Print the Cash Requirements report.
2. Suspend, force or change invoice dates, if necessary.
Accounts Payable
3
3. Start the Check Run.
4. Print the Check Proof List to check the accuracy of check information prior to printing.
5. Print Checks and post them to the General Ledger.
6. Post any handwritten checks to the General Ledger or issue printed checks "on the fly" as needed.
7. Create an ACH Transmission file.
8. Print the Check Register report.
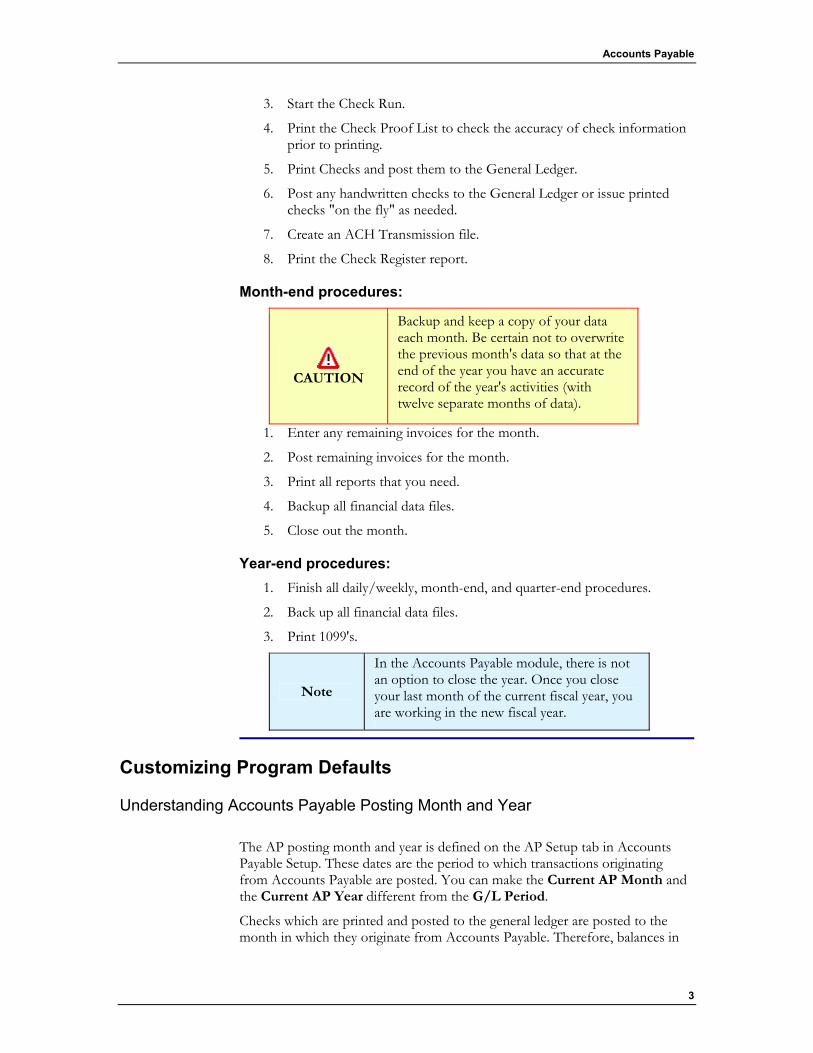
Month-end procedures:
CAUTION
Backup and keep a copy of your data each month. Be certain not to overwrite the previous month's data so that at the end of the year you have an accurate record of the year's activities (with twelve separate months of data).
1. Enter any remaining invoices for the month.
2. Post remaining invoices for the month.
3. Print all reports that you need.
4. Backup all financial data files.
5. Close out the month.
Year-end procedures: 1. Finish all daily/weekly, month-end, and quarter-end procedures.
2. Back up all financial data files.
3. Print 1099's.
Note
In the Accounts Payable module, there is not an option to close the year. Once you close your last month of the current fiscal year, you are working in the new fiscal year.
Customizing Program Defaults Understanding Accounts Payable Posting Month and Year
The AP posting month and year is defined on the AP Setup tab in Accounts Payable Setup. These dates are the period to which transactions originating from Accounts Payable are posted. You can make the Current AP Month and the Current AP Year different from the G/L Period.
Checks which are printed and posted to the general ledger are posted to the month in which they originate from Accounts Payable. Therefore, balances in
ACS Version 10.6 - Accounts Payable
4
the general ledger do not reflect these payments until the current month and current year in the General Ledger module matches the date of the Accounts Payable transactions.
Example: Your current AP month is October. The G/L Period is September. You have issued a check in AP for $176.00. The Accounts Payable invoice is posted and paid, but the general ledger balance is not affected. When the G/L Period reaches October, the $176.00 is deducted from the checking account.
Understanding Accounts Payable Setup
Use Accounts Payable Setup to configure default program settings.
Warn on Duplicate Invoice Numbers — Select to receive a warning message when a duplicate invoice number is entered.
Current AP Month — Select the current accounts payable month. Click the down arrow to select a month from the drop-down list.
Current AP Year — Select the current accounts payable year. Click the down arrow to select a year from the drop-down list.
Prompt to void invoices when void check — Select to receive a prompt to void the invoices associated with the check when voiding checks.
Print Invoice Detail on Vendor Check Stub — Select to print the invoice account distribution on the vendor's check stub.
Auto Assign Next Vendor Code — If selected, the program automatically generates the next available vendor number for new vendor entries.
Next Vendor Code — Choose a starting number for your vendor codes by typing it in Next Vendor Code. This number is used to automatically assign a number to the next vendor if Auto Assign Next Vendor Code is selected or if you click Next when adding or editing a vendor record.
Print Overflow Checks on Plain Paper — Select to print all overflow distributions on plain paper at the end of the run. Check numbers are not skipped when Print Overflow Checks on Plain Paper is selected.
Check Layout Design — Click to access the Check Layout Design feature.
Defining Accounts Payable Setup
Use the Accounts Payable Setup to configure settings in Accounts Payable that make processing transactions easier and quicker. Indicate whether or not you want to receive a warning message when a duplicate invoice number is entered.
To define Accounts Payable setup 1. Under Advanced Tools, click the Settings tab.
2. In the drop-down list, select AccountsPayable.

Accounts Payable
5
3. Click Go .
4. You can choose to receive a warning message when a duplicate invoice number is entered. To select this option, click Warn on Duplicate Invoice Numbers.
5. Select the current month for accounts payable. Click the down arrow to select a month in the drop-down list.
6. Select the current year for accounts payable. Click the down arrow to select a year in the drop-down list.
7. When you void a check, you can choose to receive a prompt to void invoices associated with the check. To select this option, clickPrompt to void invoices when void check.
8. You can choose to print the invoice account distribution on the vendor's check stub. To select this option, click Print Invoice Detail on Vendor Check Stub.
9. Click OK.
Understanding the Default Calculation Method
By default, ACS calculates year-to-date (YTD) totals based upon the following (which you can change if necessary by entering different dates):
• If you are operating on a fiscal year, totals are calculated beginning from the first day of the fiscal year (MM/01/20XX) to the last day of the current month in Accounts Payable.
• If you are operating on a calendar year, totals are calculated beginning from the first day of the calendar year (01/01/20XX) to the last day of the current month in Accounts Payable.
• By default, all 1099 amounts are calculated beginning from the first day of the calendar year (01/01/20XX) to the last day of the current month in Accounts Payable.
Understanding Fund Accounting
Fund accounting properties If you have different funds set up in General Ledger, you can select the Enable Fund Accounting option on the G/L Interface tab in General Ledger Setup. When Enable Fund Accounting is selected, the following is true:
• Default checking accounts that display are based upon the checking account for each fund. Default checking accounts are set up in the General Ledger module in Define Lists>Add/Edit Funds.
• (Applicable for Accrual Basis only) Account distributions for invoices are placed in the appropriate Accrual account that is defined from each fund. Accrual accounts for each fund are defined in the General Ledger module in Define Lists>Add/Edit Funds.
ACS Version 10.6 - Accounts Payable
6
• If you select the Track Discounts Taken option, discounts for account distributions are placed in the appropriate Discount account that is defined for each fund.
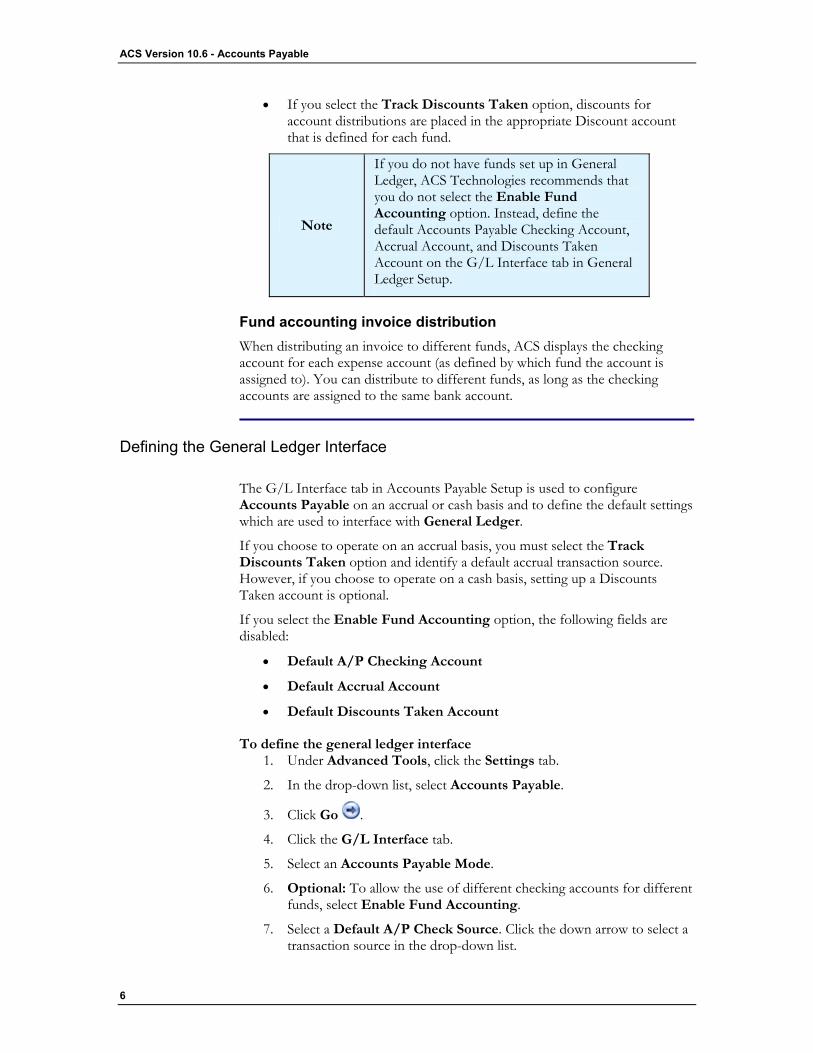
Note
If you do not have funds set up in General Ledger, ACS Technologies recommends that you do not select the Enable Fund Accounting option. Instead, define the default Accounts Payable Checking Account, Accrual Account, and Discounts Taken Account on the G/L Interface tab in General Ledger Setup.
Fund accounting invoice distribution When distributing an invoice to different funds, ACS displays the checking account for each expense account (as defined by which fund the account is assigned to). You can distribute to different funds, as long as the checking accounts are assigned to the same bank account.
Defining the General Ledger Interface
The G/L Interface tab in Accounts Payable Setup is used to configure Accounts Payable on an accrual or cash basis and to define the default settings which are used to interface with General Ledger.
If you choose to operate on an accrual basis, you must select the Track Discounts Taken option and identify a default accrual transaction source. However, if you choose to operate on a cash basis, setting up a Discounts Taken account is optional.
If you select the Enable Fund Accounting option, the following fields are disabled:
• Default A/P Checking Account
• Default Accrual Account
• Default Discounts Taken Account
To define the general ledger interface 1. Under Advanced Tools, click the Settings tab.
2. In the drop-down list, select Accounts Payable.
3. Click Go .
4. Click the G/L Interface tab.
5. Select an Accounts Payable Mode.
6. Optional: To allow the use of different checking accounts for different funds, select Enable Fund Accounting.
7. Select a Default A/P Check Source. Click the down arrow to select a transaction source in the drop-down list.
Accounts Payable
7
8. Enter a Default A/P Checking Account. Click Lookup to select an account in the Account Lookup window.
9. For accrual basis accounting only: Select a Default Accrual Source. Click the down arrow to select a transaction source in the drop-down list.
10. For accrual basis accounting only: Enter a Default Accrual
Account. Click Lookup button to select an account in the Account Lookup window.
11. To maintain discounts in a separate account, select the Track Discounts Taken option.
12. Enter a Default Discounts Taken Account. Click Lookup to select an account in the account Lookup window.
13. Click OK.
Defining Vendor Types Managing Vendor Lists
You can change or remove an item in any of the lists you defined for use in the vendor file. However, keep in mind that Vendor Type is the only list that is unique to vendors. All of the other lists are also used in the other Financial Suite modules.
When you make a change to the Other lists, the change affects any record with the item assigned to it. For example, you add an address type named Business, and you assign this address type to contacts in the Accounts Receivable module. You decide to change the description of Business to Street for use in your vendor records. All of the contacts in Accounts Receivable with an address type of Business also change to Street.
Adding a Vendor Type
The vendor type allows you to categorize vendors by description. For example, you can use the description of Utility for all utility companies that you use, such as phone, water, electricity, and natural gas. Once you assign the vendor type to vendors, you can group vendors by type in the vendor list to help you find vendors easier.
To add a vendor type 1. Under Advanced Tools, click the Define Lists tab.
2. In the list, select Accounts Payable.
3. Click Go .
4. Under Available Lists, select Vendor Types.
ACS Version 10.6 - Accounts Payable
8
5. Click Add.
6. Enter a description for the type of vendor.
7. Optional: Select the Active check box to display the appropriate status. The available statuses are:
• Active
• Not active
8. Optional: To add another vendor type, select Add Another.
9. Click OK.
10. Optional: To print a Vendor Type List report, click Print.
Updating a Vendor Type
When editing a vendor type, the vendor records are updated also. If you change the type status to inactive, the vendor type remains attached to any vendor to which it is assigned.
To change a vendor type 1. Under Advanced Tools, click the Define Lists tab.
2. In the list, select, Accounts Payable.
3. Click Go .
4. Under Available Lists, select Vendor Types.
5. Select the vendor type that you want to update, and click Edit.
6. Enter the revised information, and click OK.
Deleting a Vendor Type
If a vendor type is assigned to vendors, ACS alerts you that the type is assigned to vendors and issues a prompt to clear the type from all vendors. You can select to continue or cancel at that time.
To delete a vendor type 1. Under Advanced Tools, click the Define Lists tab.
2. In the list, select Accounts Payable.
3. Click Go .
4. Select the vendor type you want to delete and click Delete.
5. Click Yes to the confirmation message.
Accounts Payable
9
Adding Vendors Adding New Vendors
Vendors are companies or individuals with whom you do business. Some vendors may provide a service for you, such as lawn care or payroll processing. Other vendors may provide supplies for you such as office equipment or robes for the choir. Your utility companies are vendors as well. Make it a habit to enter anyone in the Vendor file that you pay for services rendered.
Prior to entering vendors, you need to set up your vendor types in Define Lists. If you need help with setting up the vendor types, see Adding a Vendor Type.
If an individual has a record in ACS, you can select the individual's name in the Global Name List to quickly add the vendor record type. Using the record in the Global Name List speeds up your data entry by copying personal information, such as address, phone number, e-mail address, and social security number. Besides saving you a great deal of time entering duplicate information, it prevents you from inadvertently adding a duplicate record. Once the vendor record is created, you can add any additional information to each tab that is necessary to complete the record.
If a vendor is not an individual, make sure to select the Company check box in the Name Information area. Enter the company name in the Last Name field, and leave the First Name and Middle fields blank. When searching for vendors, search in the Last Name field to include all vendors.
In General Ledger Setup, the format of the display name is defined. All names throughout the Financial Suite display in the defined format. This includes reports, both preview and print, and ACS grids. If you want to change the way a particular name displays, select the Retain check box in the Name Information area and enter the name in the new format.
To add a vendor 1. Under Manage Records, click the Records tab.
2. In the drop-down list, select Add/Edit Vendors.
3. Click Go .
4. Click Add.
5. Enter information in the appropriate fields under Name Information. For more information on these fields, see Understanding Name Information.
6. Enter the information in the appropriate fields on each tab. For information on each tab, see Getting an Overview of the Add Vendor Window.
7. Click OK.
To add a vendor from the global name list 1. Under Manage Records, click the Records tab.
2. In the drop-down list, select Add/Edit Vendors.
ACS Version 10.6 - Accounts Payable
10
3. Click Go .
4. Click Add.
5. In the Last Name field, click Lookup and select a record in the Global Name List.
6. Click OK.
7. Enter the information in the appropriate fields on each tab. For more information about each tab, see Getting an Overview of the Add Vendor Window.
8. Click OK.
Adding Vendors While Entering An Invoice
In the Accounts Payable module, you can add vendors while entering invoices.
To add a vendor while entering an invoice
1. In the Accounts Payable Add Invoice window, click Lookup in the Vendor Code field.
2. Click Add.
3. Beginning with step #5, follow the steps in the topic named Adding Vendors.
Managing Vendor Information
You can print, change, or delete vendor information at any time. You can change which address is global, and which is the primary, or mailing address. You can add a new phone number or e-mail address for the vendor or a contact. You can delete a contact and add a new one. On the accounts tab, you can change the general ledger account number for the vendor, or change the setting for the memo. If the vendor decides to use the Automated Clearing House (ACH) for receiving payment, you can add the ACH information on the Payment tab. All of these actions are part of updating a vendor's record even though you are adding new information to an existing record.
If you delete an existing vendor record, you are updating the record also. Deleting a vendor record removes the record from the global name list, which updates the global name list. Deactivating a vendor is a record update also.
You can print a list all vendors, a range of vendors, or information for one vendor.
Accounts Payable
11
Updating a Vendor Record
If you change the 1099 option for a vendor with invoices in ACS, a message displays when you click OK. You must choose one of the following:
Yes — changes the 1099 flag on all invoices for the vendor to match the new 1099 setting
No — leaves the 1099 setting unchanged
Cancel — cancels the changes you entered on the vendor's record
To change vendor record 1. Under Manage Records, click in the Enter Name field, and enter the
company name or the individual's last name.
2. Press ENTER.
3. If necessary, select the correct record in the Find Individual window, then click Use Selected. If multiple records exist for the individual, select the correct record type in the list, then click OK.
4. Click any tab and enter the revised information.
5. Click OK.
Editing Vendors While Adding an Invoice
In Accounts Payable, you can edit vendors while entering invoices.
To edit a vendor while entering an invoice 1. Under Manage Records, click the Transactions tab.
2. In the drop-down list, select Accounts Payable Invoices.
3. Click Go .
4. Click Add/Edit Invoices.
5. Click Add.
6. In the Vendor Code field, click Lookup .
7. Select the vendor and click Edit.
8. Enter the necessary information.
9. Click OK.
Deleting or Deactivating a Vendor
You can only delete a vendor if the vendor has had no transactions in the current year. If you cannot delete a vendor, but still want the vendor removed from your list of active vendors, you can deactivate the vendor record instead.
ACS Version 10.6 - Accounts Payable
12
To delete or deactivate a vendor record 1. Under Manage Records, click the Records tab.
2. In the drop-down list, select Add/Edit Vendors.
3. Click Go .
4. Select the vendor's record that you want to delete or deactivate.
5. If deactivating the record, click Edit. If deleting the record, go to step #7.
6. Under Name Information, clear the Active check box. This is the last step for deactivating a vendor record.
7. Click Delete.
8. Click Yes to the confirmation message.
Customizing Vendor Information Importing Information
When editing a vendor record, you can import information from ACS's People, Organizations, or Headmaster applications.
To import information for an existing vendor
1. Under Manage Records, on the Records tab, select Add/Edit Vendors.
2. Press ENTER.
3. Locate the appropriate vendor and click Edit.
4. In the Name Information section, click Import, andfollow the on-screen instructions.
Note
Once a vendor's information has been imported, the Import link in the vendor window changes to Clear Refresh Link. If clicked, Accounts Payable will no longer update name and address information for the vendor from the import program.
Profile Information
Adding Vendor Profile Information
If the vendor is to receive a 1099 at year-end, you can mark the vendor as a 1099 vendor on the Profile tab.
Accounts Payable
13
The vendor's contact information displays on the Profile tab so you can access this information quickly.
To add profile information 1. Under Manage Records, click in the Enter Name field and enter the
company name or the individual's last name.
2. Press ENTER.
3. If necessary, select the correct record in the Find Individual window, then click Use Selected. If multiple records exist for the individual, select the correct record type in the list, then click OK.
4. Click the Profile tab.
5. Enter the vendor information. For information on these fields, see Getting an Overview of the Vendor Profile Tab.
6. Click OK.
Updating Profile Information
You can change the vendor information on the profile tab in the vendor's record at any time.
To change the profile information 1. Under Manage Records, click in the Enter Name field and enter the
company name or the individual's last name.
2. Press ENTER.
3. If necessary, select the correct record in the Find Individual window, then click Use Selected. If multiple records exist for the individual, select the correct record type in the list, then click OK.
4. Click the Profile tab.
5. Enter the revised information, and click OK.
Addresses
Adding Addresses
You can add as many addresses to a record as you need and assign an address type to help differentiate between multiple addresses. However, if the individual has more than one record type in ACS, you need to add the address only once. Each address displays on all record types for the individual.
If the individual has more than one address, you can select one as the global address. You can assign the global setting to only one address for the individual. If you want to clear the setting from an address, you must assign the global setting to another address. The global address displays in the Global Name List.
ACS Version 10.6 - Accounts Payable
14
To add an address 1. Under Manage Records, in the Enter Name field, enter the company
name or individual's last name.
2. Press ENTER.
3. If necessary, select the correct record in the Find Individual window, then click Use Selected. If multiple record types exist for the individual, select the correct record type in the list, then click OK.
4. Click the Addresses tab.
5. Click Add.
6. In the Address Type list, select a description for the address you are entering.
7. If you want to make this the global address for the individual's record, select the Global check box.
8. Enter the address information in the appropriate fields. For information on these fields, see Understanding Address Information.
9. Click OK.
Updating Address Information
You can change or remove the address information for a vendor or an individual at any time. You can also change the primary or mailing address whenever necessary.
To change the address information for an individual or vendor 1. Under Manage Records, click in the Enter Name field, and enter the
company name or the individual's last name.
2. Press ENTER.
3. If necessary, select the correct record in the Find Individual window, then click Use Selected. If multiple records exist for the individual, select the correct record type in the list, then click OK.
4. Click the Addresses tab.
5. Select the address that you want to change, and click Edit.
6. Click in the address field and enter the revised information.
7. Click OK.
8. Repeat steps 5–7 for each address that you want to change.
Deleting an Address You can remove the address information for an individual or a vendor at any time.
Accounts Payable
15
To delete an address 1. Under Manage Records, click in the Enter Name field, and enter the
company name or the individual's last name.
2. Press ENTER.
3. If necessary, select the correct record in the Find Individual window, then click Use Selected. If multiple records exist for the individual, select the correct record type in the list, then click OK.
4. Click the Addresses tab.
5. Select the address that you want to remove, then click Delete.
6. Click Yes to the confirmation message.
ZIP Codes
Adding a ZIP Code
Use this procedure to add a ZIP Code when you are adding a vendor in the Accounts Payable module or adding a customer in the Accounts Receivable module.
To add a ZIP Code
1. In the ZIP Code field, click Lookup .
2. Click Add.
3. Enter the city.
4. Enter the two-letter state abbreviation.
5. Enter the ZIP Code.
6. If you are not entering a United States ZIP Code, clear the USA ZIP option.
7. Enter the country. If you do not clear the USA ZIP option, the Country option is not available.
8. Click OK.
ZIP Code Lookup
To search for a ZIP code
1. Click Lookup .
2. Click in the field that you want to search.
3. Begin typing your search criteria. ACS performs the search as you type.
4. When the record you want is highlighted, click OK.
ACS Version 10.6 - Accounts Payable
16
Phone Numbers
Adding Phone Numbers
You can add as many phone numbers to a record as you need and assign a type to each one to help differentiate between multiple phone numbers. However, if the individual has more than one record type in ACS (for example, vendor, customer, contact, or employee), you need to add a phone number only once. Each one displays on all record types for the individual.
To add a phone number 1. Under Manage Records, in the Enter Name field, enter the company
name or the individual's last name.
2. Press ENTER.
3. If necessary, select the correct record in the Find Individual window, then click Use Selected. If multiple records exist for the individual, select the correct record type in the list, then click OK.
4. Click the Phones/E-mail tab.
5. Under Phones, click Add.
6. In the Phone Type list, select a description for the phone number you are entering.
7. Enter the phone number information. For information on these fields, see Understanding Phone Fields.
8. Click OK.
Updating Phones/E-mail Information
You can change a phone number or e-mail address on a vendor's or individual's record at any time. You can also change the primary phone number and e-mail address for the record.
To change a phone number or e-mail address 1. Under Manage Records, click in the Enter Name field and enter the
company name or the individual's last name.
2. Press ENTER.
3. If necessary, select the correct record in the Find Individual window, then click Use Selected. If multiple records exist for the individual, select the correct record type in the list, then click OK.
4. Click the Phones/E-mail tab.
5. Select the phone number or e-mail address that you want to change, then click Edit.
6. Enter the revised information, and click OK.
Accounts Payable
17
Deleting a Phone Number or E-mail Address
You can remove a phone number or e-mail address from a vendor's or individual's record at any time.
To delete a phone number or an e-mail address 1. Under Manage Records, click in the Enter Name field and enter the
company name or the individual's last name.
2. Press ENTER.
3. If necessary, select the correct record in the Find Individual window, then click Use Selected. If multiple records exist for the individual, select the correct record type in the list, then click OK.
4. Click the Phones/E-mail tab.
5. Select the phone number or e-mail address that you want to remove, then click Delete.
6. Click Yes to the confirmation message.
E-mail Addresses
Adding E-mail Addresses
You can add as many e-mail addresses to a record as you need and assign a type to each one to help differentiate between multiple e-mail addresses. However, if the individual has more than one record type in ACS (for example, vendor, customer, contact, or employee), you only need to add an e-mail address once. Each one displays on all record types for the individual.
To add e-mail addresses 1. Under Manage Records, in the Enter Name field, enter the company
name or the individual's last name.
2. Press ENTER.
3. If necessary, select the correct record in the Find Individual window, then click Use Selected. If multiple records exist for the individual, select the correct record type in the list, then click OK.
4. Click the Phones/E-mail tab.
5. Under E-mail Addresses, click Add.
6. In the E-mail Type list, select a description for the e-mail address you are entering.
7. Enter the e-mail address information. For information on these fields, see Understanding E-mail Address Fields.
8. Click OK.
ACS Version 10.6 - Accounts Payable
18
Setting the Primary or Mailing Address
You can select one primary and one mailing address for each vendor. The primary address and the mailing address can be the same, or they can be different. You can set one as the street address and set the other as the post office box. You can also select which address type to print on reports and labels.
To set the primary or mailing address 1. Under Manage Records, click in the Enter Name field and enter the
company name or the individual's last name.
2. Press ENTER.
3. If necessary, select the correct record in the Find Individual window, then click Use Selected. If multiple records exist for the individual, select the correct record type in the list, then click OK.
4. Click the Addresses tab.
5. Under Active Addresses, make the following selections:
• Click in the Primary list and select a description.
• Click in the Mailing list and select a description.
8. Click OK.
Updating Phones/E-mail Information
You can change a phone number or e-mail address on a vendor's or individual's record at any time. You can also change the primary phone number and e-mail address for the record.
To change a phone number or e-mail address 1. Under Manage Records, click in the Enter Name field and enter the
company name or the individual's last name.
2. Press ENTER.
3. If necessary, select the correct record in the Find Individual window, then click Use Selected. If multiple records exist for the individual, select the correct record type in the list, then click OK.
4. Click the Phones/E-mail tab.
5. Select the phone number or e-mail address that you want to change, then click Edit.
6. Enter the revised information, and click OK.
Accounts Payable
19
Deleting a Phone Number or E-mail Address
You can remove a phone number or e-mail address from a vendor's or individual's record at any time.
To delete a phone number or an e-mail address 1. Under Manage Records, click in the Enter Name field and enter the
company name or the individual's last name.
2. Press ENTER.
3. If necessary, select the correct record in the Find Individual window, then click Use Selected. If multiple records exist for the individual, select the correct record type in the list, then click OK.
4. Click the Phones/E-mail tab.
5. Select the phone number or e-mail address that you want to remove, then click Delete.
6. Click Yes to the confirmation message.
Expense Account Information
Adding Expense Account Information
You can save time when you are entering invoices by assigning a general ledger expense account to a vendor's record. When you select the vendor for an invoice, the expense account is automatically assigned to the invoice. If necessary, you can change the expense account on the invoice.
To add expense account information 1. Under Manage Records, click in the Enter Name field and enter the
company name or the individual's last name.
2. Press ENTER.
3. If necessary, select the correct record in the Find Individual window, then click Use Selected. If multiple records exist for the individual, select the correct record type in the list, then click OK.
4. Click the Accounts tab.
5. Enter the expense account information. For information on these fields, see Getting an Overview of the Accounts Tab.
6. Click OK.
ACS Version 10.6 - Accounts Payable
20
Updating Expense Account Information
You can change the expense account assigned to a vendor at any time. Some reasons to change the expense account are:
• You decided to charge expenses for the vendor to a different account
• You discovered the wrong account was assigned to the vendor.
To change the expense account information 1. Under Manage Records, click in the Enter Name field, and enter the
company name, or the individual's last name.
2. Press ENTER.
3. If necessary, select the correct record in the Find Individual window, then click Use Selected. If multiple records exist for the individual, select the correct record type in the list, then click OK.
4. Click the Accounts tab.
5. Enter the revised information, and click OK.
Comments
Adding Comments
You can add comments to a vendor's record and assign a description to indicate the comment type. You can also designate a comment as the key comment for the record. If you include comments in the ACS grid, the key comment displays.
To add comments to a record 1. Under Manage Records, in the Enter Name field, enter the company
name or the individual's last name.
2. Press ENTER.
3. If necessary, select the correct record in the Find Individual window, then click Use Selected. If multiple records exist for the individual, select the correct record type in the list, then click OK.
4. Click the Comments tab.
5. Click Add.
6. Enter the comment information. For information on these fields, see Understanding Comment Fields.
7. Click OK.
Accounts Payable
21
Updating Comments
You can update a comment for a vendor or an individual at any time. You can also change which comment is the key comment.
To change a comment 1. Under Manage Records, click in the Enter Name field, and enter the
company name or the individual's last name.
2. Press ENTER.
3. If necessary, select the correct record in the Find Individual window, then click Use Selected. If multiple records exist for the individual, select the correct record type in the list, then click OK.
4. Click the Comments tab.
5. Select a comment, and click Edit.
6. Enter the revised information, and click OK.
Contacts
Adding Contacts
You can add contacts to the vendor's or employee's record and select a description for the contact type. There is no limit to the number of contacts you can add to a vendor or individual. The first contact you add is considered the primary contact for both vendors and individuals. For employees, the first contact you add is also considered the emergency contact. For information on setting these fields, see Setting the Primary and Emergency Contacts.
To add contacts 1. Under Manage Records, in the Enter Name field, enter the company
name or the individual's last name.
2. Press ENTER.
3. If necessary, select the correct record in the Find Individual window, then click Use Selected. If multiple records exist for the individual, select the correct record type in the list, then click OK.
4. Click the Contacts tab.
5. Click Add.
6. Enter the name information for the contact. For information on these fields, see Understanding Name Information.
7. In the Type list, select a description for the contact person.
8. Click a tab, then click Add. Enter the information for each tab. For more information, see Understanding Contacts Fields.
9. Click OK.

ACS Version 10.6 - Accounts Payable
22
Setting the Primary Contact
ACS marks the first contact you enter for a vendor or individual as the primary contact. Although you can have only one primary contact for each record, you select which contact is the primary contact. This is the contact that prints on most reports.
To set the primary contact 1. Under Manage Records, click in the Enter Name field and enter the
company name or the individual's last name.
2. Press ENTER.
3. If necessary, select the correct record in the Find Individual window, then click Use Selected. If multiple records exist for the individual, select the correct record type in the list, then click OK.
4. Click the Contacts tab.
5. In the PrimaryContact list, select a contact.
6. Click OK.
Updating Contact Information
You can change contact information on a vendor or an individual at any time. You can also change the primary contact whenever necessary.
To change contact information 1. Under Manage Records, in the Enter Name field, enter the company
name, or the last name of the individual.
2. Press ENTER.
3. If necessary, select the correct record in the Find Individual window, then click Use Selected. If multiple records exist for the individual, select the correct record type in the list, then click OK.
4. Click the Contacts tab.
5. Select the contact that you want to update, and click Edit. If you want to update the phone number only, select the contact. Under Phones, select the phone number, then click Edit.
6. Enter the revised information, and click OK.
Accounts Payable
23
Deleting a Contact
You can delete a contact at any time. If you delete the primary contact, the next contact listed becomes the primary contact. If no other contact exists for the record, the record does not display or print on Contact List reports, and no contacts display or print on Master List reports.
To delete a contact 1. Under Manage Records, in the Enter Name field, enter the name of
the company, or the last name of the individual.
2. Press ENTER.
3. If necessary, select the correct record in the Find Individual window, then click Use Selected. If multiple records exist for the individual, select the correct record type in the list, then click OK.
4. Click the Contacts tab.
5. Select the contact that you want to remove, then click Delete.
6. Click Yes to the confirmation message.
Payment Type Information
Adding Payment Type Information
You can add the payment information for a vendor on the Payment Type tab of the vendor's record.
To add payment type information 1. Under Manage Records, in the Enter Name field, enter the company
name or the individual's last name.
2. Press ENTER.
3. If necessary, select the correct record in the Find Individual window, then click Use Selected. If multiple records exist for the individual, select the correct record type in the list, then click OK.
4. Click the Payment Type tab.
5. Select the payment type for the vendor. If you select ACH, click Update Account Information. Otherwise, skip to step # 7. For more information on the Payment Type tab, see Getting an Overview of the Payment Type Tab.
6. Click Add, then enter the information in the appropriate fields. For more information on the bank account fields, see Understanding the Add Bank Account Window.
7. Click OK.
ACS Version 10.6 - Accounts Payable
24
Entering Direct Payment Information for a Specific Vendor
If a vendor chooses to have their payments sent directly to a bank account rather than receiving a check, you can enter direct payment information on the vendor's record. The vendor must provide you with the following information:
• Type of account (checking, savings, money market)
• Account number
• Bank transit number
To enter direct payment information for a specific vendor 1. Under Manage Records, in the Enter Name field, enter the name of
the company or the individual's last name.
2. Press ENTER.
3. If necessary, select the correct record in the Find Individual window, then click Use Selected. If multiple records exist for the individual, select the correct record type in the list, then click OK.
4. Click the Payment Type tab.
5. Select ACH, then click Update Account Information.
6. Enter the information in the appropriate fields. For more information on these fields, see Understanding the Add Bank Account Window.
7. Click OK.
Updating Payment Type Information
You can change the payment type information on a vendor's record at any time.
To change the payment type information 1. Under Manage Records, in the Enter Name field, enter the company
name, or the individual's last name.
2. Press ENTER.
3. If necessary, select the correct record in the Find Individual window, then click Use Selected. If multiple records exist for the individual, select the correct record type in the list, then click OK.
4. Click the Payment Type tab.
5. Enter the revised information, and click OK.
Invoices
Memorizing Invoices
Accounts Payable
25
Memorizing A Previously Entered Invoice You can memorize an invoice that is already in ACS.
To memorize a previously entered invoice 1. Under Manage Records, click the Transactions tab.
2. In the drop-down list, select Accounts Payable Invoices.
3. Click Go .
4. Click Add/Edit Invoices.
5. Click the View bar above the invoice listing to define the invoice display.
6. Select the invoice to memorize.
7. Click Memorize.
8. Click Yes to memorize the invoice.
9. Enter a Memorized Transaction Description.
10. Select a payment Frequency.
11. Choose one of the following payment options:
• If you want to pay this invoice indefinitely, select the Continuous Payments option.
• If this invoice has a set number of payments, enter the number of payments. For example, enter 60 for the number of payments on a 5 year van loan.
12. Click OK.
Note
If you select Continuous Payments, the Number of Payments option is not available. If you choose to enter a number of payments, the invoice is not available for selection in ACS when the number of payments reaches the amount of times specified.
Entering Vendor and Payment Information on a Memorized Invoice
If you select the Continuous Payments option when memorizing an invoice, the Number of Payments option is not available. If you choose to enter a number of payments, once that number is reached, you cannot generate that invoice again. However, the invoice remains in ACS. If you need to generate the invoice again, you can edit the invoice and increase the number of payments.
If you select Warn on Duplicate Invoice Numbers in Accounts Payable Setup, ACS adds a record indicator (beginning with 1) to the end of the invoice number when the invoice is generated. This signifies a generated invoice and prevents duplicate invoice numbers. For example, an invoice number of 1234
ACS Version 10.6 - Accounts Payable
26
becomes number 12341 when the invoice is generated. The second time the invoice is generated, the invoice number becomes 12342. If you do not select the Warn on Duplicate Invoice Numbers option in Accounts Payable Setup, the invoice number on the memorized invoice remains the same each time it is generated.
By default, if there are multiple invoices for the same vendor when payments are generated, all invoice amounts are combined into one sum. The vendor receives one check for the total amount. When you select the Pay Separate option, ACS prints a separate check for each invoice.
To enter vendor and payment information 1. Select a vendor.
2. Enter an invoice description.
3. Enter an invoice number. Click Next to assign the next available invoice number for the selected vendor.
4. To assign the same invoice number each time you generate the memorized invoice for payment, select the Retain option.
5. Enter an invoice frequency. Click the down arrow to select a frequency in the drop-down list.
6. Select one of the following payment options:
• If you want to pay this invoice indefinitely, select Continuous Payments.
• Enter the number of payments due on this invoice.
7. To print a separate check for this invoice, select the Pay Separate option.
8. To include the invoice amount on the vendor's 1099, select the 1099option.
9. Enter the following amounts:
• Invoice Amt— Enter the amount of the invoice.
• Invoice Term— Enter any discount offered to your organization by the vendor.
• Partial Amt—To pay an amount less than the full invoice amount, enter the partial payment amount.
10. In the Memo field, enter any information that you want to print in the memo field of the check for this invoice.
Editing a Memorized Invoice from the Invoice Calendar
To edit a memorized invoice from the Invoice Calendar 1. Under Manage Records, click the Transactions tab.
2. In the drop-down list, select Accounts Payable Invoices.
3. Click Go .
Accounts Payable
27
4. Click Memorized Invoices.
5. Click Invoice Calendar.
6. Under Memorized Invoices, select the invoice you want to edit.
7. Click Edit Memorized.
8. Make the necessary changes.
9. Click OK.
10. Click Yes.
Scheduling Invoices
Scheduling Memorized Invoices
A scheduled invoice differs from a memorized invoice in that it is due on a specific date. When you create a non-scheduled memorized invoice, you set the invoice payment frequency (monthly, weekly, daily), but you do not assign a specific date that the invoice is due. With a scheduled invoice, you define the date the invoice is due and the frequency it is paid.
To schedule a memorized invoice 1. Under Manage Records, click the Transactions tab.
2. In the drop-down list, select Accounts Payable Invoices.
3. Click Go .
4. Click Memorized Invoices.
5. Click Invoice Calendar.
6. Select the Month and Year to schedule the invoice. You can view the calendar year using the navigational buttons below:
• Click to scroll backward through the months prior to the current month.
• Click to scroll forward through the months beyond the current month.
7. Under Schedule Options, select the invoice payment frequency in the Frequency list.
8. Optional: Under Memorized Invoices, select one of the following options:
• Select Scheduled to view and change the payment dates of previously scheduled invoices.
• Select Non-Scheduled to view only non-scheduled, memorized invoices.
• Select All to view scheduled and non-scheduled invoices.
ACS Version 10.6 - Accounts Payable
28
9. To schedule an invoice, select an invoice under Memorized Invoices and drag it to the appropriate date on the calendar.
10. Continue scheduling invoices.
Adjusting the Number of Payments
If you did not select the Continuous Payments? option when you created a memorized invoice, you indicated a designated number of payments until the invoice is paid. You can edit both the number of payments assigned and the number of payments already paid from the invoice calendar.
To adjust the payment option from the invoice calendar 1. Under Manage Records, click the Transactions tab.
2. In the drop-down list, select Accounts Payable Invoices.
3. Click Go .
4. Click Memorized Invoices.
5. Click Invoice Calendar.
6. Under Memorized Invoices, select the invoice that you want to change.
7. Click in the #Pmts (Number of Payments) field, and enter the number of scheduled payments.
8. Press ENTER.
9. Click in the #Made (Number of Payments Made) field, and enter the number of payments made.
10. Press ENTER.
Changing the Scheduled Invoice Due Date
To change the scheduled date of a single scheduled invoice to another date within the same month, click and drag the red dot beside the scheduled date on the calendar and drop it over a different date.
A blue dot indicates that more that one invoice is due on a date. The amount that displays beside the dot reflects the combined total of all invoices due on the same date. You cannot change the scheduled date of multiple invoices by dragging the blue dot.
To change the due dates of multiple scheduled invoices, follow steps 1–5 in the following procedure.
To change the scheduled invoice due date 1. Under Manage Records, click the Transactions tab.
2. In the drop-down list, select Accounts Payable Invoices.
Accounts Payable
29
3. Click Go .
4. Click Memorized Invoices.
5. Click Invoice Calendar.
6. In the Memorized Invoices area, select the scheduled date (Sch. Date) field for the invoice.
7. Enter the new date. Click the down arrow to select a date in the calendar.
8. Press ENTER.
Removing the Scheduled Date from an Invoice
To remove the scheduled date from an invoice 1. Under Manage Records, click the Transactions tab.
2. In the drop-down list, select Accounts Payable Invoices.
3. Click Go .
4. Click Memorized Invoices.
5. Click Invoice Calendar.
6. Use one of the following methods to remove the scheduled date:
• In the Memorized Invoices area, click the SchDate (Scheduled Date) field and press DELETE.
• In the Memorized Invoices area, click the SchDate (Scheduled Date) field. Click the down arrow and select Clear in the calendar.
• If multiple invoices are due on the same date, select the date in the invoices calendar. In the list of invoices, select the invoice that you want to remove from that date and drag it to the Memorized Invoices area.
Editing a Scheduled Invoice
Note
Editing the frequency option is different from assigning a different frequency option to the invoice. When you assign a new frequency to an invoice, you simply swap one payment frequency for another. When you edit a frequency option, you are redefining the option. The changes are applied globally to any invoice using the newly defined frequency.
To edit a scheduled invoice 1. Under Manage Records, click the Transactions tab.
ACS Version 10.6 - Accounts Payable
30
2. In the drop-down list, select Accounts Payable Invoices.
3. Click Go .
4. Click Memorized Invoices.
5. Click Invoice Calendar.
6. Optional: Under Schedule Options, assign a different invoice frequency to the invoice. Click the down arrow to select a frequency in the drop-down list.
7. Optional: Edit the Frequency Option.
8. Optional: Adjust the Payment Option.
9. Optional: Change the Scheduled Invoice Due Date.
10. Optional: Unschedule the invoice.
11. Optional: View and edit the original invoice information.
12. Make other changes as necessary.
Creating Memorized Invoices
Understanding Invoice Frequencies
An Invoice Frequency option is selected when memorizing an invoice or when scheduling a memorized invoice. Assigning a frequency option to an invoice allows the user to track how often the invoice is paid.
You can select one of the predefined frequencies, or you can create additional frequencies. In most cases, user-defined frequencies are a variation of an existing invoice frequency. The following is a list of the predefined frequencies:
• Annual — once per year
• Bi-Monthly — every two months
• Bi-Weekly — every two weeks
• Daily — every day
• Monthly — once every month
• Quarterly — once every quarter
• Semi-Annual — twice a year
• Semi-Monthly — twice a month
• Weekly — every week
Example 1: You have several utility bills which are due monthly, but the due dates fall at different times within the month. Create a frequency called "Monthly1" for invoices due the first week in the month, "Monthly2" for
Accounts Payable
31
invoices due the second week in the month, and so on. Although the schedule option (monthly) and the frequency (once per month) of newly created invoice frequencies are identical to the ACS-defined Monthly frequency, making these small distinctions in the name of the frequency will help you to identify when the invoice is due at a glance.
Example 2: Your exterminator comes every three months. Create a frequency option where the schedule option is "monthly" and the frequency is "three."
Adding Memorized Invoices
Regular memorized invoices You can memorize invoices that are entered frequently so you do not have to enter them multiple times. Think of a memorized invoice as a template or a master copy of the invoice. Use it over and over to create invoices for recurring bills. This will save you the trouble of having to enter the statistical information each time the invoice is due. Instead, when the invoice is due, open the memorized copy and create a new invoice from the memorized version. Because it is the master copy, the memorized invoice does not have an invoice number. To create a new invoice, you will only need to add an invoice number and make any other minor changes.
Invoices such as bank notes, office equipment service contracts, and software support contracts are examples of the kinds of invoices you might memorize. These invoices do not usually vary in amounts; therefore, it is more efficient to memorize them. Many users also find it helpful to memorize invoices that do vary in amount when the bill is a recurring one. For instance, an invoice for a utility bill varies in amount, but could be memorized to save time since the amount is the only part of the invoice that changes.
Scheduled memorized invoices A Scheduled invoice is a type of memorized invoice which has been assigned a specific due date. In addition to selecting the payment frequency of the invoice, the user also selects the date that the invoice is paid.
Example: Your church van payment of $315.87 is due on the 15th of every month. You schedule a monthly payment of $315.87 to be paid on the 10th of the month. Schedule the invoice earlier than the actual payment due date to make sure the payment arrives on time.
Caution
A Scheduled Invoice does not automatically generate a standard invoice when the invoice is due. Scheduling the invoice assists you in your record keeping by allowing you to view the invoices, payment amounts, and due dates from the invoice calendar. However, you still have to create an invoice in time for the invoice due date.
To add a memorized invoice 1. Under Manage Records, click the Transactions tab.
ACS Version 10.6 - Accounts Payable
32
2. In the drop-down list, select Accounts Payable Invoices.
3. Click Go .
4. Click Memorized Invoices.
5. Click Add.
6. Enter Vendor and Payment and Information.
7. Enter Disbursement Information.
8. Click OK.
9. Click Yes.
Entering Disbursement Information
If you did not select the Projects In Use option in General Ledger Transaction Setup, the Proj field is not available.
If you selected the 1099 option when you entered invoice and amount information, the distribution amount is included in the vendor's YTD purchases total.
Comments print on the check stub, along with the associated expense account and distribution amount.
To enter disbursement information 1. In the Exp Acct (Expense Account) field, press ENTER to accept the
default expense code for the selected vendor. If no expense account is assigned, or you want to change the general ledger account, click Lookup to select an account in account Lookup window.
2. In the Chk Acct (Checking Account) field, press ENTER to accept the default checking account code for the selected vendor. If no checking account is assigned, or you want to change the checking account, click Lookup to select an account in the account Lookup window.
3. To distribute the invoice amount to one expense account, press TAB. To distribute the invoice amount to multiple accounts, enter the amount to distribute to the current account and press TAB. After you finish adding information related to this account, press enter to add a new line. Select a new account to disburse some portion or the remaining portion of the invoice.
4. In the Proj field, enter or select a project code.
5. In the Comments field, enter a comment.
6. To exclude an amount from the 1099, double-click in the 1099 field to clear the check box.
Accounts Payable
33
Editing a Memorized Invoice
To edit a memorized invoice 1. Under Manage Records, click the Transactions tab.
2. In the drop-down list, select Accounts Payable Invoices.
3. Click Go .
4. Click Memorized Invoices.
5. Optional: Select a Frequency Filter. For example, if you want to see only invoices with a monthly payment frequency, select Monthly.
6. To customize the invoices view, select Memorized, Scheduled, or All.
7. Select the invoice that you want to edit and click Edit.
8. Make the necessary changes.
9. Click OK.
Deleting a Memorized Invoice
To delete a memorized (scheduled or non-scheduled) invoice 1. Under Manage Records, click the Transactions tab.
2. In the drop-down list, select Accounts Payable Invoices.
3. Click Go .
4. Click Memorized Invoices.
5. Optional: Select a Frequency Filter. For example, if you want to see only invoices with a monthly payment frequency, select Monthly.
6. To customize the view of invoices, select Memorized, Scheduled, or All.
7. Select the invoice that you want to delete.
8. Click Delete.
9. Click Yes.
Viewing a Memorized Invoice
You can view a selected memorized invoice from the View Memorized Invoice screen. You can continue viewing other memorized invoices from View Memorized Invoice without having to return to Add/Edit Memorized Invoices.
To view a memorized invoice 1. Under Manage Records, click the Transactions tab.
ACS Version 10.6 - Accounts Payable
34
2. In the drop-down list, select Accounts Payable Invoices.
3. Click Go .
4. Click Memorized Invoices.
5. Optional: To sort the invoices, click the column header to sort.
6. Select the invoice you want to view.
7. Click View.
8. To view the first and last invoices in the list, click and .
9. To scroll through the list one invoice at a time, click and .
Entering Invoices
Understanding Partial Payment
A partial payment amount is an amount due on an invoice which is a portion of the total disbursement of the invoice. For example, you may wish to suspend one or more disbursements of an invoice if the vendor’s obligation has not been met. The partial payment amount is either the portion you are paying, or the portion left due on the invoice, depending on when you are viewing the invoice.
Adding An Invoice
Many users find it helpful to enter invoices as they are received. Adopting this practice significantly increases your efficiency.
The information entered in the Memo field prints in the memo section of your checks.
To add an invoice 1. Under Manage Records, click the Transactions tab.
2. In the drop-down list, select Accounts Payable Invoices.
3. Click Go .
4. Click Add/Edit Invoices.
5. Click Add.
6. There are three ways to select a vendor: enter the name of the vendor and press Enter, right-click to select Lookup by Code and enter a vendor code, or click Lookup to select a vendor in the Vendor Lookup window.

Accounts Payable
35
7. From Post Month/Year, press ENTER to accept the current posting period. Click the up and down arrows in the Month and Year date
boxes to select a different posting period.
8. Enter the Invoice number and amount information.
9. Optional: Enter a Memo or description of the invoice.
10. Press TAB.
10. Enter invoice disbursement information.
11. Click OK.
12. Click Yes.
Entering Disbursement Information
In the Distribution section, determine the number of expense and checking accounts you want to use.
If you assigned an expense account to the vendor, ACS populates the expense account field (Exp Acct) with the account code. You can change the account code in the distribution line. Click Lookup to select an account in the account Lookup window.
If you selected the Enable Fund Accounting option in Accounts Payable Setup, ACS populates the checking account field (Chk Acct) with the account code for the fund. You can change the account code in the distribution. Click Lookup to select an account in the Account Lookup window. If you enter a checking account from a different fund, a crossing funds message displays.
The Proj option is not available unless you selected Projects In Use in the General Ledger Transaction Setup.
Comments print on the check stub, along with the associated expense account and the distribution amount. Comments also print on several Accounts Payable reports and are also displayed on the Inquiry window when you view Accounts Payable information.
To enter disbursement information 1. Press ENTER to accept the default expense account (Exp Acct)
assigned to the vendor. Click Lookup to select a different account in the Account Lookup window.
2. Press ENTER to accept the default checking account (Chk Acct) assigned to the bank. Click Lookup to select a different account in the Account Lookup window.
3. In the Amount field, the total amount of the invoice displays. To distribute the invoice to one expense account, press TAB. To distribute the invoice to multiple accounts, enter the amount to distribute to the current account and press TAB. After you finish adding information related to this account, press enter to add a new line and select a new
ACS Version 10.6 - Accounts Payable
36
account to disburse some portion or the remaining portion of the invoice.
4. Optional: In the Proj field, enter or select a General Ledger project code.
5. Optional: Enter a comment.
6. Optional: For each distribution line, select or clear the 1099 option as needed.
7. Optional: To suspend payment on a line item amount, clear the Pay check box.
Creating an Invoice from a Purchase Order
Before creating an invoice from a purchase order, you must "receive" and post the purchase order in the Purchase Orders module.
To create an invoice from a purchase order 1. Under Manage Records, click the Transactions tab.
2. In the drop-down list, select Accounts Payable Invoices.
3. Click Go .
4. Click Create From PO.
5. Select the purchase orders for which you want to create invoices.
6. Click Create Invoices.
7. Click Yes to create the invoice.
Deleting Invoice Distributions
Use these instructions to delete invoice distributions when editing regular and memorized invoices in Accounts Payable.
Note
When the invoice amount is decreased, the balance on the invoice changes from zero to a negative amount. To clear the negative balance, you must delete a distribution line, or cancel the edit transaction.
To delete invoice distributions 1. Under Manage Records, click the Transactions tab.
2. In the drop-down list, select Accounts Payable Invoices.
3. Click Go .
4. Select Add/Edit Invoices. If necessary, select the correct posting period.
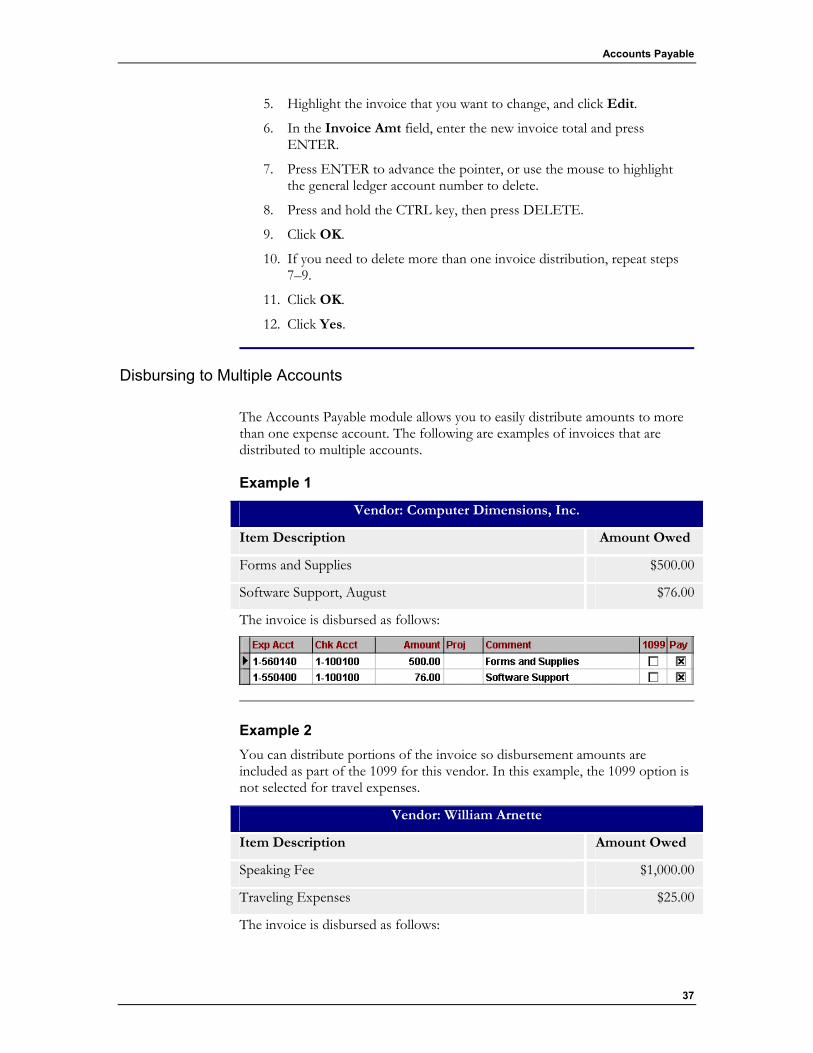
Accounts Payable
37
5. Highlight the invoice that you want to change, and click Edit.
6. In the Invoice Amt field, enter the new invoice total and press ENTER.
7. Press ENTER to advance the pointer, or use the mouse to highlight the general ledger account number to delete.
8. Press and hold the CTRL key, then press DELETE.
9. Click OK.
10. If you need to delete more than one invoice distribution, repeat steps 7–9.
11. Click OK.
12. Click Yes.
Disbursing to Multiple Accounts
The Accounts Payable module allows you to easily distribute amounts to more than one expense account. The following are examples of invoices that are distributed to multiple accounts.
Example 1
Vendor: Computer Dimensions, Inc.
Item Description Amount Owed
Forms and Supplies $500.00
Software Support, August $76.00
The invoice is disbursed as follows:
Example 2 You can distribute portions of the invoice so disbursement amounts are included as part of the 1099 for this vendor. In this example, the 1099 option is not selected for travel expenses.
Vendor: William Arnette
Item Description Amount Owed
Speaking Fee $1,000.00
Traveling Expenses $25.00
The invoice is disbursed as follows:
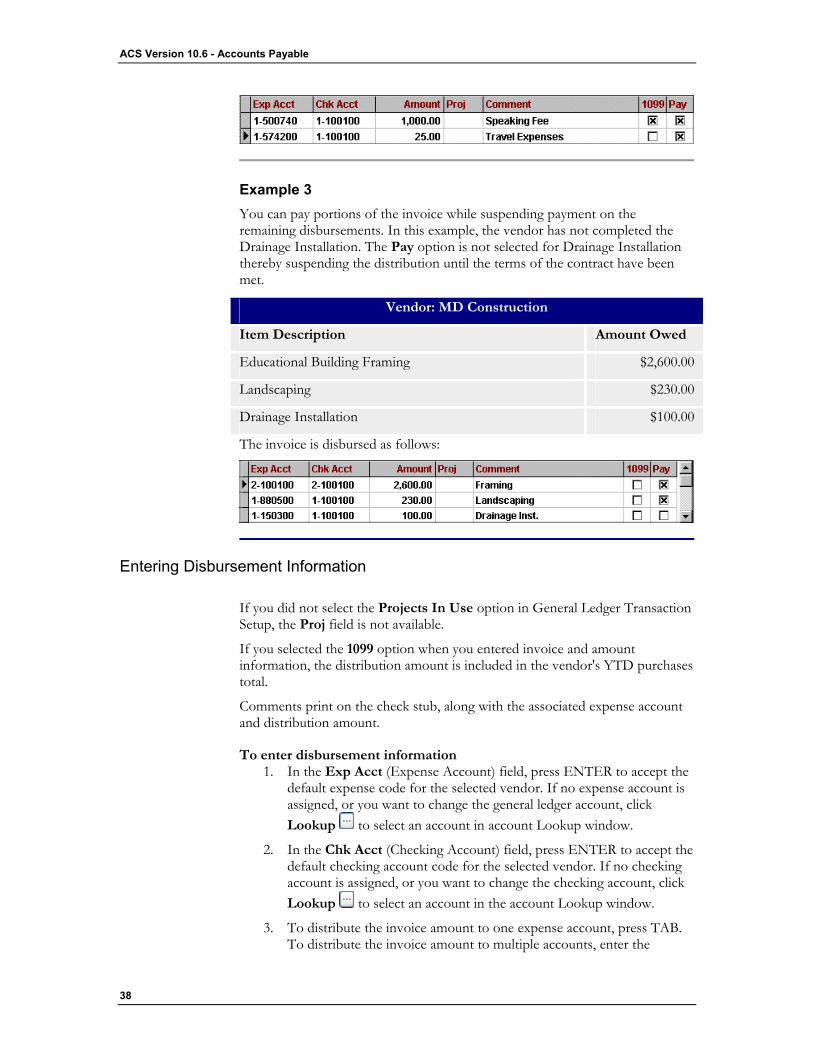
ACS Version 10.6 - Accounts Payable
38
Example 3 You can pay portions of the invoice while suspending payment on the remaining disbursements. In this example, the vendor has not completed the Drainage Installation. The Pay option is not selected for Drainage Installation thereby suspending the distribution until the terms of the contract have been met.
Vendor: MD Construction
Item Description Amount Owed
Educational Building Framing $2,600.00
Landscaping $230.00
Drainage Installation $100.00
The invoice is disbursed as follows:
Entering Disbursement Information
If you did not select the Projects In Use option in General Ledger Transaction Setup, the Proj field is not available.
If you selected the 1099 option when you entered invoice and amount information, the distribution amount is included in the vendor's YTD purchases total.
Comments print on the check stub, along with the associated expense account and distribution amount.
To enter disbursement information 1. In the Exp Acct (Expense Account) field, press ENTER to accept the
default expense code for the selected vendor. If no expense account is assigned, or you want to change the general ledger account, click Lookup to select an account in account Lookup window.
2. In the Chk Acct (Checking Account) field, press ENTER to accept the default checking account code for the selected vendor. If no checking account is assigned, or you want to change the checking account, click Lookup to select an account in the account Lookup window.
3. To distribute the invoice amount to one expense account, press TAB. To distribute the invoice amount to multiple accounts, enter the
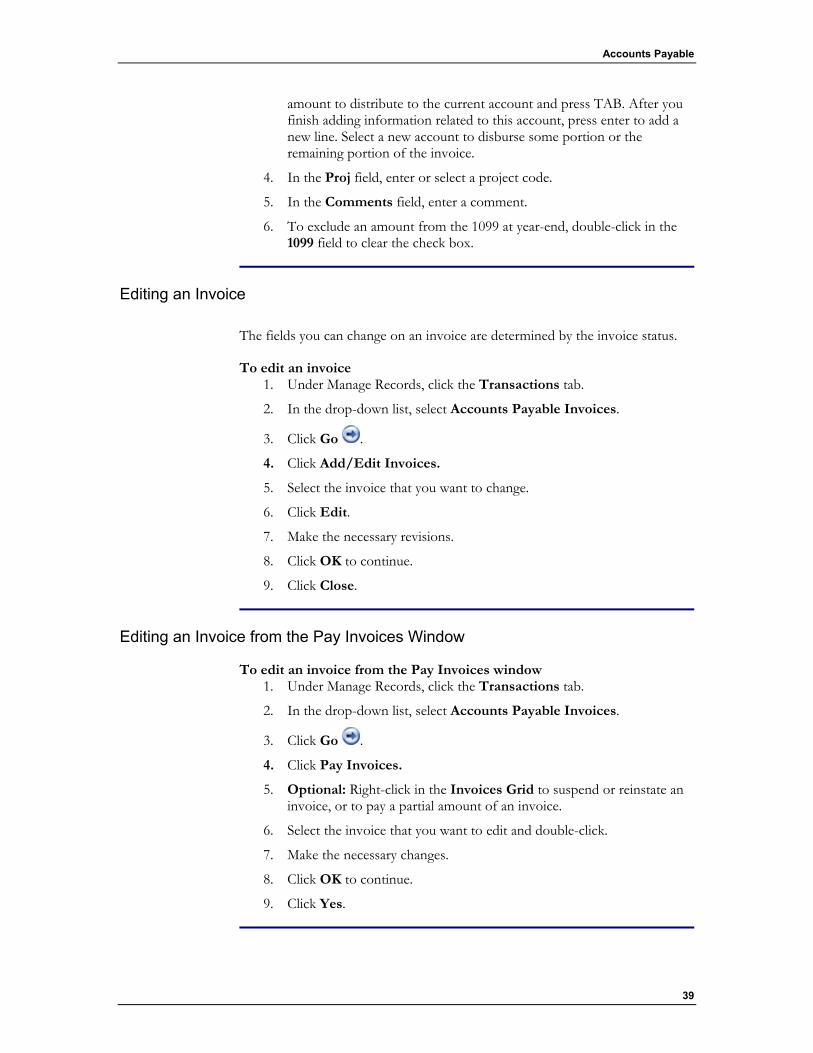
Accounts Payable
39
amount to distribute to the current account and press TAB. After you finish adding information related to this account, press enter to add a new line. Select a new account to disburse some portion or the remaining portion of the invoice.
4. In the Proj field, enter or select a project code.
5. In the Comments field, enter a comment.
6. To exclude an amount from the 1099 at year-end, double-click in the 1099 field to clear the check box.
Editing an Invoice
The fields you can change on an invoice are determined by the invoice status.
To edit an invoice 1. Under Manage Records, click the Transactions tab.
2. In the drop-down list, select Accounts Payable Invoices.
3. Click Go .
4. Click Add/Edit Invoices.
5. Select the invoice that you want to change.
6. Click Edit.
7. Make the necessary revisions.
8. Click OK to continue.
9. Click Close.
Editing an Invoice from the Pay Invoices Window
To edit an invoice from the Pay Invoices window 1. Under Manage Records, click the Transactions tab.
2. In the drop-down list, select Accounts Payable Invoices.
3. Click Go .
4. Click Pay Invoices.
5. Optional: Right-click in the Invoices Grid to suspend or reinstate an invoice, or to pay a partial amount of an invoice.
6. Select the invoice that you want to edit and double-click.
7. Make the necessary changes.
8. Click OK to continue.
9. Click Yes.
ACS Version 10.6 - Accounts Payable
40
Deleting an Invoice
In a cash environment, you can delete any unpaid (posted or unposted) invoices. In an accrual environment, you can delete any unposted invoices. Although you cannot delete posted invoices in an accrual system, you can void them if they are not paid in full.
To delete an invoice 1. Under Manage Records, click the Transactions tab.
2. In the drop-down list, select Accounts Payable Invoices.
3. Click Go .
4. Click Add/Edit Invoices.
5. Select the invoice that you want to delete.
6. Click Delete.
7. Click Yes.
Setting Partial Payment Amounts on Posted Invoices
You may have a situation in which you want to edit the payment amounts on a posted invoice and make a partial payment. Consider the following example:
Your organization hires a vendor for landscaping and drainage services. You created the invoice and posted it. Due to unforeseen budgetary constraints, you postpone the drainage installation for several months. In such a situation, you need to edit the posted invoice to set a partial payment amount for the portion of the work that is completed.
The partial amount is paid with the next check run, if the invoice is due.
To set a partial amount 1. Under Manage Records, click the Transactions tab.
2. In the drop-down list, select Accounts Payable Invoices.
3. Click Go .
4. Click Add/Edit Invoices.
5. Click the selection bar above the invoice display window and select Posted Invoices.
6. Select an invoice.
7. Click Edit.
8. In the Partial Amt field, enter the partial payment amount.
9. Click OK.
Note This option is available only when you are on the accrual system. If you are on an accrual
Accounts Payable
41
system, select the invoice and click Set Partial Amt. Enter the amount in the Partial Amount field.
Reviewing Invoices
Printing an Invoice Proof List
Use the Invoice Proof List to review invoices prior to posting them to ensure the accuracy of the invoices.
To print an Invoice Proof List 1. Under Manage Records, click the Transactions tab.
2. In the drop-down list, select Accounts Payable Invoices.
3. Click Go .
4. Click Post Invoices.
5. Set your filtering and sorting preferences.
6. Optional: Preview the Invoice Proof List.
7. Click Print.
Previewing an Invoice Proof List
The invoice proof list displays the invoice information that you entered on the Add Invoices window or generated through Add/Edit Memorized Invoices. Use the invoice proof list to verify that the invoice information is correct before posting the invoices.
To preview a proof list 1. Under Manage Records, click the Transactions tab.
2. In the drop-down list, select Accounts Payable Invoices.
3. Click Go .
4. Click Post Invoices.
3. Select from the following optional print options:
• All Users —Select this option to include invoices created by all users on your system.
• All Periods —Select this option to include invoices created in all posting periods.
• Print Distribution —Select this option to include account distribution information for each invoice.

ACS Version 10.6 - Accounts Payable
42
• Print Detail Headers— Select to print the distribution information with headers and a border. Print Detail Headers is only available when Print Distribution is selected.
• Use Selection— Select to post multiple invoices at a time. Once Use Selection is selected, press Ctrl and click on the desired invoices to post specific transactions.
• Month and Year —Select a month and year to display invoices from a particular posting period. Click the up and
down arrows in the Month and Year date boxes
to select a different posting period. If you selected All Periods, this option is not available.
4. Click Preview.
5. Use the preview tools to view the report from the Preview window.
6. To print the proof list from the preview screen, click Print .
Editing an Invoice from the Proof List Window
To edit invoice information 1. Under Manage Records, click the Transactions tab.
2. In the drop-down list, select Accounts Payable Invoices.
3. Click Go .
4. Click Invoice Proof List.
5. Under Open Transactions, select the invoice you want to edit.
6. Click Edit.
7. Make changes as necessary.
8. Click OK.
9. Click Yes.
Deleting an Invoice
To delete an invoice 1. Under Manage Records, click the Transactions tab.
2. In the drop-down list, select Accounts Payable Invoices.
3. Click Go .
4. Click Add/Edit Invoices.
5. Select the invoice to delete. You can delete multiple invoices at once by selecting multiple invoices. Press Ctrl and Shift, then click to select multiple invoices.
6. Click Delete.
Accounts Payable
43
7. Click Yes.
Viewing an Invoice
You can view a selected invoice from the View Invoice window. In addition, you can continue to view other invoices in the list from the View Invoice window without returning to Add/Edit Invoices.
To view an invoice 1. Under Manage Records, click the Transactions tab.
2. In the drop-down list, select Accounts Payable Invoices.
3. Click Go .
4. Click Add/Edit Invoices.
5. Define the invoice display order.
6. Define the selection of invoices.
7. Select the invoice that you want to view.
8. Click View.
9. To view the first and last invoices in the list, click and .
10. To scroll through the list one invoice at a time, click and .
11. Click Close.
Viewing an Invoice
You can view a particular invoice from the View Invoice window. While viewing the selected invoice, you also have the option of viewing other invoices from the list of open transactions without returning to the Invoice Proof List window.
To view an invoice 1. Under Manage Records, click the Transactions tab.
2. In the drop-down list, select Accounts Payable Invoices.
3. Click Go .
4. Click Invoice Proof List.
5. Under Open Transactions, select the invoice that you want to view.
6. Click View.
7. To view the first and last invoices in the list, click the First and
Last buttons.
ACS Version 10.6 - Accounts Payable
44
8. To scroll through the list one invoice at a time, click the Previous
and Next buttons.
Posting Invoices
Accrual Basis Invoice Posting
Under Unposted Invoices on the Post Invoices window, you can select any invoice in the list of invoices to display a detailed description of the invoice at the bottom of the window.
To post invoices in an accrual environment 1. Under Manage Records, click the Transactions tab.
2. In the drop-down list, select Accounts Payable Invoices.
3. Click Go .
4. Click Post Invoices.
5. Enter the posting date. Click the down arrow to select a date from the calendar.
6. Click the up and down arrows in the Post Month/Year date
boxes to select the correct month and year. To post invoices for all periods, select All Periods.
7. The default Transaction Source displays. Click the down arrow to select a different source.
8. The default Accrual Account displays. Click Lookup to select an account. Note: If you selected the Enable Fund Accounting option in Setup, the Accrual Account option is not available.
7. Click Post Invoices.
8. Click Yes to post the invoices.
9. Click OK.
Cash Basis Invoice Posting
To post invoices in a cash environment 1. Under Manage Records, click the Transactions tab.
2. In the drop-down list, select Accounts Payable Invoices.
3. Click Go .
4. Click Post Invoices.
5. Enter a Posting Date. Click the down arrow to select a date in the calendar.
Accounts Payable
45
6. To post invoices for a specific month, click the up and down arrows in
the Post Month/Year date boxes to select the posting period. To post invoices for all periods, select All Periods.
7. Optional: In the Unposted Invoices section, select any invoice to view a detailed description of the invoice in the window at the bottom of the screen.
8. Click Post Invoices.
9. Click Yes to post invoices.
10. Click OK.
Posting Invoices
Invoices entered into ACS do not affect account balances until they are posted and paid. After you finish editing and viewing invoices, you cannot issue checks for vendors until the invoices are posted.
If you post transactions to an inactive account, the account status changes to Active. The steps for posting invoices for cash basis and accrual basis systems differ.
Editing Posted Invoices
You can edit invoices even after they are posted. Perform the following editing tasks from Add/Edit Invoices:
• Void a Posted Invoice
• Set a Partial Payment Amount on a Posted Invoice
• Complete a Partially Paid, Posted Invoice
Suspending Invoices
About Suspended Invoices
The Suspend? option allows you to halt payment of an invoice. If this option is selected, no distribution amounts are paid until you clear the Suspend? option. Even if the invoice is due when you process invoices, a suspended invoice is ignored.
Note in the example below that when you select Suspend? from the Add Invoice window, the Pay option for each distribution is still selected. However, the Suspend? option overrides these settings. Neither of the distributions are paid until the user reinstates the invoice.

ACS Version 10.6 - Accounts Payable
46
Suspending an Invoice
You can suspend payment on unposted invoices and posted, unpaid invoices.
To suspend an invoice 1. Under Manage Records, click the Transactions tab.
2. In the drop-down list, select Accounts Payable Invoices.
3. Click Go .
4. Click Add/Edit Invoices.
5. Click the view bar to define your selection of invoices.
6. Right-click the invoice, and select Suspend.
Reinstating a Suspended Invoice
Once the invoice is reinstated, the invoice is selected for payment the next time you process invoices if the due date falls within the pay-through-date.
Note You can also edit the invoice and clear the Suspend option to reinstate the invoice.
To reinstate a suspended invoice 1. Under Manage Records, click the Transactions tab.
2. In the drop-down list, select Accounts Payable Invoices.
3. Click Go .
4. Click Add/Edit Invoices.
Accounts Payable
47
5. To define the invoice display and locate the invoice, click the View bar above the invoice listing.
6. Right-click the invoice.
7. Select Reinstate.
Completing Invoices
Completing a Partially Paid, Posted Invoice in an Accrual Environment
To complete a partially paid, posted invoice in an accrual environment, you must void the invoice.
To select a partially paid, posted invoice for completion 1. Under Manage Records, click the Transactions tab.
2. In the drop-down list, select Accounts Payable Invoices.
3. Click Go .
4. Click Add/Edit Invoices.
5. Click the selection bar above the invoice display and select Posted Invoices.
6. Click the selection bar again and select Partially Paid.
7. Select the invoice that you want to complete.
8. Click Complete.
9. Click Yes. The Reversing Accrual Transaction Completing Invoice dialog box opens.
To complete a partially paid, posted invoice 1. Enter a Posting Date. Click the down arrow to select a date in the
calendar.
2. In the Month and Year date boxes , click the up and down arrows to select the correct posting period.
3. Select the appropriate Transaction Source.
4. If the Enable Fund Accounting option is not selected on the G/L Interface tab in Setup, verify the correct accrual account code displays. If necessary, click Lookup to select a different account code in the account Lookup window.
5. Enter an explanation in the Void Explanation memo text box.
6. Click Complete.

ACS Version 10.6 - Accounts Payable
48
Completing a Partially Paid, Posted Invoice in a Cash Environment
To complete a partially paid, posted invoice 1. Under Manage Records, click the Transactions tab.
2. In the drop-down list, select Accounts Payable Invoices.
3. Click Go .
4. Click Add/Edit Invoices.
5. Click the selection bar above the invoice display and select Posted Invoices.
6. Click the selection bar again and select Partially Paid.
7. Select the invoice that you want to complete.
8. Click Complete.
9. Click Yes.
Completing a Partially Paid, Posted Invoice
After paying a partial amount on an invoice, you may later discover that the remaining portion of the invoice can never be paid. Consider the following scenario.
You hired a vendor for building repairs. You posted the invoice and partially paid the invoice for the portion of the service that was completed. Later, you discover that some of the work was not completed satisfactorily. As a result, you hire a new vendor to complete the remainder of the job.
In order to account for the remaining amount of the invoice with the first vendor that will never be paid, you must complete the invoice so that the partial amount is no longer in ACS as an outstanding invoice. A completed invoice is marked posted and paid in ACS. The method for completing invoices differs depending on whether or not you are working in an accrual basis or cash basis environment.
Creating an Invoice from a Purchase Order
Before creating an invoice from a purchase order, you must "receive" and post the purchase order in the Purchase Orders module.
To create an invoice from a purchase order 1. Under Manage Records, click the Transactions tab.
2. In the drop-down list, select Accounts Payable Invoices.
3. Click Go .
4. Click Create From PO.
5. Select the purchase orders for which you want to create invoices.

Accounts Payable
49
6. Click Create Invoices.
7. Click Yes to create the invoice.
Voiding Invoices
Voiding an Invoice
You can void a posted invoice in Accounts Payable as long as the invoice is not paid. If an invoice is paid, you must void the check associated with the invoice. Once the check is voided, the invoice is marked Unpaid and you can void it. If an invoice is partially paid, you must complete it. For more information, see Completing an Invoice. The method for voiding invoices differs depending on whether you are operating in a cash basis or accrual basis system.
Understanding Invoice Editing and Voiding Rules
The following are general guidelines in place for the Accounts Payable module:
Cash basis accounting guidelines • You can change all information on unposted invoices.
• You can change all information on posted, unpaid invoices (in other words, the checks are not printed and posted).
• You can change the remaining partial payment amount of a paid invoice.
Accrual basis accounting guidelines • You can change all information on unposted invoices.
• You can change the following for posted invoices:
• The Pay Separate? flag
• The Force? flag
• The Suspend? flag
• The 1099? flag
• The Partial Payment amount
• You can change the remaining partial payment amount of a paid invoice.

ACS Version 10.6 - Accounts Payable
50
Voiding an Invoice in a Cash Basis Environment
You can void any posted invoice that is not paid. You must complete invoices with a partial payment.
CAUTION
When you void an invoice, the invoice remains in ACS. You can reference voided invoices from the Inquiry window. The voided invoices are identified by an asterisk (*). Alternately, if you delete an invoice, it is completely removed from ACS. For good record keeping purposes, voiding an invoice is preferable to deleting an invoice.
To void an invoice 1. Under Manage Records, click the Transactions tab.
2. In the drop-down list, select Accounts Payable Invoices.
3. Click Go .
4. Click Add/Edit Invoices.
5. Define your selection of invoices.
6. Select the invoice that you want to void and click Void.
5. Click Yes.
Voiding an Invoice in an Accrual Basis Environment
You can void any posted invoice that is not paid. You must complete partially paid invoices.
To select an invoice for voiding 1. Under Manage Records, click the Transactions tab.
2. In the drop-down list, select Accounts Payable Invoices.
3. Click Go .
4. Click Add/Edit Invoices.
5. Define your selection of invoices.
6. Select the invoice that you want to void and click Void.
8. Click Yes to continue. The Reversing Accrual Transaction Voiding Invoice dialog box displays.
To void the invoice 1. Enter a Posting Date. Click the down arrow to select a date in the
calendar.
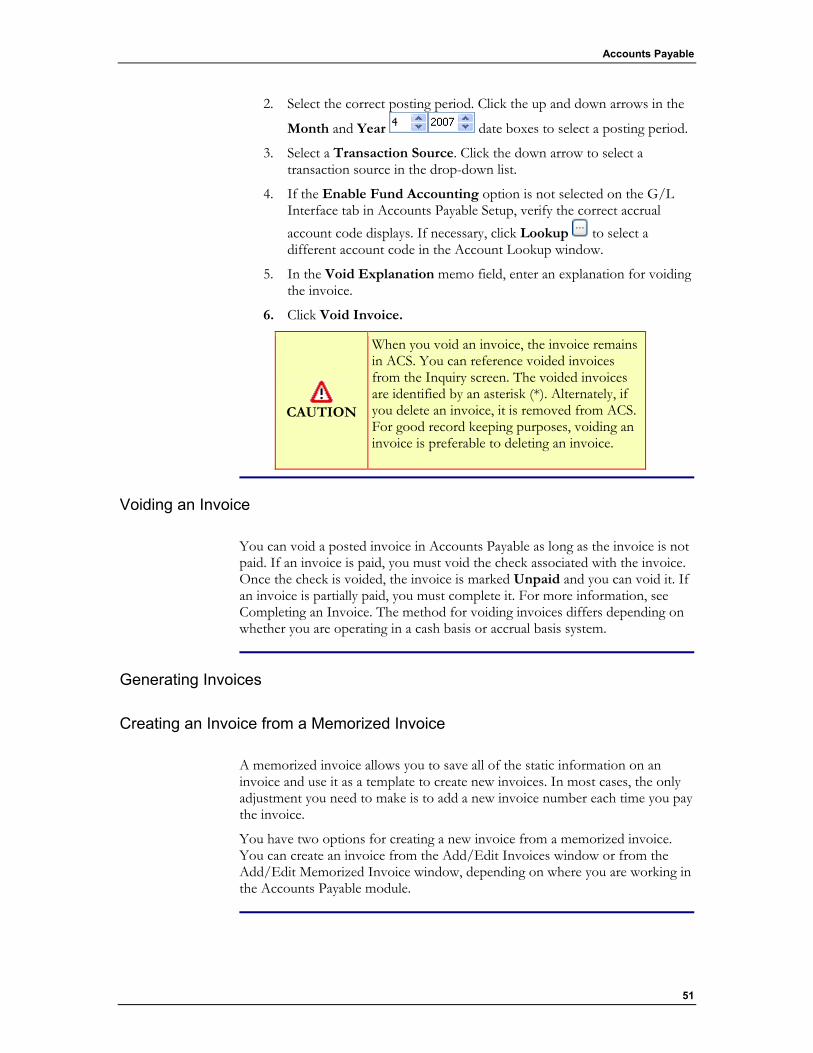
Accounts Payable
51
2. Select the correct posting period. Click the up and down arrows in the
Month and Year date boxes to select a posting period.
3. Select a Transaction Source. Click the down arrow to select a transaction source in the drop-down list.
4. If the Enable Fund Accounting option is not selected on the G/L Interface tab in Accounts Payable Setup, verify the correct accrual account code displays. If necessary, click Lookup to select a different account code in the Account Lookup window.
5. In the Void Explanation memo field, enter an explanation for voiding the invoice.
6. Click Void Invoice.
CAUTION
When you void an invoice, the invoice remains in ACS. You can reference voided invoices from the Inquiry screen. The voided invoices are identified by an asterisk (*). Alternately, if you delete an invoice, it is removed from ACS. For good record keeping purposes, voiding an invoice is preferable to deleting an invoice.
Voiding an Invoice
You can void a posted invoice in Accounts Payable as long as the invoice is not paid. If an invoice is paid, you must void the check associated with the invoice. Once the check is voided, the invoice is marked Unpaid and you can void it. If an invoice is partially paid, you must complete it. For more information, see Completing an Invoice. The method for voiding invoices differs depending on whether you are operating in a cash basis or accrual basis system.
Generating Invoices
Creating an Invoice from a Memorized Invoice
A memorized invoice allows you to save all of the static information on an invoice and use it as a template to create new invoices. In most cases, the only adjustment you need to make is to add a new invoice number each time you pay the invoice.
You have two options for creating a new invoice from a memorized invoice. You can create an invoice from the Add/Edit Invoices window or from the Add/Edit Memorized Invoice window, depending on where you are working in the Accounts Payable module.
ACS Version 10.6 - Accounts Payable
52
Creating an Invoice from a Memorized Invoice
When a scheduled or non-scheduled memorized invoice is due, you must create a new invoice. The memorized invoice saves you data-entry time by serving as a template from which you can create a new invoice.
To create an invoice from a memorized invoice 1. Under Manage Records, select the Transactions tab.
2. In the drop-down list, select Accounts Payable Invoices.
3. Click Go .
4. Click Memorized Invoices.
5. Optional: Select a Frequency Filter. For example, if you want to see only invoices with a monthly payment frequency, select Monthly.
6. Optional: Select Memorized, Scheduled, or All to customize the view of invoices.
7. Optional: To sort the invoices, click the header of the column that you want to sort.
8. Highlight the invoice that you want to create and click Create Invoice.
9. Enter an invoice number. Click Next to enter the next auto-generated invoice number for the selected vendor.
10. Make other changes as necessary.
11. To accept the changes, click OK.
12. Click Yes.
Generating Multiple Invoices from Memorized Invoices
The Generate Invoices option is used to create multiple invoices from multiple scheduled and non-scheduled memorized invoices. The Generate Invoices option performs the same function as the Create Invoice option, except that you create more than one invoice at a time.
To generate multiple invoices from memorized invoices 1. Under Manage Records, click the Transactions tab.
2. In the drop-down list, select Accounts Payable Invoices.
3. Click Go .
4. Click Memorized Invoices.
5. Click Generate Invoices.
6. Choose an invoice display option:
• To display all memorized, non-scheduled invoices, select Memorized.
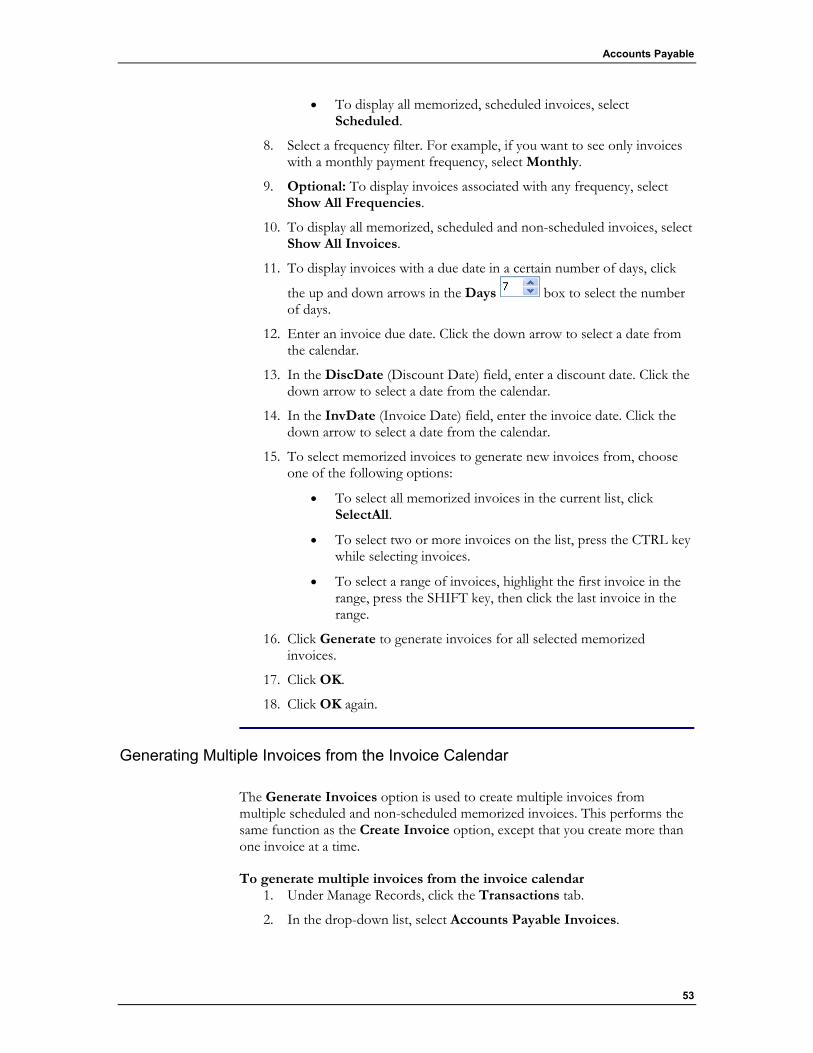
Accounts Payable
53
• To display all memorized, scheduled invoices, select Scheduled.
8. Select a frequency filter. For example, if you want to see only invoices with a monthly payment frequency, select Monthly.
9. Optional: To display invoices associated with any frequency, select Show All Frequencies.
10. To display all memorized, scheduled and non-scheduled invoices, select Show All Invoices.
11. To display invoices with a due date in a certain number of days, click
the up and down arrows in the Days box to select the number of days.
12. Enter an invoice due date. Click the down arrow to select a date from the calendar.
13. In the DiscDate (Discount Date) field, enter a discount date. Click the down arrow to select a date from the calendar.
14. In the InvDate (Invoice Date) field, enter the invoice date. Click the down arrow to select a date from the calendar.
15. To select memorized invoices to generate new invoices from, choose one of the following options:
• To select all memorized invoices in the current list, click SelectAll.
• To select two or more invoices on the list, press the CTRL key while selecting invoices.
• To select a range of invoices, highlight the first invoice in the range, press the SHIFT key, then click the last invoice in the range.
16. Click Generate to generate invoices for all selected memorized invoices.
17. Click OK.
18. Click OK again.
Generating Multiple Invoices from the Invoice Calendar
The Generate Invoices option is used to create multiple invoices from multiple scheduled and non-scheduled memorized invoices. This performs the same function as the Create Invoice option, except that you create more than one invoice at a time.
To generate multiple invoices from the invoice calendar 1. Under Manage Records, click the Transactions tab.
2. In the drop-down list, select Accounts Payable Invoices.
ACS Version 10.6 - Accounts Payable
54
3. Click Go .
4. Click Memorized Invoices.
5. Click Invoice Calendar.
6. Click Generate Invoices.
7. Choose an invoice display option:
• To display all memorized, non-scheduled invoices, select Memorized.
• To display all memorized, scheduled invoices, select Scheduled.
9. Select a frequency filter. For example, if you only want to see invoices with a monthly payment frequency, select Monthly.
10. Optional: Select Show All Frequencies to display all invoice frequencies.
11. To display all memorized, scheduled and non-scheduled invoices, select Show All Invoices.
12. Enter an invoice due date.Click the down arrow to select a date from the calendar.
13. Enter a Discount Date (Disc. Date). Click the down arrow to select a date from the calendar.
14. Enter an Invoice Date (Inv. Date). Click the down arrow to select a date from the calendar.
15. Select memorized invoices to generate invoices using one of the following options:
• To select all memorized invoices in the current list, click Select All.
• To select two or more invoices on the list, press the CTRL key while selecting invoices.
• To select a range of invoices, highlight the first invoice in the range, press and hold the SHIFT key, then click the last invoice in the range.
Note Click Unselect All at any time to reset your selections.
16. Click Generate to generate invoices for all selected memorized invoices.
17. Click OK.
18. Click OK again.
Accounts Payable
55
Generating New Invoices from Memorized Invoices
You have two options for creating new invoices from a group of memorized invoices. You can generate invoices from the Add/Edit Memorized Invoices window or from within the Invoice Calendar depending on where you are working in Accounts Payable.
Creating an Invoice from a Memorized Invoice in Add/Edit Invoices
To select a memorized invoice 1. Under Manage Records, click the Transactions tab.
2. In the drop-down list, select Accounts Payable Invoices.
3. Click Go .
4. Click Add/Edit Invoices.
5. Click Add.
6. Click Sel Mem (Select Memorized).
7. Optional: Click the column header to sort invoices by Vendor, Name, Description, Amount, or Frequency.
8. Select the invoice that you want to memorize and click OK.
9. In the Invoice# field, enter an invoice number. Click Next to auto-assign the next available invoice number for the selected vendor.
10. Change any other information as necessary.
11. Click OK.
Checks
Resetting the Check Lock
Only one user can print checks at a time. When a user is printing checks, ACS places a lock on check printing so that no other user on your network can print. If an event out of the ordinary occurs (such as a power outage) during check printing, the check lock remains in place. Before checks can print again, reset the check lock.
To reset the check lock 1. Under Advanced Tools, click the Admin Utilities tab.
2. In the drop-down list, select Maintenance Utilities.
3. Click Go .
4. Click Reset Check Lock.
5. Click Yes.
ACS Version 10.6 - Accounts Payable
56
6. Click OK.
7. Click Close.
Understanding Check Memo Options
You can only select Check Memo options if you are not paying all invoices separately. If vendors with multiple invoices are included in the check run, the total amount due to each vendor is combined on one check when the Check Memo option is selected. The selected memo option determines the text that prints on the memo line of checks in the check run.
• First Invoice — In a multiple invoice situation, the memo on the first invoice for the vendor is used for the entire check. For example, many users always type the vendor's account number in the Memo field. This way they can let the memo from either the first or last invoice print on every check for the vendor.
• Last Invoice — Same as First Invoice, except the memo on the last invoice is used for the entire check.
• Generated — ACS generates a standard memo.
• Prompt for Memo — When processing checks, a prompt displays to enter a check memo for each vendor with multiple invoices to pay.
Printing Checks
Starting a Check Run
To start a check run 1. Under ManageRecords, click the Transactions tab.
2. In the drop-down list, select Accounts Payable Checks.
3. Click Go .
4. On the Print/Post Checks menu, click Pay Invoices.
5. Enter a Pay Through Date, or select Show All Invoices to show all unpaid invoices. Click the down arrow to select a date in the calendar.
6. Enter a check date. Click the down arrow to select a date in the calendar.
7. Enter the first check number you want to use when printing checks.
8. Select the bank from which you want to pay invoices. Click the down arrow to select a bank in the drop-down list.
9. Enter the first ACH/Online reference number you want to use when processing ACH and online payments.
10. Optional: If you want to print a separate check for each invoice, select the Pay All Invoices Separately option. If you do not select this
Accounts Payable
57
option and a vendor has multiple invoices in the check run, ACS combines the amounts of all the invoices and generates a single check for the sum of the invoices.
11. In the Memo Option field, select a memo option.
12. Optional: Right-click in the Invoices Grid to suspend/reinstate an invoice or to pay a partial amount of an invoice.
13. Select the Pay check box for each invoice to pay in this check run. To select all invoices, select the Pay All Invoices option, or right-click and select Select All.
14. Click Process Checks.
Note
If you selected the option to Pay Separate on one or more of the invoices, ACS prints a separate check for that invoice.
If you selected the Pay All Invoices Separately option, the Memo Optionfield is not available.
Printing the Cash Requirements Report
The Cash Requirements report displays a list of unpaid invoices and the current amount due for each invoice. The amounts on this report are compared against your current account balances in the general ledger. Reviewing the Cash Requirements report can help you determine if there is currently enough money in your accounts to pay all invoices that are due. You can also print this report periodically to track expenses before invoices are due.
To print a cash requirements report 1. Under Manage Records, click the Transactions tab.
2. In the drop-down list, select Accounts Payable Invoices.
3. Click Go .
4. Click Pay Invoices.
5. Enter a Pay Through Date. To view payments due through a certain date, click the down arrow to select a date in the calendar. To view all unpaid invoices, select the Show All Invoices option.
6. Enter a Check Date. Click the down arrow to select a date in the calendar.
7. Select a bank. Click the down arrow to select a bank in the drop-down list.
8. Select the invoices.
9. Click Print Cash Requirements.
11. Choose one of the following Sort Options.
ACS Version 10.6 - Accounts Payable
58
• Select Vendor Name to sort the report by vendor name.
• Select Account Distribution to sort the report by account.
12. Select Print Distributions to print account distributions on the report.
13. Optional: Select All Banks to print cash requirements for all bank accounts. If you do not select All Banks, only the cash requirements for the bank you selected on the Pay Invoices -Invoices tab print on the report.
14. Do one of the following:
• Select Print Marked Invoices to print cash requirements for all of the invoices marked for payment.
• Select Print Unmarked Invoices to print the cash requirements for all of the invoices not marked for payment.
• Select both to print the cash requirements for all invoices.
15. Optional: Click Preview to preview the report.
16. Click the Print button to print the report.
Note
The check date is the date ACS uses to verify you are making the payment in time to honor a vendor discount (if applicable). If the check date is on or before the discount date, the discount is taken.
Editing Checks on the Pay Invoices — Checks Tab
You can edit a check on the Pay Invoices — Checks tab before the check is printed and posted. Checks must be processed for the Checks tab to display.
You can edit the following fields on the Checks tab:
• Check No — You can change the check number only when the Printed? box is selected.
• Date
• Memo
• Printed — Select this option to post a handwritten check to the general ledger. Accounts Payable recognizes the check as printed, but posts the check information to the general ledger.
To edit checks on the Pay Invoices — Checks tab 1. Under ManageRecords, click the Transactions tab.
2. In the drop-down list, select Accounts Payable Checks.
3. Click Go .
4. Select the Checks tab.
Accounts Payable
59
5. Select the check that you want to edit.
6. Make the necessary changes in the allowed fields.
7. Optional: To view the Check Distribution, double-click on the check.
Printing a Sample Check
Many users find it helpful to print a sample check on a piece of paper to conserve checks. Simply mark an X in the upper right hand corner of the paper where the check number would normally print. Print the sample and lay it over a blank check to verify the positioning of the fields.
To print a sample check 1. Under Manage Records, click the Transactions tab.
2. In the drop-down list, select Accounts Payable Checks.
3. Click Go .
4. Click Pay Invoices.
5. Start a check run.
6. On the Pay Invoices - Checks tab, click Print/Post Checks.
7. Position blank checks in your printer.
8. Click Print Sample.
Printing Checks and Posting to the General Ledger
All of the check printing options (for example, check numbers) are controlled by the check layout template in Accounts Payable Setup.
If you post transactions to an inactive account, the account status changes to active.
To print and post checks to the general ledger 1. Under Manage Records, click the Transactions tab.
2. In the drop-down list, select Accounts Payable Checks.
3. Click Go .
4. Click Pay Invoices.
5. Start a check run.
6. Click Print/Post Checks.
7. Enter a posting date. Click the down arrow to select a date in the calendar.
8. In the Post Month/Year field, select the posting period you want the checks to post to the general ledger. Click the up and down arrows in
ACS Version 10.6 - Accounts Payable
60
the Month and Year date boxes to select the posting period.
9. Enter the first check number that you want to print and post.
10. Select the appropriate Check Transaction and ACH/Online Transaction Sources from the drop-down lists.
11. Enter the first ACH/Online Ref # that you want to assign to the first online or ACH payment in the check run.
12. Optional: Show Printer Dialog— To display printer properties before printing, select this option.
13. Optional: Create Extract File— If you want ACS to generate a report of the check and check stub information, select this option. The report automatically opens in a preview window for your review. You can also print the report. The information for each check displays and prints on a separate page.
14. Optional: Extract Check Numbers— To extract the check numbers to the extract file report, select this option.
15. Click Preview to preview the checks.
16. Click Print to print the checks. A message displays to place checks or stock paper in the printer. Click OK. ACS prints the checks.
17. A message displays asking if the checks printed correctly. If the checks printed properly, click Yes. If the checks did not print properly, click No.
• If you click No, the Reprint Checks window displays. In the Print column, select the checks you want to reprint and click OK.
• A message displays asking if you want to reprint the selected checks. Click Yes.
• The Accounts Payable - Print Checks window displays. Click Print.
18. Once the checks have printed correctly, a message displays asking if you want to post the checks now. Click Yes to post the checks.
19. Click OK.
Printing the Check Proof List
The Check Proof List displays a complete listing of all the checks in the latest check run. Print this report before you print your checks and post them to the general ledger to double-check the accuracy of checks.
To print the check proof list 1. Under Manage Records, click the Transactions tab.
2. In the drop-down list, select Accounts Payable Checks.
Accounts Payable
61
3. Click Go .
4. Click Pay Invoices.
5. Start a check run.
6. Click Check Proof List.
7. Select or clear ACH, Online, and Check, depending on which types of transactions you want to print on the report.
8. Select a sorting criteria:
• Unprinted, Unposted
• Printed, Unposted
• All
9. Click Preview to view the report.
10. Click Print.
Printing the Check Register Report
The check register report prints a list of checks after posting.
To print the check register report 1. Under Manage Records, click the Transactions tab.
2. In the drop-down list, select Accounts Payable Checks.
3. Click Go .
4. Click Check Register.
5. Select or clear ACH, Online, and Check, depending on which types of transactions you want to print on the report.
6. Click Preview to view the check register.
7. Click Print.
Issuing Checks
Starting a check run to generate a batch of checks for a series of invoices that are due is one approach for managing invoices in Accounts Payable. Sometimes, however, you need the added flexibility of being able to print one or more checks "on the fly" or enter information from handwritten checks into ACS. The Issue Checks option provides this flexibility. Using this option, you can issue printed checks while adding an invoice, quickly print checks for invoices already entered, or you can post information from handwritten checks to the general ledger.
ACS Version 10.6 - Accounts Payable
62
Issuing handwritten checks for a new invoice You can use the Issue Checks option to enter handwritten checks into ACS. For example, your church is having a fundraising dinner for the new day care center the church is building. You go to Flowers-R-Us florist shop and ACME Paper Supply to purchase decorations for the fellowship hall. You use two, handwritten checks to pay for your purchases. To get these checks into ACS so that they are posted to the general ledger, you must issue the checks in the Accounts Payable module. When you issue a handwritten check, an invoice is created and the check is posted to the general ledger, but the check is not printed.
Issuing printed checks for a new invoice You can also use the Issue Checks option to quickly print checks to pay for items or services for which no invoice has been previously entered. For example, one morning, you discover that a squirrel is trapped in the building. You call the Pests-B-Gone pest removal service. Use the Issue Checks option to quickly enter an invoice, set up the vendor as a one-time vendor, if necessary, and print the check.
Issuing handwritten checks for an unpaid invoice You can issue a handwritten check for an unpaid invoice. For example, a cake has been ordered for your church's anniversary dinner from The Cake Factory, a local bakery. You have already called ahead, found out the pricing and entered an invoice. However, you decide not to print a check because the Associate Pastor has the church checkbook and has been asked to drop by the bakery and write a check for the cake. Use the Issue Checks option to post the invoice without printing a check.
Issuing printed checks for an unpaid invoice You can use the Issue Checks option to quickly print a check for an existing, unpaid invoice. For example, Joe Smith mows the church grounds every second Thursday in the Summer. You have a scheduled invoice on file for Joe. Because he plans to be out of town the rest of the week, Joe comes by to mow the lawn three days ahead of schedule. Use the Issue Checks option to print the check.
Issuing a Handwritten Check for a New Invoice in an Accrual Environment
You can issue and post handwritten and printed checks together. Handwritten checks post to the general ledger along with the printed checks, but do not print.
To issue a handwritten check for a new invoice 1. Under Manage Records, click the Transactions tab.
2. In the drop-down list, select Accounts Payable Checks and click Go
.
3. Click Issue Checks.
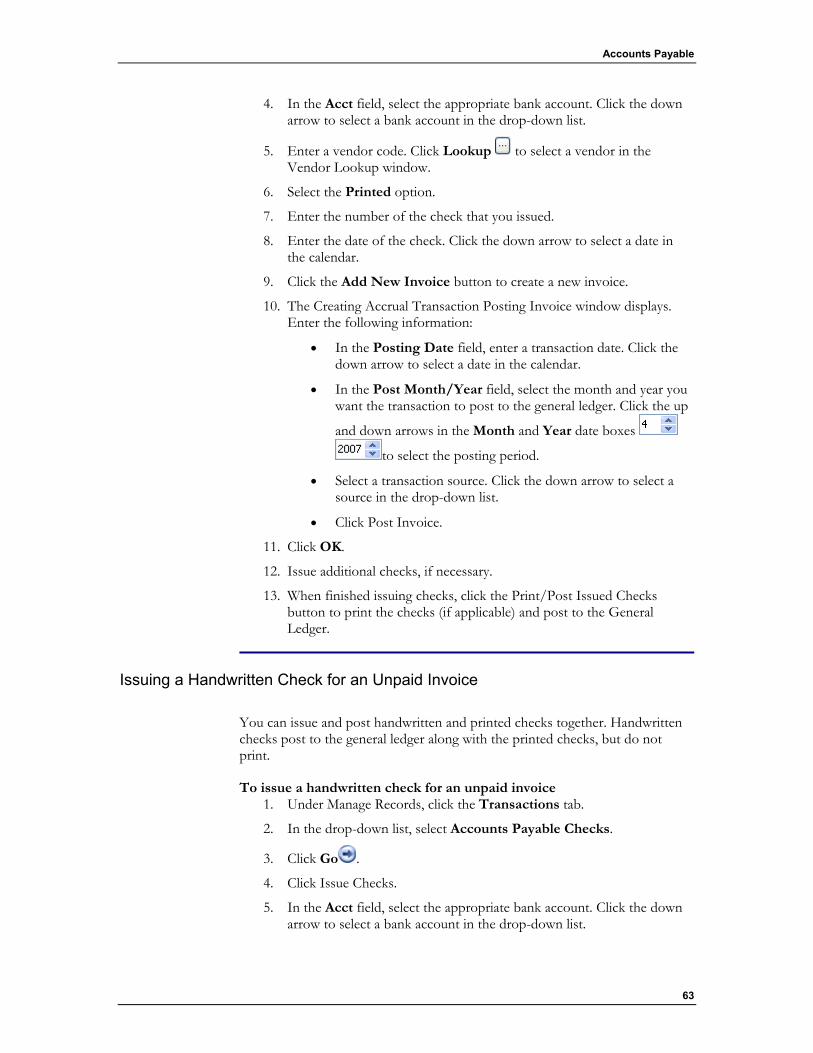
Accounts Payable
63
4. In the Acct field, select the appropriate bank account. Click the down arrow to select a bank account in the drop-down list.
5. Enter a vendor code. Click Lookup to select a vendor in the Vendor Lookup window.
6. Select the Printed option.
7. Enter the number of the check that you issued.
8. Enter the date of the check. Click the down arrow to select a date in the calendar.
9. Click the Add New Invoice button to create a new invoice.
10. The Creating Accrual Transaction Posting Invoice window displays. Enter the following information:
• In the Posting Date field, enter a transaction date. Click the down arrow to select a date in the calendar.
• In the Post Month/Year field, select the month and year you want the transaction to post to the general ledger. Click the up
and down arrows in the Month and Year date boxes
to select the posting period.
• Select a transaction source. Click the down arrow to select a source in the drop-down list.
• Click Post Invoice.
11. Click OK.
12. Issue additional checks, if necessary.
13. When finished issuing checks, click the Print/Post Issued Checks button to print the checks (if applicable) and post to the General Ledger.
Issuing a Handwritten Check for an Unpaid Invoice
You can issue and post handwritten and printed checks together. Handwritten checks post to the general ledger along with the printed checks, but do not print.
To issue a handwritten check for an unpaid invoice 1. Under Manage Records, click the Transactions tab.
2. In the drop-down list, select Accounts Payable Checks.
3. Click Go .
4. Click Issue Checks.
5. In the Acct field, select the appropriate bank account. Click the down arrow to select a bank account in the drop-down list.
ACS Version 10.6 - Accounts Payable
64
6. Enter a vendor code. Click Lookup to select a vendor in the Vendor Lookup window.
7. Select the Printed option.
8. Enter the number of the check.
9. Click the Unpaid Invoices tab and select the invoice for which you want to issue a check.
10. Click the Pay Invoice button, then select the Check Information tab.
11. Issue any additional checks.
12. When finished issuing checks, click the Print/Post Issued Checks button to print (if applicable) and post your checks.
Issuing a Handwritten Check for a New Invoice in a Cash Basis Environment
You can issue and post handwritten and printed checks together. Handwritten checks post to the general ledger along with the printed checks, but do not print.
To issue a handwritten check for a new invoice 1. Under Manage Records, click the Transactions tab.
2. In the drop-down list, select Accounts Payable Checks.
3. Click Go .
4. Click Issue Checks.
5. In the Acct field, select the appropriate bank account. Click the down arrow to select a bank account in the drop-down list.
6. Enter a vendor code. Click Lookup to select a vendor in the Vendor Lookup window.
7. Select the Printed option.
8. Enter the number of the check that you issued.
9. Click Add New Invoice to create a new invoice.
10. Click OK.
11. Issue additional checks, if necessary.
12. When finished issuing checks, click Print/Post Issued Checks to print the checks (if applicable) and post to the general ledger.
Issuing a Printed Check for a New Invoice in an Accrual Environment
You can issue and post handwritten and printed checks together. Handwritten checks post to the general ledger along with the printed checks, but do not print.
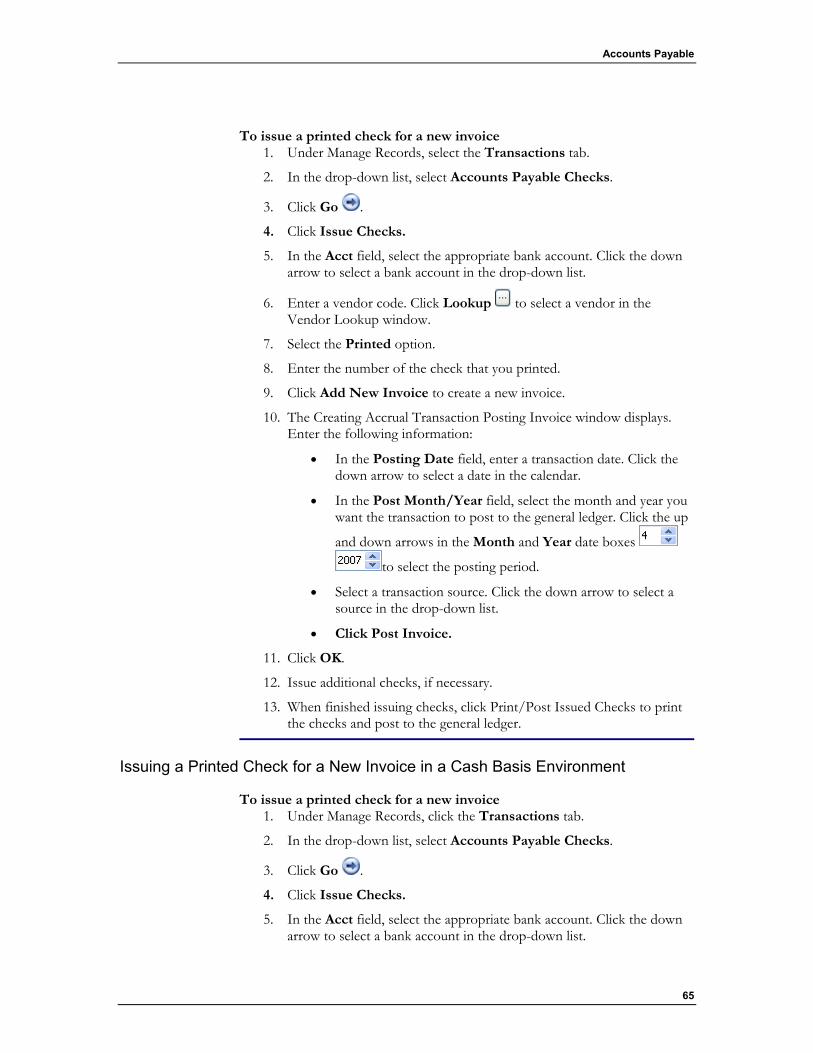
Accounts Payable
65
To issue a printed check for a new invoice 1. Under Manage Records, select the Transactions tab.
2. In the drop-down list, select Accounts Payable Checks.
3. Click Go .
4. Click Issue Checks.
5. In the Acct field, select the appropriate bank account. Click the down arrow to select a bank account in the drop-down list.
6. Enter a vendor code. Click Lookup to select a vendor in the Vendor Lookup window.
7. Select the Printed option.
8. Enter the number of the check that you printed.
9. Click Add New Invoice to create a new invoice.
10. The Creating Accrual Transaction Posting Invoice window displays. Enter the following information:
• In the Posting Date field, enter a transaction date. Click the down arrow to select a date in the calendar.
• In the Post Month/Year field, select the month and year you want the transaction to post to the general ledger. Click the up
and down arrows in the Month and Year date boxes
to select the posting period.
• Select a transaction source. Click the down arrow to select a source in the drop-down list.
• Click Post Invoice.
11. Click OK.
12. Issue additional checks, if necessary.
13. When finished issuing checks, click Print/Post Issued Checks to print the checks and post to the general ledger.
Issuing a Printed Check for a New Invoice in a Cash Basis Environment
To issue a printed check for a new invoice 1. Under Manage Records, click the Transactions tab.
2. In the drop-down list, select Accounts Payable Checks.
3. Click Go .
4. Click Issue Checks.
5. In the Acct field, select the appropriate bank account. Click the down arrow to select a bank account in the drop-down list.
ACS Version 10.6 - Accounts Payable
66
6. Enter a vendor code. Click Lookup to select a vendor in the Vendor Lookup window.
7. Select the Printed option.
8. Enter the number of the check you printed.
9. Click Add New Invoice to create a new invoice and enter the appropriate information.
10. Click OK.
11. Issue any additional checks.
12. When finished issuing checks, click Print/Post Issued Checks to print the checks and post to the general ledger.
Issuing Printed Checks for an Unpaid Invoice
To issue a printed check for an unpaid invoice 1. Under Manage Records, click the Transactions tab.
2. In the drop-down list, select Accounts Payable Checks.
3. Click Go .
4. Click Issue Checks.
5. In the Acct field, select the appropriate bank account. Click the down arrow to select a bank account in the drop-down list.
6. Enter a vendor code. Click Lookup to select a vendor in the Vendor Lookup window.
7. Enter the check number that you want to assign to this check.
8. Select the Unpaid Invoices tab and select the invoice for which you want to issue a check.
9. Click Pay Invoice, then select the Check Information tab.
10. Issue any additional checks.
11. When finished issuing checks, click Print/Post Issued Checks to print and post your checks.
Voiding Checks
Finding a Check in the Void Checks Window
The first step in voiding a check is to locate the check. You can find a check quickly in the Void Checks window with the Find Checks option. You can use the following search criteria to locate the checks:
• Vendor — enter a vendor code. Click Lookup to select a vendor in the Vendor Lookup window.
Accounts Payable
67
• Check number — enter a check number in the Check No field.
• Bank account — enter a bank account in the Bank field. Click the down arrow to select a bank account in the drop-down list.
• Memo — enter a check memo in the Memo field.
• Check date — enter a date. Click the down arrow to select a date in the calendar.
• Amount — enter the amount of the check in the Amount field.
To find a check 1. Under Manage Records, click the Transactions tab.
2. In the drop-down list, select Accounts Payable Checks.
3. Click Go .
4. Click Void Checks.
5. Specify one or more of the search criteria.
6. Click Find Checks. All checks that match your search criteria display.
Voiding a Check
You must issue a void in the Accounts Payable module for any check that you issued in Accounts Payable.
To select a check for voiding 1. Under Manage Records, click the Transactions tab.
2. In the drop-down list, select Accounts Payable Checks.
3. Click Go .
4. Click Void Checks.
5. Locate the check that you want to void.
6. Click Find Checks. All checks matching your search criteria display.
7. Select the check you want to void.
8. If necessary, you can verify the check information with the following options:
• To view the check information, select ViewCheck.
• To view the invoice information, select any invoice associated with the check, then click ViewInvoice.
9. Select the Void Check option.
10. If the selected check is reconciled in the general ledger, a confirmation message displays. To continue, click Yes.
11. The Void Accounts Payable Check window displays.

ACS Version 10.6 - Accounts Payable
68
To void a check 1. Select the correct posting period. Click the up and down arrows in the
Month and Year date boxes to select the posting period.
2. Select a Transaction Source. Click the down arrow to select a transaction source in the drop-down list.
3. In the Void Explanation memo text field, enter an explanation for voiding the invoice.
4. To void the check, click Void Check.
5. If you selected the Prompt to void invoices when void check option in Accounts Payable Setup, a confirmation message displays. To void the invoices attached to the check, click Yes.
Clearing the Check Run
When you process checks in the Accounts Payable module, ACS creates a file that identifies the checks to print for the selected invoices. Once you print and post all checks, ACS clears the check file.
If you need to re-run your checks, use the Clear Check Run option to manually clear checks from the check file. For instance, if you experience a printer malfunction early in the check printing process, you can clear the check file and start the check run again.
Note
If you have successfully printed a number of checks in the batch prior to experiencing printing difficulties, see the topic entitled The Print Restart Option. This option allows you to restart printing from a particular check number.
To clear the check run 1. Under Manage Records, click the Transactions tab.
2. In the drop-down list, select Accounts Payable Checks.
3. Click Go .
4. Click Pay Invoices.
5. Click the Checks tab.
6. Click Clear Checks.
7. Click Yes to clear the check file.
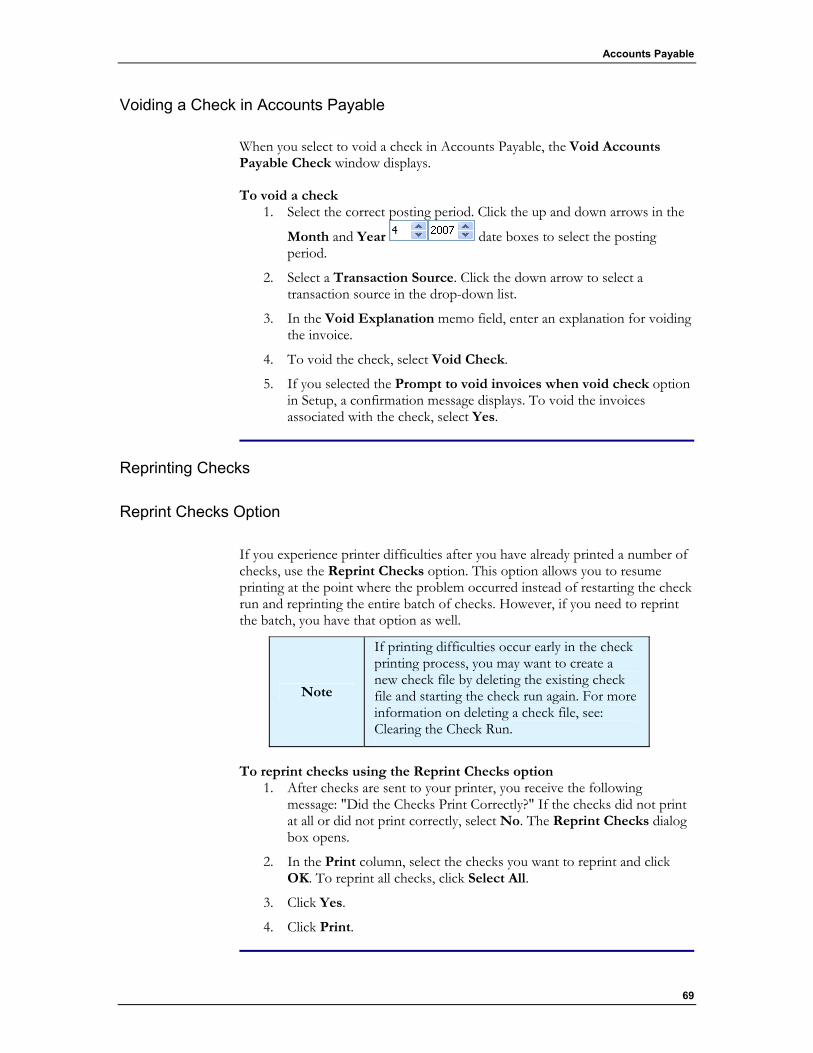
Accounts Payable
69
Voiding a Check in Accounts Payable
When you select to void a check in Accounts Payable, the Void Accounts Payable Check window displays.
To void a check 1. Select the correct posting period. Click the up and down arrows in the
Month and Year date boxes to select the posting period.
2. Select a Transaction Source. Click the down arrow to select a transaction source in the drop-down list.
3. In the Void Explanation memo field, enter an explanation for voiding the invoice.
4. To void the check, select Void Check.
5. If you selected the Prompt to void invoices when void check option in Setup, a confirmation message displays. To void the invoices associated with the check, select Yes.
Reprinting Checks
Reprint Checks Option
If you experience printer difficulties after you have already printed a number of checks, use the Reprint Checks option. This option allows you to resume printing at the point where the problem occurred instead of restarting the check run and reprinting the entire batch of checks. However, if you need to reprint the batch, you have that option as well.
Note
If printing difficulties occur early in the check printing process, you may want to create a new check file by deleting the existing check file and starting the check run again. For more information on deleting a check file, see: Clearing the Check Run.
To reprint checks using the Reprint Checks option 1. After checks are sent to your printer, you receive the following
message: "Did the Checks Print Correctly?" If the checks did not print at all or did not print correctly, select No. The Reprint Checks dialog box opens.
2. In the Print column, select the checks you want to reprint and click OK. To reprint all checks, click Select All.
3. Click Yes.
4. Click Print.
ACS Version 10.6 - Accounts Payable
70
ACH Payments
Creating an ACH Transmission File
The ACH (Automated Clearinghouse) transmission file is used by your bank to electronically deposit direct payment participants' checks in the appropriate bank accounts of the various banks used by your vendors. You can create the ACH file before or after printing/posting checks. Check with your banking institution for specific transmission requirements.
Note
Before sending your first ACH file, your bank may require you to send a prenotification file. The bank uses this file to verify that vendor data is being transmitted correctly. For more information, see: Creating a Direct Payment Prenotification File.
To create an ACH file 1. Under Manage Records, click the Transactions tab.
2. In the drop-down list, select Accounts Payable Checks.
3. Click Go .
4. Click Create ACH File.
6. Select the ACH file Options.
7. Click Process.
8. Optional: Click Print to print an ACH Proof List.
9. Optional: Click Delete to delete an ACH entry.
10. Click Create File to create the ACH file.
11. Enter the location to save the file and a file name. Click Save.
12. A message displays indicating the total number of direct payment records written to the file and the total amount of the transmission. To complete the process, click OK.
Note
You can also access the CreateACHFile option on the Checks tab of the PayInvoices window.
Creating a Direct Payment Prenotification File
Before sending your first ACH file, your bank may require you to send a pre-notification file. Your bank uses this file to verify your direct payment
Accounts Payable
71
information and to make sure that electronic transmission of data is occurring properly.
To create an ACH Pre-notification File 1. Under Manage Records, click the Transactions tab.
2. In the drop-down list, select Accounts Payable Checks.
3. Click Go .
4. Click Create ACH File.
5. Select Prenotification File.
6. Click Process.
7. Optional: Click Print to print an ACHProofList.
8. Optional: Click Delete to delete an ACH entry.
9. Click Create File to create the ACH file.
10. Enter the location, file name, and click Save. A message displays indicating the total number of records written to the file and the total amount of the transmission.
11. Click OK to complete the process.
12. Close the Create ACH File window. The Direct Payment Prenotification option is automatically cleared.
Invoice and Check Inquiry
Setting Filter Options
You can use any of the filtering options to locate an invoice or a range of invoices. You can use the filtering options together to narrow your search, if necessary.
To reset the default values, click the Reset button.
To set filter options 1. Under Manage Records, select the Transactions tab.
2. In the drop-down list, select Accounts Payable Invoices.
3. Click Go .
4. Click Add/Edit Invoices.
5. Click Filter by.
6. In the Vendor field, enter the vendor name. Click Lookup to select a vendor in the Vendor Lookup window.
7. In the Bank field, click the down arrow to select the bank account in the drop-down list.
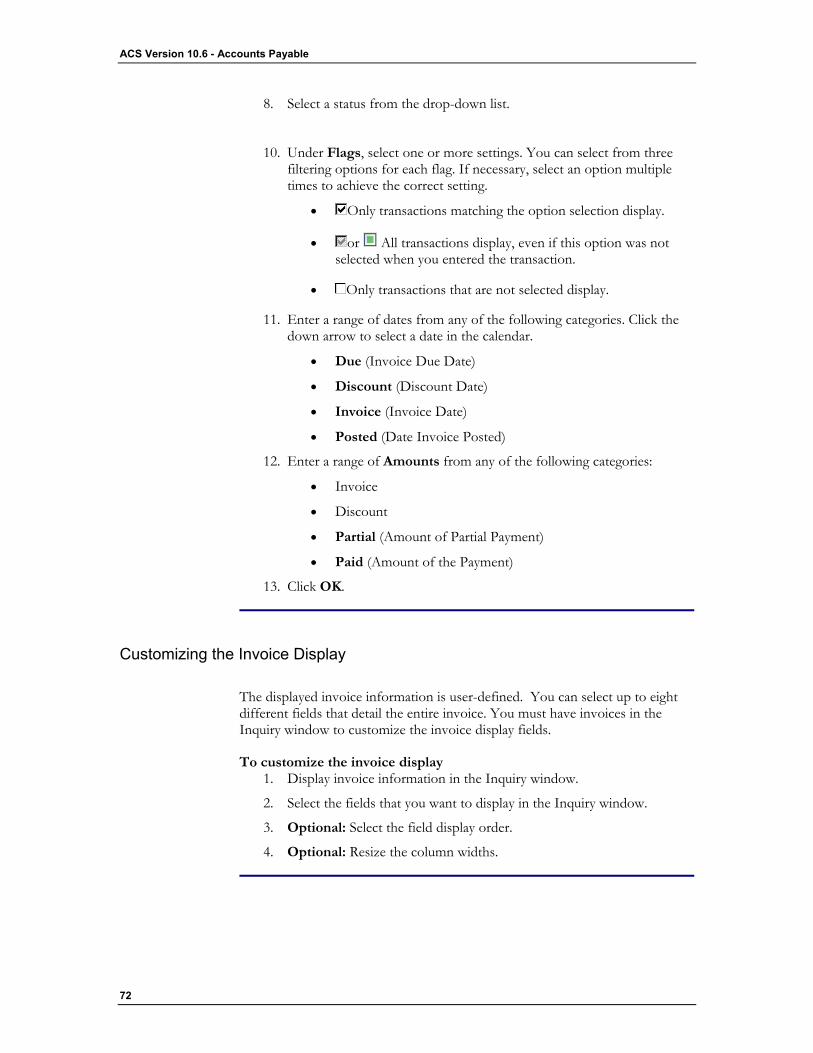
ACS Version 10.6 - Accounts Payable
72
8. Select a status from the drop-down list.
10. Under Flags, select one or more settings. You can select from three filtering options for each flag. If necessary, select an option multiple times to achieve the correct setting.
• Only transactions matching the option selection display.
• or All transactions display, even if this option was not selected when you entered the transaction.
• Only transactions that are not selected display.
11. Enter a range of dates from any of the following categories. Click the down arrow to select a date in the calendar.
• Due (Invoice Due Date)
• Discount (Discount Date)
• Invoice (Invoice Date)
• Posted (Date Invoice Posted)
12. Enter a range of Amounts from any of the following categories:
• Invoice
• Discount
• Partial (Amount of Partial Payment)
• Paid (Amount of the Payment)
13. Click OK.
Customizing the Invoice Display
The displayed invoice information is user-defined. You can select up to eight different fields that detail the entire invoice. You must have invoices in the Inquiry window to customize the invoice display fields.
To customize the invoice display 1. Display invoice information in the Inquiry window.
2. Select the fields that you want to display in the Inquiry window.
3. Optional: Select the field display order.
4. Optional: Resize the column widths.
Accounts Payable
73
Viewing Invoice Information from the Inquiry Window
You can double-click on an invoice to view complete information for it.
If you select to view invoice information, you can select the 1099 check box to select or clear the invoice as a 1099 amount.
To view invoice information 1. Under Run Inquiries, select Vendor Inquiry in the drop-down list.
2. Click Go .
3. Enter a Vendor Code. Click Lookup to select a vendor in the Vendor Lookup window.
4. The current posting month displays. Click the up and down arrows in
the Month date box to select a different month.
5. The current posting year displays. Click the up and down arrows in the
Year date box to select a different year.
6. Select to view Paid, Unpaid, or Bothpaid and unpaid invoices.
7. Select to view Posted, Unposted, or Both posted and unposted invoices.
8. Select one of the following options:
• MTD— view current month-to-date checks
• YTD— view current year-to-date checks
• All— view all checks for the selected vendor
Viewing Check Information from the Inquiry Window
You can double-click on any check to view the invoices associated with it.
To view check information 1. Under Run Inquiries, select Vendor Inquiry in the drop-down list.
2. Click Go .
3. Click the Checks tab.
4. Enter a Vendor Code. Click Lookup to select a vendor in the Vendor Lookup window.
5. The current posting month displays. Click the up and down arrows in
the Month date box to change the month.
6. The current posting year displays. Click the up and down arrow in the
Year date box to change the year.
7. Select one of the following options:
ACS Version 10.6 - Accounts Payable
74
• MTD— view current month-to-date checks
• YTD— view current year-to-date checks
• All— view all checks for the selected vendor
Viewing Totals from the Inquiry Window
Use the Totals Inquiry feature to view the following information:
• Vendor Totals
• Invoice Totals
• Month-To-Date Check Totals
• Year-To-Date Check Totals
To view totals from the Inquiry window 1. Under Run Inquiries, select Vendor Inquiry in the drop-down list.
2. Click Go .
3. Enter a Vendor Code. Click Lookup to select a vendor in the Vendor Lookup window.
4. The current posting month displays. Click the up and down arrows in
the Month date box to select a different month.
5. The current posting year displays. Click the up and down arrows in the
Year date box to select a different year.
6. Click the Totals tab.
7. To calculate the totals, click Yes.
8. Under Display Selection, select to view totals for the selected vendor or for all vendors.
Finding a Check Using the Find Option
If you have a large number of checks and need to find a specific check or group of checks, you can use the Find option. The Find option offers expanded search criteria and filtering capability and is similar to locating invoices from the Inquiry window.
Note
To return to the Inquiry window with a specific check selected, double-click on the check. To view the invoice associated with the check, double-click on the check again.
To find a check 1. Under Run Inquiries, select Vendor Inquiry in the drop-down list.
Accounts Payable
75
2. Click Go .
3. Select the Checks tab.
4. Click Find.
5. Enter information for any combination of the check filters. For example, search by Reference Number only, or search by Reference Number and Amount.
6. Click Find.
Finding an Invoice Using the Find Option
If you have a large number of invoices and need to find a specific invoice or group of invoices, you can use the Find option. The Find option offers expanded search criteria and filtering capability and is similar to locating invoices from the Inquiry window.
Note
To return to the Inquiry window with a specific invoice selected, double-click on the invoice. Double-click on the invoice once again to view complete invoice information on the selected invoice.
To find an invoice 1. Under Run Inquiries, select Vendor Inquiry in the drop-down list.
2. Click Go .
3. Click Find.
4. Enter information for any combination of the invoice filters. For example, search by Invoice Amount only or search by Invoice Due Date and Invoice Amount.
5. Click Find.
Year-to-Date Check Totals
The Year-to-Date Check Totals in Inquiry are based on the Post Month/Year of a check. The amount represents a total of all checks and voids posted to the year selected in Inquiry. Checks that are voided from previous years, or check dates that do not match the selected Post Month/Year when the checks were posted can affect the YTD Check Totals.
Use YTD Check Totals to view the following items:
• # of Checks Written
• # of Voided Checks
• YTD Checks
ACS Version 10.6 - Accounts Payable
76
• YTD Discounts
• YTD Voids
Reports
Customizing YTD Purchases List Report Dates
When you print the YTD Purchases List report, ACS populates the date fields for year-to-date purchases and 1099 purchases based on the beginning of your accounting year, the beginning of the tax year, and the last day of the current posting month in the Accounts Payable module. You can change these dates to meet the needs of your organization.
To customize the report dates 1. Under Generate Reports, click the Reports tab.
2. In the drop-down list, select Accounts Payable.
3. Click Go .
4. In the list of reports, expand Lists, then select YTD Purchases List.
5. Click Preview.
6. Enter the dates of your choice. For more information about the date fields, see Getting an Overview of the Enter Report Dates Window.
7. Click OK.
Customizing and Printing Labels
You can print labels at any time. ACS provides six options for printing labels on a dot matrix printer and two options for printing labels on a laser printer.
After previewing the labels, you can click Customize to change the label layout if you decide that changes are needed. You can access the Customize option in the following methods:
• After previewing the report, click Customize in the report menu bar.
• Right-click the report list, then click Customize.
To print labels 1. Under Generate Reports, click the Labels tab.
2. In the drop-down list, select Vendor Labels.
3. Click Go .
4. Under Reports, select a label format.
5. Click Customize.
6. Optional: Select the filter options.
Accounts Payable
77
7. Click Label Layout.
8. Select the fields that you want to print on each line of the labels. For more information on the available fields, see Getting an Overview of the Label Layout.
9. Click OK.
10. Click Print .
11. Optional: Click Save to save your label settings.
12. To exit, click Close.
Customizing Accounts Payable Reports on the Options Tab
Use the Options tab in Accounts Payable Reports for configuring your report to meet the needs of your organization. You can access the Options tab in the following ways:
• Select the report, then click Customize.
• Preview the report, then click Customize in the report menu bar.
• Right-click in the report list, then click Customize.
To customize reports on the Options tab 1. Under Generate Reports, click the Reports tab.
2. In the list, select Accounts Payable.
3. Click Go .
4. Expand the report type and select the report you want to display or print.
5. Click Customize.
6. Select the options and fields that you want for your report. For more information about the options and fields, see Getting an Overview of the Accounts Payable Options Tab.
7. Click OK.
Customizing Reports in Report Options
Using the Report Options dialog box, you can customize the title of your selected report without clicking Customize. If your report uses a period view and dates, you can also select the View and the dates of the information that you want to include in the report in Report Options.
To customize reports in Report Options 1. Under Generate Reports, click the Reports tab.
2. In the drop-down list, select Accounts Payable.
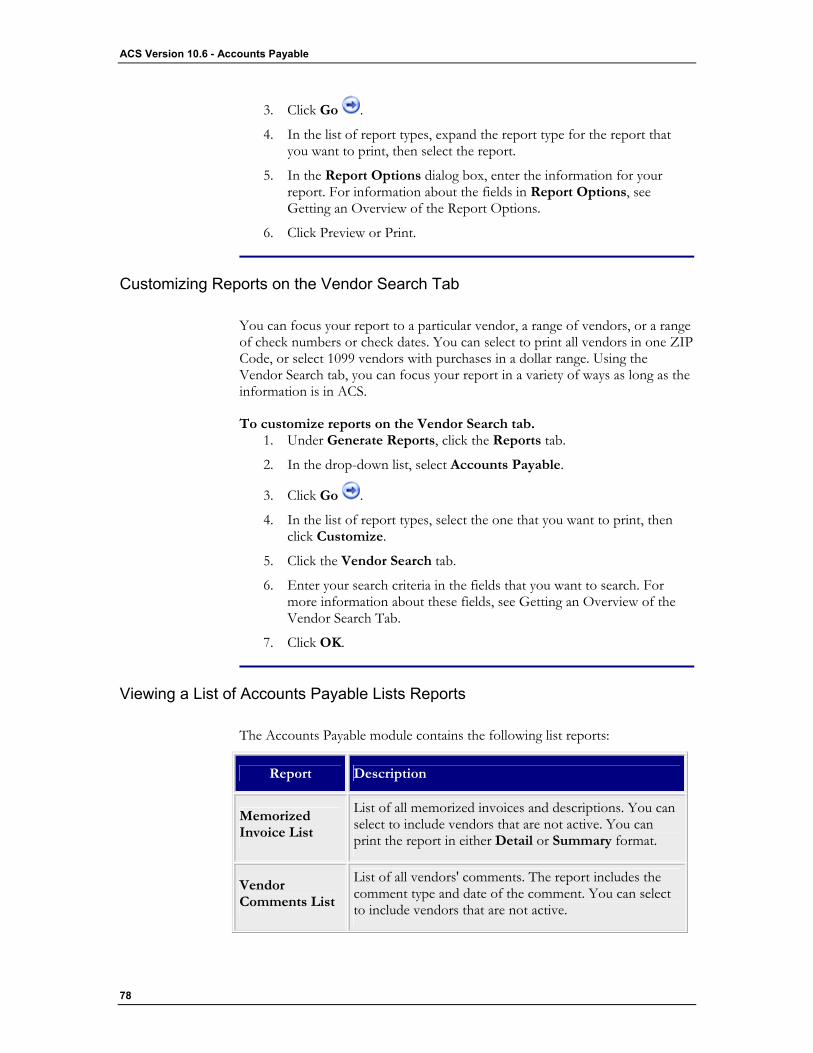
ACS Version 10.6 - Accounts Payable
78
3. Click Go .
4. In the list of report types, expand the report type for the report that you want to print, then select the report.
5. In the Report Options dialog box, enter the information for your report. For information about the fields in Report Options, see Getting an Overview of the Report Options.
6. Click Preview or Print.
Customizing Reports on the Vendor Search Tab
You can focus your report to a particular vendor, a range of vendors, or a range of check numbers or check dates. You can select to print all vendors in one ZIP Code, or select 1099 vendors with purchases in a dollar range. Using the Vendor Search tab, you can focus your report in a variety of ways as long as the information is in ACS.
To customize reports on the Vendor Search tab. 1. Under Generate Reports, click the Reports tab.
2. In the drop-down list, select Accounts Payable.
3. Click Go .
4. In the list of report types, select the one that you want to print, then click Customize.
5. Click the Vendor Search tab.
6. Enter your search criteria in the fields that you want to search. For more information about these fields, see Getting an Overview of the Vendor Search Tab.
7. Click OK.
Viewing a List of Accounts Payable Lists Reports
The Accounts Payable module contains the following list reports:
Report Description
Memorized Invoice List
List of all memorized invoices and descriptions. You can select to include vendors that are not active. You can print the report in either Detail or Summary format.
Vendor Comments List
List of all vendors' comments. The report includes the comment type and date of the comment. You can select to include vendors that are not active.
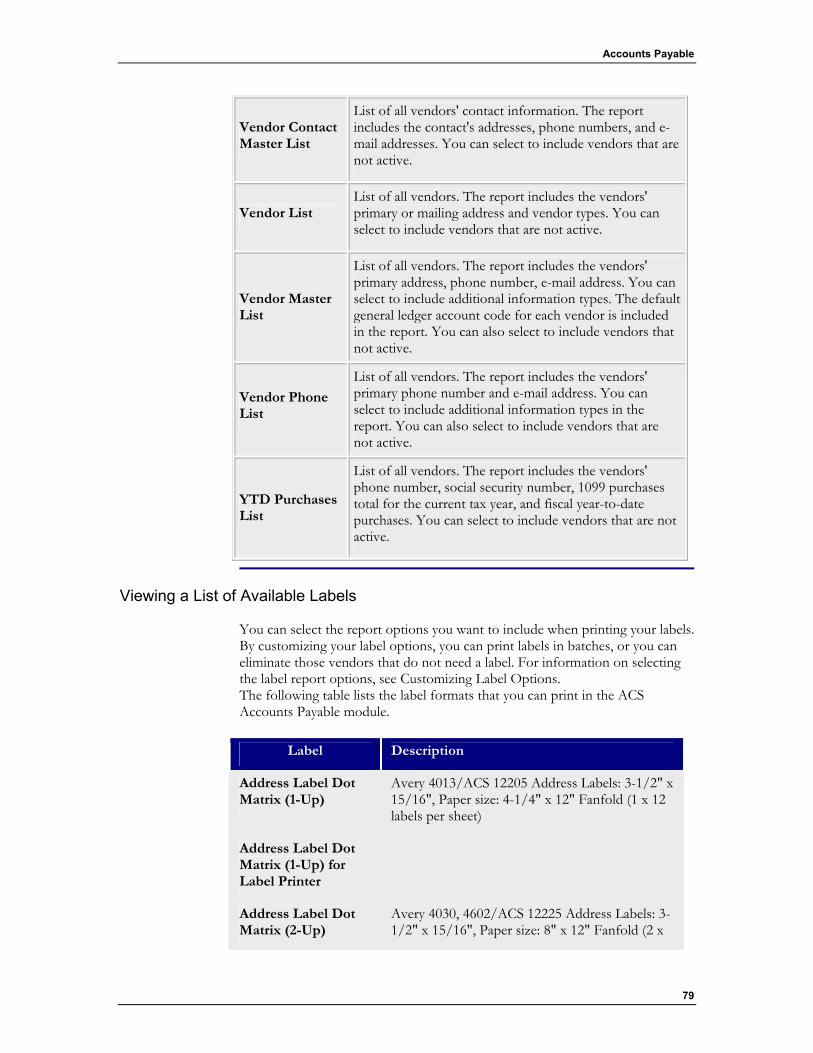
Accounts Payable
79
Vendor Contact Master List
List of all vendors' contact information. The report includes the contact's addresses, phone numbers, and e-mail addresses. You can select to include vendors that are not active.
Vendor List List of all vendors. The report includes the vendors' primary or mailing address and vendor types. You can select to include vendors that are not active.
Vendor Master List
List of all vendors. The report includes the vendors' primary address, phone number, e-mail address. You can select to include additional information types. The default general ledger account code for each vendor is included in the report. You can also select to include vendors that not active.
Vendor Phone List
List of all vendors. The report includes the vendors' primary phone number and e-mail address. You can select to include additional information types in the report. You can also select to include vendors that are not active.
YTD Purchases List
List of all vendors. The report includes the vendors' phone number, social security number, 1099 purchases total for the current tax year, and fiscal year-to-date purchases. You can select to include vendors that are not active.
Viewing a List of Available Labels You can select the report options you want to include when printing your labels. By customizing your label options, you can print labels in batches, or you can eliminate those vendors that do not need a label. For information on selecting the label report options, see Customizing Label Options. The following table lists the label formats that you can print in the ACS Accounts Payable module.
Label Description
Address Label Dot Matrix (1-Up)
Avery 4013/ACS 12205 Address Labels: 3-1/2" x 15/16", Paper size: 4-1/4" x 12" Fanfold (1 x 12 labels per sheet)
Address Label Dot Matrix (1-Up) for Label Printer
Address Label Dot Matrix (2-Up)
Avery 4030, 4602/ACS 12225 Address Labels: 3-1/2" x 15/16", Paper size: 8" x 12" Fanfold (2 x
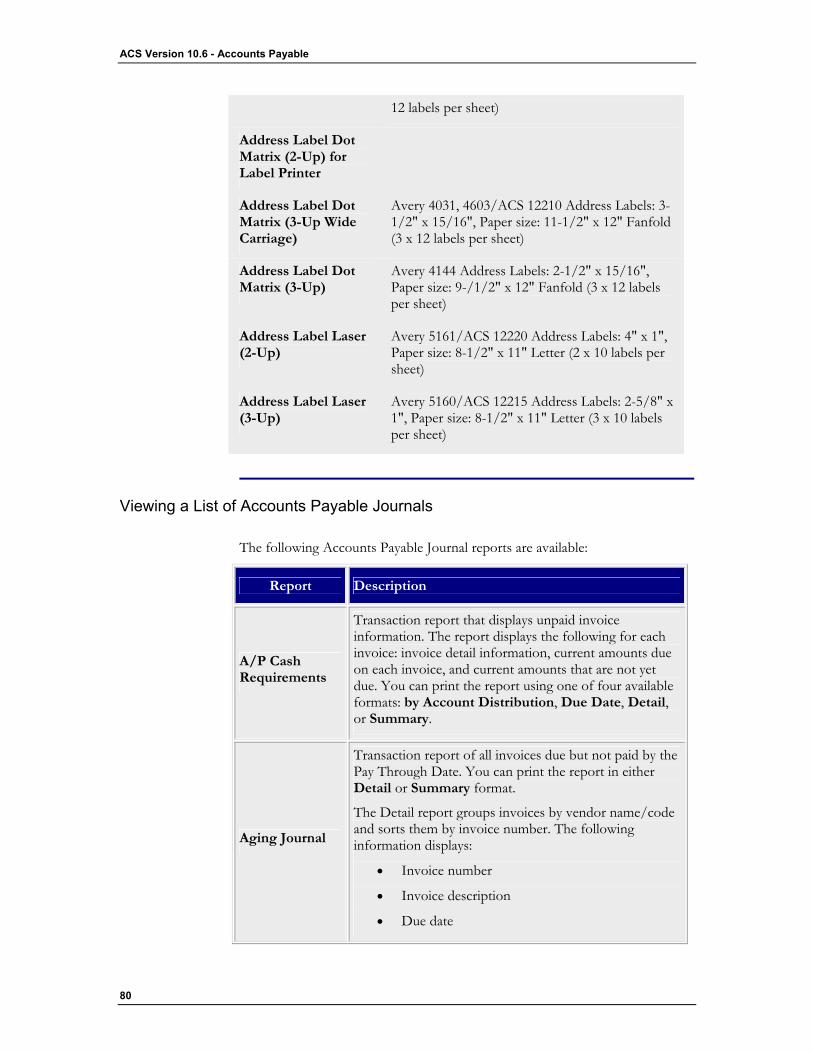
ACS Version 10.6 - Accounts Payable
80
12 labels per sheet)
Address Label Dot Matrix (2-Up) for Label Printer
Address Label Dot Matrix (3-Up Wide Carriage)
Avery 4031, 4603/ACS 12210 Address Labels: 3-1/2" x 15/16", Paper size: 11-1/2" x 12" Fanfold (3 x 12 labels per sheet)
Address Label Dot Matrix (3-Up)
Avery 4144 Address Labels: 2-1/2" x 15/16", Paper size: 9-/1/2" x 12" Fanfold (3 x 12 labels per sheet)
Address Label Laser (2-Up)
Avery 5161/ACS 12220 Address Labels: 4" x 1", Paper size: 8-1/2" x 11" Letter (2 x 10 labels per sheet)
Address Label Laser (3-Up)
Avery 5160/ACS 12215 Address Labels: 2-5/8" x 1", Paper size: 8-1/2" x 11" Letter (3 x 10 labels per sheet)
Viewing a List of Accounts Payable Journals
The following Accounts Payable Journal reports are available:
Report Description
A/P Cash Requirements
Transaction report that displays unpaid invoice information. The report displays the following for each invoice: invoice detail information, current amounts due on each invoice, and current amounts that are not yet due. You can print the report using one of four available formats: by Account Distribution, Due Date, Detail, or Summary.
Aging Journal
Transaction report of all invoices due but not paid by the Pay Through Date. You can print the report in either Detail or Summary format.
The Detail report groups invoices by vendor name/code and sorts them by invoice number. The following information displays:
• Invoice number
• Invoice description
• Due date
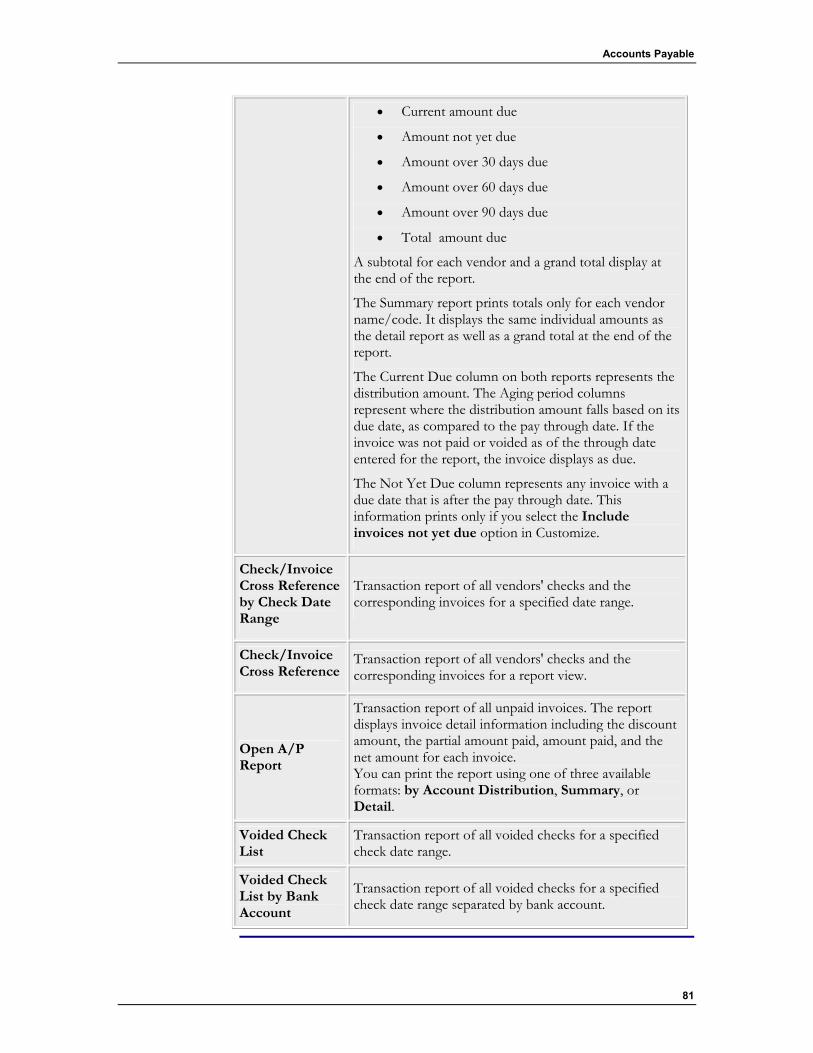
Accounts Payable
81
• Current amount due
• Amount not yet due
• Amount over 30 days due
• Amount over 60 days due
• Amount over 90 days due
• Total amount due
A subtotal for each vendor and a grand total display at the end of the report.
The Summary report prints totals only for each vendor name/code. It displays the same individual amounts as the detail report as well as a grand total at the end of the report.
The Current Due column on both reports represents the distribution amount. The Aging period columns represent where the distribution amount falls based on its due date, as compared to the pay through date. If the invoice was not paid or voided as of the through date entered for the report, the invoice displays as due.
The Not Yet Due column represents any invoice with a due date that is after the pay through date. This information prints only if you select the Include invoices not yet due option in Customize.
Check/Invoice Cross Reference by Check Date Range
Transaction report of all vendors' checks and the corresponding invoices for a specified date range.
Check/Invoice Cross Reference
Transaction report of all vendors' checks and the corresponding invoices for a report view.
Open A/P Report
Transaction report of all unpaid invoices. The report displays invoice detail information including the discount amount, the partial amount paid, amount paid, and the net amount for each invoice. You can print the report using one of three available formats: by Account Distribution, Summary, or Detail.
Voided Check List
Transaction report of all voided checks for a specified check date range.
Voided Check List by Bank Account
Transaction report of all voided checks for a specified check date range separated by bank account.
ACS Version 10.6 - Accounts Payable
82
Printer Setup
After ACS financial software is installed, you should set up your printer to meet your organization's needs. By default, ACS uses the printer and font defaults set in the Microsoft® Windows® Control Panel. Any changes made to Windows Printers and Fonts settings are normally reflected in ACS.
You can choose a printer other than the Windows default printer to use with ACS. Once a printer is selected, modify the report fonts and printer setup from within ACS. The changes you make will not affect other applications you are currently using. Printer settings will vary depending on the printer selected.
The default font used by ACS is usually Times New Roman - 10pt. On most reports, you can change the default font. However, there are a few reports that require a specific font and/or font size in order to print correctly. Also, keep in mind that some fonts may take longer to print than others.
If you change printers without modifying fonts and printer setup, the printer setup is reset to ACS defaults.
Customizing and Printing Labels
You can print labels at any time. ACS provides six options for printing labels on a dot matrix printer and two options for printing labels on a laser printer.
After previewing the labels, you can click Customize to change the label layout if you decide that changes are needed. You can access the Customize option in the following methods:
• After previewing the report, click Customize in the report menu bar.
• Right-click the report list, then click Customize.
To print labels 1. Under Generate Reports, click the Labels tab.
2. In the drop-down list, select Vendor Labels.
3. Click Go .
4. Under Reports, select a label format.
5. Click Customize.
6. Optional: Select the filter options.
7. Click Label Layout.
8. Select the fields that you want to print on each line of the labels. For more information on the available fields, see Getting an Overview of the Label Layout.
9. Click OK.
10. Click Print .
11. Optional: Click Save to save your label settings.
Accounts Payable
83
12. To exit, click Close.
Printing Rolodex Cards
When you print Rolodex® cards, vendors are printed one per card with the following information:
• Address information
• Primary phone information
• Primary e-mail information
• Primary contact information and one additional contact
Once you select the report options, you can preview the cards to make sure the information displays correctly. In the Preview window, you can choose to send the cards by electronic mail to a recipient or export the cards to another application.
You can save the report setup so that you do not have to remember the selections you made.
To print Rolodex cards 1. Under Generate Reports, click the Reports tab.
2. In the drop-down list, select Accounts Payable.
3. Click Go .
4. In the list of report types, select Cards.
5. Select the card format, then click Customize.
6. Select the report options.
7. Click OK.
8. Click Print .
Period End Closing the Month
Closing the month simply changes your default posting month.
If you have unposted invoices, you can still close the current month and post these invoices in the correct month at a later time.
To close the month 1. Under Manage Records, click the Transactions tab.
2. In the drop-down list, select Accounts Payable Invoices.
3. Click Go .
4. Click Close Current Month.
ACS Version 10.6 - Accounts Payable
84
5. If you have unposted invoices for the month, a message displays. Click Yes to continue with closing the month. Click No to exit.
6. If you do not have unposted invoices, the following message displays: "You are about to close the current month! Ok to set posting period to [Month/Year]?" Click Yes to close the month.
Entering 1099 Adjustments
Beginning Accounts Payable after January 1 If you begin using the Accounts Payable module after the first of the year, you can enter the 1099 adjustments for each vendor. You can enter all accumulated dollar amounts for all applicable 1099 invoices without entering each invoice manually into the system.
Example: You begin using the Accounts Payable module on March 1, 2007. You paid your groundskeeper 4 times in the period January through February. You paid him $75.00 each time. Instead of entering four separate invoices for $75.00, use the 1099 Adjustment option to input the total dollar amount of $300.00.
1099 adjustment function When entering 1099 adjustments, ACS prompts you to enter an expense account and a checking account. However, the adjustments are not posted to the General Ledger. The adjustments are treated as invoices and are marked posted and paid. That is, they are treated as if the invoice is already posted and the check is already printed. The main purpose of the 1099 Adjustment option is to make sure that 1099 totals for each vendor are correct at the end of the year. If you want to change the 1099 status of an existing invoice that is incorrectly marked, you can make the change in Inquiry or Add/Edit Invoices.
Note The 1099 Adjustment Utility adjusts the vendor's 1099 total as well as the vendor's YTD purchases total.
To enter 1099 adjustments 1. Under Manage Records, click the Period End Procedures tab.
2. In the drop-down list, select 1099 & YTD Adjustments.
3. Click Go .
4. There are three ways to select a vendor: enter the name of the vendor and press Enter, right-click to select Lookup by Code andenter a vendor code, or click Lookup to select a vendor in the Vendor Lookup window.
5. In the Invoice# field, enter an invoice number. Click Next to auto-assign the next available invoice number for the selected vendor.
6. In the Invoice Amt field, enter the dollar amount by which you want change the vendor's purchases total. Enter a positive amount to

Accounts Payable
85
increase the 1099 and YTD purchases amounts. Enter a negative amount to decrease the 1099 and YTD purchases amounts.
7. Enter the following dates. Click the down arrow to select a date from the calendar.
• Invoice Date— date the invoice is created.
• Due Date— month and year the 1099 adjustments display in the Inquiry window.
• Post Date— date the invoice is posted.
8. In the Invoice Memo text field, enter a description. "1099 Adjustment" is a typical example.
9. In the Chk Acct field, enter a checking account number.
10. In the Exp Acct field, enter an expense account number.
11. In the Post Month/Year field, click the up and down arrows in the
Month and Year date boxes to select the correct posting period.
12. Click Apply.
Period End Reports
1099 Options
Reports — Select 1099's - Laser Printer.
Print Transactions From and to — Enter the beginning and ending date range for the 1099 information to include in the 1099 totals. Click the down arrow to select a date in the calendar.
Preview — Select to preview 1099s before printing the forms.
Print — Click to select a printer and print 1099s.
Printer Setup — Select to change your printer settings.
View Reports Fields Select one of the following options:
• <user name> — Select to display all saved reports for the current user and all ACS reports.
• Public — Select to display all saved reports marked as Public and all ACS reports.
Print 1096 — Click to edit 1096 fields or print the 1096.
ACS Version 10.6 - Accounts Payable
86
1099 Setup Options
In Period End Reports, the following fields and options are available for the Accounts Payable 1099s on the Setup tab:
Report Options Sort By — To print 1099s in a particular order, select a sort option.
Fed Tax ID — Verify your federal tax ID number. If necessary, enter your federal tax ID number in the Fed Tax ID field.
State Tax ID — Verify your state tax ID number. If necessary, enter your state tax ID number in the State Tax ID field.
Vendor Options Include Inactive Vendors — Select to print 1099s for both inactive and active vendors.
Include 1099 Purchases Under $600 — Select to print 1099s for vendors with 1099 purchases that total less than $600 and 1099s for vendors with purchases over $600.
Vendor Type — To filter by vendor type, select this option and click Select to choose the vendor types.
Selection Options Vendor Code — To filter by vendor code, enter a range of vendor codes. Click Lookup to select the codes in the Vendor Lookup list.
Vendor Name — To filter by vendor names, enter a range of vendor names. Click Lookup to select the names from the Vendor Lookup list.
Address Line 1 and Address Line 2 — Enter address information as the filter.
City — Enter a city as the filter.
State — Enter a two-letter state abbreviation as the filter.
ZIP Code — Enter a range of ZIP Codes as the filter.
YTD Purchases — Enter a range of year-to-date purchase amounts as the filter.
YTD 1099 Purchases — Enter a range of year-to-date 1099 purchase amounts as the filter.
1099 Preview Options
Use the following preview tools in the 1099 preview window:
Option Description
Print Click this button to print the 1099.
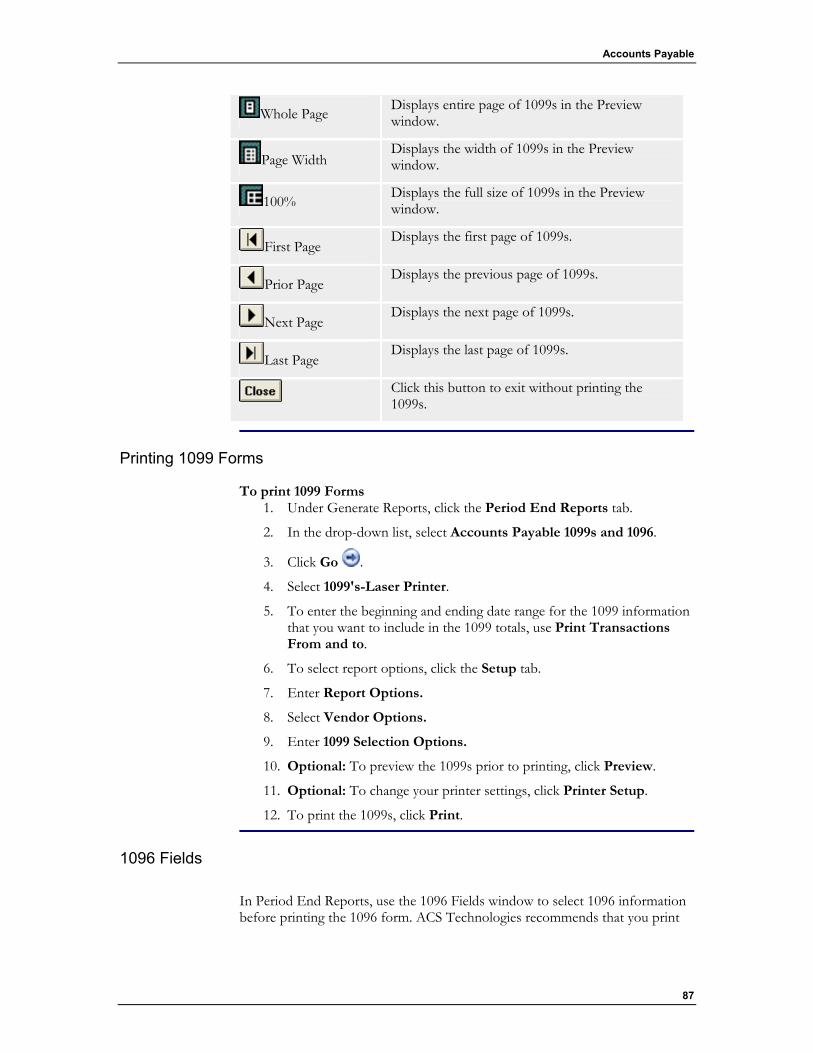
Accounts Payable
87
Whole Page Displays entire page of 1099s in the Preview window.
Page Width Displays the width of 1099s in the Preview window.
100% Displays the full size of 1099s in the Preview window.
First Page Displays the first page of 1099s.
Prior Page Displays the previous page of 1099s.
Next Page Displays the next page of 1099s.
Last Page Displays the last page of 1099s.
Click this button to exit without printing the 1099s.
Printing 1099 Forms
To print 1099 Forms 1. Under Generate Reports, click the Period End Reports tab.
2. In the drop-down list, select Accounts Payable 1099s and 1096.
3. Click Go .
4. Select 1099's-Laser Printer.
5. To enter the beginning and ending date range for the 1099 information that you want to include in the 1099 totals, use Print Transactions From and to.
6. To select report options, click the Setup tab.
7. Enter Report Options.
8. Select Vendor Options.
9. Enter 1099 Selection Options.
10. Optional: To preview the 1099s prior to printing, click Preview.
11. Optional: To change your printer settings, click Printer Setup.
12. To print the 1099s, click Print.
1096 Fields
In Period End Reports, use the 1096 Fields window to select 1096 information before printing the 1096 form. ACS Technologies recommends that you print
ACS Version 10.6 - Accounts Payable
88
the form on plain paper first to make sure the form lines up correctly and your settings are correct.
Preaddressed 1096? — If your organization's name and address are pre-printed on the 1096 form, select this option.
Final Return? — If your organization is not required to file Forms 1099, 1098, 5498, or W2-G in the future, either on paper, magnetically, or electronically, select this option.
Contact Information Enter the following optional information:
• Contact Name
• Telephone Number
• E-mail Address
• Fax Number
Preview — Click to preview the form before printing.
Print — Click to select the printer and print the form.
Cancel — Click to exit the 1096 fields window without printing.
Printing the 1096
To print 1096 forms 1. Under Generate Reports, click the Period End Reports tab.
2. In the drop-down list, select Accounts Payable 1099s and 1096.
3. Click Go .
4. Click Print 1096.
5. If your name and address are pre-printed on the 1096 form and you do not want it to be overwritten, select the Preaddressed 1096option.
6. If you will not be required to file Forms 1099, 1098, 5498, or W2-G in the future, either on paper, magnetically, or electronically, select the Final Return option.
7. Enter your contact information.
8. Click Preview to preview the 1096.
9. Click Print to print the 1096.
89
Glossary
A A/P Check Source: You may define a default check source for the Accounts Payable
module. The system defaults to this source when you are ready to post checks to General Ledger. This is a default value only, if you need to select a different check source for a specific check or batch of checks, it may easily be changed from the Post Checks option.
Account: A record of financial transactions for one specific portion of an organization, which shows inflow and outflow of dollar amounts.
Account Code: A code assigned to an account used to locate, identify, and store data in the correct place within the General Ledger. Account numbers can be up to 20 characters and can be alphabetical or numerical.
Account Inquiry: A way of attaining data, through display, of all financial transactions within an account, along with various other information that can provide a complete picture of an accounts current and past activity.
Account Type: A description of the function of an account within the accounting system. In ACS for Windows General Ledger account types are called Major Headings.
Accrual Source: You may define a default accrual source for the Accounts Payable module. The system defaults to this source.
Accumulated Depreciation: Refers to the total, cumulative amount of depreciation expense that has been recorded since the fixed asset was acquired. The purpose is to show how much of the total cost a fixed asset has been depreciated over time.
Acquired Date: The date the fixed asset was obtained by the organization. You can also track whether it was donated by an individual or group, or purchased outright by the organization.
Addition: An adjustment which adds a certain amount or percentage to an employee's wages.
Adjustments: A recording of the completed part of a continuous transaction that occurs over time.
Adjustments (Payroll): A customized amount or percentage that modifies an employee's wages. The three types of adjustments are an Addition to an employee’s wages, a Deduction to an employee’s wages, a Contribution to specific General Ledger accounts (does not affect employee wages).
Area 1: An area that can be used to group accounts together for reports even if the accounts are in different funds.
ACS Version 10.6 - Accounts Payable
90
Area 2: An area that can be used to group accounts together for reports even if the accounts are in different funds.
Asset: 1. An economic resource belonging to an organization. Assets can be cash, cash in the bank, savings, bonds, investments, equipment, land, etc. 2. A particular Major Heading (account type).
B Backup: Preserves copies of files on a different drive, directory or media to protect against
the destruction or loss of the original files in the event of hardware or system failure.
Bank Accounts: Accounts your organization has established at a financial institution.
Batch: A group of Time Sheet records that can be recalled and posted at any point in time. For example, you can set up a recurring batch named "Standard Payroll" that contains all your normal payroll information.
Billing Address: The address to which payments are sent.
Billing Code: A code used to define each type of billing.
Bookkeeping Month: The calendar month for which you are entering financial transactions into the General Ledger. This month does not necessarily have to be the same as the current month.
Budget (monthly): An amount belonging to an account that indicates the anticipated inflow and outflow of funds during a calendar month.
Budget (yearly): An amount belonging to an account that indicates the anticipated annual inflow and outflow of funds.
C Cash Journal Entry: A journal entry that described the effect of a cash transaction on the
accounts of an entry.
Chart of Accounts: A list showing all account descriptions, account codes, and Major Headings (account types) that exist in the General Ledger.
Check Date: The date printed on the check.
Check Entry: A transaction that is based on a check stub.
Check Reconciliation: A comparison of a bank statement with the organization’s general ledger conducted to identify errors and necessary adjustments
Checking Account: The default account that displays when adding an invoice for the vendor.
Closed Transactions: Transactions which have been entered into the ledger and have been posted to the desired period, these cannot be changed.
Closing Account: The account to which other accounts are closed into at the end of a period in order to reduce the account balances to zero
Committees: An area to which accounts of a specific type are assigned so that they can be grouped together by reports, even if the accounts are in separate funds.
Common Law Employees: An individual who performs a service for you, if you have control over how those services are performed.
Condition: A user-defined element used to describe the actual physical condition of the asset (poor, fair, good, excellent, etc.).
Contact: An individual to whom you can address questions or concerns.
Continue Payments: This option is available for memorized invoices. Select this option of you wish to pay this invoice for an indeterminate time period.
Contribution: An adjustment which is an employer contribution to specific General Ledger accounts. This adjustment does not affect employee wages.
Glossary
91
Cost Centers: A Cost Center is used to define which General Ledger accounts to debit and credit for each Time Sheet entry. You can associate Cost Centers with each employee's record in order to track wages and other compensation.
Credit: A transaction amount that appears in the right hand column of an account record.
Credit Memo: A credit adjustment applied to an invoice.
Customer: An individual being provided goods or services.
D Debit: A transaction amount that appears in the left hand column of an account record.
Debit Memo: A debit adjustment applied to an invoice.
Deduction: An adjustment which subtracts a certain amount or percentage from an employee's wages.
Department: An area to which accounts of a specific type are assigned so that they can be grouped together by reports, even if the accounts belong to different sets of funds.
Department (F/A): An area to which assets of a specific type or location are assigned. For example, departments can be Administration, Education, Maintenance, Accounting, or Music.
Deposit: A transfer of funds from the originator into the bank account.
Depreciable Basis: Refers to the dollar amount from which an asset's depreciation is calculated. This can be the original cost of a recently purchased item, or the estimated current value of a donated item.
Depreciation Methods: The three most popular methods of calculating depreciation are, Straight Line Depreciation, Double Declining Balance Depreciation, and Sum of the Year’s Digits Depreciation.
Direct Deposit: A deposit which is made electronically.
Direct Withdrawal: A payment or withdrawal made without a check.
Disbursed: The amount of the invoice that is disbursed to the appropriate expense accounts.
Discount: A discount is a percentage of the invoice that is deducted if the invoice is paid by a certain date. For example, you receive a discount of 2.5% if an invoice is paid within 15 days.
Discount (A/R): An amount deducted from the amount billed if the invoice is paid by the terms specified at the time of billing. This amount is entered when posting payments.
Discount Date: The date by which the invoice must be paid in order to receive a discount.
Discounts Taken: You have the option to track discounts taken, which disburses all discounts to an account which you designate.
E Employee Record: The master file which contains all pertinent information regarding an
employee.
Enter (Transactions): The process of typing data regarding financial transactions into the computer. This is different from posting transactions. When transactions are entered into the computer they remain in a collective file and wait to be disbursed into the proper account during posting.
Expense: A type of account that reflects the cost of operating such as Utilties, Salary or Postage.
Expense Account: The default expense account that displays when adding an invoice for this vendor.
F
ACS Version 10.6 - Accounts Payable
92
Fixed Assets: Anything of value owned by your organization, including but not limited to land, buildings, tools, furniture, machinery, and vehicles.
Force Payment: An option which forces payment of an invoice the next time checks are printed.
Form 1099: A form required by the Internal Revenue Service for vendors who meet certain requirements as specified by the United States Tax Code.
Form 941 Worksheet: The 941 Worksheet aids an employer in calculating the required information in Form 941.
Frequency: A recording of how often an asset will have its depreciation calculated.
Fund Accounting: Fund Accounting is the use of funds as separate sets of books.
Fund Code: A three character code used to separate accounts or different sets of financial books.
Fund Principal Account: The resources of an organization (comparable to owner’s equity in a business). The Fund Principal is equal to the difference between the Assets and Liabilities. All Revenue and Expense accounts are closed to a Fund Principal account at the end of a year. Although the Fund Principal heading is a Major Heading, it is also a Liability. In order for the balance sheet to print correctly, you must have your Fund Principal accounts located under the Fund Principal heading.
G Global Amount: The default amount of the adjustment which affects all occurrences of the
adjustment.
Global Limit: The default maximum limit of the adjustment.
H Headings: An account description that serves as a the main heading for an account type
group. such as Assets and Liabilities.
Historical Cost: This is the original value/price of the fixed asset at the time of its acquisition.
I Inquiry: A method of viewing and printing accounts only, neither transactions nor accounts
may be edited.
Invoice Filter: Invoice filters are used to control which invoices display on the Add/Edit screen. For example, you may wish to view only posted invoices, only invoices entered for a particular vendor, or invoices with a range of discount dates.
J Journal: A form of report.
Journal Entry: A transaction entry that is not from a check or a deposit. Corrections and adjustments are examples of Journal Entries.
L Late Charges: Charges generated when an invoice goes unpaid for more than thirty days.
Late charges can be generated from Add/Edit Invoices. The amount of the late charge is determined by the percentage stated in Setup.
Liability: A type of account that reflects a debt owed, such as goods or services bought on credit or time.
Glossary
93
Life: This is the estimated time, expressed in years, that a fixed asset will hold useful value for your organization. After this period, the asset is usually retired and sold for its salvage value.
List: 1. A form of report. 2. Areas of categorization used to cross-reference accounts.
M Maintenance: Section where records of an asset's maintenance history is recorded.
Important records, such as oil changes, tune ups, and repairs are logged here.
Memorized Transaction: A transaction which is used frequently in your organization can be memorized so that it need not be entered multiple times.
O One time Vendor: A vendor who is paid either one time only, or very infrequently. An
invoice may be entered and posted for a one time vendor without storing the vendor record in the system.
Open Transactions: An open transaction is a transaction which has been entered but not yet posted to the General Ledger.
Other Expense: A type of account that reflects a cost of operating that is not a regular or expected expense, i.e. non-budgeted.
Other Revenue: A type of account that reflects amounts received by an organization that are not part of the regular anticipated source of revenue or income, i.e. non-budgeted.
P Partial Amount: An amount due on an invoice which is a fraction of the total disbursement
of the invoice. For example, you may wish to suspend one or more disbursements of an invoice if the vendor’s obligation has not been met.
Pay Periods: The period of time for which an employee is paid for services rendered.
Pay Through Date: The date the system uses to determine which invoices are paid. Invoices with a due date on or before the Pay Through Date are paid, unless payment has been suspended.
Pay Types: Pay Types define a category of pay and taxes which are applicable to that category. The Pay Types are then associated with an employee's record to define amounts which are subject to various taxes.
Payables: An amount that is owed to a provider of a good or service that is due sometime in the near future.
Payees: Payees are individuals or companies to whom you owe a dollar amount in return for a purchased good or service. When you are entering Check transactions, you must specify the Payee for the check.
Period End Procedures: Steps which you should perform at the end of each month and year in order to ensure the ledger is kept accurate and is in line with Generally Accepted Accounting Principles.
Permanent Restricted: A restricted account, such as a donation in the form of a grant, that one can only use the interest on the principal, but cannot use the principal itself.
Post (Transactions): The computer actions of placing all financial transactions that have been entered into the proper General Ledger accounts to provide an accurate record of the organizations financial business. This closes all open transactions.
Posting Journal: A record of all posting activity for the desired period.
Project: A three character code that allows you follow transactions that belong to a specific project and then report on the financial status of that project. For example, if your organization is renovating a building, you can attach Project Codes to all transactions (or parts of transactions) that deal with building renovations.
ACS Version 10.6 - Accounts Payable
94
Proof List: A list of open transactions, primarily used as a method of checking transactions to ensure accuracy.
Public Report: A Public Report is a report that you create and allow other users in your organization to access.
R Receivables: An amount that is due for goods or services rendered.
Restricted Accounts: Accounts which are amounts designated for a single use only, i.e. renovations, flowers, community projects.
Retire Date: The date on which a fixed asset's useful life has expired.
Revenue: A type of account that reflects amounts received by an organization in the form of contributions and donations, which are the regular economic resources for that organization.
Revenue Center: A code used to define each income account set up in General Ledger.
S Salvage Value: The estimated dollar value an asset still holds after its useful life has
expired.
Separate Payments: An option which, if selected, results in a separate check for each invoice to a single vendor in a check run. If this is not selected, all invoices for this vendor, in the same check run, are paid with one check.
Setup: The process of setting up the General Ledger by providing the system with items such as the date, account formats, transaction options, etc.
Source (Transaction): A Source is the journal origin of a transaction entered into the General Ledger. These codes can be used to separate transactions for viewing and reporting purposes.
Source Type: The Source Type of the transaction is the category of origination the Source is associated. There are 10 default sources, but the user can add additional sources at any time. However, the default Source Types cannot be changed. They are Adjustment, Check, Deposit, Direct Deposit, Direct Withdrawal, Bank Transfer, Bank Interest, Bank Charge.
Statutory Employees: An individual who works for you, but is not covered under the common law definition. Statutory employees are considered employees for Social Security, Medicare, and FUTA taxes under certain conditions.
Street Address: The physical address of the vendor.
Sub Heading: You may define up to four levels of Sub Headings. Sub Headings are used to determine the placement of accounts on reports.
Subtotal: Allows you to subtotal subheadings which groups those accounts into one total for the Detailed Analysis Reports. This allows you to print detail and summary information on one report.
Suspending Payments: An option which, if selected, results in not paying the invoice until the option is deselected.
T Tax Accounts: The General Ledger accounts to which taxes are disbursed for both
employee and employer.
Tax District: A user-defined field, used to separate asset and depreciation information for report purposes.
Tax Tables: A complete set of applicable Federal and State taxes that affect your payroll operations. Additional tax tables may be added to reflect Local Taxes.
Temporary Restricted: A restricted account, such as a gift designated for a certain purpose.

Glossary
95
Time Sheets: An accounting of the hours worked in a specific pay period, for a group of employees.
Toolbar: A row of icons or buttons which serve as shortcuts to certain menu functions.
V Vendor: A vendor is a provider of the good or service which your organization purchases.
Vendor Code: A unique code that is assigned to each vendor.
Vendor Type: A 3 character code defined by the user to group types of vendors together, such as Utilities, Caterers and Florists.
vendors:
W W-2 Form: A form detailing wages and taxes for an employee for a given year.
Worker's Compensation Category: A job type description that takes into account an individual's risk of injury while performing their duties.
Worker's Compensation Code: A code that is either published by the state governing body and given to you by your insurance provider or a unique six character code that you define.


97
Index
98
1 1099 Adjustments
Entering ............................................. 78 1099 Adjustments................................... 78
A A/P Setup
Defining................................................ 4 Defining the General Ledger Interface. 5 Entering 1099 Adjustments................ 78 Setting Up Vendor Types..................... 7 Start Up Outline ................................... 1
A/P Setup ................................................. 1
A/P Setup ................................................. 4
A/P Setup ................................................. 5
A/P Setup ................................................. 7
A/P Utilities Entering 1099 Adjustments................ 78
A/P Utilities ............................................. 78
About Accounts Payable ................................ 1 Fund Accounting.................................. 5 Issuing Checks .................................. 57 Memorized Invoices.. 22, 23, 24, 28, 29, 30, 31, 47, 48, 50 Posting Invoices................................. 41 Scheduled Invoices................ 24, 25, 26 Suspended Invoices .......................... 42 The A/P Posting Month and Year ........ 3
About ........................................................ 3
About ........................................................ 5
About ...................................................... 41
About ...................................................... 42
About ...................................................... 57
Accrual Basis Accounting Completing a Partially Paid, Posted Invoice ............................................... 43 Invoice Posting .................................. 40 Issuing a Printed Check for a New Invoice (Accrual) ................................ 60 Issuing Handwritten Checks for a New Invoice ............................................... 58 Voiding an Invoice ............................. 46
Accrual Basis Accounting....................... 40
Accrual Basis Accounting....................... 43
Accrual Basis Accounting....................... 46
Accrual Basis Accounting....................... 58
Accrual Basis Accounting....................... 60
ACH File ................................................. 64
Add/Edit Invoices Window Adding Invoices ................................. 31 Deleting Invoices ............................... 36 Editing Invoices.................................. 36 Editing Posted Invoices ..................... 41 Viewing Invoices ................................ 39
Add/Edit Invoices Window...................... 31
Add/Edit Invoices Window...................... 36
Add/Edit Invoices Window...................... 36
Add/Edit Invoices Window...................... 39
Add/Edit Invoices Window...................... 41
Add/Edit Memorized Invoices Window Editing Memorized Invoices............... 30 Generating Invoices........................... 48 Viewing Memorized Invoices ............. 31
Add/Edit Memorized Invoices Window... 30
Add/Edit Memorized Invoices Window... 31
Add/Edit Memorized Invoices Window... 48
Adding Invoices.............................................. 31 Memorized Invoices........................... 28 Vendors ............................................... 8
Adding .................................................... 28
Adding .................................................... 31
Addresses .................................. 12, 13, 16
C Cash Basis Accounting
Completing a Partially Paid, Posted Invoice ............................................... 44 Invoice Posting .................................. 41 Issuing a Handwritten Check for a New Invoice ............................................... 59 Issuing a Printed Check for a New Invoice ............................................... 60 Voiding an Invoice ............................. 45
Cash Basis Accounting .......................... 41
Cash Basis Accounting .......................... 44
Cash Basis Accounting .......................... 45
Cash Basis Accounting .......................... 59
Cash Basis Accounting .......................... 60
Cash Requirements ............................... 52
Changing Due Date of a Scheduled Invoice ...... 25
Changing................................................ 25
Check Lock Resetting............................................ 51
Check Lock ............................................ 51
Check Printing Clearing the Check Run .................... 63 Issuing Printed Checks on the Fly ..... 57
Check Printing........................................ 57
Check Printing........................................ 63
Check Register....................................... 56
Checks About Issuing..................................... 57 Clearing the Check Run .................... 63 Editing from Preview Checks Window54 Finding ............................................... 69 Initiating a Check Run ....................... 52 Issuing a Handwritten Check for a New Invoice (Accrual) ................................ 58 Issuing a Handwritten Check for a New Invoice (Cash).................................... 59 Issuing a Handwritten Check for an Unpaid Invoice................................... 58 Issuing a Printed Check for a New Invoice (Accrual) ................................ 60
Index
99
Issuing a Printed Check for a New Invoice (Cash).................................... 60 Issuing a Printed Check for an Unpaid Invoice ............................................... 61 Printing a Sample Check ................... 54 Printing and Posting to the General Ledger................................................ 54 Printing Check Proof List ................... 56 Viewing Check Information from Inquiry Window .............................................. 68 Viewing Check Summary Totals........ 68 Voiding............................................... 62
Checks ................................................... 52
Checks ................................................... 54
Checks ................................................... 54
Checks ................................................... 54
Checks ................................................... 56
Checks ................................................... 58
Checks ................................................... 58
Checks ................................................... 59
Checks ................................................... 60
Checks ................................................... 60
Checks ................................................... 61
Checks ................................................... 62
Checks ................................................... 63
Checks ................................................... 68
Checks ................................................... 68
Checks ................................................... 69
Closing Out the Month............................ 77
Comments .............................................. 18
Completing A Partially Paid, Posted Invoice (Accrual) ............................................ 43 A Partially Paid, Posted Invoice (Cash)........................................................... 44
Completing ............................................. 43
Completing ............................................. 44
Contacts ........................................... 19, 20
Creating Standard Invoice from Memorized..... 47
Creating.................................................. 47
D Deactivating
Vendors ............................................. 10 Deactivating............................................ 10
Deleting Invoices from the Add/Edit Invoices Window .............................................. 36 Invoices from the Invoice Proof List Window .............................................. 39 Memorized Invoices........................... 30 Vendor Type ........................................ 8 Vendors ............................................. 10
Deleting .................................................... 8
Deleting .................................................. 30
Deleting .................................................. 36
Deleting .................................................. 39
Direct Payment....................................... 21
Disbursing Multiple Accounts............................... 34
Disbursing .............................................. 34
Distributions Disbursing to Multiple Accounts ........ 34
Distributions ..................................... 32, 33
Distributions ........................................... 34
Distributions ........................................... 35
E Editing
Checks from Preview Checks Window........................................................... 54 Invoice Editing and Voiding Rules ..... 45 Invoices from Add/Edit Invoices Window........................................................... 36 Invoices from Invoice Proof List Window........................................................... 39 Memorized Invoices from Add/Edit Memorized Invoices Window............. 30 Memorized Invoices from the Invoice Calendar ............................................ 24 Scheduled Invoices............................ 26 Vendor Information ............................ 10 Vendor Type Description ..................... 7
Editing ...................................................... 7
Editing .................................................... 10
Editing .................................................... 24
Editing .................................................... 26
Editing .................................................... 30
Editing .................................................... 36
Editing .................................................... 39
Editing .................................................... 45
Editing .................................................... 54
E-mail Address........................... 15, 16, 17
Expense Account ............................. 17, 18
F Fund Accounting
About ................................................... 5 Fund Accounting ...................................... 5
G General Ledger
Defining the Interface Between A/P and............................................................. 5 Posting Checks to.............................. 54
General Ledger ........................................ 5
General Ledger ...................................... 54
Generating Standard Invoices from Memorized Invoices.............................................. 50
Generating ............................................. 50
H Handwritten Checks
ACS Version 10.6 - Accounts Payable
100
About Issuing ..................................... 57 Issuing for a New Invoice (Accrual) ... 58 Issuing for a New Invoice (Cash)....... 59 Issuing for an Unpaid Invoice ............ 58
Handwritten Checks ............................... 57
Handwritten Checks ............................... 58
Handwritten Checks ............................... 58
Handwritten Checks ............................... 59
I Inquiry Window
Configuring Invoice Display ............... 67 Finding Checks .................................. 69 Finding Invoices................................. 69 Viewing Check Information from........ 68 Viewing Invoice Information from....... 67 Viewing Summary Totals ................... 68
Inquiry Window....................................... 67
Inquiry Window....................................... 68
Inquiry Window....................................... 68
Inquiry Window....................................... 69
Inquiry Window....................................... 69
Invoice and Check Inquiry Configuring Invoice Display ............... 67 Finding Checks .................................. 69 Finding Invoices................................. 69 Viewing Check Information ................ 68 Viewing Invoice Information from Inquiry Window .............................................. 67 Viewing Summary Totals ................... 68
Invoice and Check Inquiry ...................... 67
Invoice and Check Inquiry ...................... 67
Invoice and Check Inquiry ...................... 68
Invoice and Check Inquiry ...................... 68
Invoice and Check Inquiry ...................... 69
Invoice and Check Inquiry ...................... 69
Invoice Calendar Editing Memorized Invoices from....... 24 Generating Invoices........................... 49
Invoice Calendar .................................... 24
Invoice Calendar .................................... 49
Invoice Display Configuring ........................................ 67
Invoice Display ....................................... 67
Invoice Proof List Window Deleting Invoices ............................... 39 Editing Invoices.................................. 39 Previewing a Proof List ...................... 38 Printing an Invoice Proof List ............. 37 Viewing an Invoice from..................... 40
Invoice Proof List Window...................... 37
Invoice Proof List Window...................... 38
Invoice Proof List Window...................... 39
Invoice Proof List Window...................... 39
Invoice Proof List Window...................... 40
Invoices Adding................................................ 31
Adding Memorized............................. 28 Changing the Invoice Due Date of Scheduled.......................................... 25 Creating Standard from Memorized .. 47 Deleting a Memorized........................ 30 Deleting from the Add/Edit Invoices Window.............................................. 36 Deleting from the Invoice Proof List Window.............................................. 39 Editing a Scheduled........................... 26 Editing and Voiding Rules ................. 45 Editing from Add/Edit Invoices Window........................................................... 36 Editing from Invoice Proof List Window........................................................... 39 Editing Memorized from Add/Edit Memorized Invoices Window............. 30 Editing Memorized from Invoice Calendar ............................................ 24 Editing Posted.................................... 41 Finding ............................................... 69 Generating ......................................... 50 Memorizing Previously Entered......... 22 Posting (Accrual) ............................... 40 Posting (Cash) ................................... 41 Reinstating Suspended ..................... 43 Scheduling Memorized ...................... 24 Suspending........................................ 42 Unscheduling Scheduled................... 26 Viewing a Memorized ........................ 31 Viewing from Add/Edit Invoices Window........................................................... 39 Viewing from Invoice Proof List Window........................................................... 40 Viewing Invoice Information from Inquiry Window.............................................. 67 Viewing Invoice Summary Totals ...... 68
Invoices .................................................. 22
Invoices .................................................. 24
Invoices .................................................. 24
Invoices .................................................. 25
Invoices .................................................. 26
Invoices .................................................. 26
Invoices .................................................. 28
Invoices .................................................. 30
Invoices .................................................. 30
Invoices .................................................. 31
Invoices .................................................. 31
Invoices .................................................. 36
Invoices .................................................. 36
Invoices .................................................. 36
Invoices .................................................. 39
Invoices .................................................. 39
Invoices .................................................. 39
Invoices .................................................. 40
Invoices .................................................. 40
Invoices .................................................. 41
Invoices .................................................. 41
Invoices .................................................. 42
Invoices .................................................. 43
Index
101
Invoices .................................................. 45
Invoices .................................................. 47
Invoices .................................................. 48
Invoices .................................................. 50
Invoices .................................................. 67
Invoices .................................................. 68
Invoices .................................................. 69
Issuing Checks About ................................................. 57 Issuing a Handwritten Check for a New Invoice (Cash).................................... 59 Issuing a Handwritten Check for an Unpaid Invoice ................................... 58 Issuing a Printed Check for a New Invoice (Cash).................................... 60 Issuing a Printed Check for an Unpaid Invoices.............................................. 61 Issuing Handwritten Checks for a New Invoice (Accrual) ................................ 58
Issuing Checks ....................................... 57
Issuing Checks ....................................... 58
Issuing Checks ....................................... 58
Issuing Checks ....................................... 59
Issuing Checks ....................................... 60
Issuing Checks ....................................... 61
L Labels
Printing......................................... 70, 76 Labels..................................................... 73
Locating Checks..................................... 69
Locating Invoices.................................... 69
M Memorized Invoices
Adding................................................ 28 Creating a Standard Invoice from...... 50 Creating Standard from Memorized... 47 Deleting.............................................. 30 Editing from Add/Edit Memorized Invoices Window................................ 30 Editing from Invoice Calendar............ 24 Generating Multiple Invoices from ..... 48 Memorizing Previously Entered Invoices........................................................... 22 Scheduling ......................................... 24 Viewing .............................................. 31
Memorized Invoices ............................... 22
Memorized Invoices ............................... 24
Memorized Invoices ............................... 24
Memorized Invoices ............................... 28
Memorized Invoices ............................... 30
Memorized Invoices ............................... 30
Memorized Invoices ............................... 31
Memorized Invoices ............................... 47
Memorized Invoices ............................... 48
Memorized Invoices ............................... 50
Month Close Out Procedure................... 77
Multiple Accounts Disbursing an Invoice Amount to ....... 34
Multiple Accounts ................................... 34
Multiple Invoices..................................... 48
O Outline
Procedures .......................................... 2 Start Up................................................ 1
Outline...................................................... 1
Outline...................................................... 2
P Partial Payment...................................... 31
Partially Paid Invoices Completing (Accrual) ......................... 43 Completing (Cash)............................. 44
Partially Paid Invoices ............................ 43
Partially Paid Invoices ............................ 44
Payment Type .................................. 21, 22
Phone Number ..................... 14, 15, 16, 17
Posted Invoices Completing a Partially Paid (Accrual) 43 Completing a Partially Paid (Cash).... 44 Editing................................................ 41 Setting Partial Payment Amounts on. 37 Voiding......................................... 45, 47
Posted Invoices...................................... 37
Posted Invoices...................................... 41
Posted Invoices...................................... 43
Posted Invoices...................................... 44
Posted Invoices...................................... 45
Posted Invoices...................................... 47
Posting Checks to the General Ledger........... 54 Invoices (Accrual) .............................. 40 Invoices (Cash).................................. 41
Posting ................................................... 40
Posting ................................................... 41
Posting ................................................... 54
Posting Invoices About ................................................. 41
Posting Invoices ..................................... 41
Prenotification File.................................. 65
Preview Checks Window Editing Checks................................... 54
Preview Checks Window........................ 54
Printing Checks Clearing the Check Run .................... 63 Issuing a Printed Check for a New Invoice (Accrual) ................................ 60 Issuing a Printed Check for a New Invoice (Cash).................................... 60 Issuing a Printed Check for an Unpaid Invoice ............................................... 61 Issuing on the Fly............................... 57
ACS Version 10.6 - Accounts Payable
102
Print Restart Option ........................... 64 Printing a Sample Check ................... 54 Printing Checks and Posting to the General Ledger.................................. 54 Reprint Option.................................... 64
Printing Checks ...................................... 54
Printing Checks ...................................... 54
Printing Checks ...................................... 57
Printing Checks ...................................... 60
Printing Checks ...................................... 60
Printing Checks ...................................... 61
Printing Checks ...................................... 63
Printing Checks ...................................... 64 Printing Problems
Clearing the Check Run..................... 63 Print Restart Option ........................... 64 Reprint Option.................................... 64
Printing Problems ................................... 63
Printing Problems ................................... 64
Procedures Outline................................... 2
Processing Invoices Clearing the Check Run..................... 63 Initiating a Check Run........................ 52 Printing Cash Requirements Report .. 52
Processing Invoices ............................... 52
Processing Invoices ............................... 52
Processing Invoices ............................... 63
Profile Information ............................ 11, 12
Proof List Previewing an Invoice Proof List........ 38 Printing a Check Proof List ................ 56 Printing an Invoice Proof List ............. 37
Proof List ................................................ 37
Proof List ................................................ 38
Proof List ................................................ 56
Purchase Order ...................................... 33
R Reports
Printing Cash Requirements.............. 52 Printing Labels ............................. 70, 76 Printing the Check Register Report ... 56
Reports................................................... 52
Reports................................................... 56
Reports................................................... 70
Reports................................................... 71
Reports................................................... 72
Reports................................................... 72
Resetting Check Lock ........................................ 51
Resetting ................................................ 51
Reviewing Checks Printing the Check Register Report ... 56
Reviewing Checks.................................. 56
Reviewing Invoices
Printing an Invoice Proof List ............. 37 Reviewing Invoices ................................ 37
S Scheduled Invoices
Adding................................................ 24 Adjusting the Number of Payments ... 25 Changing the Invoice Due Date......... 25 Editing................................................ 26 Unscheduling..................................... 26
Scheduled Invoices ................................ 24
Scheduled Invoices ................................ 25
Scheduled Invoices ................................ 25
Scheduled Invoices ................................ 26
Scheduled Invoices ................................ 26
Searching Finding Checks.................................. 69 Finding Invoices................................. 69
Searching ............................................... 69
Searching ............................................... 69
Special Procedures Resetting the Check Lock.................. 51
Special Procedures ................................ 51
Staring a Check Run .............................. 52
Start Up Outline........................................ 1
Suspended Invoices About ................................................. 42 Reinstating......................................... 43 Suspending Invoices.......................... 42
Suspended Invoices............................... 42
Suspended Invoices............................... 42
Suspended Invoices............................... 43
T The A/P Posting Month and Year
About ................................................... 3 The A/P Posting Month and Year............. 3
U Utilities
Resetting the Check Lock.................. 51 Utilities.................................................... 51
V Vendor Type
Deleting................................................ 8 Setting Up............................................ 7
Vendor Type............................................. 7
Vendor Type............................................. 8
Vendors Adding
Adding Vendors While Entering An Invoice............................................. 9
Adding.................................................. 8 Deleting a Vendor Type....................... 8 Deleting or Deactivating..................... 10 Editing Vendor Information ................ 10 Editing Vendor Type Description ......... 7
Index
103
Editing Vendors While Adding an Invoice ............................................... 10 Setting Up Vendor Types..................... 7
Vendors .................................................... 7
Vendors .................................................... 7
Vendors .................................................... 8
Vendors .................................................... 9
Vendors .................................................. 10
Viewing Invoice and Check Summary Totals .. 68 Invoices from Add/Edit Invoices Window........................................................... 39 Invoices from Invoice Proof List Window........................................................... 40 Memorized Invoices........................... 31
Viewing................................................... 31
Viewing................................................... 39
Viewing................................................... 40
Viewing................................................... 67
Viewing................................................... 68
Voiding Checks............................................... 62 Posted Invoices ........................... 45, 47
Voiding ................................................... 45
Voiding ................................................... 47
Voiding ................................................... 62
Voiding Checks Finding a Check in Void Checks Window.............................................. 61
Voiding Checks ...................................... 61
Voiding Invoices Accrual Environment.......................... 46 Cash Environment ............................. 45 Invoice Editing and Voiding Rules ..... 45
Voiding Invoices ..................................... 45
Voiding Invoices ..................................... 45
Voiding Invoices ..................................... 46
Z ZIP Code ................................................ 14