Embed Size (px)
Citation preview
U.S. ARMY MEDICAL DEPARTMENT CENTER AND SCHOOL
FORT SAM HOUSTON, TEXAS 78234-6100
ADMINISTER INTRAMUSCULAR, SUBCUTANEOUS, AND
INTRADERMAL INJECTIONS
SUBCOURSE MD0552 EDITION 100
DEVELOPMENT
This subcourse is approved for resident and correspondence course instruction. It reflects the current thought of the Academy of Health Sciences and conforms to printed Department of the Army doctrine as closely as currently possible. Development and progress render such doctrine continuously subject to change.
ADMINISTRATION
For comments or questions regarding enrollment, student records, or shipments, contact the Nonresident Instruction Section at DSN 471-5877, commercial (210) 221-5877, toll-free 1-800-344-2380; fax: 210-221-4012 or DSN 471-4012, e-mail [email protected], or write to: COMMANDER AMEDDC&S ATTN MCCS HSN 2105 11TH STREET SUITE 4192 FORT SAM HOUSTON TX 78234-5064 Approved students whose enrollments remain in good standing may apply to the Nonresident Instruction Section for subsequent courses by telephone, letter, or e-mail. Be sure your social security number is on all correspondence sent to the Academy of Health Sciences.
CLARIFICATION OF TRAINING LITERATURE TERMINOLOGY When used in this publication, words such as "he," "him," "his," and "men" are intended to include both the masculine and feminine genders, unless specifically stated otherwise or when obvious in context. .
TABLE OF CONTENTS Lesson Paragraph 1 PREPARATION AND ADMINISTRATION OF MEDICATIONS Section I. Basic Principles of Administration 1-1--1-6 of Medications Section II. Administration of Medications 1-7--1-11 Section III. Procedures for Assembling Syringe and Drawing Medication 1-12--1-14 Exercises 2 PROCEDURES FOR ADMINISTERING THE THREE TYPES OF INJECTIONS Section I. Administer an Intramuscular Injection 2-1--2-3 Section II. Administer a Subcutaneous. Injection 2-4--2-5 Section III. Administer an Intradermal. Injection 2-6--2-7 Exercises 3 IMMUNIZATIONS 3-1--3-4 TABLE OF CONTENTS FOR OPTIONAL VIDEOTAPE SECTION Approximate Start Times Minutes:Seconds 1. Introduction-Basic Principles 0:00 2 Assemble a Needle and Syringe 2:15 3 Prepare and Draw Medications Into a Syringe 8:30 4 Administer Injections 17:15 5 Immunizations 33:15
MD0552 i
CORRESPONDENCE COURSE OF THE UNITED STATES ARMY MEDICAL DEPARTMENT CENTER AND SCHOOL
SUBCOURSE MD0552
ADMINISTER INTRAMUSCULAR, SUBCUTANEOUS,
AND INTRADERMAL INJECTIONS
INTRODUCTION This subcourse presents the basic concepts and knowledge required for administering medication through injections. Topics include choosing and assembling the correct needles and syringes, the three methods of injections, recording, and follow-up patient care. This subcourse will provide you with a basic understanding of the skills and knowledge required in order to administer injections. You can use this subcourse to refresh your skills or to learn background information. Successful completion of this subcourse will NOT qualify you to administer injections. You MUST be trained under the supervision of a person who is qualified to instruct you in these processes, supervise your hands-on practice, and evaluate your skills and abilities. An optional videotape (VT) is available for your use. The videotape "Administering Intramuscular, Subcutaneous and Intradermal Injection," PIN 710492 (TVT 8-280) with a running time of 36:45 is not furnished. If you wish to view this tape, contact your unit training officer/NCO to request it from your supporting Training Support Center/Visual Information Center. Your unit may also request the tape from the following online internet source: http://dodimagery.afis.osd.mil You do not have to view the videotape in order to pass the examination. The videotape may enhance your understanding of the procedures, but it is not necessary for successful completion of the subcourse.
Subcourse Components: This subcourse consists of three lessons. Lesson 1, Preparation and Administration of Medications. Lesson 2, Procedures for Administering the Three Types of Injections. Lesson 3, Immunizations.
Study Suggestions: Here are some suggestions that may be helpful to you in completing this subcourse:
MD0552 ii
MD0552 iii
--Read and study each lesson carefully. --Complete the subcourse lesson by lesson. After completing each lesson, work the exercises at the end of the lesson, marking your answers in this booklet. --After completing each set of lesson exercises, compare your answers with those on the solution sheet that follows the exercises. If you have answered an exercise incorrectly, check the reference cited after the answer on the solution sheet to determine why your response was not the correct one. Credit Awarded: To receive credit hours, you must be officially enrolled and complete an examination furnished by the Nonresident Instruction Section at Fort Sam Houston, Texas. Upon successful completion of the examination for this subcourse, you will be awarded 5 credit hours. You can enroll by going to the web site http://atrrs.army.mil and enrolling under "Self Development" (School Code 555). A listing of correspondence courses and subcourses available through the Nonresident Instruction Section is found in Chapter 4 of DA Pamphlet 350-59, Army Correspondence Course Program Catalog. The DA PAM is available at the following website: http://www.usapa.army.mil/pdffiles/p350-59.pdf.
LESSON ASSIGNMENT LESSON 1 Preparation and Administration of Medications. TEXT ASSIGNMENT Paragraphs 1-1 through 1-14. If possible, watch the corresponding portion of the videotape (0:00--17:15). LESSON OBJECTIVES After completing this lesson, you should be able to: 1-1. Identify the two medication systems presently in use in Army medical facilities. 1-2. Identify the principles associated with preparing and obtaining medication. 1-3. Determine procedures for identifying the patient. 1-4. Determine the procedures associated with administering medication. 1-5. Determine the principles associated with monitoring the patient after you have administered medication. 1-6. Determine the principles associated with charting medication. 1-7. Determine when sterile injections of medication are used. 1-8. Determine the various types of injections. 1-9. Determine the procedures for control of the needles and syringes. 1-10. Determine procedures to follow for patient safety. 1-11. Determine the instruments used to administer
parenteral injections. 1-12. Determine procedures for assembling the needle and syringe. 1-13. Determine the procedures for preparing and drawing medication into a syringe. SUGGESTION After completing the assignment, complete the exercises of this lesson. These exercises will help you achieve the lesson objectives.
MD0552 1-1
LESSON 1
PREPARATION AND ADMINISTRATION OF MEDICATIONS
Section I. BASIC PRINCIPLES OF ADMINISTRATION OF MEDICATIONS
1-1. PREPARATION AND ADMINISTRATION OF MEDICATIONS a. The preparation and administration of medications is a serious responsibility. Experience has shown that it is best to follow established policies and regulations pertaining to their administration. Such regulations vary depending on location, but the principles of safety do not vary. Safety regulations are effective only when they are understood and readily interpreted by those who use them. When in doubt and/or before departing from established policy, always consult with a more experienced person. b. There are two medication systems presently in use in Army medical facilities. One is the bulk drug system in which stock supplies are kept and from which individual dosages are prepared. The other is the unit dose system in which the unit dosage is prepared (and sometimes packaged) by the pharmacy. A unit dose package contains the ordered amount of a drug for a single administration in the proper form by the usual route. It is found in medicine carts. Medicine carts generally have drawers for each room on the ward, with compartments within the drawers corresponding to the bed assignment of each patient. The compartment should have a medication slip which indicates the patient's name, dosage, room and bed number, and required medication. The information may also be found on a medication Kardex as well as the patient's chart. c. As the medical specialist, you must perform a patient care handwash prior to preparing and administering medications. 1-2. PRINCIPLES ASSOCIATED WITH PREPARING OR OBTAINING MEDICATIONS Although you will not usually be required to administer medications, you must master the basic rules of administration so that you will be prepared should the occasion arise. a. Concentrate fully on the task at hand. b. Make sure that the information on the medication card/slip is identical to the physician's written order and the label on the patient's medicine. If not, report it to your supervisor immediately.
MD0552 1-2
c. Never give a medication from an unlabeled container or one on which the label is illegible. The container should be returned to the pharmacy for relabeling in accordance with (IAW) local standing operating procedure (SOP). d. Whether preparing a dose of medication from a stock supply or obtaining medication from a unit dose package, read the label three times to ensure that the medication and dosage are correct. Read the label: (1) As the medication is taken from the shelf or medicine cart. (2) Before the medication is poured or taken from the package or compartment. (3) As the stock container or empty unit dose package is returned to the shelf or medicine cart. e. Check your drug dose calculations with your supervisor, nurse, or physician if you are not completely sure of your calculations. f. Use appropriate measurement equipment to measure quantities as ordered. For example, use a graduated container to measure liquids. g. Do not alter the dosage ordered for other medication. Check the order with the nurse, physician, or supervisor. h. Use special care to return medications to their correct location. In some instances, each patient's medication is kept in a designated place on a shelf or compartment in a central storage area. Never return an unused dose of medicine to a stock bottle. It should be disposed of IAW local SOP. i. Arrange stock supplies so that preparations for internal use are separated from those used externally. j. Store medications according to manufacturer's specifications. For example, vitamin B12 requires refrigeration. k. Store narcotic and abusable drugs (those dispensed under special legal regulations) and hypodermic supplies in a secure location in accordance with the local SOP. l. Do not handle tablets or capsules. Shake the required number of tablets/capsules into the container cap and then place the medication into the container that you will take to the patient's bedside.
MD0552 1-3
m. Check the container label for the expiration date. Dispose of "expired" medications IAW local SOP. 1-3. PRINCIPLES ASSOCIATED WITH IDENTIFYING THE PATIENT a. Positively identify the patient immediately prior to administering any medication. b. Check his identaband or ask him to state his name. Patients have been known to answer to names other than their own. 1-4. PRINCIPLES ASSOCIATED WITH ADMINISTERING MEDICATIONS a. Administer only the medication that you prepared or removed from the medicine cart. b. Be familiar with the potential effects (good and bad) of any medication you administer. If in doubt, check with a nurse, physician, or pharmacist. c. Administer medication only by the route specified on the doctor's orders. If the route is not specified or if you are in doubt about the correct route of administration of the medication, check with a nurse, physician, or pharmacist. d. Administer the medication at the time specified on the doctor's orders. e. Assist weak or helpless patients in taking medications as necessary. f. Remain with the patient until he takes the medication. If the patient refuses his medication, inform your supervisor and document the incident IAW local SOP. 1-5. PRINCIPLES ASSOCIATED WITH MONITORING THE PATIENT All patients must be observed after the medication is administered. The type and duration of the observation will vary with the patient and the type of medication. The patient should be observed for any specific reaction or complication that is expected from a certain medication. For example, diarrhea could be a reaction to the administration of ampicillin. If you are in doubt, ask the nurse, physician, or supervisor. If the patient has an adverse reaction to a medication, immediately inform the nurse or physician on duty. You will also observe for effectiveness of the medication, especially those given for pain relief.
MD0552 1-4
1-6. PRINCIPLES ASSOCIATED WITH CHARTING MEDICATIONS a. Never chart a medication as having been given until it has been administered. Check the chart before giving the medication to avoid duplication. b. Record all administrations of medications IAW local SOP. (1) As a minimum, record the name of the drug, dosage, time and route of administration, patient's reaction or lack of reaction to the medication (if appropriate), and the name of the person who administered the medication. (2) Correct charting helps to prevent administering a medication twice.
Section II. ADMINISTRATION OF MEDICATIONS 1-7. STERILE INJECTION OF MEDICATIONS A needle and syringe are used to introduce a suitable liquid preparation of a drug(s) directly into the body tissues or veins. A sterile injection of medication is used: a. When rapid action by the drug is desired. b. When the drug might be destroyed by digestive juices or vomited if given by mouth. c. When the patient is unconscious or injured so that he cannot be given the medication by mouth. d. When local skin areas need to be anesthetized for an operative procedure. e. When the medication has to be concentrated in a specific area of the body. 1-8. INJECTION METHODS Commonly included among the injection methods of drug administration are subcutaneous (beneath the skin), intramuscular (within the substance of the muscle), and intradermal (within the dermis). These injection methods are also referred to as parenteral (other than through the intestine). Because of the accuracy of these methods of administration, these injections provide the patient with a more precise amount of drug and a more rapid onset of drug action. These procedures will be discussed in more detail later in this subcourse.
MD0552 1-5
a. Subcutaneous (Hypodermic) Injection. The drug is injected by syringe and needle into the tissues just beneath the skin. A preparation for subcutaneous use must be a sterile liquid capable of complete absorption or it will irritate the tissues. Although the subcutaneous injection may be given in almost any area of the body, the usual sites are the lateral (outer) aspect of the upper arms and the anterior (front) surface of the thighs. b. Intramuscular Injection. The drug is injected into a muscle, usually in the buttocks, sometimes in the upper arm or the thigh. The needle is inserted at a 90 degree angle to the skin, through the skin and subcutaneous tissue into the underlying muscle. c. Intradermal Injection. The drug is injected into the upper layers of the skin, rather than under the skin as in a subcutaneous injection. Minute amounts (0.1 ml) and less are given intradermally, usually to test for drug sensitivity before administering larger amounts by other methods. The medial (inner) surface of the forearm is the site most frequently used. 1-9. CONTROL OF NEEDLES AND SYRINGES Needles and syringes are controlled IAW local SOP. 1-10. PATIENT SAFETY Patient safety is a critical factor. You must learn how to administer medications correctly. Wrong injections of some medications may seriously harm or kill a patient. Aseptic technique must be strictly maintained during the preparation and administration of a drug. Failure to do so could result in the introduction of foreign particles or other types of contamination directly into the body. Infection may be introduced through the needle puncture in the skin, and irreparable damage to a major nerve or other structure may occur due to improper technique or a dull needle. 1-11. INSTRUMENTS USED TO ADMINISTER A PARENTERAL INJECTION Administering medicine by injection requires needles and syringes that are sterile, accurate in measuring dosages, and convenient to use. Using the correct equipment for injection will minimize discomfort or danger to the patient. Figure 1-1 illustrates a disposable rigid plastic container and a disposable needle and syringe. a. The needle is a tube with a cutting edge that punctures beneath the protective area of the skin. It is made of steel or other metal and is generally disposable. The parts of a needle consist of a lumen (cavity through which medication flows), bevel (slanted tip/cutting edge), hub, and cannula (shaft) (see figure 1-2). The needle comes in standard lengths from one-half inch to six inches (see figure 1-3). The length is determined by measuring from the tip of the point to the junction of the shaft. The choice of length depends on the route ordered for administration. The choice of needle gauge depends upon the thickness (viscosity) of the medication. The gauge is
MD0552 1-6
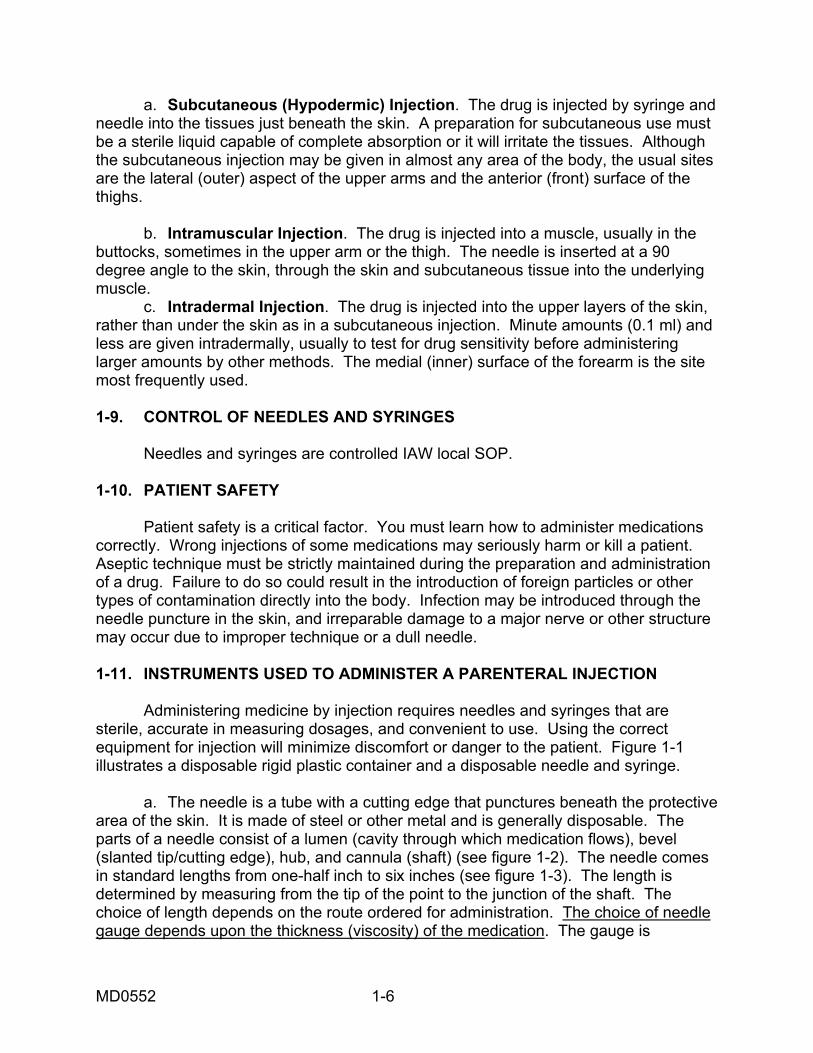
indicated by numbers 14 to 27. The higher the gauge (size) number, the smaller the diameter of the needle. A small gauge is needed for viscous medications; a large gauge is needed for "thin" or watery medications. b. The syringe is the instrument used for injecting liquids. It consists of a barrel, plunger, and needle adapter that attaches to the needle (see figure 1-4). The plunger pushes the medication through the barrel into the needle. The barrel is marked in cubic centimeters/ milliliters (cc/ml). Syringes come in different sizes
Figure 1-1. Disposable needle, syringe, and container.
Figure 1-2. Parts of a needle.
MD0552 1-7
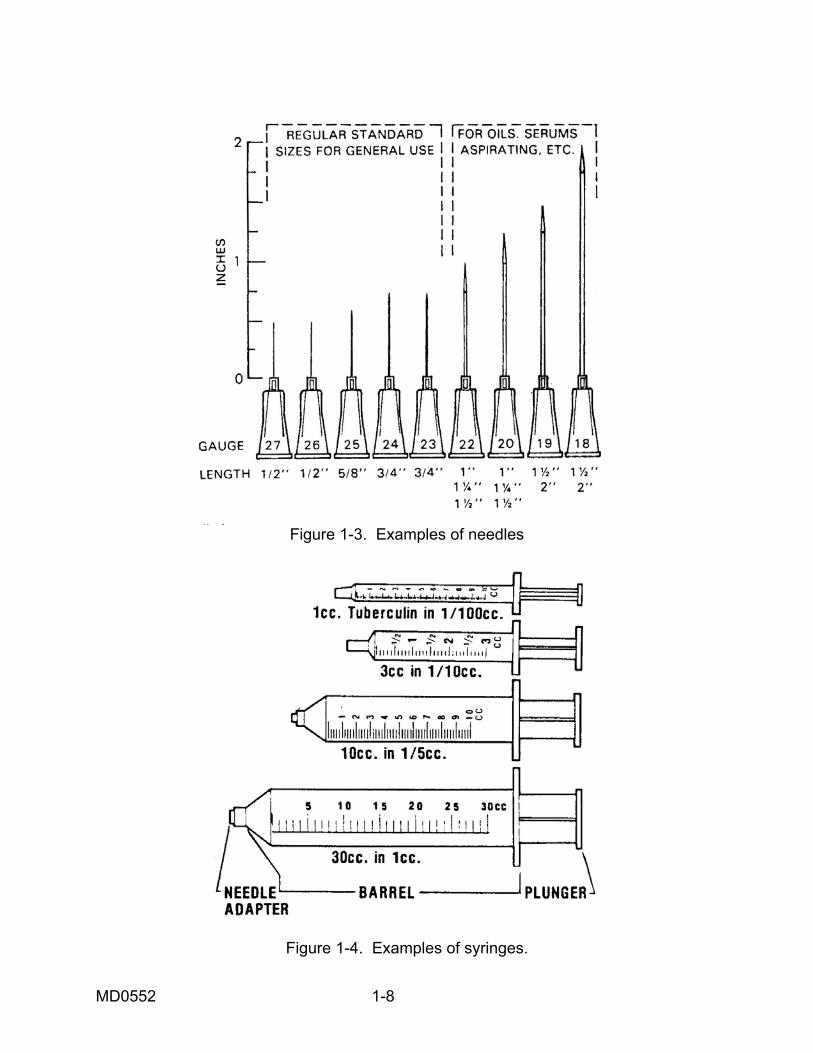
Figure 1-3. Examples of needles
Figure 1-4. Examples of syringes.
MD0552 1-8
Section III. PROCEDURES FOR ASSEMBLING SYRINGE AND DRAWING MEDICATION
1-12. BACKGROUND INFORMATION a. The administration of medicine by injection requires equipment (needles and syringes) that is sterile, accurate in measuring dosage, convenient to use, and that will produce as little discomfort and/or hazard for the patient as possible. A needle and syringe are used to introduce suitable liquid preparations of drugs directly into the body tissue or blood vessels. Because of the accuracy of these methods of administration, these injections provide the patient with a more precise amount of drug and a more rapid onset of drug action than with oral medications. b. Patient safety is a critical factor for the basic medical specialist. Aseptic techniques must be strictly maintained during the preparation and administration of a drug. Foreign particles or other types of contamination on a needle could be injected directly into the body. Infection may be introduced through the needle hole in the skin. Irreparable damage to major nerves or other structures may occur due to improper technique or a dull needle. Needles and syringes are controlled items. The medical specialist is responsible for the security and control and ultimate disposal of this equipment. 1-13. STEPS IN THE PROCEDURE FOR ASSEMBLING THE NEEDLE AND SYRINGE a. Determine Type of Medication, Time of Administration, and Route of Injection. This step is to determine the type of needle needed. b. Perform Patient Care Handwash. Wash hands according to instructions provided in your previous training whether you are in the clinic or field environment. c. Gather Required Equipment. (1) Choice of needle. The length of the needle you choose will depend upon the type of injection. The gauge size you choose will depend upon the type of medication (see figure 1-3). (a) Subcutaneous (SQ) injection. Subcutaneous injection requires a short needle. The length should be one-half to seven-eighths inch. Gauge size should be 23 to 25. (b) Intradermal (ID) injection. The length of the needle should be one-fourth to one-half inch with the gauge size 26. (c) Intramuscular (IM) injection. The length of the needle should be one to one and one-half inches with the gauge size 20 to 22.
MD0552 1-9

(2) Choice of syringe. The choice of syringe depends on the amount of solution and the type of solution administered (see figure 1-4). (a) When you select a syringe, check for the total capacity of the syringe. The syringe is usually calibrated in cubic centimeters (cc). Be sure the syringe is large enough to contain enough medication to give the shot. The size of the syringe should only be large enough to accommodate the dosage being given. (b) Check the calibration of the syringe so you can place the exact amount of medication in the syringe (see figure 1-5).
Figure 1-5. Injection Chart d. Inspect Packaging for Defects. Check to determine if the package has been opened or if it has any holes. If you note any water or discoloration that may indicate water has damaged the syringe, or if you suspect that the package has been tampered with in any way, discard the package and obtain sterile equipment. e. Unpack the Syringe. Remove the syringe from its packaging without contaminating any sterile parts. The sterile parts of the syringe are the needle adapter and the shaft of the plunger, which goes into the barrel. Any contamination could cause infection to the patient. (1) Syringe in flexible wrapper. (a) Peel the sides of the wrapper apart to expose the rear end of the syringe.
MD0552 1-10
(b) Grasp the syringe by the barrel with the free hand. (c) Pull the syringe from the packaging. (d) Dispose of empty packaging in appropriate receptacle. (2) Syringe in hard plastic tube (cartridge package). (a) Press straight down on top of the tube with your thumb or use twisting motion. (b) Press until you hear a distinct click. The click indicates the seal has not previously been broken. If you don't hear the click, discard the syringe and get another tube. (c) Lift the top (cap) off the tube (cartridge) and put it down on your working surface. (d) Grasp the syringe by the barrel with a free hand. (e) Pull the syringe from the tube (cartridge) on your working surface. Be careful not to contaminate the needle adapter of the syringe. (f) Put the empty tube (cartridge) on your working surface. (g) Using the free hand, hold the syringe between the first two fingers with the needle adapter forward, pointing away from the back of the hand. f. Inspect Plunger of Syringe. (1) Grasp syringe with the nondominant hand and pull plunger back and forth checking for smooth and easy movement. (2) Visually check the rubber stopper (inside the syringe) to ensure that it is attached securely to the top end of the plunger, forming a seal. The rubber stopper may become stuck or detached from the top end of the plunger, breaking the seal. (3) Discard the syringe and select another if the plunger is stuck or does not move smoothly. Repeat steps c through e above. g. Unpack Needle. Remove the needle from its packaging without contaminating it. Any contamination of the needle may cause infection to develop in the patient. (1) Peel the sides of wrapper apart and expose the rear end of the needle.
MD0552 1-11
(2) Grasp the cover of the needle and remove from wrapper, taking care not to touch the hub. (3) Discard the empty wrapper in the appropriate place. h. Assemble Needle and Syringe. (1) Remove the protective cover from the needle adapter on the syringe. Holding the syringe in the nondominant hand and the needle by the protective cover in the dominant hand, insert the needle adapter into the needle hub. (2) Tighten the needle with a one-fourth turn to ensure that it is attached securely to the needle hub. (3) Do not touch the needle adapter or the hub to avoid contamination of the sterile surface. i. Remove Protective Cover from Needle. (1) Hold the needle and syringe in an upright position. (2) Grasp the protective cover with the nondominant hand. (3) Pull the protective cover from the needle straight off with an upward motion. Do not use a twisting motion as this may cause the needle to come off the needle hub. j. Inspect Needle. (1) Visually inspect the needle for the following flaws: (a) Burrs. Rough edges on the needle that could tear the patient's skin during the injection. (b) Barbs. Hook-like edges that extend away from the needle edge and could cause injury to the patient. (c) Needle damage. Bent or broken needle. (d) Contamination. Rust or foreign particles on needles. (2) If the needle has any of these defects, discard and obtain a sterile needle. k. Replace Cover. Place the protective cover back onto the needle.
MD0552 1-12
l. Place Assembled Needle and Syringe on Work Surface. (1) Leave the protective cover on the needle. (2) Leave the plunger pushed fully into the barrel. (3) Put the assembled needle and syringe in a convenient place on the working surface. (4) Keep the assembled needle and syringe continually within range of vision. NOTE: When you assemble a needle and syringe, you are responsible for maintaining sterility of the equipment. 1-14. STEPS IN THE PROCEDURE FOR PREPARING AND DRAWING MEDICATIONS INTO A SYRINGE In this section, we will continue describing the procedures for giving an injection. These procedures will differ according to the type of medicine and from the type of vial. a. Verify Medication. The medical specialist should check the doctor's order or the therapeutic documentation care plan for the type, route, and dose of medication to administer. b. Perform Patient Care Handwash. Wash hands according to instructions provided in your previous training-whether you are in the clinic or field environment. c. Gather Equipment. The following should be placed on the medication tray. (1) Correct type of medication. (2) Sterile syringes. (3) Appropriate sizes of needles, including extras. (4) Skin antiseptic IAW local policy such as alcohol or Betadine swabs, sponges, or foil-wrapped germicide wipes. (5) Container for destruction and disposal of needle. d. Assemble Needle and Syringe. See paragraph 1-13.
MD0552 1-13
e. Check Drug Container Label. The medical specialist verifies medication against the therapeutic documentation care plan. (1) Verification should be made at least three times to ensure accuracy. This verification should happen at the following times: (a) When the medical specialist obtains the container from the place of storage, usually a medicine cabinet. (b) Before the medical specialist withdraws medication from the container. (c) When the container is returned to the place of storage. (2) Follow directions on container regarding expiration date and follow local policy regarding use of multidose vials. (3) Check to determine if medication was stored properly (refrigerated). f. Examine Rubber Stopper. The rubber stopper should not be damaged. There should not be any small cores or plugs torn from the stopper due to improper injection of needles (see figure 1-6). Follow the examination procedures below: (1) If vial is new, remove metal protective cap. (2) Examine the rubber stopper for defects such as small cores or plugs torn in the stopper. (3) If a defective stopper is identified, hold the vial to the light to examine for any foreign particles and to detect any changes in the color and consistency of the medication. (4) Check the date that the multidose vial was opened and the expiration date on the medication. (5) Follow the directions on the container regarding expiration date and follow local policy regarding use of multidose vials. (6) Check to determine if the medication was stored properly; e.g., refrigeration. (7) The dosage should be verified against the doctor's orders or therapeutic documentation care plan.
MD0552 1-14
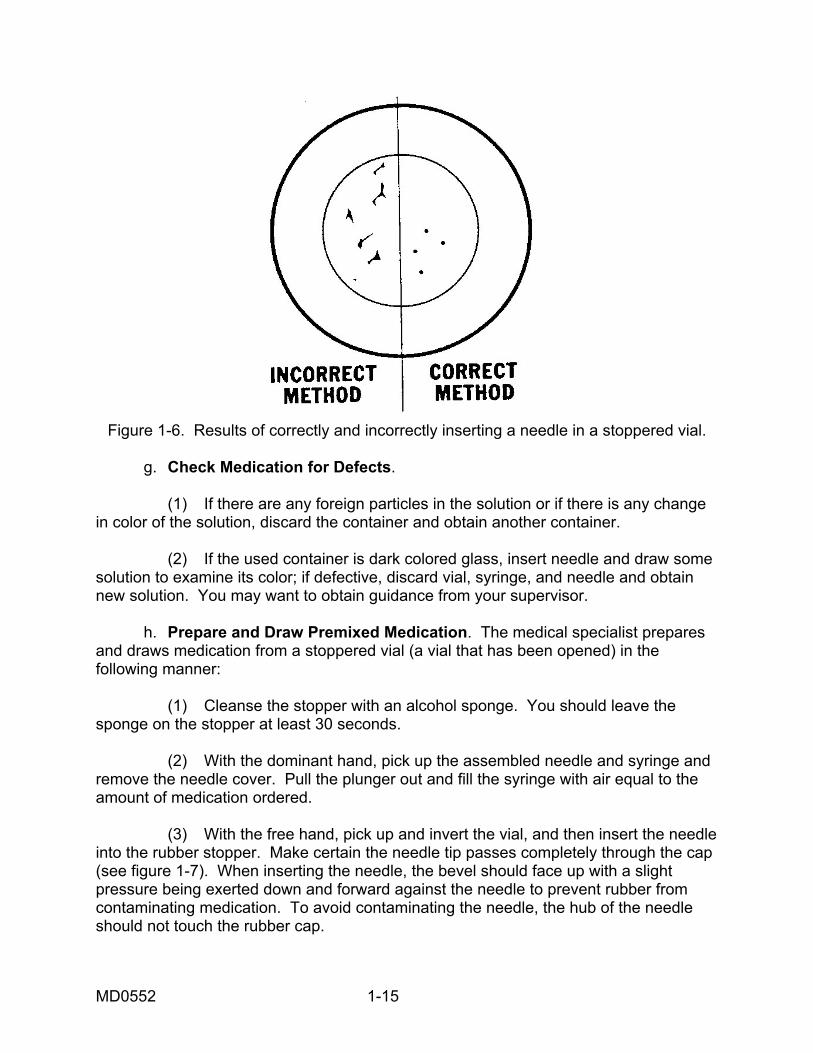
Figure 1-6. Results of correctly and incorrectly inserting a needle in a stoppered vial.
g. Check Medication for Defects. (1) If there are any foreign particles in the solution or if there is any change in color of the solution, discard the container and obtain another container. (2) If the used container is dark colored glass, insert needle and draw some solution to examine its color; if defective, discard vial, syringe, and needle and obtain new solution. You may want to obtain guidance from your supervisor. h. Prepare and Draw Premixed Medication. The medical specialist prepares and draws medication from a stoppered vial (a vial that has been opened) in the following manner: (1) Cleanse the stopper with an alcohol sponge. You should leave the sponge on the stopper at least 30 seconds. (2) With the dominant hand, pick up the assembled needle and syringe and remove the needle cover. Pull the plunger out and fill the syringe with air equal to the amount of medication ordered. (3) With the free hand, pick up and invert the vial, and then insert the needle into the rubber stopper. Make certain the needle tip passes completely through the cap (see figure 1-7). When inserting the needle, the bevel should face up with a slight pressure being exerted down and forward against the needle to prevent rubber from contaminating medication. To avoid contaminating the needle, the hub of the needle should not touch the rubber cap.
MD0552 1-15
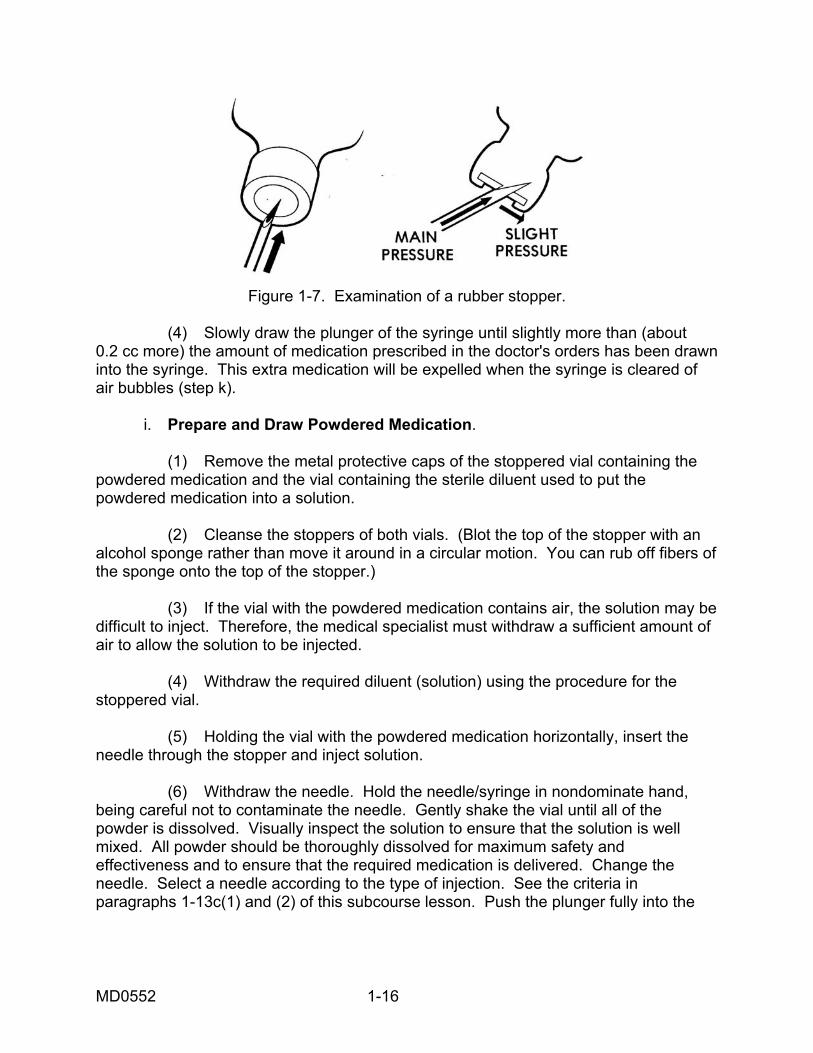
Figure 1-7. Examination of a rubber stopper.
(4) Slowly draw the plunger of the syringe until slightly more than (about 0.2 cc more) the amount of medication prescribed in the doctor's orders has been drawn into the syringe. This extra medication will be expelled when the syringe is cleared of air bubbles (step k). i. Prepare and Draw Powdered Medication. (1) Remove the metal protective caps of the stoppered vial containing the powdered medication and the vial containing the sterile diluent used to put the powdered medication into a solution. (2) Cleanse the stoppers of both vials. (Blot the top of the stopper with an alcohol sponge rather than move it around in a circular motion. You can rub off fibers of the sponge onto the top of the stopper.) (3) If the vial with the powdered medication contains air, the solution may be difficult to inject. Therefore, the medical specialist must withdraw a sufficient amount of air to allow the solution to be injected. (4) Withdraw the required diluent (solution) using the procedure for the stoppered vial. (5) Holding the vial with the powdered medication horizontally, insert the needle through the stopper and inject solution. (6) Withdraw the needle. Hold the needle/syringe in nondominate hand, being careful not to contaminate the needle. Gently shake the vial until all of the powder is dissolved. Visually inspect the solution to ensure that the solution is well mixed. All powder should be thoroughly dissolved for maximum safety and effectiveness and to ensure that the required medication is delivered. Change the needle. Select a needle according to the type of injection. See the criteria in paragraphs 1-13c(1) and (2) of this subcourse lesson. Push the plunger fully into the
MD0552 1-16
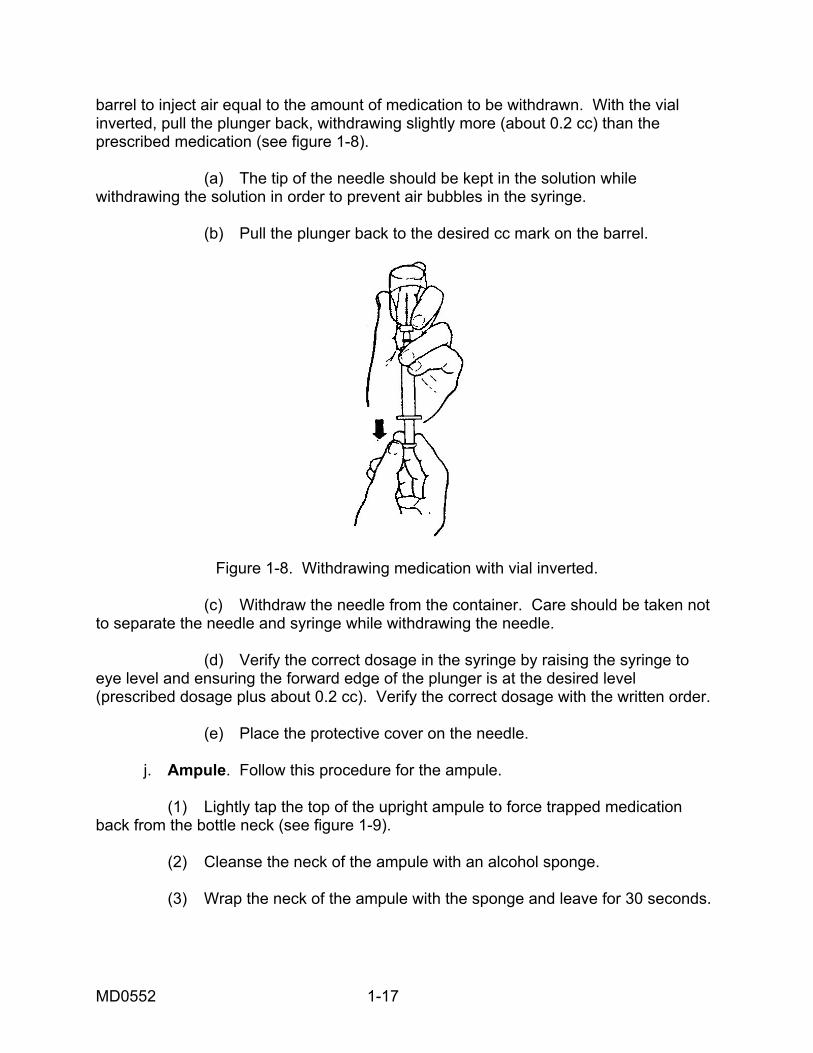
barrel to inject air equal to the amount of medication to be withdrawn. With the vial inverted, pull the plunger back, withdrawing slightly more (about 0.2 cc) than the prescribed medication (see figure 1-8). (a) The tip of the needle should be kept in the solution while withdrawing the solution in order to prevent air bubbles in the syringe. (b) Pull the plunger back to the desired cc mark on the barrel.
Figure 1-8. Withdrawing medication with vial inverted.
(c) Withdraw the needle from the container. Care should be taken not to separate the needle and syringe while withdrawing the needle. (d) Verify the correct dosage in the syringe by raising the syringe to eye level and ensuring the forward edge of the plunger is at the desired level (prescribed dosage plus about 0.2 cc). Verify the correct dosage with the written order. (e) Place the protective cover on the needle. j. Ampule. Follow this procedure for the ampule. (1) Lightly tap the top of the upright ampule to force trapped medication back from the bottle neck (see figure 1-9). (2) Cleanse the neck of the ampule with an alcohol sponge. (3) Wrap the neck of the ampule with the sponge and leave for 30 seconds.
MD0552 1-17
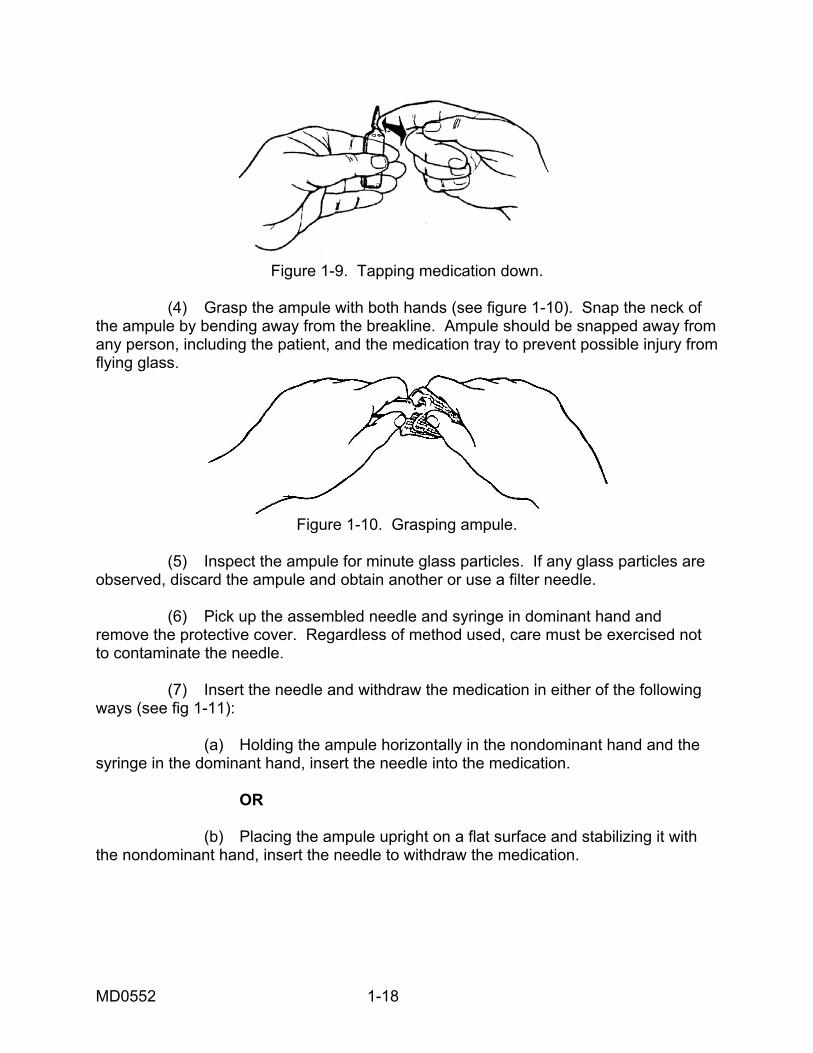
Figure 1-9. Tapping medication down.
(4) Grasp the ampule with both hands (see figure 1-10). Snap the neck of the ampule by bending away from the breakline. Ampule should be snapped away from any person, including the patient, and the medication tray to prevent possible injury from flying glass.
Figure 1-10. Grasping ampule.
(5) Inspect the ampule for minute glass particles. If any glass particles are observed, discard the ampule and obtain another or use a filter needle. (6) Pick up the assembled needle and syringe in dominant hand and remove the protective cover. Regardless of method used, care must be exercised not to contaminate the needle. (7) Insert the needle and withdraw the medication in either of the following ways (see fig 1-11): (a) Holding the ampule horizontally in the nondominant hand and the syringe in the dominant hand, insert the needle into the medication. OR (b) Placing the ampule upright on a flat surface and stabilizing it with the nondominant hand, insert the needle to withdraw the medication.
MD0552 1-18
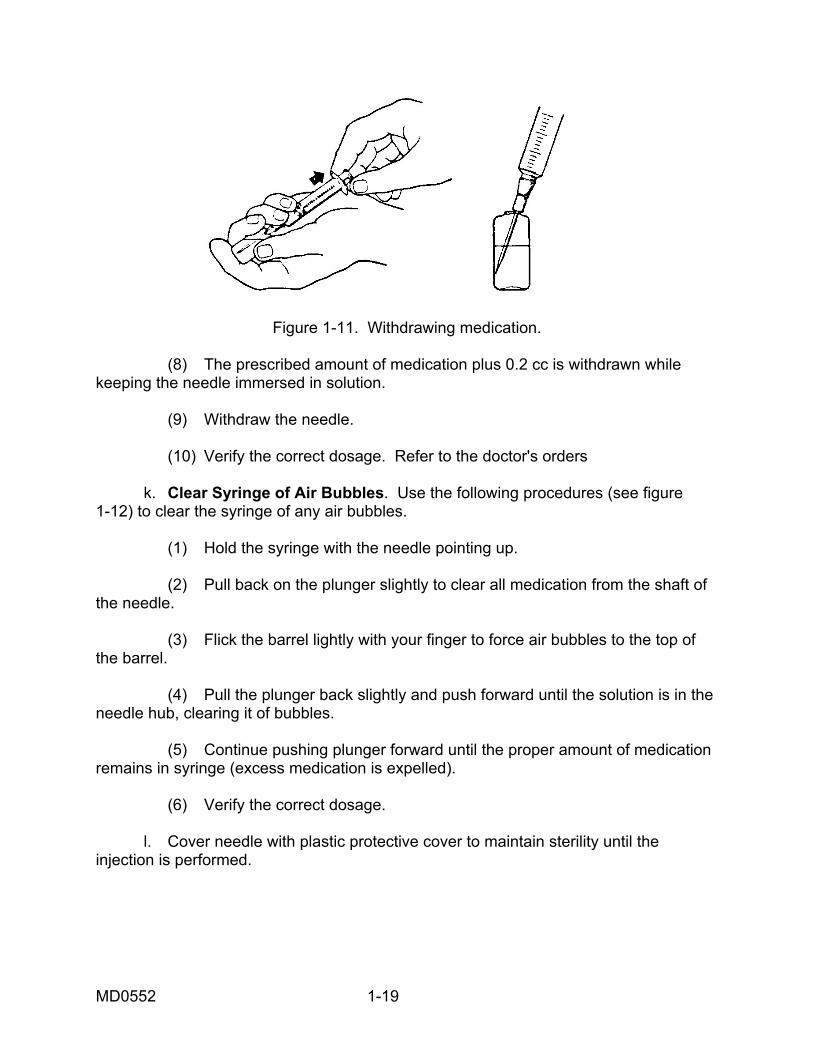
Figure 1-11. Withdrawing medication. (8) The prescribed amount of medication plus 0.2 cc is withdrawn while keeping the needle immersed in solution. (9) Withdraw the needle. (10) Verify the correct dosage. Refer to the doctor's orders k. Clear Syringe of Air Bubbles. Use the following procedures (see figure 1-12) to clear the syringe of any air bubbles. (1) Hold the syringe with the needle pointing up. (2) Pull back on the plunger slightly to clear all medication from the shaft of the needle. (3) Flick the barrel lightly with your finger to force air bubbles to the top of the barrel. (4) Pull the plunger back slightly and push forward until the solution is in the needle hub, clearing it of bubbles. (5) Continue pushing plunger forward until the proper amount of medication remains in syringe (excess medication is expelled). (6) Verify the correct dosage. l. Cover needle with plastic protective cover to maintain sterility until the injection is performed.
MD0552 1-19
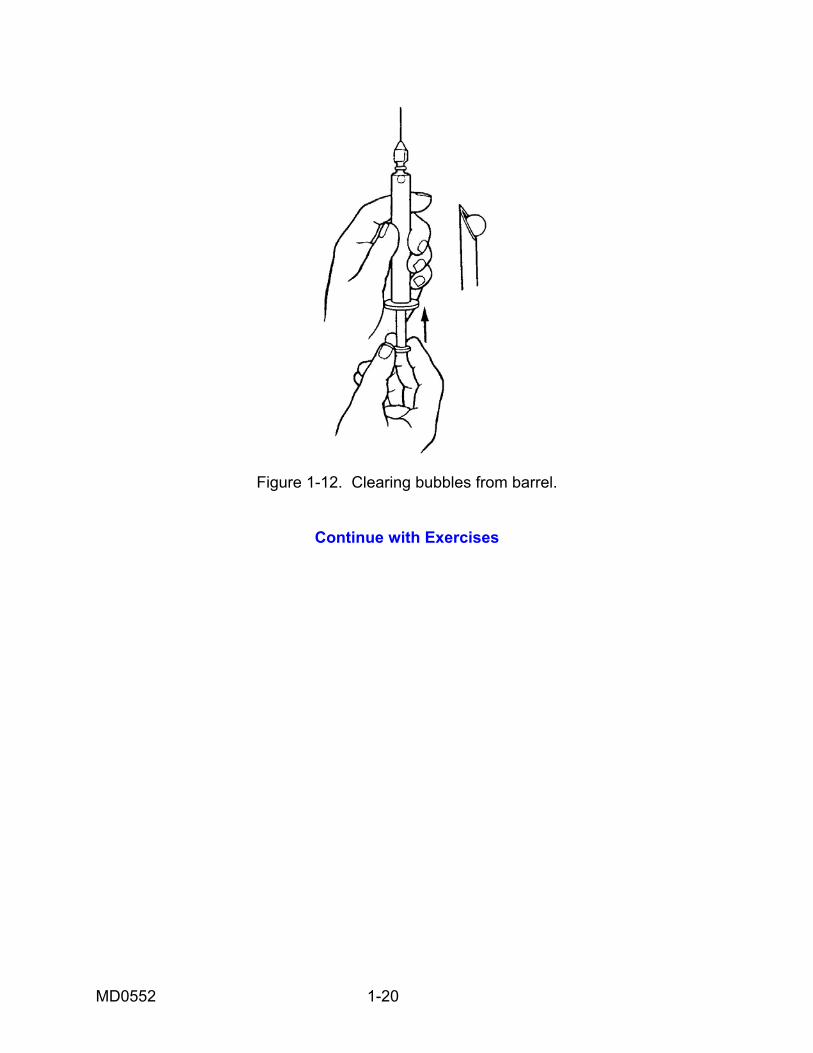
Figure 1-12. Clearing bubbles from barrel.
Continue with Exercises
MD0552 1-20
EXERCISES. LESSON 1 INSTRUCTIONS. Answer the following exercises by writing the answer in the space provided or by marking the correct answer. After you have completed all of these items, turn to "Solutions to Exercises" at the end of the lesson and check your answers. 1. List the two medication systems in use in the Army medical facilities. ________________________________________________________________ ________________________________________________________________ 2. One of the basic rules of administering medication is to read the label three times. a. True. b. False. 3. If there is any doubt about a patient's identity, what should you do? a. Ask a physician. b. Ask your supervisor. c. Ask the patient his name. 4. If a patient refuses medication, what should you do? a. Tell the doctor. b. Tell your supervisor. c. Remove the medication. 5. List the principles associated with charting medication. ________________________________________________________________ ________________________________________________________________
MD0552 1-21

6. List some conditions that make it desirable to use a sterile injection of medication. ________________________________________________________________ ________________________________________________________________ ________________________________________________________________ ________________________________________________________________ ________________________________________________________________ 7. What are the three methods of administering injections? ________________________________________________________________ ________________________________________________________________ ________________________________________________________________ 8. The gauge of needles goes from _________ to ________ with the highest number being the _______________ needle. 9. A small gauge needle is needed for ______________ medications and a large gauge needle is needed for ___________________ medications. 10. The size of the syringe used depends upon: ________________________________________________________________ 11. What length needle should you use for a subcutaneous injection? ________________________________________________________________ 12. What length needle should you use for an intradermal injection? ________________________________________________________________
MD0552 1-22
13. What length needle should you use for an intramuscular injection? ________________________________________________________________ 14. What should you do first to assemble the needle and syringe? ________________________________________________________________ 15. If a needle has burrs, what should you do with it? ________________________________________________________________ 16. What should you look for when inspecting a rubber stopper? ________________________________________________________________ ________________________________________________________________
Check Your Answers on Next Page
MD0552 1-23
MD0552 1-24
SOLUTIONS TO EXERCISES: LESSON 1 1. Bulk drug system and unit dose system. (para 1-1b) 2. a (para 1-2d) 3. c (para 1-3b) 4. b (para 1-4f) 5. Do not chart the medication until it has been administered and record all administrations of medications. (para 1-6a) 6. When rapid action by the drug is desired. When the drug might be destroyed by digestive juices or vomited if given by mouth. When the patient is unconscious or injured so that he cannot be given the medication by mouth. When local skin areas need to be anesthetized for an operative procedure. When the medication has to be concentrated in a specific area of the body.
(para 1-7) 7. Subcutaneous, intramuscular, and intradermal. (para 1-8) 8. 14 to 27, smallest. (para 1-11a) 9. Viscous medications, thin or watery medications. (para 1-11a) 10. The amount of solution and the type of medication being used. (para 1-13c(2)) 11. 1/2 to 7/8 inch (para 1-13c(1), figure 1-5) 12. 1/4 to 1/2 inch (para 1-13c(1), figure 1-5) 13. 1 to 1 1/2 inches (para 1-13c(1), figure 1-5) 14. Remove the protective cover (para 1-13h(1)) 15. Discard it (para 1-13j(2)) 16. There should not be any small cores or plugs torn from the stopper due to
improper injection of needles. (para 1-14f)
End of Lesson 1
LESSON ASSIGNMENT LESSON 2 Procedures for Administering the Three Types of Injections. TEXT ASSIGNMENT Paragraphs 2-1 through 2-7. If possible, watch the corresponding portion of the videotape (17:15--33:15). LESSON OBJECTIVES After completing this lesson, you should be able to: 2-1. Determine when to give an intramuscular injection. 2-2. Determine the type of needles and syringes to use in administering an intramuscular injection. 2-3. Determine the procedures for administering an intramuscular injection. 2-4. Determine the procedures for choosing the injection site for the intramuscular injection. 2-5. Determine the procedures for destroying the needles and syringe for any injection procedure. 2-6. Determine the procedures for recording the injection. 2-7. Determine when a subcutaneous injection is used. 2-8. Determine the sites where the subcutaneous injection is administered. 2-9. Determine the procedures for postinjection patient care. 2-10. Determine when to administer an intradermal injection. 2-11. Determine the types of needles and syringes used when administering an intradermal injection. 2-12. Determine the procedures for administering intradermal injections. 2-13. Determine the procedures to follow after you have administered an intradermal injection. SUGGESTION After completing the assignment, complete the exercises of this lesson. These exercises will help you achieve the lesson objectives.
MD0552 2-1
LESSON 2
PROCEDURES FOR ADMINISTERING THE THREE TYPES OF INJECTIONS
Section I. ADMINISTER AN INTRAMUSCULAR INJECTION 2-1. GENERAL This lesson discusses the procedures for administering the three types of injections. The basic preparation (checking the doctor's order, washing hands, assembling needle and syringe, and drawing medication) is basically the same for all types of administering medication. Remember that this subcourse by itself does not present sufficient training for you to be proficient in administering injections. You need "hands-on" training under the guidance of a qualified person before you begin administering injections. 2-2. INTRODUCTION An intramuscular (IM) injection is the preferred route of administering medication when fairly rapid-acting and long-lasting dosage of medication is required. Some medications that are irritating to the subcutaneous tissue may be given into the deep muscle tissue. Injection of medication into muscle tissue forms a deposit of medication that is absorbed gradually into the bloodstream. An intramuscular injection is the safest, easiest, and best tolerated of the injection routes. Remember the following guidelines: a. The needle should be not less than one inch in length or more than one and one-half inches long (20 to 22 gauge). A needle one and one-fourth inches long (20 to 22 gauge) is commonly used. b. A maximum volume of medication of five milliliters per injection can be administered at one site to an adult. 2-3. PROCEDURE FOR ADMINISTERING AN INTRAMUSCULAR INJECTION NOTE: The steps are basically the same for all the types of injections. a. Check Doctor's Orders and Obtain Medication. Of course, no injection is given without the doctor's orders. The orders are checked to ensure correct medication is obtained and administered. The correct dosage may already be prepared by the hospital pharmacy. b. Gather Equipment. You will need a needle and syringe, antiseptic pads, adhesive bandages (such as Band-Aid), and an emergency cart. The emergency cart, which contains equipment and materials to treat a patient in case of anaphylactic shock and cardiac arrest, should be available in the immediate area. IAW AR 40-562, an anaphylaxis tray with specific contents must be maintained in every room where
MD0552 2-2
immunizations are administered. Cardiac arrest may develop as a result of anaphylactic shock, which can be caused by very small amounts of strange substances. c. Wash Hands. Use the patient care handwash procedures. d. Assemble Needle and Syringe. Use the procedures discussed in the first lesson of this subcourse. Remember to adhere to strict aseptic techniques. e. Check Expiration Date of Medication. Do not use a medication whose expiration date has passed. Discard or return the medication to the pharmacy IAW local policy. f. Draw Medication into Syringe. Do not combine immunizations or other medications into one syringe unless specifically ordered by the physician. Normally these types of medications will be prepared by the pharmacy. g. Identify Patient. Refer to the patient's wrist-name tag for the patient's name or ask the patient, "What is your name?" and compare to the doctor's orders. h. Prepare the Patient. (1) Ask the patient about any known allergies before you administer any medication. You should ask about specific allergic reactions such as penicillin, eggs, or horse serum to refresh his memory. You should refer to his chart to see if any allergies are listed. If the patient is a young child or an older person, they may not be able to tell you. If there is a known allergy, consult the senior medical person in the area for guidance. Do not administer the injection if you are not sure there are no allergies. Allergic reactions can make the patient very sick or even cause death. (2) Ask females about the possibility of current pregnancy. Some medications can cause severe birth defects if given to the mother during pregnancy. If there is a possibility of pregnancy, do not administer the injection. Refer the patient to the physician or senior medical person. (3) Provide privacy for the patient if injecting in the buttocks or lateral thigh. Be sure to abide by a local SOP. (4) Tell the patient about the injection procedure. Be sure to wake up a patient if he has been sleeping. If a patient is unconscious and you think he cannot understand what you are telling him, tell the patient anyway. A patient may be frightened and/or violent. If this is the case, you must seek assistance. i. Select Injection Site and Position Patient. An intramuscular injection is usually given in the buttocks, thigh, or the upper arm area. If the medication is more than 1 cc, give the injection in the buttocks. The amount of medication determines the selection of the site.
MD0552 2-3
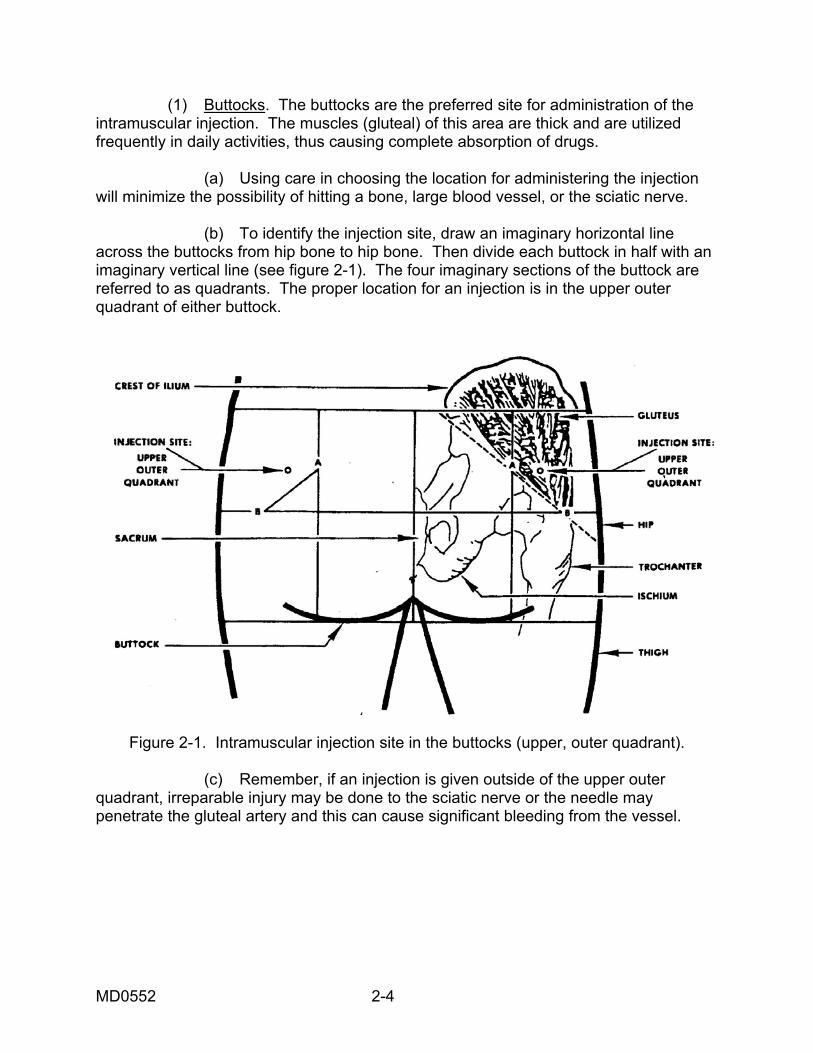
(1) Buttocks. The buttocks are the preferred site for administration of the intramuscular injection. The muscles (gluteal) of this area are thick and are utilized frequently in daily activities, thus causing complete absorption of drugs. (a) Using care in choosing the location for administering the injection will minimize the possibility of hitting a bone, large blood vessel, or the sciatic nerve. (b) To identify the injection site, draw an imaginary horizontal line across the buttocks from hip bone to hip bone. Then divide each buttock in half with an imaginary vertical line (see figure 2-1). The four imaginary sections of the buttock are referred to as quadrants. The proper location for an injection is in the upper outer quadrant of either buttock.
Figure 2-1. Intramuscular injection site in the buttocks (upper, outer quadrant). (c) Remember, if an injection is given outside of the upper outer quadrant, irreparable injury may be done to the sciatic nerve or the needle may penetrate the gluteal artery and this can cause significant bleeding from the vessel.
MD0552 2-4
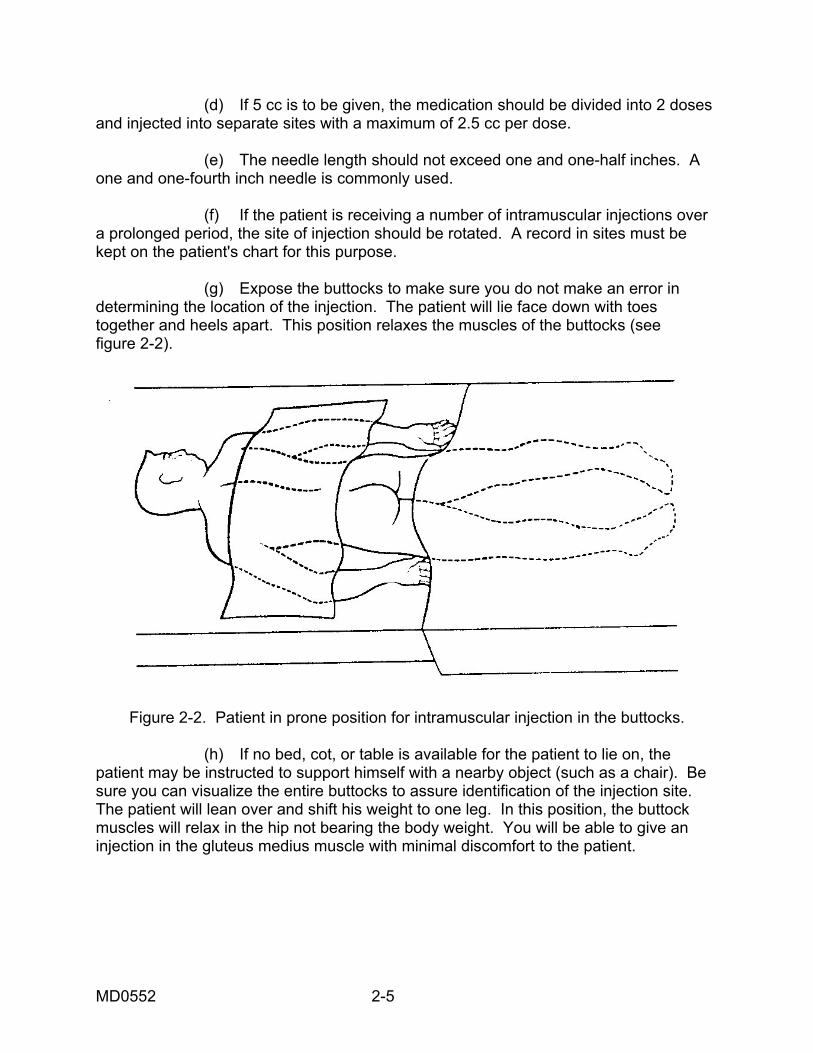
(d) If 5 cc is to be given, the medication should be divided into 2 doses and injected into separate sites with a maximum of 2.5 cc per dose. (e) The needle length should not exceed one and one-half inches. A one and one-fourth inch needle is commonly used. (f) If the patient is receiving a number of intramuscular injections over a prolonged period, the site of injection should be rotated. A record in sites must be kept on the patient's chart for this purpose. (g) Expose the buttocks to make sure you do not make an error in determining the location of the injection. The patient will lie face down with toes together and heels apart. This position relaxes the muscles of the buttocks (see figure 2-2).
Figure 2-2. Patient in prone position for intramuscular injection in the buttocks. (h) If no bed, cot, or table is available for the patient to lie on, the patient may be instructed to support himself with a nearby object (such as a chair). Be sure you can visualize the entire buttocks to assure identification of the injection site. The patient will lean over and shift his weight to one leg. In this position, the buttock muscles will relax in the hip not bearing the body weight. You will be able to give an injection in the gluteus medius muscle with minimal discomfort to the patient.
MD0552 2-5
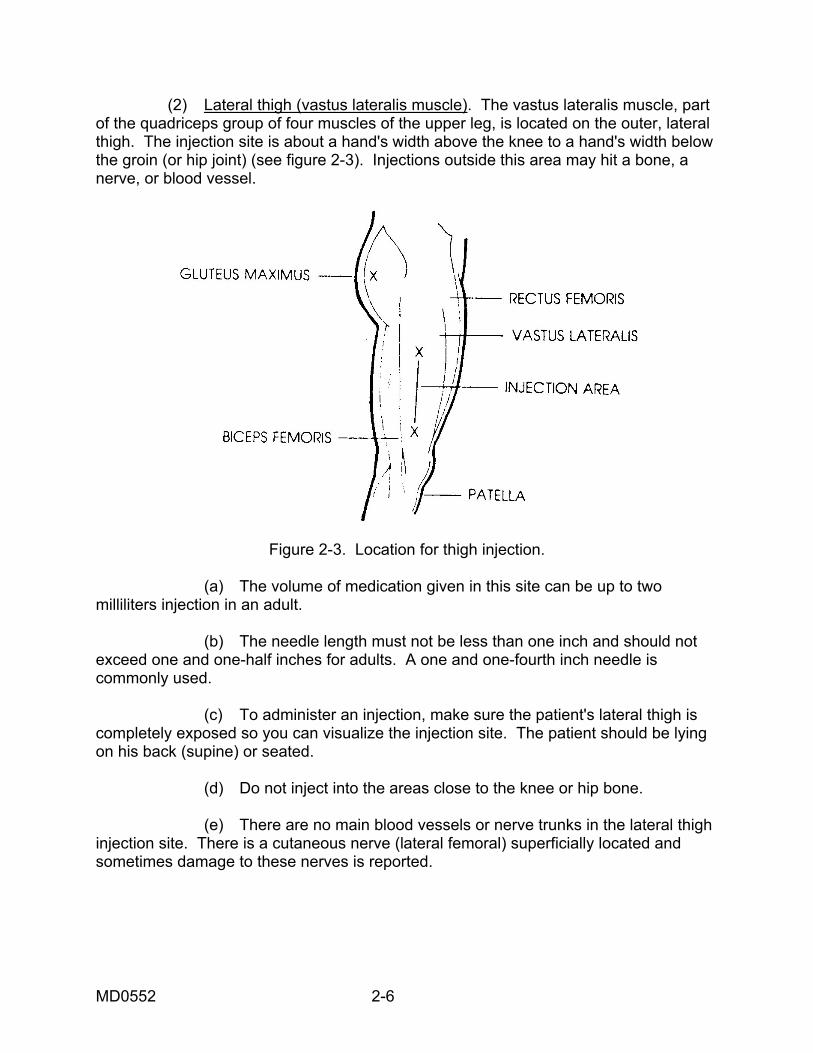
(2) Lateral thigh (vastus lateralis muscle). The vastus lateralis muscle, part of the quadriceps group of four muscles of the upper leg, is located on the outer, lateral thigh. The injection site is about a hand's width above the knee to a hand's width below the groin (or hip joint) (see figure 2-3). Injections outside this area may hit a bone, a nerve, or blood vessel.
Figure 2-3. Location for thigh injection. (a) The volume of medication given in this site can be up to two milliliters injection in an adult. (b) The needle length must not be less than one inch and should not exceed one and one-half inches for adults. A one and one-fourth inch needle is commonly used. (c) To administer an injection, make sure the patient's lateral thigh is completely exposed so you can visualize the injection site. The patient should be lying on his back (supine) or seated. (d) Do not inject into the areas close to the knee or hip bone. (e) There are no main blood vessels or nerve trunks in the lateral thigh injection site. There is a cutaneous nerve (lateral femoral) superficially located and sometimes damage to these nerves is reported.
MD0552 2-6
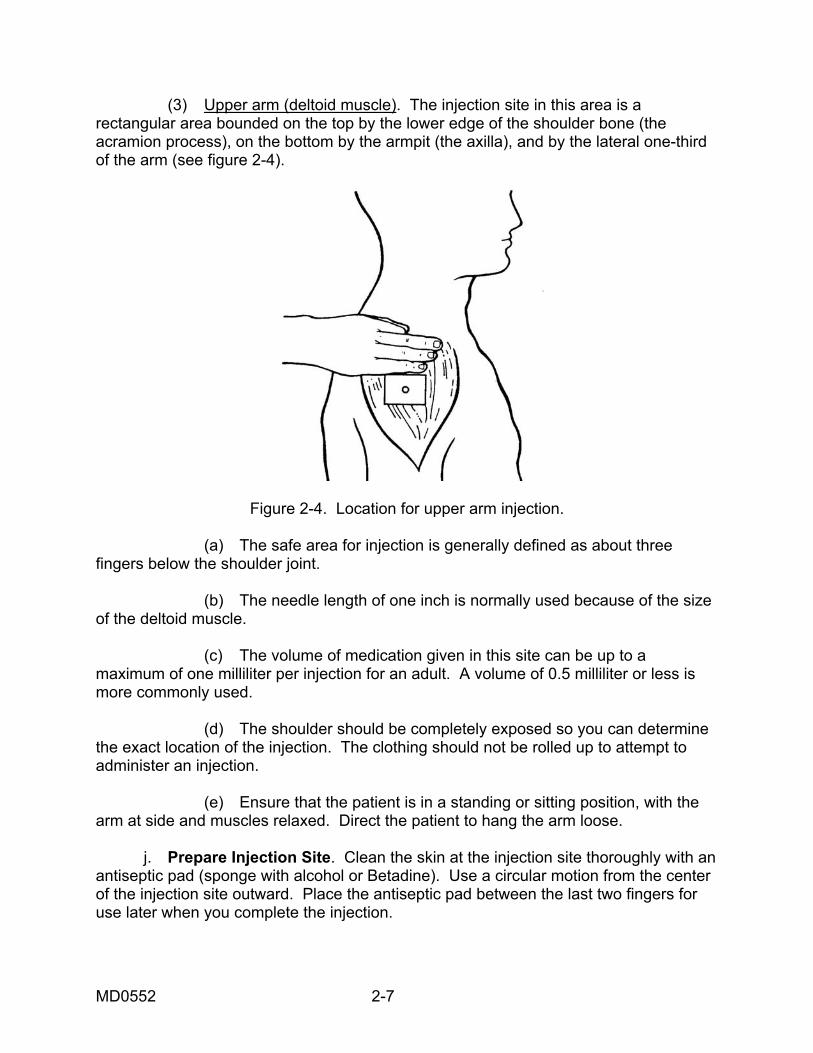
(3) Upper arm (deltoid muscle). The injection site in this area is a rectangular area bounded on the top by the lower edge of the shoulder bone (the acramion process), on the bottom by the armpit (the axilla), and by the lateral one-third of the arm (see figure 2-4).
Figure 2-4. Location for upper arm injection. (a) The safe area for injection is generally defined as about three fingers below the shoulder joint. (b) The needle length of one inch is normally used because of the size of the deltoid muscle. (c) The volume of medication given in this site can be up to a maximum of one milliliter per injection for an adult. A volume of 0.5 milliliter or less is more commonly used. (d) The shoulder should be completely exposed so you can determine the exact location of the injection. The clothing should not be rolled up to attempt to administer an injection. (e) Ensure that the patient is in a standing or sitting position, with the arm at side and muscles relaxed. Direct the patient to hang the arm loose. j. Prepare Injection Site. Clean the skin at the injection site thoroughly with an antiseptic pad (sponge with alcohol or Betadine). Use a circular motion from the center of the injection site outward. Place the antiseptic pad between the last two fingers for use later when you complete the injection.
MD0552 2-7
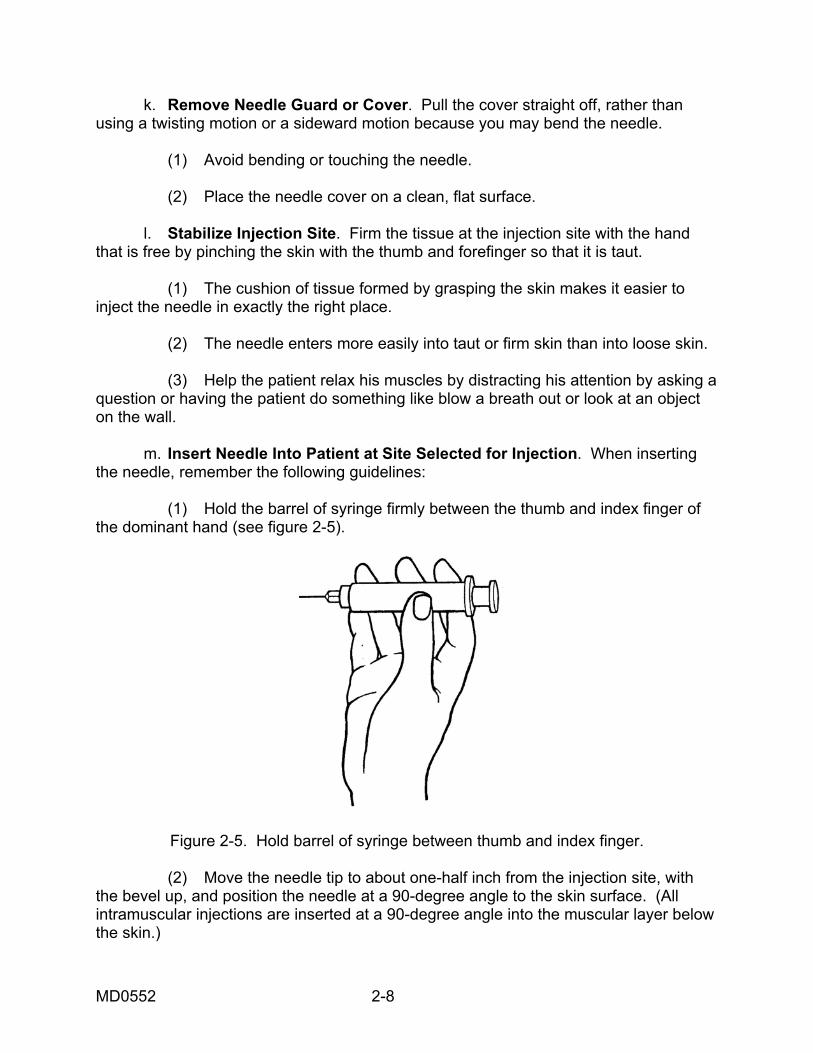
k. Remove Needle Guard or Cover. Pull the cover straight off, rather than using a twisting motion or a sideward motion because you may bend the needle. (1) Avoid bending or touching the needle. (2) Place the needle cover on a clean, flat surface. l. Stabilize Injection Site. Firm the tissue at the injection site with the hand that is free by pinching the skin with the thumb and forefinger so that it is taut. (1) The cushion of tissue formed by grasping the skin makes it easier to inject the needle in exactly the right place. (2) The needle enters more easily into taut or firm skin than into loose skin. (3) Help the patient relax his muscles by distracting his attention by asking a question or having the patient do something like blow a breath out or look at an object on the wall. m. Insert Needle Into Patient at Site Selected for Injection. When inserting the needle, remember the following guidelines: (1) Hold the barrel of syringe firmly between the thumb and index finger of the dominant hand (see figure 2-5).
Figure 2-5. Hold barrel of syringe between thumb and index finger. (2) Move the needle tip to about one-half inch from the injection site, with the bevel up, and position the needle at a 90-degree angle to the skin surface. (All intramuscular injections are inserted at a 90-degree angle into the muscular layer below the skin.)
MD0552 2-8
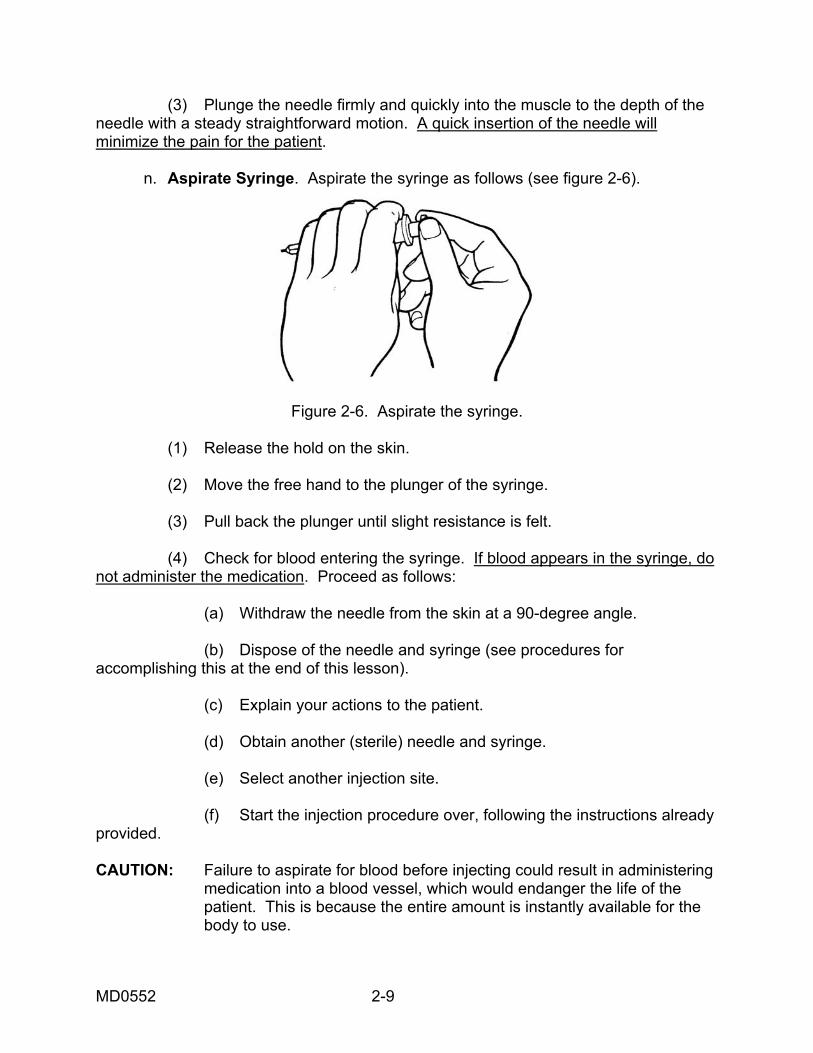
(3) Plunge the needle firmly and quickly into the muscle to the depth of the needle with a steady straightforward motion. A quick insertion of the needle will minimize the pain for the patient. n. Aspirate Syringe. Aspirate the syringe as follows (see figure 2-6).
Figure 2-6. Aspirate the syringe. (1) Release the hold on the skin. (2) Move the free hand to the plunger of the syringe. (3) Pull back the plunger until slight resistance is felt. (4) Check for blood entering the syringe. If blood appears in the syringe, do not administer the medication. Proceed as follows: (a) Withdraw the needle from the skin at a 90-degree angle. (b) Dispose of the needle and syringe (see procedures for accomplishing this at the end of this lesson). (c) Explain your actions to the patient. (d) Obtain another (sterile) needle and syringe. (e) Select another injection site. (f) Start the injection procedure over, following the instructions already provided. CAUTION: Failure to aspirate for blood before injecting could result in administering medication into a blood vessel, which would endanger the life of the patient. This is because the entire amount is instantly available for the body to use.
MD0552 2-9
o. Inject Medication. To inject the medication, do the following procedures: (1) Stabilize the syringe with the nondominant hand. (2) Place the thumb of the dominant hand on the plunger and the index and middle fingers under the hook of the syringe barrel. (3) Push the plunger into the syringe barrel with a slow, continuous downward movement as far as the plunger will go. (4) Make sure that all the medication is injected. Any medication that is left in the needle at the end of the injection may dribble into the subcutaneous tissue as it is withdrawn. Tissue injury may result. p. Withdraw Needle. To withdraw the needle: (1) Place the alcohol pad you are holding just above the injection site with the nondominant hand. (2) Remove the needle straight out in same direction as the injection with a quick, outward motion. q. Massage Injection Site. Rub the injection site with the alcohol pad with a firm, circular motion for about five seconds. Massaging helps to disperse the medicine so that it can be absorbed more quickly. r. Cover Injection Site. Place an adhesive bandage over the injection site to protect clothes from possible bloodstains and protect the injection site from possible infection. s. Perform Postinjection Patient Care. Perform as follows: (1) Observe the patient for unusual reactions. Any medication can cause anaphylactic reactions. (2) Give appropriate information regarding the medication and required waiting time to the patient in accordance with local guidelines. (3) Care should be provided for the bed patient as follows: (a) Position the patient for comfort. (b) Ask the patient if there is anything else you can do. (c) Tell the patient when you expect to return to check on any reaction and to notify you if he experiences any problems.
MD0552 2-10
t. Dispose Expended Needle and Syringe. Place the needle and syringe in a non-permeable container in accordance with local policy. Proper disposal of equipment prevents cross contamination, drug abuse, and injury by needles. u. Record Administration of Intramuscular Injection. Record the information in the patient's medical record (inpatient or outpatient) or field medical card IAW local policy. (1) Prompt recording prevents other personnel from administering the same medication. (2) After recording the information, follow local procedure for returning the patient's medical record, or field medical card, to the records holding area.
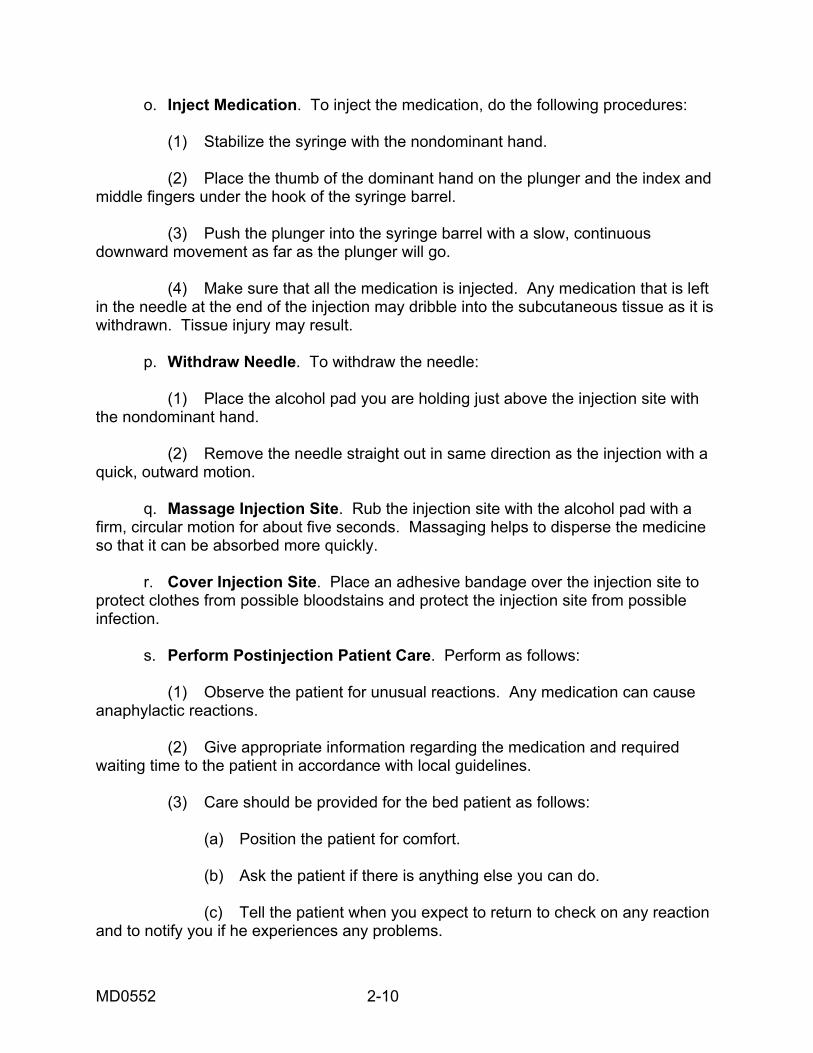
Section II. ADMINISTER A SUBCUTANEOUS INJECTION 2-4. INTRODUCTION a. The subcutaneous (SQ) method of injection is commonly ordered for medication that requires a slower absorption rate than IM injections provide. b. The needle must pass through the epidermis and dermis to reach the subcutaneous fatty (adipose) tissue (see figure 2-7). Small volumes of medication that are voluble and nonirritating to body tissues are administered by this method. A variety of medications, such as insulin and some immunizations, are given subcutaneously.
Figure 2-7. Insertion of needle.
MD0552 2-11
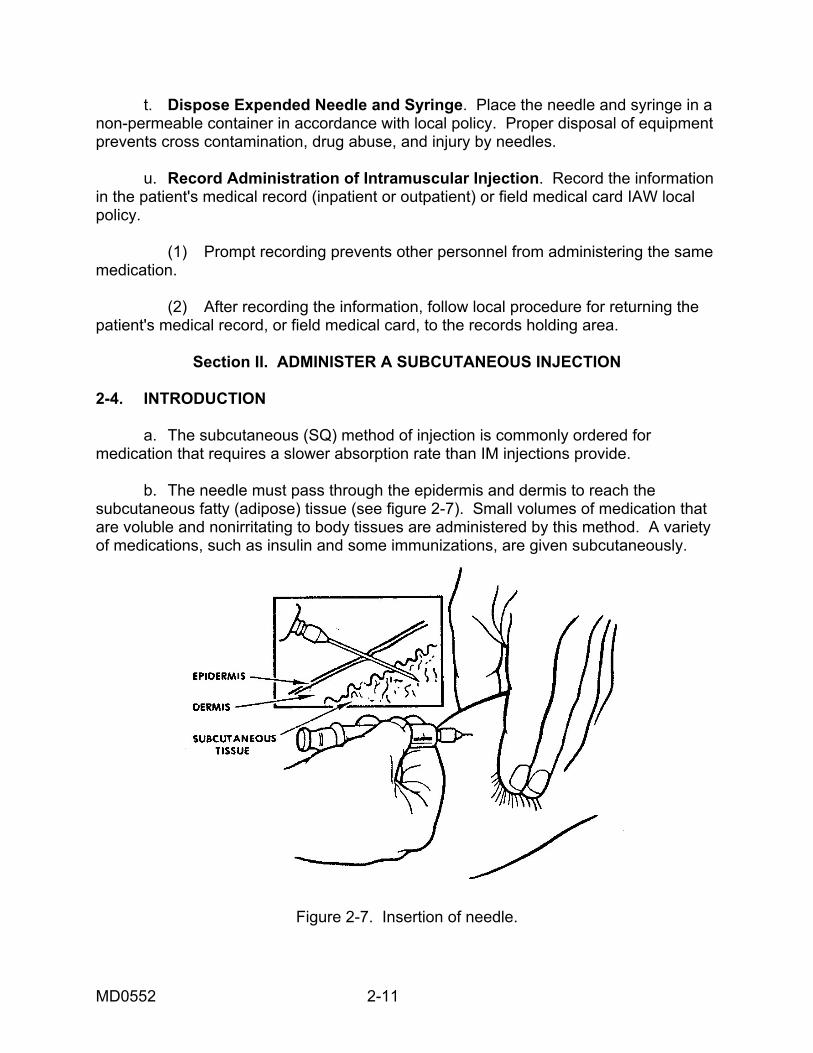
2-5. PROCEDURE FOR ADMINISTERING A SUBCUTANEOUS INJECTION a. Follow procedures outlined in paragraph 2-3. b. Select injection site and position patient. (1) Outer aspect of upper arm (deltoid area of the shoulder). The injection site (see figure 2-8) is one hand's width down from the top of the shoulder and a third of the way around to the arm's outer aspect. The patient may be seated or standing with the upper arm you have chosen exposed.
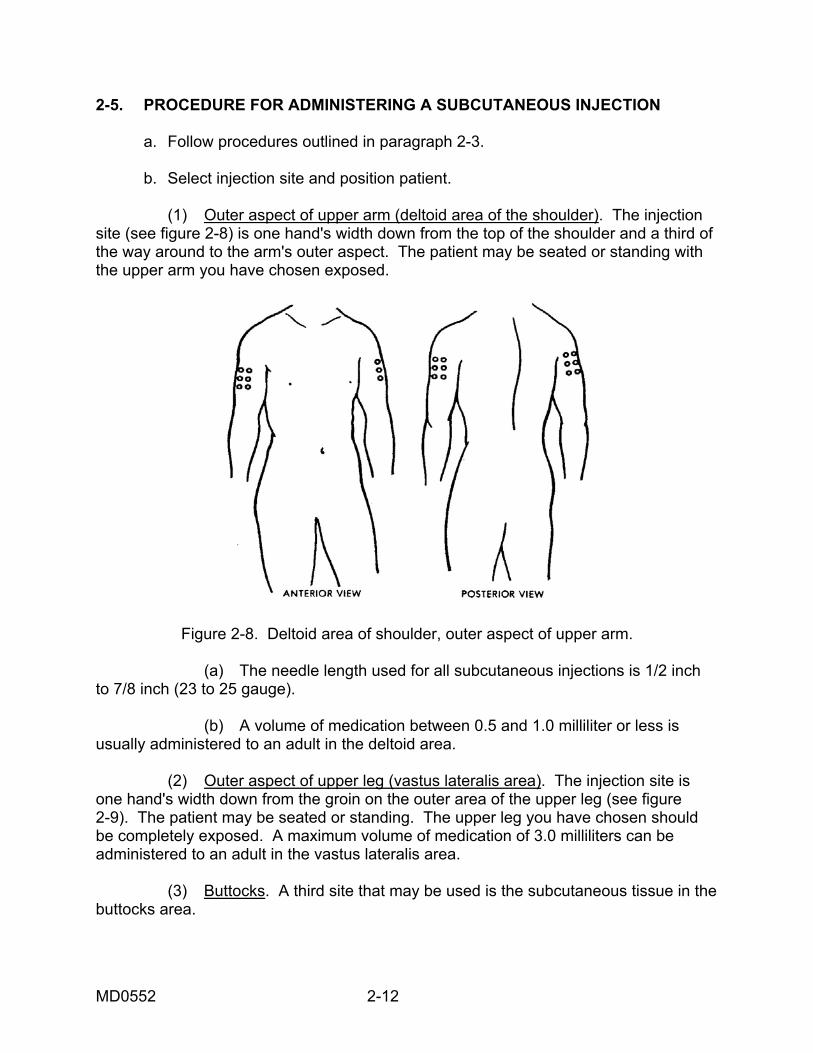
Figure 2-8. Deltoid area of shoulder, outer aspect of upper arm. (a) The needle length used for all subcutaneous injections is 1/2 inch to 7/8 inch (23 to 25 gauge). (b) A volume of medication between 0.5 and 1.0 milliliter or less is usually administered to an adult in the deltoid area. (2) Outer aspect of upper leg (vastus lateralis area). The injection site is one hand's width down from the groin on the outer area of the upper leg (see figure 2-9). The patient may be seated or standing. The upper leg you have chosen should be completely exposed. A maximum volume of medication of 3.0 milliliters can be administered to an adult in the vastus lateralis area. (3) Buttocks. A third site that may be used is the subcutaneous tissue in the buttocks area.
MD0552 2-12
Figure 2-9. Vastus lateralis area, outer aspect of upper leg. c. Prepare the Injection Site. Clean the site with an antiseptic pad using a circular motion from the center point outward about two inches. d. Remove Needle Guard. The needle cover should be pulled straight off. Any twisting motion or a sideward motion may bend the needle. Do not touch the needle. Lay the needle cover on a clean, flat surface. e. Stabilize Injection Site. Pinch up tissue on the upper arm or upper thigh, whichever you have chosen (see fig 2-7). (1) Pinch the skin gently between the thumb and index finger to form a fold of skin without touching the injection site. (2) The fold of tissue helps determine the exact size of needle needed. Measure from the fold's base to its crest and select a needle close to the length of the fold. f. Insert Needle. (1) Hold the barrel of the syringe between the thumb and the index finger with bevel up. (2) Insert the needle at a 45-degree angle to the skin (see figure 2-7). All subcutaneous injections are inserted at a 45-degree angle into the fatty tissue below the skin.
MD0552 2-13

(3) Insert the needle only to three-fourths of the length of the needle using a firm, quick, forward thrust to minimize discomfort. (4) Release the skin. Release the pinched skin while stabilizing the syringe barrel. g. Aspirate the Syringe. Refer to paragraph 2-3n above. h. Inject the Medicine. Press the plunger into the barrel with the thumb slowly and steadily until all medication is expelled. Medication should be injected slowly. Rapid injection will put pressure on the tissue and cause pain. i. Remove the Needle. Place an antiseptic pad slightly above the injection site. Withdraw needle quickly at same 45-degree angle as inserted and bring pad down on injection site. j. Massage the Site. Gently massage the injection site with an antiseptic pad after you remove the needle unless medication guidance indicates otherwise. (1) Gentle pressure applied to the injection site will help seal punctured tissue and disperse the medication so that it is absorbed readily. (2) You may use the same antiseptic pad that was used to prepare the site before the injection. k. Cover Injection Site. Place an adhesive bandage over the injection site to protect clothes if bleeding occurs and to prevent infection. l. Perform Postinjection Patient Care. Refer to paragraph 2-3u.
Section III. ADMINISTER AN INTRADERMAL INJECTION 2-6. GENERAL a. An intradermal (ID) injection is the injection of a small amount of fluid into the dermal layer of the skin (see figure 2-10). It is frequently done as a diagnostic measure, such as for tuberculin testing (screening test for tuberculosis referred to as a tine test) and allergy testing (placing very small amounts of the suspected antigen or allergen in a solution under the skin). The intradermal injection is made in skin areas of the body that are soft and yielding. b. Often the tuberculin syringe is the only syringe with fine enough calibrations to measure the minute dose that is used. A 26-gauge needle, which is one-fourth to one-half inch in length, is usually selected. The fluid is in a small welt or "wheal" (a small swelling of the skin due to the medication placed under the skin) just under the surface of the skin and between its layers.
MD0552 2-14
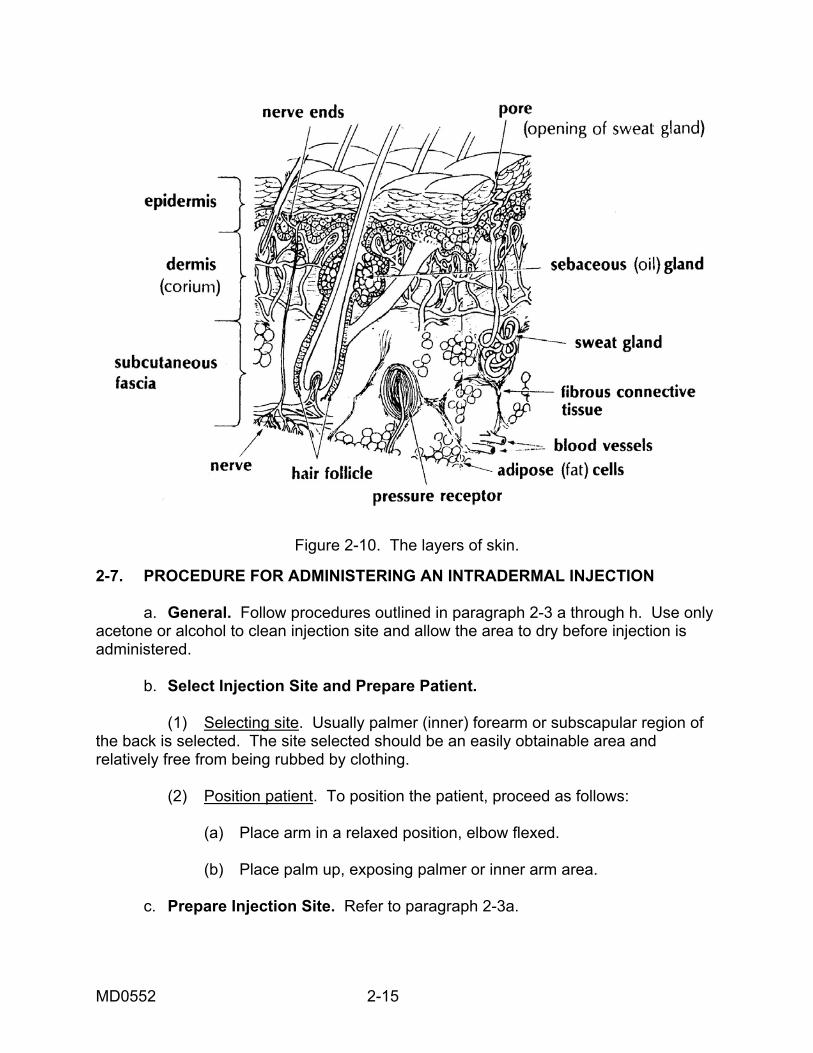
Figure 2-10. The layers of skin. 2-7. PROCEDURE FOR ADMINISTERING AN INTRADERMAL INJECTION a. General. Follow procedures outlined in paragraph 2-3 a through h. Use only acetone or alcohol to clean injection site and allow the area to dry before injection is administered. b. Select Injection Site and Prepare Patient. (1) Selecting site. Usually palmer (inner) forearm or subscapular region of the back is selected. The site selected should be an easily obtainable area and relatively free from being rubbed by clothing. (2) Position patient. To position the patient, proceed as follows: (a) Place arm in a relaxed position, elbow flexed. (b) Place palm up, exposing palmer or inner arm area. c. Prepare Injection Site. Refer to paragraph 2-3a.
MD0552 2-15
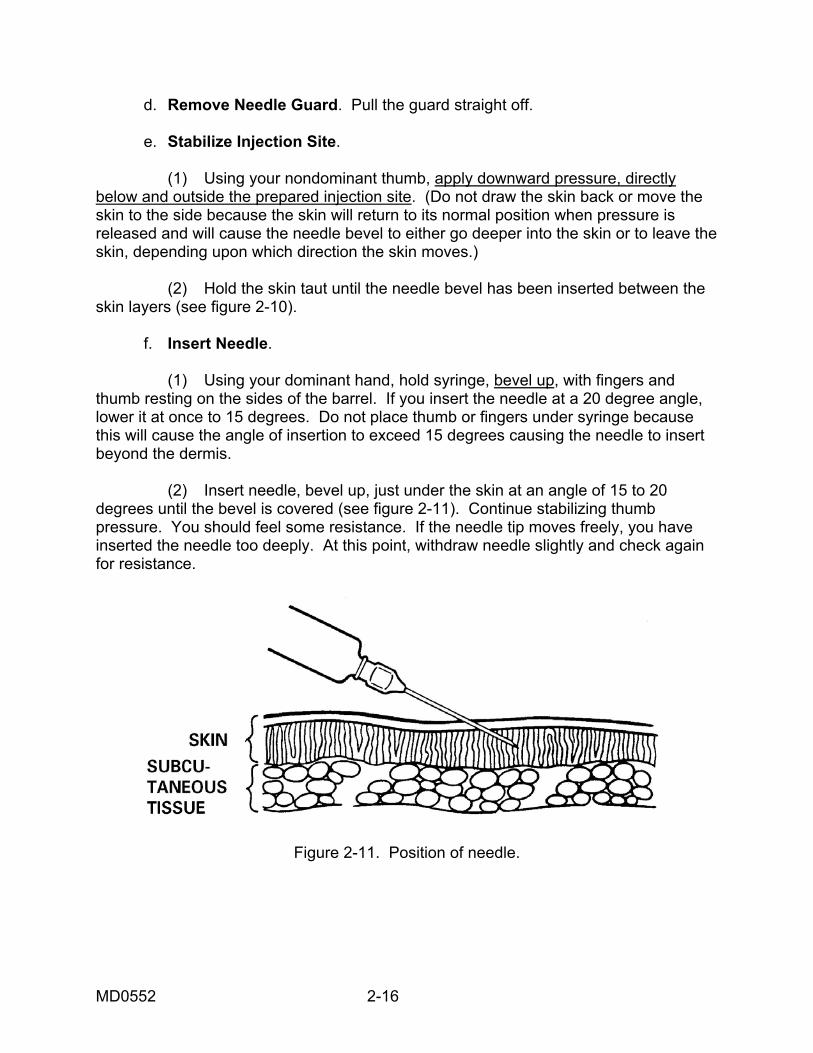
d. Remove Needle Guard. Pull the guard straight off. e. Stabilize Injection Site. (1) Using your nondominant thumb, apply downward pressure, directly below and outside the prepared injection site. (Do not draw the skin back or move the skin to the side because the skin will return to its normal position when pressure is released and will cause the needle bevel to either go deeper into the skin or to leave the skin, depending upon which direction the skin moves.) (2) Hold the skin taut until the needle bevel has been inserted between the skin layers (see figure 2-10). f. Insert Needle. (1) Using your dominant hand, hold syringe, bevel up, with fingers and thumb resting on the sides of the barrel. If you insert the needle at a 20 degree angle, lower it at once to 15 degrees. Do not place thumb or fingers under syringe because this will cause the angle of insertion to exceed 15 degrees causing the needle to insert beyond the dermis. (2) Insert needle, bevel up, just under the skin at an angle of 15 to 20 degrees until the bevel is covered (see figure 2-11). Continue stabilizing thumb pressure. You should feel some resistance. If the needle tip moves freely, you have inserted the needle too deeply. At this point, withdraw needle slightly and check again for resistance.
Figure 2-11. Position of needle.
MD0552 2-16
g. Inject Medication. It is not necessary to aspirate the syringe since no large vessels are commonly found in the superficial layer of the skin. Inject the medication as follows: (1) Continue holding syringe with same hand. (2) Release skin tension with other hand. (3) With free hand, push plunger slowly forward until the medication is injected and a wheal appears at the site of the injection. The appearance of a wheal indicates that the medication has entered the area between the intradermal tissues. If a wheal does not appear, withdraw the needle and repeat the procedure in another site. h. Withdraw Needle. To withdraw the needle, quickly withdraw it at the same angle that it was inserted. i. Cover Injection Site. Without applying pressure, quickly cover injection site with a dry sterile small gauze. j. Perform Postinjection Patient Care. Refer to paragraph 2-3u. k. Evaluate Reaction of Medication. Usually you, as the medical specialist, will not evaluate the reaction of a suspected allergic reaction or a tuberculin test, but will record the reaction. For a tuberculin test, the patient will wait 48 to 72 hours and then return to have an evaluation to determine if the patient has been exposed to tuberculosis. If the intradermal injection is done to determine if the patient is allergic to dust, pollen, or similar substances, a reaction will take place in a few minutes after the substance has been placed under the skin. (1) Instruct the patient to wait or return to have the test read according to local SOP. (2) Caution patient not to rub, scratch, or wash injection site. Rubbing, scratching, or washing may spread or dilute the medication, causing a false reading at a later time. l. Dispose of Equipment. Dispose of equipment according to local SOP. m. Record Administration of Intradermal Injection. Record the injection information on the patient's chart or record.
Continue with Exercises
MD0552 2-17
EXERCISES. LESSON 2 INSTRUCTIONS. Answer the following exercises by writing the answer in the space provided. After you have completed all of these items, turn to "Solutions to Exercises" at the end of the lesson and check your answers. 1. When is an intramuscular injection administered? What is the maximum volume of the medication? ________________________________________________________________ ________________________________________________________________ ________________________________________________________________ 2. What are the steps in preparing the patients for injections prior to administering an injection? ________________________________________________________________ ________________________________________________________________ ________________________________________________________________ 3. What are the areas on the body where intramuscular injections are given? ________________________________________________________________ ________________________________________________________________ ________________________________________________________________ 4. How does one identify the injection site in the buttocks area? ________________________________________________________________ ________________________________________________________________ ________________________________________________________________ ________________________________________________________________
MD0552 2-18
5. What is the length of the needle used for an intramuscular injection in the buttocks? ________________________________________________________________ 6. What is the position in which the patient is normally placed for an intramuscular injection in the buttocks? ________________________________________________________________ ________________________________________________________________ 7. What are the steps in inserting a needle into the patient when administering an intramuscular injection? ________________________________________________________________ ________________________________________________________________ ________________________________________________________________ ________________________________________________________________ ________________________________________________________________ ________________________________________________________________ 8. How does one aspirate the syringe? ________________________________________________________________ ________________________________________________________________ ________________________________________________________________ ________________________________________________________________
MD0552 2-19
9. What does one do if blood appears in the syringe during aspiration? ________________________________________________________________ ________________________________________________________________ ________________________________________________________________ ________________________________________________________________ ________________________________________________________________ 10. How does one inject the (IM) medication into the patient? ________________________________________________________________ ________________________________________________________________ ________________________________________________________________ 11. How does one withdraw the needle from an intramuscular injection? ________________________________________________________________ ________________________________________________________________ ________________________________________________________________ 12. What should you look for after giving an intramuscular injection? ________________________________________________________________ ________________________________________________________________ 13. When does one administer a subcutaneous injection? ________________________________________________________________ ________________________________________________________________ ________________________________________________________________
MD0552 2-20

14. What are the injection sites for the subcutaneous injection? ________________________________________________________________ ________________________________________________________________ 15. What are the steps in administering a subcutaneous injection after you have selected the injection site? ________________________________________________________________ ________________________________________________________________ ________________________________________________________________ ________________________________________________________________ ________________________________________________________________ ________________________________________________________________ ________________________________________________________________ 16. What needle is selected for the subcutaneous injection? ________________________________________________________________ 17. When is an intradermal injection used? ________________________________________________________________ ________________________________________________________________ ________________________________________________________________ 18. What injection sites are used for the intradermal injection? ________________________________________________________________ ________________________________________________________________
MD0552 2-21
19. What step is performed in an intramuscular or subcutaneous injection, but is not necessary when administering an intradermal injection? ________________________________________________________________ 20. How does one insert the needle when administering an intradermal injection? ________________________________________________________________ ________________________________________________________________ ________________________________________________________________ ________________________________________________________________
Check Your Answers on Next Page
MD0552 2-22
SOLUTIONS TO EXERCISES. LESSON 2 1. When fairly rapid and long-lasting dosage of medication is required. 5 ml. (para 2-2) 2. Ask patient about allergies. Provide privacy. Explain procedures. (para 2-3h) 3. Buttocks, lateral thigh, upper arm. (para 2-3i) 4. Draw an imaginary line across the buttocks from hip bone to hip bone. Divide each buttock in half with an imaginary vertical line. Select the upper outer quadrant. (para 2-3i(1)(b)) 5. Not over 1-1/2 inches, usually 1-1/4 inches. (para 2-3i(1)(e)) 6. Lying face down, toes together, and heels apart. (para 2-3i (1)(g)) 7. Hold the barrel of syringe firmly between the thumb and index finger of the dominant hand. Move the needle tip to about one-half inch from the injection site with the bevel up and position the needle at a 90 degree angle to the skin surface. Plunge the needle firmly and quickly into the muscle to the depth of the needle with a steady straight forward motion. (para 2-3m) 8. Release hold on skin. Move the free hand to plunger. Pull back plunger until slight resistance is felt. Check for blood entering syringe. (para 2-3n) 9. Withdraw needle at a 90o angle. Dispose of needle and syringe. Obtain another needle and syringe. Tell patient that you must give a second injection. Select new injection site. Start the injection procedure over. (para 2-3n(4)) 10. Place thumb on the plunger and index and middle fingers under hook of syringe barrel. Push plunger into syringe barrel with a slow, continuous downward movement as far as the plunger will go. (para 2-3o) 11. Place an alcohol pad over the injection site and apply pressure. Remove the needle straight out at a 90 o angle with a quick outward motion. (para 2-3p) 12. Observe the patient for unusual reactions such as signs of breathing difficulties and shock. (para 2-3s(1)) 13. When the reaction time desired is faster than can be obtained when medication is given by mouth, but slower than oral medication or IM injection methods yield. (para 2-4a)
MD0552 2-23
MD0552 2-24
14. Outer aspect of upper arm and outer aspect of upper leg. (para 2-5b(1), (2)) 15. Clean injection site. Remove needle guard. Pinch up tissue at injection site. Quickly insert needle at 45� angle with bevel up. Release skin. Aspirate syringe. Inject medication. Remove needle. Massage site. Replace needle guard. Place an adhesive bandage over injection site. Perform postinjection patient care. Dispose of expended needle and syringe. Record injection. (para 2-5c through l) 16. Needle length used is 1/2 to 7/8 inch length (23 to 25 gauge). (para 2-5b(1)(a)) 17. When a small amount of fluid is to be injected into the dermal layer of the skin. Used for various skin tests, tuberculosis test. (para 2-6) 18. Inner forearm. Subscapular region of the back. (para 2-7b (1)) 19. Aspirating the syringe. (para 2-7g) 20. Using your dominant hand, hold syringe, bevel up, with fingers and thumb resting on the sides of the barrel. Insert needle just under the skin at an angle of 15 o until the bevel is covered. (para 2-7f)
End of Lesson 2
LESSON ASSIGNMENT LESSON 3 Immunizations. TEXT ASSIGNMENT Paragraphs 3-1 through 3-4. If possible, watch the
corresponding portion of the videotape (33:15 on)). LESSON OBJECTIVES After completing this lesson, you should be able to: 3-1. Determine the various types of immunization agents. 3-2. Determine the Army Immunization Program requirements. 3-3. Identify the procedures for administering an immunization. 3-4. Determine procedures for storing or disposing of vaccination vials. 3-5. Determine the procedures for recording the immunization. SUGGESTIONS After completing the assignment, complete the exercises at the end of this lesson. These exercises will help you achieve the lesson objectives.
MD0552 3-1
LESSON 3
IMMUNIZATIONS 3-1. GENERAL An individual's resistance to a specific disease or infection depends upon the presence in the body of protective chemical substances called antibodies. When the body produces its own antibodies, it is termed active immunity. Active immunity results from having an infectious disease or from receiving an injection or inoculation of biological medication that induces an immune response. Active immunity may develop in days or weeks, but the protection received will last for relatively long periods. Another type of immunity, described as passive, is acquired. This immunity results from the body receiving serum that contains antibodies that have been preformed in humans or animals. Although this serum confers immediate protection, the immunity does not last as long. Passive immunity does not stimulate antibody formation. 3-2. IMMUNIZING AGENTS Preparations administered to produce immunity are called immunizing agents. They are known as vaccines, toxoids, and antiserums. Both vaccines and toxoids cause the body to produce their own antibodies (bringing about active immunity), while antiserums produce passive immunity. a. Vaccines. Vaccines contain either weakened or killed microorganisms (such as viruses, bacteria, or rickettsia) that are administered for the prevention, improvement, or treatment of infectious diseases. Examples are typhoid, measles, poliomyelitis, and smallpox vaccines. b. Toxoids. Toxoids contain suspensions of modified toxins that have lost their toxicity but which have maintained the properties of combining with antitoxins, or stimulating the formation of antitoxins. Examples are diphtheria and tetanus toxoids. c. Antiserums. Antiserums are preparations of blood serum that already contain an antibody or antibodies. They are used when there is not time to wait for the body of the exposed or infected person to produce its own antibodies. Examples are tetanus, immune globulin, and rabies. 3-3. THE ARMY IMMUNIZATION PROGRAM a. Immunizations. The Army requires all its healthy military personnel to be actively immunized against diseases such as typhoid, tetanus, diphtheria, poliomyelitis, and influenza. Individuals traveling or assigned to certain areas may be required to be immunized against yellow fever, cholera, plague, or other diseases. Upon initial induction, recruits are also given the following vaccines--adenovirus (types 4 and 7),
MD0552 3-2
meningococcal (types A and C), rubella, rubeola, and TB skin hypersensitivity testing. AR 40-562 gives details of requirements, dosages, and administration. Additional information on immunizations and immunizing agents may be found in TB MED 114. Copies of these two publications governing the administration of immunization to members of the Armed Forces and their dependents must be kept readily available at all locations where immunizing agents are administered. Every medical specialist who gives immunizations must read and be very familiar with the contents of these directives. b. Intervals. The intervals for giving immunizations are prescribed in AR 40-562. They are minimum intervals and must never be shortened. If a series is interrupted before completion, it should not be started again but should be completed by giving the remaining injections, regardless of time lapse. If a period longer than that prescribed between stimulating (booster) doses has elapsed, the initial series is not repeated. Once a basic series is completed, it need not be repeated because a stimulating dose is adequate; the single, small booster dose renews the production of antibodies to an effective immunizing level. c. Immunization Record (SF 601). The Immunization Record (SF 601 form is prepared (in an original copy only) for all military personnel when the initial series of immunizations is given. All immunizations are recorded on this form and kept in the health record. It is the official record of an individual's immunizations and related data and the source of information for completing the Immunization Certificate. d. Immunization Certificate. A Public Health Service Certificate (International Certificate of Vaccination, PHS Form 731) is prepared for all individuals receiving immunizations. Military personnel must carry this form when performing international travel. Nonmilitary personnel retain PHS Form 731 as their official record of immunizations received. 3-4. PROCEDURE FOR ADMINISTERING AN IMMUNIZATION Whenever immunizations are given, a military or civilian member of the medical department must be present. This person must be trained and qualified in emergency resuscitative techniques. Follow the local SOP, AR 40-15, AR 40-562, and TB MED 114. a. Interview Patient. The patient should bring the records mentioned above. Perform the following steps as part of the immunization procedures. (1) Refer to the Immunization Record or Certificate to determine what immunizations are needed. (This could include a physician's order or a requirement to go overseas.)
MD0552 3-3
(2) Determine whether known allergies exist. A history of reactions to previous immunizations is of great importance to alert you to possible reactions and allow you to take precautions as necessary. Allergies to eggs or fowl are important when immunization agents prepared in eggs are used, such as influenza or yellow fever. As in any type of injection procedure, allergic patients, as well as those presenting a history of suspected allergies, should be referred to the supervisor for a decision on immunizing procedure. Patients with a history of sensitivity to an immunizing agent are usually exempt from the immunizations. Ask the patient the following questions when obtaining the patient's allergy history: (a) "Have you ever had a reaction to any previous immunization?" (b) "Do you have a known allergy to eggs or fowl (chicken, ducks, or turkey, and so forth)?" (c) "Do you now experience or have you ever experienced a disorder such as asthma or hay fever?" (3) Determine whether the patient is pregnant, if appropriate. Follow local policy concerning questioning women as to whether they are pregnant or suspect they may be pregnant. (a) Tact and discretion must be used to avoid unnecessary embarrassment. (b) Determining pregnancy is important because of the possible effect of certain immunizing agents on the unborn child. (c) Most immunizing clinics will not administer an immunizing agent to a pregnant woman without written authorization from her obstetrician. NOTE: Usually, large groups of personnel are scheduled for immunizations at one time so an automatic hypodermic gun can be used and the immunization process speeded up. There may be times when you need to administer only two or three immunization injections during the day, then you would need to administer the injection with a needle and syringe. This lesson will provide the procedures to follow to administer injections with a needle and syringe. Personnel trained in the use of the hypodermic gun will instruct you on its operation and maintenance before you are required to use it. b. Have Emergency Tray Available. An emergency tray should be present and readily accessible. An emergency tray contains materials for immediate treatment of serious reactions, including a constricting band and syringe containing a 1:1000 aqueous solution of epinephrine. A tracheostomy set should be available since the majority of fatalities reported involve asphyxiation due to laryngeal edema or swelling.
MD0552 3-4
c. Perform Handwash. Perform patient care handwash. d. Obtain Immunizing Agent. Vaccines are kept in a refrigerator or other designated storage area. The proper storage temperature of different vaccines is found on their labels and must be adhered to in order to keep them safe for administration. Some vaccines contain live organisms and must remain frozen. Since a considerable amount of variation exists between storage temperatures and potency periods for these vaccines, it is essential to review the instructions on the labels for each vaccine. Check the clinic SOP regarding proper storage of preconstituted and reconstituted vaccines. All other equipment for administering immunizations will be available in a specific location within the clinic. e. Check Label for Expiration Date. (1) The labels of all immunizing agents have an expiration date. The expiration date is the last date the vaccine may be used. (2) Vaccines or other immunizing agents must not be used after the date of expiration. Expired agents must be disposed of in accordance with local policy. (3) If vaccine is outdated, obtain new vaccine and discard or return outdated vaccine IAW local policy. f. Examine Vial and Contents. (1) Check the agent for unnecessary or unusual particles, clotting, discoloration, evidence of bacterial growth, or abnormal appearance. (2) Do not use the agent if anything unusual is observed. (3) Consult your supervisor or the pharmacy if you find any evidence of the above mentioned problems with the vaccine. g. Draw Up Required Amount of Immunizing Agent. (1) To determine the amount of immunizing agent required, refer to AR 40-562, check the local clinic SOP, check the supervisor's directive, or check the doctor's orders. (2) If directed to draw the vaccine, have the supervisor check the dosage prior to administration. (3) Use a different sterile needle and syringe for each individual. h. Select Site Administration. Determine appropriate site and route for administration.
MD0552 3-5
i. Expose and Prepare Injection Site. (1) Ask the patient or assist the patient to remove outer garments to allow complete visualization of the selected site for injection. The deltoid area may have to be further exposed by pushing the sleeve of the T-shirt up and over the deltoid area. (2) Prepare the site by the use of a suitable cleaning agent (either acetone, Betadine, or alcohol) and allow to dry thoroughly. j. Administer Immunization. (1) Whenever immunizations are given, a military or civilian member of the medical department/service will be present who is trained and qualified in emergency resuscitative technique in accordance with local SOP. See AR 40-562 for specific requirements. (2) As indicated earlier, immunizations can also be administered by jet injection, commonly referred to as "by injection gun." Advantages include facilitating mass immunization procedures, reducing hazards of transmitting serum hepatitis, reducing requirements for large numbers of sterilized needles and syringes, and eliminating many hours expended in the care and processing of reusable syringes and needles and preparing individual dosage from vaccine vials. k. Observe Patient. Observe for reactions. (1) The period for observation may be determined by local SOP--usually 30 minutes. The patient should not leave the inoculation area for at least 10 minutes and should not be more than five minutes transportation time away from area during the first 30 minutes. (2) Any dangerous, allergic reaction to any biologic agent or drug, the date, type, and severity of reaction will be recorded on the patient's appropriate immunization certificates or records. A medical warning tag should also be made. (3) Urticaria (hives) and pruritis (itching) are common reactions. Allergic reactions vary in nature, severity, and time of onset. Hives and itching are the most common, occurring approximately 20 minutes after inoculation. Some vaccines after several hours to a day may produce general systemic reactions consisting of fever, malaise (general aches and pains), chills, and gastrointestinal upsets as well as a local reaction or swelling, redness, and tenderness at the site of injection. This type of reaction is not usually severe unless accompanied by other life-threatening symptoms.
MD0552 3-6
(4) Observe the patient for progressive signs and symptoms of anaphylactic shock. Immediately treat for anaphylactic shock if signs and symptoms indicate shock. (a) Anaphylactic shock is an immediate emergency demanding emergency intervention to prevent a patient's death. (b) Anaphylactic shock is a life-threatening allergic reaction following exposure to a substance to which the patient is allergic. Death may occur within minutes to several hours due to respiratory failure brought on by edema or constriction of the larynx and/or spasms of the bronchus, vascular collapse, and circulatory failure, leading to coma and death. (5) Observe for undesirable reactions. Whenever local or constitutional reactions of unexpected severity or frequency, local infections, abscess formation that is not traceable to errors in techniques of administration, or other significant manifestations occur which may be due to the use of a biologic product, further administration of the lot will be discontinued. Refer to your immediate supervisor. l. Dispose of Equipment. Dispose of the needle and syringe in accordance with local SOP. Most areas where immunizations are administered have special plastic or cardboard devices for storing used needles and syringes. Place used needle and syringe intact into the designated container. m. Dispose of or Store Vial. (1) Dispose of the vaccination vials in accordance with the clinic's SOP. Containers of all living vaccines should be handled as infectious wastes. When these items are discarded, they should be burned, boiled, or autoclaved. (2) Store unused vaccine in accordance with the manufacturer's instructions, clinic SOP, or regulations such as AR 40-562 or TB MED 114. If the vial contains more than one dose, mark the date and time opened and your initials on the label and place in refrigeration. n. Perform a Patient Care Handwash. As always, perform a patient care handwash after treating a patient. o. Record Immunization. (1) Record the date, dose, and immunization on the patient's Public Health Service Form 731. Recording of this information should be done in accordance with AR 40-562.
MD0552 3-7
(2) Record the date, dose, and immunization on the SF 601 in the patient's health record in accordance with AR 40-403. (3) Some vaccinations may require that the patient return and be evaluated by personnel in the clinic. Such a test is the tuberculosis skin hypersensitivity test (tine test). The results of the test should be recorded in the patient's health record but there are no results listed on the "shot record," only that the patient received the vaccination. (4) It is important to remember that entries for yellow fever must be authenticated on the PHS Form 731 by the Department of the Defense immunization stamp and the actual signature of the physician or his designated representative. Immunizations other than yellow fever may be authenticated by initialing.
Continue with Exercises
MD0552 3-8
EXERCISES, LESSON 3 INSTRUCTIONS: Answer the following exercises by writing the answer in the space provided. After you have completed all of these items, turn to "Solutions to Exercises" at the end of the lesson and check your answers. 1. List the agents used to produce immunity. ________________________________________________________________ 2. Describe the Army Immunization Program. ________________________________________________________________ ________________________________________________________________ ________________________________________________________________ ________________________________________________________________ 3. What are the records used that record all immunization injections and where are these records kept? ________________________________________________________________ ________________________________________________________________ ________________________________________________________________ 4. List the steps in administering an immunization. (See if you can remember ten steps.) ________________________________________________________________ ________________________________________________________________ ________________________________________________________________ ________________________________________________________________ ________________________________________________________________
MD0552 3-9
________________________________________________________________ ________________________________________________________________ ________________________________________________________________ ________________________________________________________________ ________________________________________________________________ 5. What questions do you ask the patient to determine known allergies? (See if you can remember four.) ________________________________________________________________ ________________________________________________________________ ________________________________________________________________ ________________________________________________________________ 6. What is the purpose of the emergency tray? ________________________________________________________________ ________________________________________________________________ 7. What do you look for when you observe a patient who has received an injection? ________________________________________________________________ ________________________________________________________________ 8. Name one vaccination that may require the patient to return to be evaluated by personnel in the clinic. ________________________________________________________________
Check Your Answers on Next Page
MD0552 3-10
MD0552 3-11
SOLUTIONS TO EXERCISES 1. Vaccines, toxoids, and antiserums. (para 3-2) 2. The Army requires its healthy military personnel to be actively immunized against typhoid, tetanus, diphtheria, poliomyelitis, and influenza. Individuals traveling or assigned to certain areas may also be immunized against yellow fever, cholera, and plague. Intervals for giving immunizations are prescribed in AR 40-562. (para 3-3) 3. Immunization Record (SF 601). This is kept in the health record. Immunization Certification (International Certificate of Vaccination, PHS Form 731). This is kept by the individual. (para 3-3c and d) 4. Interview patient. Perform patient care handwash. Obtain immunization agent. Check label for expiration date. Examine vial and contents. Draw up required amount of vaccine. Select site of administration, expose and prepare injection site. Administer immunization. Observe patient. Dispose of equipment. (para 3-4) 5. Have you ever had a reaction to any previous immunization? Do you have a known allergy to eggs or fowl? Have you ever experienced a disorder such as asthma or hay fever? Are you or could you be pregnant? (If appropriate.) (para 3-4a) 6. Treat a patient with serious reaction to medication. (para 3-4b) 7. Observe for any allergic reactions. (para 3-4k) 8. Tine. (para 3-4o(3))
End of Lesson 3