Embed Size (px)
Citation preview
Microsoft Dynamics
®
AX
Advanced bank reconciliation
– processing and
troubleshooting
White Paper
In Microsoft Dynamics AX 2012 R2, you can import electronic bank statements and reconcile the imported bank statements
with bank documents.
June 2013
www.microsoft.com/dynamics/ax
2 ADVANCED BANK RECONCILIATION – PROCESSING AND TROUBLESHOOTING
Table of Contents
Introduction ................................................................................................ 3
Bank statements and companies ................................................................. 3
Setting up number sequences for bank statement import ........................... 3
Set up advanced bank reconciliation import................................................ 3
Import an electronic bank statement by using advanced bank reconciliation ............................................................................................ 10
Reconcile a bank statement by using advanced bank reconciliation ......... 12
Troubleshooting issues during the import of bank statements .................. 14
Debugging issues between .xslt files and the import file .......................... 14
3
ADVANCED BANK RECONCILIATION – PROCESSING AND TROUBLESHOOTING
Introduction
In Microsoft Dynamics AX 2012 R2, you can import electronic bank statements and reconcile the imported bank statements with bank documents. If there are issues with the import process, this white paper provides some steps that can help you debug issues between .xslt files and the file being imported, and it also provides troubleshooting information.
Bank statements and companies
Microsoft Dynamics AX Application Integration Framework (AIF) is not company-specific and works across companies. Because of this, if the inbound port that is set up for the bank statement import is
not restricted to a specific company (in the Restrict to company field on the Security FastTab), the bank statement is imported into the default company from your user profile.
For example, you are logged on to Company B, but your user profile’s default company is Company A. In this case, if you are using an inbound port that is not restricted to a specific company, the bank statement is imported into Company A. However, if the inbound port is restricted to Company B, the bank statement is imported into that company, regardless of the default company assigned to your user profile.
Therefore, you might want to set up a separate inbound port for each company that you must import bank statements into.
Setting up number sequences for bank statement import
To make sure that you have assigned number sequences for all companies that you are importing
bank statements into, use the Cash and bank management parameters form. (Click Cash and
bank management > Setup > Cash and bank management parameters, and then click the Number sequences tab.) Set up number sequences for the statement ID, download ID, and reconcile ID.
Set up advanced bank reconciliation import
Before you can import electronic bank statements and reconcile the imported bank statements with bank documents, you must set up the advanced bank reconciliation import.
Open the Bank accounts form. (Click Cash and bank management > Common > Bank 1.accounts > Bank accounts.)
Select the bank account to reconcile. 2.
4 ADVANCED BANK RECONCILIATION – PROCESSING AND TROUBLESHOOTING
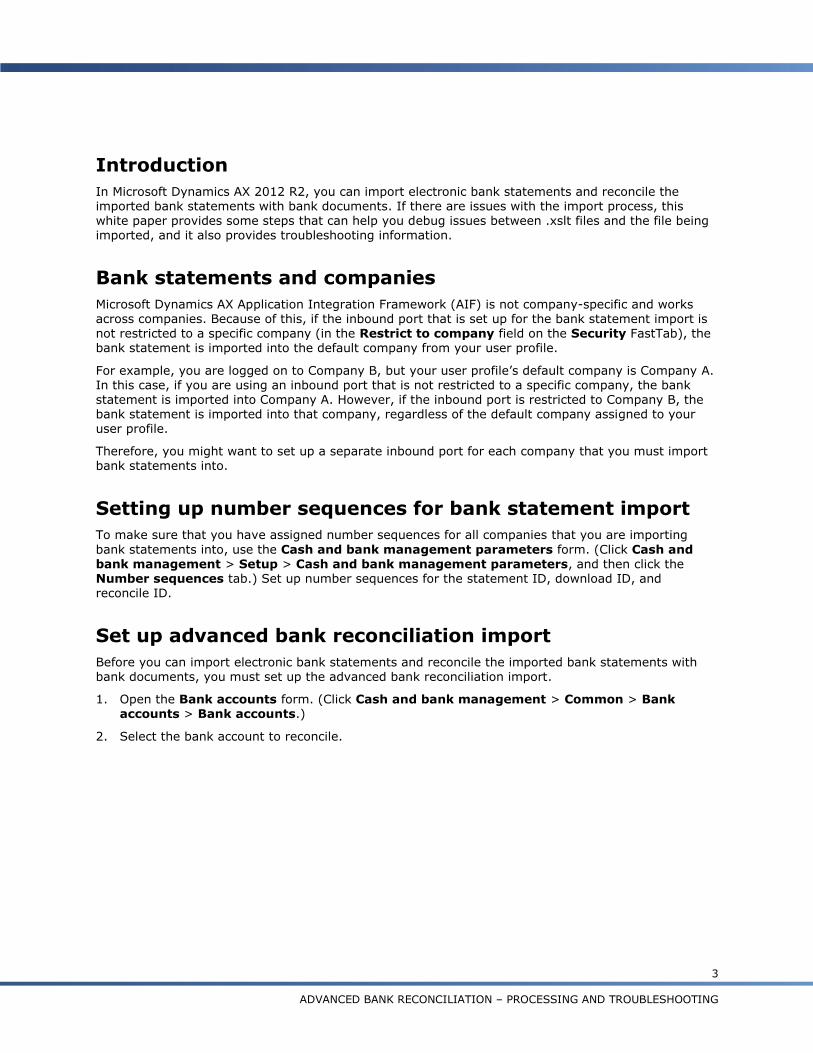
On the Reconciliation FastTab, select the Advanced bank reconciliation check box. 3.
Figure 1 Bank accounts form
Close the form. 4.
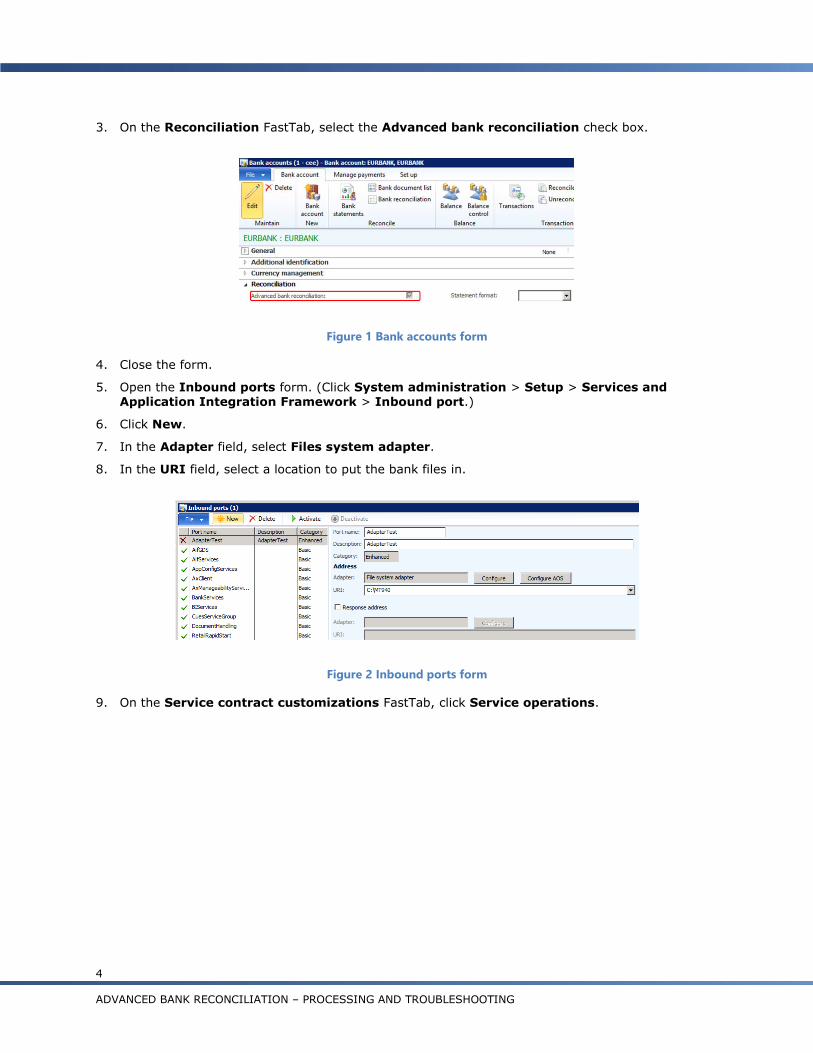
Open the Inbound ports form. (Click System administration > Setup > Services and 5.Application Integration Framework > Inbound port.)
Click New. 6.
In the Adapter field, select Files system adapter. 7.
In the URI field, select a location to put the bank files in. 8.
Figure 2 Inbound ports form
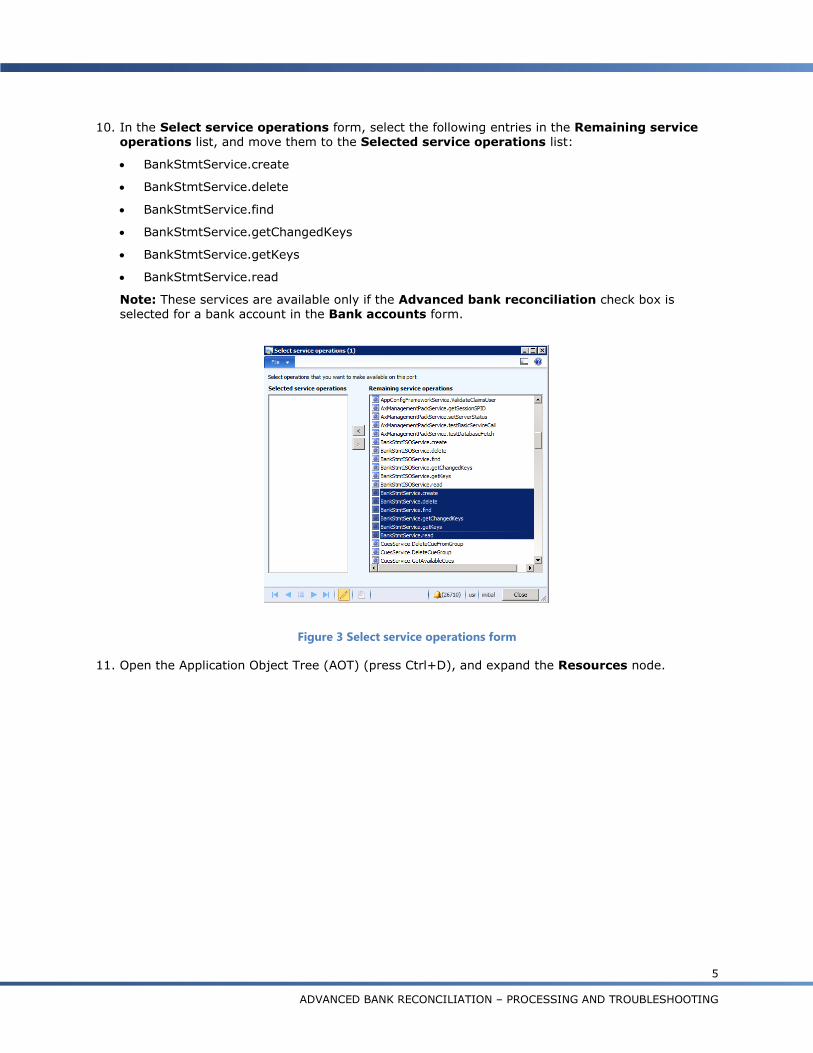
On the Service contract customizations FastTab, click Service operations. 9.
5
ADVANCED BANK RECONCILIATION – PROCESSING AND TROUBLESHOOTING
In the Select service operations form, select the following entries in the Remaining service 10.operations list, and move them to the Selected service operations list:
BankStmtService.create
BankStmtService.delete
BankStmtService.find
BankStmtService.getChangedKeys
BankStmtService.getKeys
BankStmtService.read
Note: These services are available only if the Advanced bank reconciliation check box is selected for a bank account in the Bank accounts form.
Figure 3 Select service operations form
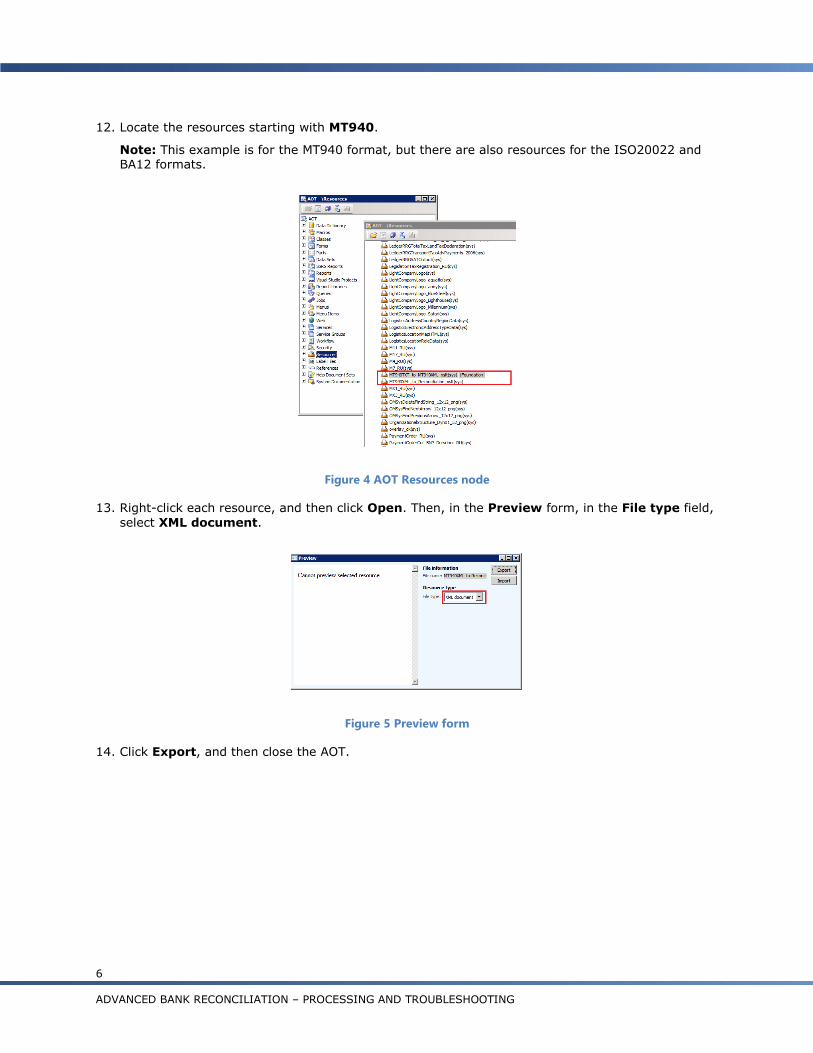
Open the Application Object Tree (AOT) (press Ctrl+D), and expand the Resources node. 11.
6 ADVANCED BANK RECONCILIATION – PROCESSING AND TROUBLESHOOTING
Locate the resources starting with MT940. 12.
Note: This example is for the MT940 format, but there are also resources for the ISO20022 and BA12 formats.
Figure 4 AOT Resources node
Right-click each resource, and then click Open. Then, in the Preview form, in the File type field, 13.
select XML document.
Figure 5 Preview form
Click Export, and then close the AOT. 14.
7
ADVANCED BANK RECONCILIATION – PROCESSING AND TROUBLESHOOTING
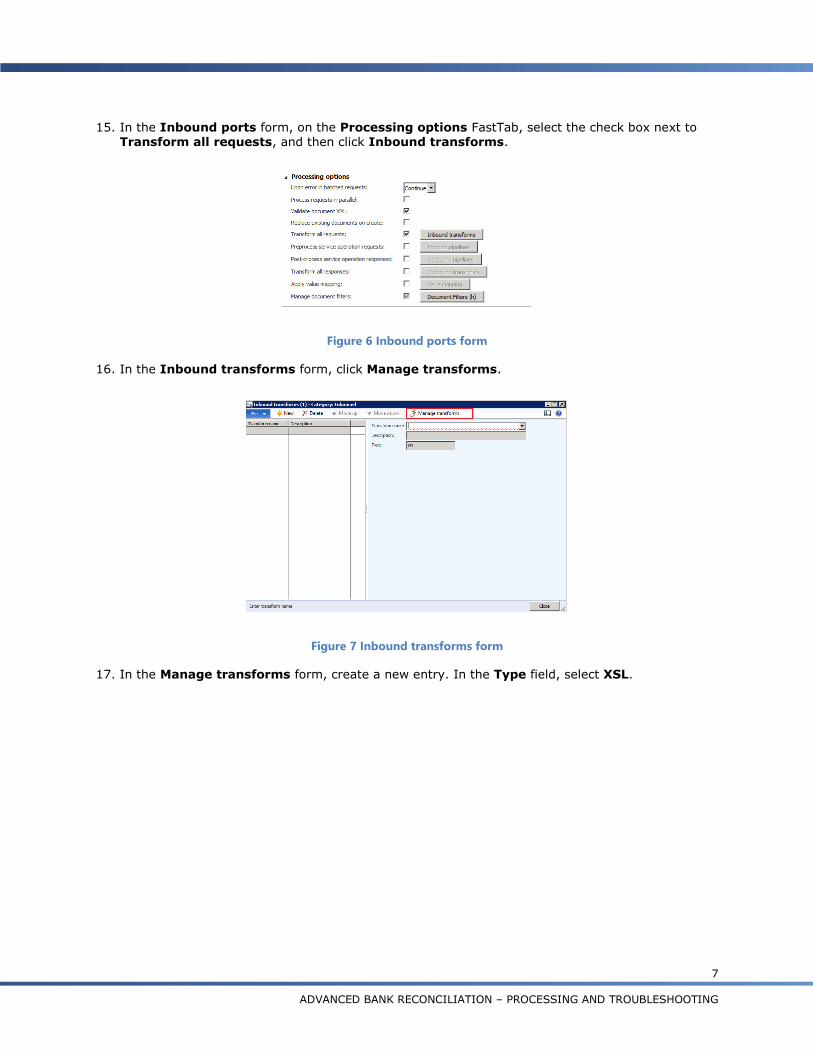
In the Inbound ports form, on the Processing options FastTab, select the check box next to 15.Transform all requests, and then click Inbound transforms.
Figure 6 Inbound ports form
In the Inbound transforms form, click Manage transforms. 16.
Figure 7 Inbound transforms form
In the Manage transforms form, create a new entry. In the Type field, select XSL. 17.
8 ADVANCED BANK RECONCILIATION – PROCESSING AND TROUBLESHOOTING
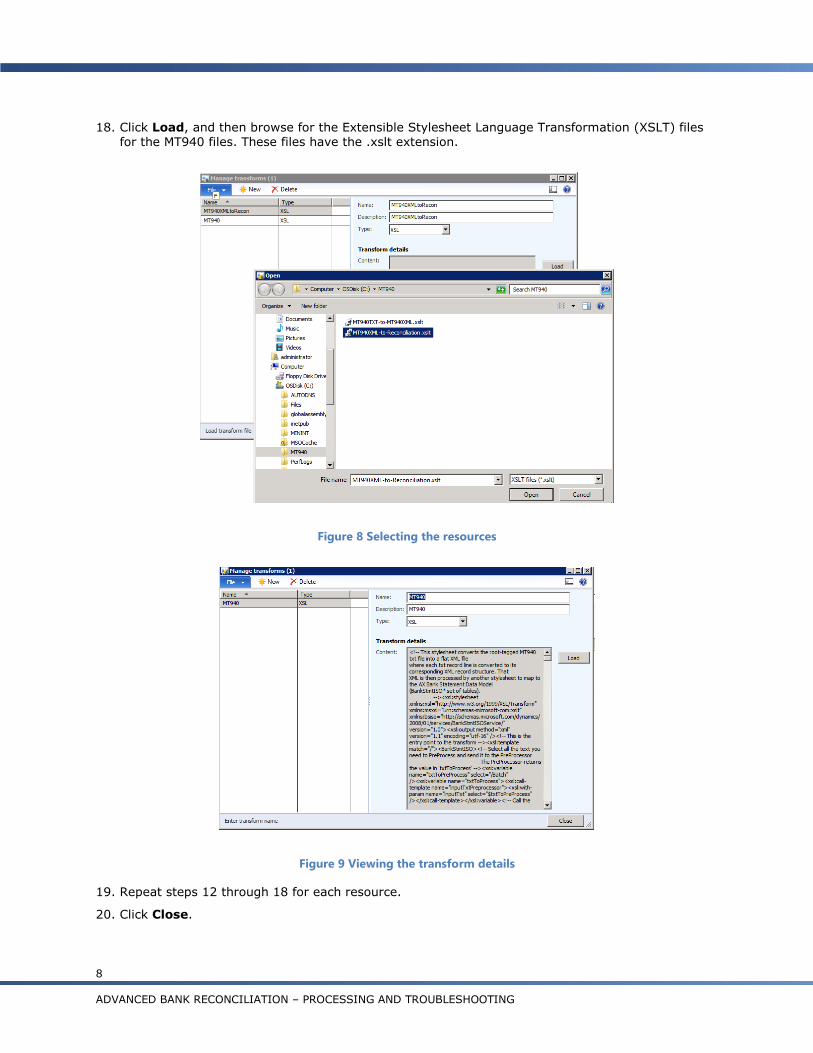
Click Load, and then browse for the Extensible Stylesheet Language Transformation (XSLT) files 18.for the MT940 files. These files have the .xslt extension.
Figure 8 Selecting the resources
Figure 9 Viewing the transform details
Repeat steps 12 through 18 for each resource. 19.
Click Close. 20.
9
ADVANCED BANK RECONCILIATION – PROCESSING AND TROUBLESHOOTING
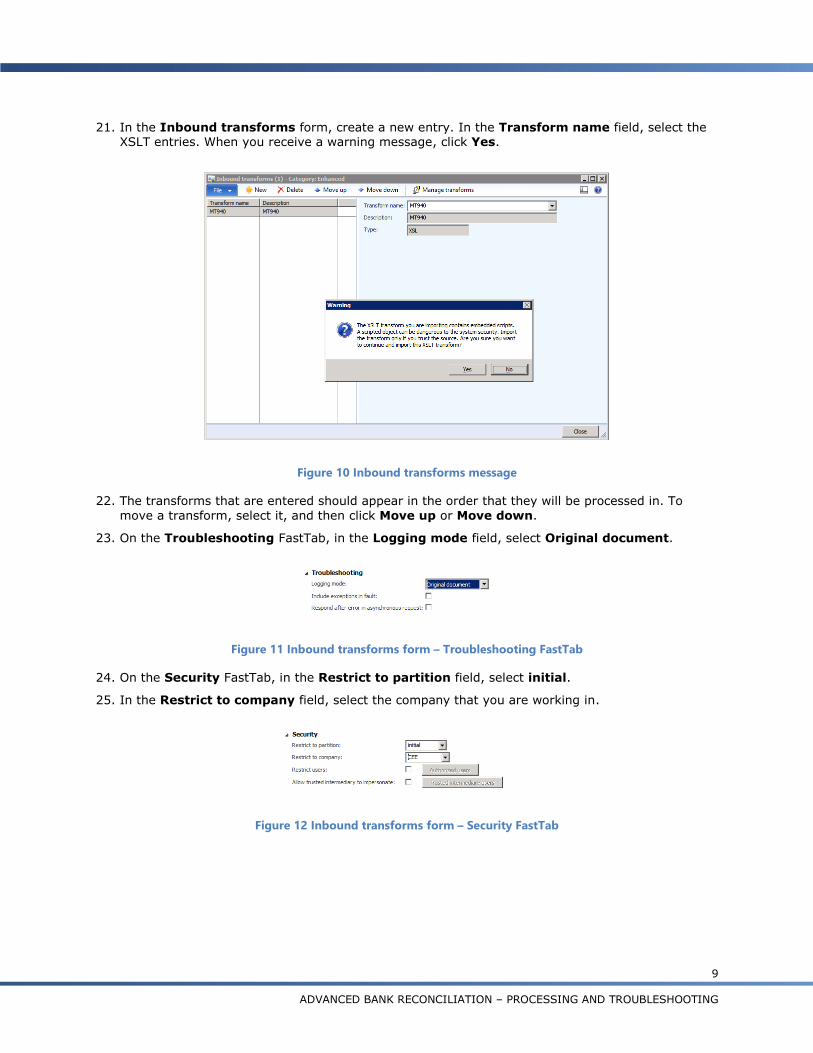
In the Inbound transforms form, create a new entry. In the Transform name field, select the 21.XSLT entries. When you receive a warning message, click Yes.
Figure 10 Inbound transforms message
The transforms that are entered should appear in the order that they will be processed in. To 22.
move a transform, select it, and then click Move up or Move down.
On the Troubleshooting FastTab, in the Logging mode field, select Original document. 23.
Figure 11 Inbound transforms form – Troubleshooting FastTab
On the Security FastTab, in the Restrict to partition field, select initial. 24.
In the Restrict to company field, select the company that you are working in. 25.
Figure 12 Inbound transforms form – Security FastTab
10 ADVANCED BANK RECONCILIATION – PROCESSING AND TROUBLESHOOTING
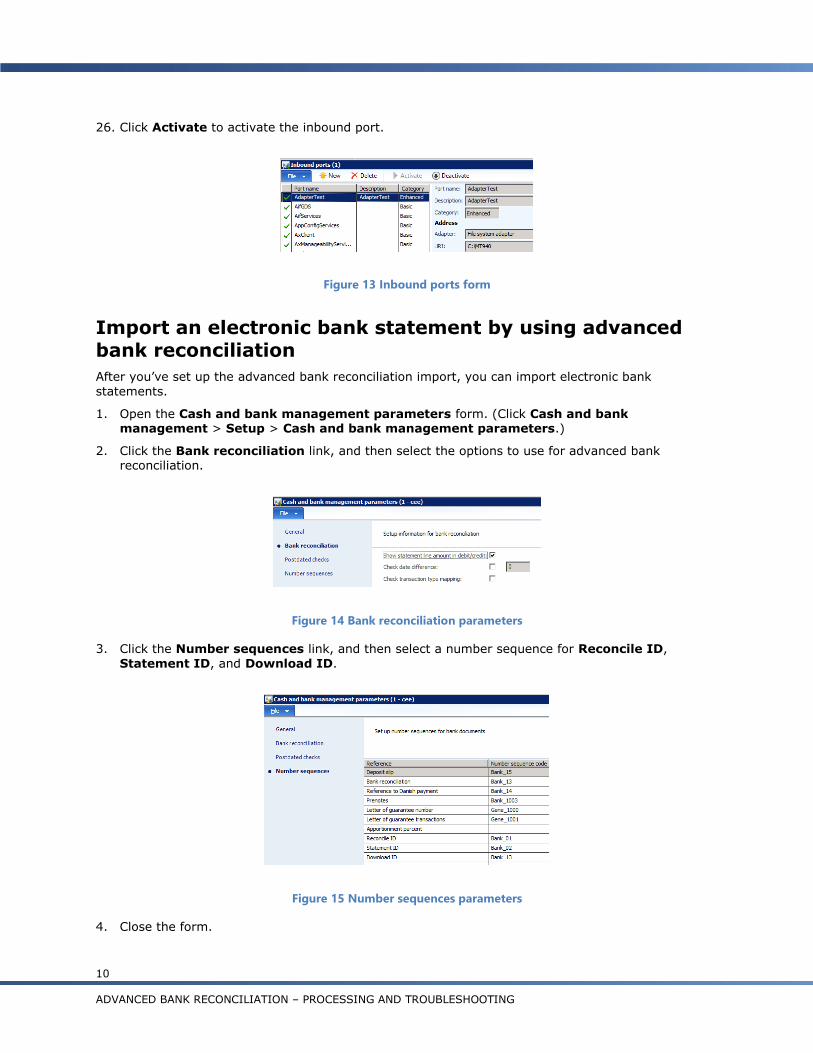
Click Activate to activate the inbound port. 26.
Figure 13 Inbound ports form
Import an electronic bank statement by using advanced
bank reconciliation
After you’ve set up the advanced bank reconciliation import, you can import electronic bank
statements.
Open the Cash and bank management parameters form. (Click Cash and bank 1.management > Setup > Cash and bank management parameters.)
Click the Bank reconciliation link, and then select the options to use for advanced bank 2.reconciliation.
Figure 14 Bank reconciliation parameters
Click the Number sequences link, and then select a number sequence for Reconcile ID, 3.
Statement ID, and Download ID.
Figure 15 Number sequences parameters
Close the form. 4.
11
ADVANCED BANK RECONCILIATION – PROCESSING AND TROUBLESHOOTING
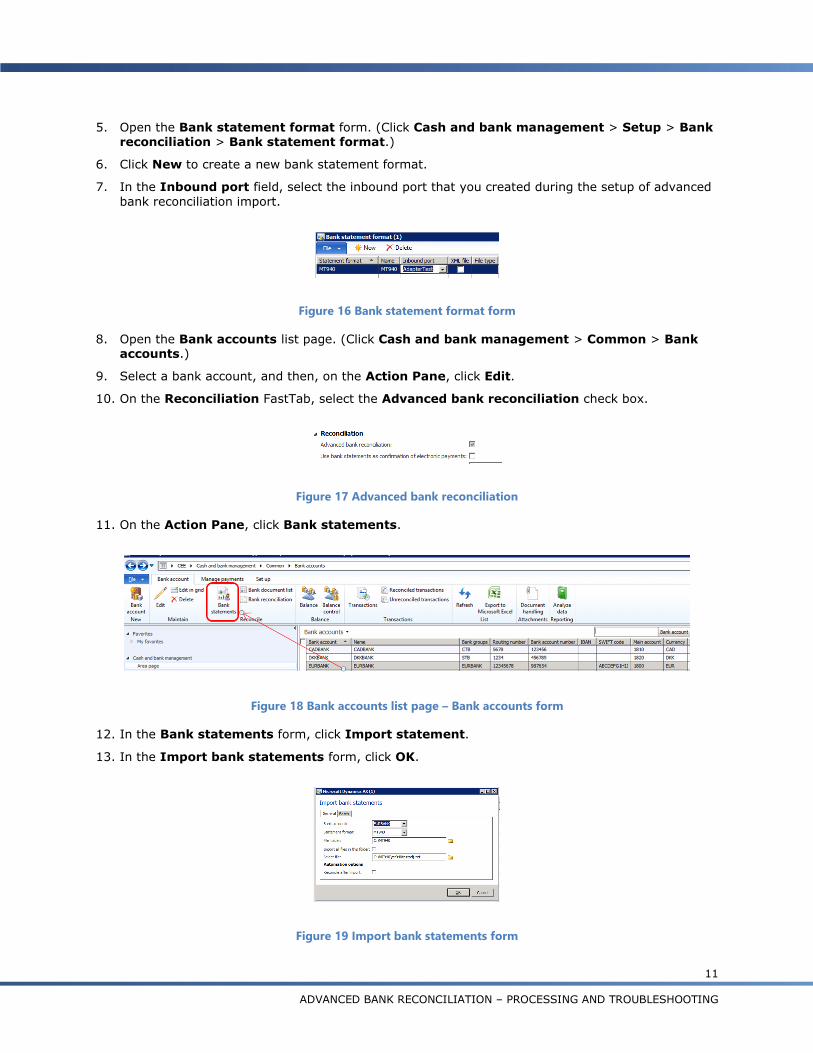
Open the Bank statement format form. (Click Cash and bank management > Setup > Bank 5.reconciliation > Bank statement format.)
Click New to create a new bank statement format. 6.
In the Inbound port field, select the inbound port that you created during the setup of advanced 7.
bank reconciliation import.
Figure 16 Bank statement format form
Open the Bank accounts list page. (Click Cash and bank management > Common > Bank 8.accounts.)
Select a bank account, and then, on the Action Pane, click Edit. 9.
On the Reconciliation FastTab, select the Advanced bank reconciliation check box. 10.
Figure 17 Advanced bank reconciliation
On the Action Pane, click Bank statements. 11.
Figure 18 Bank accounts list page – Bank accounts form
In the Bank statements form, click Import statement. 12.
In the Import bank statements form, click OK. 13.
Figure 19 Import bank statements form
12 ADVANCED BANK RECONCILIATION – PROCESSING AND TROUBLESHOOTING
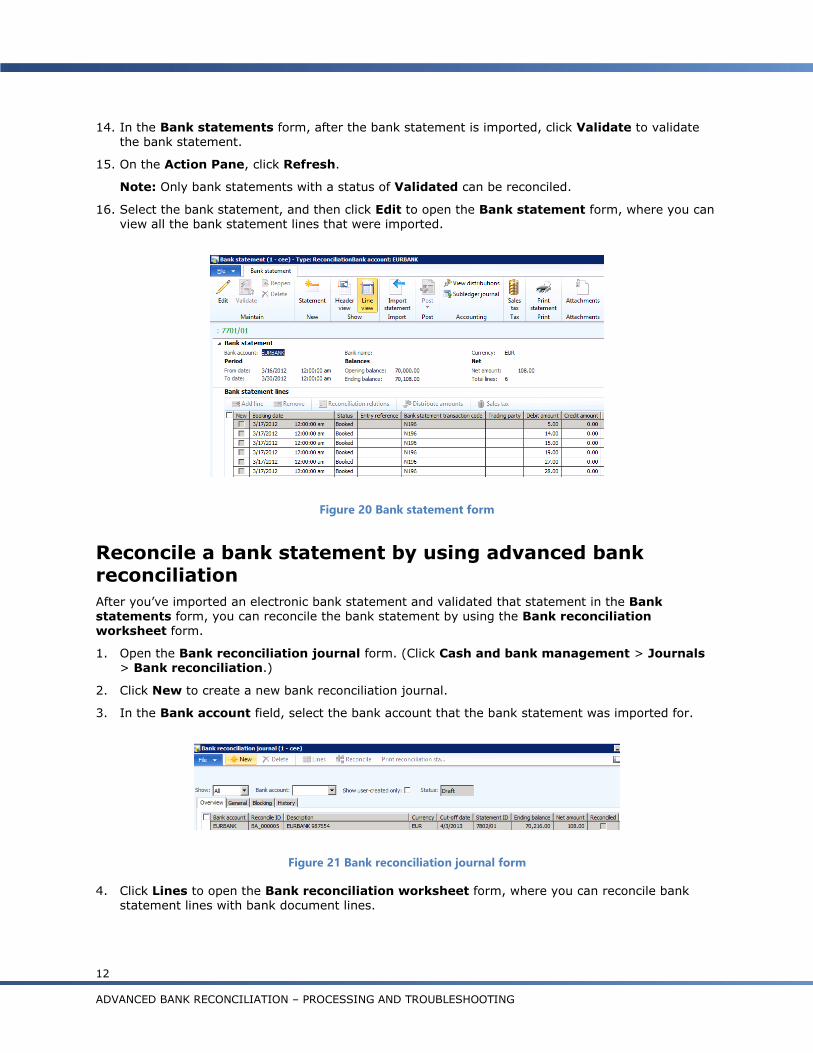
In the Bank statements form, after the bank statement is imported, click Validate to validate 14.the bank statement.
On the Action Pane, click Refresh. 15.
Note: Only bank statements with a status of Validated can be reconciled.
Select the bank statement, and then click Edit to open the Bank statement form, where you can 16.view all the bank statement lines that were imported.
Figure 20 Bank statement form
Reconcile a bank statement by using advanced bank reconciliation
After you’ve imported an electronic bank statement and validated that statement in the Bank statements form, you can reconcile the bank statement by using the Bank reconciliation worksheet form.
Open the Bank reconciliation journal form. (Click Cash and bank management > Journals 1.> Bank reconciliation.)
Click New to create a new bank reconciliation journal. 2.
In the Bank account field, select the bank account that the bank statement was imported for. 3.
Figure 21 Bank reconciliation journal form
Click Lines to open the Bank reconciliation worksheet form, where you can reconcile bank 4.statement lines with bank document lines.
13
ADVANCED BANK RECONCILIATION – PROCESSING AND TROUBLESHOOTING
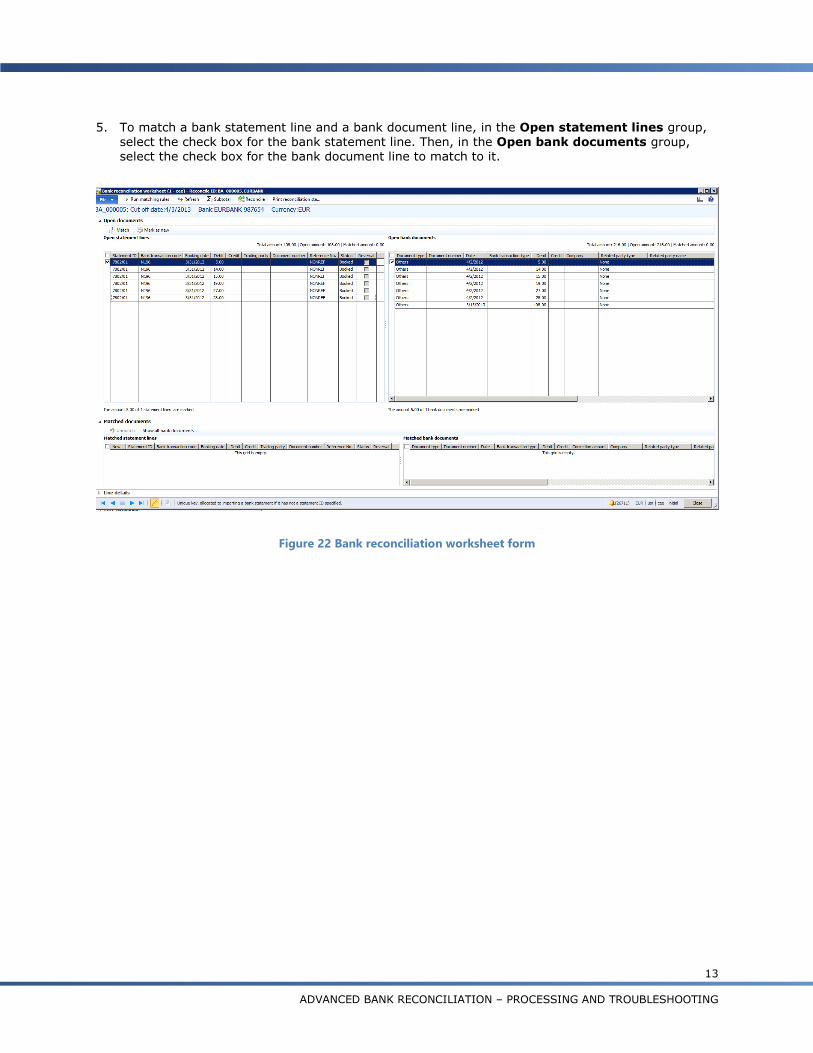
To match a bank statement line and a bank document line, in the Open statement lines group, 5.select the check box for the bank statement line. Then, in the Open bank documents group, select the check box for the bank document line to match to it.
Figure 22 Bank reconciliation worksheet form
14 ADVANCED BANK RECONCILIATION – PROCESSING AND TROUBLESHOOTING
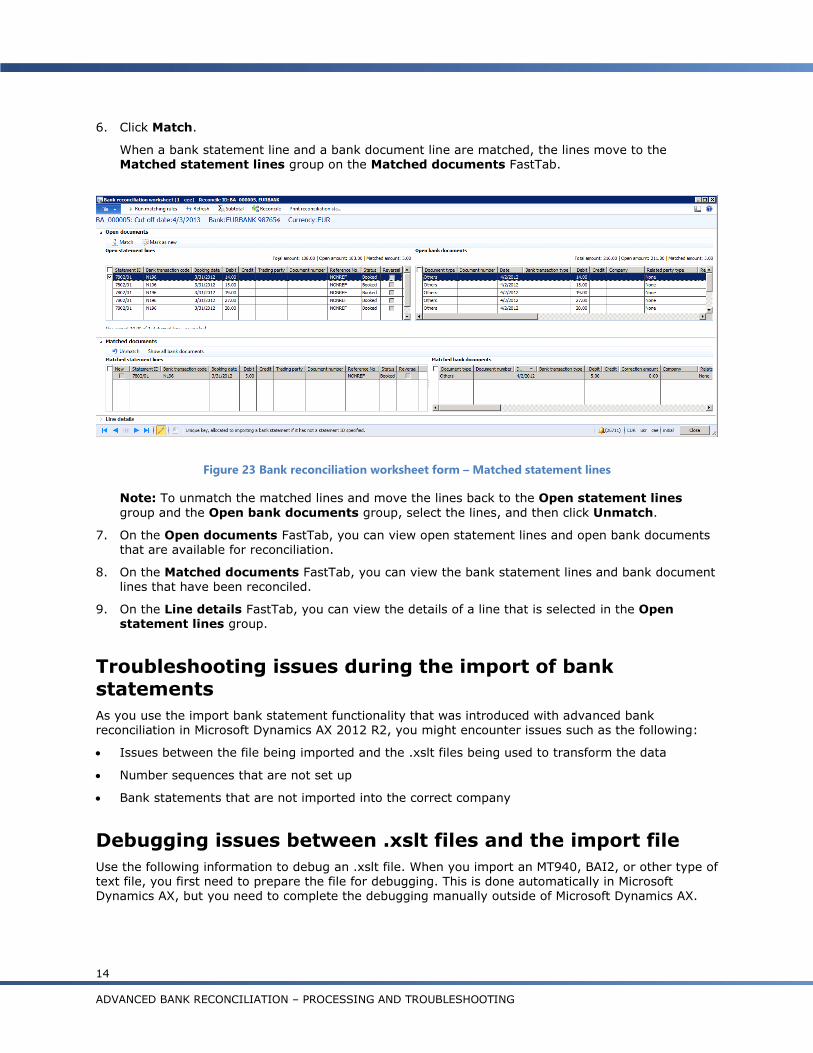
Click Match. 6.
When a bank statement line and a bank document line are matched, the lines move to the Matched statement lines group on the Matched documents FastTab.
Figure 23 Bank reconciliation worksheet form – Matched statement lines
Note: To unmatch the matched lines and move the lines back to the Open statement lines
group and the Open bank documents group, select the lines, and then click Unmatch.
On the Open documents FastTab, you can view open statement lines and open bank documents 7.that are available for reconciliation.
On the Matched documents FastTab, you can view the bank statement lines and bank document 8.lines that have been reconciled.
On the Line details FastTab, you can view the details of a line that is selected in the Open 9.statement lines group.
Troubleshooting issues during the import of bank statements
As you use the import bank statement functionality that was introduced with advanced bank reconciliation in Microsoft Dynamics AX 2012 R2, you might encounter issues such as the following:
Issues between the file being imported and the .xslt files being used to transform the data
Number sequences that are not set up
Bank statements that are not imported into the correct company
Debugging issues between .xslt files and the import file
Use the following information to debug an .xslt file. When you import an MT940, BAI2, or other type of text file, you first need to prepare the file for debugging. This is done automatically in Microsoft Dynamics AX, but you need to complete the debugging manually outside of Microsoft Dynamics AX.
15
ADVANCED BANK RECONCILIATION – PROCESSING AND TROUBLESHOOTING
If you are importing an XML file, start with step 2, because your file is already in the proper format.
In a text editor such as Notepad, open the file to import. Because this is a text file, you must add 1.the content XML header so that the file can be used by the .xslt file.
Add this information to the top of your text file:
<?xml version="1.0"?>
<Batch><![CDATA[
Add this information to the bottom of your text file:
]]></Batch>
Save the file. 2.
In Microsoft Visual Studio, open the .xslt file. This .xslt file is used to convert the raw file to a flat 3.
XML file. Open the properties sheet (click View > Properties Window), and select the file from
step 1 as your input file.
Note: The MT940 and BAI2 imports use two XLST transforms – one to transform from text file to XML and another to transform from XML to the reconciliation format. Most problems occur in the transform from text file to XML.
In Visual Studio, add breakpoints where needed, such as at the rowToFields section. 4.
Start the debugger by clicking XML > Start XSLT Debugging or DEBUG > Start XSLT 5.Debugging. Use standard debugging commands such as Step into, Step over, Step out, and Continue to move within the .xslt file.
In the Output window, monitor the output, and compare it with your expected output. 6.
Make any necessary changes to the .xslt file, and then save your changes. Then reload the 7.changes into your transform within AIF to make them work in Microsoft Dynamics AX.
When you’ve finished debugging, if you added the debugging text to your file in step 1, remove 8.
that text before you try to import your file.
16 ADVANCED BANK RECONCILIATION – PROCESSING AND TROUBLESHOOTING
The information contained in this document represents the current view of Microsoft Corporation on the issues discussed as of the
date of publication. Because Microsoft must respond to changing market conditions, it should not be interpreted to be a
commitment on the part of Microsoft, and Microsoft cannot guarantee the accuracy of any information presented after the date of
publication.
This white paper is for informational purposes only. Microsoft makes no warranties, express or implied, in this document.
Complying with all applicable copyright laws is the responsibility of the user. Without limiting the rights under copyright, no part of this document may be reproduced, stored in, or introduced into a retrieval system, or transmitted in any form or by any means
(electronic, mechanical, photocopying, recording, or otherwise), or for any purpose, without the express written permission of
Microsoft Corporation.
Microsoft may have patents, patent applications, trademarks, copyrights, or other intellectual property rights covering subject
matter in this document. Except as expressly provided in any written license agreement from Microsoft, the furnishing of this
document does not give you any license to these patents, trademarks, copyrights, or other intellectual property.
© 2013 Microsoft Corporation. All rights reserved.
Microsoft, Microsoft Dynamics, the Microsoft Dynamics logo, and Visual Studio are either registered trademarks or trademarks of
Microsoft Corporation in the United States and/or other countries.
Microsoft Dynamics is a line of integrated, adaptable business management solutions that enables you and your people to make business decisions with greater confidence. Microsoft Dynamics works like and with familiar Microsoft software, automating and streamlining financial, customer relationship and supply chain processes in a way that helps you drive business success.
U.S. and Canada Toll Free 1-888-477-7989
Worldwide +1-701-281-6500
www.microsoft.com/dynamics