Embed Size (px)
Citation preview
SAP COMMUNITY NETWORK SDN - sdn.sap.com | BPX - bpx.sap.com | BOC - boc.sap.com | UAC - uac.sap.com
© 2011 SAP AG 1
ALE Settings, for Communication
between a BW System and an SAP
System
Applies to:
SAP ECC 6.0. For more details, visit the EDW homepage.
Summary
This document helps people to create ALE settings, which are needed for the communication between a BW System and an SAP System (ECC), are created in the background with the use of the created destinations.
Author: Sai Ram Reddy Neelapu
Company: Atos Origin - Singapore
Created on: 04 April 2011
Author Bio
Sai Ram Reddy Neelapu working as Senior ABAP Consultant, with Atos Origin for past 6 years.
ALE Settings, for Communication between a BW System and an SAP System
SAP COMMUNITY NETWORK SDN - sdn.sap.com | BPX - bpx.sap.com | BOC - boc.sap.com | UAC - uac.sap.com
© 2011 SAP AG 2
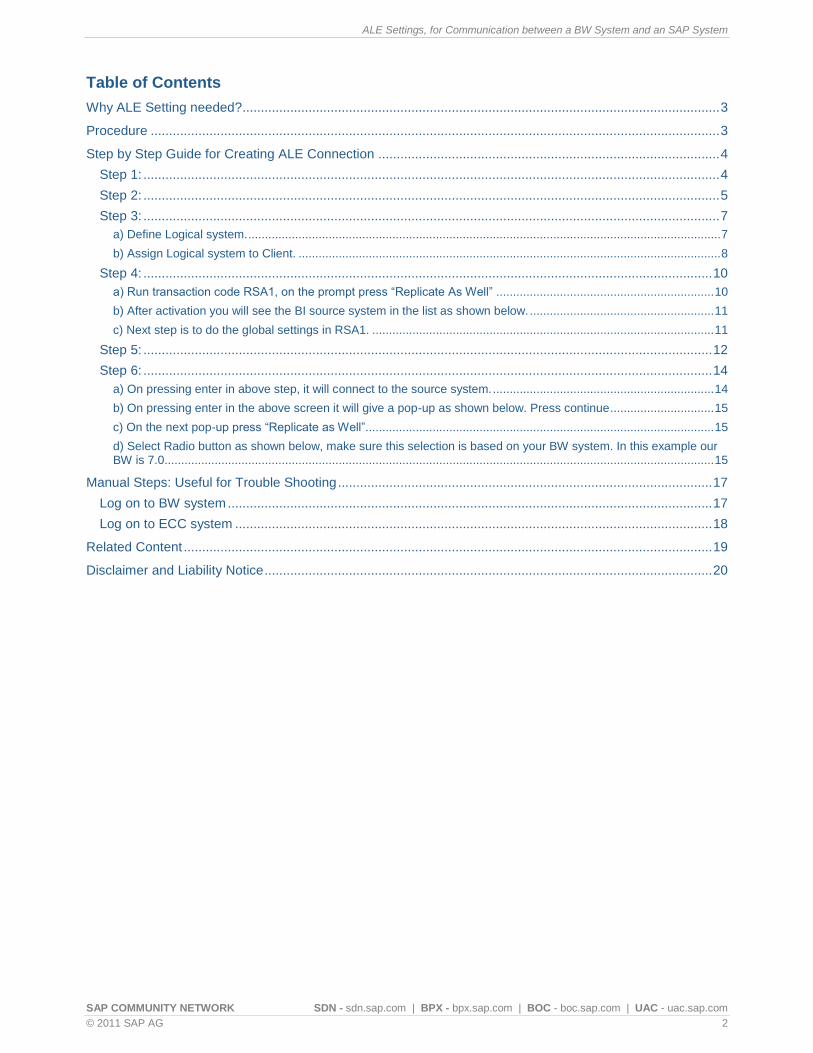
Table of Contents
Why ALE Setting needed?.................................................................................................................................. 3
Procedure ........................................................................................................................................................... 3
Step by Step Guide for Creating ALE Connection ............................................................................................. 4
Step 1: ............................................................................................................................................................. 4
Step 2: ............................................................................................................................................................. 5
Step 3: ............................................................................................................................................................. 7 a) Define Logical system. ............................................................................................................................................. 7
b) Assign Logical system to Client. .............................................................................................................................. 8
Step 4: ........................................................................................................................................................... 10 a) Run transaction code RSA1, on the prompt press “Replicate As Well” ................................................................. 10
b) After activation you will see the BI source system in the list as shown below. ....................................................... 11
c) Next step is to do the global settings in RSA1. ...................................................................................................... 11
Step 5: ........................................................................................................................................................... 12
Step 6: ........................................................................................................................................................... 14 a) On pressing enter in above step, it will connect to the source system. .................................................................. 14
b) On pressing enter in the above screen it will give a pop-up as shown below. Press continue ............................... 15
c) On the next pop-up press “Replicate as Well”. ....................................................................................................... 15
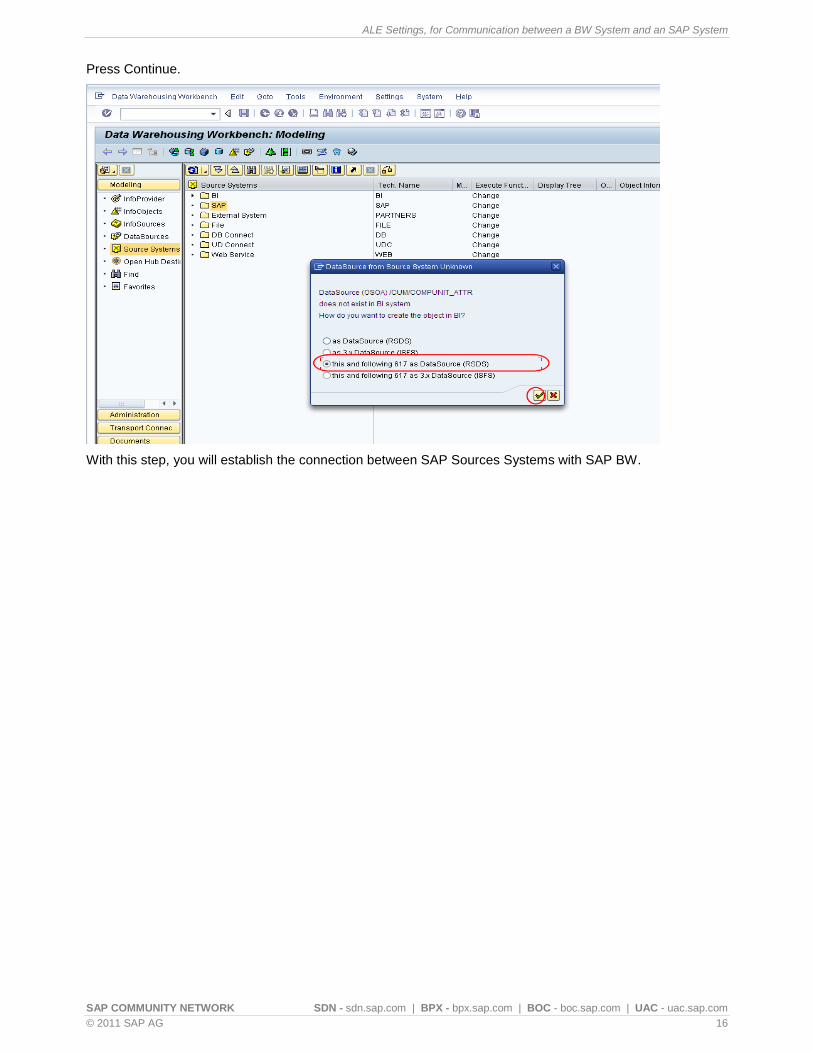
d) Select Radio button as shown below, make sure this selection is based on your BW system. In this example our BW is 7.0.................................................................................................................................................................... 15
Manual Steps: Useful for Trouble Shooting ...................................................................................................... 17
Log on to BW system .................................................................................................................................... 17
Log on to ECC system .................................................................................................................................. 18
Related Content ................................................................................................................................................ 19
Disclaimer and Liability Notice .......................................................................................................................... 20
ALE Settings, for Communication between a BW System and an SAP System
SAP COMMUNITY NETWORK SDN - sdn.sap.com | BPX - bpx.sap.com | BOC - boc.sap.com | UAC - uac.sap.com
© 2011 SAP AG 3
Why ALE Setting needed?
The ALE settings, which are needed for the communication between a BW System and an SAP System (ECC), are created in the background with the use of the created destinations. These settings are made in BW as well as in the source system (ECC). The BW settings for the new connection are created in BW.
If the new SAP source system has been created, Metadata is requested automatically from the source system.
Procedure
There are two different ways of establishing the connection with source system.
Creating an SAP Source System Manually
Creating an SAP Source System Automatically
ALE Settings, for Communication between a BW System and an SAP System
SAP COMMUNITY NETWORK SDN - sdn.sap.com | BPX - bpx.sap.com | BOC - boc.sap.com | UAC - uac.sap.com
© 2011 SAP AG 4
Step by Step Guide for Creating ALE Connection
List of transaction codes, needs to be used.
SU01 Maintain user
SALE Display ALE Customizing
RSA1 Modeling - DW Workbench
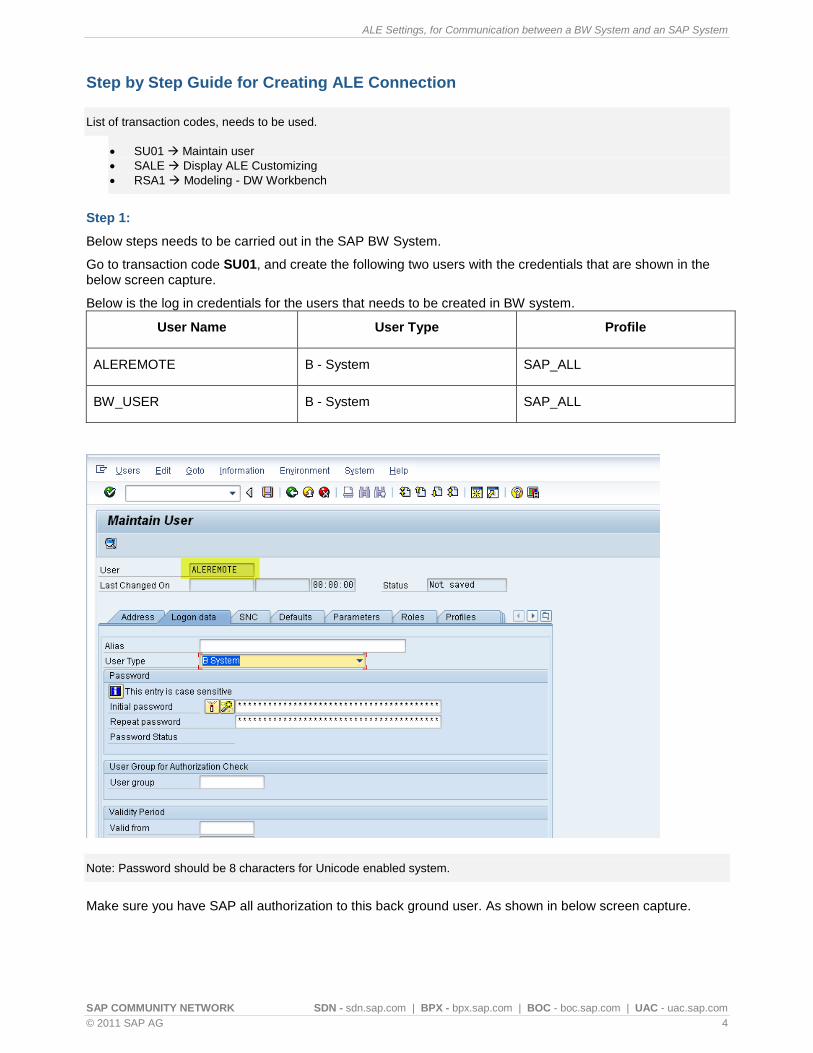
Step 1:
Below steps needs to be carried out in the SAP BW System.
Go to transaction code SU01, and create the following two users with the credentials that are shown in the below screen capture.
Below is the log in credentials for the users that needs to be created in BW system.
User Name User Type Profile
ALEREMOTE B - System SAP_ALL
BW_USER B - System SAP_ALL
Note: Password should be 8 characters for Unicode enabled system.
Make sure you have SAP all authorization to this back ground user. As shown in below screen capture.
ALE Settings, for Communication between a BW System and an SAP System
SAP COMMUNITY NETWORK SDN - sdn.sap.com | BPX - bpx.sap.com | BOC - boc.sap.com | UAC - uac.sap.com
© 2011 SAP AG 5
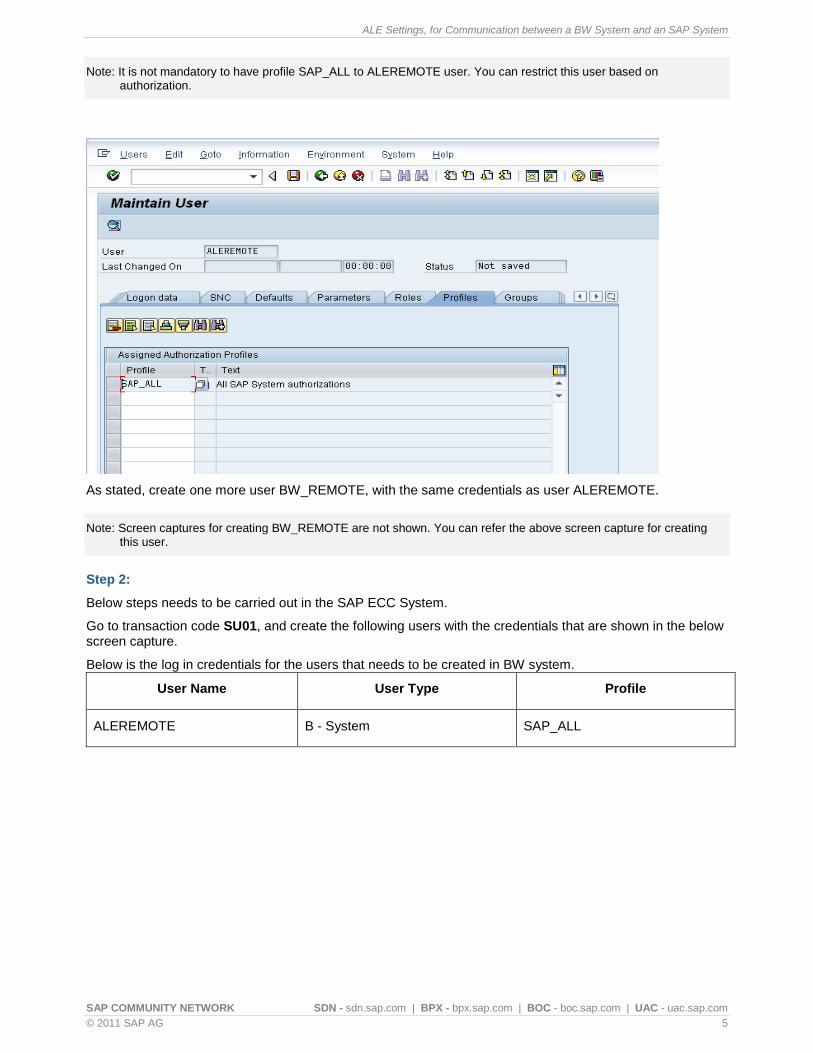
Note: It is not mandatory to have profile SAP_ALL to ALEREMOTE user. You can restrict this user based on authorization.
As stated, create one more user BW_REMOTE, with the same credentials as user ALEREMOTE.
Note: Screen captures for creating BW_REMOTE are not shown. You can refer the above screen capture for creating this user.
Step 2:
Below steps needs to be carried out in the SAP ECC System.
Go to transaction code SU01, and create the following users with the credentials that are shown in the below screen capture.
Below is the log in credentials for the users that needs to be created in BW system.
User Name User Type Profile
ALEREMOTE B - System SAP_ALL

ALE Settings, for Communication between a BW System and an SAP System
SAP COMMUNITY NETWORK SDN - sdn.sap.com | BPX - bpx.sap.com | BOC - boc.sap.com | UAC - uac.sap.com
© 2011 SAP AG 6
Note: Password should be 8 characters for Unicode enabled system.
Make sure you have SAP all authorization to this back ground user. As shown in below screen capture.
Note: It is not mandatory to have profile SAP_ALL to ALEREMOTE user. You can restrict this user based on authorization.
ALE Settings, for Communication between a BW System and an SAP System
SAP COMMUNITY NETWORK SDN - sdn.sap.com | BPX - bpx.sap.com | BOC - boc.sap.com | UAC - uac.sap.com
© 2011 SAP AG 7
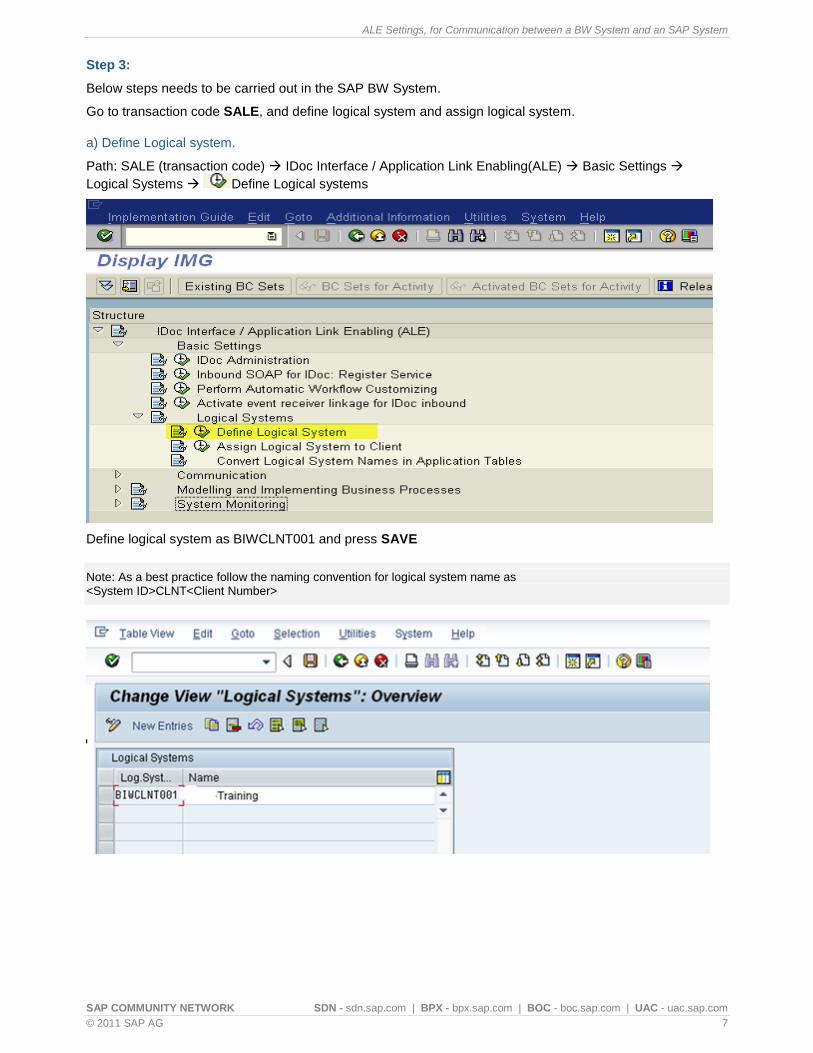
Step 3:
Below steps needs to be carried out in the SAP BW System.
Go to transaction code SALE, and define logical system and assign logical system.
a) Define Logical system.
Path: SALE (transaction code) IDoc Interface / Application Link Enabling(ALE) Basic Settings
Logical Systems Define Logical systems
Define logical system as BIWCLNT001 and press SAVE
Note: As a best practice follow the naming convention for logical system name as <System ID>CLNT<Client Number>
ALE Settings, for Communication between a BW System and an SAP System
SAP COMMUNITY NETWORK SDN - sdn.sap.com | BPX - bpx.sap.com | BOC - boc.sap.com | UAC - uac.sap.com
© 2011 SAP AG 8
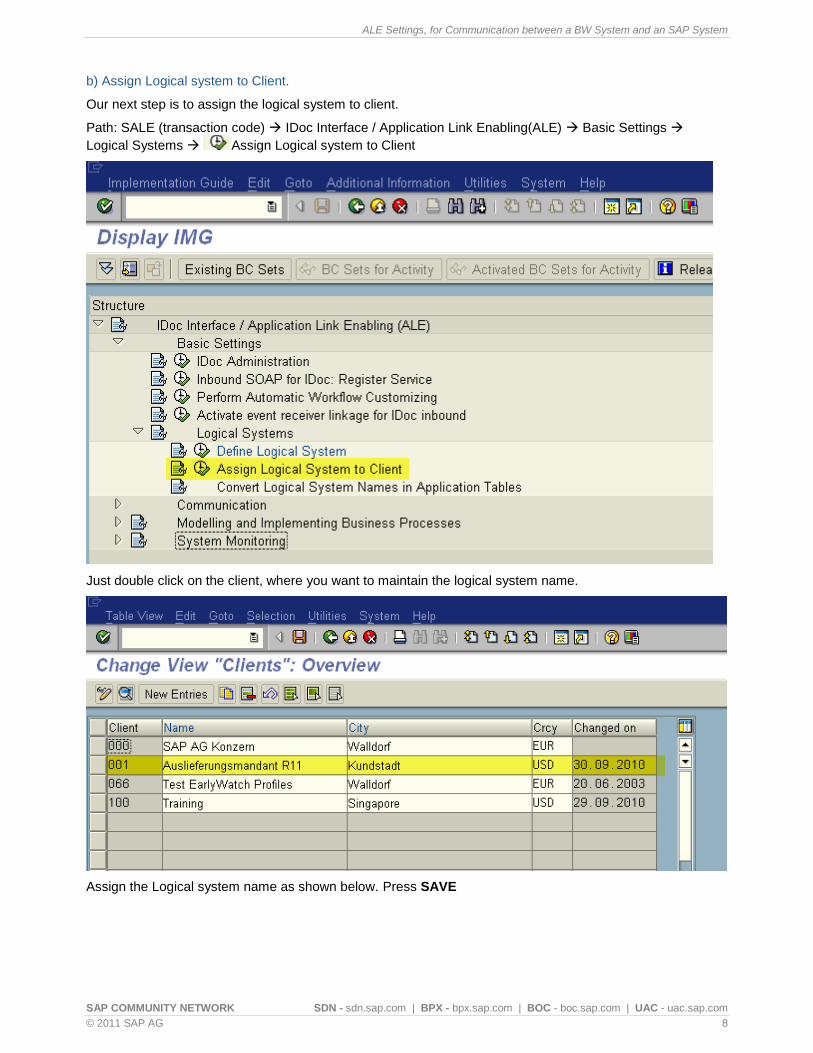
b) Assign Logical system to Client.
Our next step is to assign the logical system to client.
Path: SALE (transaction code) IDoc Interface / Application Link Enabling(ALE) Basic Settings
Logical Systems Assign Logical system to Client
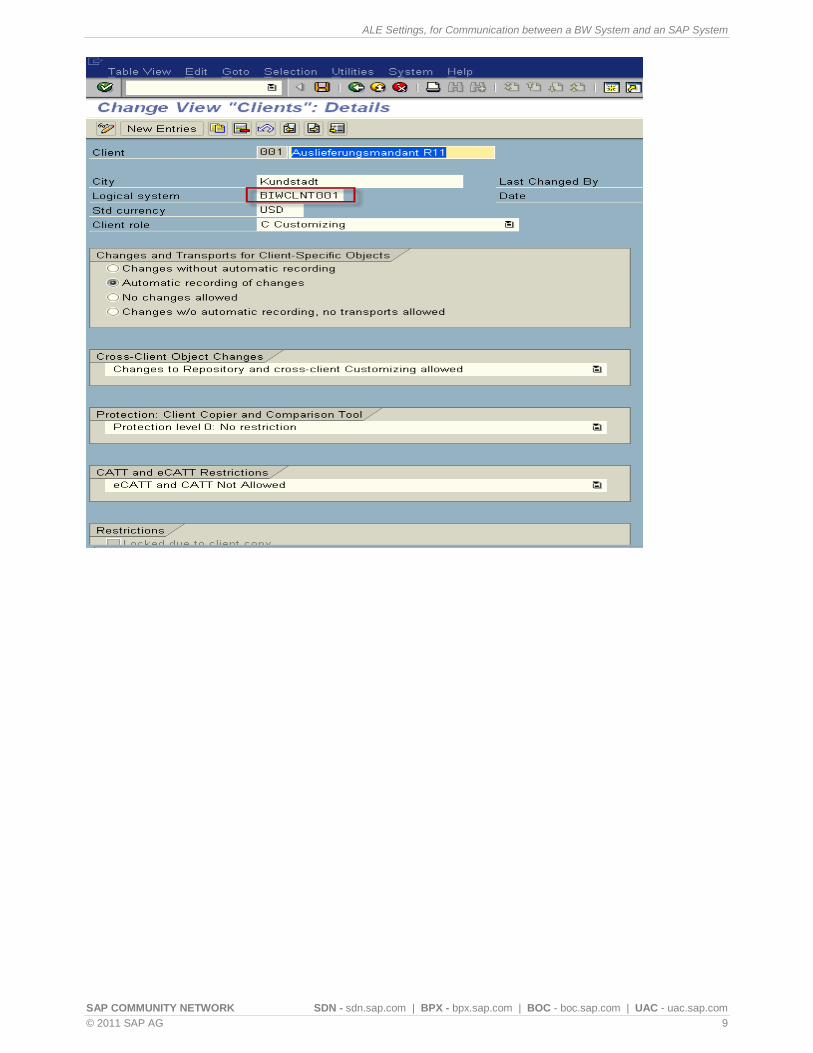
Just double click on the client, where you want to maintain the logical system name.
Assign the Logical system name as shown below. Press SAVE
ALE Settings, for Communication between a BW System and an SAP System
SAP COMMUNITY NETWORK SDN - sdn.sap.com | BPX - bpx.sap.com | BOC - boc.sap.com | UAC - uac.sap.com
© 2011 SAP AG 9
ALE Settings, for Communication between a BW System and an SAP System
SAP COMMUNITY NETWORK SDN - sdn.sap.com | BPX - bpx.sap.com | BOC - boc.sap.com | UAC - uac.sap.com
© 2011 SAP AG 10
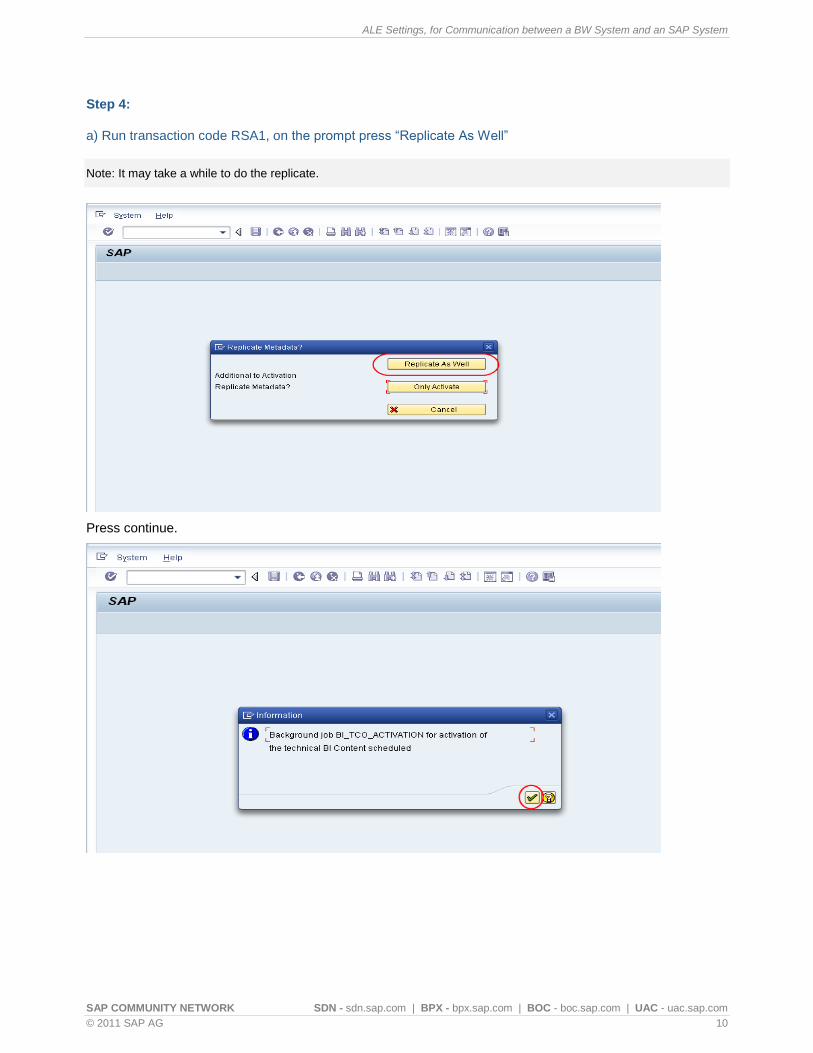
Step 4:
a) Run transaction code RSA1, on the prompt press “Replicate As Well”
Note: It may take a while to do the replicate.
Press continue.
ALE Settings, for Communication between a BW System and an SAP System
SAP COMMUNITY NETWORK SDN - sdn.sap.com | BPX - bpx.sap.com | BOC - boc.sap.com | UAC - uac.sap.com
© 2011 SAP AG 11
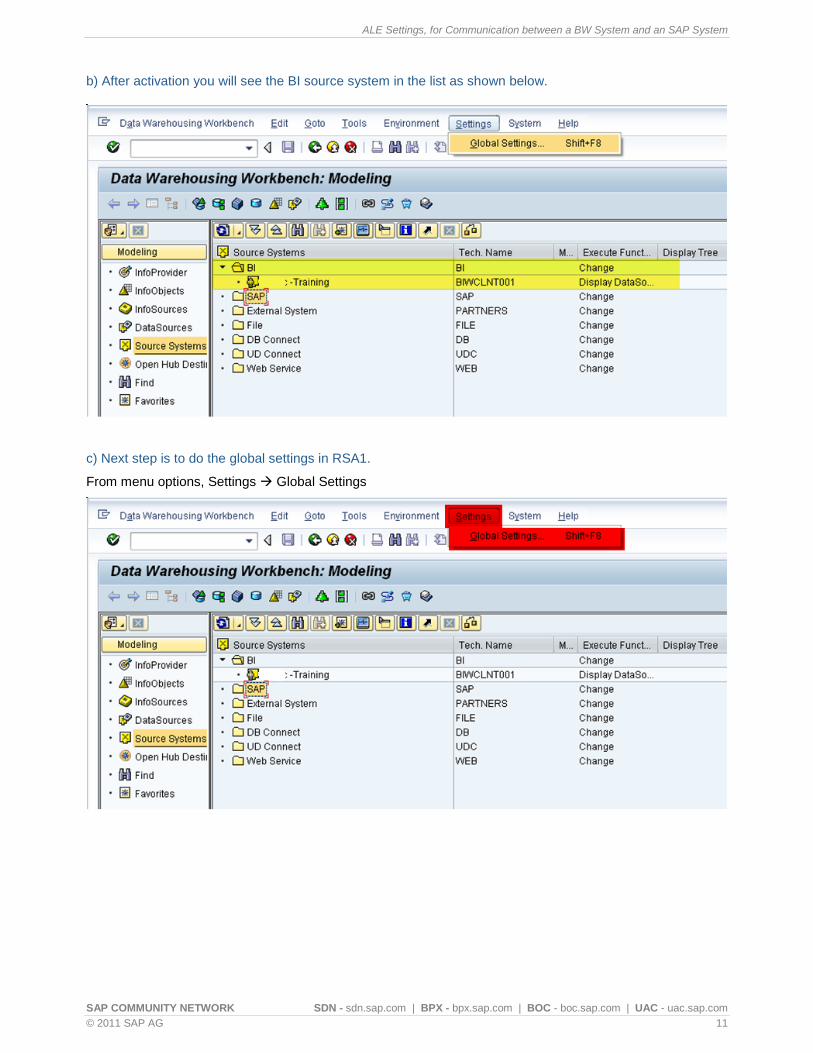
b) After activation you will see the BI source system in the list as shown below.
c) Next step is to do the global settings in RSA1.
From menu options, Settings Global Settings
ALE Settings, for Communication between a BW System and an SAP System
SAP COMMUNITY NETWORK SDN - sdn.sap.com | BPX - bpx.sap.com | BOC - boc.sap.com | UAC - uac.sap.com
© 2011 SAP AG 12
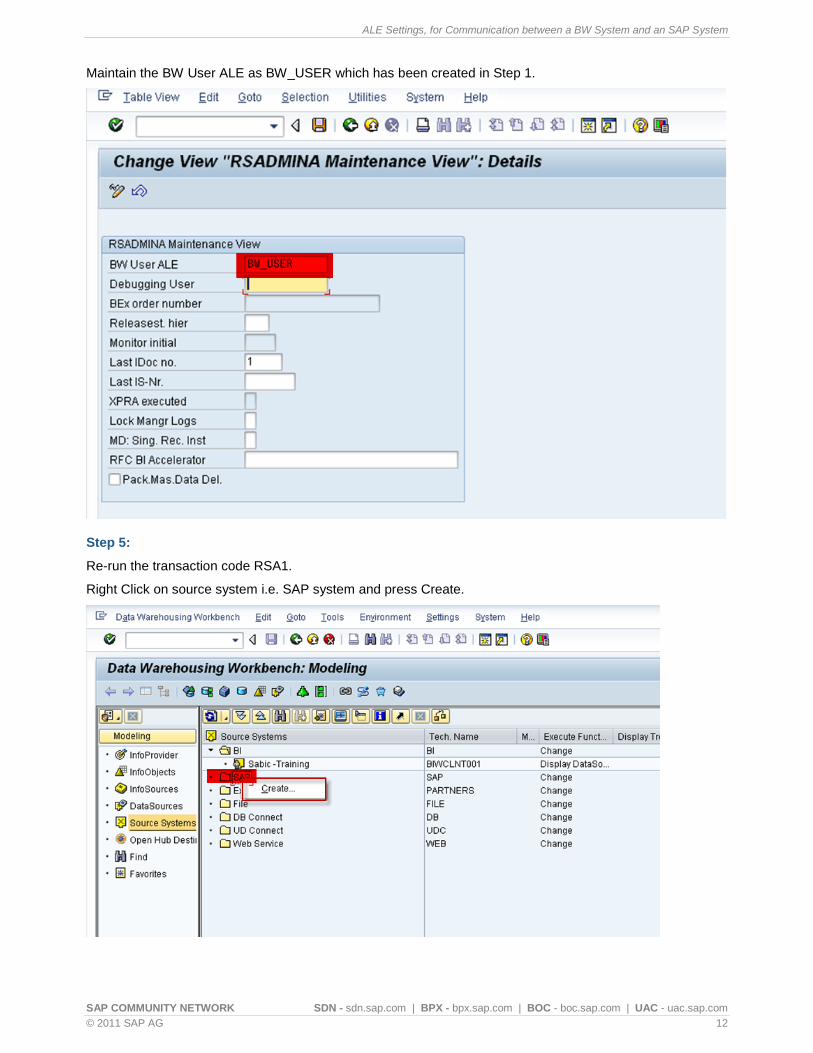
Maintain the BW User ALE as BW_USER which has been created in Step 1.
Step 5:
Re-run the transaction code RSA1.
Right Click on source system i.e. SAP system and press Create.
ALE Settings, for Communication between a BW System and an SAP System
SAP COMMUNITY NETWORK SDN - sdn.sap.com | BPX - bpx.sap.com | BOC - boc.sap.com | UAC - uac.sap.com
© 2011 SAP AG 13
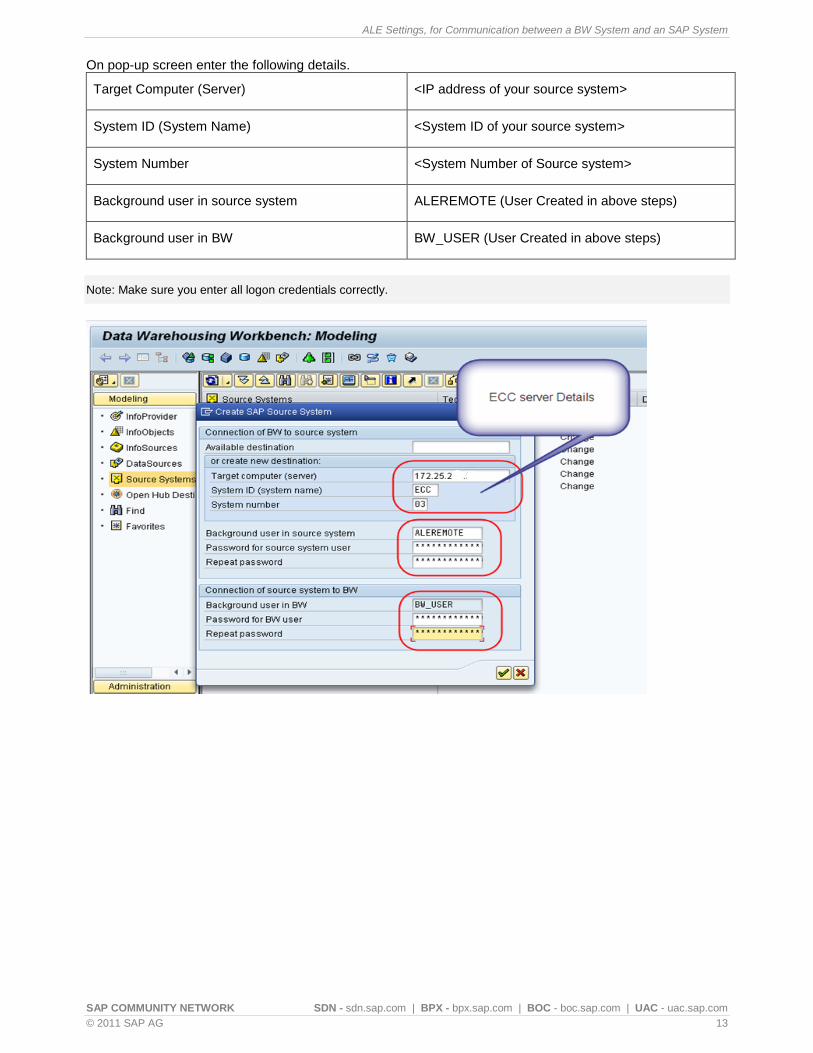
On pop-up screen enter the following details.
Target Computer (Server) <IP address of your source system>
System ID (System Name) <System ID of your source system>
System Number <System Number of Source system>
Background user in source system ALEREMOTE (User Created in above steps)
Background user in BW BW_USER (User Created in above steps)
Note: Make sure you enter all logon credentials correctly.

ALE Settings, for Communication between a BW System and an SAP System
SAP COMMUNITY NETWORK SDN - sdn.sap.com | BPX - bpx.sap.com | BOC - boc.sap.com | UAC - uac.sap.com
© 2011 SAP AG 14
Press Enter to continue. On prompt as shown below press enter to continue.
Step 6:
a) On pressing enter in above step, it will connect to the source system.
Enter the log in credentials, as shown below.
ALE Settings, for Communication between a BW System and an SAP System
SAP COMMUNITY NETWORK SDN - sdn.sap.com | BPX - bpx.sap.com | BOC - boc.sap.com | UAC - uac.sap.com
© 2011 SAP AG 15
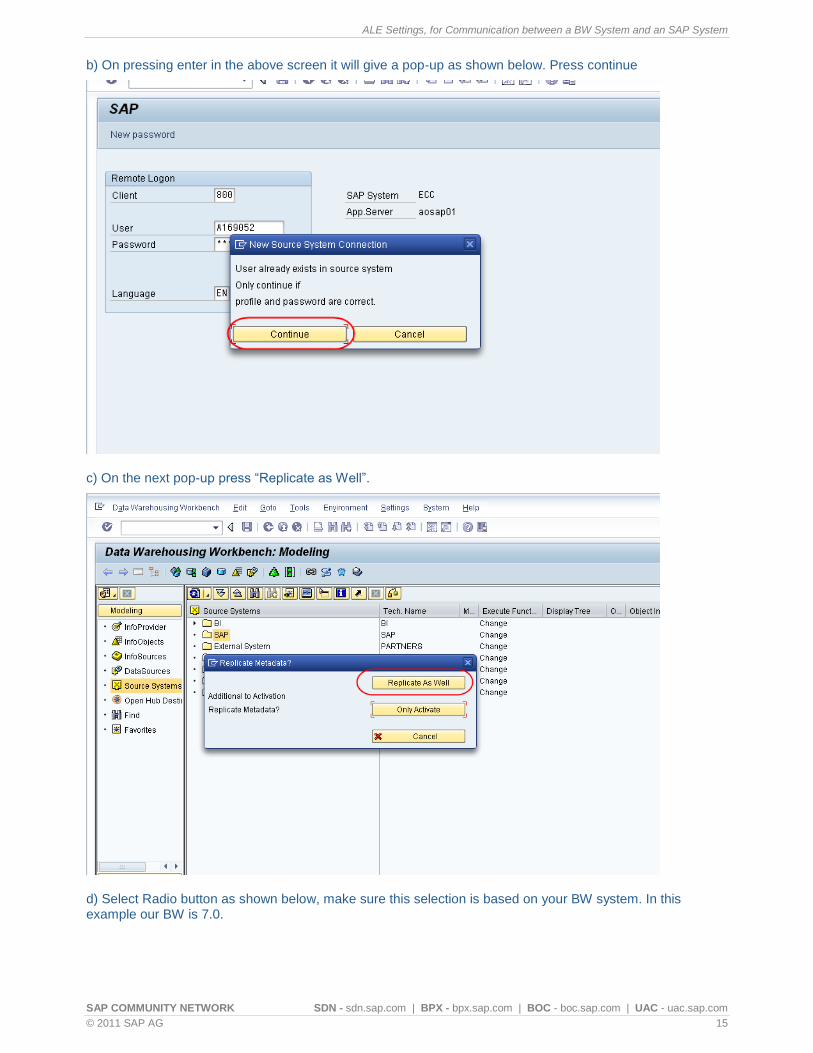
b) On pressing enter in the above screen it will give a pop-up as shown below. Press continue
c) On the next pop-up press “Replicate as Well”.
d) Select Radio button as shown below, make sure this selection is based on your BW system. In this example our BW is 7.0.
ALE Settings, for Communication between a BW System and an SAP System
SAP COMMUNITY NETWORK SDN - sdn.sap.com | BPX - bpx.sap.com | BOC - boc.sap.com | UAC - uac.sap.com
© 2011 SAP AG 16
Press Continue.
With this step, you will establish the connection between SAP Sources Systems with SAP BW.
ALE Settings, for Communication between a BW System and an SAP System
SAP COMMUNITY NETWORK SDN - sdn.sap.com | BPX - bpx.sap.com | BOC - boc.sap.com | UAC - uac.sap.com
© 2011 SAP AG 17
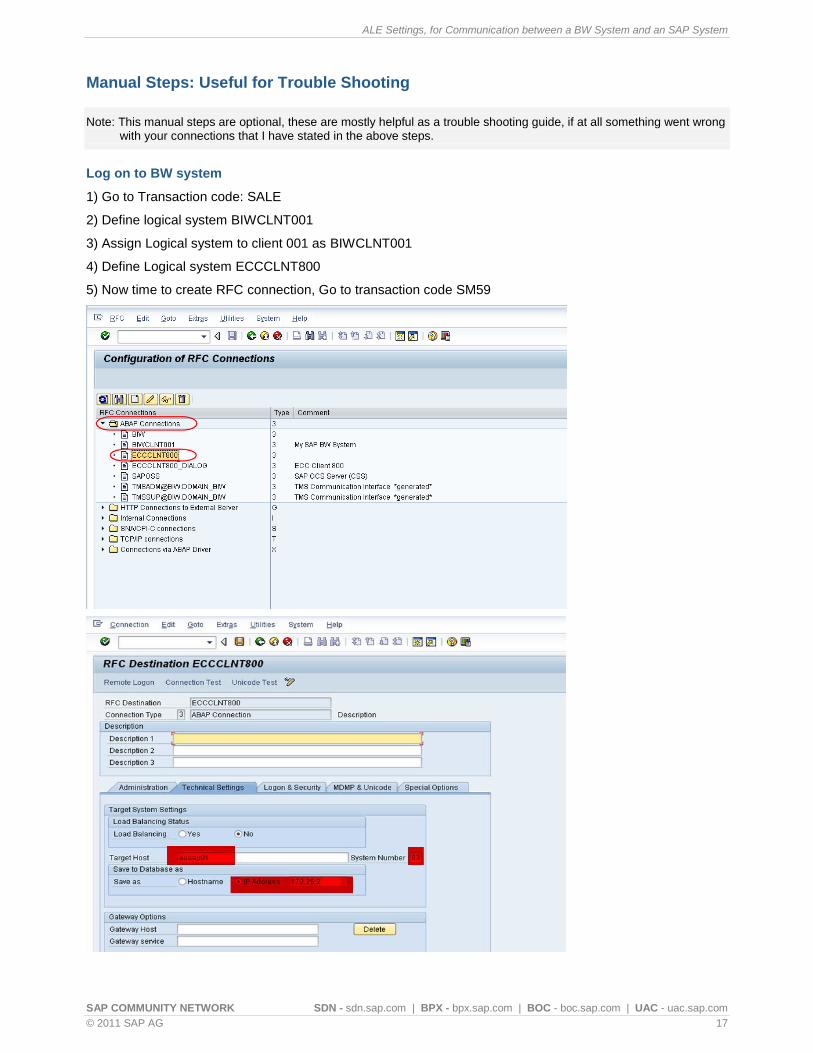
Manual Steps: Useful for Trouble Shooting
Note: This manual steps are optional, these are mostly helpful as a trouble shooting guide, if at all something went wrong with your connections that I have stated in the above steps.
Log on to BW system
1) Go to Transaction code: SALE
2) Define logical system BIWCLNT001
3) Assign Logical system to client 001 as BIWCLNT001
4) Define Logical system ECCCLNT800
5) Now time to create RFC connection, Go to transaction code SM59
ALE Settings, for Communication between a BW System and an SAP System
SAP COMMUNITY NETWORK SDN - sdn.sap.com | BPX - bpx.sap.com | BOC - boc.sap.com | UAC - uac.sap.com
© 2011 SAP AG 18
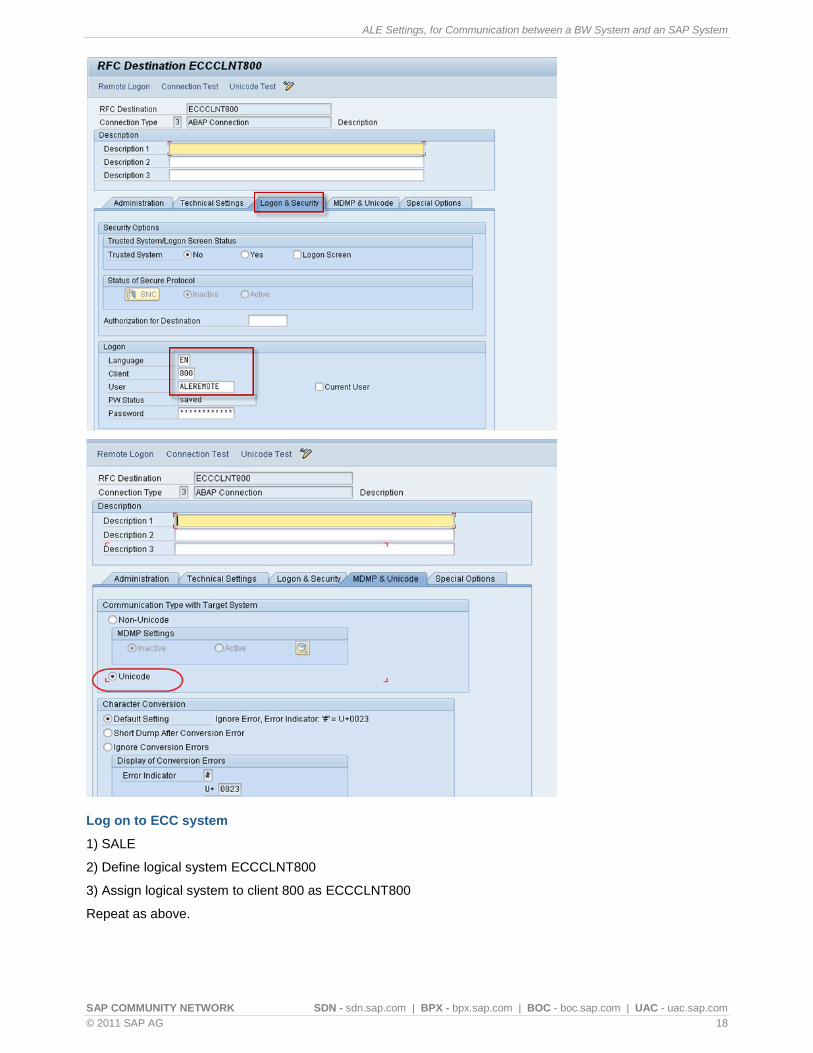
Log on to ECC system
1) SALE
2) Define logical system ECCCLNT800
3) Assign logical system to client 800 as ECCCLNT800
Repeat as above.
ALE Settings, for Communication between a BW System and an SAP System
SAP COMMUNITY NETWORK SDN - sdn.sap.com | BPX - bpx.sap.com | BOC - boc.sap.com | UAC - uac.sap.com
© 2011 SAP AG 19
Related Content
www.help.sap.com
Creating an SAP Source System
For more details, visit the EDW homepage.
ALE Settings, for Communication between a BW System and an SAP System
SAP COMMUNITY NETWORK SDN - sdn.sap.com | BPX - bpx.sap.com | BOC - boc.sap.com | UAC - uac.sap.com
© 2011 SAP AG 20
Disclaimer and Liability Notice
This document may discuss sample coding or other information that does not include SAP official interfaces and therefore is not supported by SAP. Changes made based on this information are not supported and can be overwritten during an upgrade.
SAP will not be held liable for any damages caused by using or misusing the information, code or methods suggested in this document, and anyone using these methods does so at his/her own risk.
SAP offers no guarantees and assumes no responsibility or liability of any type with respect to the content of this technical article or code sample, including any liability resulting from incompatibility between the content within this document and the materials and services offered by SAP. You agree that you will not hold, or seek to hold, SAP responsible or liable with respect to the content of this document.


![SAP BW Configuration - Basic System Settings[1]](https://img.pdfslide.net/doc/110x75/544ed97fb1af9f2f638b5356/sap-bw-configuration-basic-system-settings1.jpg)