Embed Size (px)
Citation preview
January 2016 DocID026411 Rev 3 1/26
AN4503Application note
Environmental sensors: Hardware abstraction layer for Android
by Adalberto Muhuho and Lorenzo Sarchi
IntroductionThis application note provides guidelines for successfully integrating STMicroelectronics environmental sensors (pressure, humidity, ultraviolet) into Linux/Android operating systems.
www.st.com
Contents AN4503
2/26 DocID026411 Rev 3
Contents
1 Document overview . . . . . . . . . . . . . . . . . . . . . . . . . . . . . . . . . . . . . . . . . 4
1.1 Android sensor HAL overview . . . . . . . . . . . . . . . . . . . . . . . . . . . . . . . . . . 4
1.1.1 Kernel . . . . . . . . . . . . . . . . . . . . . . . . . . . . . . . . . . . . . . . . . . . . . . . . . . . 5
1.1.2 Sensor libraries . . . . . . . . . . . . . . . . . . . . . . . . . . . . . . . . . . . . . . . . . . . . 5
1.1.3 Application framework . . . . . . . . . . . . . . . . . . . . . . . . . . . . . . . . . . . . . . . 5
2 Test environment / ecosystem . . . . . . . . . . . . . . . . . . . . . . . . . . . . . . . . . 6
2.1 Connecting the sensors to the PandaBoard . . . . . . . . . . . . . . . . . . . . . . . . 6
2.2 Specific settings for the Ubuntu 13.04 environment . . . . . . . . . . . . . . . . . . 7
2.3 Building Android KitKat-4.4 . . . . . . . . . . . . . . . . . . . . . . . . . . . . . . . . . . . . 8
2.3.1 Downloading the packages . . . . . . . . . . . . . . . . . . . . . . . . . . . . . . . . . . . 9
2.3.2 Apply required patches . . . . . . . . . . . . . . . . . . . . . . . . . . . . . . . . . . . . . 10
2.3.3 Compile the sources . . . . . . . . . . . . . . . . . . . . . . . . . . . . . . . . . . . . . . . 10
2.3.4 Flash the image to the PandaBoard SD card . . . . . . . . . . . . . . . . . . . . 11
3 Linux kernel space . . . . . . . . . . . . . . . . . . . . . . . . . . . . . . . . . . . . . . . . . 12
3.1 Overview of the environment . . . . . . . . . . . . . . . . . . . . . . . . . . . . . . . . . . 12
3.1.1 I²C bus initialization patch . . . . . . . . . . . . . . . . . . . . . . . . . . . . . . . . . . . 12
3.1.2 I²C_board_info structure patch . . . . . . . . . . . . . . . . . . . . . . . . . . . . . . . 13
3.1.3 As an example of platform_data . . . . . . . . . . . . . . . . . . . . . . . . . . . . . . 13
3.1.4 After rebuilding the kernel . . . . . . . . . . . . . . . . . . . . . . . . . . . . . . . . . . . 13
3.2 Driver description . . . . . . . . . . . . . . . . . . . . . . . . . . . . . . . . . . . . . . . . . . . 13
3.2.1 How to build and install the device drivers . . . . . . . . . . . . . . . . . . . . . . . 13
3.2.2 Controlling the device drivers from Linux user space . . . . . . . . . . . . . . 14
3.3 Permission setting . . . . . . . . . . . . . . . . . . . . . . . . . . . . . . . . . . . . . . . . . . 16
3.4 Output data from the driver . . . . . . . . . . . . . . . . . . . . . . . . . . . . . . . . . . . 16
3.4.1 Where to find the data . . . . . . . . . . . . . . . . . . . . . . . . . . . . . . . . . . . . . . 16
3.4.2 Sample application for reading data . . . . . . . . . . . . . . . . . . . . . . . . . . . 16
4 Android sensor HAL . . . . . . . . . . . . . . . . . . . . . . . . . . . . . . . . . . . . . . . . 18
4.1 Overview . . . . . . . . . . . . . . . . . . . . . . . . . . . . . . . . . . . . . . . . . . . . . . . . . 18
4.1.1 Sensor libraries . . . . . . . . . . . . . . . . . . . . . . . . . . . . . . . . . . . . . . . . . . . 18
4.2 Files . . . . . . . . . . . . . . . . . . . . . . . . . . . . . . . . . . . . . . . . . . . . . . . . . . . . . 18
DocID026411 Rev 3 3/26
AN4503 Contents
26
4.3 How to build and install the Android sensor HAL . . . . . . . . . . . . . . . . . . . 18
5 Building a simple apk for testing . . . . . . . . . . . . . . . . . . . . . . . . . . . . . . 20
6 Troubleshooting . . . . . . . . . . . . . . . . . . . . . . . . . . . . . . . . . . . . . . . . . . . 23
7 Keywords . . . . . . . . . . . . . . . . . . . . . . . . . . . . . . . . . . . . . . . . . . . . . . . . . 24
7.1 Glossary and acronyms . . . . . . . . . . . . . . . . . . . . . . . . . . . . . . . . . . . . . . 24
8 Revision history . . . . . . . . . . . . . . . . . . . . . . . . . . . . . . . . . . . . . . . . . . . 25
Document overview AN4503
4/26 DocID026411 Rev 3
1 Document overview
This document explains how to integrate the STMicroelectronics environmental sensor in Linux/Android systems.
It provides detailed information and procedures on how to manage this task.
The ST code mentioned in the document can be available through your local sales representative.
The configuration files of the sensor HAL (hardware abstraction layer) are also discussed along with the issues and possible solutions for successfully integrating different kinds of sensors.
Finally, the building and installation of this library is also described.
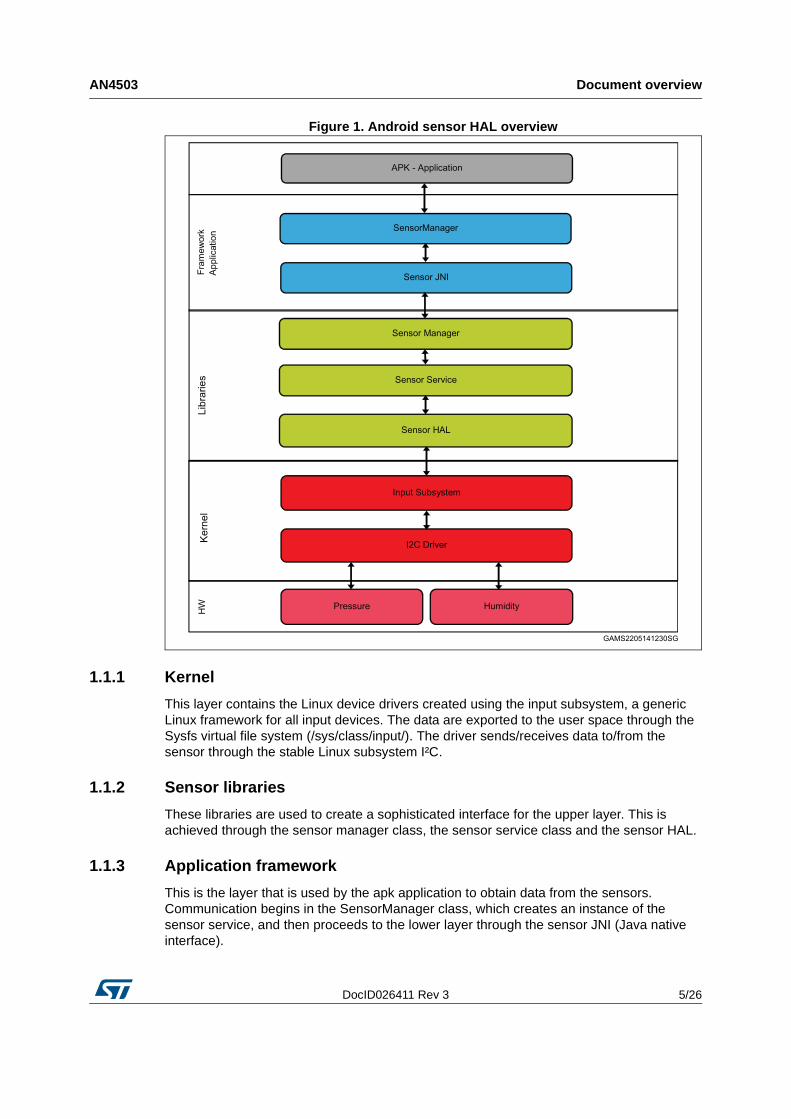
1.1 Android sensor HAL overviewThe Android sensor HAL is the library which provides the links from kernel-space drivers to the Android sensor service and Android sensor manager.
The architecture of the Android sensor framework is shown in the next figure
DocID026411 Rev 3 5/26
AN4503 Document overview
26
Figure 1. Android sensor HAL overview
1.1.1 Kernel
This layer contains the Linux device drivers created using the input subsystem, a generic Linux framework for all input devices. The data are exported to the user space through the Sysfs virtual file system (/sys/class/input/). The driver sends/receives data to/from the sensor through the stable Linux subsystem I²C.
1.1.2 Sensor libraries
These libraries are used to create a sophisticated interface for the upper layer. This is achieved through the sensor manager class, the sensor service class and the sensor HAL.
1.1.3 Application framework
This is the layer that is used by the apk application to obtain data from the sensors. Communication begins in the SensorManager class, which creates an instance of the sensor service, and then proceeds to the lower layer through the sensor JNI (Java native interface).
Test environment / ecosystem AN4503
6/26 DocID026411 Rev 3
2 Test environment / ecosystem
This document refers to the following test environment:
• Panda board:– Processor: Omap4430– Board: PandaBoard ES Rev B2.
• Host PC: – HP EliteBook 8470p
• Linux:– Ubuntu 13.04
• Android:– KitKat-4.4
• Compile environment:– androidearm-eabi7
2.1 Connecting the sensors to the PandaBoardOur STMicroelectronics DIL24 adapters STEVAL-MKI141V2, STEVAL-MKI142V1 and STEVAL-MKI165V1, respectively the "HTS221 humidity sensor", "LPS25H pressure sensor" and "LPS25HB pressure sensor" are used for the test.
Refer to www.st.com for further information.
The adapters are connected to the J3-expansion connectors of the PandaBoard; the tests are performed using the I²C bus.
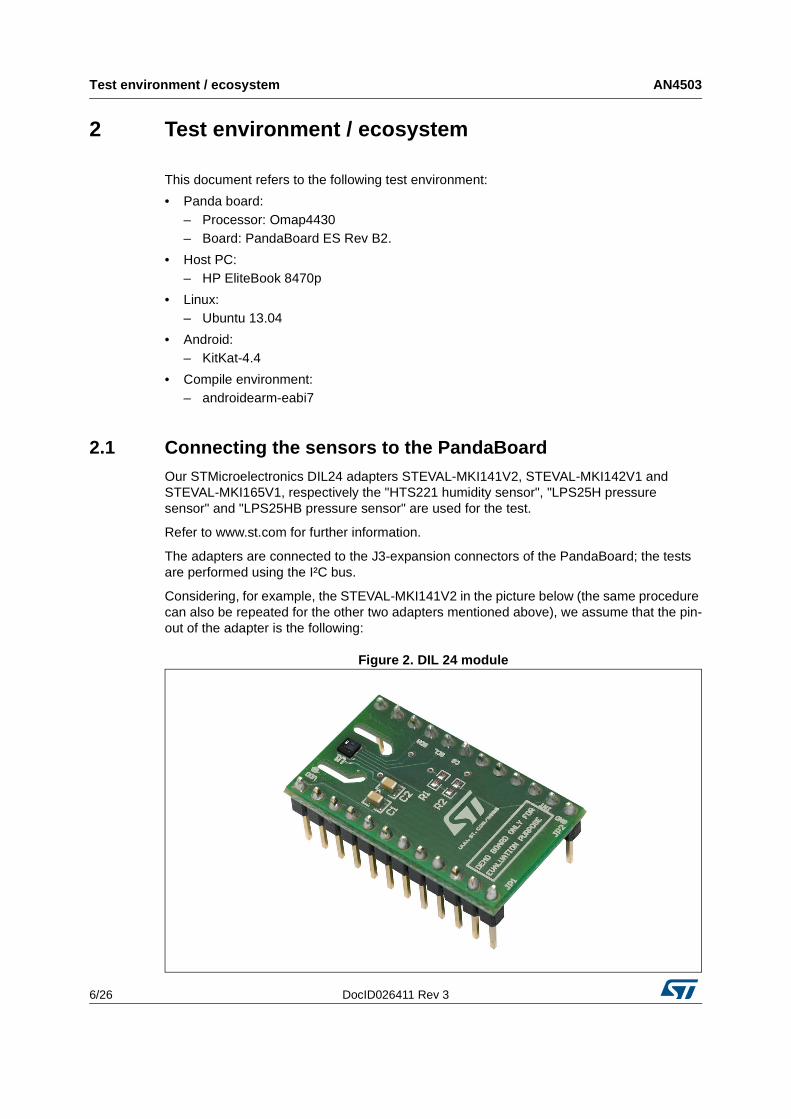
Considering, for example, the STEVAL-MKI141V2 in the picture below (the same procedure can also be repeated for the other two adapters mentioned above), we assume that the pin-out of the adapter is the following:
Figure 2. DIL 24 module
DocID026411 Rev 3 7/26
AN4503 Test environment / ecosystem
26
Pin-1: Vdd; Pin-2: Vdd_IO; Pin-19: CS; Pin-20: SCL; Pin-21: SDA; Pin-22: SDO
Where Pin-1 is top-left, Pin-12 is bottom-left, Pin-13 is bottom-right and Pin-24 is top-right.
These pins must be connected to the following pins of the “Expansion Connector A, J3” of the PandaBoard:
2.2 Specific settings for the Ubuntu 13.04 environm entAfter the standard installation of Ubuntu-13.04, some specific settings are applied.
Version packages used:
• Java: JDK1.6.0_45 and JRE1.6.0_45
• GNU Make 3.82
• Python 2.7.4
Other installed packages are referred to in:
“http://source.android.com/source/initializing.html#installing-required-packages-ubuntu-1204”, by replacing the i386 label with amd64 for 64-bit packages.
Note: At the time of writing, the specific subtitle for the 1304 package does not exist.
• sudo apt-get install git gnupg flex bison gperf build-essential \ zip curl libc6-dev libncurses5-dev:amd64 x11proto-core-dev \libx11-dev:amd64 libreadline6-dev:amd64 libgl1-mesa-glx:amd64 \libgl1-mesa-dev g++-multilib mingw32 tofrodos \python-markdown libxml2-utils xsltproc zlib1g-dev: amd64
• sudo ln -s /usr/lib/amd64-linux-gnu/mesa/libGL.so.1 /usr/lib/ amd64-linux-gnu/libGL.so
The 64-bit libz.so.1 is replaced with the corresponding 32-bit libz
• sudo apt-get install lib32z1.
To use “apt-get” (needed for the above and other settings) when working with a proxy, the file /etc/apt/apt.conf.d/01proxy is created with the following single line of code:
• acquire: http::Proxy http://username:password@proxyname:8080
Table 1. DIL 24 module vs. PandaBoard connection
ST DIL24 PANDA J3 Exp Conn A
Pin n° Signal Pin n° Signal
1 Vdd 1 VIO_1V8
2 Vdd_IO 1 VIO_1V8
13 GND 28 GND
14 INT1 20 GPIO_134
19 CS (1)
1. CS needs to be connected to Vdd_IO
20 SCL 24 SCL
21 SDA 23 SDA
22 SDO 22 SDO/GPIO_39
Test environment / ecosystem AN4503
8/26 DocID026411 Rev 3
A file bashrc in folder “/home/user” is created with the following single line of code:
• export USE_CACHE=1
From the Android Root Source, the following command is applied:
[RAS]: /prebuilts/misc/linux-x86/ccache/ccache -M 50G
To download and compile kernel sources, 'git' is configured as follows:
• $ git config --global user.email "e-mailing_address"
• $ git config --global user.name "user"
To connect to the board with fastboot and adb commands, the following lines are added to the /etc/udev/rules.d/51-android.rules file.
• # adb protocol on panda (PandaBoard)
• SUBSYSTEM=="usb", ATTR{idVendor}=="0451", ATTR{idProduct}=="d101", MODE="0666", owner=”username”
• # fastboot protocol on panda (PandaBoard)
• SUBSYSTEM=="usb", ATTR{idVendor}=="0451", ATTR{idProduct}=="d022", MODE="0666", owner=”username”
• # usbboot protocol on panda (PandaBoard)
• SUBSYSTEM=="usb", ATTR{idVendor}=="0451", ATTR{idProduct}=="d010", MODE="0666", owner=”username”
Permission for this file must also be changed:
"chmod a+x /etc/udev/rules.d/51-android.rules.
Then restart udev service with the "sudo service udev restart" command.
2.3 Building Android KitKat-4.4The following steps are required to build the Environment:
• Download the packages
• Apply required patches
• Compile the sources
• Flash the image to the PandaBoard SD card
These steps are detailed in the following sections.
DocID026411 Rev 3 9/26
AN4503 Test environment / ecosystem
26
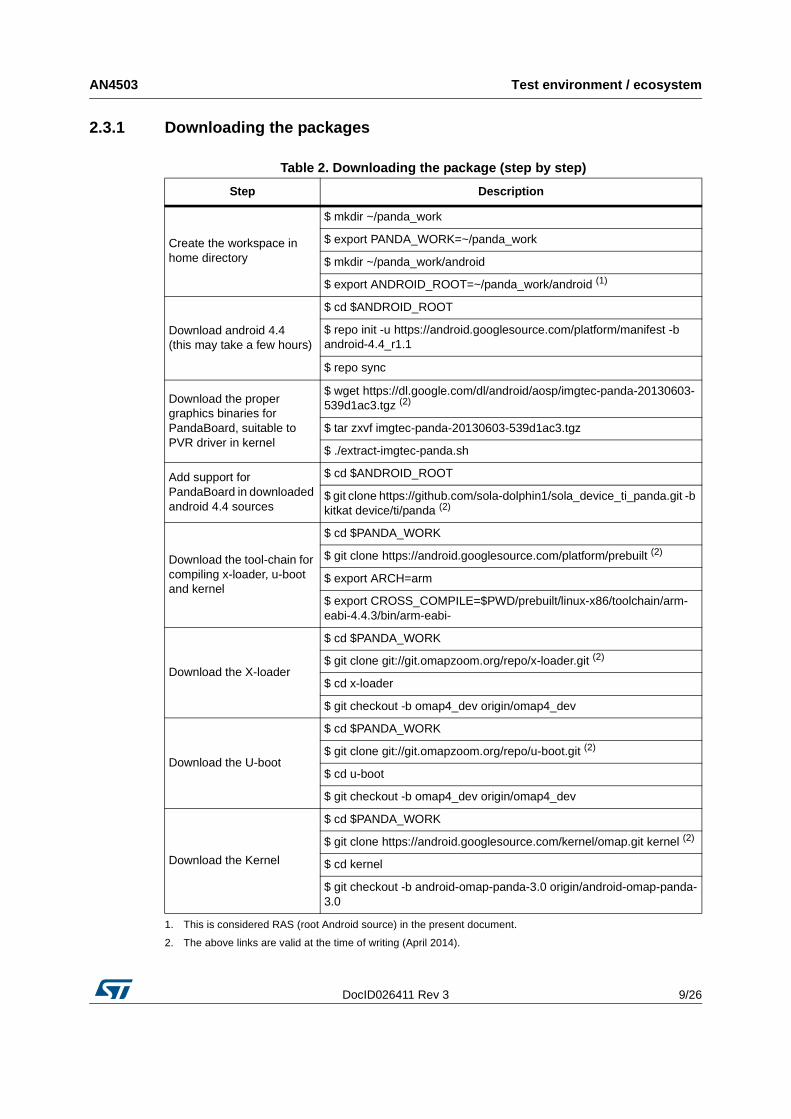
2.3.1 Downloading the packages
Table 2. Downloading the package (step by step)
Step Description
Create the workspace in home directory
$ mkdir ~/panda_work
$ export PANDA_WORK=~/panda_work
$ mkdir ~/panda_work/android
$ export ANDROID_ROOT=~/panda_work/android (1)
1. This is considered RAS (root Android source) in the present document.
Download android 4.4(this may take a few hours)
$ cd $ANDROID_ROOT
$ repo init -u https://android.googlesource.com/platform/manifest -b android-4.4_r1.1
$ repo sync
Download the proper graphics binaries for PandaBoard, suitable to PVR driver in kernel
$ wget https://dl.google.com/dl/android/aosp/imgtec-panda-20130603-539d1ac3.tgz (2)
2. The above links are valid at the time of writing (April 2014).
$ tar zxvf imgtec-panda-20130603-539d1ac3.tgz
$ ./extract-imgtec-panda.sh
Add support for PandaBoard in downloaded android 4.4 sources
$ cd $ANDROID_ROOT
$ git clone https://github.com/sola-dolphin1/sola_device_ti_panda.git -b kitkat device/ti/panda (2)
Download the tool-chain for compiling x-loader, u-boot and kernel
$ cd $PANDA_WORK
$ git clone https://android.googlesource.com/platform/prebuilt (2)
$ export ARCH=arm
$ export CROSS_COMPILE=$PWD/prebuilt/linux-x86/toolchain/arm-eabi-4.4.3/bin/arm-eabi-
Download the X-loader
$ cd $PANDA_WORK
$ git clone git://git.omapzoom.org/repo/x-loader.git (2)
$ cd x-loader
$ git checkout -b omap4_dev origin/omap4_dev
Download the U-boot
$ cd $PANDA_WORK
$ git clone git://git.omapzoom.org/repo/u-boot.git (2)
$ cd u-boot
$ git checkout -b omap4_dev origin/omap4_dev
Download the Kernel
$ cd $PANDA_WORK
$ git clone https://android.googlesource.com/kernel/omap.git kernel (2)
$ cd kernel
$ git checkout -b android-omap-panda-3.0 origin/android-omap-panda-3.0
Test environment / ecosystem AN4503
10/26 DocID026411 Rev 3
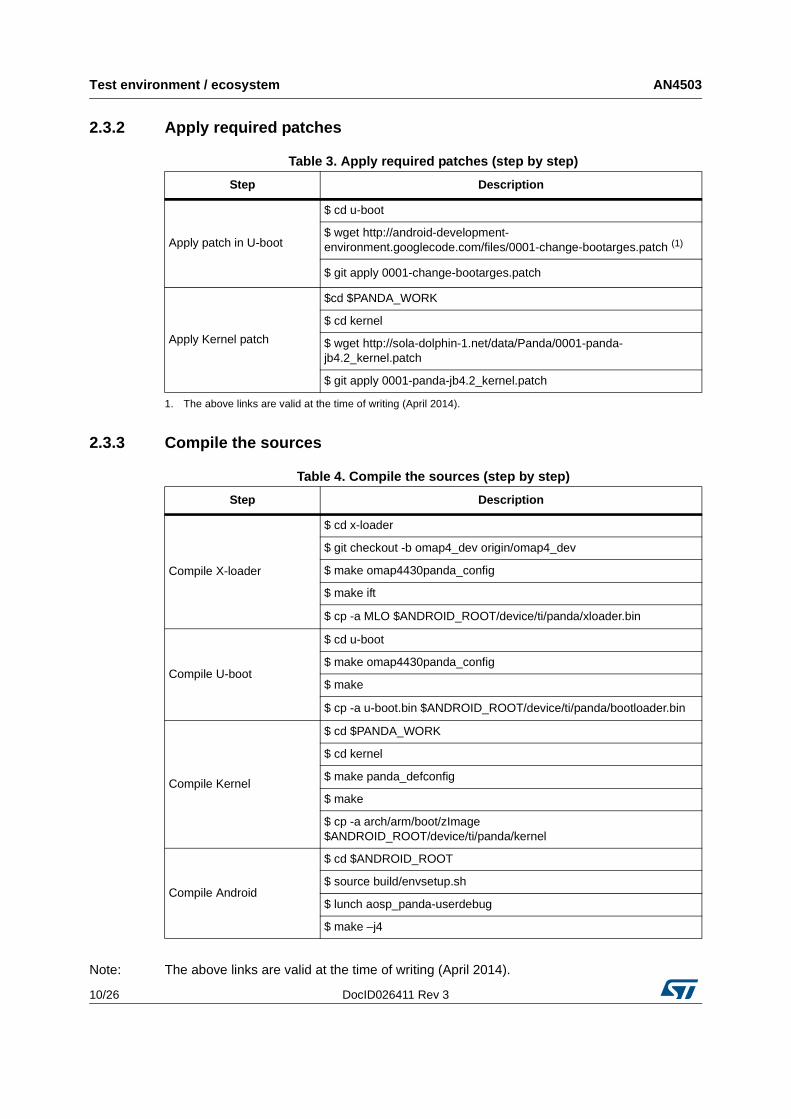
2.3.2 Apply required patches
2.3.3 Compile the sources
Note: The above links are valid at the time of writing (April 2014).
Table 3. Apply required patches (step by step)
Step Description
Apply patch in U-boot
$ cd u-boot
$ wget http://android-development-environment.googlecode.com/files/0001-change-bootarges.patch (1)
1. The above links are valid at the time of writing (April 2014).
$ git apply 0001-change-bootarges.patch
Apply Kernel patch
$cd $PANDA_WORK
$ cd kernel
$ wget http://sola-dolphin-1.net/data/Panda/0001-panda-jb4.2_kernel.patch
$ git apply 0001-panda-jb4.2_kernel.patch
Table 4. Compile the sources (step by step)
Step Description
Compile X-loader
$ cd x-loader
$ git checkout -b omap4_dev origin/omap4_dev
$ make omap4430panda_config
$ make ift
$ cp -a MLO $ANDROID_ROOT/device/ti/panda/xloader.bin
Compile U-boot
$ cd u-boot
$ make omap4430panda_config
$ make
$ cp -a u-boot.bin $ANDROID_ROOT/device/ti/panda/bootloader.bin
Compile Kernel
$ cd $PANDA_WORK
$ cd kernel
$ make panda_defconfig
$ make
$ cp -a arch/arm/boot/zImage $ANDROID_ROOT/device/ti/panda/kernel
Compile Android
$ cd $ANDROID_ROOT
$ source build/envsetup.sh
$ lunch aosp_panda-userdebug
$ make –j4
DocID026411 Rev 3 11/26
AN4503 Test environment / ecosystem
26
2.3.4 Flash the image to the PandaBoard SD card
Refer to the README file in $ANDROID_ROOT/device/ti/panda/.
Linux kernel space AN4503
12/26 DocID026411 Rev 3
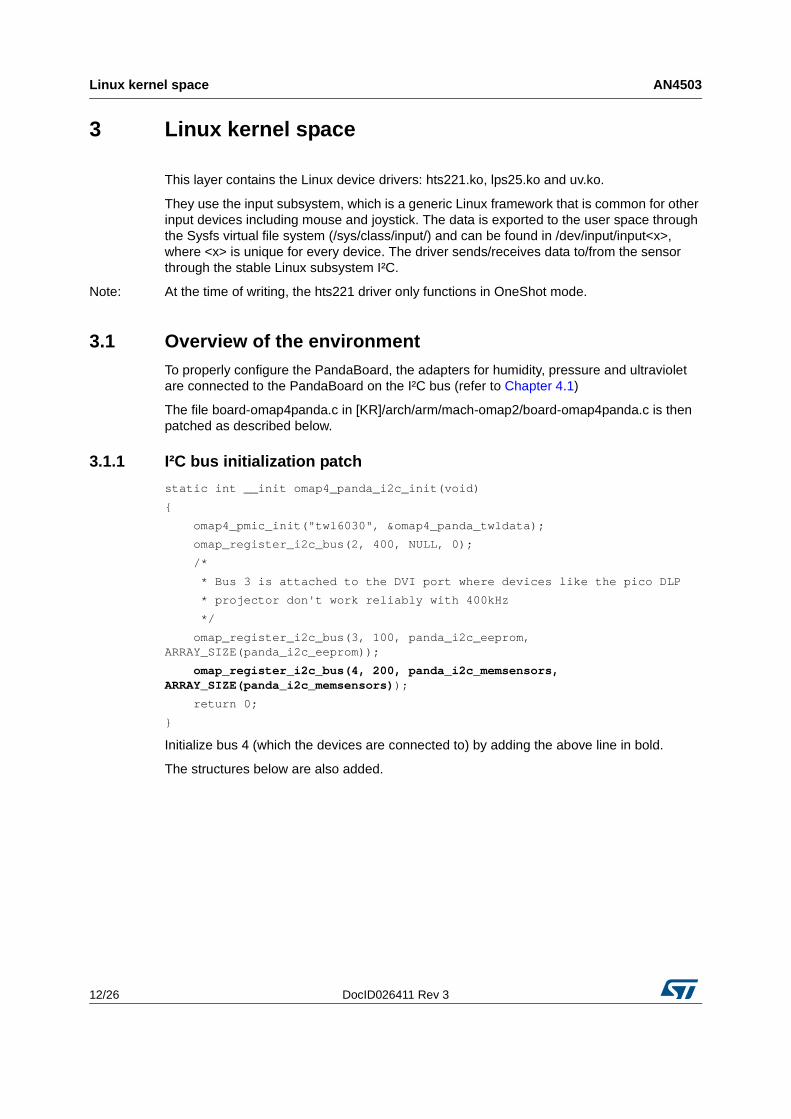
3 Linux kernel space
This layer contains the Linux device drivers: hts221.ko, lps25.ko and uv.ko.
They use the input subsystem, which is a generic Linux framework that is common for other input devices including mouse and joystick. The data is exported to the user space through the Sysfs virtual file system (/sys/class/input/) and can be found in /dev/input/input<x>, where <x> is unique for every device. The driver sends/receives data to/from the sensor through the stable Linux subsystem I²C.
Note: At the time of writing, the hts221 driver only functions in OneShot mode.
3.1 Overview of the environmentTo properly configure the PandaBoard, the adapters for humidity, pressure and ultraviolet are connected to the PandaBoard on the I²C bus (refer to Chapter 4.1)
The file board-omap4panda.c in [KR]/arch/arm/mach-omap2/board-omap4panda.c is then patched as described below.
3.1.1 I²C bus initialization patch
static int __init omap4_panda_i2c_init(void)
{
omap4_pmic_init("twl6030", &omap4_panda_twldata );
omap_register_i2c_bus(2, 400, NULL, 0);
/*
* Bus 3 is attached to the DVI port where devi ces like the pico DLP
* projector don't work reliably with 400kHz
*/
omap_register_i2c_bus(3, 100, panda_i2c_eeprom, ARRAY_SIZE(panda_i2c_eeprom));
omap_register_i2c_bus(4, 200, panda_i2c_memsensors, ARRAY_SIZE(panda_i2c_memsensors));
return 0;
}
Initialize bus 4 (which the devices are connected to) by adding the above line in bold.
The structures below are also added.
DocID026411 Rev 3 13/26
AN4503 Linux kernel space
26
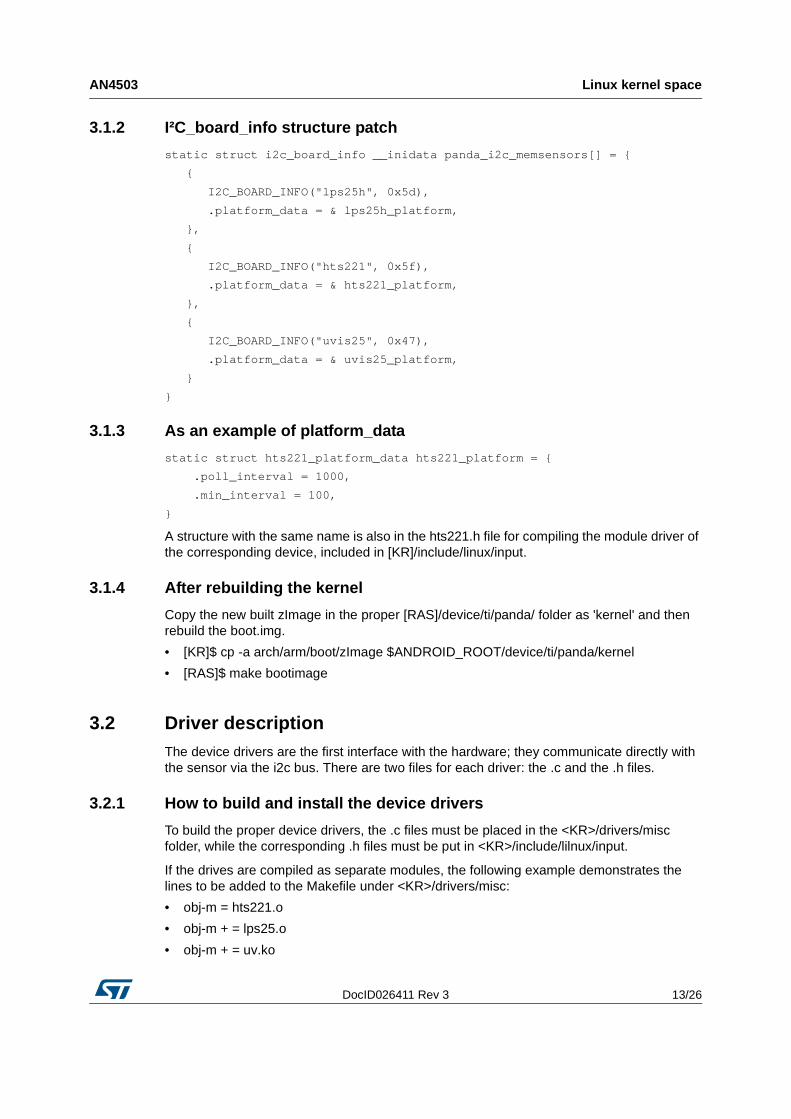
3.1.2 I²C_board_info structure patch
static struct i2c_board_info __inidata panda_i2c_me msensors[] = {
{
I2C_BOARD_INFO("lps25h", 0x5d),
.platform_data = & lps25h_platform,
},
{
I2C_BOARD_INFO("hts221", 0x5f),
.platform_data = & hts221_platform,
},
{
I2C_BOARD_INFO("uvis25", 0x47),
.platform_data = & uvis25_platform,
}
}
3.1.3 As an example of platform_data
static struct hts221_platform_data hts221_platform = {
.poll_interval = 1000,
.min_interval = 100,
}
A structure with the same name is also in the hts221.h file for compiling the module driver of the corresponding device, included in [KR]/include/linux/input.
3.1.4 After rebuilding the kernel
Copy the new built zImage in the proper [RAS]/device/ti/panda/ folder as 'kernel' and then rebuild the boot.img.
• [KR]$ cp -a arch/arm/boot/zImage $ANDROID_ROOT/device/ti/panda/kernel
• [RAS]$ make bootimage
3.2 Driver descriptionThe device drivers are the first interface with the hardware; they communicate directly with the sensor via the i2c bus. There are two files for each driver: the .c and the .h files.
3.2.1 How to build and install the device drivers
To build the proper device drivers, the .c files must be placed in the <KR>/drivers/misc folder, while the corresponding .h files must be put in <KR>/include/lilnux/input.
If the drives are compiled as separate modules, the following example demonstrates the lines to be added to the Makefile under <KR>/drivers/misc:
• obj-m = hts221.o
• obj-m + = lps25.o
• obj-m + = uv.ko
Linux kernel space AN4503
14/26 DocID026411 Rev 3
Then run the command: "make modules" from <KR>.
After making the modules run the following commands:
• [RAS]$ adb root
• [RAS]$ adb remount
The built hts221.ko, lps25.ko and uv.ko modules, located under <KR>/drivers/misc are then placed in the Android filesystem with the usual procedure:
• [RAS]$ adb push [modulename].ko /system/lib/hw
They can then be installed and rendered functional:
• [RAS]$ adb shell
[Android shell]$ insmod /system/lib/hw/[modulename].ko
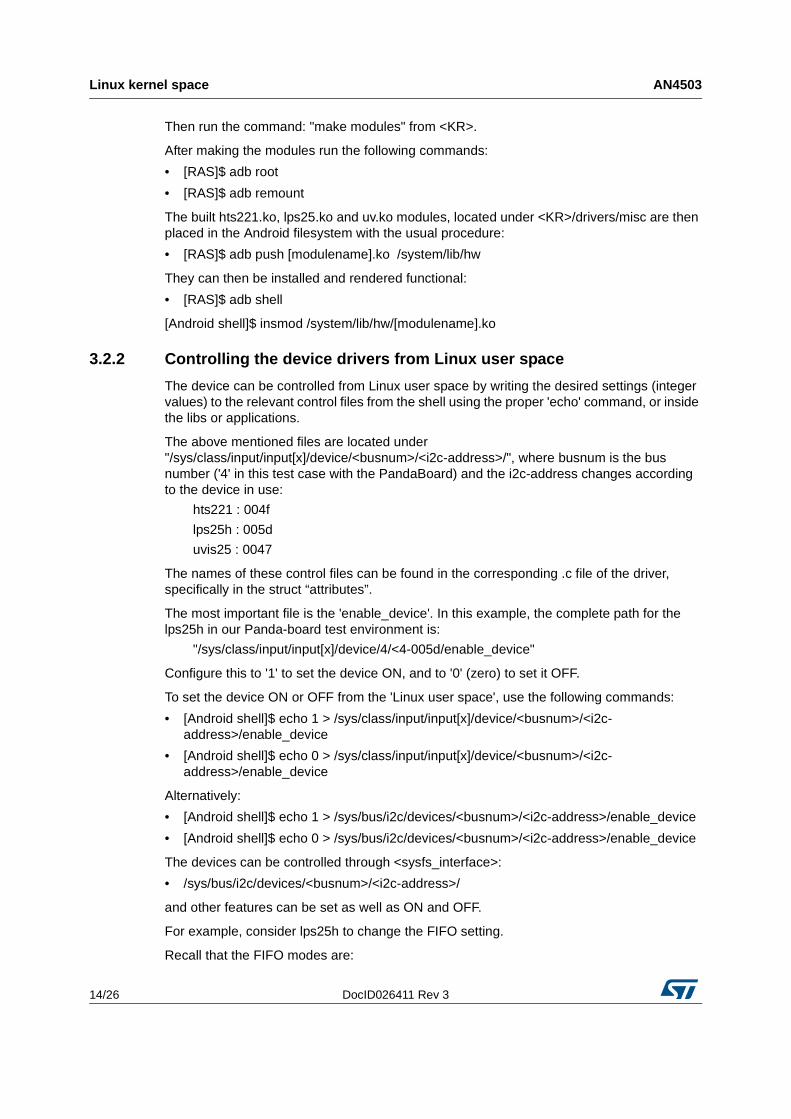
3.2.2 Controlling the device drivers from Linux use r space
The device can be controlled from Linux user space by writing the desired settings (integer values) to the relevant control files from the shell using the proper 'echo' command, or inside the libs or applications.
The above mentioned files are located under "/sys/class/input/input[x]/device/<busnum>/<i2c-address>/", where busnum is the bus number ('4' in this test case with the PandaBoard) and the i2c-address changes according to the device in use:
hts221 : 004f
lps25h : 005d
uvis25 : 0047
The names of these control files can be found in the corresponding .c file of the driver, specifically in the struct “attributes”.
The most important file is the 'enable_device'. In this example, the complete path for the lps25h in our Panda-board test environment is:
"/sys/class/input/input[x]/device/4/<4-005d/enable_device"
Configure this to '1' to set the device ON, and to '0' (zero) to set it OFF.
To set the device ON or OFF from the 'Linux user space', use the following commands:
• [Android shell]$ echo 1 > /sys/class/input/input[x]/device/<busnum>/<i2c-address>/enable_device
• [Android shell]$ echo 0 > /sys/class/input/input[x]/device/<busnum>/<i2c-address>/enable_device
Alternatively:
• [Android shell]$ echo 1 > /sys/bus/i2c/devices/<busnum>/<i2c-address>/enable_device
• [Android shell]$ echo 0 > /sys/bus/i2c/devices/<busnum>/<i2c-address>/enable_device
The devices can be controlled through <sysfs_interface>:
• /sys/bus/i2c/devices/<busnum>/<i2c-address>/
and other features can be set as well as ON and OFF.
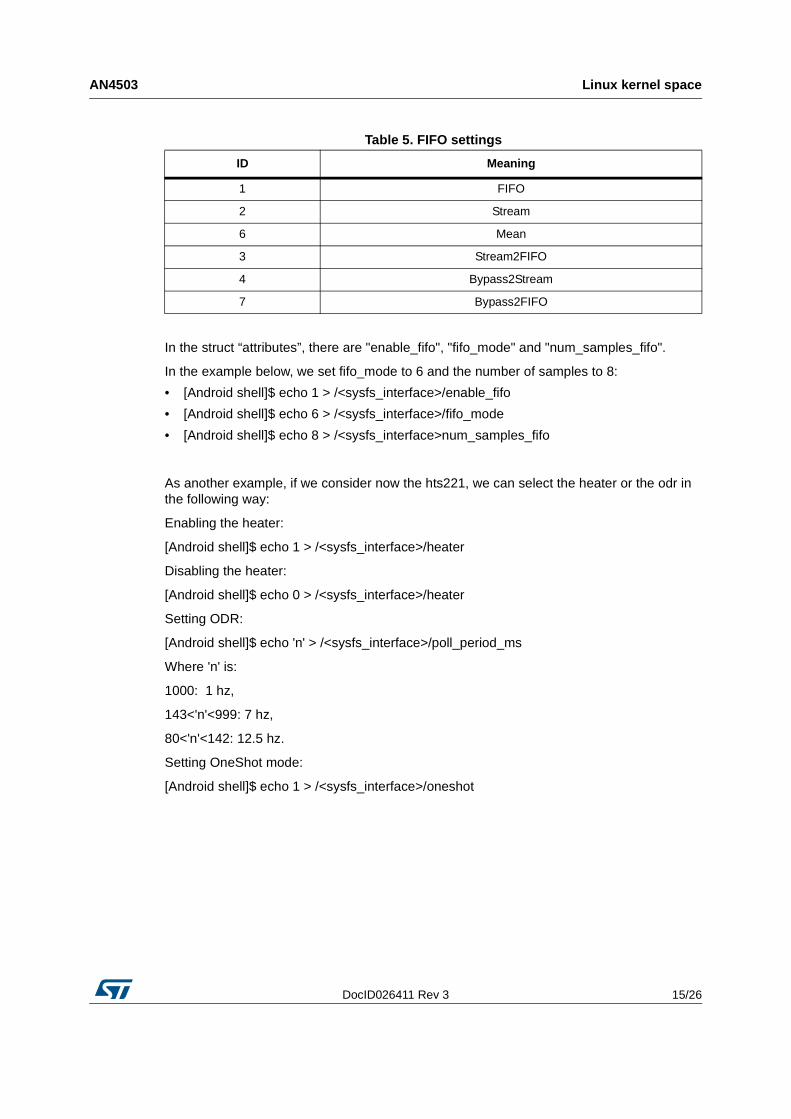
For example, consider lps25h to change the FIFO setting.
Recall that the FIFO modes are:
DocID026411 Rev 3 15/26
AN4503 Linux kernel space
26
In the struct “attributes”, there are "enable_fifo", "fifo_mode" and "num_samples_fifo".
In the example below, we set fifo_mode to 6 and the number of samples to 8:
• [Android shell]$ echo 1 > /<sysfs_interface>/enable_fifo
• [Android shell]$ echo 6 > /<sysfs_interface>/fifo_mode
• [Android shell]$ echo 8 > /<sysfs_interface>num_samples_fifo
As another example, if we consider now the hts221, we can select the heater or the odr in the following way:
Enabling the heater:
[Android shell]$ echo 1 > /<sysfs_interface>/heater
Disabling the heater:
[Android shell]$ echo 0 > /<sysfs_interface>/heater
Setting ODR:
[Android shell]$ echo 'n' > /<sysfs_interface>/poll_period_ms
Where 'n' is:
1000: 1 hz,
143<'n'<999: 7 hz,
80<'n'<142: 12.5 hz.
Setting OneShot mode:
[Android shell]$ echo 1 > /<sysfs_interface>/oneshot
Table 5. FIFO settings
ID Meaning
1 FIFO
2 Stream
6 Mean
3 Stream2FIFO
4 Bypass2Stream
7 Bypass2FIFO
Linux kernel space AN4503
16/26 DocID026411 Rev 3
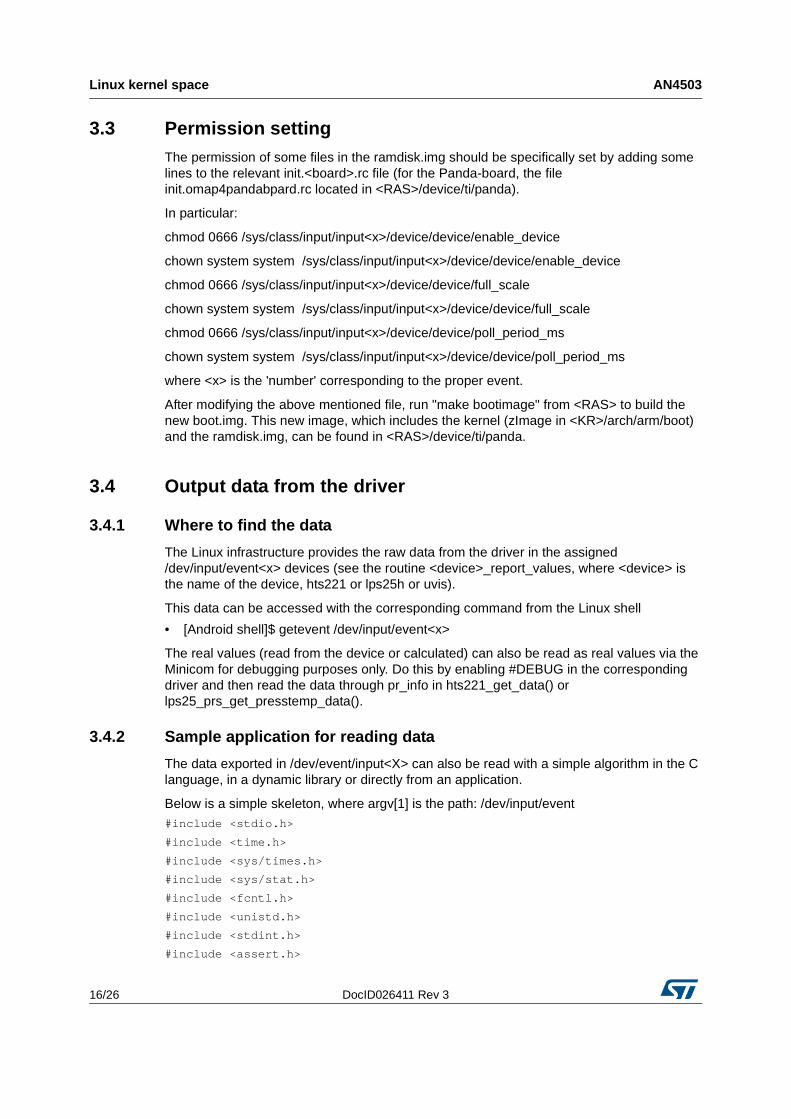
3.3 Permission settingThe permission of some files in the ramdisk.img should be specifically set by adding some lines to the relevant init.<board>.rc file (for the Panda-board, the file init.omap4pandabpard.rc located in <RAS>/device/ti/panda).
In particular:
chmod 0666 /sys/class/input/input<x>/device/device/enable_device
chown system system /sys/class/input/input<x>/device/device/enable_device
chmod 0666 /sys/class/input/input<x>/device/device/full_scale
chown system system /sys/class/input/input<x>/device/device/full_scale
chmod 0666 /sys/class/input/input<x>/device/device/poll_period_ms
chown system system /sys/class/input/input<x>/device/device/poll_period_ms
where <x> is the 'number' corresponding to the proper event.
After modifying the above mentioned file, run "make bootimage" from <RAS> to build the new boot.img. This new image, which includes the kernel (zImage in <KR>/arch/arm/boot) and the ramdisk.img, can be found in <RAS>/device/ti/panda.
3.4 Output data from the driver
3.4.1 Where to find the data
The Linux infrastructure provides the raw data from the driver in the assigned /dev/input/event<x> devices (see the routine <device>_report_values, where <device> is the name of the device, hts221 or lps25h or uvis).
This data can be accessed with the corresponding command from the Linux shell
• [Android shell]$ getevent /dev/input/event<x>
The real values (read from the device or calculated) can also be read as real values via the Minicom for debugging purposes only. Do this by enabling #DEBUG in the corresponding driver and then read the data through pr_info in hts221_get_data() or lps25_prs_get_presstemp_data().
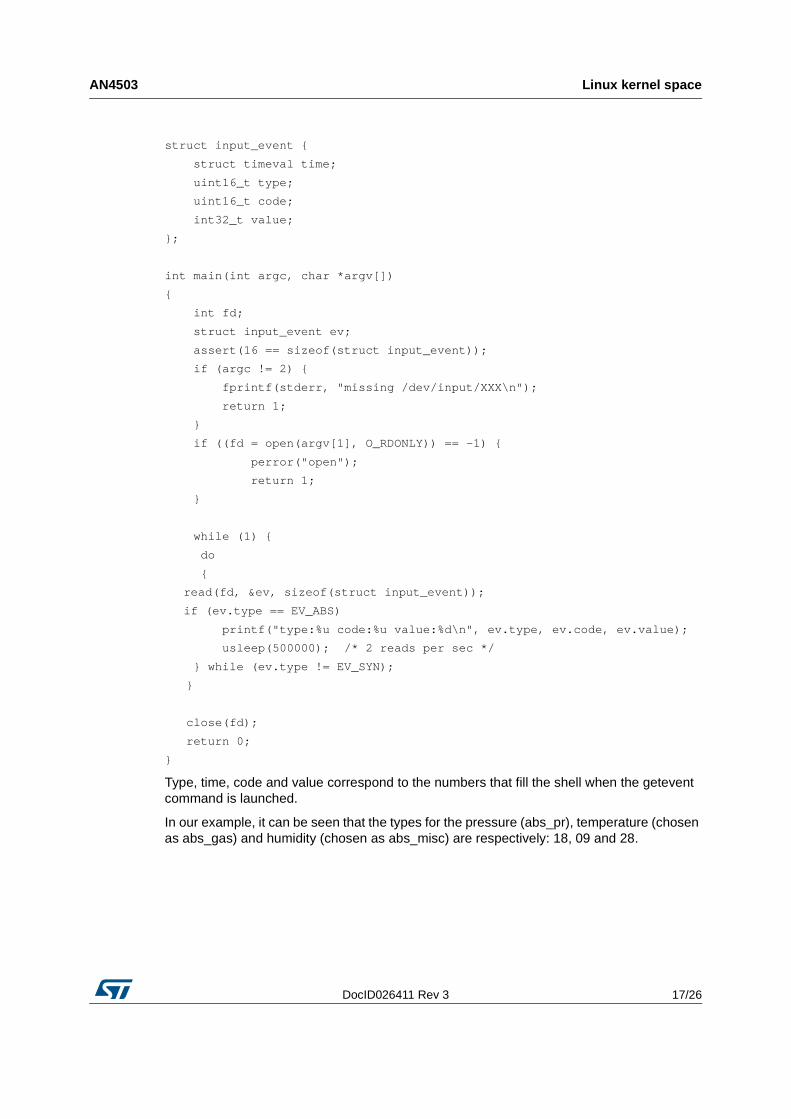
3.4.2 Sample application for reading data
The data exported in /dev/event/input<X> can also be read with a simple algorithm in the C language, in a dynamic library or directly from an application.
Below is a simple skeleton, where argv[1] is the path: /dev/input/event#include <stdio.h>
#include <time.h>
#include <sys/times.h>
#include <sys/stat.h>
#include <fcntl.h>
#include <unistd.h>
#include <stdint.h>
#include <assert.h>
DocID026411 Rev 3 17/26
AN4503 Linux kernel space
26
struct input_event {
struct timeval time;
uint16_t type;
uint16_t code;
int32_t value;
};
int main(int argc, char *argv[])
{
int fd;
struct input_event ev;
assert(16 == sizeof(struct input_event));
if (argc != 2) {
fprintf(stderr, "missing /dev/input/XXX\n") ;
return 1;
}
if ((fd = open(argv[1], O_RDONLY)) == -1) {
perror("open");
return 1;
}
while (1) {
do
{
read(fd, &ev, sizeof(struct input_event));
if (ev.type == EV_ABS)
printf("type:%u code:%u value:%d\n", ev.typ e, ev.code, ev.value);
usleep(500000); /* 2 reads per sec */
} while (ev.type != EV_SYN);
}
close(fd);
return 0;
}
Type, time, code and value correspond to the numbers that fill the shell when the getevent command is launched.
In our example, it can be seen that the types for the pressure (abs_pr), temperature (chosen as abs_gas) and humidity (chosen as abs_misc) are respectively: 18, 09 and 28.
Android sensor HAL AN4503
18/26 DocID026411 Rev 3
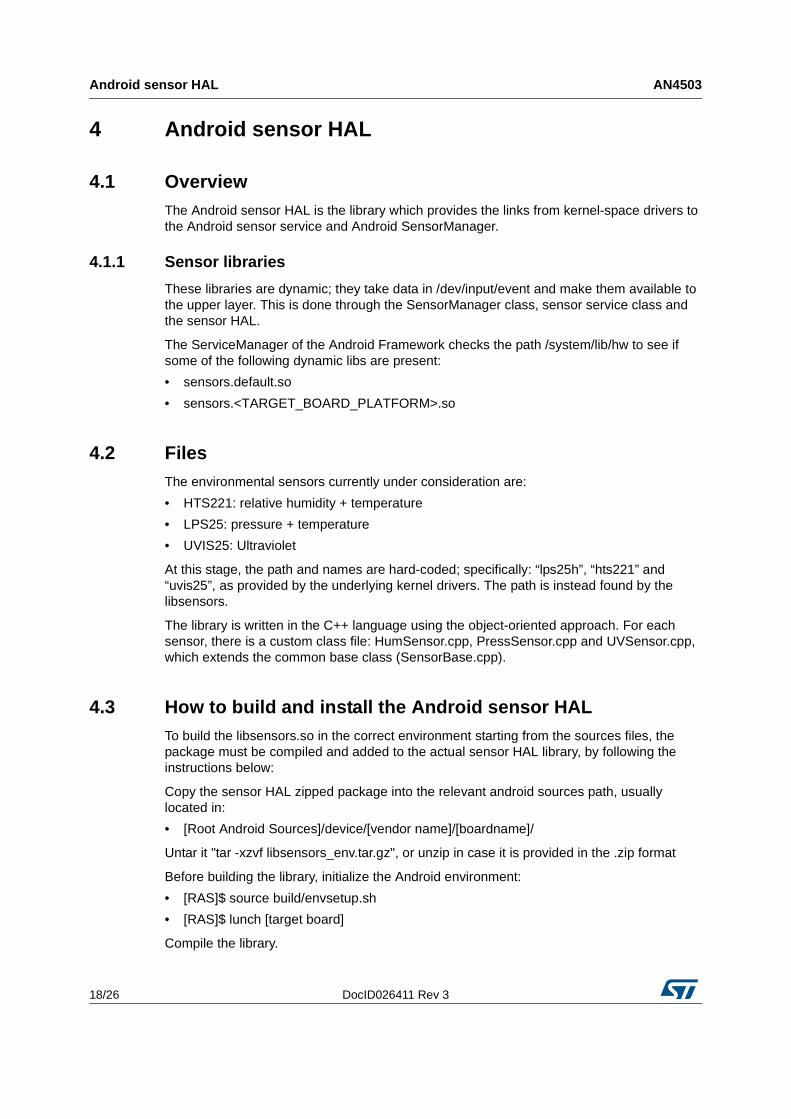
4 Android sensor HAL
4.1 OverviewThe Android sensor HAL is the library which provides the links from kernel-space drivers to the Android sensor service and Android SensorManager.
4.1.1 Sensor libraries
These libraries are dynamic; they take data in /dev/input/event and make them available to the upper layer. This is done through the SensorManager class, sensor service class and the sensor HAL.
The ServiceManager of the Android Framework checks the path /system/lib/hw to see if some of the following dynamic libs are present:
• sensors.default.so
• sensors.<TARGET_BOARD_PLATFORM>.so
4.2 FilesThe environmental sensors currently under consideration are:
• HTS221: relative humidity + temperature
• LPS25: pressure + temperature
• UVIS25: Ultraviolet
At this stage, the path and names are hard-coded; specifically: “lps25h”, “hts221” and “uvis25”, as provided by the underlying kernel drivers. The path is instead found by the libsensors.
The library is written in the C++ language using the object-oriented approach. For each sensor, there is a custom class file: HumSensor.cpp, PressSensor.cpp and UVSensor.cpp, which extends the common base class (SensorBase.cpp).
4.3 How to build and install the Android sensor HALTo build the libsensors.so in the correct environment starting from the sources files, the package must be compiled and added to the actual sensor HAL library, by following the instructions below:
Copy the sensor HAL zipped package into the relevant android sources path, usually located in:
• [Root Android Sources]/device/[vendor name]/[boardname]/
Untar it "tar -xzvf libsensors_env.tar.gz", or unzip in case it is provided in the .zip format
Before building the library, initialize the Android environment:
• [RAS]$ source build/envsetup.sh
• [RAS]$ lunch [target board]
Compile the library.
DocID026411 Rev 3 19/26
AN4503 Android sensor HAL
26
In the HAL folder:
• [RAS]/device/[vendor name]/[boardname]/libsensors
launch the “mm” command in the HAL folder to build a dynamic library named sensors.[board name].so. At the end of the process, it can be found in:
• [RAS]/out/target/product/[boardname]/system/lib/hw/
This library can then be added to the existing library, remounting the filesystem and using the "adb push" command. Follow these steps:
• [RAS]$ adb root
• [RAS]$ adb remount
• [RAS]$ adb push sensors.[boardname].so /system/lib/hw
• [RAS]$ adb shell] stop
• [RAS]$ adb shell] start
Note: In case of other similar libraries with the same name, use different useful names, like sensors.[processorname].so.
For reference purposes with the Panda-board, use the example: sensors.omap4.so.
The name of the lib that is built can be chosen and changed by writing the desired name in:
LOCAL_MODULE := sensors.$(TARGET_BOARD_PLATFORM) in the relevant Android.mk file.
Building a simple apk for testing AN4503
20/26 DocID026411 Rev 3
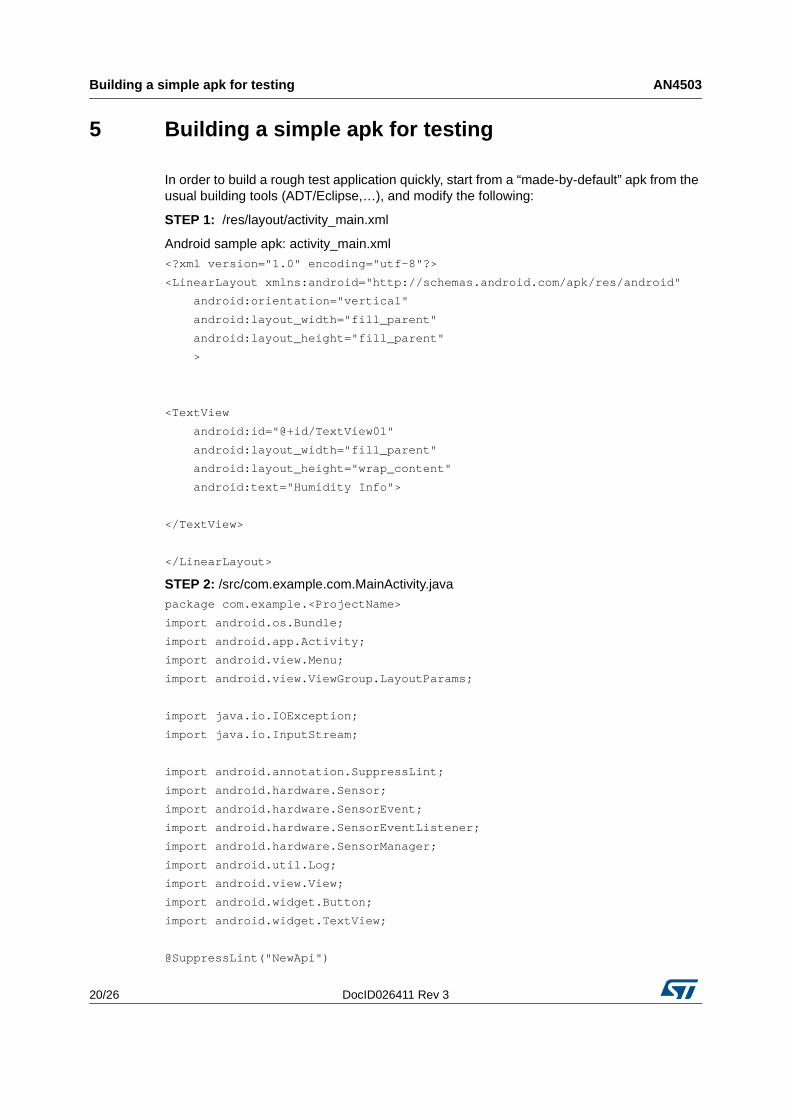
5 Building a simple apk for testing
In order to build a rough test application quickly, start from a “made-by-default” apk from the usual building tools (ADT/Eclipse,…), and modify the following:
STEP 1: /res/layout/activity_main.xml
Android sample apk: activity_main.xml<?xml version="1.0" encoding="utf-8"?>
<LinearLayout xmlns:android="http://schemas.android .com/apk/res/android"
android:orientation="vertical"
android:layout_width="fill_parent"
android:layout_height="fill_parent"
>
<TextView
android:id="@+id/TextView01"
android:layout_width="fill_parent"
android:layout_height="wrap_content"
android:text="Humidity Info">
</TextView>
</LinearLayout>
STEP 2: /src/com.example.com.MainActivity.javapackage com.example.<ProjectName>
import android.os.Bundle;
import android.app.Activity;
import android.view.Menu;
import android.view.ViewGroup.LayoutParams;
import java.io.IOException;
import java.io.InputStream;
import android.annotation.SuppressLint;
import android.hardware.Sensor;
import android.hardware.SensorEvent;
import android.hardware.SensorEventListener;
import android.hardware.SensorManager;
import android.util.Log;
import android.view.View;
import android.widget.Button;
import android.widget.TextView;
@SuppressLint("NewApi")
DocID026411 Rev 3 21/26
AN4503 Building a simple apk for testing
26
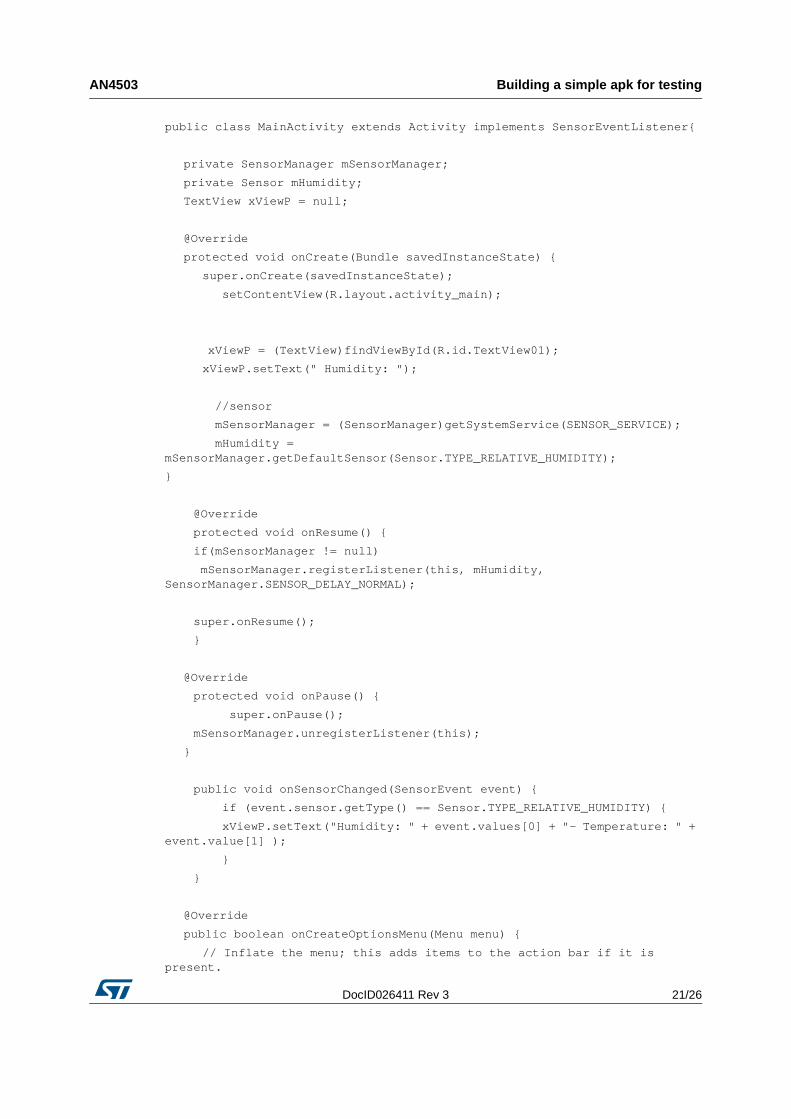
public class MainActivity extends Activity implemen ts SensorEventListener{
private SensorManager mSensorManager;
private Sensor mHumidity;
TextView xViewP = null;
@Override
protected void onCreate(Bundle savedInstanceState) {
super.onCreate(savedInstanceState);
setContentView(R.layout.activity_main);
xViewP = (TextView)findViewById(R.id.TextView 01);
xViewP.setText(" Humidity: ");
//sensor
mSensorManager = (SensorManager)getSystemSer vice(SENSOR_SERVICE);
mHumidity = mSensorManager.getDefaultSensor(Sensor.TYPE_RELATIV E_HUMIDITY);
}
@Override
protected void onResume() {
if(mSensorManager != null)
mSensorManager.registerListener(this, mHumidit y, SensorManager.SENSOR_DELAY_NORMAL);
super.onResume();
}
@Override
protected void onPause() {
super.onPause();
mSensorManager.unregisterListener(this);
}
public void onSensorChanged(SensorEvent event) {
if (event.sensor.getType() == Sensor.TYPE_R ELATIVE_HUMIDITY) {
xViewP.setText("Humidity: " + event.values[ 0] + "- Temperature: " + event.value[1] );
}
}
@Override
public boolean onCreateOptionsMenu(Menu menu) {
// Inflate the menu; this adds items to the action bar if it is present.
Building a simple apk for testing AN4503
22/26 DocID026411 Rev 3
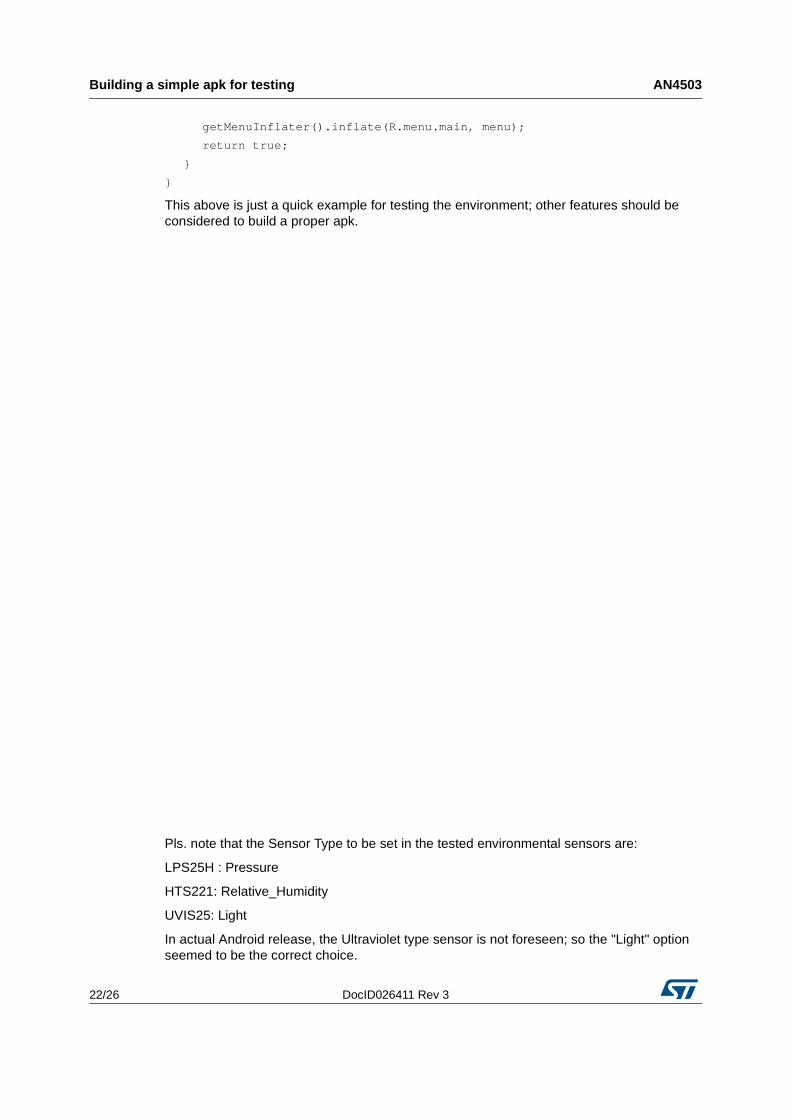
getMenuInflater().inflate(R.menu.main, menu);
return true;
}
}
This above is just a quick example for testing the environment; other features should be considered to build a proper apk.
Pls. note that the Sensor Type to be set in the tested environmental sensors are:
LPS25H : Pressure
HTS221: Relative_Humidity
UVIS25: Light
In actual Android release, the Ultraviolet type sensor is not foreseen; so the "Light" option seemed to be the correct choice.
DocID026411 Rev 3 23/26
AN4503 Troubleshooting
26
6 Troubleshooting
Below is a list of potential problems and corresponding solutions:
• HW setup of the environment:– While loading the module with the shell command "insmod
/system/lib/hw/<devicename>.ko”, the "minicom" shell of the Host PC should show the message that the device is correctly probed.
– All the files under the path /sys/class/input/input[x]/device/<busnum>/<i2c-address> should then be available (in particular, enable_device).
• Data can be seen through the minicom, but it is not exported to /dev/input/event<X>– There could be problems in the input_allocate_device; check the complete
environment.– Also verify the correct permissions of the files. In particular, the files enable_device
and pollrate_ms should be 664 at least.
• Data are exported in /dev/input/event<X>, but not seen through the apk.– Check for problems in the Linux user space or Android Environment.– The sample application in Section 3.4.2 can be used to verify if the data arrives in the
Linux user space. If it does, the problem is in the Android specific environment; try the following commands from RAS on the HOST PC:
[RAS]$ adb logcat
or
[RAS]$ adb logcat | grep sensor
to select the relevant messages on that subject.– A better alternative might be to add some specific logs in order to address the
location of the problem. This can be done by adding "ALOGI("Type of Message")" to the original code.
• Java Compilation problem of the Root Android Source.– In case the compilation fails after few minutes, ensure that the Java PATH and choice
are correctly set: Assuming jdk is in /usr/java, then: $ PATH=/usr/java/jdk1.6.0_45:$PATH
Note: In some cases, writing "/" at the end of the PATH (i.e. /usr/java/jdk1.6.0_45/) can create compile problems.
– $ sudo update-alternatives --install "/usr/bin/java" "java" "/usr/java/jdk1.6.0_45/bin/java" 1
– $ sudo update-alternatives --install "/usr/bin/javac" "javac" "/usr/javac/jdk1.6.0_45/bin/javac" 1
– $ sudo update-alternatives --install "/usr/bin/javaws" "javac" "/usr/javaws/jdk1.6.0_45/bin/javaws" 1
– In the /etc/environment, add: export JAVA_HOME='usr/java/jdk1.6.0_45/bin
• Linux is working but Android fails and cannot be seen on the screen.– Check for error messages relating to framebuffer failure. If there are, verify that the
downloaded “Imgtec” graphics library perfectly matches the PVR driver in the kernel (in gpu/pvr/), as per Section 2.3.1
Keywords AN4503
24/26 DocID026411 Rev 3
7 Keywords
7.1 Glossary and acronymsThe terms, abbreviations and acronyms used in this document are listed and described here in alphabetical order.
• ACK - Acknowledge
• APK - Android Application Package
• FIFO - First In / First Out
• HAL - Hardware Abstraction Layer
• HW - Hardware
• JNI - Java Native Interface
• KR - Kernel Root
• PCB - Printed Circuit Board
• RAS - Root Android Source: ~/panda_work/android
• SoC - System on Chip
• SW - Software
• TS - Time Stamp
• UML - Unified Modeling Language
DocID026411 Rev 3 25/26
AN4503 Revision history
26
8 Revision history
Table 6. Document revision history
Date Revision Changes
23-Jun-2014 1 Initial release
29-Jul-2014 2 Updated title on the cover page
21-Jan-2016 3 Updated: Figure 2 and Section 2.1 on page 6

AN4503
26/26 DocID026411 Rev 3
IMPORTANT NOTICE – PLEASE READ CAREFULLY
STMicroelectronics NV and its subsidiaries (“ST”) reserve the right to make changes, corrections, enhancements, modifications, and improvements to ST products and/or to this document at any time without notice. Purchasers should obtain the latest relevant information on ST products before placing orders. ST products are sold pursuant to ST’s terms and conditions of sale in place at the time of order acknowledgement.
Purchasers are solely responsible for the choice, selection, and use of ST products and ST assumes no liability for application assistance or the design of Purchasers’ products.
No license, express or implied, to any intellectual property right is granted by ST herein.
Resale of ST products with provisions different from the information set forth herein shall void any warranty granted by ST for such product.
ST and the ST logo are trademarks of ST. All other product or service names are the property of their respective owners.
Information in this document supersedes and replaces information previously supplied in any prior versions of this document.
© 2016 STMicroelectronics – All rights reserved