Embed Size (px)
Citation preview
www.novell.com/documentation
Android App User GuideZENworks® Mobile Management 3.2.x September 2015
Legal Notices
Novell, Inc., makes no representations or warranties with respect to the contents or use of this documentation, and specifically disclaims any express or implied warranties of merchantability or fitness for any particular purpose. Further, Novell, Inc., reserves the right to revise this publication and to make changes to its content, at any time, without obligation to notify any person or entity of such revisions or changes.
Further, Novell, Inc., makes no representations or warranties with respect to any software, and specifically disclaims any express or implied warranties of merchantability or fitness for any particular purpose. Further, Novell, Inc., reserves the right to make changes to any and all parts of Novell software, at any time, without any obligation to notify any person or entity of such changes.
Any products or technical information provided under this Agreement may be subject to U.S. export controls and the trade laws of other countries. You agree to comply with all export control regulations and to obtain any required licenses or classification to export, re-export or import deliverables. You agree not to export or re-export to entities on the current U.S. export exclusion lists or to any embargoed or terrorist countries as specified in the U.S. export laws. You agree to not use deliverables for prohibited nuclear, missile, or chemical biological weaponry end uses. See the Novell International Trade Services Web page (http://www.novell.com/info/exports/) for more information on exporting Novell software. Novell assumes no responsibility for your failure to obtain any necessary export approvals.
Copyright © 2012-15 Novell, Inc. All rights reserved. No part of this publication may be reproduced, photocopied, stored on a retrieval system, or transmitted without the express written consent of the publisher.
Novell, Inc.1800 South Novell PlaceProvo, UT 84606U.S.A.www.novell.com
Online Documentation: To access the latest online documentation for this and other Novell products, see the Novell Documentation Web page (http://www.novell.com/documentation).
Novell Trademarks
For Novell trademarks, see the Novell Trademark and Service Mark list (http://www.novell.com/company/legal/trademarks/tmlist.html).
Third-Party Materials
All third-party trademarks are the property of their respective owners.
ZENworks Mobile Management 3.2.x ZENworks for Android ZENworks Mobile Management for Android 3
Table of Contents
ZENworks Mobile Management for Android 4
Installation Instructions 5
Installing from the Google Play Store ........................................................................... 5 Installing from the ZENworks Mobile Management Portal ............................................ 6
Enrollment Instructions 8
ActiveSync Account Set Up for Samsung KNOX Devices ......................................... 11
Setting up an ActiveSync Account 12
Using ZENworks Mobile Management 17
ZENworks Mobile Management Settings and Options ............................................... 17 Encryption and Password Requirements .................................................................... 22 Accessing Managed Apps .......................................................................................... 23
Accessing the Corporate Managed Apps List ................................................ 23 Blacklists / Whitelists ...................................................................................... 25
Accessing the Shared File List .................................................................................... 26
Maintenance and Usage Tips 27
Uninstalling ZENworks Mobile Management .............................................................. 27 What to Do if You Change Devices ............................................................................ 27 Setting the Synchronization Mode .............................................................................. 28 Accessing the User Self-Administration Portal ........................................................... 29
Appendix A: Identity Certificate Installation 30
ZENworks Mobile Management 3.2.x ZENworks for Android ZENworks Mobile Management for Android 4
ZENworks Mobile Management for Android
The ZENworks Mobile Management application for Android devices interfaces with the ZENworks Mobile Management server.
ZENworks Mobile Management was designed to enable Android users to keep up-to-date with company security policies and management features, and to ensure the confidentiality and integrity of wirelessly transmitted corporate information.
ZENworks Mobile Management also enables you to access your company’s recommended applications and utilize the self-servicing dashboard to locate a misplaced device or issue a lock/wipe command to a potentially compromised device.
Requirements
Android OS version 2.2.x, 2.3–2.3.7, 3.0–3.2, 4.0–4.4, 5.0–5.1
User account on the ZENworks Mobile Management server
ZENworks Mobile Management 3.2.x ZENworks for Android Installation Instructions 5
Installation Instructions
Installing from the Google Play Store Google Play Store is an updated version of the digital marketplace, Android Market. Some devices might still display the Android Market icon. Either icon will take you to where you can obtain the app.
Using Google Play Store or the Android Market requires a Gmail account.
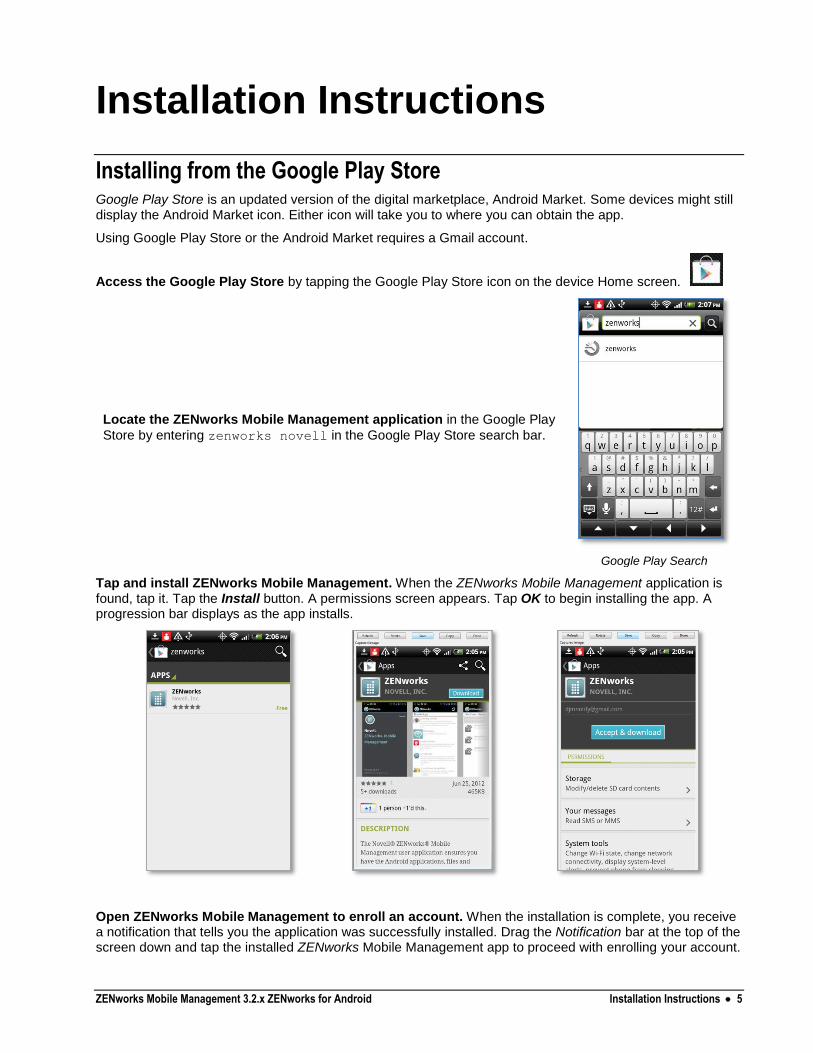
Access the Google Play Store by tapping the Google Play Store icon on the device Home screen.
Locate the ZENworks Mobile Management application in the Google Play
Store by entering zenworks novell in the Google Play Store search bar.
Google Play Search
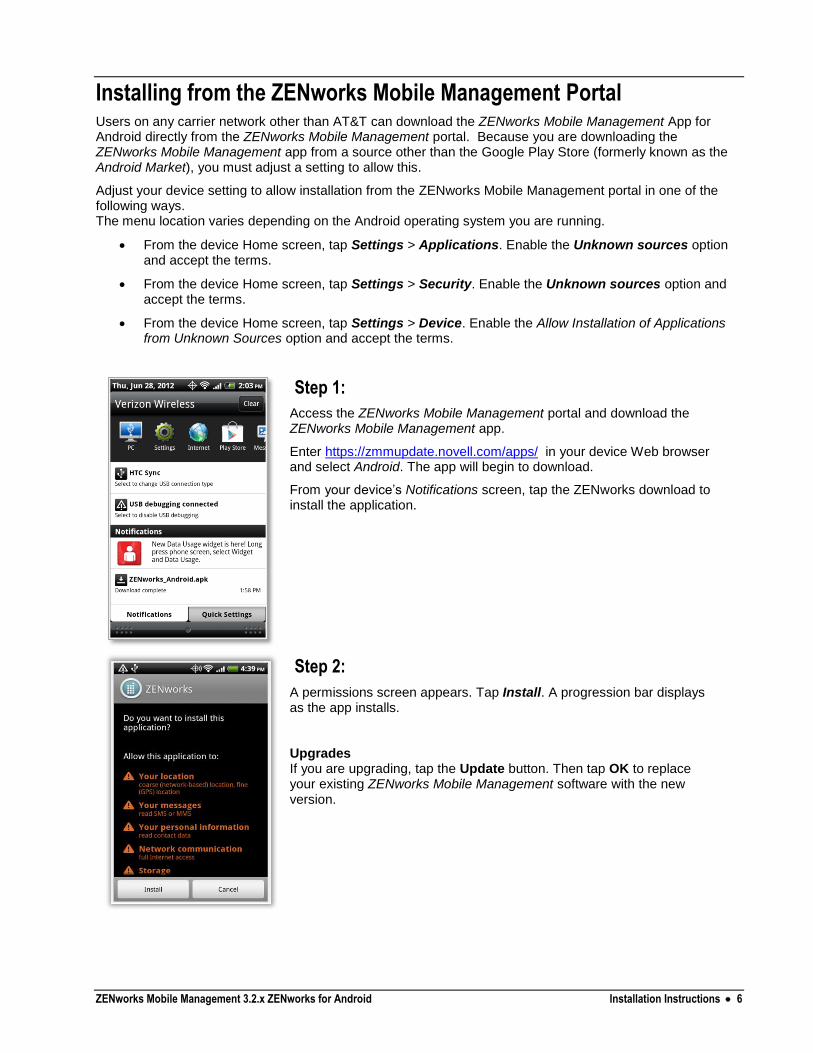
Tap and install ZENworks Mobile Management. When the ZENworks Mobile Management application is found, tap it. Tap the Install button. A permissions screen appears. Tap OK to begin installing the app. A progression bar displays as the app installs.
Open ZENworks Mobile Management to enroll an account. When the installation is complete, you receive a notification that tells you the application was successfully installed. Drag the Notification bar at the top of the screen down and tap the installed ZENworks Mobile Management app to proceed with enrolling your account.
ZENworks Mobile Management 3.2.x ZENworks for Android Installation Instructions 6
Installing from the ZENworks Mobile Management Portal Users on any carrier network other than AT&T can download the ZENworks Mobile Management App for Android directly from the ZENworks Mobile Management portal. Because you are downloading the ZENworks Mobile Management app from a source other than the Google Play Store (formerly known as the Android Market), you must adjust a setting to allow this.
Adjust your device setting to allow installation from the ZENworks Mobile Management portal in one of the following ways. The menu location varies depending on the Android operating system you are running.
From the device Home screen, tap Settings > Applications. Enable the Unknown sources option and accept the terms.
From the device Home screen, tap Settings > Security. Enable the Unknown sources option and accept the terms.
From the device Home screen, tap Settings > Device. Enable the Allow Installation of Applications from Unknown Sources option and accept the terms.
Step 1:
Access the ZENworks Mobile Management portal and download the ZENworks Mobile Management app.
Enter https://zmmupdate.novell.com/apps/ in your device Web browser and select Android. The app will begin to download.
From your device’s Notifications screen, tap the ZENworks download to install the application.
Step 2:
A permissions screen appears. Tap Install. A progression bar displays as the app installs.
Upgrades If you are upgrading, tap the Update button. Then tap OK to replace your existing ZENworks Mobile Management software with the new version.
ZENworks Mobile Management 3.2.x ZENworks for Android Installation Instructions 7
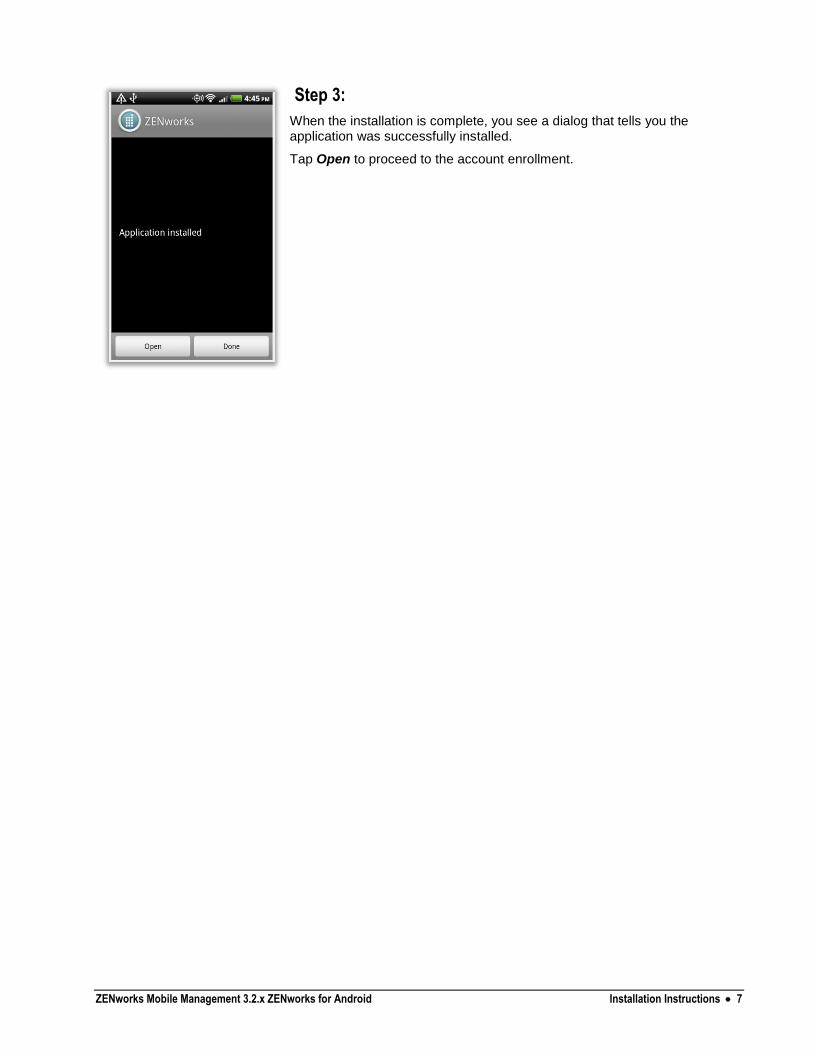
Step 3:
When the installation is complete, you see a dialog that tells you the application was successfully installed.
Tap Open to proceed to the account enrollment.
ZENworks Mobile Management 3.2.x ZENworks for Android Enrollment Instructions 8
Enrollment Instructions
The method your organization uses to identify you as an authorized user will determine the enrollment process for your device.
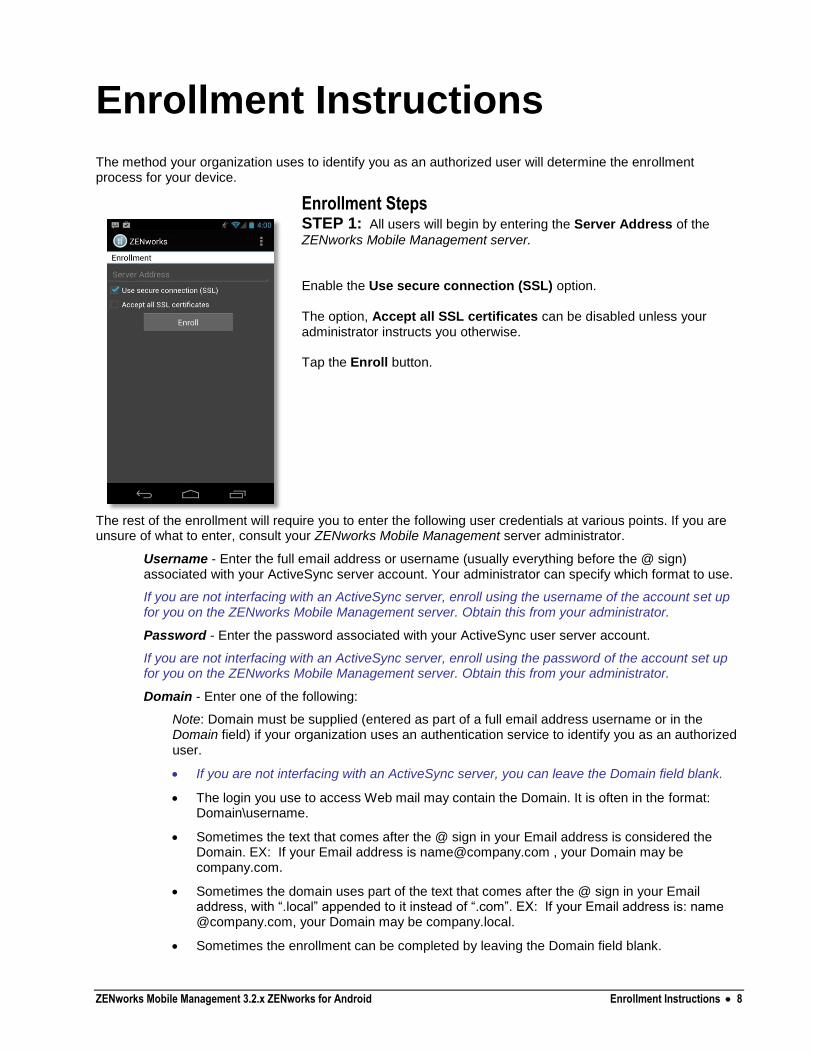
Enrollment Steps STEP 1: All users will begin by entering the Server Address of the
ZENworks Mobile Management server. Enable the Use secure connection (SSL) option. The option, Accept all SSL certificates can be disabled unless your administrator instructs you otherwise. Tap the Enroll button.
The rest of the enrollment will require you to enter the following user credentials at various points. If you are unsure of what to enter, consult your ZENworks Mobile Management server administrator.
Username - Enter the full email address or username (usually everything before the @ sign) associated with your ActiveSync server account. Your administrator can specify which format to use.
If you are not interfacing with an ActiveSync server, enroll using the username of the account set up for you on the ZENworks Mobile Management server. Obtain this from your administrator.
Password - Enter the password associated with your ActiveSync user server account.
If you are not interfacing with an ActiveSync server, enroll using the password of the account set up for you on the ZENworks Mobile Management server. Obtain this from your administrator.
Domain - Enter one of the following:
Note: Domain must be supplied (entered as part of a full email address username or in the Domain field) if your organization uses an authentication service to identify you as an authorized user.
If you are not interfacing with an ActiveSync server, you can leave the Domain field blank.
The login you use to access Web mail may contain the Domain. It is often in the format: Domain\username.
Sometimes the text that comes after the @ sign in your Email address is considered the Domain. EX: If your Email address is [email protected] , your Domain may be company.com.
Sometimes the domain uses part of the text that comes after the @ sign in your Email address, with “.local” appended to it instead of “.com”. EX: If your Email address is: name @company.com, your Domain may be company.local.
Sometimes the enrollment can be completed by leaving the Domain field blank.

ZENworks Mobile Management 3.2.x ZENworks for Android Enrollment Instructions 9
STEP 2: Enter your user credentials via one of the following processes:
Enter your Username and Password. Enter the Domain. Designate device Ownership. Is it your Personal device or a Company owned device? Tap Enroll.
Enter your Username. Enter the Domain. Tap Login.
Enter your Password, then tap Login.
Enter your Username. Enter the Domain. Tap Login.
You are redirected to an authentication service. Enter the Username and Password by which the service identifies you, then tap Login. Note: These credentials may be different than your ActiveSync server credentials. Consult your administrator.

ZENworks Mobile Management 3.2.x ZENworks for Android Enrollment Instructions 10
STEP 3: Complete the enrollment.
If you are prompted for the ZENworks Mobile Management End User License Agreement, accept it.
If you are prompted with your organization’s Acceptable Use Policy, read and accept it.
If you are using a Samsung KNOX device, you will be prompted to accept the Samsung Enterprise License agreement. Check the acknowledgement box and tap Confirm.
The enrollment finishes and displays a dialog that indicates the enrollment was successful. Your next step is to set up an Exchange ActiveSync account on the device. Tap OK.
If you are using a Samsung KNOX device, load the ActiveSync profile and automatically create your Exchange ActiveSync mail account. Otherwise proceed to Set Up an ActiveSync Account.
The device synchronizes and displays the ZENworks Mobile Management Status screen.
You might be prompted to set a screen unlock password and/or encrypt your device data if your organization requires it.
Tap the Options icon or the device’s menu button and choose the View Policies option to check your organization’s password requirements (password length, character type, etc.).
The next step is to set up a TouchDown account on the device.
ZENworks Mobile Management 3.2.x ZENworks for Android Enrollment Instructions 11
ActiveSync Account Set Up for Samsung KNOX Devices
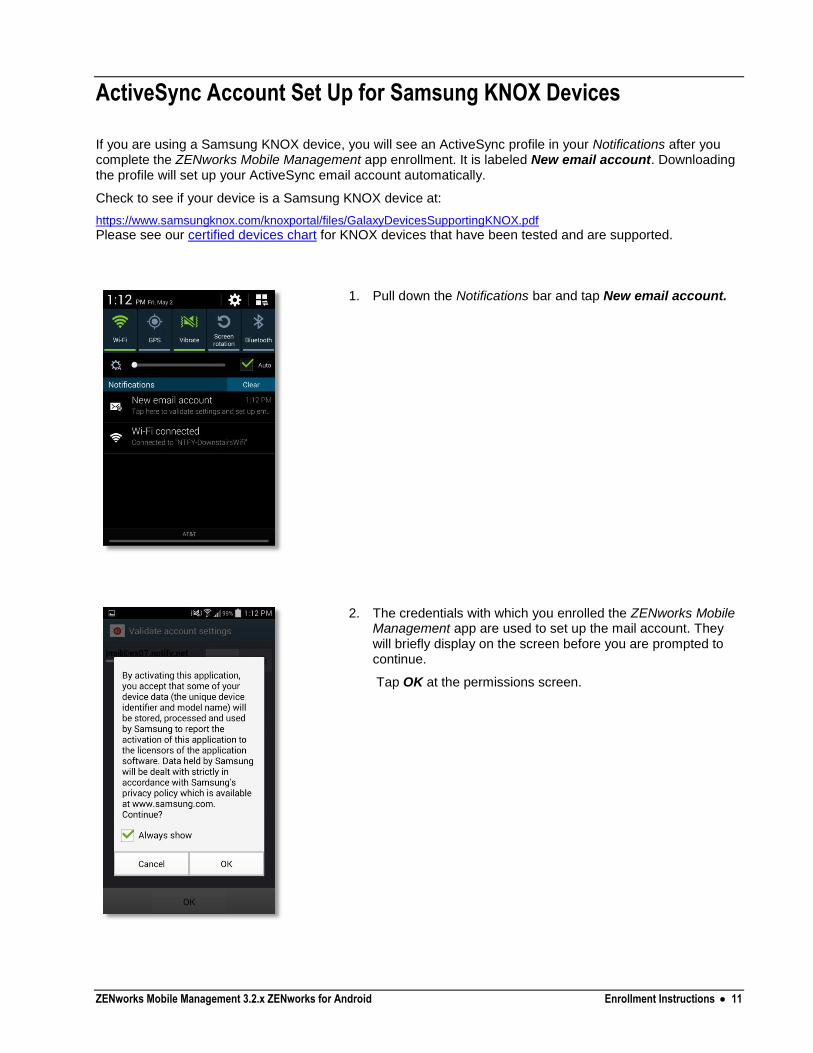
If you are using a Samsung KNOX device, you will see an ActiveSync profile in your Notifications after you complete the ZENworks Mobile Management app enrollment. It is labeled New email account. Downloading the profile will set up your ActiveSync email account automatically.
Check to see if your device is a Samsung KNOX device at:
https://www.samsungknox.com/knoxportal/files/GalaxyDevicesSupportingKNOX.pdf
Please see our certified devices chart for KNOX devices that have been tested and are supported.
1. Pull down the Notifications bar and tap New email account.
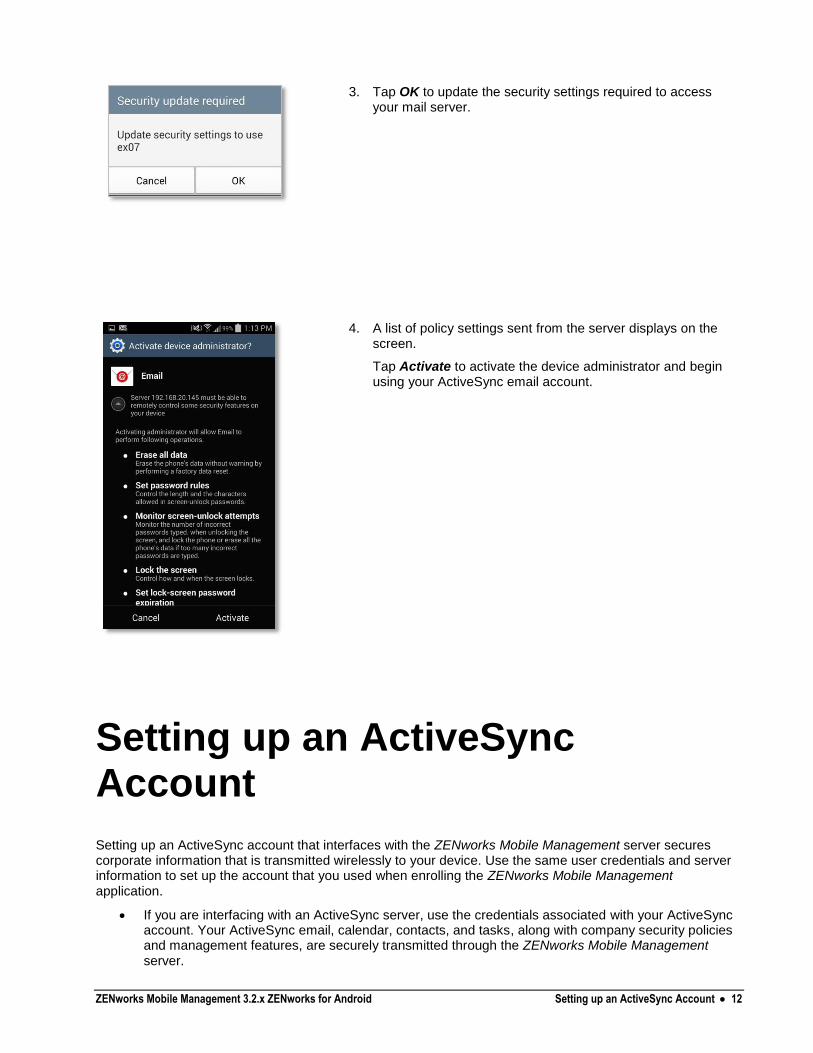
2. The credentials with which you enrolled the ZENworks Mobile Management app are used to set up the mail account. They will briefly display on the screen before you are prompted to continue.
Tap OK at the permissions screen.
ZENworks Mobile Management 3.2.x ZENworks for Android Setting up an ActiveSync Account 12
3. Tap OK to update the security settings required to access your mail server.
4. A list of policy settings sent from the server displays on the screen.
Tap Activate to activate the device administrator and begin using your ActiveSync email account.
Setting up an ActiveSync Account
Setting up an ActiveSync account that interfaces with the ZENworks Mobile Management server secures corporate information that is transmitted wirelessly to your device. Use the same user credentials and server information to set up the account that you used when enrolling the ZENworks Mobile Management application.
If you are interfacing with an ActiveSync server, use the credentials associated with your ActiveSync account. Your ActiveSync email, calendar, contacts, and tasks, along with company security policies and management features, are securely transmitted through the ZENworks Mobile Management server.
ZENworks Mobile Management 3.2.x ZENworks for Android Setting up an ActiveSync Account 13
If you are not interfacing with an ActiveSync server, use the credentials associated with your ZENworks Mobile Management account. Company security policies and management features will be securely transmitted through the ZENworks Mobile Management server.
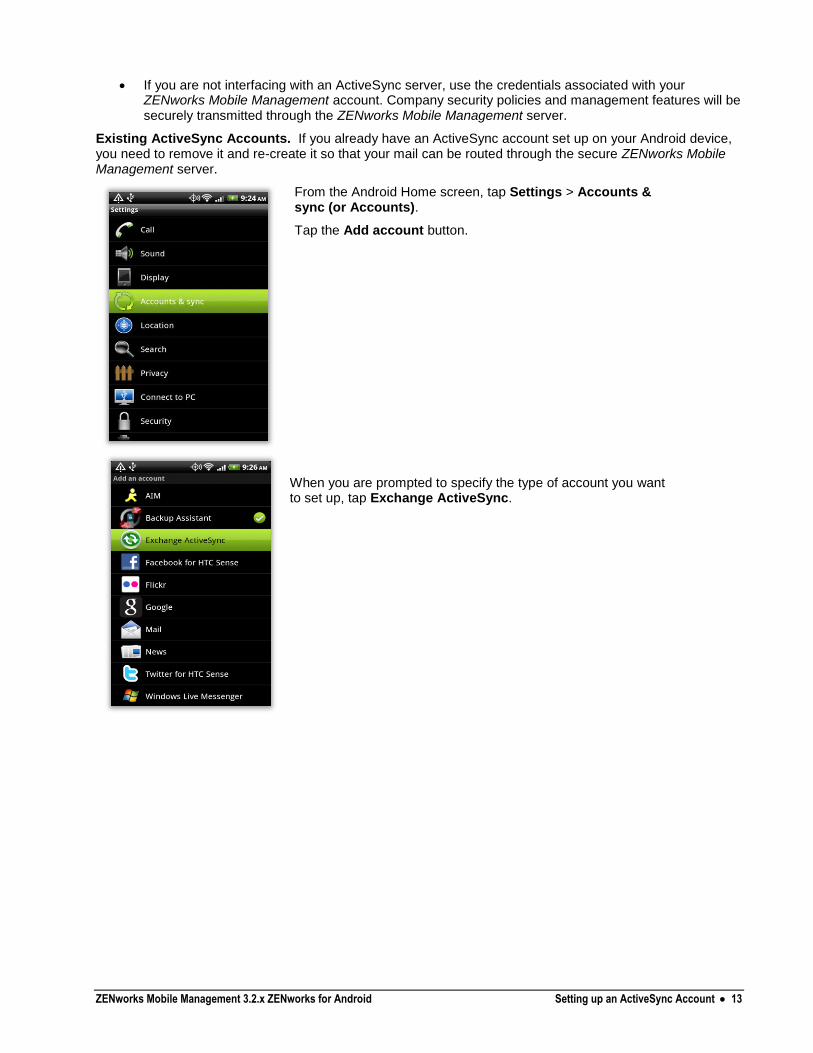
Existing ActiveSync Accounts. If you already have an ActiveSync account set up on your Android device, you need to remove it and re-create it so that your mail can be routed through the secure ZENworks Mobile Management server.
From the Android Home screen, tap Settings > Accounts & sync (or Accounts).
Tap the Add account button.
When you are prompted to specify the type of account you want to set up, tap Exchange ActiveSync.
ZENworks Mobile Management 3.2.x ZENworks for Android Setting up an ActiveSync Account 14
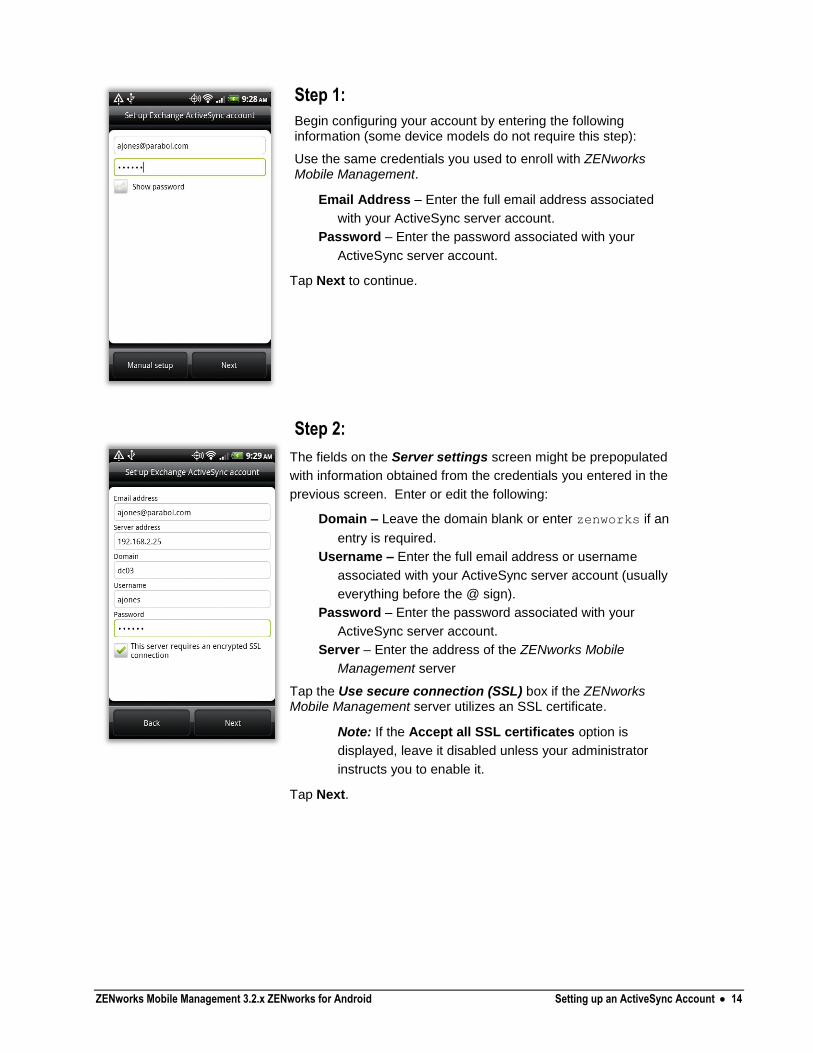
Step 1:
Begin configuring your account by entering the following information (some device models do not require this step):
Use the same credentials you used to enroll with ZENworks Mobile Management.
Email Address – Enter the full email address associated
with your ActiveSync server account.
Password – Enter the password associated with your
ActiveSync server account.
Tap Next to continue.
Step 2:
The fields on the Server settings screen might be prepopulated
with information obtained from the credentials you entered in the
previous screen. Enter or edit the following:
Domain – Leave the domain blank or enter zenworks if an
entry is required.
Username – Enter the full email address or username
associated with your ActiveSync server account (usually
everything before the @ sign).
Password – Enter the password associated with your
ActiveSync server account.
Server – Enter the address of the ZENworks Mobile
Management server
Tap the Use secure connection (SSL) box if the ZENworks Mobile Management server utilizes an SSL certificate.
Note: If the Accept all SSL certificates option is
displayed, leave it disabled unless your administrator
instructs you to enable it.
Tap Next.
ZENworks Mobile Management 3.2.x ZENworks for Android Setting up an ActiveSync Account 15
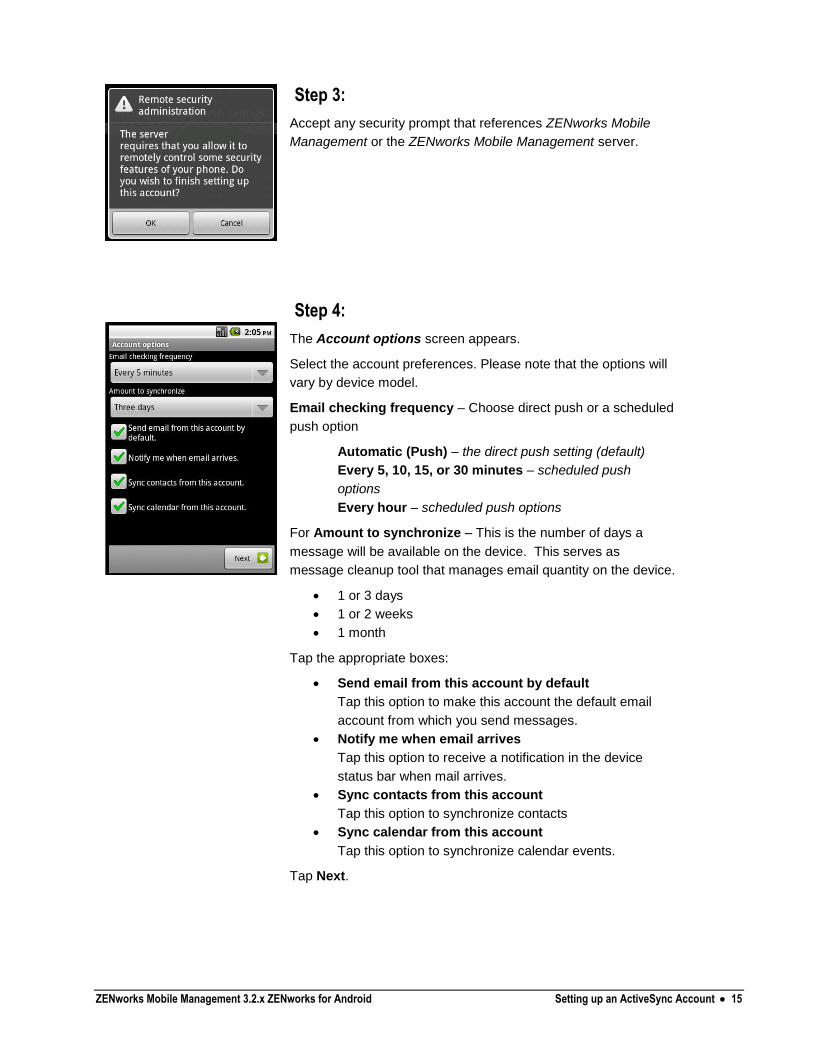
Step 3:
Accept any security prompt that references ZENworks Mobile
Management or the ZENworks Mobile Management server.
Step 4:
The Account options screen appears.
Select the account preferences. Please note that the options will
vary by device model.
Email checking frequency – Choose direct push or a scheduled
push option
Automatic (Push) – the direct push setting (default)
Every 5, 10, 15, or 30 minutes – scheduled push
options
Every hour – scheduled push options
For Amount to synchronize – This is the number of days a
message will be available on the device. This serves as
message cleanup tool that manages email quantity on the device.
1 or 3 days
1 or 2 weeks
1 month
Tap the appropriate boxes:
Send email from this account by default
Tap this option to make this account the default email
account from which you send messages.
Notify me when email arrives
Tap this option to receive a notification in the device
status bar when mail arrives.
Sync contacts from this account
Tap this option to synchronize contacts
Sync calendar from this account
Tap this option to synchronize calendar events.
Tap Next.
ZENworks Mobile Management 3.2.x ZENworks for Android Setting up an ActiveSync Account 16
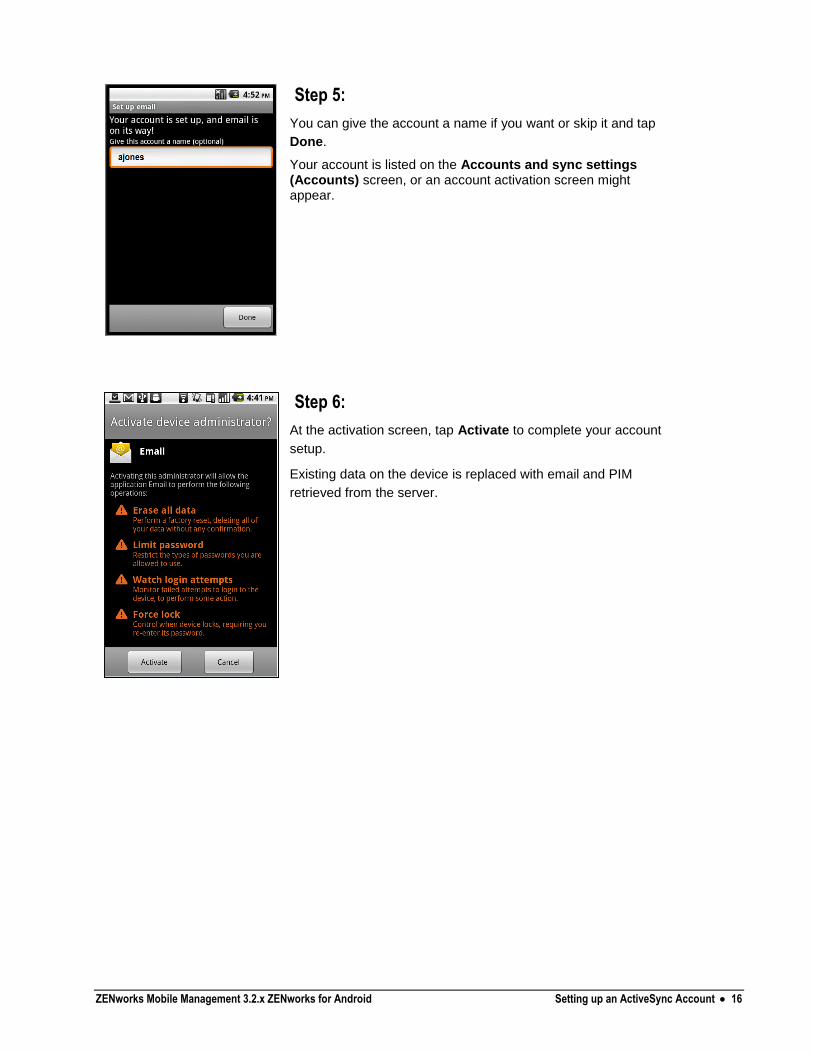
Step 5:
You can give the account a name if you want or skip it and tap
Done.
Your account is listed on the Accounts and sync settings (Accounts) screen, or an account activation screen might appear.
Step 6:
At the activation screen, tap Activate to complete your account
setup.
Existing data on the device is replaced with email and PIM
retrieved from the server.
ZENworks Mobile Management 3.2.x ZENworks for Android Using ZENworks Mobile Management 17
Using ZENworks Mobile Management
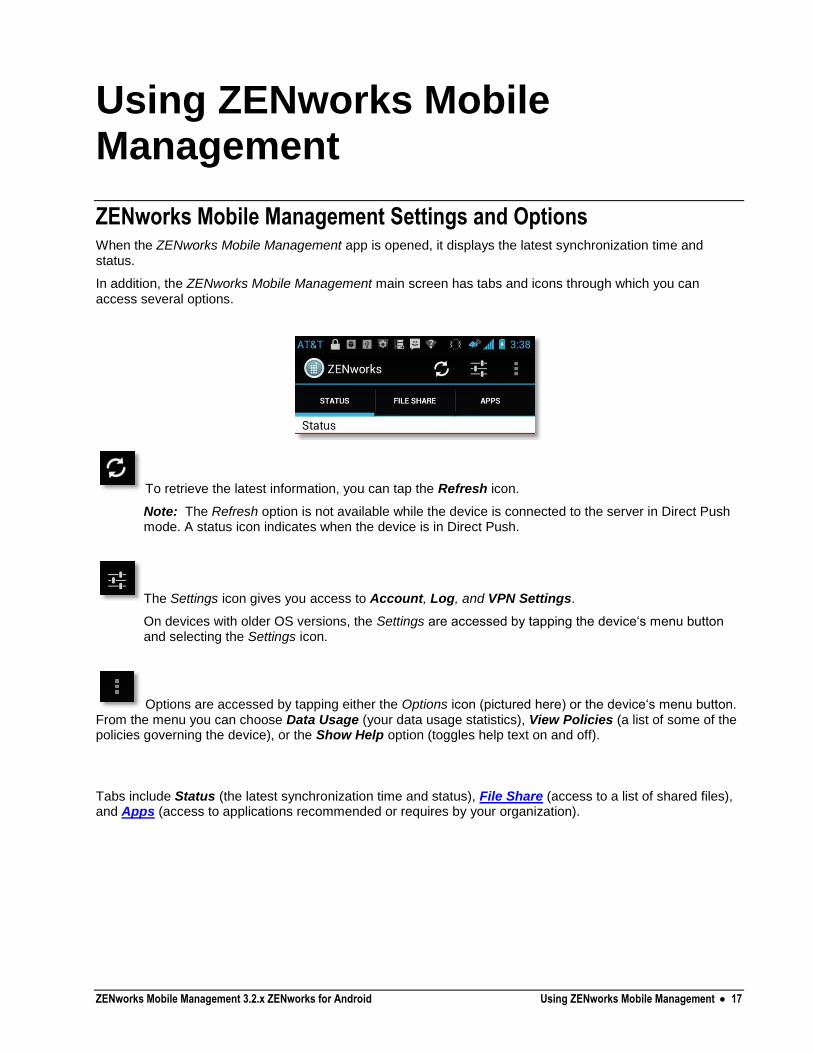
ZENworks Mobile Management Settings and Options When the ZENworks Mobile Management app is opened, it displays the latest synchronization time and status.
In addition, the ZENworks Mobile Management main screen has tabs and icons through which you can access several options.
To retrieve the latest information, you can tap the Refresh icon.
Note: The Refresh option is not available while the device is connected to the server in Direct Push mode. A status icon indicates when the device is in Direct Push.
The Settings icon gives you access to Account, Log, and VPN Settings.
On devices with older OS versions, the Settings are accessed by tapping the device‘s menu button and selecting the Settings icon.
Options are accessed by tapping either the Options icon (pictured here) or the device‘s menu button. From the menu you can choose Data Usage (your data usage statistics), View Policies (a list of some of the policies governing the device), or the Show Help option (toggles help text on and off).
Tabs include Status (the latest synchronization time and status), File Share (access to a list of shared files), and Apps (access to applications recommended or requires by your organization).
ZENworks Mobile Management 3.2.x ZENworks for Android Using ZENworks Mobile Management 18
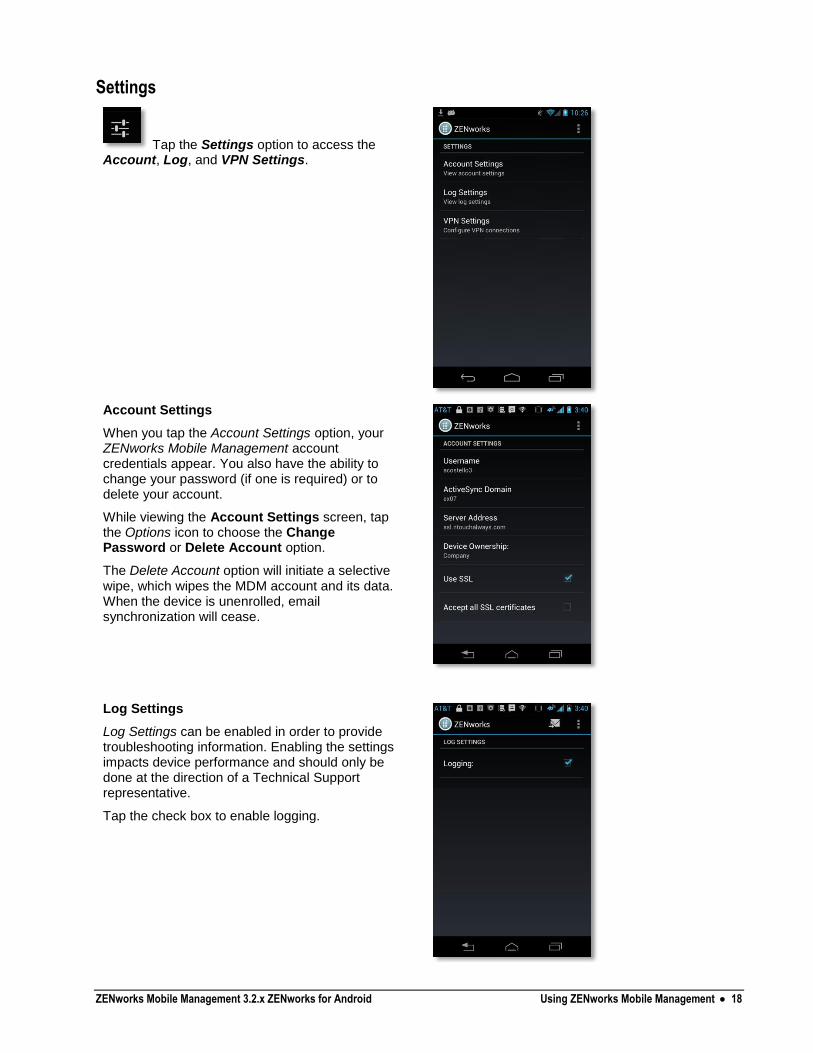
Settings
Tap the Settings option to access the Account, Log, and VPN Settings.
Account Settings
When you tap the Account Settings option, your ZENworks Mobile Management account credentials appear. You also have the ability to change your password (if one is required) or to delete your account.
While viewing the Account Settings screen, tap the Options icon to choose the Change Password or Delete Account option.
The Delete Account option will initiate a selective wipe, which wipes the MDM account and its data. When the device is unenrolled, email synchronization will cease.
Log Settings
Log Settings can be enabled in order to provide troubleshooting information. Enabling the settings impacts device performance and should only be done at the direction of a Technical Support representative.
Tap the check box to enable logging.
ZENworks Mobile Management 3.2.x ZENworks for Android Using ZENworks Mobile Management 19
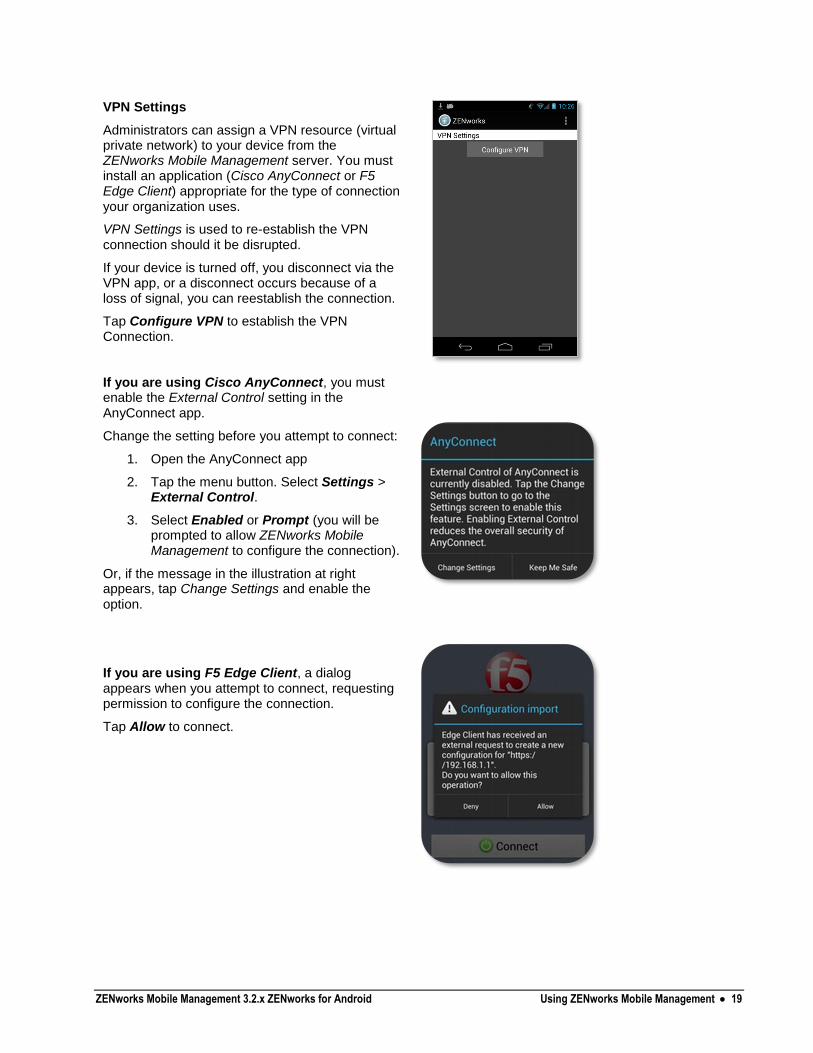
VPN Settings
Administrators can assign a VPN resource (virtual private network) to your device from the ZENworks Mobile Management server. You must install an application (Cisco AnyConnect or F5 Edge Client) appropriate for the type of connection your organization uses.
VPN Settings is used to re-establish the VPN connection should it be disrupted.
If your device is turned off, you disconnect via the VPN app, or a disconnect occurs because of a loss of signal, you can reestablish the connection.
Tap Configure VPN to establish the VPN Connection.
If you are using Cisco AnyConnect, you must enable the External Control setting in the AnyConnect app.
Change the setting before you attempt to connect:
1. Open the AnyConnect app
2. Tap the menu button. Select Settings > External Control.
3. Select Enabled or Prompt (you will be prompted to allow ZENworks Mobile Management to configure the connection).
Or, if the message in the illustration at right appears, tap Change Settings and enable the option.
If you are using F5 Edge Client, a dialog appears when you attempt to connect, requesting permission to configure the connection.
Tap Allow to connect.
ZENworks Mobile Management 3.2.x ZENworks for Android Using ZENworks Mobile Management 20
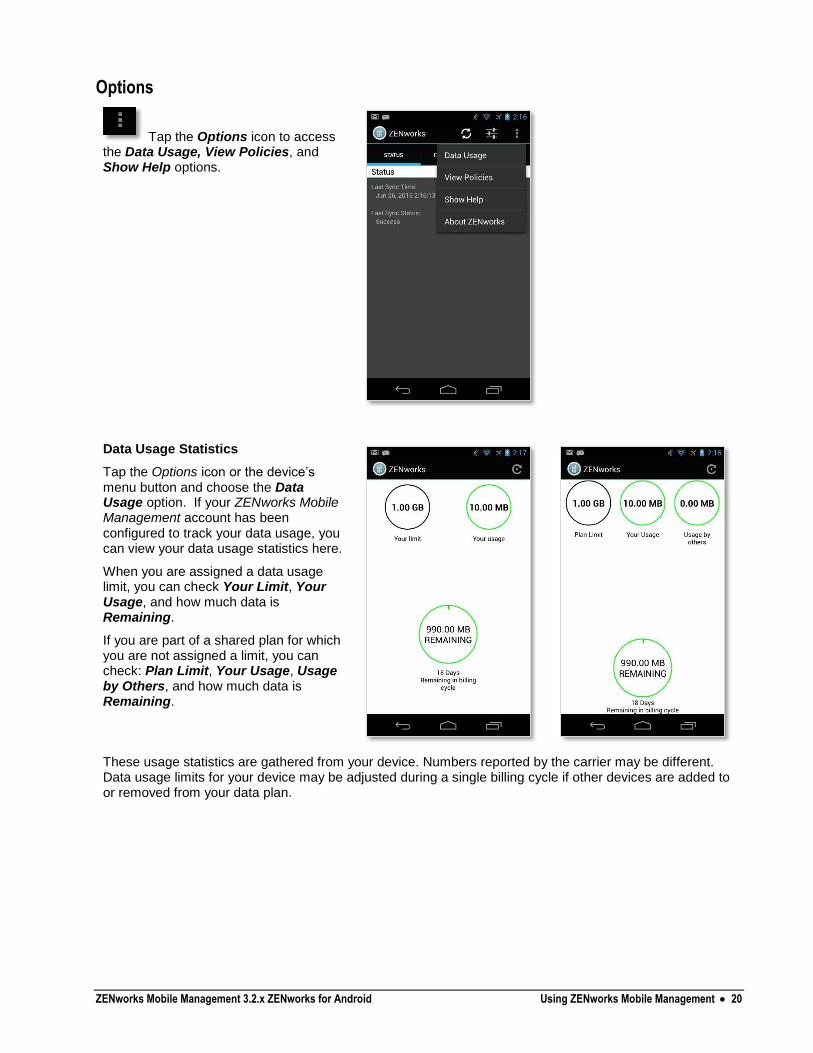
Options
Tap the Options icon to access the Data Usage, View Policies, and Show Help options.
Data Usage Statistics
Tap the Options icon or the device’s menu button and choose the Data Usage option. If your ZENworks Mobile Management account has been configured to track your data usage, you can view your data usage statistics here.
When you are assigned a data usage limit, you can check Your Limit, Your Usage, and how much data is Remaining.
If you are part of a shared plan for which you are not assigned a limit, you can check: Plan Limit, Your Usage, Usage by Others, and how much data is Remaining.
These usage statistics are gathered from your device. Numbers reported by the carrier may be different. Data usage limits for your device may be adjusted during a single billing cycle if other devices are added to or removed from your data plan.
ZENworks Mobile Management 3.2.x ZENworks for Android Using ZENworks Mobile Management 21
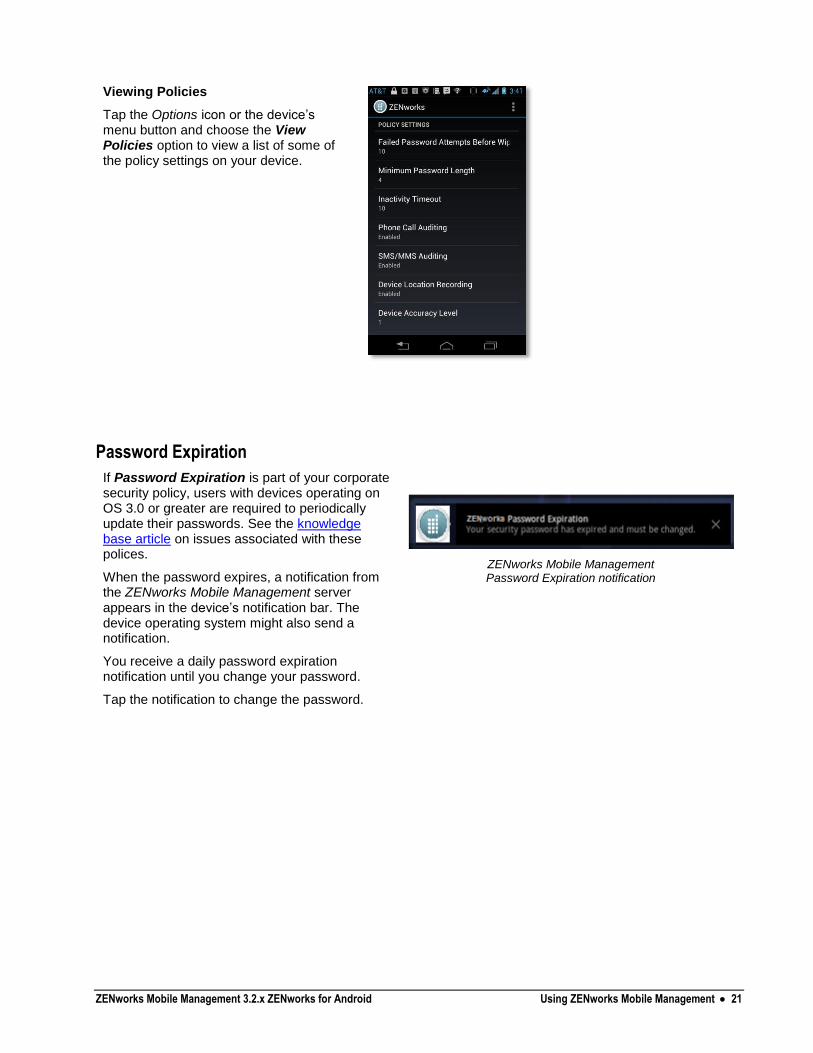
Viewing Policies
Tap the Options icon or the device’s menu button and choose the View Policies option to view a list of some of the policy settings on your device.
Password Expiration
If Password Expiration is part of your corporate security policy, users with devices operating on OS 3.0 or greater are required to periodically update their passwords. See the knowledge base article on issues associated with these polices.
When the password expires, a notification from the ZENworks Mobile Management server appears in the device’s notification bar. The device operating system might also send a notification.
You receive a daily password expiration notification until you change your password.
Tap the notification to change the password.
ZENworks Mobile Management Password Expiration notification
ZENworks Mobile Management 3.2.x ZENworks for Android Using ZENworks Mobile Management 22
Encryption and Password Requirements For security reasons, your organization might require that you password protect your device and/or that you encrypt the data stored on the device. If these policies are enforced, the ZENworks Mobile Management app will prompt you to create a password and/or encrypt your device.
To see the password policies your organization has implemented, tap the Options icon in the ZENworks Mobile Management app and select View Policies.
Password Requirement When password requirement policies have been enabled on the ZENworks Mobile Management server, the ZENworks app verifies that a password has been created and that it meets specified criteria, such as password length or character content. ZENworks Mobile Management reinforces password requirements on the device by repeatedly prompting you to create a qualifying unlock password.
If the initial prompt to create a qualifying unlock password is dismissed, the device prompts again two minutes later. If the second prompt is dismissed without creating a password, the device will ask again after 60 minutes. From this point on, every time the password prompt is dismissed, the device repeats the request 5 seconds later, until the user creates a password.
Users should keep in mind that password length applies to unlock passwords, patterns, or PINs. An existing password that does not meet the qualifying criteria can also trigger the prompts. Users have experienced this when using a pattern type unlock code. For example, if a 6 digit simple passcode is the requirement, a 6 dot pattern code must be used, even though the native device dialog that appears will state that 4 or more are required.
Encryption Requirement
When the device encryption requirement policy has been enabled on the ZENworks Mobile Management server, the ZENworks app verifies that data stored on the device is encrypted. ZENworks Mobile Management reinforces encryption requirements for the device by repeatedly prompting you to encrypt your device.
If the initial prompt to encrypt is dismissed, the device prompts again two minutes later. If the second prompt is dismissed without initiating the encryption, the device will ask again after 60 minutes. From this point on, every time the encryption prompt is dismissed, the device repeats the request 5 seconds later, until the user initiates the encryption.
ZENworks Mobile Management 3.2.x ZENworks for Android Using ZENworks Mobile Management 23
Accessing Managed Apps
Accessing the Corporate Managed Apps List
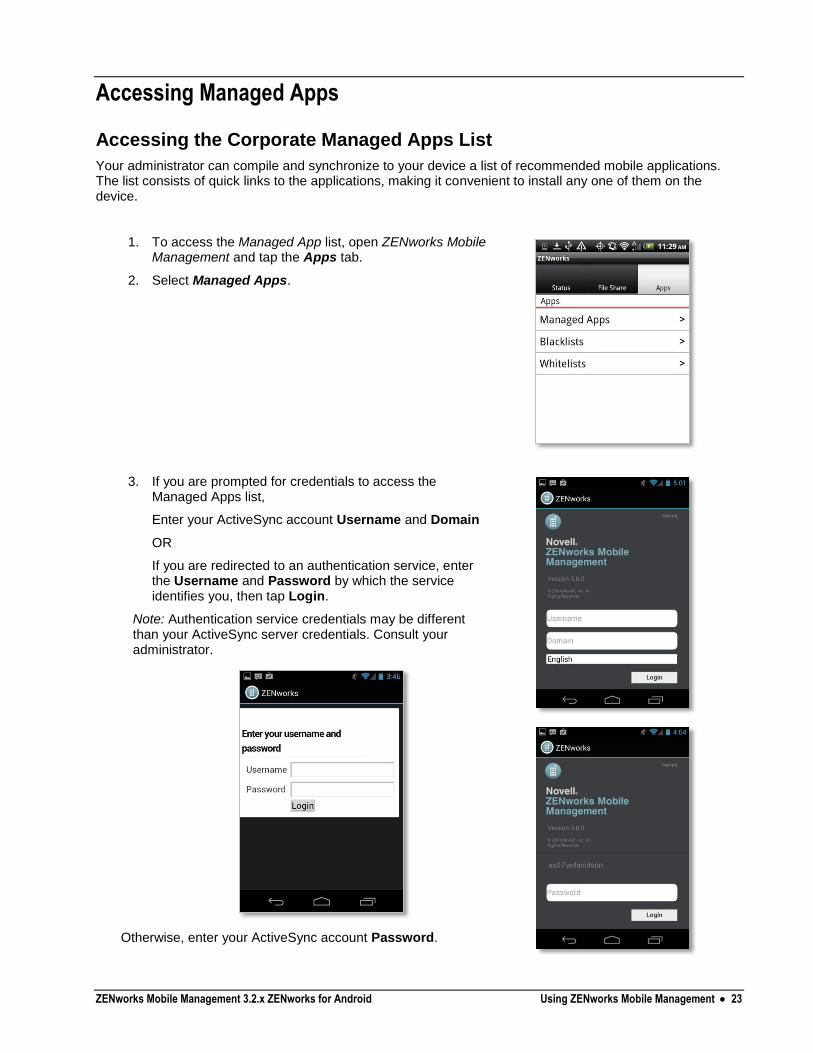
Your administrator can compile and synchronize to your device a list of recommended mobile applications. The list consists of quick links to the applications, making it convenient to install any one of them on the device.
1. To access the Managed App list, open ZENworks Mobile Management and tap the Apps tab.
2. Select Managed Apps.
3. If you are prompted for credentials to access the Managed Apps list,
Enter your ActiveSync account Username and Domain
OR
If you are redirected to an authentication service, enter the Username and Password by which the service identifies you, then tap Login.
Note: Authentication service credentials may be different than your ActiveSync server credentials. Consult your administrator.
Otherwise, enter your ActiveSync account Password.

ZENworks Mobile Management 3.2.x ZENworks for Android Using ZENworks Mobile Management 24
4. A browser launches a web page where a list of available apps is displayed.
The apps might be categorized or they might be displayed in an uncategorized list. Categories are displayed in an expandable/collapsible list. Tap a category to expand it and view its apps. Tap it again to collapse the list.
Tap the app you wish to install and navigate to where it is located in the Google Play Store.
“Required” displayed beside an app indicates that it is required by your organization and has automatically prompted you to install the app. A prompt will continue to appear until the app is installed.
ZENworks Mobile Management 3.2.x ZENworks for Android Using ZENworks Mobile Management 25
Blacklists / Whitelists
Your organization’s usage policy may only permit selected mobile applications. All others can be restricted with the use of a blacklist or whitelist.
Apps Restricted by a Blacklist: If an application installed on your device matches a blacklist filter string, your access to email, shared files, app lists, or other organization resources can be blocked.
Apps Restricted by a Whitelist: If an application installed on your device does not match one of the whitelist filter strings, your access to email, shared files, app lists, or other organization resources can be blocked.
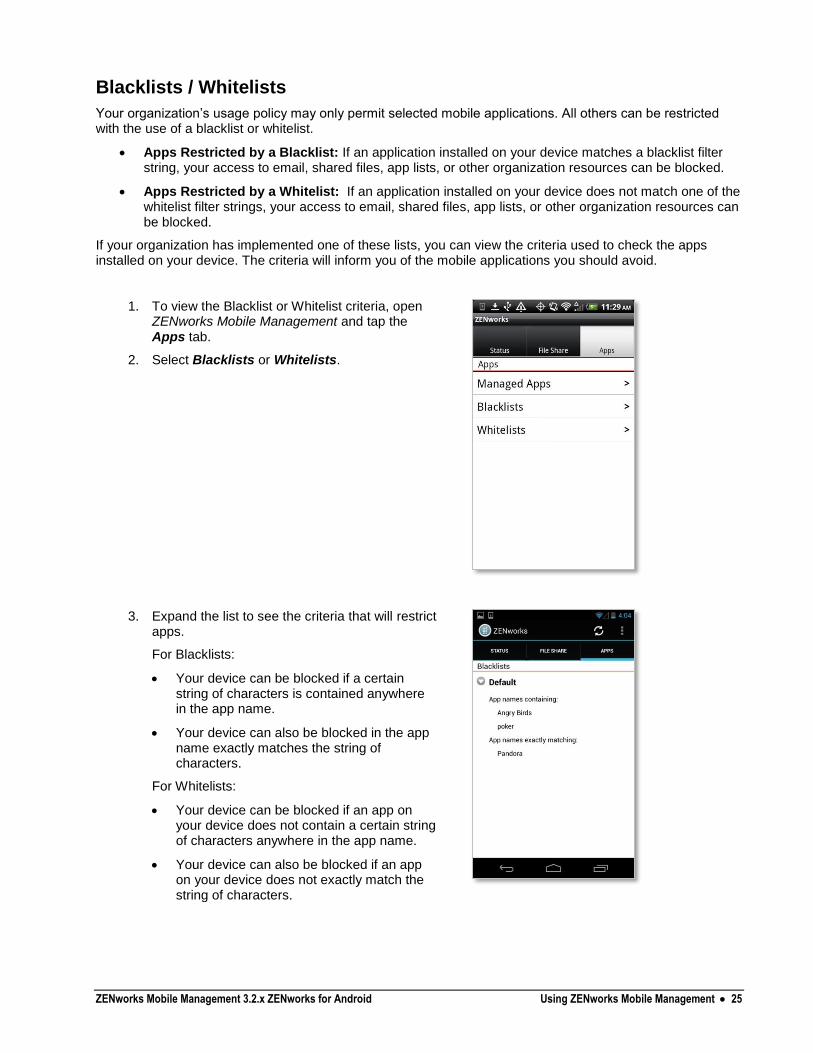
If your organization has implemented one of these lists, you can view the criteria used to check the apps installed on your device. The criteria will inform you of the mobile applications you should avoid.
1. To view the Blacklist or Whitelist criteria, open ZENworks Mobile Management and tap the Apps tab.
2. Select Blacklists or Whitelists.
3. Expand the list to see the criteria that will restrict apps.
For Blacklists:
Your device can be blocked if a certain string of characters is contained anywhere in the app name.
Your device can also be blocked in the app name exactly matches the string of characters.
For Whitelists:
Your device can be blocked if an app on your device does not contain a certain string of characters anywhere in the app name.
Your device can also be blocked if an app on your device does not exactly match the string of characters.
ZENworks Mobile Management 3.2.x ZENworks for Android Using ZENworks Mobile Management 26
Accessing the Shared File List Your administrator can compile and make available a directory of folders and files. If the policy to which you have been assigned permits, you have access to these files on your device.
To view the files, you must have viewing applications installed on the device that support the file types. For example, you must have a PDF reader in order to view a PDF file.
If your organization requires it, it may be necessary to encrypt your device data before you can access the shared File List.
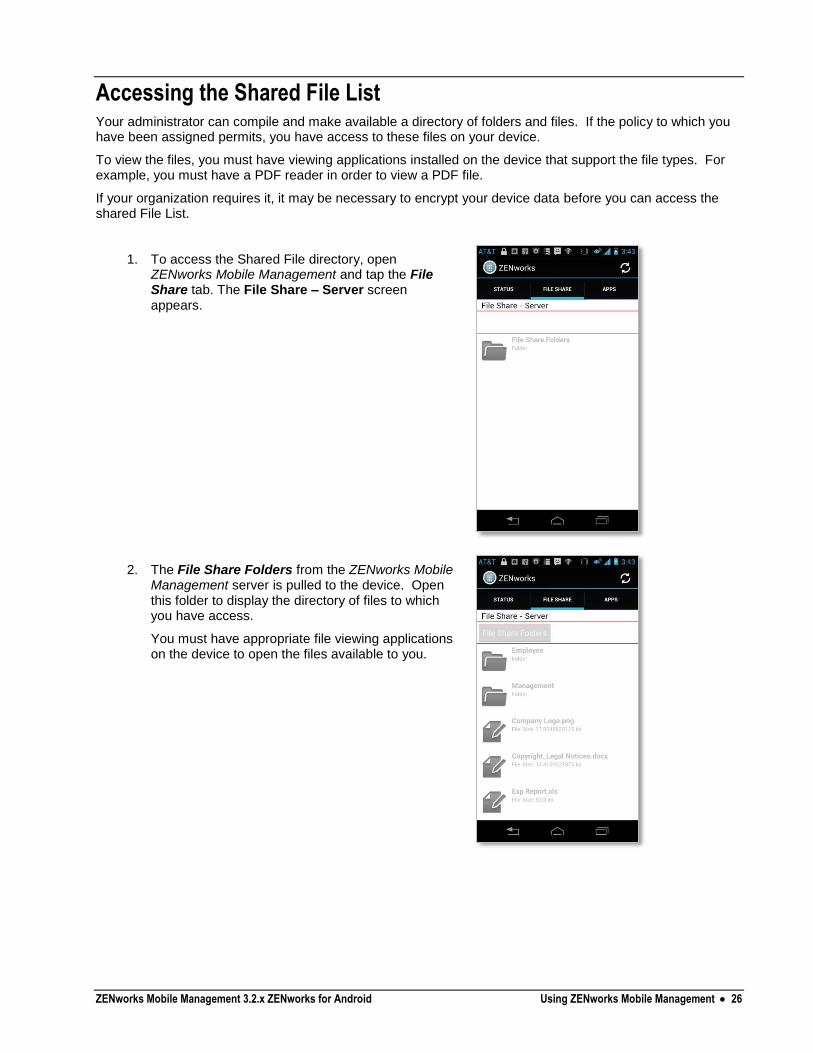
1. To access the Shared File directory, open ZENworks Mobile Management and tap the File Share tab. The File Share – Server screen appears.
2. The File Share Folders from the ZENworks Mobile Management server is pulled to the device. Open this folder to display the directory of files to which you have access.
You must have appropriate file viewing applications on the device to open the files available to you.
ZENworks Mobile Management 3.2.x ZENworks for Android Maintenance and Usage Tips 27
Maintenance and Usage Tips
Uninstalling ZENworks Mobile Management When you uninstall the ZENworks Mobile Management app, all application data files are also removed.
Delete your ZENworks Mobile Management account before you uninstall the ZENworks Mobile Management app.
Deleting Your ZENworks Mobile Management Account
1. Open ZENworks Mobile Management and tap the Settings icon.
2. Select Account Settings.
3. Tap the Options icon and select Delete Account.
4. Confirm the deletion by answering Yes to the confirmation question.
Uninstalling the ZENworks Mobile Management App
5. From the device Home screen, tap Settings > Applications > Manage Applications.
6. Tap ZENworks Mobile Management.
7. Tap Uninstall.
What to Do if You Change Devices If you change devices, your ZENworks Mobile Management administrator must clear device enrollment on the server before you can enroll the new device.
Uninstall the ZENworks Mobile Management app from the old device by performing the steps in Uninstalling ZENworks Mobile Management.
After you verify that the administrator has cleared the device enrollment, proceed with enrolling the new device.
Note: Your administrator must also Clear Device Enrollment on the server if you are re-enrolling a device that has been reset to factory settings.

ZENworks Mobile Management 3.2.x ZENworks for Android Maintenance and Usage Tips 28
Setting the Synchronization Mode With Direct Push, the device maintains an open connection. The alternative is a Scheduled Push mode where the device is set to check for new messages at a set interval.
Setting a device in Direct Push mode may increase battery consumption. If your battery is not lasting as long as you would like, set a Scheduled Push interval.
To change synchronization to a Scheduled Push mode:
1. From the device Home screen, go to Settings.
2. Tap Accounts & sync.
3. Disable Background data and Auto-sync.
ZENworks Mobile Management 3.2.x ZENworks for Android Maintenance and Usage Tips 29
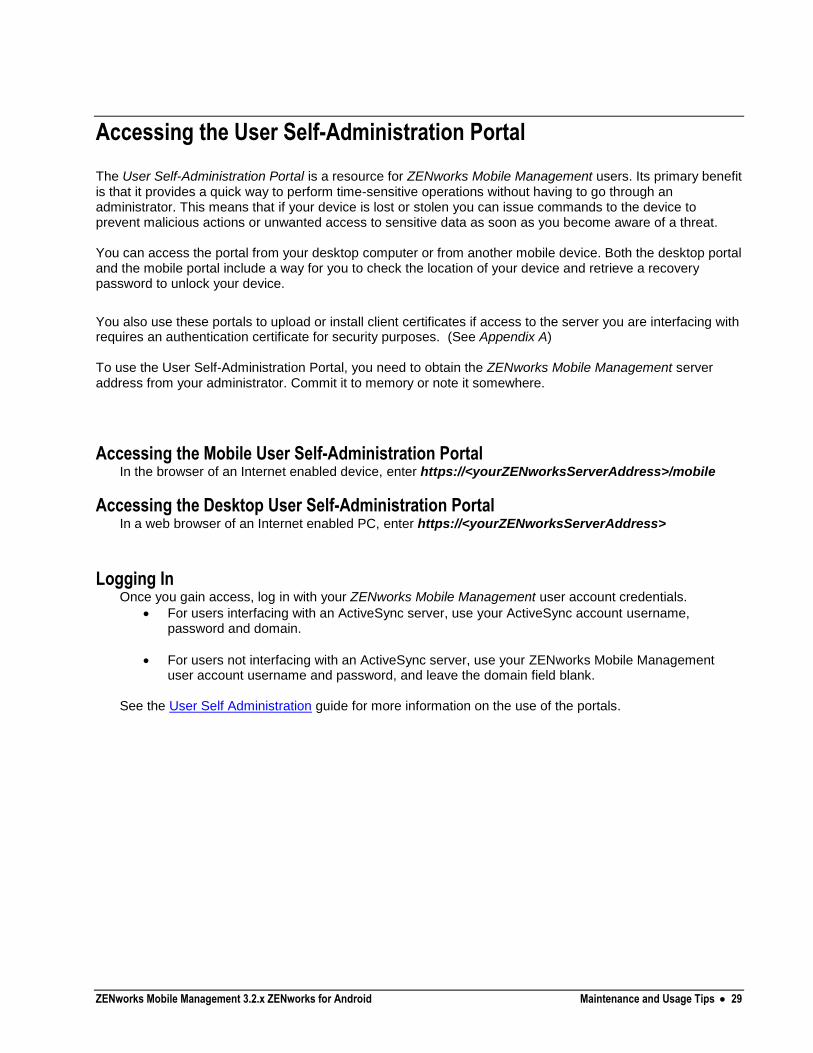
Accessing the User Self-Administration Portal The User Self-Administration Portal is a resource for ZENworks Mobile Management users. Its primary benefit is that it provides a quick way to perform time-sensitive operations without having to go through an administrator. This means that if your device is lost or stolen you can issue commands to the device to prevent malicious actions or unwanted access to sensitive data as soon as you become aware of a threat. You can access the portal from your desktop computer or from another mobile device. Both the desktop portal and the mobile portal include a way for you to check the location of your device and retrieve a recovery password to unlock your device.
You also use these portals to upload or install client certificates if access to the server you are interfacing with requires an authentication certificate for security purposes. (See Appendix A) To use the User Self-Administration Portal, you need to obtain the ZENworks Mobile Management server address from your administrator. Commit it to memory or note it somewhere.
Accessing the Mobile User Self-Administration Portal In the browser of an Internet enabled device, enter https://<yourZENworksServerAddress>/mobile
Accessing the Desktop User Self-Administration Portal In a web browser of an Internet enabled PC, enter https://<yourZENworksServerAddress>
Logging In Once you gain access, log in with your ZENworks Mobile Management user account credentials.
For users interfacing with an ActiveSync server, use your ActiveSync account username, password and domain.
For users not interfacing with an ActiveSync server, use your ZENworks Mobile Management user account username and password, and leave the domain field blank.
See the User Self Administration guide for more information on the use of the portals.
ZENworks Mobile Management 3.2.x ZENworks for Android Appendix A: Identity Certificate Installation 30
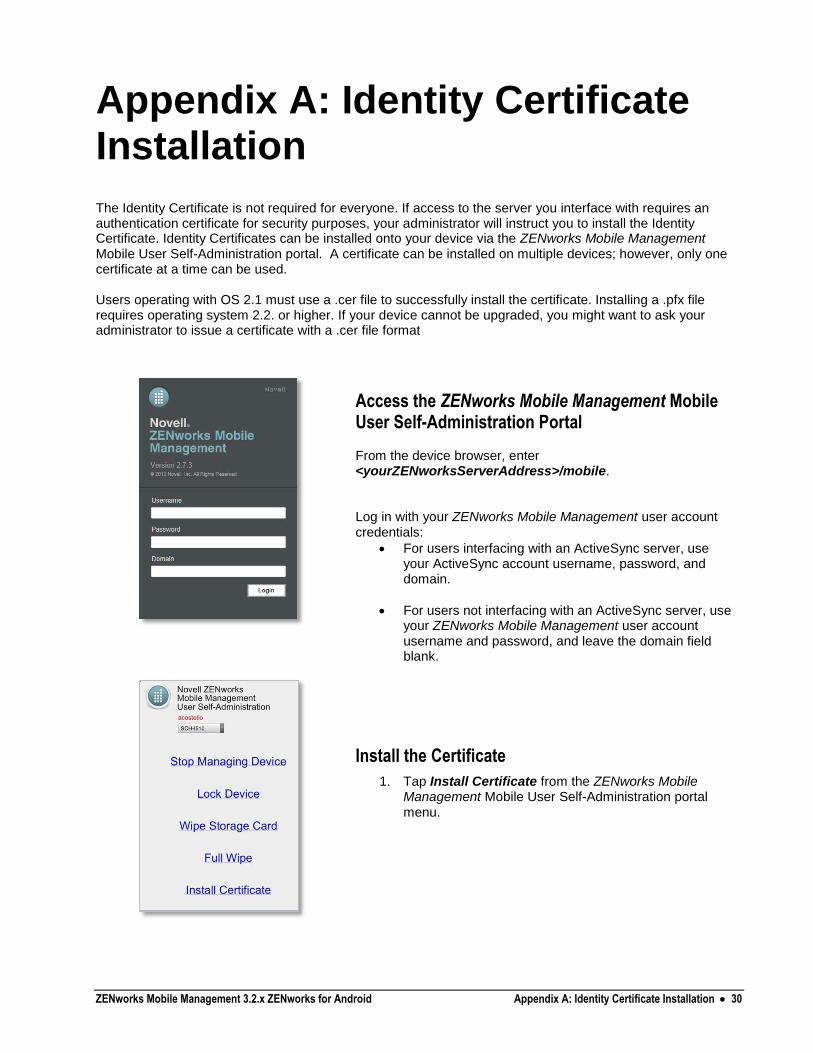
Appendix A: Identity Certificate Installation
The Identity Certificate is not required for everyone. If access to the server you interface with requires an authentication certificate for security purposes, your administrator will instruct you to install the Identity Certificate. Identity Certificates can be installed onto your device via the ZENworks Mobile Management Mobile User Self-Administration portal. A certificate can be installed on multiple devices; however, only one certificate at a time can be used. Users operating with OS 2.1 must use a .cer file to successfully install the certificate. Installing a .pfx file requires operating system 2.2. or higher. If your device cannot be upgraded, you might want to ask your administrator to issue a certificate with a .cer file format
Access the ZENworks Mobile Management Mobile User Self-Administration Portal From the device browser, enter <yourZENworksServerAddress>/mobile. Log in with your ZENworks Mobile Management user account credentials:
For users interfacing with an ActiveSync server, use your ActiveSync account username, password, and domain.
For users not interfacing with an ActiveSync server, use your ZENworks Mobile Management user account username and password, and leave the domain field blank.
Install the Certificate
1. Tap Install Certificate from the ZENworks Mobile Management Mobile User Self-Administration portal menu.
ZENworks Mobile Management 3.2.x ZENworks for Android Appendix A: Identity Certificate Installation 31
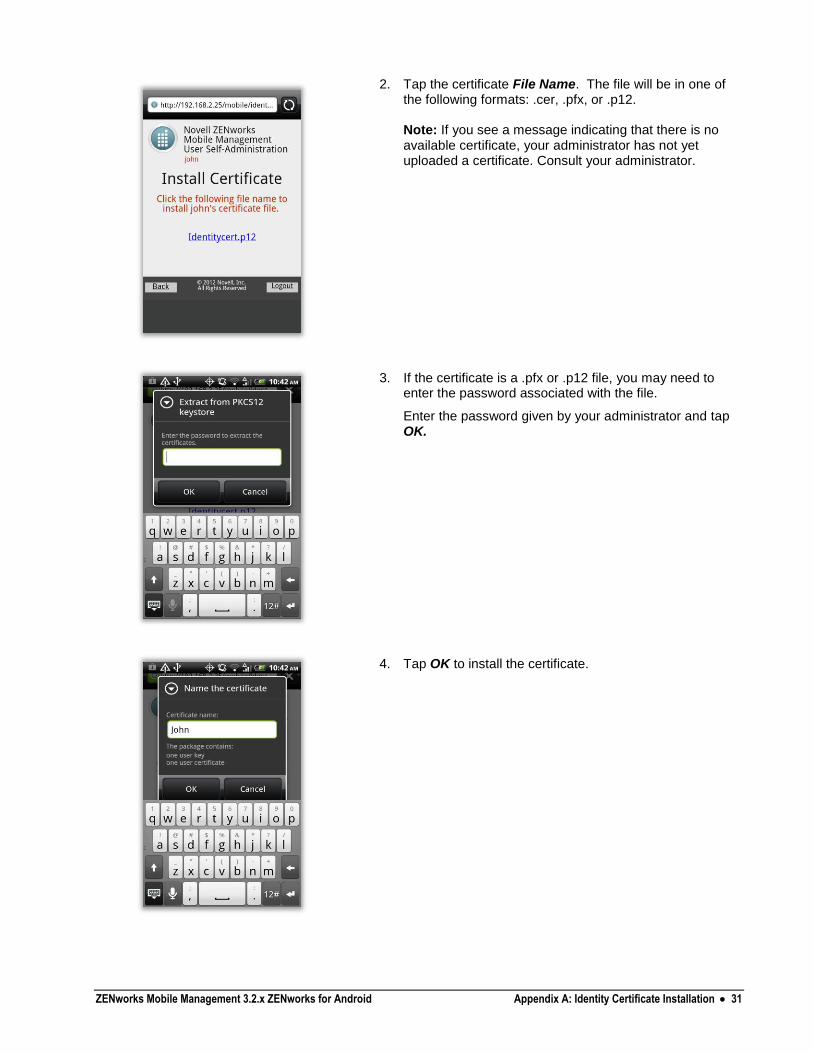
2. Tap the certificate File Name. The file will be in one of the following formats: .cer, .pfx, or .p12. Note: If you see a message indicating that there is no available certificate, your administrator has not yet uploaded a certificate. Consult your administrator.
3. If the certificate is a .pfx or .p12 file, you may need to enter the password associated with the file.
Enter the password given by your administrator and tap OK.
4. Tap OK to install the certificate.
ZENworks Mobile Management 3.2.x ZENworks for Android Appendix A: Identity Certificate Installation 32
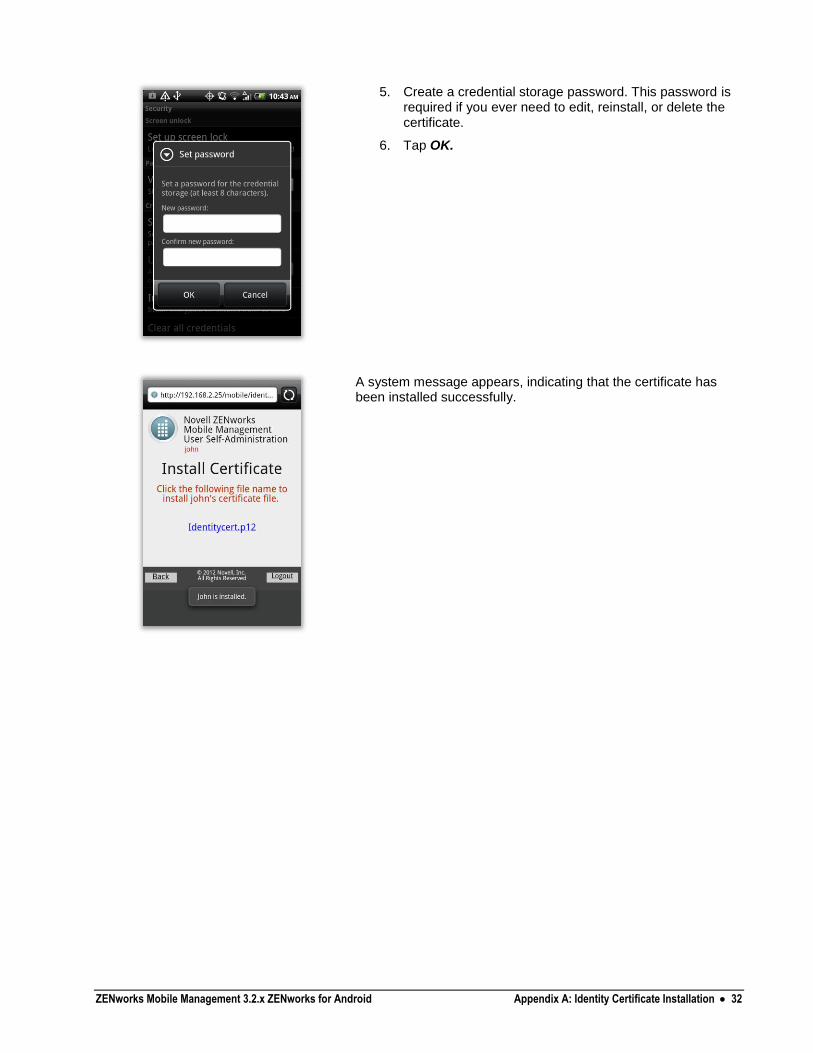
5. Create a credential storage password. This password is required if you ever need to edit, reinstall, or delete the certificate.
6. Tap OK.
A system message appears, indicating that the certificate has been installed successfully.