Embed Size (px)
Citation preview
Training: Basic Administration of the AppGate (Classic)
1 Training: Basic Administration of the AppGate (Classic) © Copyright 2016 Cryptzone North America Inc.
Basic Administration of the AppGate Classic
Basic Administration of AppGate (Classic) V3.0
Training: Basic Administration of the AppGate (Classic)
2 Training: Basic Administration of the AppGate (Classic) © Copyright 2016 Cryptzone North America Inc.
Copyright information
Copyright © 2016 Cryptzone North America Inc. All rights reserved.
Information in this document is subject to change without notice and does not represent a commitment on the part of the vendor or its representatives. Permission to use, distribute, or copy not granted without written approval. No part of this document may be reproduced or transmitted in any form or by any means, electronic or mechanical, including photocopying, without the written permission of Cryptzone North America Inc. Complying with all applicable copyright laws in the US and other countries is the responsibility of the user.
The Cryptzone logo, AppGate (Classic) are trademarks of Cryptzone North America Inc. Microsoft is a registered trademark of Microsoft Corporation in the United States and/or other countries. All other product names mentioned herein are trademarks of their respective owners.
Technical support For licensing or technical support information, please submit your requests via the Cryptzone Help Center at http://support.cryptzone.com using your Service Cloud account. For more information, visit www.cryptzone.com.
Training: Basic Administration of the AppGate (Classic)
3 Training: Basic Administration of the AppGate (Classic) © Copyright 2016 Cryptzone North America Inc.
Table of Contents
Basic Administration of the AppGate Classic ...................................................................................... 1 Chapter 1. About the Basic Training ..................................................................................................... 6
1.1. Who Should Use This Guide ................................................................................................ 6 1.2. How to follow the content of this document ......................................................................... 6
Chapter 2. The Birds Eye View ........................................................................................................... 7 2.1. Hey! It's an appliance! .......................................................................................................... 7
Caution .................................................................................................. 7 2.2. Different Security Perspectives............................................................................................. 8 2.3. What happens when you start an AppGate (Classic) session? .............................................. 9 2.4. Two modes of operation ..................................................................................................... 12 2.5. What makes AppGate (Classic) different from most VPNs ............................................... 13 2.6. AppGate (Classic) - a software collection .......................................................................... 15 2.7. Summary of key characteristics of the AppGate (Classic) system ..................................... 16
Chapter 3. Client Features .................................................................................................................. 18 3.1. Client types ............................................................................................................ 18 3.2. Host file writer, IP tunnel driver, Port Mover - how do they relate? .................................. 19 3.3. Client settings ............................................................................................................ 19
Chapter 4. Server ................................................................................................................................. 21 4.1. Administration of an AppGate (Classic) ............................................................................. 21 4.2. Extensive built-in help ........................................................................................................ 21 4.3. Hierarchical Administration ............................................................................................... 21 4.4. Users and Authentication .................................................................................................... 24 4.5. Roles, Services and Components ........................................................................................ 27
Tip ....................................................................................................... 33 Note ..................................................................................................... 33 Note ..................................................................................................... 33 Caution ................................................................................................ 35 Caution ................................................................................................ 37 Caution ................................................................................................ 38 Note ..................................................................................................... 38 Note ..................................................................................................... 38 Note ..................................................................................................... 38 Note ..................................................................................................... 38 Note ..................................................................................................... 40 Note ..................................................................................................... 42
Chapter 5. Integrating with IT infrastructure ..................................................................................... 45 5.1. Integrating with LDAP/AD ................................................................................................ 45
Note ..................................................................................................... 46 Caution ................................................................................................ 47 Note ..................................................................................................... 50
5.2. Integrating with external authentication system using RADIUS ........................................ 51 5.3. Selection of authentication method ..................................................................................... 53
Chapter 6. Client Security .................................................................................................................. 54 6.1. Overview ............................................................................................................ 54
Tip ....................................................................................................... 55 6.2. Client Checks ............................................................................................................ 55 6.3. Access Rules ............................................................................................................ 57
Caution ................................................................................................ 58 6.4. Using Access Rules ............................................................................................................ 58
Training: Basic Administration of the AppGate (Classic)
4 Training: Basic Administration of the AppGate (Classic) © Copyright 2016 Cryptzone North America Inc.
Caution ................................................................................................ 59 Caution ................................................................................................ 59
6.5. Writing your own Client Check commands ........................................................................ 59 Chapter 7. Client Configuration and Server Customization ............................................................. 60
7.1. Client Configuration ........................................................................................................... 60 7.2. Server Customization .......................................................................................................... 61
Chapter 8. IP Tunneling ..................................................................................................................... 62 8.1. How it works ............................................................................................................ 62 8.2. How to set IP tunneling up ................................................................................................. 62 8.3. A few words of caution ....................................................................................................... 63
Chapter 9. Single sign-on ................................................................................................................... 64 9.1. Single sign-on for Web based services ............................................................................... 64
Chapter 10. Managing Complex Environments ................................................................................. 67 10.1. Combinable Roles ............................................................................... 67 10.2. Dynamic services ................................................................................ 68
Chapter 11. Troubleshooting .............................................................................................................. 69 11.1. Overview ............................................................................................. 69 11.2. Client-side Troubleshooting ................................................................ 69 11.3. Troubleshooting on the AppGate (Classic) ......................................... 72 11.4. Trouble Shooting on the Application Server ....................................... 72
Chapter 12. System Maintenance ....................................................................................................... 74 12.1. Backup and Restore ............................................................................ 74
Note ..................................................................................................... 74 12.2. File System Manager .......................................................................... 75
Appendix A. Setting up the lab environment for the exercises ......................................................... 77

Training: Basic Administration of the AppGate (Classic)
5 Training: Basic Administration of the AppGate (Classic) © Copyright 2016 Cryptzone North America Inc.
List of Exercises
Exercise 4.1: Connecting with the Console and adding a License ...................................................... 23 Exercise 4.2: Connecting with a client ................................................................................................ 28 Exercise 4.3: Local Accounts .............................................................................................................. 29 Exercise 4.4: Users, Roles, Services and Components ........................................................................ 31 Exercise 4.5: IP Access component ..................................................................................................... 33 Exercise 4.6: Web Access components ............................................................................................... 35 Exercise 4.7: Client Command component ......................................................................................... 37 Exercise 4.8: File Access Component ................................................................................................. 40 Exercise 4.9: Server Command Components ...................................................................................... 42 Exercise 6.1: Check.exe options .......................................................................................................... 54 Exercise 6.2: Setting up a Client Check .............................................................................................. 56 Exercise 9.1: Single Sign-on with Web Access components ............................................................... 65 Exercise 10.1: Combinable Roles ........................................................................................................ 67
Training: Basic Administration of the AppGate (Classic)
6 Training: Basic Administration of the AppGate (Classic) © Copyright 2016 Cryptzone North America Inc.
Chapter 1. About the Basic Training This document will enable you to use and operate the AppGate Classic. It contains both text and exercises that you will need to complete to assimilate the information.
1.1. Who Should Use This Guide
The guide has been written by the technical staff that manages the AppGate system. In order to fully profit from the training, knowledge of the following subjects is required:
• TCP/IP networking, including DNS, routing, the three-way handshake, differences between TCP
and UDP and DHCP.
• The way the applications offered works, especially how they behave on the network.
• How to run virtual servers.
1.2. How to follow the content of this document
The last chapter of this document is about setting up the AppGate (Classic) lab. Readers can either start by reading the theoretical part and then setup the lab or jump to the configuration section and setup the lab first.
Training: Basic Administration of the AppGate (Classic)
7 Training: Basic Administration of the AppGate (Classic) © Copyright 2016 Cryptzone North America Inc.
Chapter 2. The Birds Eye View Most people can be divided into one of two categories when it comes to digesting information: "details first" or "overview first". This booklet will follow the "overview first" path - those who like details will not have to wait very long however.
This chapter will introduce a number of key concepts that are needed for understanding: -
• It's an appliance!
• How security perspectives map to AppGate (Classic) functions.
• What happens when you run a session?
• Four ways to solve the problem.
• So... it's a VPN? Isn't it?
• The software collection.
2.1. Hey! It's an appliance!
The AppGate (Classic) is always shipped as an appliance. This means that it's a server with all the required software installed from the start. It also means that the end-user doesn't need to maintain the operating system or any of the included software. From time to time a new release of the system are made and there is an upgrade mechanism to easily do the upgrades.
The rationale behind only shipping appliances is ease of use - both for our customers and ourselves. From a customer point of view appliance based systems are easy to install and manage; it's a box that is installed. The burden of integrating between the system and the operating environment of the server is skipped entirely; the interoperability issues for hardware and software have been solved by the vendor which also means we as a vendor can focus on improving functionality instead of adding compatibility for all sorts of exotic hardware and software.
2.1.1. Hardware appliances
The AppGate (Classic) currently ships in two different sizes to meet requirements for number of simultaneous users and/or requirements for hardware redundancy. We also offer a virtual appliance. All our appliances can be clustered. Clustering can be used both to increase the number of simultaneous users and to improve reliability. All network interfaces support VLAN tagging which makes it possible to connect to more networks than there are ports. Dividing different types of computers and servers into separate networks can improve overall security and the AppGate (Classic) functionality as well.
2.1.2. Virtual appliances
The virtual appliances are identical to the hardware appliances but for the lack of hardware. From a functional perspective, there's no difference. Running a virtual appliance in production is a supported configuration.
Caution One must be aware that a virtual server sharing hardware with other virtual servers is more susceptible to degraded performance from competing virtual server rather than a standalone hardware appliance. Running in a virtualized environment may also increase the security exposure since it adds some additional ways of compromising the system.
Training: Basic Administration of the AppGate (Classic)
8 Training: Basic Administration of the AppGate (Classic) © Copyright 2016 Cryptzone North America Inc.
2.2. Different Security Perspectives
Security is a very generic term that can be used to quantify many different aspects and perspectives. This section mentions five perspectives and what AppGate (Classic) functions there are to deal with them.
Authenticity Are we sure the information we access is authentic and hasn't been tampered
with in transit? AppGate (Classic) uses encryption to protect against tampering (as well as disclosure).
Are we sure we are communicating with the correct service and not some impostor (aka phishing or man-in-the-middle attacks). AppGate (Classic) uses a mechanism called "Host keys" to do a fingerprint check on the server before connecting.
Authentication How do we identify the user? AppGate (Classic) can use plain passwords
as well as virtually any two- f a c t o r authentication method. It supports integration with nearly all authentication system vendors. Some examples in use are one-time- passwords via SMS text messages, hardware password tokens and software password tokens on smart phones. Authentication using certificates is also supported. The system has a One-time-password system called Cryptzone OTP pre-installed and ready to use.
Admissibility Is the client computer trustworthy? The AppGate (Classic) can enforce client
checks to test the security of the client computer, for example whether the anti- virus is up-to-date or if it's a managed corporate laptop. It's also possible to verify that the AppGate (Classic) Device Firewall is running or not.
Authorization What is the user allowed to do? Access rules can be created to implement any
security policy. Different parameters like user id, the outcome of client checks, network location, type of authentication, group membership in LDAP/AD can be used to control access as a whole or to individual services. for example It’s possible to limit access to non-sensitive services if a weak authentication method was used. Providing secure access to the right resources is the core function of the AppGate (Classic).
Availability Can one be sure that the system is up and running when one needs it? The
AppGate (Classic) can be clustered to improve availability. It's also possible to design a cluster with multiple internet service providers (ISPs) spread over different locations to further improve availability. Even security systems need to be easy to use - if they are not, users will try to bypass them. One of the many features that make the AppGate (Classic) easy to use is Roaming. This allows a session to survive temporary network disruptions (for example going through a tunnel while connected from a smart phone) and it can also be used to switch between networks, for example, when moving a laptop from a wired network at the desk to a wireless one in the conference room. Roaming can be allowed or disallowed on an individual basis
Training: Basic Administration of the AppGate (Classic)
9 Training: Basic Administration of the AppGate (Classic) © Copyright 2016 Cryptzone North America Inc.
Security must be easier to use than to bypass - or people will bypass it
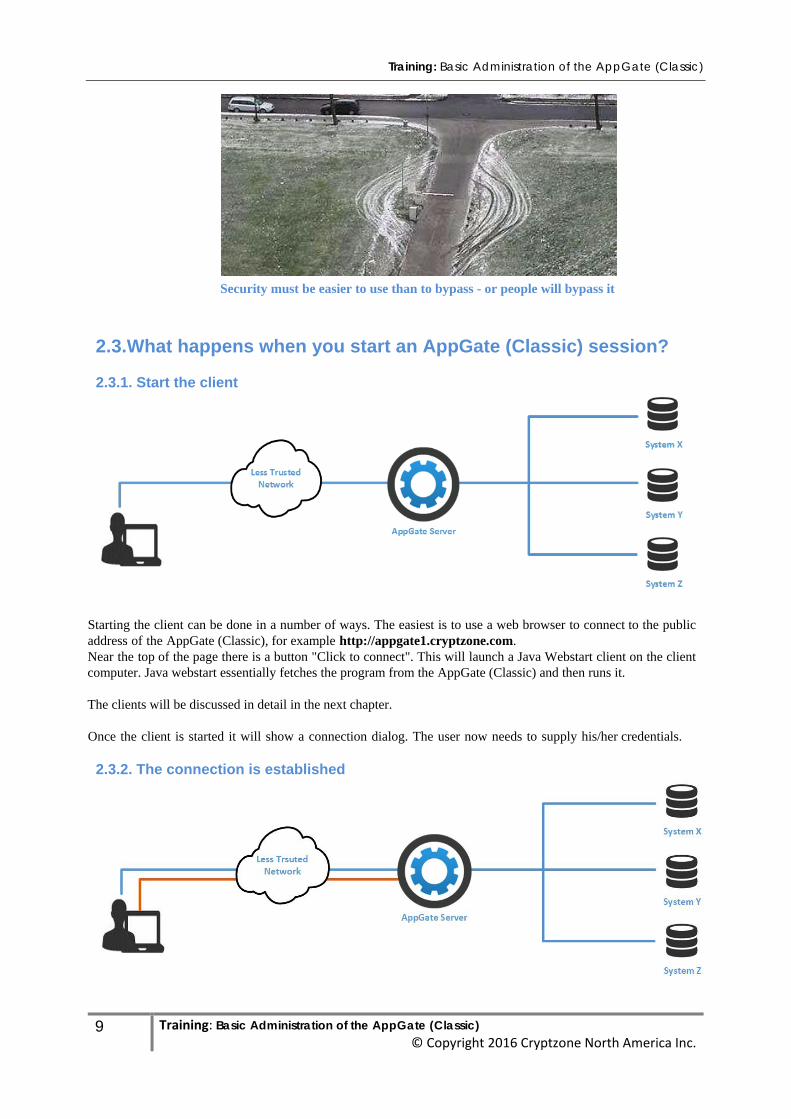
2.3. What happens when you start an AppGate (Classic) session?
2.3.1. Start the client
Starting the client can be done in a number of ways. The easiest is to use a web browser to connect to the public address of the AppGate (Classic), for example http://appgate1.cryptzone.com. Near the top of the page there is a button "Click to connect". This will launch a Java Webstart client on the client computer. Java webstart essentially fetches the program from the AppGate (Classic) and then runs it. The clients will be discussed in detail in the next chapter. Once the client is started it will show a connection dialog. The user now needs to supply his/her credentials. 2.3.2. The connection is established

Training: Basic Administration of the AppGate (Classic)
10 Training: Basic Administration of the AppGate (Classic) © Copyright 2016 Cryptzone North America Inc.
When the user clicks on Connect a number of things will happen "under the hood":
1. The fingerprint of the AppGate (Classic) is verified using Hosts keys (except for the very first connection at which time the fingerprint is stored for future verifications).
2. An encrypted tunnel is created between the client and the AppGate (Classic).
3. The user is looked up in the configured account sources.
4. The user is authenticated. The list of available authentication methods is based upon server configuration
and which account source the user was found in.
5. The client is checked using Client Checks. Results are reported back to the server.
6. Access rules are applied using all information gathered so far. The result will determine which roles will be available to the user and possibly the content of these roles as well.
2.3.3. Optionally select a role
If the user has access to more than one roles at this point (after the access rules have been applied), a role selection dialog box will be shown. If the user has no role available, a dialog box informing about this will be displayed and the client will terminate.
Training: Basic Administration of the AppGate (Classic)
11 Training: Basic Administration of the AppGate (Classic) © Copyright 2016 Cryptzone North America Inc.
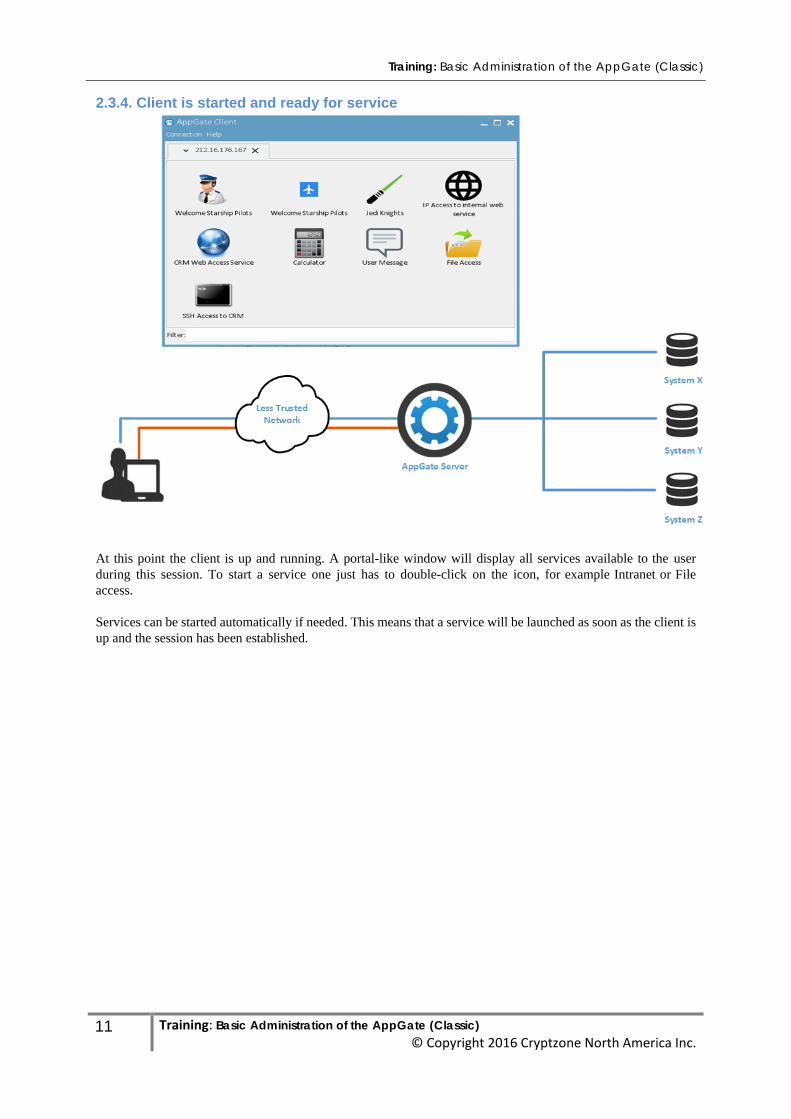
2.3.4. Client is started and ready for service
At this point the client is up and running. A portal-like window will display all services available to the user during this session. To start a service one just has to double-click on the icon, for example Intranet or File access.
Services can be started automatically if needed. This means that a service will be launched as soon as the client is up and the session has been established.
Training: Basic Administration of the AppGate (Classic)
12 Training: Basic Administration of the AppGate (Classic) © Copyright 2016 Cryptzone North America Inc.
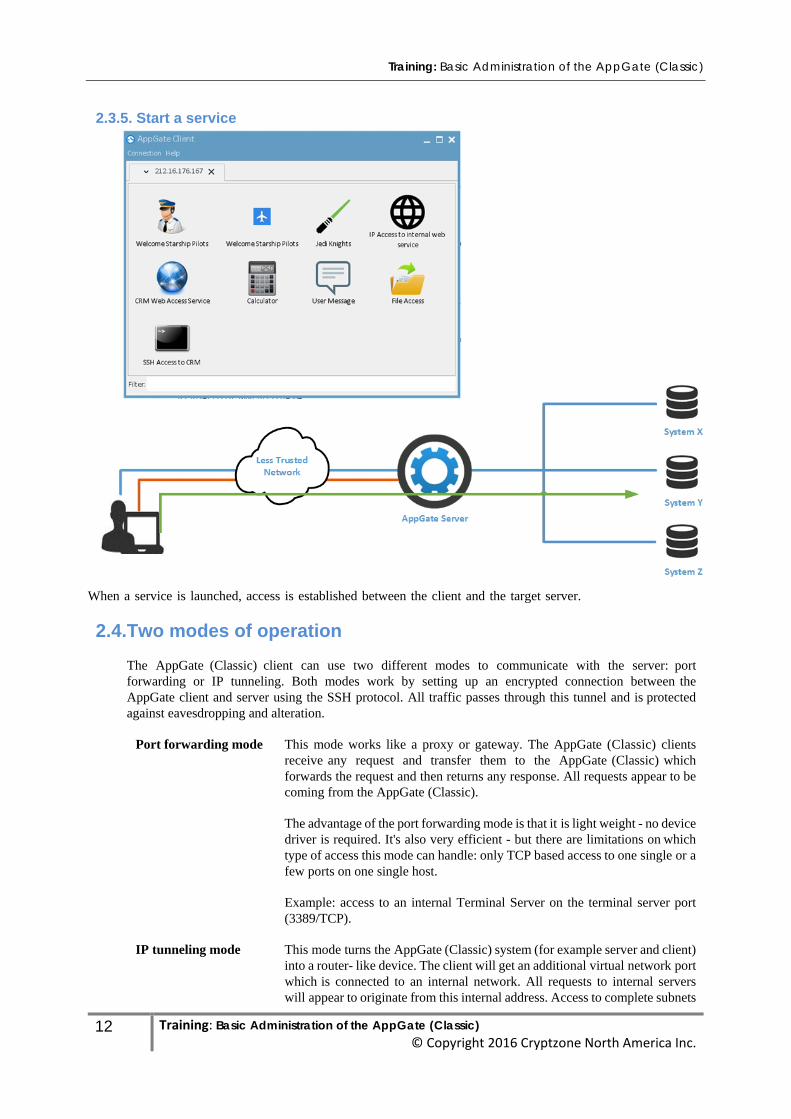
2.3.5. Start a service
When a service is launched, access is established between the client and the target server. 2.4. Two modes of operation
The AppGate (Classic) client can use two different modes to communicate with the server: port forwarding or IP tunneling. Both modes work by setting up an encrypted connection between the AppGate client and server using the SSH protocol. All traffic passes through this tunnel and is protected against eavesdropping and alteration.
Port forwarding mode This mode works like a proxy or gateway. The AppGate (Classic) clients
receive any request and transfer them to the AppGate (Classic) which forwards the request and then returns any response. All requests appear to be coming from the AppGate (Classic).
The advantage of the port forwarding mode is that it is light weight - no device driver is required. It's also very efficient - but there are limitations on which type of access this mode can handle: only TCP based access to one single or a few ports on one single host.
Example: access to an internal Terminal Server on the terminal server port (3389/TCP).
IP tunneling mode This mode turns the AppGate (Classic) system (for example server and client)
into a router- like device. The client will get an additional virtual network port which is connected to an internal network. All requests to internal servers will appear to originate from this internal address. Access to complete subnets
Training: Basic Administration of the AppGate (Classic)
13 Training: Basic Administration of the AppGate (Classic) © Copyright 2016 Cryptzone North America Inc.
and port ranges can be granted (equivalent of a traditional VPN).
The advantage of the IP tunneling mode is that it can achieve any type of connectivity. The disadvantage is that it requires the installation of a device driver: the IP tunnel driver.
Example: access to all ports both TCP and UDP on every host on a subnet (aka full access).
Regardless of which mode is used all data will be protected and only authorized access will be granted,
AppGate (Classic) server can have clients operating in both modes at the same time.
2.4.1. Additional Meta modes
In addition to the two main modes of operation, the AppGate (Classic) system offers additional modes to solve some special situations.
SSL gateway The SSL gateway (also referred to as the SSL client) is a module that allows access
to some types of services from any https-capable web browser. This is not designed to be the primary access route for users but rather a fallback solution when nothing else works, for example for devices that don't run the AppGate (Classic) clients (simple mobile phones, surf kiosks etc.) or i n similar situations. It will work for most web based services and for file access.
The advantage with this gateway is that it doesn't require a client and will work on nearly any type of device. The disadvantage is that its functionality is limited to web based services and it also lacks some security features (for example client checks).
A separate license is required to activate this module.
2.5. What makes AppGate (Classic) different from most VPNs
This section is perhaps the most important section of this chapter. AppGate (Classic) differs from almost all other VPN or remote access solutions in a very fundamental way. Understanding the difference will make understanding the AppGate (Classic) much easier but it can also transform the way you think about networks.
Training: Basic Administration of the AppGate (Classic)
14 Training: Basic Administration of the AppGate (Classic) © Copyright 2016 Cryptzone North America Inc.
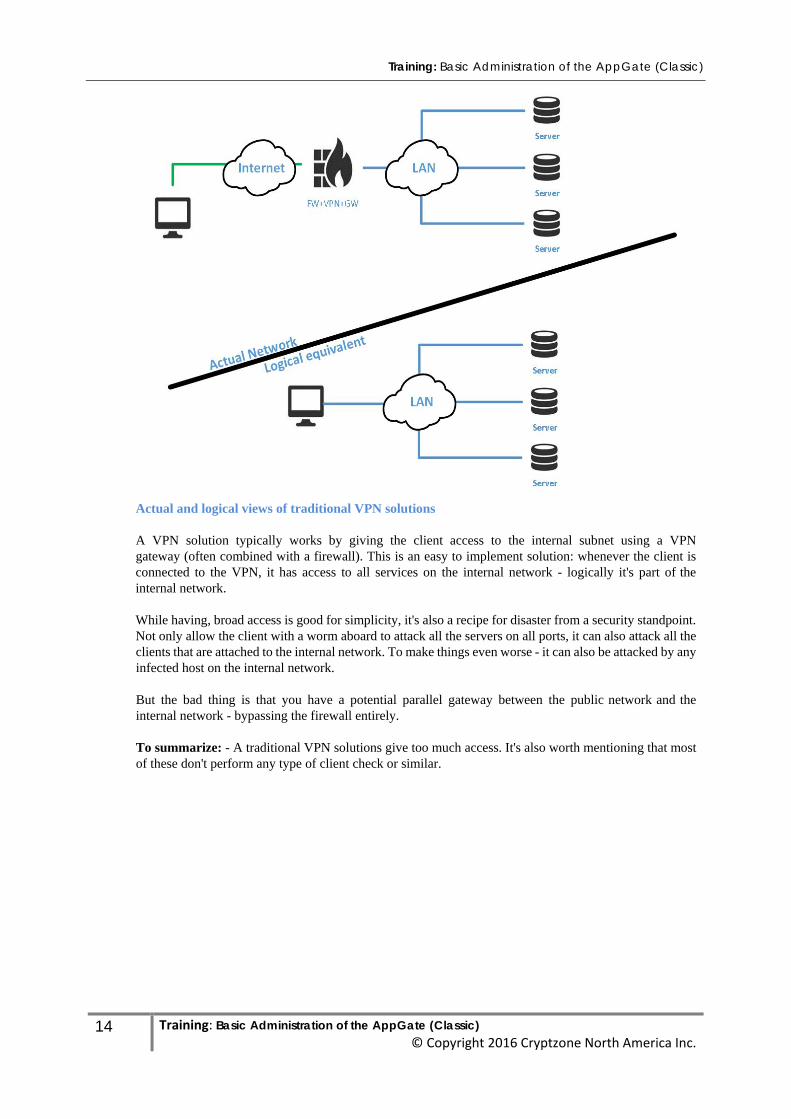
Actual and logical views of traditional VPN solutions
A VPN solution typically works by giving the client access to the internal subnet using a VPN gateway (often combined with a firewall). This is an easy to implement solution: whenever the client is connected to the VPN, it has access to all services on the internal network - logically it's part of the internal network.
While having, broad access is good for simplicity, it's also a recipe for disaster from a security standpoint. Not only allow the client with a worm aboard to attack all the servers on all ports, it can also attack all the clients that are attached to the internal network. To make things even worse - it can also be attacked by any infected host on the internal network.
But the bad thing is that you have a potential parallel gateway between the public network and the internal network - bypassing the firewall entirely.
To summarize: - A traditional VPN solutions give too much access. It's also worth mentioning that most of these don't perform any type of client check or similar.
Training: Basic Administration of the AppGate (Classic)
15 Training: Basic Administration of the AppGate (Classic) © Copyright 2016 Cryptzone North America Inc.
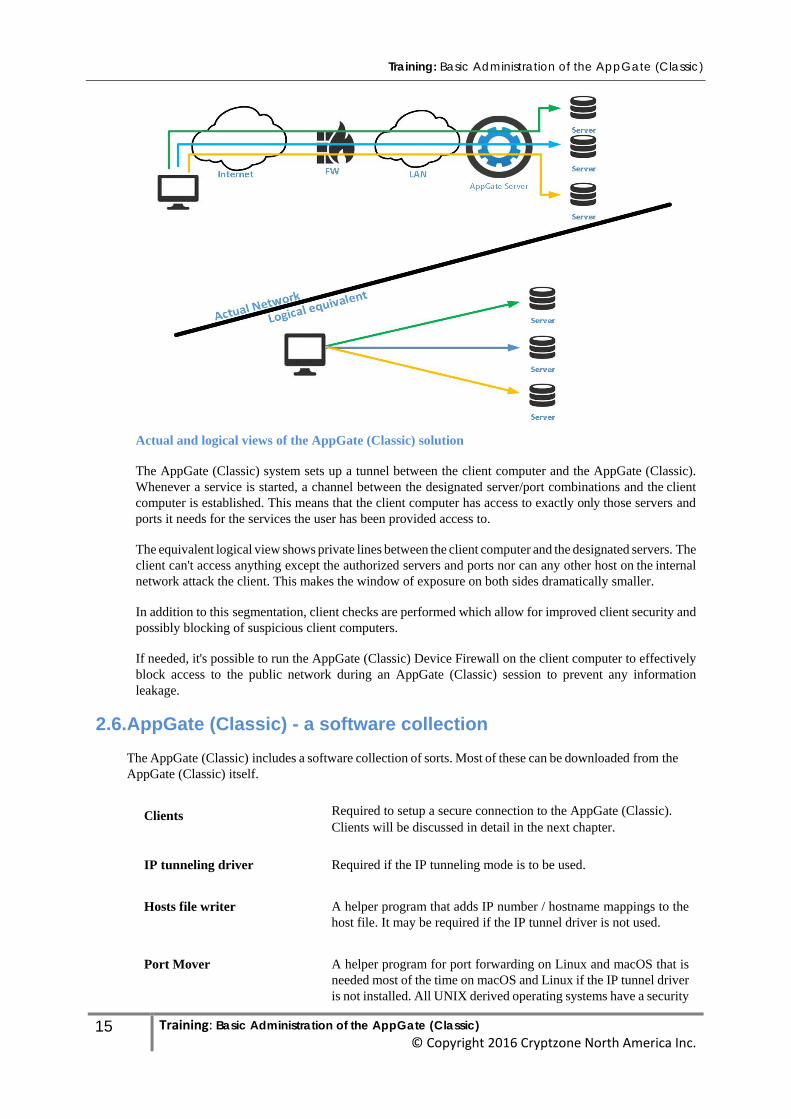
Actual and logical views of the AppGate (Classic) solution
The AppGate (Classic) system sets up a tunnel between the client computer and the AppGate (Classic). Whenever a service is started, a channel between the designated server/port combinations and the client computer is established. This means that the client computer has access to exactly only those servers and ports it needs for the services the user has been provided access to.
The equivalent logical view shows private lines between the client computer and the designated servers. The client can't access anything except the authorized servers and ports nor can any other host on the internal network attack the client. This makes the window of exposure on both sides dramatically smaller.
In addition to this segmentation, client checks are performed which allow for improved client security and possibly blocking of suspicious client computers.
If needed, it's possible to run the AppGate (Classic) Device Firewall on the client computer to effectively block access to the public network during an AppGate (Classic) session to prevent any information leakage.
2.6. AppGate (Classic) - a software collection
The AppGate (Classic) includes a software collection of sorts. Most of these can be downloaded from the AppGate (Classic) itself.
Clients Required to setup a secure connection to the AppGate (Classic). Clients will be discussed in detail in the next chapter.
IP tunneling driver Required if the IP tunneling mode is to be used.
Hosts file writer A helper program that adds IP number / hostname mappings to the host file. It may be required if the IP tunnel driver is not used.
Port Mover A helper program for port forwarding on Linux and macOS that is needed most of the time on macOS and Linux if the IP tunnel driver is not installed. All UNIX derived operating systems have a security
Training: Basic Administration of the AppGate (Classic)
16 Training: Basic Administration of the AppGate (Classic) © Copyright 2016 Cryptzone North America Inc.
feature preventing normal users from opening listeners on ports below 1024. This helper program allows a user to bypass this limit in a controlled way.
AppGate Console The AppGate console is the administration program for the AppGate (Classic).
Device Firewall The Device Firewall is a separate product acting as a personal firewall. It's mentioned in this list because it can interact with the AppGate (Classic) by enforcing a separate rule set while being connected to the server. This product is available for windows OS only.
Policy Manager The Policy Manager is a management tool for deploying and managing groups of computers with the Device Firewall installed. Together, AppGate (Classic), the Device Firewall and the Policy Manager can create extremely secure client connection.
2.7. Summary of key characteristics of the AppGate (Classic) system
Very wide client platform support Java webstart clients exist for windows and Linux and can work on Mac by launching it from the terminal or right click and launch it. Installable clients exist for all major operating system. Access via the SSL gateway allows access from most devices. See Section 3.1, “Client types” for more details
Client based A client based solution allows tighter interaction with the client, making it possible to run local commands, perform client checks, etc. See Section 6.2, “Client Checks” for more details.
No modification of OS required (in port forwards mode)
For most applications, it's not necessary to modify the operating system (for example by installing a device driver). This can be especially important if access must be granted to external parties (for example contractors or outsourcing partners) who may not be able to install device drivers on their work stations.
Flexible • Multiple user databases
• Multiple authentication methods • Granular access rules for security policy
implementation • Strong client security
No modification of application
Some solutions require extensive reconfiguration to work with remote access solutions or you need to use special address/port combinations to access them. One of AppGate's (Classic) goals is to make it simple and easy to use - which is why we try to be invisible to both client and server.

Training: Basic Administration of the AppGate (Classic)
17 Training: Basic Administration of the AppGate (Classic) © Copyright 2016 Cryptzone North America Inc.
Extensive logging Some organizations have legal or internal requirements for logging (for example auditing). Logs are also an important debugging tool. The log system on the AppGate (Classic) can be tuned to provide the amount of logs that is needed. Logs can also be sent to a log server. There is a good log analysis GUI in the AppGate (Classic) console.
Scalability and redundancy Customers are running AppGate (Classic) systems with anything from a handful of users to in excess of 10000 users simultaneously. To build large systems or to grow as the number of users increases, it's possible to cluster AppGate (Classic). Clustering can also be used to improve redundancy. By using separate Internet Service Providers, separate server locations etc. it's possible to achieve very high availability. It's also possible to create hot-standby systems that are not used as long as the main nodes are operational.
Gracefully coexists with other security services
Many security systems want total control over their environment and are terrible at coexisting with other similar solutions. Due in part to being designed differently, AppGate (Classic) does not have this flaw. An AppGate (Classic) system can be installed and new services can be setup in a controlled manner without disrupting any existing solutions. Users can be given access via the AppGate (Classic) system without removing their old solution - one at a time if required. When everybody has migrated all their services, the old solution can then be removed.
Training: Basic Administration of the AppGate (Classic)
18 Training: Basic Administration of the AppGate (Classic) © Copyright 2016 Cryptzone North America Inc.
Chapter 3. Client Features 3.1. Client types
The Java Webstart clients for Windows, Linux and Solaris
This is the recommended client type for regular computers. Java Webstart programs work by downloading software from the net (in our case the AppGate (Classic) itself). These downloads are digitally signed to ensure integrity and authenticity.
What makes Java Webstart interesting is that it completely removes the task of managing client software from the shoulders of the IT staff. Whenever a Java Webstart program starts, it automatically checks if it needs to upgrade (for example download a new copy instead of using the cached version) - thus always running the current version.
The Java Webstart client is started by using a web browser to view the web page presented by the AppGate (Classic), this would- b e http:// appgate.example.com/.
Installable clients for Windows, macOS, Linux and Solaris
The installable clients are identical to the Java Webstart ones. The only differences are that a self-contained Java runtime is bundled into the installation package and that the program is saved on the computer. They are available for downloading on the AppGate (Classic).
Citrix or Windows Terminal Servers
An installable client is available. Due to these being hosts with multiple users working simultaneously a special client is required to separate the access rights of the different users. Both IP tunneling and port forwarding are possible.
Linux Client for Multi-user Systems An installable client is available. Due to this being hosts with multiple users working simultaneously a special client is required to separate the access rights of the different users. IP tunneling mode is not possible on this client type.
Training: Basic Administration of the AppGate (Classic)
19 Training: Basic Administration of the AppGate (Classic) © Copyright 2016 Cryptzone North America Inc.
3.2. Host file writer, IP tunnel driver, Port Mover - how do they relate?
One of the most important mechanisms used by the AppGate (Classic) system for redirecting traffic through the encrypted tunnel between the client and the AppGate (Classic) is modification of the hosts file. The hosts file contains local mappings between IP addresses and hostnames (for example 123.456.7.89 server.example.com). Most of the time these look-ups are done using DNS but it is possible to override this by adding lines to the hosts file.
To allow modification of the hosts file on Windows, Linux and macOS as well a helper application is needed. On Windows this helper application is called the "Hosts File Writer", on macOS and Linux it's called the "Port Mover" (the reason being that it also allows opening of ports in the normally restricted range below port 1024).
The IP tunnel driver contains the functionality for both hosts file writing and port moving - thus it's not necessary (nor allowed) to install both the IP tunnel driver and the port mover/host file writer at the same time.
3.3. Client settings
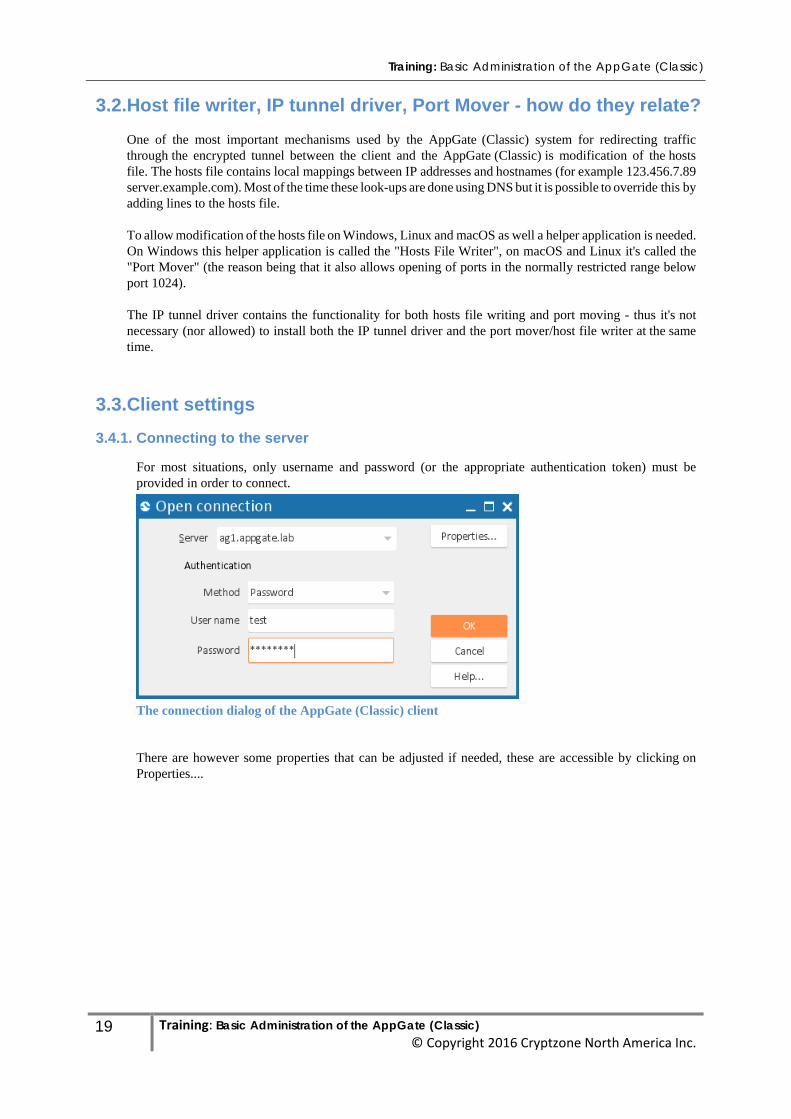
3.4.1. Connecting to the server
For most situations, only username and password (or the appropriate authentication token) must be provided in order to connect.
The connection dialog of the AppGate (Classic) client
There are however some properties that can be adjusted if needed, these are accessible by clicking on Properties....
Training: Basic Administration of the AppGate (Classic)
20 Training: Basic Administration of the AppGate (Classic) © Copyright 2016 Cryptzone North America Inc.
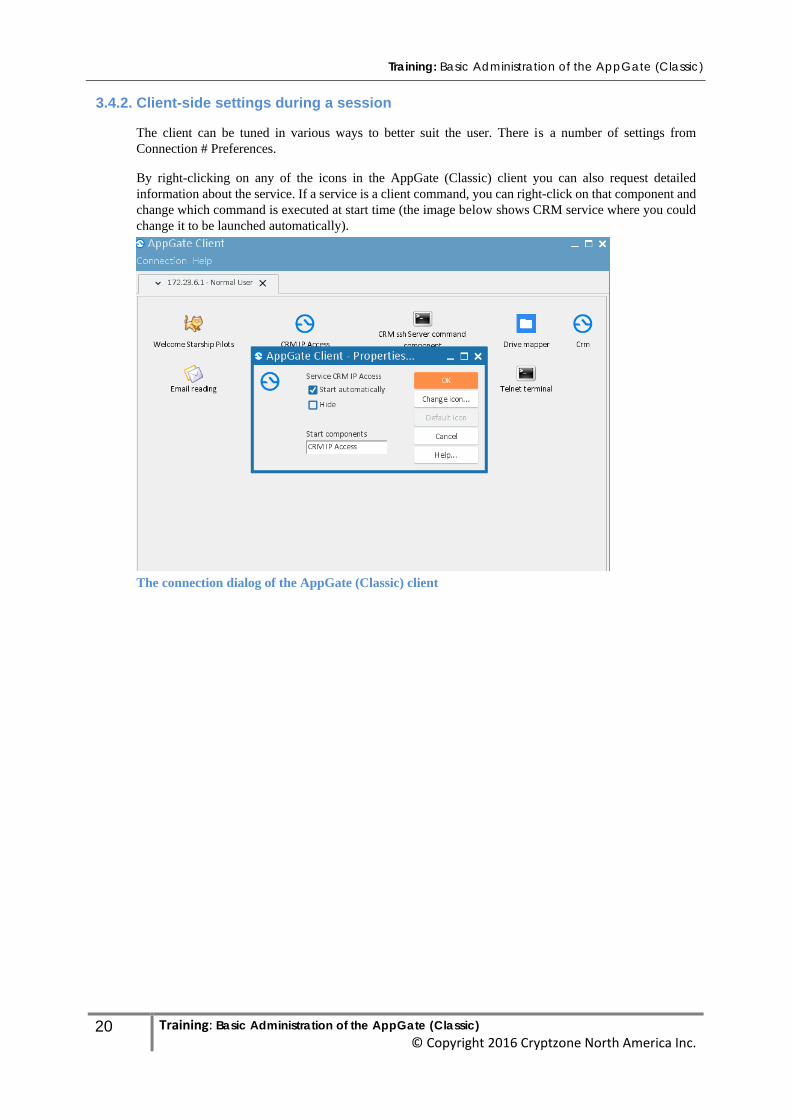
3.4.2. Client-side settings during a session
The client can be tuned in various ways to better suit the user. There is a number of settings from Connection # Preferences.
By right-clicking on any of the icons in the AppGate (Classic) client you can also request detailed information about the service. If a service is a client command, you can right-click on that component and change which command is executed at start time (the image below shows CRM service where you could change it to be launched automatically).
The connection dialog of the AppGate (Classic) client
Training: Basic Administration of the AppGate (Classic)
21 Training: Basic Administration of the AppGate (Classic) © Copyright 2016 Cryptzone North America Inc.
Chapter 4. Server 4.1. Administration of an AppGate (Classic)
Administration is mostly done via the AppGate (Classic) Console. This graphical user interface allows to efficiently perform most tasks. There are some rarely done operations that may require command line work.
The AppGate (Classic) Console exists in both Java Webstart and installable versions for Windows and Linux. Since the AppGate (Classic) Console version must match the server version exactly, using the Java Webstart version is very convenient since it will automatically make sure the versions match.
The AppGate (Classic) Console connects to the server as exactly as the same way the client does - no extra network ports or similar is needed. To be able to connect with the AppGate (Classic) Console the user must be a member of the Admin role.
4.2. Extensive built-in help
There is built-in help of the AppGate (Classic) Console where the entire administration manual is available from within the program. The printed version is over 300 pages - all of which is included.
Almost every view within the console has a Help button, clicking on this will show the right section in the manual.
4.3. Hierarchical Administration
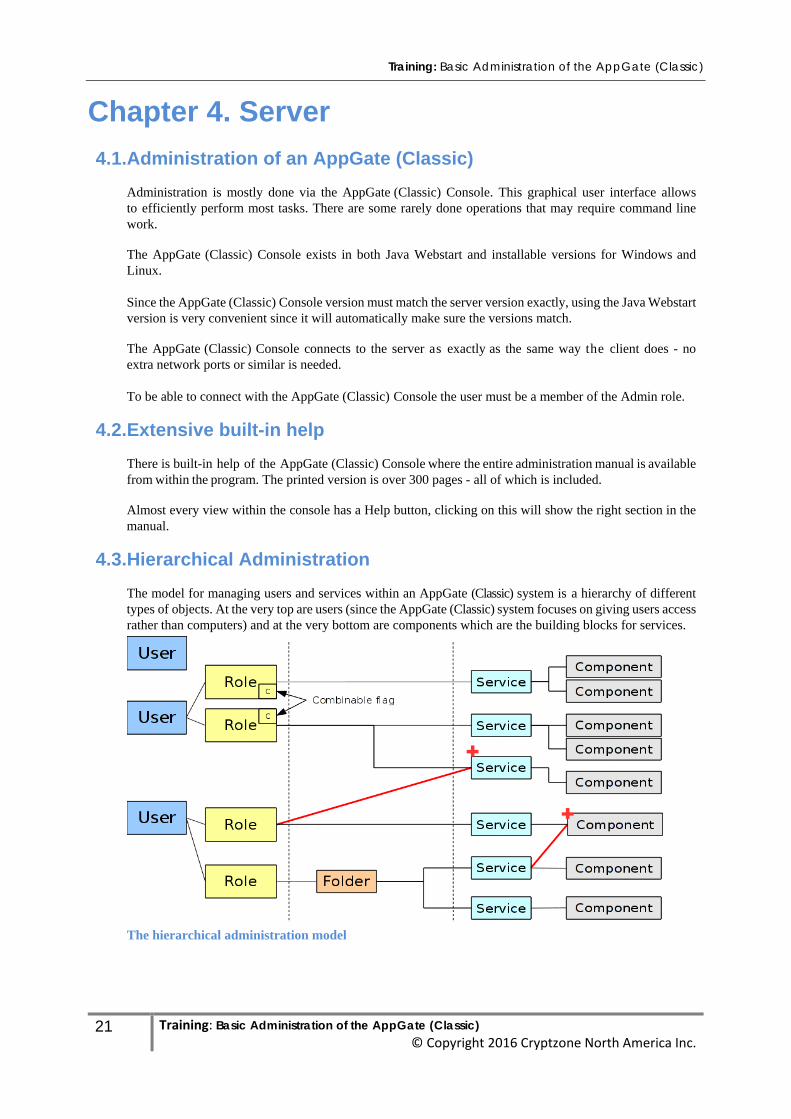
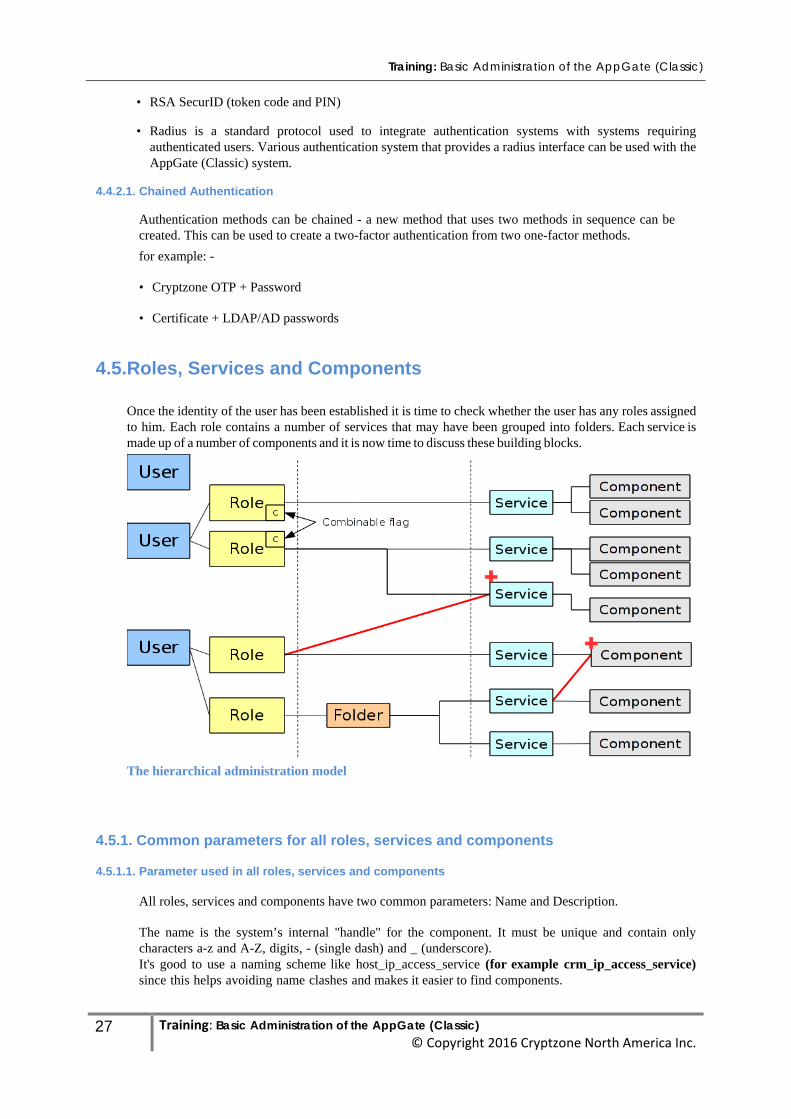
The model for managing users and services within an AppGate (Classic) system is a hierarchy of different types of objects. At the very top are users (since the AppGate (Classic) system focuses on giving users access rather than computers) and at the very bottom are components which are the building blocks for services.
The hierarchical administration model
Training: Basic Administration of the AppGate (Classic)
22 Training: Basic Administration of the AppGate (Classic) © Copyright 2016 Cryptzone North America Inc.
The illustration above serves to highlight a number of important features:
User Users can be part of zero, one or several different Roles.
Role A role contains services or folders of services. A role can be shared by any number of users. Roles can be combined. This means that the user can select a pseudo role called "Combined" upon connection which is the sum of all combinable roles. If there are roles available that are not combinable, the user can select one of those or the combined one.
Folder A folder is a way of grouping a number of services together - usually to de-clutter
the user interface.
Service A service is a useful entity for the user, for example access to the intranet or similar. A service is built from one or more components.
Component Components are used to build services.
There are a number of component types, they will be discussed in Section 4.5.3, “Overview of the Component types”
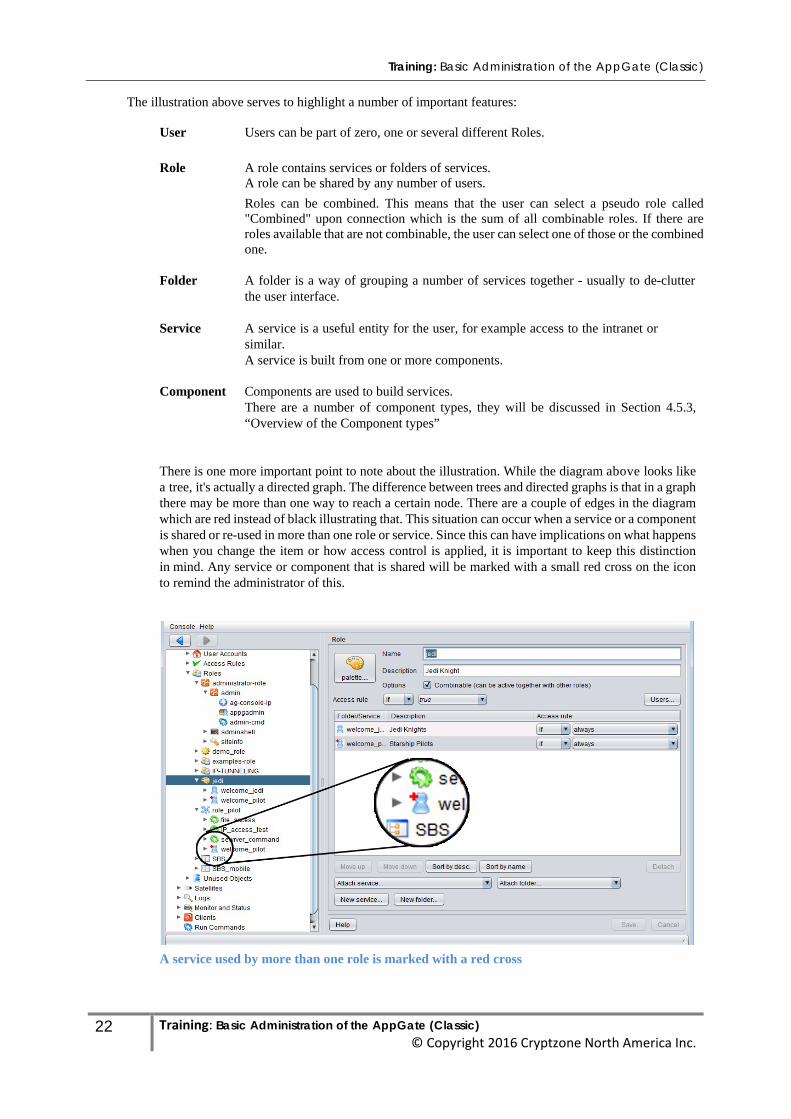
There is one more important point to note about the illustration. While the diagram above looks like a tree, it's actually a directed graph. The difference between trees and directed graphs is that in a graph there may be more than one way to reach a certain node. There are a couple of edges in the diagram which are red instead of black illustrating that. This situation can occur when a service or a component is shared or re-used in more than one role or service. Since this can have implications on what happens when you change the item or how access control is applied, it is important to keep this distinction in mind. Any service or component that is shared will be marked with a small red cross on the icon to remind the administrator of this.
A service used by more than one role is marked with a red cross
Training: Basic Administration of the AppGate (Classic)
23 Training: Basic Administration of the AppGate (Classic) © Copyright 2016 Cryptzone North America Inc.
Exercise 4.1: Connecting with the console and adding a license
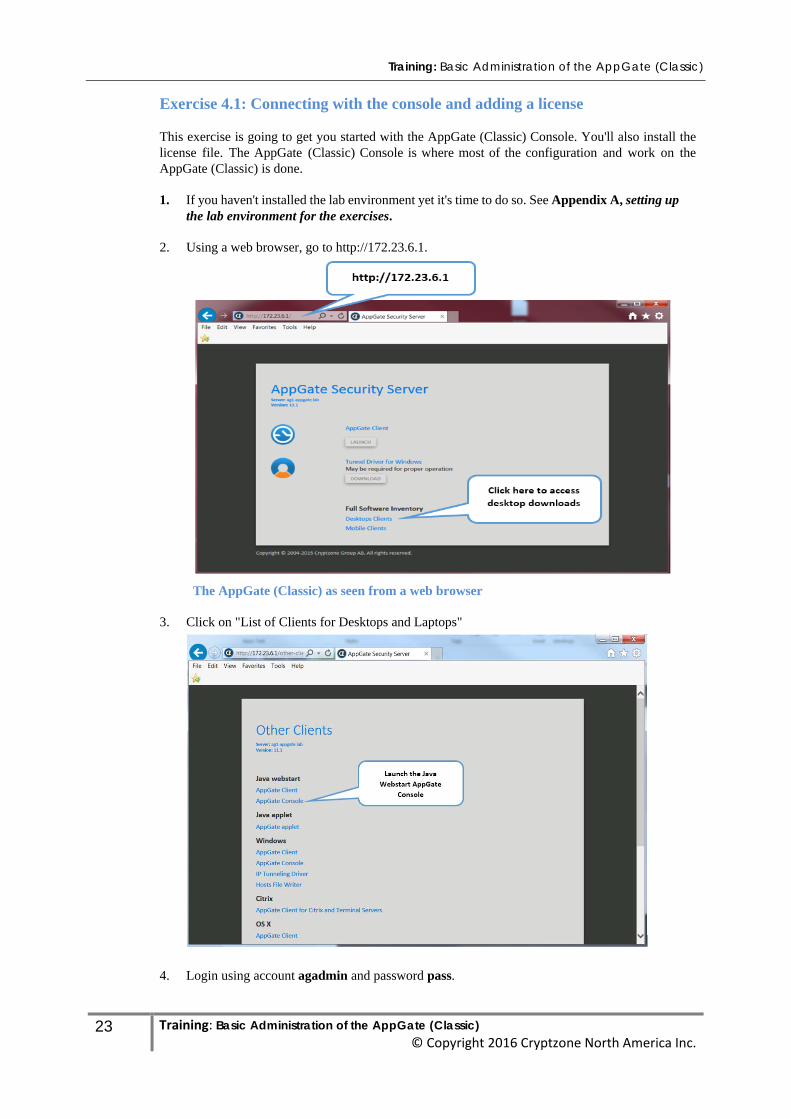
This exercise is going to get you started with the AppGate (Classic) Console. You'll also install the license file. The AppGate (Classic) Console is where most of the configuration and work on the AppGate (Classic) is done.
1. If you haven't installed the lab environment yet it's time to do so. See Appendix A, setting up
the lab environment for the exercises.
2. Using a web browser, go to http://172.23.6.1.
The AppGate (Classic) as seen from a web browser
3. Click on "List of Clients for Desktops and Laptops"
4. Login using account agadmin and password pass.
Training: Basic Administration of the AppGate (Classic)
24 Training: Basic Administration of the AppGate (Classic) © Copyright 2016 Cryptzone North America Inc.
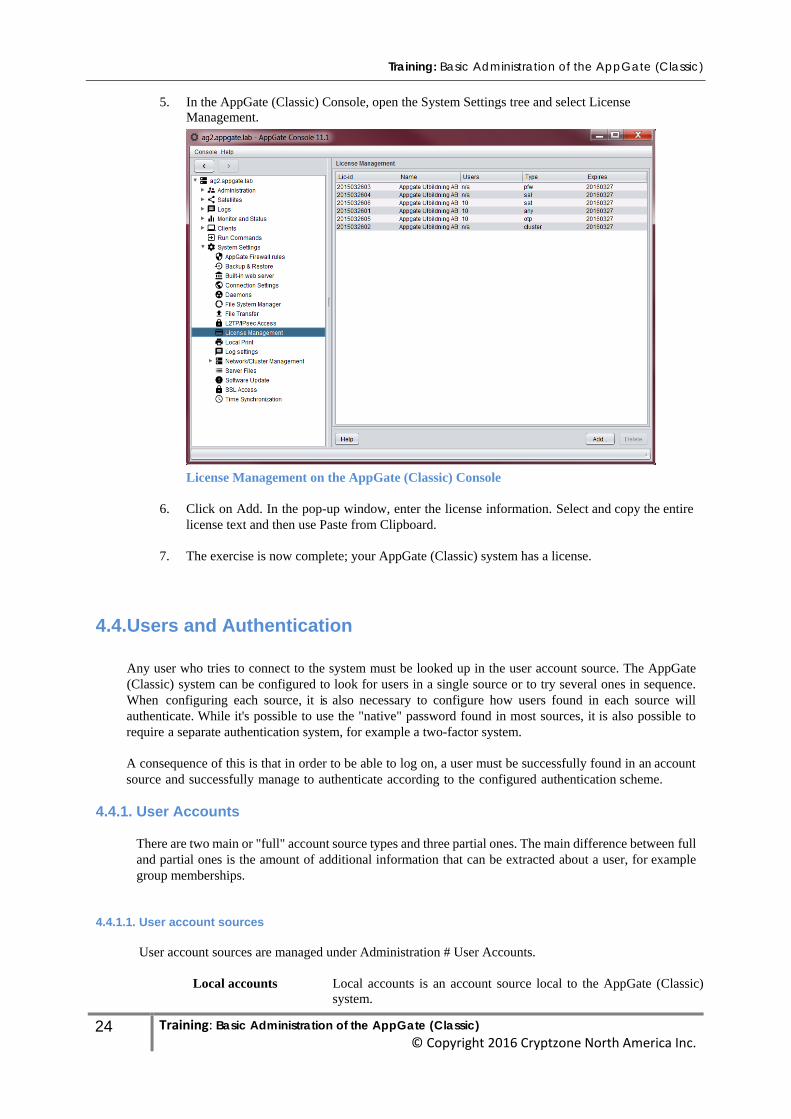
5. In the AppGate (Classic) Console, open the System Settings tree and select License Management.
License Management on the AppGate (Classic) Console
6. Click on Add. In the pop-up window, enter the license information. Select and copy the entire
license text and then use Paste from Clipboard.
7. The exercise is now complete; your AppGate (Classic) system has a license.
4.4. Users and Authentication
Any user who tries to connect to the system must be looked up in the user account source. The AppGate (Classic) system can be configured to look for users in a single source or to try several ones in sequence. When configuring each source, it is also necessary to configure how users found in each source will authenticate. While it's possible to use the "native" password found in most sources, it is also possible to require a separate authentication system, for example a two-factor system.
A consequence of this is that in order to be able to log on, a user must be successfully found in an account source and successfully manage to authenticate according to the configured authentication scheme.
4.4.1. User Accounts
There are two main or "full" account source types and three partial ones. The main difference between full and partial ones is the amount of additional information that can be extracted about a user, for example group memberships.
4.4.1.1. User account sources
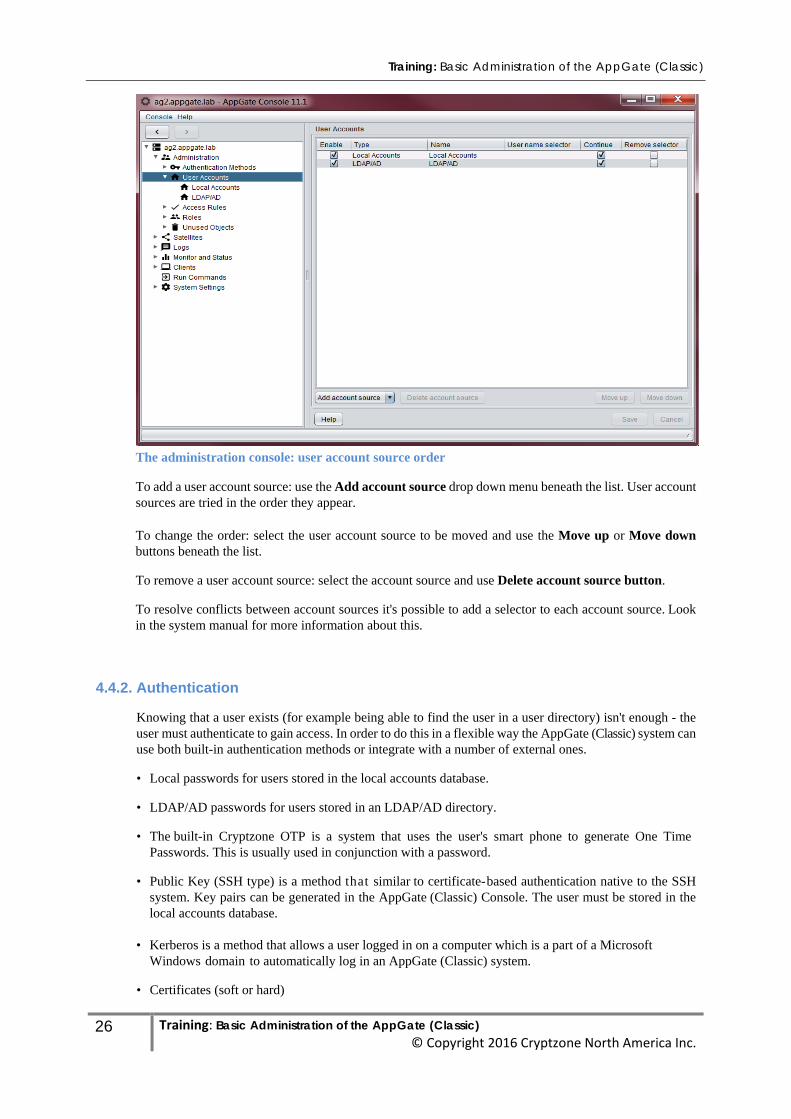
User account sources are managed under Administration # User Accounts.
Local accounts Local accounts is an account source local to the AppGate (Classic) system.
Training: Basic Administration of the AppGate (Classic)
25 Training: Basic Administration of the AppGate (Classic) © Copyright 2016 Cryptzone North America Inc.
It's used by default, initially containing the agadmin account. Users located in this account source can be configured individually.
There is a limited set of attributes that can be set for each user as well.
For small installations, this is a good account source and it is also a useful source to keep special accounts for example the agadmin account or temporary accounts for external support staff or similar) but if there is infrastructure present on site to manage users (for example an LDAP/AD directory) it is inefficient to maintain an extra copy of that within the AppGate (Classic).
LDAP/AD accounts The AppGate (Classic) system can interface with an LDAP or
LDAP/AD directory and look for users there. When the integration is setup, you also decide which authentication methods will be available to users found in the account source.
The LDAP/AD account source is the most versatile account source that can be used. It's possible to use various methods to assign available roles to the users based upon the contents of the LDAP/AD directory. Group memberships can be used; an attribute can be designated to hold a list of available roles or the location of the user within the LDAP tree can be used. Details about this will be discussed in Chapter 5. Integrating with IT infrastructure.
It is also possible to import attributes from the LDAP/AD directory to the AppGate (Classic) system and use these in access rules or components.
SecurID accounts The AppGate (Classic) system can integrate with a SecurID server and
look for users in that directory. This is a limited account source since this directory is unable to export any information about the user.
Radius accounts The AppGate (Classic) system can integrate with various
authentication server providing the radius protocol and look for users in that directory. This is a limited account source since this directory is unable to export any information about the user.
Certificate accounts The AppGate (Classic) system can be configured to accept certificates
as an account source. This is a limited account source since virtually no information about the user can be extracted.
4.4.1.2. Order of account sources
The order in which the account sources are tested when looking for a user may be important. It's quite easy to configure the order and it's also possible to configure ways of dealing with conflicts between overlapping account sources (for example if the same user name is found in more than one account source).
Training: Basic Administration of the AppGate (Classic)
26 Training: Basic Administration of the AppGate (Classic) © Copyright 2016 Cryptzone North America Inc.
The administration console: user account source order
To add a user account source: use the Add account source drop down menu beneath the list. User account sources are tried in the order they appear. To change the order: select the user account source to be moved and use the Move up or Move down buttons beneath the list.
To remove a user account source: select the account source and use Delete account source button.
To resolve conflicts between account sources it's possible to add a selector to each account source. Look in the system manual for more information about this.
4.4.2. Authentication
Knowing that a user exists (for example being able to find the user in a user directory) isn't enough - the user must authenticate to gain access. In order to do this in a flexible way the AppGate (Classic) system can use both built-in authentication methods or integrate with a number of external ones.
• Local passwords for users stored in the local accounts database.
• LDAP/AD passwords for users stored in an LDAP/AD directory.
• The built-in Cryptzone OTP is a system that uses the user's smart phone to generate One Time
Passwords. This is usually used in conjunction with a password.
• Public Key (SSH type) is a method that similar to certificate-based authentication native to the SSH system. Key pairs can be generated in the AppGate (Classic) Console. The user must be stored in the local accounts database.
• Kerberos is a method that allows a user logged in on a computer which is a part of a Microsoft Windows domain to automatically log in an AppGate (Classic) system.
• Certificates (soft or hard)
Training: Basic Administration of the AppGate (Classic)
27 Training: Basic Administration of the AppGate (Classic) © Copyright 2016 Cryptzone North America Inc.
• RSA SecurID (token code and PIN)
• Radius is a standard protocol used to integrate authentication systems with systems requiring authenticated users. Various authentication system that provides a radius interface can be used with the AppGate (Classic) system.
4.4.2.1. Chained Authentication
Authentication methods can be chained - a new method that uses two methods in sequence can be created. This can be used to create a two-factor authentication from two one-factor methods. for example: -
• Cryptzone OTP + Password
• Certificate + LDAP/AD passwords
4.5. Roles, Services and Components
Once the identity of the user has been established it is time to check whether the user has any roles assigned to him. Each role contains a number of services that may have been grouped into folders. Each service is made up of a number of components and it is now time to discuss these building blocks.
The hierarchical administration model
4.5.1. Common parameters for all roles, services and components
4.5.1.1. Parameter used in all roles, services and components
All roles, services and components have two common parameters: Name and Description.
The name is the system’s internal "handle" for the component. It must be unique and contain only characters a-z and A-Z, digits, - (single dash) and _ (underscore). It's good to use a naming scheme like host_ip_access_service (for example crm_ip_access_service) since this helps avoiding name clashes and makes it easier to find components.
Training: Basic Administration of the AppGate (Classic)
28 Training: Basic Administration of the AppGate (Classic) © Copyright 2016 Cryptzone North America Inc.
The description is what is shown to the users in the client. This can contain any sign within the ASCII character set (for example English alphabet and punctuation characters), national characters are being worked on but not fully implemented at the time of this writing. This should be some explanatory description of the component. Keep it short since there isn't a lot of space available to show the descriptions in the client.
4.5.1.2. Icons - used in roles and services
It is possible to change the icon displayed for a role or service. This is done by clicking on the icon in the role/service's panel.
4.5.1.3. Hostname - used in many component types
In most places where a host name is entered, an automatic test for reachability is made as soon as something has been modified. This means that the AppGate (Classic) server will try to connect to the indicated server on the indicated or default port. A green check mark will be displayed next to the host name if the connection was successful, a red X mark otherwise.
The X mark can mean that the internal server is inaccessible (due to a firewall or routing problems or even DNS), off-line or that the service is off-line or configured to use a different port. If a red check mark is displayed, investigate the cause before moving on - it is unlikely that the service will work unless the green check mark is shown.
4.5.2. Roles
A role is a container for a number of services. Usually it will be a number of services needed for a specific type of tasks, for example all the services which need to be accessed by a helpdesk member. Finding the right divisions among groups is one of the hardest challenges as a system grows.
Tip In many cases, it is a good strategy to setup a default role that contains the common services that all users of the system require and then setup a number of additional roles that will be added to those who need them. By making all roles combinable, a user can be granted access to both default systems and his/her specific systems.
Exercise 4.2: Connecting with a client
This exercise will have you connect to the AppGate (Classic) lab. The main purpose of it is to make sure that your client environment is setup in a way that will work for the exercises. This is done by performing a number of tests on your client as you connect (using a mechanism called "Client Checks" that we will cover later on).
1. Using your web client, go to http://172.23.6.1
2. Click on Launch AppGate Client.
3. Login using the account demo and the password Demo@4
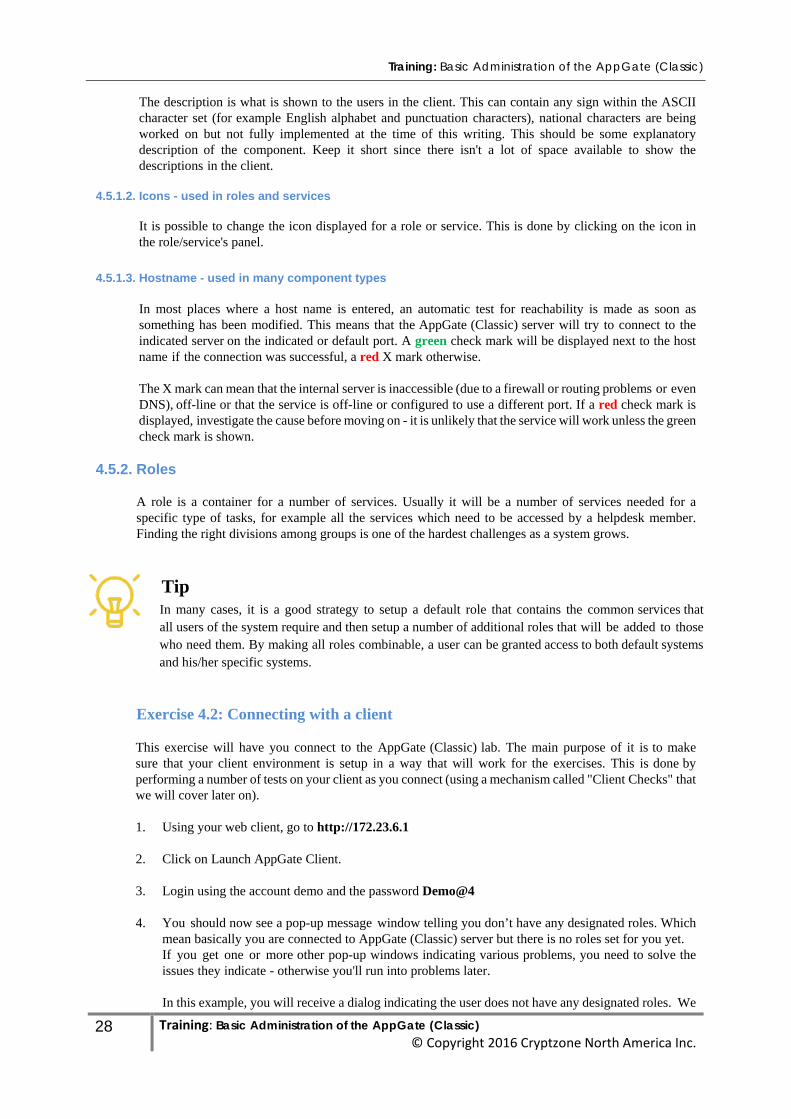
4. You should now see a pop-up message window telling you don’t have any designated roles. Which
mean basically you are connected to AppGate (Classic) server but there is no roles set for you yet. If you get one or more other pop-up windows indicating various problems, you need to solve the issues they indicate - otherwise you'll run into problems later. In this example, you will receive a dialog indicating the user does not have any designated roles. We
Training: Basic Administration of the AppGate (Classic)
29 Training: Basic Administration of the AppGate (Classic) © Copyright 2016 Cryptzone North America Inc.
will add roles to another user later in the guide so further changes are not required at this time.
Exercise 4.3: Local Accounts
This exercise will introduce you to working with the AppGate (Classic) Console. You will setup an account and study the different options.
1. Connect to your AppGate (Classic) using the AppGate Console.
2. Navigate to Administration # User Accounts # Local Accounts
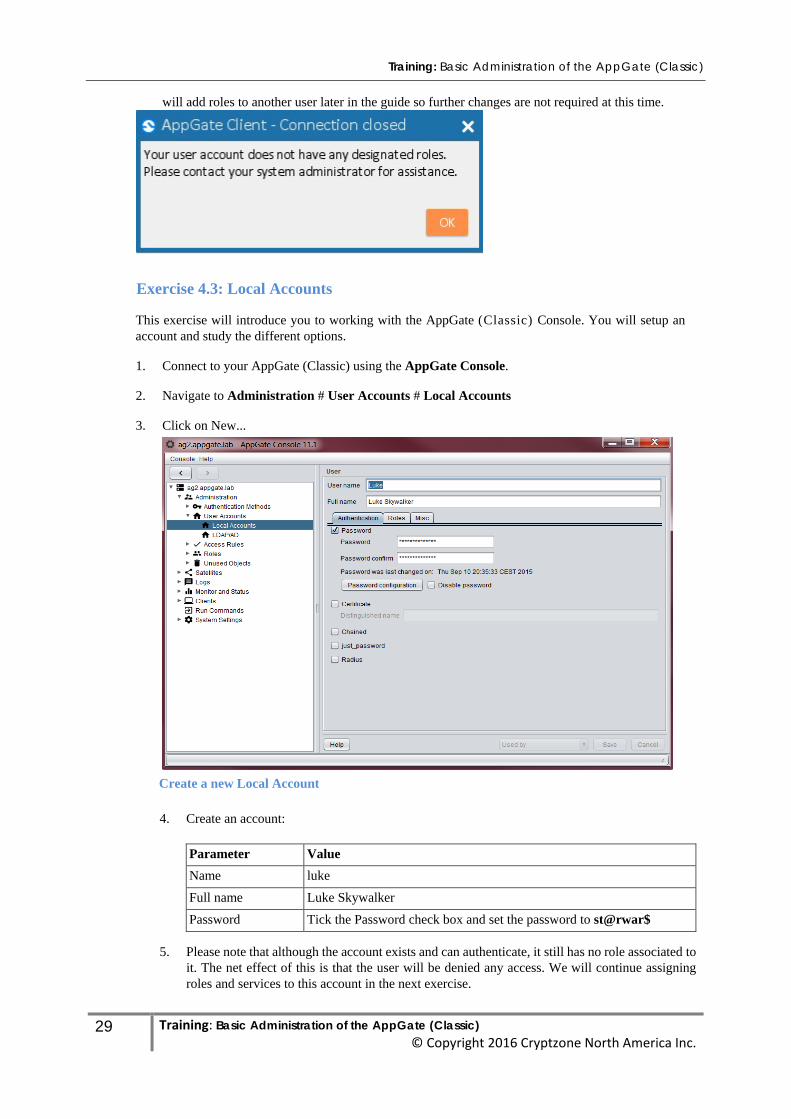
3. Click on New...
Create a new Local Account
4. Create an account:
Parameter Value Name luke Full name Luke Skywalker Password Tick the Password check box and set the password to st@rwar$
5. Please note that although the account exists and can authenticate, it still has no role associated to it. The net effect of this is that the user will be denied any access. We will continue assigning roles and services to this account in the next exercise.
Training: Basic Administration of the AppGate (Classic)
30 Training: Basic Administration of the AppGate (Classic) © Copyright 2016 Cryptzone North America Inc.
4.5.3. Overview of the Component types
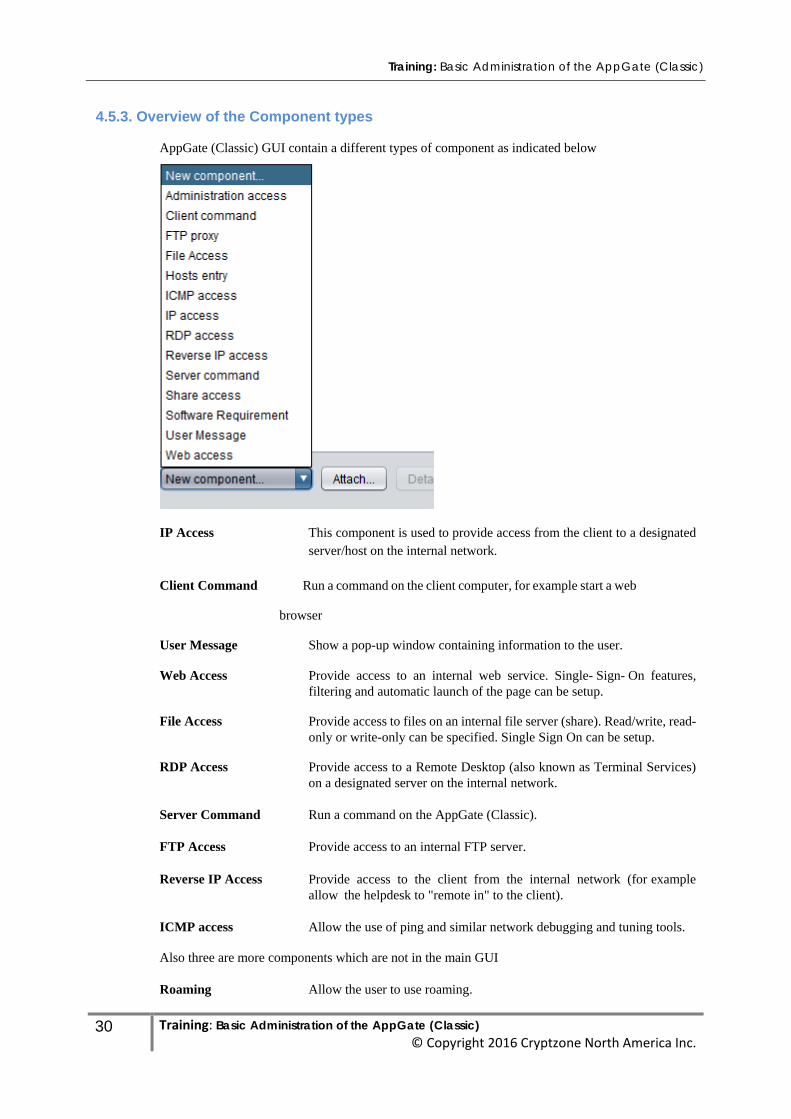
AppGate (Classic) GUI contain a different types of component as indicated below
IP Access This component is used to provide access from the client to a designated server/host on the internal network.
Client Command Run a command on the client computer, for example start a web
browser
User Message Show a pop-up window containing information to the user.
Web Access Provide access to an internal web service. Single- Sign- On features, filtering and automatic launch of the page can be setup.
File Access Provide access to files on an internal file server (share). Read/write, read-
only or write-only can be specified. Single Sign On can be setup.
RDP Access Provide access to a Remote Desktop (also known as Terminal Services) on a designated server on the internal network.
Server Command Run a command on the AppGate (Classic). FTP Access Provide access to an internal FTP server. Reverse IP Access Provide access to the client from the internal network (for example
allow the helpdesk to "remote in" to the client).
ICMP access Allow the use of ping and similar network debugging and tuning tools. Also three are more components which are not in the main GUI
Roaming Allow the user to use roaming.
Training: Basic Administration of the AppGate (Classic)
31 Training: Basic Administration of the AppGate (Classic) © Copyright 2016 Cryptzone North America Inc.
Print Allow the user to use the remote printing function.
SSH Agent Allow the user to use SSH native single sign on towards internal
network Servers Admin Allow the user to administer the AppGate (Classic) system.
Log Allow the user to read the logs on the AppGate (Classic) system.
Exercise 4.4: Users, Roles, Services and Components
This exercise will finish introducing you to the different layers of the AppGate (Classic) hierarchical administration model. You will assign a role to the account created in the last exercise and populate the role with a service. Finally, you'll try it.
1. Create a new role and save changes as you progress when prompted
a. Go to Administration # Roles.
b. Create a new role:
Parameter Value Name role_pilot Description Starship Pilot Icon Optionally change the icon by clicking on it. Combinable Make sure this check box is not ticked.
2. Create a new service:
a. Click on New Service:
Parameter Value Name welcome_pilot Description Welcome Starship Pilots Icon Optionally change the icon by clicking on it.
b. From the New component drop-down menu, select a User Message.
c. Configure the new component:
Parameter Value
Name welcome_pilot_user_message
Description Pilot Message
Window Title Pilot Message Window
Message Safe Skies!
3. Add the role to the account:
a. Go to Administration # User Accounts # Local Accounts
b. Double click on the user luke
Training: Basic Administration of the AppGate (Classic)
32 Training: Basic Administration of the AppGate (Classic) © Copyright 2016 Cryptzone North America Inc.
c. Open the Roles pane
d. Find role_pilot in the right-hand list and select it
e. Click on the blue "arrow" pointing towards the left to add role_pilot to the list of available roles.
4. Try to login and verify that it works as expected.
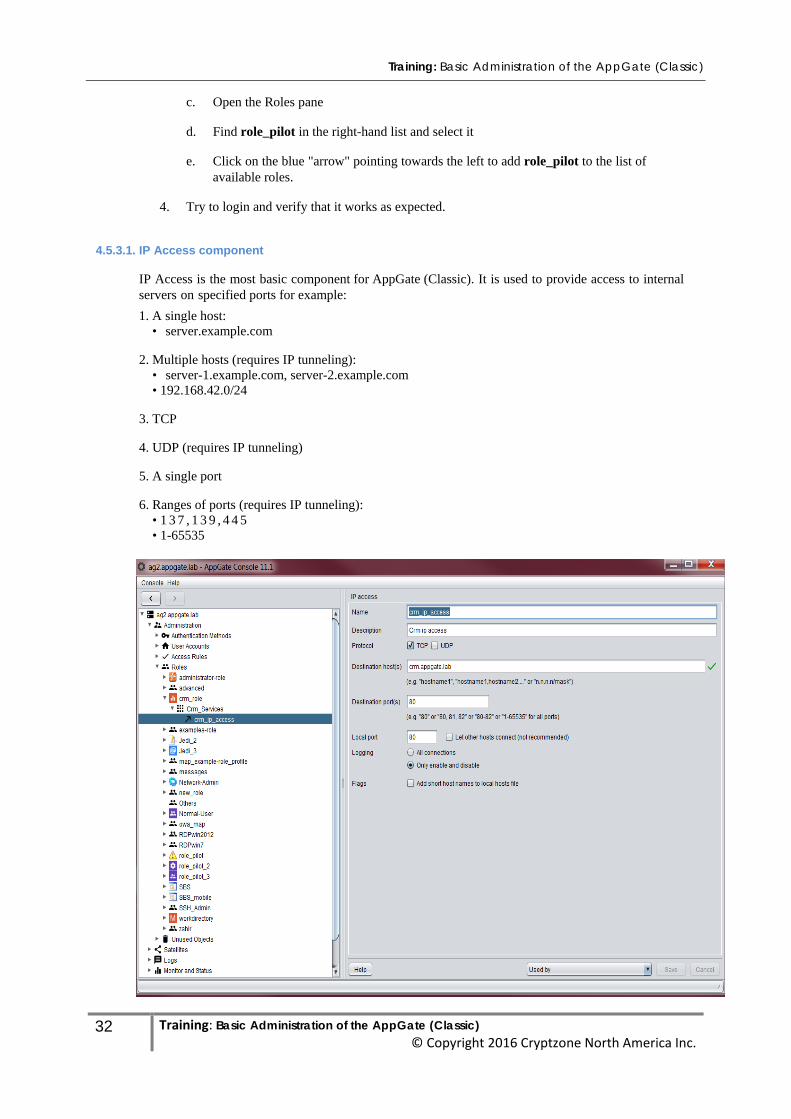
4.5.3.1. IP Access component
IP Access is the most basic component for AppGate (Classic). It is used to provide access to internal servers on specified ports for example: 1. A single host:
• server.example.com
2. Multiple hosts (requires IP tunneling): • server-1.example.com, server-2.example.com • 192.168.42.0/24
3. TCP
4. UDP (requires IP tunneling)
5. A single port
6. Ranges of ports (requires IP tunneling):
• 1 3 7 , 1 3 9 , 4 4 5 • 1-65535
Training: Basic Administration of the AppGate (Classic)
33 Training: Basic Administration of the AppGate (Classic) © Copyright 2016 Cryptzone North America Inc.
Defining an IP Access component
Tip Use IP hostnames whenever possible in the destination host(s) field. When an IP access component is defined using an IP hostname, the client adds an entry to the client host file making it possible to access the internal server with its IP hostname instead of the IP address.
Some of the functionality requires the use of IP tunneling. For IP tunneling to work, a number of prerequisites must be met:
1. The client must have the IP tunneling driver installed. 2. The server must have been configured to use IP tunneling. This includes setting up IP tunnel pools
and possibly setting up routing on the internal network.
If these prerequisites are not met, IP tunneling will not work and the system will fall back to using port forwarding mode.
Components that are setup in a way that they require IP tunneling will not be available if IP tunneling is not operating. For this reason, it is good practice to avoid this when possible. One may choose to use more than one IP access components each providing access to an internal server rather than just using a single one with a list of servers.
Exercise 4.5: IP Access component
This exercise will demonstrate the use of IP Access components. We will setup a service that will grant access to an internal web service and test it.
Note The default password policy for AppGate (Classic) require minimum 6 characters, so in order to create the account user1 with password pass you need to change the policy by going to Administration ---Authentication Methods ---Password and change Minimum length to 4. And Non-lowercase to 0 and Non-alphanumeric to 0. We will do that for lab simplicity purpose, however this shouldn’t be done in a production enviroment. Note Don’t forget to setup your DNS correctly to achieve the exercise.
1. Create new user as exercise 4.4 username/ user1 and password/ pass.
2. Re-use one of the roles previously created or create a new one.
3. Add a service with an IP Access component:
Parameter Value Name crm_ip_access_component Description CRM IP Access
Destination host(s) crm.appgate.lab Destination port(s): 80 Protocol TCP
4. Keep the console running.
Training: Basic Administration of the AppGate (Classic)
34 Training: Basic Administration of the AppGate (Classic) © Copyright 2016 Cryptzone North America Inc.
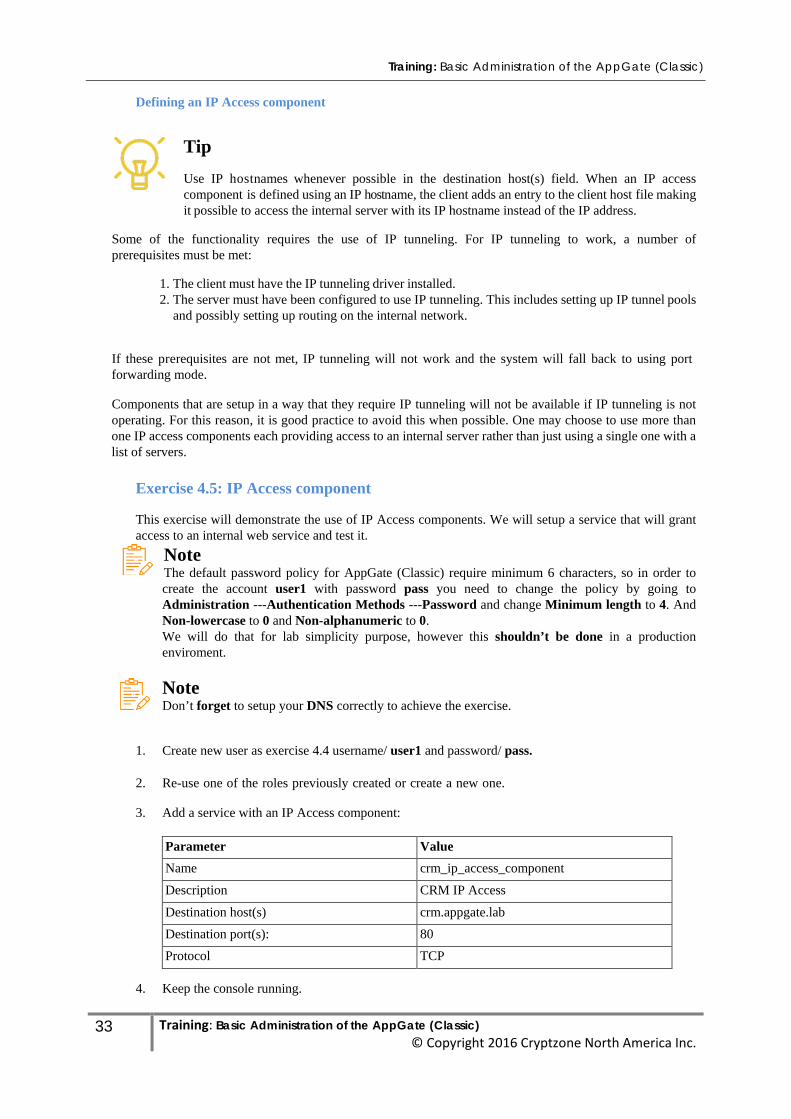
5. Start an AppGate (Classic) Client, log-on and start the service you just created. Nothing visible will happen (except the green check mark on the service icon in the AppGate Client). This is because the service we've setup only sets up access.
6. Start your web browser and to http://crm.appgate.lab/ . When asked for authentication, use account
user1 and password pass.
CRM web service
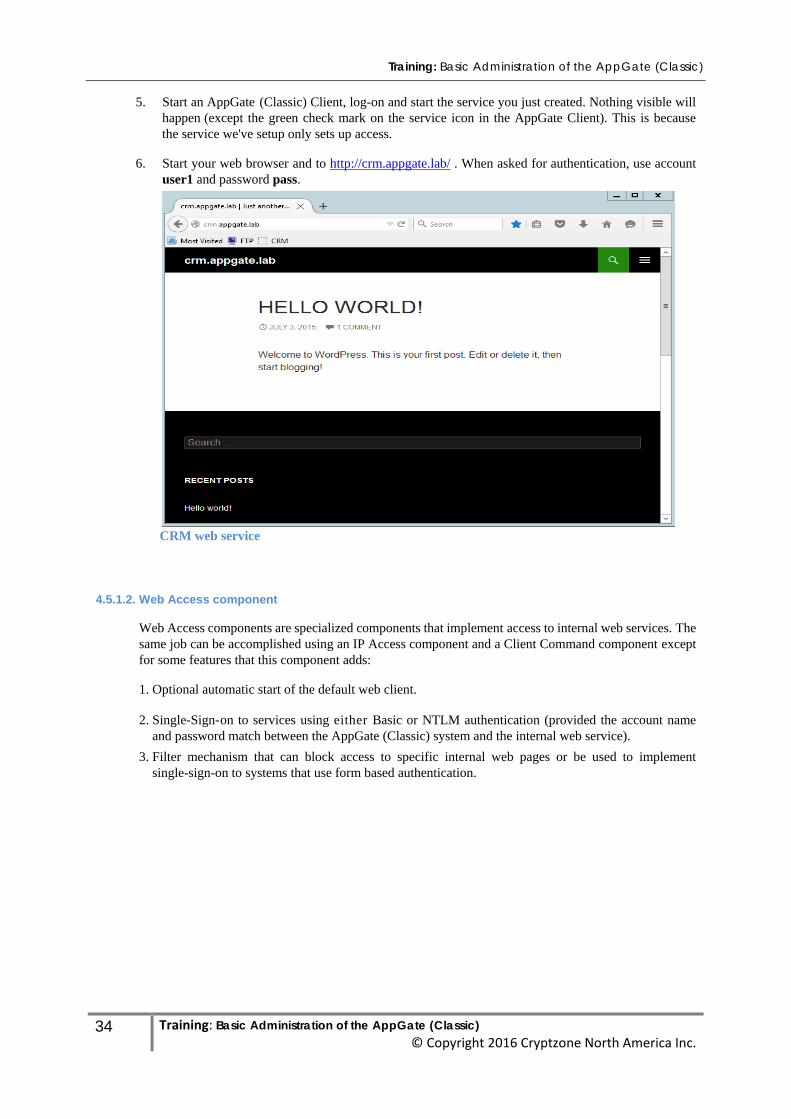
4.5.1.2. Web Access component
Web Access components are specialized components that implement access to internal web services. The same job can be accomplished using an IP Access component and a Client Command component except for some features that this component adds:
1. Optional automatic start of the default web client.
2. Single-Sign-on to services using either Basic or NTLM authentication (provided the account name
and password match between the AppGate (Classic) system and the internal web service). 3. Filter mechanism that can block access to specific internal web pages or be used to implement
single-sign-on to systems that use form based authentication.
Training: Basic Administration of the AppGate (Classic)
35 Training: Basic Administration of the AppGate (Classic) © Copyright 2016 Cryptzone North America Inc.
Web Access component
Caution If some users are going to be using the SSL client (for example access the AppGate (Classic) services via an HTTPS capable web client), the Web Access components must be used (as opposed to a combination of IP Access components and Client Command components). The SSL client only implements Web Access Components and File Access Components.
Exercise 4.6: Web Access components
This exercise will show you how to setup a Web Access component.
1. Create a new service in one of your roles. 2. Add a Web Access component to the role
Parameter Value Name crm_web_access_component Description CRM Web Access Web server crm.appgate.lab Options Use AppGate password to authenticate web requests (SSO)
3. Once connected with the AppGate (Classic) client, start the service.
Training: Basic Administration of the AppGate (Classic)
36 Training: Basic Administration of the AppGate (Classic) © Copyright 2016 Cryptzone North America Inc.
4. You should be logged in automatically since you select SSO
It should behave pretty much the same way as the "CRM IP Access" we created in the previous exercise.
4.5.1.3. Client Command component
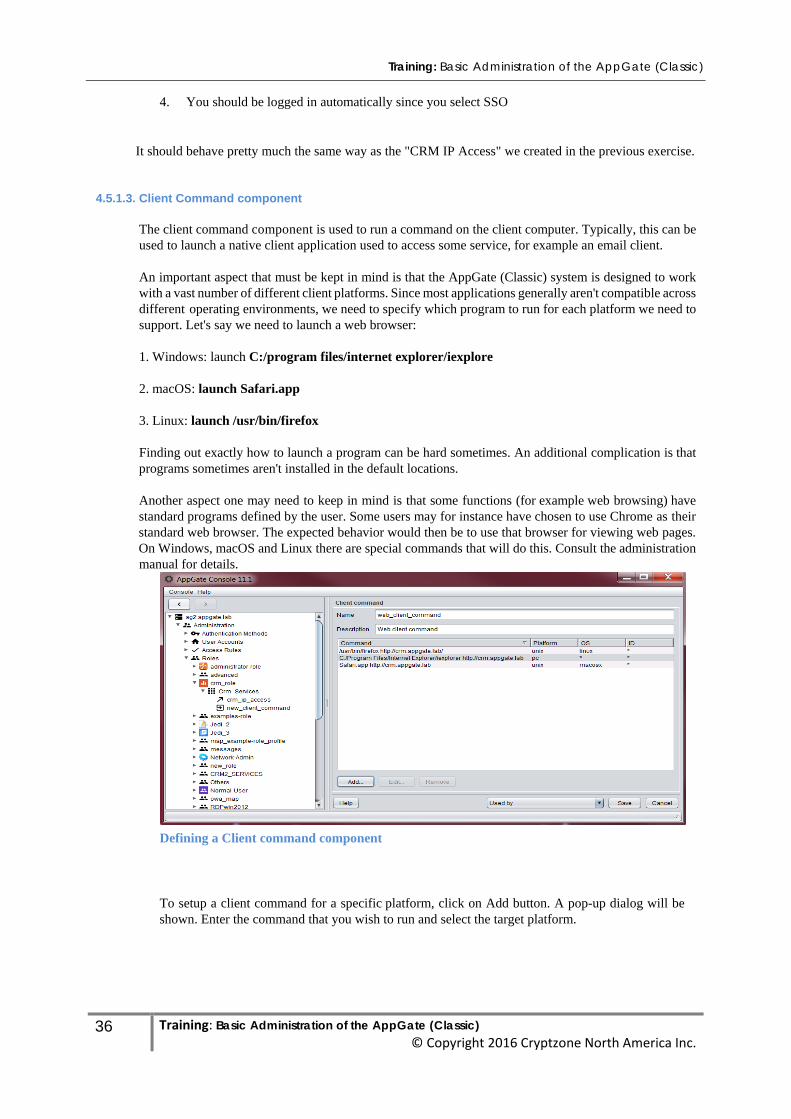
The client command component is used to run a command on the client computer. Typically, this can be used to launch a native client application used to access some service, for example an email client.
An important aspect that must be kept in mind is that the AppGate (Classic) system is designed to work with a vast number of different client platforms. Since most applications generally aren't compatible across different operating environments, we need to specify which program to run for each platform we need to support. Let's say we need to launch a web browser:
1. Windows: launch C:/program files/internet explorer/iexplore
2. macOS: launch Safari.app
3. Linux: launch /usr/bin/firefox
Finding out exactly how to launch a program can be hard sometimes. An additional complication is that programs sometimes aren't installed in the default locations.
Another aspect one may need to keep in mind is that some functions (for example web browsing) have standard programs defined by the user. Some users may for instance have chosen to use Chrome as their standard web browser. The expected behavior would then be to use that browser for viewing web pages. On Windows, macOS and Linux there are special commands that will do this. Consult the administration manual for details.
Defining a Client command component
To setup a client command for a specific platform, click on Add button. A pop-up dialog will be shown. Enter the command that you wish to run and select the target platform.
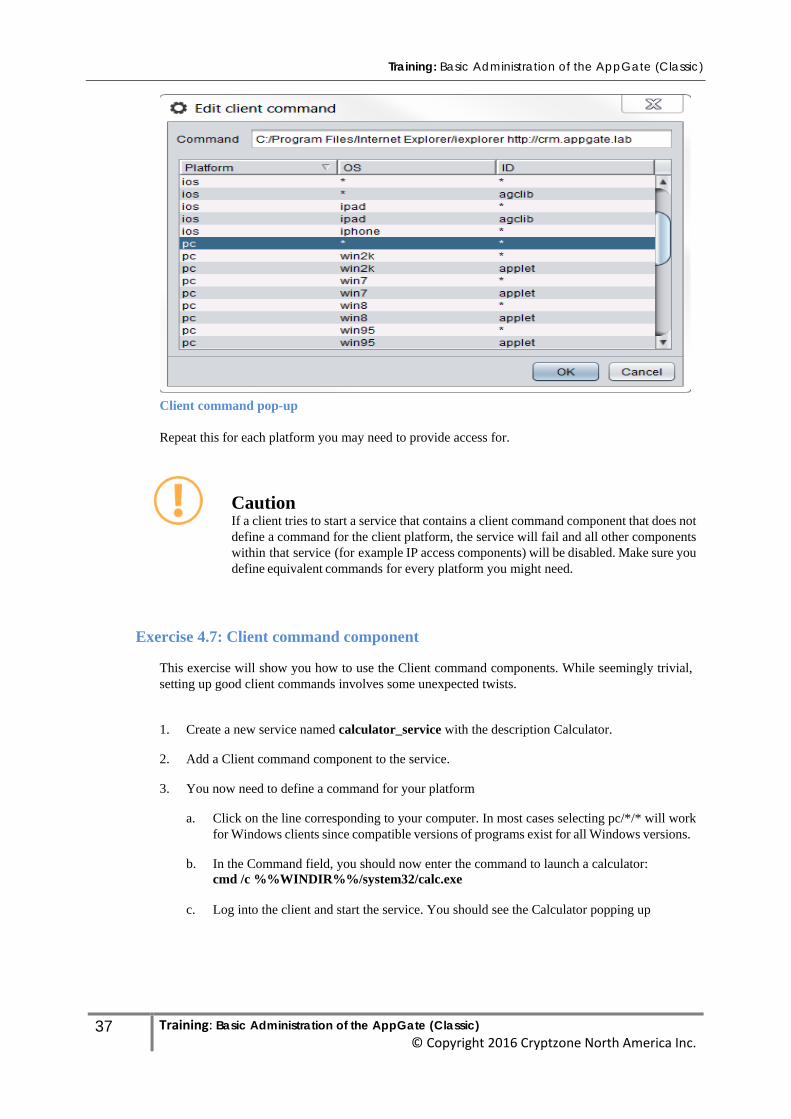
Training: Basic Administration of the AppGate (Classic)
37 Training: Basic Administration of the AppGate (Classic) © Copyright 2016 Cryptzone North America Inc.
Client command pop-up
Repeat this for each platform you may need to provide access for.
Caution If a client tries to start a service that contains a client command component that does not define a command for the client platform, the service will fail and all other components within that service (for example IP access components) will be disabled. Make sure you define equivalent commands for every platform you might need.
Exercise 4.7: Client command component
This exercise will show you how to use the Client command components. While seemingly trivial, setting up good client commands involves some unexpected twists.
1. Create a new service named calculator_service with the description Calculator.
2. Add a Client command component to the service.
3. You now need to define a command for your platform
a. Click on the line corresponding to your computer. In most cases selecting pc/*/* will work
for Windows clients since compatible versions of programs exist for all Windows versions.
b. In the Command field, you should now enter the command to launch a calculator: cmd /c %%WINDIR%%/system32/calc.exe
c. Log into the client and start the service. You should see the Calculator popping up
Training: Basic Administration of the AppGate (Classic)
38 Training: Basic Administration of the AppGate (Classic) © Copyright 2016 Cryptzone North America Inc.
Caution When setting up a Client command component it is not good practice to rely on the PATH of the user to find programs. Good practice is to fully specify the path to any program that should be run (for example use %%WINDIR%%/system32/calc.exe and not calc.exe).
Note Any \ (back-slash) character in paths must be replaced by / (forward-slash). The back- slash character is a special character on UNIX systems and using it in commands may cause confusion and unexpected behavior.
Note We use an environment variable %WINDIR% in the exercise. This variable is always defined on a Windows system and points to where the standard Windows software is installed. It is good practice to use this kind of variables since it prevents failed client commands on systems that have non-standard Windows installations. In order to have access to environment variables however we must run the command in a command shell, that's why the command starts with "cmd /c".
Note The AppGate (Classic) system provides a few keyword substitutions for Client command components, these are prefixed with a % character, hence we need to replace %WINDIR% with %%WINDIR%% (%% is expanded to % by the AppGate client). See the manual for details about which keyword substitutions are available. Note AppGate (Classic) provides a special command agstart.exe that can be used on the Windows platform. It can be used (among other things) to launch web pages using the user’s default web browser (agstart.exe url http://www.example.com/).
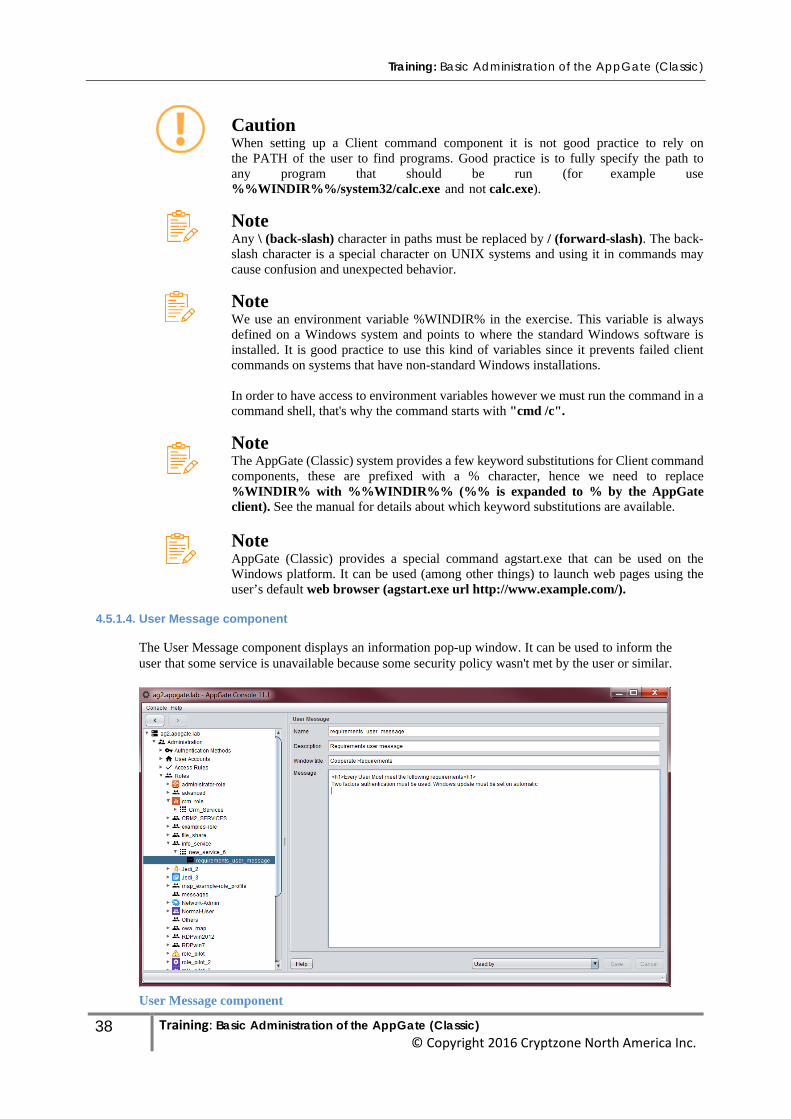
4.5.1.4. User Message component
The User Message component displays an information pop-up window. It can be used to inform the user that some service is unavailable because some security policy wasn't met by the user or similar.
User Message component

Training: Basic Administration of the AppGate (Classic)
39 Training: Basic Administration of the AppGate (Classic) © Copyright 2016 Cryptzone North America Inc.
A sub-set of HTML code can be used in the Message field. The exact list of supported tags is dependent upon which Java version the client is running. Tags that are supported by most implementations however are the following:
Headings H1 - H6
Formatting I (italic), B (bold)
Lists ul (itemize list), ol (numbered list)
Links a (usually only displays as a link, not clickable)
Example of a user message dialog
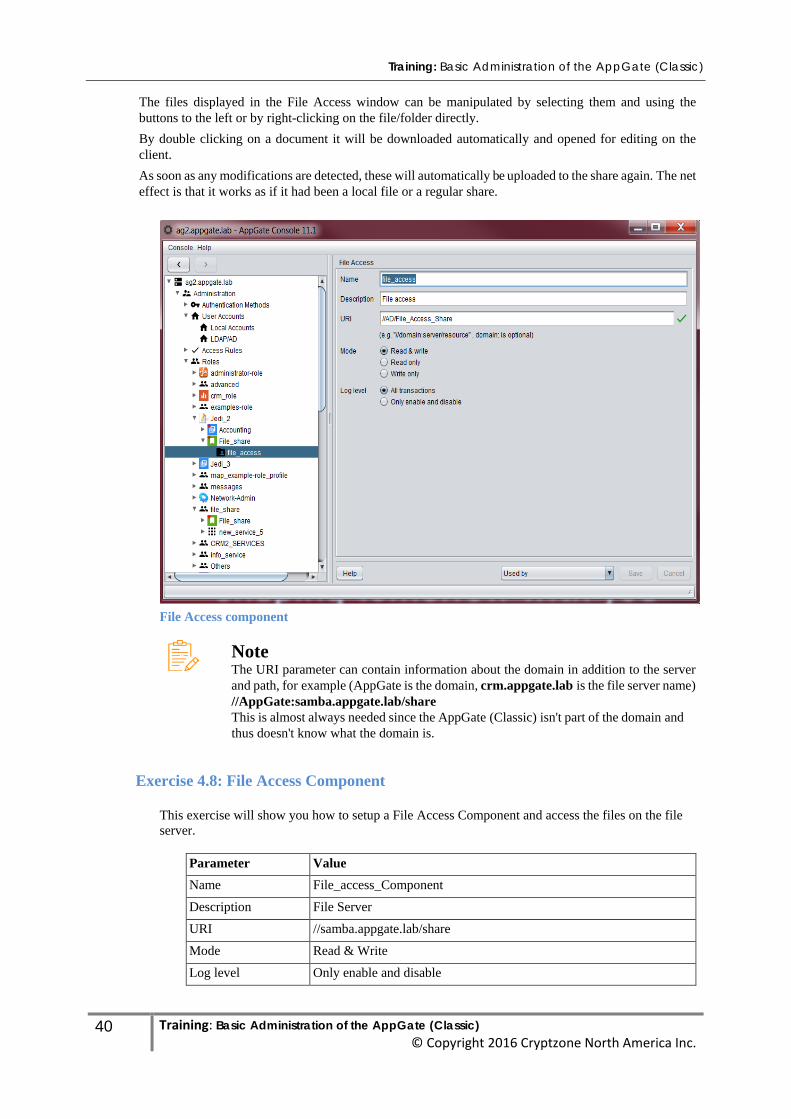
4.5.1.5. File Access Component
The file access component will provide access to internal shares (file servers). When launched, a service with a File Access component will open an explorer like window where files can be manipulated and accessed.
Explorer-like window produced by the file access component
Training: Basic Administration of the AppGate (Classic)
40 Training: Basic Administration of the AppGate (Classic) © Copyright 2016 Cryptzone North America Inc.
The files displayed in the File Access window can be manipulated by selecting them and using the buttons to the left or by right-clicking on the file/folder directly. By double clicking on a document it will be downloaded automatically and opened for editing on the client. As soon as any modifications are detected, these will automatically be uploaded to the share again. The net effect is that it works as if it had been a local file or a regular share.
File Access component
Note The URI parameter can contain information about the domain in addition to the server and path, for example (AppGate is the domain, crm.appgate.lab is the file server name) //AppGate:samba.appgate.lab/share This is almost always needed since the AppGate (Classic) isn't part of the domain and thus doesn't know what the domain is.
Exercise 4.8: File Access Component
This exercise will show you how to setup a File Access Component and access the files on the file server.
Parameter Value Name File_access_Component Description File Server URI //samba.appgate.lab/share Mode Read & Write Log level Only enable and disable
Training: Basic Administration of the AppGate (Classic)
41 Training: Basic Administration of the AppGate (Classic) © Copyright 2016 Cryptzone North America Inc.
Now assign that role to user1 and login with the client, you should be able to access the file server and download the files
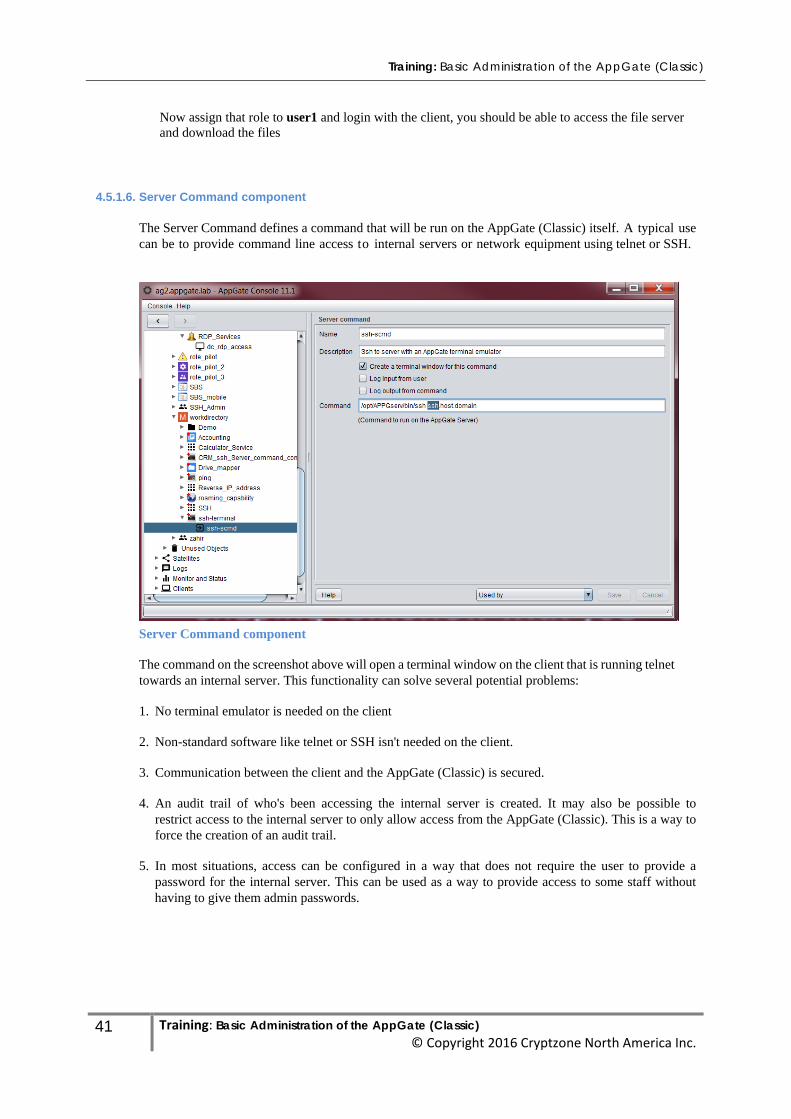
4.5.1.6. Server Command component
The Server Command defines a command that will be run on the AppGate (Classic) itself. A typical use can be to provide command line access to internal servers or network equipment using telnet or SSH.
Server Command component
The command on the screenshot above will open a terminal window on the client that is running telnet towards an internal server. This functionality can solve several potential problems:
1. No terminal emulator is needed on the client
2. Non-standard software like telnet or SSH isn't needed on the client.
3. Communication between the client and the AppGate (Classic) is secured.
4. An audit trail of who's been accessing the internal server is created. It may also be possible to
restrict access to the internal server to only allow access from the AppGate (Classic). This is a way to force the creation of an audit trail.
5. In most situations, access can be configured in a way that does not require the user to provide a
password for the internal server. This can be used as a way to provide access to some staff without having to give them admin passwords.
Training: Basic Administration of the AppGate (Classic)
42 Training: Basic Administration of the AppGate (Classic) © Copyright 2016 Cryptzone North America Inc.
Exercise 4.9: Server Command Components
This exercise will show you how to run SSH from the AppGate (Classic) to provide access to an internal server while providing an audit trail.
1. Create a new service and add a Server Command component to it:
Parameter Value Name crm_ssh_server_command_component Description ssh access to CRM Create a terminal window Make sure this check box is ticked. Command /opt/APPGserv/bin/ssh -l user1 192.168.42.42
2. Log-in with the AppGate (Classic) client and try the service. You'll get a terminal window giving you command-line access to crm.appgate.lab.
Note As with Client Commands, it is best practice to use the full path to any programs used in Server Command components as well.
4.5.1.7. FTP Component
The FTP Access component implements access to internal FTP servers through the AppGate (Classic) system. It is a specialized component that deals with the unusual way the FTP protocol works.
4.5.1.8. Reverse IP Access Component
The Reverse IP Access component allows access from specified hosts on the internal network to the client (on specified ports). Typical use is to allow access to help desks or similar to "remote in" when they need to assist a user. This component only works if the session is using the IP tunneling mode.
4.5.1.9. ICMP Component
The ICMP component allows selected parts of the ICMP protocol to be used. The most common use of this is ping that can be used to check whether a host is reachable or not. Allowing ICMP is usually a good idea since it is used to tune IP connections but some organizations ban it as it can be used to map the network.
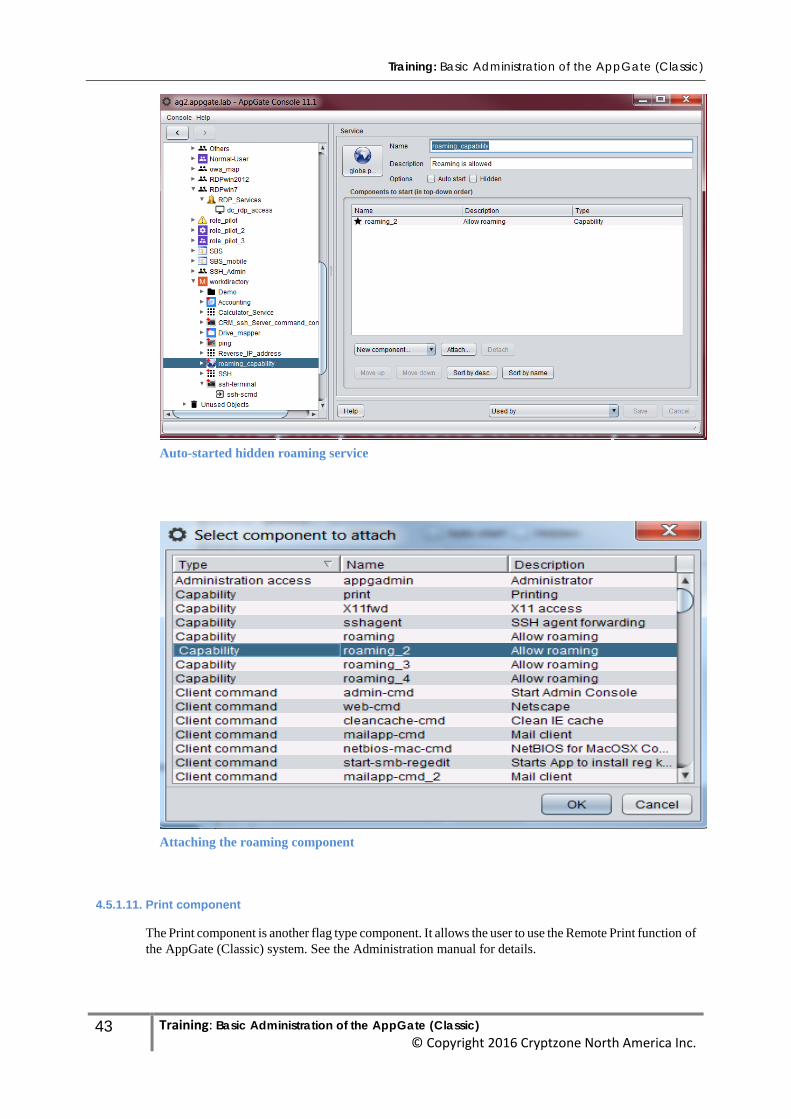
4.5.1.10. Roaming Component
The roaming component is not a component but rather a flag that signals whether to allow roaming or not. One cannot create a new roaming component, instead it must be attached (see Attach... next to New component...) to a service. Typically, this will be a hidden service that is automatically started. Roaming is a feature which allows clients to suspend the connection to the AppGate server and later to resume it again. The user does not need to re-authenticate when reconnecting. Indeed, the entire process can be completely automated and nearly invisible to the user. All established connections will remain alive while roaming. This feature is intended for mobile users who move around between networks.
Training: Basic Administration of the AppGate (Classic)
43 Training: Basic Administration of the AppGate (Classic) © Copyright 2016 Cryptzone North America Inc.
Auto-started hidden roaming service
Attaching the roaming component
4.5.1.11. Print component
The Print component is another flag type component. It allows the user to use the Remote Print function of the AppGate (Classic) system. See the Administration manual for details.
Training: Basic Administration of the AppGate (Classic)
44 Training: Basic Administration of the AppGate (Classic) © Copyright 2016 Cryptzone North America Inc.
4.5.1.12. SSH Agent component
The SSH Agent component is another flag type component. It allows the user to use the SSH native Single sign-on function to access internal Unix-based servers. See the Administration manual for details.
4.5.1.13. Admin component
To be allowed to administer an AppGate (Classic) system a user must have an Admin component somewhere in his role. It is a flag type component.
4.5.1.14. Log component
The Log component allows users who have this in their role to access the AppGate (Classic) system logs. This can be useful to a help-desk or junior system administrators.
Training: Basic Administration of the AppGate (Classic)
45 Training: Basic Administration of the AppGate (Classic) © Copyright 2016 Cryptzone North America Inc.
Chapter 5. Integrating with IT infrastructure 5.1. Integrating with LDAP/AD
Most organizations have some sort of directory to manage their users. Typically, Active Directory or some other form of LDAP is used. Rather than creating a separate directory to manage AppGate (Classic) users, it is encouraged to integrate with the existing directory.
The AppGate (Classic) can use an LDAP directory to both lookup users and check their passwords. Lookups are done when needed - the AppGate (Classic) doesn't cache the database or similar. To be able to do these lookups, the AppGate (Classic) needs an account in the LDAP directory which is referred to as the bind user.
Tip When the LDAP directory is of AD type, the bind user should be a member of the account operators group. This will ensure that some additional features (for example warning about password expiration) are handled correctly.
If needed, the AppGate (Classic) system can integrate with more than one LDAP directories. The AppGate (Classic) system will query each of the configured directories until it finds a match or runs out of directories.
AD directories offer more features that other LDAP directories due to using a standard schema (for example directory structure). It is possible however to setup other LDAP implementations with AD compatible schema. If that is done, you can run any LDAP server in "AD mode" and benefit the added functionality.
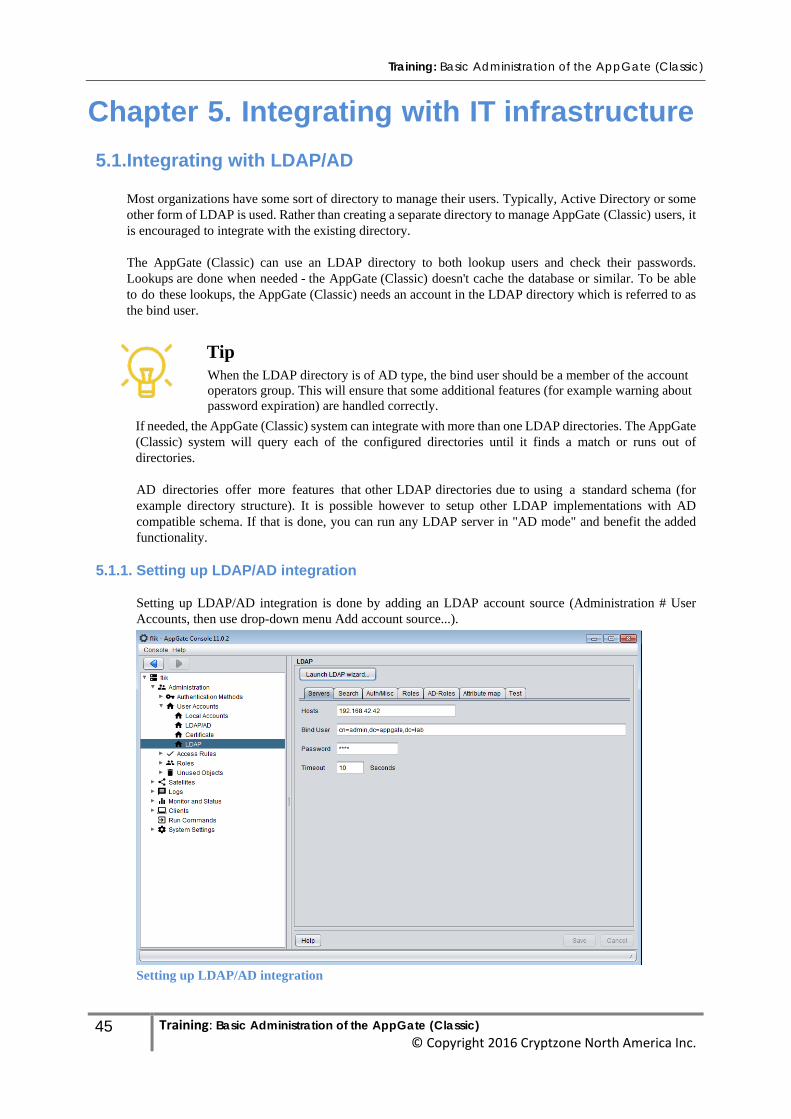
5.1.1. Setting up LDAP/AD integration
Setting up LDAP/AD integration is done by adding an LDAP account source (Administration # User Accounts, then use drop-down menu Add account source...).
Setting up LDAP/AD integration

Training: Basic Administration of the AppGate (Classic)
46 Training: Basic Administration of the AppGate (Classic) © Copyright 2016 Cryptzone North America Inc.
The best way to proceed is to use the wizard: click on Launch LDAP wizard. The wizard will walk you through the process of setting up the integration, verifying each step along the way and offering ways of testing it at several points. The steps differ slightly depending on the LDAP being a Microsoft Active Directory or not.
1. The LDAP/AD servers must be pointed out. This is also where you indicate whether this is an AD server or a generic LDAP server.
Setting up your LDAP/AD servers The system will try to connect using LDAPS and LDAP. If you want password aging and similar to be handled correctly, you must use LDAPS (for example your AD server needs a signed valid server certificate).
2. Most LDAP servers require a bind user to allow queries. You need a user that is allowed to read
user information.
Note Good practice is to setup a dedicated user as a bind user for the AppGate (Classic) system
If you want password aging and similar to work when working against an AD server, you must have a bind user that is part of the Account Operators group.
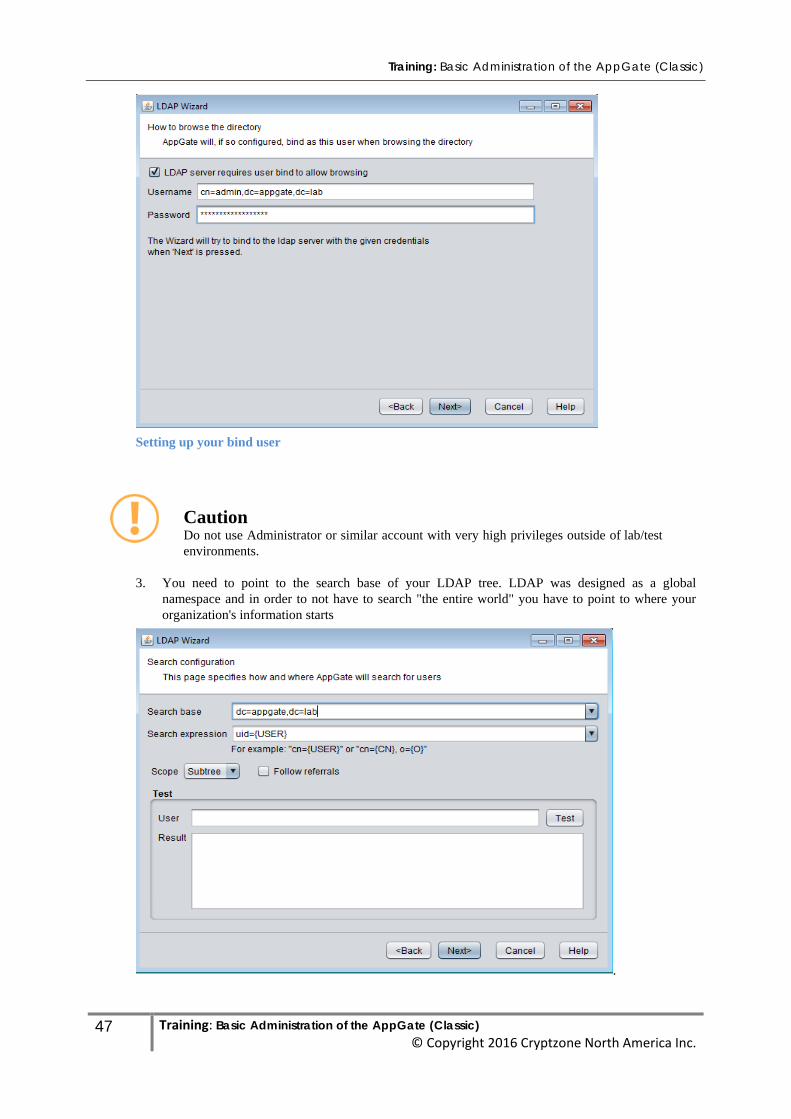
Training: Basic Administration of the AppGate (Classic)
47 Training: Basic Administration of the AppGate (Classic) © Copyright 2016 Cryptzone North America Inc.
Setting up your bind user
Caution Do not use Administrator or similar account with very high privileges outside of lab/test environments.
3. You need to point to the search base of your LDAP tree. LDAP was designed as a global namespace and in order to not have to search "the entire world" you have to point to where your organization's information starts
.
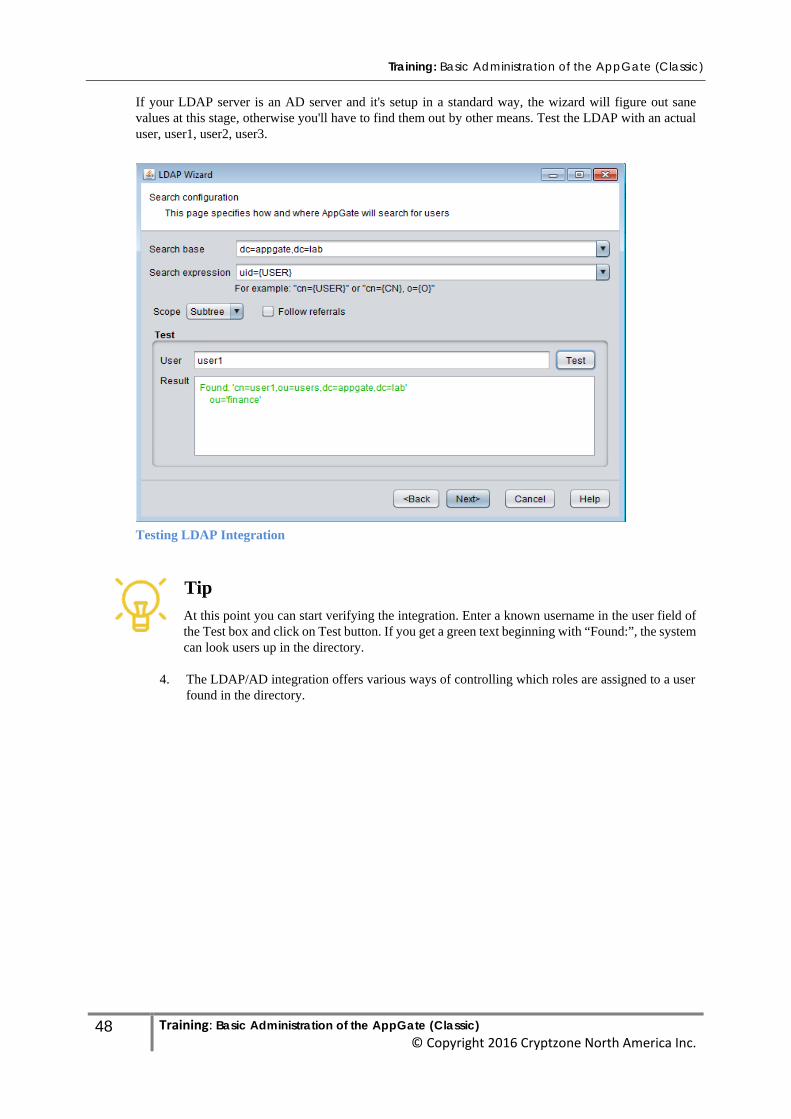
Training: Basic Administration of the AppGate (Classic)
48 Training: Basic Administration of the AppGate (Classic) © Copyright 2016 Cryptzone North America Inc.
If your LDAP server is an AD server and it's setup in a standard way, the wizard will figure out sane values at this stage, otherwise you'll have to find them out by other means. Test the LDAP with an actual user, user1, user2, user3.
Testing LDAP Integration
Tip At this point you can start verifying the integration. Enter a known username in the user field of the Test box and click on Test button. If you get a green text beginning with “Found:”, the system can look users up in the directory.
4. The LDAP/AD integration offers various ways of controlling which roles are assigned to a user found in the directory.
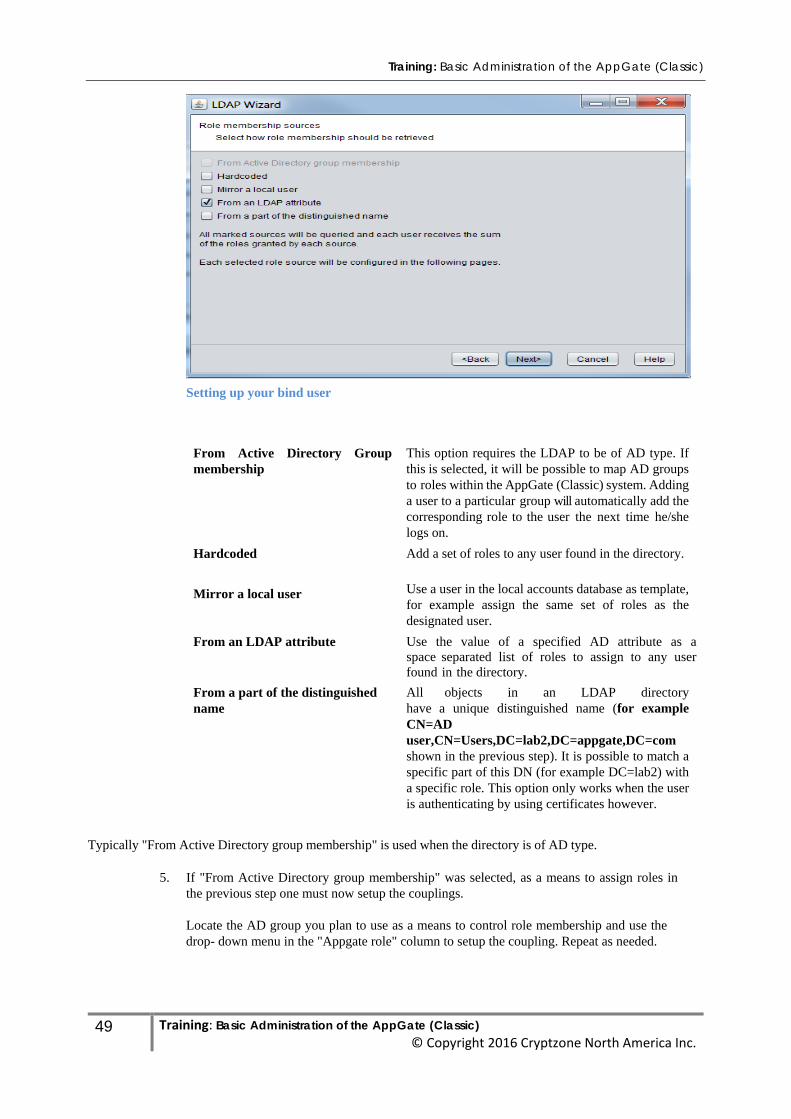
Training: Basic Administration of the AppGate (Classic)
49 Training: Basic Administration of the AppGate (Classic) © Copyright 2016 Cryptzone North America Inc.
Setting up your bind user
From Active Directory Group membership
This option requires the LDAP to be of AD type. If this is selected, it will be possible to map AD groups to roles within the AppGate (Classic) system. Adding a user to a particular group will automatically add the corresponding role to the user the next time he/she logs on.
Hardcoded Add a set of roles to any user found in the directory.
Mirror a local user Use a user in the local accounts database as template, for example assign the same set of roles as the designated user.
From an LDAP attribute Use the value of a specified AD attribute as a space separated list of roles to assign to any user found in the directory.
From a part of the distinguished name
All objects in an LDAP directory have a unique distinguished name (for example CN=AD user,CN=Users,DC=lab2,DC=appgate,DC=com shown in the previous step). It is possible to match a specific part of this DN (for example DC=lab2) with a specific role. This option only works when the user is authenticating by using certificates however.
Typically "From Active Directory group membership" is used when the directory is of AD type.
5. If "From Active Directory group membership" was selected, as a means to assign roles in the previous step one must now setup the couplings.
Locate the AD group you plan to use as a means to control role membership and use the drop- down menu in the "Appgate role" column to setup the coupling. Repeat as needed.
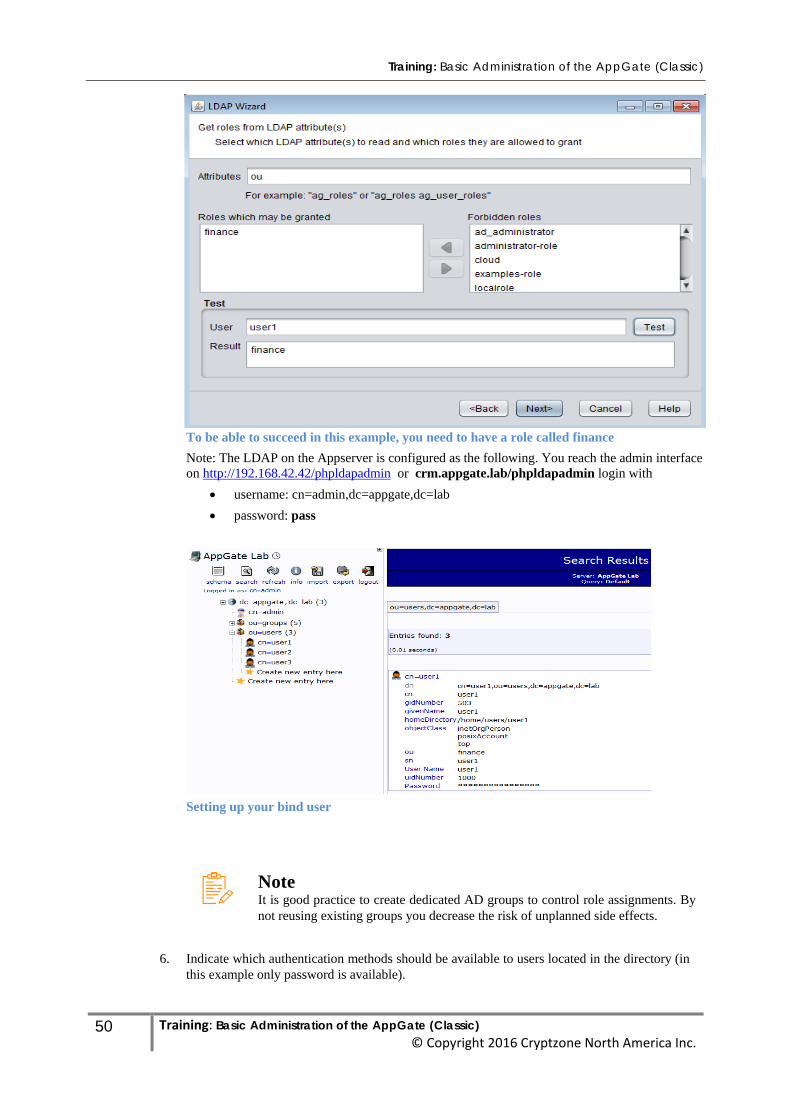
Training: Basic Administration of the AppGate (Classic)
50 Training: Basic Administration of the AppGate (Classic) © Copyright 2016 Cryptzone North America Inc.
To be able to succeed in this example, you need to have a role called finance Note: The LDAP on the Appserver is configured as the following. You reach the admin interface on http://192.168.42.42/phpldapadmin or crm.appgate.lab/phpldapadmin login with
• username: cn=admin,dc=appgate,dc=lab • password: pass
Setting up your bind user
Note It is good practice to create dedicated AD groups to control role assignments. By not reusing existing groups you decrease the risk of unplanned side effects.
6. Indicate which authentication methods should be available to users located in the directory (in this example only password is available).
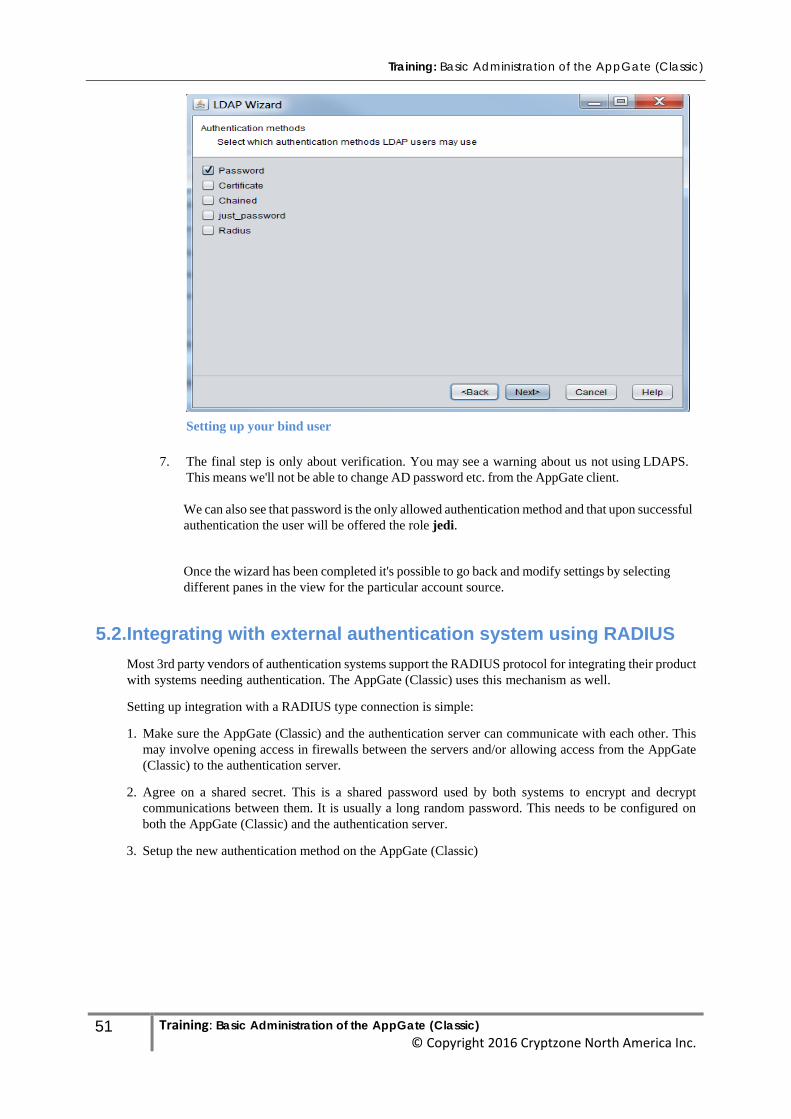
Training: Basic Administration of the AppGate (Classic)
51 Training: Basic Administration of the AppGate (Classic) © Copyright 2016 Cryptzone North America Inc.
Setting up your bind user
7. The final step is only about verification. You may see a warning about us not using LDAPS.
This means we'll not be able to change AD password etc. from the AppGate client.
We can also see that password is the only allowed authentication method and that upon successful authentication the user will be offered the role jedi.
Once the wizard has been completed it's possible to go back and modify settings by selecting different panes in the view for the particular account source.
5.2. Integrating with external authentication system using RADIUS
Most 3rd party vendors of authentication systems support the RADIUS protocol for integrating their product with systems needing authentication. The AppGate (Classic) uses this mechanism as well.
Setting up integration with a RADIUS type connection is simple:
1. Make sure the AppGate (Classic) and the authentication server can communicate with each other. This may involve opening access in firewalls between the servers and/or allowing access from the AppGate (Classic) to the authentication server.
2. Agree on a shared secret. This is a shared password used by both systems to encrypt and decrypt communications between them. It is usually a long random password. This needs to be configured on both the AppGate (Classic) and the authentication server.
3. Setup the new authentication method on the AppGate (Classic)
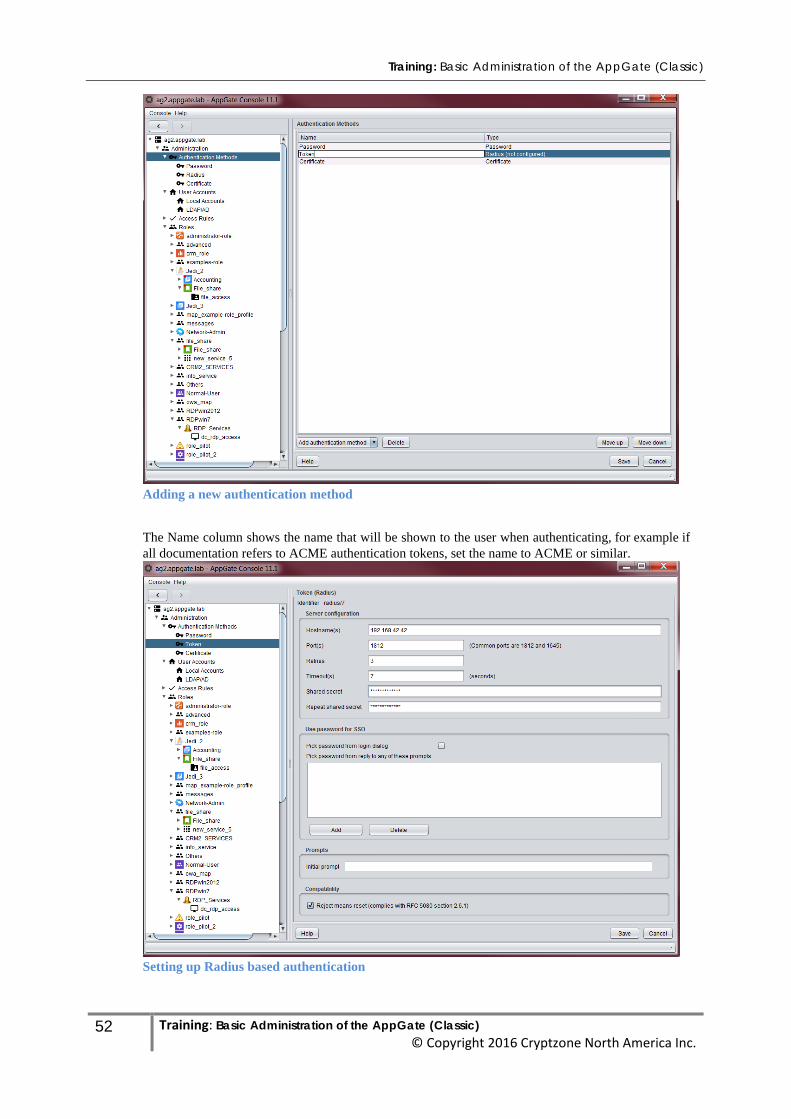
Training: Basic Administration of the AppGate (Classic)
52 Training: Basic Administration of the AppGate (Classic) © Copyright 2016 Cryptzone North America Inc.
Adding a new authentication method
The Name column shows the name that will be shown to the user when authenticating, for example if all documentation refers to ACME authentication tokens, set the name to ACME or similar.
Setting up Radius based authentication
Training: Basic Administration of the AppGate (Classic)
53 Training: Basic Administration of the AppGate (Classic) © Copyright 2016 Cryptzone North America Inc.
A minimal setup requires a hostname, the correct port and the shared secret. In this case the shared secret is ‘network’. Users are ‘userX’ with password ‘pass’, where x is 1, 2, 3…12.
5.3. Selection of authentication method When connecting to the AppGate (Classic) the user will be offered to use all authentication methods that are configured on the system (which is the default behavior but it can be tuned, see Section 7.1.1, “Tuning authentication methods”). Depending on how the system is configured, the user may be denied access or have limited access if the proper authentication method isn't selected.
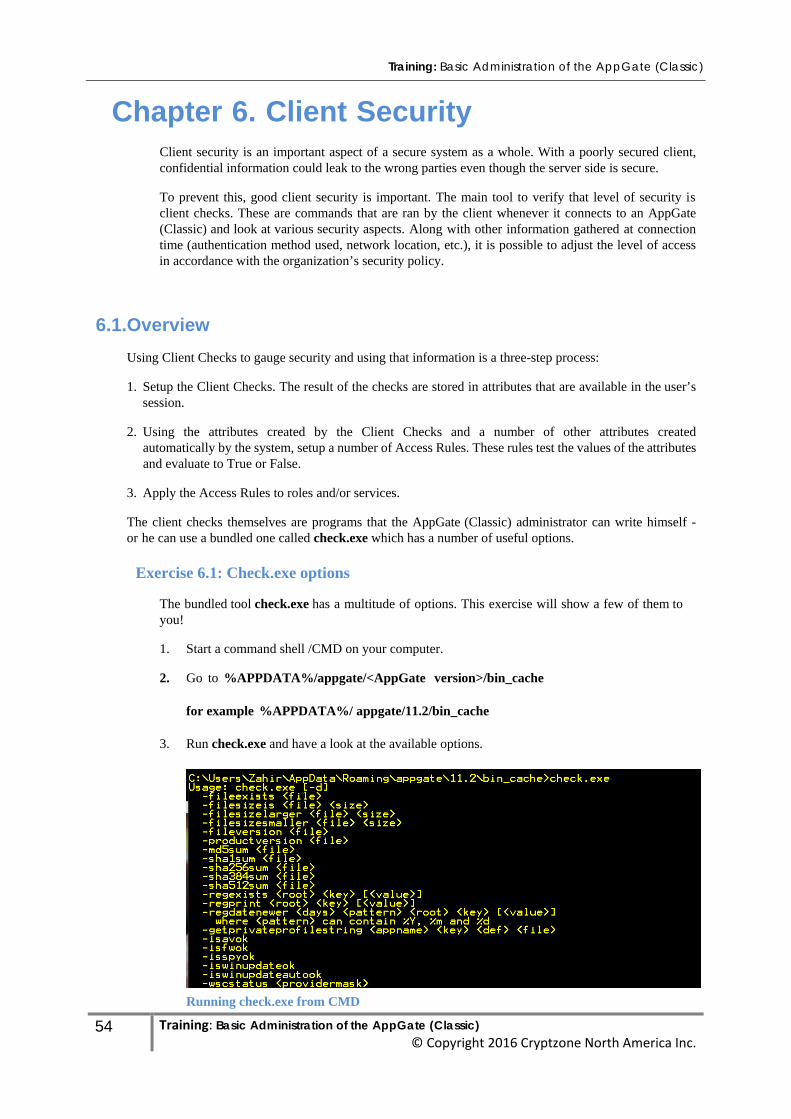
Training: Basic Administration of the AppGate (Classic)
54 Training: Basic Administration of the AppGate (Classic) © Copyright 2016 Cryptzone North America Inc.
Chapter 6. Client Security Client security is an important aspect of a secure system as a whole. With a poorly secured client, confidential information could leak to the wrong parties even though the server side is secure.
To prevent this, good client security is important. The main tool to verify that level of security is client checks. These are commands that are ran by the client whenever it connects to an AppGate (Classic) and look at various security aspects. Along with other information gathered at connection time (authentication method used, network location, etc.), it is possible to adjust the level of access in accordance with the organization’s security policy.
6.1. Overview
Using Client Checks to gauge security and using that information is a three-step process:
1. Setup the Client Checks. The result of the checks are stored in attributes that are available in the user’s session.
2. Using the attributes created by the Client Checks and a number of other attributes created
automatically by the system, setup a number of Access Rules. These rules test the values of the attributes and evaluate to True or False.
3. Apply the Access Rules to roles and/or services.
The client checks themselves are programs that the AppGate (Classic) administrator can write himself - or he can use a bundled one called check.exe which has a number of useful options.
Exercise 6.1: Check.exe options
The bundled tool check.exe has a multitude of options. This exercise will show a few of them to you!
1. Start a command shell /CMD on your computer.
2. Go to %APPDATA%/appgate/<AppGate version>/bin_cache
for example %APPDATA%/ appgate/11.2/bin_cache
3. Run check.exe and have a look at the available options.
Running check.exe from CMD
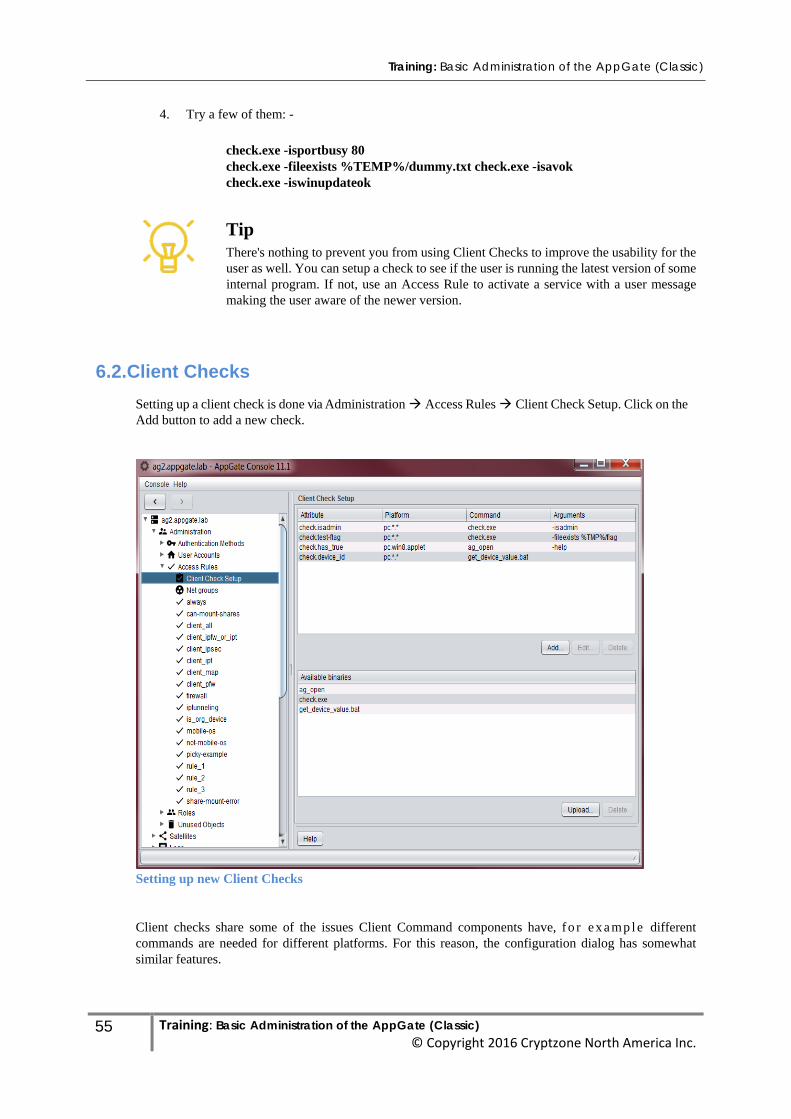
Training: Basic Administration of the AppGate (Classic)
55 Training: Basic Administration of the AppGate (Classic) © Copyright 2016 Cryptzone North America Inc.
4. Try a few of them: -
check.exe -isportbusy 80 check.exe -fileexists %TEMP%/dummy.txt check.exe -isavok check.exe -iswinupdateok
Tip There's nothing to prevent you from using Client Checks to improve the usability for the user as well. You can setup a check to see if the user is running the latest version of some internal program. If not, use an Access Rule to activate a service with a user message making the user aware of the newer version.
6.2. Client Checks
Setting up a client check is done via Administration Access Rules Client Check Setup. Click on the Add button to add a new check.
Setting up new Client Checks
Client checks share some of the issues Client Command components have, fo r examp le different commands are needed for different platforms. For this reason, the configuration dialog has somewhat similar features.
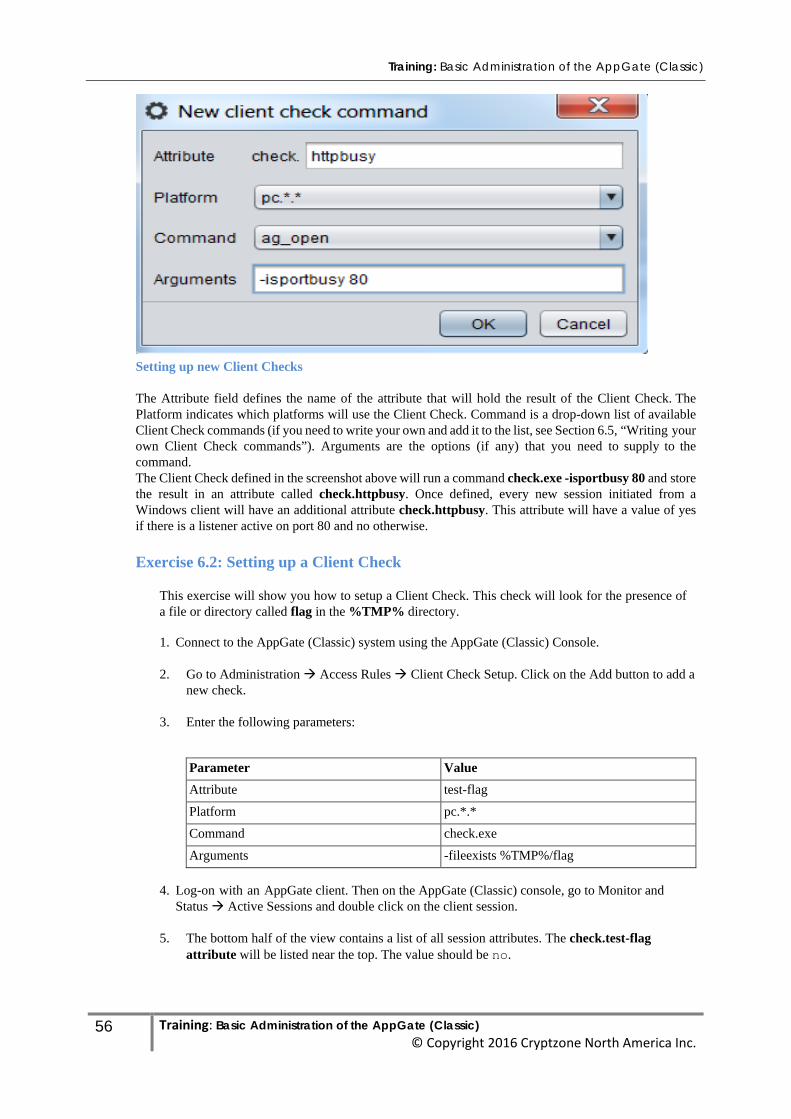
Training: Basic Administration of the AppGate (Classic)
56 Training: Basic Administration of the AppGate (Classic) © Copyright 2016 Cryptzone North America Inc.
Setting up new Client Checks
The Attribute field defines the name of the attribute that will hold the result of the Client Check. The Platform indicates which platforms will use the Client Check. Command is a drop-down list of available Client Check commands (if you need to write your own and add it to the list, see Section 6.5, “Writing your own Client Check commands”). Arguments are the options (if any) that you need to supply to the command. The Client Check defined in the screenshot above will run a command check.exe -isportbusy 80 and store the result in an attribute called check.httpbusy. Once defined, every new session initiated from a Windows client will have an additional attribute check.httpbusy. This attribute will have a value of yes if there is a listener active on port 80 and no otherwise.
Exercise 6.2: Setting up a Client Check
This exercise will show you how to setup a Client Check. This check will look for the presence of a file or directory called flag in the %TMP% directory.
1. Connect to the AppGate (Classic) system using the AppGate (Classic) Console.
2. Go to Administration Access Rules Client Check Setup. Click on the Add button to add a
new check.
3. Enter the following parameters:
Parameter Value Attribute test-flag Platform pc.*.* Command check.exe Arguments -fileexists %TMP%/flag
4. Log-on with an AppGate client. Then on the AppGate (Classic) console, go to Monitor and Status Active Sessions and double click on the client session.
5. The bottom half of the view contains a list of all session attributes. The check.test-flag
attribute will be listed near the top. The value should be no.

Training: Basic Administration of the AppGate (Classic)
57 Training: Basic Administration of the AppGate (Classic) © Copyright 2016 Cryptzone North America Inc.
6. Create the directory %TMP%\flag. You can either do this by using an explorer window (go to %TMP% and create a new folder) or using a command shell (mkdir %TMP%\flag).
7. Log-out and back in again with the AppGate (Classic) client. Look at the session attributes again.
Has the value of check.test-flag changed?
Setting up a Client Check command doesn't actually achieve anything - it's strictly only information gathering. In order to actually use the information, an Access Rule is required.
6.3. Access Rules
Access Rules will look at information (typically session attributes) and compare it against some value. Depending on the outcome they will produce a True or False value.
Access Rules support Boolean notation to combine the results of several comparisons or even combine other Access Rules into a True/False result.
Creating Access Rules
When creating a new access rule it's recommended that you use the helper buttons below the expression window. Start by clearing the expression.
To test the value of an attribute, click on Attribute... to open a popup that will help you enter the comparison.
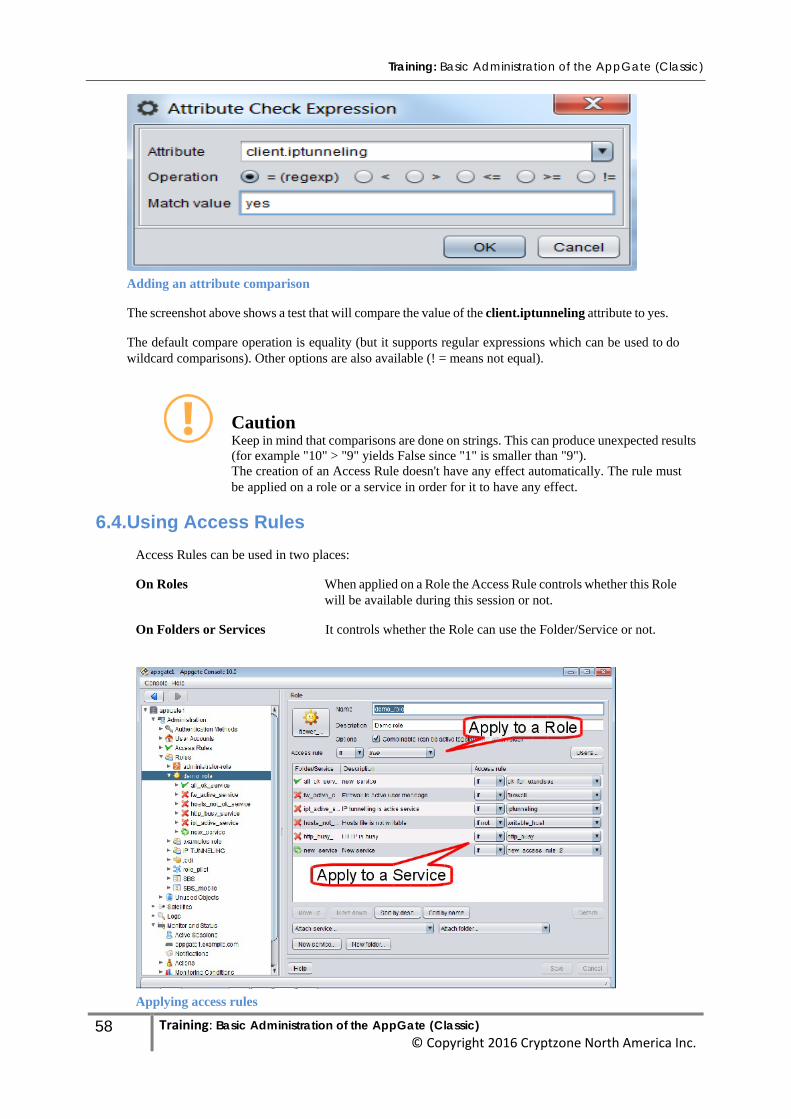
Training: Basic Administration of the AppGate (Classic)
58 Training: Basic Administration of the AppGate (Classic) © Copyright 2016 Cryptzone North America Inc.
Adding an attribute comparison
The screenshot above shows a test that will compare the value of the client.iptunneling attribute to yes.
The default compare operation is equality (but it supports regular expressions which can be used to do wildcard comparisons). Other options are also available (! = means not equal).
Caution Keep in mind that comparisons are done on strings. This can produce unexpected results (for example "10" > "9" yields False since "1" is smaller than "9"). The creation of an Access Rule doesn't have any effect automatically. The rule must be applied on a role or a service in order for it to have any effect.
6.4. Using Access Rules
Access Rules can be used in two places:
On Roles When applied on a Role the Access Rule controls whether this Role will be available during this session or not.
On Folders or Services It controls whether the Role can use the Folder/Service or not.
Applying access rules
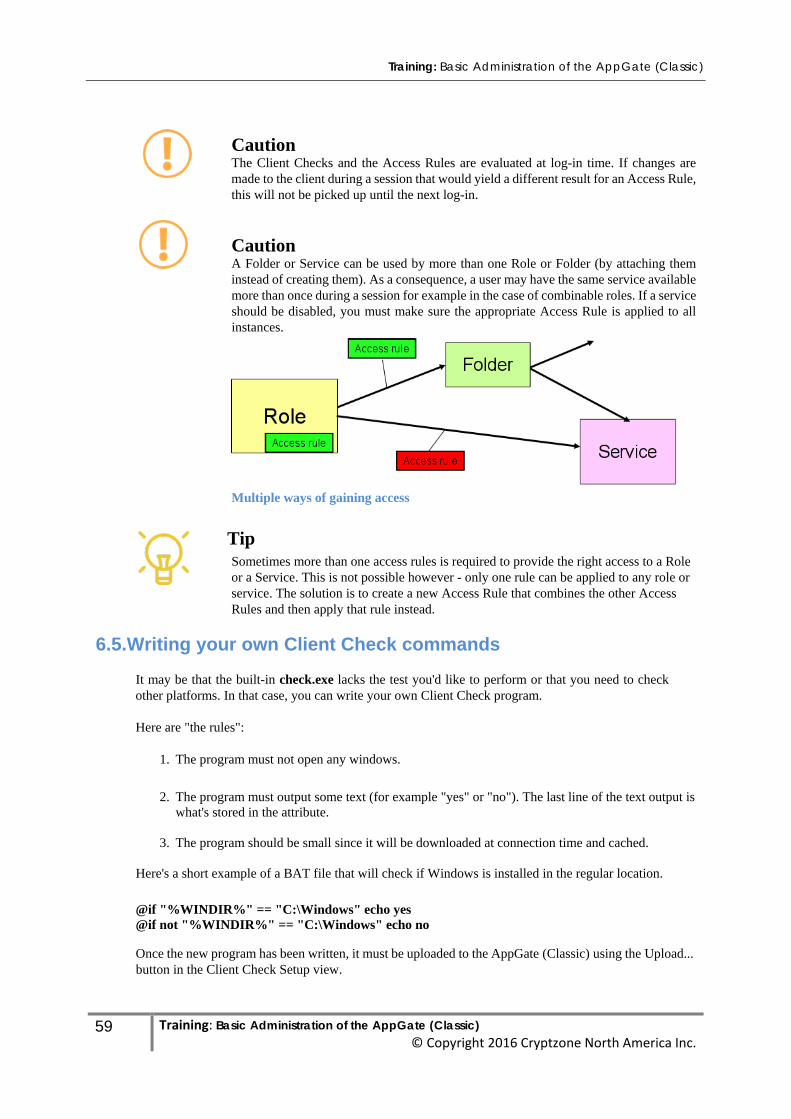
Training: Basic Administration of the AppGate (Classic)
59 Training: Basic Administration of the AppGate (Classic) © Copyright 2016 Cryptzone North America Inc.
Caution The Client Checks and the Access Rules are evaluated at log-in time. If changes are made to the client during a session that would yield a different result for an Access Rule, this will not be picked up until the next log-in.
Caution A Folder or Service can be used by more than one Role or Folder (by attaching them instead of creating them). As a consequence, a user may have the same service available more than once during a session for example in the case of combinable roles. If a service should be disabled, you must make sure the appropriate Access Rule is applied to all instances.
Multiple ways of gaining access
Tip Sometimes more than one access rules is required to provide the right access to a Role or a Service. This is not possible however - only one rule can be applied to any role or service. The solution is to create a new Access Rule that combines the other Access Rules and then apply that rule instead.
6.5. Writing your own Client Check commands
It may be that the built-in check.exe lacks the test you'd like to perform or that you need to check other platforms. In that case, you can write your own Client Check program.
Here are "the rules":
1. The program must not open any windows.
2. The program must output some text (for example "yes" or "no"). The last line of the text output is
what's stored in the attribute.
3. The program should be small since it will be downloaded at connection time and cached.
Here's a short example of a BAT file that will check if Windows is installed in the regular location.
@if "%WINDIR%" == "C:\Windows" echo yes @if not "%WINDIR%" == "C:\Windows" echo no
Once the new program has been written, it must be uploaded to the AppGate (Classic) using the Upload... button in the Client Check Setup view.
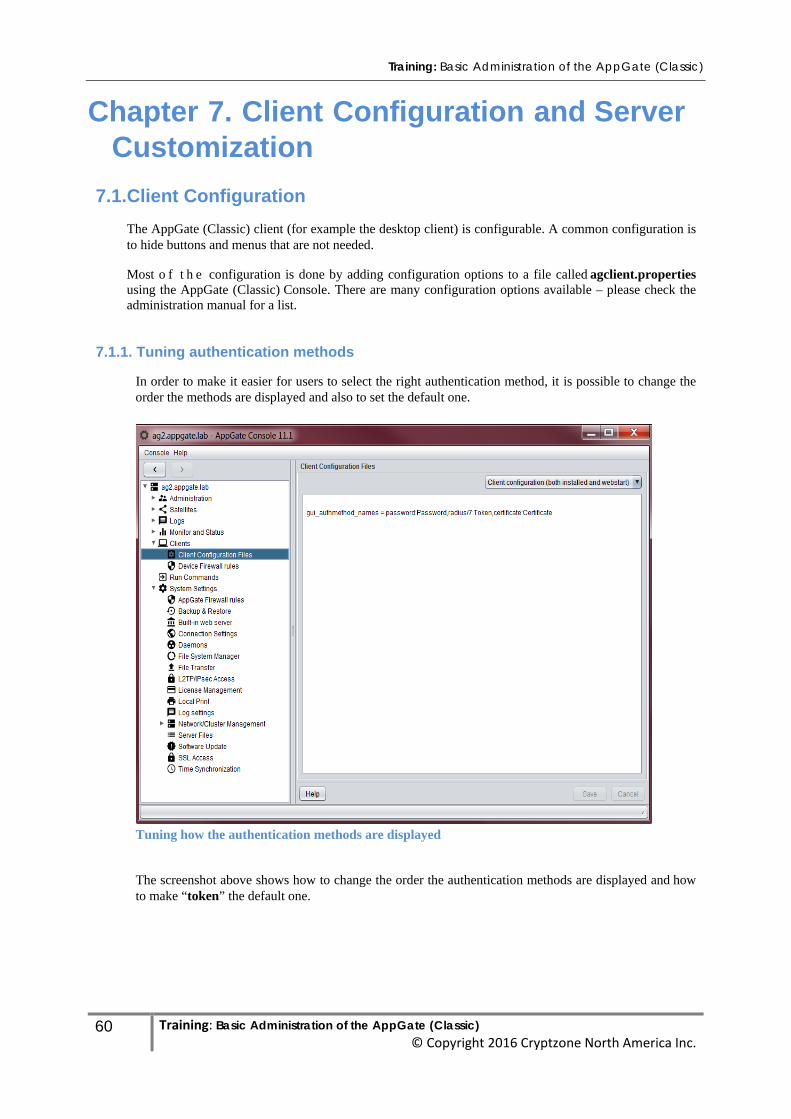
Training: Basic Administration of the AppGate (Classic)
60 Training: Basic Administration of the AppGate (Classic) © Copyright 2016 Cryptzone North America Inc.
Chapter 7. Client Configuration and Server Customization
7.1. Client Configuration
The AppGate (Classic) client (for example the desktop client) is configurable. A common configuration is to hide buttons and menus that are not needed.
Most o f t h e configuration is done by adding configuration options to a file called agclient.properties using the AppGate (Classic) Console. There are many configuration options available – please check the administration manual for a list.
7.1.1. Tuning authentication methods
In order to make it easier for users to select the right authentication method, it is possible to change the order the methods are displayed and also to set the default one.
Tuning how the authentication methods are displayed
The screenshot above shows how to change the order the authentication methods are displayed and how to make “token” the default one.
Training: Basic Administration of the AppGate (Classic)
61 Training: Basic Administration of the AppGate (Classic) © Copyright 2016 Cryptzone North America Inc.
7.2. Server Customization
There is a lot of customizations that can be done on the server side as well. A common one is to change the logotype displayed on the client download page of the server.
Procedure 7.1. Customizing the logotype of the clients download page
1. Create a PNG image called top.png with your logotype. Aim for a size of about 280x60 pixels.
2. Connect to the AppGate (Classic) using the console
3. Using the file transfer mechanism (System Settings # File Transfer), copy the image to /var/
opt/appgate/webroot.local/images.
Using a similar technique it's possible to change the look and feel of the pages or even the content. Make sure however to only make changes in webroot.local since this ensures that your customization survives upgrades.
Training: Basic Administration of the AppGate (Classic)
62 Training: Basic Administration of the AppGate (Classic) © Copyright 2016 Cryptzone North America Inc.
Chapter 8. IP Tunneling 8.1. How it works
One of the limitations of the SSH protocol is that it can only tunnel TCP. It is also limited by the fact that you can't access network ranges or ranges of ports easily. Since many protocols today use UDP or dynamic ports, a better alternative was needed. The IP Tunnel driver is this alternative.
The IP Tunnel driver adds a virtual network card to the client computer. Any traffic going in to this card is tunneled to the AppGate (Classic) and from there routed to internal servers. Just like when the system is using the Port Forwarding mode, only access granted by the Role and Services in use is allowed.
The virtual network card is handed an IP address from an IP tunnel address pool that must be configured on the AppGate (Classic) system. Usually this is an address from the internal network. As services are started on the client, static routes are added to the client routing table that sets the virtual network card IP as the gateway to reach the internal system.
8.2. How to set IP tunneling up
To make IP tunneling work, the following requisites must be met:
• Any client who wishes to use the IP tunneling mode must have the IP tunnel driver installed. This can be fetched using a web browser from the AppGate Classic.
• An IP tunnel address pool must be configured on the AppGate (Classic). This is described a bit later in
this text. 8.2.1. IP tunnel address pools
The IP tunnel address pools are network segments set aside for use by the AppGate (Classic) system. It will hand IP numbers out from these pools to clients who need them. The AppGate (Classic) system must have exclusive use for these addresses (for example there must be no internal DHCP server handing out addresses from the same range nor is it allowed for any non AppGate (Classic) client to use these addresses). An IP tunnel address pool is usually part of the internal network (it is possible to use other parts too - please consult the administration manual on how to do that).
8.2.1.1. An example of an internal network with an IP tunnel address pool
Name Network Comment Internal 192.168.0.0/24 The internal network with 254 usable IP numbers
(192.168.0.1- 192.168.0.254) IP tunnel address pool 192.168.0.240/29 The IP tunnel address pool with 6 usable IP numbers
(192.168.0.241 - 192.168.0.247)
There are three different types of pools:
Per System Pools These are pools where IP addresses are handed out at random whenever a client needs one. If you're running a cluster each cluster node must have its own pool.
Per User Pools Per User Pools are used to hand out fixed personal IP addresses. Any user who
Training: Basic Administration of the AppGate (Classic)
63 Training: Basic Administration of the AppGate (Classic) © Copyright 2016 Cryptzone North America Inc.
has a registered personal IP address will be given this IP address (which must be part of a Per User Pool) if it's free (if the user has connected more than once this may not be the case, an IP address will be picked from the Per System Pool in that case).
Satellite Pools If any AppGate (Classic) satellites are to be used with the system, they
need IP addresses for proper function.
Configuring the IP tunnel address pool is done under System Settings # Network/Cluster Management # IP Tunneling Pools. Click on Add and enter the network specification of the IP tunnel address pool.
8.3. A few words of caution
Some services change semantics when IP tunneling mode is used. This is a consequence of the AppGate (Classic) system port forwarding mode essentially being a proxy while the IP tunneling mode being a router. The problem is that under some circumstances hostnames will not be mapped to the same IP addresses.
8.3.1. An example of IP name conflict
Let's say we want to setup a Web Access component to reach an internal web service intranet.example.com (192.168.0.32). At the same time some of the IT administrators need to access the internal web server using SSH to do maintenance. Let's see how IP names and IP addresses are mapped depending on the active mode.
Mode Service IP name IP address Port Forward mode Web Access intranet.example.com 127.0.0.2
IP Access intranet.example.com 127.0.0.2 IP Tunneling mode Web Access intranet.example.com 127.0.0.2
IP Access intranet.example.com 192.168.0.32
As you can see, when running in IP tunneling mode, there's a conflict between the Web Access component and the IP Access component. This is because Web Access components always run in Port Forwarding mode while IP Access components use the IP Tunneling mode when available.
How can we deal with these conflicts?
1. Avoid mixing Web Access components and IP Access components. It may be possible to replace Web
Access components with a combination of IP Access components and Client Command components. The drawback of this however is that you lose the ability to use these services from an SSL client (for example web browsers connecting via https) and you get degraded functionality when using the IPsec clients.
2. Use different hostnames for different modes. For example, setup the Web Access using
intranet.example.com and the IP Access using intranethost.example.com.
3. Avoid IP tunneling.
Training: Basic Administration of the AppGate (Classic)
64 Training: Basic Administration of the AppGate (Classic) © Copyright 2016 Cryptzone North America Inc.
Chapter 9. Single-sign-on (SSO) There is no magic bullet for doing single-sign-on. This is because there's no standard way on how it is supposed to be done. Instead, most protocols have their own solution to the problem and in some cases many different solutions.
Since there's no unique authentication method or even a limited set of methods, no product can guarantee that it can make single sign-on work in all circumstances. AppGate (Classic) is no exception to this. The AppGate (Classic) system does however provide built in single sign-on to some protocols and variants. It also provides a framework which can be used to implement single sign-on for other services.
9.1. Single sign-on for Web based services
There are three major ways of implementing authentication for web services:
BASIC auth This is the "original" method. Typically the user gets a pop-up window asking for an account name and a password.
NTLM auth This is an improved version of the BASIC auth. From a user’s perspective, it is
indistinguishable from the latter.
Form based auth This is when the user is completing a web form with the account name, password and possibly other information.
The AppGate (Classic) system can handle single sign-on to BASIC and NTLM right out of the box. A requisite for this to work however, is that the same account name and password is used to authenticate to the AppGate (Classic) as to the internal web service. In the case of two-factor authentication it's possible to configure which password is to be used for single sign-on purposes.
For form based authentication it's possible to use the filter mechanism of the AppGate Web Access component to implement single-sign-on.
In addition to these methods, it is also possible to have the AppGate (Classic) system inject a header into the HTTP request containing the ID of the authenticated user. If the web service can be configured to verify that the request has transited via the AppGate (Classic) system and contains the header, it can be used as single-sign-on.
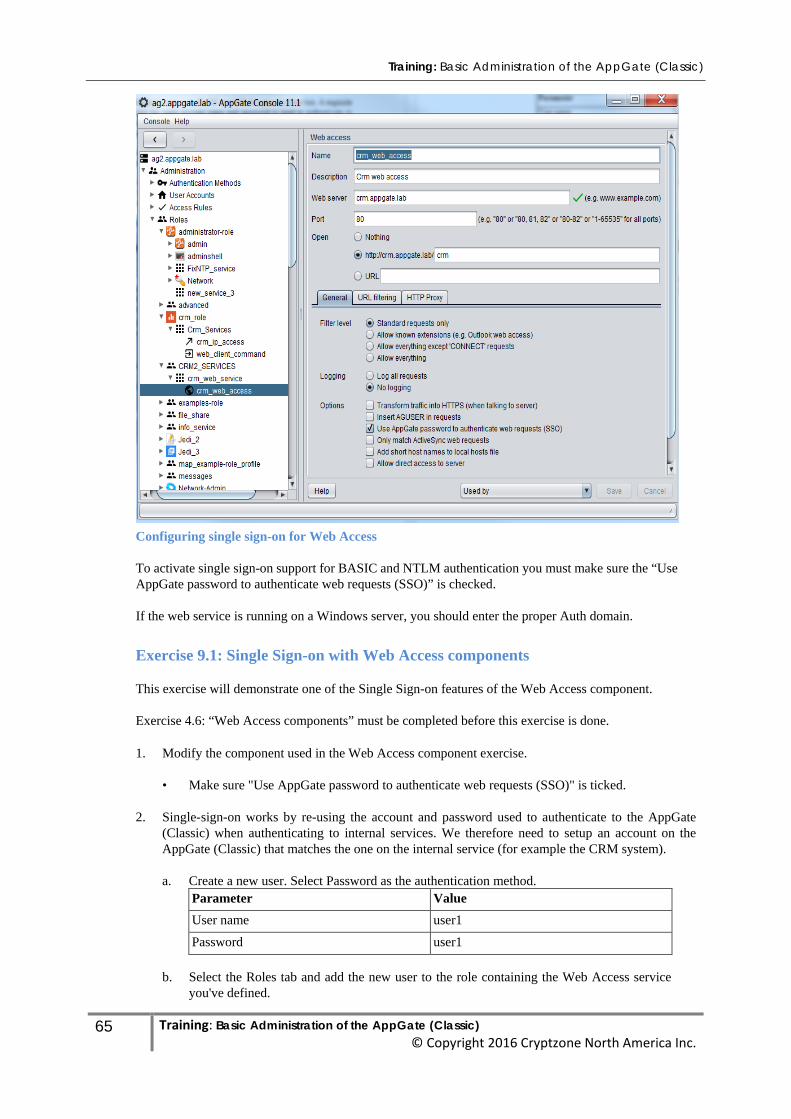
Training: Basic Administration of the AppGate (Classic)
65 Training: Basic Administration of the AppGate (Classic) © Copyright 2016 Cryptzone North America Inc.
Configuring single sign-on for Web Access
To activate single sign-on support for BASIC and NTLM authentication you must make sure the “Use AppGate password to authenticate web requests (SSO)” is checked.
If the web service is running on a Windows server, you should enter the proper Auth domain.
Exercise 9.1: Single Sign-on with Web Access components
This exercise will demonstrate one of the Single Sign-on features of the Web Access component.
Exercise 4.6: “Web Access components” must be completed before this exercise is done.
1. Modify the component used in the Web Access component exercise.
• Make sure "Use AppGate password to authenticate web requests (SSO)" is ticked.
2. Single-sign-on works by re-using the account and password used to authenticate to the AppGate (Classic) when authenticating to internal services. We therefore need to setup an account on the AppGate (Classic) that matches the one on the internal service (for example the CRM system).
a. Create a new user. Select Password as the authentication method.
Parameter Value User name user1 Password user1
b. Select the Roles tab and add the new user to the role containing the Web Access service you've defined.

Training: Basic Administration of the AppGate (Classic)
66 Training: Basic Administration of the AppGate (Classic) © Copyright 2016 Cryptzone North America Inc.
3. Close your web browser and clear cookies /cache- otherwise it will remember the credentials
that you entered in the Web Access components exercise.
4. Connect with the AppGate client and launch the service. Start your browser. The CRM page will show without prompting for authentication.
Training: Basic Administration of the AppGate (Classic)
67 Training: Basic Administration of the AppGate (Classic) © Copyright 2016 Cryptzone North America Inc.
Chapter 10. Managing Complex Environments
10.1. Combinable Roles
Most organizations have users with different roles and privileges. This gives rise to the question of how to organize different access of the users. One of the best tools to make this task manageable is the combinable roles.
The strategy Cryptzone recommends is to setup a base role containing only what everybody (or at least the vast majority) needs. Then set up roles for all other functions by making all the roles combinable there is one basic setup for every user and then more access is granted as needed.
The trick is obviously to find the groups of services that will make out a role. Ideally the following rules should be followed:
• No service should be needed in two different roles.
• All that is needed to perform a function should be contained in one role. Complete the
following exercise to get a better understanding Exercise 10.1: Combinable Roles
This exercise will show you the effects of making roles combinable or not.
1. Create a new role named jedi (description "Jedi Knight"). Make sure the Combinable check
box is not ticked.
2. Add a service to the jedi role:
a. Name should be welcome_jedi with a description "Jedi Knights".
b. Add a new component to the service:
Parameter Value Name user_msg_jedi Description Jedi Message Window title: Jedi Message Window Message: May the force be with you!
3. Add the role to the user (this time we'll try another method compared to Exercise 4.4: “Users, Roles, Services and Components”):
• Go to Administration # Roles # role_jedi
• Click on Users...
• Find the account luke in the right hand list and select it.
• Click on the blue "arrow" pointing towards the left to add the user to the list of users
authorized to use the role_jedi.
Training: Basic Administration of the AppGate (Classic)
68 Training: Basic Administration of the AppGate (Classic) © Copyright 2016 Cryptzone North America Inc.
4. Try to login a couple of times with different settings on the Combinable check box for both the jedi_knight and starship_pilot roles. What's the difference?
10.2. Dynamic services
A common situation is to have users who need to access their own desktops in the office while traveling (for example using RDP). How does one achieve this without creating individual roles for every user or giving all users access to everybody's desktop? This can be achieved through Dynamic Services.
A dynamic service that allows a user to reach his desktop but nobody else's could be implemented in the following way:
• Setup the LDAP/AD integration to import an LDAP/AD attribute that should hold the IP
hostname of the user's desktop (this assumes the desktop has a fixed IP hostname).
• Setup a server-side script to process session attributes. This script will verify if the attribute has any content. If there is content, try to reach the host. If the host is reachable, set an attribute to flag that we have a valid personal desktop and another attribute that holds the IP hostname of the desktop.
• Create a service within a role used by users who'll benefit from this. The service will only
be available if the flag attribute defined above is true. The service will provide RDP access (or some other IP access) to the desktop (using the attribute holding the IP name as hostname).
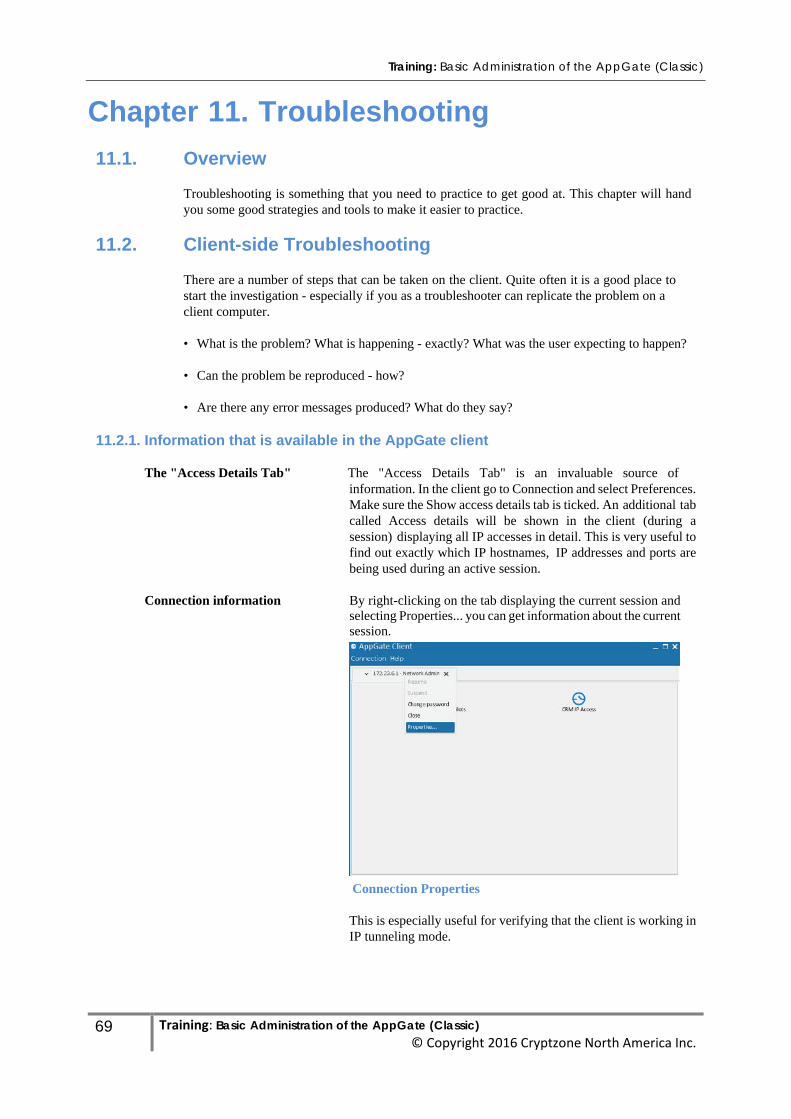
Training: Basic Administration of the AppGate (Classic)
69 Training: Basic Administration of the AppGate (Classic) © Copyright 2016 Cryptzone North America Inc.
Chapter 11. Troubleshooting 11.1. Overview
Troubleshooting is something that you need to practice to get good at. This chapter will hand you some good strategies and tools to make it easier to practice.
11.2. Client-side Troubleshooting
There are a number of steps that can be taken on the client. Quite often it is a good place to start the investigation - especially if you as a troubleshooter can replicate the problem on a client computer.
• What is the problem? What is happening - exactly? What was the user expecting to happen?
• Can the problem be reproduced - how?
• Are there any error messages produced? What do they say?
11.2.1. Information that is available in the AppGate client
The "Access Details Tab" The "Access Details Tab" is an invaluable source of
information. In the client go to Connection and select Preferences. Make sure the Show access details tab is ticked. An additional tab called Access details will be shown in the client (during a session) displaying all IP accesses in detail. This is very useful to find out exactly which IP hostnames, IP addresses and ports are being used during an active session.
Connection information By right-clicking on the tab displaying the current session and
selecting Properties... you can get information about the current session.
Connection Properties
This is especially useful for verifying that the client is working in IP tunneling mode.
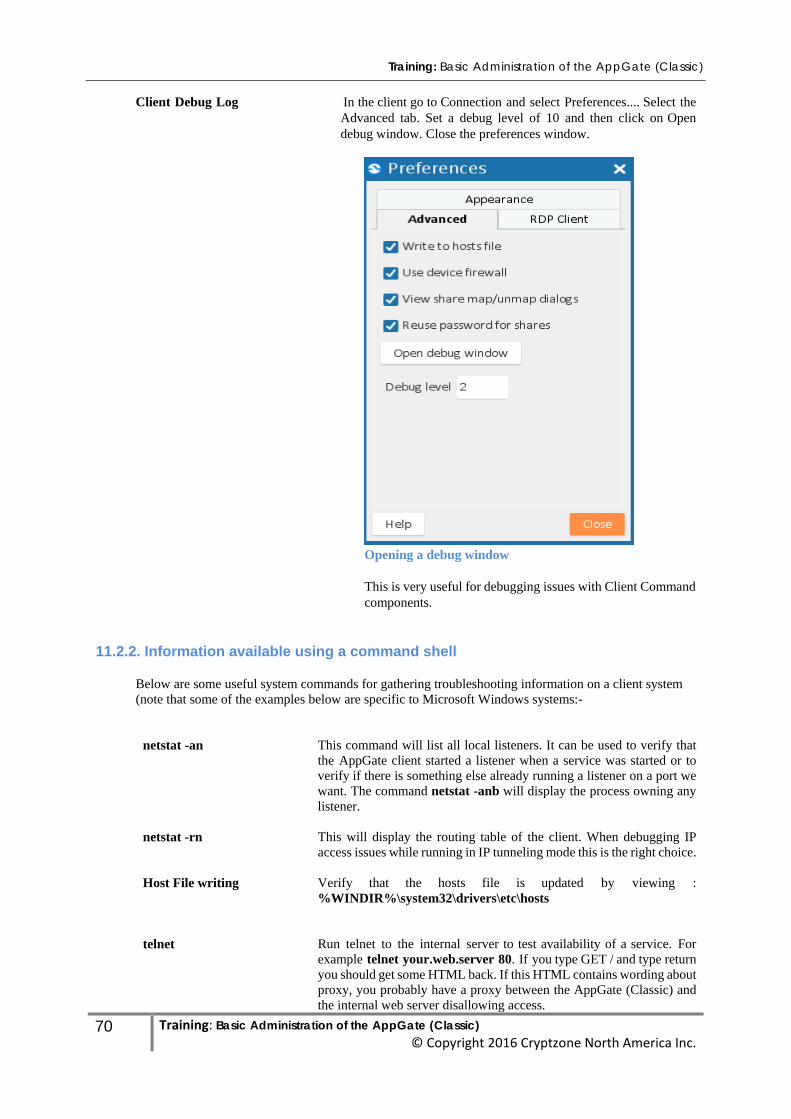
Training: Basic Administration of the AppGate (Classic)
70 Training: Basic Administration of the AppGate (Classic) © Copyright 2016 Cryptzone North America Inc.
Client Debug Log In the client go to Connection and select Preferences.... Select the Advanced tab. Set a debug level of 10 and then click on Open debug window. Close the preferences window.
Opening a debug window
This is very useful for debugging issues with Client Command components.
11.2.2. Information available using a command shell
Below are some useful system commands for gathering troubleshooting information on a client system (note that some of the examples below are specific to Microsoft Windows systems:-
netstat -an This command will list all local listeners. It can be used to verify that the AppGate client started a listener when a service was started or to verify if there is something else already running a listener on a port we want. The command netstat -anb will display the process owning any listener.
netstat -rn This will display the routing table of the client. When debugging IP access issues while running in IP tunneling mode this is the right choice.
Host File writing Verify that the hosts file is updated by viewing : %WINDIR%\system32\drivers\etc\hosts
telnet Run telnet to the internal server to test availability of a service. For example telnet your.web.server 80. If you type GET / and type return you should get some HTML back. If this HTML contains wording about proxy, you probably have a proxy between the AppGate (Classic) and the internal web server disallowing access.
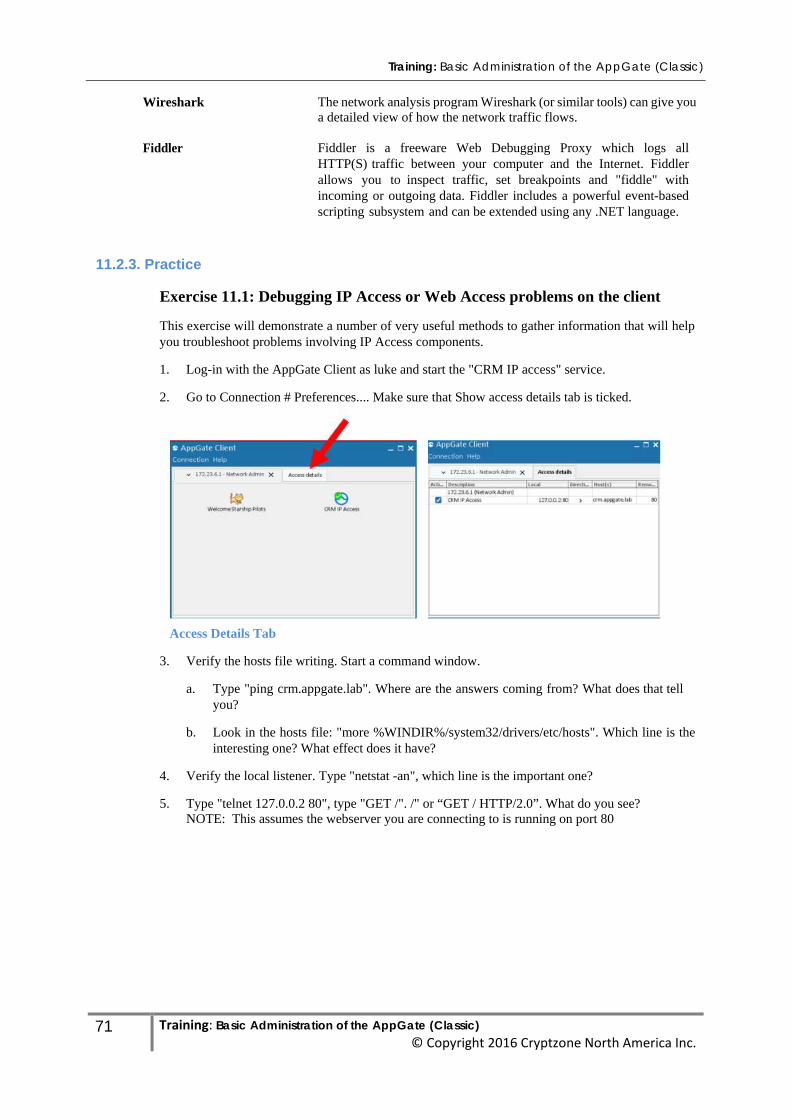
Training: Basic Administration of the AppGate (Classic)
71 Training: Basic Administration of the AppGate (Classic) © Copyright 2016 Cryptzone North America Inc.
Wireshark The network analysis program Wireshark (or similar tools) can give you a detailed view of how the network traffic flows.
Fiddler Fiddler is a freeware Web Debugging Proxy which logs all HTTP(S) traffic between your computer and the Internet. Fiddler allows you to inspect traffic, set breakpoints and "fiddle" with incoming or outgoing data. Fiddler includes a powerful event-based scripting subsystem and can be extended using any .NET language.
11.2.3. Practice
Exercise 11.1: Debugging IP Access or Web Access problems on the client
This exercise will demonstrate a number of very useful methods to gather information that will help you troubleshoot problems involving IP Access components.
1. Log-in with the AppGate Client as luke and start the "CRM IP access" service.
2. Go to Connection # Preferences.... Make sure that Show access details tab is ticked.
Access Details Tab
3. Verify the hosts file writing. Start a command window.
a. Type "ping crm.appgate.lab". Where are the answers coming from? What does that tell
you?
b. Look in the hosts file: "more %WINDIR%/system32/drivers/etc/hosts". Which line is the interesting one? What effect does it have?
4. Verify the local listener. Type "netstat -an", which line is the important one?
5. Type "telnet 127.0.0.2 80", type "GET /". /" or “GET / HTTP/2.0”. What do you see? NOTE: This assumes the webserver you are connecting to is running on port 80
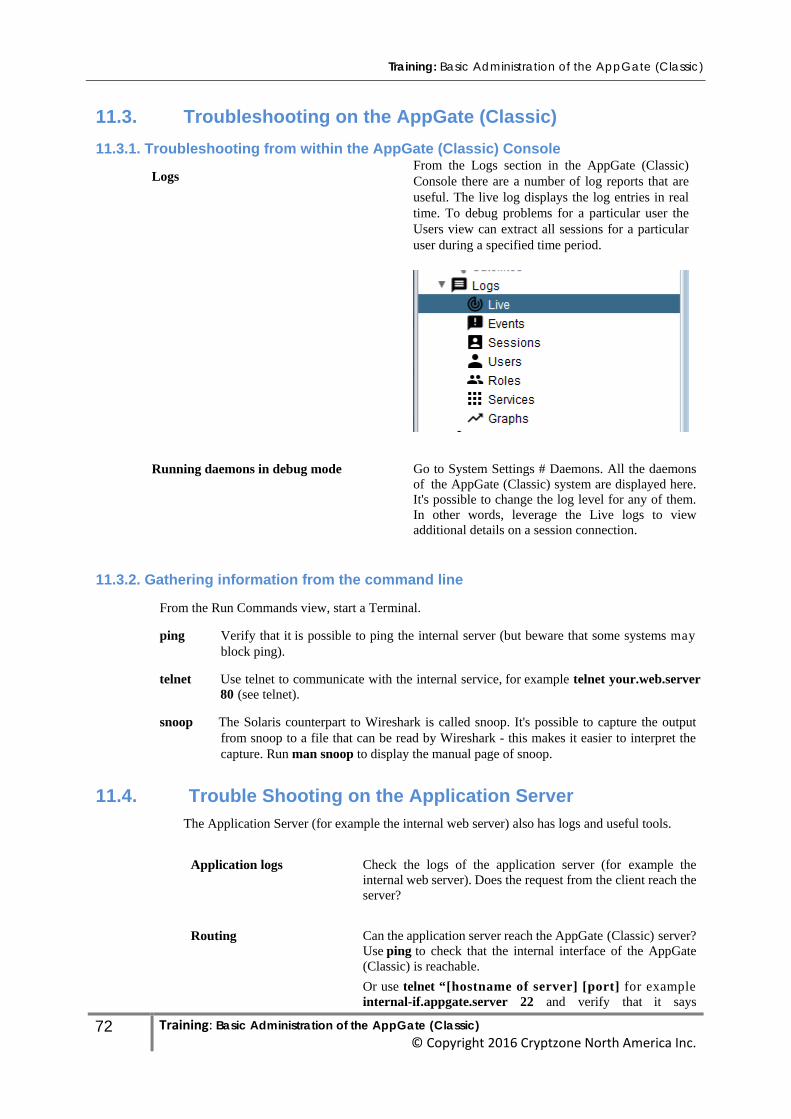
Training: Basic Administration of the AppGate (Classic)
72 Training: Basic Administration of the AppGate (Classic) © Copyright 2016 Cryptzone North America Inc.
11.3. Troubleshooting on the AppGate (Classic)
11.3.1. Troubleshooting from within the AppGate (Classic) Console
Logs From the Logs section in the AppGate (Classic) Console there are a number of log reports that are useful. The live log displays the log entries in real time. To debug problems for a particular user the Users view can extract all sessions for a particular user during a specified time period.
Running daemons in debug mode Go to System Settings # Daemons. All the daemons of the AppGate (Classic) system are displayed here. It's possible to change the log level for any of them. In other words, leverage the Live logs to view additional details on a session connection.
11.3.2. Gathering information from the command line
From the Run Commands view, start a Terminal.
ping Verify that it is possible to ping the internal server (but beware that some systems may block ping).
telnet Use telnet to communicate with the internal service, for example telnet your.web.server 80 (see telnet).
snoop The Solaris counterpart to Wireshark is called snoop. It's possible to capture the output
from snoop to a file that can be read by Wireshark - this makes it easier to interpret the capture. Run man snoop to display the manual page of snoop.
11.4. Trouble Shooting on the Application Server
The Application Server (for example the internal web server) also has logs and useful tools.
Application logs Check the logs of the application server (for example the internal web server). Does the request from the client reach the server?
Routing Can the application server reach the AppGate (Classic) server? Use ping to check that the internal interface of the AppGate (Classic) is reachable. Or use telnet “[hostname of server] [port] for example internal-if.appgate.server 22 and verify that it says
Training: Basic Administration of the AppGate (Classic)
73 Training: Basic Administration of the AppGate (Classic) © Copyright 2016 Cryptzone North America Inc.
something with AppGate (Classic) in the answer. If the client is using IP tunneling mode, ping the clients IP tunneling IP address.
tracert/traceroute It's also possible to check routing, etc. with tracert (windows) or traceroute on most (most *nix distributions).
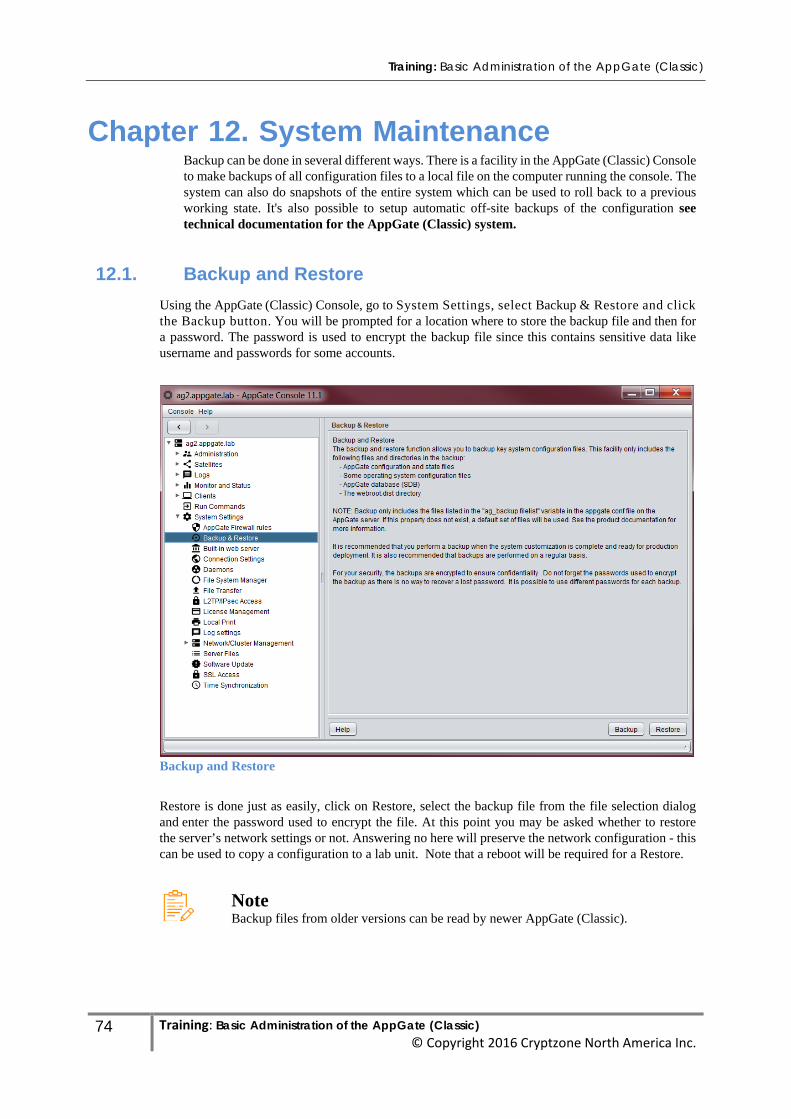
Training: Basic Administration of the AppGate (Classic)
74 Training: Basic Administration of the AppGate (Classic) © Copyright 2016 Cryptzone North America Inc.
Chapter 12. System Maintenance Backup can be done in several different ways. There is a facility in the AppGate (Classic) Console to make backups of all configuration files to a local file on the computer running the console. The system can also do snapshots of the entire system which can be used to roll back to a previous working state. It's also possible to setup automatic off-site backups of the configuration see technical documentation for the AppGate (Classic) system.
12.1. Backup and Restore
Using the AppGate (Classic) Console, go to System Settings, select Backup & Restore and click the Backup button. You will be prompted for a location where to store the backup file and then for a password. The password is used to encrypt the backup file since this contains sensitive data like username and passwords for some accounts.
Backup and Restore
Restore is done just as easily, click on Restore, select the backup file from the file selection dialog and enter the password used to encrypt the file. At this point you may be asked whether to restore the server’s network settings or not. Answering no here will preserve the network configuration - this can be used to copy a configuration to a lab unit. Note that a reboot will be required for a Restore.
Note Backup files from older versions can be read by newer AppGate (Classic).
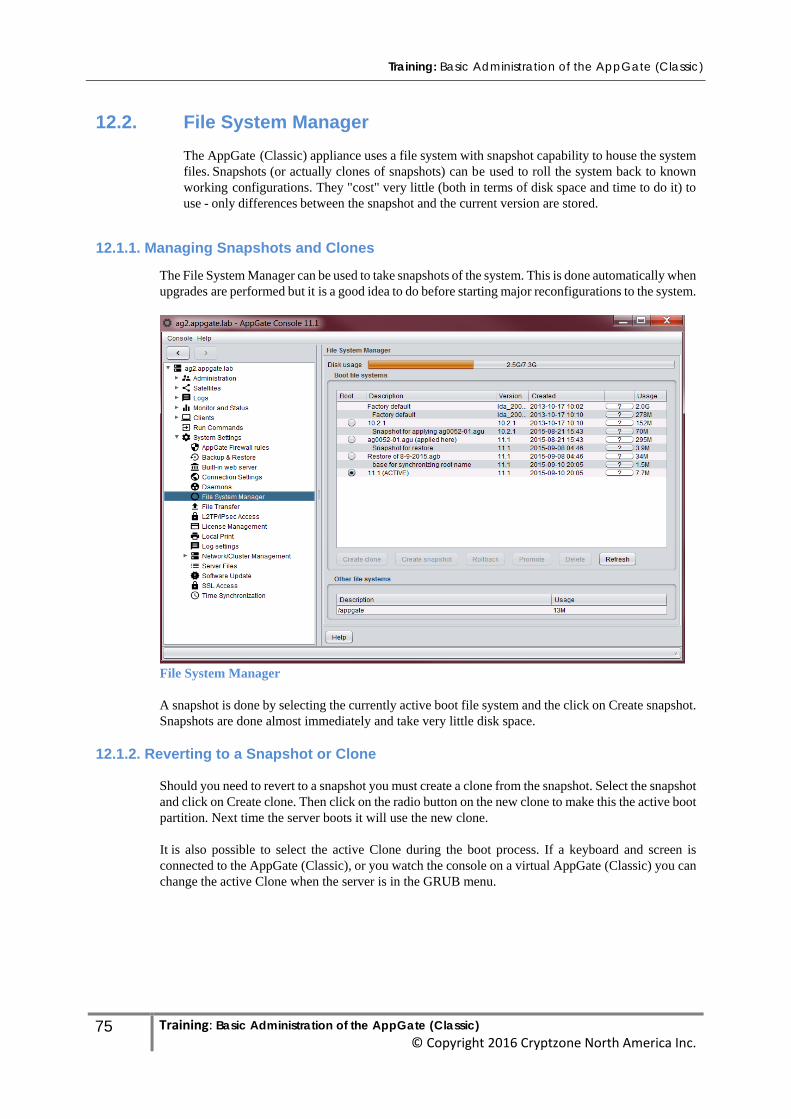
Training: Basic Administration of the AppGate (Classic)
75 Training: Basic Administration of the AppGate (Classic) © Copyright 2016 Cryptzone North America Inc.
12.2. File System Manager
The AppGate (Classic) appliance uses a file system with snapshot capability to house the system files. Snapshots (or actually clones of snapshots) can be used to roll the system back to known working configurations. They "cost" very little (both in terms of disk space and time to do it) to use - only differences between the snapshot and the current version are stored.
12.1.1. Managing Snapshots and Clones
The File System Manager can be used to take snapshots of the system. This is done automatically when upgrades are performed but it is a good idea to do before starting major reconfigurations to the system.
File System Manager
A snapshot is done by selecting the currently active boot file system and the click on Create snapshot. Snapshots are done almost immediately and take very little disk space.
12.1.2. Reverting to a Snapshot or Clone
Should you need to revert to a snapshot you must create a clone from the snapshot. Select the snapshot and click on Create clone. Then click on the radio button on the new clone to make this the active boot partition. Next time the server boots it will use the new clone.
It is also possible to select the active Clone during the boot process. If a keyboard and screen is connected to the AppGate (Classic), or you watch the console on a virtual AppGate (Classic) you can change the active Clone when the server is in the GRUB menu.
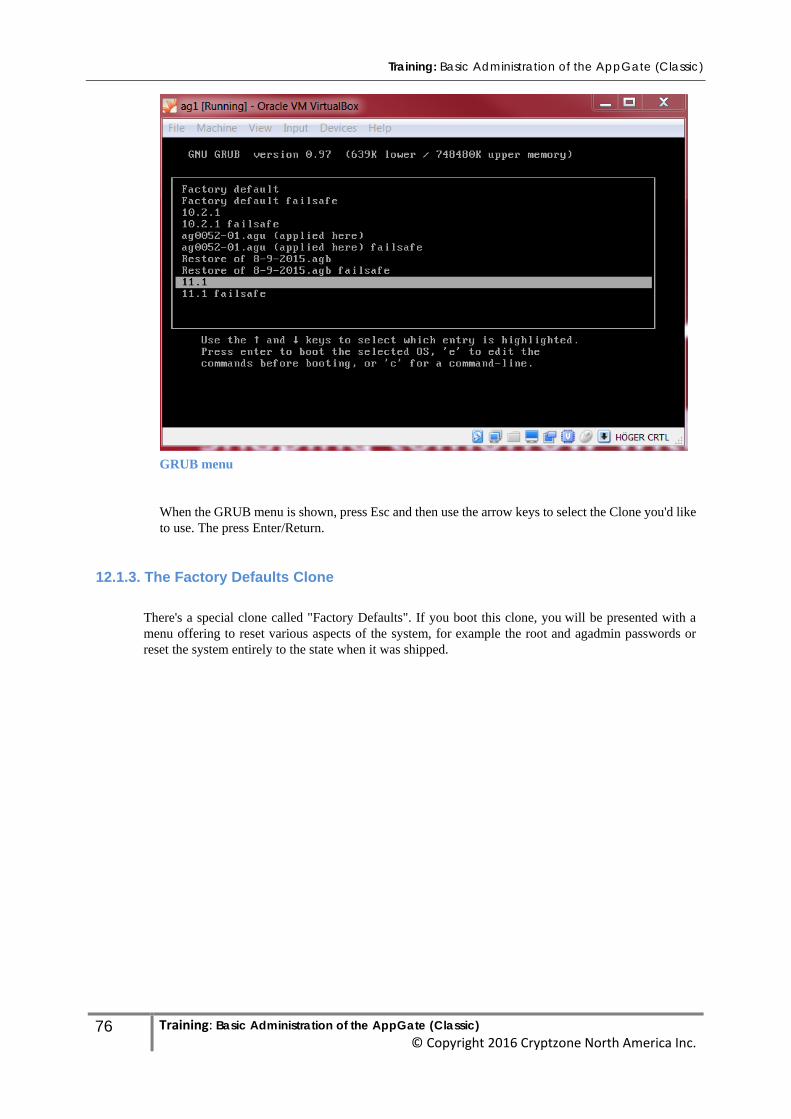
Training: Basic Administration of the AppGate (Classic)
76 Training: Basic Administration of the AppGate (Classic) © Copyright 2016 Cryptzone North America Inc.
GRUB menu
When the GRUB menu is shown, press Esc and then use the arrow keys to select the Clone you'd like to use. The press Enter/Return.
12.1.3. The Factory Defaults Clone
There's a special clone called "Factory Defaults". If you boot this clone, you will be presented with a menu offering to reset various aspects of the system, for example the root and agadmin passwords or reset the system entirely to the state when it was shipped.
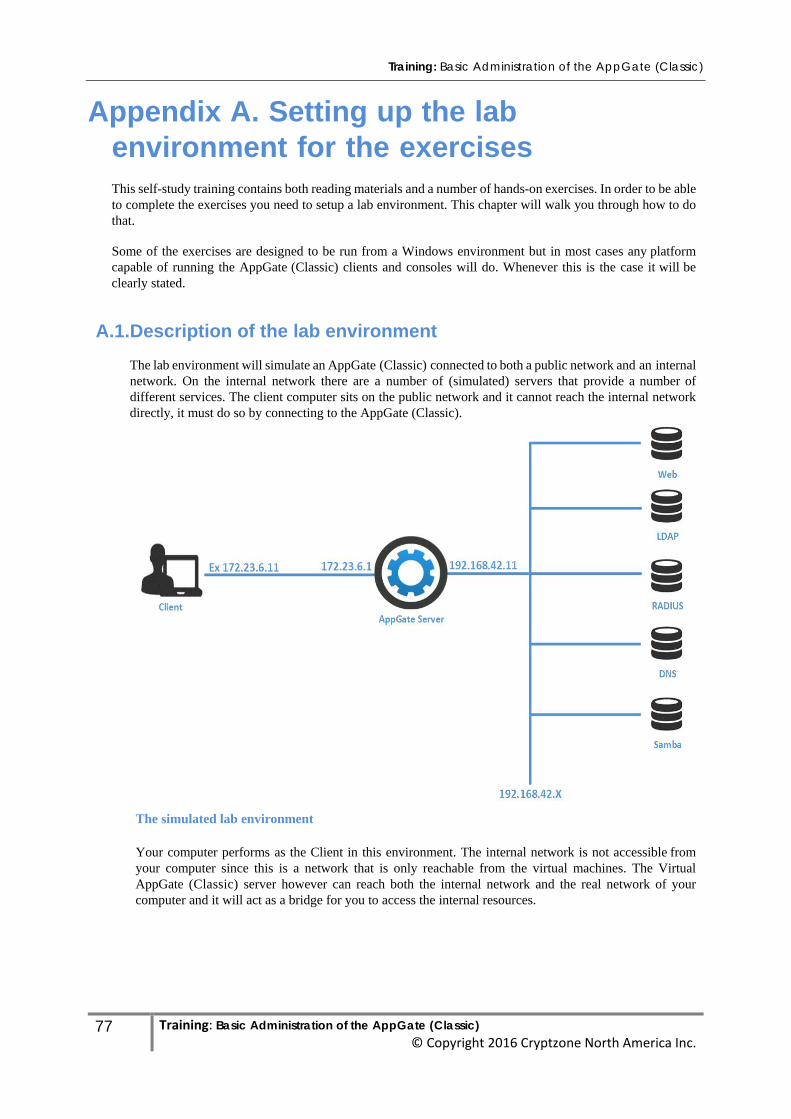
Training: Basic Administration of the AppGate (Classic)
77 Training: Basic Administration of the AppGate (Classic) © Copyright 2016 Cryptzone North America Inc.
Appendix A. Setting up the lab environment for the exercises This self-study training contains both reading materials and a number of hands-on exercises. In order to be able to complete the exercises you need to setup a lab environment. This chapter will walk you through how to do that.
Some of the exercises are designed to be run from a Windows environment but in most cases any platform capable of running the AppGate (Classic) clients and consoles will do. Whenever this is the case it will be clearly stated.
A.1.Description of the lab environment
The lab environment will simulate an AppGate (Classic) connected to both a public network and an internal network. On the internal network there are a number of (simulated) servers that provide a number of different services. The client computer sits on the public network and it cannot reach the internal network directly, it must do so by connecting to the AppGate (Classic).
The simulated lab environment
Your computer performs as the Client in this environment. The internal network is not accessible from your computer since this is a network that is only reachable from the virtual machines. The Virtual AppGate (Classic) server however can reach both the internal network and the real network of your computer and it will act as a bridge for you to access the internal resources.
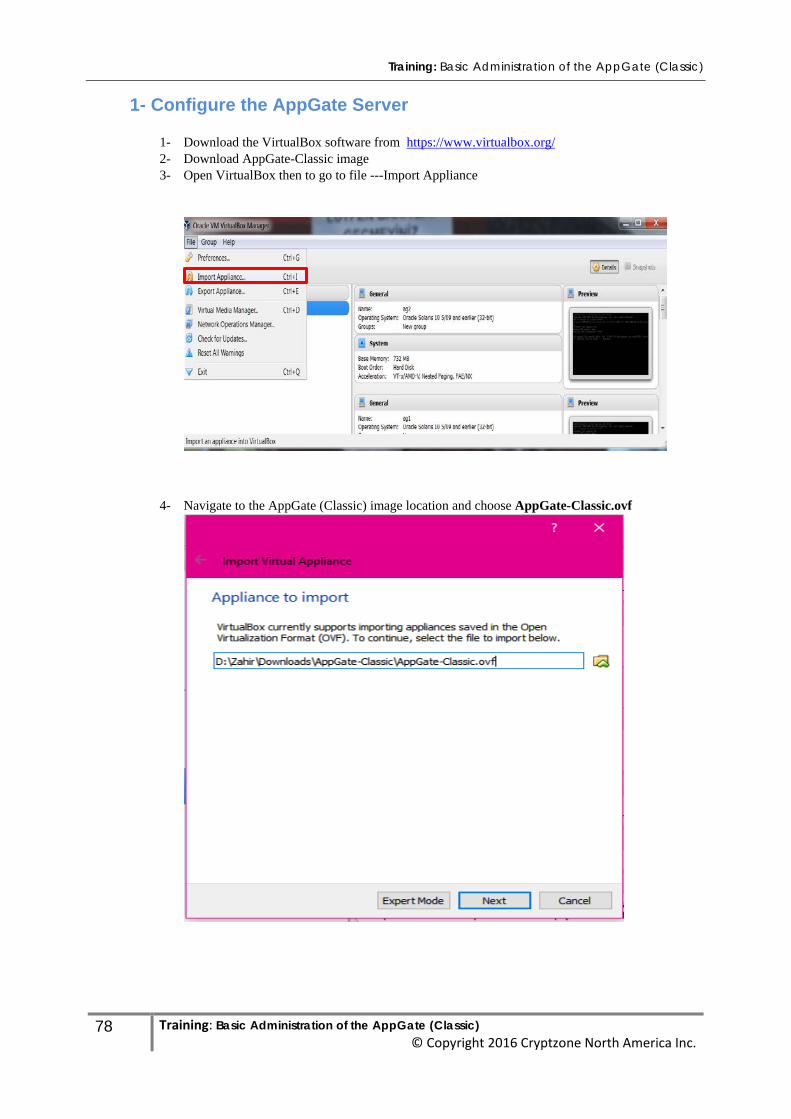
Training: Basic Administration of the AppGate (Classic)
78 Training: Basic Administration of the AppGate (Classic) © Copyright 2016 Cryptzone North America Inc.
1- Configure the AppGate Server
1- Download the VirtualBox software from https://www.virtualbox.org/ 2- Download AppGate-Classic image 3- Open VirtualBox then to go to file ---Import Appliance
4- Navigate to the AppGate (Classic) image location and choose AppGate-Classic.ovf
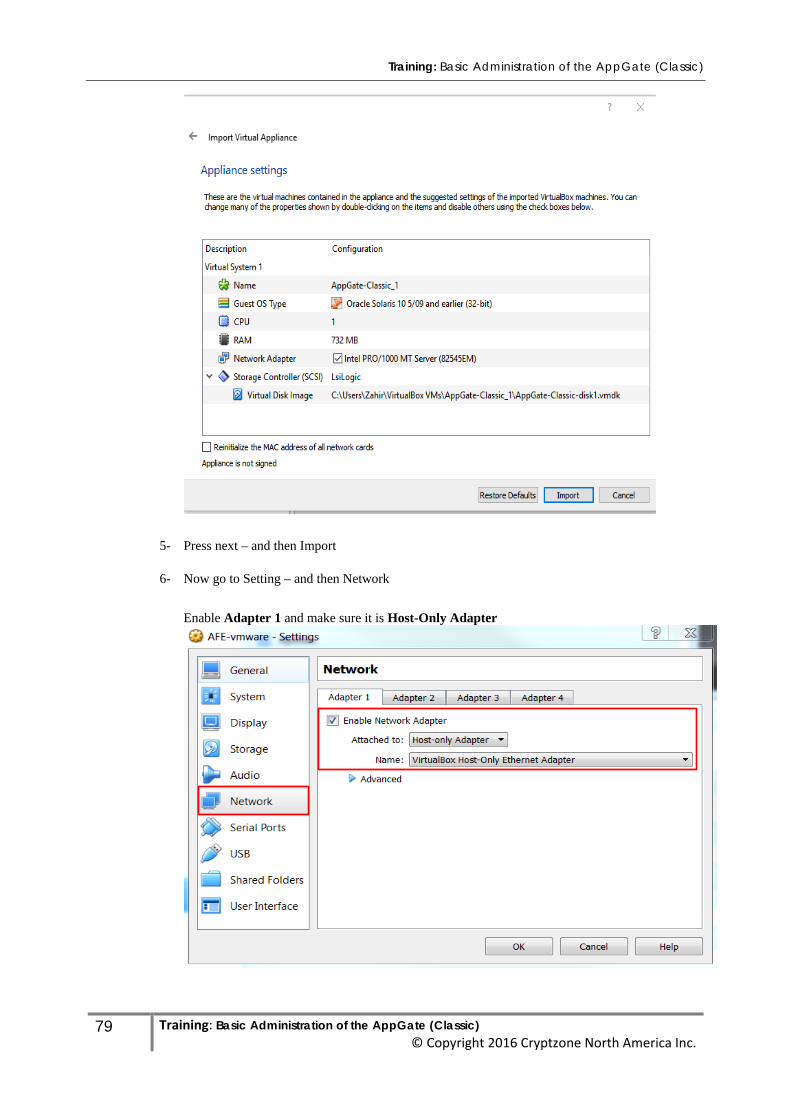
Training: Basic Administration of the AppGate (Classic)
79 Training: Basic Administration of the AppGate (Classic) © Copyright 2016 Cryptzone North America Inc.
5- Press next – and then Import
6- Now go to Setting – and then Network
Enable Adapter 1 and make sure it is Host-Only Adapter
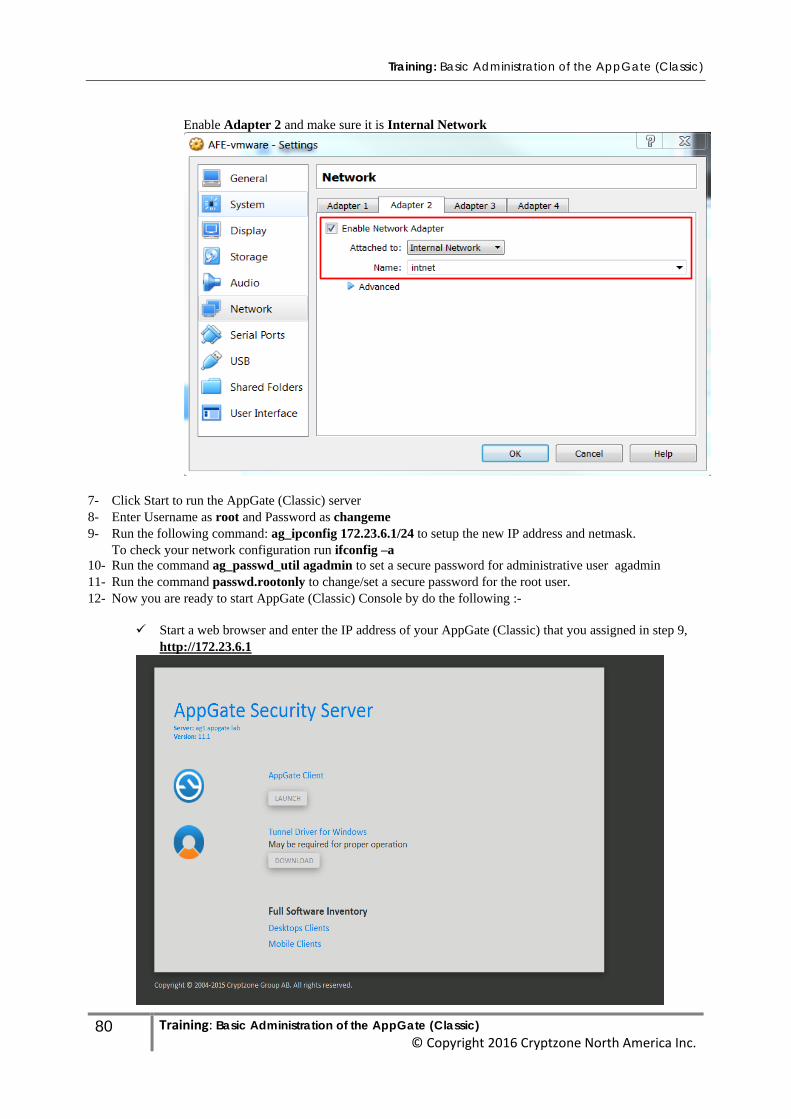
Training: Basic Administration of the AppGate (Classic)
80 Training: Basic Administration of the AppGate (Classic) © Copyright 2016 Cryptzone North America Inc.
Enable Adapter 2 and make sure it is Internal Network
7- Click Start to run the AppGate (Classic) server 8- Enter Username as root and Password as changeme 9- Run the following command: ag_ipconfig 172.23.6.1/24 to setup the new IP address and netmask.
To check your network configuration run ifconfig –a 10- Run the command ag_passwd_util agadmin to set a secure password for administrative user agadmin 11- Run the command passwd.rootonly to change/set a secure password for the root user. 12- Now you are ready to start AppGate (Classic) Console by do the following :-
Start a web browser and enter the IP address of your AppGate (Classic) that you assigned in step 9,
http://172.23.6.1
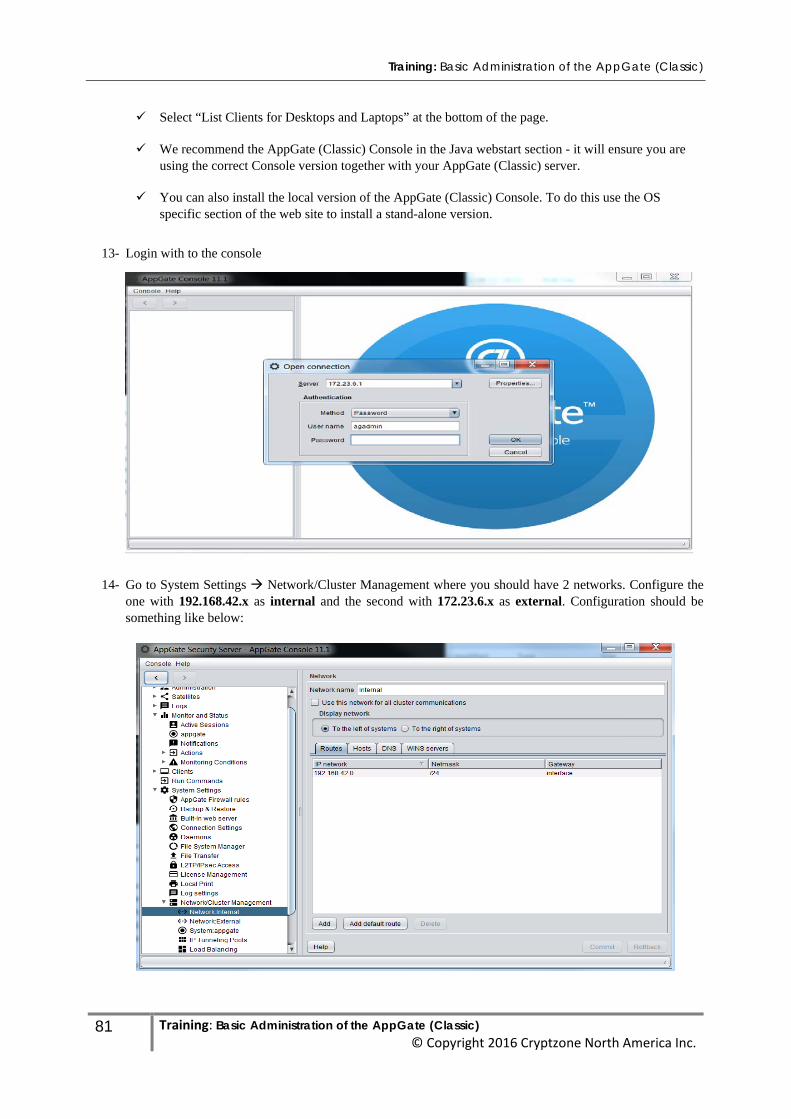
Training: Basic Administration of the AppGate (Classic)
81 Training: Basic Administration of the AppGate (Classic) © Copyright 2016 Cryptzone North America Inc.
Select “List Clients for Desktops and Laptops” at the bottom of the page.
We recommend the AppGate (Classic) Console in the Java webstart section - it will ensure you are
using the correct Console version together with your AppGate (Classic) server.
You can also install the local version of the AppGate (Classic) Console. To do this use the OS specific section of the web site to install a stand-alone version.
13- Login with to the console
14- Go to System Settings Network/Cluster Management where you should have 2 networks. Configure the one with 192.168.42.x as internal and the second with 172.23.6.x as external. Configuration should be something like below:
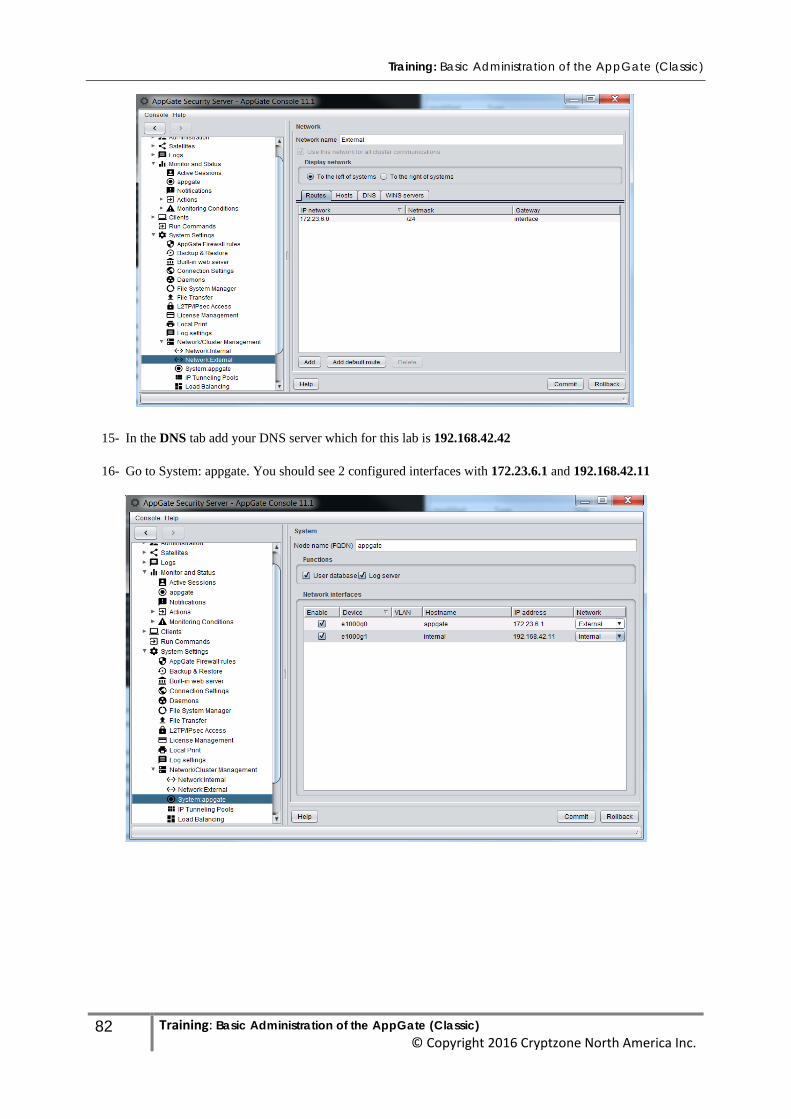
Training: Basic Administration of the AppGate (Classic)
82 Training: Basic Administration of the AppGate (Classic) © Copyright 2016 Cryptzone North America Inc.
15- In the DNS tab add your DNS server which for this lab is 192.168.42.42
16- Go to System: appgate. You should see 2 configured interfaces with 172.23.6.1 and 192.168.42.11
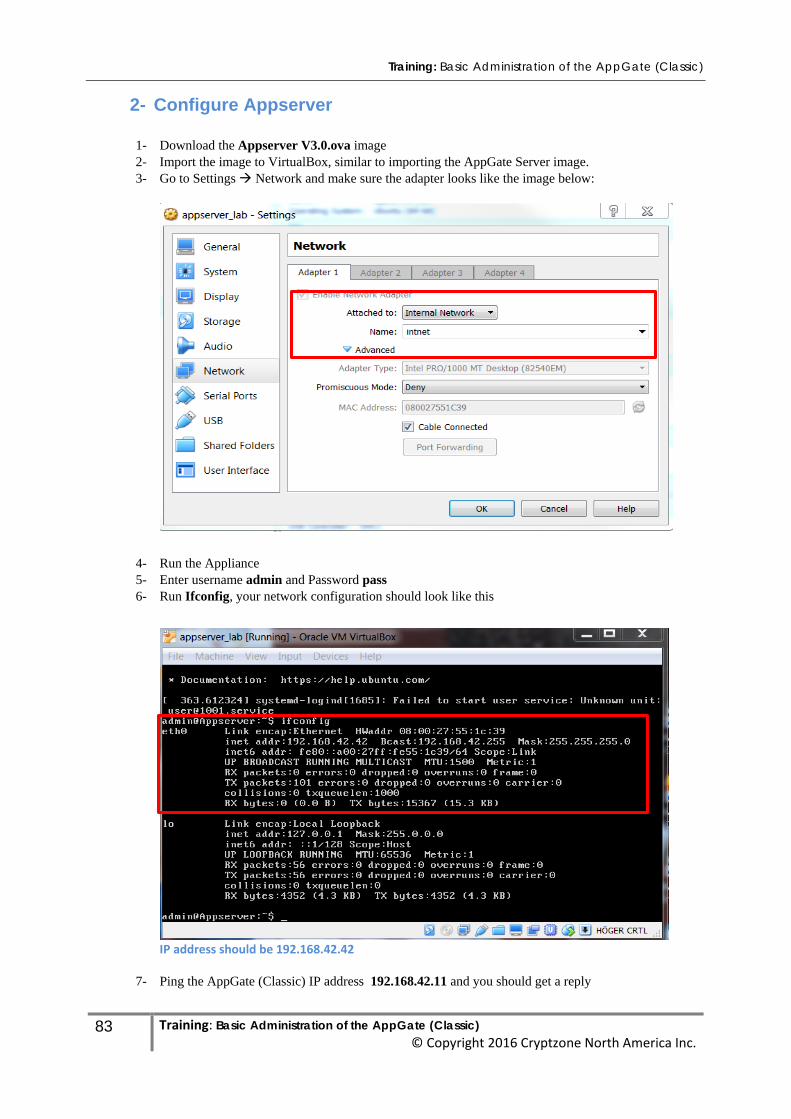
Training: Basic Administration of the AppGate (Classic)
83 Training: Basic Administration of the AppGate (Classic) © Copyright 2016 Cryptzone North America Inc.
2- Configure Appserver
1- Download the Appserver V3.0.ova image 2- Import the image to VirtualBox, similar to importing the AppGate Server image. 3- Go to Settings Network and make sure the adapter looks like the image below:
4- Run the Appliance 5- Enter username admin and Password pass 6- Run Ifconfig, your network configuration should look like this
IP address should be 192.168.42.42
7- Ping the AppGate (Classic) IP address 192.168.42.11 and you should get a reply
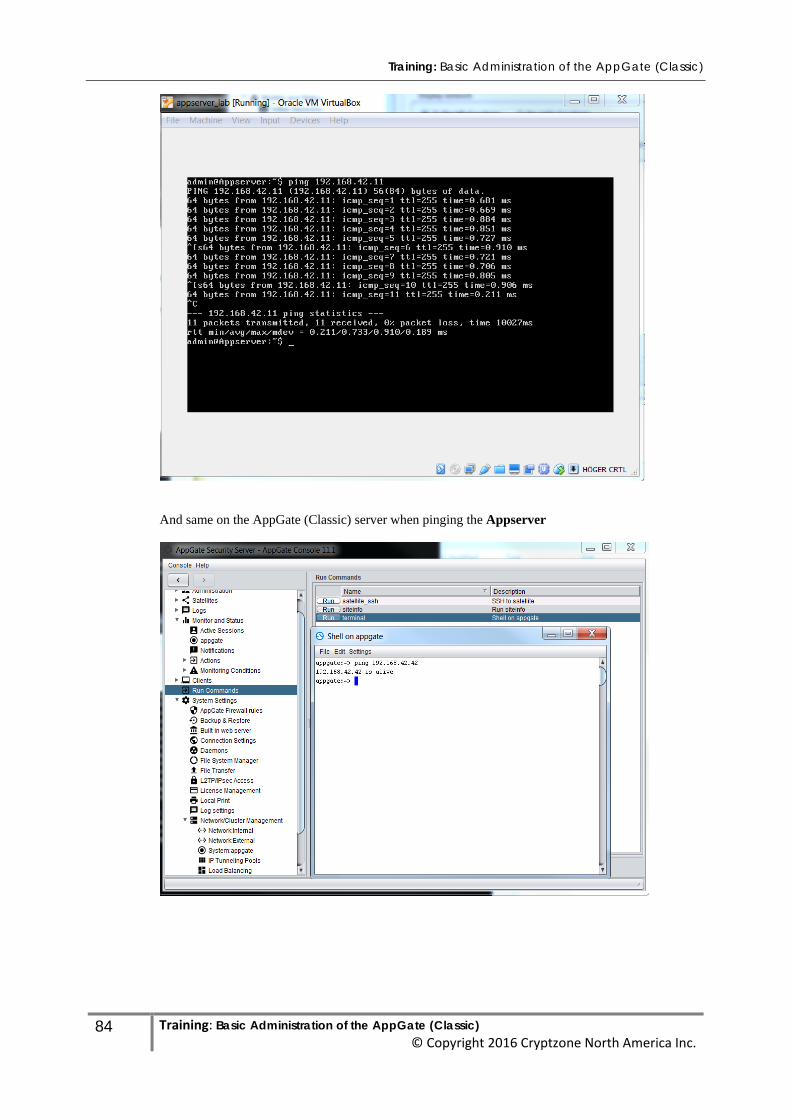
Training: Basic Administration of the AppGate (Classic)
84 Training: Basic Administration of the AppGate (Classic) © Copyright 2016 Cryptzone North America Inc.
And same on the AppGate (Classic) server when pinging the Appserver