Embed Size (px)
Citation preview
R&S®SMW200ACreating Tutorials and InteractiveExamplesApplication Sheet
Appli
catio
n She
et
1178.3611.02 ─ 04(;ÜT;2)
Test
& Me
asur
emen
t
This manual describes firmware version FW 3.20.459.xx and later of the R&S®SMW200A.
© 2016 Rohde & Schwarz GmbH & Co. KGMühldorfstr. 15, 81671 München, GermanyPhone: +49 89 41 29 - 0Fax: +49 89 41 29 12 164Email: [email protected]: www.rohde-schwarz.comSubject to change – Data without tolerance limits is not binding.R&S® is a registered trademark of Rohde & Schwarz GmbH & Co. KG.Trade names are trademarks of the owners.
The following abbreviations are used throughout this manual: R&S®SMW200A is abbreviated as R&S SMW.
ContentsR&S®SMW200A
3Application Sheet 1178.3611.02 ─ 04
Contents1 What Are Tutorials?...............................................................................3
2 How to Start a Tutorial...........................................................................3
3 Creating Custom Interactive Examples............................................... 6
4 Related Remote Control Commands..................................................11
5 Learn More About the R&S SMW........................................................13
6 Annex.................................................................................................... 13
1 What Are Tutorials?Tutorials are text files with small file size and a mandatory file extension (*.tut). Atutorial file contains the mandatory string #!scpi followed by a sequence of SCPIcommands. A set of tutorials is embedded in the software. The R&S SMW searches forcustom tutorial files in the var/user directory or on a connected USB memory stick.
When a tutorial file is started, the R&S SMW performs the configurations step-by-step.Dialogs are opened and closed automatically; changed parameters are highlighted inorange. Additional background information or explanation on the performed actions arealso displayed.
You can use the tutorials functionality to create interactive examples and demonstra-tions, if for instance:● The R&S SMW provides a new functionality that needs to be explained to different
users, like for example colleagues or customers● There is a particular configuration or a comprehensive feature that needs a demon-
stration● Your goal is to impart knowledge and skills, e.g. that the users are able to imitate
the required steps and understand the process.
2 How to Start a TutorialA set of tutorials is embedded in the software.
To start a tutorial in an interactive step-by-step mode
1. Press the SETUP key on the front panel.
How to Start a TutorialR&S®SMW200A
4Application Sheet 1178.3611.02 ─ 04
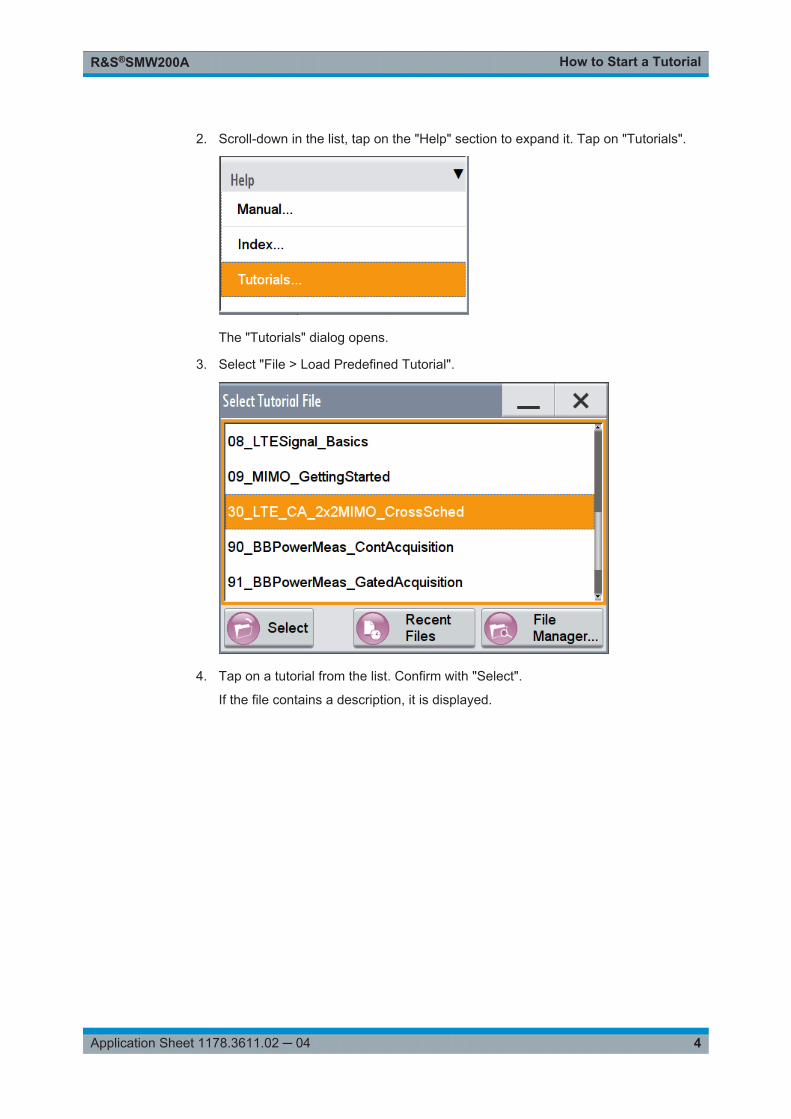
2. Scroll-down in the list, tap on the "Help" section to expand it. Tap on "Tutorials".
The "Tutorials" dialog opens.
3. Select "File > Load Predefined Tutorial".
4. Tap on a tutorial from the list. Confirm with "Select".
If the file contains a description, it is displayed.
How to Start a TutorialR&S®SMW200A
5Application Sheet 1178.3611.02 ─ 04
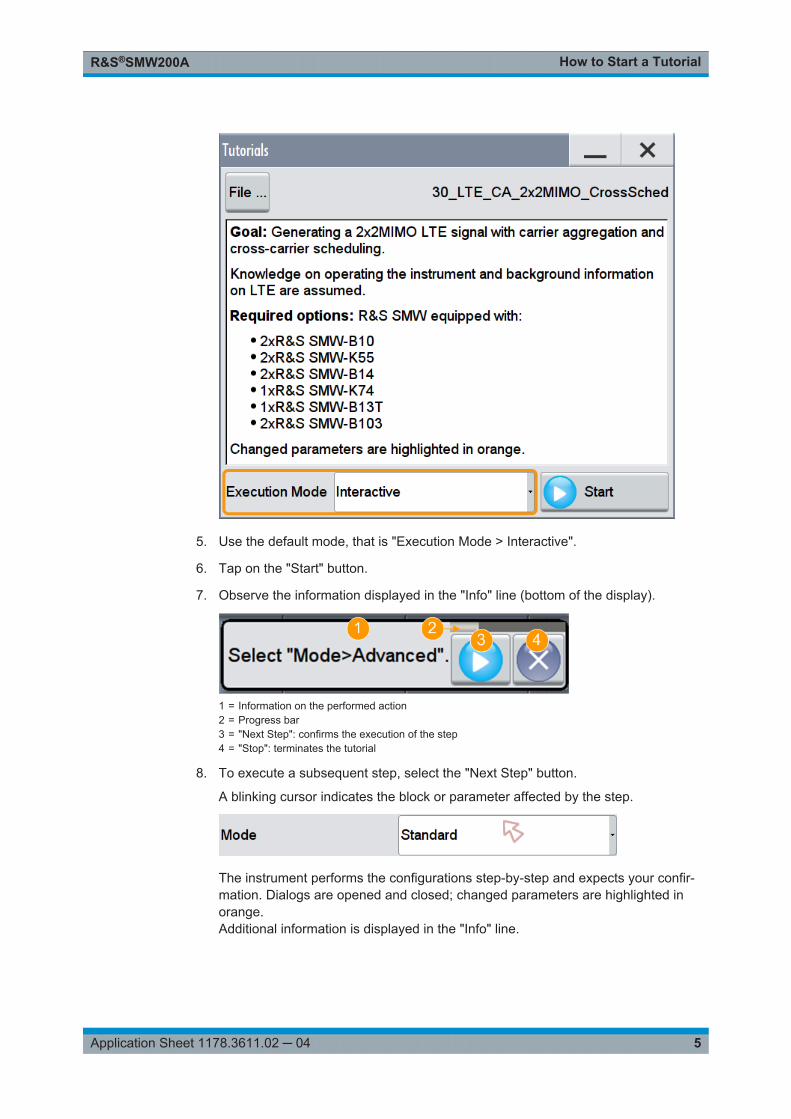
5. Use the default mode, that is "Execution Mode > Interactive".
6. Tap on the "Start" button.
7. Observe the information displayed in the "Info" line (bottom of the display).
1 = Information on the performed action2 = Progress bar3 = "Next Step": confirms the execution of the step4 = "Stop": terminates the tutorial
8. To execute a subsequent step, select the "Next Step" button.
A blinking cursor indicates the block or parameter affected by the step.
The instrument performs the configurations step-by-step and expects your confir-mation. Dialogs are opened and closed; changed parameters are highlighted inorange.Additional information is displayed in the "Info" line.
Creating Custom Interactive ExamplesR&S®SMW200A
6Application Sheet 1178.3611.02 ─ 04
To stop the tutorial
The demonstration can be terminated at any time.
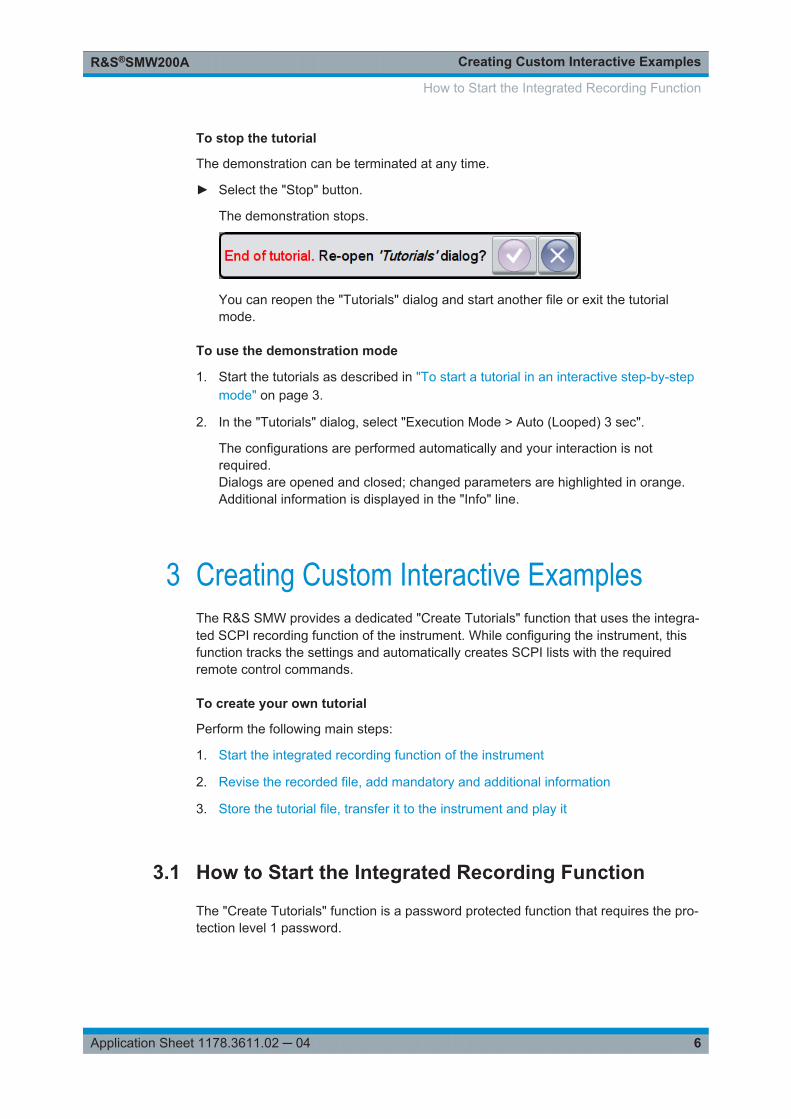
► Select the "Stop" button.
The demonstration stops.
You can reopen the "Tutorials" dialog and start another file or exit the tutorialmode.
To use the demonstration mode
1. Start the tutorials as described in "To start a tutorial in an interactive step-by-stepmode" on page 3.
2. In the "Tutorials" dialog, select "Execution Mode > Auto (Looped) 3 sec".
The configurations are performed automatically and your interaction is notrequired.Dialogs are opened and closed; changed parameters are highlighted in orange.Additional information is displayed in the "Info" line.
3 Creating Custom Interactive ExamplesThe R&S SMW provides a dedicated "Create Tutorials" function that uses the integra-ted SCPI recording function of the instrument. While configuring the instrument, thisfunction tracks the settings and automatically creates SCPI lists with the requiredremote control commands.
To create your own tutorial
Perform the following main steps:
1. Start the integrated recording function of the instrument
2. Revise the recorded file, add mandatory and additional information
3. Store the tutorial file, transfer it to the instrument and play it
3.1 How to Start the Integrated Recording Function
The "Create Tutorials" function is a password protected function that requires the pro-tection level 1 password.
How to Start the Integrated Recording Function
Creating Custom Interactive ExamplesR&S®SMW200A
7Application Sheet 1178.3611.02 ─ 04
To unlock the protection level 1
1. On the instrument's front panel, press the SETUP key.
2. Select "Security > Protection > Protection Level 1 > Password"
3. Enter the protection level 1 password.The default password is 123456.
To start the integrated recording function of the instrument
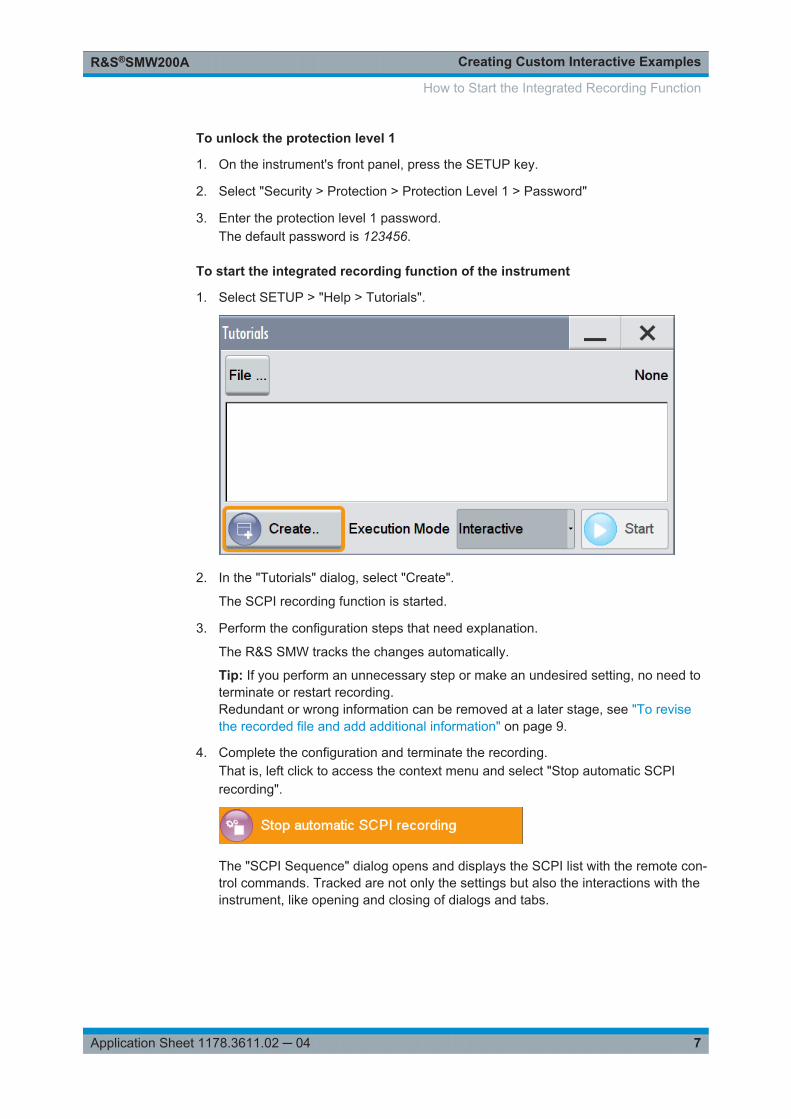
1. Select SETUP > "Help > Tutorials".
2. In the "Tutorials" dialog, select "Create".
The SCPI recording function is started.
3. Perform the configuration steps that need explanation.
The R&S SMW tracks the changes automatically.
Tip: If you perform an unnecessary step or make an undesired setting, no need toterminate or restart recording.Redundant or wrong information can be removed at a later stage, see "To revisethe recorded file and add additional information" on page 9.
4. Complete the configuration and terminate the recording.That is, left click to access the context menu and select "Stop automatic SCPIrecording".
The "SCPI Sequence" dialog opens and displays the SCPI list with the remote con-trol commands. Tracked are not only the settings but also the interactions with theinstrument, like opening and closing of dialogs and tabs.
How to Start the Integrated Recording Function
Creating Custom Interactive ExamplesR&S®SMW200A
8Application Sheet 1178.3611.02 ─ 04
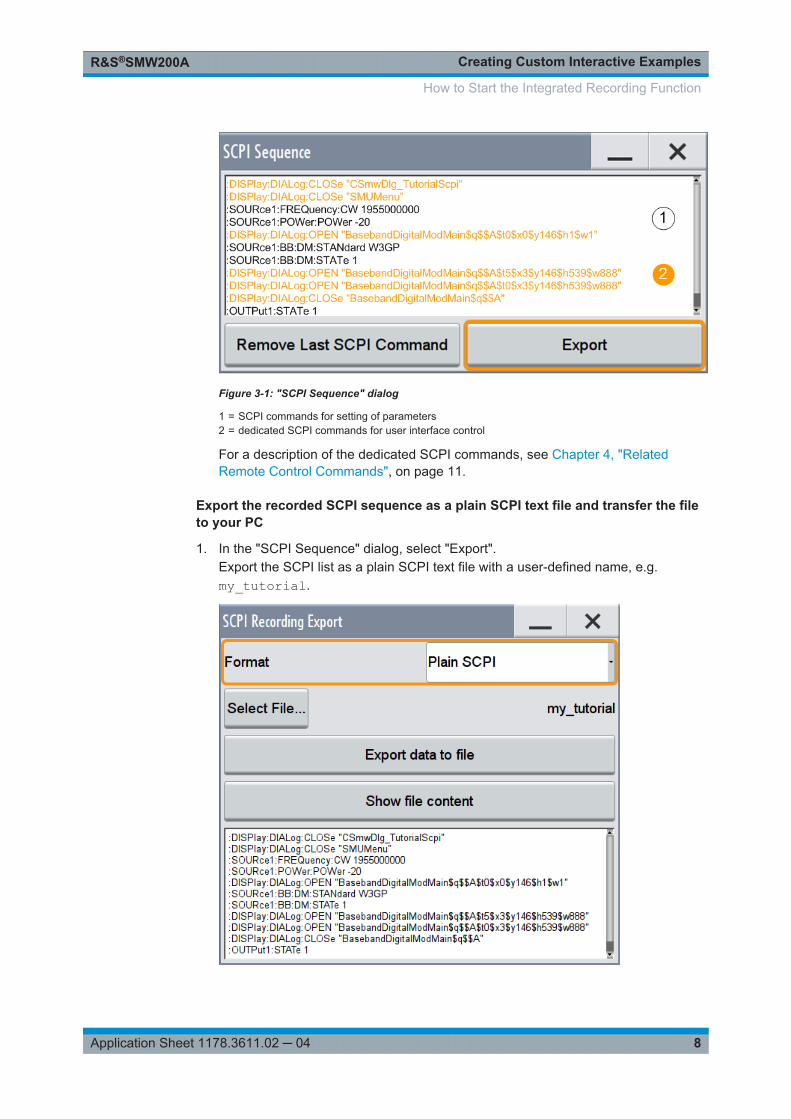
Figure 3-1: "SCPI Sequence" dialog
1 = SCPI commands for setting of parameters2 = dedicated SCPI commands for user interface control
For a description of the dedicated SCPI commands, see Chapter 4, "RelatedRemote Control Commands", on page 11.
Export the recorded SCPI sequence as a plain SCPI text file and transfer the fileto your PC
1. In the "SCPI Sequence" dialog, select "Export".Export the SCPI list as a plain SCPI text file with a user-defined name, e.g.my_tutorial.
How to Start the Integrated Recording Function
Creating Custom Interactive ExamplesR&S®SMW200A
9Application Sheet 1178.3611.02 ─ 04
Per default, the text file is stored in the var/user directory of the instrument. Themandatory file extension *.tut is assigned automatically.
2. Use one of the standard methods to transfer this file to your PC.For example, use a USB memory stick or mount the var/user directory of theR&S SMW in the explorer of your PC.
For step-by-step instructions:● Refer to section "Files and Data Management" in the R&S SMW user manual● Use the embedded help of the instrument.
3.2 How to Revise the Recorded File
To revise the recorded file and add additional information
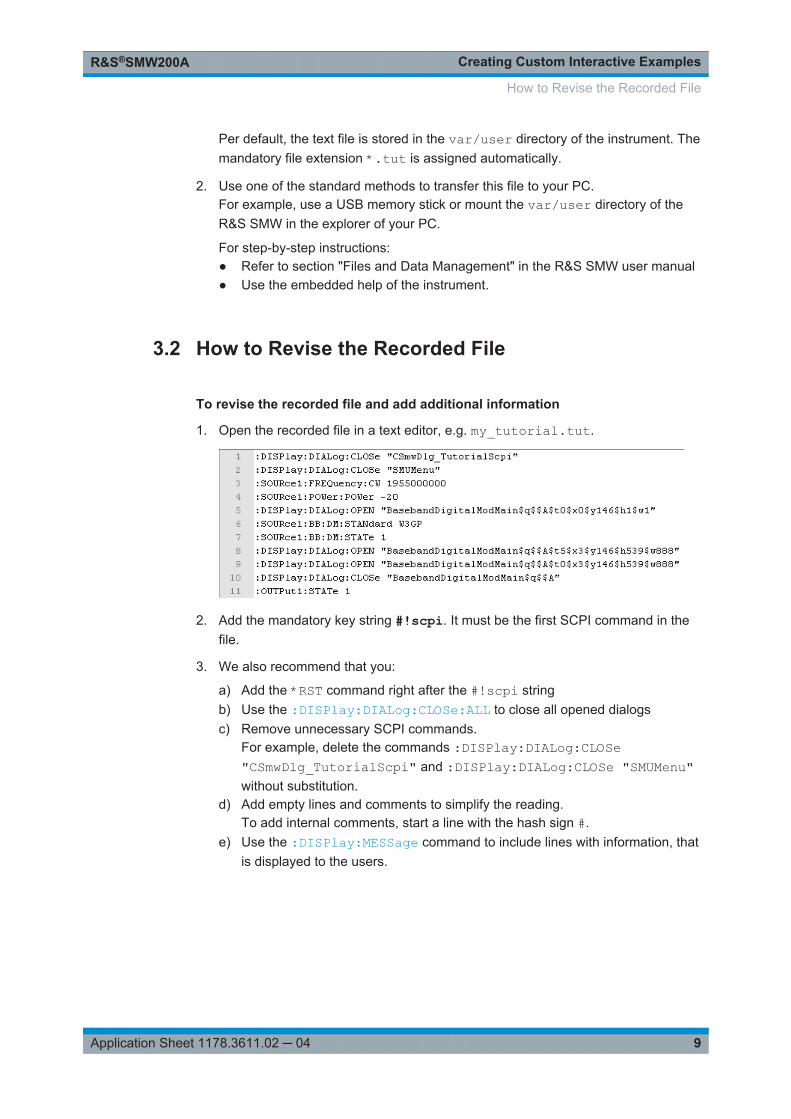
1. Open the recorded file in a text editor, e.g. my_tutorial.tut.
2. Add the mandatory key string #!scpi. It must be the first SCPI command in thefile.
3. We also recommend that you:
a) Add the *RST command right after the #!scpi stringb) Use the :DISPlay:DIALog:CLOSe:ALL to close all opened dialogsc) Remove unnecessary SCPI commands.
For example, delete the commands :DISPlay:DIALog:CLOSe"CSmwDlg_TutorialScpi" and :DISPlay:DIALog:CLOSe "SMUMenu"without substitution.
d) Add empty lines and comments to simplify the reading.To add internal comments, start a line with the hash sign #.
e) Use the :DISPlay:MESSage command to include lines with information, thatis displayed to the users.
How to Revise the Recorded File
Creating Custom Interactive ExamplesR&S®SMW200A
10Application Sheet 1178.3611.02 ─ 04
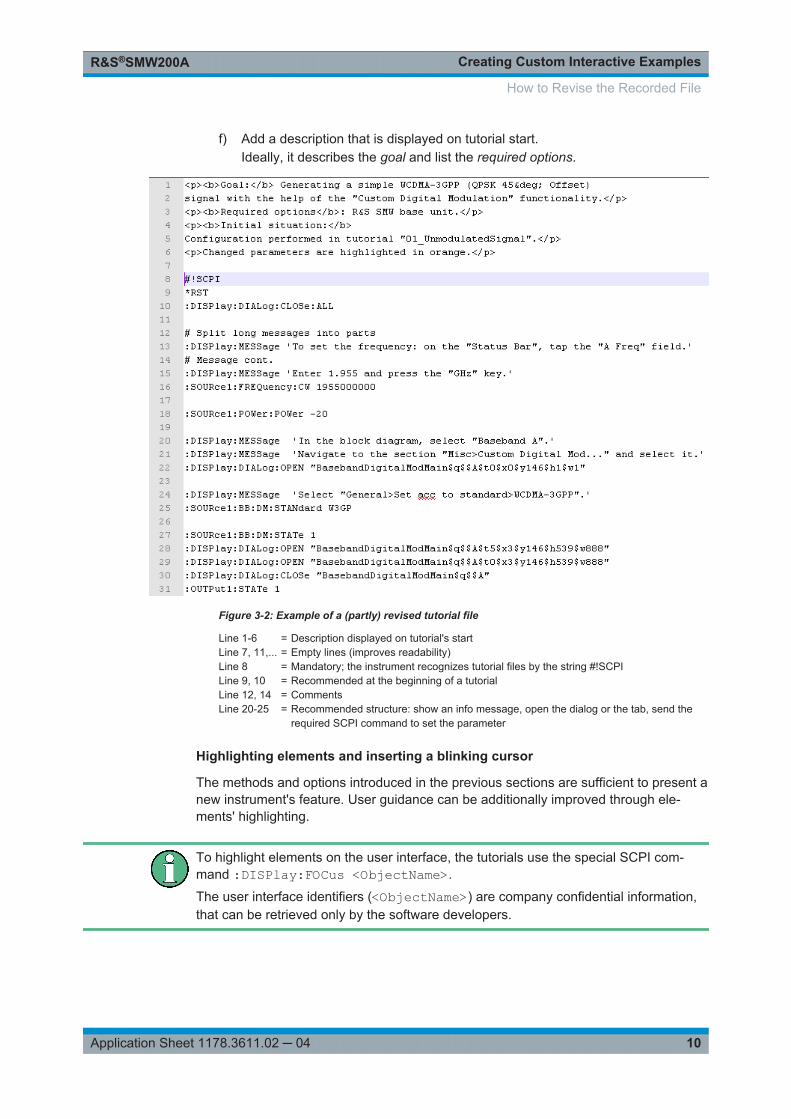
f) Add a description that is displayed on tutorial start.Ideally, it describes the goal and list the required options.
Figure 3-2: Example of a (partly) revised tutorial file
Line 1-6 = Description displayed on tutorial's startLine 7, 11,... = Empty lines (improves readability)Line 8 = Mandatory; the instrument recognizes tutorial files by the string #!SCPILine 9, 10 = Recommended at the beginning of a tutorialLine 12, 14 = CommentsLine 20-25 = Recommended structure: show an info message, open the dialog or the tab, send the
required SCPI command to set the parameter
Highlighting elements and inserting a blinking cursor
The methods and options introduced in the previous sections are sufficient to present anew instrument's feature. User guidance can be additionally improved through ele-ments' highlighting.
To highlight elements on the user interface, the tutorials use the special SCPI com-mand :DISPlay:FOCus <ObjectName>.
The user interface identifiers (<ObjectName>) are company confidential information,that can be retrieved only by the software developers.
How to Revise the Recorded File

Related Remote Control CommandsR&S®SMW200A
11Application Sheet 1178.3611.02 ─ 04
3.3 How to Test Your Tutorial
To store the file and transfer it to the instrument
► Use one of the standard methods to transfer the *.tut file to the var/user direc-tory of the instrument.You can also start the *.tut file from a connected USB memory stick.
For step-by-step instructions, refer to section "Files and Data Management" in theR&S SMW user manual.
To start the tutorial
1. Select SETUP > "Help > Tutorial".
2. Select "File > User Defined" and select the tutorial file.
If the file contains a description, it is displayed.
3. Select "Start".
4 Related Remote Control Commands:DISPlay:DIALog:ID?........................................................................................................11:DISPlay:DIALog:OPEN....................................................................................................12:DISPlay:DIALog:CLOSe.................................................................................................. 12:DISPlay:DIALog:CLOSe:ALL............................................................................................13:DISPlay:MESSage.......................................................................................................... 13
:DISPlay:DIALog:ID?
Returns the dialog identifiers of the open dialogs in a string separated by blanks.
Related Remote Control CommandsR&S®SMW200A
12Application Sheet 1178.3611.02 ─ 04
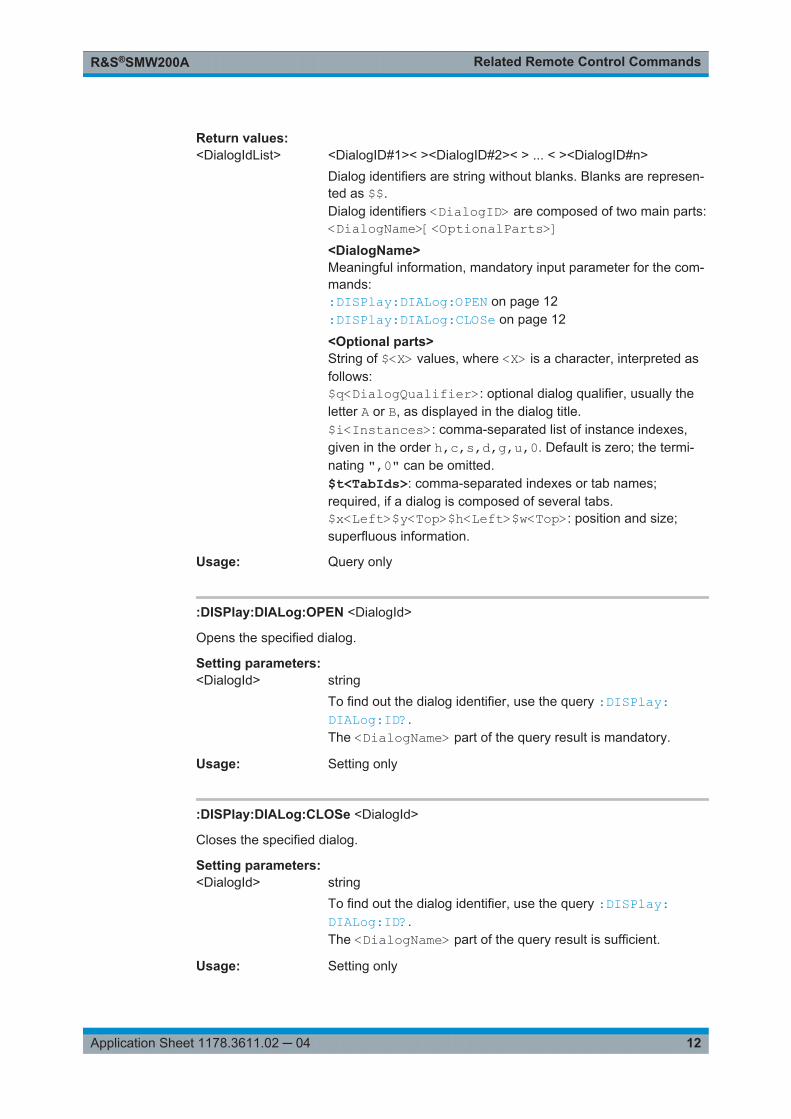
Return values: <DialogIdList> <DialogID#1>< ><DialogID#2>< > ... < ><DialogID#n>
Dialog identifiers are string without blanks. Blanks are represen-ted as $$.Dialog identifiers <DialogID> are composed of two main parts:<DialogName>[<OptionalParts>]<DialogName>Meaningful information, mandatory input parameter for the com-mands::DISPlay:DIALog:OPEN on page 12:DISPlay:DIALog:CLOSe on page 12
<Optional parts>String of $<X> values, where <X> is a character, interpreted asfollows:$q<DialogQualifier>: optional dialog qualifier, usually theletter A or B, as displayed in the dialog title.$i<Instances>: comma-separated list of instance indexes,given in the order h,c,s,d,g,u,0. Default is zero; the termi-nating ",0" can be omitted.$t<TabIds>: comma-separated indexes or tab names;required, if a dialog is composed of several tabs.$x<Left>$y<Top>$h<Left>$w<Top>: position and size;superfluous information.
Usage: Query only
:DISPlay:DIALog:OPEN <DialogId>
Opens the specified dialog.
Setting parameters: <DialogId> string
To find out the dialog identifier, use the query :DISPlay:DIALog:ID?.The <DialogName> part of the query result is mandatory.
Usage: Setting only
:DISPlay:DIALog:CLOSe <DialogId>
Closes the specified dialog.
Setting parameters: <DialogId> string
To find out the dialog identifier, use the query :DISPlay:DIALog:ID?.The <DialogName> part of the query result is sufficient.
Usage: Setting only
Learn More About the R&S SMWR&S®SMW200A
13Application Sheet 1178.3611.02 ─ 04
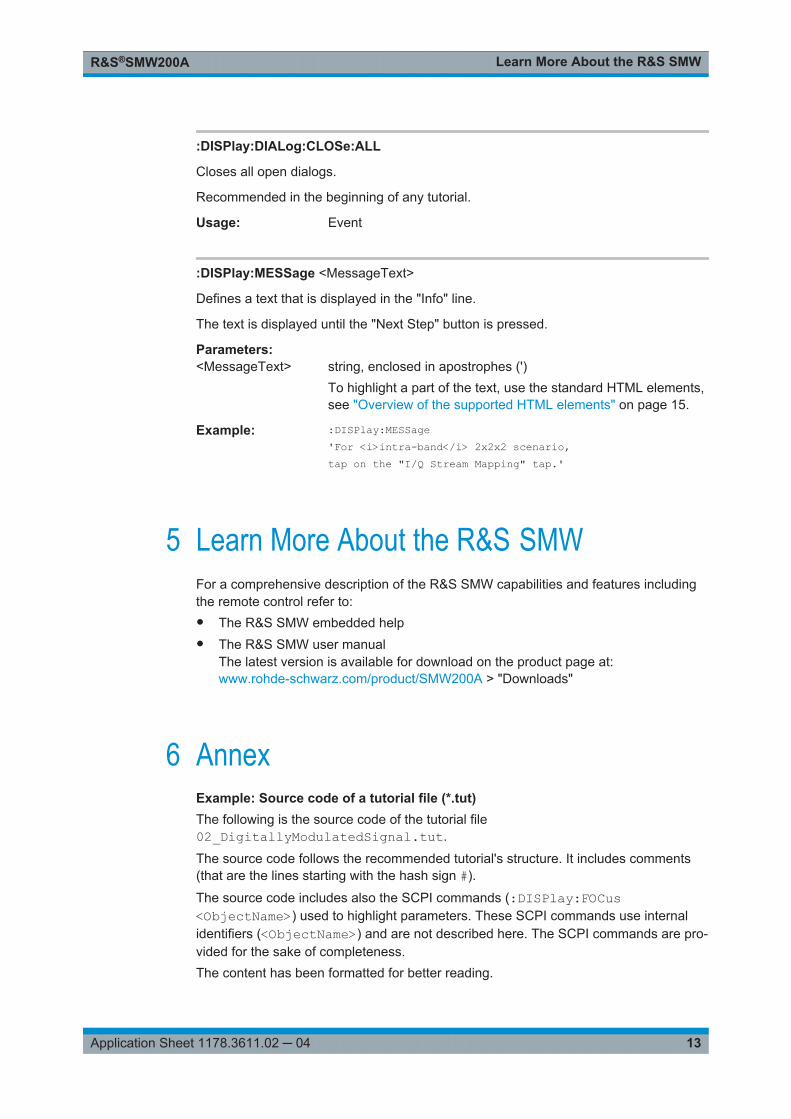
:DISPlay:DIALog:CLOSe:ALL
Closes all open dialogs.
Recommended in the beginning of any tutorial.
Usage: Event
:DISPlay:MESSage <MessageText>
Defines a text that is displayed in the "Info" line.
The text is displayed until the "Next Step" button is pressed.
Parameters:<MessageText> string, enclosed in apostrophes (')
To highlight a part of the text, use the standard HTML elements,see "Overview of the supported HTML elements" on page 15.
Example: :DISPlay:MESSage 'For <i>intra-band</i> 2x2x2 scenario, tap on the "I/Q Stream Mapping" tap.'
5 Learn More About the R&S SMWFor a comprehensive description of the R&S SMW capabilities and features includingthe remote control refer to:● The R&S SMW embedded help● The R&S SMW user manual
The latest version is available for download on the product page at:www.rohde-schwarz.com/product/SMW200A > "Downloads"
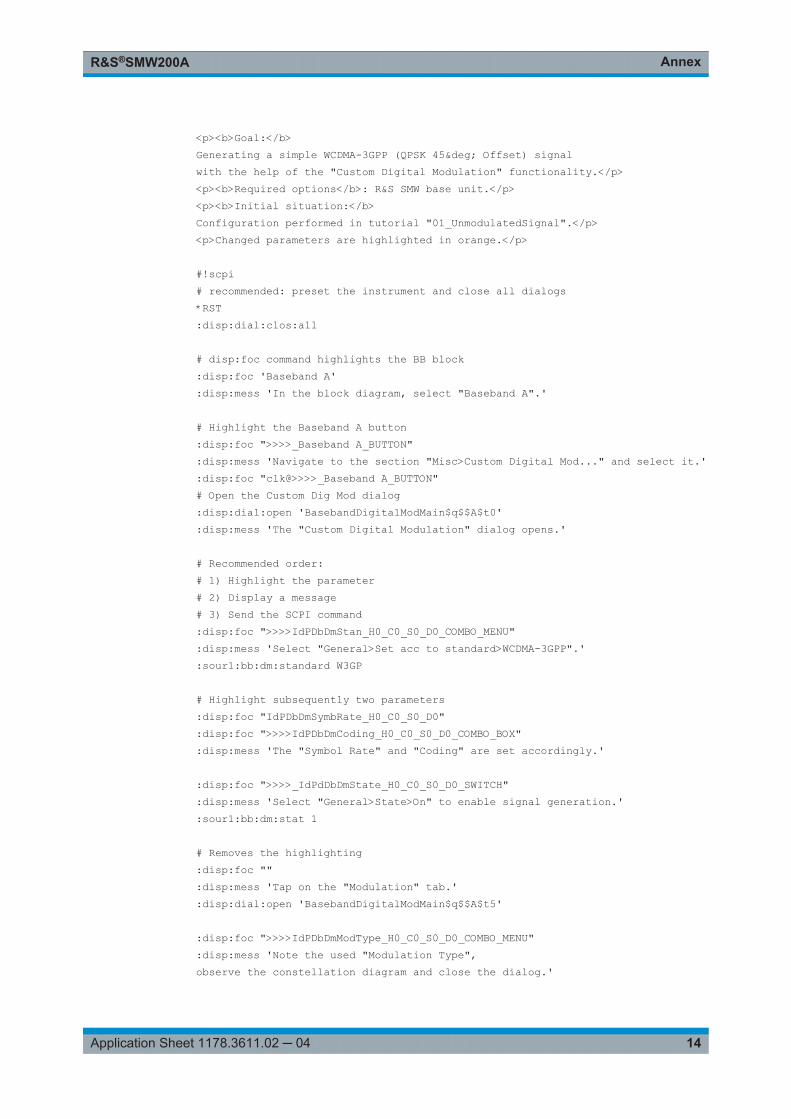
6 AnnexExample: Source code of a tutorial file (*.tut)The following is the source code of the tutorial file02_DigitallyModulatedSignal.tut.
The source code follows the recommended tutorial's structure. It includes comments(that are the lines starting with the hash sign #).
The source code includes also the SCPI commands (:DISPlay:FOCus <ObjectName>) used to highlight parameters. These SCPI commands use internalidentifiers (<ObjectName>) and are not described here. The SCPI commands are pro-vided for the sake of completeness.The content has been formatted for better reading.
AnnexR&S®SMW200A
14Application Sheet 1178.3611.02 ─ 04
<p><b>Goal:</b> Generating a simple WCDMA-3GPP (QPSK 45° Offset) signal with the help of the "Custom Digital Modulation" functionality.</p><p><b>Required options</b>: R&S SMW base unit.</p><p><b>Initial situation:</b> Configuration performed in tutorial "01_UnmodulatedSignal".</p><p>Changed parameters are highlighted in orange.</p>
#!scpi# recommended: preset the instrument and close all dialogs*RST:disp:dial:clos:all
# disp:foc command highlights the BB block:disp:foc 'Baseband A':disp:mess 'In the block diagram, select "Baseband A".'
# Highlight the Baseband A button:disp:foc ">>>>_Baseband A_BUTTON":disp:mess 'Navigate to the section "Misc>Custom Digital Mod..." and select it.':disp:foc "clk@>>>>_Baseband A_BUTTON"# Open the Custom Dig Mod dialog:disp:dial:open 'BasebandDigitalModMain$q$$A$t0':disp:mess 'The "Custom Digital Modulation" dialog opens.'
# Recommended order: # 1) Highlight the parameter# 2) Display a message# 3) Send the SCPI command:disp:foc ">>>>IdPDbDmStan_H0_C0_S0_D0_COMBO_MENU":disp:mess 'Select "General>Set acc to standard>WCDMA-3GPP".':sour1:bb:dm:standard W3GP
# Highlight subsequently two parameters:disp:foc "IdPDbDmSymbRate_H0_C0_S0_D0":disp:foc ">>>>IdPDbDmCoding_H0_C0_S0_D0_COMBO_BOX":disp:mess 'The "Symbol Rate" and "Coding" are set accordingly.'
:disp:foc ">>>>_IdPdDbDmState_H0_C0_S0_D0_SWITCH":disp:mess 'Select "General>State>On" to enable signal generation.':sour1:bb:dm:stat 1
# Removes the highlighting:disp:foc "":disp:mess 'Tap on the "Modulation" tab.':disp:dial:open 'BasebandDigitalModMain$q$$A$t5'
:disp:foc ">>>>IdPDbDmModType_H0_C0_S0_D0_COMBO_MENU":disp:mess 'Note the used "Modulation Type", observe the constellation diagram and close the dialog.'
AnnexR&S®SMW200A
15Application Sheet 1178.3611.02 ─ 04
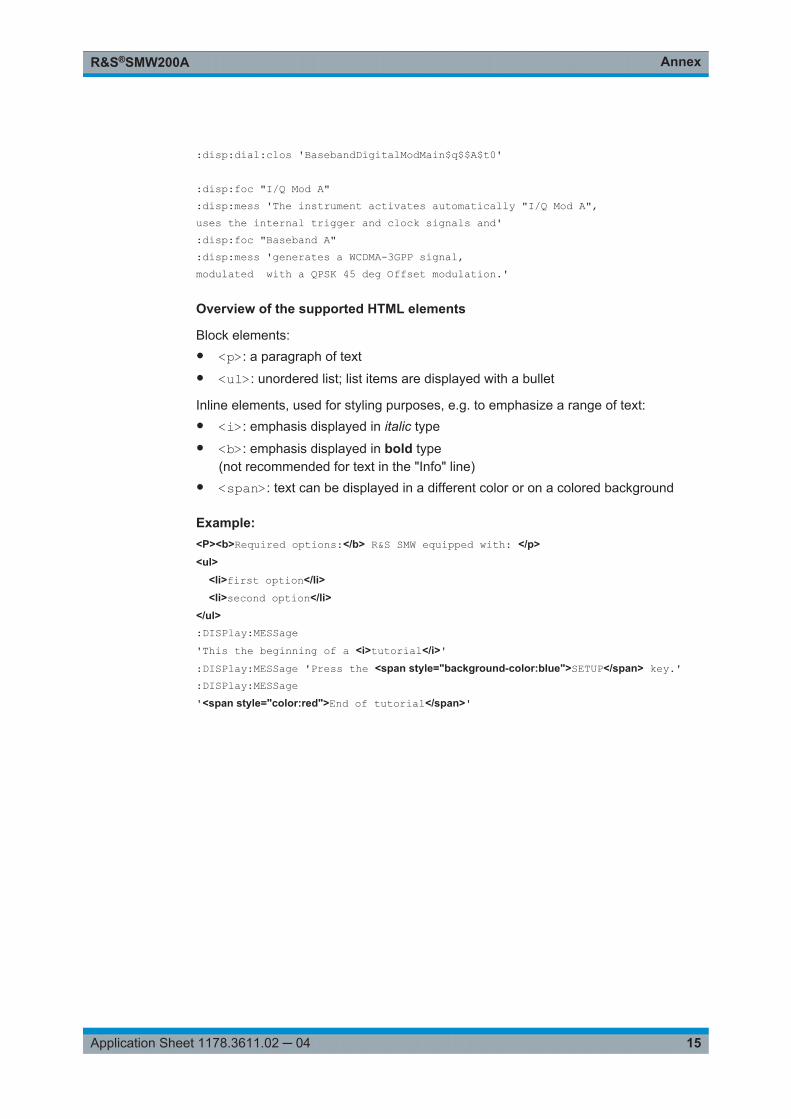
:disp:dial:clos 'BasebandDigitalModMain$q$$A$t0'
:disp:foc "I/Q Mod A":disp:mess 'The instrument activates automatically "I/Q Mod A", uses the internal trigger and clock signals and' :disp:foc "Baseband A":disp:mess 'generates a WCDMA-3GPP signal, modulated with a QPSK 45 deg Offset modulation.'
Overview of the supported HTML elements
Block elements:● <p>: a paragraph of text● <ul>: unordered list; list items are displayed with a bullet
Inline elements, used for styling purposes, e.g. to emphasize a range of text:● <i>: emphasis displayed in italic type● <b>: emphasis displayed in bold type
(not recommended for text in the "Info" line)● <span>: text can be displayed in a different color or on a colored background
Example: <P><b>Required options:</b> R&S SMW equipped with: </p><ul> <li>first option</li> <li>second option</li></ul>:DISPlay:MESSage 'This the beginning of a <i>tutorial</i>':DISPlay:MESSage 'Press the <span style="background-color:blue">SETUP</span> key.':DISPlay:MESSage '<span style="color:red">End of tutorial</span>'