Embed Size (px)
Citation preview
Page 1
AS122487-L
Flexible Families – Learn to Make Your Families Flex and Stretch Like Never Before John Pierson sixtysecondrevit.com / EvolveLAB
Description
This hands-on lab will teach you built-in Revit methods that let your Revit families flex like never before. Multiple, positionable 3D grip handles for doors, grip handles that are formula driven, grip handles with visibility and animation of families are just a couple of the examples we’ll cover in this lab.
Speaker
John Pierson is a Computational BIM Specialist at EvolveLAB and a Revit Certified Professional for all disciplines. John has presented at Revit Technology Conference where he was rated as one of the top 5 speakers. He is an active member of the Dynamo community and currently manages Rhythm; which is among the top 5 most downloaded Dynamo packages. You can contact John by the following means:
Twitter: @60secondrevit Email: [email protected] Blog: sixtysecondrevit.com Podcast: simplycomplex.org Company Websit : EvolveBIM.com
Similar AU Classes to Check Out!
Revit Families: A Step by Step Introduction – Paul Aubin
Families in Motion – Marcello Sgambelluri
More Families in Motion – Marcello Sgambelluri
Programming Revit MEP, Say it Ain’t Dynamo(getting started in Dynamo) – Jason Boehning
Learning Objectives
• Review traditional methods to family creation.
• Learn new methods to enable 3D grip handles in Revit
• Learn new methods to control visibility of grip handles in Revit families.
• Learn how to animate your Revit families.
• Learn how to create formula driven grip handles.
Page 2
Traditional Methods to Family Creation
Anyone who knows how to build Revit families is familiar with the ever-popular reference plane. These are often referred to as “the bones” of a parametric family. Reference planes allow for use to add parameters that in turn control geometry within the family.
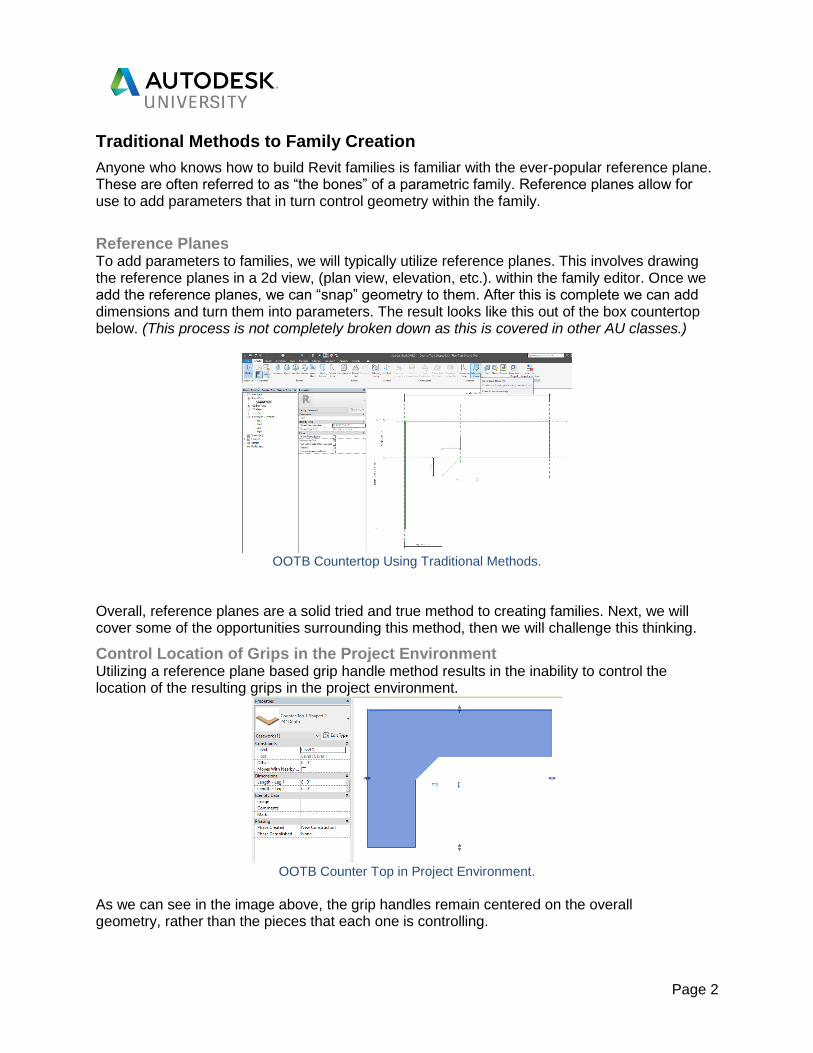
Reference Planes To add parameters to families, we will typically utilize reference planes. This involves drawing the reference planes in a 2d view, (plan view, elevation, etc.). within the family editor. Once we add the reference planes, we can “snap” geometry to them. After this is complete we can add dimensions and turn them into parameters. The result looks like this out of the box countertop below. (This process is not completely broken down as this is covered in other AU classes.)
OOTB Countertop Using Traditional Methods.
Overall, reference planes are a solid tried and true method to creating families. Next, we will cover some of the opportunities surrounding this method, then we will challenge this thinking.
Control Location of Grips in the Project Environment Utilizing a reference plane based grip handle method results in the inability to control the location of the resulting grips in the project environment.
OOTB Counter Top in Project Environment.
As we can see in the image above, the grip handles remain centered on the overall geometry, rather than the pieces that each one is controlling.
Page 3
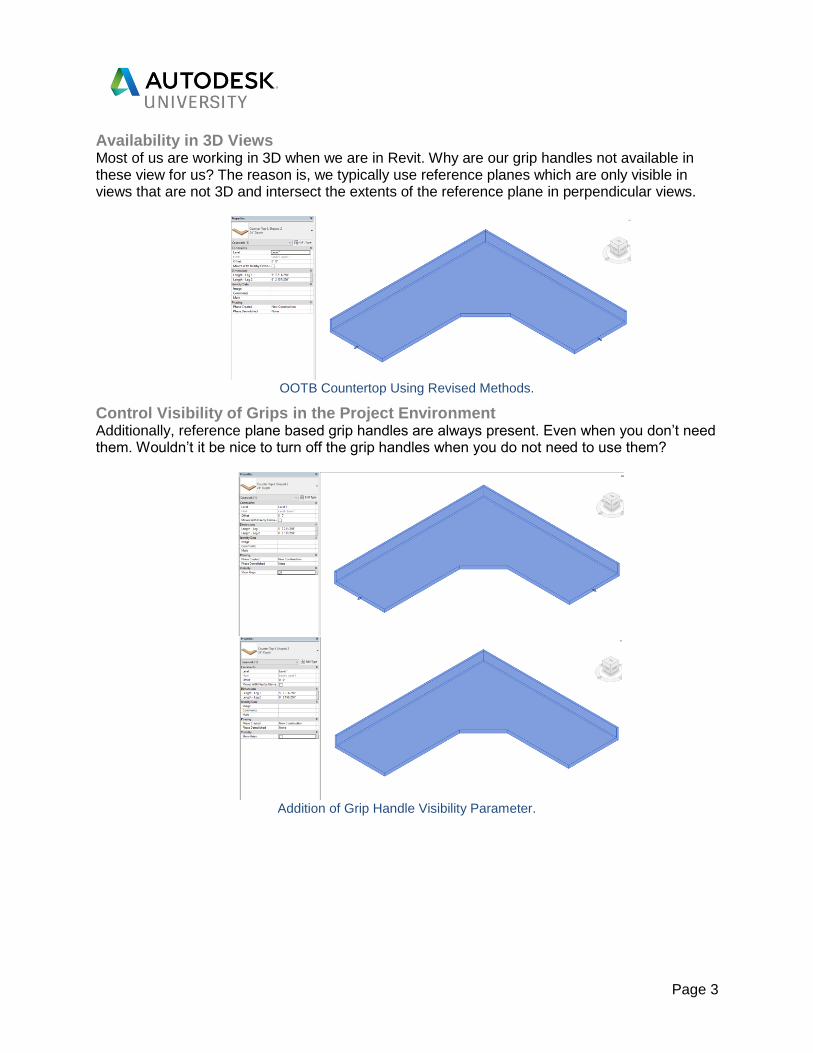
Availability in 3D Views Most of us are working in 3D when we are in Revit. Why are our grip handles not available in these view for us? The reason is, we typically use reference planes which are only visible in views that are not 3D and intersect the extents of the reference plane in perpendicular views.
OOTB Countertop Using Revised Methods.
Control Visibility of Grips in the Project Environment Additionally, reference plane based grip handles are always present. Even when you don’t need them. Wouldn’t it be nice to turn off the grip handles when you do not need to use them?
Addition of Grip Handle Visibility Parameter.
Page 4
Revising the OOTB Countertop Family.
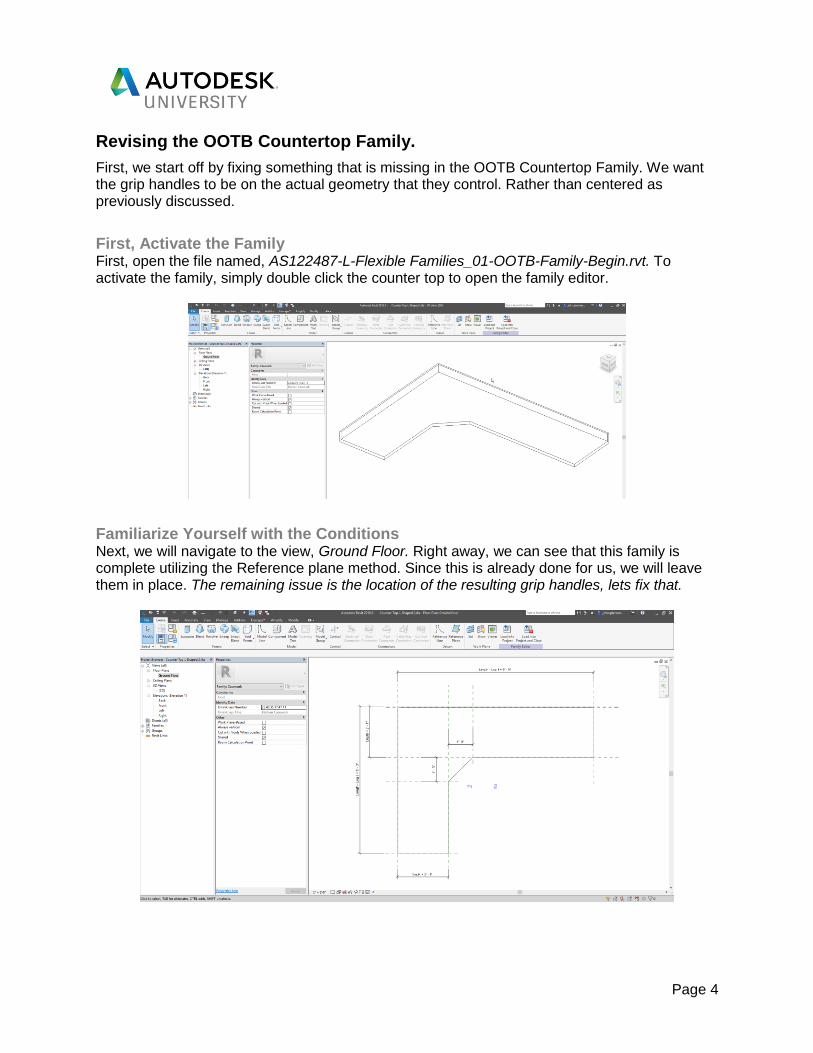
First, we start off by fixing something that is missing in the OOTB Countertop Family. We want the grip handles to be on the actual geometry that they control. Rather than centered as previously discussed.
First, Activate the Family First, open the file named, AS122487-L-Flexible Families_01-OOTB-Family-Begin.rvt. To activate the family, simply double click the counter top to open the family editor.
Familiarize Yourself with the Conditions Next, we will navigate to the view, Ground Floor. Right away, we can see that this family is complete utilizing the Reference plane method. Since this is already done for us, we will leave them in place. The remaining issue is the location of the resulting grip handles, lets fix that.
Page 5
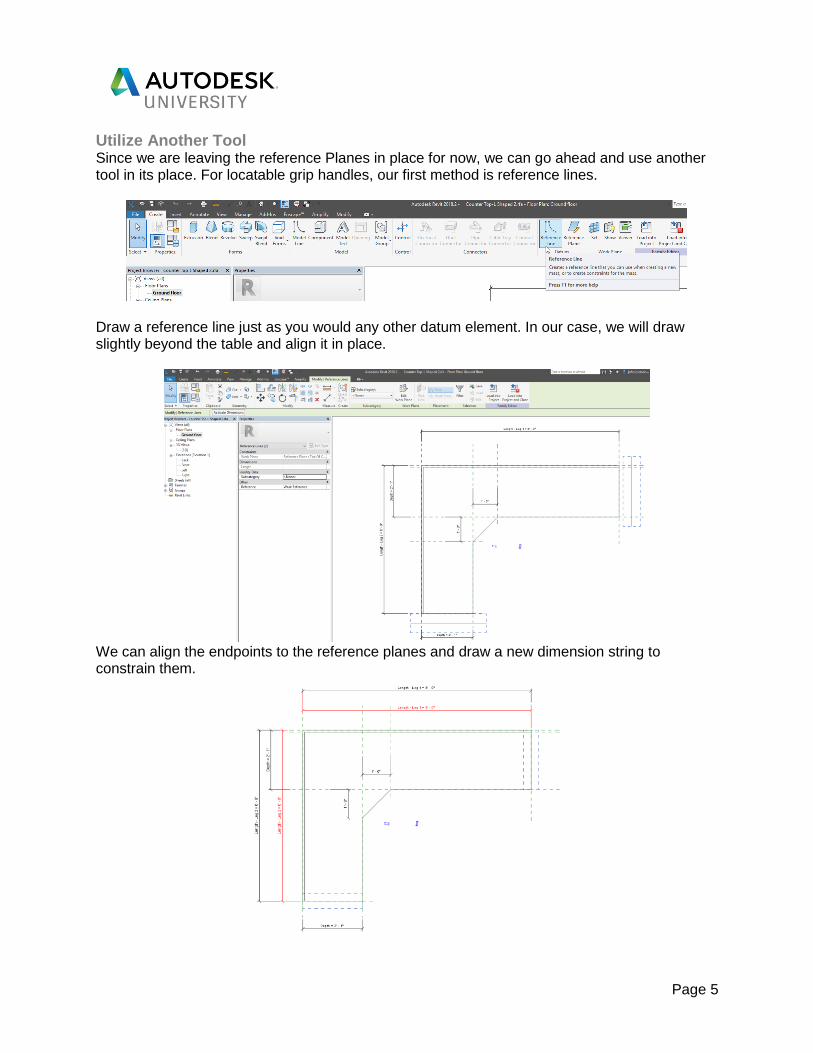
Utilize Another Tool Since we are leaving the reference Planes in place for now, we can go ahead and use another tool in its place. For locatable grip handles, our first method is reference lines.
Draw a reference line just as you would any other datum element. In our case, we will draw slightly beyond the table and align it in place.
We can align the endpoints to the reference planes and draw a new dimension string to constrain them.
Page 6
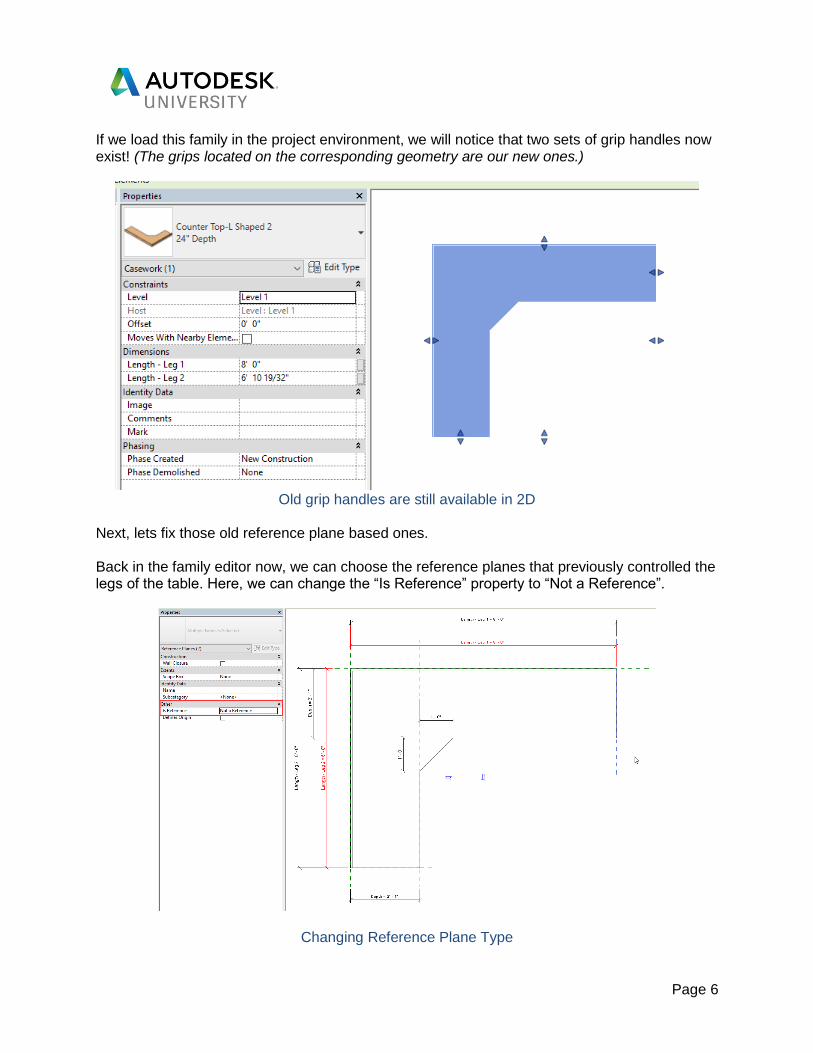
If we load this family in the project environment, we will notice that two sets of grip handles now exist! (The grips located on the corresponding geometry are our new ones.)
Old grip handles are still available in 2D
Next, lets fix those old reference plane based ones. Back in the family editor now, we can choose the reference planes that previously controlled the legs of the table. Here, we can change the “Is Reference” property to “Not a Reference”.
Changing Reference Plane Type
Page 7
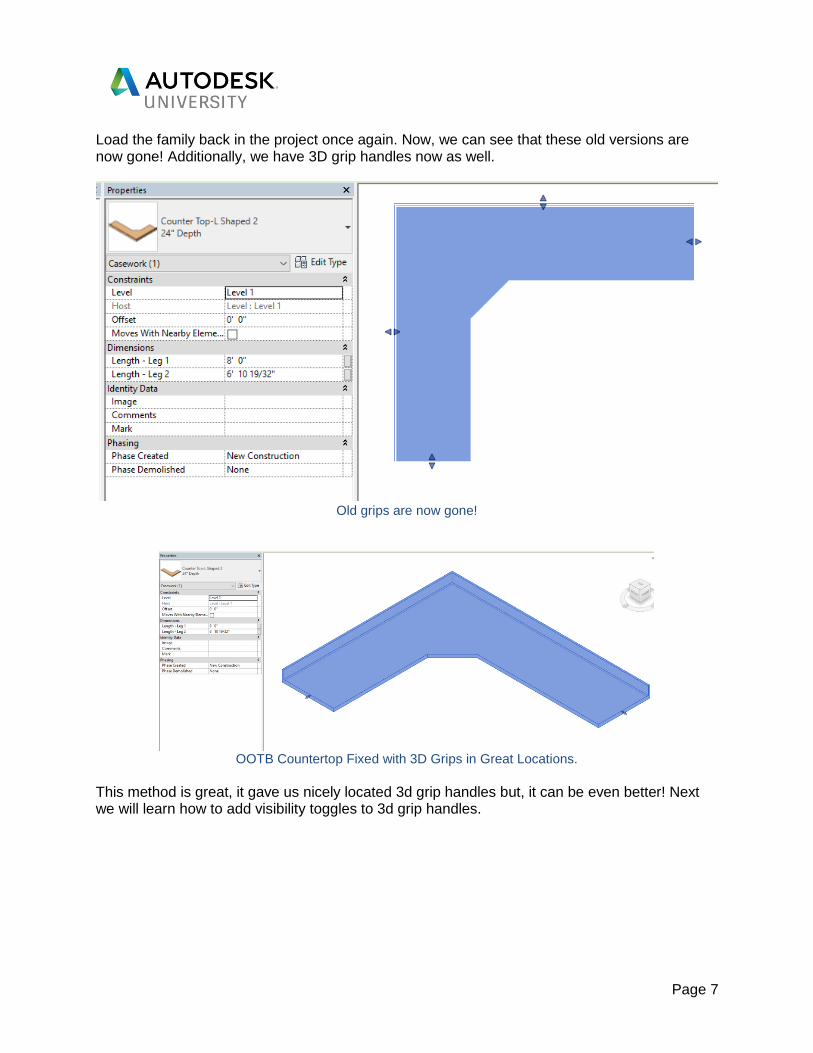
Load the family back in the project once again. Now, we can see that these old versions are now gone! Additionally, we have 3D grip handles now as well.
Old grips are now gone!
OOTB Countertop Fixed with 3D Grips in Great Locations.
This method is great, it gave us nicely located 3d grip handles but, it can be even better! Next we will learn how to add visibility toggles to 3d grip handles.
Page 8
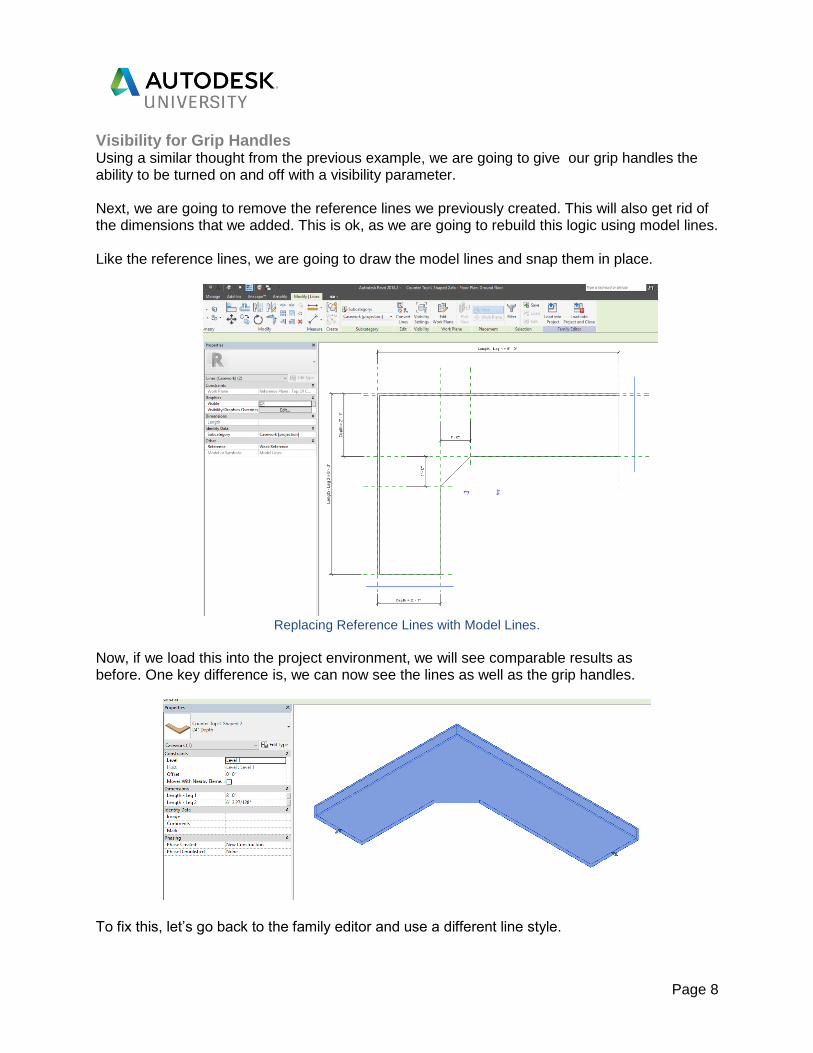
Visibility for Grip Handles Using a similar thought from the previous example, we are going to give our grip handles the ability to be turned on and off with a visibility parameter.
Next, we are going to remove the reference lines we previously created. This will also get rid of the dimensions that we added. This is ok, as we are going to rebuild this logic using model lines.
Like the reference lines, we are going to draw the model lines and snap them in place.
Replacing Reference Lines with Model Lines.
Now, if we load this into the project environment, we will see comparable results as before. One key difference is, we can now see the lines as well as the grip handles.
To fix this, let’s go back to the family editor and use a different line style.
Page 9
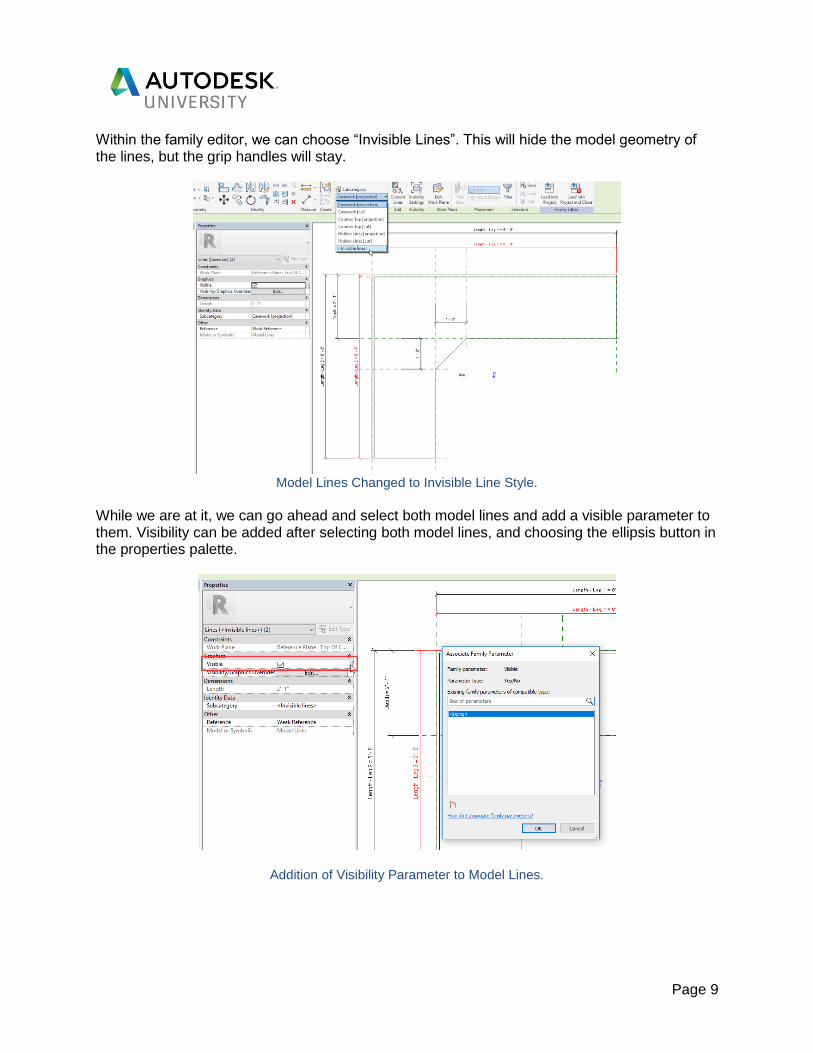
Within the family editor, we can choose “Invisible Lines”. This will hide the model geometry of the lines, but the grip handles will stay.
Model Lines Changed to Invisible Line Style.
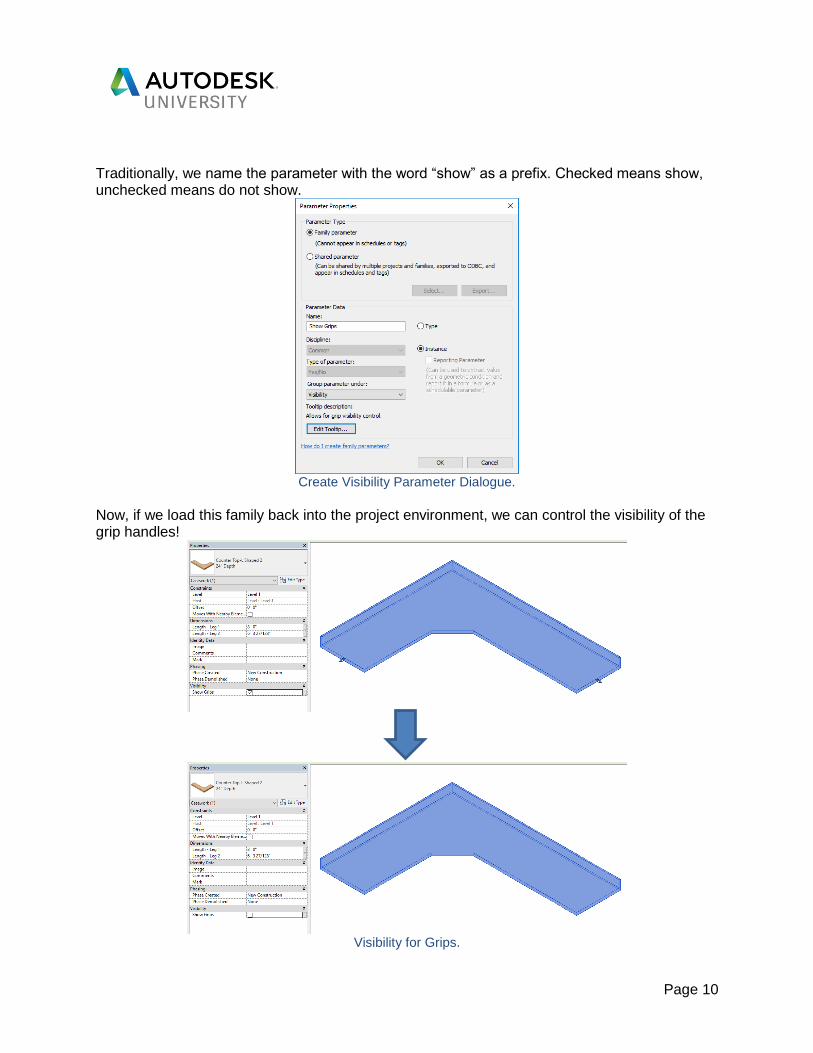
While we are at it, we can go ahead and select both model lines and add a visible parameter to them. Visibility can be added after selecting both model lines, and choosing the ellipsis button in the properties palette.
Addition of Visibility Parameter to Model Lines.
Page 10
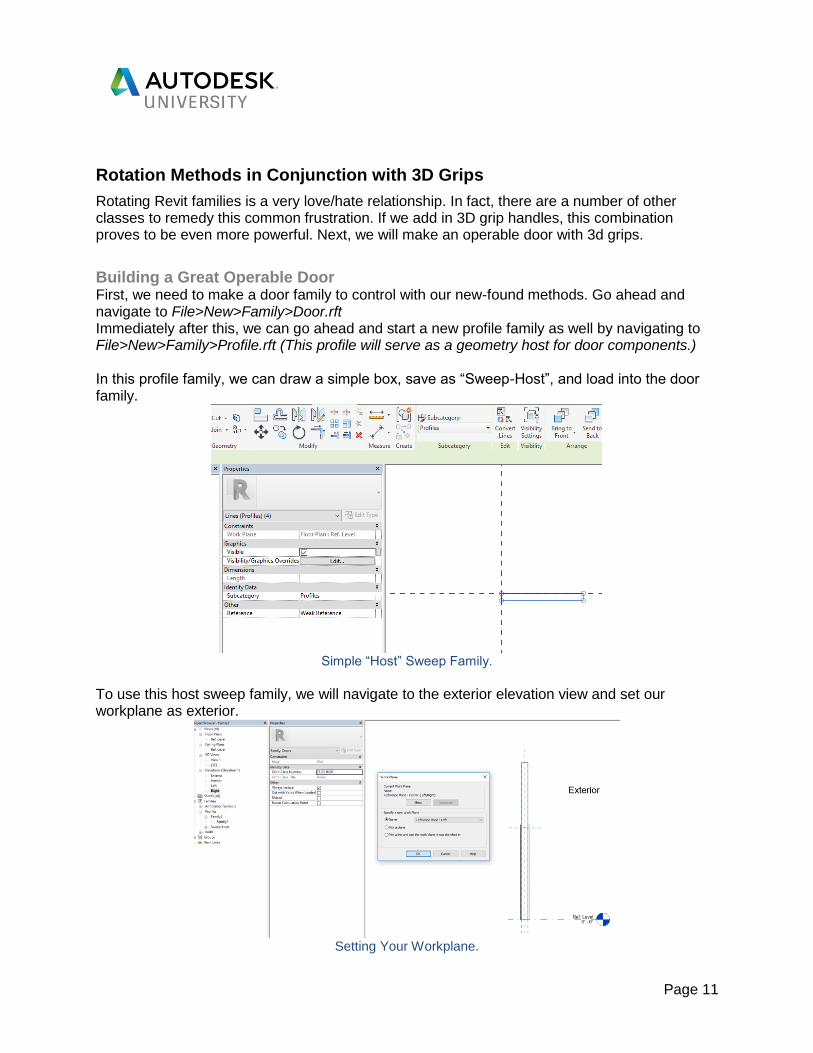
Traditionally, we name the parameter with the word “show” as a prefix. Checked means show, unchecked means do not show.
Create Visibility Parameter Dialogue.
Now, if we load this family back into the project environment, we can control the visibility of the grip handles!
Visibility for Grips.
Page 11
Rotation Methods in Conjunction with 3D Grips
Rotating Revit families is a very love/hate relationship. In fact, there are a number of other classes to remedy this common frustration. If we add in 3D grip handles, this combination proves to be even more powerful. Next, we will make an operable door with 3d grips.
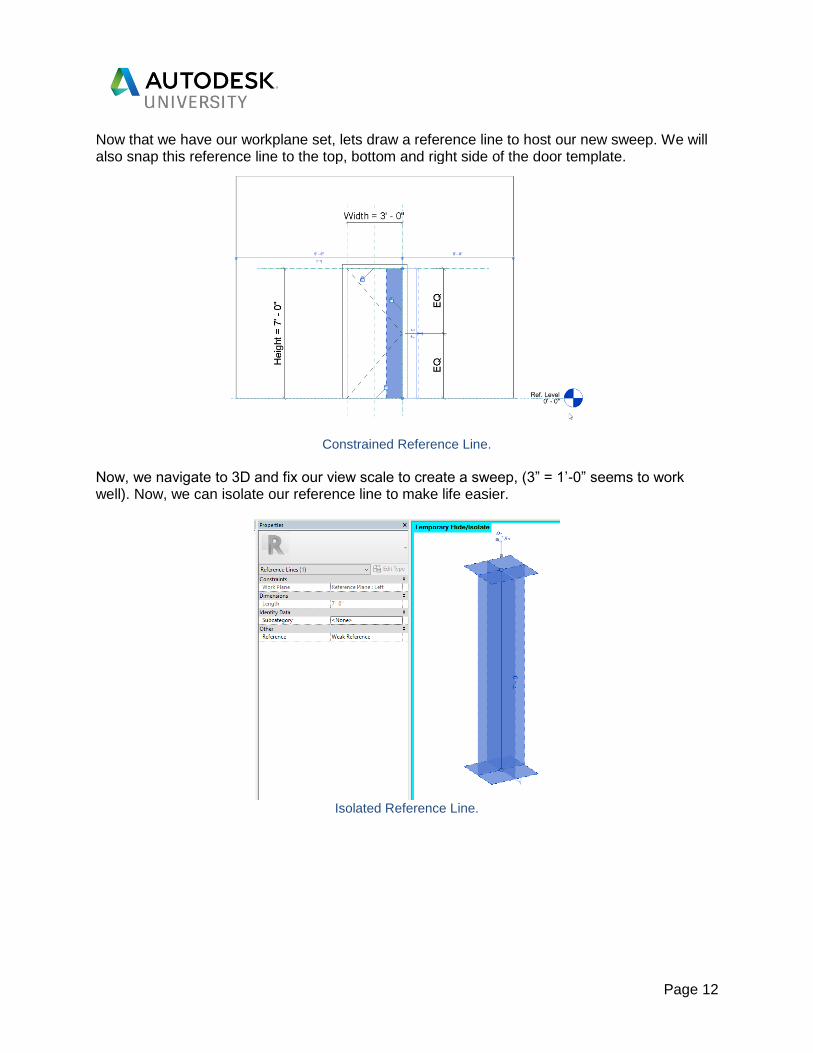
Building a Great Operable Door First, we need to make a door family to control with our new-found methods. Go ahead and navigate to File>New>Family>Door.rft Immediately after this, we can go ahead and start a new profile family as well by navigating to File>New>Family>Profile.rft (This profile will serve as a geometry host for door components.) In this profile family, we can draw a simple box, save as “Sweep-Host”, and load into the door family.
Simple “Host” Sweep Family.
To use this host sweep family, we will navigate to the exterior elevation view and set our workplane as exterior.
Setting Your Workplane.
Page 12
Now that we have our workplane set, lets draw a reference line to host our new sweep. We will also snap this reference line to the top, bottom and right side of the door template.
Constrained Reference Line.
Now, we navigate to 3D and fix our view scale to create a sweep, (3” = 1’-0” seems to work well). Now, we can isolate our reference line to make life easier.
Isolated Reference Line.

Page 13
Now, we can finally add the sweep by navigating to Create > Sweep. We will choose pick path and select our reference line. Then select our profile that we created previously.
Creation of a Sweep Component.
If we reset our Hide/Isolate, we should now have a piece of geometry to use as a host for panels and whatnot. Let’s go ahead and make this invisible, because we just need it to host geometry.
“Host” Sweep Marked as Invisible.
Page 14
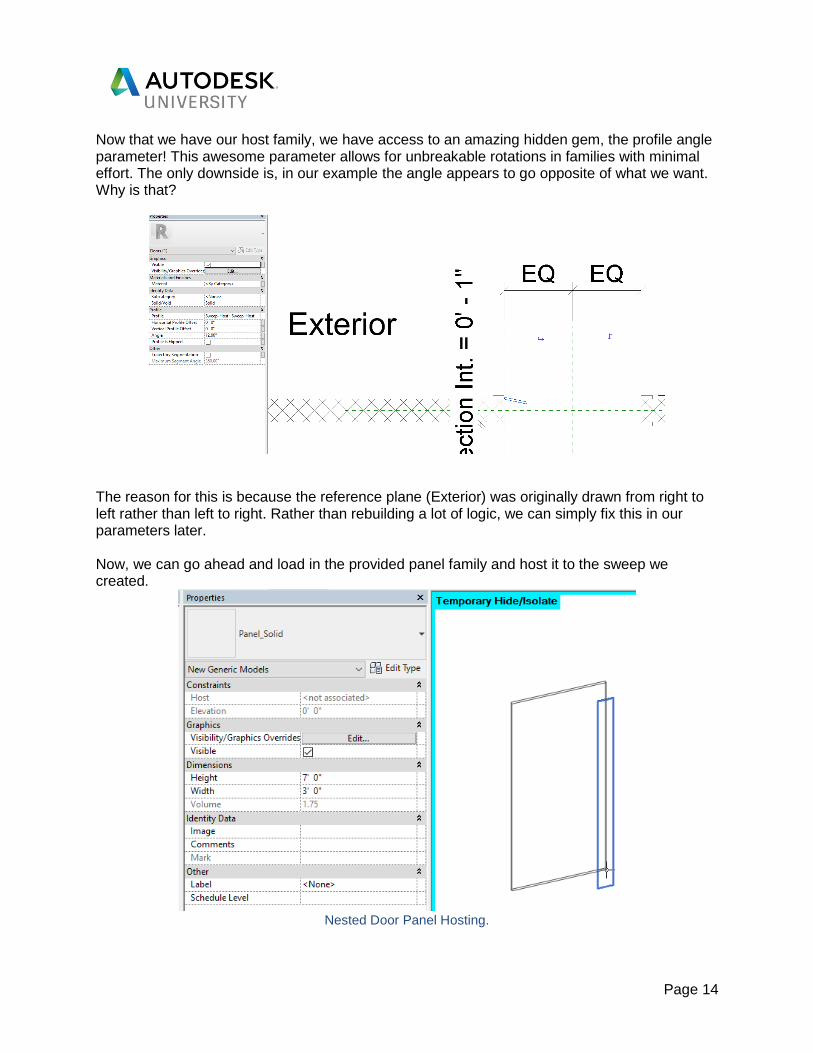
Now that we have our host family, we have access to an amazing hidden gem, the profile angle parameter! This awesome parameter allows for unbreakable rotations in families with minimal effort. The only downside is, in our example the angle appears to go opposite of what we want. Why is that?
The reason for this is because the reference plane (Exterior) was originally drawn from right to left rather than left to right. Rather than rebuilding a lot of logic, we can simply fix this in our parameters later. Now, we can go ahead and load in the provided panel family and host it to the sweep we created.
Nested Door Panel Hosting.
Page 15
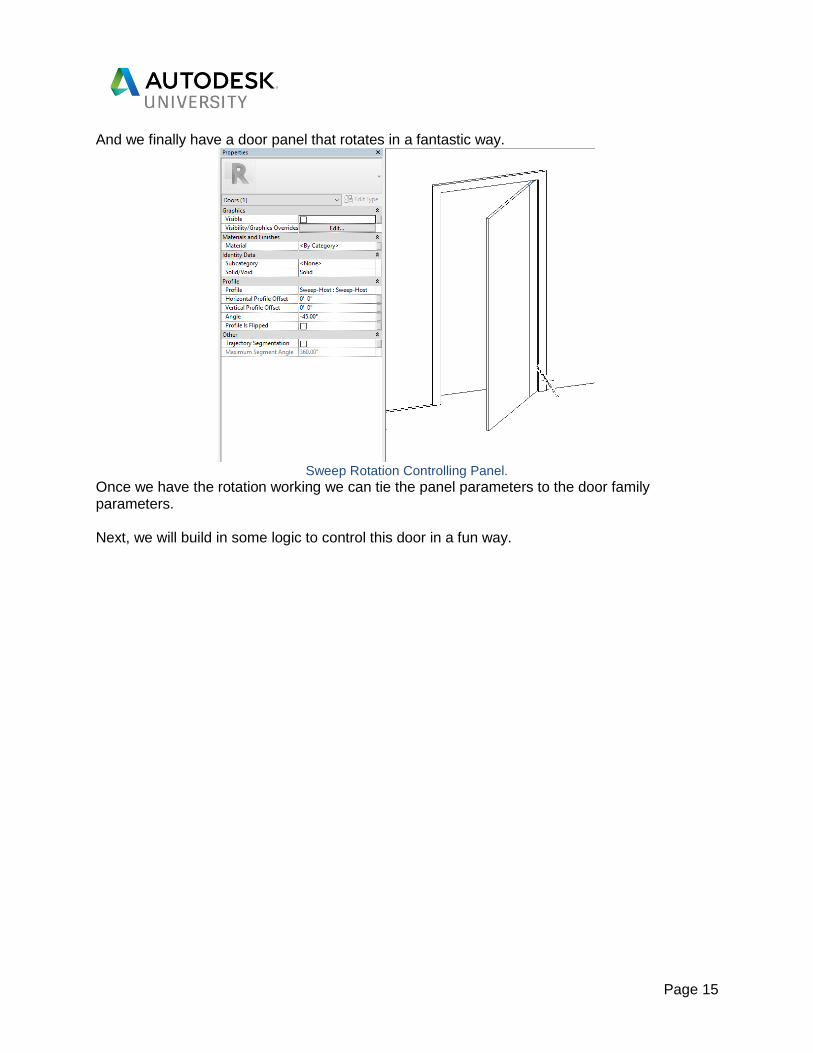
And we finally have a door panel that rotates in a fantastic way.
Sweep Rotation Controlling Panel.
Once we have the rotation working we can tie the panel parameters to the door family parameters.
Next, we will build in some logic to control this door in a fun way.
Page 16
Controlling Families with a Slider (not in Dynamo)
Dynamo. You have probably seen this awesome extension in action or at the very least heard of it. One of the coolest features in Dynamo is the ability to drive model elements with slider components.
Number Slider in Dynamo.
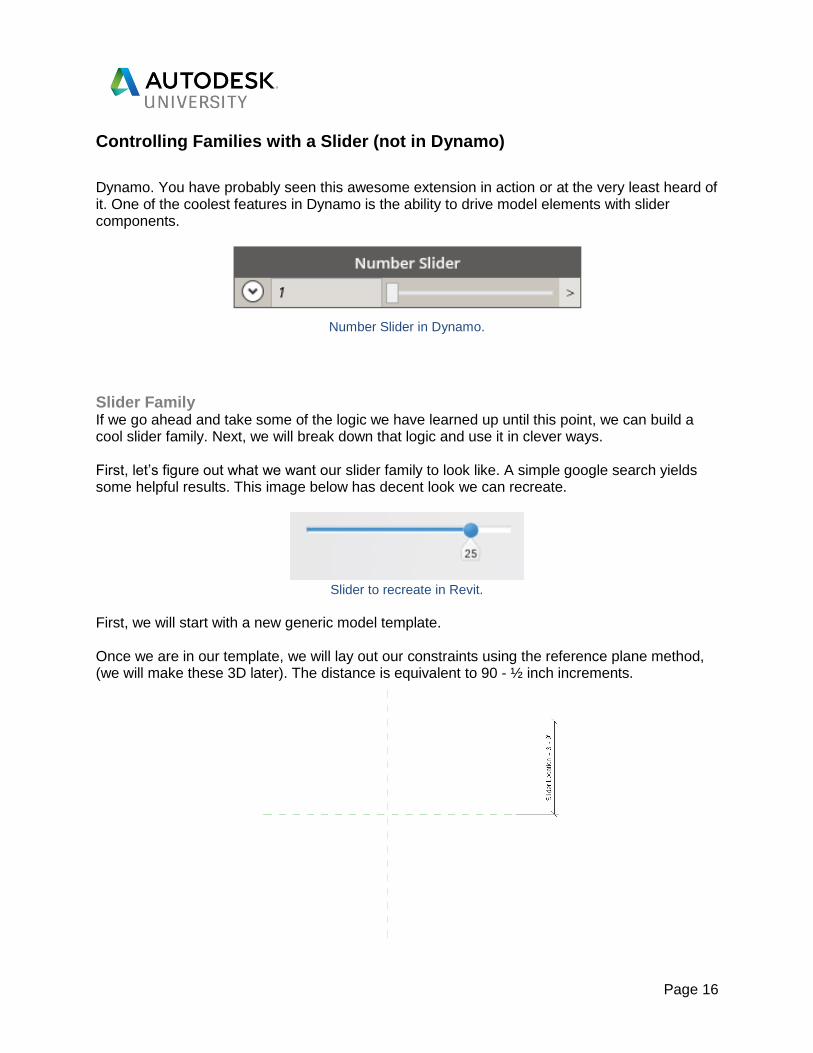
Slider Family If we go ahead and take some of the logic we have learned up until this point, we can build a cool slider family. Next, we will break down that logic and use it in clever ways. First, let’s figure out what we want our slider family to look like. A simple google search yields some helpful results. This image below has decent look we can recreate.
Slider to recreate in Revit.
First, we will start with a new generic model template. Once we are in our template, we will lay out our constraints using the reference plane method, (we will make these 3D later). The distance is equivalent to 90 - ½ inch increments.

Page 17
Next, we will lay out some geometry that is representative of the slider. One of the most important things to keep in mind is, to lock the circle to the top reference plane. This is achieved through the “center mark visible” parameter.
Circle Slider.
After getting the circle locked in place, you can create the rest of the representing geometry.
Now we can load this in our door family and tie it to 3D grip handles. Back in our door family we can place the slider, add a base reference plane and a model line to create a 3D grip handle.
Page 18
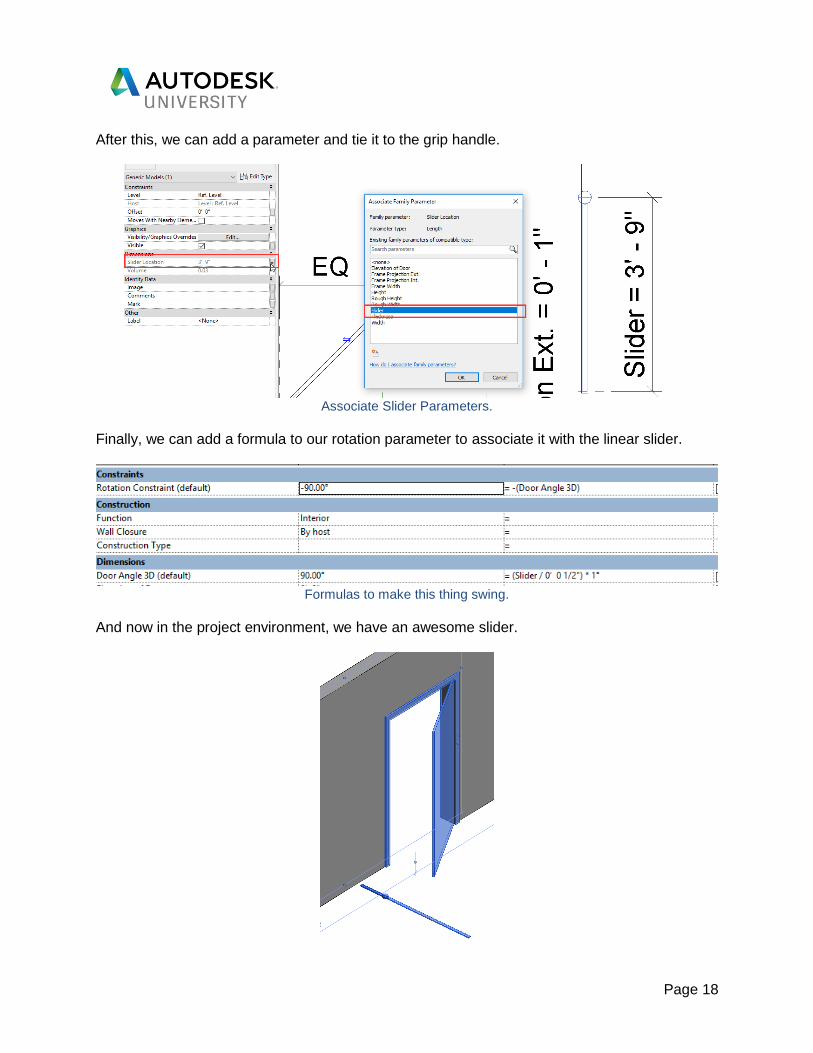
After this, we can add a parameter and tie it to the grip handle.
Associate Slider Parameters.
Finally, we can add a formula to our rotation parameter to associate it with the linear slider.
Formulas to make this thing swing.
And now in the project environment, we have an awesome slider.
Page 19
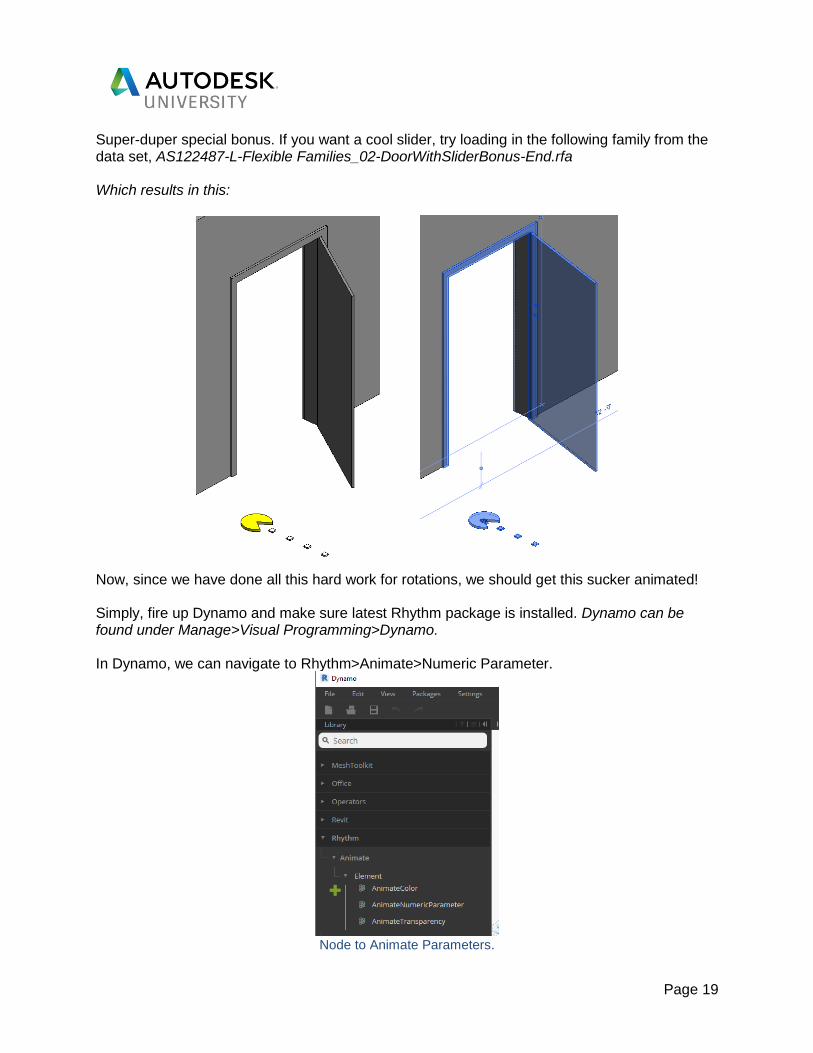
Super-duper special bonus. If you want a cool slider, try loading in the following family from the data set, AS122487-L-Flexible Families_02-DoorWithSliderBonus-End.rfa Which results in this:
Now, since we have done all this hard work for rotations, we should get this sucker animated! Simply, fire up Dynamo and make sure latest Rhythm package is installed. Dynamo can be found under Manage>Visual Programming>Dynamo. In Dynamo, we can navigate to Rhythm>Animate>Numeric Parameter.
Node to Animate Parameters.
Page 20
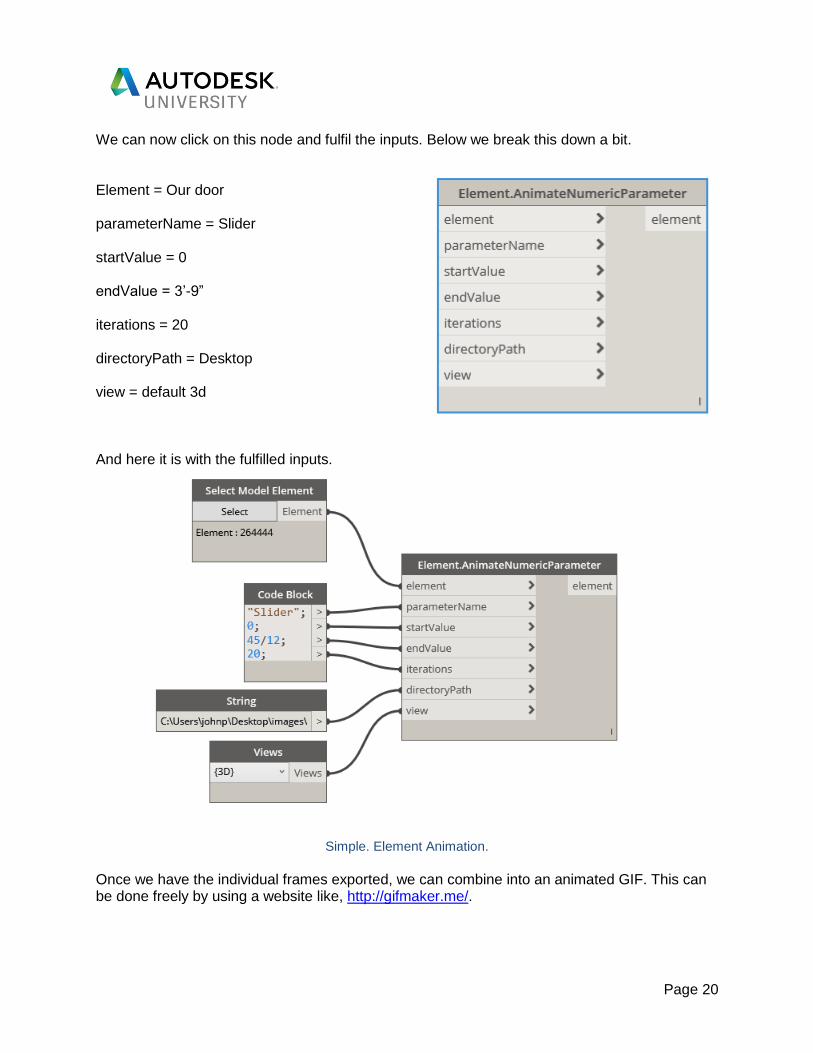
We can now click on this node and fulfil the inputs. Below we break this down a bit.
Element = Our door parameterName = Slider startValue = 0 endValue = 3’-9” iterations = 20 directoryPath = Desktop view = default 3d And here it is with the fulfilled inputs.
Simple. Element Animation.
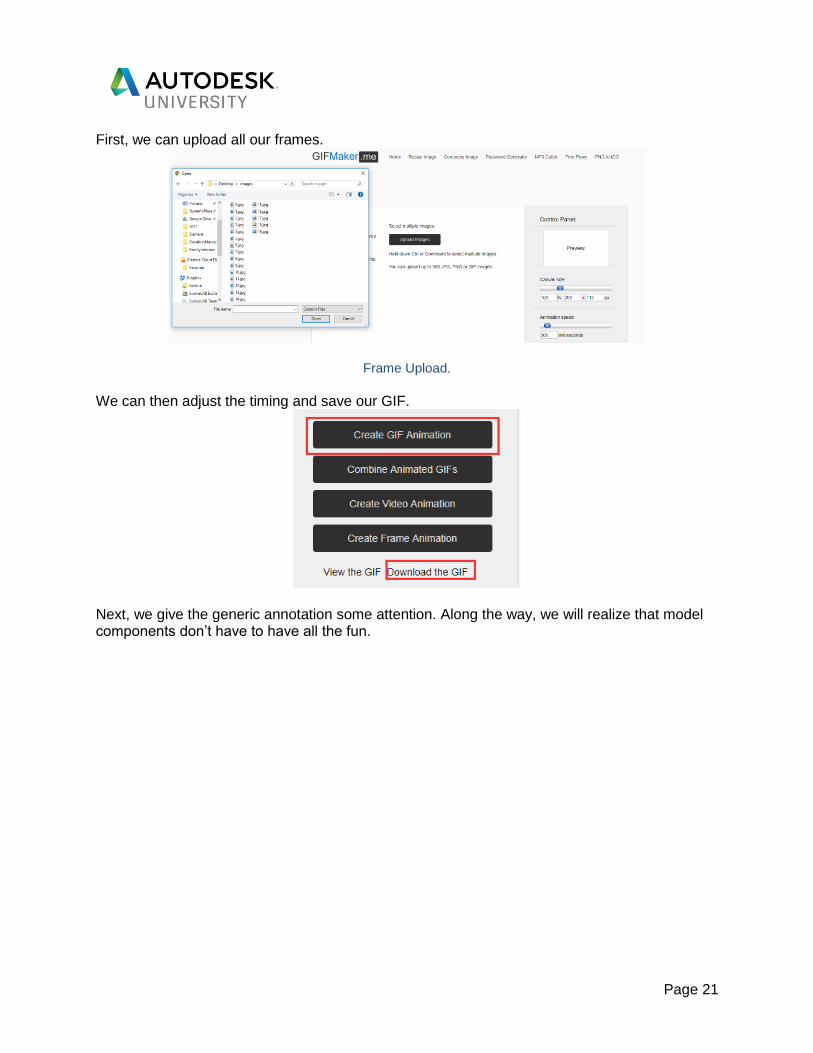
Once we have the individual frames exported, we can combine into an animated GIF. This can be done freely by using a website like, http://gifmaker.me/.
Page 21
First, we can upload all our frames.
Frame Upload.
We can then adjust the timing and save our GIF.
Next, we give the generic annotation some attention. Along the way, we will realize that model components don’t have to have all the fun.
Page 22
Generic Annotations with Grip Handles
If you have ever used a generic annotation family you’ve probably noticed that you cannot add reference planes to them. If you didn’t know this, trust me, I’ve tried a ton of ways.
Inability to add reference plane via UI.
Inability to add reference plane via API.
Inability to copy built in reference planes in family template.
Additionally, reference lines will not give us grip handles in the same way they did for us previously. Confusing…
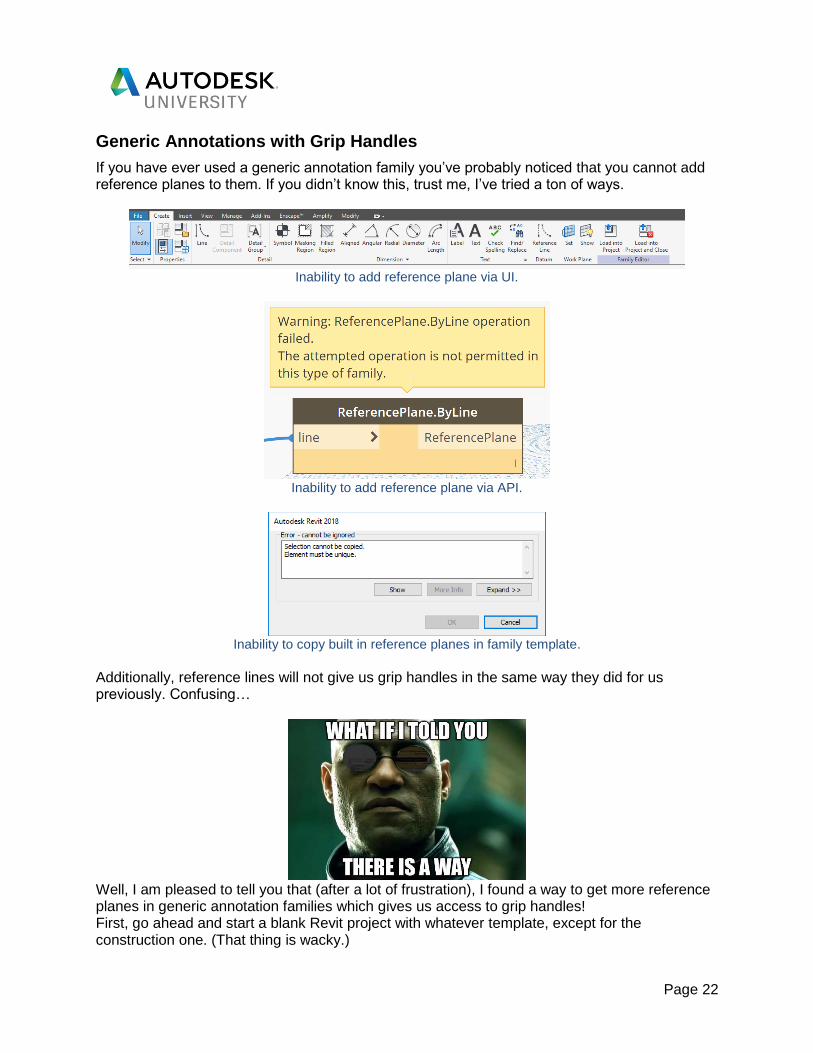
Well, I am pleased to tell you that (after a lot of frustration), I found a way to get more reference planes in generic annotation families which gives us access to grip handles! First, go ahead and start a blank Revit project with whatever template, except for the construction one. (That thing is wacky.)
Page 23
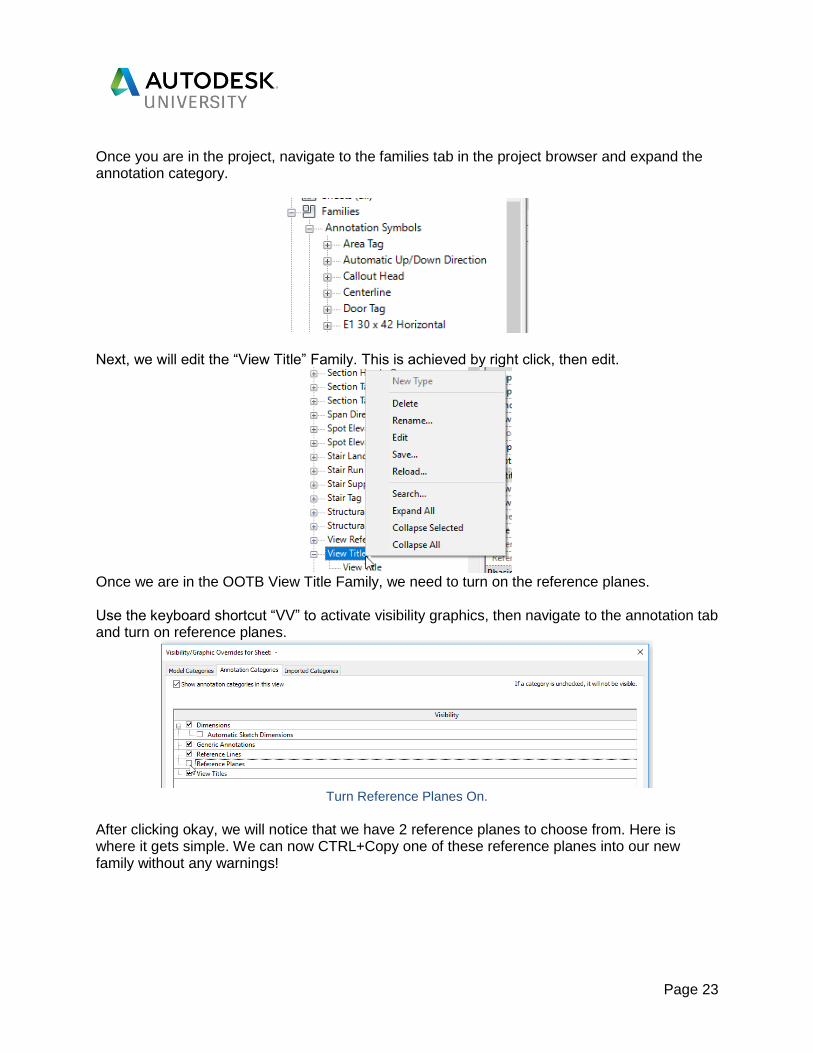
Once you are in the project, navigate to the families tab in the project browser and expand the annotation category.
Next, we will edit the “View Title” Family. This is achieved by right click, then edit.
Once we are in the OOTB View Title Family, we need to turn on the reference planes. Use the keyboard shortcut “VV” to activate visibility graphics, then navigate to the annotation tab and turn on reference planes.
Turn Reference Planes On.
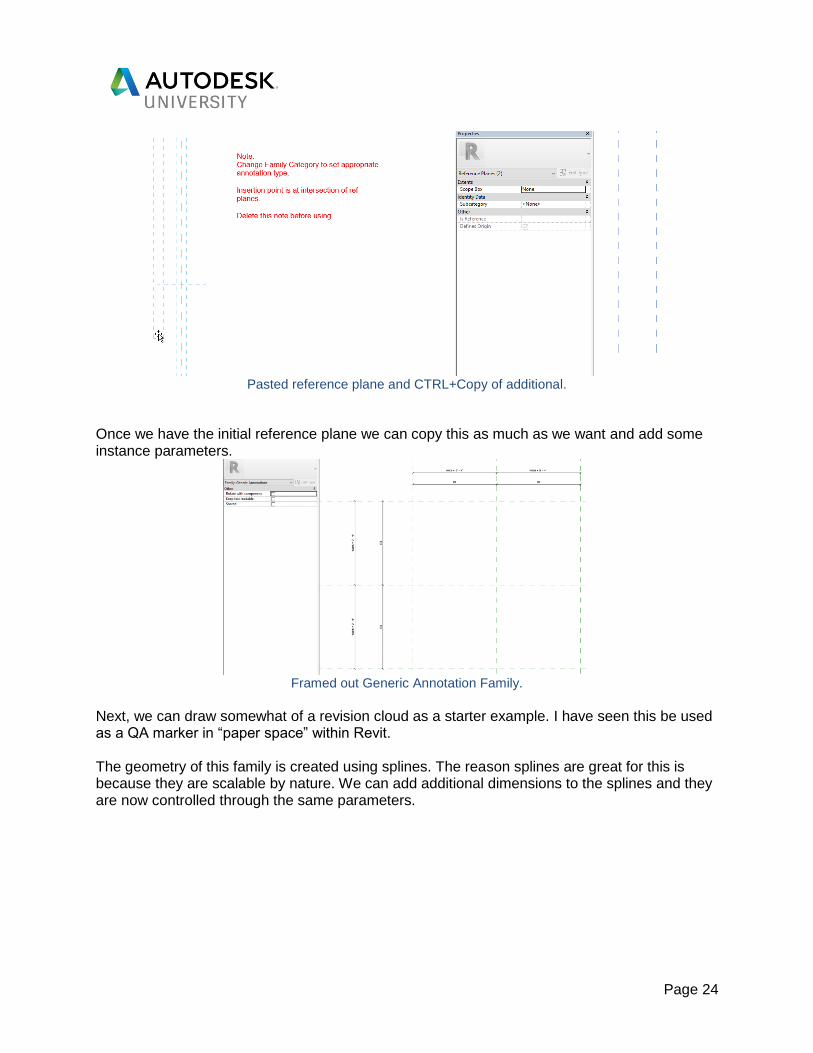
After clicking okay, we will notice that we have 2 reference planes to choose from. Here is where it gets simple. We can now CTRL+Copy one of these reference planes into our new family without any warnings!
Page 24
Pasted reference plane and CTRL+Copy of additional.
Once we have the initial reference plane we can copy this as much as we want and add some instance parameters.
Framed out Generic Annotation Family.
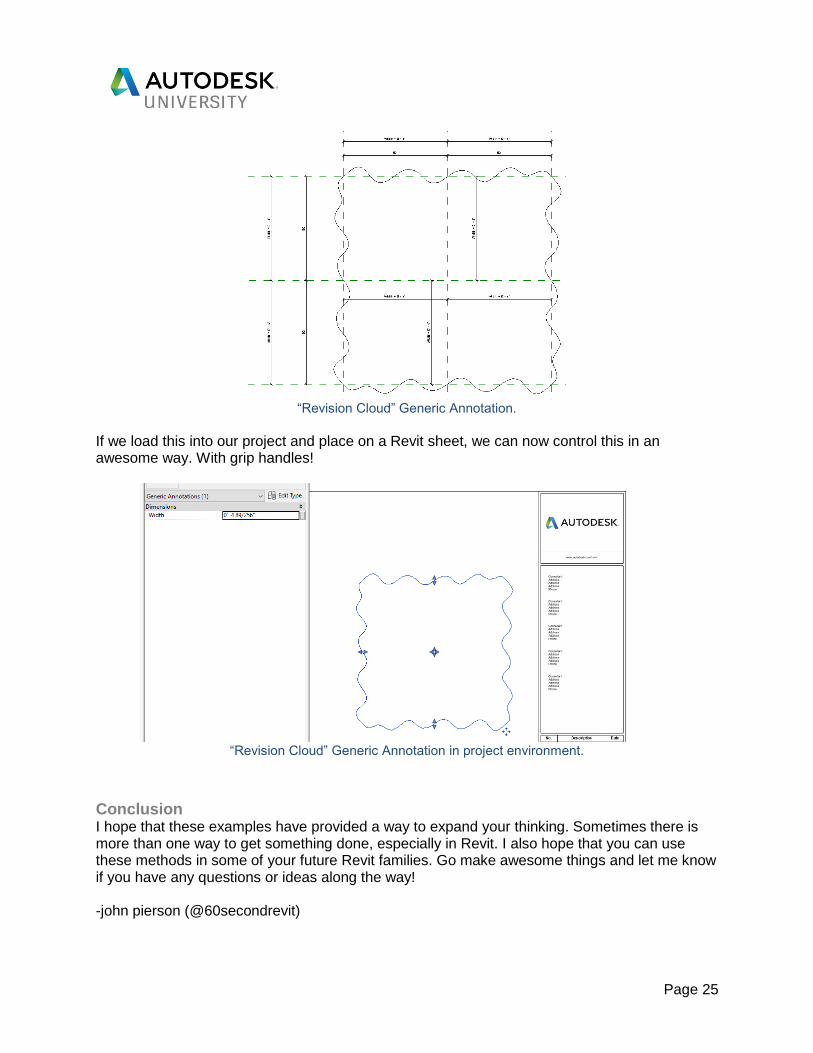
Next, we can draw somewhat of a revision cloud as a starter example. I have seen this be used as a QA marker in “paper space” within Revit. The geometry of this family is created using splines. The reason splines are great for this is because they are scalable by nature. We can add additional dimensions to the splines and they are now controlled through the same parameters.
Page 25
“Revision Cloud” Generic Annotation.
If we load this into our project and place on a Revit sheet, we can now control this in an awesome way. With grip handles!
“Revision Cloud” Generic Annotation in project environment.
Conclusion I hope that these examples have provided a way to expand your thinking. Sometimes there is more than one way to get something done, especially in Revit. I also hope that you can use these methods in some of your future Revit families. Go make awesome things and let me know if you have any questions or ideas along the way! -john pierson (@60secondrevit)