Embed Size (px)
Citation preview
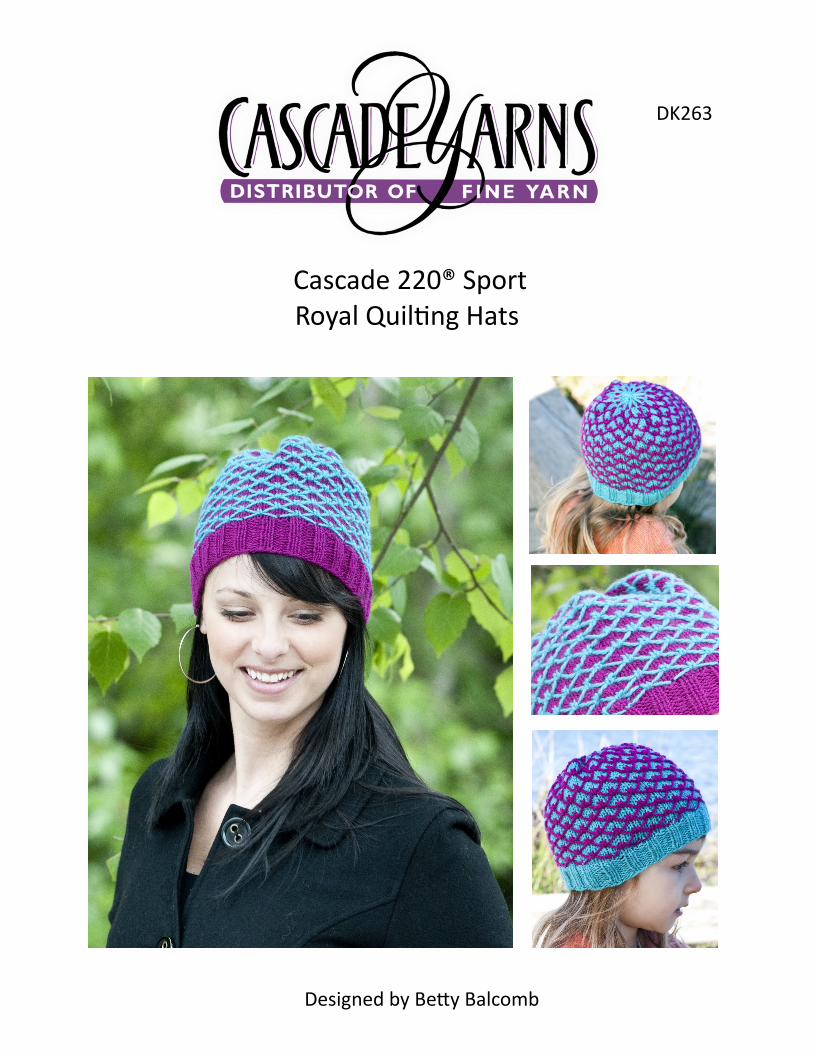
Cascade 220® Sport Royal Quilting Hats
DK263
Designed by Betty Balcomb
Cascade 220® Sport Royal Quilting Hats By Betty Balcomb
This wonderful 2-color pattern is surprisingly easy especially worked in the round. Strands or floats are laid down on the right side of the fabric and then a couple rows later you lift the strand and catch it in a stitch to form the slightly draped diagonal lines. The finished fabric seems to be two layers, an underlying layer of plain stockinette with a scrim of diamond shapes nesting comfortably on top. Materials: I skein each of Cascade 220® Sport in sharply contrasting colors. Pictured hats are knit in colors 8892 and 7803. Size 6 and 7 16” circular needles and size 7 DPNs OR SIZE REQUIRED TO OB-TAIN GAUGE. Sizes: Pictured hats will fit a child. Directions are for the smaller hat with changes for a larger size in parentheses. Where only 1 number appears, it applies to both sizes. Gauge: 6 sts/inch in pattern on larger needles.
DIRECTIONS: With smaller circular needle and Color A, cast on 80(92) sts. Place marker and join in the round be-ing careful not to twist sts. Work K2, P2 ribbing until band measures 1-1/4(1-1/2)” from cast-on edge. K the next row inc’g 4 sts evenly spaced across row, 84(96 sts). Now you will work the Royal Quilting Pattern. There is a jog at the join but it’s not that visible and you can always be careful to keep the jog at the back of your head. The pattern: Repeat of 6 sts, 8 rows Row 1: W/Color B *K1, SL5 wyif, (Yes, the yarn is in front so the float shows. Be sure to have the float a little loose, spread the 5 slipped sts out on the needle to about the gauge and lay the strand across this length, about an inch), rep. from * across row. At end of row to lock in the final float you will have to slip the marker and K1 from left of marker then slip that st back to the left needle. The stitch will be knit twice but pull a little tight and the extra stitch blends in. Rows 2 and 3: W/Color A, Knit entire 2 rows Row 4: W/Color B, SL3 wyib, *knit 1 “lift and catch stitch” (Kl&c) by inserting the tip of the right nee-dle under the float that was created in Row 1 and then knitting the next st so that the middle of the float is caught up in the stitch forming the first set of sides of a diamond shape, SL5 wyib, rep. from * to last 2 sts, end SL2 wyib. Row 5: W/Color B, SL3 wyib, *K1, SL5 wyif, rep. from * to last 2 sts ending SL2 wyif but to complete pattern slip marker, SL3 from left of marker and K1 creating a final float spanning 5 sts, then slip the 4 sts to left of marker back to left needle (only 1 st gets knit twice as on row 1). Rows 6 and 7: W/Color A, Knit entire 2 rows.
Row 8: W/Color B, the yarn will be forward a few sts to the left, leaving an adequate float, pull yarn across wrong side of fabric to be in position to work the row. *Kl&c, SL5 wyib, rep. from * to end of row. Repeat Rows 1 to 8 until hat measures about 5-1/2(6-1/2) inches from the cast on edge. You must end with a row 8. Err on the side of a little more than the given measurement rather than less if you don’t come out quite right. You have made the hat a little taller than usual to the crown because the shaping of the dome happens very quickly in order to come out with a nice design on the very top. Shape crown: Row 1: Work same as first row of pattern but pull the floats a little tighter than before because when you work the lift and catch you will be spanning fewer sts. Row 2: W/Color A, knit across row. Row 3: W/Color A, K2 K2tog, *K4, K2tog, rep. from * ending K2. Row 4: W/Color B, SL2 wyib, *work Kl&c but as you do the st. also k2tog, SL3 wyib, rep. from * ending with Kl&c with K2tog, SL1. Row 5: W/Color B, SL2 wyib, *K1, SL3 wyib, rep. from * ending SL1. Row 6: W/Color A, knit across row. Row 7: W/Color A, *K2tog, K2, rep. from * across row. Row 8: W/Color B, K1, *SL1 wyib, K2tog, rep from * ending K2tog which will be the last st of the row merged with the st to the left of the marker Row 9: W/Color B, SL1 wyib, K1. Cut B leaving a tail long enough to weave in. Row 10: W/Color A, knit across row. Row 11: W/Color A, K2tog across row. Repeat row 11 as necessary until there are few enough sts to tie off the top. Cut yarn leaving about a 9” tail. Thread yarn onto tapestry needle, pass it through the remaining sts and pull tail tight. Weave in ends.