Embed Size (px)
Citation preview
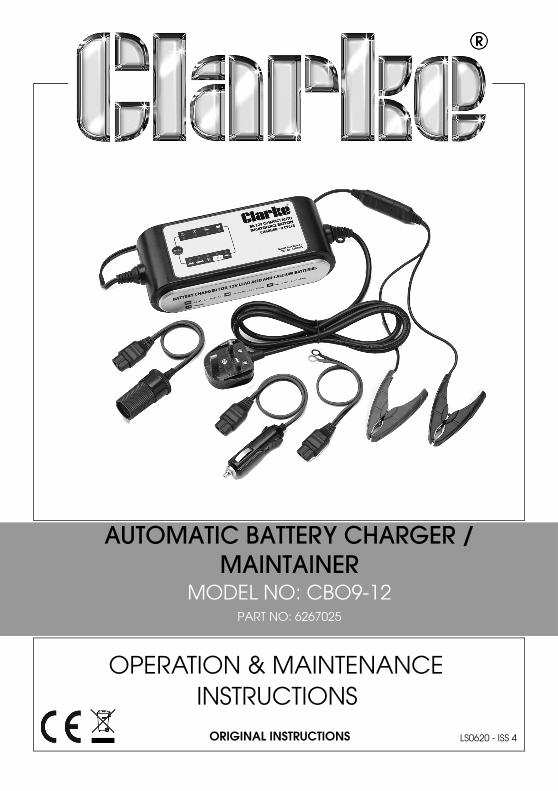
AUTOMATIC BATTERY CHARGER / MAINTAINER
MODEL NO: CBO9-12PART NO: 6267025
OPERATION & MAINTENANCEINSTRUCTIONS
LS0620 - ISS 4ORIGINAL INSTRUCTIONS
P
INTRODUCTION
Thank you for purchasing this CLARKE product.
Before attempting to use this product, please read this manual thoroughly and follow the instructions carefully. In doing so you will ensure the safety of yourself and that of others around you, and you can look forward to your purchase giving you long and satisfactory service.
GUARANTEE
This product is guaranteed against faulty manufacture for a period of 12 months from the date of purchase. Please keep your receipt which will be required as proof of purchase.
This guarantee is invalid if the product is found to have been abused or tampered with in any way, or not used for the purpose for which it was intended.
Faulty goods should be returned to their place of purchase, no product can be returned to us without prior permission.
This guarantee does not effect your statutory rights.
ENVIRONMENTAL RECYCLING POLICY
Through purchase of this product, the customer is taking on the obligation to deal with the WEEE in accordance with the WEEE regulations in relation to the treatment, recycling & recovery and environmentally sound disposal of the WEEE.
In effect, this means that this product must not be disposed of with general household waste. It must be disposed of according to the laws governing Waste Electrical and Electronic Equipment (WEEE) at a recognised disposal facility.
2arts & Service: 020 8988 7400 / E-mail: [email protected] or [email protected]
P
SAFETY INSTRUCTIONS
• Always keep the charger in good condition.
• Keep the charger clean.
• Always keep the work area clean and tidy and make sure that there is sufficient lighting.
• Use eye protection (standard spectacles are not adequate) and protective clothing. Do not touch your eyes while working with batteries.
• Remove loose clothing, watches, and any jewellery, and contain long hair. A lead acid battery can cause a short-circuit current sufficient to weld metal to metal, which will cause dangerous burns.
• Read the vehicle manufacturers instruction manual for specified battery charging instructions.
• Disconnect the battery and move it to a safe, dry level area for charging. If the battery cannot be removed, refer to manufacturers handbook.
• Clean the clamps and battery terminals to remove oxidation.
• When you connect the clamps to the battery, make sure that you follow the correct polarity. Red is Positive (+) and Black is Negative (-).
• DO NOT pull or lift the charger by its cables.
• DO NOT pull plugs from the sockets by the power cable.
• DO NOT try to charge a non-rechargeable battery.
• DO NOT use the charger for something other than that for which it is designed.
• DO NOT let the clamps touch each other when the power is on.
• DO NOT get the charger wet or use it in damp or wet locations or areas where there is condensation.
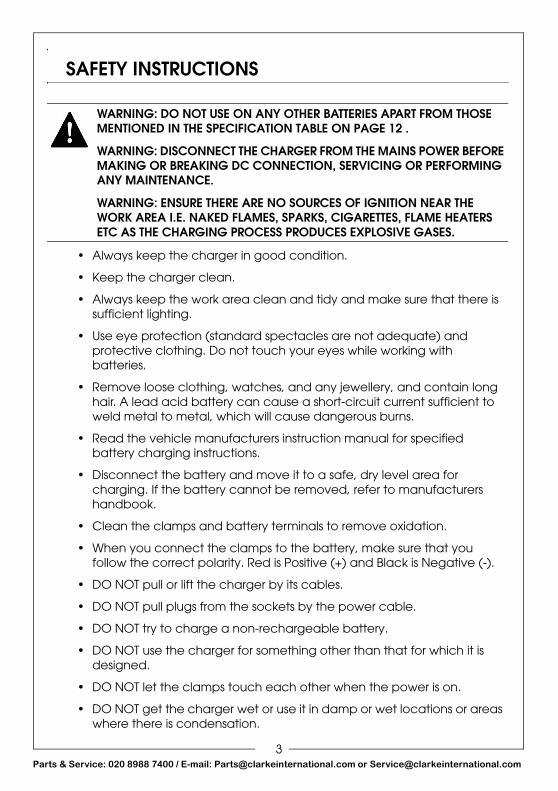
WARNING: DO NOT USE ON ANY OTHER BATTERIES APART FROM THOSE MENTIONED IN THE SPECIFICATION TABLE ON PAGE 12 .
WARNING: DISCONNECT THE CHARGER FROM THE MAINS POWER BEFORE MAKING OR BREAKING DC CONNECTION, SERVICING OR PERFORMING ANY MAINTENANCE.
WARNING: ENSURE THERE ARE NO SOURCES OF IGNITION NEAR THE WORK AREA I.E. NAKED FLAMES, SPARKS, CIGARETTES, FLAME HEATERS ETC AS THE CHARGING PROCESS PRODUCES EXPLOSIVE GASES.
3arts & Service: 020 8988 7400 / E-mail: [email protected] or [email protected]

P
• DO NOT operate the charger if there is any visible damage.
• DO NOT try to modify or open the charger.
• DO NOT charge the battery with the engine running.
• DO NOT charge a frozen battery.
• When not in use disconnect the charger from the power supply and keep in a safe, dry area.
• DO NOT let untrained persons operate the charger. It is not intended for use by persons with reduced physical, sensory or mental capabilities, or lack of experience and knowledge, unless they have been given instruction concerning the use of the charger and are supervised by a person responsible for their safety.
• Keep children and unauthorised persons away from the working area.
• Follow these instructions and those of the battery and vehicle manufacturers.
PERSONAL PRECAUTIONS• Ensure there is another person within hearing range of your voice, or
close enough to come to your aid, should a problem arise.
• Have fresh water and soap nearby in case battery acid contacts skin, clothing or eyes.
• Wash immediately with soap and water if battery acid contacts skin or clothing. If acid enters the eye, flush the eye immediately with cool, clean running water for at least 15 minutes and seek immediate medical attention.
• DO NOT smoke or allow a flame in the vicinity of battery or engine.
SAFETY SYMBOLS
Read all instructions before use
For indoor use only.
4arts & Service: 020 8988 7400 / E-mail: [email protected] or [email protected]
P
ELECTRICAL CONNECTIONS
Connect the mains lead to a standard, 230 Volt (50Hz) electrical supply through an approved BS1363/A plug fitted with a BS1362 fuse.
If the plug has to be changed because of damage, it must be removed and a replacement fitted, following the wiring instructions shown below. The old plug must be discarded safely, as insertion into a power socket could cause an electrical hazard.
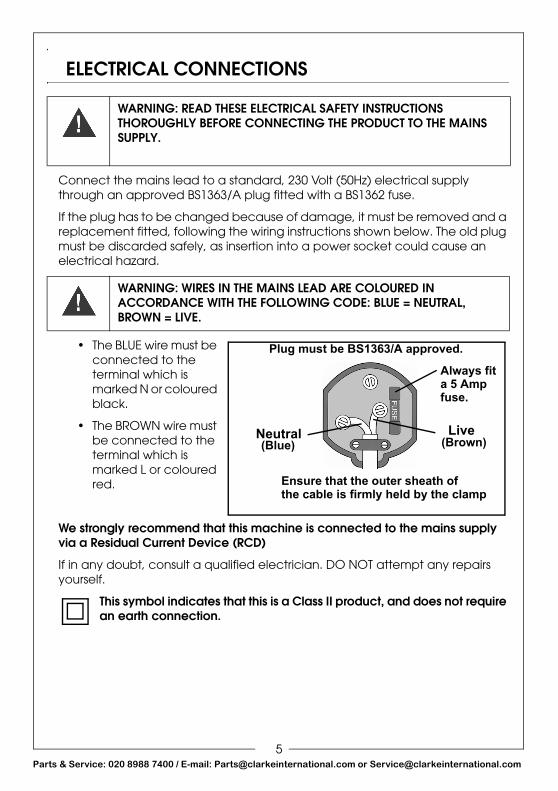
• The BLUE wire must be connected to the terminal which is marked N or coloured black.
• The BROWN wire must be connected to the terminal which is marked L or coloured red.
We strongly recommend that this machine is connected to the mains supply via a Residual Current Device (RCD)
If in any doubt, consult a qualified electrician. DO NOT attempt any repairs yourself.
This symbol indicates that this is a Class II product, and does not require an earth connection.
WARNING: READ THESE ELECTRICAL SAFETY INSTRUCTIONS THOROUGHLY BEFORE CONNECTING THE PRODUCT TO THE MAINS SUPPLY.
WARNING: WIRES IN THE MAINS LEAD ARE COLOURED IN ACCORDANCE WITH THE FOLLOWING CODE: BLUE = NEUTRAL, BROWN = LIVE.
Plug must be BS1363/A approved.
Always fit
Ensure that the outer sheath of
Neutral(Blue)
Live(Brown)
a 5 Amp
the cable is firmly held by the clamp
fuse.
5arts & Service: 020 8988 7400 / E-mail: [email protected] or [email protected]
P
THE 9-STAGE CHARGING PROCESS
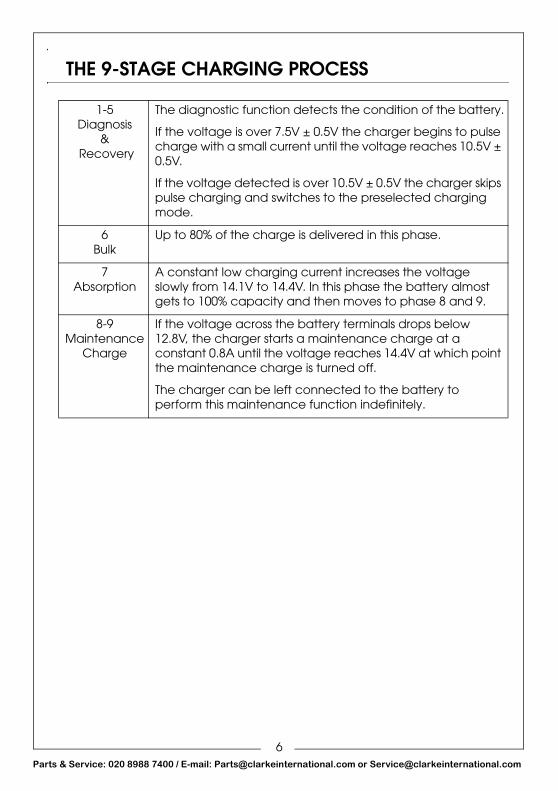
1-5Diagnosis
& Recovery
The diagnostic function detects the condition of the battery.
If the voltage is over 7.5V ± 0.5V the charger begins to pulse charge with a small current until the voltage reaches 10.5V ± 0.5V.
If the voltage detected is over 10.5V ± 0.5V the charger skips pulse charging and switches to the preselected charging mode.
6Bulk
Up to 80% of the charge is delivered in this phase.
7Absorption
A constant low charging current increases the voltage slowly from 14.1V to 14.4V. In this phase the battery almost gets to 100% capacity and then moves to phase 8 and 9.
8-9Maintenance
Charge
If the voltage across the battery terminals drops below 12.8V, the charger starts a maintenance charge at a constant 0.8A until the voltage reaches 14.4V at which point the maintenance charge is turned off.
The charger can be left connected to the battery to perform this maintenance function indefinitely.
6arts & Service: 020 8988 7400 / E-mail: [email protected] or [email protected]
P
ATTACHMENTS
1. The charger should be connected to the battery or the vehicle accessory (cigar lighter) socket, before connecting it to the mains supply.
IMPORTANT: Check the vehicle handbook and note whether the vehicle has a positive earth or negative earth.
2. The output cable from the charger terminates in a socket. Connect one of
the following leads into this socket.
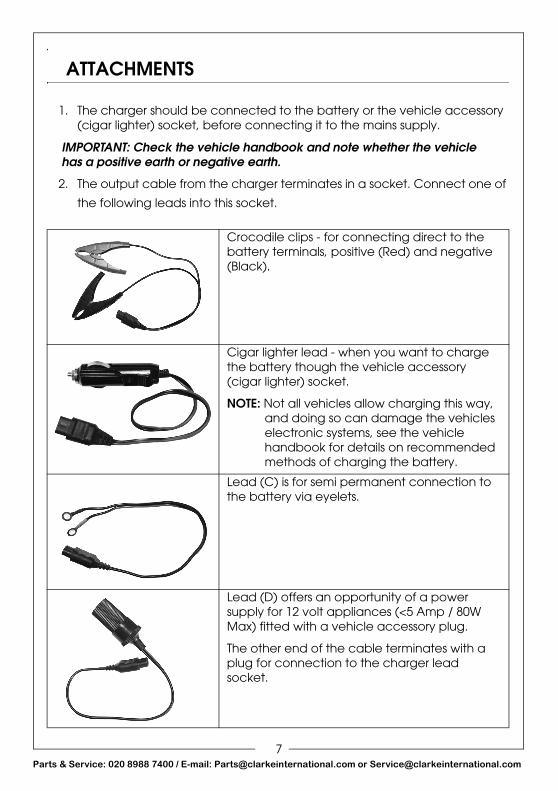
Crocodile clips - for connecting direct to the battery terminals, positive (Red) and negative (Black).
Cigar lighter lead - when you want to charge the battery though the vehicle accessory (cigar lighter) socket.
NOTE: Not all vehicles allow charging this way, and doing so can damage the vehicles electronic systems, see the vehicle handbook for details on recommended methods of charging the battery.
Lead (C) is for semi permanent connection to the battery via eyelets.
Lead (D) offers an opportunity of a power supply for 12 volt appliances (<5 Amp / 80W Max) fitted with a vehicle accessory plug.
The other end of the cable terminates with a plug for connection to the charger lead socket.
7arts & Service: 020 8988 7400 / E-mail: [email protected] or [email protected]
P
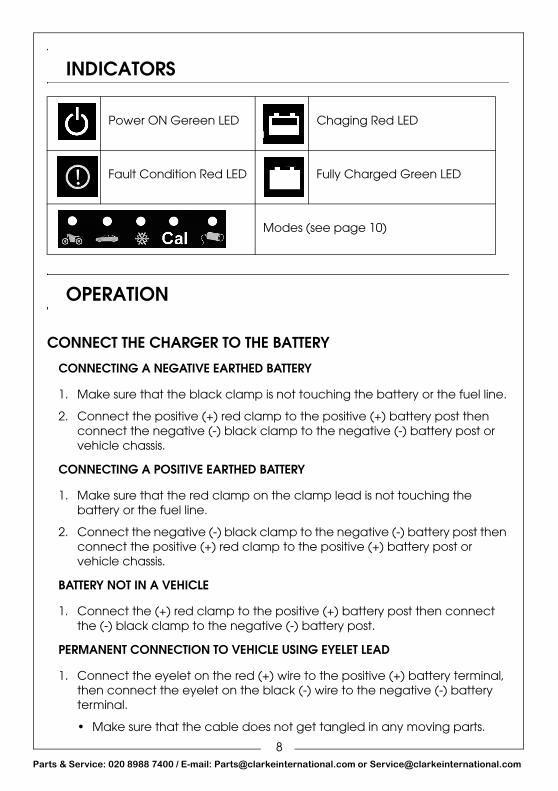
INDICATORS
OPERATION
CONNECT THE CHARGER TO THE BATTERY
CONNECTING A NEGATIVE EARTHED BATTERY
1. Make sure that the black clamp is not touching the battery or the fuel line.
2. Connect the positive (+) red clamp to the positive (+) battery post then connect the negative (-) black clamp to the negative (-) battery post or vehicle chassis.
CONNECTING A POSITIVE EARTHED BATTERY
1. Make sure that the red clamp on the clamp lead is not touching the battery or the fuel line.
2. Connect the negative (-) black clamp to the negative (-) battery post then connect the positive (+) red clamp to the positive (+) battery post or vehicle chassis.
BATTERY NOT IN A VEHICLE
1. Connect the (+) red clamp to the positive (+) battery post then connect the (-) black clamp to the negative (-) battery post.
PERMANENT CONNECTION TO VEHICLE USING EYELET LEAD
1. Connect the eyelet on the red (+) wire to the positive (+) battery terminal, then connect the eyelet on the black (-) wire to the negative (-) battery terminal.
• Make sure that the cable does not get tangled in any moving parts.
Power ON Gereen LED Chaging Red LED
Fault Condition Red LED Fully Charged Green LED
Modes (see page 10)
8arts & Service: 020 8988 7400 / E-mail: [email protected] or [email protected]
P
CONNECT CHARGER TO MAINS POWER SUPPLY1. Insert the plug into the mains power supply.
2. Switch on the power supply.
• The “POWER” LED will illuminate.
CHARGER SETUP1. Press the MODE button repeatedly to select the mode you want to use
(See “Charging Modes” on page 10.) for a full description.
• The LED adjacent to the selected made will be illuminated.
• If the Mode button is pressed again during charging, the charger will switch to the next charging mode and will function in that mode.
• Once the battery is fully charged and if the charger remains connected, the charger will switch to trickle charge / maintenance mode and will remain in this mode even if the user selects another mode. This protects the battery from being damaged
2. When the “FULL” LED is lit and maintenance mode is not required, disconnect the charger from the power supply, remove the clamps from the battery in the reverse order they were fitted.
FAULT PROTECTIONIn the case of a short circuit, open circuit, or reversed polarity, the “Fault” (!) LED will light up and the charger will turn off and revert to standby mode.
The fault must be identified and resolved before any of the charging modes are initiated.
9arts & Service: 020 8988 7400 / E-mail: [email protected] or [email protected]
P
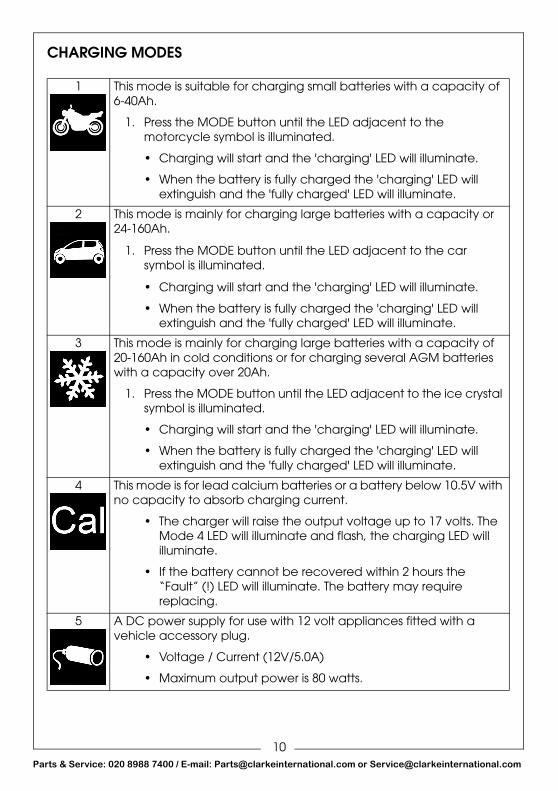
CHARGING MODES
1 This mode is suitable for charging small batteries with a capacity of 6-40Ah.
1. Press the MODE button until the LED adjacent to the motorcycle symbol is illuminated.
• Charging will start and the 'charging' LED will illuminate.
• When the battery is fully charged the 'charging' LED will extinguish and the 'fully charged' LED will illuminate.
2 This mode is mainly for charging large batteries with a capacity or 24-160Ah.
1. Press the MODE button until the LED adjacent to the car symbol is illuminated.
• Charging will start and the 'charging' LED will illuminate.
• When the battery is fully charged the 'charging' LED will extinguish and the 'fully charged' LED will illuminate.
3 This mode is mainly for charging large batteries with a capacity of 20-160Ah in cold conditions or for charging several AGM batteries with a capacity over 20Ah.
1. Press the MODE button until the LED adjacent to the ice crystal symbol is illuminated.
• Charging will start and the 'charging' LED will illuminate.
• When the battery is fully charged the 'charging' LED will extinguish and the 'fully charged' LED will illuminate.
4 This mode is for lead calcium batteries or a battery below 10.5V with no capacity to absorb charging current.
• The charger will raise the output voltage up to 17 volts. The Mode 4 LED will illuminate and flash, the charging LED will illuminate.
• If the battery cannot be recovered within 2 hours the “Fault” (!) LED will illuminate. The battery may require replacing.
5 A DC power supply for use with 12 volt appliances fitted with a vehicle accessory plug.
• Voltage / Current (12V/5.0A)
• Maximum output power is 80 watts.
10arts & Service: 020 8988 7400 / E-mail: [email protected] or [email protected]
P
MAINTENANCE
Other than cleaning, this charger does not require any specific maintenance.
CLEANINGOnly use a dry cloth to clean the charger. DO NOT use solvents or cleaning agents on the casing.
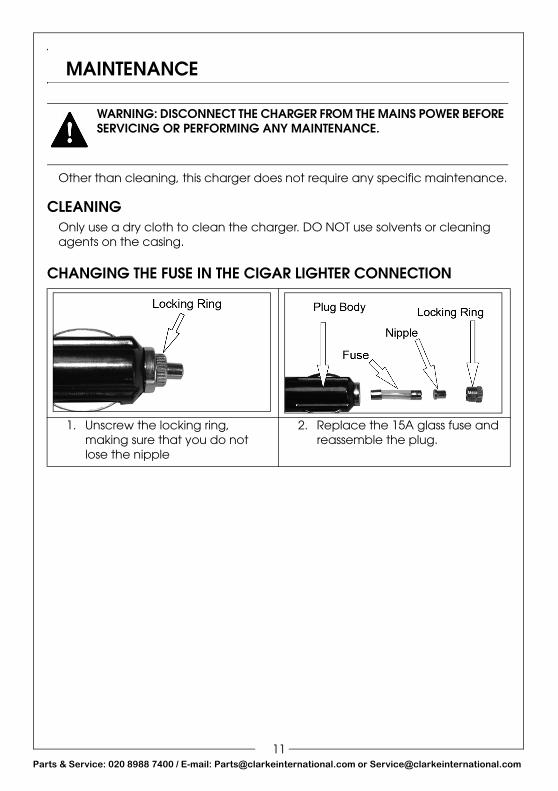
CHANGING THE FUSE IN THE CIGAR LIGHTER CONNECTION
WARNING: DISCONNECT THE CHARGER FROM THE MAINS POWER BEFORE SERVICING OR PERFORMING ANY MAINTENANCE.
1. Unscrew the locking ring, making sure that you do not lose the nipple
2. Replace the 15A glass fuse and reassemble the plug.
11arts & Service: 020 8988 7400 / E-mail: [email protected] or [email protected]
P
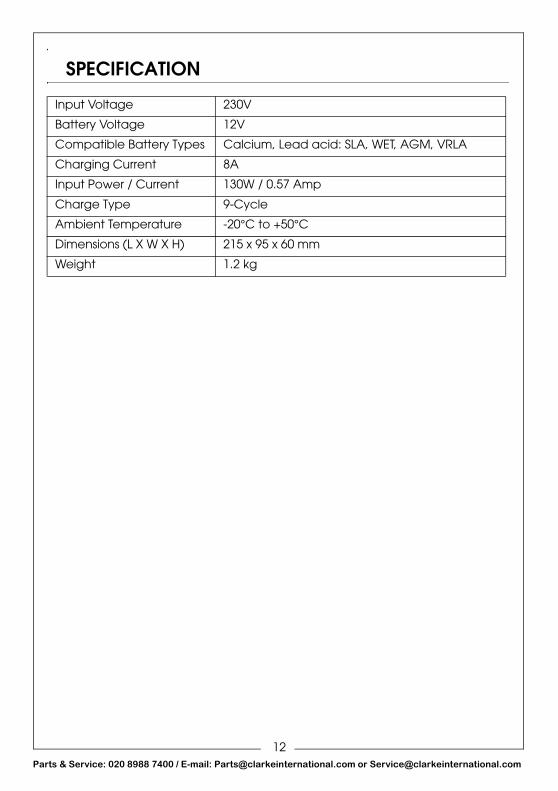
SPECIFICATION
Input Voltage 230V
Battery Voltage 12V
Compatible Battery Types Calcium, Lead acid: SLA, WET, AGM, VRLA
Charging Current 8A
Input Power / Current 130W / 0.57 Amp
Charge Type 9-Cycle
Ambient Temperature -20°C to +50°C
Dimensions (L X W X H) 215 x 95 x 60 mm
Weight 1.2 kg
12arts & Service: 020 8988 7400 / E-mail: [email protected] or [email protected]
P
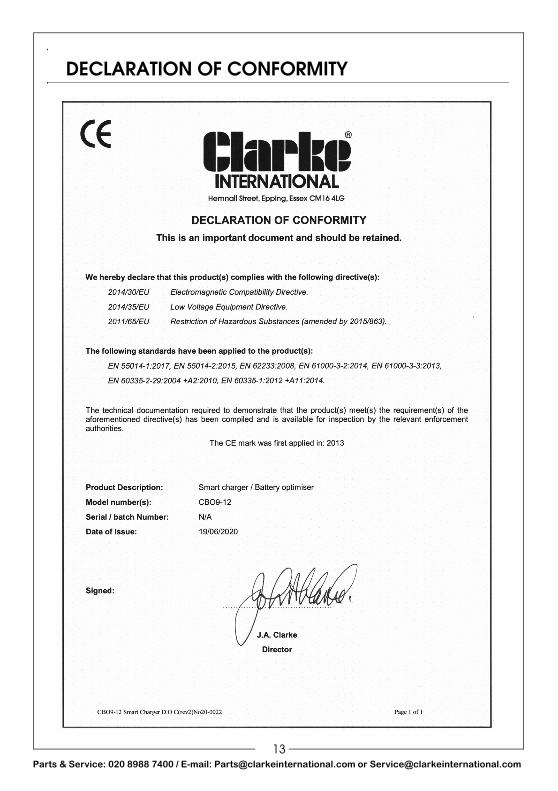
DECLARATION OF CONFORMITY
13arts & Service: 020 8988 7400 / E-mail: [email protected] or [email protected]