Embed Size (px)
Citation preview
User Guide
AvePoint Privacy Impact Assessment
Service Pack 2
Issued November 2016
2
AvePoint Privacy Impact Assessment User Guide
Table of Contents
Table of Contents .......................................................................................................................................... 2
What Is New in this Guide ............................................................................................................................. 5
About AvePoint Privacy Impact Assessment ................................................................................................ 6
Submitting Documentation Feedback to AvePoint ...................................................................................... 7
System Requirements ................................................................................................................................... 8
Minimum Requirements ........................................................................................................................... 8
Support Information ................................................................................................................................. 9
Installation .................................................................................................................................................. 10
Installing AvePoint Privacy Impact Assessment ...................................................................................... 10
Configuring Installation Settings Manually ......................................................................................... 10
Installing AvePoint Privacy Impact Assessment automatically ........................................................... 12
Uninstalling AvePoint Privacy Impact Assessment ................................................................................. 14
Using AvePoint Privacy Impact Assessment Configuration Tool ............................................................ 14
Logging into AvePoint Privacy Impact Assessment ..................................................................................... 16
Settings........................................................................................................................................................ 17
System Security Settings ......................................................................................................................... 17
Account Management ............................................................................................................................ 17
Authentication Manager ..................................................................................................................... 17
Group Management ............................................................................................................................ 19
User Management .............................................................................................................................. 21
Application Settings ................................................................................................................................ 23
Configuring Outgoing E-mail Settings ................................................................................................. 23
Configuring E-mail Template Settings ................................................................................................. 24
My Tasks...................................................................................................................................................... 26
Managing My Tasks ................................................................................................................................. 26
Answering Questions .............................................................................................................................. 26
Reviewing Answers ................................................................................................................................. 27
Question Bank ............................................................................................................................................. 29
Launching the Question Bank ................................................................................................................. 29
3
AvePoint Privacy Impact Assessment User Guide
Managing Questions ............................................................................................................................... 29
Adding a Category ................................................................................................................................... 29
Adding a Question ................................................................................................................................... 29
Editing a Category or Question ............................................................................................................... 30
Deleting Categories and Questions ......................................................................................................... 31
Downloading Questions .......................................................................................................................... 31
Uploading Questions ............................................................................................................................... 31
Question Collection ..................................................................................................................................... 33
Launching Question Collection ............................................................................................................... 33
Managing Question Collections .............................................................................................................. 33
Adding a Question Collection ................................................................................................................. 33
Configuring a Question Collection ...................................................................................................... 34
Editing Question Collections ................................................................................................................... 35
Downloading Question Collections ......................................................................................................... 35
Uploading Question Collections .............................................................................................................. 35
Project Manager ......................................................................................................................................... 38
Launching Project Manager .................................................................................................................... 38
Managing Projects .................................................................................................................................. 38
Adding a Project ...................................................................................................................................... 38
Editing a Project ...................................................................................................................................... 41
Starting a Project..................................................................................................................................... 41
Deleting Projects ..................................................................................................................................... 41
Project Monitor ....................................................................................................................................... 41
Stopping a Project Instance ................................................................................................................ 41
View Details about a Project Instance ................................................................................................ 41
Deleting a Project Instance ................................................................................................................. 42
Report Manager .......................................................................................................................................... 43
Managing Reports ................................................................................................................................... 43
Adding a Report ...................................................................................................................................... 43
Editing a Report ...................................................................................................................................... 44
Exporting a Report .................................................................................................................................. 45
Deleting Reports ..................................................................................................................................... 45
4
AvePoint Privacy Impact Assessment User Guide
Appendix A: Configuring the Question File and Question Collection File .................................................. 46
Configuring the Question File ................................................................................................................. 46
Configuring Attributes for the Question File ...................................................................................... 46
Configuring the Question Collection File ................................................................................................ 48
Configuring Attributes for the Question Collection File ..................................................................... 48
Appendix B: Modifying the Allowed Maximum Size of Uploaded Attachments ........................................ 50
Appendix C: Configuring Restricted File Types to Upload as Attachments ................................................ 51
Appendix D: Enabling only One Assignee to Answer Questions ................................................................. 52
Appendix E: Updating AvePoint Privacy Impact Assessment ..................................................................... 53
Appendix F: Exporting the Project Information to XML Files...................................................................... 54
Appendix G: Modifying the Redirected URL of Task or Project Alert ......................................................... 56
Appendix H: Modifying the Display Format of AD User Names ................................................................. 57
Appendix I: Database Collation Issue .......................................................................................................... 59
Notices and Copyright Information ............................................................................................................ 60
5
AvePoint Privacy Impact Assessment User Guide
What Is New in this Guide
Support using AvePoint Privacy Impact Assessment in SQL Server 2014.
Support exporting a report with answer comments.
Support changing the display format of an AD user name by modifying the configuration file.
Support assigning all questions to assignees in batch.
6
AvePoint Privacy Impact Assessment User Guide
About AvePoint Privacy Impact Assessment
When developing or procuring any information technology (IT) that collects, maintains, or disseminates
personal information, an AvePoint Privacy Impact Assessment (APIA) can ensure privacy protections are
addressed throughout the development, design, and deployment of a technology by providing an
analysis of how personally identifiable information is collected, maintained, used, and disseminated.
7
AvePoint Privacy Impact Assessment User Guide
Submitting Documentation Feedback to AvePoint
AvePoint encourages customers to provide feedback regarding our product documentation. You can
Submit Your Feedback on our website.
8
AvePoint Privacy Impact Assessment User Guide
System Requirements
Refer to the sections below for the AvePoint Privacy Impact Assessment system requirements.
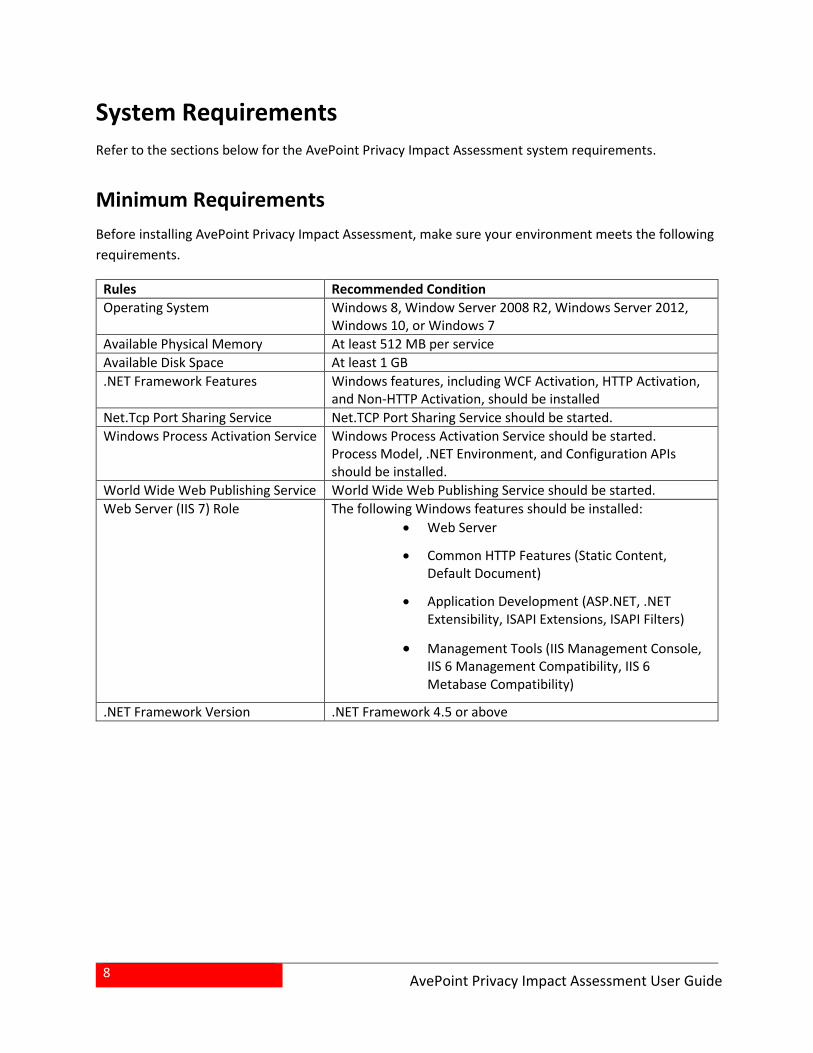
Minimum Requirements
Before installing AvePoint Privacy Impact Assessment, make sure your environment meets the following
requirements.
Rules Recommended Condition
Operating System Windows 8, Window Server 2008 R2, Windows Server 2012, Windows 10, or Windows 7
Available Physical Memory At least 512 MB per service
Available Disk Space At least 1 GB
.NET Framework Features Windows features, including WCF Activation, HTTP Activation, and Non-HTTP Activation, should be installed
Net.Tcp Port Sharing Service Net.TCP Port Sharing Service should be started.
Windows Process Activation Service Windows Process Activation Service should be started. Process Model, .NET Environment, and Configuration APIs should be installed.
World Wide Web Publishing Service World Wide Web Publishing Service should be started.
Web Server (IIS 7) Role The following Windows features should be installed:
Web Server
Common HTTP Features (Static Content, Default Document)
Application Development (ASP.NET, .NET Extensibility, ISAPI Extensions, ISAPI Filters)
Management Tools (IIS Management Console, IIS 6 Management Compatibility, IIS 6 Metabase Compatibility)
.NET Framework Version .NET Framework 4.5 or above
9
AvePoint Privacy Impact Assessment User Guide
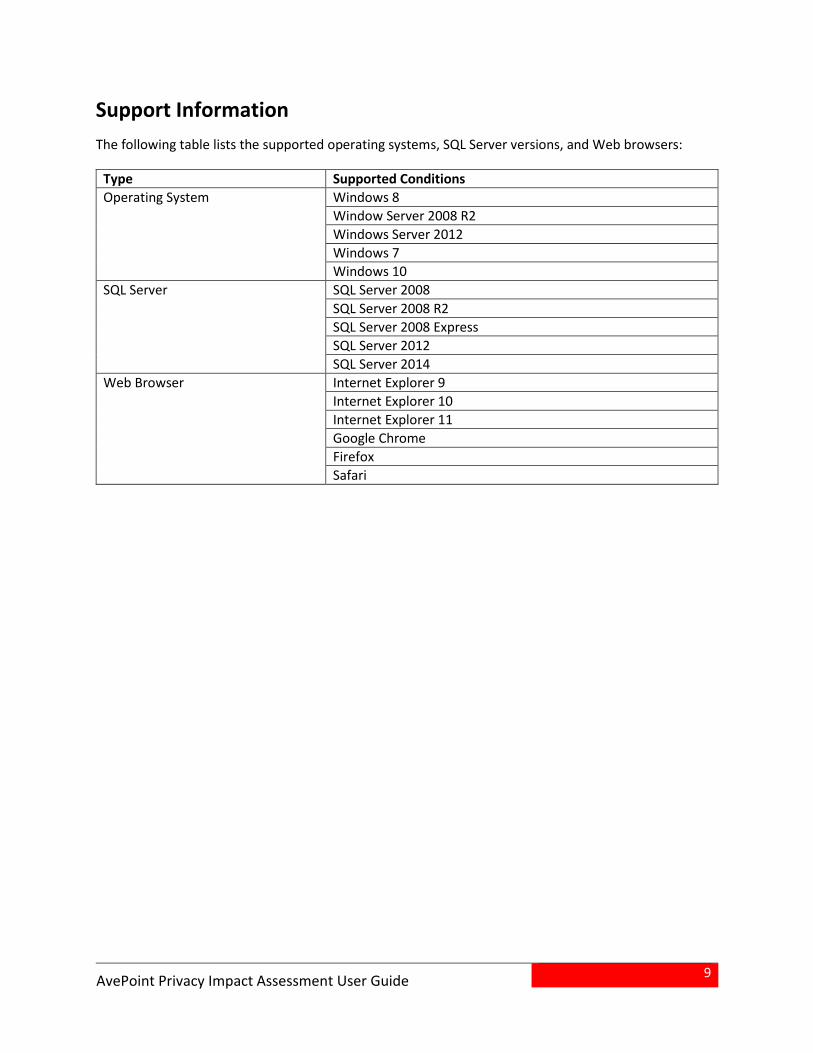
Support Information
The following table lists the supported operating systems, SQL Server versions, and Web browsers:
Type Supported Conditions
Operating System
Windows 8
Window Server 2008 R2
Windows Server 2012
Windows 7
Windows 10
SQL Server
SQL Server 2008
SQL Server 2008 R2
SQL Server 2008 Express
SQL Server 2012
SQL Server 2014 Web Browser Internet Explorer 9
Internet Explorer 10
Internet Explorer 11
Google Chrome
Firefox
Safari
10
AvePoint Privacy Impact Assessment User Guide
Installation
Refer to the following sections for details about the installation of AvePoint Privacy Impact Assessment.
*Note: AvePoint does not suggest you download APIA onto your personal computer or laptop. APIA is
best hosted by your IT department. Refer to System Requirements on the minimum requirements
needed to install APIA.
Installing AvePoint Privacy Impact Assessment
Complete the following steps before installing AvePoint Privacy Impact Assessment:
1. Locate the AvePoint Privacy Impact Assessment directory.
2. Extract all files from the installation ZIP file.
3. Open the Setup.exe file. The AvePoint Privacy Impact Assessment Installation Wizard appears. There are two options in the AvePoint Privacy Impact Assessment Installation Wizard:
INSTALL – Select this option to install AvePoint Privacy Impact Assessment automatically. You are not required to configure any settings for the installation, AvePoint Privacy Impact Assessment is installed based on the default settings.
ADVANCED – Select this option, you can manually configure the installation settings. AvePoint Privacy Impact Assessment is installed based on your configured settings.
Configuring Installation Settings Manually
If you have selected ADVANCED in the AvePoint Privacy Impact Assessment Installation Wizard,
complete the following settings to install AvePoint Privacy Impact Assessment.
1. In the Customer Information interface, enter your Name and Organization into the provided field, and select Next.
2. Carefully review the AvePoint Privacy Impact Assessment License Agreement.
3. After you have read the agreement, select the I accept the terms in the license agreement checkbox, and select Next.
4. By default, AvePoint Privacy Impact Assessment will be installed in C:\Program Files\AvePoint. To change this location, select Browse. Select Next.
5. AvePoint Privacy Impact Assessment will perform a brief pre-scan of the environment to ensure that all hardware and configurations meet the minimum system requirements.
If any components are missing or need to be configured, click the Install Now link you to have the system automatically perform the installation.
*Note: Most changes will require the user to have local administrator rights to the
computer.
11
AvePoint Privacy Impact Assessment User Guide
If a failure occurs, select the Failed status link of each failure, and then Details to review additional detailed information.
6. Select Next to start the configurations of service for the AvePoint Privacy Impact Assessment.
7. Set up the Service Configuration:
a. AvePoint Privacy Impact Assessment Host – Enter the hostname or IP address of the
machine where AvePoint Privacy Impact Assessment will be installed.
b. IIS Website Settings ‒ Configure the IIS website settings for the AvePoint Privacy Impact
Assessment. You can select to use an existing IIS website or create a new IIS website.
The IIS website is used to access the AvePoint Privacy Impact Assessment.
o Use an existing IIS website ‒ Select an existing IIS website from the drop-down list, and if necessary, you can adjust the Website Port used to access the AvePoint Privacy Impact Assessment.
o Create a new IIS web site ‒ Enter the website name for creating a new IIS website for AvePoint Privacy Impact Assessment. The default Website Port number used to access AvePoint Privacy Impact Assessment is 17000, you do not need to change it unless a known port conflict exists.
o Website Port ‒ Enter the port number for AvePoint Privacy Impact Assessment communication. The default port number is 17000.
c. Application Pool Settings ‒ Configure the IIS application pool settings for the
corresponding website to collect and manage requests sent to corresponding website.
Enter the application pool name and application pool account settings to create a new
IIS application pool for the corresponding website.
*Note: The specified user must be a local administrator.
8. Select Next to start the configurations of databases for the AvePoint Privacy Impact Assessment.
9. Set up the Configuration Database Settings. In this page, MS SQL is selected in the Database Type drop-down menu. The following information must be configured for the MS SQL database:
a. Database Settings ‒ Specify a Configuration Database for AvePoint Privacy Impact
Assessment to store its settings and configurations.
o Database Server ‒ Enter the server name or IP address of the database server you wish to connect to.
o AvePoint Privacy Impact Assessment Database Name ‒ Enter a name for AvePoint Privacy Impact Assessment Configuration Database. If the database does not exist, it will be automatically created in the specified database server.
b. Database Credentials ‒ Select whether Windows Authentication or SQL Authentication
for the AvePoint Privacy Impact Assessment Configuration Database is to be used when
connecting to the SQL server.
12
AvePoint Privacy Impact Assessment User Guide
o Windows Authentication ‒ Use this method when you want the user identity to be confirmed by Windows.
o SQL Authentication ‒ SQL server will confirm the user identity itself according to the specified account and password.
c. Advanced Database Settings ‒ Enter a failover database server name to specify it as a
hot standby database server for the AvePoint Privacy Impact Assessment Configuration
Database to maximize the database availability and minimize the downtime. You must
set up database mirroring in SQL server before configuring the Advanced Database
Settings to ensure the availability of the failover database server.
If you select Built-in Database in the Database Type drop-down menu, no additional
configuration is necessary.
*Note: AvePoint Privacy Impact Assessment uses the 64-bit or 32-bit English version of SQL
express with built-in databases.
Select Next.
10. Set up the Advanced Configuration to select a Secure Socket Layer (SSL) certificate.
Built-in Certificate ‒ Use the certificate provided by AvePoint Privacy Impact Assessment. No additional configuration is necessary.
User-defined Certificate ‒ AvePoint Privacy Impact Assessment accepts user-defined certificates, but AvePoint cannot guarantee full AvePoint Privacy Impact Assessment functionality if a user-defined certificate is used. AvePoint strongly recommends you use the provided built-in certificate.
11. In the Ready to Install AvePoint Privacy Impact Assessment page, all of the information configured in the previous steps is listed. Select Install to begin the installation. Select Back to return to the previous interface. Select Cancel to exit the installation wizard without saving any of the configurations.
12. After the installation is complete, select Finish to exit the installation wizard. AvePoint Privacy Impact Assessment is installed.
Installing AvePoint Privacy Impact Assessment automatically
If you have selected INSTALL in the AvePoint Privacy Impact Assessment Installation Wizard, complete
the Customer Information, License Agreement and Installation Location settings, refer to step 1 to step
4 in the Configuring Installation Settings Manually for details. Then, select Next. The installation process
starts based on the default settings. The default settings include:
Installation Rule Scanning – AvePoint Privacy Impact Assessment performs a brief pre-scan of the environment to ensure that all hardware and configurations meet the minimum system requirements. The checking rules include:
o Operating System Edition
13
AvePoint Privacy Impact Assessment User Guide
o Available Physical Memory
o Available Disk Space
o .NET Framework Features
o Net.Tcp Port Sharing Service
o Windows Process Activation Service
o World Wide Web Publishing Service
o Web Server (IIS 7) Role
o .NET Framework Version
If the related features or services are not installed, AvePoint Privacy Impact Assessment
will install them automatically; if the rule Operating System Edition, Available Physical
Memory and Available Disk Space do not meet the requirement, the install will fail.
Service Configuration – The followings are the Service Configuration default settings:
o AvePoint Privacy Impact Assessment Host – The host is the machine where AvePoint Privacy Impact Assessment will install.
o IIS Website Settings – A new IIS website APIA will be created, the default port is 17000.
If there is a website whose name is APIA or APIA + Number, a new website APIA
+ Number + 1 will be created, the port is the APIA + Number’s port + 1. For
example: if there is website whose name is APIA5, its port number is 17002, the
created website name will be APIA6, and port number is 17003.
If there is no website name conflict, but there is a port whose number is 17000,
the created website’s port will be 17001.
o Application Pool Settings – The application pool will be created. It will have the same name as the IIS website. If that name already exist, the created pool name will be the existed name plus 1. For example: if the IIS website name is APIA, but there is already an application pool whose name is APIA, a new application pool whose name is APIA1 will be created.
AvePoint Privacy Impact Assessment uses the identity ApplicationPoolIdentity
as the application pool account.
Configuration Database Settings – AvePoint Privacy Impact Assessment uses the built-in database by default.
SSL Certification – AvePoint Privacy Impact Assessment uses the built-in certification.
After the installation is complete, select Finish to exit the installation wizard. AvePoint Privacy Impact
Assessment is installed.
14
AvePoint Privacy Impact Assessment User Guide
Uninstalling AvePoint Privacy Impact Assessment
There are three methods to uninstall AvePoint Privacy Impact Assessment.
Use the Uninstall button on the Start menu by completing the following steps:
1. Open the Start menu in Windows on the Server where AvePoint Privacy Impact Assessment is installed.
2. Navigate to All Programs > AvePoint Privacy Impact Assessment.
3. Select Uninstall. The AvePoint Privacy Impact Assessment Uninstallation Wizard appears.
4. Select Remove to start the uninstallation process. AvePoint Privacy Impact Assessment is uninstalled. You can specify whether or not to remove the related SQL Server instance and the AvePoint Privacy Impact Assessment built-in database files by selecting the Remove all existing data checkbox.
Use the Uninstall functionality in Control Panel by completing the following steps:
1. Open the Start menu in Windows on the Server where AvePoint Privacy Impact Assessment is installed.
2. Select Control Panel.
3. Select Uninstall a program under Programs in the Control Panel window.
4. Right-click AvePoint Privacy Impact Assessment in Programs and Features window.
5. Select Uninstall/Change. The AvePoint Privacy Impact Assessment Uninstallation Wizard appears.
6. Select Remove to start the uninstallation process. AvePoint Privacy Impact Assessment is uninstalled. You can specify whether or not to remove the related SQL Server instance and the AvePoint Privacy Impact Assessment built-in database files by selecting the Remove all existing data checkbox.
Use the Setup.exe file by completing the following steps:
1. Locate the AvePoint Privacy Impact Assessment directory.
2. Open the extracted installation folder and open the Setup.exe file. The AvePoint Privacy Impact Assessment Uninstallation Wizard appears.
3. Select Remove to start the uninstallation process. AvePoint Privacy Impact Assessment is uninstalled. You can specify whether or not to remove the related SQL Server instance and the AvePoint Privacy Impact Assessment built-in database files by selecting the Remove all existing data checkbox.
Using AvePoint Privacy Impact Assessment Configuration Tool
After you install AvePoint Privacy Impact Assessment, you can open the Start menu, and then find
AvePoint Privacy Impact Assessment Configuration Tool. Select AvePoint Privacy Impact Assessment
15
AvePoint Privacy Impact Assessment User Guide
Configuration Tool. The AvePoint Privacy Impact Assessment Configuration Tool interface appears. You
can edit the related settings. For details about the settings, refer to Installing AvePoint Privacy Impact
Assessment.
*Note: If you have selected INSTALL in the AvePoint Privacy Impact Assessment Installation Wizard, you
will see two options in the Service Configuration step in the configuration tool: Default Mode
Configuration and Advanced Mode Configuration. You can change the mode to Advanced Mode
Configuration and configure the related settings; if you have selected ADVANCED to configure
Installation settings manually in the AvePoint Privacy Impact Assessment Installation Wizard, you cannot
change it to the Default Mode Configuration in the configuration tool.
16
AvePoint Privacy Impact Assessment User Guide
Logging into AvePoint Privacy Impact Assessment
To log into the AvePoint Privacy Impact Assessment, complete the following steps:
1. Open the AvePoint Privacy Impact Assessment icon on your desktop to begin using AvePoint Privacy Impact Assessment.
2. On the AvePoint Privacy Impact Assessment Sign In page, enter the following information:
Login ID – Enter admin.
Password – Enter admin.
Authentication Mode – Select Local System in the drop-down list.
Remember my login ID – Select whether or not to remember the login ID on this computer.
This account will allow you to configure other users (administrators and non-administrators)
within the system. For more information, refer to Account Management.
3. Select Login to log into AvePoint Privacy Impact Assessment.
17
AvePoint Privacy Impact Assessment User Guide
Settings
The Settings page allows you to customize configurations that affect AvePoint Privacy Impact
Assessment as a whole, or configure settings that may be relevant to certain features.
Log into AvePoint Privacy Impact Assessment, and select Settings to launch its interface. If you are
already in the software, select Settings on the top of the interface.
System Security Settings
System Security Settings is used to configure how long a user can be inactive before being automatically
logged off.
Select System Security Settings under the System Settings heading to access the System Security
Settings interface. Enter an integer into the Logon will expire in: text box, and then select either
Minutes or Hours in the drop-down menu. Select Save to save the settings.
Account Management
The Account Management interface includes settings for Authentication Manager, Group Management,
and User Management. Refer to the following sections for details.
Authentication Manager
Authentication Manager allows you to view and manage integrated authentication methods that are
used by AvePoint Privacy Impact Assessment. This means that AvePoint Privacy Impact Assessment can
leverage and customize your pre-existing authentication methods, including:
Local System – Allows the users to log into AvePoint Privacy Impact Assessment.
Windows Authentication – Allows users to log onto AvePoint Privacy Impact Assessment using their Windows Authentication credentials.
AD Integration – Allows users to log onto AvePoint Privacy Impact Assessment using their Active Directory authentication credentials.
To access Authentication Manager for AvePoint Privacy Impact Assessment from the Settings interface,
select Authentication Manager under the Account Management heading.
Configuring Windows Authentication
To leverage users’ Windows Authentication credentials to access AvePoint Privacy Impact Assessment:
1. In the Windows Authentication field of the Authentication Manager interface, select Edit, and then select an Authentication Type from the drop-down menu:
NTLM
18
AvePoint Privacy Impact Assessment User Guide
Negotiate (Kerberos)
*Note: The Kerberos authentication method must be previously configured in the
operating system before you select the Negotiate (Kerberos) option. Otherwise, NTLM
authentication method will be enabled.
2. Select Save after the Authentication Type drop-down menu to save your changes, or select Cancel to cancel any changes.
3. Select Set as Default next to the method to set the default authentication method.
4. Select Disable or Enable after Windows Authentication to disable or enable the authentication method.
5. Select the retract ( ) button or expand ( ) button before Windows Authentication to retract or expand the authentication information.
Configuring AD Integration
To leverage users’ Active Directory authentication credentials to access AvePoint Privacy Impact
Assessment:
Configure your Active Directories in the AD Integration field of the Authentication Manager interface.
You will see a list of previously configured Active Directories under the AD Integration field. You can
customize how these Active Directories are displayed in the following ways:
Search – Filters the Active Directories displayed by the keyword you designate; the keyword must be contained in a column value. At the top of the table displaying the Active Directories, enter the keyword for the Active Directory you want to display.
Sort – Select the ascending ( ) button or descending ( ) button to sort the column values in an ascending order or descending order.
Select the select all ( ) button before the Domain column to select all of the Active Directories.
To go to the next page, select the next (>) button at the lower right corner. To return to the previous page, select the previous (<) button at the lower right corner.
To add a new Active Directory, complete the following steps:
1. Select Add on the top of the table displaying the Active Directories. The Add AD Integration interface appears.
2. Enter the Domain, Username and Password in the corresponding textbox.
3. Select Save to save the changes or select Cancel to return to the Authentication Manager interface without saving any changes.
4. Select Enable after AD Integration. The Active Directory has been integrated with AvePoint Privacy Impact Assessment. It will be shown in the Authentication Mode drop-down list of the AvePoint Privacy Impact Assessment login page.
19
AvePoint Privacy Impact Assessment User Guide
To make changes to a previously configured integrated Active Directory, complete the following steps:
1. Select the Active Directory, the Edit AD Integration interface appears.
2. Make the necessary changes.
3. Select Save to save the changes and return to the Authentication Manager interface, or select Cancel to return to the Authentication Manager interface without saving any changes.
To delete a previously configured Active Directory, complete the following steps:
1. Select the Active Directory by selecting the corresponding checkbox.
2. Select Delete on the top of the table displaying the Active Directories.
3. A warning message will appear to confirm the deletion. Select OK to delete the selected Active Directory, or select Cancel without any changes.
To allow the use of credentials from the corresponding Active Directory to access AvePoint Privacy
Impact Assessment, complete the following steps:
1. Select the Active Directory by selecting the corresponding checkbox.
2. Select Enable on the top of the table displaying the Active Directories.
To disallow the use of credentials from the corresponding Active Directory to access AvePoint Privacy
Impact Assessment, complete the following steps:
1. Select the Active Directory by selecting the corresponding checkbox.
2. Select Disable on the top of the table displaying the Active Directories.
Additionally, you can:
Select Set as Default after the method to set the method as the default authentication method.
Select Disable or Enable after AD Integration to disable or enable the authentication method.
Select the retract ( ) button or expand ( ) button before AD Integration to retract or expand the authentication information.
Group Management
Group Management allows you to apply or change the same permission levels for all users within the
same user group. You can also change the permission levels of a user by changing the group that the
user resides.
To access Group Management, complete the following steps:
1. Navigate to AvePoint Privacy Impact Assessment > Settings. The Settings interface appears.
2. Select Group Management under the Account Management heading of the Settings interface.
20
AvePoint Privacy Impact Assessment User Guide
3. In the Group Management interface, you will see a list of previously configured user groups. The Administrators group comes pre-configured and users of this group have Full Control permissions for all modules.
You can customize how these user groups are displayed in the following ways:
Search – Filters the Active Directories displayed by the keyword you designate; the keyword must be contained in a column value. At the top of the table displaying the Active Directories, enter the keyword for the Active Directory you want to display.
Sort – Select the ascending ( ) button or descending ( ) button to sort the column values in an ascending order or descending order.
Select the select all ( ) button before the Group Name column to select all of the Active Directories.
To go to the next page, select the next (>) button at the lower right corner. To return to the previous page, select the previous (<) button at the lower right corner.
Adding or Editing Groups
To add a new group to AvePoint Privacy Impact Assessment, complete the following steps:
1. Select Add Group in the Groups page. To modify a previously configured group, select the group.
2. In the Add Group or Edit Group interface, configure the following settings:
Group Name – Enter a group name.
Description – Enter an optional Description for future references.
Permissions – Select any of the permissions for the group:
o Question Definition – Gives users in the group access to use Question Bank and Question Collection in AvePoint Privacy Impact Assessment.
o Project Manager – Gives users in the group access to use Project Manager in AvePoint Privacy Impact Assessment.
o Answer Question – Enables users in the group to answer questions. The users can view the Need Answers tab in the My Tasks in AvePoint Privacy Impact Assessment.
o Review Answer – Enables users in the group to review answers. The group user can view the Need Review tab in My Tasks in AvePoint Privacy Impact Assessment.
o Report Manager – Gives users in the group access to use Report Manager in AvePoint Privacy Impact Assessment.
o Settings – Enables users in the group to configure settings in AvePoint Privacy Impact Assessment.
21
AvePoint Privacy Impact Assessment User Guide
3. Select Save to save the changes, or select Cancel to return to the Groups interface without any changes. If you are editing a group, select the Save As button to save the group as another one.
Viewing Users
To view users in a group, complete the following steps:
1. Select a group, and then select Show Users. The Show Users interface appears.
2. All the existing users are listed in the interface. You can select Add User to Group to add another users to the selected group. Select Remove User from Group to remove the users from the selected groups. Every user must belong to at least one group.
Deleting Groups
To delete groups, complete the following steps:
1. Select the groups that you want to delete.
2. Select Delete.
3. A warning message will appear to confirm the deletion. Select OK to delete the selected groups, or select Cancel to return to the Groups interface without deleting the selected groups. If the selected group contains some users, the group cannot be deleted.
User Management
To access User Management, complete the following steps:
1. Navigate to AvePoint Privacy Impact Assessment > Settings. The Settings interface appears.
2. Select User Management under the Account Manager heading of the Settings interface.
Customize how these users are displayed in any of the following ways:
Search – Filters the Active Directories displayed by the keyword you designate; the keyword must be contained in a column value. At the top of the table displaying the Active Directories, enter the keyword for the Active Directory you want to display.
Sort – Select the ascending ( ) button or descending ( ) button to sort the column values in an ascending order or descending order.
Select the select all ( ) button before the Username column to select all of the users.
Filter the column ( ) – Filters which item in the list is displayed. You can filter whichever item you want, rather than search based on a keyword. Hover over a column
name, and then select the filter button ( ) of the column you want to filter, then select the checkbox next to the item name to have that item shown in the list.
To go to the next page, select the next (>) button at the lower right corner. To return to the previous page, select the previous (<) button at the lower-right corner.
22
AvePoint Privacy Impact Assessment User Guide
Adding or Editing Users
To add a new user to AvePoint Privacy Impact Assessment, complete the following steps:
1. Select Add User in the Groups page. To modify a user, select on the user.
2. In the Add User or Edit User interface, select a User Type to configure the method for authentication:
Local User – Select Local User in the User Type section to manually enter the authentication credentials for this user. Configure the following settings to add a local user:
o Username – Enter the Username.
o E-mail – Enter the e-mail of the user you are adding.
o Description – Enter the description for further reference.
o Password – Enter the password.
o Confirm Password – Re-enter your password.
o Add to Group – Set the permissions for this user by adding the user to a previously configured AvePoint Privacy Impact Assessment group. The user will have all of the permissions of the specified group.
Active Directory User – Select Active Directory User in the User Type section to utilize the user’s active directory authentication credentials for this new user. Configure the following settings to add an active directory user:
o AD User Name – Enter the name of the user or the AD group name you wish to add into this field, and then select Validation Test to verify that the username or group you entered is valid. Use the semicolon (;) as the separator if multiple users or groups are entered.
o Description – Enter an optional Description for future references.
o Add to Group – Set the permissions for this user or AD group users by adding the user or group to a previously configured AvePoint Privacy Impact Assessment group, the user will have all of the permissions of the specified group. The AD group user will have all of the permissions of the added group.
*Note: After you add an AD group into an AvePoint Privacy Impact Assessment
group, the AD group users will have all permissions of the added group. When
the new user logs into AvePoint Privacy Impact Assessment using the AD group
user, the user is automatically added to the User Management list. This group
only contains the Answer Question and Review Answer permissions, the user
will not be added into the AvePoint Privacy Impact Assessment group to which
the AD group belongs.
For example: If the AD group A is added into the AvePoint Privacy Impact
Assessment group B, which contains the Answer Question, Review Answer, and
23
AvePoint Privacy Impact Assessment User Guide
Question Definition permissions. AD user 1 belongs to the AD group A. After AD
user 2 logs into AvePoint Privacy Impact Assessment, the AD user 1 is
automatically added into the default group xxx, but not added into the AvePoint
Privacy Impact Assessment group B. Before the AD group A is removed from
AvePoint Privacy Impact Assessment, user 1 has the Answer Question, Review
Answer, and Question Definition permissions. If the AD group A is removed
from AvePoint Privacy Impact Assessment, AD user 1 only has the Answer
Question, Review Answer in AvePoint Privacy Impact Assessment.
Windows User – Select Windows User in the User Type section to utilize the user’s Windows authentication credentials for this new user. Configure the following settings to add a Windows user:
o Windows User – Enter the name of the user you wish to add into the Windows User Name field, and then select Validation Test to verify that the username you entered is valid.
o Description – Enter an optional Description for future references.
o Add to Group – Set the permissions for this user by adding the user to a previously configured AvePoint Privacy Impact Assessment group, the user will have all of the permissions of the specified group.
3. Select Save to save the changes, or select Cancel to return to the Users interface without any changes.
Deleting Users
To delete users, complete the following steps:
1. Select the users you want to delete.
2. Select Delete.
3. A warning message will appear to confirm the deletion. Select OK to delete the selected user, or select Cancel to return to the Users interface without deleting the selected user.
Application Settings
The Application Profiles interface includes settings for Outgoing E-mail Settings and E-mail Template.
For more information, refer to the following sections.
Configuring Outgoing E-mail Settings
To access Outgoing E-mail Settings for AvePoint Privacy Impact Assessment, in the Settings interface,
select Outgoing E-mail Settings under the Application Settings heading. The outgoing e-mail server
must be configured for AvePoint Privacy Impact Assessment to send out e-mail notifications.
To configure the outgoing e-mail settings, complete the following steps:

24
AvePoint Privacy Impact Assessment User Guide
1. Configure the following settings:
Outgoing E-mail Server (SMTP) – Enter the address of the outgoing e-mail server.
Port – Enter the SMTP port. The default SMTP port is 25. For SSL authentication, the default port is 587.
Sender – Enter the e-mail address for all AvePoint Privacy Impact Assessment e-mails to be from.
Username on SMTP – Enter the sender’s username on the SMTP server. If you do not enter the sender’s username, the outgoing e-mail will be sent anonymously.
Password on SMTP – Enter the sender’s password to log onto the SMTP server, if you entered a Username on SMTP.
SSL authentication – Configure this option according to your E-mail settings. If you select this option, the Username on SMTP and Password on SMTP must be configured.
2. Select Save to save your configurations, or select Cancel to exit the interface.
Configuring E-mail Template Settings
E-mail Template allow you to customize notification e-mails sent by AvePoint Privacy Impact
Assessment, such as when notifying the assignee to answer questions or when notifying reviewer to
reviewing answers.
To access E-mail Template in the Settings interface, select E-mail Template under the Application
Settings heading.
You can customize how these users are displayed in the following ways:
Search – Filters the Active Directories displayed by the keyword you designate; the keyword must be contained in a column value. At the top of the table displaying the Active Directories, enter the keyword for the Active Directory you want to display.
Sort – Select the ascending ( ) button or descending ( ) button to sort the column values in an ascending order or descending order.
Select the select all ( ) button before the E-mail Template Name column to select all of the templates.
Filter the column ( ) – Filters which item in the list is displayed. You can filter whichever item you want, rather than search based on a keyword. Hover over a column
name, and then select the filter button ( ) of the column you want to filter, then select the checkbox next to the item name to have that item shown in the list.
To go to the next page, select the next (>) button at the lower right corner. To return to the previous page, select the previous (<) button at the lower-right corner.
Adding or Editing E-mail Templates
To add a new e-mail template to AvePoint Privacy Impact Assessment, complete the following steps:
25
AvePoint Privacy Impact Assessment User Guide
1. Select Add E-mail Template in the E-mail Template Settings interface. To modify a previously configured e-mail template, select on the e-mail template.
2. In the Add E-mail Template or Edit E-mail Template interface, configure the following settings.
In the General Settings field:
E-mail Template Name – Enter a name the for e-mail template.
Description – Enter an optional Description for the e-mail template for future reference.
E-mail Template Type – Select an e-mail template type from the drop-down menu to designate when the e-mail template can be used in AvePoint Privacy Impact Assessment.
Subject – Enter a subject name of the e-mail notification for the e-mail template. You can insert reference in the Subject by selecting the Insert Reference hyperlink. A Reference is a parameter that will call up the corresponding bit of information for which it is named specific to each individual service request.
In the Message Body field:
Under the Basic Mode tab, enter the content of the message body of the e-mail notification for
the e-mail template. You can insert reference in the message body by selecting the Insert
Reference hyperlink. A reference is a parameter that will call up the corresponding bit of
information for which it is named specific to each individual service request.
Under the Text Mode tab, the message body of the e-mail notification for the e-mail template is
displayed in the HTML format. Customize the body by editing or inserting the attributes. You can
customize to insert an image, table, etc. You can also insert reference in the message body by
selecting the Insert Reference hyperlink. A reference is a parameter that will call up the
corresponding bit of information for which it is named specific to each individual service
request.
3. Select Save to saving the settings, or select Cancel to exit the interface without saving any changes.
Deleting E-mail Templates
To delete e-mail templates, complete the following steps:
1. Select the e-mail templates you want to delete.
2. Select Delete. A warning message appears, asking you to confirm the deletion.
3. Select OK to delete the selected e-mail templates, or select Cancel to return to the E-mail Template Settings interface without deleting the selected e-mail templates.
26
AvePoint Privacy Impact Assessment User Guide
My Tasks
My Tasks displays all tasks (including questions and question groups) that are assigned to you. The
questions that require an answer are displayed under the Need Answers tab. The questions that have
been answered by another user and require your review are displayed under the Need Review tab.
Managing My Tasks
In the My Task interface, customize how these questions or groups (under the Need Answers tab and
Need Review tab) are displayed in any of the following ways:
Search – Filters the questions or groups displayed by the keyword you designate; the keyword must be contained in a column value. At the top of the table displaying the questions or groups, enter the keyword for the questions or groups you want to display.
Sort – Select the ascending ( ) button or descending ( ) button to sort the column values in an ascending order or descending order.
Filter the column ( ) – Filters which item in the list is displayed. You can filter whichever item you want, rather than search based on a keyword. Hover over a column
name, and then select the filter button ( ) of the column you want to filter, then select the checkbox next to the item name to have that item shown in the list.
To change the number of profiles displayed per page, select the desired number from 5 (default value), 8, 10, 15, 25, 50, 100 in the Show rows drop-down menu at the top of the table displaying the question collections.
To go to the next page, select the next (>) button at the lower right corner. To return to the previous page, select the previous (<) button at the lower-right corner.
Answering Questions
To answer questions, complete the following steps:
1. Under the Need Answers tab, select a question or a group. The Answer Question interface appears.
Answer each question in the interface. Optionally, you can select Add File after each question, and then select a file from the pop-up window to add an attachment for helping answer your question or providing more information. You can also upload multiple attachments.
*Note: Restricted File types are not supported to upload AvePoint Privacy Impact Assessment.
For more information, refer to Appendix C: Configuring Restricted File Types to Upload as
Attachments.
*Note: By default, the size of each uploaded file cannot exceed 50 MB. The allowed maximum
size of uploading a file can be changed by editing the APIASetting.config file. For more
27
AvePoint Privacy Impact Assessment User Guide
information, refer to Appendix B: Modifying the Allowed Maximum Size of Uploaded
Attachments.
2. Select Submit. If you have answered the question and then select Submit, you can view the question’s history.
Before you submit your answers, you can temporally save a draft of your answers. Select Save
to save you answers. The next time you select the question in the Answer Question interface,
your previous edits will be available.
*Note: If you select Save to save your incomplete answer and the question has assigned to
multiple users, you cannot edit your answer or submit your answer the next time you go into
the Answer Question interface if the answers were submitted by another user. However, you
will see who has answered the question under the Answered by column.
3. Select Cancel to return to the My Tasks interface without saving any changes.
You can view the question or question group’s status in the Status column under the Need Answers tab.
If you have submitted your answers, you cannot edit your answers. If the reviewer rejects your answers,
the status of the question or question group will be Rejected and need answer, and you must answer
the questions again. After you answer a question, you can select the question and go to the Answer
Question interface to view the question’s history.
Reviewing Answers
To review answers, complete the following steps:
1. Under the Need Review tab, select a question or a group that needs to be approved. The Review Answer interface appears.
2. Review the answer to the selected question or review the answers to the questions in the selected question group. You can view the attachments uploaded by the answerer. You can view the risk value of a question. For the Text type question, the Privacy Risk field’s default value is the value specified when the question is created, you can view the risk value and edit the risk value of each answer.
3. Optionally, add a comment in the Review field. You can also select Add File in the Review field, and then select a file from the pop-up window to add an attachment for providing more information. You can upload multiple attachments.
*Note: The restricted file types are not supported to upload to AvePoint Privacy Impact
Assessment. For more information, refer to .
*Note: By default, the size of each uploaded file cannot exceed 50 MB. The allowed maximum
size of uploading a file can be changed by editing the APIASetting.config file. For more
information, refer to Appendix B: Modifying the Allowed Maximum Size of Uploaded
Attachments.

28
AvePoint Privacy Impact Assessment User Guide
4. Approve or reject the answers by selecting Approve or Reject on the top of the interface.
5. Select View History to view the history of the questions.
6. Select Cancel to return to the My Tasks interface without saving any changes.

29
AvePoint Privacy Impact Assessment User Guide
Question Bank
The Question Bank is used to create or edit questions and create categories for classifying questions.
Launching the Question Bank
To launch the Question Bank, complete the following steps:
1. Log into AvePoint Privacy Impact Assessment.
2. Select Question Bank to launch its interface.
3. If you are already in the software, select Question Bank on the top of the interface.
Managing Questions
All previously added questions are displayed in the Question Bank interface. To change the number of
questions displayed per page, select the desired number from the Show rows drop-down menu.
To go to the next page, select the next (>) button in the lower-right corner. To return to the previous
page, select the previous (<) button in the lower-right corner.
To find a desired question, enter a keyword that exists in a question value in the search box, and then
select the search ( ) button. The matching questions are displayed.
Select the retract ( ) button or expand ( ) button next to Questions to retract or expand all categories
in the current page; select the retract ( ) button or expand ( ) button next to categories to retract or
expand the corresponding category.
Adding a Category
To add a category, complete the following steps:
1. Select Add Category above the table listing the questions. The Add Category interface appears.
2. Enter a category name.
3. Select Save to save the created category, or select Cancel to exit the Add Category interface without saving any changes.
The categories are arranged in alphabetical order on the Question Bank page. After you add a category,
the alphabetized list on the Question Bank page will be updated to include the newly added category.
Adding a Question
To add a question, complete the following steps:
30
AvePoint Privacy Impact Assessment User Guide
1. Select Add Question above the table listing the questions.
2. The Add Question interface appears. Configure the following settings for adding a question:
Category – Select a category for the question. Select Create New Category to create a new category.
*Note: If you select a category before selecting the Add Question button in the
Question Bank page, the selected category will be automatically selected in the Add
Question page.
Question Text – Specify the question.
Description – Enter a description for further reference.
Policy URL – Enter a URL that will link to a website that introduces the question’s related rules.
Training Topic – Select the training topic that is used to provide information for answering questions. This is optional.
Question Type – Select a question type from the drop-down list.
Answer Choice – If Multiple Choice (Multiple Answers) or Multiple Choice (Only One Answer) is selected as the question type, the Answer Choice field appears. Enter an answer choice in the Choice textbox, and enter the corresponding risk values that are used to evaluate the risk condition in the Risk textbox. Select Add. The choice record is added into the table of the Answer Choice field, which will be the question’s choice. Select the delete ( ) button to delete a record from the table, select Add to add another choice for the question.
Privacy Risk – If Text or Yes/No is selected as the question type, the Privacy Risk field appears.
o If Text is selected as the question type, you must enter a risk value in the Privacy Risk field. The reviewer can view and edit the risk value. The default value is 0.
o If Yes/No is selected as the question type, you must enter the risk values for Yes or No. By default, the risk values for Yes and No are 0.
Answer Comment – Select whether or not to allow the answerer to add comment to this question by selecting or deselecting the Responder may add a comment to this question.
3. Select Save to save the question, or select Cancel to exit the interface without saving any changes. Select Preview to preview the created question.
Editing a Category or Question
To edit a category or a question, complete the following steps:
31
AvePoint Privacy Impact Assessment User Guide
1. Select on a category or question in the Question Bank interface. The Edit Category or Edit Question interface appears.
2. Edit the settings according to your own requirement.
3. Select Save to save the changes, select Save As to save the category or question to another one. Select Cancel to exit the Edit Category or Edit Question interface without saving any changes.
Deleting Categories and Questions
To delete categories and questions, complete the following steps:
1. Select Delete to delete the selected categories or questions.
2. A warning message will appear to confirm the deletion. Select OK to delete the selected projects, or select Cancel to return to the Question Bank interface without deleting the selected categories or questions.
Downloading Questions
AvePoint Privacy Impact Assessment allows you to download the selected questions. To download
questions, complete the following steps:
1. Select the questions.
2. Select Download. The selected questions are included in a ZIP file named Question.zip.
3. Save the ZIP file.
4. Check the questions in the ZIP files. You can edit the downloaded questions, or use the downloaded question as a template for creating new question. Refer to Configuring the Question File for details about configuring the question file.
Uploading Questions
AvePoint Privacy Impact Assessment allows you to upload the custom questions to AvePoint Privacy
Impact Assessment > Question Bank. To upload questions, complete the following steps:
1. Select Upload. A pop-up window appears.
2. Select the custom ZIP file that contains the custom questions.
3. Select Open in the pop-up window. The questions are uploaded to AvePoint Privacy Impact Assessment.
If there are some questions whose IDs are same as those of the custom questions that you want
to upload, a conflict occurs. A window appears after you select Open:
32
AvePoint Privacy Impact Assessment User Guide
Figure 1: Question conflict window.
Select Details in the window to view the detailed conflict questions. Select the checkboxes
before the questions, and then select Replace. The selected questions will replace the existing
ones in AvePoint Privacy Impact Assessment. Select Cancel to quit uploading the questions.
33
AvePoint Privacy Impact Assessment User Guide
Question Collection
The Question Collection feature collects all questions for a particular reviewer; the collected questions
are sent to a reviewer via a review and approve workflow in AvePoint Privacy Impact Assessment.
Questions can be added to a question collection, or added to a group and then added to a question
collection.
Launching Question Collection
To launch the Question Collection interface, complete the following steps:
1. Log into AvePoint Privacy Impact Assessment.
2. Select Question Collection to launch the interface.
3. If you are already in the software, select Question Collection on the top of the interface.
Managing Question Collections
In the Question Collection interface, you will see a list of previously configured question collections. You
can customize how these question collections are displayed in the following ways:
Search – Filters the question collections displayed by the keyword you designate; the keyword must be contained in a column value. At the top of the table displaying the question collections, enter the keyword for the question collections you want to display.
Sort – Select the ascending ( ) button or descending ( ) button to sort the column values in an ascending order or descending order.
Select the select all ( ) button before the Question Collection column to select all of the question collections.
To change the number of profiles displayed per page, select the desired number from 5 (default value), 8, 10, 15, 25, 50, 100 in the Show rows drop-down menu at the top of the table displaying the question collections.
To go to the next page, select the next (>) button at the lower right corner. To return to the previous page, select the previous (<) button at the lower-right corner.
Adding a Question Collection
To add a question collection, complete the following steps:
1. Select Add Question Collection above the table listing the question collections. The Add Question Collection interface appears.
2. Configure the settings in the Add Question Collection interface.
34
AvePoint Privacy Impact Assessment User Guide
Question Collection Name – Enter a question collection name.
Description – Enter an optional description.
Question Order Type – Select the question order type:
o Sequential – If you select Sequential, the questions or question groups added in the question collection have the order. They will be assigned to the assignees in order.
o Parallel – If you select Parallel, the questions or question groups added in the question collection have no order. They will be assigned to the assignees at the same time.
Configure Question Collection – Configure settings in the Configure Question Collection field. Refer to Configuring a Question Collection for details.
3. Select Save to save the question collection, or select Cancel to exit the Add Question Collection interface without saving any changes.
Configuring a Question Collection
You can add groups and questions to a question collection. The questions can be firstly added to a
group, or they can directly be added to a question collection. All of the questions in the group are
assigned to one person.
Refer to the following sections for details.
Adding Groups to a Question Collection
To add a group to a question collection, complete the following steps:
1. Select Add Group in the Configure Question Collection field. The Add Group interface appears.
2. Enter a group name in the Add Group interface.
3. Select Save to save the created group, or select Cancel to exit the window without saving any changes.
Adding Questions
To add questions, complete the following steps:
1. Select Add Question in the Configure Question Collection field. The Add Question interface appears. All of the created questions in Question Bank are displayed in a table of the window. You can select a question to view details about the question.
2. Select your desired questions, or select entire categories by selecting the checkboxes before the questions or categories. You can enter a keyword in the search box and then select the search
( ) button to find the desired question first.
3. Select Add on the upper-left corner or from the lower-right corner of the interface to add the selected items directly to the question collection.
35
AvePoint Privacy Impact Assessment User Guide
4. To add questions to a group, select a group in the Add to group drop-down list, and then select Add on the upper-left corner or from the lower-right corner.
All of the added questions and groups are displayed in the table of the Configure Question Collection
field. If you have selected Sequential as the Question Order Type, you can change the order of the
groups and questions in the question collection by selecting the drop-down list in the Order column.
Then, the questions and groups will also be displayed based on the order you specified.
Deleting Questions
Select Delete to delete the selected questions. If you select a group and select Delete, all of the
questions in the group are deleted.
Editing Question Collections
To edit question collections, complete the following steps:
1. Select on a question collection in the Question Collection interface. The Edit Question Collection interface appears.
2. Edit the settings according to your own requirement.
3. Select Save to save the changes, select Save As to save the question collection to another one, or select Cancel to exit the Edit Question Collection interface without saving any changes.
Downloading Question Collections
AvePoint Privacy Impact Assessment allows you to download selected question collections. To download
question collections, complete the following steps:
1. Select the question collections.
2. Select Download. The selected question collections are included in a ZIP file named QuestionCollection.zip.
3. Save the ZIP file. The question collection files and the related question files are all contained in the downloaded ZIP file. You can also edit the downloaded files, or use the downloaded file as a template for creating new question collection. Refer to Configuring the Question Collection File for details about configuring the question collection files.
Uploading Question Collections
AvePoint Privacy Impact Assessment allows you to upload the custom question collections to AvePoint
Privacy Impact Assessment > Question Collection. To upload question collections, complete the
following steps:
1. Select Upload. A pop-up window appears.
36
AvePoint Privacy Impact Assessment User Guide
2. Select the custom ZIP file that contains the custom question collections.
3. Select Open in the pop-up window. The question collections are uploaded to AvePoint Privacy Impact Assessment.
If there are some question collection name or question IDs that are same as those of the custom
question collections or questions that you want to upload, a conflict occurs.
A window appears after you select Open:
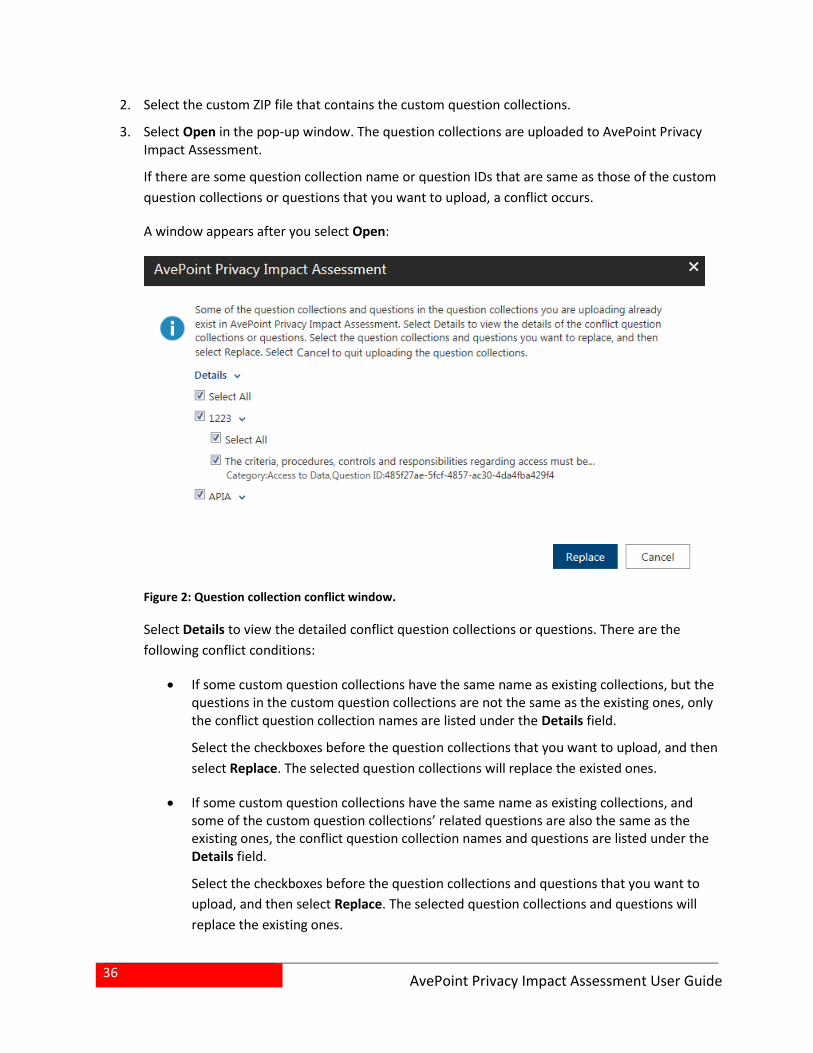
Figure 2: Question collection conflict window.
Select Details to view the detailed conflict question collections or questions. There are the
following conflict conditions:
If some custom question collections have the same name as existing collections, but the questions in the custom question collections are not the same as the existing ones, only the conflict question collection names are listed under the Details field.
Select the checkboxes before the question collections that you want to upload, and then
select Replace. The selected question collections will replace the existed ones.
If some custom question collections have the same name as existing collections, and some of the custom question collections’ related questions are also the same as the existing ones, the conflict question collection names and questions are listed under the Details field.
Select the checkboxes before the question collections and questions that you want to
upload, and then select Replace. The selected question collections and questions will
replace the existing ones.
37
AvePoint Privacy Impact Assessment User Guide
If some questions in the custom question are the same as existing questions, but the corresponding custom question collections are not the same as the existing ones, the conflict questions are listed under the Details field. The related question collections are also listed under the Details field, but the checkboxes before the question collections are grayed out.
Select the checkboxes before the questions that you want to upload, and then select
Replace. The selected questions will replace the existing ones.
Select Cancel to quit uploading the question collections or questions.
38
AvePoint Privacy Impact Assessment User Guide
Project Manager
The Project Manager interface allows you to manage all AvePoint Privacy Impact Assessment projects. It
allows you to define the entire workflow of a project. A project is a kind of workflow, which defines the
reviewer of the answers to the questions, the answerers of the questions as well as the related
templates and alerts.
Launching Project Manager
To launch Project Manager, complete the following steps:
1. Log into AvePoint Privacy Impact Assessment.
2. Select Project Manager to launch the interface.
3. If you are already in the software, select Project Manager on the top of the interface.
Managing Projects
In the Project Manager interface, you will see a list of previously configured projects. You can customize
how these question collections are displayed in the following ways:
Search – Filters the projects displayed by the keyword you designate; the keyword must be contained in a column value. At the top of the table displaying the projects, enter the keyword for the projects you want to display.
Sort – Select the ascending ( ) button or descending ( ) button to sort the column values in an ascending order or descending order.
Select the select all ( ) button before the Project column to select all of the projects.
Filter the column ( ) – Filters which item in the list is displayed. You can filter whichever item you want, rather than search based on a keyword. Hover over a column
name, and then select the filter button ( ) of the column you want to filter, then select the checkbox next to the item name to have that item shown in the list.
To go to the next page, select the next (>) button at the lower right corner. To return to the previous page, select the previous (<) button at the lower-right corner.
Adding a Project
To add a project, select Add Project above the table listing the projects. The Add Project interface
appears. To add a project, complete the following steps:
1. In the Project Name page of the Add Project interface, configure the following settings:
Project Name – Enter a project name.
39
AvePoint Privacy Impact Assessment User Guide
Description – Enter an optional description.
Question Collection – Select a question collection.
Reviewer – Enter reviewers. You can enter one or more users, or AD groups. Any of the entered users can review and approve the answer.
2. Select Next. The Assignee page appears. All of the groups and questions in the question collection selected in the Project Name page are displayed in the Question column. Select the right arrow ( ) before a question to review its risk value. You can also edit the risk values.
To assign all questions or question groups to one or more assignees in batch, select the Assign
all questions in batch link. Enter assignees in the Assignee text box, and select OK. All of the
questions or question groups in the project are assigned to the assignees in batch.
To assign each question or question group, enter the assignees after the corresponding question
and group. The questions in a group cannot be assigned to different assignees; they can only be
assigned to a person together as a question group. You can enter one or multiple users in an
Assignee field.
By default, all of the entered users need to answer the question or questions in a group. You can
also change the configuration file APIASetting.config if you want only one assignee among all
assignees to answer the question or questions in a group. For details about configuring the file,
refer to Appendix D: Enabling only One Assignee to Answer Questions.
If you selected Sequential as the Question Order Type in the selected question collection, the
questions or question groups will be sequentially assigned to the corresponding assignees
according to the order of the questions or question groups. If you selected Parallel as the
Question Order Type in the selected question collection, the questions or question groups have
no order, and they will be assigned to the corresponding assignees at the same time.
3. Select Next. The Project Configuration interface appears. Configure the following settings.
In the Project field:
Enable Recurrence – Select whether or not to enable the recurrence of this project. If you select Yes, configure the following settings:
o Start Time – Specify the project’s start time, and then enter a number in the Restart project after _ Years/Months field. The project will restart after the specified time. Specify the number of occurrences in the End by _ occurrences. The project will not restart after the specified occurrences. If a -1 appears in this field, the occurrences are unlimited.
Expiration Time – Specify the number, and then select Days or Months. The project will expire after the specified number of days or months. If a -1 appears in this field, the number of allowed occurrences is unlimited.
Risk Level – Enter the risk values to define the section of Pass, Warn and Fail. If the total risk values of the assignees’ answers is in the Pass section, the final risk level of the
40
AvePoint Privacy Impact Assessment User Guide
project is Pass; if the total risk values of the assignees’ answers is in the Warn section, the final risk level of the project is Warn; if the total risk values of the assignees’ answers is in the Fail section, the final risk of the project is Fail. For example: you specify 10 and 20 as the risk values to divide the Pass, Warn and Fail sections. If the total risk values of the assignee’s answers is 15, the final risk level of the project is Warn. You can view the risk level and the total risk values of a project in the Project Monitor.
In the Task Alert field:
Enable Task Alert – Select whether or not to enable the task alert. If you select Yes, configure the following settings:
o E-mail Template – Select an e-mail template for the reviewer, and then select an e-mail template for the assignee.
o Frequency – Repeat the alert at a set frequency. Enter a positive integer into the text box and select Days or Month from the drop-down menu.
o End Time – Select an option:
End only when questions are answered or reviewed – Select this option. The alert will end after the questions are answered or the answers are reviewed.
End after _ alerts – Select this option, and specify a positive integer. The alert will end after the specified number of alerts.
In the Project Alert field:
Enable Project Alert – Select whether or not to enable the project expire alert. If Yes is selected, configure the following settings:
o E-mail Template – Select an e-mail template.
o Alert at Expiration – Specify the users who will receive the alert when the project is expired.
Alert me – Select this option. The alert will send to the project creator.
Alert specified users – Select this option, and then specify the users who will receive the alert.
*Note: Users who click the link in the task alert or project alert will be navigated to the AvePoint
Privacy Impact Assessment. But if AvePoint Privacy Impact Assessment is installed in the
intranet, users outside the intranet cannot access it after clicking the link. To solve this issue, the
IP address or hostname in the URL redirected from the link must be replaced with the domain
name or DNS name. For more information, refer to Appendix G: Modifying the Redirected URL
of Task or Project Alert.
4. Select Save to save the project, select Save and Start Now to start the project immediately, or select Cancel to return to the Project Manager interface without saving any changes.
41
AvePoint Privacy Impact Assessment User Guide
Editing a Project
To edit a project, complete the following steps:
1. Select on a project in the Project Manager interface. The Edit Project interface appears.
2. Edit the settings according to your own requirement.
3. Select Save to save the changes, select Save and Start Now to start the project immediately, select Save As to save the project as a new project, or select Cancel to exit the Edit Project interface without saving any changes.
Starting a Project
To start a project, complete the following steps:
1. Select a project.
2. Select Start above the table listing all of the projects to start a project immediately.
Deleting Projects
To delete projects, complete the following steps:
1. Select the projects that you want to delete.
2. Select Delete to delete the selected projects. A warning message will appear to confirm the deletion.
3. Select OK to delete the selected projects, or select Cancel to return to the Project Manager interface without deleting the selected projects.
Project Monitor
Project Monitor allows you to view the status or details of project instances, and manage the project
instances all from a central interface. Select Project Monitor in the Project Manager interface to access
the Project Monitor interface.
All of the project instances are listed in the Project Monitor interface. You can view the Project Name,
Start Time, Finish Time, Status and Risk Level of a project instance.
Stopping a Project Instance
Select an In Progress project instance, and then select Stop to stop the project instance.
View Details about a Project Instance
Select a project instance, and then select View Details to view the details about a project instance.
42
AvePoint Privacy Impact Assessment User Guide
Deleting a Project Instance
To delete project instances, complete the following steps:
1. Select the project instances that you want to delete.
2. Select Delete to delete the selected project instances. A warning message will appear to confirm the deletion.
3. Select OK to delete the selected projects, or select Cancel without deleting the selected project instances.
43
AvePoint Privacy Impact Assessment User Guide
Report Manager
Report Manager generates data from a completed project instance in a report and allows users to
customize the report document.
Managing Reports
In the Report Manager interface, you will see a list of previously configured reports. Customize how
these reports are displayed in any of the following ways:
Search – Filters the reports displayed by the keyword you designate; the keyword must be contained in a column value. At the top of the table displaying the reports, enter the keyword for the reports you want to display.
Sort – Select the ascending ( ) button or descending ( ) button to sort the column values in an ascending order or descending order.
Select the select all ( ) button before the Report column to select all of the projects.
To go to the next page, select the next (>) button at the lower right corner. To return to the previous page, select the previous (<) button at the lower-right corner.
Adding a Report
To add a report, select Add Report above the table listing the reports. The Add Report interface
appears. To add a report, complete the following steps:
1. In the Report Name and Project Selection page of the Add Report interface, configure the following settings:
Report Name – Enter a report name.
Description – Enter an optional description.
Project – Select a project from the drop-down list.
Project Instance – Select a project instance from the drop-down list that contains all of the project’s completed project instances.
Select Next. The Add Questions page appears.
2. Select the questions that will be included in the report by selecting the checkboxes before the questions. Answers of all the assigned users and users in the assigned AD groups will be included in the report.
Select Next. The Report Configuration page appears.
44
AvePoint Privacy Impact Assessment User Guide
3. Configure the following settings:
Header – Select whether or not to insert the header image or header message that will be displayed at the header of the report. Select Browse, and then select a header image. Enter the header message in the Header message text box.
Footer – Select whether or not to insert the footer image or header message that will be displayed at the footer of the report. Select Browse, and then select a footer image. Enter the footer message in the Footer message text box.
In the Cover Page section, configure the following settings in the report’s cover page:
System Information – Specify the system information, the system information will be displayed in the report’s cover page.
o Company or Agency Name – Enter the name of the company or agency.
o System Name – Provide the full name of the system for which this privacy impact assessment is being completed.
o System Acronym – Provide the system acronym for which this privacy impact assessment is being completed.
o System Owner – Provide the name of the client Division or Office.
Insert Logo – Insert the logo for the report.
In the Thank You Page section, configure the following settings in the report’s cover page:
Signature – Select whether or not to insert a place where the user can sign in the report.
Thank You Message – Enter the Thank You Message which will be displayed in the report’s Thank You Page.
In the Advance section, configure the following settings:
History Information – Select the Include the change history information for all questions option to export the history information in the report.
Attachment – Select the Export all documents attached in the project option to export all attachments in the report.
Comment – Select the Include comments for all answers option to export the comments in the report.
4. Select Save to save the report, or select Cancel to return to the Report Manager interface without saving any changes.
Editing a Report
To edit a report, complete the following steps:
1. Select on a report in the Report Manager interface. The Edit Report interface appears.

45
AvePoint Privacy Impact Assessment User Guide
2. Edit the settings as needed.
3. Select Save to save the changes, select Save As to save the report to another one, or select Cancel to exit the Edit Report interface without saving any changes.
Exporting a Report
Select a report, select Export above the table listing the reports, and then save the report. The report
will be exported. The questions, answers, and the display names of the answerers are included in the
report for review. If you have selected the Include the change history information for all questions,
Export all documents attached in the project, and the Include comments for all answers options when
you add the report, the change history information and comments are displayed in the exported report,
and the attachments are also exported.
Deleting Reports
To delete reports, complete the following steps:
1. Select the reports that you want to delete.
2. Select Delete. A warning message will appear to confirm the deletion.
3. Select OK to delete the selected reports, or select Cancel to return to the Report Manager interface without deleting the selected reports.
46
AvePoint Privacy Impact Assessment User Guide
Appendix A: Configuring the Question File and Question
Collection File
AvePoint Privacy Impact Assessment allows you to customize your own questions and question
collections out of AvePoint Privacy Impact Assessment by configuring the question file and question
collection file.
Configuring the Question File
To configure the question file, complete the following steps:
1. Get a question file template, you can download a question from AvePoint Privacy Impact Assessment as the template.
2. Open the .xml file (question file) with Notepad.
3. Configuring attributes in the question file. For detailed information on configuring the attributes, refer to Configuring Attributes for the Question File.
4. Save the changes.
5. You can configure multiple question collection files, and zip the configured files to a ZIP file. Then, upload the file to AvePoint Privacy Impact Assessment. All of the custom questions will be uploaded to AvePoint Privacy Impact Assessment.
Configuring Attributes for the Question File
Refer to the following question file example:
<!--Copyright 2014-2016 AvePoint All Rights Reserved.-->
<QDF>
<Category>Access to the Data</Category>
<Id>29d03924-343e-4bb8-9576-28f47834d37b</Id>
<Name>Are the criteria, procedures, controls and responsibilities regarding access
documented?</Name>
<Description>
</Description>
<PolicyURL>
</PolicyURL>
<TrainingTopic>
</TrainingTopic>
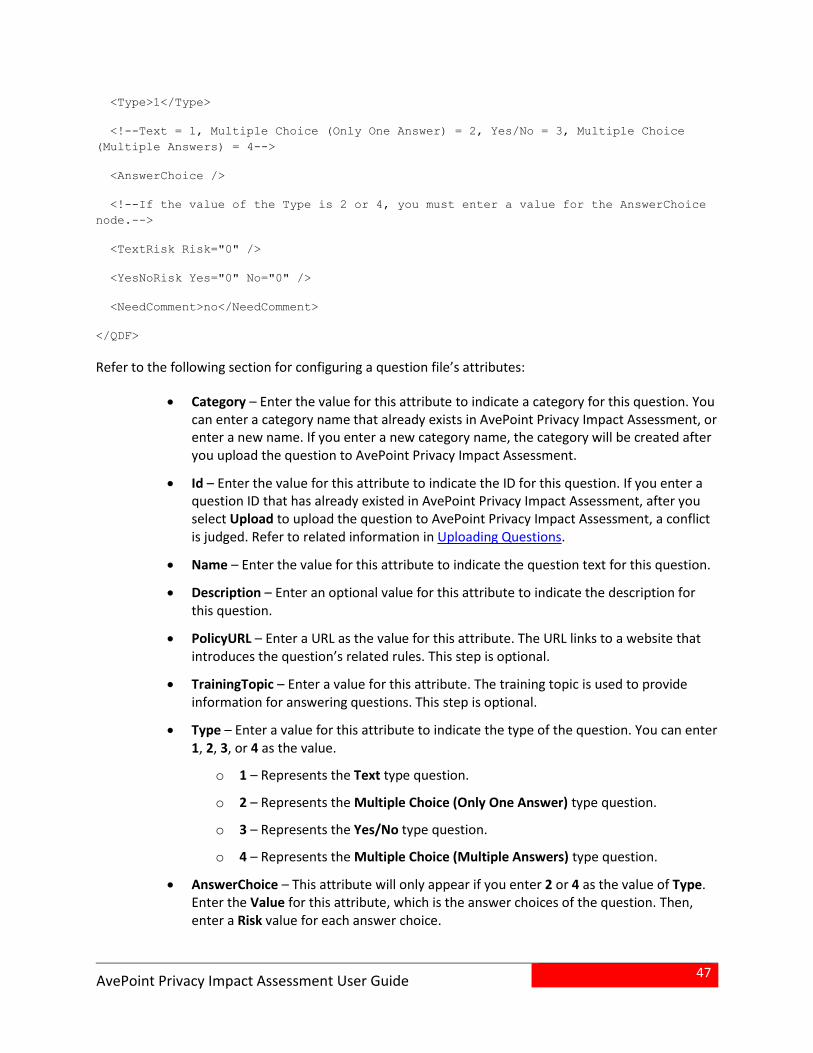
47
AvePoint Privacy Impact Assessment User Guide
<Type>1</Type>
<!--Text = 1, Multiple Choice (Only One Answer) = 2, Yes/No = 3, Multiple Choice
(Multiple Answers) = 4-->
<AnswerChoice />
<!--If the value of the Type is 2 or 4, you must enter a value for the AnswerChoice
node.-->
<TextRisk Risk="0" />
<YesNoRisk Yes="0" No="0" />
<NeedComment>no</NeedComment>
</QDF>
Refer to the following section for configuring a question file’s attributes:
Category – Enter the value for this attribute to indicate a category for this question. You can enter a category name that already exists in AvePoint Privacy Impact Assessment, or enter a new name. If you enter a new category name, the category will be created after you upload the question to AvePoint Privacy Impact Assessment.
Id – Enter the value for this attribute to indicate the ID for this question. If you enter a question ID that has already existed in AvePoint Privacy Impact Assessment, after you select Upload to upload the question to AvePoint Privacy Impact Assessment, a conflict is judged. Refer to related information in Uploading Questions.
Name – Enter the value for this attribute to indicate the question text for this question.
Description – Enter an optional value for this attribute to indicate the description for this question.
PolicyURL – Enter a URL as the value for this attribute. The URL links to a website that introduces the question’s related rules. This step is optional.
TrainingTopic – Enter a value for this attribute. The training topic is used to provide information for answering questions. This step is optional.
Type – Enter a value for this attribute to indicate the type of the question. You can enter 1, 2, 3, or 4 as the value.
o 1 – Represents the Text type question.
o 2 – Represents the Multiple Choice (Only One Answer) type question.
o 3 – Represents the Yes/No type question.
o 4 – Represents the Multiple Choice (Multiple Answers) type question.
AnswerChoice – This attribute will only appear if you enter 2 or 4 as the value of Type. Enter the Value for this attribute, which is the answer choices of the question. Then, enter a Risk value for each answer choice.
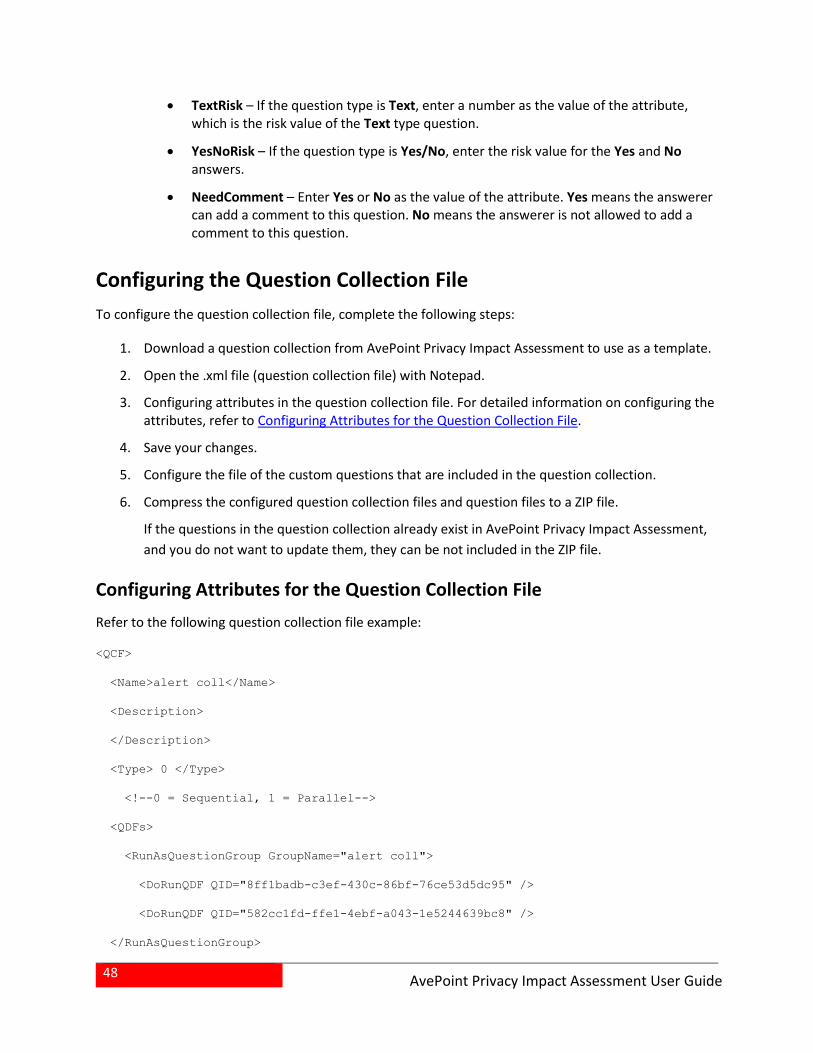
48
AvePoint Privacy Impact Assessment User Guide
TextRisk – If the question type is Text, enter a number as the value of the attribute, which is the risk value of the Text type question.
YesNoRisk – If the question type is Yes/No, enter the risk value for the Yes and No answers.
NeedComment – Enter Yes or No as the value of the attribute. Yes means the answerer can add a comment to this question. No means the answerer is not allowed to add a comment to this question.
Configuring the Question Collection File
To configure the question collection file, complete the following steps:
1. Download a question collection from AvePoint Privacy Impact Assessment to use as a template.
2. Open the .xml file (question collection file) with Notepad.
3. Configuring attributes in the question collection file. For detailed information on configuring the attributes, refer to Configuring Attributes for the Question Collection File.
4. Save your changes.
5. Configure the file of the custom questions that are included in the question collection.
6. Compress the configured question collection files and question files to a ZIP file.
If the questions in the question collection already exist in AvePoint Privacy Impact Assessment,
and you do not want to update them, they can be not included in the ZIP file.
Configuring Attributes for the Question Collection File
Refer to the following question collection file example:
<QCF>
<Name>alert coll</Name>
<Description>
</Description>
<Type> 0 </Type>
<!--0 = Sequential, 1 = Parallel-->
<QDFs>
<RunAsQuestionGroup GroupName="alert coll">
<DoRunQDF QID="8ff1badb-c3ef-430c-86bf-76ce53d5dc95" />
<DoRunQDF QID="582cc1fd-ffe1-4ebf-a043-1e5244639bc8" />
</RunAsQuestionGroup>
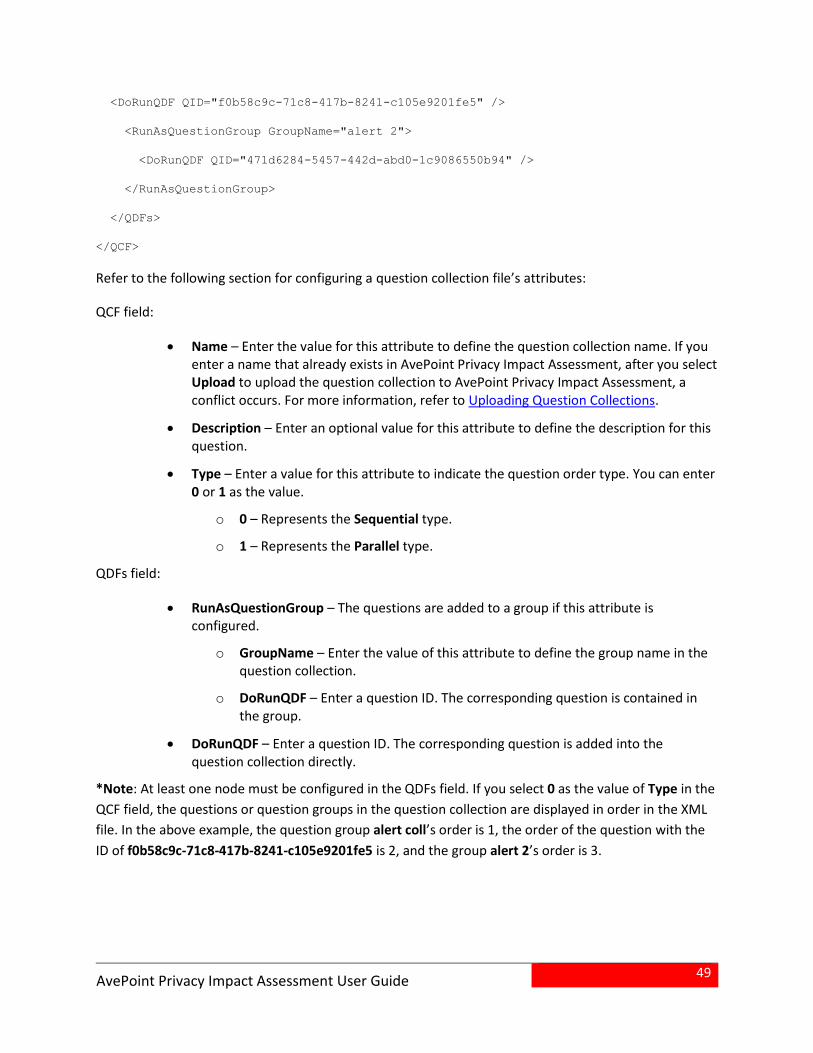
49
AvePoint Privacy Impact Assessment User Guide
<DoRunQDF QID="f0b58c9c-71c8-417b-8241-c105e9201fe5" />
<RunAsQuestionGroup GroupName="alert 2">
<DoRunQDF QID="471d6284-5457-442d-abd0-1c9086550b94" />
</RunAsQuestionGroup>
</QDFs>
</QCF>
Refer to the following section for configuring a question collection file’s attributes:
QCF field:
Name – Enter the value for this attribute to define the question collection name. If you enter a name that already exists in AvePoint Privacy Impact Assessment, after you select Upload to upload the question collection to AvePoint Privacy Impact Assessment, a conflict occurs. For more information, refer to Uploading Question Collections.
Description – Enter an optional value for this attribute to define the description for this question.
Type – Enter a value for this attribute to indicate the question order type. You can enter 0 or 1 as the value.
o 0 – Represents the Sequential type.
o 1 – Represents the Parallel type.
QDFs field:
RunAsQuestionGroup – The questions are added to a group if this attribute is configured.
o GroupName – Enter the value of this attribute to define the group name in the question collection.
o DoRunQDF – Enter a question ID. The corresponding question is contained in the group.
DoRunQDF – Enter a question ID. The corresponding question is added into the question collection directly.
*Note: At least one node must be configured in the QDFs field. If you select 0 as the value of Type in the
QCF field, the questions or question groups in the question collection are displayed in order in the XML
file. In the above example, the question group alert coll’s order is 1, the order of the question with the
ID of f0b58c9c-71c8-417b-8241-c105e9201fe5 is 2, and the group alert 2’s order is 3.
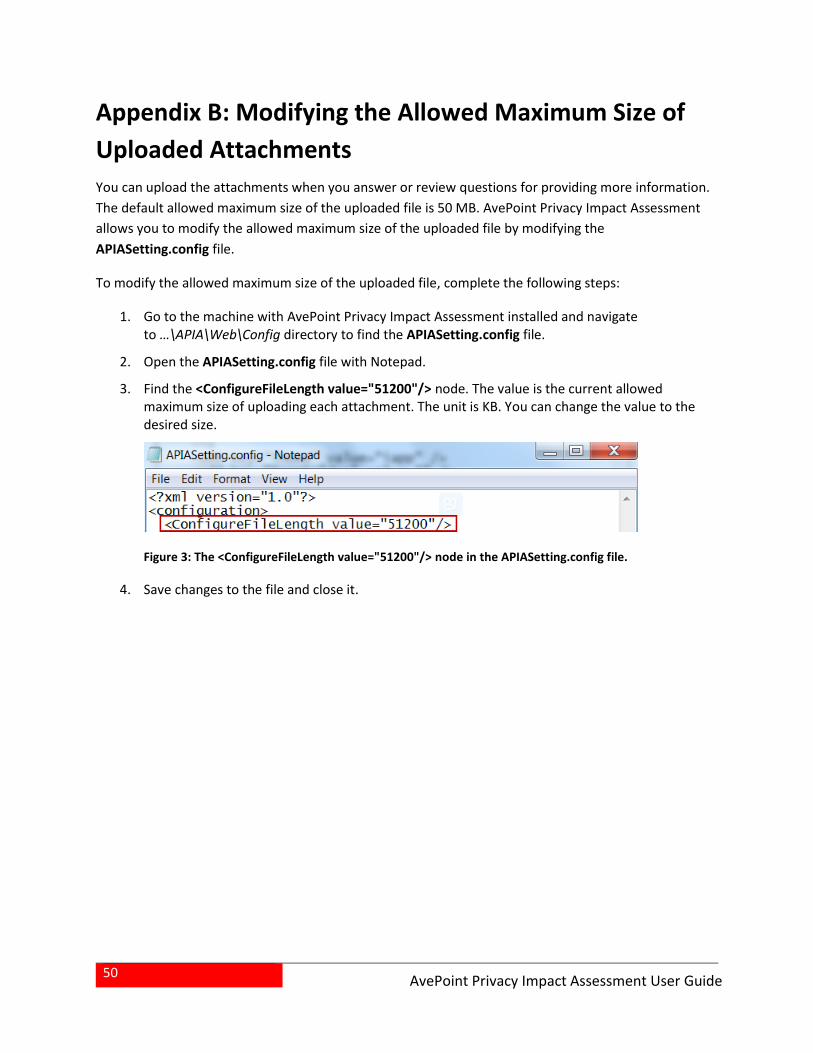
50
AvePoint Privacy Impact Assessment User Guide
Appendix B: Modifying the Allowed Maximum Size of
Uploaded Attachments
You can upload the attachments when you answer or review questions for providing more information.
The default allowed maximum size of the uploaded file is 50 MB. AvePoint Privacy Impact Assessment
allows you to modify the allowed maximum size of the uploaded file by modifying the
APIASetting.config file.
To modify the allowed maximum size of the uploaded file, complete the following steps:
1. Go to the machine with AvePoint Privacy Impact Assessment installed and navigate to …\APIA\Web\Config directory to find the APIASetting.config file.
2. Open the APIASetting.config file with Notepad.
3. Find the <ConfigureFileLength value="51200"/> node. The value is the current allowed maximum size of uploading each attachment. The unit is KB. You can change the value to the desired size.
Figure 3: The <ConfigureFileLength value="51200"/> node in the APIASetting.config file.
4. Save changes to the file and close it.
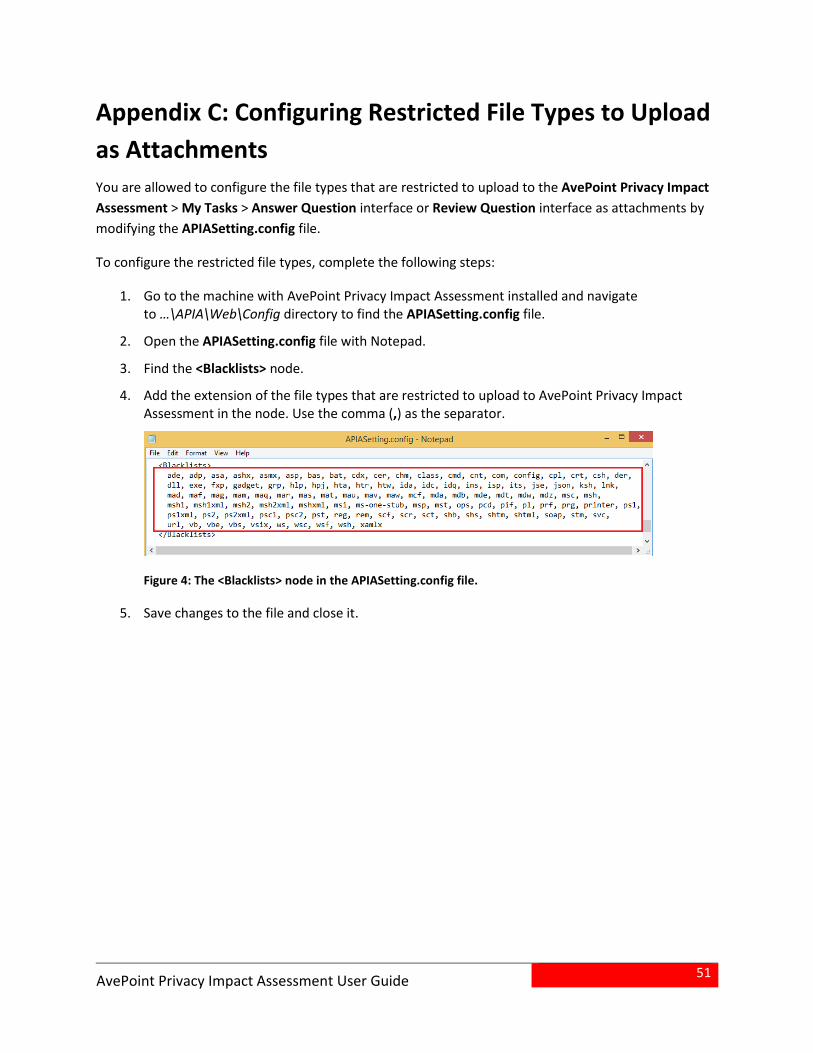
51
AvePoint Privacy Impact Assessment User Guide
Appendix C: Configuring Restricted File Types to Upload
as Attachments
You are allowed to configure the file types that are restricted to upload to the AvePoint Privacy Impact
Assessment > My Tasks > Answer Question interface or Review Question interface as attachments by
modifying the APIASetting.config file.
To configure the restricted file types, complete the following steps:
1. Go to the machine with AvePoint Privacy Impact Assessment installed and navigate to …\APIA\Web\Config directory to find the APIASetting.config file.
2. Open the APIASetting.config file with Notepad.
3. Find the <Blacklists> node.
4. Add the extension of the file types that are restricted to upload to AvePoint Privacy Impact Assessment in the node. Use the comma (,) as the separator.
Figure 4: The <Blacklists> node in the APIASetting.config file.
5. Save changes to the file and close it.
52
AvePoint Privacy Impact Assessment User Guide
Appendix D: Enabling only One Assignee to Answer
Questions
When you specify users and AD groups as the assignees, all of the assignees is required to answer the
questions. If you want only one assignee among all assignees to answer questions, you can configure the
file APIASetting.config. Refer to the following steps:
1. Go to the machine with AvePoint Privacy Impact Assessment installed and navigate to …\APIA\Web\Config directory to find the APIASetting.config file.
2. Open the APIASetting.config file with Notepad.
3. Find the <AllUsersRequired value="true"/> node. Change the value from true to false. Then, only one of all the assignees is required to answer the assigned question.
*Note: Once the workflow is routed to the AD group, all of the AD group users are created in the
Settings > User Management list. The AD users have all AvePoint Privacy Impact Assessment
permissions same as the AD group to which the AD users belong. If the corresponding AD group
is removed from AvePoint Privacy Impact Assessment, the AD user will have the permissions
directly added to them.
4. Save changes to the file and close it.
53
AvePoint Privacy Impact Assessment User Guide
Appendix E: Updating AvePoint Privacy Impact
Assessment
To update an old version of AvePoint Privacy Impact Assessment to a newer version, complete the
following steps:
1. Contact an AvePoint representative for links to the AvePoint Privacy Impact Assessment package.
2. Download the ZIP file.
3. Unzip the package and locate the APIAUpgrade.exe file.
4. Open the file to run it, or right-click the file, and then select Run as administrator to run it.
*Note: The Web Deploy must be installed before updating AvePoint Privacy Impact Assessment.
By default, the WebDeploy_amd64_en-US.msi file and WebDeploy_x86_en-US.msi file are
provided in the package. If the Web Deploy is not installed, a message will be appear to remind
you of installing the Web Deploy. Select Yes to automatically install Web Deploy on your
machine, or select Cancel to cancel the install.
*Note: The previous version of AvePoint Privacy Impact Assessment must be installed in the
machine where the update package resides.
5. The AvePoint Privacy Impact Assessment Upgrade Tool interface appears. The used IIS website name is listed in the interface.
6. Select Update. The update process starts.
7. Select Finish.
If the update fails (for example, the DLL files under the IIS website are used by another program
during the update process, the update will fail), a window with a prompt message appears. You
can select Rollback in the window to roll back AvePoint Privacy Impact Assessment to the
version before the update, and then try to run the update again.
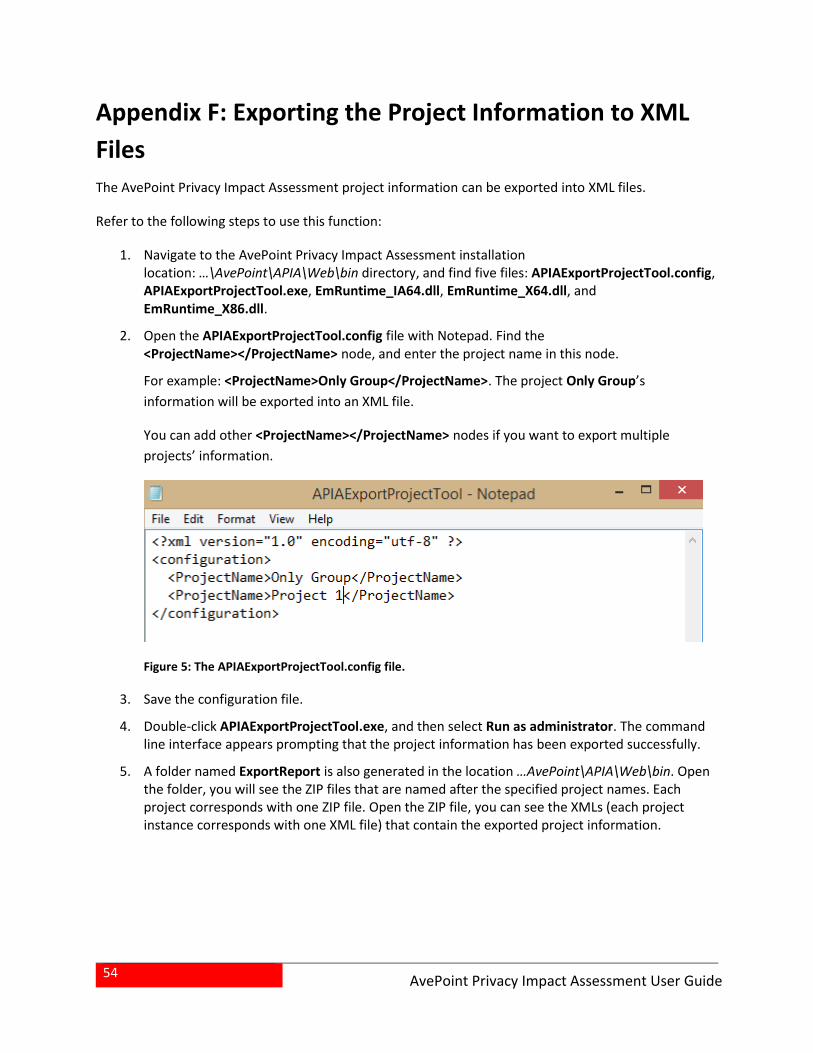
54
AvePoint Privacy Impact Assessment User Guide
Appendix F: Exporting the Project Information to XML
Files
The AvePoint Privacy Impact Assessment project information can be exported into XML files.
Refer to the following steps to use this function:
1. Navigate to the AvePoint Privacy Impact Assessment installation location: …\AvePoint\APIA\Web\bin directory, and find five files: APIAExportProjectTool.config, APIAExportProjectTool.exe, EmRuntime_IA64.dll, EmRuntime_X64.dll, and EmRuntime_X86.dll.
2. Open the APIAExportProjectTool.config file with Notepad. Find the <ProjectName></ProjectName> node, and enter the project name in this node.
For example: <ProjectName>Only Group</ProjectName>. The project Only Group’s
information will be exported into an XML file.
You can add other <ProjectName></ProjectName> nodes if you want to export multiple
projects’ information.
Figure 5: The APIAExportProjectTool.config file.
3. Save the configuration file.
4. Double-click APIAExportProjectTool.exe, and then select Run as administrator. The command line interface appears prompting that the project information has been exported successfully.
5. A folder named ExportReport is also generated in the location …AvePoint\APIA\Web\bin. Open the folder, you will see the ZIP files that are named after the specified project names. Each project corresponds with one ZIP file. Open the ZIP file, you can see the XMLs (each project instance corresponds with one XML file) that contain the exported project information.
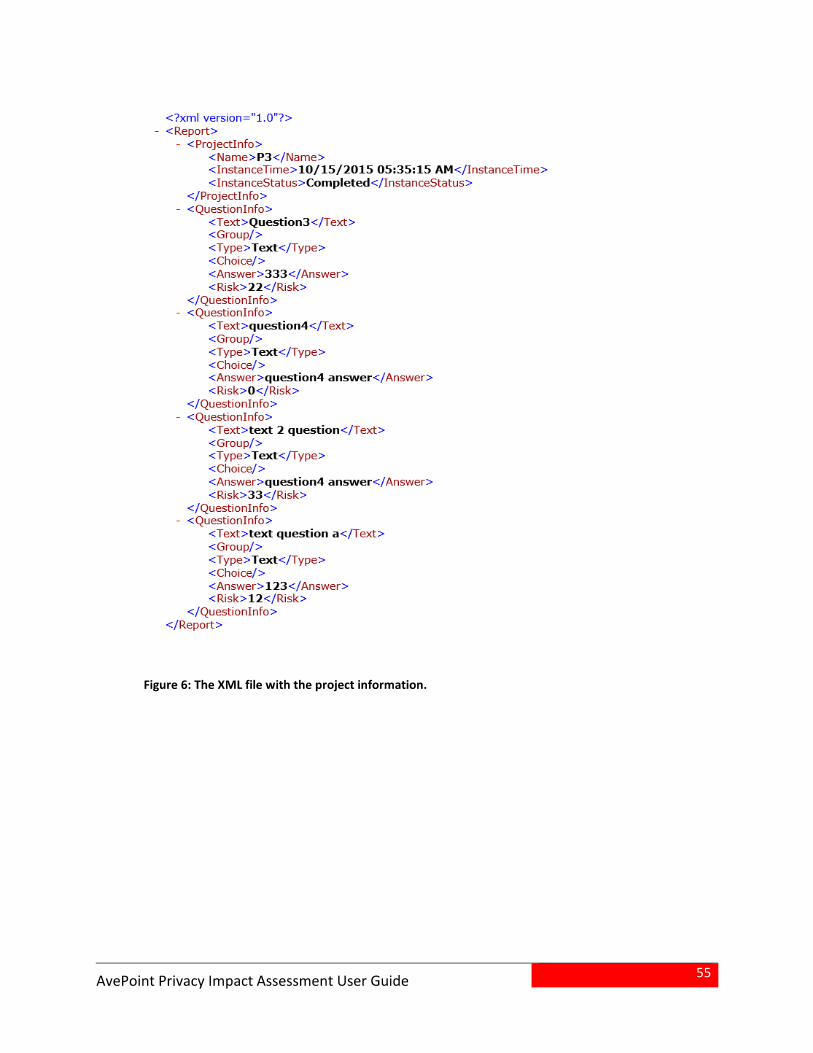
55
AvePoint Privacy Impact Assessment User Guide
Figure 6: The XML file with the project information.
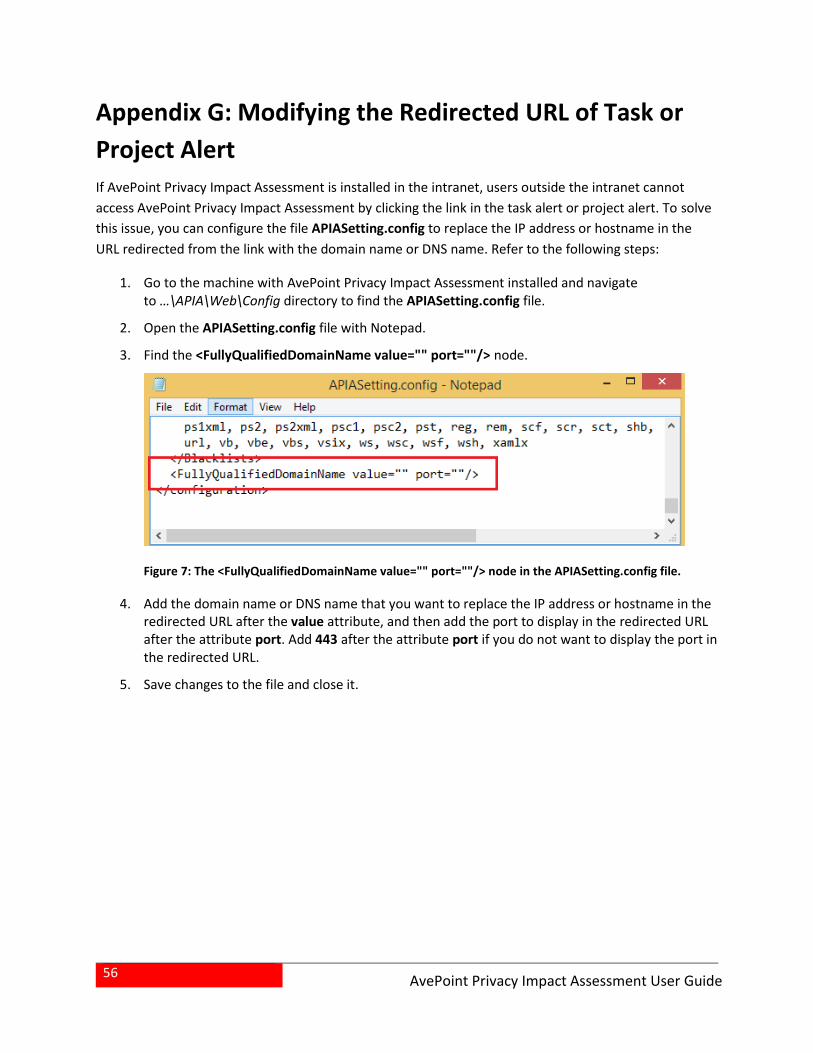
56
AvePoint Privacy Impact Assessment User Guide
Appendix G: Modifying the Redirected URL of Task or
Project Alert
If AvePoint Privacy Impact Assessment is installed in the intranet, users outside the intranet cannot
access AvePoint Privacy Impact Assessment by clicking the link in the task alert or project alert. To solve
this issue, you can configure the file APIASetting.config to replace the IP address or hostname in the
URL redirected from the link with the domain name or DNS name. Refer to the following steps:
1. Go to the machine with AvePoint Privacy Impact Assessment installed and navigate to …\APIA\Web\Config directory to find the APIASetting.config file.
2. Open the APIASetting.config file with Notepad.
3. Find the <FullyQualifiedDomainName value="" port=""/> node.
Figure 7: The <FullyQualifiedDomainName value="" port=""/> node in the APIASetting.config file.
4. Add the domain name or DNS name that you want to replace the IP address or hostname in the redirected URL after the value attribute, and then add the port to display in the redirected URL after the attribute port. Add 443 after the attribute port if you do not want to display the port in the redirected URL.
5. Save changes to the file and close it.
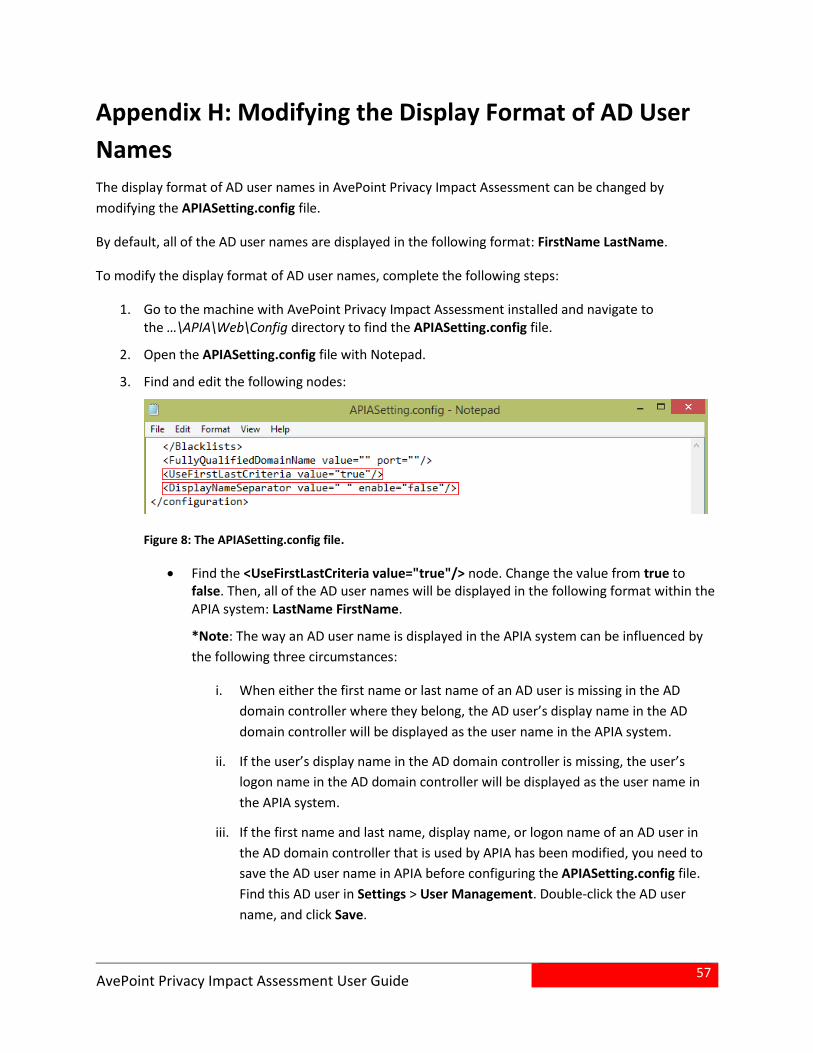
57
AvePoint Privacy Impact Assessment User Guide
Appendix H: Modifying the Display Format of AD User
Names
The display format of AD user names in AvePoint Privacy Impact Assessment can be changed by
modifying the APIASetting.config file.
By default, all of the AD user names are displayed in the following format: FirstName LastName.
To modify the display format of AD user names, complete the following steps:
1. Go to the machine with AvePoint Privacy Impact Assessment installed and navigate to the …\APIA\Web\Config directory to find the APIASetting.config file.
2. Open the APIASetting.config file with Notepad.
3. Find and edit the following nodes:
Figure 8: The APIASetting.config file.
Find the <UseFirstLastCriteria value="true"/> node. Change the value from true to false. Then, all of the AD user names will be displayed in the following format within the APIA system: LastName FirstName.
*Note: The way an AD user name is displayed in the APIA system can be influenced by
the following three circumstances:
i. When either the first name or last name of an AD user is missing in the AD
domain controller where they belong, the AD user’s display name in the AD
domain controller will be displayed as the user name in the APIA system.
ii. If the user’s display name in the AD domain controller is missing, the user’s
logon name in the AD domain controller will be displayed as the user name in
the APIA system.
iii. If the first name and last name, display name, or logon name of an AD user in
the AD domain controller that is used by APIA has been modified, you need to
save the AD user name in APIA before configuring the APIASetting.config file.
Find this AD user in Settings > User Management. Double-click the AD user
name, and click Save.
58
AvePoint Privacy Impact Assessment User Guide
Find the <DisplayNameSeparator value=" " enable="false"/> node. Change the value of the enable parameter from false to true to configure a separator for display names. Configure the separator you want to use as the value of the value parameter. The default separator is a space.
4. Save changes to the file and close it.
59
AvePoint Privacy Impact Assessment User Guide
Appendix I: Database Collation Issue
If you encounter a database collation error when using an existing database that is not an AvePoint
Privacy Impact Assessment database during the AvePoint Privacy Impact Assessment Manager
installation process, log into SQL Server and configure the following settings according to the steps
below:
1. Log into SQL Server instance.
2. Right-click the specified database and then select Properties.
3. Select Options and set Latin1_General_CI_AS_KS_WS for the corresponding collation of the specified database.
After you complete the configuration above, to successfully use an existing database that is not an
AvePoint Privacy Impact Assessment created database, ensure that the specified database is empty.
60
AvePoint Privacy Impact Assessment User Guide
Notices and Copyright Information
Notice The materials contained in this publication are owned or provided by AvePoint, Inc. and are the property of AvePoint or its licensors, and are protected by copyright, trademark and other intellectual property laws. No trademark or copyright notice in this publication may be removed or altered in any way.
Copyright Copyright ©2014-2016 AvePoint, Inc. All rights reserved. All materials contained in this publication are protected by United States and international copyright laws and no part of this publication may be reproduced, modified, displayed, stored in a retrieval system, or transmitted in any form or by any means, electronic, mechanical, photocopying, recording or otherwise, without the prior written consent of AvePoint, 3 Second Street, Jersey City, NJ 07311, USA or, in the case of materials in this publication owned by third parties, without such third party’s consent. Notwithstanding the foregoing, to the extent any AvePoint material in this publication is reproduced or modified in any way (including derivative works and transformative works), by you or on your behalf, then such reproduced or modified materials shall be automatically assigned to AvePoint without any further act and you agree on behalf of yourself and your successors, assigns, heirs, beneficiaries, and executors, to promptly do all things and sign all documents to confirm the transfer of such reproduced or modified materials to AvePoint.
Trademarks AvePoint®, DocAve®, the AvePoint logo, and the AvePoint Pyramid logo are registered trademarks of AvePoint, Inc. with the United States Patent and Trademark Office. These registered trademarks, along with all other trademarks of AvePoint used in this publication are the exclusive property of AvePoint and may not be used without prior written consent.
Microsoft, MS-DOS, Internet Explorer, Microsoft Office SharePoint Servers 2007/2010/2013, SharePoint Portal Server 2003, Windows SharePoint Services, Windows SQL server, and Windows are either registered trademarks or trademarks of Microsoft Corporation.
Adobe Acrobat and Acrobat Reader are trademarks of Adobe Systems, Inc.
All other trademarks contained in this publication are the property of their respective owners and may not be used without such party’s consent.
Changes The material in this publication is for information purposes only and is subject to change without notice. While reasonable efforts have been made in the preparation of this publication to ensure its accuracy, AvePoint makes no representation or warranty, expressed or implied, as to its completeness, accuracy, or suitability, and assumes no liability resulting from errors or omissions in this publication or from the use of the information contained herein. AvePoint reserves the right to make changes in the Graphical User Interface of the AvePoint software without reservation and without notification to its users.
AvePoint, Inc. Harborside Financial Center, Plaza 10 3 Second Street, 9th Floor Jersey City, New Jersey 07311 USA