Embed Size (px)
Citation preview

AWE Surface 1.2 Documentation
AWE Surface is a new, robust, highly optimized, physically plausible shader for DAZ Studio and 3Delight employing physically based rendering (PBR) metalness / roughness workflow. Using a primarily uber shader approach, it can be used to render materials such as dielectrics, glass and metal.
Features Highlight
Physically based BRDF (Oren Nayar for diffuse, Cook Torrance, Ashikhmin Shirley and GGX for specular).
Micro facet energy loss compensation for the diffuse and transmission lobe.
Transmission with Beer-Lambert based absorption.
BRDF based importance sampling. Multiple importance sampling (MIS) with 3delight's path traced area light shaders such as the aweAreaPT shader.
Explicit Russian Roulette for next event estimation and path termination.
Raytraced subsurface scattering with forward/backward scattering via Henyey Greenstein phase function.
Physically based Fresnel for both dielectric and metal materials. Unified index of refraction value for both reflection and transmission with dielectrics. An artist friendly metallic Fresnel based on Ole Gulbrandsen model using reflection color and edge tint to derive complex IOR.
Physically based thin film interference (iridescence).
Shader based, global illumination.
Luminance based, Reinhard tone mapping with exposure, temperature and saturation controls.
Toggle switches for each lobe.
Diffuse Oren Nayar based translucency with support for bleed through shadows. Can use separate front/back side diffuse color and texture.
Two specular/reflection lobes for the base, one specular/reflection lobe for coat.
Anisotropic specular and reflection (only with Ashikhmin Shirley and GGX BRDF), with map-controllable direction.
Glossy Fresnel with explicit roughness values, one for the base and one for the coat layer.
Optimized opacity handling with user controllable thresholds.
Imports most settings and values when converting materials from dsDefaultMaterial, HumanSurface Shader, UberSurface and UberSurface 2.
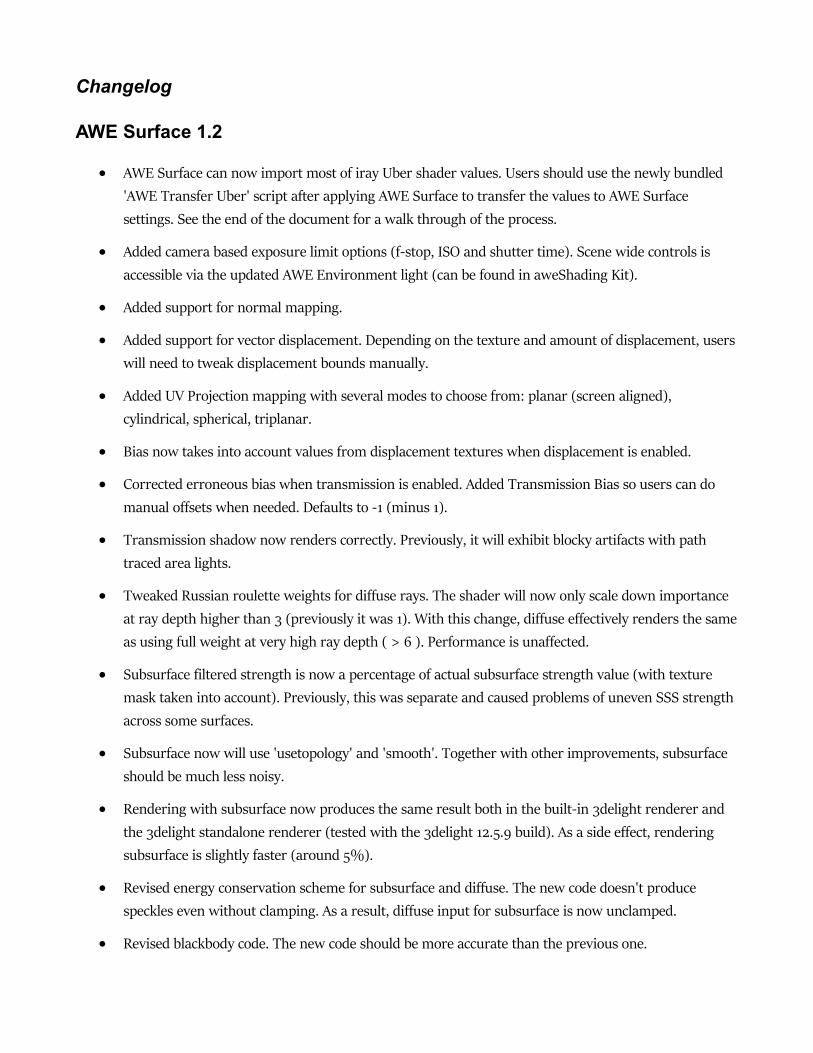
Changelog
AWE Surface 1.2
AWE Surface can now import most of iray Uber shader values. Users should use the newly bundled 'AWE Transfer Uber' script after applying AWE Surface to transfer the values to AWE Surface settings. See the end of the document for a walk through of the process.
Added camera based exposure limit options (f-stop, ISO and shutter time). Scene wide controls is accessible via the updated AWE Environment light (can be found in aweShading Kit).
Added support for normal mapping.
Added support for vector displacement. Depending on the texture and amount of displacement, userswill need to tweak displacement bounds manually.
Added UV Projection mapping with several modes to choose from: planar (screen aligned), cylindrical, spherical, triplanar.
Bias now takes into account values from displacement textures when displacement is enabled.
Corrected erroneous bias when transmission is enabled. Added Transmission Bias so users can do manual offsets when needed. Defaults to -1 (minus 1).
Transmission shadow now renders correctly. Previously, it will exhibit blocky artifacts with path traced area lights.
Tweaked Russian roulette weights for diffuse rays. The shader will now only scale down importance at ray depth higher than 3 (previously it was 1). With this change, diffuse effectively renders the sameas using full weight at very high ray depth ( > 6 ). Performance is unaffected.
Subsurface filtered strength is now a percentage of actual subsurface strength value (with texture mask taken into account). Previously, this was separate and caused problems of uneven SSS strength across some surfaces.
Subsurface now will use 'usetopology' and 'smooth'. Together with other improvements, subsurface should be much less noisy.
Rendering with subsurface now produces the same result both in the built-in 3delight renderer and the 3delight standalone renderer (tested with the 3delight 12.5.9 build). As a side effect, rendering subsurface is slightly faster (around 5%).
Revised energy conservation scheme for subsurface and diffuse. The new code doesn't produce speckles even without clamping. As a result, diffuse input for subsurface is now unclamped.
Revised blackbody code. The new code should be more accurate than the previous one.
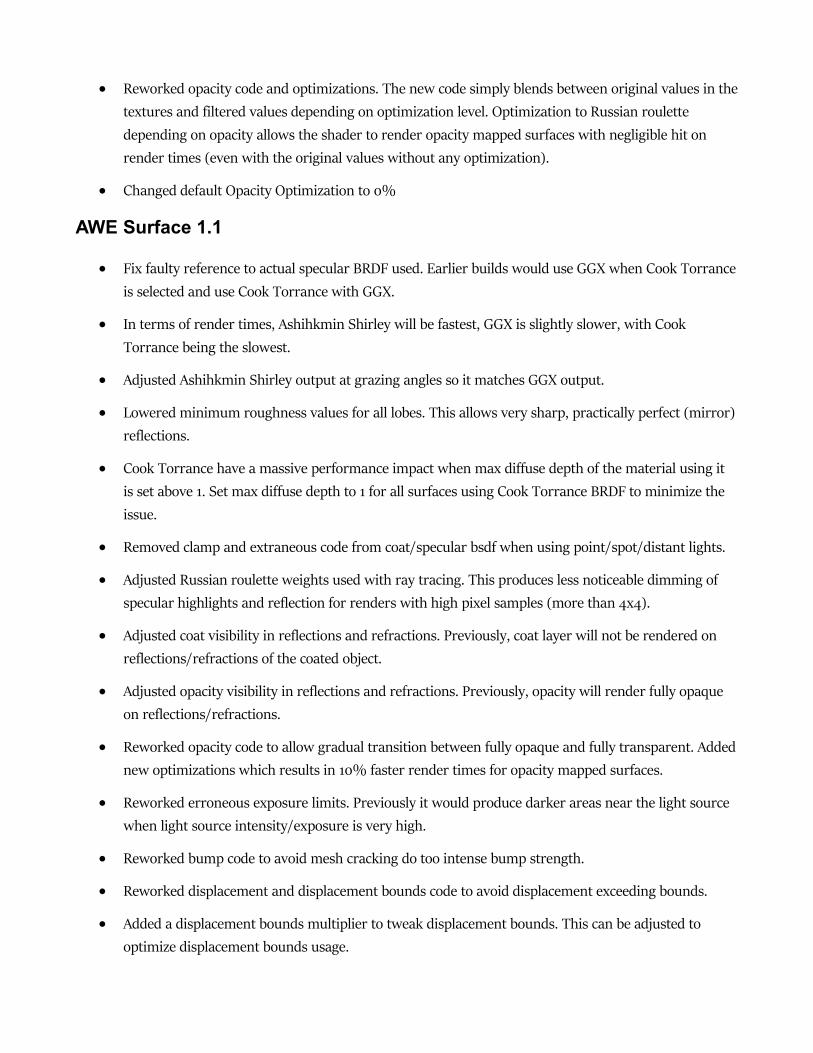
Reworked opacity code and optimizations. The new code simply blends between original values in thetextures and filtered values depending on optimization level. Optimization to Russian roulette depending on opacity allows the shader to render opacity mapped surfaces with negligible hit on render times (even with the original values without any optimization).
Changed default Opacity Optimization to 0%
AWE Surface 1.1
Fix faulty reference to actual specular BRDF used. Earlier builds would use GGX when Cook Torranceis selected and use Cook Torrance with GGX.
In terms of render times, Ashihkmin Shirley will be fastest, GGX is slightly slower, with Cook Torrance being the slowest.
Adjusted Ashihkmin Shirley output at grazing angles so it matches GGX output.
Lowered minimum roughness values for all lobes. This allows very sharp, practically perfect (mirror)reflections.
Cook Torrance have a massive performance impact when max diffuse depth of the material using it is set above 1. Set max diffuse depth to 1 for all surfaces using Cook Torrance BRDF to minimize the issue.
Removed clamp and extraneous code from coat/specular bsdf when using point/spot/distant lights.
Adjusted Russian roulette weights used with ray tracing. This produces less noticeable dimming of specular highlights and reflection for renders with high pixel samples (more than 4x4).
Adjusted coat visibility in reflections and refractions. Previously, coat layer will not be rendered on reflections/refractions of the coated object.
Adjusted opacity visibility in reflections and refractions. Previously, opacity will render fully opaque on reflections/refractions.
Reworked opacity code to allow gradual transition between fully opaque and fully transparent. Addednew optimizations which results in 10% faster render times for opacity mapped surfaces.
Reworked erroneous exposure limits. Previously it would produce darker areas near the light source when light source intensity/exposure is very high.
Reworked bump code to avoid mesh cracking do too intense bump strength.
Reworked displacement and displacement bounds code to avoid displacement exceeding bounds.
Added a displacement bounds multiplier to tweak displacement bounds. This can be adjusted to optimize displacement bounds usage.
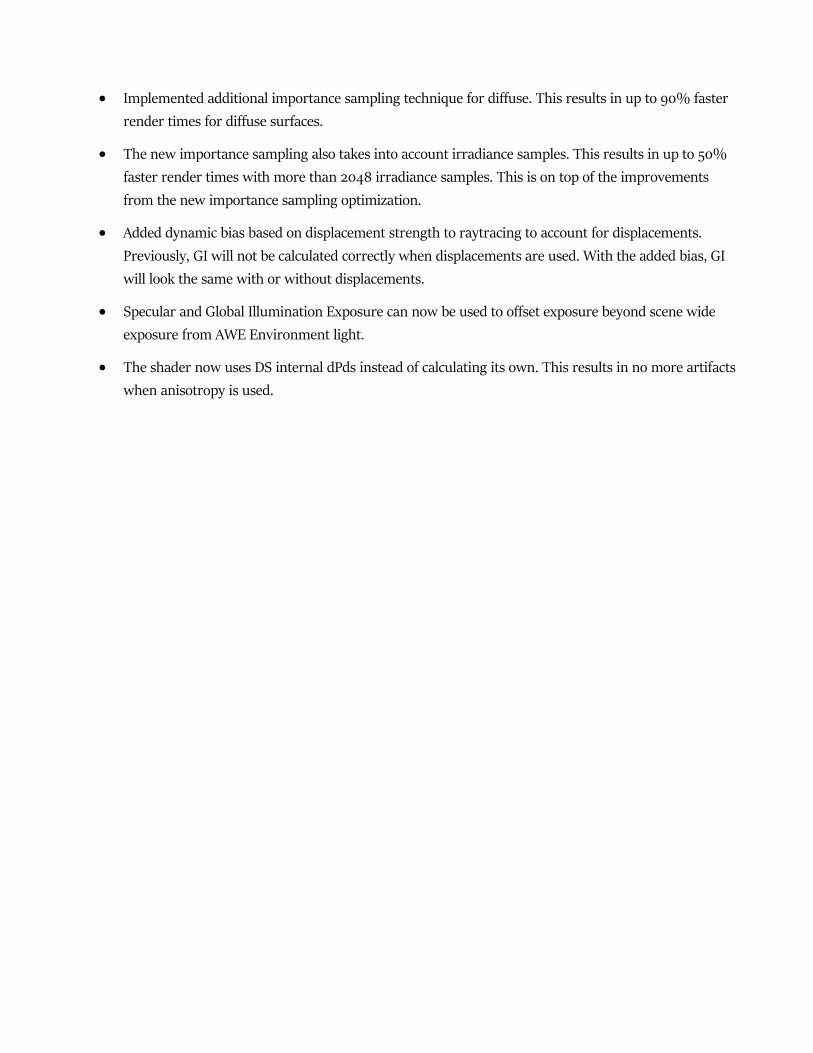
Implemented additional importance sampling technique for diffuse. This results in up to 90% faster render times for diffuse surfaces.
The new importance sampling also takes into account irradiance samples. This results in up to 50% faster render times with more than 2048 irradiance samples. This is on top of the improvements from the new importance sampling optimization.
Added dynamic bias based on displacement strength to raytracing to account for displacements. Previously, GI will not be calculated correctly when displacements are used. With the added bias, GI will look the same with or without displacements.
Specular and Global Illumination Exposure can now be used to offset exposure beyond scene wide exposure from AWE Environment light.
The shader now uses DS internal dPds instead of calculating its own. This results in no more artifactswhen anisotropy is used.
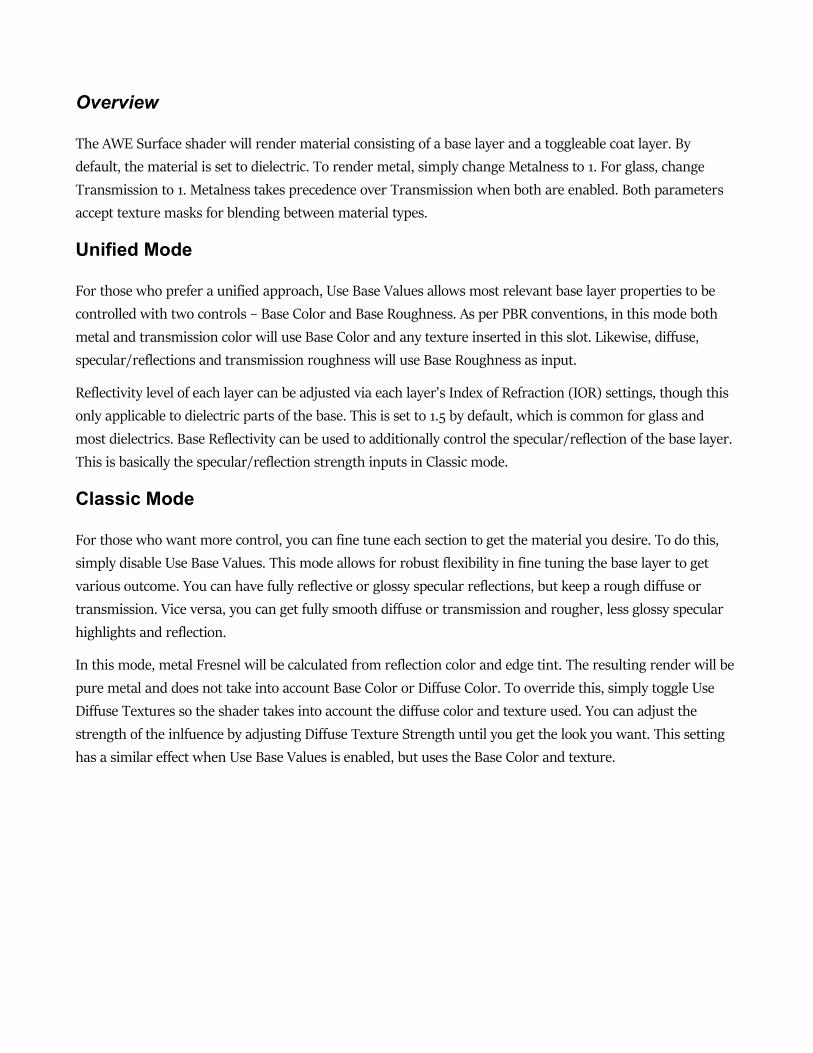
Overview
The AWE Surface shader will render material consisting of a base layer and a toggleable coat layer. By default, the material is set to dielectric. To render metal, simply change Metalness to 1. For glass, change Transmission to 1. Metalness takes precedence over Transmission when both are enabled. Both parameters accept texture masks for blending between material types.
Unified Mode
For those who prefer a unified approach, Use Base Values allows most relevant base layer properties to be controlled with two controls – Base Color and Base Roughness. As per PBR conventions, in this mode both metal and transmission color will use Base Color and any texture inserted in this slot. Likewise, diffuse, specular/reflections and transmission roughness will use Base Roughness as input.
Reflectivity level of each layer can be adjusted via each layer's Index of Refraction (IOR) settings, though this only applicable to dielectric parts of the base. This is set to 1.5 by default, which is common for glass and most dielectrics. Base Reflectivity can be used to additionally control the specular/reflection of the base layer. This is basically the specular/reflection strength inputs in Classic mode.
Classic Mode
For those who want more control, you can fine tune each section to get the material you desire. To do this, simply disable Use Base Values. This mode allows for robust flexibility in fine tuning the base layer to get various outcome. You can have fully reflective or glossy specular reflections, but keep a rough diffuse or transmission. Vice versa, you can get fully smooth diffuse or transmission and rougher, less glossy specular highlights and reflection.
In this mode, metal Fresnel will be calculated from reflection color and edge tint. The resulting render will be pure metal and does not take into account Base Color or Diffuse Color. To override this, simply toggle Use Diffuse Textures so the shader takes into account the diffuse color and texture used. You can adjust the strength of the inlfuence by adjusting Diffuse Texture Strength until you get the look you want. This setting has a similar effect when Use Base Values is enabled, but uses the Base Color and texture.
Base Layer
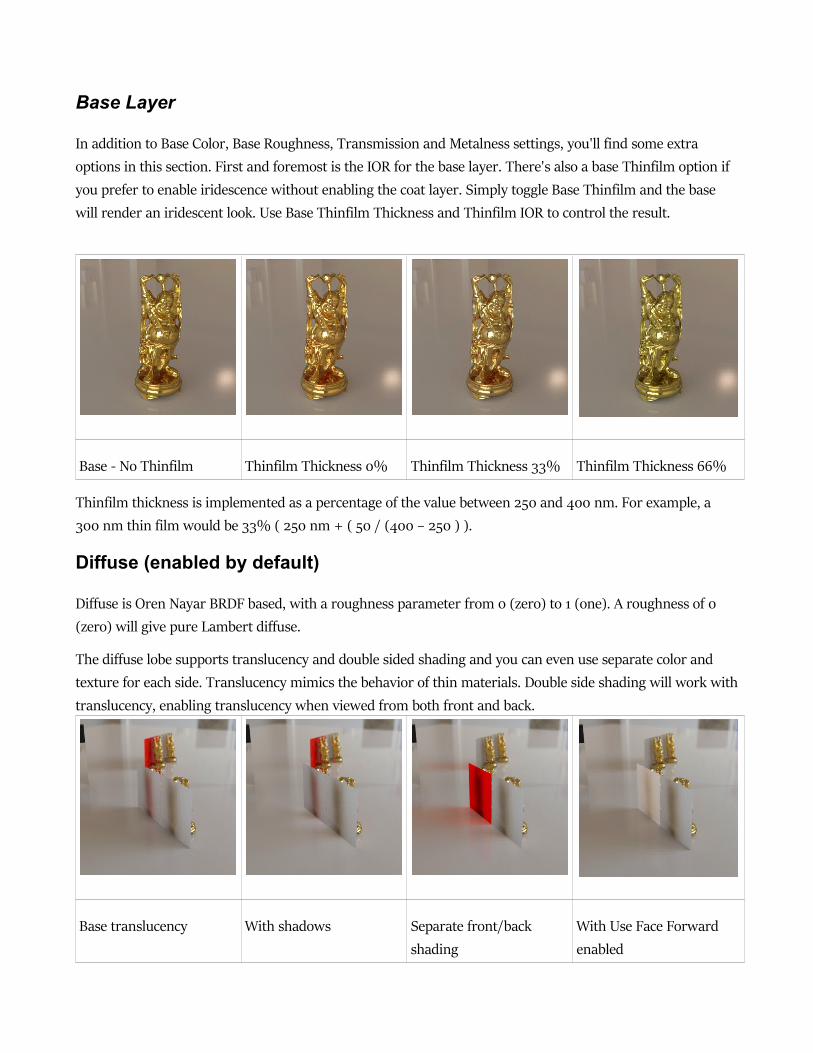
In addition to Base Color, Base Roughness, Transmission and Metalness settings, you'll find some extra options in this section. First and foremost is the IOR for the base layer. There's also a base Thinfilm option if you prefer to enable iridescence without enabling the coat layer. Simply toggle Base Thinfilm and the base will render an iridescent look. Use Base Thinfilm Thickness and Thinfilm IOR to control the result.
Base - No Thinfilm Thinfilm Thickness 0% Thinfilm Thickness 33% Thinfilm Thickness 66%
Thinfilm thickness is implemented as a percentage of the value between 250 and 400 nm. For example, a 300 nm thin film would be 33% ( 250 nm + ( 50 / (400 – 250 ) ).
Diffuse (enabled by default)
Diffuse is Oren Nayar BRDF based, with a roughness parameter from 0 (zero) to 1 (one). A roughness of 0 (zero) will give pure Lambert diffuse.
The diffuse lobe supports translucency and double sided shading and you can even use separate color and texture for each side. Translucency mimics the behavior of thin materials. Double side shading will work withtranslucency, enabling translucency when viewed from both front and back.
Base translucency With shadows Separate front/back shading
With Use Face Forward enabled
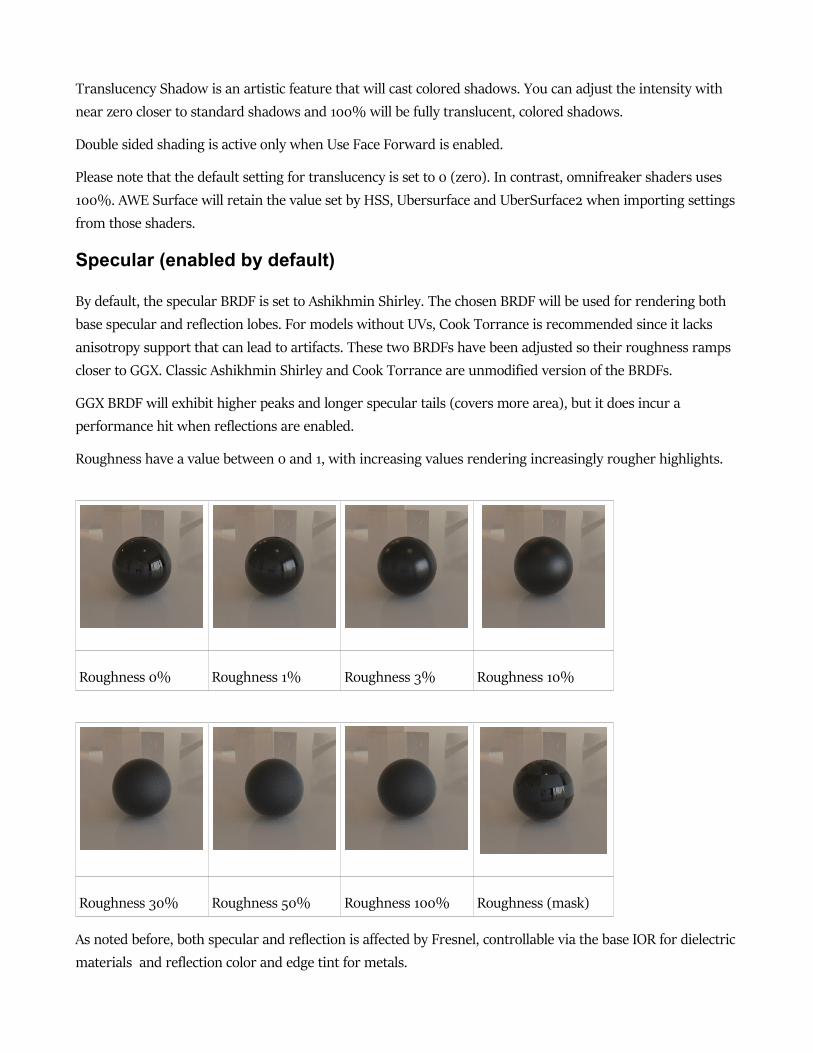
Translucency Shadow is an artistic feature that will cast colored shadows. You can adjust the intensity with near zero closer to standard shadows and 100% will be fully translucent, colored shadows.
Double sided shading is active only when Use Face Forward is enabled.
Please note that the default setting for translucency is set to 0 (zero). In contrast, omnifreaker shaders uses 100%. AWE Surface will retain the value set by HSS, Ubersurface and UberSurface2 when importing settingsfrom those shaders.
Specular (enabled by default)
By default, the specular BRDF is set to Ashikhmin Shirley. The chosen BRDF will be used for rendering both base specular and reflection lobes. For models without UVs, Cook Torrance is recommended since it lacks anisotropy support that can lead to artifacts. These two BRDFs have been adjusted so their roughness ramps closer to GGX. Classic Ashikhmin Shirley and Cook Torrance are unmodified version of the BRDFs.
GGX BRDF will exhibit higher peaks and longer specular tails (covers more area), but it does incur a performance hit when reflections are enabled.
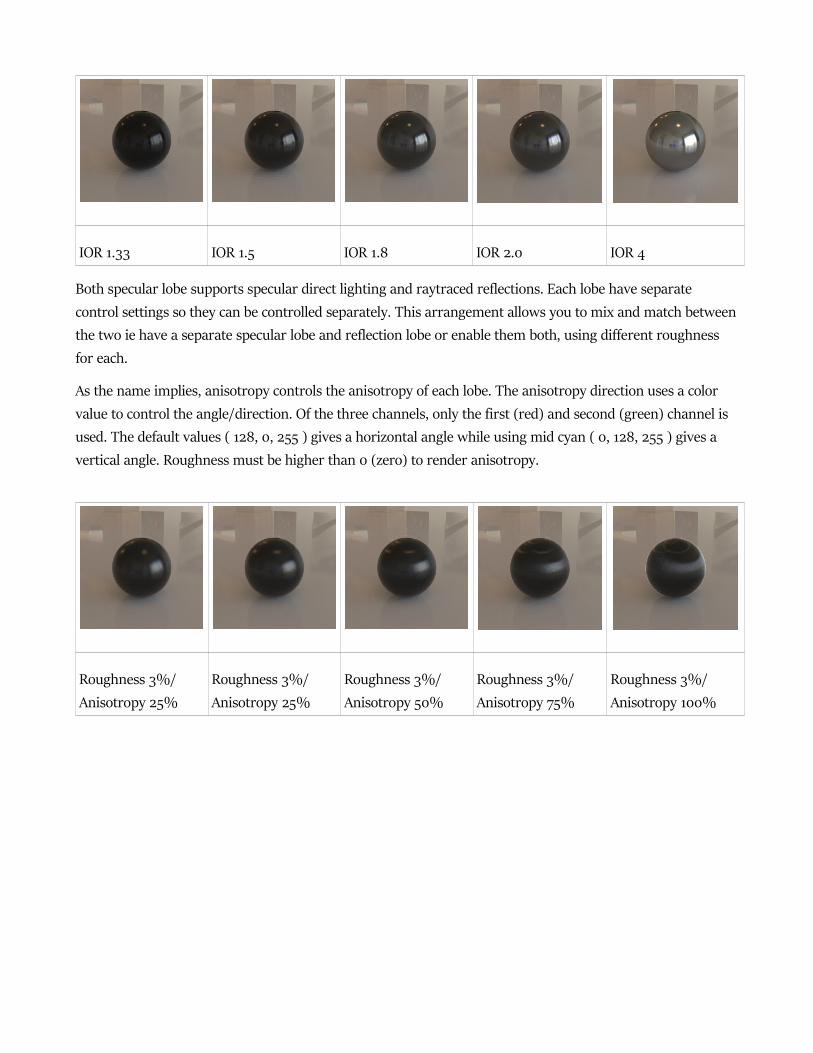
Roughness have a value between 0 and 1, with increasing values rendering increasingly rougher highlights.
Roughness 0% Roughness 1% Roughness 3% Roughness 10%
Roughness 30% Roughness 50% Roughness 100% Roughness (mask)
As noted before, both specular and reflection is affected by Fresnel, controllable via the base IOR for dielectricmaterials and reflection color and edge tint for metals.
IOR 1.33 IOR 1.5 IOR 1.8 IOR 2.0 IOR 4
Both specular lobe supports specular direct lighting and raytraced reflections. Each lobe have separate control settings so they can be controlled separately. This arrangement allows you to mix and match betweenthe two ie have a separate specular lobe and reflection lobe or enable them both, using different roughness for each.
As the name implies, anisotropy controls the anisotropy of each lobe. The anisotropy direction uses a color value to control the angle/direction. Of the three channels, only the first (red) and second (green) channel is used. The default values ( 128, 0, 255 ) gives a horizontal angle while using mid cyan ( 0, 128, 255 ) gives a vertical angle. Roughness must be higher than 0 (zero) to render anisotropy.
Roughness 3%/ Anisotropy 25%
Roughness 3%/ Anisotropy 25%
Roughness 3%/ Anisotropy 50%
Roughness 3%/ Anisotropy 75%
Roughness 3%/ Anisotropy 100%
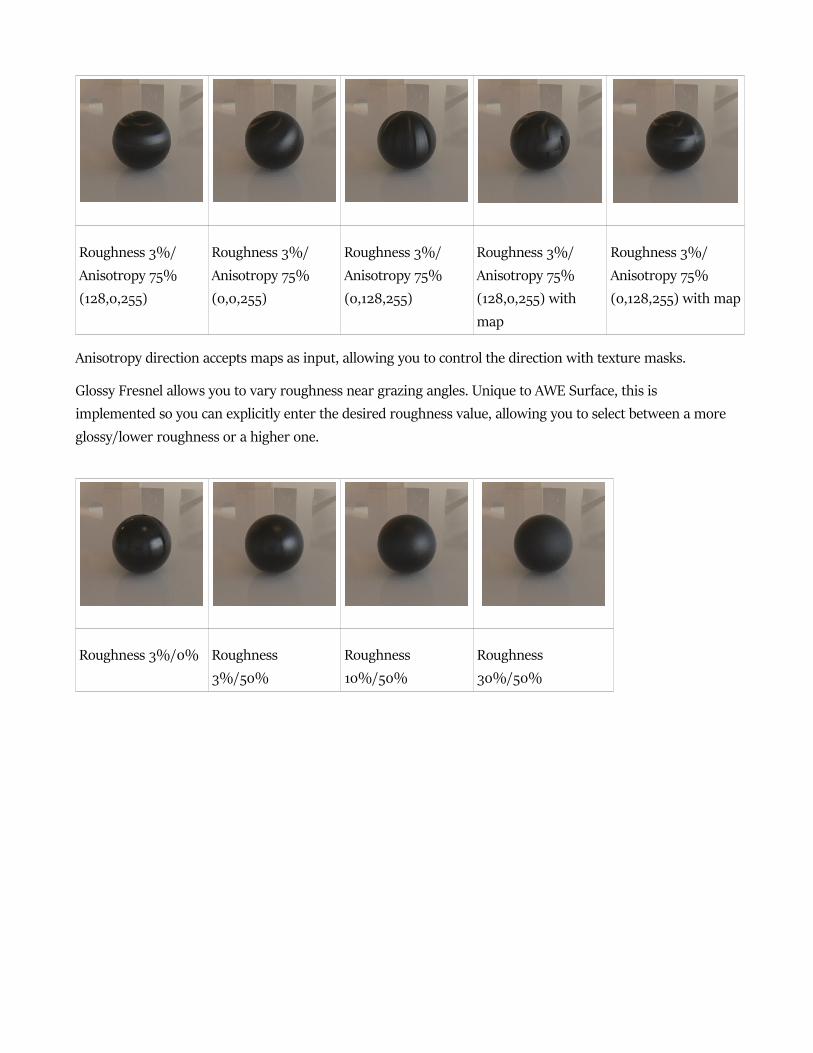
Roughness 3%/ Anisotropy 75% (128,0,255)
Roughness 3%/ Anisotropy 75% (0,0,255)
Roughness 3%/ Anisotropy 75% (0,128,255)
Roughness 3%/ Anisotropy 75% (128,0,255) with map
Roughness 3%/ Anisotropy 75% (0,128,255) with map
Anisotropy direction accepts maps as input, allowing you to control the direction with texture masks.
Glossy Fresnel allows you to vary roughness near grazing angles. Unique to AWE Surface, this is implemented so you can explicitly enter the desired roughness value, allowing you to select between a more glossy/lower roughness or a higher one.
Roughness 3%/0% Roughness 3%/50%
Roughness 10%/50%
Roughness 30%/50%

Here's an example : with high roughness as the main value, you can use glossy Fresnel to directly control the amount of reflection at grazing angles.
Roughness 50%/0%
Roughness 5%/1% Roughness 50%/30%
Roughness 50%/10%
Glossy Fresnel also affects anisotropy.
Roughness 2.5%/ Anisotropy 100%
Roughness 2.5%/ Anisotropy 100%, Roughness at Grazing Angle 0%
By default, the 2nd specular / reflection lobe is enabled while the 1st one is disabled. Glossy Fresnel is also disabled by default for the base layer.
Please note that specular color does not have texture inputs. This is by design and all specular masks should be placed in their respective strength inputs. It does mean texture mask in the color slots will be discarded when converting from dsDefault materials.
Transmission
Refraction is controlled with the same IOR used for the specular and reflection lobes. Both Transmission Distance and Transmission Color directly determine what is rendered. Transmission Color will not have any effect when Transmission Distance is 0. To avoid confusion, Transmission Distance is set to 0.5 by default so
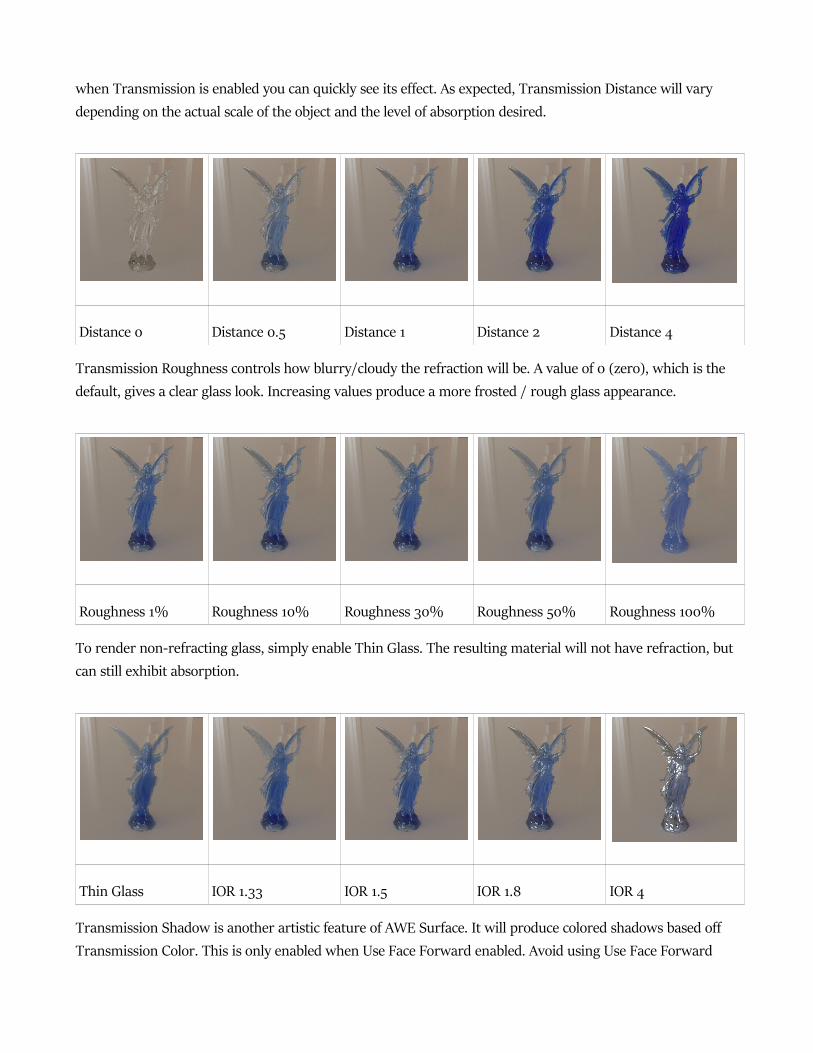
when Transmission is enabled you can quickly see its effect. As expected, Transmission Distance will vary depending on the actual scale of the object and the level of absorption desired.
Distance 0 Distance 0.5 Distance 1 Distance 2 Distance 4
Transmission Roughness controls how blurry/cloudy the refraction will be. A value of 0 (zero), which is the default, gives a clear glass look. Increasing values produce a more frosted / rough glass appearance.
Roughness 1% Roughness 10% Roughness 30% Roughness 50% Roughness 100%
To render non-refracting glass, simply enable Thin Glass. The resulting material will not have refraction, but can still exhibit absorption.
Thin Glass IOR 1.33 IOR 1.5 IOR 1.8 IOR 4
Transmission Shadow is another artistic feature of AWE Surface. It will produce colored shadows based off Transmission Color. This is only enabled when Use Face Forward enabled. Avoid using Use Face Forward
with models actually having thickness since it will render double refraction when transmission is enabled.
There are no toggle for transmission because it is controlled by the Transmission slider in the Base section.
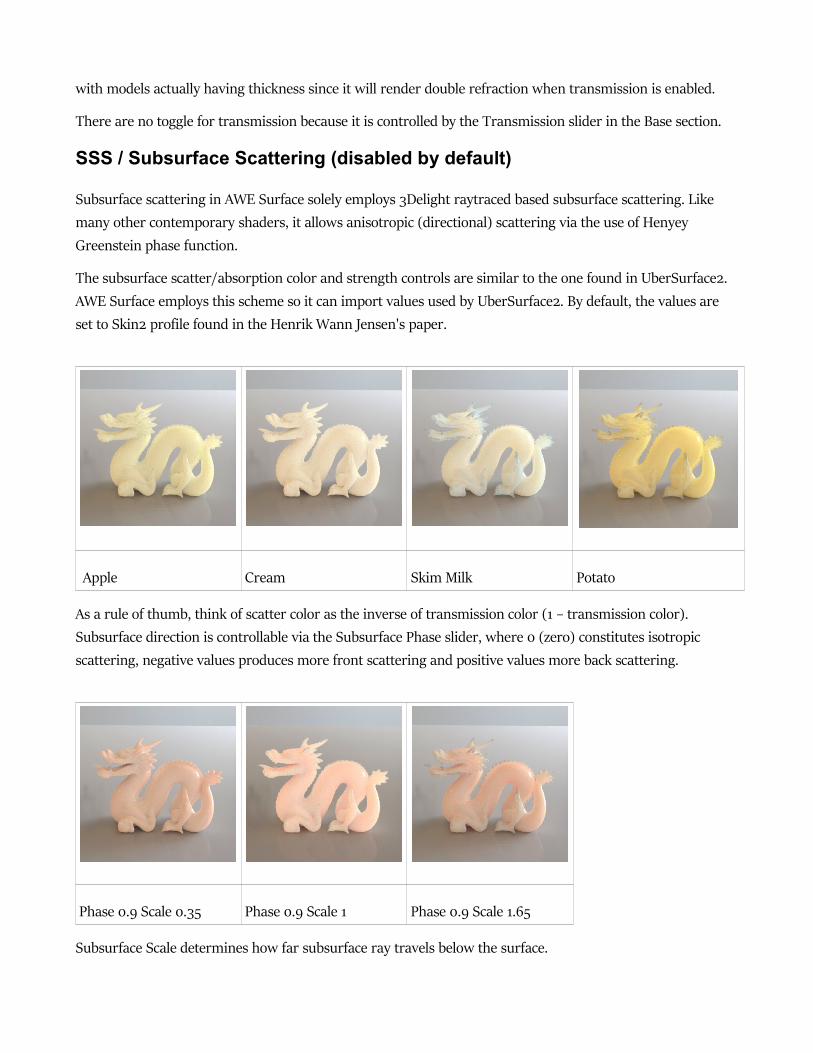
SSS / Subsurface Scattering (disabled by default)
Subsurface scattering in AWE Surface solely employs 3Delight raytraced based subsurface scattering. Like many other contemporary shaders, it allows anisotropic (directional) scattering via the use of Henyey Greenstein phase function.
The subsurface scatter/absorption color and strength controls are similar to the one found in UberSurface2. AWE Surface employs this scheme so it can import values used by UberSurface2. By default, the values are set to Skin2 profile found in the Henrik Wann Jensen's paper.
Apple Cream Skim Milk Potato
As a rule of thumb, think of scatter color as the inverse of transmission color (1 – transmission color). Subsurface direction is controllable via the Subsurface Phase slider, where 0 (zero) constitutes isotropic scattering, negative values produces more front scattering and positive values more back scattering.
Phase 0.9 Scale 0.35 Phase 0.9 Scale 1 Phase 0.9 Scale 1.65
Subsurface Scale determines how far subsurface ray travels below the surface.
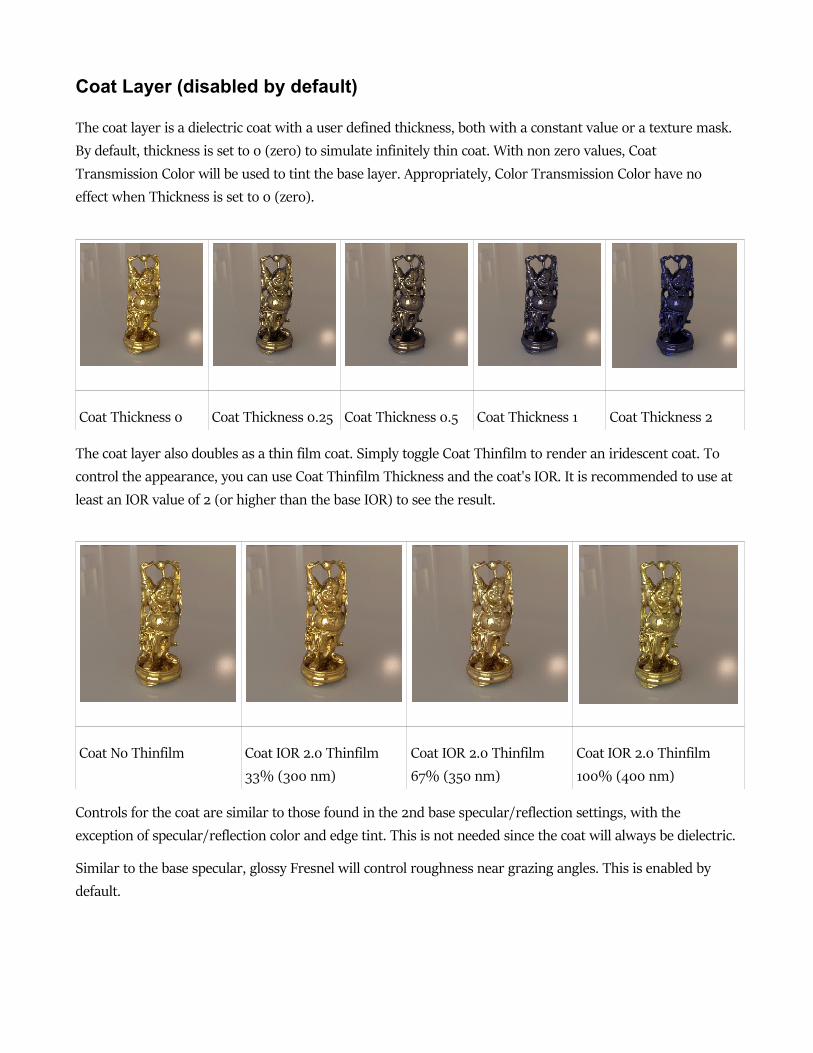
Coat Layer (disabled by default)
The coat layer is a dielectric coat with a user defined thickness, both with a constant value or a texture mask. By default, thickness is set to 0 (zero) to simulate infinitely thin coat. With non zero values, Coat Transmission Color will be used to tint the base layer. Appropriately, Color Transmission Color have no effect when Thickness is set to 0 (zero).
Coat Thickness 0 Coat Thickness 0.25 Coat Thickness 0.5 Coat Thickness 1 Coat Thickness 2
The coat layer also doubles as a thin film coat. Simply toggle Coat Thinfilm to render an iridescent coat. To control the appearance, you can use Coat Thinfilm Thickness and the coat's IOR. It is recommended to use at least an IOR value of 2 (or higher than the base IOR) to see the result.
Coat No Thinfilm Coat IOR 2.0 Thinfilm 33% (300 nm)
Coat IOR 2.0 Thinfilm 67% (350 nm)
Coat IOR 2.0 Thinfilm 100% (400 nm)
Controls for the coat are similar to those found in the 2nd base specular/reflection settings, with the exception of specular/reflection color and edge tint. This is not needed since the coat will always be dielectric.
Similar to the base specular, glossy Fresnel will control roughness near grazing angles. This is enabled by default.
Tiling
Tiling controls are provided, following the scheme employed by dsDefault material. Both vertical and horizontal tiling is supported, in the form of scale and offset. For flexibility, the base and coat layer can be tiled and offset independently of each other.
Tiling values from dsDefault material will be imported by AWE Surface during conversion, while values fromomnifreaker shaders will not be imported. Please note that it also imports settings without limits as well.
Bump and Displacement (enabled by default)
Both bump and displacement mapping is supported. When either are enabled, they affects both base and coat. Controls are the same as dsDefault material.
Texture maps will be imported by AWE Surface during conversion. As also minimum (negative) and maximum (positive) values from dsDefaultMaterial.
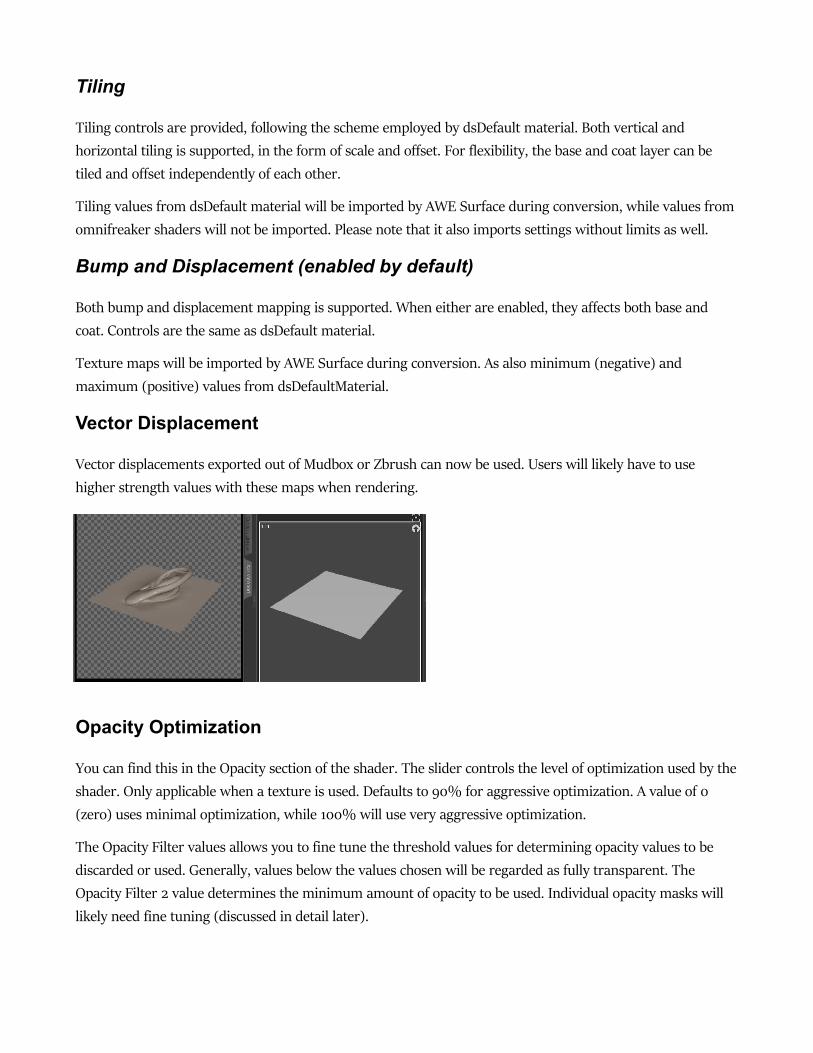
Vector Displacement
Vector displacements exported out of Mudbox or Zbrush can now be used. Users will likely have to use higher strength values with these maps when rendering.
Opacity Optimization
You can find this in the Opacity section of the shader. The slider controls the level of optimization used by theshader. Only applicable when a texture is used. Defaults to 90% for aggressive optimization. A value of 0 (zero) uses minimal optimization, while 100% will use very aggressive optimization.
The Opacity Filter values allows you to fine tune the threshold values for determining opacity values to be discarded or used. Generally, values below the values chosen will be regarded as fully transparent. The Opacity Filter 2 value determines the minimum amount of opacity to be used. Individual opacity masks will likely need fine tuning (discussed in detail later).
Options
Additional options are available to control more advanced features of AWE Surface. They have been categorized into these subsections – General, Specular, Transmission, Subsurface, Lighting, Masks, and Visibility.
General Options
Use Face Forward (disabled by default)
This is a toggle-able switch between enabling shading only on the front facing side or on both front and back.This should only be enabled on infinitely thin surfaces with single side normal. Enabling face forward incurs a penalty hit in render times especially with translucency and/or subsurface scattering.
Light Category
This feature allows light linking between surfaces and a single/ group of light sources. You can include or exclude certain lights from affecting certain materials. This is empty by default, making sure surfaces calculates all facing lights in the scene during rendering.Usage Syntax (enter these values in the Light Category field without quotes)"" (empty field, default) - Matches all lights regardless of their category."name" - Matches lights that belong to category ‘name’."-name” - matches lights that do not belong to category ‘name’, including lights that do not belong to any category. "*" - Matches every light that belongs to at least one category."-" - Matches nothing.Example: “specular&-crowd” - All lights in the "specular" category but omit ones in the "crowd" category
Trace Group & Trace Group Membership
Similar to light categories, but applied to ray tracing operations which include global illumination, reflections and refractions. To use this feature, you will need to first set Trace Group Membership on the target materials (to be included/excluded), and then use the value/name you used in the Trace Group field on materials that you want to have the effect.Usage Syntax (enter these values in the Trace Group field without quotes)"" (empty field, default ) - Objects which don’t belong to any group."group1" – Only objects which belong to group1."group1,group2" - Only objects which belong to group1 or group2."+group1" - Objects which belong to group1 or which don’t belong to any group."-group1" - Objects which don’t belong to group1.Example: “metal,-dielectric” - All materials in the "metal" category but omit ones in the "dielectric" category
Specular Options (applies to all lobe when enabled)
Multiply Specular & Reflection with Opacity (disabled by default)
As the name implies, this option forces specular and reflection to be multiplied with opacity values/mask. Disabling this allows you to make diffuse completely opaque or multiplied with a mask, but keep specular, reflection and refraction solid.
Specular Map to Roughness Multiplier (set to zero by default)
A convenience feature to 'try' and derive roughness values from specular maps. A factor of 0 (zero) will be the same as not enabling the feature, while higher values will take into account the specular texture when computing roughness. Increasing values generally cause less roughness.
Normalize Specular Map & Specular Map Strength (disabled by default)
Another set of convenience features to deal with very low, dark specular maps. Obviously, it will only work when a specular map is used. Normalize Specular Map will try to normalize the values in the specular map sothey are closer to the reflectivity levels appropriate for the IOR used in the base and coat. Maps used on the 1st
and 2nd specular/reflection lobes will use the base IOR for reference, while maps used on the coat will use the coat IOR. Specular Map Strength simply multiplies the map with the chosen value.
Trace BRDF Override (disabled by default)
When enabled, the shader will use Ashihkmin Shirley instead of GGX BRDF for all reflection lobes. Useful if you like to use GGX BSDF for specular, but want to avoid the performance hit of raytracing GGX reflections. The BRDF will also use Ashihkmin Shirley for specular from path traced area lights.Transmission Options
Transmission Scale Multiplier 1 and 2
This modifies the shader's transmission scale units. The first scale is a multiplier between 0.1 and 10. The second uses (2^multiplier) formula, ranging from -4 to 4.
SSS (Subsurface Scattering) Options
Subsurface Scale Multiplier 1 and 2
This modifies the shader's subsurface scale units. The first scale is a multiplier between 0.1 and 10. The second uses (2^multiplier) formula, ranging from -4 to 4.
Subsurface Samples and Subsurface Ray Weight
Essentially, both affect quality and performance when subsurface is enabled. Less values will be faster but more likely to have noise, while higher values will be slower and less likely to have noise. In general, ray weights have more of an impact compared to samples. For less significant materials, ray weight can be set to 12.5% with 128 samples.
Use Diffuse Texture with SSS
A convenience feature when working with SSS. When not set to 0 (zero), this setting will mix the diffuse texture (or the base texture) with subsurface scattering. This is set to 0 (zero) by default. Textures mask in the subsurface scattering color and strength slots will still be taken into account even when this is enabled.
Filtered Diffuse options
Another set of convenience feature. This basically filters diffuse texture values (but not diffuse color) below the specified color from having any subsurface scattering when Subsurface Strength in Filtered Area is set to 0 (zero).
Lighting Options
Max Diffuse Depth and Max Specular Depth
Sets maximum ray bounce depth limit of the material for each type of ray. By default, max diffuse depth is setto 6 bounces and max specular depth set to 16.
If maximum trace depth in the 3delight render settings is lower, the shader will use the limits set in the render settings. Vice versa, if maximum trace depth in the render settings is higher, it will use the maximum depth set in the material.
High Max Specular Depth is generally needed to render refraction. For reflection only materials like metals, you can actually get away with lower values. Thankfully, there's almost no noticeable difference in performance with high values so it is recommended to leave the value to default.
In contrast, higher Max Diffuse Depth values does incur a very small performance hit. For a little bit of speedup, with materials that have Transmission or Metalness set to 100%, you can set a lower Max Diffuse Depth. This avoids unnecessary diffuse rays bounces from those materials, which will not contribute to scenelighting since they're specular only materials. It's best to keep it above 1, so that color bleeding will still come from glass and metals.
Those who want an ambient occlusion look can set Max Diffuse Depth to 1. Render times will likely be slightlyfaster and can be beneficial for preview renders.
Photon Shading Model
Determine the photon shading model for the material. Only useful when you have photon emitting lights in the scene, either for caustics or photon-based global illumination.
Global Illumination Options
The Global Illumination switch disables or enables AWE Surface's built-in global illumination (diffuse indirectlight). You can even turn this feature on and off global illumination during an IPR session to improve render times when previewing a scene.
The Exposure slider controls the strength of global illumination. Computed with (2 ^ EV – Exposure Value ). A value of zero sets this to 1x, while 2 will be 2x, 3 will be 4x. Vice versa, -1 will set it to ½, -2 will be ¼.
The irradiance samples slider controls the amount of ray samples. GI is enabled by default with irradiance samples set to 128 samples. Less value have minimal performance hit, while higher values will take longer to render.
Path Traced Area Light
This enable support for 3delight's path traced area lights. Enable this feature if you use area light based shaders with sampling strategy set to 'trace'. When global illumination and/or reflection is disabled, this feature needs to be enabled to get direct lighting from path traced area lights.
Side note, diffuse and specular direct lighting from path traced area lights are essentially 'free' when reflections and GI are enabled. Turning off this feature have no effect when reflections and/or GI are enabled.You can safely disable this when using only point/spot/distant lights or illuminance sampling based area lights.
Specular Exposure (set to zero by default)
Sets the exposure level for specular but not reflection. Computed with (2 ^ EV – Exposure Value ). A value of zero sets this to 1x, while 2 will be 2x, 3 will be 4x. Vice versa, -1 will set it to ½, -2 will be ¼.
Tone Mapping Controls
These control various tone mapping features. Global will get the values from a control light, while Override will use the specified value in the shader. Off disables tone mapping and exposure control. You can specify a specific tone mapping control light in the Tone Mapping Control field. This is essentially a specific light “__category”.
Tone mapping will be carried out on pixels above the luminance upper value and below the lower value. Using 0 (zero) for an upper value completely tone maps all values. Setting lower value above 0 (zero) will tone maps pixels below that value. This is also true if the lower value is higher than the upper value.
Temperature Controls
As with tone mapping controls, the options available are the same. Global will get the values from a control light, while Override will use the specified value in the material. Off disables it completely. The Temperature Control field allows for separate temperature control light to be used. When empty, this will recognize all lights or follow the value used for tone mapping control light. Values are between 1000 to 10000 K.
Saturation Controls
Same arrangement as tone mapping and temperature controls. Global will get the values from a control light,while Override will use the specified value in the material. Off disables it completely. The Saturation value is set to 0 (zero). Setting this to -1 desaturates the material completely, while 1 over-saturates it.
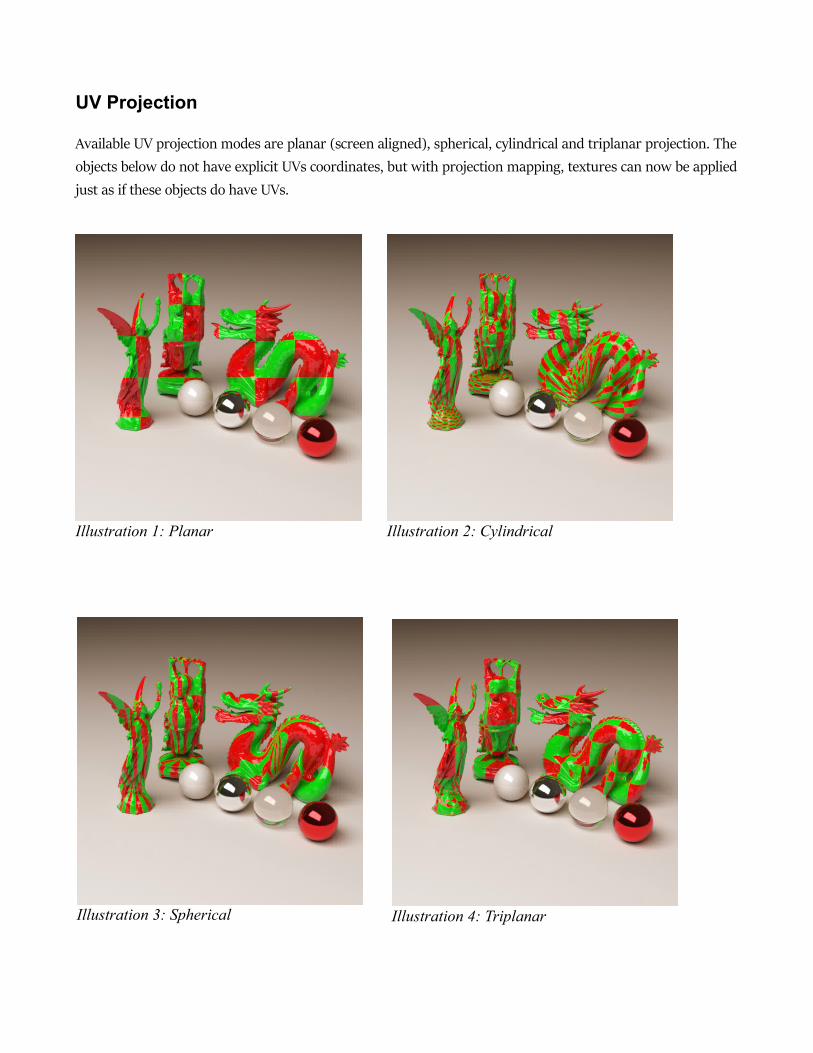
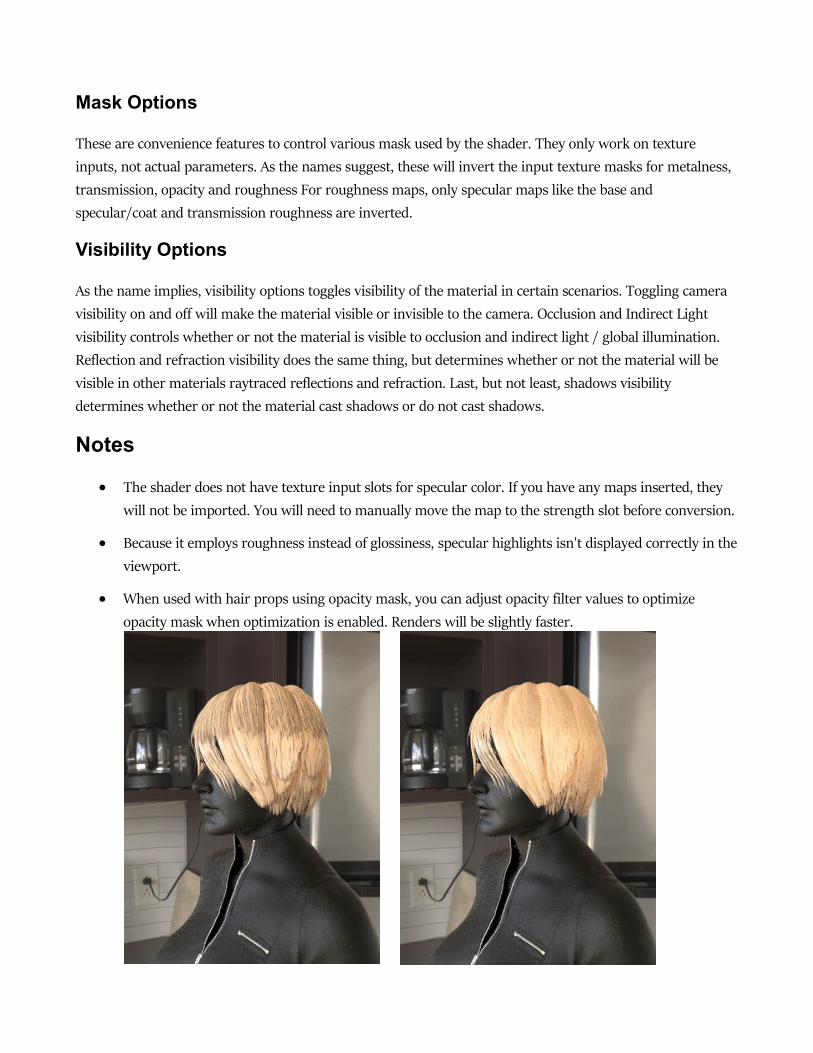
UV Projection
Available UV projection modes are planar (screen aligned), spherical, cylindrical and triplanar projection. Theobjects below do not have explicit UVs coordinates, but with projection mapping, textures can now be appliedjust as if these objects do have UVs.
Illustration 1: Planar Illustration 2: Cylindrical
Illustration 3: Spherical Illustration 4: Triplanar
Mask Options
These are convenience features to control various mask used by the shader. They only work on texture inputs, not actual parameters. As the names suggest, these will invert the input texture masks for metalness, transmission, opacity and roughness For roughness maps, only specular maps like the base and specular/coat and transmission roughness are inverted.
Visibility Options
As the name implies, visibility options toggles visibility of the material in certain scenarios. Toggling camera visibility on and off will make the material visible or invisible to the camera. Occlusion and Indirect Light visibility controls whether or not the material is visible to occlusion and indirect light / global illumination. Reflection and refraction visibility does the same thing, but determines whether or not the material will be visible in other materials raytraced reflections and refraction. Last, but not least, shadows visibility determines whether or not the material cast shadows or do not cast shadows.
Notes
The shader does not have texture input slots for specular color. If you have any maps inserted, they will not be imported. You will need to manually move the map to the strength slot before conversion.
Because it employs roughness instead of glossiness, specular highlights isn't displayed correctly in theviewport.
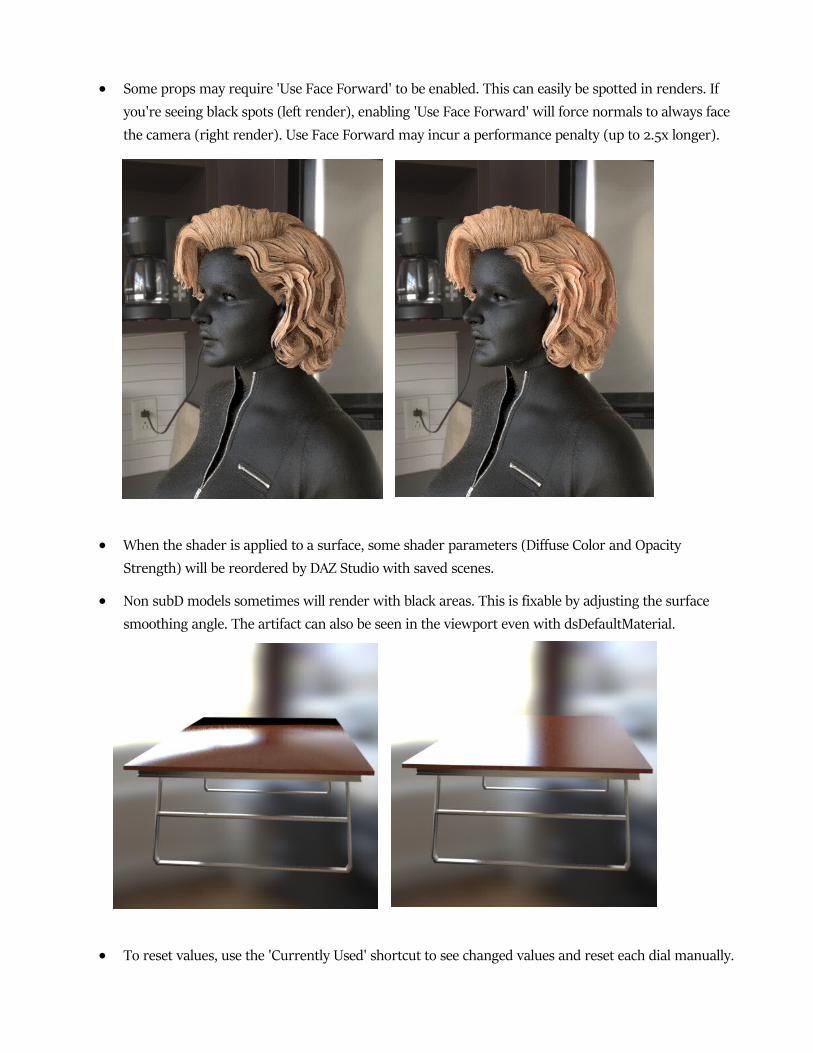
When used with hair props using opacity mask, you can adjust opacity filter values to optimize opacity mask when optimization is enabled. Renders will be slightly faster.
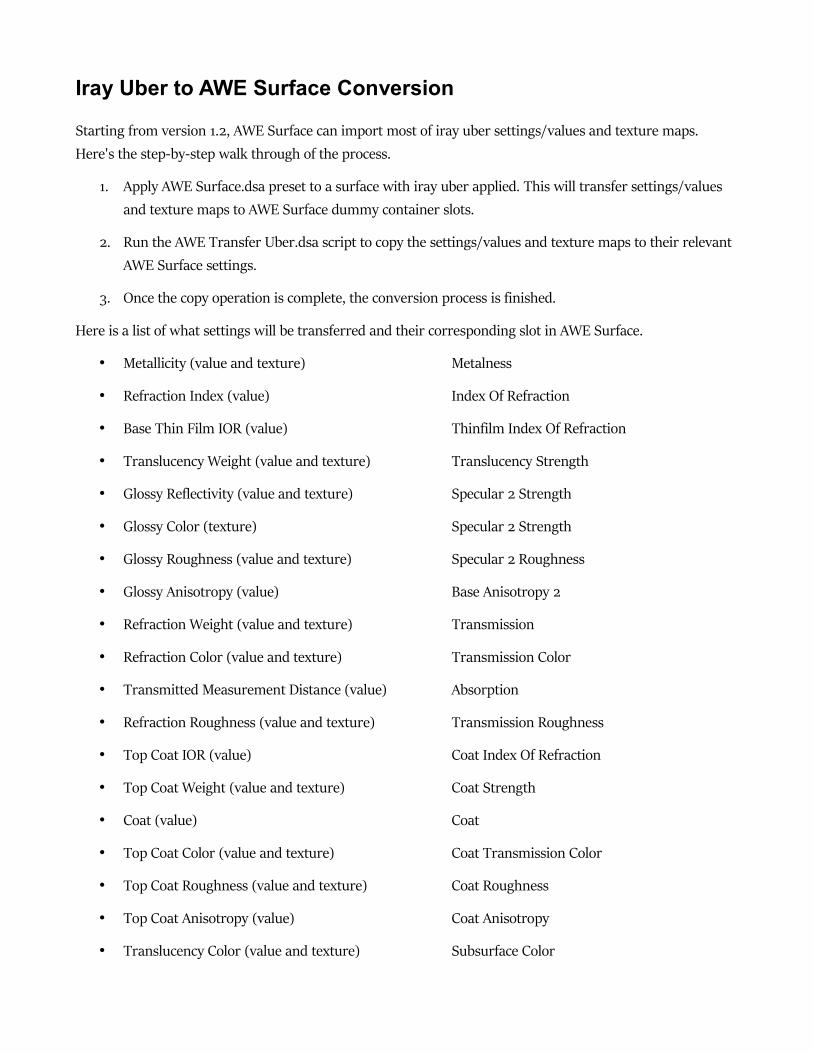
Some props may require 'Use Face Forward' to be enabled. This can easily be spotted in renders. If you're seeing black spots (left render), enabling 'Use Face Forward' will force normals to always face the camera (right render). Use Face Forward may incur a performance penalty (up to 2.5x longer).
When the shader is applied to a surface, some shader parameters (Diffuse Color and Opacity Strength) will be reordered by DAZ Studio with saved scenes.
Non subD models sometimes will render with black areas. This is fixable by adjusting the surface smoothing angle. The artifact can also be seen in the viewport even with dsDefaultMaterial.
To reset values, use the 'Currently Used' shortcut to see changed values and reset each dial manually.
Iray Uber to AWE Surface Conversion
Starting from version 1.2, AWE Surface can import most of iray uber settings/values and texture maps. Here's the step-by-step walk through of the process.
1. Apply AWE Surface.dsa preset to a surface with iray uber applied. This will transfer settings/values and texture maps to AWE Surface dummy container slots.
2. Run the AWE Transfer Uber.dsa script to copy the settings/values and texture maps to their relevant AWE Surface settings.
3. Once the copy operation is complete, the conversion process is finished.
Here is a list of what settings will be transferred and their corresponding slot in AWE Surface.
• Metallicity (value and texture) Metalness
• Refraction Index (value) Index Of Refraction
• Base Thin Film IOR (value) Thinfilm Index Of Refraction
• Translucency Weight (value and texture) Translucency Strength
• Glossy Reflectivity (value and texture) Specular 2 Strength
• Glossy Color (texture) Specular 2 Strength
• Glossy Roughness (value and texture) Specular 2 Roughness
• Glossy Anisotropy (value) Base Anisotropy 2
• Refraction Weight (value and texture) Transmission
• Refraction Color (value and texture) Transmission Color
• Transmitted Measurement Distance (value) Absorption
• Refraction Roughness (value and texture) Transmission Roughness
• Top Coat IOR (value) Coat Index Of Refraction
• Top Coat Weight (value and texture) Coat Strength
• Coat (value) Coat
• Top Coat Color (value and texture) Coat Transmission Color
• Top Coat Roughness (value and texture) Coat Roughness
• Top Coat Anisotropy (value) Coat Anisotropy
• Translucency Color (value and texture) Subsurface Color
• SSS Amount (value and texture) Subsurface Strength
• Scattering Measurement Distance (value) Subsurface Scale
• SSS Direction (value) Subsurface Phase
• Base Bump (value and texture) Bump Strength
• Cutout Opacity (value and texture) Opacity Strength
After the conversion, you may run the 'Transfer Specular Maps' script to copy specular maps from the first specular strength slot into the second specular and coat strength slot if you need to. Running the script on a surface with iray Uber will give an error and will not do anything.
Extra Notes
• Although roughness values and mask will be transferred, the values used by iray Uber and AWE Surface will likely to be different and produce different results unless the value is 0 (zero) or 1 (one).
• Both iray Uber and AWE Surface has translucency settings, but AWE Surface translucency is very specific. Translucency should only be used for surfaces/objects without any thickness such as a simple plane polygon. Subsurface scattering should be used for objects with actual thickness and translucency doesn't directly affect subsurface.
• While AWE Surface can use subsurface maps, most of the time they are not optimal to be used when using subsurface. For skin, it is generally recommended to remove any subsurface maps carried over by the conversion process from iray uber or any other 3delight shaders such as UberSurface or AoA's Subsurface shader. Subsurface will take into account the diffuse reflectance of the material, so users will only need to an albedo/color map in the diffuse color slot.
Tips and Tricks
Here are some simple tips and tricks to use with AWE Shading Kit, AWE Surface (or general rendering).
Setting Up (Essential)
• Go to render settings. Restore to defaults. • Enable gamma correction and set gain to 1 and gamma to 2.2. • For final renders, render with the the 'Scripted 3delight', either with RaytracerDraft or RaytracerFinal
only. • For fast previewing, choose the '3delight' and render with progressive 'Enabled' or use the Aux
Viewport for IPR to get realtime interactive preview.
• Use the default 128 irradiance samples for previews. For final quality renders, increase irradiance samples as needed to 2048. AWE Surface have no sample limits, so even higher samples can be used.
Light (for physical plausibility/PBR)
• In the AWE Environment light, use Temperature Value to adjust white balance of the render. • Typical white balance values based of actual cameras are between 4400-5750K. • Fpr film based cameras, daylight film uses 5500K, tungsten film 3200K. • If you adjust white balance, you have to adjust the temperature of your lights to compensate. • Typical temperatures for lights are between 2700K (Warm White) and 6500K (Daylight). • For a white balance of 5500K, add 1000K (6500-5500) to the light's temperature
(spot/point/distant/area/mesh lights) to balance out temperatures for direct light.
AWEAreaPT Intensity Scale and Intensity Scale Offset settings are based on Exposure Value (EV).
• Incrementing -/+ 1 EV will decrease light intensity by half or increase intensity to 2x. • For example a 100% intensity with 0 EV, will be 100%, -1 EV will be 50%, with 1 EV it will be 200%. • Distance wise, 1 EV corresponds to roughly increasing/decreasing the distance by 150 cm below 500
cm. Use 300 cm beyond 500 cm. • EV scale is in energy per unit scale, so the larger the emitter, the more energy the light emits. • In relation to emitter size for area/mesh lights, 4x the total area scale, 1/4 of the EV. • For example, with a plane of 1x1 m with a uniform scale of 400% (400% in x, 400% in y), you need
to set the EV to 1/4 of its original value. • If you only change the scale in one axis, say by 400% (100% in x, 400% in y), then set the EV to 1/2
of its original value.
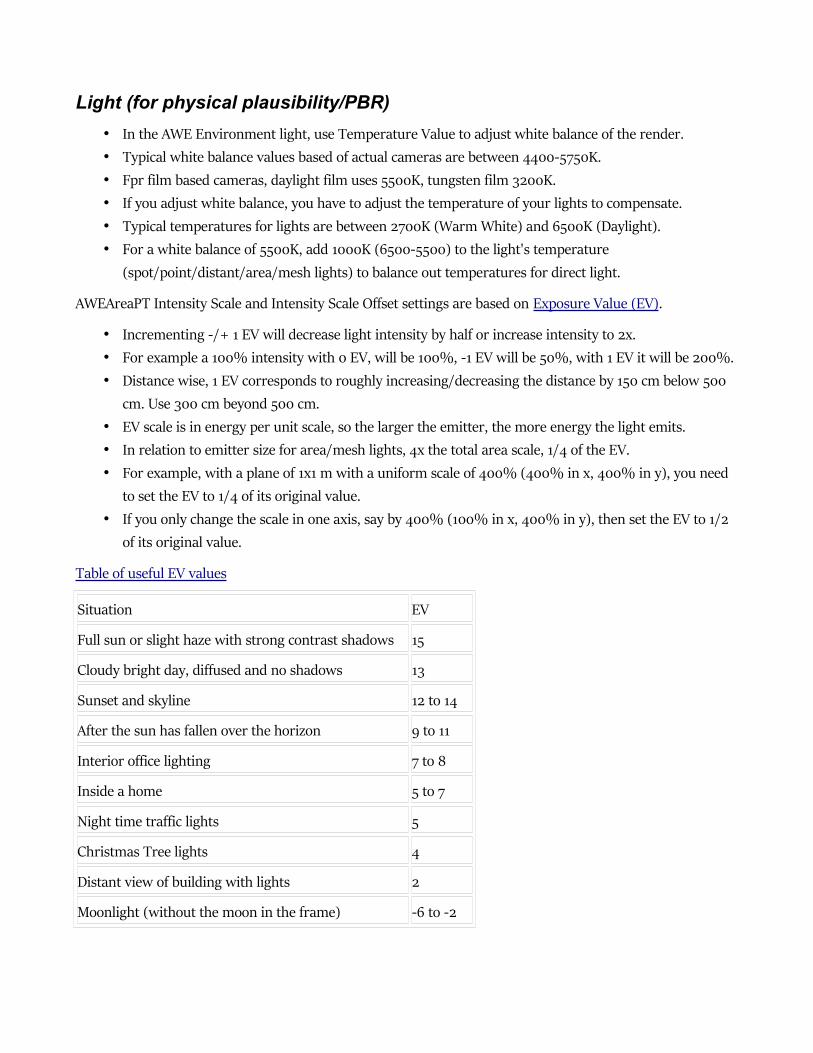
Table of useful EV values
Situation EV
Full sun or slight haze with strong contrast shadows 15
Cloudy bright day, diffused and no shadows 13
Sunset and skyline 12 to 14
After the sun has fallen over the horizon 9 to 11
Interior office lighting 7 to 8
Inside a home 5 to 7
Night time traffic lights 5
Christmas Tree lights 4
Distant view of building with lights 2
Moonlight (without the moon in the frame) -6 to -2
To simulate sunlight with an area light.
• Use a 1x1 m area light emitter. A sphere with 12 segments and sides should be good enough. Make sure it doesn't use subdivision.
• Change the scale to 25% and make sure it's somewhere around at least 1000 cm (typically I use 1075 cm) away from the point of focus.
• Point of focus typically will be the center of your scene. For AWEAreaPT light sets, this will be the pivot node.
• Set EV scale to 11, for example by setting Intensity Scale to 8 and Intensity Scale Offset to 3 (8+3 = 11).
• Alternatively with 14 EV, scale should be 12.5% and distance 2275 cm (1075+1200 = 2275). • Another alternative is using Intensity Scale to 0, Intensity Scale Offset to around -7 to -7.25 and
setting Falloff to 0. This setting works best to get more fill of the environment and very hard/sharp shadows.
With the updated AWEAreaPT, you can actually animate between the above settings if you like.
Specular / Reflection for skin
• Enable at least one specular/reflection lobe on the base layer. • By default, the second specular/reflection lobe is enabled. • Set the lobe's specular strength to 35%. • If you use specular strength textures, make sure to enable 'Normalize Specular Map'. It will make
things consistent. • Typical index of reflection (IOR) for skin will be between 1.35 and 1.6. • Set roughness to a value of 20% for dry skin and 10% for a more glossy skin. • Change either the IOR and/or roughness to control specular highlights, keeping specular strength the
same if possible. • To simulate fuzz/velvet around the edges, make sure to enable Glossy Fresnel on the base and set it
to 22.5%.
Subsurface Tint / Color Correction for skin
• Remove any subsurface color/strength maps from the subsurface color/strength slots. • Set skin to 50% diffuse strength. Typical Caucasian skin will be between 45 to 55%. • Tanned or darker skin will be around 65 to 75% (or more depending on how dark the texture is). • Use the skin2 SSS profile by applying AWE SSS Skin 2. • For less saturation, decrease the saturation color of the subsurface absorption color by half. For
example, 255 will be 128.
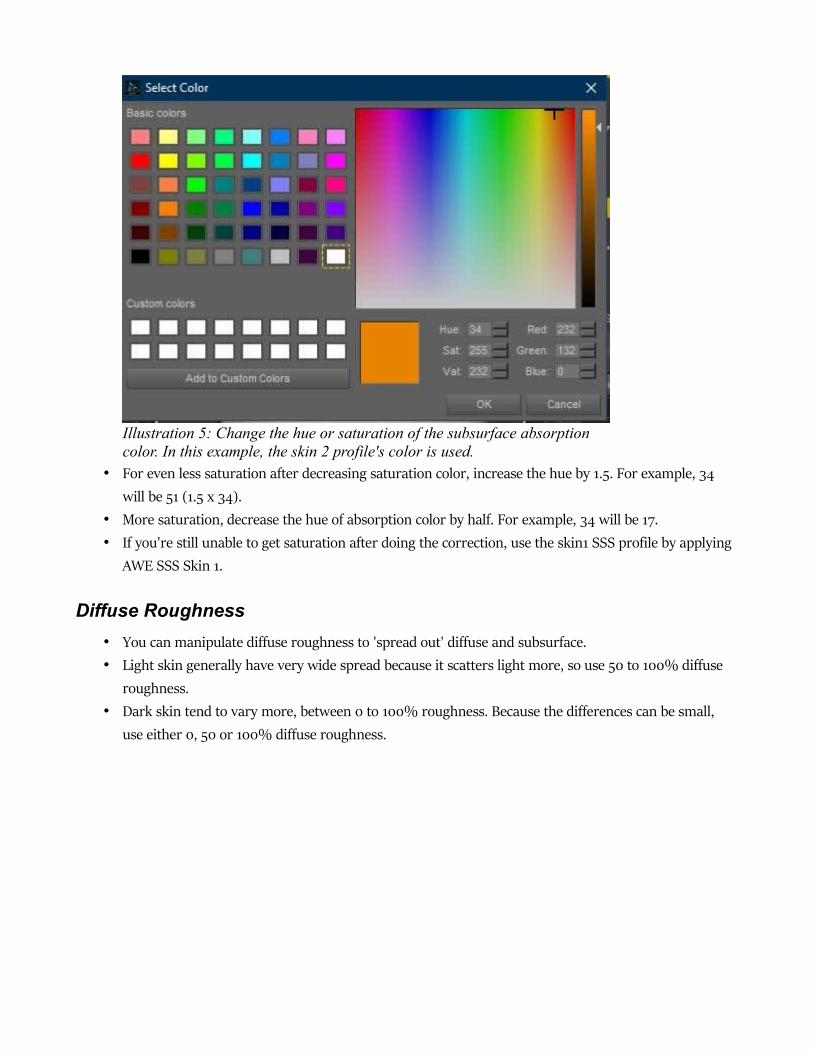
Illustration 5: Change the hue or saturation of the subsurface absorption color. In this example, the skin 2 profile's color is used.
• For even less saturation after decreasing saturation color, increase the hue by 1.5. For example, 34 will be 51 (1.5 x 34).
• More saturation, decrease the hue of absorption color by half. For example, 34 will be 17. • If you're still unable to get saturation after doing the correction, use the skin1 SSS profile by applying
AWE SSS Skin 1.
Diffuse Roughness
• You can manipulate diffuse roughness to 'spread out' diffuse and subsurface. • Light skin generally have very wide spread because it scatters light more, so use 50 to 100% diffuse
roughness. • Dark skin tend to vary more, between 0 to 100% roughness. Because the differences can be small,
use either 0, 50 or 100% diffuse roughness.
![[XLS] · Web viewAWE 10727 AWE 2214 AWE 2316 AWE 6316 AWE 6416 AWE 6514 AWE 6515 AWE 6516 AWE 6616 AWE 6720 AWE 7316 AWE 7516 AWE 7616 AWE 7727 AWE 7728 AWE 8525 AWE 8527 AWE 8725](https://img.pdfslide.net/doc/110x75/5aa8577d7f8b9a6c188b6e3b/xls-viewawe-10727-awe-2214-awe-2316-awe-6316-awe-6416-awe-6514-awe-6515-awe-6516.jpg)