Embed Size (px)
Citation preview
AXIS Camera Explorer - ACE User’s Guide
Contents Licensing Information What is ACE and What Can it Do? Installing ACE Adding a Camera Adding an Album Adding a Quad View Object Camera Switching Recording a Movie Saving a Snapshot Working with Movies Creating an AVI-movie Live Video Sites Other Settings and Functions
Licensing Information ACE is provided as licensed software. The installation procedure will give you the opportunity to enter a valid license code during installation. If you choose not to enter your license code during installation, ACE will then function as a time-limited demo for 14 days only, after which it will be disabled. You must then enter a valid license code to continue using the program. Please contact your Axis dealer for a license code if you do not already possess one. It is, of course, also possible to enter a valid license code at any time during the 14-day trial period. You can do this from the menu item Help – About.
What is ACE and What Can it Do? ACE (AXIS Camera Explorer) is an add-on component for Windows that provides quick and easy access to Axis Network Cameras and the images they produce. The program uses Windows Explorer as its interface and all viewing operations and settings are made here.
ACE provides simple, but effective functions for viewing live feeds, snapshots and movies from your network camera. You can also perform simple edits on your movies and create AVI-files for distribution.
Installing ACE
Before You Start
Before installing your new software you must first set your camera’s IP-address. Please refer to the Installation Guide for your camera for more information.
Installation
Click the setup file for the program. You will be asked where you want to install the program. Restart your computer if you are asked to.
Check the Installation
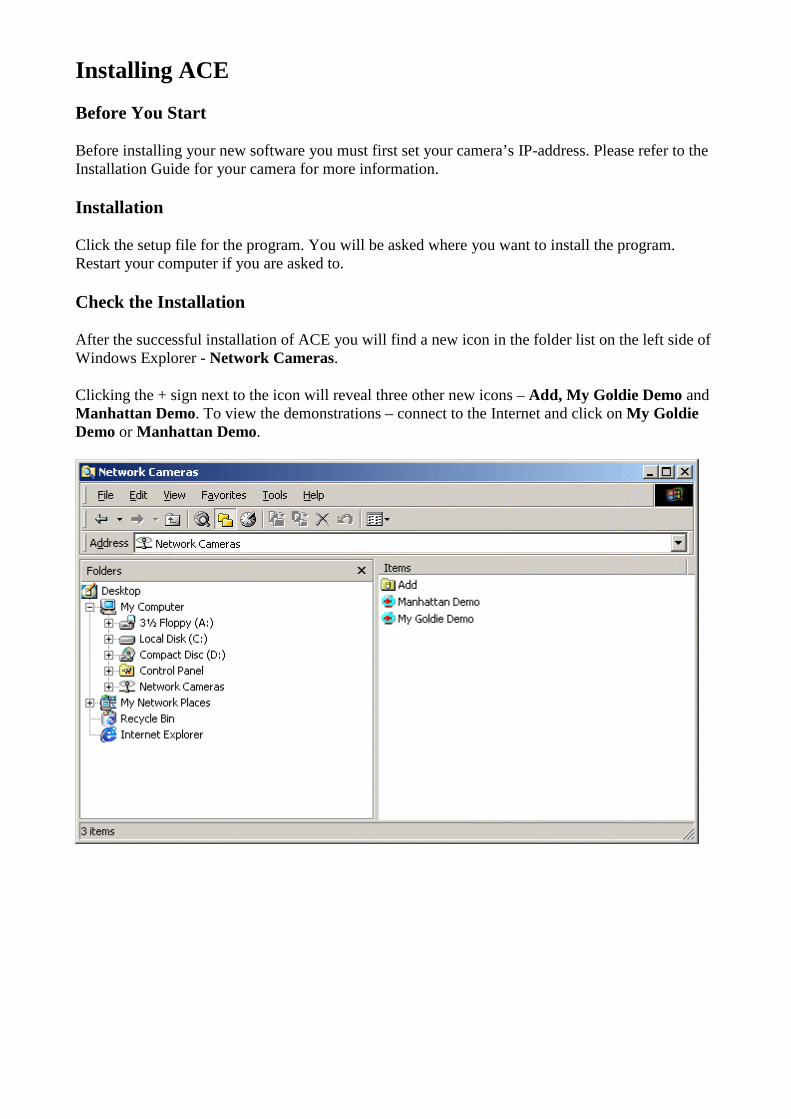
After the successful installation of ACE you will find a new icon in the folder list on the left side of Windows Explorer - Network Cameras.
Clicking the + sign next to the icon will reveal three other new icons – Add, My Goldie Demo and Manhattan Demo. To view the demonstrations – connect to the Internet and click on My Goldie Demo or Manhattan Demo.
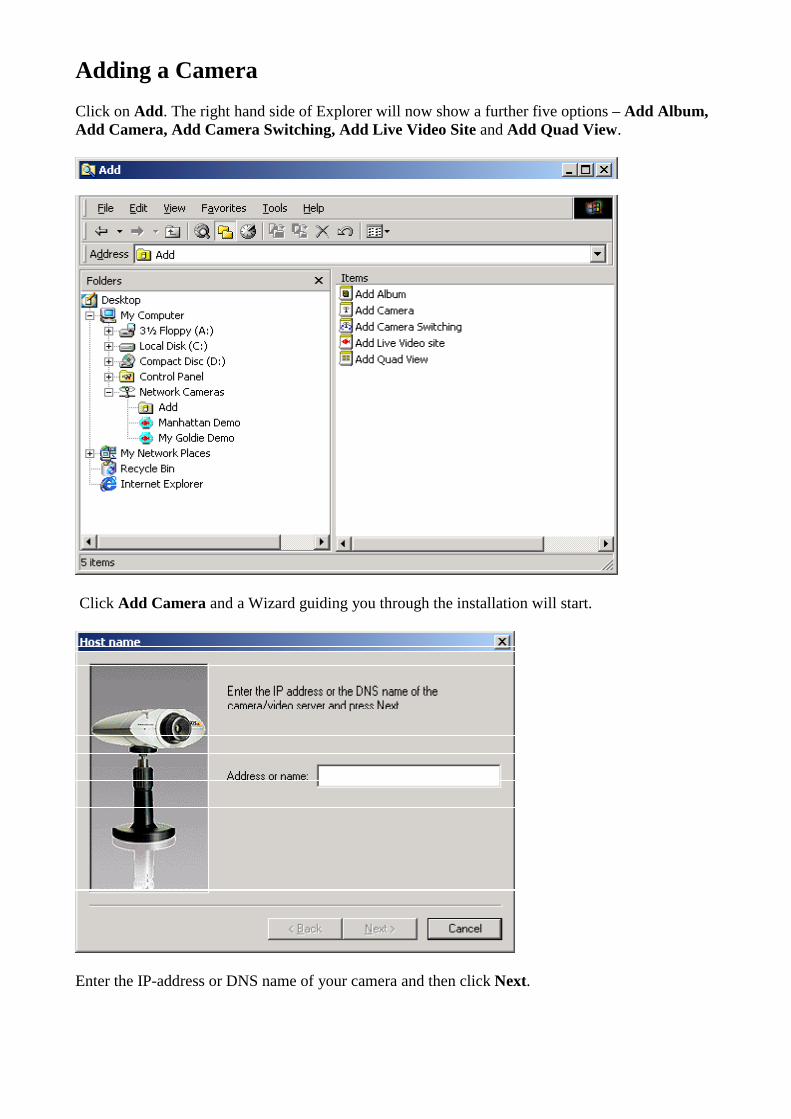
Adding a Camera Click on Add. The right hand side of Explorer will now show a further five options – Add Album, Add Camera, Add Camera Switching, Add Live Video Site and Add Quad View.
Click Add Camera and a Wizard guiding you through the installation will start.
Enter the IP-address or DNS name of your camera and then click Next.
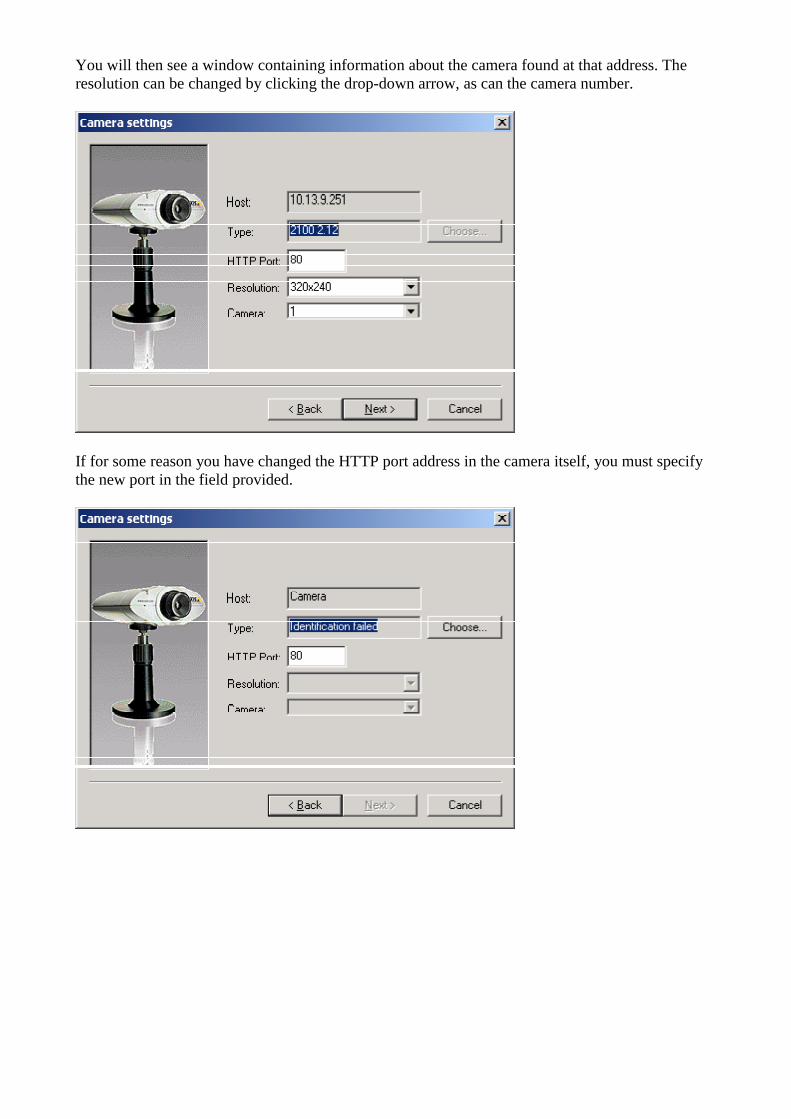
You will then see a window containing information about the camera found at that address. The resolution can be changed by clicking the drop-down arrow, as can the camera number.
If for some reason you have changed the HTTP port address in the camera itself, you must specify the new port in the field provided.
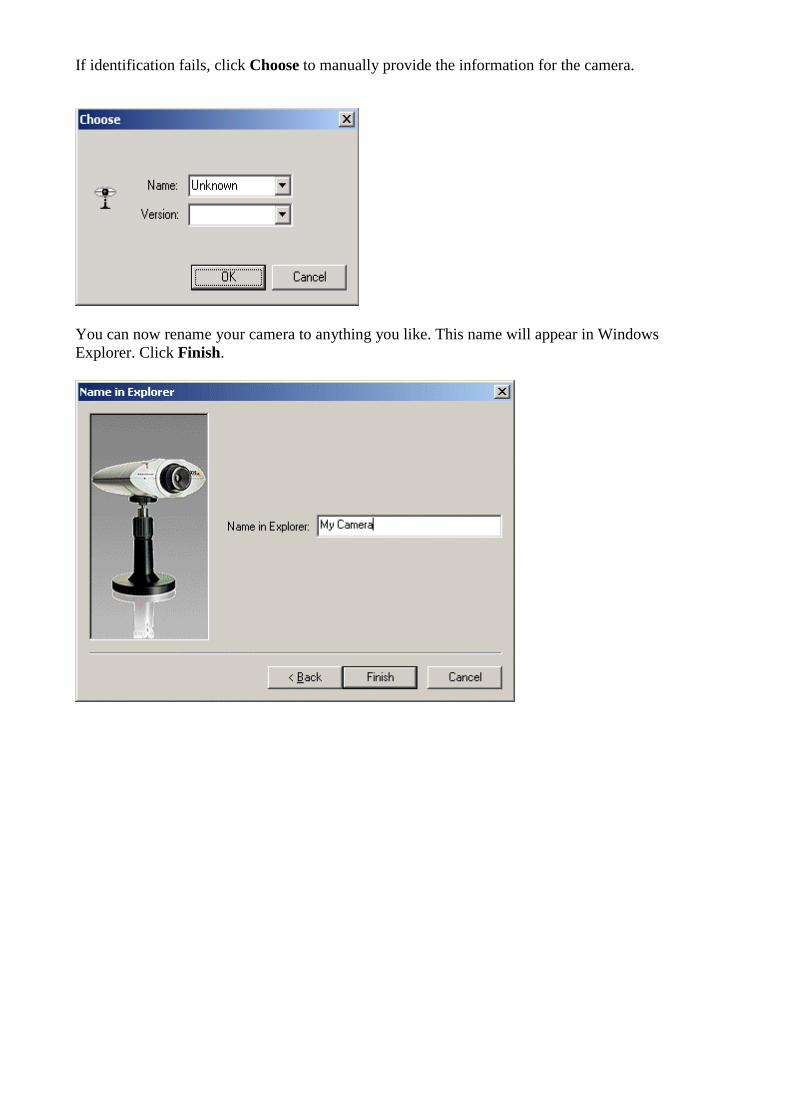
If identification fails, click Choose to manually provide the information for the camera.
You can now rename your camera to anything you like. This name will appear in Windows Explorer. Click Finish.
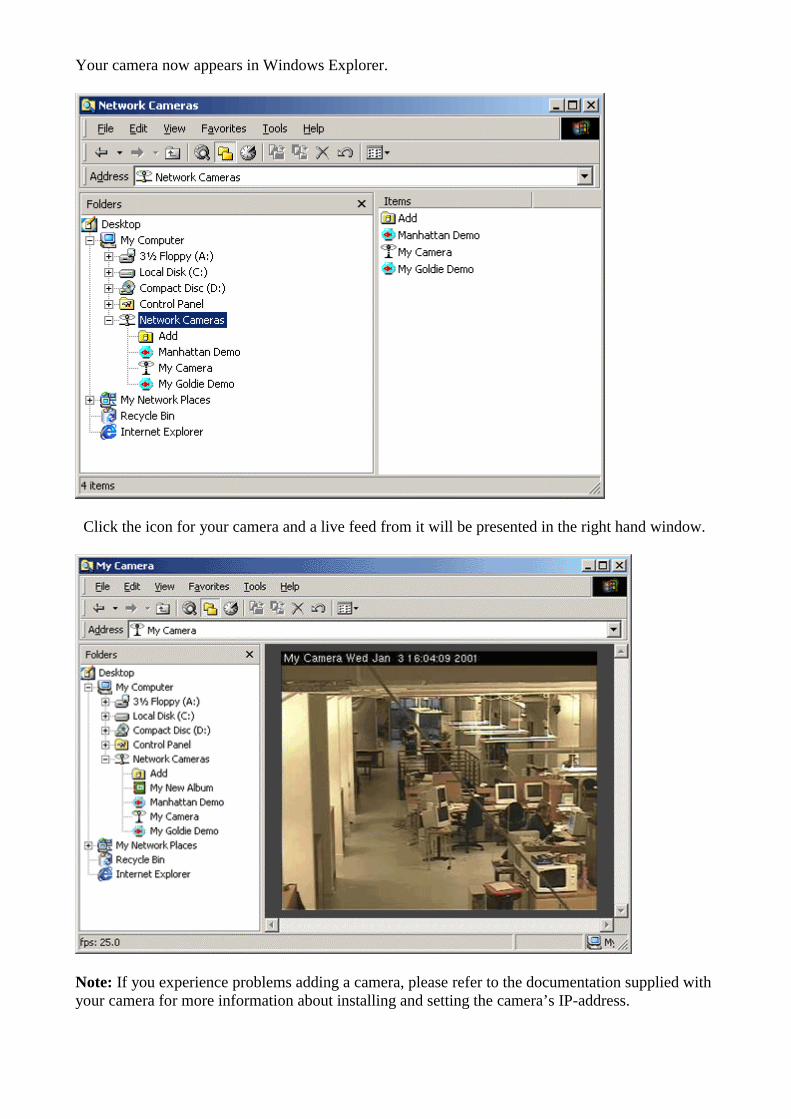
Your camera now appears in Windows Explorer.
Click the icon for your camera and a live feed from it will be presented in the right hand window.
Note: If you experience problems adding a camera, please refer to the documentation supplied with your camera for more information about installing and setting the camera’s IP-address.
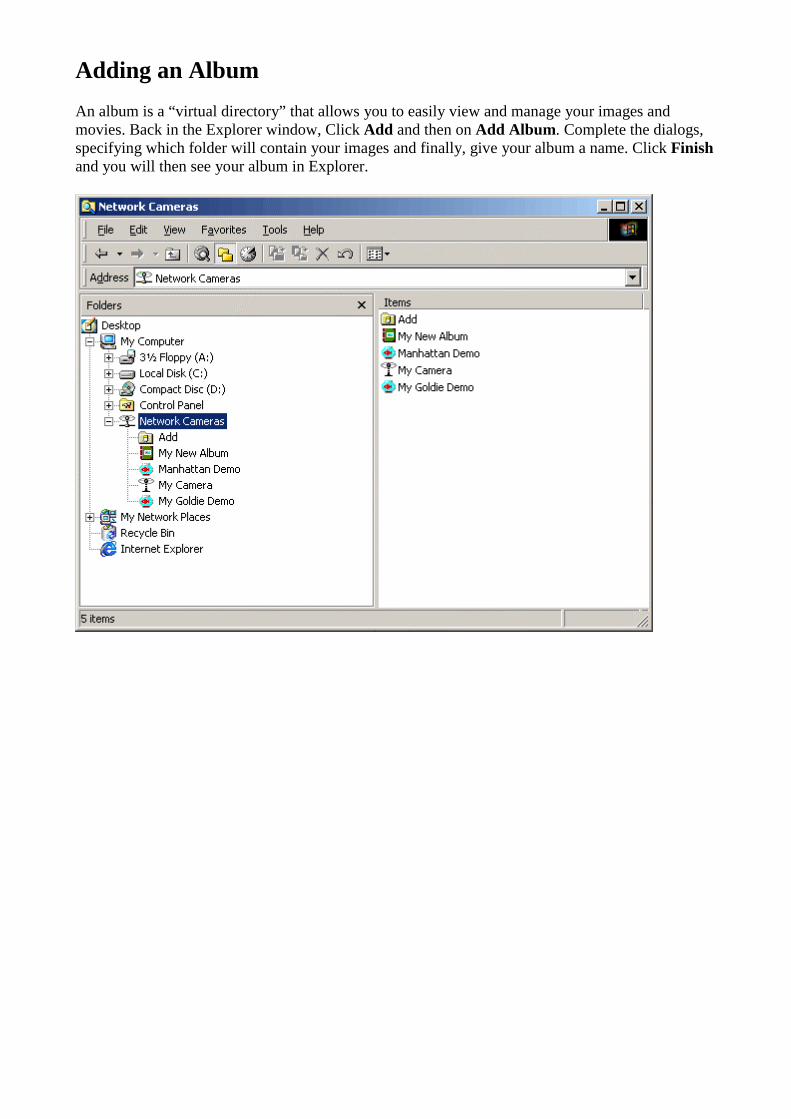
Adding an Album An album is a “virtual directory” that allows you to easily view and manage your images and movies. Back in the Explorer window, Click Add and then on Add Album. Complete the dialogs, specifying which folder will contain your images and finally, give your album a name. Click Finish and you will then see your album in Explorer.
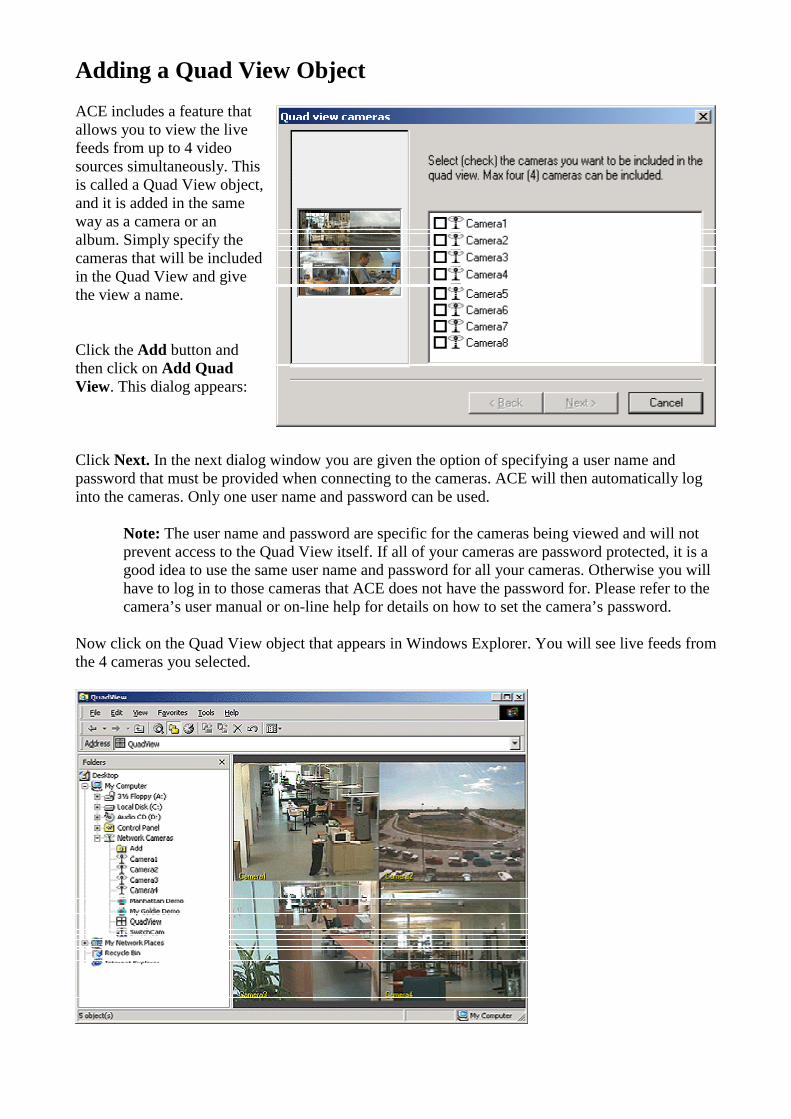
Adding a Quad View Object ACE includes a feature that allows you to view the live feeds from up to 4 video sources simultaneously. This is called a Quad View object, and it is added in the same way as a camera or an album. Simply specify the cameras that will be included in the Quad View and give the view a name. Click the Add button and then click on Add Quad View. This dialog appears: Click Next. In the next dialog window you are given the option of specifying a user name and password that must be provided when connecting to the cameras. ACE will then automatically log into the cameras. Only one user name and password can be used.
Note: The user name and password are specific for the cameras being viewed and will not prevent access to the Quad View itself. If all of your cameras are password protected, it is a good idea to use the same user name and password for all your cameras. Otherwise you will have to log in to those cameras that ACE does not have the password for. Please refer to the camera’s user manual or on-line help for details on how to set the camera’s password.
Now click on the Quad View object that appears in Windows Explorer. You will see live feeds from the 4 cameras you selected.

By right-clicking on the image you will see a context menu, from which you can choose to Display Names or not, and whether or not to use a Limited Frame Rate. This last option is useful if you are experiencing bandwidth problems and need to decrease the frame rate in the images. The other two options available in the context menu are Retain Image Size and Size to fit. These are described in Other Settings and Functions below. To change the properties for the Quad View, right-click on the object (icon) in Explorer’s right hand window and click Properties. Right-clicking and selecting Open will display the Quad View in a new window. To access the various other functions available in ACE, e.g. to record a movie, select the individual camera instead.
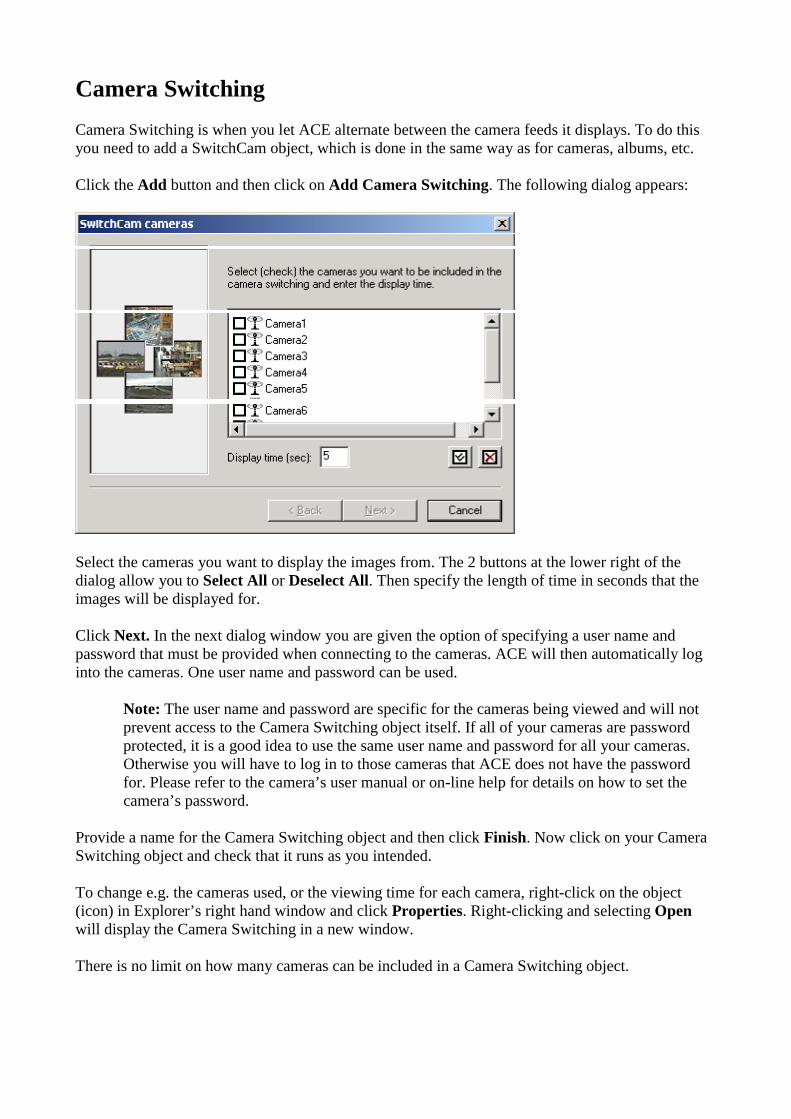
Camera Switching Camera Switching is when you let ACE alternate between the camera feeds it displays. To do this you need to add a SwitchCam object, which is done in the same way as for cameras, albums, etc. Click the Add button and then click on Add Camera Switching. The following dialog appears:
Select the cameras you want to display the images from. The 2 buttons at the lower right of the dialog allow you to Select All or Deselect All. Then specify the length of time in seconds that the images will be displayed for. Click Next. In the next dialog window you are given the option of specifying a user name and password that must be provided when connecting to the cameras. ACE will then automatically log into the cameras. One user name and password can be used.
Note: The user name and password are specific for the cameras being viewed and will not prevent access to the Camera Switching object itself. If all of your cameras are password protected, it is a good idea to use the same user name and password for all your cameras. Otherwise you will have to log in to those cameras that ACE does not have the password for. Please refer to the camera’s user manual or on-line help for details on how to set the camera’s password.
Provide a name for the Camera Switching object and then click Finish. Now click on your Camera Switching object and check that it runs as you intended. To change e.g. the cameras used, or the viewing time for each camera, right-click on the object (icon) in Explorer’s right hand window and click Properties. Right-clicking and selecting Open will display the Camera Switching in a new window. There is no limit on how many cameras can be included in a Camera Switching object.
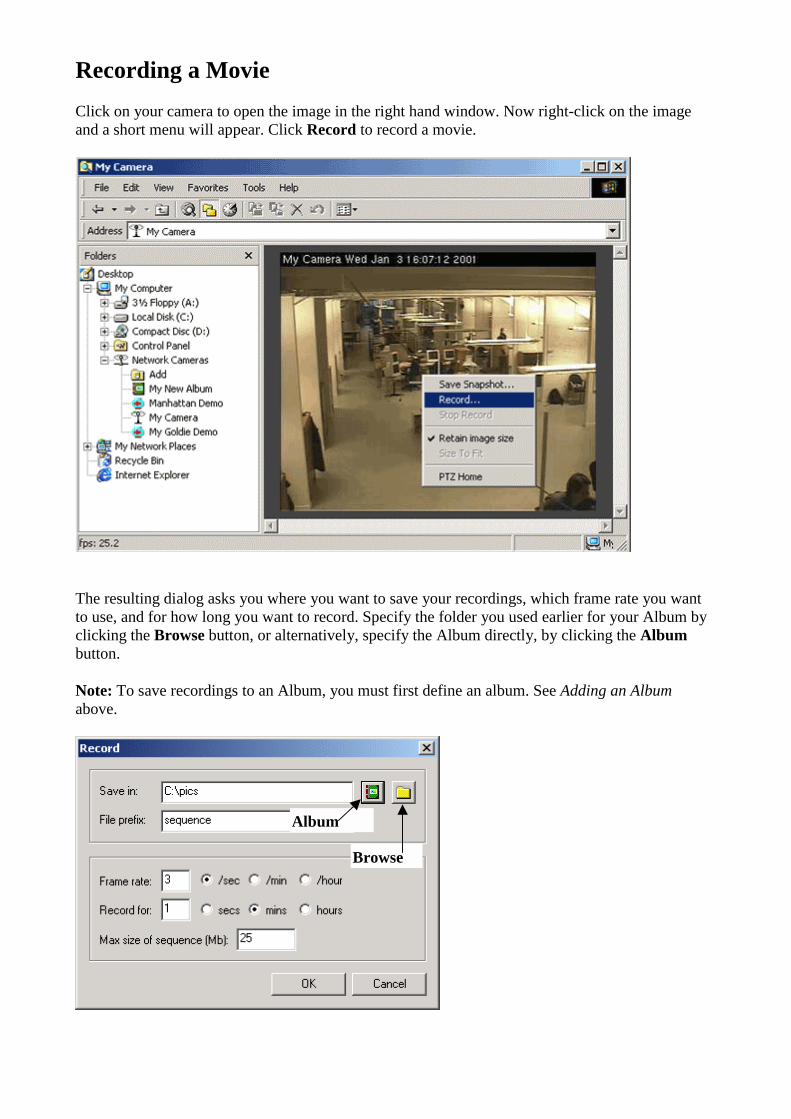
Recording a Movie Click on your camera to open the image in the right hand window. Now right-click on the image and a short menu will appear. Click Record to record a movie.
The resulting dialog asks you where you want to save your recordings, which frame rate you want to use, and for how long you want to record. Specify the folder you used earlier for your Album by clicking the Browse button, or alternatively, specify the Album directly, by clicking the Album button.
Note: To save recordings to an Album, you must first define an album. See Adding an Album above.
Album
Browse
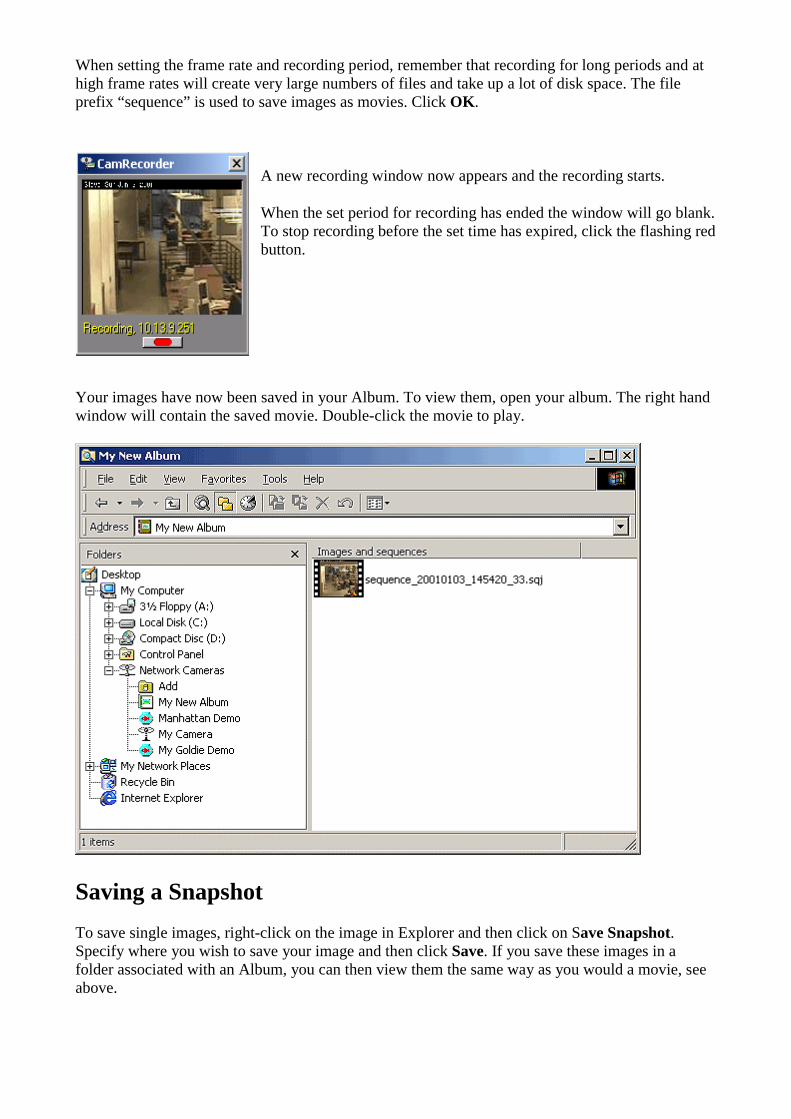
When setting the frame rate and recording period, remember that recording for long periods and at high frame rates will create very large numbers of files and take up a lot of disk space. The file prefix “sequence” is used to save images as movies. Click OK.
A new recording window now appears and the recording starts.
When the set period for recording has ended the window will go blank. To stop recording before the set time has expired, click the flashing red button.
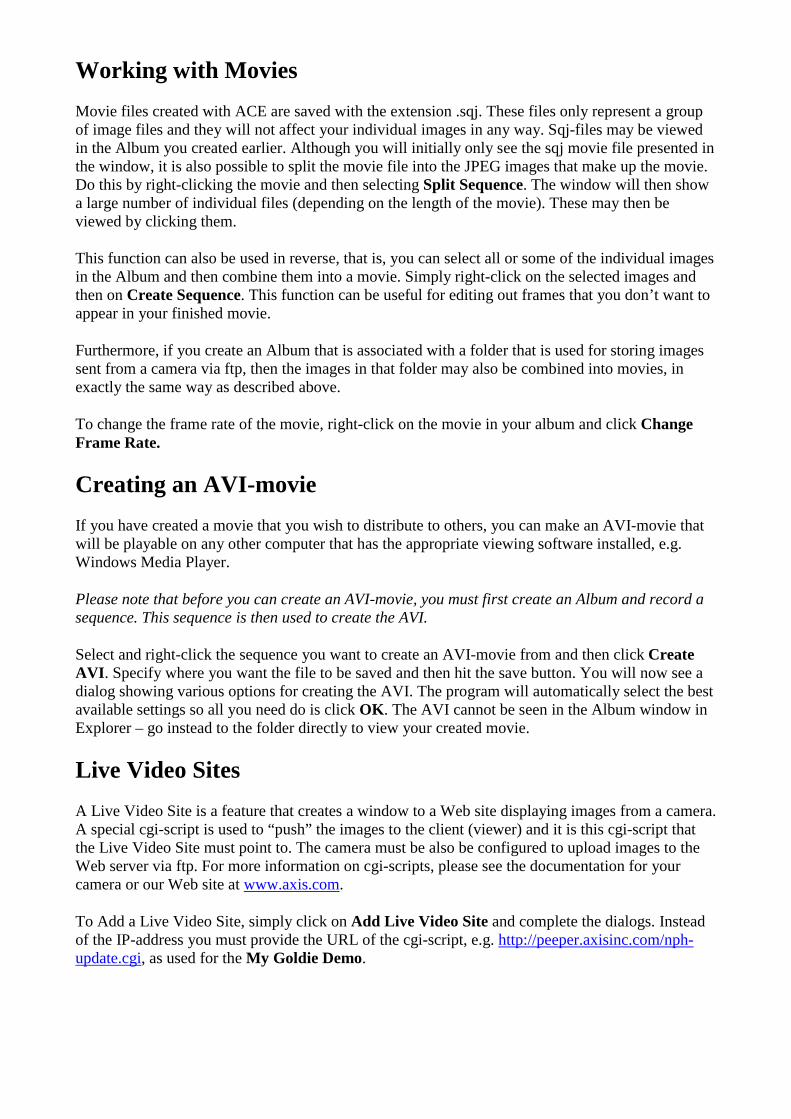
Your images have now been saved in your Album. To view them, open your album. The right hand window will contain the saved movie. Double-click the movie to play.
Saving a Snapshot To save single images, right-click on the image in Explorer and then click on Save Snapshot. Specify where you wish to save your image and then click Save. If you save these images in a folder associated with an Album, you can then view them the same way as you would a movie, see above.
Working with Movies Movie files created with ACE are saved with the extension .sqj. These files only represent a group of image files and they will not affect your individual images in any way. Sqj-files may be viewed in the Album you created earlier. Although you will initially only see the sqj movie file presented in the window, it is also possible to split the movie file into the JPEG images that make up the movie. Do this by right-clicking the movie and then selecting Split Sequence. The window will then show a large number of individual files (depending on the length of the movie). These may then be viewed by clicking them.
This function can also be used in reverse, that is, you can select all or some of the individual images in the Album and then combine them into a movie. Simply right-click on the selected images and then on Create Sequence. This function can be useful for editing out frames that you don’t want to appear in your finished movie.
Furthermore, if you create an Album that is associated with a folder that is used for storing images sent from a camera via ftp, then the images in that folder may also be combined into movies, in exactly the same way as described above.
To change the frame rate of the movie, right-click on the movie in your album and click Change Frame Rate.
Creating an AVI-movie If you have created a movie that you wish to distribute to others, you can make an AVI-movie that will be playable on any other computer that has the appropriate viewing software installed, e.g. Windows Media Player.
Please note that before you can create an AVI-movie, you must first create an Album and record a sequence. This sequence is then used to create the AVI.
Select and right-click the sequence you want to create an AVI-movie from and then click Create AVI. Specify where you want the file to be saved and then hit the save button. You will now see a dialog showing various options for creating the AVI. The program will automatically select the best available settings so all you need do is click OK. The AVI cannot be seen in the Album window in Explorer – go instead to the folder directly to view your created movie.
Live Video Sites A Live Video Site is a feature that creates a window to a Web site displaying images from a camera. A special cgi-script is used to “push” the images to the client (viewer) and it is this cgi-script that the Live Video Site must point to. The camera must be also be configured to upload images to the Web server via ftp. For more information on cgi-scripts, please see the documentation for your camera or our Web site at www.axis.com.
To Add a Live Video Site, simply click on Add Live Video Site and complete the dialogs. Instead of the IP-address you must provide the URL of the cgi-script, e.g. http://peeper.axisinc.com/nph-update.cgi, as used for the My Goldie Demo.
Other Settings and Functions
Shortcuts
If you click on Network Cameras in the left hand window of Explorer you will then see all the installed cameras and Albums on the right hand side. Right-click and drag any item onto your desktop and create a shortcut to it.
Right-click Menu
Right clicking on a Camera, Album or Live Video Site in Explorer will display a menu containing the following items:
• Explore – opens a new Explorer window showing the Camera, Album or Live Video Site • Open – opens a viewer window for the Camera, Album or Live Video Site • Properties – shows the Camera, Album or Live Video Site’s current settings.
Right-clicking on a Camera will also show the link Open Home Page. This link will start your Web browser and take you to the camera’s home page
Full Screen
When the image from a Camera or a Live Video Site is displayed in the right hand window in Windows Explorer, pressing F11 on your keyboard will open the image in full-screen mode. Pressing F11 again or clicking anywhere in the image will return the image to its previous display in Explorer.
Online Help
When any of the items contained in Network Cameras is selected, pressing F1 will open a browser window containing this document. Alternatively, click Help on the Explorer title bar.
Size to fit
By right-clicking on the image in Explorer it is possible to enable or disable the setting Retain Image Size. Enabling this function (a check mark will be visible) prevents the image from increasing or decreasing in size when the window is resized. The size controlled is based on the currently selected image resolution.
Disabling Retain Image Size also means that you can select Size To Fit. This function will resize the image so that it fills the entire window, no matter how the window is changed.
Pan/Tilt/Zoom
If you have a Pan/Tilt/Zoom (PTZ) device connected to your camera, this can be controlled directly from the image display in Windows Explorer. The mouse is used to perform the following operations:
• To center the image, click anywhere in the image. • To return “Home” double- click the wheel or middle (third) button on the mouse.
Alternatively, right-click and select PTZ Home from the context menu. • To zoom in or out, scroll with the mouse wheel. • To go to maximum zoom (zoom in) press Ctrl + double-click the wheel or middle (third)
button. • To go to minimum zoom (zoom out) press Shift + double-click the wheel or middle (third)
button.
Zooming in and out is done via "relative zoom", which means that this operation cannot be performed on video servers/cameras that do not support relative zoom.
Back to Contents
Rev 1.2 June 2001