Embed Size (px)
Citation preview

B-310N/B-510DNNetwork Installation Guide
Guide d’installation réseau


En
glis
h
Installing the Printer on Your Network
Follow these instructions to install the software and connect the printer to your network.
First, make sure you install the ink cartridges and load paper as described on the Start Here sheet that came with the printer. Then follow the steps below for Windows® or on page 7 for Macintosh®.
Windows Network Connection
The software works with Windows 2000, Windows Server 2003, Windows Server 2008, Windows XP, Windows XP Professional x64 Edition, Windows Vista®, and Windows 7. Before you begin, make sure you have a standard RJ-45 network cable (not included).
Note:
The steps show installation screens for the B-510DN, but the installation instructions are the same for the B-310N.
1. Turn off the printer.
2. Connect one end of the cable to the printer’s 10/100 Ethernet port. Then connect the other end to your network switch or hub.
3. Turn on the printer.
4. Insert your printer CD.
With Windows 7 and Windows Vista, if you see the AutoPlay window, click Run Setup.exe. When you see the User Account Control screen, click Yes or Continue.
3
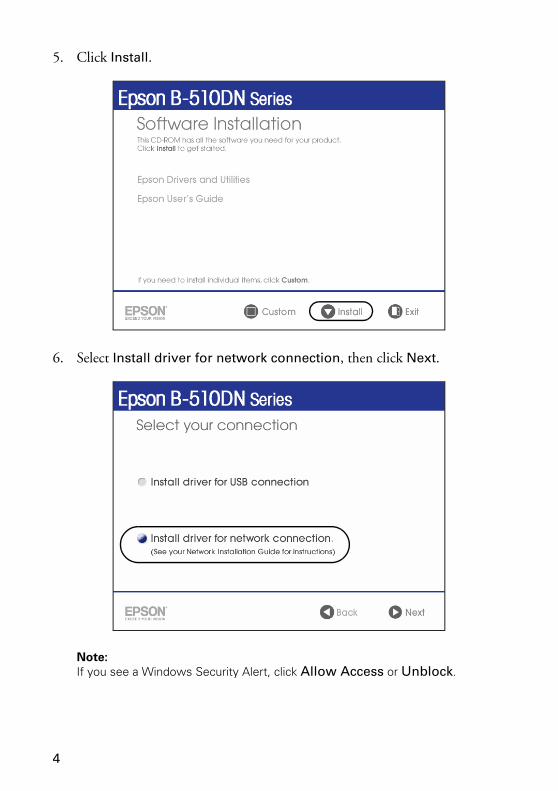
5. Click Install.
6. Select Install driver for network connection, then click Next.
Note:
If you see a Windows Security Alert, click Allow Access or Unblock.
4
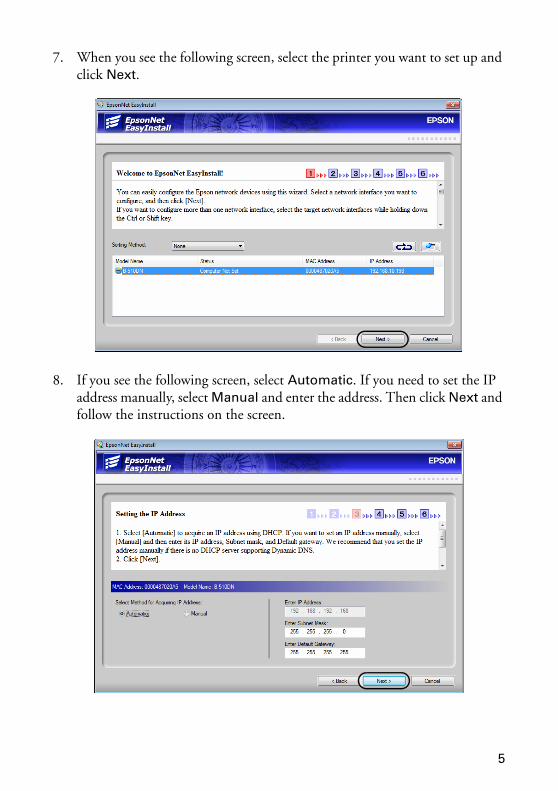
7. When you see the following screen, select the printer you want to set up and click Next.
8. If you see the following screen, select Automatic. If you need to set the IP address manually, select Manual and enter the address. Then click Next and follow the instructions on the screen.
5
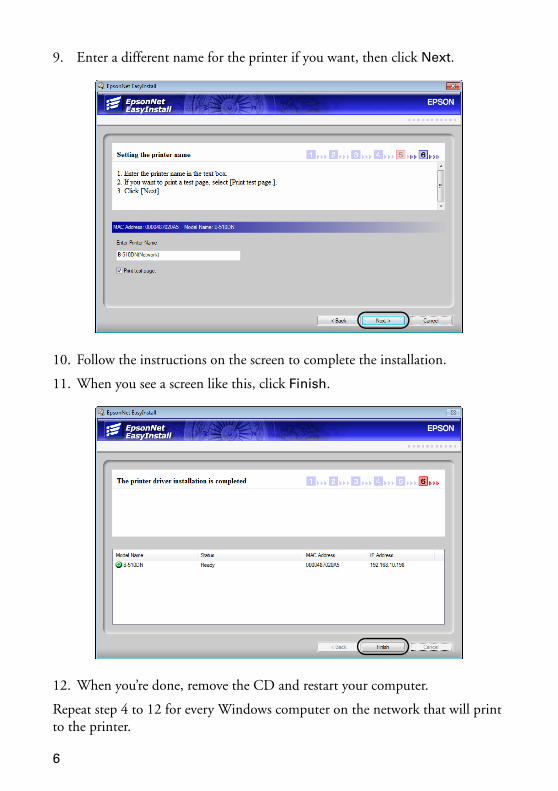
9. Enter a different name for the printer if you want, then click Next.
10. Follow the instructions on the screen to complete the installation.
11. When you see a screen like this, click Finish.
12. When you’re done, remove the CD and restart your computer.
Repeat step 4 to 12 for every Windows computer on the network that will print to the printer.
6
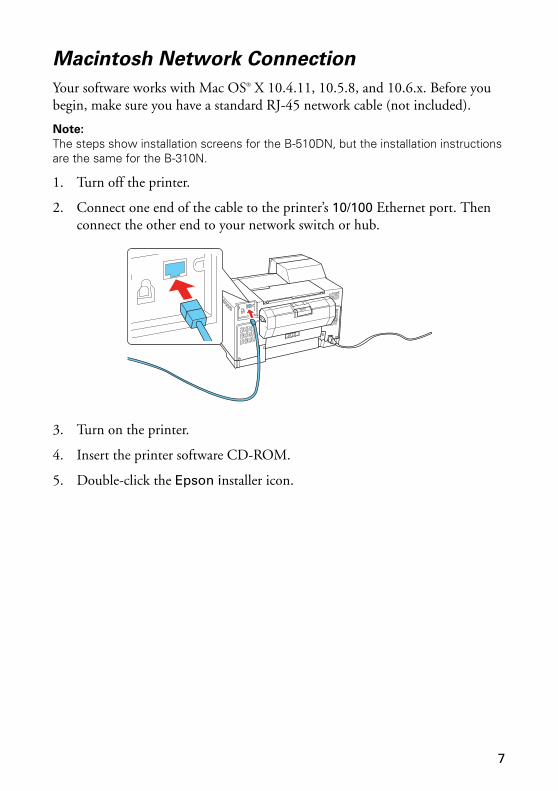
Macintosh Network Connection
Your software works with Mac OS® X 10.4.11, 10.5.8, and 10.6.x. Before you begin, make sure you have a standard RJ-45 network cable (not included).
Note:
The steps show installation screens for the B-510DN, but the installation instructions are the same for the B-310N.
1. Turn off the printer.
2. Connect one end of the cable to the printer’s 10/100 Ethernet port. Then connect the other end to your network switch or hub.
3. Turn on the printer.
4. Insert the printer software CD-ROM.
5. Double-click the Epson installer icon.
7

6. Click Install.
7. When you see this screen, click Exit.
8
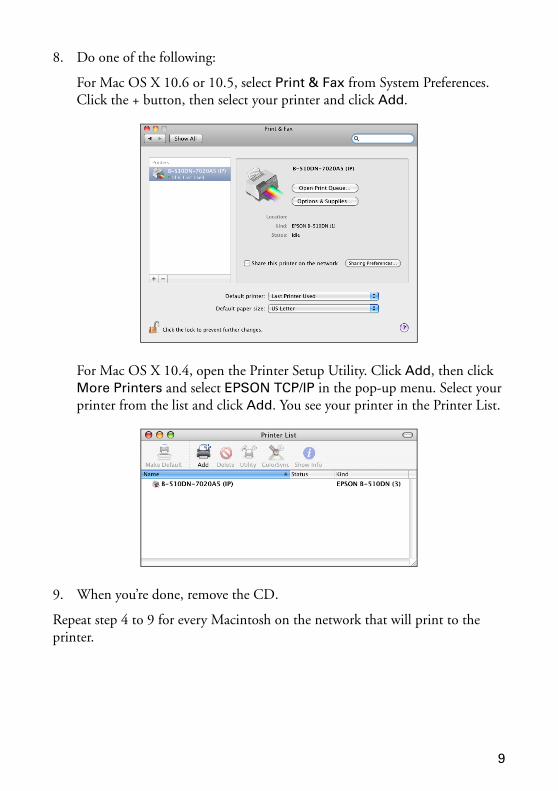
8. Do one of the following:
For Mac OS X 10.6 or 10.5, select Print & Fax from System Preferences. Click the + button, then select your printer and click Add.
For Mac OS X 10.4, open the Printer Setup Utility. Click Add, then click More Printers and select EPSON TCP/IP in the pop-up menu. Select your printer from the list and click Add. You see your printer in the Printer List.
9. When you’re done, remove the CD.
Repeat step 4 to 9 for every Macintosh on the network that will print to the printer.
9
Copyright NoticeAll rights reserved. No part of this publication may be reproduced, stored in a retrieval system, or transmitted in any form or by any means, electronic, mechanical, photocopying, recording, or otherwise, without the prior written permission of Seiko Epson Corporation. The information contained herein is designed only for use with this Epson product. Epson is not responsible for any use of this information as applied to other equipment.
Neither Seiko Epson Corporation nor its affiliates shall be liable to the purchaser of this product or third parties for damages, losses, costs, or expenses incurred by purchaser or third parties as a result of: accident, misuse, or abuse of this product or unauthorized modifications, repairs, or alterations to this product, or (excluding the U.S.) failure to strictly comply with Seiko Epson Corporation’s operating and maintenance instructions.
Seiko Epson Corporation shall not be liable for any damages or problems arising from the use of any options or any consumable products other than those designated as Original Epson Products or Epson Approved Products by Seiko Epson Corporation.
Software License Agreements
In addition to software program rights owned by Seiko Epson Corporation, this product also includes open-source software. See the “Software Notices” section in the online User’s Guide for a list of open-source software and software license terms applied to this printer.
Trademarks
Epson is a registered trademark and Epson Exceed Your Vision is a registered logomark of Seiko Epson Corporation.
General Notice: Other product names used herein are for identification purposes only and may be trademarks of their respective owners. Epson disclaims any and all rights in those marks.
This information is subject to change without notice.
© 2009 Epson America, Inc. 11/09
10
Fra
nça
is
Installation de l’imprimante sur votre réseau
Suivez ces instructions pour installer le logiciel et connecter l’imprimante à votre réseau.
Premièrement, assurez-vous d’installer les cartouches d’encre et de charger du papier tel qu’indiqué sur l’affiche Point de départ qui est incluse avec votre imprimante. Ensuite, suivez les étapes ci-dessous pour Windows® ou passez à la page 15 pour Macintosh®.
Connexion réseau sous Windows
Le logiciel fonctionne sous Windows 2000, Windows Sever 2003, Windows Sever 2008, Windows XP, Windows XP Professional x64 Edition, Windows Vista® et Windows 7. Avant de commencer, assurez-vous d’avoir un câble réseau RJ-45 standard (non inclus).
Remarque : Les étapes ci-dessous montrent les écrans pour l’imprimante B-510DN, mais les directives d’installation sont les mêmes pour l’imprimante B-310N.
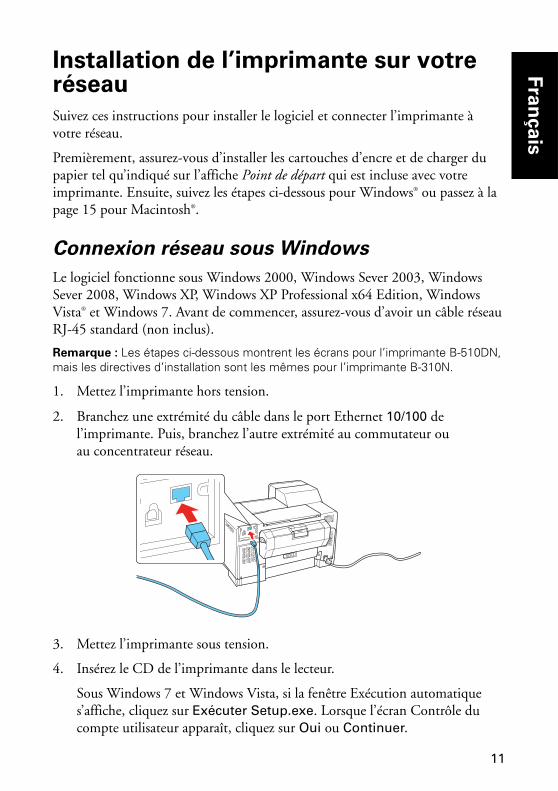
1. Mettez l’imprimante hors tension.
2. Branchez une extrémité du câble dans le port Ethernet 10/100 de l’imprimante. Puis, branchez l’autre extrémité au commutateur ou au concentrateur réseau.
3. Mettez l’imprimante sous tension.
4. Insérez le CD de l’imprimante dans le lecteur.
Sous Windows 7 et Windows Vista, si la fenêtre Exécution automatique s’affiche, cliquez sur Exécuter Setup.exe. Lorsque l’écran Contrôle du compte utilisateur apparaît, cliquez sur Oui ou Continuer.
11
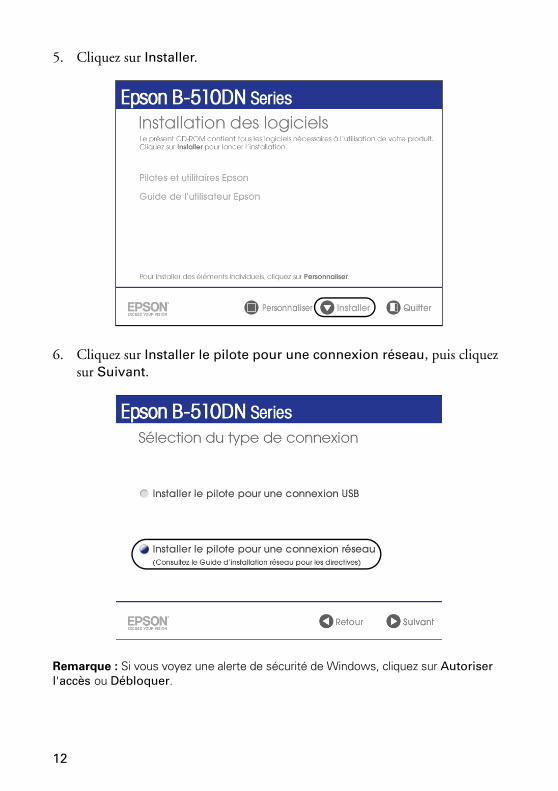
5. Cliquez sur Installer.
6. Cliquez sur Installer le pilote pour une connexion réseau, puis cliquez sur Suivant.
Remarque : Si vous voyez une alerte de sécurité de Windows, cliquez sur Autoriser l'accès ou Débloquer.
12
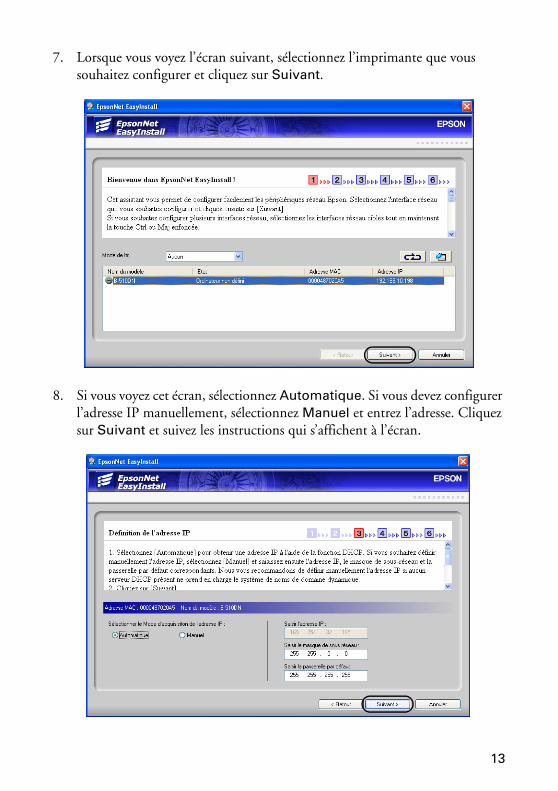
7. Lorsque vous voyez l’écran suivant, sélectionnez l’imprimante que vous souhaitez configurer et cliquez sur Suivant.
8. Si vous voyez cet écran, sélectionnez Automatique. Si vous devez configurer l’adresse IP manuellement, sélectionnez Manuel et entrez l’adresse. Cliquez sur Suivant et suivez les instructions qui s’affichent à l’écran.
13
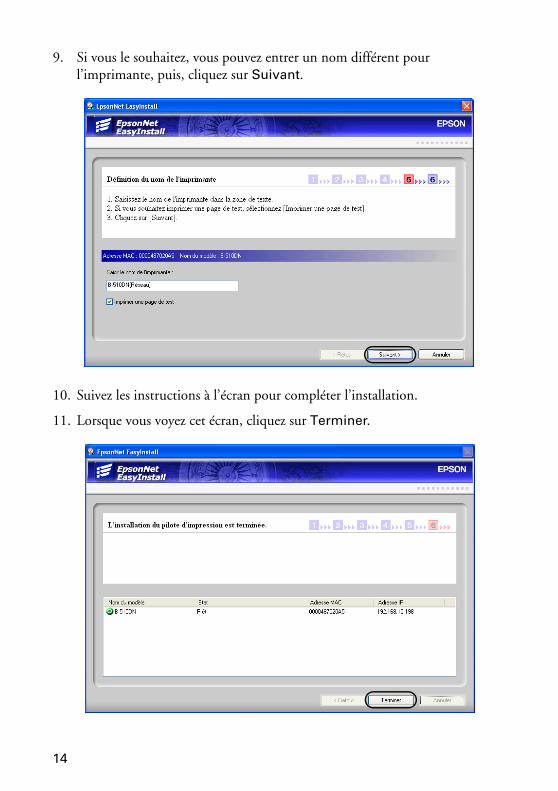
9. Si vous le souhaitez, vous pouvez entrer un nom différent pour l’imprimante, puis, cliquez sur Suivant.
10. Suivez les instructions à l’écran pour compléter l’installation.
11. Lorsque vous voyez cet écran, cliquez sur Terminer.
14
12. Lorsque vous avez terminé, retirez le CD du lecteur et redémarrez votre ordinateur.
Répétez les étapes 4 à 12 pour chaque ordinateur Windows sur le réseau qui imprimera sur l’imprimante.
Connexion réseau sous Macintosh
Votre logiciel fonctionne sous Mac OS® X 10.4.11, 10.5.8 et 10.6.x. Avant de commencer, assurez-vous d’avoir un câble réseau RJ-45 standard (non inclus).
Remarque : Les étapes ci-dessous montrent les écrans pour l’imprimante B-510DN, mais les directives d’installation sont les mêmes pour l’imprimante B-310N.
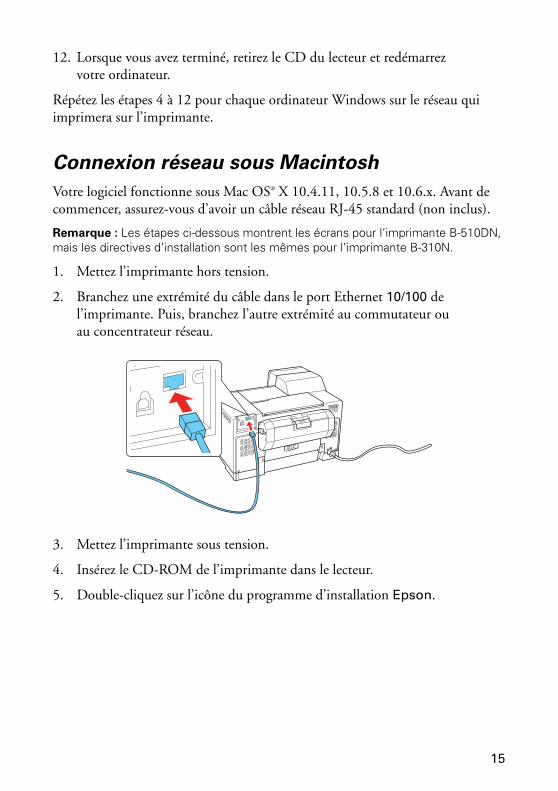
1. Mettez l’imprimante hors tension.
2. Branchez une extrémité du câble dans le port Ethernet 10/100 de l’imprimante. Puis, branchez l’autre extrémité au commutateur ou au concentrateur réseau.
3. Mettez l’imprimante sous tension.
4. Insérez le CD-ROM de l’imprimante dans le lecteur.
5. Double-cliquez sur l’icône du programme d’installation Epson.
15
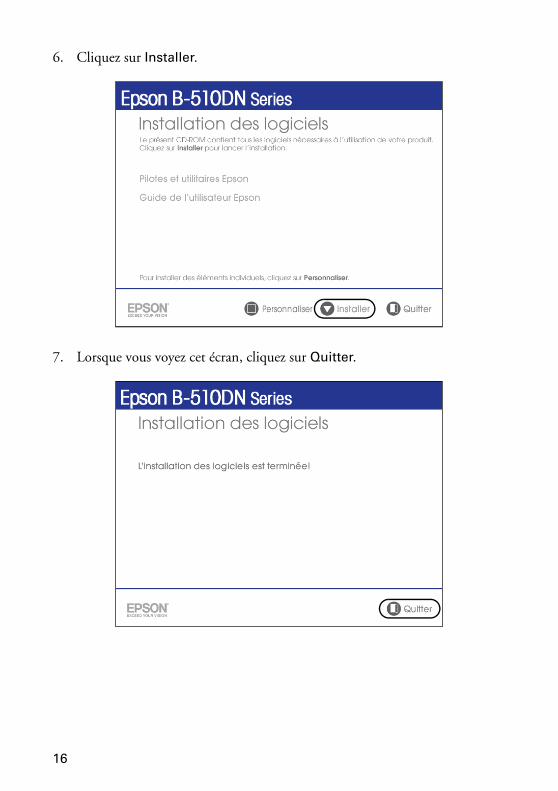
6. Cliquez sur Installer.
7. Lorsque vous voyez cet écran, cliquez sur Quitter.
16
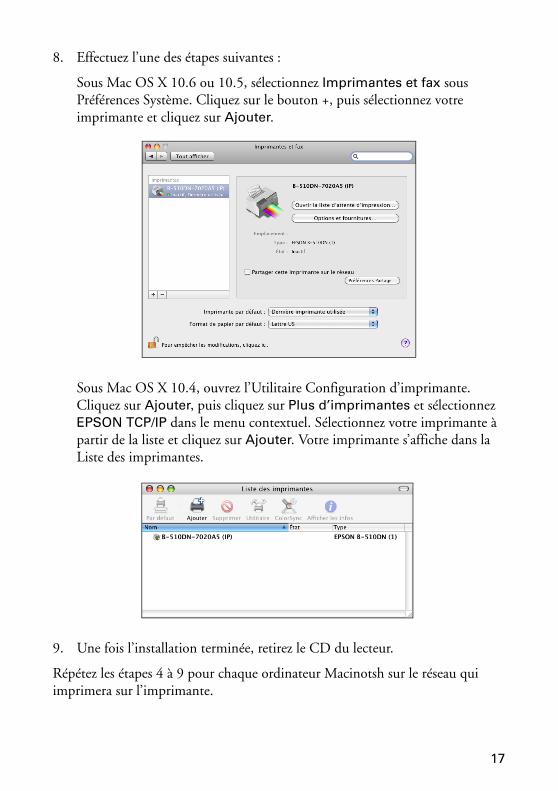
8. Effectuez l’une des étapes suivantes :
Sous Mac OS X 10.6 ou 10.5, sélectionnez Imprimantes et fax sous Préférences Système. Cliquez sur le bouton +, puis sélectionnez votre imprimante et cliquez sur Ajouter.
Sous Mac OS X 10.4, ouvrez l’Utilitaire Configuration d’imprimante. Cliquez sur Ajouter, puis cliquez sur Plus d’imprimantes et sélectionnez EPSON TCP/IP dans le menu contextuel. Sélectionnez votre imprimante à partir de la liste et cliquez sur Ajouter. Votre imprimante s’affiche dans la Liste des imprimantes.
9. Une fois l’installation terminée, retirez le CD du lecteur.
Répétez les étapes 4 à 9 pour chaque ordinateur Macinotsh sur le réseau qui imprimera sur l’imprimante.
17
Avis sur les droits d’auteurTous droits réservés. Il est interdit de reproduire, de conserver dans un système central ou de transmettre le contenu de cette publication sous quelque forme et par quelque moyen que ce soit – reproduction électronique ou mécanique, photocopie, enregistrement ou autre – sans la permission écrite préalable de Seiko Epson Corporation. Les renseignements contenus dans le présent guide concernent uniquement ce produit Epson. Epson ne peut être tenue responsable de l’utilisation de ces renseignements pour faire fonctionner d’autres équipements.
Ni Seiko Epson Corporation ni ses filiales ne sont responsables vis-à-vis de l’acheteur de ce produit ou de tierces parties en cas de dommages, de pertes, de frais ou de dépenses engagées par l’acheteur ou les tierces parties par suite : d’un accident, d’une utilisation incorrecte ou abusive, de modifications non autorisées, de réparations ou (à l’exception des États-Unis) du non-respect des consignes d’utilisation et d’entretien de Seiko Epson Corporation.
Seiko Epson Corporation décline toute responsabilité en cas de dommages ou de problèmes découlant de l’utilisation d’options ou de produits consommables autres que les produits désignés comme produits Epson d’origine ou comme produits approuvés pour Epson par Seiko Epson Corporation.
Licences d’utilisation des logiciels
En plus des droits de programmes des logiciels appartenant à Seiko Epson Corporation, ce produit inclut aussi des codes source libre. Consultez la section « Avis concernant les logiciels » du Guide de l’utilisateur en ligne pour obtenir la liste des codes source libre et des conditions d’utilisation des logiciels inclus pour cette imprimante.
Marques de commerce
Epson est une marque déposée et Epson Exceed Your Vision est un logo déposé de Seiko Epson Corporation.
Avis général : Les autres noms de produit figurant dans le présent document ne sont cités qu’à titre d’identification et peuvent être des marques de commerce de leurs propriétaires respectifs. Epson renonce à tous les droits associés à ces marques.
L’information contenue dans le présent document peut être modifiée sans préavis.
© 2009 Epson America, Inc. 11/09
18


© 2009 Epson America, Inc.CPD-27742
Printed in XXXXXXPays d’impression : XXXXXX