Embed Size (px)
Citation preview
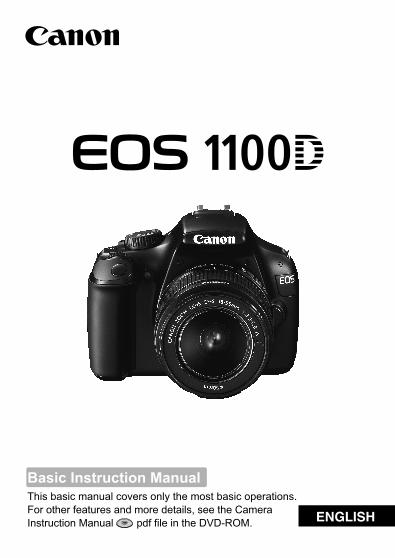
Basic Instruction ManualThis basic manual covers only the most basic operations. For other features and more details, see the Camera Instruction Manual pdf file in the DVD-ROM. ENGLISH
2
The EOS 1100D is a high-performance, digital single-lens reflex camera featuring a fine-detail CMOS sensor with approx. 12.2 effective megapixels, DIGIC 4, high-precision and high-speed 9-point AF, approx. 3 fps continuous shooting, Live View shooting, and High-Definition (HD) movie shooting.The camera is highly responsive for shooting at anytime, provides many functions fitted for advanced shooting, and offers many other features.
Refer to This Manual while Using the Camera to Further Familiarize Yourself with the CameraWith a digital camera, you can immediately view the image you have captured. While reading this manual, take a few test shots and see how they come out. You can then better understand the camera.To avoid botched pictures and accidents, first read the “Safety Warnings” (p.79, 80) and “Handling Precautions” (p.8, 9).
Testing the Camera Before Use and LiabilityAfter shooting, playback and check whether the images have been properly recorded. If the camera or memory card is faulty and the images cannot be recorded or downloaded to a computer, Canon cannot be held liable for any loss or inconvenience caused.
CopyrightsCopyright laws in your country may prohibit the use of your recorded images of people and certain subjects for anything but private enjoyment. Also be aware that certain public performances, exhibitions, etc., may prohibit photography even for private enjoyment.
Introduction
This camera is compatible with SD memory cards, SDHC memory cards, and SDXC memory cards. This manual will refer to all these cards as just “card.”* The camera does not come with a card for recording images.
Please purchase it separately.
3
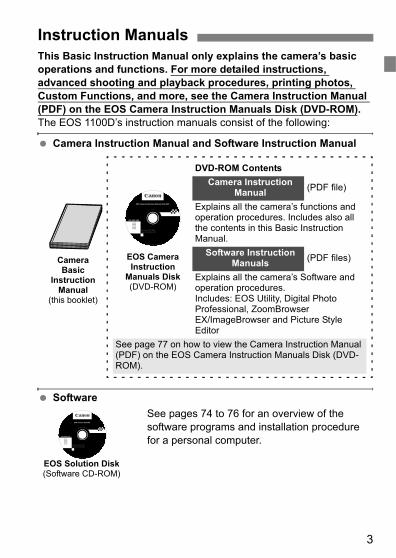
This Basic Instruction Manual only explains the camera’s basic operations and functions. For more detailed instructions, advanced shooting and playback procedures, printing photos, Custom Functions, and more, see the Camera Instruction Manual (PDF) on the EOS Camera Instruction Manuals Disk (DVD-ROM).The EOS 1100D’s instruction manuals consist of the following:
Camera Instruction Manual and Software Instruction Manual
SoftwareSee pages 74 to 76 for an overview of the software programs and installation procedure for a personal computer.
Instruction Manuals
DVD-ROM ContentsCamera Instruction
Manual (PDF file)
Explains all the camera’s functions and operation procedures. Includes also all the contents in this Basic Instruction Manual.
Software Instruction Manuals (PDF files)
Explains all the camera’s Software and operation procedures. Includes: EOS Utility, Digital Photo Professional, ZoomBrowser EX/ImageBrowser and Picture Style Editor
See page 77 on how to view the Camera Instruction Manual (PDF) on the EOS Camera Instruction Manuals Disk (DVD-ROM).
CameraBasic
Instruction Manual
(this booklet)
EOS CameraInstruction
Manuals Disk(DVD-ROM)
Windows XXX XXX
EOS Camera Instruction Manuals Disk XXX
Mac OS X XXX XXX
XXXXXXXXXXXXXXXXXXXXXXXXX
CEL-XXX XXX
© CANON INC. 20XX. Made in the EU.
EOS Solution Disk(Software CD-ROM)
EOS Solution Disk XXX
CEL-XXX XXX
© CANON INC. 20XX. Made in the EU.
Windows XXX XXXMac OS X XXX XXX
XXXXXXXXXXXXXXXXXXXXXXXXX
4
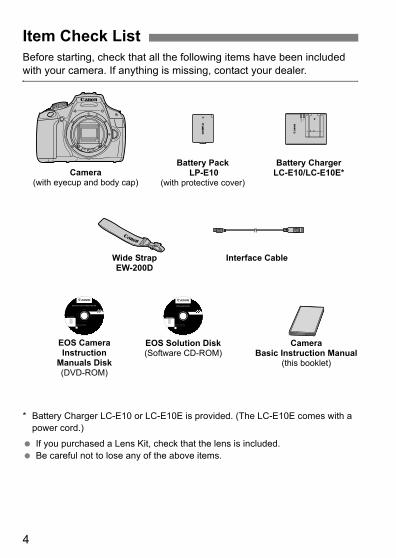
Before starting, check that all the following items have been included with your camera. If anything is missing, contact your dealer.
* Battery Charger LC-E10 or LC-E10E is provided. (The LC-E10E comes with a power cord.)
If you purchased a Lens Kit, check that the lens is included.Be careful not to lose any of the above items.
Item Check List
Battery Pack LP-E10
(with protective cover)
Battery Charger LC-E10/LC-E10E*
Interface CableWide StrapEW-200D
Camera(with eyecup and body cap)
EOS Solution Disk(Software CD-ROM)
EOS Camera Instruction
Manuals Disk(DVD-ROM)
Camera Basic Instruction Manual
(this booklet)
Windows XXX XXX
EOS Camera Instruction Manuals Disk XXX
Mac OS X XXX XXX
XXXXXXXXXXXXXXXXXXXXXXXXX
CEL-XXX XXX
© CANON INC. 20XX. Made in the EU.
EOS Solution Disk XXX
CEL-XXX XXX
© CANON INC. 20XX. Made in the EU.
Windows XXX XXXMac OS X XXX XXX
XXXXXXXXXXXXXXXXXXXXXXXXX
5
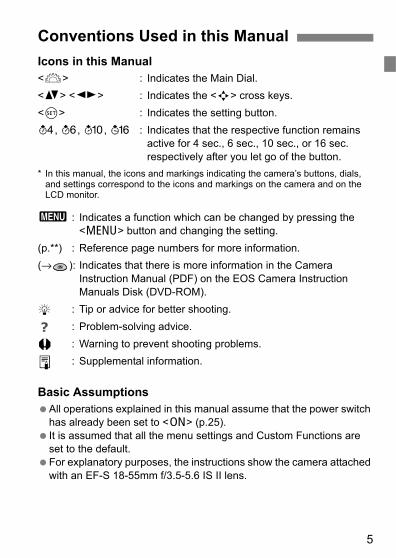
Icons in this Manual<6> : Indicates the Main Dial.<V> <U> : Indicates the <S> cross keys.<0> : Indicates the setting button.0, 9, 7, 8 : Indicates that the respective function remains
active for 4 sec., 6 sec., 10 sec., or 16 sec. respectively after you let go of the button.
* In this manual, the icons and markings indicating the camera’s buttons, dials, and settings correspond to the icons and markings on the camera and on the LCD monitor.
3 : Indicates a function which can be changed by pressing the <M> button and changing the setting.
(p.**) : Reference page numbers for more information.(→ ): Indicates that there is more information in the Camera
Instruction Manual (PDF) on the EOS Camera Instruction Manuals Disk (DVD-ROM).
: Tip or advice for better shooting.: Problem-solving advice.: Warning to prevent shooting problems.: Supplemental information.
Basic AssumptionsAll operations explained in this manual assume that the power switch has already been set to <1> (p.25).It is assumed that all the menu settings and Custom Functions are set to the default.For explanatory purposes, the instructions show the camera attached with an EF-S 18-55mm f/3.5-5.6 IS II lens.
Conventions Used in this Manual
6
2
1
Introduction 2Instruction Manuals ........................................................................................... 3
Item Check List.................................................................................................. 4
Conventions Used in this Manual ...................................................................... 5
Handling Precautions ........................................................................................ 8
Quick Start Guide ............................................................................................ 10
Nomenclature .................................................................................................. 12
Getting Started 19Charging the Battery ....................................................................................... 20
Installing and Removing the Battery and Card................................................ 22
Turning on the Power ...................................................................................... 25
Setting the Date and Time............................................................................... 27
Selecting the Interface Language.................................................................... 28
Attaching and Detaching a Lens ..................................................................... 29
About the Lens Image Stabilizer...................................................................... 31
Basic Operation............................................................................................... 32
3 Menu Operations................................................................................... 34
Formatting the Card......................................................................................... 36
Switching the LCD Monitor Display ................................................................. 38
Feature Guide ................................................................................................. 39
Basic Shooting 411 Fully Automatic Shooting........................................................................... 42
1 Full Auto Techniques................................................................................. 44
7 Disabling Flash.......................................................................................... 45
C Creative Auto Shooting ............................................................................. 46
2 Shooting Portraits....................................................................................... 49
3 Shooting Landscapes................................................................................ 50
4 Shooting Close-ups .................................................................................... 51
5 Shooting Moving Subjects......................................................................... 52
6 Shooting Portraits at Night ......................................................................... 53
Q Quick Control ............................................................................................. 54
Contents
7
Contents
6
5
4
3 Shooting with the LCD Monitor (Live View Shooting) 55A Shooting with the LCD Monitor ..................................................................56
Changing the Autofocus Mode.........................................................................59
MF: Focusing Manually ....................................................................................64
Shooting Movies 65k Shooting Movies ........................................................................................66
Image Playback 69x Image Playback..........................................................................................70
k Playing Movies...........................................................................................71
Software Start Guide 73Software Start Guide........................................................................................74
EOS Camera Instruction Manuals ...................................................................77
Safety Warnings...............................................................................................79
8
Camera CareThis camera is a precision instrument. Do not drop it or subject it to physical shock.The camera is not waterproof and cannot be used underwater. If you accidentally drop the camera into water, promptly consult your nearest Canon Service Center. Wipe off any water droplets with a dry cloth. If the camera has been exposed to salty air, wipe it with a well-wrung wet cloth.Never leave the camera near anything having a strong magnetic field such as a magnet or electric motor. Also avoid using or leaving the camera near anything emitting strong radio waves such as a large antenna. Strong magnetic fields can cause camera misoperation or destroy image data.Do not leave the camera in excessive heat such as in a car in direct sunlight. High temperatures can cause the camera to malfunction.The camera contains precision electronic circuitry. Never attempt to disassemble the camera yourself.Use a blower to blow away dust on the lens, viewfinder, reflex mirror, and focusing screen. Do not use cleaners that contain organic solvents to clean the camera body or lens. For stubborn dirt, take the camera to the nearest Canon Service Center.Do not touch the camera’s electrical contacts with your fingers. This is to prevent the contacts from corroding. Corroded contacts can cause camera misoperation.If the camera is suddenly brought in from the cold into a warm room, condensation may form on the camera and internal parts. To prevent condensation, first put the camera in a sealed plastic bag and let it adjust to the warmer temperature before taking it out of the bag.If condensation forms on the camera, do not use the camera. This is to avoid damaging the camera. If there is condensation, remove the lens, card and battery from the camera, and wait until the condensation has evaporated before using the camera.If the camera will not be used for an extended period, remove the battery and store the camera in a cool, dry, well-ventilated location. Even while the camera is in storage, press the shutter button a few times once in a while to check that the camera is still working.Avoid storing the camera where there are corrosive chemicals such as a darkroom or chemical lab.If the camera has not been used for an extended period, test all its functions before using it. If you have not used the camera for some time or if there is an important shoot coming up, have the camera checked by your Canon dealer or check the camera yourself and make sure it is working properly.
Handling Precautions
9
Handling Precautions
LCD MonitorAlthough the LCD monitor is manufactured with very high precision technology with over 99.99% effective pixels, there might be a few dead pixels among the remaining 0.01% or less pixels. Dead pixels displaying only black or red, etc., are not a malfunction. They do not affect the images recorded.If the LCD monitor is left on for a prolonged period, screen burn-in may occur where you see remnants of what was displayed. However, this is only temporary and will disappear when the camera is left unused for a few days.In low or high temperatures, the LCD monitor display may seem slow or it might look black. It will return to normal at room temperature.
CardsTo protect the card and its recorded data, note the following:
Do not drop, bend, or wet the card. Do not subject it to excessive force, physical shock, or vibration.Do not touch the card’s electronic contacts with your fingers or anything metallic.Do not store or use the card near anything having a strong magnetic field such as a TV set, speakers, or magnet. Also avoid places prone to having static electricity.Do not leave the card in direct sunlight or near a heat source.Store the card in a case.Do not store the card in hot, dusty, or humid locations.
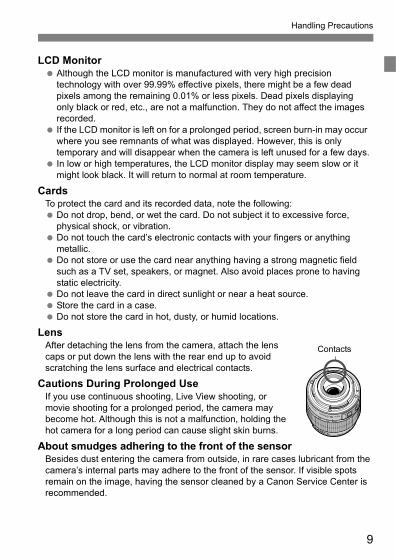
LensAfter detaching the lens from the camera, attach the lens caps or put down the lens with the rear end up to avoid scratching the lens surface and electrical contacts.
Cautions During Prolonged UseIf you use continuous shooting, Live View shooting, or movie shooting for a prolonged period, the camera may become hot. Although this is not a malfunction, holding the hot camera for a long period can cause slight skin burns.
About smudges adhering to the front of the sensorBesides dust entering the camera from outside, in rare cases lubricant from the camera’s internal parts may adhere to the front of the sensor. If visible spots remain on the image, having the sensor cleaned by a Canon Service Center is recommended.
Contacts
10
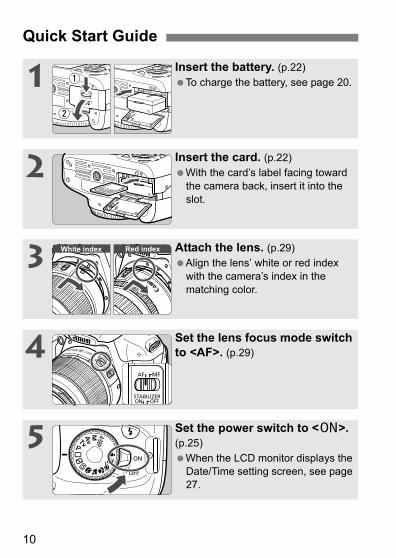
Quick Start Guide
1 Insert the battery. (p.22)To charge the battery, see page 20.
2 Insert the card. (p.22)With the card’s label facing toward the camera back, insert it into the slot.
3 Attach the lens. (p.29)Align the lens’ white or red index with the camera’s index in the matching color.
4 Set the lens focus mode switch to <AF>. (p.29)
5 Set the power switch to <1>. (p.25)
When the LCD monitor displays the Date/Time setting screen, see page 27.
White index Red index
11
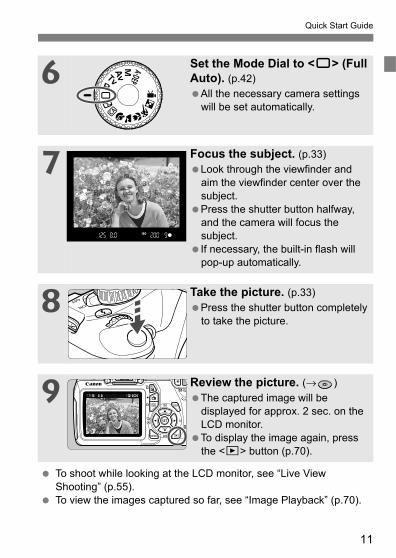
Quick Start Guide
6 Set the Mode Dial to <1> (Full Auto). (p.42)
All the necessary camera settings will be set automatically.
7 Focus the subject. (p.33)Look through the viewfinder and aim the viewfinder center over the subject.Press the shutter button halfway, and the camera will focus the subject.If necessary, the built-in flash will pop-up automatically.
8 Take the picture. (p.33)Press the shutter button completely to take the picture.
9 Review the picture. (→ )The captured image will be displayed for approx. 2 sec. on the LCD monitor.To display the image again, press the <x> button (p.70).
To shoot while looking at the LCD monitor, see “Live View Shooting” (p.55).To view the images captured so far, see “Image Playback” (p.70).
12
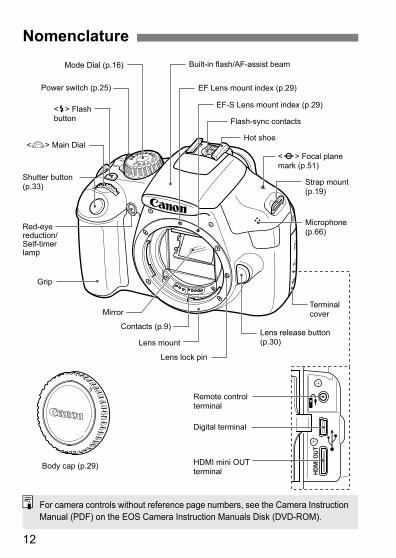
NomenclatureMode Dial (p.16)
Power switch (p.25)
<D> Flash button
<6> Main Dial
Shutter button (p.33)
Red-eye reduction/Self-timer lamp
Grip
Mirror
Lens lock pin
Lens mount
Contacts (p.9)
Remote control terminal
HDMI mini OUT terminal
Digital terminal
Built-in flash/AF-assist beam
EF Lens mount index (p.29)
EF-S Lens mount index (p.29)
Flash-sync contacts
Hot shoe
<V> Focal plane mark (p.51)
Strap mount (p.19)
Microphone (p.66)
Terminal cover
Lens release button (p.30)
Body cap (p.29)
For camera controls without reference page numbers, see the Camera Instruction Manual (PDF) on the EOS Camera Instruction Manuals Disk (DVD-ROM).
13
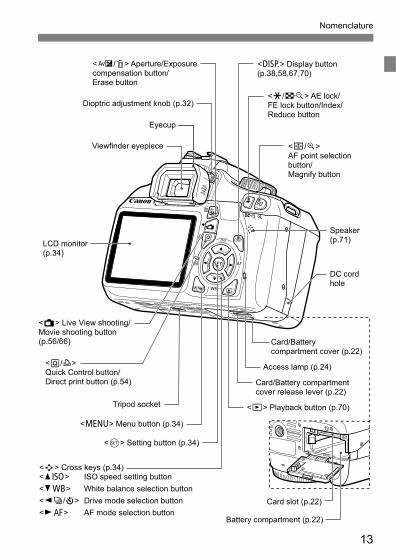
Nomenclature
Card slot (p.22)
<S> Cross keys (p.34) <WZ> ISO speed setting button <XB> White balance selection button <Yi/j> Drive mode selection button <ZE> AF mode selection button
<0> Setting button (p.34)
<M> Menu button (p.34)
Tripod socket
<Q/l> Quick Control button/Direct print button (p.54)
LCD monitor (p.34)
<A> Live View shooting/Movie shooting button (p.56/66)
<O/L> Aperture/Exposure compensation button/Erase button
Viewfinder eyepiece
Eyecup
Dioptric adjustment knob (p.32)<A/I> AE lock/FE lock button/Index/Reduce button
<S/u> AF point selection button/Magnify button
<B> Display button(p.38,58,67,70)
Speaker (p.71)
DC cord hole
Access lamp (p.24)
Card/Battery compartment cover (p.22)
Card/Battery compartment cover release lever (p.22)
<x> Playback button (p.70)
Battery compartment (p.22)
Nomenclature
14
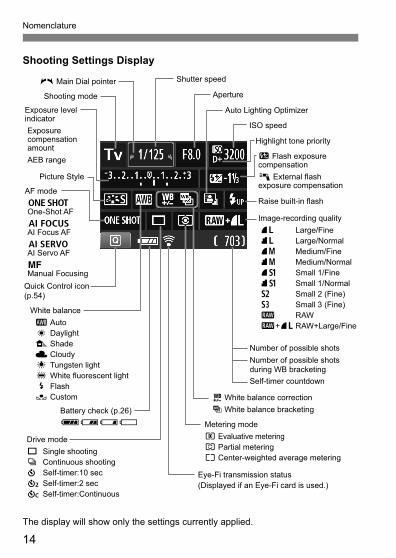
Shooting Settings Display
The display will show only the settings currently applied.
2 White balance correction B White balance bracketing
White balance Q Auto W Daylight E Shade R Cloudy Y Tungsten light U White fluorescent light I Flash O Custom
Battery check (p.26) zxcn
Drive mode u Single shooting i Continuous shooting j Self-timer:10 sec l Self-timer:2 sec q Self-timer:Continuous
Eye-Fi transmission status (Displayed if an Eye-Fi card is used.)
Metering mode q Evaluative metering w Partial metering e Center-weighted average metering
Quick Control icon (p.54)
AF mode X One-Shot AF 9 AI Focus AF Z AI Servo AF g Manual Focusing
Picture Style
Shutter speed
Aperture c Main Dial pointer
Shooting mode
Exposure level indicatorExposure compensation amountAEB range
Image-recording quality 73 Large/Fine 83 Large/Normal 74 Medium/Fine 84 Medium/Normal 7a Small 1/Fine 8a Small 1/Normal b Small 2 (Fine) c Small 3 (Fine) 1 RAW 1+73 RAW+Large/Fine
Number of possible shots
Self-timer countdown
Number of possible shots during WB bracketing
Highlight tone priority
Raise built-in flash
y Flash exposure compensation0 External flash exposure compensation
Auto Lighting Optimizer
ISO speed

15
Nomenclature
Viewfinder Information
The display will show only the settings currently applied.
<A> AE lock/ AEB in-progress
<D> Flash-ready Improper FE lock warning
<e> High-speed sync (FP flash)<d> FE lock/ FEB in-progress
<y> Flash exposure compensation
Shutter speed FE lock (FEL) Busy (buSY) Built-in flash recycling (D buSY)
Focusing screen
Card full warning (FuLL) Card error warning (Card) No card warning (Card)
Aperture
Exposure level indicator Exposure compensation amount AEB rangeRed-eye reduction lamp-on indicator
<A> Highlight tone priority
ISO speed
<0> Monochrome shooting
Max. burst
<o> Focus confirmation light
<2> White balance correction
<Z> ISO speed
AF point activation indicator < > AF point activation indicator < >
AF points
Nomenclature
16
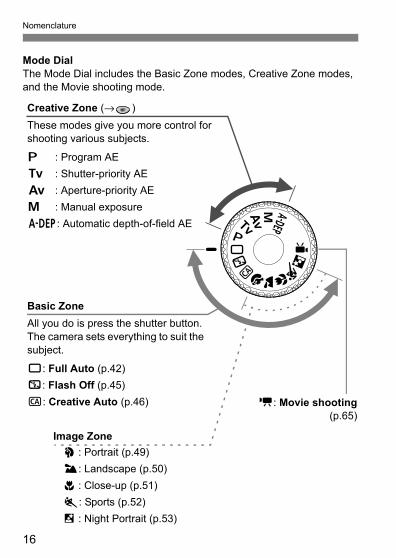
Mode DialThe Mode Dial includes the Basic Zone modes, Creative Zone modes, and the Movie shooting mode.
Basic ZoneAll you do is press the shutter button. The camera sets everything to suit the subject.
1: Full Auto (p.42)7: Flash Off (p.45)C: Creative Auto (p.46)
Creative Zone (→ )These modes give you more control for shooting various subjects.
d : Program AEs : Shutter-priority AEf : Aperture-priority AEa : Manual exposure8: Automatic depth-of-field AE
Image Zone2 : Portrait (p.49)3: Landscape (p.50)4 : Close-up (p.51)5: Sports (p.52)6 : Night Portrait (p.53)
k: Movie shooting(p.65)
17
Nomenclature
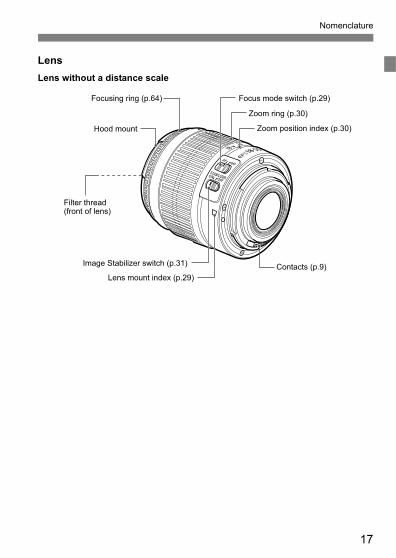
LensLens without a distance scale
Focusing ring (p.64)
Hood mount
Filter thread (front of lens)
Image Stabilizer switch (p.31)
Lens mount index (p.29) Contacts (p.9)
Focus mode switch (p.29)
Zoom ring (p.30)
Zoom position index (p.30)
Nomenclature
18
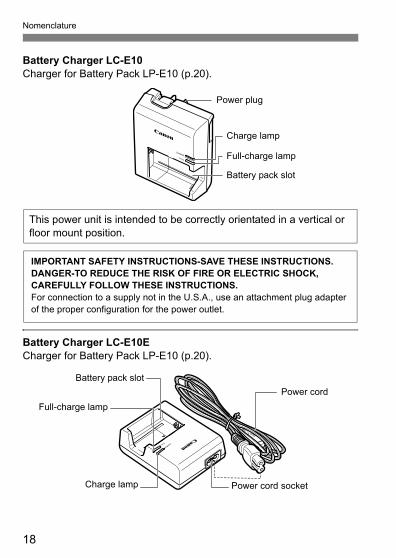
Battery Charger LC-E10Charger for Battery Pack LP-E10 (p.20).
Battery Charger LC-E10ECharger for Battery Pack LP-E10 (p.20).
Battery pack slot
Power plug
Charge lamp
Full-charge lamp
This power unit is intended to be correctly orientated in a vertical or floor mount position.
IMPORTANT SAFETY INSTRUCTIONS-SAVE THESE INSTRUCTIONS.DANGER-TO REDUCE THE RISK OF FIRE OR ELECTRIC SHOCK, CAREFULLY FOLLOW THESE INSTRUCTIONS.For connection to a supply not in the U.S.A., use an attachment plug adapter of the proper configuration for the power outlet.
Power cord
Power cord socket
Battery pack slot
Charge lamp
Full-charge lamp
19
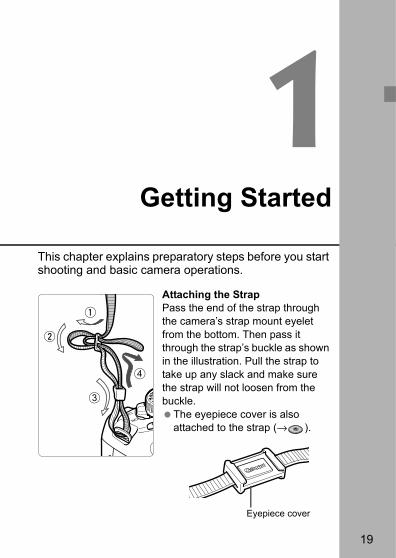
1Getting Started
This chapter explains preparatory steps before you start shooting and basic camera operations.
Attaching the StrapPass the end of the strap through the camera’s strap mount eyelet from the bottom. Then pass it through the strap’s buckle as shown in the illustration. Pull the strap to take up any slack and make sure the strap will not loosen from the buckle.
The eyepiece cover is also attached to the strap (→ ).
Eyepiece cover
20
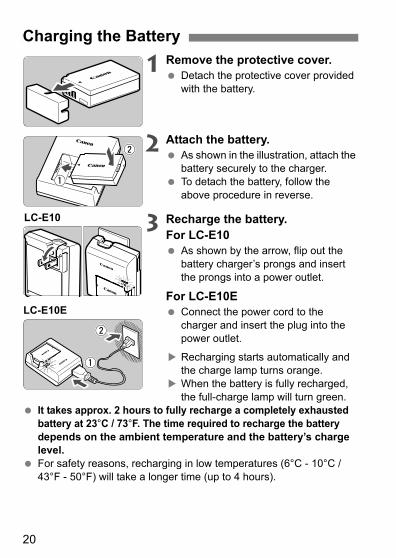
1 Remove the protective cover.Detach the protective cover provided with the battery.
2 Attach the battery.As shown in the illustration, attach the battery securely to the charger.To detach the battery, follow the above procedure in reverse.
3 Recharge the battery.For LC-E10
As shown by the arrow, flip out the battery charger’s prongs and insert the prongs into a power outlet.
For LC-E10EConnect the power cord to the charger and insert the plug into the power outlet.
Recharging starts automatically and the charge lamp turns orange.When the battery is fully recharged, the full-charge lamp will turn green.
It takes approx. 2 hours to fully recharge a completely exhausted battery at 23°C / 73°F. The time required to recharge the battery depends on the ambient temperature and the battery’s charge level.For safety reasons, recharging in low temperatures (6°C - 10°C / 43°F - 50°F) will take a longer time (up to 4 hours).
Charging the Battery
LC-E10
LC-E10E
21
Charging the Battery
Upon purchase, the battery is not fully charged.Recharge the battery before using.
Recharge the battery on the day before or on the day it is to be used.Even during storage, a charged battery will gradually drain and lose its power.
After recharging the battery, detach it and unplug the charger from the power outlet.
When not using the camera, remove the battery.If the battery is left in the camera for a prolonged period, a small amount of power current is released, resulting in excess discharge and shorter battery life. Store the battery with the protective cover (provided) attached. Storing the battery after it is fully charged can lower the battery’s performance.
The battery charger can also be used in foreign countries.The battery charger is compatible with a 100 V AC to 240 V AC 50/60 Hz power source. If necessary, attach a commercially-available plug adapter for the respective country or region. Do not attach any portable voltage transformer to the battery charger. Doing so can damage the battery charger.
If the battery becomes exhausted quickly even after being fully charged, the battery has reached the end of its service life.Purchase a new battery.
Tips for Using the Battery and Charger
After disconnecting the charger’s power plug, do not touch the prongs for at least 3 sec.Do not charge any battery other than a Battery Pack LP-E10.The Battery Pack LP-E10 is dedicated to Canon products only. Using it with an incompatible battery charger or product may result in malfunction or accidents for which Canon cannot be held liable.
22
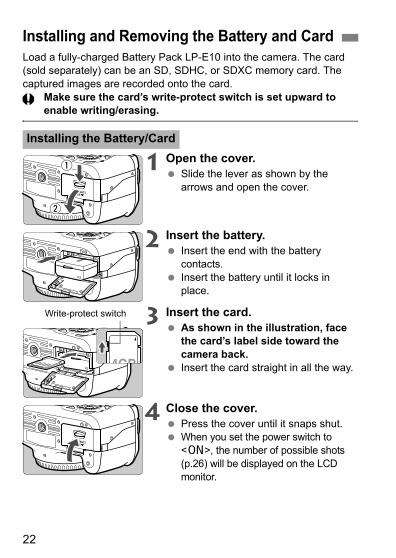
Load a fully-charged Battery Pack LP-E10 into the camera. The card (sold separately) can be an SD, SDHC, or SDXC memory card. The captured images are recorded onto the card.
Make sure the card’s write-protect switch is set upward to enable writing/erasing.
1 Open the cover.Slide the lever as shown by the arrows and open the cover.
2 Insert the battery.Insert the end with the battery contacts.Insert the battery until it locks in place.
3 Insert the card.As shown in the illustration, face the card’s label side toward the camera back.Insert the card straight in all the way.
4 Close the cover.Press the cover until it snaps shut.When you set the power switch to <1>, the number of possible shots (p.26) will be displayed on the LCD monitor.
Installing and Removing the Battery and Card
Installing the Battery/Card
Write-protect switch
23
Installing and Removing the Battery and Card
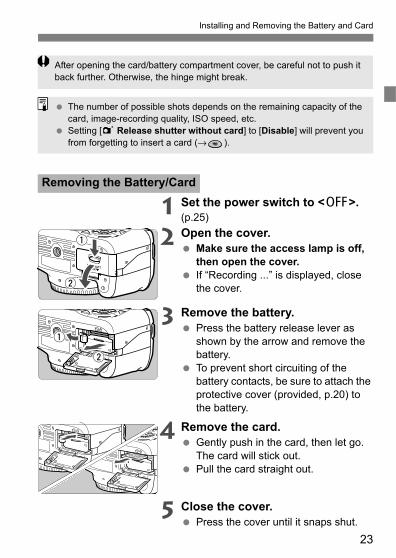
1 Set the power switch to <2>. (p.25)
2 Open the cover.Make sure the access lamp is off, then open the cover.If “Recording ...” is displayed, close the cover.
3 Remove the battery.Press the battery release lever as shown by the arrow and remove the battery.To prevent short circuiting of the battery contacts, be sure to attach the protective cover (provided, p.20) to the battery.
4 Remove the card.Gently push in the card, then let go. The card will stick out.Pull the card straight out.
5 Close the cover.Press the cover until it snaps shut.
Removing the Battery/Card
After opening the card/battery compartment cover, be careful not to push it back further. Otherwise, the hinge might break.
The number of possible shots depends on the remaining capacity of the card, image-recording quality, ISO speed, etc.Setting [1 Release shutter without card] to [Disable] will prevent you from forgetting to insert a card (→ ).
Installing and Removing the Battery and Card
24
When the access lamp is lit or blinking, it indicates that images are being written to or read by the card, being erased, or data is being transferred. When the access lamp is lit or blinking, do not open the card/battery compartment cover and never do any of the following. Otherwise, the image data may be destroyed or the card or camera may be damaged.• Removing the card.• Removing the battery.• Shaking or banging the camera around.If the card already contains recorded images, the image number might not start from 0001 (→ ).Do not touch the card’s contacts with your fingers or metal objects.If a card-related error message is displayed on the LCD monitor, remove and reinsert the card. If the error persists, use a different card. If you can transfer all the images on the card to a computer, transfer all the images and then format the card with the camera (p.36). The card may then return to normal.
25
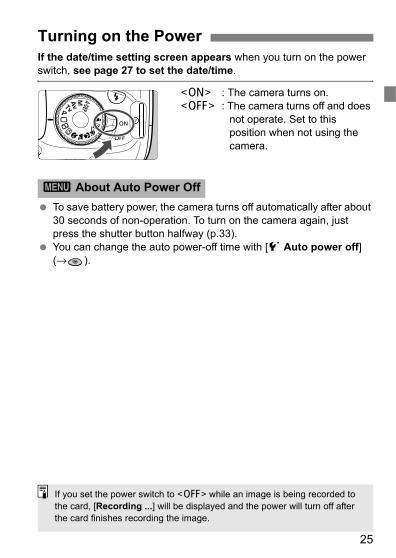
If the date/time setting screen appears when you turn on the power switch, see page 27 to set the date/time.
<1> : The camera turns on.<2> : The camera turns off and does
not operate. Set to this position when not using the camera.
To save battery power, the camera turns off automatically after about 30 seconds of non-operation. To turn on the camera again, just press the shutter button halfway (p.33).You can change the auto power-off time with [5 Auto power off] (→ ).
Turning on the Power
3 About Auto Power Off
If you set the power switch to <2> while an image is being recorded to the card, [Recording ...] will be displayed and the power will turn off after the card finishes recording the image.
Turning on the Power
26
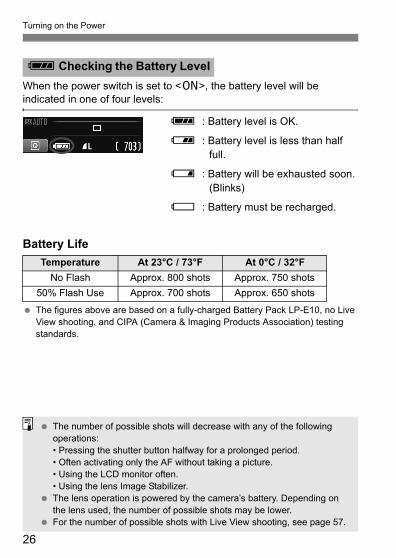
When the power switch is set to <1>, the battery level will be indicated in one of four levels:
z : Battery level is OK.
x : Battery level is less than half full.
c : Battery will be exhausted soon. (Blinks)
n : Battery must be recharged.
Battery Life
The figures above are based on a fully-charged Battery Pack LP-E10, no Live View shooting, and CIPA (Camera & Imaging Products Association) testing standards.
z Checking the Battery Level
Temperature At 23°C / 73°F At 0°C / 32°FNo Flash Approx. 800 shots Approx. 750 shots
50% Flash Use Approx. 700 shots Approx. 650 shots
The number of possible shots will decrease with any of the following operations:• Pressing the shutter button halfway for a prolonged period.• Often activating only the AF without taking a picture.• Using the LCD monitor often.• Using the lens Image Stabilizer.The lens operation is powered by the camera’s battery. Depending on the lens used, the number of possible shots may be lower.For the number of possible shots with Live View shooting, see page 57.
27
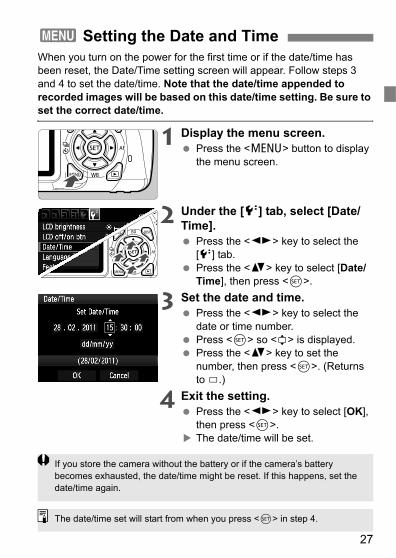
When you turn on the power for the first time or if the date/time has been reset, the Date/Time setting screen will appear. Follow steps 3 and 4 to set the date/time. Note that the date/time appended to recorded images will be based on this date/time setting. Be sure to set the correct date/time.
1 Display the menu screen.Press the <M> button to display the menu screen.
2 Under the [6] tab, select [Date/Time].
Press the <U> key to select the [6] tab.Press the <V> key to select [Date/Time], then press <0>.
3 Set the date and time.Press the <U> key to select the date or time number.Press <0> so <a> is displayed.Press the <V> key to set the number, then press <0>. (Returns to b.)
4 Exit the setting.Press the <U> key to select [OK], then press <0>.The date/time will be set.
3 Setting the Date and Time
If you store the camera without the battery or if the camera’s battery becomes exhausted, the date/time might be reset. If this happens, set the date/time again.
The date/time set will start from when you press <0> in step 4.

28
1 Display the menu screen.Press the <M> button to display the menu screen.
2 Under the [6] tab, select [LanguageK].
Press the <U> key to select the [6] tab.Press the <V> key to select [LanguageK] (the fourth item from the top), then press <0>.
3 Set the desired language.Press the <S> key to select the language, then press <0>.The interface language will change.
3 Selecting the Interface Language
29
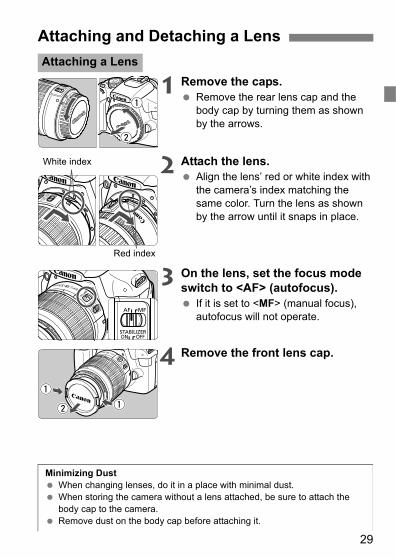
1 Remove the caps.Remove the rear lens cap and the body cap by turning them as shown by the arrows.
2 Attach the lens.Align the lens’ red or white index with the camera’s index matching the same color. Turn the lens as shown by the arrow until it snaps in place.
3 On the lens, set the focus mode switch to <AF> (autofocus).
If it is set to <MF> (manual focus), autofocus will not operate.
4 Remove the front lens cap.
Attaching and Detaching a LensAttaching a Lens
White index
Red index
Minimizing DustWhen changing lenses, do it in a place with minimal dust.When storing the camera without a lens attached, be sure to attach the body cap to the camera.Remove dust on the body cap before attaching it.
Attaching and Detaching a Lens
30
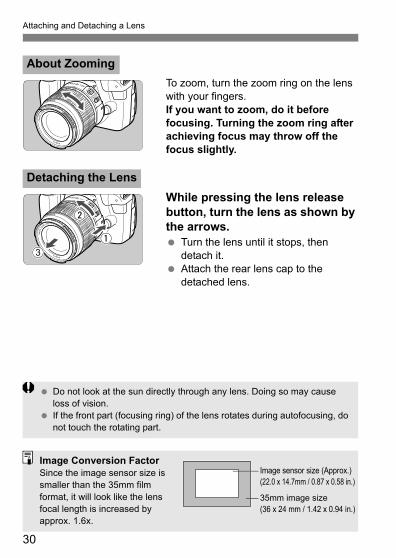
To zoom, turn the zoom ring on the lens with your fingers.If you want to zoom, do it before focusing. Turning the zoom ring after achieving focus may throw off the focus slightly.
While pressing the lens release button, turn the lens as shown by the arrows.
Turn the lens until it stops, then detach it.Attach the rear lens cap to the detached lens.
About Zooming
Detaching the Lens
Do not look at the sun directly through any lens. Doing so may cause loss of vision.If the front part (focusing ring) of the lens rotates during autofocusing, do not touch the rotating part.
Image Conversion FactorSince the image sensor size is smaller than the 35mm film format, it will look like the lens focal length is increased by approx. 1.6x.
Image sensor size (Approx.)(22.0 x 14.7mm / 0.87 x 0.58 in.)
35mm image size (36 x 24 mm / 1.42 x 0.94 in.)
31
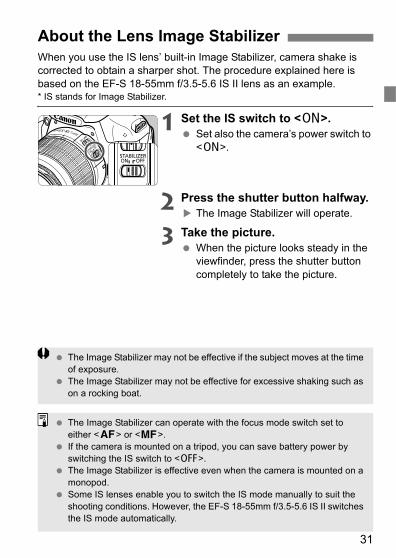
When you use the IS lens’ built-in Image Stabilizer, camera shake is corrected to obtain a sharper shot. The procedure explained here is based on the EF-S 18-55mm f/3.5-5.6 IS II lens as an example.* IS stands for Image Stabilizer.
1 Set the IS switch to <1>.Set also the camera’s power switch to <1>.
2 Press the shutter button halfway.The Image Stabilizer will operate.
3 Take the picture.When the picture looks steady in the viewfinder, press the shutter button completely to take the picture.
About the Lens Image Stabilizer
The Image Stabilizer may not be effective if the subject moves at the time of exposure.The Image Stabilizer may not be effective for excessive shaking such as on a rocking boat.
The Image Stabilizer can operate with the focus mode switch set to either <f> or <g>.If the camera is mounted on a tripod, you can save battery power by switching the IS switch to <2>.The Image Stabilizer is effective even when the camera is mounted on a monopod.Some IS lenses enable you to switch the IS mode manually to suit the shooting conditions. However, the EF-S 18-55mm f/3.5-5.6 IS II switches the IS mode automatically.
32
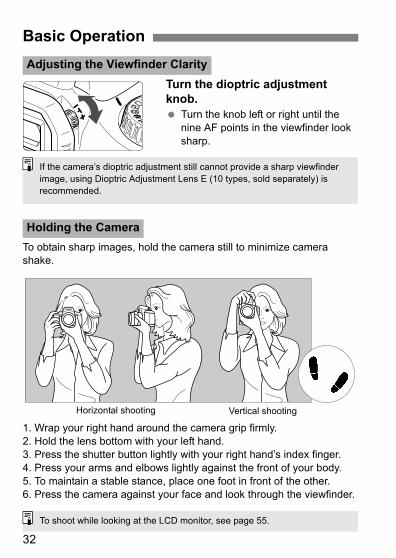
Turn the dioptric adjustment knob.
Turn the knob left or right until the nine AF points in the viewfinder look sharp.
To obtain sharp images, hold the camera still to minimize camera shake.
1. Wrap your right hand around the camera grip firmly.2. Hold the lens bottom with your left hand.3. Press the shutter button lightly with your right hand’s index finger.4. Press your arms and elbows lightly against the front of your body.5. To maintain a stable stance, place one foot in front of the other.6. Press the camera against your face and look through the viewfinder.
Basic OperationAdjusting the Viewfinder Clarity
Holding the Camera
If the camera’s dioptric adjustment still cannot provide a sharp viewfinder image, using Dioptric Adjustment Lens E (10 types, sold separately) is recommended.
Vertical shootingHorizontal shooting
To shoot while looking at the LCD monitor, see page 55.
33
Basic Operation
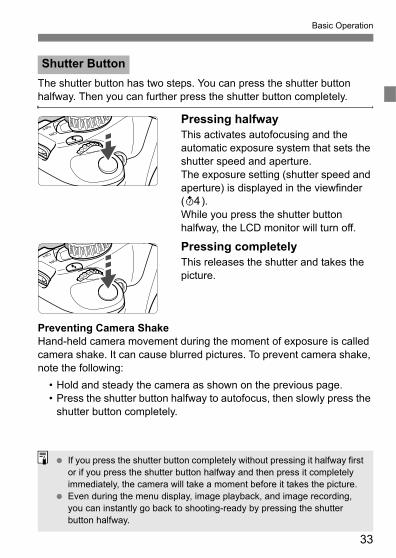
The shutter button has two steps. You can press the shutter button halfway. Then you can further press the shutter button completely.
Pressing halfwayThis activates autofocusing and the automatic exposure system that sets the shutter speed and aperture.The exposure setting (shutter speed and aperture) is displayed in the viewfinder (0).While you press the shutter button halfway, the LCD monitor will turn off.
Pressing completelyThis releases the shutter and takes the picture.
Preventing Camera ShakeHand-held camera movement during the moment of exposure is called camera shake. It can cause blurred pictures. To prevent camera shake, note the following:
• Hold and steady the camera as shown on the previous page.• Press the shutter button halfway to autofocus, then slowly press the
shutter button completely.
Shutter Button
If you press the shutter button completely without pressing it halfway first or if you press the shutter button halfway and then press it completely immediately, the camera will take a moment before it takes the picture.Even during the menu display, image playback, and image recording, you can instantly go back to shooting-ready by pressing the shutter button halfway.

34
With menus, you can set various functions such as the image-recording quality, date/time, etc. While looking at the LCD monitor, use the <M> button, <S> cross keys, and <0> button on the camera back to operate the menus.
In the Basic Zone, Movie shooting mode, and Creative Zone, the tabs and menu options displayed will be different.
3 Menu Operations
Menu Screen
<S> Cross keysLCD monitor
<0> button
<M> button
Tab
Menu itemsMenu settings
1 Shooting
5 Set-up
9 My Menu3 Playback
Basic Zone modes Movie shooting mode
Creative Zone modes
35
3 Menu Operations
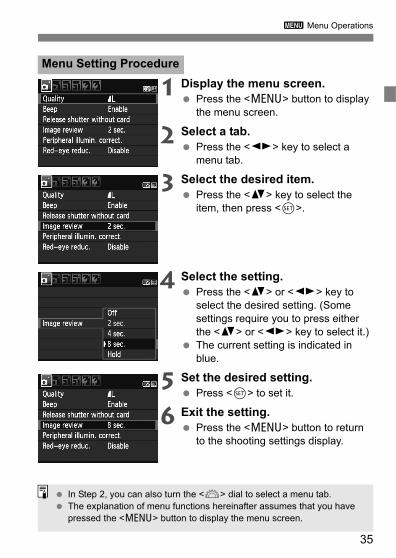
1 Display the menu screen.Press the <M> button to display the menu screen.
2 Select a tab.Press the <U> key to select a menu tab.
3 Select the desired item.Press the <V> key to select the item, then press <0>.
4 Select the setting.Press the <V> or <U> key to select the desired setting. (Some settings require you to press either the <V> or <U> key to select it.)The current setting is indicated in blue.
5 Set the desired setting.Press <0> to set it.
6 Exit the setting.Press the <M> button to return to the shooting settings display.
Menu Setting Procedure
In Step 2, you can also turn the <6> dial to select a menu tab.The explanation of menu functions hereinafter assumes that you have pressed the <M> button to display the menu screen.
36
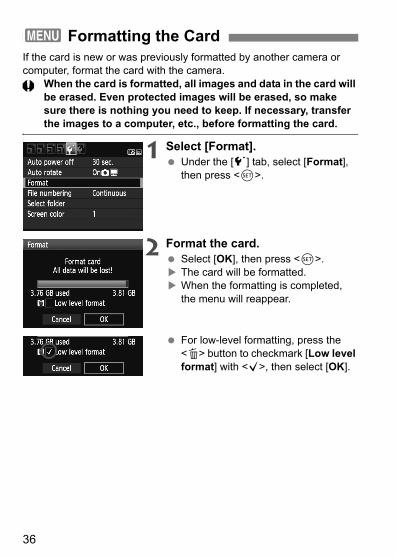
If the card is new or was previously formatted by another camera or computer, format the card with the camera.
When the card is formatted, all images and data in the card will be erased. Even protected images will be erased, so make sure there is nothing you need to keep. If necessary, transfer the images to a computer, etc., before formatting the card.
1 Select [Format].Under the [5] tab, select [Format], then press <0>.
2 Format the card.Select [OK], then press <0>.The card will be formatted.When the formatting is completed, the menu will reappear.
For low-level formatting, press the <L> button to checkmark [Low level format] with <X>, then select [OK].
3 Formatting the Card
37
3 Formatting the Card
The card is new.The card was formatted by a different camera or a computer.The card is full with images or data.A card-related error is displayed (→ ).
Execute [Format] in the following cases:
About Low-level FormattingDo low-level formatting if the card’s recording or reading speed seems slow or if you want to totally erase all data in the card.Since low-level formatting will erase all recordable sectors in the card, the formatting will take slightly longer than normal formatting.You can stop the low-level formatting by selecting [Cancel]. Even in this case, normal formatting will have been completed and you can use the card as usual.
When the card is formatted or data is erased, only the file management information is changed. The actual data is not completely erased. Be aware of this when selling or discarding the card. When discarding the card, execute low-level formatting or destroy the card physically to prevent the data from being leaked.Before using a new Eye-Fi card, the software in the card must be installed in your computer. Then format the card with the camera.
The card capacity displayed on the card format screen might be smaller than the capacity indicated on the card.This device incorporates exFAT technology licensed from Microsoft.
38
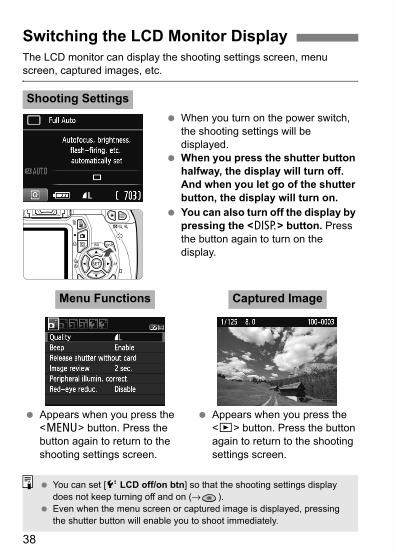
The LCD monitor can display the shooting settings screen, menu screen, captured images, etc.
When you turn on the power switch, the shooting settings will be displayed.When you press the shutter button halfway, the display will turn off. And when you let go of the shutter button, the display will turn on.You can also turn off the display by pressing the <B> button. Press the button again to turn on the display.
Switching the LCD Monitor Display
Shooting Settings
Appears when you press the <M> button. Press the button again to return to the shooting settings screen.
Appears when you press the <x> button. Press the button again to return to the shooting settings screen.
Menu Functions Captured Image
You can set [6 LCD off/on btn] so that the shooting settings display does not keep turning off and on (→ ).Even when the menu screen or captured image is displayed, pressing the shutter button will enable you to shoot immediately.
39
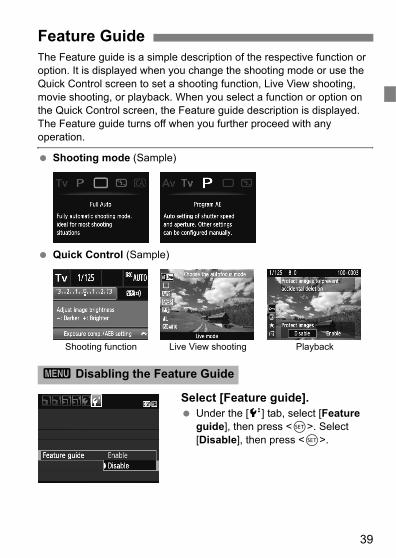
The Feature guide is a simple description of the respective function or option. It is displayed when you change the shooting mode or use the Quick Control screen to set a shooting function, Live View shooting, movie shooting, or playback. When you select a function or option on the Quick Control screen, the Feature guide description is displayed. The Feature guide turns off when you further proceed with any operation.
Shooting mode (Sample)
Quick Control (Sample)
Select [Feature guide].Under the [6] tab, select [Feature guide], then press <0>. Select [Disable], then press <0>.
Feature Guide
3 Disabling the Feature Guide
Shooting function Live View shooting Playback

40
41
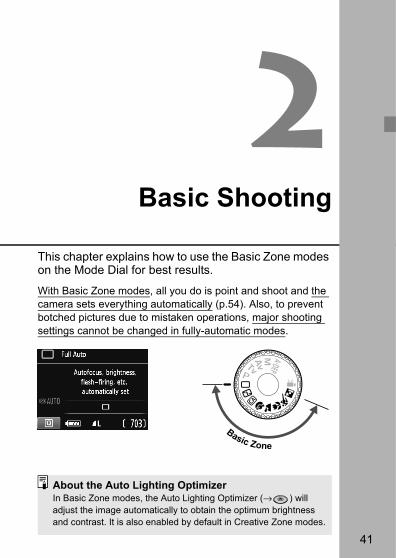
2Basic Shooting
This chapter explains how to use the Basic Zone modes on the Mode Dial for best results.
With Basic Zone modes, all you do is point and shoot and the camera sets everything automatically (p.54). Also, to prevent botched pictures due to mistaken operations, major shooting settings cannot be changed in fully-automatic modes.
Basic Zone
About the Auto Lighting OptimizerIn Basic Zone modes, the Auto Lighting Optimizer (→ ) will adjust the image automatically to obtain the optimum brightness and contrast. It is also enabled by default in Creative Zone modes.
42
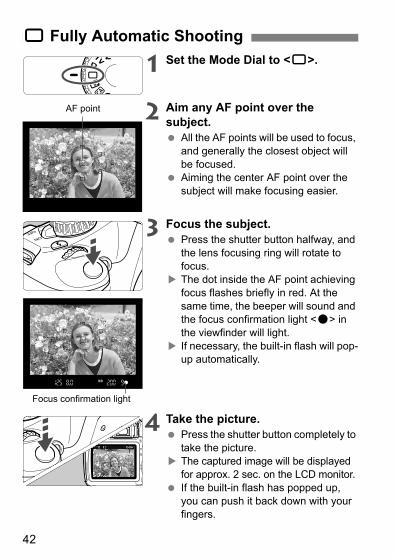
1 Set the Mode Dial to <1>.
2 Aim any AF point over the subject.
All the AF points will be used to focus, and generally the closest object will be focused.Aiming the center AF point over the subject will make focusing easier.
3 Focus the subject.Press the shutter button halfway, and the lens focusing ring will rotate to focus.The dot inside the AF point achieving focus flashes briefly in red. At the same time, the beeper will sound and the focus confirmation light <o> in the viewfinder will light.If necessary, the built-in flash will pop-up automatically.
4 Take the picture.Press the shutter button completely to take the picture.The captured image will be displayed for approx. 2 sec. on the LCD monitor.If the built-in flash has popped up, you can push it back down with your fingers.
1 Fully Automatic Shooting
AF point
Focus confirmation light
43
1 Fully Automatic Shooting
The focus confirmation light <o> blinks and focus is not achieved.Aim the AF point over an area having good contrast, then press the shutter button halfway (p.33). If you are too close to the subject, move away and try again.Sometimes multiple AF points flash simultaneously.This indicates that focus has been achieved at all those AF points. When the AF point covering the desired subject flashes, take the picture.The beeper continues to beep softly. (The focus confirmation light <o> does not light.)It indicates that the camera is focusing continuously on a moving subject. (The focus confirmation light <o> does not light.) You can take sharp pictures of a moving subject.Pressing the shutter button halfway does not focus the subject.If the focus mode switch on the lens is set to <MF> (Manual Focus), set it to <AF> (Auto Focus).Although it is daylight, the flash popped up.For a backlit subject, the flash may pop up to help lighten the subject’s dark areas.In low light, the built-in flash fired a series of flashes.Pressing the shutter button halfway may trigger the built-in flash to fire a series of flashes to assist autofocusing. This is called AF-assist beam. Its effective range is about 4 meters/13.1 feet.Although flash was used, the picture came out dark.The subject was too far away. The subject should be within 5 meters/16.4 feet from the camera.When flash was used, the bottom part of the picture came out unnaturally dark.The subject was too close to the camera, and a shadow was created by the lens barrel. The subject should be at least 1 meter/3.3 feet away from the camera. If a hood has been attached to the lens, remove it before taking the flash picture.
FAQ
44
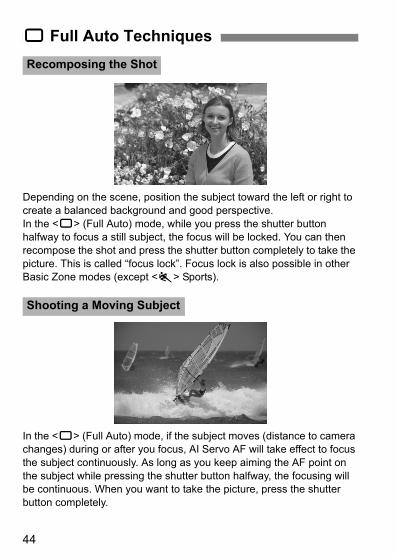
Depending on the scene, position the subject toward the left or right to create a balanced background and good perspective.In the <1> (Full Auto) mode, while you press the shutter button halfway to focus a still subject, the focus will be locked. You can then recompose the shot and press the shutter button completely to take the picture. This is called “focus lock”. Focus lock is also possible in other Basic Zone modes (except <5> Sports).
In the <1> (Full Auto) mode, if the subject moves (distance to camera changes) during or after you focus, AI Servo AF will take effect to focus the subject continuously. As long as you keep aiming the AF point on the subject while pressing the shutter button halfway, the focusing will be continuous. When you want to take the picture, press the shutter button completely.
1 Full Auto TechniquesRecomposing the Shot
Shooting a Moving Subject
45
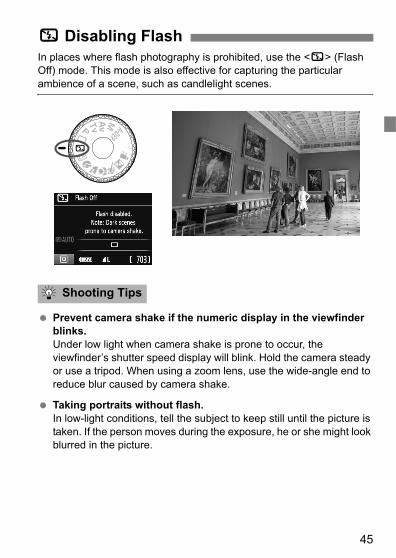
In places where flash photography is prohibited, use the <7> (Flash Off) mode. This mode is also effective for capturing the particular ambience of a scene, such as candlelight scenes.
Prevent camera shake if the numeric display in the viewfinder blinks.Under low light when camera shake is prone to occur, the viewfinder’s shutter speed display will blink. Hold the camera steady or use a tripod. When using a zoom lens, use the wide-angle end to reduce blur caused by camera shake.
Taking portraits without flash.In low-light conditions, tell the subject to keep still until the picture is taken. If the person moves during the exposure, he or she might look blurred in the picture.
7 Disabling Flash
Shooting Tips
46
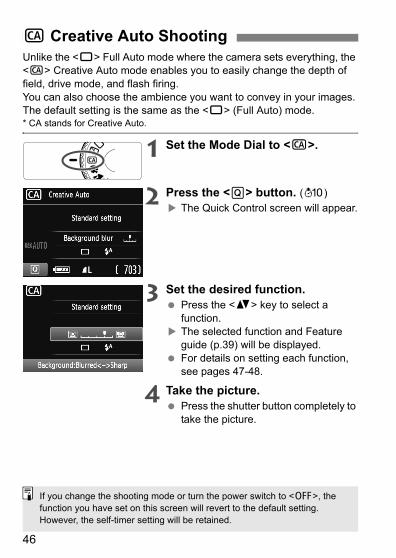
Unlike the <1> Full Auto mode where the camera sets everything, the <C> Creative Auto mode enables you to easily change the depth of field, drive mode, and flash firing.You can also choose the ambience you want to convey in your images. The default setting is the same as the <1> (Full Auto) mode.* CA stands for Creative Auto.
1 Set the Mode Dial to <C>.
2 Press the <Q> button. (7)The Quick Control screen will appear.
3 Set the desired function.Press the <V> key to select a function.The selected function and Feature guide (p.39) will be displayed.For details on setting each function, see pages 47-48.
4 Take the picture.Press the shutter button completely to take the picture.
C Creative Auto Shooting
If you change the shooting mode or turn the power switch to <2>, the function you have set on this screen will revert to the default setting. However, the self-timer setting will be retained.
47
C Creative Auto Shooting
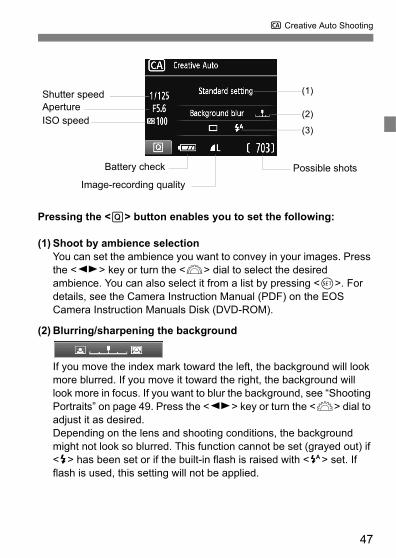
Pressing the <Q> button enables you to set the following:
(1) Shoot by ambience selectionYou can set the ambience you want to convey in your images. Press the <U> key or turn the <6> dial to select the desired ambience. You can also select it from a list by pressing <0>. For details, see the Camera Instruction Manual (PDF) on the EOS Camera Instruction Manuals Disk (DVD-ROM).
(2) Blurring/sharpening the background
If you move the index mark toward the left, the background will look more blurred. If you move it toward the right, the background will look more in focus. If you want to blur the background, see “Shooting Portraits” on page 49. Press the <U> key or turn the <6> dial to adjust it as desired.Depending on the lens and shooting conditions, the background might not look so blurred. This function cannot be set (grayed out) if <r> has been set or if the built-in flash is raised with <a> set. If flash is used, this setting will not be applied.
Shutter speed (1)
(2)
(3)
Battery check Possible shots
ISO speed
Image-recording quality
Aperture
C Creative Auto Shooting
48
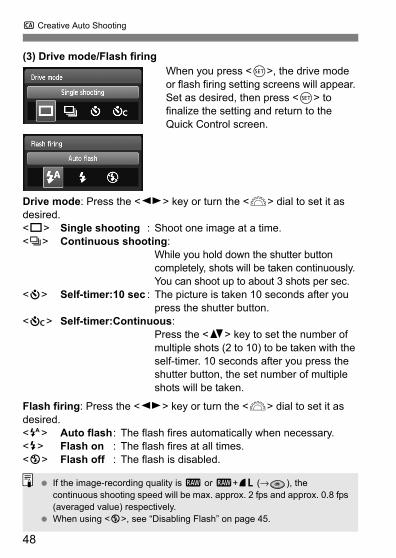
(3) Drive mode/Flash firingWhen you press <0>, the drive mode or flash firing setting screens will appear. Set as desired, then press <0> to finalize the setting and return to the Quick Control screen.
Drive mode: Press the <U> key or turn the <6> dial to set it as desired.<u> Single shooting : Shoot one image at a time.<i> Continuous shooting:
While you hold down the shutter button completely, shots will be taken continuously. You can shoot up to about 3 shots per sec.
<j> Self-timer:10 sec : The picture is taken 10 seconds after you press the shutter button.
<q> Self-timer:Continuous:Press the <V> key to set the number of multiple shots (2 to 10) to be taken with the self-timer. 10 seconds after you press the shutter button, the set number of multiple shots will be taken.
Flash firing: Press the <U> key or turn the <6> dial to set it as desired.<a> Auto flash: The flash fires automatically when necessary.<I> Flash on : The flash fires at all times.<b> Flash off : The flash is disabled.
If the image-recording quality is 1 or 1+73 (→ ), the continuous shooting speed will be max. approx. 2 fps and approx. 0.8 fps (averaged value) respectively.When using <b>, see “Disabling Flash” on page 45.
49
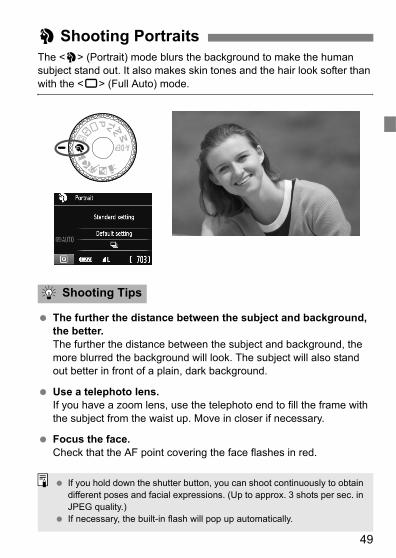
The <2> (Portrait) mode blurs the background to make the human subject stand out. It also makes skin tones and the hair look softer than with the <1> (Full Auto) mode.
The further the distance between the subject and background, the better.The further the distance between the subject and background, the more blurred the background will look. The subject will also stand out better in front of a plain, dark background.
Use a telephoto lens.If you have a zoom lens, use the telephoto end to fill the frame with the subject from the waist up. Move in closer if necessary.
Focus the face.Check that the AF point covering the face flashes in red.
2 Shooting Portraits
Shooting Tips
If you hold down the shutter button, you can shoot continuously to obtain different poses and facial expressions. (Up to approx. 3 shots per sec. in JPEG quality.)If necessary, the built-in flash will pop up automatically.
50
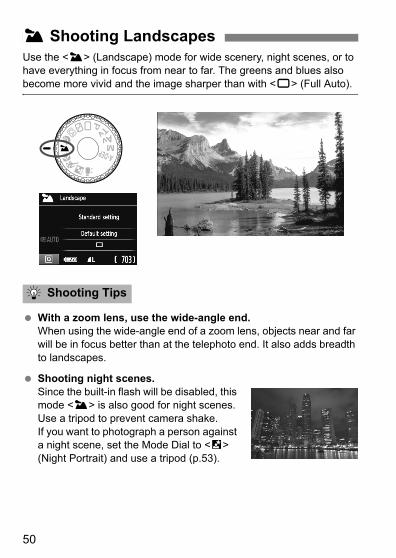
Use the <3> (Landscape) mode for wide scenery, night scenes, or to have everything in focus from near to far. The greens and blues also become more vivid and the image sharper than with <1> (Full Auto).
With a zoom lens, use the wide-angle end.When using the wide-angle end of a zoom lens, objects near and far will be in focus better than at the telephoto end. It also adds breadth to landscapes.
Shooting night scenes.Since the built-in flash will be disabled, this mode <3> is also good for night scenes. Use a tripod to prevent camera shake.If you want to photograph a person against a night scene, set the Mode Dial to <6> (Night Portrait) and use a tripod (p.53).
3 Shooting Landscapes
Shooting Tips
51
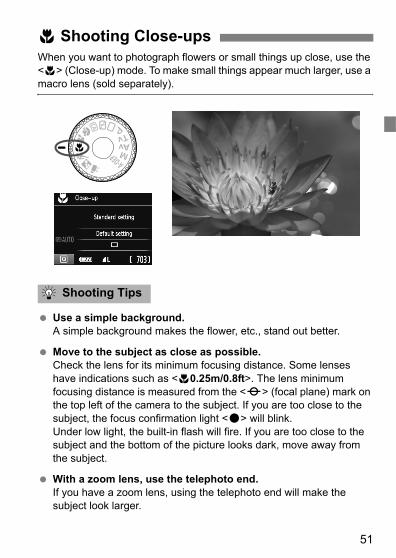
When you want to photograph flowers or small things up close, use the <4> (Close-up) mode. To make small things appear much larger, use a macro lens (sold separately).
Use a simple background.A simple background makes the flower, etc., stand out better.
Move to the subject as close as possible.Check the lens for its minimum focusing distance. Some lenses have indications such as <40.25m/0.8ft>. The lens minimum focusing distance is measured from the <V> (focal plane) mark on the top left of the camera to the subject. If you are too close to the subject, the focus confirmation light <o> will blink.Under low light, the built-in flash will fire. If you are too close to the subject and the bottom of the picture looks dark, move away from the subject.
With a zoom lens, use the telephoto end.If you have a zoom lens, using the telephoto end will make the subject look larger.
4 Shooting Close-ups
Shooting Tips

52
To photograph a moving subject, whether it is a child running or a moving vehicle, use the <5> (Sports) mode.
Use a telephoto lens.Using a telephoto lens is recommended so you can shoot from afar.
Use the center AF point to focus.Aim the center AF point over the subject, then press the shutter button halfway to autofocus. During autofocusing, the beeper will continue beeping softly. If focus cannot be achieved, the focus confirmation light <o> will blink.When you want to take the picture, press the shutter button completely. If you hold down the shutter button, continuous shooting (max. approx. 3 shots per sec. in JPEG quality) and autofocusing will take effect.
5 Shooting Moving Subjects
Shooting Tips
Under low light when camera shake is prone to occur, the viewfinder’s shutter speed display on the bottom left will blink. Hold the camera steady and shoot.
53
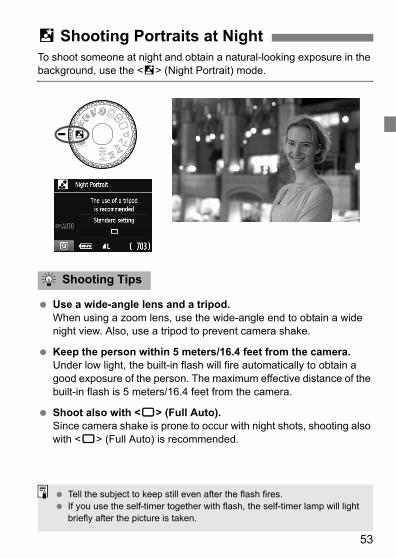
To shoot someone at night and obtain a natural-looking exposure in the background, use the <6> (Night Portrait) mode.
Use a wide-angle lens and a tripod.When using a zoom lens, use the wide-angle end to obtain a wide night view. Also, use a tripod to prevent camera shake.
Keep the person within 5 meters/16.4 feet from the camera.Under low light, the built-in flash will fire automatically to obtain a good exposure of the person. The maximum effective distance of the built-in flash is 5 meters/16.4 feet from the camera.
Shoot also with <1> (Full Auto).Since camera shake is prone to occur with night shots, shooting also with <1> (Full Auto) is recommended.
6 Shooting Portraits at Night
Shooting Tips
Tell the subject to keep still even after the flash fires.If you use the self-timer together with flash, the self-timer lamp will light briefly after the picture is taken.

54
In Basic Zone modes when the shooting settings screen is displayed, you can press the <Q> button to display the Quick Control screen. The table below indicates the functions that can be set with the Quick Control screen in each Basic Zone mode.
1 Set the Mode Dial to a Basic Zone mode.
2 Press the <Q> button. (7)The Quick Control screen will appear.
3 Set the function.Press the <V> key to select a function. (Step not necessary in the 1/7 mode.)The selected function and Feature guide (p.39) will be displayed.Press the <U> key or turn the <6> dial to change the setting.
Settable Functions in Basic Zone Modeso: Set automatically k: User selectable : Not selectable
* Use the <V> key to set the number of continuous shots.
Q Quick Control
Function 1(p.42)
7(p.45)
C(p.46)
2(p.49)
3(p.50)
4(p.51)
5(p.52)
6(p.53)
Drive mode
u: Single shooting k k k k k k
i: Continuous shooting k k k
Self-timer
j: 10 sec. k k k k k k k k
q: Continuous* k k k k k k k k
Flash firing
Automatic firing o k o o o
Flash on (Fires at all times) k
Flash off o k o o
Shoot by ambience selection (→ ) k k k k k k
Shoot by lighting or scene type (→ ) k k k k
Blurring/sharpening the background (p.47) k
Example: Portrait mode
55
3Shooting with the LCD Monitor
(Live View Shooting)You can shoot while viewing the image on the camera’s LCD monitor. This is called “Live View shooting”.
Live View shooting is effective for still subjects which do not move.If you handhold the camera and shoot while viewing the LCD monitor, camera shake can cause blurred images. Using a tripod is recommended.
For other functions, more details, and cautions related to Live View shooting, see the Camera Instruction Manual (PDF) on the EOS Camera Instruction Manuals Disk (DVD-ROM).
About Remote Live View ShootingWith EOS Utility (provided software, p.74) installed in your computer, you can connect the camera to the computer and shoot remotely while viewing the computer screen. For details, see the PDF Software Instruction Manual (p.77) on the EOS Camera Instruction Manuals Disk (DVD-ROM).
56
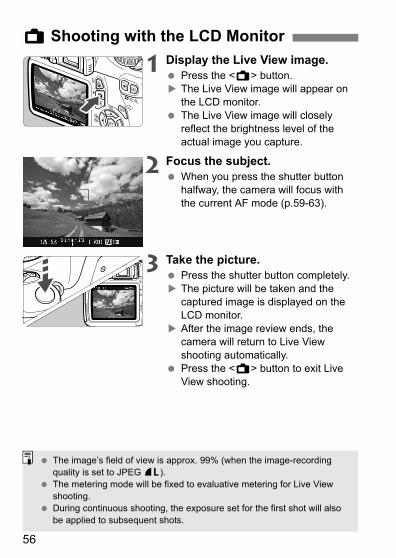
1 Display the Live View image.Press the <A> button.The Live View image will appear on the LCD monitor.The Live View image will closely reflect the brightness level of the actual image you capture.
2 Focus the subject.When you press the shutter button halfway, the camera will focus with the current AF mode (p.59-63).
3 Take the picture.Press the shutter button completely.The picture will be taken and the captured image is displayed on the LCD monitor.After the image review ends, the camera will return to Live View shooting automatically.Press the <A> button to exit Live View shooting.
A Shooting with the LCD Monitor
The image’s field of view is approx. 99% (when the image-recording quality is set to JPEG 73).The metering mode will be fixed to evaluative metering for Live View shooting.During continuous shooting, the exposure set for the first shot will also be applied to subsequent shots.
57
A Shooting with the LCD Monitor
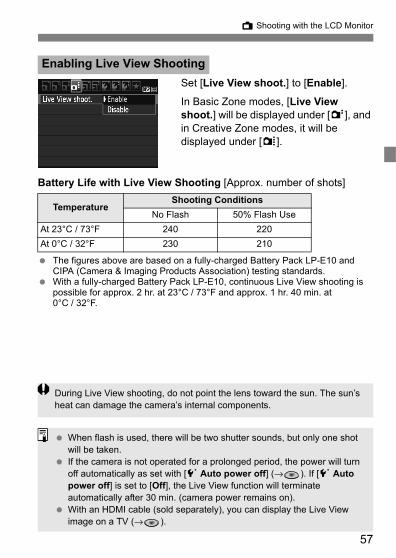
Set [Live View shoot.] to [Enable].
In Basic Zone modes, [Live View shoot.] will be displayed under [2], and in Creative Zone modes, it will be displayed under [z].
Battery Life with Live View Shooting [Approx. number of shots]
The figures above are based on a fully-charged Battery Pack LP-E10 and CIPA (Camera & Imaging Products Association) testing standards.With a fully-charged Battery Pack LP-E10, continuous Live View shooting is possible for approx. 2 hr. at 23°C / 73°F and approx. 1 hr. 40 min. at 0°C / 32°F.
Enabling Live View Shooting
TemperatureShooting Conditions
No Flash 50% Flash UseAt 23°C / 73°F 240 220At 0°C / 32°F 230 210
During Live View shooting, do not point the lens toward the sun. The sun’s heat can damage the camera’s internal components.
When flash is used, there will be two shutter sounds, but only one shot will be taken.If the camera is not operated for a prolonged period, the power will turn off automatically as set with [5 Auto power off] (→ ). If [5 Auto power off] is set to [Off], the Live View function will terminate automatically after 30 min. (camera power remains on).With an HDMI cable (sold separately), you can display the Live View image on a TV (→ ).
A Shooting with the LCD Monitor
58
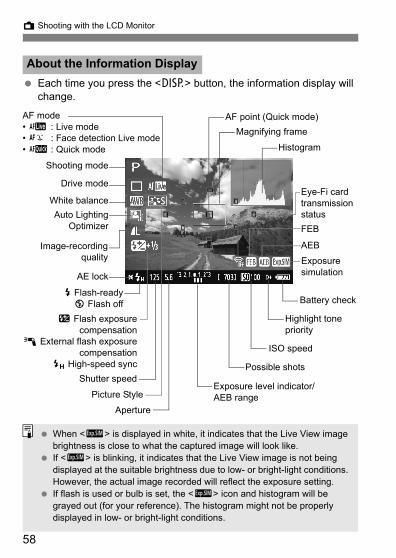
Each time you press the <B> button, the information display will change.
About the Information Display
Magnifying frame
ISO speed
Exposure level indicator/AEB range
Aperture
Shutter speed
Picture Style
Battery check
Exposure simulation
Image-recordingquality
White balance
y Flash exposurecompensation
0 External flash exposurecompensation
e High-speed sync
AF point (Quick mode)
FEB
AEB
Highlight tone priority
Histogram
Drive mode
AE lock
r Flash-readyb Flash off
Auto LightingOptimizer
AF mode• d : Live mode• c : Face detection Live mode• f : Quick mode
Possible shots
Eye-Fi card transmission status
Shooting mode
When <g> is displayed in white, it indicates that the Live View image brightness is close to what the captured image will look like.If <g> is blinking, it indicates that the Live View image is not being displayed at the suitable brightness due to low- or bright-light conditions. However, the actual image recorded will reflect the exposure setting.If flash is used or bulb is set, the <g> icon and histogram will be grayed out (for your reference). The histogram might not be properly displayed in low- or bright-light conditions.
59
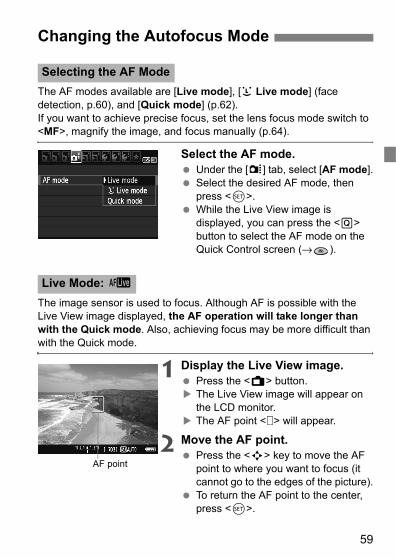
The AF modes available are [Live mode], [u Live mode] (face detection, p.60), and [Quick mode] (p.62).If you want to achieve precise focus, set the lens focus mode switch to <MF>, magnify the image, and focus manually (p.64).
Select the AF mode.Under the [z] tab, select [AF mode].Select the desired AF mode, then press <0>.While the Live View image is displayed, you can press the <Q> button to select the AF mode on the Quick Control screen (→ ).
The image sensor is used to focus. Although AF is possible with the Live View image displayed, the AF operation will take longer than with the Quick mode. Also, achieving focus may be more difficult than with the Quick mode.
1 Display the Live View image.Press the <A> button.The Live View image will appear on the LCD monitor.The AF point < > will appear.
2 Move the AF point.Press the <S> key to move the AF point to where you want to focus (it cannot go to the edges of the picture).To return the AF point to the center, press <0>.
Changing the Autofocus Mode
Selecting the AF Mode
Live Mode: d
AF point
Changing the Autofocus Mode
60
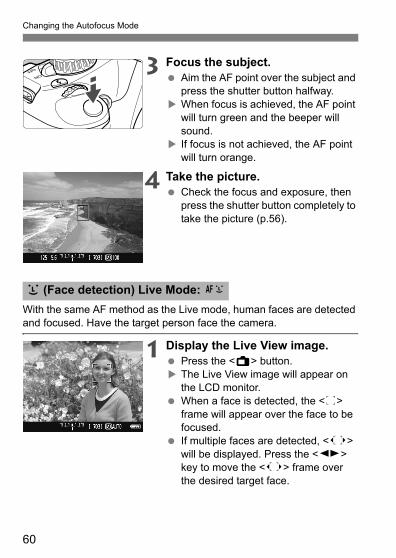
3 Focus the subject.Aim the AF point over the subject and press the shutter button halfway.When focus is achieved, the AF point will turn green and the beeper will sound.If focus is not achieved, the AF point will turn orange.
4 Take the picture.Check the focus and exposure, then press the shutter button completely to take the picture (p.56).
With the same AF method as the Live mode, human faces are detected and focused. Have the target person face the camera.
1 Display the Live View image.Press the <A> button.The Live View image will appear on the LCD monitor.When a face is detected, the <p> frame will appear over the face to be focused.If multiple faces are detected, <q> will be displayed. Press the <U> key to move the <q> frame over the desired target face.
u (Face detection) Live Mode: c
61
Changing the Autofocus Mode
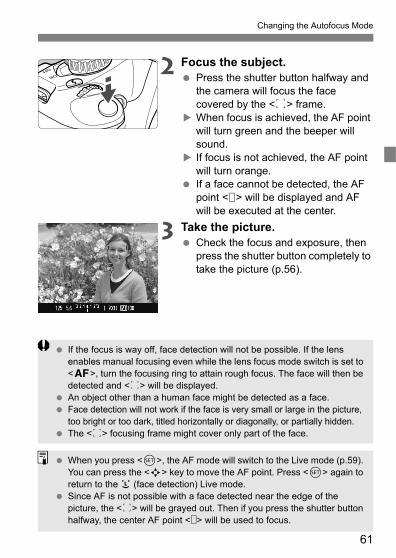
2 Focus the subject.Press the shutter button halfway and the camera will focus the face covered by the <p> frame.When focus is achieved, the AF point will turn green and the beeper will sound.If focus is not achieved, the AF point will turn orange.If a face cannot be detected, the AF point < > will be displayed and AF will be executed at the center.
3 Take the picture.Check the focus and exposure, then press the shutter button completely to take the picture (p.56).
If the focus is way off, face detection will not be possible. If the lens enables manual focusing even while the lens focus mode switch is set to <f>, turn the focusing ring to attain rough focus. The face will then be detected and <p> will be displayed.An object other than a human face might be detected as a face.Face detection will not work if the face is very small or large in the picture, too bright or too dark, titled horizontally or diagonally, or partially hidden.The <p> focusing frame might cover only part of the face.
When you press <0>, the AF mode will switch to the Live mode (p.59). You can press the <S> key to move the AF point. Press <0> again to return to the u (face detection) Live mode.Since AF is not possible with a face detected near the edge of the picture, the <p> will be grayed out. Then if you press the shutter button halfway, the center AF point < > will be used to focus.
Changing the Autofocus Mode
62
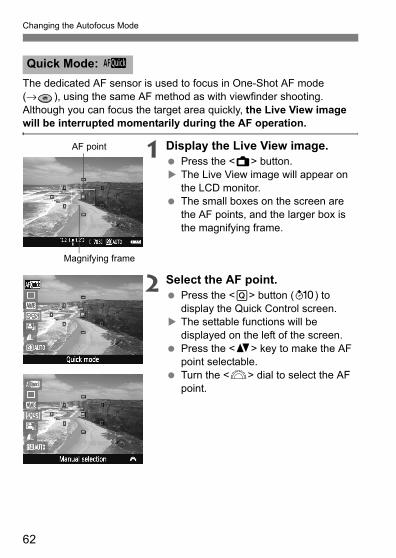
The dedicated AF sensor is used to focus in One-Shot AF mode (→ ), using the same AF method as with viewfinder shooting.Although you can focus the target area quickly, the Live View image will be interrupted momentarily during the AF operation.
1 Display the Live View image.Press the <A> button.The Live View image will appear on the LCD monitor.The small boxes on the screen are the AF points, and the larger box is the magnifying frame.
2 Select the AF point.Press the <Q> button (7) to display the Quick Control screen.The settable functions will be displayed on the left of the screen.Press the <V> key to make the AF point selectable.Turn the <6> dial to select the AF point.
Quick Mode: f
AF point
Magnifying frame

63
Changing the Autofocus Mode
3 Focus the subject.Aim the AF points over the subject and press the shutter button halfway.The Live View image will turn off, the reflex mirror will go back down, and AF will be executed.When focus is achieved, the AF point which achieved focus will turn green and the Live View image will reappear.If focus is not achieved, the AF point will turn orange and blink.
4 Take the picture.Check the focus and exposure, then press the shutter button completely to take the picture (p.56).
You cannot take a picture during autofocusing. Take the picture while the Live View image is displayed.
64
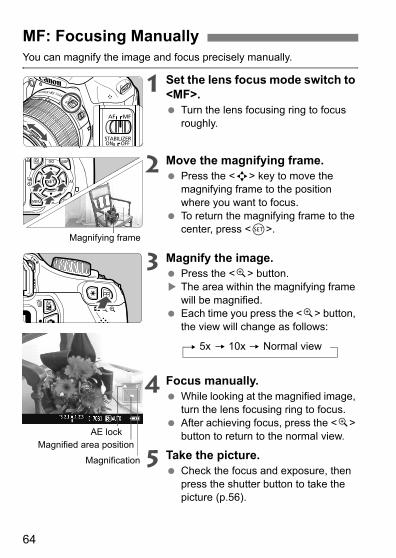
You can magnify the image and focus precisely manually.
1 Set the lens focus mode switch to <MF>.
Turn the lens focusing ring to focus roughly.
2 Move the magnifying frame.Press the <S> key to move the magnifying frame to the position where you want to focus.To return the magnifying frame to the center, press <0>.
3 Magnify the image.Press the <u> button.The area within the magnifying frame will be magnified.Each time you press the <u> button, the view will change as follows:
4 Focus manually.While looking at the magnified image, turn the lens focusing ring to focus.After achieving focus, press the <u> button to return to the normal view.
5 Take the picture.Check the focus and exposure, then press the shutter button to take the picture (p.56).
MF: Focusing Manually
Magnifying frame
AE lockMagnified area position
Magnification
5x 10x Normal view
65
4Shooting Movies
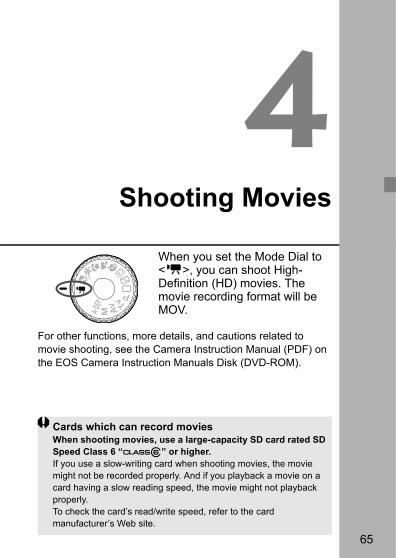
When you set the Mode Dial to <k>, you can shoot High-Definition (HD) movies. The movie recording format will be MOV.
For other functions, more details, and cautions related to movie shooting, see the Camera Instruction Manual (PDF) on the EOS Camera Instruction Manuals Disk (DVD-ROM).
Cards which can record moviesWhen shooting movies, use a large-capacity SD card rated SD Speed Class 6 “ ” or higher.If you use a slow-writing card when shooting movies, the movie might not be recorded properly. And if you playback a movie on a card having a slow reading speed, the movie might not playback properly.To check the card’s read/write speed, refer to the card manufacturer’s Web site.
66
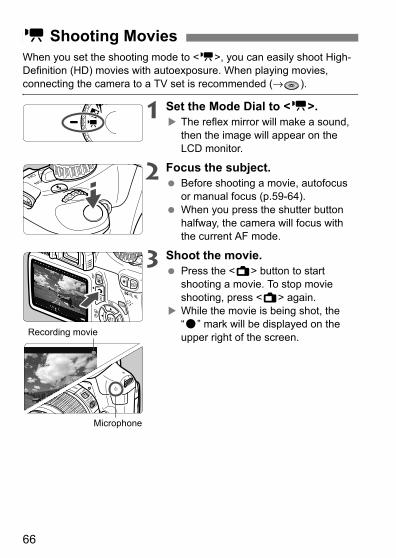
When you set the shooting mode to <k>, you can easily shoot High-Definition (HD) movies with autoexposure. When playing movies, connecting the camera to a TV set is recommended (→ ).
1 Set the Mode Dial to <k>.The reflex mirror will make a sound, then the image will appear on the LCD monitor.
2 Focus the subject.Before shooting a movie, autofocus or manual focus (p.59-64).When you press the shutter button halfway, the camera will focus with the current AF mode.
3 Shoot the movie.Press the <A> button to start shooting a movie. To stop movie shooting, press <A> again.While the movie is being shot, the “o” mark will be displayed on the upper right of the screen.
k Shooting Movies
Recording movie
Microphone
67
k Shooting Movies
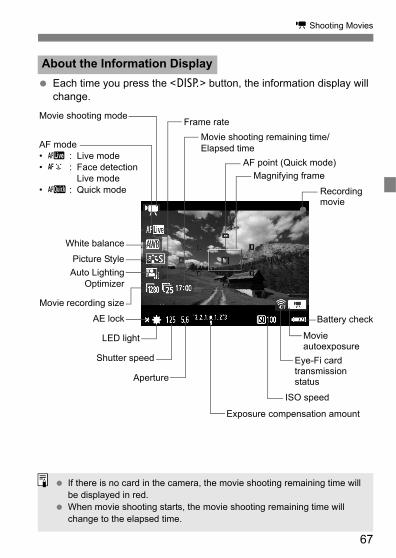
Each time you press the <B> button, the information display will change.
About the Information Display
Movie shooting remaining time/Elapsed time
Recording movie
Magnifying frameAF point (Quick mode)
Movie autoexposure
ISO speed
Exposure compensation amount
Aperture
AE lock
White balance
Movie recording size
Auto LightingOptimizer
LED light
Picture Style
AF mode• d : Live mode• c : Face detection
Live mode• f : Quick mode
Battery check
Frame rateMovie shooting mode
Eye-Fi card transmission status
Shutter speed
If there is no card in the camera, the movie shooting remaining time will be displayed in red.When movie shooting starts, the movie shooting remaining time will change to the elapsed time.
k Shooting Movies
68
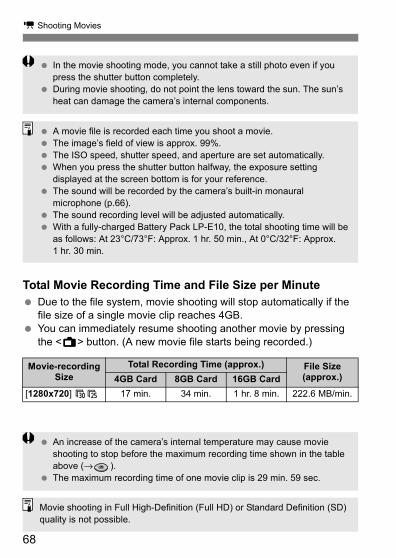
Total Movie Recording Time and File Size per MinuteDue to the file system, movie shooting will stop automatically if the file size of a single movie clip reaches 4GB.You can immediately resume shooting another movie by pressing the <A> button. (A new movie file starts being recorded.)
Movie-recording Size
Total Recording Time (approx.) File Size (approx.)4GB Card 8GB Card 16GB Card
[1280x720] 65 17 min. 34 min. 1 hr. 8 min. 222.6 MB/min.
In the movie shooting mode, you cannot take a still photo even if you press the shutter button completely.During movie shooting, do not point the lens toward the sun. The sun’s heat can damage the camera’s internal components.
A movie file is recorded each time you shoot a movie.The image’s field of view is approx. 99%.The ISO speed, shutter speed, and aperture are set automatically.When you press the shutter button halfway, the exposure setting displayed at the screen bottom is for your reference.The sound will be recorded by the camera’s built-in monaural microphone (p.66).The sound recording level will be adjusted automatically.With a fully-charged Battery Pack LP-E10, the total shooting time will be as follows: At 23°C/73°F: Approx. 1 hr. 50 min., At 0°C/32°F: Approx. 1 hr. 30 min.
An increase of the camera’s internal temperature may cause movie shooting to stop before the maximum recording time shown in the table above (→ ).The maximum recording time of one movie clip is 29 min. 59 sec.
Movie shooting in Full High-Definition (Full HD) or Standard Definition (SD) quality is not possible.
69
5Image Playback
This chapter explains the basic ways to playback images and movies.For other functions, more details, and cautions related to playback operations, see the Camera Instruction Manual (PDF) on the EOS Camera Instruction Manuals Disk (DVD-ROM).
About images taken with another camera:The camera might not be able to properly display images captured with a different camera or edited with a computer or whose file name was changed.
70
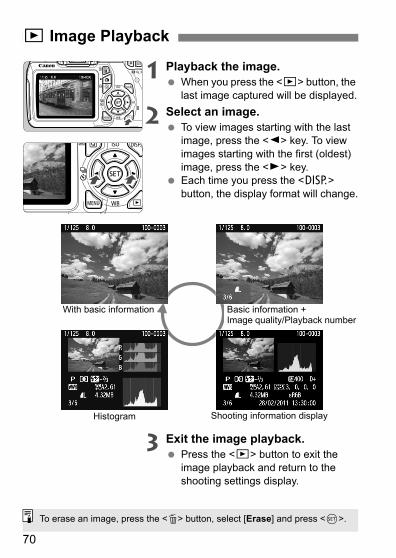
1 Playback the image.When you press the <x> button, the last image captured will be displayed.
2 Select an image.To view images starting with the last image, press the <Y> key. To view images starting with the first (oldest) image, press the <Z> key.Each time you press the <B> button, the display format will change.
3 Exit the image playback.Press the <x> button to exit the image playback and return to the shooting settings display.
x Image Playback
With basic information
Histogram
Basic information + Image quality/Playback number
Shooting information display
To erase an image, press the <L> button, select [Erase] and press <0>.
71
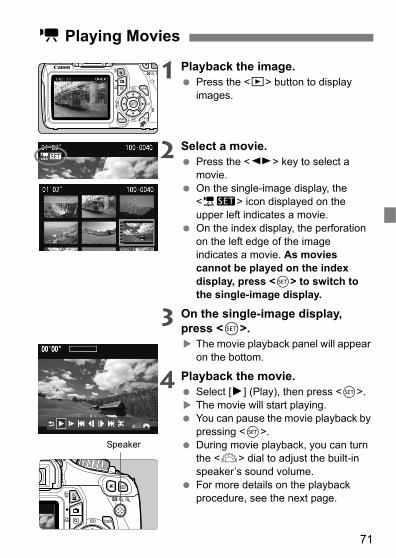
1 Playback the image.Press the <x> button to display images.
2 Select a movie.Press the <U> key to select a movie.On the single-image display, the <1s> icon displayed on the upper left indicates a movie.On the index display, the perforation on the left edge of the image indicates a movie. As movies cannot be played on the index display, press <0> to switch to the single-image display.
3 On the single-image display, press <0>.
The movie playback panel will appear on the bottom.
4 Playback the movie.Select [7] (Play), then press <0>.The movie will start playing.You can pause the movie playback by pressing <0>.During movie playback, you can turn the <6> dial to adjust the built-in speaker’s sound volume.For more details on the playback procedure, see the next page.
k Playing Movies
Speaker
k Playing Movies
72
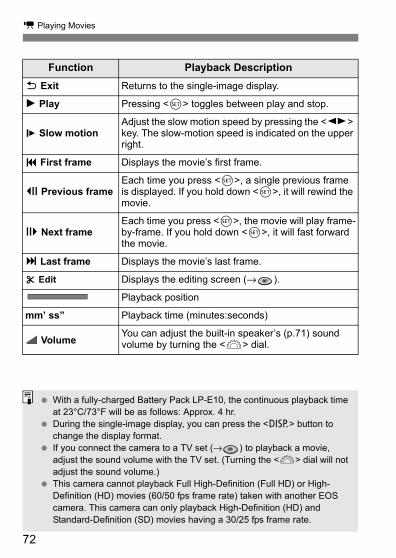
Function Playback Description2 Exit Returns to the single-image display.
7 Play Pressing <0> toggles between play and stop.
8 Slow motionAdjust the slow motion speed by pressing the <U> key. The slow-motion speed is indicated on the upper right.
5 First frame Displays the movie’s first frame.
3 Previous frameEach time you press <0>, a single previous frame is displayed. If you hold down <0>, it will rewind the movie.
6 Next frameEach time you press <0>, the movie will play frame-by-frame. If you hold down <0>, it will fast forward the movie.
4 Last frame Displays the movie’s last frame.
X Edit Displays the editing screen (→ ).
Playback position
mm’ ss” Playback time (minutes:seconds)
9 VolumeYou can adjust the built-in speaker’s (p.71) sound volume by turning the <6> dial.
With a fully-charged Battery Pack LP-E10, the continuous playback time at 23°C/73°F will be as follows: Approx. 4 hr.During the single-image display, you can press the <B> button to change the display format.If you connect the camera to a TV set (→ ) to playback a movie, adjust the sound volume with the TV set. (Turning the <6> dial will not adjust the sound volume.)This camera cannot playback Full High-Definition (Full HD) or High-Definition (HD) movies (60/50 fps frame rate) taken with another EOS camera. This camera can only playback High-Definition (HD) and Standard-Definition (SD) movies having a 30/25 fps frame rate.
73
6Software Start Guide
This chapter explains how to view the PDF files on the EOS Camera Instruction Manuals Disk (DVD-ROM). It also gives an overview of the software on the EOS Solution Disk CD-ROM and explains how to install them on a personal computer.
EOS Solution Disk
(Software)
EOS Camera Instruction
Manuals Disk
Windows XXX XXX
EOS Camera Instruction Manuals Disk XXX
Mac OS X XXX XXX
XXXXXXXXXXXXXXXXXXXXXXXXX
CEL-XXX XXX
© CANON INC. 20XX. Made in the EU.
EOS Solution Disk XXX
CEL-XXX XXX
© CANON INC. 20XX. Made in the EU.
Windows XXX XXXMac OS X XXX XXX
XXXXXXXXXXXXXXXXXXXXXXXXX
74
Software Start Guide
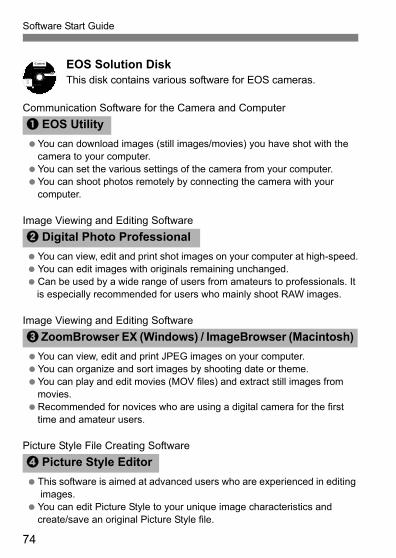
EOS Solution DiskThis disk contains various software for EOS cameras.
Communication Software for the Camera and Computer
You can download images (still images/movies) you have shot with the camera to your computer.You can set the various settings of the camera from your computer.You can shoot photos remotely by connecting the camera with your computer.
Image Viewing and Editing Software
You can view, edit and print shot images on your computer at high-speed.You can edit images with originals remaining unchanged.Can be used by a wide range of users from amateurs to professionals. It is especially recommended for users who mainly shoot RAW images.
Image Viewing and Editing Software
You can view, edit and print JPEG images on your computer.You can organize and sort images by shooting date or theme.You can play and edit movies (MOV files) and extract still images from movies.Recommended for novices who are using a digital camera for the first time and amateur users.
Picture Style File Creating Software
This software is aimed at advanced users who are experienced in editing images.You can edit Picture Style to your unique image characteristics and create/save an original Picture Style file.
a EOS Utility
b Digital Photo Professional
c ZoomBrowser EX (Windows) / ImageBrowser (Macintosh)
d Picture Style Editor
EOS Solution Disk XXX
CEL-XXX XXX
© CANON INC. 20XX. Made in the EU.
Windows XXX XXXMac OS X XXX XXX
XXXXXXXXXXXXXXXXXXXXXXXXX
75
Software Start Guide
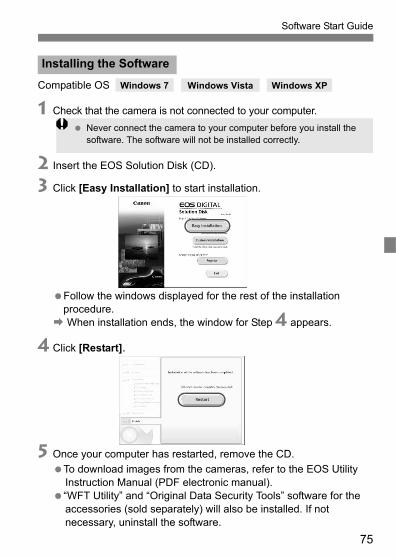
Compatible OS
1 Check that the camera is not connected to your computer.
2 Insert the EOS Solution Disk (CD).
3 Click [Easy Installation] to start installation.
Follow the windows displayed for the rest of the installation procedure.
B When installation ends, the window for Step 4 appears.
4 Click [Restart].
5 Once your computer has restarted, remove the CD.To download images from the cameras, refer to the EOS Utility Instruction Manual (PDF electronic manual). “WFT Utility” and “Original Data Security Tools” software for the accessories (sold separately) will also be installed. If not necessary, uninstall the software.
Installing the Software
Never connect the camera to your computer before you install the software. The software will not be installed correctly.
Windows 7 Windows Vista Windows XP
76
Software Start Guide
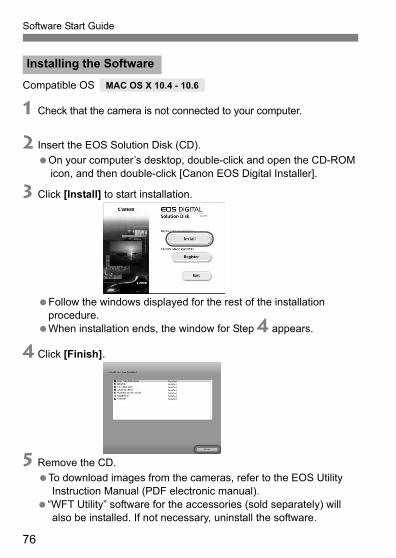
Compatible OS
1 Check that the camera is not connected to your computer.
2 Insert the EOS Solution Disk (CD).On your computer’s desktop, double-click and open the CD-ROM icon, and then double-click [Canon EOS Digital Installer].
3 Click [Install] to start installation.
Follow the windows displayed for the rest of the installation procedure.When installation ends, the window for Step 4 appears.
4 Click [Finish].
5 Remove the CD.To download images from the cameras, refer to the EOS Utility Instruction Manual (PDF electronic manual).
“WFT Utility” software for the accessories (sold separately) will also be installed. If not necessary, uninstall the software.
Installing the Software
MAC OS X 10.4 - 10.6
77
Software Start Guide
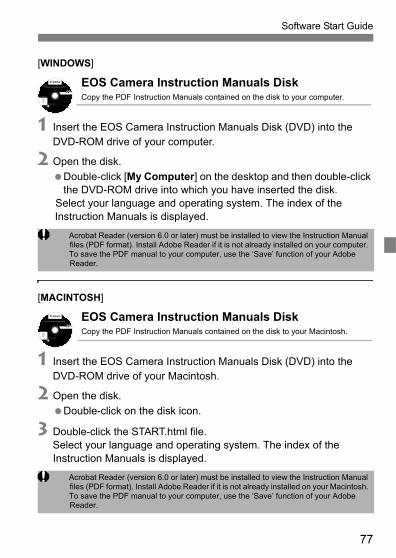
[WINDOWS]
EOS Camera Instruction Manuals DiskCopy the PDF Instruction Manuals contained on the disk to your computer.
1 Insert the EOS Camera Instruction Manuals Disk (DVD) into the DVD-ROM drive of your computer.
2 Open the disk.Double-click [My Computer] on the desktop and then double-click the DVD-ROM drive into which you have inserted the disk.
Select your language and operating system. The index of the Instruction Manuals is displayed.
[MACINTOSH]
EOS Camera Instruction Manuals DiskCopy the PDF Instruction Manuals contained on the disk to your Macintosh.
1 Insert the EOS Camera Instruction Manuals Disk (DVD) into the DVD-ROM drive of your Macintosh.
2 Open the disk.Double-click on the disk icon.
3 Double-click the START.html file.Select your language and operating system. The index of the Instruction Manuals is displayed.
Acrobat Reader (version 6.0 or later) must be installed to view the Instruction Manual files (PDF format). Install Adobe Reader if it is not already installed on your computer. To save the PDF manual to your computer, use the ‘Save’ function of your Adobe Reader.
Acrobat Reader (version 6.0 or later) must be installed to view the Instruction Manual files (PDF format). Install Adobe Reader if it is not already installed on your Macintosh. To save the PDF manual to your computer, use the ‘Save’ function of your Adobe Reader.
Windows XXX XXX
EOS Camera Instruction Manuals Disk XXX
Mac OS X XXX XXX
XXXXXXXXXXXXXXXXXXXXXXXXX
CEL-XXX XXX
© CANON INC. 20XX. Made in the EU.
Windows XXX XXX
EOS Camera Instruction Manuals Disk XXX
Mac OS X XXX XXX
XXXXXXXXXXXXXXXXXXXXXXXXX
CEL-XXX XXX
© CANON INC. 20XX. Made in the EU.

78
TrademarksAdobe is a trademark of Adobe Systems Incorporated.Windows is a trademark or registered trademark of Microsoft Corporation in the United States and other countries.Macintosh and Mac OS are trademarks or registered trademarks of Apple Inc. in the United States and other countries.SDXC logo is a trademark of SD-3C, LLC.HDMI, HDMI logo, and High-Definition Multimedia Interface are a trademark or registered trademark of HDMI Licensing LLC.All other corporate and product names and trademarks mentioned in this manual are the property of their respective owners.
About MPEG-4 Licensing“This product is licensed under AT&T patents for the MPEG-4 standard and may be used for encoding MPEG-4 compliant video and/or decoding MPEG-4 compliant video that was encoded only (1) for a personal and non-commercial purpose or (2) by a video provider licensed under the AT&T patents to provide MPEG-4 compliant video. No license is granted or implied for any other use for MPEG-4 standard.”* Notice displayed in English as required.
Use of genuine Canon accessories is recommendedThis product is designed to achieve excellent performance when used with genuine Canon accessories. Canon shall not be liable for any damage to this product and/or accidents such as fire, etc., caused by the malfunction of non-genuine Canon accessories (e.g., a leakage and/or explosion of a battery pack). Please note that this warranty does not apply to repairs arising out of the malfunction of non-genuine Canon accessories, although you may request such repairs on a chargeable basis.
79
Safety WarningsFollow these safeguards and use the equipment properly to prevent injury, death, and material damage.
Preventing Serious Injury or Death• To prevent fire, excessive heat, chemical leakage, and explosions, follow the
safeguards below:- Do not use any batteries, power sources, and accessories not specified in this
booklet. Do not use any home-made or modified batteries.- Do not short-circuit, disassemble, or modify the battery pack or back-up battery. Do
not apply heat or apply solder to the battery pack or back-up battery. Do not expose the battery pack or back-up battery to fire or water. And do not subject the battery pack or back-up battery to strong physical shock.
- Do not install the battery pack or back-up battery in reversed polarity (+ –). Do not mix new and old or different types of batteries.
- Do not recharge the battery pack outside the allowable ambient temperature range of 0°C - 40°C (32°F - 104°F). Also, do not exceed the recharging time.
- Do not insert any foreign metallic objects into the electrical contacts of the camera, accessories, connecting cables, etc.
• Keep the back-up battery away from children. If a child swallows the battery, consult a physician immediately. (Battery chemicals may harm the stomach and intestines.)
• When disposing of a battery pack or back-up battery, insulate the electrical contacts with tape to prevent contact with other metallic objects or batteries. This is to prevent fire or an explosion.
• If excessive heat, smoke, or fumes are emitted during battery pack recharging, immediately unplug the battery charger from the power outlet to stop the recharging and prevent a fire.
• If the battery pack or back-up battery leaks, changes color, deforms, or emits smoke or fumes, remove it immediately. Be careful not to get burned in the process.
• Prevent any battery leakage from contacting your eyes, skin, and clothing. It can cause blindness or skin problems. If the battery leakage contacts your eyes, skin, or clothing, flush the affected area with lots of clean water without rubbing it. See a physician immediately.
• During the recharging, keep the equipment away from the reach of children. The cord can accidentally choke the child or give an electrical shock.
• Do not leave any cords near a heat source. It can deform the cord or melt the insulation and cause a fire or electrical shock.
• Do not fire the flash at someone driving a car. It may cause an accident.• Do not fire the flash near a person’s eyes. It may impair the person’s vision. When
using flash to photograph an infant, keep at least 1 meter away.• Before storing the camera or accessory when not in use, remove the battery pack and
disconnect the power plug. This is to prevent electrical shock, heat generation, and fire.
• Do not use the equipment where there is flammable gas. This is to prevent an explosion or fire.
80
• If you drop the equipment and the casing breaks open to expose the internal parts, do not touch the internal parts due to the possibility of electrical shock.
• Do not disassemble or modify the equipment. High-voltage internal parts can cause electrical shock.
• Do not look at the sun or an extremely bright light source through the camera or lens. Doing so may damage your vision.
• Keep the camera from the reach of small children. The neck strap can accidentally choke the child.
• Do not store the equipment in dusty or humid places. This is to prevent fire and electrical shock.
• Before using the camera inside an airplane or hospital, check if it is allowed. Electromagnetic waves emitted by the camera may interfere with the plane’s instruments or the hospital’s medical equipment.
• To prevent fire and electrical shock, follow the safeguards below:- Always insert the power plug all the way in.- Do not handle a power plug with wet hands.- When unplugging a power plug, grasp and pull the plug instead of the cord.- Do not scratch, cut, or excessively bend the cord or put a heavy object on the cord.
Also do not twist or tie the cords.- Do not connect too many power plugs to the same power outlet.- Do not use a cord whose insulation has been damaged.
• Occasionally unplug the power plug and use a dry cloth to clean off the dust around the power outlet. If the surrounding is dusty, humid, or oily, the dust on the power outlet may become moist and short-circuit the outlet to cause a fire.
Preventing Injury or Equipment Damage• Do not leave equipment inside a car under the hot sun or near a heat source. The
equipment may become hot and cause skin burns.• Do not carry the camera around while it is attached to a tripod. Doing so may cause
injury. Also make sure the tripod is sturdy enough to support the camera and lens.• Do not leave a lens or lens-attached camera under the sun without the lens cap
attached. Otherwise, the lens may concentrate the sun’s rays and cause a fire.• Do not cover or wrap the battery-recharging apparatus with a cloth. Doing so may trap
heat within and cause the casing to deform or catch fire.• If you drop the camera in water or if water or metal fragments enter inside the camera,
promptly remove the battery pack and back-up battery. This is to prevent fire and electrical shock.
• Do not use or leave the battery pack or back-up battery in a hot environment. Doing so may cause battery leakage or a shorter battery life. The battery pack or back-up battery can also become hot and cause skin burns.
• Do not use paint thinner, benzene, or other organic solvents to clean the equipment. Doing so may cause fire or a health hazard.
If the product does not work properly or requires repair, contact your dealer or your nearest Canon Service Center.

81
European Union (and EEA) only.These symbols indicate that this product is not to be disposed of with your household waste, according to the WEEE Directive (2002/96/EC), the Battery Directive (2006/66/EC) and/or your national laws implementing those Directives. If a chemical symbol is printed beneath the symbol shown above, in accordance with the Battery Directive,
this indicates that a heavy metal (Hg = Mercury, Cd = Cadmium, Pb = Lead) is present in this battery or accumulator at a concentration above an applicable threshold specified in the Battery Directive.This product should be handed over to a designated collection point, e.g., on an authorized one-for-one basis when you buy a new similar product or to an authorized collection site for recycling waste electrical and electronic equipment (EEE) and batteries and accumulators. Improper handling of this type of waste could have a possible impact on the environment and human health due to potentially hazardous substances that are generally associated with EEE. Your cooperation in the correct disposal of this product will contribute to the effective usage of natural resources. For more information about the recycling of this product, please contact your local city office, waste authority, approved scheme or your household waste disposal service or visit www.canon-europe.com/environment.(EEA: Norway, Iceland and Liechtenstein)

82
IMPORTANT SAFETY INSTRUCTIONS1. SAVE THESE INSTRUCTIONS — This manual contains important safety
and operating instructions for Battery Charger LC-E10 & LC-E10E.2. Before using the charger, read all instructions and cautionary remarks on
(1) the charger, (2) the battery pack, and (3) the product using the battery pack.
3. CAUTION — To reduce risk of injury, charge only the Battery Pack LP-E10. Other types of batteries may burst, causing personal injury and other damage.
4. Do not expose the charger to rain or snow.5. Use of an attachment not recommended or sold by Canon may result in
fire, electric shock, or personal injury.6. To reduce risk of damage to electric plug and cord, pull by plug rather than
by cord when disconnecting charger.7. Make sure cord is located so that it will not be stepped on, tripped over, or
otherwise subjected to damage or stress.8. Do not operate the charger with damaged cord or plug - replace them
immediately.9. Do not operate the charger if it has received a sharp blow, been dropped,
or otherwise damaged in any way; take it to a qualified serviceman.10. Do not disassemble the charger; take it to a qualified serviceman when
service or repair is required. Incorrect reassembly may result in a risk of electric shock or fire.
11. To reduce risk of electric shock, unplug charger from outlet before attempting any maintenance or cleaning.
MAINTENANCE INSTRUCTIONUnless otherwise stated in this manual, there are no user serviceable parts inside. Refer servicing to qualified serviceman.
CAUTIONRISK OF EXPLOSION IF BATTERY IS REPLACED BY AN INCORRECT TYPE. DISPOSE OF USED BATTERIES ACCORDING TO LOCAL REGULATION.


CANON INC.30-2 Shimomaruko 3-chome, Ohta-ku, Tokyo 146-8501, Japan
Europe, Africa & Middle East
CANON EUROPA N.V.PO Box 2262, 1180 EG Amstelveen, The Netherlands
For your local Canon office, please refer to your warranty card or to www.canon-europe.com/Support
The product and associated warranty are provided in European countries by Canon Europa N.V.
This Instruction Manual booklet is current as of January 2011. For information on the camera’s compatibility with any accessories and lenses introduced after this date, contact any Canon Service Center.
CEL-SR2HA210 © CANON INC. 2011 PRINTED IN THE EU