Embed Size (px)
Citation preview

HELP MANUAL: BillQuick Outlook Add-In Help
BillQuick | Power Up Your Business (866) 945-1595 | www.bqe.com | [email protected]
BillQuick Outlook Add-In Help Manual 2017

HELP MANUAL: BillQuick Outlook Add-In Help
BillQuick | Power Up Your Business (866) 945-1595 | www.bqe.com | [email protected]
Table of Contents Welcome ................................................................................................................... 1
Introduction .............................................................................................................. 2
System Requirements ................................................................................................. 2
BillQuick Outlook Add-In Overview ............................................................................... 2
Appointments ......................................................................................................... 2
Tasks ..................................................................................................................... 2
Emails .................................................................................................................... 2
Contacts ................................................................................................................. 2
Features ................................................................................................................... 3
Key Features .......................................................................................................... 3
Contact Info .............................................................................................................. 3
Corporate Office ...................................................................................................... 3
Sales ..................................................................................................................... 3
Technical Support .................................................................................................... 4
Australia Office........................................................................................................ 4
Europe Office .......................................................................................................... 5
Start-Up .................................................................................................................... 6
Welcome ................................................................................................................... 6
Installation ................................................................................................................ 6
Product Activation ...................................................................................................... 6
Licensing and User Management ............................................................................... 7
Product Licensing & User Management Overview ............................................................ 7
Reference Info ..................................................................................................... 8
Product Licensing and User Management–Licenses Tab ................................................... 8
Product Licensing and User Management-Users Tab ........................................................ 8
How Do I ............................................................................................................. 9
How Do I Assign Users? .............................................................................................. 9
How Do I Licence Outlook Add-In? ............................................................................. 10
How Do I Manage Licensing? ..................................................................................... 10
BillQuick Login ......................................................................................................... 10
BillQuick Menu ......................................................................................................... 11
BillQuick—Outlook Add-In Settings ............................................................................. 12
Send to BillQuick ...................................................................................................... 14
Send to BillQuick Overview ........................................................................................ 14
Reference Info ...................................................................................................... 14
Send to BillQuick ...................................................................................................... 14
HELP MANUAL: BillQuick Outlook Add-In Help
BillQuick | Power Up Your Business (866) 945-1595 | www.bqe.com | [email protected]
Smart Match ............................................................................................................ 17
How Do I .............................................................................................................. 18
How Do I Send Appointments? ................................................................................... 18
How Do I Send Tasks? .............................................................................................. 18
How Do I Send Emails? ............................................................................................. 19
How Do I Send Contacts? .......................................................................................... 21
Get from BillQuick .................................................................................................... 23
Get from BillQuick Overview ...................................................................................... 23
Reference Info ...................................................................................................... 23
Get Contacts............................................................................................................ 23
How Do I .............................................................................................................. 24
How Do I Get Contacts from BillQuick?........................................................................ 24
Appendix ................................................................................................................. 26
Implementation Checklist .......................................................................................... 26
HELP MANUAL: BillQuick Outlook Add-In Help
BillQuick | Power Up Your Business (866) 945-1595 | www.bqe.com | [email protected]
1
WELCOME
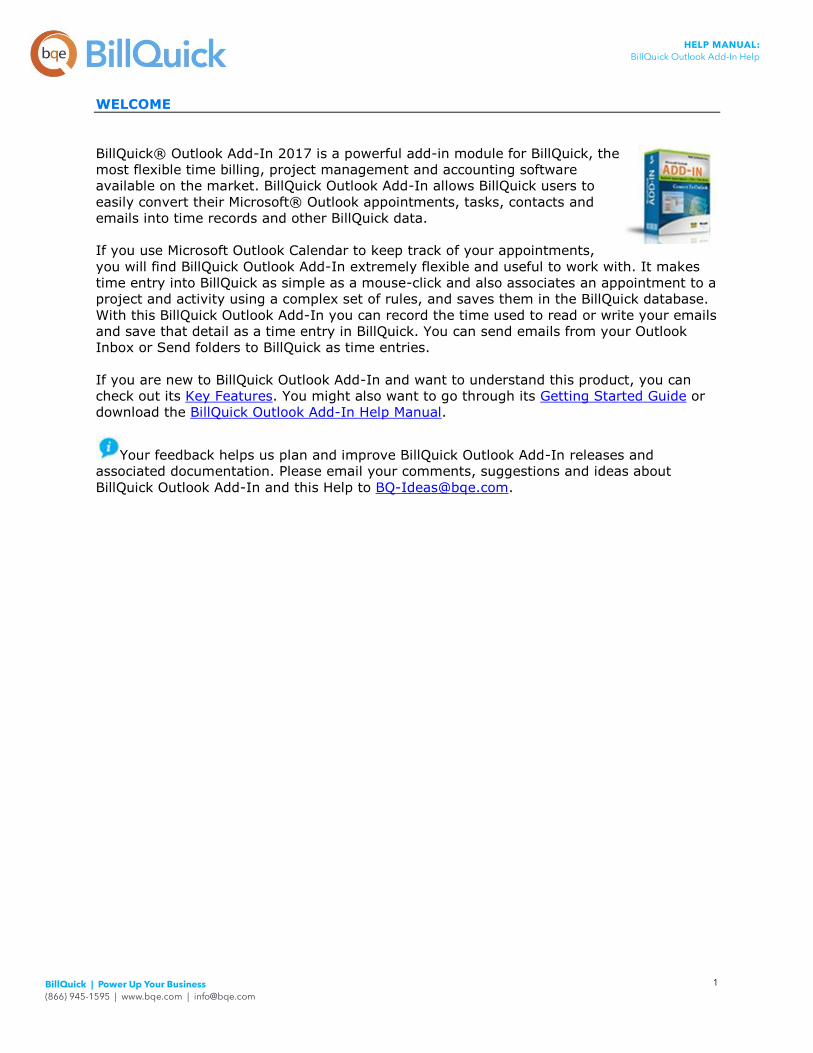
BillQuick® Outlook Add-In 2017 is a powerful add-in module for BillQuick, the
most flexible time billing, project management and accounting software
available on the market. BillQuick Outlook Add-In allows BillQuick users to
easily convert their Microsoft® Outlook appointments, tasks, contacts and
emails into time records and other BillQuick data.
If you use Microsoft Outlook Calendar to keep track of your appointments,
you will find BillQuick Outlook Add-In extremely flexible and useful to work with. It makes
time entry into BillQuick as simple as a mouse-click and also associates an appointment to a
project and activity using a complex set of rules, and saves them in the BillQuick database.
With this BillQuick Outlook Add-In you can record the time used to read or write your emails
and save that detail as a time entry in BillQuick. You can send emails from your Outlook
Inbox or Send folders to BillQuick as time entries.
If you are new to BillQuick Outlook Add-In and want to understand this product, you can
check out its Key Features. You might also want to go through its Getting Started Guide or
download the BillQuick Outlook Add-In Help Manual.
Your feedback helps us plan and improve BillQuick Outlook Add-In releases and
associated documentation. Please email your comments, suggestions and ideas about
BillQuick Outlook Add-In and this Help to [email protected].
HELP MANUAL: BillQuick Outlook Add-In Help
BillQuick | Power Up Your Business (866) 945-1595 | www.bqe.com | [email protected]
2
INTRODUCTION
SYSTEM REQUIREMENTS
Please check out the BillQuick Outlook Add-In Getting Started Guide for installation and
startup information. You can also visit the website for the system requirements.
BILLQUICK OUTLOOK ADD-IN OVERVIEW
BillQuick Outlook Add-In is a useful module that integrates directly within Microsoft Outlook.
With this program, you can easily convert Outlook appointments, tasks, contacts and emails
into time records and other BillQuick data. In addition, you can quickly complete a time card
by turning any Outlook task into a project time entry.
The BillQuick Outlook Add-In module is centered on four main features:
Appointments
BillQuick Outlook Add-In enables users to convert appointments to time entries in BillQuick.
Appointments are easily associated with the BillQuick projects and activities. With this
feature you can keep track of appointments in Outlook Calendar and easily convert them
into time entries.
Tasks
A task is a personal or work-related errand or activity that you want to track through
completion. Tasks can occur once or repeatedly (recurring) at regular intervals. A task can
be anything from reporting to the manager every week to solving customer issues. Such
events and the frequency of their occurrence can easily be tracked with Outlook tasks and
sent to BillQuick as time entries. You can make time entries for any date you choose,
irrespective of the time period of the tasks.
Emails
Emails from your Outlook Inbox and Sent folders can be logged into BillQuick just like
appointments and tasks. The time you spend on reading or writing an email gets stored as a
time entry in the BillQuick database. By default, 15 minutes are saved; however, the
duration time can be edited prior to sending information to BillQuick. Any email in Outlook
(Inbox or Sent folder) can be sent to BillQuick by selecting it and then choosing the Send To
BillQuick options from the menu bar or the shortcut menu.
New email messages can also be sent to BillQuick. When a new email is composed in
Outlook, BillQuick menu gets added to its menu bar. The options in the BillQuick menu allow
users to send new emails and simultaneously log them as time entries in BillQuick. These
options get enabled only after a user logs in to BillQuick.
Contacts
The BillQuick Outlook Add-In can be used to create Outlook contacts and it allows you to
send these contacts directly to BillQuick. Contacts can be sent as Employee, Client, Client
Contact and Vendor.
HELP MANUAL: BillQuick Outlook Add-In Help
BillQuick | Power Up Your Business (866) 945-1595 | www.bqe.com | [email protected]
3
FEATURES
Key Features
Installs in your desktop copy of Microsoft Outlook
Converts Outlook appointments, tasks, emails and contacts to BillQuick data
Real-time update of hours from any Outlook appointment
Allows time entry review and adjustment before sending to BillQuick
Enables approval of time entry before sending to BillQuick
Provides convenient ‘Send to BillQuick’ top menu and shortcut menu
CONTACT INFO
BQE Software, Inc. is a California based C Corporation, founded in 1995. It first introduced
its flagship product, BillQuick, in May 1996 and since then BQE has developed a host of
programs and solutions for your specific needs.
You can contact us for information about the latest products and services, ordering
products, training and consulting, technical support, report customization or any other
business query.
Corporate Office
Address:
BQE Software
3825 Del Amo Blvd.
Torrance, CA 90503
USA
Telephone: +1 (310) 602-4010
Fax: (310) 784-8482
Office Hours: Monday to Friday
8 AM to 5 PM Pacific Standard Time
Website: www.bqe.com
BQE Blog: blog.bqe.com
User Forum: BillQuick Yahoo Group
Services: www.bqe.com/Services
Sales
Contact our sales representative for information about the latest products and services.
Telephone: 1 (855) 237-1238 (Within USA)
+1 310-602-4020 (Outside USA)
Website: www.bqe.com
Email: [email protected]
HELP MANUAL: BillQuick Outlook Add-In Help
BillQuick | Power Up Your Business (866) 945-1595 | www.bqe.com | [email protected]
4
Technical Support
For technical support, you can contact our Support Team. Before you call, email or fax us,
please provide the following information for the fastest possible service:
Product serial number (registration number)
Your name, company name and phone number
Exact product name and version number (To find the version of BillQuick, click Help,
About BillQuick)
Type of operating system (for example, Windows XP)
Complete description of the issue, including steps to reproduce it
Exact wording of any messages displayed when you encountered the problem
Steps taken to resolve the problem
All previous email threads with BQE Software about the issue, if any
Telephone: +1 (310) 602-4030
Knowledge Base: kb.bqe.com
Email: [email protected]
Website: www.bqe.com/Support
Hours: 7 AM to 3 PM Pacific Standard Time
Australia Office
Address: BQE Software
255 Broadway Suite 7
Glebe, N.S.W 2037
Australia
Telephone: 1300-245-566
+61 (02) 9249 7327 (Outside Australia)
Fax: +61 02-8323-4615
Sales Hours: Monday to Friday
8:30 AM to 5:30 PM Eastern Time
Website: www.bqe.com.au
Email: [email protected]
Support Hours: Monday to Friday
8:30 AM to 5:30 PM Australian Eastern Standard Time
HELP MANUAL: BillQuick Outlook Add-In Help
BillQuick | Power Up Your Business (866) 945-1595 | www.bqe.com | [email protected]
5
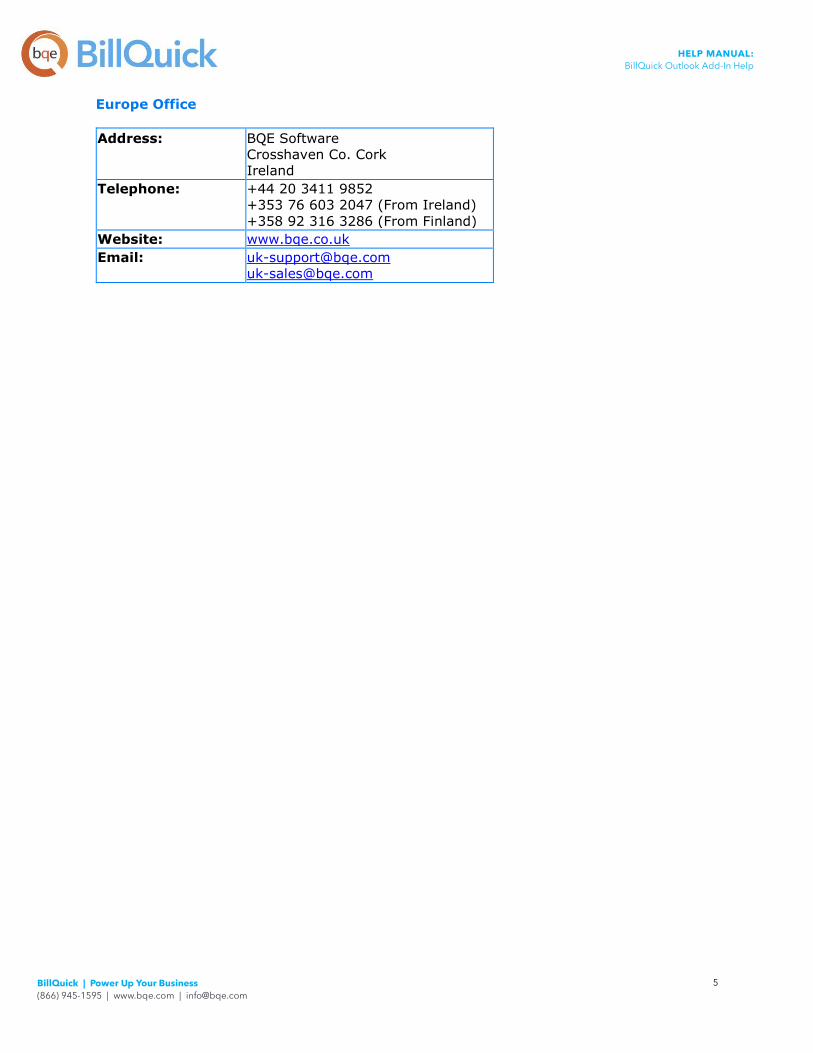
Europe Office
Address: BQE Software
Crosshaven Co. Cork
Ireland
Telephone: +44 20 3411 9852
+353 76 603 2047 (From Ireland)
+358 92 316 3286 (From Finland)
Website: www.bqe.co.uk
Email: [email protected]
HELP MANUAL: BillQuick Outlook Add-In Help
BillQuick | Power Up Your Business (866) 945-1595 | www.bqe.com | [email protected]
6
START-UP
WELCOME
BillQuick® Outlook Add-In 2017 is a powerful add-in module for BillQuick, the
most flexible time billing, project management and accounting software
available on the market. BillQuick Outlook Add-In allows BillQuick users to
easily convert their Microsoft® Outlook appointments, tasks, contacts and
emails into time records and other BillQuick data.
If you use Microsoft Outlook Calendar to keep track of your appointments,
you will find BillQuick Outlook Add-In extremely flexible and useful to work with. It makes
time entry into BillQuick as simple as a mouse-click and also associates an appointment to a
project and activity using a complex set of rules, and saves them in the BillQuick database.
With this BillQuick Outlook Add-In you can record the time used to read or write your emails
and save that detail as a time entry in BillQuick. You can send emails from your Outlook
Inbox or Send folders to BillQuick as time entries.
If you are new to BillQuick Outlook Add-In and want to understand this product, you can
check out its Key Features. You might also want to go through its Getting Started Guide or
download the BillQuick Outlook Add-In Help Manual.
Your feedback helps us plan and improve BillQuick Outlook Add-In releases and
associated documentation. Please email your comments, suggestions and ideas about
BillQuick Outlook Add-In and this Help to [email protected].
INSTALLATION
BillQuick Outlook Add-In can be installed on a single-user system or a networking
environment. It also operates in a network environment, both peer-to-peer and client-
server networks. In either scenario, the database is located in a folder on a personal
computer or shared drive.
See the BillQuick Outlook Add-In Getting Started Guide for detailed installation
instructions.
PRODUCT ACTIVATION
When you start BillQuick Outlook Add-In and it is either not yet activated or in the
evaluation mode, the Product Activation screen displays. See the BillQuick Outlook Add-In
Getting Started Guide for more information.
HELP MANUAL: BillQuick Outlook Add-In Help
BillQuick | Power Up Your Business (866) 945-1595 | www.bqe.com | [email protected]
7
Licensing and User Management
PRODUCT LICENSING & USER MANAGEMENT OVERVIEW
BillQuick Outlook Add-In offers various options for licensing and registering your copy of the
software. You can use the Product Activation or Product Licensing & User Management
screen to do that.
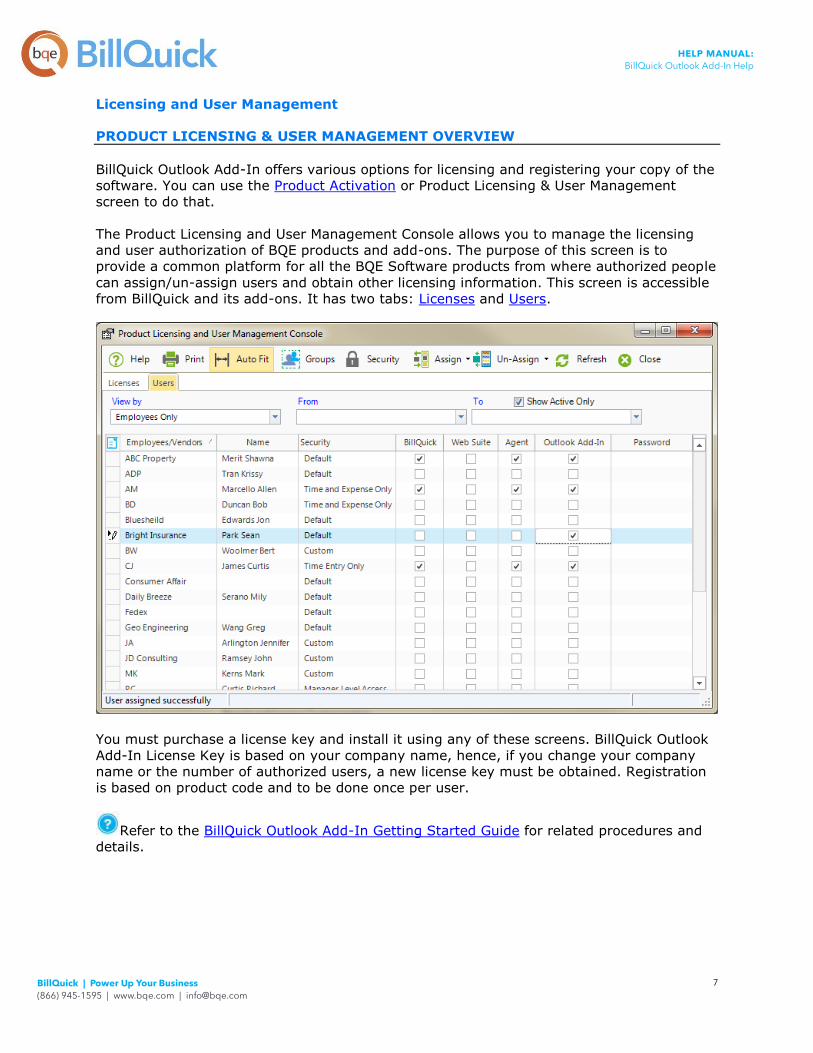
The Product Licensing and User Management Console allows you to manage the licensing
and user authorization of BQE products and add-ons. The purpose of this screen is to
provide a common platform for all the BQE Software products from where authorized people
can assign/un-assign users and obtain other licensing information. This screen is accessible
from BillQuick and its add-ons. It has two tabs: Licenses and Users.
You must purchase a license key and install it using any of these screens. BillQuick Outlook
Add-In License Key is based on your company name, hence, if you change your company
name or the number of authorized users, a new license key must be obtained. Registration
is based on product code and to be done once per user.
Refer to the BillQuick Outlook Add-In Getting Started Guide for related procedures and
details.
HELP MANUAL: BillQuick Outlook Add-In Help
BillQuick | Power Up Your Business (866) 945-1595 | www.bqe.com | [email protected]
8
Reference Info
PRODUCT LICENSING AND USER MANAGEMENT–LICENSES TAB
The following are descriptions of fields on the Product Licensing and User Management
Console–Licenses screen:
Product:
Lists the various software products for which licenses can be assigned to users. The list
consists of BillQuick and its add-ons like Agent, Web Suite, etc.
License Key:
Encrypted sequence that uniquely identifies your company and authorized user count. The
BillQuick or any other product license key is based on your company name. If you have
purchased a license, you need to enter the licensed company name in the Company screen
prior to entering the license key here. License keys are stored in the database. If the
company name is changed after the database is licensed, the result will be an unlicensed
program.
Users:
The total number of licenses purchased for a BQE Software product. It displays after you
enter the license key. Additional licenses can be purchased at any time, which increases this
number.
Users = Assigned + Available
In Use:
The number of licensed users that are logged in to a program simultaneously. Thus, it
equals the currently logged in users for a program.
Assigned:
The number of unique login IDs and simultaneous users allowed in the program. It depends
on the number of licenses purchased for your software.
Assigned = Users - Available
Available:
The number of licenses remaining or still available for a software product. The available
number of users can be assigned to the desired employees and vendors.
Available = Users - Assigned
To obtain your license key, contact us at 888-245-5669 or email [email protected] or fax
(310) 784-8428.
PRODUCT LICENSING AND USER MANAGEMENT-USERS TAB
The following are descriptions of fields on the Product Licensing and User Management–
Users screen:
View By:
You can choose the desired view mode by employees, vendors or their groups. For example,
if you choose Employees Only, only employees will display in the grid and hence those can
be authorized to use any licensed program. Similarly, if you choose a group, then members
of that group will be available for assignment as authorized users of a program.
HELP MANUAL: BillQuick Outlook Add-In Help
BillQuick | Power Up Your Business (866) 945-1595 | www.bqe.com | [email protected]
9
From-To:
Depending on what is selected in the View By field, employees, vendors or their groups can
be selected from these drop-down lists. You can select a single ID or a range of IDs in the
From-To fields.
Show Active Only:
Select this option if you want to display only active employees and vendors in the grid.
Cleared, the inactive employees and vendors will also display but will be unavailable.
Grid
Field Chooser:
Click to open the Field Chooser to hide or show columns in the grid. Select the field names
you want to show in the grid. You can also drag-and-drop fields between the Field Chooser
and the grid. Whether or not fields are hidden, values are recorded to them when data is
entered. By default, some of the fields are already selected and displayed in the grid. Clear
them if you want to hide them in the grid. The column names in the Field Chooser are listed
in alphabetical order.
Employees/Vendors:
Displays a list of employees or vendors, depending on your View By mode and From To
range. The desired employees or vendors can be assigned as authorized users of the listed
program. Only assigned users can log into a program.
Name:
Displays the name of the employee or vendor. It uses the Last Name/First Name format.
Security:
Displays the pre-defined security profiles assigned to the employee or vendor. However, you
can change it here by selecting another profile from the drop-down list.
BillQuick, Web Suite, Agent and Outlook Add-In:
This is the list of available programs–BillQuick and its add-ons. You can assign or un-assign
users for all these programs by selecting the relevant boxes. You can also assign or un-
assign all the available users for a program using the Assign or Unassign buttons.
Password:
You have the ability to change passwords of employees and vendors by entering a new one
here. When you enter or change any password, BillQuick prompts you to verify it by re-
typing it in the Confirm Password dialog box.
How Do I
HOW DO I ASSIGN USERS?
To assign users to BillQuick® Outlook Add-In:
1. In BillQuick, select File menu > Licensing & User Management. The Product Licensing
and User Management screen displays.
2. Click the Users tab.
HELP MANUAL: BillQuick Outlook Add-In Help
BillQuick | Power Up Your Business (866) 945-1595 | www.bqe.com | [email protected]
10
3. If your firm has a larger number of users, use the available filters (for example, View
By and From/To drop-down list).
4. In the grid, select the check box in the desired product column (for example, Outlook
Add-In) for the relevant users to authorize them to access the program.
HOW DO I LICENCE OUTLOOK ADD-IN?
One way to license the BillQuick Outlook Add-In software is via the Product Licensing & User
Management screen:
1. In BillQuick, select File menu, Licensing and User Management.
2. On the Licenses tab, enter your License Key for BillQuick Outlook Add-In exactly as it
is provided in the email instructions received from BQE.
3. Click Update. The number of authorized users and other relevant information
displays.
4. When you have finished, click Close.
If you have any questions or issues with the licensing, contact BillQuick Support.
HOW DO I MANAGE LICENSING?
Do the following to manage your BillQuick Outlook Add-In licenses:
1. In BillQuick, select File menu > Licensing & User Management. The Product Licensing
and User Management screen displays.
2. Click the Licenses tab. The license keys for your currently purchased products display
in addition to details on how the product licenses have been assigned.
3. To add or edit a BillQuick Outlook Add-In license key, click in its License Key column.
Enter the key exactly as specified in your license and registration email.
4. On the button panel, click Update. The task is complete!
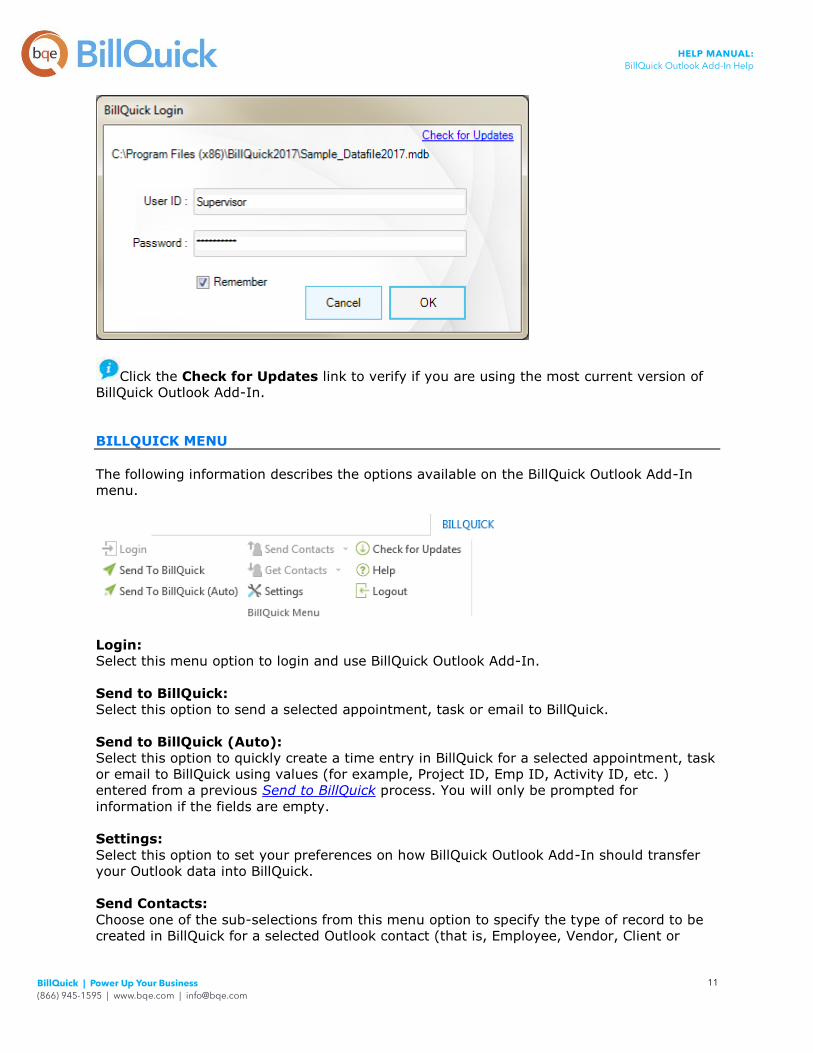
BILLQUICK LOGIN
You need to log in to BillQuick from Microsoft Outlook to use the BillQuick Outlook Add-In
program. You can always log in with the default User ID, supervisor, whose default
password is also supervisor. Select the Remember check box to have BillQuick Outlook Add-
In remember your User ID.
Both User ID and Passwords can be changed like all other login passwords in the Security
section of BillQuick.
HELP MANUAL: BillQuick Outlook Add-In Help
BillQuick | Power Up Your Business (866) 945-1595 | www.bqe.com | [email protected]
11
Click the Check for Updates link to verify if you are using the most current version of
BillQuick Outlook Add-In.
BILLQUICK MENU
The following information describes the options available on the BillQuick Outlook Add-In
menu.
Login:
Select this menu option to login and use BillQuick Outlook Add-In.
Send to BillQuick:
Select this option to send a selected appointment, task or email to BillQuick.
Send to BillQuick (Auto):
Select this option to quickly create a time entry in BillQuick for a selected appointment, task
or email to BillQuick using values (for example, Project ID, Emp ID, Activity ID, etc. )
entered from a previous Send to BillQuick process. You will only be prompted for
information if the fields are empty.
Settings:
Select this option to set your preferences on how BillQuick Outlook Add-In should transfer
your Outlook data into BillQuick.
Send Contacts:
Choose one of the sub-selections from this menu option to specify the type of record to be
created in BillQuick for a selected Outlook contact (that is, Employee, Vendor, Client or
HELP MANUAL: BillQuick Outlook Add-In Help
BillQuick | Power Up Your Business (866) 945-1595 | www.bqe.com | [email protected]
12
Client Contact). You can see the Send Contacts option only when Contacts are selected in
Microsoft® Outlook.
Get Contacts:
Choose one of the sub-selections from this menu to specify the type of BillQuick contact to
be transferred to Outlook (that is, Employee, Vendor, Client or Client Contact).
The Send or Get Contacts options only display when Outlook Contacts view is active.
Check for Updates:
Select this option to check for the latest version of BillQuick Outlook Add-In. If there is a
new update to download, BillQuick Outlook Add-In prompts you to download it.
Help:
Select this option to display the BillQuick Outlook Add-In Help.
Logout:
Select this menu option to log out of BillQuick Outlook Add-In.
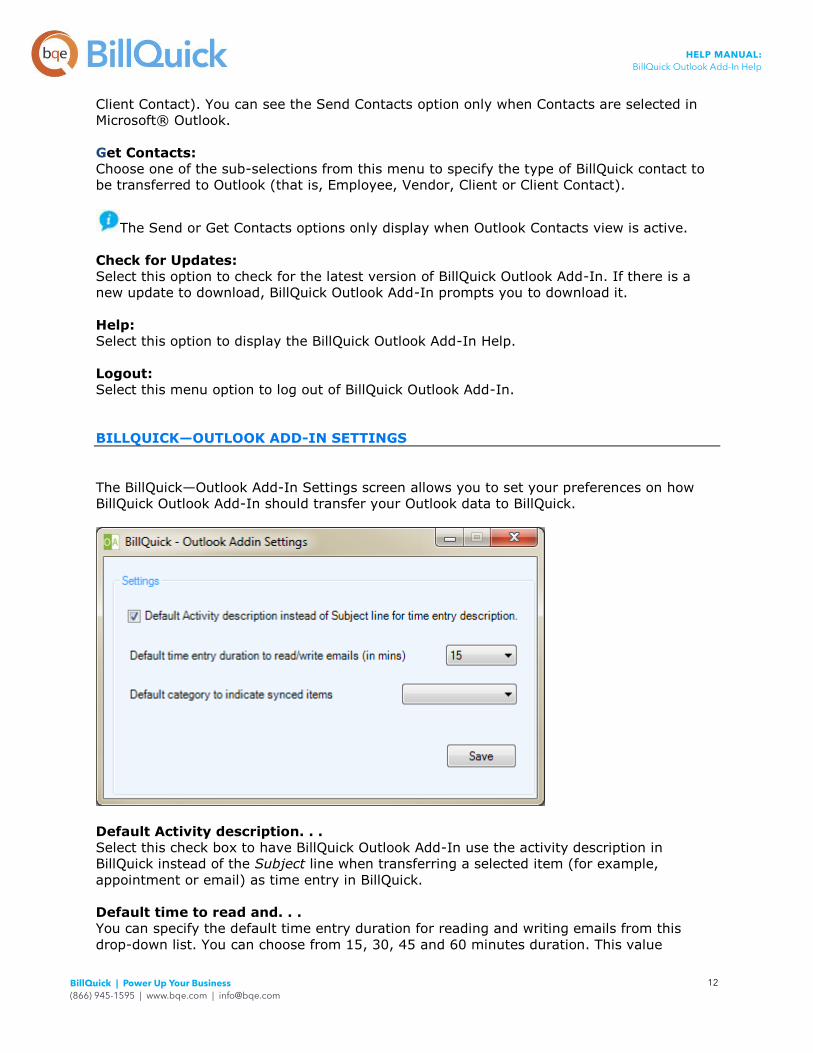
BILLQUICK—OUTLOOK ADD-IN SETTINGS
The BillQuick—Outlook Add-In Settings screen allows you to set your preferences on how
BillQuick Outlook Add-In should transfer your Outlook data to BillQuick.
Default Activity description. . .
Select this check box to have BillQuick Outlook Add-In use the activity description in
BillQuick instead of the Subject line when transferring a selected item (for example,
appointment or email) as time entry in BillQuick.
Default time to read and. . .
You can specify the default time entry duration for reading and writing emails from this
drop-down list. You can choose from 15, 30, 45 and 60 minutes duration. This value

HELP MANUAL: BillQuick Outlook Add-In Help
BillQuick | Power Up Your Business (866) 945-1595 | www.bqe.com | [email protected]
13
displays in the Duration field of the Send. . .to BillQuick window that displays during the
send process and can be edited.
Default category to indicate synced items:
This option helps you to select a color that is assigned to a category, say appointments,
tasks, emails and contacts when sending them to BillQuick. It helps you to quickly identify
the items already sent to BillQuick. You can select a color from the available category list
and save that from the Settings screen. By default, the BillQuick Outlook Add-In adds a new
color category named ‘BillQuick Time’ and saves it as the default color category to indicate
the synced items.
Save:
Click to save your settings and close the screen.
HELP MANUAL: BillQuick Outlook Add-In Help
BillQuick | Power Up Your Business (866) 945-1595 | www.bqe.com | [email protected]
14
SEND TO BILLQUICK
SEND TO BILLQUICK OVERVIEW
The 'Send to BillQuick' option is the core function of the BillQuick Outlook Add-In tool. This
feature is used to send appointments, tasks and emails to BillQuick as time entries. When
used, you can enter descriptive detail, edit the time and duration of an activity; and flag the
item as billable, approved or both.
You can also select the employee, project and activity with which to associate the selected
item. The Send to BillQuick option can be selected from the main Outlook menu or the pop-
up menu that displays when you right-click on a selected item (for example, appointment,
email, etc.).
Reference Info
SEND TO BILLQUICK
The following information describes the options available on the 'Send to BillQuick' screens
that display when the Send to BillQuick option is selected for an appointment, task or email.
With this screen users can edit the details for a selected item (that is, Employee, Project
and Activity) before sending it to BillQuick. You can also send Outlook contacts to BillQuick
as employees, clients, etc.
HELP MANUAL: BillQuick Outlook Add-In Help
BillQuick | Power Up Your Business (866) 945-1595 | www.bqe.com | [email protected]
15
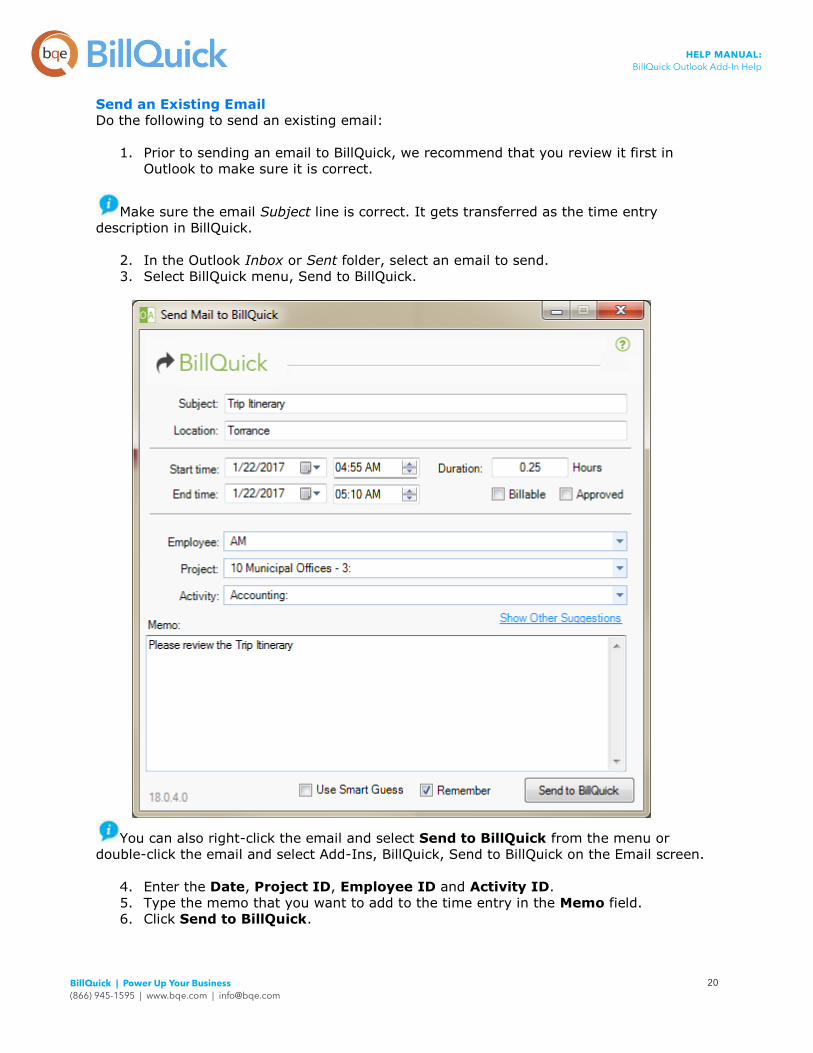
Subject:
The subject is automatically filled in when an email or appointment is selected in Outlook.
The Subject is used as the description for the time entry created in BillQuick for the selected
email or appointment.
Location:
The location is automatically filled in when an appointment is selected in Outlook Calendar
view. It can be a room number or location of the appointment.
Start Date/Time:
This field displays the start date and start time for the selected item.
End Date/Time:
This field displays the end date and end time for a selected activity.
Duration:
This field displays the duration (in hours) of the activity selected to send to BillQuick. This
field gives the billing hours for your time entry.
HELP MANUAL: BillQuick Outlook Add-In Help
BillQuick | Power Up Your Business (866) 945-1595 | www.bqe.com | [email protected]
16
The default time entry duration time (for example, 15min, 30min, etc.) for reading and
writing emails is specified in Settings.
Billable:
Select this check box to indicate the time entry as billable. The status will display in the
BillQuick Time Entry screen after the information is sent.
Approved:
Select this check box to make the time entry available for invoicing in BillQuick. Otherwise,
the time entry will need to be approved for invoicing in BillQuick.
Employee:
From the drop-down list, select a BillQuick Employee or vendor with whom to associate this
time entry.
Project:
You can associate your appointment to any BillQuick Project. Either type or select from the
drop-down list the Project ID that you want to associate with the appointment. If you don't
remember the ID, look at the descriptions in the drop-down list for the one that matches
your project.
If your project doesn't match any existing projects, you can make a new project in
BillQuick.
Show Memo/Show Other Suggestions:
This link toggles between the Memo field and the Smart Guess List.
Activity:
You can associate a selected item (for example, email, task or appointment) to any BillQuick
Activity. Either type or select from the drop-down list the Activity ID for the item. If you
don't remember the ID, look at the descriptions in the drop-down list for the one that
matches your task.
Memo:
Enter a memo in this field for the selected item. The entered comments are transferred as a
time entry memo in BillQuick.
You can use Windows' cut/copy/paste features in this textbox using the shortcut menu.
Smart Guess List:
This grid displays a list of frequently selected Projects and Activities when the Use Smart
Guess check box is selected.
Use Smart Guess:
Select this check box to have BillQuick Outlook Add-In use Smart Guess technology to make
the Send to BillQuick process faster. With this technology, BillQuick Outlook Add-In can
associate a task, appointment or email to BillQuick data fields like project, employee and
activity using a complex set of rules based on your previous time records. The program will
remember the last 3 matches of activity, project and employee.
HELP MANUAL: BillQuick Outlook Add-In Help
BillQuick | Power Up Your Business (866) 945-1595 | www.bqe.com | [email protected]
17
Remember:
Select this check box to remember your settings for future use.
Send to BillQuick:
Click to send the selected item to the BillQuick database.
By default, the logged in BillQuick database gets synced with the BillQuick Outlook Add-
In at the time of login.
SMART MATCH
BillQuick Outlook Add-In allows you to send contacts to BillQuick as employees, clients,
client contacts and vendors.
If a contact with the same name, phone number or company exists in BillQuick, Outlook
Add-In prompts you with the Smart Match screen. It gives you the option to either merge
the Outlook contact record with an existing BillQuick record or create a new record.
Grid
This grid displays a list of BillQuick contacts that closely match the record you are
attempting to send. To merge an Outlook contact with a listed record, select the check box
in the Select column.
The criteria used for selecting possible matches is as follows:
Employees/Vendors: Smart Match compares the first and last names of the
contact and Employee. It compares the contact's telephone numbers (that is, Home,
Primary, Mobile and Business) with the Employee's Phone field. If any of these three
fields matches the data for an employee in BillQuick, that employee's information is
displayed in the Smart match grid.
HELP MANUAL: BillQuick Outlook Add-In Help
BillQuick | Power Up Your Business (866) 945-1595 | www.bqe.com | [email protected]
18
Client: Smart match compares the First and Last names of the Outlook contact with
the Client's. It compares the contact phone number (that is, Home, Primary, Mobile
and Business) with the Client's Phone field in BillQuick. In addition, the contact
Company Name with Client Company are compared.
The Contact phone numbers are compared in the following order to the BillQuick Client
record: Business, Mobile, Primary and Home.
Client Contact: Smart Match compares the First and Last names of the Outlook
contact with the Client Contact, contact telephone number (that is, Home, Primary,
Mobile and Business) with Client Contact's Phone field and contact Company Name
with Client Contact Company.
The telephone numbers are compared in the same order as with the client record.
Create as New:
Select this check box to create a new record in BillQuick based on the selected Outlook
contact.
Send to BillQuick:
Click this button to send the Outlook contact information to BillQuick.
How Do I
HOW DO I SEND APPOINTMENTS?
BillQuick Outlook Add-In enables you to send an appointment to BillQuick. Do the following
to send appointments to BillQuick:
1. Prior to sending an appointment to BillQuick, we recommend that you review it first.
Edit the appointment in Outlook if necessary to make sure it is correct before
beginning the Send process.
You need to open a single occurrence of a recurring appointment series.
2. Select the appointment in the Calendar view.
3. Select BillQuick menu, Send to BillQuick.
You can also right-click the appointment and select Send to BillQuick from the menu or
double-click the appointment and select Add-Ins, BillQuick, Send to BillQuick on the
Appointments screen.
4. Enter the Date, Project ID, Employee ID and Activity ID.
5. Type the memo that you want to add to the time entry in the Memo field.
6. Click Send to BillQuick to save the selected appointment as a time entry in
BillQuick.
HOW DO I SEND TASKS?
BillQuick Outlook Add-In enables you to send tasks to BillQuick. Do the following to send a
task to BillQuick:
HELP MANUAL: BillQuick Outlook Add-In Help
BillQuick | Power Up Your Business (866) 945-1595 | www.bqe.com | [email protected]
19
1. Prior to sending a task to BillQuick, we recommend that you review it first. Edit the
task in Outlook if necessary to make sure it is correct before beginning the Send
process.
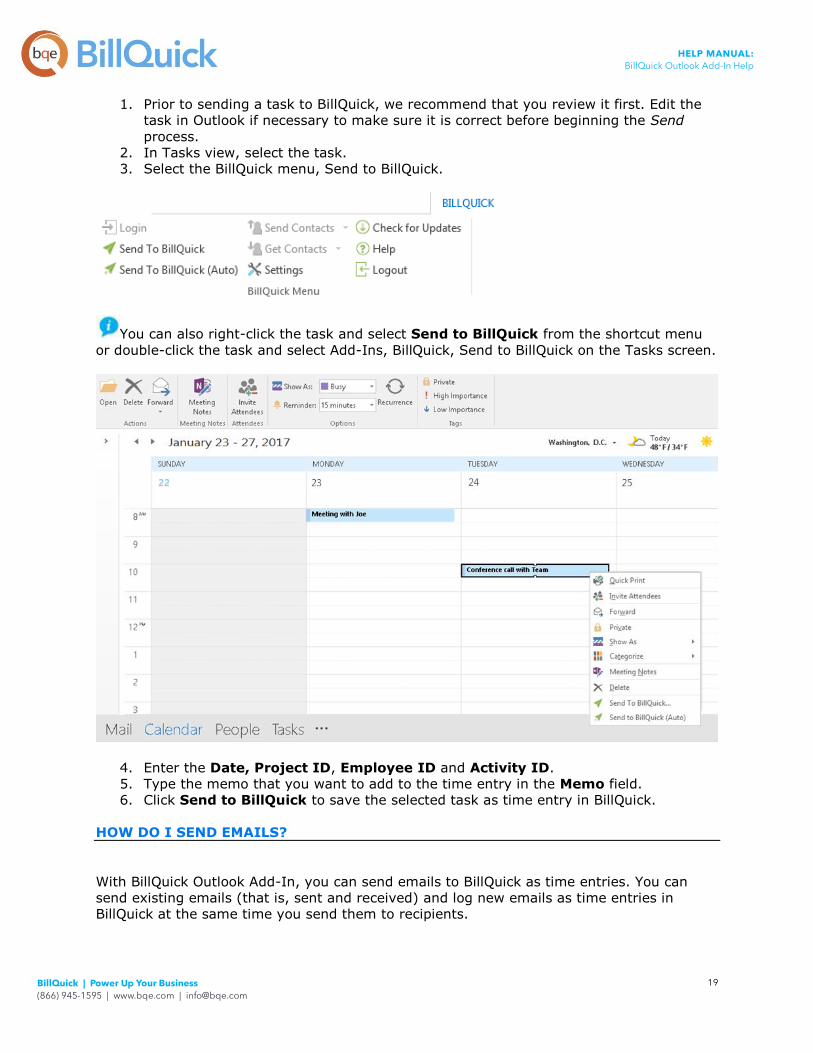
2. In Tasks view, select the task.
3. Select the BillQuick menu, Send to BillQuick.
You can also right-click the task and select Send to BillQuick from the shortcut menu
or double-click the task and select Add-Ins, BillQuick, Send to BillQuick on the Tasks screen.
4. Enter the Date, Project ID, Employee ID and Activity ID.
5. Type the memo that you want to add to the time entry in the Memo field.
6. Click Send to BillQuick to save the selected task as time entry in BillQuick.
HOW DO I SEND EMAILS?
With BillQuick Outlook Add-In, you can send emails to BillQuick as time entries. You can
send existing emails (that is, sent and received) and log new emails as time entries in
BillQuick at the same time you send them to recipients.
HELP MANUAL: BillQuick Outlook Add-In Help
BillQuick | Power Up Your Business (866) 945-1595 | www.bqe.com | [email protected]
20
Send an Existing Email
Do the following to send an existing email:
1. Prior to sending an email to BillQuick, we recommend that you review it first in
Outlook to make sure it is correct.
Make sure the email Subject line is correct. It gets transferred as the time entry
description in BillQuick.
2. In the Outlook Inbox or Sent folder, select an email to send.
3. Select BillQuick menu, Send to BillQuick.
You can also right-click the email and select Send to BillQuick from the menu or
double-click the email and select Add-Ins, BillQuick, Send to BillQuick on the Email screen.
4. Enter the Date, Project ID, Employee ID and Activity ID.
5. Type the memo that you want to add to the time entry in the Memo field.
6. Click Send to BillQuick.
HELP MANUAL: BillQuick Outlook Add-In Help
BillQuick | Power Up Your Business (866) 945-1595 | www.bqe.com | [email protected]
21
Create and Send New Email to BillQuick
You can create an email and simultaneously send it to the recipients and BillQuick by using
the Send and Log feature.
When Send and Log is used, BillQuick Outlook Add-In sends the same time entry values (for
example, Project ID, Employee ID, and Activity ID) sent the last time the Send to BillQuick
screen was used with the Remember check box selected. If this option was not used or the
fields were blank, you will be prompted to enter the values.
Do the following to create an email and log it in BillQuick as a time entry:
1. Create an email in Outlook.
Make sure the email Subject line is correct. It gets transferred as the time entry
Description in BillQuick.
2. Select Add-Ins, BillQuick, Send and Log from the Message screen.
3. Click OK on the confirmation message.
HOW DO I SEND CONTACTS?
Do the following to send a contact to BillQuick from Microsoft Outlook:
1. In Outlook Contacts view, right-click a contact record to send to BillQuick.
2. You can also double-click it and open its screen.
3. On the BillQuick shortcut menu (or Add-Ins tab), choose how you would want to
save the contact's information in BillQuick (that is, Employee, Vendor, Client or
Client Contact).
HELP MANUAL: BillQuick Outlook Add-In Help
BillQuick | Power Up Your Business (866) 945-1595 | www.bqe.com | [email protected]
22
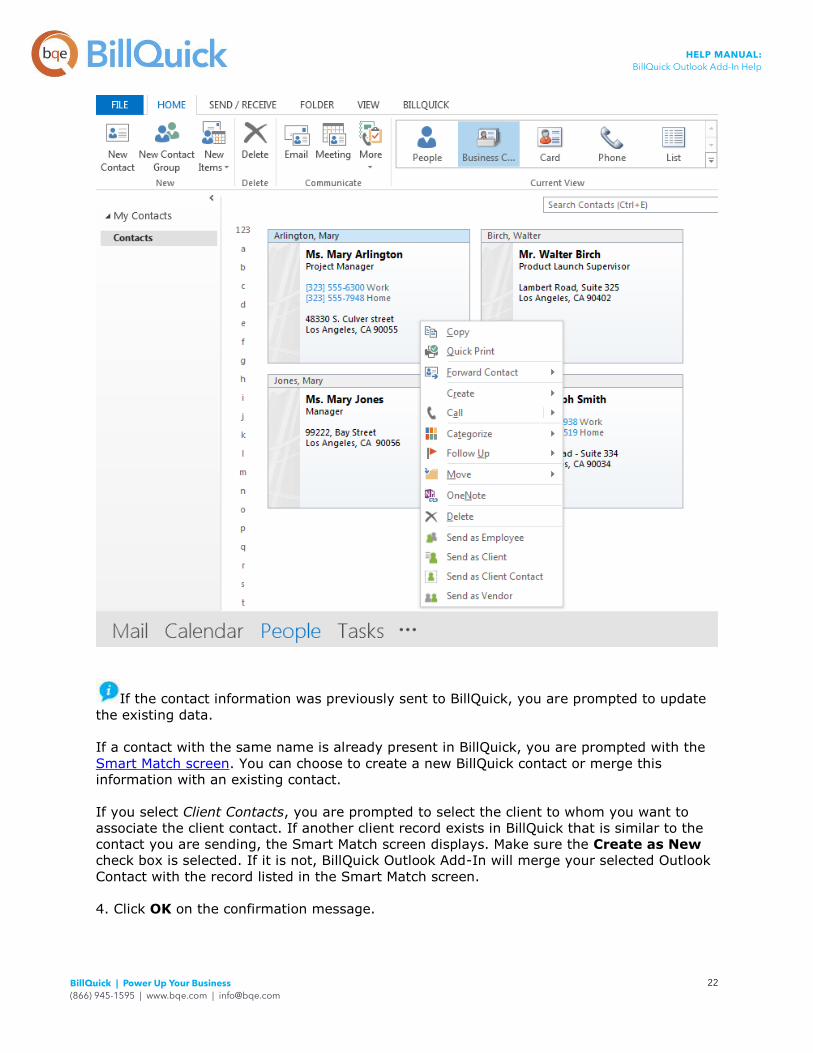
If the contact information was previously sent to BillQuick, you are prompted to update
the existing data.
If a contact with the same name is already present in BillQuick, you are prompted with the
Smart Match screen. You can choose to create a new BillQuick contact or merge this
information with an existing contact.
If you select Client Contacts, you are prompted to select the client to whom you want to
associate the client contact. If another client record exists in BillQuick that is similar to the
contact you are sending, the Smart Match screen displays. Make sure the Create as New
check box is selected. If it is not, BillQuick Outlook Add-In will merge your selected Outlook
Contact with the record listed in the Smart Match screen.
4. Click OK on the confirmation message.
HELP MANUAL: BillQuick Outlook Add-In Help
BillQuick | Power Up Your Business (866) 945-1595 | www.bqe.com | [email protected]
23
GET FROM BILLQUICK
GET FROM BILLQUICK OVERVIEW
Besides sending information to BillQuick, you can also retrieve data from BillQuick. BillQuick
Outlook Add-In can be used to create Microsoft Outlook contacts from BillQuick employee,
client, client contact and vendor records. After you choose the type of records that you want
to get into Outlook as contacts, BillQuick Outlook Add-In displays a window listing the
matching contacts.
Information from BillQuick records are stored in Outlook as follows:
Employees or Vendors: The Employee Home Phone is stored as the Primary
Telephone Number of the Outlook contact. The address of the employee or vendor
from BillQuick is stored in the Outlook contact's business address field.
Clients: The Client Phone is stored in the Outlook contact's Primary Telephone
Number field. The client address from BillQuick is stored in the Outlook contact's
Business Address field.
Client Contacts: The Client Contact Work Phone is stored in the Outlook contact's
Primary Telephone Number field. The address of the BillQuick client contact is stored
in the Business Address field in Outlook.
The rest of the fields for Employees, Vendors, Clients and Client Contacts (that is, First
name, Last Name, Company, Email, Title, etc.) are stored in the corresponding fields with
matching names for a contact in Outlook.
Reference Info
GET CONTACTS
BillQuick Outlook Add-In allows you to get Employee, Clients, Client Contacts and Vendor
records from BillQuick. After you choose the type of records that you want to get into
Outlook as contacts, BillQuick Outlook Add-In displays a window listing the matching
contacts.
Items that have already been transferred to Outlook are displayed in blue.
HELP MANUAL: BillQuick Outlook Add-In Help
BillQuick | Power Up Your Business (866) 945-1595 | www.bqe.com | [email protected]
24
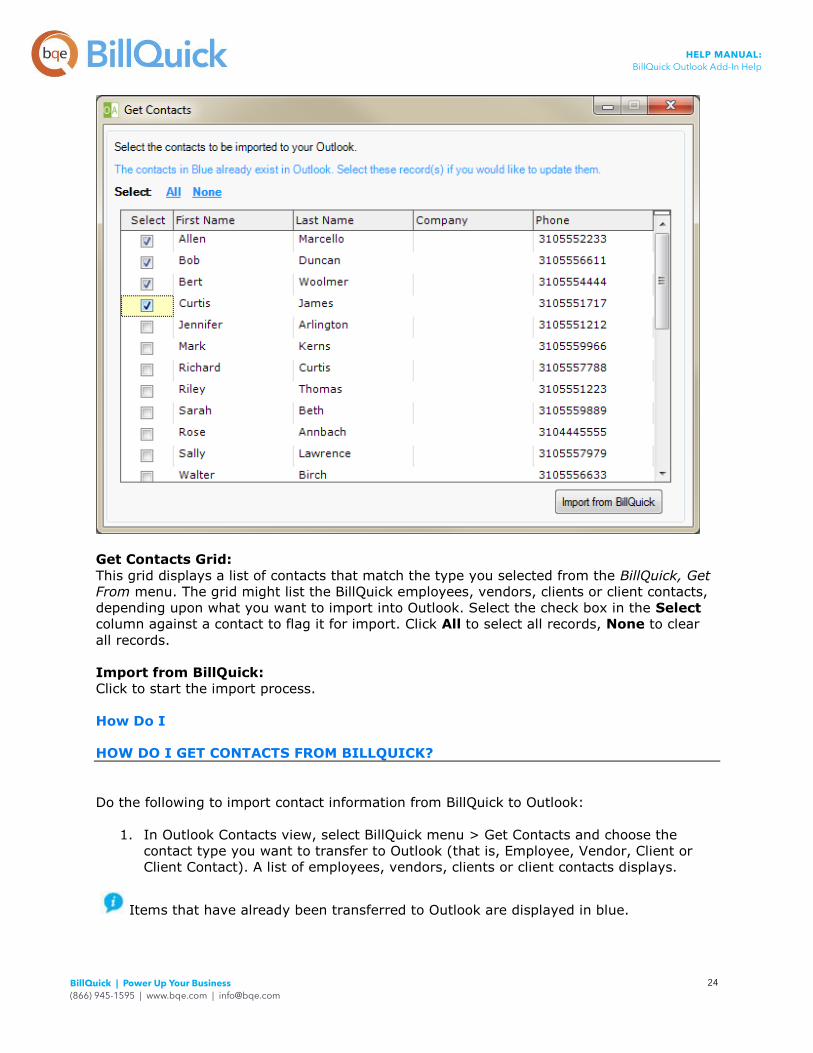
Get Contacts Grid:
This grid displays a list of contacts that match the type you selected from the BillQuick, Get
From menu. The grid might list the BillQuick employees, vendors, clients or client contacts,
depending upon what you want to import into Outlook. Select the check box in the Select
column against a contact to flag it for import. Click All to select all records, None to clear
all records.
Import from BillQuick:
Click to start the import process.
How Do I
HOW DO I GET CONTACTS FROM BILLQUICK?
Do the following to import contact information from BillQuick to Outlook:
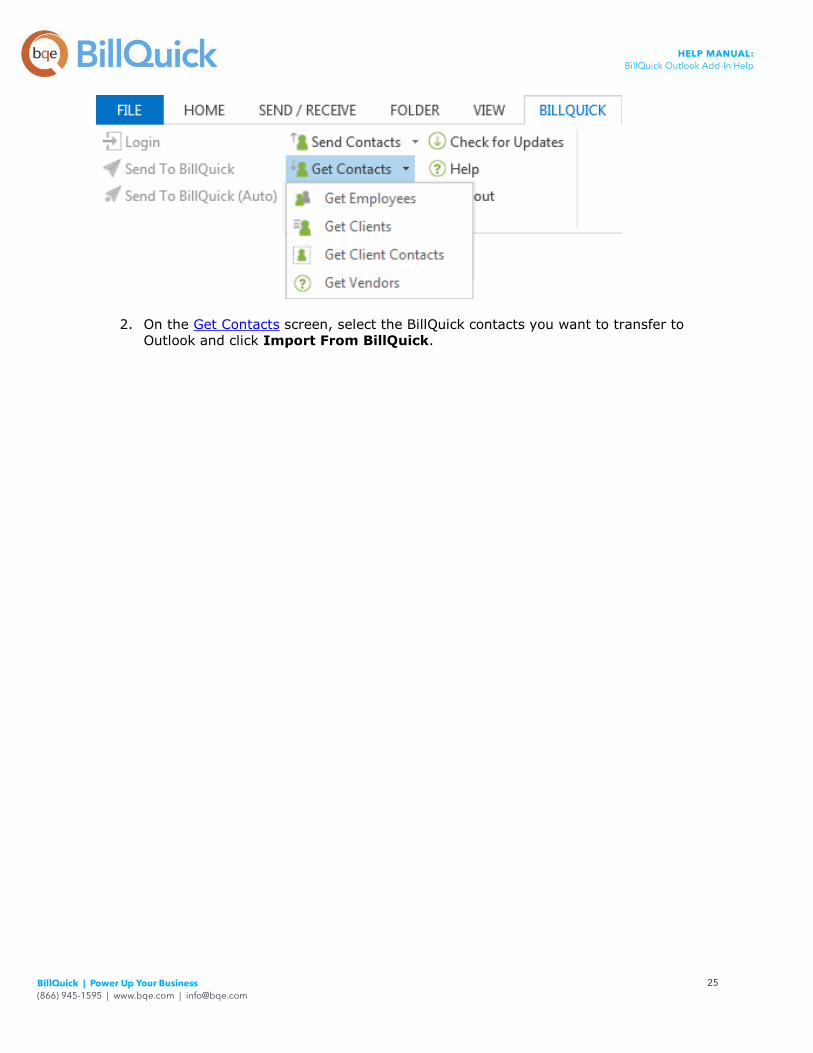
1. In Outlook Contacts view, select BillQuick menu > Get Contacts and choose the
contact type you want to transfer to Outlook (that is, Employee, Vendor, Client or
Client Contact). A list of employees, vendors, clients or client contacts displays.
Items that have already been transferred to Outlook are displayed in blue.
HELP MANUAL: BillQuick Outlook Add-In Help
BillQuick | Power Up Your Business (866) 945-1595 | www.bqe.com | [email protected]
25
2. On the Get Contacts screen, select the BillQuick contacts you want to transfer to
Outlook and click Import From BillQuick.
HELP MANUAL: BillQuick Outlook Add-In Help
BillQuick | Power Up Your Business (866) 945-1595 | www.bqe.com | [email protected]
26
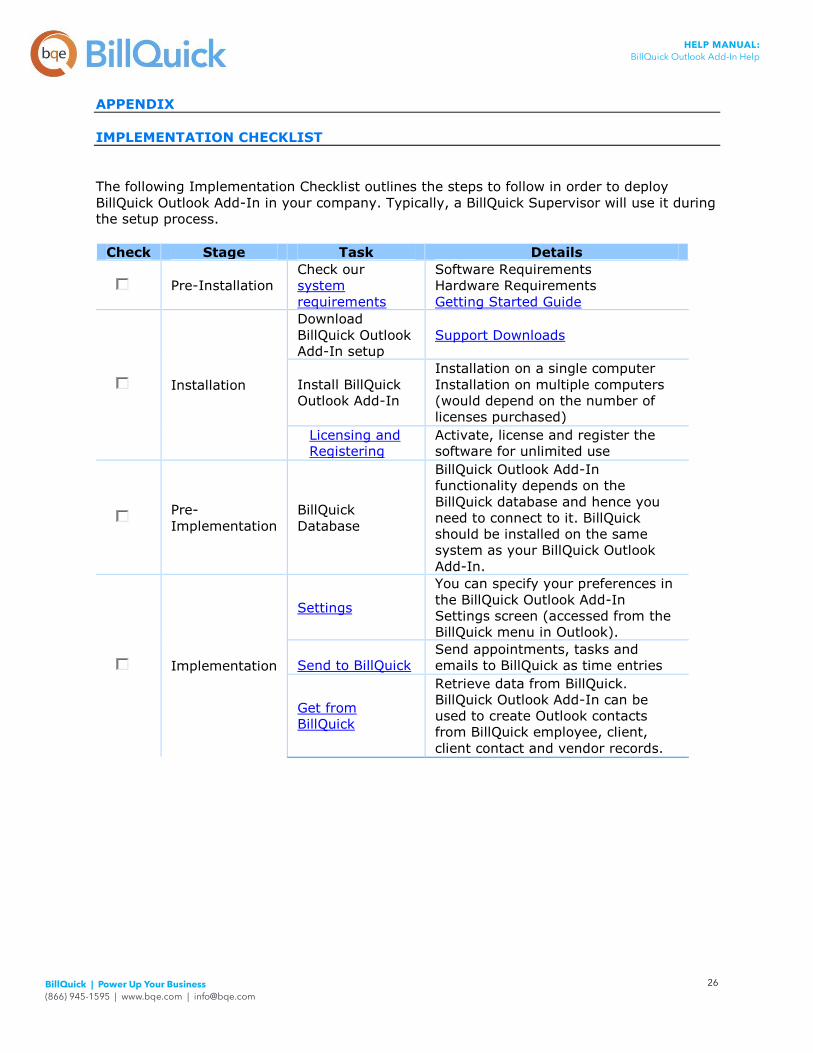
APPENDIX
IMPLEMENTATION CHECKLIST
The following Implementation Checklist outlines the steps to follow in order to deploy
BillQuick Outlook Add-In in your company. Typically, a BillQuick Supervisor will use it during
the setup process.
Check Stage Task Details
Pre-Installation
Check our
system
requirements
Software Requirements
Hardware Requirements
Getting Started Guide
Installation
Download
BillQuick Outlook
Add-In setup
Support Downloads
Install BillQuick
Outlook Add-In
Installation on a single computer
Installation on multiple computers
(would depend on the number of
licenses purchased)
Licensing and
Registering
Activate, license and register the
software for unlimited use
Pre-
Implementation
BillQuick
Database
BillQuick Outlook Add-In
functionality depends on the
BillQuick database and hence you
need to connect to it. BillQuick
should be installed on the same
system as your BillQuick Outlook
Add-In.
Implementation
Settings
You can specify your preferences in
the BillQuick Outlook Add-In
Settings screen (accessed from the
BillQuick menu in Outlook).
Send to BillQuick
Send appointments, tasks and
emails to BillQuick as time entries
Get from
BillQuick
Retrieve data from BillQuick.
BillQuick Outlook Add-In can be
used to create Outlook contacts
from BillQuick employee, client,
client contact and vendor records.
HELP MANUAL: BillQuick Outlook Add-In Help
BillQuick | Power Up Your Business (866) 945-1595 | www.bqe.com | [email protected]
27
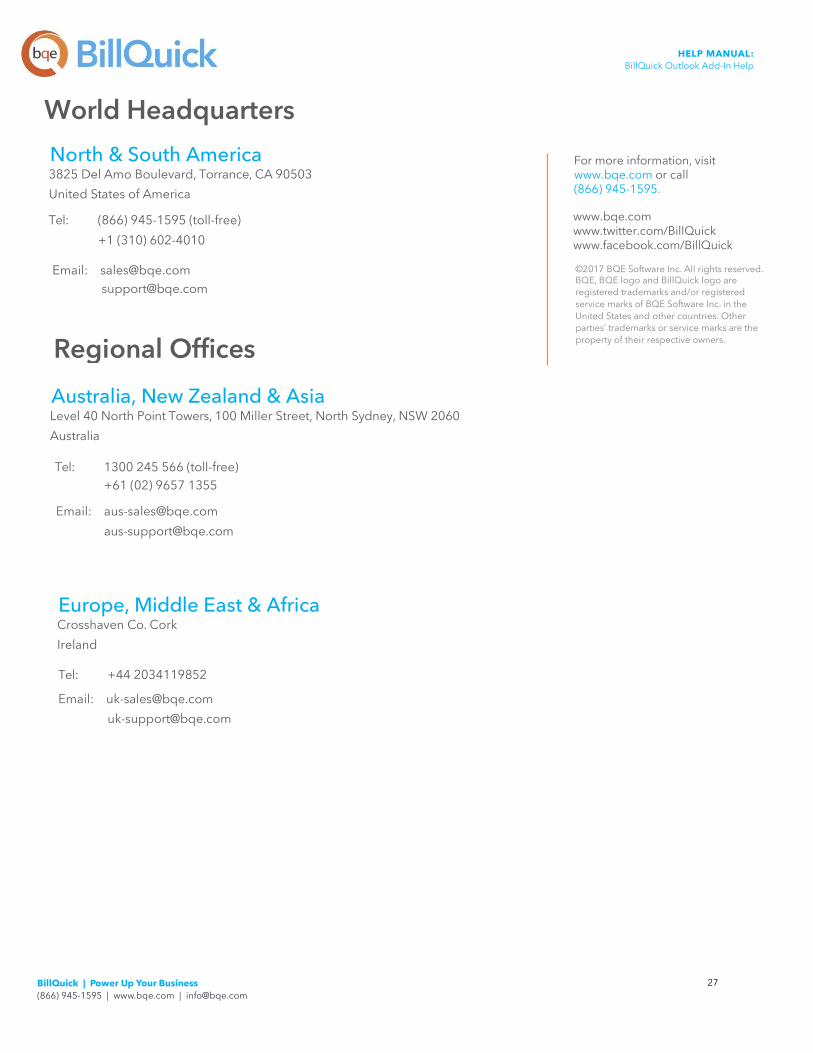
World Headquarters North & South America 3825 Del Amo Boulevard, Torrance, CA 90503 United States of America
Tel: (866) 945-1595 (toll-free) +1 (310) 602-4010
Email: [email protected] [email protected]
Regional Offices Australia, New Zealand & Asia Level 40 North Point Towers, 100 Miller Street, North Sydney, NSW 2060 Australia
Tel: 1300 245 566 (toll-free) +61 (02) 9657 1355
Email: [email protected] [email protected]
Europe, Middle East & Africa Crosshaven Co. Cork Ireland
Tel: +44 2034119852
Email: [email protected] [email protected]
For more information, visit www.bqe.com or call (866) 945-1595.
www.bqe.com www.twitter.com/BillQuick www.facebook.com/BillQuick
©2017 BQE Software Inc. All rights reserved. BQE, BQE logo and BillQuick logo are registered trademarks and/or registered service marks of BQE Software Inc. in the United States and other countries. Other parties’ trademarks or service marks are the property of their respective owners.