Embed Size (px)
Citation preview

SAP BusinessObjects Business Intelligence platformDocument Version: 4.2 – 2015-11-12
Business Intelligence Platform Installation Guide for Windows
Content
1 Document History. . . . . . . . . . . . . . . . . . . . . . . . . . . . . . . . . . . . . . . . . . . . . . . . . . . . . . . . . . . . . . 5
2 Introduction. . . . . . . . . . . . . . . . . . . . . . . . . . . . . . . . . . . . . . . . . . . . . . . . . . . . . . . . . . . . . . . . . . 72.1 About this Document. . . . . . . . . . . . . . . . . . . . . . . . . . . . . . . . . . . . . . . . . . . . . . . . . . . . . . . . . . . . . 72.2 Purpose. . . . . . . . . . . . . . . . . . . . . . . . . . . . . . . . . . . . . . . . . . . . . . . . . . . . . . . . . . . . . . . . . . . . . . 72.3 Constraints. . . . . . . . . . . . . . . . . . . . . . . . . . . . . . . . . . . . . . . . . . . . . . . . . . . . . . . . . . . . . . . . . . . . 72.4 Variables. . . . . . . . . . . . . . . . . . . . . . . . . . . . . . . . . . . . . . . . . . . . . . . . . . . . . . . . . . . . . . . . . . . . . 72.5 Terminology. . . . . . . . . . . . . . . . . . . . . . . . . . . . . . . . . . . . . . . . . . . . . . . . . . . . . . . . . . . . . . . . . . . 82.6 Additional documentation. . . . . . . . . . . . . . . . . . . . . . . . . . . . . . . . . . . . . . . . . . . . . . . . . . . . . . . . . 9
3 Planning. . . . . . . . . . . . . . . . . . . . . . . . . . . . . . . . . . . . . . . . . . . . . . . . . . . . . . . . . . . . . . . . . . . . . 113.1 New Features and Components. . . . . . . . . . . . . . . . . . . . . . . . . . . . . . . . . . . . . . . . . . . . . . . . . . . . .123.2 Upgrade support. . . . . . . . . . . . . . . . . . . . . . . . . . . . . . . . . . . . . . . . . . . . . . . . . . . . . . . . . . . . . . . 133.3 Database servers. . . . . . . . . . . . . . . . . . . . . . . . . . . . . . . . . . . . . . . . . . . . . . . . . . . . . . . . . . . . . . . 143.4 Languages. . . . . . . . . . . . . . . . . . . . . . . . . . . . . . . . . . . . . . . . . . . . . . . . . . . . . . . . . . . . . . . . . . . 14
4 Preparation. . . . . . . . . . . . . . . . . . . . . . . . . . . . . . . . . . . . . . . . . . . . . . . . . . . . . . . . . . . . . . . . . . 154.1 System requirements. . . . . . . . . . . . . . . . . . . . . . . . . . . . . . . . . . . . . . . . . . . . . . . . . . . . . . . . . . . .16
Account permissions. . . . . . . . . . . . . . . . . . . . . . . . . . . . . . . . . . . . . . . . . . . . . . . . . . . . . . . . . .16Network permissions. . . . . . . . . . . . . . . . . . . . . . . . . . . . . . . . . . . . . . . . . . . . . . . . . . . . . . . . . .17
4.2 Preparing the CMS system or Auditing Data Store database. . . . . . . . . . . . . . . . . . . . . . . . . . . . . . . . 17Extra requirements for IBM DB2. . . . . . . . . . . . . . . . . . . . . . . . . . . . . . . . . . . . . . . . . . . . . . . . . .19Extra requirements for Sybase ASE. . . . . . . . . . . . . . . . . . . . . . . . . . . . . . . . . . . . . . . . . . . . . . . 19Extra requirements for SAP HANA . . . . . . . . . . . . . . . . . . . . . . . . . . . . . . . . . . . . . . . . . . . . . . . 20Extra requirements for CMS clustering with SQL Anywhere. . . . . . . . . . . . . . . . . . . . . . . . . . . . . . 20
4.3 SAP support. . . . . . . . . . . . . . . . . . . . . . . . . . . . . . . . . . . . . . . . . . . . . . . . . . . . . . . . . . . . . . . . . . 21Support for SAP System Landscape Directory (SLD). . . . . . . . . . . . . . . . . . . . . . . . . . . . . . . . . . . 21Support for SAP Solution Manager Diagnostics (SMD). . . . . . . . . . . . . . . . . . . . . . . . . . . . . . . . . .22Support for CA Wily Introscope. . . . . . . . . . . . . . . . . . . . . . . . . . . . . . . . . . . . . . . . . . . . . . . . . . 23Support for SAP BW . . . . . . . . . . . . . . . . . . . . . . . . . . . . . . . . . . . . . . . . . . . . . . . . . . . . . . . . . .23
4.4 Final checklist. . . . . . . . . . . . . . . . . . . . . . . . . . . . . . . . . . . . . . . . . . . . . . . . . . . . . . . . . . . . . . . . . 23
5 Installation. . . . . . . . . . . . . . . . . . . . . . . . . . . . . . . . . . . . . . . . . . . . . . . . . . . . . . . . . . . . . . . . . . 255.1 Overview. . . . . . . . . . . . . . . . . . . . . . . . . . . . . . . . . . . . . . . . . . . . . . . . . . . . . . . . . . . . . . . . . . . . 255.2 To download the server installation program. . . . . . . . . . . . . . . . . . . . . . . . . . . . . . . . . . . . . . . . . . . 255.3 To run an interactive installation. . . . . . . . . . . . . . . . . . . . . . . . . . . . . . . . . . . . . . . . . . . . . . . . . . . . 26
To select an install type. . . . . . . . . . . . . . . . . . . . . . . . . . . . . . . . . . . . . . . . . . . . . . . . . . . . . . . . 27While the installation program runs. . . . . . . . . . . . . . . . . . . . . . . . . . . . . . . . . . . . . . . . . . . . . . . 40
2 © 2015 SAP SE or an SAP affiliate company. All rights reserved.Business Intelligence Platform Installation Guide for Windows
Content
When installation is complete. . . . . . . . . . . . . . . . . . . . . . . . . . . . . . . . . . . . . . . . . . . . . . . . . . . 405.4 To run a silent installation. . . . . . . . . . . . . . . . . . . . . . . . . . . . . . . . . . . . . . . . . . . . . . . . . . . . . . . . 40
Command-line switch parameters. . . . . . . . . . . . . . . . . . . . . . . . . . . . . . . . . . . . . . . . . . . . . . . . 41Installation option parameters. . . . . . . . . . . . . . . . . . . . . . . . . . . . . . . . . . . . . . . . . . . . . . . . . . . 44
5.5 To run a phase-wise installation. . . . . . . . . . . . . . . . . . . . . . . . . . . . . . . . . . . . . . . . . . . . . . . . . . . . 53To run a phase-wise installation for new installation. . . . . . . . . . . . . . . . . . . . . . . . . . . . . . . . . . . . 53To run a phase-wise installation for update. . . . . . . . . . . . . . . . . . . . . . . . . . . . . . . . . . . . . . . . . . 54
6 Post-Installation. . . . . . . . . . . . . . . . . . . . . . . . . . . . . . . . . . . . . . . . . . . . . . . . . . . . . . . . . . . . . . 566.1 Verifying your installation. . . . . . . . . . . . . . . . . . . . . . . . . . . . . . . . . . . . . . . . . . . . . . . . . . . . . . . . . 56
Checking the installed version. . . . . . . . . . . . . . . . . . . . . . . . . . . . . . . . . . . . . . . . . . . . . . . . . . . 56Troubleshooting login issues. . . . . . . . . . . . . . . . . . . . . . . . . . . . . . . . . . . . . . . . . . . . . . . . . . . . 57
6.2 Creating additional Adaptive Processing Servers. . . . . . . . . . . . . . . . . . . . . . . . . . . . . . . . . . . . . . . . 576.3 Deploying web applications. . . . . . . . . . . . . . . . . . . . . . . . . . . . . . . . . . . . . . . . . . . . . . . . . . . . . . . 586.4 SAP support. . . . . . . . . . . . . . . . . . . . . . . . . . . . . . . . . . . . . . . . . . . . . . . . . . . . . . . . . . . . . . . . . . 58
To configure System Landscape Directory (SLD) Data Supplier (DS) post installation. . . . . . . . . . . 58To configure SMD Agent post installation. . . . . . . . . . . . . . . . . . . . . . . . . . . . . . . . . . . . . . . . . . . 58To configure CA Wily Introscope Agent post installation. . . . . . . . . . . . . . . . . . . . . . . . . . . . . . . . . 59
6.5 Third-party ERP integration. . . . . . . . . . . . . . . . . . . . . . . . . . . . . . . . . . . . . . . . . . . . . . . . . . . . . . . 60To enable Siebel Enterprise integration. . . . . . . . . . . . . . . . . . . . . . . . . . . . . . . . . . . . . . . . . . . . 60To enable JD Edwards EnterpriseOne integration. . . . . . . . . . . . . . . . . . . . . . . . . . . . . . . . . . . . . 60To enable Oracle E-Business Suite (EBS) integration. . . . . . . . . . . . . . . . . . . . . . . . . . . . . . . . . . . 61
6.6 Post-install diagnostic checks. . . . . . . . . . . . . . . . . . . . . . . . . . . . . . . . . . . . . . . . . . . . . . . . . . . . . .626.7 Making changes to the BI platform. . . . . . . . . . . . . . . . . . . . . . . . . . . . . . . . . . . . . . . . . . . . . . . . . . 62
To modify the BI platform. . . . . . . . . . . . . . . . . . . . . . . . . . . . . . . . . . . . . . . . . . . . . . . . . . . . . . 62To repair the BI platform. . . . . . . . . . . . . . . . . . . . . . . . . . . . . . . . . . . . . . . . . . . . . . . . . . . . . . . 63To remove the BI platform. . . . . . . . . . . . . . . . . . . . . . . . . . . . . . . . . . . . . . . . . . . . . . . . . . . . . .64Patching third-party solutions bundled with the BI platform. . . . . . . . . . . . . . . . . . . . . . . . . . . . . . 65
6.8 When the administrator account password is lost. . . . . . . . . . . . . . . . . . . . . . . . . . . . . . . . . . . . . . . . 656.9 Post-installation configuration of fonts in the fontalias.xml file. . . . . . . . . . . . . . . . . . . . . . . . . . . . . . . 666.10 Verifying fips in your installation. . . . . . . . . . . . . . . . . . . . . . . . . . . . . . . . . . . . . . . . . . . . . . . . . . . . 676.11 Viewing log summary. . . . . . . . . . . . . . . . . . . . . . . . . . . . . . . . . . . . . . . . . . . . . . . . . . . . . . . . . . . .68
7 Installing BI Platform Client Tools. . . . . . . . . . . . . . . . . . . . . . . . . . . . . . . . . . . . . . . . . . . . . . . . 697.1 Desktop client applications. . . . . . . . . . . . . . . . . . . . . . . . . . . . . . . . . . . . . . . . . . . . . . . . . . . . . . . .69
Web Intelligence Rich Client. . . . . . . . . . . . . . . . . . . . . . . . . . . . . . . . . . . . . . . . . . . . . . . . . . . . .70Business View Manager. . . . . . . . . . . . . . . . . . . . . . . . . . . . . . . . . . . . . . . . . . . . . . . . . . . . . . . 70Report Conversion Tool. . . . . . . . . . . . . . . . . . . . . . . . . . . . . . . . . . . . . . . . . . . . . . . . . . . . . . . 70Universe design tool. . . . . . . . . . . . . . . . . . . . . . . . . . . . . . . . . . . . . . . . . . . . . . . . . . . . . . . . . . 71Query as a Web Service. . . . . . . . . . . . . . . . . . . . . . . . . . . . . . . . . . . . . . . . . . . . . . . . . . . . . . . . 71Information design tool. . . . . . . . . . . . . . . . . . . . . . . . . . . . . . . . . . . . . . . . . . . . . . . . . . . . . . . . 72Translation Management Tool. . . . . . . . . . . . . . . . . . . . . . . . . . . . . . . . . . . . . . . . . . . . . . . . . . . 72
Business Intelligence Platform Installation Guide for WindowsContent © 2015 SAP SE or an SAP affiliate company. All rights reserved. 3

Data Federation Administration Tool. . . . . . . . . . . . . . . . . . . . . . . . . . . . . . . . . . . . . . . . . . . . . . 72Widgets for the BI Platform. . . . . . . . . . . . . . . . . . . . . . . . . . . . . . . . . . . . . . . . . . . . . . . . . . . . . 73
7.2 To download the Client Tools installation program. . . . . . . . . . . . . . . . . . . . . . . . . . . . . . . . . . . . . . . 737.3 Client Tools installation prerequisites. . . . . . . . . . . . . . . . . . . . . . . . . . . . . . . . . . . . . . . . . . . . . . . . 747.4 To run an interactive installation of Client Tools. . . . . . . . . . . . . . . . . . . . . . . . . . . . . . . . . . . . . . . . . 747.5 To run a silent installation of Client Tools. . . . . . . . . . . . . . . . . . . . . . . . . . . . . . . . . . . . . . . . . . . . . . 76
Command-line silent install of Client Tools. . . . . . . . . . . . . . . . . . . . . . . . . . . . . . . . . . . . . . . . . . 77Installation option parameters for Client Tools. . . . . . . . . . . . . . . . . . . . . . . . . . . . . . . . . . . . . . . 79
7.6 Making changes to Client Tools. . . . . . . . . . . . . . . . . . . . . . . . . . . . . . . . . . . . . . . . . . . . . . . . . . . . .84To modify Client Tools. . . . . . . . . . . . . . . . . . . . . . . . . . . . . . . . . . . . . . . . . . . . . . . . . . . . . . . . 84To repair a Client Tools installation. . . . . . . . . . . . . . . . . . . . . . . . . . . . . . . . . . . . . . . . . . . . . . . .85To remove Client Tools. . . . . . . . . . . . . . . . . . . . . . . . . . . . . . . . . . . . . . . . . . . . . . . . . . . . . . . . 85
7.7 Upgrading Client Tools. . . . . . . . . . . . . . . . . . . . . . . . . . . . . . . . . . . . . . . . . . . . . . . . . . . . . . . . . . .86
4 © 2015 SAP SE or an SAP affiliate company. All rights reserved.Business Intelligence Platform Installation Guide for Windows
Content
1 Document History
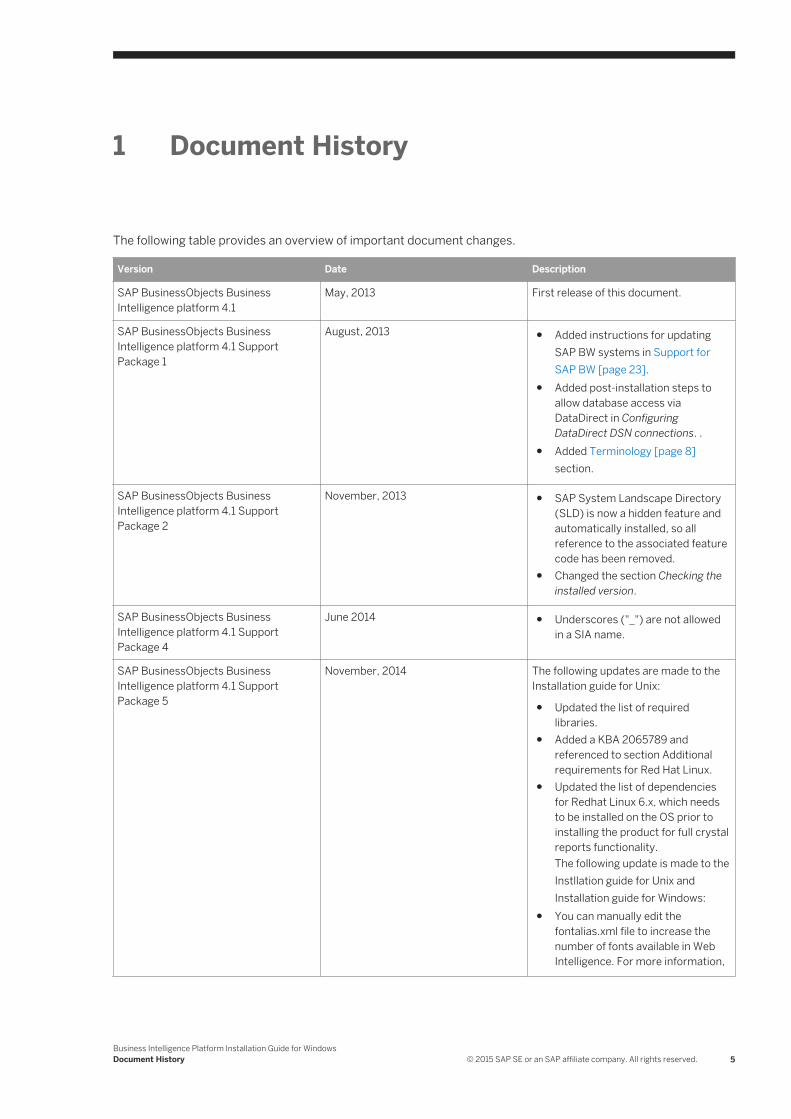
The following table provides an overview of important document changes.
Version Date Description
SAP BusinessObjects Business Intelligence platform 4.1
May, 2013 First release of this document.
SAP BusinessObjects Business Intelligence platform 4.1 Support Package 1
August, 2013 ● Added instructions for updating SAP BW systems in Support for SAP BW [page 23].
● Added post-installation steps to allow database access via DataDirect in Configuring DataDirect DSN connections. .
● Added Terminology [page 8] section.
SAP BusinessObjects Business Intelligence platform 4.1 Support Package 2
November, 2013 ● SAP System Landscape Directory (SLD) is now a hidden feature and automatically installed, so all reference to the associated feature code has been removed.
● Changed the section Checking the installed version.
SAP BusinessObjects Business Intelligence platform 4.1 Support Package 4
June 2014 ● Underscores ("_") are not allowed in a SIA name.
SAP BusinessObjects Business Intelligence platform 4.1 Support Package 5
November, 2014 The following updates are made to the Installation guide for Unix:
● Updated the list of required libraries.
● Added a KBA 2065789 and referenced to section Additional requirements for Red Hat Linux.
● Updated the list of dependencies for Redhat Linux 6.x, which needs to be installed on the OS prior to installing the product for full crystal reports functionality.The following update is made to the Instllation guide for Unix and Installation guide for Windows:
● You can manually edit the fontalias.xml file to increase the number of fonts available in Web Intelligence. For more information,
Business Intelligence Platform Installation Guide for WindowsDocument History © 2015 SAP SE or an SAP affiliate company. All rights reserved. 5
Version Date Description
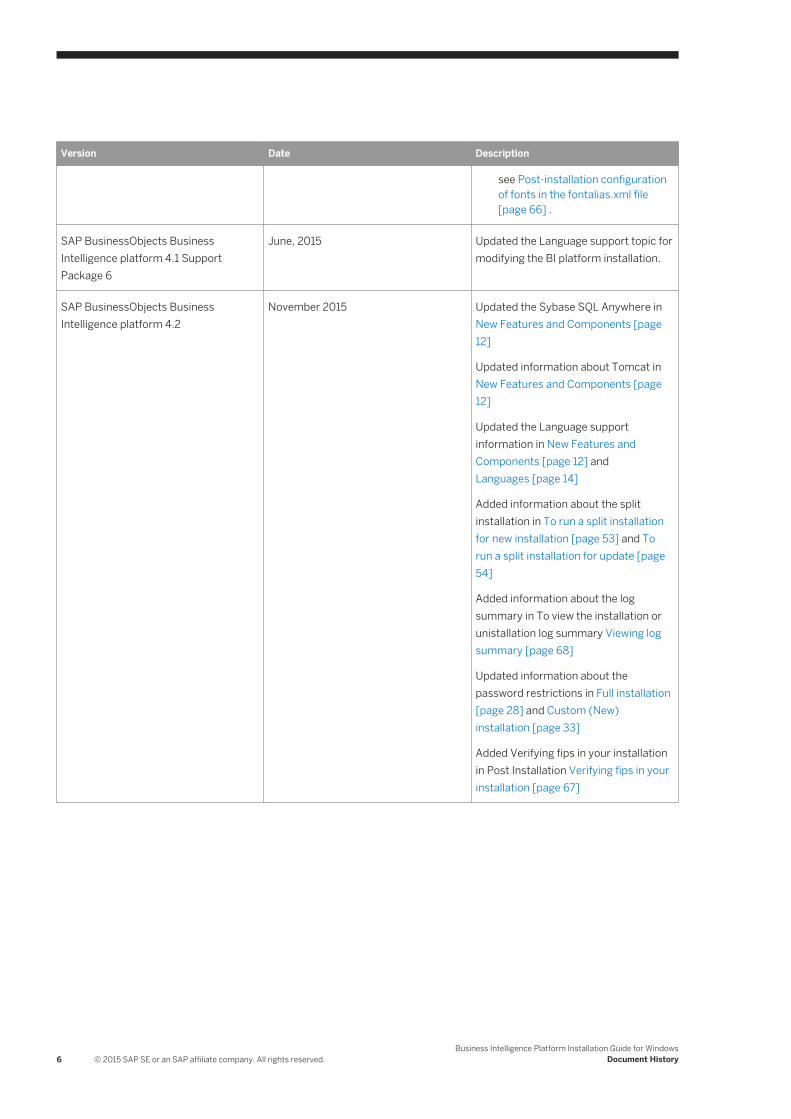
see Post-installation configuration of fonts in the fontalias.xml file [page 66] .
SAP BusinessObjects Business Intelligence platform 4.1 Support Package 6
June, 2015 Updated the Language support topic for modifying the BI platform installation.
SAP BusinessObjects Business Intelligence platform 4.2
November 2015 Updated the Sybase SQL Anywhere in New Features and Components [page 12]
Updated information about Tomcat in New Features and Components [page 12]
Updated the Language support information in New Features and Components [page 12] and Languages [page 14]
Added information about the split installation in To run a split installation for new installation [page 53] and To run a split installation for update [page 54]
Added information about the log summary in To view the installation or unistallation log summary Viewing log summary [page 68]
Updated information about the password restrictions in Full installation [page 28] and Custom (New) installation [page 33]
Added Verifying fips in your installation in Post Installation Verifying fips in your installation [page 67]
6 © 2015 SAP SE or an SAP affiliate company. All rights reserved.Business Intelligence Platform Installation Guide for Windows
Document History
2 Introduction
This document guides you through the installation of the BI platform.
2.1 About this Document
The following documentation provides administrators with information, procedures, and options for the installation, removal, and modification of a BI platform server. Two versions of this guide exist:
● SAP BusinessObjects Business Intelligence Platform Installation Guide for Windows: for use with Microsoft Windows operating systems (this document).
● SAP BusinessObjects Business Intelligence Platform Installation Guide for Unix: for use with Unix or Linux operating systems.
This document also provides information and procedures for the installation of the BI platform Client Tools.
2.2 Purpose
This document is intended for system administrators performing a full installation of the BI platform. For information on applying minor release, Support Package, or Patch updates to your existing installation, see the Update installation guides at http://help.sap.com/bobip.
2.3 Constraints
This guide does not describe how to set up a supported host operating system, database, web application, or web server. If you are planning to use a dedicated database, web application, or web server, it must be installed and functioning before attempting to install the BI platform.
2.4 Variables
The following variables are used throughout this guide.
Business Intelligence Platform Installation Guide for WindowsIntroduction © 2015 SAP SE or an SAP affiliate company. All rights reserved. 7
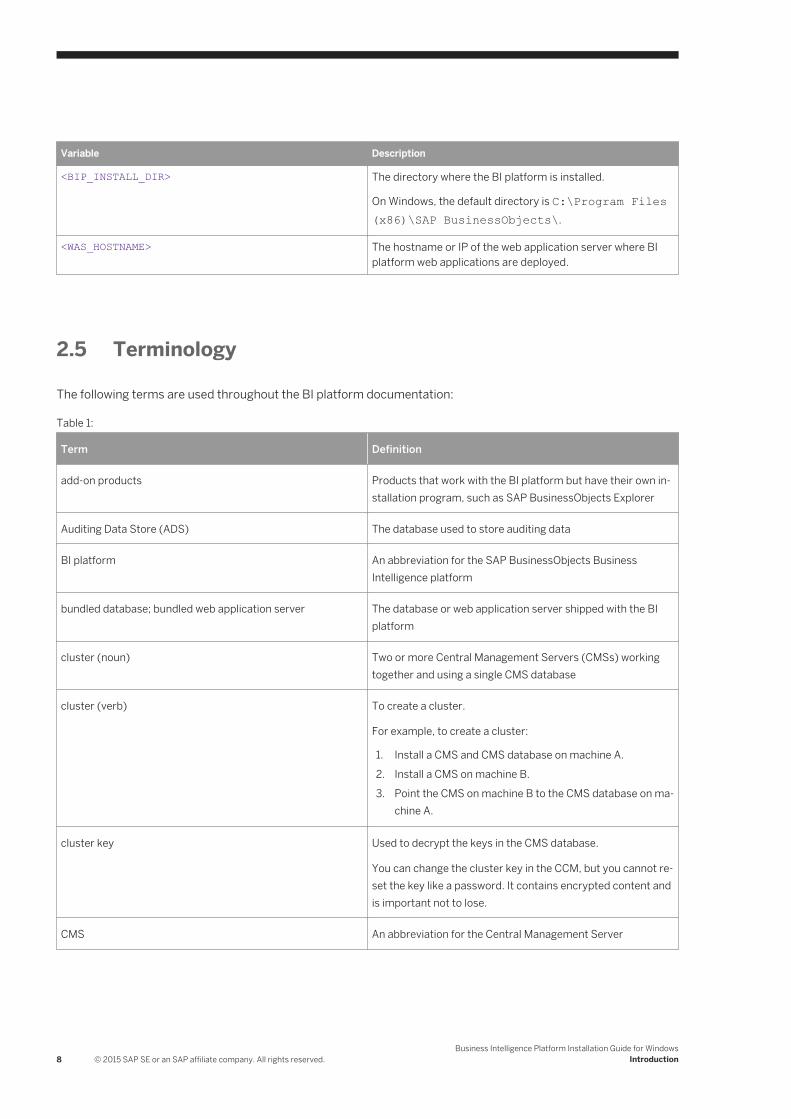
Variable Description
<BIP_INSTALL_DIR> The directory where the BI platform is installed.
On Windows, the default directory is C:\Program Files (x86)\SAP BusinessObjects\.
<WAS_HOSTNAME> The hostname or IP of the web application server where BI platform web applications are deployed.
2.5 Terminology
The following terms are used throughout the BI platform documentation:
Table 1:
Term Definition
add-on products Products that work with the BI platform but have their own installation program, such as SAP BusinessObjects Explorer
Auditing Data Store (ADS) The database used to store auditing data
BI platform An abbreviation for the SAP BusinessObjects Business Intelligence platform
bundled database; bundled web application server The database or web application server shipped with the BI platform
cluster (noun) Two or more Central Management Servers (CMSs) working together and using a single CMS database
cluster (verb) To create a cluster.
For example, to create a cluster:
1. Install a CMS and CMS database on machine A.2. Install a CMS on machine B.3. Point the CMS on machine B to the CMS database on ma
chine A.
cluster key Used to decrypt the keys in the CMS database.
You can change the cluster key in the CCM, but you cannot reset the key like a password. It contains encrypted content and is important not to lose.
CMS An abbreviation for the Central Management Server
8 © 2015 SAP SE or an SAP affiliate company. All rights reserved.Business Intelligence Platform Installation Guide for Windows
Introduction
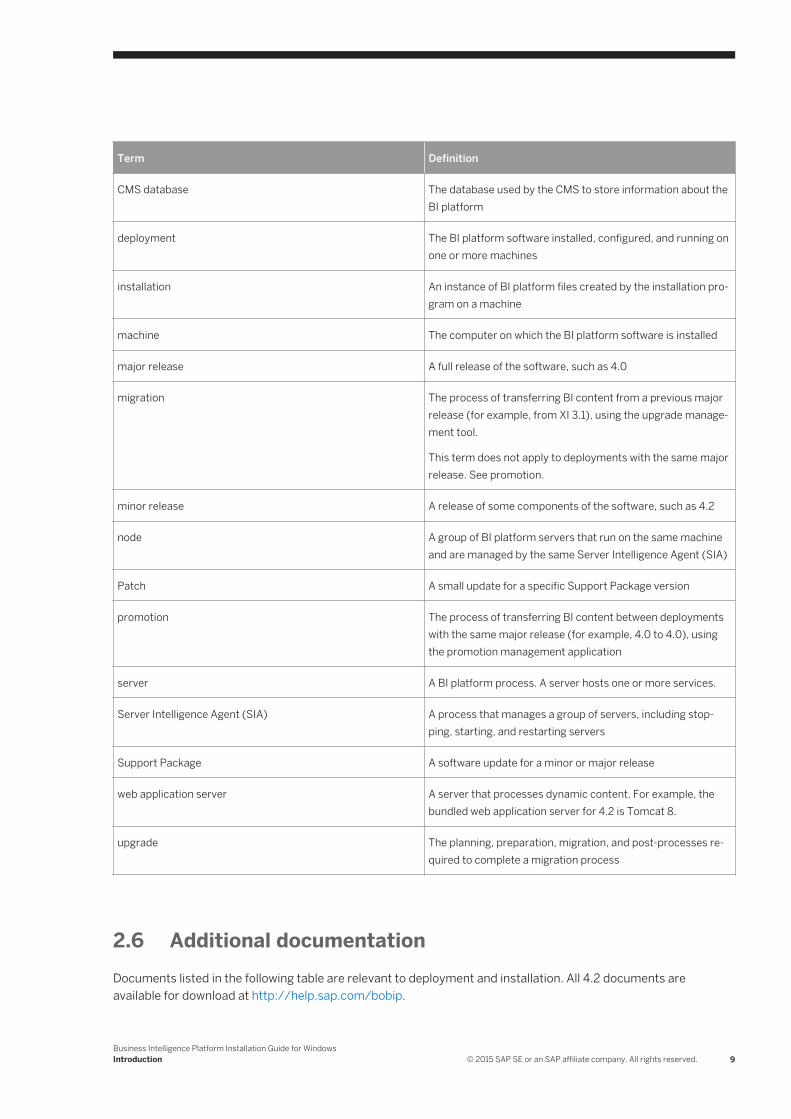
Term Definition
CMS database The database used by the CMS to store information about the BI platform
deployment The BI platform software installed, configured, and running on one or more machines
installation An instance of BI platform files created by the installation program on a machine
machine The computer on which the BI platform software is installed
major release A full release of the software, such as 4.0
migration The process of transferring BI content from a previous major release (for example, from XI 3.1), using the upgrade management tool.
This term does not apply to deployments with the same major release. See promotion.
minor release A release of some components of the software, such as 4.2
node A group of BI platform servers that run on the same machine and are managed by the same Server Intelligence Agent (SIA)
Patch A small update for a specific Support Package version
promotion The process of transferring BI content between deployments with the same major release (for example, 4.0 to 4.0), using the promotion management application
server A BI platform process. A server hosts one or more services.
Server Intelligence Agent (SIA) A process that manages a group of servers, including stopping, starting, and restarting servers
Support Package A software update for a minor or major release
web application server A server that processes dynamic content. For example, the bundled web application server for 4.2 is Tomcat 8.
upgrade The planning, preparation, migration, and post-processes required to complete a migration process
2.6 Additional documentationDocuments listed in the following table are relevant to deployment and installation. All 4.2 documents are available for download at http://help.sap.com/bobip.
Business Intelligence Platform Installation Guide for WindowsIntroduction © 2015 SAP SE or an SAP affiliate company. All rights reserved. 9
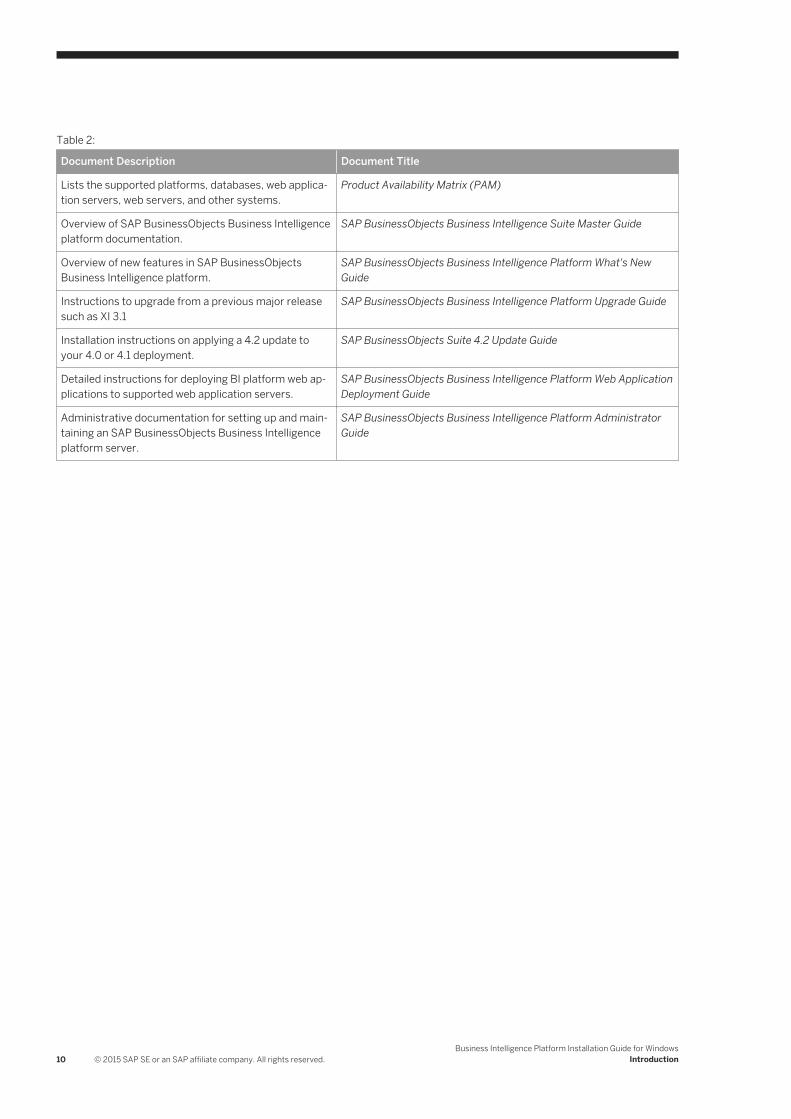
Table 2:
Document Description Document Title
Lists the supported platforms, databases, web application servers, web servers, and other systems.
Product Availability Matrix (PAM)
Overview of SAP BusinessObjects Business Intelligence platform documentation.
SAP BusinessObjects Business Intelligence Suite Master Guide
Overview of new features in SAP BusinessObjects Business Intelligence platform.
SAP BusinessObjects Business Intelligence Platform What's New Guide
Instructions to upgrade from a previous major release such as XI 3.1
SAP BusinessObjects Business Intelligence Platform Upgrade Guide
Installation instructions on applying a 4.2 update to your 4.0 or 4.1 deployment.
SAP BusinessObjects Suite 4.2 Update Guide
Detailed instructions for deploying BI platform web applications to supported web application servers.
SAP BusinessObjects Business Intelligence Platform Web Application Deployment Guide
Administrative documentation for setting up and maintaining an SAP BusinessObjects Business Intelligence platform server.
SAP BusinessObjects Business Intelligence Platform Administrator Guide
10 © 2015 SAP SE or an SAP affiliate company. All rights reserved.Business Intelligence Platform Installation Guide for Windows
Introduction
3 Planning
The BI platform can be installed on Windows, Unix, or Linux platforms.
Before installing:
● Ensure the operating system, application server, database server, and other components on which you will install the BI platform are supported. See the SAP BusinessObjects BI 4.0 Product Availability Matrix (PAM) at http://service.sap.com/sap/support/pam?hash=pvnr%3D67837800100900006540 .
● Decide whether to use the included Sybase SQL Anywhere database server for the CMS and auditing databases.If you do not have a database server to use with the BI platform, the installation program can install and configure one for you. It is recommended that you evaluate your requirements against information from your database server vendor to determine which supported database would best suit your organization's requirements.
NoteIf you do not plan to use the default database that is included in the installation program, ensure the database that you plan to use is configured before beginning the installation. The database must have user accounts with the appropriate database privileges ready, and the appropriate drivers must be installed and verified as working. The installation program will connect to and initialize the database.
The installation program will only install a database on the local machine. It cannot install across a network.● Decide whether to use the included Tomcat web application server.
If you do not have a web application server system to host BI platform web applications, the installation program can install and configure one for you. It is recommended that you evaluate your requirements against information from your web application server vendor to determine which web application server would best suit your organization's requirements. To use any other supported web application server, it must be installed, configured, enabled, and accessible before you install the BI platform.The installation program will only install Tomcat on the local machine. It cannot install across a network.During installation, users need to provide details regarding the SIA or Node name, the Cluster Key, and the Cluster name.SIA/Node name is an identifier only, it need not be a DNS resolvable hostname.It does need to be unique within the cluster, so something like Node1 would be appropriate, or ProdNode1.Cluster Name also need not be DNS resolvable. This is a user friendly name that identifies an overall environment which may encompass dozens of BOE servers working together.For example: BOEProduction or BOEDev, BOETest. The cluster name must be unique to each cluster of servers.This can be used to hide the real hostnames of machines when users log into the environment for security and simplicity reasons.This also allows you to add and remove hosts from the environment without making changes to the end user systems or processes.Cluster Key is a string that is used to prevent accidentally clustering machines together. You can think of it as a password that servers exchange behind the scene. Each cluster needs its own unique cluster key. This cluster key is also used for some encryption functionality and can be changed over time as needed with no impact to users.
Business Intelligence Platform Installation Guide for WindowsPlanning © 2015 SAP SE or an SAP affiliate company. All rights reserved. 11
3.1 New Features and Components
The following features and components are new in the BI platform 4.2 installation program.
Sybase SQL Anywhere bundled database
Sybase SQL Anywhere, bundled database server for the CMS and Auditing Data Store is updated to version 16.
If you are using the update installation program to update a 4.0 installation that uses the bundled Microsoft SQL Server Express database server to 4.2, your SQL Server database is preserved and can be used. You can use this bundled database server with no further action. Alternatively, you can migrate your existing databases to SAP SQL Anywhere by following the steps described in “Migrating to Sybase SQL Anywhere” in the SAP BusinessObjects Business Intelligence Suite 4.1 Support Package Update Guide.
Tomcat 8 bundled web application server
Tomcat 8.0 is now the default, bundled web application server.
If you are using the update installation program to update a 4.0 or 4.1 installation that uses the bundled Tomcat 6.0 or 7.0 web application server respectively to 4.2, your system is automatically updated to Tomcat 8.0.
Note● Any custom settings which you have applied in Tomcat 6.0 are migrated to Tomcat 8.0. Certain Tomcat
6.0 configuration files are backed up automatically to:<BIP_INSTALL_DIR>\tomcat6ConfBackup\
● Any Custom settings you had applied in Tomcat 7.0 are retained in Tomcat 8.0 web application server.However, we strongly recommend you to validate if the custom settings are available in Tomcat 8
● If you are using a tomcat cluster configuration on your existing BI platform, then remove the following listener tag from the cluster configuration before updating to BI platform 4.2Listener tag : org.apache.catalina.ha.session.JvmRouteSessionIDBinderListener
● If you are using tomcat cluster configuration on your existing BI platform, and you have already updated to BI platform 4.2, then remove the following listener tag from the cluster configuration and restart tomcat 8Listener tag : org.apache.catalina.ha.session.JvmRouteSessionIDBinderListener
New Language support for BI platform
You can now add or remove a language by modifying your BI platform installation.
When you update the Business Intelligence platform from base version to 4.2, new languages that are added in the higher version are not displayed in the base version.
12 © 2015 SAP SE or an SAP affiliate company. All rights reserved.Business Intelligence Platform Installation Guide for Windows
Planning
For Example: If you update from the base version 4.1 SPX to 4.2, new languages that are added in 4.2 is not displayed in the base version 4.1 SPX. If you want new languages (such as Arabic) to be displayed in 4.2 , modify the base version 4.1 SPX.
To add or remove a language, go to Start Control Panel Programs and Features , select your BI platform server or Client Tools product and click Uninstall/Change. Select the Modify option and add or remove languages from the Choose Language Packs screen.
3.2 Upgrade support
Definition of Upgrade and Update
Update means adding support packages or patches to a 4.x release. Upgrade means moving a BusinessObject Enterprise XI 3.1 release to a BI platform 4.0 or 4.1 or 4.2 release.
Updating from 4.X to a 4.2
Use this table to select the correct update guide.
NoteYou can install the 4.2 update directly on a BI platform 4.0 installation. You do not need to install the 4.1 update first.
Table 3:
Type of update Example Guide
minor release update ● Installing 4.2 on a 4.0 or 4.1 release BI Platform minor release update guide
Upgrading from XI 3.1
To upgrade the SAP BusinessObjects Enterprise XI 3.1 or other 3.X release to the BI platform 4.2, you must first perform a full installation of BI platform 4.2, then use the Upgrade management tool to migrate content and settings from the 3.X installation. See the Business Intelligence Platform Upgrade Guide for more information.
You can perform a 3.X/4.X side-by-side installation, which installs the new version 4.X, leaving the previously installed 3.X version intact. However, this is not a recommended installation scenario. In this case, ensure that you do not choose port numbers and directories that are already in use by the earlier install to perform installation to a unique directory and not creating port conflicts. A machine can host more than one version of SAP BusinessObjects Business Intelligence platform, although system performance may be degraded if both are running at once.
Business Intelligence Platform Installation Guide for WindowsPlanning © 2015 SAP SE or an SAP affiliate company. All rights reserved. 13
3.3 Database servers
If you do not have a database server in place for use with the BI platform, the installation program can install and configure one for you. It is recommended that you evaluate your requirements against information from your database server vendor to determine which supported database would best suit your organization's requirements.
Sybase SQL Anywhere is the default database server. Any other database server must be running and accessible when you run the installation program.
NoteThe database client and server must use the Unicode character set.
For a list of supported database versions, revision levels, and requirements, consult the SAP BusinessObjects BI 4.1 Product Availability Matrix (PAM), available at http://service.sap.com/sap/support/pam?hash=pvnr%3D67837800100900006540 .
NoteThe CMS database should be on the local network, and not accessed across a WAN connection. It should be very responsive, on the order of less than 10ms response time, 5ms or faster.
3.4 Languages
The BI platform user interface has been translated into more than 40 languages. You can add support for different languages by installing language packs, either during the full installation or when modifying the installation. We recommend that you install only the language packs that are required because the installed size of language packs can be large.
To add a new language in windows platform, follow the procedure below
1. Go to Start Control Panel Programs and Features2. Select SAP BusinessObjects Business Intelligence platform base version.3. Choose Modify and then choose Next.4. Select the new language from the Select language Packages and choose Next.5. Select the features and choose Next.6. In the Expand Installation screen and Choose Next.7. Enter the CMS administrator password and choose Next.8. To start installation choose Next.9. To complete the installation choose Finish
The new language has now been added.
14 © 2015 SAP SE or an SAP affiliate company. All rights reserved.Business Intelligence Platform Installation Guide for Windows
Planning
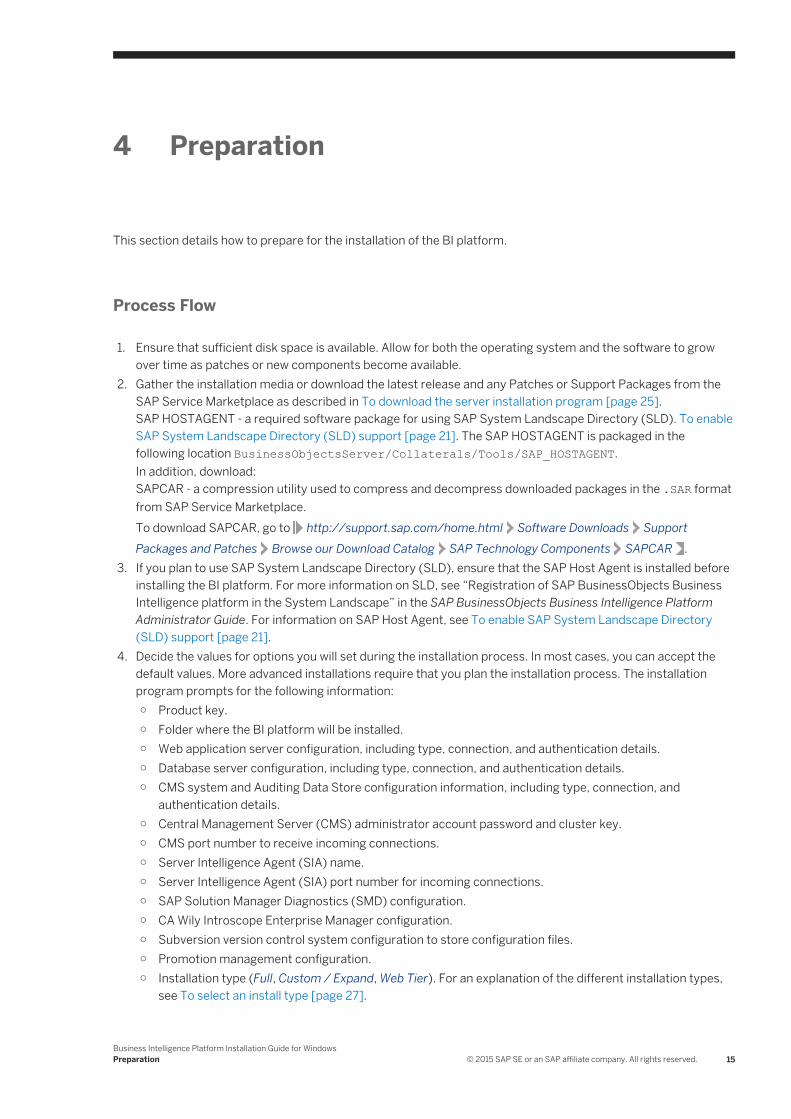
4 Preparation
This section details how to prepare for the installation of the BI platform.
Process Flow
1. Ensure that sufficient disk space is available. Allow for both the operating system and the software to grow over time as patches or new components become available.
2. Gather the installation media or download the latest release and any Patches or Support Packages from the SAP Service Marketplace as described in To download the server installation program [page 25].SAP HOSTAGENT - a required software package for using SAP System Landscape Directory (SLD). To enable SAP System Landscape Directory (SLD) support [page 21]. The SAP HOSTAGENT is packaged in the following location BusinessObjectsServer/Collaterals/Tools/SAP_HOSTAGENT.In addition, download:SAPCAR - a compression utility used to compress and decompress downloaded packages in the .SAR format from SAP Service Marketplace.To download SAPCAR, go to http://support.sap.com/home.html Software Downloads Support Packages and Patches Browse our Download Catalog SAP Technology Components SAPCAR .
3. If you plan to use SAP System Landscape Directory (SLD), ensure that the SAP Host Agent is installed before installing the BI platform. For more information on SLD, see “Registration of SAP BusinessObjects Business Intelligence platform in the System Landscape” in the SAP BusinessObjects Business Intelligence Platform Administrator Guide. For information on SAP Host Agent, see To enable SAP System Landscape Directory (SLD) support [page 21].
4. Decide the values for options you will set during the installation process. In most cases, you can accept the default values. More advanced installations require that you plan the installation process. The installation program prompts for the following information:○ Product key.○ Folder where the BI platform will be installed.○ Web application server configuration, including type, connection, and authentication details.○ Database server configuration, including type, connection, and authentication details.○ CMS system and Auditing Data Store configuration information, including type, connection, and
authentication details.○ Central Management Server (CMS) administrator account password and cluster key.○ CMS port number to receive incoming connections.○ Server Intelligence Agent (SIA) name.○ Server Intelligence Agent (SIA) port number for incoming connections.○ SAP Solution Manager Diagnostics (SMD) configuration.○ CA Wily Introscope Enterprise Manager configuration.○ Subversion version control system configuration to store configuration files.○ Promotion management configuration.○ Installation type (Full, Custom / Expand, Web Tier). For an explanation of the different installation types,
see To select an install type [page 27].
Business Intelligence Platform Installation Guide for WindowsPreparation © 2015 SAP SE or an SAP affiliate company. All rights reserved. 15
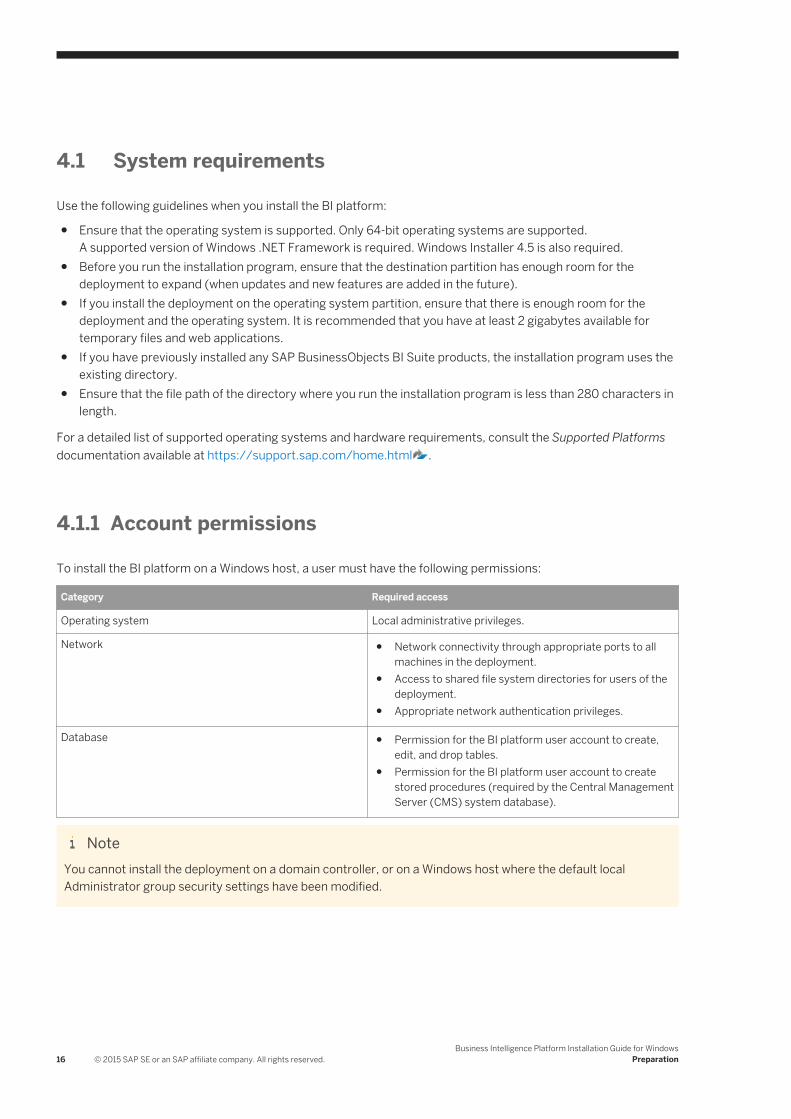
4.1 System requirements
Use the following guidelines when you install the BI platform:
● Ensure that the operating system is supported. Only 64-bit operating systems are supported.A supported version of Windows .NET Framework is required. Windows Installer 4.5 is also required.
● Before you run the installation program, ensure that the destination partition has enough room for the deployment to expand (when updates and new features are added in the future).
● If you install the deployment on the operating system partition, ensure that there is enough room for the deployment and the operating system. It is recommended that you have at least 2 gigabytes available for temporary files and web applications.
● If you have previously installed any SAP BusinessObjects BI Suite products, the installation program uses the existing directory.
● Ensure that the file path of the directory where you run the installation program is less than 280 characters in length.
For a detailed list of supported operating systems and hardware requirements, consult the Supported Platforms documentation available at https://support.sap.com/home.html .
4.1.1 Account permissions
To install the BI platform on a Windows host, a user must have the following permissions:
Category Required access
Operating system Local administrative privileges.
Network ● Network connectivity through appropriate ports to all machines in the deployment.
● Access to shared file system directories for users of the deployment.
● Appropriate network authentication privileges.
Database ● Permission for the BI platform user account to create, edit, and drop tables.
● Permission for the BI platform user account to create stored procedures (required by the Central Management Server (CMS) system database).
NoteYou cannot install the deployment on a domain controller, or on a Windows host where the default local Administrator group security settings have been modified.
16 © 2015 SAP SE or an SAP affiliate company. All rights reserved.Business Intelligence Platform Installation Guide for Windows
Preparation
4.1.2 Network permissions
Ensure that the upgrade management tool can communicate with the source and destination deployments. For more information on network permissions, see the “Securing SAP BusinessObjects Business Intelligence platform” chapter of the SAP BusinessObjects Business Intelligence platform Administrator’s Guide.
4.1.2.1 Choosing a server location
When planning a distributed installation, consider the latency between servers. To maintain high CMS performance, place your CMS on the same subnet as the CMS system and Auditing Data Store database servers.
The CMS can also be clustered, so that CMS server processes run on different host systems in the cluster. When creating a CMS cluster, ensure that each machine experiences the same network latency to the CMS system or Auditing Data Store.
Consult the “Clustering Central Management Servers” section of the SAP BusinessObjects Business Intelligence Platform Administrator Guide for more information on clustering CMS server processes.
4.2 Preparing the CMS system or Auditing Data Store database
To use a database server other than the default one, complete the following tasks before installing the BI platform.
● Create a database (or tablespace or schema, if applicable to your database), and account to store CMS configuration and system information. A second tablespace or scheme is required to hold auditing information. Record the database, tablespace, and account information so you can enter the details when prompted by the BI platform installation program.
CautionIf you have an existing BI platform installation, you must create a fresh database and migrate existing content after the install is complete.
● Ensure that your database server is configured to use Unicode character encoding (such as UTF-8).● Ensure that the database accounts have privileges to create, modify, and delete tables, and to create stored
procedures.● When using a database server on a network, the appropriate database client drivers must be installed and
verified as working before installing BI platform. Contact your database administrator to establish which drivers are required for your database.
During your installation, you will be prompted for the connection and authentication credentials so that the installation program can initialize the database. The table below shows which information is required for supported databases:
Business Intelligence Platform Installation Guide for WindowsPreparation © 2015 SAP SE or an SAP affiliate company. All rights reserved. 17
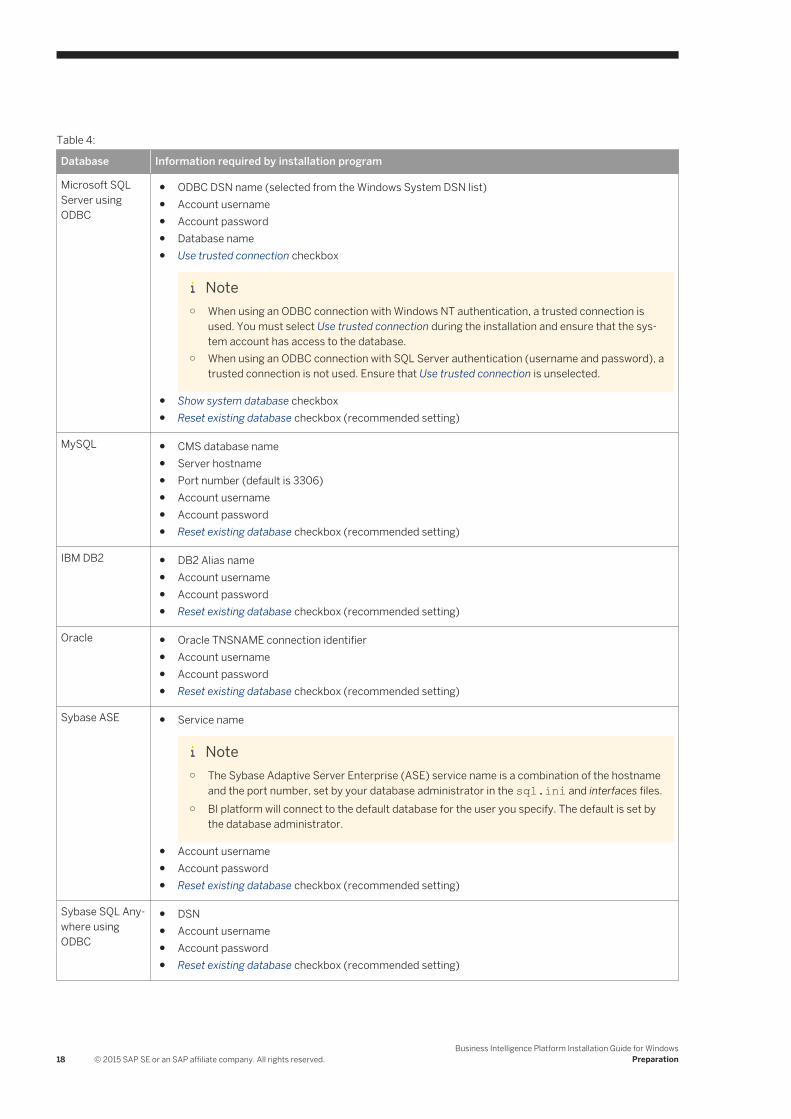
Table 4:
Database Information required by installation program
Microsoft SQL Server using ODBC
● ODBC DSN name (selected from the Windows System DSN list)● Account username● Account password● Database name● Use trusted connection checkbox
Note○ When using an ODBC connection with Windows NT authentication, a trusted connection is
used. You must select Use trusted connection during the installation and ensure that the system account has access to the database.
○ When using an ODBC connection with SQL Server authentication (username and password), a trusted connection is not used. Ensure that Use trusted connection is unselected.
● Show system database checkbox● Reset existing database checkbox (recommended setting)
MySQL ● CMS database name● Server hostname● Port number (default is 3306)● Account username● Account password● Reset existing database checkbox (recommended setting)
IBM DB2 ● DB2 Alias name● Account username● Account password● Reset existing database checkbox (recommended setting)
Oracle ● Oracle TNSNAME connection identifier● Account username● Account password● Reset existing database checkbox (recommended setting)
Sybase ASE ● Service name
Note○ The Sybase Adaptive Server Enterprise (ASE) service name is a combination of the hostname
and the port number, set by your database administrator in the sql.ini and interfaces files.○ BI platform will connect to the default database for the user you specify. The default is set by
the database administrator.
● Account username● Account password● Reset existing database checkbox (recommended setting)
Sybase SQL Anywhere using ODBC
● DSN● Account username● Account password● Reset existing database checkbox (recommended setting)
18 © 2015 SAP SE or an SAP affiliate company. All rights reserved.Business Intelligence Platform Installation Guide for Windows
Preparation
Note● MaxDB support for CMS system or Auditing Data Store database is deprecated from BI platform 4.2.● If you are using MaxDB for CMS system or auditing data store database, we recommend you to migrate
your data to other supported database.For more information on migrating your data to other database refer, SAP Business Intelligence Platform Administrator Guide.For more information on other supported database, see PAM http://support.sap.com/pam
4.2.1 Extra requirements for IBM DB2
IBM DB2 has requirements that must be met before installing the BI platform:
● Ensure that the DB2 database is created with the following settings:
Collating Sequence = "Identity" Codeset = "UTF-8" Territory = "<XX>"
Replace <XX> with the code that is appropriate for your location. Consult your DB2 documentation for more information. If your DB2 database does not have the Collating Sequence = "Identity" setting, the user and user group objects may not sort as expected in the CMC.
● Create a user temporary table space before installing the BI platform. If you do not create a user temporary table space, the BI platform installation program will not be able to configure the DB2 database.For more information on user temporary table spaces in IBM DB2, see DB2 Basics: Table spaces and buffer pools in the IBM technical library: http://www.ibm.com/developerworks/data/library/techarticle/0212wieser/0212wieser.html .
● When using IBM DB2 to host an Auditing Data Store database, ensure that the page size for the auditing table space is set to a minimum of 8192 (8 KB).
● Ensure that the CMS system database is not partitioned. The Auditing Data Store database may be partitioned.
4.2.2 Extra requirements for Sybase ASE
If you are using Sybase ASE for the CMS or auditing database:
● Create a database with a page size of 8 KB. The default page size is 2KB, which is too small for the CMS system database to run efficiently. The page size is set up during the database creation and cannot be changed after the database is created.
● Use a Unicode character set, such as UTF-8.
Business Intelligence Platform Installation Guide for WindowsPreparation © 2015 SAP SE or an SAP affiliate company. All rights reserved. 19
4.2.3 Extra requirements for SAP HANA
If you are using SAP HANA for the CMS database, you must select the default database during installation then export the data to an SAP HANA database. See To select SAP HANA as a CMS database in the SAP BusinessObjects Business Intelligence platform Administrator's Guide.
4.2.4 Extra requirements for CMS clustering with SQL Anywhere
If you are using the bundled SQL Anywhere database server for the CMS, there are two prerequisites before adding a new node on a new machine to CMS cluster. On the machine hosting the new node:
1. You must install the SQL Anywhere Database Client.Download the SQL Anywhere 16 client for your operating system at: http://scn.sap.com/docs/DOC-35857
2. You must create an ODBC DSN connecting to the primary node SQL Anywhere CMS database.On the primary node, right-click the SIA in the Central Configuration Manager (CCM) and select Properties. The CMS DSN is found on the Configuration tab with details found in the Windows ODBC Data Source Administrator. By default the DSN is BI4_CMS_DSN.
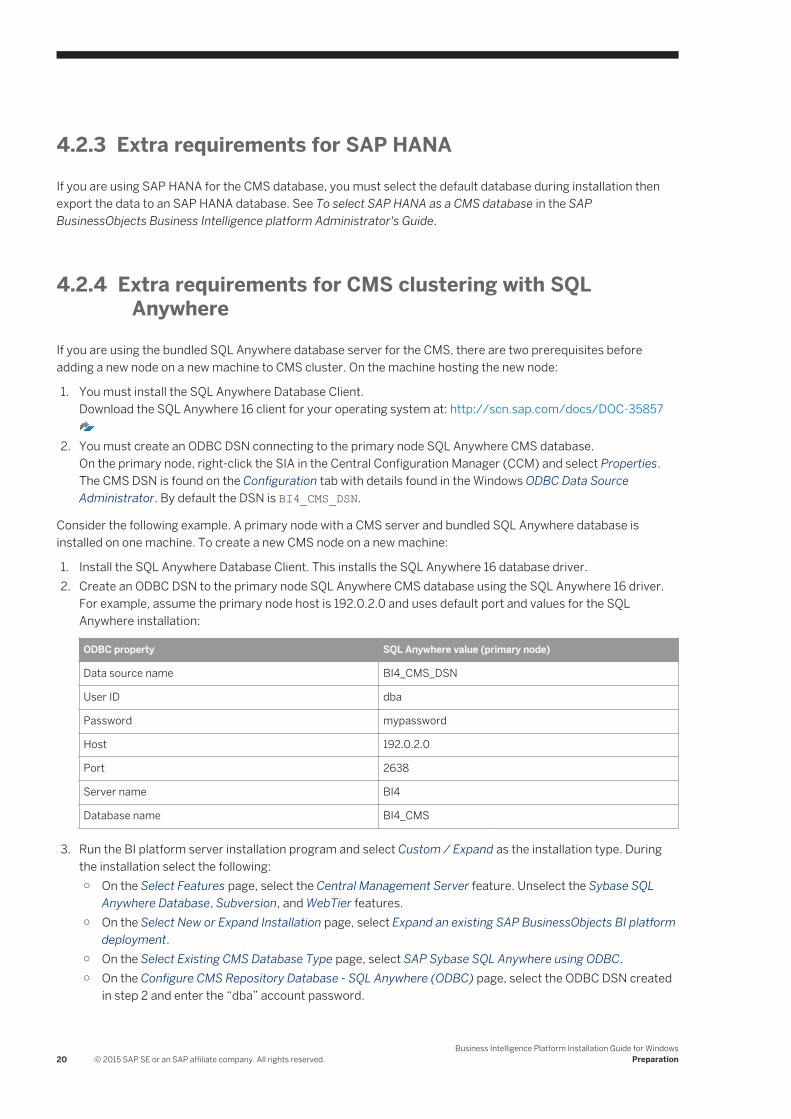
Consider the following example. A primary node with a CMS server and bundled SQL Anywhere database is installed on one machine. To create a new CMS node on a new machine:
1. Install the SQL Anywhere Database Client. This installs the SQL Anywhere 16 database driver.2. Create an ODBC DSN to the primary node SQL Anywhere CMS database using the SQL Anywhere 16 driver.
For example, assume the primary node host is 192.0.2.0 and uses default port and values for the SQL Anywhere installation:
ODBC property SQL Anywhere value (primary node)
Data source name BI4_CMS_DSN
User ID dba
Password mypassword
Host 192.0.2.0
Port 2638
Server name BI4
Database name BI4_CMS
3. Run the BI platform server installation program and select Custom / Expand as the installation type. During the installation select the following:○ On the Select Features page, select the Central Management Server feature. Unselect the Sybase SQL
Anywhere Database, Subversion, and WebTier features.○ On the Select New or Expand Installation page, select Expand an existing SAP BusinessObjects BI platform
deployment.○ On the Select Existing CMS Database Type page, select SAP Sybase SQL Anywhere using ODBC.○ On the Configure CMS Repository Database - SQL Anywhere (ODBC) page, select the ODBC DSN created
in step 2 and enter the “dba” account password.
20 © 2015 SAP SE or an SAP affiliate company. All rights reserved.Business Intelligence Platform Installation Guide for Windows
Preparation
○ Proceed and complete the installation of the new CMS server node.
4.3 SAP support
4.3.1 Support for SAP System Landscape Directory (SLD)
SAP System Landscape Directory (SLD) is a directory service that maintains a list of installed SAP and (optionally) non-SAP software. SLD provides two main categories of information:
● Software already installed● Software that could be installed at a later time
SAP systems come with a data supplier (DS) component that automatically updates the landscape directory. Non-SAP software that supports SLD registers through an open API. The information gathered on installed software includes:
● Version● Host information● Connection information
To use SLD support, ensure that SAP Host Agent is installed and working on the system(s) that host the BI platform. SAP Host Agent may be installed and configured before or after installing the BI platform.
4.3.1.1 To enable SAP System Landscape Directory (SLD) support
If you plan on using SAP System Landscape Directory (SLD) or SAP Solution Manager Diagnostics (SMD), ensure that the SAP Host Agent is installed and configured. The following steps walk you through installing SAP Host Agent.
SAP Host Agent may be installed and configured before or after installing the BI platform. For more information on SAP Host Agent, see “Registration of SAP BusinessObjects Business Intelligence platform in the System Landscape” in the SAP BusinessObjects Business Intelligence Platform Administrator Guide.
NoteIf you have installed SAP GUI or SAP Solution Manager Diagnostics (SMD), skip to step 4 below.
Prior to installing support for SAP System Landscape Directory (SLD) there must be an sapadm user with administrator privileges.
The SAP_LocalAdmin group must also exist, and the sapadm user must be a member. The sapadm user password is required during the SAPHOSTCONTROL installation.
1. The SAP HOST AGENT is packaged in collaterals, in the following location <Install_Dir>/BusinessObjectser/Collaterals/Tools/SAP_HOSTAGENT.
Business Intelligence Platform Installation Guide for WindowsPreparation © 2015 SAP SE or an SAP affiliate company. All rights reserved. 21
2. Install SAPHOSTCONTROL by entering the following command:saphostexec -install
3. Locate the sldreg tool, which is usually located in the following folder:
<%Program Files%>\SAP\hostctrl\exe4. Create an SLD key with the following command:
sldreg –configure connect.keyYou will be prompted to supply a username, password, host, port, and protocol for connecting to the SLD server.
5. Enter the information requested.The sldreg tool creates a connect.key file that will automatically be used by sld-ds to push information to SLD server.
If you have already installed the BI platform, restart all SIA nodes in the Central Configuration Manager (CCM) to register with the SLD.
4.3.2 Support for SAP Solution Manager Diagnostics (SMD)
SAP Solution Manager Diagnostics (SMD) monitors the performance of systems in the SAP System Landscape Directory (SLD). Problems can be identified, analyzed, and resolved with the information gathered by SMD, which includes:
● Performance monitoring● Configuration management● Log management● Load testing● Alerting● Resource monitoring
Tools integrated into SMD include:
● CA Wily IntroscopeFor full instrumentation, both SMD and CA Wily Introscope should be used.
● SAP LoadRunner by HP
Non-SAP software with an SAP-certified integration is entered into a central repository and transferred automatically to your SAP System Landscape Directories (SLD). SAP customers can then easily identify which version of third-party product integration has been certified by SAP within their SAP system environment. This service provides additional awareness for third-party products besides our online catalogs for third-party products.
To use SMD, the SMD Agent must be installed. SMD Agent may be installed and configured before or after installing the BI platform. During installation, the installation program prompts for the hostname and port number of the SMD Agent. If you do not want to use SMD, or you will install SMD later, you can choose not to use SMD. The SMD Agent can be configured later in the Central Management Console (CMC) Placeholders screen. For more information, seeTo configure SMD Agent post installation [page 58].
SMD Agent is included in the COLLATERALS\DiagnosticsAgent7.3 folder of the installation directory. For information on installing SMD agent, see SAP Note 1448655.
22 © 2015 SAP SE or an SAP affiliate company. All rights reserved.Business Intelligence Platform Installation Guide for Windows
Preparation
4.3.3 Support for CA Wily Introscope
CA Wily Introscope is included as a part of SAP Solution Manager Diagnostics (SMD). For full instrumentation, both SMD and CA Wily Introscope should be used.
To use CA Wily Introscope and SMD, the SMD Agent must be installed. SMD Agent may be installed and configured before or after installing the BI platform.
During installation, the installation program prompts for the hostname and port number of the Introscope Agent. If you do not want to use Introscope, or you will install it later, you can choose not use Introscope. Introscope can be configured later in the Central Management Console (CMC) Placeholders screen. For more information, seeTo configure SMD Agent post installation [page 58].
4.3.4 Support for SAP BW
The BI platform can integrate with SAP BW. To get the best performance from SAP BW, follow the instructions in these SAP Notes on https://service.sap.com :
● 1771995 - Incorrect number of hierarchy levels in Design Time● 1750788 - BICS metadata service enhancement● 1767351 - Missing metadata of characteristics in the fix filter● 1776999 - Incorrect hierarchy sorting● 1777544 - Metadata missing for node type attributes● 1778347 - Attributes for node types are not read● 1770434 - Dynamic filter of compound char. is incorrect● 1762156 - Nodes in fixed filter in Design Time are incorrect● 1776688 - Too many hierarchy levels are read● 1798297 - Correction for issue found on Samsung queries● 1806813 - Text of characteristic values is not read● 1809517 - Correction for invalid variable order when retrieving the list of variables through the design time
services● 1811124 - This note fixes the sorting of the of drill down characteristics returned by the design-time API so that
it matches the runtime sorting● 1812142 - This note fixes the sorting of the hierarchies returned by the design-time API so that it matches the
runtime sorting● 1817482 - This note adds the feature for the Design Time API to choose whether members should be read
initially or not. By default, there are not read; this provides a performance enhancement for SL.
4.4 Final checklist
Prior to installing the BI platform, review the following checklist.
● Have you decided on the installation destination folder?
Business Intelligence Platform Installation Guide for WindowsPreparation © 2015 SAP SE or an SAP affiliate company. All rights reserved. 23
Note○ The use of Unicode characters in the destination folder is not supported.○ Ensure that the installation destination folder is not the same folder in which the installation program
has been extracted (do not install to the current working directory when running the installation program from the current working directory).
● Have you verified appropriate network connectivity between all machines that will be part of your deployment?
● If you are using your own database server:○ Have you created a database, tablespace (if required), and accounts for the CMS system and Auditing
Data Store databases?○ Have you made sure you can log onto the database from the BI platform host?○ If you are using IBM DB2 or Sybase ASE, have you verified that your database was created with the
correct settings? (Some settings can't be modified after the database has been created.)○ Has the database client software been properly configured?
● If you are using your own web application server:○ Have you decided on which web application server to use?○ Has the server already been installed and configured?○ Have you ensured that your existing web application server has the required JDK installed?
● If you plan to use SAP System Landscape Directory (SLD), ensure that SAP Host Agent been installed and configured. For more information, seeSupport for SAP System Landscape Directory (SLD) [page 21].
● If you plan to use SAP Solution Manager Diagnostics (SMD), SMD Agent may have been installed and configured before or after the BI platform. For more information, see Support for SAP Solution Manager Diagnostics (SMD) [page 22].
Installation on Microsoft Windows requires a minimum screen solution of 1024 × 768.
NoteThe BI platform installation program no longer installs Client Tools. Client Tools can only be installed with the dedicated Client Tools installation program.
24 © 2015 SAP SE or an SAP affiliate company. All rights reserved.Business Intelligence Platform Installation Guide for Windows
Preparation
5 Installation
This chapter guides you through the installation of the BI platform.
5.1 Overview
There are three different methods of running the installation program for the BI platform:
● Interactive installationAn interactive wizard prompts for all information related to the installation. Use this option to select individual installation options from a series of screens. This is the default installation method.
● Silent installationInstallation options are given on the command-line or in a text file. This option is useful if you want to install the same configuration on multiple machines.
● Phase-wise installationThe installation is performed in two phases - Caching and Installation after caching
If the installation program encounters an unexpected condition, and is unable to continue, it will undo any work completed up to that point, and return the system to the state that it was in before the installation started.
When the installation program detects an identical previously-installed version, it will enter maintenance mode, allowing you to remove, repair, or modify the software.
The BI platform requires a database server and web application server to function. If you do not have an existing database, the installation program automatically installs and configures a Sybase SQL Anywhere database. If you do not have an existing web application server, the installation program automatically installs and configures a Tomcat web application server.
NoteThe installation program may take more than one hour to complete.
5.2 To download the server installation program
1. Go to https://support.sap.com/home.html > Software Downloads.2. Select Installations and Upgrades>A–Z Index.
3. Select B SBOP BI platform (former SBOP Enterprise) SBOP BI PLATFORM (ENTERPRISE) SBOP BI PLATFORM 4.2 .
4. Select Installation and Upgrade and then select your platform.
Business Intelligence Platform Installation Guide for WindowsInstallation © 2015 SAP SE or an SAP affiliate company. All rights reserved. 25
5. Select all of the packages titled SBOP BI PLATFORM <version> SERVER plus any additional add-on products you require, then follow the instructions on the website to download and extract the packages.
The software may take a long time to download, and you may need to contact the system administrator to ensure your company's firewall will not terminate the download process.
Support Packages and Patches are installation programs that contain updates to BI platform software. You can download them from https://support.sap.com/home.html > Software Downloads Support Packages and Patches A–Z Index . For more information on installing Support Packages and Patches, see the SAP BusinessObjects BI Suite Update Guides.
Note● Users need to use the SAP Download manager for download. When you download the server installation
program without the download manager, it results in failed or partial downloads.● To extract the solaris and air tar files, users need to use gnu tar, or gtar, to extract, and not the default tar
utility. Else, the installation would fail.
5.3 To run an interactive installation
Before installing, ensure that the account being used has Administrator privileges. The installation requires that the account being used is a member of the Windows Administrators group, and that the default privileges assigned to the Administrators group have not been modified.
The installation program requires a minimum screen resolution of 1024 × 768 pixels. Using Microsoft Remote Desktop Connection to run the installation program is supported, as long as a minimum screen resolution of 1024 × 768 pixels is used.
NoteThe installation log file is saved to <BIP_INSTALL_DIR>\InstallData\logs\<DATEandTIME>\setupengine.log.
1. Locate and run setup.exe.
2. Select the setup language.
The language setting is used by the installation program to display information to you in the language of your choice. If you select a non-English language, the corresponding language pack is automatically installed on the server.
NoteThe installation program will automatically run in the same language as your operating system. The language used by the installation program will determine the names used for Windows components configured by the installation program, such as Windows service names and Start menu shortcuts. These names cannot be changed later and are not affected by language settings once the installation is complete.
3. On the Check Prerequisites page, review the results and decide whether to continue with the installation, or abort and correct any unmet requirements.
26 © 2015 SAP SE or an SAP affiliate company. All rights reserved.Business Intelligence Platform Installation Guide for Windows
Installation
The installation program checks for required components and conditions. If a dependency prerequisite condition is critical, the installation program will not allow the installation to proceed. If the missing or unsupported component is optional, you have the option to either continue with the installation or stop and correct the condition.
4. Review the installation welcome page.5. On the License Agreement page, review the agreement and select I accept the License Agreement.6. On the Configure Product Registration page, enter the product key.
TipStore the product key in a safe place in case you need to re-install the product.
7. On the Select Language Packs page, select additional languages to install from the list.The language currently being used by the operating system is selected automatically. English language support cannot be deselected because it is used if a problem is detected with an individual language.
The Select Install Type page appears.
5.3.1 To select an install type
The Select Install Type page is used to select the type of installation to perform.
1. Select one of the following install type options:
○ FullInstalls all required server components onto a single machine. Use this option to create a single-host deployment, such as a pre-production development or test environment.
○ Custom / ExpandAllows experienced users to select individual features. Use this option:○ When distributing server components between more than one host, such as creating a CMS cluster.○ When you want full control over which features are deployed to a host.
NoteIf you are adding a new node to a CMS cluster that uses the bundled SQL Anywhere database server, see Extra requirements for CMS clustering with SQL Anywhere [page 20] before proceeding with the installation.
○ Web TierThe web tier includes web applications such as BI launch pad and the Central Management Console (CMC). Use the Web Tier installation option to install Java web applications onto a dedicated Java web application server.If you already have a supported web application server installed, you can deselect the option to install Tomcat, and only install the Java web applications.
2. Proceed to the next page to start configuring the selected installation.
On the Configure Destination Folder page, review the destination folder shown. This is the folder into which the installation program will install the BI platform. If the folder does not exist, the installation program creates it.
Business Intelligence Platform Installation Guide for WindowsInstallation © 2015 SAP SE or an SAP affiliate company. All rights reserved. 27
Note○ The use of Unicode characters in the destination folder is not supported.○ Ensure that the destination folder is not set to the same folder in which the installation program has
been extracted.
○ If you have already installed SAP BusinessObjects products, the Destination Folder Information field is not editable, and the path to the existing folder is displayed.
○ If you selected a Full installation, proceed to the following Full section.○ If you selected a Custom / Expand installation, proceed to the following Custom / Expand section.○ If you selected a Web Tier installation, proceed to the following Web Tier section.
5.3.1.1 Full installation
The following steps are performed for Full installations of the BI platform.
1. On the Select Default or Existing Database page, select a database option to store Central Management Server (CMS) and Auditing Data Store (ADS) information.
Option Description
Configure and install a Sybase SQL Anywhere database
If you do not have a database server in place for use with the BI platform, the installation program can install and configure Sybase SQL Anywhere for you.
NoteInstallation of third-party patches or updates is not supported for bundled software. For details, see Patching third-party solutions bundled with the BI platform [page 65].
Configure an existing database
If you have an existing database server, the installation program prompts for information on the database type and connection credentials for both the CMS system and auditing databases.
NoteAn existing database must have user accounts with the appropriate privileges ready, and the appropriate drivers must be installed and verified as working. The installation program attempts to connect to, and initialize, the database as a part of the installation process.
It is recommended that you evaluate your requirements against information from your database server vendor to determine which supported database would best suit your organization's needs.
2. If you selected Configure an existing database:a. On the Select Existing CMS Database Type page, select the database type of the existing CMS database.b. On the Select Existing Auditing Database Type page, select the database type of the existing auditing
database.If you do not want to use the auditing feature, select No auditing database.
3. On the Select Java Web Application Server page, select an option for hosting the BI platform web applications.
28 © 2015 SAP SE or an SAP affiliate company. All rights reserved.Business Intelligence Platform Installation Guide for Windows
Installation
Option Description
Install the default Tomcat Java Web Application Server and automatically deploy web applications
If you do not have a web application server in place for use with the BI platform, the installation program can install and configure a Tomcat web application server for you. The BI platform web applications are automatically deployed to Tomcat.
NoteInstallation of third party patches or updates is not supported for bundled software. For details, see Patching third-party solutions bundled with the BI platform [page 65].
Manually deploy web applications to a supported Java Web Application Server after the installation
If you have an existing, supported Java web application server, select this option and then deploy web applications to it later (after installation) using the WDeploy tool. For more information, see the SAP BusinessObjects Business Intelligence Platform Web Application Deployment Guide
NoteThe BI platform does not support the automatic deployment of web applications to any web application server other than the bundled Tomcat web application server during the installation program.
Install the Web Application Container Server and automatically deploy web applications
If you do not want to use a Java application server to host your BI platform web applications, then select this option to host them on Web Application Container Server (WACS).
It is recommended that you evaluate your requirements against information from your web application server vendor to determine which supported web application server would best suit your organization's needs.
NoteWhen configuring a production environment, it is recommended that the web application server is hosted on a separate system from the BI platform servers. Running the BI platform servers and a web application server on the same host in a production environment may decrease performance.
4. One the Select Version Management page, decide whether to install and configure Subversion version control system.
Option Description
Configure and install Subversion
Installs and configures Subversion version control system.
Do not configure a version control system at this time
If you have an existing, supported version control system, you must manually configure it with the Central Management Console (CMC) after the installation is complete. For more information, see the “Version management” and “Promotion management” sections of the Business Intelligence Platform Administrator Guide.
The BI platform can maintain different versions of BI resources that exist in the CMS repository in a version control system, making it easier to revert to a previous configuration when needed using the CMC.
5. On the Configure Server Intelligence Agent (SIA) page, review the default name and port number for the SIA node.
Business Intelligence Platform Installation Guide for WindowsInstallation © 2015 SAP SE or an SAP affiliate company. All rights reserved. 29
Option Description
Node Name
This is the name that you will see in the Central Configuration Manager (CCM). Many CMS servers can be managed by a single SIA.
The name must consist of English characters (A-Z, a-z, and 0-9) and contain no spaces or other punctuation. Underscores ("_") are not allowed. The SIA name cannot start with a number.
SIA Port The port is used for the SIA to listen for incoming connections from the CMS. The SIA must be able to receive incoming connections on this port, so ensure that your firewall is configured appropriately.
Port 6410 is a standard TCP/IP port number reserved for use with a BI platform SIA.
6. On the Configure Central Management Server (CMS) page, review the default value for the CMS port number.This is the port on which the CMS listens for incoming connections from the web application server, web server (if applicable), other CMS nodes (if applicable) and servers. The CMS must be able to receive incoming connections on this port, so ensure that your firewall is configured appropriately.Port 6400 is a standard TCP/IP port number reserved for use with the BI platform CMS.
7. On the Configure CMS Account page, enter and confirm the CMS Administrator account password and the CMS cluster key.The CMS Administrator is a super-user account in the BI platform authentication system, used only to administer your server configuration. It is not part of any operating system or single sign-on authentication system.Communication between some CMS components is encrypted to provide a higher level of security when using clusters.
NoteThe administrator password entered during full install must always contain at least two of the following character classes: Upper case letters and lower case letters.
8. Configure the CMS system database.a. If you selected Configure and install a Sybase SQL Anywhere database, enter the account and port
information on the Configure Sybase SQL Anywhere page.
Enter the port number for Sybase SQL Anywhere to listen for incoming database queries. The database must be able to receive incoming connections on this port, so ensure that your firewall is configured appropriately. Also enter and confirm the database administrator account password.
b. If you selected Configure an existing database, enter the connection information for your existing database to use for the CMS on the Configure CMS Repository Database - <database type> page.
If you're using an ODBC database driver, you must configure an ODBC data source. A system ODBC DSN can be configured from: Start Control Panel Administrative Tools Data Sources (ODBC) .
c. If you selected Configure an existing database, and you plan to use auditing, enter the connection information for your existing database to use for the ADS on the Configure Auditing Database page.
9. If you selected Install the default Tomcat Java Web Application Server and automatically deploy web applications, review the default port values on the Configure Tomcat page.
Option Description
Connection port The port on which the web application server listens for incoming connections from web clients.
30 © 2015 SAP SE or an SAP affiliate company. All rights reserved.Business Intelligence Platform Installation Guide for Windows
Installation
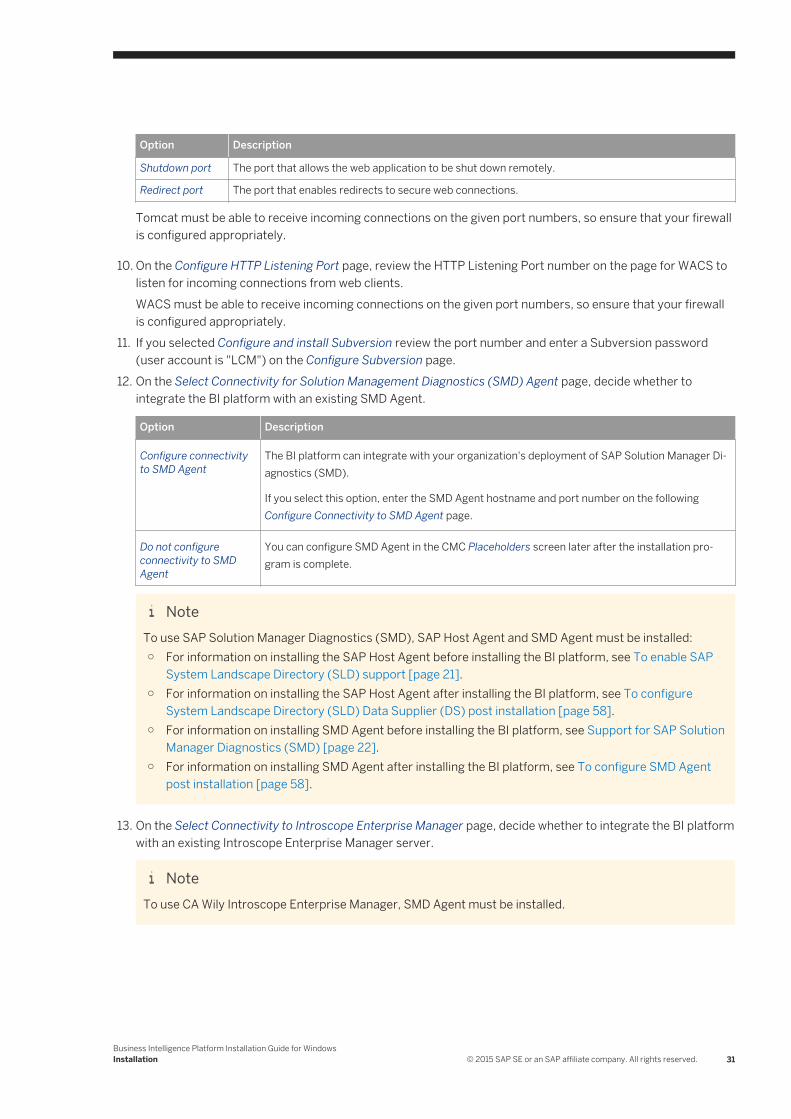
Option Description
Shutdown port The port that allows the web application to be shut down remotely.
Redirect port The port that enables redirects to secure web connections.
Tomcat must be able to receive incoming connections on the given port numbers, so ensure that your firewall is configured appropriately.
10. On the Configure HTTP Listening Port page, review the HTTP Listening Port number on the page for WACS to listen for incoming connections from web clients.WACS must be able to receive incoming connections on the given port numbers, so ensure that your firewall is configured appropriately.
11. If you selected Configure and install Subversion review the port number and enter a Subversion password (user account is "LCM") on the Configure Subversion page.
12. On the Select Connectivity for Solution Management Diagnostics (SMD) Agent page, decide whether to integrate the BI platform with an existing SMD Agent.
Option Description
Configure connectivity to SMD Agent
The BI platform can integrate with your organization's deployment of SAP Solution Manager Diagnostics (SMD).
If you select this option, enter the SMD Agent hostname and port number on the following Configure Connectivity to SMD Agent page.
Do not configure connectivity to SMD Agent
You can configure SMD Agent in the CMC Placeholders screen later after the installation program is complete.
NoteTo use SAP Solution Manager Diagnostics (SMD), SAP Host Agent and SMD Agent must be installed:○ For information on installing the SAP Host Agent before installing the BI platform, see To enable SAP
System Landscape Directory (SLD) support [page 21].○ For information on installing the SAP Host Agent after installing the BI platform, see To configure
System Landscape Directory (SLD) Data Supplier (DS) post installation [page 58].○ For information on installing SMD Agent before installing the BI platform, see Support for SAP Solution
Manager Diagnostics (SMD) [page 22].○ For information on installing SMD Agent after installing the BI platform, see To configure SMD Agent
post installation [page 58].
13. On the Select Connectivity to Introscope Enterprise Manager page, decide whether to integrate the BI platform with an existing Introscope Enterprise Manager server.
NoteTo use CA Wily Introscope Enterprise Manager, SMD Agent must be installed.
Business Intelligence Platform Installation Guide for WindowsInstallation © 2015 SAP SE or an SAP affiliate company. All rights reserved. 31
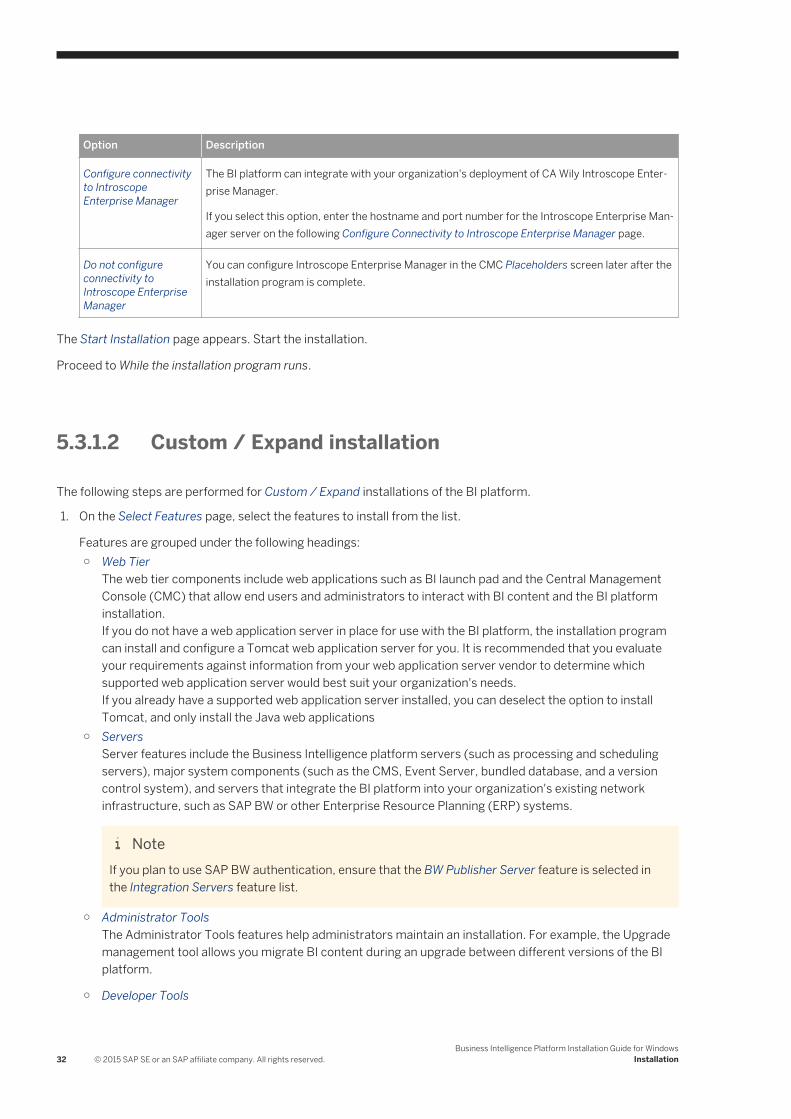
Option Description
Configure connectivity to Introscope Enterprise Manager
The BI platform can integrate with your organization's deployment of CA Wily Introscope Enterprise Manager.
If you select this option, enter the hostname and port number for the Introscope Enterprise Manager server on the following Configure Connectivity to Introscope Enterprise Manager page.
Do not configure connectivity to Introscope Enterprise Manager
You can configure Introscope Enterprise Manager in the CMC Placeholders screen later after the installation program is complete.
The Start Installation page appears. Start the installation.
Proceed to While the installation program runs.
5.3.1.2 Custom / Expand installation
The following steps are performed for Custom / Expand installations of the BI platform.
1. On the Select Features page, select the features to install from the list.
Features are grouped under the following headings:○ Web Tier
The web tier components include web applications such as BI launch pad and the Central Management Console (CMC) that allow end users and administrators to interact with BI content and the BI platform installation.If you do not have a web application server in place for use with the BI platform, the installation program can install and configure a Tomcat web application server for you. It is recommended that you evaluate your requirements against information from your web application server vendor to determine which supported web application server would best suit your organization's needs.If you already have a supported web application server installed, you can deselect the option to install Tomcat, and only install the Java web applications
○ ServersServer features include the Business Intelligence platform servers (such as processing and scheduling servers), major system components (such as the CMS, Event Server, bundled database, and a version control system), and servers that integrate the BI platform into your organization's existing network infrastructure, such as SAP BW or other Enterprise Resource Planning (ERP) systems.
NoteIf you plan to use SAP BW authentication, ensure that the BW Publisher Server feature is selected in the Integration Servers feature list.
○ Administrator Tools The Administrator Tools features help administrators maintain an installation. For example, the Upgrade management tool allows you migrate BI content during an upgrade between different versions of the BI platform.
○ Developer Tools
32 © 2015 SAP SE or an SAP affiliate company. All rights reserved.Business Intelligence Platform Installation Guide for Windows
Installation
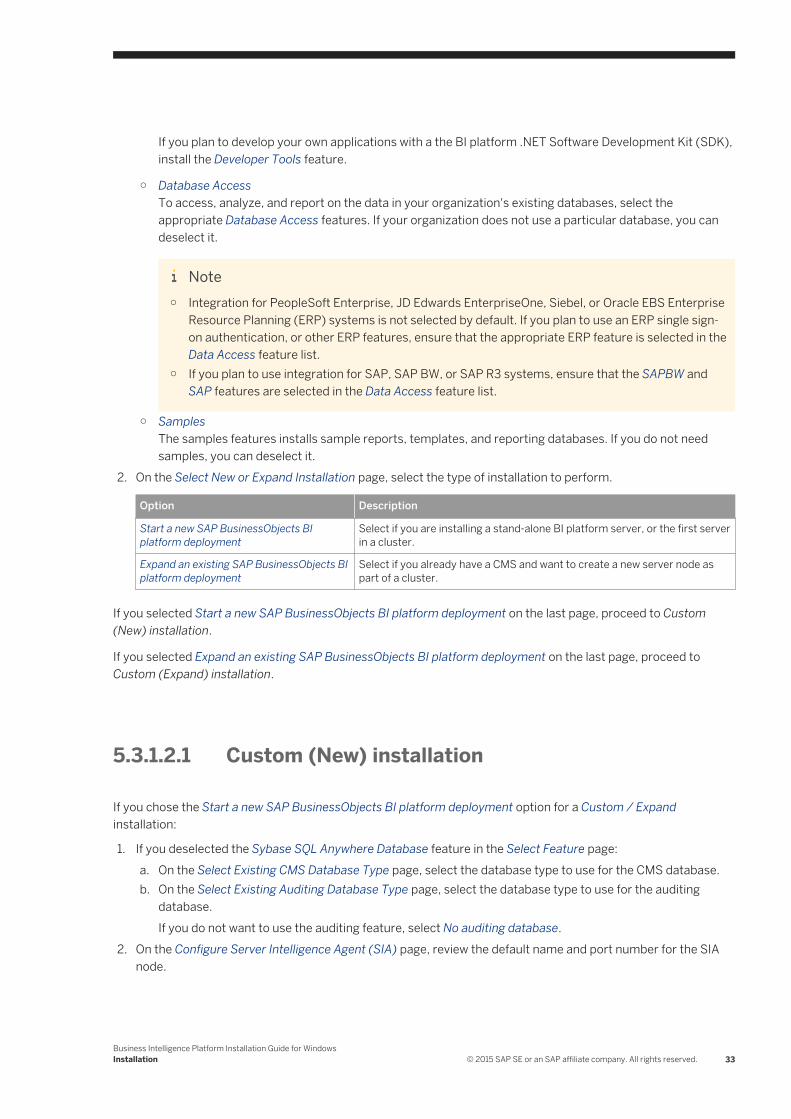
If you plan to develop your own applications with a the BI platform .NET Software Development Kit (SDK), install the Developer Tools feature.
○ Database AccessTo access, analyze, and report on the data in your organization's existing databases, select the appropriate Database Access features. If your organization does not use a particular database, you can deselect it.
Note○ Integration for PeopleSoft Enterprise, JD Edwards EnterpriseOne, Siebel, or Oracle EBS Enterprise
Resource Planning (ERP) systems is not selected by default. If you plan to use an ERP single sign-on authentication, or other ERP features, ensure that the appropriate ERP feature is selected in the Data Access feature list.
○ If you plan to use integration for SAP, SAP BW, or SAP R3 systems, ensure that the SAPBW and SAP features are selected in the Data Access feature list.
○ SamplesThe samples features installs sample reports, templates, and reporting databases. If you do not need samples, you can deselect it.
2. On the Select New or Expand Installation page, select the type of installation to perform.
Option Description
Start a new SAP BusinessObjects BI platform deployment
Select if you are installing a stand-alone BI platform server, or the first server in a cluster.
Expand an existing SAP BusinessObjects BI platform deployment
Select if you already have a CMS and want to create a new server node as part of a cluster.
If you selected Start a new SAP BusinessObjects BI platform deployment on the last page, proceed to Custom (New) installation.
If you selected Expand an existing SAP BusinessObjects BI platform deployment on the last page, proceed to Custom (Expand) installation.
5.3.1.2.1 Custom (New) installation
If you chose the Start a new SAP BusinessObjects BI platform deployment option for a Custom / Expand installation:
1. If you deselected the Sybase SQL Anywhere Database feature in the Select Feature page:a. On the Select Existing CMS Database Type page, select the database type to use for the CMS database.b. On the Select Existing Auditing Database Type page, select the database type to use for the auditing
database.If you do not want to use the auditing feature, select No auditing database.
2. On the Configure Server Intelligence Agent (SIA) page, review the default name and port number for the SIA node.
Business Intelligence Platform Installation Guide for WindowsInstallation © 2015 SAP SE or an SAP affiliate company. All rights reserved. 33
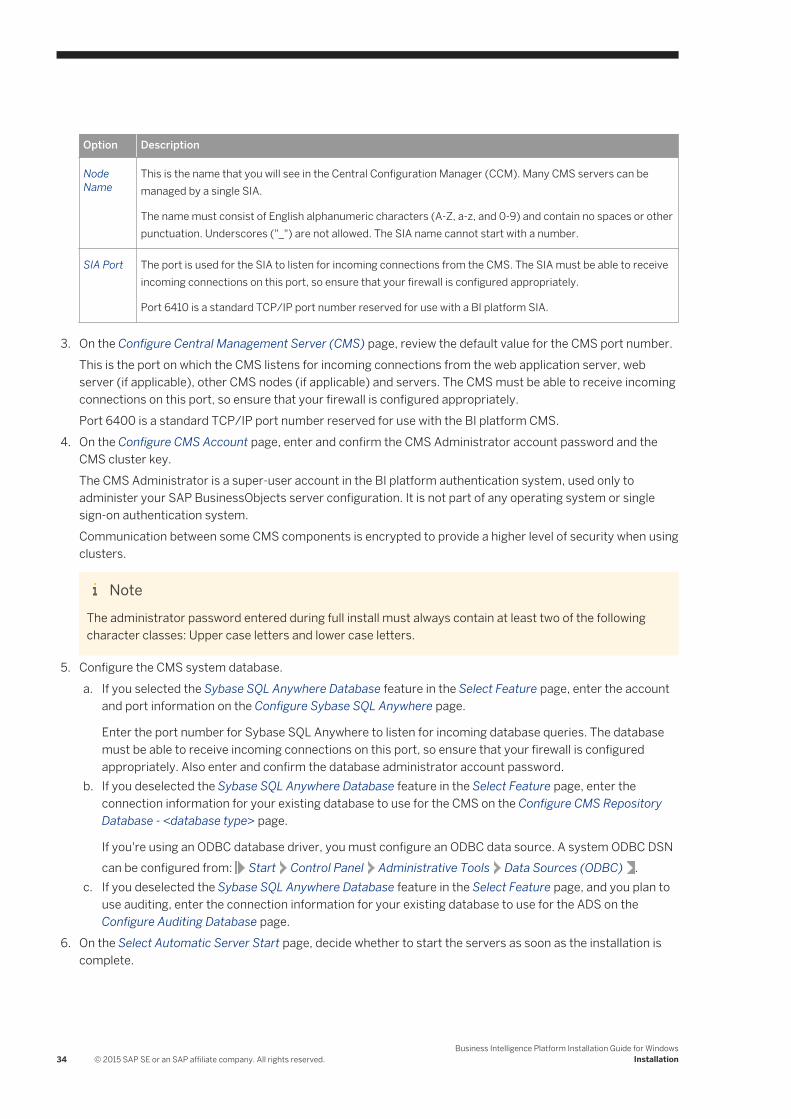
Option Description
Node Name
This is the name that you will see in the Central Configuration Manager (CCM). Many CMS servers can be managed by a single SIA.
The name must consist of English alphanumeric characters (A-Z, a-z, and 0-9) and contain no spaces or other punctuation. Underscores ("_") are not allowed. The SIA name cannot start with a number.
SIA Port The port is used for the SIA to listen for incoming connections from the CMS. The SIA must be able to receive incoming connections on this port, so ensure that your firewall is configured appropriately.
Port 6410 is a standard TCP/IP port number reserved for use with a BI platform SIA.
3. On the Configure Central Management Server (CMS) page, review the default value for the CMS port number.This is the port on which the CMS listens for incoming connections from the web application server, web server (if applicable), other CMS nodes (if applicable) and servers. The CMS must be able to receive incoming connections on this port, so ensure that your firewall is configured appropriately.Port 6400 is a standard TCP/IP port number reserved for use with the BI platform CMS.
4. On the Configure CMS Account page, enter and confirm the CMS Administrator account password and the CMS cluster key.The CMS Administrator is a super-user account in the BI platform authentication system, used only to administer your SAP BusinessObjects server configuration. It is not part of any operating system or single sign-on authentication system.Communication between some CMS components is encrypted to provide a higher level of security when using clusters.
NoteThe administrator password entered during full install must always contain at least two of the following character classes: Upper case letters and lower case letters.
5. Configure the CMS system database.a. If you selected the Sybase SQL Anywhere Database feature in the Select Feature page, enter the account
and port information on the Configure Sybase SQL Anywhere page.
Enter the port number for Sybase SQL Anywhere to listen for incoming database queries. The database must be able to receive incoming connections on this port, so ensure that your firewall is configured appropriately. Also enter and confirm the database administrator account password.
b. If you deselected the Sybase SQL Anywhere Database feature in the Select Feature page, enter the connection information for your existing database to use for the CMS on the Configure CMS Repository Database - <database type> page.
If you're using an ODBC database driver, you must configure an ODBC data source. A system ODBC DSN can be configured from: Start Control Panel Administrative Tools Data Sources (ODBC) .
c. If you deselected the Sybase SQL Anywhere Database feature in the Select Feature page, and you plan to use auditing, enter the connection information for your existing database to use for the ADS on the Configure Auditing Database page.
6. On the Select Automatic Server Start page, decide whether to start the servers as soon as the installation is complete.
34 © 2015 SAP SE or an SAP affiliate company. All rights reserved.Business Intelligence Platform Installation Guide for Windows
Installation

If you select No, the servers must be started manually with the Central Configuration Manager (CCM) after the installation is complete.
7. If you selected the Tomcat feature in the Select Feature page , review the default port values on the Configure Tomcat page.
Option Description
Connection port The port on which the web application server listens for incoming connections from web clients.
Shutdown port The port that allows the web application to be shut down remotely.
Redirect port The port that enables redirects to secure web connections.
Tomcat must be able to receive incoming connections on the given port numbers, so ensure that your firewall is configured appropriately.
8. If you selected the Web Application Container Server or RESTful Web Service features in the Select Feature page, review the HTTP Listening Port number on the Configure HTTP Listening Port page.WACS must be able to receive incoming connections on the given port numbers, so ensure that your firewall is configured appropriately.
9. If you selected the Subversion feature in the Select Feature page, review the port number and enter a Subversion password (user account is "LCM") on the Configure Subversion page.
10. On the Select Connectivity for Solution Management Diagnostics (SMD) Agent page, decide whether to integrate the BI platform with an existing SMD Agent.
Option Description
Configure connectivity to SMD Agent
The BI platform can integrate with your organization's deployment of SAP Solution Manager Diagnostics (SMD).
If you select this option, enter the SMD Agent hostname and port number on the following Configure Connectivity to SMD Agent page.
Do not configure connectivity to SMD Agent
You can configure SMD Agent in the CMC Placeholders screen later after the installation program is complete.
NoteTo use SAP Solution Manager Diagnostics (SMD), SAP Host Agent and SMD Agent must be installed:○ For information on installing the SAP Host Agent before installing the BI platform, see To enable SAP
System Landscape Directory (SLD) support [page 21].○ For information on installing the SAP Host Agent after installing the BI platform, see To configure
System Landscape Directory (SLD) Data Supplier (DS) post installation [page 58].○ For information on installing SMD Agent before installing the BI platform, see Support for SAP Solution
Manager Diagnostics (SMD) [page 22].○ For information on installing SMD Agent after installing the BI platform, see To configure SMD Agent
post installation [page 58].
11. On the Select Connectivity to Introscope Enterprise Manager page, decide whether to integrate the BI platform with an existing Introscope Enterprise Manager server.
Business Intelligence Platform Installation Guide for WindowsInstallation © 2015 SAP SE or an SAP affiliate company. All rights reserved. 35
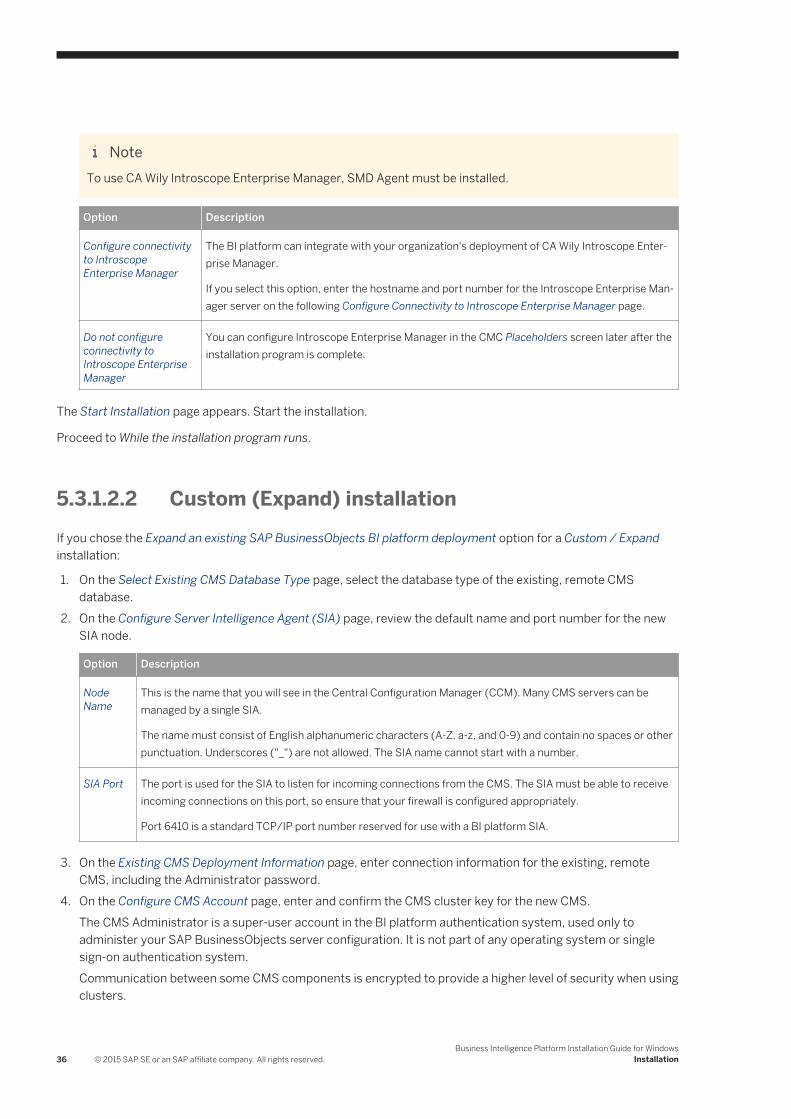
NoteTo use CA Wily Introscope Enterprise Manager, SMD Agent must be installed.
Option Description
Configure connectivity to Introscope Enterprise Manager
The BI platform can integrate with your organization's deployment of CA Wily Introscope Enterprise Manager.
If you select this option, enter the hostname and port number for the Introscope Enterprise Manager server on the following Configure Connectivity to Introscope Enterprise Manager page.
Do not configure connectivity to Introscope Enterprise Manager
You can configure Introscope Enterprise Manager in the CMC Placeholders screen later after the installation program is complete.
The Start Installation page appears. Start the installation.
Proceed to While the installation program runs.
5.3.1.2.2 Custom (Expand) installationIf you chose the Expand an existing SAP BusinessObjects BI platform deployment option for a Custom / Expand installation:
1. On the Select Existing CMS Database Type page, select the database type of the existing, remote CMS database.
2. On the Configure Server Intelligence Agent (SIA) page, review the default name and port number for the new SIA node.
Option Description
Node Name
This is the name that you will see in the Central Configuration Manager (CCM). Many CMS servers can be managed by a single SIA.
The name must consist of English alphanumeric characters (A-Z, a-z, and 0-9) and contain no spaces or other punctuation. Underscores ("_") are not allowed. The SIA name cannot start with a number.
SIA Port The port is used for the SIA to listen for incoming connections from the CMS. The SIA must be able to receive incoming connections on this port, so ensure that your firewall is configured appropriately.
Port 6410 is a standard TCP/IP port number reserved for use with a BI platform SIA.
3. On the Existing CMS Deployment Information page, enter connection information for the existing, remote CMS, including the Administrator password.
4. On the Configure CMS Account page, enter and confirm the CMS cluster key for the new CMS.The CMS Administrator is a super-user account in the BI platform authentication system, used only to administer your SAP BusinessObjects server configuration. It is not part of any operating system or single sign-on authentication system.Communication between some CMS components is encrypted to provide a higher level of security when using clusters.
36 © 2015 SAP SE or an SAP affiliate company. All rights reserved.Business Intelligence Platform Installation Guide for Windows
Installation
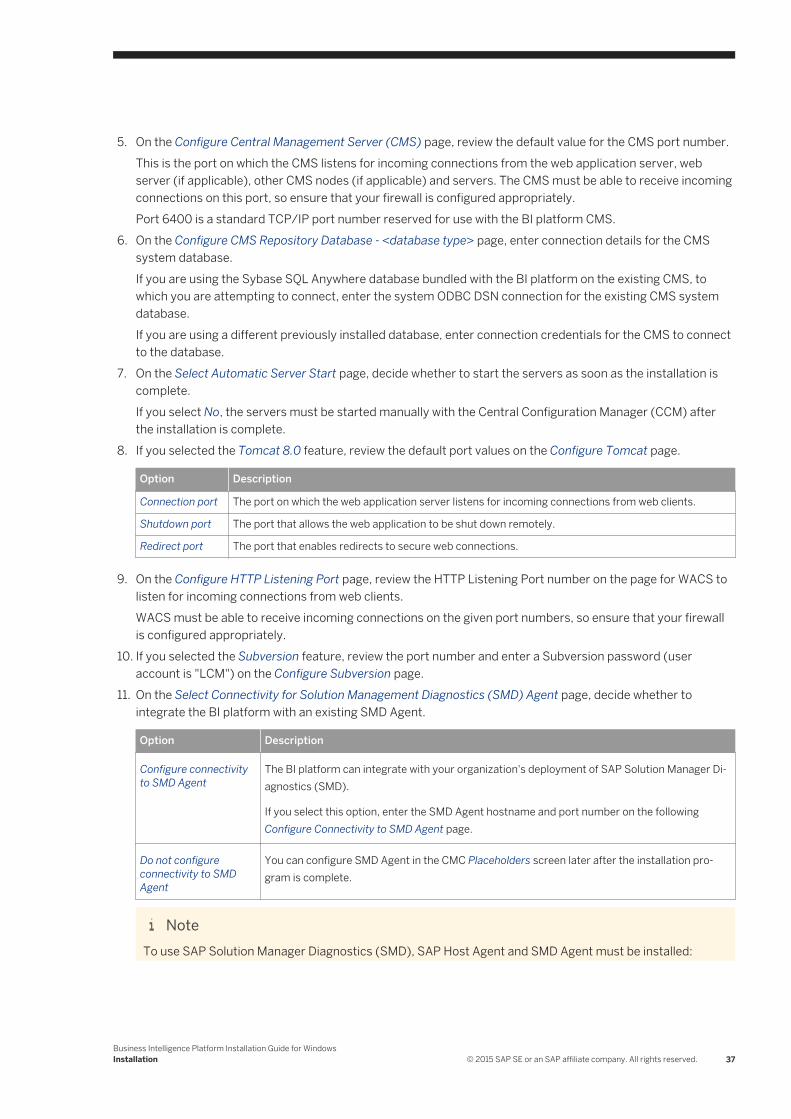
5. On the Configure Central Management Server (CMS) page, review the default value for the CMS port number.This is the port on which the CMS listens for incoming connections from the web application server, web server (if applicable), other CMS nodes (if applicable) and servers. The CMS must be able to receive incoming connections on this port, so ensure that your firewall is configured appropriately.Port 6400 is a standard TCP/IP port number reserved for use with the BI platform CMS.
6. On the Configure CMS Repository Database - <database type> page, enter connection details for the CMS system database.If you are using the Sybase SQL Anywhere database bundled with the BI platform on the existing CMS, to which you are attempting to connect, enter the system ODBC DSN connection for the existing CMS system database.If you are using a different previously installed database, enter connection credentials for the CMS to connect to the database.
7. On the Select Automatic Server Start page, decide whether to start the servers as soon as the installation is complete.If you select No, the servers must be started manually with the Central Configuration Manager (CCM) after the installation is complete.
8. If you selected the Tomcat 8.0 feature, review the default port values on the Configure Tomcat page.
Option Description
Connection port The port on which the web application server listens for incoming connections from web clients.
Shutdown port The port that allows the web application to be shut down remotely.
Redirect port The port that enables redirects to secure web connections.
9. On the Configure HTTP Listening Port page, review the HTTP Listening Port number on the page for WACS to listen for incoming connections from web clients.WACS must be able to receive incoming connections on the given port numbers, so ensure that your firewall is configured appropriately.
10. If you selected the Subversion feature, review the port number and enter a Subversion password (user account is "LCM") on the Configure Subversion page.
11. On the Select Connectivity for Solution Management Diagnostics (SMD) Agent page, decide whether to integrate the BI platform with an existing SMD Agent.
Option Description
Configure connectivity to SMD Agent
The BI platform can integrate with your organization's deployment of SAP Solution Manager Diagnostics (SMD).
If you select this option, enter the SMD Agent hostname and port number on the following Configure Connectivity to SMD Agent page.
Do not configure connectivity to SMD Agent
You can configure SMD Agent in the CMC Placeholders screen later after the installation program is complete.
NoteTo use SAP Solution Manager Diagnostics (SMD), SAP Host Agent and SMD Agent must be installed:
Business Intelligence Platform Installation Guide for WindowsInstallation © 2015 SAP SE or an SAP affiliate company. All rights reserved. 37

○ For information on installing the SAP Host Agent before installing the BI platform, see To enable SAP System Landscape Directory (SLD) support [page 21].
○ For information on installing the SAP Host Agent after installing the BI platform, see To configure System Landscape Directory (SLD) Data Supplier (DS) post installation [page 58].
○ For information on installing SMD Agent before installing the BI platform, see Support for SAP Solution Manager Diagnostics (SMD) [page 22].
○ For information on installing SMD Agent after installing the BI platform, see To configure SMD Agent post installation [page 58].
12. On the Select Connectivity to Introscope Enterprise Manager page, decide whether to integrate the BI platform with an existing Introscope Enterprise Manager server.
NoteTo use CA Wily Introscope Enterprise Manager, SMD Agent must be installed.
Option Description
Configure connectivity to Introscope Enterprise Manager
The BI platform can integrate with your organization's deployment of CA Wily Introscope Enterprise Manager.
If you select this option, enter the hostname and port number for the Introscope Enterprise Manager server on the following Configure Connectivity to Introscope Enterprise Manager page.
Do not configure connectivity to Introscope Enterprise Manager
You can configure Introscope Enterprise Manager in the CMC Placeholders screen later after the installation program is complete.
The Start Installation page appears. Start the installation.
Proceed to While the installation program runs.
5.3.1.3 Web Tier installation
The web tier contains web applications such as BI launch pad and the Central Management Console (CMC). Use the Web Tier installation option to install BI platform web applications onto your web application server.
Note● During the web tier installation, you are prompted to logon to an existing Central Management Server
(CMS) as the BI platform Administrator. You must have a CMS running remotely or on the same machine to perform the web tier installation.
● If you plan to use a web tier with third-party authentication, or integration for Enterprise Resource Planning (ERP) systems such as Siebel Enterprise, JD Edwards EnterpriseOne, or Oracle E-Business Suite, you must perform a Custom / Expand installation and select the components you need.For example, to perform a web tier installation with ERP support, select the following components from the Custom / Expand feature list:
○ Instances WebTier Java Web Applications
38 © 2015 SAP SE or an SAP affiliate company. All rights reserved.Business Intelligence Platform Installation Guide for Windows
Installation
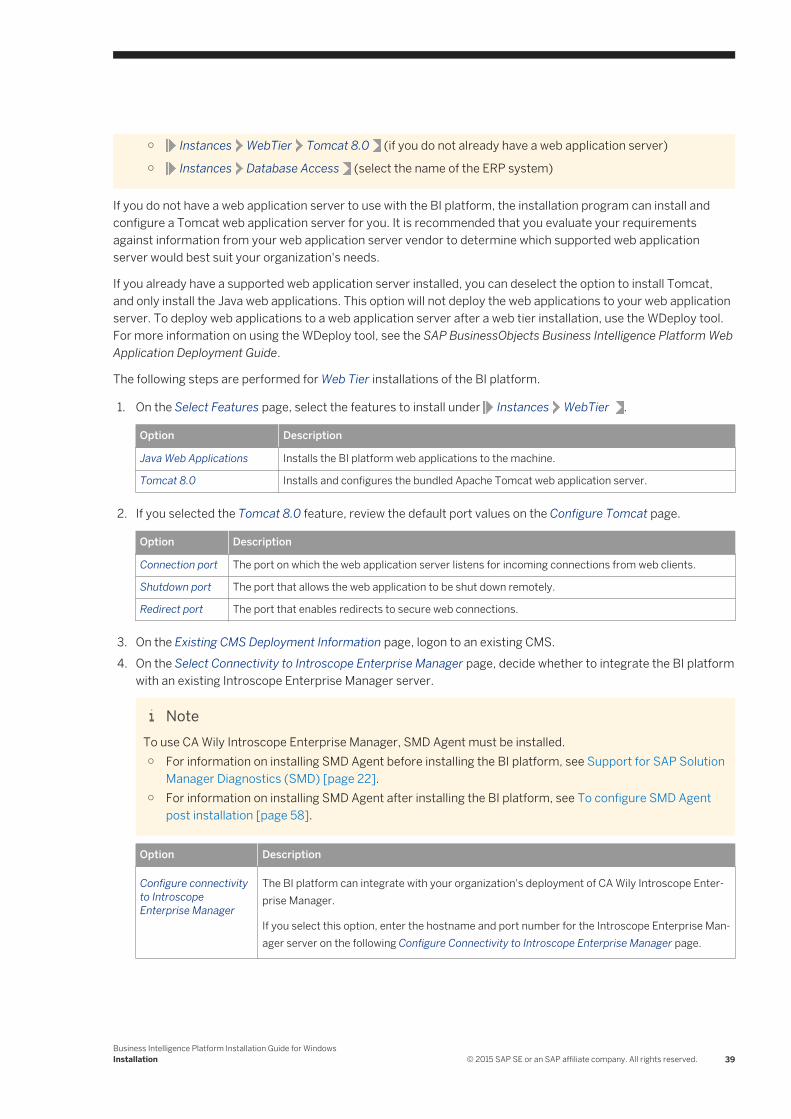
○ Instances WebTier Tomcat 8.0 (if you do not already have a web application server)
○ Instances Database Access (select the name of the ERP system)
If you do not have a web application server to use with the BI platform, the installation program can install and configure a Tomcat web application server for you. It is recommended that you evaluate your requirements against information from your web application server vendor to determine which supported web application server would best suit your organization's needs.
If you already have a supported web application server installed, you can deselect the option to install Tomcat, and only install the Java web applications. This option will not deploy the web applications to your web application server. To deploy web applications to a web application server after a web tier installation, use the WDeploy tool. For more information on using the WDeploy tool, see the SAP BusinessObjects Business Intelligence Platform Web Application Deployment Guide.
The following steps are performed for Web Tier installations of the BI platform.
1. On the Select Features page, select the features to install under Instances WebTier .
Option Description
Java Web Applications Installs the BI platform web applications to the machine.
Tomcat 8.0 Installs and configures the bundled Apache Tomcat web application server.
2. If you selected the Tomcat 8.0 feature, review the default port values on the Configure Tomcat page.
Option Description
Connection port The port on which the web application server listens for incoming connections from web clients.
Shutdown port The port that allows the web application to be shut down remotely.
Redirect port The port that enables redirects to secure web connections.
3. On the Existing CMS Deployment Information page, logon to an existing CMS.4. On the Select Connectivity to Introscope Enterprise Manager page, decide whether to integrate the BI platform
with an existing Introscope Enterprise Manager server.
NoteTo use CA Wily Introscope Enterprise Manager, SMD Agent must be installed.○ For information on installing SMD Agent before installing the BI platform, see Support for SAP Solution
Manager Diagnostics (SMD) [page 22].○ For information on installing SMD Agent after installing the BI platform, see To configure SMD Agent
post installation [page 58].
Option Description
Configure connectivity to Introscope Enterprise Manager
The BI platform can integrate with your organization's deployment of CA Wily Introscope Enterprise Manager.
If you select this option, enter the hostname and port number for the Introscope Enterprise Manager server on the following Configure Connectivity to Introscope Enterprise Manager page.
Business Intelligence Platform Installation Guide for WindowsInstallation © 2015 SAP SE or an SAP affiliate company. All rights reserved. 39

Option Description
Do not configure connectivity to Introscope Enterprise Manager
You can configure Introscope Enterprise Manager in the CMC Placeholders screen later after the installation program is complete.
The Start Installation page appears. Start the installation.
Proceed to While the installation program runs.
5.3.2 While the installation program runs
The progress bar illustrates the progress of the installation as a whole.
NoteWhen performing an Expand installation, the existing CMS may be restarted automatically as a part of the installation process.
5.3.3 When installation is complete
When the installation is complete, review the information in the Post Installation Steps screen. If you are not using the bundled Tomcat web application server, you must deploy web applications with the WDeploy web application deployment tool.
5.3.3.1 Reboot suppression
If a file is locked during the installation, you may be prompted to restart the server after the installation. You can choose to reboot immediately, or later. However, if you choose to suppress the reboot, the system may be in an unsupported state until the system is rebooted.
5.4 To run a silent installation
Every option in the installation wizard can be read from a response file invoked at the command-line. This type of installation is called a silent install.
A response file is a text file containing installation option parameters in key-value format. When using a response file to give installation options, the installation program is run from the command-line with the -r <RESPONSE_FILE> parameter, where <RESPONSE_FILE> is the name of the response file.
40 © 2015 SAP SE or an SAP affiliate company. All rights reserved.Business Intelligence Platform Installation Guide for Windows
Installation
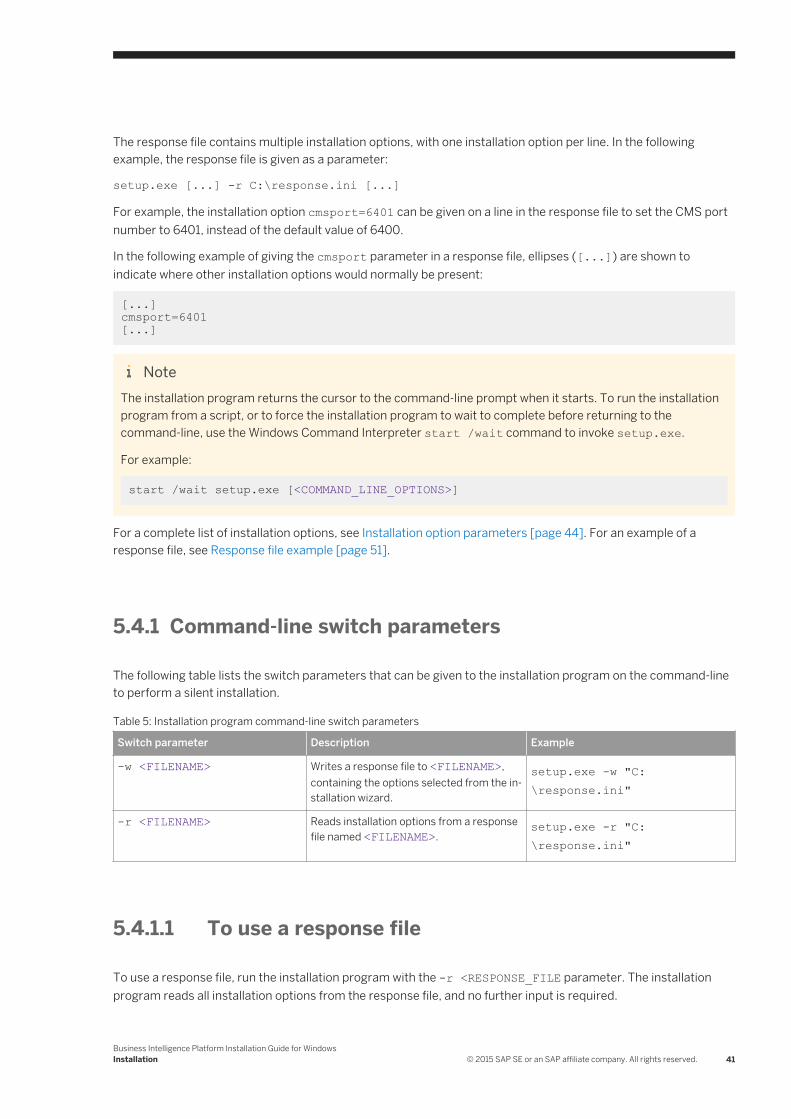
The response file contains multiple installation options, with one installation option per line. In the following example, the response file is given as a parameter:
setup.exe [...] -r C:\response.ini [...]
For example, the installation option cmsport=6401 can be given on a line in the response file to set the CMS port number to 6401, instead of the default value of 6400.
In the following example of giving the cmsport parameter in a response file, ellipses ([...]) are shown to indicate where other installation options would normally be present:
[...] cmsport=6401 [...]
NoteThe installation program returns the cursor to the command-line prompt when it starts. To run the installation program from a script, or to force the installation program to wait to complete before returning to the command-line, use the Windows Command Interpreter start /wait command to invoke setup.exe.
For example:
start /wait setup.exe [<COMMAND_LINE_OPTIONS>]
For a complete list of installation options, see Installation option parameters [page 44]. For an example of a response file, see Response file example [page 51].
5.4.1 Command-line switch parameters
The following table lists the switch parameters that can be given to the installation program on the command-line to perform a silent installation.
Table 5: Installation program command-line switch parameters
Switch parameter Description Example
-w <FILENAME> Writes a response file to <FILENAME>, containing the options selected from the installation wizard.
setup.exe -w "C:\response.ini"
-r <FILENAME> Reads installation options from a response file named <FILENAME>.
setup.exe -r "C:\response.ini"
5.4.1.1 To use a response file
To use a response file, run the installation program with the -r <RESPONSE_FILE parameter. The installation program reads all installation options from the response file, and no further input is required.
Business Intelligence Platform Installation Guide for WindowsInstallation © 2015 SAP SE or an SAP affiliate company. All rights reserved. 41
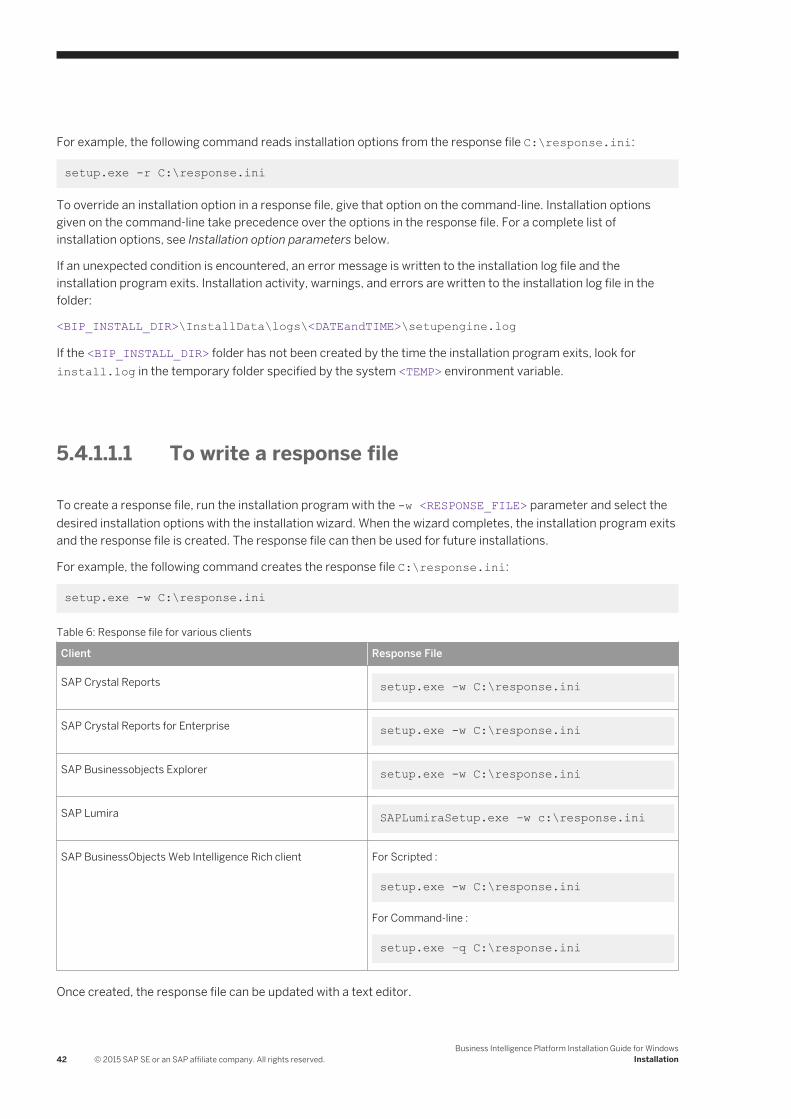
For example, the following command reads installation options from the response file C:\response.ini:
setup.exe -r C:\response.ini
To override an installation option in a response file, give that option on the command-line. Installation options given on the command-line take precedence over the options in the response file. For a complete list of installation options, see Installation option parameters below.
If an unexpected condition is encountered, an error message is written to the installation log file and the installation program exits. Installation activity, warnings, and errors are written to the installation log file in the folder:
<BIP_INSTALL_DIR>\InstallData\logs\<DATEandTIME>\setupengine.log
If the <BIP_INSTALL_DIR> folder has not been created by the time the installation program exits, look for install.log in the temporary folder specified by the system <TEMP> environment variable.
5.4.1.1.1 To write a response file
To create a response file, run the installation program with the -w <RESPONSE_FILE> parameter and select the desired installation options with the installation wizard. When the wizard completes, the installation program exits and the response file is created. The response file can then be used for future installations.
For example, the following command creates the response file C:\response.ini:
setup.exe -w C:\response.ini
Table 6: Response file for various clients
Client Response File
SAP Crystal Reports setup.exe -w C:\response.ini
SAP Crystal Reports for Enterprise setup.exe -w C:\response.ini
SAP Businessobjects Explorer setup.exe -w C:\response.ini
SAP Lumira SAPLumiraSetup.exe -w c:\response.ini
SAP BusinessObjects Web Intelligence Rich client For Scripted :
setup.exe -w C:\response.ini
For Command-line :
setup.exe –q C:\response.ini
Once created, the response file can be updated with a text editor.
42 © 2015 SAP SE or an SAP affiliate company. All rights reserved.Business Intelligence Platform Installation Guide for Windows
Installation
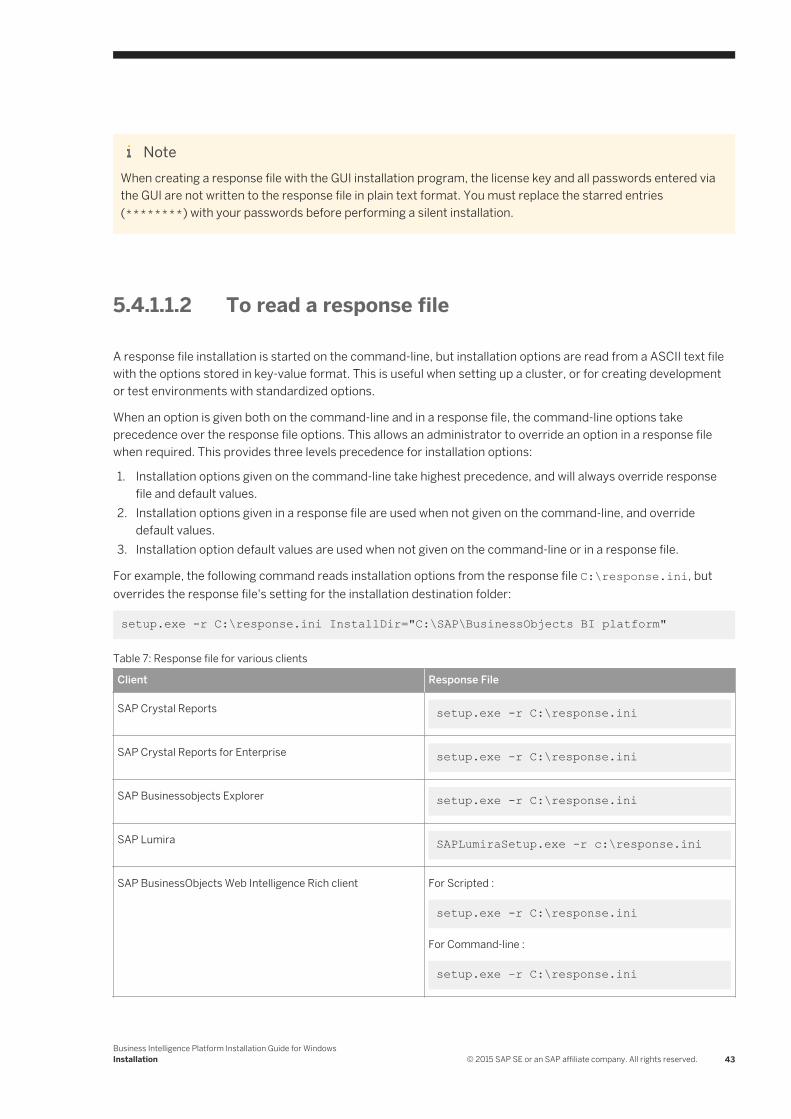
NoteWhen creating a response file with the GUI installation program, the license key and all passwords entered via the GUI are not written to the response file in plain text format. You must replace the starred entries (********) with your passwords before performing a silent installation.
5.4.1.1.2 To read a response file
A response file installation is started on the command-line, but installation options are read from a ASCII text file with the options stored in key-value format. This is useful when setting up a cluster, or for creating development or test environments with standardized options.
When an option is given both on the command-line and in a response file, the command-line options take precedence over the response file options. This allows an administrator to override an option in a response file when required. This provides three levels precedence for installation options:
1. Installation options given on the command-line take highest precedence, and will always override response file and default values.
2. Installation options given in a response file are used when not given on the command-line, and override default values.
3. Installation option default values are used when not given on the command-line or in a response file.
For example, the following command reads installation options from the response file C:\response.ini, but overrides the response file's setting for the installation destination folder:
setup.exe -r C:\response.ini InstallDir="C:\SAP\BusinessObjects BI platform"
Table 7: Response file for various clients
Client Response File
SAP Crystal Reports setup.exe -r C:\response.ini
SAP Crystal Reports for Enterprise setup.exe -r C:\response.ini
SAP Businessobjects Explorer setup.exe -r C:\response.ini
SAP Lumira SAPLumiraSetup.exe -r c:\response.ini
SAP BusinessObjects Web Intelligence Rich client For Scripted :
setup.exe -r C:\response.ini
For Command-line :
setup.exe –r C:\response.ini
Business Intelligence Platform Installation Guide for WindowsInstallation © 2015 SAP SE or an SAP affiliate company. All rights reserved. 43
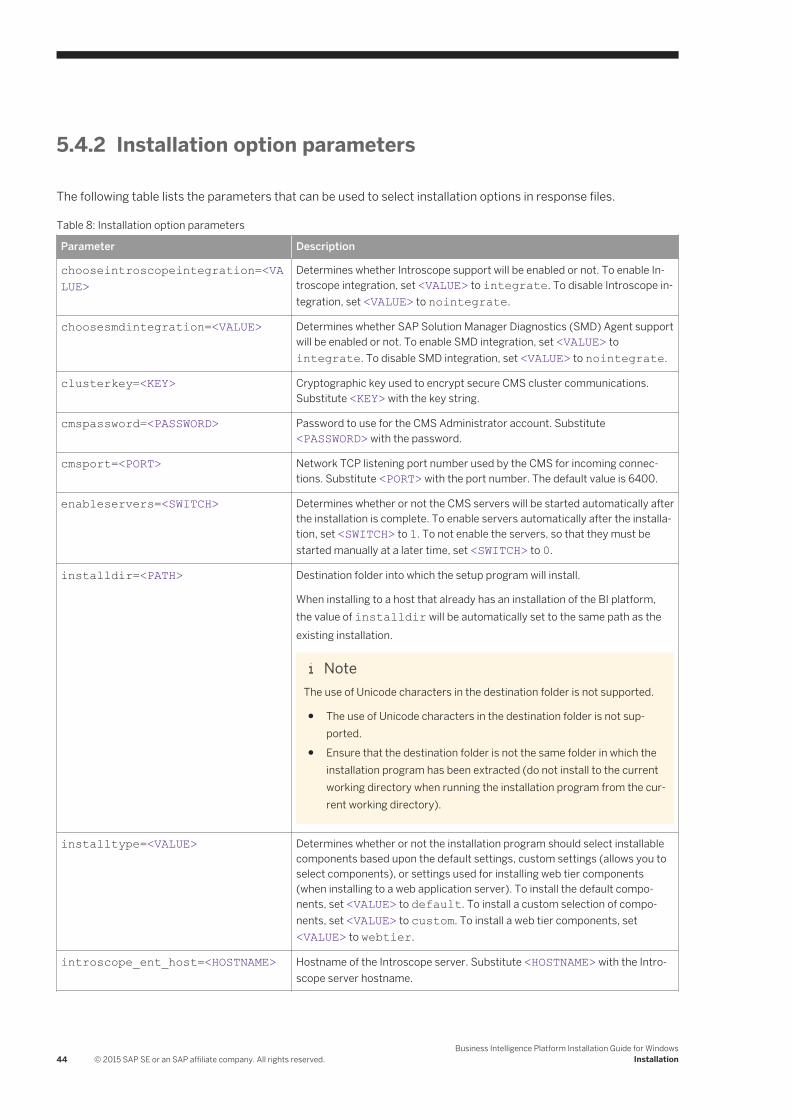
5.4.2 Installation option parameters
The following table lists the parameters that can be used to select installation options in response files.
Table 8: Installation option parameters
Parameter Description
chooseintroscopeintegration=<VALUE>
Determines whether Introscope support will be enabled or not. To enable Introscope integration, set <VALUE> to integrate. To disable Introscope integration, set <VALUE> to nointegrate.
choosesmdintegration=<VALUE> Determines whether SAP Solution Manager Diagnostics (SMD) Agent support will be enabled or not. To enable SMD integration, set <VALUE> to integrate. To disable SMD integration, set <VALUE> to nointegrate.
clusterkey=<KEY> Cryptographic key used to encrypt secure CMS cluster communications. Substitute <KEY> with the key string.
cmspassword=<PASSWORD> Password to use for the CMS Administrator account. Substitute <PASSWORD> with the password.
cmsport=<PORT> Network TCP listening port number used by the CMS for incoming connections. Substitute <PORT> with the port number. The default value is 6400.
enableservers=<SWITCH> Determines whether or not the CMS servers will be started automatically after the installation is complete. To enable servers automatically after the installation, set <SWITCH> to 1. To not enable the servers, so that they must be started manually at a later time, set <SWITCH> to 0.
installdir=<PATH> Destination folder into which the setup program will install.
When installing to a host that already has an installation of the BI platform, the value of installdir will be automatically set to the same path as the existing installation.
NoteThe use of Unicode characters in the destination folder is not supported.
● The use of Unicode characters in the destination folder is not supported.
● Ensure that the destination folder is not the same folder in which the installation program has been extracted (do not install to the current working directory when running the installation program from the current working directory).
installtype=<VALUE> Determines whether or not the installation program should select installable components based upon the default settings, custom settings (allows you to select components), or settings used for installing web tier components (when installing to a web application server). To install the default components, set <VALUE> to default. To install a custom selection of components, set <VALUE> to custom. To install a web tier components, set <VALUE> to webtier.
introscope_ent_host=<HOSTNAME> Hostname of the Introscope server. Substitute <HOSTNAME> with the Introscope server hostname.
44 © 2015 SAP SE or an SAP affiliate company. All rights reserved.Business Intelligence Platform Installation Guide for Windows
Installation
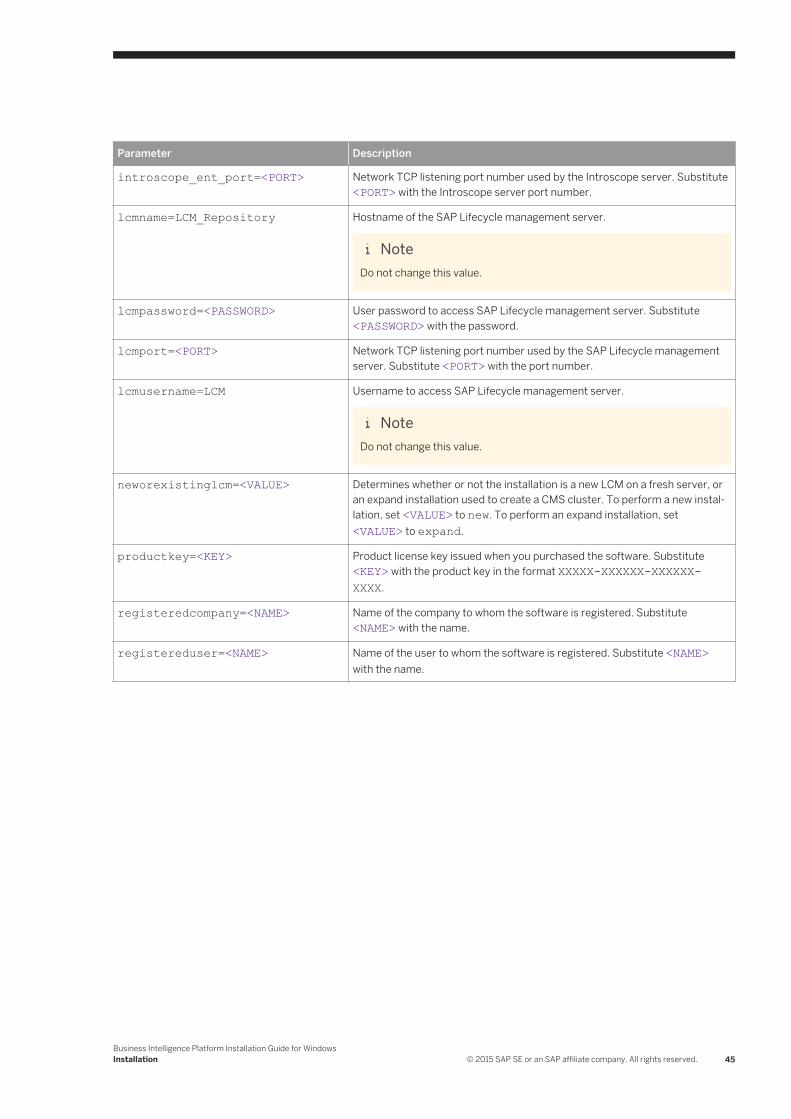
Parameter Description
introscope_ent_port=<PORT> Network TCP listening port number used by the Introscope server. Substitute <PORT> with the Introscope server port number.
lcmname=LCM_Repository Hostname of the SAP Lifecycle management server.
NoteDo not change this value.
lcmpassword=<PASSWORD> User password to access SAP Lifecycle management server. Substitute <PASSWORD> with the password.
lcmport=<PORT> Network TCP listening port number used by the SAP Lifecycle management server. Substitute <PORT> with the port number.
lcmusername=LCM Username to access SAP Lifecycle management server.
NoteDo not change this value.
neworexistinglcm=<VALUE> Determines whether or not the installation is a new LCM on a fresh server, or an expand installation used to create a CMS cluster. To perform a new installation, set <VALUE> to new. To perform an expand installation, set <VALUE> to expand.
productkey=<KEY> Product license key issued when you purchased the software. Substitute <KEY> with the product key in the format XXXXX-XXXXXX-XXXXXX-XXXX.
registeredcompany=<NAME> Name of the company to whom the software is registered. Substitute <NAME> with the name.
registereduser=<NAME> Name of the user to whom the software is registered. Substitute <NAME> with the name.
Business Intelligence Platform Installation Guide for WindowsInstallation © 2015 SAP SE or an SAP affiliate company. All rights reserved. 45
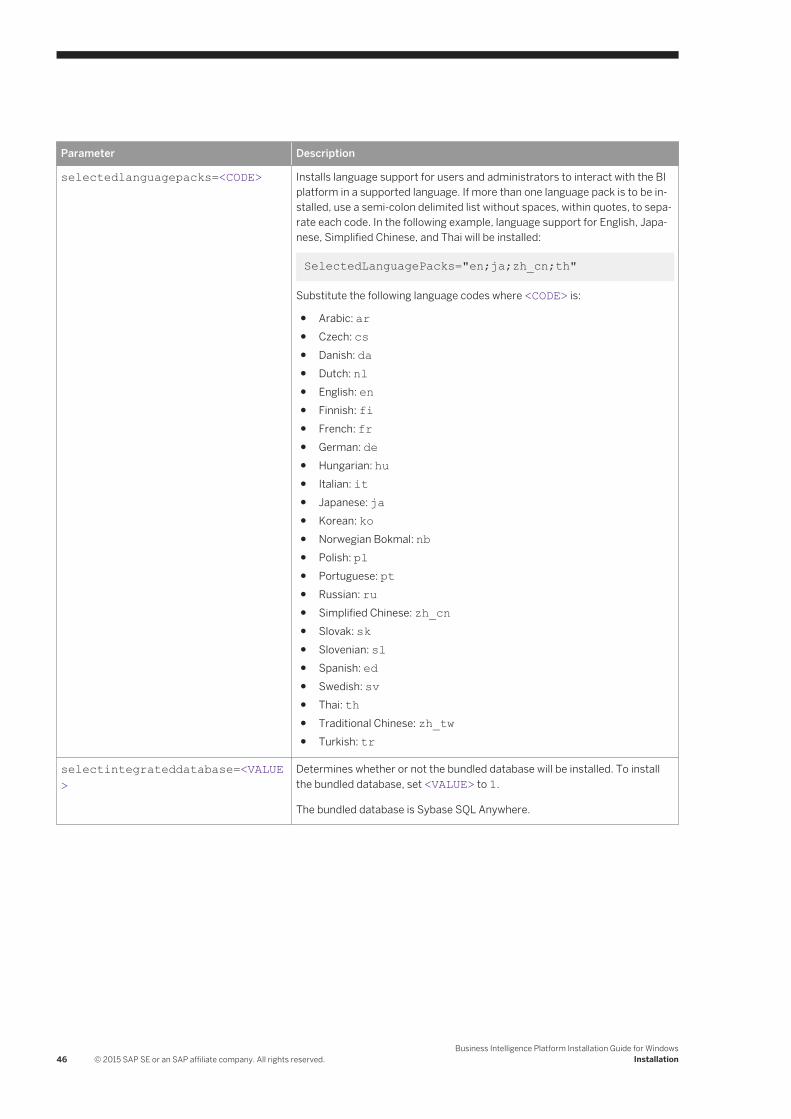
Parameter Description
selectedlanguagepacks=<CODE> Installs language support for users and administrators to interact with the BI platform in a supported language. If more than one language pack is to be installed, use a semi-colon delimited list without spaces, within quotes, to separate each code. In the following example, language support for English, Japanese, Simplified Chinese, and Thai will be installed:
SelectedLanguagePacks="en;ja;zh_cn;th"
Substitute the following language codes where <CODE> is:
● Arabic: ar● Czech: cs● Danish: da● Dutch: nl● English: en● Finnish: fi● French: fr● German: de● Hungarian: hu● Italian: it● Japanese: ja● Korean: ko● Norwegian Bokmal: nb● Polish: pl● Portuguese: pt● Russian: ru● Simplified Chinese: zh_cn● Slovak: sk● Slovenian: sl● Spanish: ed● Swedish: sv● Thai: th● Traditional Chinese: zh_tw● Turkish: tr
selectintegrateddatabase=<VALUE>
Determines whether or not the bundled database will be installed. To install the bundled database, set <VALUE> to 1.
The bundled database is Sybase SQL Anywhere.
46 © 2015 SAP SE or an SAP affiliate company. All rights reserved.Business Intelligence Platform Installation Guide for Windows
Installation
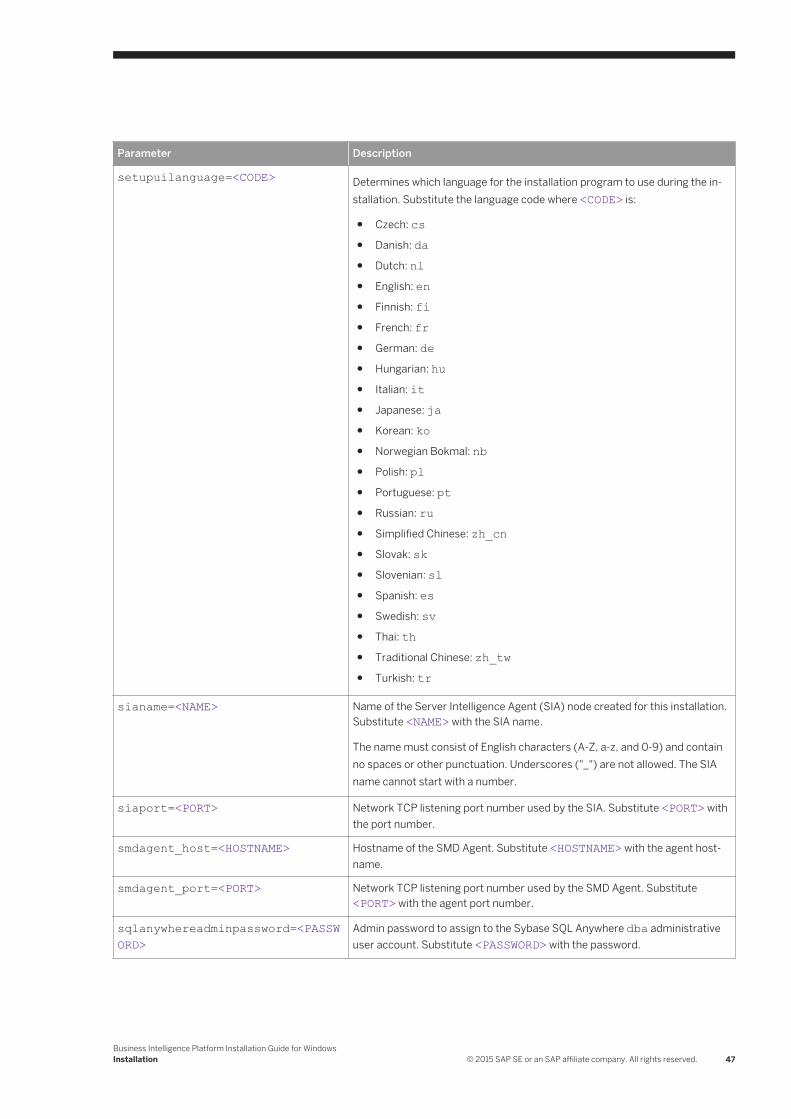
Parameter Description
setupuilanguage=<CODE> Determines which language for the installation program to use during the installation. Substitute the language code where <CODE> is:
● Czech: cs● Danish: da● Dutch: nl● English: en● Finnish: fi● French: fr● German: de● Hungarian: hu● Italian: it● Japanese: ja● Korean: ko● Norwegian Bokmal: nb● Polish: pl● Portuguese: pt● Russian: ru● Simplified Chinese: zh_cn● Slovak: sk● Slovenian: sl● Spanish: es● Swedish: sv● Thai: th● Traditional Chinese: zh_tw● Turkish: tr
sianame=<NAME> Name of the Server Intelligence Agent (SIA) node created for this installation. Substitute <NAME> with the SIA name.
The name must consist of English characters (A-Z, a-z, and 0-9) and contain no spaces or other punctuation. Underscores ("_") are not allowed. The SIA name cannot start with a number.
siaport=<PORT> Network TCP listening port number used by the SIA. Substitute <PORT> with the port number.
smdagent_host=<HOSTNAME> Hostname of the SMD Agent. Substitute <HOSTNAME> with the agent hostname.
smdagent_port=<PORT> Network TCP listening port number used by the SMD Agent. Substitute <PORT> with the agent port number.
sqlanywhereadminpassword=<PASSWORD>
Admin password to assign to the Sybase SQL Anywhere dba administrative user account. Substitute <PASSWORD> with the password.
Business Intelligence Platform Installation Guide for WindowsInstallation © 2015 SAP SE or an SAP affiliate company. All rights reserved. 47
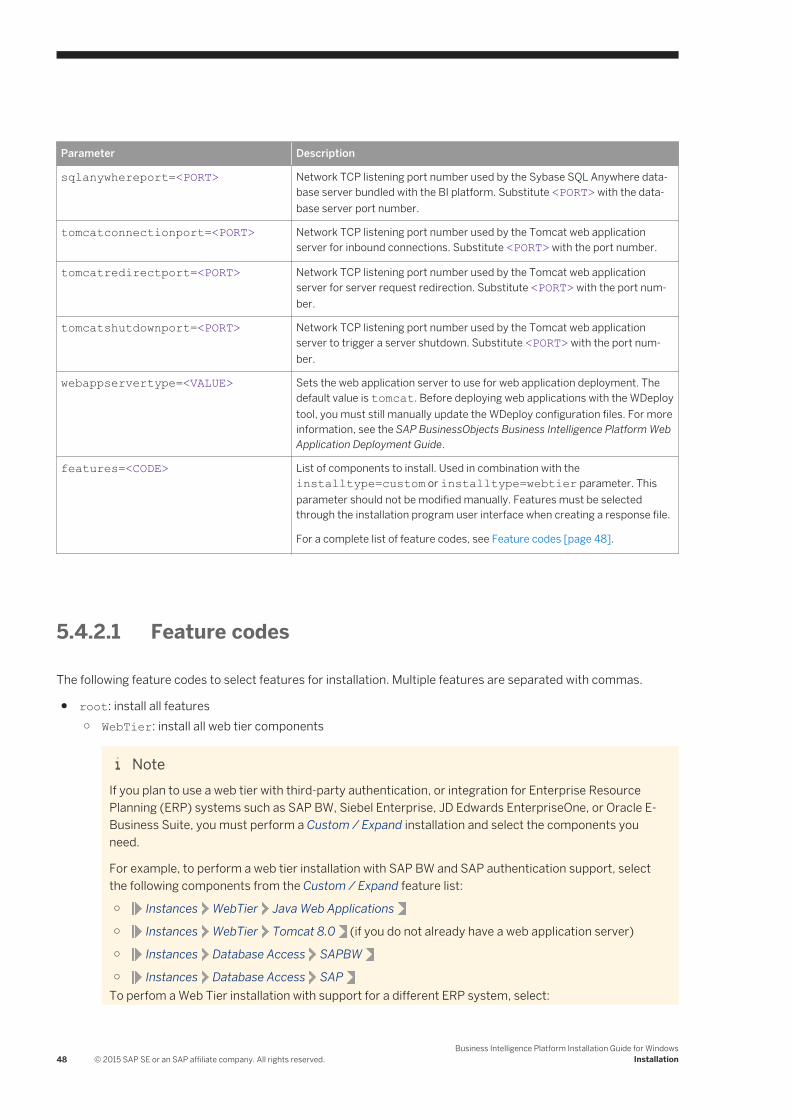
Parameter Description
sqlanywhereport=<PORT> Network TCP listening port number used by the Sybase SQL Anywhere database server bundled with the BI platform. Substitute <PORT> with the database server port number.
tomcatconnectionport=<PORT> Network TCP listening port number used by the Tomcat web application server for inbound connections. Substitute <PORT> with the port number.
tomcatredirectport=<PORT> Network TCP listening port number used by the Tomcat web application server for server request redirection. Substitute <PORT> with the port number.
tomcatshutdownport=<PORT> Network TCP listening port number used by the Tomcat web application server to trigger a server shutdown. Substitute <PORT> with the port number.
webappservertype=<VALUE> Sets the web application server to use for web application deployment. The default value is tomcat. Before deploying web applications with the WDeploy tool, you must still manually update the WDeploy configuration files. For more information, see the SAP BusinessObjects Business Intelligence Platform Web Application Deployment Guide.
features=<CODE> List of components to install. Used in combination with the installtype=custom or installtype=webtier parameter. This parameter should not be modified manually. Features must be selected through the installation program user interface when creating a response file.
For a complete list of feature codes, see Feature codes [page 48].
5.4.2.1 Feature codes
The following feature codes to select features for installation. Multiple features are separated with commas.
● root: install all features○ WebTier: install all web tier components
NoteIf you plan to use a web tier with third-party authentication, or integration for Enterprise Resource Planning (ERP) systems such as SAP BW, Siebel Enterprise, JD Edwards EnterpriseOne, or Oracle E-Business Suite, you must perform a Custom / Expand installation and select the components you need.
For example, to perform a web tier installation with SAP BW and SAP authentication support, select the following components from the Custom / Expand feature list:
○ Instances WebTier Java Web Applications
○ Instances WebTier Tomcat 8.0 (if you do not already have a web application server)
○ Instances Database Access SAPBW
○ Instances Database Access SAPTo perfom a Web Tier installation with support for a different ERP system, select:
48 © 2015 SAP SE or an SAP affiliate company. All rights reserved.Business Intelligence Platform Installation Guide for Windows
Installation
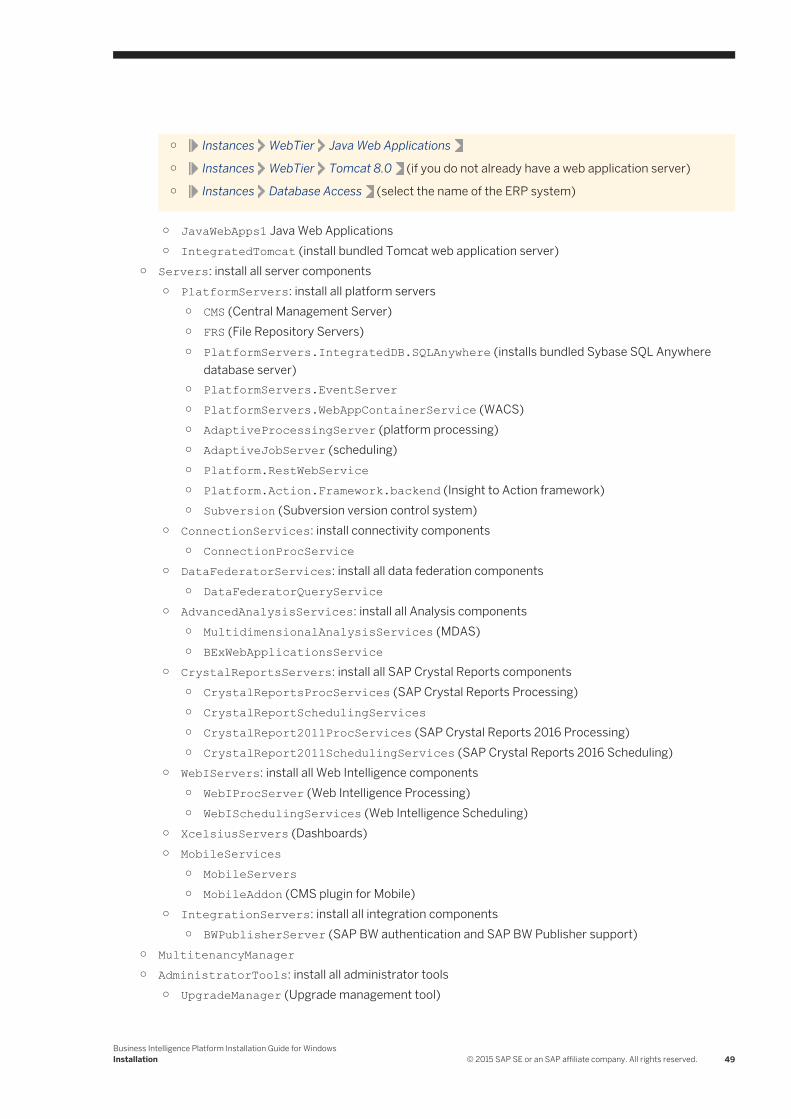
○ Instances WebTier Java Web Applications
○ Instances WebTier Tomcat 8.0 (if you do not already have a web application server)
○ Instances Database Access (select the name of the ERP system)
○ JavaWebApps1 Java Web Applications○ IntegratedTomcat (install bundled Tomcat web application server)
○ Servers: install all server components○ PlatformServers: install all platform servers
○ CMS (Central Management Server)○ FRS (File Repository Servers)○ PlatformServers.IntegratedDB.SQLAnywhere (installs bundled Sybase SQL Anywhere
database server)○ PlatformServers.EventServer○ PlatformServers.WebAppContainerService (WACS)○ AdaptiveProcessingServer (platform processing)○ AdaptiveJobServer (scheduling)○ Platform.RestWebService○ Platform.Action.Framework.backend (Insight to Action framework)○ Subversion (Subversion version control system)
○ ConnectionServices: install connectivity components○ ConnectionProcService
○ DataFederatorServices: install all data federation components○ DataFederatorQueryService
○ AdvancedAnalysisServices: install all Analysis components○ MultidimensionalAnalysisServices (MDAS)○ BExWebApplicationsService
○ CrystalReportsServers: install all SAP Crystal Reports components○ CrystalReportsProcServices (SAP Crystal Reports Processing)○ CrystalReportSchedulingServices○ CrystalReport2011ProcServices (SAP Crystal Reports 2016 Processing)○ CrystalReport2011SchedulingServices (SAP Crystal Reports 2016 Scheduling)
○ WebIServers: install all Web Intelligence components○ WebIProcServer (Web Intelligence Processing)○ WebISchedulingServices (Web Intelligence Scheduling)
○ XcelsiusServers (Dashboards)○ MobileServices
○ MobileServers○ MobileAddon (CMS plugin for Mobile)
○ IntegrationServers: install all integration components○ BWPublisherServer (SAP BW authentication and SAP BW Publisher support)
○ MultitenancyManager○ AdministratorTools: install all administrator tools
○ UpgradeManager (Upgrade management tool)
Business Intelligence Platform Installation Guide for WindowsInstallation © 2015 SAP SE or an SAP affiliate company. All rights reserved. 49
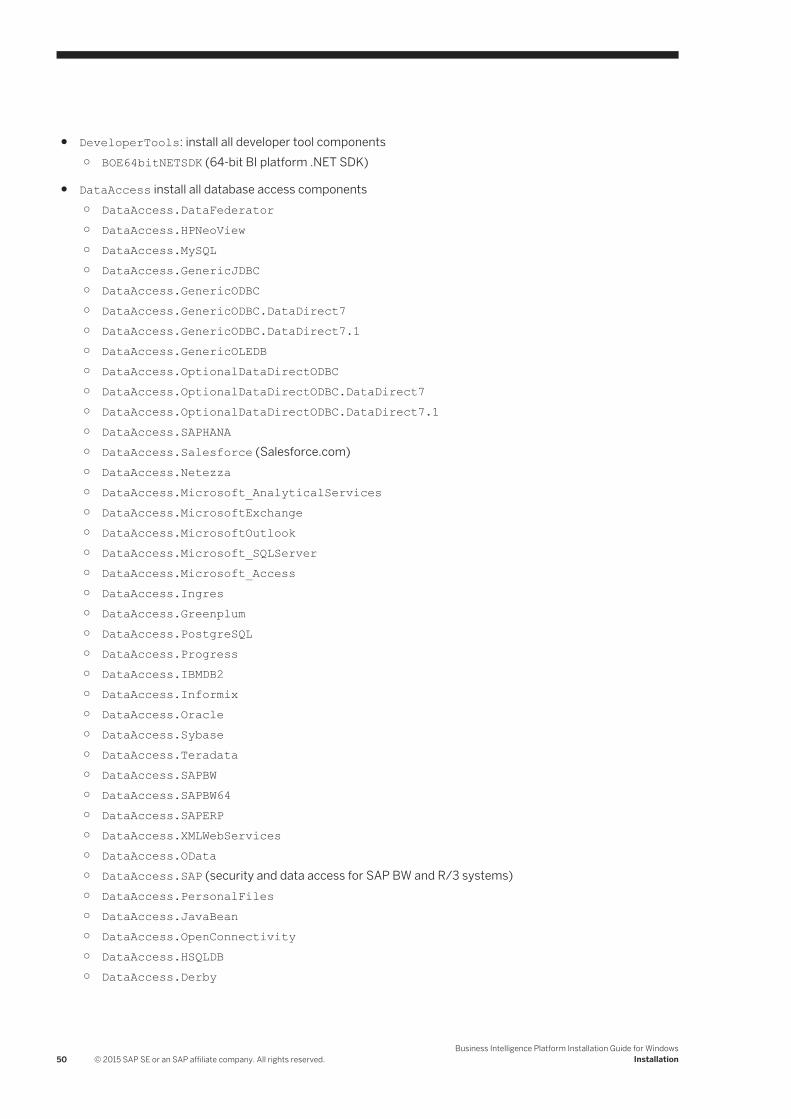
● DeveloperTools: install all developer tool components○ BOE64bitNETSDK (64-bit BI platform .NET SDK)
● DataAccess install all database access components○ DataAccess.DataFederator○ DataAccess.HPNeoView○ DataAccess.MySQL○ DataAccess.GenericJDBC○ DataAccess.GenericODBC○ DataAccess.GenericODBC.DataDirect7○ DataAccess.GenericODBC.DataDirect7.1○ DataAccess.GenericOLEDB○ DataAccess.OptionalDataDirectODBC○ DataAccess.OptionalDataDirectODBC.DataDirect7○ DataAccess.OptionalDataDirectODBC.DataDirect7.1○ DataAccess.SAPHANA○ DataAccess.Salesforce (Salesforce.com)○ DataAccess.Netezza○ DataAccess.Microsoft_AnalyticalServices○ DataAccess.MicrosoftExchange○ DataAccess.MicrosoftOutlook○ DataAccess.Microsoft_SQLServer○ DataAccess.Microsoft_Access○ DataAccess.Ingres○ DataAccess.Greenplum○ DataAccess.PostgreSQL○ DataAccess.Progress○ DataAccess.IBMDB2○ DataAccess.Informix○ DataAccess.Oracle○ DataAccess.Sybase○ DataAccess.Teradata○ DataAccess.SAPBW○ DataAccess.SAPBW64○ DataAccess.SAPERP○ DataAccess.XMLWebServices○ DataAccess.OData○ DataAccess.SAP (security and data access for SAP BW and R/3 systems)○ DataAccess.PersonalFiles○ DataAccess.JavaBean○ DataAccess.OpenConnectivity○ DataAccess.HSQLDB○ DataAccess.Derby
50 © 2015 SAP SE or an SAP affiliate company. All rights reserved.Business Intelligence Platform Installation Guide for Windows
Installation
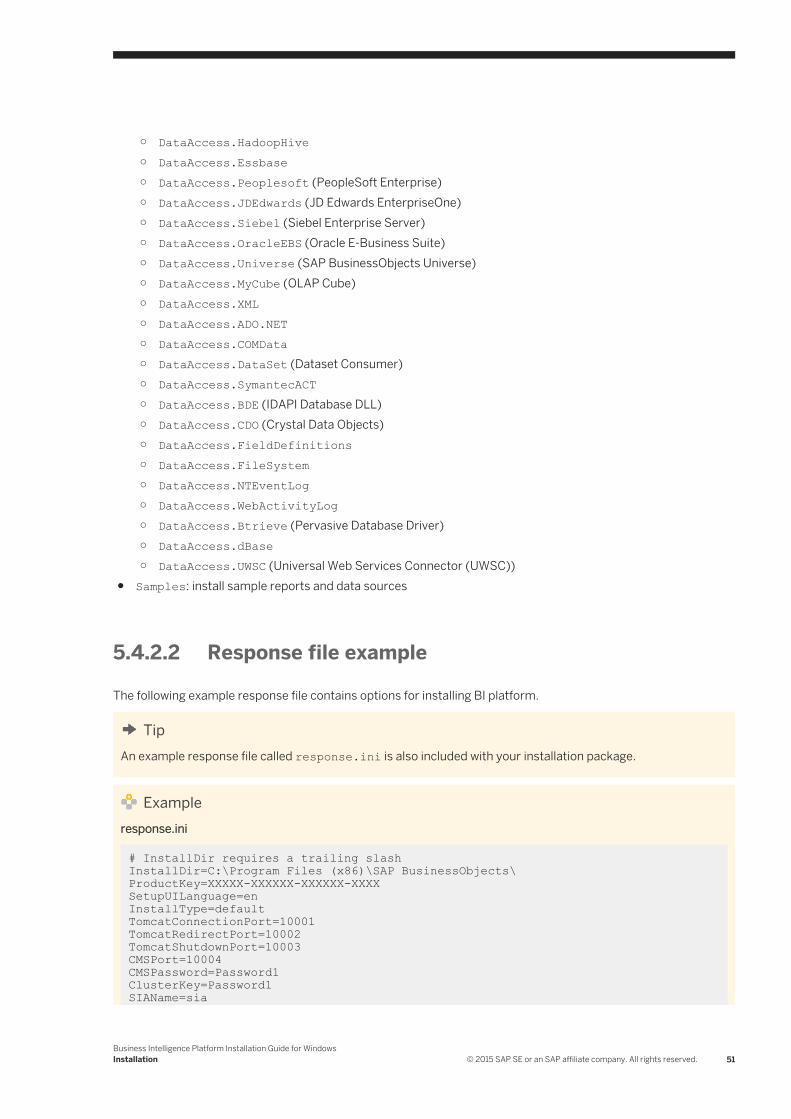
○ DataAccess.HadoopHive○ DataAccess.Essbase○ DataAccess.Peoplesoft (PeopleSoft Enterprise)○ DataAccess.JDEdwards (JD Edwards EnterpriseOne)○ DataAccess.Siebel (Siebel Enterprise Server)○ DataAccess.OracleEBS (Oracle E-Business Suite)○ DataAccess.Universe (SAP BusinessObjects Universe)○ DataAccess.MyCube (OLAP Cube)○ DataAccess.XML○ DataAccess.ADO.NET○ DataAccess.COMData○ DataAccess.DataSet (Dataset Consumer)○ DataAccess.SymantecACT○ DataAccess.BDE (IDAPI Database DLL)○ DataAccess.CDO (Crystal Data Objects)○ DataAccess.FieldDefinitions○ DataAccess.FileSystem○ DataAccess.NTEventLog○ DataAccess.WebActivityLog○ DataAccess.Btrieve (Pervasive Database Driver)○ DataAccess.dBase○ DataAccess.UWSC (Universal Web Services Connector (UWSC))
● Samples: install sample reports and data sources
5.4.2.2 Response file example
The following example response file contains options for installing BI platform.
TipAn example response file called response.ini is also included with your installation package.
Exampleresponse.ini
# InstallDir requires a trailing slash InstallDir=C:\Program Files (x86)\SAP BusinessObjects\ProductKey=XXXXX-XXXXXX-XXXXXX-XXXXSetupUILanguage=enInstallType=defaultTomcatConnectionPort=10001TomcatRedirectPort=10002TomcatShutdownPort=10003CMSPort=10004CMSPassword=Password1ClusterKey=Password1SIAName=sia
Business Intelligence Platform Installation Guide for WindowsInstallation © 2015 SAP SE or an SAP affiliate company. All rights reserved. 51
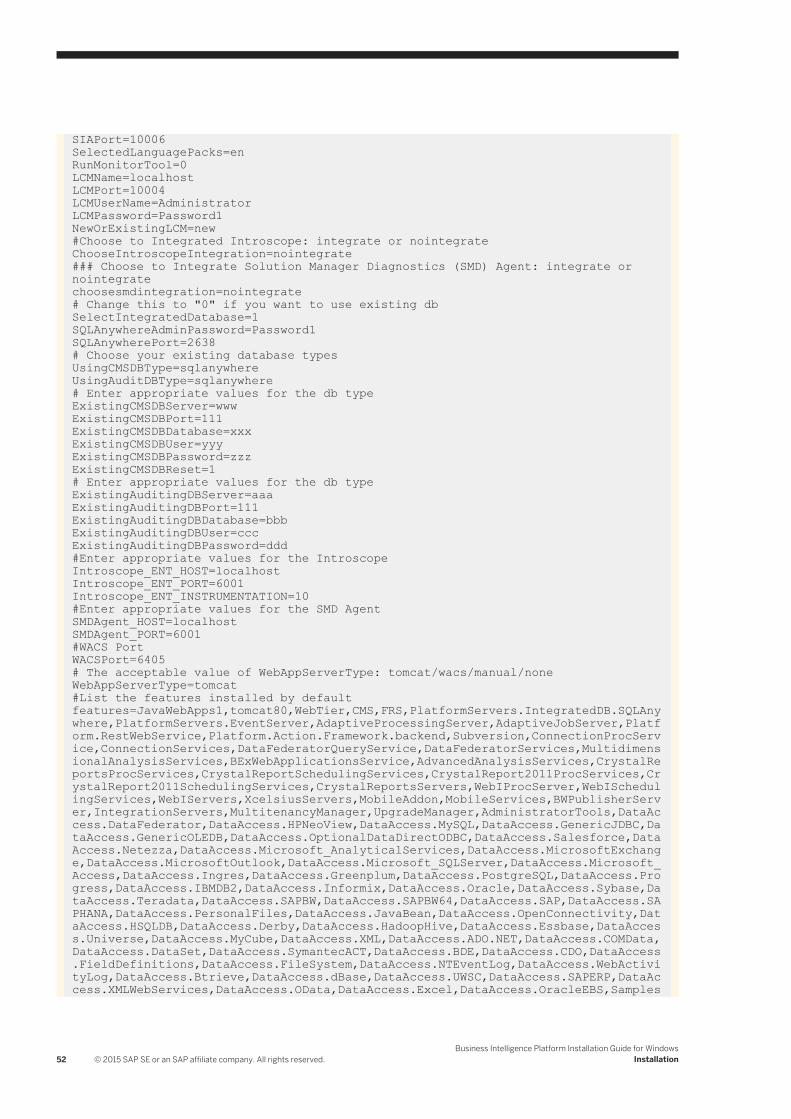
SIAPort=10006SelectedLanguagePacks=enRunMonitorTool=0LCMName=localhostLCMPort=10004LCMUserName=AdministratorLCMPassword=Password1NewOrExistingLCM=new#Choose to Integrated Introscope: integrate or nointegrateChooseIntroscopeIntegration=nointegrate### Choose to Integrate Solution Manager Diagnostics (SMD) Agent: integrate or nointegratechoosesmdintegration=nointegrate# Change this to "0" if you want to use existing dbSelectIntegratedDatabase=1SQLAnywhereAdminPassword=Password1SQLAnywherePort=2638# Choose your existing database typesUsingCMSDBType=sqlanywhereUsingAuditDBType=sqlanywhere# Enter appropriate values for the db typeExistingCMSDBServer=wwwExistingCMSDBPort=111ExistingCMSDBDatabase=xxxExistingCMSDBUser=yyyExistingCMSDBPassword=zzzExistingCMSDBReset=1# Enter appropriate values for the db typeExistingAuditingDBServer=aaaExistingAuditingDBPort=111ExistingAuditingDBDatabase=bbbExistingAuditingDBUser=cccExistingAuditingDBPassword=ddd#Enter appropriate values for the IntroscopeIntroscope_ENT_HOST=localhostIntroscope_ENT_PORT=6001Introscope_ENT_INSTRUMENTATION=10#Enter appropriate values for the SMD AgentSMDAgent_HOST=localhostSMDAgent_PORT=6001#WACS PortWACSPort=6405# The acceptable value of WebAppServerType: tomcat/wacs/manual/noneWebAppServerType=tomcat#List the features installed by defaultfeatures=JavaWebApps1,tomcat80,WebTier,CMS,FRS,PlatformServers.IntegratedDB.SQLAnywhere,PlatformServers.EventServer,AdaptiveProcessingServer,AdaptiveJobServer,Platform.RestWebService,Platform.Action.Framework.backend,Subversion,ConnectionProcService,ConnectionServices,DataFederatorQueryService,DataFederatorServices,MultidimensionalAnalysisServices,BExWebApplicationsService,AdvancedAnalysisServices,CrystalReportsProcServices,CrystalReportSchedulingServices,CrystalReport2011ProcServices,CrystalReport2011SchedulingServices,CrystalReportsServers,WebIProcServer,WebISchedulingServices,WebIServers,XcelsiusServers,MobileAddon,MobileServices,BWPublisherServer,IntegrationServers,MultitenancyManager,UpgradeManager,AdministratorTools,DataAccess.DataFederator,DataAccess.HPNeoView,DataAccess.MySQL,DataAccess.GenericJDBC,DataAccess.GenericOLEDB,DataAccess.OptionalDataDirectODBC,DataAccess.Salesforce,DataAccess.Netezza,DataAccess.Microsoft_AnalyticalServices,DataAccess.MicrosoftExchange,DataAccess.MicrosoftOutlook,DataAccess.Microsoft_SQLServer,DataAccess.Microsoft_Access,DataAccess.Ingres,DataAccess.Greenplum,DataAccess.PostgreSQL,DataAccess.Progress,DataAccess.IBMDB2,DataAccess.Informix,DataAccess.Oracle,DataAccess.Sybase,DataAccess.Teradata,DataAccess.SAPBW,DataAccess.SAPBW64,DataAccess.SAP,DataAccess.SAPHANA,DataAccess.PersonalFiles,DataAccess.JavaBean,DataAccess.OpenConnectivity,DataAccess.HSQLDB,DataAccess.Derby,DataAccess.HadoopHive,DataAccess.Essbase,DataAccess.Universe,DataAccess.MyCube,DataAccess.XML,DataAccess.ADO.NET,DataAccess.COMData,DataAccess.DataSet,DataAccess.SymantecACT,DataAccess.BDE,DataAccess.CDO,DataAccess.FieldDefinitions,DataAccess.FileSystem,DataAccess.NTEventLog,DataAccess.WebActivityLog,DataAccess.Btrieve,DataAccess.dBase,DataAccess.UWSC,DataAccess.SAPERP,DataAccess.XMLWebServices,DataAccess.OData,DataAccess.Excel,DataAccess.OracleEBS,Samples
52 © 2015 SAP SE or an SAP affiliate company. All rights reserved.Business Intelligence Platform Installation Guide for Windows
Installation
5.5 To run a phase-wise installation
The installation is performed in two phases - Caching and Installation after caching.
● Caching is the process of copying the software to the installation directory● Installation after caching is the actual installation process
5.5.1 To run a phase-wise installation for new installation
To do a phase-wise installation, perform the following steps:
1. Navigate to command prompt.2. Enter the location where the software is downloaded..3. Enter the setup.exe -cache <path><file name>.
For example: setup.exe -cache c:\response.ini4. In the Select setup language window, select the setup language.
The setup language setting is to display information during the installation in the language of your choice.5. In the Check Prerequisites window, review the results and decide whether to continue with the installation, or
abort and correct any unmet requirements.The installation program checks for required components and conditions.○ If a dependency prerequisite condition is critical, the installation program will not allow the installation to
proceed○ If the missing or unsupported component is optional, you have the option to either continue with the
installation or abort and correct the condition6. In the Installation wizard window, review the instructions displayed.7. In the License Agreement window, review and accept the license agreement.8. In the Configure Product Registration window, enter the product key.9. In the Select Language Packages window, select additional languages to install from the list.
The language currently being used by the operating system is selected automatically. English language support cannot be deselected because the BI platform uses English if a problem is detected with an individual language.
NoteIn the Select Languages Packages window, you can select the check box to add or remove language packs.
10. In the Select Install Type window, select one of the type of install○ Full Installation :If you selected a Full installation, proceed to the following Full installation section.
Business Intelligence Platform Installation Guide for WindowsInstallation © 2015 SAP SE or an SAP affiliate company. All rights reserved. 53
○ Custom/Expand Instllation : If you selected a Custom/Expand installation, proceed to the following Custom/Expand installation section.
○ Web Tier: If you selected a Web Tier installation, proceed to the following Web Tier installation section.11. Start Installation window apperars, To start caching, choose Next.12. Caching completed successfully screen appears.
NoteDuring the caching process the system downtime is eliminated.
13. Navigate to the directory where response.ini file is located.14. Enter the passwords and product key; and save the response.ini file.
For example: Enter the CMS Cluster Key, Administrator Password, and SQL Anywhere Password information.15. Navigate to command prompt.16. Enter the location where the software is downloaded.17. Enter the setup.exe -resume_after_cache <path><file name>
For example: setup.exe -resume_after_cache c:\response.ini18. In the Resume installation window, choose OK19. In the Post Installation Steps window, follow the instructions and choose Next
The installation of is completed successfully.
Note● You can experience the system downtime only during the installation after caching, hence the overall
system downtime is reduced.● After you start the installation, the installer repairs any errors that occurred during the caching and
proceeds with the installation
5.5.2 To run a phase-wise installation for update
To do a phase-wise installation patch update, perform the following steps:
1. Navigate to command prompt.2. Enter the location where the software is downloaded..3. Enter the setup.exe -cache <path><file name>.
For example: setup.exe -cache c:\response.ini4. In the Select setup language window, select the setup language.
The setup language setting is to display information during the installation in the language of your choice.5. In the Check Prerequisites window, review the results and decide whether to continue with the installation, or
abort and correct any unmet requirements.The installation program checks for required components and conditions.○ If a dependency prerequisite condition is critical, the installation program will not allow the installation to
proceed
54 © 2015 SAP SE or an SAP affiliate company. All rights reserved.Business Intelligence Platform Installation Guide for Windows
Installation
○ If the missing or unsupported component is optional, you have the option to either continue with the installation or abort and correct the condition
6. In the Installation wizard window, review the instructions displayed.7. In the License Agreement window, review and accept the license agreement.8. In the Existing CMS Deployment Information window, enter the CMS Logon Administrator Information
password.9. Start Installation window apperars, To start caching, choose Next.10. Caching completed successfully screen appears.
NoteDuring the caching process the system downtime is eliminated.
11. Navigate to the directory where response.ini file is located.12. Enter the Remote CMS Administrator Password and save the response.ini file.13. Navigate to command prompt.14. Enter the location where the software is downloaded..15. Enter the setup.exe -resume_after_cache <path><file name>.
For example: setup.exe -resume_after_cache c:\response.ini16. In the Resume installation window, choose OK17. In the Post Installation Steps window, follow the instructions and choose Next
The installation of patch update is completed successfully.
Note● You can experience the system downtime only during the installation after caching, hence the overall
system downtime is reduced.● After you start the installation, the installer repairs any errors that occurred during the caching and
proceeds with the installation
Business Intelligence Platform Installation Guide for WindowsInstallation © 2015 SAP SE or an SAP affiliate company. All rights reserved. 55
6 Post-Installation
This section describes the activities that should be performed after the installation program has finished, to test that the installation was successful.
6.1 Verifying your installation
You can verify that your installation was successful by using a Central Management Console (CMC) to log onto your CMS. The CMC is used to administer servers, users and groups, rights, and security policies.
If you have installed a dedicated web application server, you can enter the web application server's URL to access the CMC. Use the following URL:
http://<WAS_HOSTNAME>:<PORT>/BOE/CMC
Substitute <WAS_HOSTNAME> for the hostname of the web application server and <PORT> for the web application server's listening port. If you are using a custom web application server root context or BOE.war web application context, the URL will be different.
If you are using Internet Explorer, you may receive several Internet Explorer Enhanced Security Configuration warnings because the new server is not yet added to the list of trusted sites. Click Add to add the local web server to the list of trusted web sites. If your server is not using SSL encryption, deselect Require server verification (https:) for all sites in this zone.
Log on as the Administrator user by typing Administrator into the User Name field and entering the administrative password that you entered into the installation program.
For more information on using the CMC, see the SAP BusinessObjects Business Intelligence Platform Administrator Guide.
6.1.1 Checking the installed version
Use one of the following methods to check the version of the BI platform that you have installed:
● On Windows deployments, use Windows Add Remove Programs (ARP)● On Unix or Linux deployments, run modifyOrRemoveProducts.sh
BI products and Client Tools
You can see the current version information for BI platform Client Tools and other SAP BusinessObjects BI products such as SAP Crystal Reports in the Help About menu.
56 © 2015 SAP SE or an SAP affiliate company. All rights reserved.Business Intelligence Platform Installation Guide for Windows
Post-Installation

6.1.2 Troubleshooting login issues
If you are unable to log on to the CMS using the CMC, or launch the CMC, evaluate the following possible causes:
1. Is a firewall blocking the CMS port number (default 6400) or the web application server port?Check the Windows Firewall settings by going to: Start Settings Control Panel Windows Firewall .
2. Is the URL correct?The default URL to access the CMC is:
http://<WAS_HOSTNAME>:<PORT>/BOE/CMC
Substitute <WAS_HOSTNAME> for the hostname of the web application server and <PORT> for the web application server's listening port. If you are using a custom web application server root context or BOE.war web application context, the URL will be different.
3. Is the correct method specified in the Authentication field?The default authentication type is Enterprise, referring to native BI platform authentication system.If you are using an LDAP or Windows AD single sign-on authentication system, select the system instead.
4. Did you provide the correct user credentials in the User Name and Password fields on the CMC login screen?The name of the administrative account is Administrator. You entered the password during the installation process.
5. Is the Server Intelligence Agent (SIA) running.?Go to: Start Programs SAP Business Intelligence SAP BusinessObjects BI platform 4 Central Configuration Manager .If the SIA is not running, start it.
6. Ensure that the database server(s) used for the CMS system and Auditing Data Store databases are running, and that the network connection from the CMS to the database is working.
If none of these solutions work, consider repairing or reinstalling the software or contacting support at: https://support.sap.com/home.html .
6.2 Creating additional Adaptive Processing Servers
The installation program installs one Adaptive Processing Server (APS) per host system. Depending on the features that you've installed, this APS may host a large number of services, such as the Monitoring Service, Lifecycle Management Service, Multi-Dimensional Analysis Service (MDAS), Publishing Service, and others.
For production or test systems, the best practice is to create additional APSs, and configure the APSs to meet your business requirements.
You can create additional APSs in two ways:
● Run the System Configuration Wizard.The wizard helps you with basic configurations of your BI platform system, including configuring APSs according to predefined deployment templates. The APS configuration provided by the wizard is a good starting point; however, system sizing must still be performed.The wizard is available from the Central Management Console (CMC). For more information about the wizard, see “Introduction to the System Configuration Wizard” in the Business Intelligence Platform Administrator Guide. For more information about default deployment templates, see the SAP BusinessObjects BI platform
Business Intelligence Platform Installation Guide for WindowsPost-Installation © 2015 SAP SE or an SAP affiliate company. All rights reserved. 57
Deployment Templates document, which is available from within the wizard, and also at http://help.sap.com/bobip.
● Use the CMC to manually create and configure additional APSs. For details, see “Adding, cloning, and deleting servers” in the Business Intelligence Platform Administrator Guide.
RememberSelecting a deployment template in the wizard or manually creating additional APSs does not replace system sizing. Ensure that sizing is performed: http://www.sap.com/bisizing .
6.3 Deploying web applications
The installation only deploys web applications to the bundled version of Tomcat. To deploy web applications to a supported web application server, you must deploy the web applications manually with the WDeploy tool, or with the web application server administrative console.
The WDeploy tool automates the deployment of web applications to supported web application servers. For more information on using WDeploy, see the SAP BusinessObjects Business Intelligence Platform Web Application Deployment Guide.
6.4 SAP support
6.4.1 To configure System Landscape Directory (SLD) Data Supplier (DS) post installation
If you decided not to enable support for SAP System Landscape Directory (SLD) when installing the BI platform, you can enable it at any time later by installing SAP Host Agent. For more information, see To enable SAP System Landscape Directory (SLD) support [page 21].
Once SAP Host Agent is installed, open the Central Management Console (CMC), select the Servers tab, and restart the SIA nodes. SLD registration will automatically occur whenever a SIA is restarted or created.
To enable SLD support for web applications deployed to a web application server, see “SAP System Landscape Directory (SLD) registration” in the SAP BusinessObjects Business Intelligence Platform Web Application Deployment Guide.
6.4.2 To configure SMD Agent post installation
If you did not configure SAP Solution Manager Diagnostics (SMD) during the installation process, you can still give the SMD Agent hostname and port number in the Central Management Console (CMC).
58 © 2015 SAP SE or an SAP affiliate company. All rights reserved.Business Intelligence Platform Installation Guide for Windows
Post-Installation
NoteSMD Agent must be installed before configuring the SMD Agent hostname and port number in the BI platform.
1. Open the Central Management Console.2. Select the Servers tab.3. Expand the SIA Nodes folder in server list, and right-click the SIA to be updated.4. Select Placeholders from the context menu.5. Ensure that the placeholders related to SMD Agent are set correctly:
a. Update the %SMDAgentHost% placeholder with the SMD Agent hostname.b. Update the %SMDAgentPort% placeholder with the SMD Agent port number.
6. Save and close the Placeholders screen.7. Restart the SIA.8. When more than one SIA is present, repeat steps 3-7 for each SIA in the Nodes folder.
6.4.3 To configure CA Wily Introscope Agent post installation
If you did not configure CA Wily Introscope during the installation process, you can configure it later in the Central Management Console (CMC).
NoteThe Introscope Agent must be installed and running before configuring it in the CMC.
1. Open the Central Management Console.2. Select the Servers tab.3. Expand the SIA Nodes folder in server list, and right-click the SIA to be updated.4. Select Placeholders from the context menu.5. Ensure that the placeholders related to Introscope are set correctly:
a. Change the %IntroscopeAgentEnableInstrumentation% placeholder from false to true.b. Update the %IntroscopeAgentManagerHost% placeholder with the Introscope Agent hostname.c. Update the %IntroscopeAgenEnterpriseManagerPort% placeholder with the Introscope Agent port
number.d. Review %IntroscopeAgenEnterpriseManagerTransport% to ensure that the correct network
transport is selected (for example, TCP).
6. Save and close the Placeholders screen.7. Restart the SIA.8. When more than one SIA is present, repeat steps 3-7 for each SIA in the Nodes folder.
Business Intelligence Platform Installation Guide for WindowsPost-Installation © 2015 SAP SE or an SAP affiliate company. All rights reserved. 59
6.5 Third-party ERP integration
6.5.1 To enable Siebel Enterprise integration
To integrate the BI platform with Siebel Enterprise, you may need to take some additional steps. There are two methods you can use to report off Siebel data:
● Reporting from a local Siebel clientTo report from a local Siebel client, ensure that Siebel Enterprise is configured so that either Siebel Dedicated Web Client or Mobile Web Client is enabled and accessible.
● Report directly off your Siebel Enterprise serverTo enable Siebel Enterprise integration, the Siebel Java Data Bean JAR files must be copied to the BI platform and web application server lib folders.
1. Locate the classes folder that was created when you installed Siebel Tools.
The Java data bean files are typically located in the SIEBEL_HOME\classes folder. For example, the Siebel classes folder may be C:\Program Files (x86)\Siebel\7.8\classes.
2. Copy the SiebelJI.jar and SiebelJI_enu.jar Java data bean files to the BI platform Java lib directory.
For example, copy C:\Program Files (x86)\Siebel\7.8\classes\SiebelJI.jar and C:\Program Files (x86)\Siebel\7.8\classes\SiebelJI_enu.jar to <BIP_INSTALL_DIR>\SAP BusinessObjects Enterprise XI 4.0\java\lib\siebel.
3. Copy the SiebelJI.jar and SiebelJI_enu.jar Java data bean files to the lib directory of your web application server.
For example, copy C:\Program Files (x86)\Siebel\7.8\classes\SiebelJI.jar and C:\Program Files (x86)\Siebel\7.8\classes\SiebelJI_enu.jar to <WAS_INSTALL_DIR>\lib\. If you installed the Tomcat web application server bundled with the BI platform, the folder is <BIP_INSTALL_DIR>\tomcat\lib.
4. Restart the Central Management Server and web application server.
For more information, see “Configuring for Siebel integration” in the SAP BusinessObjects Business Intelligence Platform Administrator Guide.
6.5.2 To enable JD Edwards EnterpriseOne integration
To enable JD Edwards EnterpriseOne integration, the JD Edwards Java Data Bean JAR files must be copied to the BI platform Java lib folder.
1. Locate the classes folder that was created when you installed JD Edwards EnterpriseOne.
The Java data bean files are typically located in the <JDE_HOME>\system\classes folder.
2. Locate the following Java data bean files:○ kernel.jar○ jdeutil.jar○ log4j.jar
60 © 2015 SAP SE or an SAP affiliate company. All rights reserved.Business Intelligence Platform Installation Guide for Windows
Post-Installation
○ pseoneqryxml.jar○ pseonexml.jar
3. Copy the .jar files above into the BI platform JD Edwards lib folder:
<BIP_INSTALL_DIR>\SAP BusinessObjects Enterprise XI 4.0\java\lib\jdedwards\default\jdedwards.
4. Also copy the .jar into the web application server Java lib folder. For example, if you're using the web application server bundled with the BI platform, the default web application server lib directory is:
<BIP_INSTALL_DIR>\tomcat\lib.
5. Restart the Central Management Server and Web Application Server.
For more information, see “Configuring for JD Edwards integration” in the SAP BusinessObjects Business Intelligence Platform Administrator Guide.
6.5.3 To enable Oracle E-Business Suite (EBS) integration
To enable reporting from Oracle EBS data sources in SAP Crystal Reports, ensure that the 32-bit Oracle client is installed on systems running SAP Crystal Reports.
To enable BI platform integration with Oracle EBS, including Oracle EBS authentication and import roles, follow the steps below.
1. Install and configure the 64-bit Oracle client on BI platform hosts.When installing the 64-bit Oracle client, ensure that the following components are installed:○ Oracle JDBC driver○ JDBC-OCI bridge
2. Verify that the Oracle client can connect by logging on to the Oracle EBS database on the client.3. Copy the following Oracle client binaries to the BI platform Oracle library.
Copy:○ <ORA_HOME>\bin\ocijdbc11.dll
To: <BIP_INSTALL_DIR>\SAP BusinessObjects Enterprise XI 4.0\win64_x64.
4. Copy the following file to the web application server lib directory.
Copy:○ <ORA_HOME>\jdbc\lib\ojdbc5.jar
Copy the file to the web application server lib directory. For example, if you're using the web application server bundled with the BI platform, the default web application server lib directory is:
<BIP_INSTALL_DIR>\tomcat\lib.
5. Restart the CMS.6. Stop the web application server.7. Clean up the web application work folder.
For example, on the Tomcat web application server bundled with the BI platform, remove all the files in the Tomcat work folder (<BIP_INSTALL_DIR>\tomcat\work\Catalina\localhost\BOE).
8. Restart the web application server.
Business Intelligence Platform Installation Guide for WindowsPost-Installation © 2015 SAP SE or an SAP affiliate company. All rights reserved. 61
After installing integration for Oracle E-Business Suite, ensure that the Oracle EBS security context is enforced. To do this, manually create the bobj_pkg package in any new Oracle EBS database before using the integration solution for the first time. To generate the package, log on to the Oracle EBS database and use the PL\SQL code given in the following file:
<BIP_INSTALL_DIR>\SAP BusinessObjects Enterprise XI 4.0\Samples\ebs\bobj_pkg.txt
6.6 Post-install diagnostic checks
You can run the Monitoring Tool at any time to run a diagnostics check and look for problems.
To access the Monitoring Tool in order to run diagnostic tests, log on to the Central Management Console (CMC), select the Monitoring screen, and click the Probes tab.
6.7 Making changes to the BI platform
6.7.1 To modify the BI platform
These instructions describe the process to modify your BI platform installation by adding or removing installed components though the Windows Control Panel.
It is recommended that you back up the CMS system database before modifying the BI platform.
1. Go to: Start Control Panel Programs and Features .2. Right-click SAP BusinessObjects Business Intelligence platform 4.2 and select Uninstall/Change.3. On the Application Maintenance page, select Modify and click Next.4. On the Select Language Packs page, select any languages you want to install; unselect any languages you
want to remove. Click Next to continue.5. On the Select Features page, select any features you want to install; unselect any features you want to
remove.
Features are grouped under the following headings:○ Web Tier
The web tier components include web applications such as BI launch pad and the Central Management Console (CMC) that allow end users and administrators to interact with BI content and the BI platform installation.If you do not have a web application server in place for use with the BI platform, the installation program can install and configure a Tomcat web application server for you. It is recommended that you evaluate your requirements against information from your web application server vendor to determine which supported web application server would best suit your organization's needs.If you already have a supported web application server installed, you can deselect the option to install Tomcat, and only install the Java web applications
○ Servers
62 © 2015 SAP SE or an SAP affiliate company. All rights reserved.Business Intelligence Platform Installation Guide for Windows
Post-Installation
Server features include the Business Intelligence platform servers (such as processing and scheduling servers), major system components (such as the CMS, Event Server, bundled database, and a version control system), and servers that integrate the BI platform into your organization's existing network infrastructure, such as SAP BW or other Enterprise Resource Planning (ERP) systems.
NoteIf you plan to use SAP BW authentication, ensure that the BW Publisher Server feature is selected in the Integration Servers feature list.
○ Administrator Tools The Administrator Tools features help administrators maintain an installation. For example, the Upgrade management tool allows you migrate BI content during an upgrade between different versions of the BI platform.
○ Developer ToolsIf you plan to develop your own applications with a the BI platform .NET Software Development Kit (SDK), install the Developer Tools feature.
○ Database AccessTo access, analyze, and report on the data in your organization's existing databases, select the appropriate Database Access features. If your organization does not use a particular database, you can deselect it.
Note○ Integration for PeopleSoft Enterprise, JD Edwards EnterpriseOne, Siebel, or Oracle EBS Enterprise
Resource Planning (ERP) systems is not selected by default. If you plan to use an ERP single sign-on authentication, or other ERP features, ensure that the appropriate ERP feature is selected in the Data Access feature list.
○ If you plan to use integration for SAP, SAP BW, or SAP R3 systems, ensure that the SAPBW and SAP features are selected in the Data Access feature list.
○ SamplesThe samples features installs sample reports, templates, and reporting databases. If you do not need samples, you can deselect it.
6. Click Next to apply your changes.
The Start Installation page appears. Start the installation.
6.7.2 To repair the BI platform
These instructions describe the process to repair a BI platform installation from the Microsoft Windows Control Panel. This process restores the files and settings originally configured by the setup program.
It is recommended that you back up the CMS system database before running a repair.
1. Go to: Start Control Panel Programs and Features .2. Right-click SAP BusinessObjects Business Intelligence platform 4.2 and select Uninstall/Change.3. On the Application Maintenance page, select Repair and click Next.4. (Optional) On the Existing CMS Deployment Information page, enter the CMS connection and logon
information for the existing, remote CMS.
Business Intelligence Platform Installation Guide for WindowsPost-Installation © 2015 SAP SE or an SAP affiliate company. All rights reserved. 63
NoteIf you cannot connect to your existing, remote CMS, click No when prompted and you can proceed with the repair.
The Start Installation page appears. Start the installation. Once the repair is complete, the system is restored to its original configuration.
6.7.3 To remove the BI platform
These instructions describe the process to permanently uninstall the BI platform from a machine.
It is recommended that you back up the CMS database before removing the BI platform.
NoteAdd-on products that have dependencies on other products should be removed before the product on which they depend. For example, if Explorer installed on a machine, remove it first, as it will not function without the BI platform.
NotePrerequisite for uninstalling or downgrading from SAP BusinessObjects BI platform 4.2 to 4.1 SP05 and from 4.2 to 4.0 SP11
When uninstalling or downgrading SAP BusinessObjects BI Platform from 4.2 to 4.1 SP05 and from 4.2 to 4.0 SP11, make sure that you restore the FRS file backup and CMS database backup manually. Also, perform the following:
● Navigate to the following DFO location Install Location SAP BusinessObjects Enterprise XI 4.0 dfodfo_xxxxxxxxxxxxxxx SI
● Remove the two DFO files (i.e CrystalReportsNextGenProcessingServiceContainer and OutOfBoxCrystalReportsNextGenProcessingServer) from the cache directory.
● Move it into a new directory.● Then restart the SIA.
The following items will remain:
● The CMS repository auditing databases, as they may be shared with other programs. If you are using the bundled Sybase SQL Anywhere database server, a backup of the CMS and auditing database files (.db) remain at the following location: <BIP_INSTALL_DIR>\sqlanywhere\database.backup.<DATE>\
● The file repository folder, as it may contain user data.● Web applications deployed to a web application server will not be undeployed. Use the WDeploy command or
the web application server administrative console to undeploy web applications.● Web application files customized to an individual web application server.● Configuration files
64 © 2015 SAP SE or an SAP affiliate company. All rights reserved.Business Intelligence Platform Installation Guide for Windows
Post-Installation
NoteThese items can be removed manually by an administrator if required.
1. Run the Central Configuration Manager (CCM) by selecting Start Programs SAP Business IntelligenceSAP BusinessObjects BI platform 4 Central Configuration Manager .
2. Change the status of all servers to stopped.3. When all of the servers are stopped, close the CCM.
4. Go to: Start Control Panel Programs and Features .5. Right-click SAP BusinessObjects Business Intelligence platform 4.2 and select Uninstall/Change.6. On the Application Maintenance page, select Remove and click Next.7. On the Uninstall Confirmation page, confirm that you want uninstall by clicking Next.
The uninstallation program starts and the BI platform is removed from the system.
6.7.4 Patching third-party solutions bundled with the BI platform
There are several third-party software solutions bundled with the BI platform 4.2 installation, including:
● SAP Sybase SQL Anywhere● Apache Tomcat 8.0● SAP JVM
These third-party solutions are delivered as-is and without any support to patch them with vendor-delivered patches or updates. In the event of a security issues arising in those delivered products, SAP will patch them in subsequent Support Packages (SPs) or Patches as necessary.
If your business has the need to run a newer version or patch of the bundled software, consider switching to a fully featured solution providing you with a greater flexibility and support. For a list of databases, web application servers, and other systems supported by this release, see the Product Availability Matrix (Supported Platforms/PAR), available on the SAP BusinessObjects section of the SAP Support Portal at: https://support.sap.com/home.html .
NoteThe SAP JVM/JDK must not be swapped with another vendor's JVM/JDK.
6.8 When the administrator account password is lost
If the credentials for the BI platform administrator account are lost, consider whether another administrative account is available, and use it to change the password for the BI platform administrator account.
If this is not possible, refer to SAP Knowledge Base Article 1679970 - How to reset the Administrator password in Business Intelligence Platform 4.X.
Business Intelligence Platform Installation Guide for WindowsPost-Installation © 2015 SAP SE or an SAP affiliate company. All rights reserved. 65
6.9 Post-installation configuration of fonts in the fontalias.xml file
You can increase the number of fonts available in Web Intelligence by manually editing the fontalias.xml file.
NoteYou must obtain and install fonts on your machine before configuring fonts in the fontalias.xml file.
● On UNIX, the file is located in the following directory:<BOBJ_INST_DIR>/sap_bobj/enterprise_xi40/<platform>_x64/fonts
● On the 64-bit Windows server, the file is located in the following folder:<SAP_BOBJ_INST_DIR>\SAP BusinessObjects Enterprise XI 4.0\win64_x64\fonts
● On the 32-bit Windows client, the file is located in the following folder:<SAP_BOBJ_INST_DIR>\SAP BusinessObjects Enterprise XI 4.0\win32_x86\fonts
NoteTo ensure consistent fonts are used, ensure that the fonts added to the Web Intelligence Rich Client machine deployments are also added to the BI Platform server machine deployments.
A sample of the default fontalias.xml appears below:
<FONTALIASMANAGER> <FONT NAME="Arial"> <FONTFAMILY PLATFORM="ttf" NAME="Arial"> <FONTATTRIBUTE BOLD="false" ITALIC="false" LOGICAL="Arial" PHYSICAL="Arial.ttf;arial.ttf"/> <FONTATTRIBUTE BOLD="true" ITALIC="false" LOGICAL="Arial Bold" PHYSICAL="Arial-Bold.ttf;arialbd.ttf;arialb.ttf"/> <FONTATTRIBUTE BOLD="false" ITALIC="true" LOGICAL="Arial Italic" PHYSICAL="Arial-Italic.ttf;ariali.ttf"/> <FONTATTRIBUTE BOLD="true" ITALIC="true" LOGICAL="Arial Bold Italic" PHYSICAL="Arial-BoldItalic.ttf;arialbi.ttf;arialz.ttf"/> </FONTFAMILY> <FONTFAMILY PLATFORM="win" NAME="Arial"/> <FONTFAMILY PLATFORM="java" NAME="Arial, Helvetica, 'Courier New', 'Times New Roman'"/> <FONTFAMILY PLATFORM="html" NAME="Arial, Helvetica, 'Courier New', 'Times New Roman'"/> </FONT> </FONTALIASMANAGER>
You need to do the following:
● Define a FONT entity for each new font.● List the font name in the NAME attribute for the Web Intelligence applications.● Specify in each FONTATTRIBUTE entity the LOGICAL name of the font, as well as the PHYSICAL (file name) of
the font. Any substation fonts will be listed in the PHYSICAL attribute separated by semicolons.
66 © 2015 SAP SE or an SAP affiliate company. All rights reserved.Business Intelligence Platform Installation Guide for Windows
Post-Installation
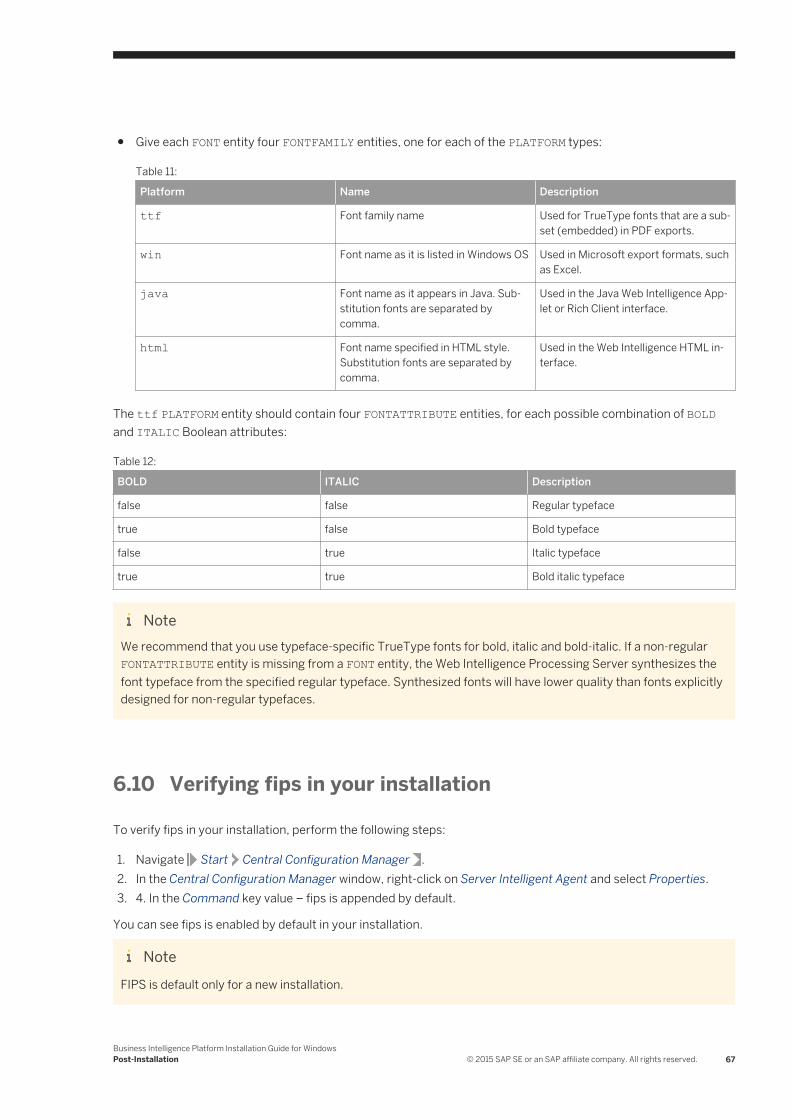
● Give each FONT entity four FONTFAMILY entities, one for each of the PLATFORM types:
Table 11:
Platform Name Description
ttf Font family name Used for TrueType fonts that are a subset (embedded) in PDF exports.
win Font name as it is listed in Windows OS Used in Microsoft export formats, such as Excel.
java Font name as it appears in Java. Substitution fonts are separated by comma.
Used in the Java Web Intelligence Applet or Rich Client interface.
html Font name specified in HTML style. Substitution fonts are separated by comma.
Used in the Web Intelligence HTML interface.
The ttf PLATFORM entity should contain four FONTATTRIBUTE entities, for each possible combination of BOLD and ITALIC Boolean attributes:
Table 12:
BOLD ITALIC Description
false false Regular typeface
true false Bold typeface
false true Italic typeface
true true Bold italic typeface
NoteWe recommend that you use typeface-specific TrueType fonts for bold, italic and bold-italic. If a non-regular FONTATTRIBUTE entity is missing from a FONT entity, the Web Intelligence Processing Server synthesizes the font typeface from the specified regular typeface. Synthesized fonts will have lower quality than fonts explicitly designed for non-regular typefaces.
6.10 Verifying fips in your installation
To verify fips in your installation, perform the following steps:
1. Navigate Start Central Configuration Manager .2. In the Central Configuration Manager window, right-click on Server Intelligent Agent and select Properties.3. 4. In the Command key value – fips is appended by default.
You can see fips is enabled by default in your installation.
NoteFIPS is default only for a new installation.
Business Intelligence Platform Installation Guide for WindowsPost-Installation © 2015 SAP SE or an SAP affiliate company. All rights reserved. 67
6.11 Viewing log summary
ErrorsAndWarnings.log file contains exclusively the errors and warnings that occurred during install or uninstall or modify or repair the BI platform. The status of install or uninstall of the SAP BusinessObjects BI platform 4.2 has following scenarios:
● BI platform 4.2 has been successfully installed or uninstalled● BI platform 4.2 has been successfully installed or uninstalled with warnings.● BI platform 4.2 has encountered errors during the install or uninstall process
The hyperlink Click here for details appears in case of warnings or errors during the installation or uninstallation or modifying or reparing. When you select Click here for details, you can see the errors and warnings listed in the file.
Alternatively the errors and warnings log file is saved to <INSTALL_DIR>\InstallData\logs\<DATEandTIME>\ErrorsAndWarnings.log.
68 © 2015 SAP SE or an SAP affiliate company. All rights reserved.Business Intelligence Platform Installation Guide for Windows
Post-Installation

7 Installing BI Platform Client Tools
The BI platform Client Tools can only be installed by a dedicated installation program, and are no longer bundled with the installation of the BI platform servers.
The BI platform Client Tools installation program installs a suite of desktop clients on supported Windows operating systems only. Client Tools are not available for Unix or Linux operating systems.
Note● Although the Client Tools are supported on 64-bit operating systems, the Client Tools themselves are only
available as 32-bit applications.● When installing a database driver for Client Tools on 64-bit operating systems, ensure that you install the
32-bit version. A 32-bit application cannot use a 64-bit driver.● If you install both the Client Tools and BI platform servers on the same 64-bit Windows operating system,
you must install both 32-bit and 64-bit database drivers on the machine. You must also ensure that both 32-bit and 64-bit database connector middleware is installed and that their data source configurations are identical, because Client Tools requests in this scenario may be handled by either of the two 32-bit or 64-bit Native Connectivity Services.
Some of the client applications that make up the Client Tools suite are also available with their own stand-alone installation program. This allows you to install the client application by itself, without having to install the Client Tools suite's Custom installation option.
Client Tools can co-exist on a system that also runs BI platform server software. When installing both BI platform servers and Client Tools on the same system, it is recommended that the server components (including add-ons and language packs) are installed before Client Tools. This allows the Client Tools to use same the same components as the server.
No product key is required to install Client Tools, but you require administrative privileges for the account being used to run the installation program.
If a file is in use during the installation, the installation program recommends a system reboot when the install is complete. Although the reboot can be postponed, and you can continue to use the system after the installation, the system may be in an unsupported state until it is rebooted. It is recommended that you restart the system at the end of an installation if a reboot is recommended.
7.1 Desktop client applications
The following desktop client applications are installed by the BI platform Client Tools installation program:
● Web Intelligence Rich Client● Business View Manager● Report Conversion Tool● Universe design tool
Business Intelligence Platform Installation Guide for WindowsInstalling BI Platform Client Tools © 2015 SAP SE or an SAP affiliate company. All rights reserved. 69
● Web service query tool● Information design tool● Translation Management Tool● Data Federation Administration Tool● Widgets for the BI platform● Developer Components
For integrating BusinessObjects functionality into interactive web applications. Includes the BI platform Java SDK, Web Services SDK, and .NET SDK.
● Data Access and Security
7.1.1 Web Intelligence Rich Client
Web Intelligence Rich Client is an ad-hoc analysis and reporting tool for business users with or without access to the BI platform.
It allows business users to access data via universes (.unv and .unx), BEx queries, or other sources, using familiar business terms in a drag-and-drop interface. Workflows allow very broad or very narrow questions to be analyzed, and for further questions to be asked at any point in the analysis workflow.
Web Intelligence Rich Client users can continue working with Web Intelligence document files (.wid) even when unable to connect to a Central Management Server (CMS).
7.1.2 Business View Manager
Business View Manager allows users to build semantic layer objects that simplify underlying database complexity.
Business View Manager can create data connections, dynamic data connections, data foundations, business elements, business views, and relational views. It also allows detailed column and row-level security to be set for the objects in a report.
Designers can build connections to multiple data sources, join tables, alias field names, create calculated fields, and then use the simplified structure as a Business View. Report designers and users can then use the business view as the basis for their reports, rather than and building their own queries from the data directly.
7.1.3 Report Conversion Tool
The Report Conversion Tool converts reports to Web Intelligence format and publishes them to a Central Management Server (CMS).
Reports can be retrieved from the CMS folders Public, Favorites, or Inbox. Once converted, reports publish to the same folder as the original Web Intelligence report, or to a different folder. The tool does not convert all Web Intelligence features and reports. The level of conversion depends on the features in the original report. Some features prevent the report from being converted. Other features are modified, reimplemented, or removed by the tool during conversion.
70 © 2015 SAP SE or an SAP affiliate company. All rights reserved.Business Intelligence Platform Installation Guide for Windows
Installing BI Platform Client Tools
The Report Conversion Tool also lets you audit your converted reports. This helps identify reports that cannot be fully converted by the Report Conversion Tool and explains why.
7.1.4 Universe design tool
Universe design tool (formerly Universe Designer) allows data designers to combine data from multiple sources in a semantic layer that hides database complexity from end users. It abstracts the complexity of data by using business rather than technical language to access, manipulate, and organize data.
Universe design tool provides a graphical interface to select and view tables in a database. The database tables are represented as table symbols in a schema diagram. Designers can use this interface to manipulate tables, create joins between tables, create alias tables, create contexts, and solve loops in a schema.
You can also create universes from metadata sources. Universe design tool is used for the universe generation at the end of the creation process.
7.1.5 Query as a Web Service
Query as a Web Service is a wizard-based application that allows queries to be made into a web service and integrated with web-ready applications. Queries can be saved to create a catalog of standard queries that application builders can select as required.
Business Intelligence (BI) content is usually bound to a specific user interface of BI tools. Query as a Web Service changes this by allowing BI content to be delivered to any user interface that can process web services.
Query as a Web Service is designed to work on top of any Microsoft Windows application the same way as other web services. Query as a Web Service is based on the W3C web service specifications SOAP, SDL, and XML. It has two main components:
● Server componentThe server component (included in the BI platform) stores the Query as a Web Service catalog and hosts the published web services.
● Client toolThis is how business users create and publish their queries as a web service on the server. You can install the client tool on several machines that can access and share the same catalog stored on the server. The client tool communicates with the server components via web services.
Query as a Web Service allows web queries to be used as part of a range of client-side solutions, including:
● Microsoft Office, Excel, and InfoPath● SAP NetWeaver Technology Platform● OpenOffice● Business rules and process management applications● Enterprise Service Bus platforms
Business Intelligence Platform Installation Guide for WindowsInstalling BI Platform Client Tools © 2015 SAP SE or an SAP affiliate company. All rights reserved. 71
7.1.6 Information design tool
Information design tool (formerly Information Designer) is a metadata design environment that enables a designer to extract, define, and manipulate metadata from relational and OLAP sources to create and deploy SAP BusinessObjects universes.
7.1.7 Translation Management Tool
The BI platform provides support for multilingual documents and universes. A multilingual document contains localized versions of universe metadata and document prompts. A user can create reports, for example, from the same universe in their chosen languages.
Translation Management Tool (formerly Translation Manager) defines the multilingual universes and manages translation of universes and other report and analytic resources in the CMS repository.
Translation Management Tool:
● Translates universe or documents for a multilingual audience.● Defines the metadata language parts of a document, and the appropriate translation. It generates external
XLIFF format and imports XLIFF files to get translated information.● Lists the universe or document structure to be translated.● Lets you translate the metadata through the user interface, or through an external translation tool by
importing and exporting XLIFF files.● Creates multilingual documents.
7.1.8 Data Federation Administration Tool
The Data Federation Administration Tool (formerly Data Federator) is a rich client application that offers easy-to-use features to manage your data federation service.
Tightly integrated in the BI platform, the data federation service enables multi-source universes by distributing queries across disparate data sources, and lets you federate data through a single data foundation.
The data federation administration tool lets you optimize data federation queries and fine-tune the data federation query engine for the best possible performance.
You use the data federation administration tool to do the following:
● Test SQL queries.● Visualize optimization plans which detail how federated queries are distributed to each source.● Compute statistics and set system parameters to fine-tune the data federation services and get the best
possible performance.● Manage properties to control how queries are executed in each data source at the connector level.● Monitor running SQL queries.● Browse the history of executed queries.
72 © 2015 SAP SE or an SAP affiliate company. All rights reserved.Business Intelligence Platform Installation Guide for Windows
Installing BI Platform Client Tools

7.1.9 Widgets for the BI PlatformWidgets are mini-applications that allow easy and fast access to frequently used functions and provide visual information from your desktop. Widgets for the BI platform (formerly BI Widgets) allow your organization to provide access to existing Business Intelligence (BI) content on the BI platform, or you can add Web Dynpro applications that are registered as XBCML (Extensible Business Client Markup Language) widgets on the SAP NetWeaver Application Server components as desktop widgets.
To render XBCML widgets on the user's desktop, SAP Web Dynpro Flex Client is used. The SAP Web Dynpro Flex Client is a rendering engine based on Adobe Flex which is used for rendering widgets. For details about how to configure Web Dynpro applications, see the To enable widgets on the SAP NetWeaver Application Server components topic in the Widgets for SAP BusinessObjects User Guide.
NoteThe SAP Web Dynpro Flex Client support for XBCML Widgets begins in release 7.0 EhP2 SP3. Flex Client queue support is confined only to Flex Client issues found in XBCML widgets in these specified releases.
With widgets, you search or browse for existing content, such as Web Intelligence documents, Dashboards models, and Web Dynpro applications, then paste the information onto your desktop so it is available when needed.
As a widget, the content gains the following features from the widget framework:
● User-controlled size and positioning● Automatic refresh● Optional setting as the top application window● Full BI platform security (Web Intelligence report parts and Dashboards models only)● Saved display● Saved data context state (Web Intelligence report parts only)● Web Intelligence OpenDocument links to detailed reports (Web Intelligence documents only)● Tabbed views (Dashboards models only)
7.2 To download the Client Tools installation program1. Go to https://service.sap.com/support > Software Downloads.2. Select Installations and Upgrades>A–Z Index.
3. Select B SBOP BI platform (former SBOP Enterprise) SBOP BI PLATFORM (ENTERPRISE) SBOP BI PLATFORM 4.2 .
4. Select Installation and Upgrade and then select your platform.5. Select SBOP BI PLATFORM <version> CLIENT TOOLS WINDOWS (32B), then follow the instructions on the
website to download and extract the objects.
The software may take a long time to download, and you may need to contact the system administrator to ensure your company's firewall will not terminate the download process.
Support Packages and Patches are installation programs that contain updates to BI platform software. You can download them from https://service.sap.com/support > Software Downloads Support Packages and
Business Intelligence Platform Installation Guide for WindowsInstalling BI Platform Client Tools © 2015 SAP SE or an SAP affiliate company. All rights reserved. 73
Patches A–Z Index . For more information on installing Support Packages and Patches, see the SAP BusinessObjects BI Suite Update Guides.
7.3 Client Tools installation prerequisites
Before installing or making changes to a Client Tools installation, ensure that:
● Any existing BI Suite client tools and products are closed before running the installation program. If any client tool fails to start after the installation, running the installation program in repair mode should correct the issue.
● All BI platform servers on the machine are stopped except the CMS and File Repository Servers (FRS).● The account being used has Administrator privileges. The installation requires that the account being used is
a member of the Windows Administrators group, and that the default privileges assigned to the Administrators group have not been modified.
● You are using a minimum screen resolution of 1024 × 768 pixels. Using Microsoft Remote Desktop Connection to run the installation program is supported, as long as a minimum screen resolution of 1024 × 768 pixels is used.
7.4 To run an interactive installation of Client Tools
NoteThe installation log file is saved to <BIP_INSTALL_DIR>\InstallData\logs\<DATEandTIME>\setupengine.log.
1. Locate and run setup.exe.
2. Select the setup language.
The language setting is used by the installation program to display information to you in the language of your choice. If you select a non-English language, the corresponding language pack is automatically installed on the server.
NoteThe installation program will automatically run in the same language as your operating system. The language used by the installation program will determine the names used for Windows components configured by the installation program, such as Windows service names and Start menu shortcuts. These names cannot be changed later and are not affected by language settings once the installation is complete.
3. On the Check Prerequisites page, review the results and decide whether to continue with the installation, or abort and correct any unmet requirements.The installation program checks for required components and conditions. If a dependency prerequisite condition is critical, the installation program will not allow the installation to proceed. If the missing or
74 © 2015 SAP SE or an SAP affiliate company. All rights reserved.Business Intelligence Platform Installation Guide for Windows
Installing BI Platform Client Tools
unsupported component is optional, you have the option to either continue with the installation or stop and correct the condition.
4. Review the installation welcome page.5. On the License Agreement page, review the agreement and select I accept the License Agreement.6. On the Select Language Packs page, select additional languages to install from the list.
The language currently being used by the operating system is selected automatically. English language support cannot be deselected because it is used if a problem is detected with an individual language.
7. On the Configure Destination Folder page, review the destination folder shown.
This is the folder into which the installation program will install the BI platform Client Tools. If the folder does not exist, the installation program creates it.
Note○ The use of Unicode characters in the destination folder is not supported.○ Ensure that the destination folder is not set to the same folder in which the installation program has
been extracted.
○ If you have already installed SAP BusinessObjects products, the Destination Folder Information field is not editable, and the path to the existing folder is displayed.
8. On the Select Features page, select the features to install from the list.Features are grouped under the following headings:○ Client components
Desktop client applications:○ Web Intelligence Rich Client○ Business View Manager○ Report Conversion Tool○ Universe Design Tool○ Query as a Web Service○ Information Design Tool○ Translation Management Tool○ Data Federation Administration Tool○ Widgets
○ Developer Components○ SAP BusinessObjects BI platform Java SDK○ SAP BusinessObjects BI platform Web Services SDK○ SAP BusinessObjects BI platform .NET SDK○ Crystal Reports Java SDK○ SAP BusinessObjects Semantic Layer Java SDK
○ Semantic Layer SDK○ Semantic Layer SDK Samples
○ Data Access and SecurityThe individual drivers listed under this heading allow client tools to access supported reporting database systems, or third-party authentication for Enterprise Resource Planning (ERP) systems.
The Start Installation page appears. Start the installation.
Business Intelligence Platform Installation Guide for WindowsInstalling BI Platform Client Tools © 2015 SAP SE or an SAP affiliate company. All rights reserved. 75

7.5 To run a silent installation of Client Tools
Every option in the installation wizard can be given from the command-line. This type of installation is known as a silent install.
Installation options can be given directly on the command-line as a parameter, or can be stored in a response file.
● Giving installation options on the command-lineInstallation options can be passed directly to the setup program from the command-line as a parameter. For example, the installation option CMSPort=6401 can be given on the command-line as a parameter when running the installation program to set the CMS port number to 6401, instead of the default value of 6400.In the following example of giving the CMSPort parameter on the command-line, ellipses ([...]) are shown to indicate where other installation options would normally be present:setup.exe [...] CMSPort=6401 [...]
● Giving installation options in a response fileInstallation options can be stored in a response file, which is a text file containing installation option parameters in key-value format. When using a response file to give installation options, the installation program is run from the command-line with the -r <RESPONSE_FILE> parameter, where <RESPONSE_FILE> is the name of the response file.The response file contains multiple installation options, with one installation option per line. In the following example, the response file is given as a parameter:setup.exe [...] -r C:\response.ini [...]For example, the installation option CMSPort=6401 can be given on a line in the response file to set the CMS port number to 6401, instead of the default value of 6400.In the following example of giving the CMSPort parameter in a response file, ellipses ([...]) are shown to indicate where other installation options would normally be present:
[...] CMSPort=6401 [...]
NoteThe installation program returns the cursor to the command-line prompt when it starts. To run the installation program from a script, or to force the installation program to wait to complete before returning to the command-line, use the Windows Command Interpreter start /wait command to invoke setup.exe.
For example:
start /wait setup.exe [<COMMAND_LINE_OPTIONS>]
For a complete list of installation options, see Installation option parameters for Client Tools [page 79]. For an example of a response file, see Response file example [page 51].
76 © 2015 SAP SE or an SAP affiliate company. All rights reserved.Business Intelligence Platform Installation Guide for Windows
Installing BI Platform Client Tools

7.5.1 Command-line silent install of Client Tools
You can install Client Tools with one command by giving parameters on the command-line. This is referred to as a silent installation. When parameters are supplied on the command-line, the installation will not prompt for information.
7.5.1.1 To use a response file
To use a response file, run the installation program with the -r <RESPONSE_FILE parameter. The installation program reads all installation options from the response file, and no further input is required.
For example, the following command reads installation options from the response file C:\response.ini:
setup.exe -r C:\response.ini
To override an installation option in a response file, give that option on the command-line. Installation options given on the command-line take precedence over the options in the response file. For a complete list of installation options, see Installation option parameters below.
If an unexpected condition is encountered, an error message is written to the installation log file and the installation program exits. Installation activity, warnings, and errors are written to the installation log file in the folder:
<BIP_INSTALL_DIR>\InstallData\logs\<DATEandTIME>\setupengine.log
If the <BIP_INSTALL_DIR> folder has not been created by the time the installation program exits, look for install.log in the temporary folder specified by the system <TEMP> environment variable.
7.5.1.1.1 To write a response file
To create a response file, run the installation program with the -w <RESPONSE_FILE> parameter and select the desired installation options with the installation wizard. When the wizard completes, the installation program exits and the response file is created. The response file can then be used for future installations.
For example, the following command creates the response file C:\response.ini:
setup.exe -w C:\response.ini
Table 13: Response file for various clients
Client Response File
SAP Crystal Reports setup.exe -w C:\response.ini
SAP Crystal Reports for Enterprise setup.exe -w C:\response.ini
Business Intelligence Platform Installation Guide for WindowsInstalling BI Platform Client Tools © 2015 SAP SE or an SAP affiliate company. All rights reserved. 77
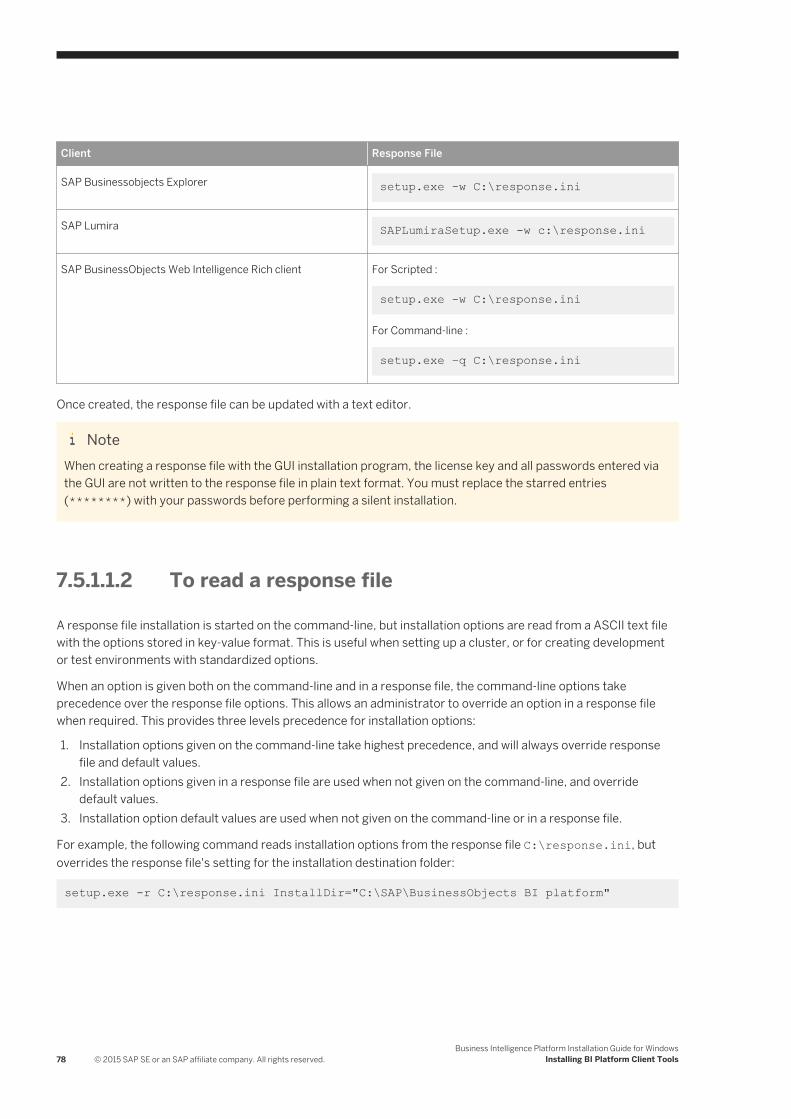
Client Response File
SAP Businessobjects Explorer setup.exe -w C:\response.ini
SAP Lumira SAPLumiraSetup.exe -w c:\response.ini
SAP BusinessObjects Web Intelligence Rich client For Scripted :
setup.exe -w C:\response.ini
For Command-line :
setup.exe –q C:\response.ini
Once created, the response file can be updated with a text editor.
NoteWhen creating a response file with the GUI installation program, the license key and all passwords entered via the GUI are not written to the response file in plain text format. You must replace the starred entries (********) with your passwords before performing a silent installation.
7.5.1.1.2 To read a response file
A response file installation is started on the command-line, but installation options are read from a ASCII text file with the options stored in key-value format. This is useful when setting up a cluster, or for creating development or test environments with standardized options.
When an option is given both on the command-line and in a response file, the command-line options take precedence over the response file options. This allows an administrator to override an option in a response file when required. This provides three levels precedence for installation options:
1. Installation options given on the command-line take highest precedence, and will always override response file and default values.
2. Installation options given in a response file are used when not given on the command-line, and override default values.
3. Installation option default values are used when not given on the command-line or in a response file.
For example, the following command reads installation options from the response file C:\response.ini, but overrides the response file's setting for the installation destination folder:
setup.exe -r C:\response.ini InstallDir="C:\SAP\BusinessObjects BI platform"
78 © 2015 SAP SE or an SAP affiliate company. All rights reserved.Business Intelligence Platform Installation Guide for Windows
Installing BI Platform Client Tools
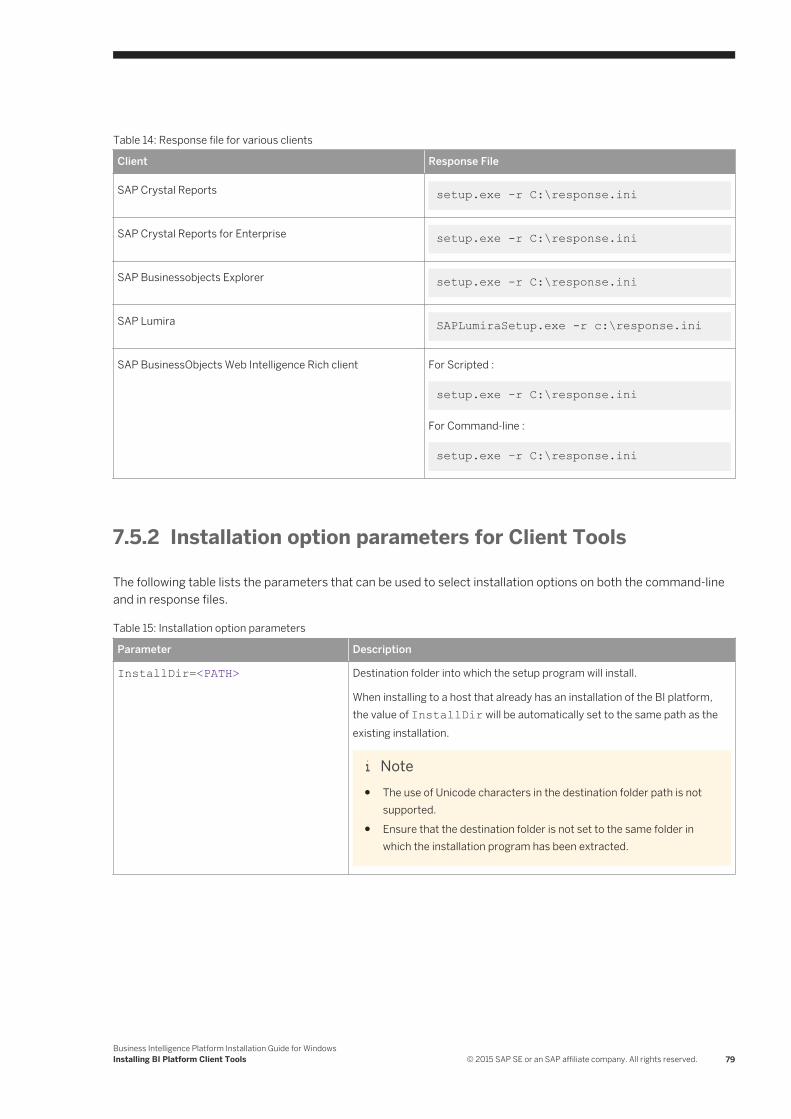
Table 14: Response file for various clients
Client Response File
SAP Crystal Reports setup.exe -r C:\response.ini
SAP Crystal Reports for Enterprise setup.exe -r C:\response.ini
SAP Businessobjects Explorer setup.exe -r C:\response.ini
SAP Lumira SAPLumiraSetup.exe -r c:\response.ini
SAP BusinessObjects Web Intelligence Rich client For Scripted :
setup.exe -r C:\response.ini
For Command-line :
setup.exe –r C:\response.ini
7.5.2 Installation option parameters for Client Tools
The following table lists the parameters that can be used to select installation options on both the command-line and in response files.
Table 15: Installation option parameters
Parameter Description
InstallDir=<PATH> Destination folder into which the setup program will install.
When installing to a host that already has an installation of the BI platform, the value of InstallDir will be automatically set to the same path as the existing installation.
Note● The use of Unicode characters in the destination folder path is not
supported.● Ensure that the destination folder is not set to the same folder in
which the installation program has been extracted.
Business Intelligence Platform Installation Guide for WindowsInstalling BI Platform Client Tools © 2015 SAP SE or an SAP affiliate company. All rights reserved. 79
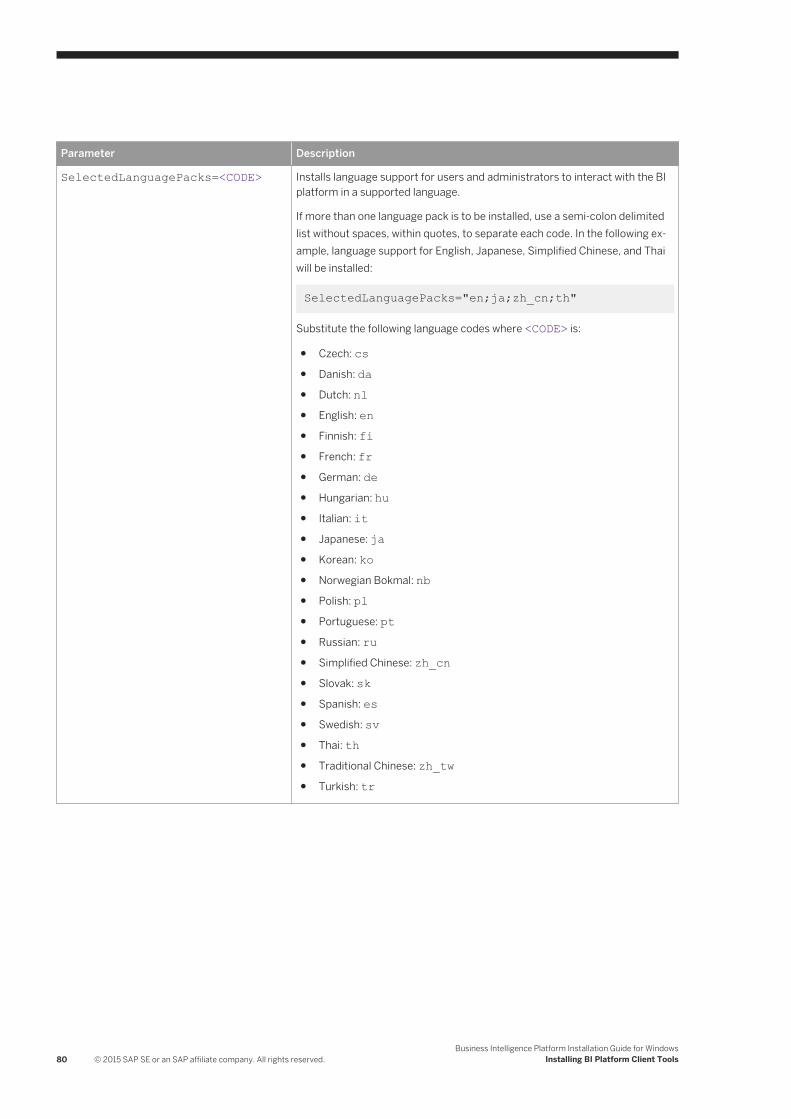
Parameter Description
SelectedLanguagePacks=<CODE> Installs language support for users and administrators to interact with the BI platform in a supported language.
If more than one language pack is to be installed, use a semi-colon delimited list without spaces, within quotes, to separate each code. In the following example, language support for English, Japanese, Simplified Chinese, and Thai will be installed:
SelectedLanguagePacks="en;ja;zh_cn;th"
Substitute the following language codes where <CODE> is:
● Czech: cs● Danish: da● Dutch: nl● English: en● Finnish: fi● French: fr● German: de● Hungarian: hu● Italian: it● Japanese: ja● Korean: ko● Norwegian Bokmal: nb● Polish: pl● Portuguese: pt● Russian: ru● Simplified Chinese: zh_cn● Slovak: sk● Spanish: es● Swedish: sv● Thai: th● Traditional Chinese: zh_tw● Turkish: tr
80 © 2015 SAP SE or an SAP affiliate company. All rights reserved.Business Intelligence Platform Installation Guide for Windows
Installing BI Platform Client Tools
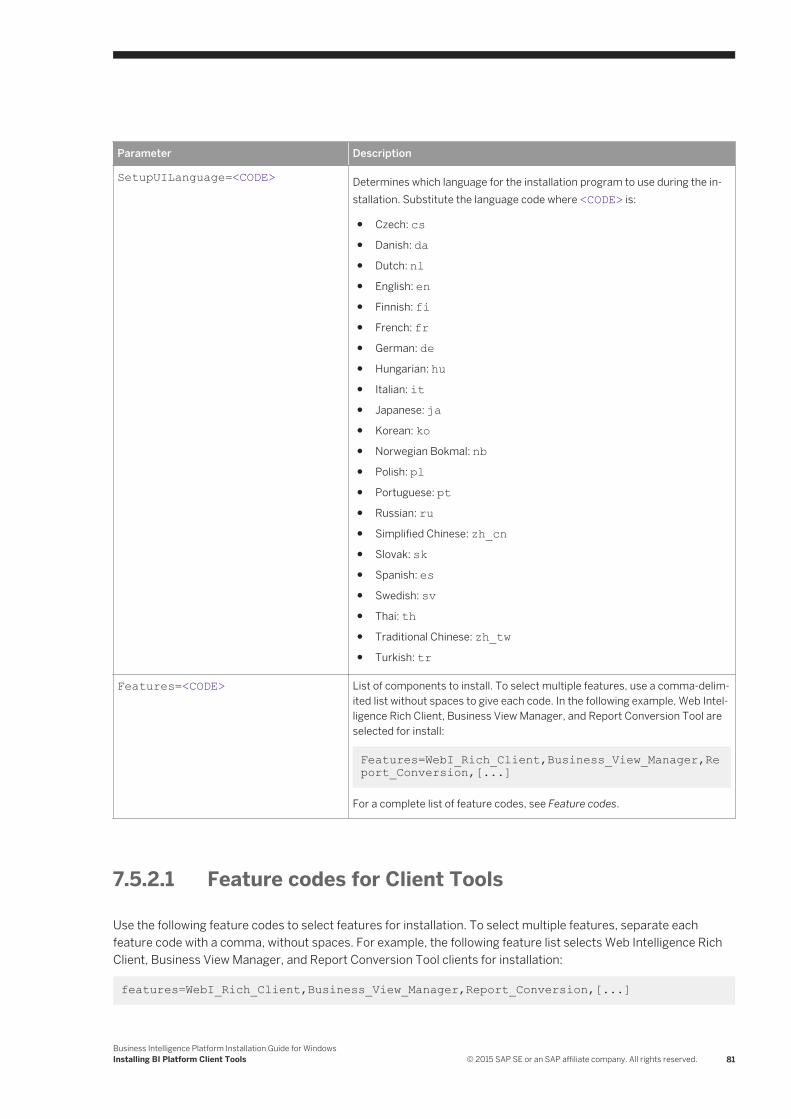
Parameter Description
SetupUILanguage=<CODE> Determines which language for the installation program to use during the installation. Substitute the language code where <CODE> is:
● Czech: cs● Danish: da● Dutch: nl● English: en● Finnish: fi● French: fr● German: de● Hungarian: hu● Italian: it● Japanese: ja● Korean: ko● Norwegian Bokmal: nb● Polish: pl● Portuguese: pt● Russian: ru● Simplified Chinese: zh_cn● Slovak: sk● Spanish: es● Swedish: sv● Thai: th● Traditional Chinese: zh_tw● Turkish: tr
Features=<CODE> List of components to install. To select multiple features, use a comma-delimited list without spaces to give each code. In the following example, Web Intelligence Rich Client, Business View Manager, and Report Conversion Tool are selected for install:
Features=WebI_Rich_Client,Business_View_Manager,Report_Conversion,[...]
For a complete list of feature codes, see Feature codes.
7.5.2.1 Feature codes for Client Tools
Use the following feature codes to select features for installation. To select multiple features, separate each feature code with a comma, without spaces. For example, the following feature list selects Web Intelligence Rich Client, Business View Manager, and Report Conversion Tool clients for installation:
features=WebI_Rich_Client,Business_View_Manager,Report_Conversion,[...]
Business Intelligence Platform Installation Guide for WindowsInstalling BI Platform Client Tools © 2015 SAP SE or an SAP affiliate company. All rights reserved. 81
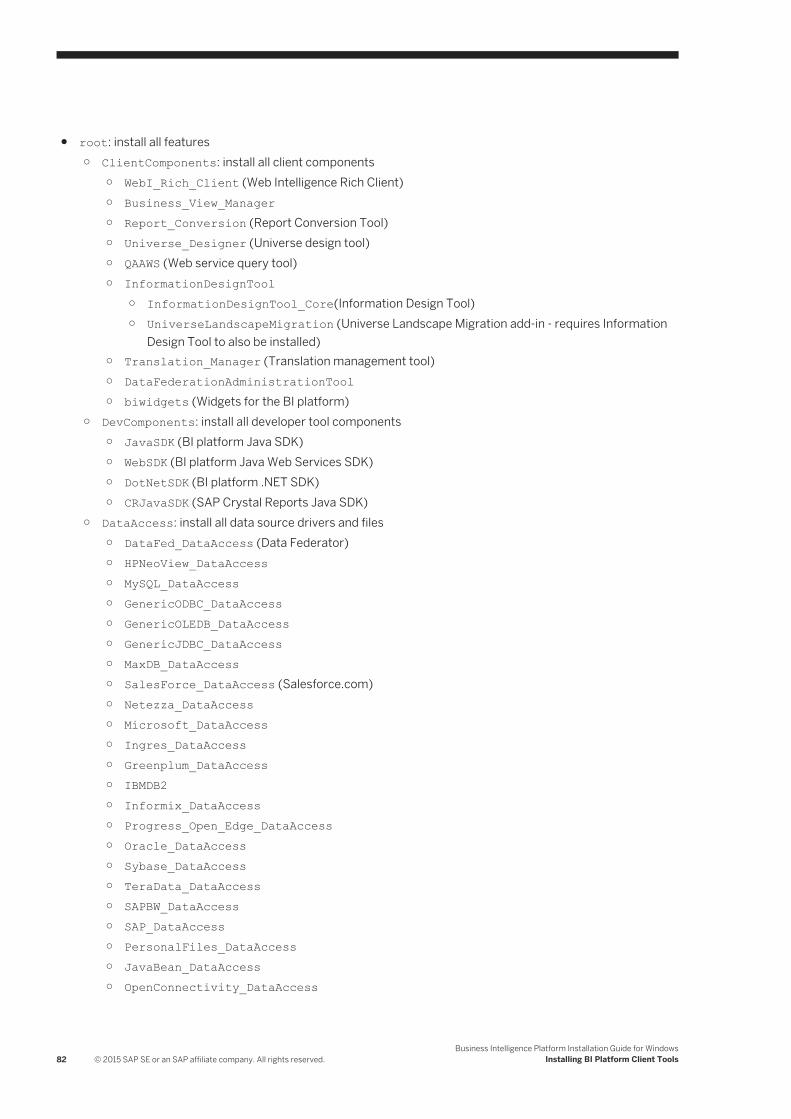
● root: install all features○ ClientComponents: install all client components
○ WebI_Rich_Client (Web Intelligence Rich Client)○ Business_View_Manager○ Report_Conversion (Report Conversion Tool)○ Universe_Designer (Universe design tool)○ QAAWS (Web service query tool)○ InformationDesignTool
○ InformationDesignTool_Core(Information Design Tool)○ UniverseLandscapeMigration (Universe Landscape Migration add-in - requires Information
Design Tool to also be installed)○ Translation_Manager (Translation management tool)○ DataFederationAdministrationTool○ biwidgets (Widgets for the BI platform)
○ DevComponents: install all developer tool components○ JavaSDK (BI platform Java SDK)○ WebSDK (BI platform Java Web Services SDK)○ DotNetSDK (BI platform .NET SDK)○ CRJavaSDK (SAP Crystal Reports Java SDK)
○ DataAccess: install all data source drivers and files○ DataFed_DataAccess (Data Federator)○ HPNeoView_DataAccess○ MySQL_DataAccess○ GenericODBC_DataAccess○ GenericOLEDB_DataAccess○ GenericJDBC_DataAccess○ MaxDB_DataAccess○ SalesForce_DataAccess (Salesforce.com)○ Netezza_DataAccess○ Microsoft_DataAccess○ Ingres_DataAccess○ Greenplum_DataAccess○ IBMDB2○ Informix_DataAccess○ Progress_Open_Edge_DataAccess○ Oracle_DataAccess○ Sybase_DataAccess○ TeraData_DataAccess○ SAPBW_DataAccess○ SAP_DataAccess○ PersonalFiles_DataAccess○ JavaBean_DataAccess ○ OpenConnectivity_DataAccess
82 © 2015 SAP SE or an SAP affiliate company. All rights reserved.Business Intelligence Platform Installation Guide for Windows
Installing BI Platform Client Tools
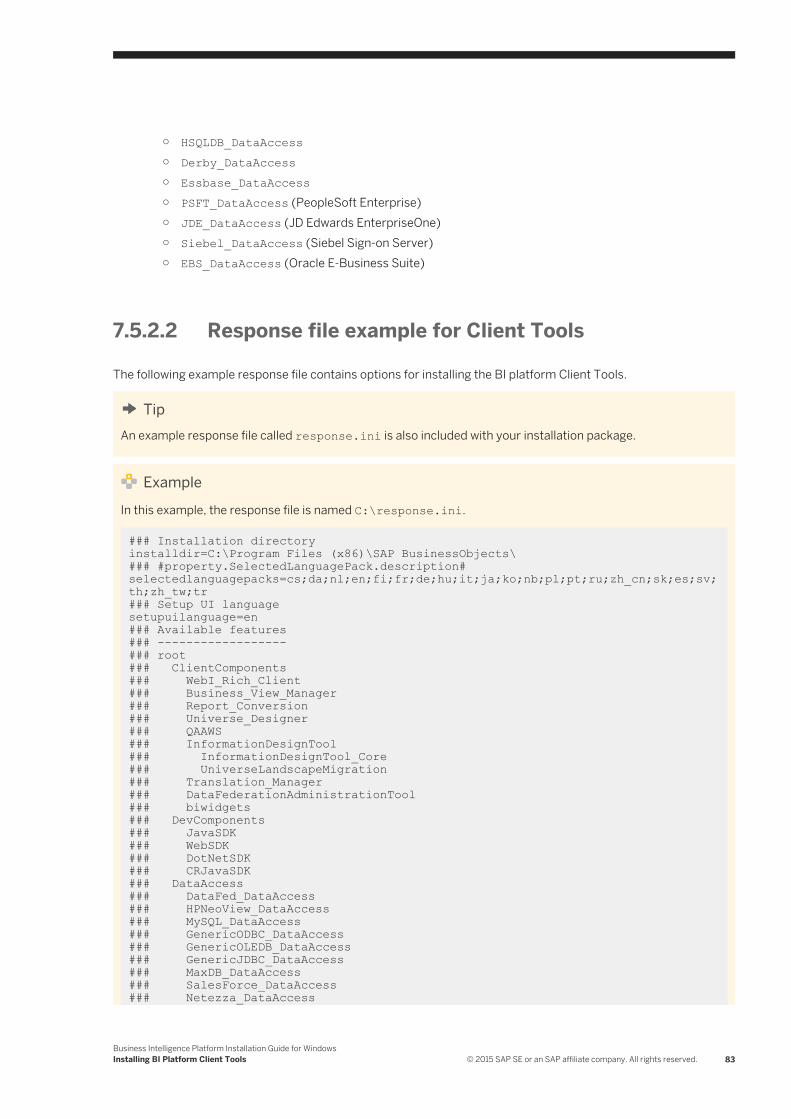
○ HSQLDB_DataAccess○ Derby_DataAccess○ Essbase_DataAccess○ PSFT_DataAccess (PeopleSoft Enterprise)○ JDE_DataAccess (JD Edwards EnterpriseOne)○ Siebel_DataAccess (Siebel Sign-on Server)○ EBS_DataAccess (Oracle E-Business Suite)
7.5.2.2 Response file example for Client Tools
The following example response file contains options for installing the BI platform Client Tools.
TipAn example response file called response.ini is also included with your installation package.
ExampleIn this example, the response file is named C:\response.ini.
### Installation directory installdir=C:\Program Files (x86)\SAP BusinessObjects\### #property.SelectedLanguagePack.description#selectedlanguagepacks=cs;da;nl;en;fi;fr;de;hu;it;ja;ko;nb;pl;pt;ru;zh_cn;sk;es;sv;th;zh_tw;tr### Setup UI languagesetupuilanguage=en### Available features### ------------------### root### ClientComponents### WebI_Rich_Client### Business_View_Manager### Report_Conversion### Universe_Designer### QAAWS### InformationDesignTool### InformationDesignTool_Core### UniverseLandscapeMigration### Translation_Manager### DataFederationAdministrationTool### biwidgets### DevComponents### JavaSDK### WebSDK### DotNetSDK### CRJavaSDK### DataAccess### DataFed_DataAccess### HPNeoView_DataAccess### MySQL_DataAccess### GenericODBC_DataAccess### GenericOLEDB_DataAccess### GenericJDBC_DataAccess### MaxDB_DataAccess### SalesForce_DataAccess### Netezza_DataAccess
Business Intelligence Platform Installation Guide for WindowsInstalling BI Platform Client Tools © 2015 SAP SE or an SAP affiliate company. All rights reserved. 83
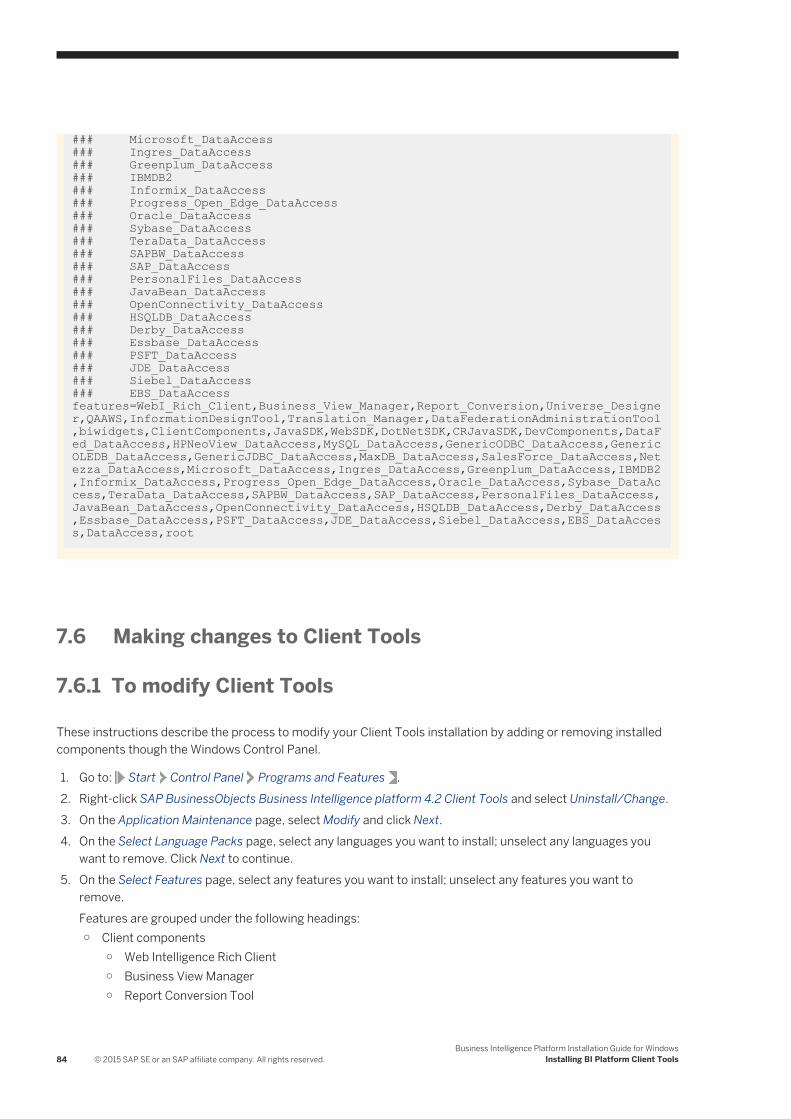
### Microsoft_DataAccess### Ingres_DataAccess### Greenplum_DataAccess### IBMDB2### Informix_DataAccess### Progress_Open_Edge_DataAccess### Oracle_DataAccess### Sybase_DataAccess### TeraData_DataAccess### SAPBW_DataAccess### SAP_DataAccess### PersonalFiles_DataAccess### JavaBean_DataAccess### OpenConnectivity_DataAccess### HSQLDB_DataAccess### Derby_DataAccess### Essbase_DataAccess### PSFT_DataAccess### JDE_DataAccess### Siebel_DataAccess### EBS_DataAccess features=WebI_Rich_Client,Business_View_Manager,Report_Conversion,Universe_Designer,QAAWS,InformationDesignTool,Translation_Manager,DataFederationAdministrationTool,biwidgets,ClientComponents,JavaSDK,WebSDK,DotNetSDK,CRJavaSDK,DevComponents,DataFed_DataAccess,HPNeoView_DataAccess,MySQL_DataAccess,GenericODBC_DataAccess,GenericOLEDB_DataAccess,GenericJDBC_DataAccess,MaxDB_DataAccess,SalesForce_DataAccess,Netezza_DataAccess,Microsoft_DataAccess,Ingres_DataAccess,Greenplum_DataAccess,IBMDB2,Informix_DataAccess,Progress_Open_Edge_DataAccess,Oracle_DataAccess,Sybase_DataAccess,TeraData_DataAccess,SAPBW_DataAccess,SAP_DataAccess,PersonalFiles_DataAccess,JavaBean_DataAccess,OpenConnectivity_DataAccess,HSQLDB_DataAccess,Derby_DataAccess,Essbase_DataAccess,PSFT_DataAccess,JDE_DataAccess,Siebel_DataAccess,EBS_DataAccess,DataAccess,root
7.6 Making changes to Client Tools
7.6.1 To modify Client Tools
These instructions describe the process to modify your Client Tools installation by adding or removing installed components though the Windows Control Panel.
1. Go to: Start Control Panel Programs and Features .2. Right-click SAP BusinessObjects Business Intelligence platform 4.2 Client Tools and select Uninstall/Change.3. On the Application Maintenance page, select Modify and click Next.4. On the Select Language Packs page, select any languages you want to install; unselect any languages you
want to remove. Click Next to continue.5. On the Select Features page, select any features you want to install; unselect any features you want to
remove.Features are grouped under the following headings:○ Client components
○ Web Intelligence Rich Client○ Business View Manager○ Report Conversion Tool
84 © 2015 SAP SE or an SAP affiliate company. All rights reserved.Business Intelligence Platform Installation Guide for Windows
Installing BI Platform Client Tools
○ Universe Design Tool○ Query as a Web Service○ Information Design Tool
○ Information Design Tool○ Universe Landscape Migration
This feature requires Information Design Tool to also be installed. If you currently have both features installed and want to remove Information Design Tool, you must unselect and remove both features.
○ Translation Management Tool○ Data Federation Administration Tool○ Widgets
○ Developer Components○ SAP BusinessObjects BI platform Java SDK○ SAP BusinessObjects BI platform Web Services SDK○ SAP BusinessObjects BI platform .NET SDK○ Crystal Reports Java SDK○ SAP BusinessObjects Semantic Layer Java SDK
○ Semantic Layer Java SDK○ Semantic Layer Java SDK Samples
○ Data Access and SecurityThe individual drivers listed under this heading allow client tools to access a broad range of supported data sources.
6. Click Next to apply your changes.
The Start Installation page appears. Start the installation.
7.6.2 To repair a Client Tools installation
These instructions describe the process to repair your Client Tools installation through the Windows Control Panel. This process restores the files originally installed by the setup program.
It is recommended that you back up your system before running a repair.
1. Go to: Start Control Panel Programs and Features .2. Right-click SAP BusinessObjects Business Intelligence platform 4.2 Client Tools and click Uninstall/Change.3. On the Application Maintenance page, select Repair and click Next.
The Start Installation page appears. Start the installation. Once the repair is complete, the Client Tools are restored their original configuration.
7.6.3 To remove Client Tools
The following steps remove the entire set of BI platform Client Tools from a system.
Business Intelligence Platform Installation Guide for WindowsInstalling BI Platform Client Tools © 2015 SAP SE or an SAP affiliate company. All rights reserved. 85
NoteTo add or remove individual tools and applications, use the steps described in “To modify Client Tools”.
1. Go to: Start Control Panel Programs and Features .2. Right-click SAP BusinessObjects Business Intelligence platform 4.2 Client Tools and click Uninstall/Change.
NoteIf you have installed a Client Tools application using another installation method, each application instance will appear separately in the Programs and Features list.
For example, if Web Intelligence Rich Client was installed once by the Client Tools installation program, and then again with the stand-alone installation program, there is an entry in the Programs and Features list for both Web Intelligence Rich Client and BI platform 4.2 Client Tools (containing a separate installation of Web Intelligence Rich Client). Either can be removed without affecting the other. To remove the application entirely, remove both Web Intelligence Rich Client and BI platform 4.2 Client Tools.
3. On the Application Maintenance page, select Remove and click Next.4. On the Uninstall Confirmation page, confirm that you want uninstall by clicking Next.
The uninstallation program starts and the BI platform Client Tools are removed from the system.
7.7 Upgrading Client Tools
The Client Tools installation program will not modify existing previous versions of the BI platform Client Tools. BI platform Client Tools are supported when installed on systems that also contain the following previous Client Tool versions:
● SAP BusinessObjects Business Intelligence platform XI 3.1 (any version)● BusinessObjects Enterprise XI 3.0● BusinessObjects Enterprise XI R2
The installation of BI platform Client Tools with Client Tools form BusinessObjects Enterprise 10 or BusinessObjects Enterprise XI is not supported and you may encounter compatibility issues.
86 © 2015 SAP SE or an SAP affiliate company. All rights reserved.Business Intelligence Platform Installation Guide for Windows
Installing BI Platform Client Tools
Important Disclaimers and Legal Information
Coding SamplesAny software coding and/or code lines / strings ("Code") included in this documentation are only examples and are not intended to be used in a productive system environment. The Code is only intended to better explain and visualize the syntax and phrasing rules of certain coding. SAP does not warrant the correctness and completeness of the Code given herein, and SAP shall not be liable for errors or damages caused by the usage of the Code, unless damages were caused by SAP intentionally or by SAP's gross negligence.
AccessibilityThe information contained in the SAP documentation represents SAP's current view of accessibility criteria as of the date of publication; it is in no way intended to be a binding guideline on how to ensure accessibility of software products. SAP in particular disclaims any liability in relation to this document. This disclaimer, however, does not apply in cases of wilful misconduct or gross negligence of SAP. Furthermore, this document does not result in any direct or indirect contractual obligations of SAP.
Gender-Neutral LanguageAs far as possible, SAP documentation is gender neutral. Depending on the context, the reader is addressed directly with "you", or a gender-neutral noun (such as "sales person" or "working days") is used. If when referring to members of both sexes, however, the third-person singular cannot be avoided or a gender-neutral noun does not exist, SAP reserves the right to use the masculine form of the noun and pronoun. This is to ensure that the documentation remains comprehensible.
Internet HyperlinksThe SAP documentation may contain hyperlinks to the Internet. These hyperlinks are intended to serve as a hint about where to find related information. SAP does not warrant the availability and correctness of this related information or the ability of this information to serve a particular purpose. SAP shall not be liable for any damages caused by the use of related information unless damages have been caused by SAP's gross negligence or willful misconduct. All links are categorized for transparency (see: http://help.sap.com/disclaimer).
Business Intelligence Platform Installation Guide for WindowsImportant Disclaimers and Legal Information © 2015 SAP SE or an SAP affiliate company. All rights reserved. 87

www.sap.com/contactsap
© 2015 SAP SE or an SAP affiliate company. All rights reserved.No part of this publication may be reproduced or transmitted in any form or for any purpose without the express permission of SAP SE or an SAP affiliate company. The information contained herein may be changed without prior notice.Some software products marketed by SAP SE and its distributors contain proprietary software components of other software vendors. National product specifications may vary.These materials are provided by SAP SE or an SAP affiliate company for informational purposes only, without representation or warranty of any kind, and SAP or its affiliated companies shall not be liable for errors or omissions with respect to the materials. The only warranties for SAP or SAP affiliate company products and services are those that are set forth in the express warranty statements accompanying such products and services, if any. Nothing herein should be construed as constituting an additional warranty.SAP and other SAP products and services mentioned herein as well as their respective logos are trademarks or registered trademarks of SAP SE (or an SAP affiliate company) in Germany and other countries. All other product and service names mentioned are the trademarks of their respective companies.Please see http://www.sap.com/corporate-en/legal/copyright/index.epx for additional trademark information and notices.