Embed Size (px)
Citation preview
Made in China
Important Information:Before assembly, read these instructions. Make sure all preassembled parts are tight. Store this instruction manual in envelope (attached to mattress support tube) for future reference.
By Sorelle - A Division of C&T International, Inc.46 Whelan Road East Rutherford N J. 07073 U S ATel, +1(201)531 1919 Fax,+1(201)531 1920Sorelle
1050CRIB AND MORE

2
WARNING - • Read all instructions before assembling crib. KEEP INSTRUCTIONS FOR FUTURE USE. DO NOT
USE THIS CRIB IF THE INSTRUCTIONS CANNOT BE STRICTLY FOLLOWED.
• Before each usage or assembly, inspect crib for damaged hardware, loose joints, missing parts or sharp edges. DO NOT use crib is any parts are missing or broken. Ask your dealer or write to C&T Internatinoal/Sorelle for replacement parts and instructional literature if needed. DO NOT substitute parts.
• To reduce the risk of SIDS, pediatricians recommend healthy infants be placed on their backs to sleep, unless otherwise advised by your physician.
• When child is able to climb out or reaches the height of 35 in. (90 cm), the crib shall no longer be used and can be converted to the transitional bed.
• DO NOT place crib near window where cords from blinds or drapes may strangle a child. Child may fall out of window. DO NOT place cords, straps or similar items that could become wound around the child’s neck in or near the crib.
• Strings can cause strangulation! DO NOT place items with a string around a child’s neck, such as hood strings or pacifier cords. DO NOT suspend strings over a crib or attach strings to toys.
• If refinishing, use a non-toxic finish specified for children’s products.• The product including side rails must be erected prior to use. • Always provide the supervision necessary for the continued safety of your child. When used for
playing, never leave child unattended.
• To help prevent stangulation tighten all fasteners .• A child can trap parts of the body or clothing on loose fasteners .
• When child is able to pull to a standing position, set matter to lowest position and remove bumper pads, large toys and other objects that could serve as steps for climbing out.”
• Never use plastic shipping bags or other plastic film as mattress covers because they can cause
suffocation.
• DO NOT use a water mattress with this crib.
• Ensure a safe environment for your child by checking regularly, (that every component is properly and securely in place) before placing your child in the crib. Make sure that all bolts and fasteners are tight.
CRIB WARNINGS
Failure to follow these warnings and assembly instructions could result in serious injury or death. !
WARNING - Infants can suffocate in gaps between a mattress too small or too thick and product sides. On soft bedding, NEVER add a mattress, pillow, comforter, or padding.
!
WARNING
STRANGULATION HAZARD
FALL HAZARD
CAUTION : ANY MATTRESS USED IN THIS CRIB MUST BE AT LEAST 24” (61CM) x 38” (96.5CM) WITH A THICKNESS NOT EXCEEDING 6” (15CM).
3
CLEANING & MAINTENANCE• ALWAYS STORE THE CRIB & CHANGING TABLE IN A CLEAN AND DRY PLACE.• TO CLEAN YOUR CRIB & CHANGING TABLE, USE A SOFT DAMP CLOTH WITH A SMALL AMOUNT OF MILD SOAP, WIPE IMMEDIATELY WITH A DRY CLOTH.• DO NOT USE ABRASIVES OR DETERGENT ON CRIB & CHANGING TABLE SURFACES.• REGULARLY CHECK ALL SCREWS AND FITTINGS TO ENSURE THEY ARE TIGHT.• THE IDEAL BALANCE IS TO MAINTAIN THE TEMPERATURE AROUND 21°C (70°F) AND THE RELATIVE HUMIDITY AT 40% TO PREVENT WARPING OR SPLITTING.
• FALL HAZARD—to prevent death or serious injury, always keep child within arm’s reach. Never leave child unattended.
• Read all instructions before use of the changing table. Keep instructions for future use.
• Check all screws and bolts and make sure they are tight before using. From time to time check over your Changing Table. You should never use it if parts are missing or broken,
• Use only the pad provided by the manufacturer.
• DO NOT use the changing table if it is damaged or broken.
• Maximum weight of child: 25 lbs. (11.4 kg)
• Always secure the pad provided to the changing surface by inserting the safety belt through the slot in the changing pad. Always use the restraining strap provided
Failure to follow these warnings and assembly instructions could result in serious injury or death. WARNING -
CHANGING TABLE WARNINGS
!
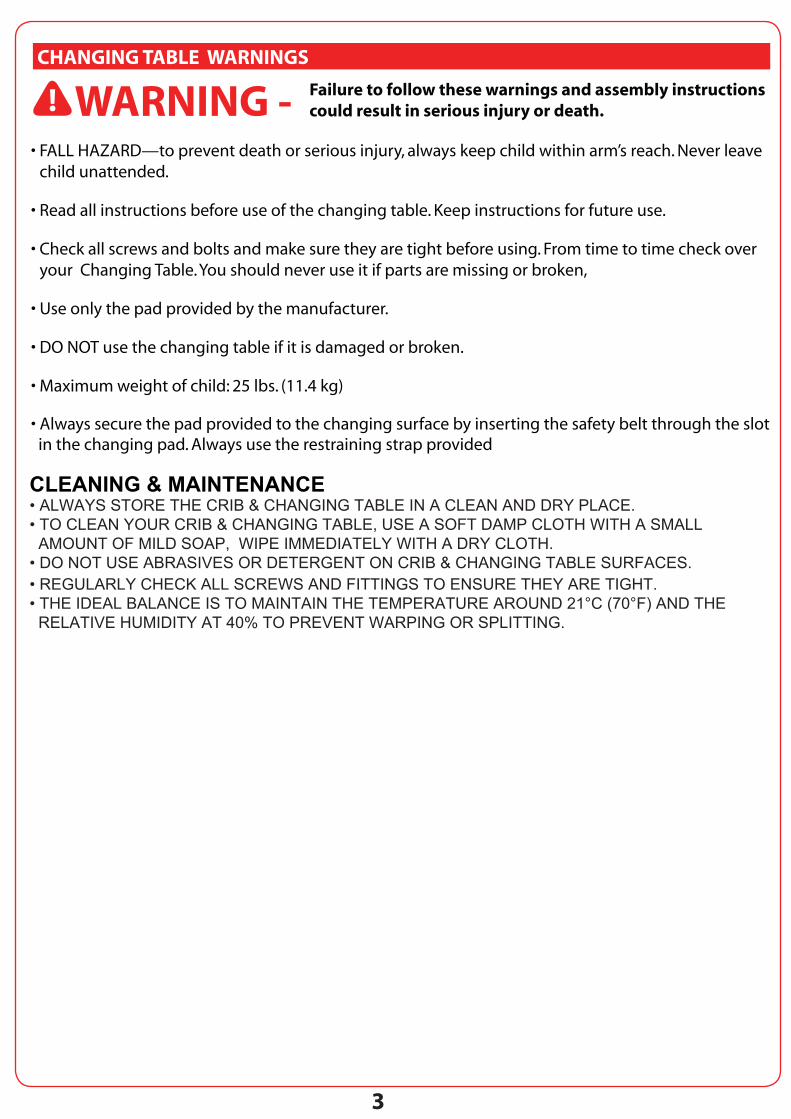
4PARTS LIST
Crib AssemblyParts List
(A1) Left Side Rail (x1) (C1) Front Side Rail (x1)(B1) Back Side Rail (x1)
(D1) (x14)(E1) Front & Back Contoured Top (x2)
(F1) Rear Leg (x1) (G1) Front Leg (x1)
(H1) (x2)
(I1) (x2)
Mattress Support Assembly Parts
(Q) Bolt with Loctite® Threadlocker Blue (x4)
(X1) Dowel Pin (x4)
Allen Wrench
Allen Wrench
5PARTS LIST
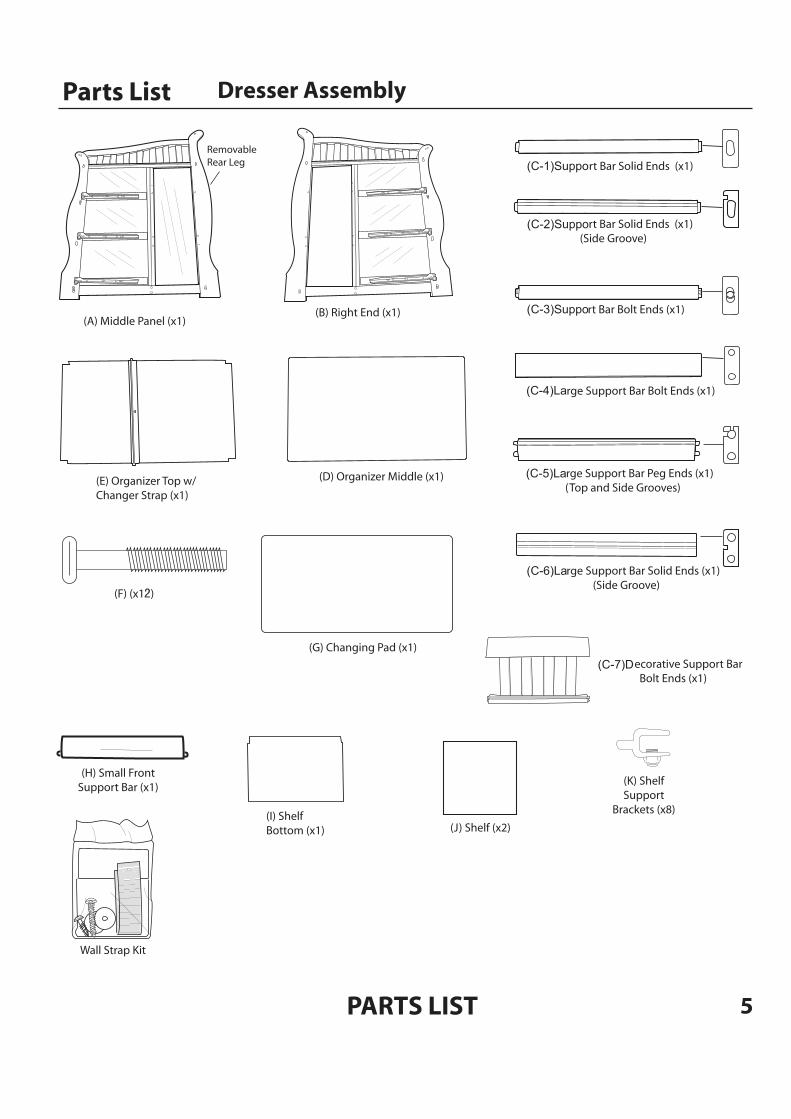
Dresser Assembly Parts List
M
r zer Tr
J
rtrack
t
r z M
Frr
vL
ec ra v r
r
rr v
r
r r
r rT r v
r rr v
W r
2
(C-1)Suppo
(C-2)Suppo
(C-3)Suppo
(C-4)La
(C-5)La
(C-6)La
(C-7)D
6PARTS LIST
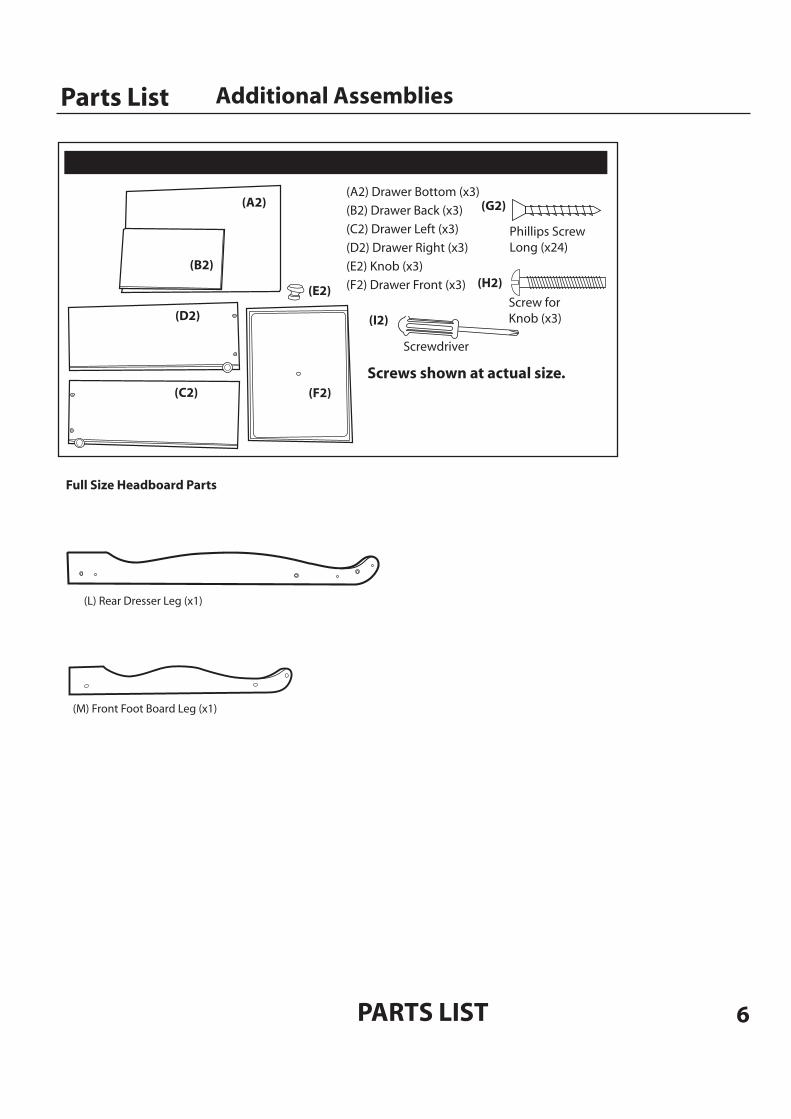
Additional AssembliesParts List
(L) Rear Dresser Leg (x1)
(M) Front Foot Board Leg (x1)
Screwdriver
(A2) Drawer Bottom (x3)
(B2) Drawer Back (x3)
(C2) Drawer Left (x3)
(D2) Drawer Right (x3)
(E2) Knob (x3)
(F2) Drawer Front (x3)
(G2)
Phillips Screw Long (x24)
(B2)
(A2)
(C2)
(D2) (I2)
(H2)
Screw for Knob (x3)
Screws shown at actual size.
(E2)
Full Size Headboard Parts
(F2)
7ASSEMBLY
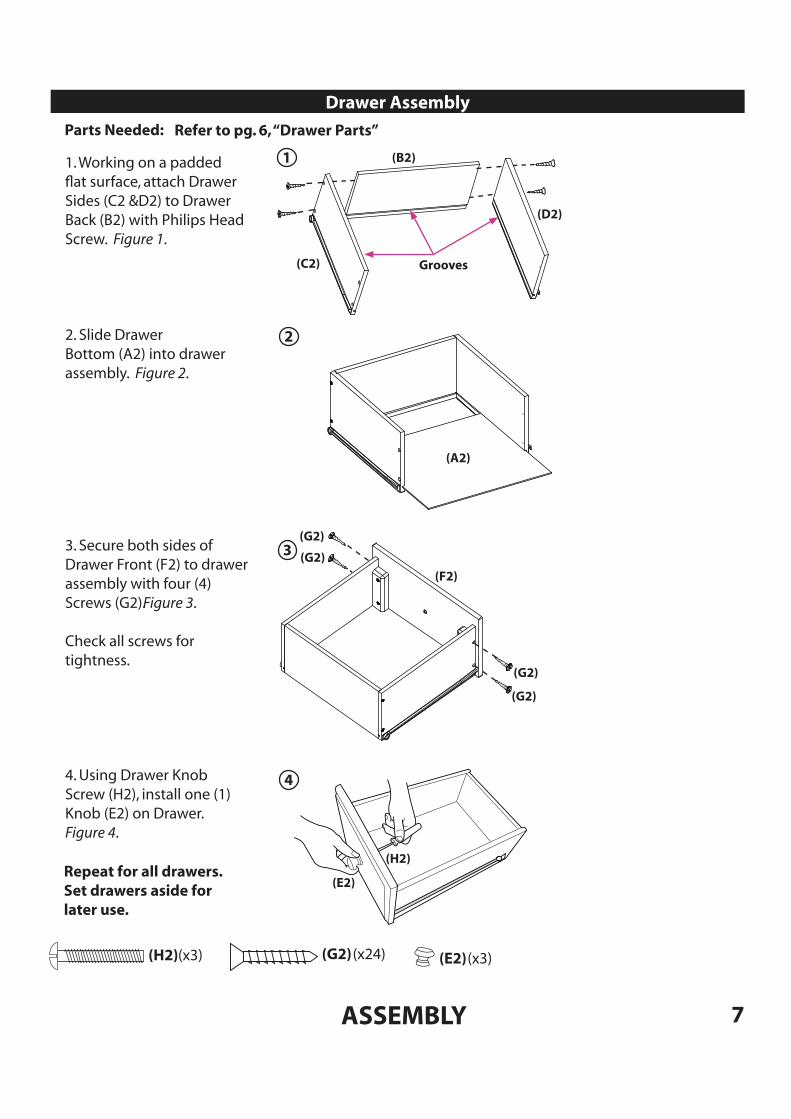
Drawer Assembly
(H2) (x3) (G2) (x24)
1
2
3
4
Grooves
1. Working on a padded fl at surface, attach Drawer Sides (C2 &D2) to Drawer Back (B2) with Philips Head Screw. Figure 1.
2. Slide Drawer Bottom (A2) into drawer assembly. Figure 2.
3. Secure both sides of Drawer Front (F2) to drawer assembly with four (4) Screws (G2). Figure 3.
Check all screws for tightness.
4. Using Drawer Knob Screw (H2), install one (1) Knob (E2) on Drawer. Figure 4.
Repeat for all drawers. Set drawers aside for later use.
(D2)
(B2)
(A2)
Parts Needed: Refer to pg. 6, “Drawer Parts”
(C2)
(E2)
(F2)
(G2)
(G2)
(G2)
(G2)
(H2)
(E2) (x3)
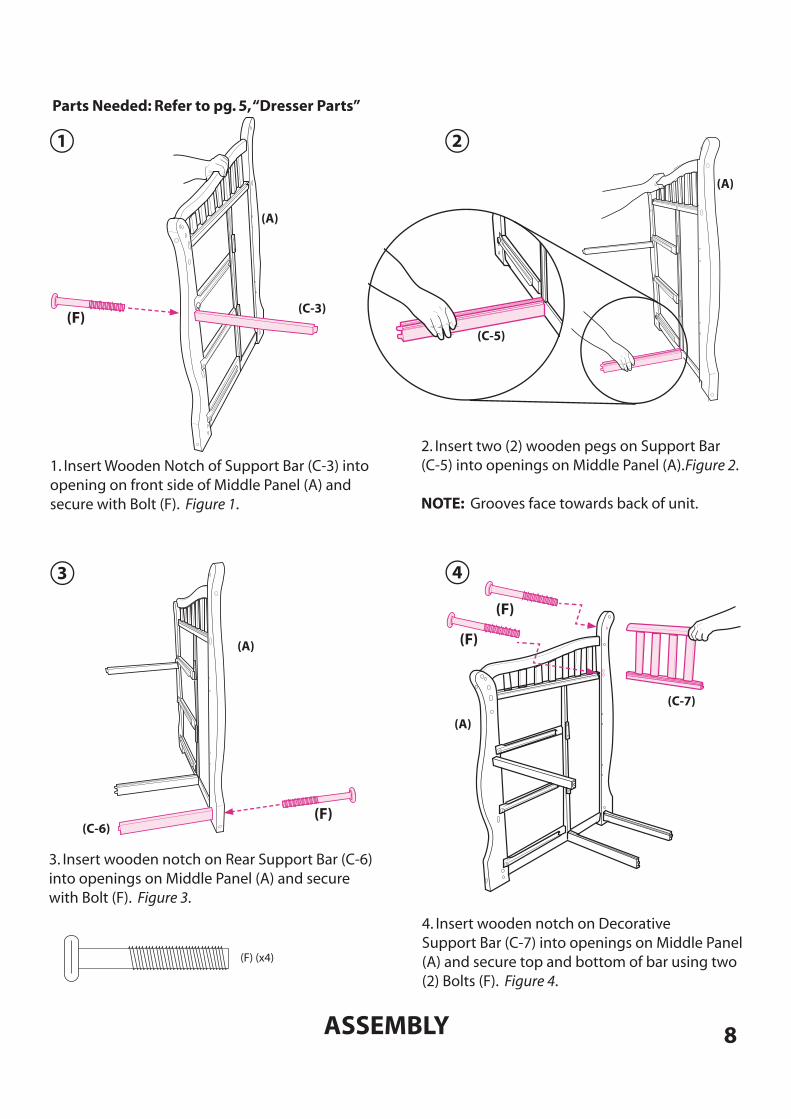
8ASSEMBLY
(A)
(C-3)
1. Insert Wooden Notch of Support Bar (C-3) into opening on front side of Middle Panel (A) and secure with Bolt (F). Figure 1.
1
Parts Needed: Refer to pg. 5, “Dresser Parts”
(F)
2. Insert two (2) wooden pegs on Support Bar (C-5) into openings on Middle Panel (A). Figure 2.
NOTE: Grooves face towards back of unit.
(A)
(C-5)
2
(A)
3. Insert wooden notch on Rear Support Bar (C-6) into openings on Middle Panel (A) and secure with Bolt (F). Figure 3.
3
(C-6)(F)
(F) (x4)
(A)
4. Insert wooden notch on Decorative Support Bar (C-7) into openings on Middle Panel (A) and secure top and bottom of bar using two (2) Bolts (F). Figure 4.
4
(C-7)
(F)
(F)
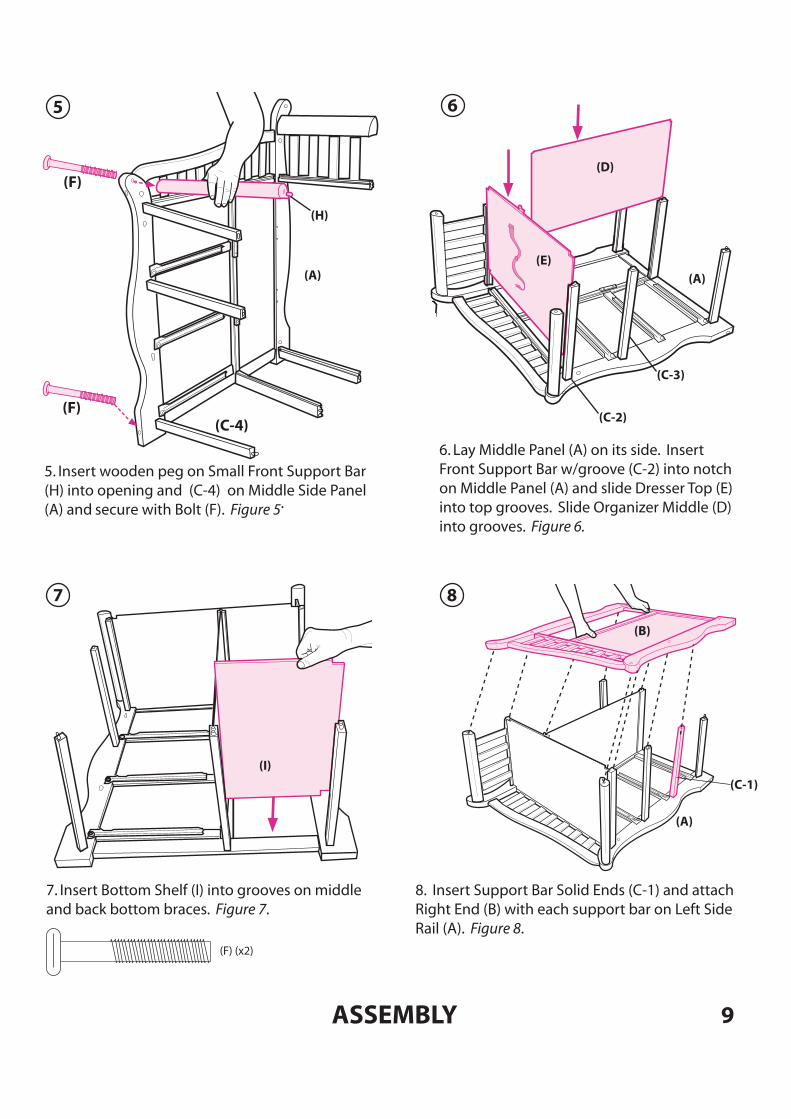
9ASSEMBLY
5. Insert wooden peg on Small Front Support Bar (H) into opening and (C-4) on Middle Side Panel (A) and secure with Bolt (F). Figure 5.
5
(F)
(H)
(A)
8. Insert Support Bar Solid Ends (C-1) and attach Right End (B) with each support bar on Left Side Rail (A). Figure 8.
8
(B)
(A)
(C-1)
7. Insert Bottom Shelf (I) into grooves on middle and back bottom braces. Figure 7.
7
(I)
(F) (x2)
6. Lay Middle Panel (A) on its side. Insert Front Support Bar w/groove (C-2) into notch on Middle Panel (A) and slide Dresser Top (E) into top grooves. Slide Organizer Middle (D) into grooves. Figure 6.
6
(E)
(D)
(A)
(C-3)
(C-2)(F)
(C-4)
10ASSEMBLY
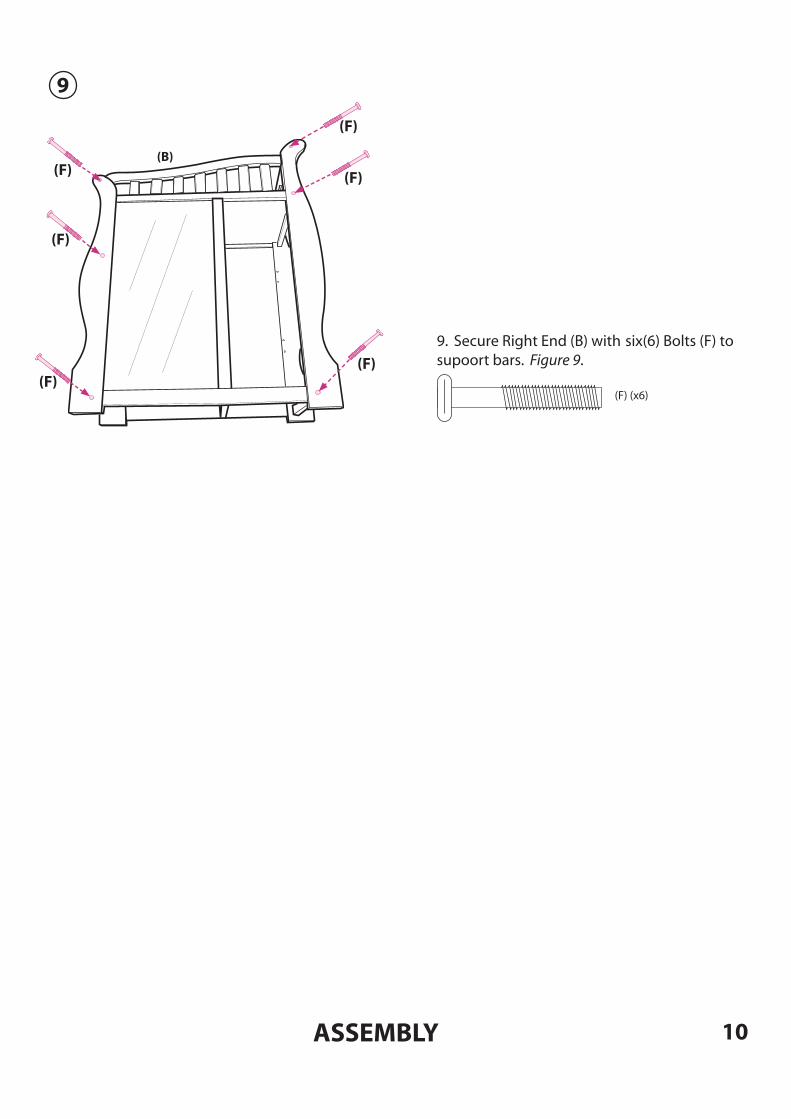
9. Secure Right End (B) with six(6) Bolts (F) to supoort bars. Figure 9.
9
(B)
(F)
(F) (x6)
(F)
(F)
(F)
(F)
(F)
11ASSEMBLY
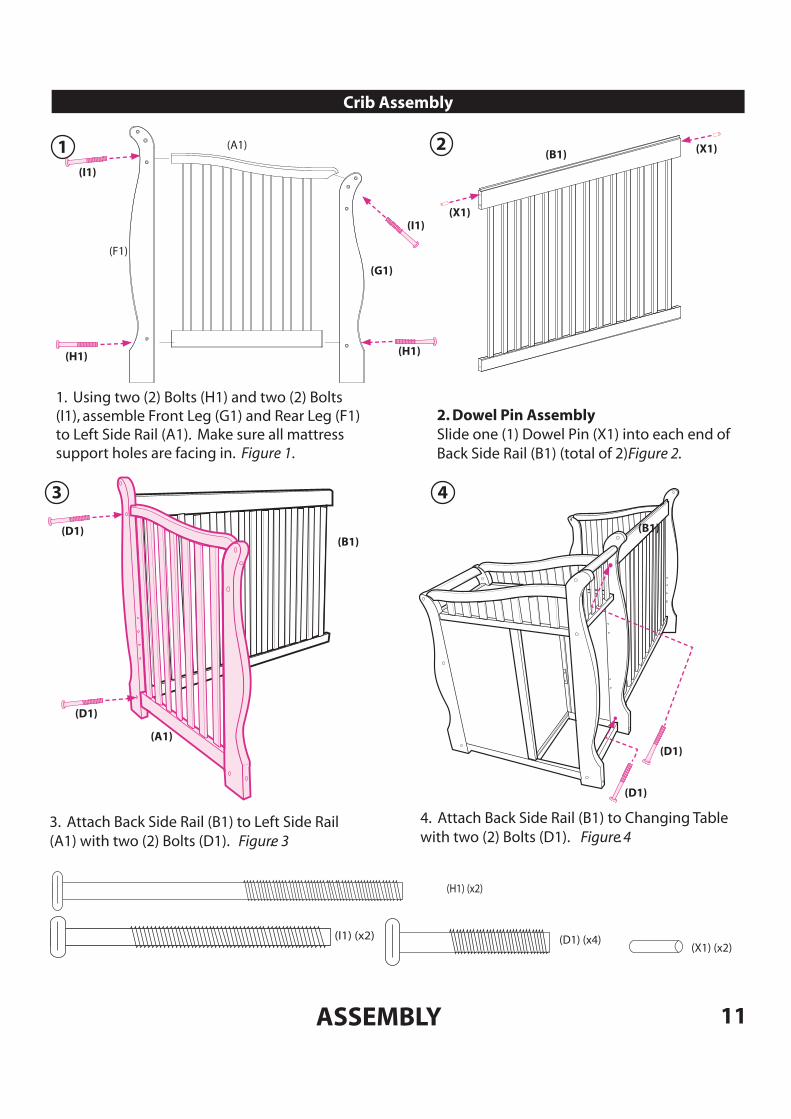
(H1) (x2)
(D1) (x4)(I1) (x2)
3. Attach Back Side Rail (B1) to Left Side Rail (A1) with two (2) Bolts (D1). Figure 3.
(D1)
(B1)
(A1)
3
(D1)
1. Using two (2) Bolts (H1) and two (2) Bolts (I1), assemble Front Leg (G1) and Rear Leg (F1) to Left Side Rail (A1). Make sure all mattress support holes are facing in. Figure 1.
(F1)
(G1)
(H1)
1
(H1)
(A1)
Crib Assembly
4. Attach Back Side Rail (B1) to Changing Table with two (2) Bolts (D1). Figure 4.
(D1)
(D1)
4
2
2. Dowel Pin AssemblySlide one (1) Dowel Pin (X1) into each end of Back Side Rail (B1) (total of 2). Figure 2.
(B1)
(X1)
(B1)
(X1) (x2)
(I1)
(I1)
(X1)
12ASSEMBLY
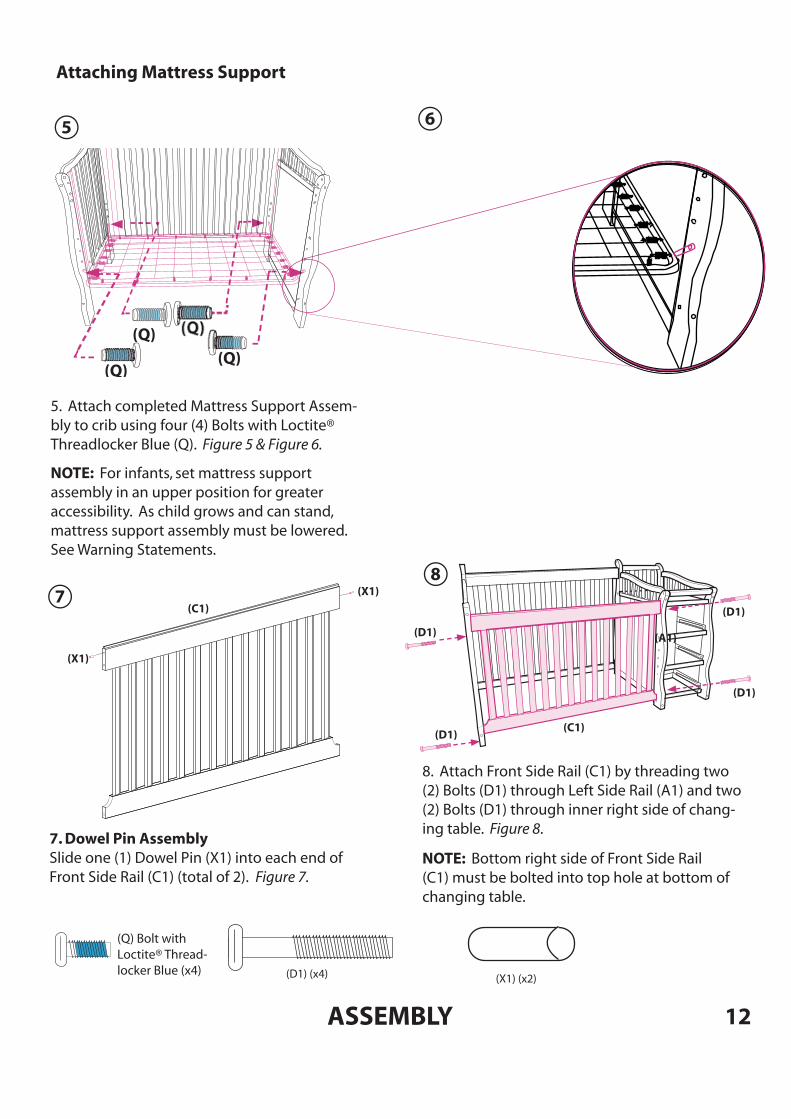
(D1)
8. Attach Front Side Rail (C1) by threading two (2) Bolts (D1) through Left Side Rail (A1) and two (2) Bolts (D1) through inner right side of chang-ing table. Figure 8.
NOTE: Bottom right side of Front Side Rail (C1) must be bolted into top hole at bottom of changing table.
(C1)
8
(D1)
(D1)
(D1)
6
Attaching Mattress Support
5. Attach completed Mattress Support Assem-bly to crib using four (4) Bolts with Loctite® Threadlocker Blue (Q). Figure 5 & Figure 6.
NOTE: For infants, set mattress support assembly in an upper position for greater accessibility. As child grows and can stand, mattress support assembly must be lowered. See Warning Statements.
5
(D1) (x4)
(Q) Bolt with Loctite® Thread-locker Blue (x4)
7. Dowel Pin AssemblySlide one (1) Dowel Pin (X1) into each end of Front Side Rail (C1) (total of 2). Figure 7.
(C1)
(X1)
(X1)
7
(A1)
(X1) (x2)
(Q)(Q)
(Q) (Q)
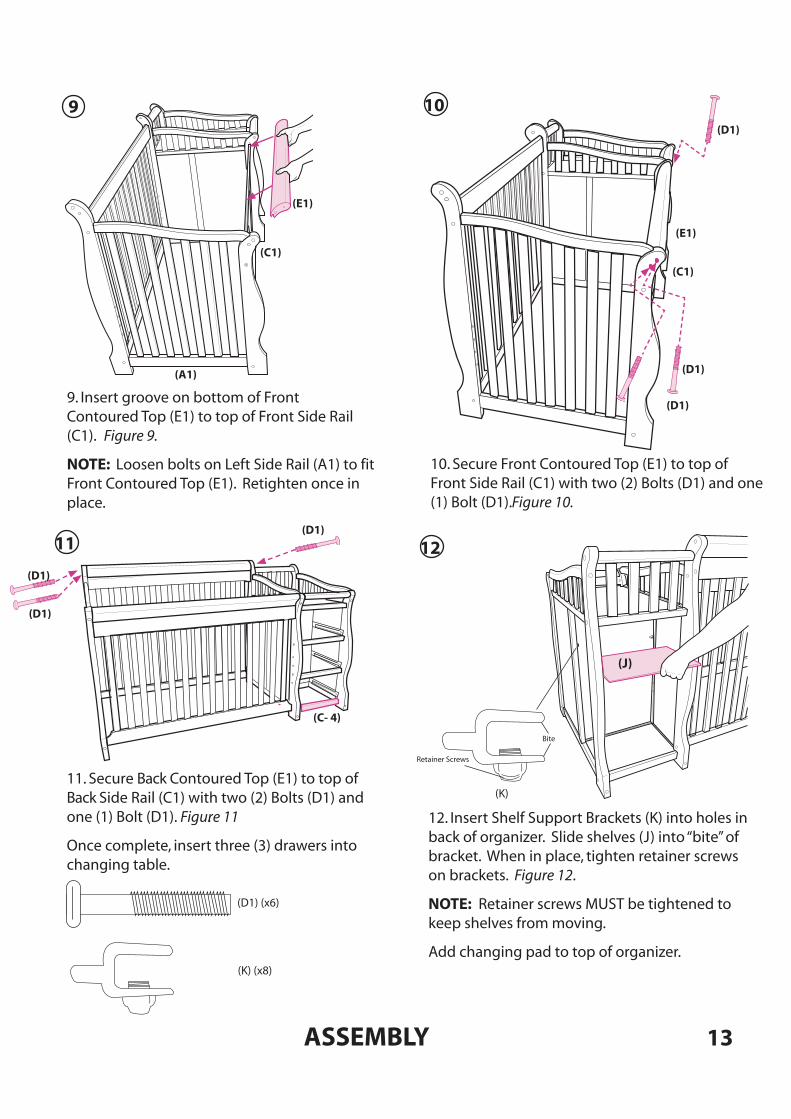
13ASSEMBLY
12. Insert Shelf Support Brackets (K) into holes in back of organizer. Slide shelves (J) into “bite” of bracket. When in place, tighten retainer screws on brackets. Figure 12.
NOTE: Retainer screws MUST be tightened to keep shelves from moving.
Add changing pad to top of organizer.
(J)
(K)
Bite
Retainer Screws
(D1) (x6)
11. Secure Back Contoured Top (E1) to top of Back Side Rail (C1) with two (2) Bolts (D1) and one (1) Bolt (D1). Figure 11.
Once complete, insert three (3) drawers into changing table.
(C- 4)
9. Insert groove on bottom of Front Contoured Top (E1) to top of Front Side Rail (C1). Figure 9.
NOTE: Loosen bolts on Left Side Rail (A1) to fitFront Contoured Top (E1). Retighten once in place.
(E1)
9
(C1)
(A1)
10. Secure Front Contoured Top (E1) to top of Front Side Rail (C1) with two (2) Bolts (D1) and one (1) Bolt (D1). Figure 10.
(E1)
(D1)
(D1)
(C1)
10
(D1)
11 12(D1)
(D1)
(D1)
(K) (x8)
14ASSEMBLY
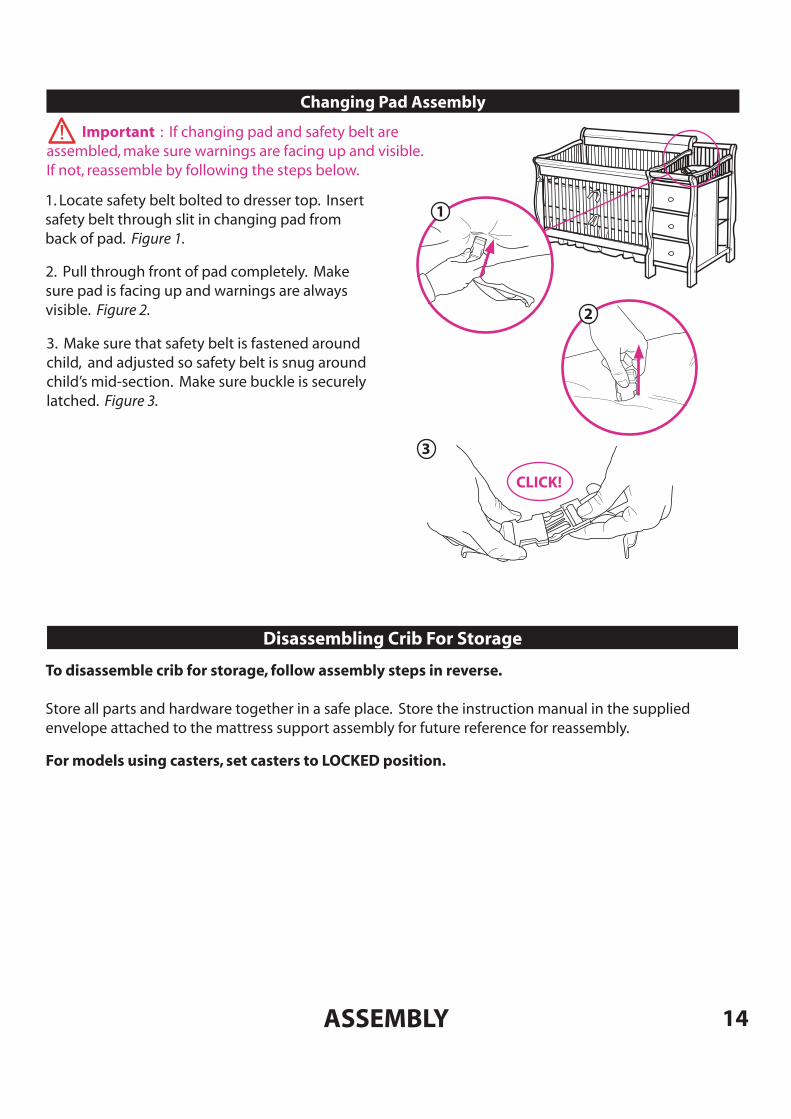
Changing Pad Assembly
3. Make sure that safety belt is fastened around child, and adjusted so safety belt is snug around child’s mid-section. Make sure buckle is securely latched. Figure 3.
CLICK!
1
2
3
2. Pull through front of pad completely. Make sure pad is facing up and warnings are always visible. Figure 2.
Important : If changing pad and safety belt are assembled, make sure warnings are facing up and visible. If not, reassemble by following the steps below.
1. Locate safety belt bolted to dresser top. Insert safety belt through slit in changing pad from back of pad. Figure 1.
Disassembling Crib For Storage
To disassemble crib for storage, follow assembly steps in reverse.
Store all parts and hardware together in a safe place. Store the instruction manual in the supplied envelope attached to the mattress support assembly for future reference for reassembly.
For models using casters, set casters to LOCKED position.
15ASSEMBLY
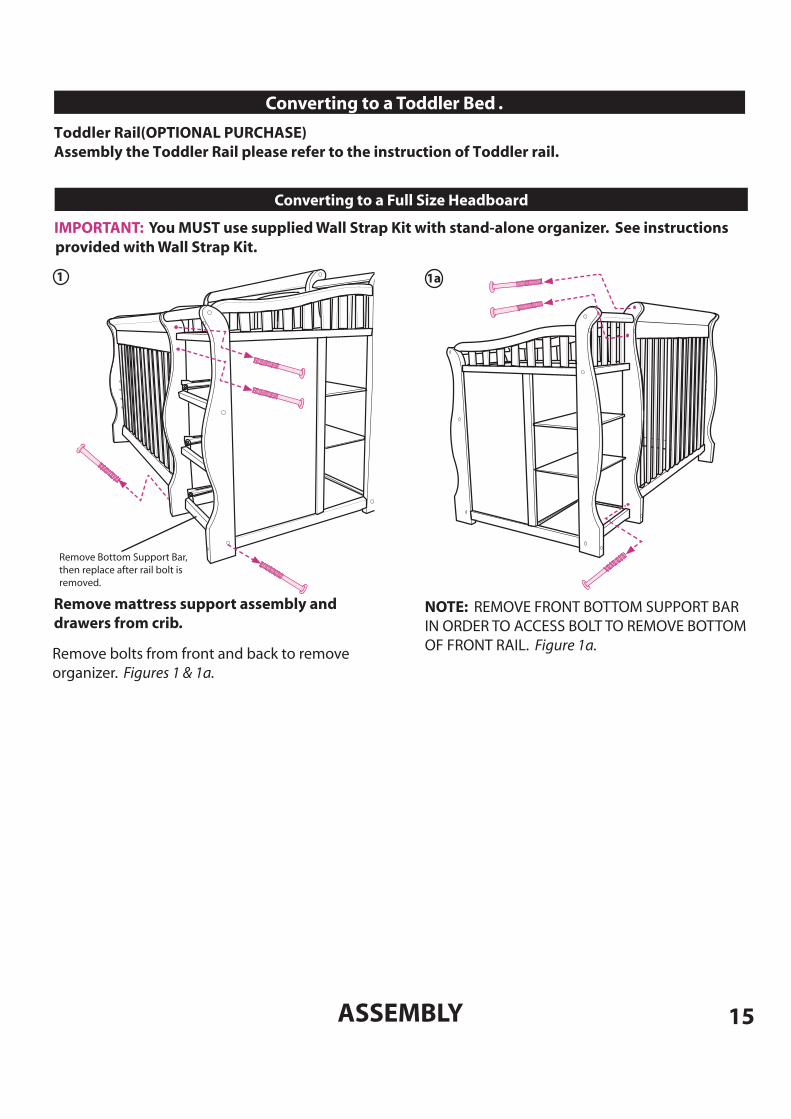
Converting to a Toddler Bed .
Toddler Rail(OPTIONAL PURCHASE)Assembly the Toddler Rail please refer to the instruction of Toddler rail.
Converting to a Full Size Headboard
Remove bolts from front and back to remove organizer. Figures 1 & 1a.
1
Remove mattress support assembly and drawers from crib.
1a
NOTE: REMOVE FRONT BOTTOM SUPPORT BAR IN ORDER TO ACCESS BOLT TO REMOVE BOTTOM OF FRONT RAIL. Figure 1a.
Remove Bottom Support Bar, then replace after rail bolt is removed.
IMPORTANT: You MUST use supplied Wall Strap Kit with stand-alone organizer. See instructions provided with Wall Strap Kit.
16
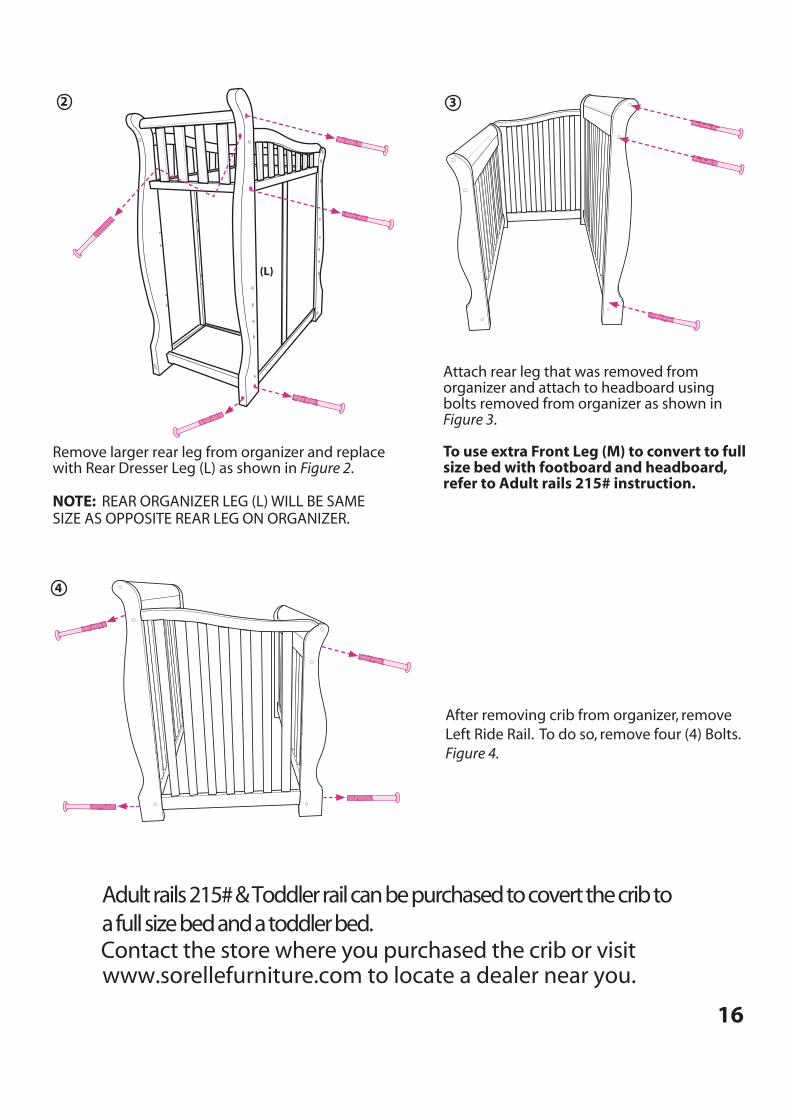
3
Attach rear leg that was removed from organizer and attach to headboard using bolts removed from organizer as shown in Figure 3.
To use extra Front Leg (M) to convert to full size bed with footboard and headboard, refer to Adult rails 215# instruction.
After removing crib from organizer, remove Left Ride Rail. To do so, remove four (4) Bolts. Figure 4.
4
2
Remove larger rear leg from organizer and replace with Rear Dresser Leg (L) as shown in Figure 2.
NOTE: REAR ORGANIZER LEG (L) WILL BE SAME SIZE AS OPPOSITE REAR LEG ON ORGANIZER.
(L)
Adult rails 215# & Toddler rail can be purchased to covert the crib to a full size bed and a toddler bed.Contact the store where you purchased the crib or visit www.sorellefurniture.com to locate a dealer near you.