Embed Size (px)
Citation preview
C152 Laboratory Exercise 3
Professor: Krste AsanovicTA: Albert Magyar
Original Author: Christopher CelioDepartment of Electrical Engineering & Computer Science
University of California, Berkeley
March 13, 2019
1 Introduction and goals
The goal of this laboratory assignment is to allow you to conduct a variety of experiments in theChisel simulation environment.
You will be provided a complete implementation of a speculative out–of–order processor. Stu-dents will run experiments on it, analyze the design, and make recommendations for future devel-opment. You can also choose to improve the design as part of the open-ended portion.
The lab has two sections, a directed portion and an open–ended portion. Everyone will do thedirected portion the same way, and grades will be assigned based on correctness. The open–endedportion will allow you to pursue more creative investigations, and your grade will be based on theeffort made to complete the task or the arguments you provide in support of your ideas.
Students are encouraged to discuss solutions to the lab assignments with other students, butmust run through the directed portion of the lab by themselves and turn in their own lab report.For the open-ended portion of each lab, students can work individually or in groups of two or three.Any open-ended lab assignment completed as a group should be written up and handed in as asingle submission, separate from the directed section. Students are free to take part in differentgroups for different lab assignments.
You are only required to do one of the open–ended assignments. These assignments are ingeneral starting points or suggestions.
It is also important to stress that how concise the report is and how the datais presented will be taken into account when grading. Problems usually are specificabout what statistics they want, so there is no need to give them all. Tables andespecially graphs are much more efficient and effective ways to communicate data.There is a 10-page limit for each section of the lab.
1.1 Chisel & The Berkeley Out–of–Order Machine
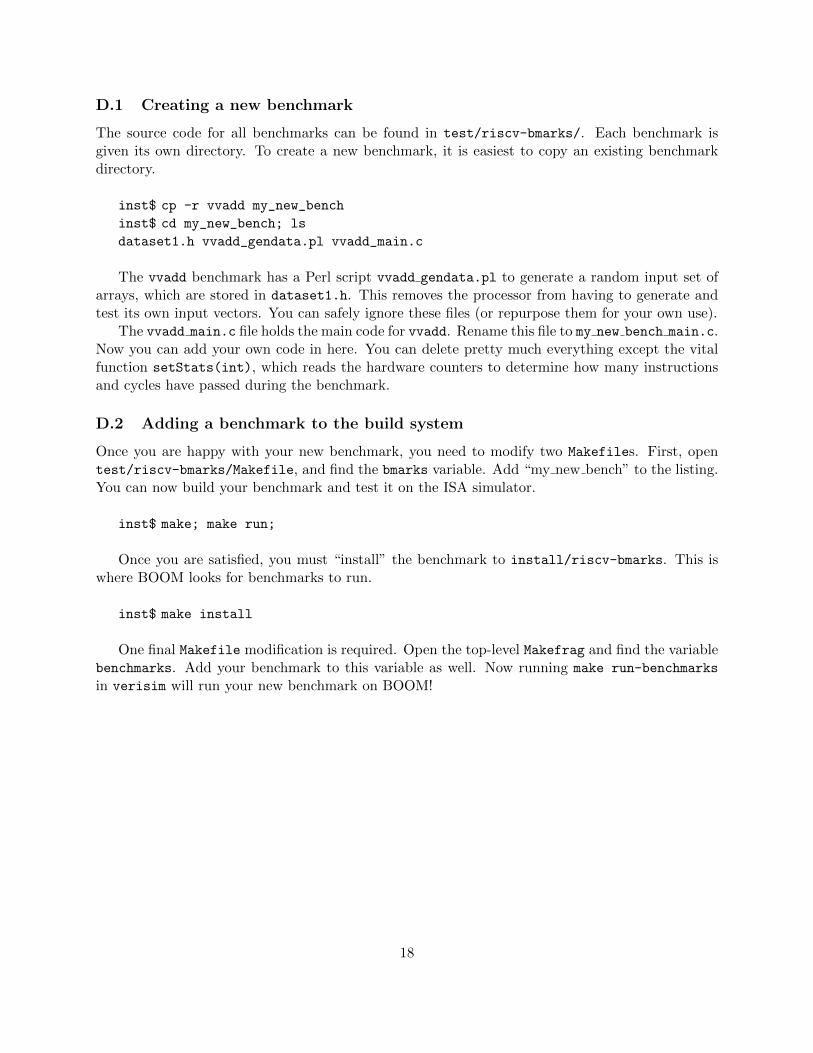
The Chisel infrastructure is similar to Lab 1, with the addition of a new processor, the RISC-VBerkeley Out–of–Order Machine, or “BOOM”. BOOM is heavily inspired by the MIPS R10k andthe Alpha 21264 out–of–order processors[1, 3]. Like the R10k and the 21264, BOOM is a unifiedphysical register file design (also known as “explicit register renaming”).
1
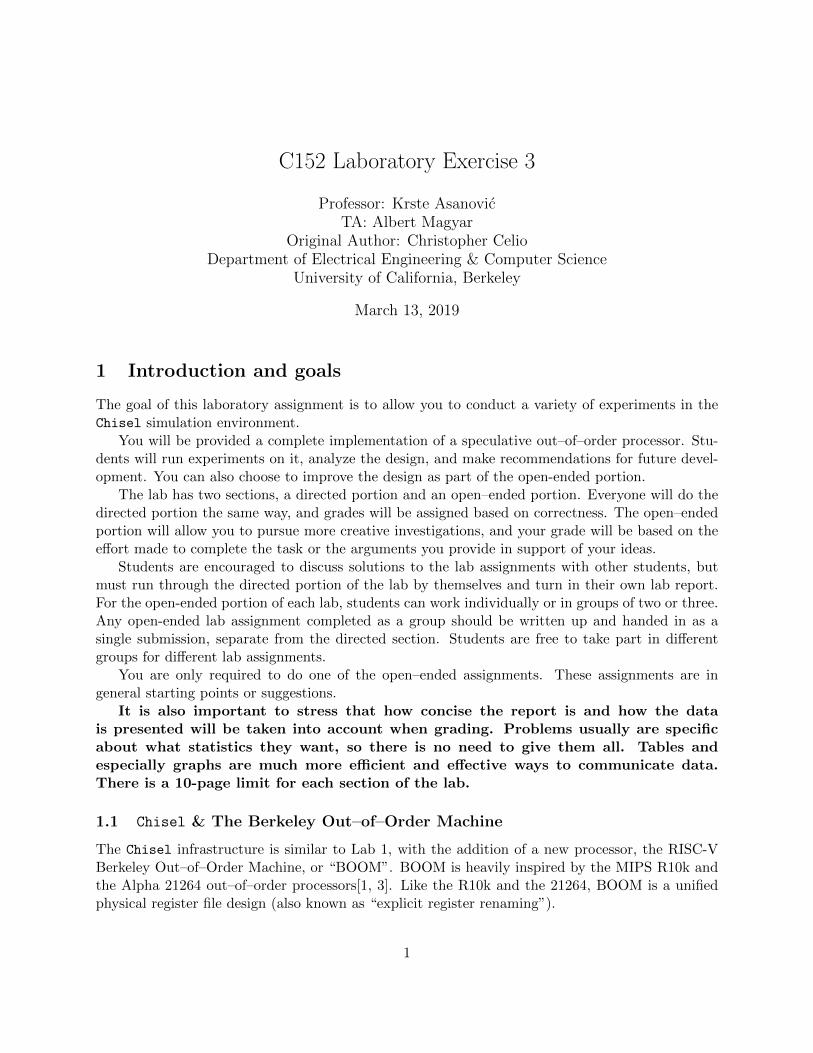
The Chip
For this lab, you will be given an entire functioning processor, implemented in Chisel. The Chiselsource code describes an entire “chip” with an interface to the outside world via a DRAM memorylink. On-chip is an out–of–order core, which is where the focus of this lab will be. The core, in thiscase the BOOM processor, is directly connected to an instruction cache (16kB) and a non-blockingdata cache (16kB). Any miss in either cache will require a trip to DRAM[2] (located “off-chip”).
Figure 1: The high-level view of the “chip”.
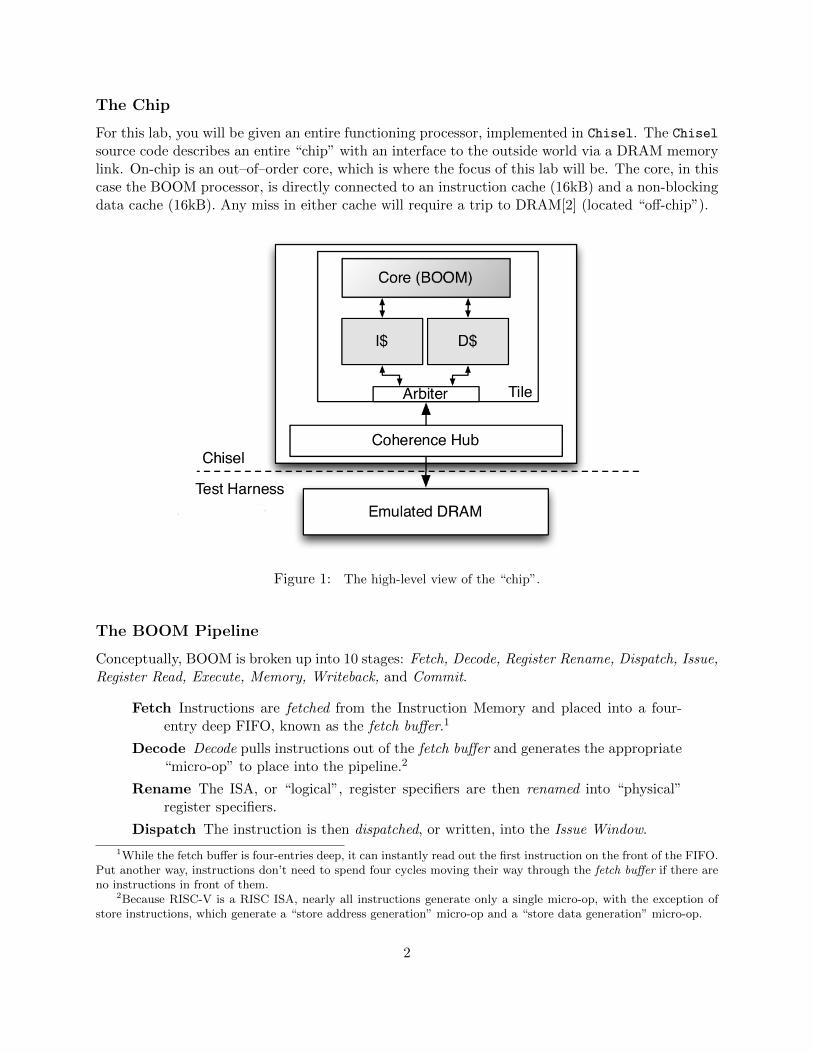
The BOOM Pipeline
Conceptually, BOOM is broken up into 10 stages: Fetch, Decode, Register Rename, Dispatch, Issue,Register Read, Execute, Memory, Writeback, and Commit.
Fetch Instructions are fetched from the Instruction Memory and placed into a four-entry deep FIFO, known as the fetch buffer.1
Decode Decode pulls instructions out of the fetch buffer and generates the appropriate“micro-op” to place into the pipeline.2
Rename The ISA, or “logical”, register specifiers are then renamed into “physical”register specifiers.
Dispatch The instruction is then dispatched, or written, into the Issue Window.
1While the fetch buffer is four-entries deep, it can instantly read out the first instruction on the front of the FIFO.Put another way, instructions don’t need to spend four cycles moving their way through the fetch buffer if there areno instructions in front of them.
2Because RISC-V is a RISC ISA, nearly all instructions generate only a single micro-op, with the exception ofstore instructions, which generate a “store address generation” micro-op and a “store data generation” micro-op.
2
F1(IC)
Fetch Buffer
Front-end Back-end
B2(BPD)
F2 DEC/REN1
REN2/DIS
B1(BTB)
ISS(ALU)
SEL/FMT
WB
Out-of-order processing
WB
branch redirects
F3
ISS(MEM)
ISS(FP)
RRD
RRD EX EX EX EX
RRD EX
EX DC
WBRRD EX EX EX
WB
B3
Figure 2: The Berkeley Out of Order Machine Processor.
Issue Instructions sitting in the Issue Window wait until all of their operands are ready,and are then issued. This is the beginning of the out–of–order piece of the pipeline.
RF Read Issued instructions first read their operands from the unified physical registerfile...
Execute and then enter the Execute stage where the integer ALU resides. Issuedmemory operations perform their address calculations in the Execute stage, andthen the address is sent to the data cache (if it is a load) in which the data isaccessed during the Memory stage. The calculated addresses are also written intothe Load/Store Unit at the end of the Execute stage.
Memory The Load/Store Unit consists of three queues: a Load Address Queue (LAQ),a Store Address Queue (SAQ), and a Store Data Queue (SDQ) (see Figure 5).Loads are optimistically fired to memory when their address is added to the LAQduring the Execute stage. In parallel, the incoming load compares its addressagainst the SAQ to find if there are any store addresses that the load depends on.If the store data is present, the load receives the data from the store (store dataforwarding) and the memory request is killed. If the data is not present, the loadwaits until the data becomes present and is then retried.
Stores are fired to memory at commit, when both its address and its data arepresent.
Writeback ALU operations and load operations are written back to the physical reg-ister file.
Commit The Reorder Buffer, or ROB, tracks the status of each instruction in thepipeline. When the head of the ROB is not-busy, it commits the instruction. Forstores, the ROB signals to the store at the head of the Store Queue that it can nowwrite its data to memory. For loads, the ROB signals the Load/Store Unit to verifythat the load did not fail a memory ordering dependence (i.e., a load issued before
3
a store it depended on committed). If the load did fail, the entire pipeline must bekilled and restarted. Exceptions are also taken at this point, which requires slowlyunwinding the ROB to return the rename map tables to their proper state.
BOOM supports full branch speculation and branch prediction. Each instruction, no matterwhere it is in the pipeline, is accompanied by a branch mask that marks which branches theinstruction is “speculated under”. A mispredicted branch requires killing all instructions thatdepended on that branch. When a branch instructions passes through Rename, copies of theRegister Rename Table and the Free List are made. On a mispredict, the saved processor state isrestored.
The “front-end” contains a Branch History Table, composed of simple n-bit history countersindexed by the PC. The BHT is read in parallel with instruction cache access. As an instructionis returned from the cache and inserted into the fetch buffer, the instruction is quickly checked tosee if it is a branch. If the instruction is a branch, the prediction is used to redirect the front-endon a TAKE BRANCH prediction.3
BOOM implements instructions from the RISC-V variant RV64S. RV64S is the 64-bit variantwhich supports the supervisor-level ISA.
See Figure 5 for a more detailed diagram of the pipeline. Additional information on BOOMcan be found in the appendices and the CS152 Section 7 notes; in particular, the issue window, theload/store unit, and the execution pipeline are covered in greater detail.
3Although shown in the diagrams, the BTB has been disabled for this lab.
4
1.2 Graded Items
You will turn in a hard copy of your results to the professor or TA. Some of the open-ended questionsalso request source code - there will be further instructions on Piazza about how to submit codeto the course staff via Github. Please label each section of the results clearly. The following itemsneed to be turned in for evaluation:
1. Problem 2.2: CPI, branch predictor statistics, and answers
2. Problem 2.3: CPI statistics and answers
3. Problem 3.1/3.2/3.3 modifications and evaluations (submit source code if required via Github)
2 Directed Portion
The questions in the directed portion of the lab use Chisel. A tutorial (and other documenta-tion) on the Chisel language can be found at (http://chisel.eecs.berkeley.edu).4 Althoughstudents will not be required to write Chisel code as part of this lab, students will need to writeinstrumentation code in C++ code which probes the state of a Chisel processor.
WARNING: BOOM is an ongoing project at Berkeley. While it has been taped out andhas reached a fairly mature state, some more imaginative parameter changes or branch predictorbehaviors will create new instruction interleavings which may expose unseen bugs in the processoritself.
2.1 Setting Up Your Chisel Workspace
To complete this lab you will log in to an instructional server, which is where you will use Chisel
and the RISC-V tool-chain.The tools for this lab were set up to run on the icluster servers: icluster6.eecs, icluster7.eecs,
icluster8.eecs, icluster9.eecs.
4Chisel documentation can also be found within the lab itself. Look under $Lab3Root/chisel/doc/ for moreinformation.
5
First, clone the lab materials:
inst$ git clone ~cs152/sp19/lab3.git
inst$ cd ./lab3
inst$ ./init-submodule.sh
inst$ export LAB3ROOT=$PWD
The “init-submodules.sh” script initializes and updates the submodules that you will need forthis lab. Do not use “git clone –recursive” or “git submodule init –recursive”, as this will clonethe RISC-V toolchain, which is quite large. The RISC-V tools for this lab have been pre-installedfor you. We will refer to ./lab3 as ${LAB3ROOT} in the rest of the handout to denote the locationof the Lab 3 directory.
The directory structure is shown below:
• ${LAB3ROOT}/
– init-submodules.sh Run this script after a fresh clone to get the right submodules.
– boom/ Chisel source code for the BOOM processor
– rocket-chip/
∗ src/main/scala Chisel source code for RocketChip SoC components
∗ chisel3 The Chisel source code
∗ riscv-tools
· riscv-fesvr RISC-V Frontend Server: Host system code that loads program into
RocketChip
· riscv-tests RISC-V tests: ISA tests and benchmarks
– testchipip Chisel source code for additional SoC components
– src/main/scala/boomexampleChisel source code gluing Boom, RocketChip and TestChipIP together.
– Makefrag The common Makefrag.
– verisim/ Directory where Verilator simulator is built and run
∗ Makefile
∗ output/
– install/riscv-bmarks/ Directory benchmarks get installed to
– test/riscv-bmarks/ Benchmark source code
The most interesting items have been bolded: the verisim/Makefile to build and test theprocessor, the Chisel source code found in boom/, and the output files found in verisim/output/.
The following command will set up your bash environment, giving you access to the entireCS152 lab tool-chain. Run it before each session:5 6
inst$ source ~cs152/sp19/cs152.lab3.bashrc
5Or better yet, add this command to your bash profile.6If you see errors about “fesvr/htif.h”, then you probably have an improperly set environment.
6
To compile the Chisel source code for BOOM, compile the resulting Verilog simulator, and runall benchmarks, run the following command:
inst$ cd ${LAB3ROOT}/verisim
inst$ make run-benchmarks
To “clean” everything, simply run make with the clean parameter:
inst$ make clean
The entire build and test process should take around ten to fifteen minutes on the iclustermachines.7
2.2 Gathering the CPI and Branch Prediction Accuracy of BOOM
For this problem, collect and report the CPI and branch predictor accuracy for the benchmarksdhrystone, median, multiply, qsort, rsort, towers, and vvadd. You will do this twice for BOOM:with and without branch prediction turned on. First, turn off branch prediction as follows:
inst$ vim ${LAB3ROOT}/src/main/scala/boomexample/Config.scala
Change the setting USE_BRANCH_PREDICTOR to “false”. Then compile the resulting simulatorand run it through the benchmarks as follows:
inst$ cd ${LAB3ROOT}/verisim
inst$ make run-benchmarks
inst$ make benchmark-stats
The Makefile compiles the Chisel code into Verilog code, then compiles Verilog code into acycle-accurate simulator, and finally calls the RISC-V front-end server which starts the simulatorand runs a suite of benchmarks on the target processor. The make benchmark-stats commandreads the generated *.out files (located in verisim/output/) and pulls out the counter statistics.
After you get the benchmark stats with branch prediction turned off, do this again, but withbranch prediction turned on.8
The default parameters for BOOM are summarized in Table 1. While some of these parameters(instruction window, ROB, LD/ST unit) are on the small side, the machine is generally well fedbecause it only fetches and dispatches one instruction at a time, and the pipeline is not very long.9
7The generated C++ source code is ∼5MB in size, so some patience is required while it compiles.8The default branch predictor provided with this lab is a branch history table made up of 128 two-bit counters,
indexed by PC.9Also, by keeping many of BOOM’s data structures small, it keeps compile time fast(er) and allows us to easily
visualize the entire state on the machine when viewing the debug versions of the *.out files generated by simulation.
7
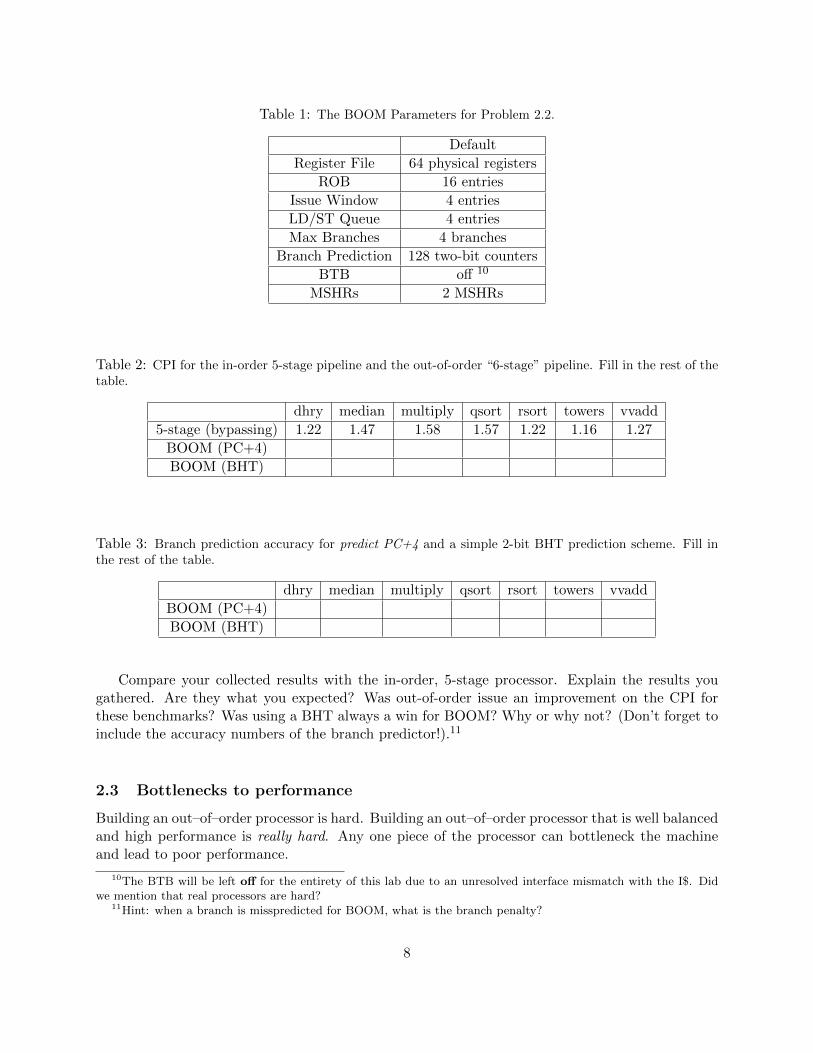
Table 1: The BOOM Parameters for Problem 2.2.
Default
Register File 64 physical registers
ROB 16 entries
Issue Window 4 entries
LD/ST Queue 4 entries
Max Branches 4 branches
Branch Prediction 128 two-bit counters
BTB off 10
MSHRs 2 MSHRs
Table 2: CPI for the in-order 5-stage pipeline and the out-of-order “6-stage” pipeline. Fill in the rest of thetable.
dhry median multiply qsort rsort towers vvadd
5-stage (bypassing) 1.22 1.47 1.58 1.57 1.22 1.16 1.27
BOOM (PC+4)
BOOM (BHT)
Table 3: Branch prediction accuracy for predict PC+4 and a simple 2-bit BHT prediction scheme. Fill inthe rest of the table.
dhry median multiply qsort rsort towers vvadd
BOOM (PC+4)
BOOM (BHT)
Compare your collected results with the in-order, 5-stage processor. Explain the results yougathered. Are they what you expected? Was out-of-order issue an improvement on the CPI forthese benchmarks? Was using a BHT always a win for BOOM? Why or why not? (Don’t forget toinclude the accuracy numbers of the branch predictor!).11
2.3 Bottlenecks to performance
Building an out–of–order processor is hard. Building an out–of–order processor that is well balancedand high performance is really hard. Any one piece of the processor can bottleneck the machineand lead to poor performance.
10The BTB will be left off for the entirety of this lab due to an unresolved interface mismatch with the I$. Didwe mention that real processors are hard?
11Hint: when a branch is misspredicted for BOOM, what is the branch penalty?
8
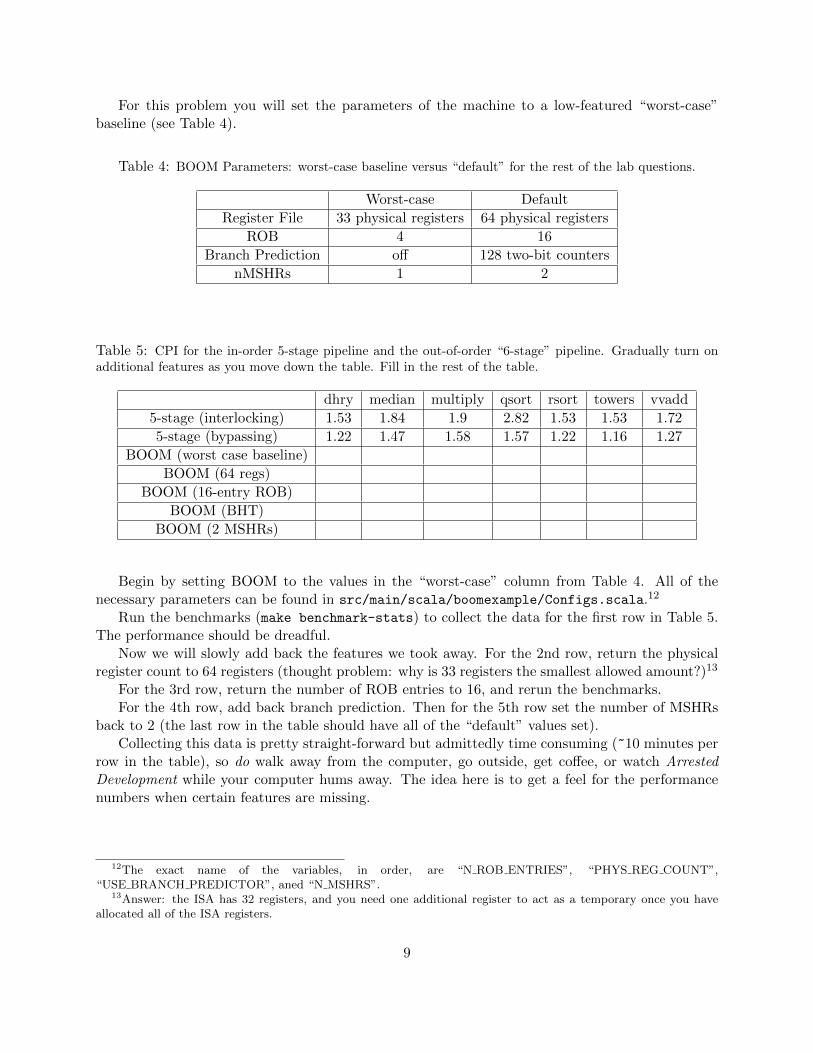
For this problem you will set the parameters of the machine to a low-featured “worst-case”baseline (see Table 4).
Table 4: BOOM Parameters: worst-case baseline versus “default” for the rest of the lab questions.
Worst-case Default
Register File 33 physical registers 64 physical registers
ROB 4 16
Branch Prediction off 128 two-bit counters
nMSHRs 1 2
Table 5: CPI for the in-order 5-stage pipeline and the out-of-order “6-stage” pipeline. Gradually turn onadditional features as you move down the table. Fill in the rest of the table.
dhry median multiply qsort rsort towers vvadd
5-stage (interlocking) 1.53 1.84 1.9 2.82 1.53 1.53 1.72
5-stage (bypassing) 1.22 1.47 1.58 1.57 1.22 1.16 1.27
BOOM (worst case baseline)
BOOM (64 regs)
BOOM (16-entry ROB)
BOOM (BHT)
BOOM (2 MSHRs)
Begin by setting BOOM to the values in the “worst-case” column from Table 4. All of thenecessary parameters can be found in src/main/scala/boomexample/Configs.scala.12
Run the benchmarks (make benchmark-stats) to collect the data for the first row in Table 5.The performance should be dreadful.
Now we will slowly add back the features we took away. For the 2nd row, return the physicalregister count to 64 registers (thought problem: why is 33 registers the smallest allowed amount?)13
For the 3rd row, return the number of ROB entries to 16, and rerun the benchmarks.For the 4th row, add back branch prediction. Then for the 5th row set the number of MSHRs
back to 2 (the last row in the table should have all of the “default” values set).Collecting this data is pretty straight-forward but admittedly time consuming (~10 minutes per
row in the table), so do walk away from the computer, go outside, get coffee, or watch ArrestedDevelopment while your computer hums away. The idea here is to get a feel for the performancenumbers when certain features are missing.
12The exact name of the variables, in order, are “N ROB ENTRIES”, “PHYS REG COUNT”,“USE BRANCH PREDICTOR”, aned “N MSHRS”.
13Answer: the ISA has 32 registers, and you need one additional register to act as a temporary once you haveallocated all of the ISA registers.
9
3 Open-ended Portion
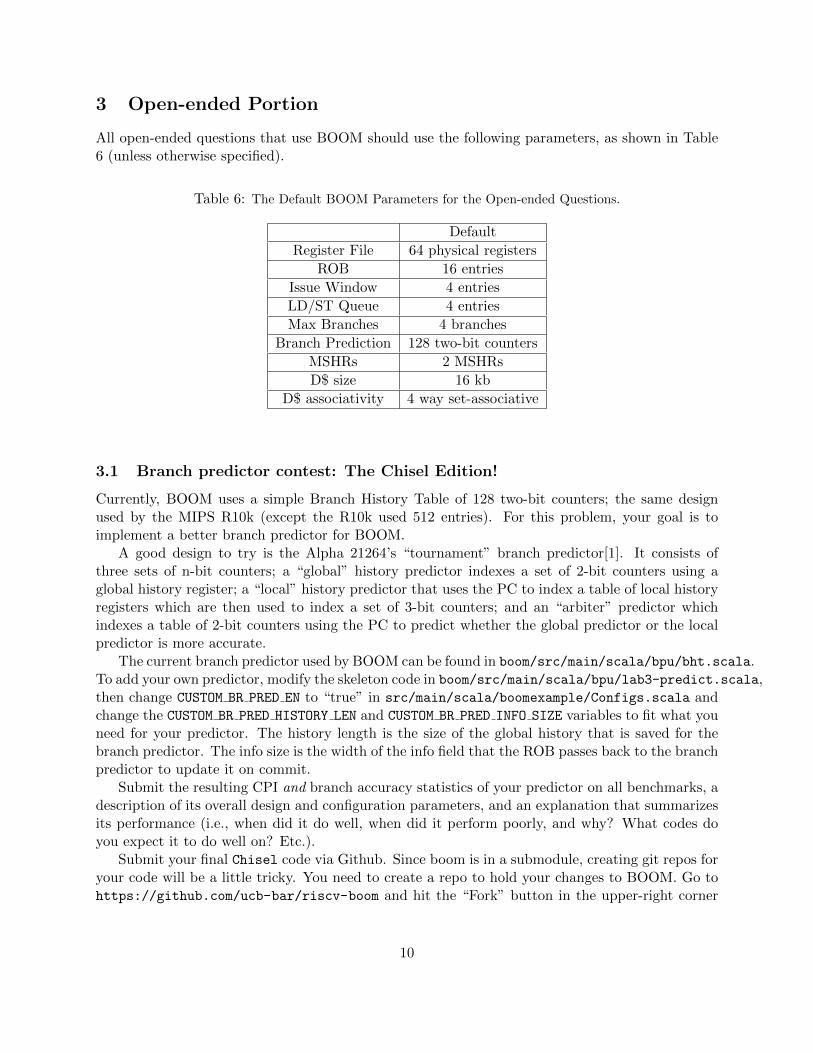
All open-ended questions that use BOOM should use the following parameters, as shown in Table6 (unless otherwise specified).
Table 6: The Default BOOM Parameters for the Open-ended Questions.
Default
Register File 64 physical registers
ROB 16 entries
Issue Window 4 entries
LD/ST Queue 4 entries
Max Branches 4 branches
Branch Prediction 128 two-bit counters
MSHRs 2 MSHRs
D$ size 16 kb
D$ associativity 4 way set-associative
3.1 Branch predictor contest: The Chisel Edition!
Currently, BOOM uses a simple Branch History Table of 128 two-bit counters; the same designused by the MIPS R10k (except the R10k used 512 entries). For this problem, your goal is toimplement a better branch predictor for BOOM.
A good design to try is the Alpha 21264’s “tournament” branch predictor[1]. It consists ofthree sets of n-bit counters; a “global” history predictor indexes a set of 2-bit counters using aglobal history register; a “local” history predictor that uses the PC to index a table of local historyregisters which are then used to index a set of 3-bit counters; and an “arbiter” predictor whichindexes a table of 2-bit counters using the PC to predict whether the global predictor or the localpredictor is more accurate.
The current branch predictor used by BOOM can be found in boom/src/main/scala/bpu/bht.scala.To add your own predictor, modify the skeleton code in boom/src/main/scala/bpu/lab3-predict.scala,then change CUSTOM BR PRED EN to “true” in src/main/scala/boomexample/Configs.scala andchange the CUSTOM BR PRED HISTORY LEN and CUSTOM BR PRED INFO SIZE variables to fit what youneed for your predictor. The history length is the size of the global history that is saved for thebranch predictor. The info size is the width of the info field that the ROB passes back to the branchpredictor to update it on commit.
Submit the resulting CPI and branch accuracy statistics of your predictor on all benchmarks, adescription of its overall design and configuration parameters, and an explanation that summarizesits performance (i.e., when did it do well, when did it perform poorly, and why? What codes doyou expect it to do well on? Etc.).
Submit your final Chisel code via Github. Since boom is in a submodule, creating git repos foryour code will be a little tricky. You need to create a repo to hold your changes to BOOM. Go tohttps://github.com/ucb-bar/riscv-boom and hit the “Fork” button in the upper-right corner
10
of the page. If it asks you what destination you’d like to select, fork it to your personal account.Next, commit and push your changes to boom.
inst$ cd boom
inst$ git checkout -b cs152-sp19-lab3; git add -u; git commit
inst$ git remote set-url origin [email protected]:yourusername/riscv-boom.git
inst$ git push -u origin cs152-sp19-lab3
inst$ cd ..
The team with the highest-performing custom hardware branch predictor will receive 10%overall extra credit for Lab 3.
Note: the nice thing about branch predictors is their correctness is only a secondary concern:their job is to output a single True/False signal, and the pipeline will handle cleaning up the mess!Corollary: if you see any tests or benchmarks fail, this is a bug in BOOM that is being uncoveredby new instruction interleavings created by your branch predictor. Contact your TA if this occursand carry on.
3.2 Branch predictor contest: The C++ Edition!
For this open-ended project, you will design your own branch predictor and test it on some realisticbenchmarks.
Changing the operation of branch prediction in hardware would be arduous, but luckily acompletely separate framework for such an exploration already exists. It was created for a branchpredictor contest run by the MICRO conference and the Journal of Instruction-Level Parallelism.The contest provided entrants with C++ framework for implementing and testing their submissions,which is what you will use for our in-class study. Information and code can be found at:http://hpca23.cse.tamu.edu/taco/camino/cbp2/
A description of the available framework can be found at:http://hpca23.cse.tamu.edu/taco/camino/cbp2/cbp2-infrastructure-v2/doc/index.html
You can compile and run this framework on essentially any machine with a decently modernversion of gcc/g++. So, while the TA will not be able to help you with setup problems on yourpersonal machine, you may choose to compile and experiment there to avoid server contention. Youwill only have to modify one .h file to complete the assignment! Just follow the directions at theabove link.
Just like the original contest, we will allow your submissions to be in one of two categories (orboth). The categories are realistic predictors (the size of the data structures used by your predictorare capped) or idealistic predictors (no limits on the resources used by your predictor). Even forrealistic predictors, we are only concerned about the memory used by the simulated branch predictorstructures, not the memory used by the simulator itself. Follow the original contest guidelines.
In the interests of time, you can pick 3-5 benchmarks from the many included with the frameworkto test iterations of your predictor design on. If you want to submit to the contest, make sure youleave at least one benchmark from the whole set that you do not test the predictor on!
A final rule: you can browse textbooks/technical literature for ideas for branch predictor designs,but don’t get code from the internet.
For the lab report: Submit the source code for your predictor, an overall description ofits functionality, and a summary of its performance on 3-5 of the benchmarks provided with theframework. Report which benchmarks you tested your predictor out on.
11
For the contest: We will take the code you submit with the lab, and test its performance ona set of benchmarks chosen by us. Please email your code in a .zip file to the TA.
3.3 Writing torture benchmarks: create code that exercises different featuresin the LSU.
The goal of this open-ended assignment is to purposefully design a set of benchmarks which stressdifferent parts of BOOM. This problem is broken down into two parts:
• Write two benchmarks to stress the Load/Store Unit
• Write a benchmark(s) to introspect a parameter within BOOM
3.3.1 Part 1: Load/Store Unit Micro-benchmarks
You may have noticed that many of the benchmarks do not use all of the (very complicated)features in the Load/Store Unit. For example, few benchmarks perform any store data forwarding.For this part, you will implement two (small) benchmarks, each attempting to exercise a differentcharacteristic.
• Maximize store data forwarding
• Maximize memory ordering failures
As a reminder, “store data forwarding” is when a load is able to use the data waiting in thestore data queue (SDQ) before the store has committed (there is a store->load dependence inthe program). A memory ordering failure is when a load that depends on a store (a store->load
dependence) is issued to memory before the store has been issued to memory - the load has receivedthe wrong data.
There is no line limit for the code used in this problem. Each benchmark must run for at leasttwenty thousand cycles (as provided by the SetStats() printout).
Two skeleton benchmarks are provided for you in test/riscv-bmarks/lsu_forwarding/ andtest/riscv-bmarks/lsu_failures/. To build and test them under the RISC-V ISA simulator:
inst$ cd ${LAB3ROOT}/test/riscv-bmarks/
inst$ make run
Once you are satisfied with your code and would like to run it on BOOM, type:
inst$ cd ${LAB3ROOT}/test/riscv-bmarks/
inst$ make install
... to install it to ${LAB3ROOT}/install/riscv-bmarks/. Add your benchmark to the BOOMemulator build system by modifying the variable benchmarks in Makefrag.14
Finally, you can run BOOM as usual:
14You will also probably want to comment out the other benchmarks so you do not have to waste time runningthem.
12
inst$ cd ${LAB3ROOT}/verisim
inst$ make run-benchmarks
Be creative! When you are finished, submit your code via Github. In your report, discuss someof the ideas you considered, and describe how your final benchmarks work.
Finally, it is possible that you may uncover bugs in BOOM through your stress testing: if youdo, consider your benchmarking efforts a success! (save a copy of any offending code and let yourTA know about any bugs you find).
3.3.2 Part 2: Parameter Introspection
Now the real challenge! Pick a non-binary parameter in BOOM’s design and try to discover itsvalue via a benchmark you design and implement yourself!
The basic strategy is as follows.
1. Implement a micro-benchmark that stresses a certain parameter of the machine and measurethe machine’s performance.
2. Go into src/main/scala/boomexample/Configs.scala to change the parameter you arestudying, and rerun your benchmark.
3. Repeat to gather more results.
4. Build a model to describe how performance is affected by modifying your parameter.
Your model should be good enough that the TA can take your model and benchmark, run it ona machine and discover the value of the parameter in question without knowing its value a priori(even better if the TA can change other parameters of the machine so your model is not simply alookup table).
Here are a set of parameters to choose from:15
• ROB size (N ROB ENTRIES)
• Number of physical registers (PHYS REG COUNT)
• Maximum number of branches (MAX BR COUNT)
• Number of issue window slots (N ISSUE SLOTS)
• Number of entries in the load and store queues (N LSU ENTRIES)
• Number of entries in the fetch buffer (FETCH BUF SIZE)
• Number of entries in the BHT (N BHT ENTRIES)
• Data cache MSHRs (N MSHRS)
• Data cache associativity (DCACHE WAYS) 16
These parameters are all at the top of src/main/scala/boomexample/Configs.cala.Submit your code, describe how it works, and what ideas you explored. Also submit your data
and your model showing how well it works on BOOM.
15You may not use cache size(number of sets) as a parameter, as that is too easy.16You can’t set the associativity smaller than 4 when we have a 16 kb cache. Why is this?
13
Naturally, this is a challenging task. The goal of this project is to make you think very carefullyabout out-of-order micro-architecture and write code to defeat the processor. There may notnecessarily be a “clean” answer here.
Warning: not all parameters are created equally. Some will be harder challenges than others,and we cannot guarantee that all parameters will be doable. However, you might be surprised whatyou can discover! (especially when you can white-box test your ideas).
4 The Third Portion: Feedback
Please take a moment to fill out the form at https://goo.gl/forms/bE75ESm68NhCA7r72.
5 Acknowledgments
This lab was originally developed for CS152 at UC Berkeley by Christopher Celio, and partiallyinspired by the previous set of CS152 labs written by Henry Cook.
References
[1] R. Kessler. The Alpha 21264 Microprocessor. IEEE Micro, 19(2):24–36, 1999.[2] P. Rosenfeld, E. Cooper-Balis, and B. Jacob. Dramsim2: A cycle accurate memory system
simulator. Computer Architecture Letters, 10(1):16 –19, jan.-june 2011.[3] K. Yeager. The MIPS R10000 Superscalar Microprocessor. IEEE Micro, 16(2):28–41, 1996.
14
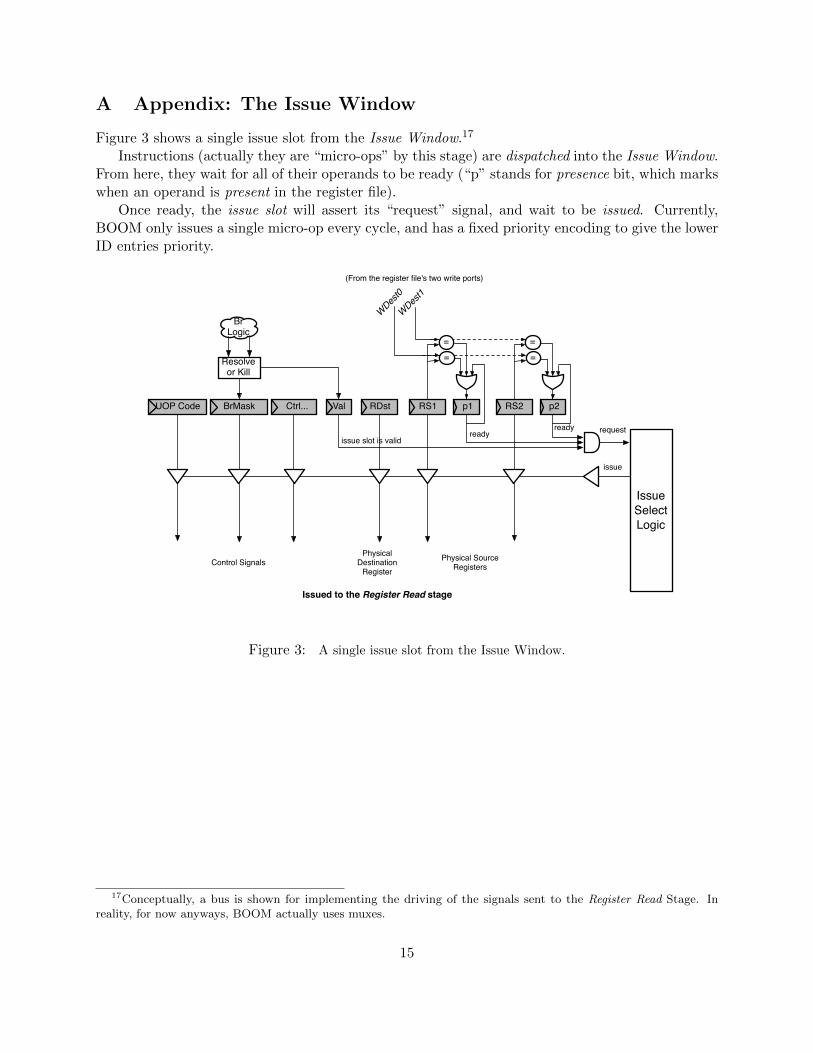
A Appendix: The Issue Window
Figure 3 shows a single issue slot from the Issue Window.17
Instructions (actually they are “micro-ops” by this stage) are dispatched into the Issue Window.From here, they wait for all of their operands to be ready (“p” stands for presence bit, which markswhen an operand is present in the register file).
Once ready, the issue slot will assert its “request” signal, and wait to be issued. Currently,BOOM only issues a single micro-op every cycle, and has a fixed priority encoding to give the lowerID entries priority.
ready
UOP Code BrMask RS1 p1RDstCtrl...
WDest0
WDest1
==
RS2 p2
==
(From the register file's two write ports)
Resolveor Kill
Br Logic
Val
IssueSelectLogic
requestissue slot is valid
ready
issue
Issued to the Register Read stage
Control SignalsPhysical
DestinationRegister
Physical SourceRegisters
Figure 3: A single issue slot from the Issue Window.
17Conceptually, a bus is shown for implementing the driving of the signals sent to the Register Read Stage. Inreality, for now anyways, BOOM actually uses muxes.
15
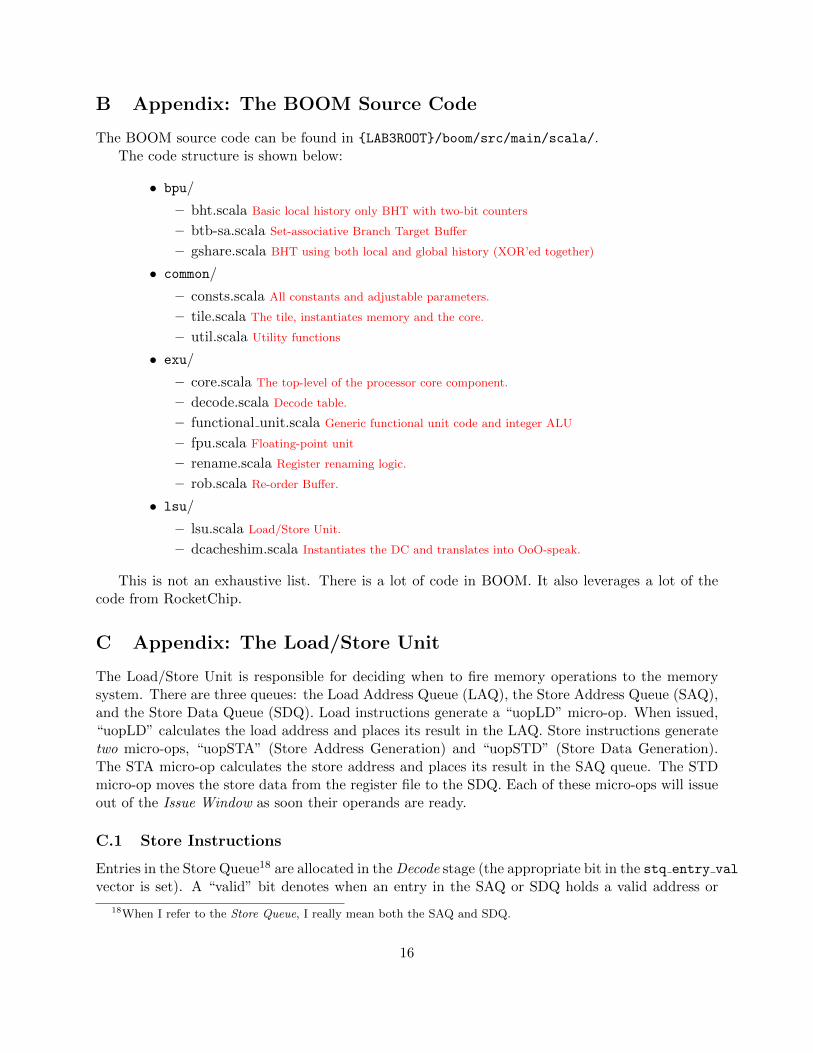
B Appendix: The BOOM Source Code
The BOOM source code can be found in {LAB3ROOT}/boom/src/main/scala/.The code structure is shown below:
• bpu/
– bht.scala Basic local history only BHT with two-bit counters
– btb-sa.scala Set-associative Branch Target Buffer
– gshare.scala BHT using both local and global history (XOR’ed together)
• common/
– consts.scala All constants and adjustable parameters.
– tile.scala The tile, instantiates memory and the core.
– util.scala Utility functions
• exu/
– core.scala The top-level of the processor core component.
– decode.scala Decode table.
– functional unit.scala Generic functional unit code and integer ALU
– fpu.scala Floating-point unit
– rename.scala Register renaming logic.
– rob.scala Re-order Buffer.
• lsu/
– lsu.scala Load/Store Unit.
– dcacheshim.scala Instantiates the DC and translates into OoO-speak.
This is not an exhaustive list. There is a lot of code in BOOM. It also leverages a lot of thecode from RocketChip.
C Appendix: The Load/Store Unit
The Load/Store Unit is responsible for deciding when to fire memory operations to the memorysystem. There are three queues: the Load Address Queue (LAQ), the Store Address Queue (SAQ),and the Store Data Queue (SDQ). Load instructions generate a “uopLD” micro-op. When issued,“uopLD” calculates the load address and places its result in the LAQ. Store instructions generatetwo micro-ops, “uopSTA” (Store Address Generation) and “uopSTD” (Store Data Generation).The STA micro-op calculates the store address and places its result in the SAQ queue. The STDmicro-op moves the store data from the register file to the SDQ. Each of these micro-ops will issueout of the Issue Window as soon their operands are ready.
C.1 Store Instructions
Entries in the Store Queue18 are allocated in the Decode stage (the appropriate bit in the stq entry val
vector is set). A “valid” bit denotes when an entry in the SAQ or SDQ holds a valid address or
18When I refer to the Store Queue, I really mean both the SAQ and SDQ.
16
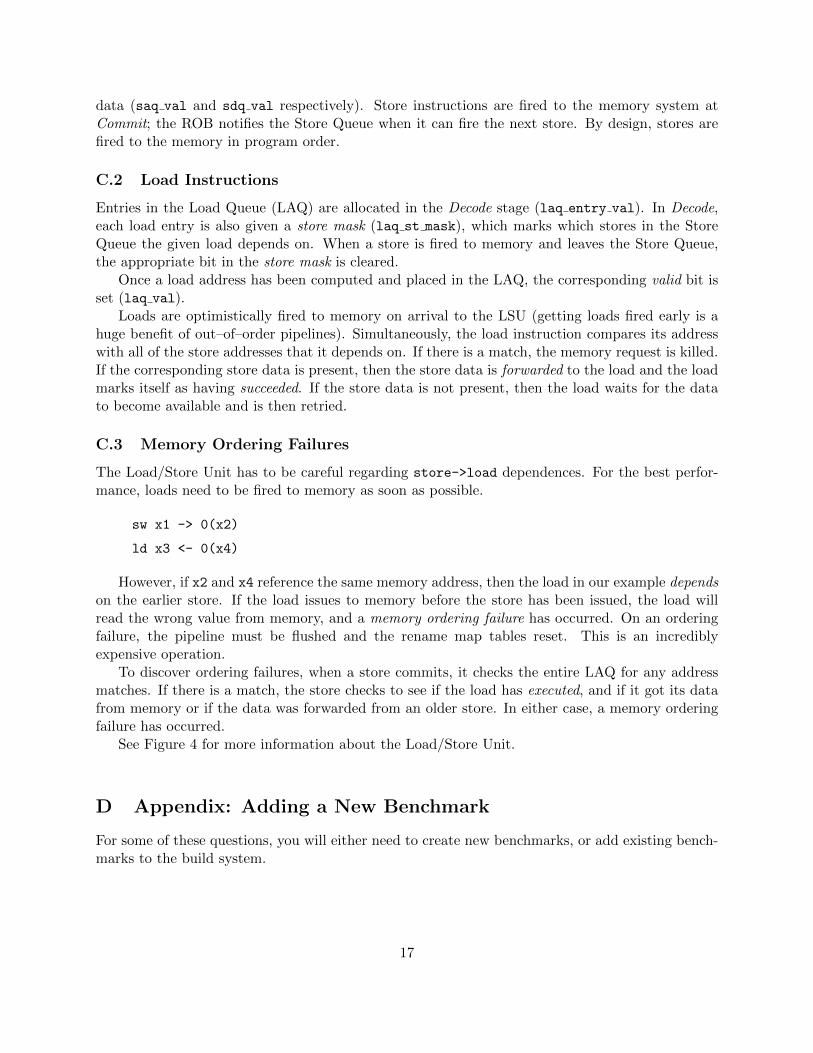
data (saq val and sdq val respectively). Store instructions are fired to the memory system atCommit; the ROB notifies the Store Queue when it can fire the next store. By design, stores arefired to the memory in program order.
C.2 Load Instructions
Entries in the Load Queue (LAQ) are allocated in the Decode stage (laq entry val). In Decode,each load entry is also given a store mask (laq st mask), which marks which stores in the StoreQueue the given load depends on. When a store is fired to memory and leaves the Store Queue,the appropriate bit in the store mask is cleared.
Once a load address has been computed and placed in the LAQ, the corresponding valid bit isset (laq val).
Loads are optimistically fired to memory on arrival to the LSU (getting loads fired early is ahuge benefit of out–of–order pipelines). Simultaneously, the load instruction compares its addresswith all of the store addresses that it depends on. If there is a match, the memory request is killed.If the corresponding store data is present, then the store data is forwarded to the load and the loadmarks itself as having succeeded. If the store data is not present, then the load waits for the datato become available and is then retried.
C.3 Memory Ordering Failures
The Load/Store Unit has to be careful regarding store->load dependences. For the best perfor-mance, loads need to be fired to memory as soon as possible.
sw x1 -> 0(x2)
ld x3 <- 0(x4)
However, if x2 and x4 reference the same memory address, then the load in our example dependson the earlier store. If the load issues to memory before the store has been issued, the load willread the wrong value from memory, and a memory ordering failure has occurred. On an orderingfailure, the pipeline must be flushed and the rename map tables reset. This is an incrediblyexpensive operation.
To discover ordering failures, when a store commits, it checks the entire LAQ for any addressmatches. If there is a match, the store checks to see if the load has executed, and if it got its datafrom memory or if the data was forwarded from an older store. In either case, a memory orderingfailure has occurred.
See Figure 4 for more information about the Load/Store Unit.
D Appendix: Adding a New Benchmark
For some of these questions, you will either need to create new benchmarks, or add existing bench-marks to the build system.
17
D.1 Creating a new benchmark
The source code for all benchmarks can be found in test/riscv-bmarks/. Each benchmark isgiven its own directory. To create a new benchmark, it is easiest to copy an existing benchmarkdirectory.
inst$ cp -r vvadd my_new_bench
inst$ cd my_new_bench; ls
dataset1.h vvadd_gendata.pl vvadd_main.c
The vvadd benchmark has a Perl script vvadd gendata.pl to generate a random input set ofarrays, which are stored in dataset1.h. This removes the processor from having to generate andtest its own input vectors. You can safely ignore these files (or repurpose them for your own use).
The vvadd main.c file holds the main code for vvadd. Rename this file to my new bench main.c.Now you can add your own code in here. You can delete pretty much everything except the vitalfunction setStats(int), which reads the hardware counters to determine how many instructionsand cycles have passed during the benchmark.
D.2 Adding a benchmark to the build system
Once you are happy with your new benchmark, you need to modify two Makefiles. First, opentest/riscv-bmarks/Makefile, and find the bmarks variable. Add “my new bench” to the listing.You can now build your benchmark and test it on the ISA simulator.
inst$ make; make run;
Once you are satisfied, you must “install” the benchmark to install/riscv-bmarks. This iswhere BOOM looks for benchmarks to run.
inst$ make install
One final Makefile modification is required. Open the top-level Makefrag and find the variablebenchmarks. Add your benchmark to this variable as well. Now running make run-benchmarks
in verisim will run your new benchmark on BOOM!
18
LAQvaladdr st_mask
AddressCalculation
ALU
assocsearch
A E
ROBcom_valid
com_uopcodecom_st_tagcom_ld_tag
R
LSU Behavior
1. Incoming loads are immediately issued to datacache - must search SAQ for matches - kill mem request on SAQ match - forward store data if available
2. If load is killed or nacked (but no store data is forwarded) load sleeps until commit time - reissue "sleeper" load at commit
3. issue stores to memory at commit - search LAQ for matches (ordering failures) - failed loads require pipeline rollback
Faddress validentry allocatedload executed (sent to mem)load requesting wakeupload failed (detected mem ordering failure)bit mask of dependee storesindex of store the load got its data from (if any)
assocsearch
forward_std_idx
Addr
Data Array
ECC/Fmt
Writeport
Datacache
SAQaddrvalA
fwd_std_idx
Age Logic
fwd_std_val
SDQdataval
Data
NACK
KILL
req_kill
Forwarding Store Datato a Load?
fwd_std_val
addrmatches
op1 op2
Store Address Load Address
Data
Data
Data nack
stores
sleeper/retry load
fast/optimistic
load
at committime
LOAD/STORE UNIT
youngest store idxload depends on
RegisterFile
brkill
brkill
val
kill
Figure 4: The Load/Store Unit.
19
Decode &Rename1
FP Issue Window
PhysicalFP RegisterFile (3x2)(PFRF)
ROB
Commit
wakeup
uop tags
inst
2
2
LSU
Datacache
FPU FDvALU
iMul iDiv
Physical Int Register
File (6x3)(PIRF)
uop tags uop tags
ALU
ALU Issue Window
Mem Issue Window
toInt(LL
wport)
toPFRF(LL wport)
2
I2F
toPFRF(LL wport)
F2I
Rename2 &Dispatch
2
Instructioncache
BPD
predict
hashBTB
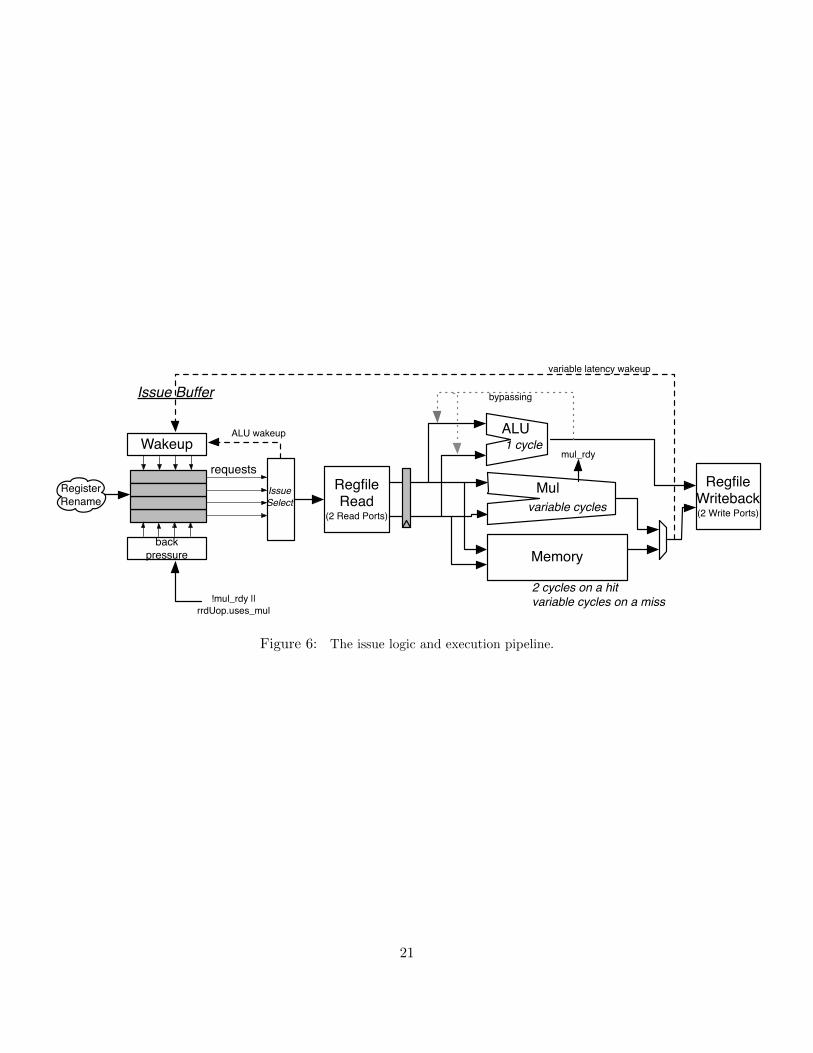
Figure 5: A more detailed diagram of BOOM.
20
RegisterRename
ALU
RegfileRead
(2 Read Ports)
Issue Buffer
Issue Select
requestsMul
Memory
RegfileWriteback(2 Write Ports)
Wakeup 1 cycle
variable cycles
2 cycles on a hitvariable cycles on a miss
ALU wakeup
variable latency wakeup
mul_rdy
!mul_rdy || rrdUop.uses_mul
back pressure
bypassing
Figure 6: The issue logic and execution pipeline.
21


![E-C152 Cover1 [Converted]](https://img.pdfslide.net/doc/110x75/61aec1a7db8d8f1bcc573ec1/e-c152-cover1-converted.jpg)