Embed Size (px)
Citation preview
Page 1
CALENDAR & FISCAL YEAR-END CLOSING PROCEDURES
MICROSOFT DYNAMICS GP
RELEASES GP 2013, GP 2015 and GP 2016
Date: 12/6/16
Microsoft Dynamics GP - Month and Year End User Guide - UXC Eclipse
COPYRIGHT NOTICE
Page 2
CONTENTS
CALENDAR & FISCAL YEAR-END CLOSING PROCEDURES ................................................................. 1
General Tips and Reminders.......................................................................................................... 6
• Fixed Asset Luxury Auto Depreciation changes ............................ Error! Bookmark not defined.
• Changes to all 1099 forms (1099-DIV, 1099-INT, 1099-MISC, 1096) ........... Error! Bookmark not defined.
• No W-2 or W-3 Form changes....................................................... Error! Bookmark not defined.
• Minimal W-2 electronic filing changes ......................................... Error! Bookmark not defined.
• The Affordable Care Act (ACA) fixes and updates – required if you need to provide 1095-C forms to your employees ...................................................................... Error! Bookmark not defined.
Backups ................................................................................................................................................ 6
Timing .................................................................................................................................................. 6
History .................................................................................................................................................. 7
File Maintenance - Optional ................................................................................................................ 7
Year-End Closing Sequence .................................................................................................................. 7
Reconcile .............................................................................................................................................. 8
Step 1: Reconcile Sales Order Processing ........................................................................................ 8
Step 2: Reconcile Purchase Order Processing .................................................................................. 8
Step 3: Reconcile Inventory ............................................................................................................. 8
Step 4: Reconcile Project Accounting .............................................................................................. 8
Step 5: Reconcile Field Service ......................................................................................................... 8
Sales Order Processing Year-End Procedures – OPTIONAL .............................................................. 9
Sales Order Processing year-end checklist .......................................................................................... 9
Detailed information for each step in the year-end checklist ............................................................. 9
Step 1: Reconcile Sales Documents ................................................................................................. 9
Step 2: Remove Completed Sales Documents ............................................................................... 10
Step 3: Print The Following Month-End Reports (Optional): ......................................................... 11
Purchase Order Year-end Closing Procedures - OPTIONAL ............................................................ 12
Purchase Order year-end checklist .................................................................................................... 12
Detailed information for each step in the year-end checklist ........................................................... 12
Step 1: Reconcile Purchasing Documents ...................................................................................... 12
Step 2: Remove Completed Purchase Orders ................................................................................ 13
Step 3: Print the following Month-End reports (Optional): ........................................................... 14
Inventory Year-End Closing Procedures ....................................................................................... 16

Microsoft Dynamics GP - Month and Year End User Guide - UXC Eclipse
COPYRIGHT NOTICE
Page 3
Inventory Control year-end checklist ................................................................................................. 16
Detailed information for each step in the year-end checklist ........................................................... 16
Step 1: Post All Transactions For The Year ..................................................................................... 16
Step 2: Reconcile Inventory Quantities.......................................................................................... 17
Step 3: Complete A Physical Inventory Count And Post Any Adjustments ................................... 17
Step 4: Print Additional Reports .................................................................................................... 18
Step 5: Make a backup ................................................................................................................... 18
Step 6: Close the year .................................................................................................................... 18
Step 7: Close the fiscal periods for the Inventory series (optional). .............................................. 20
Inventory Control Year-End Closing Tips ........................................................................................... 21
Inventory Year-End Frequently Asked Questions .............................................................................. 21
Receivables Management Year-End Closing Procedures - OPTIONAL ............................................ 24
Receivables Management Year-End Closing Checklist ...................................................................... 24
Detailed Information For Each Step In The Year-End Checklist ......................................................... 24
Step 1: Post All The Sales And Receivables Transactions For The Year ......................................... 24
Step 2: Create A Pre-Year-End Closing Backup .............................................................................. 27
Step 3: Close the Year .................................................................................................................... 27
Calendar Year Details ......................................................................................................................... 28
Fiscal Year Details .............................................................................................................................. 28
Step 4: Close the Fiscal Periods (Optional) .................................................................................... 29
Step 5: Close the Tax Year - Optional ............................................................................................. 29
December Statements ....................................................................................................................... 30
January statements ............................................................................................................................ 31
Receivables Management Year-End Closing Tips .............................................................................. 31
Payables Management Year-End Closing Procedures - Optional ................................................... 32
Payables Management Master Year-End Closing Checklist ............................................................... 32
Payables Management calendar year-end closing checklist ............................................................. 32
Payables Management fiscal year-end closing checklist ................................................................... 33
Detailed information for each step in the year-end checklist ........................................................... 33
Step 1: Post All Transactions for the Year ...................................................................................... 33
Step 2: Print the Historical Aged Trial Balance Report .................................................................. 35
Step 3: Print the Vendor Period Analysis Report ........................................................................... 35
Step 4: Install the Year End Update .............................................................................................. 36
Step 5: Make A Backup That Is Named "Pre-1099 Edits" .............................................................. 36
Step 6: Verify the 1099 Information and Edit As Required ............................................................ 36
Step 7: Print the 1099 Statements ................................................................................................. 41
Microsoft Dynamics GP - Month and Year End User Guide - UXC Eclipse
COPYRIGHT NOTICE
Page 4
Additional Notes on 1099’s ............................................................................................................ 42
Step 8: Make a backup that is named "Pre Year-End" ................................................................... 43
Step 9: Close the year .................................................................................................................... 43
Step 10: Close the fiscal periods .................................................................................................... 46
Step 11: Close the tax year ............................................................................................................ 46
Payables Management Frequently asked questions ......................................................................... 47
Payables Management Year-End Closing Tips ................................................................................... 48
Payroll Year-End Closing Procedures ........................................................................................... 49
Latest Runtime and Service Pack Version Numbers .......................................................................... 49
Other preparation tasks for Year-End ................................................................................................ 50
Testing W-2’s before closing the year ............................................................................................... 51
Payroll Year-End Checklist ................................................................................................................. 51
Detailed information for each step in the year-end checklist ........................................................... 52
Step 1: Complete All Pay Runs For The Current Year. ................................................................... 52
Step 2: Complete all payroll month and quarter end procedures (optional). ............................... 52
Step 3: Make a backup of your company data labeled Pre Year End Wage File ........................... 52
Step 4: Install the Year End Update ............................................................................................... 52
Step 5: Create the Year End File..................................................................................................... 53
Step 6: Make a backup of your company data labeled Post Year End Wage File .......................... 53
Step 7: Verify W-2 and 1099-R statement information ................................................................. 54
Step 8: Print the W-2 and 1099-R Validation Report ..................................................................... 54
Step 9: Archive Inactive Employee Human Resources Information (Optional) ............................. 56
Step 10: Create the Human Resources attendance period schedules for the New Year .............. 56
Step 11: Set Up Fiscal Periods For 2016 ......................................................................................... 57
Step 12: Close the Fiscal Periods for the Payroll Series ................................................................. 57
Step 13: Install the 2016 Payroll Tax Table Update ....................................................................... 57
Step 14: Process Pay Runs for 2016. .............................................................................................. 58
Step 15: Print the W-2 Statements and the W-3 Transmittal Form .............................................. 59
Step 16: Print the 1099-R forms and the 1096 Transmittal form .................................................. 60
Step 17: Create an Electronic W2 file (Optional) ........................................................................... 61
Payroll Year-End Closing Frequently Asked Questions ...................................................................... 62
Fixed Assets Year-End Closing Procedures ................................................................................... 67
Fixed Asset Management year-end checklist .................................................................................... 67
Detailed information for each step in the year-end checklist ........................................................... 67
Step 1: Perform all the year-end closing procedures for Payables Management ......................... 67
Step 2: Enter all the fixed asset transactions for the current fiscal year ....................................... 67
Microsoft Dynamics GP - Month and Year End User Guide - UXC Eclipse
COPYRIGHT NOTICE
Page 5
Step 3: Depreciate all assets through the last day of the current fiscal year ................................ 67
Step 4: Perform the GL Posting (GL Interface) process (Optional) ................................................ 69
Step 5: Print any year-end reports that you want to keep as part of the year-end financial records ........................................................................................................................................... 70
Step 6: Verify the Fixed Assets calendar is built correctly (Optional) ............................................ 71
Step 7: Verify that the quarters are set up correctly for all the fiscal years .................................. 72
Step 8: Make a backup ................................................................................................................... 72
Step 9: Perform the fixed assets year-end closing routine ............................................................ 73
Frequently asked questions (FAQ) ..................................................................................................... 74
Analytical Accounting Year-End Closing Procedures ..................................................................... 76
Analytical Accounting year-end checklist .......................................................................................... 76
Frequently asked questions (FAQ) ..................................................................................................... 81
General Ledger Year-End Closing Procedures ............................................................................... 82
General Ledger year-end checklist .................................................................................................... 82
Detailed information for each step in the year-end checklist ........................................................... 82
Step 1: Complete the posting and closing procedures for other modules .................................... 82
Step 2: Post the final adjusting entries in General Ledger. ............................................................ 83
Step 3: Create a SmartList to verify the Posting Type of each account. ........................................ 83
Step 4: Close the last period of the fiscal year (optional). ............................................................. 84
Step 5: Perform File Maintenance on all the Financial series files (Optional). .............................. 84
Step 6: Verify the settings in the General Ledger Setup window .................................................. 84
Step 7: Make a backup ................................................................................................................... 85
Step 8: Print a final Detailed Trial Balance. .................................................................................... 86
Step 9: Print final financial statements. ......................................................................................... 86
Step 10: Set up a new year in Fiscal Periods Setup. ....................................................................... 86
Step 11: Close the fiscal year. ........................................................................................................ 87
Step 12: Close all fiscal periods for all series (optional). ............................................................... 88
Step 13: Adjust the budget figures for the new year and if you use Microsoft Dynamics GP Advanced Financial Analysis reports, then print the financial statements. .................................. 89
Step 14: Create post closing backup. ............................................................................................. 89
Frequently Asked Questions .............................................................................................................. 89
How to Set Up An Adjusting Period In General Ledger ...................................................................... 95
Microsoft Dynamics GP - Month and Year End User Guide - UXC Eclipse
COPYRIGHT NOTICE
Page 6
General Tips and Reminders This document provides instructions for Year-End closing for versions GP 2013, GP2015 and GP 2016. There may be some differences in navigation between versions. The instructions in this document will include the navigation path for each version when applicable. If you are using the home page for a specific module the path will be similar for instance Microsoft Dynamics GP Menu > Tools > Utilities > Sales > Reconcile-Remove Sales Documents would be the path if you are using the menus but on the Sales home page you would look under the Utilities area then Reconcile-Remove Sales Documents.
You will also notice that many of the items are marked as “Optional”. We suggest that you review these optional steps and decide what is relevant and/or feasible for your business. All of the procedures marked optional are considered best practices, and we highly recommend that you consider these steps when making decisions regarding year end.
Note: We have included instructions for version GP 2010 but Microsoft will not be releasing the year-end update or tax table updates for version GP 2010. The following is a list of changes that may impact your business. If your business requires the following changes you will need to upgrade to GP 2013 GP 2015 or GP 2016. Please let us know if you would like to schedule an upgrade.
The year-end update for Microsoft Dynamics GP – US Version include the following:
1. Fixed Assets Depreciation Limit changes (Path Act)
2. Payables 1096 form change
3. Payables 1099-Int change
4. The Affordable Care Act (ACA) fixes and updates – required if you need to provide 1095-C forms to your employees
Backups Backups are an important component of a closing process. Some closing procedures recommend numerous backups throughout the process. We limit our backup recommendations in this document to a few critical points. How often you perform a backup during the closing process will vary depending on the amount of space available on your server, the number of modules you are closing at one time, and the number of steps involved in closing a particular module. Most companies will have their IT staff create backups on the SQL server.
Timing Fixed Assets and Inventory are considered date sensitive modules. Because these modules are date sensitive, you may not post transactions into the next fiscal year and run the Year-End closing process at a later time. You must run the close at the end of the fiscal year prior to entering transactions for the next fiscal year.
Receivables Management and Payables Management are also date sensitive modules in certain areas. If you are currently tracking your Customer/Vendor statistics using any of the following: Receivables/Payables Summary Reports, SmartLists, or the summary windows such as the “Amounts Since Last Close” view, you will want to process the fiscal and/or calendar year end close prior to posting transactions for the new year.
Microsoft Dynamics GP - Month and Year End User Guide - UXC Eclipse
COPYRIGHT NOTICE
Page 7
It is important to understand that if you elect to either delay OR not to run the closing procedure at all in Receivables Management or Payables Management prior to processing transactions for the new year, the figures in the “Amounts Since Last Close” view in the Vendor summary windows will be incorrect, as well as many of the reports and Smartlists that contain Customer/Vendor statistics. The tables that hold this information get updated during the close process so if the close is not done on time, the figures will be skewed.
History If you are keeping several years of history, Year End is perhaps a good time to consider removing history especially if you have limited space. Contact your local UXC Edlipse representative or UXC Eclipse Support for assistance with removing history.
File Maintenance - Optional If you are not already performing regular database maintenance routines on your system, we recommend that you perform Check Links on each of the modules before closing. Run the process for one series at a time and choose to include all tables. The error log can be printed to the screen initially and sent to the printer if there are any errors to review. Depending on the size of your data, you may want to run this process overnight or over the weekend.
1. Open Check Links Window under Microsoft Dynamics GP Menu >> Maintenance >> Check Links
2. Project Check Links – Microsoft Dynamics GP Menu > Maintenance > PA Check Links
3. Revenue and Expense Deferral Check Links – Microsoft Dynamics GP Menu > Maintenance >
Deferral Check Links
4. Field Service Check Links – Microsoft Dynamics GP Menu > Maintenance > FSS Check Links
5. Analytical Accounting Check Links - Microsoft Dynamics GP Menu > Maintenance > Analytical
Accounting Check Links
6. Advanced Security Check Links (Field Level Security) – Microsoft Dynamics GP Menu >
Maintenance > Advanced Security
Year-End Closing Sequence Year-end closing should be performed in the following order:
1. Inventory
2. Receivables Management
3. Payables Management
4. Fixed Assets
5. General Ledger
Note: Payroll year-end procedures are independent of those in other modules and are always performed at the calendar year-end.
Microsoft Dynamics GP - Month and Year End User Guide - UXC Eclipse
COPYRIGHT NOTICE
Page 8
Note: The Sales Order Processing and Purchase Order Processing modules have no REQUIRED Year End Close procedures. The Year End steps outlined in this document for SOP and POP are noted as OPTIONAL and are the same as your typical Month End procedures. We do recommend that you run the Reconcile Utility described in the next section on ALL of the Distribution Modules. These procedures are considered to be Best Practices for maintaining your system.
Note: If you are using the Analytical Accounting module there are a few steps that may need to be done. We have outlined these steps as part of the GL year end close procedures. There is not a separate close process for AA, when you close GL it will also close AA.
Reconcile We recommend that you run the reconcile procedures in Microsoft Dynamics GP in the following order:
Step 1: Reconcile Sales Order Processing
Microsoft Dynamics GP Menu > Tools > Utilities > Sales > Reconcile – Remove Sales Documents
Step 2: Reconcile Purchase Order Processing
Microsoft Dynamics GP Menu > Tools > Utilities > Purchasing > Reconcile Purchasing Documents.
Step 3: Reconcile Inventory
Microsoft Dynamics GP Menu > Tools > Utilities > Inventory > Reconcile
Step 4: Reconcile Project Accounting
Note: This step is required only if you are using Project Accounting.
Microsoft Dynamics GP Menu > Tools > Utilities > Project > PA Reconcile IV
Step 5: Reconcile Field Service
Note: This step is required only if you are using any of the Field Service functionalities. This step reconciles all the Field Service modules.
Starting in GP 2010 the Reconcile Quantities is now part of the inventory quantities reconcile process
under Microsoft Dynamics GP Menu > Tools > Utilities > Inventory > Reconcile.
Microsoft Dynamics GP - Month and Year End User Guide - UXC Eclipse
COPYRIGHT NOTICE
Page 9
Sales Order Processing Year-End Procedures – OPTIONAL The year-end procedures are the same as the month end procedures for sales order processing. If you have not been performing these tasks on a monthly basis, please do so at year end.
Sales Order Processing year-end checklist 1. Reconcile Sales Documents
2. Remove Completed Sales Documents
3. Print the Month-End reports (Optional)
Detailed information for each step in the year-end checklist
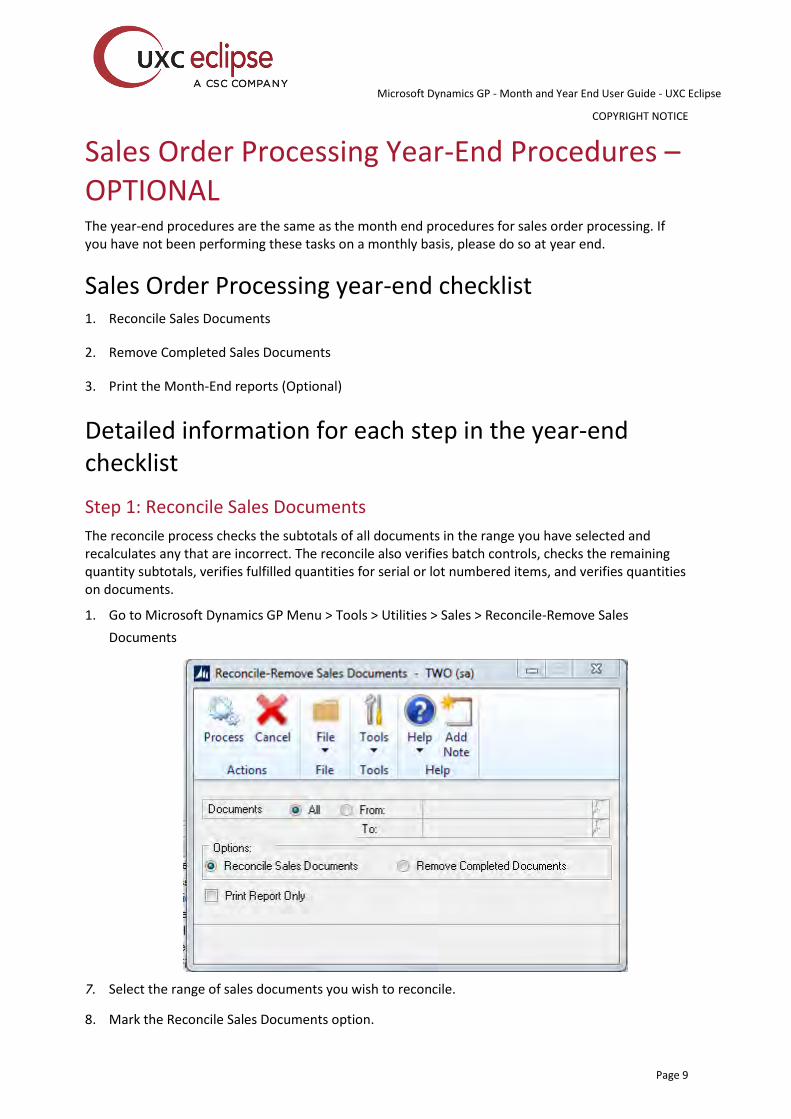
Step 1: Reconcile Sales Documents
The reconcile process checks the subtotals of all documents in the range you have selected and recalculates any that are incorrect. The reconcile also verifies batch controls, checks the remaining quantity subtotals, verifies fulfilled quantities for serial or lot numbered items, and verifies quantities on documents.
1. Go to Microsoft Dynamics GP Menu > Tools > Utilities > Sales > Reconcile-Remove Sales
Documents
7. Select the range of sales documents you wish to reconcile.
8. Mark the Reconcile Sales Documents option.
Microsoft Dynamics GP - Month and Year End User Guide - UXC Eclipse
COPYRIGHT NOTICE
Page 10
a) If you select the Print Report Only option, a report will be printed showing the documents
that will be reconciled based on the range entered. Printing the report only will not adjust
any quantities on any documents.
b) If you select Print Report Only along with Reconcile Sales Documents, the report will show
you details of the documents actually reconciled during the process.
c) Select Process to reconcile the selected range of sales documents. When the reconcile
process is complete, a report will print listing the details of any changes made to sales
documents.
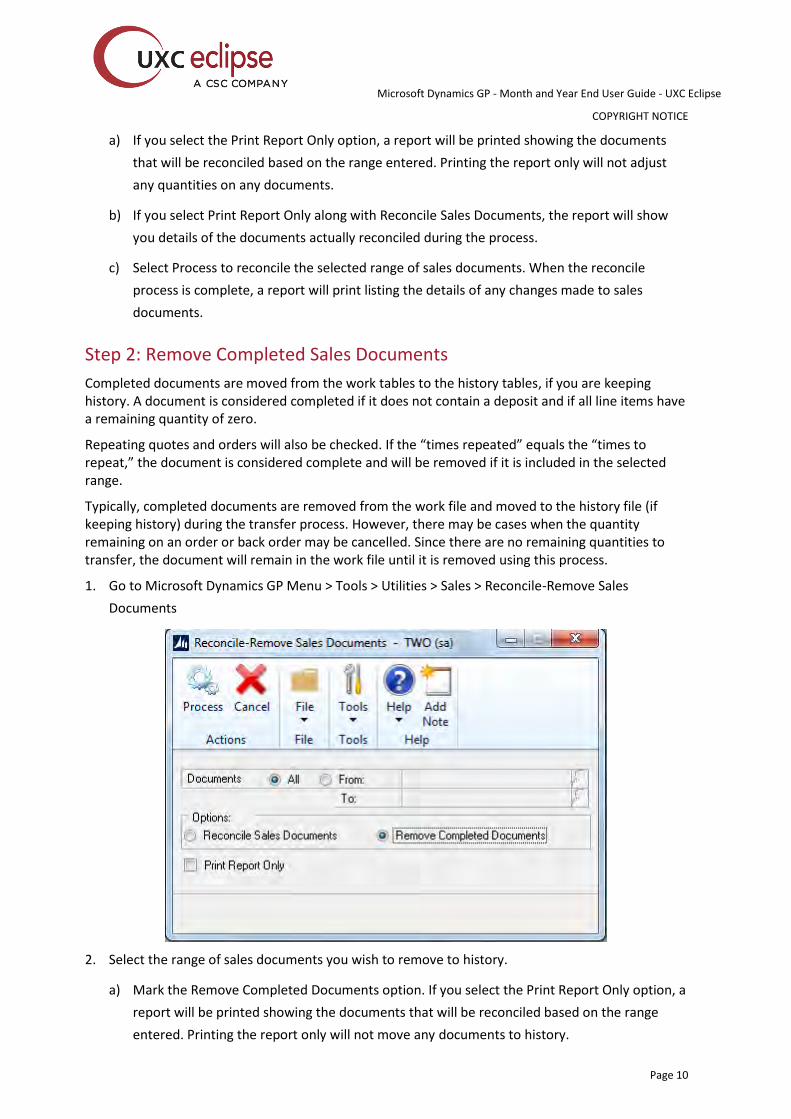
Step 2: Remove Completed Sales Documents
Completed documents are moved from the work tables to the history tables, if you are keeping history. A document is considered completed if it does not contain a deposit and if all line items have a remaining quantity of zero.
Repeating quotes and orders will also be checked. If the “times repeated” equals the “times to repeat,” the document is considered complete and will be removed if it is included in the selected range.
Typically, completed documents are removed from the work file and moved to the history file (if keeping history) during the transfer process. However, there may be cases when the quantity remaining on an order or back order may be cancelled. Since there are no remaining quantities to transfer, the document will remain in the work file until it is removed using this process.
1. Go to Microsoft Dynamics GP Menu > Tools > Utilities > Sales > Reconcile-Remove Sales
Documents
2. Select the range of sales documents you wish to remove to history.
a) Mark the Remove Completed Documents option. If you select the Print Report Only option, a
report will be printed showing the documents that will be reconciled based on the range
entered. Printing the report only will not move any documents to history.
Microsoft Dynamics GP - Month and Year End User Guide - UXC Eclipse
COPYRIGHT NOTICE
Page 11
b) If you select Print Report Only along with Remove Completed Documents, the report will
show you details of the documents actually moved to history during the process.
c) Select Process to remove to history the selected range of sales documents. When the
reconcile process is complete, a report will print listing the details of any changes made to
sales documents.
Step 3: Print The Following Month-End Reports (Optional):
SOP Document Analysis Report (Reports > Sales > Analysis)
SOP Inventory Sales Report (Reports > Sales > Analysis)
Sales Transaction History (Reports > Sales > History)
Sales Serial/Lot History Report, if applicable (Reports > Sales > History)
Microsoft Dynamics GP - Month and Year End User Guide - UXC Eclipse
COPYRIGHT NOTICE
Page 12
Purchase Order Year-end Closing Procedures - OPTIONAL The year-end procedures are the same as the month end procedures for purchase order processing. If you have not been performing these tasks on a monthly basis, please do so at year end.
Purchase Order year-end checklist 1. Reconcile Purchasing Documents
2. Remove Completed Purchase Orders
3. Print the Month-End reports (Optional)
Detailed information for each step in the year-end checklist
Step 1: Reconcile Purchasing Documents
Reconciling is the process of verifying that the totals on your purchase orders match the totals recorded in your accounting records. When you reconcile purchase orders, the following will be recalculated and adjusted if necessary:
Document quantity cancelled
Document subtotals
Document extended costs and remaining quantities
Remaining purchase order subtotals
Purchase order status
Line item status
Line item extended cost
Discount available
Trade discount
Quantities linked to sales line items
Taxes
Quantity ordered for the control blanket line item on blanket purchase orders and drop-ship
blanket purchase orders
Reconcile Purchase Orders assumes that line item information is correct. Document totals will be reconciled to match line item detail amounts and quantities.
Before running the Reconcile Payables Accounts utility in Payables Management or the Reconcile Inventory Quantities utility in Inventory, run the Reconcile Purchase Orders utility in Purchase Order
Microsoft Dynamics GP - Month and Year End User Guide - UXC Eclipse
COPYRIGHT NOTICE
Page 13
Processing. It is important that the purchasing documents are correct since purchasing information may be altered and is used when Reconcile Inventory Quantities and Reconcile Payables Accounts utilities are performed.
Before reconciling Purchase Orders, backup your company’s data files or database.
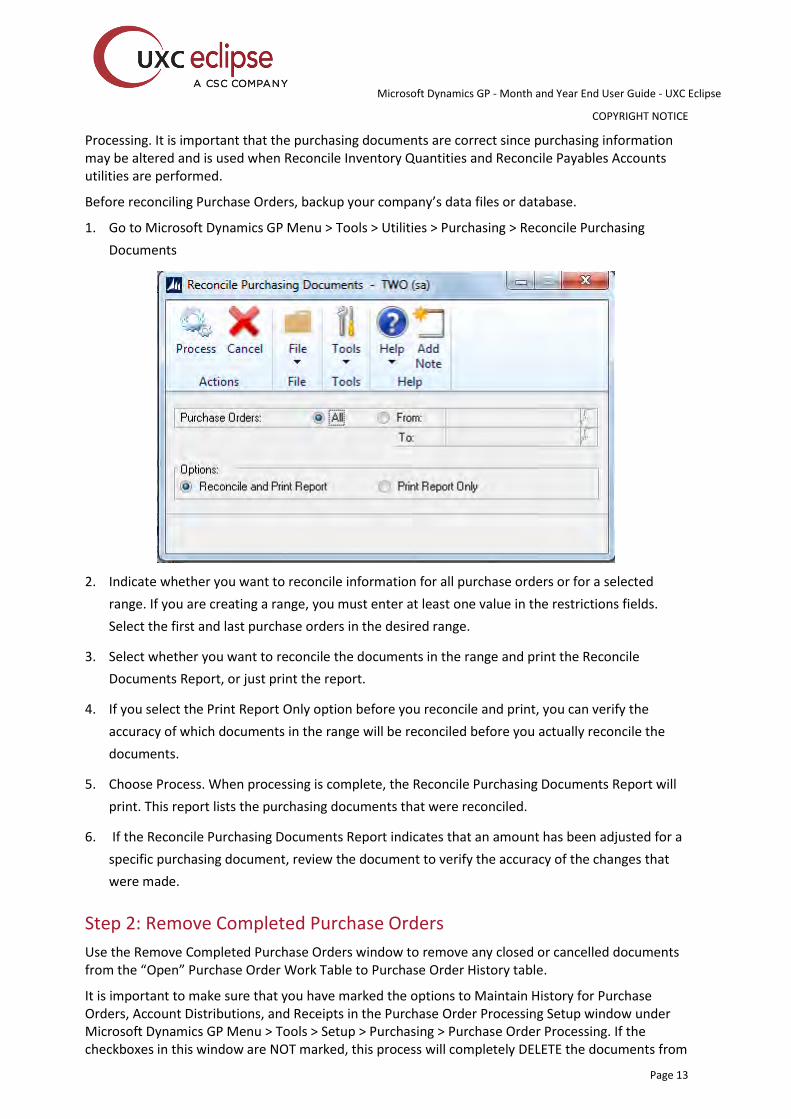
1. Go to Microsoft Dynamics GP Menu > Tools > Utilities > Purchasing > Reconcile Purchasing
Documents
2. Indicate whether you want to reconcile information for all purchase orders or for a selected
range. If you are creating a range, you must enter at least one value in the restrictions fields.
Select the first and last purchase orders in the desired range.
3. Select whether you want to reconcile the documents in the range and print the Reconcile
Documents Report, or just print the report.
4. If you select the Print Report Only option before you reconcile and print, you can verify the
accuracy of which documents in the range will be reconciled before you actually reconcile the
documents.
5. Choose Process. When processing is complete, the Reconcile Purchasing Documents Report will
print. This report lists the purchasing documents that were reconciled.
6. If the Reconcile Purchasing Documents Report indicates that an amount has been adjusted for a
specific purchasing document, review the document to verify the accuracy of the changes that
were made.
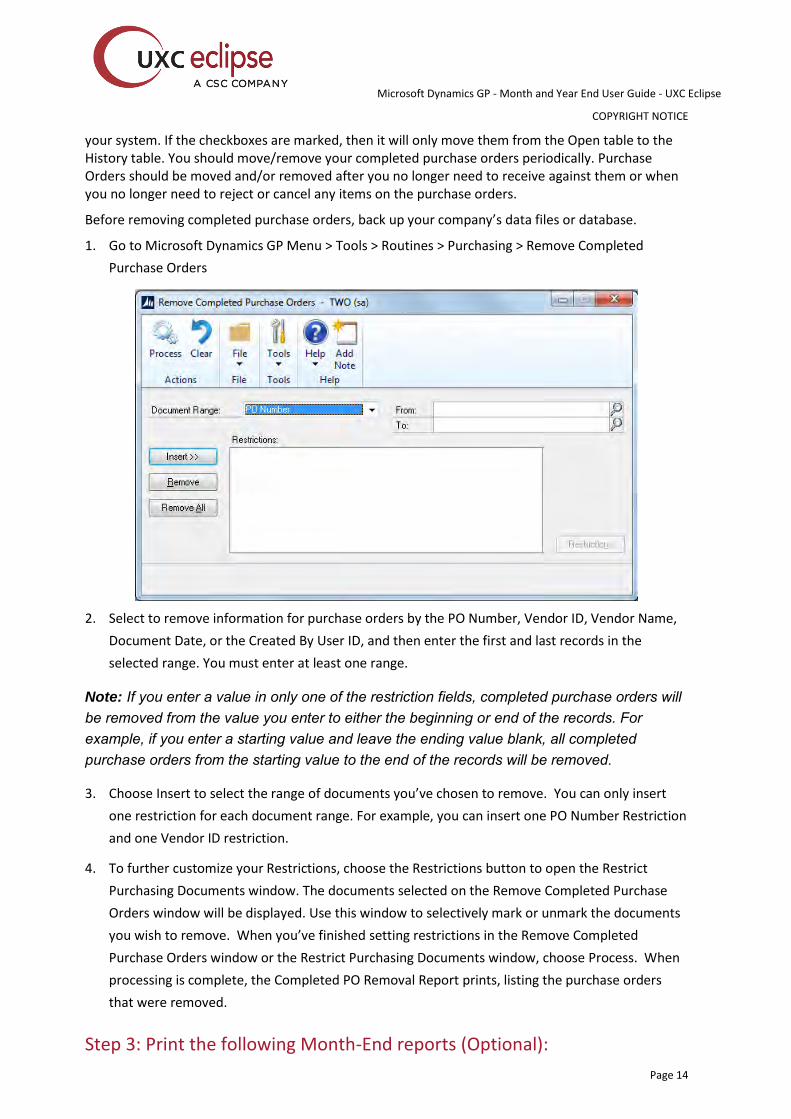
Step 2: Remove Completed Purchase Orders
Use the Remove Completed Purchase Orders window to remove any closed or cancelled documents from the “Open” Purchase Order Work Table to Purchase Order History table.
It is important to make sure that you have marked the options to Maintain History for Purchase Orders, Account Distributions, and Receipts in the Purchase Order Processing Setup window under Microsoft Dynamics GP Menu > Tools > Setup > Purchasing > Purchase Order Processing. If the checkboxes in this window are NOT marked, this process will completely DELETE the documents from
Microsoft Dynamics GP - Month and Year End User Guide - UXC Eclipse
COPYRIGHT NOTICE
Page 14
your system. If the checkboxes are marked, then it will only move them from the Open table to the History table. You should move/remove your completed purchase orders periodically. Purchase Orders should be moved and/or removed after you no longer need to receive against them or when you no longer need to reject or cancel any items on the purchase orders.
Before removing completed purchase orders, back up your company’s data files or database.
1. Go to Microsoft Dynamics GP Menu > Tools > Routines > Purchasing > Remove Completed
Purchase Orders
2. Select to remove information for purchase orders by the PO Number, Vendor ID, Vendor Name,
Document Date, or the Created By User ID, and then enter the first and last records in the
selected range. You must enter at least one range.
Note: If you enter a value in only one of the restriction fields, completed purchase orders will be removed from the value you enter to either the beginning or end of the records. For example, if you enter a starting value and leave the ending value blank, all completed purchase orders from the starting value to the end of the records will be removed.
3. Choose Insert to select the range of documents you’ve chosen to remove. You can only insert
one restriction for each document range. For example, you can insert one PO Number Restriction
and one Vendor ID restriction.
4. To further customize your Restrictions, choose the Restrictions button to open the Restrict
Purchasing Documents window. The documents selected on the Remove Completed Purchase
Orders window will be displayed. Use this window to selectively mark or unmark the documents
you wish to remove. When you’ve finished setting restrictions in the Remove Completed
Purchase Orders window or the Restrict Purchasing Documents window, choose Process. When
processing is complete, the Completed PO Removal Report prints, listing the purchase orders
that were removed.
Step 3: Print the following Month-End reports (Optional):

Microsoft Dynamics GP - Month and Year End User Guide - UXC Eclipse
COPYRIGHT NOTICE
Page 15
Received/Not Invoiced Report (Reports > Purchasing > Analysis)
o Note: Items appear on the Received/Not Invoiced report when the receipt of the goods is posted. The records will disappear from the report when the invoice is matched and saved. This means that the report will not match the Accrued Purchases account in the General Ledger as long as there are any unposted invoices in Purchase Order Processing.
If you are on GP2015 R2 or higher a new SQL Reporting Services Report is available called Historical Received Not Invoiced. It produces a report showing what was received into inventory but not invoiced as of a date you specify.
Purchase Order Status Report (Reports > Purchasing > Analysis)
Shipment/Invoice Matching Report (Reports > Purchasing > Analysis)
Receivings Trx History Report (Reports > Purchasing > History)
Microsoft Dynamics GP - Month and Year End User Guide - UXC Eclipse
COPYRIGHT NOTICE
Page 16
Inventory Year-End Closing Procedures Closing a year transfers all summarized current-year quantity, (cost and sales amounts) to transaction history for the items for which you've been keeping summarized sales history. This procedure also updates each item's beginning quantity to the quantity on hand at each site. It will also set the quantity sold field to zero for each item.
Inventory Control year-end checklist 1. Post all transactions for the year
2. Reconcile Inventory quantities
3. Complete a physical inventory count and post any adjustments
4. Print Additional Reports
5. Make a backup
6. Close the year
7. Close the fiscal periods for the Inventory series (optional)
Detailed information for each step in the year-end checklist
Step 1: Post All Transactions For The Year
Be sure that all Invoicing, Sales Order Processing and Inventory transactions for the current year have been entered and posted before you close the year. This is important to ensure that historical information is accurate for the year you are closing and year-to-date amounts are accurately stated for the year. If you wish to enter future-period transactions before closing the year, create a new batch with new transactions, but don't post it until after the year has been closed.
Microsoft Dynamics GP - Month and Year End User Guide - UXC Eclipse
COPYRIGHT NOTICE
Page 17
Step 2: Reconcile Inventory Quantities
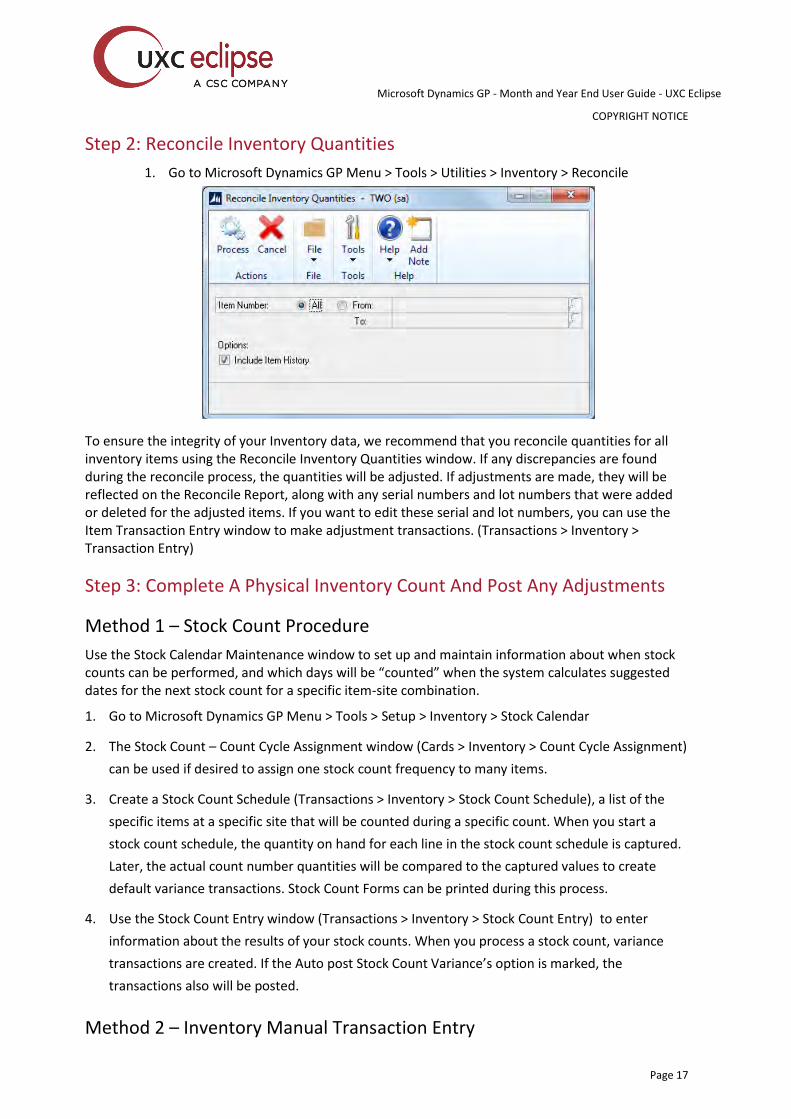
1. Go to Microsoft Dynamics GP Menu > Tools > Utilities > Inventory > Reconcile
To ensure the integrity of your Inventory data, we recommend that you reconcile quantities for all inventory items using the Reconcile Inventory Quantities window. If any discrepancies are found during the reconcile process, the quantities will be adjusted. If adjustments are made, they will be reflected on the Reconcile Report, along with any serial numbers and lot numbers that were added or deleted for the adjusted items. If you want to edit these serial and lot numbers, you can use the Item Transaction Entry window to make adjustment transactions. (Transactions > Inventory > Transaction Entry)
Step 3: Complete A Physical Inventory Count And Post Any Adjustments
Method 1 – Stock Count Procedure
Use the Stock Calendar Maintenance window to set up and maintain information about when stock counts can be performed, and which days will be “counted” when the system calculates suggested dates for the next stock count for a specific item-site combination.
1. Go to Microsoft Dynamics GP Menu > Tools > Setup > Inventory > Stock Calendar
2. The Stock Count – Count Cycle Assignment window (Cards > Inventory > Count Cycle Assignment)
can be used if desired to assign one stock count frequency to many items.
3. Create a Stock Count Schedule (Transactions > Inventory > Stock Count Schedule), a list of the
specific items at a specific site that will be counted during a specific count. When you start a
stock count schedule, the quantity on hand for each line in the stock count schedule is captured.
Later, the actual count number quantities will be compared to the captured values to create
default variance transactions. Stock Count Forms can be printed during this process.
4. Use the Stock Count Entry window (Transactions > Inventory > Stock Count Entry) to enter
information about the results of your stock counts. When you process a stock count, variance
transactions are created. If the Auto post Stock Count Variance’s option is marked, the
transactions also will be posted.
Method 2 – Inventory Manual Transaction Entry
Microsoft Dynamics GP - Month and Year End User Guide - UXC Eclipse
COPYRIGHT NOTICE
Page 18
You also have the option to manually create your inventory adjusting entries. First print a Physical Inventory Checklist using the Inventory Activity Reports window and perform a physical count of your Inventory Items to verify that Quantity on Hand amounts are accurate for all Items.
1. Reports > Inventory > Activity > Physical Inventory Checklist
2. If discrepancies exist, enter the necessary adjustments in the Item Transaction Entry window
(Transactions > Inventory > Transaction Entry) and post them.
Step 4: Print Additional Reports
Print any additional reports from the selections under Reports > Inventory you will need for planning or your permanent records, including the following reports:
Historical Stock Status Report – Reports > Inventory > Activity > Historical Stock Status
Purchase Receipts Report – Reports > Inventory > Activity > Purchase Receipts
Turnover Report – Reports > Inventory > Analysis > Turnover Report
Transaction History Report – Reports > Inventory > History > Transaction History
Serial Number List – Reports > Inventory > Serial/Lots > Serial Number
Lot Number List – Reports > Inventory > Serial/Lots > Lot Number
Note: If you plan to remove sold purchase receipts during the year-end closing process, we recommend that you print the Purchase Receipts Report to review the receipts that will be removed.
Step 5: Make a backup
Make a backup before you close the year. Place the backup in a safe, permanent storage. This backup ensures that you have a permanent record of the company's financial position at the end of the year and allows you to quickly restore the information in the event of a power fluctuation or if another issue occurs during the year-end close procedure. See section on Backups under General Tips and Reminders for more information on creating backups.
Step 6: Close the year
The Inventory year-end closing accomplishes the following tasks:
Transfers all summarized current-year quantity, (cost and sales amounts) to transaction
history for the items for which you've been keeping summarized sales history.
Updates the item's Beginning Quantity to the Quantity On Hand at each site. Certain reports,
such as the Turnover Report, use the beginning quantity field for report calculations.
Zeros the Quantity Sold field in Item Quantities Maintenance (Cards > Inventory > Items
Qtys/Sites) for each site.
Remove Purchase Receipts and cost change history for items that have been completely sold.
Remove any discontinued Items from the Item records that have been completely sold.
Microsoft Dynamics GP - Month and Year End User Guide - UXC Eclipse
COPYRIGHT NOTICE
Page 19
Remove any Lot attributes from the records of Lot Numbered Items if they have been
completely sold.
Updates the Standard Cost of each Item to the Current Cost if you're using either the FIFO
Periodic or LIFO Periodic Valuation Method. This feature does not occur if using
Manufacturing.
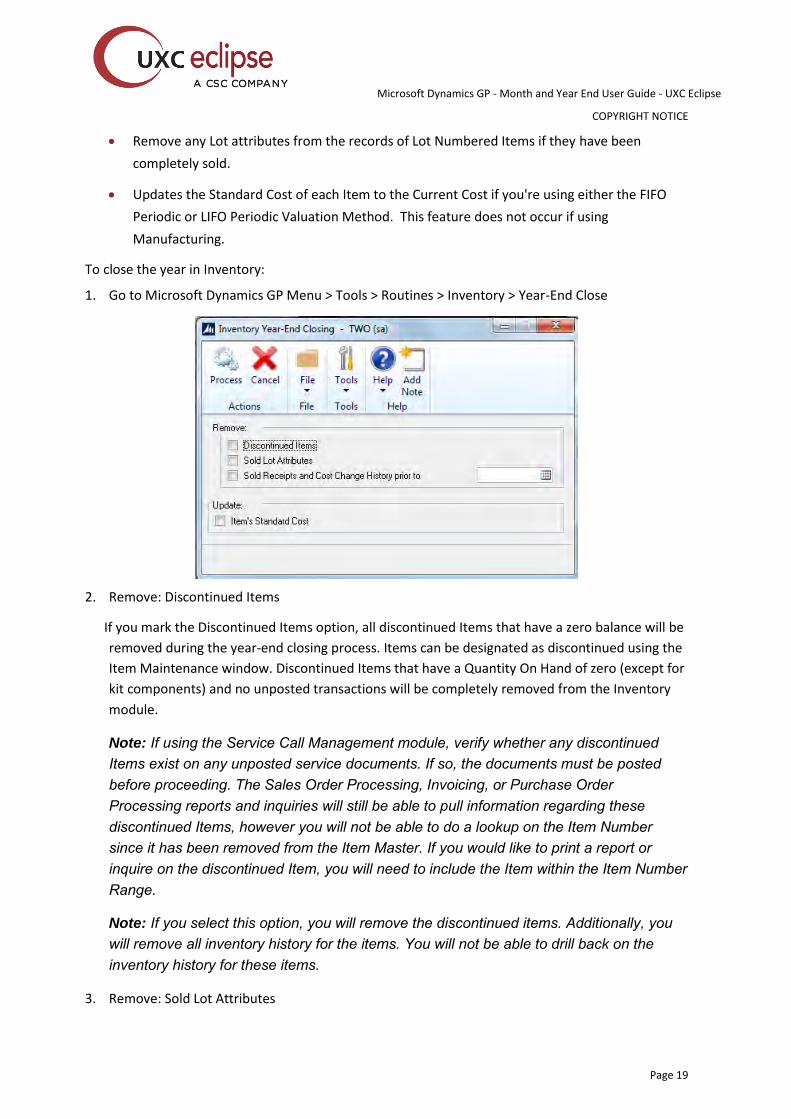
To close the year in Inventory:
1. Go to Microsoft Dynamics GP Menu > Tools > Routines > Inventory > Year-End Close
2. Remove: Discontinued Items
If you mark the Discontinued Items option, all discontinued Items that have a zero balance will be
removed during the year-end closing process. Items can be designated as discontinued using the
Item Maintenance window. Discontinued Items that have a Quantity On Hand of zero (except for
kit components) and no unposted transactions will be completely removed from the Inventory
module.
Note: If using the Service Call Management module, verify whether any discontinued Items exist on any unposted service documents. If so, the documents must be posted before proceeding. The Sales Order Processing, Invoicing, or Purchase Order Processing reports and inquiries will still be able to pull information regarding these discontinued Items, however you will not be able to do a lookup on the Item Number since it has been removed from the Item Master. If you would like to print a report or inquire on the discontinued Item, you will need to include the Item within the Item Number Range.
Note: If you select this option, you will remove the discontinued items. Additionally, you will remove all inventory history for the items. You will not be able to drill back on the inventory history for these items.
3. Remove: Sold Lot Attributes
Microsoft Dynamics GP - Month and Year End User Guide - UXC Eclipse
COPYRIGHT NOTICE
Page 20
If you mark Sold Lot Attributes, values for completely sold lot numbers will be removed. (For
example, you can remove the value ‘red’ for the lot attribute color if you have sold all lot-
numbered items that have been assigned the value ‘red’.)
4. Remove: Sold Receipts and Cost Change History prior to xx/xx/xx date
If you mark Sold Receipts and Cost Change History and enter a date, all sold purchase receipts,
quantity sold details, and historical cost changes with dates that come before the date that you
have entered for items that use Average Perpetual, Last In, First Out (LIFO) Perpetual, or the First
In, First Out (FIFO) Periodic valuation method will be removed.
Before removing all sold receipts and historical cost changes, you should print a Purchase
Receipts Report and review the receipts that will be removed.
5. Update: Item's Standard Cost
If you mark item's Standard Cost, the standard cost for any items that have been assigned the
FIFO periodic or LIFO periodic valuation method will be adjusted automatically to reflect each
item's current cost or the amount you most recently paid for the item.
Note: If you are registered for the Manufacturing module, you will be unable to select the Item's Standard Cost check box.
NOTE: When you select to update an item's standard cost during the Inventory Year-End Closing process for Standard Cost Items, you must have the Standard Cost Revaluation Account populated in one of the two locations listed below in order for the Year-End Close process to complete. If you don't have the account populated the Exception Report will print with the list of items that need to be populated before you will be able to process the year-end closing. 1) Cards > Inventory > Item > Account (for each periodic item) 2) Microsoft Dynamics GP > Tools > Setup > Posting > Posting Accounts > Inventory series.
6. When you have selected your options, click Process to begin the year-end closing process. While
the year end close routine is running, users will not be able to post inventory transactions,
reconcile quantities, change valuation methods, or change decimal places for items.
Step 7: Close the fiscal periods for the Inventory series (optional).
To ensure that no one posts transactions to an incorrect period or year, use the Fiscal Periods Setup window to close any fiscal periods that are still open for the year.
1. Go to Microsoft Dynamics GP Menu > Tools > Setup > Company > Fiscal Periods.
2. Mark the periods you wish to close under the Inventory Series.
Note: Make sure that you have posted all transactions for the period and year for all modules
before closing fiscal periods. If you later need to post transactions to a fiscal period you’ve
already closed, use the Fiscal Periods Setup window to reopen the period before posting the
transaction.
Microsoft Dynamics GP - Month and Year End User Guide - UXC Eclipse
COPYRIGHT NOTICE
Page 21
Inventory Control Year-End Closing Tips The year-end close must be completed prior to posting any transactions for the new year.
Make sure to consider the implications outlined in this document before marking the
following options in the Inventory Year End Close window: Discontinued Items, Sold Receipts
or Sold Lot Attributes. If marked, all discontinued items, sold receipts or sold lot attributes
that have a zero balance will be removed during the year-end closing process.
If you mark Update Item's Standard Cost, the standard cost for any items that have been
assigned the FIFO periodic or LIFO periodic valuation methods will be adjusted automatically
to reflect each item's current cost, which is the amount you most recently paid for the item.
There is no Year-End Closing report for Inventory.
Inventory Year-End Frequently Asked Questions Average Cost Update
Q1. How is the average cost of an item updated throughout the year and during the year-end
closing process when you use the Average Perpetual valuation method?
A1. If you are using the Average Perpetual valuation method, all receipts for each item will be
averaged to determine the average cost. The year-end closing process does not change the
average cost. However, it will remove the purchase receipts that have been completely sold. The
next time that a receipt is entered, the average cost will be revalued with the receipts that
remain in the Inventory Purchase Receipts file.
Standard Cost Update
Q2. Can the Inventory Year-End Closing routine be used throughout the year to update the
standard cost of items if using the periodic valuation method?
A2. This is not recommended because the beginning quantity field is updated during the year-end
closing process. This would make that field incorrect on reports such as the Turnover Report. In
addition, all summary sales history information would be incorrectly moved to the following
year.
There are three methods to adjust the standard cost of an item:
1. During the Inventory Year End Close (Recommended to only be done at year end): Microsoft
Dynamics GP Menu > Tools > Routines > Inventory > Year-end Close) - If you select to update
the Standard Cost, the Standard Cost of the item will be adjusted automatically to the
Current Cost, or the amount you most recently paid for the item.
2. Item Maintenance (Cards > Inventory > Item) - You can edit the Standard Cost of the item on
the item card.
Microsoft Dynamics GP - Month and Year End User Guide - UXC Eclipse
COPYRIGHT NOTICE
Page 22
3. If you are on GP2013 or higher, use the Change Item Standard Cost (Inventory >> Utilities >>
Change Item Standard Cost) window utility to change the standard cost of an item and
automatically create an adjustment in General Ledger keeping the inventory and accounts in
balance. Only certain items can be changed in this window:
a) Items must be using a periodic valuation method
b) Item status must be sales inventory or discontinued
c) If you have the Manufacturing module registered, you will not be able to use this window.
Use the windows available in that module instead
Discontinued Items
Q3. When performing the Inventory Year-End Closing routine, I selected to Remove Discontinued
Items, however, the discontinued items did not get removed. Why?
A3. If any of the discontinued items are components of kits, they will first need to be removed as
components of the kits. You can use the Component Report (Reports > Inventory > Items > Kit
List) to identify the components. To remove the item from the kit, use the Item Kit Maintenance
Window under Cards > Inventory > Kits. Select the kit item and find the discontinued item
component. Highlight the item, and choose Edit – Delete Row to remove it as a component. Save
the change you made.
Next, check if the items are finished goods or components of bills of materials. The BM
Component Where-Used Report (Reports > Inventory > Setup > Component Where Used) can be
used to identify which discontinued items are components of bills of materials. In the report
option, the following Bill Status check boxes and Component Status check boxes should be
selected: Active, Pending, Obsolete.
The BM Bill of Materials Report (Reports > Inventory > Setup > Single-Level Bill of Materials) can
be used to find which discontinued items are bills of materials. In the report option, the following
Bill Status check boxes and Component Status check boxes should be selected: Active, Pending,
Obsolete.
If any of the discontinued items are components of a bill of materials, the components need to
be removed from the bills. This is true for all statuses of the bills and components, including
Active, Pending, and Obsolete. The components can be removed in the Bill of Materials
Maintenance window (Cards > Inventory > Bill of Materials). In the Bill Number list, click the bill,
click the status in the Status list, and then find the component in the scrolling window. Click the
component line, click Edit, and then click Delete Row. Click Save to save the change.
If any of the discontinued items are bills of materials, the bill needs to be deleted. This is true for
all bill statuses, including Active, Pending, and Obsolete. The bill can be deleted in the Bill of
Materials Maintenance window (Cards > Inventory > Bill of Materials). In the Bill Number list,
click the bill, click the status in the Status list, and then click Delete.
A4.
Microsoft Dynamics GP - Month and Year End User Guide - UXC Eclipse
COPYRIGHT NOTICE
Page 23
Late Year End Closing
Q4. What is the effect of doing a late inventory year-end close in Great Plains?
A5. Year-end closing for this module is optional.
In summary, the fields that are updated during year-end closing are mainly used in reports for
quantity summaries. If these fields are not important, you may decide not to run year-end
closing.
The inventory year-end close moves the summary history information from the current year to
last year (as seen under Cards/Inventory/History), and zeroes out the current year information.
We do recommend that you close the inventory module before you post sales and purchase
transactions in the new year because, if you do this, the item's history numbers will not be
accurate (as seen under Cards/Inventory/History.) Also, the Inventory Turnover Report may not
be accurate, because the item's beginning quantities for the year will not be accurate. To
illustrate, say you sold 100 items in 2014. Then, you sold 10 additional items in 2014. You posted
these 2014 inventory transactions. Before doing 2014 year-end close for inventory, you will have
a quantity sold of 110 in 2015. After the 2014 year end close, you will have a value of 0 instead of
10 for your 2015 (Current Year) Sales Quantity and 110 for your 2014 (Last Year) Sales Quantity.
The summary windows in inventory with the specific views of calendar or fiscal year are date-
sensitive. The inventory year end close process is not date-sensitive.
Microsoft Dynamics GP - Month and Year End User Guide - UXC Eclipse
COPYRIGHT NOTICE
Page 24
Receivables Management Year-End Closing Procedures - OPTIONAL
Receivables Management Year-End Closing Checklist Note: Receivables Management is date sensitive in certain areas. The Receivables Management closing process updates several tables and fields that track customer data. This is important for organizations that use any of the following items to track customer statistics:
The SmartList objects
The Receivables Management summary reports
The Amounts Since Last Close view in the Customer Summary window
Therefore, to ensure the accuracy of the data displayed in the Customer SmartList objects, the Receivables Management summary reports, and the Amounts Since Last Close view in the Customer Summary Inquiry window, we recommend that you follow these steps:
1. Post all the sales and receivables transactions for the year.
2. Create a pre-year-end closing backup.
3. Close the year.
4. Close the fiscal periods. (Optional)
5. Close the tax year.
Detailed Information For Each Step In The Year-End Checklist
Step 1: Post All The Sales And Receivables Transactions For The Year
Post all the sales and receivables transactions for the year before you close the year. If you need to enter any transactions for a future period prior to closing the year, enter the transactions in a batch, but do not post it until after you have closed the year.
As previously mentioned, since some areas of Microsoft Dynamics GP are date sensitive, it is important to run the closing routine if you rely on any of the Smart Lists, Receivables Summary Reports or the Amounts Since Last Close View of the Customer Summary window to track your customer statistics. If you do not close the year after you enter all the transactions for the current year and before you enter all the transactions for the new year, these areas will contain incorrect information. The following areas of Microsoft Dynamics GP that are not date sensitive are as follows:
The Amounts Since Last Close view in the Customer Summary window
The Customer Finance Charge Summary window
The SmartList objects
Microsoft Dynamics GP - Month and Year End User Guide - UXC Eclipse
COPYRIGHT NOTICE
Page 25
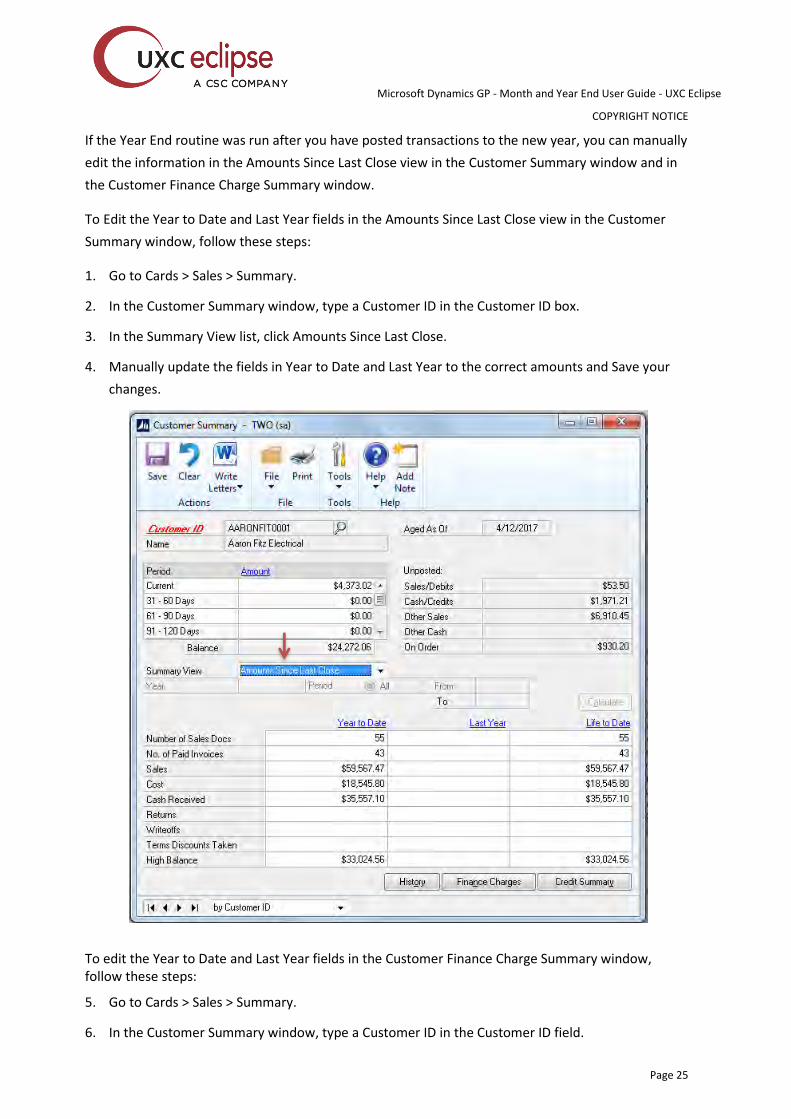
If the Year End routine was run after you have posted transactions to the new year, you can manually
edit the information in the Amounts Since Last Close view in the Customer Summary window and in
the Customer Finance Charge Summary window.
To Edit the Year to Date and Last Year fields in the Amounts Since Last Close view in the Customer
Summary window, follow these steps:
1. Go to Cards > Sales > Summary.
2. In the Customer Summary window, type a Customer ID in the Customer ID box.
3. In the Summary View list, click Amounts Since Last Close.
4. Manually update the fields in Year to Date and Last Year to the correct amounts and Save your
changes.
To edit the Year to Date and Last Year fields in the Customer Finance Charge Summary window, follow these steps:
5. Go to Cards > Sales > Summary.
6. In the Customer Summary window, type a Customer ID in the Customer ID field.
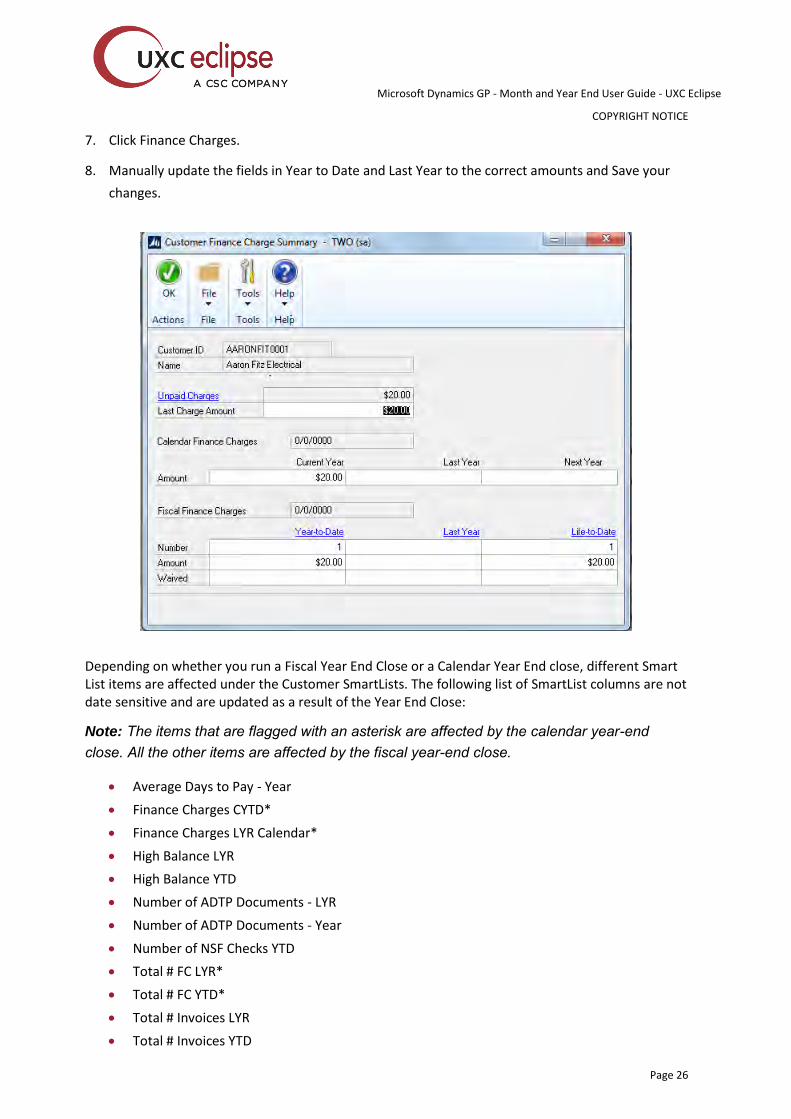
Microsoft Dynamics GP - Month and Year End User Guide - UXC Eclipse
COPYRIGHT NOTICE
Page 26
7. Click Finance Charges.
8. Manually update the fields in Year to Date and Last Year to the correct amounts and Save your
changes.
Depending on whether you run a Fiscal Year End Close or a Calendar Year End close, different Smart List items are affected under the Customer SmartLists. The following list of SmartList columns are not date sensitive and are updated as a result of the Year End Close:
Note: The items that are flagged with an asterisk are affected by the calendar year-end close. All the other items are affected by the fiscal year-end close.
Average Days to Pay - Year
Finance Charges CYTD*
Finance Charges LYR Calendar*
High Balance LYR
High Balance YTD
Number of ADTP Documents - LYR
Number of ADTP Documents - Year
Number of NSF Checks YTD
Total # FC LYR*
Total # FC YTD*
Total # Invoices LYR
Total # Invoices YTD
Microsoft Dynamics GP - Month and Year End User Guide - UXC Eclipse
COPYRIGHT NOTICE
Page 27
Total Amount of NSF Check YTD
Total Bad Debt LYR
Total Bad Debt YTD
Total Cash Received LYR
Total Cash Received YTD
Total Discounts Available YTD
Total Discounts Taken LYR
Total Discounts Taken YTD
Total Finance Charges LYR*
Total Finance Charges YTD*
Total Returns LYR
Total Returns YTD
Total Sales LYR
Total Sales YTD
Total Waived FC LYR*
Total Waived FC YTD*
Total Write-offs LYR
Total Write-offs YTD
Unpaid Finance Charges YTD*
Write Offs LYR
Write Offs YTD
Step 2: Create A Pre-Year-End Closing Backup
Make a backup before you close the year. Place the backup in a safe, permanent storage. This backup ensures that you have a permanent record of the company's financial position at the end of the year and allows you to quickly restore the information in the event of a power fluctuation or if another issue occurs during the year-end close procedure. See section on Backups under General Tips and Reminders for more information on creating backups.
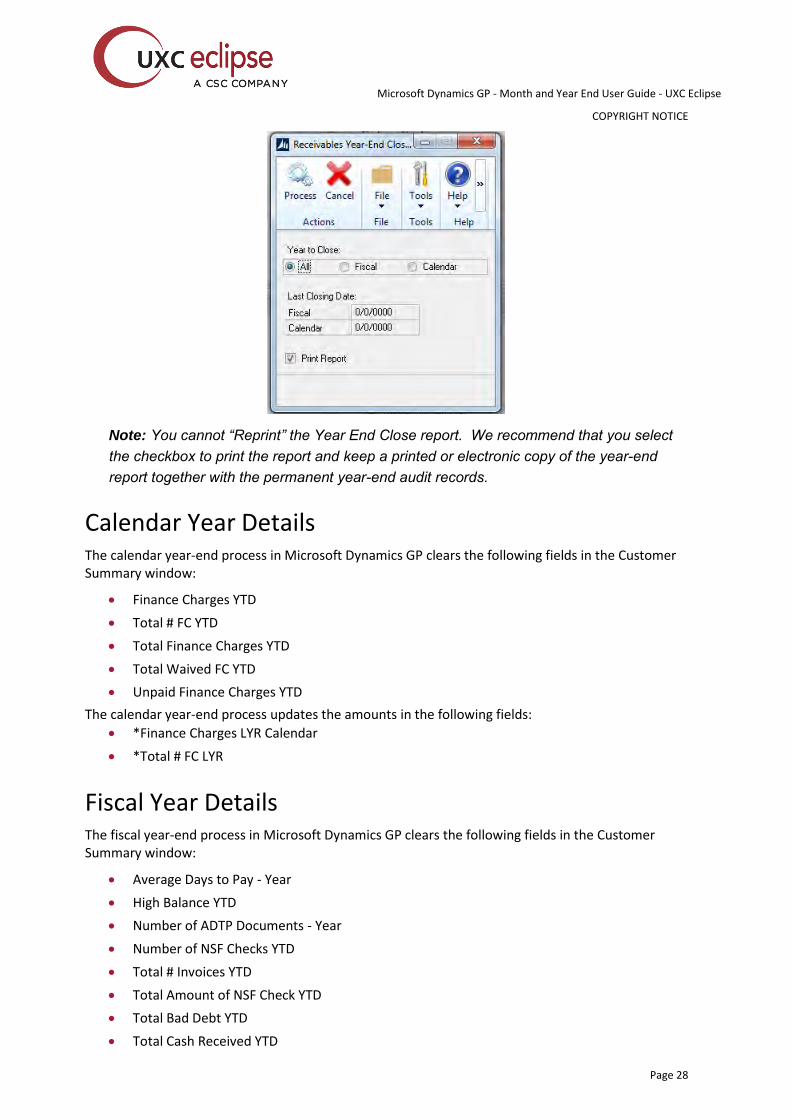
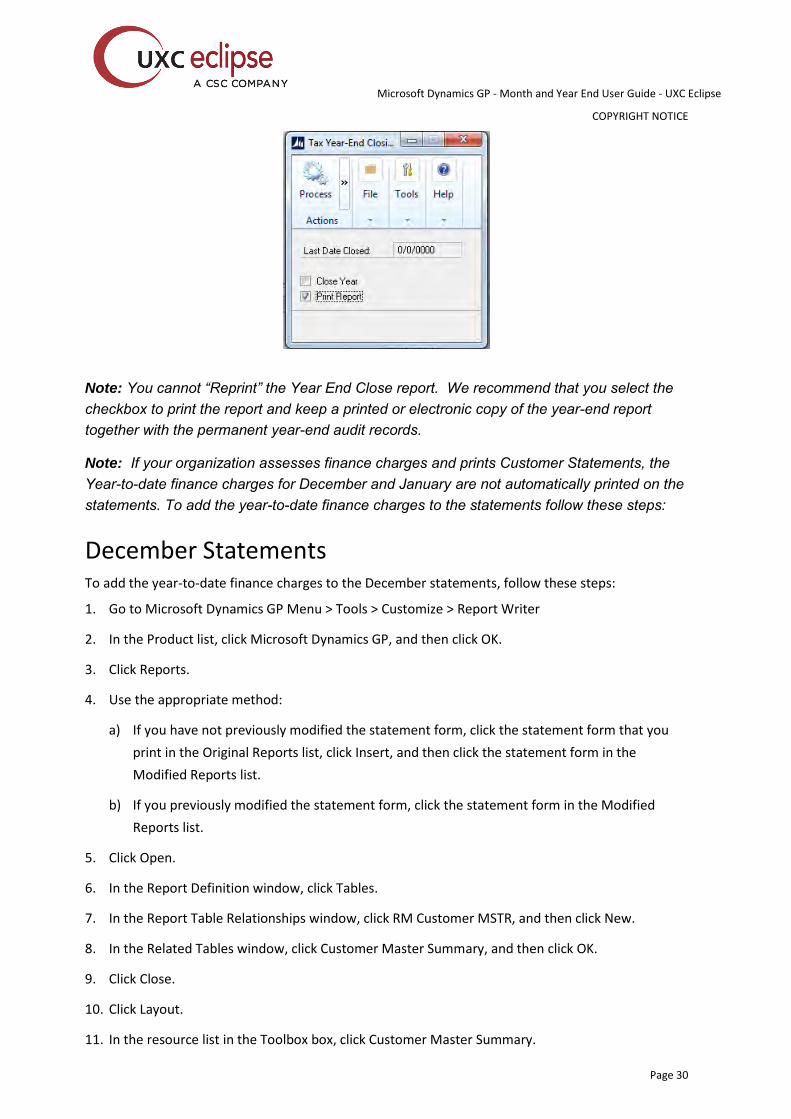
Step 3: Close the Year
1. Go to Microsoft Dynamics GP Menu > Tools > Routines > Sales > Year-End Close.
2. If you are closing both the fiscal year and the calendar year at the same time, click All. If you are
closing only the calendar year, click Calendar. If you are closing only the fiscal year, click Fiscal.
3. Click to select the Print Report check box, and then click Close Year.
Microsoft Dynamics GP - Month and Year End User Guide - UXC Eclipse
COPYRIGHT NOTICE
Page 28
Note: You cannot “Reprint” the Year End Close report. We recommend that you select the checkbox to print the report and keep a printed or electronic copy of the year-end report together with the permanent year-end audit records.
Calendar Year Details The calendar year-end process in Microsoft Dynamics GP clears the following fields in the Customer Summary window:
Finance Charges YTD
Total # FC YTD
Total Finance Charges YTD
Total Waived FC YTD
Unpaid Finance Charges YTD
The calendar year-end process updates the amounts in the following fields:
*Finance Charges LYR Calendar
*Total # FC LYR
Fiscal Year Details The fiscal year-end process in Microsoft Dynamics GP clears the following fields in the Customer Summary window:
Average Days to Pay - Year
High Balance YTD
Number of ADTP Documents - Year
Number of NSF Checks YTD
Total # Invoices YTD
Total Amount of NSF Check YTD
Total Bad Debt YTD
Total Cash Received YTD
Microsoft Dynamics GP - Month and Year End User Guide - UXC Eclipse
COPYRIGHT NOTICE
Page 29
Total Discounts Available YTD
Total Discounts Taken YTD
Total Returns YTD
Total Sales YTD
Total Write-offs YTD
Write Offs YTD
The fiscal year-end process updates the amounts in the following fields:
High Balance LYR
Number of ADTP Documents - LYR
Total # Invoices LYR
Total Bad Debt LYR
Total Cash Received LYR
Total Discounts Taken LYR
Total Returns LYR
Total Sales LYR
Total Write-offs LYR
Write Offs LYR
Step 4: Close the Fiscal Periods (Optional)
1. Go to Microsoft Dynamics GP Menu > Tools > Setup > Company > Fiscal Periods.
2. Mark the periods you wish to close under the Sales Series.
Note: Make sure that you have posted all transactions for the period and year for all modules
before closing fiscal periods. If you later need to post transactions to a fiscal period you have
already closed, use the Fiscal Periods Setup window to reopen the period before posting the
transaction.
Step 5: Close the Tax Year - Optional
Note: Closing the Tax Year is only required if you use Tax Schedules and Tax Details and the related reports and Smart Lists to track your organizations Year to Date and Last Year’s Tax figures.
Follow these steps only after you complete the year-end closing procedures for all the sales and purchasing modules. Do not close the tax year as part of the Receivables Management close if you are closing Payables Management at a later time.
To close the tax year, follow these steps:
1. Go to Microsoft Dynamics GP Menu > Tools > Routines > Company > Tax Year End Close
2. Click to select the Close Year check box, and then click to select the Print Report check box.
3. Click Process.
Microsoft Dynamics GP - Month and Year End User Guide - UXC Eclipse
COPYRIGHT NOTICE
Page 30
Note: You cannot “Reprint” the Year End Close report. We recommend that you select the checkbox to print the report and keep a printed or electronic copy of the year-end report together with the permanent year-end audit records.
Note: If your organization assesses finance charges and prints Customer Statements, the Year-to-date finance charges for December and January are not automatically printed on the statements. To add the year-to-date finance charges to the statements follow these steps:
December Statements To add the year-to-date finance charges to the December statements, follow these steps:
1. Go to Microsoft Dynamics GP Menu > Tools > Customize > Report Writer
2. In the Product list, click Microsoft Dynamics GP, and then click OK.
3. Click Reports.
4. Use the appropriate method:
a) If you have not previously modified the statement form, click the statement form that you
print in the Original Reports list, click Insert, and then click the statement form in the
Modified Reports list.
b) If you previously modified the statement form, click the statement form in the Modified
Reports list.
5. Click Open.
6. In the Report Definition window, click Tables.
7. In the Report Table Relationships window, click RM Customer MSTR, and then click New.
8. In the Related Tables window, click Customer Master Summary, and then click OK.
9. Click Close.
10. Click Layout.
11. In the resource list in the Toolbox box, click Customer Master Summary.
Microsoft Dynamics GP - Month and Year End User Guide - UXC Eclipse
COPYRIGHT NOTICE
Page 31
12. In the field list, drag Finance Charges CYTD to the layout of the report. You can position this field
in any section of the report.
13. On the File menu, click Microsoft Dynamics GP. When you are prompted to save the changes,
click Save.
14. If you have not previously modified this report, you must grant security to the report.
a. Go to Microsoft Dynamics GP Menu > Tools > Setup > System > Alternate/Modified Forms
and Reports. In the ID box, enter the Alternate/Modified Forms and Reports that is assigned
to the user.
b. In the Product list, click Microsoft Dynamics GP.
c. In the Type list, click Reports.
d. Expand Sales, and then expand the node of the modified form.
e. Click Microsoft Dynamics GP (Modified).
January statements 1. Follow steps 1 through 11 in the "December statements" section.
2. In the field list, drag Finance Charges LYR Calendar to the layout of the report. You can position
this field in any section of the report.
3. Follow steps 13 and 14 in the "December statements" section.
Receivables Management Year-End Closing Tips It is not necessary to close the calendar and fiscal years before entering transactions for the
new year. The system will automatically post to the correct fiscal and calendar years
according to the dates of the transactions. However, as previously mentioned, there are
certain areas of the program that are not date sensitive including Customer Smart List
objects, Receivables Summary reports, and the Amounts Since Last Close view in the
Receivables Summary window. Information in these windows and reports will not be correct
if you post transactions to the new year before closing the year.
Closing the calendar year will clear the calendar year-to-date finance charges and move them
to the last year field on the customer records.
The calendar year-end close in Receivables will take place at the end of the calendar year
regardless of when your fiscal year ends. If your calendar year coincides with the fiscal year
then you will close both at the end of the calendar year.
The YTD finance charges do not automatically print on the statements in December and January. If you want them to print on the statements, you must modify them by following the procedures outlined in this document. These procedures are different for each month.
Microsoft Dynamics GP - Month and Year End User Guide - UXC Eclipse
COPYRIGHT NOTICE
Page 32
Payables Management Year-End Closing Procedures - Optional Note: Payables Management is date sensitive in certain areas. The Payables Management closing process updates several tables and fields that track vendor data. This is important for organizations that use any of the following items to track vendor statistics:
The SmartList objects
The Payables Management summary reports
The Amounts Since Last Close view in the Vendor Summary window
Therefore, to ensure the accuracy of the data displayed in the Vendor SmartList objects, the Payables Management summary reports, and the Amounts Since Last Close view in the Vendor Summary Inquiry window, we recommend that you follow these steps:
Payables Management Master Year-End Closing Checklist Note: Use this checklist if you are closing your fiscal year and your calendar year at the same time.
1. Post all transactions for the year.
2. Print the Historical Aged Trial Balance report.
3. Print the Vendor Period Analysis Report.
4. Install the year-end update (Optional). See page 6 for 1099 changes included in the year end
update.
5. Make a backup that is named "Pre-1099 Edits."
6. Verify the 1099 information and edit as required.
7. Print the 1099 statements.
8. Make a backup that is named "Pre Year-End."
9. Close the year.
10. Close the fiscal periods.
11. Close the tax year.
Payables Management calendar year-end closing checklist 1. Post all transactions for the calendar year.
Microsoft Dynamics GP - Month and Year End User Guide - UXC Eclipse
COPYRIGHT NOTICE
Page 33
2. Print the Historical Aged Trial Balance report.
3. Make a backup that is named "Pre-1099 Edits."
4. Verify the 1099 information and edit it if it is required.
5. Print the 1099 statements.
6. Make a backup that is named "Pre Year-End."
7. Close the calendar year.
8. Close the fiscal periods.
9. Close the tax year.
Payables Management fiscal year-end closing checklist 1. Post all transactions for the fiscal year.
2. Print the Historical Aged Trial Balance report.
3. Print the Vendor Period Analysis Report.
4. Make a backup that is named "Pre Year-End."
5. Close the fiscal year.
6. Close the fiscal periods.
Detailed information for each step in the year-end checklist
Step 1: Post All Transactions for the Year
Post all the payables/purchasing transactions for the year before you close the year. If you need to enter any transactions for a future period prior to closing the year, enter the transactions in a batch but do not post it until after you have closed the year.
As previously mentioned, since some areas of Microsoft Dynamics GP are not date sensitive, it is important to run the closing routine if you rely on any of the Smart Lists, Payables Summary Reports or the Amounts Since Last Close View of the Vendor Summary window to track your vendor statistics. If you do not close the year after you enter all the transactions for the current year and before you enter any transactions for the new year, these areas will contain incorrect information. The following areas of Microsoft Dynamics GP that are not date sensitive are as follows:
The Amounts Since Last Close view in the Vendor Summary window
The SmartList Objects
Vendor Summary Reports
If the Year End routine was run after you have posted transactions to the new year, you can manually edit the information in the Amounts Since Last Close view in the Vendor Summary window.
Microsoft Dynamics GP - Month and Year End User Guide - UXC Eclipse
COPYRIGHT NOTICE
Page 34
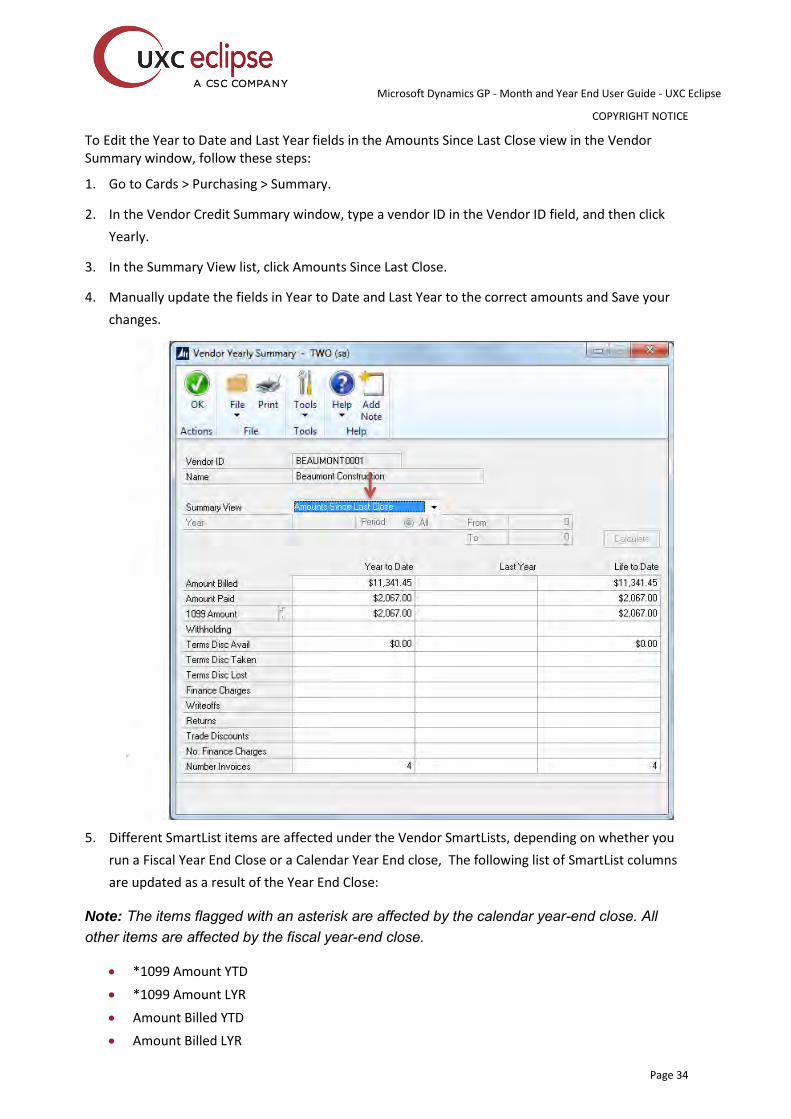
To Edit the Year to Date and Last Year fields in the Amounts Since Last Close view in the Vendor Summary window, follow these steps:
1. Go to Cards > Purchasing > Summary.
2. In the Vendor Credit Summary window, type a vendor ID in the Vendor ID field, and then click
Yearly.
3. In the Summary View list, click Amounts Since Last Close.
4. Manually update the fields in Year to Date and Last Year to the correct amounts and Save your
changes.
5. Different SmartList items are affected under the Vendor SmartLists, depending on whether you
run a Fiscal Year End Close or a Calendar Year End close, The following list of SmartList columns
are updated as a result of the Year End Close:
Note: The items flagged with an asterisk are affected by the calendar year-end close. All other items are affected by the fiscal year-end close.
*1099 Amount YTD
*1099 Amount LYR
Amount Billed YTD
Amount Billed LYR
Microsoft Dynamics GP - Month and Year End User Guide - UXC Eclipse
COPYRIGHT NOTICE
Page 35
Amount Paid YTD
Amount Paid LYR
Average Days To Pay - Year
Discount Available LYR
Discount Available YTD
Discount Lost LYR
Discount Lost YTD
Discount Taken LYR
Discount Taken YTD
Finance Charge LYR
Finance Charge YTD
Number of Finance Charges LYR
Number of Finance Charges YTD
Number of Invoice LYR
Number of Invoice YTD
Number of Paid Invoice YTD
Returns LYR
Returns YTD
Trade Discounts Taken LYR
Trade Discounts Taken YTD
Withholding LYR
Withholding YTD
Write Offs LYR
Write Offs YTD
6. Click OK.
7. Click Save.
To view the Vendor Summary reports, follow these steps:
8. Go to Reports > Purchasing> Analysis.
9. In the Reports list, click Calendar Year.
10. In the Options list, click an option, and then click Print.
Step 2: Print the Historical Aged Trial Balance Report
We recommend that you print a hard copy of the Historical Aged Trial Balance report to keep with your year-end permanent financial records. To do this, follow these steps:
1. Go to Reports > Purchasing > Trial Balance
2. In the Reports list, click Historical Aged Trial Balance.
Step 3: Print the Vendor Period Analysis Report

Microsoft Dynamics GP - Month and Year End User Guide - UXC Eclipse
COPYRIGHT NOTICE
Page 36
We recommend that you print a printed or electronic copy of the Vendor Period Analysis report to keep with your year-end permanent financial records. To do this, follow these steps
1. Go to Reports > Purchasing > Analysis
2. In the Reports list, click Period.
Step 4: Install the Year End Update
The 2016 year end update contains changes to the 1099-INT form and the 1096 form. The 1096 form was added in GP 2013.
To install the year-end update, you must follow the installation steps on each computer that has Microsoft Dynamics GP installed. The installation is similar to a service pack or hotfix. Please consult the instructions that are contained in the update. You can access the year end update for each version using the link below.
GP 2013 - Once you install the update, your version for GP 2013 will be 12.00.2130
https://mbs.microsoft.com/customersource/northamerica/GP/downloads/service-packs/MDGP2013_PatchReleases
GP 2015 - Once you install the update, your version for GP 2015 will be 14.00.01010
https://mbs.microsoft.com/customersource/northamerica/GP/downloads/service-packs/MDGP2015_PatchReleases
GP 2016 - Once you install the update, your version for GP 2016 will be 16.00.0552
https://mbs.microsoft.com/customersource/northamerica/GP/downloads/service-packs/MDGP2016_PatchReleases
Step 5: Make A Backup That Is Named "Pre-1099 Edits"
Make a backup before you close the year. Place the backup in a safe, permanent storage. This backup ensures that you have a permanent record of the company's financial position at the end of the year and allows you to quickly restore the information in the event of a power fluctuation or if another issue occurs during the year-end close procedure. See section on Backups under General Tips and Reminders for more information on creating backups.
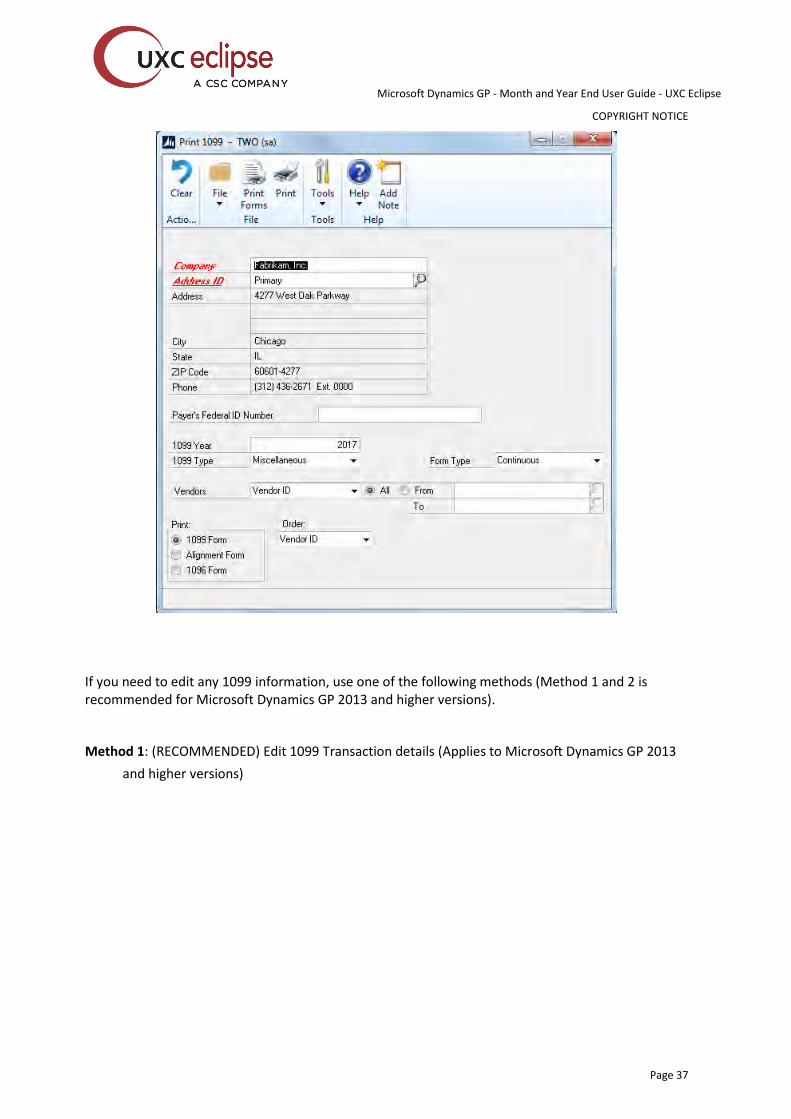
Step 6: Verify the 1099 Information and Edit As Required
To print the 1099 edit list, follow these steps:
1. Go to Microsoft Dynamics GP Menu > Tools > Routines > Purchasing > Print 1099. On the File
menu, click Print or click on the Print icon.
Microsoft Dynamics GP - Month and Year End User Guide - UXC Eclipse
COPYRIGHT NOTICE
Page 37
If you need to edit any 1099 information, use one of the following methods (Method 1 and 2 is recommended for Microsoft Dynamics GP 2013 and higher versions).
Method 1: (RECOMMENDED) Edit 1099 Transaction details (Applies to Microsoft Dynamics GP 2013
and higher versions)
Microsoft Dynamics GP - Month and Year End User Guide - UXC Eclipse
COPYRIGHT NOTICE
Page 38
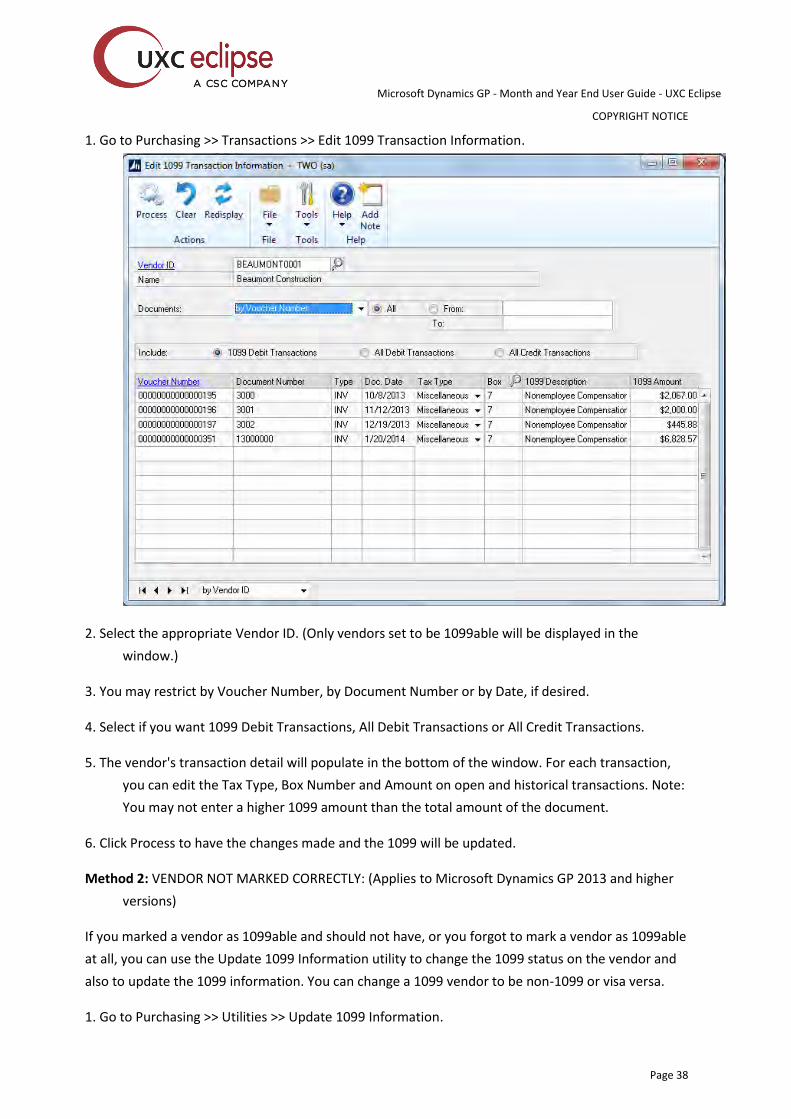
1. Go to Purchasing >> Transactions >> Edit 1099 Transaction Information.
2. Select the appropriate Vendor ID. (Only vendors set to be 1099able will be displayed in the
window.)
3. You may restrict by Voucher Number, by Document Number or by Date, if desired.
4. Select if you want 1099 Debit Transactions, All Debit Transactions or All Credit Transactions.
5. The vendor's transaction detail will populate in the bottom of the window. For each transaction,
you can edit the Tax Type, Box Number and Amount on open and historical transactions. Note:
You may not enter a higher 1099 amount than the total amount of the document.
6. Click Process to have the changes made and the 1099 will be updated.
Method 2: VENDOR NOT MARKED CORRECTLY: (Applies to Microsoft Dynamics GP 2013 and higher
versions)
If you marked a vendor as 1099able and should not have, or you forgot to mark a vendor as 1099able
at all, you can use the Update 1099 Information utility to change the 1099 status on the vendor and
also to update the 1099 information. You can change a 1099 vendor to be non-1099 or visa versa.
1. Go to Purchasing >> Utilities >> Update 1099 Information.
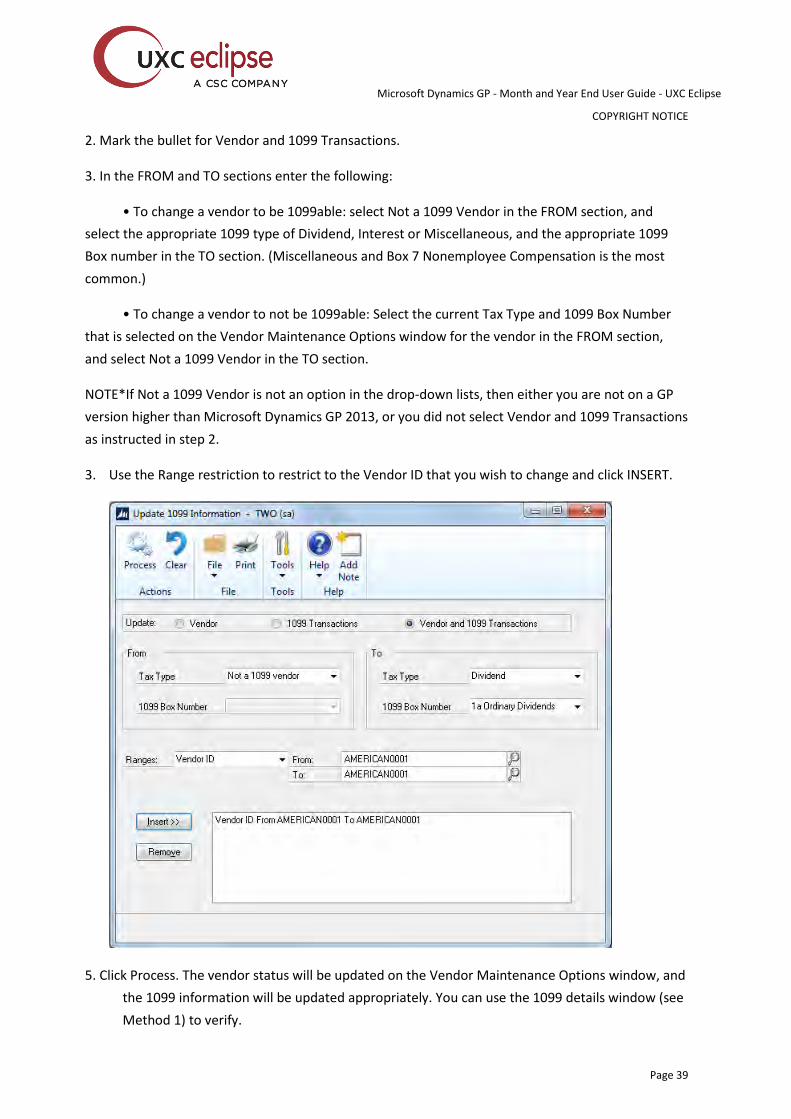
Microsoft Dynamics GP - Month and Year End User Guide - UXC Eclipse
COPYRIGHT NOTICE
Page 39
2. Mark the bullet for Vendor and 1099 Transactions.
3. In the FROM and TO sections enter the following:
• To change a vendor to be 1099able: select Not a 1099 Vendor in the FROM section, and
select the appropriate 1099 type of Dividend, Interest or Miscellaneous, and the appropriate 1099
Box number in the TO section. (Miscellaneous and Box 7 Nonemployee Compensation is the most
common.)
• To change a vendor to not be 1099able: Select the current Tax Type and 1099 Box Number
that is selected on the Vendor Maintenance Options window for the vendor in the FROM section,
and select Not a 1099 Vendor in the TO section.
NOTE*If Not a 1099 Vendor is not an option in the drop-down lists, then either you are not on a GP
version higher than Microsoft Dynamics GP 2013, or you did not select Vendor and 1099 Transactions
as instructed in step 2.
3. Use the Range restriction to restrict to the Vendor ID that you wish to change and click INSERT.
5. Click Process. The vendor status will be updated on the Vendor Maintenance Options window, and
the 1099 information will be updated appropriately. You can use the 1099 details window (see
Method 1) to verify.
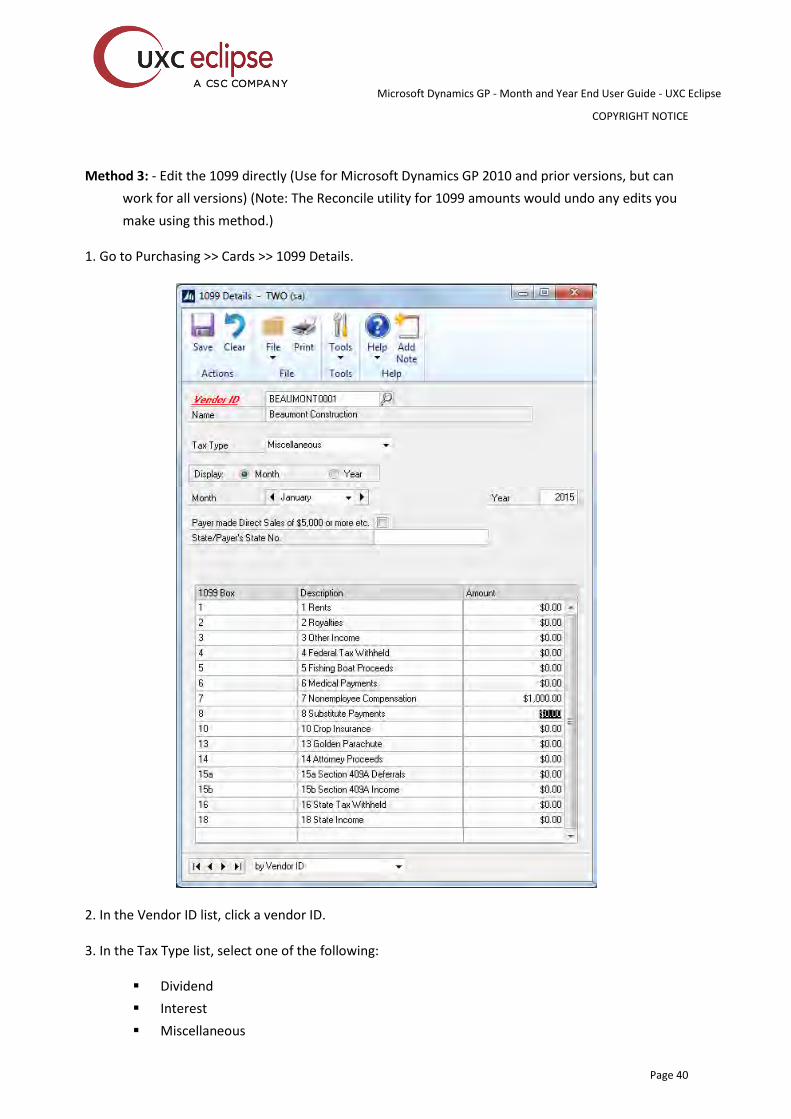
Microsoft Dynamics GP - Month and Year End User Guide - UXC Eclipse
COPYRIGHT NOTICE
Page 40
Method 3: - Edit the 1099 directly (Use for Microsoft Dynamics GP 2010 and prior versions, but can
work for all versions) (Note: The Reconcile utility for 1099 amounts would undo any edits you
make using this method.)
1. Go to Purchasing >> Cards >> 1099 Details.
2. In the Vendor ID list, click a vendor ID.
3. In the Tax Type list, select one of the following:
Dividend
Interest
Miscellaneous
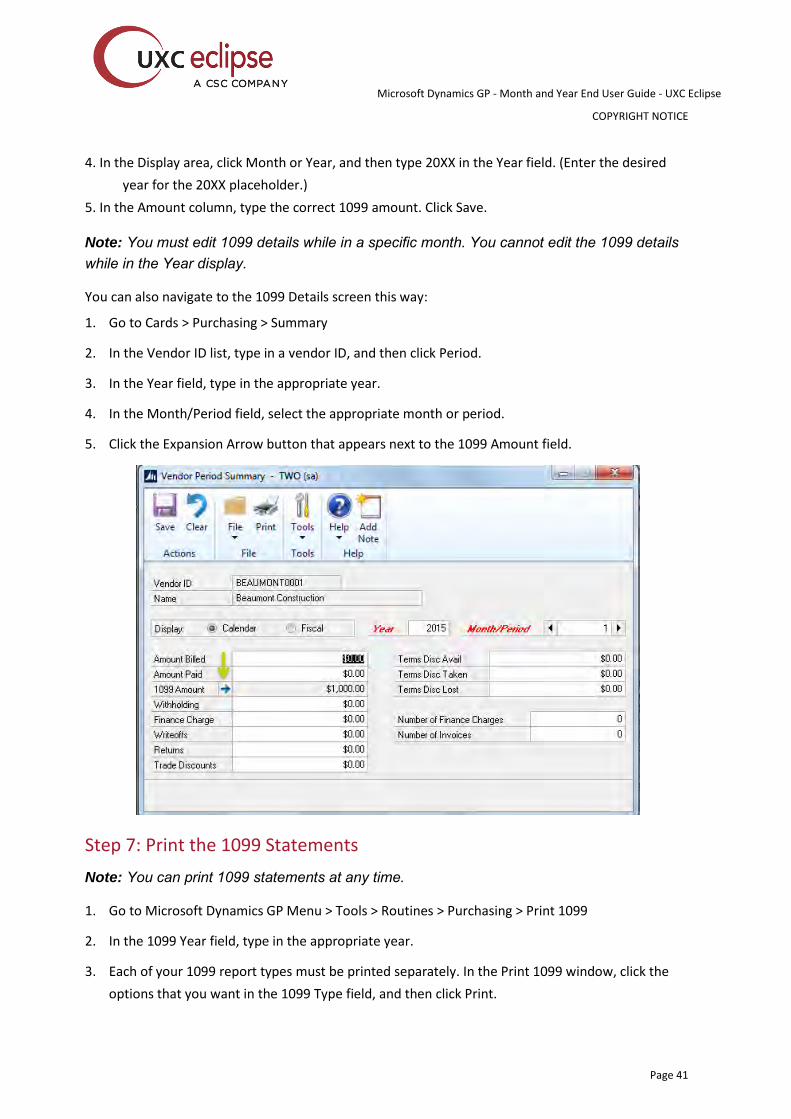
Microsoft Dynamics GP - Month and Year End User Guide - UXC Eclipse
COPYRIGHT NOTICE
Page 41
4. In the Display area, click Month or Year, and then type 20XX in the Year field. (Enter the desired
year for the 20XX placeholder.)
5. In the Amount column, type the correct 1099 amount. Click Save.
Note: You must edit 1099 details while in a specific month. You cannot edit the 1099 details while in the Year display.
You can also navigate to the 1099 Details screen this way:
1. Go to Cards > Purchasing > Summary
2. In the Vendor ID list, type in a vendor ID, and then click Period.
3. In the Year field, type in the appropriate year.
4. In the Month/Period field, select the appropriate month or period.
5. Click the Expansion Arrow button that appears next to the 1099 Amount field.
Step 7: Print the 1099 Statements
Note: You can print 1099 statements at any time.
1. Go to Microsoft Dynamics GP Menu > Tools > Routines > Purchasing > Print 1099
2. In the 1099 Year field, type in the appropriate year.
3. Each of your 1099 report types must be printed separately. In the Print 1099 window, click the
options that you want in the 1099 Type field, and then click Print.
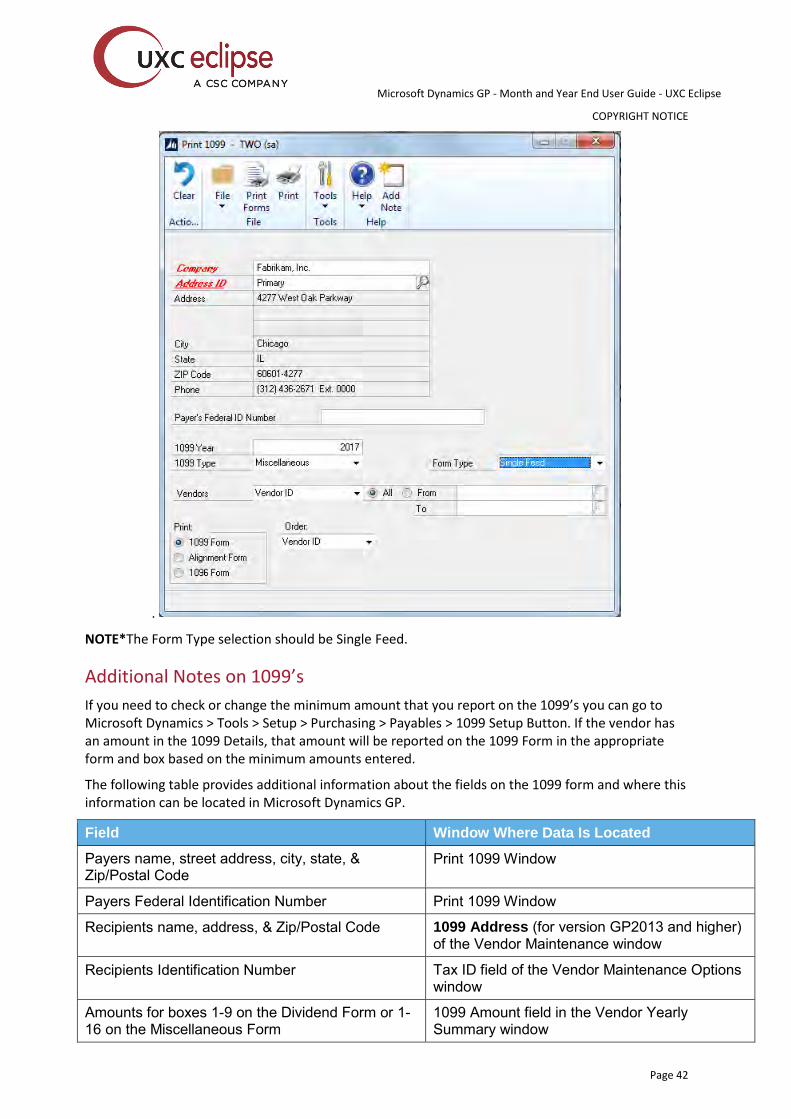
Microsoft Dynamics GP - Month and Year End User Guide - UXC Eclipse
COPYRIGHT NOTICE
Page 42
.
NOTE*The Form Type selection should be Single Feed.
Additional Notes on 1099’s
If you need to check or change the minimum amount that you report on the 1099’s you can go to Microsoft Dynamics > Tools > Setup > Purchasing > Payables > 1099 Setup Button. If the vendor has an amount in the 1099 Details, that amount will be reported on the 1099 Form in the appropriate form and box based on the minimum amounts entered.
The following table provides additional information about the fields on the 1099 form and where this information can be located in Microsoft Dynamics GP.
Field Window Where Data Is Located
Payers name, street address, city, state, & Zip/Postal Code
Print 1099 Window
Payers Federal Identification Number Print 1099 Window
Recipients name, address, & Zip/Postal Code 1099 Address (for version GP2013 and higher) of the Vendor Maintenance window
Recipients Identification Number Tax ID field of the Vendor Maintenance Options window
Amounts for boxes 1-9 on the Dividend Form or 1-16 on the Miscellaneous Form
1099 Amount field in the Vendor Yearly Summary window
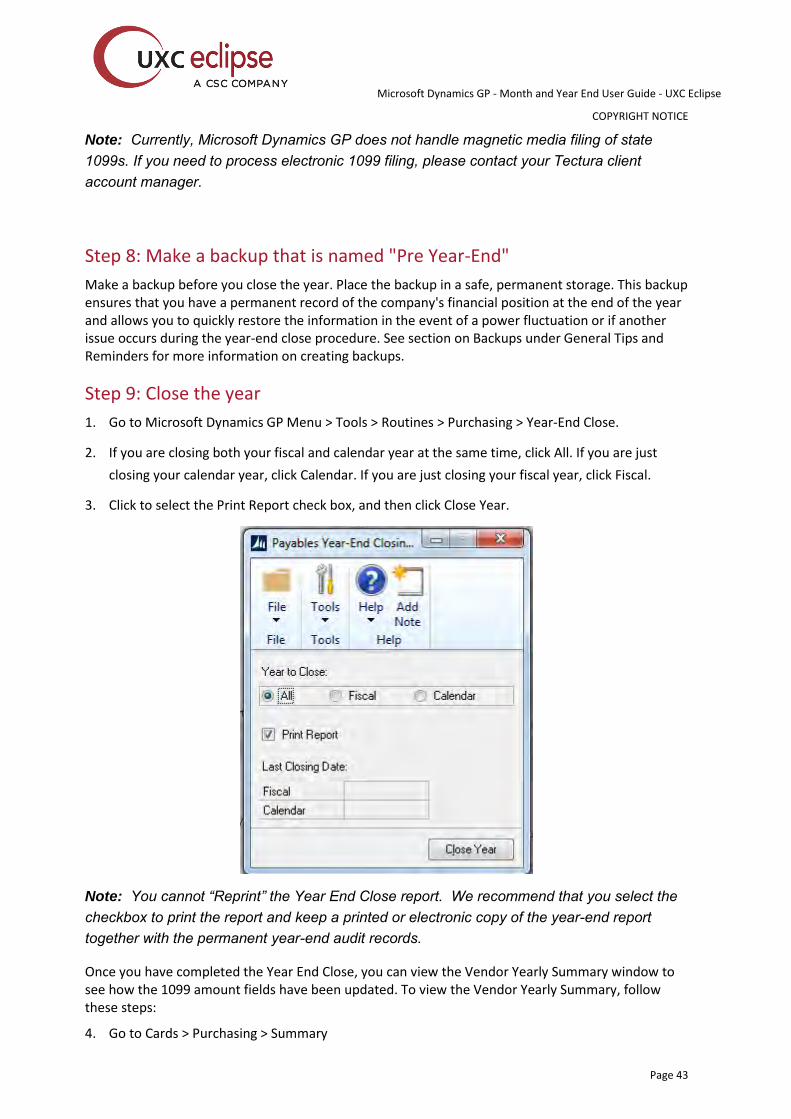
Microsoft Dynamics GP - Month and Year End User Guide - UXC Eclipse
COPYRIGHT NOTICE
Page 43
Note: Currently, Microsoft Dynamics GP does not handle magnetic media filing of state 1099s. If you need to process electronic 1099 filing, please contact your Tectura client account manager.
Step 8: Make a backup that is named "Pre Year-End"
Make a backup before you close the year. Place the backup in a safe, permanent storage. This backup ensures that you have a permanent record of the company's financial position at the end of the year and allows you to quickly restore the information in the event of a power fluctuation or if another issue occurs during the year-end close procedure. See section on Backups under General Tips and Reminders for more information on creating backups.
Step 9: Close the year
1. Go to Microsoft Dynamics GP Menu > Tools > Routines > Purchasing > Year-End Close.
2. If you are closing both your fiscal and calendar year at the same time, click All. If you are just
closing your calendar year, click Calendar. If you are just closing your fiscal year, click Fiscal.
3. Click to select the Print Report check box, and then click Close Year.
Note: You cannot “Reprint” the Year End Close report. We recommend that you select the checkbox to print the report and keep a printed or electronic copy of the year-end report together with the permanent year-end audit records.
Once you have completed the Year End Close, you can view the Vendor Yearly Summary window to see how the 1099 amount fields have been updated. To view the Vendor Yearly Summary, follow these steps:
4. Go to Cards > Purchasing > Summary
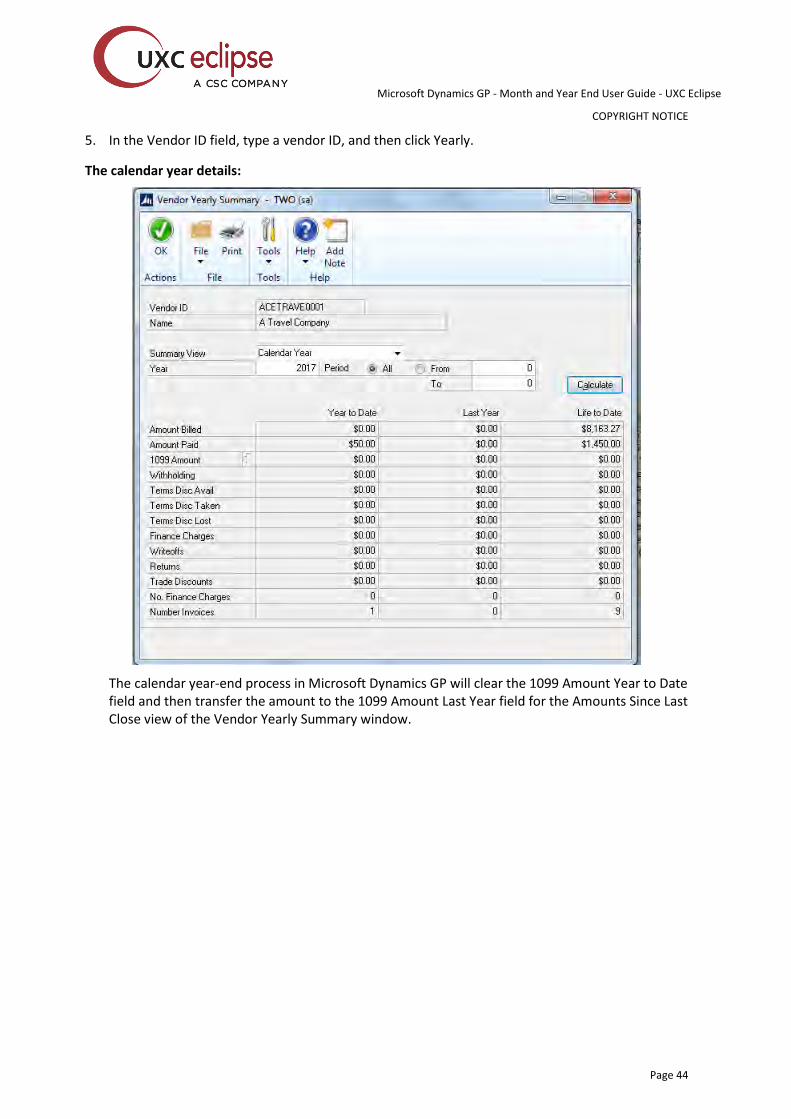
Microsoft Dynamics GP - Month and Year End User Guide - UXC Eclipse
COPYRIGHT NOTICE
Page 44
5. In the Vendor ID field, type a vendor ID, and then click Yearly.
The calendar year details:
The calendar year-end process in Microsoft Dynamics GP will clear the 1099 Amount Year to Date field and then transfer the amount to the 1099 Amount Last Year field for the Amounts Since Last Close view of the Vendor Yearly Summary window.
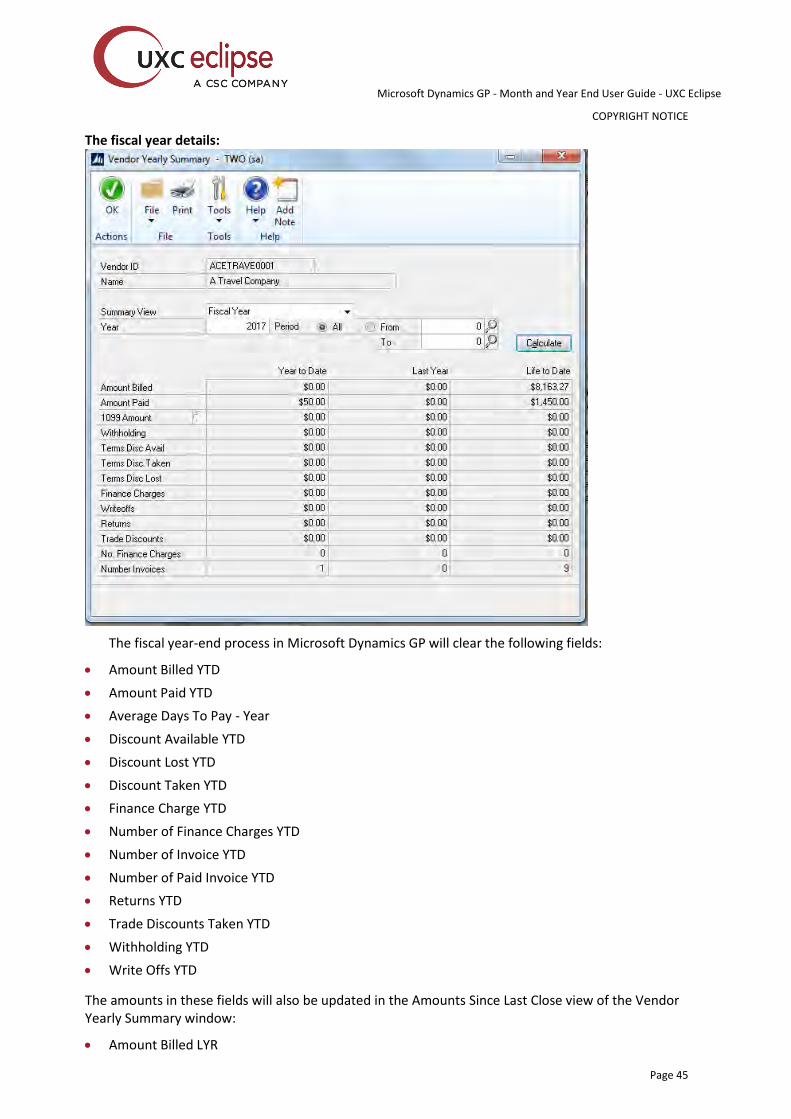
Microsoft Dynamics GP - Month and Year End User Guide - UXC Eclipse
COPYRIGHT NOTICE
Page 45
The fiscal year details:
The fiscal year-end process in Microsoft Dynamics GP will clear the following fields:
Amount Billed YTD
Amount Paid YTD
Average Days To Pay - Year
Discount Available YTD
Discount Lost YTD
Discount Taken YTD
Finance Charge YTD
Number of Finance Charges YTD
Number of Invoice YTD
Number of Paid Invoice YTD
Returns YTD
Trade Discounts Taken YTD
Withholding YTD
Write Offs YTD
The amounts in these fields will also be updated in the Amounts Since Last Close view of the Vendor Yearly Summary window:
Amount Billed LYR
Microsoft Dynamics GP - Month and Year End User Guide - UXC Eclipse
COPYRIGHT NOTICE
Page 46
Amount Paid LYR
Discount Available LYR
Discount Lost LYR
Discount Taken LYR
Finance Charge LYR
Number of Finance Charges LYR
Number of Invoice LYR
Returns LYR
Trade Discounts Taken LYR
Withholding LYR
Write Offs LYR
Step 10: Close the fiscal periods
To ensure that no one posts transactions to an incorrect period or year, use the Fiscal Periods Setup window to close any fiscal periods that are still open for the year.
1. Go to Microsoft Dynamics GP Menu > Tools > Setup > Company > Fiscal Periods.
2. Mark the periods you wish to close under the Purchasing Series.
Note: Make sure that you have posted all transactions for the period and year for all modules
before closing fiscal periods. If you later need to post transactions to a fiscal period you have
already closed, use the Fiscal Periods Setup window to reopen the period before posting the
transaction.
Step 11: Close the tax year
Note: Closing the Tax Year is only required if you use Tax Schedules and Tax Details and the related reports and Smart Lists to track your organizations Year to Date and Last Year’s Tax figures.
Follow these steps only after you complete the year-end closing procedures for all the sales and purchasing modules. Do not close the tax year as part of the Payables Management close if you are closing Receivables Management at a later time.
1. Go to Microsoft Dynamics GP Menu > Tools > Routines > Company > Tax Year-End Close
2. Click to select the Close Year check box and the Print Report check box.

Microsoft Dynamics GP - Month and Year End User Guide - UXC Eclipse
COPYRIGHT NOTICE
Page 47
3. Click Process. Click yes when you are prompted to continue with the year-end close.
Note: You cannot “Reprint” the Year End Close report. We recommend that you select the checkbox to print the report and keep a printed or electronic copy of the year-end report together with the permanent year-end audit records.
Payables Management Frequently asked questions
Q1. Are inactive vendor records cleared during year-end closing? If not, how can inactive vendor
records be removed?
A1. No, inactive vendor records are not automatically removed. To remove an inactive vendor
record, the following conditions must be true:
No current year 1099 amounts exist for the vendor
The vendor has no documents in work or history.
1. To delete all inactive vendor records that fit these criteria go to Microsoft Dynamics
GP Menu > Tools > Utilities > Purchasing > Mass Vendor Delete.
2. In the Range list, click by Vendor Status.
3. In the From list, click Inactive.
4. In the To list, click Inactive.
5. Click Process.
Q2. What should I do if I must issue a check in the new year, but I am not ready to close the old
year yet?
A2. Print the checks, but post them after you process your year-end closing. If you must post the
checks immediately, you can edit the Amount Paid fields in the Amounts Since Last Close view of
the Vendor Yearly Summary window.
Microsoft Dynamics GP - Month and Year End User Guide - UXC Eclipse
COPYRIGHT NOTICE
Page 48
Q3. What exactly does the Payables Management Year-End Close procedure do?
A3. The Calendar Year-End Close moves the 1099 Amount YTD into 1099 Last Year in the Vendor
Yearly Summary window. The Fiscal Year-End Close moves all other YTD amounts into last year
amounts.
Q4. When viewing information in the Vendor Yearly Summary window, I discovered that I have
the incorrect amount in the 1099 row for Year-to-Date Amount. How can I fix this so my 1099
forms will print the correct amount?
A4. See Step 6 of this document for methods to edit the 1099 amounts.
Q5. Is there a way to print an edit list of the 1099 vendors before I actually print the 1099
statements?
A5. The 1099 report can be printed using the Print 1099 window (Microsoft Dynamics GP Menu >
Tools > Routines > Purchasing > Click on the Print Icon). Print the 1099 forms to plain paper.
Q6. I've printed 1099 statements and some of the statements didn't have the vendor name
appearing on them. What should I do?
A6. When printing 1099 statements, the Check Name entered for the vendor record in the Vendor
Maintenance window will appear on the statement. If there isn't a vendor name appearing on
the statement, the Check Name field in this window is blank. Enter a Check Name for each
vendor or use the Report Writer to change the report to use a different field.
Payables Management Year-End Closing Tips You can print the 1099 statements using the Print 1099 window anytime and for any
calendar year.
You can enter the Payer’s Federal ID Number in the Company Setup window. Microsoft Dynamics GP Menu > Tools > Setup > Company > Company so that it defaults to the Print 1099 window
Microsoft Dynamics GP - Month and Year End User Guide - UXC Eclipse
COPYRIGHT NOTICE
Page 49
Payroll Year-End Closing Procedures In addition to the Payroll Year-End closing checklist, the following information also includes tips on installing the tax updates, preparation tasks, and instructions on reviewing your W-2’s prior to Year-End.
Latest Runtime and Service Pack Version Numbers In Microsoft Dynamics GP versions GP 2013 and GP 2015, the Year End Update includes the latest service pack as follows:
GP 2013
• https://mbs.microsoft.com/customersource/northamerica/GP/downloads/service-packs/MDGP2013_PatchReleases
• KB3194376 12.00.2130
GP 2015
• https://mbs.microsoft.com/customersource/northamerica/GP/downloads/service-packs/MDGP2015_PatchReleases
• KB3194379 14.00.01010
GP 2016
• https://mbs.microsoft.com/customersource/northamerica/GP/downloads/service-packs/MDGP2016_PatchReleases
• KB3194385 16.00.0552
*Note: the GP 2013 and GP 2015 year end update is an ALL INCLUSIVE update, just as years past. GP 2016 year end will include GP 2016 R2.
The Year End Update and Round 1 of the 2017 Tax Tables will be provided for customers on Microsoft Dynamics GP 2013, GP2015 and GP 2016.
No Year End or Tax Updates will be provided for Version GP2010
Next Updates
The 2017 Round 1 Tax Update (tax table update only) is targeted to be released the middle of December. *Do not install this until ALL pay runs for the 2016 year are completed.
After you install the Year End Update, check the Last Year-End Update date in Microsoft Dynamics GP Menu > Tools > Setup > Payroll > Payroll. It should be 11/18/2016. You can also insure that the Year End Update has been applied by checking the latest version. The version numbers are listed above.
Note: If you are unsure what version you are on Choose Help button > About Microsoft Dynamics GP.
The Year End Update Changes include the following:
• The Affordable Care Act (ACA) fixes and updates – required if you need to provide 1095-C
forms to your employees
No changes to:
• W-2 or W-3 form changes
• EFW2 (Electronic Filing) changes (deadline is now 1/31)
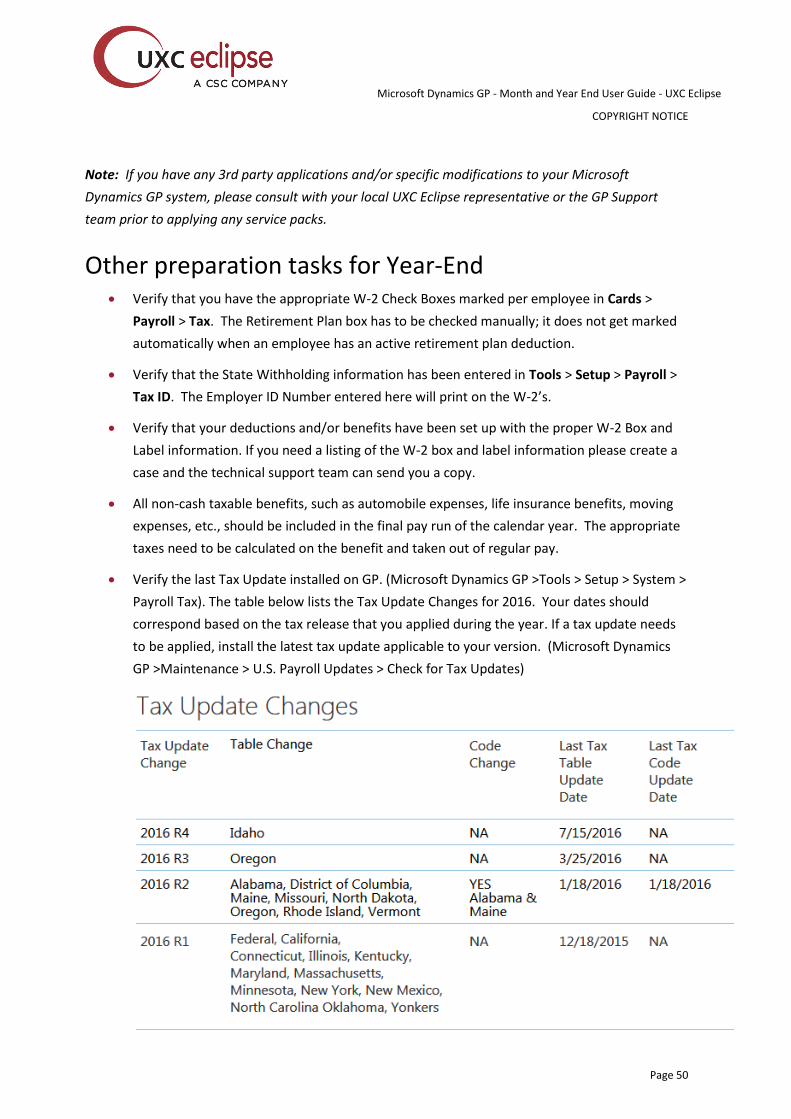
Microsoft Dynamics GP - Month and Year End User Guide - UXC Eclipse
COPYRIGHT NOTICE
Page 50
Note: If you have any 3rd party applications and/or specific modifications to your Microsoft
Dynamics GP system, please consult with your local UXC Eclipse representative or the GP Support
team prior to applying any service packs.
Other preparation tasks for Year-End Verify that you have the appropriate W-2 Check Boxes marked per employee in Cards >
Payroll > Tax. The Retirement Plan box has to be checked manually; it does not get marked
automatically when an employee has an active retirement plan deduction.
Verify that the State Withholding information has been entered in Tools > Setup > Payroll >
Tax ID. The Employer ID Number entered here will print on the W-2’s.
Verify that your deductions and/or benefits have been set up with the proper W-2 Box and
Label information. If you need a listing of the W-2 box and label information please create a
case and the technical support team can send you a copy.
All non-cash taxable benefits, such as automobile expenses, life insurance benefits, moving
expenses, etc., should be included in the final pay run of the calendar year. The appropriate
taxes need to be calculated on the benefit and taken out of regular pay.
Verify the last Tax Update installed on GP. (Microsoft Dynamics GP >Tools > Setup > System >
Payroll Tax). The table below lists the Tax Update Changes for 2016. Your dates should
correspond based on the tax release that you applied during the year. If a tax update needs
to be applied, install the latest tax update applicable to your version. (Microsoft Dynamics
GP >Maintenance > U.S. Payroll Updates > Check for Tax Updates)
Microsoft Dynamics GP - Month and Year End User Guide - UXC Eclipse
COPYRIGHT NOTICE
Page 51
Testing W-2’s before closing the year It is possible to review W-2 information without officially closing the year. These steps should only be done when a pay run is not in process:
Make a backup of the company database.
Go to Microsoft Dynamics GP Menu > Tools > Routines > Payroll > Year-End Closing.
Type the correct reporting year in the Create Year-End Wage File for Year field, and then click
Process.
You may now review W-2 information as needed under Microsoft Dynamics GP >Tools >
Routines > Payroll > Edit W-2s.
You must delete the "Year-End Wage" file before you will be able to process any payruns for
the remainder of they year. To remove the year end file follow one of these processes:
Method #1
a. In the Year-End Closing window, click to select the Create Year-End Wage File check
box, and then click Process. Make sure that you are using the current year.
b. A message will appear saying that the file already exists, would you like to delete it?
Click Delete.
c. When you are prompted to re-create the files, click Cancel. Do not click Create at this
point.
Method #2
a. Go to HR & Payroll >> Utilities >> Payroll >> Remove Year-End Information
b. Select the year to remove year-end history information for.
c. Choose Insert to add the year to the Restrictions window. You can remove year-end
information for multiple years. If you’ve selected the wrong year, select the year and
choose Remove. The year will be removed from the Restrictions window.
d. Choose Process.
Payroll Year-End Checklist 1. Complete all pay runs for the current year.
2. Complete all month and quarter end procedures for the current year. (Optional)
3. Make a backup of your company data labeled Pre Year End Wage File
4. Install the Year-End Update. If you have already installed the Year End Update you can skip this
step. It does not have to be run again.
5. Create the year-end file
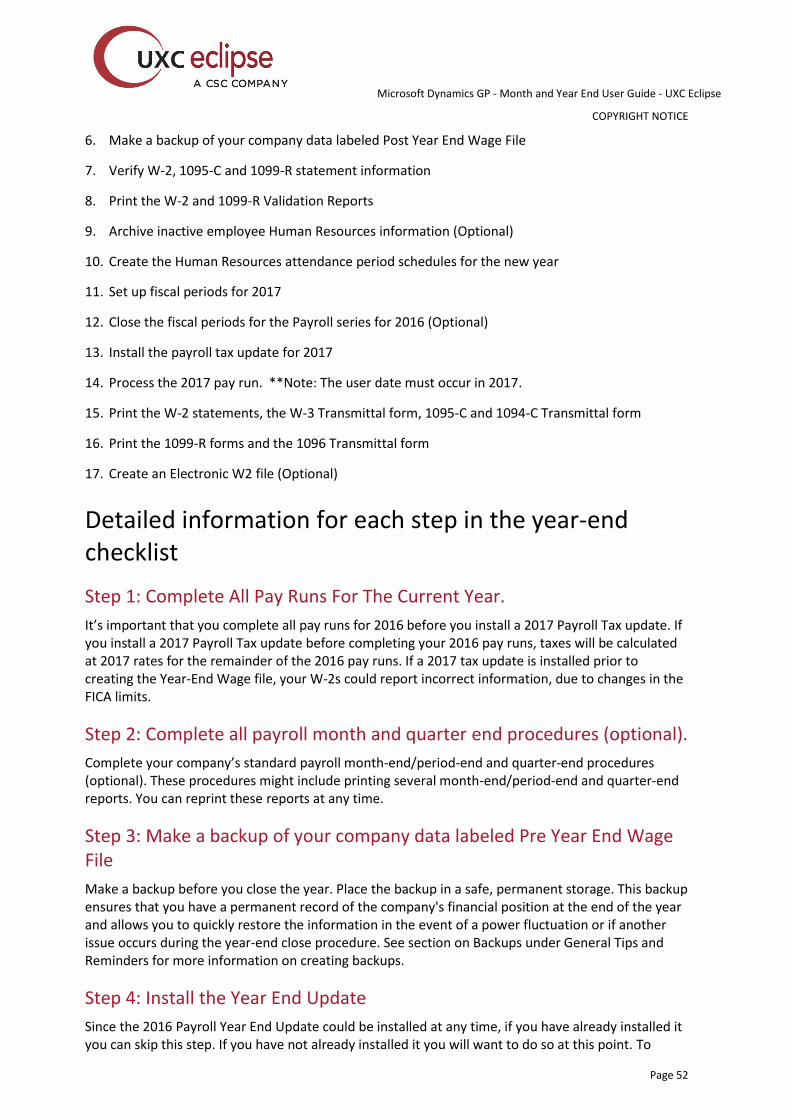
Microsoft Dynamics GP - Month and Year End User Guide - UXC Eclipse
COPYRIGHT NOTICE
Page 52
6. Make a backup of your company data labeled Post Year End Wage File
7. Verify W-2, 1095-C and 1099-R statement information
8. Print the W-2 and 1099-R Validation Reports
9. Archive inactive employee Human Resources information (Optional)
10. Create the Human Resources attendance period schedules for the new year
11. Set up fiscal periods for 2017
12. Close the fiscal periods for the Payroll series for 2016 (Optional)
13. Install the payroll tax update for 2017
14. Process the 2017 pay run. **Note: The user date must occur in 2017.
15. Print the W-2 statements, the W-3 Transmittal form, 1095-C and 1094-C Transmittal form
16. Print the 1099-R forms and the 1096 Transmittal form
17. Create an Electronic W2 file (Optional)
Detailed information for each step in the year-end checklist
Step 1: Complete All Pay Runs For The Current Year.
It’s important that you complete all pay runs for 2016 before you install a 2017 Payroll Tax update. If you install a 2017 Payroll Tax update before completing your 2016 pay runs, taxes will be calculated at 2017 rates for the remainder of the 2016 pay runs. If a 2017 tax update is installed prior to creating the Year-End Wage file, your W-2s could report incorrect information, due to changes in the FICA limits.
Step 2: Complete all payroll month and quarter end procedures (optional).
Complete your company’s standard payroll month-end/period-end and quarter-end procedures (optional). These procedures might include printing several month-end/period-end and quarter-end reports. You can reprint these reports at any time.
Step 3: Make a backup of your company data labeled Pre Year End Wage File
Make a backup before you close the year. Place the backup in a safe, permanent storage. This backup ensures that you have a permanent record of the company's financial position at the end of the year and allows you to quickly restore the information in the event of a power fluctuation or if another issue occurs during the year-end close procedure. See section on Backups under General Tips and Reminders for more information on creating backups.
Step 4: Install the Year End Update
Since the 2016 Payroll Year End Update could be installed at any time, if you have already installed it you can skip this step. If you have not already installed it you will want to do so at this point. To
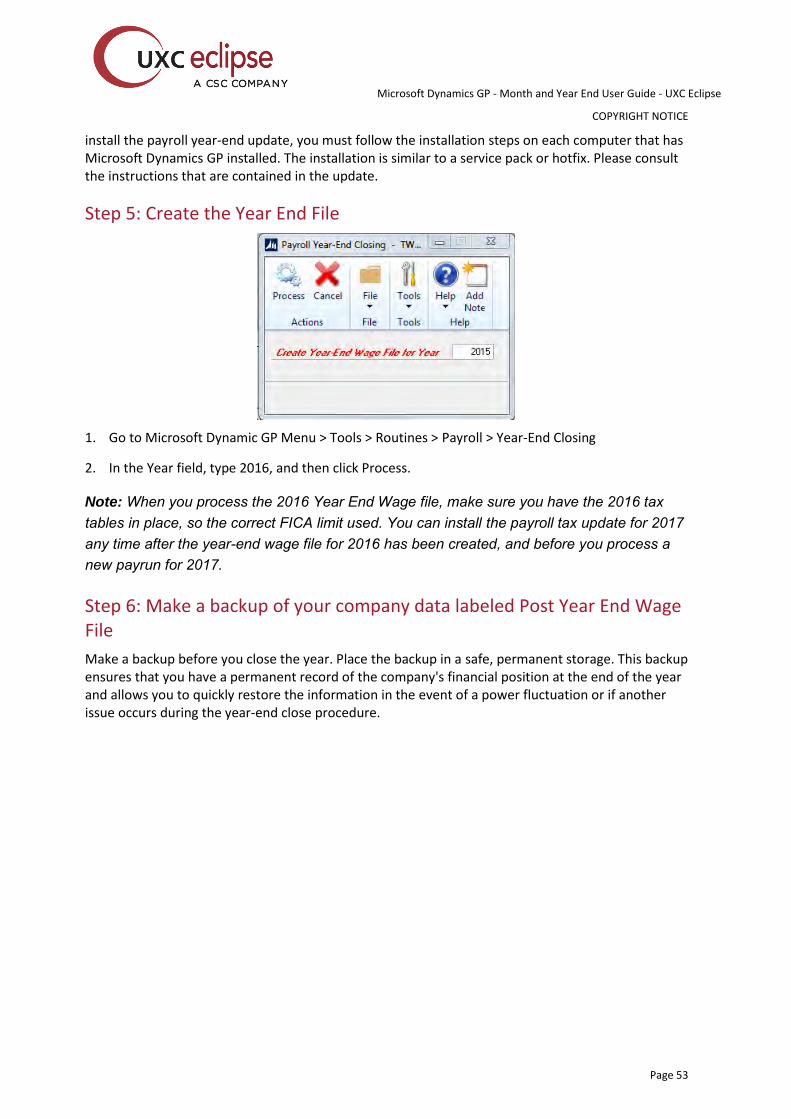
Microsoft Dynamics GP - Month and Year End User Guide - UXC Eclipse
COPYRIGHT NOTICE
Page 53
install the payroll year-end update, you must follow the installation steps on each computer that has Microsoft Dynamics GP installed. The installation is similar to a service pack or hotfix. Please consult the instructions that are contained in the update.
Step 5: Create the Year End File
1. Go to Microsoft Dynamic GP Menu > Tools > Routines > Payroll > Year-End Closing
2. In the Year field, type 2016, and then click Process.
Note: When you process the 2016 Year End Wage file, make sure you have the 2016 tax tables in place, so the correct FICA limit used. You can install the payroll tax update for 2017 any time after the year-end wage file for 2016 has been created, and before you process a new payrun for 2017.
Step 6: Make a backup of your company data labeled Post Year End Wage File
Make a backup before you close the year. Place the backup in a safe, permanent storage. This backup ensures that you have a permanent record of the company's financial position at the end of the year and allows you to quickly restore the information in the event of a power fluctuation or if another issue occurs during the year-end close procedure.
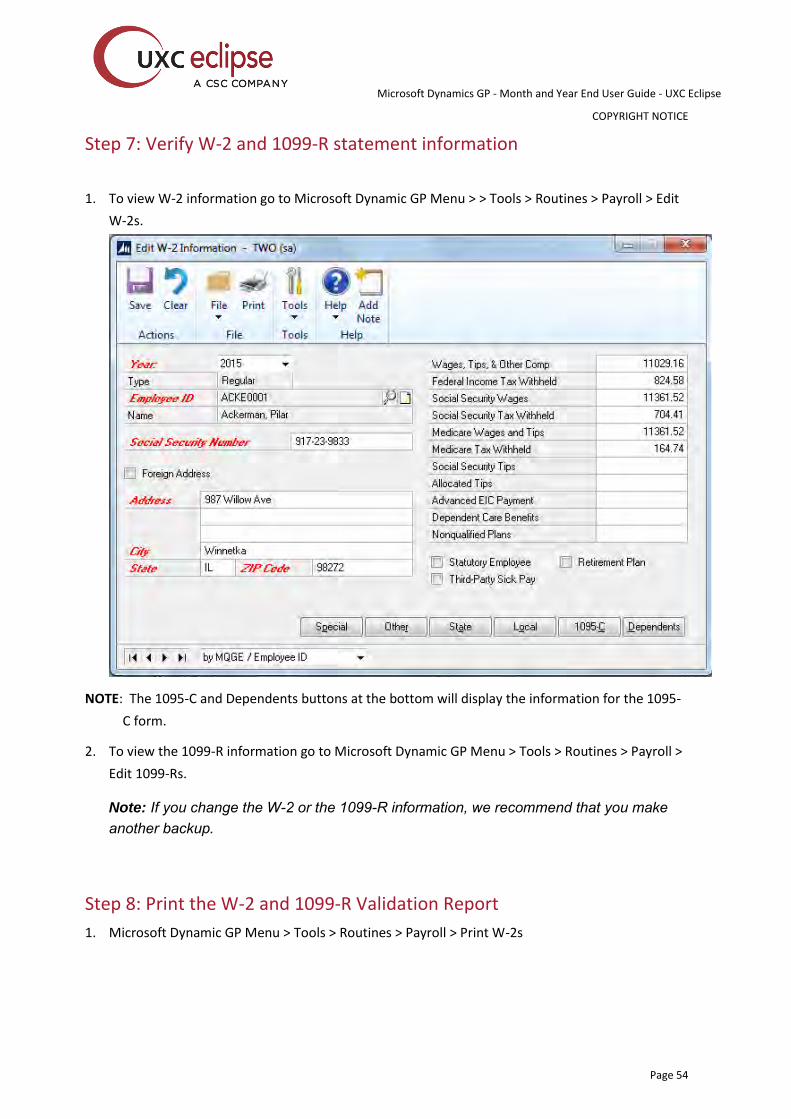
Microsoft Dynamics GP - Month and Year End User Guide - UXC Eclipse
COPYRIGHT NOTICE
Page 54
Step 7: Verify W-2 and 1099-R statement information
1. To view W-2 information go to Microsoft Dynamic GP Menu > > Tools > Routines > Payroll > Edit
W-2s.
NOTE: The 1095-C and Dependents buttons at the bottom will display the information for the 1095-
C form.
2. To view the 1099-R information go to Microsoft Dynamic GP Menu > Tools > Routines > Payroll >
Edit 1099-Rs.
Note: If you change the W-2 or the 1099-R information, we recommend that you make another backup.
Step 8: Print the W-2 and 1099-R Validation Report
1. Microsoft Dynamic GP Menu > Tools > Routines > Payroll > Print W-2s
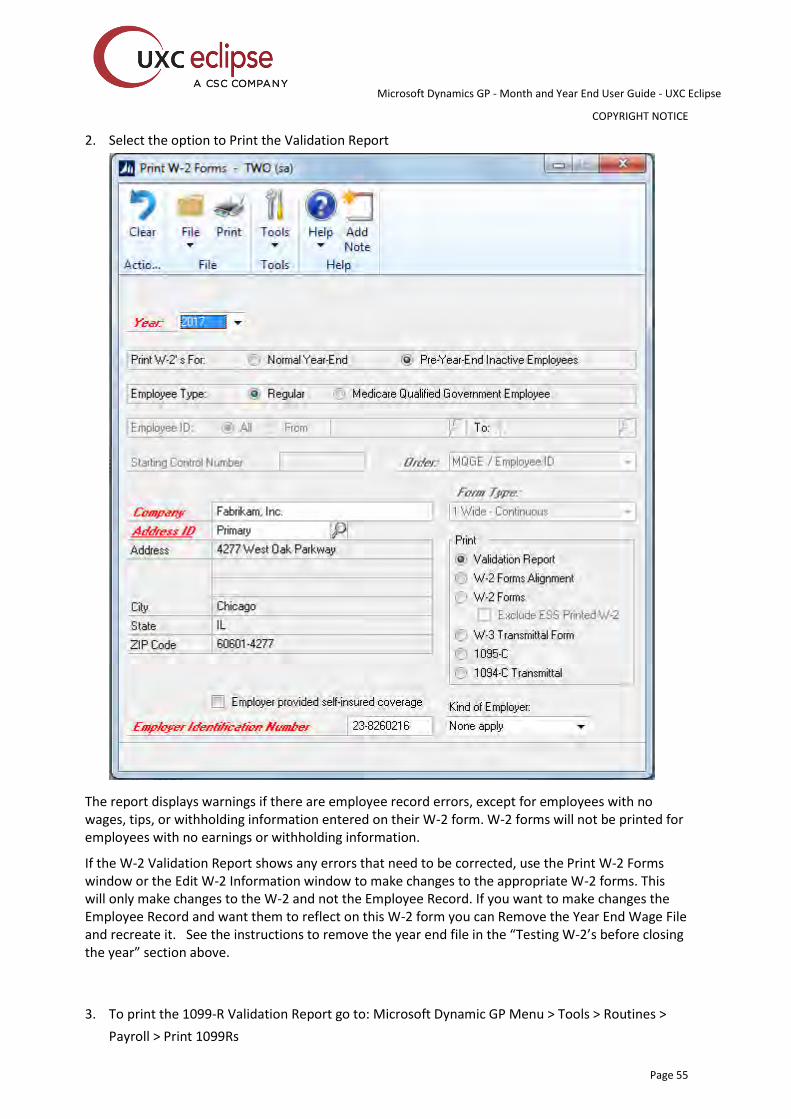
Microsoft Dynamics GP - Month and Year End User Guide - UXC Eclipse
COPYRIGHT NOTICE
Page 55
2. Select the option to Print the Validation Report
The report displays warnings if there are employee record errors, except for employees with no wages, tips, or withholding information entered on their W-2 form. W-2 forms will not be printed for employees with no earnings or withholding information.
If the W-2 Validation Report shows any errors that need to be corrected, use the Print W-2 Forms window or the Edit W-2 Information window to make changes to the appropriate W-2 forms. This will only make changes to the W-2 and not the Employee Record. If you want to make changes the Employee Record and want them to reflect on this W-2 form you can Remove the Year End Wage File and recreate it. See the instructions to remove the year end file in the “Testing W-2’s before closing the year” section above.
3. To print the 1099-R Validation Report go to: Microsoft Dynamic GP Menu > Tools > Routines >
Payroll > Print 1099Rs
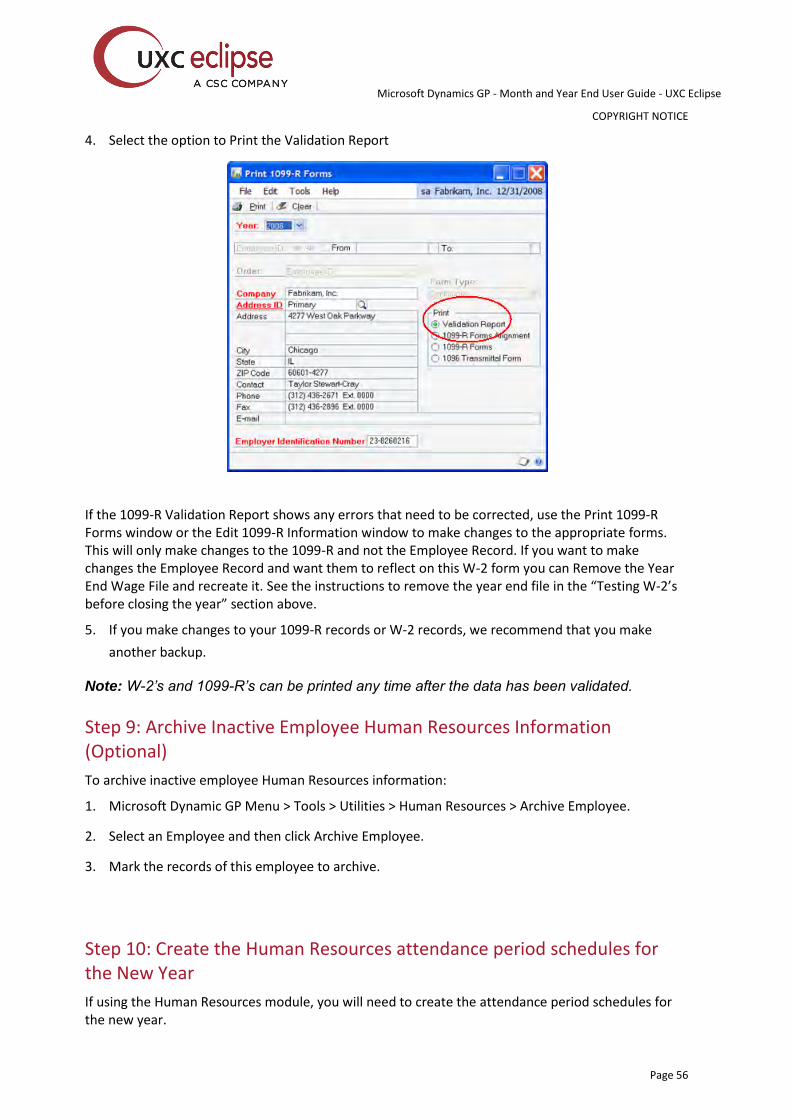
Microsoft Dynamics GP - Month and Year End User Guide - UXC Eclipse
COPYRIGHT NOTICE
Page 56
4. Select the option to Print the Validation Report
If the 1099-R Validation Report shows any errors that need to be corrected, use the Print 1099-R Forms window or the Edit 1099-R Information window to make changes to the appropriate forms. This will only make changes to the 1099-R and not the Employee Record. If you want to make changes the Employee Record and want them to reflect on this W-2 form you can Remove the Year End Wage File and recreate it. See the instructions to remove the year end file in the “Testing W-2’s before closing the year” section above.
5. If you make changes to your 1099-R records or W-2 records, we recommend that you make
another backup.
Note: W-2’s and 1099-R’s can be printed any time after the data has been validated.
Step 9: Archive Inactive Employee Human Resources Information (Optional)
To archive inactive employee Human Resources information:
1. Microsoft Dynamic GP Menu > Tools > Utilities > Human Resources > Archive Employee.
2. Select an Employee and then click Archive Employee.
3. Mark the records of this employee to archive.
Step 10: Create the Human Resources attendance period schedules for the New Year
If using the Human Resources module, you will need to create the attendance period schedules for the new year.
Microsoft Dynamics GP - Month and Year End User Guide - UXC Eclipse
COPYRIGHT NOTICE
Page 57
1. Microsoft Dynamics GP Menu > Tools > Setup > Human Resources > Attendance > Accrual
Periods
2. Change the year to 2017 and click on the pay period(s) that you use. In this screen define what
your pay periods are for 2017. Confirm that there is no lapse of dates between the 2016 pay
periods and the 2017 pay periods. To verify, open up the 2016 pay period setup screen to check
the last date of the last pay period. The next day will be the first date of the first pay period in
the next year. Also verify the Current Year field:
a) Microsoft Dynamic GP Menu > Tools > Setup > Human Resources > Attendance > Setup
3. The year should read the current year.
**Note: Based on your accrual intervals, you may need to set up accrual periods for 2018 also to
ensure that the Next Accrual Date can be populated correctly in Employee attendance
Maintenance (HR & Payroll >> Cards >> Human Resources >> Employee - Attendance >>
Maintenance)
Step 11: Set Up Fiscal Periods For 2017
To set up fiscal periods for 2017:
1. Microsoft Dynamics GP Menu > Tools > Setup > Company > Fiscal Periods
2. Type in the new year.
3. Enter the First and Last Day of the Fiscal Year.
4. Click Calculate
5. Adjust Period Beginning Dates as Needed.
6. Click OK to Save your Changes.
Note: You may want to close all periods except period 1 to prevent users from posting to future periods.
Step 12: Close the Fiscal Periods for the Payroll Series
To ensure that no one posts transactions to an incorrect period or year, use the Fiscal Periods Setup window to close any fiscal periods that are still open for the year.
1. Microsoft Dynamics GP Menu > Tools > Setup > Company > Fiscal Periods.
2. Mark the periods you wish to close under Payroll Series.
Note: Make sure that you have posted all transactions for the period and year for all modules before
closing fiscal periods. If you later need to post transactions to a fiscal period you have already closed,
use the Fiscal Periods Setup window to reopen the period before posting the transaction.
Step 13: Install the 2017 Payroll Tax Table Update
Microsoft Dynamics GP - Month and Year End User Guide - UXC Eclipse
COPYRIGHT NOTICE
Page 58
Note: Do not install the payroll tax update for 2017 until the year-end file has been created for 2016.
To install the payroll tax update for 2017:
1. Microsoft Dynamics GP Menu > Maintenance > US Payroll Updates > Check for Tax Updates
2. In the Tax Update Method window, click Automatic, and then click Next.
3. In the Authorization Number field, type your company’s authorization number, and then click Log
in.
4. Click Finish.
Note: This update can also be downloaded manually from CustomerSource:
2013
https://mbs.microsoft.com/customersource/northamerica/GP/downloads/tax-regulatory-updates/TUGP2013
2015
https://mbs.microsoft.com/customersource/northamerica/GP/downloads/tax-regulatory-updates/TUGP20105
2016
https://mbs.microsoft.com/customersource/northamerica/GP/downloads/tax-regulatory-updates/TUGP2016
Step 14: Process Pay Runs for 2017.
You can process pay runs for 2017 prior to printing W-2 forms. Your user date must be in 2017.
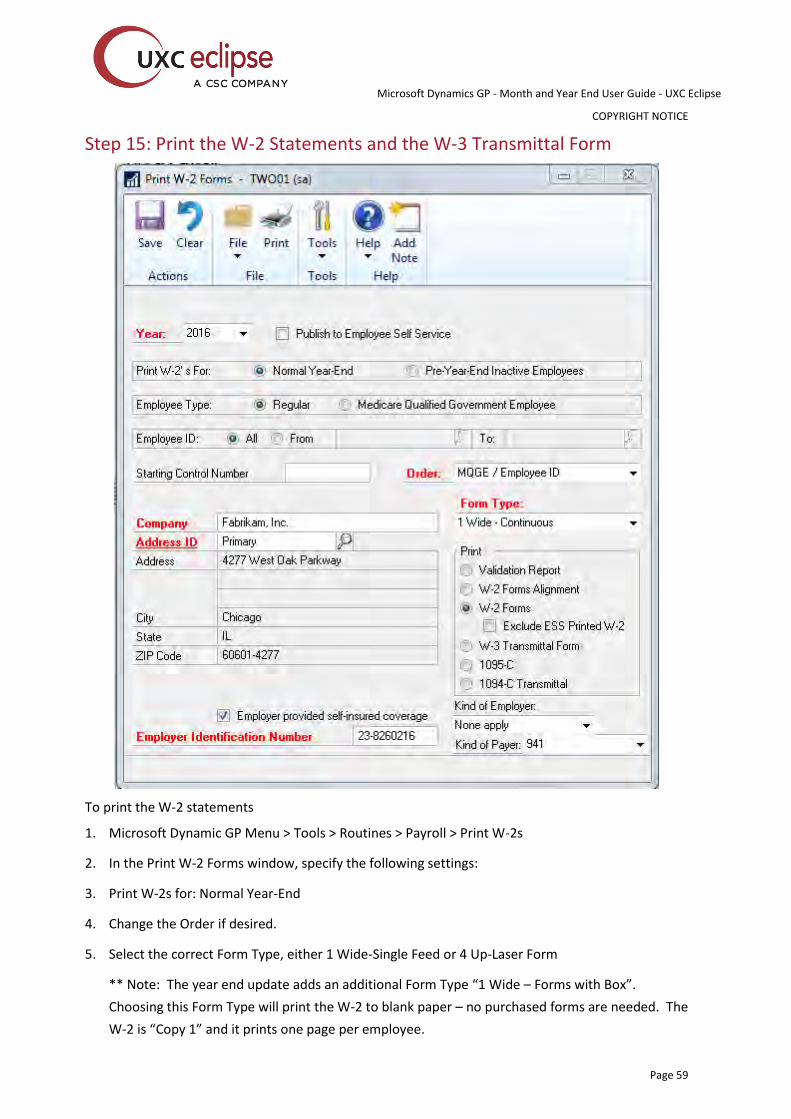
Microsoft Dynamics GP - Month and Year End User Guide - UXC Eclipse
COPYRIGHT NOTICE
Page 59
Step 15: Print the W-2 Statements and the W-3 Transmittal Form
To print the W-2 statements
1. Microsoft Dynamic GP Menu > Tools > Routines > Payroll > Print W-2s
2. In the Print W-2 Forms window, specify the following settings:
3. Print W-2s for: Normal Year-End
4. Change the Order if desired.
5. Select the correct Form Type, either 1 Wide-Single Feed or 4 Up-Laser Form
** Note: The year end update adds an additional Form Type “1 Wide – Forms with Box”.
Choosing this Form Type will print the W-2 to blank paper – no purchased forms are needed. The
W-2 is “Copy 1” and it prints one page per employee.
Microsoft Dynamics GP - Month and Year End User Guide - UXC Eclipse
COPYRIGHT NOTICE
Page 60
6. Print: W-2 Forms
7. Select Kind of Employer if needed
8. Select Kind of Payee if needed.
9. Click Print.
Note: You can print employee W-2 statements as many times as you have to.
To print the W-3 Transmittal Form:
10. Microsoft Dynamic GP Menu > Tools > Routines > Payroll > Print W-2s
11. In the Print W-2 Forms window, select the option to print the W-3 Transmittal Form
12. Click Print.
Note: You can print the W-3 Transmittal Form as many times as you have to.
To print the 1095-C Form:
13. Microsoft Dynamic GP Menu > Tools > Routines > Payroll > Print W-2s
14. In the Print W-2 Forms window, select the option to print the 1095-C
15. If you are self-insured mark the box for Employer provided self-insured coverage. This will result
in the Dependents printing on the 1095-C.
16. Click Print.
Note: You can print the 1095-C form as many times as you have to
To print the 1094-C Transmittal Form:
17. Microsoft Dynamic GP Menu > Tools > Routines > Payroll > Print W-2s
18. In the Print W-2 Forms window, select the option to print the 1094-C Transmittal Form
19. Click Print.
Note: You can print the 1094-C transmittal form as many times as you have to
Step 16: Print the 1099-R forms and the 1096 Transmittal form
1. To print the 1099 forms go to Microsoft Dynamic GP Menu > Tools > Routines > Payroll > Print
1099-Rs
2. In the Print 1099-R Forms window, select the year, click 1099-R Forms, and then click Print.
Note: You can print employee 1099-R forms as many times as needed.
To print the 1096 Transmittal form:
3. Microsoft Dynamic GP Menu > Tools > Routines > Payroll > Print 1099-Rs
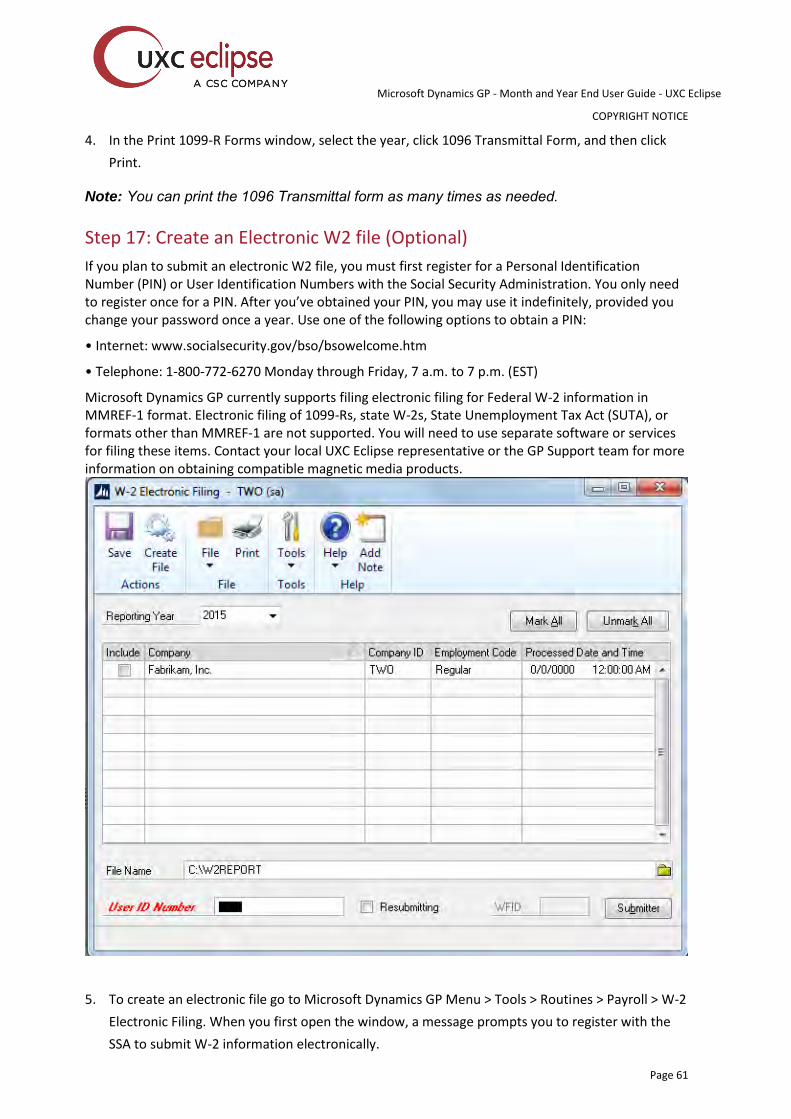
Microsoft Dynamics GP - Month and Year End User Guide - UXC Eclipse
COPYRIGHT NOTICE
Page 61
4. In the Print 1099-R Forms window, select the year, click 1096 Transmittal Form, and then click
Print.
Note: You can print the 1096 Transmittal form as many times as needed.
Step 17: Create an Electronic W2 file (Optional)
If you plan to submit an electronic W2 file, you must first register for a Personal Identification Number (PIN) or User Identification Numbers with the Social Security Administration. You only need to register once for a PIN. After you’ve obtained your PIN, you may use it indefinitely, provided you change your password once a year. Use one of the following options to obtain a PIN:
• Internet: www.socialsecurity.gov/bso/bsowelcome.htm
• Telephone: 1-800-772-6270 Monday through Friday, 7 a.m. to 7 p.m. (EST)
Microsoft Dynamics GP currently supports filing electronic filing for Federal W-2 information in MMREF-1 format. Electronic filing of 1099-Rs, state W-2s, State Unemployment Tax Act (SUTA), or formats other than MMREF-1 are not supported. You will need to use separate software or services for filing these items. Contact your local UXC Eclipse representative or the GP Support team for more information on obtaining compatible magnetic media products.
5. To create an electronic file go to Microsoft Dynamics GP Menu > Tools > Routines > Payroll > W-2
Electronic Filing. When you first open the window, a message prompts you to register with the
SSA to submit W-2 information electronically.
Microsoft Dynamics GP - Month and Year End User Guide - UXC Eclipse
COPYRIGHT NOTICE
Page 62
6. Enter the Reporting Year
7. In the W2 Electronic Filing window, click to select the check box that is next to each company
that you want to include in your electronic file.
Note: If information for a selected company is incomplete, a yellow alert icon will appear in the
scrolling window heading. Click the icon to open the Electronic Filing Employer Information Window.
Enter the missing employer information and verify the Kind of Employer selection. Choose OK to close
the window.
8. Enter your PIN or User Identification Number.
9. Click Submitter. The Electronic Filer Submitter Information window opens.
10. Enter the authorized submission information.
11. Close the Electronic Filer Submitter Information window.
12. Change the file destination information in the File Name field if it is required.
13. Click Create File.
Note: We recommend using AccuWage to check all EFW2 files before sending. This is a free tool available from the SSA website (www.socialsecurity.gov/employer/accuwage).
Payroll Year-End Closing Frequently Asked Questions
Q7. What will happen if I’ve already closed the 2016 Payroll tax year and do not install the 2017
tax update right away?
A1. Until you install the 2017 tax update containing FICA, Federal, and State tax changes, the tax
calculations for your 2017 pay runs may be incorrect.
Q8. If I use multiple companies with my accounting system, do I have to install the year-end tax
update for each company?
A7. No, the program automatically will update the system tables containing Payroll tax information.
All of the companies will reflect the update. However, you do need to install the year end update
on each workstation.
Q9. I need to print my 2017 checks before I can print W-2s. What should I do?
A8. After you create the Year-End Wage file, close the year. Install the 2017 tax update, and then
you can print checks.
Q10. What is the source of the Employer Identification Number that appears as a default in the
Print W-2 Forms window?
Microsoft Dynamics GP - Month and Year End User Guide - UXC Eclipse
COPYRIGHT NOTICE
Page 63
A9. After In the Print W-2 Forms window (Microsoft Dynamics GP menu >> Tools >> Routines >>
Payroll >> Print W-2s), select the Medicare Qualified Government Employee option in the
Employee Type box. The W-2 statements for Medicare Qualified Government Employees are
printed separately.
Q11. Can I print four W-2 statements to a page?
A10. You can print four W-2 statements to a page using the 4-Up Laser Form. Four statements for
the same employee will print per page. The form contains Copy B, Copy C, and two Copy 2 forms.
Copy A and Copy D must be printed separately. You can also print W-2s in the 1-Wide Single Feed
forms. The 1-Wide Continuous, and 2-Wide Continuous are for dot matrix printers.
Q12. How do I print multiple W-2 statements for each employee?
A11. There are two ways:
1. Using Laser form “sets” – To print all the required forms for each employee at a time (you’re
using laser form “sets”), simply enter the number of copies you need to print in the “number of
copies” field in the Print dialog box that appears after you choose Print in the Print W-2 Forms
window.
2. Using Laser form “sheets” – To print all forms for all employees repeat the Printing W-2
Statements procedure as many times as necessary to print the required number of copies.
Alternatively, print the W-2s to the screen, then click the Print button for each group of sheets.
Q13. How do I verify Federal withholding taxes?
A12. If an employee’s Federal withholding taxes seem incorrect or you want to verify the amounts,
follow these steps to help pinpoint the error source.
1. Verify your employee’s records in the Payroll Employee Tax Maintenance window.
2. Go to Cards > Payroll > Tax.
3. Check to see if any additional amounts have been entered in the Additional Withholding and
Estimated Withholding fields.
4. Open the Deduction Setup window: Microsoft Dynamics GP Menu > Tools > Setup > Payroll >
Deduction.
5. Verify that all Deductions are marked as TSA if they are supposed to be.
6. Be sure that the pay frequency of the employee’s pay codes matches the pay period of your
company. For example, if you pay your employees semimonthly, the pay frequency for the
employee’s pay code, deduction, and benefit should also be semimonthly.
Q14. How can I edit FICA Social Security wage limits?

Microsoft Dynamics GP - Month and Year End User Guide - UXC Eclipse
COPYRIGHT NOTICE
Page 64
A13. If FICA amounts are being printed incorrectly on W2s – for example, if your employee has
reached the FICA limit but the form doesn’t reflect that status – you may have tried to edit the
information but find that the forms still print the wrong information. That’s because the FICA
Social Security limit is hard-coded and can’t be edited for W-2 purposes. Instead, check to see if
the year-end wage file was created with old tax tables and an old FICA Social Security limit. If so,
you won’t be able to edit the figures so they print correctly on W-2s. To correct the information,
you’ll need to either re-create the year-end wage file after making changes in the Payroll Tax
Setup window or using the Edit Social Security Wage Limit window.
To change the information in the Payroll Tax Setup window:
1. Microsoft Dynamics GP Menu > Tools > Setup > System > Payroll Tax
2. Edit the FICA limit and re-create the year-end wage file.
To add the Edit Social Security Wage Limit window to the Navigation Pane, select the drop down button for configure buttons or right click in the navigation pane.
1. Select Add > Add Window.
2. Expand Microsoft Dynamics GP, and then expand Payroll.
3. Highlight Edit Social Security Wage Limit under Payroll and click Add. Then click Done.
Choose the Edit Social Security Wage Limit window from the shortcut bar, choose 2015, and change the wage limit to the correct amount for 2015. Click Ok.
Changes will be reflected on the W-2s but not in the Payroll Tax Setup window. This will allow you to proceed with 2016 pay runs without needing to change information if the 2016 tax update has been installed.
Q15. The correct Last Year-End Update date doesn’t appear in the Payroll Setup window, even
though I installed the 2016 year-end update and see the form changes included in the update.
Is there something I need to do?
A14. The Last Year-End Update date is read from the LastYearEndUpdate= line in the Dex.ini file.
When you install a year-end update on a particular computer, the Dex.ini file on that computer is
updated. However, in some Windows Terminal Server deployments, there is only a single
installation of Microsoft Dynamics GP, which many users access. Each user typically has a Dex.ini
file in their home Windows folder. Installing the year-end update on the server doesn’t update
each user’s Dex.ini file. In these situations, you should manually update each user’s Dex.ini file so
that the appropriate line reads LastYearEndUpdate=11/13/2015
Q16. After running the reconcile function for an employee, the FUTA and SUTA Taxable amount is
being changed in their Employee Summary screen. Why?
A15. The change is for deduction amounts that were setup to be SUTA Taxable in the
Unemployment Tax Setup but are TSA deductions, and therefore being deducted from the SUTA
Wages. The reconcile feature will not calculate the amounts of TSA deductions which are set up
to be included in taxable wages in the Unemployment Setup window (Microsoft Dynamics GP
Microsoft Dynamics GP - Month and Year End User Guide - UXC Eclipse
COPYRIGHT NOTICE
Page 65
Menu > Tools > Setup > Payroll > Unemployment). Instead it will reduce the amounts by the
employee’s current TSA amounts.
The FUTA/SUTA amounts on the Employee Summary window are listed for informational purposes only. These amounts will not be used to calculate nor will they affect the FUTA and SUTA reports. The amounts displayed on the summary window, however, will appear on the Detailed Employee list report.
We recommend running the reconcile process (Microsoft Dynamics GP Menu > Tools > Utilities > Payroll > Reconcile) and only printing the report the first time, not actually reconciling. If you have selected TSA deductions to be included as taxable wages, disregard any proposed changes to FUTA or SUTA wages on the report. If you have not, research proposed changes to FUTA or SUTA wages. In either case, you should research any proposed changes to any other amounts on the report.
Q17. In both the Edit W-2 Information - USA and the Print W-2 Forms - USA windows, there is a
list from which to select the year. Is there a limit to the number of years? Also, is each year
simply added to the Year-End Wage File, or does each year have its own Year-End Wage File
that is created during the year-end closing process?
A16. During the Payroll year-end closing process, the Year-End Wage File is created. Multiple years
of history can be saved. However, if you choose the same year (for example, 2015) twice when
performing this process, the previous file will be written over, or replaced, by the new file. As
long as the correct year is entered each time, the new year's information will be added to the
file. This information can be removed under Utilities-Payroll for any year or years.
Q18. In the Year- End Wage Report - USA window, there is a selection list that is used to specify
the year for which you wish to print the Year-End Employee Wage report. Does this mean that
the Year-End Wage File is not removed after printing W2 statements? Using Report Writer, can
I access the Year-End Employee Wage Report and create a report showing year-end
information for multiple years?
A17. The information for each year is kept in the system and can be accessed through Report
Writer.
Q19. I have printed a Year-End Wage Report and now want to run another pay run within the year
for which I created the Year-End Wage Report. How can I do this?
A18. You must remove the year-end information, make the changes and then create the Year-End
Wage file again.
1. To remove the Year End Wage File, go to Microsoft Dynamic GP Menu > Tools > Utilities >
Payroll > Remove Year End Information
2. To reclose the year, go to Microsoft Dynamic GP Menu > Tools > Routines > Payroll > Year End
Closing
3. Enter the year that you want to close and click Process.
Microsoft Dynamics GP - Month and Year End User Guide - UXC Eclipse
COPYRIGHT NOTICE
Page 66
Q20. I want to make a change to an employee record in the closed year to correct their W-2, but I
have already processed payroll in the new year. Can I do that?
A19. Yes, you may recreate the Year-End Wage file even after you have run payroll for the next
year. The payroll module is date-sensitive. Therefore, your payroll and W-2 reports will only
include the wages that apply to the year that you are reporting. The process is the same as in the
previous question.
A20. Note: You will want to be careful on what you are changing on the employee record after the
year has been closed and the tax tables have been updated for the new year. The incorrect FICA
limits could be used
Q21. How do I print W-2 statements for Medicare Qualified Government employees?
In the Print W-2 Forms window (Microsoft Dynamics GP menu >> Tools >> Routines >> Payroll >> Print W-2s), select the Medicare Qualified Government Employee option in the Employee Type box. The W-2 statements for Medicare Qualified Government Employees are printed separately.
Microsoft Dynamics GP - Month and Year End User Guide - UXC Eclipse
COPYRIGHT NOTICE
Page 67
Fixed Assets Year-End Closing Procedures Note: The Fixed Assets module is not date sensitive. You must run the Fixed Asset Year End routine prior to processing any Fixed Asset transactions for the new year. It is also very important that you close Fixed Assets prior to processing the Year End in General Ledger.
Fixed Asset Management year-end checklist 1. Complete the year-end closing procedures for Payables Management
2. Enter all the fixed asset transactions for the current fiscal year
3. Depreciate all assets through the last day of the current fiscal year
4. Perform the GL Posting (GL Interface) process (Optional)
5. Print any year-end reports that you want to keep as part of the year-end financial records
6. Verify that the Fixed Assets calendar is built correctly (Optional)
7. Verify that the quarters are set up correctly for all the fiscal years
8. Make a backup
9. Perform the fixed assets year-end closing routine
Detailed information for each step in the year-end checklist
Step 1: Perform all the year-end closing procedures for Payables Management
Make sure you have completed the Payables Management Year End Closing Routine. This guarantees that all the outstanding fixed asset transactions have been capitalized.
Step 2: Enter all the fixed asset transactions for the current fiscal year
Post all additions, changes, transfers, and retirements for the current fiscal year.
Note: Transfers and undo retirement transactions should never be performed in a historical year.
Step 3: Depreciate all assets through the last day of the current fiscal year
1. Go to Microsoft Dynamics GP Menu > Tools > Routines > Fixed Assets > Depreciate
2. In the Depreciation Target Date box, type the last date of the current fiscal year.
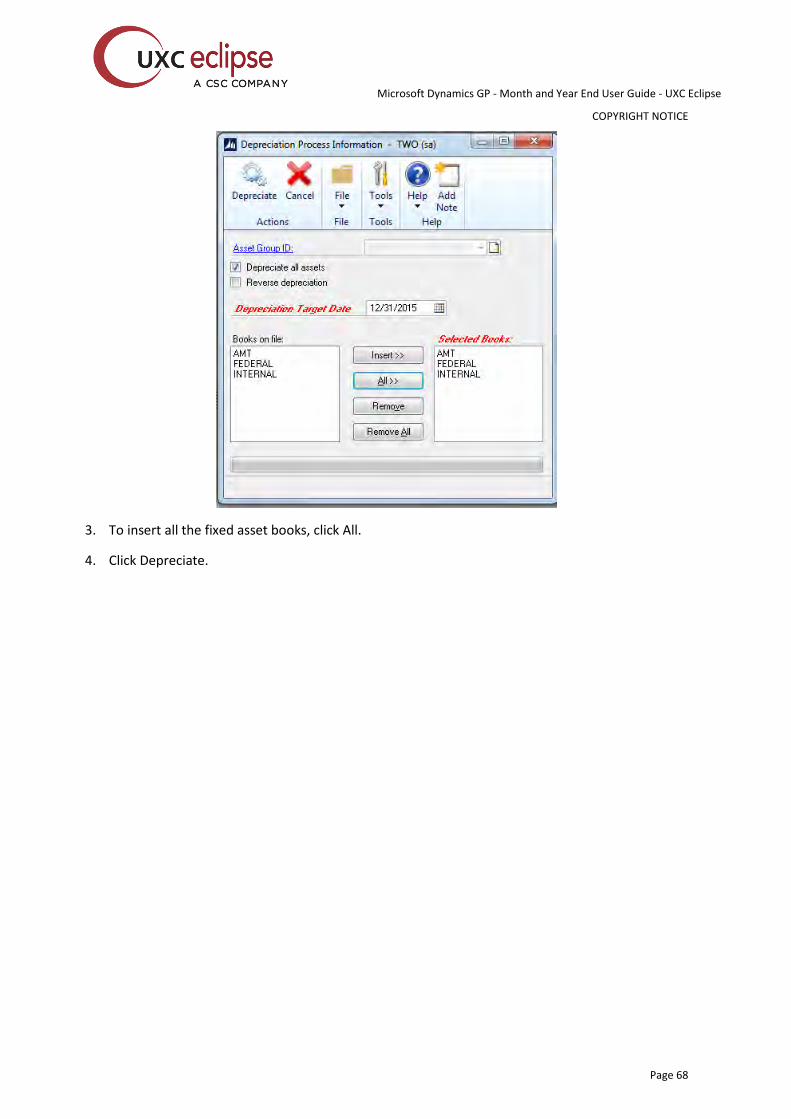
Microsoft Dynamics GP - Month and Year End User Guide - UXC Eclipse
COPYRIGHT NOTICE
Page 68
3. To insert all the fixed asset books, click All.
4. Click Depreciate.
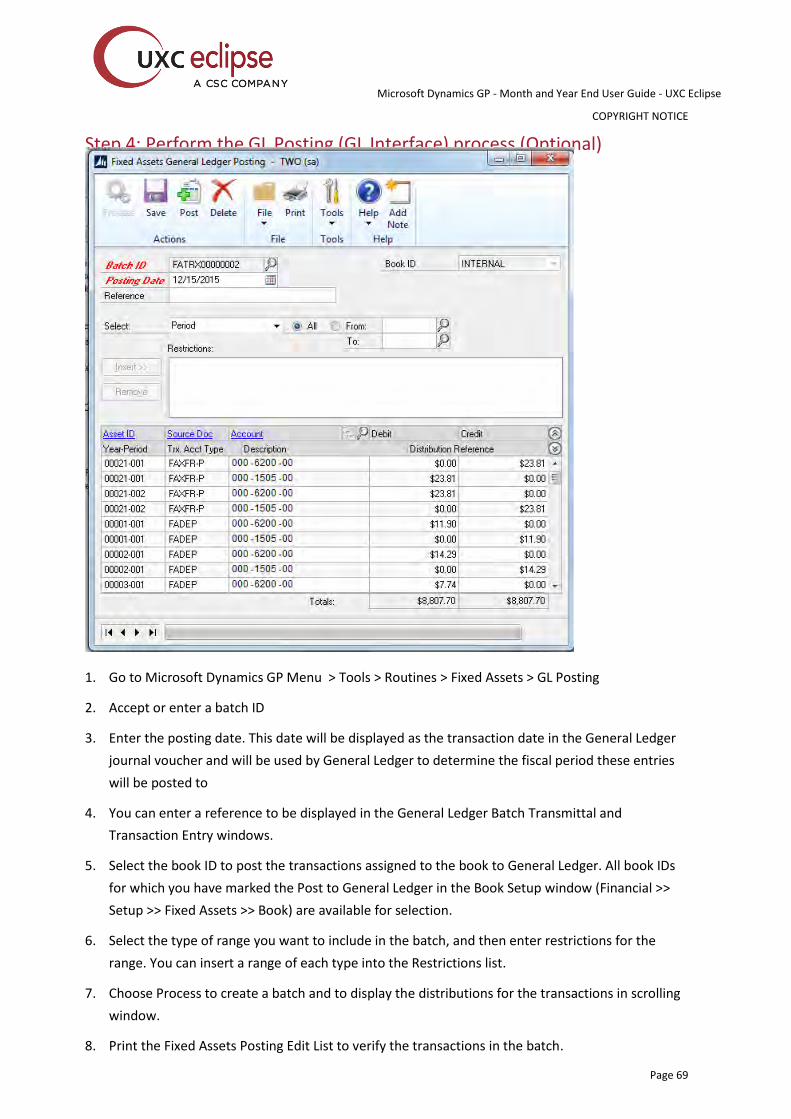
Microsoft Dynamics GP - Month and Year End User Guide - UXC Eclipse
COPYRIGHT NOTICE
Page 69
Step 4: Perform the GL Posting (GL Interface) process (Optional)
1. Go to Microsoft Dynamics GP Menu > Tools > Routines > Fixed Assets > GL Posting
2. Accept or enter a batch ID
3. Enter the posting date. This date will be displayed as the transaction date in the General Ledger
journal voucher and will be used by General Ledger to determine the fiscal period these entries
will be posted to
4. You can enter a reference to be displayed in the General Ledger Batch Transmittal and
Transaction Entry windows.
5. Select the book ID to post the transactions assigned to the book to General Ledger. All book IDs
for which you have marked the Post to General Ledger in the Book Setup window (Financial >>
Setup >> Fixed Assets >> Book) are available for selection.
6. Select the type of range you want to include in the batch, and then enter restrictions for the
range. You can insert a range of each type into the Restrictions list.
7. Choose Process to create a batch and to display the distributions for the transactions in scrolling
window.
8. Print the Fixed Assets Posting Edit List to verify the transactions in the batch.
Microsoft Dynamics GP - Month and Year End User Guide - UXC Eclipse
COPYRIGHT NOTICE
Page 70
9. In the scrolling window, you can change the account. You also can change the distribution
reference if you selected the Post in Detail option in the Fixed Asset Company Setup window.
10. If you are not ready to post the batch, choose Save. If the distributions are not correct, choose
Delete.
11. If you are ready to post the batch, choose Post. A batch using the batch number assigned to this
batch will be created in General Ledger. You can print the Fixed Assets Posting Journal report
after the posting process is complete. You also can reprint this report.
12. You can edit or post this batch in General Ledger.
Note: You may want to keep this report as part of the year-end financial records.
Step 5: Print any year-end reports that you want to keep as part of the year-end financial records
Note: The year-to-date depreciation amounts for previous fiscal years are not kept in Fixed Asset Management. Therefore, you must print any reports that contain this information before you close the year.
There are several reports available for fixed assets. We recommend that you print the following reports:
Annual Activity (Reports > Fixed Assets > Activity > Annual Activity)
Additions (Reports > Fixed Assets > Transaction > Additions)
Retirements (Reports > Fixed Assets > Transaction > Retirements)
Transfers (Reports > Fixed Assets > Transaction > Transfers)
Depreciation Ledger (Reports > Fixed Assets > Depreciation > Depreciation Ledger)
Property Ledger (Reports > Fixed Assets > Inventory > Property Ledger)
Fixed Assets to General Ledger Reconciliation (Reports > Fixed Assets > Activity> Fixed Assets to
General Ledger Reconciliation)
If you have more than one fixed asset book, we recommend that you also print the following reports:
Book to Book Reconciliation (Reports > Fixed Asset > Comparison > Book to Book Reconciliation)
Book to Book YTD Depreciation Comparison (Reports > Fixed Asset > Comparison > Book to Book
YTD Depreciation)
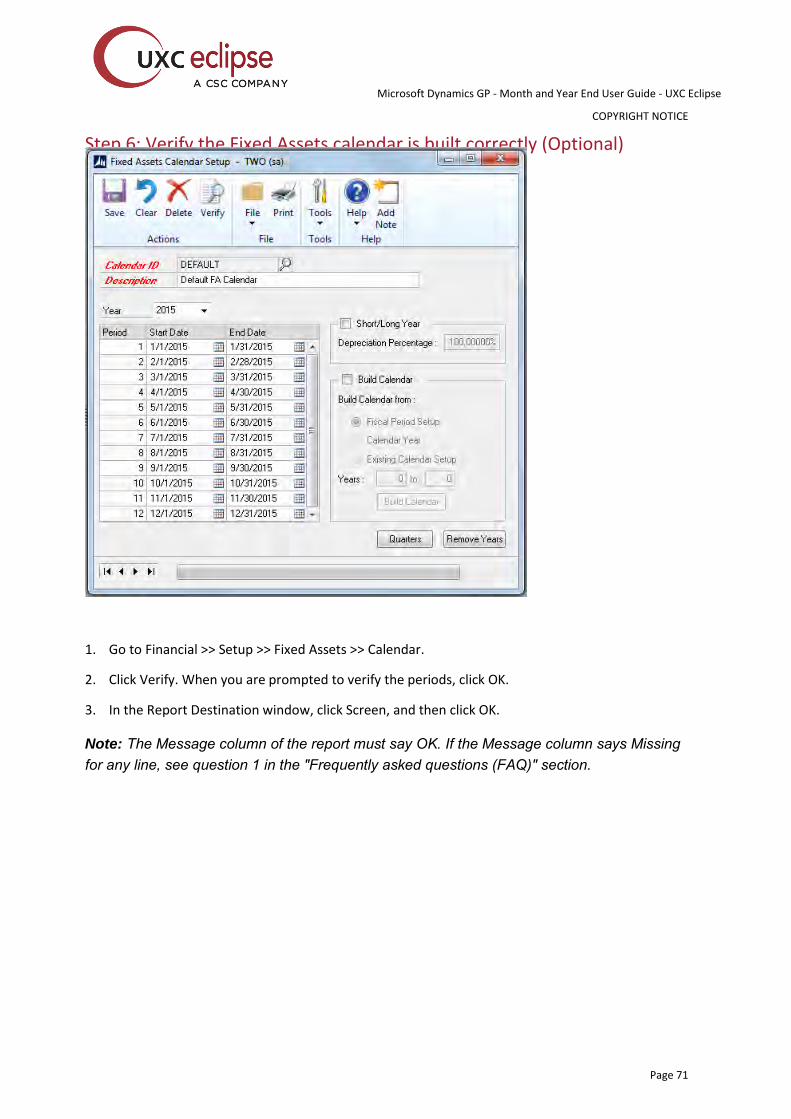
Microsoft Dynamics GP - Month and Year End User Guide - UXC Eclipse
COPYRIGHT NOTICE
Page 71
Step 6: Verify the Fixed Assets calendar is built correctly (Optional)
1. Go to Financial >> Setup >> Fixed Assets >> Calendar.
2. Click Verify. When you are prompted to verify the periods, click OK.
3. In the Report Destination window, click Screen, and then click OK.
Note: The Message column of the report must say OK. If the Message column says Missing for any line, see question 1 in the "Frequently asked questions (FAQ)" section.
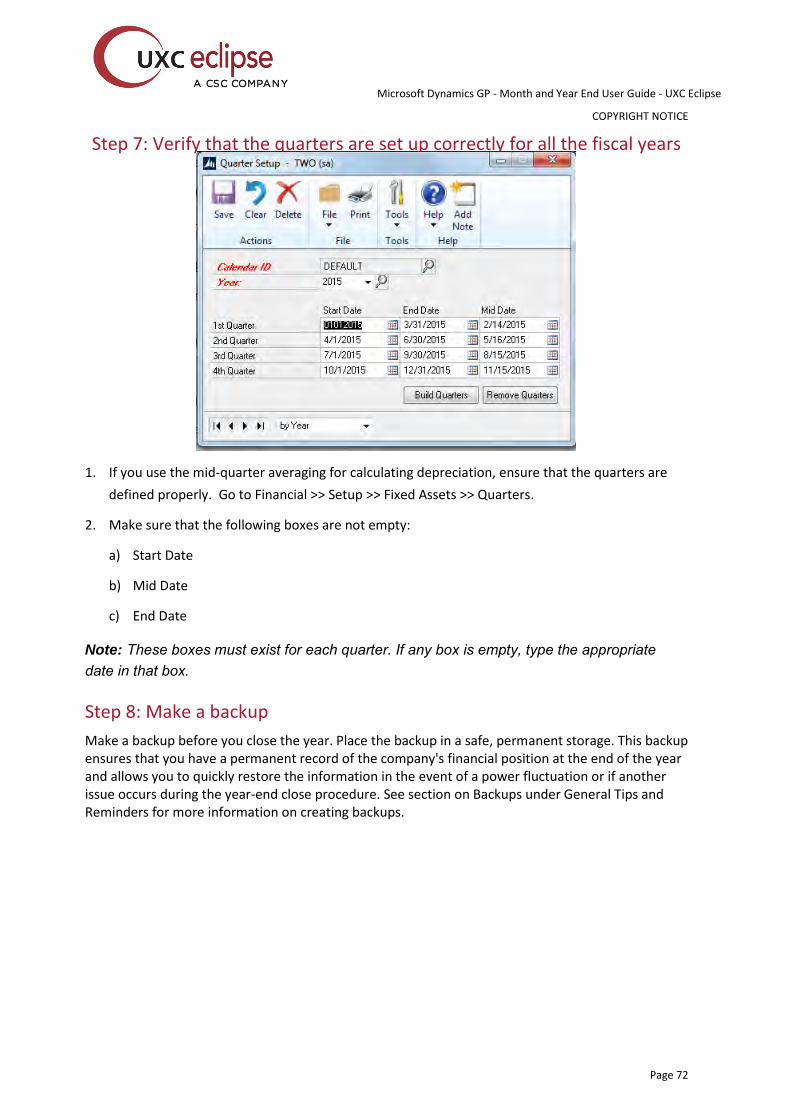
Microsoft Dynamics GP - Month and Year End User Guide - UXC Eclipse
COPYRIGHT NOTICE
Page 72
Step 7: Verify that the quarters are set up correctly for all the fiscal years
1. If you use the mid-quarter averaging for calculating depreciation, ensure that the quarters are
defined properly. Go to Financial >> Setup >> Fixed Assets >> Quarters.
2. Make sure that the following boxes are not empty:
a) Start Date
b) Mid Date
c) End Date
Note: These boxes must exist for each quarter. If any box is empty, type the appropriate date in that box.
Step 8: Make a backup
Make a backup before you close the year. Place the backup in a safe, permanent storage. This backup ensures that you have a permanent record of the company's financial position at the end of the year and allows you to quickly restore the information in the event of a power fluctuation or if another issue occurs during the year-end close procedure. See section on Backups under General Tips and Reminders for more information on creating backups.
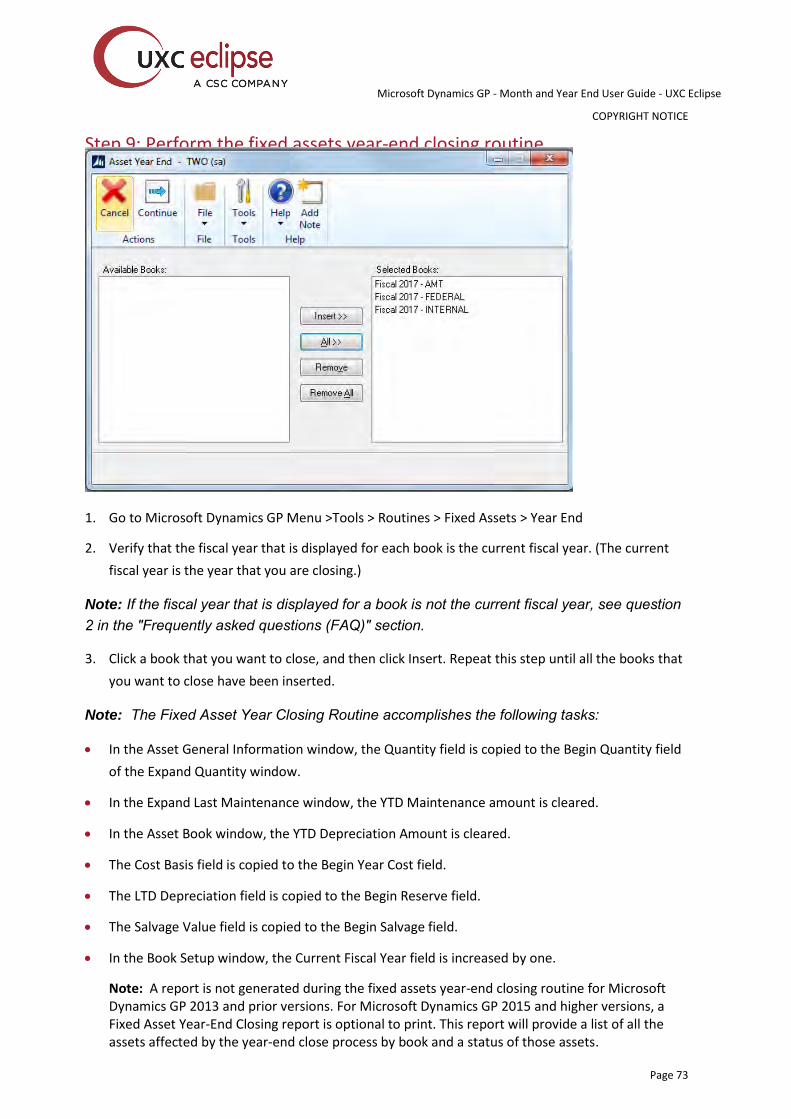
Microsoft Dynamics GP - Month and Year End User Guide - UXC Eclipse
COPYRIGHT NOTICE
Page 73
Step 9: Perform the fixed assets year-end closing routine
1. Go to Microsoft Dynamics GP Menu >Tools > Routines > Fixed Assets > Year End
2. Verify that the fiscal year that is displayed for each book is the current fiscal year. (The current
fiscal year is the year that you are closing.)
Note: If the fiscal year that is displayed for a book is not the current fiscal year, see question 2 in the "Frequently asked questions (FAQ)" section.
3. Click a book that you want to close, and then click Insert. Repeat this step until all the books that
you want to close have been inserted.
Note: The Fixed Asset Year Closing Routine accomplishes the following tasks:
In the Asset General Information window, the Quantity field is copied to the Begin Quantity field
of the Expand Quantity window.
In the Expand Last Maintenance window, the YTD Maintenance amount is cleared.
In the Asset Book window, the YTD Depreciation Amount is cleared.
The Cost Basis field is copied to the Begin Year Cost field.
The LTD Depreciation field is copied to the Begin Reserve field.
The Salvage Value field is copied to the Begin Salvage field.
In the Book Setup window, the Current Fiscal Year field is increased by one.
Note: A report is not generated during the fixed assets year-end closing routine for Microsoft Dynamics GP 2013 and prior versions. For Microsoft Dynamics GP 2015 and higher versions, a Fixed Asset Year-End Closing report is optional to print. This report will provide a list of all the assets affected by the year-end close process by book and a status of those assets.
Microsoft Dynamics GP - Month and Year End User Guide - UXC Eclipse
COPYRIGHT NOTICE
Page 74
Frequently asked questions (FAQ)
1. When I verified my Fixed Assets calendar, my "Message" column had several dates that had
a status of "Missing." How can I fix this problem?
A2. This problem may occur if the following conditions exist: the fiscal year is not a calendar year,
and the fiscal year does not have 365 days or if the fiscal year is a leap year, and it does not have
366 days. In this scenario, you must create "dummy" calendar years in the Fixed Assets calendar
so that the calendar is built without any missing days. For an example of years in a fiscal period
setup calendar, see the following table.
2.The fiscal year that is displayed for my book in the Asset Year End window is not 2014. I
closed 2013 last year, and I have not yet closed 2014. What should I do?
A21. See the answer for question 5.
3.I have closed General Ledger in Microsoft Dynamics GP, and I now realize that I have not yet
closed Fixed Asset Management. Can I perform the fixed assets year-end closing routine at this
point?
A22. We recommend that you close General Ledger last, after all the subsidiary modules have been
closed. However, Fixed Asset Management can be closed after General Ledger is closed. The GL
Posting (GL Interface) process can be performed, and then the transaction or transactions can be
posted to the closed year or to the historical year in the general ledger.
To post transactions to the historical year in the general ledger, make sure that the following options are selected in the General Ledger Setup window (Microsoft Dynamics GP Menu > Tools > Setup > Financial > General Ledger) :
Allow Posting to History
Maintain History Accounts
Maintain History Transactions
The posted transaction will update the historical year, and it will roll forward as a beginning balance to the open year. If any expense accounts or any revenue accounts were included in the transaction, they will automatically close out to the Retained Earnings account or accounts.
4. I ran the year-end routine in Fixed Asset Management, and then I ran depreciation in the
new year. I see that the depreciation is highly overstated and that some assets have a negative
number in the "Net Book Value" field. Why is the system calculating so much depreciation?
A23. This problem occurs if the following conditions are true:
The year was closed.
The assets were not depreciated through the last day of the fiscal year.
Microsoft Dynamics GP - Month and Year End User Guide - UXC Eclipse
COPYRIGHT NOTICE
Page 75
Consider the following example:
The fiscal year is a calendar year (January 1 through December 31).
The assets were depreciated through December 28 when the year was closed.
In this example, depreciation will be incorrect the next time that depreciation is run. The system does not recalculate the yearly rate when the year-end closing routine is performed. Therefore, fixed assets takes a full year of depreciation in the last few days that remain in the previous year (December 29 through December 31). The rate of depreciation is the yearly rate currently on each asset. Additionally, if there are assets that are near the end of their original life, the Net Book Value field may become negative. There are two workarounds for this problem:
Restore the data from a backup, run depreciation through the last day of the year, and then
perform the year-end closing procedures.
Reset life on all the assets.
Note: If amounts on the assets have ever been entered for the YTD Depreciation field or for the LTD Depreciation field, resetting life on the assets will change these amounts, and the result may be different. If you change the YTD Depreciation field or the LTD Depreciation field by resetting life on the asset, you will cause inconsistencies between Fixed Asset Management and General Ledger. These inconsistencies must be explained.
5.Instead of completing the year-end routine for Fixed Asset Management, I manually changed
the "Current Fiscal Year" field in the Book Setup window to the next year. Do I have to go back
and run the year-end closing routine, or can I continue to process activity in Fixed Asset
Management for the new year?
A24. If no activity, such as additions, changes, transfers, retirements, or depreciation, has been run
for the new year, the Current Fiscal Year field in the Book Setup window can be changed back to
the previous year, and then the year-end closing routine can be processed.
If any activity, such as additions, changes, transfers, retirements, or depreciation, has been run for the new year, restore the data from a backup, and then continue with the year-end closing routine.
In either situation, the year-end closing routine must be run. If the year-end closing routine is not completed, the amount in the YTD Depreciation field will be overstated on any report that includes assets that were retired or that were fully depreciated in the previous year. If the year-end closing routine is not performed, the amounts in the YTD Depreciation field will not be cleared. The amounts in the YTD Depreciation field will not be zeroed out. Therefore, these amounts will be incorrectly included in the reports for the new year.
Microsoft Dynamics GP - Month and Year End User Guide - UXC Eclipse
COPYRIGHT NOTICE
Page 76
Analytical Accounting Year-End Closing Procedures The year-end close procedures for Analytical Accounting are applicable only in versions Microsoft Dynamics GP 10.0 Service Pack 2 (10.00.1061) and beyond. You only need to do this process if you are using Analytical Accounting.
When the year-end close process is run for General Ledger in Microsoft Dynamics GP, it automatically moves the Analytical Accounting transactions from the AAG30000 historical tables to the AAG40000 series tables. (There is no separate closing procedure that must be run in Analytical Accounting.) You may select which dimensions that you want to be consolidated during the year-end process. In General Ledger, balance sheet dimensions will roll forward, and P&L dimensions will close to Retained Earnings. In Analytical Accounting, Balance Brought Forward entries are created in the AAG30000 tables for those dimensions that were marked to be included in the year-end process, and then the detail is moved to the AAG40000 series tables. Note: If you use FRx reporting, you must apply hot fix 962862 for Microsoft FRx to be able to read Analytical Accounting detail in the AAG40000 series tables.
Analytical Accounting year-end checklist
STEP 1: DETERMINE IF FINANCIAL REPORTS USE AA TABLES:
Before you close GL or do any steps in this article, run your financial reports that you normally run to balance to the GL Trial Balance. Based on what you found, follow the appropriate method: -METHOD 1 - IF CORRECT: If your Financial reports are correct and match GL, then you may proceed with steps 2-8 in this article, which still must be completed so you do not get any AA errors during the GL year end close process. Note: If you use a reporting system that only reads directly from GL tables (such as the Legacy provider in Management Reporter when reading from a GL company or other reporting tool)] for your Financial Reports, then you may continue on to Step 2 since AA data does not affect your Financial reporting. -METHOD 2 - IF NOT CORRECT: However, if your Financial reports are not correct, it is mostly likely due to the AA tables being used and the AA data does not match GL data. To verify the AA data, you must first run through the SQL scripts provided in KB 2910626 in addition to the rest of the steps in this article. Note: Data Mart in Management Reporter reads from AA (and GL) tables, or the Legacy provider used with Management Reporter may read from an AA company. Steps for Method 2: a.) First, run all the scripts in KB 2910626 to verify AA data with GL data.
Microsoft Dynamics GP - Month and Year End User Guide - UXC Eclipse
COPYRIGHT NOTICE
Page 77
Financial Reports from Management Reporter do not match the General Ledger Trial Balance Reports in Microsoft Dynamics GP http://support.microsoft.com/kb/2910626 b.) When you have completed the steps in KB 2910626, then return back to this KB and continue on with the rest of the steps listed below. (Note that step 2 and step 4 are also in KB 2910626, but we recommend to double-check this again, as they should not return any results if you already fixed this data.)
STEP 2: VERIFY AA DATA FOR OVERLAPPING YEARS
Run these scripts to make sure you do not have overlapping years in the AAG30000 Open table with the AAG40000 historical table. Each distinct year should only exist in one table or the other, but not both.
select distinct(YEAR1) from AAG30000
select distinct(YEAR1) from AAG40000
-If you find overlapping years in both tables, then it is recommended to open a support incident for assistance. The support case is chargeable since this issue is usually created due to importing records. Please note that if data-fixing is needed, this may need to be referred to consulting, which would be a billable expense to you.
STEP 3: VERIFY THE YEARS BETWEEN OPEN/HISTORICAL TABLES MATCH BETWEEN AA/GL:
Next, make sure the years are in the AA tables are in the same open or closed years as your GL tables. The AAG30000 and GL20000 open tables should have the same years. And the AAG40000 and GL30000 historical tables should contain the same closed years.
select distinct(YEAR1) from AAG30000
select distinct(OPENYEAR) from GL20000
select distinct(YEAR1)from AAG40000 order by YEAR1
select distinct(HSTYEAR) from GL30000 order by HSTYEAR
-If you find years in the AAG30000 open table PRIOR to the year you are closing, you must also do STEPS TO MOVE DATA TO HISTORY below as well to move the historical year data to history. The AAG30000 table should only have data for the years that are currently open years in GL. If you attempt to close the year in GL, you will be prompted with this message:
You must run the consolidate transactions and transfer detail to history utility for closed years to recreate the Analytical Accounting Balances Brought Forward.
So use the scripts above to determine if you need to run the STEPS TO MOVE DATA TO HISTORY, so you can prevent the message above from happening during the GL year-end close process.
Microsoft Dynamics GP - Month and Year End User Guide - UXC Eclipse
COPYRIGHT NOTICE
Page 78
STEPS TO MOVE DATA TO HISTORY: The first time you close GL on a version higher than GP 10.0 SP2 or higher (with AA activated), you will be prompted to move AA data to history before the system will allow you to close the GL year. The system will verify that the AA data is in the corresponding open/historical series of AA tables, as the GL data sits in the open/historical tables in GL. If this is not the case, you will receive a message to run the Move to History Utility for AA before you can proceed with the GL Year End close. Remember, if you have not closed your GL year (with AA activated) after installing a service pack later than SP2 for version 10.0, or upgrading to GP 2010, you may receive a message stating "You must consolidate transactions and transfer detail to history utility to close the year". Code was added to the closing process that will compare the years in the AA open tables against the historical years in the Company Fiscal Period Setup. If there is AA data in the AAG3000X series of tables for a historical year, you will receive the error. Follow these steps to consolidate those years: 1.) On the Microsoft Dynamics GP menu, point to Tools, point to Utilities, point to Financial, point to Analytical Accounting, and then click Move Data to History. 2.) The oldest year will default in that the system found in the open AAG3000x tables. You will only be able to move one year at a time. 3.) Select the appropriate option: Transfer transaction detail to history – This option will move the AA detail records from open to history tables and no BBF entries will be created. You must ensure there are no BBF entries in the AA tables otherwise you will not be able to select this option. This option just moves the records from the AAG30000 tables to the AAG40000 tables. Consolidate transactions and transfer detail to history – This option will move the AA detail records from open to history tables, and create BBF entries. However, you must have the options mentioned previously selected in order for BBF entries to be created. This option will consolidate the balances of all the transaction dimension codes in the closed year (that are marked to be consolidated) and transfer the AA information to the history tables. Note The consolidated balances are brought forward to the new year. BBF entries are created from the closed years. Print transfer preview report only – This will allow you to view the transactions that will be moved without actually moving the data. The preview report displays the consolidations that will be made. Note This option does not change data. 4.) Click OK. 5.) Repeat this process for each 'historical' year. (Where the year is in the AAG30000 open table but in the GL30000 history table. The year needs to be moved to the AA history table to match.) Note: If you rerun the distinct year scripts in 'STEP 3' above again, you should get the distinct years to match between open AA and GL tables, and historical AA and GL tables.
STEP 4: CHECK AA TABLES FOR OVERLAPPING HEADER ID'S
Microsoft Dynamics GP - Month and Year End User Guide - UXC Eclipse
COPYRIGHT NOTICE
Page 79
Run this script against the company database see if the same header ID's also exist between the tables:
select * from AAG30000 where aaGLHdrId in (select aagLHDrId from AAG40000)
- If you find duplicate header ID's both tables, then it is recommended to open a support incident for assistance. The support case is chargeable. Please note that if data-fixing is needed, this may need to be referred to consulting, which would be a billable expense to you. This would happen if you restored an older Dynamics database over the top of the current Dynamics database, and so the next available numbers stored in the AAG00102 table in the Dynamics database are set back. GP continues to increment from these values, even though they may already have been used and would result in the same aaGLHdrID value getting used for different YEAR1 values.
STEP 5: UPDATE AACOPYSTATUS VALUES
Next check for an incorrect aacopystatus value in the AAG40001 table. Run this script:
select count(*) from AAG40001 where aaCopyStatus<>8
If the script above returns results you will want to update the aaCopyStatus to '8' before running the GL Year Close: (The value of '8' is a value that the year-end close process will accept.)
update AAG40001 set aaCopyStatus=8
STEP 6: REVIEW SETUP FOR DIMENSIONS TO BE INCLUDED IN YEAR-END
Use the two steps below to turn on the Company option to include AA dimensions in the year-end close, and then to mark the individual dimensions that you want to be included in the year-end close. This will result in entries in the AAG30003 table with the same aaGLHdrID as the BBF entries in the AAG30000/AAG30001/AAG30002 tables. This is a two step process as follows: If you have not closed General Ledger yet, follow these steps to make sure the dimension is marked correctly to be included in the close process:
1. Mark the setup option to include Analytical Accounting in the year-end close as follows:
1. On the Microsoft Dynamics GP menu, point to Tools, point to Setup, point to Company, point to Analytical Accounting, and then click Options.
2. Click to select the Include in Year End Close check box, and then click OK. Note This option is just to enable the functionality to create Balance Brought Forward entries on the dimensions. The Analytical Accounting data will still move to the AAG40000 series tables when General Ledger is closed regardless of whether this option is marked.
2. Individually mark the dimensions to be included in year-end as follows:
1. On the Cards menu, point to Financial, point to Analytical Accounting, and then click Transaction Dimension.
2. In the Trx Dimension list, click the dimension that you want to include in the year-end close process.
Microsoft Dynamics GP - Month and Year End User Guide - UXC Eclipse
COPYRIGHT NOTICE
Page 80
3. In the Year End Close area, click to select the Include in Year End Close check box, and then click Save.
4. Repeat steps b and c for each dimension that you want to include in the year-end close process.
STEP 7 - VERIFY AA ACCOUNT MASTER
It is always a good idea to verify that the AA Account Master table (AAG00200) matches the GL Account Master table (GL00100) before you process a year-end close. If accounts are missing, it would cause the BBF entries in AA to be incorrect. Run the scripts below against the company database to verify that the GL Account Master, GL Account Index Master, and AA Account Master tables all have the same number of records:
-------------------------------------------------
select count(*) from GL00100
select count(*) from GL00105
select count(*) from AAG00200
-------------------------------------------------
• If the AA Account Master table has LESS records than the GL00100 table, use the script below to insert the missing GL accounts:
-------------------------------------------------
insert into aag00200
ACTINDX, aaAcctClassID,aaChangeDate,aaChangeTime)
select ACTINDX, 0, convert(char(10),getdate(),111), convert(char(12),getdate(),114)
from GL00100 where ACTINDX not in (select ACTINDX from aag00200)
-------------------------------------------------
• If the AA Account Master table has MORE records than the GL00100 table, use the script below to remove the extra records:
-------------------------------------------------
Delete AAG00200 where ACTINDX not in (Select ACTINDX from GL00100)
-------------------------------------------------
• If the GL00105 table doesn't match, refer to KB 855963 for steps on How to Recreate the Account Master Index table (GL00105).
STEP 8 - RUN TEST CLOSE
Always make a current backup before starting the GL year-end close process. It is recommended to test running the GL year-end close in a test company first to ensure you do not get any errors. The GL Year-end close process is what actually creates the balance brought forward journal entries (BBF's)
Microsoft Dynamics GP - Month and Year End User Guide - UXC Eclipse
COPYRIGHT NOTICE
Page 81
and moves the records for the year that you are closing in both General Ledger and Analytical Accounting tables. BBF entries are created in both GL and AA tables.
Make sure the GL year-end close is performed at a workstation that has AA installed and activated, and that users know not to disable AA if they receive any messages. Restore to the backup immediately, and make a screenprint of the AA error message if assistance is needed with the GL year-end close process.
STEP 9- VERIFY BALANCE SHEET REPORTS
It is recommended to compare the Balance Sheet report in Management Reporter to the General Ledger Trial Balance report from Microsoft Dynamics GP, to verify that the account balances brought forward to the new year are correct. If these balances do not match, restore to your backup and contact Microsoft Dynamics GP Support to open a support incident for additional assistance.
Frequently asked questions (FAQ) Do I need to run the 'Move to History' utility every year for Analytical Accounting?
If this is the first time you are closing GL on a version of GP 10.0 SP2 or higher (with AA activated), you will be prompted to move AA data to history before the system will allow you to close the GL year. The system will verify that the AA data is in the corresponding open/historical series of AA tables, as the GL data sits in the open/historical tables in GL. If you run into this, you will receive a message stating You must consolidate transactions and transfer detail to history utility to close the year" during the GL Year End close, and then you can refer to the steps in KB 960356 on how to resolve this. You should not need to run the Move to History Utility for AA more than the initial first time. The Move to History utility was meant to be a one-time process to get the customer 'caught up' with getting historical AA tables populated, and then data should automatically close along with the GL year-end close process going forward.
Microsoft Dynamics GP - Month and Year End User Guide - UXC Eclipse
COPYRIGHT NOTICE
Page 82
General Ledger Year-End Closing Procedures During the year-end closing routine, all records that will be moved from the GL20000 Year to Date Open table to the GL30000 History table are placed in a temporary table before they are permanently moved to the GL30000 History table. You must have enough free disk space that is equal to the size of the GL20000 table to perform the routine.
General Ledger year-end checklist 1. Complete the posting procedures and the closing procedures for other modules.
2. Post the final adjusting entries in General Ledger.
3. Create a SmartList to verify the posting type of each account.
4. Optional: Close the last period of the fiscal year.
5. Optional: Perform file maintenance on the Financial series group of modules.
6. Verify the settings in the General Ledger Setup window.
7. Make a backup.
8. Print a final Detailed Trial Balance report. (Optional)
9. Print the year-end financial statements.
10. Set up a new fiscal year.
11. Close the fiscal year.
12. Optional: Close all the fiscal periods for all the series.
13. Adjust the budget figures for the new year, and then print the financial statements.
14. Create a final backup.
Detailed information for each step in the year-end checklist
Step 1: Complete the posting and closing procedures for other modules
1. Post final transactions in all the modules except in General Ledger
2. Complete the month-end and the quarter-end procedures for all the modules except General
Ledger.
3. Complete the year-end closing procedures for each module in the following order:
a) Inventory
b) Receivables Management
c) Payables Management
Microsoft Dynamics GP - Month and Year End User Guide - UXC Eclipse
COPYRIGHT NOTICE
Page 83
d) Fixed Assets
e) Analytical Accounting for GP 10 SP 2 and greater
Note: There are no required year-end procedures for Sales Order Processing, Purchase Order
Processing, or Bill of Materials. Payroll year-end procedures are independent of the other modules
and are always performed at the calendar year-end.
Step 2: Post the final adjusting entries in General Ledger.
The adjusting entries include all the entries that correct errors that were made when transactions were recorded. The adjusting entries also include journal entries that are used to assign revenues or expenses to the period in which the revenues were earned or in which the expenses were incurred.
Use the Transaction Entry window or the Quick Journal Entry window to make adjusting entries in General Ledger.
If you have to track initial adjusting entries or post audit entries separate from other fiscal periods, auditing periods can be set up in General Ledger. This feature enables separate tracking of the adjusting entries that are made after the year is closed.
Note: If you are using closing periods and you reconcile, the transactions all move to the first period with the start date.
Step 3: Create a SmartList to verify the Posting Type of each account.
The posting type determines whether an account is closed to the retained earnings account or whether an account brings a balance forward to the next fiscal year. If the account balance will be brought forward at the end of the year, the posting type must be set to Balance Sheet. If the account balance will be closed to a retained earnings account at the end of the year, the posting type must be set to Profit and Loss. Use the Account Maintenance window if you must change the posting type for an account.
Follow these steps to verify that all accounts are setup with the correct posting type:
Accounts Mislabeled as Balance Sheet Posting Type
1. Use the SmartList object labeled ‘Accounts’ to view all General Ledger accounts including the
posting type.
2. Use the Search window to set up 2 search criteria to look for accounts that should be profit and
loss accounts but are mislabeled as balance sheet posting type:
3. Where the main segment is greater than your last balance sheet account
4. Where the Posting Type equals Balance Sheet
5. Review the results and double click on any field to open the Account card to change the posting
type.
Accounts Mislabeled as Profit and Loss Posting Type
6. Use the SmartList object labeled ‘Accounts’ to view all General Ledger accounts including the
posting type.
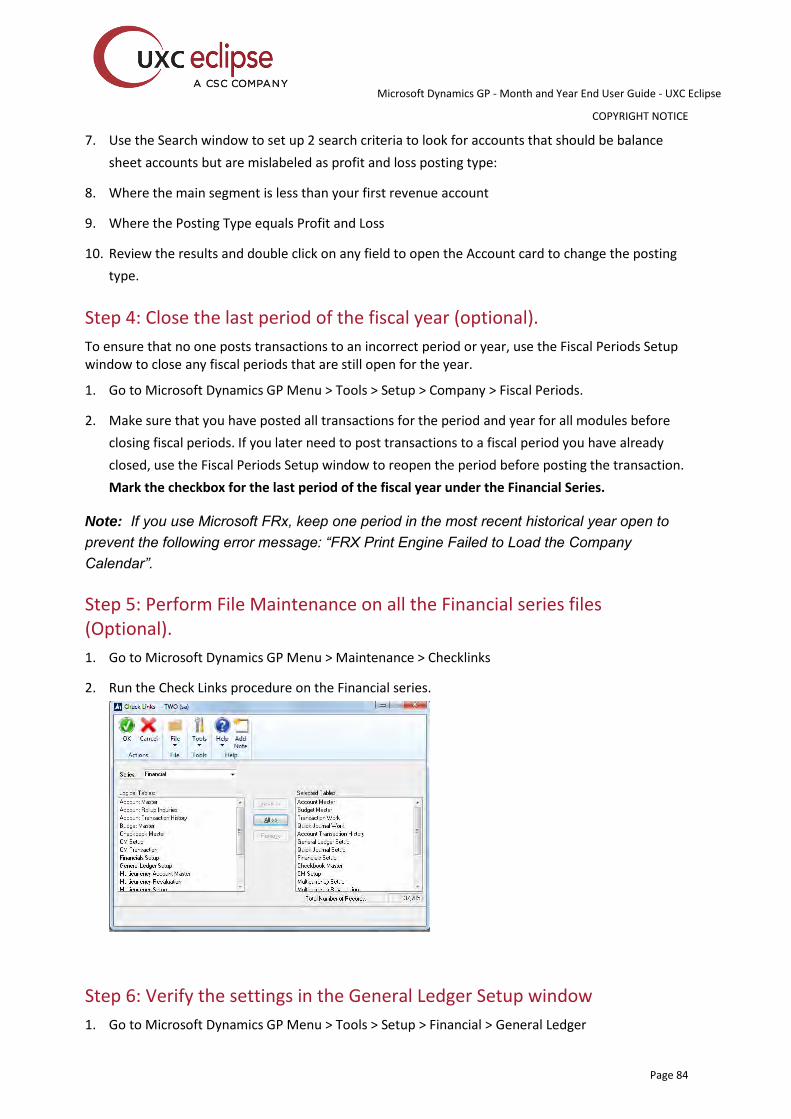
Microsoft Dynamics GP - Month and Year End User Guide - UXC Eclipse
COPYRIGHT NOTICE
Page 84
7. Use the Search window to set up 2 search criteria to look for accounts that should be balance
sheet accounts but are mislabeled as profit and loss posting type:
8. Where the main segment is less than your first revenue account
9. Where the Posting Type equals Profit and Loss
10. Review the results and double click on any field to open the Account card to change the posting
type.
Step 4: Close the last period of the fiscal year (optional).
To ensure that no one posts transactions to an incorrect period or year, use the Fiscal Periods Setup window to close any fiscal periods that are still open for the year.
1. Go to Microsoft Dynamics GP Menu > Tools > Setup > Company > Fiscal Periods.
2. Make sure that you have posted all transactions for the period and year for all modules before
closing fiscal periods. If you later need to post transactions to a fiscal period you have already
closed, use the Fiscal Periods Setup window to reopen the period before posting the transaction.
Mark the checkbox for the last period of the fiscal year under the Financial Series.
Note: If you use Microsoft FRx, keep one period in the most recent historical year open to prevent the following error message: “FRX Print Engine Failed to Load the Company Calendar”.
Step 5: Perform File Maintenance on all the Financial series files (Optional).
1. Go to Microsoft Dynamics GP Menu > Maintenance > Checklinks
2. Run the Check Links procedure on the Financial series.
Step 6: Verify the settings in the General Ledger Setup window
1. Go to Microsoft Dynamics GP Menu > Tools > Setup > Financial > General Ledger
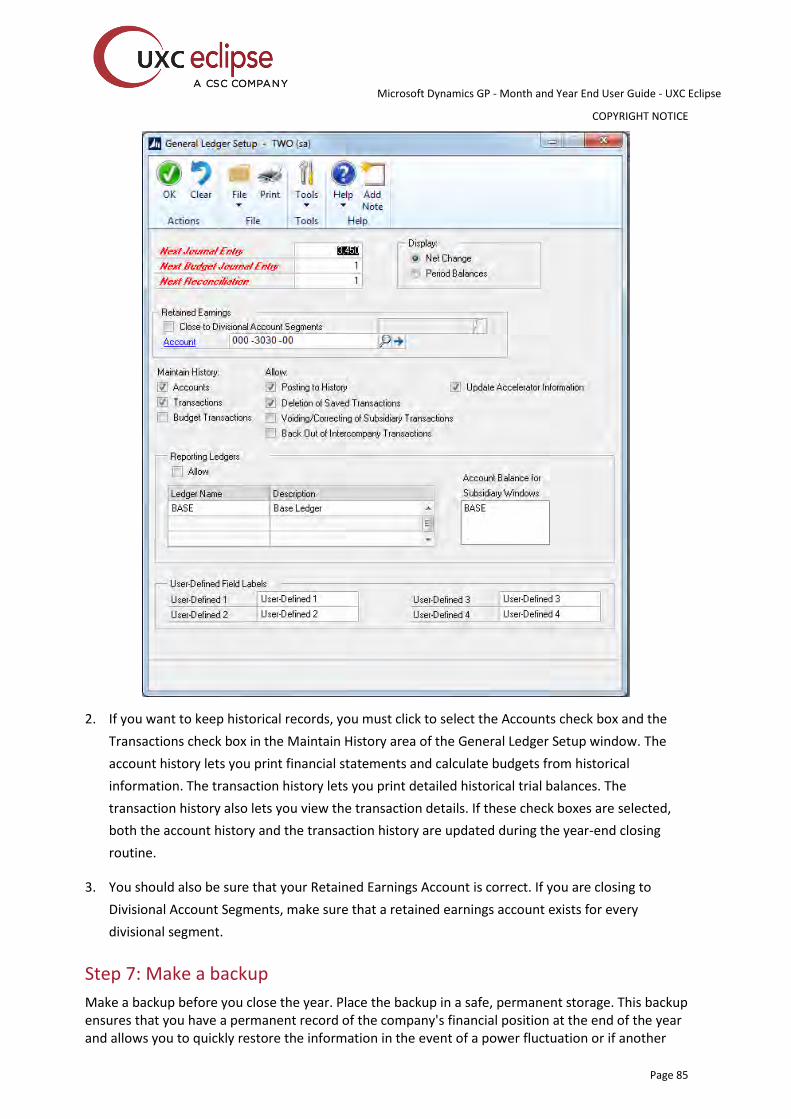
Microsoft Dynamics GP - Month and Year End User Guide - UXC Eclipse
COPYRIGHT NOTICE
Page 85
2. If you want to keep historical records, you must click to select the Accounts check box and the
Transactions check box in the Maintain History area of the General Ledger Setup window. The
account history lets you print financial statements and calculate budgets from historical
information. The transaction history lets you print detailed historical trial balances. The
transaction history also lets you view the transaction details. If these check boxes are selected,
both the account history and the transaction history are updated during the year-end closing
routine.
3. You should also be sure that your Retained Earnings Account is correct. If you are closing to
Divisional Account Segments, make sure that a retained earnings account exists for every
divisional segment.
Step 7: Make a backup
Make a backup before you close the year. Place the backup in a safe, permanent storage. This backup ensures that you have a permanent record of the company's financial position at the end of the year and allows you to quickly restore the information in the event of a power fluctuation or if another

Microsoft Dynamics GP - Month and Year End User Guide - UXC Eclipse
COPYRIGHT NOTICE
Page 86
issue occurs during the year-end close procedure. See section on Backups under General Tips and Reminders for more information on creating backups.
Step 8: Print a final Detailed Trial Balance.
Reports > Financial > Trial Balance > Detail
Note: We recommend that you post all transactions for the period and for the year for all modules before you print the Detailed Trial Balance report. If you post additional transactions later, we recommend that you print a new Detailed Trial Balance report.
Step 9: Print final financial statements.
Print any year-end financial statements required. The most common financial statements include:
Balance Sheet
Profit and Loss Statement
Statement of Cash Flow
Step 10: Set up a new year in Fiscal Periods Setup.
Before you can perform the year-end closing, a new fiscal year must be set up using the Fiscal Periods Setup window.
1. Microsoft Dynamics GP Menu > Tools > Setup > Company > Fiscal Periods
2. Type in the New Year.
3. Enter the First and Last Day of the Fiscal Year.
4. Click Calculate
5. Adjust Period Beginning Dates as Needed.
6. Click OK to Save your Changes.
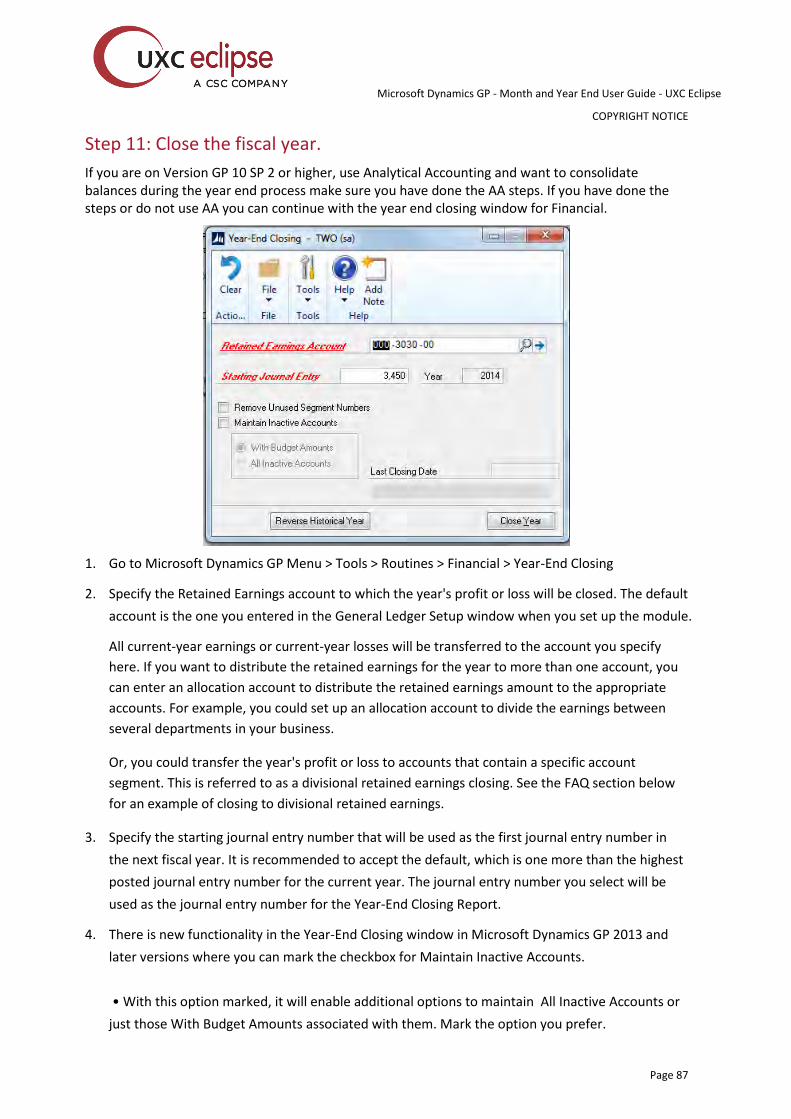
Microsoft Dynamics GP - Month and Year End User Guide - UXC Eclipse
COPYRIGHT NOTICE
Page 87
Step 11: Close the fiscal year.
If you are on Version GP 10 SP 2 or higher, use Analytical Accounting and want to consolidate balances during the year end process make sure you have done the AA steps. If you have done the steps or do not use AA you can continue with the year end closing window for Financial.
1. Go to Microsoft Dynamics GP Menu > Tools > Routines > Financial > Year-End Closing
2. Specify the Retained Earnings account to which the year's profit or loss will be closed. The default
account is the one you entered in the General Ledger Setup window when you set up the module.
All current-year earnings or current-year losses will be transferred to the account you specify
here. If you want to distribute the retained earnings for the year to more than one account, you
can enter an allocation account to distribute the retained earnings amount to the appropriate
accounts. For example, you could set up an allocation account to divide the earnings between
several departments in your business.
Or, you could transfer the year's profit or loss to accounts that contain a specific account
segment. This is referred to as a divisional retained earnings closing. See the FAQ section below
for an example of closing to divisional retained earnings.
3. Specify the starting journal entry number that will be used as the first journal entry number in
the next fiscal year. It is recommended to accept the default, which is one more than the highest
posted journal entry number for the current year. The journal entry number you select will be
used as the journal entry number for the Year-End Closing Report.
4. There is new functionality in the Year-End Closing window in Microsoft Dynamics GP 2013 and
later versions where you can mark the checkbox for Maintain Inactive Accounts.
• With this option marked, it will enable additional options to maintain All Inactive Accounts or
just those With Budget Amounts associated with them. Mark the option you prefer.

Microsoft Dynamics GP - Month and Year End User Guide - UXC Eclipse
COPYRIGHT NOTICE
Page 88
• If this checkbox is not marked, then ALL inactive accounts will be deleted by design that meet
the criteria outlined below, whether or not they were used in a budget.
• No balance
• No activity for an open period
• No account history amounts
• Not part of an allocation account
• Not part of an unposted transaction
• No multicurrency data
• No transaction history records
5. Choose the Close Year button in the Year-End Closing window to begin the closing process.
Important Click Close Year one time only. If you click more than one time, you will close more
than one year during the process. Also, if the progress window appears to stop at 50 percent, do
not restart the routine. As long as the hard disk is processing, let the process continue.
6. If you are maintaining the account history, the year-end closing routine transfers all current-year
information for each account in the chart of accounts to the account history. If you are
maintaining the transaction history, the year-end closing routine also transfers all current-year
information for each account in the chart of accounts to the transaction history. The process
then prepares the accounting system for a new fiscal year. Besides transferring current-year
figures to the transaction history and to the account history, the year-end closing routine does
the following:
a) The year-end closing routine reconciles and summarizes the general ledger balances that
accumulated throughout the year.
b) The year-end closing routine removes accounts that are marked as inactive if the accounts
match the criteria for deleting a posting account. Inactive accounts that have been set up as
budget accounts can also be deleted if they have no activity for the year. These accounts can
be deleted even if budget amounts from past years are associated with these accounts.
c) The year-end closing routine moves all profit and loss account balances to the retained
earnings account.
d) The year-end closing routine summarizes balance sheet accounts and brings the balances
forward as the beginning balances of the account in the new fiscal year.
e) The year-end closing routine prints the Year-End Closing Report.
When the year-end closing routine is complete, the Year-End Closing Report is printed. This
report lists the accounts that were closed and the transactions that were created to close those
accounts. The Year-End Closing Report is part of the audit trail. Save this report for your
company's permanent records. The Year-End Closing Report cannot be reprinted.
Step 12: Close all fiscal periods for all series (optional).
Microsoft Dynamics GP - Month and Year End User Guide - UXC Eclipse
COPYRIGHT NOTICE
Page 89
To ensure that no one posts transactions to an incorrect period or year, use the Fiscal Periods Setup window to close any fiscal periods that are still open for the year.
1. Go to Microsoft Dynamics GP Menu > Tools > Setup > Company > Fiscal Periods.
2. Make sure that you have posted all transactions for the period and year for all modules before
closing fiscal periods. If you later need to post transactions to a fiscal period you have already
closed, use the Fiscal Periods Setup window to reopen the period before posting the transaction.
Mark the periods you wish to close under the Financial Series.
Step 13: Adjust the budget figures for the new year and if you use Microsoft Dynamics GP Advanced Financial Analysis reports, edit the report layout.
Adjust budget figures by using one of the following windows:
Excel-Based Budgeting
Budget Maintenance
Single-Account Budget Maintenance
Print the Profit and Loss Statement to verify that profit and loss accounts were closed to the retained earnings account. Print the Balance Sheet to verify that balance sheet accounts indicate that the balances were brought forward.
If you are using Advanced Financial Analysis to print the financial statements, you must update the report layout to reflect the current fiscal year. To do this, follow these instructions:
1. Go to Reports > Financial > Advanced Financial.
2. In the Reports list, select the Financial Statement, click Open, and then click Layout.
3. Double-click the first column heading.
4. If the column type is set to Period Range, Year-to-Date, or Variable Year-to-Date, select the
current fiscal year in the Year list, and then click OK.
5. Repeat step 1 through step 4 for each column of each report.
Step 14: Create post closing backup.
Make a backup after you close the year. Place the backup in a safe, permanent storage. This backup ensures that you have a permanent record of the company's financial position at the end of the year and allows you to quickly restore the information in the event of a power fluctuation or if another issue occurs during the year-end close procedure. See section on Backups under General Tips and Reminders for more information on creating backups.
Frequently Asked Questions
1.Do I have to close the fiscal year before the first day of my next fiscal year?
Microsoft Dynamics GP - Month and Year End User Guide - UXC Eclipse
COPYRIGHT NOTICE
Page 90
The year-end closing routine does not have to be completed before you start your next fiscal year.
However, we recommend that you close the year as soon as possible.
2.Can I make adjusting entries after I close the year?
You can post an entry to the most recent historical year if the Posting to History check box is
selected in the General Ledger Setup window. If you post an entry to a closed year, a second
entry is automatically made that updates the beginning balances for the current fiscal year.
The following tables show an adjusting entry and the way the entry appears in the posting journal.
Adjusting Entry
12/25/2012 Administration Expenses $300 Cash $300
Posting Journal
12/25/2012 Administration Expenses $300 Cash $300 12/31/2012 Retained Earnings $300 Cash $300
3.After I performed the year-end closing routine, beginning balances are brought forward for some
of my sales and expenses accounts. Some of my asset accounts also closed to the retained
earnings account. Why did this problem occur, and what can I do to correct it?
The posting type that is specified in the Account Maintenance window for the account
determines whether a balance is brought forward for the account or whether the account is
closed to the retained earnings account. Accounts that use the Balance Sheet posting type carry
a balance forward. Accounts that use a Profit and Loss posting type close to the retained earnings
account. To resolve this problem use the appropriate method:
METHOD 1: Restore from a backup, correct the posting type, and then run the Year End Closing
routine again.
METHOD 2: For Microsoft Dynamics GP 2013 R2 (12.00.1745) and later versions, you can go to
the Year End Closing Routine window and click on the button for Reverse Historical Year, verify
the Year to Open displayed and click Process. The year will be reopened as if it was never closed
in the first place, so you can change the posting type on the account and then run the Year End
Closing routine again
METHOD 3: If you cannot restore from a backup and you are on a version earlier than GP 2103
R2, you will need to correct the accounts that had an incorrect posting type without restoring to
a backup. For more information about how to perform the steps, click the following article
Microsoft Dynamics GP - Month and Year End User Guide - UXC Eclipse
COPYRIGHT NOTICE
Page 91
number to view the article in the Microsoft Knowledge Base:
864913 How to correct accounts that were set up to use the wrong posting type after you close
the year in General Ledger in Microsoft Dynamics GP.
4.I tried to run the year-end closing routine by using a divisional retained earnings account, but
I received the following error message: “Retained Earnings account not found.” What can I do
to resolve the problem that causes this error message?
Before the routine can continue, the year-end closing routine must validate that all the required
divisional retained earnings accounts exist. For example, the Fabrikam, Inc. demonstration
company uses an account format of nnn-nnnn-nn. The first segment represents the department.
A retained earnings account must exist for each department that has a profit and loss account.
For example, if sales account 400-4100-00 exists, but no 400-nnnn-nn retained earnings account
exists, you receive this error message.
5.What happens to unit accounts during the year-end closing routine?
Prior to GP2013 unit accounts were treated as balance sheet accounts and the balances were
brought forward when the year is closed. In GP2013 a selection has been added in the Unit
Account Maintenance “Clear Balance During Year-End Close”.
Prior to closing the GL year, click on Cards > Financial > Unit Account. Mark the checkbox for
Clear Balance During Year-End Close and Save. Do this for each unit account that you wish to
have the beginning balance set to zero for the new year, as part of the GL year end close process.
If you are on a version prior to GP2013, you will need to clear the balances manually. For more information about how to clear the beginning balances for unit accounts, click the following article number to view the article in the Microsoft Knowledge Base:
857582 How to clear beginning balances for unit accounts in General Ledger in Microsoft Dynamics GP
6.I am preparing to close the year in General Ledger. Must everyone exit Microsoft Dynamics
GP before I perform the year-end routine?
A25. We recommend that client computer users stop work in Microsoft Dynamics GP while
the year-end closing routine is processing. If users continue to work in the program, transactions
may have to be entered again if problems occur during the year-end closing routine.
7. I want to allocate the net profit to the retained earnings account or to the capital accounts
each month. Also, net profit is supposed to be allocated to three retained earnings accounts or
capital accounts. Can I do this?
Microsoft Dynamics GP - Month and Year End User Guide - UXC Eclipse
COPYRIGHT NOTICE
Page 92
A26. No, you cannot do this. However, you can specify a non-financial account in the Account
Maintenance window. Use a number that is not in your current account numbering scheme. This
account acts as a suspense account for the net income or for the net loss. Every month, you can
post an adjusting entry to the three capital accounts that you want to adjust. For the offset
account, use the suspense account. When the year-end closing routine is finished, use the
suspense account as the retained earnings account. This offsets all the manual adjustments that
you made to the suspense account during the year. Make sure that the suspense account does
not appear on reports.
If you are using Advanced Financial Analysis for financial statements, when you format the balance sheet, put the NP line as the last line on the Advanced Financial Analysis statement. Then, put a page break before the NP line. The balance sheet must have an NP line. However, this line makes the net income or the net loss appear two times. Therefore, format the NP line so that it is off the financial statement. You can also use a report type of Other.
8.Why is the status of some of my financial reports set to Invalid? Note: this refers to reports
created using the Advanced Financial reporting within GP, not FRx or Management Reporter.
If a report is configured to use the accelerator file, any changes that are made to accounts in any one
of the following windows causes the status of the financial report printing options to change to
Invalid:
Account Maintenance
Unit Account Maintenance
Mass Modify Chart of Accounts
Year-End Closing
Before you print financial statements, you must update the accelerator file. To do this, follow these steps:
Go to Reports > Financial > Update Financial Accelerator.
Click Update, and then click Continue.
Close the Update Financial Accelerator Information window.
9.When I try to post a batch in the General Ledger module, I receive the following message:
“Batches cannot be posted while the Year-End Close is in progress.” The year-end closing
routine is not being run in General Ledger. What should I do?
A27. To resolve this issue, have all users close all transaction entry windows. Then, delete the
SY00800 file if you are running a Microsoft SQL Server database. To do this, run the following
statement on the DYNAMICS database:
delete SY00800 where BACHNUMB = 'GL_Close'
Microsoft Dynamics GP - Month and Year End User Guide - UXC Eclipse
COPYRIGHT NOTICE
Page 93
10.I receive the following message when I try to close the year in General Ledger: “Sorry,
another user is closing the year.” No one else is trying to close the year. What should I do?
A28. To resolve this issue, delete the SY00800 file if you are using a Microsoft SQL Server database.
To do this, run the following statement in SQL Query Analyzer on the DYNAMICS database:
delete SY00800 where BACHNUMB = 'GL_Close'
11.I am performing the year-end closing routine in General Ledger and it appears to be stopped
at 50 percent. My workstation seems to have stopped responding. What should I do?
If the year-to-date transaction open file (GL20000) is large, it may take a long time for the year-
end closing routine to finish. If the hard disk is still processing, the year-end closing routine has
not stopped responding. We recommend that you let the routine run. If the hard disk is not
processing, we recommend that you restore from a backup. Then, follow the steps in this article
again, starting at step 5.
Note: with version GP2013 and higher a progress bar was added to the Year-End Closing window
which will fill with green as the year end is processing. When the bar is full, the process is
complete.
12.If an adjusting entry has been posted to a year that is closed, can I print a corrected Trial
Balance report for that year?
A29. Yes, you can print a corrected Trial Balance report for the year that is closed. To do this, follow
these steps:
1. Go to Reports > Financial > Trial Balance> New.
2. In the Option field, type With Adjustments.
3. In the Include area, click to select the Posting Accounts check box.
4. In the Year area, click to select the History check box, and then select the historical year in the
Year list.
5. Click Destination to specify a report destination, and then click OK.
6. Click Print.
13.When I tried to perform the year-end closing routine, I received an error message that
stated that a single-use batch or a quick journal transaction had not been posted. What does
this error message mean?
A30. When you try to perform the year-end closing routine, you may receive the following error
message: “A single use batch or quick journal transaction has not been posted yet. Do you want
to continue closing?” You receive this error message if an unposted single-use batch or an
unposted quick journal transaction exists in General Ledger. This error message does not prevent
Microsoft Dynamics GP - Month and Year End User Guide - UXC Eclipse
COPYRIGHT NOTICE
Page 94
you from continuing with the year-end closing routine. If you do not want to post the single-use
batch or the quick journal transaction, continue with the year-end closing routine.
14.When I try to perform the year-end closing routine in General Ledger, why do I receive the
following error message: “[Microsoft][ODBC SQL Server Driver][SQL Server]Violation of
PRIMARY KEY constraint 'PK##0671112'. Cannot insert duplicate key in object '##0671112' “
A31. The year-end closing transactions contain a currency that is not assigned to an account.
To resolve this problem, assign the currency to the appropriate account. To do this, follow these steps:
1. Have all users exit Microsoft Dynamics GP.
2. Restore a backup of the company database that was made before you tried to perform the
General Ledger year-end closing routine.
3. Start the Support Administrator Console, Microsoft SQL Query Analyzer, or SQL Server
Management Studio. To do this, use one of the following methods depending on the program
that you are using.
a) Microsoft SQL Server 2000: Start > All Programs > Microsoft SQL Server > Query Analyzer.
b) Microsoft SQL Server 2005 or 2008: Start > All Programs > Microsoft SQL Server 2005 or
2008 > click SQL Server Management Studio.
c) SQL Server Desktop Engine: Start > All Programs > Microsoft Administrator Console > click
Support Administrator Console.
4. Run the following script against the company database:
a) Select CURNCYID FROM GL20000
5. Make Note of all currencies displayed in the CURNCYID column.
6. Start Microsoft Dynamics GP, and then log in as user ‘sa’.
7. Go to Cards > Financial > Account.
8. In the Account field, type the retained earnings account number.
9. Click Currency.
10. In the Select Account Currencies window, mark the Currency ID check boxes that you Noted in
step 5.
11. Perform the year-end closing routine in General Ledger.
15.Why did the year-end closing process delete some GL accounts that may be tied to budgets?
A32. The year-end closing process will delete GL accounts that are marked as inactive and have no
activity in the current year. With GP2013 a selection has been added to the Year end closing screen
to “Maintain Inactive Accounts” which will prevent inactive accounts from being deleted.
Microsoft Dynamics GP - Month and Year End User Guide - UXC Eclipse
COPYRIGHT NOTICE
Page 95
How to Set Up An Adjusting Period In General Ledger This section describes how to set up an adjusting period to record adjustments that are posted to the general ledger after the year-end close process has been performed.
The adjusting period that you set up should meet the following conditions:
The adjusting period should start on the last day of the fiscal year.
The adjusting period should not overlap any other period dates.
To set up an adjusting period in General Ledger in Microsoft Dynamics GP, follow these steps.
Note: Historical periods cannot be changed.
1. Go to Microsoft Dynamics GP Menu > Tools > Setup > Company > Fiscal Periods
a) Set up each fiscal period. To do this, see the steps in the following example.
Note: This example assumes that the fiscal year starts on January 1 and ends on December 31 and that the fiscal year has a 13th adjusting period.
i) In the Year list, click a year. For example, click 2012.
ii) In the First Day field, type a first day for the fiscal period. For example, type 01/01/2012.
iii) In the Last Day field, type a last day for the fiscal period. For example, type 12/31/2012.
iv) In the Number of Periods field, type the number of periods for the fiscal year. For
example, type 13.
v) Click Calculate.
vi) If it is necessary, adjust the start dates of the periods. In this example, type dates in the
Date column beside the corresponding entry in the Period Name column as indicated in
the following list:
Period 1: 01/01/2012
Period 2: 02/01/2012
Period 3: 03/01/2012
Period 4: 04/01/2012
Period 5: 05/01/2012
Period 6: 06/01/2012
Period 7: 07/01/2012
Period 8: 08/01/2012
Period 9: 09/01/2012
Period 10: 10/01/2012
Period 11: 11/01/2012

Microsoft Dynamics GP - Month and Year End User Guide - UXC Eclipse
COPYRIGHT NOTICE
Page 96
Period 12: 12/01/2012
Period 13: 12/31/2012
2. Click OK.
3. Go to Microsoft Dynamics GP Menu > Tools > Utilities > Financial > Reconcile
4. Click to select the Year check box.
Click Reconcile. Microsoft Dynamics GP reconciles the account summary data to the account detail data for all general ledger accounts.
![PowerPoint Presentation · 2017-01-30 · {2] Fñ-cec—ñnancial Fn-cee—Financjal Fin-dat—ñnancial FISCAL FISCAL -cec-Fiscal calendar FISCAL calendar New fiscal year v Delete](https://img.pdfslide.net/doc/110x75/5f08d7867e708231d423fc09/powerpoint-presentation-2017-01-30-2-f-cecanancial-fn-ceeafinancjal.jpg)


![Calendar No. 88 - National Guard Bureau · 2015-06-03 · calendar no. 88 national defense authorization act for fiscal year 2016 report [to accompany s. 1376] on to authorize appropriations](https://img.pdfslide.net/doc/110x75/5f04333d7e708231d40ccecc/calendar-no-88-national-guard-bureau-2015-06-03-calendar-no-88-national-defense.jpg)