Embed Size (px)
Citation preview
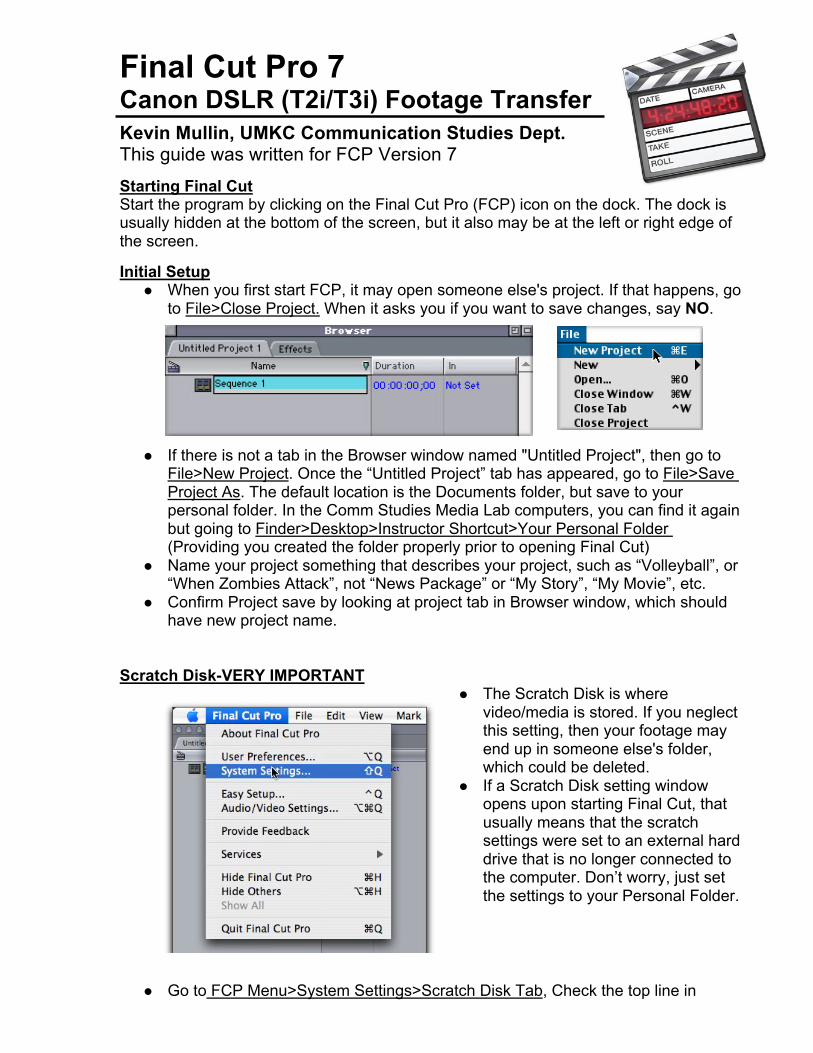
Final Cut Pro 7 Canon DSLR (T2i/T3i) Footage Transfer Kevin Mullin, UMKC Communication Studies Dept. This guide was written for FCP Version 7 Starting Final Cut Start the program by clicking on the Final Cut Pro (FCP) icon on the dock. The dock is usually hidden at the bottom of the screen, but it also may be at the left or right edge of the screen. Initial Setup
When you first start FCP, it may open someone else's project. If that happens, go to File>Close Project. When it asks you if you want to save changes, say NO.
If there is not a tab in the Browser window named "Untitled Project", then go to File>New Project. Once the “Untitled Project” tab has appeared, go to File>Save Project As. The default location is the Documents folder, but save to your personal folder. In the Comm Studies Media Lab computers, you can find it again but going to Finder>Desktop>Instructor Shortcut>Your Personal Folder (Providing you created the folder properly prior to opening Final Cut)
Name your project something that describes your project, such as “Volleyball”, or “When Zombies Attack”, not “News Package” or “My Story”, “My Movie”, etc.
Confirm Project save by looking at project tab in Browser window, which should have new project name.
Scratch Disk-VERY IMPORTANT The Scratch Disk is where
video/media is stored. If you neglect this setting, then your footage may end up in someone else's folder, which could be deleted.
If a Scratch Disk setting window opens upon starting Final Cut, that usually means that the scratch settings were set to an external hard drive that is no longer connected to the computer. Don’t worry, just set the settings to your Personal Folder.
Go to FCP Menu>System Settings>Scratch Disk Tab, Check the top line in

window's location is set to your Personal Folder. If you need to change location, click Set, find your folder and click Open, and you
can now verify that the correct location has been set. Finally click OK CHECK THE SCRATCH DISK SETTINGS EVERY TIME YOU
START EDITING!!!
Camera/SD Memory Card Connection Options There are two main options when it comes to hooking up the camcorder or card reader to the computer to transfer your video footage to the computer.
• The best option is to eject the SD card from the camera, insert into a compatible card reader & connect the SD/Card Reader combination to the computer via a USB cable.
• The second option is to hook up the camera directly to the computer via a USB cable, however this only works if you have pre-loaded the manufacturers software on your computer.
• You’ll know that your camcorder/card is properly mounted on the computer when
a removable drive icon pops up on the desktop. • It is important to follow these directions to properly import the footage into Final
Cut. While the quicktime (.mov) files created in the camera can be imported into Final Cut directly, it is not the best practice to do so. These files are recorded in an h264 codec, which is not easily edited in Final Cut. The best practice is to transode the files to a format compatible with Final Cut, prior to the actual editing. Luckily, Final Cut will easily transcode the footage for you.
• If you don’t transcode before you edit, the clip playback may be choppy &
you’ll frequently have to render clips on the timeline.
Transfer/Ingest Video Footage Into Final Cut
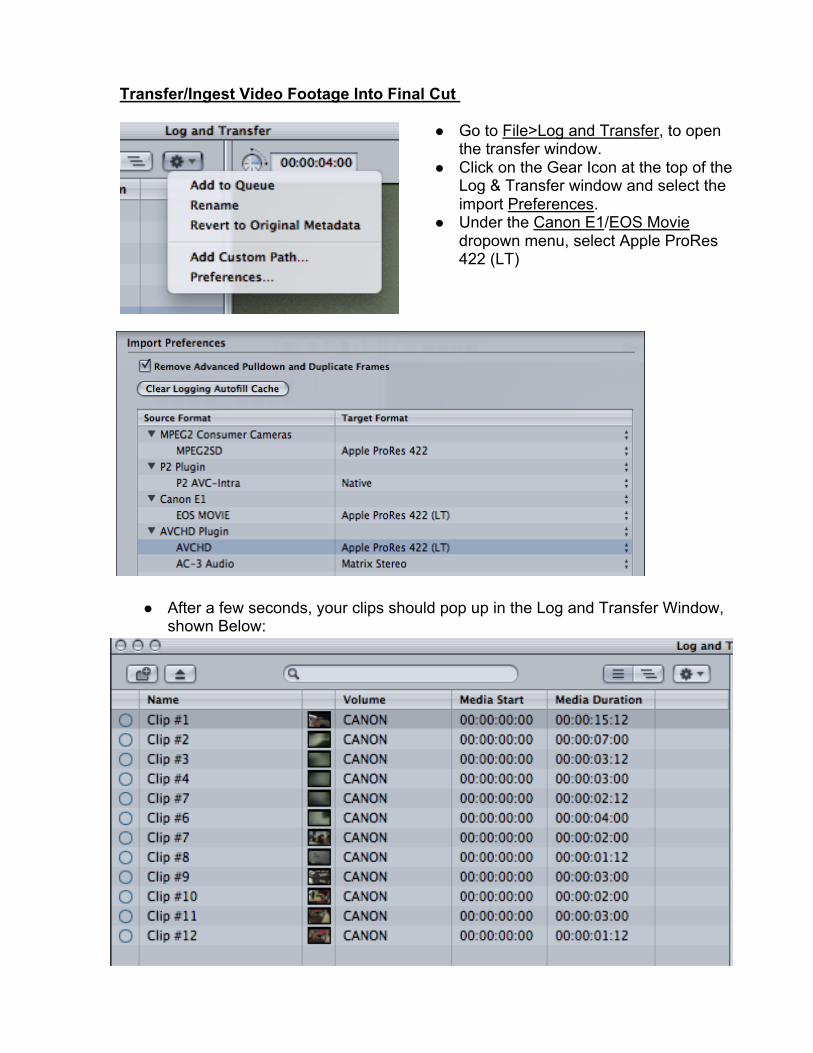
Go to File>Log and Transfer, to open the transfer window.
Click on the Gear Icon at the top of the Log & Transfer window and select the import Preferences.
Under the Canon E1/EOS Movie dropown menu, select Apple ProRes 422 (LT)
After a few seconds, your clips should pop up in the Log and Transfer Window,
shown Below:

Transfer/Ingest Process You have several options when logging your clips before transferring the
footage from the card to the computer, such as: ■ Setting in/out points on individual clips to only transfer the portion of the
clip you want. ■ Clicking on the Name Preset will provide you with different clip naming
options. ■ You also have the ability to enter clip information such as Scene,
Shot/Take, Angle, & Log Notes When you completed any logging/naming changes drag the clip(s) to the
transfer queue in the lower left hand portion of the window labeled, “Drag Media Here”.
Once the clip has been dragged into the transfer queue, it will begin transcoding.
When transcoding is complete, the transfer queue will be empty and your transcoded clips will appear in the browser window.
Close the Log and Transfer Window when the transfer process is complete.
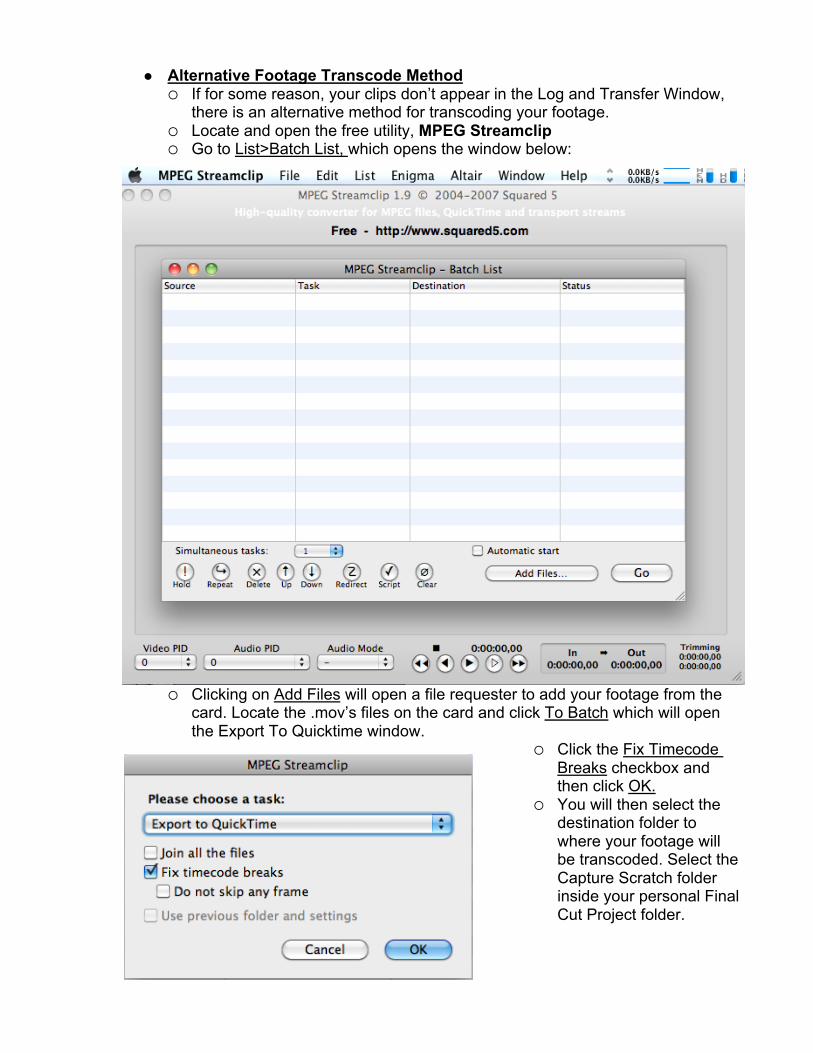
Alternative Footage Transcode Method
If for some reason, your clips don’t appear in the Log and Transfer Window, there is an alternative method for transcoding your footage.
Locate and open the free utility, MPEG Streamclip Go to List>Batch List, which opens the window below:
Clicking on Add Files will open a file requester to add your footage from the card. Locate the .mov’s files on the card and click To Batch which will open the Export To Quicktime window.
Click the Fix Timecode Breaks checkbox and then click OK.
You will then select the destination folder to where your footage will be transcoded. Select the Capture Scratch folder inside your personal Final Cut Project folder.
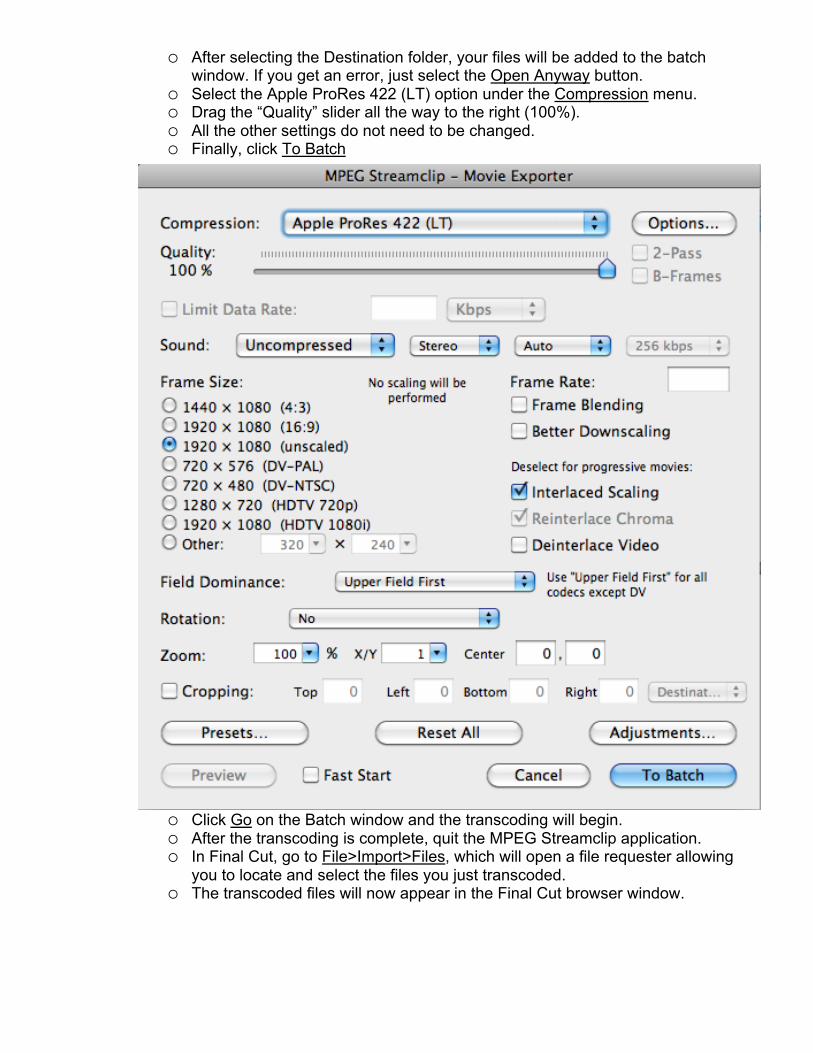
After selecting the Destination folder, your files will be added to the batch window. If you get an error, just select the Open Anyway button.
Select the Apple ProRes 422 (LT) option under the Compression menu. Drag the “Quality” slider all the way to the right (100%). All the other settings do not need to be changed. Finally, click To Batch
Click Go on the Batch window and the transcoding will begin. After the transcoding is complete, quit the MPEG Streamclip application. In Final Cut, go to File>Import>Files, which will open a file requester allowing
you to locate and select the files you just transcoded. The transcoded files will now appear in the Final Cut browser window.
Backing Up a SD/CF Card ALWAYS, ALWAYS, ALWAYS BACKUP YOUR SD CARD AFTER EACH SHOOT!!
There are times when it is a good idea to back up your footage prior to transcoding into Final Cut, such as: ■ When you do not have Final Cut or MPEG Streamclip out In the field when
shooting and you need to clear the card to resume shooting. ■ You’re shooting for someone else and you’re not sure what they will be
editing with, so you should backup the footage in its native format. Insert the SD/CF card into a compatible card reader connected to your Mac
via a USB cable, simply insert the card into the card slot your Mac if it has one, or attach the camera in playback bode if the card is still in the camera.
You’ll know that your camcorder/card is properly mounted on the computer when a removable drive icon pops up on the desktop.
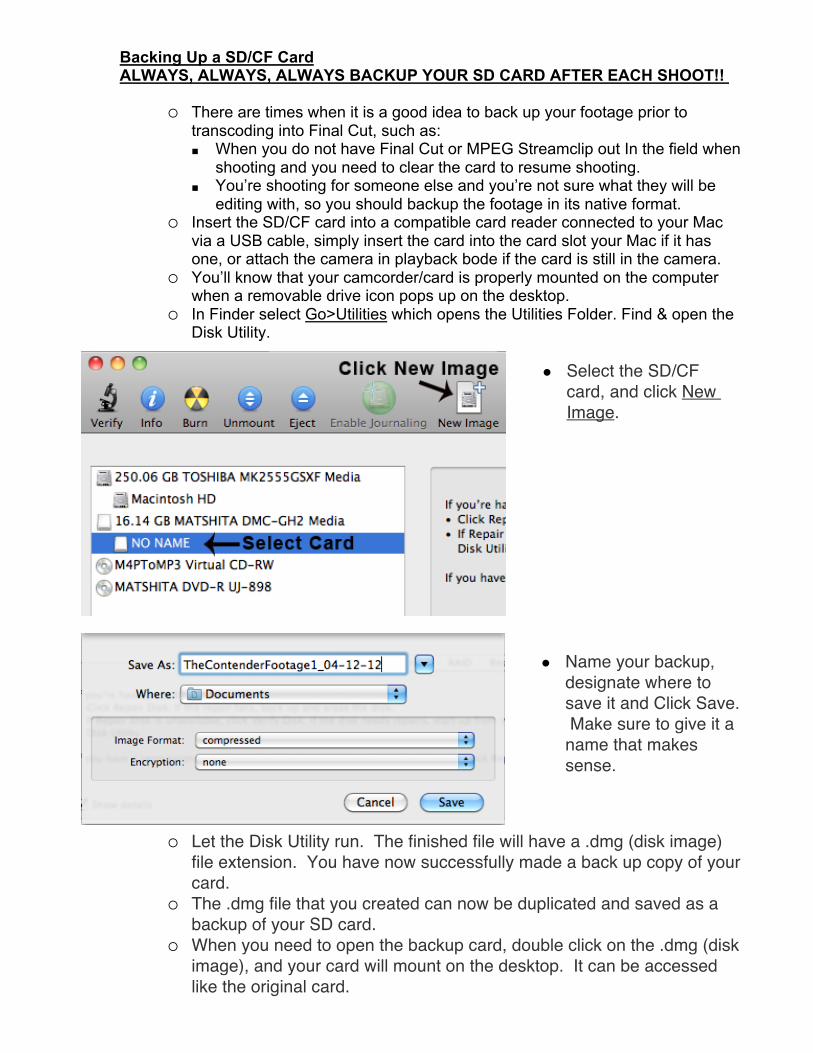
In Finder select Go>Utilities which opens the Utilities Folder. Find & open the Disk Utility.
Select the SD/CF
card, and click New Image.
Name your backup, designate where to save it and Click Save. Make sure to give it a name that makes sense.
Let the Disk Utility run. The finished file will have a .dmg (disk image)
file extension. You have now successfully made a back up copy of your card.
The .dmg file that you created can now be duplicated and saved as a backup of your SD card.
When you need to open the backup card, double click on the .dmg (disk image), and your card will mount on the desktop. It can be accessed like the original card.


![a arXiv:1409.8230v9 [cs.CV] 8 May 2017 · T3i 100 auto 3200 or 6400 auto Using the Canon Developer Tool Kit for the Canon S90 and the EOS Utility for the Canon Rebel T3i we were able](https://img.pdfslide.net/doc/110x75/601c2fd158de641ac03c8cb9/a-arxiv14098230v9-cscv-8-may-2017-t3i-100-auto-3200-or-6400-auto-using-the.jpg)


![Welcome [storage.googleapis.com]...All images were personally captured with my Canon T3i and Canon EOS M cameras. Images were taken into Adobe Light-room for processing, then Illustrator](https://img.pdfslide.net/doc/110x75/60064362f282a062ec4afbd1/welcome-all-images-were-personally-captured-with-my-canon-t3i-and-canon.jpg)