Embed Size (px)
Citation preview
Castell Arybrynwrthymôr – Version 1.1 – Rules designed by Buxeria - 2004 1
Castell Arybrynwrthymôr (The Welsh Castle)
Extension for CRY HAVOC, SIEGE, OUTREMER (CROISADES) and VIKING RAIDERS
Castell Arybrynwrthymôr – Version 1.1 – Rules designed by Buxeria - 2004 2
Table Of Contents
1 History Of The Welsh Wars.........................................................................3 1.1 First War - 1277 .............................................................................................................................3 1.2 Second War – 1282/1283...............................................................................................................3 1.3 The 1294 Uprising..........................................................................................................................3 1.4 Edward’s Castle Building Program..................................................................................................3
2 The Welsh Armies.......................................................................................4 2.1 Classes of warriors ..........................................................................................................................4
2.1.1 Spearmen ...............................................................................................................................4 2.1.2 Longbow men.........................................................................................................................4 2.1.3 Heavy Infantry ........................................................................................................................4 2.1.4 Cavalry ...................................................................................................................................4
3 The Castle ..................................................................................................5 3.1 The Name ......................................................................................................................................5 3.2 Castle Description...........................................................................................................................5 3.3 Levels.............................................................................................................................................5
4 Special Rules .............................................................................................5 4.1 Terrain Type Summary...................................................................................................................6
4.1.1 Rocks ......................................................................................................................................6 4.1.2 Rocky Stairways ......................................................................................................................6 4.1.3 Multiple Arrowslits...................................................................................................................6 4.1.4 Gemel Windows ......................................................................................................................6
4.2 Missile Restrictions..........................................................................................................................6 4.3 Buildings Under Construction .........................................................................................................7
4.3.1 Scaffoldings.............................................................................................................................7 4.3.2 Using Construction Markers ....................................................................................................8 4.3.3 Terrain Type Summary ...........................................................................................................8 4.3.4 Movements .............................................................................................................................9 4.3.5 The Treadmill..........................................................................................................................9
4.4 Entering The Castle ......................................................................................................................10 4.4.1 Terrain Type Summary .........................................................................................................10 4.4.2 Opening/Closing the Gate .....................................................................................................10 4.4.3 Raising/Lowering The Portcullis.............................................................................................11 4.4.4 Setting Fire To The Gate .......................................................................................................11
4.5 Shooting from different levels .......................................................................................................11

Castell Arybrynwrthymôr – Version 1.1 – Rules designed by Buxeria - 2004 3
1 History Of The Welsh Wars The Norman conquest of England after the battle of Hastings didn’t include most of Wales. Although the south and east of the region were ruled by English barons (known as the Lords Marchers) in the second half of the thirteenth century, mountainous northern Wales remain under the domination of Celtic tribes led by Prince Llewelyn ap Gruffudd (Llewelyn The Last). They were migrant tribesmen, half warriors and half cattle growers who didn’t mind raiding and pillaging the surroundings at will. There laws allowed them to undertake marauding for 6 weeks every summer, which turned them into fearsome fighters. They had developed the famous Welsh longbow for ambush and skirmish, which the English would later turn into a weapon of massive destruction during the Hundred Years war.
1.1 First War - 1277 Edward The First is crowned King of England in 1274 after coming back from four years at the Crusades. Llewelyn refuses to do hommage before him, which Edward considers to be a rebellion from his vassal. The numerous expeditions launched by the Lords Marchers all fail miserably due to the terrible guerilla of the Welshmen. Edward sends two armies from the south and east to the north. Thousands of Welshmen left Llewelyn to assault his last stronghold in the Snowdon mountains of the northwest. Edward then launch an army of 15,000 men reinforced with mercenary crossbowmen from Gascony. In July 1277, the army advances in a serie of stages along the north Welsh coast from Chester, taking the castles of Flint and Rhuddlan. The grain-rich island of Anglesey is isolated by the English ships, preventing Llewelyn from receiving supplies. Besieged in the mountains and with no resources, Llewelyn can only surrender, swear allegiance to the King on November 9, 1277 and sign the Treaty of Conwy. Construction or restoration of six castles is undertaken to establish Edward’s supremacy : Rhuddlan and Flint on the north shore, Ruthin and Hope in the northeast, Aberystwyth and Builth in the southwest.
1.2 Second War – 1282/1283 The Welsh resume pillaging 5 years later, attack the castles of Flint, Rhuddlan and Hawardan in the northeast and devastate the southern territories. Edward feels betrayed and decides to bring the principalty to an end. The same strategy is used as in 1277, with several armies aiming northwest. Thanks to their control of the seas, the English send an expeditionary force led by Luke de Tany, Seneschal of Gascony, on Anglesey. Once taken, he orders his engineers to build a bridge of boats to cross the Menai Straits and outflank Llewelyn troops. De Tany foolishly sends his troops over the bridge instead of waiting for Edward’s army. He is ambushed by the Welsh near Bangor but none of his men escape the deadly fight. Feeling saved, Llewelyn leads another raid near Builth but get caught in an English skirmish in December 1282 and is killed during the fight. One month later, Dolwwydelan Castle in the Snowdon Mountains is taken after a long siege. Further to the south, the garrison of Castell y Bere surrenders in April after a 10-day siege. The last resistance in Doldabarn Castle is crushed in May. As soon as March 1283, Edward orders the construction of three castles to rule the newly conquered territories in Conwy, Caernarfon and Harlech. These castles are built along the sea to be supplied by ship in case of a siege even if the Welsh occupy the interland. The Statutes of Rhuddlan assess the English supremacy on Wales. Caernarfon is set to become the capital of the region.
1.3 The 1294 Uprising Ten years later, the walls of the castle and the city are far from being completed. The Welsh led by Madog ap Llywelyn, who calls himself Prince of Wales, take arms once more. Edward is fighting in Aquitaine and the English garrisons are very limited. Caernarfon is attacked in Septembre 1294, during which the town is set on fire. Cardigan Castle on the west coast is attacked as well. Both castles resist because the control of the seas prevents the English garrisons from being cut from their supplies. Edward’s answer is immediate. All the lost territories are regain by the next summer and Caernarfon defenses are restored by November 1295. Construction of Beaumaris Castle in the island of Anglesey is decided to finally establish Edward’s domination on the rebel province.
1.4 Edward’s Castle Building Program On his way back from the Crusades, Edward visited his cousin the Count of Savoy and was very impressed with the quality of construction of the various castles built there. The King secures the services of James of St

Castell Arybrynwrthymôr – Version 1.1 – Rules designed by Buxeria - 2004 4
Georges, a highly paid master mason and military engineer in 1278 by arrangement with Count Philip of Savoy to supervise hisWelsh castle program. James has worked for Counts Peter II (1263-68) and Philip (1268-85). His last name comes from St Georges d’Espéranche Castle (Isère, France) where the same type of eight-sided towers as in Caernarfon can still be seen. Edward understood that mainland Wales would be impossible to keep in case of an uprising, that’s why all his castles were built along the sea. The distance between two subsequent castles didn’t exceed the equivalent of a one-day trip to be rescued in case of an siege. Sources:
- The Scottish and Welsh Wars 1250-1400; Osprey Publishing - Harlech, Beaumaris, Conwy and Caernarfon booklets, CADW.
2 The Welsh Armies In the late thirteenth century, tribesmen of the north west of Wales had had little exposure to the Anglo-Norman civilization. As such, they had kept a strong Celtic influence in their costume and weapons.
2.1 Classes of warriors
2.1.1 Spearmen Most of their infantry carried two spears: the first one was thrown at the beginning of the engagement, the second one was retained and used as a pike. The Anglo-Saxon Coerls of VIKING RAIDERS and the pikemen of SIEGE depict these warriors the best. Those of them shown with a spear will be considered as having 2 spears.
2.1.2 Longbow men The Welsh didn’t use the longbow to fire volleys of arrows “en masse” as Edward started to use them from 1280 in his Scottish wars. They’d rather use it as an ambush and skirmish weapon. The longbow men of SIEGE that do not wear a gambison will be used to represent them.
2.1.3 Heavy Infantry Wealthier warriors could wear a better body armour made of a short-sleeved leather jerkin with applied iron scales. Use the Thanes of VIKING RAIDERS and the Seargents of SIEGE for this class of fighters.
2.1.4 Cavalry The Welsh were not reknown for their mounted fighters. Horses were only used by their chieftains as a nobility status. The Earls of VIKING RAIDERS will be used to depict them.
Castell Arybrynwrthymôr – Version 1.1 – Rules designed by Buxeria - 2004 5
3 The Castle
3.1 The Name I really wanted an authentic Welsh name for this castle (I mean, incredibly long and impossible to pronounce, or at least that’s how I see the Welsh language !), even though these castles were built by an English King of the Plantagenet dynasty, hence speaking only French. That’s why I asked another fan of Cry Havoc, Christopher Walkley, to select a name for me. Christopher works for the Welsh Historic Monument office (CADW), and he also provided me with a lot of sources about these fantastic castles. Many thanks for all this. The name means « The castle on the hill by the sea », as a reference to the selected location: > castell = castle > ar y = on the > bryn = hill > wrth y = by the > môr = sea
3.2 Castle Description Castell Arybrynwrthymôr is an hypothetical castle, but that is inspired by several other castles of the region. The site is very similar to Harlech or Criccieth : a rocky hill overlooking the sea, with a staircase cut out of the rocks to access the quay. The gatehouse is typical of many Welsh castles and the barbican resembles the one in Beaumaris. A visitor has to go through a total of 3 each portcullis and gates to enter the castle. The curtain wall circles the castle entirely to move quickly from one point of the castle to another in case of a siege. The keep (called Magna Turris as most texts of the Thirteenth century named them) is toped with a turret from which you can shoot in any direction outside of the castle. The thick curtain wall between the keep (Magna Turris) and the Sea Tower boasts multiple arrowslits similar to those of Caernarfon. The Great Hall features 2 large gemel windowslooking out towards the inner ward. A chamber extends the building next to the keep. The chapel is the building located next to the tower with the same name.
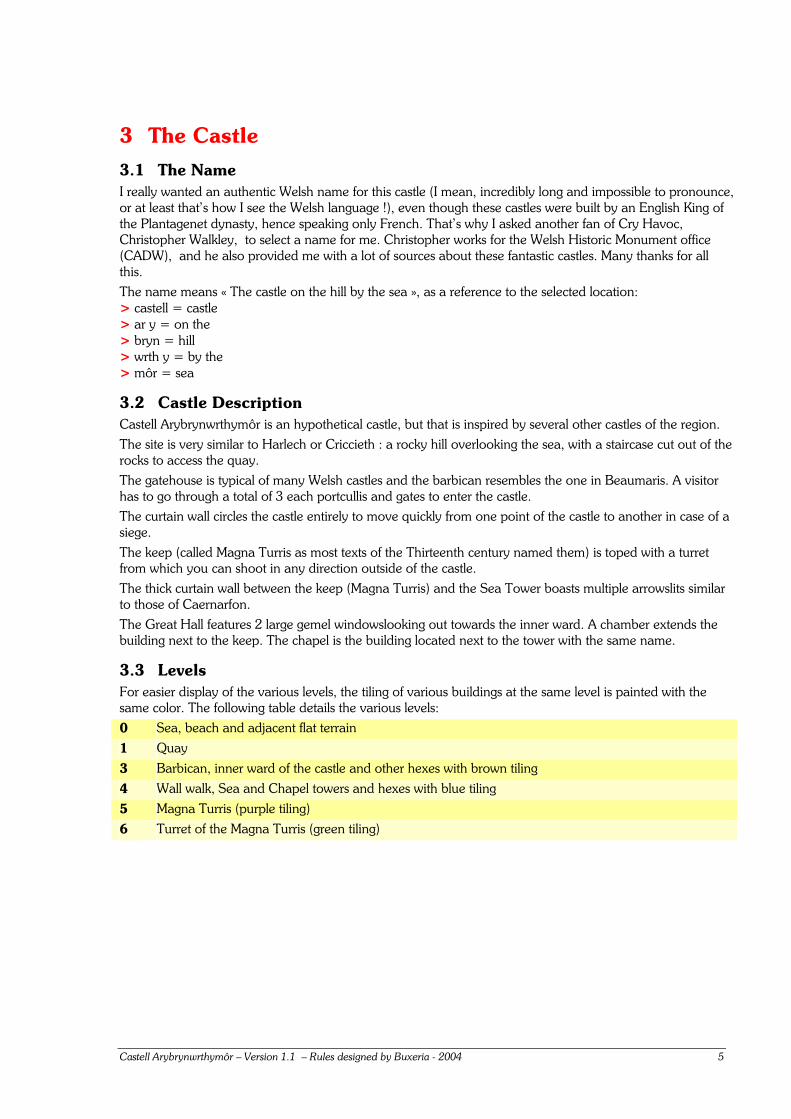
3.3 Levels For easier display of the various levels, the tiling of various buildings at the same level is painted with the same color. The following table details the various levels:
0 Sea, beach and adjacent flat terrain
1 Quay
3 Barbican, inner ward of the castle and other hexes with brown tiling
4 Wall walk, Sea and Chapel towers and hexes with blue tiling
5 Magna Turris (purple tiling)
6 Turret of the Magna Turris (green tiling)
Castell Arybrynwrthymôr – Version 1.1 – Rules designed by Buxeria - 2004 6
4 Special Rules
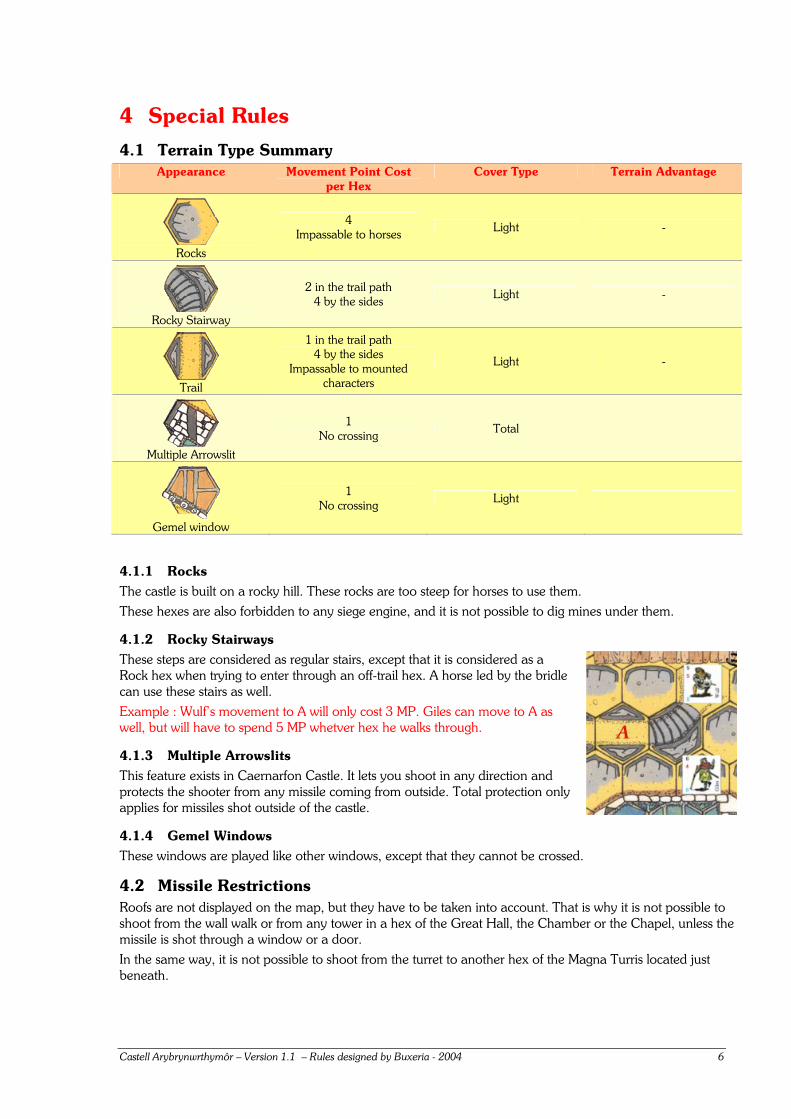
4.1 Terrain Type Summary Appearance Movement Point Cost
per Hex Cover Type Terrain Advantage
Rocks
4 Impassable to horses Light -
Rocky Stairway
2 in the trail path 4 by the sides
Light -
Trail
1 in the trail path 4 by the sides
Impassable to mounted characters
Light -
Multiple Arrowslit
1 No crossing
Total
Gemel window
1 No crossing Light
4.1.1 Rocks The castle is built on a rocky hill. These rocks are too steep for horses to use them. These hexes are also forbidden to any siege engine, and it is not possible to dig mines under them.
4.1.2 Rocky Stairways These steps are considered as regular stairs, except that it is considered as a Rock hex when trying to enter through an off-trail hex. A horse led by the bridle can use these stairs as well. Example : Wulf’s movement to A will only cost 3 MP. Giles can move to A as well, but will have to spend 5 MP whetver hex he walks through.
4.1.3 Multiple Arrowslits This feature exists in Caernarfon Castle. It lets you shoot in any direction and protects the shooter from any missile coming from outside. Total protection only applies for missiles shot outside of the castle.
4.1.4 Gemel Windows These windows are played like other windows, except that they cannot be crossed.
4.2 Missile Restrictions Roofs are not displayed on the map, but they have to be taken into account. That is why it is not possible to shoot from the wall walk or from any tower in a hex of the Great Hall, the Chamber or the Chapel, unless the missile is shot through a window or a door. In the same way, it is not possible to shoot from the turret to another hex of the Magna Turris located just beneath.

Castell Arybrynwrthymôr – Version 1.1 – Rules designed by Buxeria - 2004 7
4.3 Buildings Under Construction People of the Middle Ages were rarely fair play enough to let their enemies complete the construction of their castle to attack it, especially if the fortress, once finished, is impossible to besiege. The following rules have been designed to spice up and diversify the usage of castle maps by weakening their defensive value. For gameplay, we will differenciate 3 phases in the construction of a wall or tower :
- Wall under construction, represented with the various markers showing a cut out of a wall or tower with its masonry. The height of the wall is always one level above its base.
- Wall without battlement. The same markers can display walls having reach their final elevation. Only character cover is affected.
- Wall completed. This is how Castell Arybrynwrthymôr looks with its walls under construction :
4.3.1 Scaffoldings To build these walls, masons were using scaffoldings whose horizontal logs where direcly put in holes being left in the wall. Scaffoldings are displayed with 1, 2 and 3-hex markers. A raised ladder is mandatory to reach a scaffolding from the ground. A scaffolding elevation is identical to the one of the wall against which it is raised. A character can move freely under any scaffolding hex (they are considered to be about 3 to 4 meters high). Scaffoldings will be treated like hoardings (see the Montjoie extension) except for missile fire: you cannot shoot at a character located under from the same scaffolding hex and there is no protection from the simple wooden stick that prevents masons from falling. Scaffoldings being made of wood, they can burn just like ladders or hoardings. Scaffoldings were typically built on both sides of the wall, as shown in the example below:
Castell Arybrynwrthymôr – Version 1.1 – Rules designed by Buxeria - 2004 8
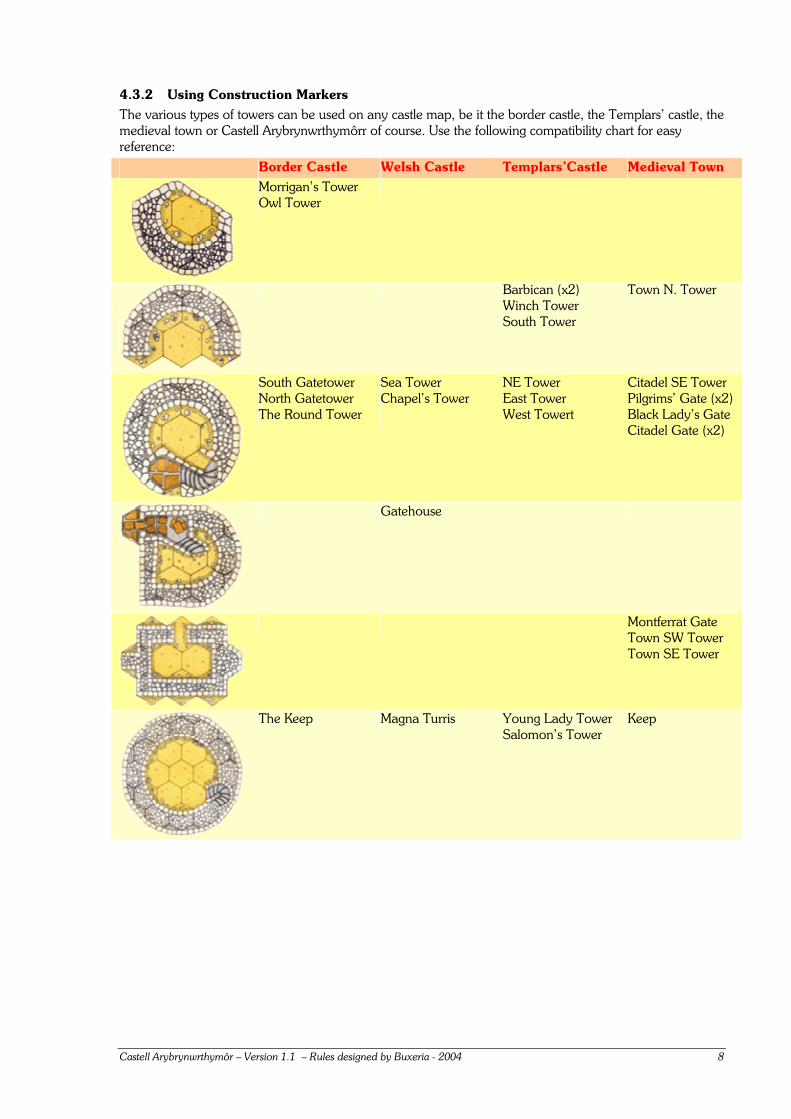
4.3.2 Using Construction Markers The various types of towers can be used on any castle map, be it the border castle, the Templars’ castle, the medieval town or Castell Arybrynwrthymôrr of course. Use the following compatibility chart for easy reference:
Border Castle Welsh Castle Templars’Castle Medieval Town
Morrigan’s Tower Owl Tower
Barbican (x2) Winch Tower South Tower
Town N. Tower
South Gatetower North Gatetower The Round Tower
Sea Tower Chapel’s Tower
NE Tower East Tower West Towert
Citadel SE Tower Pilgrims’ Gate (x2) Black Lady’s Gate Citadel Gate (x2)
Gatehouse
Montferrat Gate Town SW Tower Town SE Tower
The Keep Magna Turris Young Lady Tower Salomon’s Tower
Keep
Castell Arybrynwrthymôr – Version 1.1 – Rules designed by Buxeria - 2004 9
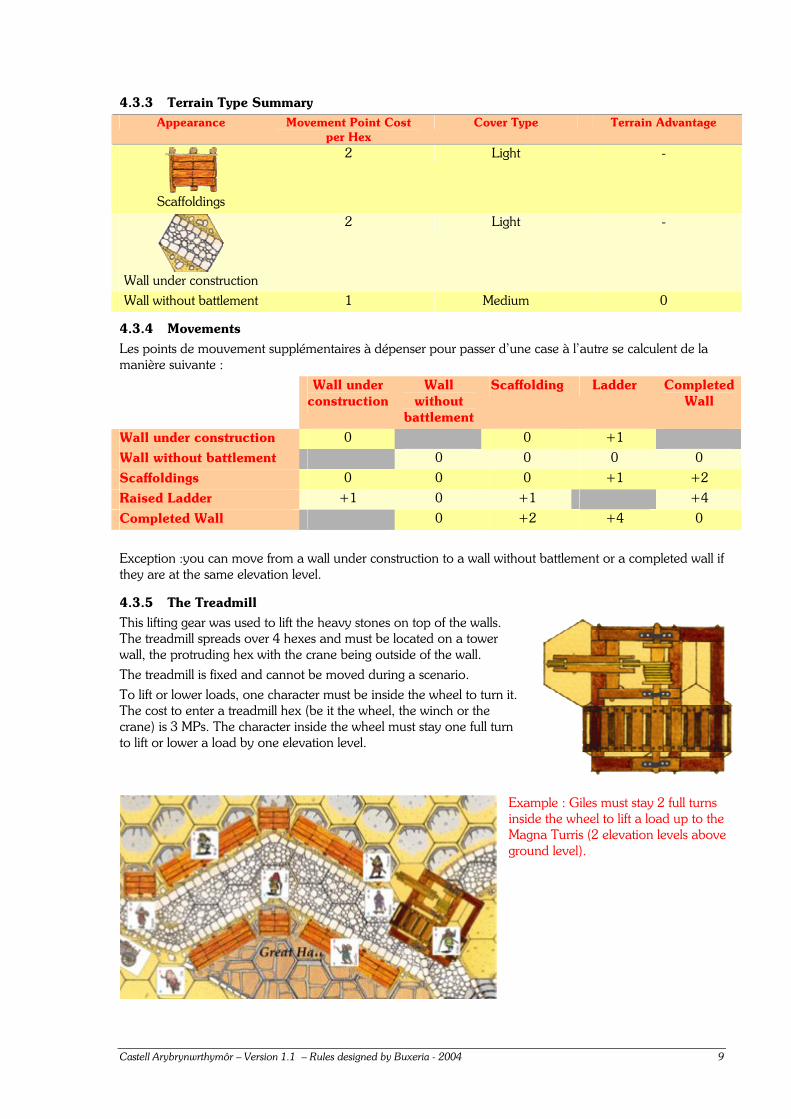
4.3.3 Terrain Type Summary Appearance Movement Point Cost
per Hex Cover Type Terrain Advantage
Scaffoldings
2 Light -
Wall under construction
2 Light -
Wall without battlement 1 Medium 0
4.3.4 Movements Les points de mouvement supplémentaires à dépenser pour passer d’une case à l’autre se calculent de la manière suivante :
Wall under construction
Wall without
battlement
Scaffolding Ladder Completed Wall
Wall under construction 0 0 +1
Wall without battlement 0 0 0 0
Scaffoldings 0 0 0 +1 +2
Raised Ladder +1 0 +1 +4
Completed Wall 0 +2 +4 0
Exception :you can move from a wall under construction to a wall without battlement or a completed wall if they are at the same elevation level.
4.3.5 The Treadmill This lifting gear was used to lift the heavy stones on top of the walls. The treadmill spreads over 4 hexes and must be located on a tower wall, the protruding hex with the crane being outside of the wall. The treadmill is fixed and cannot be moved during a scenario. To lift or lower loads, one character must be inside the wheel to turn it. The cost to enter a treadmill hex (be it the wheel, the winch or the crane) is 3 MPs. The character inside the wheel must stay one full turn to lift or lower a load by one elevation level.
Example : Giles must stay 2 full turns inside the wheel to lift a load up to the Magna Turris (2 elevation levels above ground level).
Castell Arybrynwrthymôr – Version 1.1 – Rules designed by Buxeria - 2004 10
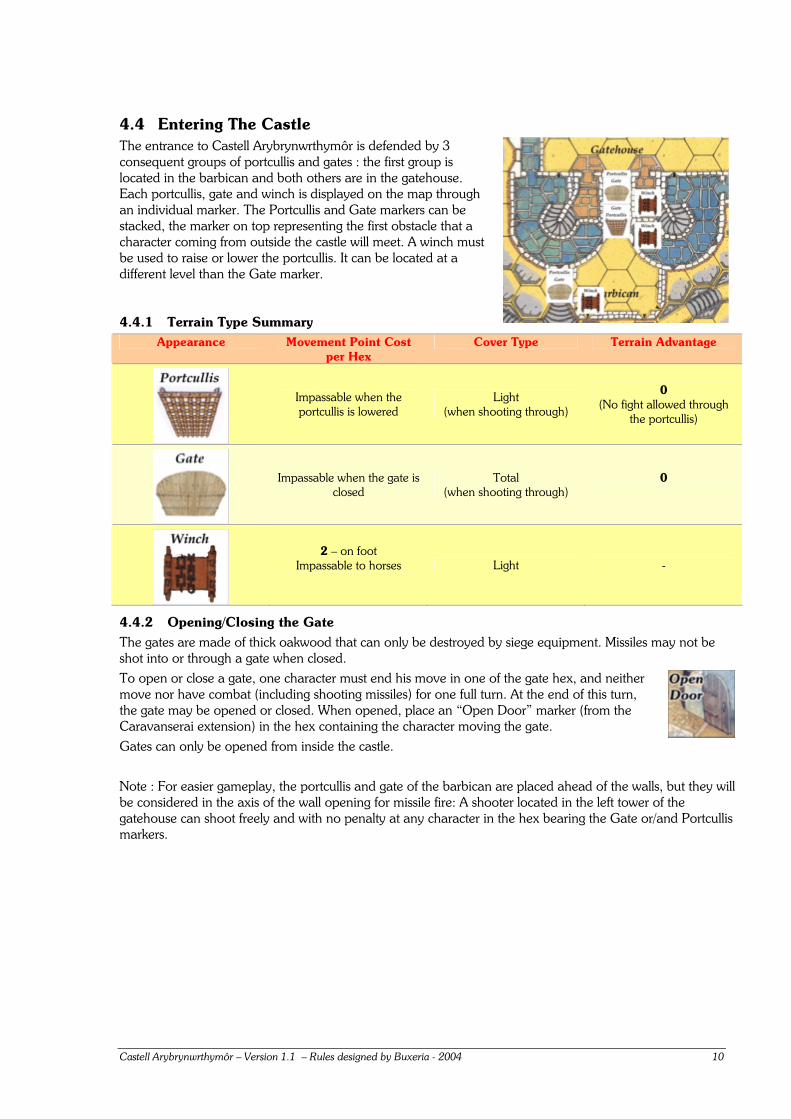
4.4 Entering The Castle The entrance to Castell Arybrynwrthymôr is defended by 3 consequent groups of portcullis and gates : the first group is located in the barbican and both others are in the gatehouse. Each portcullis, gate and winch is displayed on the map through an individual marker. The Portcullis and Gate markers can be stacked, the marker on top representing the first obstacle that a character coming from outside the castle will meet. A winch must be used to raise or lower the portcullis. It can be located at a different level than the Gate marker.
4.4.1 Terrain Type Summary Appearance Movement Point Cost
per Hex Cover Type Terrain Advantage
Impassable when the portcullis is lowered
Light (when shooting through)
0 (No fight allowed through
the portcullis)
Impassable when the gate is closed
Total (when shooting through)
0
2 – on foot Impassable to horses
Light -
4.4.2 Opening/Closing the Gate The gates are made of thick oakwood that can only be destroyed by siege equipment. Missiles may not be shot into or through a gate when closed. To open or close a gate, one character must end his move in one of the gate hex, and neither move nor have combat (including shooting missiles) for one full turn. At the end of this turn, the gate may be opened or closed. When opened, place an “Open Door” marker (from the Caravanserai extension) in the hex containing the character moving the gate. Gates can only be opened from inside the castle. Note : For easier gameplay, the portcullis and gate of the barbican are placed ahead of the walls, but they will be considered in the axis of the wall opening for missile fire: A shooter located in the left tower of the gatehouse can shoot freely and with no penalty at any character in the hex bearing the Gate or/and Portcullis markers.
Castell Arybrynwrthymôr – Version 1.1 – Rules designed by Buxeria - 2004 11
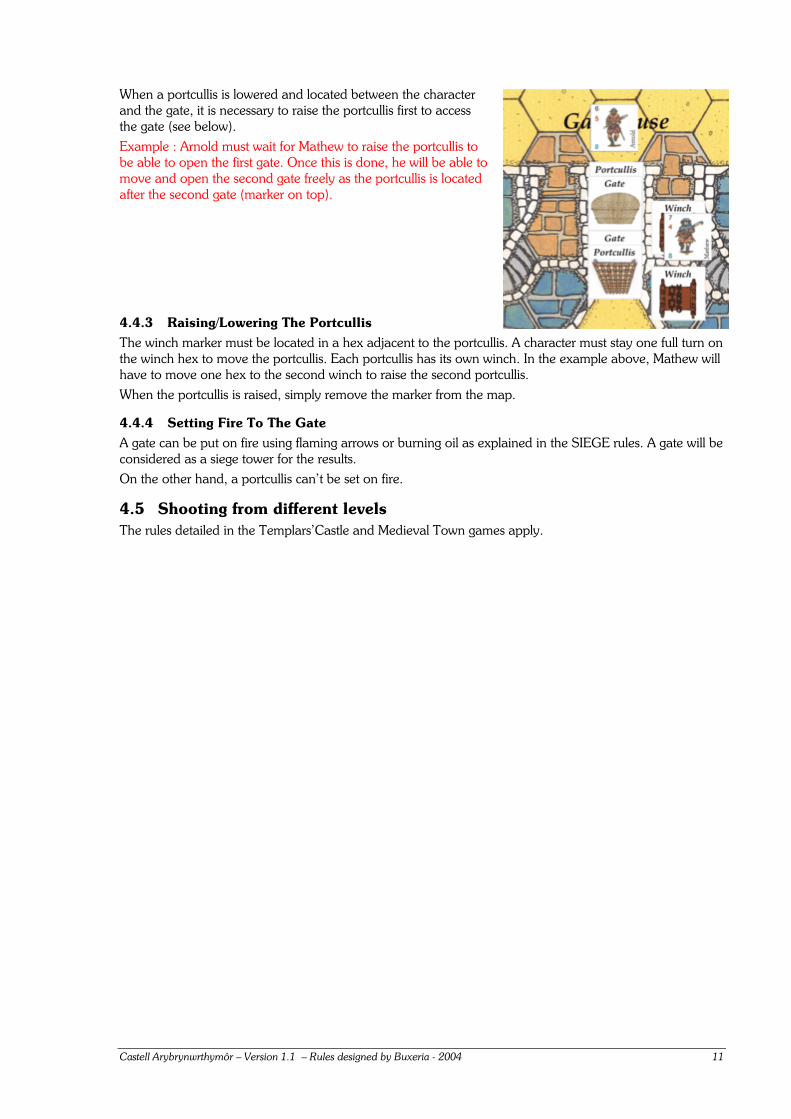
When a portcullis is lowered and located between the character and the gate, it is necessary to raise the portcullis first to access the gate (see below). Example : Arnold must wait for Mathew to raise the portcullis to be able to open the first gate. Once this is done, he will be able to move and open the second gate freely as the portcullis is located after the second gate (marker on top).
4.4.3 Raising/Lowering The Portcullis The winch marker must be located in a hex adjacent to the portcullis. A character must stay one full turn on the winch hex to move the portcullis. Each portcullis has its own winch. In the example above, Mathew will have to move one hex to the second winch to raise the second portcullis. When the portcullis is raised, simply remove the marker from the map.
4.4.4 Setting Fire To The Gate A gate can be put on fire using flaming arrows or burning oil as explained in the SIEGE rules. A gate will be considered as a siege tower for the results. On the other hand, a portcullis can’t be set on fire.
4.5 Shooting from different levels The rules detailed in the Templars’Castle and Medieval Town games apply.
![Wakelin Award Selectionfriendsoftheglynnvivian.com/wp-content/uploads/...Castell Coch [the Red Castle], as visitors are invited to discover over 20 works created by one of the UK’s](https://img.pdfslide.net/doc/110x75/5f8297f071904f4c054d1555/wakelin-award-selectionfri-castell-coch-the-red-castle-as-visitors-are-invited.jpg)