Embed Size (px)
Citation preview

CATS-GSM Tag (CGT) Operating Manual
Germany - Australia
CATS Manual for CATS-GSM-Tag BT Date: 06-12-2016 www.cats.is [email protected]
2
Content
CATS-GSM TAG (CGT) 1
CONTENT 2
CATS-GSM TAG OPERATING INSTRUCTIONS (BT VERSION 1) 3
INTRODUCTION TO THE CATS – GSM TAG (CGT) 3
CONNECTING TO THE DEVICE: 4
ONLINE GPS AND GSM/CDMA (NETWORK) TESTING 7
DIFFERENT GSM MODES (E.G. MODE 3 FOR TURTLE AND 4 /5 FOR SEALS) 8
DUTY CYCLE PROGRAMMING (WHEN TO RECORD GPS/ACTIVITY AND SEND A MESSAGE ETC.) 8
LIVE VIEW 9
LED SIGNALS OF THE CATS-GSM TAG 9
START RECORDING: 10
DOWNLOADING STORED DATA: 10
UPLOADING DATA SAVED TO THE ANDROID DEVICE 10
POWER MANAGEMENT: 10
FIRMWARE UPGRADE: 11
LONG TERM STORAGE: 11
TROUBLE SHOOTING: 12
EXAMPLE OF PARAMETER SETTINGS AND RESULTING STATISTICS: 13
CATS-GSM APPENDIX (VR3.0.0) 14
PROGRAMMING EXAMPLE: 14
CATS Manual for CATS-GSM-Tag BT Date: 06-12-2016 www.cats.is [email protected]
3
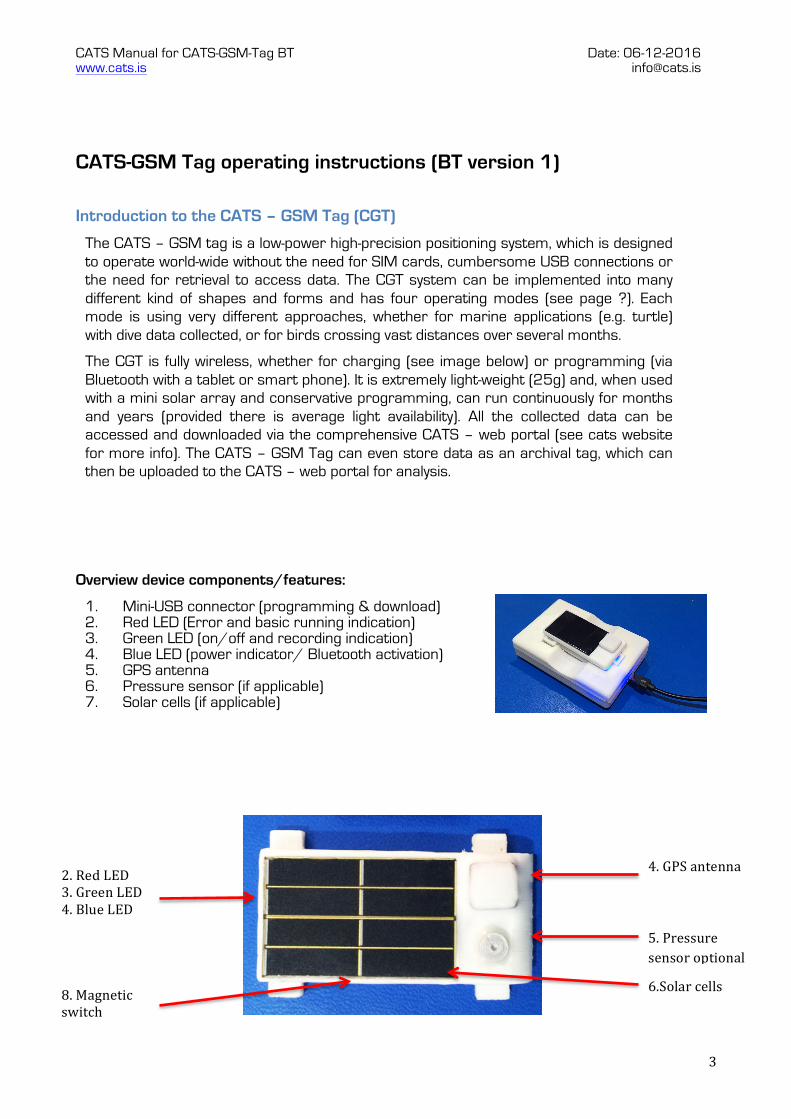
6.Solar cells
2. Red LED 3. Green LED 4. Blue LED
4. GPS antenna
5. Pressure sensor optional
CATS-GSM Tag operating instructions (BT version 1)
Introduction to the CATS – GSM Tag (CGT)
The CATS – GSM tag is a low-power high-precision positioning system, which is designed to operate world-wide without the need for SIM cards, cumbersome USB connections or the need for retrieval to access data. The CGT system can be implemented into many different kind of shapes and forms and has four operating modes (see page ?). Each mode is using very different approaches, whether for marine applications (e.g. turtle) with dive data collected, or for birds crossing vast distances over several months.
The CGT is fully wireless, whether for charging (see image below) or programming (via Bluetooth with a tablet or smart phone). It is extremely light-weight (25g) and, when used with a mini solar array and conservative programming, can run continuously for months and years (provided there is average light availability). All the collected data can be accessed and downloaded via the comprehensive CATS – web portal (see cats website for more info). The CATS – GSM Tag can even store data as an archival tag, which can then be uploaded to the CATS – web portal for analysis.
Overview device components/features:
1. Mini-USB connector (programming & download) 2. Red LED (Error and basic running indication) 3. Green LED (on/off and recording indication) 4. Blue LED (power indicator/ Bluetooth activation) 5. GPS antenna 6. Pressure sensor (if applicable) 7. Solar cells (if applicable)
8. Magnetic switch
CATS Manual for CATS-GSM-Tag BT Date: 06-12-2016 www.cats.is [email protected]
4
Connecting to the device:
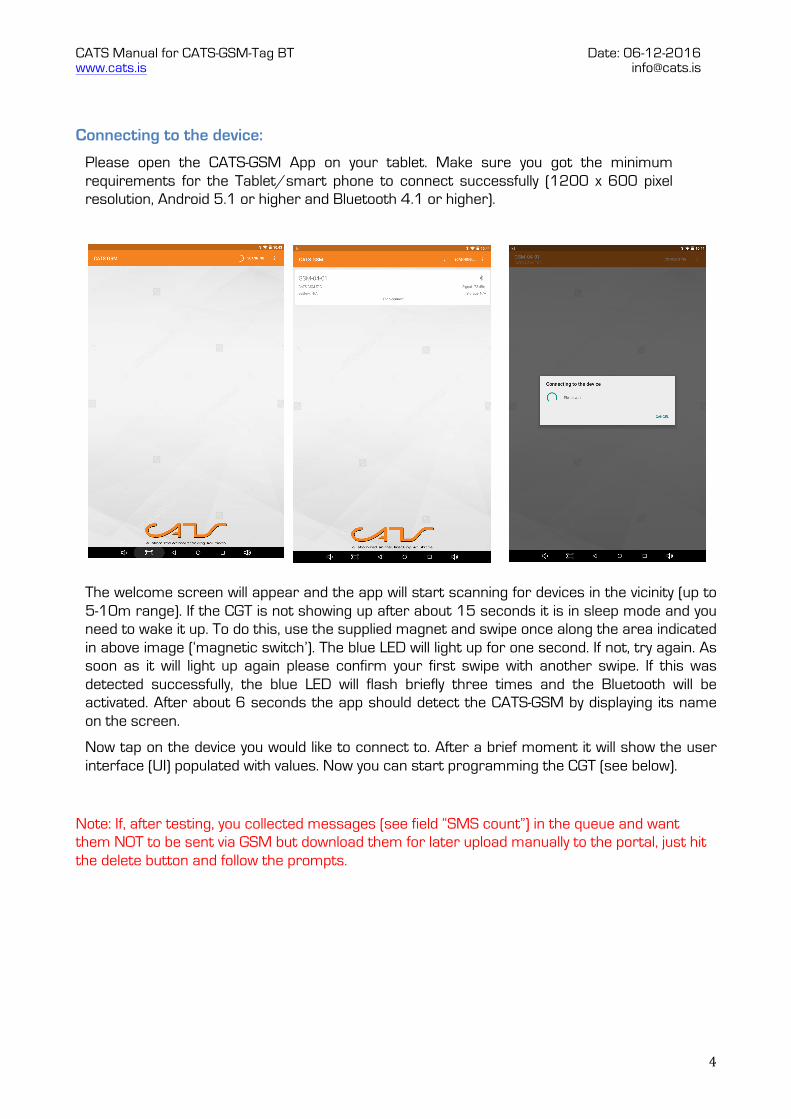
Please open the CATS-GSM App on your tablet. Make sure you got the minimum requirements for the Tablet/smart phone to connect successfully (1200 x 600 pixel resolution, Android 5.1 or higher and Bluetooth 4.1 or higher).
The welcome screen will appear and the app will start scanning for devices in the vicinity (up to 5-10m range). If the CGT is not showing up after about 15 seconds it is in sleep mode and you need to wake it up. To do this, use the supplied magnet and swipe once along the area indicated in above image (‘magnetic switch’). The blue LED will light up for one second. If not, try again. As soon as it will light up again please confirm your first swipe with another swipe. If this was detected successfully, the blue LED will flash briefly three times and the Bluetooth will be activated. After about 6 seconds the app should detect the CATS-GSM by displaying its name on the screen.
Now tap on the device you would like to connect to. After a brief moment it will show the user interface (UI) populated with values. Now you can start programming the CGT (see below).
Note: If, after testing, you collected messages (see field “SMS count”) in the queue and want them NOT to be sent via GSM but download them for later upload manually to the portal, just hit the delete button and follow the prompts.
CATS Manual for CATS-GSM-Tag BT Date: 06-12-2016 www.cats.is [email protected]
5
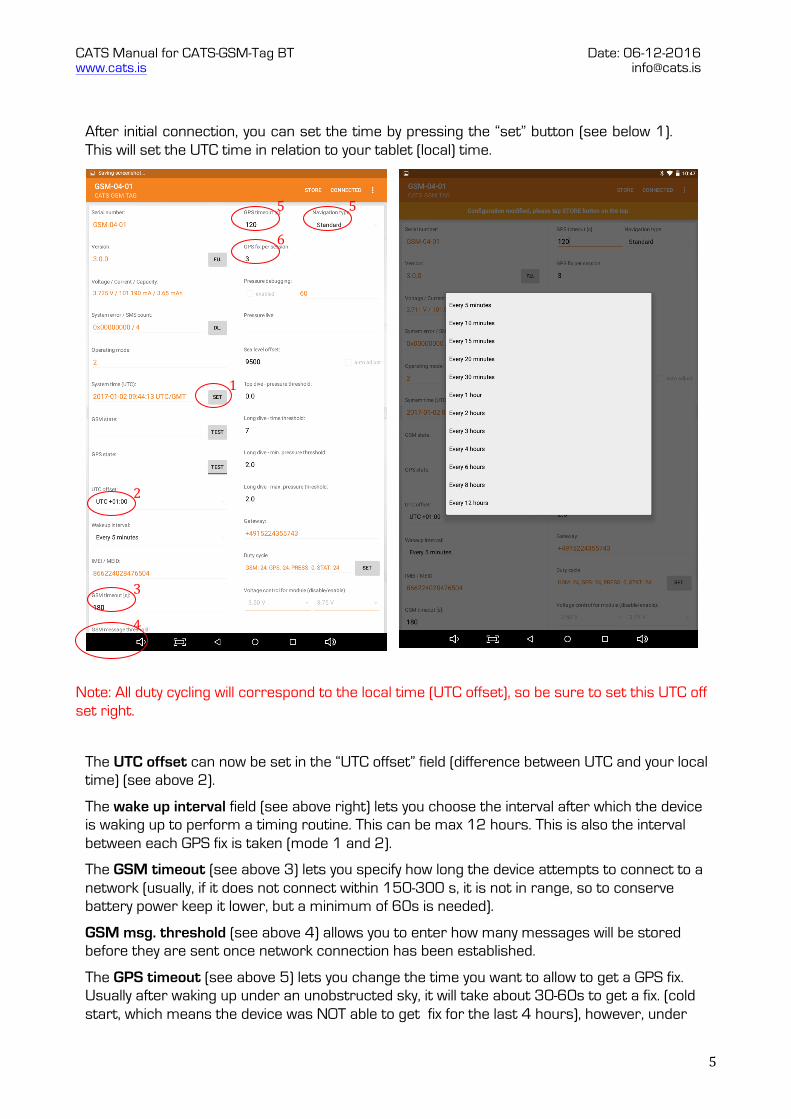
After initial connection, you can set the time by pressing the “set” button (see below 1). This will set the UTC time in relation to your tablet (local) time.
Note: All duty cycling will correspond to the local time (UTC offset), so be sure to set this UTC off set right.
The UTC offset can now be set in the “UTC offset” field (difference between UTC and your local time) (see above 2).
The wake up interval field (see above right) lets you choose the interval after which the device is waking up to perform a timing routine. This can be max 12 hours. This is also the interval between each GPS fix is taken (mode 1 and 2).
The GSM timeout (see above 3) lets you specify how long the device attempts to connect to a network (usually, if it does not connect within 150-300 s, it is not in range, so to conserve battery power keep it lower, but a minimum of 60s is needed).
GSM msg. threshold (see above 4) allows you to enter how many messages will be stored before they are sent once network connection has been established.
The GPS timeout (see above 5) lets you change the time you want to allow to get a GPS fix. Usually after waking up under an unobstructed sky, it will take about 30-60s to get a fix. (cold start, which means the device was NOT able to get fix for the last 4 hours), however, under
1
2
3
4
5 5
6
CATS Manual for CATS-GSM-Tag BT Date: 06-12-2016 www.cats.is [email protected]
6
canopy or similar it can take up to 200-300s. (Note: short fix intervals only need a few seconds to get a fix (hot start))
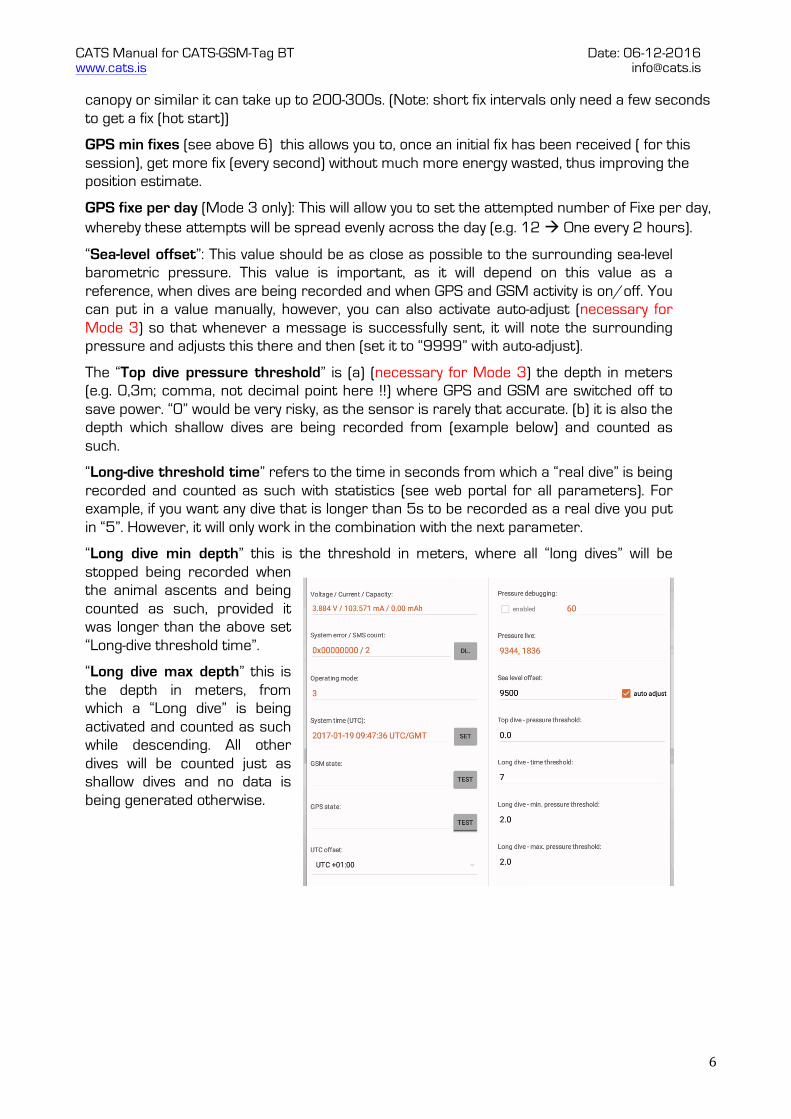
GPS min fixes (see above 6) this allows you to, once an initial fix has been received ( for this session), get more fix (every second) without much more energy wasted, thus improving the position estimate.
GPS fixe per day (Mode 3 only): This will allow you to set the attempted number of Fixe per day, whereby these attempts will be spread evenly across the day (e.g. 12 à One every 2 hours).
“Sea-level offset”: This value should be as close as possible to the surrounding sea-level barometric pressure. This value is important, as it will depend on this value as a reference, when dives are being recorded and when GPS and GSM activity is on/off. You can put in a value manually, however, you can also activate auto-adjust (necessary for Mode 3) so that whenever a message is successfully sent, it will note the surrounding pressure and adjusts this there and then (set it to “9999” with auto-adjust).
The “Top dive pressure threshold” is (a) (necessary for Mode 3) the depth in meters (e.g. 0,3m; comma, not decimal point here !!) where GPS and GSM are switched off to save power. “0” would be very risky, as the sensor is rarely that accurate. (b) it is also the depth which shallow dives are being recorded from (example below) and counted as such.
“Long-dive threshold time” refers to the time in seconds from which a “real dive” is being recorded and counted as such with statistics (see web portal for all parameters). For example, if you want any dive that is longer than 5s to be recorded as a real dive you put in “5”. However, it will only work in the combination with the next parameter.
“Long dive min depth” this is the threshold in meters, where all “long dives” will be stopped being recorded when the animal ascents and being counted as such, provided it was longer than the above set “Long-dive threshold time”.
“Long dive max depth” this is the depth in meters, from which a “Long dive” is being activated and counted as such while descending. All other dives will be counted just as shallow dives and no data is being generated otherwise.

CATS Manual for CATS-GSM-Tag BT Date: 06-12-2016 www.cats.is [email protected]
7
Online GPS and GSM/CDMA (network) testing
The CATS-GSM/CDMA tag allows you to test the GPS while connected to the PC. In order to get a fix, make sure you are not obstructed by anything. Once you press the “GPS” button in the lower UI area you will see values appear in the “GPS-state” field (see left). The first digit shows you when the GPS module was activated within the device (“1”), the second number shows you the number of successful fixes, the third and fourth are timing values, whereby the fifth and sixth will show the location (Lat –Long) as soon as it has a fix (this can take up to 3 min on initialisation. The last digit shows again a timing value (when it gets a fix, it might not fit all values in the field). The coloured dot indicates the status of the test (yellow when connecting, green when fix has been taken, red when there is an error, then please contact CATS). Once you are finished with testing, just press the “GPS” button again to return and end the test mode.
To test the mobile network connection, you follow a similar procedure. Press the ‘Test SMS’ button (lower part of UI) and three digits will appear in the “GSM state” field. First, two zeros and “99” will appear (grey dot), after about 30-50s the first zero must change to “1”, which means, that it was activated in the module and communicates (yellow dot). At that time, the third digit will show you the signal strength, the higher the better (anything from 4-6, which is about one bar on your mobile phone) will be enough to send a message. After another 10-60s the second zero should also change to “1” or “2”, only the “2” signals a successful connection to the network and a message can theoretically be sent. However, if there is no network near, it will not change to 1. During the following actual attempt to send a message, the second digit will change either to “10” and then to “20”, or directly to “20”, which means that it has sent the test message successfully (green dot).
(GSM test-value explanation first value: type of connection to available network ( second value: progress of GSM module transmission ( third value: Signal strength of GSM tag (1 – weakest; 31 – strongest; 99 – not available)
If it will not change to “20” (i.e. stays at 10) the test has failed (red dot). If the signal was not good enough, it may stop the test with only the yellow dot. In this case please repeat the test with a different logger position to improve reception. It will take another 15-30 seconds for the test to finish. Only then can you continue with the User Interface (GSM test button not faded out any longer). After a few seconds you should be able to see the message in the CATS-Web portal. The GSM test cannot be stopped once initiated and needs to be completed.

CATS Manual for CATS-GSM-Tag BT Date: 06-12-2016 www.cats.is [email protected]
8
Different GSM modes (e.g. mode 3 for Turtle and 4 /5 for seals)
(Note: different modes can only be activated by CATS) The CATS-GSM is designed to run in different modes. Mode “1” is designed for terrestrial long-term tracking use with the accelerometer being used as activity sensor and the GPS is controlled by it. Mode “3”, “4” and “5” is similar, however, designed for marine applications, whereby the pressure sensor (depth) controls intelligently the GSM and GPS functions to avoid futile GPS/GSM attempts. Mode “2” is predominantly for simple GPS recording with location acquisition or more frequent terrestrial or avian tracking.
Duty cycle programming (when to record GPS/activity and send a message etc.)
(Note: if “GSM Region” box is not checked, messages are only sent as programmed, if checked, messages are sent as soon as they are created!!! And within the specified region of the rectangle, potentially incurring higher battery usage) Press the duty cycle “set” button on the main UI window (next to “Duty cycle field”).
You can program the CGT by checking the appropriate boxes (all numbers represent local time of day). “GSM interval”: Each tick represents a time of day, where the device attempts to connect to the network (this can vary up to 59min within the ticked hour). Remember, each connection can result in multiple messages, depending to the data stored and recorded and the messages in the queue that could not be sent in earlier attempts, whereby the youngest messages in the queue is sent first. By ticking the “send immediate” box, you get a message, as soon as the device has a message (or more) in the queue AND has the chance to connect to a network.
“GSM region”, if this is activated it gives you an area (rectangular), in which the GSM will be activated according to the hours per day defined above. This means, only if the GPS “finds” itself in this area, will the above - programmed “GSM interval” duty-cycle come into effect and performs its routine (i.e. send messages) . However, it does not affect all other recording parameters – they are still being active. This will avoid futile GSM connections in areas where it is known that no network service exists (or vice versa). If the “GSM region” is not activated all duty-cycling will be performed
at the times and areas as programmed.
CATS Manual for CATS-GSM-Tag BT Date: 06-12-2016 www.cats.is [email protected]
9
“GPS interval”, lets you choose when a GPS fix (or more than one, see “GPS min. fixes”) will be attempted. “Accel. Interval”: lets you choose when the above programmed activity samples are performed during each day. Ticking the “sat. spy” box allows the device to “feel” for satellites and if it doesn’t sense any in the sky (e.g. device is underground or similar) it will shut down this GPS fix attempt straight away. However, sometimes it is not wise to use this, as some animals might be out of satellite view only for a few seconds (e.g. burrowing birds) before being ‘out’ again in the open.
As the CGT also sends “statistics” about its performance (last field in this sub menu), it might be enough to tick this also only once or twice a day when deployed, but for testing every hour might be useful. Make sure you press “store” when finished with the duty cycle programming window, unless you do not want it to be saved. Always make sure you press the “Store” button before disconnecting.
“Voltage control”, allows you to choose the Voltage where your device will switch off (disable) and switch on after the solar cells will have re-charged it (enable). Be aware, that this will have major implications on your tag performance!!
Live view
Once you have connected the CGT (see UI above), you can see the Accl. sensor (if integrated) work and watch the values (x-y-z-axis values). Similar with the pressure sensor values (if fitted), here the first value is the pressure in mbar with another digit added for accuracy (e.g. 10012, which would be 1001,2 mbar), however, you will find these values converted into meters in the web portal. The second digit shows the temperature (e.g. 2590 à 25.90 degrees Celsius).
LED signals of the CATS-GSM tag
Once connected a dim red/green combination lights up for a second then sequence of LED flashes (3 x green followed by one red LEDs) indicates initialization and connection, followed by the same sequence again. After that, as long as nothing is activated or being tested the red LED will flash every 15s, indicating that it is working.
During the online GSM test, the green LED will flash slowly as soon as it has a successful internal module connection (not a network connection), as indicated with a “1” in the associated UI field (see above). Once you stop GSM test, the green LED might keep flashing for a few seconds with occasional red flashes (still every 15s).
During GPS online testing, the Green LED behaves similar to the GSM testing, however, flashing is slightly faster.
Once you will disconnect from the PC you will see the same lighting sequence as during connection. However, depending to programming, there may be additional flashing frequencies.
CATS Manual for CATS-GSM-Tag BT Date: 06-12-2016 www.cats.is [email protected]
10
Start recording:
As soon as the CATS device is disconnected from the tablet/smartphone it will be initialised (LEDs flashing, see above) automatically and then it is activated. Depending to programming, it may go straight to sleep or it will be trying to record data, which will be accompanied by various of LED signals. It usually tries to attempt to get a fix straight away and to send some messages about its configuration to the portal.
Downloading stored data:
All stored data in the CATS-GSM tag is temporary but accessible as long as its storage is not full. The internal storage allows for thousands of data points to be saved and when connected to the App you can access this data without the need to send this via SMS – in effect, you can use it as an archival tag.
When connected to the UI successfully, you will see the stored messages in the UI field (sys error/SMS count). Hit the “del” button and follow the prompts. After having saved the messages you can upload them in the GSM CATS web portal and view the data.
Uploading data saved to the android device
In order to upload your tag data that you downloaded from the device, please tap the triple dots at the top right corner and choose the “Show exported recordings”. You will be presented with all the data that you have stored on the android device. The green tick marks the data that already has been uploaded to the web portal successfully. Choose your data set that you wan to upload to the web portal and follow the prompts. Now you can view the data in the web portal under your tag in question.
Note: Always watch the LEDs during initialization and if they do not flash the way they are supposed to (e.g. a slow continuous red flashing) disconnect re-try and if problem persist contact CATS.
Once finished with programming and everything has been saved, you can disconnect the device from the App (top left triple dots in UI).
Power management:
The CGT maybe equipped with solar cells, which will charge the device when exposed to the sun. At an average use of a few network connections and conservative activity and GPS usage per day, the device will last for many days without light. When sleeping, the device uses almost no energy at all. Nevertheless, if the battery charge drops to the programmed voltage (see Volt. control for module) it will disconnect power to the CGT and will only start up again (and continue recording based on its set “on” voltage). This will ensure long recording times, however, also the potential of longer pauses in-between recordings.
CATS Manual for CATS-GSM-Tag BT Date: 06-12-2016 www.cats.is [email protected]
11
Before deployment, you can recharge the CGT via the wireless charger or by exposing it to direct sunlight. The CATS-GSM tag should be fully charged within 3-5 h. (Non-solar-powered devices may many hours when empty to recharge, depending their battery capacity).
Firmware upgrade:
In order get the device into the upgrade mode connect to the CATS-GSM App (see above). Once connected hit the “fu” button (top left next to FW version filed). Now please follow the prompts. Locate the “firmware.bin” file. The new firmware is now ready for operation.
Long term storage:
When not in use and the CATS - GSM Tag needs to be stored for a longer period of time, please charge it to about 4 volts, set all parameters in the duty-cycling menu to zero (“0”) (i.e. GPS, GSM, Pressure, Statistics) and the “wake-up interval” in the main menu to 12 hours. Then please set the “disable voltage” to 3.7V and the “enable voltage” to 3.75V. In addition do not store it in a dark place. Ideally where day - or sunlight can reach the solar panels of the CGT. This will ensure that the device gets enough power to keep sleeping in a state of charge that is not damaging the battery.
Note: Please consider the duty-cycling mode to reduce activation times. All parameters are interacting with each other. One parameter set wrong can disable the tag, or deliver huge amounts of data!!
Be sure what you do
Now again, do not forget to hit the ‘store’ button to save the values you entered and check again whether these are the right ones. After that, make sure that the values in the main UI are still all right, one by one, and hit the store button here as well again to confirm all parameters. Good luck CATS
CATS Manual for CATS-GSM-Tag BT Date: 06-12-2016 www.cats.is [email protected]
12
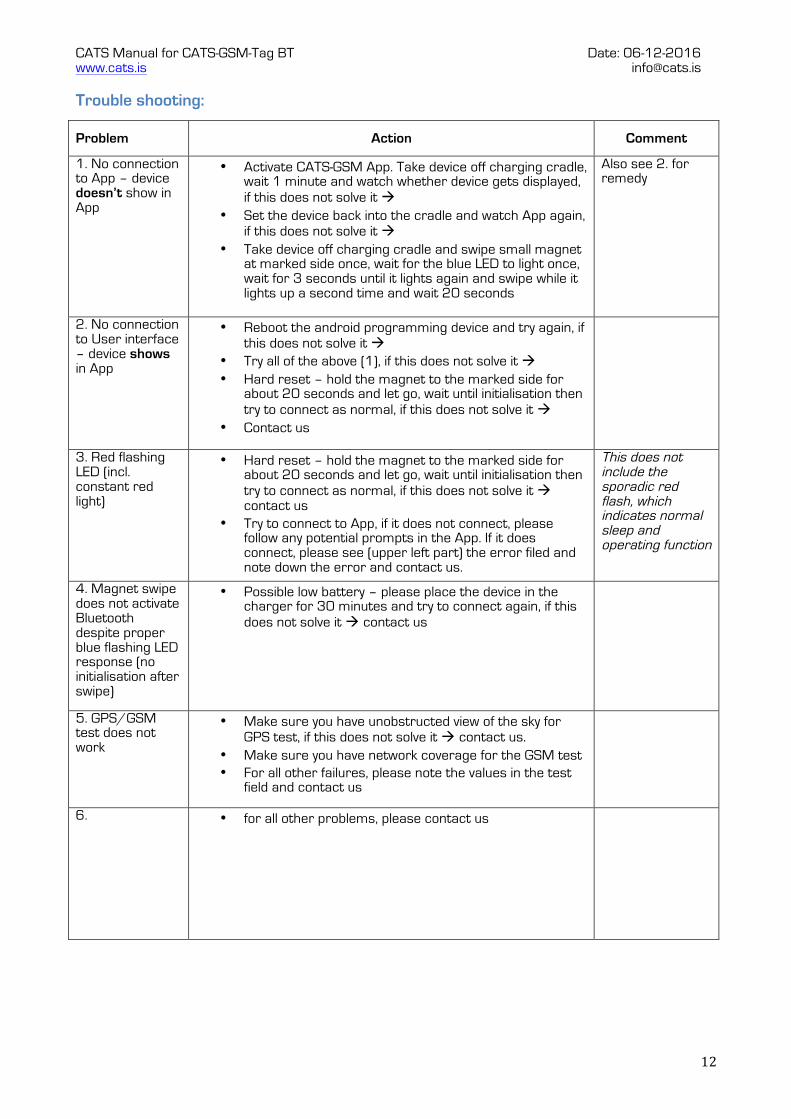
Trouble shooting:
Problem Action Comment
1. No connection to App – device doesn’t show in App
• Activate CATS-GSM App. Take device off charging cradle, wait 1 minute and watch whether device gets displayed, if this does not solve it à
• Set the device back into the cradle and watch App again, if this does not solve it à
• Take device off charging cradle and swipe small magnet at marked side once, wait for the blue LED to light once, wait for 3 seconds until it lights again and swipe while it lights up a second time and wait 20 seconds
Also see 2. for remedy
2. No connection to User interface – device shows in App
• Reboot the android programming device and try again, if this does not solve it à
• Try all of the above (1), if this does not solve it à • Hard reset – hold the magnet to the marked side for
about 20 seconds and let go, wait until initialisation then try to connect as normal, if this does not solve it à
• Contact us
3. Red flashing LED (incl. constant red light)
• Hard reset – hold the magnet to the marked side for about 20 seconds and let go, wait until initialisation then try to connect as normal, if this does not solve it à contact us
• Try to connect to App, if it does not connect, please follow any potential prompts in the App. If it does connect, please see (upper left part) the error filed and note down the error and contact us.
This does not include the sporadic red flash, which indicates normal sleep and operating function
4. Magnet swipe does not activate Bluetooth despite proper blue flashing LED response (no initialisation after swipe)
• Possible low battery – please place the device in the charger for 30 minutes and try to connect again, if this does not solve it à contact us
5. GPS/GSM test does not work
• Make sure you have unobstructed view of the sky for GPS test, if this does not solve it à contact us.
• Make sure you have network coverage for the GSM test • For all other failures, please note the values in the test
field and contact us
6. • for all other problems, please contact us
CATS Manual for CATS-GSM-Tag BT Date: 06-12-2016 www.cats.is [email protected]
13
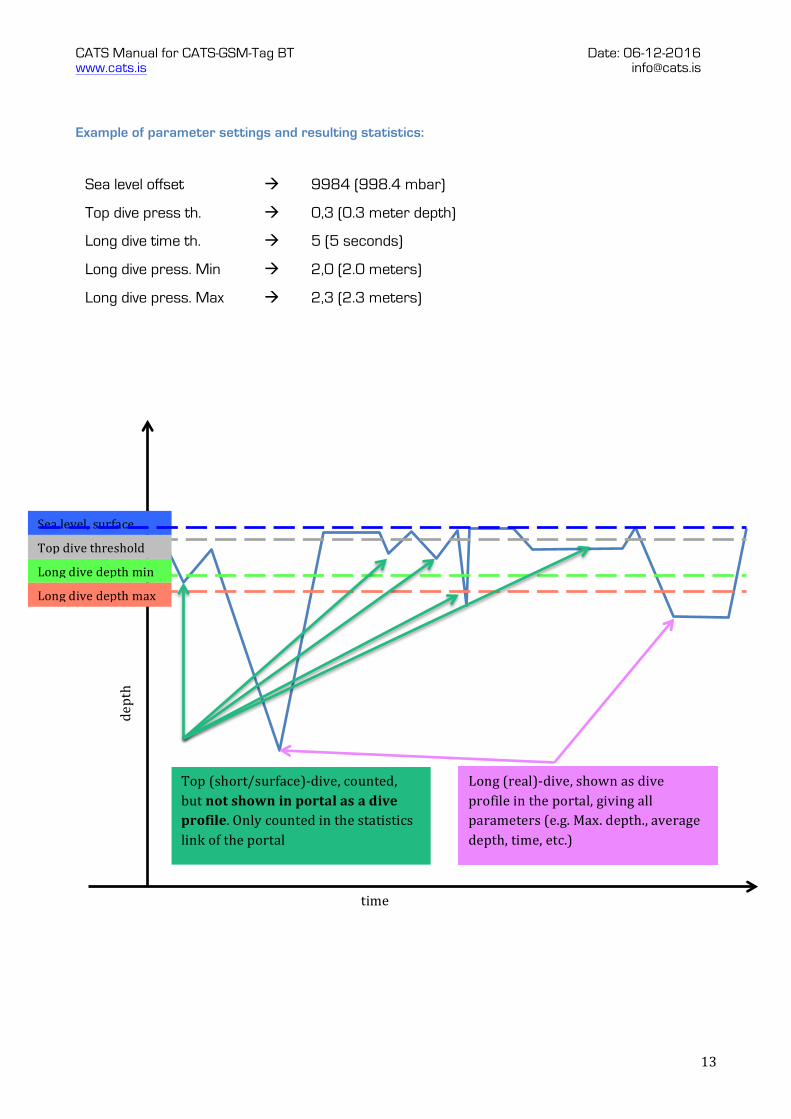
Example of parameter settings and resulting statistics:
Sea level offset à 9984 (998.4 mbar)
Top dive press th. à 0,3 (0.3 meter depth)
Long dive time th. à 5 (5 seconds)
Long dive press. Min à 2,0 (2.0 meters)
Long dive press. Max à 2,3 (2.3 meters)
Long dive depth min
Long dive depth max
Top dive threshold
Sea level, surface
time
depth
Long (real)-‐dive, shown as dive profile in the portal, giving all parameters (e.g. Max. depth., average depth, time, etc.)
Top (short/surface)-‐dive, counted, but not shown in portal as a dive profile. Only counted in the statistics link of the portal
CATS Manual for CATS-GSM-Tag BT Date: 06-12-2016 www.cats.is [email protected]
14
CATS-GSM appendix (vr3.0.0)
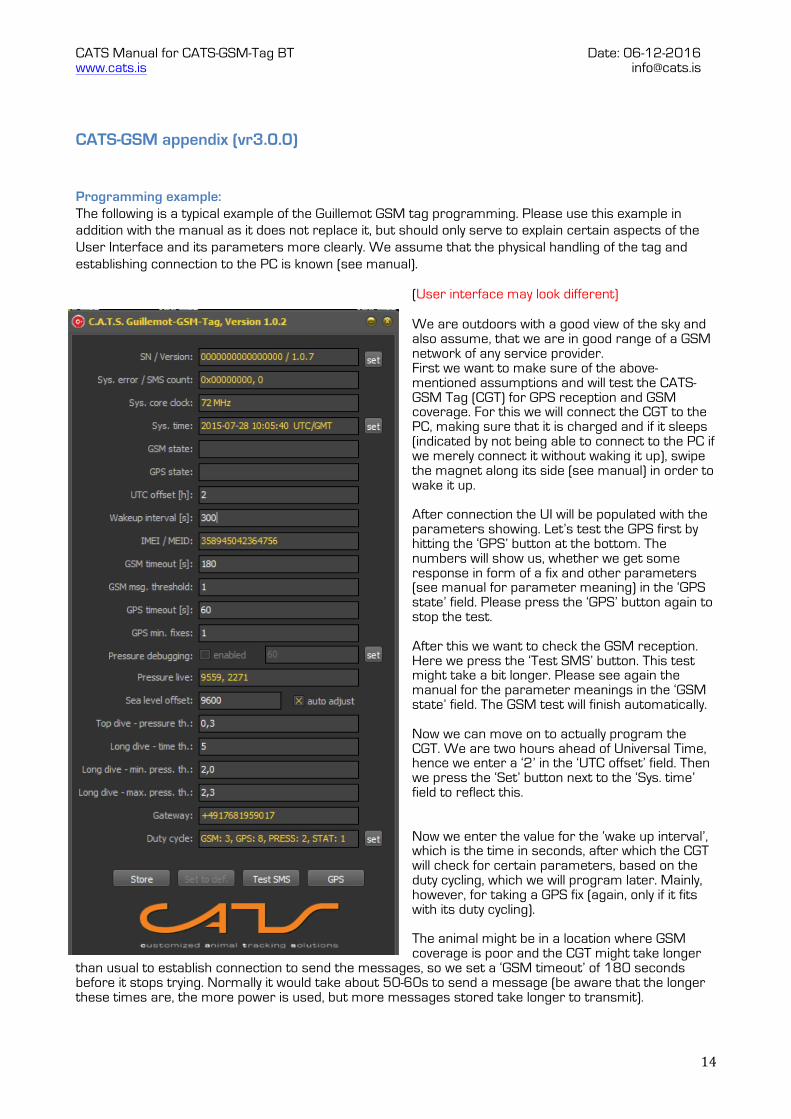
Programming example: The following is a typical example of the Guillemot GSM tag programming. Please use this example in addition with the manual as it does not replace it, but should only serve to explain certain aspects of the User Interface and its parameters more clearly. We assume that the physical handling of the tag and establishing connection to the PC is known (see manual).
(User interface may look different)
We are outdoors with a good view of the sky and also assume, that we are in good range of a GSM network of any service provider. First we want to make sure of the above-mentioned assumptions and will test the CATS-GSM Tag (CGT) for GPS reception and GSM coverage. For this we will connect the CGT to the PC, making sure that it is charged and if it sleeps (indicated by not being able to connect to the PC if we merely connect it without waking it up), swipe the magnet along its side (see manual) in order to wake it up. After connection the UI will be populated with the parameters showing. Let’s test the GPS first by hitting the ‘GPS’ button at the bottom. The numbers will show us, whether we get some response in form of a fix and other parameters (see manual for parameter meaning) in the ‘GPS state’ field. Please press the ‘GPS’ button again to stop the test. After this we want to check the GSM reception. Here we press the ‘Test SMS’ button. This test might take a bit longer. Please see again the manual for the parameter meanings in the ‘GSM state’ field. The GSM test will finish automatically. Now we can move on to actually program the CGT. We are two hours ahead of Universal Time, hence we enter a ‘2’ in the ‘UTC offset’ field. Then we press the ‘Set’ button next to the ‘Sys. time’ field to reflect this. Now we enter the value for the ‘wake up interval’, which is the time in seconds, after which the CGT will check for certain parameters, based on the duty cycling, which we will program later. Mainly, however, for taking a GPS fix (again, only if it fits with its duty cycling). The animal might be in a location where GSM coverage is poor and the CGT might take longer
than usual to establish connection to send the messages, so we set a ‘GSM timeout’ of 180 seconds before it stops trying. Normally it would take about 50-60s to send a message (be aware that the longer these times are, the more power is used, but more messages stored take longer to transmit).
CATS Manual for CATS-GSM-Tag BT Date: 06-12-2016 www.cats.is [email protected]
15
Next we want, as soon as a message is stored and the CGT has the duty to send (based on our programming), that a message is sent - so we enter ‘1’ into the ‘GSM msg. threshold’ field. If you think that it is better to store some messages to send them all at once, than enter a different value. For the ‘GPS timeout’ we know that the animal is mostly under a very clear sky, so we set this to a minimum (90s) to save energy, however, for your information, as soon as the GPS gets a fix it will stop automatically. So an extended ‘time out’ is only useful in cases where it might not get a fix due to obstructions or other reasons. The GPS is the most power-hungry component of the CGT, so be mindful, but also do not set it too low. As we only want one GPS fix for every attempt we programmed (remember the wake up interval) we enter ‘1’ into the ‘GPS min fixes’ field. Sometimes it is more sensible to increase this number to increase the accuracy. It will only take a few seconds longer for more fixes (GPS sampling rate when activated is 1Hz). The next parameters are important for the entire working of the dive statistics. As we are connected to the PC right now, we can see the live pressure and temperature values (updated every second). As the CGT is pressure controlled, it needs to know its current atmospheric pressure to measure how deep it will be once under water in order to adhere to its programming. You can, either read it off right now and enter it into the field if you know that the weather will not change much, or you can enter the value and check the ‘auto adjust’ field, which means that it will, after each message is sent, take the current pressure reading and will adjust it accordingly. The ‘top-dive pressure threshold’ field signifies the depth in meters, where we think that it is safe for the CGT to start measuring a dive. If you set this too low, than you might have many dives recorded, filling up the message storage and sending too many messages, using too much power and the CGT fails to accomplish its task. In our case we think that our animal might often just move above 0.3m without really diving, so we set it at this value or higher (i.e. >0.3m). We are also only interested in longer dives, which means I want the CGT to not record in detail any dives less than 5 seconds (no matter how deep), hence our value in the screenshot of 5s. Next, we want that the animal’s ‘real dives’ are only starting when descending beyond 2.3 meters and should stop when ascending at 2.0 meters. You can think of reasons why this must be different values, whereby the minimum must be smaller than the maximum. So the next two fields will be adjusted accordingly. Here it is noted now, that, based on our programming, any dive under 0.3m and shorter than 5 seconds (even if it is deeper than 2.3 meters) will be ignored in the detailed analysis, however, it will be in the statistics as short surface dives (top dives). In addition, you need at least 8 ‘Long dives’ in order to get a message generated. Now do not forget to hit the ‘store’ button to save the values you entered and check again whether these are the right ones. Next up the duty cycling of the CGT. This will be crucial for your energy consumption and many other associated aspects of the CGT. It is important to mention that whatever hour of the day you check under the various parameters, it is always relating to your local time (offset from UTC). In addition, it does not mean that programmed actions are being executed at the exact hour – this can vary within the entire hour that is checked. ‘GSM interval’ - as we know that our animal is usually always in a well network-covered area between 1200 and 1400hrs local time, we set our GSM activation only to those times, so, no matter how many messages have been accumulated, the CGT will start trying to send within those times. ‘GSM region’ – we also know that some days the animal is not within the GSM network coverage at the above-programmed time. To avoid futile attempts we will program the CGT with a certain region and check the box to activate it. Here it is noted, that both states have to be valid in order to activate the GSM module à time of day, plus region. Yet, if the CGT finds itself in the region within the time, it will not wait until the next time the CGT wakes up, it will straight away attempt to send a message.
CATS Manual for CATS-GSM-Tag BT Date: 06-12-2016 www.cats.is [email protected]
16
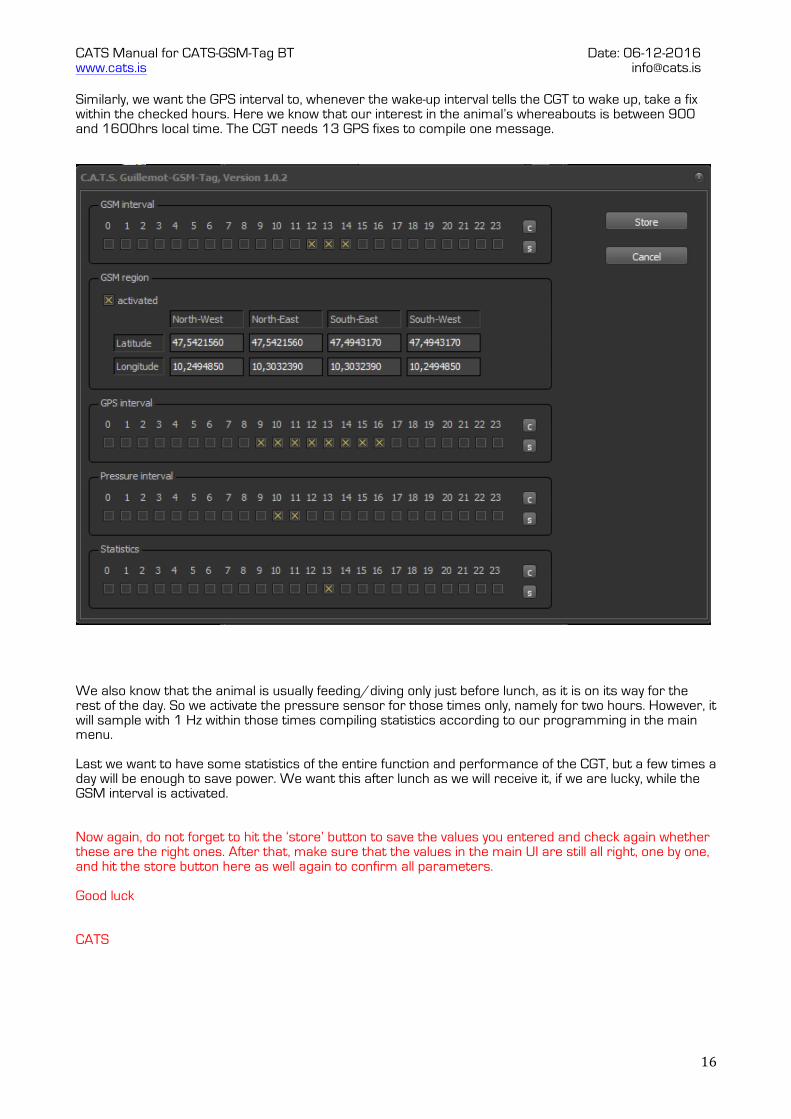
Similarly, we want the GPS interval to, whenever the wake-up interval tells the CGT to wake up, take a fix within the checked hours. Here we know that our interest in the animal’s whereabouts is between 900 and 1600hrs local time. The CGT needs 13 GPS fixes to compile one message.
We also know that the animal is usually feeding/diving only just before lunch, as it is on its way for the rest of the day. So we activate the pressure sensor for those times only, namely for two hours. However, it will sample with 1 Hz within those times compiling statistics according to our programming in the main menu. Last we want to have some statistics of the entire function and performance of the CGT, but a few times a day will be enough to save power. We want this after lunch as we will receive it, if we are lucky, while the GSM interval is activated. Now again, do not forget to hit the ‘store’ button to save the values you entered and check again whether these are the right ones. After that, make sure that the values in the main UI are still all right, one by one, and hit the store button here as well again to confirm all parameters. Good luck CATS