Embed Size (px)
Citation preview

CC100 Colony counter
Please read the User Manual carefully before use, and follow all operating and safety instructions!
user manual english

2
User Manual
CC100 Colony counter
Preface
Users should read this Manual carefully, follow the instructions and procedures, and beware of all the cautions when using this instrument.
Service
When help is needed, you can always contact the Service Department of manufacturer for technical support:
www.labbox.com / e-mail: [email protected] Please provide the customer care representative with the following information: • Serial number • Description of problem • Your contact information
Warranty
This instrument is warranted to be free from defects in materials and workmanship under normal use and service, for a period of 24 months from the date of invoice. The warranty is extended only to the original purchaser. It shall not apply to any product or parts which have been damaged on account of improper installation, improper connections, misuse, accident or abnormal conditions of operation. For claim under the warranty please contact your supplier.
3
Contents
Preface............................................................................................................................................................. 2 Service.............................................................................................................................................................. 2 Warranty......................................................................................................................................................... 2 Contents ........................................................................................................................................................... 3 1. Safety Instructions .................................................................................................................................. 4 2. Inspection ................................................................................................................................................. 4 2.1 Receiving Inspection................................................................................................................................ 4 2.2 Listing of Items ......................................................................................................................................... 4 3. Assembly ................................................................................................................................................. 5 4. Main part diagram ............................................................................................................................... 6 5. Control panel .......................................................................................................................................... 7 6. Installation ............................................................................................................................................... 7 7. Operation ............................................................................................................................................... 8 8. Maintenance ......................................................................................................................................... 10 9. Troubleshooting .................................................................................................................................... 11 10. Software Instructions (Optional) ........................................................................................................ 12 11. Software Installation Guide ............................................................................................................... 12 12. Software operation guide – Data access ....................................................................................... 15 13. Software operation guide – Data deletion .................................................................................... 18 14. Software operation guide – Data Query ....................................................................................... 20 15. Software operation guide – Data Print .......................................................................................... 21 16. Software operation guide – Data Saving ...................................................................................... 24 17. Software operation guide – Change Language ........................................................................... 25
4
1. Safety Instructions
-This colony counter is designed for laboratory usage only.
-Please read this manual carefully before installing or operating this equipment. The instrument shall not be modified in any way. Any modification will void the warranty and may result in potential safety hazard. We are not responsible for any injury or damage caused by modifying the instrument without authorization. -To avoid the instrument from being burnt or disordered on operation, please use the power adaptor and USB connecting cable supplied by the manufacturer. -Don’t scratch the surface of the Petri dish holder to avoid affecting the illumination of the backlight. -If the equipment is used in a manner not specified by the manufacturer, the protection provided by the equipment may be impaired. The instrument shall not be modified or altered in any way. Any modification or alteration will void the warranty, void the regulatory certifications and create a potential safety hazard. -We are not responsible for any injury or damage caused by using the instrument for any non-intended purpose, or modifying the instrument by any person who is not authorized. -Operating environment: Indoor use, 5 ºC to 40 ºC max. 80% RH max. Main supply voltage fluctuations up to ±10 % of the nominal voltage. Overvoltage category I. Pollution degree II.
2. Inspection
2.1 Receiving Inspection
Unpack the equipment carefully and check for any damages which may have arisen during transport. Please contact your supplier for technical support.
Note: If there is any apparent damage to the system, please do not plug it into the power line.
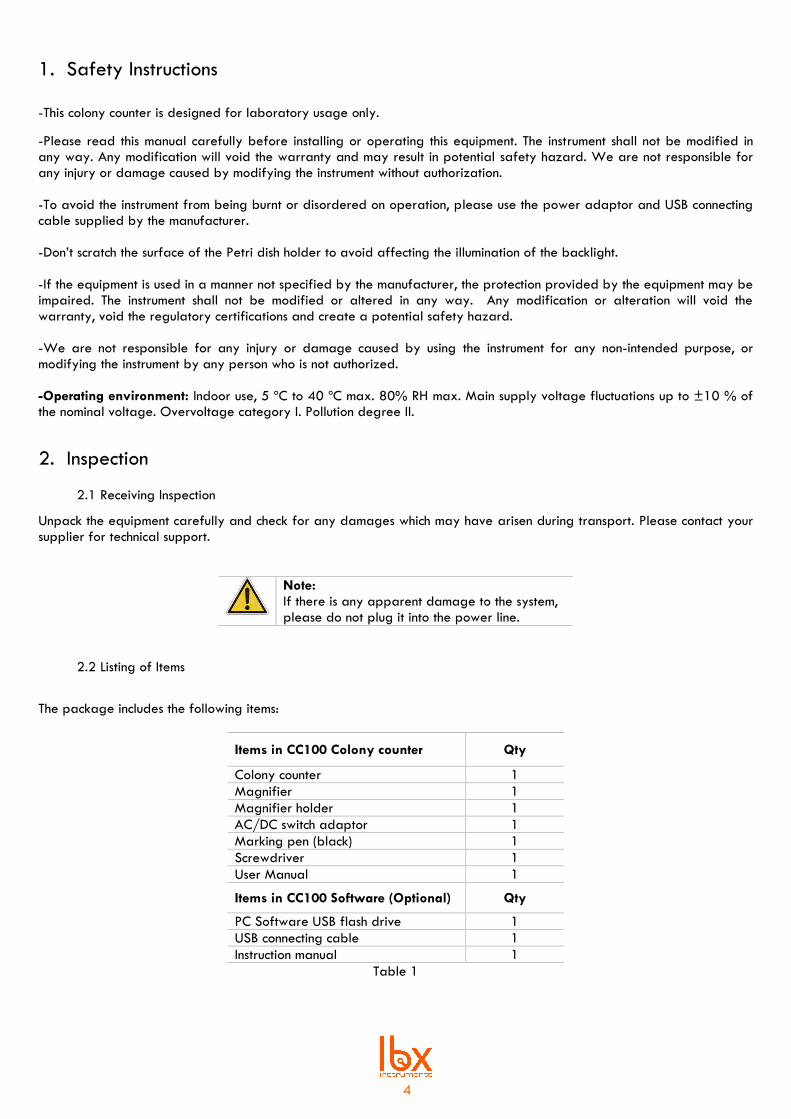
2.2 Listing of Items
The package includes the following items:
Items in CC100 Colony counter Qty
Colony counter 1
Magnifier 1
Magnifier holder 1
AC/DC switch adaptor 1
Marking pen (black) 1
Screwdriver 1
User Manual 1
Items in CC100 Software (Optional) Qty
PC Software USB flash drive 1
USB connecting cable 1
Instruction manual 1
Table 1
5
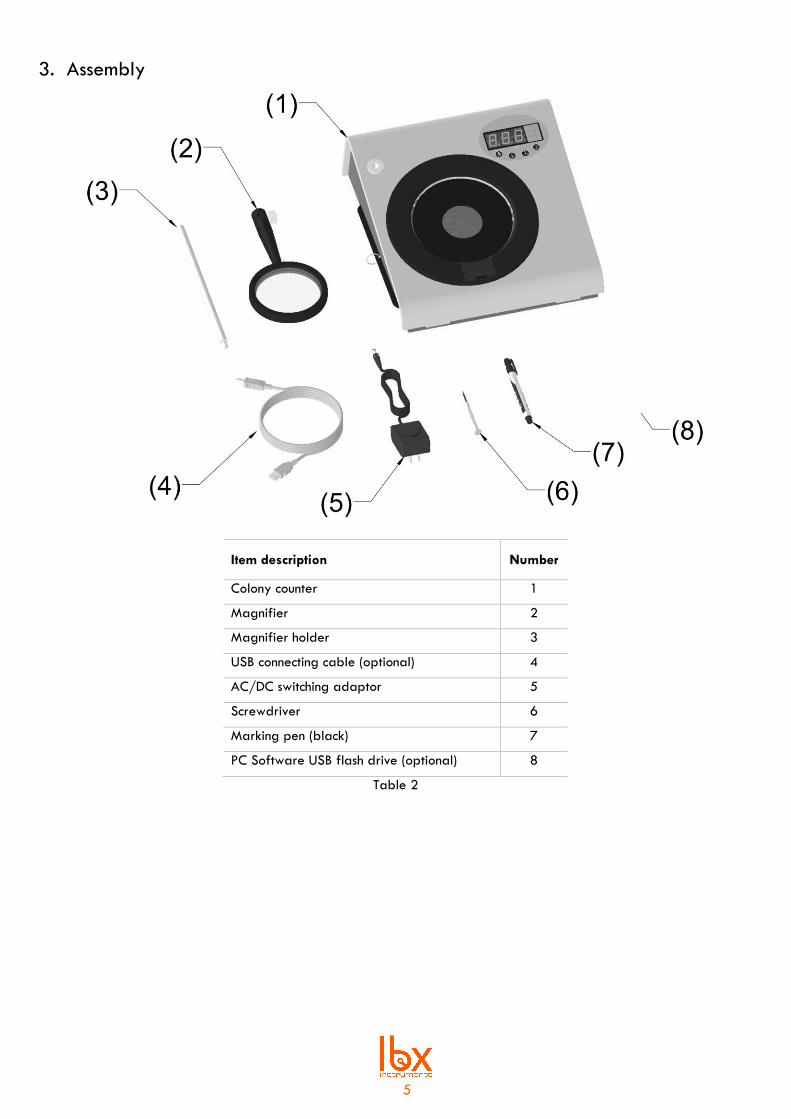
3. Assembly
Item description Number
Colony counter 1
Magnifier 2
Magnifier holder 3
USB connecting cable (optional) 4
AC/DC switching adaptor 5
Screwdriver 6
Marking pen (black) 7
PC Software USB flash drive (optional) 8
Table 2
6
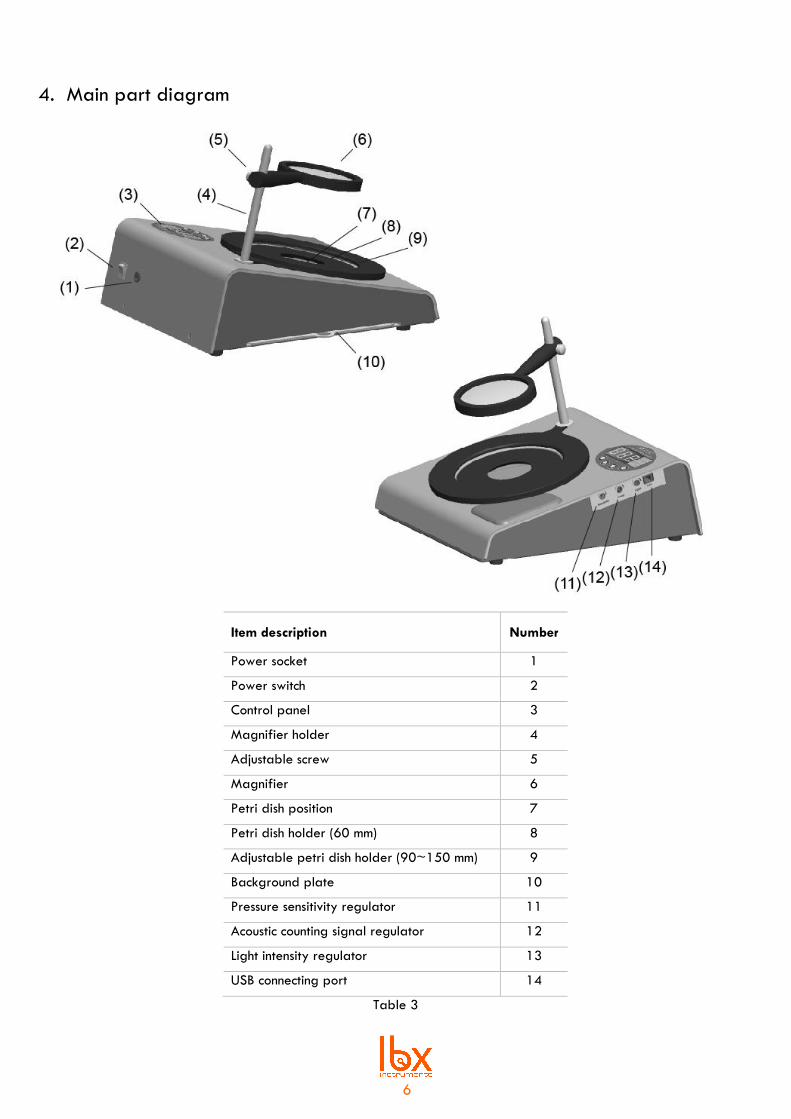
4. Main part diagram
Item description Number
Power socket 1
Power switch 2
Control panel 3
Magnifier holder 4
Adjustable screw 5
Magnifier 6
Petri dish position 7
Petri dish holder (60 mm) 8
Adjustable petri dish holder (90~150 mm) 9
Background plate 10
Pressure sensitivity regulator 11
Acoustic counting signal regulator 12
Light intensity regulator 13
USB connecting port 14
Table 3
7
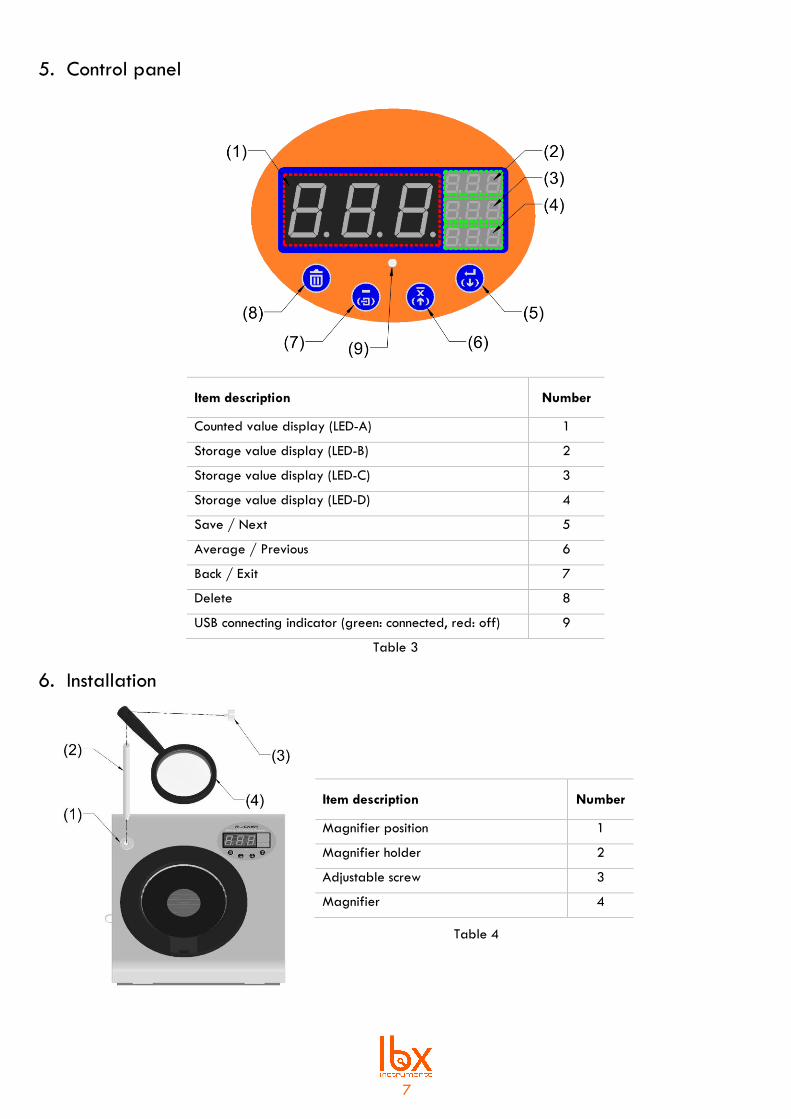
5. Control panel
Item description Number
Counted value display (LED-A) 1
Storage value display (LED-B) 2
Storage value display (LED-C) 3
Storage value display (LED-D) 4
Save / Next 5
Average / Previous 6
Back / Exit 7
Delete 8
USB connecting indicator (green: connected, red: off) 9
Table 3
6. Installation
Table 4
Item description Number
Magnifier position 1
Magnifier holder 2
Adjustable screw 3
Magnifier 4
8
1. Plug the power cord into the main unit and make sure the supplied voltage is within affordable range of power
adaptor.
2. Install the magnifier on the main unit by following above diagram and adjust the height of magnifier properly.
3. If you want to transfer the counting data to a computer, please use USB cable provided to connect PC and colony
counter and start the operation of software. For the first time use, please install the software by referring to the
file of “PC Software Installation and Operation” on USB flash drive.
4. Please use the screwdriver provided to adjust the pressure sensitivity, acoustic volume, illumination required.
5. Change background plate (White/Black) if necessary
6. Please keep the Petri dish position and the magnifier clean to assure good light transmission.
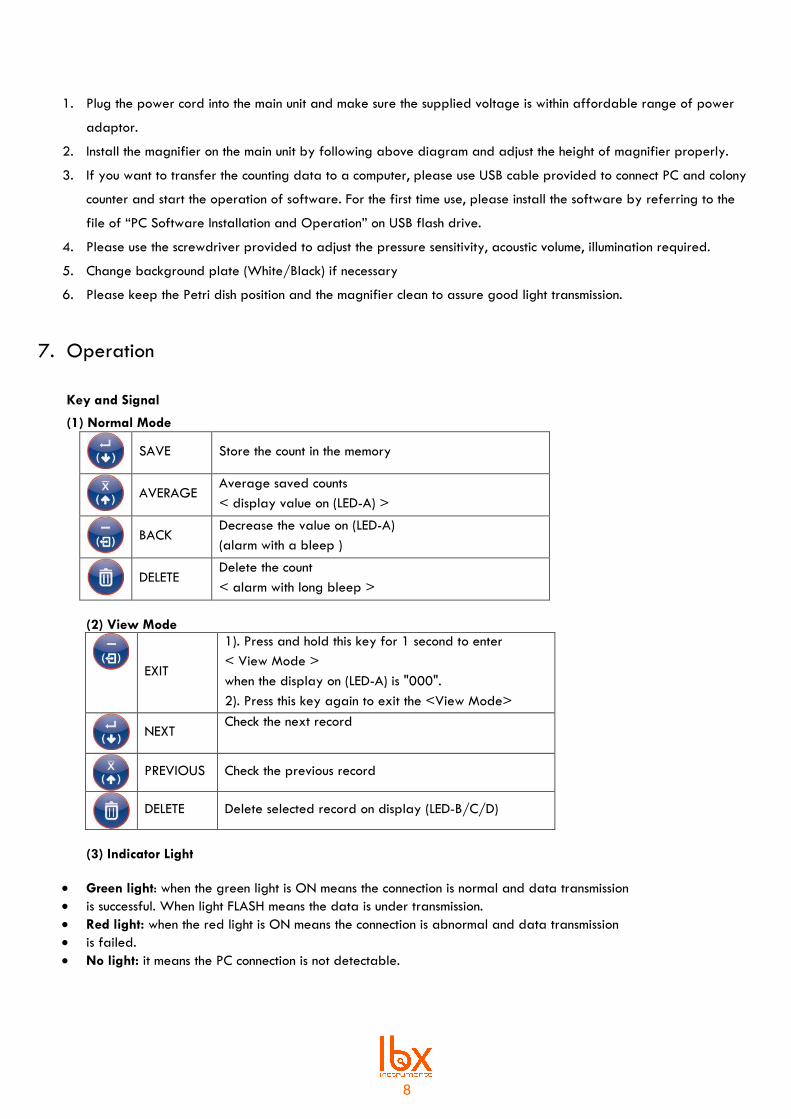
7. Operation
Key and Signal
(1) Normal Mode
SAVE Store the count in the memory
AVERAGE
Average saved counts
< display value on (LED-A) >
BACK
Decrease the value on (LED-A)
(alarm with a bleep )
DELETE
Delete the count
< alarm with long bleep >
(2) View Mode
EXIT
1). Press and hold this key for 1 second to enter
< View Mode >
when the display on (LED-A) is "000".
2). Press this key again to exit the <View Mode>
NEXT
Check the next record
PREVIOUS Check the previous record
DELETE Delete selected record on display (LED-B/C/D)
(3) Indicator Light
• Green light: when the green light is ON means the connection is normal and data transmission
• is successful. When light FLASH means the data is under transmission.
• Red light: when the red light is ON means the connection is abnormal and data transmission
• is failed.
• No light: it means the PC connection is not detectable.
9
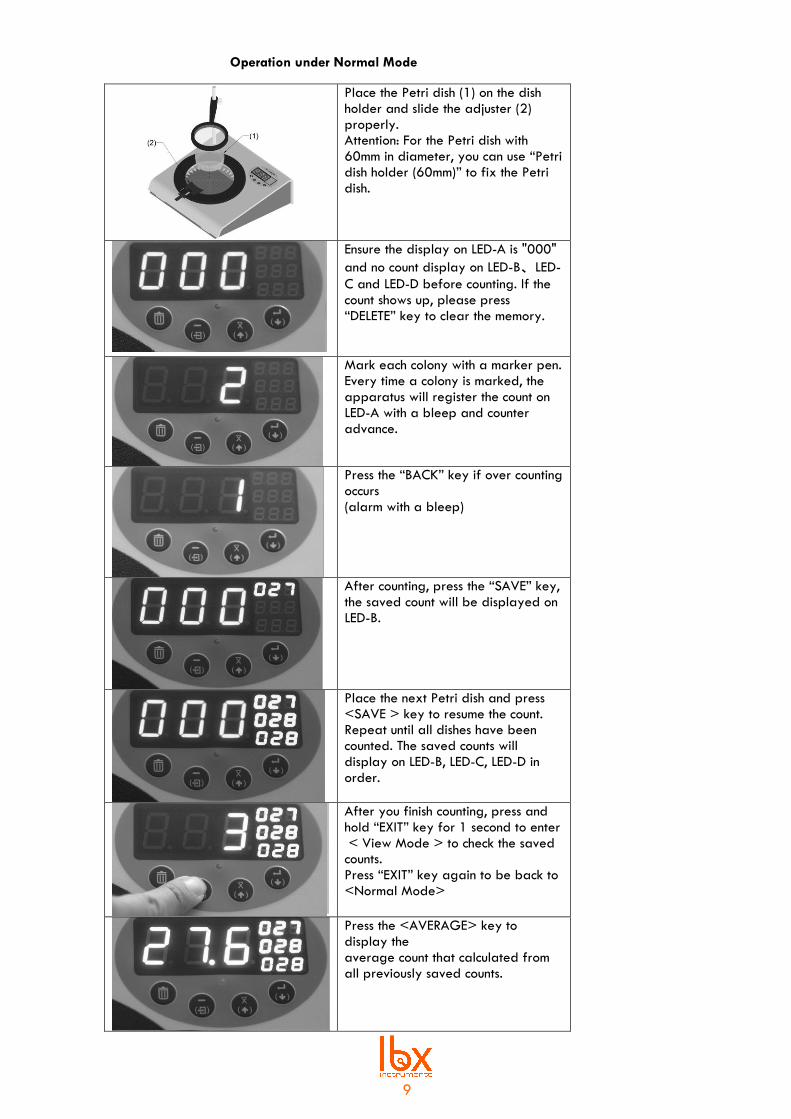
Operation under Normal Mode
Place the Petri dish (1) on the dish holder and slide the adjuster (2) properly. Attention: For the Petri dish with 60mm in diameter, you can use “Petri dish holder (60mm)” to fix the Petri dish.
Ensure the display on LED-A is "000"
and no count display on LED-B、LED-
C and LED-D before counting. If the count shows up, please press “DELETE” key to clear the memory.
Mark each colony with a marker pen. Every time a colony is marked, the apparatus will register the count on LED-A with a bleep and counter advance.
Press the “BACK” key if over counting occurs (alarm with a bleep)
After counting, press the “SAVE” key, the saved count will be displayed on LED-B.
Place the next Petri dish and press <SAVE > key to resume the count. Repeat until all dishes have been counted. The saved counts will display on LED-B, LED-C, LED-D in order.
After you finish counting, press and hold “EXIT” key for 1 second to enter < View Mode > to check the saved counts. Press “EXIT” key again to be back to <Normal Mode>
Press the <AVERAGE> key to display the average count that calculated from all previously saved counts.
10
Notice:
• If the counted Petri dishes are over 3 batches, the display will only show the record of latest 3 batches. For the record of previous counts, it will be saved, but not show on display.
• The main unit can store up to 100 records in memory. It will fail to work if the record is over 100. Please delete the record or activate “AVERAGE” facility, so the main unit can resume working.
• If the main unit connects to PC, the saved counts and average counts will be sent to the software on PC when you press “AVERAGE” key.
• Please refer to the file of “Installation and Operation of Software” on USB flash drive for operation of software.
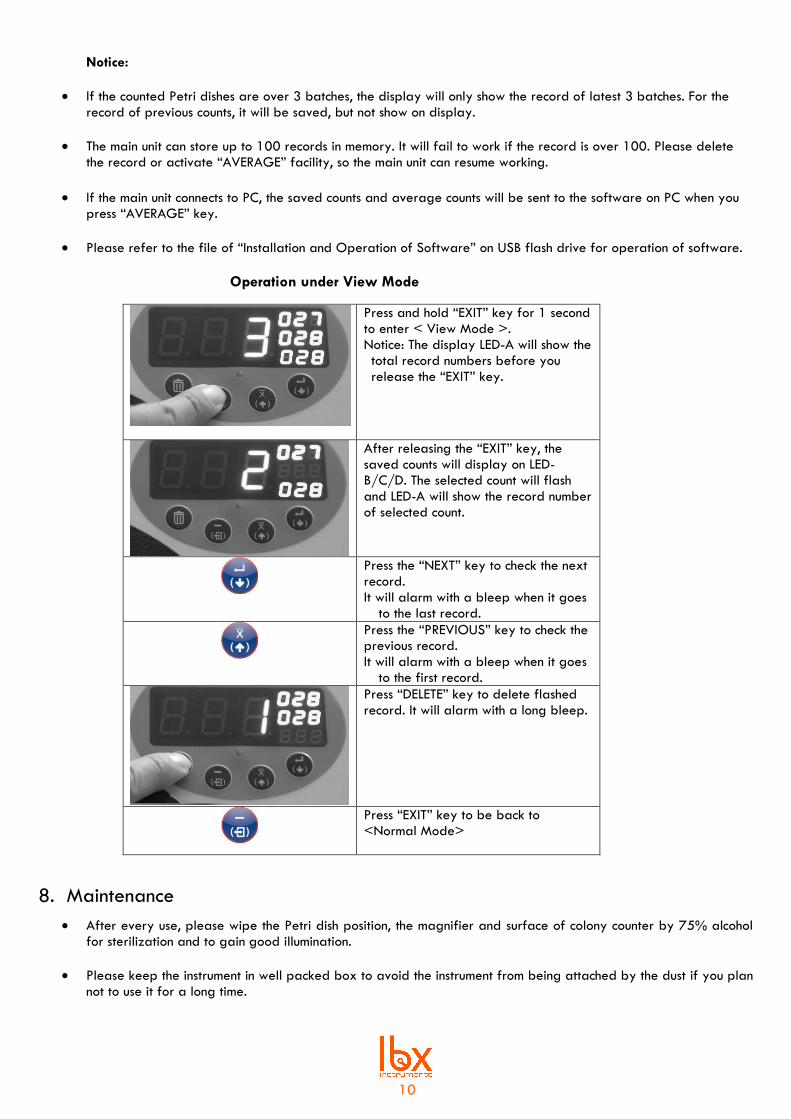
Operation under View Mode
Press and hold “EXIT” key for 1 second to enter < View Mode >. Notice: The display LED-A will show the total record numbers before you release the “EXIT” key.
After releasing the “EXIT” key, the saved counts will display on LED-B/C/D. The selected count will flash and LED-A will show the record number of selected count.
Press the “NEXT” key to check the next record. It will alarm with a bleep when it goes
to the last record.
Press the “PREVIOUS” key to check the previous record. It will alarm with a bleep when it goes
to the first record.
Press “DELETE” key to delete flashed record. It will alarm with a long bleep.
Press “EXIT” key to be back to <Normal Mode>
8. Maintenance
• After every use, please wipe the Petri dish position, the magnifier and surface of colony counter by 75% alcohol for sterilization and to gain good illumination.
• Please keep the instrument in well packed box to avoid the instrument from being attached by the dust if you plan not to use it for a long time.
11
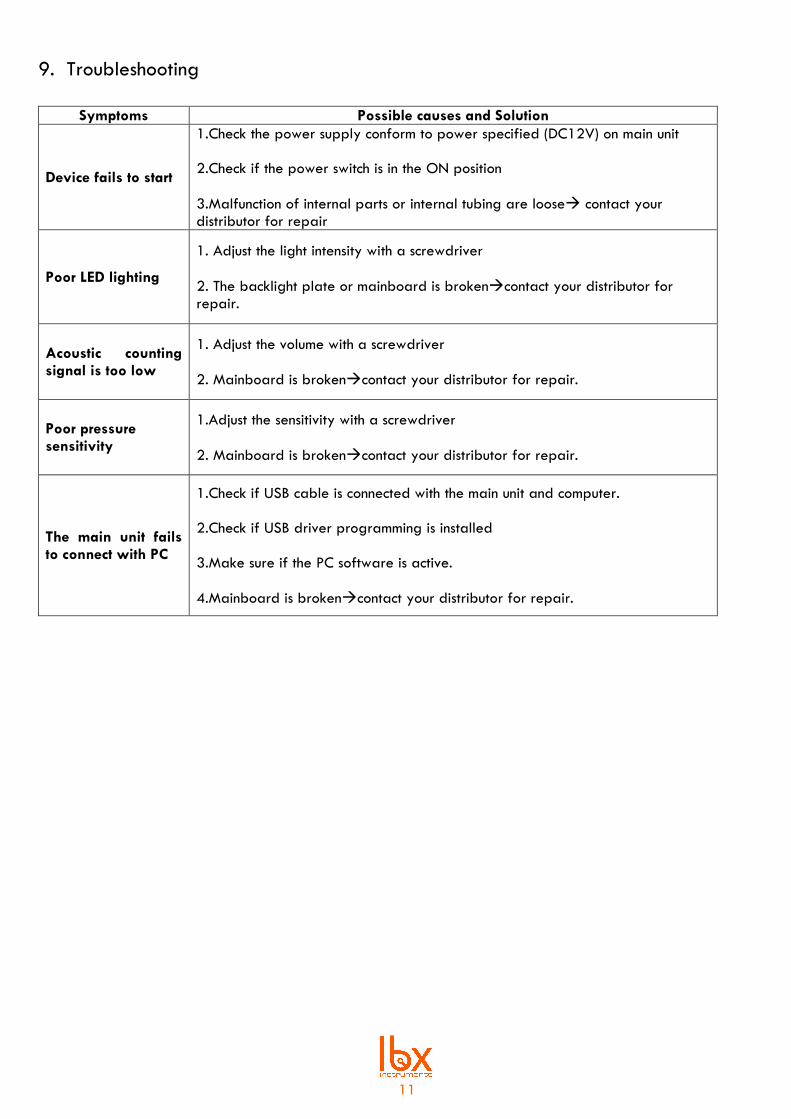
9. Troubleshooting
Symptoms Possible causes and Solution
1. Device fails to start
1.Check the power supply conform to power specified (DC12V) on main unit 2.Check if the power switch is in the ON position
3.Malfunction of internal parts or internal tubing are loose→ contact your distributor for repair
2. Poor LED lighting
1. 1. Adjust the light intensity with a screwdriver 2.
3. 2. The backlight plate or mainboard is broken→contact your distributor for repair.
3. Acoustic counting signal is too low
4. 1. Adjust the volume with a screwdriver
2. Mainboard is broken→contact your distributor for repair.
1. Poor pressure sensitivity
1.Adjust the sensitivity with a screwdriver
1. 2. Mainboard is broken→contact your distributor for repair.
2. The main unit fails to connect with PC
1. 1.Check if USB cable is connected with the main unit and computer. 2.
2.Check if USB driver programming is installed
3. 3.Make sure if the PC software is active. 4.
5. 4.Mainboard is broken→contact your distributor for repair.
12
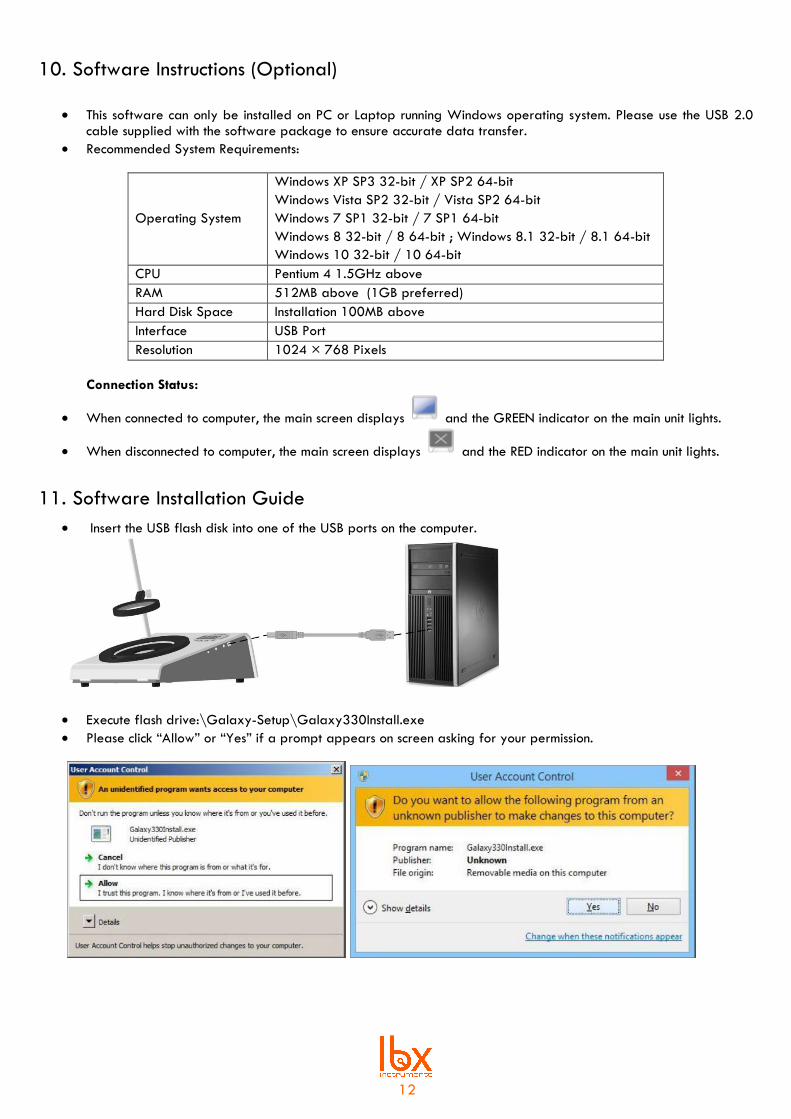
10. Software Instructions (Optional)
• This software can only be installed on PC or Laptop running Windows operating system. Please use the USB 2.0 cable supplied with the software package to ensure accurate data transfer.
• Recommended System Requirements:
Operating System
Windows XP SP3 32-bit / XP SP2 64-bit
Windows Vista SP2 32-bit / Vista SP2 64-bit
Windows 7 SP1 32-bit / 7 SP1 64-bit
Windows 8 32-bit / 8 64-bit ; Windows 8.1 32-bit / 8.1 64-bit
Windows 10 32-bit / 10 64-bit
CPU Pentium 4 1.5GHz above
RAM 512MB above (1GB preferred)
Hard Disk Space Installation 100MB above
Interface USB Port
Resolution 1024 × 768 Pixels
Connection Status:
• When connected to computer, the main screen displays and the GREEN indicator on the main unit lights.
• When disconnected to computer, the main screen displays and the RED indicator on the main unit lights.
11. Software Installation Guide
• Insert the USB flash disk into one of the USB ports on the computer.
• Execute flash drive:\Galaxy-Setup\Galaxy330Install.exe
• Please click “Allow” or “Yes” if a prompt appears on screen asking for your permission.

13
• Click “Setup” to install driver before software installation. (System auto detect 32- bit or 64 -bit version)
• Note: You must be logged in as an administrator to install this program. Driver Installation
1. Click “Next” to start installation. 2. Click “I accept” and then click “Next” to begin installation.
3. The driver installation begins and click “Install” to continue installation process.
4. Click "Finish" to complete the installation then begin installing software.
14
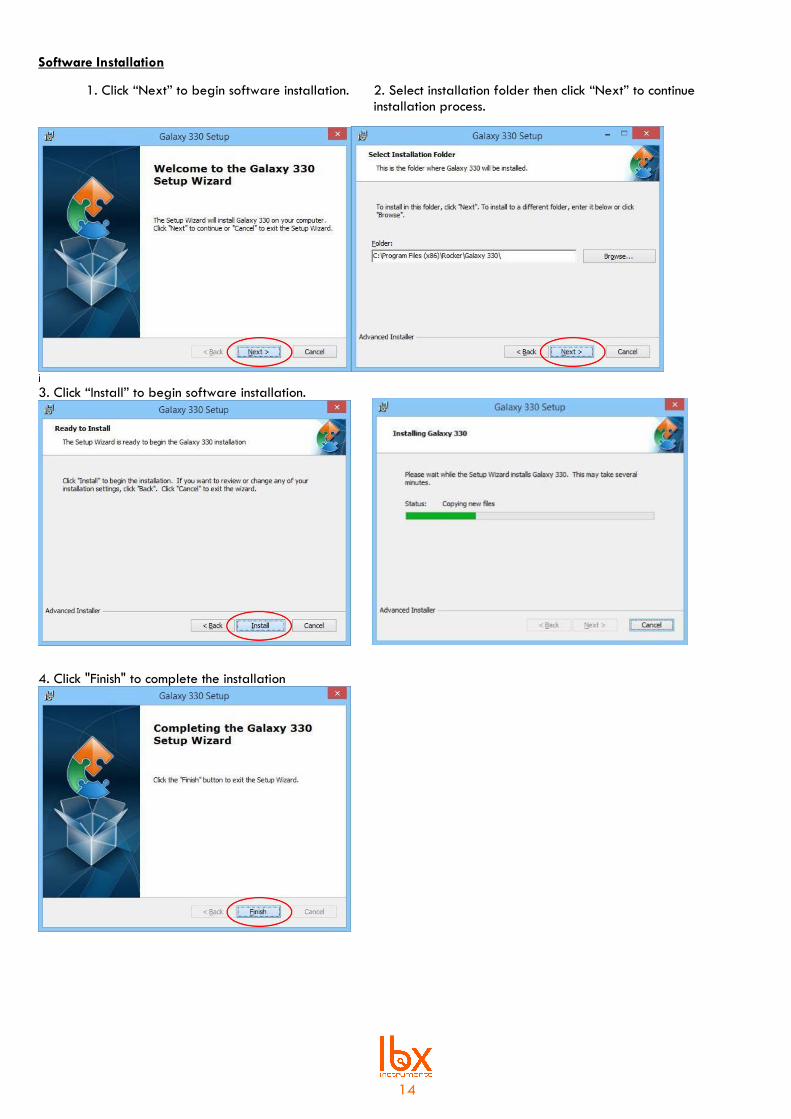
Software Installation
1. Click “Next” to begin software installation. 2. Select installation folder then click “Next” to continue installation process.
i
3. Click “Install” to begin software installation.
4. Click "Finish" to complete the installation
15
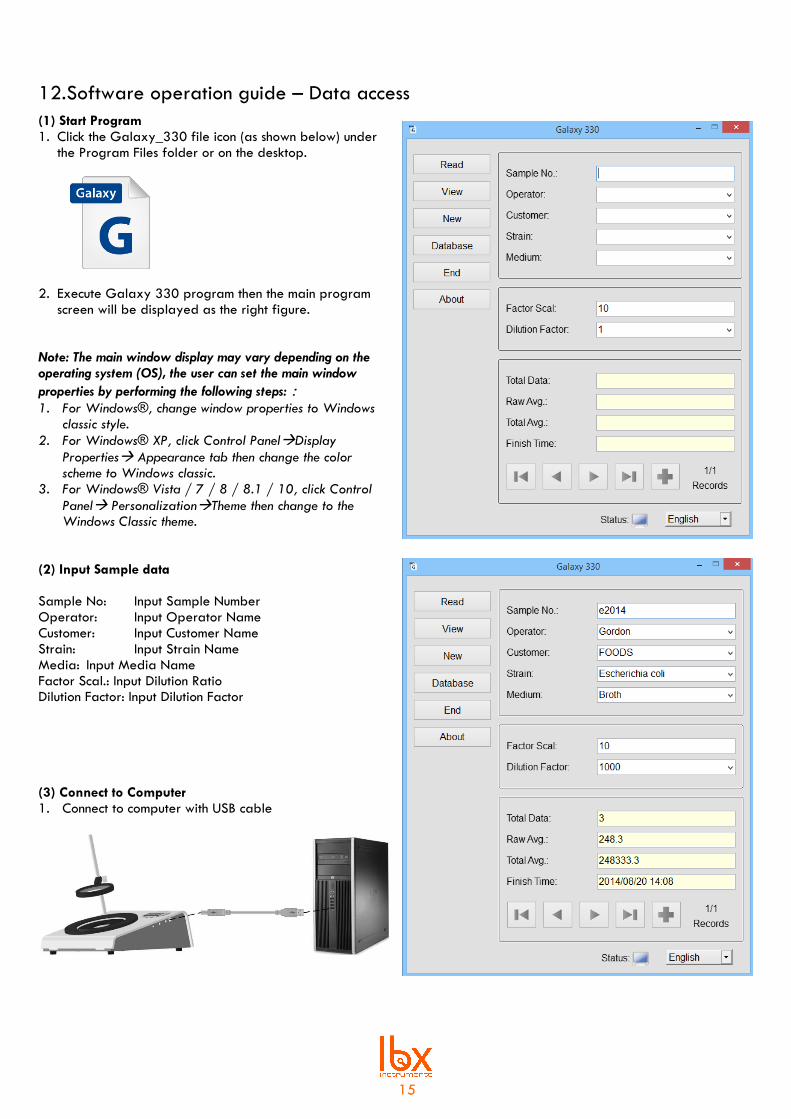
12. Software operation guide – Data access
(1) Start Program 1. Click the Galaxy_330 file icon (as shown below) under
the Program Files folder or on the desktop.
2. Execute Galaxy 330 program then the main program screen will be displayed as the right figure.
Note: The main window display may vary depending on the operating system (OS), the user can set the main window
properties by performing the following steps::
1. For Windows®, change window properties to Windows classic style.
2. For Windows® XP, click Control Panel→Display
Properties→ Appearance tab then change the color scheme to Windows classic.
3. For Windows® Vista / 7 / 8 / 8.1 / 10, click Control
Panel→ Personalization→Theme then change to the Windows Classic theme.
(2) Input Sample data Sample No: Input Sample Number Operator: Input Operator Name Customer: Input Customer Name Strain: Input Strain Name Media: Input Media Name Factor Scal.: Input Dilution Ratio Dilution Factor: Input Dilution Factor (3) Connect to Computer 1. Connect to computer with USB cable
16
2. Switch on Colony Counter then the Status indictor will display connection signal.
3. When connected, the status indicator will display and Colony Counter indicator will display “Green”.
4. When disconnected, the status indicator will display and Colony Counter indicator will display “Red”.
Note: When the USB is connected, Windows® will automatically detect the hardware and perform driver, please be patient
while in process.
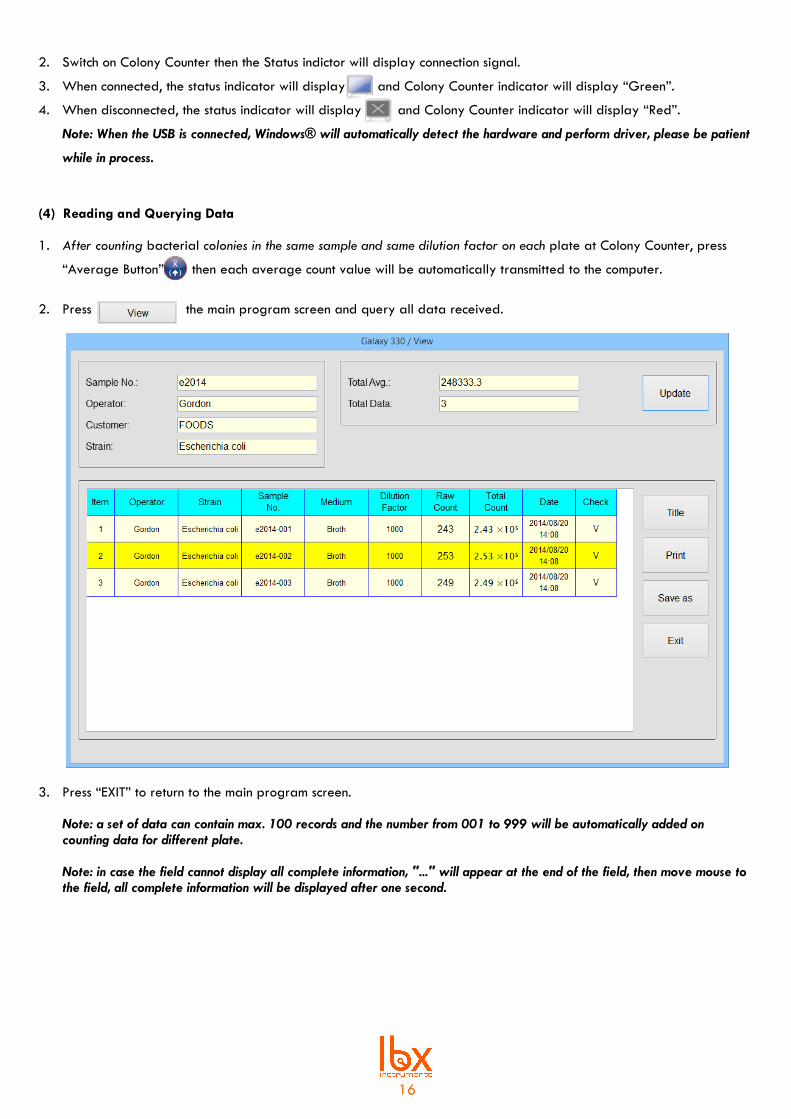
(4) Reading and Querying Data 1. After counting bacterial colonies in the same sample and same dilution factor on each plate at Colony Counter, press
“Average Button” then each average count value will be automatically transmitted to the computer.
2. Press in the main program screen and query all data received.
3. Press “EXIT” to return to the main program screen. Note: a set of data can contain max. 100 records and the number from 001 to 999 will be automatically added on counting data for different plate. Note: in case the field cannot display all complete information, "..." will appear at the end of the field, then move mouse to the field, all complete information will be displayed after one second.
17
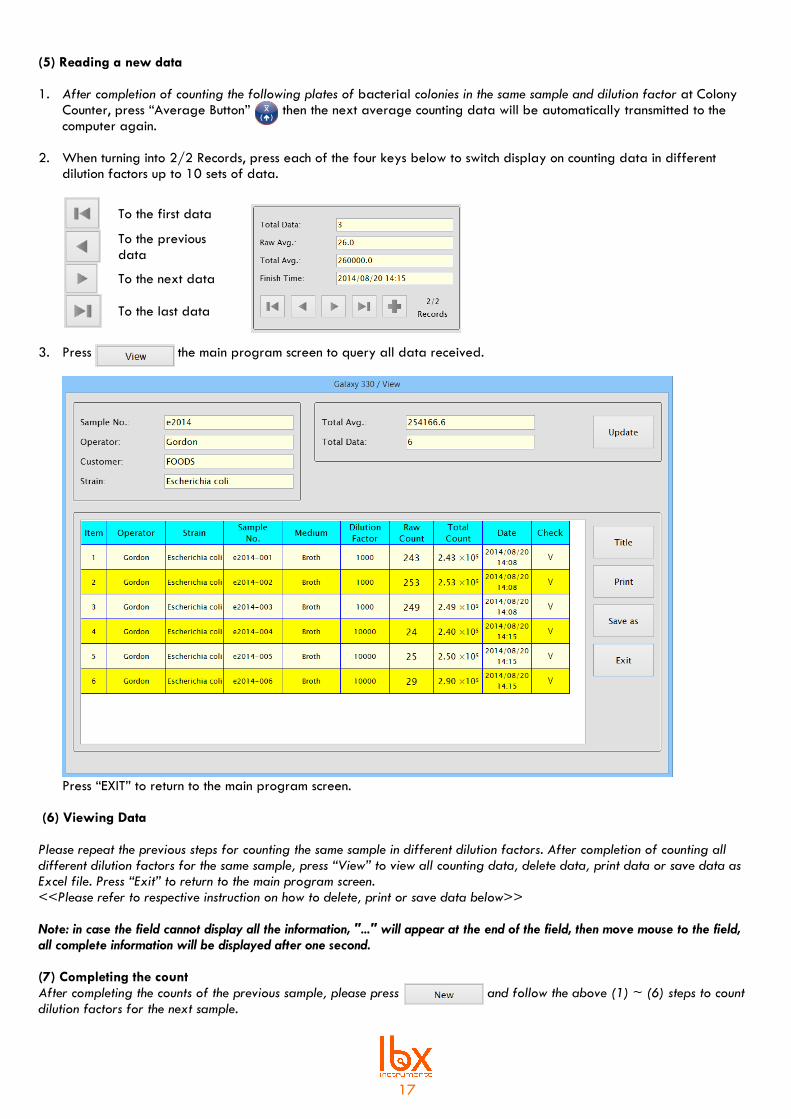
(5) Reading a new data 1. After completion of counting the following plates of bacterial colonies in the same sample and dilution factor at Colony
Counter, press “Average Button” then the next average counting data will be automatically transmitted to the computer again.
2. When turning into 2/2 Records, press each of the four keys below to switch display on counting data in different dilution factors up to 10 sets of data.
To the first data
To the previous data
To the next data
To the last data
3. Press in the main program screen to query all data received.
Press “EXIT” to return to the main program screen.
(6) Viewing Data Please repeat the previous steps for counting the same sample in different dilution factors. After completion of counting all different dilution factors for the same sample, press “View” to view all counting data, delete data, print data or save data as Excel file. Press “Exit” to return to the main program screen. <<Please refer to respective instruction on how to delete, print or save data below>>
Note: in case the field cannot display all the information, "..." will appear at the end of the field, then move mouse to the field, all complete information will be displayed after one second. (7) Completing the count After completing the counts of the previous sample, please press and follow the above (1) ~ (6) steps to count dilution factors for the next sample.
18
Note: a. After pressing the "New" key, a confirmation screen will appear. Press confirmation key to store all received data in database and then press to view the set of data just saved; b. This software can store up to max. 100,000 sets of data, once the number of the stored data exceeds the max. number, it will automatically delete the earliest data and then store the newly created data.
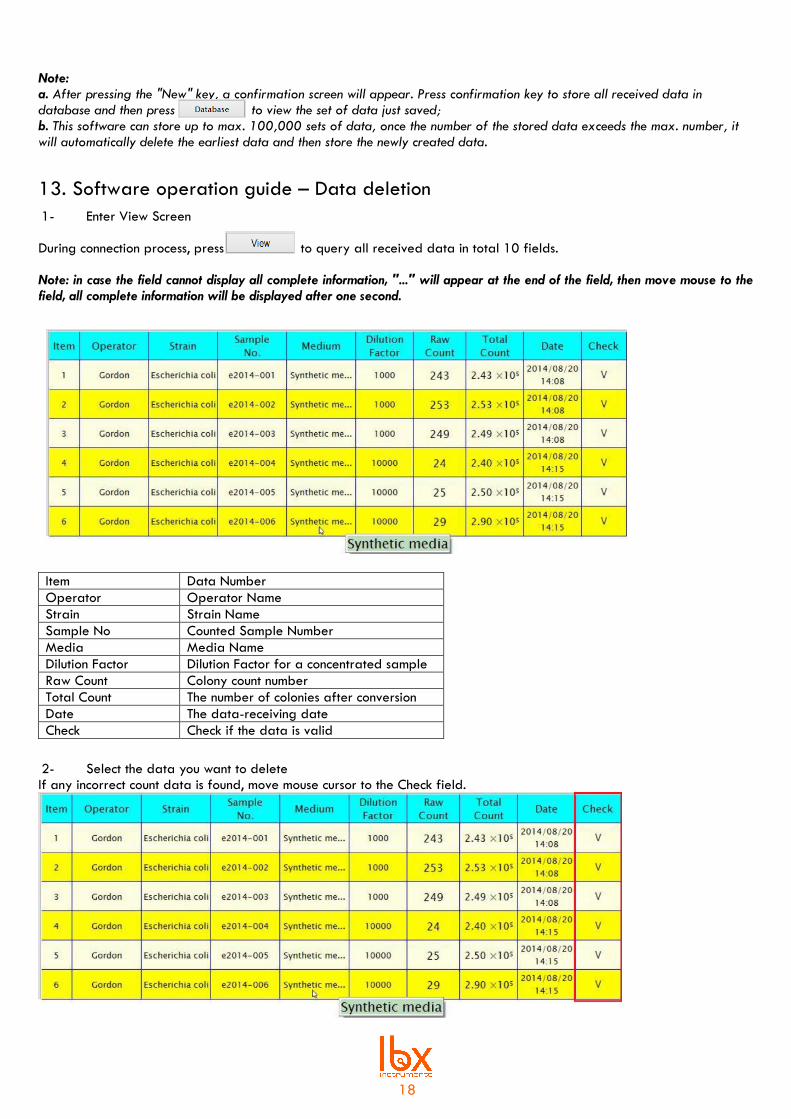
13. Software operation guide – Data deletion
1- Enter View Screen During connection process, press to query all received data in total 10 fields. Note: in case the field cannot display all complete information, "..." will appear at the end of the field, then move mouse to the field, all complete information will be displayed after one second.
Item Data Number
Operator Operator Name
Strain Strain Name
Sample No Counted Sample Number
Media Media Name
Dilution Factor Dilution Factor for a concentrated sample
Raw Count Colony count number
Total Count The number of colonies after conversion
Date The data-receiving date
Check Check if the data is valid
2- Select the data you want to delete If any incorrect count data is found, move mouse cursor to the Check field.
19
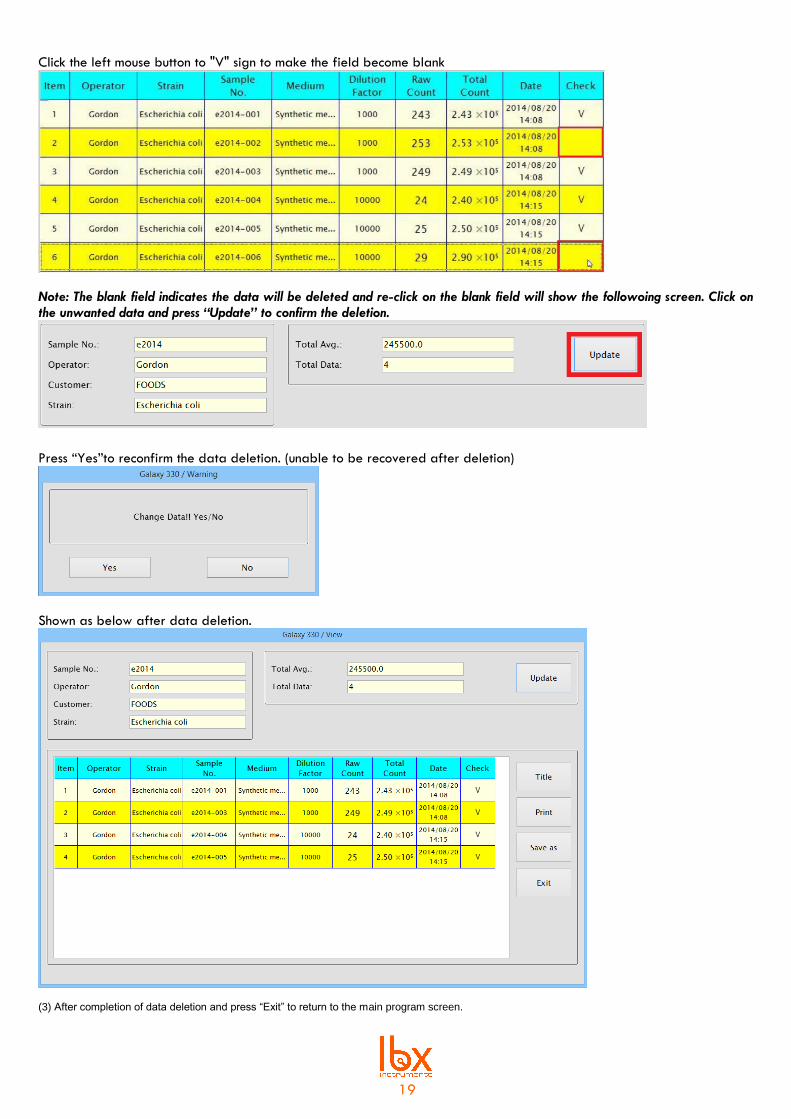
Click the left mouse button to "V" sign to make the field become blank
Note: The blank field indicates the data will be deleted and re-click on the blank field will show the followoing screen. Click on the unwanted data and press “Update” to confirm the deletion.
Press “Yes”to reconfirm the data deletion. (unable to be recovered after deletion)
Shown as below after data deletion.
(3) After completion of data deletion and press “Exit” to return to the main program screen.
20
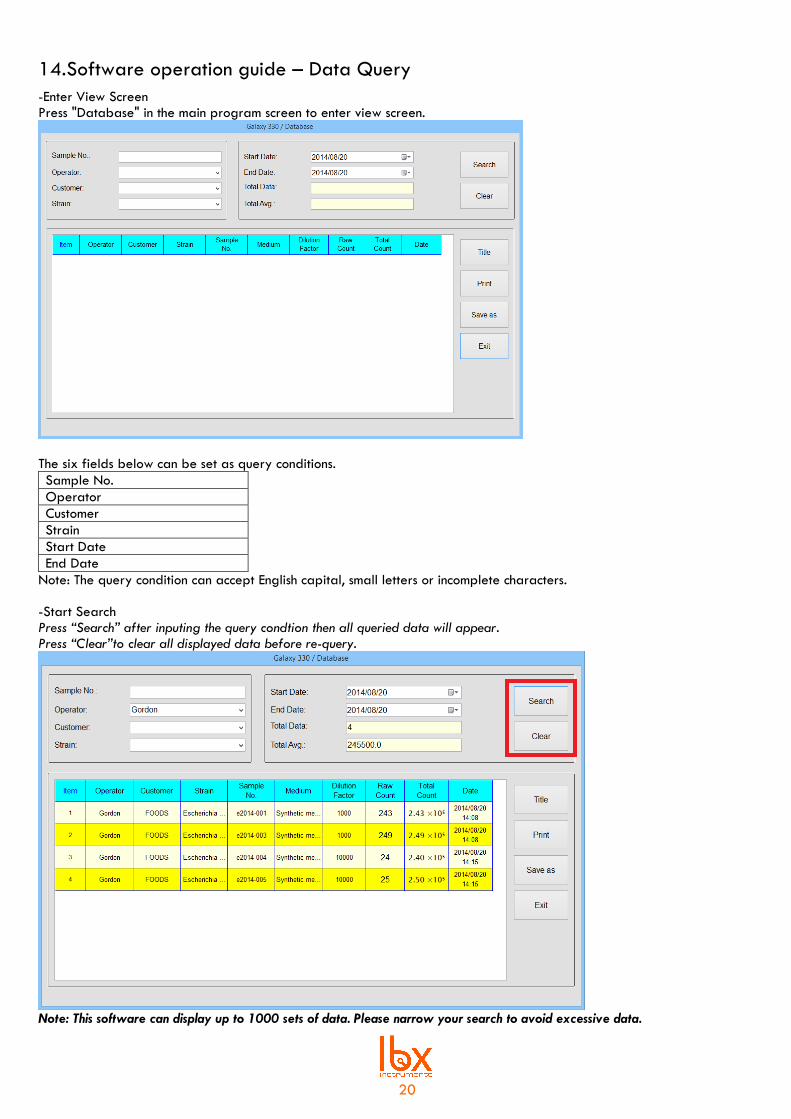
14. Software operation guide – Data Query
-Enter View Screen Press "Database" in the main program screen to enter view screen.
The six fields below can be set as query conditions.
Sample No.
Operator
Customer
Strain
Start Date
End Date
Note: The query condition can accept English capital, small letters or incomplete characters. -Start Search Press “Search” after inputing the query condtion then all queried data will appear. Press “Clear”to clear all displayed data before re-query.
Note: This software can display up to 1000 sets of data. Please narrow your search to avoid excessive data.
21
-Search Result The search result will be displayed as above in total 10 fields incl. Item No., Operator, Customer, Strain, Sample No, Media, Dilution Factor, Raw Count, Total Count and Date. Note: in case the field cannot display all complete information, "..." will appear at the end of the field, then move mouse to the field, all complete information will be displayed after one second.
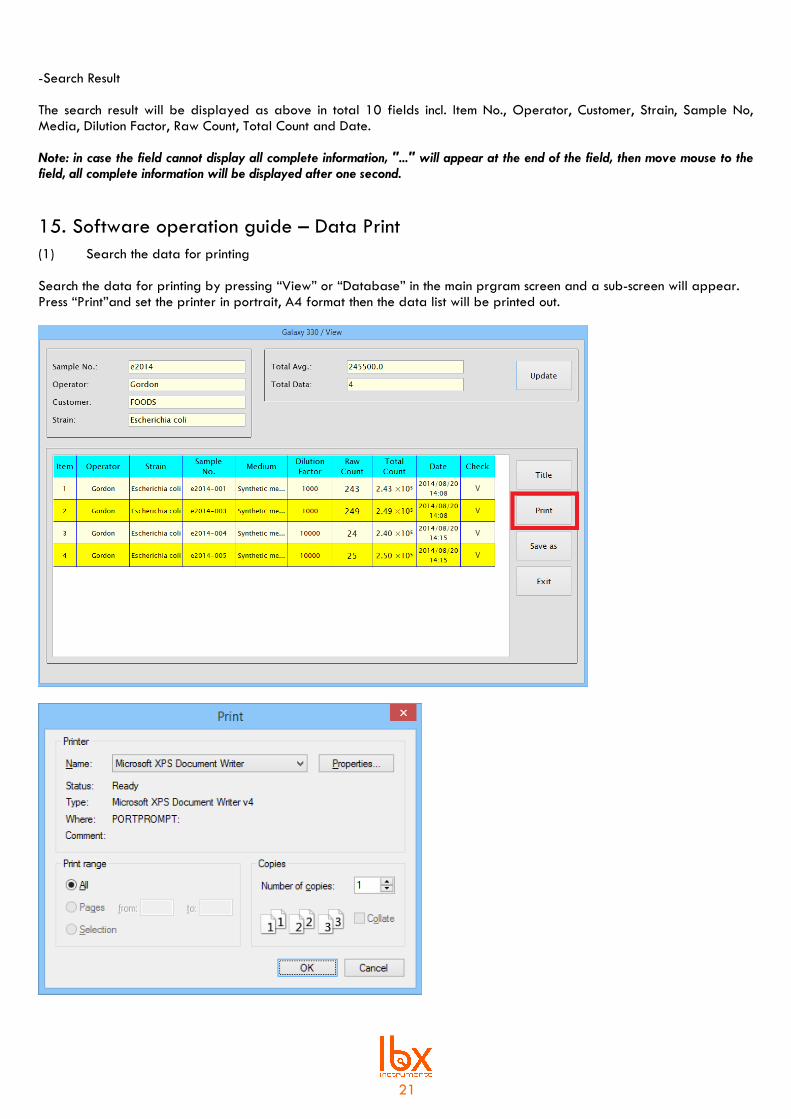
15. Software operation guide – Data Print
(1) Search the data for printing
Search the data for printing by pressing “View” or “Database” in the main prgram screen and a sub-screen will appear. Press “Print”and set the printer in portrait, A4 format then the data list will be printed out.
22
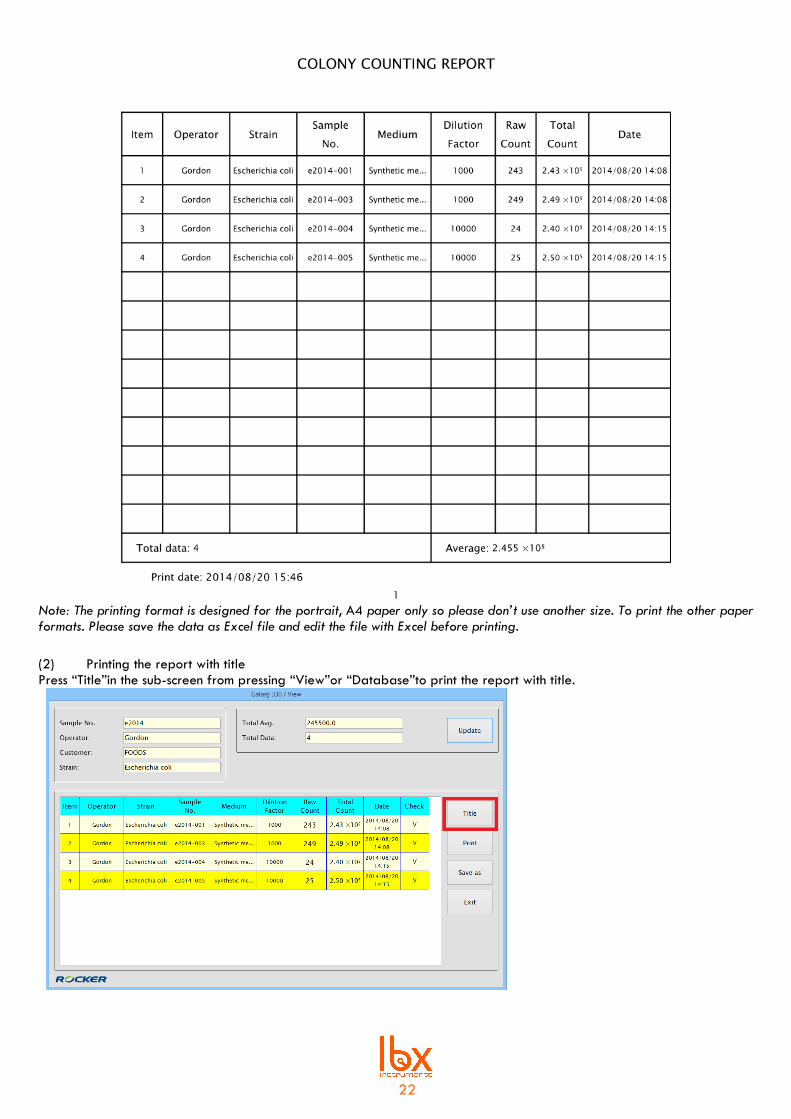
Note: The printing format is designed for the portrait, A4 paper only so please don’t use another size. To print the other paper formats. Please save the data as Excel file and edit the file with Excel before printing.
(2) Printing the report with title Press “Title”in the sub-screen from pressing “View”or “Database”to print the report with title.
23
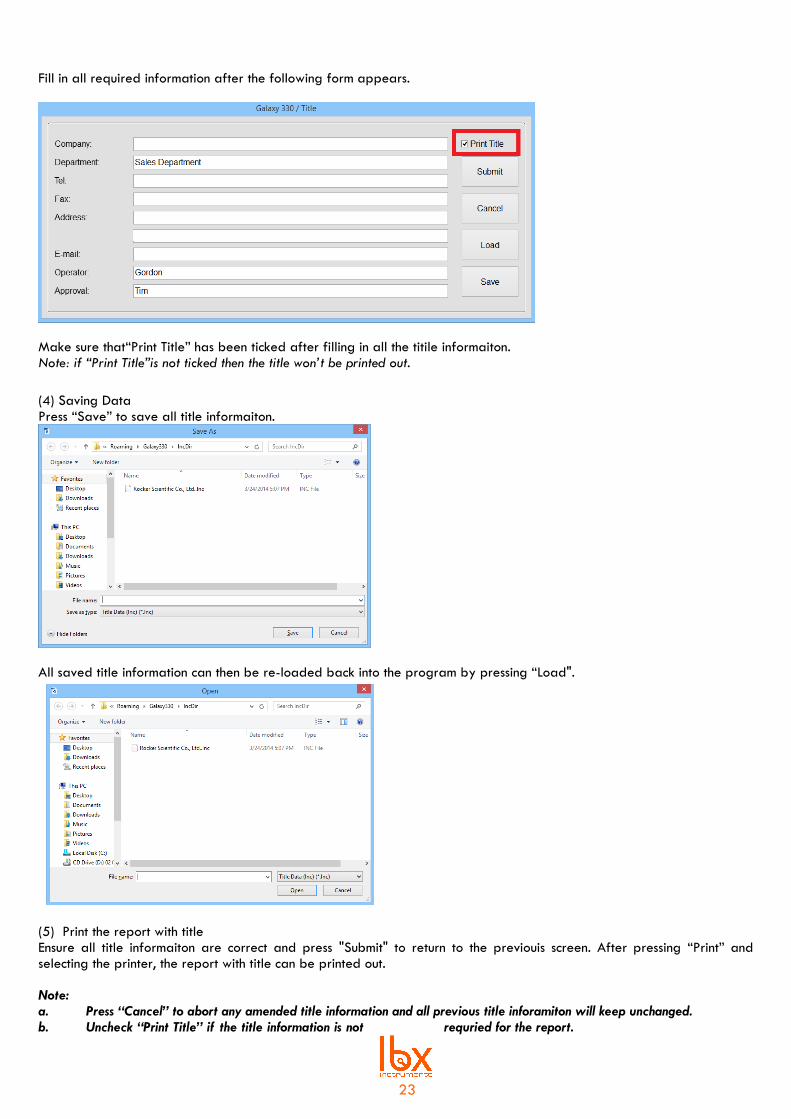
Fill in all required information after the following form appears.
Make sure that“Print Title” has been ticked after filling in all the titile informaiton. Note: if “Print Title”is not ticked then the title won’t be printed out.
(4) Saving Data Press “Save” to save all title informaiton.
All saved title information can then be re-loaded back into the program by pressing “Load".
(5) Print the report with title Ensure all title informaiton are correct and press "Submit" to return to the previouis screen. After pressing “Print” and selecting the printer, the report with title can be printed out. Note: a. Press “Cancel” to abort any amended title information and all previous title inforamiton will keep unchanged. b. Uncheck “Print Title” if the title information is not requried for the report.
24
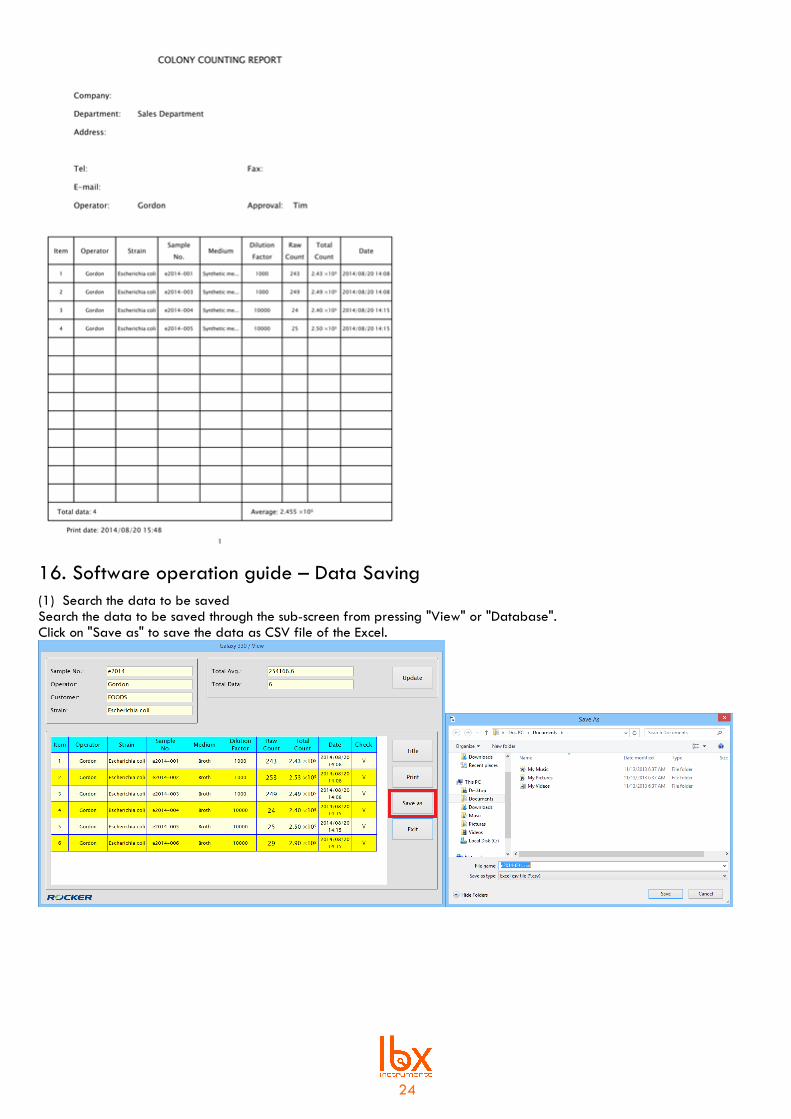
16. Software operation guide – Data Saving
(1) Search the data to be saved Search the data to be saved through the sub-screen from pressing "View" or "Database". Click on "Save as" to save the data as CSV file of the Excel.
25
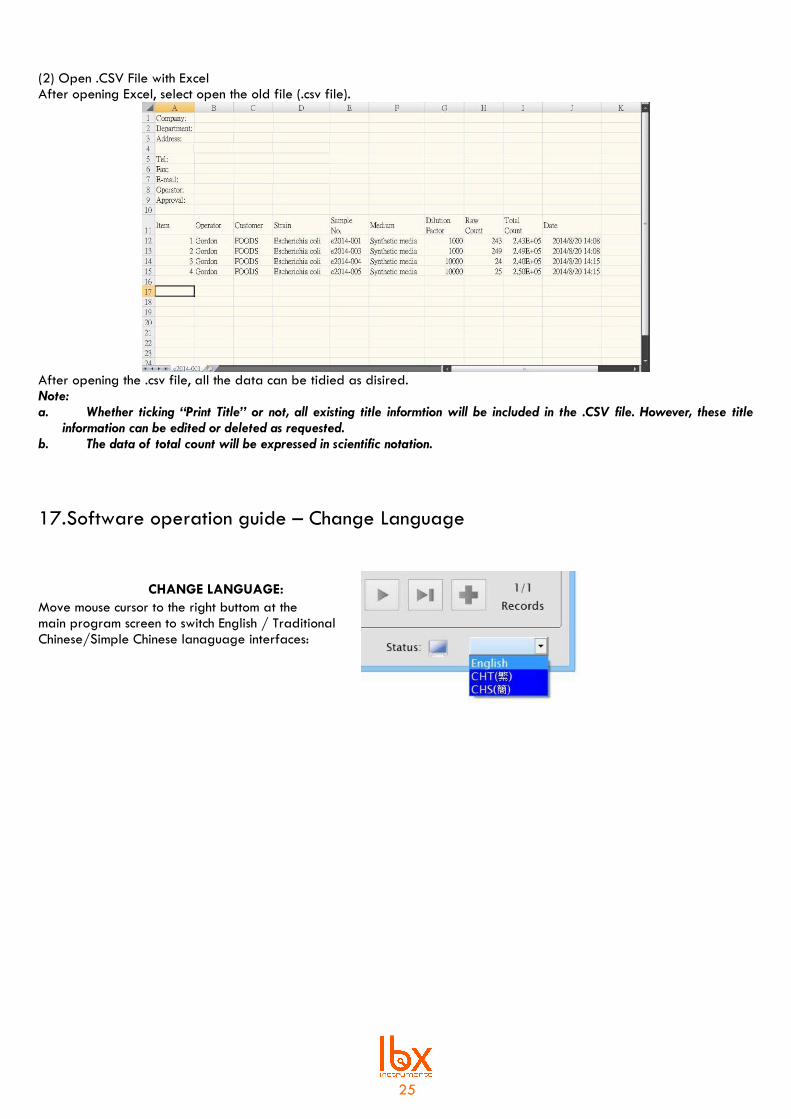
(2) Open .CSV File with Excel After opening Excel, select open the old file (.csv file).
After opening the .csv file, all the data can be tidied as disired. Note: a. Whether ticking “Print Title” or not, all existing title informtion will be included in the .CSV file. However, these title
information can be edited or deleted as requested. b. The data of total count will be expressed in scientific notation.
17. Software operation guide – Change Language
CHANGE LANGUAGE:
Move mouse cursor to the right buttom at the main program screen to switch English / Traditional Chinese/Simple Chinese lanaguage interfaces:

26
Nota importante para los aparatos electrónicos
vendidos en España Important note for electronic
devices sold in Spain
Remarque importante pour les appareils électroniques vendus en Espagne
Instrucciones sobre la protección del medio ambiente y la eliminación de aparatos electrónicos:
Nota importante para los aparatos electrónicos vendidos en Francia
Important note for electronic devices sold in France
Remarque importante pour les appareils électroniques vendus en France
Informations sur la protection du milieu environnemental et élimination des déchets électroniques :
Los aparatos eléctricos y electrónicos marcados con este símbolo no pueden desecharse en vertederos. De conformidad con la Directiva 2002/96/ CE, los usuarios de la Unión Europea de aparatos eléctricos y electrónicos, tienen la oportunidad de retornar el instrumento para su eliminación al distribuidor o fabricante del equipo después de la compra de uno nuevo. La eliminación ilegal de aparatos eléctricos y electrónicos es castigada con multa administrativa.
Les appareils électriques et électroniques portant ce symbole ne peuvent pas être jetés dans les
décharges. En réponse à la règlementation, Labbox remplit ses obligations relatives à la fin de vie des équipements électriques de laboratoire qu’il met sur le marché en finançant la filière de recyclage de Récylum dédiée aux DEEE Pro qui les reprend gratuitement (plus d’informations sur www.recylum.com). L’élimination illégale d’appareils électriques et électroniques est punie d’amende
administrative.

27

www.labbox.com