Embed Size (px)
Citation preview
Use CHECKSUM Number to Make the LookUp Transformation Simple
Lookup is one of the frequently used transformations in Informatica PowerCenter. This
transformation is considered to be relatively simple, but at times this can become complex because
of the amount of data to be cached, number of columns used in the lookup condition, checks on
columns fetched from lookup table etc... In this article lets see how we can take care of couple of
these issues using CHECKSUM number.
What is ChecksumA checksum is a value used to verify the integrity of a file or a data. Checksums are typically used to compare two sets of data to make sure they are the same. If the checksums don't match those of the original file or data, the data may have been altered.
Informatica Implementation
Lets consider one of the complex lookup scenario, which we use in SCD Type 2 mapping for our
demonstration purpose. You can check out the complete SCD Type 2 Implementation from one of
our previous article.
In normal SCD Type 2 mapping we use a Lookup to fetch all the columns (attributes) from the
dimension tables and compare the attributes with the records from the source. If there is a changed
value in any of the attributes, the record will be set for update else insert. If you are loading a
dimension with hundreds of attribute, you can imagine the complexity involved in the lookup in terms
of number of columns in the lookup, lookup cache size and comparison of the attributes.
Lets consider the Customer Dimension load, we will be identifying the update based on any change
in any of the columns CUST_NAME, ADDRESS1, ADDRESS2, CITY, STATE or ZIP else the record
will be inserted into the Dimension Table.
Datamodel needs
We need to create an additional database table column to store the CHECKSUM number.
Checksum number created by Informatica is 32 character hexadecimal value. So add
the column below to the Dimension Table.
CHK_SUM_NB VARCHAR2(32)
This Column in the target table will be populated for every record inserted into the Dimension Table,
using the function provided in the next section.
Checksum number generation
Informatica provides the function MD5() for Checksum generation. This function returns a unique
32 character hexadecimal value. Below expression generates the checksum number for the
Customer Dimension.
MD5(CUST_NAME || ADDRESS1 || ADDRESS2 || CITY || STATE || TO_CHAR(ZIP))
Note : This value needs to be populated for every record inserted into the Dimension Table by the
mapping.
Lookup Transformation
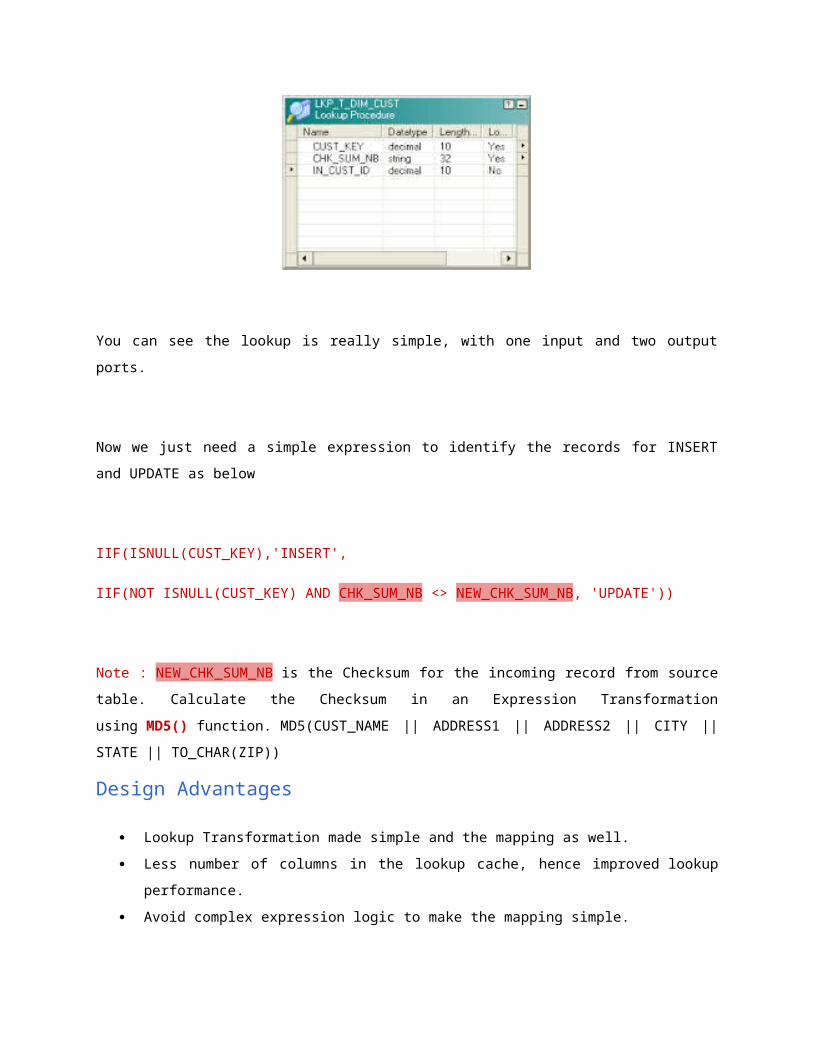
Now we can create a simple lookup transformation to fetch the checksum number (CHK_SUM_NB,
which is already stored in the Dimension table T_DIM_CUST) and the surrogate key (CUST_KEY)
from the dimension table.
You can see the lookup is really simple, with one input and two output ports.
Now we just need a simple expression to identify the records for INSERT and UPDATE as below
IIF(ISNULL(CUST_KEY),'INSERT',
IIF(NOT ISNULL(CUST_KEY) AND CHK_SUM_NB <> NEW_CHK_SUM_NB, 'UPDATE'))
Note : NEW_CHK_SUM_NB is the Checksum for the incoming record from source table. Calculate
the Checksum in an Expression Transformation using MD5() function. MD5(CUST_NAME ||
ADDRESS1 || ADDRESS2 || CITY || STATE || TO_CHAR(ZIP))
Design Advantages
Lookup Transformation made simple and the mapping as well.
Less number of columns in the lookup cache, hence improved lookup performance.
Avoid complex expression logic to make the mapping simple.
Hope you guys enjoyed this and you will be able to implement this in your upcoming projects. Please
leave us a comment in case you have any questions of difficulties implementing this.
An ETL Framework for Change Data Capture (CDC)
Change data capture (CDC) is the process of capturing changes made at the data source and
applying them throughout the Data Warehouse. Since capturing and preserving the state of data
across time is one of the core functions of a data warehouse, a change data capture framework has
a very important role in ETL design for Data Warehouses. Change Data Capture can be set up on
different ways based on Timestamps on rows, Version Numbers on rows, Status indicators on rows
etc. Here we will be building our framework based on "Timestamps on rows" approach.
In one of the our early articles, we spoke about operational meta data logging framework. Lets add
on to that and build our Change Data Capture framework. We will be leveraging the capabilities
provided by Informatica PowerCenter to build our framework.
Framework Components
Our Framework for Change Data Capture will include below components.
1. A Relational Table :- To store the meta data.
2. Mapping, Workflow variables : Variables to store and process latest timestamp of
processed records.
3. A Reusable Expression :- A reusable expression transformation to find latest
timestamp of processed records.
4. Pre, Post Session Command Task :- Command task to collect the meta data.
5. Reusable Worklet :- Worklet to log the data load details into the relational table.
1. Relational TableA relation table will be used to store the operational data with the below structure. Data in this table will be retained for historical analysis.
o ETL_JOB_NAME : ETL job name or Session name.
o ETL_RUN_DATE : ETL job execution date.
o DATA_START_TIME : Least timestamp of processed records
o DATA_END_TIME : Latest timestamp of processed records
o SRC_TABLE : Source table used in the ETL job.
o TGT_TABLE : Target table used in the ETL job.
o ETL_START_TIME : ETL job execution start timestamp.
o ETL_END_TIME : ETL job execution end timestamp.
o SRC_RECORD_COUNT : Number of records read from source.
o INS_RECORD_COUNT : Number of records inserted into target.
o UPD_RECORD_COUNT : Number of records updated in target.
o ERR_RECORD_COUNT : Number of records error out in target.
o ETL_STATUS : ETL Job status, SUCCESS or FAILURE.
o ETL_CREATE_TIME : Record create timestamp.
o ETL_UPDATE_TIME : Record update timestamp.
2. Mapping and Workflow Variables
Two mapping variables will be used to capture the least and latest timestamp of the records
processed through each data load. These variables hold the time frame of the data processed.
o $$M_DATA_START_TIME as Date/Time
o $$M_DATA_END_TIME as Date/Time
Additionally two workflow variables will be used to capture the least and latest timestamp of the
records processed through each data load. These variables hold the time frame of the data
processed.
o $$WF_DATA_START_TIME as Date/Time
o $$WF_DATA_END_TIME as Date/Time
Note : Usage of these variables are described in the implementation Steps.
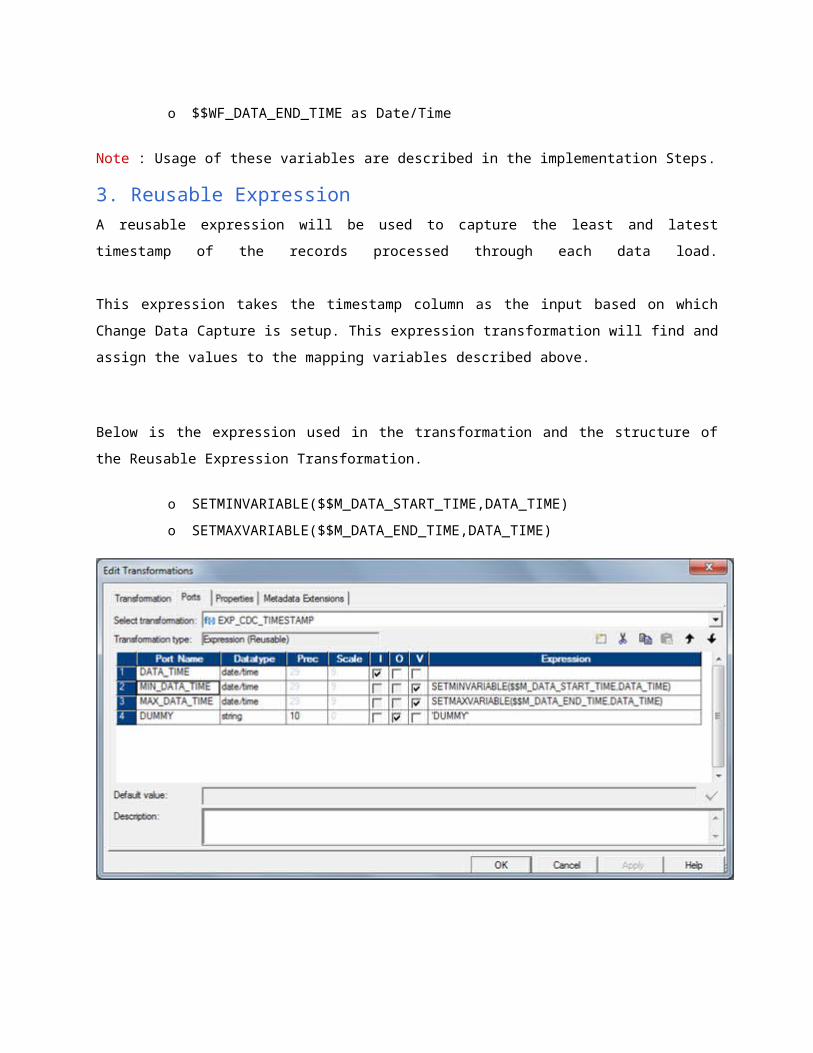
3. Reusable Expression
A reusable expression will be used to capture the least and latest timestamp of the records
processed through each data load.
This expression takes the timestamp column as the input based on which Change Data Capture is
setup. This expression transformation will find and assign the values to the mapping variables
described above.
Below is the expression used in the transformation and the structure of the Reusable Expression
Transformation.
o SETMINVARIABLE($$M_DATA_START_TIME,DATA_TIME)
o SETMAXVARIABLE($$M_DATA_END_TIME,DATA_TIME)
4. Pre and Post Session Command Task
Pre and Post session command task will be used to generate a comma delimited file with session
run details. This file will be stored into $PMSourceFileDir\ directory with a
name $PMWorkflowName_stat.txt.
Note :
$PMSourceFileDir, $PMWorkflowName are the session parameter, which gives the source
file directory and name of workflow.
File name generated will always be <WorkflowName>_stat.txt
The comma delimited file will have the structure as below.
o ETL Start time
o ETL End time
o ETL Job name
o Source table name
o Target table name
o Source record count
o Records inserted count

o Records updated count
o Error record count
o ETL Job status
We will be using the built-in session parameters to collect session run details.
o $PMSessionName : Name of the Informatica session.
o $PMSourceName@TableName : Name of the source table name.
o $PMTargetName@TableName : Name of the source table name.
o $PMSourceQualifierName@numAffectedRows : Number of records returned from
source.
o $PMTargetName@numAffectedRows : Number of record inserted/updated into the
target table.
o $PMTargetName@numRejectedRows : Number of records error out in target.
Note : SourceName, TargetName, SourceQualifierName will be replaced by corresponding
transformation instance name used in the mapping.
Pre Session Command TaskPre session command task will be used to create the file with the session start time stamp.
echo %DATE:~10,4%-%DATE:~4,2%-%DATE:~7,2% %TIME:~0,2%:%TIME:~3,2%:%TIME:~6,2%,
> $PMSourceFileDir\$PMWorkflowName_stat.txt
Post Session Success Command TaskPost session success command task will be used to append the file, which is created in the pre session command with session run details. This will capture the SUCCESS status along with other session run details.
echo %DATE:~10,4%-%DATE:~4,2%-%DATE:~7,2% %TIME:~0,2%:%TIME:~3,2%:%TIME:~6,2%,
$PMSessionName,
$PMSTG_CUSTOMER_MASTER@TableName,
$PMINS_CUSTOMER_MASTER@TableName,
$PMSQ_STG_CUSTOMER_MASTER@numAffectedRows,
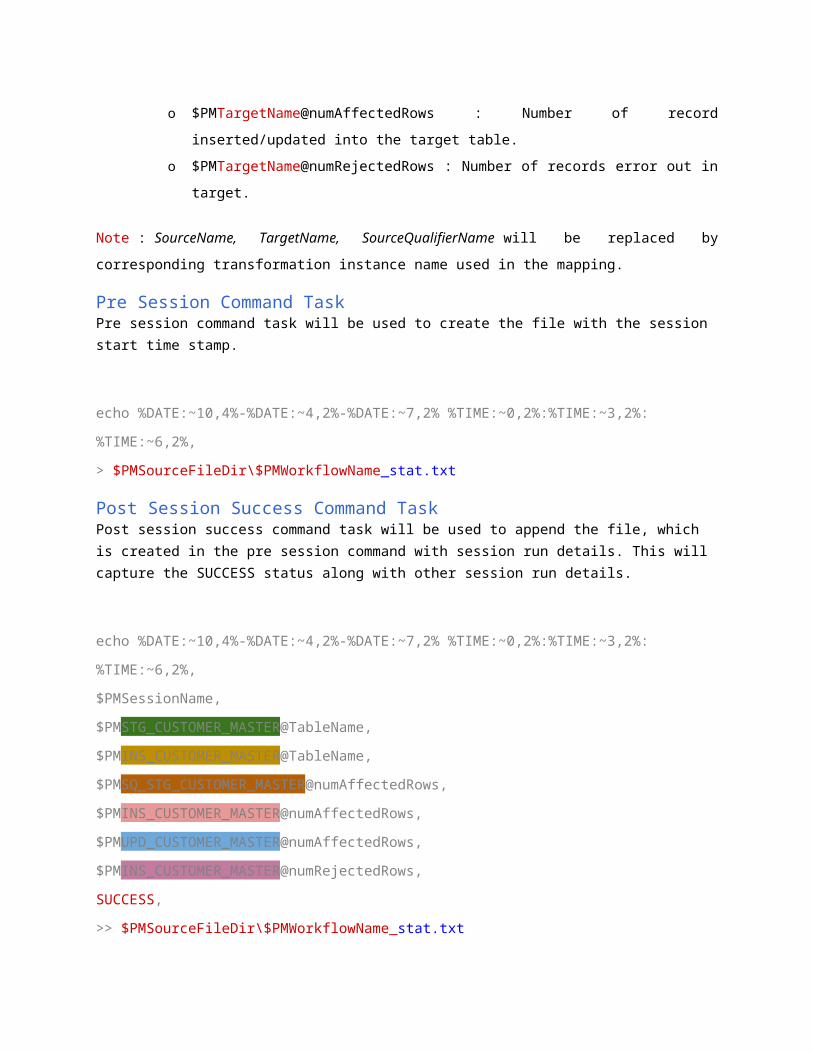
$PMINS_CUSTOMER_MASTER@numAffectedRows,
$PMUPD_CUSTOMER_MASTER@numAffectedRows,
$PMINS_CUSTOMER_MASTER@numRejectedRows,
SUCCESS,
>> $PMSourceFileDir\$PMWorkflowName_stat.txt
Post Session Failure Command Task
Post session failure command task will be used to append the file, which is created in the pre
session command with session run details. This will capture the FAILURE status along with other
session run details.
echo %DATE:~10,4%-%DATE:~4,2%-%DATE:~7,2% %TIME:~0,2%:%TIME:~3,2%:%TIME:~6,2%,
$PMSessionName,
$PMSTG_CUSTOMER_MASTER@TableName,
$PMINS_CUSTOMER_MASTER@TableName,
$PMSQ_STG_CUSTOMER_MASTER@numAffectedRows,
$PMINS_CUSTOMER_MASTER@numAffectedRows,
$PMUPD_CUSTOMER_MASTER@numAffectedRows,
$PMINS_CUSTOMER_MASTER@numRejectedRows,
FAILURE,
>> $PMSourceFileDir\$PMWorkflowName_stat.txt
Note :
Pre, Post session commands need to be changed based on Informatica server operating
system.
Highlighted part of the script need to be change based on the source, target table instance
name used in the mapping.
5. Reusable Worklet
A worklet will be created to read data from the comma delimited file generated by the pre, post
session command task. In addition to the data read from the comma delimited file, the worklet takes
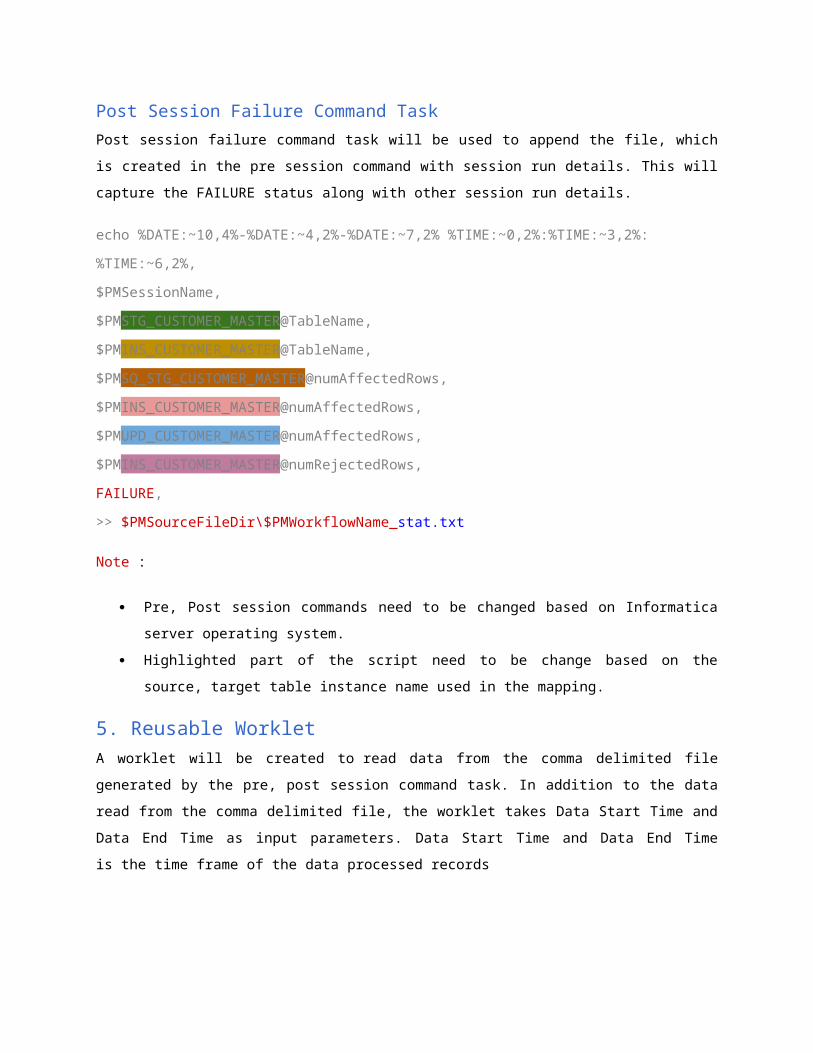
Data Start Time and Data End Time as input parameters. Data Start Time and Data End Time is the
time frame of the data processed records
Reusable Mapping
A reusable mapping will be created to read data from the comma delimited file generated by the pre
and post session command task.
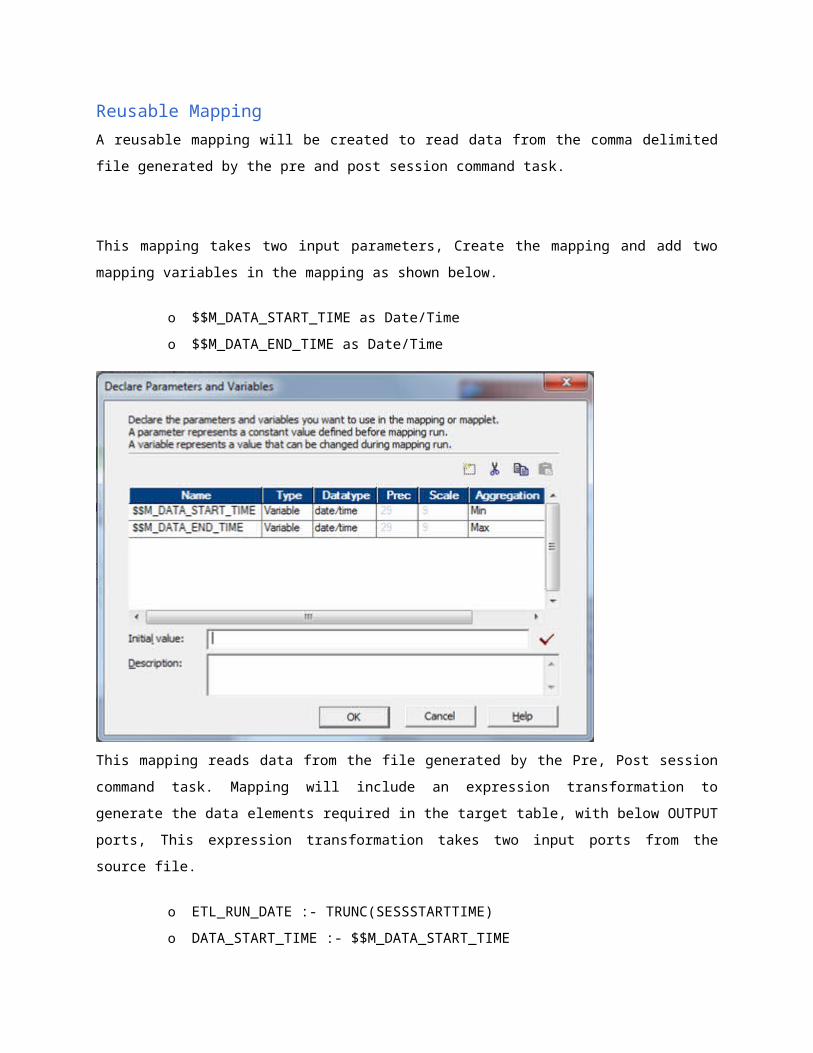
This mapping takes two input parameters, Create the mapping and add two mapping variables in the
mapping as shown below.
o $$M_DATA_START_TIME as Date/Time
o $$M_DATA_END_TIME as Date/Time
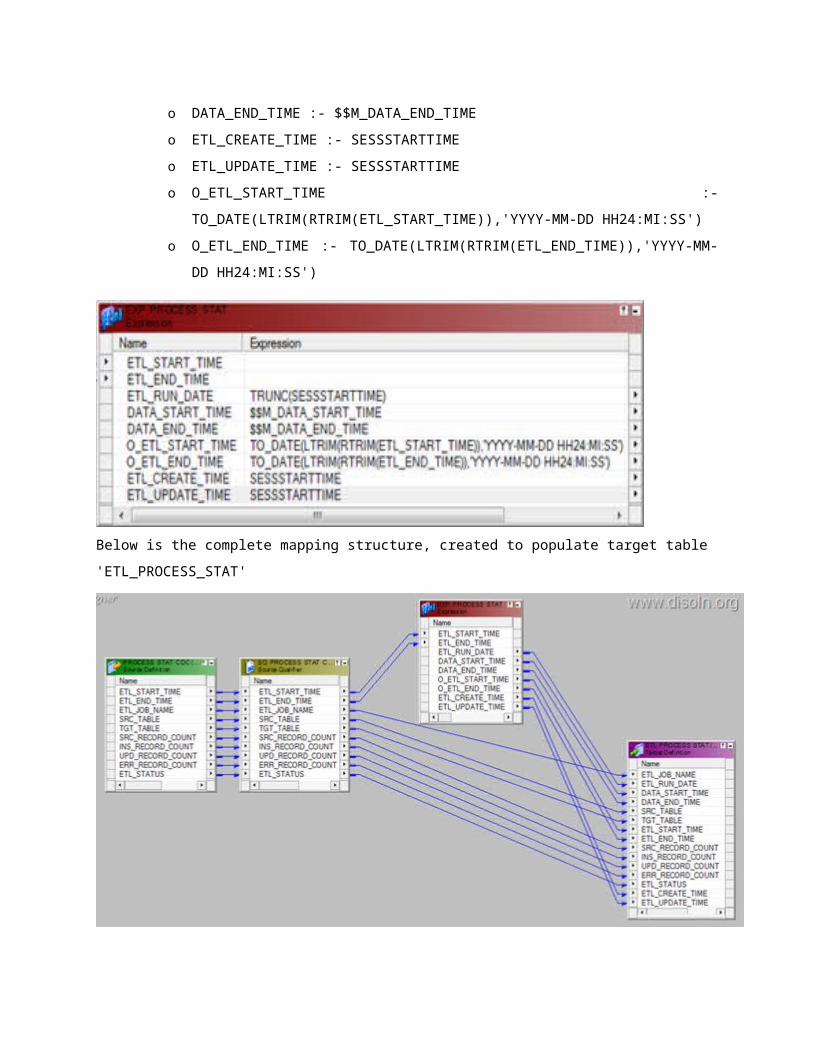
This mapping reads data from the file generated by the Pre, Post session command task. Mapping
will include an expression transformation to generate the data elements required in the target table,
with below OUTPUT ports, This expression transformation takes two input ports from the source file.
o ETL_RUN_DATE :- TRUNC(SESSSTARTTIME)
o DATA_START_TIME :- $$M_DATA_START_TIME
o DATA_END_TIME :- $$M_DATA_END_TIME
o ETL_CREATE_TIME :- SESSSTARTTIME
o ETL_UPDATE_TIME :- SESSSTARTTIME
o O_ETL_START_TIME :- TO_DATE(LTRIM(RTRIM(ETL_START_TIME)),'YYYY-MM-
DD HH24:MI:SS')
o O_ETL_END_TIME :- TO_DATE(LTRIM(RTRIM(ETL_END_TIME)),'YYYY-MM-DD
HH24:MI:SS')
Below is the complete mapping structure, created to populate target table 'ETL_PROCESS_STAT'
Reusable Worklet
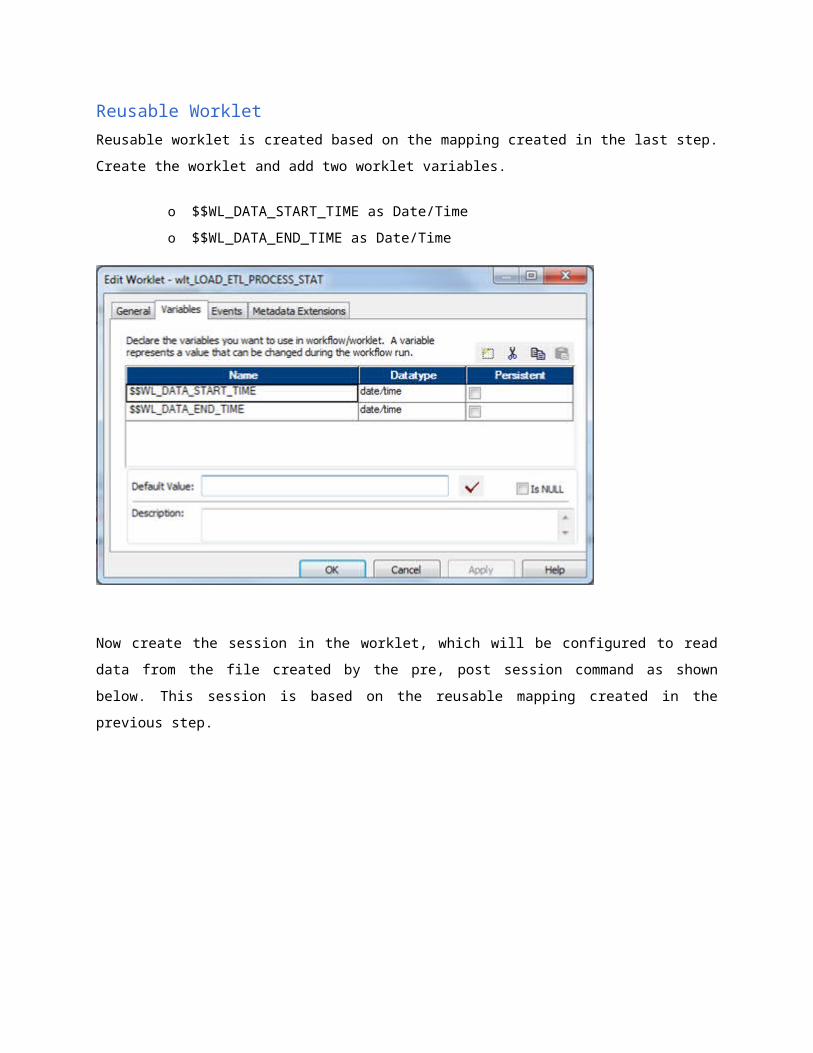
Reusable worklet is created based on the mapping created in the last step. Create the worklet and
add two worklet variables.
o $$WL_DATA_START_TIME as Date/Time
o $$WL_DATA_END_TIME as Date/Time
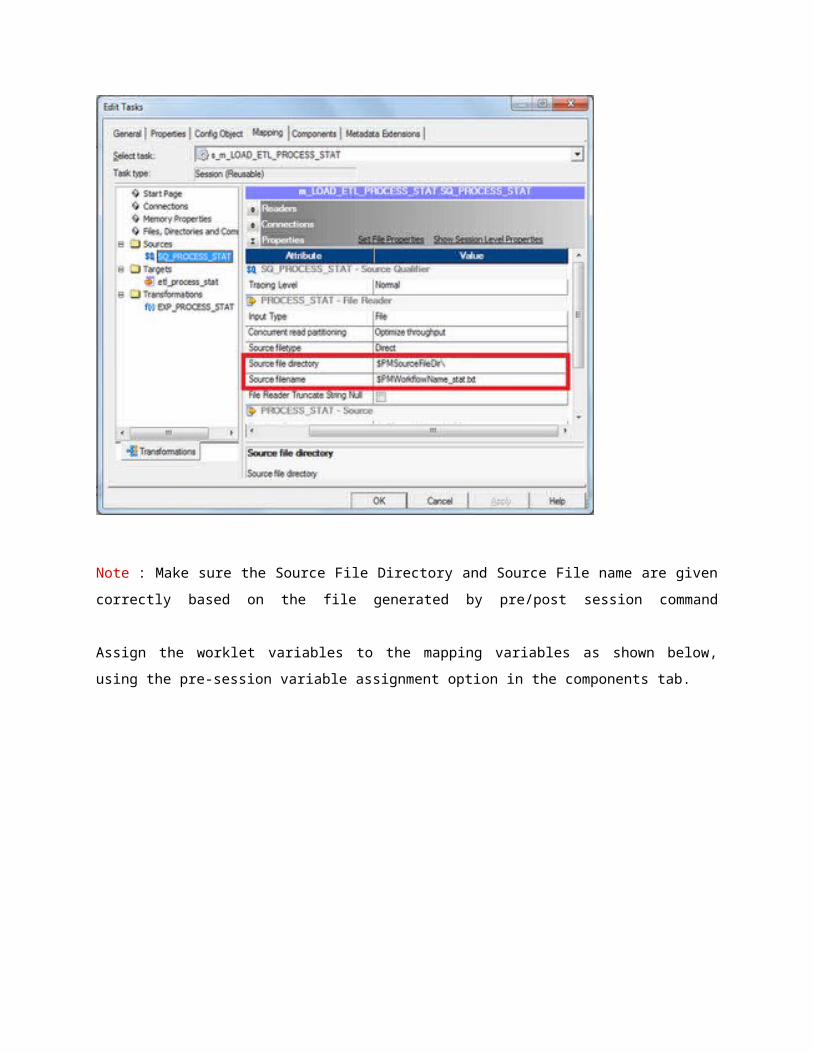
Now create the session in the worklet, which will be configured to read data from the file created by
the pre, post session command as shown below. This session is based on the reusable mapping
created in the previous step.
Note : Make sure the Source File Directory and Source File name are given correctly based on the
file generated by pre/post session command
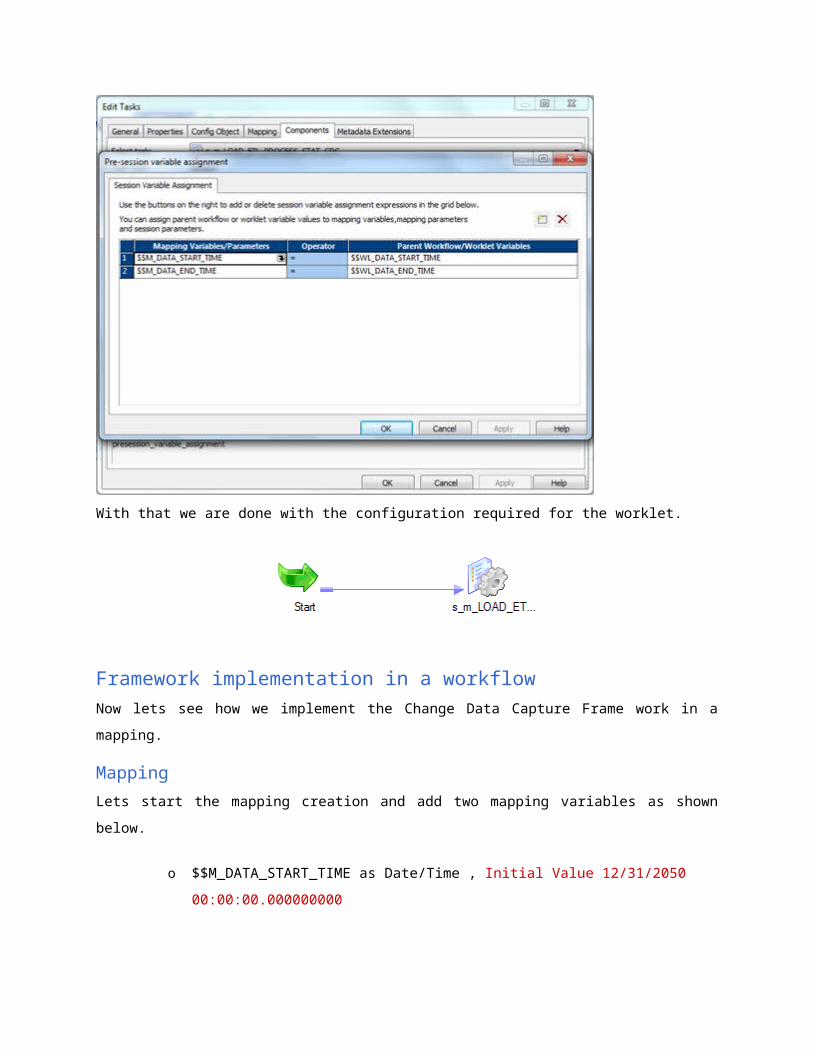
Assign the worklet variables to the mapping variables as shown below, using the pre-session
variable assignment option in the components tab.
With that we are done with the configuration required for the worklet.
Framework implementation in a workflow
Now lets see how we implement the Change Data Capture Frame work in a mapping.
Mapping
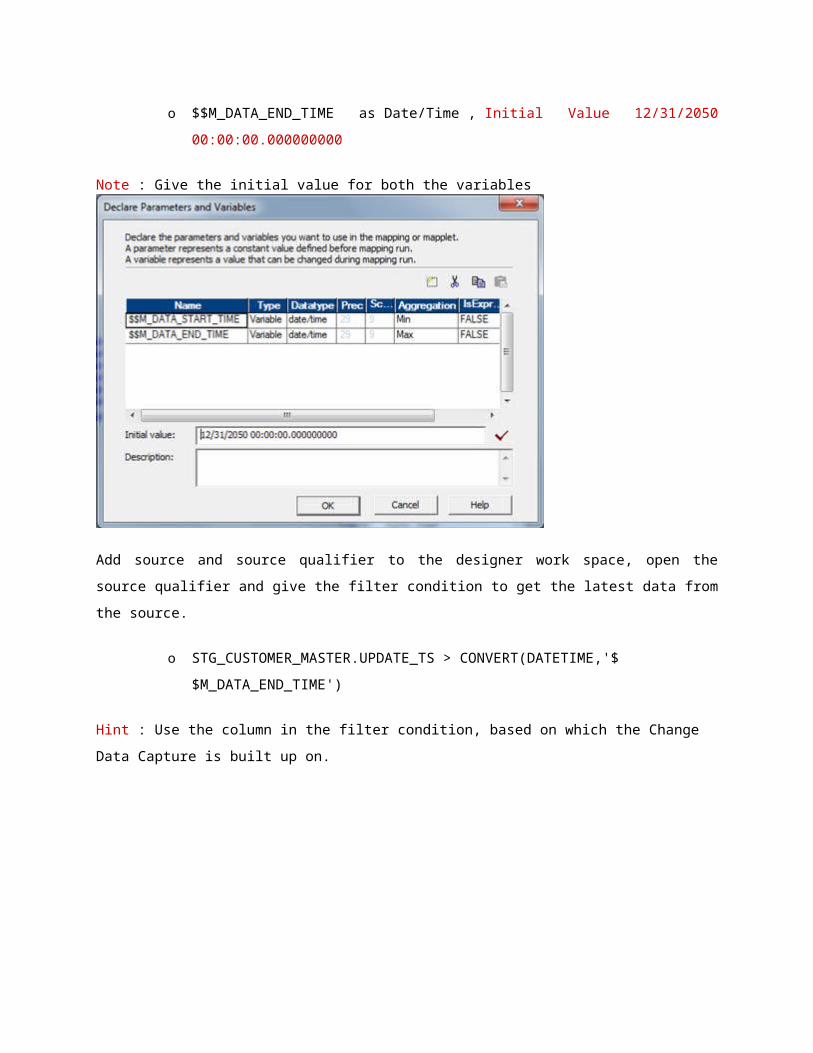
Lets start the mapping creation and add two mapping variables as shown below.
o $$M_DATA_START_TIME as Date/Time , Initial Value 12/31/2050
00:00:00.000000000
o $$M_DATA_END_TIME as Date/Time , Initial Value 12/31/2050
00:00:00.000000000
Note : Give the initial value for both the variables
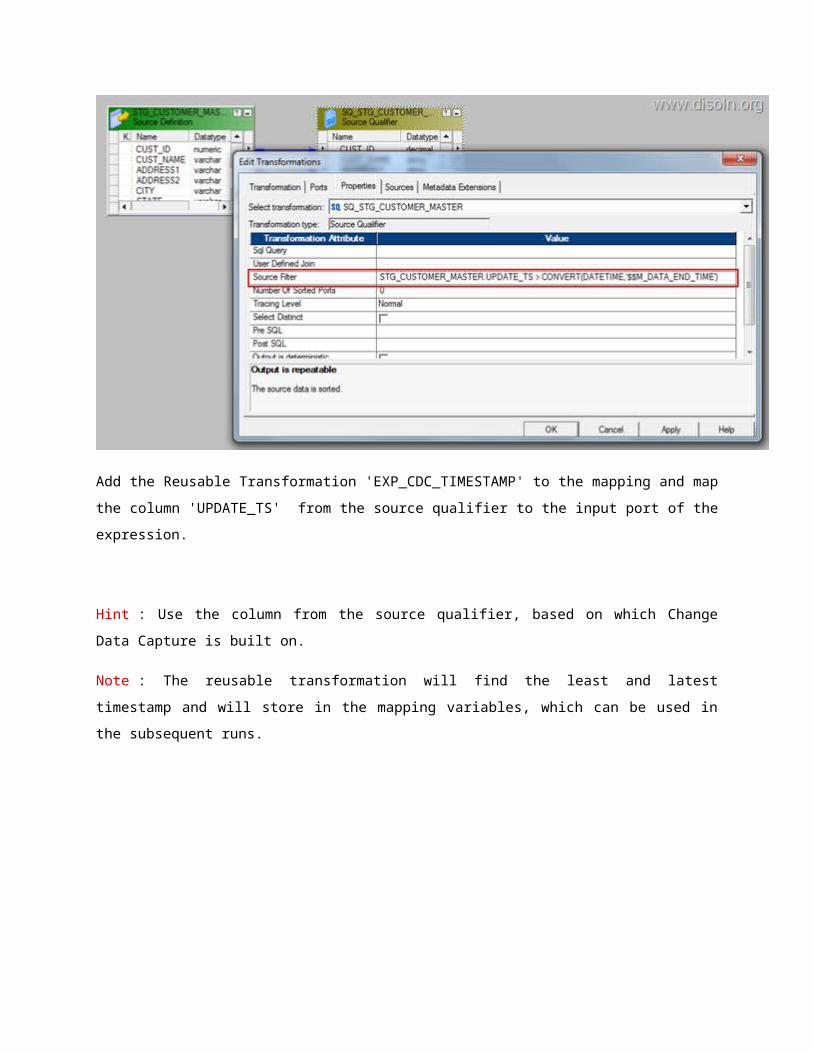
Add source and source qualifier to the designer work space, open the source qualifier and give the
filter condition to get the latest data from the source.
o STG_CUSTOMER_MASTER.UPDATE_TS > CONVERT(DATETIME,'$
$M_DATA_END_TIME')
Hint : Use the column in the filter condition, based on which the Change Data Capture is built up on.
Add the Reusable Transformation 'EXP_CDC_TIMESTAMP' to the mapping and map the column
'UPDATE_TS' from the source qualifier to the input port of the expression.
Hint : Use the column from the source qualifier, based on which Change Data Capture is built on.
Note : The reusable transformation will find the least and latest timestamp and will store in the
mapping variables, which can be used in the subsequent runs.
Map the DUMMY column from 'EXP_CDC_TIMESTAMP' to the down stream transformation and
complete all other transformation required in the mapping.
Workflow
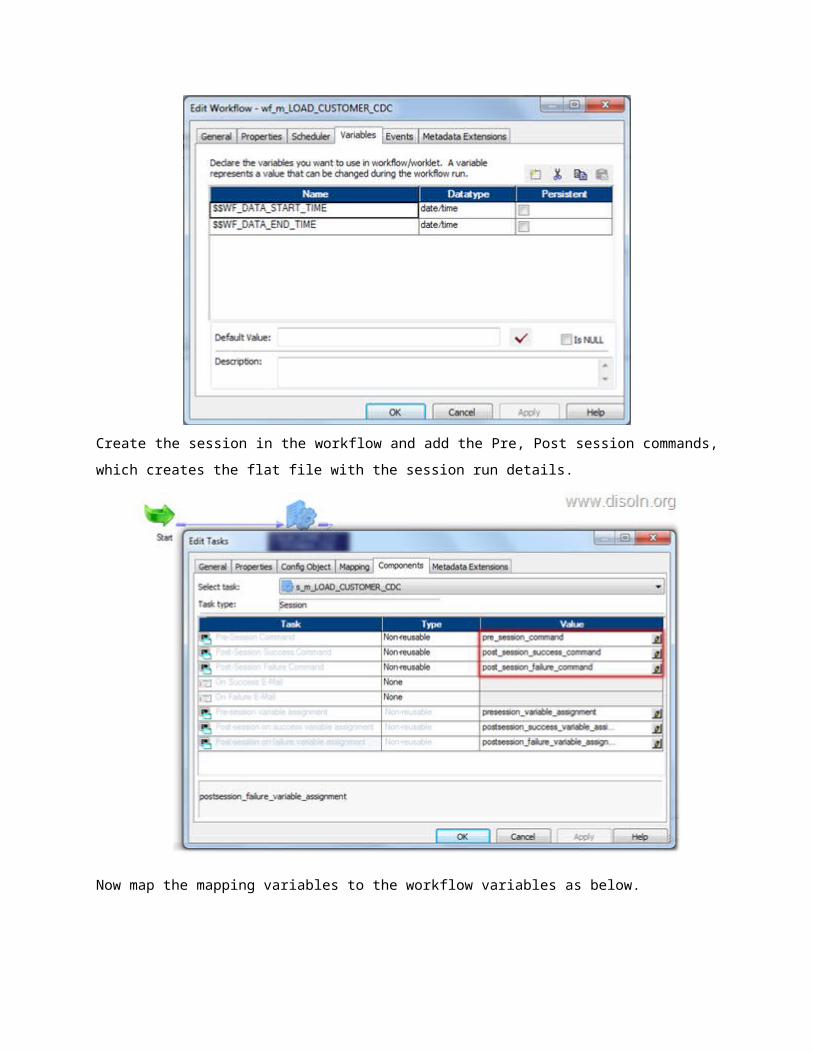
Once the mapping is complete. lets create the workflow and add two workflow variables as shown
below.
o $$WF_DATA_START_TIME as Date/Time
o $$WF_DATA_END_TIME as Date/Time

Create the session in the workflow and add the Pre, Post session commands, which creates the flat
file with the session run details.
Now map the mapping variables to the workflow variables as below.
Add the worklet to the workflow and assign the workflow variables to the worklet variable as in below
image.
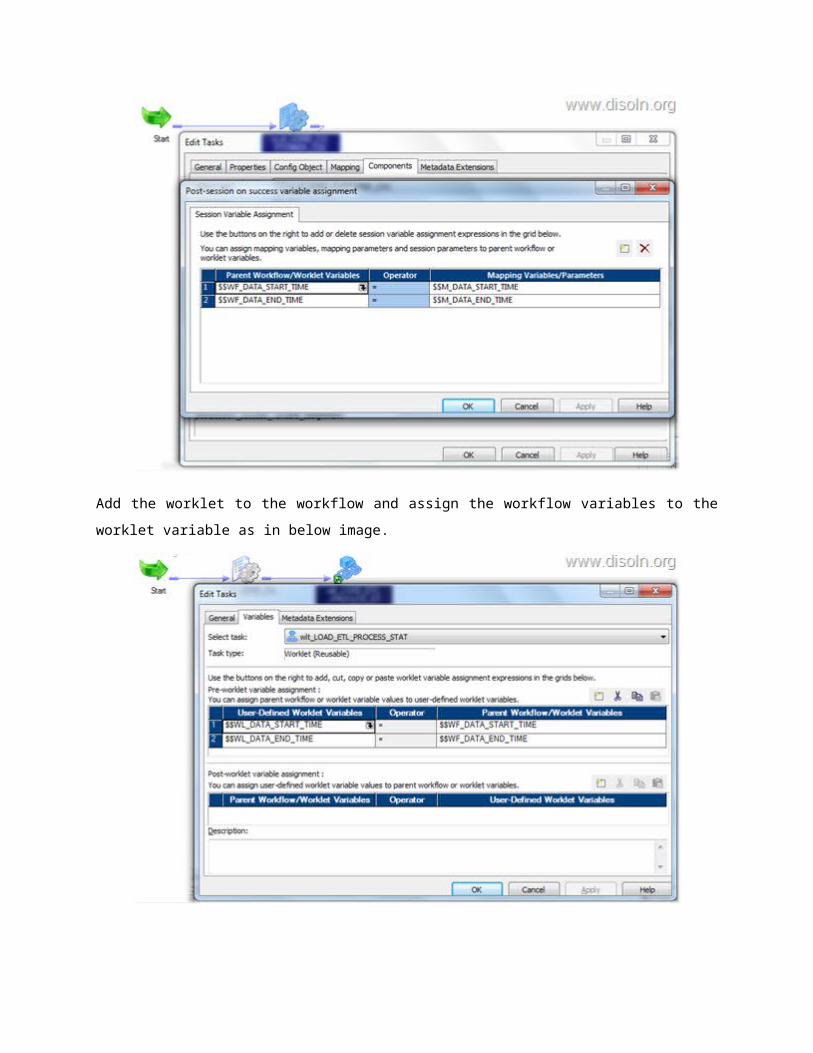
With that we are done with the configuration. And below is the structure of the completed workflow,
with Change Data Capture Framework.
Hope you enjoyed this post. We will be expanding this framework by adding features like notification
capability, detail error capturing, change data capture etc... in the coming posts. Please leave your
comments and thought about this.
Change Data Capture (CDC) Made Easy Using Mapping Variables
At times we may need to implement Change Data Capture for small data integration projects which
includes just couple of workflows. Introducing a Change Data Capture framework for such project is
not a recommended way to handle this, just because of the efforts required to build the framework
may not be justified. Here in this article lets discuss about a simple, easy approach handle Change
Data Capture.
We will be using Informatica Mapping Variables to building our Change Data Capture logic. Before even we talk about the implementation, lets understand the Mapping Variable
Informatica Mapping Variable
What is Mapping Variable
These are variables created in PowerCenter Designer, which you can use in any expression in a
mapping, and you can also use the mapping variables in a source qualifier filter, user-defined join, or
extract override, and in the Expression Editor of reusable transformations.
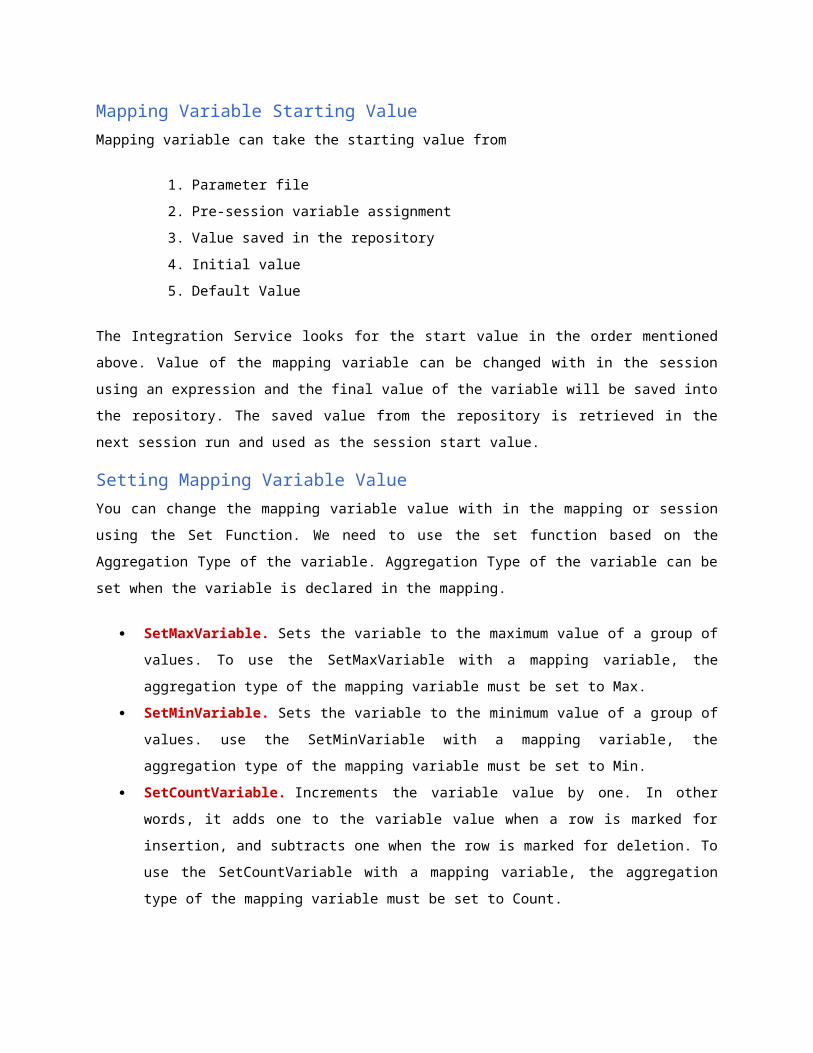
Mapping Variable Starting Value
Mapping variable can take the starting value from
1. Parameter file
2. Pre-session variable assignment
3. Value saved in the repository

4. Initial value
5. Default Value
The Integration Service looks for the start value in the order mentioned above. Value of the mapping
variable can be changed with in the session using an expression and the final value of the variable
will be saved into the repository. The saved value from the repository is retrieved in the next session
run and used as the session start value.
Setting Mapping Variable Value
You can change the mapping variable value with in the mapping or session using the Set Function.
We need to use the set function based on the Aggregation Type of the variable. Aggregation Type of
the variable can be set when the variable is declared in the mapping.
SetMaxVariable. Sets the variable to the maximum value of a group of values. To use the
SetMaxVariable with a mapping variable, the aggregation type of the mapping variable must
be set to Max.
SetMinVariable. Sets the variable to the minimum value of a group of values. use the
SetMinVariable with a mapping variable, the aggregation type of the mapping variable must
be set to Min.
SetCountVariable. Increments the variable value by one. In other words, it adds one to the
variable value when a row is marked for insertion, and subtracts one when the row is marked
for deletion. To use the SetCountVariable with a mapping variable, the aggregation type of
the mapping variable must be set to Count.
SetVariable. Sets the variable to the configured value. At the end of a session, it compares
the final current value of the variable to the start value of the variable. Based on the
aggregate type of the variable, it saves a final value to the repository.
Change Data Capture Implementation
Now we understand the mapping variables, lets go ahead and start building our mapping with
Change Data Capture.
Here we are going to implement Change Data Capture for CUSTOMER data load. We need to load
any new customer or changed customers data to a flat file. Since the column UPDATE_TS value
changes for any new or updated customer record, we will be able to find the new or changed
customer records using UPDATE_TS column.
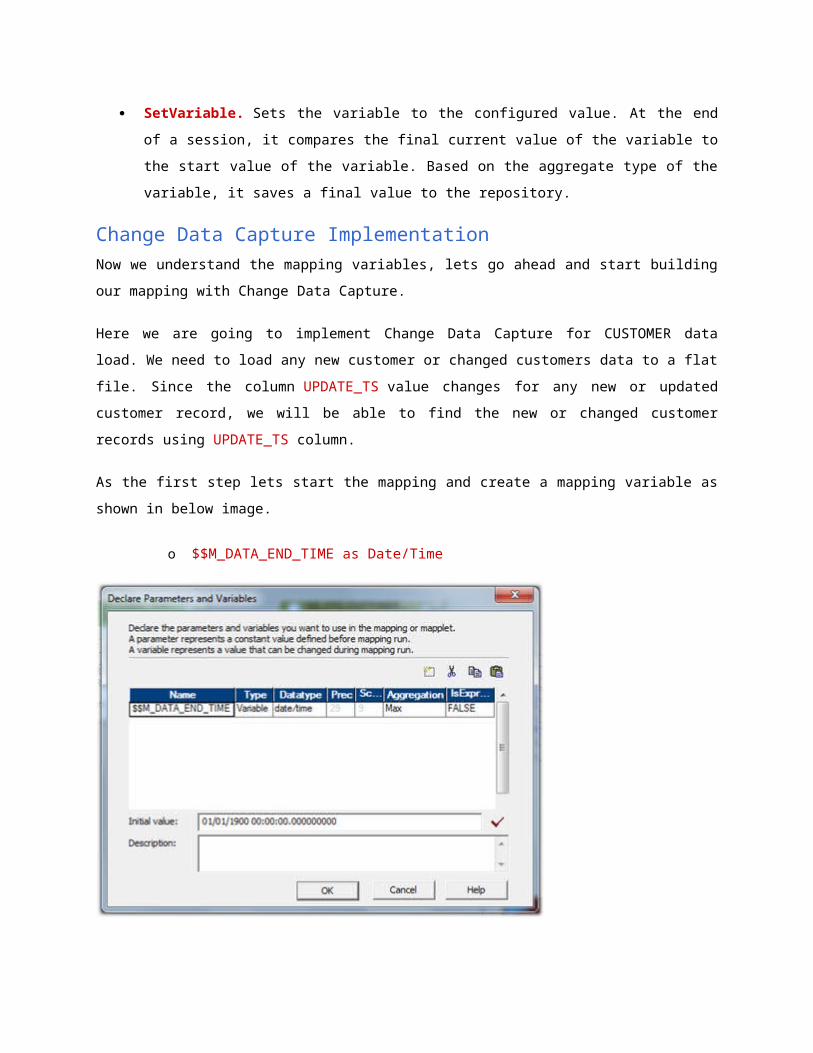
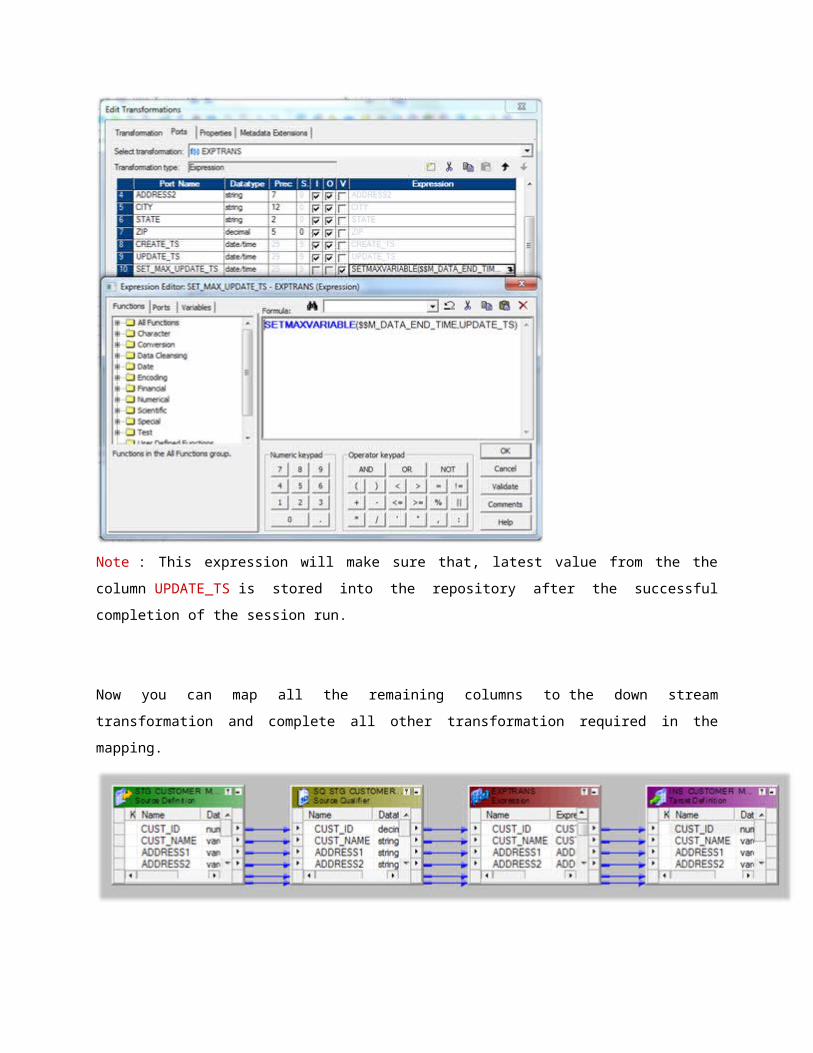
As the first step lets start the mapping and create a mapping variable as shown in below image.
o $$M_DATA_END_TIME as Date/Time
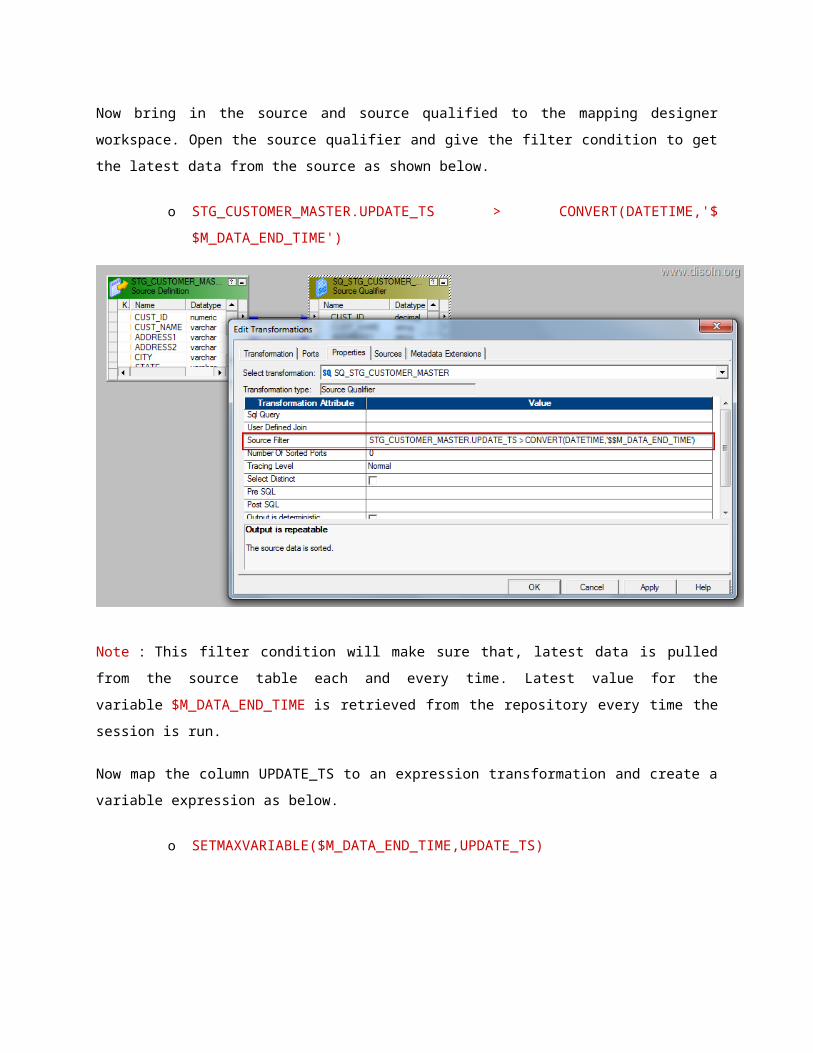
Now bring in the source and source qualified to the mapping designer workspace. Open the source
qualifier and give the filter condition to get the latest data from the source as shown below.
o STG_CUSTOMER_MASTER.UPDATE_TS > CONVERT(DATETIME,'$
$M_DATA_END_TIME')
Note : This filter condition will make sure that, latest data is pulled from the source table each and
every time. Latest value for the variable $M_DATA_END_TIME is retrieved from the repository every
time the session is run.
Now map the column UPDATE_TS to an expression transformation and create a variable
expression as below.
o SETMAXVARIABLE($M_DATA_END_TIME,UPDATE_TS)
Note : This expression will make sure that, latest value from the the column UPDATE_TS is stored
into the repository after the successful completion of the session run.
Now you can map all the remaining columns to the down stream transformation and complete all
other transformation required in the mapping.
That’s all you need to configure Change Data Capture, Now create your workflow and run the
workflow.
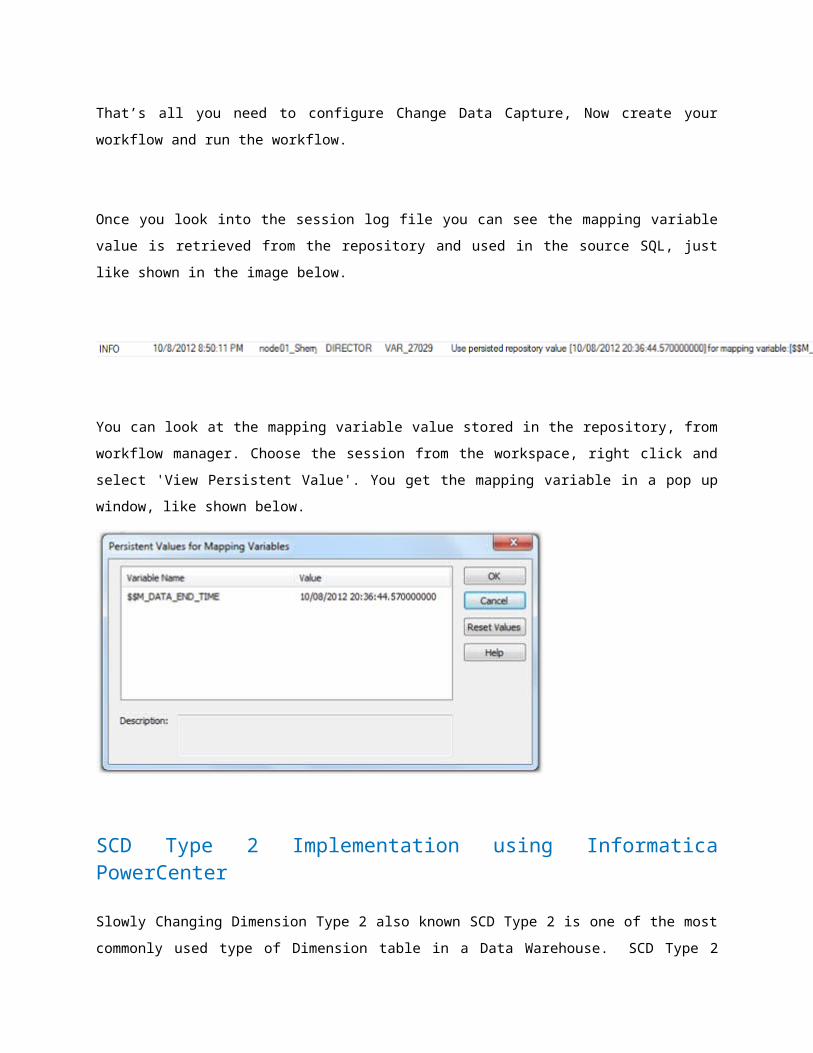
Once you look into the session log file you can see the mapping variable value is retrieved from the
repository and used in the source SQL, just like shown in the image below.
You can look at the mapping variable value stored in the repository, from workflow manager. Choose
the session from the workspace, right click and select 'View Persistent Value'. You get the mapping
variable in a pop up window, like shown below.
SCD Type 2 Implementation using Informatica PowerCenter
Slowly Changing Dimension Type 2 also known SCD Type 2 is one of the most commonly used type
of Dimension table in a Data Warehouse. SCD Type 2 dimension loads are considered to be
complex mainly because of the data volume we process and because of the number of
transformation we are using in the mapping. Here in this article, we will be building an Informatica
PowerCenter mapping to load SCD Type 2 Dimension.
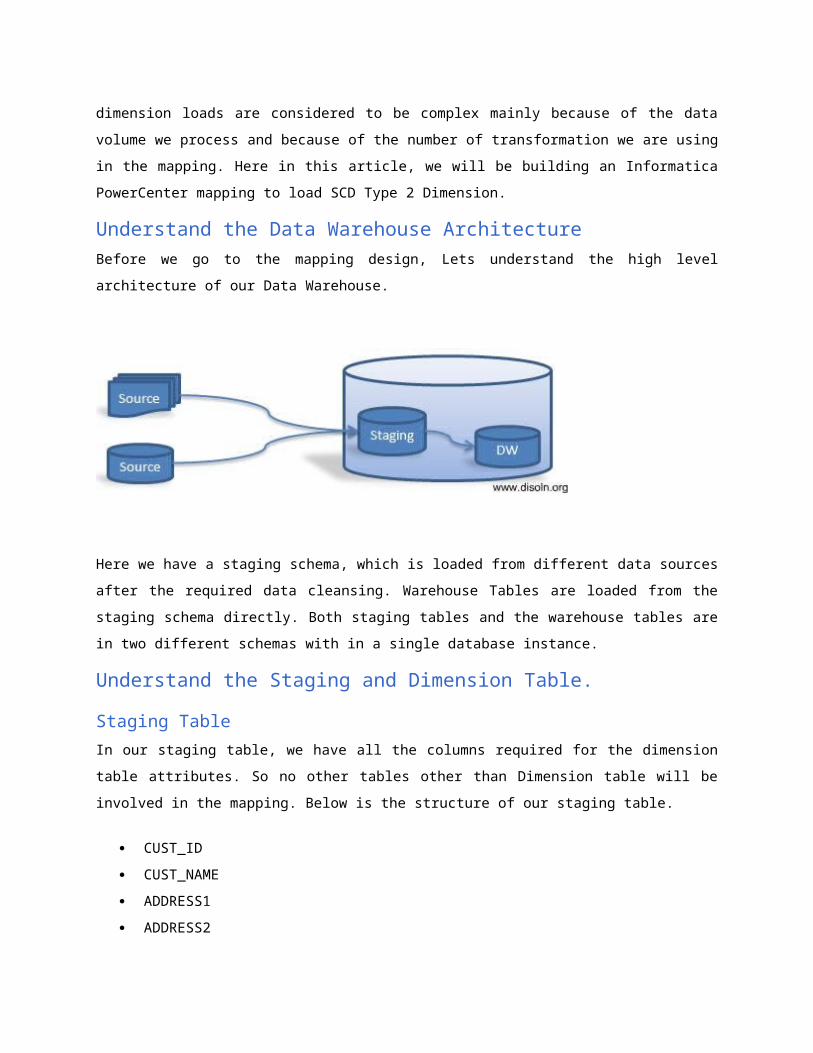
Understand the Data Warehouse Architecture
Before we go to the mapping design, Lets understand the high level architecture of our Data
Warehouse.
Here we have a staging schema, which is loaded from different data sources after the required data
cleansing. Warehouse Tables are loaded from the staging schema directly. Both staging tables and
the warehouse tables are in two different schemas with in a single database instance.
Understand the Staging and Dimension Table.
Staging Table
In our staging table, we have all the columns required for the dimension table attributes. So no other
tables other than Dimension table will be involved in the mapping. Below is the structure of our
staging table.
CUST_ID
CUST_NAME
ADDRESS1
ADDRESS2
CITY
STATE
ZIP
Key Points :
1. Staging table will have only one days data.
2. Data is uniquely identified using CUST_ID.
3. All attribute required by Dimension Table is available in the staging table.
Dimension Table
Here is the structure of our Dimension table.
CUST_KEY
AS_OF_START_DT
AS_OF_END_DT
CUST_ID
CUST_NAME
ADDRESS1
ADDRESS2
CITY
STATE
ZIP
CHK_SUM_NB
CREATE_DT
UPDATE_DT
Key Points :
1. CUST_KEY is the surrogate key.
2. CUST_ID, AS_OF_END_DT is the Natural key, hence the unique record identifier.
3. Record versions are kept based on Time Range using AS_OF_START_DT,
AS_OF_END_DATE
4. Active record will have an AS_OF_END_DATE value 12-31-4000
5. Checksum value of all dimension attribute columns are stored into the column
CHK_SUM_NB
Mapping Building and Configuration
Now we understand the ETL Architecture, Staging Table, Dimension Table and the design
considerations, we can go to the mapping development. We are splitting the mapping development
into six steps.
1. Join Staging Table and Dimension Table
2. Data Transformation
o Generate Surrogate Key
o Generate Checksum Number
o Other Calculations
3. Identify Insert/Update
4. Insert the new Records
5. Update(Expire) the Old Version
6. Insert the new Version of Updated Record
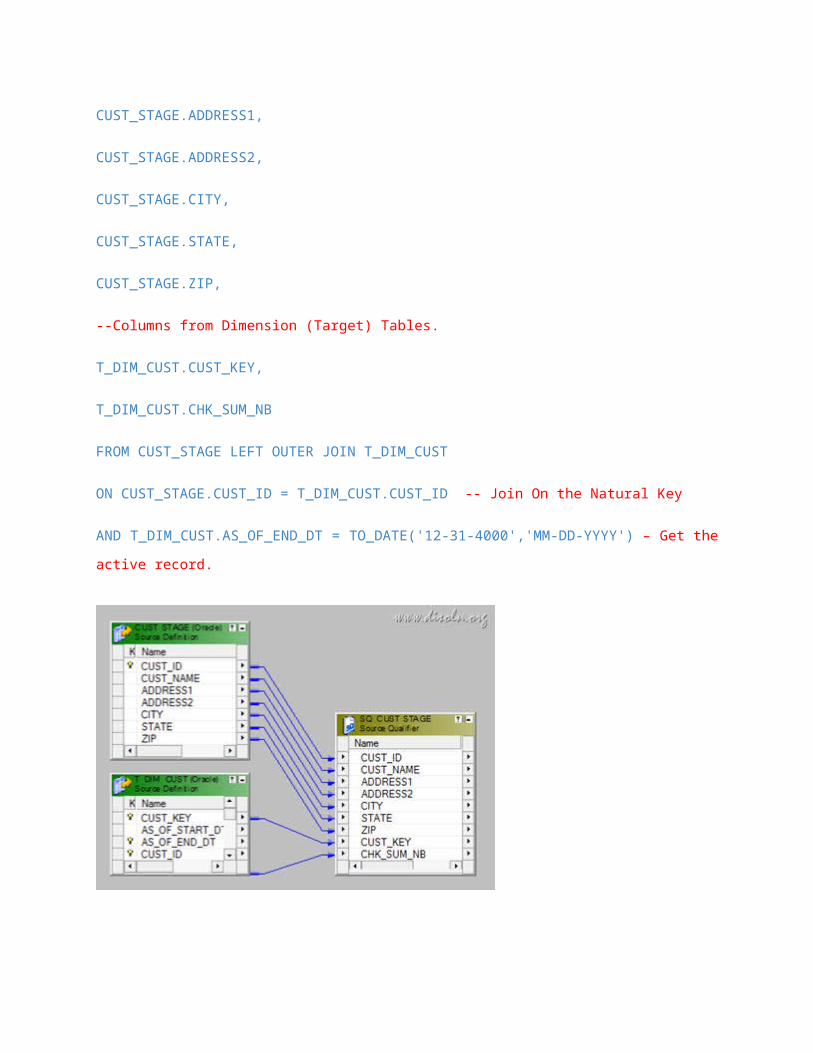
1. Join Staging Table and Dimension Table
We are going to OUTER JOIN both the Staging (Source) Table and the Dimension (Target) Table
using the SQL Override below. An OUTER Join gives you all the records from the Staging table and
the corresponding records from Dimension table. if it is there is no corresponding record in the
Dimension table, it returns NULL values for the Dimension table columns.
SELECT
--Columns From Staging (Source) Tables CUST_STAGE.CUST_ID,
CUST_STAGE.CUST_NAME,
CUST_STAGE.ADDRESS1,
CUST_STAGE.ADDRESS2,
CUST_STAGE.CITY,
CUST_STAGE.STATE,
CUST_STAGE.ZIP,
--Columns from Dimension (Target) Tables.
T_DIM_CUST.CUST_KEY,
T_DIM_CUST.CHK_SUM_NB
FROM CUST_STAGE LEFT OUTER JOIN T_DIM_CUST
ON CUST_STAGE.CUST_ID = T_DIM_CUST.CUST_ID -- Join On the Natural Key
AND T_DIM_CUST.AS_OF_END_DT = TO_DATE('12-31-4000','MM-DD-YYYY') – Get the active
record.
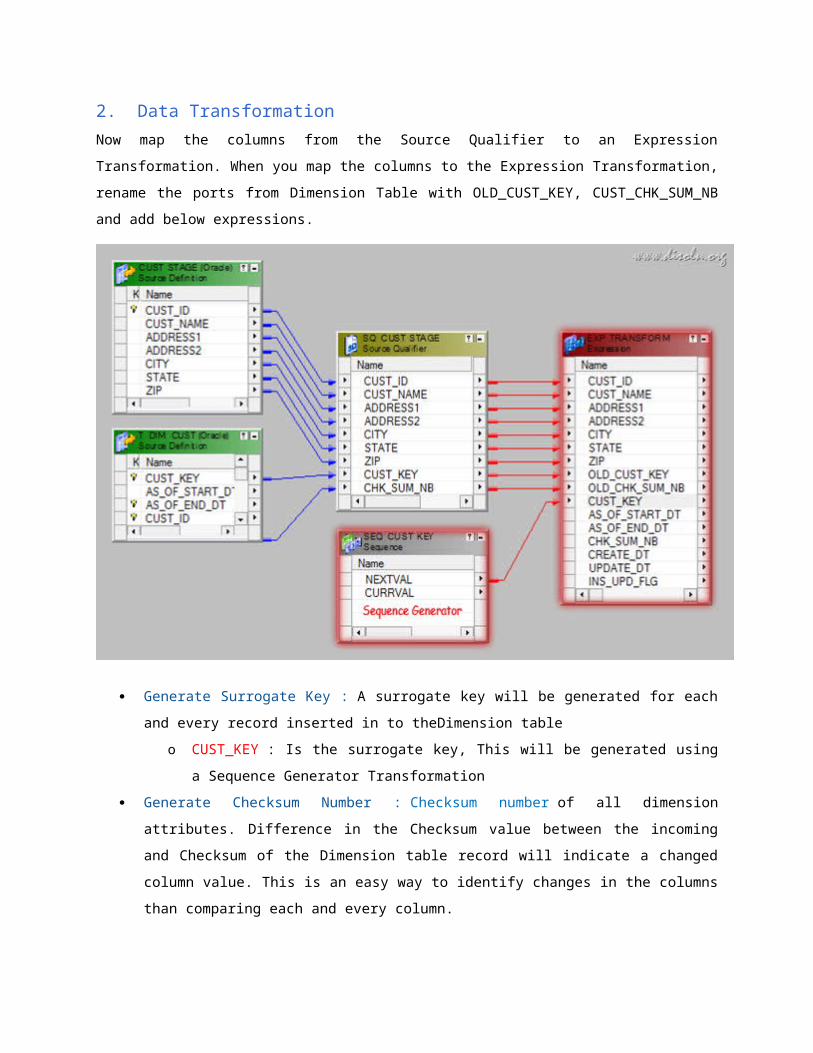
2. Data Transformation
Now map the columns from the Source Qualifier to an Expression Transformation. When you map
the columns to the Expression Transformation, rename the ports from Dimension Table with
OLD_CUST_KEY, CUST_CHK_SUM_NB and add below expressions.
Generate Surrogate Key : A surrogate key will be generated for each and every record
inserted in to theDimension table
o CUST_KEY : Is the surrogate key, This will be generated using a Sequence
Generator Transformation
Generate Checksum Number : Checksum number of all dimension attributes. Difference in
the Checksum value between the incoming and Checksum of the Dimension table record will
indicate a changed column value. This is an easy way to identify changes in the columns
than comparing each and every column.
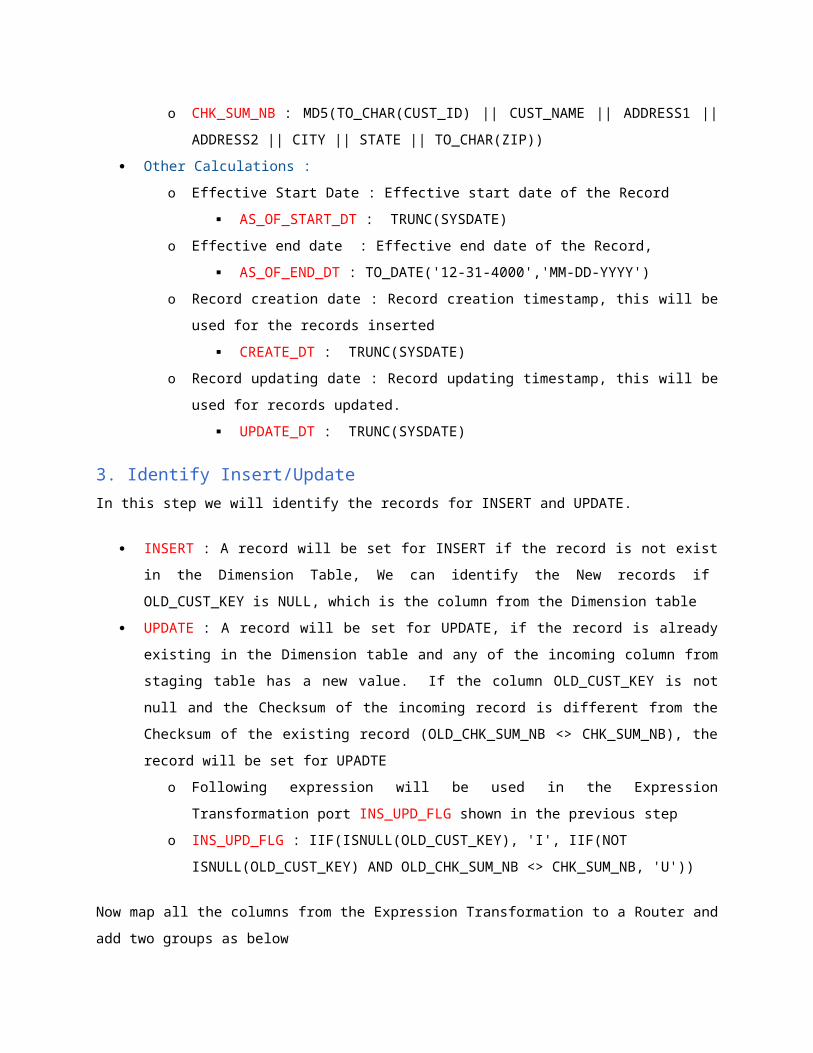
o CHK_SUM_NB : MD5(TO_CHAR(CUST_ID) || CUST_NAME || ADDRESS1 ||
ADDRESS2 || CITY || STATE || TO_CHAR(ZIP))
Other Calculations :
o Effective Start Date : Effective start date of the Record
AS_OF_START_DT : TRUNC(SYSDATE)
o Effective end date : Effective end date of the Record,
AS_OF_END_DT : TO_DATE('12-31-4000','MM-DD-YYYY')
o Record creation date : Record creation timestamp, this will be used for the records
inserted
CREATE_DT : TRUNC(SYSDATE)
o Record updating date : Record updating timestamp, this will be used for records
updated.
UPDATE_DT : TRUNC(SYSDATE)
3. Identify Insert/Update
In this step we will identify the records for INSERT and UPDATE.
INSERT : A record will be set for INSERT if the record is not exist in the Dimension Table,
We can identify the New records if OLD_CUST_KEY is NULL, which is the column from the
Dimension table
UPDATE : A record will be set for UPDATE, if the record is already existing in the Dimension
table and any of the incoming column from staging table has a new value. If the column
OLD_CUST_KEY is not null and the Checksum of the incoming record is different from the
Checksum of the existing record (OLD_CHK_SUM_NB <> CHK_SUM_NB), the record will
be set for UPADTE
o Following expression will be used in the Expression Transformation
port INS_UPD_FLG shown in the previous step
o INS_UPD_FLG : IIF(ISNULL(OLD_CUST_KEY), 'I', IIF(NOT
ISNULL(OLD_CUST_KEY) AND OLD_CHK_SUM_NB <> CHK_SUM_NB, 'U'))
Now map all the columns from the Expression Transformation to a Router and add two groups as
below
o INSERT : IIF(INS_UPD_FLG = 'I', TRUE, FALSE)
o UPDATE : IIF(INS_UPD_FLG = 'U', TRUE, FALSE)
4. Insert The new Records
Now map all the columns from the ‘INSERT’ group to the Dimension table instance T_DIM_CUST.
While mapping the columns, we don’t need any column named OLD_, which is pulled from the
Dimension table.

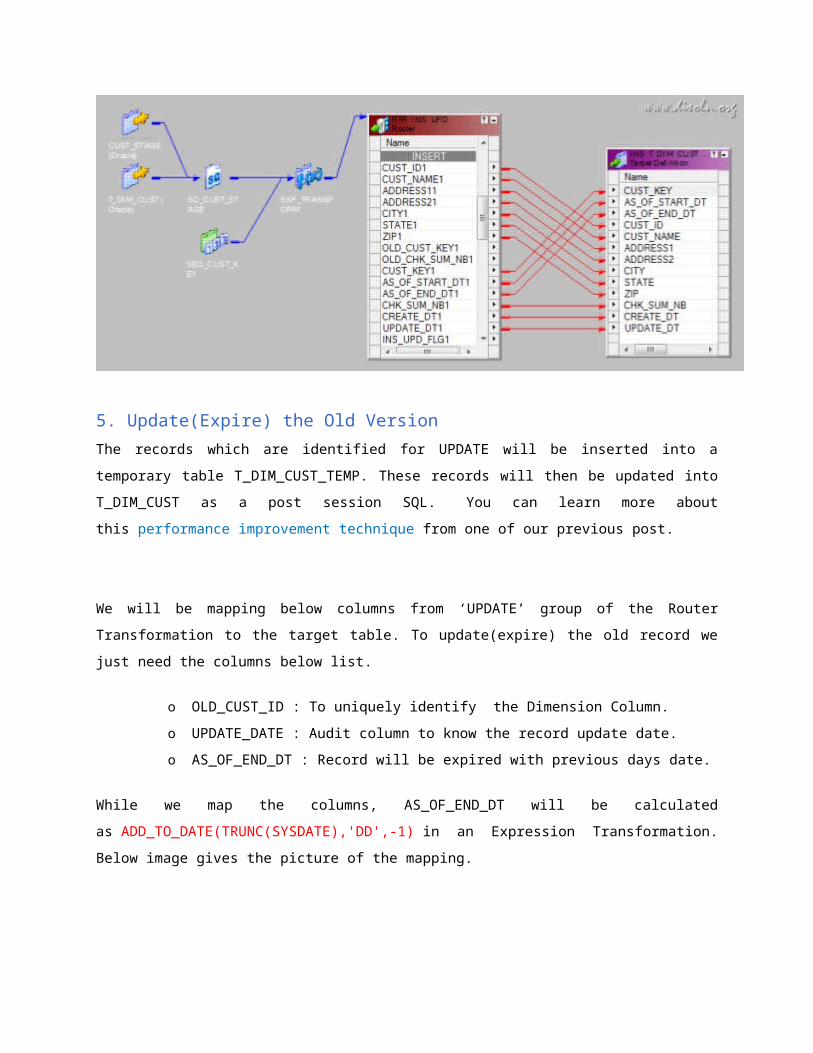
5. Update(Expire) the Old Version
The records which are identified for UPDATE will be inserted into a temporary table
T_DIM_CUST_TEMP. These records will then be updated into T_DIM_CUST as a post session
SQL. You can learn more about this performance improvement technique from one of our previous
post.
We will be mapping below columns from ‘UPDATE’ group of the Router Transformation to the target
table. To update(expire) the old record we just need the columns below list.
o OLD_CUST_ID : To uniquely identify the Dimension Column.
o UPDATE_DATE : Audit column to know the record update date.
o AS_OF_END_DT : Record will be expired with previous days date.
While we map the columns, AS_OF_END_DT will be calculated
as ADD_TO_DATE(TRUNC(SYSDATE),'DD',-1) in an Expression Transformation. Below image
gives the picture of the mapping.
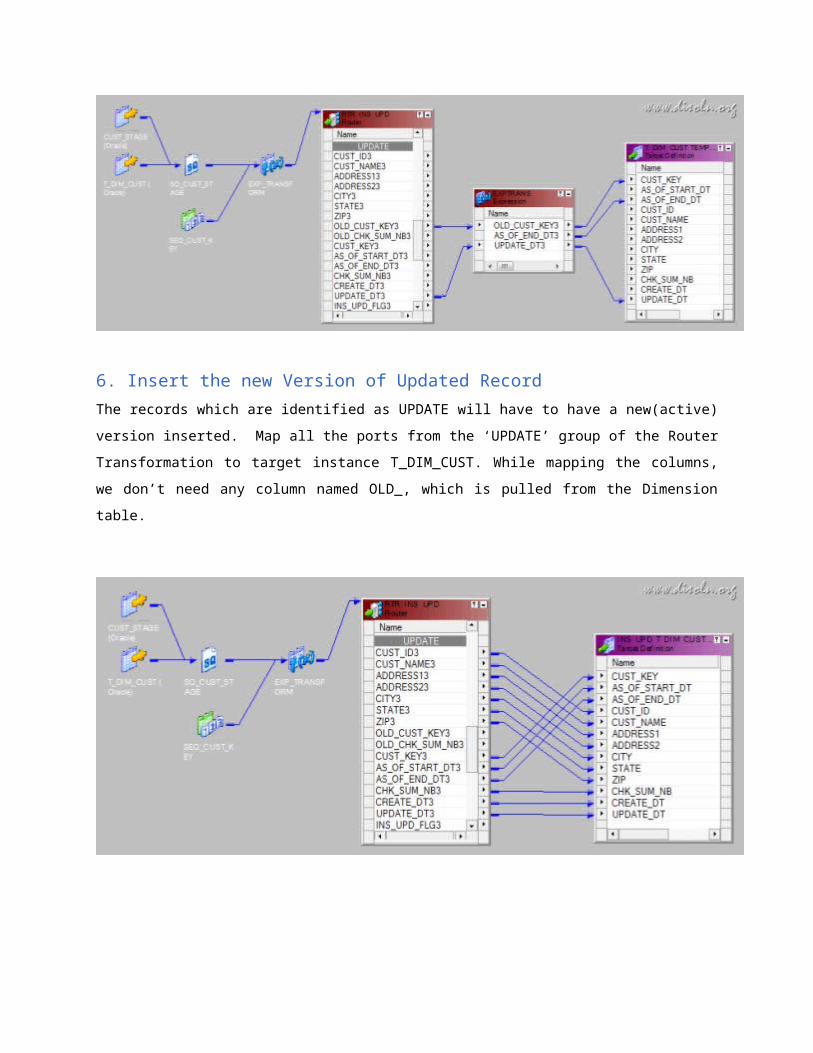
6. Insert the new Version of Updated Record
The records which are identified as UPDATE will have to have a new(active) version inserted. Map
all the ports from the ‘UPDATE’ group of the Router Transformation to target instance
T_DIM_CUST. While mapping the columns, we don’t need any column named OLD_, which is
pulled from the Dimension table.
Workflow and Session Creation
During the session configuration process, add the below SQL as part of the Post session SQL
statement as shown below. This correlated update SQL will update the records in T_DIM_CUST
table with the values from T_DIM_CUST_TEMP. Like we mentioned previously, this is
a performance improvement technique used to update huge tables.
UPDATE T_DIM_CUST SET
T_DIM_CUST.AS_OF_END_DT,
T_DIM_CUST.UPDATE_DT) =
(SELECT
T_DIM_CUST_TEMP.AS_OF_END_DT,
T_DIM_CUST_TEMP.UPDATE_DT
FROM T_DIM_CUST_TEMP
WHERE T_DIM_CUST_TEMP.CUST_KEY = T_DIM_CUST.CUST_KEY) WHERE EXISTS
(SELECT 1
FROM T_DIM_CUST_TEMP
WHERE T_DIM_CUST_TEMP.CUST_KEY = T_DIM_CUST.CUST_KEY)
Now lets look at the data see how it looks from the below image.