Embed Size (px)
Citation preview

25
CHAPTER 3HOW TO PERFORM PERIMETRY YOU CAN TRUST
INTRODUCTION
PERIMETRY – A SUBJECTIVE TEST
Perimetry is an elaborate test that depends, to a great extent, on subjective factors such as the patient’s cooper-ation and comfort, as well as on using the correct patient information and set-up. Due to this subjective compo-
extent of untrustworthy results largely depends on how well perimetry is performed in clinical practice and has been reported to range from 3% to 29% of all visual
-
In view of the relatively high occurrence of untrust-
sure that the time invested in perimetry is well spent, because poorly performed perimetric tests have hardly
and care necessary to obtain trustworthy results by fol-lowing certain rules to avoid the most common pitfalls.

26
Provide clear instructio
ns
focus on perimetry
Co
llabo
rate
with
the
test
ing p
rocedure
Provide encouragemen
t
Allow necessary time to
Be m
otiva
ted to
per
fo
rm th
e test
throughout the testimp
ort
ance
of p
erim
etry
Provide recognition and appreciation
Provide supervision
Provide adequate training
Ask
que
stio
ns a
bout
PA
TIE
NT
DOCTOREXAM
INER
Em
ph
asiz
e th
e im
port
ance
of t
he test
Ask questions
Accuracy in entering data
Express need for a break
Make notes about patient performance
Perform perimetric test well
FIGURE 3-1 In perimetry, it is essential that doctors, examiners and patients have a positive attitude towards perimetry and that
each member of the team contributes to achieving optimum results.
Chapter 3 | How to perform perimetry you can trust
PERIMETRY – NEED FOR A TEAM APPROACH
THE IMPORTANT ROLE OF THE DOCTOR
collaboratively to obtain optimal perimetric test results.
Patients who understand why perimetry is needed and -
vated to undergo a perimetric test. Due to the relationship
FIG 3-1 shows how each member of the team can contrib-ute. When this approach is successfully implemented, perimetry can be performed in a positive atmosphere.
and trust they establish with their patients, doctors are in the best position to convey the importance of perimetry to their patients.
THE DOCTOR-PATIENT RELATIONSHIP
PERIMETRY REQUIRES A TEAM APPROACH
27Introduction
THE IMPORTANT ROLE OF THE VISUAL FIELD EXAMINER
ways. Not only are examiners responsible for correctly
Eye doctors should also clearly convey the importance of
them in the clinic. For example, the doctor is responsible
the importance of trustworthy perimetric results to the -
crucial because this information has a direct impact on whether the results of the test can be trusted. Diligence
that the patients perform perimetry to the very best of
performance, patients need to be comfortably positioned
them, and they need to understand how to perform the test. A competent examiner will ensure that the patient is not only correctly positioned, but also comfortable. Similarly, a good examiner will convey what is expected of the patient and will give clear instructions on how to
periods by pausing the test if this will be helpful to the
setting up the perimeter, they also directly oversee the patient during the test.
this goal, the doctor must provide training and give feed-
to perform trustworthy perimetric tests. Doctors should -
reduce the examiner’s focus on the patient.
in performing this aspect of perimetry can significantly reduce the number of untrustworthy tests and inter-
patient. Additionally, the patient should be encouraged -
lems encountered, and when a brief rest period would be
-
tests themselves and will understand how the patient
go a long way in ensuring patient cooperation and will allow the examiner to give genuine encouragement to the patient when needed during the test.
THE DOCTOR-EXAMINER RELATIONSHIP
ROLE IN CORRECTLY SETTING UP THE PERIMETER
THE EXAMINER-PATIENT RELATIONSHIP
28
Noise
Light Heat
Cold
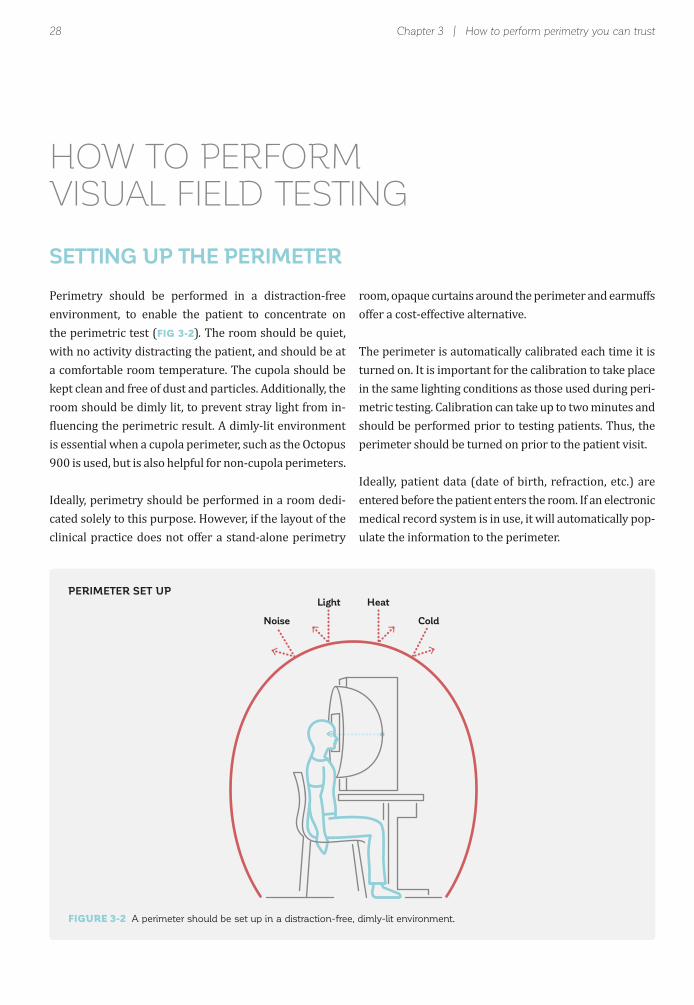
FIGURE 3-2 A perimeter should be set up in a distraction-free, dimly-lit environment.
Chapter 3 | How to perform perimetry you can trust
HOW TO PERFORMVISUAL FIELD TESTING
SETTING UP THE PERIMETER
Perimetry should be performed in a distraction-free environment, to enable the patient to concentrate on the perimetric test (FIG 3-2).with no activity distracting the patient, and should be at
room should be dimly lit, to prevent stray light from in-
is essential when a cupola perimeter, such as the Octopus 900 is used, but is also helpful for non-cupola perimeters.
Ideally, perimetry should be performed in a room dedi-cated solely to this purpose. However, if the layout of the clinical practice does not offer a stand-alone perimetry
PERIMETER SET UP
offer a cost-effective alternative.
in the same lighting conditions as those used during peri-
perimeter should be turned on prior to the patient visit.
Ideally, patient data (date of birth, refraction, etc.) are entered before the patient enters the room. If an electronic medical record system is in use, it will automatically pop-ulate the information to the perimeter.
29
30°
180° 0°
150° 30°
120° 60°
90°
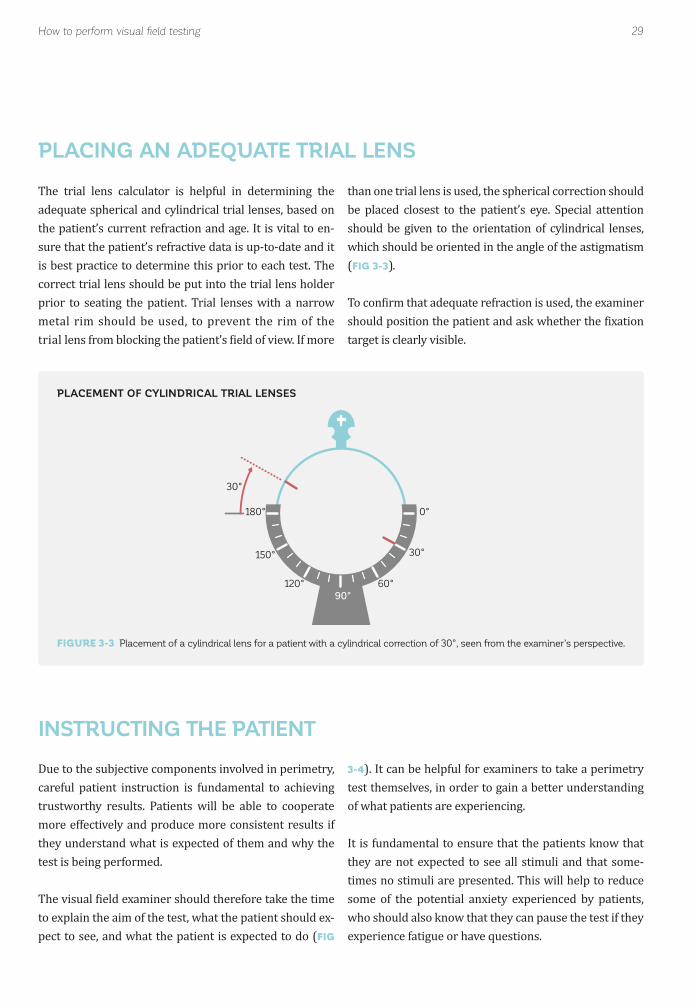
FIGURE 3-3 Placement of a cylindrical lens for a patient with a cylindrical correction of 30°, seen from the examiner’s perspective.
How to perform visual field testing
PLACEMENT OF CYLINDRICAL TRIAL LENSES
INSTRUCTING THE PATIENT
PLACING AN ADEQUATE TRIAL LENS
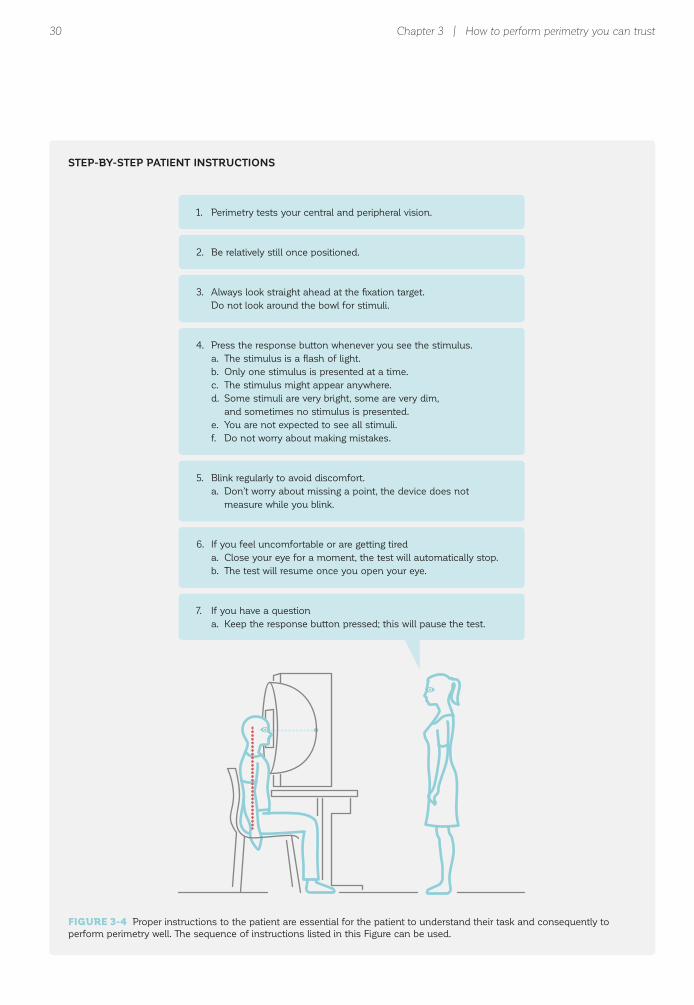
Due to the subjective components involved in perimetry, careful patient instruction is fundamental to achieving trustworthy results. Patients will be able to cooperate more effectively and produce more consistent results if they understand what is expected of them and why the test is being performed.
to explain the aim of the test, what the patient should ex-pect to see, and what the patient is expected to do (FIG
3-4
test themselves, in order to gain a better understanding of what patients are experiencing.
they are not expected to see all stimuli and that some-
some of the potential anxiety experienced by patients,
the patient’s current refraction and age. It is vital to en-sure that the patient’s refractive data is up-to-date and it
correct trial lens should be put into the trial lens holder
metal rim should be used, to prevent the rim of the
than one trial lens is used, the spherical correction should be placed closest to the patient’s eye. Special attention should be given to the orientation of cylindrical lenses, which should be oriented in the angle of the astigmatism (FIG 3-3).
target is clearly visible.
30
1. Perimetry tests your central and peripheral vision.
2. Be relatively still once positioned.
3. Always look straight ahead at the fixation target.
Do not look around the bowl for stimuli.
4. Press the response button whenever you see the stimulus.
a. The stimulus is a flash of light.
b. Only one stimulus is presented at a time.
c. The stimulus might appear anywhere.
d. Some stimuli are very bright, some are very dim,
and sometimes no stimulus is presented.
e. You are not expected to see all stimuli.
f. Do not worry about making mistakes.
5. Blink regularly to avoid discomfort.
a. Don’t worry about missing a point, the device does not
measure while you blink.
6. If you feel uncomfortable or are getting tired
a. Close your eye for a moment, the test will automatically stop.
b. The test will resume once you open your eye.
7. If you have a question
a. Keep the response button pressed; this will pause the test.
FIGURE 3-4 Proper instructions to the patient are essential for the patient to understand their task and consequently to
perform perimetry well. The sequence of instructions listed in this Figure can be used.
Chapter 3 | How to perform perimetry you can trust
STEP-BY-STEP PATIENT INSTRUCTIONS
31
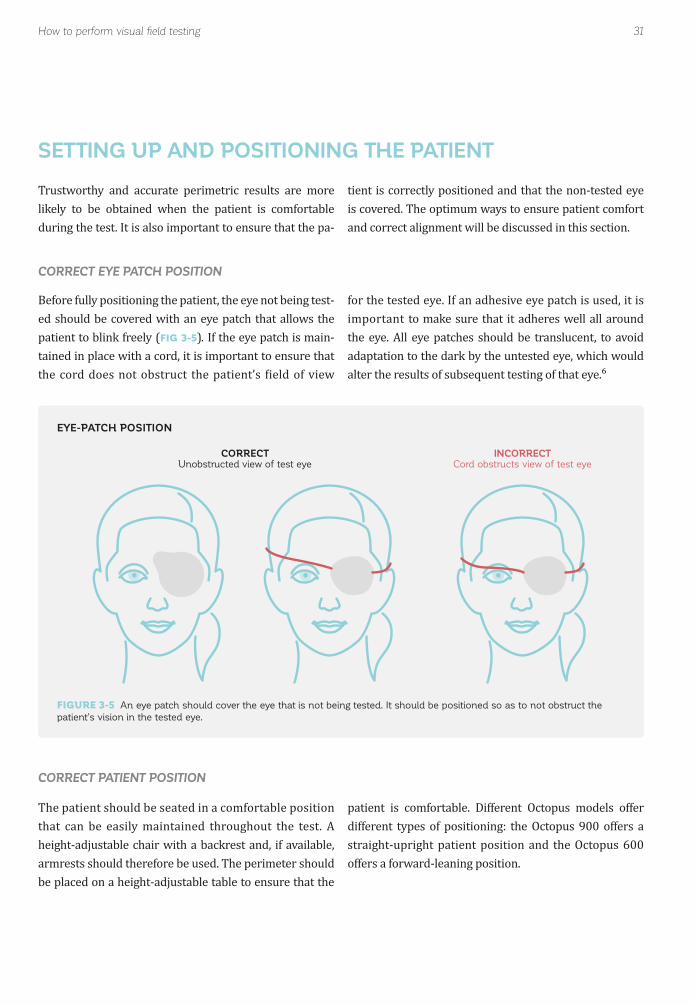
FIGURE 3-5 An eye patch should cover the eye that is not being tested. It should be positioned so as to not obstruct the
patient’s vision in the tested eye.
INCORRECTCord obstructs view of test eye
How to perform visual field testing
CORRECT EYE PATCH POSITION
CORRECT PATIENT POSITION
EYE-PATCH POSITION
SETTING UP AND POSITIONING THE PATIENT
during the test. It is also important to ensure that the pa-
CORRECTUnobstructed view of test eye
Before fully positioning the patient, the eye not being test-ed should be covered with an eye patch that allows the
(FIG 3-5). If the eye patch is main-tained in place with a cord, it is important to ensure that
that can be easily maintained throughout the test. A
be placed on a height-adjustable table to ensure that the
tient is correctly positioned and that the non-tested eye
and correct alignment will be discussed in this section.
for the tested eye. If an adhesive eye patch is used, it is
the eye. All eye patches should be translucent, to avoid
patient is comfortable. Different Octopus models offer
straight-upright patient position and the Octopus 600 offers a forward-leaning position.
32
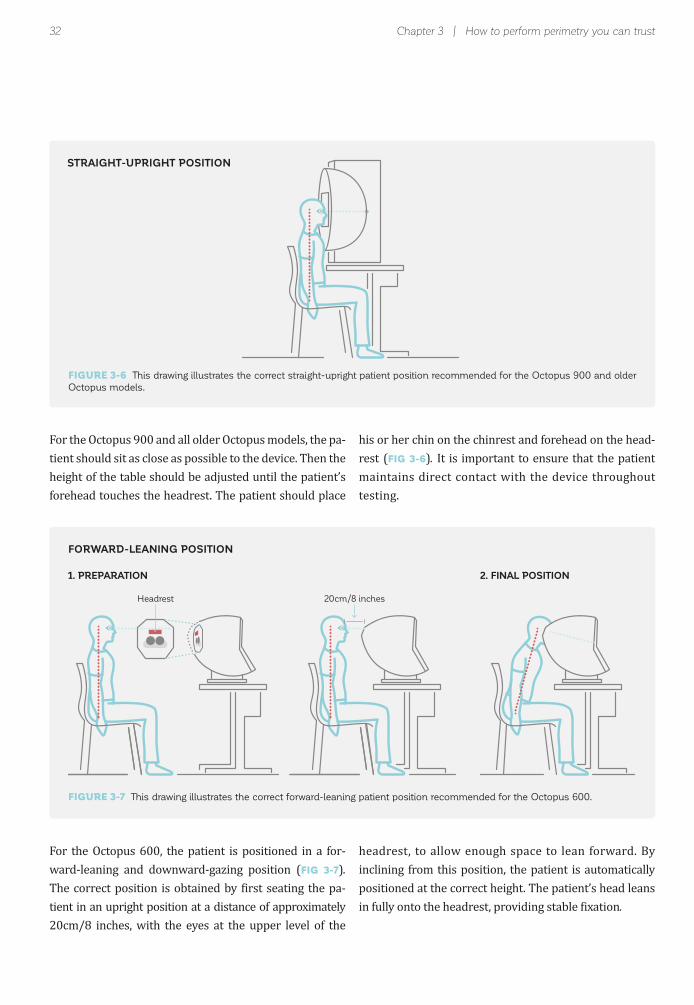
FIGURE 3-6 This drawing illustrates the correct straight-upright patient position recommended for the Octopus 900 and older
Octopus models.
Headrest 20cm/8 inches
STRAIGHT-UPRIGHT POSITION
Chapter 3 | How to perform perimetry you can trust
FORWARD-LEANING POSITION
For the Octopus 900 and all older Octopus models, the pa-
height of the table should be adjusted until the patient’s
For the Octopus 600, the patient is positioned in a for-ward-leaning and downward-gazing position (FIG 3-7).
-tient in an upright position at a distance of approximately 20cm/8 inches, with the eyes at the upper level of the
headrest, to allow enough space to lean forward. By inclining from this position, the patient is automatically
.
FIGURE 3-7 This drawing illustrates the correct forward-leaning patient position recommended for the Octopus 600.
1. PREPARATION 2. FINAL POSITION
his or her chin on the chinrest and forehead on the head-rest (FIG 3-6). It is important to ensure that the patient maintains direct contact with the device throughout testing.

33
FIGURE 3-8 The left-hand panel shows an eye in the video monitor that is correctly positioned, with the cross-hair target locat-
ed within the boundaries of the pupil. The right-hand panel shows an eye that is incorrectly positioned, with the cross-hair target
located outside the boundaries of the pupil.
FIGURE 3-9 The patient’s eye should be positioned in the center of the trial lens and as close as possible without touching it.
CORRECTCentral pupil position
CORRECTCentral pupil position
CORRECTTrial lens close to eye
INCORRECT Off-center pupil position
INCORRECTOff-center pupil position
INCORRECTTrial lens too far away
How to perform visual field testing
CORRECT EYE POSITION
CORRECT PUPIL POSITION
CORRECT TRIAL LENS POSITION
Once the patient is correctly positioned in the device, it is important to ensure that the eye is also correctly po-sitioned. Overall, the eye should be well-aligned with the
It is important for the patient’s eye to be as close as pos-sible to the trial lens, in order to avoid the typical “ring” defect (i.e., trial lens rim artifact) that occurs when the
the examiner can see the patient’s eye. When the patient
aligned with the cross-hair target provided on the video
lens. However, the lens should not touch the eyelashes,
.
patient is positioned too far away from the trial lens (FIG
3-9).
cross-hair target is within the boundaries of the pupil (FIG 3-8).changing the position of the chinrest.
34 Chapter 3 | How to perform perimetry you can trust
10°
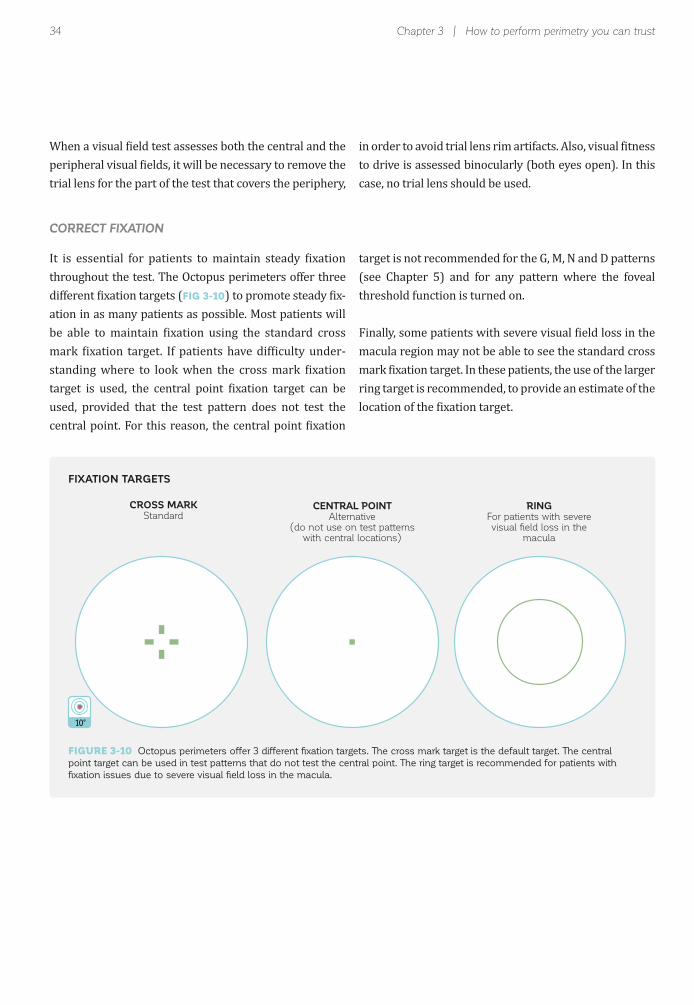
CORRECT FIXATION
FIXATION TARGETS
trial lens for the part of the test that covers the periphery,
(FIG 3-10) -ation in as many patients as possible. Most patients will
-
used, provided that the test pattern does not test the
to drive is assessed binocularly (both eyes open). In this case, no trial lens should be used.
target is not recommended for the G, M, N and D patterns (see Chapter 5) and for any pattern where the foveal threshold function is turned on.
macula region may not be able to see the standard cross
ring target is recommended, to provide an estimate of the
FIGURE 3-10 Octopus perimeters offer 3 different fixation targets. The cross mark target is the default target. The central
point target can be used in test patterns that do not test the central point. The ring target is recommended for patients with
fixation issues due to severe visual field loss in the macula.
10°
CENTRAL POINTAlternative
(do not use on test patterns with central locations)
RINGFor patients with severevisual field loss in the
macula
CROSS MARKStandard
35How to perform visual field testing
USE OF FIXATION CONTROL
MONITORING THE PATIENT DURING THE EXAMINATION
results, it is essential to monitor patients throughout the examination and not leave them unattended and unmon-itored. During the test, it is helpful to encourage patients by telling them that they are doing well and by letting
--
-ute of the test, to ensure that patients have understood what they are expected to do during the test. If a patient shows an unusual response (e.g., no response at all, a re-
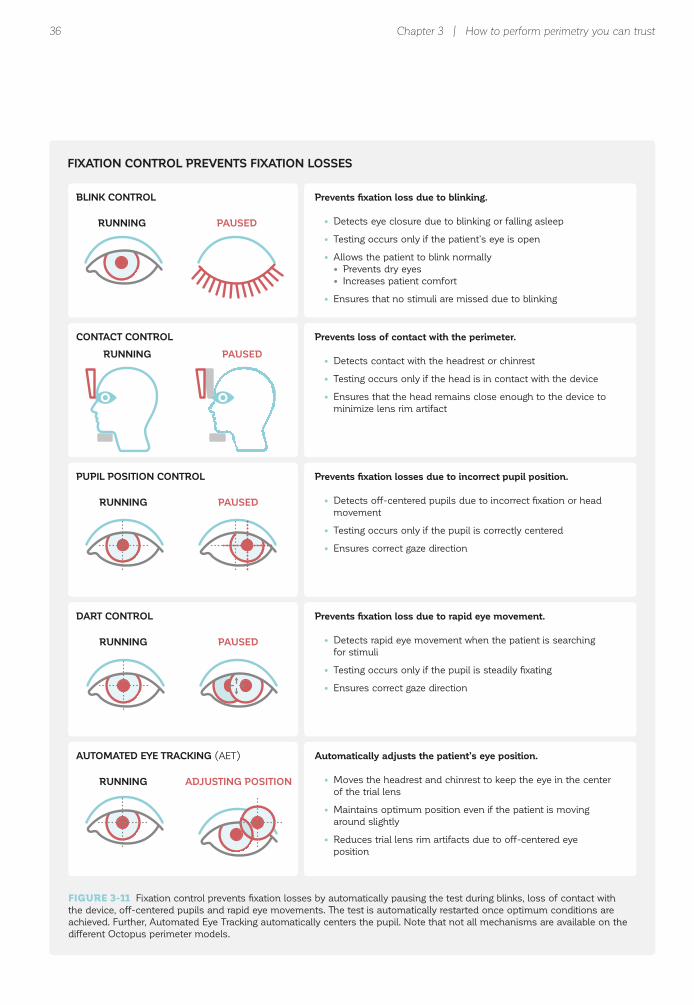
With Fixation Control, the test is stopped automatically if
stimuli or head movements) and automatically restarted -
occurs for more than just a few seconds, a warning message will alert the examiner to properly reposition and reinstruct the patient.
Fixation Control consists of several separate control mechanisms, as outlined in FIG 3-11, which can be turned
the test should be interrupted and the patient should be reinstructed. If the results seem compromised, it is rec-ommended to start a new test and discard the compro-mised one. It is important to note, however, that patients with impaired vision often do not respond due to their condition and not because they answer unreliably.
If a patient shows inconsistent behavior, the examiner -
interpretation of the test.
Control mechanisms active. However, since some patients -
ical reasons (i.e., reduced central vision, unsteady pupil or nystagmus), individual mechanisms within Fixation Con-
possible. If it is necessary to turn off some mechanisms,
results in the light of this information and should consider that the test might have reduced reliability.
FIG 3-11 provides more information about the different control mechanisms of Octopus Fixation Control. Note
36 Chapter 3 | How to perform perimetry you can trust
BLINK CONTROL
FIXATION CONTROL PREVENTS FIXATION LOSSES
PUPIL POSITION CONTROL
DART CONTROL
AUTOMATED EYE TRACKING (AET)
CONTACT CONTROL
RUNNING
RUNNING
RUNNING
RUNNING
RUNNING
PAUSED
PAUSED
PAUSED
ADJUSTING POSITION
PAUSED
Prevents fixation loss due to blinking.
• Detects eye closure due to blinking or falling asleep
• Testing occurs only if the patient’s eye is open
• Allows the patient to blink normally
• Prevents dry eyes
• Increases patient comfort
• Ensures that no stimuli are missed due to blinking
Prevents fixation losses due to incorrect pupil position.
• Detects off-centered pupils due to incorrect fixation or head
movement
• Testing occurs only if the pupil is correctly centered
• Ensures correct gaze direction
Prevents fixation loss due to rapid eye movement.
• Detects rapid eye movement when the patient is searching
for stimuli
• Testing occurs only if the pupil is steadily fixating
• Ensures correct gaze direction
Automatically adjusts the patient’s eye position.
• Moves the headrest and chinrest to keep the eye in the center
of the trial lens
• Maintains optimum position even if the patient is moving
around slightly
• Reduces trial lens rim artifacts due to off-centered eye
position
Prevents loss of contact with the perimeter.
• Detects contact with the headrest or chinrest
• Testing occurs only if the head is in contact with the device
• Ensures that the head remains close enough to the device to
minimize lens rim artifact
FIGURE 3-11 Fixation control prevents fixation losses by automatically pausing the test during blinks, loss of contact with
the device, off-centered pupils and rapid eye movements. The test is automatically restarted once optimum conditions are
achieved. Further, Automated Eye Tracking automatically centers the pupil. Note that not all mechanisms are available on the
different Octopus perimeter models.
37Common pitfalls to avoid
INCONSISTENT PATIENT BEHAVIOR
COMMON PITFALLS TO AVOID
that cannot be trusted. By paying attention to and man-aging these factors, a well-trained examiner will have a
pitfalls in perimetry and provides guidance on how to avoid them.
-ing the stimuli from reaching the retina, are all commonly
Many of these pitfalls can be avoided by paying close at-tention to the set-up procedure, by observing the patient
repeating instructions if necessary, which is the focus of this section. Chapters 7 and 8 provide information on
after the test is completed.
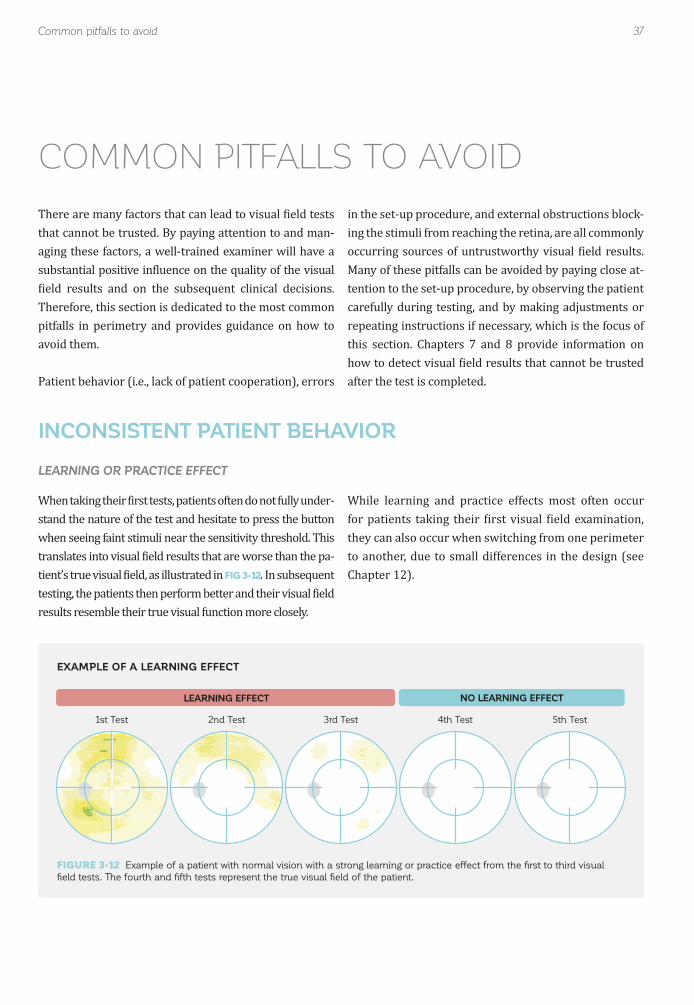
LEARNING OR PRACTICE EFFECT
-stand the nature of the test and hesitate to press the button
- FIG 3-12.
results resemble their true visual function more closely.
While learning and practice effects most often occur
they can also occur when switching from one perimeter to another, due to small differences in the design (see Chapter 12).
EXAMPLE OF A LEARNING EFFECT
FIGURE 3-12 Example of a patient with normal vision with a strong learning or practice effect from the first to third visual
field tests. The fourth and fifth tests represent the true visual field of the patient.
1st Test 2nd Test 3rd Test 4th Test 5th Test
LEARNING EFFECT NO LEARNING EFFECT
38 Chapter 3 | How to perform perimetry you can trust
While learning or practice effects cannot always be -
tient instruction and observation. Running a practice test prior to real testing is a good procedure if time allows.
performing perimetry, the patient will often be hesitant -
sponse button at all. If this is observed, it is recommended to interrupt the test and reinstruct the patient.
FATIGUE EFFECT
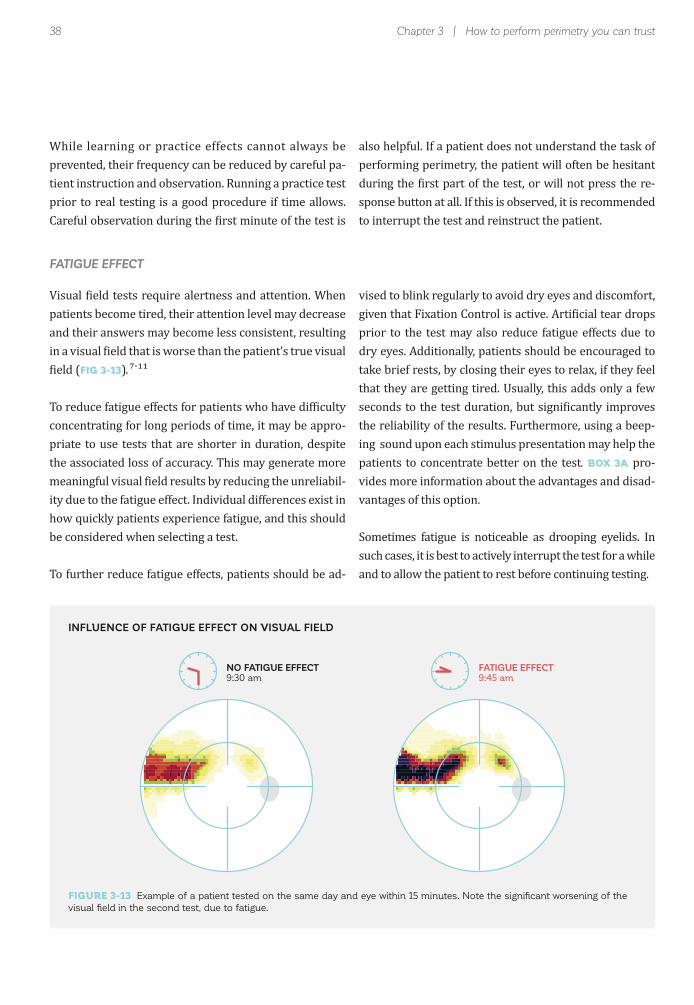
patients become tired, their attention level may decrease and their answers may become less consistent, resulting
(FIG 3-13). -
concentrating for long periods of time, it may be appro-priate to use tests that are shorter in duration, despite
-ity due to the fatigue effect. Individual differences exist in
be considered when selecting a test.
-
prior to the test may also reduce fatigue effects due to dry eyes. Additionally, patients should be encouraged to
that they are getting tired. Usually, this adds only a few
the reliability of the results. Furthermore, using a beep-ing sound upon each stimulus presentation may help the patients to concentrate better on the test. BOX 3A pro-vides more information about the advantages and disad-vantages of this option.
Sometimes fatigue is noticeable as drooping eyelids. In such cases, it is best to actively interrupt the test for a while and to allow the patient to rest before continuing testing.
INFLUENCE OF FATIGUE EFFECT ON VISUAL FIELD
FIGURE 3-13 Example of a patient tested on the same day and eye within 15 minutes. Note the significant worsening of the
visual field in the second test, due to fatigue.
NO FATIGUE EFFECT9:30 am
FATIGUE EFFECT9:45 am
39Common pitfalls to avoid
BOX 3A
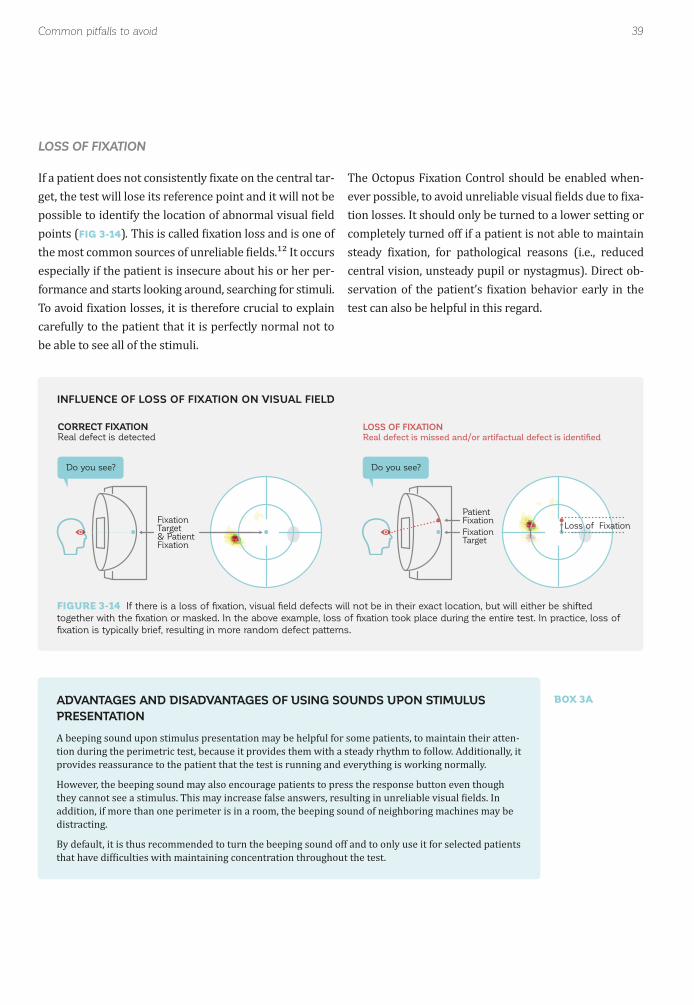
LOSS OF FIXATION
-get, the test will lose its reference point and it will not be
points (FIG 3-14).
especially if the patient is insecure about his or her per-
carefully to the patient that it is perfectly normal not to be able to see all of the stimuli.
--
tion losses. It should only be turned to a lower setting or completely turned off if a patient is not able to maintain
central vision, unsteady pupil or nystagmus). Direct ob-
test can also be helpful in this regard.
INFLUENCE OF LOSS OF FIXATION ON VISUAL FIELD
FIGURE 3-14 If there is a loss of fixation, visual field defects will not be in their exact location, but will either be shifted
together with the fixation or masked. In the above example, loss of fixation took place during the entire test. In practice, loss of
fixation is typically brief, resulting in more random defect patterns.
Do you see?
CORRECT FIXATIONReal defect is detected
FixationTarget& PatientFixation
LOSS OF FIXATION
Real defect is missed and/or artifactual defect is identified
Do you see?
FixationTarget
PatientFixation
Loss of Fixation
ADVANTAGES AND DISADVANTAGES OF USING SOUNDS UPON STIMULUS
PRESENTATION
A beeping sound upon stimulus presentation may be helpful for some patients, to maintain their atten-tion during the perimetric test, because it provides them with a steady rhythm to follow. Additionally, it
However, the beeping sound may also encourage patients to press the response button even though
addition, if more than one perimeter is in a room, the beeping sound of neighboring machines may be distracting.
By default, it is thus recommended to turn the beeping sound off and to only use it for selected patients
40 Chapter 3 | How to perform perimetry you can trust
MISTAKES IN THE SET-UP PROCEDURE
LACK OF PATIENT ATTENTION
ACCURATE ENTRY OF PATIENT INFORMATION
TRIGGER-HAPPY PATIENTS
INADEQUATE CORRECTION OF REFRACTIVE ERROR
patient’s test performance. In addition, some patients
due to fear that they are not performing well, or anxiety about the outcome.
Patient data, such as date of birth and refraction, need to be entered in the perimeter. It is important to ensure that this information is accurate. For example, if the wrong date of birth is entered, most representations of the
Some patients, consciously or unconsciously, want to
-
the response button even if they do not see a stimulus. False positive trials where no stimuli are presented are used to detect trigger-happy patients (for more details, see Chapter 7). It is important to watch for false positive
a blurring of the stimulus. If the patient does not have a
power will have the opposite effect.
-correctly refracted, or that the examiner uses the wrong
technician can strongly reduce these anxieties and in-crease the reliability of the results. Distractions should also be reduced to a minimum. If the clinic layout does not offer a stand-alone perimetry room, light-dimming curtains around the perimeter and ear muffs can offer a cost-effective alternative.
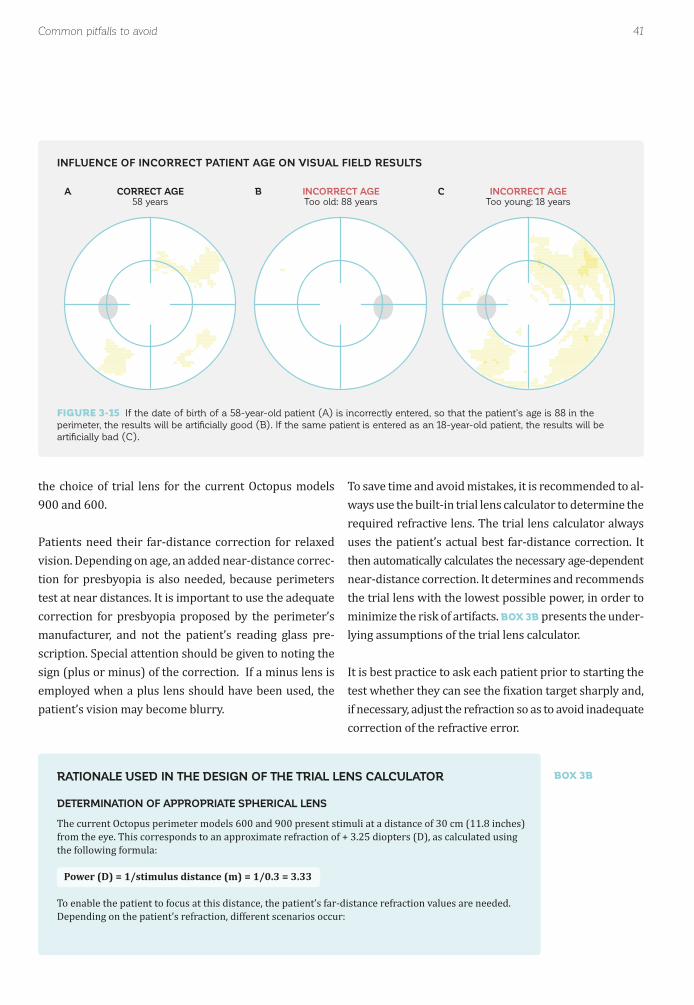
measured sensitivities is compared to the data for an average normal person of the same age, rather than an average normal person who is younger or older. FIG 3-15
answers carefully during the examination. If a patient responds to more than one false positive stimulus during the test, it will be helpful to interrupt the test immediately and reinstruct the patient, in order to avoid an unreliable result. Note that a beeping sound upon stimulus presen-tation may encourage trigger-happy patients to press the response button and it is thus recommended not to use
previously, it is possible that it may have changed since then, especially among older patients.
lens. It is important to consult the user manual for the respective perimeter, as the choice of trial lens depends
41Common pitfalls to avoid
BOX 3B
CORRECT AGE58 years
INCORRECT AGEToo old: 88 years
INCORRECT AGEToo young: 18 years
INFLUENCE OF INCORRECT PATIENT AGE ON VISUAL FIELD RESULTS
A B C
FIGURE 3-15 If the date of birth of a 58-year-old patient (A) is incorrectly entered, so that the patient’s age is 88 in the
perimeter, the results will be artificially good (B). If the same patient is entered as an 18-year-old patient, the results will be
artificially bad (C).
the choice of trial lens for the current Octopus models 900 and 600.
Patients need their far-distance correction for relaxed vision. Depending on age, an added near-distance correc-tion for presbyopia is also needed, because perimeters
correction for presbyopia proposed by the perimeter’s manufacturer, and not the patient’s reading glass pre-scription. Special attention should be given to noting the sign (plus or minus) of the correction. If a minus lens is employed when a plus lens should have been used, the patient’s vision may become blurry.
-ways use the built-in trial lens calculator to determine the
uses the patient’s actual best far-distance correction. It then automatically calculates the necessary age-dependent near-distance correction. It determines and recommends the trial lens with the lowest possible power, in order to
BOX 3B presents the under-lying assumptions of the trial lens calculator.
correction of the refractive error.
RATIONALE USED IN THE DESIGN OF THE TRIAL LENS CALCULATOR
DETERMINATION OF APPROPRIATE SPHERICAL LENS
he current Octopus perimeter models 600 and 900 present stimuli at a distance of 30 cm (11.8 inches)
Power (D) = 1/stimulus distance (m) = 1/0.3 = 3.33
o enable the patient to focus at this distance, the patient’s far-distance refraction values are needed.
42 Chapter 3 | How to perform perimetry you can trust
Normally sighted patients:
Young emmetropic patients can accommodate at 30cm, so they do not need an additional trial lens. With increasing age, patients gradually lose their ability to accommodate their eyes (i.e., to change their
-ters (D) of refractive power are needed depending of the age of the patient (see table below).
Hyperopic and presbyopic patients:
H -sponding to their refraction (R). As with emmetropic patients who are older, additional diopters (D) are needed to support their near optical correction (presbyopia) (see table below).
Myopic patients:
Near sighted patients of up to -3 D do not necessarily need corrective lenses, as they can focus at 30
additional correction. For refractive values above -3 D, add 3.25 D to the refractive value (e.g., for R = -4 D; use a -0.75 D lens). As for presbyopic and emmetropic patients, with increasing age, near optical
Corrections in the cupola perimeter of Octopus 900
C
Octopus trial lens calculator.
Correction in the central field perimeter of the Octopus 600
correction for presbyopia. Only their actual refraction (R) is needed. If younger patients are over-cor-
DETERMINATION OF APPROPRIATE CYLINDER LENS
Cylinder Correction (Octopus 900)
A cylinder correction can be discarded when the prescription is 0.25 D or less, because it does not alter
Spherical equivalent = ½ * cylinder correction
correct for cylinders larger than 1 D. For cylinders larger than 1 D, a cylindrical correction is needed. Remember to get the cylinder axis oriented to the proper angle on the lens holder. (For the special case of the Octopus 600 refer to the user manual).
Age
< 30
30 – 39
40 – 44
45 – 49
50 – 54
55 -59
>= 60
Hyperopic
R > 0 D
R
Emmetropic
R = 0 D
No lens
R = -0.5 D
No lens
R = -1 D
No lens
No lens
R = -1.5 D
No lens
No lens
No lens
R = -2 D
No lens
No lens
No lens
No lens
R = -2.5 D
No lens
No lens
No lens
No lens
No lens
R = -3 D
No lens
No lens
No lens
No lens
No lens
No lens
No lens
R < -3 D
Myopic
43Common pitfalls to avoid
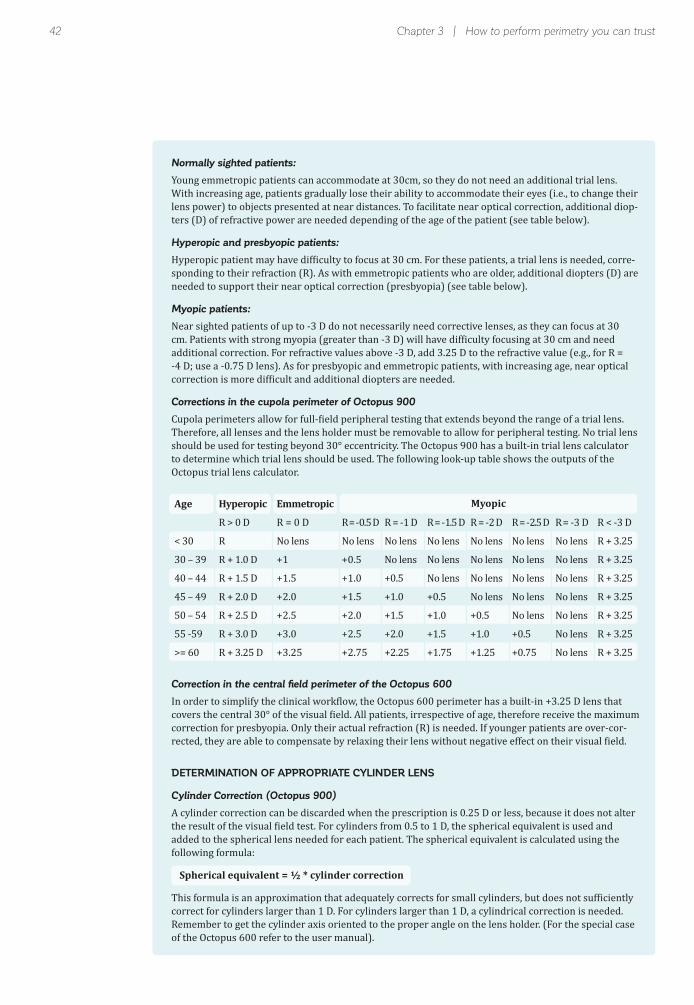
NO ARTIFACT LENS RIM ARTIFACT
EXTERNAL OBSTRUCTIONS BLOCKING STIMULI FROM REACHING THE RETINA
LENS RIM ARTIFACTS
FIG
3-16
trial lens rim artifacts, the patient should be positioned
so that the eye is as close as possible to the trial lens with-out touching it, and aligned in the center of the trial lens
-tion to warn if the lens is too far from the eye.
INFLUENCE OF LENS RIM ARTIFACTS ON VISUAL FIELD RESULTS
FIGURE 3-16 If the patient is correctly positioned close to the trial lens (A), rim artifacts do not appear within 30° of the field
of view. If the patient is too far away from the trial lens (B), the edge of the visual field shows the rim of the lens.
FACIAL STRUCTURE OF THE PATIENT
It is important to observe the physiognomy (facial struc-ture) of the patient. A prominent nose, a heavy brow or long
-
facial structure, it is recommended to turn or tilt the
(FIG
3-17).
DIRTY CONTACT LENS
Since very high corrections can lead to peripheral dis-tortions, it is advisable for a patient with very high cor-rections to wear contact lenses. Patients with moderate myopia may also leave their contact lenses in. If contact
lenses are used, they must be inspected before the test. Dirty contact lenses reduce the amount of light entering
in the Defect Curve as a downward shift of the entire curve.
A) B)
44 Chapter 3 | How to perform perimetry you can trust
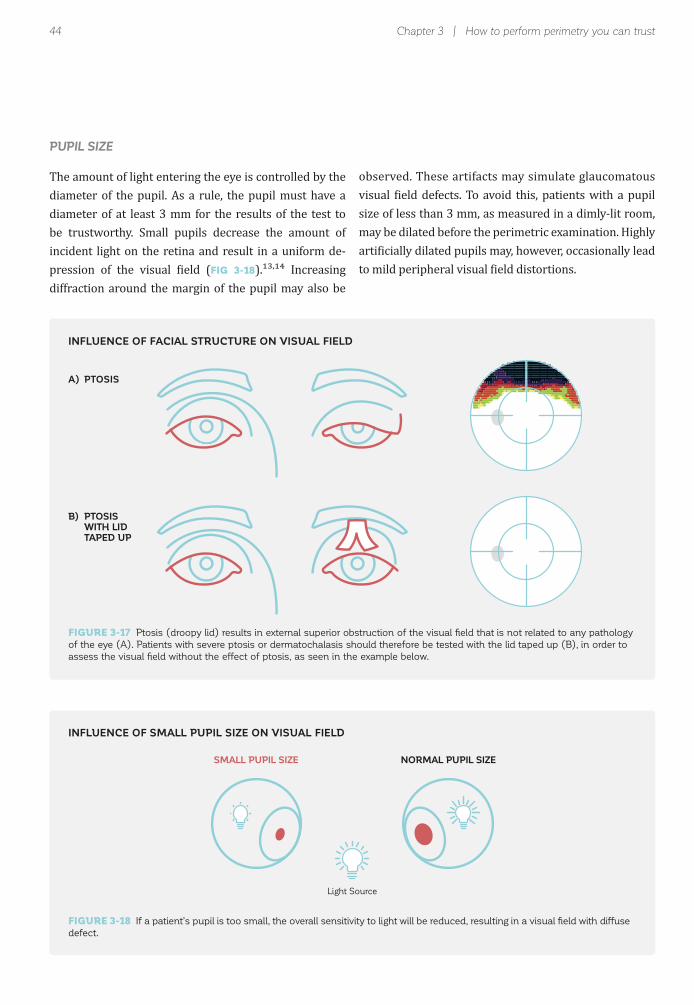
PUPIL SIZE
diameter of the pupil. As a rule, the pupil must have a diameter of at least 3 mm for the results of the test to be trustworthy. Small pupils decrease the amount of incident light on the retina and result in a uniform de-
FIG 3-18 ,
diffraction around the margin of the pupil may also be
size of less than 3 mm, as measured in a dimly-lit room, may be dilated before the perimetric examination. Highly
INFLUENCE OF FACIAL STRUCTURE ON VISUAL FIELD
INFLUENCE OF SMALL PUPIL SIZE ON VISUAL FIELD
FIGURE 3-17 Ptosis (droopy lid) results in external superior obstruction of the visual field that is not related to any pathology
of the eye (A). Patients with severe ptosis or dermatochalasis should therefore be tested with the lid taped up (B), in order to
assess the visual field without the effect of ptosis, as seen in the example below.
FIGURE 3-18 If a patient’s pupil is too small, the overall sensitivity to light will be reduced, resulting in a visual field with diffuse
defect.
SMALL PUPIL SIZE NORMAL PUPIL SIZE
Light Source
A) PTOSIS
B) PTOSIS WITH LID TAPED UP

45References
Obtaining reliable results is important in order to interpret -
more controlled conditions such as the large Ocular Hy-
REFERENCES
CLINICAL RELEVANCE OF UNTRUSTWORTHY VISUAL FIELDS
Ophthalmology
Ophthalmology3. Johnson CA, Nelson-Quigg JM. A prospective three-year study of response properties of normal subjects and patients during automated perimetry. Ophthalmology
Arch OphthalmolOphthalmology.
Arch Ophthalmo
Eur J Ophthalmol8. Hudson C, Wild JM, O'Neill EC. Fatigue effects during a single session of automated static threshold perimetry. Invest Ophthalmol Vis Sci9. Johnson CA, Adams CW, Lewis RA. Fatigue effects in automated perimetry. Appl Opt
Graefes Arch Clin Exp Ophthalmol.
11. Wild JM, Searle AE, Dengler-Harles M, O'Neill EC. Long-term follow-up of baseline learning and fatigue effects in the automated perimetry of glaucoma and ocular hypertensive patients. Acta Ophthalmol (Copenh)
study. Arch Ophthalmol
Ophthalmology
threshold LED perimetry. I. Pupil size. Ophthalmic Physiol Opt
was false positive errors, which accounted for 18% of all
superior and inferior depressions due to facial features