Embed Size (px)
Citation preview
Chapter 6: Importing and Exporting Data
Importing • 117
Importing and Exporting Data Importing
Importing Data into a Graph Window
Importing a Single ASCII File To import a single ASCII file into a graph window, select File:Import ASCII:Single File when the desired graph layer is active. This menu command opens the Import ASCII dialog box.
Alternately, click the Import ASCII button on the Standard toolbar. Select the desired file and perform one of the following: •
•
To import the file using the default import options, click Open. To import the file using custom import options, click Options. This action opens the ASCII Import Options for Graph dialog box. To learn about the settings in this dialog box, see "Customizing the Default ASCII Import Settings" on page 122.
When importing a single file into a graph window using this dialog box, Origin assumes the first column of data to be X values, and all subsequent columns to contain Y values. To specify different XY plotting associations, import the data file by selecting File:Import ASCII:Multiple Files.
A Note on Automatically Displaying Header Information in a Graph
Header information in a data file can be automatically displayed in the graph window by performing the following:
1) Before importing the data file, create a text label in the desired graph layer. To create a text label, click the Text Tool button on the Tools toolbar and then click in the graph window at the location where you want to display the header information. This action opens the Text Control dialog box.
2) In the text box, type header. This text displays in the lower view box.
3) Click OK to close the dialog box.
4) Hold the ALT key down while double-clicking on header text label. This action opens the Label Control dialog box. Type header in the Object Name text box.
5) Click OK to close the dialog box.
6) Import the ASCII file which includes header information. The text automatically displays in the newly created text label.
You can also drag-and-drop ASCII data files into a graph. To learn about this, see "Origin's Drag-and-Drop Data File Support for Graphs" on page 120.
Chapter 6: Importing and Exporting Data
Importing • 118
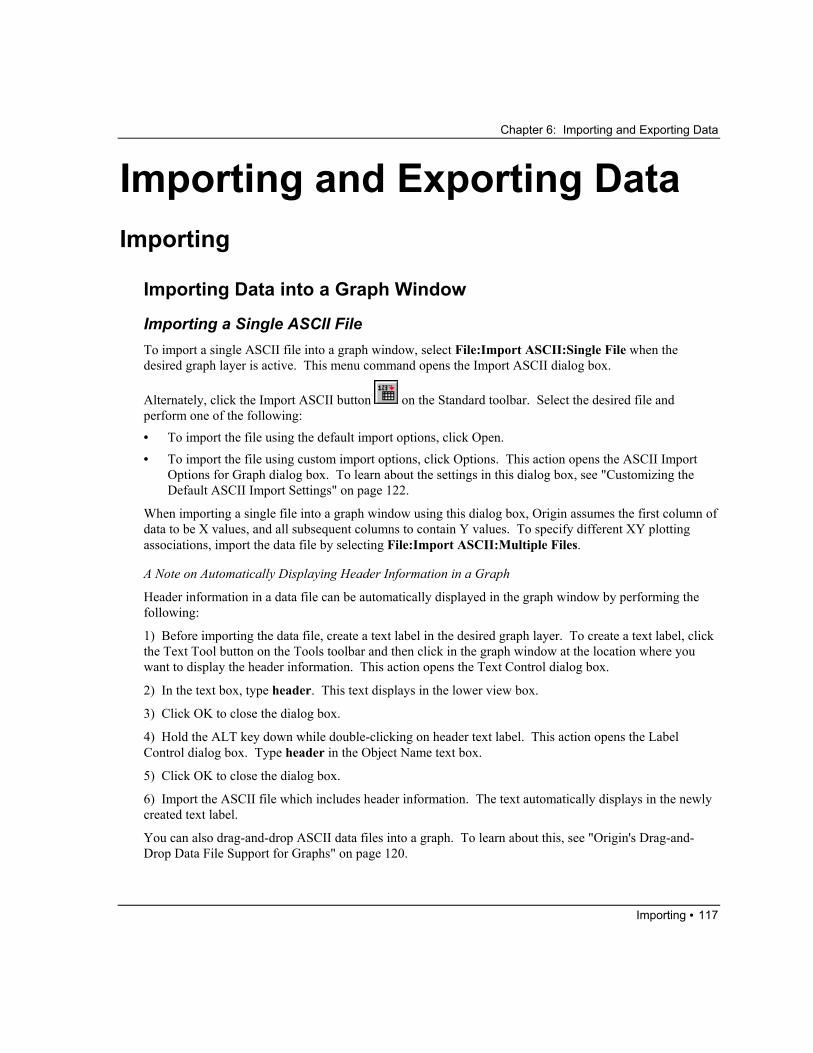
Importing Multiple ASCII Files To import multiple ASCII files into a graph window, select File:Import ASCII:Multiple Files when the desired graph layer is active.
This menu command opens the Import Multiple ASCII dialog box.
Alternately, click the Import Multiple ASCII button on the Standard toolbar.
Note: The Import Multiple ASCII dialog box allows you to import data into a graph or worksheet. If you open the dialog box when a graph window is active, you can import the data into a worksheet by selecting the Import Each Selected File into a New Worksheet check box.
The Import Multiple ASCII Dialog Box (Graph Window Active)
Selecting a File for Import
To add a file to the lower list box, double-click on the file in the “File Name” list box, or click on the file in the “File Name” list box and then click Add File(s).
Chapter 6: Importing and Exporting Data
Importing • 119
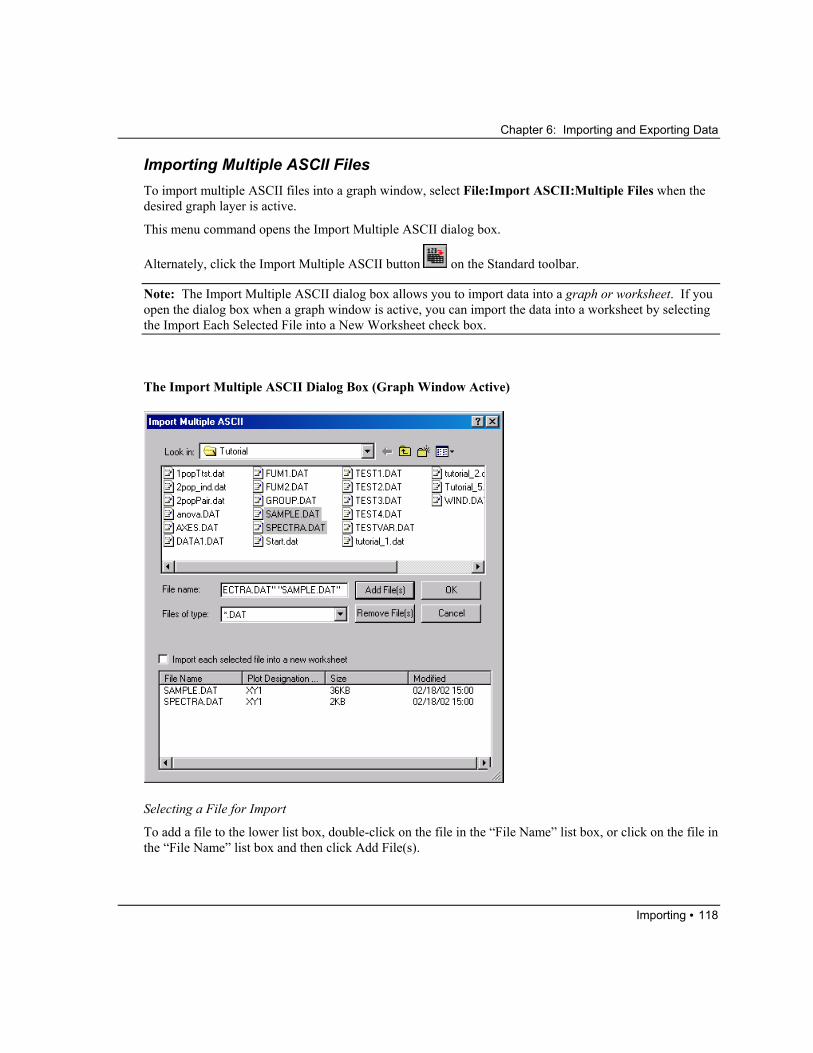
Removing a Selected File
To remove a file from the lower list box, select the file from this list box and then click Remove File(s).
Assigning Plotting Designations (available only when graph window is active)
To facilitate plotting your data, Origin includes a Plot Designation Column section in the list of selected files. You can select a plotting designation arrangement or you can type an arrangement by double-clicking on the default value. This action opens a combination box from which you can select or type a new arrangement.
Origin provides the following selections:
XY1: Origin will import all the columns. Origin assumes the first column contains X values and all remaining columns contain Y values. In this case, the "1" indicates that the last character "Y" is repeated for all remaining columns.
DXY1: Origin will import all the columns. Origin assumes the first column contains values that should be disregarded. Origin assumes the second column contains X values and the remaining columns contain Y values. "1" indicates that the last character "Y" is repeated for all remaining columns.
XY: Origin will import the first and second columns as X and Y values respectively. XY2: Origin will import all the columns. However, in this case Origin assumes the first column contains X1 values, the second column contains Y1 values, the third column contains X2 values, the fourth column contains Y2 values, and so on. In this case, the "2" indicates that the last two characters "X" and "Y" are repeated for all remaining columns.
XYE: Origin will import the first, second, and third columns as X, Y, and Y error values respectively.
XYZ: Origin will import the first, second, and third columns as X, Y, and Z values respectively.
Alternatively, use the following letters to specify a custom column designation arrangement:
X: X values
Y: Y values
Z: Z values
D: disregarded values - these values are not imported
E: Y error values
H: X error values
L: label values
Chapter 6: Importing and Exporting Data
Importing • 120
When you type or select a plotting designation arrangement, the arrangement determines the number of columns that are imported, as well as their plotting designations. If a number is included as a terminating character, it indicates the "repeat unit" in the arrangement.
Example 1: If you select XY1, Origin imports all the columns. Origin assumes the first column contains X values and all remaining columns contain Y values. In this case, the "1" indicates that the last character "Y" is repeated for all remaining columns.
Example 2: If you select XY2, again Origin imports all the columns. However, in this case Origin assumes the first column contains X1 values, the second column contains Y1 values, the third column contains X2 values, the fourth column contains Y2 values, and so on. In this case, the "2" indicates that the last two characters "X" and "Y" are repeated for all remaining columns.
Example 3: If you select XYE2, Origin imports the file using the following arrangement: XY(YError)Y(YError)Y(YError)... as "Y" and "E" are repeated.
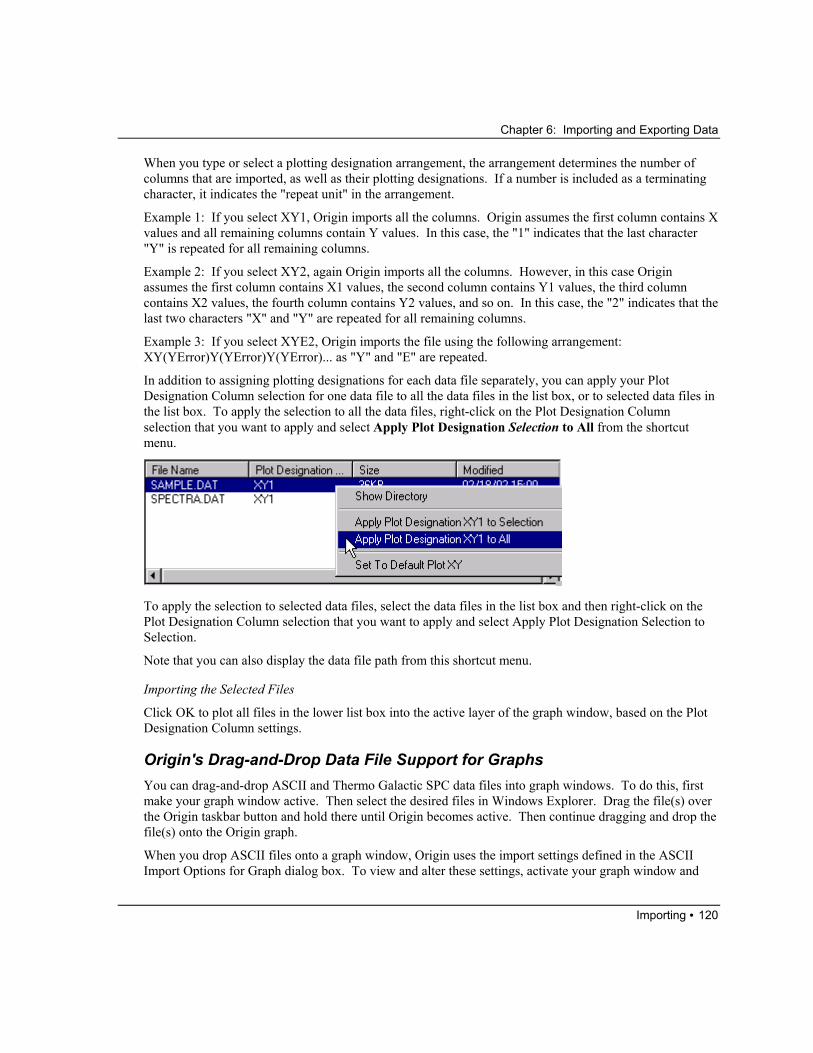
In addition to assigning plotting designations for each data file separately, you can apply your Plot Designation Column selection for one data file to all the data files in the list box, or to selected data files in the list box. To apply the selection to all the data files, right-click on the Plot Designation Column selection that you want to apply and select Apply Plot Designation Selection to All from the shortcut menu.
To apply the selection to selected data files, select the data files in the list box and then right-click on the Plot Designation Column selection that you want to apply and select Apply Plot Designation Selection to Selection.
Note that you can also display the data file path from this shortcut menu.
Importing the Selected Files
Click OK to plot all files in the lower list box into the active layer of the graph window, based on the Plot Designation Column settings.
Origin's Drag-and-Drop Data File Support for Graphs You can drag-and-drop ASCII and Thermo Galactic SPC data files into graph windows. To do this, first make your graph window active. Then select the desired files in Windows Explorer. Drag the file(s) over the Origin taskbar button and hold there until Origin becomes active. Then continue dragging and drop the file(s) onto the Origin graph.
When you drop ASCII files onto a graph window, Origin uses the import settings defined in the ASCII Import Options for Graph dialog box. To view and alter these settings, activate your graph window and
Chapter 6: Importing and Exporting Data
Importing • 121
then select File:Import ASCII:Single File. Click the Options button to open this dialog box. To learn about the settings in this dialog box, see "Customizing the Default ASCII Import Settings" on page 122.
Adding Drag-and-Drop Support for a New File Type
Origin provides a mechanism to add drag-and-drop support for additional file types. When any file is dropped onto Origin from Windows Explorer, Origin looks in the DOFILE.OGS script file located in your Origin folder. Specifically, it looks for a section named [OnOpenExtension], where Extension is the file extension of the dropped file. If found, that section is executed and the file name is passed as an argument. This means that you can add drag-and-drop import support for custom files, by providing routines to handle the import of an extension type.
To learn more about this, review the AUTOMATION.OPJ sample project located in your Origin \SAMPLES\PROGRAMMING\AUTOMATION subfolder. Additionally, more information is available in the Knowledge Database on the OriginLab website. Search in Category = Import/Export, and use the key word "drag".
Importing Data into a Worksheet Window Data can be imported from ASCII, Lotus, dBASE, DIF, LabTech, Thermo Galactic SPC, Minitab, SigmaPlot, and Sound files, vectors and matrices from Mathematica, and Kaleidagraph data files. Axon Scope Binary Files (*.ABF) and Axon binary data files (*.DAT) can also be imported into Origin. Additionally, you can use ODBC to query a database. The data import menu commands are listed in the File:Import menu when the worksheet is active.
When importing ASCII data files, Origin provides tools for importing a single file into a worksheet, or multiple files into a single or multiple worksheets. Additionally, Origin provides controls to customize the ASCII import settings for both single and multiple file selection.
Note: You cannot import Excel files. Instead, select File:Open Excel to open the Excel workbook as a workbook or as an Origin worksheet. For more information on opening Excel workbooks, see “Working with Excel in Origin”.
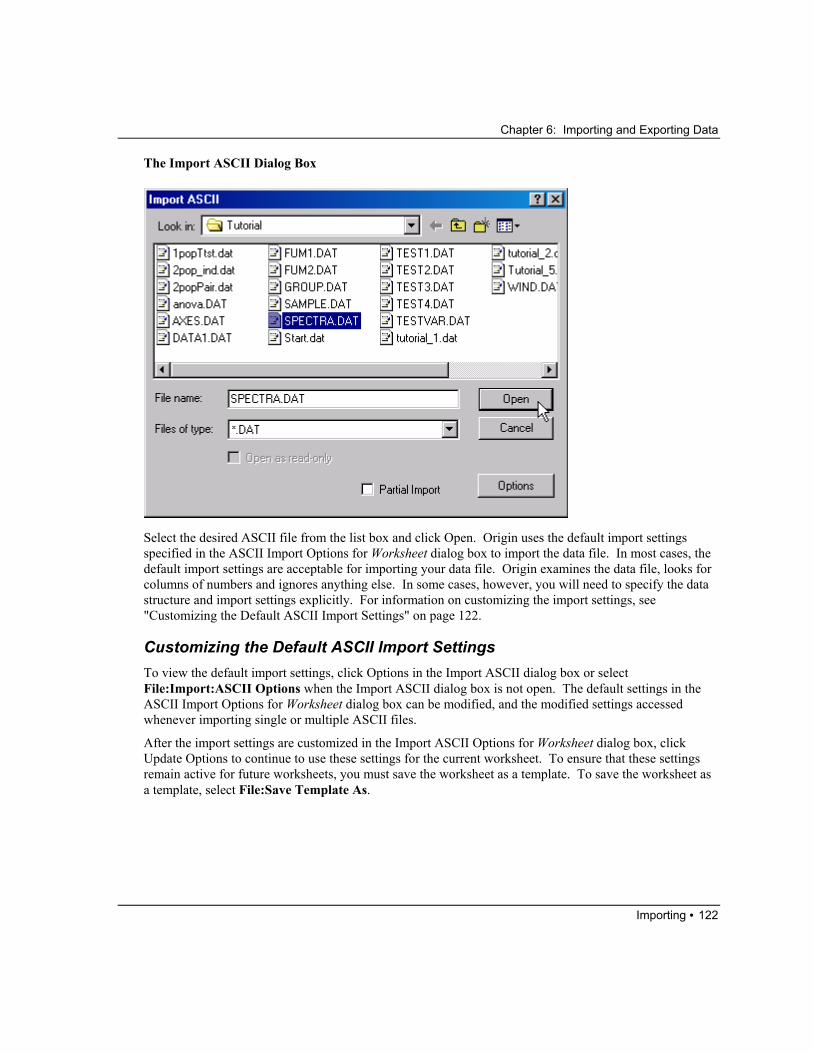
Importing a Single ASCII Data File into the Worksheet To import a single ASCII file into the active worksheet, select File:Import:Single ASCII. This menu command opens the Import ASCII dialog box.
Chapter 6: Importing and Exporting Data
Importing • 122
The Import ASCII Dialog Box
Select the desired ASCII file from the list box and click Open. Origin uses the default import settings specified in the ASCII Import Options for Worksheet dialog box to import the data file. In most cases, the default import settings are acceptable for importing your data file. Origin examines the data file, looks for columns of numbers and ignores anything else. In some cases, however, you will need to specify the data structure and import settings explicitly. For information on customizing the import settings, see "Customizing the Default ASCII Import Settings" on page 122.
Customizing the Default ASCII Import Settings To view the default import settings, click Options in the Import ASCII dialog box or select File:Import:ASCII Options when the Import ASCII dialog box is not open. The default settings in the ASCII Import Options for Worksheet dialog box can be modified, and the modified settings accessed whenever importing single or multiple ASCII files.
After the import settings are customized in the Import ASCII Options for Worksheet dialog box, click Update Options to continue to use these settings for the current worksheet. To ensure that these settings remain active for future worksheets, you must save the worksheet as a template. To save the worksheet as a template, select File:Save Template As.
Chapter 6: Importing and Exporting Data
Importing • 123
The ASCII Import Options for Worksheet Dialog Box
The File Structure Group
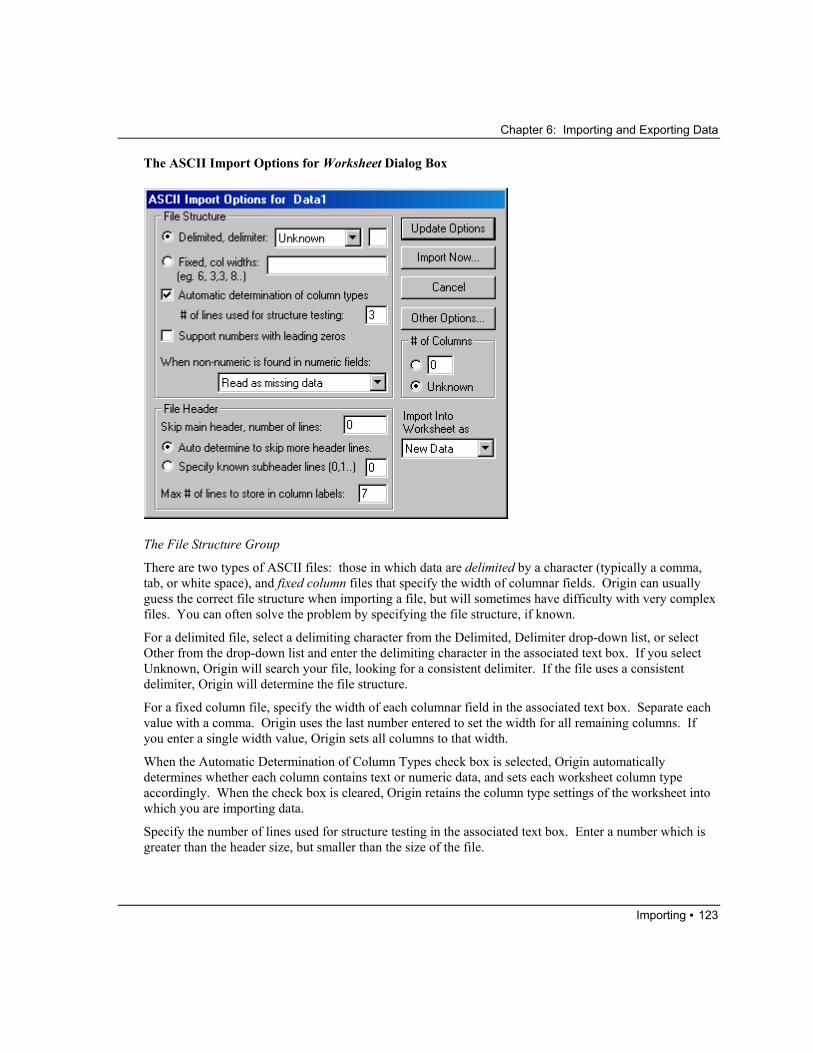
There are two types of ASCII files: those in which data are delimited by a character (typically a comma, tab, or white space), and fixed column files that specify the width of columnar fields. Origin can usually guess the correct file structure when importing a file, but will sometimes have difficulty with very complex files. You can often solve the problem by specifying the file structure, if known.
For a delimited file, select a delimiting character from the Delimited, Delimiter drop-down list, or select Other from the drop-down list and enter the delimiting character in the associated text box. If you select Unknown, Origin will search your file, looking for a consistent delimiter. If the file uses a consistent delimiter, Origin will determine the file structure.
For a fixed column file, specify the width of each columnar field in the associated text box. Separate each value with a comma. Origin uses the last number entered to set the width for all remaining columns. If you enter a single width value, Origin sets all columns to that width.
When the Automatic Determination of Column Types check box is selected, Origin automatically determines whether each column contains text or numeric data, and sets each worksheet column type accordingly. When the check box is cleared, Origin retains the column type settings of the worksheet into which you are importing data.
Specify the number of lines used for structure testing in the associated text box. Enter a number which is greater than the header size, but smaller than the size of the file.
Chapter 6: Importing and Exporting Data
Importing • 124
If your data file contains zero-padded data (data with leading zeros), select the Support Numbers with Leading Zeros check box to properly import the data.
When importing a file, Origin looks at the contents of the first few cells to determine if a column contains numeric or non-numeric information. The When Non-Numeric is Found in Numeric Fields drop-down list selection controls how Origin proceeds if non-numeric information is encountered in a numeric column after the header. Select an option from the associated drop-down list.
The File Header Group
The number of lines that should be ignored before Origin starts importing data is specified in the Skip Main Header, Number of Lines text box. Select the Auto Determine to Skip more Header Lines radio button to cause Origin to skip lines until it encounters a consistent and recognizable file structure. You can also select a specific number of sub-header lines to skip by selecting the Specify Known Subheader Lines (0,1...) radio button and editing the associated text box.
You can store text from the file header in the worksheet’s column labels. This option is provided by the “Max # of Lines to Store in Column Labels” text box. By default, up to seven lines of header text can be stored in the column labels.
The # of Columns Group
When the Unknown radio button is selected, Origin imports all columns in the file. You may also specify x number of columns for Origin to import. If the file you want to import contains more than x columns, only the first x columns import. If the file contains less than x columns, the entire file imports. Origin does not create additional worksheet columns.
The Import Into Worksheet as Drop-down List
This option determines how the imported data is added to the active worksheet. The New Data option enables overwriting of the existing worksheet data. The New Columns option adds new columns to the right of the current columns in the worksheet, as necessary, to accommodate the data. The New Rows option adds new rows to the bottom of the worksheet, as necessary, to accommodate the data.
Note: If you are importing your data into new columns and a column name in your file duplicates a column name already used in the worksheet, you can append the file’s column name into the worksheet column’s label field. To do this, open the Data Import Options for Worksheet dialog box (File:Import:Other Options), and select the Create Column Labels from Header check box. Now when you plot your data, Origin will automatically include the column label information in the graph legend.
The Import Now Button
Click Import Now to import the ASCII file after you are satisfied with the dialog box settings. Origin updates the worksheet and opens the Import ASCII dialog box, from which you select an ASCII file. The file is imported using the current dialog box settings.
The Update Options button
Click Update Options to save the current settings into the active worksheet and close the dialog box.
Chapter 6: Importing and Exporting Data
Importing • 125
The Other Options Button
Click Other Options to open the Data Import Options for Worksheet dialog box. This dialog box provides additional control for importing ASCII files.
Additional ASCII import options are available in the Data Import Options for Worksheet dialog box. To open this dialog box, click Other Options in the ASCII Import Options for Worksheet dialog box, or select File:Import ASCII:Other Options.
The Data Import Options for Worksheet Dialog Box
The Rename Columns if 1st Line Contains Labels Check Box
If selected, this check box directs Origin to take the first line of the imported file that contains text, and use the text to name the worksheet columns.
The Rename Worksheet to Data File Name Check Box
If selected, this check box directs Origin to change the name of the active worksheet to the name of the imported file.
The Apply New Range to Associated Data Plots Check Box
If this check box is selected, the display range is set to encompass all of the imported data. If this check box is cleared, the current worksheet display range settings remain in effect. Clearing this check box lets you view a specific range of data from a series of imported data files. For example, if you have plotted a column of worksheet data and set the display range from row 10 to row 35, only imported data points in these rows display.
The Create Column Labels from Header Check Box
If selected, this check box directs Origin to append the import file column names to the associated worksheet column labels. Origin automatically displays the column labels after importing the file.
A Note on Importing Your Data Set and Displaying File Labels in the Column Name and Column Label Fields
If your data file includes two lines of column information, such as the following data file, you can display the file’s column names (Thrust and Pitch) in the worksheet column name field, and both the file’s column names and labels (Thrust and Pitch, Lbs and Deg) in the worksheet column label field. Doing this allows you to maximize the data set information displayed by default in the graph legend.

Chapter 6: Importing and Exporting Data
Importing • 126
Thrust Pitch
Lbs Deg
1 4
2 56
3 42
etc…
To display the file’s names and labels in the worksheet, select the Rename Columns if 1st Line Contains Labels check box and the Create Column Labels from Header check box in the Data Import Options for Worksheet dialog box. After importing the data file, Origin automatically displays both header lines in the worksheet column label fields.
Thrust(X) Pitch(Y)
Thrust Pitch
Lbs Deg
1 4
2 56
3 42
etc…
When you highlight and plot the data, the worksheet’s column labels display in the graph legend by default.
Importing a Range of an ASCII File To import a selected range of an ASCII file, select the Partial Import check box in the Import ASCII dialog box (File:Import:Single ASCII). After selecting your file and clicking Open, Origin opens the Import Verification dialog box. Edit this dialog box to specify a range for partial import.

Chapter 6: Importing and Exporting Data
Importing • 127
The Import Verification Dialog Box
The path and file name for the data file is displayed at the top of this dialog box. In addition, the number of columns and rows in the file are displayed in the associated list boxes.
The Partial Import Group
Select the Partial Import check box to import a range of the ASCII file.
Specify the file import range by typing the desired “From” and “To” limits in the Column and Row text boxes.
The Import Data Group
Select the Replace Existing Data from Row 1 Column 1 radio button to replace the existing data in the destination worksheet.
Select the As New Columns from 1st Empty Column radio button to add the import data to the first empty column to the right in the worksheet. This column is created if necessary.
Select the Append to End of Existing Data from Column 1 radio button to append the import data to the first available row in the worksheet, starting with column 1.
Importing Multiple ASCII Data Files into a Single or Multiple Worksheets Origin allows you to import multiple ASCII data files into the same worksheet (as new columns), or into separate worksheets. •
•
When importing into the same worksheet (as new columns), Origin uses the Import ASCII Options for Worksheet dialog box settings for the active worksheet to determine the data file structure. When importing into separate worksheets, you can select the worksheet template for each data file. Thus, for each data file, Origin uses the Import ASCII Options for Worksheet dialog box settings for the selected worksheet template to determine the data file structure.
Chapter 6: Importing and Exporting Data
Importing • 128
To learn about the Import ASCII Options for Worksheet dialog box, see "Customizing the Default ASCII Import Settings" on page 122.
To import multiple ASCII data files into a worksheet or worksheets, select File:Import:Multiple ASCII
when a worksheet is active, or click the Import Multiple ASCII button on the Standard toolbar when any window is active. If you click this button when a graph window is active, the Import Multiple ASCII dialog box provides controls to import into a graph window. However, to re-direct import to a worksheet (or worksheets), select the Import Each Selected File Into a New Worksheet check box.
The Import Multiple ASCII Dialog Box (Worksheet Window Active)
To import the files into separate columns of the active worksheet, select New Columns in the Import each file as drop down list. To import the files into separate worksheets, select New Worksheet from the drop down list. When New Worksheet is selected , a Template column displays in the list box. Double-click on a file's Template listing to select a new template from the associated drop-down list.
Chapter 6: Importing and Exporting Data
Importing • 129
In addition to assigning a template for each data file separately, you can apply your Template selection for one data file to all the data files in the list box, or to selected data files in the list box. To apply the selection to all the data files, right-click on the Template selection that you want to apply and select Apply Template Template to All from the shortcut menu.
To apply the selection to selected data files, select the data files in the list box and then right-click on the Template selection that you want to apply and select Apply Template Template to Selection.
Note that you can also set the selection to the default template from this shortcut menu. The default template is controlled by the Default Multi-ASCII Import Template selection on the Miscellaneous tab of the Options dialog box (Tools:Options).
Importing Lotus Files To import a Lotus file into the active worksheet, select File:Import:Lotus. Origin supports Lotus version 1.x, 2.1, 3.x, 4, and 5.
Importing dBASE Files To import a dBASE file into the active worksheet, select File:Import:dBASE. Origin supports dBASE ll, dBASE lll, dBASE lll Plus, and dBASE lV.
Importing DIF Files To import a DIF file into the active worksheet, select File:Import:DIF.
Importing LabTech Files To import LabTech binary real and binary integer formats into the active worksheet, select File:Import:LabTech.
Note: Other LabTech formats are text-based and are imported as ASCII files.
Chapter 6: Importing and Exporting Data
Importing • 130
Importing Sound Files To import a Sound (WAV) file into the active worksheet, select File:Import:Sound.
Importing Kaleidagraph Binary Data To import Kaleidagraph binary data into the active worksheet, select File:Import:Kaleidagraph.
Importing Mathematica (Vectors and Matrices) To import Mathematica (vectors and matrices) into the active worksheet, select File:Import:Mathematica.
Note: An "Origin Link for Mathematica" tool is also available from the Add-on Modules page of the OriginLab website. The link provides a multi-tabbed dialog box that allows transfer of data and expressions between Mathematica and Origin. Any Mathematica expression can be entered and results viewed in a scrollable window. You can use Mathematica's kernel to transform your data and then use Origin to graph the results.
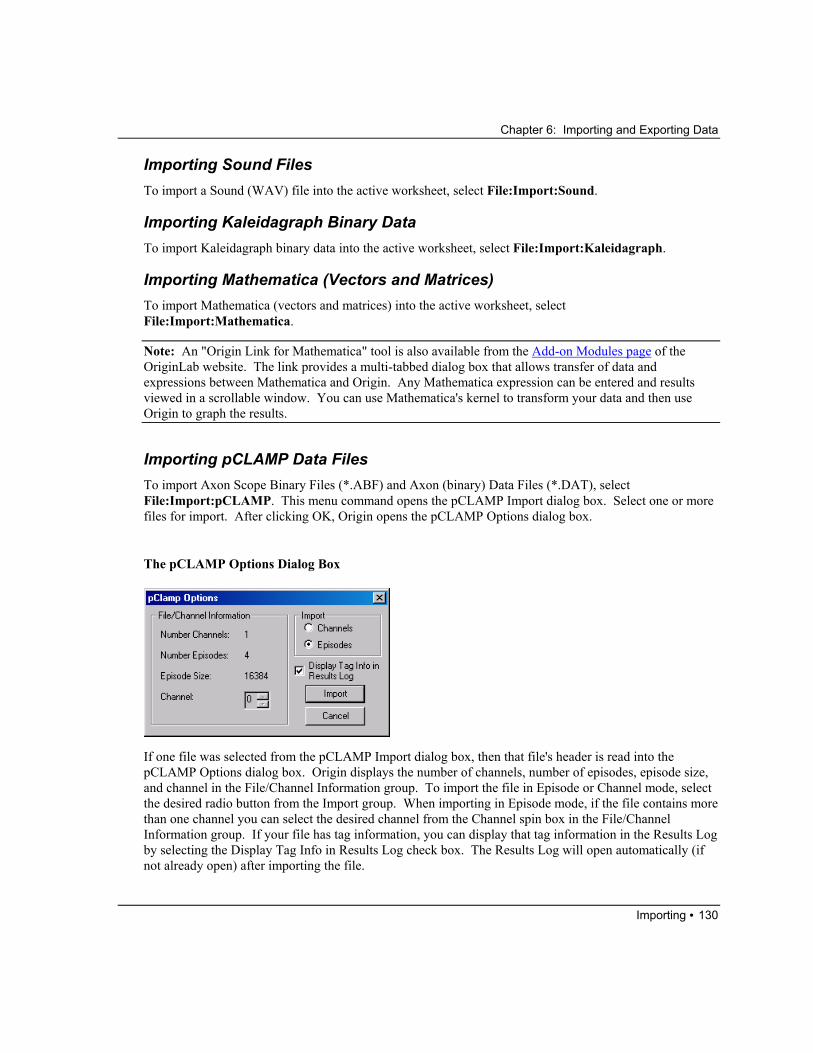
Importing pCLAMP Data Files To import Axon Scope Binary Files (*.ABF) and Axon (binary) Data Files (*.DAT), select File:Import:pCLAMP. This menu command opens the pCLAMP Import dialog box. Select one or more files for import. After clicking OK, Origin opens the pCLAMP Options dialog box.
The pCLAMP Options Dialog Box
If one file was selected from the pCLAMP Import dialog box, then that file's header is read into the pCLAMP Options dialog box. Origin displays the number of channels, number of episodes, episode size, and channel in the File/Channel Information group. To import the file in Episode or Channel mode, select the desired radio button from the Import group. When importing in Episode mode, if the file contains more than one channel you can select the desired channel from the Channel spin box in the File/Channel Information group. If your file has tag information, you can display that tag information in the Results Log by selecting the Display Tag Info in Results Log check box. The Results Log will open automatically (if not already open) after importing the file.
Chapter 6: Importing and Exporting Data
Importing • 131
If more than one file was selected from the pCLAMP Import dialog box, then all controls are unavailable except the Channels and Episodes radio buttons. Select the desired radio button and click Import to import the data.
Once your pCLAMP data is imported into Origin, you have full access to Origin's plotting and analysis tools. Additionally, a special graph template, PCLAMP.OTP, is provided to plot and explore your pCLAMP data. To open this graph template, select the worksheet data that you want to plot and then select Plot:Template. This menu command opens the Open dialog box. Select PCLAMP.OTP from your Origin folder and click Open.
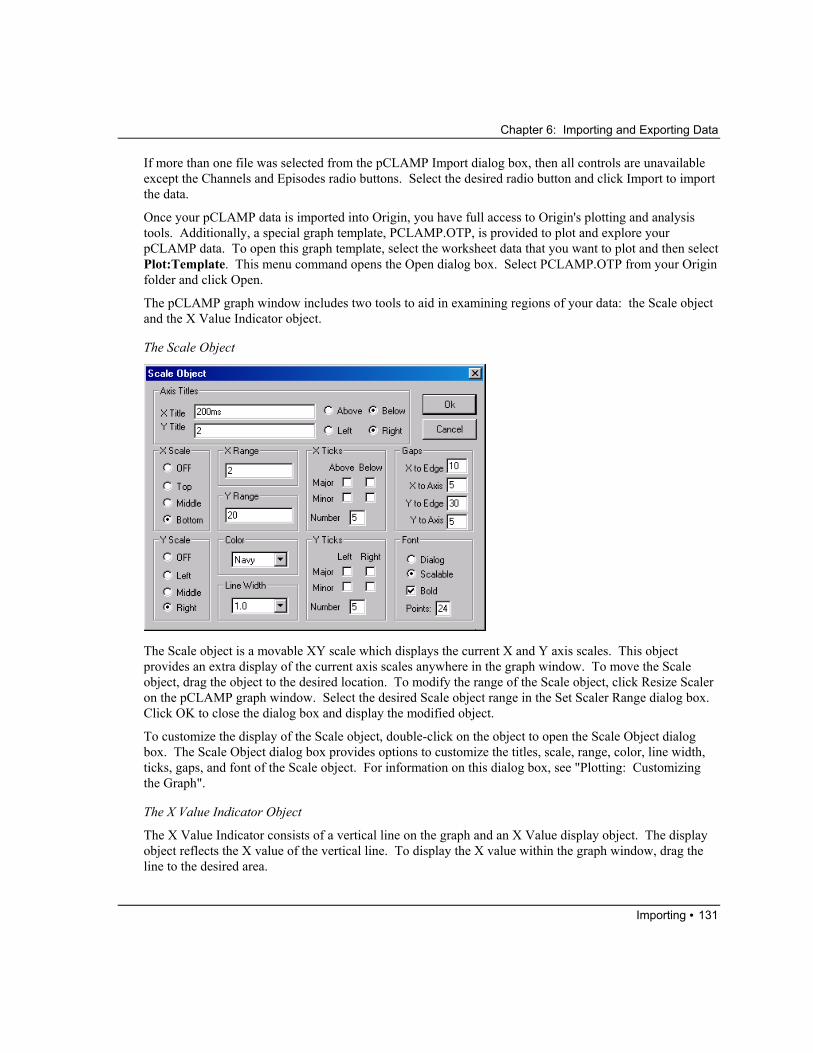
The pCLAMP graph window includes two tools to aid in examining regions of your data: the Scale object and the X Value Indicator object.
The Scale Object
The Scale object is a movable XY scale which displays the current X and Y axis scales. This object provides an extra display of the current axis scales anywhere in the graph window. To move the Scale object, drag the object to the desired location. To modify the range of the Scale object, click Resize Scaler on the pCLAMP graph window. Select the desired Scale object range in the Set Scaler Range dialog box. Click OK to close the dialog box and display the modified object.
To customize the display of the Scale object, double-click on the object to open the Scale Object dialog box. The Scale Object dialog box provides options to customize the titles, scale, range, color, line width, ticks, gaps, and font of the Scale object. For information on this dialog box, see "Plotting: Customizing the Graph".
The X Value Indicator Object
The X Value Indicator consists of a vertical line on the graph and an X Value display object. The display object reflects the X value of the vertical line. To display the X value within the graph window, drag the line to the desired area.
Chapter 6: Importing and Exporting Data
Importing • 132
To edit the display of the vertical line, double-click on the line to open the Arrow Control dialog box. Select the desired dialog box settings and click OK to close the dialog box and update the vertical line.
Importing Thermo Galactic SPC Data Files To import Thermo Galactic SPC data files, select File:Import:Thermo Galactic (SPC). Origin supports both single and multiple arrays.
=> If the data file contains an array of X values, then Origin assigns those values to an X column.
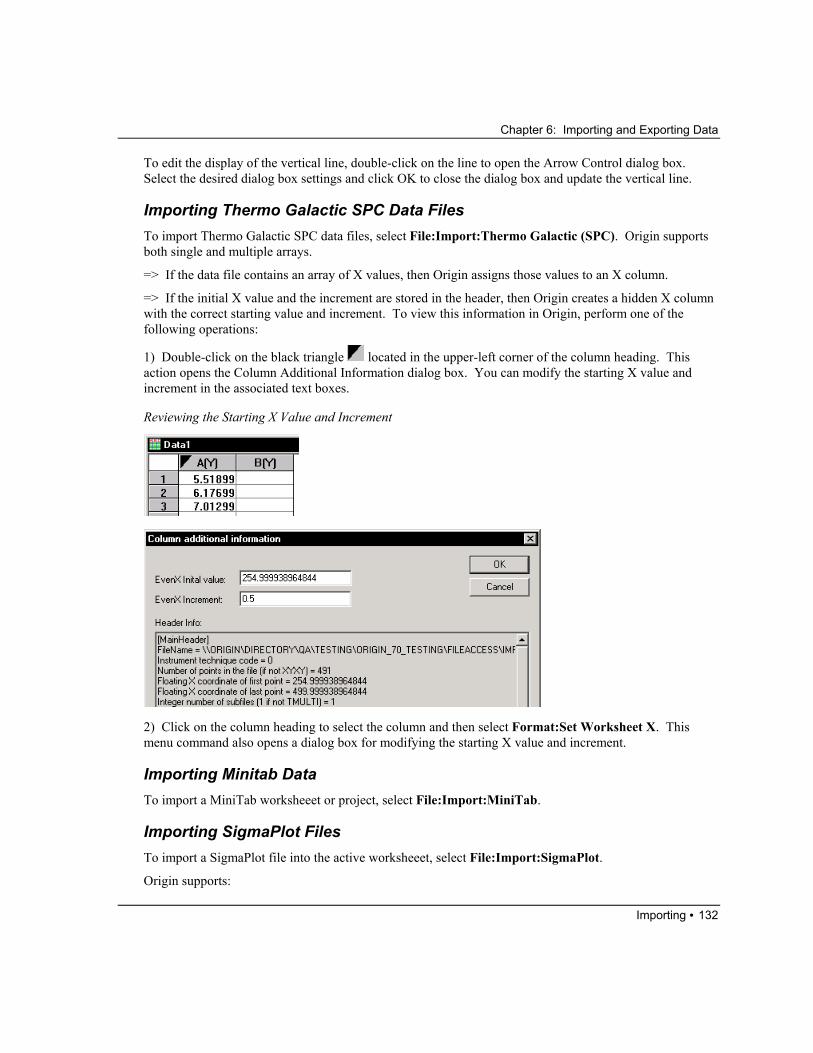
=> If the initial X value and the increment are stored in the header, then Origin creates a hidden X column with the correct starting value and increment. To view this information in Origin, perform one of the following operations:
1) Double-click on the black triangle located in the upper-left corner of the column heading. This action opens the Column Additional Information dialog box. You can modify the starting X value and increment in the associated text boxes.
Reviewing the Starting X Value and Increment
2) Click on the column heading to select the column and then select Format:Set Worksheet X. This menu command also opens a dialog box for modifying the starting X value and increment.
Importing Minitab Data To import a MiniTab worksheeet or project, select File:Import:MiniTab.
Importing SigmaPlot Files To import a SigmaPlot file into the active worksheeet, select File:Import:SigmaPlot.
Origin supports:

Chapter 6: Importing and Exporting Data
Importing • 133
SP5, SigmaPlot for DOS
SPW, SigmaPlot for Windows (v.1 and 2)
JNB, SigmaPlot for Windows (v.3, 2000, and 2001)
Chapter 6: Importing and Exporting Data
Importing • 134
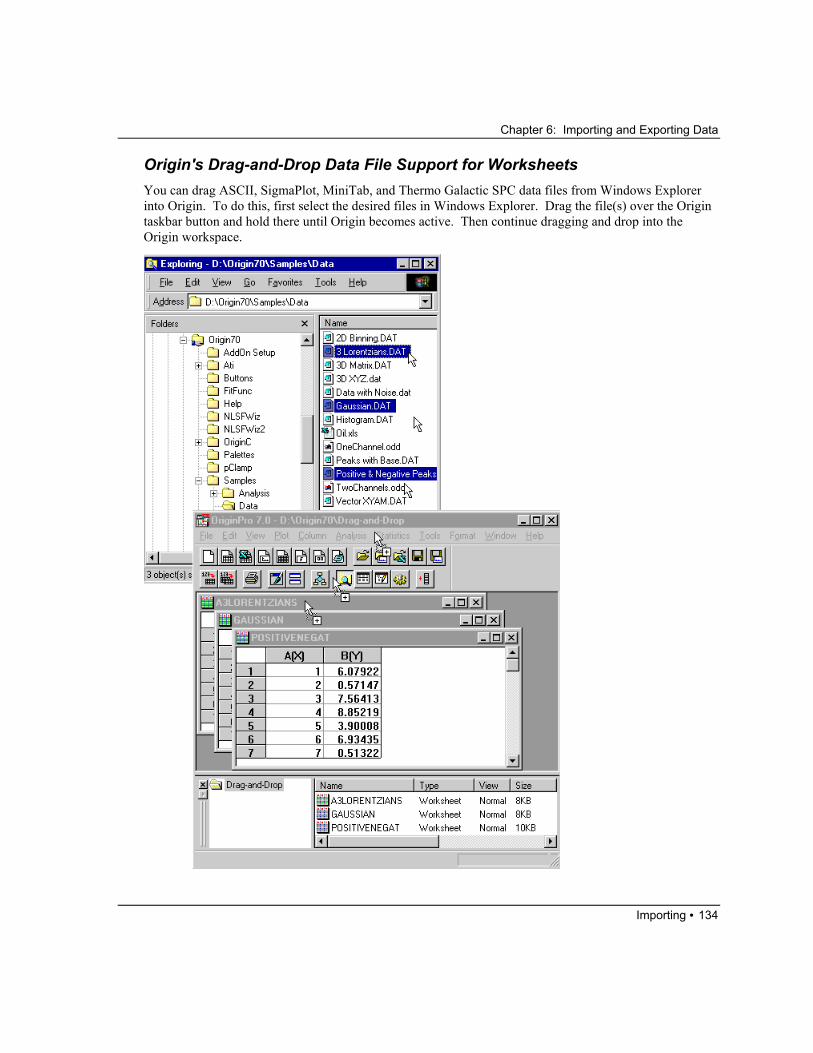
Origin's Drag-and-Drop Data File Support for Worksheets You can drag ASCII, SigmaPlot, MiniTab, and Thermo Galactic SPC data files from Windows Explorer into Origin. To do this, first select the desired files in Windows Explorer. Drag the file(s) over the Origin taskbar button and hold there until Origin becomes active. Then continue dragging and drop into the Origin workspace.
Chapter 6: Importing and Exporting Data
Importing • 135
=> For ASCII and Thermo Galactic SPC files, if you drop the data into a worksheet, the data imports into that worksheet. If you drop the data into a blank area of the workspace, the data imports into a new worksheet.
=> For SigmaPlot and Minitab files, the data always imports into a new worksheet, independent of where you drop it.
When you drag-and-drop ASCII files, Origin uses the worksheet's import settings defined in the ASCII Import Options for Worksheet dialog box. To view and alter these settings, activate your worksheet window and then select File:Import:ASCII Options. To learn about the settings in this dialog box, see "Customizing the Default ASCII Import Settings" on page 122.
Adding Drag-and-Drop Support for a New File Type
Origin provides a mechanism to add drag-and-drop support for additional file types. When any file is dropped onto Origin from Windows Explorer, Origin looks in the DOFILE.OGS script file located in your Origin folder. Specifically, it looks for a section named [OnOpenExtension], where Extension is the file extension of the dropped file. If found, that section is executed and the file name is passed as an argument. This means that you can add drag-and-drop import support for custom files, by providing routines to handle the import of an extension type.
To learn more about this, review the AUTOMATION.OPJ sample project located in your Origin \SAMPLES\PROGRAMMING\AUTOMATION subfolder. Additionally, more information is available in the Knowledge Database on the OriginLab website. Search in Category = Import/Export, and use the key word "drag".
Origin's Drag-and-Drop Data File Support for Matrices You can drag Thermo Galactic SPC data files from Windows Explorer into an Origin matrix. To do this, first make a matrix active in Origin. Then select the desired file in Windows Explorer. Drag the file over the Origin taskbar button and hold there until Origin becomes active. Then continue dragging and drop into the Origin matrix.
You can also drag image files into an Origin matrix. To learn more about Origin's support of image data, see "Working with Raster Graphic Images in Origin".
Importing Data from a Database Using ODBC Origin's ODBC (Open Data Base Connectivity) allows you to import data from a data source directly into an Origin worksheet.
ODBC Terminology Database: The term database refers to a 'DataBase Management System' (DBMS) such as Microsoft Access. A DBMS provides an efficient way to store and access data.
Data source: The term data source refers to a particular set of data stored and managed by a particular DBMS. For example, you might have one data source named Exp1 saved in the Microsoft Access database, and another data source named Proj1 stored in yet another database.
Chapter 6: Importing and Exporting Data
Importing • 136
Tables and Views: A data source consists of tables of data. These tables can be joined using SQL commands to form views. Views are virtual tables that don't take up additional space beyond their component tables and the SQL command that joins them together. For example, a table consisting of names and zip codes can be joined to a table consisting of zip codes and city/state information to form a 'view' of name, city, state, and zip code.
SQL: SQL stands for Structured Query Language. SQL is a standardized language that has evolved for accessing data from a variety of databases. SQL can be used to select particular data from your data source. The result of an SQL 'query' can be saved as a view, or read into another application for examination.
ODBC: ODBC stands for Open Data Base Connectivity. ODBC is a library of functions that provides a common interface for a variety of database systems.
ODBC Driver: Database manufacturers create ODBC drivers that interpret the common ODBC interface functions into a form understandable to their particular database system. In this way, an application such as Origin can use a single common ODBC interface to access a variety of databases, provided they have an ODBC driver.
Origin's ODBC Feature Origin's ODBC feature allows you to select a data source from any database for which an ODBC driver is installed, including Microsoft Access and Excel, dBASE, FoxPro, and Paradox. Once you have selected your database, you can then select a table or a view from the desired data source. Select all or part of the data source table or view for import into your Origin worksheet.
Origin also provides a DLL (Dynamic Link Library of functions) that can be used to form an ODBC command object. The properties and methods of this command object connect Origin to Microsoft's ODBC interface. This interface is a library of functions that allows you to specify a data source, execute SQL (Structured Query Language) queries and retrieve data. An ODBC database driver interprets and implements the ODBC interface function calls for its associated database, taking care of the particulars of that database. Origin can thus access a data source from any database for which there is an ODBC driver.
Importing a Data Source Table into Origin Select File:Import:ODBC. This menu command opens the ODBC Dialog dialog box.

Chapter 6: Importing and Exporting Data
Importing • 137
The ODBC Dialog Data Base Tab
Edit this tab to add or delete data sources, and to select data sources and tables and views.
The Data Source list displays any data source that you currently have access to. These names are user-defined and are not necessarily the same as the file name containing the data source.
The Table/View List displays the tables/views associated with the selected data source.
The Add Source button connects you to Microsoft's ODBC Data Source Administrator dialog box, which allows you to add a new data source, find the full path name of any data source already listed, delete an existing data source, and add or delete a database driver. Consult the dialog box's Help file for further instructions.
Chapter 6: Importing and Exporting Data
Importing • 138
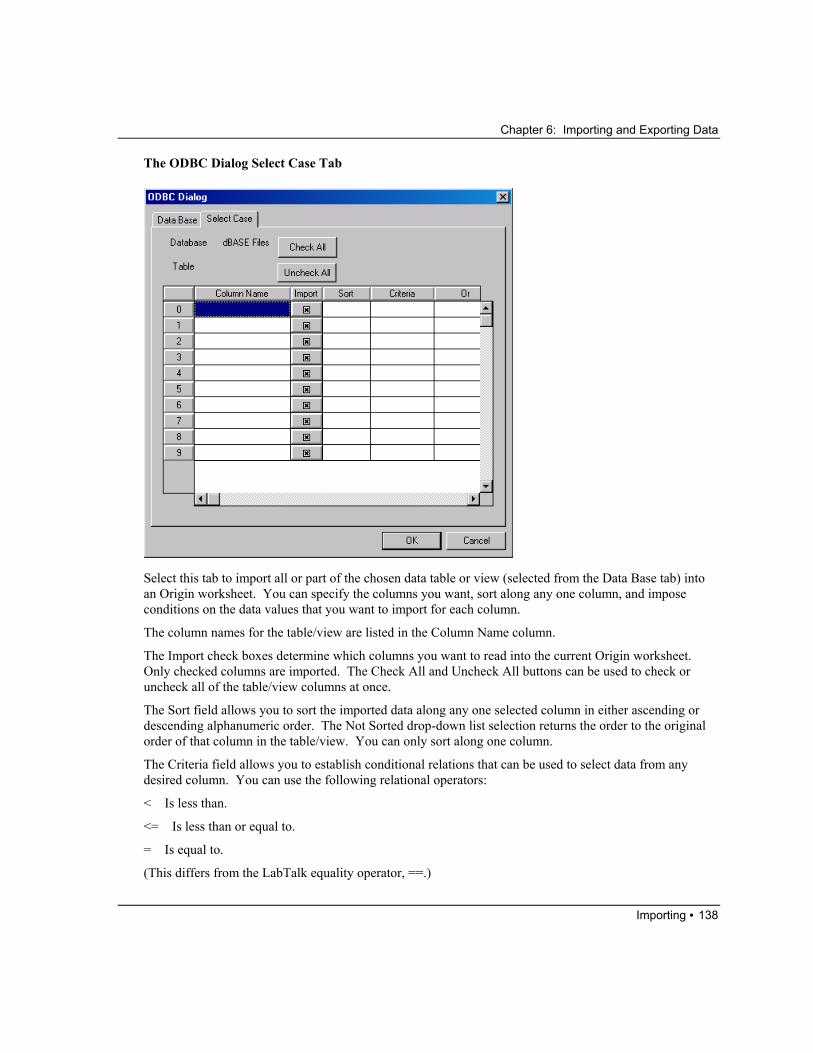
The ODBC Dialog Select Case Tab
Select this tab to import all or part of the chosen data table or view (selected from the Data Base tab) into an Origin worksheet. You can specify the columns you want, sort along any one column, and impose conditions on the data values that you want to import for each column.
The column names for the table/view are listed in the Column Name column.
The Import check boxes determine which columns you want to read into the current Origin worksheet. Only checked columns are imported. The Check All and Uncheck All buttons can be used to check or uncheck all of the table/view columns at once.
The Sort field allows you to sort the imported data along any one selected column in either ascending or descending alphanumeric order. The Not Sorted drop-down list selection returns the order to the original order of that column in the table/view. You can only sort along one column.
The Criteria field allows you to establish conditional relations that can be used to select data from any desired column. You can use the following relational operators:
< Is less than.
<= Is less than or equal to.
= Is equal to.
(This differs from the LabTalk equality operator, ==.)
Chapter 6: Importing and Exporting Data
Importing • 139
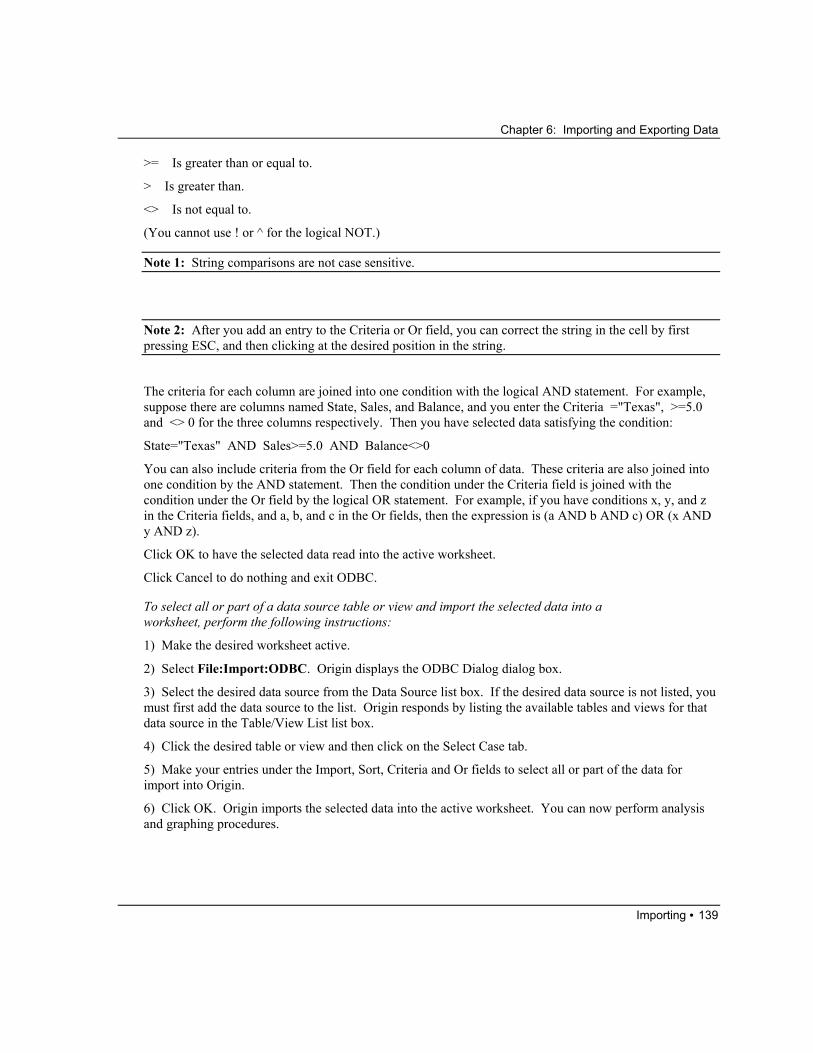
>= Is greater than or equal to.
> Is greater than.
<> Is not equal to.
(You cannot use ! or ^ for the logical NOT.)
Note 1: String comparisons are not case sensitive.
Note 2: After you add an entry to the Criteria or Or field, you can correct the string in the cell by first pressing ESC, and then clicking at the desired position in the string.
The criteria for each column are joined into one condition with the logical AND statement. For example, suppose there are columns named State, Sales, and Balance, and you enter the Criteria ="Texas", >=5.0 and <> 0 for the three columns respectively. Then you have selected data satisfying the condition:
State="Texas" AND Sales>=5.0 AND Balance<>0
You can also include criteria from the Or field for each column of data. These criteria are also joined into one condition by the AND statement. Then the condition under the Criteria field is joined with the condition under the Or field by the logical OR statement. For example, if you have conditions x, y, and z in the Criteria fields, and a, b, and c in the Or fields, then the expression is (a AND b AND c) OR (x AND y AND z).
Click OK to have the selected data read into the active worksheet.
Click Cancel to do nothing and exit ODBC.
To select all or part of a data source table or view and import the selected data into a worksheet, perform the following instructions:
1) Make the desired worksheet active.
2) Select File:Import:ODBC. Origin displays the ODBC Dialog dialog box.
3) Select the desired data source from the Data Source list box. If the desired data source is not listed, you must first add the data source to the list. Origin responds by listing the available tables and views for that data source in the Table/View List list box.
4) Click the desired table or view and then click on the Select Case tab.
5) Make your entries under the Import, Sort, Criteria and Or fields to select all or part of the data for import into Origin.
6) Click OK. Origin imports the selected data into the active worksheet. You can now perform analysis and graphing procedures.
Chapter 6: Importing and Exporting Data
Importing • 140
Maintaining the ODBC
Adding Data Sources and Drivers
You can reach Microsoft's ODBC Data Source Administrator dialog box directly from your Windows Control Panel (Start:Settings:Control Panel). This dialog box allows you to:
1) Add a new data source.
2) See the full path name of any data source already listed.
3) Delete an existing data source.
4) Add or delete a database driver.
Review the associated Help file for instructions.
To add a data source, you will need to select a driver appropriate to your data source from the list of installed drivers and enter the path and file name of the file which contains the data source. Give the data source a name meaningful to your current application. The new data source will now be listed in the Data Source list in Origin's Data Base tab of the ODBC Dialog dialog box. Origin can then access this new data source.
Troubleshooting Tips
You must install the proper ODBC driver for the database you are using. For example, if your data source is stored in a database version that is newer than the database driver you have on your computer, then you may not be able to access your data source. Additionally, other software that you install may modify your current ODBC files and disrupt function. If you have trouble using ODBC, re-install Microsoft's ODBC files. You can do this by re-installing Microsoft Office (which will include the ODBC interface functions and drivers you need).
Pasting Data into Origin In addition to adding data to a worksheet by importing a data file, data can be pasted, transposed and pasted, or pasted and linked into the worksheet using the Clipboard.
To paste the current contents of the Clipboard into the selected cell, or range of cells in a worksheet, select Edit:Paste while the worksheet is active. To paste a single value into the worksheet, click on the desired destination cell and select Edit:Paste. To paste a range of values, select the cell that is to be the upper-left
corner of the range, then select Edit:Paste. Shortcut: Click the Paste button on the Edit toolbar.
To transpose the data when pasting into the destination cells, select the cell that is to be the upper-left corner of the range, then select Edit:Paste Transpose.
To link the data when pasting into the destination cells, select the cell that is to be the upper-left corner of the range, then select Edit:Paste Link. This command establishes a DDE (Dynamic Data Exchange) link with the source data file. When the source data changes, the data in the Origin worksheet reflects those changes. When you close an Origin project in which you have established a DDE link, Origin reminds you that this project is linked to another document. The next time you open the project, Origin opens the Start DDE Link dialog box, allowing you to re-establish the link with the source file.
Chapter 6: Importing and Exporting Data
Exporting • 141
The Start DDE Link Dialog Box
If you click Yes in the Start DDE Link dialog box when the source application is closed, Origin will re-open the source application and file only if the source application is in the DOS path. If the source application is not in the DOS path, Origin fails to open the source application when you click Yes and instead opens the Origin file without the external link. Thus, to ensure that the link to the source file is correctly re-established, open the source application and file and then return to Origin and click Yes in the Start DDE Link dialog box.
Exporting
Exporting Worksheet Data Worksheet data can be exported to another application by creating an export file or by copying the data to the Clipboard.
A Note on Significant Figures in the Worksheet
When you enter a numeric value in a worksheet cell, Origin may round off the displayed value depending on the numeric display settings in the Worksheet Column Format dialog box and the settings on the Numeric Format tab of the Options dialog box. Origin uses the entered value in calculations. However, only the rounded off value is exported to a file or copied to the Clipboard.
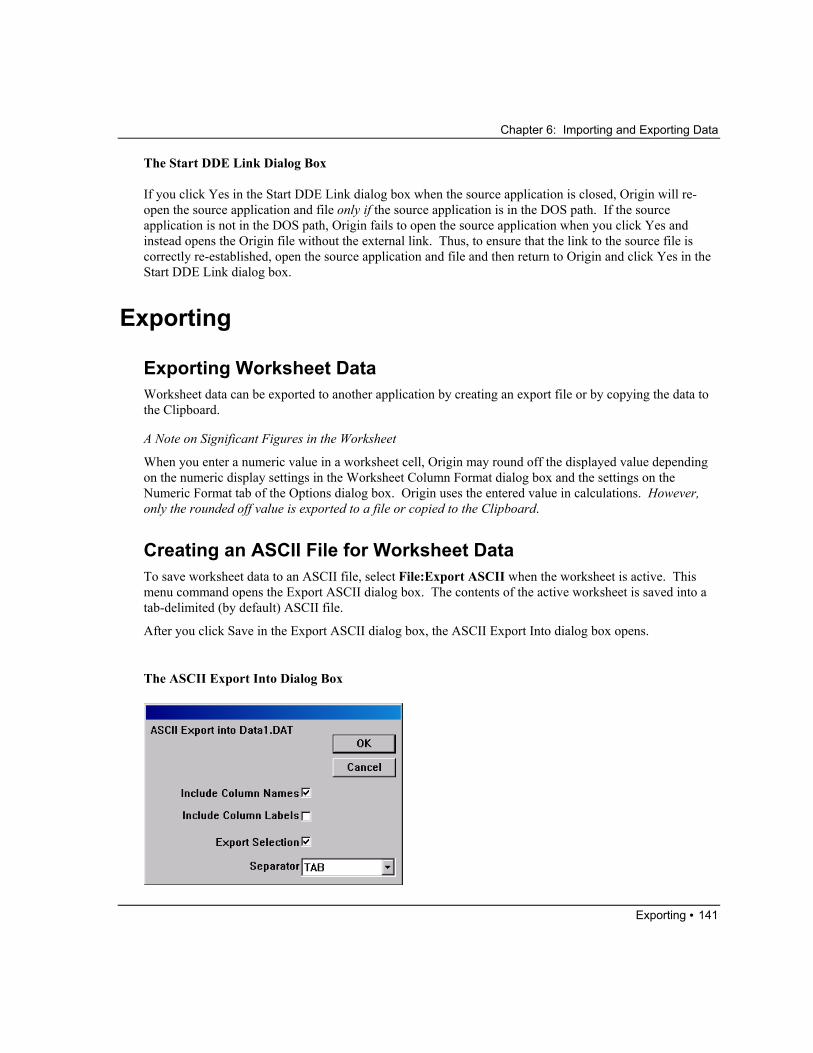
Creating an ASCII File for Worksheet Data To save worksheet data to an ASCII file, select File:Export ASCII when the worksheet is active. This menu command opens the Export ASCII dialog box. The contents of the active worksheet is saved into a tab-delimited (by default) ASCII file.
After you click Save in the Export ASCII dialog box, the ASCII Export Into dialog box opens.
The ASCII Export Into Dialog Box
Chapter 6: Importing and Exporting Data
Exporting • 142
The Include Column Names Check Box
When this check box is selected, the column names are copied to the first line of the ASCII file, followed by <CR>, and then the data. The separator selected from the Separator drop-down list is used to separate the column names and data.
The Include Column Labels Check Box
When this check box is selected (and the Include Column Names check box is selected), the column labels are copied to the second line of the ASCII file, followed by <CR>, and then the data. If the Include Column Names check box is not selected, then the column labels are copied to the first line of the ASCII data file.
The separator selected from the Separator drop-down list is used to separate the column labels and data.
The Export Selection Check Box
If you want to export a section of the worksheet data, highlight the desired section of data before selecting File:Export ASCII. If a section of worksheet data is selected, the Export Selection check box will be selected by default. Do not clear the check box unless you want to export the entire contents of the worksheet.
If you select Edit:Set As Begin and Edit:Set As End to set the worksheet range, the Export Selection check box will not be selected. Only the displayed worksheet range exports.
The Separator Drop-down List
Select the desired separator (or delimiter) from the Separator drop-down list for the data and column names/labels (if the Include Column Names/Labels check boxes are selected).
Creating an ASCII file for a Range of Data If you want to save a range of worksheet data to an ASCII file, perform one of the following procedures before selecting File:Export ASCII.
1) Highlight the desired range of worksheet data.
2) Delete the rows and columns of data that you do not want to export using the Edit:Delete menu command. This results in a permanent alteration of your worksheet.
3) Change the display range of the worksheet before exporting the data. Use the Edit:Set as Begin and Edit:Set as End menu commands to establish the display range for a column or range of columns. After exporting the desired data range, return the worksheet to the full display range by selecting Edit:Reset to Full Range.
Copying Worksheet Data To copy worksheet data to another application using the Clipboard, highlight the desired data range and
select Edit:Copy or click the Copy button on the Edit toolbar. The worksheet data can then be pasted into another Windows application.
Chapter 6: Importing and Exporting Data
Exchanging Data Between Worksheets • 143
Exchanging Data Between Worksheets Data can be exchanged between Origin worksheets, or within a single Origin worksheet, via the Clipboard, or by entering commands in the Script window. When exchanging data via the Clipboard, Origin provides a paste transpose option.
Note: When you enter a numeric value in a worksheet cell, Origin rounds off the displayed value if the number of digits after the decimal place exceeds the value specified in the Numeric Display text box, when Set Decimal Places is selected from the Numeric Display drop-down list, both of which are located in the Worksheet Column Format dialog box. Origin uses the entered value in calculations. However, only the rounded off value is exported to a file or copied to the clipboard.
Using the Clipboard to Exchange Data To copy data between or within a worksheet, select the desired data and then select Edit:Copy. If you copied a single value to the Clipboard, click on the desired destination cell and select Edit:Paste. If you copied a range of values to the Clipboard, select the cell that is to be the upper-left corner of the range, then select Edit:Paste.
To transpose the data when pasting into the destination cells, select the cell that is to be the upper-left corner of the range, then select Edit:Paste Transpose. If necessary, Origin adds columns to the worksheet to hold the transposed data.
Using the Script Window to Exchange Data LabTalk script can be entered in the Script window for immediate execution. The LabTalk copy command can be used to copy a data set from one worksheet to another.
Using LabTalk to Copy Data Sets
1) Click the New Project button on the Standard toolbar to open a new project.
2) Open a second worksheet by clicking the New Worksheet button on the Standard toolbar.
3) Type numeric values in the first four rows of columns A and B in the Data1 worksheet.
4) Click the Script Window button on the Standard toolbar to open the Script window.
5) In the Script window, type the following command and then press ENTER (script is not case-sensitive):
COPY DATA1_A DATA2_A
Execution of this command copies column A of the Data1 worksheet to column A of the Data2 worksheet. If the script did not execute, check that the Script Execution menu command (Edit:Script Execution) is selected from the Script window menu bar. Click on the menu command if it is not checked, and then click at the end of the command line. Press ENTER to execute the script.