Embed Size (px)
DESCRIPTION
Choosing and Using your Weber Performer Silver Barbecue Kettle
Citation preview

Choosing and Using YourBarbecue Kettle
A151872MCKI p1-99 25/10/04 10:32 AM Page 1
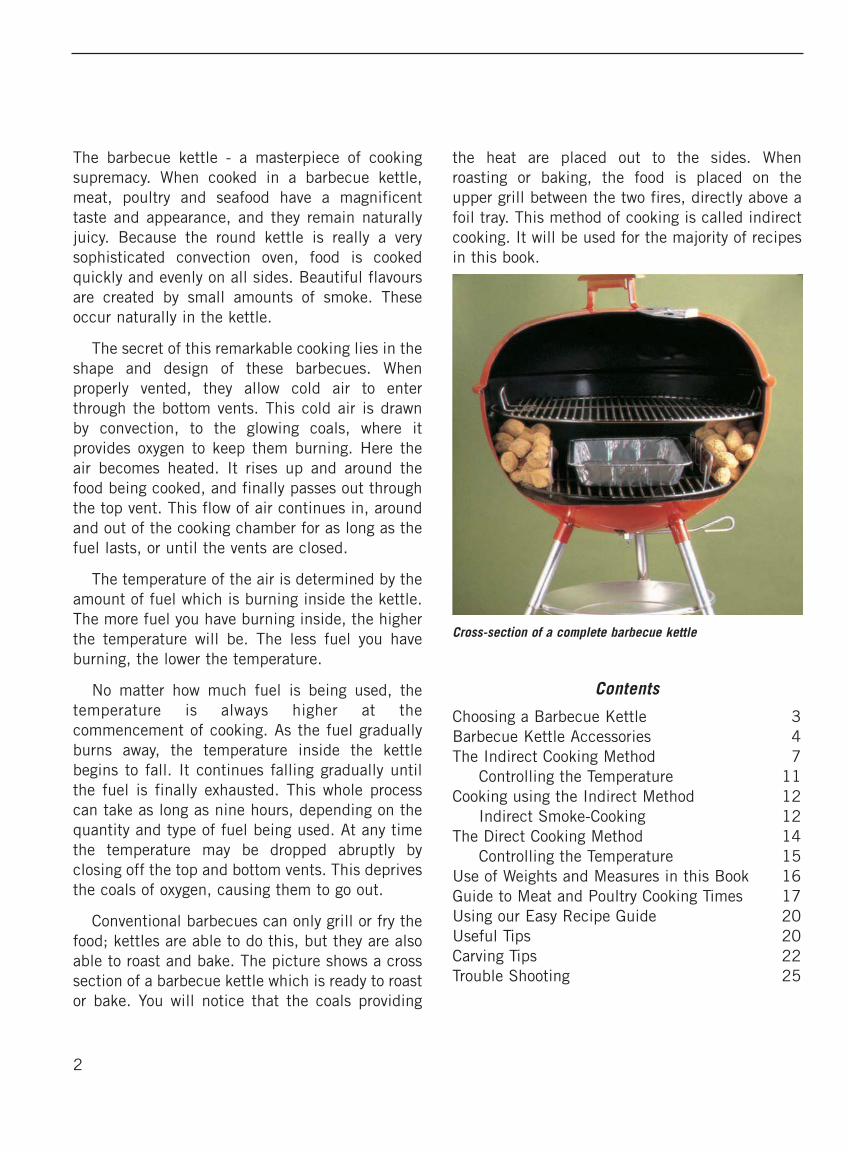
The barbecue kettle - a masterpiece of cookingsupremacy. When cooked in a barbecue kettle,meat, poultry and seafood have a magnificenttaste and appearance, and they remain naturallyjuicy. Because the round kettle is really a verysophisticated convection oven, food is cookedquickly and evenly on all sides. Beautiful flavoursare created by small amounts of smoke. Theseoccur naturally in the kettle.
The secret of this remarkable cooking lies in theshape and design of these barbecues. Whenproperly vented, they allow cold air to enterthrough the bottom vents. This cold air is drawn by convection, to the glowing coals, where itprovides oxygen to keep them burning. Here theair becomes heated. It rises up and around thefood being cooked, and finally passes out throughthe top vent. This flow of air continues in, aroundand out of the cooking chamber for as long as thefuel lasts, or until the vents are closed.
The temperature of the air is determined by theamount of fuel which is burning inside the kettle.The more fuel you have burning inside, the higherthe temperature will be. The less fuel you haveburning, the lower the temperature.
No matter how much fuel is being used, thetemperature is always higher at thecommencement of cooking. As the fuel graduallyburns away, the temperature inside the kettlebegins to fall. It continues falling gradually untilthe fuel is finally exhausted. This whole processcan take as long as nine hours, depending on thequantity and type of fuel being used. At any timethe temperature may be dropped abruptly byclosing off the top and bottom vents. This deprivesthe coals of oxygen, causing them to go out.
Conventional barbecues can only grill or fry thefood; kettles are able to do this, but they are alsoable to roast and bake. The picture shows a crosssection of a barbecue kettle which is ready to roastor bake. You will notice that the coals providing
the heat are placed out to the sides. When roasting or baking, the food is placed on the upper grill between the two fires, directly above afoil tray. This method of cooking is called indirectcooking. It will be used for the majority of recipesin this book.
Cross-section of a complete barbecue kettle
Contents
Choosing a Barbecue Kettle 3Barbecue Kettle Accessories 4The Indirect Cooking Method 7
Controlling the Temperature 11Cooking using the Indirect Method 12
Indirect Smoke-Cooking 12The Direct Cooking Method 14
Controlling the Temperature 15Use of Weights and Measures in this Book 16Guide to Meat and Poultry Cooking Times 17Using our Easy Recipe Guide 20Useful Tips 20Carving Tips 22Trouble Shooting 25
2
A151872MCKI p1-99 25/10/04 10:32 AM Page 2
Choosing a Barbecue KettleThe first thing you should do is to make sure thatyou get a real barbecue kettle. Barbecue kettlesare round, not rectangular. It is this "roundness"that provides the near perfect air circulation whichgives them such a huge cooking advantage.
Over the past 20 years, there have beensomewhere between 30 and 40 different brands ofbarbecue kettles sold in Australia (interestinglyonly 2 or 3 of these brands still survive).
Barbecue kettles vary greatly in price andquality. Often the essentials needed for barbecuekettle cooking are not included as standardequipment with your purchase. For these reasonswe thought it would be helpful to examine thecomponent parts of a barbecue kettle, and identifythe essentials required for successful cooking.
HandlesThe handles on barbecue kettles are normally oftwo types; they are either welded to the bowl orbolted through it. If the handles are welded to thebarbecue, they are much stronger. Bolted handlesinevitably work loose. This means enormousleverage is placed on the body of the barbecueresulting in chipped enamel or damaged paintwork.
VentsThe vents are very important because they controlthe amount of air which can flow through thebarbecue. They create the natural convectionnecessary for this type of cooking. Both top andbottom vents should be large enough to allow agood flow of air to enter and exit the cookingchamber.
In our opinion the One-Touch™ system as found on some of the Weber® models is superior to all others. It allows the user to remove
accumulated ashes without having to remove theinternal grills. It also allows the 3 bottom vents tobe closed with one simple movement.
Enamel or PaintOne thing is certain - all barbecue kettles shouldbe coated inside and out with vitreous or porcelainenamel.
Painted barbecues inevitably deteriorate for tworeasons. They are usually unable to withstand thefierce heat generated by cooking fires, and theycannot withstand cleaning with caustic-basedoven cleaners. Perhaps this is why kitchen ovenshave always had an enamel surface.
Leg AttachmentFor safety reasons, the legs should be firmlyattached to the barbecue bowl. They should becapable of being locked into place, rather thanmerely held by thumb screws. This will avoidpossible serious accidents.
Inside the BarbecueThere should be two grills. The top grill (cookinggrill), which is usually chromed or nickel plated,supports the food. The bottom grill (charcoal grill)supports the barbecue fuel.
If you intend to roast or bake in your barbecuekettle, charcoal rails or baskets are essential. Theyhold the hot coals to the sides and prevent themfrom collapsing and falling under the food. If thesewere not included as standard equipment with yourbarbecue kettle, they can be acquired as anaccessory. Some type of tray placed between thecoals on the bottom grill will be required to catchfats falling from the meat being cooked above. Werecommend the use of foil trays, rather than bakingdishes or steel trays which may become too hot,causing the fats to smoke excessively or even ignite
3
A151872MCKI p1-99 25/10/04 10:32 AM Page 3
The Size of Your Barbecue KettleMost barbecue kettles are 57 cm (221/2") indiameter. This is an excellent working size for theaverage family. (We always use two barbecueswhen entertaining friends with a menu of severalcourses.) For instance, you could smoke food oruse the wok on one barbecue while cooking a largeroast on the other. Barbecue kettles with a smallerdiameter than 57 cm usually have limitations withrespect to the size and variety of food that can becooked on them.
Barbecue Kettle AccessoriesThere is an extensive range of barbecue kettleaccessories, many of which are excellent valueand of great aid to the outdoor chef.
The Charcoal Basket Lighting System.Developed during the 1990s this system is a mustfor people who bought their kettle for the purposeof roasting outdoors.
They make lighting preparation much quickerand easier.
This system comprises two accessories; the first,metal baskets that hold just the right amount of fuelfor indirect cooking and the second, a speciallyshaped charcoal grill, with cavities designed to holdfirelighters directly below the baskets.
Barbecue TongsWe recommend that the barbecue kettle chef hasat least three sets of household tongs for use withthe kettle. One pair we always leave with ourbarbecues. It is a long pair, and is used solely formoving hot coals, or left over fuel around from oneside to the other in the barbecue. This long set isnot used to pick up or turn food. The two othersets of tongs are shorter, and are used for pickingup small or large roasts, steaks, chops and thelike. They soon become an extension of your hand.
Gas ConversionsMany people have such a busy lifestyle that theysimply don’t have time available for lightingbriquettes. These are the people who love to usetheir barbecue kettle with gas. Remember whenpurchasing a gas conversion kit to select one thatis designed to cook by the indirect method. Thebest of them have two heat settings so that youcan easily produce a flavour that almost perfectlymatches that of briquettes.
The Weber Gas Kit The Weber Gas System is the only gas burnersystem we have found to meet these requirements.It has been specifically designed for indirectcooking. Weber provides lighting instructions with the GasKit which are simple to follow. Once the barbecueis alight place the drip pan(s) on the bottom grillbetween the burners. Replace the top grill. Thefood should be positioned on the top grill over thedrip pan(s). Commence cooking by replacing thelid.Following are instructions on how to use the WeberGas System with the recipes from this book. Eachrecipe details the type of fire to be used.
Hot Fire: Set the control knob to High andcook for 50-60 minutes, then turnto Low for the remainder of thecooking time.
Normal Fire: Set the control knob to High andcook for 25-30 minutes then turn toLow for the remainder of thecooking time.
Low Fire: Set the control knob to Low for theentire cooking time.
Follow these directions and in nearly all casesyou’ll find that cooking times are the same asshown in the recipes in this book.
4
A151872MCKI p1-99 25/10/04 10:32 AM Page 4
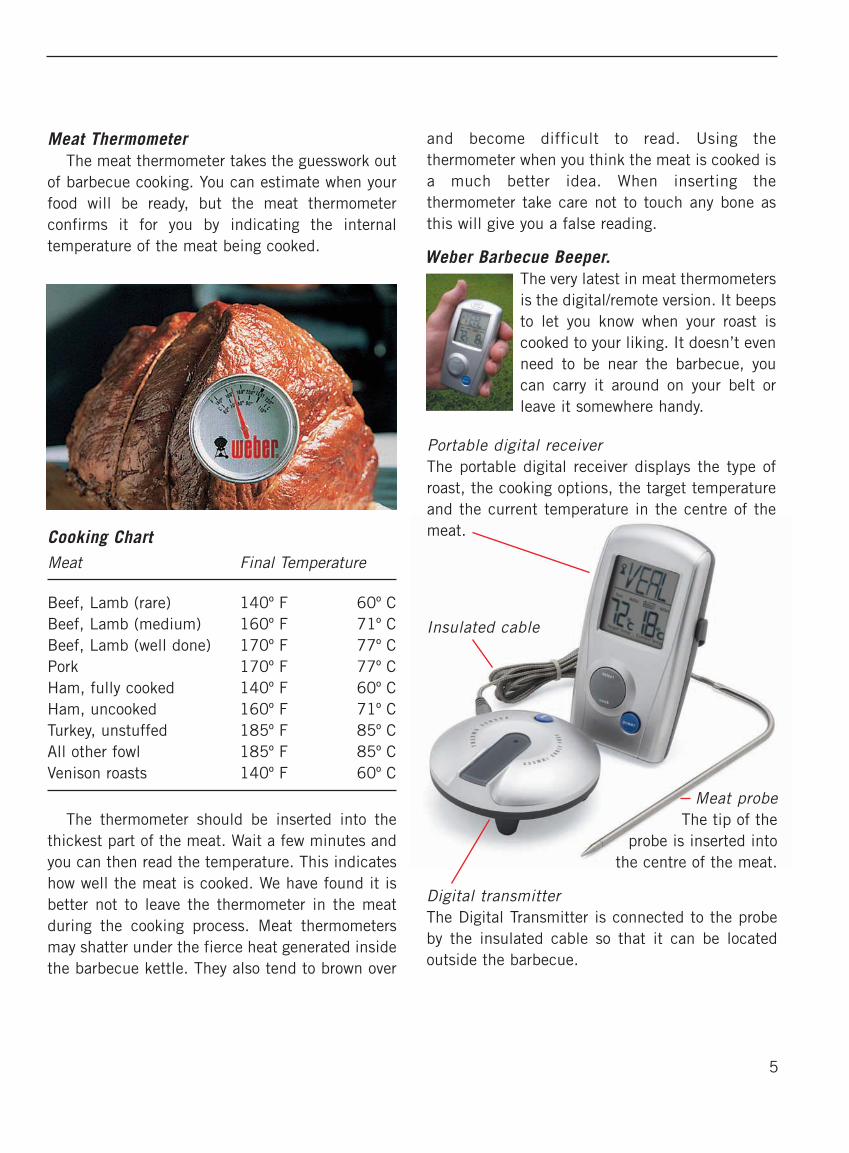
Meat ThermometerThe meat thermometer takes the guesswork out
of barbecue cooking. You can estimate when yourfood will be ready, but the meat thermometerconfirms it for you by indicating the internaltemperature of the meat being cooked.
Cooking ChartMeat Final Temperature
Beef, Lamb (rare) 140º F 60º CBeef, Lamb (medium) 160º F 71º CBeef, Lamb (well done) 170º F 77º CPork 170º F 77º CHam, fully cooked 140º F 60º CHam, uncooked 160º F 71º CTurkey, unstuffed 185º F 85º CAll other fowl 185º F 85º CVenison roasts 140º F 60º C
The thermometer should be inserted into thethickest part of the meat. Wait a few minutes andyou can then read the temperature. This indicateshow well the meat is cooked. We have found it isbetter not to leave the thermometer in the meatduring the cooking process. Meat thermometersmay shatter under the fierce heat generated insidethe barbecue kettle. They also tend to brown over
and become difficult to read. Using thethermometer when you think the meat is cooked isa much better idea. When inserting thethermometer take care not to touch any bone asthis will give you a false reading.
The very latest in meat thermometersis the digital/remote version. It beepsto let you know when your roast iscooked to your liking. It doesn’t evenneed to be near the barbecue, youcan carry it around on your belt orleave it somewhere handy.
Portable digital receiverThe portable digital receiver displays the type ofroast, the cooking options, the target temperatureand the current temperature in the centre of themeat.
5
Insulated cable
Digital transmitterThe Digital Transmitter is connected to the probeby the insulated cable so that it can be locatedoutside the barbecue.
Meat probeThe tip of the
probe is inserted intothe centre of the meat.
A151872MCKI p1-27.qxp 26/7/06 7:50 AM Page 5
Weber Barbecue Beeper.

Oven Mittens or ClothAn insulated mitten or cloth can be a great help.Some barbecues have bottom vents located nearthe coals and they can become extremely hot totouch. Avoid closing any of the vents on thebarbecue with your bare hands.
SkewersFor kebabs we like to use the cane variety. Theserequire no washing up. They are fully disposable,and do an adequate job on the barbecue. If youare going to place wooden skewers directly overthe coals, it pays to soak them in water for sometime prior to cooking. It is important, however, touse stainless steel skewers when cooking foodswhich take a long time.
Chinese WokWok cooking on the barbecue adds a delightfulvariety to outdoor entertaining. Woks are excitingto watch when being used, and they add a lot ofatmosphere to outdoor cooking.
Woks are available at barbecue shops and thebarbecue departments in most major retail stores.They are designed to fit both 57 cm (221/2") and47 cm (181/2") barbecue kettles.
Cast Iron Cooking GrillA cast iron grill, like the one pictured, fits on top of the cooking grill. When pre-heated, the iron becomes very hot. Cooking a steak on thissurface brands the meat, giving it a magnificentappearance and flavour.
HotplateTo complete your barbecue kettle equipment youreally should have a hotplate. This will enable youto cook old favourites like onion rings, eggs,bacon, hamburgers and pancakes.
6
A151872MCKI p1-27.qxp 26/7/06 7:50 AM Page 6
The Indirect Cooking Method
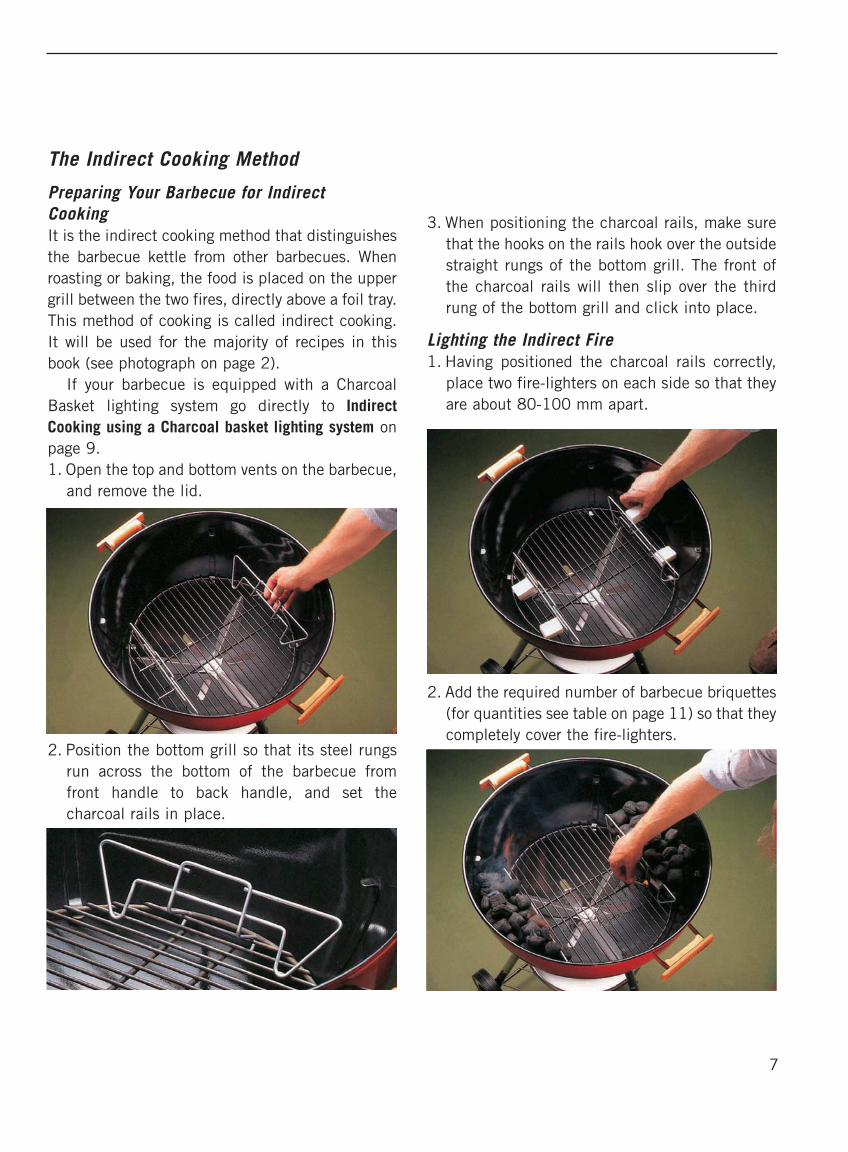
Preparing Your Barbecue for Indirect CookingIt is the indirect cooking method that distinguishesthe barbecue kettle from other barbecues. Whenroasting or baking, the food is placed on the uppergrill between the two fires, directly above a foil tray.This method of cooking is called indirect cooking.It will be used for the majority of recipes in thisbook (see photograph on page 2).
If your barbecue is equipped with a CharcoalBasket lighting system go directly to IndirectCooking using a Charcoal basket lighting system onpage 9.1. Open the top and bottom vents on the barbecue,
and remove the lid.
2. Position the bottom grill so that its steel rungsrun across the bottom of the barbecue from front handle to back handle, and set the charcoal rails in place.
3. When positioning the charcoal rails, make surethat the hooks on the rails hook over the outsidestraight rungs of the bottom grill. The front ofthe charcoal rails will then slip over the thirdrung of the bottom grill and click into place.
Lighting the Indirect Fire1. Having positioned the charcoal rails correctly,
place two fire-lighters on each side so that theyare about 80-100 mm apart.
2. Add the required number of barbecue briquettes(for quantities see table on page 11) so that theycompletely cover the fire-lighters.
7
A151872MCKI p1-99 25/10/04 10:33 AM Page 7

3. Light the fire-lighters by passing a lighted matchor taper through the charcoal rails, and touchingthe lighters with the flame. Make sure that all ofthe fire-lighters are burning well before leavingthe barbecue (sometimes a strong wind can blowthem out if they are not burning well).
4. The barbecue may now be left until the coalsare ready to cook. It will take about 45 minutesfor the fire to establish itself. During this time,make sure that the lid is left off the barbecue.This allows more oxygen to reach the coals. On no account should you place the lid on the barbecue while the fire is getting ready to cook.
The fire will now progress through the followingstages.
Stage 1. The firelighters burn with a yellow flamefor about 10 minutes. Do not attempt tocook in this time. The temperature willnot be hot enough, and the food willabsorb kerosene fumes giving it anunpleasant taste.
Stage 2. After the fire-lighters cease burning, thefire will appear to go out. This is not so,the coals are in fact burning below, andthe fire will continue to grow. There isinsufficient temperature to cook at thisstage.
Stage 3. 20-25 minutes after lighting, some ofthe coals will be glowing and coated witha brownish ash. To achieve the correctcooking temperature, all of the briquettesshould be ashed over, so don’t attempt tocook yet.
8
A151872MCKI p1-99 25/10/04 10:33 AM Page 8
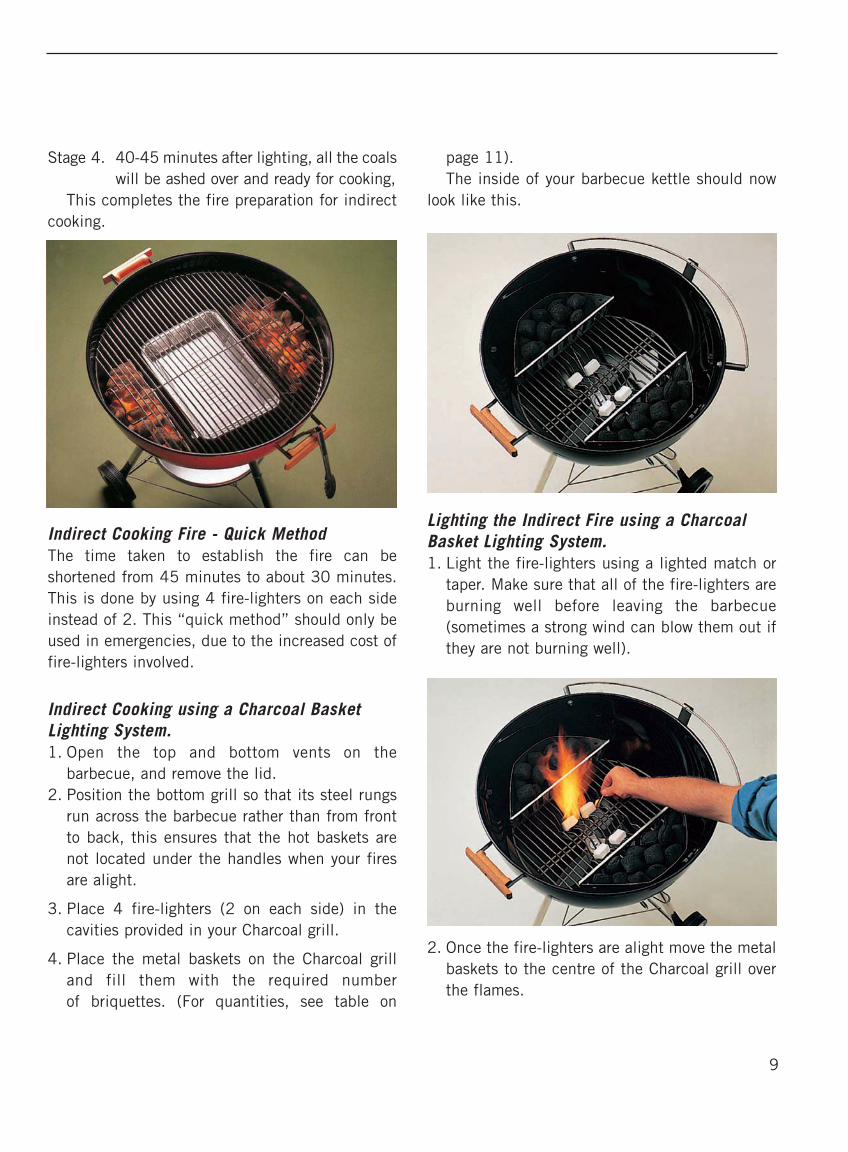
Stage 4. 40-45 minutes after lighting, all the coalswill be ashed over and ready for cooking,
This completes the fire preparation for indirectcooking.
Indirect Cooking Fire - Quick MethodThe time taken to establish the fire can beshortened from 45 minutes to about 30 minutes.This is done by using 4 fire-lighters on each sideinstead of 2. This “quick method” should only beused in emergencies, due to the increased cost offire-lighters involved.
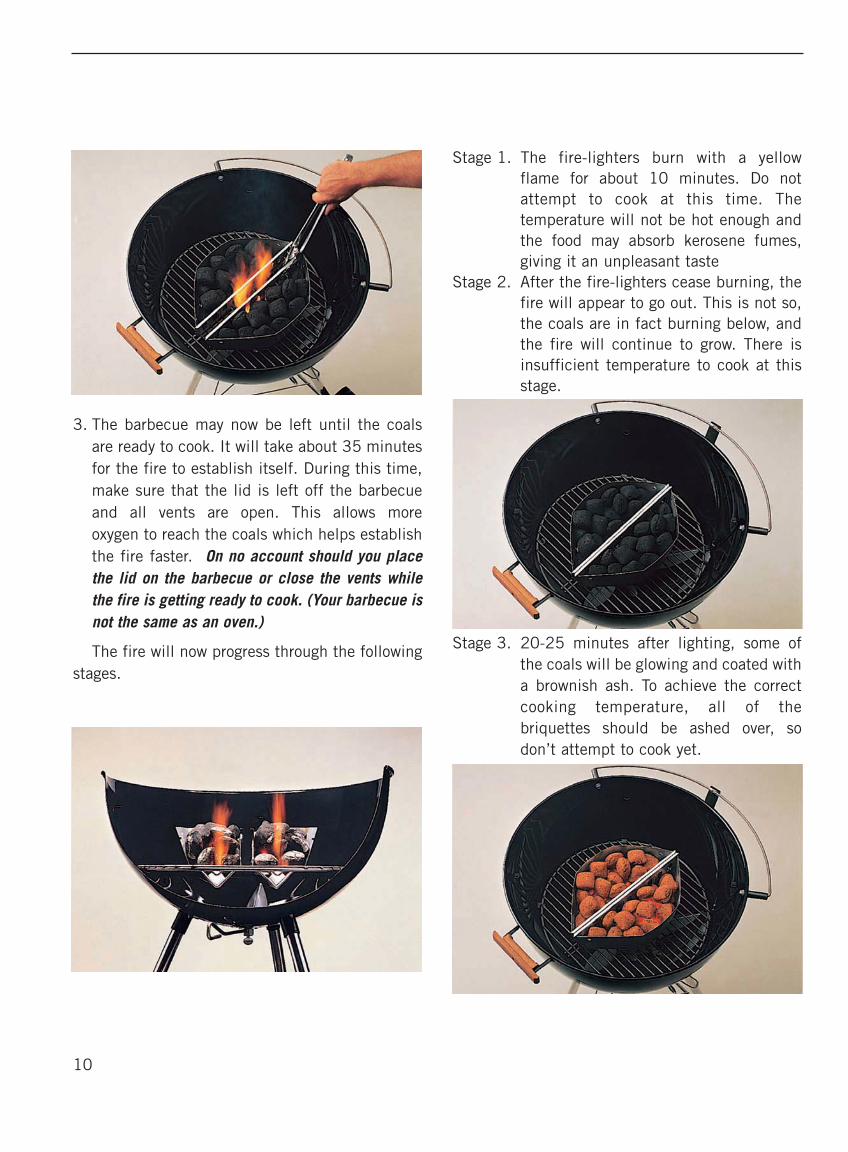
Indirect Cooking using a Charcoal BasketLighting System.1. Open the top and bottom vents on the
barbecue, and remove the lid.2. Position the bottom grill so that its steel rungs
run across the barbecue rather than from frontto back, this ensures that the hot baskets arenot located under the handles when your firesare alight.
3. Place 4 fire-lighters (2 on each side) in thecavities provided in your Charcoal grill.
4. Place the metal baskets on the Charcoal grilland fill them with the required number of briquettes. (For quantities, see table on
page 11).The inside of your barbecue kettle should now
look like this.
Lighting the Indirect Fire using a CharcoalBasket Lighting System.1. Light the fire-lighters using a lighted match or
taper. Make sure that all of the fire-lighters areburning well before leaving the barbecue(sometimes a strong wind can blow them out ifthey are not burning well).
2. Once the fire-lighters are alight move the metalbaskets to the centre of the Charcoal grill overthe flames.
9
A151872MCKI p1-99 25/10/04 10:33 AM Page 9
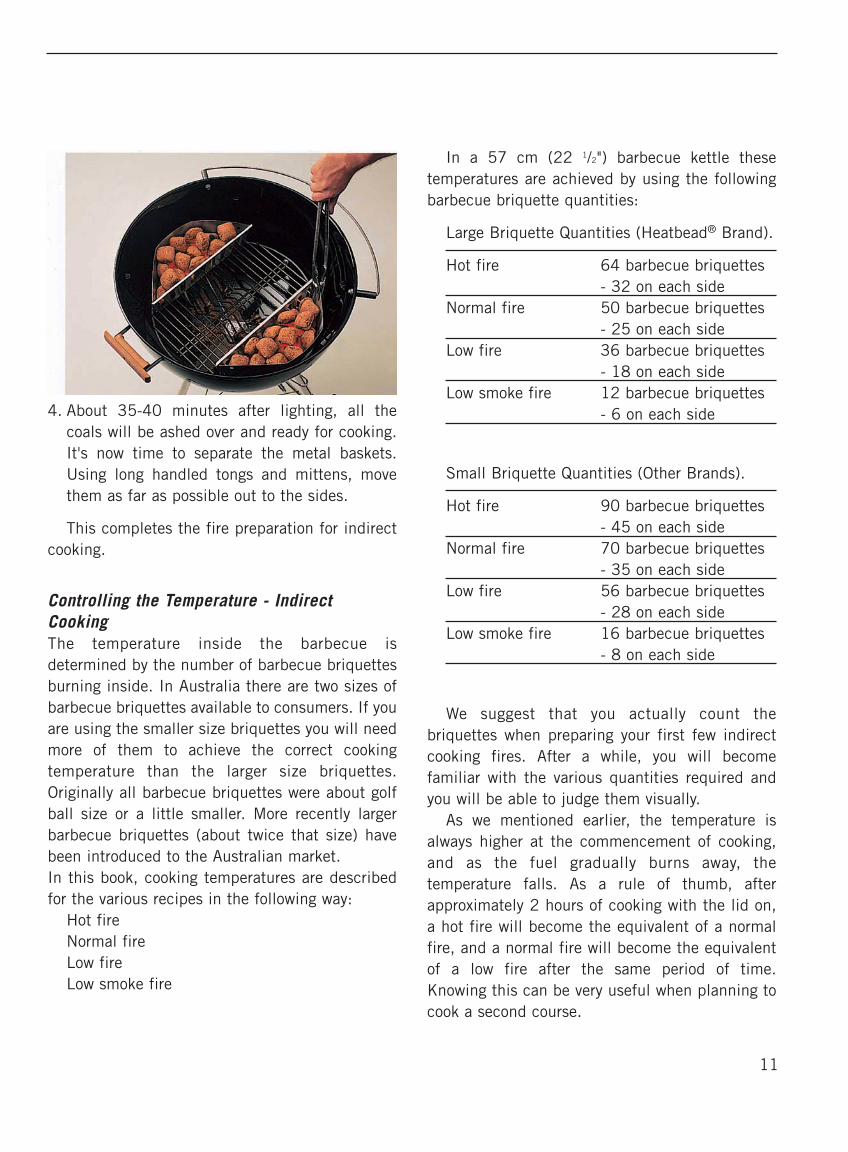
3. The barbecue may now be left until the coalsare ready to cook. It will take about 35 minutesfor the fire to establish itself. During this time,make sure that the lid is left off the barbecueand all vents are open. This allows more oxygen to reach the coals which helps establishthe fire faster. On no account should you placethe lid on the barbecue or close the vents whilethe fire is getting ready to cook. (Your barbecue isnot the same as an oven.)
The fire will now progress through the followingstages.
Stage 1. The fire-lighters burn with a yellow flame for about 10 minutes. Do notattempt to cook at this time. Thetemperature will not be hot enough andthe food may absorb kerosene fumes,giving it an unpleasant taste
Stage 2. After the fire-lighters cease burning, thefire will appear to go out. This is not so,the coals are in fact burning below, andthe fire will continue to grow. There isinsufficient temperature to cook at thisstage.
Stage 3. 20-25 minutes after lighting, some ofthe coals will be glowing and coated witha brownish ash. To achieve the correctcooking temperature, all of thebriquettes should be ashed over, sodon’t attempt to cook yet.
10
A151872MCKI p1-99 25/10/04 10:33 AM Page 10
4. About 35-40 minutes after lighting, all thecoals will be ashed over and ready for cooking.It's now time to separate the metal baskets.Using long handled tongs and mittens, movethem as far as possible out to the sides.
This completes the fire preparation for indirectcooking.
Controlling the Temperature - IndirectCookingThe temperature inside the barbecue isdetermined by the number of barbecue briquettesburning inside. In Australia there are two sizes ofbarbecue briquettes available to consumers. If youare using the smaller size briquettes you will needmore of them to achieve the correct cookingtemperature than the larger size briquettes.Originally all barbecue briquettes were about golfball size or a little smaller. More recently largerbarbecue briquettes (about twice that size) havebeen introduced to the Australian market.In this book, cooking temperatures are describedfor the various recipes in the following way:
Hot fireNormal fire Low fireLow smoke fire
In a 57 cm (22 1/2") barbecue kettle thesetemperatures are achieved by using the followingbarbecue briquette quantities:
Large Briquette Quantities (Heatbead® Brand).
Hot fire 64 barbecue briquettes- 32 on each side
Normal fire 50 barbecue briquettes- 25 on each side
Low fire 36 barbecue briquettes- 18 on each side
Low smoke fire 12 barbecue briquettes- 6 on each side
Small Briquette Quantities (Other Brands).
Hot fire 90 barbecue briquettes- 45 on each side
Normal fire 70 barbecue briquettes- 35 on each side
Low fire 56 barbecue briquettes- 28 on each side
Low smoke fire 16 barbecue briquettes- 8 on each side
We suggest that you actually count the briquettes when preparing your first few indirectcooking fires. After a while, you will becomefamiliar with the various quantities required andyou will be able to judge them visually.
As we mentioned earlier, the temperature is always higher at the commencement of cooking,and as the fuel gradually burns away, thetemperature falls. As a rule of thumb, afterapproximately 2 hours of cooking with the lid on,a hot fire will become the equivalent of a normalfire, and a normal fire will become the equivalentof a low fire after the same period of time.Knowing this can be very useful when planning tocook a second course.
11
A151872MCKI p1-99 4/11/04 12:36 PM Page 11
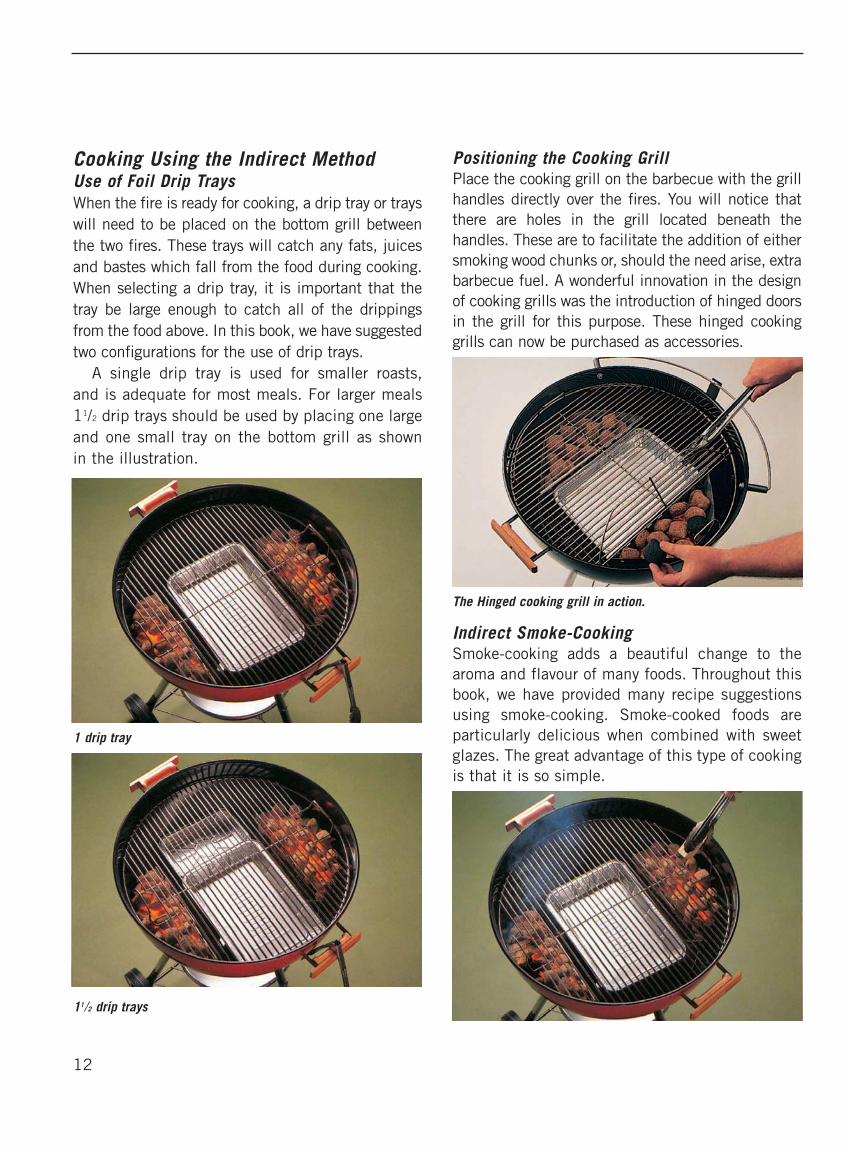
Cooking Using the Indirect MethodUse of Foil Drip TraysWhen the fire is ready for cooking, a drip tray or trayswill need to be placed on the bottom grill betweenthe two fires. These trays will catch any fats, juicesand bastes which fall from the food during cooking.When selecting a drip tray, it is important that thetray be large enough to catch all of the drippingsfrom the food above. In this book, we have suggestedtwo configurations for the use of drip trays.
A single drip tray is used for smaller roasts, and is adequate for most meals. For larger meals11/2 drip trays should be used by placing one largeand one small tray on the bottom grill as shown in the illustration.
1 drip tray
11/2 drip trays
Positioning the Cooking GrillPlace the cooking grill on the barbecue with the grillhandles directly over the fires. You will notice thatthere are holes in the grill located beneath thehandles. These are to facilitate the addition of eithersmoking wood chunks or, should the need arise, extrabarbecue fuel. A wonderful innovation in the designof cooking grills was the introduction of hinged doorsin the grill for this purpose. These hinged cookinggrills can now be purchased as accessories.
The Hinged cooking grill in action.
Indirect Smoke-CookingSmoke-cooking adds a beautiful change to thearoma and flavour of many foods. Throughout thisbook, we have provided many recipe suggestionsusing smoke-cooking. Smoke-cooked foods areparticularly delicious when combined with sweetglazes. The great advantage of this type of cookingis that it is so simple.
12
A151872MCKI p1-99 25/10/04 10:34 AM Page 12
Normal indirect fires are transformed into smoke-cooking fires by adding just 1 or 2 chunks of hickorywood (or other smoking material) to the coals oneach side of the barbecue. The more smoke flavouryou require, the more hickory chunks you add. It isa good idea to leave the lid off for a little while whenadding the hickory. This allows it to catch fire. Onceit is burning, replace the barbecue lid, and it willbegin smoking quite intensely. It is important to usechunks of smoking wood rather than chips orsawdust. The chunks smoke longer and require lessattention, resulting in a far superior smoke flavour.
Lower temperatures are created inside thebarbecue by using less fuel. We have found “TheLow Smoke Fire” (see page 11 for briquettequantities) creates an excellent temperature forsmoking small fish.
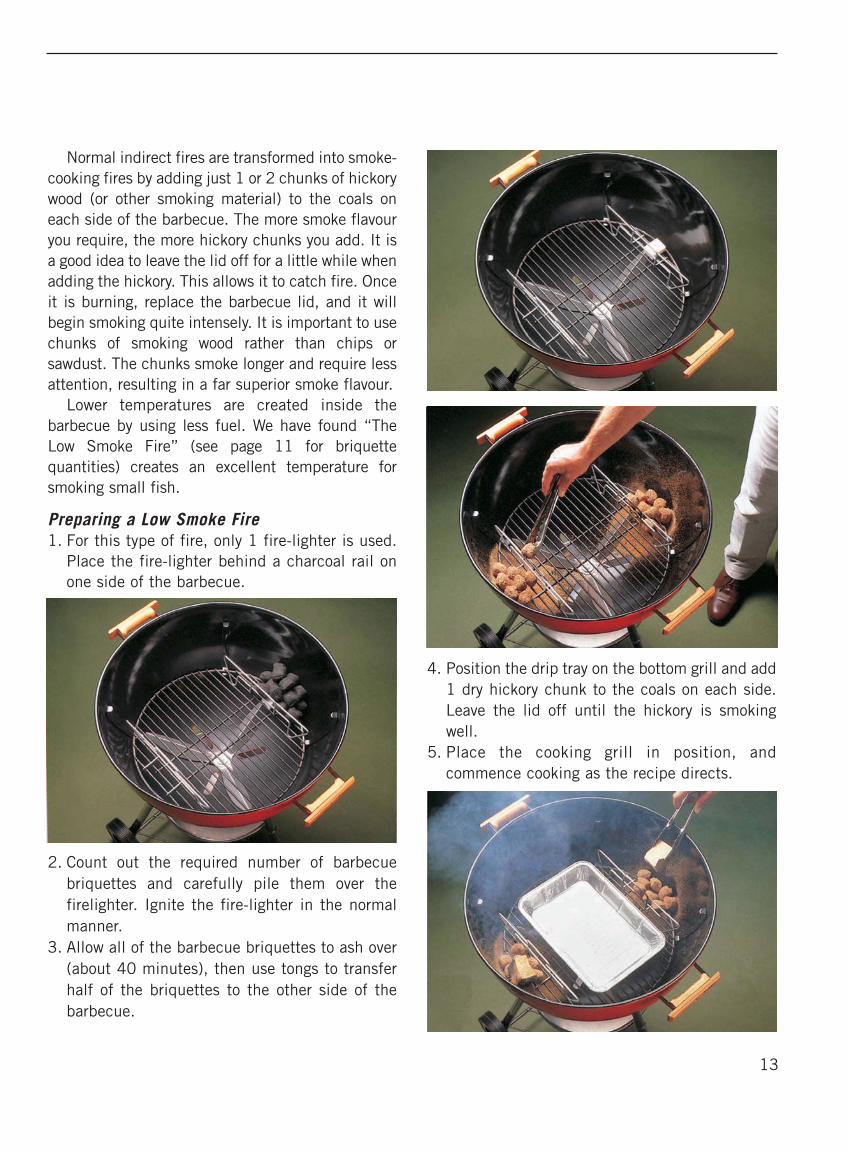
Preparing a Low Smoke Fire1. For this type of fire, only 1 fire-lighter is used.
Place the fire-lighter behind a charcoal rail onone side of the barbecue.
2. Count out the required number of barbecuebriquettes and carefully pile them over thefirelighter. Ignite the fire-lighter in the normalmanner.
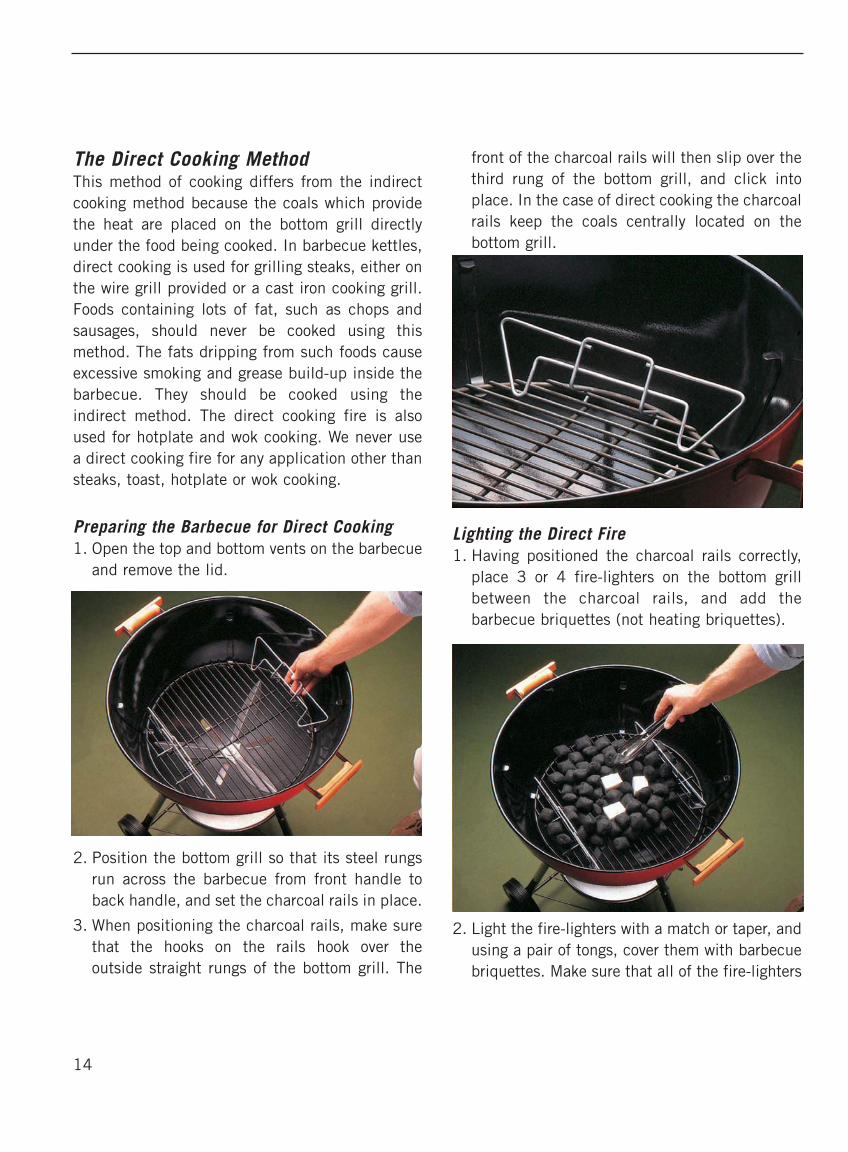
3. Allow all of the barbecue briquettes to ash over(about 40 minutes), then use tongs to transferhalf of the briquettes to the other side of thebarbecue.
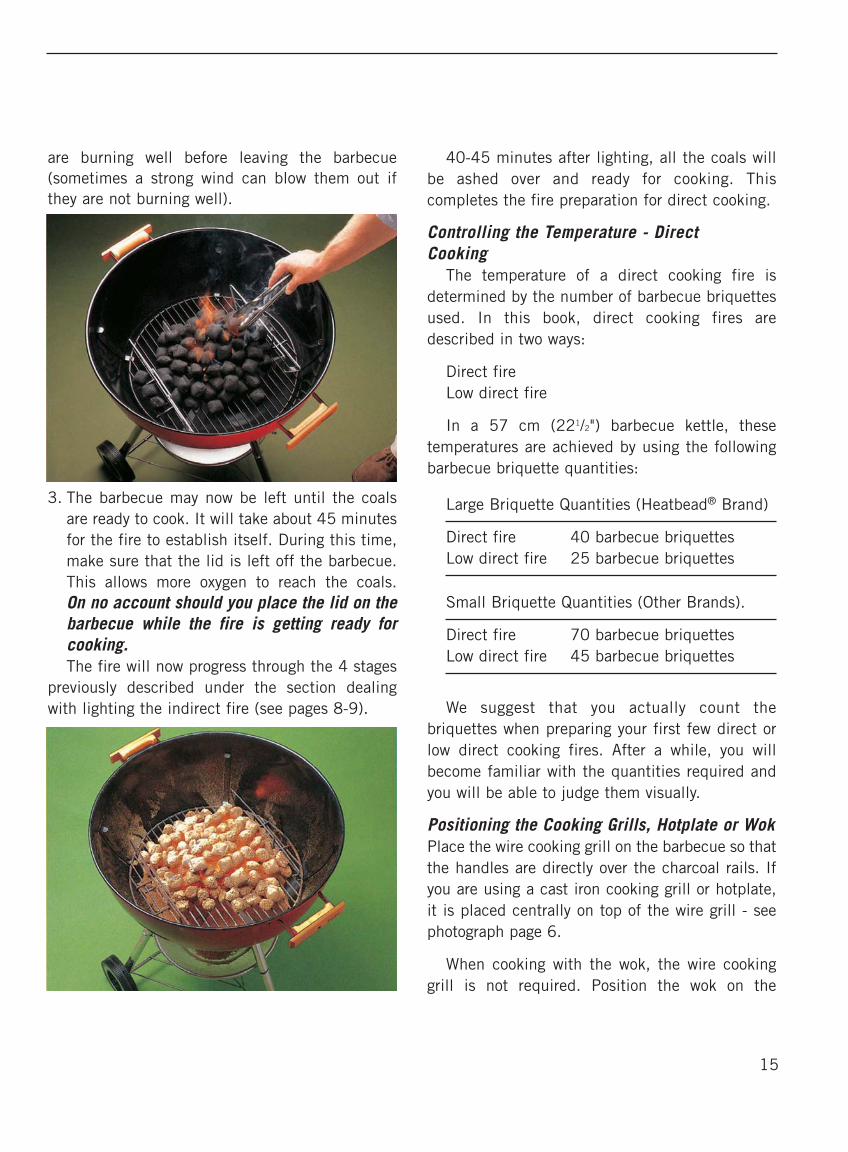
4. Position the drip tray on the bottom grill and add1 dry hickory chunk to the coals on each side.Leave the lid off until the hickory is smokingwell.
5. Place the cooking grill in position, andcommence cooking as the recipe directs.
13
A151872MCKI p1-99 25/10/04 10:34 AM Page 13
The Direct Cooking MethodThis method of cooking differs from the indirectcooking method because the coals which providethe heat are placed on the bottom grill directlyunder the food being cooked. In barbecue kettles,direct cooking is used for grilling steaks, either onthe wire grill provided or a cast iron cooking grill.Foods containing lots of fat, such as chops andsausages, should never be cooked using thismethod. The fats dripping from such foods causeexcessive smoking and grease build-up inside thebarbecue. They should be cooked using theindirect method. The direct cooking fire is alsoused for hotplate and wok cooking. We never usea direct cooking fire for any application other thansteaks, toast, hotplate or wok cooking.
Preparing the Barbecue for Direct Cooking1. Open the top and bottom vents on the barbecue
and remove the lid.
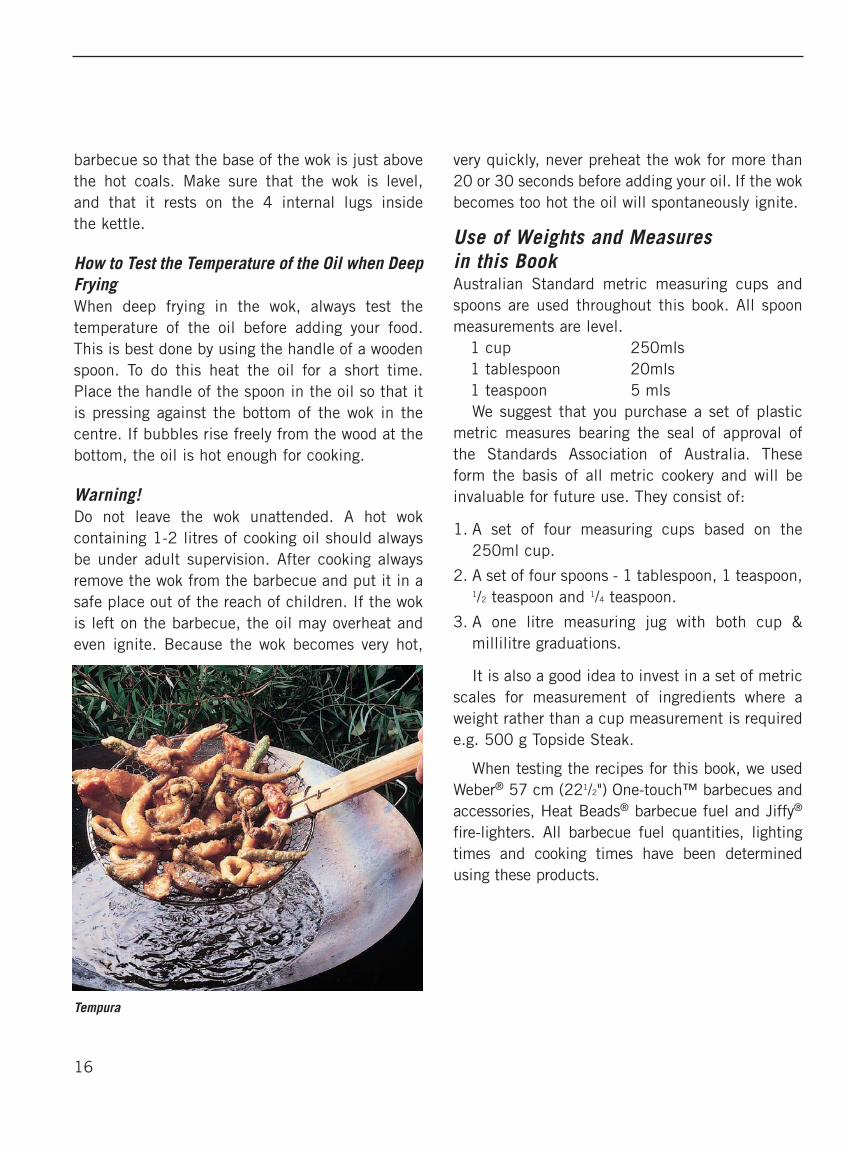
2. Position the bottom grill so that its steel rungsrun across the barbecue from front handle toback handle, and set the charcoal rails in place.
3. When positioning the charcoal rails, make surethat the hooks on the rails hook over the outside straight rungs of the bottom grill. The
front of the charcoal rails will then slip over thethird rung of the bottom grill, and click intoplace. In the case of direct cooking the charcoalrails keep the coals centrally located on thebottom grill.
Lighting the Direct Fire1. Having positioned the charcoal rails correctly,
place 3 or 4 fire-lighters on the bottom grillbetween the charcoal rails, and add thebarbecue briquettes (not heating briquettes).
2. Light the fire-lighters with a match or taper, andusing a pair of tongs, cover them with barbecuebriquettes. Make sure that all of the fire-lighters
14
A151872MCKI p1-99 25/10/04 10:34 AM Page 14
are burning well before leaving the barbecue(sometimes a strong wind can blow them out ifthey are not burning well).
3. The barbecue may now be left until the coalsare ready to cook. It will take about 45 minutesfor the fire to establish itself. During this time,make sure that the lid is left off the barbecue.This allows more oxygen to reach the coals.On no account should you place the lid on thebarbecue while the fire is getting ready forcooking.The fire will now progress through the 4 stages
previously described under the section dealingwith lighting the indirect fire (see pages 8-9).
40-45 minutes after lighting, all the coals willbe ashed over and ready for cooking. Thiscompletes the fire preparation for direct cooking.
Controlling the Temperature - DirectCooking
The temperature of a direct cooking fire isdetermined by the number of barbecue briquettesused. In this book, direct cooking fires aredescribed in two ways:
Direct fireLow direct fire
In a 57 cm (221/2") barbecue kettle, thesetemperatures are achieved by using the followingbarbecue briquette quantities:
Large Briquette Quantities (Heatbead® Brand)
Direct fire 40 barbecue briquettesLow direct fire 25 barbecue briquettes
Small Briquette Quantities (Other Brands).
Direct fire 70 barbecue briquettesLow direct fire 45 barbecue briquettes
We suggest that you actually count thebriquettes when preparing your first few direct orlow direct cooking fires. After a while, you willbecome familiar with the quantities required andyou will be able to judge them visually.
Positioning the Cooking Grills, Hotplate or WokPlace the wire cooking grill on the barbecue so thatthe handles are directly over the charcoal rails. Ifyou are using a cast iron cooking grill or hotplate,it is placed centrally on top of the wire grill - seephotograph page 6.
When cooking with the wok, the wire cookinggrill is not required. Position the wok on the
15
A151872MCKI p1-99 4/11/04 12:37 PM Page 15
barbecue so that the base of the wok is just abovethe hot coals. Make sure that the wok is level, and that it rests on the 4 internal lugs inside the kettle.
How to Test the Temperature of the Oil when DeepFryingWhen deep frying in the wok, always test thetemperature of the oil before adding your food.This is best done by using the handle of a woodenspoon. To do this heat the oil for a short time.Place the handle of the spoon in the oil so that itis pressing against the bottom of the wok in thecentre. If bubbles rise freely from the wood at thebottom, the oil is hot enough for cooking.
Warning!Do not leave the wok unattended. A hot wokcontaining 1-2 litres of cooking oil should alwaysbe under adult supervision. After cooking alwaysremove the wok from the barbecue and put it in asafe place out of the reach of children. If the wokis left on the barbecue, the oil may overheat andeven ignite. Because the wok becomes very hot,
very quickly, never preheat the wok for more than20 or 30 seconds before adding your oil. If the wokbecomes too hot the oil will spontaneously ignite.
Use of Weights and Measures in this BookAustralian Standard metric measuring cups andspoons are used throughout this book. All spoonmeasurements are level.
1 cup 250mls1 tablespoon 20mls1 teaspoon 5 mlsWe suggest that you purchase a set of plastic
metric measures bearing the seal of approval ofthe Standards Association of Australia. These form the basis of all metric cookery and will beinvaluable for future use. They consist of:
1. A set of four measuring cups based on the250ml cup.
2. A set of four spoons - 1 tablespoon, 1 teaspoon,1/2 teaspoon and 1/4 teaspoon.
3. A one litre measuring jug with both cup &millilitre graduations.
It is also a good idea to invest in a set of metricscales for measurement of ingredients where aweight rather than a cup measurement is requirede.g. 500 g Topside Steak.
When testing the recipes for this book, we usedWeber® 57 cm (221/2") One-touch™ barbecues andaccessories, Heat Beads® barbecue fuel and Jiffy®
fire-lighters. All barbecue fuel quantities, lightingtimes and cooking times have been determinedusing these products.
16
Tempura
A151872MCKI p1-99 9/8/06 8:49 AM Page 16