Embed Size (px)
Citation preview
TTTeeeccchhhnnniiicccaaalll DDDooocccuuummmeeennntttaaatttiiiooonnn
Cisco CallManager
H323 Interoperability Operating QuesCom with Cisco CallManager 3.3 - 4.0 - 4.1
This document and information it contains are property of QuesCom. They shall not be reproduced nor disclosed to any person except to those having a need to know them
without prior written consent of QuesCom.
QuesCom Product : QuesCom 300/400 IP-GSM
System Release : 3.51 and above
Document version 02.01, February 07, 18 pages
Summary
H323 Trunk Configuration with the Cisco CallManager 3.3 - 4.0 – 4.1
This application note describes the steps necessary to get a Cisco CallManager (including the particular case of Publisher & Subscriber) and a Cisco CallManager Express to control a QuesCom 400
gateway. The configuration depicted is very simple with just one QuesCom gateway configured as a trunk.
This note does not deal with the configuration parts that are not relevant for interoperability, thus
SIM management, PSTN gateway/route configuration and so on are not described
Please check the QuesCom documentation for additional information or contact the QuesCom Support hotline at: +33 (0) 820 20 38 46 or by email to [email protected]
Cisco CallManager H323 Interoperability Operating QuesCom with Cisco CallManager 3.3 - 4.0 - 4.1
Page 2/18
TTTeeeccchhhnnniiicccaaalll DDDooocccuuummmeeennntttaaatttiiiooonnn
1. Introduction
The configuration is splited in 3 parts :
- Configuring the Cisco CallManager and the QuesCom 400 to register with H323 Cisco
CallManager (Chapter 2).
- Particular case : Configuring the QuesCom 400 to register with H323 Cisco CallManager Publisher + Subscriber (Chapter 3)
- Configuring the Cisco CallManager Express and the QuesCom 400 to register with H323 Cisco
CallManager Express (Chapter 4)
2. Configuration for Cisco CallManager used with QuesCom IP/GSM gateway
2.1 Configuring the Cisco CallManager
The easiest way to understand how to create a successful configuration is to see one and hence this
guide walks you through a sample configuration exercise using Cisco CallManager 3.3 or 4.0 and a French routing/numbering plan.
2.1.1 Add a new trunk
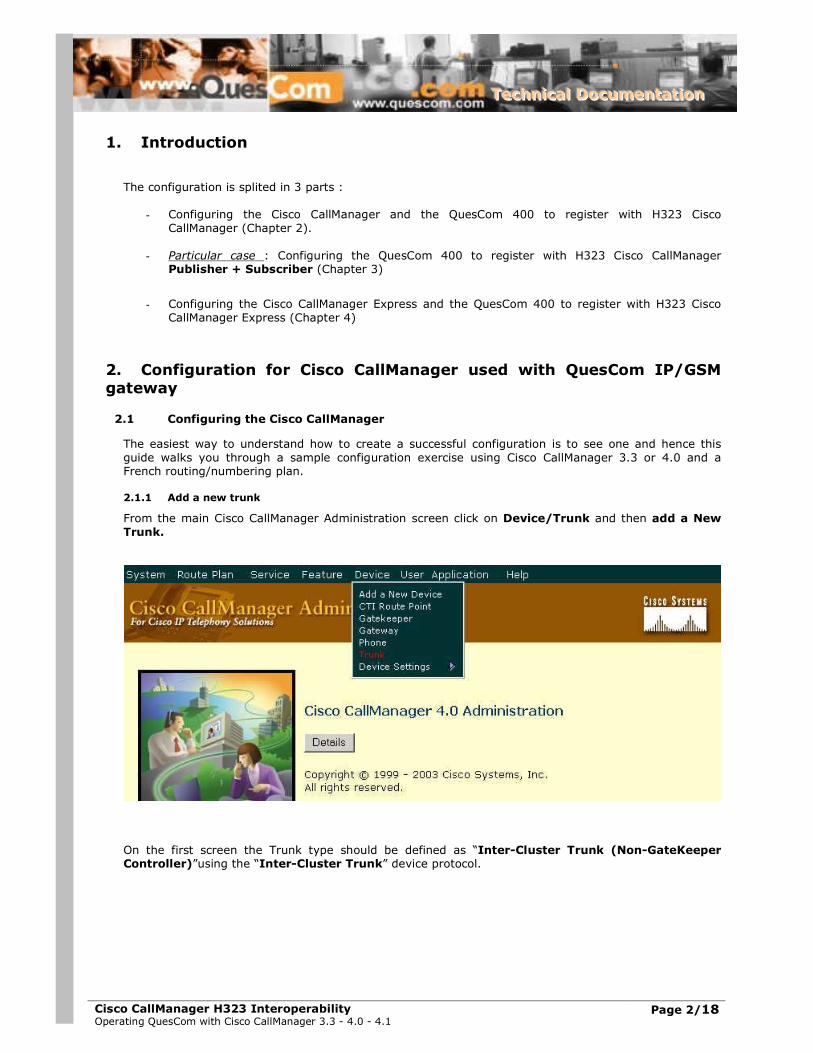
From the main Cisco CallManager Administration screen click on Device/Trunk and then add a New
Trunk.
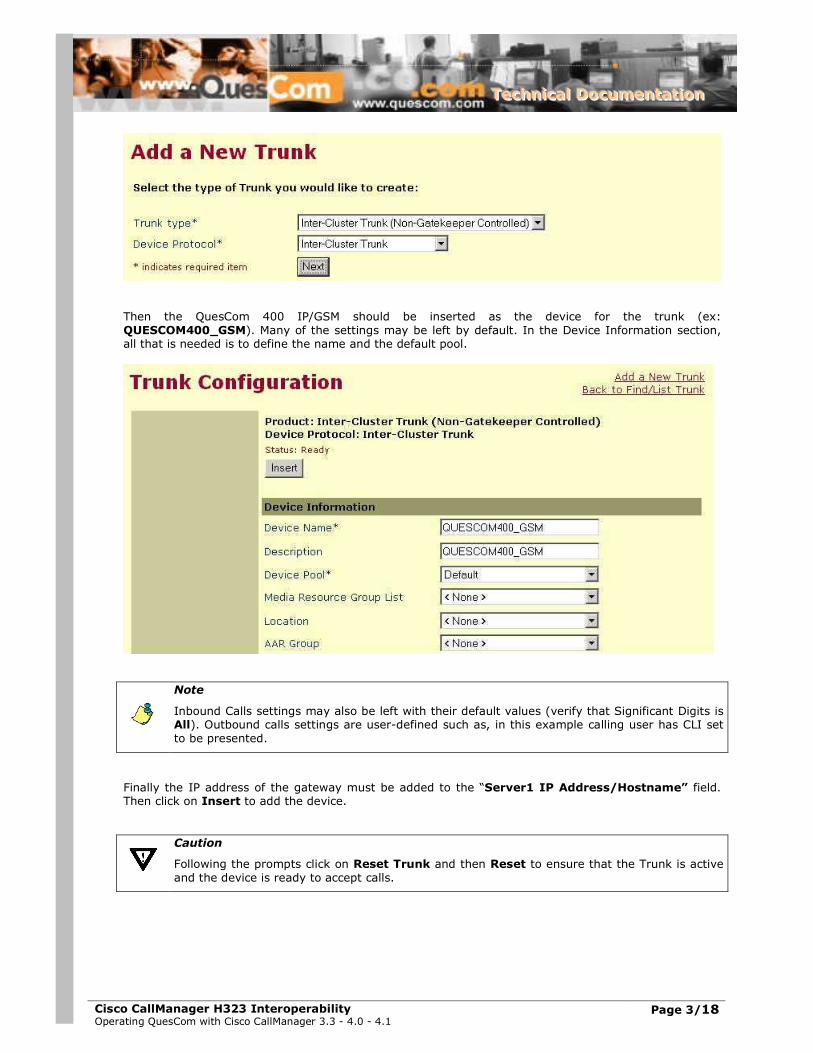
On the first screen the Trunk type should be defined as “Inter-Cluster Trunk (Non-GateKeeper Controller)”using the “Inter-Cluster Trunk” device protocol.
Cisco CallManager H323 Interoperability Operating QuesCom with Cisco CallManager 3.3 - 4.0 - 4.1
Page 3/18
TTTeeeccchhhnnniiicccaaalll DDDooocccuuummmeeennntttaaatttiiiooonnn
Then the QuesCom 400 IP/GSM should be inserted as the device for the trunk (ex:
QUESCOM400_GSM). Many of the settings may be left by default. In the Device Information section, all that is needed is to define the name and the default pool.
Note
Inbound Calls settings may also be left with their default values (verify that Significant Digits is All). Outbound calls settings are user-defined such as, in this example calling user has CLI set
to be presented.
Finally the IP address of the gateway must be added to the “Server1 IP Address/Hostname” field. Then click on Insert to add the device.
Caution
Following the prompts click on Reset Trunk and then Reset to ensure that the Trunk is active
and the device is ready to accept calls.
Cisco CallManager H323 Interoperability Operating QuesCom with Cisco CallManager 3.3 - 4.0 - 4.1
Page 4/18
TTTeeeccchhhnnniiicccaaalll DDDooocccuuummmeeennntttaaatttiiiooonnn
2.1.2 Route configuration
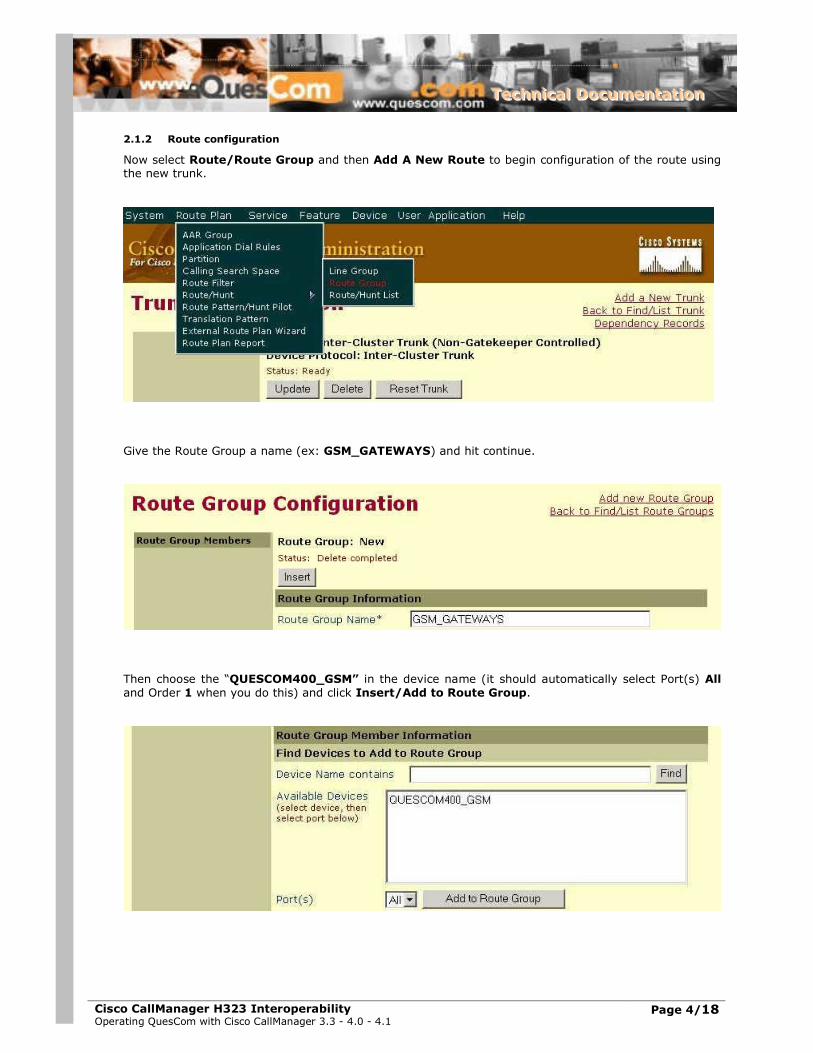
Now select Route/Route Group and then Add A New Route to begin configuration of the route using the new trunk.
Give the Route Group a name (ex: GSM_GATEWAYS) and hit continue.
Then choose the “QUESCOM400_GSM” in the device name (it should automatically select Port(s) All
and Order 1 when you do this) and click Insert/Add to Route Group.
Cisco CallManager H323 Interoperability Operating QuesCom with Cisco CallManager 3.3 - 4.0 - 4.1
Page 5/18
TTTeeeccchhhnnniiicccaaalll DDDooocccuuummmeeennntttaaatttiiiooonnn
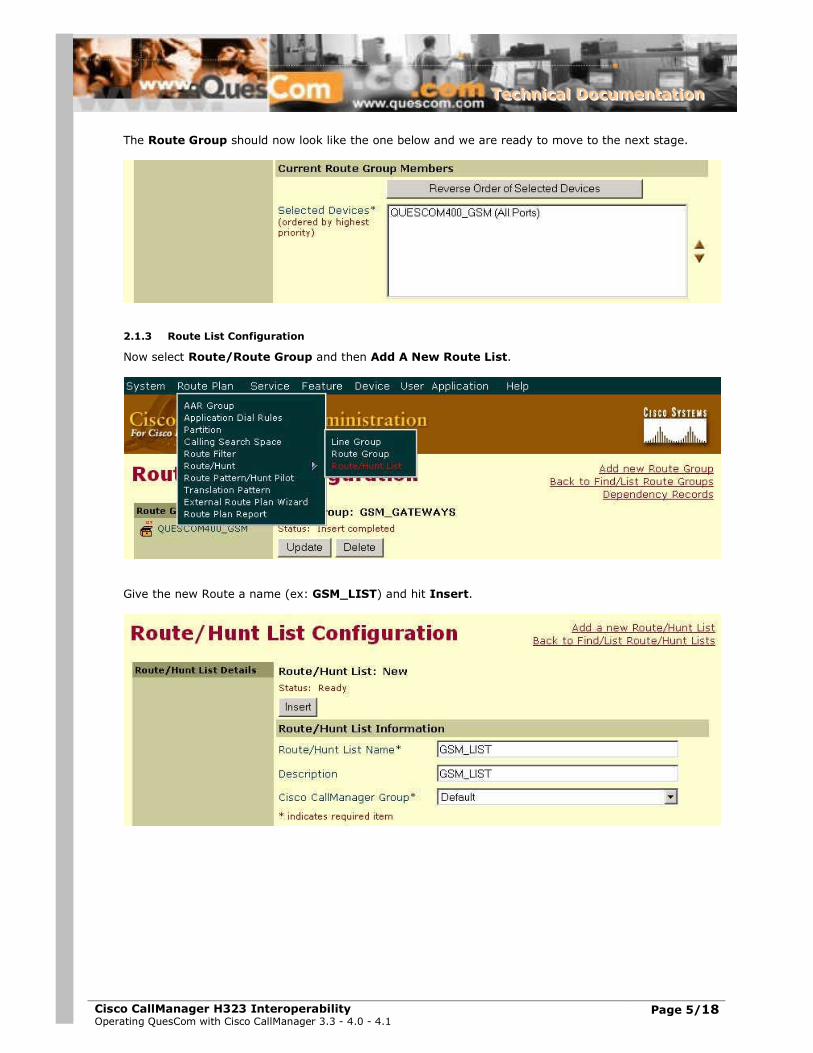
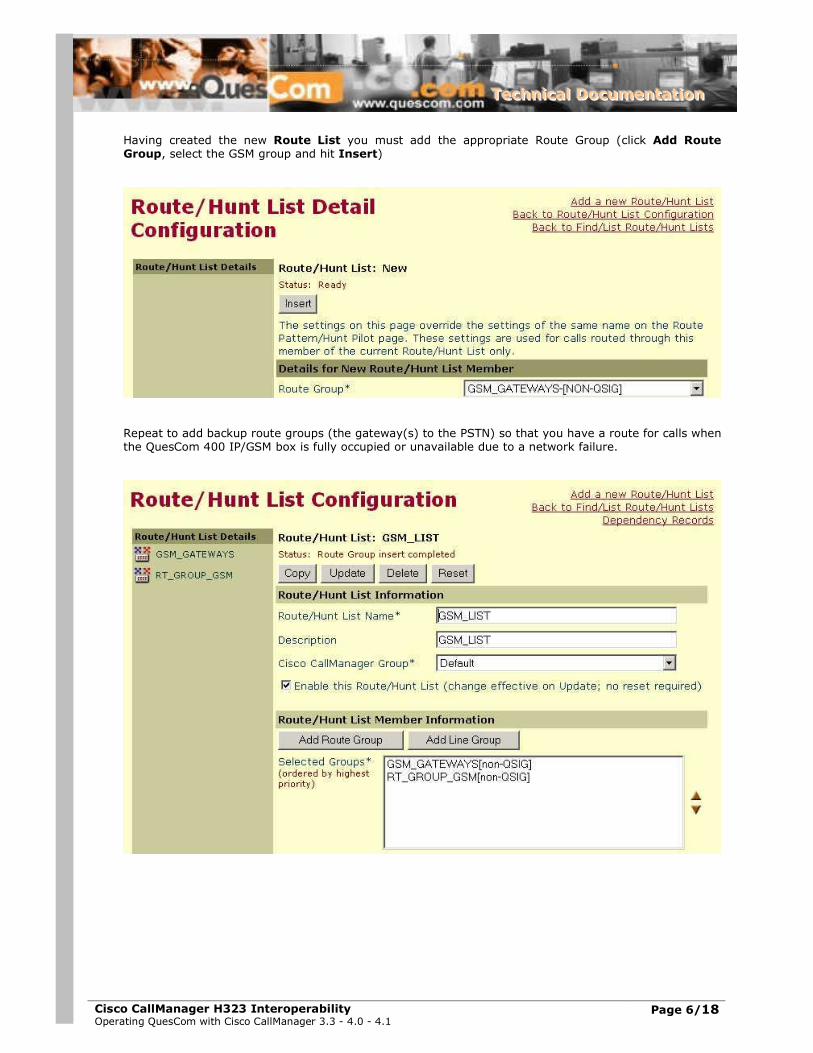
The Route Group should now look like the one below and we are ready to move to the next stage.
2.1.3 Route List Configuration
Now select Route/Route Group and then Add A New Route List.
Give the new Route a name (ex: GSM_LIST) and hit Insert.
Cisco CallManager H323 Interoperability Operating QuesCom with Cisco CallManager 3.3 - 4.0 - 4.1
Page 6/18
TTTeeeccchhhnnniiicccaaalll DDDooocccuuummmeeennntttaaatttiiiooonnn
Having created the new Route List you must add the appropriate Route Group (click Add Route Group, select the GSM group and hit Insert)
Repeat to add backup route groups (the gateway(s) to the PSTN) so that you have a route for calls when the QuesCom 400 IP/GSM box is fully occupied or unavailable due to a network failure.

Cisco CallManager H323 Interoperability Operating QuesCom with Cisco CallManager 3.3 - 4.0 - 4.1
Page 7/18
TTTeeeccchhhnnniiicccaaalll DDDooocccuuummmeeennntttaaatttiiiooonnn
2.1.4 Route Pattern Configuration
Select Route/Route Pattern and then Add a New Route Pattern
You should choose the appropriate route pattern to match mobile numbers, the new GSM route list and
hit Insert. French numbering plan is 06 XX XX XX XX
Now if you see a screen like the one below you have fully enabled the QuesCom 400 IP/GSM gateway within Cisco CallManager
Congratulations you have configured the Cisco CallManager to recognize and use the QuesCom 400
IP/GSM gateway.
Cisco CallManager H323 Interoperability Operating QuesCom with Cisco CallManager 3.3 - 4.0 - 4.1
Page 8/18
TTTeeeccchhhnnniiicccaaalll DDDooocccuuummmeeennntttaaatttiiiooonnn
2.2 Configuring the QuesCom to register with H323 Cisco CallManager
This section describes how to setup the QuesCom 400 IP/GSM to accept calls from the Cisco
CallManager. The Cisco CallManager has to be declared on the QuesCom 400 IP/GSM as a “Foreign
Gatekeeper” with VoIP profiles set to “No RAS” and “Wait Terminal Capability”. Here is how to proceed.
Connect to Qportal : http://<QuescomIPaddress>:8000 (ex: http//192.168.11:8000)
Login with “General Administrator” as a login, default password is “quescom”
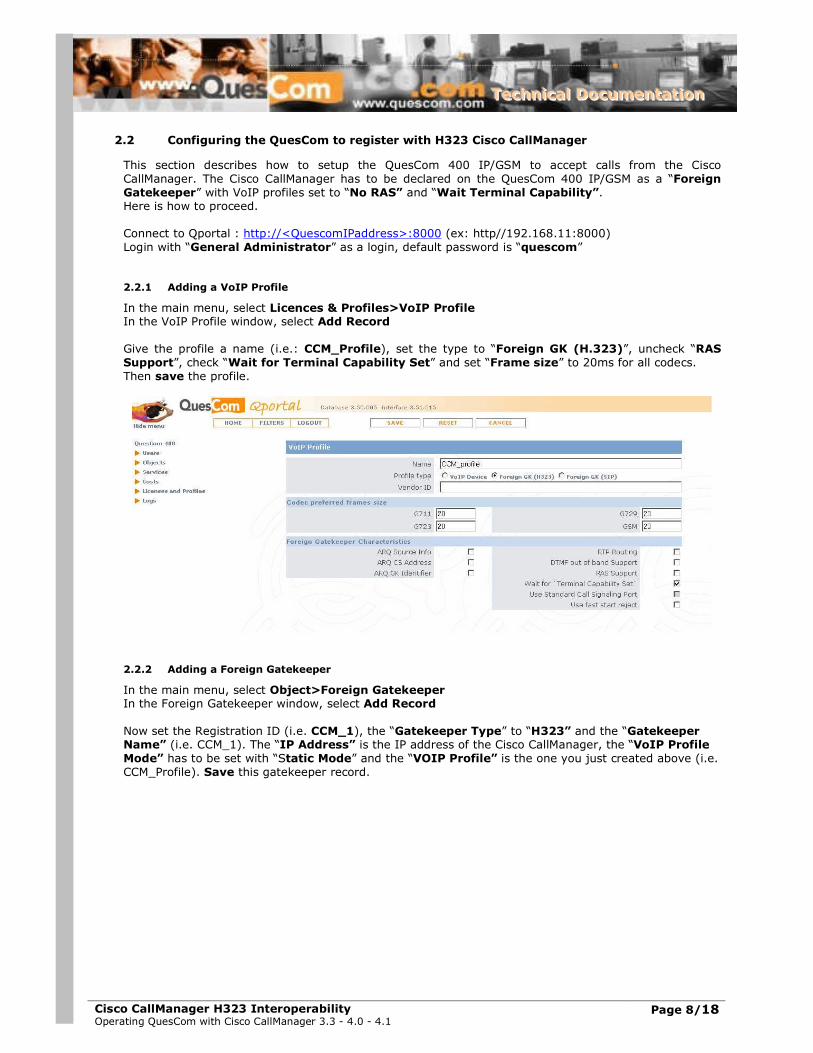
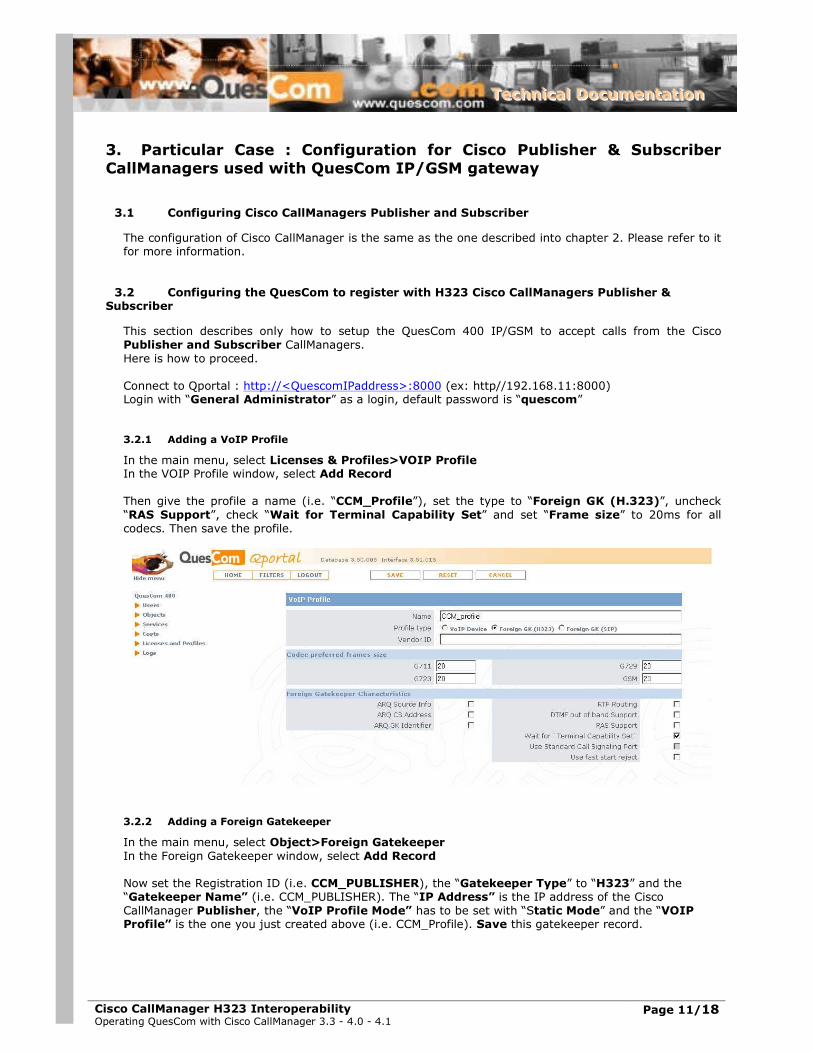
2.2.1 Adding a VoIP Profile
In the main menu, select Licences & Profiles>VoIP Profile In the VoIP Profile window, select Add Record
Give the profile a name (i.e.: CCM_Profile), set the type to “Foreign GK (H.323)”, uncheck “RAS
Support”, check “Wait for Terminal Capability Set” and set “Frame size” to 20ms for all codecs.
Then save the profile.
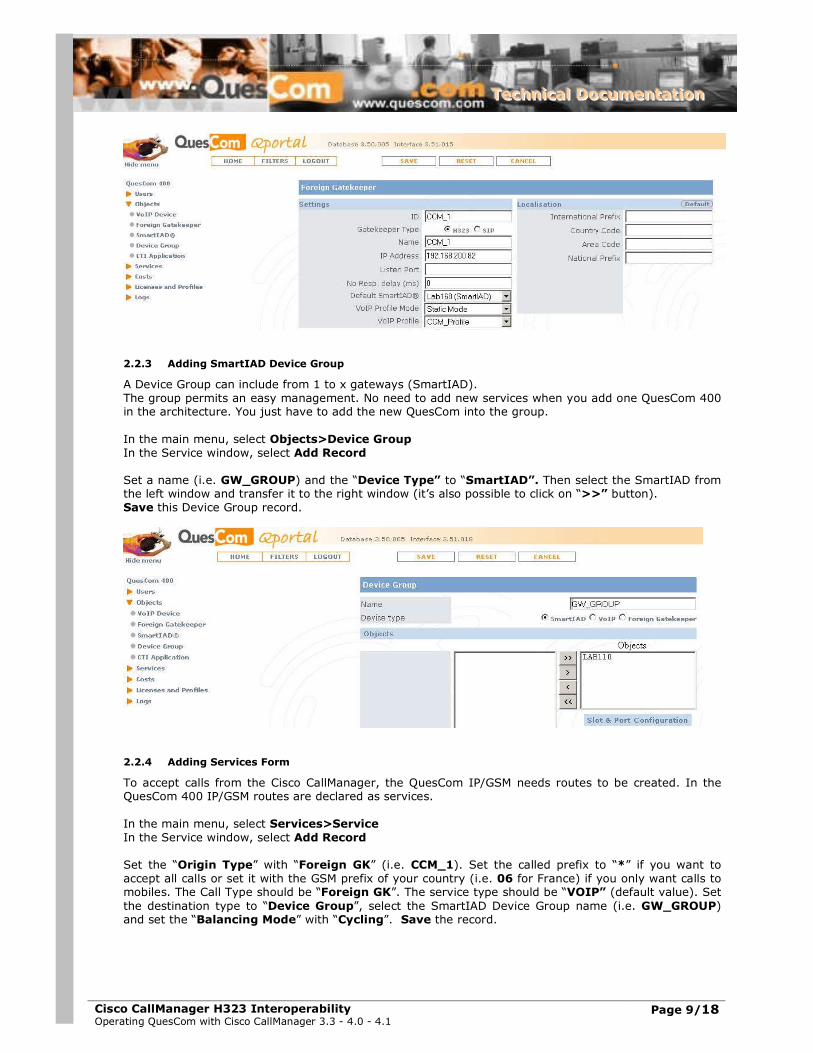
2.2.2 Adding a Foreign Gatekeeper
In the main menu, select Object>Foreign Gatekeeper In the Foreign Gatekeeper window, select Add Record
Now set the Registration ID (i.e. CCM_1), the “Gatekeeper Type” to “H323” and the “Gatekeeper Name” (i.e. CCM_1). The “IP Address” is the IP address of the Cisco CallManager, the “VoIP Profile
Mode” has to be set with “Static Mode” and the “VOIP Profile” is the one you just created above (i.e.
CCM_Profile). Save this gatekeeper record.
Cisco CallManager H323 Interoperability Operating QuesCom with Cisco CallManager 3.3 - 4.0 - 4.1
Page 9/18
TTTeeeccchhhnnniiicccaaalll DDDooocccuuummmeeennntttaaatttiiiooonnn
2.2.3 Adding SmartIAD Device Group
A Device Group can include from 1 to x gateways (SmartIAD).
The group permits an easy management. No need to add new services when you add one QuesCom 400 in the architecture. You just have to add the new QuesCom into the group.
In the main menu, select Objects>Device Group
In the Service window, select Add Record
Set a name (i.e. GW_GROUP) and the “Device Type” to “SmartIAD”. Then select the SmartIAD from the left window and transfer it to the right window (it’s also possible to click on “>>” button).
Save this Device Group record.
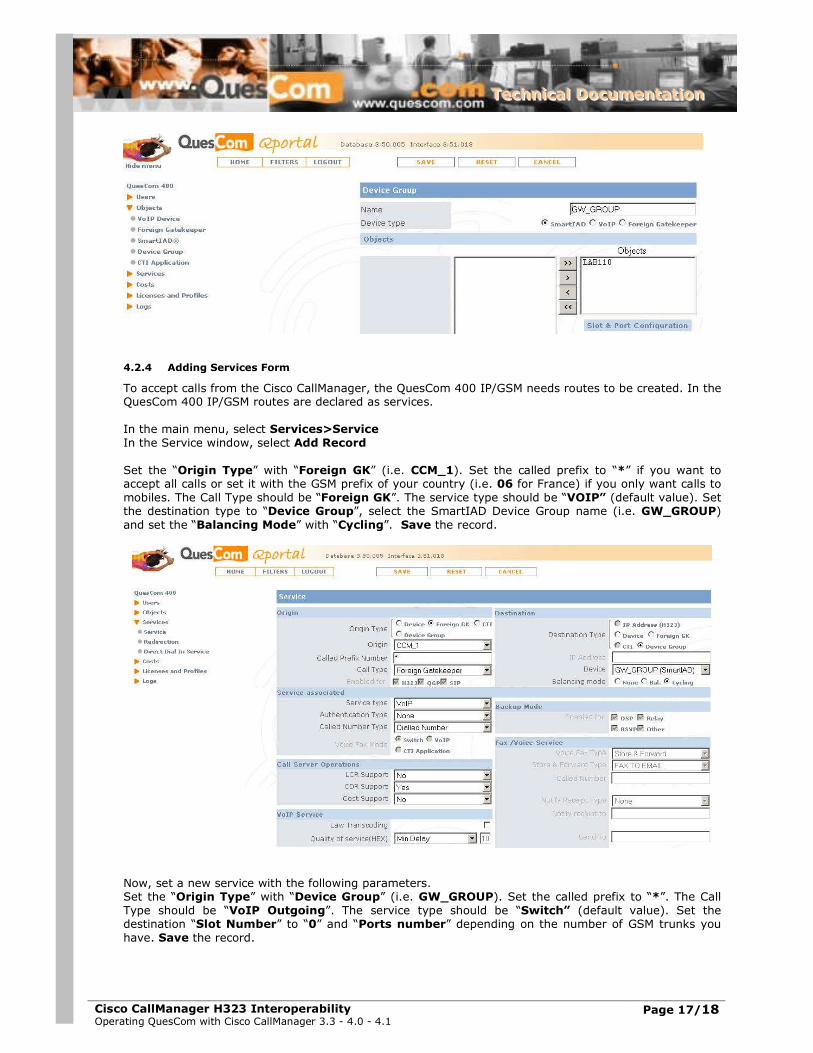
2.2.4 Adding Services Form
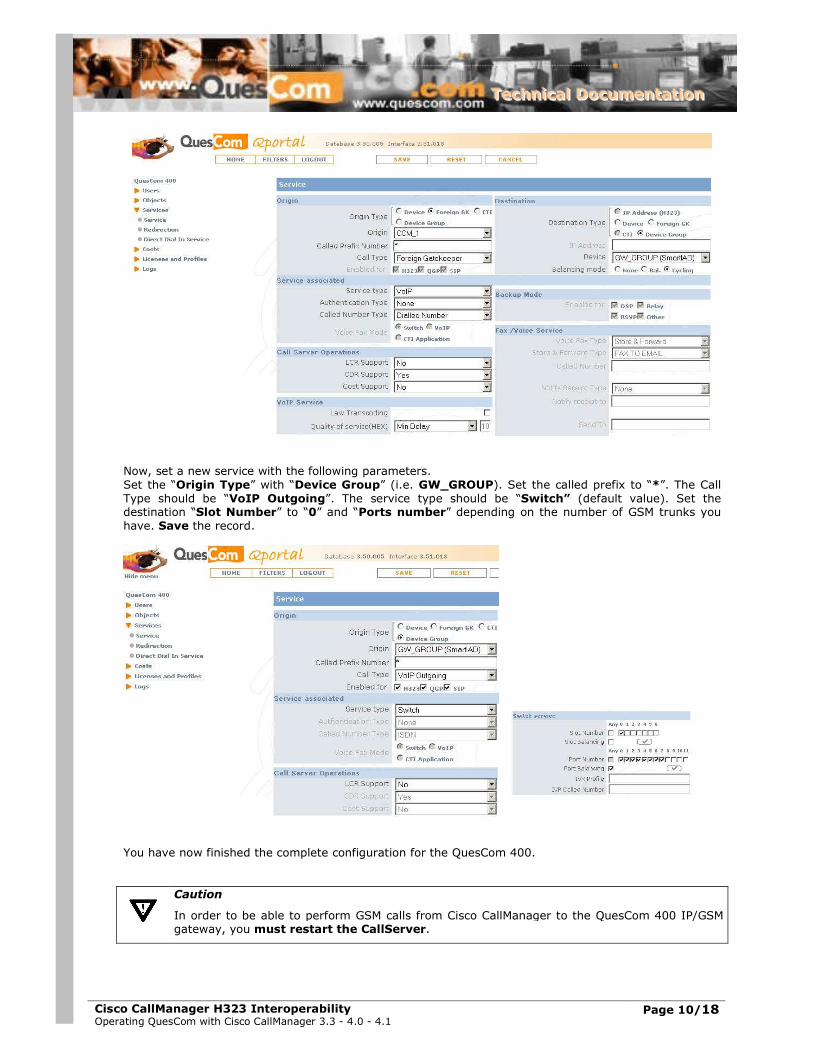
To accept calls from the Cisco CallManager, the QuesCom IP/GSM needs routes to be created. In the QuesCom 400 IP/GSM routes are declared as services.
In the main menu, select Services>Service
In the Service window, select Add Record
Set the “Origin Type” with “Foreign GK” (i.e. CCM_1). Set the called prefix to “*” if you want to
accept all calls or set it with the GSM prefix of your country (i.e. 06 for France) if you only want calls to mobiles. The Call Type should be “Foreign GK”. The service type should be “VOIP” (default value). Set
the destination type to “Device Group”, select the SmartIAD Device Group name (i.e. GW_GROUP) and set the “Balancing Mode” with “Cycling”. Save the record.
Cisco CallManager H323 Interoperability Operating QuesCom with Cisco CallManager 3.3 - 4.0 - 4.1
Page 10/18
TTTeeeccchhhnnniiicccaaalll DDDooocccuuummmeeennntttaaatttiiiooonnn
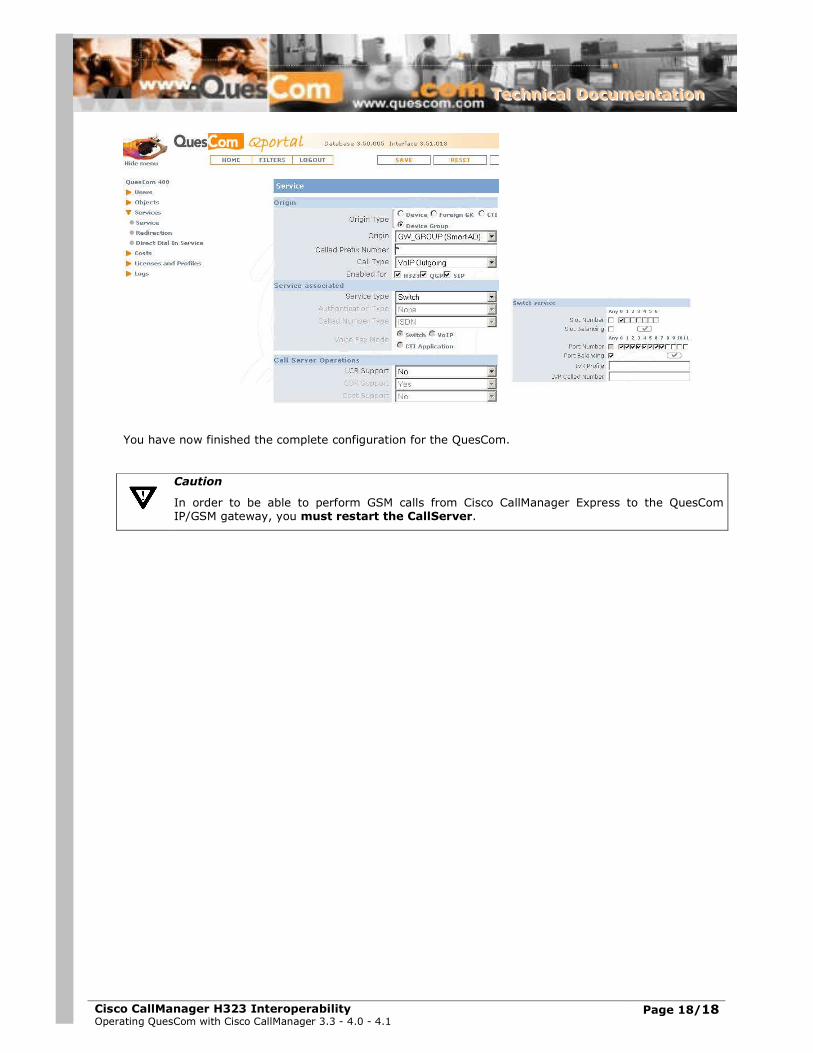
Now, set a new service with the following parameters.
Set the “Origin Type” with “Device Group” (i.e. GW_GROUP). Set the called prefix to “*”. The Call
Type should be “VoIP Outgoing”. The service type should be “Switch” (default value). Set the destination “Slot Number” to “0” and “Ports number” depending on the number of GSM trunks you
have. Save the record.
You have now finished the complete configuration for the QuesCom 400.
Caution
In order to be able to perform GSM calls from Cisco CallManager to the QuesCom 400 IP/GSM gateway, you must restart the CallServer.
Cisco CallManager H323 Interoperability Operating QuesCom with Cisco CallManager 3.3 - 4.0 - 4.1
Page 11/18
TTTeeeccchhhnnniiicccaaalll DDDooocccuuummmeeennntttaaatttiiiooonnn
3. Particular Case : Configuration for Cisco Publisher & Subscriber
CallManagers used with QuesCom IP/GSM gateway
3.1 Configuring Cisco CallManagers Publisher and Subscriber
The configuration of Cisco CallManager is the same as the one described into chapter 2. Please refer to it for more information.
3.2 Configuring the QuesCom to register with H323 Cisco CallManagers Publisher & Subscriber
This section describes only how to setup the QuesCom 400 IP/GSM to accept calls from the Cisco
Publisher and Subscriber CallManagers.
Here is how to proceed.
Connect to Qportal : http://<QuescomIPaddress>:8000 (ex: http//192.168.11:8000) Login with “General Administrator” as a login, default password is “quescom”
3.2.1 Adding a VoIP Profile
In the main menu, select Licenses & Profiles>VOIP Profile In the VOIP Profile window, select Add Record
Then give the profile a name (i.e. “CCM_Profile”), set the type to “Foreign GK (H.323)”, uncheck
“RAS Support”, check “Wait for Terminal Capability Set” and set “Frame size” to 20ms for all
codecs. Then save the profile.
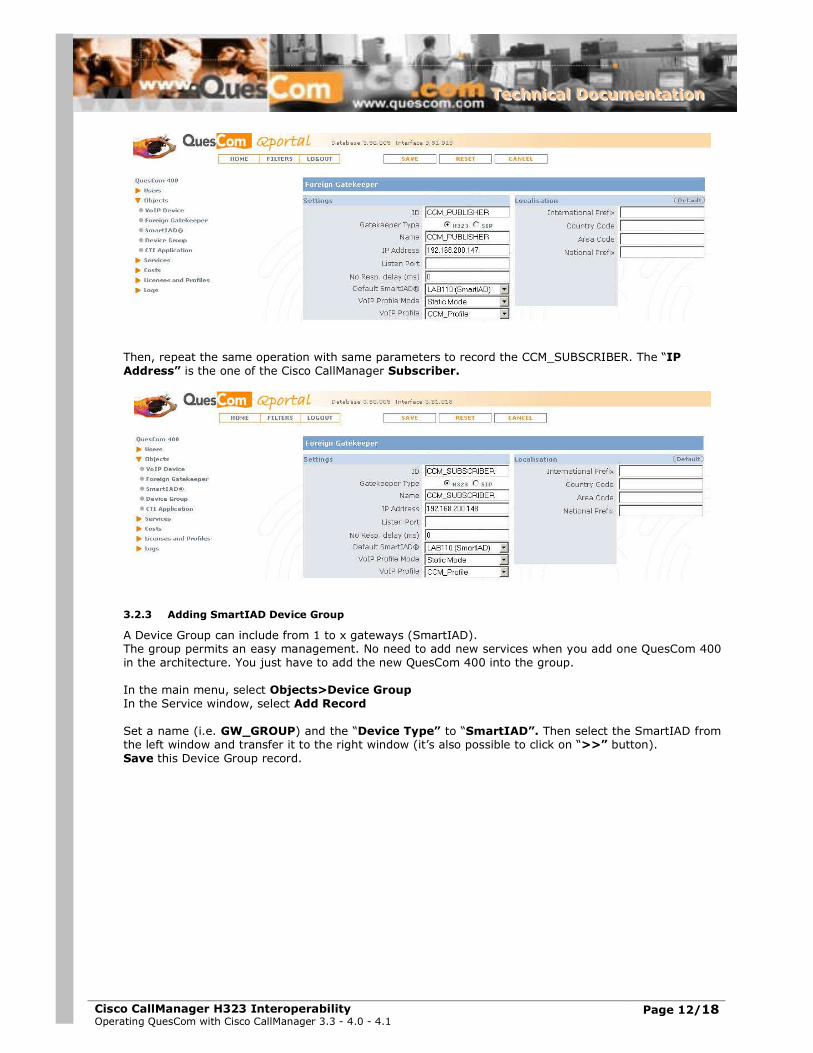
3.2.2 Adding a Foreign Gatekeeper
In the main menu, select Object>Foreign Gatekeeper
In the Foreign Gatekeeper window, select Add Record
Now set the Registration ID (i.e. CCM_PUBLISHER), the “Gatekeeper Type” to “H323” and the “Gatekeeper Name” (i.e. CCM_PUBLISHER). The “IP Address” is the IP address of the Cisco
CallManager Publisher, the “VoIP Profile Mode” has to be set with “Static Mode” and the “VOIP Profile” is the one you just created above (i.e. CCM_Profile). Save this gatekeeper record.
Cisco CallManager H323 Interoperability Operating QuesCom with Cisco CallManager 3.3 - 4.0 - 4.1
Page 12/18
TTTeeeccchhhnnniiicccaaalll DDDooocccuuummmeeennntttaaatttiiiooonnn
Then, repeat the same operation with same parameters to record the CCM_SUBSCRIBER. The “IP
Address” is the one of the Cisco CallManager Subscriber.
3.2.3 Adding SmartIAD Device Group
A Device Group can include from 1 to x gateways (SmartIAD). The group permits an easy management. No need to add new services when you add one QuesCom 400
in the architecture. You just have to add the new QuesCom 400 into the group.
In the main menu, select Objects>Device Group
In the Service window, select Add Record
Set a name (i.e. GW_GROUP) and the “Device Type” to “SmartIAD”. Then select the SmartIAD from the left window and transfer it to the right window (it’s also possible to click on “>>” button).
Save this Device Group record.
Cisco CallManager H323 Interoperability Operating QuesCom with Cisco CallManager 3.3 - 4.0 - 4.1
Page 13/18
TTTeeeccchhhnnniiicccaaalll DDDooocccuuummmeeennntttaaatttiiiooonnn
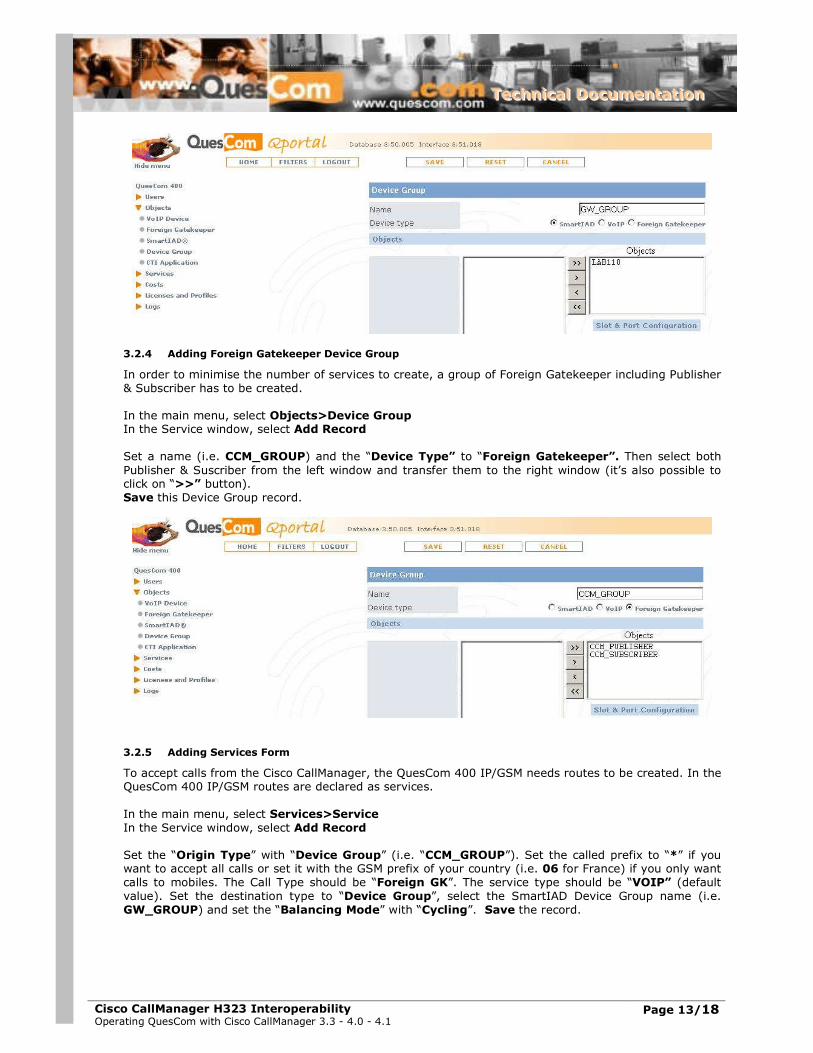
3.2.4 Adding Foreign Gatekeeper Device Group
In order to minimise the number of services to create, a group of Foreign Gatekeeper including Publisher
& Subscriber has to be created.
In the main menu, select Objects>Device Group In the Service window, select Add Record
Set a name (i.e. CCM_GROUP) and the “Device Type” to “Foreign Gatekeeper”. Then select both
Publisher & Suscriber from the left window and transfer them to the right window (it’s also possible to click on “>>” button).
Save this Device Group record.
3.2.5 Adding Services Form
To accept calls from the Cisco CallManager, the QuesCom 400 IP/GSM needs routes to be created. In the QuesCom 400 IP/GSM routes are declared as services.
In the main menu, select Services>Service
In the Service window, select Add Record
Set the “Origin Type” with “Device Group” (i.e. “CCM_GROUP”). Set the called prefix to “*” if you want to accept all calls or set it with the GSM prefix of your country (i.e. 06 for France) if you only want
calls to mobiles. The Call Type should be “Foreign GK”. The service type should be “VOIP” (default
value). Set the destination type to “Device Group”, select the SmartIAD Device Group name (i.e.
GW_GROUP) and set the “Balancing Mode” with “Cycling”. Save the record.

Cisco CallManager H323 Interoperability Operating QuesCom with Cisco CallManager 3.3 - 4.0 - 4.1
Page 14/18
TTTeeeccchhhnnniiicccaaalll DDDooocccuuummmeeennntttaaatttiiiooonnn
Now, set a new service with the following parameters. Set the “Origin Type” with “Device Group” (i.e. “GW_GROUP”). Set the called prefix to “*”. The Call
Type should be “VoIP Outgoing”. The service type should be “Switch” (default value). Set the
destination “Slot Number” to “0” and “Ports number” depending on the number of GSM trunks you
have. Save the record.
You have now finished the complete configuration for the QuesCom 400.
Caution
In order to be able to perform GSM calls from Cisco CallManager Publisher and Subscriber to the
QuesCom 400 IP/GSM gateway, you must restart the CallServer.

Cisco CallManager H323 Interoperability Operating QuesCom with Cisco CallManager 3.3 - 4.0 - 4.1
Page 15/18
TTTeeeccchhhnnniiicccaaalll DDDooocccuuummmeeennntttaaatttiiiooonnn
4. Configuration for Cisco CallManager Express used with QuesCom
IP/GSM gateway
4.1 Configuring the Cisco CallManager Express
Connect to the Cisco CallManager Express and set a “Dial-peer” VoIP configured with the QuesCom IP address and the GSM prefix.
Below you can find an exemple of elements to set into the Cisco CallManager Express :
- Set a voice class depending on the codec you need to use.
- In the dial-peer, set the “destination-pattern” with the GSM prefix (i.e. 06 for France) and the
“session target” with the IP address of the QuesCom 400 (i.e. “192.168.200.100” in the exemple)
! ! voice class codec 1 codec preference 1 g711ulaw codec preference 2 g711alaw codec preference 3 g729br8 ! ! dial-peer voice 1 voip destination-pattern . . . . . . . . . . progress_ind setup enable 3 voice-class codec 1 session target ipv4:192.168.200.100 ! !
4.2 Configuring the QuesCom to register with H323 Cisco CallManager Express
This section describes how to setup the QuesCom 400 IP/GSM to accept calls from the Cisco CallManager
Express. The Cisco CallManager Express has to be declared on the QuesCom 400 IP/GSM as a “Foreign Gatekeeper” with VoIP profiles set to “No RAS” and “Wait Terminal Capability” must be
unchecked. Here is how to proceed.
Connect to Qportal : http://<Q400IPaddress>:8000 (ex: http//192.168.11:8000) Login with “General Administrator” as a login, default password is “quescom”
4.2.1 Adding a VoIP Profile
Then give the profile a name (i.e.: CCM_Profile), set the type to “Foreign GK (H.323)”, uncheck “RAS Support”, leave uncheck “Wait for Terminal Capability Set” and set “Frame size” to 20ms
for all codecs. Then save the profile.
Cisco CallManager H323 Interoperability Operating QuesCom with Cisco CallManager 3.3 - 4.0 - 4.1
Page 16/18
TTTeeeccchhhnnniiicccaaalll DDDooocccuuummmeeennntttaaatttiiiooonnn
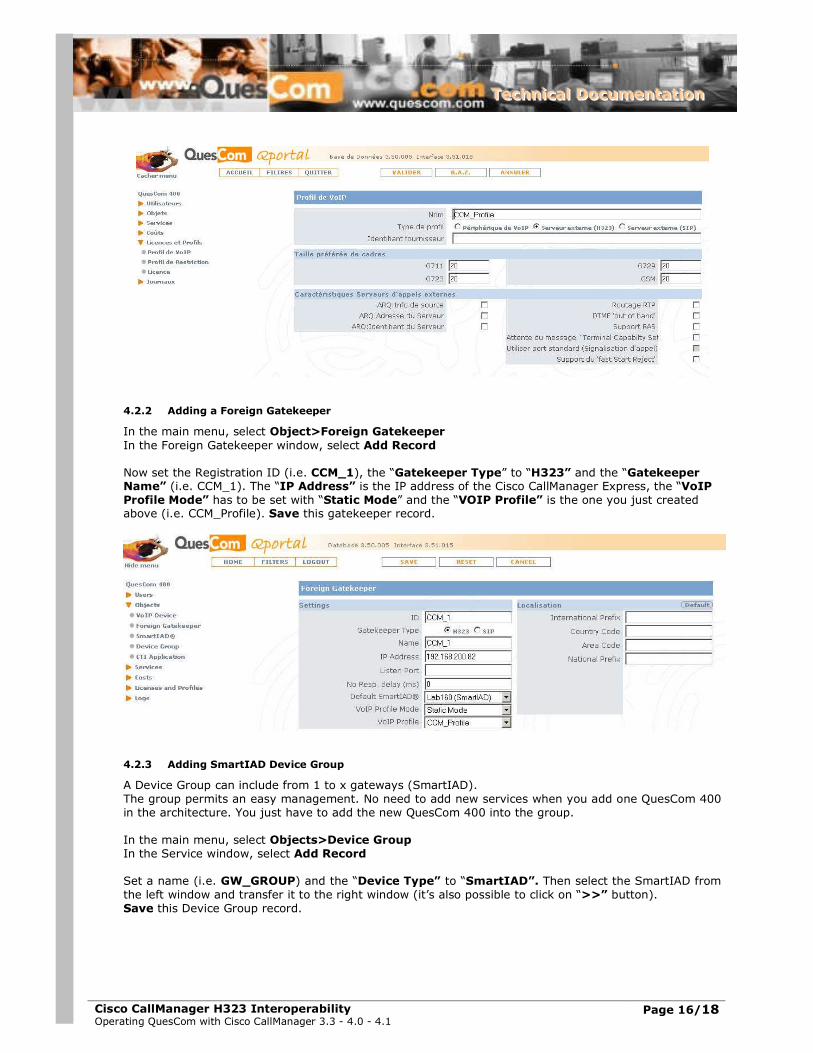
4.2.2 Adding a Foreign Gatekeeper
In the main menu, select Object>Foreign Gatekeeper
In the Foreign Gatekeeper window, select Add Record
Now set the Registration ID (i.e. CCM_1), the “Gatekeeper Type” to “H323” and the “Gatekeeper Name” (i.e. CCM_1). The “IP Address” is the IP address of the Cisco CallManager Express, the “VoIP
Profile Mode” has to be set with “Static Mode” and the “VOIP Profile” is the one you just created above (i.e. CCM_Profile). Save this gatekeeper record.
4.2.3 Adding SmartIAD Device Group
A Device Group can include from 1 to x gateways (SmartIAD).
The group permits an easy management. No need to add new services when you add one QuesCom 400
in the architecture. You just have to add the new QuesCom 400 into the group.
In the main menu, select Objects>Device Group
In the Service window, select Add Record
Set a name (i.e. GW_GROUP) and the “Device Type” to “SmartIAD”. Then select the SmartIAD from
the left window and transfer it to the right window (it’s also possible to click on “>>” button).
Save this Device Group record.
Cisco CallManager H323 Interoperability Operating QuesCom with Cisco CallManager 3.3 - 4.0 - 4.1
Page 17/18
TTTeeeccchhhnnniiicccaaalll DDDooocccuuummmeeennntttaaatttiiiooonnn
4.2.4 Adding Services Form
To accept calls from the Cisco CallManager, the QuesCom 400 IP/GSM needs routes to be created. In the QuesCom 400 IP/GSM routes are declared as services.
In the main menu, select Services>Service
In the Service window, select Add Record
Set the “Origin Type” with “Foreign GK” (i.e. CCM_1). Set the called prefix to “*” if you want to accept all calls or set it with the GSM prefix of your country (i.e. 06 for France) if you only want calls to
mobiles. The Call Type should be “Foreign GK”. The service type should be “VOIP” (default value). Set the destination type to “Device Group”, select the SmartIAD Device Group name (i.e. GW_GROUP)
and set the “Balancing Mode” with “Cycling”. Save the record.
Now, set a new service with the following parameters. Set the “Origin Type” with “Device Group” (i.e. GW_GROUP). Set the called prefix to “*”. The Call
Type should be “VoIP Outgoing”. The service type should be “Switch” (default value). Set the destination “Slot Number” to “0” and “Ports number” depending on the number of GSM trunks you
have. Save the record.
Cisco CallManager H323 Interoperability Operating QuesCom with Cisco CallManager 3.3 - 4.0 - 4.1
Page 18/18
TTTeeeccchhhnnniiicccaaalll DDDooocccuuummmeeennntttaaatttiiiooonnn
You have now finished the complete configuration for the QuesCom.
Caution
In order to be able to perform GSM calls from Cisco CallManager Express to the QuesCom IP/GSM gateway, you must restart the CallServer.