Embed Size (px)
Citation preview

Cisco Systems, Inc.www.cisco.com
Cisco has more than 200 offices worldwide. Addresses, phone numbers, and fax numbers are listed on the Cisco website at www.cisco.com/go/offices.
Cisco Unified Attendant Console Advanced - User GuideVersion 11.0.1August 5, 2015
Text Part Number: OL-29382-01

THE SPECIFICATIONS AND INFORMATION REGARDING THE PRODUCTS IN THIS MANUAL ARE SUBJECT TO CHANGE WITHOUT NOTICE. ALL STATEMENTS, INFORMATION, AND RECOMMENDATIONS IN THIS MANUAL ARE BELIEVED TO BE ACCURATE BUT ARE PRESENTED WITHOUT WARRANTY OF ANY KIND, EXPRESS OR IMPLIED. USERS MUST TAKE FULL RESPONSIBILITY FOR THEIR APPLICATION OF ANY PRODUCTS.
THE SOFTWARE LICENSE AND LIMITED WARRANTY FOR THE ACCOMPANYING PRODUCT ARE SET FORTH IN THE INFORMATION PACKET THAT SHIPPED WITH THE PRODUCT AND ARE INCORPORATED HEREIN BY THIS REFERENCE. IF YOU ARE UNABLE TO LOCATE THE SOFTWARE LICENSE OR LIMITED WARRANTY, CONTACT YOUR CISCO REPRESENTATIVE FOR A COPY.
The Cisco implementation of TCP header compression is an adaptation of a program developed by the University of California, Berkeley (UCB) as part of UCB’s public domain version of the UNIX operating system. All rights reserved. Copyright © 1981, Regents of the University of California.
NOTWITHSTANDING ANY OTHER WARRANTY HEREIN, ALL DOCUMENT FILES AND SOFTWARE OF THESE SUPPLIERS ARE PROVIDED “AS IS” WITH ALL FAULTS. CISCO AND THE ABOVE-NAMED SUPPLIERS DISCLAIM ALL WARRANTIES, EXPRESSED OR IMPLIED, INCLUDING, WITHOUT LIMITATION, THOSE OF MERCHANTABILITY, FITNESS FOR A PARTICULAR PURPOSE AND NONINFRINGEMENT OR ARISING FROM A COURSE OF DEALING, USAGE, OR TRADE PRACTICE.
IN NO EVENT SHALL CISCO OR ITS SUPPLIERS BE LIABLE FOR ANY INDIRECT, SPECIAL, CONSEQUENTIAL, OR INCIDENTAL DAMAGES, INCLUDING, WITHOUT LIMITATION, LOST PROFITS OR LOSS OR DAMAGE TO DATA ARISING OUT OF THE USE OR INABILITY TO USE THIS MANUAL, EVEN IF CISCO OR ITS SUPPLIERS HAVE BEEN ADVISED OF THE POSSIBILITY OF SUCH DAMAGES.
CCDE, CCENT, CCSI, Cisco Eos, Cisco HealthPresence, Cisco Ironport, the Cisco logo, Cisco Lumin, Cisco Nexus, Cisco Nurse Connect, Cisco Stackpower, Cisco StadiumVision, Cisco TelePresence, Cisco Unified Computing System, Cisco WebEx, DCE, Flip Channels, Flip for Good, Flip Mino, Flip Video, Flip Video (Design), Flipshare (Design), Flip Ultra, and Welcome to the Human Network are trademarks; Changing the Way We Work, Live, Play, and Learn, Cisco Store, and Flip Gift Card are service marks; and Access Registrar, Aironet, AsyncOS, Bringing the Meeting To You, Catalyst, CCDA, CCDP, CCIE, CCIP, CCNA, CCNP, CCSP, CCVP, Cisco, the Cisco Certified Internetwork Expert logo, Cisco IOS, Cisco Press, Cisco Systems, Cisco Systems Capital, the Cisco Systems logo, Cisco Unity, Collaboration Without Limitation, EtherFast, EtherSwitch, Event Center, Fast Step, Follow Me Browsing, FormShare, GigaDrive, HomeLink, Internet Quotient, IOS, iPhone, iQuick Study, IronPort, the IronPort logo, LightStream, Linksys, MediaTone, MeetingPlace, MeetingPlace Chime Sound, MGX, Networkers, Networking Academy, Network Registrar, PCNow, PIX, PowerPanels, ProConnect, ScriptShare, SenderBase, SMARTnet, Spectrum Expert, StackWise, The Fastest Way to Increase Your Internet Quotient, TransPath, WebEx, and the WebEx logo are registered trademarks of Cisco Systems, Inc. and/or its affiliates in the United States and certain other countries.
All other trademarks mentioned in this document or website are the property of their respective owners. The use of the word partner does not imply a partnership relationship between Cisco and any other company. (0907R)
Any Internet Protocol (IP) addresses and phone numbers used in this document are not intended to be actual addresses and phone numbers. Any examples, command display output, network topology diagrams, and other figures included in the document are shown for illustrative purposes only. Any use of actual IP addresses or phone numbers in illustrative content is unintentional and coincidental.
Cisco Unified Attendant Console Advanced© 2015 Cisco Systems, Inc. All rights reserved.
iiiCisco Unified Attendant Console Advanced - User Guide
OL-29382-01
C O N T E N T S
Preface vii
C H A P T E R 1 Getting Started 1-1
Accessibility for Users with Disabilities 1-1
Using the Keyboard 1-2
Logging In 1-4
Go Unavailable 1-5
Interface 1-6
Menu Bar 1-7
Queues Pane 1-7
Queued Incoming Calls Pane 1-8
Directories Pane 1-9
Personal Directory Groups 1-11
Creating Personal Directory Groups 1-12
Viewing Personal Directory Group Details 1-13
Modifying Personal Directory Groups 1-13
Deleting Personal Directory Groups 1-13
Adding Contacts to Directories 1-15
Deleting Contacts from Directories 1-15
Call Control Toolbar 1-16
Calls In Progress Pane 1-17
Active Calls Pane 1-17
Parked Calls Pane 1-18
Speed Dial Pane 1-19
Adding Entries to the Speed Dial Pane 1-19
Deleting Entries from the Speed Dial Pane 1-20
Updating Entries in the Speed Dial Pane 1-20
Status Bar 1-21
Frequent Actions 1-21
Dialing a Number 1-21
Finding Contacts in Directories 1-22
Lateral Searching 1-23
Collecting Logs 1-24
Contents
ivCisco Unified Attendant Console Advanced - User Guide
OL-29382-01
C H A P T E R 2 Customizing Cisco Unified Attendant Console Advanced 2-1
General 2-2
Display 2-3
Presence 2-3
Dialling 2-4
Call Transfers 2-4
Call Park 2-4
Mute 2-4
Tones 2-5
Queued Calls 2-5
Directory 2-5
Personal Directory Groups 2-6
Alternate Numbers 2-7
Field Headers 2-7
Secondary Sort 2-7
Filter Search 2-8
Logging 2-9
Advanced 2-9
C H A P T E R 3 Using Cisco Unified Attendant Console Advanced 3-1
Answering Calls 3-2
Answer Next 3-2
Cherry Picking 3-2
Forced Delivery 3-3
Directory Call Forwarding 3-4
Alternate Numbers and Presence Status 3-4
Controlling Calls 3-5
Transferring Calls 3-6
Blind Transferring to a Known Number 3-6
Blind Transferring to a Directory Contact 3-6
Consult Transferring Calls 3-8
Consult Transferring to a Known Number 3-8
Consult Transferring to a Directory Contact 3-8
Making Calls 3-9
Making Internal Calls 3-10
Making External Calls 3-10
Holding Calls 3-10
Contents
vCisco Unified Attendant Console Advanced - User Guide
OL-29382-01
Retrieving Held Calls 3-11
Muting Calls 3-11
Parking Calls 3-11
Retrieving Parked Calls 3-12
Conferencing Calls 3-12
Re-establishing Calls 3-13
Toggling Calls 3-13
Controlling Reverted Calls 3-14
Supplying FACs and CMCs 3-15
Forced Authorization Code (FAC) 3-15
Client Matter Code (CMC) 3-15
Clearing Calls 3-15
Using Emergency Mode 3-16
Sending Emails 3-16
Sending Instant Messages 3-16
Viewing Call Status 3-17
Viewing and Using Contact Details 3-17
Emailing Contacts 3-18
Dialing External Numbers 3-19
Defining Alternate Numbers 3-19
Editing Contact Details 3-19
Adding Absent Message and Contact Information 3-20
Viewing Cisco Unified Presence Status 3-20
Viewing Microsoft Presence Status 3-21
I N D E X

Contents
viCisco Unified Attendant Console Advanced - User Guide
OL-29382-01
viiCisco Unified Attendant Console Advanced - User Guide
OL-29382-01
Preface
This guide describes the Cisco Unified Attendant Console Advanced client: a Windows application that works exclusively with Cisco Unified Communications Manager to provide telephone switchboard functionality on your computer.
Cisco Unified Attendant Console Advanced enables you to answer calls from multiple queues and transfer them to extensions. It also enables you to park and retrieve calls, and create conference calls.
Purpose of this Guide This guide describes how to:
• Configure Cisco Unified Attendant Console Advanced
• Use Cisco Unified Attendant Console Advanced to make, answer, hold, retrieve, conference, and transfer calls
Who Should Read this Guide The document is intended for Cisco Unified Attendant Console Advanced users, and the staff who train them.
Organization This guide includes the following chapters:
Chapter Title Description
1 Getting Started This chapter explains the Cisco Unified Attendant Console Advanced interface, and how to start and log in to the application.
2 Customizing Cisco Unified Attendant Console Advanced
This chapter explains how to configure and customize the application.
3 Using Cisco Unified Attendant Console Advanced
This chapter explains how to make, answer and clear calls, take notes, hold, and transfer calls.
viiiCisco Unified Attendant Console Advanced - User Guide
OL-29382-01
ConventionsThis document uses the following conventions:
Note Means reader take note.
Tip Means the following information will help you solve a problem.
Caution Means reader be careful. In this situation, you might perform an action that could result in equipment damage or loss of data.
Obtaining Documentation and Submitting a Service RequestFor information on obtaining documentation, submitting a service request, and gathering additional information, see the monthly What’s New in Cisco Product Documentation, which also lists all new and revised Cisco technical documentation:
http://www.cisco.com/en/US/docs/general/whatsnew/whatsnew.html.
Subscribe to the What’s New in Cisco Product Documentation as an RSS feed and set content to be delivered directly to your desktop using a reader application. The RSS feeds are a free service. Cisco currently supports RSS Version 2.0.
Convention Indication
bold font Commands, keywords, GUI labels and user-entered text appear in bold font.
italic font Document titles, new or emphasized terms, and arguments for which you supply values are in italic font.
<argument> Arguments for which you supply values are in angle brackets
Option1 > Option2 The relationship between menu/sub-menu items is shown using >. For example, “In the menu, click Option1, and then in the sub-menu click Option2”, is written “Choose Option1 > Option2”.
C H A P T E R
1-1Cisco Unified Attendant Console Advanced - User Guide
OL-29382-01
1Getting Started
This chapter describes how to start using Cisco Unified Attendant Console Advanced; it includes the layout of its interface, and its most frequently used functions. It also describes how to collect data from the Console log file.
Note Cisco Unified Attendant Console Advanced will only work once the relevant telephony software and hardware has been installed and configured, as described in the Cisco Unified Attendant Console Advanced Administration and Installation Guide. Contact your system administrator to configure your system.
Accessibility for Users with DisabilitiesCisco Unified Attendant Console Advanced provides accessibility features that make it easier for blind and visually impaired people to use the application.
Cisco Unified Attendant Console Advanced provides the ability to customize the appearance of the application making it simpler for users with low vision to adjust the look of the console. This enables users to work in the manner that they find most comfortable. To access the console settings choose Options > Preferences or Options > Font Size from the menu bar. For more information, see Chapter 2, “Customizing Cisco Unified Attendant Console Advanced”.
You control the Console with either mouse or keyboard. Many interface controls are icons, which display a tool tip when you hover the mouse pointer over them.
You can also use Cisco Unified Attendant Console Advanced with a screen reader plug in called JAWS. The screen reader provides information about the status of your attendant console as well as reading the text in your attendant console interface. For a console operator to be able to use this accessibility feature, their profile – set in the Cisco Unified Attendant Console Advanced Administration web application – must be assigned the VIOC role.
Cisco Unified Attendant Console Advanced also comes with context-sensitive help. For help specific to a window or pane, simply press F1.
For more information on Cisco Accessibility Program please contact through the following link http://www.cisco.com/web/about/responsibility/accessibility/contact.html.
1-2Cisco Unified Attendant Console Advanced - User Guide
OL-29382-01
Chapter 1 Getting StartedUsing the Keyboard
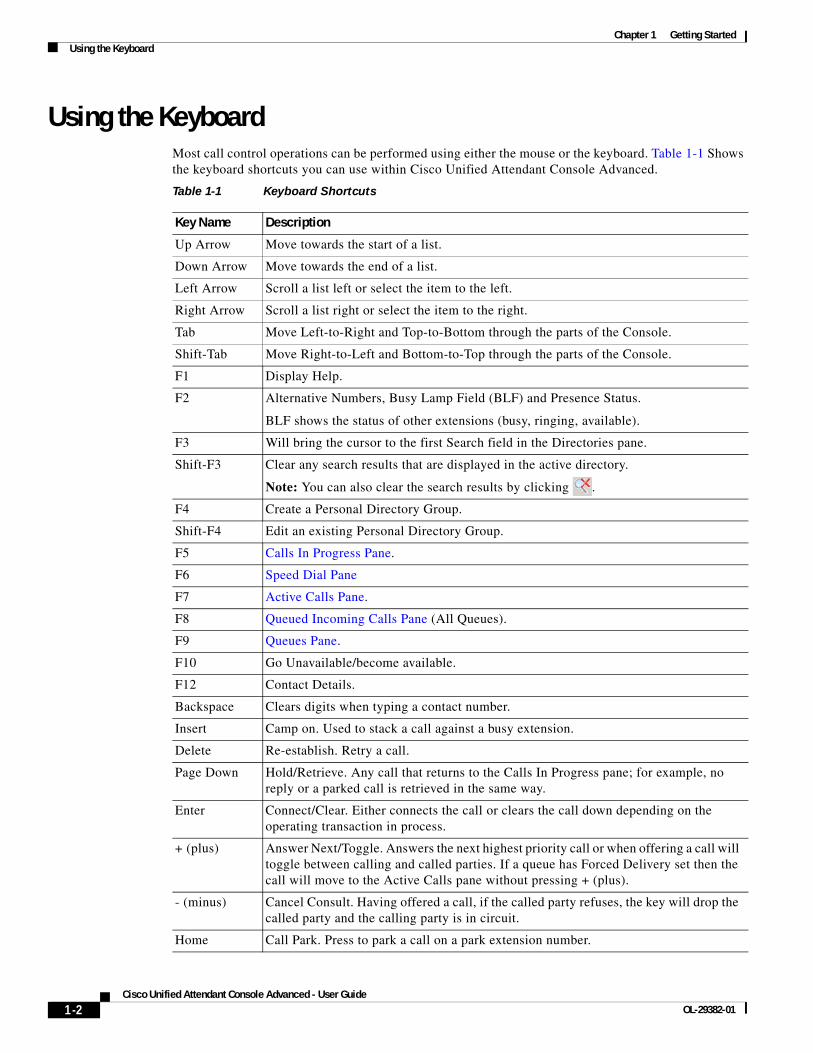
Using the Keyboard Most call control operations can be performed using either the mouse or the keyboard. Table 1-1 Shows the keyboard shortcuts you can use within Cisco Unified Attendant Console Advanced.
Table 1-1 Keyboard Shortcuts
Key Name Description
Up Arrow Move towards the start of a list.
Down Arrow Move towards the end of a list.
Left Arrow Scroll a list left or select the item to the left.
Right Arrow Scroll a list right or select the item to the right.
Tab Move Left-to-Right and Top-to-Bottom through the parts of the Console.
Shift-Tab Move Right-to-Left and Bottom-to-Top through the parts of the Console.
F1 Display Help.
F2 Alternative Numbers, Busy Lamp Field (BLF) and Presence Status.
BLF shows the status of other extensions (busy, ringing, available).
F3 Will bring the cursor to the first Search field in the Directories pane.
Shift-F3 Clear any search results that are displayed in the active directory.
Note: You can also clear the search results by clicking .
F4 Create a Personal Directory Group.
Shift-F4 Edit an existing Personal Directory Group.
F5 Calls In Progress Pane.
F6 Speed Dial Pane
F7 Active Calls Pane.
F8 Queued Incoming Calls Pane (All Queues).
F9 Queues Pane.
F10 Go Unavailable/become available.
F12 Contact Details.
Backspace Clears digits when typing a contact number.
Insert Camp on. Used to stack a call against a busy extension.
Delete Re-establish. Retry a call.
Page Down Hold/Retrieve. Any call that returns to the Calls In Progress pane; for example, no reply or a parked call is retrieved in the same way.
Enter Connect/Clear. Either connects the call or clears the call down depending on the operating transaction in process.
+ (plus) Answer Next/Toggle. Answers the next highest priority call or when offering a call will toggle between calling and called parties. If a queue has Forced Delivery set then the call will move to the Active Calls pane without pressing + (plus).
- (minus) Cancel Consult. Having offered a call, if the called party refuses, the key will drop the called party and the calling party is in circuit.
Home Call Park. Press to park a call on a park extension number.
1-3Cisco Unified Attendant Console Advanced - User Guide
OL-29382-01
Chapter 1 Getting StartedUsing the Keyboard
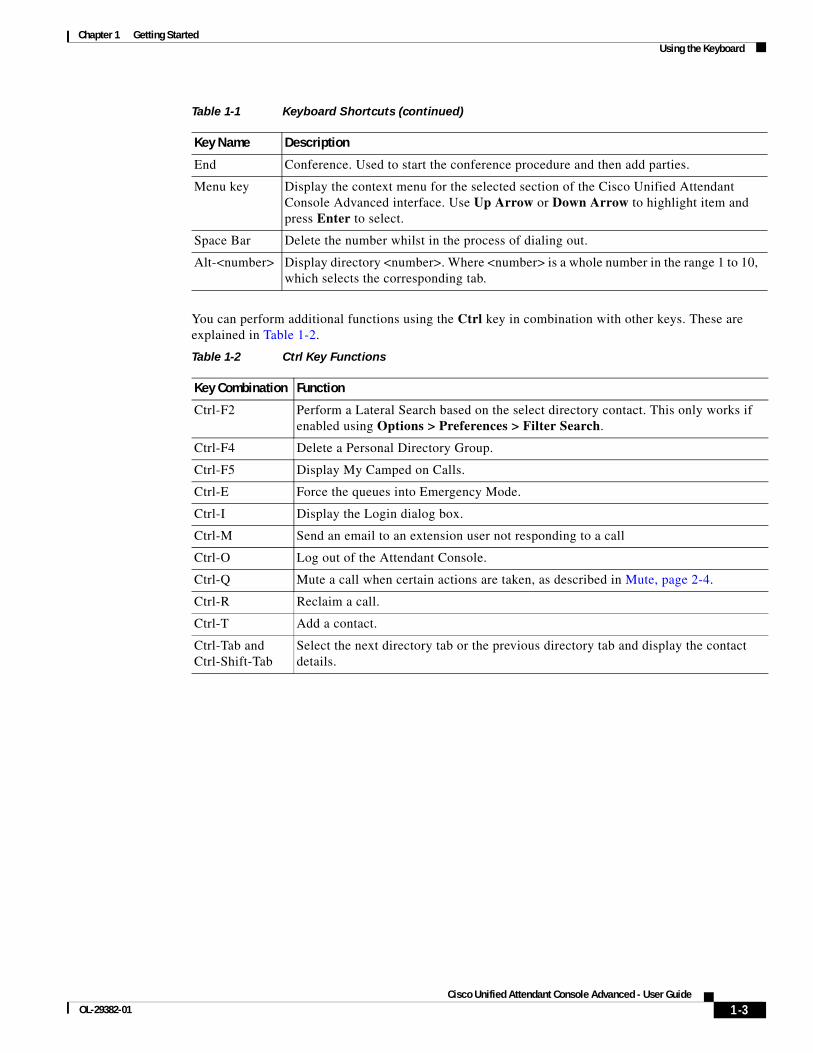
You can perform additional functions using the Ctrl key in combination with other keys. These are explained in Table 1-2.
End Conference. Used to start the conference procedure and then add parties.
Menu key Display the context menu for the selected section of the Cisco Unified Attendant Console Advanced interface. Use Up Arrow or Down Arrow to highlight item and press Enter to select.
Space Bar Delete the number whilst in the process of dialing out.
Alt-<number> Display directory <number>. Where <number> is a whole number in the range 1 to 10, which selects the corresponding tab.
Table 1-1 Keyboard Shortcuts (continued)
Key Name Description
Table 1-2 Ctrl Key Functions
Key Combination Function
Ctrl-F2 Perform a Lateral Search based on the select directory contact. This only works if enabled using Options > Preferences > Filter Search.
Ctrl-F4 Delete a Personal Directory Group.
Ctrl-F5 Display My Camped on Calls.
Ctrl-E Force the queues into Emergency Mode.
Ctrl-I Display the Login dialog box.
Ctrl-M Send an email to an extension user not responding to a call
Ctrl-O Log out of the Attendant Console.
Ctrl-Q Mute a call when certain actions are taken, as described in Mute, page 2-4.
Ctrl-R Reclaim a call.
Ctrl-T Add a contact.
Ctrl-Tab and Ctrl-Shift-Tab
Select the next directory tab or the previous directory tab and display the contact details.
1-4Cisco Unified Attendant Console Advanced - User Guide
OL-29382-01
Chapter 1 Getting StartedLogging In
Logging InYou must log in to the application with your Login Name, Password and Extension number. Each user has a unique identity to log in to Cisco Unified Attendant Console Advanced.
To log in to the Cisco Unified Attendant Console Advanced, do the following:
Step 1 Press Ctrl-I or choose File > Login.
The Login dialog box appears.
Step 2 Type your Login Name and Password.
Step 3 Either, select Use existing device details to re-use the extension you used during your last session, or enter your Extension number.
If you want to use a different number, deselect Use existing device details, and enter an Extension.
Step 4 Click Login.
The extension number you use to log in must be the Primary Number for a device. The same extension number might be configured as a primary number for another device on a different partition. If this is so, to differentiate between the two devices configured on the same extension number, the MAC address – a unique identifier for each device – is used.
During login, if the extension you enter exists in multiple partitions or is shared within the same partition in Cisco Unified Communications Manager, and you have not selected Use existing device details, the Duplicate Device window appears. You use this to select the MAC Address – the unique identifier – for a device. If the directory number for a device has multiple instances in Cisco Unified Communications Manager, the MAC Address is used to identify the relevant device. When you select a MAC address, the Directory Number, Description, Route Partition and Calling Search Space of that extension are displayed. If you are happy with the selection, click OK.
The application will now start using the selected number, which will be used for subsequent sessions from the same PC.
Note Shared Lines are not supported as operator phones.
If you are logging in to a resilient Cisco Unified Attendant Console Advanced installation, which has a Publisher (primary) and Subscriber (secondary) server, the application connects to the server it was last connected to. If the default Publisher server fails, as soon as there are no active calls the application cuts over to the Subscriber server. If the application cannot connect to the Publisher server at login, you are informed that you are being logged in to the Subscriber server. If the application cannot connect to either server, a failure message appears.
Note When you are logged in to the Subscriber server you cannot do the following:
• Change user preferences.
• Create, update or delete directory contacts, including contacts in the Busy Lamp Field (BLF) or Personal Directory Groups, nor can you create, update or delete Personal Directory Groups.

1-5Cisco Unified Attendant Console Advanced - User Guide
OL-29382-01
Chapter 1 Getting StartedGo Unavailable
If the Publisher becomes available while you are logged in to the Subscriber, you are asked whether you want to log into the Publisher or to stay logged in on the Subscriber. If the Subscriber fails while you are logged in to it, and if the Publisher is available, you are prompted that you are being logged in to the Publisher.
Go Unavailable You can take a break by going unavailable. Calls will still appear on the console but you will not be able to answer them unless they ring on your device. If you go unavailable, any call you have extended that times-out will appear on another Attendant Console in the Calls In Progress pane. If a queue is set to Forced Delivery (for more information see Forced Delivery, page 3-3) the calls on it are not delivered directly to the operator handset, but wait in the system to be routed or overflowed. If an operator is not available, the system tries to route the call to the No Operator overflow destination, configured using Cisco Unified Attendant Console Advanced Administration.
To go unavailable press F10, and then, in the Go Unavailable confirmation message box, click Yes.
To become available again, press F10.
You can also configure Cisco Unified Attendant Console Advanced so that you go unavailable automatically when you computer has been idle for a certain amount of time. For details of how to do this, see Auto Unavailable, page 2-2.
1-6Cisco Unified Attendant Console Advanced - User Guide
OL-29382-01
Chapter 1 Getting StartedInterface
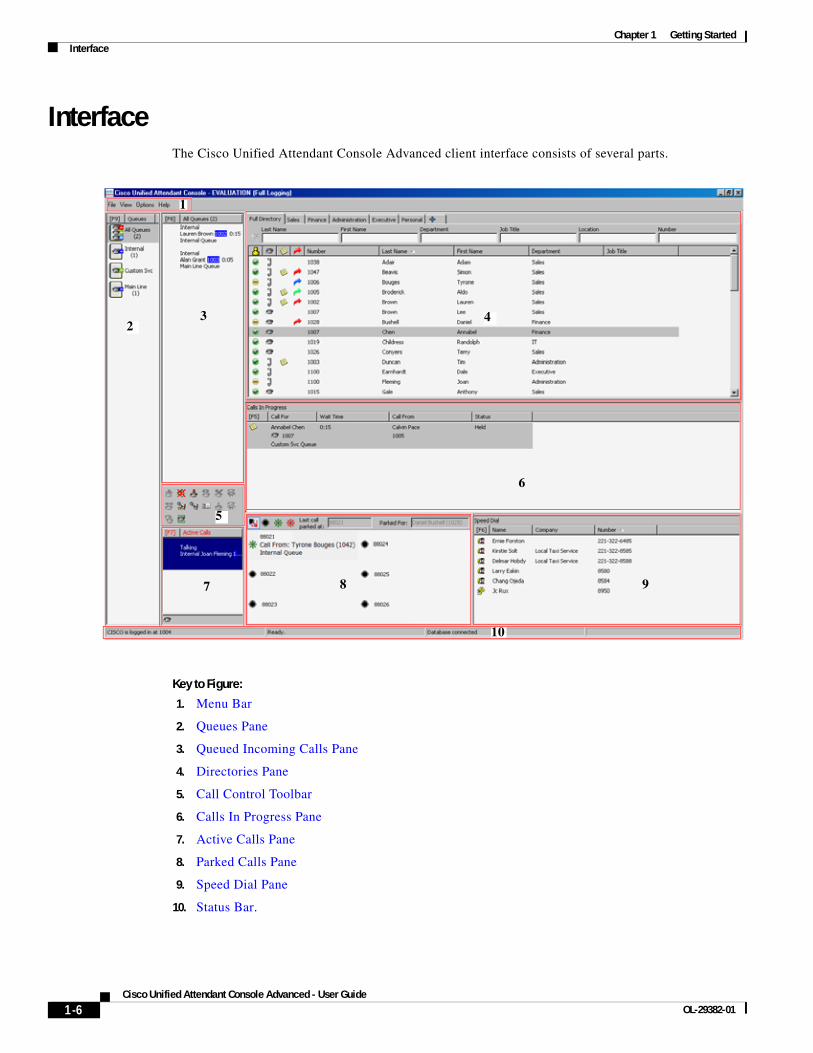
InterfaceThe Cisco Unified Attendant Console Advanced client interface consists of several parts.
Key to Figure:
1. Menu Bar
2. Queues Pane
3. Queued Incoming Calls Pane
4. Directories Pane
5. Call Control Toolbar
6. Calls In Progress Pane
7. Active Calls Pane
8. Parked Calls Pane
9. Speed Dial Pane
10. Status Bar.
2
7
6
4
5
3
8 9
1
10
1-7Cisco Unified Attendant Console Advanced - User Guide
OL-29382-01
Chapter 1 Getting StartedInterface
Menu BarTable 1-3 describes the Menu Bar.
Queues Pane The Queues pane (press F9 to view) displays the queues that are available to logged in operators. An icon is displayed for each queue.
You can view all available queues as a single icon by selecting from the main menu, View > Queues > View All Queues; and you can view an icon for each separate queue by selecting View > Queues > View Individual Queues. To view queue statistics (numbers of Calls Abandoned, Logged In Operators and Available Operators), choose View > Queues > View Queue Statistics. Queue statistics are reset at midnight. If you do not have any View > Queues options selected, the Queues pane is hidden.
Table 1-3 Menu Options
Control Name Description
File
Login Used to login.
Log out Log out from Cisco Unified Attendant Console Advanced.
Exit Close the application.
View
Toolbars Activate/deactivate the Call Control tool bar.
Queues Choose View All Queues or View Individual Queues or both. For queue statistics, choose View Queue Statistics.
Speed Dial Activate/deactivate the Speed Dial pane.
Call Park Activate/deactivate the Parked Calls pane.
Display Salutation Enable/disable the Salutation Window.
Display My Camped on Calls
Enable/disable the display of camped on calls. The shortcut for this function is (Ctrl-F5).
Options
Preferences Open the preferences window to customize Cisco Unified Attendant Console Advanced.
Emergency Set all queues to Emergency Mode. All calls will be forwarded to a preconfigured destination.
Filter Searching Activate AND searching.
Font Size Change the font size displayed in the interface.
Help
Contents Display help.
Keyword Search Use keywords to search the help file.
Graphics Display the icons used within the interface.
About Attendant Console
Display Cisco Unified Attendant Console Advanced version and copyright.

1-8Cisco Unified Attendant Console Advanced - User Guide
OL-29382-01
Chapter 1 Getting StartedInterface
When an incoming call is delivered to the queue, the number of calls waiting to be answered is displayed; depending on how the Cisco Unified Attendant Console Advanced server is configured, the caller hears either a ringing tone or music on hold until the call is answered.
In its default configuration, Attendant Console offers all incoming calls to all logged-in operators. However, you can configure Cisco Unified Attendant Console Advanced Administration to force calls to logged-in attendants in a round-robin fashion. You do not need to press the Answer Next key for the call to appear in the Active Calls pane.
Table 1-4 describes the icons that are displayed in the Queues pane.
Right-click the Queues pane to either:
• Select emergency queues (pressing Ctrl-E also displays the Emergency dialog box)
• View Queue Statistics (or choose View > Queues > View Queue Statistics). This is a toggle: clicking alternately turns it on and off.
Queued Incoming Calls Pane The Queued Incoming Calls pane (press F8 to view) displays calls waiting in queues, plus the following information:
• Name of the caller – displayed only for calls where the Calling Line Identification (CLI) matches that of a directory telephone number
• Number (CLI) of the caller
• Elapsed time the call has been waiting in queue
• Name of the queue (optional)
• A triangular icon colored to match the queue the call comes from (if Queue Call Colors have been configured for the queue, as described in Queued Calls, page 2-5)
You can use the following keyboard shortcuts to control calls in this pane:
• + (plus) – Answer the next incoming call. If a queue has Forced Delivery set, the call moves automatically to the Active Calls pane
Table 1-4 Queues Pane Icons
Icons Types of Queue
Queue that has Forced Delivery configured.
Queue that is active and ready to receive calls.
Queue in night service.
All queues (the total number of waiting calls in all available queues).
Queue in Emergency mode.
All queues in Emergency mode.

1-9Cisco Unified Attendant Console Advanced - User Guide
OL-29382-01
Chapter 1 Getting StartedInterface
• Enter – Answer the incoming call
You can also access these functions by right-clicking the pane and using the menu.
Directories Pane There are two types of directories in Cisco Unified Attendant Console Advanced:
• Full Directory - This is displayed by default, and contains all the contacts synchronized by Cisco Unified Attendant Console Advanced – both internal and external contacts.
• Personal Directory Groups - These directories can be modified to display a portion of the Full Directory. Personal Directory Groups can be edited, shared, unshared and deleted only by the user who created them. For more information, see Personal Directory Groups, page 1-11.
You can have multiple directories open simultaneously – each identified by a tab bearing its name – but you can only view one at a time. To view a different directory, simply click its name tab. By default, the
Full Directory tab is the left-most, and the Create a new Personal Directory Group tab is
right-most. You can change the order of all the tabs except Create a new Personal Directory Group by either:
• Choosing Options > Preferences > Directory, and then reordering the Directory Groups list (see Directory, page 2-5).
• Dragging the tab to the required position
Configure the Directories pane using Options > Preferences (for more information, see Directory, page 2-5).
The following contact information is displayed by default:
• Presence status . See Table 1-5 on page 1-10.
• Phone status . See Table 1-5 on page 1-10.
• Notes . See Table 1-5 on page 1-10.
• Assistant, alternate contacts or additional contact numbers . See Table 1-5 on page 1-10.
• Number
• Last Name
• First Name
• Department
• Job Title
You can resize the directory columns by dragging their header borders, or move them horizontally by dragging them by their header and then dropping them.
1-10Cisco Unified Attendant Console Advanced - User Guide
OL-29382-01
Chapter 1 Getting StartedInterface
The table below describes the columns headed by icons.
You can control calls of contacts in any directory in the following ways:
• Select a contact in the directory and then click one of the controls described in Call Control Toolbar, page 1-16.
• Right-click a contact and choose from the menu.
• Use the keyboard shortcuts described in Using the Keyboard, page 1-2.
Table 1-5 Icons in Directories
Column Heading Description
The contact presence status. For details of the icons in this column, see either Viewing Microsoft Presence Status, page 3-21 or Viewing Cisco Unified Presence Status, page 3-20, as appropriate.
The contact phone status; one of the following:
• = On hook
• = Active
• = Unavailable
• = Ringing in
This column also indicates the type of contact number being used: (mobile),
(business), (home), (fax) or (pager).
= The contact has notes attached.
Assistant, Alternate Contacts or additional Contact Numbers.
• = The contact has an Assistant added to their Alternate Numbers. This icon takes
precedence over the Alternate Contacts and additional Contact Numbers icons. For more information, see Defining Alternate Numbers, page 3-19.
• = The contact has one or more Alternate Contacts (but no Assistant) added to their Alternate Numbers. This icon takes precedence over the additional Contact Numbers
icon.
• = The contact has two or more of the following additional Contact Numbers:
– Mobile
– Business 1
– Business 2
– Home
– Pager
– Fax
This icon does not display if the contact has an Assistant or any Alternate Contacts.
1-11Cisco Unified Attendant Console Advanced - User Guide
OL-29382-01
Chapter 1 Getting StartedInterface
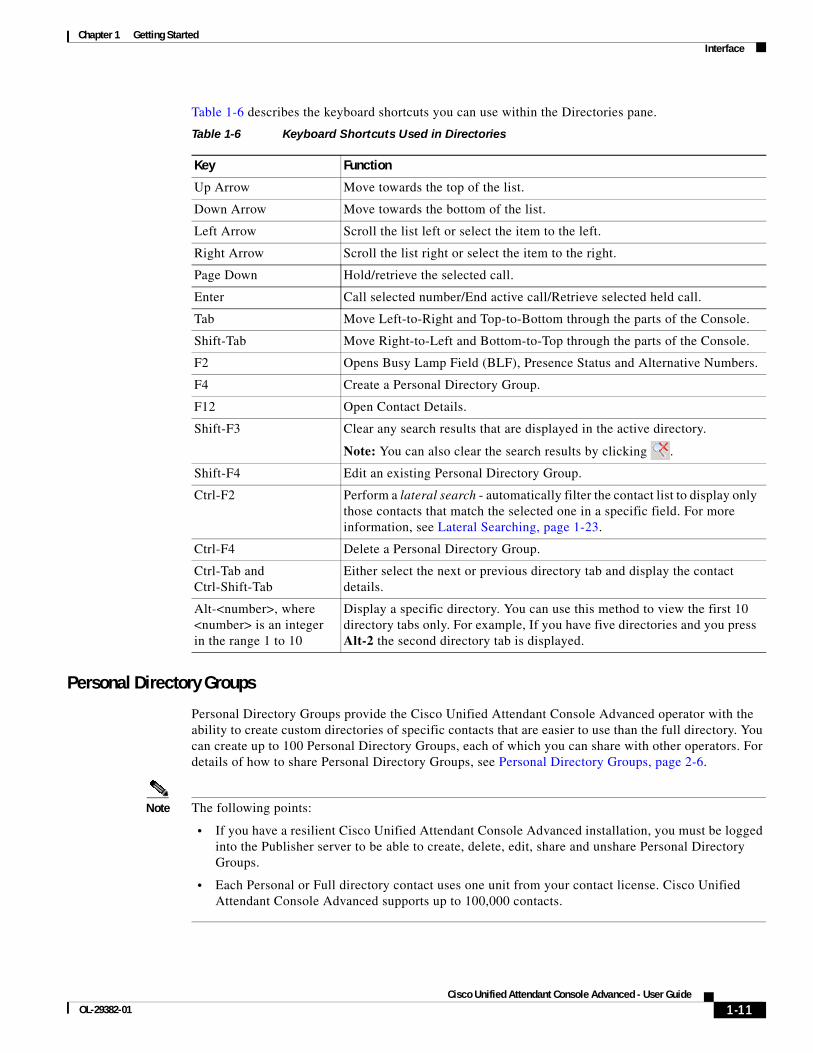
Table 1-6 describes the keyboard shortcuts you can use within the Directories pane.
Personal Directory Groups
Personal Directory Groups provide the Cisco Unified Attendant Console Advanced operator with the ability to create custom directories of specific contacts that are easier to use than the full directory. You can create up to 100 Personal Directory Groups, each of which you can share with other operators. For details of how to share Personal Directory Groups, see Personal Directory Groups, page 2-6.
Note The following points:
• If you have a resilient Cisco Unified Attendant Console Advanced installation, you must be logged into the Publisher server to be able to create, delete, edit, share and unshare Personal Directory Groups.
• Each Personal or Full directory contact uses one unit from your contact license. Cisco Unified Attendant Console Advanced supports up to 100,000 contacts.
Table 1-6 Keyboard Shortcuts Used in Directories
Key Function
Up Arrow Move towards the top of the list.
Down Arrow Move towards the bottom of the list.
Left Arrow Scroll the list left or select the item to the left.
Right Arrow Scroll the list right or select the item to the right.
Page Down Hold/retrieve the selected call.
Enter Call selected number/End active call/Retrieve selected held call.
Tab Move Left-to-Right and Top-to-Bottom through the parts of the Console.
Shift-Tab Move Right-to-Left and Bottom-to-Top through the parts of the Console.
F2 Opens Busy Lamp Field (BLF), Presence Status and Alternative Numbers.
F4 Create a Personal Directory Group.
F12 Open Contact Details.
Shift-F3 Clear any search results that are displayed in the active directory.
Note: You can also clear the search results by clicking .
Shift-F4 Edit an existing Personal Directory Group.
Ctrl-F2 Perform a lateral search - automatically filter the contact list to display only those contacts that match the selected one in a specific field. For more information, see Lateral Searching, page 1-23.
Ctrl-F4 Delete a Personal Directory Group.
Ctrl-Tab and Ctrl-Shift-Tab
Either select the next or previous directory tab and display the contact details.
Alt-<number>, where <number> is an integer in the range 1 to 10
Display a specific directory. You can use this method to view the first 10 directory tabs only. For example, If you have five directories and you press Alt-2 the second directory tab is displayed.
1-12Cisco Unified Attendant Console Advanced - User Guide
OL-29382-01
Chapter 1 Getting StartedInterface
The user who creates a Personal Directory Group is known as the owner of that group. Only the owner of a Personal Directory Group can change, delete, share or unshare the group. Ownership of Personal Directory Groups cannot be transferred to other users. The owner of the Personal Directory Group and any users sharing it can add, delete and edit manually-added contacts in the group.
To navigate between Personal Directories, you can either select the tab heading, or you can use Ctrl-Tab and Ctrl-Shift-Tab to select the next or previous directory. Alternatively, you can navigate directly to any of the first ten tabs by pressing Alt-<number>, where <number> is a whole number in the range 1 to 10.
Note You cannot use this method to select the Create a new Personal Directory Group tab .
Creating Personal Directory Groups
Note You can create up to 100 Personal Directory Groups.
To create a Personal Directory Group:
Step 1 Select the Directories pane, and then do one of the following:
• Click the Create a new Personal Directory Group tab .
• Press F4
• Right-click and choose Personal Directory Group > New.
The New Personal Directory Group dialog box appears.
Step 2 Under Details, type a meaningful Name and Description for the group.
Step 3 Under Filter, select a Field on which to filter the contacts.
Step 4 Under Filter, select the comparison to make:
• begins with
• contains
• ends with
• is equal to
• is greater than or equal to (numeric Field data only)
• is less than or equal to (numeric Field data only)
Step 5 Under Filter, type a Value to compare the Field data against.
For example: Field: Last Name, comparison: begins with, and Value: K, creates a directory of contacts whose last name begins with K.
Step 6 You can click New to add more criteria, up to a maximum of three. Click Remove to remove criteria.
Step 7 Click OK to create the Personal Directory Group.
1-13Cisco Unified Attendant Console Advanced - User Guide
OL-29382-01
Chapter 1 Getting StartedInterface
Note The following points:
• If you create a directory using the Field, Number to filter by, the Value you enter is compared against all indexed number fields (for example, Main Extension, Business 1, Business 2 and Mobile) and all contacts that meet the criteria are displayed. With the directory displaying only the Main Extension number or the substitute number (defined in Preferences Tab > General and Internal Contacts Number Priority), your Personal Directory Group may appear to contain inconsistent results. This indicates that the contact has another numbered field that matches the criteria.
For example, if a contact has the primary number 22222 and a Business 1 number of 1111, the full directory shows 22222. If Business 1 is an indexed field, when you create a Personal Directory Group with either Number is equal to 2222 or Number is equal to 1111, the contact is displayed with the number 22222.
• Once you have shared a Personal Directory Group, you cannot change the criteria used to create it.
Viewing Personal Directory Group Details
To view the details of a Personal Directory Group, such as the owner and the filter, do the following:
Step 1 Select the Personal Directory Group.
Step 2 Do one of the following:
• Press Shift-F4.
• Right-click and choose Personal Directory Group > Details
The Personal Directory Group Details dialog box appears. Click Cancel to close it.
Modifying Personal Directory Groups
Only the owner of a Personal Directory Group can modify the criteria used to create it. If you have shared a Personal Directory Group, you cannot modify it.
To modify a Personal Directory Group, do the following:
Step 1 View the Personal Directory Group details.
Step 2 In the Personal Directory Group Details dialog box, change the criteria as required, and then click OK.
Deleting Personal Directory Groups
Only the owner of a Personal Directory Group can delete it. If you delete a Personal Directory Group it no longer exists within the system. If you try to delete a Personal Directory Group to which you have manually added contacts, you are given the option of moving them to the full directory rather than deleting them.
To delete a Personal Directory Group, do the following:
1-14Cisco Unified Attendant Console Advanced - User Guide
OL-29382-01
Chapter 1 Getting StartedInterface
Step 1 Select the Personal Directory Group.
Step 2 Either:
• Press Ctrl-F4.
• Right-click and choose Personal Directory Group > Delete.
The Delete Personal Directory Group dialog box appears. The contacts in the Personal Directory Group are listed; those with alternate numbers are shown at the top of the list.
he dialog box asks you to confirm that you want to delete the Personal Directory Group. If the group is shared, the dialog box also contains a warning that the group is shared with other users and that it will be removed from their screens if you continue.
Step 3 If your Personal Directory Group does not contain manually-added contacts, continue at Step 5.
If you have manually-added contacts to the Personal Directory Group that do not exist in any other Personal Directory Group, you are warned of this fact, and given the option to move them to the Full directory before the Personal Directory Group is deleted.
Step 4 To delete the Personal Directory Group and all the contacts in it, select Delete contacts.
To move contacts to the Full directory before deleting the Personal Directory Group:
a. Select Move contacts to the full directory.
The manually added contacts are listed. By default, they are all selected for moving to the Full directory.
b. Select each contact you want to move to the Full directory; unselect (clear) any that you do not want to move.
Note If you unselect all the contacts, you must either select some contacts to move or select Delete contacts before continuing.
Step 5 Click Yes.
• If you have not manually added contacts to the Personal Directory Group, it is deleted.
• If you have not chosen to move any manually-added contacts to the Full directory, the contacts and the Personal Directory Group are deleted.
• If you have chosen to move any manually-added contacts to the Full directory, the contacts are moved and the Personal Directory Group is deleted.
Any users who were sharing the Personal Directory Group see a message telling them that it has been deleted; if any were viewing the Personal Directory Group, it disappears from their Console.
Note You can also delete a Personal Directory Group from the Personal Directory Group Details dialog box that is displayed when you modify a group; click Delete, and then follow the previous procedure from Step 3.
1-15Cisco Unified Attendant Console Advanced - User Guide
OL-29382-01
Chapter 1 Getting StartedInterface
Adding Contacts to Directories
You can create new contacts in any of the directories displayed: full or personal. Contacts added to the full directory are available to all operators. Contacts added to a Personal Directory Group are available only to the owner (creator) of the group and any other operators with which the group has been shared. The owner of a Personal Directory Group and any users sharing the group can add, delete and edit contacts in it; these changes are visible to all users sharing the Personal Directory Group.
You can select a contact in the Full Directory and drag it to a previously created Personal Directory Group tab, regardless of whether it matches the criteria set for that group. Contacts added to Personal Directory Groups cannot be dragged to the full directory.
Note If you have a resilient Cisco Unified Attendant Console Advanced installation, you must be logged into the Publisher server to be able to add, delete or change contacts.
To create a contact in the directory, do the following:
Step 1 Select the required Directories pane by pressing the relevant Alt-<number> combination, or by clicking the tab.
Step 2 Do one of the following, as appropriate:
• If you are in an active call, press F12.
• If you are not in an active call, either press Ctrl-T, or right-click within the Directories pane and then choose Add Contact.
The Contact Details window appears.
Step 3 Enter the contact details, including the Contact Type: internal contact (the default) or external contact, which you cannot change once the contact has been created. External contacts don’t have any extension details. If the call was active, the contact number is automatically inserted into the Contact Numbers tab. If the caller is on an internal number it is inserted as the Main Extension number; if the caller is on an external number it is inserted as the Business 1 number. Enter any other, relevant Contact Numbers, such as the contact’s Home or Mobile numbers.
Step 4 Click OK to save the contact to the selected directory.
If you were using a Personal Directory Group, only you and any operators you are sharing that Personal Directory Group with will be able to use the contact. For more information on sharing Personal Directory Groups, see Personal Directory Groups, page 2-6.
Deleting Contacts from Directories
You can remove manually-added contacts from any directory. You cannot delete contacts provided by Cisco Unified Communications Manager.
Note Deleting a contact from a directory permanently removes the contact from the system.
To delete a contact, do the following:
Step 1 Select the contact, and either press Ctrl-D or right-click and choose Delete Contact.
1-16Cisco Unified Attendant Console Advanced - User Guide
OL-29382-01
Chapter 1 Getting StartedInterface
A confirmation window appears.
Step 2 Click Yes to delete contact from the directory.
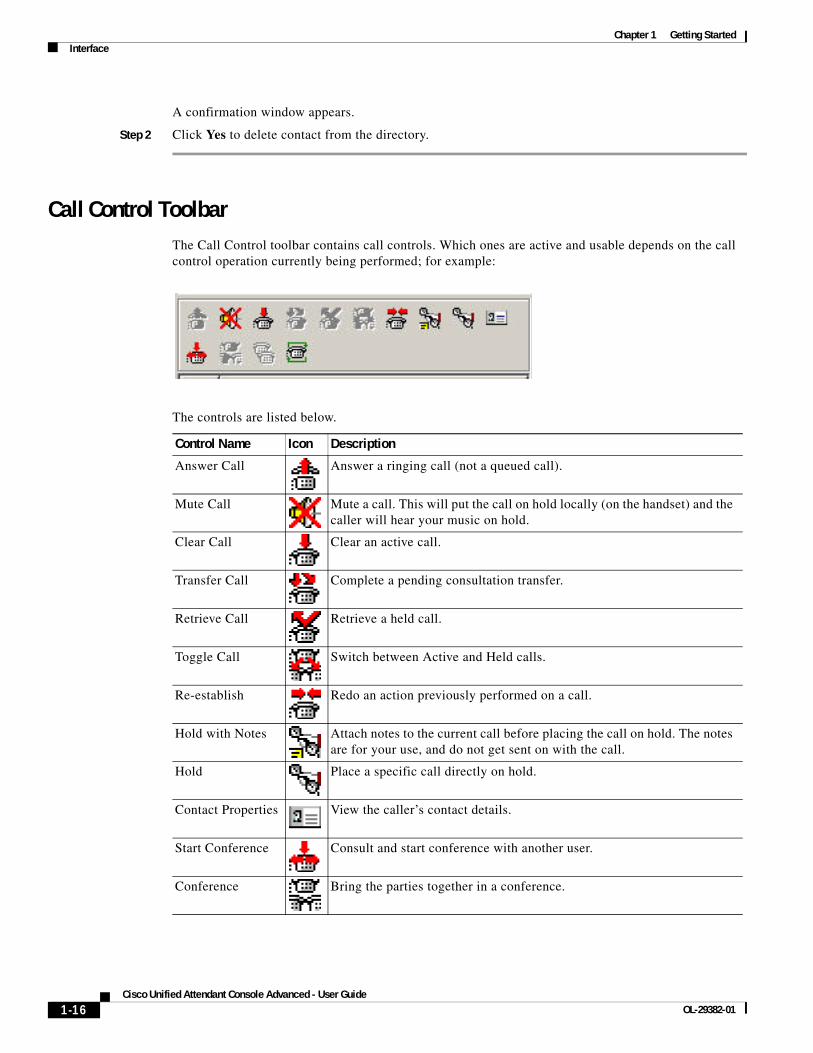
Call Control Toolbar The Call Control toolbar contains call controls. Which ones are active and usable depends on the call control operation currently being performed; for example:
The controls are listed below.
Control Name Icon Description
Answer Call Answer a ringing call (not a queued call).
Mute Call Mute a call. This will put the call on hold locally (on the handset) and the caller will hear your music on hold.
Clear Call Clear an active call.
Transfer Call Complete a pending consultation transfer.
Retrieve Call Retrieve a held call.
Toggle Call Switch between Active and Held calls.
Re-establish Redo an action previously performed on a call.
Hold with Notes Attach notes to the current call before placing the call on hold. The notes are for your use, and do not get sent on with the call.
Hold Place a specific call directly on hold.
Contact Properties View the caller’s contact details.
Start Conference Consult and start conference with another user.
Conference Bring the parties together in a conference.
1-17Cisco Unified Attendant Console Advanced - User Guide
OL-29382-01
Chapter 1 Getting StartedInterface
You can right-click a call in the Active Calls pane and then choose a menu option to perform these controls, or you can access shortcuts to them using your keyboard (see Chapter 1, “Using the Keyboard”).
Calls In Progress PaneThe Calls In Progress pane (press F5 to view) displays:
• Calls that have been placed on hold, which will return on time out
• Calls that have returned on no reply time out from being either:
– Parked
– Transferred to an extension
The timers for returns are set up through Cisco Unified Attendant Console Advanced Administration.
You can retrieve or re-establish a call from the Calls In Progress pane in the following ways:
• Select a contact in the directory and then click one of the tools described in Call Control Toolbar, page 1-16.
• Right-click a call and choose a menu option.
• Use the keyboard shortcuts described in Using the Keyboard, page 1-2.
The Calls In Progress pane contains the following information.
• Call For - The intended recipient of the call.
• Wait Time - The caller’s approximate waiting time.
• Call From - The number from which the call was transferred.
• Status - Whether the call has been placed on hold, parked on a busy extension or if the call has been returned on time-out displayed as Hold Timeout, Park Timeout, No Reply.
• - You have attached notes to the call. Hover over the call to view them.
• A triangular icon colored to match the queue the call comes from (if Queue Call Colors have been configured for the queue, as described in Queued Calls, page 2-5)
Active Calls PaneThe Active Calls pane (press F7 to view) displays calls that are being processed. The call information displayed includes:
• Name of the queue
• Current status of the call: Held, Calling, Talking or Busy
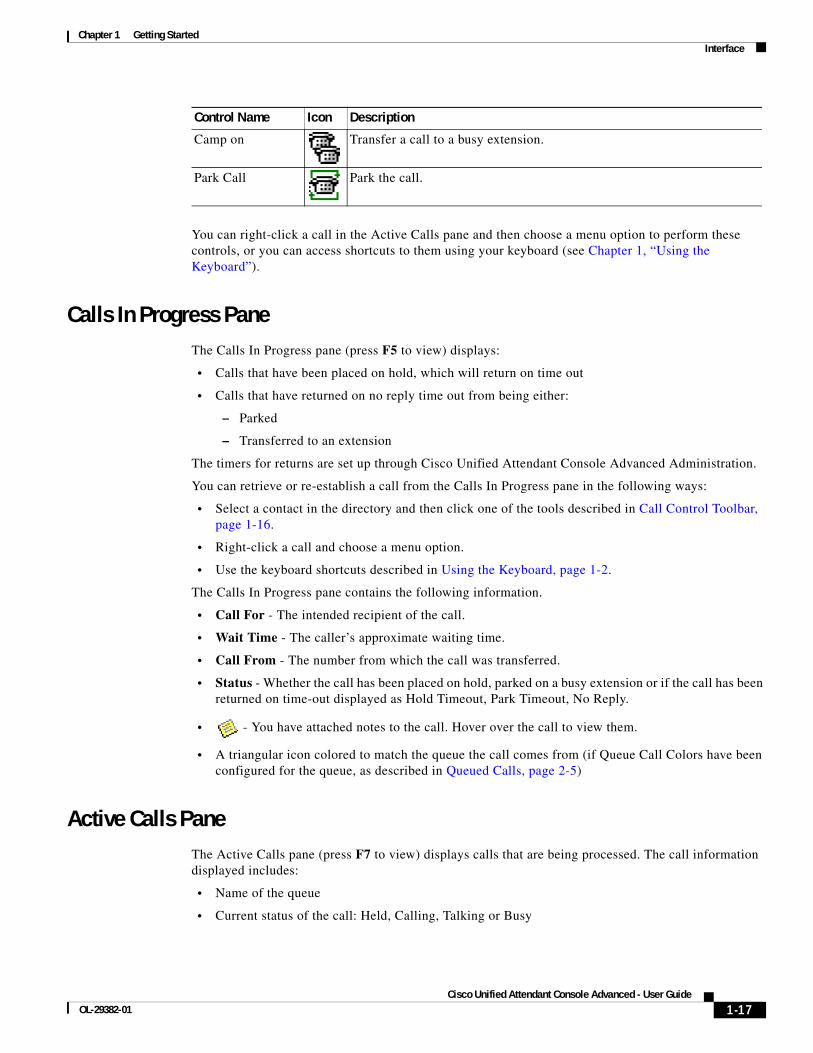
Camp on Transfer a call to a busy extension.
Park Call Park the call.
Control Name Icon Description
1-18Cisco Unified Attendant Console Advanced - User Guide
OL-29382-01
Chapter 1 Getting StartedInterface
• A triangular icon colored to match the queue the call comes from (if Queue Call Colors have been configured for the queue, as described in Queued Calls, page 2-5)
Note If a queue has been configured to Forced Delivery in Cisco Unified Attendant Console Advanced Administration, you do not need to press + (plus) to answer the call. It will automatically appear in the Active Calls pane and the caller will be in circuit.
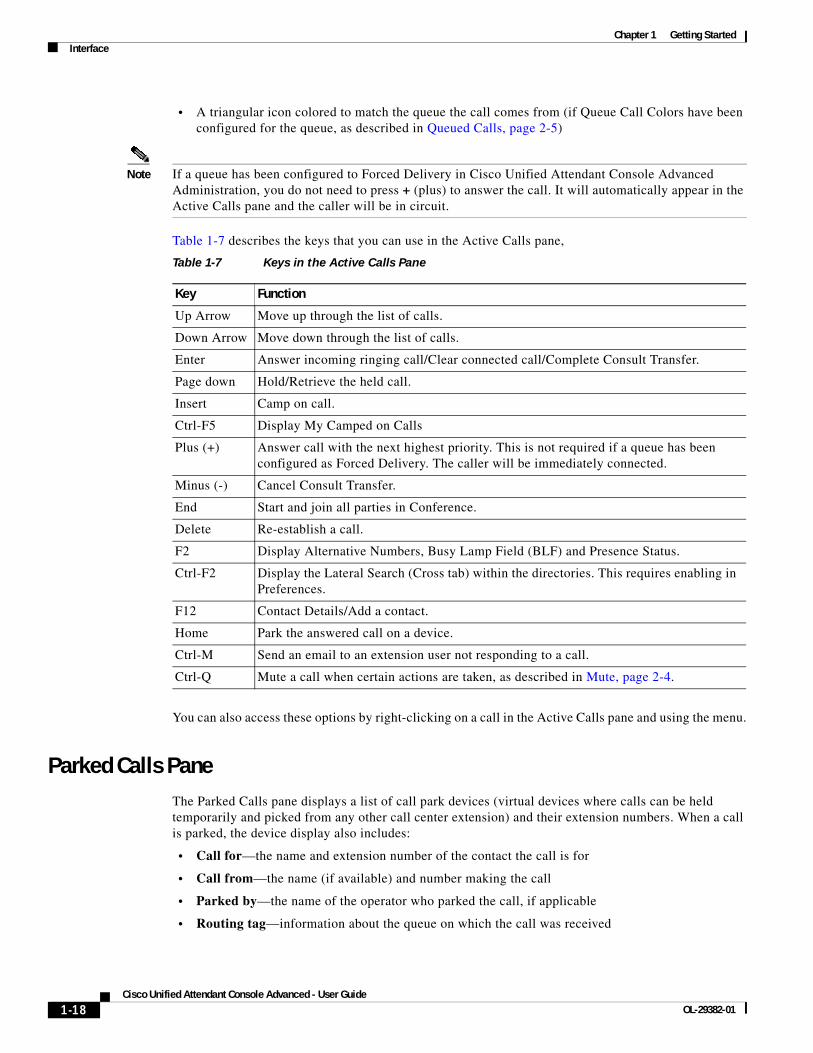
Table 1-7 describes the keys that you can use in the Active Calls pane,
You can also access these options by right-clicking on a call in the Active Calls pane and using the menu.
Parked Calls Pane The Parked Calls pane displays a list of call park devices (virtual devices where calls can be held temporarily and picked from any other call center extension) and their extension numbers. When a call is parked, the device display also includes:
• Call for—the name and extension number of the contact the call is for
• Call from—the name (if available) and number making the call
• Parked by—the name of the operator who parked the call, if applicable
• Routing tag—information about the queue on which the call was received
Table 1-7 Keys in the Active Calls Pane
Key Function
Up Arrow Move up through the list of calls.
Down Arrow Move down through the list of calls.
Enter Answer incoming ringing call/Clear connected call/Complete Consult Transfer.
Page down Hold/Retrieve the held call.
Insert Camp on call.
Ctrl-F5 Display My Camped on Calls
Plus (+) Answer call with the next highest priority. This is not required if a queue has been configured as Forced Delivery. The caller will be immediately connected.
Minus (-) Cancel Consult Transfer.
End Start and join all parties in Conference.
Delete Re-establish a call.
F2 Display Alternative Numbers, Busy Lamp Field (BLF) and Presence Status.
Ctrl-F2 Display the Lateral Search (Cross tab) within the directories. This requires enabling in Preferences.
F12 Contact Details/Add a contact.
Home Park the answered call on a device.
Ctrl-M Send an email to an extension user not responding to a call.
Ctrl-Q Mute a call when certain actions are taken, as described in Mute, page 2-4.
1-19Cisco Unified Attendant Console Advanced - User Guide
OL-29382-01
Chapter 1 Getting StartedInterface
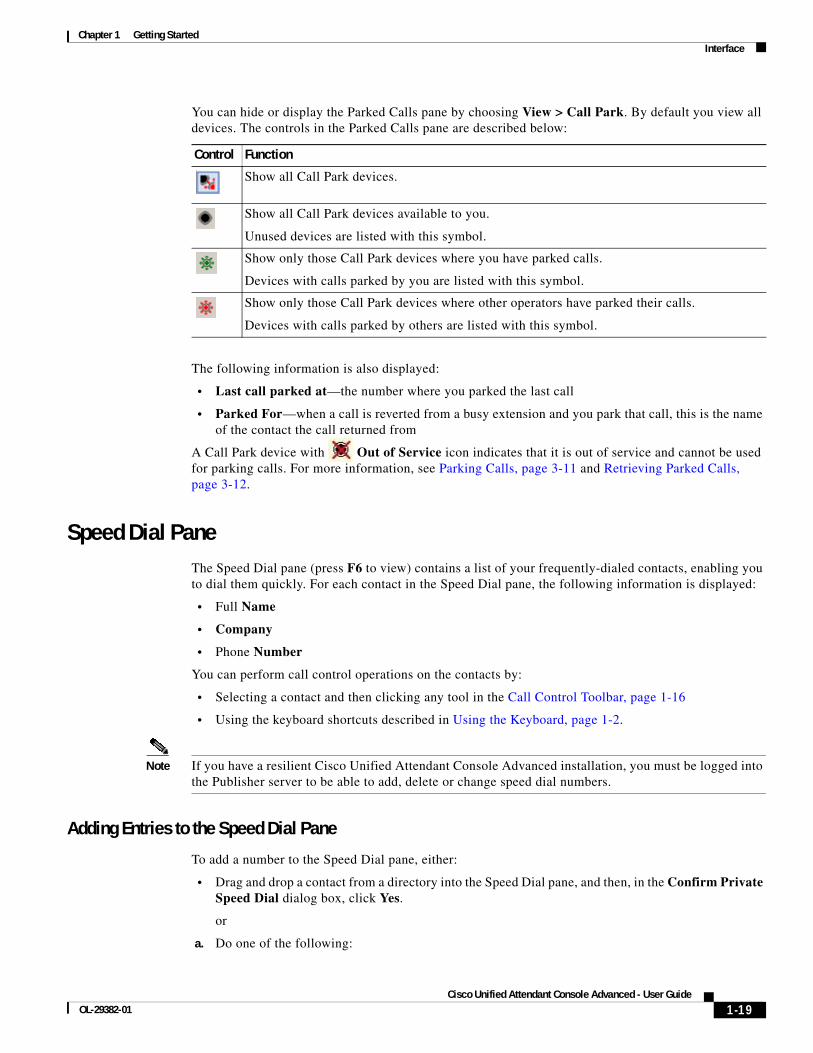
You can hide or display the Parked Calls pane by choosing View > Call Park. By default you view all devices. The controls in the Parked Calls pane are described below:
The following information is also displayed:
• Last call parked at—the number where you parked the last call
• Parked For—when a call is reverted from a busy extension and you park that call, this is the name of the contact the call returned from
A Call Park device with Out of Service icon indicates that it is out of service and cannot be used for parking calls. For more information, see Parking Calls, page 3-11 and Retrieving Parked Calls, page 3-12.
Speed Dial Pane The Speed Dial pane (press F6 to view) contains a list of your frequently-dialed contacts, enabling you to dial them quickly. For each contact in the Speed Dial pane, the following information is displayed:
• Full Name
• Company
• Phone Number
You can perform call control operations on the contacts by:
• Selecting a contact and then clicking any tool in the Call Control Toolbar, page 1-16
• Using the keyboard shortcuts described in Using the Keyboard, page 1-2.
Note If you have a resilient Cisco Unified Attendant Console Advanced installation, you must be logged into the Publisher server to be able to add, delete or change speed dial numbers.
Adding Entries to the Speed Dial Pane
To add a number to the Speed Dial pane, either:
• Drag and drop a contact from a directory into the Speed Dial pane, and then, in the Confirm Private Speed Dial dialog box, click Yes.
or
a. Do one of the following:
Control Function
Show all Call Park devices.
Show all Call Park devices available to you.
Unused devices are listed with this symbol.
Show only those Call Park devices where you have parked calls.
Devices with calls parked by you are listed with this symbol.
Show only those Call Park devices where other operators have parked their calls.
Devices with calls parked by others are listed with this symbol.
1-20Cisco Unified Attendant Console Advanced - User Guide
OL-29382-01
Chapter 1 Getting StartedInterface
– Press Alt-F6.
– Right-click the Speed Dial pane and choose Add Speed Dial
b. Type the contact Number, Name and Company to be saved as a speed dial.
c. If you want the speed dial to be visible to all operators, clear the Private Speed Dial check box.
Private speed dial numbers can only be edited and viewed by you. Other users logging into the application will not be able to view the numbers for which this checkbox is selected.
d. Click OK.
Deleting Entries from the Speed Dial Pane
To delete an entry from the Speed Dial pane, do the following:
Step 1 Select the speed dial you want to delete.
Step 2 Right-click and choose Delete Speed Dial.
Step 3 Click Yes on the confirmation message.
Updating Entries in the Speed Dial Pane
To update an entry in the speed dial pane, do the following:
Step 1 Select the speed dial you want to update.
Step 2 Right-click and choose Edit Speed Dial.
Step 3 Change the Name, Number and Company as required.
Step 4 Change the Private Speed Dial setting, as required.
Step 5 Click OK.
1-21Cisco Unified Attendant Console Advanced - User Guide
OL-29382-01
Chapter 1 Getting StartedFrequent Actions
Status Bar The status bar is an information pane at the bottom of the Cisco Unified Attendant Console Advanced window; it is divided into sections, each of which shows information about the current state of an aspect of the application. From left to right, the sections show:
• Server Connection.
• Application Status. For example, Ready.
• Database Connection.
If you hover the pointer over the Server Connection section a message is displayed when you lose your connection to the server, or when you are connected to the Subscriber server. For example:
You are connected to server “DOC-VM_CUAC002” which is your subscriber server.
Similarly, if you hover the pointer over the Database Connection section a message is displayed when you are connected to the Subscriber database. In either case, click the cross or wait 10 seconds to close the message.
After you have viewed these messages, and for as long as the condition persists, the exclamation mark icon remains displayed in the relevant status bar section.
Frequent Actions This section describes the following actions that you will frequently perform using Cisco Unified Attendant Console Advanced:
• Dialing a Number
• Finding Contacts in Directories, page 1-22
• Lateral Searching, page 1-23
Dialing a NumberInstead of selecting a contact from a directory and then making a call, if the cursor is not in a search field, you can dial a number using your keyboard. As you type, the digits appear in the field at the bottom of the Active Calls pane. You can use the following keyboard shortcuts to edit the number:
• Backspace – Erase a digit
• Space Bar – Clear the number while dialing out
• Enter – Dial the number
1-22Cisco Unified Attendant Console Advanced - User Guide
OL-29382-01
Chapter 1 Getting StartedFrequent Actions
Finding Contacts in DirectoriesCisco Unified Attendant Console Advanced’s search engine enables you to search for a specific person via configured criteria within the directories. This is useful if the console is extremely busy.
To locate a person or number, do the following:
Step 1 Select the directory that the required contact is in. This could be either the Full Directory, or a Personal Directory Group. To navigate between Personal Directories, you can either select the tab heading, or you can press Ctrl-Tab and Ctrl-Shift-Tab to select the next or previous directory. Alternatively, you can navigate directly to any of the first ten tabs by pressing Alt-<number>, where <number> is a whole number in the range 1 to 10.
Step 2 When the Directory Tab is selected the cursor will default to the first search box. Also if you start typing the cursor will automatically go to the first search box.
Step 3 You can search the directory using any of the displayed fields (control which ones are displayed as described in Directory, page 2-5). You can press Tab to jump between the search fields.
Step 4 Enter the string to search for.
Note With AND Searching enabled you can search on two fields at once. For example, John in the First Name and Smith in the Last Name. The search will return only those contact records that match BOTH fields. For how to configure AND searching, see Filter Search, page 2-8.
Step 5 Press Enter.
The selected directory displays only those contacts that match the search criteria.
Step 6 To call the contact, either double-click the contact or select it and then press Enter twice.
When the call has been completed, the directory search result clears and the full directory is re-displayed. You can configure Cisco Unified Attendant Console Advanced so that search results continue to be displayed during call control events, such as call answered and call ended. For more information, see Filter Search, page 2-8.
1-23Cisco Unified Attendant Console Advanced - User Guide
OL-29382-01
Chapter 1 Getting StartedFrequent Actions
Lateral Searching When you perform a lateral search, you filter the contact list to display only those contacts that match the one selected in one of these fields:
• None - lateral searching is disabled
• First Name
• Last Name
• User Field 1
• Job Title
• Location
• Department
• Number
You must define this field before you can perform lateral searching. To define the Lateral Search field choose Options > Preferences > Filter Search, as described in Filter Search, page 2-8.
You can laterally search any directory.
Lateral search enables you to list only those contacts with matching data in one of the above fields. For example, if you set Lateral Search to Last Name, and select a contact with the last name Smith, when you perform a lateral search, the Lateral Search results window lists only those contacts with the last name Smith. You can further refine your search (a process known as drilling down), by holding Shift and then clicking any field in the Lateral Search window (each field becomes highlighted when you hover over it), which displays only those filtered contacts with data matching that field value.
To perform a lateral search:
Step 1 In a directory, select a contact with data in the defined lateral search field.
Step 2 Press Ctrl-F2.
The Lateral Search window appears, containing the matching contacts. The title bar contains details of the search. If you move or resize the window, the next time you perform a lateral search the window will have this new size and position. You can close the window by pressing Esc.
Step 3 To drill down further, hold Shift and then click the field containing the data you are looking for. You can select any non-graphical field displayed for any contact, so long as it has been indexed in the directory. Each field becomes highlighted when you hover over it.
For example, to find all contacts named James Smith in a list of Smiths, click any that has James in the First Name field: only contacts named James Smith are now displayed.
Note To be able to continue, you must either close the Lateral Search window or select a contact in it and then perform a call control action on it; for example, dial that contact by double-clicking it or by pressing Enter.
1-24Cisco Unified Attendant Console Advanced - User Guide
OL-29382-01
Chapter 1 Getting StartedCollecting Logs
Collecting Logs Cisco Unified Attendant Console Advanced logs its activity in a series of files. Administrators and Customer Support staff can collect these logs into an archive ZIP file, and use it to check and troubleshoot the application. The archive can also include the following optional items:
• Screen captures of the desktop and the Cisco Unified Attendant Console Advanced interface when you start log collection
• The Cisco Unified Attendant Console Advanced configuration files
• Any graphic in the clipboard at the time of collection.
To collect log data into an archive:
Step 1 In the Console main menu, choose Help > Collect Logs.
The Log Collector Tool window appears.
Step 2 Either accept the default Archive location and filename or specify your own. The default path is to your computer desktop, and the default filename has the format:
<your_login_name>_<YYYYMMDD>_<HHMM>.zip
where <YYYYMMDD>_<HHMM> is the date and time that the Log Collector Tool was started.
Step 3 If you want a customized archive, select Advanced to display the Options to apply, and then select from the following (any chosen options are applied irrespective of whether Advanced is selected):
• Password protected - the archive file is open/move/delete protected using an internal password known only to Customer Support staff.
• Include application screenshot (selected by default) - a BMP file of current Console interface is included in the archive.
• Include desktop screenshot - a BMP file of your current desktop is included in the archive.
• Include configuration files (selected by default) - the Cisco Unified Attendant Console Advanced configuration files are included in the archive.
• Include clipboard contents - select this when you have an image on the clipboard, perhaps a screen capture of a dialog box or message that will help solve the problem.
• Restrict date range - collect logs only from the specified date range:
– Start at 00.00.00 on the date specified
– End at 23:59:59 on the date specified
Step 4 Click Start.
The archive ZIP file is created.
C H A P T E R
2-1Cisco Unified Attendant Console Advanced - User Guide
OL-29382-01
2Customizing Cisco Unified Attendant Console Advanced
You can customize both the appearance and functionality of Cisco Unified Attendant Console Advanced so that you can work with it in the most comfortable and efficient way. Any custom settings you make are stored in the database so that next time you log in your customized settings are used. You can only change the settings if you:
• Are connected to the Publisher server - you cannot change them when connected to the Subscriber
• Have a connection to the database
To access the console settings, in the main menu, choose Options > Preferences to open the Preferences window. On the left side of the Preferences window are the following tabs, which are described in the rest of this chapter:
• General, page 2-2
• Display, page 2-3
• Presence, page 2-3
• Dialling, page 2-4
• Call Transfers, page 2-4
• Call Park, page 2-4
• Mute, page 2-4
• Tones, page 2-5
• Queued Calls, page 2-5
• Directory, page 2-5
• Personal Directory Groups, page 2-6
• Alternate Numbers, page 2-7
• Field Headers, page 2-7
• Secondary Sort, page 2-7
• Filter Search, page 2-8
• Logging, page 2-9
• Advanced, page 2-9
2-2Cisco Unified Attendant Console Advanced - User Guide
OL-29382-01
Chapter 2 Customizing Cisco Unified Attendant Console AdvancedGeneral
GeneralThe following settings are available in this tab:
• Popup Application When
Cisco Unified Attendant Console Advanced provides you the options to pop-up the application when:
– Queued calls are waiting to be answered
– My local device rings (if this is the device you are logged in with)
– Minimize when not in use
If either or both of the first two options are checked, the application will pop-up on your desktop if it is minimized. The third option will minimize the application when there are no calls active or queuing.
• Auto Unavailable
Define how many minutes your computer must be idle before Cisco Unified Attendant Console Advanced automatically sets your mode to operator unavailable. Select Make me “unavailable” when my computer has been idle for this time period, and then choose from 5, 10, 15 or 30 minutes, or 1 hour.
• Internal Contacts Number Priority
This list shows the order in which an internal contact’s number type is chosen to populate the Number field. If the contact does not have a number of the type at the top of the list, the next number type is used, and so-on.
You can re-order the list by selecting the number type and then moving it with the up arrow and down arrow controls.
• External Contacts Number Priority
This list shows the order in which an external contact’s number type is chosen to populate the Number field. If the contact does not have a number of the type at the top of the list, the next number type is used, and so-on.
You can re-order the list by selecting the number type and then moving it with the up arrow and down arrow controls.
Note If you create a directory using the Field, Number to filter by, the Value you enter is compared against all indexed number fields (for example, Main Extension, Business 1, Business 2 and Mobile) and all contacts that meet the criteria are displayed. With the directory displaying only the Main Extension number or the substitute number (defined in Preferences Tab > General and Internal Contacts Number Priority), your Personal Directory Group may appear to contain inconsistent results. This indicates that the contact has another numbered field that matches the criteria.
For example, if a contact has the primary number 22222 and a Business 1 number of 1111, the full directory shows 22222. If Business 1 is an indexed field, when you create a Personal Directory Group with either Number is equal to 2222 or Number is equal to 1111, the contact is displayed with the number 22222.
2-3Cisco Unified Attendant Console Advanced - User Guide
OL-29382-01
Chapter 2 Customizing Cisco Unified Attendant Console AdvancedDisplay
DisplayThe Display tab enables you to set the following:
• Queues Order – if you do not want the queues sorted in the order they were created, check Sort queues alphabetically.
• When a section becomes selected – Select Change font Colour to change the font colors of the labels in Cisco Unified Attendant Console Advanced for the selected pane To this colour. This makes it easy to see which pane you have selected when operating the console. Click Colour to access the color palette, where you choose the color you want to use. The default is red.
• Display Call Information
– Show Routing Tag enables you to display the name of the queue for each call as well as the standard details. This is set by default.
– Show Time-out Conditions enables you to display details of why a call has returned to the console.
• When making calls – This controls whether the Busy Lamp Field (BLF) Presence prompt is displayed. By default Prompt if Presence Status is set is not selected.
• When dragging and dropping – The Display a drag image option enables you to see a complete image on screen of the call you are dragging across the screen.
• Font Size – Use this to change the size of the font in the Cisco Unified Attendant Console Advanced interface to help make it easier to use. Select from Default, Medium, Large or Extra Large. You can also set this parameter from the main application menu by choosing Options > Font Size.
• Resilience – Check Prompt when switching servers (the default) to be prompted when servers switch during server failure or recovery.
PresenceThis tab enables you to configure what Presence information is displayed.
• Phone Status – Select Enable Busy Lamp Status (the default) to show Busy Lamp Field (BLF) phone status symbols in the Directories and Call In Progress panes. Clear Enable Busy Lamp Status to disable Cisco Unified Attendant Console Advanced BLF-dependent features.
• Default Presence Display – Select between either Microsoft Presence Status, Cisco Presence Status or None.
• Enable Microsoft Presence Information – To display the Microsoft Presence Information (from OCS and Lync) tick this box, and then select which field will be used to retrieve the information: Email, Email 2, Email 3, User Field 1, User Field 2, User Field 3 or User Profile.
• Enable Cisco Presence Information – To display the Cisco Presence Information tick this box and select which field will be used to retrieve the information: Email, Email 2, Email 3, User Field 1, User Field 2, User Field 3 or User Profile.

2-4Cisco Unified Attendant Console Advanced - User Guide
OL-29382-01
Chapter 2 Customizing Cisco Unified Attendant Console AdvancedDialling
DiallingThe following options are available in this tab:
• Voicemail. In Voicemail prefix enter a prefix that will send the call directly to an extension's voicemail when you right-click a contact and choose Transfer to Voicemail.
• Auto Dial – Select this to automatically dial an internal or external number after a delay (from 0 to 10 seconds) you define using the Auto Dial Delay control.
Call TransfersThe following options are available in this tab:
• When Dragging and Dropping or Double Clicking
Choose the type of transfer to perform when dragging and dropping or double-clicking a call:
– Perform consultation transfer
– Perform blind transfer (this is selected by default)
• When Blind Transferring
When Blind Transferring a call, you can select Automatically Campon if busy. This automatically stacks the call on to the extension until it becomes available and increases the speed of call handling.
Note This works only if this feature in enabled on Cisco Unified Communications Manager and the end user does not have voicemail.
• When Re-establishing a Call
When re-establishing a call, you can select Automatically Campon if busy. This automatically stacks the call on to the extension until it becomes available and increases the speed of call handling.
Call ParkUnder After a call has been parked, select Show all park devices display all the park devices in the Parked Calls pane.
MuteThis tab enables you to Automatically Mute Calls When:
• Performing a search – Select this to mute when you click in any of the search fields.
• Pressing numeric keys to dial numbers – Select this to mute when you dial a number.
• Changing or selecting Directory screens – Select this to mute when you select a directory.
With any of these selected the call is held locally (on the handset) and the caller hears music on hold.
2-5Cisco Unified Attendant Console Advanced - User Guide
OL-29382-01
Chapter 2 Customizing Cisco Unified Attendant Console AdvancedTones
TonesThis tab enables you to switch tones on or off depending on specific events:
• When I have made myself unavailable – Select Do not play any tones to prevent tones playing while you are away from the Console.
• When a queued call is waiting to be answered – Select Play a Ring Tone to play a ring tone while a call is waiting in a queue.
• When a call has timed out – Select Play a Ring Tone to play a ring tone when a call reverts from the Calls In Progress or Parked Calls panes.
Queued Calls This tab enables you to color-code calls to show which queue they arrived on (for example, in the Active Calls pane), and to automatically connect queued and forced delivery calls to your phone.
To enable you to distinguish between calls in different queues, you can set a different colored indicator for each queue. Under Queue Call Colours, select Show Indicator for each queue that you want to color-code, and then, under Colour, browse to the Color dialog box and select the color to use. You can restore the original queue colors by clicking Restore Defaults.
Under Auto Connect, choose which types of calls you want automatically connected when your phone rings:
• Queued calls – only calls from standard queues are automatically connected to your phone. All other calls will ring your phone until you actually answer the call.
• Forced delivery calls – only forced delivery queued calls are automatically connected to your phone. All other calls will ring your phone until you actually answer the call.
If you select both options, all queued calls are automatically connected to your phone. Calls from the service queue are immediately automatically connected.
When you enable either option, you can also specify a Delay – the length of time (from 0.5 to 9 seconds in half-second increments) that your phone rings before that type of call is automatically connected. If you do not specify a delay, that type of call is connected immediately.
Directory The Directory tab enables you to configure and influence the way that contact information is displayed within the Directories pane of the Cisco Unified Attendant Console Advanced. It has the following sections:
• Directory Groups - Use this to control how each directory will be displayed. Select All directory groups use the same settings, and then select the directory from which all others adopt their parameters. If several directories are visible, changing the position or width of a column in one immediately changes the others in the same way.
Alternatively, if All directory groups use the same settings is not ticked, you can select a directory from the table and then configure the selected directory independently of the others.
The order of directories in the Directory Groups list (top to bottom) is the order they are displayed in the Directories pane (left to right). You can change the directory order by selecting a directory in the list and then either:
2-6Cisco Unified Attendant Console Advanced - User Guide
OL-29382-01
Chapter 2 Customizing Cisco Unified Attendant Console AdvancedPersonal Directory Groups
– Using the Up Arrow and Down Arrow controls
– Dragging it up or down the list
You can also directly reorder directories in the Directories pane by grabbing the directory title tab and dragging it to the left or right. You cannot move the Create a new Personal Directory Group tab. For more information, see Directories Pane, page 1-9.
• Default Display Order – The data in this contact record field is used to sort the contacts when they are displayed in the directory. Select from Department, First Name, Job Title, Last Name (the default), Location, Number and User Field 1.
Note If you change the Default Display Order the changes will not appear on your screen until you log out of Cisco Unified Attendant Console Advanced and then log back in.
• Show the following information – Select the check box for a contact data field to display that field in the directory. The order the fields are listed is the order in which they are displayed. To change the display order, select a field, and then either drag it or use the Up Arrow and Down Arrow keys to move it a new position in the list.
• Search Based On – Choose how many and which search fields to use to search for a record in the Internal Directory. Use Display this many search fields on the screen to display up to six fields, with the following defaults:
– Search 1 = Last Name
– Search 2 = First Name
– Search 3 = Department
– Search 4 = Job Title
– Search 5 = Location
– Search 6 = Number
Personal Directory Groups The Personal Directory Groups tab enables you to share Personal Directory Groups with other operators in your community. For more information about Personal Directory Groups, see Personal Directory Groups, page 1-11.
The Personal Directory Groups tab is available only when the following are true:
• You have created at least one Personal Directory Group.
• If you have a resilient Cisco Unified Attendant Console Advanced installation, you must be logged in on the Publisher server. The tab is not visible when logged in on the Subscriber server.
• There is at least one other operator in your community to share the Personal Directory Group with.
The tab displays lists of:
• Personal Directory Groups that can be shared (upper list)
• Operators with which Personal Directory Groups can be shared (lower list)
To share a Personal Directory Group, do the following:
Step 1 Select it from the upper list Select the Personal Directory Group you wish to share.
2-7Cisco Unified Attendant Console Advanced - User Guide
OL-29382-01
Chapter 2 Customizing Cisco Unified Attendant Console AdvancedAlternate Numbers
Step 2 In the lower list, select the check boxes corresponding to the users you wish to share the Personal Directory Group with. To cease sharing a Personal Directory Group with a user, clear the check box next to their name. If required, use the controls to select or unselect (clear) the check boxes of all users.
Step 3 Click OK or Apply (clicking OK closes the tab).
A message appears on any other live consoles to tell their attendants when a Personal Directory Group has been shared or unshared.
Alternate Numbers Use the Alternate Numbers tab to define how to display any alternative numbers information that a contact may have.
The Show the following information setting enables you to specify what information is displayed for a contact. Click the check boxes to select the information. Select an information type and then use the up/down arrows to change the order in which the information is displayed.
Alternate Numbers Display Order – Select an alternate number and then use the up/down arrows to specify the order in which the information is displayed. Set this to the same order used in the Directories pane.
Field HeadersYou can change the text of Field Headers that appear in the application by simply entering new Display Text to replace the Default Text.
To change the Display Text for Field Headers, do the following:
Step 1 Select the text in the Display Text column. Initially, this is the same as the Default Text.
Step 2 Type new Display Text.
Step 3 Click OK.
To restore the default text for all field headers, click Restore Defaults.
Secondary SortWhen you search a directory, matching contacts are first sorted according to the column you are searching, and then they are sorted according to a secondary sort column. For example, if you are searching for a Last Name beginning “Sm”, and the Last Name column has First Name defined as its secondary sort column, you might see something like this:
Smart John - Sales
Smith Anne - Sales
Smith Michael - Marketing
Smith Theresa - Administration
2-8Cisco Unified Attendant Console Advanced - User Guide
OL-29382-01
Chapter 2 Customizing Cisco Unified Attendant Console AdvancedFilter Search
Smythe Adam - Marketing
The Smiths are sorted according to first name.
If you now change the Last Name secondary sort column to Department, the same search would return:
Smart John - Sales
Smith Theresa - Administration
Smith Michael - Marketing
Smith Anne - Sales
Smythe Adam - Marketing
Every column in your directory has a default secondary sort column You can change this default to any column you want.
To change a secondary sort column, do the following:
Step 1 In the Secondary Sort pane, for your chosen Sort Column, click the corresponding value in the Secondary Sort Column.
Step 2 From the menu, choose a new secondary sort column. You can change the secondary sort column for as many Sort Columns as you require.
Step 3 Click OK.
If you change a secondary sort column, you can restore all default values by clicking Restore Defaults.
Filter SearchAs you search in any of the search fields within the directories, you can specify how you want the search to perform on screen. This tab enables you to set those preferences by selecting the following options:
• During call control
Select Retain existing directory search to retain the search results during call control events. If you do not select this, call control events (such as call answered, new call directly to operator's extension, and call ended) clear the search results and re-display the full directory. When you select this you have to press Shift-F3 to clear the search results.
• AND Searching
This enables you to select two criteria at once and search for entries that meet both of them. For example, John in the First Name and Smith in the Last Name. The search returns only those records that meet the criteria entered in both fields.
Select I want to use AND Searching to enable this function.
Note You can also activate this feature by choosing Options > Filter Searching and then Use AND Searching.
With the function enabled, by default, typing in a search field clears the one to the right, forcing you to define the search from left to right. You can disable this behavior by clearing Clear remaining search fields when typing.
2-9Cisco Unified Attendant Console Advanced - User Guide
OL-29382-01
Chapter 2 Customizing Cisco Unified Attendant Console AdvancedLogging
• When Performing a Filter Search
– Press Enter to perform search – Once you have entered some information in any one of the search fields, selecting this option performs a search when you press Enter.
– Search after every key press – This option refreshes the search results with every key you press to enter a search value in the field. This is the default setting. This option is disabled if you select I want to use AND Searching.
– Search after a delay – If this option is selected and you enter information in the search field, the search result will be displayed with a delay in seconds specified using the Search Delay slider.
• Lateral Search
The Lateral Search feature enables you to search for an alternative contact by pressing Ctrl-F2. Select from None, First Name, Last Name, User Field 1, Job Title, Location, Department or Number. Selecting None disables Lateral Searching.
LoggingThis tab enables you to turn logging on and off. Use the check boxes to control the following:
• Database – select to enable database activity logging.
• Server Communication – select to enable server communication logging.
The operator log path and file name is displayed for reference.
Advanced This tab controls which types of directly transferred calls (according to their destination) are sent back to you if unanswered
Direct transfers allow the end party to see the originating CLI (Caller Line Identification – the caller's number). However, using direct transfers restricts the ability of Cisco Unified Attendant Console Advanced's to return transferred calls to you if they are not answered.
By default, blind transfers redirect calls from your handset to the Service Queue (CTI Port), and the call is then connected to the end party. By contrast, direct transfers bypass the Service Queue and send the call directly to the end party. The caller is not placed on hold (so they hear ringing rather than music), and the originating CLI is displayed to the end party, rather than the details of the Service Queue.
Note If you use direct transfers you will lose recall functionality, and the only calls the system will be able to recall internally are ones to devices monitored by the Cisco Unified Attendant Console Advanced Server.
Under When transferring calls, select which types of unanswered directly transferred calls you want to revert back to you following timeout:
• All calls (the default)
• Internal calls
• External calls
• No calls

2-10Cisco Unified Attendant Console Advanced - User Guide
OL-29382-01
Chapter 2 Customizing Cisco Unified Attendant Console AdvancedAdvanced
Note This feature takes up to a minute to become active after you log in or enable it, depending on the system latency, bandwidth and your configuration.

C H A P T E R
3-1Cisco Unified Attendant Console Advanced - User Guide
OL-29382-01
3Using Cisco Unified Attendant Console Advanced
This section describes bow to use Cisco Unified Attendant Console Advanced to do the following:
• Answering Calls, page 3-2
• Transferring Calls, page 3-6
• Making Calls, page 3-9
• Holding Calls, page 3-10
• Retrieving Held Calls, page 3-11
• Muting Calls, page 3-11
• Parking Calls, page 3-11
• Retrieving Parked Calls, page 3-12
• Conferencing Calls, page 3-12
• Re-establishing Calls, page 3-13
• Toggling Calls, page 3-13
• Controlling Reverted Calls, page 3-14
• Supplying FACs and CMCs, page 3-15
• Clearing Calls, page 3-15
• Using Emergency Mode, page 3-16
• Sending Emails, page 3-16
• Sending Instant Messages, page 3-16
• Viewing Call Status, page 3-17
• Viewing and Using Contact Details, page 3-17
• Viewing Cisco Unified Presence Status, page 3-20
• Viewing Microsoft Presence Status, page 3-21
3-2Cisco Unified Attendant Console Advanced - User Guide
OL-29382-01
Chapter 3 Using Cisco Unified Attendant Console AdvancedAnswering Calls
Answering CallsCisco Unified Attendant Console Advanced attends two types of calls,
• Internal Calls – that are received from a local extension
• External Calls – that are received from an external number
Calls that are being attended appear in the Active Calls pane.
The calls coming into the system are prioritized and queued in the Queued Incoming Calls pane. Calls can be answered using the following three methods,
• Answer Next – Answering the next call in queue.
• Cherry Picking – Selecting a particular call from the queue to answer.
• Forced Delivery - Queues can be configured as Forced Delivery which means the calls will be distributed to the longest idle Attendant.
Answer NextIncoming calls are prioritized by the system and then displayed in the Queued Incoming Calls pane in descending order of priority.
Use Answer Next to answer queued calls in the order of priority set by the system.
To answer the next call using the keyboard, do the following:
Step 1 Press F8 to select the Queued Incoming Calls pane.
Step 2 Press the + (plus) key.
The next highest priority call is delivered to your handset.
To answer the next call using the mouse:
Step 1 Right-click in the All Queues pane.
Step 2 From the menu, choose Answer Next.
Irrespective of the call you right-clicked, the next highest priority call is delivered to your handset.
Cherry Picking The incoming calls being displayed can be cherry picked from a specific queue as required.
In order to answer a call you must select a queue and then select the call you wish to answer.
To select a queue using the keyboard, do the following:
Step 1 Press F9 to select the Queues pane.
Step 2 Use the Up Arrow and Down Arrow keys to select the required queue.
3-3Cisco Unified Attendant Console Advanced - User Guide
OL-29382-01
Chapter 3 Using Cisco Unified Attendant Console AdvancedAnswering Calls
Step 3 The Queued Incoming Calls pane displays the calls that are waiting in the selected queue.
Note To revert back to seeing all calls from all queues, select All Queues icon from F9.
If you are using a mouse, simply click a queue in the Queues pane. After selecting the queue, you are ready to take waiting calls.
To answer calls in the selected queues, using the keyboard, do the following:
Step 1 Select the Queued Incoming Calls pane by pressing F8.
Step 2 Using the Up Arrow and Down Arrow keys, select the call to answer.
Step 3 Press Enter to connect the call.
A personal call direct to your extension will show in the Active Calls pane, and ring your handset. You
can answer by picking up the handset, or by clicking Answer Call.
Note You can simply drag and drop a call from the Queued Incoming Calls pane to the Active Calls pane to answer.
Forced DeliveryA specific queue can be designated to be immediately answered by the next free attendant. The calls in this queue are configured to be presented to the longest idle attendant or a circular work-share between attendants logged in and able to answer the queue. Forced delivery queues are identifiable by a green indicator. You do not need to press Answer Next (+), as the call will go directly to the Active Calls pane
and ring the handset. You can answer by picking up the handset, or by clicking Answer Call.
You can configure Cisco Unified Attendant Console Advanced so that forced delivery calls are automatically connected when your phone rings. For more information, see Queued Calls, page 2-5.
You can log out while a forced delivery call is ringing on your handset.
3-4Cisco Unified Attendant Console Advanced - User Guide
OL-29382-01
Chapter 3 Using Cisco Unified Attendant Console AdvancedAnswering Calls
Directory Call ForwardingIf a contact has Call Forwarding set on their device an icon reflects this in the Directories pane.
Note If a contact has multiple lines, the Call Forwarding icon is displayed only if it is configured on the primary line.
Hovering over the contact displays further details, such as the number that the Call Forwarding is set to divert to.
To see any secondary lines, select the contact and then press F2, to display the Alternate Numbers window.
Alternate Numbers and Presence Status To display the Presence Status and Alternate Numbers for a contact, select the contact and press F2. The Alternate Numbers For <contact> - [<presence>] window appears. The window also appears when you transfer a call to an extension with a presence status assigned.
Under Presence Status Details, you can use the navigation pane on the left to display pages containing the following information:
• Summary – The default setting, showing phone status, Cisco presence, Microsoft presence and alternate contact details.
Phone Status – Contact Phone Status, including the BLF subscription number and the status of any multiple lines linked to the phone. This is not displayed if Enable Busy Lamp Status is not set, as described in Presence, page 2-3. The Phone Status icons are shown below.
Icon Description
On-hook
Off-hook
Unavailable
Ringing in
Ringing out
Ringing out on busy extension
Connected
Call on hold
Diverted
Notes
3-5Cisco Unified Attendant Console Advanced - User Guide
OL-29382-01
Chapter 3 Using Cisco Unified Attendant Console AdvancedAnswering Calls
The BLF subscription number is generated from the DN – according to the Directory BLF Rules – and is used internally to retrieve the BLF phone state. It is read-only, and cannot be used to search the directory.
• Cisco Presence – Cisco Presence. If Cisco Presence is not configured, status Unknown is displayed.
• Microsoft Presence – Microsoft Presence and Notes. If Microsoft Presence is not configured, status Unknown is displayed.
• Contact Notes – Contact Information and Contact Absent Message.
Each of the above pages contains the following:
• Alternate Contact Details – the alternative numbers for the contact. If the number is saved in the directory, the contact's full name is displayed instead of the number. You can select an alternate contact and use the call controls on it.
• Call controls – use these to control a call to an alternate number; for example, to place it on hold. For more information, see Controlling Calls, page 3-5.
Controlling Calls
To control a call, do the following:
Step 1 Select a contact from Alternate Contact Details.
Step 2 Click the required call control icon:
• Answer Call
• Call
• Consult
• Blind Transfer
• Transfer to Voicemail
• Hold
• Hold with Notes
• Start Conference
• Park Call
Alternatively, click Close to cancel.
You can use the following keyboard shortcuts to control calls:
• Enter – The call is consult transferred to the selected alternate contact.
• Enter twice – The call is blind transferred to the selected alternate contact.
• Ctrl-P – The Park and Page dialog box opens, but only if
– Paging is running
– The selected contact is internal
– Paging is supported by the selected alternate phone
3-6Cisco Unified Attendant Console Advanced - User Guide
OL-29382-01
Chapter 3 Using Cisco Unified Attendant Console AdvancedTransferring Calls
Transferring CallsAfter answering the call, you can transfer it to a requested device, contact or external number. A transfer can be made either as a blind or consult (announced) transfer. Calls can be transferred to any available destination either internally or externally.
Transferring a call is straightforward and can be completed by either entering the desired extension number (if known), or searching the directories for the correct contact.
A blind transfer is a call that is transferred without consulting the recipient.
Blind Transferring to a Known NumberTo blind transfer a call to a known number using the keyboard, do the following:
Step 1 Answer a call or select the call in the Active Calls pane.
Step 2 Type the destination number (internal or external). The cursor is automatically placed in the Dial Box.
Step 3 Press Enter twice in quick succession to transfer the call.
To blind transfer a call to a known number using a mouse, do the following:
Step 1 Answer a call or select the call in the Active Calls pane.
Step 2 Type the destination number (internal or external). The cursor will automatically be placed in the Dial Box.
Step 3 Press Enter to start the transfer.
Step 4 Press Transfer again to transfer the call.
Blind Transferring to a Directory Contact If the extension number of the desired recipient is not known you can easily search the directory to find the correct contact. The directories will allow searches to be made via a number of search fields that appear at the top of the Directories pane.
To blind transfer a call to a Directory Contact using the keyboard, do the following:
Step 1 Answer a call or select the call in the Active Calls pane.
Step 2 If searching for a contact using the first displayed search field, simply start typing. Alternatively pressing F3 will take the cursor to the first displayed search field. The cursor will automatically move to the first search field. If you need to use a search field that isn’t the first on the screen, press Tab to find the right field to type into.
Step 3 As you type, the directory will shrink as contacts are matched (Depending on how Filter Search is configured; for more information, see Filter Search, page 2-8). Keep typing until the required contact is found, or use the up or down arrow to highlight the contact.
3-7Cisco Unified Attendant Console Advanced - User Guide
OL-29382-01
Chapter 3 Using Cisco Unified Attendant Console AdvancedTransferring Calls
Step 4 Press Enter twice in quick succession (less than 1.5 seconds) to transfer the call.
To blind transfer a call to a Directory Contact using the mouse, do the following:
Step 1 Answer a call or select the call in the Active Calls pane.
Step 2 Click into the required search field in the Directories pane. Alternatively, pressing F3 will take you to the first search field in the displayed directory
Step 3 Start typing and as you type the directory will shrink as contacts are matched. Keep typing until the required contact is visible, and then select the desired contact
Step 4 Double-click the contact to initiate the transfer.
Step 5 Press Transfer to transfer the call.
Or
Step 1 Select the call within the Active Calls pane.
Step 2 Drag the call and then drop it into the relevant destination within the Directories pane.
Note When the contact is in a specific Personal Directory Group, open that directory by hovering over the tab and then select the contact.
Or
Step 1 Select call details in the Active Calls pane.
Step 2 Select the relevant destination within the Directory or Speed Dial panes and right-click.
Step 3 From the menu choose Blind Transfer.
If a transferred call is not answered within a certain time duration, the call is reverted back to the Active Calls pane. These calls can then be handled through Reverted Call Controls explained in Controlling Reverted Calls, page 3-14.
3-8Cisco Unified Attendant Console Advanced - User Guide
OL-29382-01
Chapter 3 Using Cisco Unified Attendant Console AdvancedTransferring Calls
Consult Transferring Calls In this case, the destination of the transfer is consulted before the actual transfer takes place.
Consult Transferring to a Known Number
To consult transfer a call to a known number using the keyboard, do the following:
Step 1 Answer a call or select the call in the Active Calls pane.
Step 2 Type the destination number. The cursor is automatically placed in the Dial Box.
Step 3 Press Enter to make the enquiry call.
Step 4 After consulting with the destination, press Enter to complete the transfer.
To consult transfer a call to a known number using a mouse, do the following:
Step 1 Answer a call or select the call in the Active Calls pane.
Step 2 Using the keyboard type the destination number. The cursor will automatically be placed in the Dial Box.
Step 3 Press Enter to initiate the transfer.
Step 4 Press Transfer again to transfer the call after consulting.
Consult Transferring to a Directory Contact
If the extension number of the desired recipient is not known, you can easily search the Directory to find the correct contact. The directories will allow searches to be made via a number of search fields that appear at the top of the Directories pane.
To consult transfer a call to a Directory Contact using the keyboard,
Step 1 Answer a call or select the call in the Active Calls pane.
Step 2 Select the Directory that the contact appears in. This can be done by pressing Alt and the Number of the tab. Example: Alt and 3 will open the 3rd tab, Alt and 5 will open the 5th tab.
Step 3 If searching for a contact using the first displayed search field, simply start typing. The cursor will automatically move to the first search field. Alternatively, pressing F3 will also move the cursor to the first search field. If you need to use a search field that isn’t the first on the screen, press Tab to find the right field to type into.
Step 4 As you type the directory will shrink as contacts are matched (Depending on how Filter Search is configured; for more information, see Filter Search, page 2-8). Keep typing until the required contact is found, or use the up or down arrow to highlight the contact.
Step 5 Press Enter to initiate the enquiry call.
Step 6 After the consult, press Enter again to complete the transfer.
3-9Cisco Unified Attendant Console Advanced - User Guide
OL-29382-01
Chapter 3 Using Cisco Unified Attendant Console AdvancedMaking Calls
To consult transfer a call to a Directory Contact using the mouse:
Step 1 Answer a call or select the call in the Active Calls pane.
Step 2 Click into the required search field in the required Directory. In the case where Personal Directories have been created, click the respective Directory tab.
Step 3 Start typing and as you type the directory will shrink as contacts are matched (Depending on how Filter Search is configured, See Filter Search, page 2-8). Keep typing until the required contact is visible and then select the desired contact.
Step 4 Double-click the contact to initiate the transfer.
Step 5 Press Transfer to transfer the call after consulting.
Or
Step 1 Select the call within the Active Calls pane.
Step 2 Drag the call to the relevant destination within the required Directory. This sets up the enquiry call.
Step 3 Press Transfer to transfer the call after consulting.
Or
Step 1 Select call details that are displayed in the Active Calls pane.
Step 2 Select the required Directory or Speed Dial panes and right-click.
Step 3 From the menu choose Consult.
Step 4 Ensure that the call initiated is selected within the Active Calls pane.
Step 5 Click Transfer Call.
Although in these procedures a consult, or enquiry call has been made, if for some reason the transferred call is not connected within a certain time duration, the call is reverted back to the Active Calls pane. These calls can then be handled through Reverted Call Controls explained in Controlling Reverted Calls, page 3-14.
Making CallsCisco Unified Attendant Console Advanced enables you to dial and make calls. Calls can either be made directly to a contact or can be made using different call controls such as Call Parking, Transferring and Conference. These call controls are explained in Call Control Toolbar, page 1-16.
You can make two types of call:
• Internal Call – Calls that are made to the numbers existing within the system. For example, in a call center, calls made to the numbers within the call center are called internal numbers.
• External Call – Calls that are made to the numbers external to the system. For example, an operator in a call center can make a call to a customer for marketing purposes.
3-10Cisco Unified Attendant Console Advanced - User Guide
OL-29382-01
Chapter 3 Using Cisco Unified Attendant Console AdvancedHolding Calls
Making Internal Calls To call a local extension, do the following:
Step 1 Enter the required number. No matter which console pane you have selected, as you type, the digits will appear in the Calling box under the Active Calls pane.
Step 2 Click Connect/Clear or press Enter.
A call will be initiated for the selected contact and the details will be displayed in the Active Calls pane.
Making External CallsTo make an external call using a keyboard, do the following:
Step 1 Dial the number of the access code and then the external number. (Unless Cisco Unified Attendant Console Advanced is configured to add the Access Number. This is done on the Cisco Unified Attendant Console Advanced).
Step 2 Press Enter to start dialing.
It is not necessary to place the cursor in the Calling Box, when you start typing the numerical values, it will automatically type in it.
To make an external call using a mouse, do the following:
Step 1 Select the required Directory.
Step 2 Double-click the number to dial.
Holding Calls While answering a call, you can place the active call on hold to answer other incoming calls. The call is held on a Service Queue for the time period set as Hold Recall Time in Cisco Unified Attendant Console Advanced Administration. After the Hold Recall Time elapses, the status of the call changes from Held to Hold Timeout. You can handle these reverted calls using the Reverted Call Controls explained in Controlling Reverted Calls, page 3-14. A call can be reverted irrespective of whether the timeout has been reached.
To hold a call through the keyboard, do the following:
Step 1 Press F7 to select Active Calls pane.
Step 2 Select a call using the Up Arrow and Down Arrow keys.
3-11Cisco Unified Attendant Console Advanced - User Guide
OL-29382-01
Chapter 3 Using Cisco Unified Attendant Console AdvancedRetrieving Held Calls
Step 3 Press Page Down to hold the selected call.
To hold a call using a mouse, do the following:
Step 1 Select a call in Active Calls pane.
Step 2 Click Hold.
Retrieving Held CallsCalls placed on hold can be retrieved from the Calls In Progress pane to Active Calls pane. Calls reverted from Hold, Park and Transfer can also be seen in Calls In Progress pane.
To retrieve a held call using keyboard, do the following:
Step 1 Press F5 to select Calls In Progress pane.
Step 2 Select a call using the Up Arrow and Down Arrow keys.
Step 3 Press Page Down to retrieve the held call.
To retrieve the held call using mouse, do the following:
Step 1 Click a held call in the Calls In Progress pane.
Step 2 Click Retrieve.
Muting CallsCisco Unified Attendant Console Advanced provides the ability to mute a call when certain actions are being undertaken. There are two types of Mute, the first is automated and is set via the Options > Preferences > Mute tab. If this has been enabled it can include when a search is being made, when a number is being dialed, or if you are changing or selecting Directory screens.
The second type of muting a call is manual and is instigated either by clicking Mute ( ) or pressing Ctrl-Q. The same key combination will also un-mute a call. Alternatively you can right-click the active call and select Mute from the menu.
Parking Calls Parking calls is like holding calls except that any logged in console attendant can retrieve the call. The call is held on a call parking device. Any console operator can pick up the call simply by dialing the extension number of the call park device. You can either park a call on a specific park device, or let the system select the device for you. You can see the available call parking devices in the Parked Calls pane.
3-12Cisco Unified Attendant Console Advanced - User Guide
OL-29382-01
Chapter 3 Using Cisco Unified Attendant Console AdvancedRetrieving Parked Calls
To park a call using a keyboard, do the following:
Step 1 Press F7 to select Active Calls pane.
Step 2 Select a call using the Up Arrow and Down Arrow keys.
Step 3 Press Home to park the call on one of the available call parking devices.
To park a call using a mouse, do the following:
Step 1 Select a call in the Active Calls pane.
Step 2 Either:
• Click Park Call, to park it in any available device.
• Drag and drop the call onto a selected Park device.
If a parked call is not answered within a certain time duration, the call is reverted back to the Calls In Progress pane. Such calls can then be handled through Reverted Call Controls explained in Controlling Reverted Calls, page 3-14.
Retrieving Parked CallsTo retrieve a parked call using a mouse, do one of the following:
• Double-click the Call Parking device
• Drag and drop the call to the Active Calls pane
• Right-click the device and select Retrieve from the menu
• Click Retrieve.
To retrieve a parked call using the keyboard, simply dial the Park device number.
If a parked call remains unanswered for the Call Park Recall time, it will revert back to the Calls In Progress pane, from where you can retrieve the call using the methods described in Retrieving Held Calls, page 3-11.
Conferencing CallsA Conference call enables you to add a third person to a call session.
With a connected call, to start conference with a third party using the keyboard, do the following:
Step 1 Select the extension that is to be added into the conference or type the number.
Step 2 Press End.
Step 3 Wait for the third party to answer and press End to join all three parties.
3-13Cisco Unified Attendant Console Advanced - User Guide
OL-29382-01
Chapter 3 Using Cisco Unified Attendant Console AdvancedRe-establishing Calls
With a connected call, to start conference with a third party using a mouse, do the following:
Step 1 Select the extension that is to be added into the conference or type the number.
Step 2 Click Start Conference and the conference is initiated.
Step 3 Wait for the third party to answer and click Conference.
Once the conference is in progress an additional field is highlighted in the Active Calls pane. The field is labeled as Conference Controller and is used to drop you out from the call once all the parties are in conversation.
If any of the parties does not respond to the conference call, the call is reverted back. Such calls can then be handled through Reverted Call Controls explained in Controlling Reverted Calls, page 3-14.
Note If the third person does not want to start the conference, Cisco Unified Attendant Console Advanced clears the initiated call. This will take you back to the original call.
Re-establishing Calls The Re-establish function enables you to repeat the previous control action on a call with a single click or key press.
The following actions cause the caller to wait, and may be returned to the Calls In Progress pane after a time-out:
• Hold
• Hold with Notes
• Transfer
• Conference
• Campon
• Park
You can repeat them simply by clicking Re-establish or pressing Delete.
Toggling CallsWith two active calls in progress, one held and one connected, you can toggle between them.
When a contact is called for consultation, the incoming call is put on hold. Once the destination accepts answers, you can right-click the incoming call in the Active Calls pane and choose Toggle. The incoming call that was held during consultation will become active.
On the other hand, the call made to the external contact will be put on hold. You can also toggle by pressing the + (plus) key.
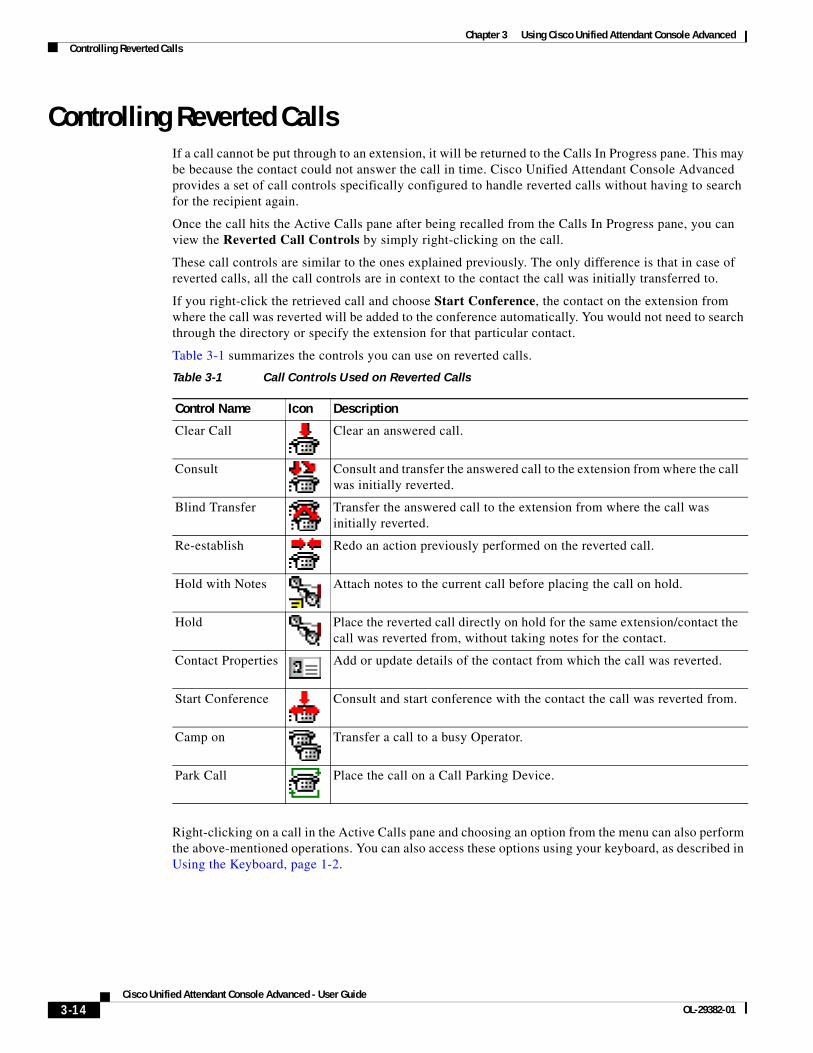
3-14Cisco Unified Attendant Console Advanced - User Guide
OL-29382-01
Chapter 3 Using Cisco Unified Attendant Console AdvancedControlling Reverted Calls
Controlling Reverted Calls If a call cannot be put through to an extension, it will be returned to the Calls In Progress pane. This may be because the contact could not answer the call in time. Cisco Unified Attendant Console Advanced provides a set of call controls specifically configured to handle reverted calls without having to search for the recipient again.
Once the call hits the Active Calls pane after being recalled from the Calls In Progress pane, you can view the Reverted Call Controls by simply right-clicking on the call.
These call controls are similar to the ones explained previously. The only difference is that in case of reverted calls, all the call controls are in context to the contact the call was initially transferred to.
If you right-click the retrieved call and choose Start Conference, the contact on the extension from where the call was reverted will be added to the conference automatically. You would not need to search through the directory or specify the extension for that particular contact.
Table 3-1 summarizes the controls you can use on reverted calls.
Right-clicking on a call in the Active Calls pane and choosing an option from the menu can also perform the above-mentioned operations. You can also access these options using your keyboard, as described in Using the Keyboard, page 1-2.
Table 3-1 Call Controls Used on Reverted Calls
Control Name Icon Description
Clear Call Clear an answered call.
Consult Consult and transfer the answered call to the extension from where the call was initially reverted.
Blind Transfer Transfer the answered call to the extension from where the call was initially reverted.
Re-establish Redo an action previously performed on the reverted call.
Hold with Notes Attach notes to the current call before placing the call on hold.
Hold Place the reverted call directly on hold for the same extension/contact the call was reverted from, without taking notes for the contact.
Contact Properties Add or update details of the contact from which the call was reverted.
Start Conference Consult and start conference with the contact the call was reverted from.
Camp on Transfer a call to a busy Operator.
Park Call Place the call on a Call Parking Device.
3-15Cisco Unified Attendant Console Advanced - User Guide
OL-29382-01
Chapter 3 Using Cisco Unified Attendant Console AdvancedSupplying FACs and CMCs
Supplying FACs and CMCs You may need to provide a Forced Authorization Code (FAC) and/or Client Matter Code (CMC) to perform an External Blind Transfer. The Administrator configures these codes through Cisco Unified Attendant Console Advanced Administration. If this is required during a consultation transfer you will see a dialog box on screen, simply enter the correct code and your call will be made.
Forced Authorization Code (FAC) Often in call centers, agents are blocked from making consult transfers to external or international numbers. Forced Authorization Codes (FACs) enable agents to unblock these calls. When agents attempt external call transfers, the Code Required dialog box is displayed, into which they must enter the FAC before the call can continue. If they fail to enter a FAC, or enter an incorrect FAC, the call fails.
Client Matter Code (CMC)Client Matter Codes are used to provide extra call logging facilities within Cisco Unified Communications Manager. This is used to log calls for different clients.
The concept of the CMC is that you must enter CMC Code before an external call or transfer can proceed. The call detail records are updated with the CMC code along with the call information. This can then be used later on to charge calls to different cost centers.
Clearing CallsIn order to disconnect an active call when the enquiry is complete, you need to clear the call from the Active Calls pane.
To clear a call using the keyboard, do the following:
Step 1 Press F7 to select the Active Calls pane.
Step 2 Press Enter.
To clear a call using a mouse, do the following:
Step 1 Click the call within the Active Calls pane.
Step 2 Right-click and choose Clear Call.
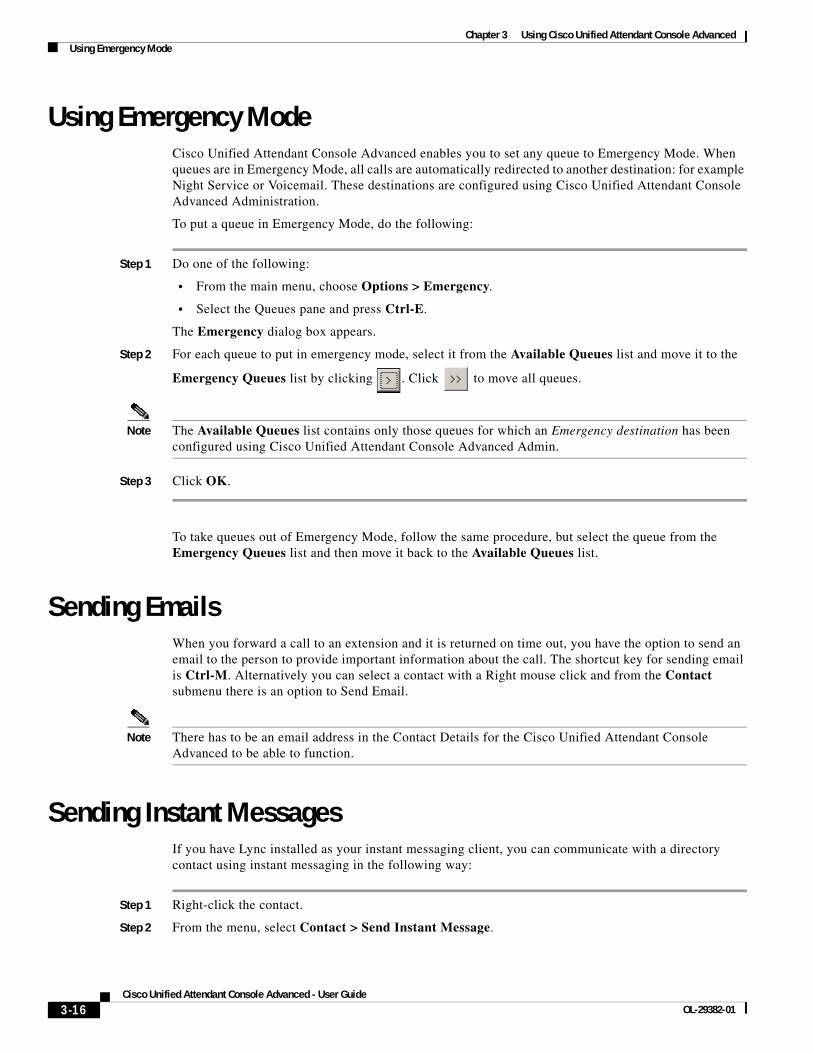
3-16Cisco Unified Attendant Console Advanced - User Guide
OL-29382-01
Chapter 3 Using Cisco Unified Attendant Console AdvancedUsing Emergency Mode
Using Emergency Mode Cisco Unified Attendant Console Advanced enables you to set any queue to Emergency Mode. When queues are in Emergency Mode, all calls are automatically redirected to another destination: for example Night Service or Voicemail. These destinations are configured using Cisco Unified Attendant Console Advanced Administration.
To put a queue in Emergency Mode, do the following:
Step 1 Do one of the following:
• From the main menu, choose Options > Emergency.
• Select the Queues pane and press Ctrl-E.
The Emergency dialog box appears.
Step 2 For each queue to put in emergency mode, select it from the Available Queues list and move it to the
Emergency Queues list by clicking . Click to move all queues.
Note The Available Queues list contains only those queues for which an Emergency destination has been configured using Cisco Unified Attendant Console Advanced Admin.
Step 3 Click OK.
To take queues out of Emergency Mode, follow the same procedure, but select the queue from the Emergency Queues list and then move it back to the Available Queues list.
Sending Emails When you forward a call to an extension and it is returned on time out, you have the option to send an email to the person to provide important information about the call. The shortcut key for sending email is Ctrl-M. Alternatively you can select a contact with a Right mouse click and from the Contact submenu there is an option to Send Email.
Note There has to be an email address in the Contact Details for the Cisco Unified Attendant Console Advanced to be able to function.
Sending Instant Messages If you have Lync installed as your instant messaging client, you can communicate with a directory contact using instant messaging in the following way:
Step 1 Right-click the contact.
Step 2 From the menu, select Contact > Send Instant Message.
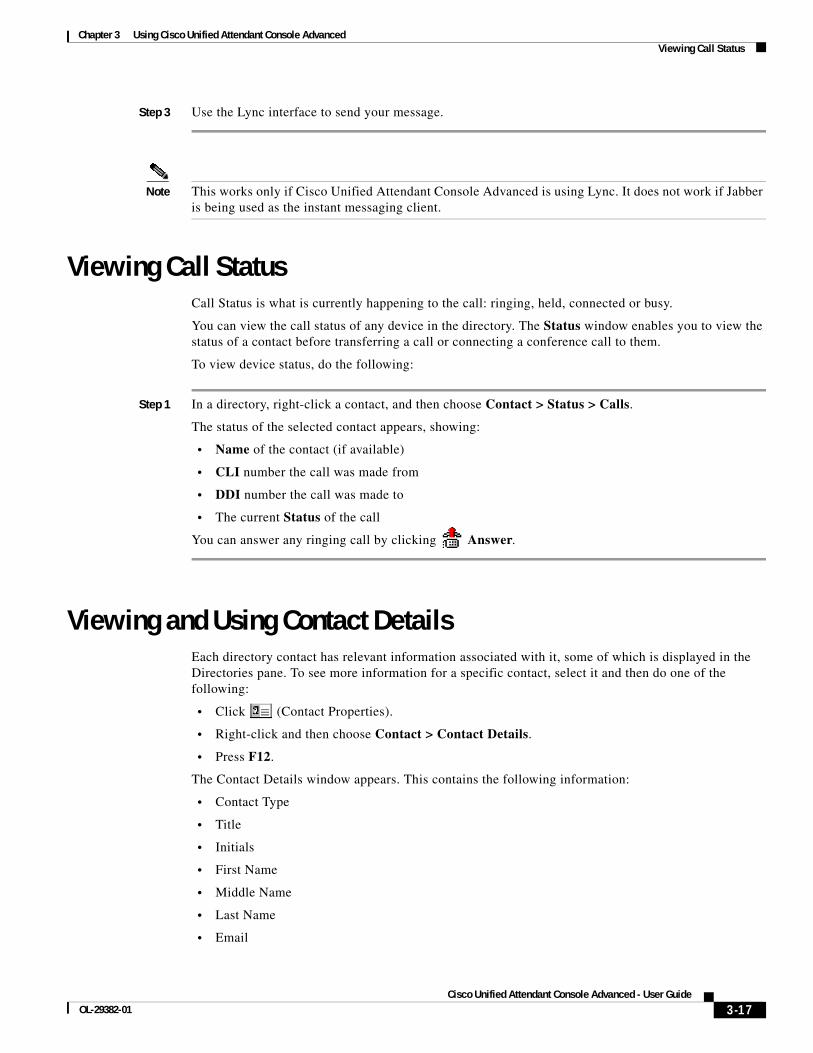
3-17Cisco Unified Attendant Console Advanced - User Guide
OL-29382-01
Chapter 3 Using Cisco Unified Attendant Console AdvancedViewing Call Status
Step 3 Use the Lync interface to send your message.
Note This works only if Cisco Unified Attendant Console Advanced is using Lync. It does not work if Jabber is being used as the instant messaging client.
Viewing Call StatusCall Status is what is currently happening to the call: ringing, held, connected or busy.
You can view the call status of any device in the directory. The Status window enables you to view the status of a contact before transferring a call or connecting a conference call to them.
To view device status, do the following:
Step 1 In a directory, right-click a contact, and then choose Contact > Status > Calls.
The status of the selected contact appears, showing:
• Name of the contact (if available)
• CLI number the call was made from
• DDI number the call was made to
• The current Status of the call
You can answer any ringing call by clicking Answer.
Viewing and Using Contact Details Each directory contact has relevant information associated with it, some of which is displayed in the Directories pane. To see more information for a specific contact, select it and then do one of the following:
• Click (Contact Properties).
• Right-click and then choose Contact > Contact Details.
• Press F12.
The Contact Details window appears. This contains the following information:
• Contact Type
• Title
• Initials
• First Name
• Middle Name
• Last Name
3-18Cisco Unified Attendant Console Advanced - User Guide
OL-29382-01
Chapter 3 Using Cisco Unified Attendant Console AdvancedViewing and Using Contact Details
• Email 2
• Email 3
• Address Line 1
• Address Line 2
• Address Line 3
• Address Line 4
• Post/Zip Code
• User Field 1
• User Field 2
• User Field 3
• User Profile
You can edit any of the information in the Contact Details window, except for fields with dimmed labels.
Emailing Contacts If the email address of the contact person is added in the Contact Details, then Cisco Unified Attendant Console Advanced can mail the contact from this window. It will open the mail client configured on your
machine. You can click the to write an email.
3-19Cisco Unified Attendant Console Advanced - User Guide
OL-29382-01
Chapter 3 Using Cisco Unified Attendant Console AdvancedViewing and Using Contact Details
Dialing External Numbers Click the Contact Numbers tab to view the following information:
• Main Extension, with a check box that enables you to Use device name instead.
• Device Name, select the Use device name check box to us this instead of the main extension.
• Business 1 - business phone number
• Business 2
• Home - home phone number
• Mobile - mobile phone number
• Pager - pager phone number
• Fax - fax phone number
Select a number and then click Use Number to dial that number.
Defining Alternate Numbers You can define alternative numbers for a contact:
• A single Assistant.
• Any number of Alternate contacts.
To add an alternate number, do the following:
Step 1 Click the Alternate Numbers tab.
Step 2 Under either Assistant or Alternate, as appropriate, click Add.
The Select dialog box appears
Step 3 Select the contact and then click Add.
Step 4 In Contact Details, click OK.
Controls enable you to Delete Alternate Numbers, or Replace each with another.
Editing Contact Details To edit contact details do the following:
Step 1 Select the required Directories pane by pressing the relevant Alt-<number> combination, or by clicking the tab.
Step 2 Select a contact.
Step 3 Do one of the following:
– Press F12
– Right-click and then choose Contact > Contact Details.
– Click (Contact Details)
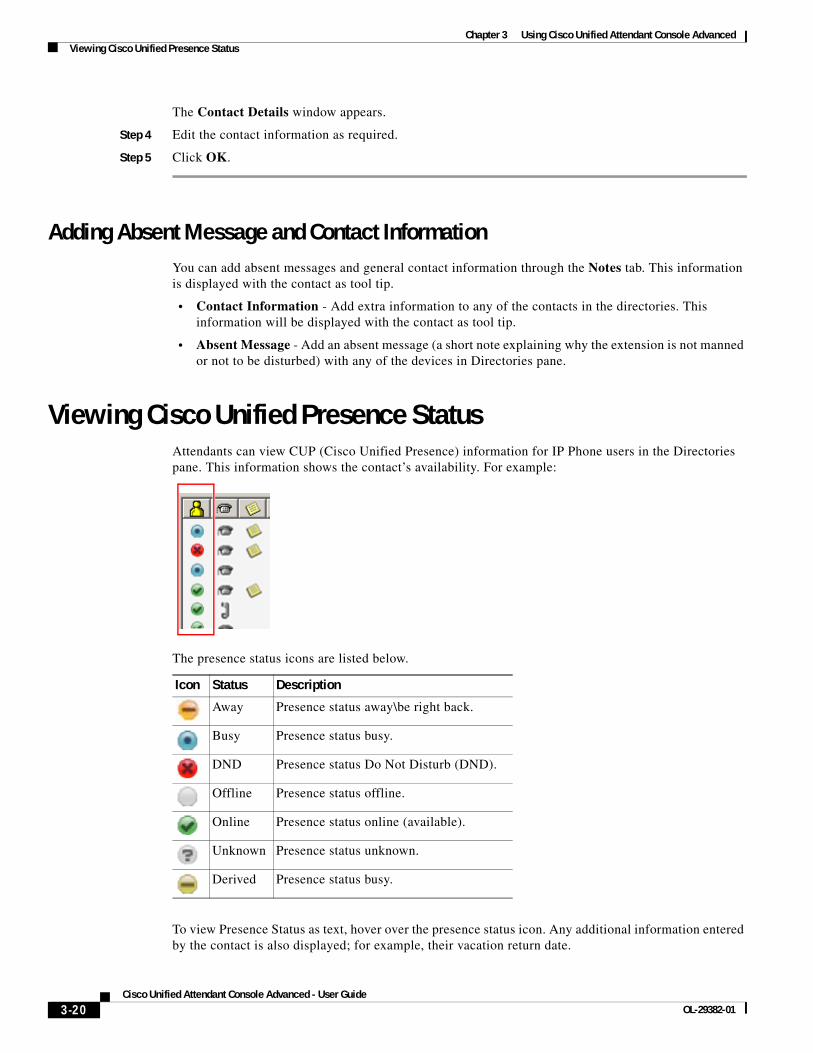
3-20Cisco Unified Attendant Console Advanced - User Guide
OL-29382-01
Chapter 3 Using Cisco Unified Attendant Console AdvancedViewing Cisco Unified Presence Status
The Contact Details window appears.
Step 4 Edit the contact information as required.
Step 5 Click OK.
Adding Absent Message and Contact InformationYou can add absent messages and general contact information through the Notes tab. This information is displayed with the contact as tool tip.
• Contact Information - Add extra information to any of the contacts in the directories. This information will be displayed with the contact as tool tip.
• Absent Message - Add an absent message (a short note explaining why the extension is not manned or not to be disturbed) with any of the devices in Directories pane.
Viewing Cisco Unified Presence StatusAttendants can view CUP (Cisco Unified Presence) information for IP Phone users in the Directories pane. This information shows the contact’s availability. For example:
The presence status icons are listed below.
To view Presence Status as text, hover over the presence status icon. Any additional information entered by the contact is also displayed; for example, their vacation return date.
Icon Status Description
Away Presence status away\be right back.
Busy Presence status busy.
DND Presence status Do Not Disturb (DND).
Offline Presence status offline.
Online Presence status online (available).
Unknown Presence status unknown.
Derived Presence status busy.
3-21Cisco Unified Attendant Console Advanced - User Guide
OL-29382-01
Chapter 3 Using Cisco Unified Attendant Console AdvancedViewing Microsoft Presence Status
Viewing Microsoft Presence Status Cisco Unified Attendant Console Advanced can display Microsoft Presence Information for contacts that have been added to the local copy of Microsoft Office Communicator.
Where contact status has been set, the following presence status icons will be displayed in the Directories pane.
To view Presence Status, do the following:
Step 1 Select a contact in a Directory.
Step 2 Hover over a presence status graphic.
Step 3 Presence Status details will be displayed
You can view any additional status information by hovering over the contact icon (for example, for a Vacation it will display the return date).
Icon Status Description
Away Presence status away\be right back.
Busy Presence status busy.
Do Not Disturb Presence status no not disturb (Reachability status of Do Not Disturb)
Inactive Presence Status Inactive. This is automatically triggered by Communicator if the account is inactive for a defined period. Default is 5 minutes.
Busy Inactive Presence Status Busy Inactive. This is automatically triggered by Communicator if the account has gone from Busy to inactive for a defined period. Default is 5 minutes.
Offline Presence status offline
Online Presence status online (Reachability status of Available)
Unknown Presence status unknown (Reachability status of Unknown)

3-22Cisco Unified Attendant Console Advanced - User Guide
OL-29382-01
Chapter 3 Using Cisco Unified Attendant Console AdvancedViewing Microsoft Presence Status
IN-1Cisco Unified Attendant Console Advanced - User Guide
OL-29382-01
I N D E X
A
accessibility for users with disabilities 1-1
alternate numbers, defining 3-19
Alternate Numbers preference 2-7
AND searching 2-8
answering calls 3-2
archive collection, collecting log archive 1-24
archiving logs 1-24
Auto Dial options 2-4
automatic camp on 2-4
B
BLF-dependent features, disabling 2-3
BLF subscription number 3-4
blind transferring 2-4
Busy Lamp Field (BLF) 1-2
C
Call Park preference 2-4
Calls In Progress pane 1-17
Call Transfers preference 2-4
clearing calls 3-15
collecting logs 1-24
conferencing calls 3-12
contact details (contact properties) 3-17
contact numbers 1-10
Contact Numbers (Contact Details) tab 1-15, 3-19
contacts
adding 1-15
finding 1-22
D
dialing numbers 1-21
Directory preference 2-5
directory tab, moving 1-9
direct transfers 2-9
Display preference 2-3
drill down search 1-23
E
emails, sending 3-16
emergency mode 3-16
external calls, making 3-10
F
FAC and CMC settings 3-9
Field Headers preference 2-7
Filter Search preference 2-8
G
General preference 2-2
go unavailable 1-5, 2-2
H
holding calls 3-10
I
instant messages, sending 3-16
Index
IN-2Cisco Unified Attendant Console Advanced - User Guide
OL-29382-01
interface
Active Calls 1-17
All Queues 1-8
Call Control Toolbar 1-16
Call Park 1-18
Calls In Progress 1-17
Directories 1-9
layout 1-6
Menu Bar 1-7
Personal Directory Groups 1-11
Queues 1-7
Speed Dial 1-19
internal calls, making 3-10
L
log collection 1-24
logging in 1-4
M
making calls 3-9
Mute preference 2-4
P
parked calls
information 1-18
retrieving 3-12
parking calls 3-11
personal directory groups 1-11
sharing 2-6
Personal Directory Groups preference 2-6
Preferences
Alternate Numbers 2-7
Call Park 2-4
Call Transfers 2-4
Directory 2-5
Display 2-3
Field Headers 2-7
Filter Search 2-8
General 2-2
Mute 2-4
Personal Directory Groups 2-6
Secondary Sort 2-7
Tones 2-5
presence status
Cisco Unified Presence 3-20
Microsoft presence 3-21
Q
queue color 2-5
queue statistics, viewing 1-7
R
re-establishing calls 2-4, 3-13, 3-17
retrieving held calls 3-11
retrieving parked calls 3-12
reverted calls, controlling 3-14
S
Secondary Sort preference 2-7
sending
instant messages 3-16
sending emails 3-16
speed dial
deleting numbers 1-20
speed dial, updating number 1-20
speed dials, adding 1-19
T
toggling calls 3-13
Index
IN-3Cisco Unified Attendant Console Advanced - User Guide
OL-29382-01
Tones preference 2-5
transfer call
blind external 3-8
consult internal 3-8
direct 2-9
transferring calls
blind external 3-6
V
VIOC role 1-1
Voicemail prefix for dialed numbers 2-4

Index
IN-4Cisco Unified Attendant Console Advanced - User Guide
OL-29382-01