Embed Size (px)
Citation preview
Cisco Unity Express Guide to Writing and Editing Scripts for Version 7.0 and LaterAuto Attendant and Interactive Voice Response Scripts
April 27, 2010
Americas HeadquartersCisco Systems, Inc.170 West Tasman DriveSan Jose, CA 95134-1706 USAhttp://www.cisco.comTel: 408 526-4000
800 553-NETS (6387)Fax: 408 527-0883

THE SPECIFICATIONS AND INFORMATION REGARDING THE PRODUCTS IN THIS MANUAL ARE SUBJECT TO CHANGE WITHOUT NOTICE. ALL STATEMENTS, INFORMATION, AND RECOMMENDATIONS IN THIS MANUAL ARE BELIEVED TO BE ACCURATE BUT ARE PRESENTED WITHOUT WARRANTY OF ANY KIND, EXPRESS OR IMPLIED. USERS MUST TAKE FULL RESPONSIBILITY FOR THEIR APPLICATION OF ANY PRODUCTS.
THE SOFTWARE LICENSE AND LIMITED WARRANTY FOR THE ACCOMPANYING PRODUCT ARE SET FORTH IN THE INFORMATION PACKET THAT SHIPPED WITH THE PRODUCT AND ARE INCORPORATED HEREIN BY THIS REFERENCE. IF YOU ARE UNABLE TO LOCATE THE SOFTWARE LICENSE OR LIMITED WARRANTY, CONTACT YOUR CISCO REPRESENTATIVE FOR A COPY.
The Cisco implementation of TCP header compression is an adaptation of a program developed by the University of California, Berkeley (UCB) as part of UCB’s public domain version of the UNIX operating system. All rights reserved. Copyright © 1981, Regents of the University of California.
NOTWITHSTANDING ANY OTHER WARRANTY HEREIN, ALL DOCUMENT FILES AND SOFTWARE OF THESE SUPPLIERS ARE PROVIDED “AS IS” WITH ALL FAULTS. CISCO AND THE ABOVE-NAMED SUPPLIERS DISCLAIM ALL WARRANTIES, EXPRESSED OR IMPLIED, INCLUDING, WITHOUT LIMITATION, THOSE OF MERCHANTABILITY, FITNESS FOR A PARTICULAR PURPOSE AND NONINFRINGEMENT OR ARISING FROM A COURSE OF DEALING, USAGE, OR TRADE PRACTICE.
IN NO EVENT SHALL CISCO OR ITS SUPPLIERS BE LIABLE FOR ANY INDIRECT, SPECIAL, CONSEQUENTIAL, OR INCIDENTAL DAMAGES, INCLUDING, WITHOUT LIMITATION, LOST PROFITS OR LOSS OR DAMAGE TO DATA ARISING OUT OF THE USE OR INABILITY TO USE THIS MANUAL, EVEN IF CISCO OR ITS SUPPLIERS HAVE BEEN ADVISED OF THE POSSIBILITY OF SUCH DAMAGES.
CCDE, CCENT, CCSI, Cisco Eos, Cisco Explorer, Cisco HealthPresence, Cisco IronPort, the Cisco logo, Cisco Nurse Connect, Cisco Pulse, Cisco SensorBase, Cisco StackPower, Cisco StadiumVision, Cisco TelePresence, Cisco TrustSec, Cisco Unified Computing System, Cisco WebEx, DCE, Flip Channels, Flip for Good, Flip Mino, Flipshare (Design), Flip Ultra, Flip Video, Flip Video (Design), Instant Broadband, and Welcome to the Human Network are trademarks; Changing the Way We Work, Live, Play, and Learn, Cisco Capital, Cisco Capital (Design), Cisco:Financed (Stylized), Cisco Store, Flip Gift Card, and One Million Acts of Green are service marks; and Access Registrar, Aironet, AllTouch, AsyncOS, Bringing the Meeting To You, Catalyst, CCDA, CCDP, CCIE, CCIP, CCNA, CCNP, CCSP, CCVP, Cisco, the Cisco Certified Internetwork Expert logo, Cisco IOS, Cisco Lumin, Cisco Nexus, Cisco Press, Cisco Systems, Cisco Systems Capital, the Cisco Systems logo, Cisco Unity, Collaboration Without Limitation, Continuum, EtherFast, EtherSwitch, Event Center, Explorer, Follow Me Browsing, GainMaker, iLYNX, IOS, iPhone, IronPort, the IronPort logo, Laser Link, LightStream, Linksys, MeetingPlace, MeetingPlace Chime Sound, MGX, Networkers, Networking Academy, PCNow, PIX, PowerKEY, PowerPanels, PowerTV, PowerTV (Design), PowerVu, Prisma, ProConnect, ROSA, SenderBase, SMARTnet, Spectrum Expert, StackWise, WebEx, and the WebEx logo are registered trademarks of Cisco and/or its affiliates in the United States and certain other countries.
All other trademarks mentioned in this document or website are the property of their respective owners. The use of the word partner does not imply a partnership relationship between Cisco and any other company. (1002R)
Any Internet Protocol (IP) addresses used in this document are not intended to be actual addresses. Any examples, command display output, and figures included in the document are shown for illustrative purposes only. Any use of actual IP addresses in illustrative content is unintentional and coincidental.
Cisco Unity Express Guide to Writing and Editing Scripts for Version 7.0 and Later Copyright © 2010 Cisco Systems, Inc. All rights reserved.

COL-22479-01
C O N T E N T S
Script Editor Overview 1
Concepts for Writing Scripts 1Variables 2Parameters 2Operators 2Expressions 2Flow Control Steps 2Error Handling for Scripts 2Prompts 3Trigger 3AA Sample Script 3Selecting the IVR Option 3Script Design 4Validating and Testing a Script 6
Scripting Techniques 6
Terms 7
Additional References 7Documents Related to Cisco Unity Express 7Technical Assistance 8
Obtaining Documentation, Obtaining Support, and Security Guidelines 8
Using the Script Editor 9
Overview of the Cisco Unity Express Script Editor 9
Palette Pane 10
Design Pane 10
Step Properties 12
Variable Pane 12
Variables 13
Defining Variables 13
Basic Built-in Variable Types 15
Exporting Variables by Using Parameters 17
Contact Variable 17
Prompt Variable 17
iiiisco Unity Express Guide to Writing and Editing Scripts for Version 7.0 and Later
Contents
User Variable 17
Debug Pane 18
Using Prompts 18
Using Expressions 18
Using Operators 19
Handling Exceptions 20
Continue on Prompt Errors Step 20
Error Output Branches 21
On Exception Goto Step 21
Using Default Scripts 22
Script Interruption 22
Installing the Cisco Unity Express Script Editor 23
Auto Attendant Script Example 25
Sample Script Overview 25
System Prompts 27
Configuring the Auto Attendant Sample Script 27
Configuring the Script Variables 28
Configuring Steps in the Design Pane 29
Configuring the Main Menu Step 33
Configuring the Play Prompt Step 53
Configuring the Call Redirect Step 54
Configuring the If Step 54
Configuring the Play Prompt Step 54
Configuring the Terminate Step 54
Inserting the End Step 54
Using Cisco Unified CME Night Service with Cisco Unity Express Script Example 55
Overview 55
Components Used 55
Integrating Cisco Unity Express with Cisco Unified CME Night Service 56
Cisco Unified CME Configuration 57
Cisco Unity Express Configuration 57
Cisco Unity Express Script 57
Verifying the Configuration 59
Script Editor Step Reference 61
Call Contact Steps 61
Call Redirect 62
Get Call Contact Info 63
ivCisco Unity Express Guide to Writing and Editing Scripts for Version 7.0 and Later
OL-22479-01
Contents
Place Call (IVR Only) 65
Contact Steps (IVR Only) 67
Accept 67
Get Contact Info 68
Set Contact Info 70
Terminate 71
Database Steps (IVR Only) 71
DB Read 73
General Tab 73
SQL Tab 74
Comments Tab 76
DB Get 76
General Tab 77
Field Selection Tab 78
DB Write 79
General Tab 79
SQL Tab 80
Test Tab 82
Comments Tab 82
DB Release 83
Document Steps (IVR Only) 84
Cache Document 84
Create File Document (IVR Only) 85
Create URL Document 86
Text Substitution for Keywords 88
eMail Contact Steps (IVR Only) 90
Attach To eMail 90
Create eMail 92
Send eMail 93
Fax Contact Steps (IVR Only) 94
Create Fax 94
Attach to Fax 95
Send Fax 96
General Steps 98
Annotate 99
Business Hours 100
Call Subflow 100
General Tab 101
Parameter Mapping Tab 101
vCisco Unity Express Guide to Writing and Editing Scripts for Version 7.0 and Later
OL-22479-01
Contents
Date Time Round-off 103
Day of Week 103
Decrement 105
Delay 105
End 106
Get List Member (IVR Only) 106
Goto 107
If 108
Increment 108
Is Holiday 109
Label 109
On Exception Clear 110
On Exception Goto 110
Set 111
Set Application Parameter 112
Start 113
Switch 113
Time of Day 115
HTTP Contact Steps (IVR Only) 116
Get Http Contact Info 117
General Tab 117
Headers Tab 118
Parameters Tab 119
Cookies Tab 120
Environment Tab 121
Http Redirect 123
Send Response 123
Set Http Contact Info 124
General Tab 124
Headers Tab 125
Cookies Tab 126
Media Steps 126
Explicit Confirmation 127
General Tab 127
Prompts Tab 128
Input Tab 129
Extended Get Digit String Step 130
General Tab 131
Prompt Tab 131
Input Tab 132
viCisco Unity Express Guide to Writing and Editing Scripts for Version 7.0 and Later
OL-22479-01
Contents
DTMF Control Tab 133
Get Digit String 134
General Tab 135
Prompt Tab 136
Input Tab 137
Filter Tab 138
Implicit Confirmation 139
Menu 140
General Tab 141
Prompt Tab 143
Input Tab 143
Name To User 144
General Tab 146
Prompt Tab 147
Input Tab 148
Dialog Tab 149
Play Prompt 150
General Tab 151
Prompt Tab 151
Input Tab 152
Extended Play Prompt 153
General Tab 153
Prompt Tab 154
Input Tab 154
Send Digit String (IVR Only) 155
Dial-by-Extension Menu 155
General Tab 156
Prompt Tab 158
Input Tab 158
Dial-by-Extension Tab 160
Voice Browser (IVR Only) 160
General Tab 161
Request Parameters Tab 162
Return Parameters Tab 162
Prompt Steps 163
Create Conditional Prompt 164
Create Container Prompt 165
Create Generated Prompt 168
Generator Types 170
Session Steps 175
viiCisco Unity Express Guide to Writing and Editing Scripts for Version 7.0 and Later
OL-22479-01
Contents
Set Session Info 175
General Tab 175
Context Tab 176
User Steps 177
Get User Info 177
Extension To User 179
User Authenticate 180
Audit Step 181
Authorize User 183
Logout User 184
VoiceMail Step 184
General Tab 184
viiiCisco Unity Express Guide to Writing and Editing Scripts for Version 7.0 and Later
OL-22479-01
Script Editor Overview
Last Updated: April 27, 2010
This guide provides an overview using the Cisco Unity Express 7.0 Script Editor for writing Auto Attendant (AA) scripts. The guide also includes a line-by-line description of the AA sample script and a script step reference.
The Interactive Voice Response option is a separately licensed option that integrates with Cisco Unity Express. The functionality described for IVR is available only if you have purchased a separate IVR software license.
Scripts enable you to customize the Cisco Unity Express AA and IVR features. Scripts work to receive input, make decisions, and perform tasks. By using the Cisco Unity Express Script Editor, you identify variables to receive user input, create conditions that require decisions (or branches), and determine which tasks to perform, based on those decisions.
A script stored on the router module runs in response to a request from a user or a predetermined condition. The scripts allow callers to receive recorded audio messages and prompts for further action. For example, if a caller calls a business during nonbusiness hours, the caller can hear either a recorded message stating the business’s hours of operation or hear a prompt to leave a message. The message and prompt are the result of the Cisco Unity Express software running a script.
A more advanced use of scripts could involve checking an account balance at a bank. For example, a caller is prompted to enter an account number by using a telephone keypad, and the caller then receives an audio message stating the account balance.
This chapter contains the following sections:
• Concepts for Writing Scripts, page 1
• Scripting Techniques, page 6
• Terms, page 7
• Additional References, page 7
• Obtaining Documentation, Obtaining Support, and Security Guidelines, page 8
Concepts for Writing ScriptsThis section provides information on the main concepts that are used in writing scripts.
1Cisco Unity Express Guide to Writing and Editing Scripts for 7.0 and Later Versions
OL-22479-01
Script Editor OverviewConcepts for Writing Scripts
VariablesUse variables in your program to hold data. You must provide a name and a type for each variable that you want to use in your script. Use the variable name to refer to the data that the variable contains. The type of variable determines what types of data (text, integers, and so on) it can hold and what operations can be performed on it.
ParametersA parameter is a property of a variable that allows the variable to be visible to the administrator through the Cisco Unity Express web interface. The administrator can then change the variable without having to edit the script and then upload it to the Cisco Unity Express module again.
OperatorsIn addition to performing an operation, an operator returns a value. The return value and its type depend on the operator and the types of data the operator is operating on. For example, the increment operator (increment step) adds 1 to a value.
ExpressionsVariables and operators are the basic building blocks of scripts. You can combine variables and operators to form expressions that compute, return values, and control the flow of a script.
Flow Control StepsA flow control step directs the order in which the script is run. The If, Switch, and Goto steps are examples of flow control steps.
Without flow control steps, the script runs these steps in the sequential order in which they appear in the Design pane from top to bottom. You can use flow control in your scripts to conditionally run steps, to repeatedly run a block of steps, and to otherwise change the normal, sequential flow of the script.
Control steps direct the script to proceed in a specific way. For example, you might want a set of steps to run only if certain conditions are met.
Flow control is accomplished by following these steps:
• If: If the following condition x is met, perform the following task, y.
• Switch: Matches a condition to one of several tasks.
• Goto: When a script reaches a Goto step, the script stops running and continues at the indicated next point in the script.
Error Handling for ScriptsError handling provides a way for a script to stop running in a predetermined sequence, or to continue running when it receives unexpected results or when a task does not complete successfully.
2Cisco Unity Express Guide to Writing and Editing Scripts for 7.0 and Later Versions
OL-22479-01

Script Editor OverviewConcepts for Writing Scripts
PromptsPrompts exist as audio files on the router and have the file extension .wav, as in greeting.wav. The Cisco Unity Express Script Editor uses the following two types of prompts:
• System prompts: Used internally by Cisco modules and Cisco sample scripts.
• User prompts: Defined by the user, and managed by the administrator through Voice Mail > Prompts on the Cisco Unity Express GUI administrator interface or by calling in to Administration via Telephone (AvT).
TriggerA trigger is a specific event or condition that causes an application to run. There can be several triggers for a single application. A number of triggers are created automatically in Cisco Unity Express.
For example, a call to extension 1000 causes Cisco Unified Communications Manager Express (formerly known as Cisco Unified CallManager Express) to route the call to Cisco Unity Express, which then looks for a trigger for the call and starts the associated application.
AA Sample ScriptThe auto attendant (AA) sample script uses the sample script aa_sample1.aef, which is included with the Cisco Unity Express Script Editor, to illustrate basic procedures for configuring auto attendant scripts. For details on the auto attendant script, see the Auto Attendant Script Example chapter.
Selecting the IVR OptionThe functionality described for the Cisco Unity Express IVR software is available only if you have purchased a separate IVR software add-on package.
The Cisco Unity Express IVR software allows a telephone caller to select options from a voice menu and to otherwise interact with the Cisco Unity Express system. After the system plays a pre-recorded voice prompt, the caller presses a number on a telephone keypad to select an option.
To select the IVR option, complete the following steps:
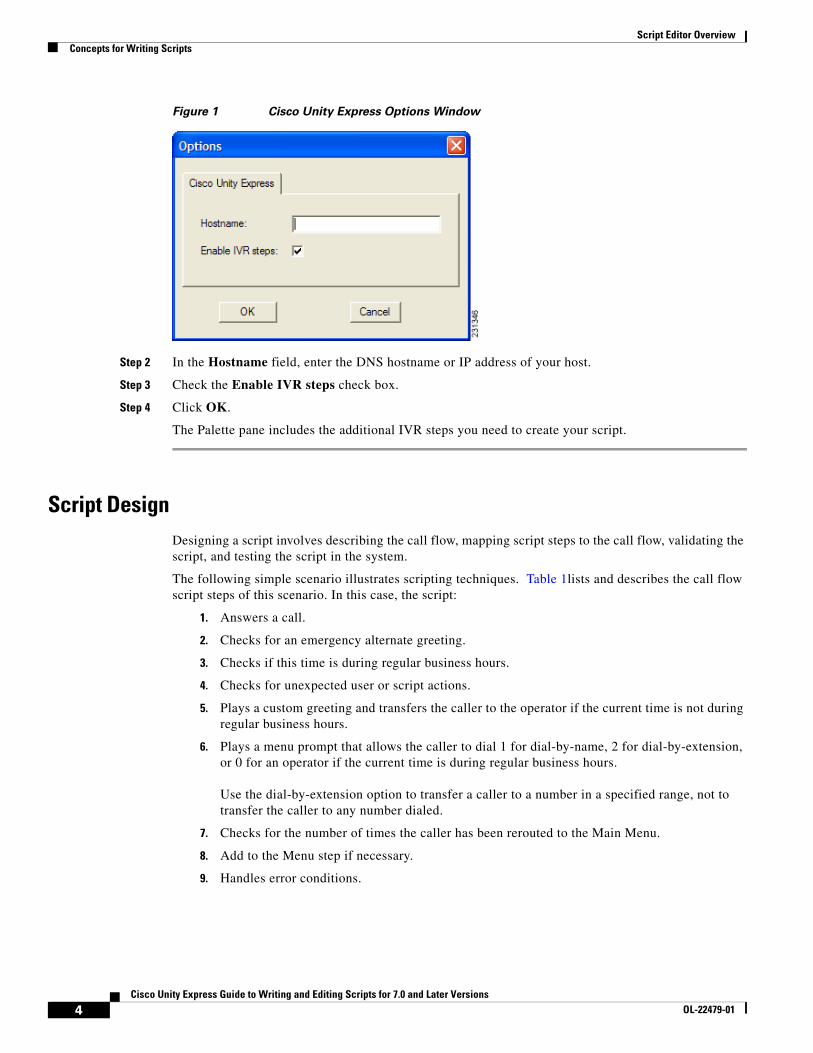
Step 1 Choose Tools > Options from the Cisco Unity Express toolbar. The Cisco Unity Express Options window, shown in Figure 1, appears.
3Cisco Unity Express Guide to Writing and Editing Scripts for 7.0 and Later Versions
OL-22479-01
Script Editor OverviewConcepts for Writing Scripts
Figure 1 Cisco Unity Express Options Window
Step 2 In the Hostname field, enter the DNS hostname or IP address of your host.
Step 3 Check the Enable IVR steps check box.
Step 4 Click OK.
The Palette pane includes the additional IVR steps you need to create your script.
Script DesignDesigning a script involves describing the call flow, mapping script steps to the call flow, validating the script, and testing the script in the system.
The following simple scenario illustrates scripting techniques. Table 1lists and describes the call flow script steps of this scenario. In this case, the script:
1. Answers a call.
2. Checks for an emergency alternate greeting.
3. Checks if this time is during regular business hours.
4. Checks for unexpected user or script actions.
5. Plays a custom greeting and transfers the caller to the operator if the current time is not during regular business hours.
6. Plays a menu prompt that allows the caller to dial 1 for dial-by-name, 2 for dial-by-extension, or 0 for an operator if the current time is during regular business hours. Use the dial-by-extension option to transfer a caller to a number in a specified range, not to transfer the caller to any number dialed.
7. Checks for the number of times the caller has been rerouted to the Main Menu.
8. Add to the Menu step if necessary.
9. Handles error conditions.
4Cisco Unity Express Guide to Writing and Editing Scripts for 7.0 and Later Versions
OL-22479-01
Script Editor OverviewConcepts for Writing Scripts
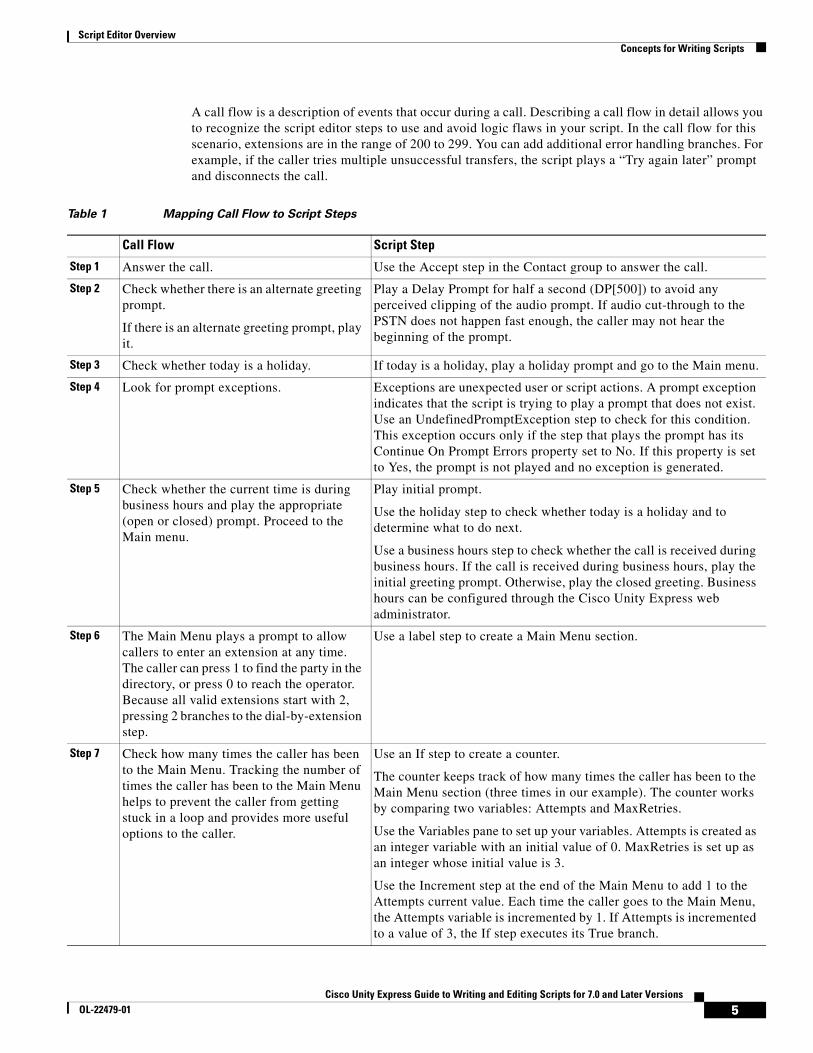
A call flow is a description of events that occur during a call. Describing a call flow in detail allows you to recognize the script editor steps to use and avoid logic flaws in your script. In the call flow for this scenario, extensions are in the range of 200 to 299. You can add additional error handling branches. For example, if the caller tries multiple unsuccessful transfers, the script plays a “Try again later” prompt and disconnects the call.
Table 1 Mapping Call Flow to Script Steps
Call Flow Script Step
Step 1 Answer the call. Use the Accept step in the Contact group to answer the call.
Step 2 Check whether there is an alternate greeting prompt.
If there is an alternate greeting prompt, play it.
Play a Delay Prompt for half a second (DP[500]) to avoid any perceived clipping of the audio prompt. If audio cut-through to the PSTN does not happen fast enough, the caller may not hear the beginning of the prompt.
Step 3 Check whether today is a holiday. If today is a holiday, play a holiday prompt and go to the Main menu.
Step 4 Look for prompt exceptions. Exceptions are unexpected user or script actions. A prompt exception indicates that the script is trying to play a prompt that does not exist. Use an UndefinedPromptException step to check for this condition. This exception occurs only if the step that plays the prompt has its Continue On Prompt Errors property set to No. If this property is set to Yes, the prompt is not played and no exception is generated.
Step 5 Check whether the current time is during business hours and play the appropriate (open or closed) prompt. Proceed to the Main menu.
Play initial prompt.
Use the holiday step to check whether today is a holiday and to determine what to do next.
Use a business hours step to check whether the call is received during business hours. If the call is received during business hours, play the initial greeting prompt. Otherwise, play the closed greeting. Business hours can be configured through the Cisco Unity Express web administrator.
Step 6 The Main Menu plays a prompt to allow callers to enter an extension at any time. The caller can press 1 to find the party in the directory, or press 0 to reach the operator. Because all valid extensions start with 2, pressing 2 branches to the dial-by-extension step.
Use a label step to create a Main Menu section.
Step 7 Check how many times the caller has been to the Main Menu. Tracking the number of times the caller has been to the Main Menu helps to prevent the caller from getting stuck in a loop and provides more useful options to the caller.
Use an If step to create a counter.
The counter keeps track of how many times the caller has been to the Main Menu section (three times in our example). The counter works by comparing two variables: Attempts and MaxRetries.
Use the Variables pane to set up your variables. Attempts is created as an integer variable with an initial value of 0. MaxRetries is set up as an integer whose initial value is 3.
Use the Increment step at the end of the Main Menu to add 1 to the Attempts current value. Each time the caller goes to the Main Menu, the Attempts variable is incremented by 1. If Attempts is incremented to a value of 3, the If step executes its True branch.
5Cisco Unity Express Guide to Writing and Editing Scripts for 7.0 and Later Versions
OL-22479-01
Script Editor OverviewScripting Techniques
Validating and Testing a ScriptTo debug your script, verify its operation in various scenarios, such as regular user input, timeout, and anticipated error conditions.
Before uploading a script, use the Cisco Unity Express Script Editor Validate tool and check that the Validation Succeeded message appears. Any errors appear in the Debug pane. Double-click them to find the error condition in the script.
After uploading the script to the Cisco Unity Express system, use the default traces to troubleshoot problems. Use the EXECUTING_STEP filter to display only the script steps, as they are run, in the trace. Use the clear trace command to clear previous trace messages before using the show trace command. For example:
clear traceMake a test call.show trace buffer long | include EXECUTING_STEP
Scripting TechniquesWhen Maximum Retries on the NameToUser step is set to 0 or 1, you must use a Terminating Key character. Without the Terminating Key character, the step does not go to the Successful branch of this step. Instead, the step always goes to the Timeout branch, even if there is a match.
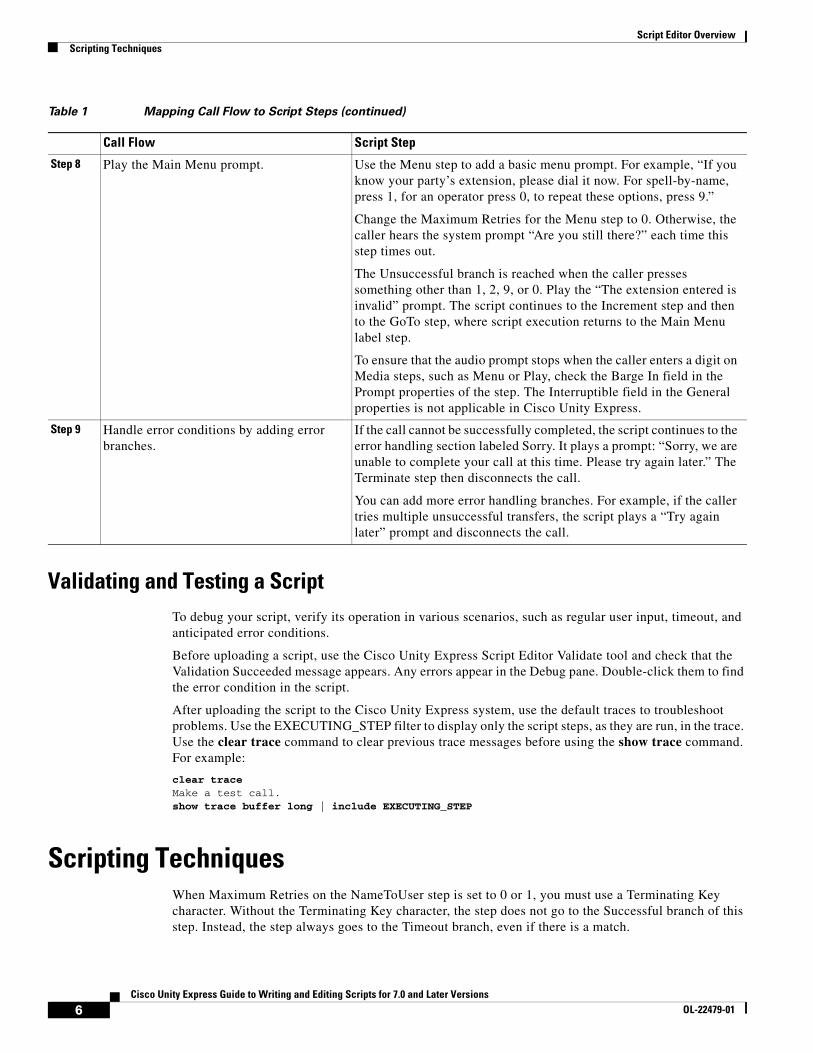
Step 8 Play the Main Menu prompt. Use the Menu step to add a basic menu prompt. For example, “If you know your party’s extension, please dial it now. For spell-by-name, press 1, for an operator press 0, to repeat these options, press 9.”
Change the Maximum Retries for the Menu step to 0. Otherwise, the caller hears the system prompt “Are you still there?” each time this step times out.
The Unsuccessful branch is reached when the caller presses something other than 1, 2, 9, or 0. Play the “The extension entered is invalid” prompt. The script continues to the Increment step and then to the GoTo step, where script execution returns to the Main Menu label step.
To ensure that the audio prompt stops when the caller enters a digit on Media steps, such as Menu or Play, check the Barge In field in the Prompt properties of the step. The Interruptible field in the General properties is not applicable in Cisco Unity Express.
Step 9 Handle error conditions by adding error branches.
If the call cannot be successfully completed, the script continues to the error handling section labeled Sorry. It plays a prompt: “Sorry, we are unable to complete your call at this time. Please try again later.” The Terminate step then disconnects the call.
You can add more error handling branches. For example, if the caller tries multiple unsuccessful transfers, the script plays a “Try again later” prompt and disconnects the call.
Table 1 Mapping Call Flow to Script Steps (continued)
Call Flow Script Step
6Cisco Unity Express Guide to Writing and Editing Scripts for 7.0 and Later Versions
OL-22479-01
Script Editor OverviewTerms
You must create all variables in a script before you can use them. If you create a variable and you later delete it, use the Validate tool to find it.
Set the Parameter of a variable property to make the variable available to the Cisco Unity Express administrator through the web page.
Alternately, do not set the Parameter of a variable property to prevent it from being accidentally changed through the web page.
Note You cannot assign a system prompt to a prompt variable when you define it. You must use the Set step or the Create Prompt step to assign a system prompt to a variable.
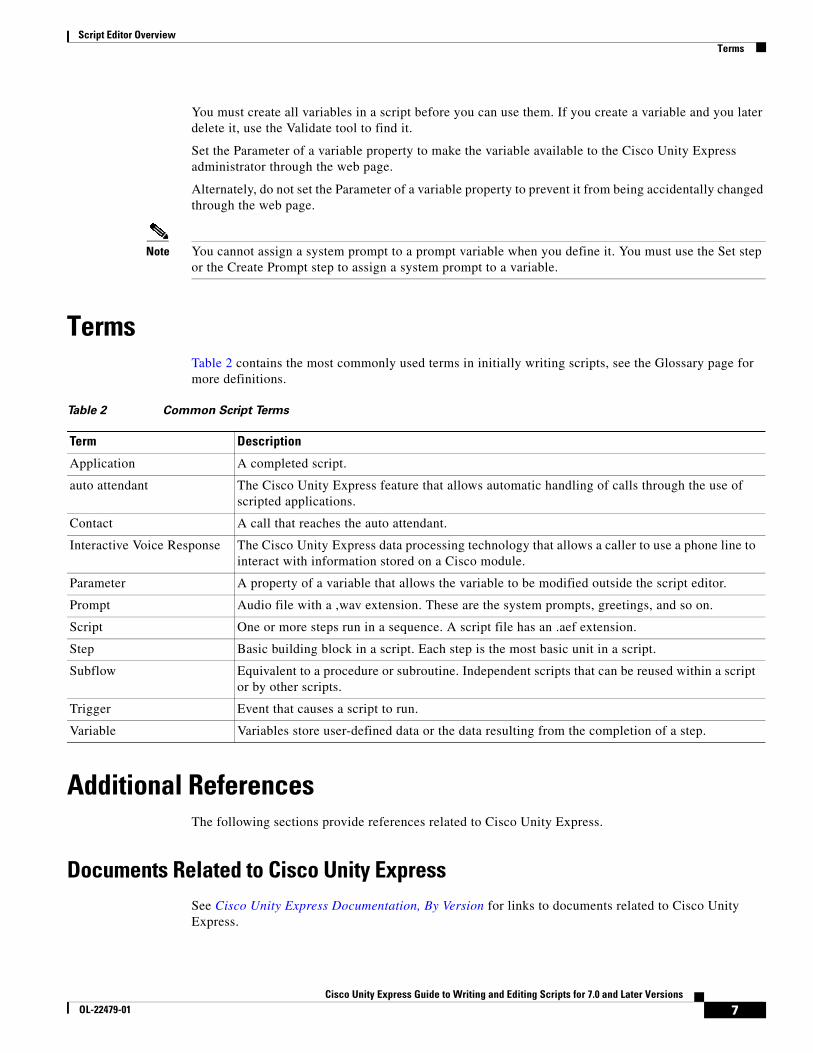
Terms Table 2 contains the most commonly used terms in initially writing scripts, see the Glossary page for more definitions.
Additional ReferencesThe following sections provide references related to Cisco Unity Express.
Documents Related to Cisco Unity ExpressSee Cisco Unity Express Documentation, By Version for links to documents related to Cisco Unity Express.
Table 2 Common Script Terms
Term Description
Application A completed script.
auto attendant The Cisco Unity Express feature that allows automatic handling of calls through the use of scripted applications.
Contact A call that reaches the auto attendant.
Interactive Voice Response The Cisco Unity Express data processing technology that allows a caller to use a phone line to interact with information stored on a Cisco module.
Parameter A property of a variable that allows the variable to be modified outside the script editor.
Prompt Audio file with a ,wav extension. These are the system prompts, greetings, and so on.
Script One or more steps run in a sequence. A script file has an .aef extension.
Step Basic building block in a script. Each step is the most basic unit in a script.
Subflow Equivalent to a procedure or subroutine. Independent scripts that can be reused within a script or by other scripts.
Trigger Event that causes a script to run.
Variable Variables store user-defined data or the data resulting from the completion of a step.
7Cisco Unity Express Guide to Writing and Editing Scripts for 7.0 and Later Versions
OL-22479-01
Script Editor OverviewObtaining Documentation, Obtaining Support, and Security Guidelines
Technical Assistance
Obtaining Documentation, Obtaining Support, and Security Guidelines
For information on obtaining documentation, obtaining support, providing documentation feedback, security guidelines, and also recommended aliases and general Cisco documents, see the monthly What’s New in Cisco Product Documentation, which also lists all new and revised Cisco technical documentation, at:
http://www.cisco.com/en/US/docs/general/whatsnew/whatsnew.html
Description Link
The Cisco Technical Support & Documentation website contains thousands of pages of searchable technical content, including links to products, technologies, solutions, technical tips, and tools. Registered Cisco.com users can log in from this page to access even more content.
http://www.cisco.com/techsupport
8Cisco Unity Express Guide to Writing and Editing Scripts for 7.0 and Later Versions
OL-22479-01
Using the Script Editor
Last Updated: April 27, 2010
This chapter describes how to use the Cisco Unity Express Script Editor in the following sections:
• Overview of the Cisco Unity Express Script Editor, page 9
• Palette Pane, page 10
• Design Pane, page 10
• Variable Pane, page 12
• Debug Pane, page 18
• Using Prompts, page 18
• Using Expressions, page 18
• Using Operators, page 19
• Handling Exceptions, page 20
• Installing the Cisco Unity Express Script Editor, page 23
Overview of the Cisco Unity Express Script EditorThe Cisco Unity Express Script Editor is a visual programming environment for creating auto attendant application scripts.
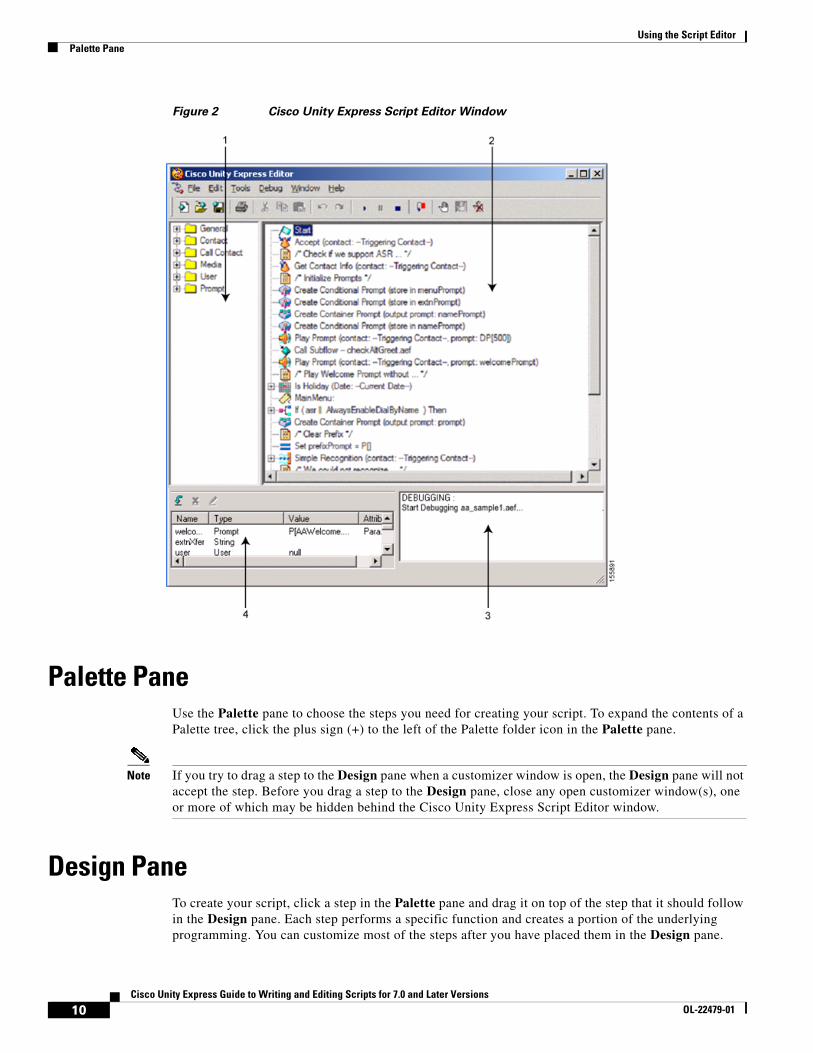
Figure 2 shows the Cisco Unity Express Script Editor window, which is divided into four panes:
1. Palette
2. Design
3. Debug
4. Variable
9Cisco Unity Express Guide to Writing and Editing Scripts for 7.0 and Later Versions
OL-22479-01
Using the Script EditorPalette Pane
Figure 2 Cisco Unity Express Script Editor Window
Palette PaneUse the Palette pane to choose the steps you need for creating your script. To expand the contents of a Palette tree, click the plus sign (+) to the left of the Palette folder icon in the Palette pane.
Note If you try to drag a step to the Design pane when a customizer window is open, the Design pane will not accept the step. Before you drag a step to the Design pane, close any open customizer window(s), one or more of which may be hidden behind the Cisco Unity Express Script Editor window.
Design PaneTo create your script, click a step in the Palette pane and drag it on top of the step that it should follow in the Design pane. Each step performs a specific function and creates a portion of the underlying programming. You can customize most of the steps after you have placed them in the Design pane.
10Cisco Unity Express Guide to Writing and Editing Scripts for 7.0 and Later Versions
OL-22479-01
Using the Script EditorDesign Pane
To add a step to your script, drag the step icon from the Palette pane and drop it onto the step that it will follow in the Design pane. Place the steps in logical order for the script that you are building.
To change the order of a step in the script, drag the individual step icon from its existing location to its new location. To delete a step, select the step icon and press the Delete key.
To end the script, click the General palette and drag End to your script. The End step appears.
Many steps have output branches under which you can add steps to provide the desired script logic based on the End condition of the step.
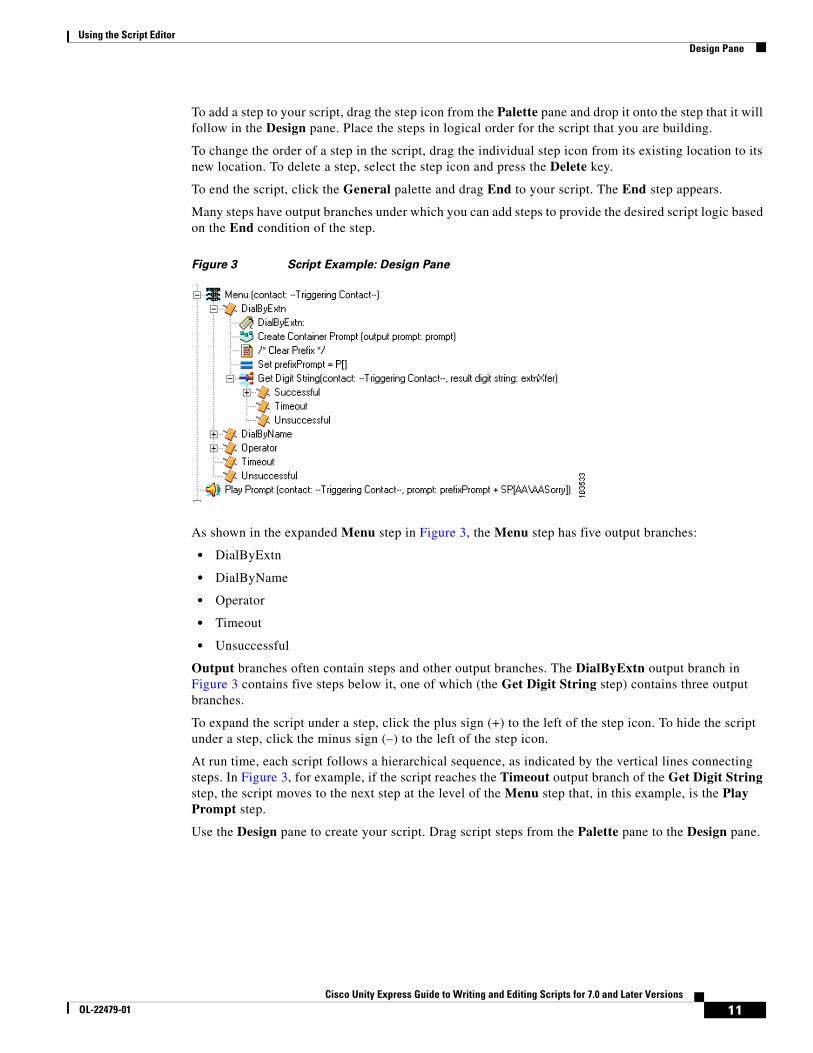
Figure 3 Script Example: Design Pane
As shown in the expanded Menu step in Figure 3, the Menu step has five output branches:
• DialByExtn
• DialByName
• Operator
• Timeout
• Unsuccessful
Output branches often contain steps and other output branches. The DialByExtn output branch in Figure 3 contains five steps below it, one of which (the Get Digit String step) contains three output branches.
To expand the script under a step, click the plus sign (+) to the left of the step icon. To hide the script under a step, click the minus sign (–) to the left of the step icon.
At run time, each script follows a hierarchical sequence, as indicated by the vertical lines connecting steps. In Figure 3, for example, if the script reaches the Timeout output branch of the Get Digit String step, the script moves to the next step at the level of the Menu step that, in this example, is the Play Prompt step.
Use the Design pane to create your script. Drag script steps from the Palette pane to the Design pane.
11Cisco Unity Express Guide to Writing and Editing Scripts for 7.0 and Later Versions
OL-22479-01
Using the Script EditorVariable Pane
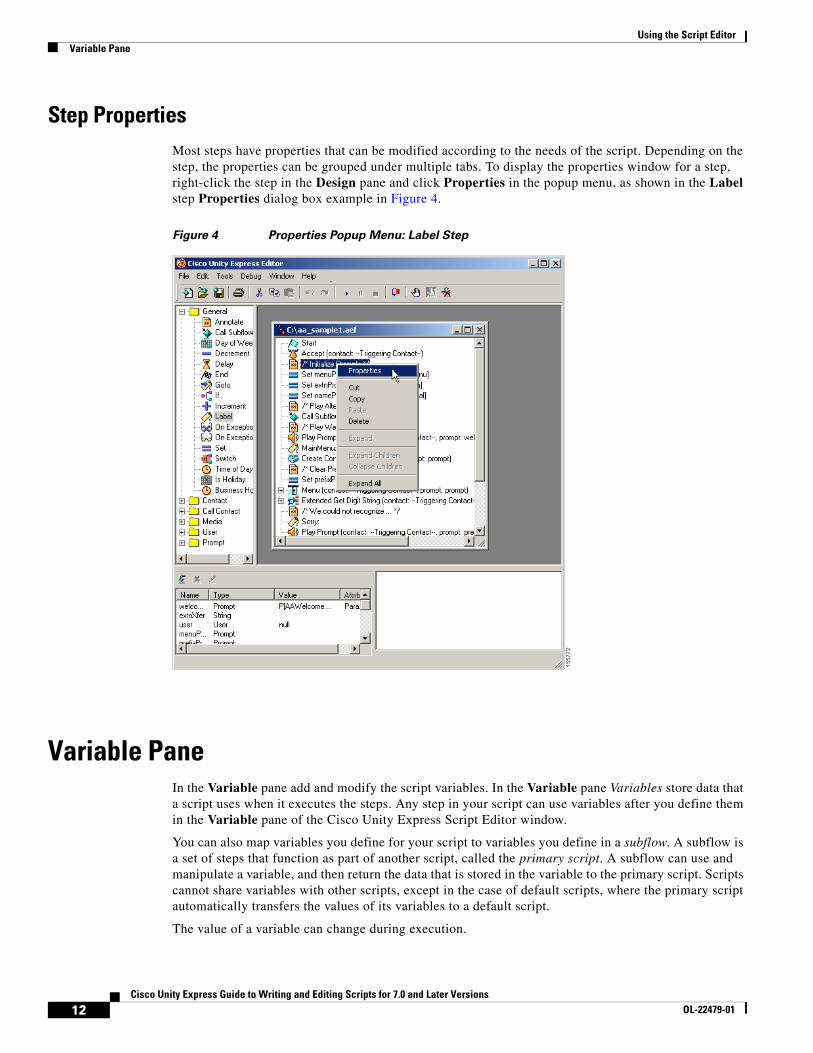
Step PropertiesMost steps have properties that can be modified according to the needs of the script. Depending on the step, the properties can be grouped under multiple tabs. To display the properties window for a step, right-click the step in the Design pane and click Properties in the popup menu, as shown in the Label step Properties dialog box example in Figure 4.
Figure 4 Properties Popup Menu: Label Step
Variable PaneIn the Variable pane add and modify the script variables. In the Variable pane Variables store data that a script uses when it executes the steps. Any step in your script can use variables after you define them in the Variable pane of the Cisco Unity Express Script Editor window.
You can also map variables you define for your script to variables you define in a subflow. A subflow is a set of steps that function as part of another script, called the primary script. A subflow can use and manipulate a variable, and then return the data that is stored in the variable to the primary script. Scripts cannot share variables with other scripts, except in the case of default scripts, where the primary script automatically transfers the values of its variables to a default script.
The value of a variable can change during execution.
12Cisco Unity Express Guide to Writing and Editing Scripts for 7.0 and Later Versions
OL-22479-01
Using the Script EditorVariable Pane
VariablesVariables store user-defined data or data resulting from the completion of a step or expression. Any step in your script can use a variable after it has been defined. Because data comes in different forms, you must also define the variable type before you can use it. Variables are grouped into the following basic built-in variable types (see the “Basic Built-in Variable Types” section on page 15):
• Boolean
• Character
• Float
• Integer
• String
• Date
• Time
• BigDecimal
• BigInteger
• Double
• Long
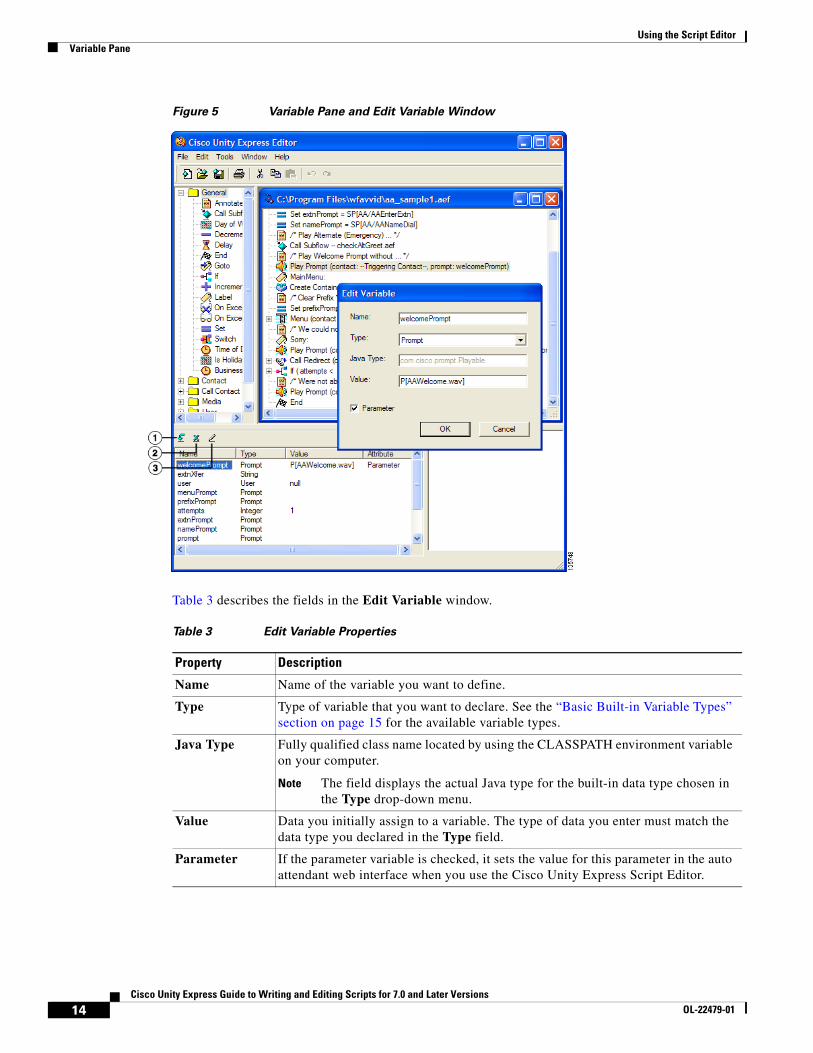
Defining VariablesBecause data comes in different forms, you must also define the variable before you can use it. Click the:
1. New Variable icon at the top left corner of the Variable pane to define a new variable.
The Edit Variable window appears. After you use the Edit Variable window to define your variables, the variables appear in the Variable pane.
2. Delete Variable to delete the selected variable.
3. Modify Variable to change the variable to the selected variable.
13Cisco Unity Express Guide to Writing and Editing Scripts for 7.0 and Later Versions
OL-22479-01
Using the Script EditorVariable Pane
Figure 5 Variable Pane and Edit Variable Window
Table 3 describes the fields in the Edit Variable window.
Table 3 Edit Variable Properties
Property Description
Name Name of the variable you want to define.
Type Type of variable that you want to declare. See the “Basic Built-in Variable Types” section on page 15 for the available variable types.
Java Type Fully qualified class name located by using the CLASSPATH environment variable on your computer.
Note The field displays the actual Java type for the built-in data type chosen in the Type drop-down menu.
Value Data you initially assign to a variable. The type of data you enter must match the data type you declared in the Type field.
Parameter If the parameter variable is checked, it sets the value for this parameter in the auto attendant web interface when you use the Cisco Unity Express Script Editor.
14Cisco Unity Express Guide to Writing and Editing Scripts for 7.0 and Later Versions
OL-22479-01
Using the Script EditorVariable Pane
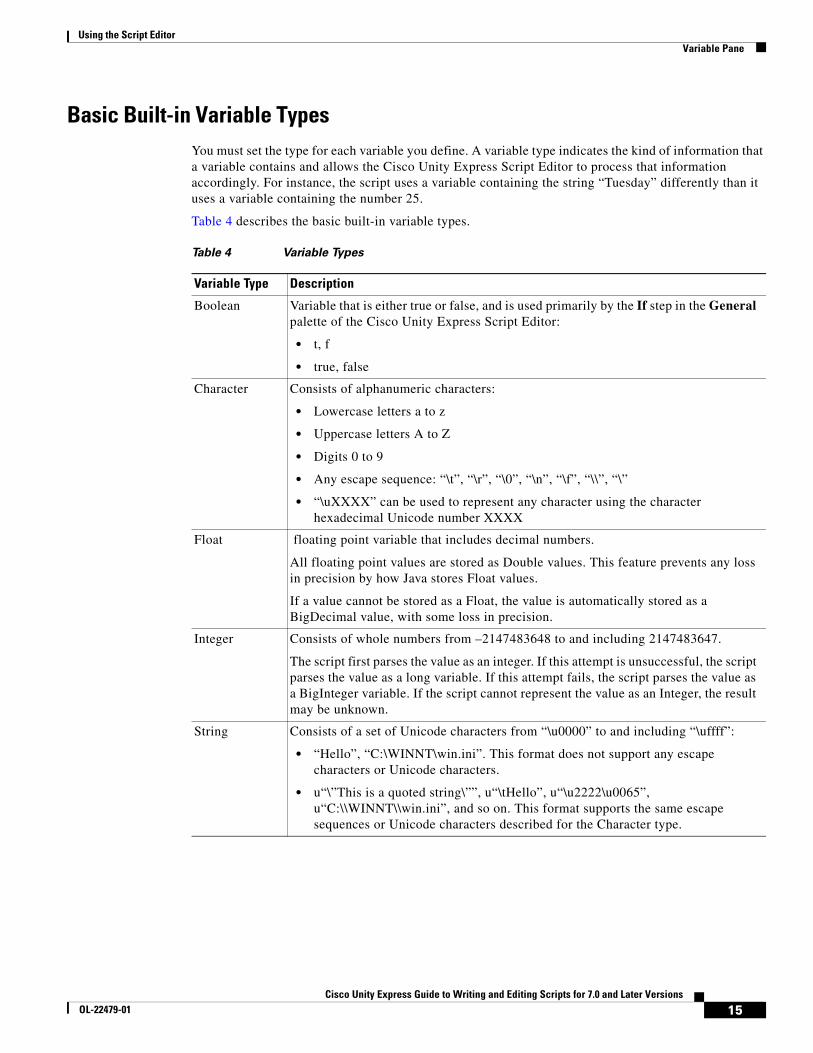
Basic Built-in Variable TypesYou must set the type for each variable you define. A variable type indicates the kind of information that a variable contains and allows the Cisco Unity Express Script Editor to process that information accordingly. For instance, the script uses a variable containing the string “Tuesday” differently than it uses a variable containing the number 25.
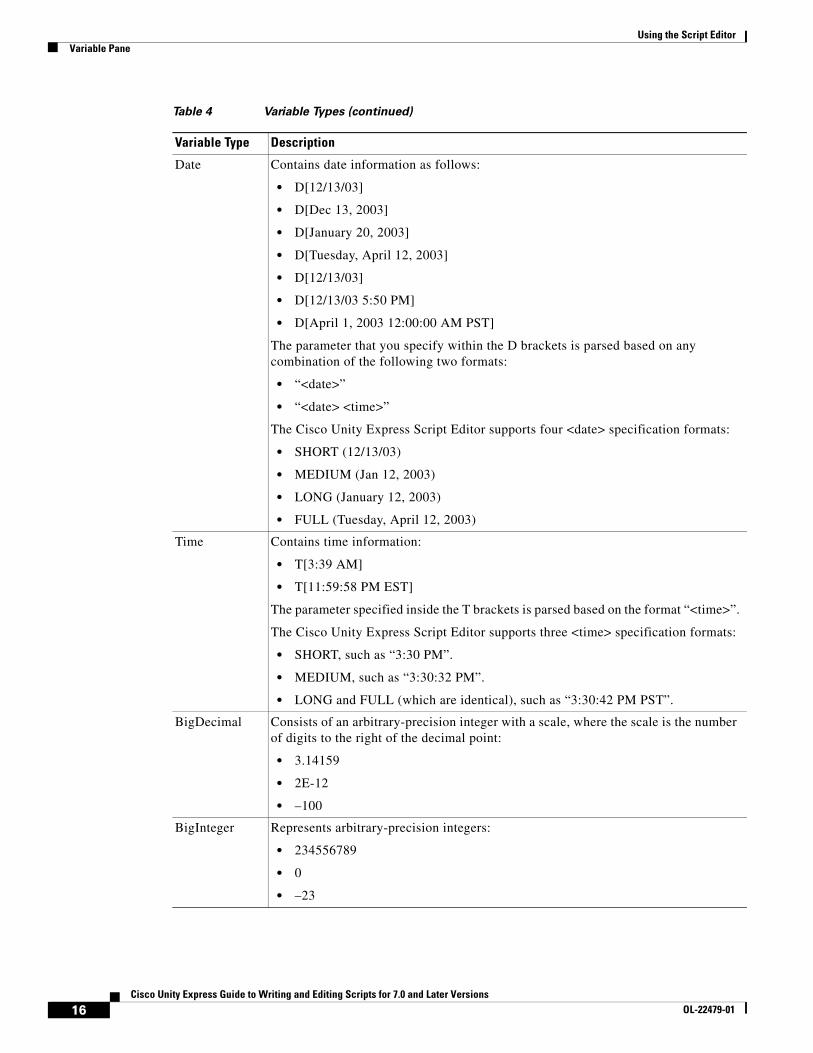
Table 4 describes the basic built-in variable types.
Table 4 Variable Types
Variable Type Description
Boolean Variable that is either true or false, and is used primarily by the If step in the General palette of the Cisco Unity Express Script Editor:
• t, f
• true, false
Character Consists of alphanumeric characters:
• Lowercase letters a to z
• Uppercase letters A to Z
• Digits 0 to 9
• Any escape sequence: “\t”, “\r”, “\0”, “\n”, “\f”, “\\”, “\”
• “\uXXXX” can be used to represent any character using the character hexadecimal Unicode number XXXX
Float floating point variable that includes decimal numbers.
All floating point values are stored as Double values. This feature prevents any loss in precision by how Java stores Float values.
If a value cannot be stored as a Float, the value is automatically stored as a BigDecimal value, with some loss in precision.
Integer Consists of whole numbers from –2147483648 to and including 2147483647.
The script first parses the value as an integer. If this attempt is unsuccessful, the script parses the value as a long variable. If this attempt fails, the script parses the value as a BigInteger variable. If the script cannot represent the value as an Integer, the result may be unknown.
String Consists of a set of Unicode characters from “\u0000” to and including “\uffff”:
• “Hello”, “C:\WINNT\win.ini”. This format does not support any escape characters or Unicode characters.
• u“\”This is a quoted string\””, u“\tHello”, u“\u2222\u0065”, u“C:\\WINNT\\win.ini”, and so on. This format supports the same escape sequences or Unicode characters described for the Character type.
15Cisco Unity Express Guide to Writing and Editing Scripts for 7.0 and Later Versions
OL-22479-01
Using the Script EditorVariable Pane
Date Contains date information as follows:
• D[12/13/03]
• D[Dec 13, 2003]
• D[January 20, 2003]
• D[Tuesday, April 12, 2003]
• D[12/13/03]
• D[12/13/03 5:50 PM]
• D[April 1, 2003 12:00:00 AM PST]
The parameter that you specify within the D brackets is parsed based on any combination of the following two formats:
• “<date>”
• “<date> <time>”
The Cisco Unity Express Script Editor supports four <date> specification formats:
• SHORT (12/13/03)
• MEDIUM (Jan 12, 2003)
• LONG (January 12, 2003)
• FULL (Tuesday, April 12, 2003)
Time Contains time information:
• T[3:39 AM]
• T[11:59:58 PM EST]
The parameter specified inside the T brackets is parsed based on the format “<time>”.
The Cisco Unity Express Script Editor supports three <time> specification formats:
• SHORT, such as “3:30 PM”.
• MEDIUM, such as “3:30:32 PM”.
• LONG and FULL (which are identical), such as “3:30:42 PM PST”.
BigDecimal Consists of an arbitrary-precision integer with a scale, where the scale is the number of digits to the right of the decimal point:
• 3.14159
• 2E-12
• –100
BigInteger Represents arbitrary-precision integers:
• 234556789
• 0
• –23
Table 4 Variable Types (continued)
Variable Type Description
16Cisco Unity Express Guide to Writing and Editing Scripts for 7.0 and Later Versions
OL-22479-01
Using the Script EditorVariable Pane
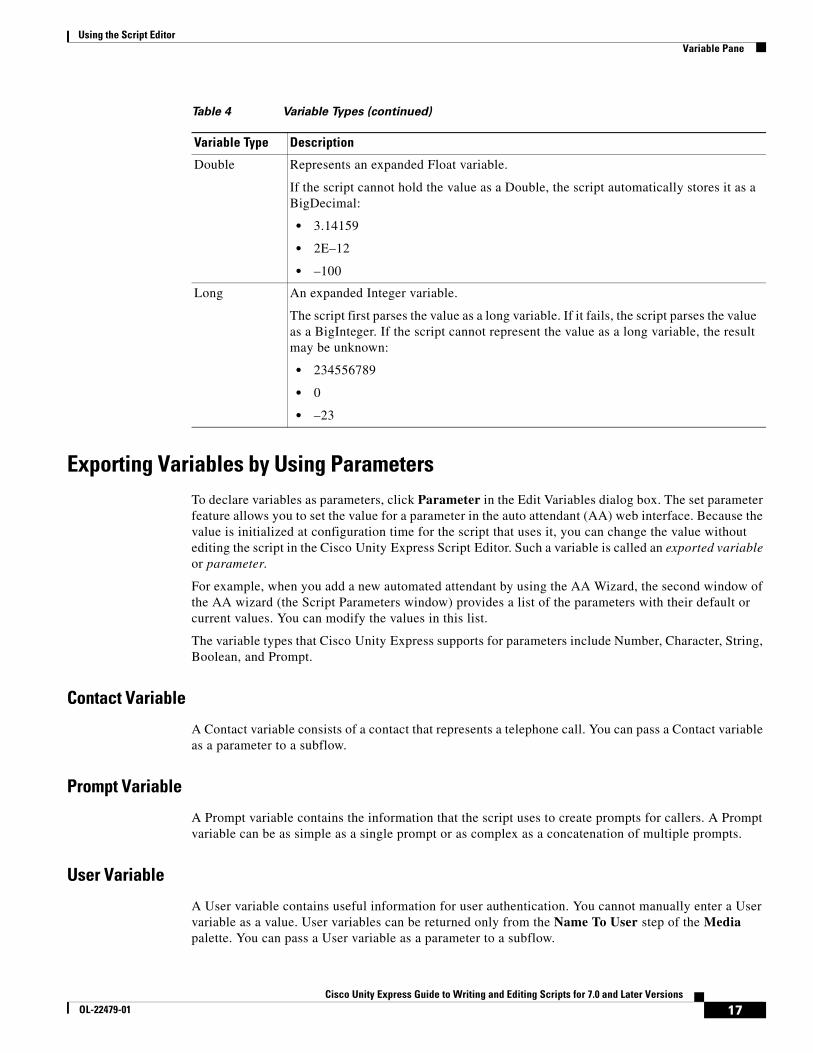
Exporting Variables by Using ParametersTo declare variables as parameters, click Parameter in the Edit Variables dialog box. The set parameter feature allows you to set the value for a parameter in the auto attendant (AA) web interface. Because the value is initialized at configuration time for the script that uses it, you can change the value without editing the script in the Cisco Unity Express Script Editor. Such a variable is called an exported variable or parameter.
For example, when you add a new automated attendant by using the AA Wizard, the second window of the AA wizard (the Script Parameters window) provides a list of the parameters with their default or current values. You can modify the values in this list.
The variable types that Cisco Unity Express supports for parameters include Number, Character, String, Boolean, and Prompt.
Contact Variable
A Contact variable consists of a contact that represents a telephone call. You can pass a Contact variable as a parameter to a subflow.
Prompt Variable
A Prompt variable contains the information that the script uses to create prompts for callers. A Prompt variable can be as simple as a single prompt or as complex as a concatenation of multiple prompts.
User Variable
A User variable contains useful information for user authentication. You cannot manually enter a User variable as a value. User variables can be returned only from the Name To User step of the Media palette. You can pass a User variable as a parameter to a subflow.
Double Represents an expanded Float variable.
If the script cannot hold the value as a Double, the script automatically stores it as a BigDecimal:
• 3.14159
• 2E–12
• –100
Long An expanded Integer variable.
The script first parses the value as a long variable. If it fails, the script parses the value as a BigInteger. If the script cannot represent the value as a long variable, the result may be unknown:
• 234556789
• 0
• –23
Table 4 Variable Types (continued)
Variable Type Description
17Cisco Unity Express Guide to Writing and Editing Scripts for 7.0 and Later Versions
OL-22479-01
Using the Script EditorDebug Pane
Debug PaneThe Debug pane is not available in this release.
Using PromptsThe Cisco Unity Express Script Editor uses the following two types of prompts:
• System prompts: Used internally by Cisco modules and Cisco sample scripts. System prompts are used internally by the system.
Note There is no guarantee of the continued availability of any system prompt in future releases.
• User prompts: Defined by the user and managed by the administrator using the Voice Mail > Prompts web page of the Cisco Unity Express GUI administrator interface or by calling in to the Greeting Management System. The script retrieves both user and system prompts from the Prompt Repository.
All Media and Prompt steps support prompts specified in the following ways:
• String expression: User-defined prompts that are located in the User Prompts directory.
• Prompt expression: Dynamically created at run time.
Note You must define all prompts played back and recorded with a RIFF header of type WAVE and G711 u-law format.
For more information on managing the prompts, see the Cisco Unity Express 7.0 GUI Administrator Guide or the Cisco Unity Express Voice-Mail and Auto-Attendant CLI Administrator Guide for 3.0 and Later Versions.
Using ExpressionsExpressions are useful if you do not know the exact prompt value at design time and instead would rather enter a formula that can be evaluated later at run time. The resulting type of the expression must match the expected input type or types (which you check at design time).
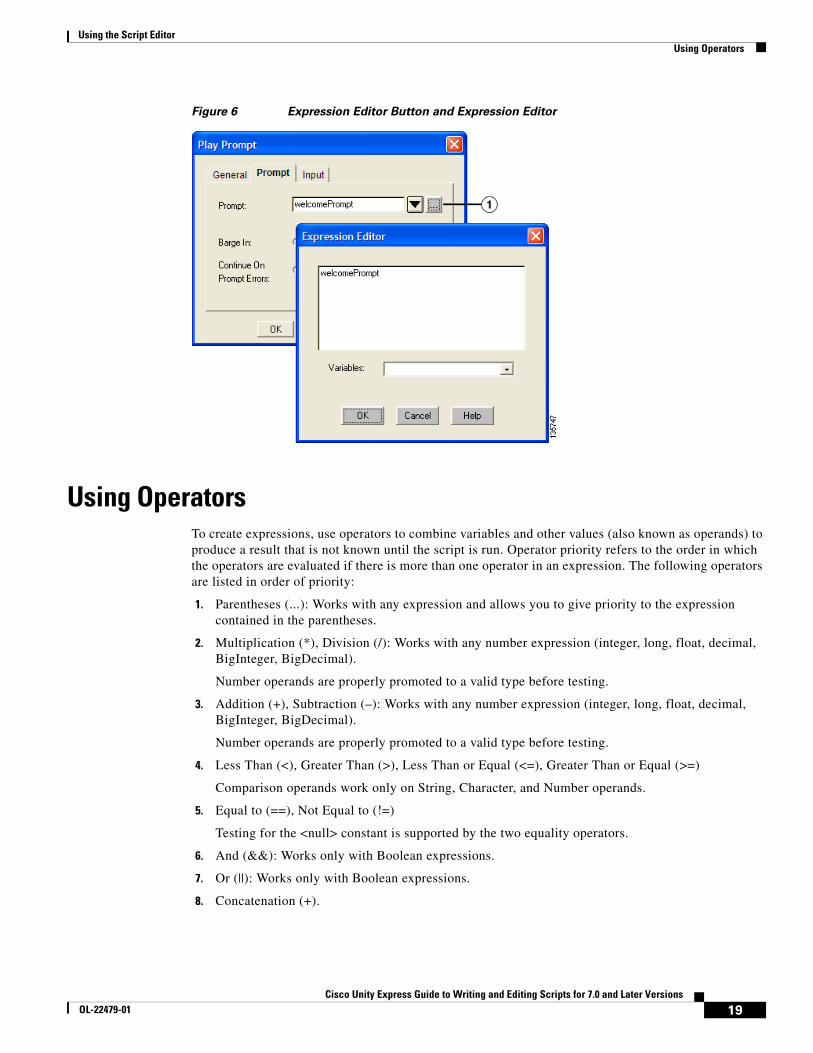
Many steps include an Expression Editor (...) button (1 in Figure 6) in the customizer window, which you can use to enter an expression.
You can enter an expression directly in the input text field, or click Expression Editor (...) to open the Expression Editor.
You can enter the expression in the text field, or choose from the Variable drop-down menu to get quick access to variables you have previously defined in the script. After you choose a variable from the Variable drop-down menu, the variable name appears in the input text field.
After you enter the expression, click OK. The Expression Editor closes.
18Cisco Unity Express Guide to Writing and Editing Scripts for 7.0 and Later Versions
OL-22479-01
Using the Script EditorUsing Operators
Figure 6 Expression Editor Button and Expression Editor
Using Operators To create expressions, use operators to combine variables and other values (also known as operands) to produce a result that is not known until the script is run. Operator priority refers to the order in which the operators are evaluated if there is more than one operator in an expression. The following operators are listed in order of priority:
1. Parentheses (...): Works with any expression and allows you to give priority to the expression contained in the parentheses.
2. Multiplication (*), Division (/): Works with any number expression (integer, long, float, decimal, BigInteger, BigDecimal).
Number operands are properly promoted to a valid type before testing.
3. Addition (+), Subtraction (–): Works with any number expression (integer, long, float, decimal, BigInteger, BigDecimal).
Number operands are properly promoted to a valid type before testing.
4. Less Than (<), Greater Than (>), Less Than or Equal (<=), Greater Than or Equal (>=)
Comparison operands work only on String, Character, and Number operands.
5. Equal to (==), Not Equal to (!=)
Testing for the <null> constant is supported by the two equality operators.
6. And (&&): Works only with Boolean expressions.
7. Or (||): Works only with Boolean expressions.
8. Concatenation (+).
19Cisco Unity Express Guide to Writing and Editing Scripts for 7.0 and Later Versions
OL-22479-01
Using the Script EditorHandling Exceptions
If at least one of the operands is a String, then the other one if it is not a prompt, one is converted to a String by using the String.value() method. The result is a new String corresponding to the concatenation of the String representation of both operands. Typically, the String.valueOf() method simply calls the toString() method of the object being concatenated, or returns the string “null” if the object is null.
If the operands are Characters, then they are concatenated together, resulting in a new String.
Handling ExceptionsThe Cisco Unity Express Script Editor provides a variety of ways to handle exceptions. Exceptions are errors in scripts from an unexpected user input or an unexpected result in scripts.
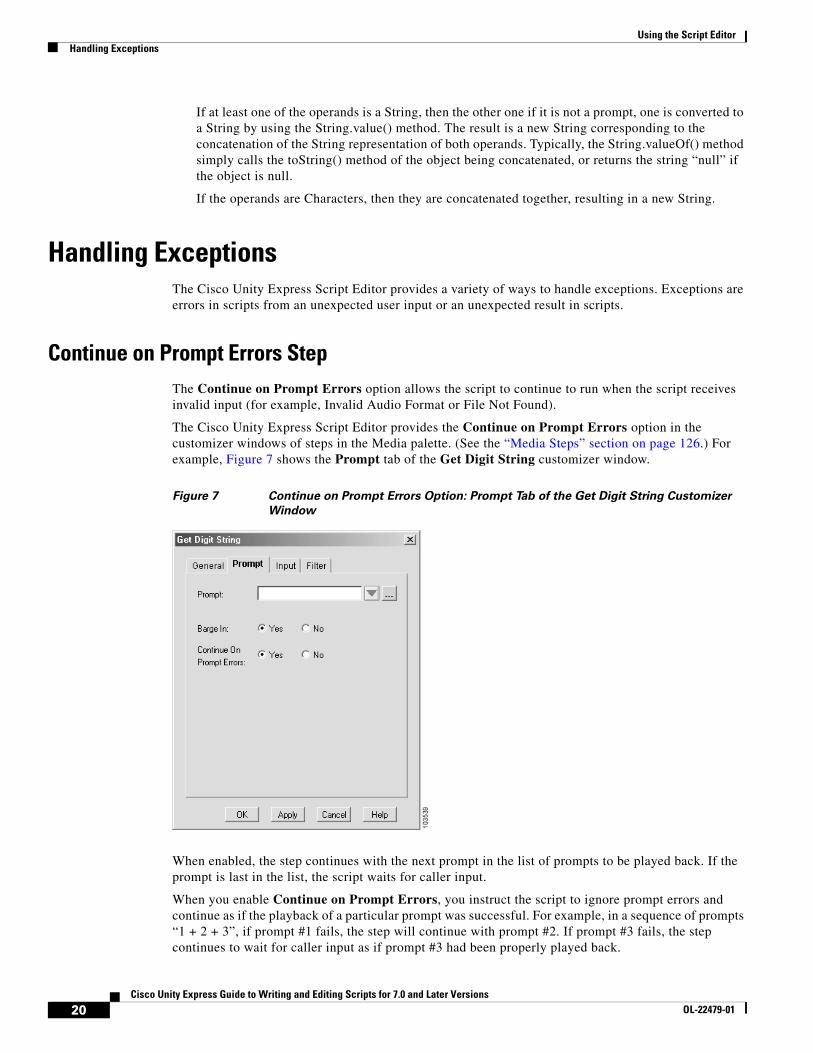
Continue on Prompt Errors StepThe Continue on Prompt Errors option allows the script to continue to run when the script receives invalid input (for example, Invalid Audio Format or File Not Found).
The Cisco Unity Express Script Editor provides the Continue on Prompt Errors option in the customizer windows of steps in the Media palette. (See the “Media Steps” section on page 126.) For example, Figure 7 shows the Prompt tab of the Get Digit String customizer window.
Figure 7 Continue on Prompt Errors Option: Prompt Tab of the Get Digit String Customizer
Window
When enabled, the step continues with the next prompt in the list of prompts to be played back. If the prompt is last in the list, the script waits for caller input.
When you enable Continue on Prompt Errors, you instruct the script to ignore prompt errors and continue as if the playback of a particular prompt was successful. For example, in a sequence of prompts “1 + 2 + 3”, if prompt #1 fails, the step will continue with prompt #2. If prompt #3 fails, the step continues to wait for caller input as if prompt #3 had been properly played back.
20Cisco Unity Express Guide to Writing and Editing Scripts for 7.0 and Later Versions
OL-22479-01
Using the Script EditorHandling Exceptions
When you disable Continue on Prompt Errors, the media steps generate an exception, which can then be handled in the script.
Available prompt exceptions are the following:
• InvalidPromptArgumentException
• PromptException
• UndefinedPromptException
• UndefinedPromptGenerator
• UnsupportedPromptExpression
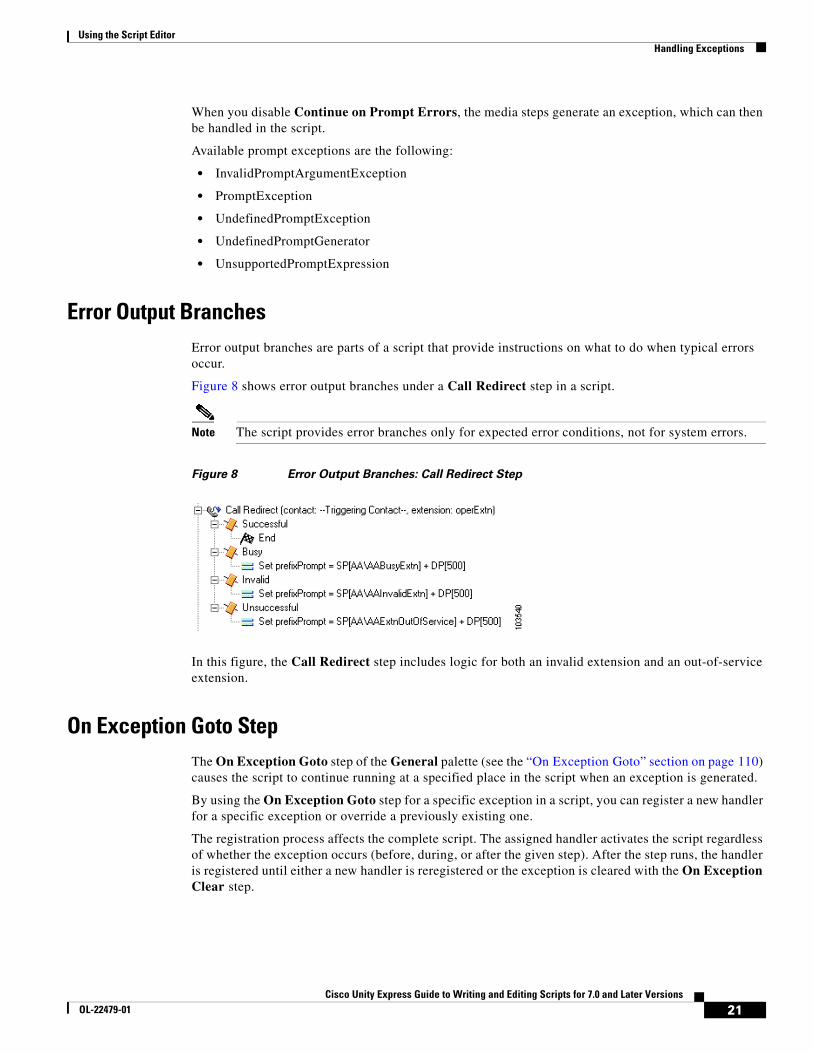
Error Output BranchesError output branches are parts of a script that provide instructions on what to do when typical errors occur.
Figure 8 shows error output branches under a Call Redirect step in a script.
Note The script provides error branches only for expected error conditions, not for system errors.
Figure 8 Error Output Branches: Call Redirect Step
In this figure, the Call Redirect step includes logic for both an invalid extension and an out-of-service extension.
On Exception Goto StepThe On Exception Goto step of the General palette (see the “On Exception Goto” section on page 110) causes the script to continue running at a specified place in the script when an exception is generated.
By using the On Exception Goto step for a specific exception in a script, you can register a new handler for a specific exception or override a previously existing one.
The registration process affects the complete script. The assigned handler activates the script regardless of whether the exception occurs (before, during, or after the given step). After the step runs, the handler is registered until either a new handler is reregistered or the exception is cleared with the On Exception Clear step.
21Cisco Unity Express Guide to Writing and Editing Scripts for 7.0 and Later Versions
OL-22479-01

Using the Script EditorHandling Exceptions
If an exception results in a subflow, the script first consults the exception handlers of the subflows. If none are defined for the given exception, the exception aborts the subflow, and the Cisco Unity Express application looks for exception handlers in the parent script. This process continues until the script finds an exception handler or the top level of the script is reached.
If no exception handlers are registered, the script aborts and error handling falls back to the last level of error handling, which is the default script.
Using Default ScriptsThe default script is the last level of user-defined error handling before the Cisco Unity Express Script Editor applies a default system treatment to all active contacts.
The Cisco Unity Express Script Editor invokes this default script under the following conditions:
• The main script aborts, which happens for either of the following reasons:
– An uncaught exception occurs.
– The Cisco Unity Express application software is unable to invoke the primary script because it has not been properly validated.
• An incoming call must be aborted because the Cisco Unity Express application software has reached its limit for the number of simultaneous sessions for the application.
In each of these scenarios, the Cisco Unity Express Script Editor marks all active contacts as aborting before the default script is run. The final state of these contacts is Aborted, even if the contacts are transferred or redirected as a result of the default script running.
Caution The purpose of the default script is to gracefully terminate the call when the main script fails, not to have a fallback to provide the original services intended by the primary script. This distinction is important because using system resources to run this default script may impair system performance. If the primary script fails too often, fix the primary script instead of providing another script to attempt the same task.
The default script does not run if the primary script ends normally. If contacts are still active when the primary script ends, all active contacts not marked as handled will abort, and all active contacts marked as handled are simply terminated. In this case, check the primary script for any design problems.
Note The default script provides only a final feedback to the contact regarding the system problem and does not continue the service or restart the service.
The system applies the CallContact script if the contact is still active after the system executes the default script (if any). The CallContact script plays back the prompt, “We are currently experiencing system problems, please call back later” as an announcement, followed by a fast busy signal.
Script InterruptionScript interruption is a feature that allows external events to interrupt the current processing of a script in order to return to another part of the script or stop the execution of the script.
Use script interruption typically when the script needs to be notified that one of its contacts has been remotely terminated, such as when the caller hangs up.
22Cisco Unity Express Guide to Writing and Editing Scripts for 7.0 and Later Versions
OL-22479-01
Using the Script EditorInstalling the Cisco Unity Express Script Editor
Note In every case, any event that triggers the need to interrupt the script can occur at any time while the script executes other steps.
By default, scripts are automatically interruptible before any step is executed. If any external event (such as that described in the preceding text) interrupts the script, the script continues running based on the proper handling for the specific event before the script continues with the next step.
If you want two consecutive steps to run without the possibility of interruption, you must move these two steps to a subflow where you can disable interruptions completely while the script processes that subflow.
Cisco Unity Express Script Editor has an “interruptible” option for some steps that allows you to indicate whether or not the script can interrupt the step from within if an external event occurs.
When a contact terminates remotely, the script performs one of the following actions:
• When a caller hangs up, the script is interrupted (if possible) and a ContactInactiveException is generated. This exception can then be handled with the OnExceptionGoto step of the General palette.
• When a caller hangs up and no exception handling logic is available, the script immediately aborts.
• When managing multiple contacts, the OnExceptionGoto step cannot differentiate which contact was remotely terminated. Instead, it must specify a Label to which it can loop through all known contact variables and use the Get Contact Info step of the General palette to search for an Active flag.
If an interrupting event occurs when the script is not currently interruptible, the script is automatically interrupted whenever it becomes interruptible again. For example, although a script is not interruptible when it is running a subflow that is marked to disable interruptions, the script processes the interruption as soon as the subflow terminates, and control is returned to the parent (if that primary script is interruptible).
Installing the Cisco Unity Express Script EditorThis section describes how to install the Cisco Unity Express Script Editor application.
Note Do not install the Cisco Unity Express Script Editor application on hardware on which the Cisco Customer Response Solutions (Cisco CRS) Editor application is currently installed. These applications share registry files and will not work if installed on the same hardware.
The Cisco Unity Express Script Editor is a Microsoft Windows application. The computer you install it on must be running one of the following operating systems:
• Windows NT (Workstation or Server) with Service Pack 4 or later
• Windows 2000 (Professional or Server)
• Windows XP Professional
Download the Cisco Unity Express Script Editor installation program from Cisco.com or install it from the Cisco Unity Express Application Software CD. The filename is Cisco Unity Express Editorx.x.x.exe, where x.x.x is the version that you are installing.
Follow these steps to install the Cisco Unity Express Script Editor:
23Cisco Unity Express Guide to Writing and Editing Scripts for 7.0 and Later Versions
OL-22479-01
Using the Script EditorInstalling the Cisco Unity Express Script Editor
Step 1 Double-click the installation program file.
The InstallShield Wizard appears and begins extracting files for the installation. (This process may take a few minutes.)
Step 2 Follow the prompts to install the application. A default installation is acceptable for most users: click Yes and Next buttons when prompted.
The prompts also allow you to move back to an earlier step in the installation process or cancel the installation completely.
Step 3 To verify that the application is installed correctly, start the application: on the task bar click Start, All Programs, Cisco Unity Express Developer, Cisco Unity Express Script Editor.
The default installation path on your hard drive is C:\Program Files\wfavvid\WFCCNEditor.exe.
24Cisco Unity Express Guide to Writing and Editing Scripts for 7.0 and Later Versions
OL-22479-01
Auto Attendant Script Example
Last Updated: April 27, 2010
This chapter describes how to configure an auto attendant (AA) script. It uses the sample script aa_sample1.aef, which is included with the Cisco Unity Express Script Editor, to illustrate basic procedures for configuring auto attendant scripts.
This chapter contains the following sections:
• Sample Script Overview, page 25
• System Prompts, page 27
• Configuring the Auto Attendant Sample Script, page 27
– Configuring the Main Menu Step, page 33
– Configuring the Play Prompt Step, page 53
– Configuring the Call Redirect Step, page 54
– Configuring the If Step, page 54
– Configuring the Play Prompt Step, page 54
– Inserting the End Step, page 54
Sample Script OverviewThe aa_sample1.aef file is a script that answers a call, asks for the name or extension of the person to whom the caller would like to be connected, and transfers the call.
Note You can modify the aa_sample1.aef file to create your own AA script. Make a backup copy of the aa_sample1.aef file before modifying it, so that you always have access to the original file.
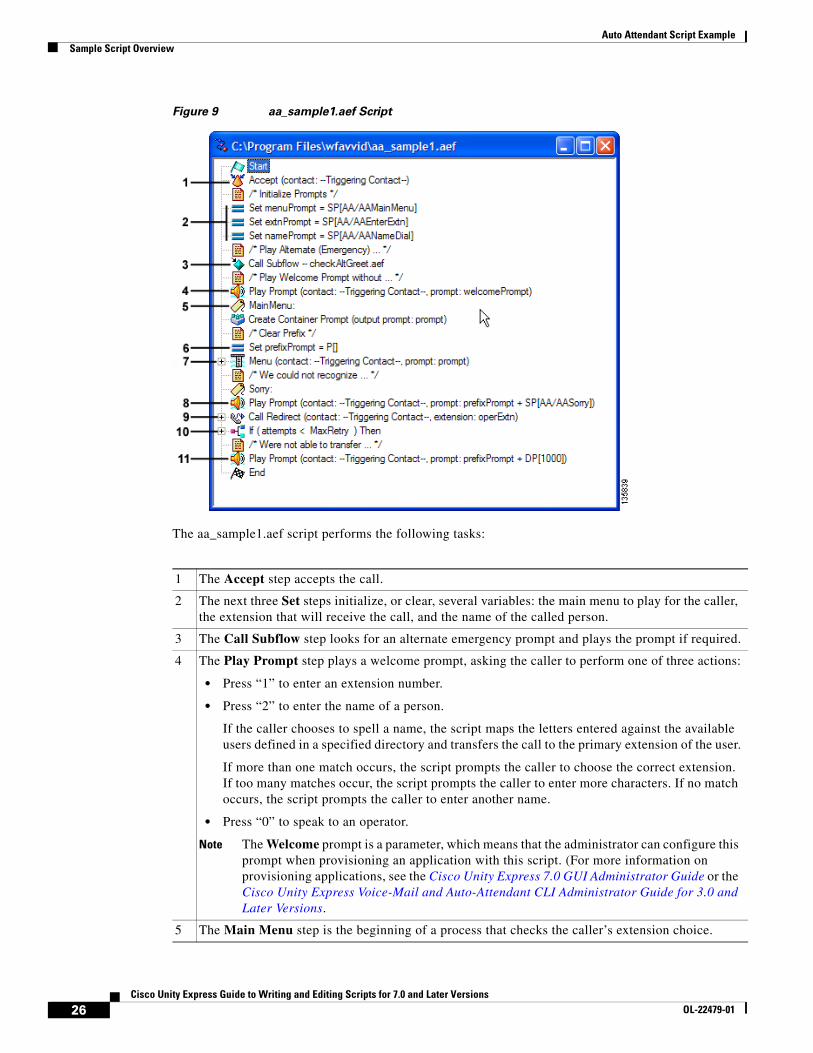
Figure 9 shows the aa_sample1.aef script as it appears in the Design pane of the Cisco Unity Express Script Editor window.
25Cisco Unity Express Guide to Writing and Editing Scripts for 7.0 and Later Versions
OL-22479-01
Auto Attendant Script ExampleSample Script Overview
Figure 9 aa_sample1.aef Script
The aa_sample1.aef script performs the following tasks:
1 The Accept step accepts the call.
2 The next three Set steps initialize, or clear, several variables: the main menu to play for the caller, the extension that will receive the call, and the name of the called person.
3 The Call Subflow step looks for an alternate emergency prompt and plays the prompt if required.
4 The Play Prompt step plays a welcome prompt, asking the caller to perform one of three actions:
• Press “1” to enter an extension number.
• Press “2” to enter the name of a person.
If the caller chooses to spell a name, the script maps the letters entered against the available users defined in a specified directory and transfers the call to the primary extension of the user.
If more than one match occurs, the script prompts the caller to choose the correct extension. If too many matches occur, the script prompts the caller to enter more characters. If no match occurs, the script prompts the caller to enter another name.
• Press “0” to speak to an operator.
Note The Welcome prompt is a parameter, which means that the administrator can configure this prompt when provisioning an application with this script. (For more information on provisioning applications, see the Cisco Unity Express 7.0 GUI Administrator Guide or the Cisco Unity Express Voice-Mail and Auto-Attendant CLI Administrator Guide for 3.0 and Later Versions.
5 The Main Menu step is the beginning of a process that checks the caller’s extension choice.
26Cisco Unity Express Guide to Writing and Editing Scripts for 7.0 and Later Versions
OL-22479-01

Auto Attendant Script ExampleSystem Prompts
System PromptsThe aa_sample1.aef script uses system prompts stored as .WAV files, which are installed automatically with the Cisco Unity Express software. These audio prompts include the following:
• AAMainMenu.wav: Provides a menu of choices: press 1 to enter an extension, press 2 to enter the first few characters of a user name, or press 0 to speak to an operator.
• AASorry.wav: States that the transfer was not successful.
• AABusyExtn.wav: States that the dialed extension is busy.
• AAInvalidExtn.wav: States that the entered extension is not a valid choice.
• AAExntOutofService.wav: States that the entered extension is no longer in service.
• AAWelcome.wav: Greets the caller.
In the auto attendant application, you can configure the filename for the AAWelcome.wav prompt by selecting the Voice Mail > Auto Attendant menu option on the Cisco Unity Express GUI administration web interface. You can change the default welcome prompt to reference a custom prompt.
Note For custom scripts, you need to record your own prompts. You can either have them recorded professionally or you can use the AvT to record them in your own voice. For more information about the AvT, see the Cisco Unity Express 7.0 GUI Administrator Guide or the Cisco Unity Express Voice-Mail and Auto-Attendant CLI Administrator Guide for 3.0 and Later Versions.
Configuring the Auto Attendant Sample ScriptThis section describes the steps necessary to configure the sample auto attendant script.
6 The Set prefixPrompt step initializes the beginning section of the prompt that the caller hears.
7 The Menu step contains a subprocess that checks the extension’s status.
8 The Play Prompt step plays a message to the caller regarding the status of the extension. If the script receives a valid extension, it transfers the call.
• If the destination is busy, the caller hears the system prompt, “The phone number you are trying to reach is currently busy.”
• If the destination is out of service, the caller hears the system prompt, “The phone number you are trying to reach is currently out of service.”
9 The Call Redirect step sends the caller to the operator if the extension is not available.
10 The If step determines if the caller has reached the maximum number of tries to connect to a valid extension.
11 The Play Prompt step plays a message if the maximum number of tries has been reached without reaching a valid extension.
27Cisco Unity Express Guide to Writing and Editing Scripts for 7.0 and Later Versions
OL-22479-01
Auto Attendant Script ExampleConfiguring the Auto Attendant Sample Script
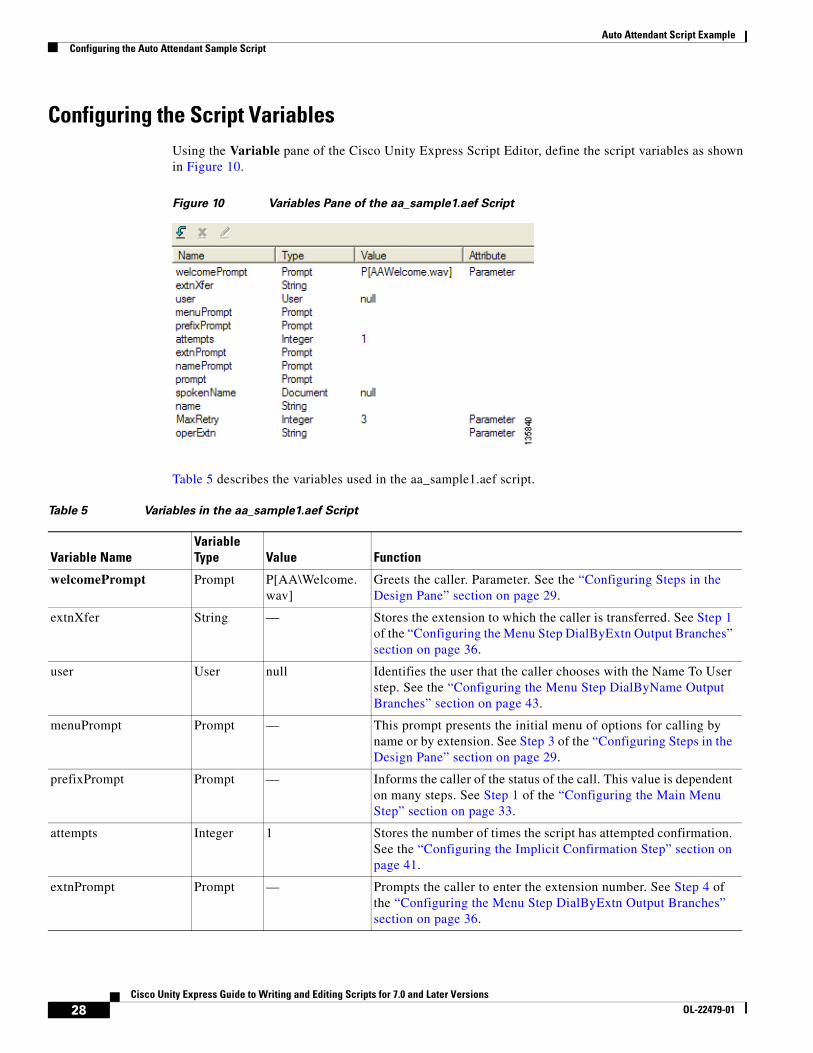
Configuring the Script VariablesUsing the Variable pane of the Cisco Unity Express Script Editor, define the script variables as shown in Figure 10.
Figure 10 Variables Pane of the aa_sample1.aef Script
Table 5 describes the variables used in the aa_sample1.aef script.
Table 5 Variables in the aa_sample1.aef Script
Variable NameVariable Type Value Function
welcomePrompt Prompt P[AA\Welcome.wav]
Greets the caller. Parameter. See the “Configuring Steps in the Design Pane” section on page 29.
extnXfer String — Stores the extension to which the caller is transferred. See Step 1 of the “Configuring the Menu Step DialByExtn Output Branches” section on page 36.
user User null Identifies the user that the caller chooses with the Name To User step. See the “Configuring the Menu Step DialByName Output Branches” section on page 43.
menuPrompt Prompt — This prompt presents the initial menu of options for calling by name or by extension. See Step 3 of the “Configuring Steps in the Design Pane” section on page 29.
prefixPrompt Prompt — Informs the caller of the status of the call. This value is dependent on many steps. See Step 1 of the “Configuring the Main Menu Step” section on page 33.
attempts Integer 1 Stores the number of times the script has attempted confirmation. See the “Configuring the Implicit Confirmation Step” section on page 41.
extnPrompt Prompt — Prompts the caller to enter the extension number. See Step 4 of the “Configuring the Menu Step DialByExtn Output Branches” section on page 36.
28Cisco Unity Express Guide to Writing and Editing Scripts for 7.0 and Later Versions
OL-22479-01
Auto Attendant Script ExampleConfiguring the Auto Attendant Sample Script
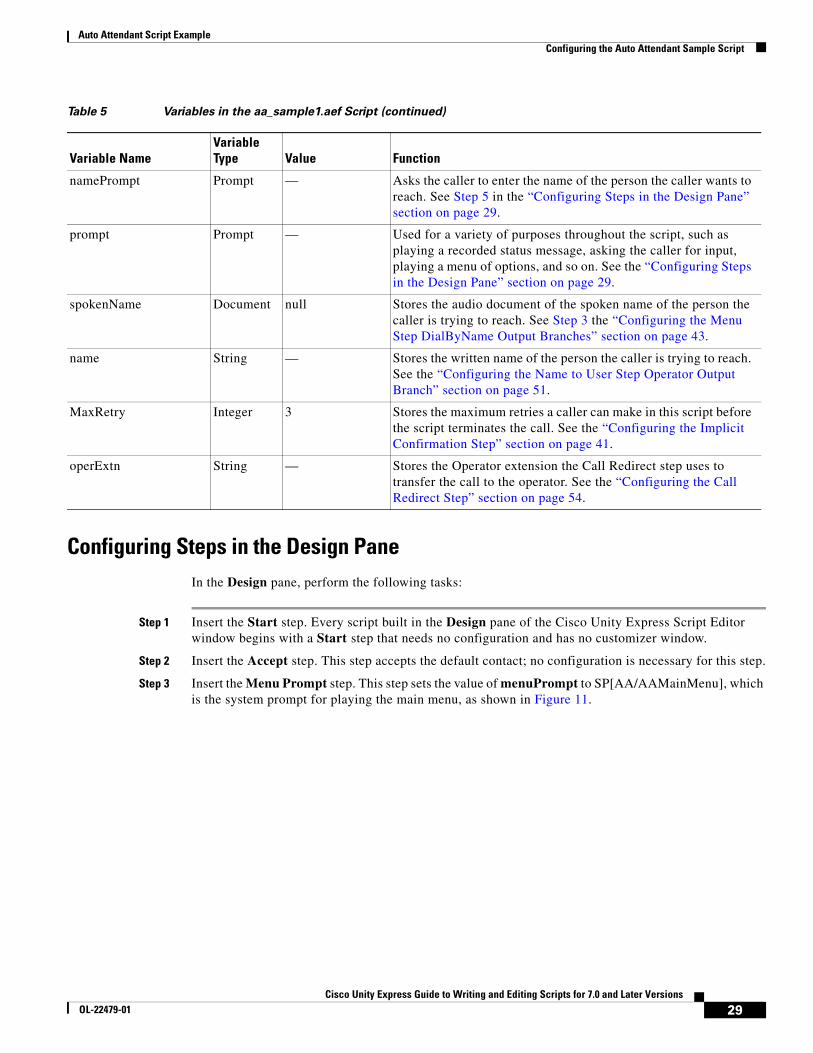
Configuring Steps in the Design PaneIn the Design pane, perform the following tasks:
Step 1 Insert the Start step. Every script built in the Design pane of the Cisco Unity Express Script Editor window begins with a Start step that needs no configuration and has no customizer window.
Step 2 Insert the Accept step. This step accepts the default contact; no configuration is necessary for this step.
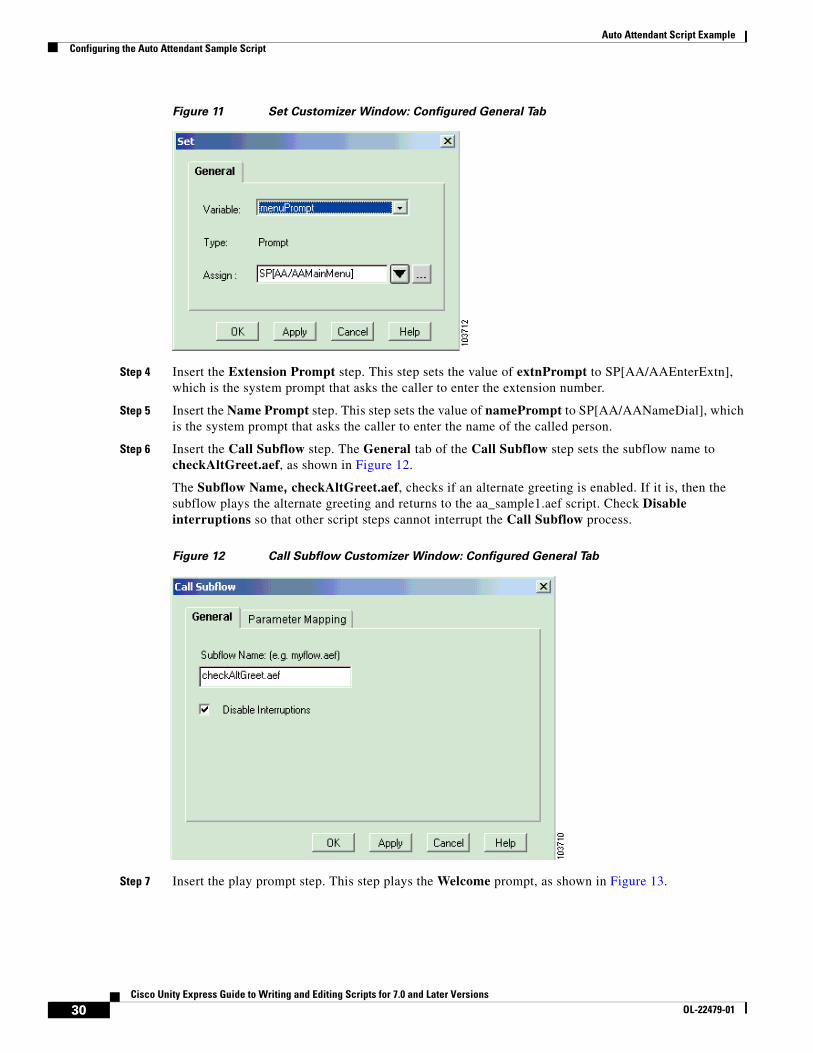
Step 3 Insert the Menu Prompt step. This step sets the value of menuPrompt to SP[AA/AAMainMenu], which is the system prompt for playing the main menu, as shown in Figure 11.
namePrompt Prompt — Asks the caller to enter the name of the person the caller wants to reach. See Step 5 in the “Configuring Steps in the Design Pane” section on page 29.
prompt Prompt — Used for a variety of purposes throughout the script, such as playing a recorded status message, asking the caller for input, playing a menu of options, and so on. See the “Configuring Steps in the Design Pane” section on page 29.
spokenName Document null Stores the audio document of the spoken name of the person the caller is trying to reach. See Step 3 the “Configuring the Menu Step DialByName Output Branches” section on page 43.
name String — Stores the written name of the person the caller is trying to reach. See the “Configuring the Name to User Step Operator Output Branch” section on page 51.
MaxRetry Integer 3 Stores the maximum retries a caller can make in this script before the script terminates the call. See the “Configuring the Implicit Confirmation Step” section on page 41.
operExtn String — Stores the Operator extension the Call Redirect step uses to transfer the call to the operator. See the “Configuring the Call Redirect Step” section on page 54.
Table 5 Variables in the aa_sample1.aef Script (continued)
Variable NameVariable Type Value Function
29Cisco Unity Express Guide to Writing and Editing Scripts for 7.0 and Later Versions
OL-22479-01
Auto Attendant Script ExampleConfiguring the Auto Attendant Sample Script
Figure 11 Set Customizer Window: Configured General Tab
Step 4 Insert the Extension Prompt step. This step sets the value of extnPrompt to SP[AA/AAEnterExtn], which is the system prompt that asks the caller to enter the extension number.
Step 5 Insert the Name Prompt step. This step sets the value of namePrompt to SP[AA/AANameDial], which is the system prompt that asks the caller to enter the name of the called person.
Step 6 Insert the Call Subflow step. The General tab of the Call Subflow step sets the subflow name to checkAltGreet.aef, as shown in Figure 12.
The Subflow Name, checkAltGreet.aef, checks if an alternate greeting is enabled. If it is, then the subflow plays the alternate greeting and returns to the aa_sample1.aef script. Check Disable interruptions so that other script steps cannot interrupt the Call Subflow process.
Figure 12 Call Subflow Customizer Window: Configured General Tab
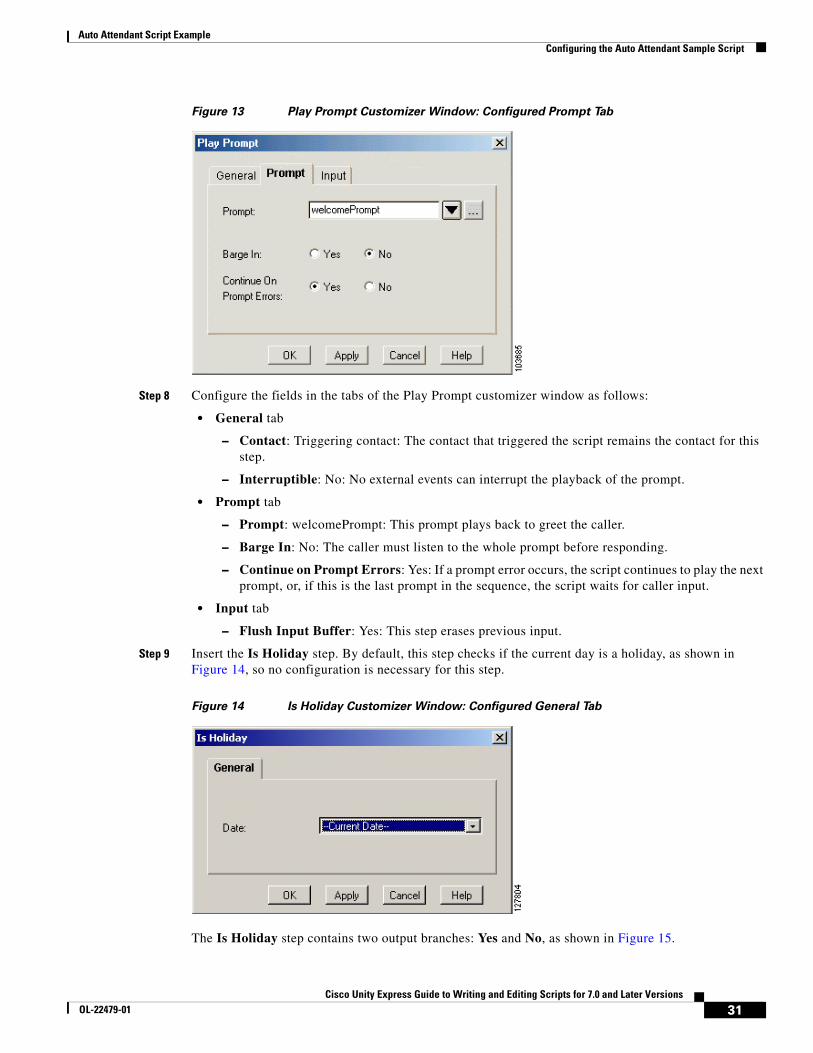
Step 7 Insert the play prompt step. This step plays the Welcome prompt, as shown in Figure 13.
30Cisco Unity Express Guide to Writing and Editing Scripts for 7.0 and Later Versions
OL-22479-01
Auto Attendant Script ExampleConfiguring the Auto Attendant Sample Script
Figure 13 Play Prompt Customizer Window: Configured Prompt Tab
Step 8 Configure the fields in the tabs of the Play Prompt customizer window as follows:
• General tab
– Contact: Triggering contact: The contact that triggered the script remains the contact for this step.
– Interruptible: No: No external events can interrupt the playback of the prompt.
• Prompt tab
– Prompt: welcomePrompt: This prompt plays back to greet the caller.
– Barge In: No: The caller must listen to the whole prompt before responding.
– Continue on Prompt Errors: Yes: If a prompt error occurs, the script continues to play the next prompt, or, if this is the last prompt in the sequence, the script waits for caller input.
• Input tab
– Flush Input Buffer: Yes: This step erases previous input.
Step 9 Insert the Is Holiday step. By default, this step checks if the current day is a holiday, as shown in Figure 14, so no configuration is necessary for this step.
Figure 14 Is Holiday Customizer Window: Configured General Tab
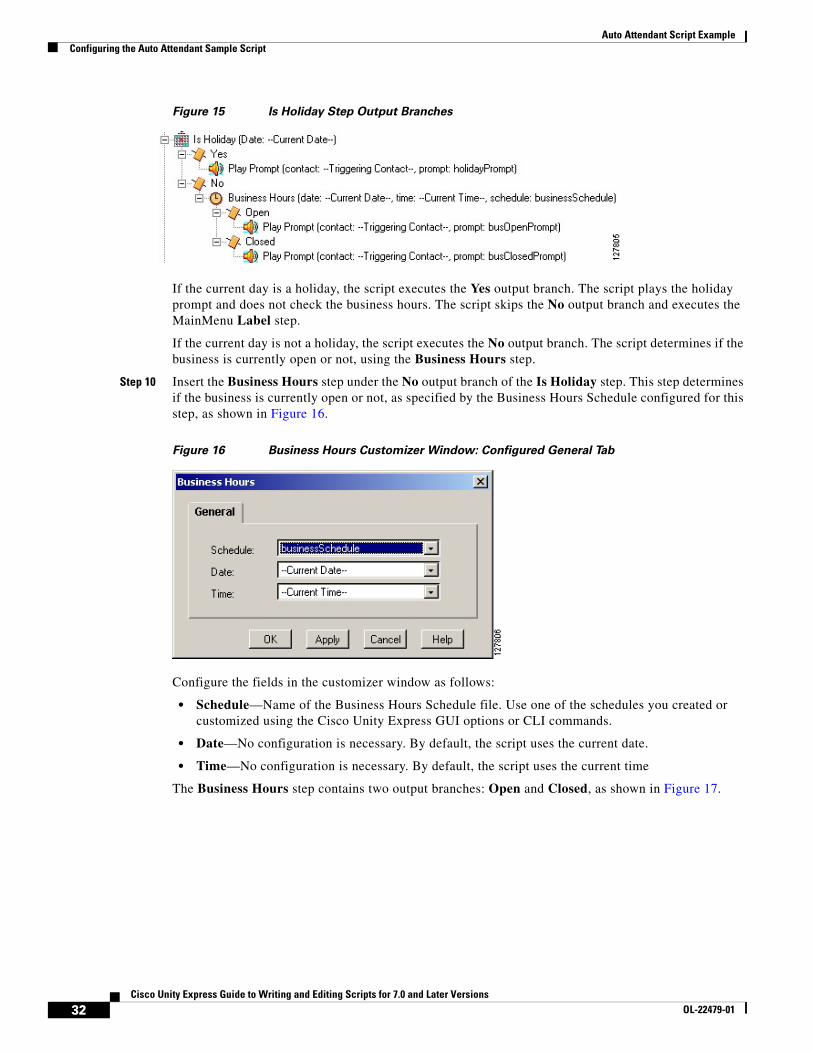
The Is Holiday step contains two output branches: Yes and No, as shown in Figure 15.
31Cisco Unity Express Guide to Writing and Editing Scripts for 7.0 and Later Versions
OL-22479-01
Auto Attendant Script ExampleConfiguring the Auto Attendant Sample Script
Figure 15 Is Holiday Step Output Branches
If the current day is a holiday, the script executes the Yes output branch. The script plays the holiday prompt and does not check the business hours. The script skips the No output branch and executes the MainMenu Label step.
If the current day is not a holiday, the script executes the No output branch. The script determines if the business is currently open or not, using the Business Hours step.
Step 10 Insert the Business Hours step under the No output branch of the Is Holiday step. This step determines if the business is currently open or not, as specified by the Business Hours Schedule configured for this step, as shown in Figure 16.
Figure 16 Business Hours Customizer Window: Configured General Tab
Configure the fields in the customizer window as follows:
• Schedule—Name of the Business Hours Schedule file. Use one of the schedules you created or customized using the Cisco Unity Express GUI options or CLI commands.
• Date—No configuration is necessary. By default, the script uses the current date.
• Time—No configuration is necessary. By default, the script uses the current time
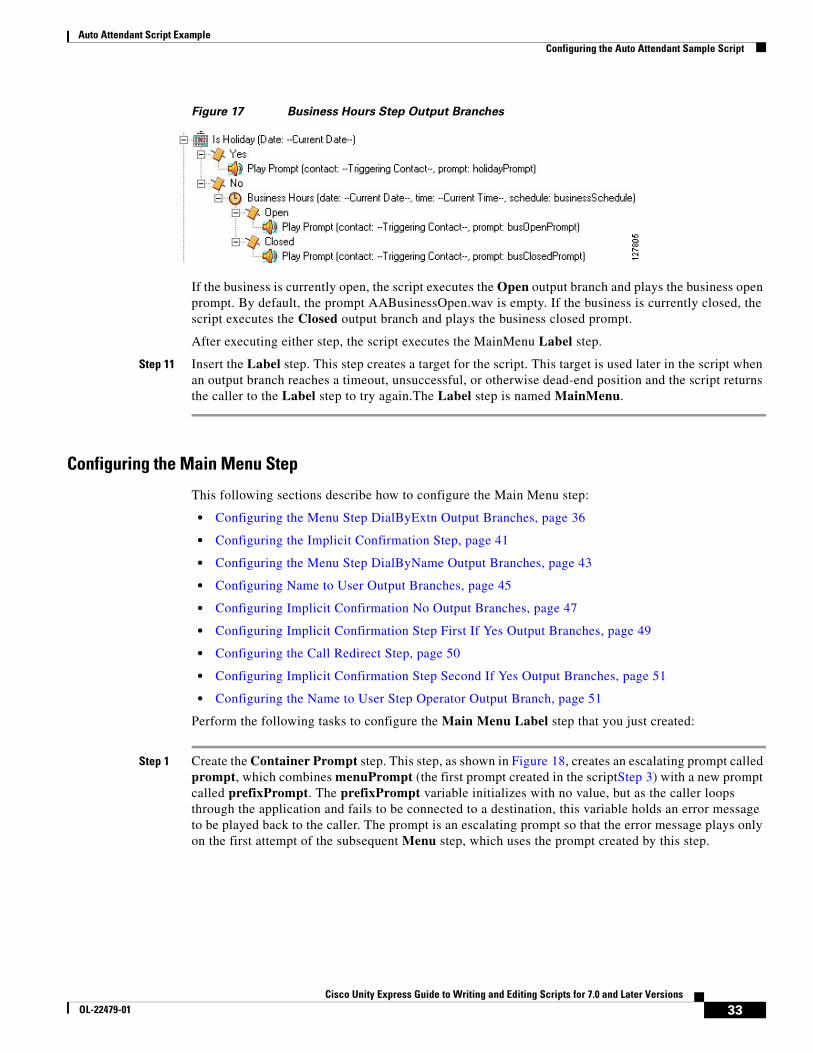
The Business Hours step contains two output branches: Open and Closed, as shown in Figure 17.
32Cisco Unity Express Guide to Writing and Editing Scripts for 7.0 and Later Versions
OL-22479-01
Auto Attendant Script ExampleConfiguring the Auto Attendant Sample Script
Figure 17 Business Hours Step Output Branches
If the business is currently open, the script executes the Open output branch and plays the business open prompt. By default, the prompt AABusinessOpen.wav is empty. If the business is currently closed, the script executes the Closed output branch and plays the business closed prompt.
After executing either step, the script executes the MainMenu Label step.
Step 11 Insert the Label step. This step creates a target for the script. This target is used later in the script when an output branch reaches a timeout, unsuccessful, or otherwise dead-end position and the script returns the caller to the Label step to try again.The Label step is named MainMenu.
Configuring the Main Menu Step
This following sections describe how to configure the Main Menu step:
• Configuring the Menu Step DialByExtn Output Branches, page 36
• Configuring the Implicit Confirmation Step, page 41
• Configuring the Menu Step DialByName Output Branches, page 43
• Configuring Name to User Output Branches, page 45
• Configuring Implicit Confirmation No Output Branches, page 47
• Configuring Implicit Confirmation Step First If Yes Output Branches, page 49
• Configuring the Call Redirect Step, page 50
• Configuring Implicit Confirmation Step Second If Yes Output Branches, page 51
• Configuring the Name to User Step Operator Output Branch, page 51
Perform the following tasks to configure the Main Menu Label step that you just created:
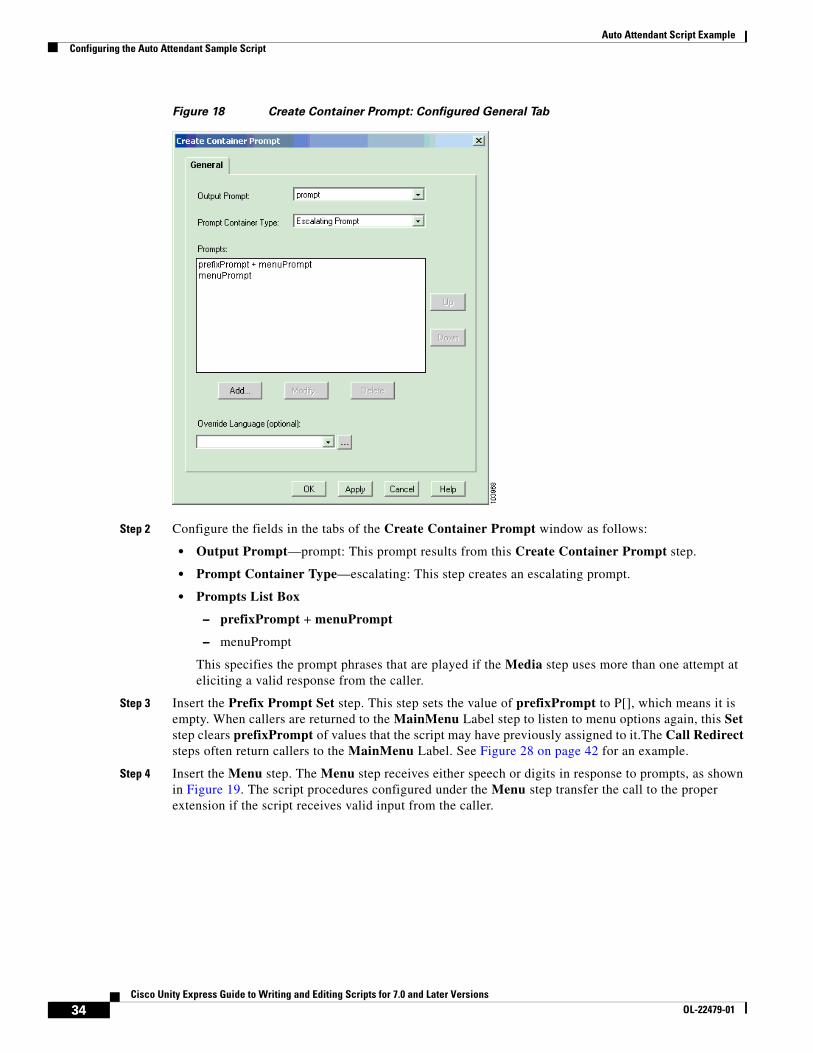
Step 1 Create the Container Prompt step. This step, as shown in Figure 18, creates an escalating prompt called prompt, which combines menuPrompt (the first prompt created in the scriptStep 3) with a new prompt called prefixPrompt. The prefixPrompt variable initializes with no value, but as the caller loops through the application and fails to be connected to a destination, this variable holds an error message to be played back to the caller. The prompt is an escalating prompt so that the error message plays only on the first attempt of the subsequent Menu step, which uses the prompt created by this step.
33Cisco Unity Express Guide to Writing and Editing Scripts for 7.0 and Later Versions
OL-22479-01
Auto Attendant Script ExampleConfiguring the Auto Attendant Sample Script
Figure 18 Create Container Prompt: Configured General Tab
Step 2 Configure the fields in the tabs of the Create Container Prompt window as follows:
• Output Prompt—prompt: This prompt results from this Create Container Prompt step.
• Prompt Container Type—escalating: This step creates an escalating prompt.
• Prompts List Box
– prefixPrompt + menuPrompt
– menuPrompt
This specifies the prompt phrases that are played if the Media step uses more than one attempt at eliciting a valid response from the caller.
Step 3 Insert the Prefix Prompt Set step. This step sets the value of prefixPrompt to P[], which means it is empty. When callers are returned to the MainMenu Label step to listen to menu options again, this Set step clears prefixPrompt of values that the script may have previously assigned to it.The Call Redirect steps often return callers to the MainMenu Label. See Figure 28 on page 42 for an example.
Step 4 Insert the Menu step. The Menu step receives either speech or digits in response to prompts, as shown in Figure 19. The script procedures configured under the Menu step transfer the call to the proper extension if the script receives valid input from the caller.
34Cisco Unity Express Guide to Writing and Editing Scripts for 7.0 and Later Versions
OL-22479-01
Auto Attendant Script ExampleConfiguring the Auto Attendant Sample Script
Figure 19 Menu Customizer Window: Configured General Tab
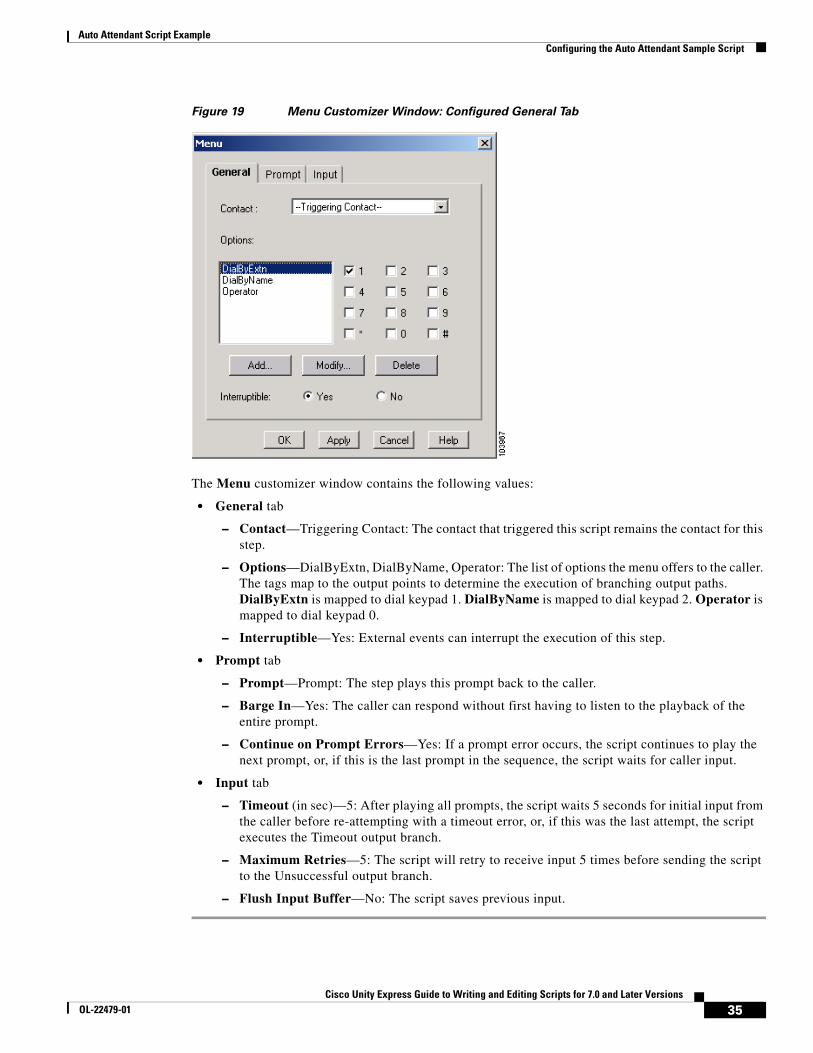
The Menu customizer window contains the following values:
• General tab
– Contact—Triggering Contact: The contact that triggered this script remains the contact for this step.
– Options—DialByExtn, DialByName, Operator: The list of options the menu offers to the caller. The tags map to the output points to determine the execution of branching output paths. DialByExtn is mapped to dial keypad 1. DialByName is mapped to dial keypad 2. Operator is mapped to dial keypad 0.
– Interruptible—Yes: External events can interrupt the execution of this step.
• Prompt tab
– Prompt—Prompt: The step plays this prompt back to the caller.
– Barge In—Yes: The caller can respond without first having to listen to the playback of the entire prompt.
– Continue on Prompt Errors—Yes: If a prompt error occurs, the script continues to play the next prompt, or, if this is the last prompt in the sequence, the script waits for caller input.
• Input tab
– Timeout (in sec)—5: After playing all prompts, the script waits 5 seconds for initial input from the caller before re-attempting with a timeout error, or, if this was the last attempt, the script executes the Timeout output branch.
– Maximum Retries—5: The script will retry to receive input 5 times before sending the script to the Unsuccessful output branch.
– Flush Input Buffer—No: The script saves previous input.
35Cisco Unity Express Guide to Writing and Editing Scripts for 7.0 and Later Versions
OL-22479-01
Auto Attendant Script ExampleConfiguring the Auto Attendant Sample Script
Configuring the Menu Step DialByExtn Output Branches
The Menu step contains two built-in output branches: Timeout and Unsuccessful. The Timeout and Unsuccessful output branches need no scripting. If the script reaches either of these branches, it proceeds to the next step on the same level as the Menu step, the second Play Prompt step (see the “Configuring the Play Prompt Step” section on page 53).
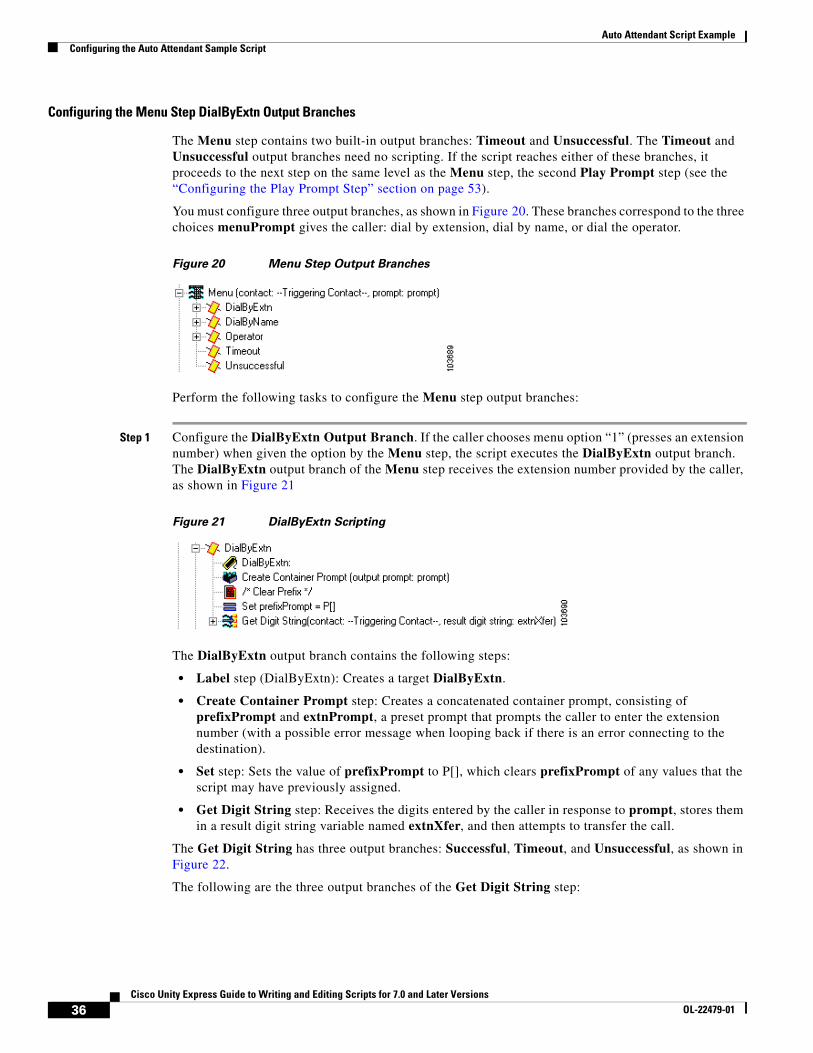
You must configure three output branches, as shown in Figure 20. These branches correspond to the three choices menuPrompt gives the caller: dial by extension, dial by name, or dial the operator.
Figure 20 Menu Step Output Branches
Perform the following tasks to configure the Menu step output branches:
Step 1 Configure the DialByExtn Output Branch. If the caller chooses menu option “1” (presses an extension number) when given the option by the Menu step, the script executes the DialByExtn output branch. The DialByExtn output branch of the Menu step receives the extension number provided by the caller, as shown in Figure 21
Figure 21 DialByExtn Scripting
The DialByExtn output branch contains the following steps:
• Label step (DialByExtn): Creates a target DialByExtn.
• Create Container Prompt step: Creates a concatenated container prompt, consisting of prefixPrompt and extnPrompt, a preset prompt that prompts the caller to enter the extension number (with a possible error message when looping back if there is an error connecting to the destination).
• Set step: Sets the value of prefixPrompt to P[], which clears prefixPrompt of any values that the script may have previously assigned.
• Get Digit String step: Receives the digits entered by the caller in response to prompt, stores them in a result digit string variable named extnXfer, and then attempts to transfer the call.
The Get Digit String has three output branches: Successful, Timeout, and Unsuccessful, as shown in Figure 22.
The following are the three output branches of the Get Digit String step:
36Cisco Unity Express Guide to Writing and Editing Scripts for 7.0 and Later Versions
OL-22479-01
Auto Attendant Script ExampleConfiguring the Auto Attendant Sample Script
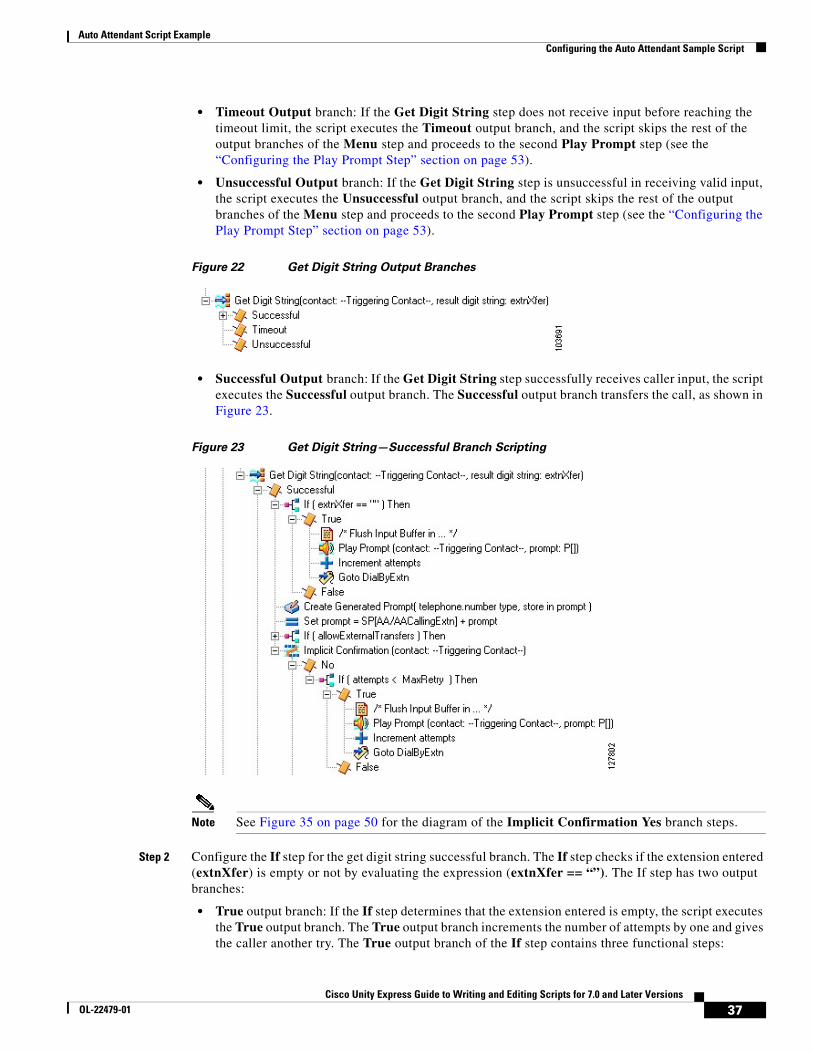
• Timeout Output branch: If the Get Digit String step does not receive input before reaching the timeout limit, the script executes the Timeout output branch, and the script skips the rest of the output branches of the Menu step and proceeds to the second Play Prompt step (see the “Configuring the Play Prompt Step” section on page 53).
• Unsuccessful Output branch: If the Get Digit String step is unsuccessful in receiving valid input, the script executes the Unsuccessful output branch, and the script skips the rest of the output branches of the Menu step and proceeds to the second Play Prompt step (see the “Configuring the Play Prompt Step” section on page 53).
Figure 22 Get Digit String Output Branches
• Successful Output branch: If the Get Digit String step successfully receives caller input, the script executes the Successful output branch. The Successful output branch transfers the call, as shown in Figure 23.
Figure 23 Get Digit String—Successful Branch Scripting
Note See Figure 35 on page 50 for the diagram of the Implicit Confirmation Yes branch steps.
Step 2 Configure the If step for the get digit string successful branch. The If step checks if the extension entered (extnXfer) is empty or not by evaluating the expression (extnXfer == “”). The If step has two output branches:
• True output branch: If the If step determines that the extension entered is empty, the script executes the True output branch. The True output branch increments the number of attempts by one and gives the caller another try. The True output branch of the If step contains three functional steps:
37Cisco Unity Express Guide to Writing and Editing Scripts for 7.0 and Later Versions
OL-22479-01
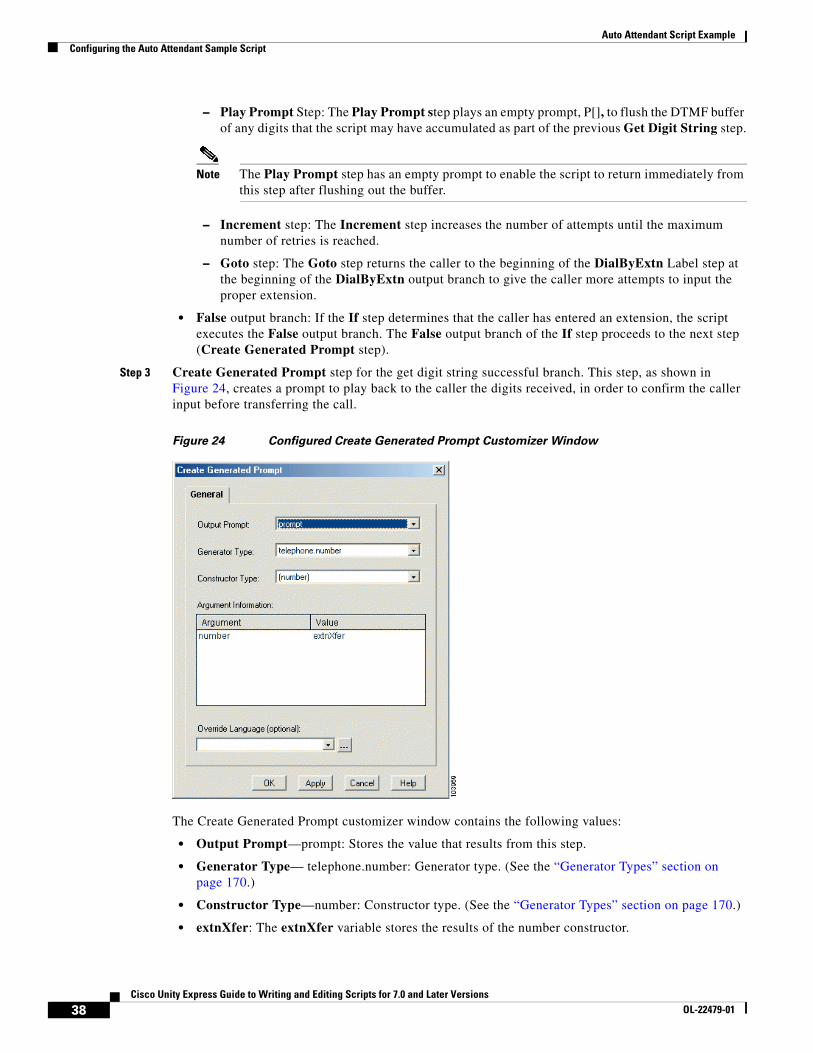
Auto Attendant Script ExampleConfiguring the Auto Attendant Sample Script
– Play Prompt Step: The Play Prompt step plays an empty prompt, P[], to flush the DTMF buffer of any digits that the script may have accumulated as part of the previous Get Digit String step.
Note The Play Prompt step has an empty prompt to enable the script to return immediately from this step after flushing out the buffer.
– Increment step: The Increment step increases the number of attempts until the maximum number of retries is reached.
– Goto step: The Goto step returns the caller to the beginning of the DialByExtn Label step at the beginning of the DialByExtn output branch to give the caller more attempts to input the proper extension.
• False output branch: If the If step determines that the caller has entered an extension, the script executes the False output branch. The False output branch of the If step proceeds to the next step (Create Generated Prompt step).
Step 3 Create Generated Prompt step for the get digit string successful branch. This step, as shown in Figure 24, creates a prompt to play back to the caller the digits received, in order to confirm the caller input before transferring the call.
Figure 24 Configured Create Generated Prompt Customizer Window
The Create Generated Prompt customizer window contains the following values:
• Output Prompt—prompt: Stores the value that results from this step.
• Generator Type— telephone.number: Generator type. (See the “Generator Types” section on page 170.)
• Constructor Type—number: Constructor type. (See the “Generator Types” section on page 170.)
• extnXfer: The extnXfer variable stores the results of the number constructor.
38Cisco Unity Express Guide to Writing and Editing Scripts for 7.0 and Later Versions
OL-22479-01
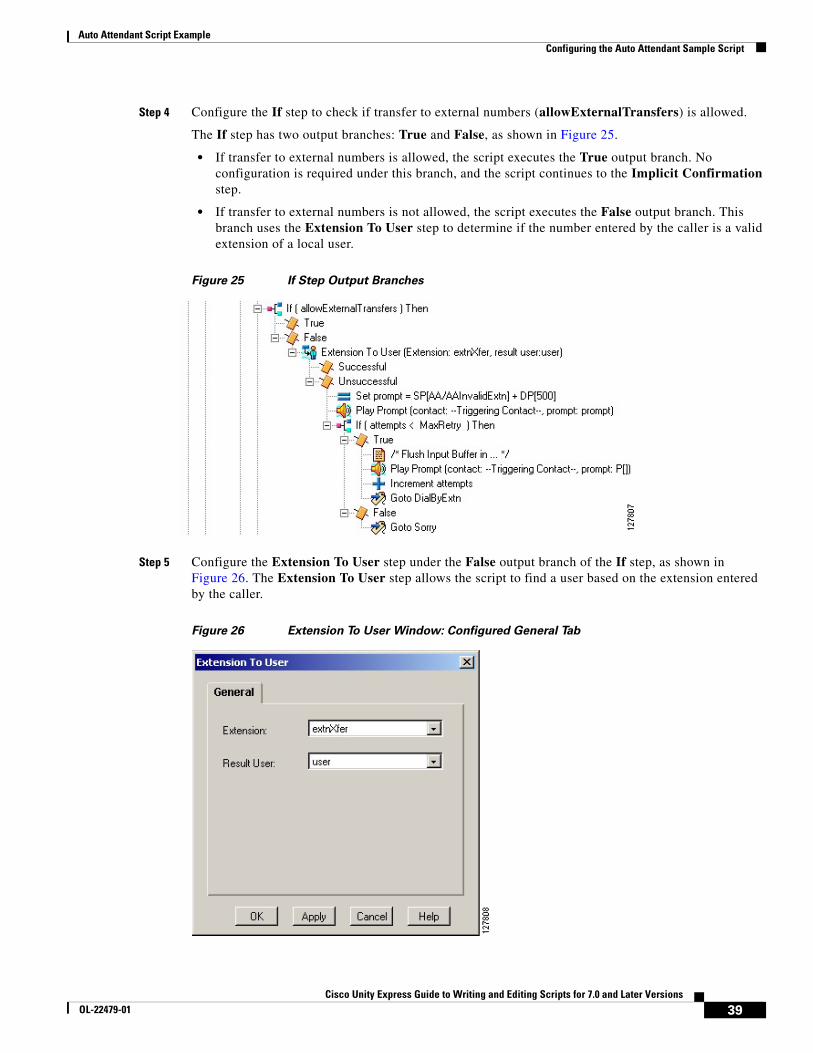
Auto Attendant Script ExampleConfiguring the Auto Attendant Sample Script
Step 4 Configure the If step to check if transfer to external numbers (allowExternalTransfers) is allowed.
The If step has two output branches: True and False, as shown in Figure 25.
• If transfer to external numbers is allowed, the script executes the True output branch. No configuration is required under this branch, and the script continues to the Implicit Confirmation step.
• If transfer to external numbers is not allowed, the script executes the False output branch. This branch uses the Extension To User step to determine if the number entered by the caller is a valid extension of a local user.
Figure 25 If Step Output Branches
Step 5 Configure the Extension To User step under the False output branch of the If step, as shown in Figure 26. The Extension To User step allows the script to find a user based on the extension entered by the caller.
Figure 26 Extension To User Window: Configured General Tab
39Cisco Unity Express Guide to Writing and Editing Scripts for 7.0 and Later Versions
OL-22479-01
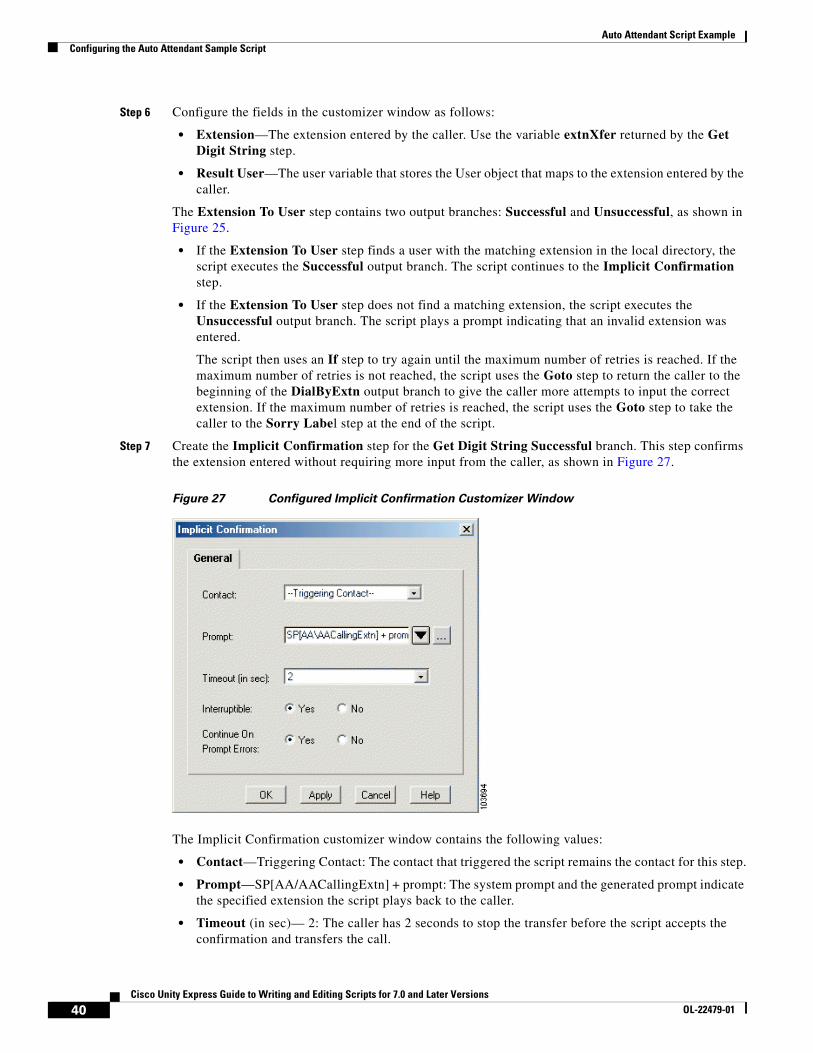
Auto Attendant Script ExampleConfiguring the Auto Attendant Sample Script
Step 6 Configure the fields in the customizer window as follows:
• Extension—The extension entered by the caller. Use the variable extnXfer returned by the Get Digit String step.
• Result User—The user variable that stores the User object that maps to the extension entered by the caller.
The Extension To User step contains two output branches: Successful and Unsuccessful, as shown in Figure 25.
• If the Extension To User step finds a user with the matching extension in the local directory, the script executes the Successful output branch. The script continues to the Implicit Confirmation step.
• If the Extension To User step does not find a matching extension, the script executes the Unsuccessful output branch. The script plays a prompt indicating that an invalid extension was entered.
The script then uses an If step to try again until the maximum number of retries is reached. If the maximum number of retries is not reached, the script uses the Goto step to return the caller to the beginning of the DialByExtn output branch to give the caller more attempts to input the correct extension. If the maximum number of retries is reached, the script uses the Goto step to take the caller to the Sorry Label step at the end of the script.
Step 7 Create the Implicit Confirmation step for the Get Digit String Successful branch. This step confirms the extension entered without requiring more input from the caller, as shown in Figure 27.
Figure 27 Configured Implicit Confirmation Customizer Window
The Implicit Confirmation customizer window contains the following values:
• Contact—Triggering Contact: The contact that triggered the script remains the contact for this step.
• Prompt—SP[AA/AACallingExtn] + prompt: The system prompt and the generated prompt indicate the specified extension the script plays back to the caller.
• Timeout (in sec)— 2: The caller has 2 seconds to stop the transfer before the script accepts the confirmation and transfers the call.
40Cisco Unity Express Guide to Writing and Editing Scripts for 7.0 and Later Versions
OL-22479-01
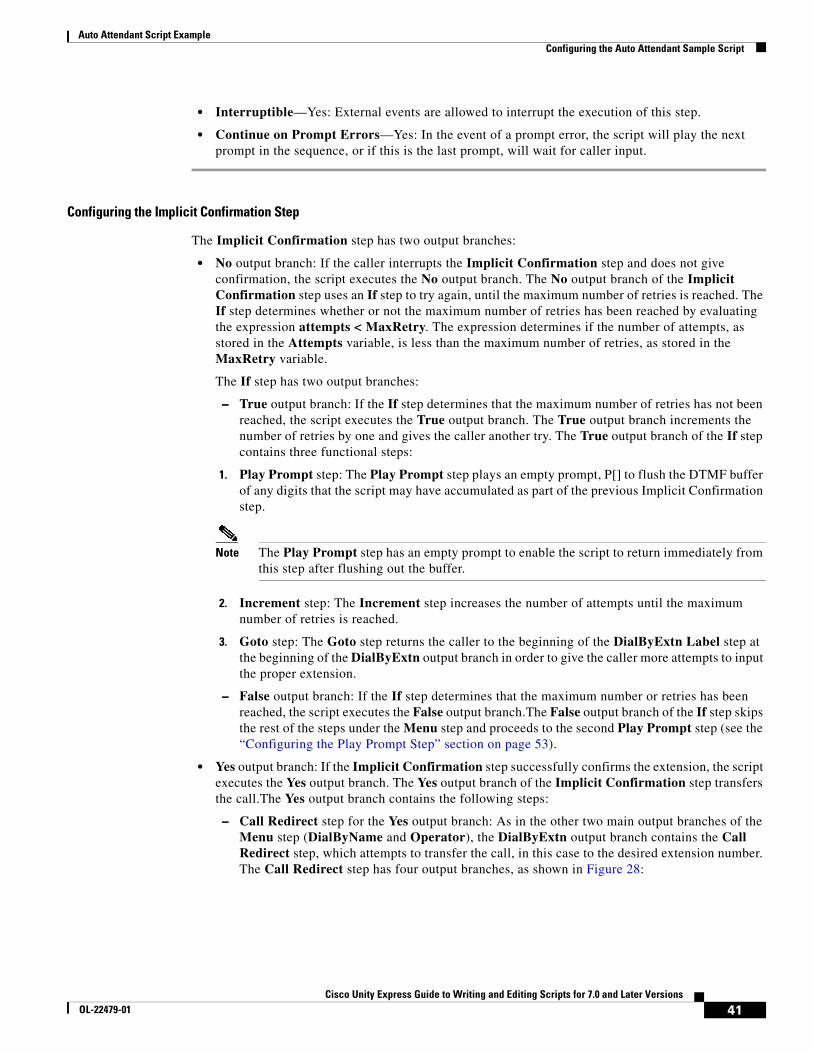
Auto Attendant Script ExampleConfiguring the Auto Attendant Sample Script
• Interruptible—Yes: External events are allowed to interrupt the execution of this step.
• Continue on Prompt Errors—Yes: In the event of a prompt error, the script will play the next prompt in the sequence, or if this is the last prompt, will wait for caller input.
Configuring the Implicit Confirmation Step
The Implicit Confirmation step has two output branches:
• No output branch: If the caller interrupts the Implicit Confirmation step and does not give confirmation, the script executes the No output branch. The No output branch of the Implicit Confirmation step uses an If step to try again, until the maximum number of retries is reached. The If step determines whether or not the maximum number of retries has been reached by evaluating the expression attempts < MaxRetry. The expression determines if the number of attempts, as stored in the Attempts variable, is less than the maximum number of retries, as stored in the MaxRetry variable.
The If step has two output branches:
– True output branch: If the If step determines that the maximum number of retries has not been reached, the script executes the True output branch. The True output branch increments the number of retries by one and gives the caller another try. The True output branch of the If step contains three functional steps:
1. Play Prompt step: The Play Prompt step plays an empty prompt, P[] to flush the DTMF buffer of any digits that the script may have accumulated as part of the previous Implicit Confirmation step.
Note The Play Prompt step has an empty prompt to enable the script to return immediately from this step after flushing out the buffer.
2. Increment step: The Increment step increases the number of attempts until the maximum number of retries is reached.
3. Goto step: The Goto step returns the caller to the beginning of the DialByExtn Label step at the beginning of the DialByExtn output branch in order to give the caller more attempts to input the proper extension.
– False output branch: If the If step determines that the maximum number or retries has been reached, the script executes the False output branch.The False output branch of the If step skips the rest of the steps under the Menu step and proceeds to the second Play Prompt step (see the “Configuring the Play Prompt Step” section on page 53).
• Yes output branch: If the Implicit Confirmation step successfully confirms the extension, the script executes the Yes output branch. The Yes output branch of the Implicit Confirmation step transfers the call.The Yes output branch contains the following steps:
– Call Redirect step for the Yes output branch: As in the other two main output branches of the Menu step (DialByName and Operator), the DialByExtn output branch contains the Call Redirect step, which attempts to transfer the call, in this case to the desired extension number. The Call Redirect step has four output branches, as shown in Figure 28:
41Cisco Unity Express Guide to Writing and Editing Scripts for 7.0 and Later Versions
OL-22479-01
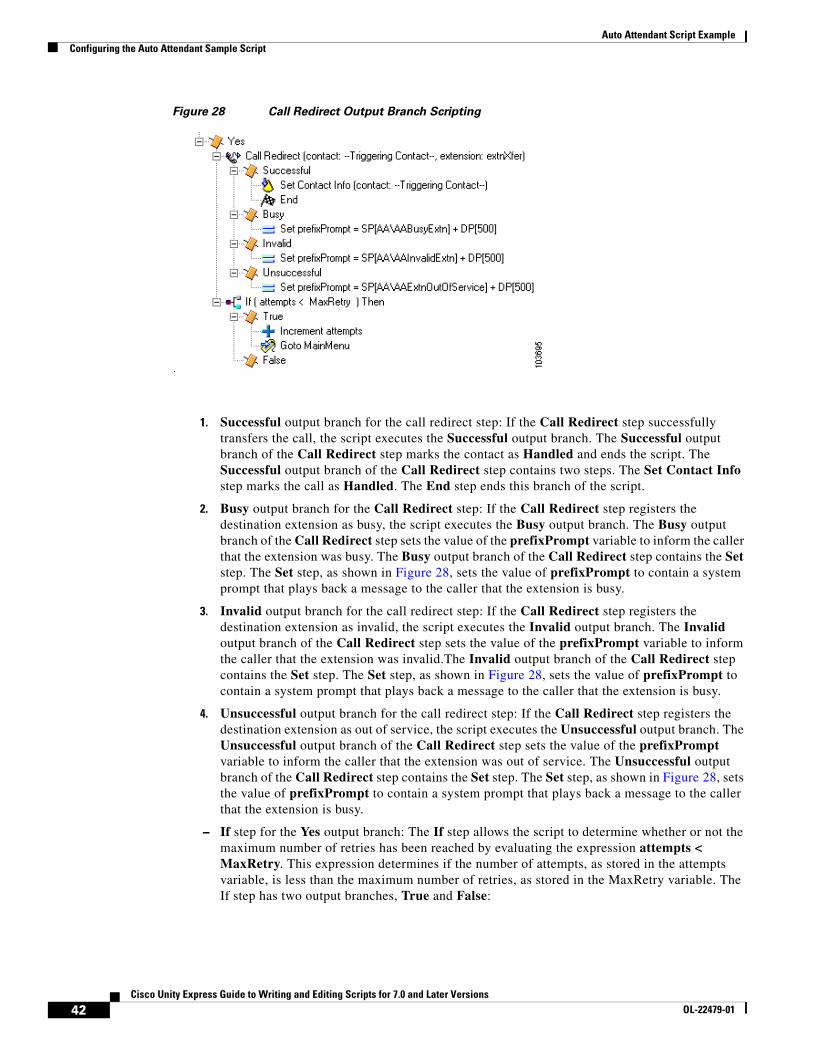
Auto Attendant Script ExampleConfiguring the Auto Attendant Sample Script
Figure 28 Call Redirect Output Branch Scripting
1. Successful output branch for the call redirect step: If the Call Redirect step successfully transfers the call, the script executes the Successful output branch. The Successful output branch of the Call Redirect step marks the contact as Handled and ends the script. The Successful output branch of the Call Redirect step contains two steps. The Set Contact Info step marks the call as Handled. The End step ends this branch of the script.
2. Busy output branch for the Call Redirect step: If the Call Redirect step registers the destination extension as busy, the script executes the Busy output branch. The Busy output branch of the Call Redirect step sets the value of the prefixPrompt variable to inform the caller that the extension was busy. The Busy output branch of the Call Redirect step contains the Set step. The Set step, as shown in Figure 28, sets the value of prefixPrompt to contain a system prompt that plays back a message to the caller that the extension is busy.
3. Invalid output branch for the call redirect step: If the Call Redirect step registers the destination extension as invalid, the script executes the Invalid output branch. The Invalid output branch of the Call Redirect step sets the value of the prefixPrompt variable to inform the caller that the extension was invalid.The Invalid output branch of the Call Redirect step contains the Set step. The Set step, as shown in Figure 28, sets the value of prefixPrompt to contain a system prompt that plays back a message to the caller that the extension is busy.
4. Unsuccessful output branch for the call redirect step: If the Call Redirect step registers the destination extension as out of service, the script executes the Unsuccessful output branch. The Unsuccessful output branch of the Call Redirect step sets the value of the prefixPrompt variable to inform the caller that the extension was out of service. The Unsuccessful output branch of the Call Redirect step contains the Set step. The Set step, as shown in Figure 28, sets the value of prefixPrompt to contain a system prompt that plays back a message to the caller that the extension is busy.
– If step for the Yes output branch: The If step allows the script to determine whether or not the maximum number of retries has been reached by evaluating the expression attempts < MaxRetry. This expression determines if the number of attempts, as stored in the attempts variable, is less than the maximum number of retries, as stored in the MaxRetry variable. The If step has two output branches, True and False:
42Cisco Unity Express Guide to Writing and Editing Scripts for 7.0 and Later Versions
OL-22479-01
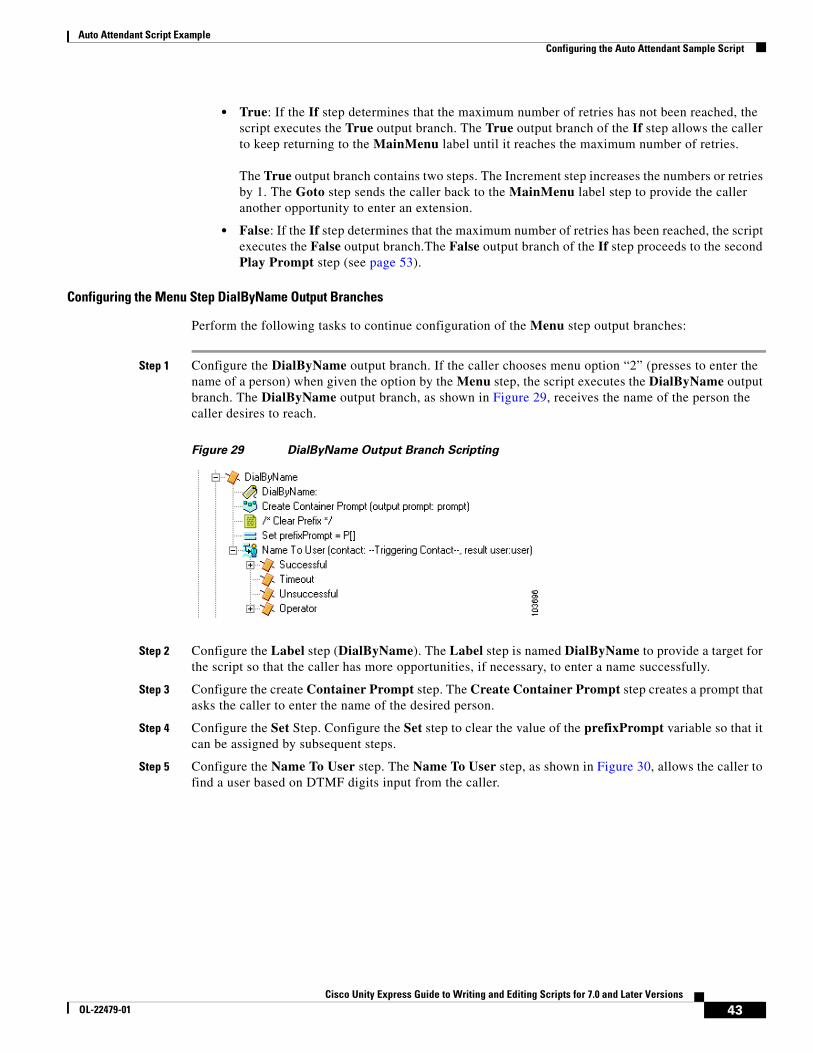
Auto Attendant Script ExampleConfiguring the Auto Attendant Sample Script
• True: If the If step determines that the maximum number of retries has not been reached, the script executes the True output branch. The True output branch of the If step allows the caller to keep returning to the MainMenu label until it reaches the maximum number of retries. The True output branch contains two steps. The Increment step increases the numbers or retries by 1. The Goto step sends the caller back to the MainMenu label step to provide the caller another opportunity to enter an extension.
• False: If the If step determines that the maximum number of retries has been reached, the script executes the False output branch.The False output branch of the If step proceeds to the second Play Prompt step (see page 53).
Configuring the Menu Step DialByName Output Branches
Perform the following tasks to continue configuration of the Menu step output branches:
Step 1 Configure the DialByName output branch. If the caller chooses menu option “2” (presses to enter the name of a person) when given the option by the Menu step, the script executes the DialByName output branch. The DialByName output branch, as shown in Figure 29, receives the name of the person the caller desires to reach.
Figure 29 DialByName Output Branch Scripting
Step 2 Configure the Label step (DialByName). The Label step is named DialByName to provide a target for the script so that the caller has more opportunities, if necessary, to enter a name successfully.
Step 3 Configure the create Container Prompt step. The Create Container Prompt step creates a prompt that asks the caller to enter the name of the desired person.
Step 4 Configure the Set Step. Configure the Set step to clear the value of the prefixPrompt variable so that it can be assigned by subsequent steps.
Step 5 Configure the Name To User step. The Name To User step, as shown in Figure 30, allows the caller to find a user based on DTMF digits input from the caller.
43Cisco Unity Express Guide to Writing and Editing Scripts for 7.0 and Later Versions
OL-22479-01
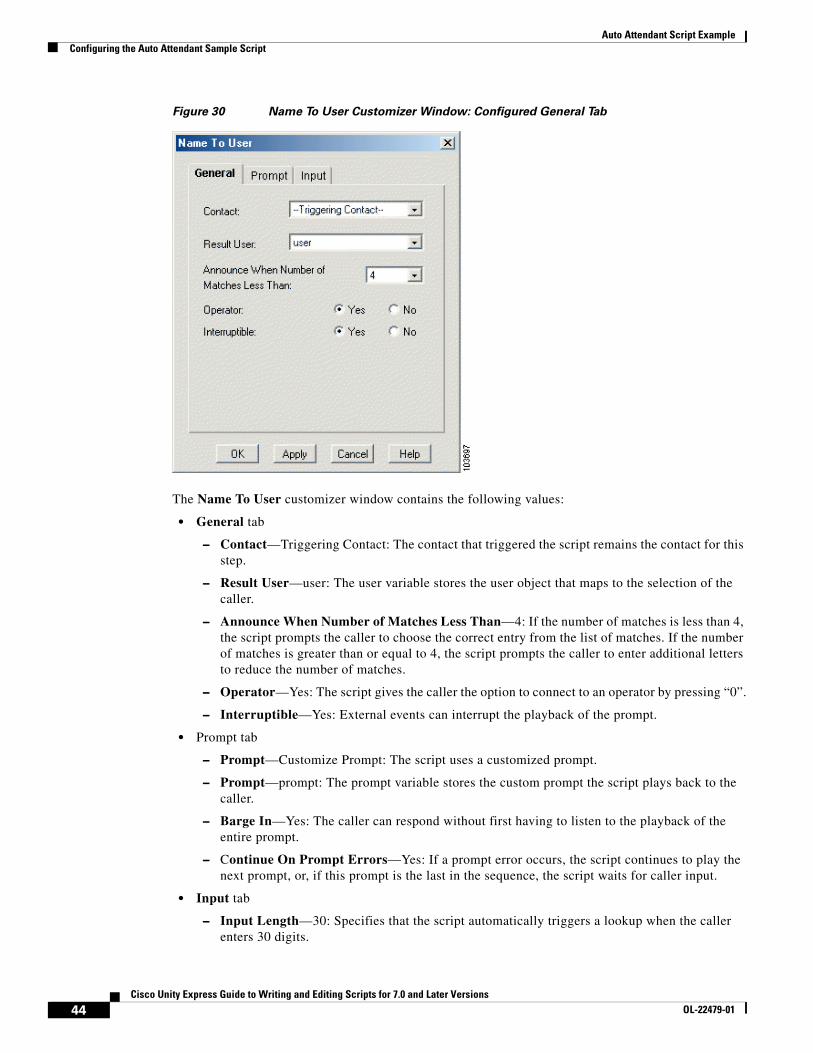
Auto Attendant Script ExampleConfiguring the Auto Attendant Sample Script
Figure 30 Name To User Customizer Window: Configured General Tab
The Name To User customizer window contains the following values:
• General tab
– Contact—Triggering Contact: The contact that triggered the script remains the contact for this step.
– Result User—user: The user variable stores the user object that maps to the selection of the caller.
– Announce When Number of Matches Less Than—4: If the number of matches is less than 4, the script prompts the caller to choose the correct entry from the list of matches. If the number of matches is greater than or equal to 4, the script prompts the caller to enter additional letters to reduce the number of matches.
– Operator—Yes: The script gives the caller the option to connect to an operator by pressing “0”.
– Interruptible—Yes: External events can interrupt the playback of the prompt.
• Prompt tab
– Prompt—Customize Prompt: The script uses a customized prompt.
– Prompt—prompt: The prompt variable stores the custom prompt the script plays back to the caller.
– Barge In—Yes: The caller can respond without first having to listen to the playback of the entire prompt.
– Continue On Prompt Errors—Yes: If a prompt error occurs, the script continues to play the next prompt, or, if this prompt is the last in the sequence, the script waits for caller input.
• Input tab
– Input Length—30: Specifies that the script automatically triggers a lookup when the caller enters 30 digits.
44Cisco Unity Express Guide to Writing and Editing Scripts for 7.0 and Later Versions
OL-22479-01
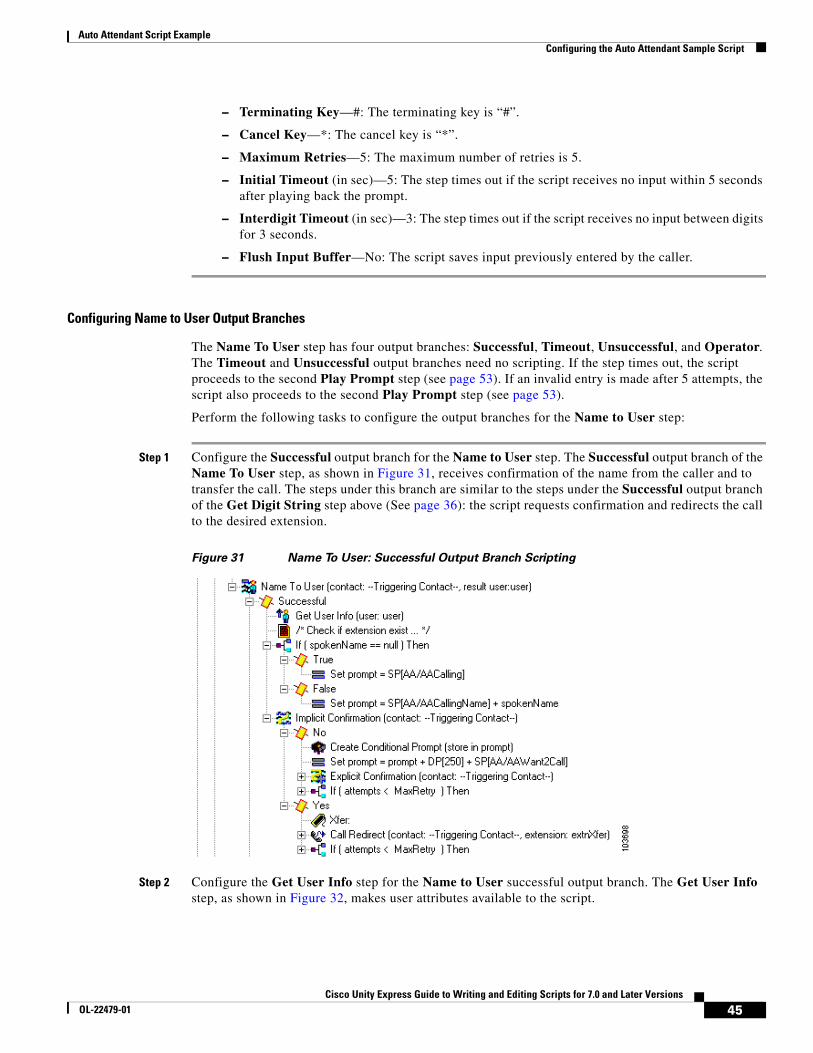
Auto Attendant Script ExampleConfiguring the Auto Attendant Sample Script
– Terminating Key—#: The terminating key is “#”.
– Cancel Key—*: The cancel key is “*”.
– Maximum Retries—5: The maximum number of retries is 5.
– Initial Timeout (in sec)—5: The step times out if the script receives no input within 5 seconds after playing back the prompt.
– Interdigit Timeout (in sec)—3: The step times out if the script receives no input between digits for 3 seconds.
– Flush Input Buffer—No: The script saves input previously entered by the caller.
Configuring Name to User Output Branches
The Name To User step has four output branches: Successful, Timeout, Unsuccessful, and Operator. The Timeout and Unsuccessful output branches need no scripting. If the step times out, the script proceeds to the second Play Prompt step (see page 53). If an invalid entry is made after 5 attempts, the script also proceeds to the second Play Prompt step (see page 53).
Perform the following tasks to configure the output branches for the Name to User step:
Step 1 Configure the Successful output branch for the Name to User step. The Successful output branch of the Name To User step, as shown in Figure 31, receives confirmation of the name from the caller and to transfer the call. The steps under this branch are similar to the steps under the Successful output branch of the Get Digit String step above (See page 36): the script requests confirmation and redirects the call to the desired extension.
Figure 31 Name To User: Successful Output Branch Scripting
Step 2 Configure the Get User Info step for the Name to User successful output branch. The Get User Info step, as shown in Figure 32, makes user attributes available to the script.
45Cisco Unity Express Guide to Writing and Editing Scripts for 7.0 and Later Versions
OL-22479-01
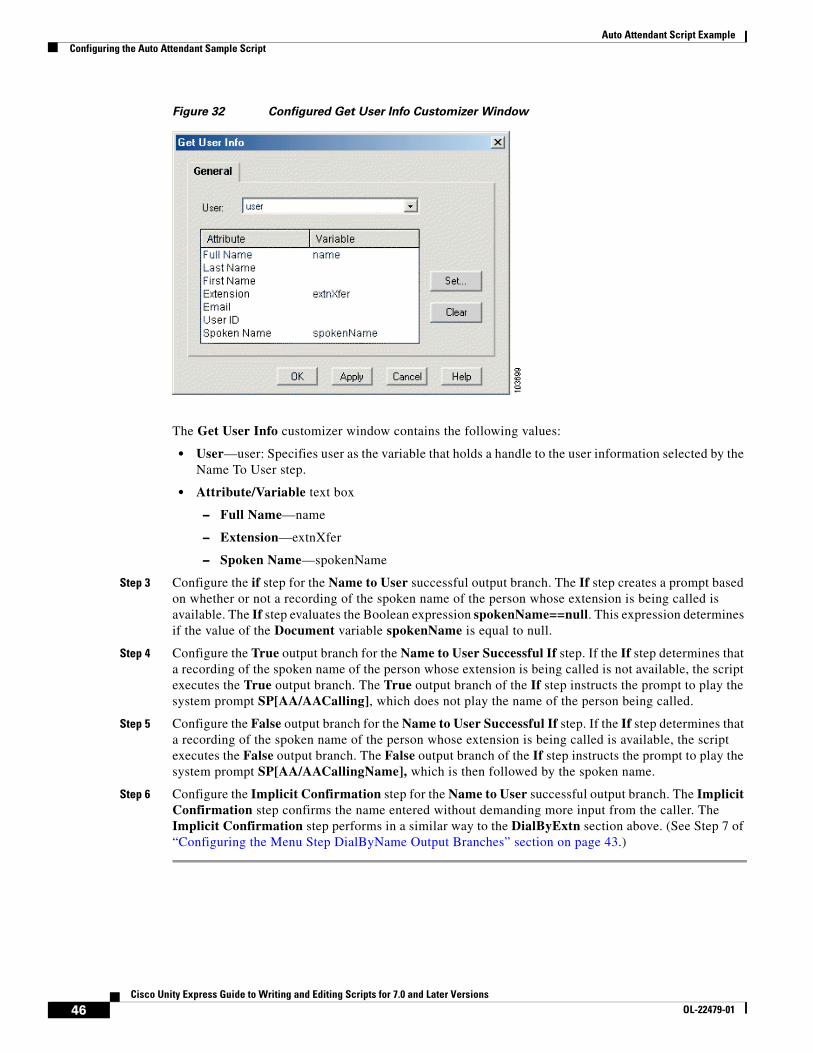
Auto Attendant Script ExampleConfiguring the Auto Attendant Sample Script
Figure 32 Configured Get User Info Customizer Window
The Get User Info customizer window contains the following values:
• User—user: Specifies user as the variable that holds a handle to the user information selected by the Name To User step.
• Attribute/Variable text box
– Full Name—name
– Extension—extnXfer
– Spoken Name—spokenName
Step 3 Configure the if step for the Name to User successful output branch. The If step creates a prompt based on whether or not a recording of the spoken name of the person whose extension is being called is available. The If step evaluates the Boolean expression spokenName==null. This expression determines if the value of the Document variable spokenName is equal to null.
Step 4 Configure the True output branch for the Name to User Successful If step. If the If step determines that a recording of the spoken name of the person whose extension is being called is not available, the script executes the True output branch. The True output branch of the If step instructs the prompt to play the system prompt SP[AA/AACalling], which does not play the name of the person being called.
Step 5 Configure the False output branch for the Name to User Successful If step. If the If step determines that a recording of the spoken name of the person whose extension is being called is available, the script executes the False output branch. The False output branch of the If step instructs the prompt to play the system prompt SP[AA/AACallingName], which is then followed by the spoken name.
Step 6 Configure the Implicit Confirmation step for the Name to User successful output branch. The Implicit Confirmation step confirms the name entered without demanding more input from the caller. The Implicit Confirmation step performs in a similar way to the DialByExtn section above. (See Step 7 of “Configuring the Menu Step DialByName Output Branches” section on page 43.)
46Cisco Unity Express Guide to Writing and Editing Scripts for 7.0 and Later Versions
OL-22479-01
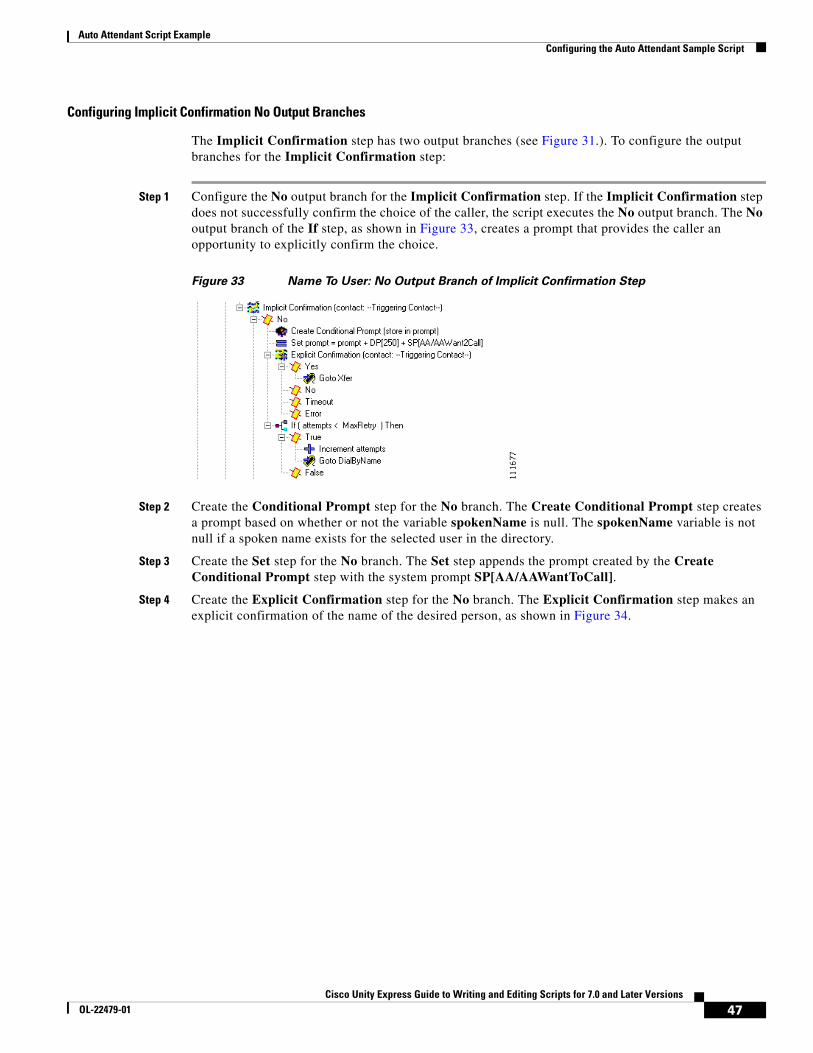
Auto Attendant Script ExampleConfiguring the Auto Attendant Sample Script
Configuring Implicit Confirmation No Output Branches
The Implicit Confirmation step has two output branches (see Figure 31.). To configure the output branches for the Implicit Confirmation step:
Step 1 Configure the No output branch for the Implicit Confirmation step. If the Implicit Confirmation step does not successfully confirm the choice of the caller, the script executes the No output branch. The No output branch of the If step, as shown in Figure 33, creates a prompt that provides the caller an opportunity to explicitly confirm the choice.
Figure 33 Name To User: No Output Branch of Implicit Confirmation Step
Step 2 Create the Conditional Prompt step for the No branch. The Create Conditional Prompt step creates a prompt based on whether or not the variable spokenName is null. The spokenName variable is not null if a spoken name exists for the selected user in the directory.
Step 3 Create the Set step for the No branch. The Set step appends the prompt created by the Create Conditional Prompt step with the system prompt SP[AA/AAWantToCall].
Step 4 Create the Explicit Confirmation step for the No branch. The Explicit Confirmation step makes an explicit confirmation of the name of the desired person, as shown in Figure 34.
47Cisco Unity Express Guide to Writing and Editing Scripts for 7.0 and Later Versions
OL-22479-01
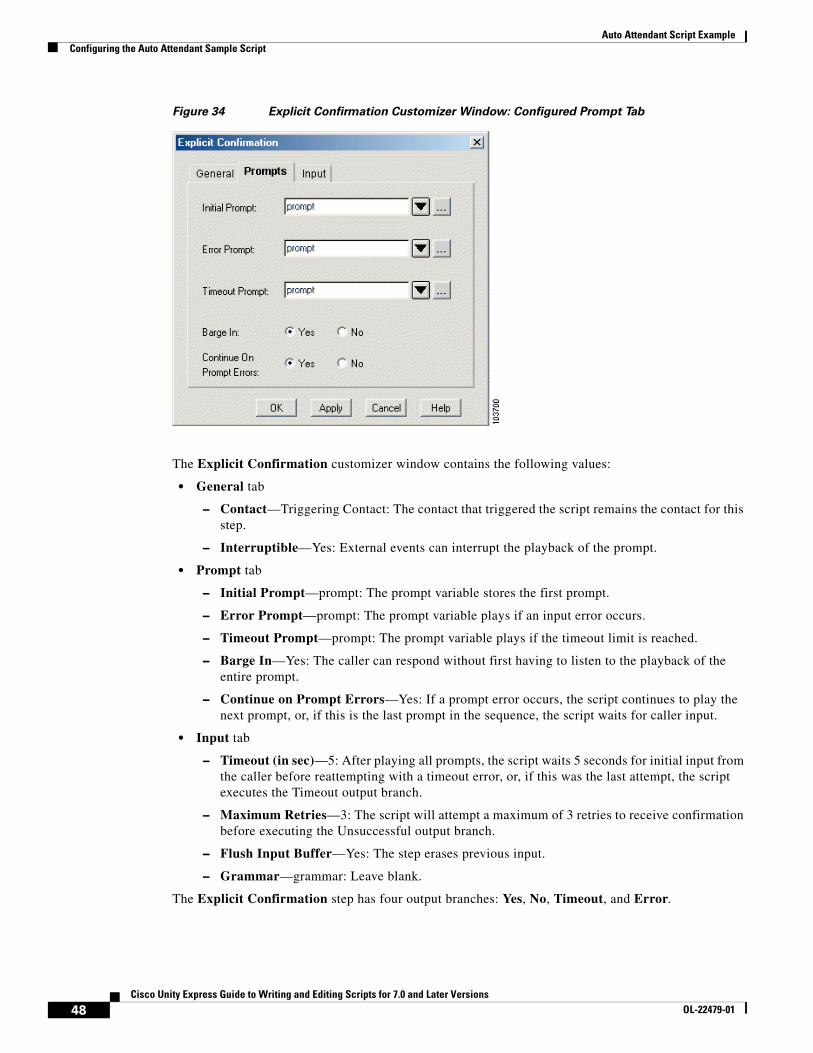
Auto Attendant Script ExampleConfiguring the Auto Attendant Sample Script
Figure 34 Explicit Confirmation Customizer Window: Configured Prompt Tab
The Explicit Confirmation customizer window contains the following values:
• General tab
– Contact—Triggering Contact: The contact that triggered the script remains the contact for this step.
– Interruptible—Yes: External events can interrupt the playback of the prompt.
• Prompt tab
– Initial Prompt—prompt: The prompt variable stores the first prompt.
– Error Prompt—prompt: The prompt variable plays if an input error occurs.
– Timeout Prompt—prompt: The prompt variable plays if the timeout limit is reached.
– Barge In—Yes: The caller can respond without first having to listen to the playback of the entire prompt.
– Continue on Prompt Errors—Yes: If a prompt error occurs, the script continues to play the next prompt, or, if this is the last prompt in the sequence, the script waits for caller input.
• Input tab
– Timeout (in sec)—5: After playing all prompts, the script waits 5 seconds for initial input from the caller before reattempting with a timeout error, or, if this was the last attempt, the script executes the Timeout output branch.
– Maximum Retries—3: The script will attempt a maximum of 3 retries to receive confirmation before executing the Unsuccessful output branch.
– Flush Input Buffer—Yes: The step erases previous input.
– Grammar—grammar: Leave blank.
The Explicit Confirmation step has four output branches: Yes, No, Timeout, and Error.
48Cisco Unity Express Guide to Writing and Editing Scripts for 7.0 and Later Versions
OL-22479-01
Auto Attendant Script ExampleConfiguring the Auto Attendant Sample Script
Step 5 Configure the Yes output branch for the Explicit Confirmation step. If the Explicit Confirmation step successfully receives confirmation from the caller, the script executes the Yes output branch. The Yes output branch of the Explicit Confirmation step directs the script to the Xfer Label step under the Yes output branch of the Implicit Confirmation step (see Step 1), which contains the steps necessary to redirect the call to the desired extension.
Step 6 Configure the No output branch for the Explicit Confirmation step. The No output branch contains the If Step. The If step determines whether or not the maximum number of retries has been reached by evaluating the expression attempts < MaxRetry. This expression determines if the number of attempts (as stored by the attempts variable) is less than the maximum retries value stored in the MaxRetry variable. If the If step determines that the maximum number of retries has not been reached, the script executes the True output branch. The True output branch of the If step provides the caller with another opportunity to enter the name of the desired person.
Step 7 Configure the Increment step of the True output branch. The Increment step increases the value of the attempts variable by 1.
Step 8 Configure the Goto step of the True output branch. The Goto step returns the caller to the beginning of the DialByName Label step at the beginning of the DialByName output branch in order to give the caller more attempts to input the proper name.
As stated in Step 6, the If step for the No output branch determines if the maximum number of retries has not been reached. If the number has been reached, the script executes the False output branch. The script proceeds to the second Play Prompt step (see the “Configuring the Play Prompt Step” section on page 53).
Configuring Implicit Confirmation Step First If Yes Output Branches
After completing configuration for the No output branch of the Implicit Confirmation step, you must configure the Yes output branch. The Yes output branch of the Implicit Confirmation step redirects the call to the desired extension, as shown in Figure 35.
49Cisco Unity Express Guide to Writing and Editing Scripts for 7.0 and Later Versions
OL-22479-01

Auto Attendant Script ExampleConfiguring the Auto Attendant Sample Script
Figure 35 Name To User: Yes Output Branch of Implicit Confirmation Step
To configure the Yes output branch of the Implicit Confirmation step, perform the following tasks:
Step 1 Create a Label step for the Implicit Confirmation Yes branch. The Label step has the value Xfer that provides a target for the Yes output branch of the Explicit Confirmation Step 5.
Step 2 Create the first If step for the Implicit Confirmation Yes branch. The first If step directs the script based on whether or not the desired extension exists by evaluating the expression extnXfer!= null. The expression determines if the value of the extnXfer variable (which stores the extension number) is not null.
Step 3 Configure the False output branch for the first If step. If the If step finds no extension for the selected user, the script executes the False output branch, which has one step, the Set step. The Set step sets the value of a prompt that will be played back to inform the caller that the extension was invalid.
Step 4 Configure the True output branch for the first If step. If the If step evaluates the desired extension as valid, the script executes the True output branch. The True output branch of the If step transfers the call using the Call Redirect step.
Configuring the Call Redirect Step
As in the other two main output branches of the Menu step (DialByExtn and Operator), the DialByName output branch contains the Call Redirect step, which attempts to transfer the call, in this case to the desired extension number. To configure the Call Redirect step, perform the following tasks:
Step 1 Configure the Successful output branch for the Call Redirect step. The Successful output branch of the Call Redirect step uses the Set Contact Info step to mark the contact as Handled and the End step to end the script.
50Cisco Unity Express Guide to Writing and Editing Scripts for 7.0 and Later Versions
OL-22479-01
Auto Attendant Script ExampleConfiguring the Auto Attendant Sample Script
Step 2 Configure the Busy output branch for the Call Redirect step. The Busy output branch of the Call Redirect step uses the Set step to set the value of the prefixPrompt variable to contain a system prompt that will play back a message to the caller that the extension is busy when the script proceeds to the final Play Prompt step (see the “Configuring the Play Prompt Step” section on page 54).
Step 3 Configure the Invalid output branch for the Call Redirect step. If the Call Redirect step registers the destination extension as invalid, the script executes the Invalid output branch. The Invalid output branch of the Call Redirect step uses the Set step to set the value of the prefixPrompt variable to contain a system prompt that will play back a message to the caller that the extension is invalid when the script proceeds to the final Play Prompt step (see the “Configuring the Play Prompt Step” section on page 54).
Step 4 Configure the Unsuccessful output branch for the Call Redirect step. If the Call Redirect step registers the destination extension as out of service, the script executes the Unsuccessful output branch. The Unsuccessful output branch of the Call Redirect step uses the Set step to set the value of the prefixPrompt variable to contain a system prompt that will play back a message to the caller that the extension is out of service when the script proceeds to the final Play Prompt step (see the “Configuring the Play Prompt Step” section on page 54).
Configuring Implicit Confirmation Step Second If Yes Output Branches
After configuring the first If Step for the Yes output branch of the Implicit Confirmation step, you need to configure the second If step. Perform the following tasks:
Step 1 Create the second If step for the Implicit Confirmation Yes branch. The second If step directs the script based on whether or not the maximum number of retries has been reached by evaluating the expression attempts < MaxRetry. The expression determines if the number of attempts, as stored in the attempts variable, is less than the maximum number of retries allowed, as stored in the MaxRetry variable.
Step 2 Configure the False output branch for the If step. If the second If step finds that the maximum number of retries has been reached, the script executes the False output branch, and the script proceeds to the final Play Prompt step (see the “Configuring the Play Prompt Step” section on page 54).
Step 3 Configure the True output branch for the If step. If the If step finds that the maximum number of retries has not been reached, the script executes the True output branch. The True output branch of the If step provides more opportunities for the caller to successfully enter a name. The Increment step increases the value of the attempts variable by 1. The Goto step returns the caller to the beginning of the DialByName Label step at the beginning of the DialByName output branch of the Get Digit String step to give the caller more attempts to input the proper extension.
Configuring the Name to User Step Operator Output Branch
To complete configuration of the output branches for the Name to User step, configure the Operator Output Branch for the Name to User Step. If the Name to User step receives caller input for transfer to the operator, the script executes the Operator output branch.The output branch transfers the call to an operator, as shown in Figure 36.
51Cisco Unity Express Guide to Writing and Editing Scripts for 7.0 and Later Versions
OL-22479-01

Auto Attendant Script ExampleConfiguring the Auto Attendant Sample Script
Figure 36 Name to User: Operator Output Branch
The Operator output branch uses the Goto step. to send the caller to the Operator output branch of the Menu step. If the caller chooses menu option “3” to speak to an operator when given the option by the Menu step, the script executes the Operator output branch.
The Operator output branch transfers the call to an operator, as shown in Figure 37.
Figure 37 Menu: Operator Output Branch
To configure the Operator output branch, perform the following tasks:
Step 1 Create the Label step (Xfer Operator) for the Operator branch. The Label step has the value Xfer Operator that provides a target for the Goto step.
Step 2 Create the Call Redirect step for the Operator branch. As in the other two main output branches of the Menu step (DialByExtn and DialByName), the Operator output branch contains the Call Redirect step, which attempts to transfer the call, in this case to the operator.
Step 3 Configure the Successful output branch for the Call Redirect step. The Successful output branch of the Call Redirect step uses the Set Contact Info step to mark the contact as Handled and the End step to end the script.
Step 4 Configure the Busy output branch for the Call Redirect step. The Busy output branch of the Call Redirect step uses the Set step to set the value of the prefixPrompt variable to contain a system prompt that will play back a message to the caller that the extension is busy when the script proceeds to the final Play Prompt step (see the “Configuring the Play Prompt Step” section on page 54).
Step 5 Configure the Invalid Output branch for the Call Redirect step. If the Call Redirect step registers the destination extension as invalid, the script executes the Invalid output branch. The Invalid output branch of the Call Redirect step uses the Set step to set the value of the prefixPrompt variable. This variable
52Cisco Unity Express Guide to Writing and Editing Scripts for 7.0 and Later Versions
OL-22479-01
Auto Attendant Script ExampleConfiguring the Auto Attendant Sample Script
contains a system prompt that plays back a message to the caller that the extension is invalid when the script proceeds to the final Play Prompt step (see the “Configuring the Play Prompt Step” section on page 54).
Step 6 Configure the Unsuccessful output branch for the Call Redirect step. If the Call Redirect step registers the destination extension as out of service, the script executes the Unsuccessful output branch. The Unsuccessful output branch of the Call Redirect step uses the Set step to set the value of the prefixPrompt variable to contain a system prompt that will play back a message to the caller that the extension is out of service when the script proceeds to the final Play Prompt step (see the “Configuring the Play Prompt Step” section on page 54).
Step 7 Configure the If step for the operator branch. The If step allows the script to determine whether or not the maximum number of retries has been reached by evaluating the expression attempts < MaxRetry. The expression determines if the number of attempts, as stored in the attempts variable, is less than the maximum number of retries, as stored in the MaxRetry variable.
Step 8 Configure the True output branch for the Operator branch If step. If the If step determines that the maximum number of retries has not been reached, the script executes the True output branch. The True output branch of the If step allows the caller to keep returning to the MainMenu label until the system reaches the maximum number of retries.The Increment step increases the value of the attempts variable by 1. The Goto step sends the script back to the MainMenu label.
Step 9 Configure the False output branch for the Operator branch If step. If the If step determines that the maximum number of retries has been reached, the script executes the False output branch. The False output branch of the If step proceeds to the next step at the same level in the script as the Menu step, which is the Play Prompt step. (See Figure 9 on page 26.)
Configuring the Play Prompt Step
If none of the steps and branches under the Menu step succeed in transferring the call, the script proceeds to the Play Prompt step. The Play Prompt step, as shown in Figure 38, plays (as a last resort) a prompt informing the caller of the inability to transfer the call. The Play Prompt step plays prefixPrompt + SP[AA/AASorry], which informs the caller of the reason that the attempted transfer was unsuccessful.
53Cisco Unity Express Guide to Writing and Editing Scripts for 7.0 and Later Versions
OL-22479-01
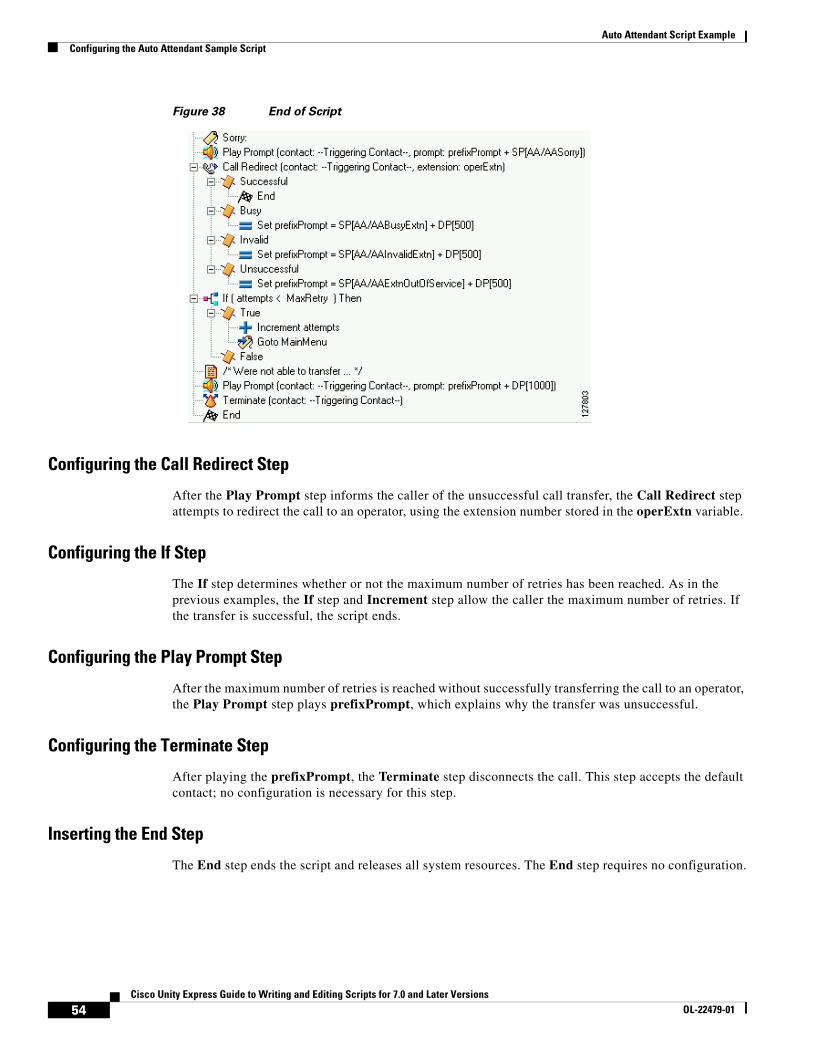
Auto Attendant Script ExampleConfiguring the Auto Attendant Sample Script
Figure 38 End of Script
Configuring the Call Redirect Step
After the Play Prompt step informs the caller of the unsuccessful call transfer, the Call Redirect step attempts to redirect the call to an operator, using the extension number stored in the operExtn variable.
Configuring the If Step
The If step determines whether or not the maximum number of retries has been reached. As in the previous examples, the If step and Increment step allow the caller the maximum number of retries. If the transfer is successful, the script ends.
Configuring the Play Prompt Step
After the maximum number of retries is reached without successfully transferring the call to an operator, the Play Prompt step plays prefixPrompt, which explains why the transfer was unsuccessful.
Configuring the Terminate Step
After playing the prefixPrompt, the Terminate step disconnects the call. This step accepts the default contact; no configuration is necessary for this step.
Inserting the End Step
The End step ends the script and releases all system resources. The End step requires no configuration.
54Cisco Unity Express Guide to Writing and Editing Scripts for 7.0 and Later Versions
OL-22479-01
Using Cisco Unified CME Night Service with Cisco Unity Express Script Example
Last Updated: April 27, 2010
This chapter describes the configuration steps and scripting required to allow a Cisco Unity Express (CUE) Auto Attendant (AA) script to determine whether the Cisco Unified Communications Manager Express (Cisco Unified CME) is operating in night service mode or not.
This chapter contains the following sections:
• Overview, page 55
• Integrating Cisco Unity Express with Cisco Unified CME Night Service, page 56
OverviewTraditional Cisco Unity Express scripts use holidays and business hour schedules defined on Cisco Unity Express itself to alter the script’s call flow. The method defined in this chapter enables the scripts to take note of the Cisco Unified CME night service setting and alter the call-flow. If the night service mode is man-ually activated or deactivated on Cisco Unified CME, the Cisco Unity Express AA script can automatically react to it when it handles the next incoming call.
Components UsedThe components for this sample configuration require the following:
• Cisco Unity Express version 2.3 or later
• Cisco Unified CME version 3.3 or later
• Cisco Unity Express Editor on the Microsoft Windows PC.
Note All sample configurations and screen output in this chapter are taken from Cisco Unity Express 8.0.1 and Cisco Unified Communications Manager Express 7.1.
The information in this document was created from the devices in a specific lab environment. All of the devices used in this document started with a cleared (default) configuration. If your network is live, make sure that you understand the potential impact of any command.
55Cisco Unity Express Guide to Writing and Editing Scripts for 7.0 and Later Versions
OL-22479-01
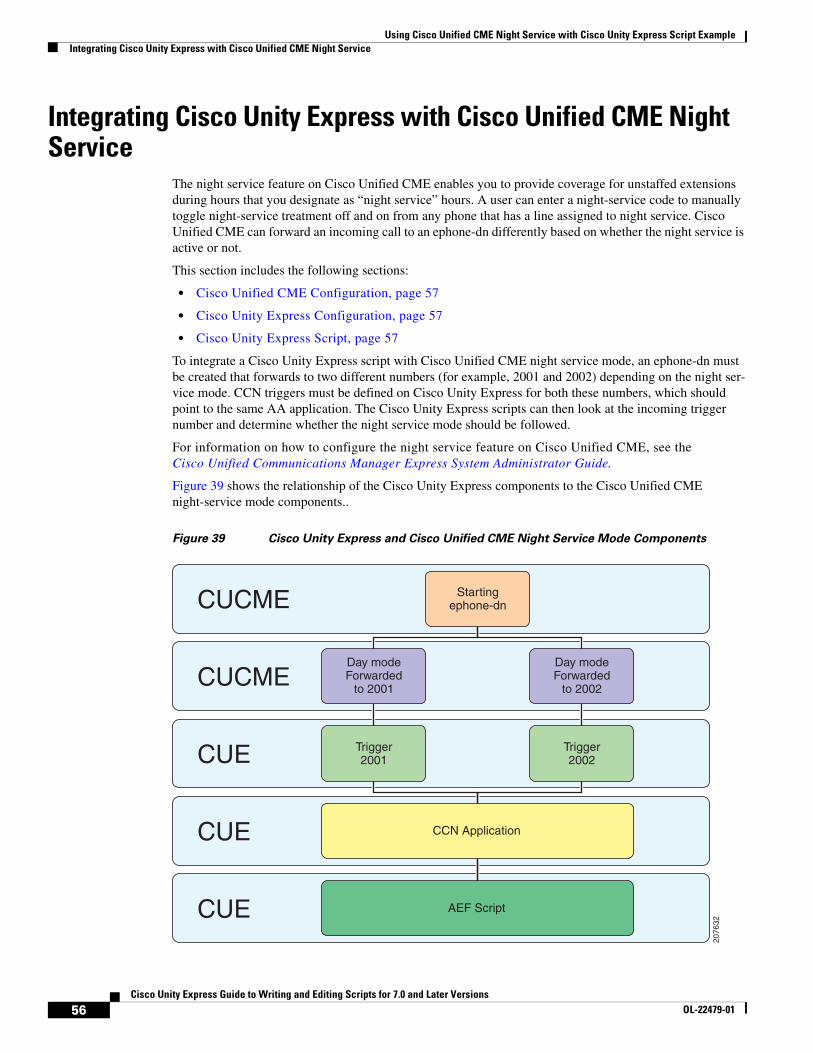
Using Cisco Unified CME Night Service with Cisco Unity Express Script ExampleIntegrating Cisco Unity Express with Cisco Unified CME Night Service
Integrating Cisco Unity Express with Cisco Unified CME Night Service
The night service feature on Cisco Unified CME enables you to provide coverage for unstaffed extensions during hours that you designate as “night service” hours. A user can enter a night-service code to manually toggle night-service treatment off and on from any phone that has a line assigned to night service. Cisco Unified CME can forward an incoming call to an ephone-dn differently based on whether the night service is active or not.
This section includes the following sections:
• Cisco Unified CME Configuration, page 57
• Cisco Unity Express Configuration, page 57
• Cisco Unity Express Script, page 57
To integrate a Cisco Unity Express script with Cisco Unified CME night service mode, an ephone-dn must be created that forwards to two different numbers (for example, 2001 and 2002) depending on the night ser-vice mode. CCN triggers must be defined on Cisco Unity Express for both these numbers, which should point to the same AA application. The Cisco Unity Express scripts can then look at the incoming trigger number and determine whether the night service mode should be followed.
For information on how to configure the night service feature on Cisco Unified CME, see the Cisco Unified Communications Manager Express System Administrator Guide.
Figure 39 shows the relationship of the Cisco Unity Express components to the Cisco Unified CME night-service mode components..
Figure 39 Cisco Unity Express and Cisco Unified CME Night Service Mode Components
2076
32
Startingephone-dn
Day modeForwarded
to 2001
Day modeForwarded
to 2002
Trigger2001
Trigger2002
CCN Application
AEF Script
CUCME
CUCME
CUE
CUE
CUE
56Cisco Unity Express Guide to Writing and Editing Scripts for 7.0 and Later Versions
OL-22479-01
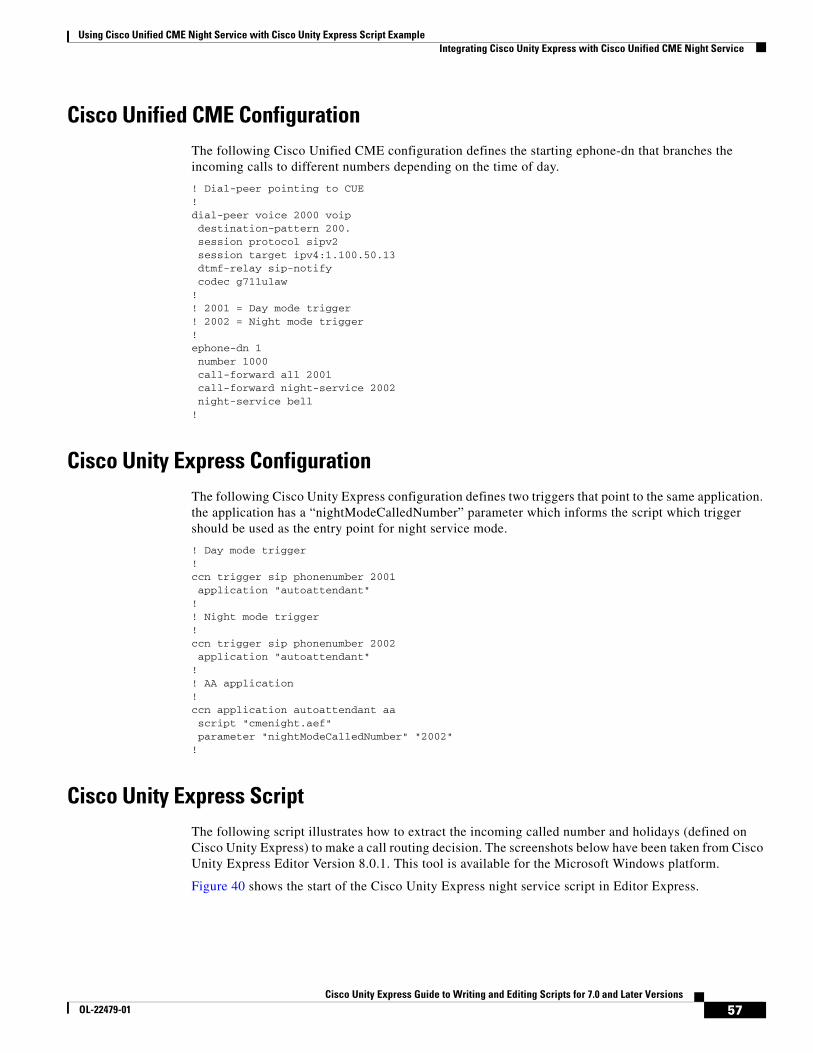
Using Cisco Unified CME Night Service with Cisco Unity Express Script ExampleIntegrating Cisco Unity Express with Cisco Unified CME Night Service
Cisco Unified CME ConfigurationThe following Cisco Unified CME configuration defines the starting ephone-dn that branches the incoming calls to different numbers depending on the time of day.
! Dial-peer pointing to CUE!dial-peer voice 2000 voip destination-pattern 200. session protocol sipv2 session target ipv4:1.100.50.13 dtmf-relay sip-notify codec g711ulaw!! 2001 = Day mode trigger! 2002 = Night mode trigger!ephone-dn 1 number 1000 call-forward all 2001 call-forward night-service 2002 night-service bell!
Cisco Unity Express ConfigurationThe following Cisco Unity Express configuration defines two triggers that point to the same application. the application has a “nightModeCalledNumber” parameter which informs the script which trigger should be used as the entry point for night service mode.
! Day mode trigger!ccn trigger sip phonenumber 2001 application "autoattendant"!! Night mode trigger!ccn trigger sip phonenumber 2002 application "autoattendant"!! AA application!ccn application autoattendant aa script "cmenight.aef" parameter "nightModeCalledNumber" "2002"!
Cisco Unity Express ScriptThe following script illustrates how to extract the incoming called number and holidays (defined on Cisco Unity Express) to make a call routing decision. The screenshots below have been taken from Cisco Unity Express Editor Version 8.0.1. This tool is available for the Microsoft Windows platform.
Figure 40 shows the start of the Cisco Unity Express night service script in Editor Express.
57Cisco Unity Express Guide to Writing and Editing Scripts for 7.0 and Later Versions
OL-22479-01
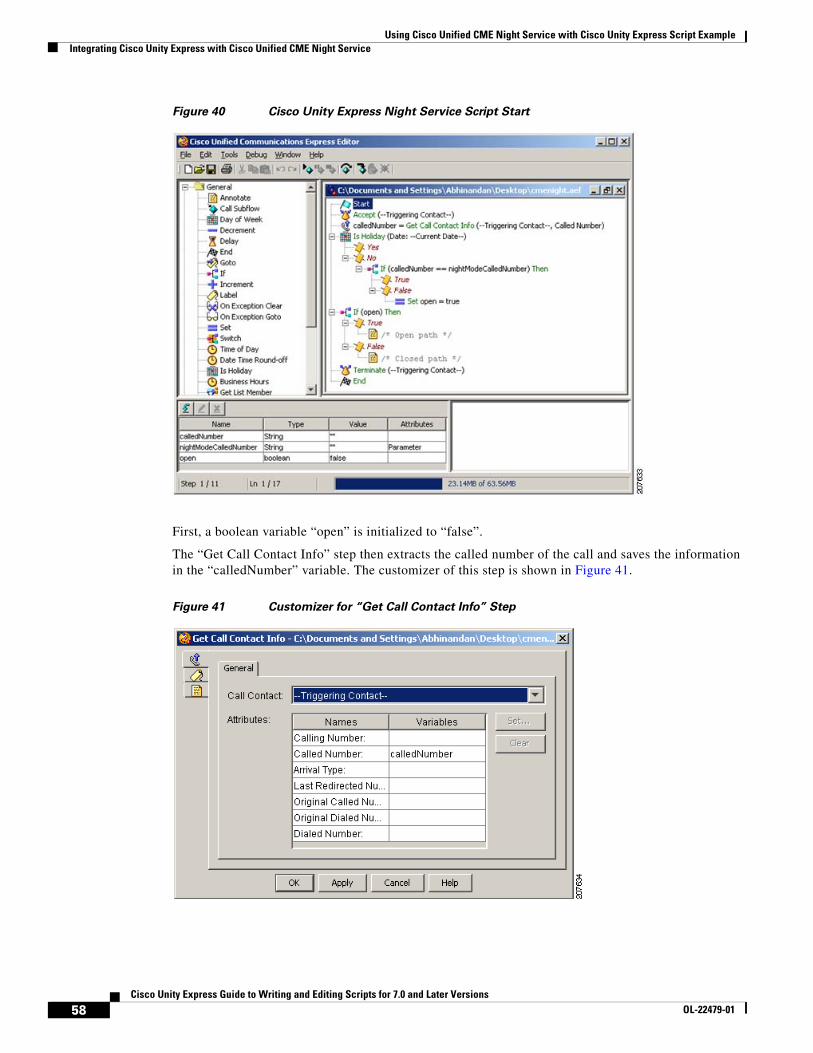
Using Cisco Unified CME Night Service with Cisco Unity Express Script ExampleIntegrating Cisco Unity Express with Cisco Unified CME Night Service
Figure 40 Cisco Unity Express Night Service Script Start
First, a boolean variable “open” is initialized to “false”.
The “Get Call Contact Info” step then extracts the called number of the call and saves the information in the “calledNumber” variable. The customizer of this step is shown in Figure 41.
Figure 41 Customizer for “Get Call Contact Info” Step
58Cisco Unity Express Guide to Writing and Editing Scripts for 7.0 and Later Versions
OL-22479-01
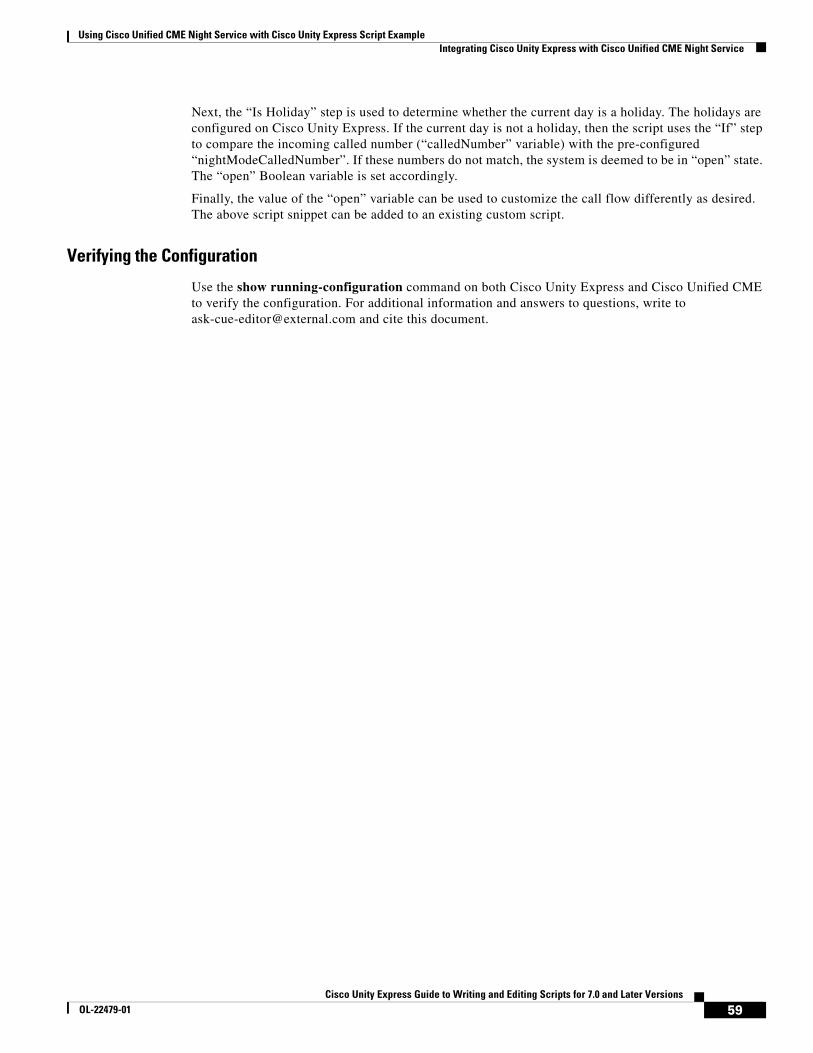
Using Cisco Unified CME Night Service with Cisco Unity Express Script ExampleIntegrating Cisco Unity Express with Cisco Unified CME Night Service
Next, the “Is Holiday” step is used to determine whether the current day is a holiday. The holidays are configured on Cisco Unity Express. If the current day is not a holiday, then the script uses the “If” step to compare the incoming called number (“calledNumber” variable) with the pre-configured “nightModeCalledNumber”. If these numbers do not match, the system is deemed to be in “open” state. The “open” Boolean variable is set accordingly.
Finally, the value of the “open” variable can be used to customize the call flow differently as desired. The above script snippet can be added to an existing custom script.
Verifying the Configuration
Use the show running-configuration command on both Cisco Unity Express and Cisco Unified CME to verify the configuration. For additional information and answers to questions, write to [email protected] and cite this document.
59Cisco Unity Express Guide to Writing and Editing Scripts for 7.0 and Later Versions
OL-22479-01

Using Cisco Unified CME Night Service with Cisco Unity Express Script ExampleIntegrating Cisco Unity Express with Cisco Unified CME Night Service
60Cisco Unity Express Guide to Writing and Editing Scripts for 7.0 and Later Versions
OL-22479-01
Script Editor Step Reference
Last Updated: April 27, 2010
This chapter lists all the steps available for use in creating auto attendant (AA) scripts and Interactive Voice Response (IVR) scripts. As indicated, some of the steps are for IVR scripts only. All of the steps are accessed using the Palette pane (see the “Palette Pane” section on page 10). This chapter includes the following sections:
• Call Contact Steps, page 61
• Contact Steps (IVR Only), page 67
• Database Steps (IVR Only), page 71
• Document Steps (IVR Only), page 84
• eMail Contact Steps (IVR Only), page 90
• Fax Contact Steps (IVR Only), page 94
• General Steps, page 98
• HTTP Contact Steps (IVR Only), page 116
• Media Steps, page 126
• Prompt Steps, page 163
• Session Steps, page 175
• User Steps, page 177
• VoiceMail Step, page 184
Call Contact StepsThe steps in the Call Contact palette provide script designers with a way to manage calls.
The Call Contact palette contains the following steps:
• Call Redirect, page 62
• Get Call Contact Info, page 63
• Place Call (IVR Only), page 65
Figure 42 shows the steps in the Call Contact palette as they appear in the Palette pane of the Cisco Unity Express Script Editor.
61Cisco Unity Express Guide to Writing and Editing Scripts for 7.0 and Later Versions
OL-22479-01

Script Editor Step ReferenceCall Contact Steps
Call RedirectUse the Call Redirect step to redirect a call to another extension.
The Call Redirect step is often used in applications to transfer a call after a desired extension has been specified.
The Call Redirect step produces four output branches:
• Successful: The call is ringing at the specified extension.
• Busy: The specified extension is busy and the call cannot be transferred.
• Invalid: The specified extension does not exist.
• Unsuccessful: The redirect step fails internally.
Configure script steps after each of the four branches to handle the possible outcomes of a redirected call.
Figure 43 shows the customizer window for the Call Redirect step.
Table 6 describes the fields of the Call Redirect customizer window.
Field Description
Call Contact Contact that you want to redirect. Default is Triggering Contact, unless another contact is defined. The names of the selected Call Contact and extension variables appear next to the Call Redirect step icon in the Design pane.
62Cisco Unity Express Guide to Writing and Editing Scripts for 7.0 and Later Versions
OL-22479-01
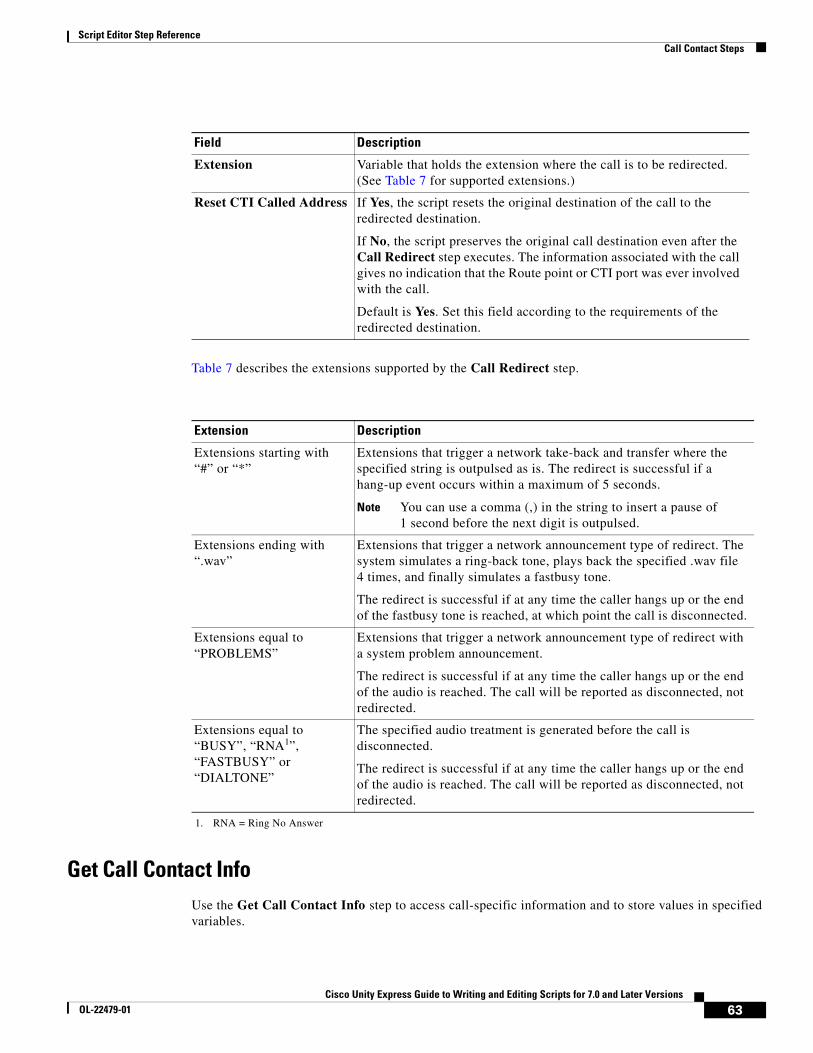
Script Editor Step ReferenceCall Contact Steps
Table 7 describes the extensions supported by the Call Redirect step.
Get Call Contact InfoUse the Get Call Contact Info step to access call-specific information and to store values in specified variables.
Extension Variable that holds the extension where the call is to be redirected. (See Table 7 for supported extensions.)
Reset CTI Called Address If Yes, the script resets the original destination of the call to the redirected destination.
If No, the script preserves the original call destination even after the Call Redirect step executes. The information associated with the call gives no indication that the Route point or CTI port was ever involved with the call.
Default is Yes. Set this field according to the requirements of the redirected destination.
Field Description
Extension Description
Extensions starting with “#” or “*”
Extensions that trigger a network take-back and transfer where the specified string is outpulsed as is. The redirect is successful if a hang-up event occurs within a maximum of 5 seconds.
Note You can use a comma (,) in the string to insert a pause of 1 second before the next digit is outpulsed.
Extensions ending with “.wav”
Extensions that trigger a network announcement type of redirect. The system simulates a ring-back tone, plays back the specified .wav file 4 times, and finally simulates a fastbusy tone.
The redirect is successful if at any time the caller hangs up or the end of the fastbusy tone is reached, at which point the call is disconnected.
Extensions equal to “PROBLEMS”
Extensions that trigger a network announcement type of redirect with a system problem announcement.
The redirect is successful if at any time the caller hangs up or the end of the audio is reached. The call will be reported as disconnected, not redirected.
Extensions equal to “BUSY”, “RNA1”, “FASTBUSY” or “DIALTONE”
1. RNA = Ring No Answer
The specified audio treatment is generated before the call is disconnected.
The redirect is successful if at any time the caller hangs up or the end of the audio is reached. The call will be reported as disconnected, not redirected.
63Cisco Unity Express Guide to Writing and Editing Scripts for 7.0 and Later Versions
OL-22479-01
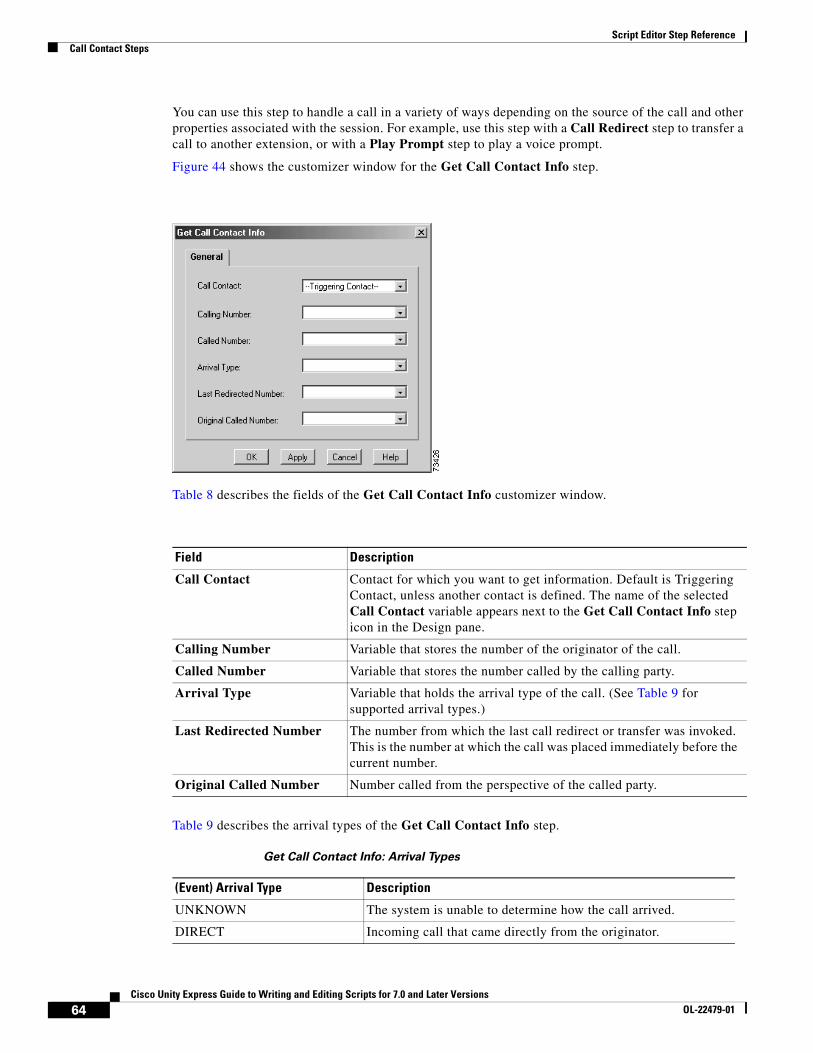
Script Editor Step ReferenceCall Contact Steps
You can use this step to handle a call in a variety of ways depending on the source of the call and other properties associated with the session. For example, use this step with a Call Redirect step to transfer a call to another extension, or with a Play Prompt step to play a voice prompt.
Figure 44 shows the customizer window for the Get Call Contact Info step.
Table 8 describes the fields of the Get Call Contact Info customizer window.
Table 9 describes the arrival types of the Get Call Contact Info step.
Field Description
Call Contact Contact for which you want to get information. Default is Triggering Contact, unless another contact is defined. The name of the selected Call Contact variable appears next to the Get Call Contact Info step icon in the Design pane.
Calling Number Variable that stores the number of the originator of the call.
Called Number Variable that stores the number called by the calling party.
Arrival Type Variable that holds the arrival type of the call. (See Table 9 for supported arrival types.)
Last Redirected Number The number from which the last call redirect or transfer was invoked. This is the number at which the call was placed immediately before the current number.
Original Called Number Number called from the perspective of the called party.
Get Call Contact Info: Arrival Types
(Event) Arrival Type Description
UNKNOWN The system is unable to determine how the call arrived.
DIRECT Incoming call that came directly from the originator.
64Cisco Unity Express Guide to Writing and Editing Scripts for 7.0 and Later Versions
OL-22479-01
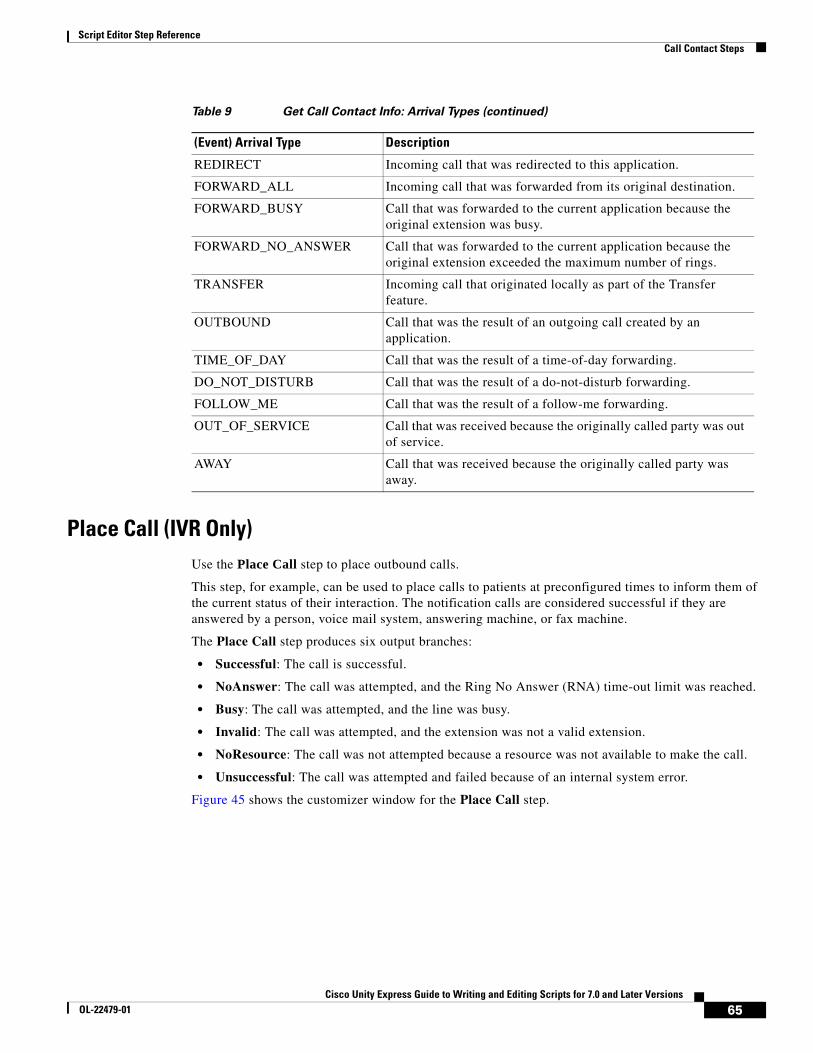
Script Editor Step ReferenceCall Contact Steps
Place Call (IVR Only)Use the Place Call step to place outbound calls.
This step, for example, can be used to place calls to patients at preconfigured times to inform them of the current status of their interaction. The notification calls are considered successful if they are answered by a person, voice mail system, answering machine, or fax machine.
The Place Call step produces six output branches:
• Successful: The call is successful.
• NoAnswer: The call was attempted, and the Ring No Answer (RNA) time-out limit was reached.
• Busy: The call was attempted, and the line was busy.
• Invalid: The call was attempted, and the extension was not a valid extension.
• NoResource: The call was not attempted because a resource was not available to make the call.
• Unsuccessful: The call was attempted and failed because of an internal system error.
Figure 45 shows the customizer window for the Place Call step.
REDIRECT Incoming call that was redirected to this application.
FORWARD_ALL Incoming call that was forwarded from its original destination.
FORWARD_BUSY Call that was forwarded to the current application because the original extension was busy.
FORWARD_NO_ANSWER Call that was forwarded to the current application because the original extension exceeded the maximum number of rings.
TRANSFER Incoming call that originated locally as part of the Transfer feature.
OUTBOUND Call that was the result of an outgoing call created by an application.
TIME_OF_DAY Call that was the result of a time-of-day forwarding.
DO_NOT_DISTURB Call that was the result of a do-not-disturb forwarding.
FOLLOW_ME Call that was the result of a follow-me forwarding.
OUT_OF_SERVICE Call that was received because the originally called party was out of service.
AWAY Call that was received because the originally called party was away.
Table 9 Get Call Contact Info: Arrival Types (continued)
(Event) Arrival Type Description
65Cisco Unity Express Guide to Writing and Editing Scripts for 7.0 and Later Versions
OL-22479-01
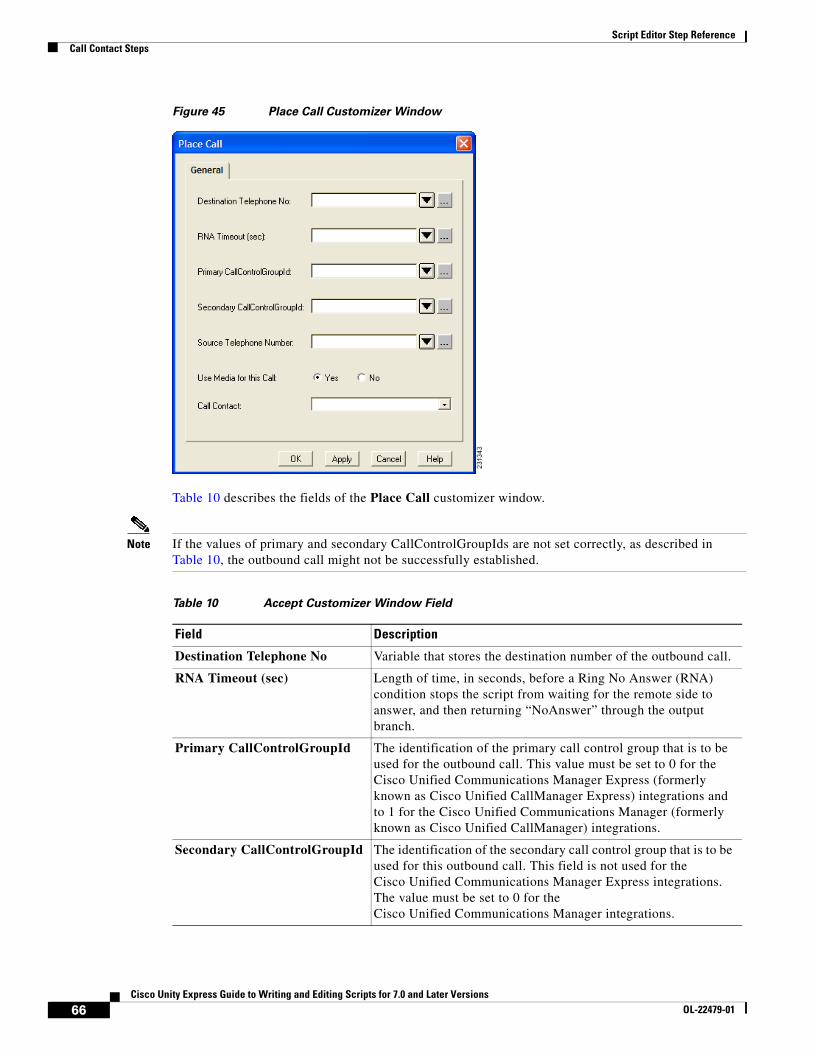
Script Editor Step ReferenceCall Contact Steps
Figure 45 Place Call Customizer Window
Table 10 describes the fields of the Place Call customizer window.
Note If the values of primary and secondary CallControlGroupIds are not set correctly, as described in Table 10, the outbound call might not be successfully established.
Table 10 Accept Customizer Window Field
Field Description
Destination Telephone No Variable that stores the destination number of the outbound call.
RNA Timeout (sec) Length of time, in seconds, before a Ring No Answer (RNA) condition stops the script from waiting for the remote side to answer, and then returning “NoAnswer” through the output branch.
Primary CallControlGroupId The identification of the primary call control group that is to be used for the outbound call. This value must be set to 0 for the Cisco Unified Communications Manager Express (formerly known as Cisco Unified CallManager Express) integrations and to 1 for the Cisco Unified Communications Manager (formerly known as Cisco Unified CallManager) integrations.
Secondary CallControlGroupId The identification of the secondary call control group that is to be used for this outbound call. This field is not used for the Cisco Unified Communications Manager Express integrations. The value must be set to 0 for the Cisco Unified Communications Manager integrations.
66Cisco Unity Express Guide to Writing and Editing Scripts for 7.0 and Later Versions
OL-22479-01
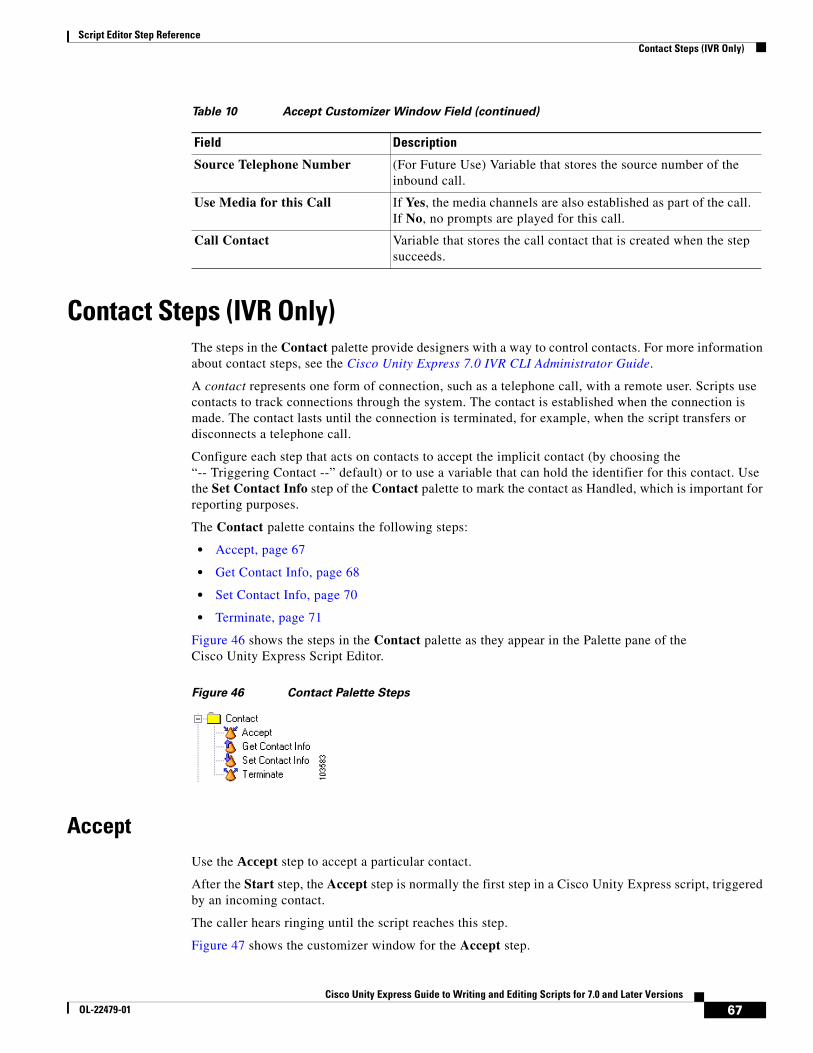
Script Editor Step ReferenceContact Steps (IVR Only)
Contact Steps (IVR Only)The steps in the Contact palette provide designers with a way to control contacts. For more information about contact steps, see the Cisco Unity Express 7.0 IVR CLI Administrator Guide.
A contact represents one form of connection, such as a telephone call, with a remote user. Scripts use contacts to track connections through the system. The contact is established when the connection is made. The contact lasts until the connection is terminated, for example, when the script transfers or disconnects a telephone call.
Configure each step that acts on contacts to accept the implicit contact (by choosing the “-- Triggering Contact --” default) or to use a variable that can hold the identifier for this contact. Use the Set Contact Info step of the Contact palette to mark the contact as Handled, which is important for reporting purposes.
The Contact palette contains the following steps:
• Accept, page 67
• Get Contact Info, page 68
• Set Contact Info, page 70
• Terminate, page 71
Figure 46 shows the steps in the Contact palette as they appear in the Palette pane of the Cisco Unity Express Script Editor.
Figure 46 Contact Palette Steps
AcceptUse the Accept step to accept a particular contact.
After the Start step, the Accept step is normally the first step in a Cisco Unity Express script, triggered by an incoming contact.
The caller hears ringing until the script reaches this step.
Figure 47 shows the customizer window for the Accept step.
Source Telephone Number (For Future Use) Variable that stores the source number of the inbound call.
Use Media for this Call If Yes, the media channels are also established as part of the call. If No, no prompts are played for this call.
Call Contact Variable that stores the call contact that is created when the step succeeds.
Table 10 Accept Customizer Window Field (continued)
Field Description
67Cisco Unity Express Guide to Writing and Editing Scripts for 7.0 and Later Versions
OL-22479-01
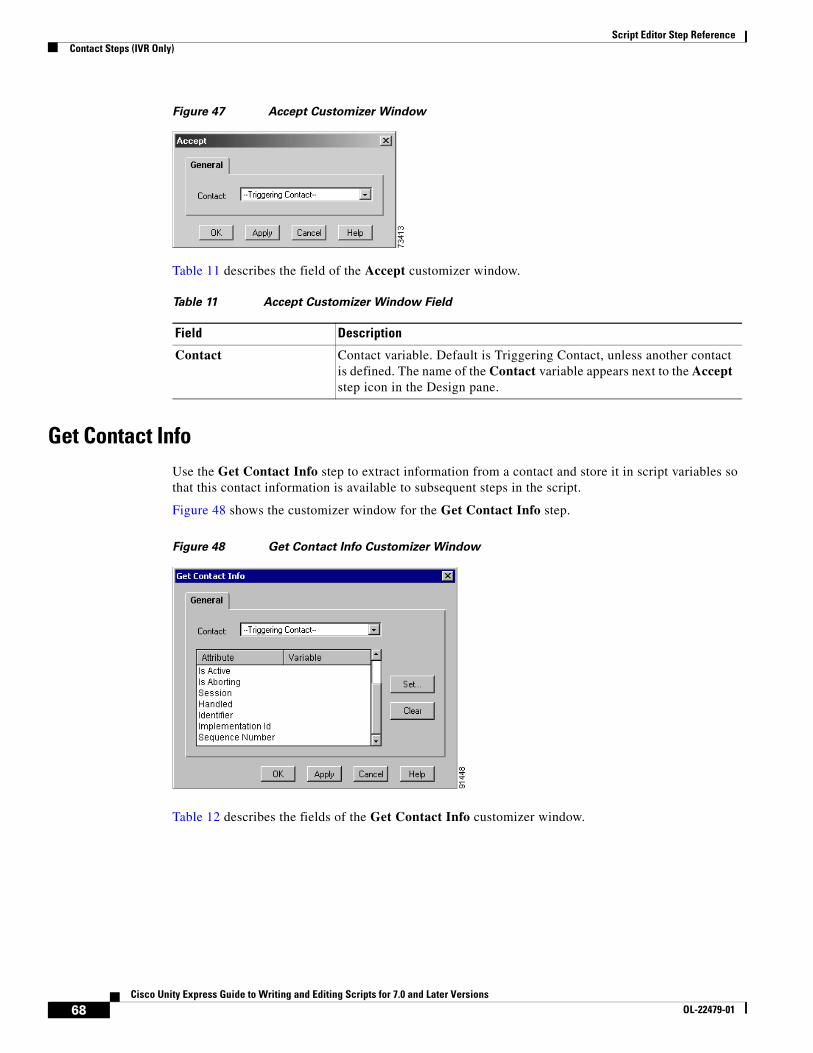
Script Editor Step ReferenceContact Steps (IVR Only)
Figure 47 Accept Customizer Window
Table 11 describes the field of the Accept customizer window.
Get Contact InfoUse the Get Contact Info step to extract information from a contact and store it in script variables so that this contact information is available to subsequent steps in the script.
Figure 48 shows the customizer window for the Get Contact Info step.
Figure 48 Get Contact Info Customizer Window
Table 12 describes the fields of the Get Contact Info customizer window.
Table 11 Accept Customizer Window Field
Field Description
Contact Contact variable. Default is Triggering Contact, unless another contact is defined. The name of the Contact variable appears next to the Accept step icon in the Design pane.
68Cisco Unity Express Guide to Writing and Editing Scripts for 7.0 and Later Versions
OL-22479-01
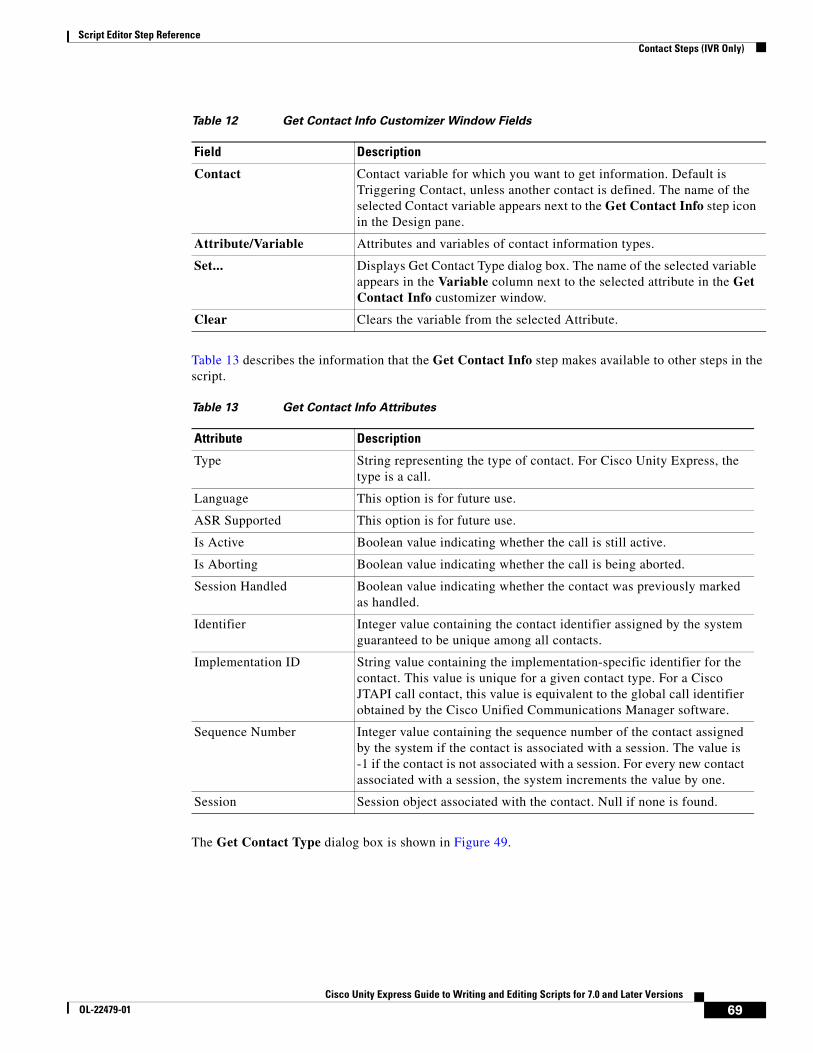
Script Editor Step ReferenceContact Steps (IVR Only)
Table 13 describes the information that the Get Contact Info step makes available to other steps in the script.
The Get Contact Type dialog box is shown in Figure 49.
Table 12 Get Contact Info Customizer Window Fields
Field Description
Contact Contact variable for which you want to get information. Default is Triggering Contact, unless another contact is defined. The name of the selected Contact variable appears next to the Get Contact Info step icon in the Design pane.
Attribute/Variable Attributes and variables of contact information types.
Set... Displays Get Contact Type dialog box. The name of the selected variable appears in the Variable column next to the selected attribute in the Get Contact Info customizer window.
Clear Clears the variable from the selected Attribute.
Table 13 Get Contact Info Attributes
Attribute Description
Type String representing the type of contact. For Cisco Unity Express, the type is a call.
Language This option is for future use.
ASR Supported This option is for future use.
Is Active Boolean value indicating whether the call is still active.
Is Aborting Boolean value indicating whether the call is being aborted.
Session Handled Boolean value indicating whether the contact was previously marked as handled.
Identifier Integer value containing the contact identifier assigned by the system guaranteed to be unique among all contacts.
Implementation ID String value containing the implementation-specific identifier for the contact. This value is unique for a given contact type. For a Cisco JTAPI call contact, this value is equivalent to the global call identifier obtained by the Cisco Unified Communications Manager software.
Sequence Number Integer value containing the sequence number of the contact assigned by the system if the contact is associated with a session. The value is -1 if the contact is not associated with a session. For every new contact associated with a session, the system increments the value by one.
Session Session object associated with the contact. Null if none is found.
69Cisco Unity Express Guide to Writing and Editing Scripts for 7.0 and Later Versions
OL-22479-01
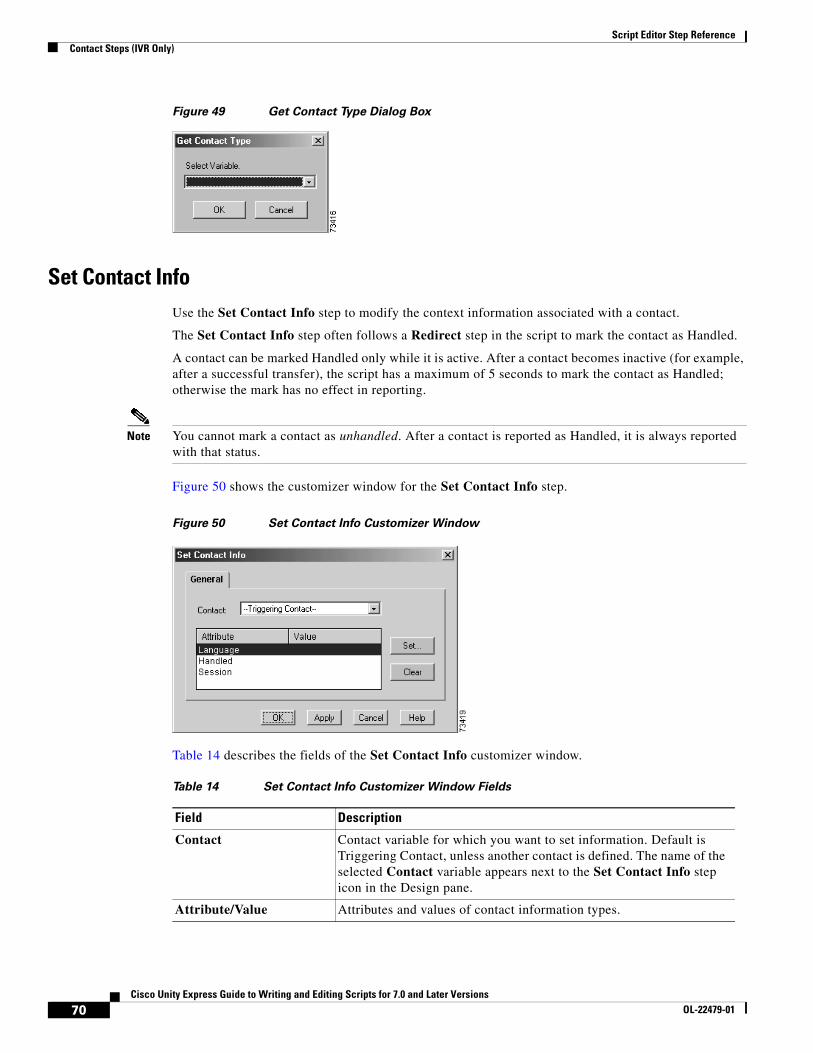
Script Editor Step ReferenceContact Steps (IVR Only)
Figure 49 Get Contact Type Dialog Box
Set Contact InfoUse the Set Contact Info step to modify the context information associated with a contact.
The Set Contact Info step often follows a Redirect step in the script to mark the contact as Handled.
A contact can be marked Handled only while it is active. After a contact becomes inactive (for example, after a successful transfer), the script has a maximum of 5 seconds to mark the contact as Handled; otherwise the mark has no effect in reporting.
Note You cannot mark a contact as unhandled. After a contact is reported as Handled, it is always reported with that status.
Figure 50 shows the customizer window for the Set Contact Info step.
Figure 50 Set Contact Info Customizer Window
Table 14 describes the fields of the Set Contact Info customizer window.
Table 14 Set Contact Info Customizer Window Fields
Field Description
Contact Contact variable for which you want to set information. Default is Triggering Contact, unless another contact is defined. The name of the selected Contact variable appears next to the Set Contact Info step icon in the Design pane.
Attribute/Value Attributes and values of contact information types.
70Cisco Unity Express Guide to Writing and Editing Scripts for 7.0 and Later Versions
OL-22479-01
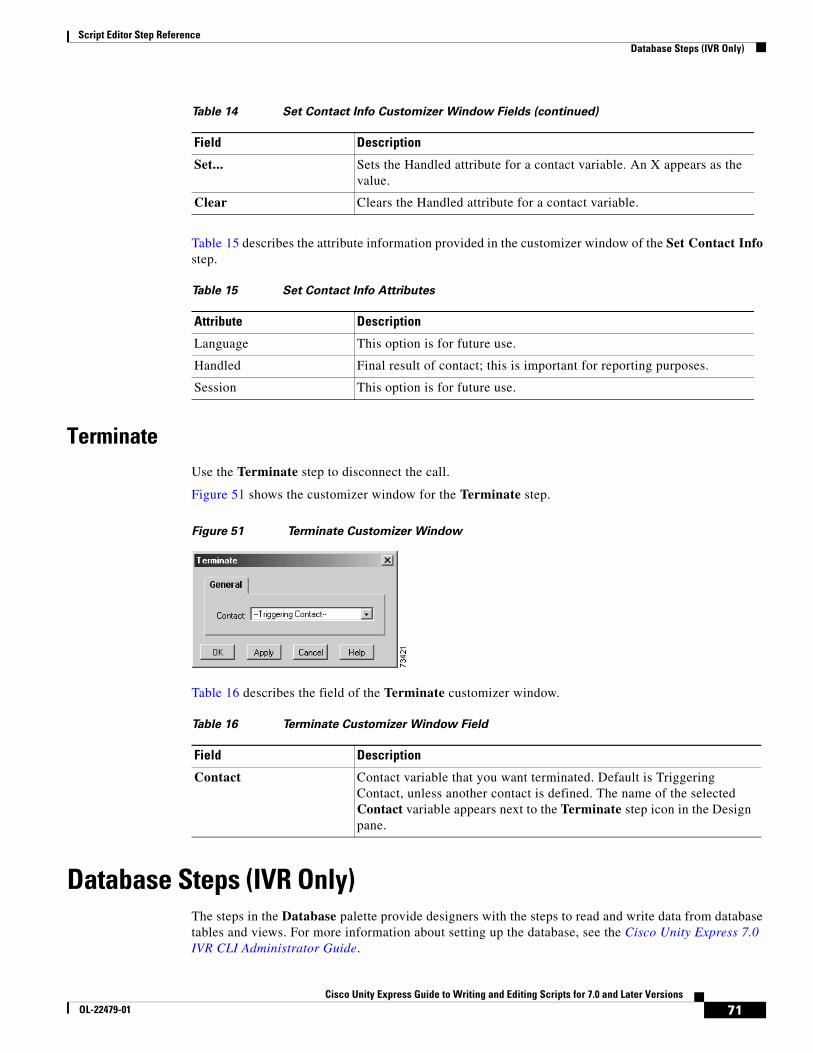
Script Editor Step ReferenceDatabase Steps (IVR Only)
Table 15 describes the attribute information provided in the customizer window of the Set Contact Info step.
TerminateUse the Terminate step to disconnect the call.
Figure 51 shows the customizer window for the Terminate step.
Figure 51 Terminate Customizer Window
Table 16 describes the field of the Terminate customizer window.
Database Steps (IVR Only)The steps in the Database palette provide designers with the steps to read and write data from database tables and views. For more information about setting up the database, see the Cisco Unity Express 7.0 IVR CLI Administrator Guide.
Set... Sets the Handled attribute for a contact variable. An X appears as the value.
Clear Clears the Handled attribute for a contact variable.
Table 14 Set Contact Info Customizer Window Fields (continued)
Field Description
Table 15 Set Contact Info Attributes
Attribute Description
Language This option is for future use.
Handled Final result of contact; this is important for reporting purposes.
Session This option is for future use.
Table 16 Terminate Customizer Window Field
Field Description
Contact Contact variable that you want terminated. Default is Triggering Contact, unless another contact is defined. The name of the selected Contact variable appears next to the Terminate step icon in the Design pane.
71Cisco Unity Express Guide to Writing and Editing Scripts for 7.0 and Later Versions
OL-22479-01
Script Editor Step ReferenceDatabase Steps (IVR Only)
The following prerequisites must be met before a script is created using Database steps:
• When the Script Editor software cannot connect to the Cisco Unity Express router, you can still create a script by manually entering the schema information in the database steps field.
For example, a table name or field name is only refreshed if there is connectivity between the Script Editor software and the Cisco Unity Express router, and the Cisco Unity Express router can connect to the external database using a defined database profile configuration.
• The Cisco Unity Express router must be reachable over the network from the Cisco Unity Express Script Editor over Java RMI protocol.
• The IP address or Domain Name Server (DNS) hostname of the Cisco Unity Express router must be defined. The network information of the module can be specified by clicking Editor Tools and Options from the Cisco Unity Express Script Editor.
• Database profiles must be created using either the Cisco Unity Express graphical user interface (GUI) or command-line interface (CLI). Database steps are not usable for script writing without database profiles, and an error message appears if database profiles have not been created.
Database steps have a resource name associated with them that are used to link multiple steps. For example, if the DB Read step is issued with the resource name myquery to execute a query, myquery will be specified in the DB Get step to retrieve results from that query. The myquery resource name is also required before the DB Release step can release database resources when it is prompted by a query.
If a resource name is used for a query, and another DB Read step is configured to use the same resource name, the results of the previous query are overwritten by the second DB Read step.
A resource name is entered in text fields associated with the DB Read and DB Write steps. Each resource name uses one database connection, and each profile is allowed a finite number of connections. If this number of allowed connections is exceeded during step execution, a Structured Query Language (SQL) Exception will be issued. To ensure that the number of connections do not go over profile maximums, you must use the DB Release step, which releases connection resources after a DB Read or DB Write step is executed. Terminating the script execution also releases database resources.
The DB Read and DB Get steps are executed in sequence by the Database script. The DB Read step performs a database query and stores the returned data internally in the Enterprise Database Subsystem (EDBS). The DB Get step uses data retrieved by the DB Read step. If the actual database contents are changed after executing the DB Read step, to the DB Get step will not reflect those changes and you must issue another DB Read to get updated data from the database.
The Database palette contains the following steps:
• DB Read, page 73
• DB Get, page 76
• DB Write, page 79
• DB Release, page 83
Figure 52 shows the steps in the Database palette as they appear in the Palette pane of the Cisco Unity Express Script Editor.
Figure 52 Database Palette Steps
72Cisco Unity Express Guide to Writing and Editing Scripts for 7.0 and Later Versions
OL-22479-01
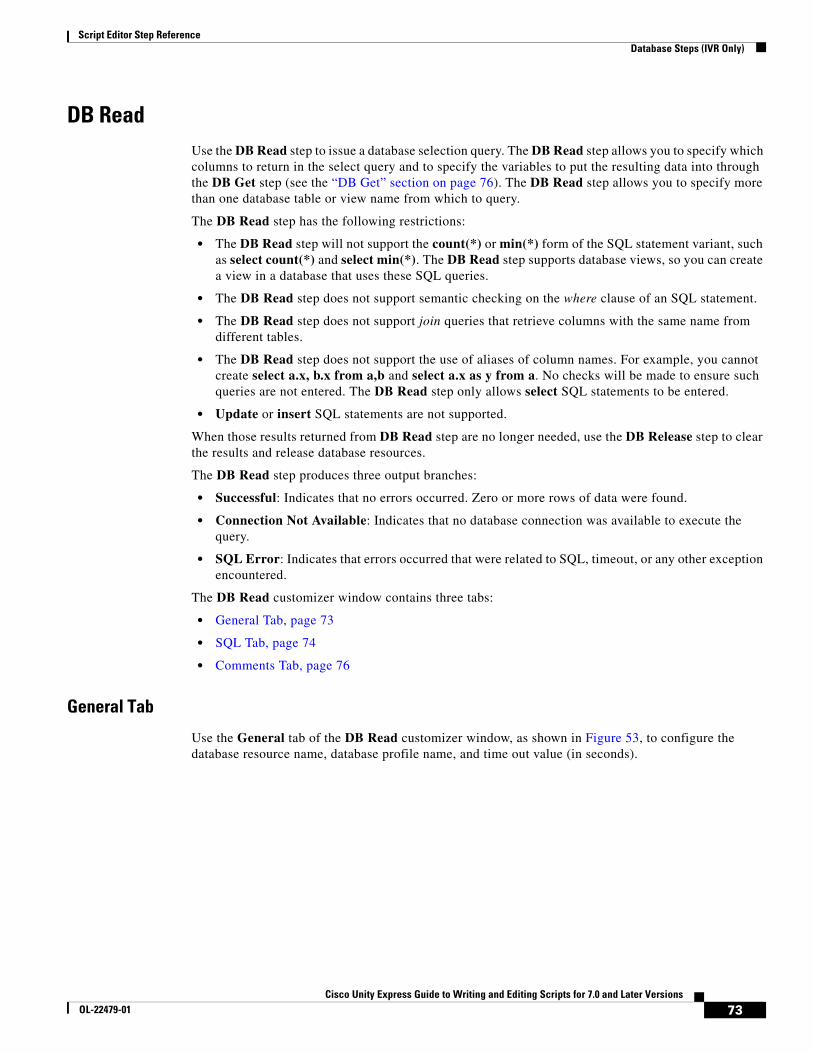
Script Editor Step ReferenceDatabase Steps (IVR Only)
DB ReadUse the DB Read step to issue a database selection query. The DB Read step allows you to specify which columns to return in the select query and to specify the variables to put the resulting data into through the DB Get step (see the “DB Get” section on page 76). The DB Read step allows you to specify more than one database table or view name from which to query.
The DB Read step has the following restrictions:
• The DB Read step will not support the count(*) or min(*) form of the SQL statement variant, such as select count(*) and select min(*). The DB Read step supports database views, so you can create a view in a database that uses these SQL queries.
• The DB Read step does not support semantic checking on the where clause of an SQL statement.
• The DB Read step does not support join queries that retrieve columns with the same name from different tables.
• The DB Read step does not support the use of aliases of column names. For example, you cannot create select a.x, b.x from a,b and select a.x as y from a. No checks will be made to ensure such queries are not entered. The DB Read step only allows select SQL statements to be entered.
• Update or insert SQL statements are not supported.
When those results returned from DB Read step are no longer needed, use the DB Release step to clear the results and release database resources.
The DB Read step produces three output branches:
• Successful: Indicates that no errors occurred. Zero or more rows of data were found.
• Connection Not Available: Indicates that no database connection was available to execute the query.
• SQL Error: Indicates that errors occurred that were related to SQL, timeout, or any other exception encountered.
The DB Read customizer window contains three tabs:
• General Tab, page 73
• SQL Tab, page 74
• Comments Tab, page 76
General Tab
Use the General tab of the DB Read customizer window, as shown in Figure 53, to configure the database resource name, database profile name, and time out value (in seconds).
73Cisco Unity Express Guide to Writing and Editing Scripts for 7.0 and Later Versions
OL-22479-01
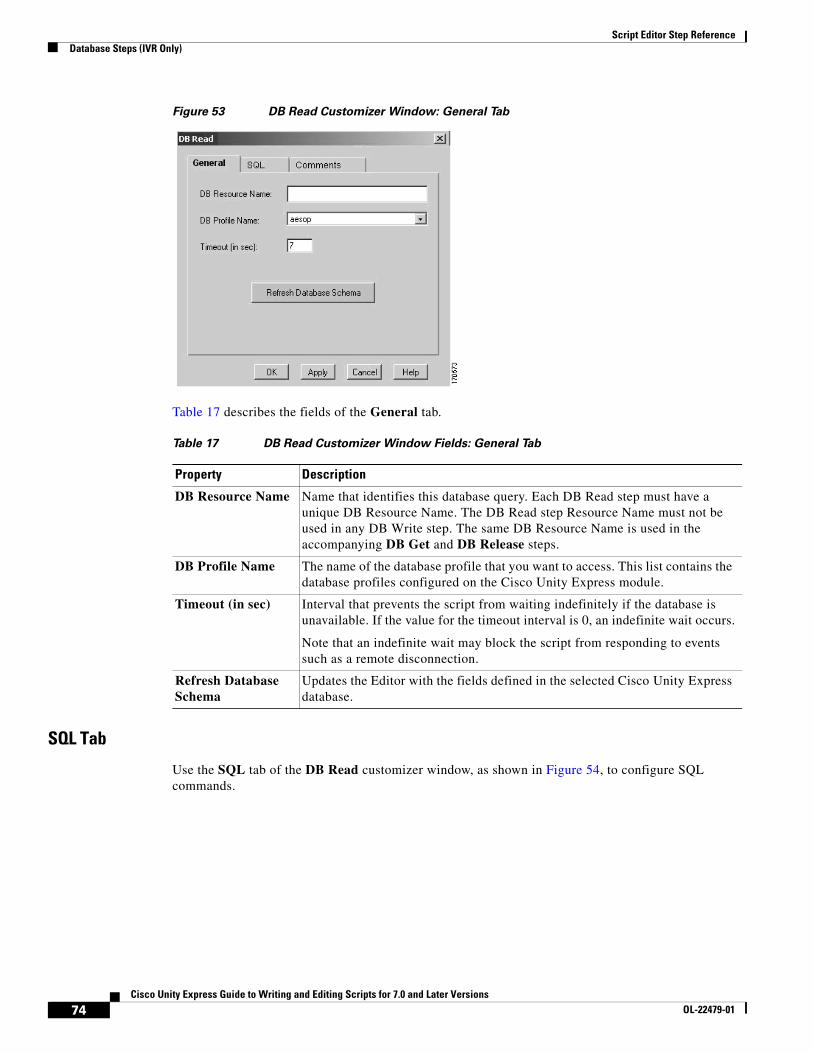
Script Editor Step ReferenceDatabase Steps (IVR Only)
Figure 53 DB Read Customizer Window: General Tab
Table 17 describes the fields of the General tab.
SQL Tab
Use the SQL tab of the DB Read customizer window, as shown in Figure 54, to configure SQL commands.
Table 17 DB Read Customizer Window Fields: General Tab
Property Description
DB Resource Name Name that identifies this database query. Each DB Read step must have a unique DB Resource Name. The DB Read step Resource Name must not be used in any DB Write step. The same DB Resource Name is used in the accompanying DB Get and DB Release steps.
DB Profile Name The name of the database profile that you want to access. This list contains the database profiles configured on the Cisco Unity Express module.
Timeout (in sec) Interval that prevents the script from waiting indefinitely if the database is unavailable. If the value for the timeout interval is 0, an indefinite wait occurs.
Note that an indefinite wait may block the script from responding to events such as a remote disconnection.
Refresh Database Schema
Updates the Editor with the fields defined in the selected Cisco Unity Express database.
74Cisco Unity Express Guide to Writing and Editing Scripts for 7.0 and Later Versions
OL-22479-01
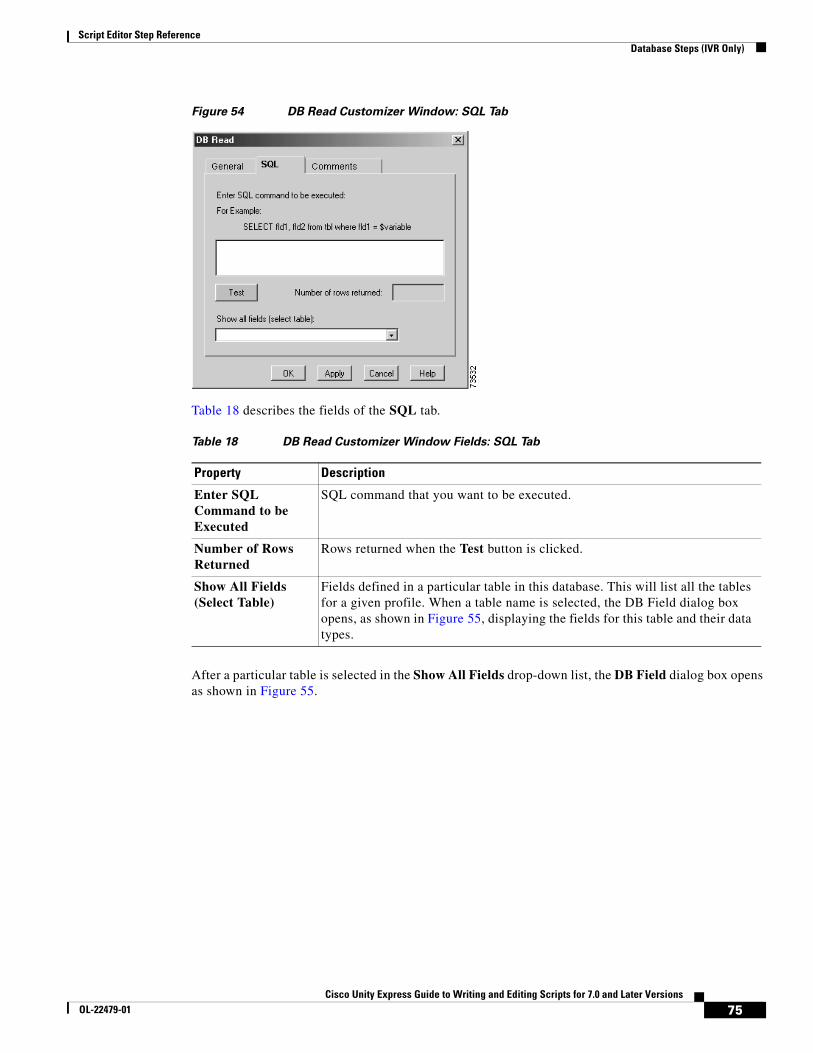
Script Editor Step ReferenceDatabase Steps (IVR Only)
Figure 54 DB Read Customizer Window: SQL Tab
Table 18 describes the fields of the SQL tab.
After a particular table is selected in the Show All Fields drop-down list, the DB Field dialog box opens as shown in Figure 55.
Table 18 DB Read Customizer Window Fields: SQL Tab
Property Description
Enter SQL Command to be Executed
SQL command that you want to be executed.
Number of Rows Returned
Rows returned when the Test button is clicked.
Show All Fields (Select Table)
Fields defined in a particular table in this database. This will list all the tables for a given profile. When a table name is selected, the DB Field dialog box opens, as shown in Figure 55, displaying the fields for this table and their data types.
75Cisco Unity Express Guide to Writing and Editing Scripts for 7.0 and Later Versions
OL-22479-01
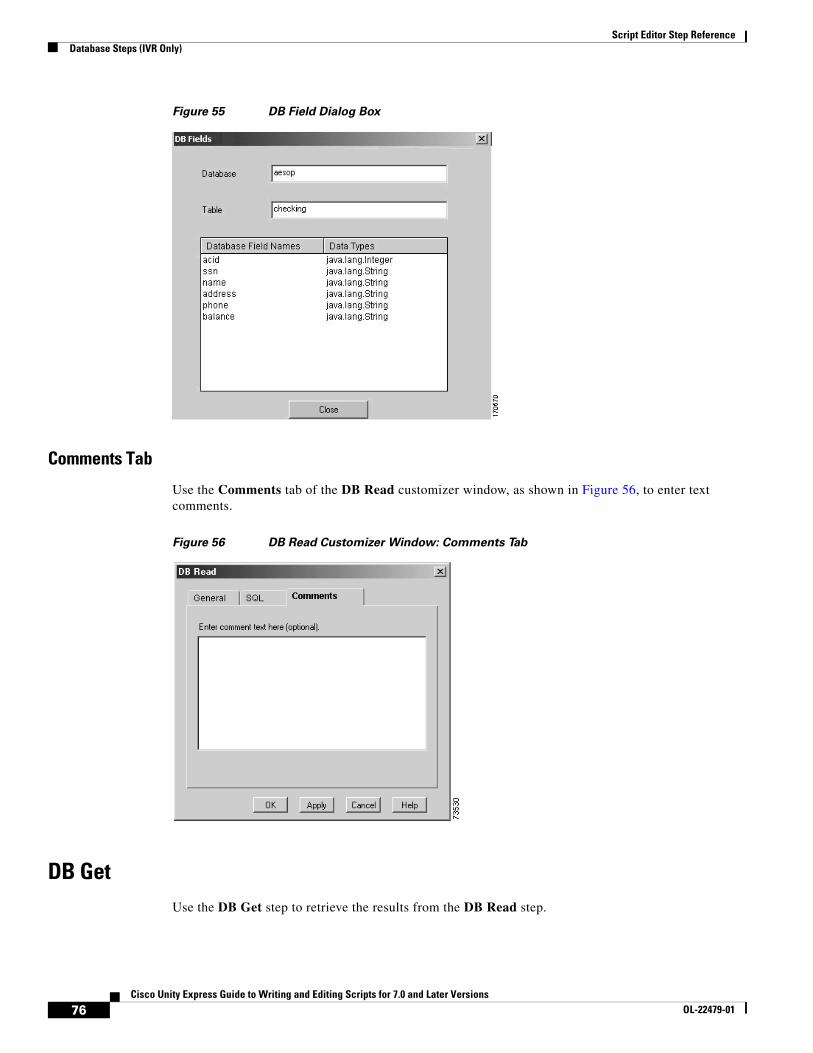
Script Editor Step ReferenceDatabase Steps (IVR Only)
Figure 55 DB Field Dialog Box
Comments Tab
Use the Comments tab of the DB Read customizer window, as shown in Figure 56, to enter text comments.
Figure 56 DB Read Customizer Window: Comments Tab
DB GetUse the DB Get step to retrieve the results from the DB Read step.
76Cisco Unity Express Guide to Writing and Editing Scripts for 7.0 and Later Versions
OL-22479-01
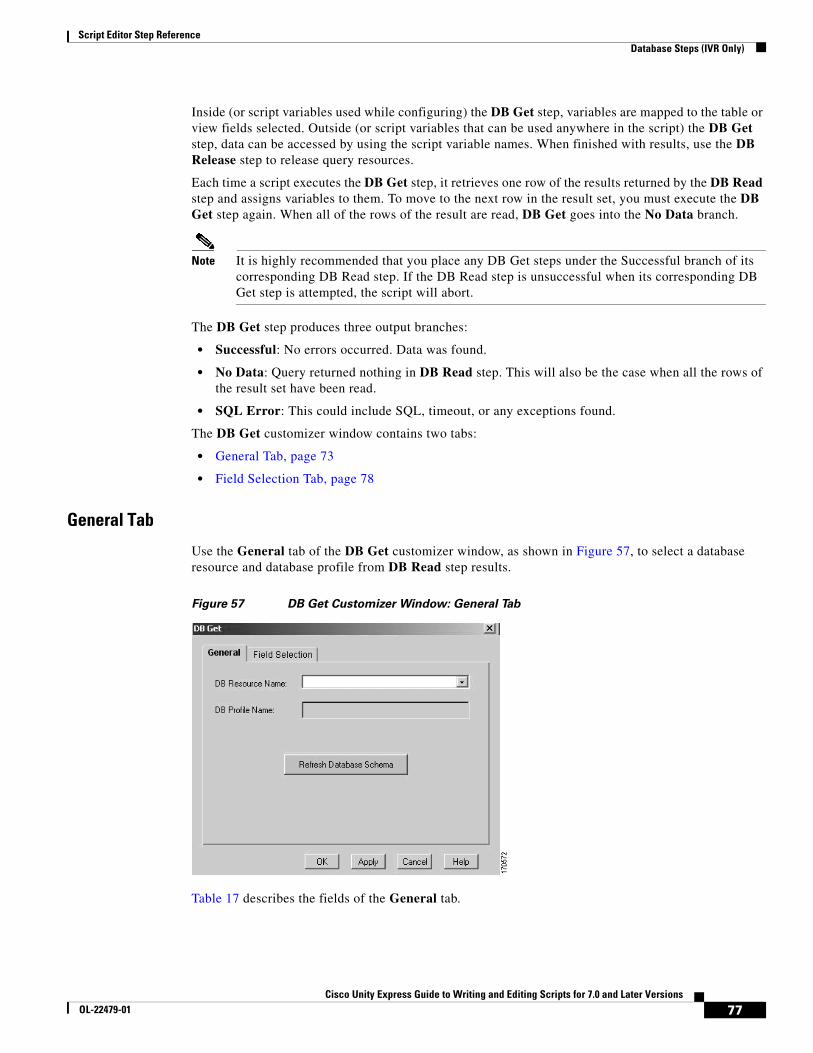
Script Editor Step ReferenceDatabase Steps (IVR Only)
Inside (or script variables used while configuring) the DB Get step, variables are mapped to the table or view fields selected. Outside (or script variables that can be used anywhere in the script) the DB Get step, data can be accessed by using the script variable names. When finished with results, use the DB Release step to release query resources.
Each time a script executes the DB Get step, it retrieves one row of the results returned by the DB Read step and assigns variables to them. To move to the next row in the result set, you must execute the DB Get step again. When all of the rows of the result are read, DB Get goes into the No Data branch.
Note It is highly recommended that you place any DB Get steps under the Successful branch of its corresponding DB Read step. If the DB Read step is unsuccessful when its corresponding DB Get step is attempted, the script will abort.
The DB Get step produces three output branches:
• Successful: No errors occurred. Data was found.
• No Data: Query returned nothing in DB Read step. This will also be the case when all the rows of the result set have been read.
• SQL Error: This could include SQL, timeout, or any exceptions found.
The DB Get customizer window contains two tabs:
• General Tab, page 73
• Field Selection Tab, page 78
General Tab
Use the General tab of the DB Get customizer window, as shown in Figure 57, to select a database resource and database profile from DB Read step results.
Figure 57 DB Get Customizer Window: General Tab
Table 17 describes the fields of the General tab.
77Cisco Unity Express Guide to Writing and Editing Scripts for 7.0 and Later Versions
OL-22479-01
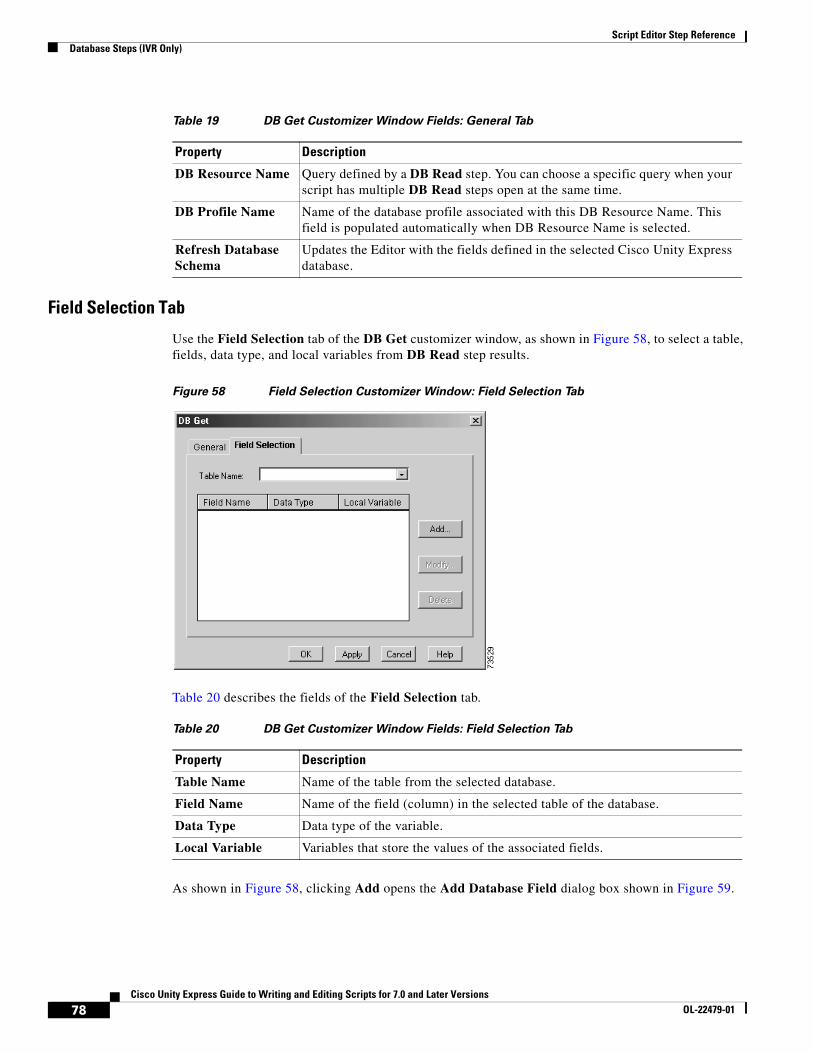
Script Editor Step ReferenceDatabase Steps (IVR Only)
Field Selection Tab
Use the Field Selection tab of the DB Get customizer window, as shown in Figure 58, to select a table, fields, data type, and local variables from DB Read step results.
Figure 58 Field Selection Customizer Window: Field Selection Tab
Table 20 describes the fields of the Field Selection tab.
As shown in Figure 58, clicking Add opens the Add Database Field dialog box shown in Figure 59.
Table 19 DB Get Customizer Window Fields: General Tab
Property Description
DB Resource Name Query defined by a DB Read step. You can choose a specific query when your script has multiple DB Read steps open at the same time.
DB Profile Name Name of the database profile associated with this DB Resource Name. This field is populated automatically when DB Resource Name is selected.
Refresh Database Schema
Updates the Editor with the fields defined in the selected Cisco Unity Express database.
Table 20 DB Get Customizer Window Fields: Field Selection Tab
Property Description
Table Name Name of the table from the selected database.
Field Name Name of the field (column) in the selected table of the database.
Data Type Data type of the variable.
Local Variable Variables that store the values of the associated fields.
78Cisco Unity Express Guide to Writing and Editing Scripts for 7.0 and Later Versions
OL-22479-01
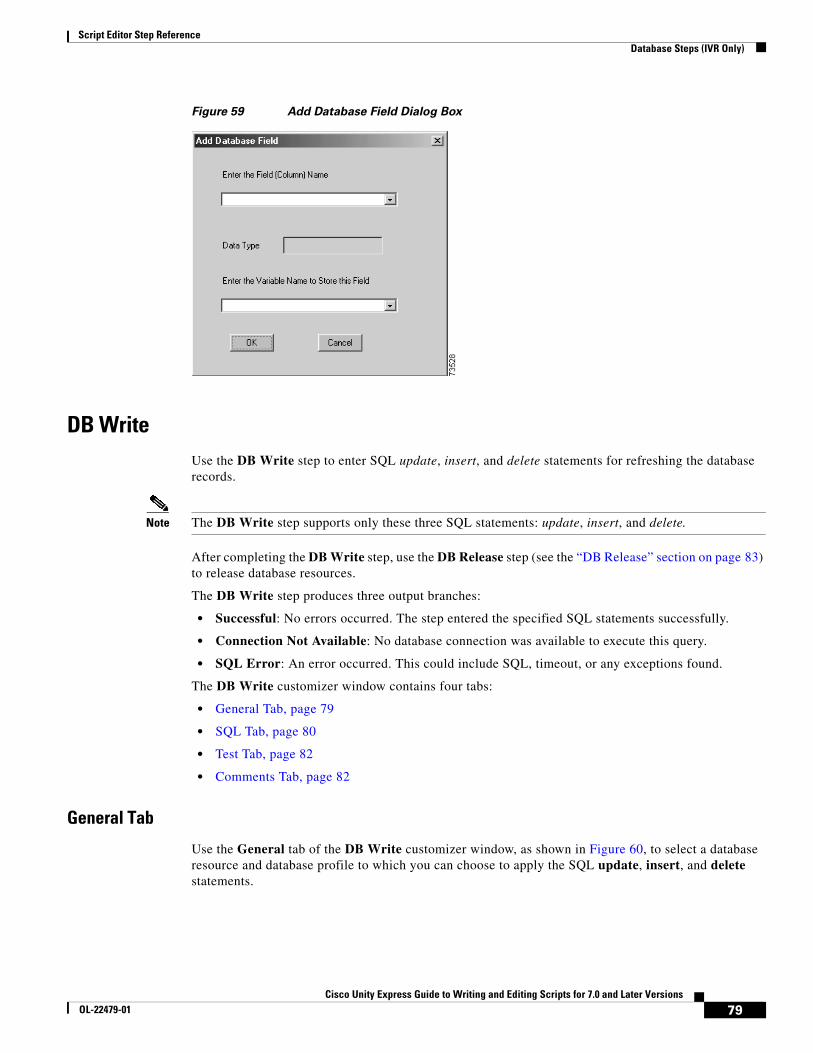
Script Editor Step ReferenceDatabase Steps (IVR Only)
Figure 59 Add Database Field Dialog Box
DB WriteUse the DB Write step to enter SQL update, insert, and delete statements for refreshing the database records.
Note The DB Write step supports only these three SQL statements: update, insert, and delete.
After completing the DB Write step, use the DB Release step (see the “DB Release” section on page 83) to release database resources.
The DB Write step produces three output branches:
• Successful: No errors occurred. The step entered the specified SQL statements successfully.
• Connection Not Available: No database connection was available to execute this query.
• SQL Error: An error occurred. This could include SQL, timeout, or any exceptions found.
The DB Write customizer window contains four tabs:
• General Tab, page 79
• SQL Tab, page 80
• Test Tab, page 82
• Comments Tab, page 82
General Tab
Use the General tab of the DB Write customizer window, as shown in Figure 60, to select a database resource and database profile to which you can choose to apply the SQL update, insert, and delete statements.
79Cisco Unity Express Guide to Writing and Editing Scripts for 7.0 and Later Versions
OL-22479-01

Script Editor Step ReferenceDatabase Steps (IVR Only)
Figure 60 DB Write Customizer Window: General Tab
Table 21 describes the fields of the General tab.
SQL Tab
Use the SQL tab of the DB Write customizer window, as shown in Figure 61, to enter SQL commands.
Table 21 DB Write Customizer Window Fields: General Tab
Property Description
DB Resource Name Name assigned to identify this database query.
DB Profile Name Name of the database profile on which you want to run your update query.
Refresh Database Schema
Updates the Editor with the fields defined in the selected Cisco Unity Express database.
80Cisco Unity Express Guide to Writing and Editing Scripts for 7.0 and Later Versions
OL-22479-01
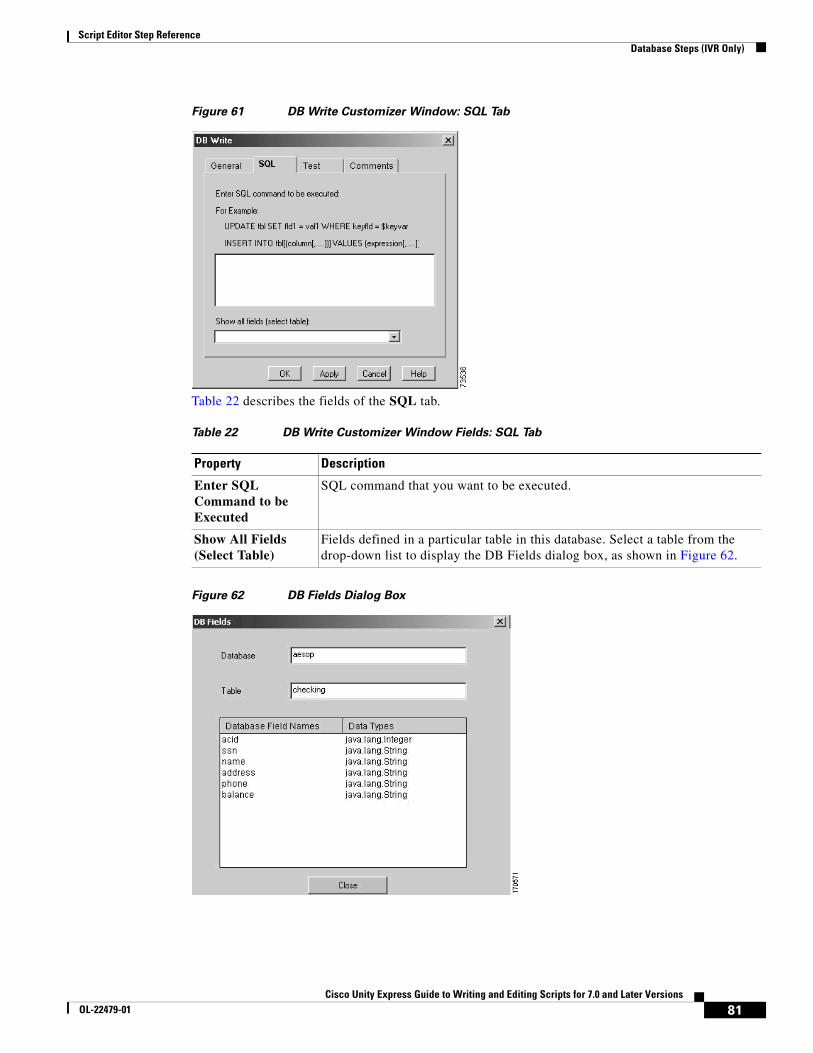
Script Editor Step ReferenceDatabase Steps (IVR Only)
Figure 61 DB Write Customizer Window: SQL Tab
Table 22 describes the fields of the SQL tab.
Figure 62 DB Fields Dialog Box
Table 22 DB Write Customizer Window Fields: SQL Tab
Property Description
Enter SQL Command to be Executed
SQL command that you want to be executed.
Show All Fields (Select Table)
Fields defined in a particular table in this database. Select a table from the drop-down list to display the DB Fields dialog box, as shown in Figure 62.
81Cisco Unity Express Guide to Writing and Editing Scripts for 7.0 and Later Versions
OL-22479-01
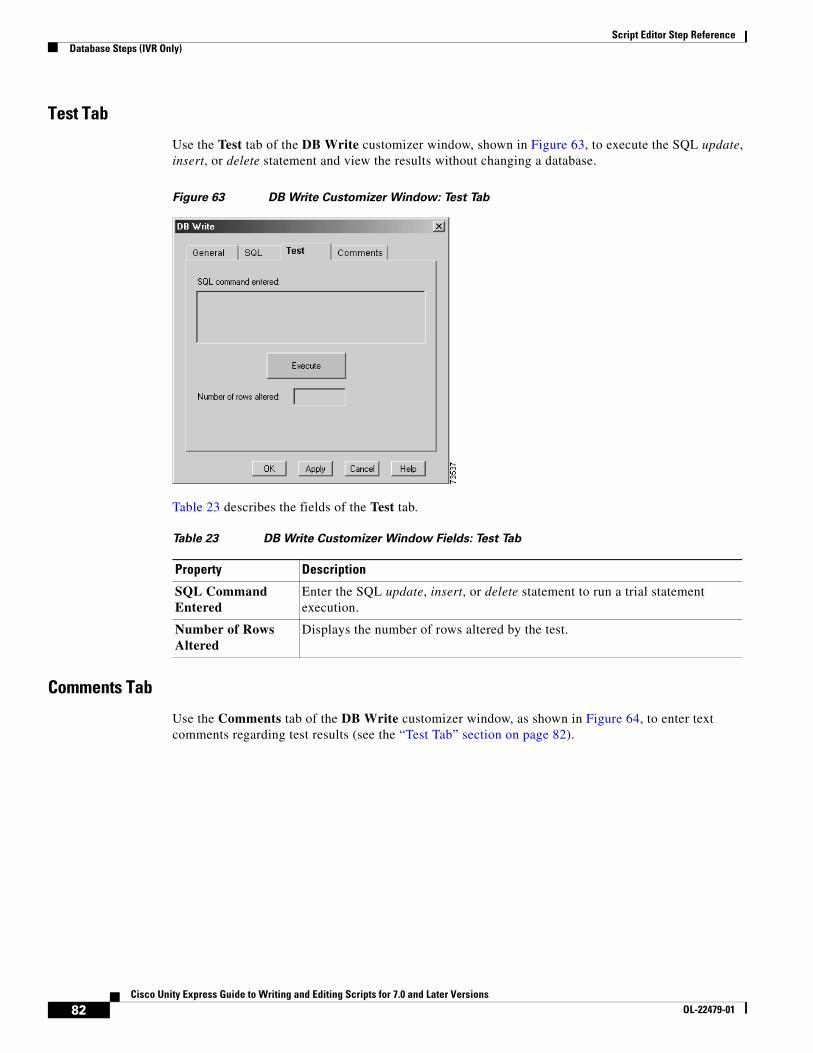
Script Editor Step ReferenceDatabase Steps (IVR Only)
Test Tab
Use the Test tab of the DB Write customizer window, shown in Figure 63, to execute the SQL update, insert, or delete statement and view the results without changing a database.
Figure 63 DB Write Customizer Window: Test Tab
Table 23 describes the fields of the Test tab.
Comments Tab
Use the Comments tab of the DB Write customizer window, as shown in Figure 64, to enter text comments regarding test results (see the “Test Tab” section on page 82).
Table 23 DB Write Customizer Window Fields: Test Tab
Property Description
SQL Command Entered
Enter the SQL update, insert, or delete statement to run a trial statement execution.
Number of Rows Altered
Displays the number of rows altered by the test.
82Cisco Unity Express Guide to Writing and Editing Scripts for 7.0 and Later Versions
OL-22479-01
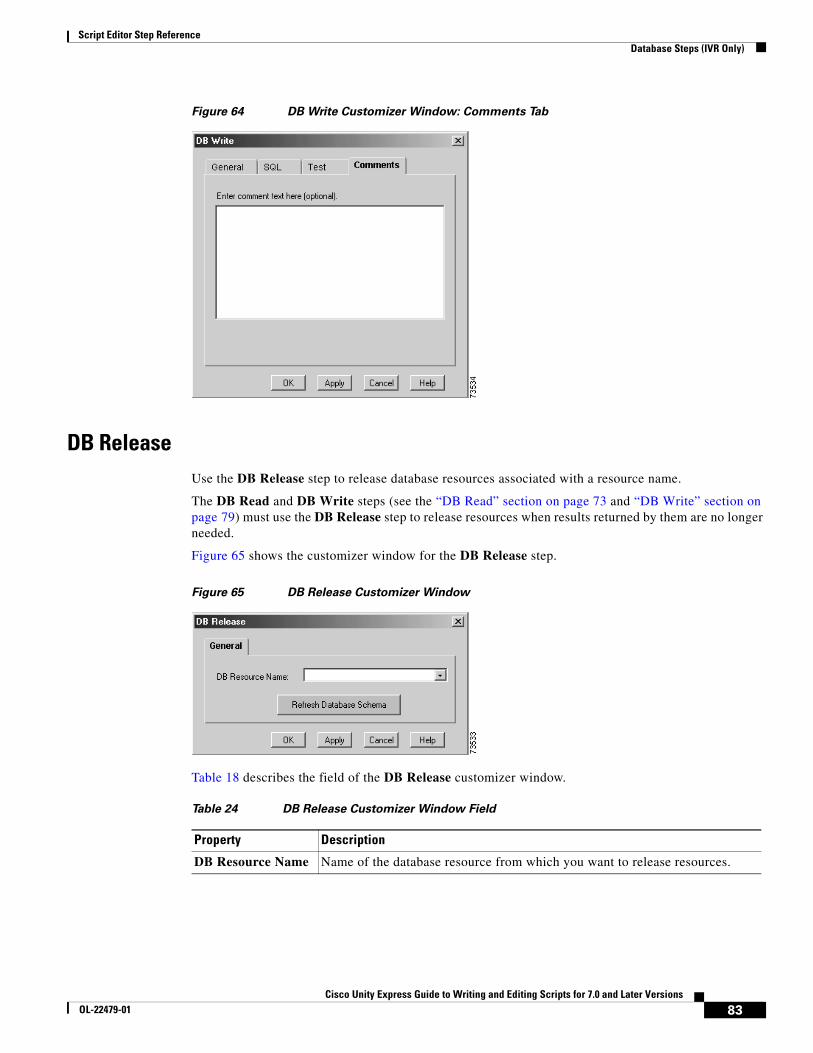
Script Editor Step ReferenceDatabase Steps (IVR Only)
Figure 64 DB Write Customizer Window: Comments Tab
DB ReleaseUse the DB Release step to release database resources associated with a resource name.
The DB Read and DB Write steps (see the “DB Read” section on page 73 and “DB Write” section on page 79) must use the DB Release step to release resources when results returned by them are no longer needed.
Figure 65 shows the customizer window for the DB Release step.
Figure 65 DB Release Customizer Window
Table 18 describes the field of the DB Release customizer window.
Table 24 DB Release Customizer Window Field
Property Description
DB Resource Name Name of the database resource from which you want to release resources.
83Cisco Unity Express Guide to Writing and Editing Scripts for 7.0 and Later Versions
OL-22479-01
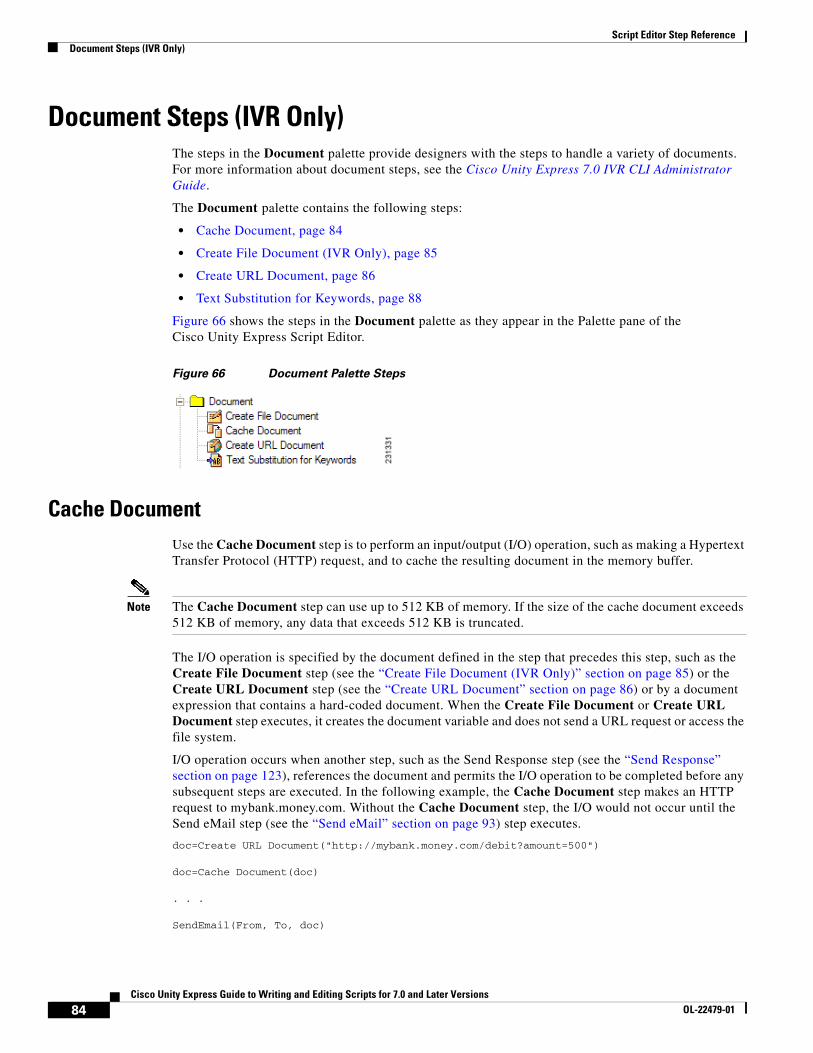
Script Editor Step ReferenceDocument Steps (IVR Only)
Document Steps (IVR Only)The steps in the Document palette provide designers with the steps to handle a variety of documents. For more information about document steps, see the Cisco Unity Express 7.0 IVR CLI Administrator Guide.
The Document palette contains the following steps:
• Cache Document, page 84
• Create File Document (IVR Only), page 85
• Create URL Document, page 86
• Text Substitution for Keywords, page 88
Figure 66 shows the steps in the Document palette as they appear in the Palette pane of the Cisco Unity Express Script Editor.
Figure 66 Document Palette Steps
Cache DocumentUse the Cache Document step is to perform an input/output (I/O) operation, such as making a Hypertext Transfer Protocol (HTTP) request, and to cache the resulting document in the memory buffer.
Note The Cache Document step can use up to 512 KB of memory. If the size of the cache document exceeds 512 KB of memory, any data that exceeds 512 KB is truncated.
The I/O operation is specified by the document defined in the step that precedes this step, such as the Create File Document step (see the “Create File Document (IVR Only)” section on page 85) or the Create URL Document step (see the “Create URL Document” section on page 86) or by a document expression that contains a hard-coded document. When the Create File Document or Create URL Document step executes, it creates the document variable and does not send a URL request or access the file system.
I/O operation occurs when another step, such as the Send Response step (see the “Send Response” section on page 123), references the document and permits the I/O operation to be completed before any subsequent steps are executed. In the following example, the Cache Document step makes an HTTP request to mybank.money.com. Without the Cache Document step, the I/O would not occur until the Send eMail step (see the “Send eMail” section on page 93) step executes.
doc=Create URL Document("http://mybank.money.com/debit?amount=500") doc=Cache Document(doc)
. . .
SendEmail(From, To, doc)
84Cisco Unity Express Guide to Writing and Editing Scripts for 7.0 and Later Versions
OL-22479-01
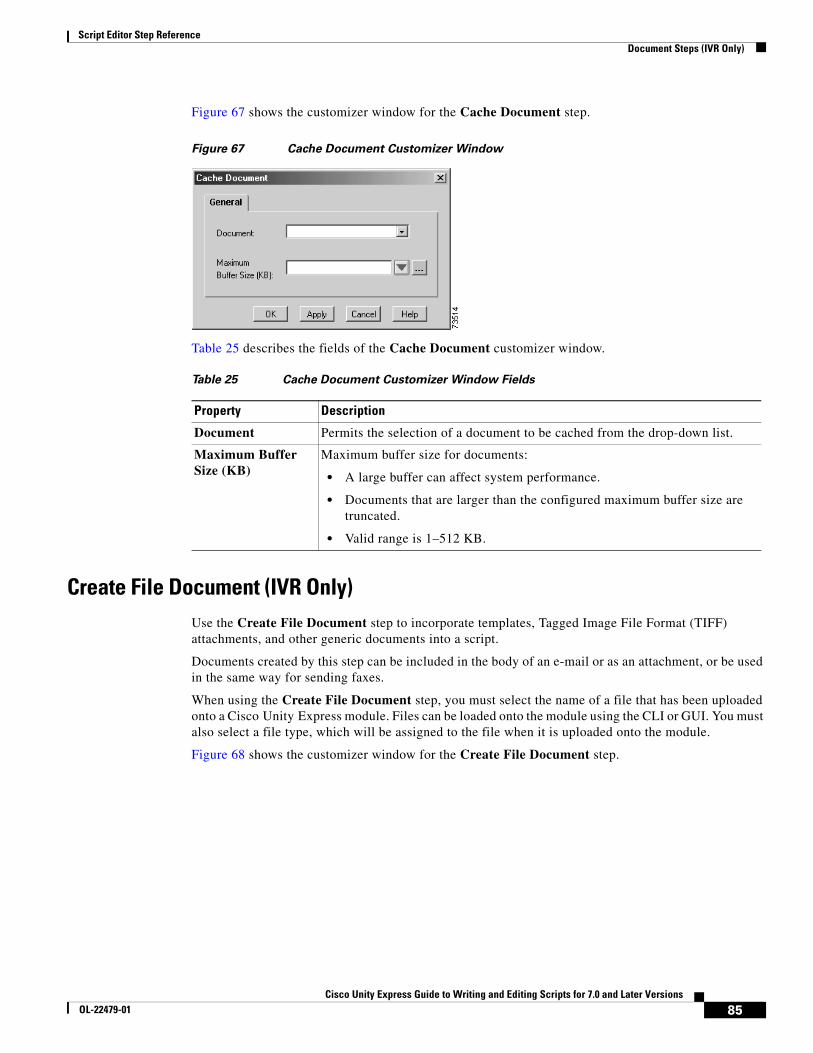
Script Editor Step ReferenceDocument Steps (IVR Only)
Figure 67 shows the customizer window for the Cache Document step.
Figure 67 Cache Document Customizer Window
Table 25 describes the fields of the Cache Document customizer window.
Create File Document (IVR Only)Use the Create File Document step to incorporate templates, Tagged Image File Format (TIFF) attachments, and other generic documents into a script.
Documents created by this step can be included in the body of an e-mail or as an attachment, or be used in the same way for sending faxes.
When using the Create File Document step, you must select the name of a file that has been uploaded onto a Cisco Unity Express module. Files can be loaded onto the module using the CLI or GUI. You must also select a file type, which will be assigned to the file when it is uploaded onto the module.
Figure 68 shows the customizer window for the Create File Document step.
Table 25 Cache Document Customizer Window Fields
Property Description
Document Permits the selection of a document to be cached from the drop-down list.
Maximum Buffer Size (KB)
Maximum buffer size for documents:
• A large buffer can affect system performance.
• Documents that are larger than the configured maximum buffer size are truncated.
• Valid range is 1–512 KB.
85Cisco Unity Express Guide to Writing and Editing Scripts for 7.0 and Later Versions
OL-22479-01
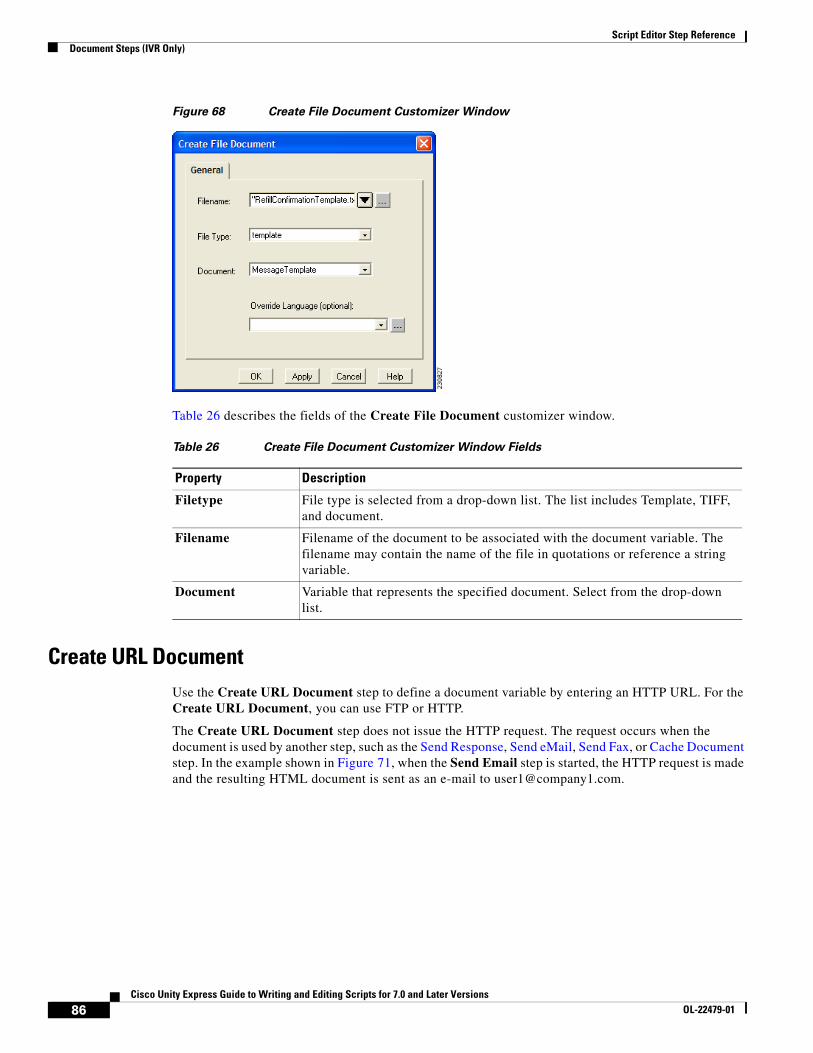
Script Editor Step ReferenceDocument Steps (IVR Only)
Figure 68 Create File Document Customizer Window
Table 26 describes the fields of the Create File Document customizer window.
Create URL DocumentUse the Create URL Document step to define a document variable by entering an HTTP URL. For the Create URL Document, you can use FTP or HTTP.
The Create URL Document step does not issue the HTTP request. The request occurs when the document is used by another step, such as the Send Response, Send eMail, Send Fax, or Cache Document step. In the example shown in Figure 71, when the Send Email step is started, the HTTP request is made and the resulting HTML document is sent as an e-mail to [email protected].
Table 26 Create File Document Customizer Window Fields
Property Description
Filetype File type is selected from a drop-down list. The list includes Template, TIFF, and document.
Filename Filename of the document to be associated with the document variable. The filename may contain the name of the file in quotations or reference a string variable.
Document Variable that represents the specified document. Select from the drop-down list.
86Cisco Unity Express Guide to Writing and Editing Scripts for 7.0 and Later Versions
OL-22479-01
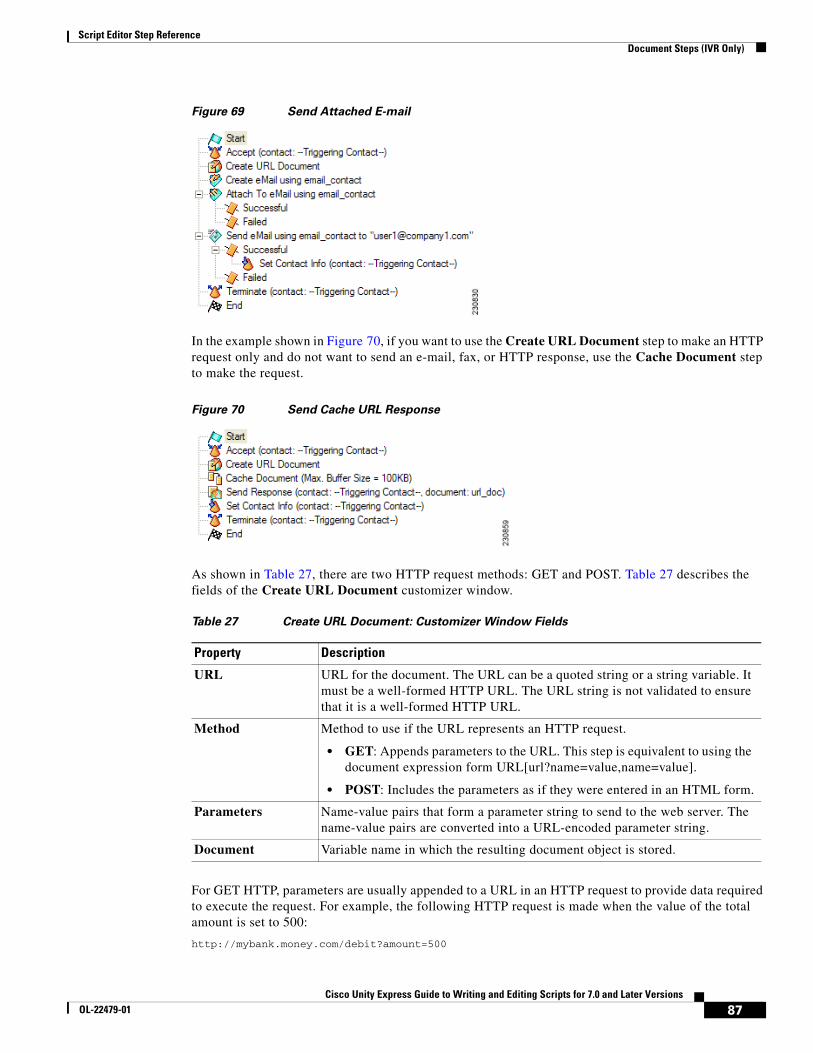
Script Editor Step ReferenceDocument Steps (IVR Only)
Figure 69 Send Attached E-mail
In the example shown in Figure 70, if you want to use the Create URL Document step to make an HTTP request only and do not want to send an e-mail, fax, or HTTP response, use the Cache Document step to make the request.
Figure 70 Send Cache URL Response
As shown in Table 27, there are two HTTP request methods: GET and POST. Table 27 describes the fields of the Create URL Document customizer window.
For GET HTTP, parameters are usually appended to a URL in an HTTP request to provide data required to execute the request. For example, the following HTTP request is made when the value of the total amount is set to 500:
http://mybank.money.com/debit?amount=500
Table 27 Create URL Document: Customizer Window Fields
Property Description
URL URL for the document. The URL can be a quoted string or a string variable. It must be a well-formed HTTP URL. The URL string is not validated to ensure that it is a well-formed HTTP URL.
Method Method to use if the URL represents an HTTP request.
• GET: Appends parameters to the URL. This step is equivalent to using the document expression form URL[url?name=value,name=value].
• POST: Includes the parameters as if they were entered in an HTML form.
Parameters Name-value pairs that form a parameter string to send to the web server. The name-value pairs are converted into a URL-encoded parameter string.
Document Variable name in which the resulting document object is stored.
87Cisco Unity Express Guide to Writing and Editing Scripts for 7.0 and Later Versions
OL-22479-01
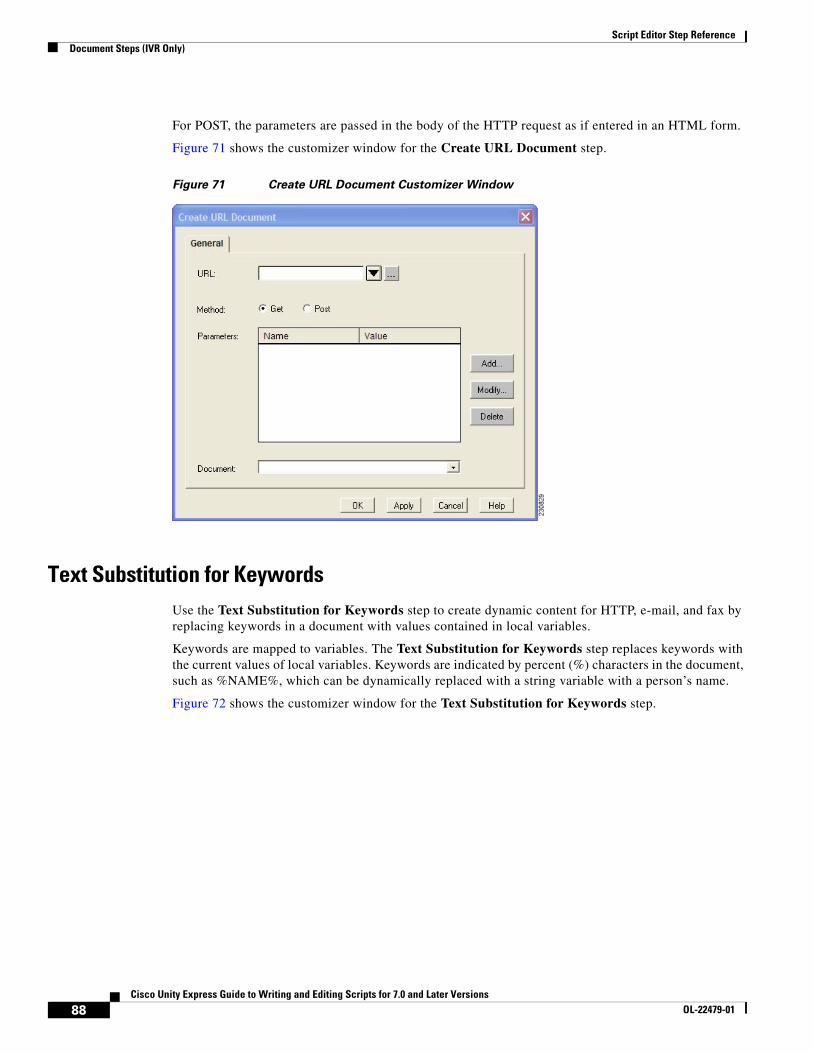
Script Editor Step ReferenceDocument Steps (IVR Only)
For POST, the parameters are passed in the body of the HTTP request as if entered in an HTML form.
Figure 71 shows the customizer window for the Create URL Document step.
Figure 71 Create URL Document Customizer Window
Text Substitution for KeywordsUse the Text Substitution for Keywords step to create dynamic content for HTTP, e-mail, and fax by replacing keywords in a document with values contained in local variables.
Keywords are mapped to variables. The Text Substitution for Keywords step replaces keywords with the current values of local variables. Keywords are indicated by percent (%) characters in the document, such as %NAME%, which can be dynamically replaced with a string variable with a person’s name.
Figure 72 shows the customizer window for the Text Substitution for Keywords step.
88Cisco Unity Express Guide to Writing and Editing Scripts for 7.0 and Later Versions
OL-22479-01
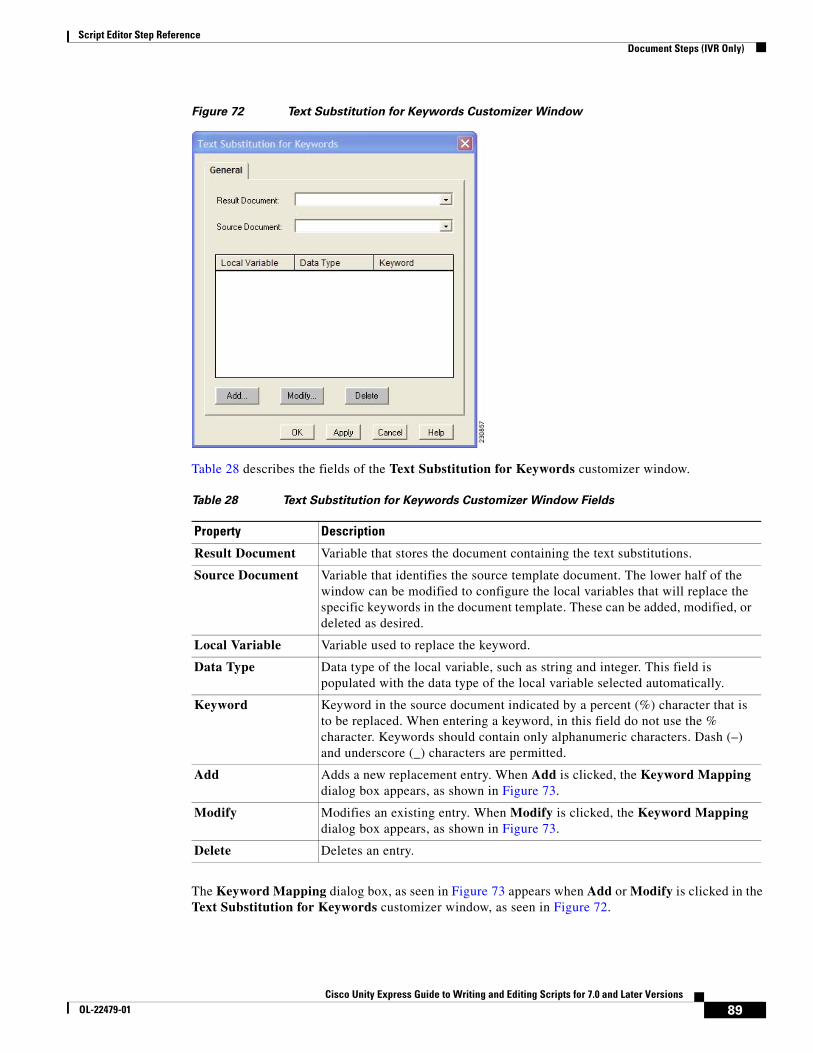
Script Editor Step ReferenceDocument Steps (IVR Only)
Figure 72 Text Substitution for Keywords Customizer Window
Table 28 describes the fields of the Text Substitution for Keywords customizer window.
The Keyword Mapping dialog box, as seen in Figure 73 appears when Add or Modify is clicked in the Text Substitution for Keywords customizer window, as seen in Figure 72.
Table 28 Text Substitution for Keywords Customizer Window Fields
Property Description
Result Document Variable that stores the document containing the text substitutions.
Source Document Variable that identifies the source template document. The lower half of the window can be modified to configure the local variables that will replace the specific keywords in the document template. These can be added, modified, or deleted as desired.
Local Variable Variable used to replace the keyword.
Data Type Data type of the local variable, such as string and integer. This field is populated with the data type of the local variable selected automatically.
Keyword Keyword in the source document indicated by a percent (%) character that is to be replaced. When entering a keyword, in this field do not use the % character. Keywords should contain only alphanumeric characters. Dash (–) and underscore (_) characters are permitted.
Add Adds a new replacement entry. When Add is clicked, the Keyword Mapping dialog box appears, as shown in Figure 73.
Modify Modifies an existing entry. When Modify is clicked, the Keyword Mapping dialog box appears, as shown in Figure 73.
Delete Deletes an entry.
89Cisco Unity Express Guide to Writing and Editing Scripts for 7.0 and Later Versions
OL-22479-01
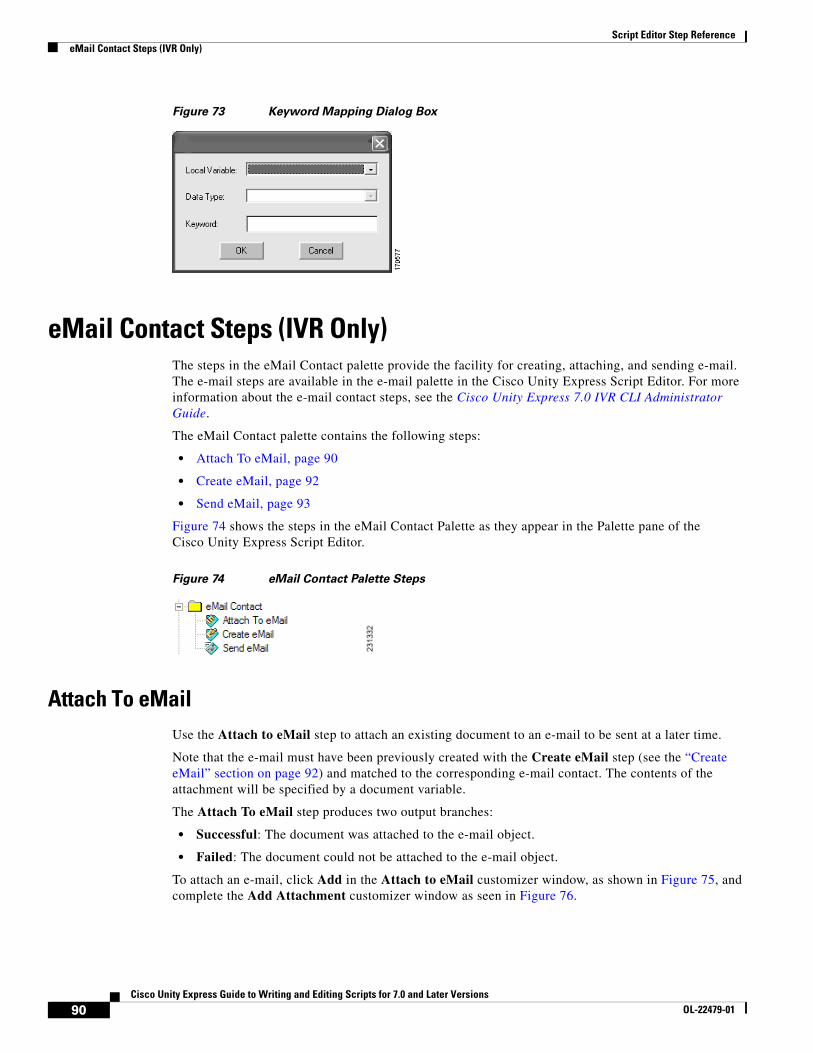
Script Editor Step ReferenceeMail Contact Steps (IVR Only)
Figure 73 Keyword Mapping Dialog Box
eMail Contact Steps (IVR Only)The steps in the eMail Contact palette provide the facility for creating, attaching, and sending e-mail. The e-mail steps are available in the e-mail palette in the Cisco Unity Express Script Editor. For more information about the e-mail contact steps, see the Cisco Unity Express 7.0 IVR CLI Administrator Guide.
The eMail Contact palette contains the following steps:
• Attach To eMail, page 90
• Create eMail, page 92
• Send eMail, page 93
Figure 74 shows the steps in the eMail Contact Palette as they appear in the Palette pane of the Cisco Unity Express Script Editor.
Figure 74 eMail Contact Palette Steps
Attach To eMailUse the Attach to eMail step to attach an existing document to an e-mail to be sent at a later time.
Note that the e-mail must have been previously created with the Create eMail step (see the “Create eMail” section on page 92) and matched to the corresponding e-mail contact. The contents of the attachment will be specified by a document variable.
The Attach To eMail step produces two output branches:
• Successful: The document was attached to the e-mail object.
• Failed: The document could not be attached to the e-mail object.
To attach an e-mail, click Add in the Attach to eMail customizer window, as shown in Figure 75, and complete the Add Attachment customizer window as seen in Figure 76.
90Cisco Unity Express Guide to Writing and Editing Scripts for 7.0 and Later Versions
OL-22479-01
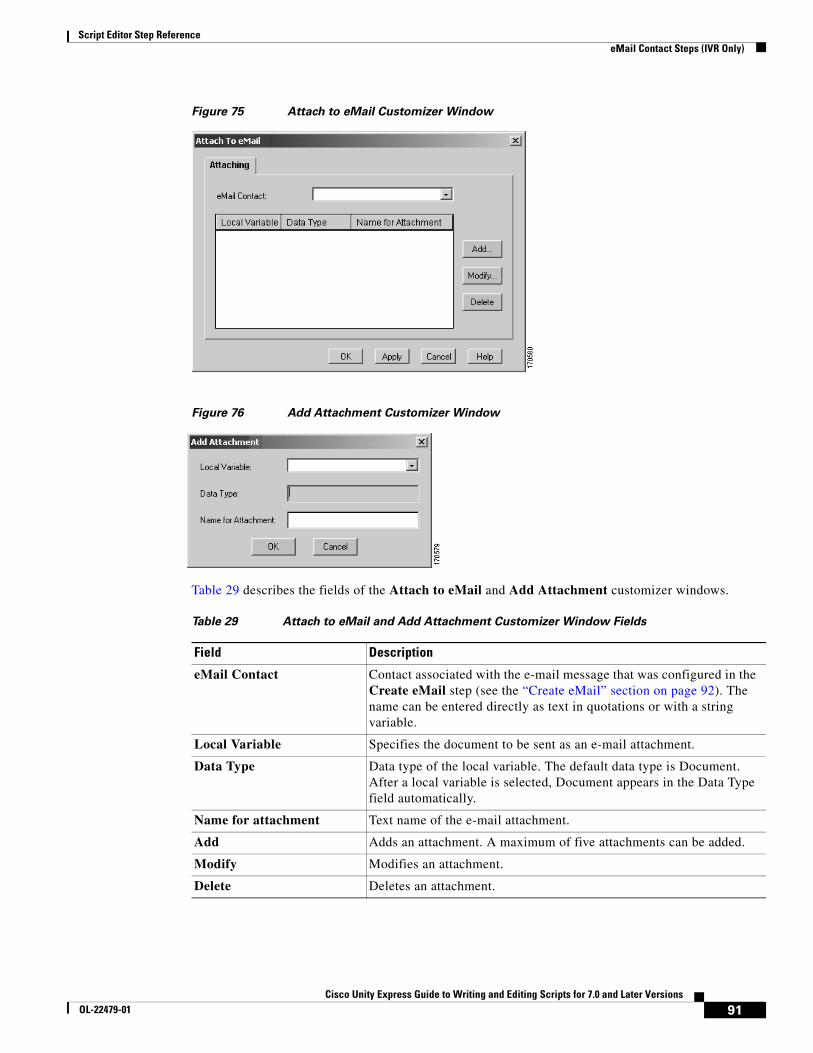
Script Editor Step ReferenceeMail Contact Steps (IVR Only)
Figure 75 Attach to eMail Customizer Window
Figure 76 Add Attachment Customizer Window
Table 29 describes the fields of the Attach to eMail and Add Attachment customizer windows.
Table 29 Attach to eMail and Add Attachment Customizer Window Fields
Field Description
eMail Contact Contact associated with the e-mail message that was configured in the Create eMail step (see the “Create eMail” section on page 92). The name can be entered directly as text in quotations or with a string variable.
Local Variable Specifies the document to be sent as an e-mail attachment.
Data Type Data type of the local variable. The default data type is Document. After a local variable is selected, Document appears in the Data Type field automatically.
Name for attachment Text name of the e-mail attachment.
Add Adds an attachment. A maximum of five attachments can be added.
Modify Modifies an attachment.
Delete Deletes an attachment.
91Cisco Unity Express Guide to Writing and Editing Scripts for 7.0 and Later Versions
OL-22479-01
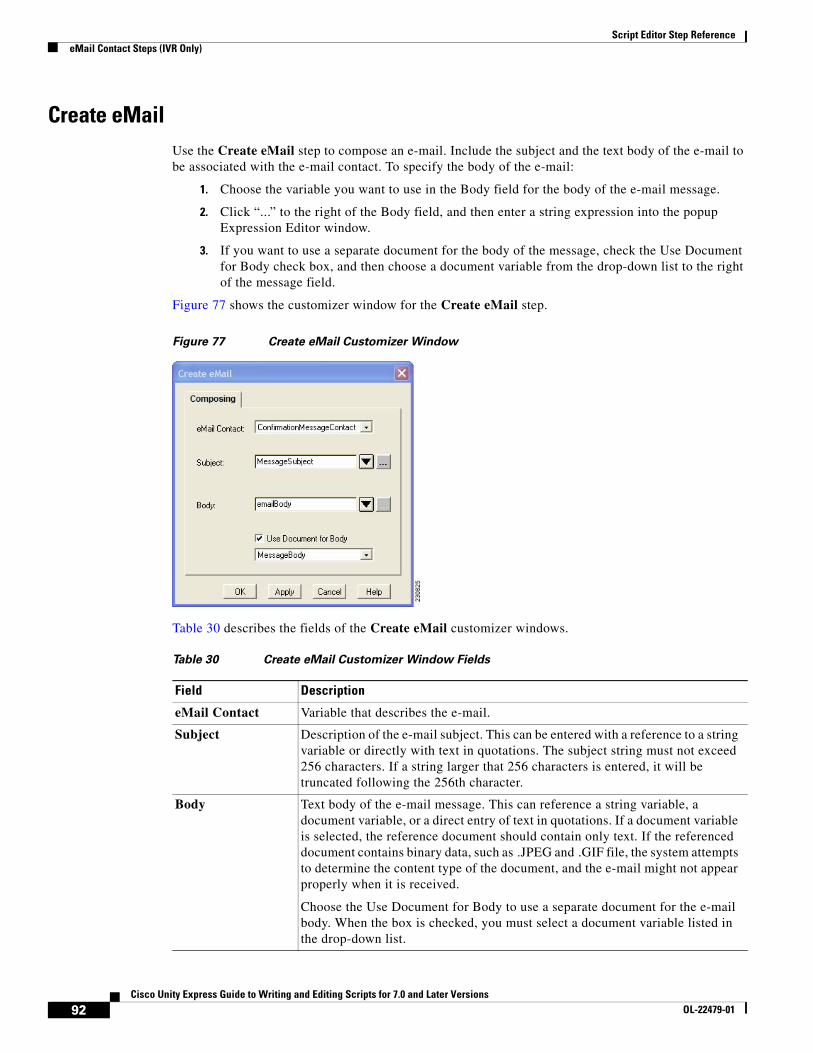
Script Editor Step ReferenceeMail Contact Steps (IVR Only)
Create eMailUse the Create eMail step to compose an e-mail. Include the subject and the text body of the e-mail to be associated with the e-mail contact. To specify the body of the e-mail:
1. Choose the variable you want to use in the Body field for the body of the e-mail message.
2. Click “...” to the right of the Body field, and then enter a string expression into the popup Expression Editor window.
3. If you want to use a separate document for the body of the message, check the Use Document for Body check box, and then choose a document variable from the drop-down list to the right of the message field.
Figure 77 shows the customizer window for the Create eMail step.
Figure 77 Create eMail Customizer Window
Table 30 describes the fields of the Create eMail customizer windows.
Table 30 Create eMail Customizer Window Fields
Field Description
eMail Contact Variable that describes the e-mail.
Subject Description of the e-mail subject. This can be entered with a reference to a string variable or directly with text in quotations. The subject string must not exceed 256 characters. If a string larger that 256 characters is entered, it will be truncated following the 256th character.
Body Text body of the e-mail message. This can reference a string variable, a document variable, or a direct entry of text in quotations. If a document variable is selected, the reference document should contain only text. If the referenced document contains binary data, such as .JPEG and .GIF file, the system attempts to determine the content type of the document, and the e-mail might not appear properly when it is received.
Choose the Use Document for Body to use a separate document for the e-mail body. When the box is checked, you must select a document variable listed in the drop-down list.
92Cisco Unity Express Guide to Writing and Editing Scripts for 7.0 and Later Versions
OL-22479-01
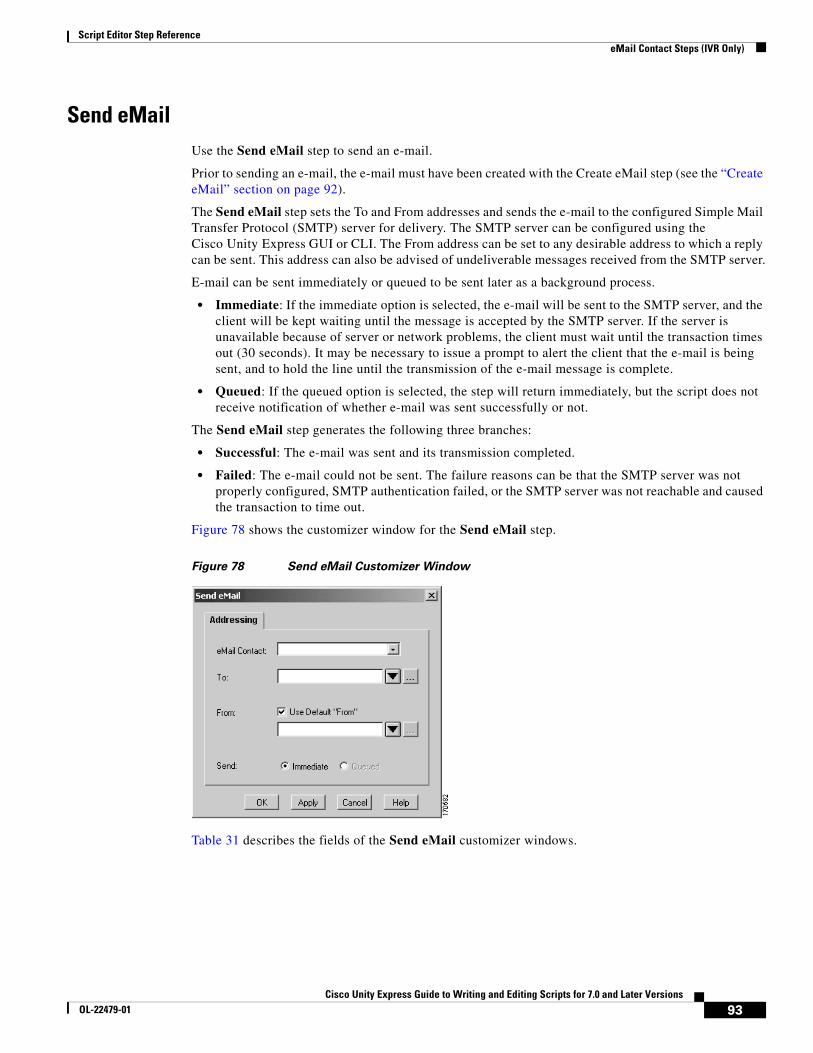
Script Editor Step ReferenceeMail Contact Steps (IVR Only)
Send eMailUse the Send eMail step to send an e-mail.
Prior to sending an e-mail, the e-mail must have been created with the Create eMail step (see the “Create eMail” section on page 92).
The Send eMail step sets the To and From addresses and sends the e-mail to the configured Simple Mail Transfer Protocol (SMTP) server for delivery. The SMTP server can be configured using the Cisco Unity Express GUI or CLI. The From address can be set to any desirable address to which a reply can be sent. This address can also be advised of undeliverable messages received from the SMTP server.
E-mail can be sent immediately or queued to be sent later as a background process.
• Immediate: If the immediate option is selected, the e-mail will be sent to the SMTP server, and the client will be kept waiting until the message is accepted by the SMTP server. If the server is unavailable because of server or network problems, the client must wait until the transaction times out (30 seconds). It may be necessary to issue a prompt to alert the client that the e-mail is being sent, and to hold the line until the transmission of the e-mail message is complete.
• Queued: If the queued option is selected, the step will return immediately, but the script does not receive notification of whether e-mail was sent successfully or not.
The Send eMail step generates the following three branches:
• Successful: The e-mail was sent and its transmission completed.
• Failed: The e-mail could not be sent. The failure reasons can be that the SMTP server was not properly configured, SMTP authentication failed, or the SMTP server was not reachable and caused the transaction to time out.
Figure 78 shows the customizer window for the Send eMail step.
Figure 78 Send eMail Customizer Window
Table 31 describes the fields of the Send eMail customizer windows.
93Cisco Unity Express Guide to Writing and Editing Scripts for 7.0 and Later Versions
OL-22479-01
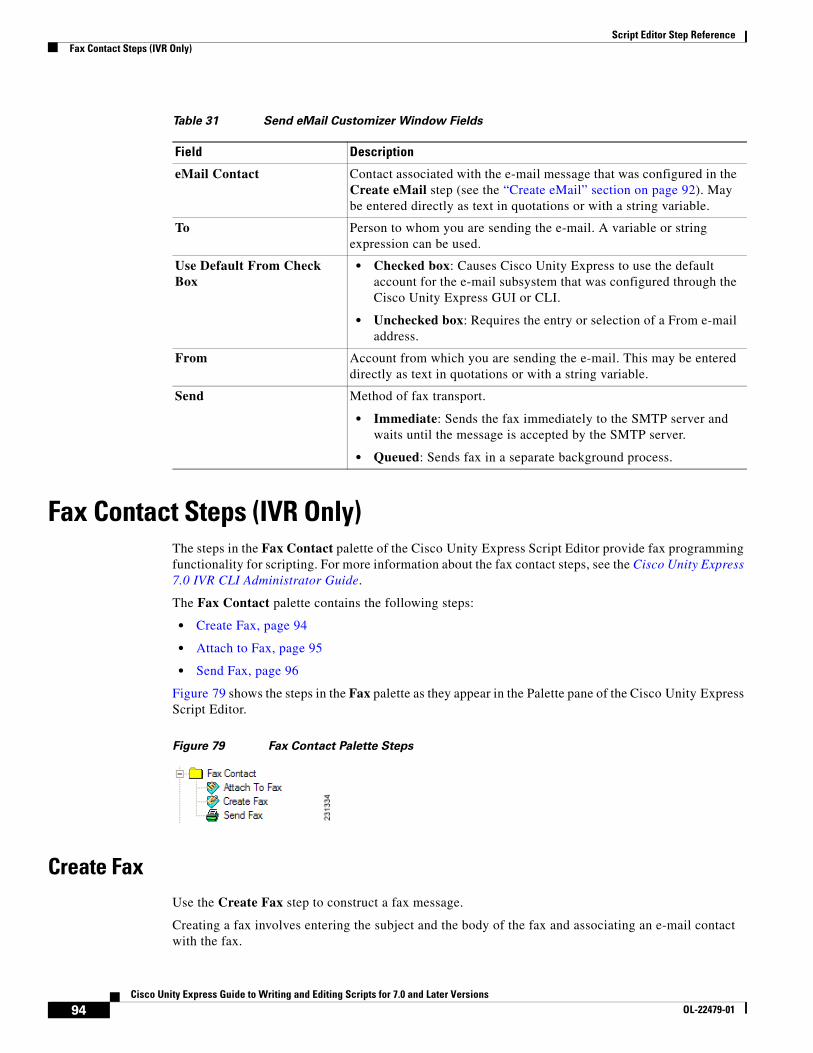
Script Editor Step ReferenceFax Contact Steps (IVR Only)
Fax Contact Steps (IVR Only)The steps in the Fax Contact palette of the Cisco Unity Express Script Editor provide fax programming functionality for scripting. For more information about the fax contact steps, see the Cisco Unity Express 7.0 IVR CLI Administrator Guide.
The Fax Contact palette contains the following steps:
• Create Fax, page 94
• Attach to Fax, page 95
• Send Fax, page 96
Figure 79 shows the steps in the Fax palette as they appear in the Palette pane of the Cisco Unity Express Script Editor.
Figure 79 Fax Contact Palette Steps
Create FaxUse the Create Fax step to construct a fax message.
Creating a fax involves entering the subject and the body of the fax and associating an e-mail contact with the fax.
Table 31 Send eMail Customizer Window Fields
Field Description
eMail Contact Contact associated with the e-mail message that was configured in the Create eMail step (see the “Create eMail” section on page 92). May be entered directly as text in quotations or with a string variable.
To Person to whom you are sending the e-mail. A variable or string expression can be used.
Use Default From Check Box
• Checked box: Causes Cisco Unity Express to use the default account for the e-mail subsystem that was configured through the Cisco Unity Express GUI or CLI.
• Unchecked box: Requires the entry or selection of a From e-mail address.
From Account from which you are sending the e-mail. This may be entered directly as text in quotations or with a string variable.
Send Method of fax transport.
• Immediate: Sends the fax immediately to the SMTP server and waits until the message is accepted by the SMTP server.
• Queued: Sends fax in a separate background process.
94Cisco Unity Express Guide to Writing and Editing Scripts for 7.0 and Later Versions
OL-22479-01
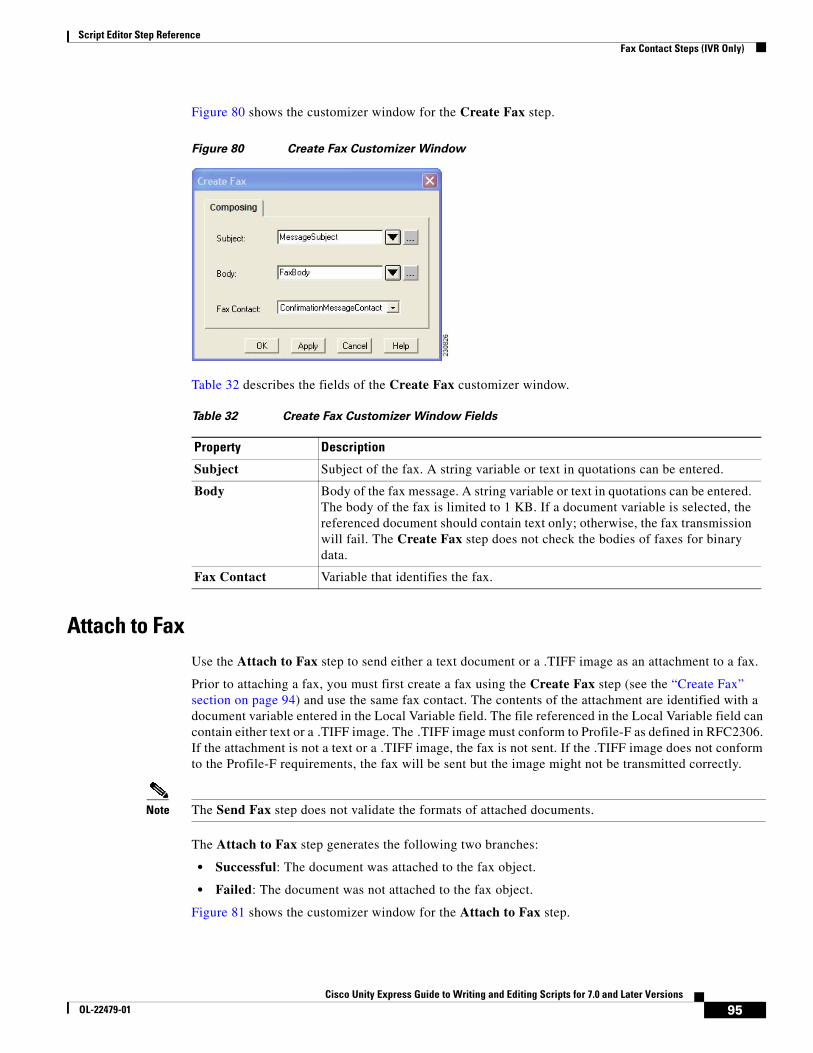
Script Editor Step ReferenceFax Contact Steps (IVR Only)
Figure 80 shows the customizer window for the Create Fax step.
Figure 80 Create Fax Customizer Window
Table 32 describes the fields of the Create Fax customizer window.
Attach to FaxUse the Attach to Fax step to send either a text document or a .TIFF image as an attachment to a fax.
Prior to attaching a fax, you must first create a fax using the Create Fax step (see the “Create Fax” section on page 94) and use the same fax contact. The contents of the attachment are identified with a document variable entered in the Local Variable field. The file referenced in the Local Variable field can contain either text or a .TIFF image. The .TIFF image must conform to Profile-F as defined in RFC2306. If the attachment is not a text or a .TIFF image, the fax is not sent. If the .TIFF image does not conform to the Profile-F requirements, the fax will be sent but the image might not be transmitted correctly.
Note The Send Fax step does not validate the formats of attached documents.
The Attach to Fax step generates the following two branches:
• Successful: The document was attached to the fax object.
• Failed: The document was not attached to the fax object.
Figure 81 shows the customizer window for the Attach to Fax step.
Table 32 Create Fax Customizer Window Fields
Property Description
Subject Subject of the fax. A string variable or text in quotations can be entered.
Body Body of the fax message. A string variable or text in quotations can be entered. The body of the fax is limited to 1 KB. If a document variable is selected, the referenced document should contain text only; otherwise, the fax transmission will fail. The Create Fax step does not check the bodies of faxes for binary data.
Fax Contact Variable that identifies the fax.
95Cisco Unity Express Guide to Writing and Editing Scripts for 7.0 and Later Versions
OL-22479-01
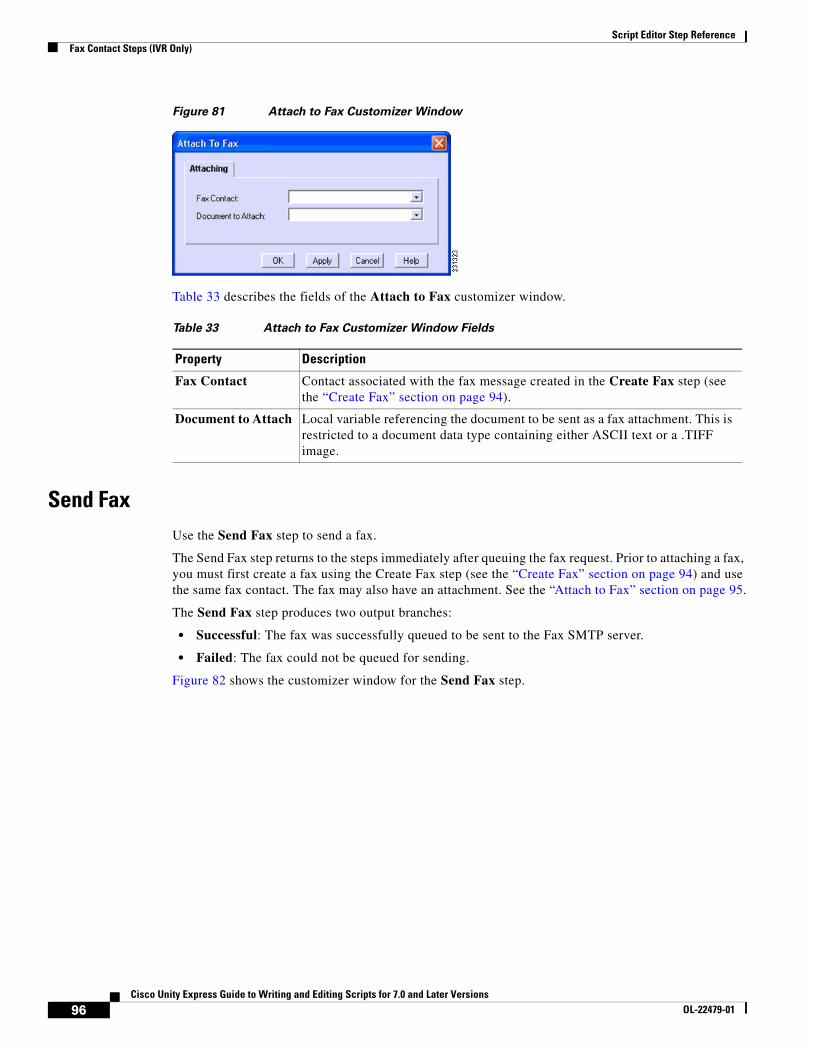
Script Editor Step ReferenceFax Contact Steps (IVR Only)
Figure 81 Attach to Fax Customizer Window
Table 33 describes the fields of the Attach to Fax customizer window.
Send FaxUse the Send Fax step to send a fax.
The Send Fax step returns to the steps immediately after queuing the fax request. Prior to attaching a fax, you must first create a fax using the Create Fax step (see the “Create Fax” section on page 94) and use the same fax contact. The fax may also have an attachment. See the “Attach to Fax” section on page 95.
The Send Fax step produces two output branches:
• Successful: The fax was successfully queued to be sent to the Fax SMTP server.
• Failed: The fax could not be queued for sending.
Figure 82 shows the customizer window for the Send Fax step.
Table 33 Attach to Fax Customizer Window Fields
Property Description
Fax Contact Contact associated with the fax message created in the Create Fax step (see the “Create Fax” section on page 94).
Document to Attach Local variable referencing the document to be sent as a fax attachment. This is restricted to a document data type containing either ASCII text or a .TIFF image.
96Cisco Unity Express Guide to Writing and Editing Scripts for 7.0 and Later Versions
OL-22479-01
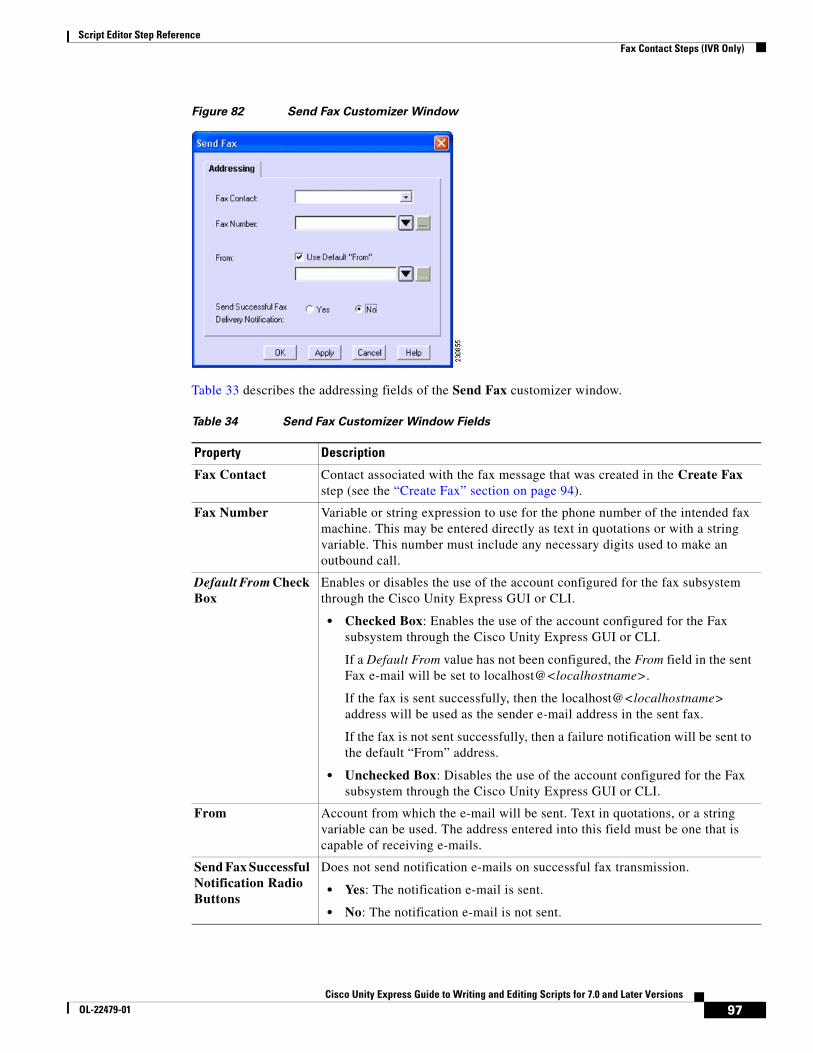
Script Editor Step ReferenceFax Contact Steps (IVR Only)
Figure 82 Send Fax Customizer Window
Table 33 describes the addressing fields of the Send Fax customizer window.
Table 34 Send Fax Customizer Window Fields
Property Description
Fax Contact Contact associated with the fax message that was created in the Create Fax step (see the “Create Fax” section on page 94).
Fax Number Variable or string expression to use for the phone number of the intended fax machine. This may be entered directly as text in quotations or with a string variable. This number must include any necessary digits used to make an outbound call.
Default From Check Box
Enables or disables the use of the account configured for the fax subsystem through the Cisco Unity Express GUI or CLI.
• Checked Box: Enables the use of the account configured for the Fax subsystem through the Cisco Unity Express GUI or CLI.
If a Default From value has not been configured, the From field in the sent Fax e-mail will be set to localhost@<localhostname>.
If the fax is sent successfully, then the localhost@<localhostname> address will be used as the sender e-mail address in the sent fax.
If the fax is not sent successfully, then a failure notification will be sent to the default “From” address.
• Unchecked Box: Disables the use of the account configured for the Fax subsystem through the Cisco Unity Express GUI or CLI.
From Account from which the e-mail will be sent. Text in quotations, or a string variable can be used. The address entered into this field must be one that is capable of receiving e-mails.
Send Fax Successful Notification Radio Buttons
Does not send notification e-mails on successful fax transmission.
• Yes: The notification e-mail is sent.
• No: The notification e-mail is not sent.
97Cisco Unity Express Guide to Writing and Editing Scripts for 7.0 and Later Versions
OL-22479-01
Script Editor Step ReferenceGeneral Steps
General StepsThe steps in the General palette of the Cisco Unity Express Script Editor provide basic programming functionality for scripting.
The General palette contains the following steps:
• Annotate, page 99
• Business Hours, page 100
• Call Subflow, page 100
• Date Time Round-off, page 103
• Day of Week, page 103
• Decrement, page 105
• Delay, page 105
• End, page 106
• Get List Member (IVR Only), page 106
• Goto, page 107
• If, page 108
• Increment, page 108
• Is Holiday, page 109
• Label, page 109
• On Exception Clear, page 110
• On Exception Goto, page 110
• Set, page 111
• Set Application Parameter, page 112
• Start, page 113
• Switch, page 113
• Time of Day, page 115
Figure 83 shows the steps in the General palette as they appear in the Palette pane of the Cisco Unity Express Script Editor.
Note The Set Application Parameter step is only available in Cisco Unity Express 8.0 and later versions.
98Cisco Unity Express Guide to Writing and Editing Scripts for 7.0 and Later Versions
OL-22479-01
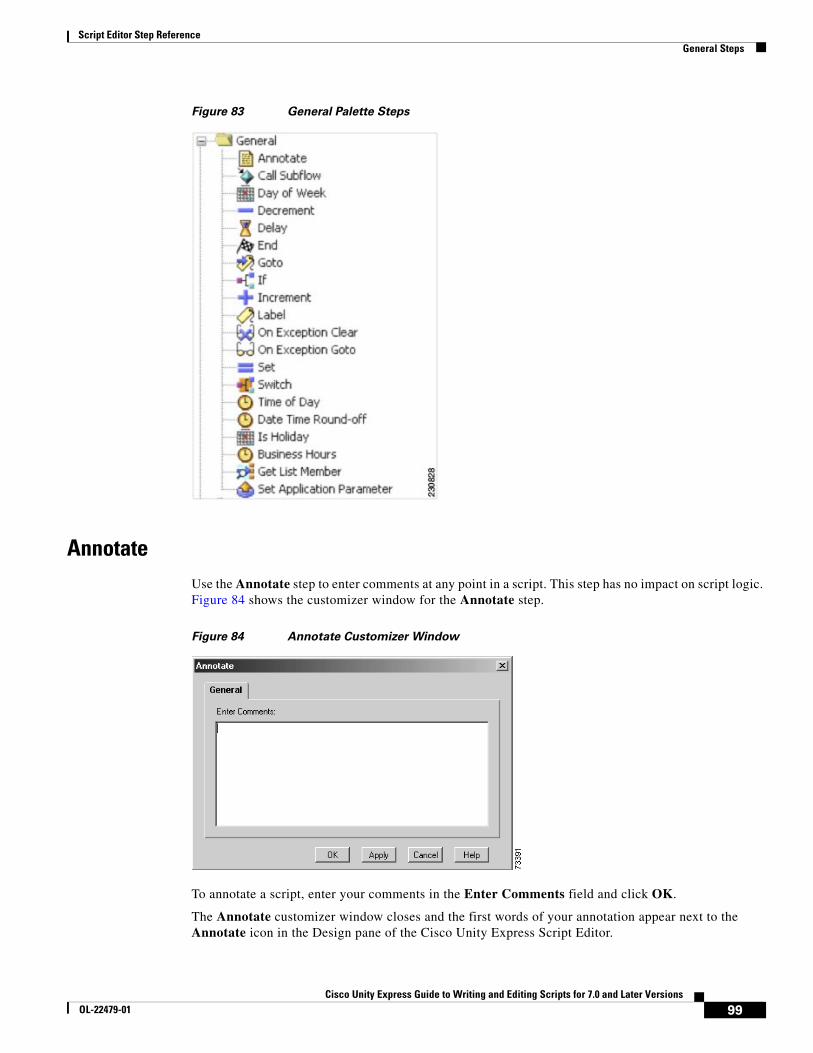
Script Editor Step ReferenceGeneral Steps
Figure 83 General Palette Steps
AnnotateUse the Annotate step to enter comments at any point in a script. This step has no impact on script logic. Figure 84 shows the customizer window for the Annotate step.
Figure 84 Annotate Customizer Window
To annotate a script, enter your comments in the Enter Comments field and click OK.
The Annotate customizer window closes and the first words of your annotation appear next to the Annotate icon in the Design pane of the Cisco Unity Express Script Editor.
99Cisco Unity Express Guide to Writing and Editing Scripts for 7.0 and Later Versions
OL-22479-01
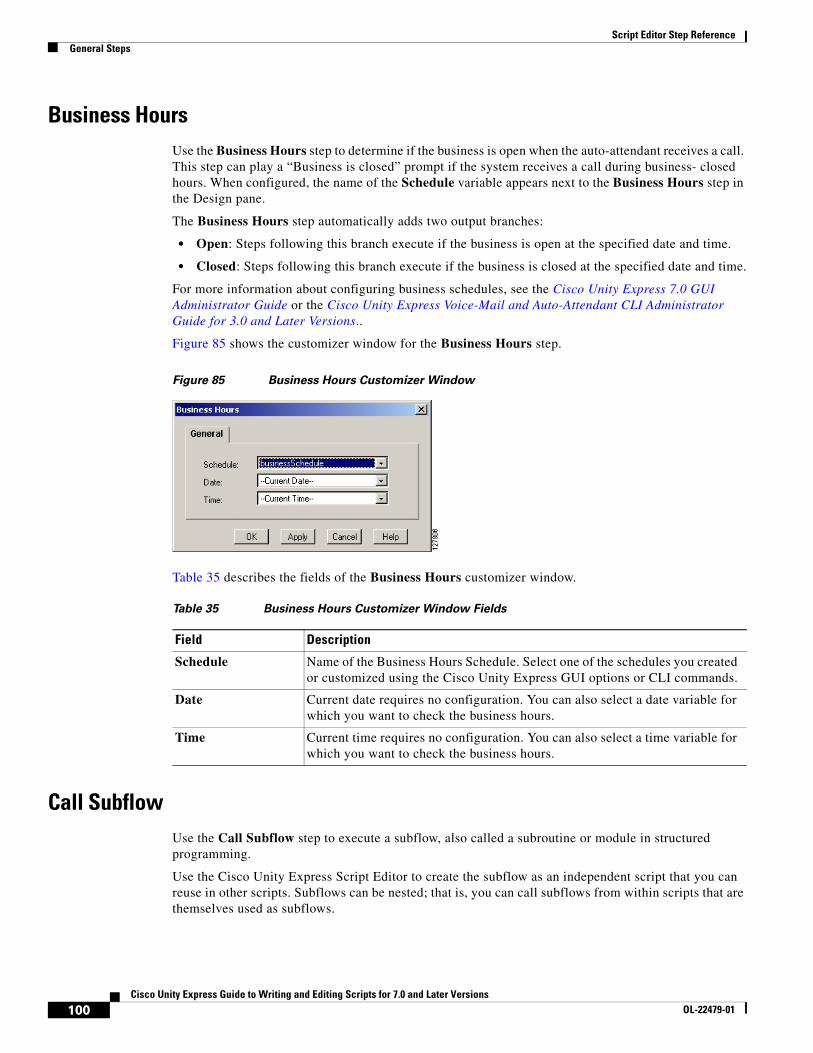
Script Editor Step ReferenceGeneral Steps
Business HoursUse the Business Hours step to determine if the business is open when the auto-attendant receives a call. This step can play a “Business is closed” prompt if the system receives a call during business- closed hours. When configured, the name of the Schedule variable appears next to the Business Hours step in the Design pane.
The Business Hours step automatically adds two output branches:
• Open: Steps following this branch execute if the business is open at the specified date and time.
• Closed: Steps following this branch execute if the business is closed at the specified date and time.
For more information about configuring business schedules, see the Cisco Unity Express 7.0 GUI Administrator Guide or the Cisco Unity Express Voice-Mail and Auto-Attendant CLI Administrator Guide for 3.0 and Later Versions..
Figure 85 shows the customizer window for the Business Hours step.
Figure 85 Business Hours Customizer Window
Table 35 describes the fields of the Business Hours customizer window.
Call SubflowUse the Call Subflow step to execute a subflow, also called a subroutine or module in structured programming.
Use the Cisco Unity Express Script Editor to create the subflow as an independent script that you can reuse in other scripts. Subflows can be nested; that is, you can call subflows from within scripts that are themselves used as subflows.
Table 35 Business Hours Customizer Window Fields
Field Description
Schedule Name of the Business Hours Schedule. Select one of the schedules you created or customized using the Cisco Unity Express GUI options or CLI commands.
Date Current date requires no configuration. You can also select a date variable for which you want to check the business hours.
Time Current time requires no configuration. You can also select a time variable for which you want to check the business hours.
100Cisco Unity Express Guide to Writing and Editing Scripts for 7.0 and Later Versions
OL-22479-01
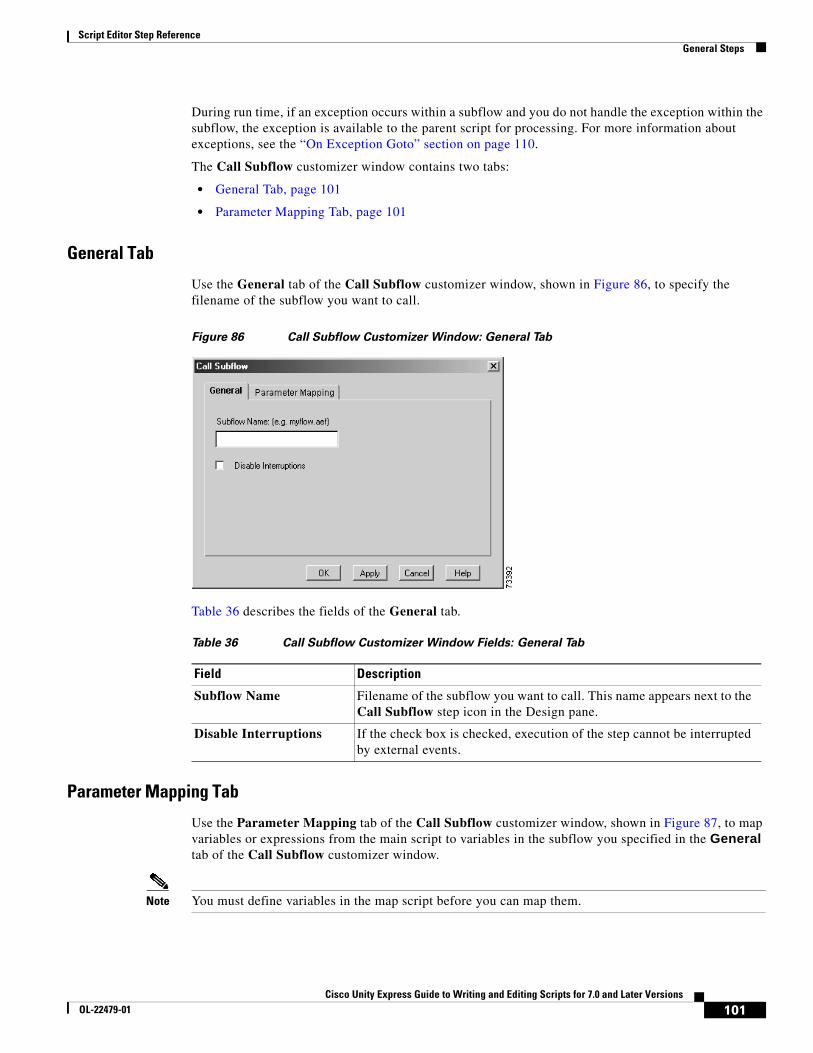
Script Editor Step ReferenceGeneral Steps
During run time, if an exception occurs within a subflow and you do not handle the exception within the subflow, the exception is available to the parent script for processing. For more information about exceptions, see the “On Exception Goto” section on page 110.
The Call Subflow customizer window contains two tabs:
• General Tab, page 101
• Parameter Mapping Tab, page 101
General Tab
Use the General tab of the Call Subflow customizer window, shown in Figure 86, to specify the filename of the subflow you want to call.
Figure 86 Call Subflow Customizer Window: General Tab
Table 36 describes the fields of the General tab.
Parameter Mapping Tab
Use the Parameter Mapping tab of the Call Subflow customizer window, shown in Figure 87, to map variables or expressions from the main script to variables in the subflow you specified in the General tab of the Call Subflow customizer window.
Note You must define variables in the map script before you can map them.
Table 36 Call Subflow Customizer Window Fields: General Tab
Field Description
Subflow Name Filename of the subflow you want to call. This name appears next to the Call Subflow step icon in the Design pane.
Disable Interruptions If the check box is checked, execution of the step cannot be interrupted by external events.
101Cisco Unity Express Guide to Writing and Editing Scripts for 7.0 and Later Versions
OL-22479-01
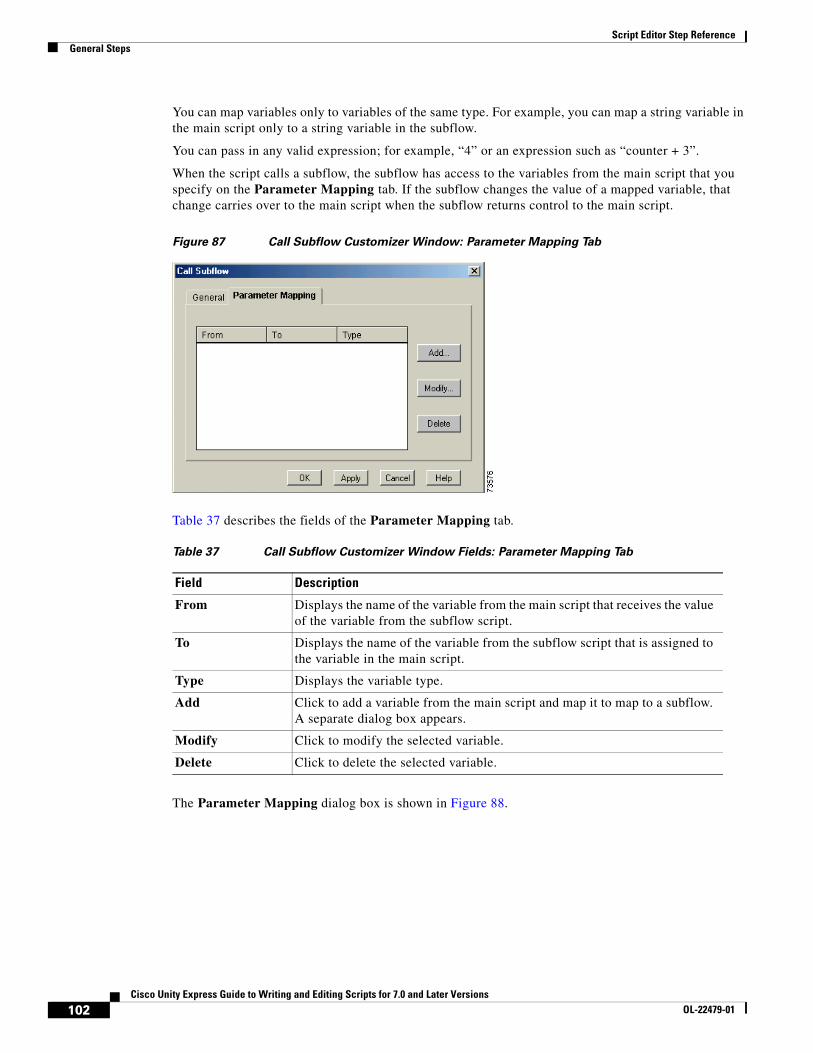
Script Editor Step ReferenceGeneral Steps
You can map variables only to variables of the same type. For example, you can map a string variable in the main script only to a string variable in the subflow.
You can pass in any valid expression; for example, “4” or an expression such as “counter + 3”.
When the script calls a subflow, the subflow has access to the variables from the main script that you specify on the Parameter Mapping tab. If the subflow changes the value of a mapped variable, that change carries over to the main script when the subflow returns control to the main script.
Figure 87 Call Subflow Customizer Window: Parameter Mapping Tab
Table 37 describes the fields of the Parameter Mapping tab.
The Parameter Mapping dialog box is shown in Figure 88.
Table 37 Call Subflow Customizer Window Fields: Parameter Mapping Tab
Field Description
From Displays the name of the variable from the main script that receives the value of the variable from the subflow script.
To Displays the name of the variable from the subflow script that is assigned to the variable in the main script.
Type Displays the variable type.
Add Click to add a variable from the main script and map it to map to a subflow. A separate dialog box appears.
Modify Click to modify the selected variable.
Delete Click to delete the selected variable.
102Cisco Unity Express Guide to Writing and Editing Scripts for 7.0 and Later Versions
OL-22479-01

Script Editor Step ReferenceGeneral Steps
Figure 88 Parameter Mapping Dialog Box
Date Time Round-offUse the Date Time Round-off step utility to round up or round down the current date and time. When the Cisco Unity Express system clock matches the approximate time of day with a rounding value set, the time associated with a connection including the rounding value, the script executes any steps configured for that output branch.
In the following examples:
• Time 6:43 is rounded up to 6:45 if the rounding setting on this step is set to 15 minutes.
• Time 6:43 is rounded up to 7:25 if the rounding setting on this step is set to 25 minutes.
• Time 6:43 is rounded up to 8:00 if the rounding setting on this step is set to 2 hours.
Day of WeekUse the Day of Week step to direct the script to different connection output branches depending on the current day of the week.
When the Cisco Unity Express system clock matches one of the days associated with a connection, the script executes any steps that you configured for that day’s connection branch.
Configure all days with output branches and assign each day its own connection(s). If a day is not assigned to at least one output branch, the Cisco Unity Express Script Editor displays a warning dialog box when you close the Day of Week customizer window.
Figure 89 shows the customizer window for the Day of Week step.
Table 38 Parameter Mapping Dialog Box
Field Description
From Expression Enter the variable name or expression from the main script.
To Variable Enter the variable name from the subflow. This name appears in the list box of the Call Subflow window.
... Click to display the Expression editor.
103Cisco Unity Express Guide to Writing and Editing Scripts for 7.0 and Later Versions
OL-22479-01
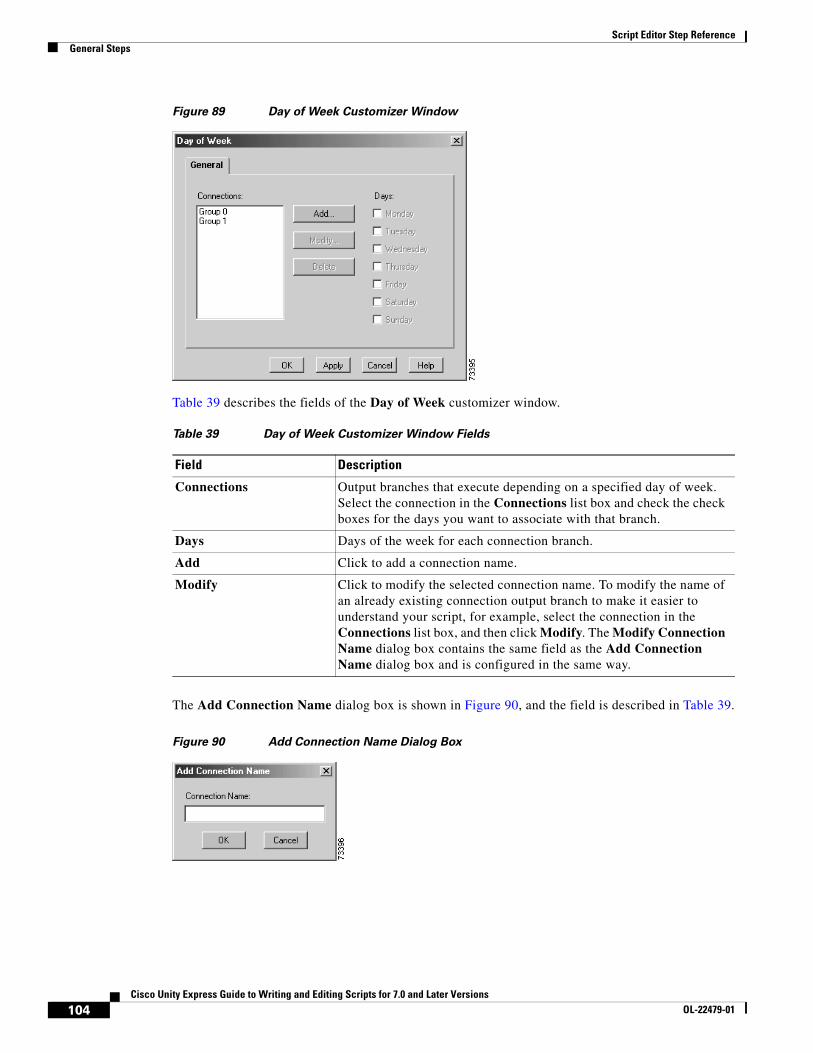
Script Editor Step ReferenceGeneral Steps
Figure 89 Day of Week Customizer Window
Table 39 describes the fields of the Day of Week customizer window.
The Add Connection Name dialog box is shown in Figure 90, and the field is described in Table 39.
Figure 90 Add Connection Name Dialog Box
Table 39 Day of Week Customizer Window Fields
Field Description
Connections Output branches that execute depending on a specified day of week. Select the connection in the Connections list box and check the check boxes for the days you want to associate with that branch.
Days Days of the week for each connection branch.
Add Click to add a connection name.
Modify Click to modify the selected connection name. To modify the name of an already existing connection output branch to make it easier to understand your script, for example, select the connection in the Connections list box, and then click Modify. The Modify Connection Name dialog box contains the same field as the Add Connection Name dialog box and is configured in the same way.
104Cisco Unity Express Guide to Writing and Editing Scripts for 7.0 and Later Versions
OL-22479-01
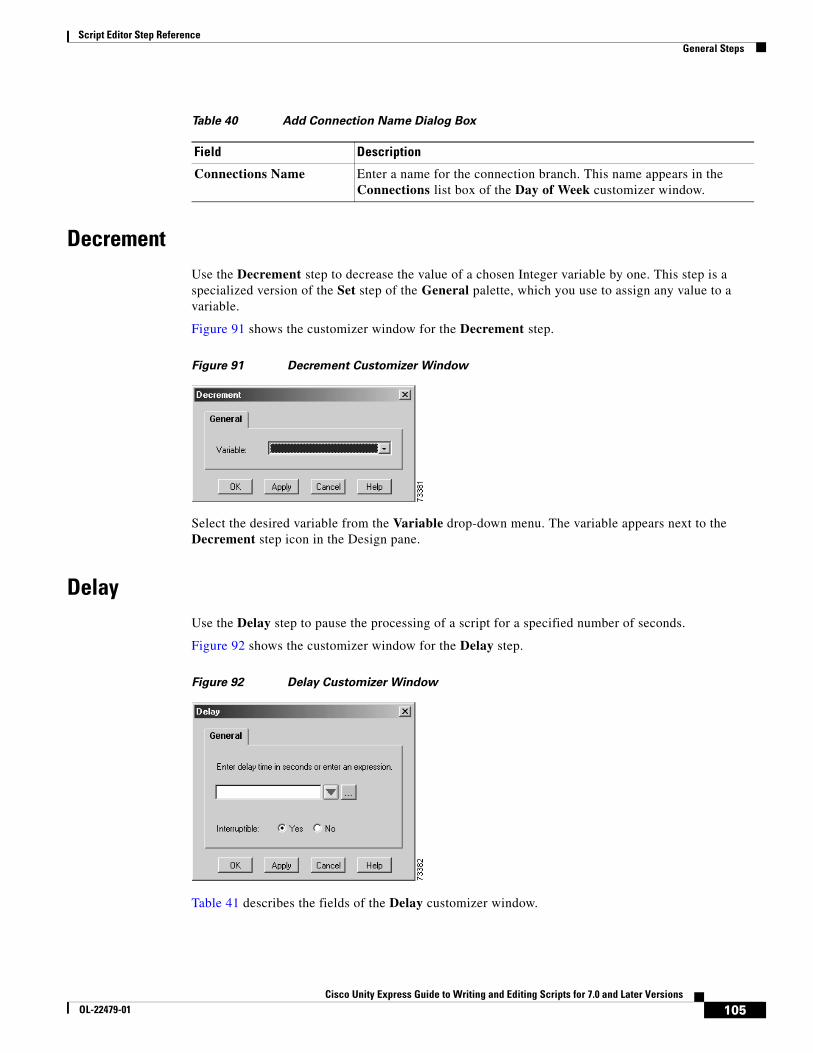
Script Editor Step ReferenceGeneral Steps
DecrementUse the Decrement step to decrease the value of a chosen Integer variable by one. This step is a specialized version of the Set step of the General palette, which you use to assign any value to a variable.
Figure 91 shows the customizer window for the Decrement step.
Figure 91 Decrement Customizer Window
Select the desired variable from the Variable drop-down menu. The variable appears next to the Decrement step icon in the Design pane.
DelayUse the Delay step to pause the processing of a script for a specified number of seconds.
Figure 92 shows the customizer window for the Delay step.
Figure 92 Delay Customizer Window
Table 41 describes the fields of the Delay customizer window.
Table 40 Add Connection Name Dialog Box
Field Description
Connections Name Enter a name for the connection branch. This name appears in the Connections list box of the Day of Week customizer window.
105Cisco Unity Express Guide to Writing and Editing Scripts for 7.0 and Later Versions
OL-22479-01
Script Editor Step ReferenceGeneral Steps
EndUse the End step at the end of a script to complete processing and free all allocated resources.
You can also use the End step at the end of a branch of logic in a script. Any call still active by the time this step is executed will automatically be processed by the system default logic.
This step has no properties and does not require a customizer.
Get List Member (IVR Only)The Get List Member step retrieves a member (token) from a specific position (index) out of a delimiter separated string list.
You can use this step to parse string data retrieved from the database and to extract a portion of it. The extracted member (token) can then be used by other steps. For example, a database query might retrieve all the active prescription numbers for a patient as a comma-separated list. This step can be used to extract individual prescription numbers out of that list, and then each of these prescription numbers can be played to the caller using the Play Prompt step, prompting them to select one of them for refill.
The Get List Member step produces two output branches:
• Success: The data was retrieved successfully and placed in the appropriate output string.
• Invalid Position: The specified position (index) from which to extract the data was invalid. If the members are being retrieved in a loop, this may signify the end of the loop.
Figure 93 shows the customizer window for the Get List Member step.
Table 41 Delay Customizer Window Fields
Field Description
Enter delay time in seconds or enter an expression Enter either the length of time, in seconds, for the delay, or an expression that specifies the length of the delay.
... Displays the expression editor. Enter an expression that specifies the length of the delay.
Interruptible Click Yes to interrupt the delay by external events.
106Cisco Unity Express Guide to Writing and Editing Scripts for 7.0 and Later Versions
OL-22479-01

Script Editor Step ReferenceGeneral Steps
Figure 93 Get List Member Window
Table 42 describes the fields of the Get List Member customizer window.
GotoUse the Goto step to cause the script logic to branch to a specified Label step within the script.
Note Use a Label step to indicate where the Goto step should branch to.
Figure 94 shows the customizer window for the Goto step.
Figure 94 Goto Customizer Window
Table 42 Get List Member Customizer Window Fields
Field Description
List Variable containing the string list.
Position Variable containing the position (index) from which the string member is to be extracted.
Delimiter Variable specifying the delimiter separating the members in the string list.
Output String Variable that stores the extracted output string from the position (index) in the string list, if the step is successful.
107Cisco Unity Express Guide to Writing and Editing Scripts for 7.0 and Later Versions
OL-22479-01
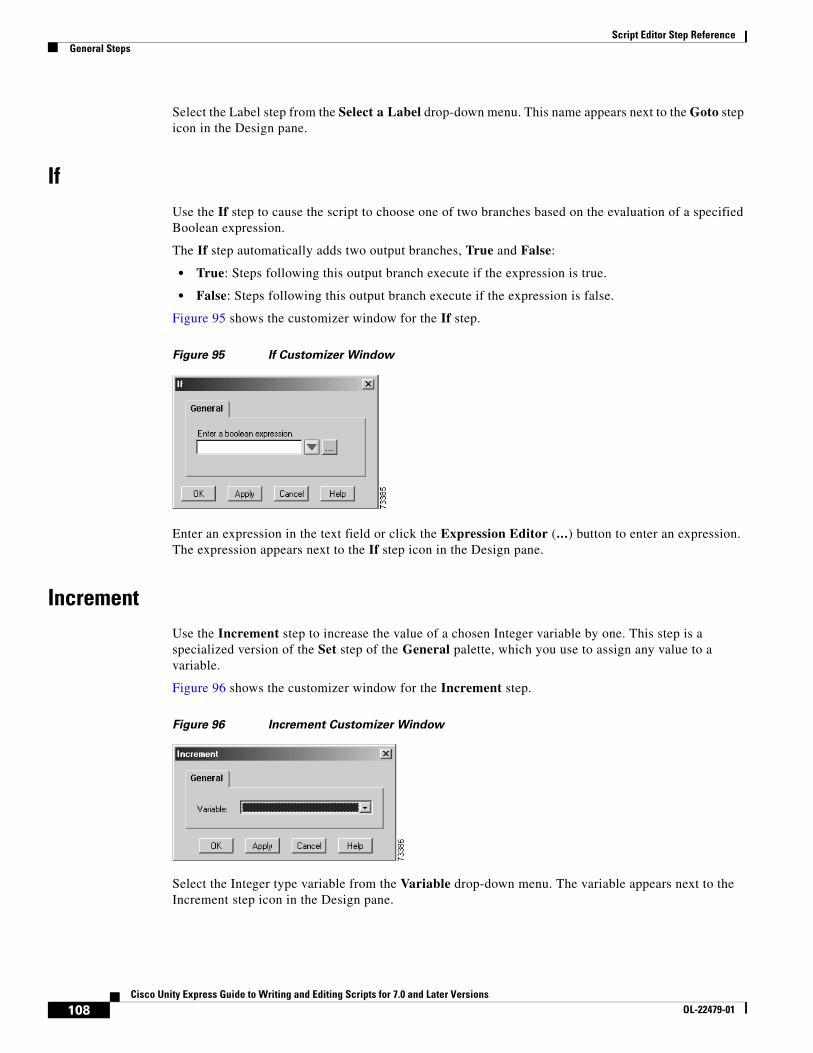
Script Editor Step ReferenceGeneral Steps
Select the Label step from the Select a Label drop-down menu. This name appears next to the Goto step icon in the Design pane.
IfUse the If step to cause the script to choose one of two branches based on the evaluation of a specified Boolean expression.
The If step automatically adds two output branches, True and False:
• True: Steps following this output branch execute if the expression is true.
• False: Steps following this output branch execute if the expression is false.
Figure 95 shows the customizer window for the If step.
Figure 95 If Customizer Window
Enter an expression in the text field or click the Expression Editor (...) button to enter an expression. The expression appears next to the If step icon in the Design pane.
IncrementUse the Increment step to increase the value of a chosen Integer variable by one. This step is a specialized version of the Set step of the General palette, which you use to assign any value to a variable.
Figure 96 shows the customizer window for the Increment step.
Figure 96 Increment Customizer Window
Select the Integer type variable from the Variable drop-down menu. The variable appears next to the Increment step icon in the Design pane.
108Cisco Unity Express Guide to Writing and Editing Scripts for 7.0 and Later Versions
OL-22479-01
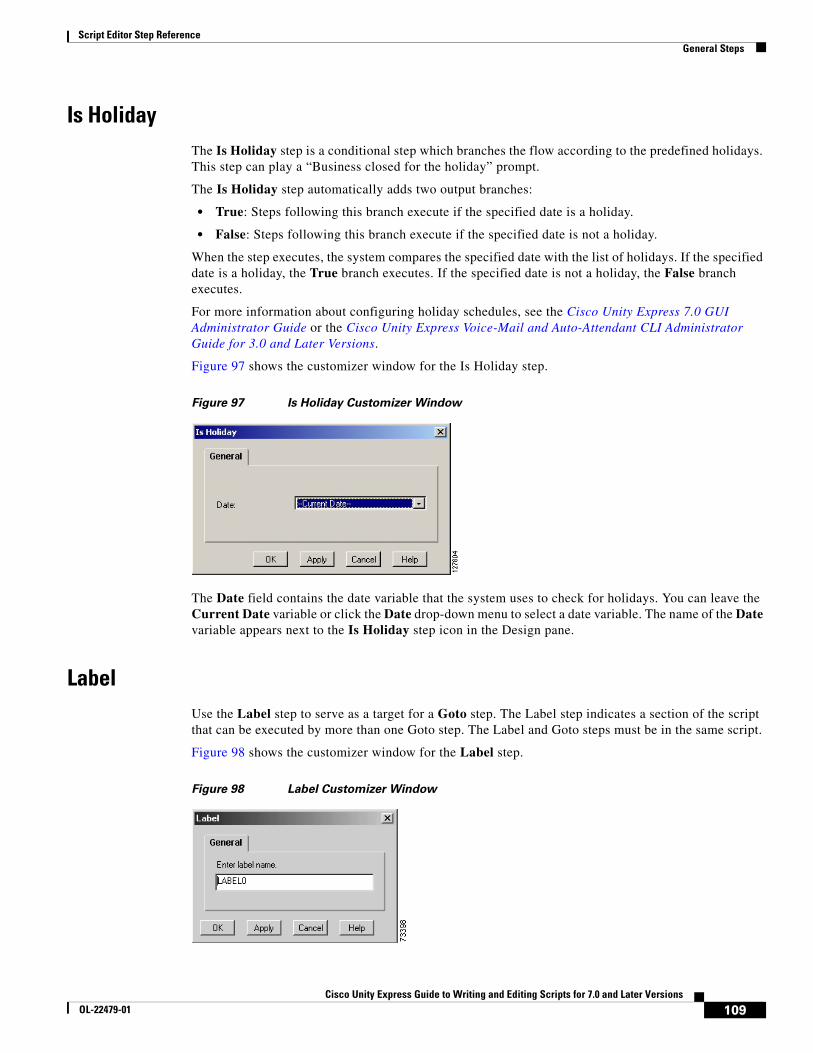
Script Editor Step ReferenceGeneral Steps
Is HolidayThe Is Holiday step is a conditional step which branches the flow according to the predefined holidays. This step can play a “Business closed for the holiday” prompt.
The Is Holiday step automatically adds two output branches:
• True: Steps following this branch execute if the specified date is a holiday.
• False: Steps following this branch execute if the specified date is not a holiday.
When the step executes, the system compares the specified date with the list of holidays. If the specified date is a holiday, the True branch executes. If the specified date is not a holiday, the False branch executes.
For more information about configuring holiday schedules, see the Cisco Unity Express 7.0 GUI Administrator Guide or the Cisco Unity Express Voice-Mail and Auto-Attendant CLI Administrator Guide for 3.0 and Later Versions.
Figure 97 shows the customizer window for the Is Holiday step.
Figure 97 Is Holiday Customizer Window
The Date field contains the date variable that the system uses to check for holidays. You can leave the Current Date variable or click the Date drop-down menu to select a date variable. The name of the Date variable appears next to the Is Holiday step icon in the Design pane.
LabelUse the Label step to serve as a target for a Goto step. The Label step indicates a section of the script that can be executed by more than one Goto step. The Label and Goto steps must be in the same script.
Figure 98 shows the customizer window for the Label step.
Figure 98 Label Customizer Window
109Cisco Unity Express Guide to Writing and Editing Scripts for 7.0 and Later Versions
OL-22479-01
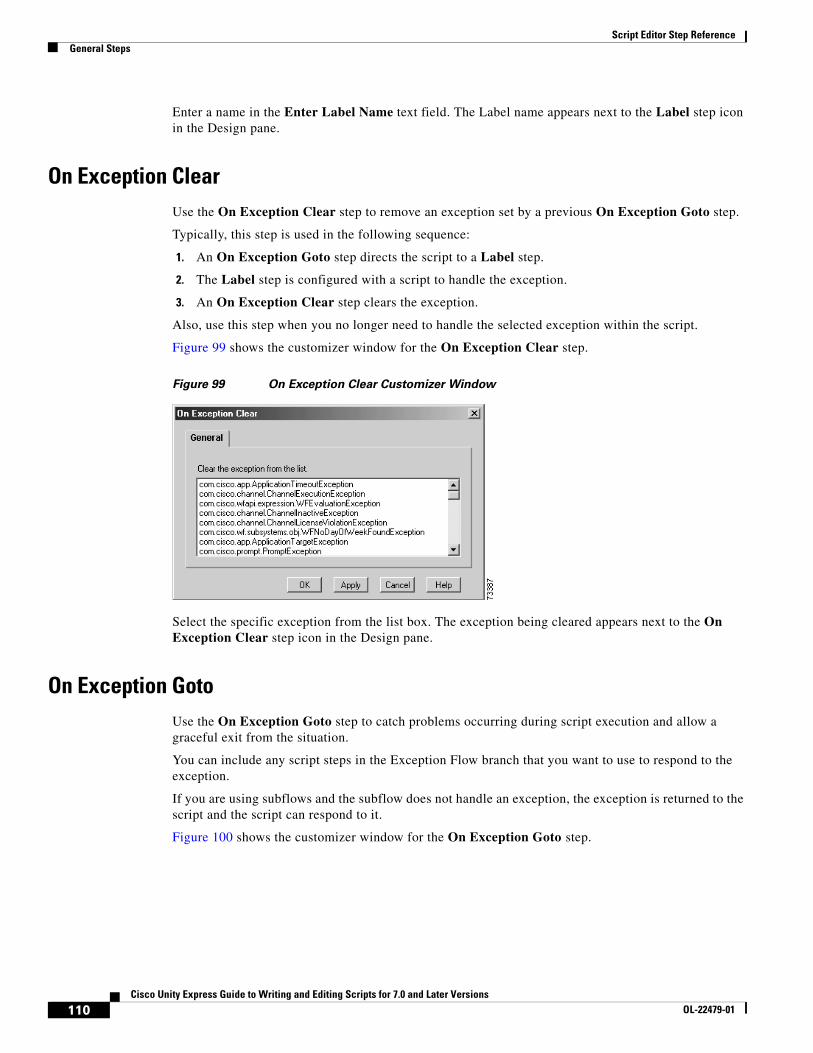
Script Editor Step ReferenceGeneral Steps
Enter a name in the Enter Label Name text field. The Label name appears next to the Label step icon in the Design pane.
On Exception ClearUse the On Exception Clear step to remove an exception set by a previous On Exception Goto step.
Typically, this step is used in the following sequence:
1. An On Exception Goto step directs the script to a Label step.
2. The Label step is configured with a script to handle the exception.
3. An On Exception Clear step clears the exception.
Also, use this step when you no longer need to handle the selected exception within the script.
Figure 99 shows the customizer window for the On Exception Clear step.
Figure 99 On Exception Clear Customizer Window
Select the specific exception from the list box. The exception being cleared appears next to the On Exception Clear step icon in the Design pane.
On Exception GotoUse the On Exception Goto step to catch problems occurring during script execution and allow a graceful exit from the situation.
You can include any script steps in the Exception Flow branch that you want to use to respond to the exception.
If you are using subflows and the subflow does not handle an exception, the exception is returned to the script and the script can respond to it.
Figure 100 shows the customizer window for the On Exception Goto step.
110Cisco Unity Express Guide to Writing and Editing Scripts for 7.0 and Later Versions
OL-22479-01
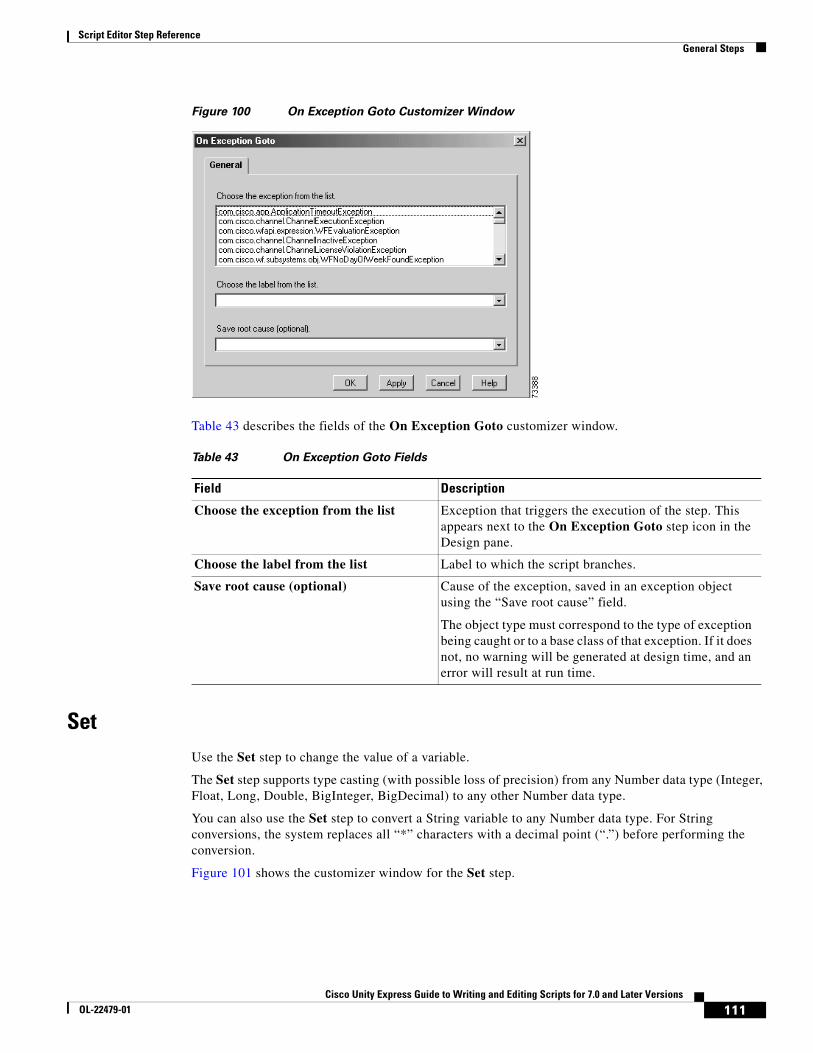
Script Editor Step ReferenceGeneral Steps
Figure 100 On Exception Goto Customizer Window
Table 43 describes the fields of the On Exception Goto customizer window.
SetUse the Set step to change the value of a variable.
The Set step supports type casting (with possible loss of precision) from any Number data type (Integer, Float, Long, Double, BigInteger, BigDecimal) to any other Number data type.
You can also use the Set step to convert a String variable to any Number data type. For String conversions, the system replaces all “*” characters with a decimal point (“.”) before performing the conversion.
Figure 101 shows the customizer window for the Set step.
Table 43 On Exception Goto Fields
Field Description
Choose the exception from the list Exception that triggers the execution of the step. This appears next to the On Exception Goto step icon in the Design pane.
Choose the label from the list Label to which the script branches.
Save root cause (optional) Cause of the exception, saved in an exception object using the “Save root cause” field.
The object type must correspond to the type of exception being caught or to a base class of that exception. If it does not, no warning will be generated at design time, and an error will result at run time.
111Cisco Unity Express Guide to Writing and Editing Scripts for 7.0 and Later Versions
OL-22479-01
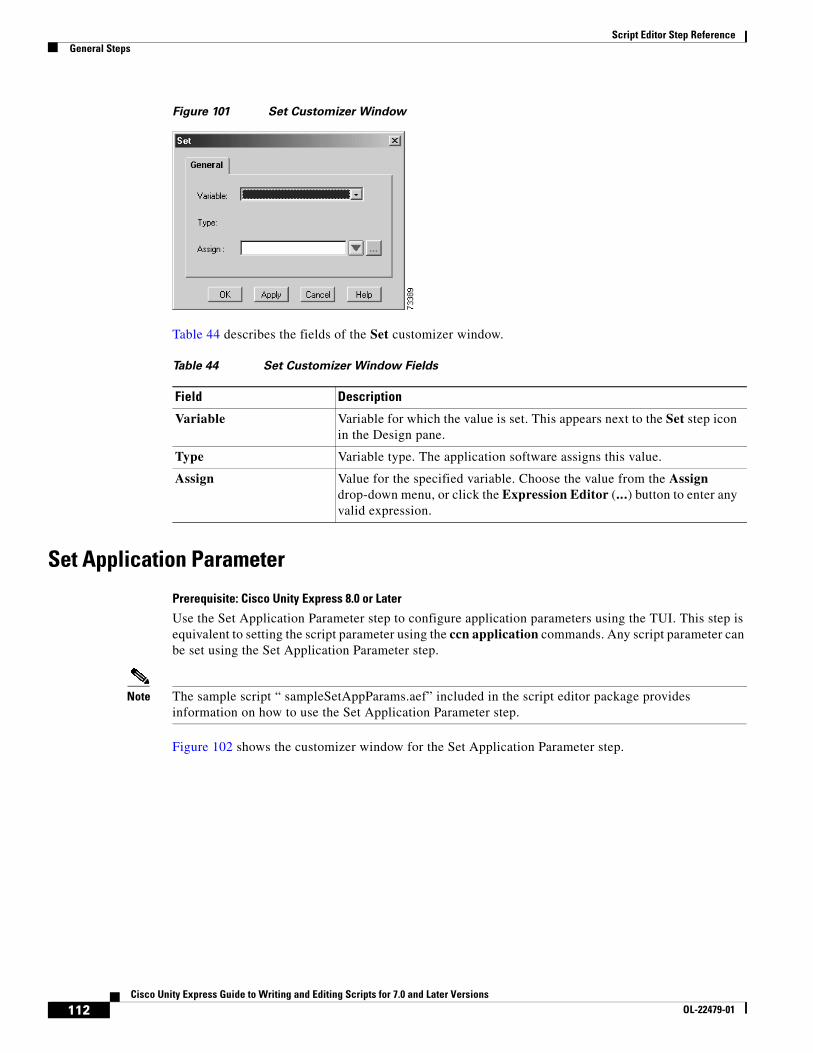
Script Editor Step ReferenceGeneral Steps
Figure 101 Set Customizer Window
Table 44 describes the fields of the Set customizer window.
Set Application Parameter
Prerequisite: Cisco Unity Express 8.0 or Later
Use the Set Application Parameter step to configure application parameters using the TUI. This step is equivalent to setting the script parameter using the ccn application commands. Any script parameter can be set using the Set Application Parameter step.
Note The sample script “ sampleSetAppParams.aef” included in the script editor package provides information on how to use the Set Application Parameter step.
Figure 102 shows the customizer window for the Set Application Parameter step.
Table 44 Set Customizer Window Fields
Field Description
Variable Variable for which the value is set. This appears next to the Set step icon in the Design pane.
Type Variable type. The application software assigns this value.
Assign Value for the specified variable. Choose the value from the Assign drop-down menu, or click the Expression Editor (...) button to enter any valid expression.
112Cisco Unity Express Guide to Writing and Editing Scripts for 7.0 and Later Versions
OL-22479-01
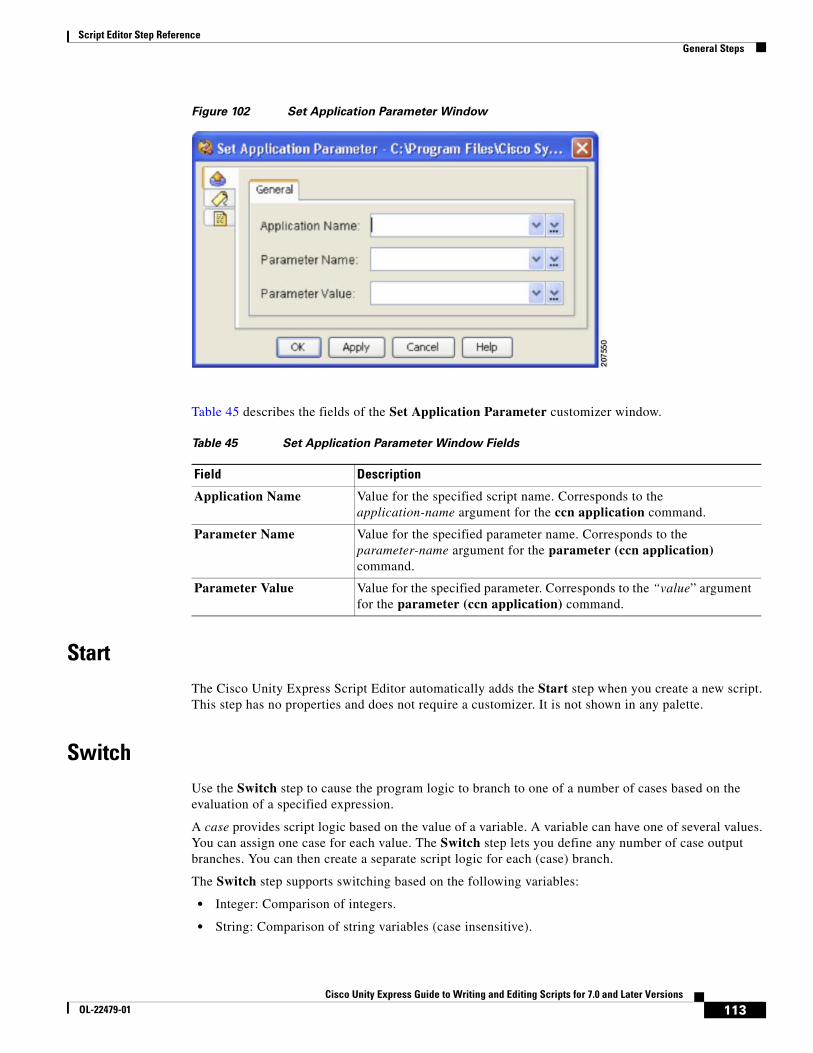
Script Editor Step ReferenceGeneral Steps
Figure 102 Set Application Parameter Window
Table 45 describes the fields of the Set Application Parameter customizer window.
StartThe Cisco Unity Express Script Editor automatically adds the Start step when you create a new script. This step has no properties and does not require a customizer. It is not shown in any palette.
SwitchUse the Switch step to cause the program logic to branch to one of a number of cases based on the evaluation of a specified expression.
A case provides script logic based on the value of a variable. A variable can have one of several values. You can assign one case for each value. The Switch step lets you define any number of case output branches. You can then create a separate script logic for each (case) branch.
The Switch step supports switching based on the following variables:
• Integer: Comparison of integers.
• String: Comparison of string variables (case insensitive).
Table 45 Set Application Parameter Window Fields
Field Description
Application Name Value for the specified script name. Corresponds to the application-name argument for the ccn application command.
Parameter Name Value for the specified parameter name. Corresponds to the parameter-name argument for the parameter (ccn application) command.
Parameter Value Value for the specified parameter. Corresponds to the “value” argument for the parameter (ccn application) command.
113Cisco Unity Express Guide to Writing and Editing Scripts for 7.0 and Later Versions
OL-22479-01
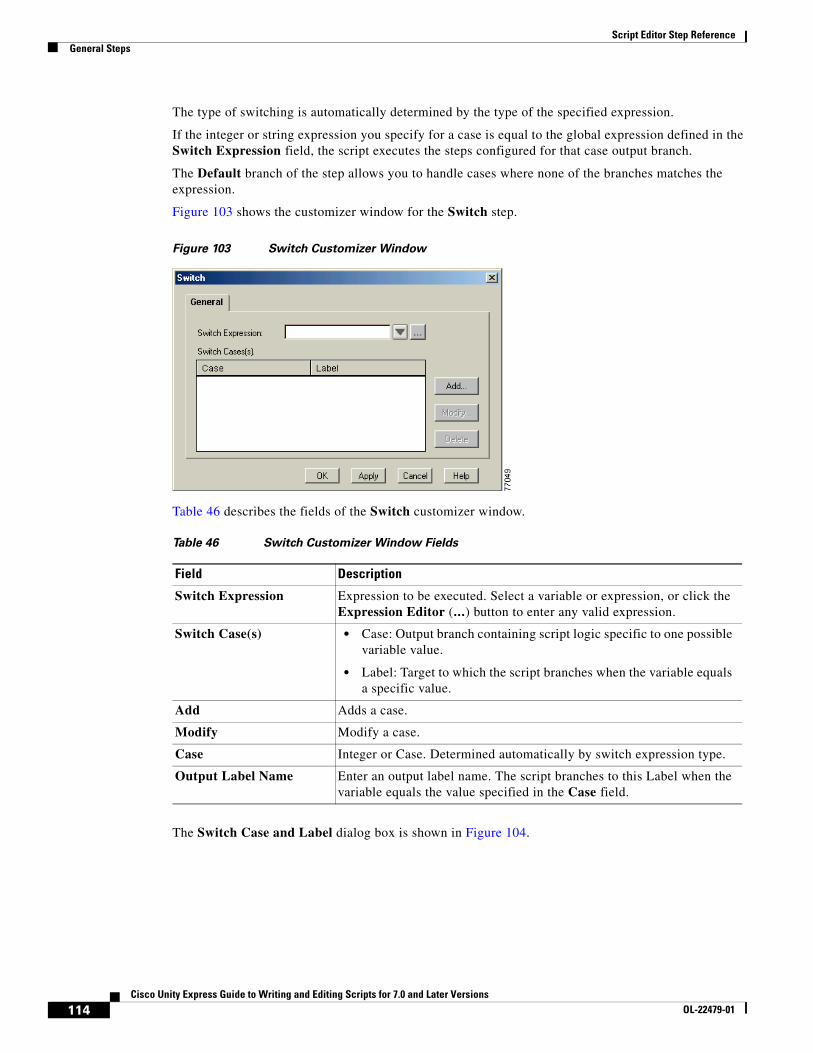
Script Editor Step ReferenceGeneral Steps
The type of switching is automatically determined by the type of the specified expression.
If the integer or string expression you specify for a case is equal to the global expression defined in the Switch Expression field, the script executes the steps configured for that case output branch.
The Default branch of the step allows you to handle cases where none of the branches matches the expression.
Figure 103 shows the customizer window for the Switch step.
Figure 103 Switch Customizer Window
Table 46 describes the fields of the Switch customizer window.
The Switch Case and Label dialog box is shown in Figure 104.
Table 46 Switch Customizer Window Fields
Field Description
Switch Expression Expression to be executed. Select a variable or expression, or click the Expression Editor (...) button to enter any valid expression.
Switch Case(s) • Case: Output branch containing script logic specific to one possible variable value.
• Label: Target to which the script branches when the variable equals a specific value.
Add Adds a case.
Modify Modify a case.
Case Integer or Case. Determined automatically by switch expression type.
Output Label Name Enter an output label name. The script branches to this Label when the variable equals the value specified in the Case field.
114Cisco Unity Express Guide to Writing and Editing Scripts for 7.0 and Later Versions
OL-22479-01
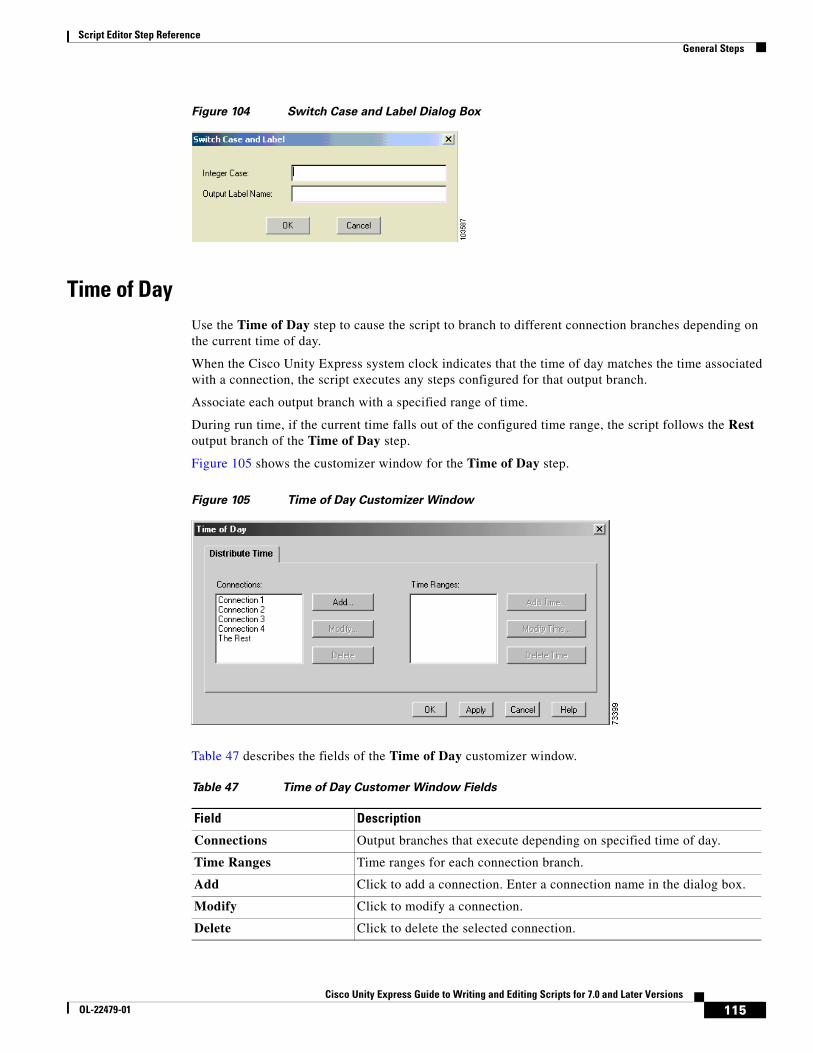
Script Editor Step ReferenceGeneral Steps
Figure 104 Switch Case and Label Dialog Box
Time of DayUse the Time of Day step to cause the script to branch to different connection branches depending on the current time of day.
When the Cisco Unity Express system clock indicates that the time of day matches the time associated with a connection, the script executes any steps configured for that output branch.
Associate each output branch with a specified range of time.
During run time, if the current time falls out of the configured time range, the script follows the Rest output branch of the Time of Day step.
Figure 105 shows the customizer window for the Time of Day step.
Figure 105 Time of Day Customizer Window
Table 47 describes the fields of the Time of Day customizer window.
Table 47 Time of Day Customer Window Fields
Field Description
Connections Output branches that execute depending on specified time of day.
Time Ranges Time ranges for each connection branch.
Add Click to add a connection. Enter a connection name in the dialog box.
Modify Click to modify a connection.
Delete Click to delete the selected connection.
115Cisco Unity Express Guide to Writing and Editing Scripts for 7.0 and Later Versions
OL-22479-01
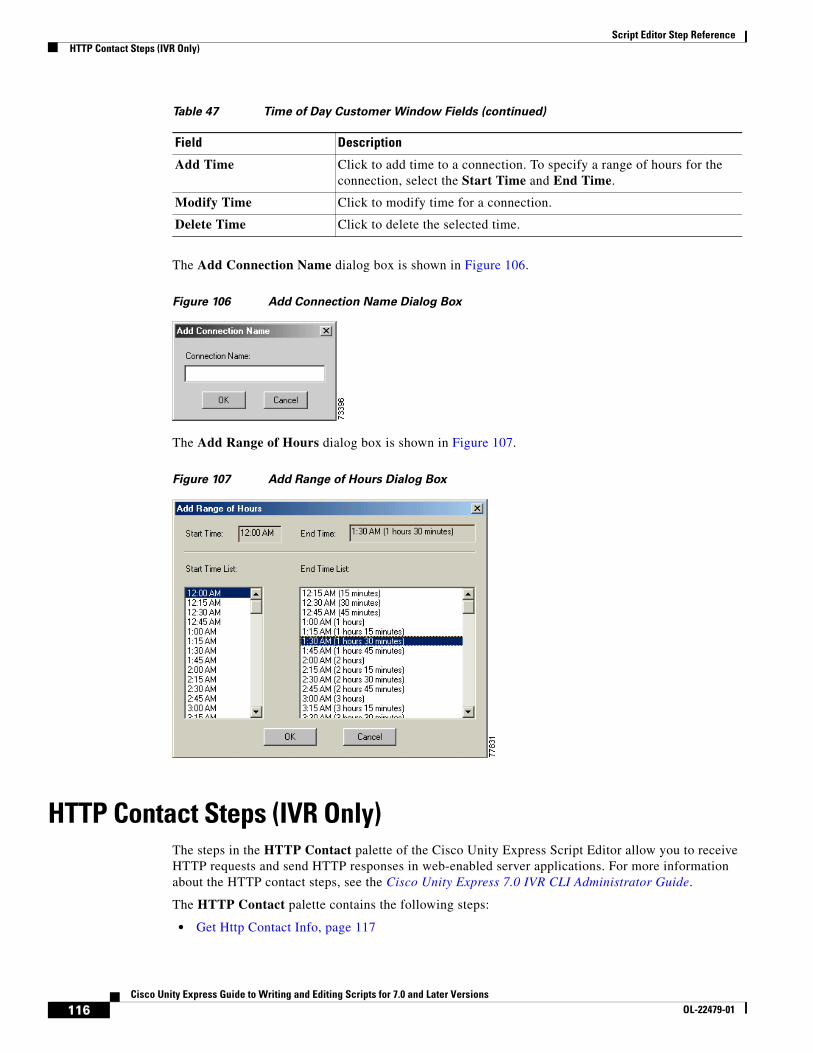
Script Editor Step ReferenceHTTP Contact Steps (IVR Only)
The Add Connection Name dialog box is shown in Figure 106.
Figure 106 Add Connection Name Dialog Box
The Add Range of Hours dialog box is shown in Figure 107.
Figure 107 Add Range of Hours Dialog Box
HTTP Contact Steps (IVR Only)The steps in the HTTP Contact palette of the Cisco Unity Express Script Editor allow you to receive HTTP requests and send HTTP responses in web-enabled server applications. For more information about the HTTP contact steps, see the Cisco Unity Express 7.0 IVR CLI Administrator Guide.
The HTTP Contact palette contains the following steps:
• Get Http Contact Info, page 117
Add Time Click to add time to a connection. To specify a range of hours for the connection, select the Start Time and End Time.
Modify Time Click to modify time for a connection.
Delete Time Click to delete the selected time.
Table 47 Time of Day Customer Window Fields (continued)
Field Description
116Cisco Unity Express Guide to Writing and Editing Scripts for 7.0 and Later Versions
OL-22479-01
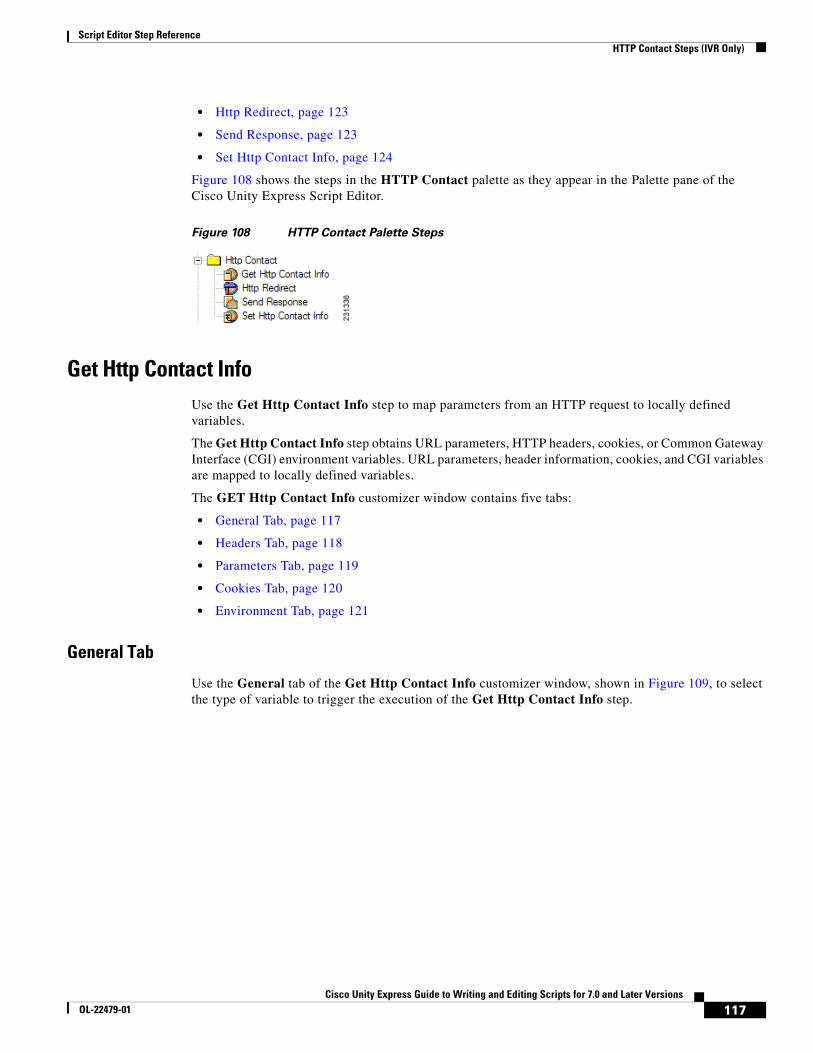
Script Editor Step ReferenceHTTP Contact Steps (IVR Only)
• Http Redirect, page 123
• Send Response, page 123
• Set Http Contact Info, page 124
Figure 108 shows the steps in the HTTP Contact palette as they appear in the Palette pane of the Cisco Unity Express Script Editor.
Figure 108 HTTP Contact Palette Steps
Get Http Contact InfoUse the Get Http Contact Info step to map parameters from an HTTP request to locally defined variables.
The Get Http Contact Info step obtains URL parameters, HTTP headers, cookies, or Common Gateway Interface (CGI) environment variables. URL parameters, header information, cookies, and CGI variables are mapped to locally defined variables.
The GET Http Contact Info customizer window contains five tabs:
• General Tab, page 117
• Headers Tab, page 118
• Parameters Tab, page 119
• Cookies Tab, page 120
• Environment Tab, page 121
General Tab
Use the General tab of the Get Http Contact Info customizer window, shown in Figure 109, to select the type of variable to trigger the execution of the Get Http Contact Info step.
117Cisco Unity Express Guide to Writing and Editing Scripts for 7.0 and Later Versions
OL-22479-01

Script Editor Step ReferenceHTTP Contact Steps (IVR Only)
Figure 109 Get Http Contact Customizer Window: General Tab
Table 48 describes the field of the General tab.
Headers Tab
Use the Headers tab of the Get Http Contact Info customizer window to display the HTTP headers that are mapped to local variables.
HTTP headers contain general information such as the type of browser or HTTP version. Each header provides one value, which is identified by the header name. For example, information from HTTP headers can be used in more complex scripts to customize the behavior of the script for different HTTP versions or for different browser types.
HTTP provides four types of headers:
• General: Used by both servers and clients (browsers)
• Server: Used only by servers
• Request: Used only by clients (browsers)
• Entity: Used by servers and by clients using POST or PUT methods
The following are common HTTP Request headers:
• Accept: Preferred media type
• Authorization: Client username and password
• From: E-mail address of the client
• Host: Hostname and port number of the server receiving the original request
• Referrer: URL of the source document
• User-Agent: Browser type
Table 48 Get Http Contact Info Customizer Window Field: General Tab
Field Description
Http Contact Contact variable that triggers the execution of the step. The default is Triggering Contact, unless another contact is specified.
118Cisco Unity Express Guide to Writing and Editing Scripts for 7.0 and Later Versions
OL-22479-01
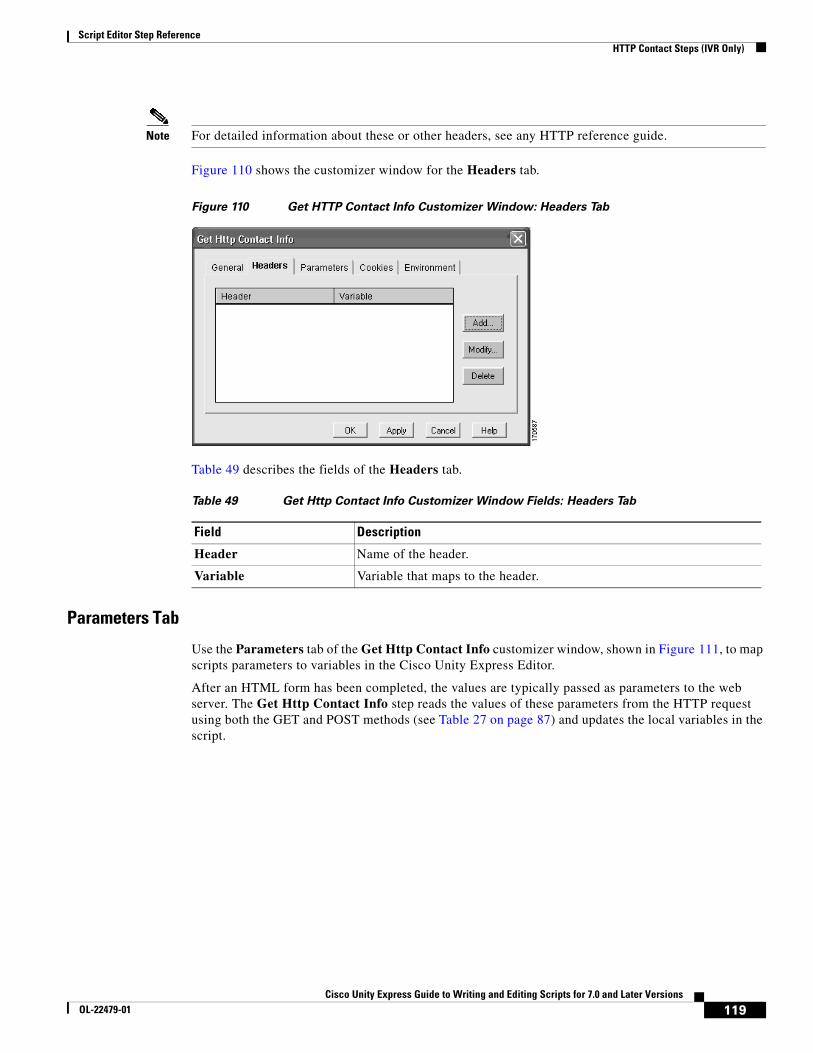
Script Editor Step ReferenceHTTP Contact Steps (IVR Only)
Note For detailed information about these or other headers, see any HTTP reference guide.
Figure 110 shows the customizer window for the Headers tab.
Figure 110 Get HTTP Contact Info Customizer Window: Headers Tab
Table 49 describes the fields of the Headers tab.
Parameters Tab
Use the Parameters tab of the Get Http Contact Info customizer window, shown in Figure 111, to map scripts parameters to variables in the Cisco Unity Express Editor.
After an HTML form has been completed, the values are typically passed as parameters to the web server. The Get Http Contact Info step reads the values of these parameters from the HTTP request using both the GET and POST methods (see Table 27 on page 87) and updates the local variables in the script.
Table 49 Get Http Contact Info Customizer Window Fields: Headers Tab
Field Description
Header Name of the header.
Variable Variable that maps to the header.
119Cisco Unity Express Guide to Writing and Editing Scripts for 7.0 and Later Versions
OL-22479-01
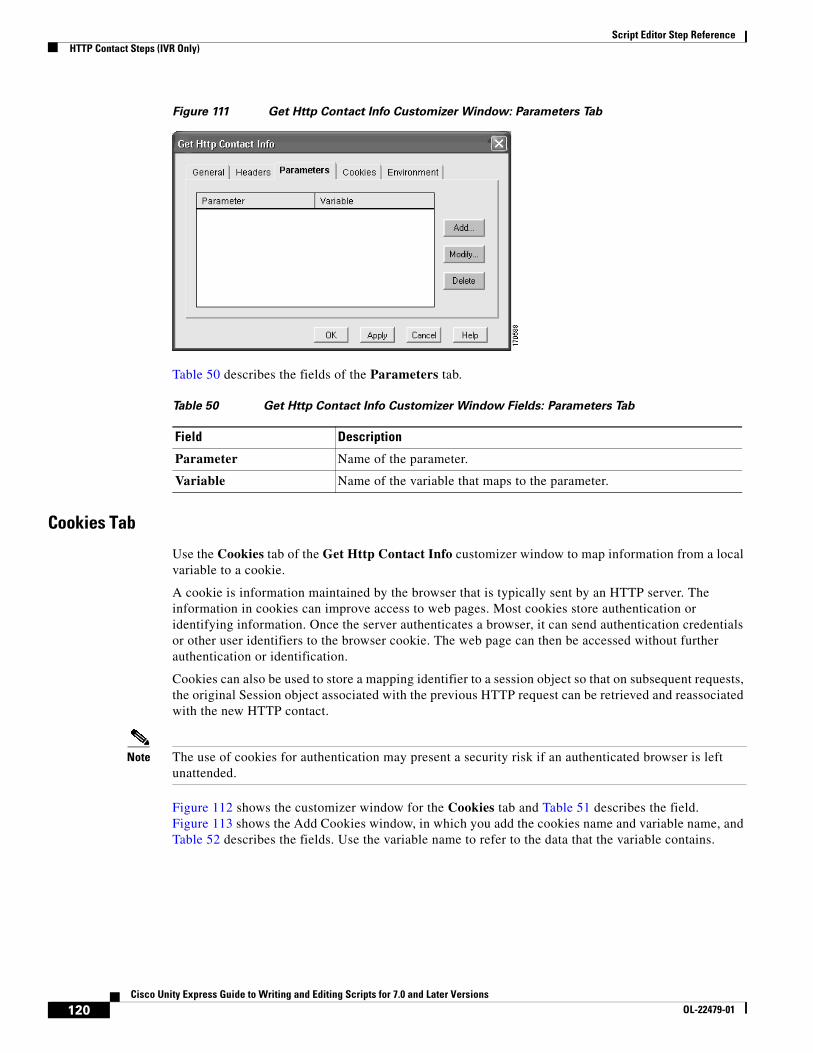
Script Editor Step ReferenceHTTP Contact Steps (IVR Only)
Figure 111 Get Http Contact Info Customizer Window: Parameters Tab
Table 50 describes the fields of the Parameters tab.
Cookies Tab
Use the Cookies tab of the Get Http Contact Info customizer window to map information from a local variable to a cookie.
A cookie is information maintained by the browser that is typically sent by an HTTP server. The information in cookies can improve access to web pages. Most cookies store authentication or identifying information. Once the server authenticates a browser, it can send authentication credentials or other user identifiers to the browser cookie. The web page can then be accessed without further authentication or identification.
Cookies can also be used to store a mapping identifier to a session object so that on subsequent requests, the original Session object associated with the previous HTTP request can be retrieved and reassociated with the new HTTP contact.
Note The use of cookies for authentication may present a security risk if an authenticated browser is left unattended.
Figure 112 shows the customizer window for the Cookies tab and Table 51 describes the field. Figure 113 shows the Add Cookies window, in which you add the cookies name and variable name, and Table 52 describes the fields. Use the variable name to refer to the data that the variable contains.
Table 50 Get Http Contact Info Customizer Window Fields: Parameters Tab
Field Description
Parameter Name of the parameter.
Variable Name of the variable that maps to the parameter.
120Cisco Unity Express Guide to Writing and Editing Scripts for 7.0 and Later Versions
OL-22479-01
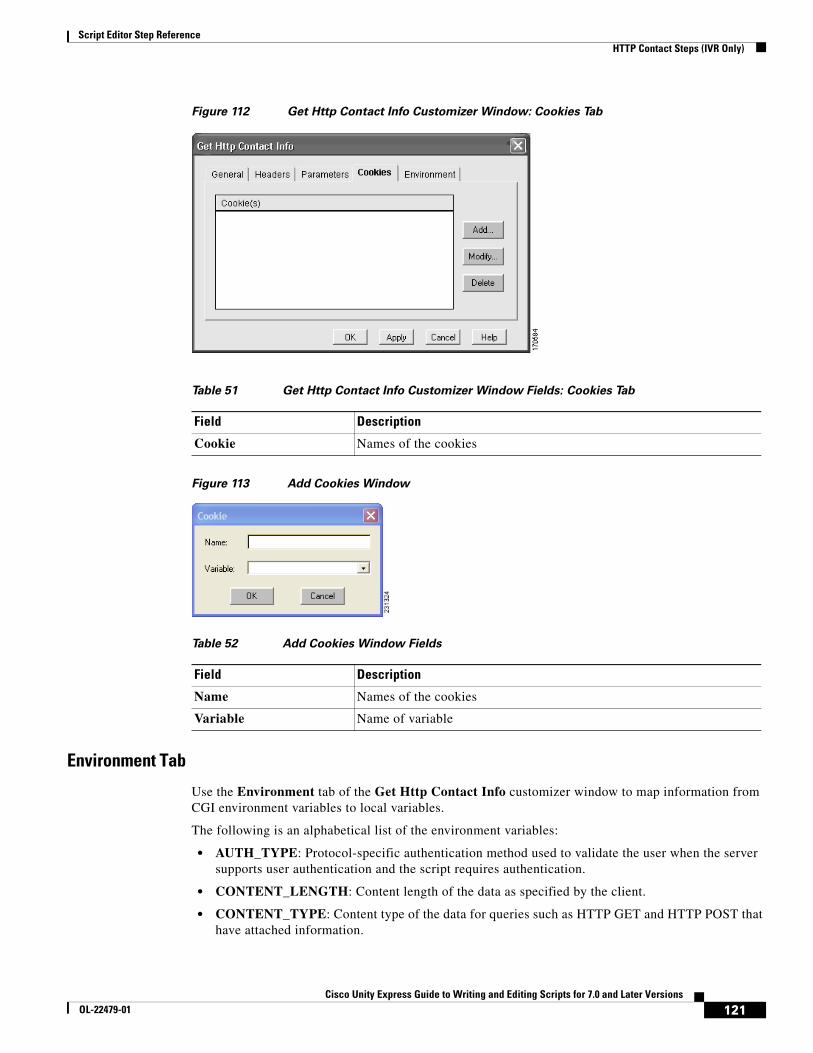
Script Editor Step ReferenceHTTP Contact Steps (IVR Only)
Figure 112 Get Http Contact Info Customizer Window: Cookies Tab
Figure 113 Add Cookies Window
Environment Tab
Use the Environment tab of the Get Http Contact Info customizer window to map information from CGI environment variables to local variables.
The following is an alphabetical list of the environment variables:
• AUTH_TYPE: Protocol-specific authentication method used to validate the user when the server supports user authentication and the script requires authentication.
• CONTENT_LENGTH: Content length of the data as specified by the client.
• CONTENT_TYPE: Content type of the data for queries such as HTTP GET and HTTP POST that have attached information.
Table 51 Get Http Contact Info Customizer Window Fields: Cookies Tab
Field Description
Cookie Names of the cookies
Table 52 Add Cookies Window Fields
Field Description
Name Names of the cookies
Variable Name of variable
121Cisco Unity Express Guide to Writing and Editing Scripts for 7.0 and Later Versions
OL-22479-01
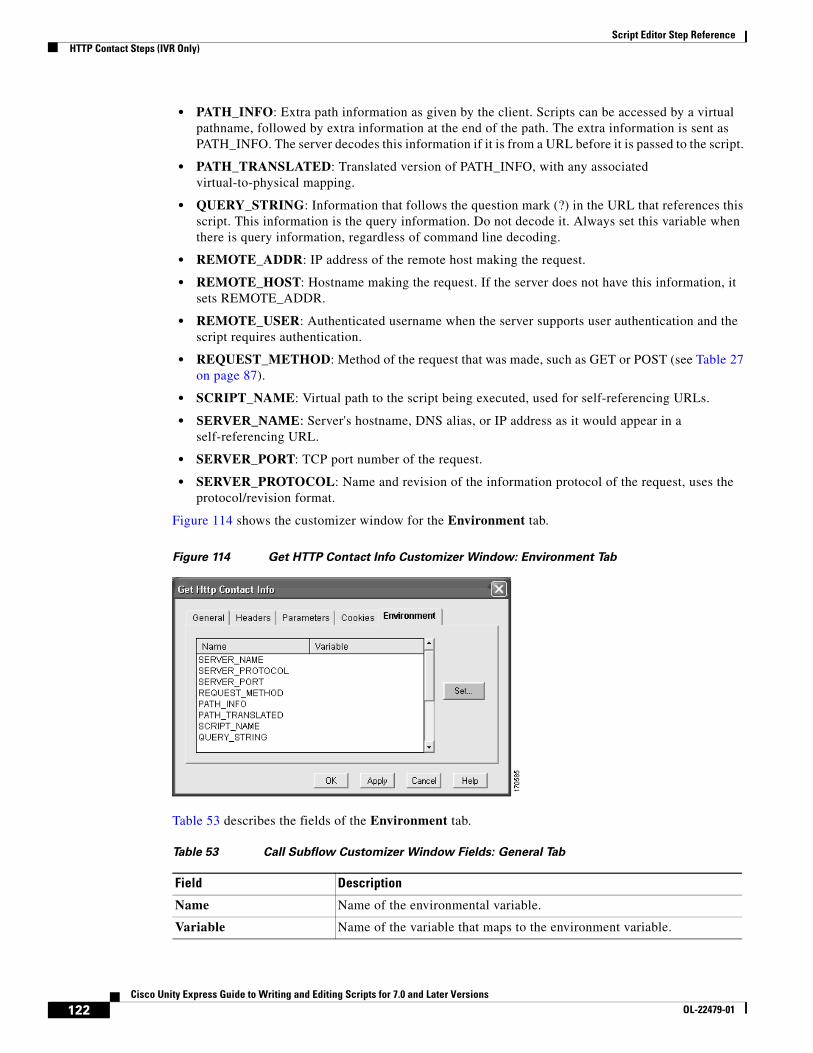
Script Editor Step ReferenceHTTP Contact Steps (IVR Only)
• PATH_INFO: Extra path information as given by the client. Scripts can be accessed by a virtual pathname, followed by extra information at the end of the path. The extra information is sent as PATH_INFO. The server decodes this information if it is from a URL before it is passed to the script.
• PATH_TRANSLATED: Translated version of PATH_INFO, with any associated virtual-to-physical mapping.
• QUERY_STRING: Information that follows the question mark (?) in the URL that references this script. This information is the query information. Do not decode it. Always set this variable when there is query information, regardless of command line decoding.
• REMOTE_ADDR: IP address of the remote host making the request.
• REMOTE_HOST: Hostname making the request. If the server does not have this information, it sets REMOTE_ADDR.
• REMOTE_USER: Authenticated username when the server supports user authentication and the script requires authentication.
• REQUEST_METHOD: Method of the request that was made, such as GET or POST (see Table 27 on page 87).
• SCRIPT_NAME: Virtual path to the script being executed, used for self-referencing URLs.
• SERVER_NAME: Server's hostname, DNS alias, or IP address as it would appear in a self-referencing URL.
• SERVER_PORT: TCP port number of the request.
• SERVER_PROTOCOL: Name and revision of the information protocol of the request, uses the protocol/revision format.
Figure 114 shows the customizer window for the Environment tab.
Figure 114 Get HTTP Contact Info Customizer Window: Environment Tab
Table 53 describes the fields of the Environment tab.
Table 53 Call Subflow Customizer Window Fields: General Tab
Field Description
Name Name of the environmental variable.
Variable Name of the variable that maps to the environment variable.
122Cisco Unity Express Guide to Writing and Editing Scripts for 7.0 and Later Versions
OL-22479-01
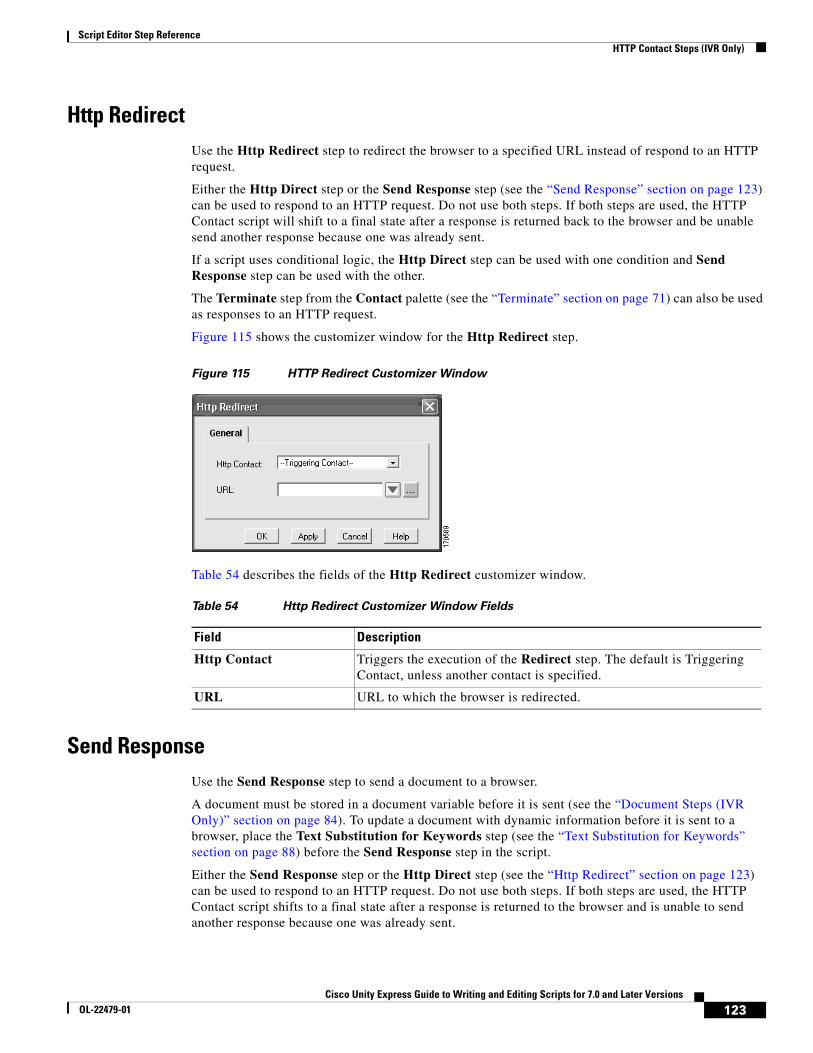
Script Editor Step ReferenceHTTP Contact Steps (IVR Only)
Http RedirectUse the Http Redirect step to redirect the browser to a specified URL instead of respond to an HTTP request.
Either the Http Direct step or the Send Response step (see the “Send Response” section on page 123) can be used to respond to an HTTP request. Do not use both steps. If both steps are used, the HTTP Contact script will shift to a final state after a response is returned back to the browser and be unable send another response because one was already sent.
If a script uses conditional logic, the Http Direct step can be used with one condition and Send Response step can be used with the other.
The Terminate step from the Contact palette (see the “Terminate” section on page 71) can also be used as responses to an HTTP request.
Figure 115 shows the customizer window for the Http Redirect step.
Figure 115 HTTP Redirect Customizer Window
Table 54 describes the fields of the Http Redirect customizer window.
Send ResponseUse the Send Response step to send a document to a browser.
A document must be stored in a document variable before it is sent (see the “Document Steps (IVR Only)” section on page 84). To update a document with dynamic information before it is sent to a browser, place the Text Substitution for Keywords step (see the “Text Substitution for Keywords” section on page 88) before the Send Response step in the script.
Either the Send Response step or the Http Direct step (see the “Http Redirect” section on page 123) can be used to respond to an HTTP request. Do not use both steps. If both steps are used, the HTTP Contact script shifts to a final state after a response is returned to the browser and is unable to send another response because one was already sent.
Table 54 Http Redirect Customizer Window Fields
Field Description
Http Contact Triggers the execution of the Redirect step. The default is Triggering Contact, unless another contact is specified.
URL URL to which the browser is redirected.
123Cisco Unity Express Guide to Writing and Editing Scripts for 7.0 and Later Versions
OL-22479-01
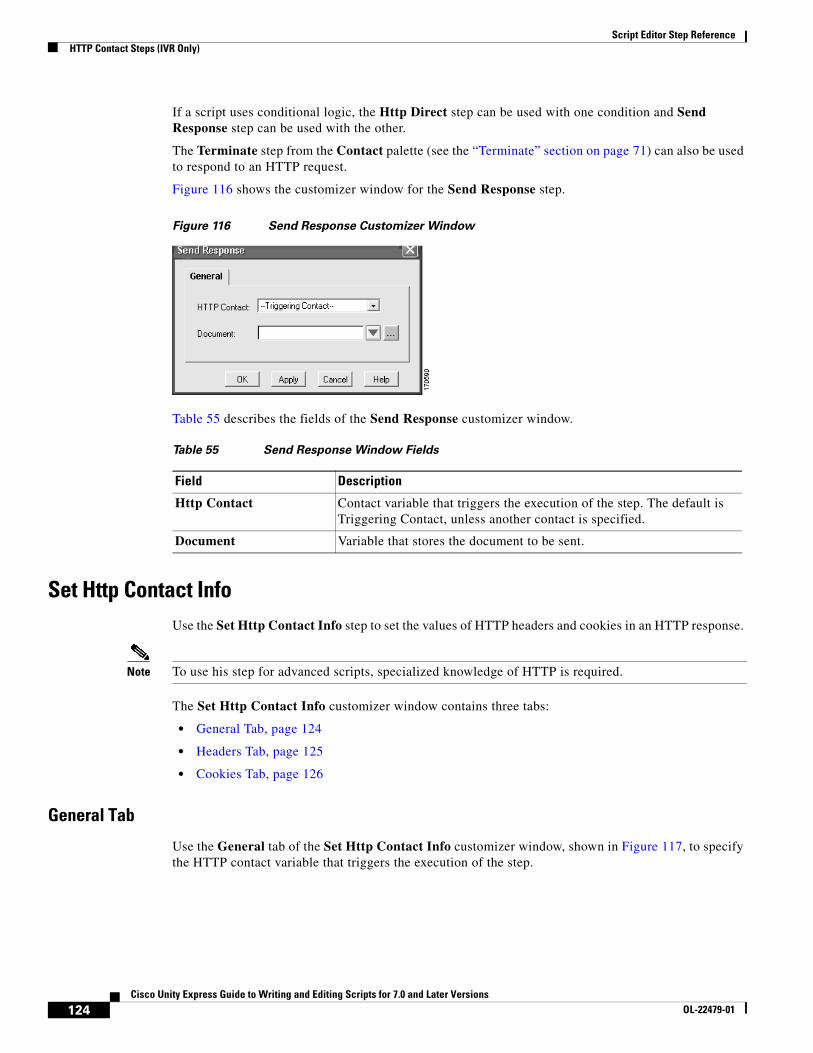
Script Editor Step ReferenceHTTP Contact Steps (IVR Only)
If a script uses conditional logic, the Http Direct step can be used with one condition and Send Response step can be used with the other.
The Terminate step from the Contact palette (see the “Terminate” section on page 71) can also be used to respond to an HTTP request.
Figure 116 shows the customizer window for the Send Response step.
Figure 116 Send Response Customizer Window
Table 55 describes the fields of the Send Response customizer window.
Set Http Contact InfoUse the Set Http Contact Info step to set the values of HTTP headers and cookies in an HTTP response.
Note To use his step for advanced scripts, specialized knowledge of HTTP is required.
The Set Http Contact Info customizer window contains three tabs:
• General Tab, page 124
• Headers Tab, page 125
• Cookies Tab, page 126
General Tab
Use the General tab of the Set Http Contact Info customizer window, shown in Figure 117, to specify the HTTP contact variable that triggers the execution of the step.
Table 55 Send Response Window Fields
Field Description
Http Contact Contact variable that triggers the execution of the step. The default is Triggering Contact, unless another contact is specified.
Document Variable that stores the document to be sent.
124Cisco Unity Express Guide to Writing and Editing Scripts for 7.0 and Later Versions
OL-22479-01
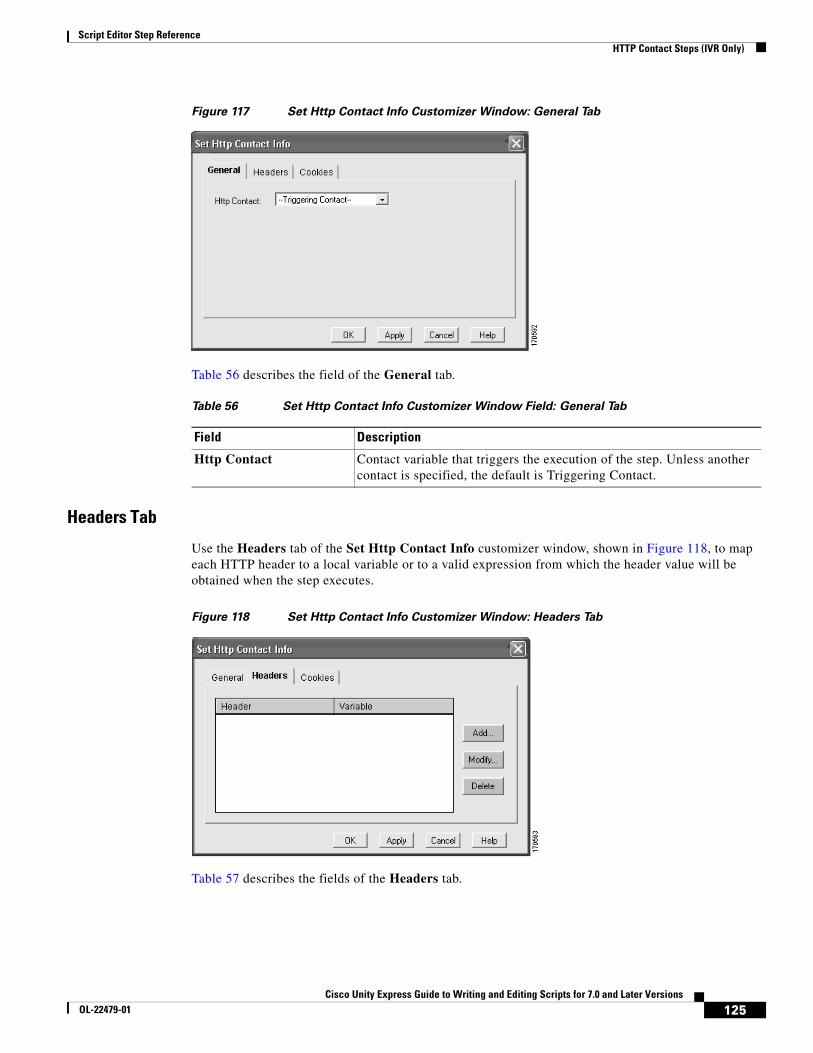
Script Editor Step ReferenceHTTP Contact Steps (IVR Only)
Figure 117 Set Http Contact Info Customizer Window: General Tab
Table 56 describes the field of the General tab.
Headers Tab
Use the Headers tab of the Set Http Contact Info customizer window, shown in Figure 118, to map each HTTP header to a local variable or to a valid expression from which the header value will be obtained when the step executes.
Figure 118 Set Http Contact Info Customizer Window: Headers Tab
Table 57 describes the fields of the Headers tab.
Table 56 Set Http Contact Info Customizer Window Field: General Tab
Field Description
Http Contact Contact variable that triggers the execution of the step. Unless another contact is specified, the default is Triggering Contact.
125Cisco Unity Express Guide to Writing and Editing Scripts for 7.0 and Later Versions
OL-22479-01
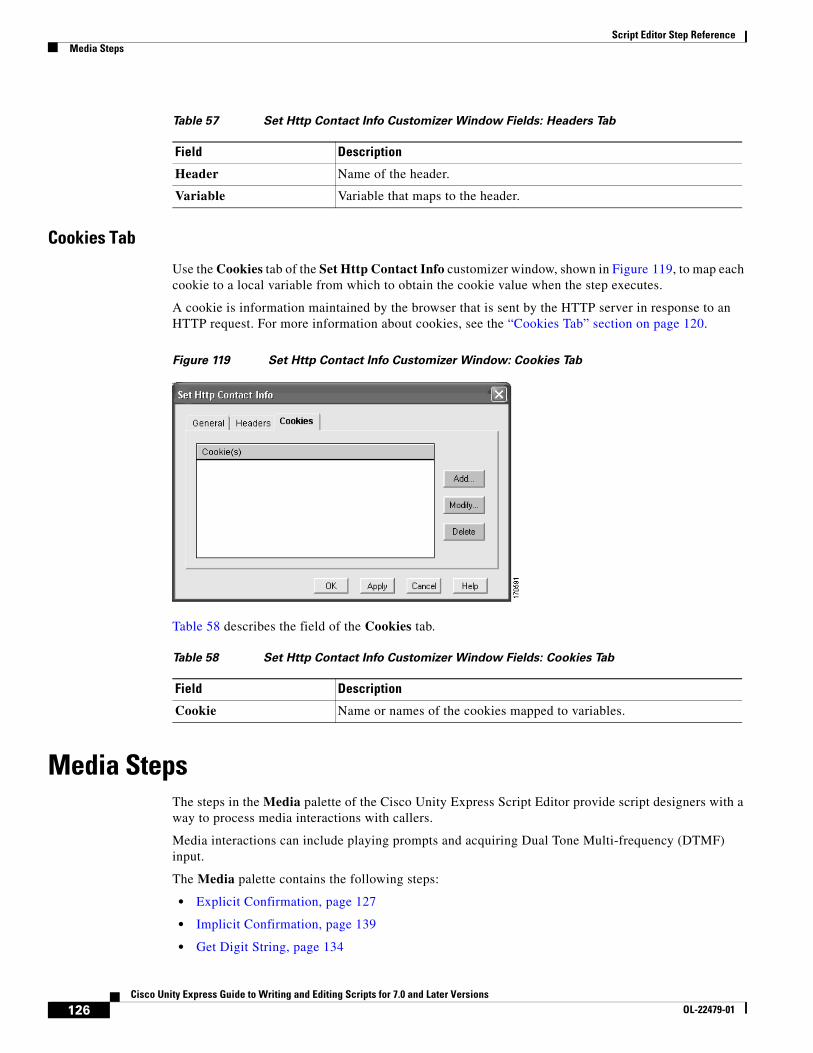
Script Editor Step ReferenceMedia Steps
Cookies Tab
Use the Cookies tab of the Set Http Contact Info customizer window, shown in Figure 119, to map each cookie to a local variable from which to obtain the cookie value when the step executes.
A cookie is information maintained by the browser that is sent by the HTTP server in response to an HTTP request. For more information about cookies, see the “Cookies Tab” section on page 120.
Figure 119 Set Http Contact Info Customizer Window: Cookies Tab
Table 58 describes the field of the Cookies tab.
Media StepsThe steps in the Media palette of the Cisco Unity Express Script Editor provide script designers with a way to process media interactions with callers.
Media interactions can include playing prompts and acquiring Dual Tone Multi-frequency (DTMF) input.
The Media palette contains the following steps:
• Explicit Confirmation, page 127
• Implicit Confirmation, page 139
• Get Digit String, page 134
Table 57 Set Http Contact Info Customizer Window Fields: Headers Tab
Field Description
Header Name of the header.
Variable Variable that maps to the header.
Table 58 Set Http Contact Info Customizer Window Fields: Cookies Tab
Field Description
Cookie Name or names of the cookies mapped to variables.
126Cisco Unity Express Guide to Writing and Editing Scripts for 7.0 and Later Versions
OL-22479-01
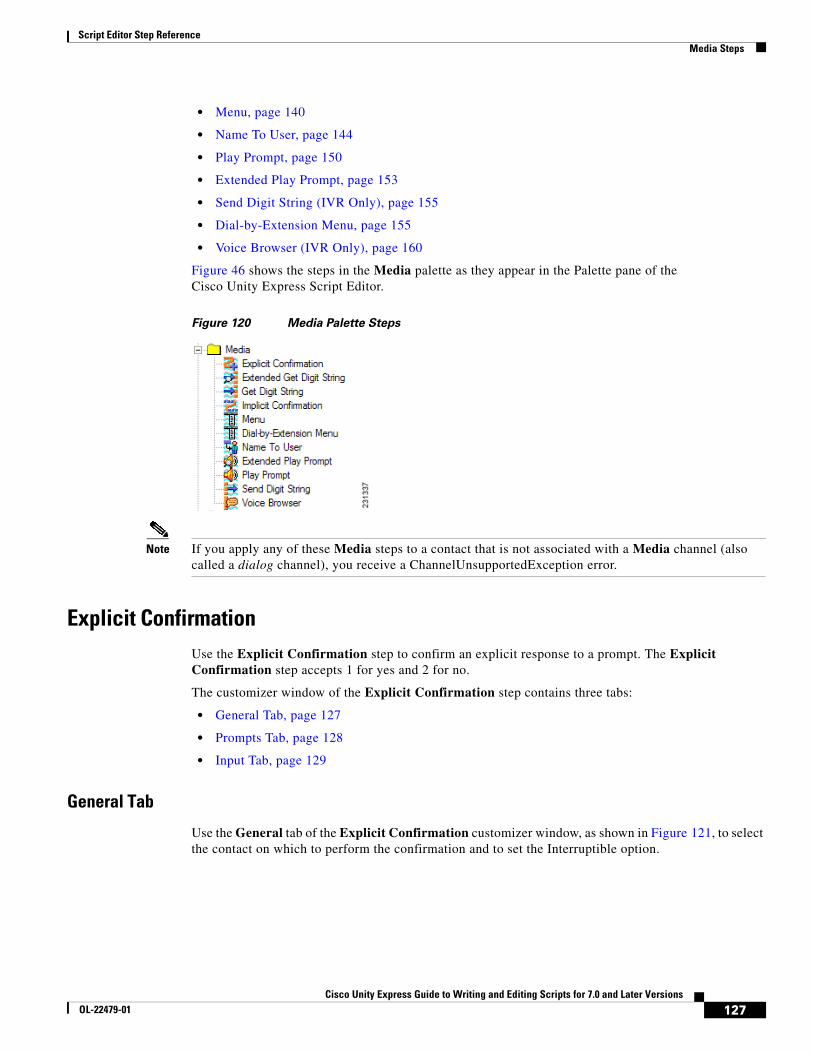
Script Editor Step ReferenceMedia Steps
• Menu, page 140
• Name To User, page 144
• Play Prompt, page 150
• Extended Play Prompt, page 153
• Send Digit String (IVR Only), page 155
• Dial-by-Extension Menu, page 155
• Voice Browser (IVR Only), page 160
Figure 46 shows the steps in the Media palette as they appear in the Palette pane of the Cisco Unity Express Script Editor.
Figure 120 Media Palette Steps
Note If you apply any of these Media steps to a contact that is not associated with a Media channel (also called a dialog channel), you receive a ChannelUnsupportedException error.
Explicit ConfirmationUse the Explicit Confirmation step to confirm an explicit response to a prompt. The Explicit Confirmation step accepts 1 for yes and 2 for no.
The customizer window of the Explicit Confirmation step contains three tabs:
• General Tab, page 127
• Prompts Tab, page 128
• Input Tab, page 129
General Tab
Use the General tab of the Explicit Confirmation customizer window, as shown in Figure 121, to select the contact on which to perform the confirmation and to set the Interruptible option.
127Cisco Unity Express Guide to Writing and Editing Scripts for 7.0 and Later Versions
OL-22479-01
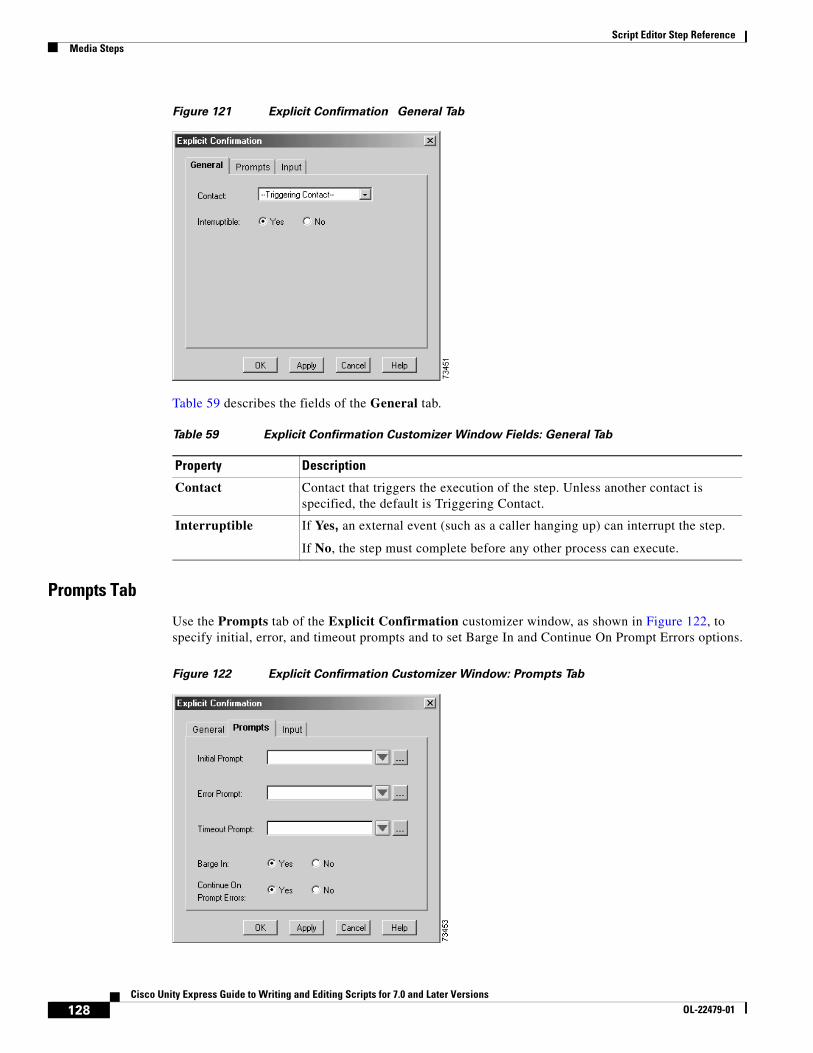
Script Editor Step ReferenceMedia Steps
Figure 121 Explicit Confirmation General Tab
Table 59 describes the fields of the General tab.
Prompts Tab
Use the Prompts tab of the Explicit Confirmation customizer window, as shown in Figure 122, to specify initial, error, and timeout prompts and to set Barge In and Continue On Prompt Errors options.
Figure 122 Explicit Confirmation Customizer Window: Prompts Tab
Table 59 Explicit Confirmation Customizer Window Fields: General Tab
Property Description
Contact Contact that triggers the execution of the step. Unless another contact is specified, the default is Triggering Contact.
Interruptible If Yes, an external event (such as a caller hanging up) can interrupt the step.
If No, the step must complete before any other process can execute.
128Cisco Unity Express Guide to Writing and Editing Scripts for 7.0 and Later Versions
OL-22479-01
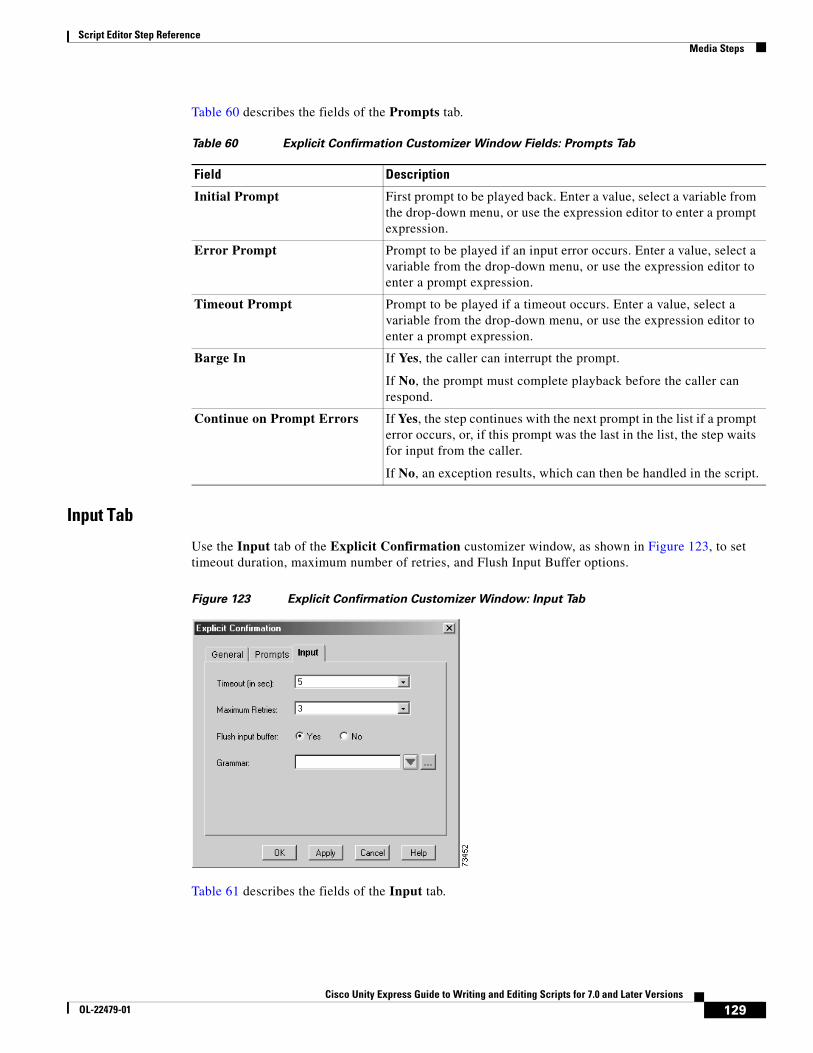
Script Editor Step ReferenceMedia Steps
Table 60 describes the fields of the Prompts tab.
Input Tab
Use the Input tab of the Explicit Confirmation customizer window, as shown in Figure 123, to set timeout duration, maximum number of retries, and Flush Input Buffer options.
Figure 123 Explicit Confirmation Customizer Window: Input Tab
Table 61 describes the fields of the Input tab.
Table 60 Explicit Confirmation Customizer Window Fields: Prompts Tab
Field Description
Initial Prompt First prompt to be played back. Enter a value, select a variable from the drop-down menu, or use the expression editor to enter a prompt expression.
Error Prompt Prompt to be played if an input error occurs. Enter a value, select a variable from the drop-down menu, or use the expression editor to enter a prompt expression.
Timeout Prompt Prompt to be played if a timeout occurs. Enter a value, select a variable from the drop-down menu, or use the expression editor to enter a prompt expression.
Barge In If Yes, the caller can interrupt the prompt.
If No, the prompt must complete playback before the caller can respond.
Continue on Prompt Errors If Yes, the step continues with the next prompt in the list if a prompt error occurs, or, if this prompt was the last in the list, the step waits for input from the caller.
If No, an exception results, which can then be handled in the script.
129Cisco Unity Express Guide to Writing and Editing Scripts for 7.0 and Later Versions
OL-22479-01
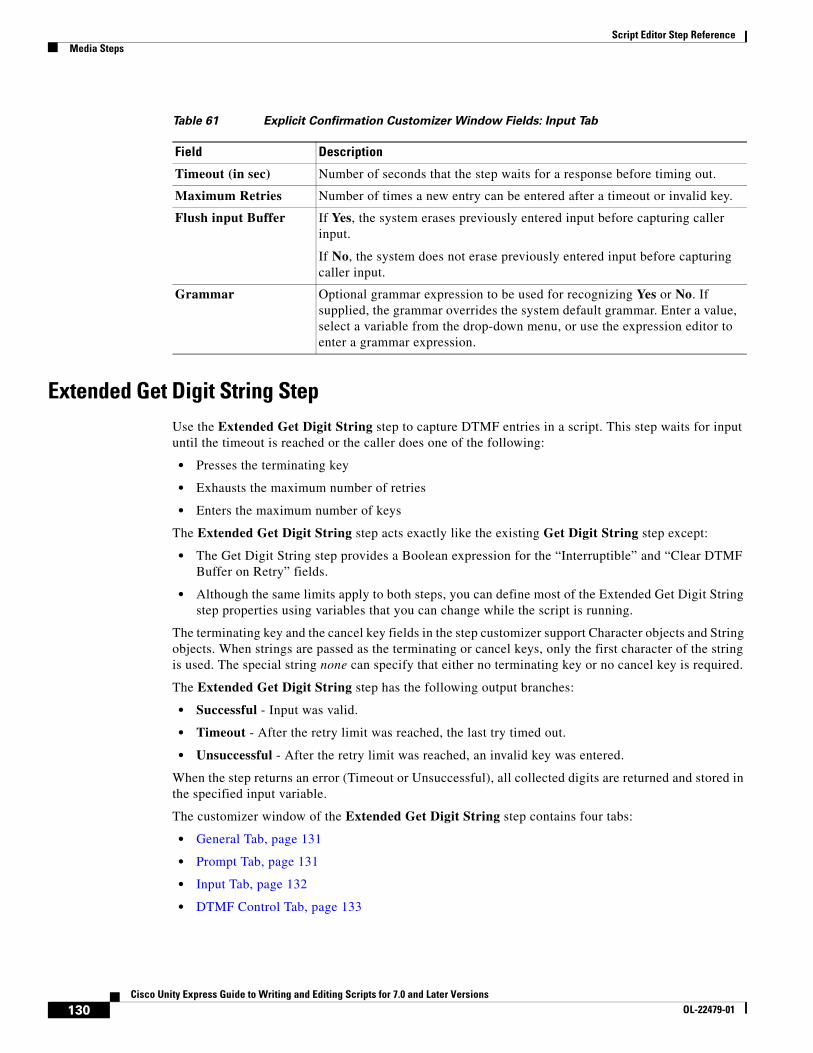
Script Editor Step ReferenceMedia Steps
Extended Get Digit String StepUse the Extended Get Digit String step to capture DTMF entries in a script. This step waits for input until the timeout is reached or the caller does one of the following:
• Presses the terminating key
• Exhausts the maximum number of retries
• Enters the maximum number of keys
The Extended Get Digit String step acts exactly like the existing Get Digit String step except:
• The Get Digit String step provides a Boolean expression for the “Interruptible” and “Clear DTMF Buffer on Retry” fields.
• Although the same limits apply to both steps, you can define most of the Extended Get Digit String step properties using variables that you can change while the script is running.
The terminating key and the cancel key fields in the step customizer support Character objects and String objects. When strings are passed as the terminating or cancel keys, only the first character of the string is used. The special string none can specify that either no terminating key or no cancel key is required.
The Extended Get Digit String step has the following output branches:
• Successful - Input was valid.
• Timeout - After the retry limit was reached, the last try timed out.
• Unsuccessful - After the retry limit was reached, an invalid key was entered.
When the step returns an error (Timeout or Unsuccessful), all collected digits are returned and stored in the specified input variable.
The customizer window of the Extended Get Digit String step contains four tabs:
• General Tab, page 131
• Prompt Tab, page 131
• Input Tab, page 132
• DTMF Control Tab, page 133
Table 61 Explicit Confirmation Customizer Window Fields: Input Tab
Field Description
Timeout (in sec) Number of seconds that the step waits for a response before timing out.
Maximum Retries Number of times a new entry can be entered after a timeout or invalid key.
Flush input Buffer If Yes, the system erases previously entered input before capturing caller input.
If No, the system does not erase previously entered input before capturing caller input.
Grammar Optional grammar expression to be used for recognizing Yes or No. If supplied, the grammar overrides the system default grammar. Enter a value, select a variable from the drop-down menu, or use the expression editor to enter a grammar expression.
130Cisco Unity Express Guide to Writing and Editing Scripts for 7.0 and Later Versions
OL-22479-01
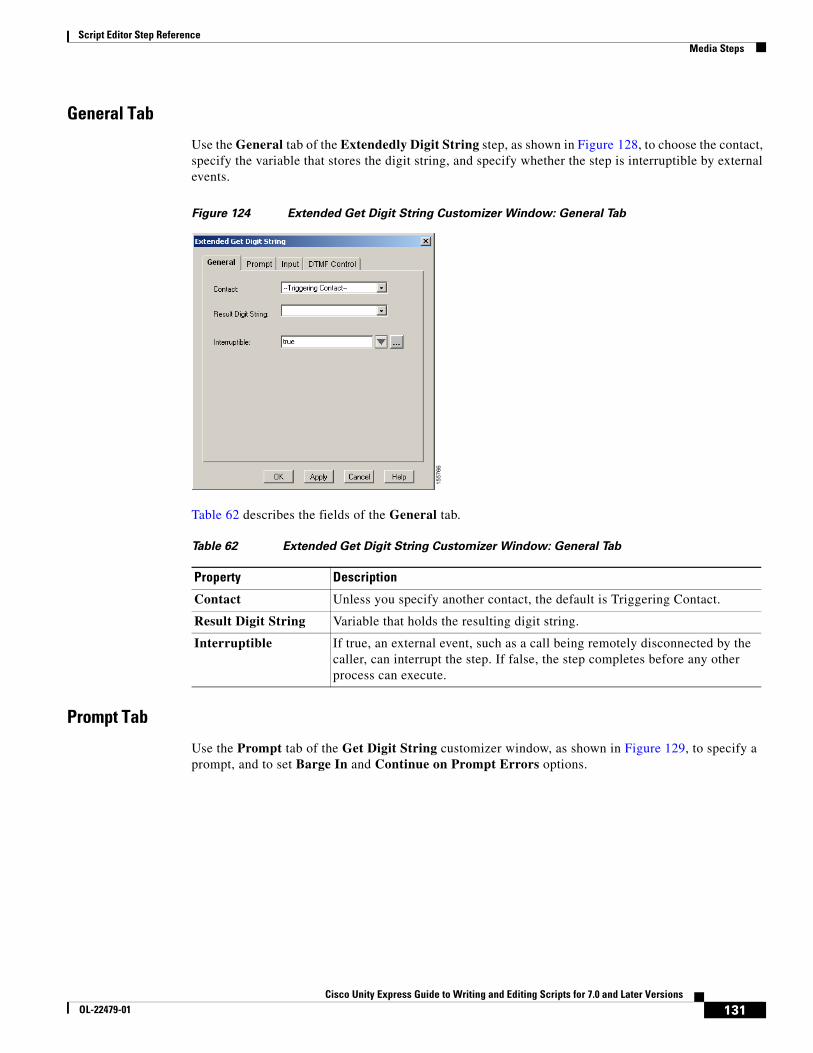
Script Editor Step ReferenceMedia Steps
General Tab
Use the General tab of the Extendedly Digit String step, as shown in Figure 128, to choose the contact, specify the variable that stores the digit string, and specify whether the step is interruptible by external events.
Figure 124 Extended Get Digit String Customizer Window: General Tab
Table 62 describes the fields of the General tab.
Prompt Tab
Use the Prompt tab of the Get Digit String customizer window, as shown in Figure 129, to specify a prompt, and to set Barge In and Continue on Prompt Errors options.
Table 62 Extended Get Digit String Customizer Window: General Tab
Property Description
Contact Unless you specify another contact, the default is Triggering Contact.
Result Digit String Variable that holds the resulting digit string.
Interruptible If true, an external event, such as a call being remotely disconnected by the caller, can interrupt the step. If false, the step completes before any other process can execute.
131Cisco Unity Express Guide to Writing and Editing Scripts for 7.0 and Later Versions
OL-22479-01
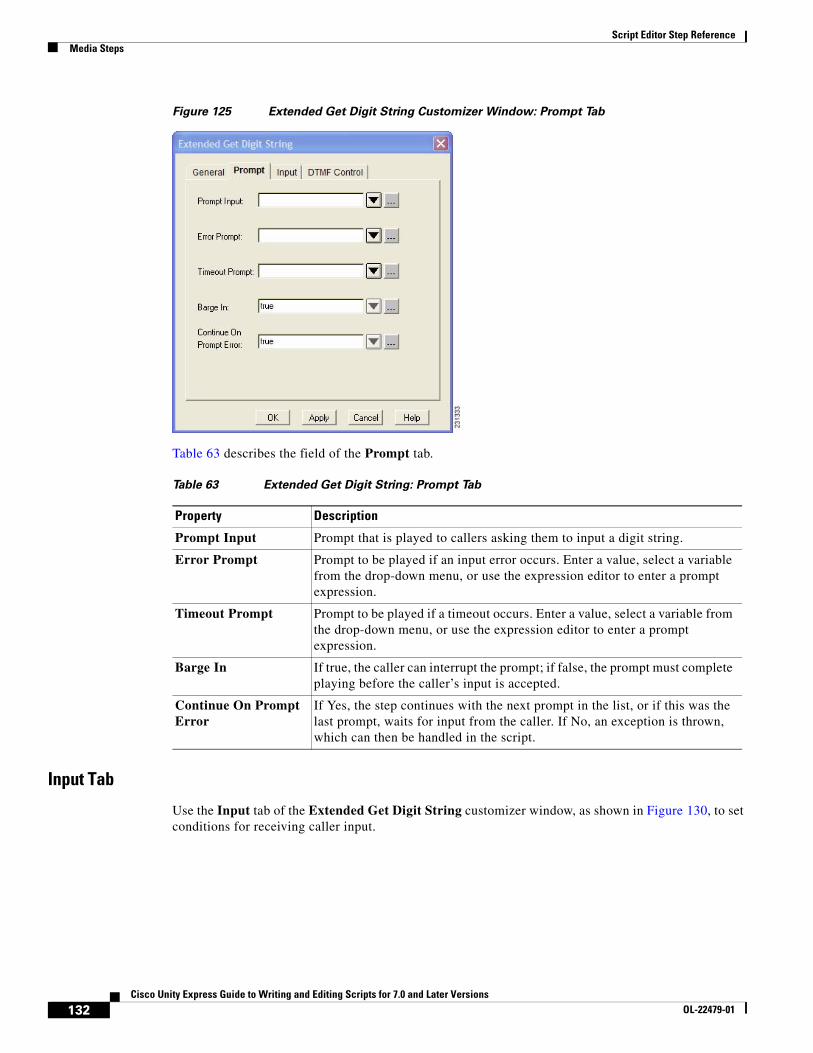
Script Editor Step ReferenceMedia Steps
Figure 125 Extended Get Digit String Customizer Window: Prompt Tab
Table 63 describes the field of the Prompt tab.
Input Tab
Use the Input tab of the Extended Get Digit String customizer window, as shown in Figure 130, to set conditions for receiving caller input.
Table 63 Extended Get Digit String: Prompt Tab
Property Description
Prompt Input Prompt that is played to callers asking them to input a digit string.
Error Prompt Prompt to be played if an input error occurs. Enter a value, select a variable from the drop-down menu, or use the expression editor to enter a prompt expression.
Timeout Prompt Prompt to be played if a timeout occurs. Enter a value, select a variable from the drop-down menu, or use the expression editor to enter a prompt expression.
Barge In If true, the caller can interrupt the prompt; if false, the prompt must complete playing before the caller’s input is accepted.
Continue On Prompt Error
If Yes, the step continues with the next prompt in the list, or if this was the last prompt, waits for input from the caller. If No, an exception is thrown, which can then be handled in the script.
132Cisco Unity Express Guide to Writing and Editing Scripts for 7.0 and Later Versions
OL-22479-01
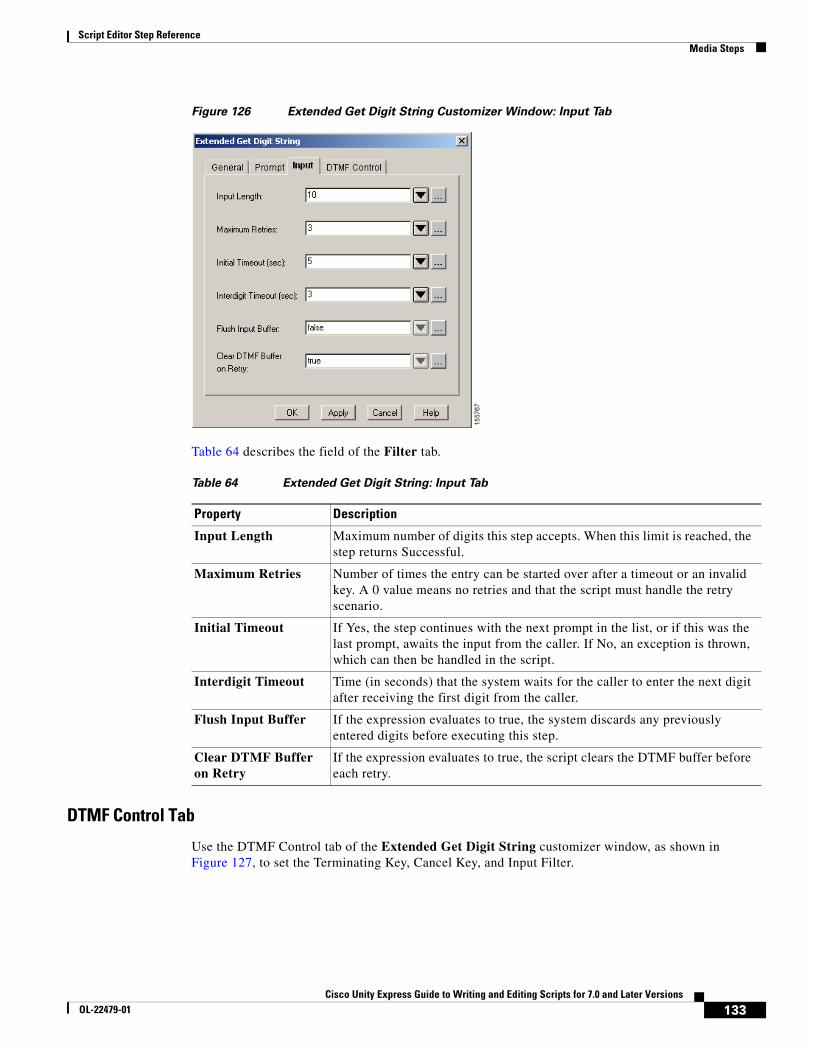
Script Editor Step ReferenceMedia Steps
Figure 126 Extended Get Digit String Customizer Window: Input Tab
Table 64 describes the field of the Filter tab.
DTMF Control Tab
Use the DTMF Control tab of the Extended Get Digit String customizer window, as shown in Figure 127, to set the Terminating Key, Cancel Key, and Input Filter.
Table 64 Extended Get Digit String: Input Tab
Property Description
Input Length Maximum number of digits this step accepts. When this limit is reached, the step returns Successful.
Maximum Retries Number of times the entry can be started over after a timeout or an invalid key. A 0 value means no retries and that the script must handle the retry scenario.
Initial Timeout If Yes, the step continues with the next prompt in the list, or if this was the last prompt, awaits the input from the caller. If No, an exception is thrown, which can then be handled in the script.
Interdigit Timeout Time (in seconds) that the system waits for the caller to enter the next digit after receiving the first digit from the caller.
Flush Input Buffer If the expression evaluates to true, the system discards any previously entered digits before executing this step.
Clear DTMF Buffer on Retry
If the expression evaluates to true, the script clears the DTMF buffer before each retry.
133Cisco Unity Express Guide to Writing and Editing Scripts for 7.0 and Later Versions
OL-22479-01
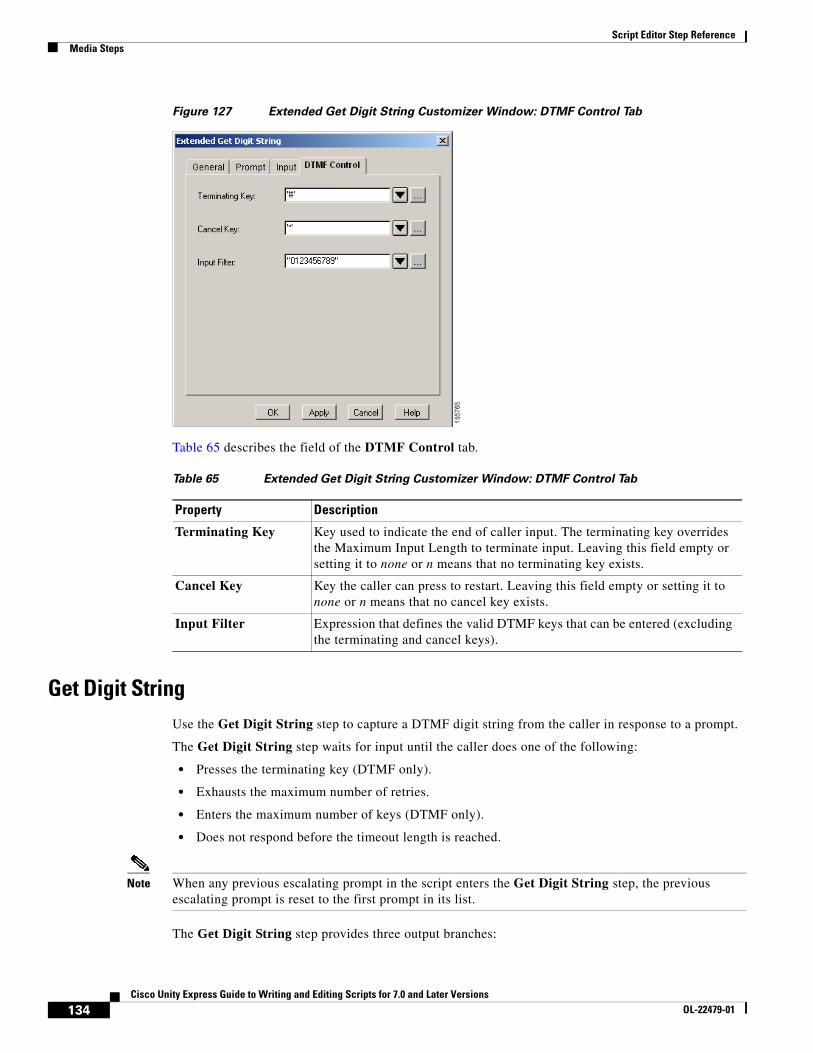
Script Editor Step ReferenceMedia Steps
Figure 127 Extended Get Digit String Customizer Window: DTMF Control Tab
Table 65 describes the field of the DTMF Control tab.
Get Digit StringUse the Get Digit String step to capture a DTMF digit string from the caller in response to a prompt.
The Get Digit String step waits for input until the caller does one of the following:
• Presses the terminating key (DTMF only).
• Exhausts the maximum number of retries.
• Enters the maximum number of keys (DTMF only).
• Does not respond before the timeout length is reached.
Note When any previous escalating prompt in the script enters the Get Digit String step, the previous escalating prompt is reset to the first prompt in its list.
The Get Digit String step provides three output branches:
Table 65 Extended Get Digit String Customizer Window: DTMF Control Tab
Property Description
Terminating Key Key used to indicate the end of caller input. The terminating key overrides the Maximum Input Length to terminate input. Leaving this field empty or setting it to none or n means that no terminating key exists.
Cancel Key Key the caller can press to restart. Leaving this field empty or setting it to none or n means that no cancel key exists.
Input Filter Expression that defines the valid DTMF keys that can be entered (excluding the terminating and cancel keys).
134Cisco Unity Express Guide to Writing and Editing Scripts for 7.0 and Later Versions
OL-22479-01
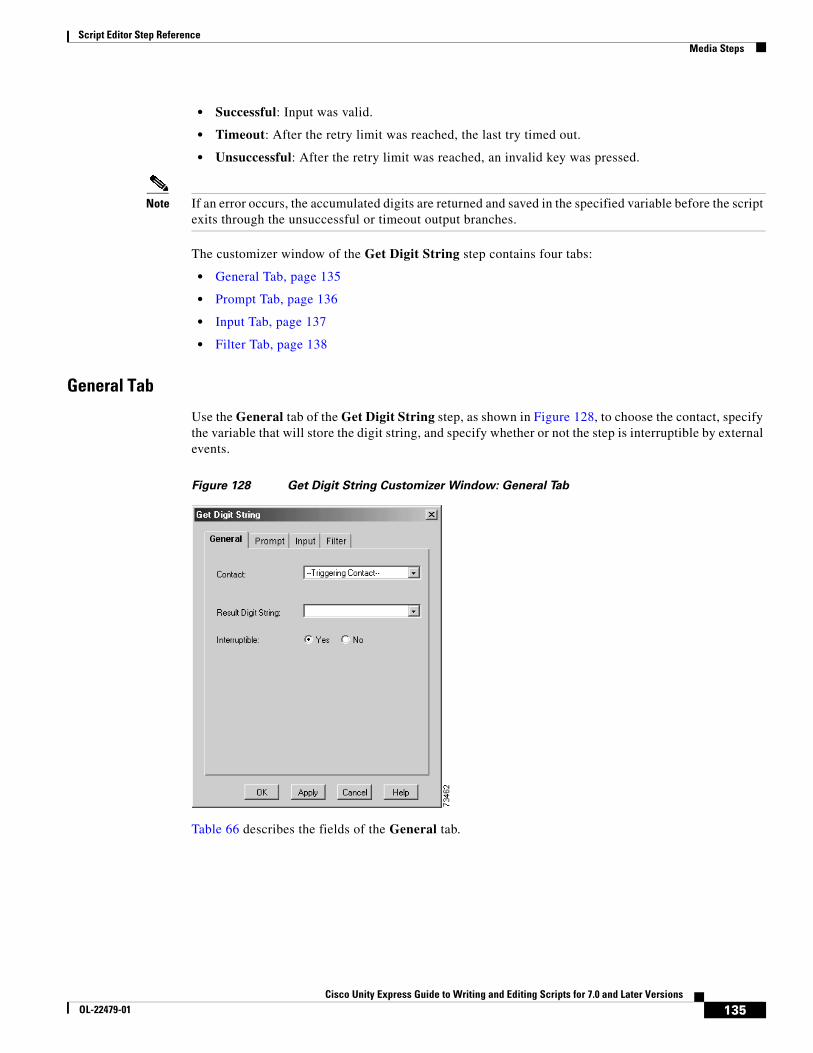
Script Editor Step ReferenceMedia Steps
• Successful: Input was valid.
• Timeout: After the retry limit was reached, the last try timed out.
• Unsuccessful: After the retry limit was reached, an invalid key was pressed.
Note If an error occurs, the accumulated digits are returned and saved in the specified variable before the script exits through the unsuccessful or timeout output branches.
The customizer window of the Get Digit String step contains four tabs:
• General Tab, page 135
• Prompt Tab, page 136
• Input Tab, page 137
• Filter Tab, page 138
General Tab
Use the General tab of the Get Digit String step, as shown in Figure 128, to choose the contact, specify the variable that will store the digit string, and specify whether or not the step is interruptible by external events.
Figure 128 Get Digit String Customizer Window: General Tab
Table 66 describes the fields of the General tab.
135Cisco Unity Express Guide to Writing and Editing Scripts for 7.0 and Later Versions
OL-22479-01
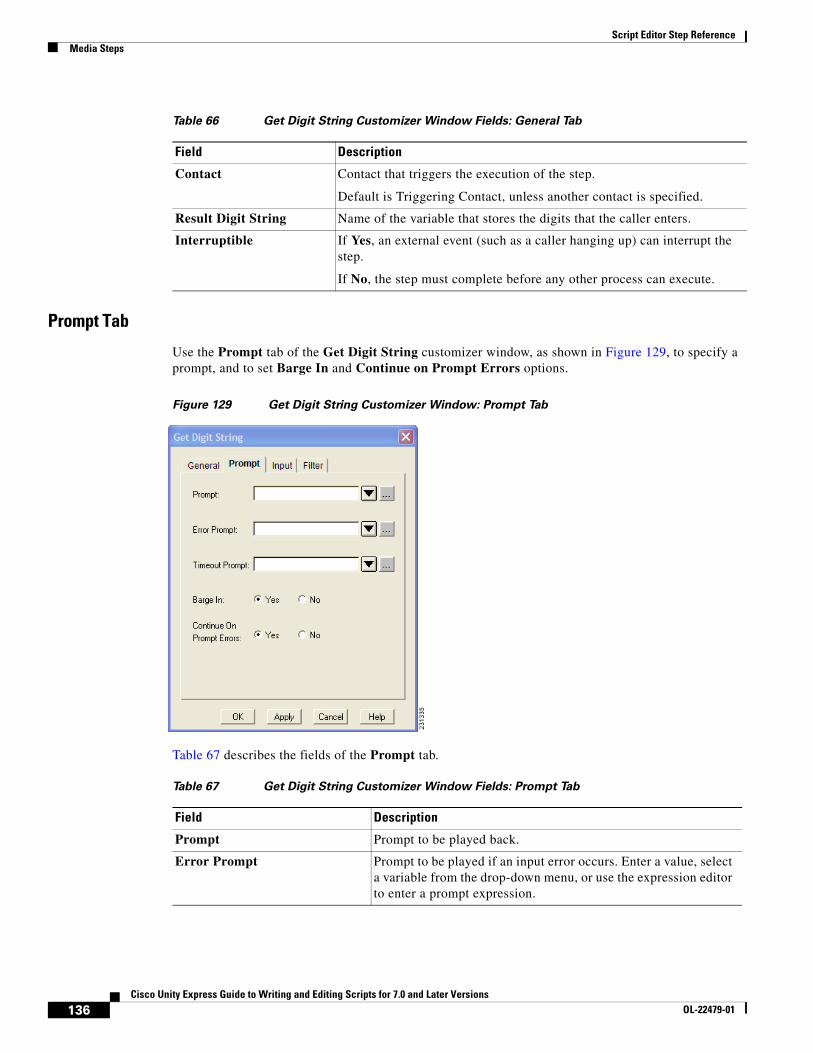
Script Editor Step ReferenceMedia Steps
Prompt Tab
Use the Prompt tab of the Get Digit String customizer window, as shown in Figure 129, to specify a prompt, and to set Barge In and Continue on Prompt Errors options.
Figure 129 Get Digit String Customizer Window: Prompt Tab
Table 67 describes the fields of the Prompt tab.
Table 66 Get Digit String Customizer Window Fields: General Tab
Field Description
Contact Contact that triggers the execution of the step.
Default is Triggering Contact, unless another contact is specified.
Result Digit String Name of the variable that stores the digits that the caller enters.
Interruptible If Yes, an external event (such as a caller hanging up) can interrupt the step.
If No, the step must complete before any other process can execute.
Table 67 Get Digit String Customizer Window Fields: Prompt Tab
Field Description
Prompt Prompt to be played back.
Error Prompt Prompt to be played if an input error occurs. Enter a value, select a variable from the drop-down menu, or use the expression editor to enter a prompt expression.
136Cisco Unity Express Guide to Writing and Editing Scripts for 7.0 and Later Versions
OL-22479-01
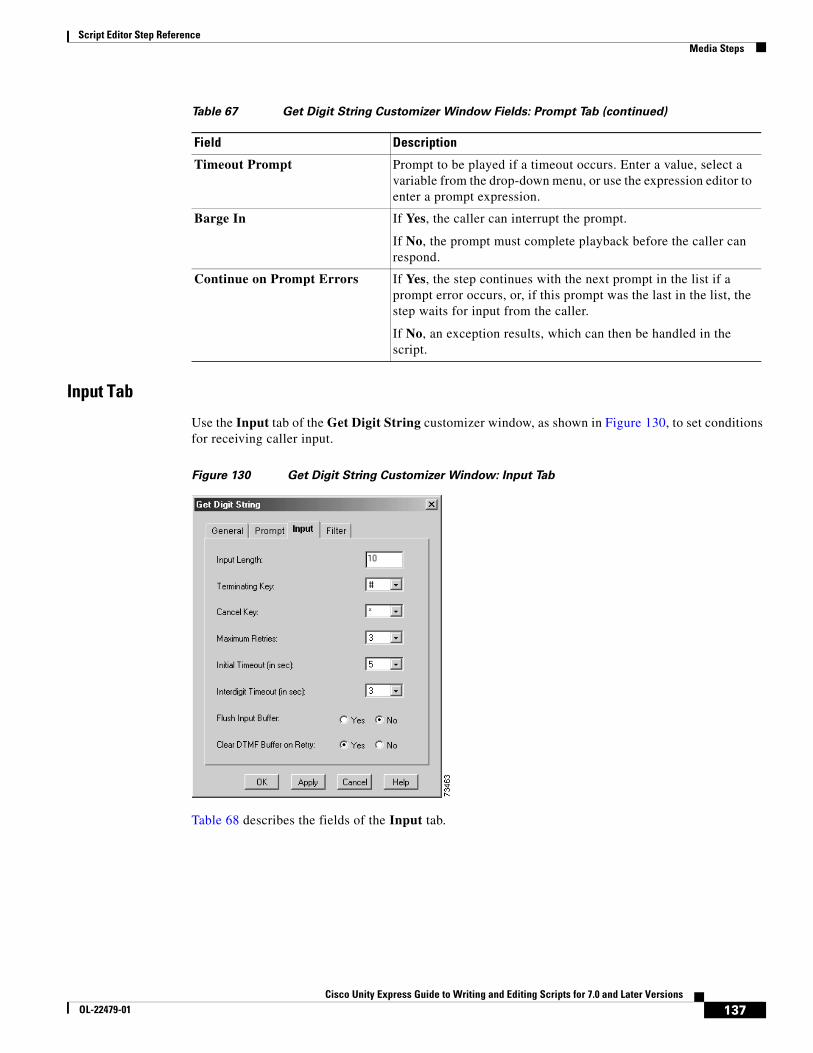
Script Editor Step ReferenceMedia Steps
Input Tab
Use the Input tab of the Get Digit String customizer window, as shown in Figure 130, to set conditions for receiving caller input.
Figure 130 Get Digit String Customizer Window: Input Tab
Table 68 describes the fields of the Input tab.
Timeout Prompt Prompt to be played if a timeout occurs. Enter a value, select a variable from the drop-down menu, or use the expression editor to enter a prompt expression.
Barge In If Yes, the caller can interrupt the prompt.
If No, the prompt must complete playback before the caller can respond.
Continue on Prompt Errors If Yes, the step continues with the next prompt in the list if a prompt error occurs, or, if this prompt was the last in the list, the step waits for input from the caller.
If No, an exception results, which can then be handled in the script.
Table 67 Get Digit String Customizer Window Fields: Prompt Tab (continued)
Field Description
137Cisco Unity Express Guide to Writing and Editing Scripts for 7.0 and Later Versions
OL-22479-01
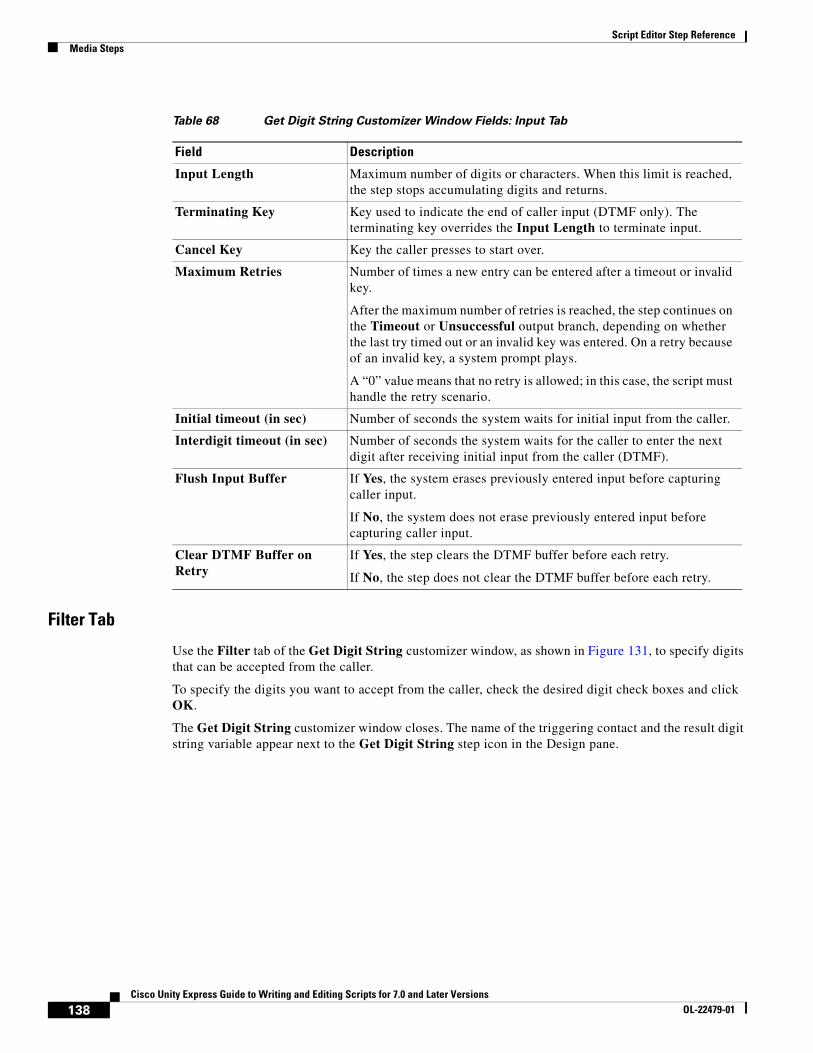
Script Editor Step ReferenceMedia Steps
Filter Tab
Use the Filter tab of the Get Digit String customizer window, as shown in Figure 131, to specify digits that can be accepted from the caller.
To specify the digits you want to accept from the caller, check the desired digit check boxes and click OK.
The Get Digit String customizer window closes. The name of the triggering contact and the result digit string variable appear next to the Get Digit String step icon in the Design pane.
Table 68 Get Digit String Customizer Window Fields: Input Tab
Field Description
Input Length Maximum number of digits or characters. When this limit is reached, the step stops accumulating digits and returns.
Terminating Key Key used to indicate the end of caller input (DTMF only). The terminating key overrides the Input Length to terminate input.
Cancel Key Key the caller presses to start over.
Maximum Retries Number of times a new entry can be entered after a timeout or invalid key.
After the maximum number of retries is reached, the step continues on the Timeout or Unsuccessful output branch, depending on whether the last try timed out or an invalid key was entered. On a retry because of an invalid key, a system prompt plays.
A “0” value means that no retry is allowed; in this case, the script must handle the retry scenario.
Initial timeout (in sec) Number of seconds the system waits for initial input from the caller.
Interdigit timeout (in sec) Number of seconds the system waits for the caller to enter the next digit after receiving initial input from the caller (DTMF).
Flush Input Buffer If Yes, the system erases previously entered input before capturing caller input.
If No, the system does not erase previously entered input before capturing caller input.
Clear DTMF Buffer on Retry
If Yes, the step clears the DTMF buffer before each retry.
If No, the step does not clear the DTMF buffer before each retry.
138Cisco Unity Express Guide to Writing and Editing Scripts for 7.0 and Later Versions
OL-22479-01
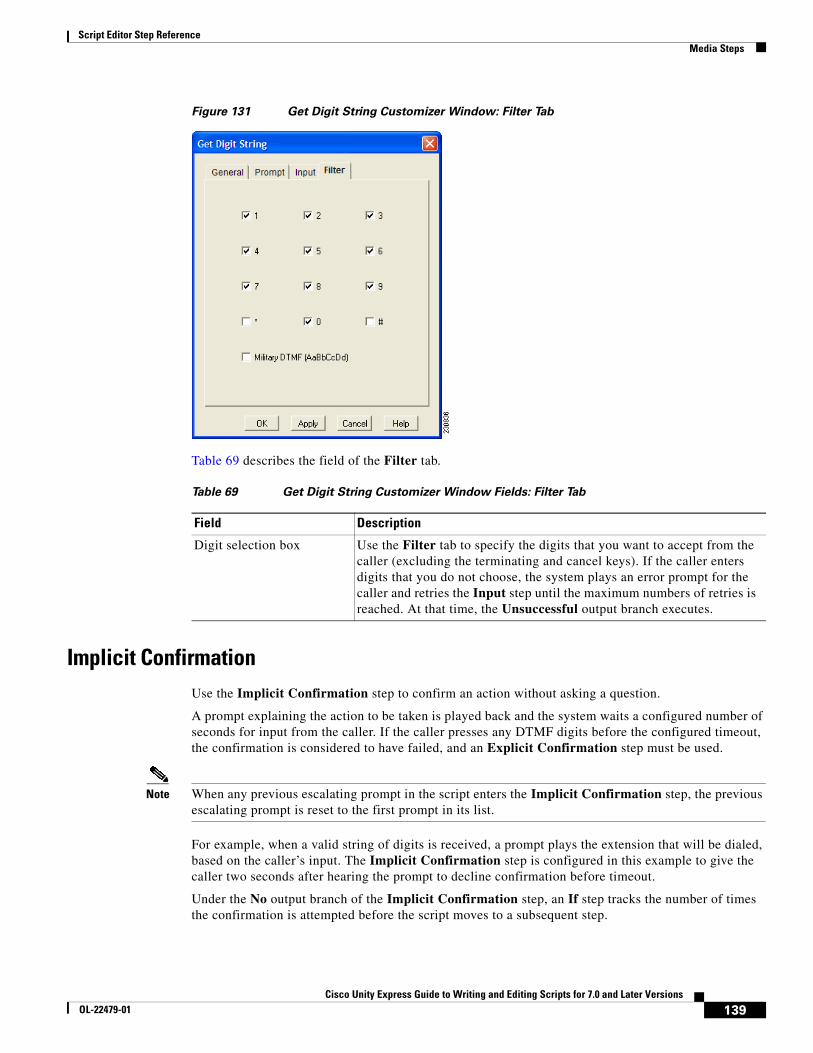
Script Editor Step ReferenceMedia Steps
Figure 131 Get Digit String Customizer Window: Filter Tab
Table 69 describes the field of the Filter tab.
Implicit ConfirmationUse the Implicit Confirmation step to confirm an action without asking a question.
A prompt explaining the action to be taken is played back and the system waits a configured number of seconds for input from the caller. If the caller presses any DTMF digits before the configured timeout, the confirmation is considered to have failed, and an Explicit Confirmation step must be used.
Note When any previous escalating prompt in the script enters the Implicit Confirmation step, the previous escalating prompt is reset to the first prompt in its list.
For example, when a valid string of digits is received, a prompt plays the extension that will be dialed, based on the caller’s input. The Implicit Confirmation step is configured in this example to give the caller two seconds after hearing the prompt to decline confirmation before timeout.
Under the No output branch of the Implicit Confirmation step, an If step tracks the number of times the confirmation is attempted before the script moves to a subsequent step.
Table 69 Get Digit String Customizer Window Fields: Filter Tab
Field Description
Digit selection box Use the Filter tab to specify the digits that you want to accept from the caller (excluding the terminating and cancel keys). If the caller enters digits that you do not choose, the system plays an error prompt for the caller and retries the Input step until the maximum numbers of retries is reached. At that time, the Unsuccessful output branch executes.
139Cisco Unity Express Guide to Writing and Editing Scripts for 7.0 and Later Versions
OL-22479-01
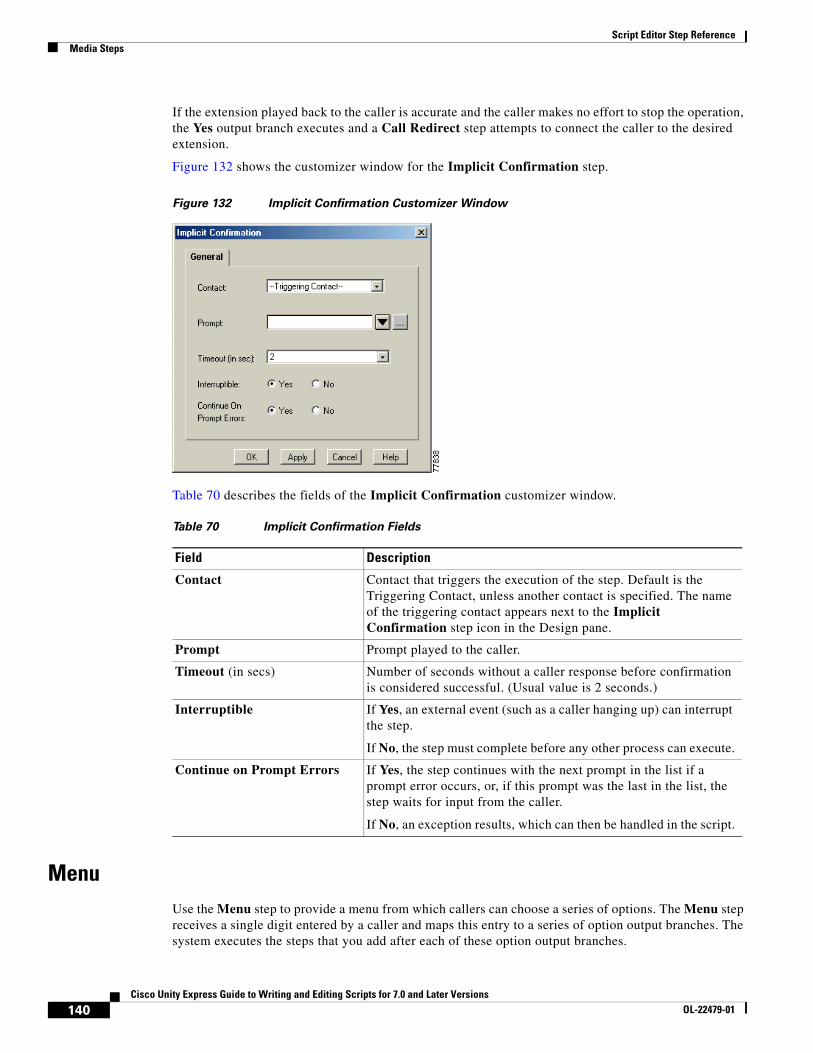
Script Editor Step ReferenceMedia Steps
If the extension played back to the caller is accurate and the caller makes no effort to stop the operation, the Yes output branch executes and a Call Redirect step attempts to connect the caller to the desired extension.
Figure 132 shows the customizer window for the Implicit Confirmation step.
Figure 132 Implicit Confirmation Customizer Window
Table 70 describes the fields of the Implicit Confirmation customizer window.
MenuUse the Menu step to provide a menu from which callers can choose a series of options. The Menu step receives a single digit entered by a caller and maps this entry to a series of option output branches. The system executes the steps that you add after each of these option output branches.
Table 70 Implicit Confirmation Fields
Field Description
Contact Contact that triggers the execution of the step. Default is the Triggering Contact, unless another contact is specified. The name of the triggering contact appears next to the Implicit Confirmation step icon in the Design pane.
Prompt Prompt played to the caller.
Timeout (in secs) Number of seconds without a caller response before confirmation is considered successful. (Usual value is 2 seconds.)
Interruptible If Yes, an external event (such as a caller hanging up) can interrupt the step.
If No, the step must complete before any other process can execute.
Continue on Prompt Errors If Yes, the step continues with the next prompt in the list if a prompt error occurs, or, if this prompt was the last in the list, the step waits for input from the caller.
If No, an exception results, which can then be handled in the script.
140Cisco Unity Express Guide to Writing and Editing Scripts for 7.0 and Later Versions
OL-22479-01
Script Editor Step ReferenceMedia Steps
Note When any previous escalating prompt in the script enters the Menu step, the previous escalating prompt is reset to the first prompt in its list.
Although the Menu step combines the functionality of a Get Digit String step and a Switch step, it allows the caller to enter only one digit.
By default, the Menu step has the following output branches:
• Output 1
• Output 2
• Output 3
• Timeout
• Unsuccessful
You can add more output branches in the General tab of the Menu customizer window.
The Menu step retries for either a timeout or an invalid digit entry (a digit that is not associated with any connections). If the maximum number of retries is reached, the Menu step follows either the Timeout or Unsuccessful connection, depending on the reason for the latest failure.
The customizer window of the Menu step contains three tabs:
• General Tab, page 141
• Prompt Tab, page 143
• Input Tab, page 143
General Tab
Use the General tab of the Menu customizer window, shown in Figure 133, to associate digits (typically entered by the caller from a telephone keypad) with an output branch label.
You can associate multiple inputs with a single output branch label, and you can associate only one output branch label with a given input.
141Cisco Unity Express Guide to Writing and Editing Scripts for 7.0 and Later Versions
OL-22479-01

Script Editor Step ReferenceMedia Steps
Figure 133 Menu Customizer Window: General Tab
Table 71 describes the fields of the General tab.
The Add New Output Option Name dialog box is shown in Figure 134.
Figure 134 Add New Output Option Name Dialog Box
Table 71 Menu Customizer Window Fields Customizer Window: General Tab
Field Description
Contact Contact that triggers the execution of the step. Unless another contact is specified, default is Triggering Contact.
Options One label for each possible output value.
Add Add a new option. The new option appears in the Options list box.
Modify Modifies the selected option using the Rename Output Option dialog box, which contains the same field as the Add New Output Option Name dialog box and is configured in the same way.
Interruptible If Yes, an external event (such as a caller hanging up) can interrupt the step.
If No, the step must complete before any other process can execute.
142Cisco Unity Express Guide to Writing and Editing Scripts for 7.0 and Later Versions
OL-22479-01
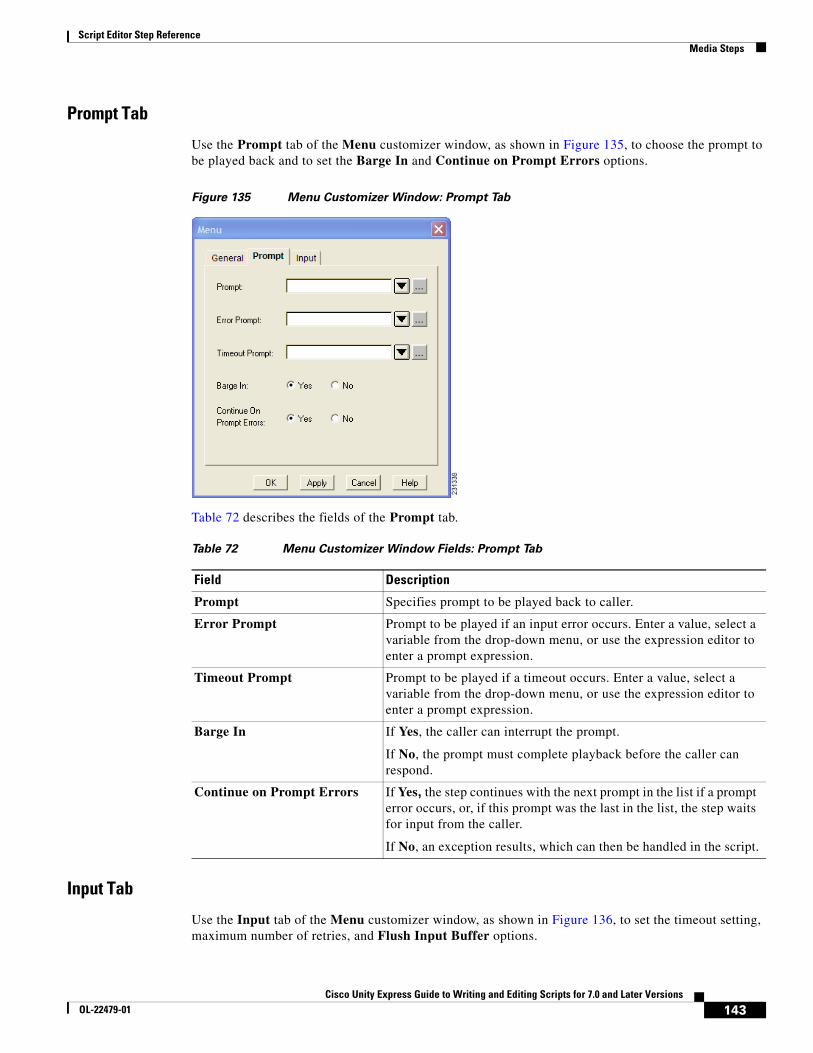
Script Editor Step ReferenceMedia Steps
Prompt Tab
Use the Prompt tab of the Menu customizer window, as shown in Figure 135, to choose the prompt to be played back and to set the Barge In and Continue on Prompt Errors options.
Figure 135 Menu Customizer Window: Prompt Tab
Table 72 describes the fields of the Prompt tab.
Input Tab
Use the Input tab of the Menu customizer window, as shown in Figure 136, to set the timeout setting, maximum number of retries, and Flush Input Buffer options.
Table 72 Menu Customizer Window Fields: Prompt Tab
Field Description
Prompt Specifies prompt to be played back to caller.
Error Prompt Prompt to be played if an input error occurs. Enter a value, select a variable from the drop-down menu, or use the expression editor to enter a prompt expression.
Timeout Prompt Prompt to be played if a timeout occurs. Enter a value, select a variable from the drop-down menu, or use the expression editor to enter a prompt expression.
Barge In If Yes, the caller can interrupt the prompt.
If No, the prompt must complete playback before the caller can respond.
Continue on Prompt Errors If Yes, the step continues with the next prompt in the list if a prompt error occurs, or, if this prompt was the last in the list, the step waits for input from the caller.
If No, an exception results, which can then be handled in the script.
143Cisco Unity Express Guide to Writing and Editing Scripts for 7.0 and Later Versions
OL-22479-01
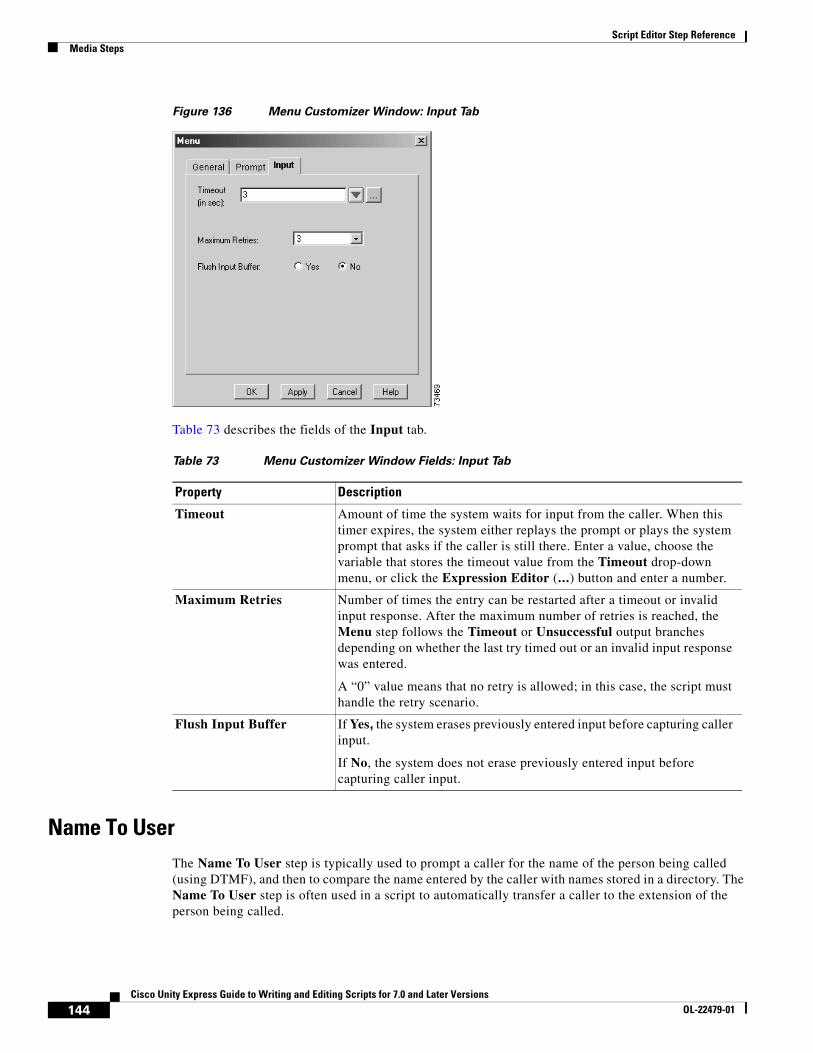
Script Editor Step ReferenceMedia Steps
Figure 136 Menu Customizer Window: Input Tab
Table 73 describes the fields of the Input tab.
Name To UserThe Name To User step is typically used to prompt a caller for the name of the person being called (using DTMF), and then to compare the name entered by the caller with names stored in a directory. The Name To User step is often used in a script to automatically transfer a caller to the extension of the person being called.
Table 73 Menu Customizer Window Fields: Input Tab
Property Description
Timeout Amount of time the system waits for input from the caller. When this timer expires, the system either replays the prompt or plays the system prompt that asks if the caller is still there. Enter a value, choose the variable that stores the timeout value from the Timeout drop-down menu, or click the Expression Editor (...) button and enter a number.
Maximum Retries Number of times the entry can be restarted after a timeout or invalid input response. After the maximum number of retries is reached, the Menu step follows the Timeout or Unsuccessful output branches depending on whether the last try timed out or an invalid input response was entered.
A “0” value means that no retry is allowed; in this case, the script must handle the retry scenario.
Flush Input Buffer If Yes, the system erases previously entered input before capturing caller input.
If No, the system does not erase previously entered input before capturing caller input.
144Cisco Unity Express Guide to Writing and Editing Scripts for 7.0 and Later Versions
OL-22479-01
Script Editor Step ReferenceMedia Steps
Another useful function of the Name To User step is to assign a value to a variable that can later be queried using the Get User Info step to retrieve information such as the extension, e-mail address, and spoken name of the user selected by the caller.
Note When any previous escalating prompt in the script enters the Name To User step, the previous escalating prompt is reset to the first prompt in its list.
The Name To User step receives DTMF input from a caller, using the following numeric keypad mapping:
• 2 = ABC
• 3 = DEF
• 4 = GHI
• 5 = JKL
• 6 = MNO
• 7 = PQRS
• 8 = TUV
• 9 = WXYZ
Using the information from this step, the script creates a subsequent prompt that plays the prerecorded name of the user selected by the caller if it exists. If no recording exists, the script will spell the user’s name.
Note The Name To User step is limited to spelling back names with ASCII-only characters, which may be a limitation under some international conditions.
The Name To User step produces the following output branches:
Note If the Name To User step matches the caller input with a single user in the Lightweight Access Directory Protocol (LDAP) directory, that result will be returned immediately without requiring the caller to confirm the selection.
• Successful: A successful match is made between the input from the caller and a name in the directory.
• Timeout: The step has reached the maximum number of retries (as configured in the customizer window) without receiving input from the caller.
• Unsuccessful: The input from the caller does not match a name in the directory.
• Operator: The operator’s extension was entered.
Note The Operator output branch appears under the Name To User step in the script only if Yes is selected for the Operator option in the General tab of the Name To User customizer window. (See Figure 137.)
The customizer window of the Name To User step contains three tabs:
• General Tab, page 146
145Cisco Unity Express Guide to Writing and Editing Scripts for 7.0 and Later Versions
OL-22479-01
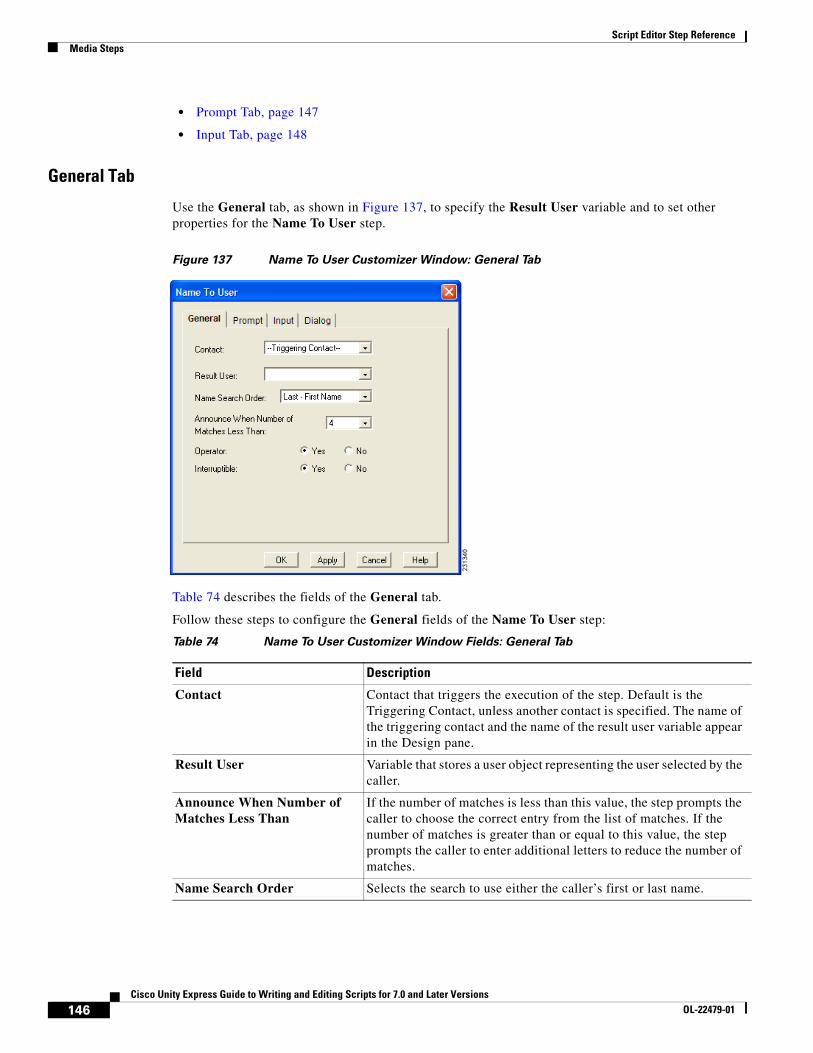
Script Editor Step ReferenceMedia Steps
• Prompt Tab, page 147
• Input Tab, page 148
General Tab
Use the General tab, as shown in Figure 137, to specify the Result User variable and to set other properties for the Name To User step.
Figure 137 Name To User Customizer Window: General Tab
Table 74 describes the fields of the General tab.
Follow these steps to configure the General fields of the Name To User step:
Table 74 Name To User Customizer Window Fields: General Tab
Field Description
Contact Contact that triggers the execution of the step. Default is the Triggering Contact, unless another contact is specified. The name of the triggering contact and the name of the result user variable appear in the Design pane.
Result User Variable that stores a user object representing the user selected by the caller.
Announce When Number of Matches Less Than
If the number of matches is less than this value, the step prompts the caller to choose the correct entry from the list of matches. If the number of matches is greater than or equal to this value, the step prompts the caller to enter additional letters to reduce the number of matches.
Name Search Order Selects the search to use either the caller’s first or last name.
146Cisco Unity Express Guide to Writing and Editing Scripts for 7.0 and Later Versions
OL-22479-01
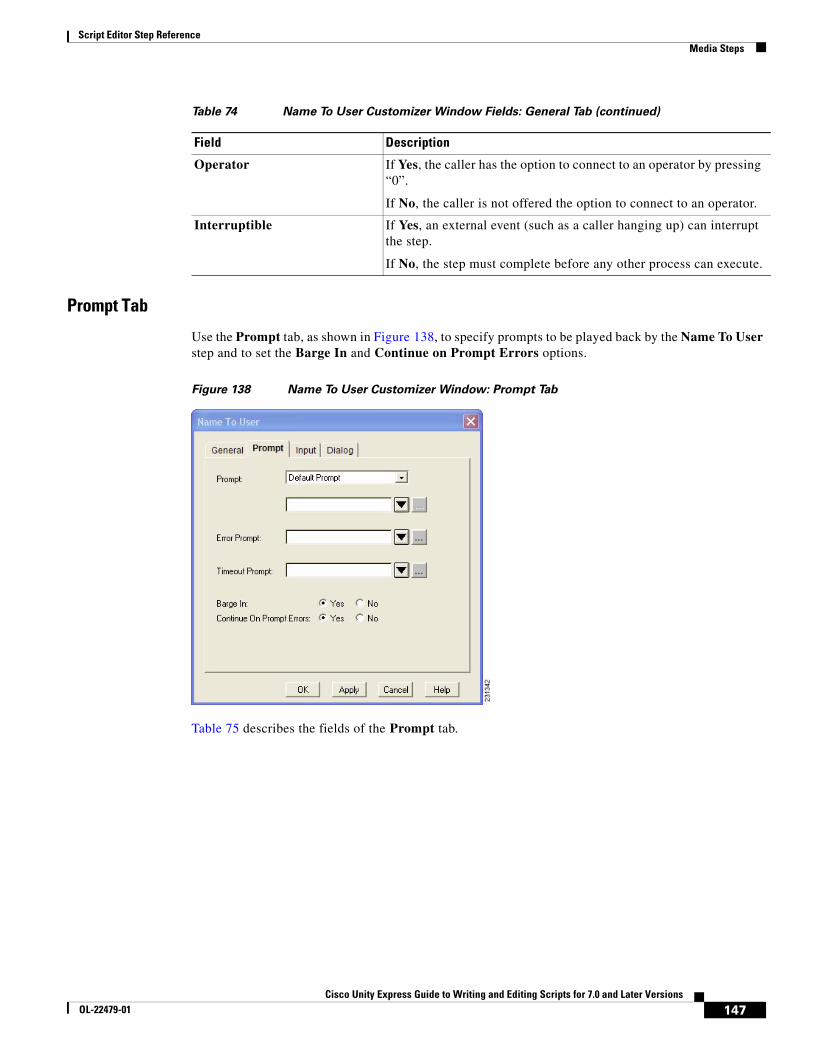
Script Editor Step ReferenceMedia Steps
Prompt Tab
Use the Prompt tab, as shown in Figure 138, to specify prompts to be played back by the Name To User step and to set the Barge In and Continue on Prompt Errors options.
Figure 138 Name To User Customizer Window: Prompt Tab
Table 75 describes the fields of the Prompt tab.
Operator If Yes, the caller has the option to connect to an operator by pressing “0”.
If No, the caller is not offered the option to connect to an operator.
Interruptible If Yes, an external event (such as a caller hanging up) can interrupt the step.
If No, the step must complete before any other process can execute.
Table 74 Name To User Customizer Window Fields: General Tab (continued)
Field Description
147Cisco Unity Express Guide to Writing and Editing Scripts for 7.0 and Later Versions
OL-22479-01
Script Editor Step ReferenceMedia Steps
Input Tab
Use the Input tab, as shown in Figure 139, to configure various input properties for the Name To User step.
Table 75 Name To User Customizer Window Fields: Prompt Tab
Field Description
Prompt Specifies the prompt to be played back to the caller.
Options from the drop-down menu:
• Default prompt: System prompt bundled with the Cisco Unity Express software: “Spell the last name followed by the first name.”
• Customized prompt: Prompt created by the script designer.
• No prompt: No prompt is played.
Enter a value, choose a prompt to play from the List of Prompts drop-down menu, click the Expression Editor (...) button and enter an expression that specifies the prompt to play.
Error Prompt Prompt to be played if an input error occurs. Enter a value, select a variable from the drop-down menu, or use the expression editor to enter a prompt expression.
Timeout Prompt Prompt to be played if a timeout occurs. Enter a value, select a variable from the drop-down menu, or use the expression editor to enter a prompt expression.
Barge In If Yes, the caller can interrupt the prompt.
If No, the prompt must complete playback before the caller can respond.
Continue on Prompt Errors
If Yes, the step continues with the next prompt in the list if a prompt error occurs, or, if this prompt was the last in the list, the step waits for input from the caller.
If No, an exception results, which can then be handled in the script.
148Cisco Unity Express Guide to Writing and Editing Scripts for 7.0 and Later Versions
OL-22479-01
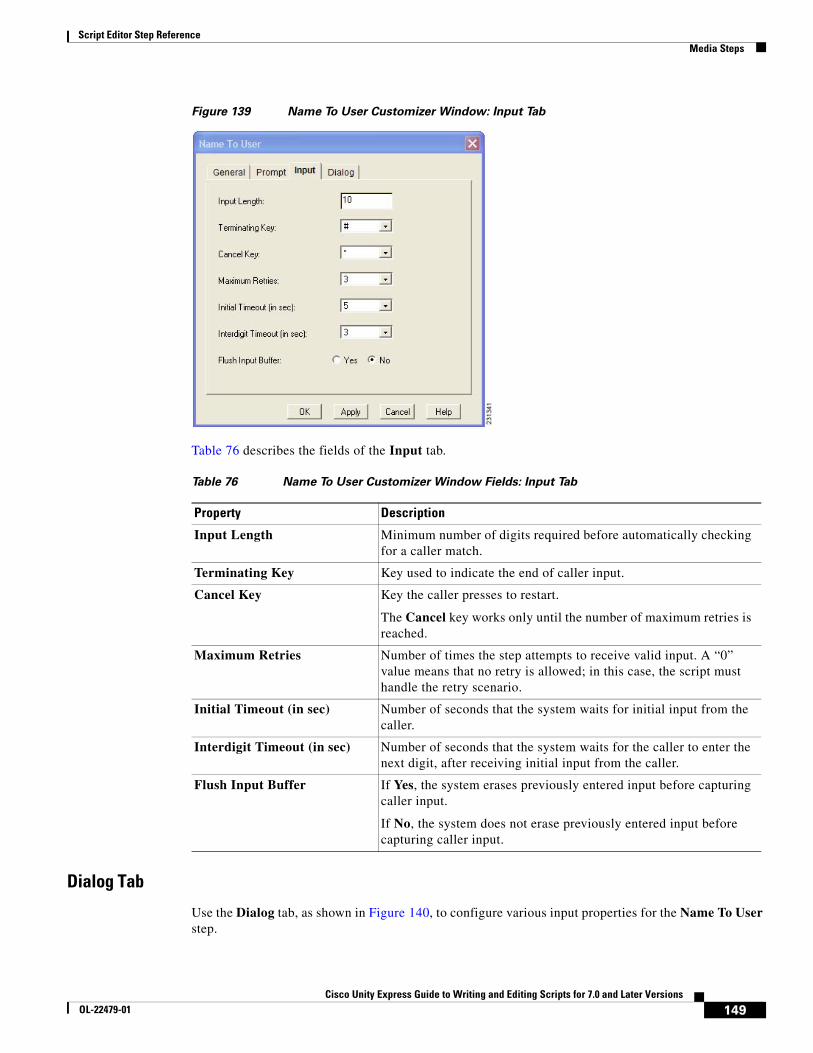
Script Editor Step ReferenceMedia Steps
Figure 139 Name To User Customizer Window: Input Tab
Table 76 describes the fields of the Input tab.
Dialog Tab
Use the Dialog tab, as shown in Figure 140, to configure various input properties for the Name To User step.
Table 76 Name To User Customizer Window Fields: Input Tab
Property Description
Input Length Minimum number of digits required before automatically checking for a caller match.
Terminating Key Key used to indicate the end of caller input.
Cancel Key Key the caller presses to restart.
The Cancel key works only until the number of maximum retries is reached.
Maximum Retries Number of times the step attempts to receive valid input. A “0” value means that no retry is allowed; in this case, the script must handle the retry scenario.
Initial Timeout (in sec) Number of seconds that the system waits for initial input from the caller.
Interdigit Timeout (in sec) Number of seconds that the system waits for the caller to enter the next digit, after receiving initial input from the caller.
Flush Input Buffer If Yes, the system erases previously entered input before capturing caller input.
If No, the system does not erase previously entered input before capturing caller input.
149Cisco Unity Express Guide to Writing and Editing Scripts for 7.0 and Later Versions
OL-22479-01
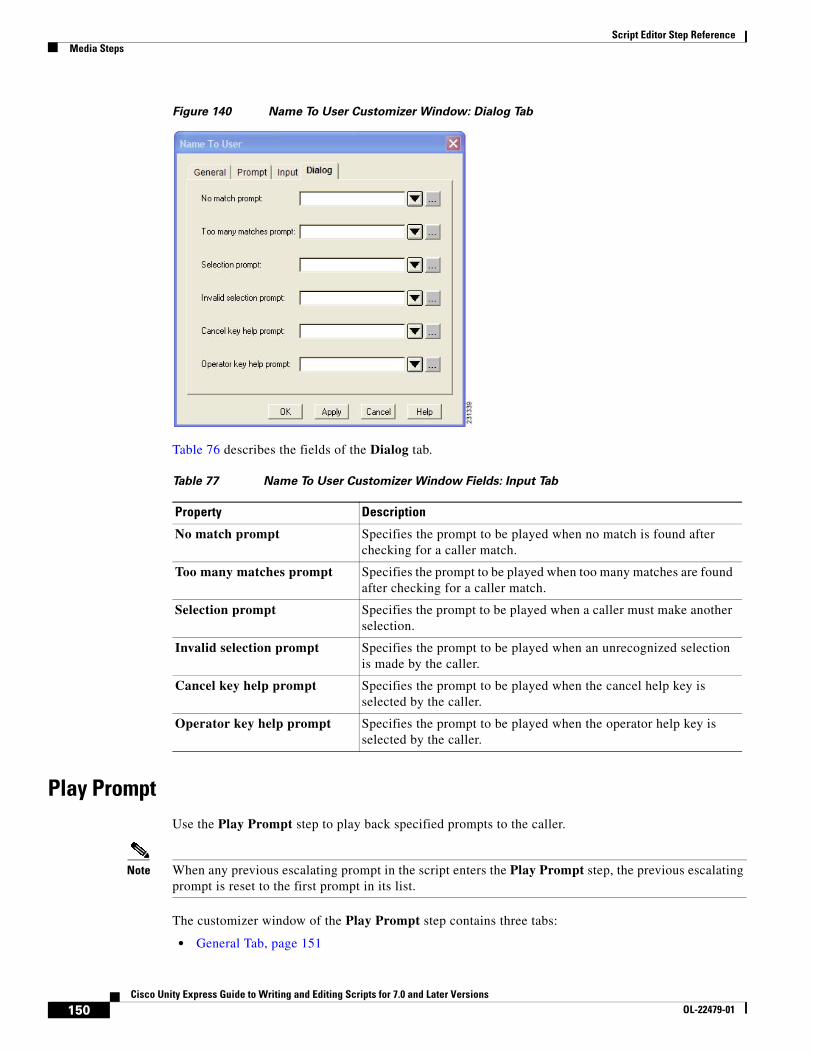
Script Editor Step ReferenceMedia Steps
Figure 140 Name To User Customizer Window: Dialog Tab
Table 76 describes the fields of the Dialog tab.
Play PromptUse the Play Prompt step to play back specified prompts to the caller.
Note When any previous escalating prompt in the script enters the Play Prompt step, the previous escalating prompt is reset to the first prompt in its list.
The customizer window of the Play Prompt step contains three tabs:
• General Tab, page 151
Table 77 Name To User Customizer Window Fields: Input Tab
Property Description
No match prompt Specifies the prompt to be played when no match is found after checking for a caller match.
Too many matches prompt Specifies the prompt to be played when too many matches are found after checking for a caller match.
Selection prompt Specifies the prompt to be played when a caller must make another selection.
Invalid selection prompt Specifies the prompt to be played when an unrecognized selection is made by the caller.
Cancel key help prompt Specifies the prompt to be played when the cancel help key is selected by the caller.
Operator key help prompt Specifies the prompt to be played when the operator help key is selected by the caller.
150Cisco Unity Express Guide to Writing and Editing Scripts for 7.0 and Later Versions
OL-22479-01
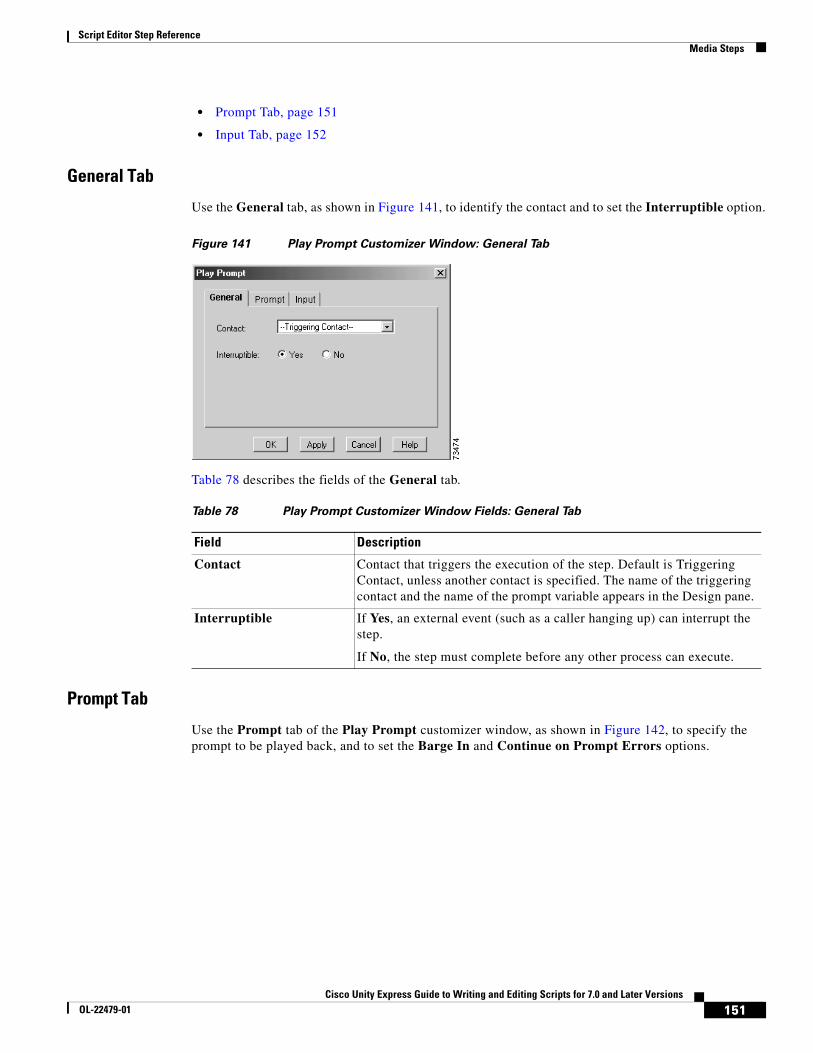
Script Editor Step ReferenceMedia Steps
• Prompt Tab, page 151
• Input Tab, page 152
General Tab
Use the General tab, as shown in Figure 141, to identify the contact and to set the Interruptible option.
Figure 141 Play Prompt Customizer Window: General Tab
Table 78 describes the fields of the General tab.
Prompt Tab
Use the Prompt tab of the Play Prompt customizer window, as shown in Figure 142, to specify the prompt to be played back, and to set the Barge In and Continue on Prompt Errors options.
Table 78 Play Prompt Customizer Window Fields: General Tab
Field Description
Contact Contact that triggers the execution of the step. Default is Triggering Contact, unless another contact is specified. The name of the triggering contact and the name of the prompt variable appears in the Design pane.
Interruptible If Yes, an external event (such as a caller hanging up) can interrupt the step.
If No, the step must complete before any other process can execute.
151Cisco Unity Express Guide to Writing and Editing Scripts for 7.0 and Later Versions
OL-22479-01
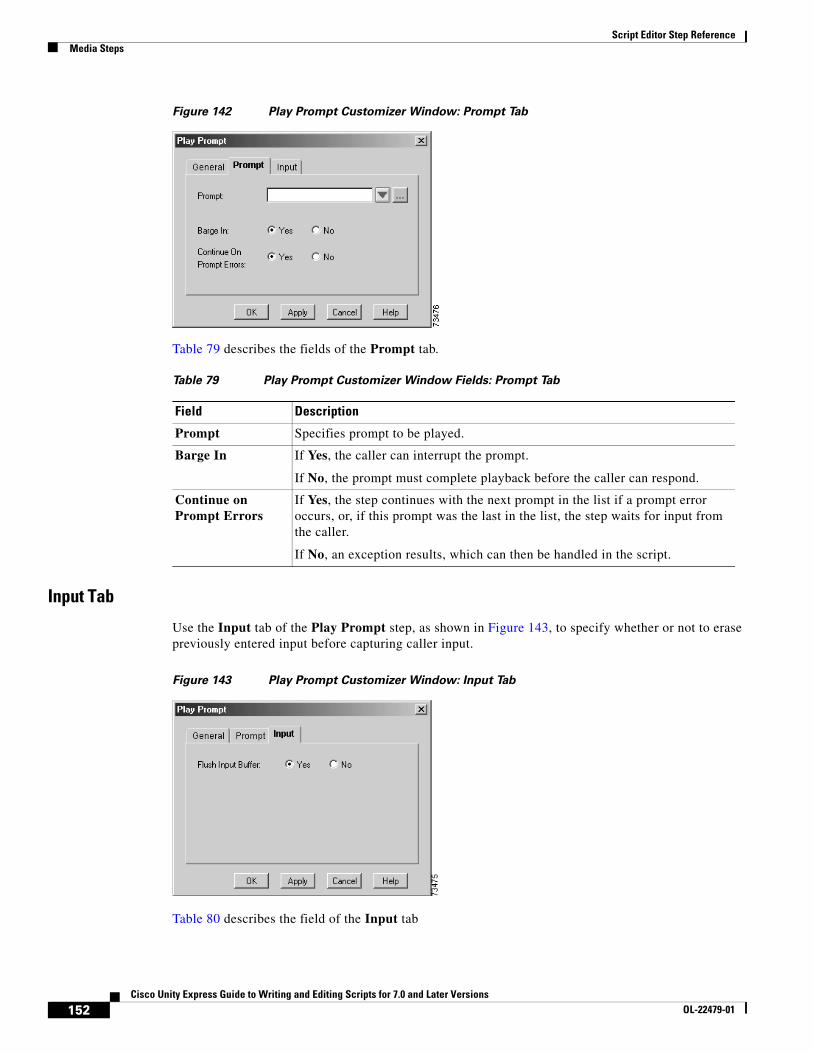
Script Editor Step ReferenceMedia Steps
Figure 142 Play Prompt Customizer Window: Prompt Tab
Table 79 describes the fields of the Prompt tab.
Input Tab
Use the Input tab of the Play Prompt step, as shown in Figure 143, to specify whether or not to erase previously entered input before capturing caller input.
Figure 143 Play Prompt Customizer Window: Input Tab
Table 80 describes the field of the Input tab
Table 79 Play Prompt Customizer Window Fields: Prompt Tab
Field Description
Prompt Specifies prompt to be played.
Barge In If Yes, the caller can interrupt the prompt.
If No, the prompt must complete playback before the caller can respond.
Continue on Prompt Errors
If Yes, the step continues with the next prompt in the list if a prompt error occurs, or, if this prompt was the last in the list, the step waits for input from the caller.
If No, an exception results, which can then be handled in the script.
152Cisco Unity Express Guide to Writing and Editing Scripts for 7.0 and Later Versions
OL-22479-01
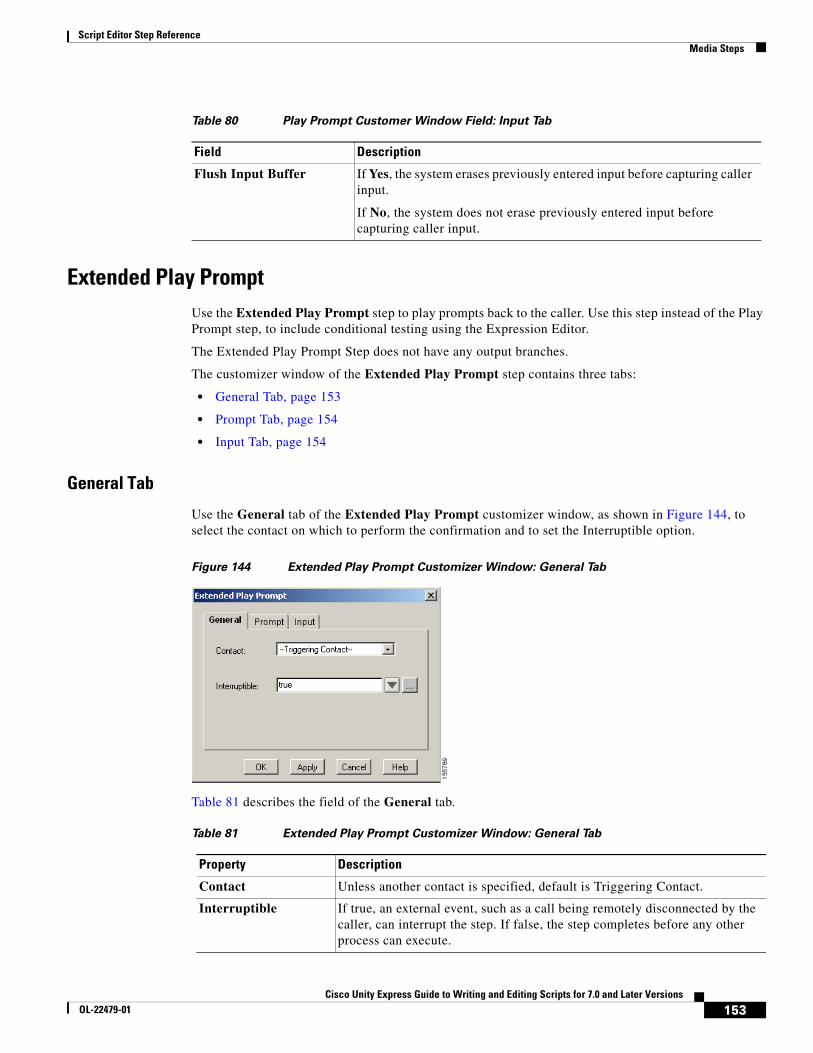
Script Editor Step ReferenceMedia Steps
Extended Play PromptUse the Extended Play Prompt step to play prompts back to the caller. Use this step instead of the Play Prompt step, to include conditional testing using the Expression Editor.
The Extended Play Prompt Step does not have any output branches.
The customizer window of the Extended Play Prompt step contains three tabs:
• General Tab, page 153
• Prompt Tab, page 154
• Input Tab, page 154
General Tab
Use the General tab of the Extended Play Prompt customizer window, as shown in Figure 144, to select the contact on which to perform the confirmation and to set the Interruptible option.
Figure 144 Extended Play Prompt Customizer Window: General Tab
Table 81 describes the field of the General tab.
Table 80 Play Prompt Customer Window Field: Input Tab
Field Description
Flush Input Buffer If Yes, the system erases previously entered input before capturing caller input.
If No, the system does not erase previously entered input before capturing caller input.
Table 81 Extended Play Prompt Customizer Window: General Tab
Property Description
Contact Unless another contact is specified, default is Triggering Contact.
Interruptible If true, an external event, such as a call being remotely disconnected by the caller, can interrupt the step. If false, the step completes before any other process can execute.
153Cisco Unity Express Guide to Writing and Editing Scripts for 7.0 and Later Versions
OL-22479-01
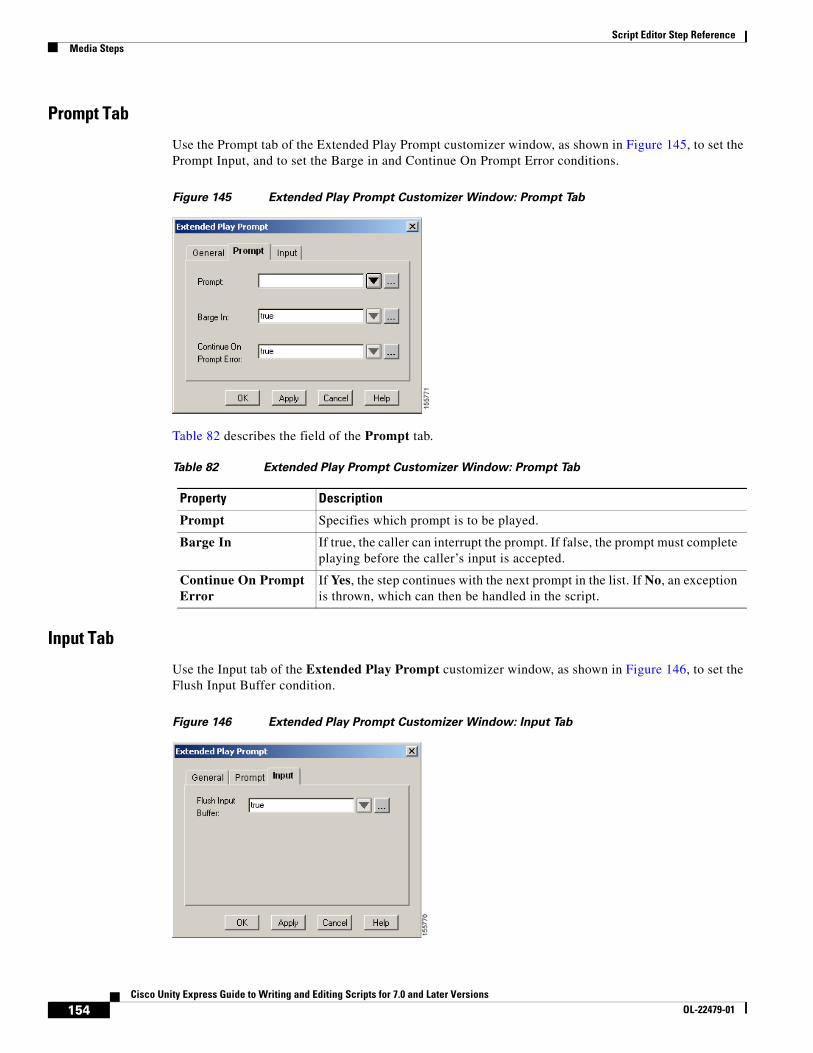
Script Editor Step ReferenceMedia Steps
Prompt Tab
Use the Prompt tab of the Extended Play Prompt customizer window, as shown in Figure 145, to set the Prompt Input, and to set the Barge in and Continue On Prompt Error conditions.
Figure 145 Extended Play Prompt Customizer Window: Prompt Tab
Table 82 describes the field of the Prompt tab.
Input Tab
Use the Input tab of the Extended Play Prompt customizer window, as shown in Figure 146, to set the Flush Input Buffer condition.
Figure 146 Extended Play Prompt Customizer Window: Input Tab
Table 82 Extended Play Prompt Customizer Window: Prompt Tab
Property Description
Prompt Specifies which prompt is to be played.
Barge In If true, the caller can interrupt the prompt. If false, the prompt must complete playing before the caller’s input is accepted.
Continue On Prompt Error
If Yes, the step continues with the next prompt in the list. If No, an exception is thrown, which can then be handled in the script.
154Cisco Unity Express Guide to Writing and Editing Scripts for 7.0 and Later Versions
OL-22479-01
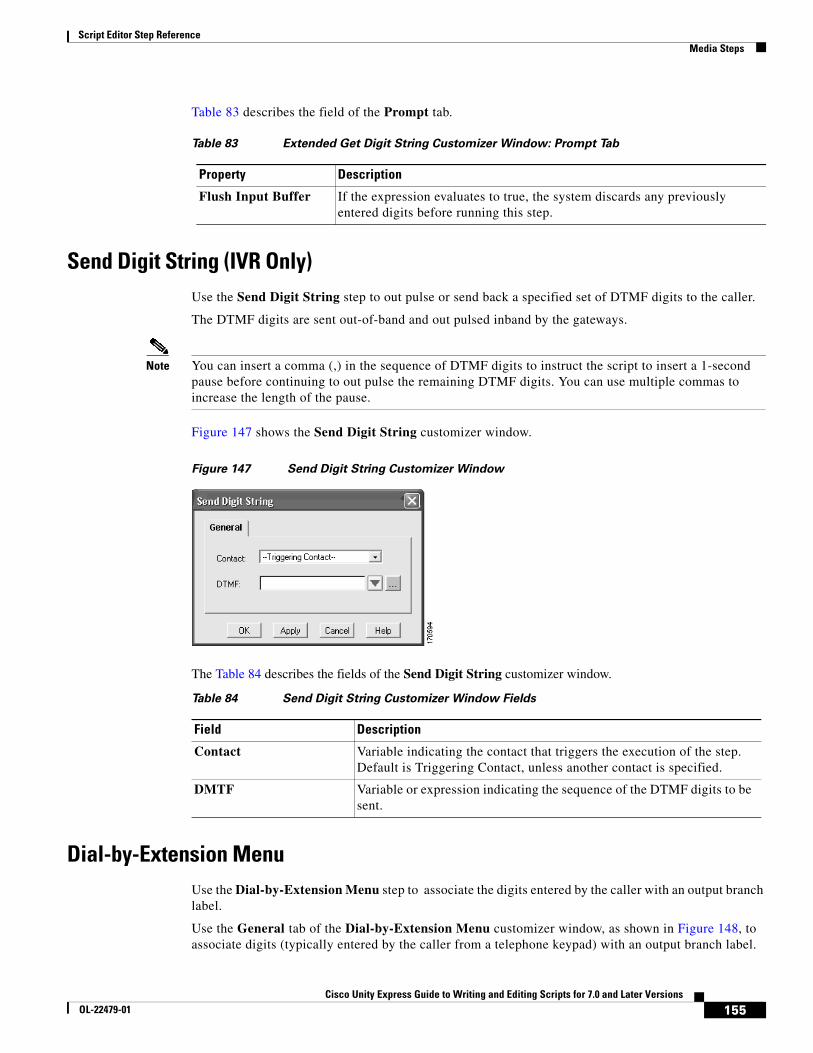
Script Editor Step ReferenceMedia Steps
Table 83 describes the field of the Prompt tab.
Send Digit String (IVR Only)Use the Send Digit String step to out pulse or send back a specified set of DTMF digits to the caller.
The DTMF digits are sent out-of-band and out pulsed inband by the gateways.
Note You can insert a comma (,) in the sequence of DTMF digits to instruct the script to insert a 1-second pause before continuing to out pulse the remaining DTMF digits. You can use multiple commas to increase the length of the pause.
Figure 147 shows the Send Digit String customizer window.
Figure 147 Send Digit String Customizer Window
The Table 84 describes the fields of the Send Digit String customizer window.
Dial-by-Extension MenuUse the Dial-by-Extension Menu step to associate the digits entered by the caller with an output branch label.
Use the General tab of the Dial-by-Extension Menu customizer window, as shown in Figure 148, to associate digits (typically entered by the caller from a telephone keypad) with an output branch label.
Table 83 Extended Get Digit String Customizer Window: Prompt Tab
Property Description
Flush Input Buffer If the expression evaluates to true, the system discards any previously entered digits before running this step.
Table 84 Send Digit String Customizer Window Fields
Field Description
Contact Variable indicating the contact that triggers the execution of the step. Default is Triggering Contact, unless another contact is specified.
DMTF Variable or expression indicating the sequence of the DTMF digits to be sent.
155Cisco Unity Express Guide to Writing and Editing Scripts for 7.0 and Later Versions
OL-22479-01
Script Editor Step ReferenceMedia Steps
You can associate multiple inputs with a single output branch label, and you can associate only one output branch label with a given input.
The Dial-by-Extension Menu step receives a single digit entered by a caller and maps this entry to a series of option output branches. The system executes the steps that you add after each of these option output branches.
The customizer window of the Dial-by-Extension Menu step contains four tabs:
• General Tab, page 156
• Prompt Tab, page 158
• Input Tab, page 158
• Dial-by-Extension Tab, page 160
General Tab
By default, the Dial-by-Extension Menu step has the following output branches:
• Output 1
• Output 2
• Output 3
• Timeout
• Unsuccessful
• Digits Collected
You can add more output branches in the General tab of the Dial-by-Extension Menu customizer window.
The Dial-by-Extension Menu step retries for either a timeout or an invalid digit entry (a digit that is not associated with any connections). If the maximum number of retries is reached, the Dial-by-Extension Menu step follows either the Timeout, Unsuccessful, or Digits Collected connection, depending on the reason for the latest failure.
156Cisco Unity Express Guide to Writing and Editing Scripts for 7.0 and Later Versions
OL-22479-01
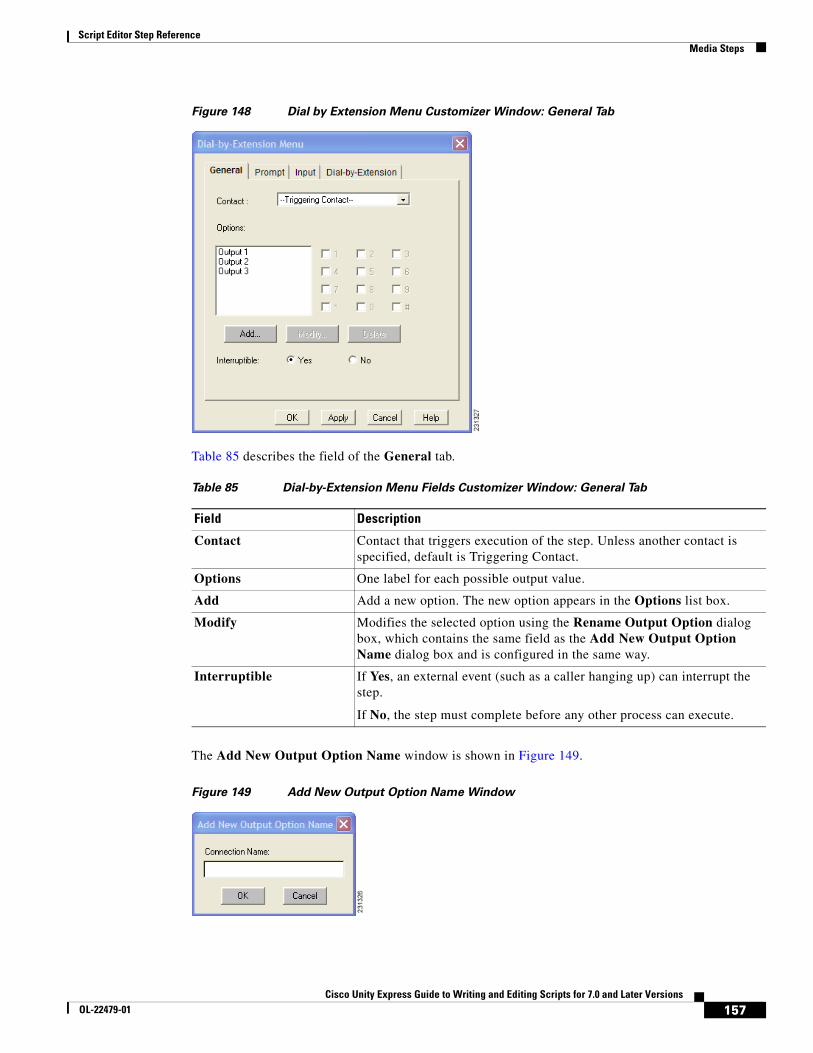
Script Editor Step ReferenceMedia Steps
Figure 148 Dial by Extension Menu Customizer Window: General Tab
Table 85 describes the field of the General tab.
The Add New Output Option Name window is shown in Figure 149.
Figure 149 Add New Output Option Name Window
Table 85 Dial-by-Extension Menu Fields Customizer Window: General Tab
Field Description
Contact Contact that triggers execution of the step. Unless another contact is specified, default is Triggering Contact.
Options One label for each possible output value.
Add Add a new option. The new option appears in the Options list box.
Modify Modifies the selected option using the Rename Output Option dialog box, which contains the same field as the Add New Output Option Name dialog box and is configured in the same way.
Interruptible If Yes, an external event (such as a caller hanging up) can interrupt the step.
If No, the step must complete before any other process can execute.
157Cisco Unity Express Guide to Writing and Editing Scripts for 7.0 and Later Versions
OL-22479-01
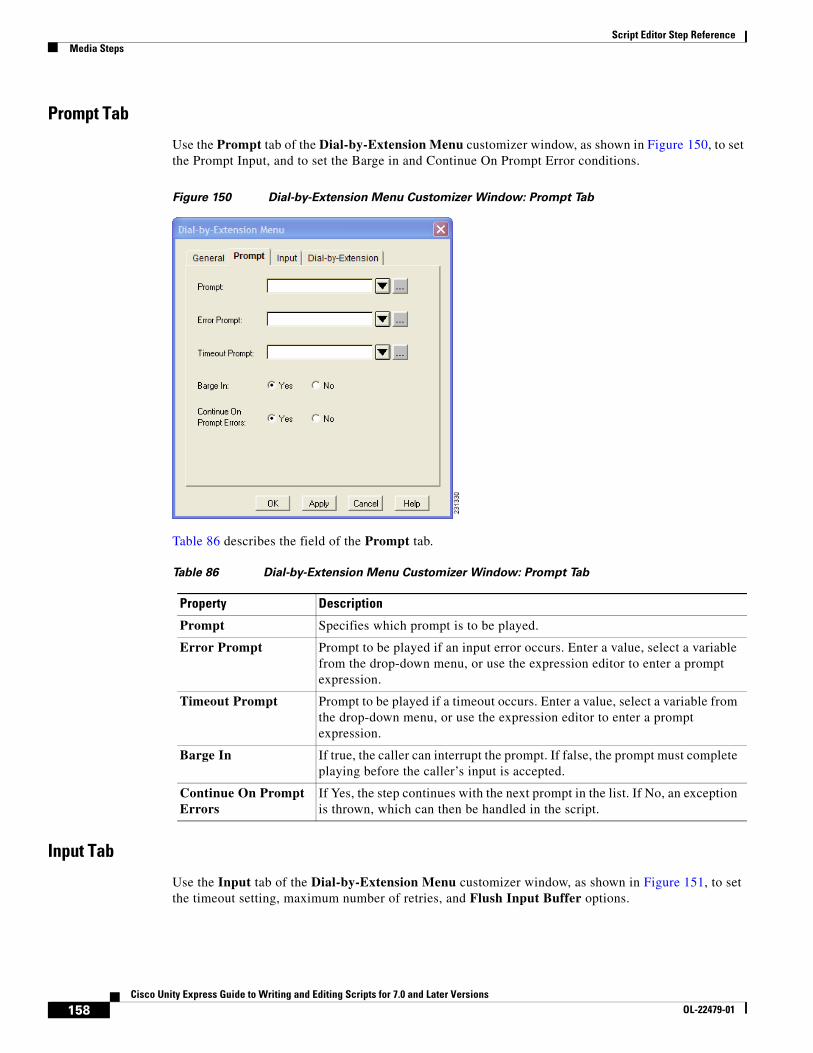
Script Editor Step ReferenceMedia Steps
Prompt Tab
Use the Prompt tab of the Dial-by-Extension Menu customizer window, as shown in Figure 150, to set the Prompt Input, and to set the Barge in and Continue On Prompt Error conditions.
Figure 150 Dial-by-Extension Menu Customizer Window: Prompt Tab
Table 86 describes the field of the Prompt tab.
Input Tab
Use the Input tab of the Dial-by-Extension Menu customizer window, as shown in Figure 151, to set the timeout setting, maximum number of retries, and Flush Input Buffer options.
Table 86 Dial-by-Extension Menu Customizer Window: Prompt Tab
Property Description
Prompt Specifies which prompt is to be played.
Error Prompt Prompt to be played if an input error occurs. Enter a value, select a variable from the drop-down menu, or use the expression editor to enter a prompt expression.
Timeout Prompt Prompt to be played if a timeout occurs. Enter a value, select a variable from the drop-down menu, or use the expression editor to enter a prompt expression.
Barge In If true, the caller can interrupt the prompt. If false, the prompt must complete playing before the caller’s input is accepted.
Continue On Prompt Errors
If Yes, the step continues with the next prompt in the list. If No, an exception is thrown, which can then be handled in the script.
158Cisco Unity Express Guide to Writing and Editing Scripts for 7.0 and Later Versions
OL-22479-01
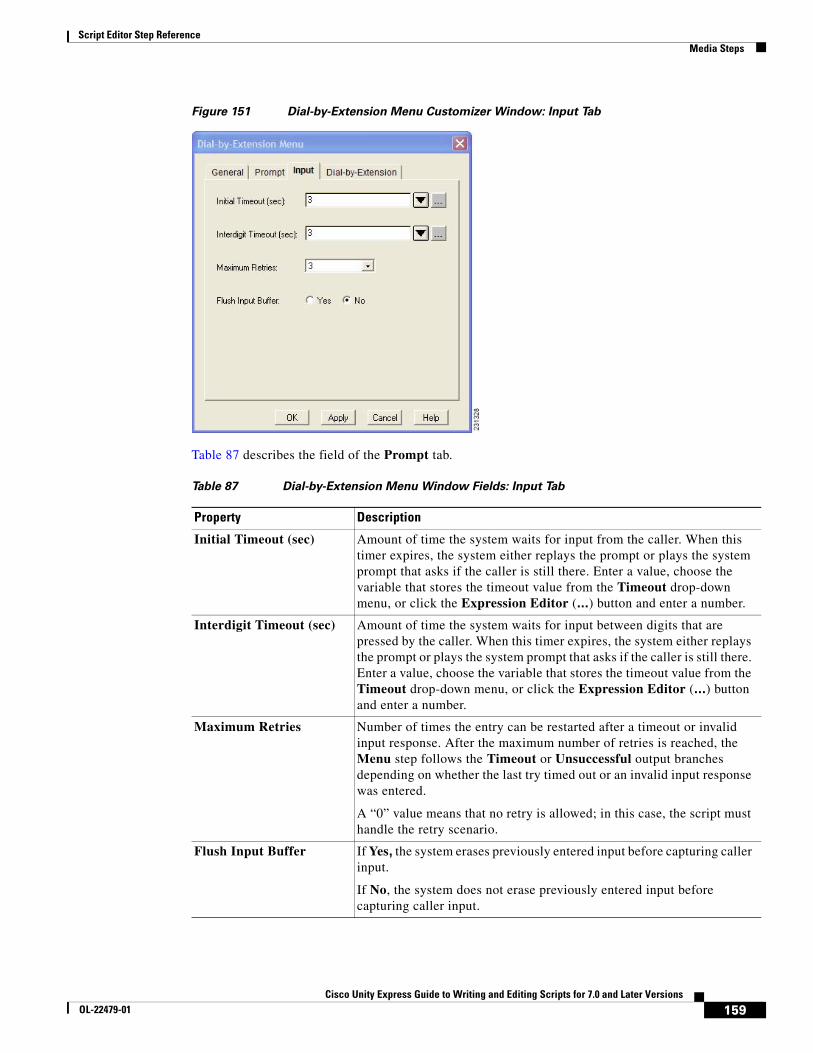
Script Editor Step ReferenceMedia Steps
Figure 151 Dial-by-Extension Menu Customizer Window: Input Tab
Table 87 describes the field of the Prompt tab.
Table 87 Dial-by-Extension Menu Window Fields: Input Tab
Property Description
Initial Timeout (sec) Amount of time the system waits for input from the caller. When this timer expires, the system either replays the prompt or plays the system prompt that asks if the caller is still there. Enter a value, choose the variable that stores the timeout value from the Timeout drop-down menu, or click the Expression Editor (...) button and enter a number.
Interdigit Timeout (sec) Amount of time the system waits for input between digits that are pressed by the caller. When this timer expires, the system either replays the prompt or plays the system prompt that asks if the caller is still there. Enter a value, choose the variable that stores the timeout value from the Timeout drop-down menu, or click the Expression Editor (...) button and enter a number.
Maximum Retries Number of times the entry can be restarted after a timeout or invalid input response. After the maximum number of retries is reached, the Menu step follows the Timeout or Unsuccessful output branches depending on whether the last try timed out or an invalid input response was entered.
A “0” value means that no retry is allowed; in this case, the script must handle the retry scenario.
Flush Input Buffer If Yes, the system erases previously entered input before capturing caller input.
If No, the system does not erase previously entered input before capturing caller input.
159Cisco Unity Express Guide to Writing and Editing Scripts for 7.0 and Later Versions
OL-22479-01
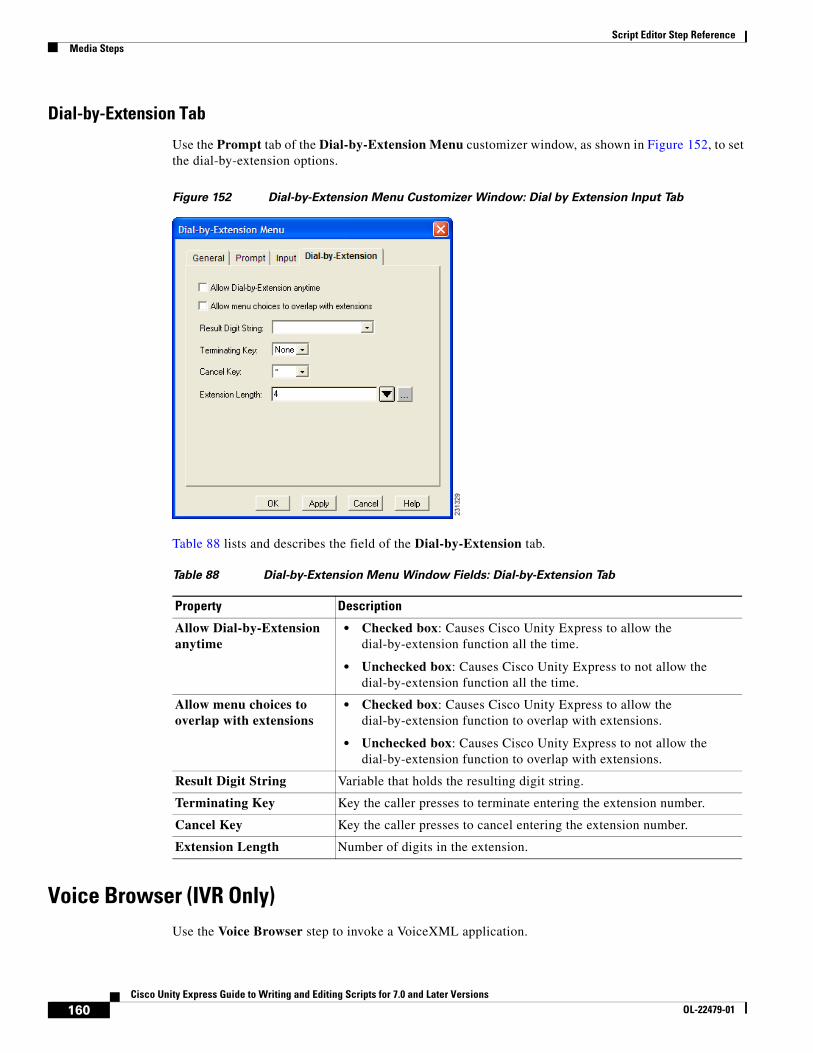
Script Editor Step ReferenceMedia Steps
Dial-by-Extension Tab
Use the Prompt tab of the Dial-by-Extension Menu customizer window, as shown in Figure 152, to set the dial-by-extension options.
Figure 152 Dial-by-Extension Menu Customizer Window: Dial by Extension Input Tab
Table 88 lists and describes the field of the Dial-by-Extension tab.
Voice Browser (IVR Only)Use the Voice Browser step to invoke a VoiceXML application.
Table 88 Dial-by-Extension Menu Window Fields: Dial-by-Extension Tab
Property Description
Allow Dial-by-Extension anytime
• Checked box: Causes Cisco Unity Express to allow the dial-by-extension function all the time.
• Unchecked box: Causes Cisco Unity Express to not allow the dial-by-extension function all the time.
Allow menu choices to overlap with extensions
• Checked box: Causes Cisco Unity Express to allow the dial-by-extension function to overlap with extensions.
• Unchecked box: Causes Cisco Unity Express to not allow the dial-by-extension function to overlap with extensions.
Result Digit String Variable that holds the resulting digit string.
Terminating Key Key the caller presses to terminate entering the extension number.
Cancel Key Key the caller presses to cancel entering the extension number.
Extension Length Number of digits in the extension.
160Cisco Unity Express Guide to Writing and Editing Scripts for 7.0 and Later Versions
OL-22479-01
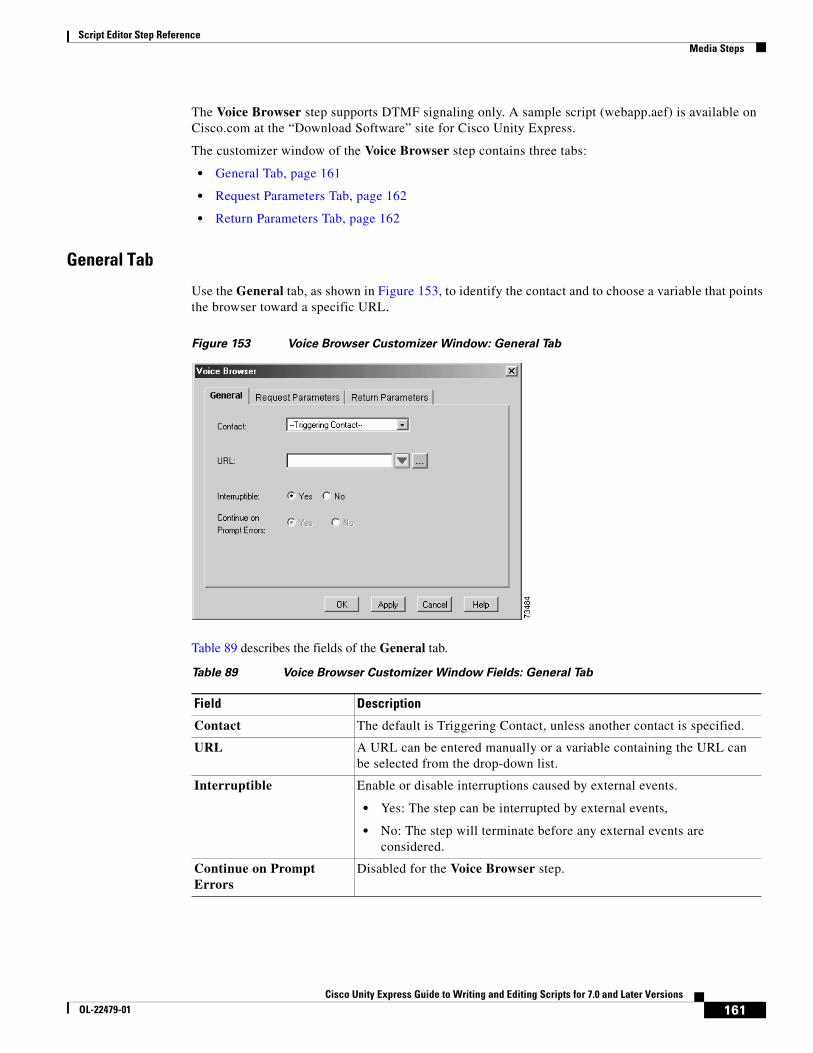
Script Editor Step ReferenceMedia Steps
The Voice Browser step supports DTMF signaling only. A sample script (webapp.aef) is available on Cisco.com at the “Download Software” site for Cisco Unity Express.
The customizer window of the Voice Browser step contains three tabs:
• General Tab, page 161
• Request Parameters Tab, page 162
• Return Parameters Tab, page 162
General Tab
Use the General tab, as shown in Figure 153, to identify the contact and to choose a variable that points the browser toward a specific URL.
Figure 153 Voice Browser Customizer Window: General Tab
Table 89 describes the fields of the General tab.
Table 89 Voice Browser Customizer Window Fields: General Tab
Field Description
Contact The default is Triggering Contact, unless another contact is specified.
URL A URL can be entered manually or a variable containing the URL can be selected from the drop-down list.
Interruptible Enable or disable interruptions caused by external events.
• Yes: The step can be interrupted by external events,
• No: The step will terminate before any external events are considered.
Continue on Prompt Errors
Disabled for the Voice Browser step.
161Cisco Unity Express Guide to Writing and Editing Scripts for 7.0 and Later Versions
OL-22479-01
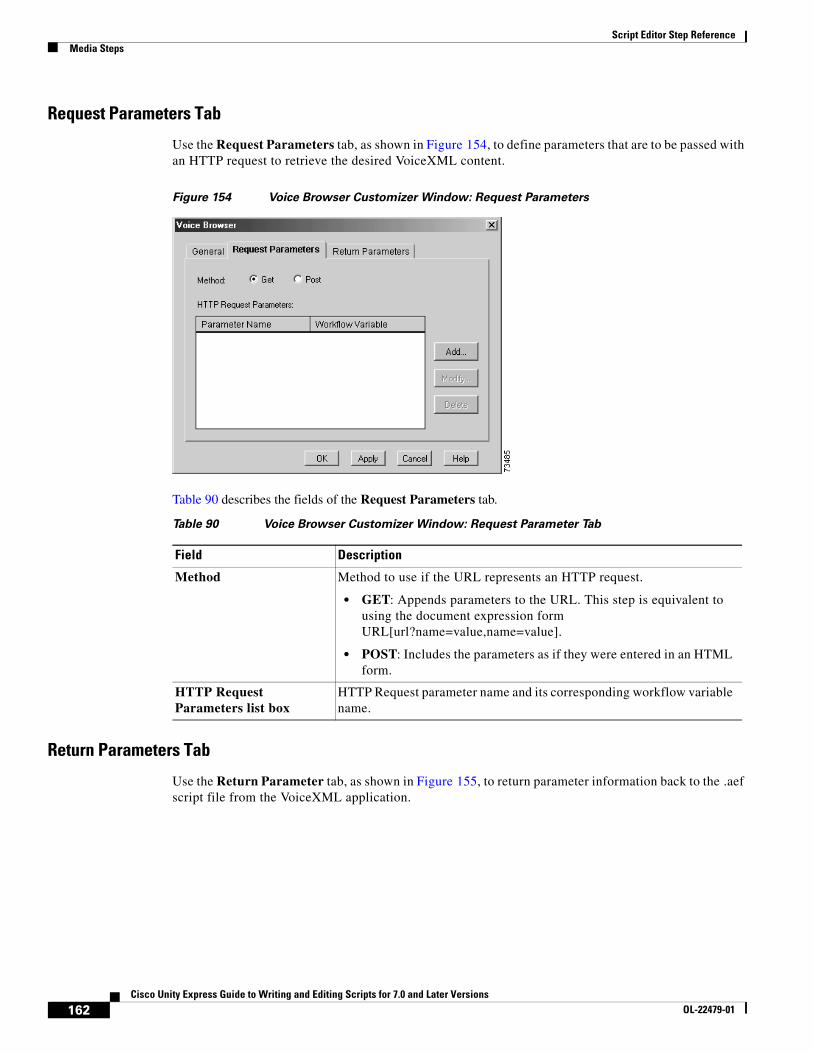
Script Editor Step ReferenceMedia Steps
Request Parameters Tab
Use the Request Parameters tab, as shown in Figure 154, to define parameters that are to be passed with an HTTP request to retrieve the desired VoiceXML content.
Figure 154 Voice Browser Customizer Window: Request Parameters
Table 90 describes the fields of the Request Parameters tab.
Return Parameters Tab
Use the Return Parameter tab, as shown in Figure 155, to return parameter information back to the .aef script file from the VoiceXML application.
Table 90 Voice Browser Customizer Window: Request Parameter Tab
Field Description
Method Method to use if the URL represents an HTTP request.
• GET: Appends parameters to the URL. This step is equivalent to using the document expression form URL[url?name=value,name=value].
• POST: Includes the parameters as if they were entered in an HTML form.
HTTP Request Parameters list box
HTTP Request parameter name and its corresponding workflow variable name.
162Cisco Unity Express Guide to Writing and Editing Scripts for 7.0 and Later Versions
OL-22479-01

Script Editor Step ReferencePrompt Steps
Figure 155 Voice Browser Customizer Window: Return Parameters Tab
Table 91 describes the fields of the Return Parameter tab.
Prompt StepsThe steps in the Prompt palette of the Cisco Unity Express Script Editor provide script designers with a way to create intelligent prompts.
The Prompt palette contains the following steps:
• Create Conditional Prompt, page 164
• Create Container Prompt, page 165
• Create Generated Prompt, page 168
Figure 156 shows the steps in the Prompt palette as they appear in the Palette pane of the Cisco Unity Express Script Editor.
Table 91 Voice Browser Customizer Window: Return Parameters Tab
Field Description
Expr Parameter Variable that will store the return value if the VoiceXML application uses the following exit statement form:
<exit expr = “ECMAScript_Expression”/>
Namelist Parameters Name of the parameter returned by the VoiceXML application and the corresponding script variable in which its value is stored if the VoiceXML application uses the following exit statement form:
<exit namelist = “string”/>
163Cisco Unity Express Guide to Writing and Editing Scripts for 7.0 and Later Versions
OL-22479-01
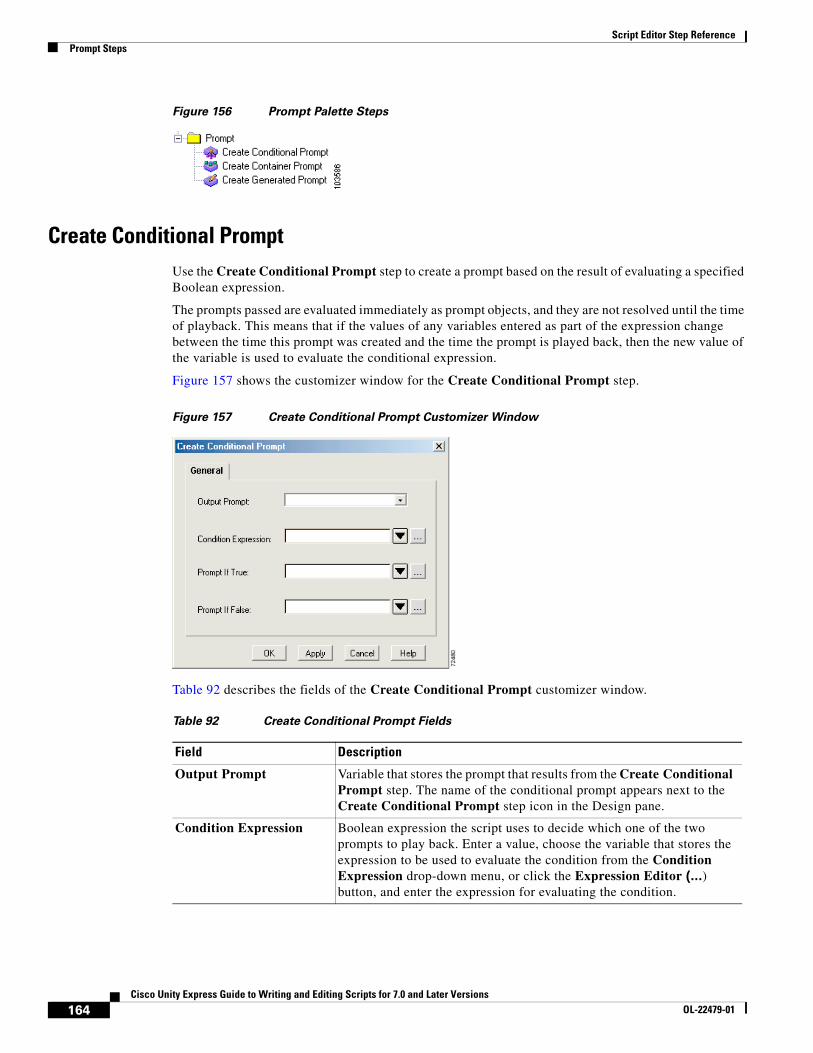
Script Editor Step ReferencePrompt Steps
Figure 156 Prompt Palette Steps
Create Conditional PromptUse the Create Conditional Prompt step to create a prompt based on the result of evaluating a specified Boolean expression.
The prompts passed are evaluated immediately as prompt objects, and they are not resolved until the time of playback. This means that if the values of any variables entered as part of the expression change between the time this prompt was created and the time the prompt is played back, then the new value of the variable is used to evaluate the conditional expression.
Figure 157 shows the customizer window for the Create Conditional Prompt step.
Figure 157 Create Conditional Prompt Customizer Window
Table 92 describes the fields of the Create Conditional Prompt customizer window.
Table 92 Create Conditional Prompt Fields
Field Description
Output Prompt Variable that stores the prompt that results from the Create Conditional Prompt step. The name of the conditional prompt appears next to the Create Conditional Prompt step icon in the Design pane.
Condition Expression Boolean expression the script uses to decide which one of the two prompts to play back. Enter a value, choose the variable that stores the expression to be used to evaluate the condition from the Condition Expression drop-down menu, or click the Expression Editor (...) button, and enter the expression for evaluating the condition.
164Cisco Unity Express Guide to Writing and Editing Scripts for 7.0 and Later Versions
OL-22479-01
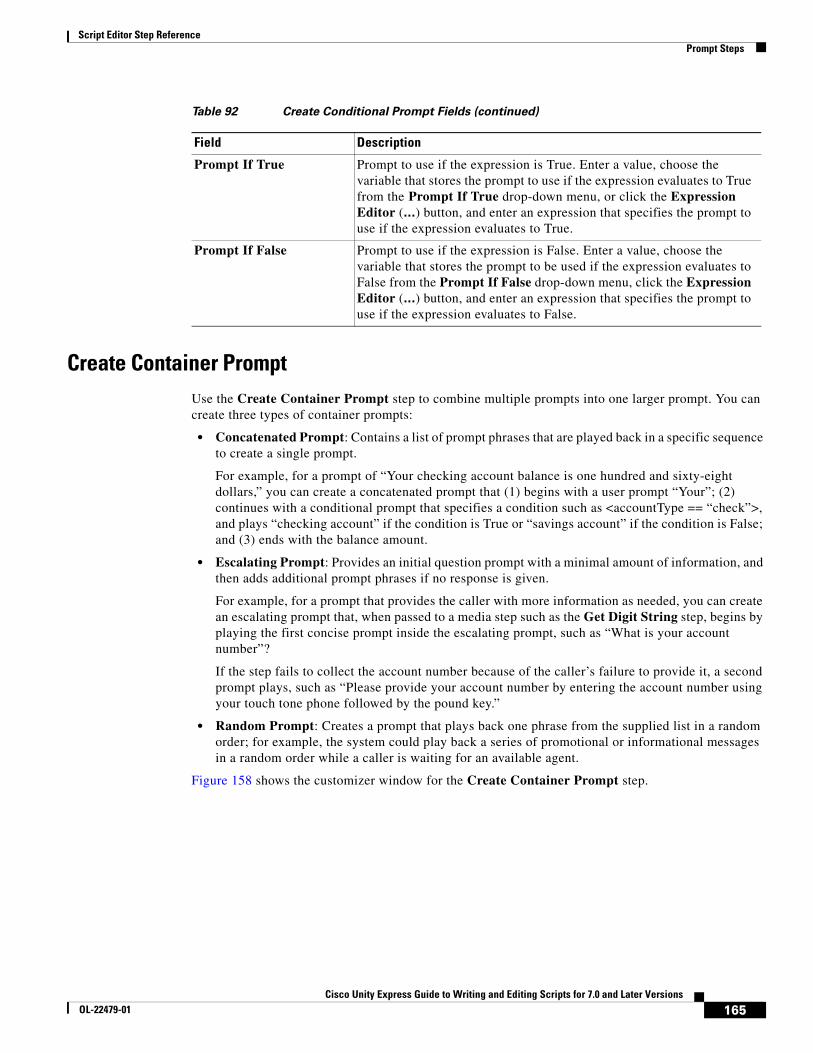
Script Editor Step ReferencePrompt Steps
Create Container PromptUse the Create Container Prompt step to combine multiple prompts into one larger prompt. You can create three types of container prompts:
• Concatenated Prompt: Contains a list of prompt phrases that are played back in a specific sequence to create a single prompt.
For example, for a prompt of “Your checking account balance is one hundred and sixty-eight dollars,” you can create a concatenated prompt that (1) begins with a user prompt “Your”; (2) continues with a conditional prompt that specifies a condition such as <accountType == “check”>, and plays “checking account” if the condition is True or “savings account” if the condition is False; and (3) ends with the balance amount.
• Escalating Prompt: Provides an initial question prompt with a minimal amount of information, and then adds additional prompt phrases if no response is given.
For example, for a prompt that provides the caller with more information as needed, you can create an escalating prompt that, when passed to a media step such as the Get Digit String step, begins by playing the first concise prompt inside the escalating prompt, such as “What is your account number”?
If the step fails to collect the account number because of the caller’s failure to provide it, a second prompt plays, such as “Please provide your account number by entering the account number using your touch tone phone followed by the pound key.”
• Random Prompt: Creates a prompt that plays back one phrase from the supplied list in a random order; for example, the system could play back a series of promotional or informational messages in a random order while a caller is waiting for an available agent.
Figure 158 shows the customizer window for the Create Container Prompt step.
Prompt If True Prompt to use if the expression is True. Enter a value, choose the variable that stores the prompt to use if the expression evaluates to True from the Prompt If True drop-down menu, or click the Expression Editor (...) button, and enter an expression that specifies the prompt to use if the expression evaluates to True.
Prompt If False Prompt to use if the expression is False. Enter a value, choose the variable that stores the prompt to be used if the expression evaluates to False from the Prompt If False drop-down menu, click the Expression Editor (...) button, and enter an expression that specifies the prompt to use if the expression evaluates to False.
Table 92 Create Conditional Prompt Fields (continued)
Field Description
165Cisco Unity Express Guide to Writing and Editing Scripts for 7.0 and Later Versions
OL-22479-01
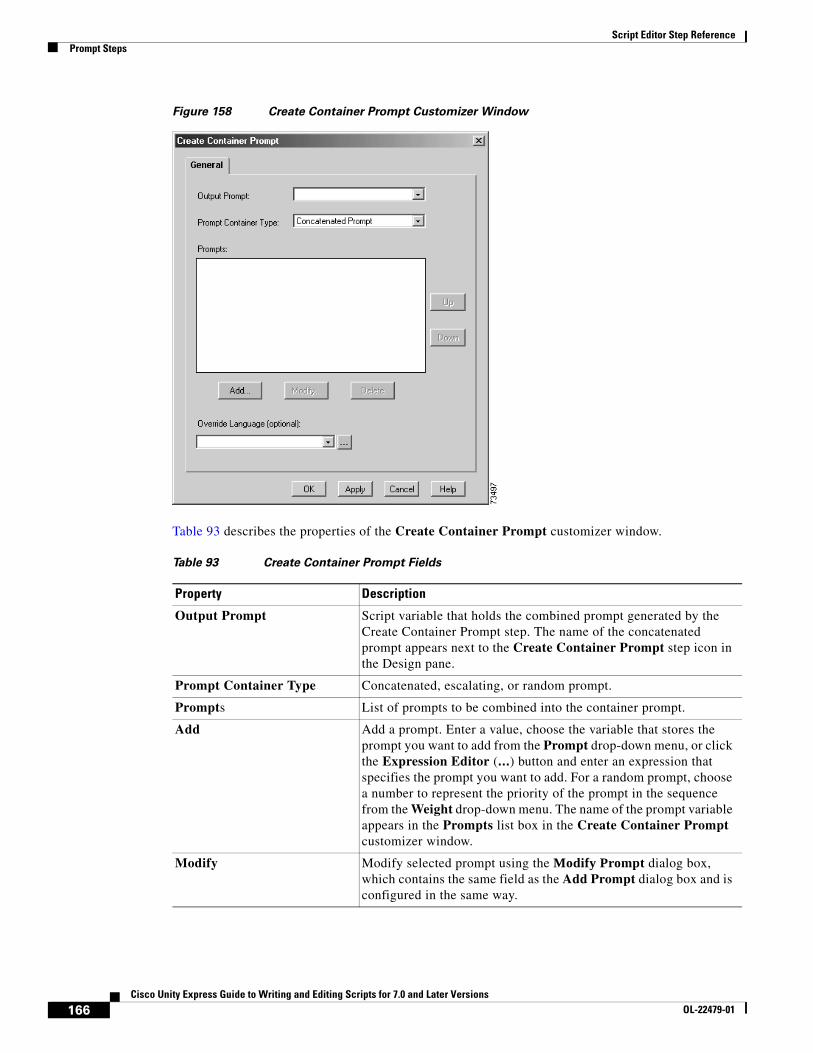
Script Editor Step ReferencePrompt Steps
Figure 158 Create Container Prompt Customizer Window
Table 93 describes the properties of the Create Container Prompt customizer window.
Table 93 Create Container Prompt Fields
Property Description
Output Prompt Script variable that holds the combined prompt generated by the Create Container Prompt step. The name of the concatenated prompt appears next to the Create Container Prompt step icon in the Design pane.
Prompt Container Type Concatenated, escalating, or random prompt.
Prompts List of prompts to be combined into the container prompt.
Add Add a prompt. Enter a value, choose the variable that stores the prompt you want to add from the Prompt drop-down menu, or click the Expression Editor (...) button and enter an expression that specifies the prompt you want to add. For a random prompt, choose a number to represent the priority of the prompt in the sequence from the Weight drop-down menu. The name of the prompt variable appears in the Prompts list box in the Create Container Prompt customizer window.
Modify Modify selected prompt using the Modify Prompt dialog box, which contains the same field as the Add Prompt dialog box and is configured in the same way.
166Cisco Unity Express Guide to Writing and Editing Scripts for 7.0 and Later Versions
OL-22479-01
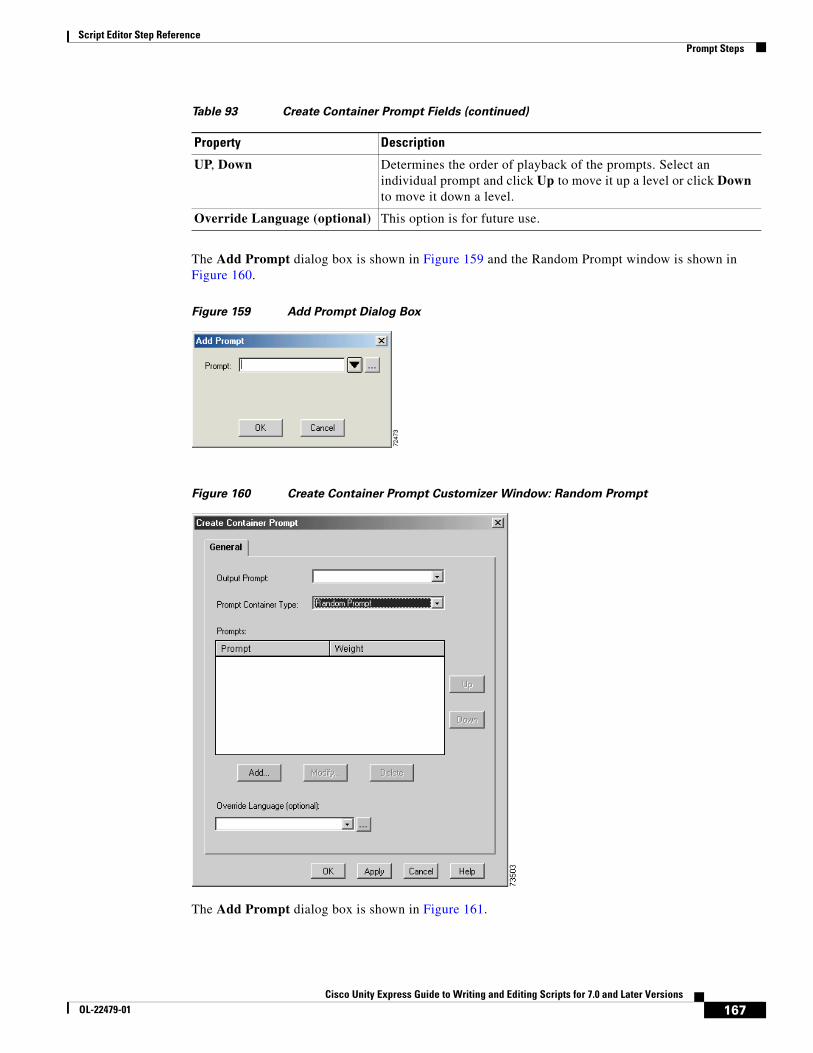
Script Editor Step ReferencePrompt Steps
The Add Prompt dialog box is shown in Figure 159 and the Random Prompt window is shown in Figure 160.
Figure 159 Add Prompt Dialog Box
Figure 160 Create Container Prompt Customizer Window: Random Prompt
The Add Prompt dialog box is shown in Figure 161.
UP, Down Determines the order of playback of the prompts. Select an individual prompt and click Up to move it up a level or click Down to move it down a level.
Override Language (optional) This option is for future use.
Table 93 Create Container Prompt Fields (continued)
Property Description
167Cisco Unity Express Guide to Writing and Editing Scripts for 7.0 and Later Versions
OL-22479-01
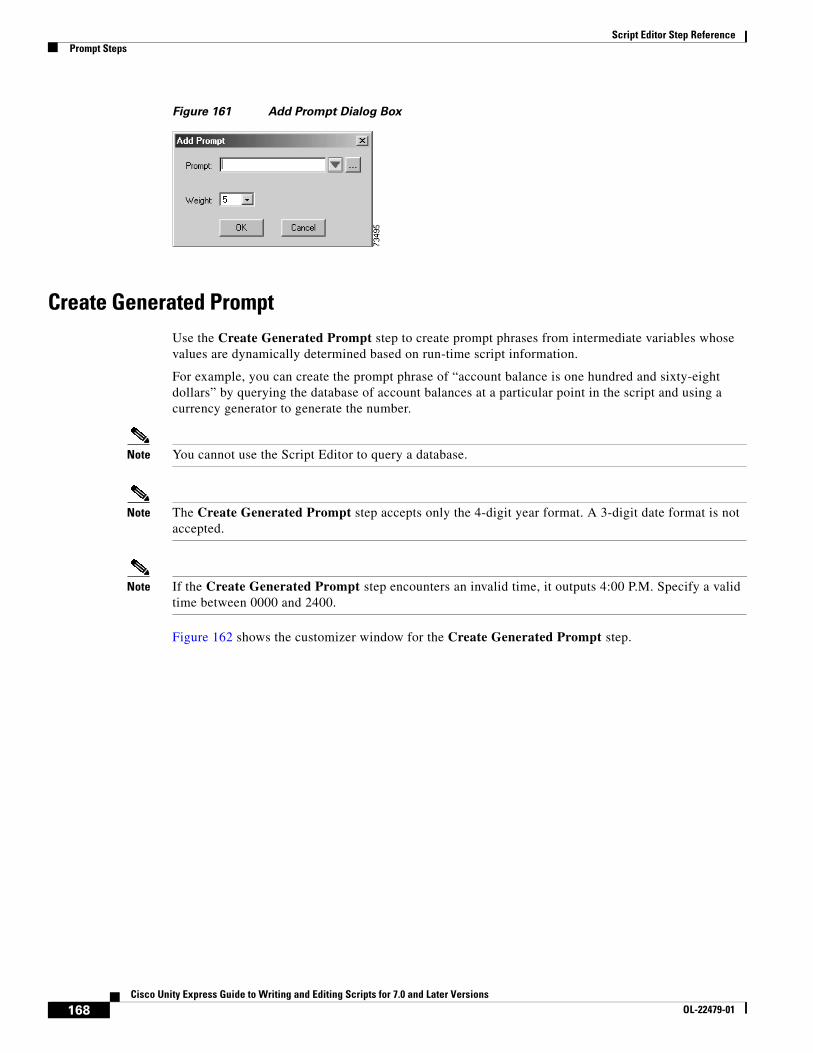
Script Editor Step ReferencePrompt Steps
Figure 161 Add Prompt Dialog Box
Create Generated PromptUse the Create Generated Prompt step to create prompt phrases from intermediate variables whose values are dynamically determined based on run-time script information.
For example, you can create the prompt phrase of “account balance is one hundred and sixty-eight dollars” by querying the database of account balances at a particular point in the script and using a currency generator to generate the number.
Note You cannot use the Script Editor to query a database.
Note The Create Generated Prompt step accepts only the 4-digit year format. A 3-digit date format is not accepted.
Note If the Create Generated Prompt step encounters an invalid time, it outputs 4:00 P.M. Specify a valid time between 0000 and 2400.
Figure 162 shows the customizer window for the Create Generated Prompt step.
168Cisco Unity Express Guide to Writing and Editing Scripts for 7.0 and Later Versions
OL-22479-01
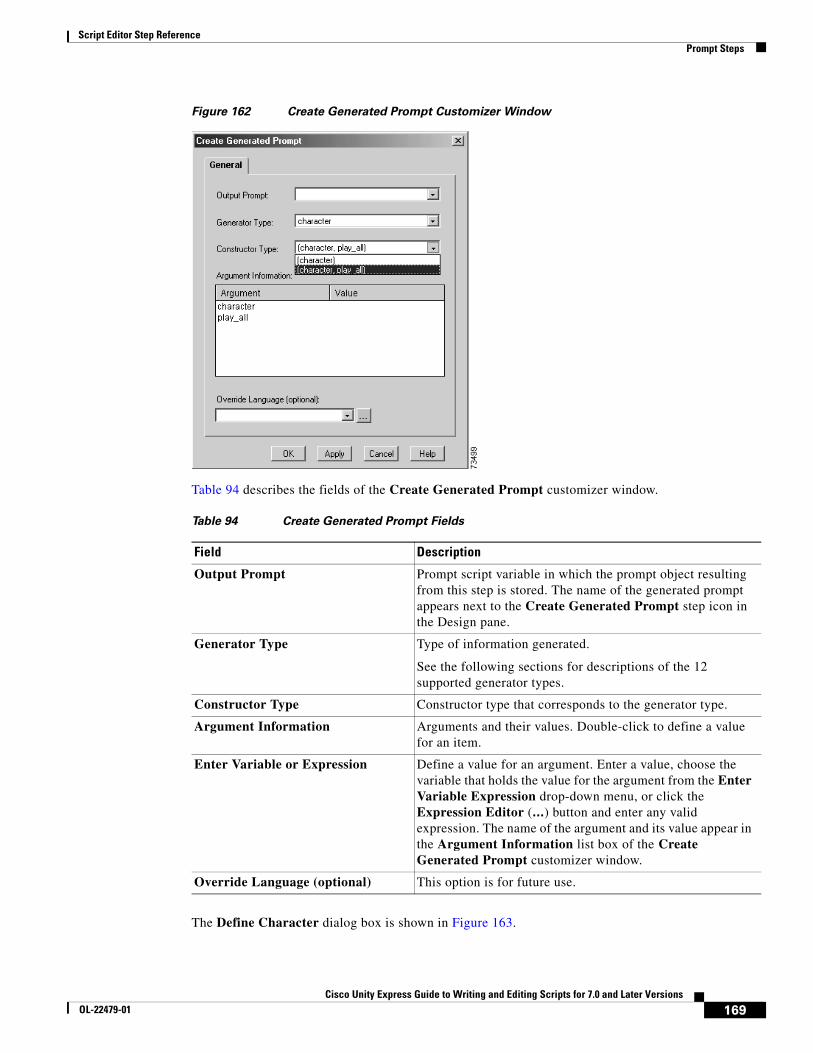
Script Editor Step ReferencePrompt Steps
Figure 162 Create Generated Prompt Customizer Window
Table 94 describes the fields of the Create Generated Prompt customizer window.
The Define Character dialog box is shown in Figure 163.
Table 94 Create Generated Prompt Fields
Field Description
Output Prompt Prompt script variable in which the prompt object resulting from this step is stored. The name of the generated prompt appears next to the Create Generated Prompt step icon in the Design pane.
Generator Type Type of information generated.
See the following sections for descriptions of the 12 supported generator types.
Constructor Type Constructor type that corresponds to the generator type.
Argument Information Arguments and their values. Double-click to define a value for an item.
Enter Variable or Expression Define a value for an argument. Enter a value, choose the variable that holds the value for the argument from the Enter Variable Expression drop-down menu, or click the Expression Editor (...) button and enter any valid expression. The name of the argument and its value appear in the Argument Information list box of the Create Generated Prompt customizer window.
Override Language (optional) This option is for future use.
169Cisco Unity Express Guide to Writing and Editing Scripts for 7.0 and Later Versions
OL-22479-01
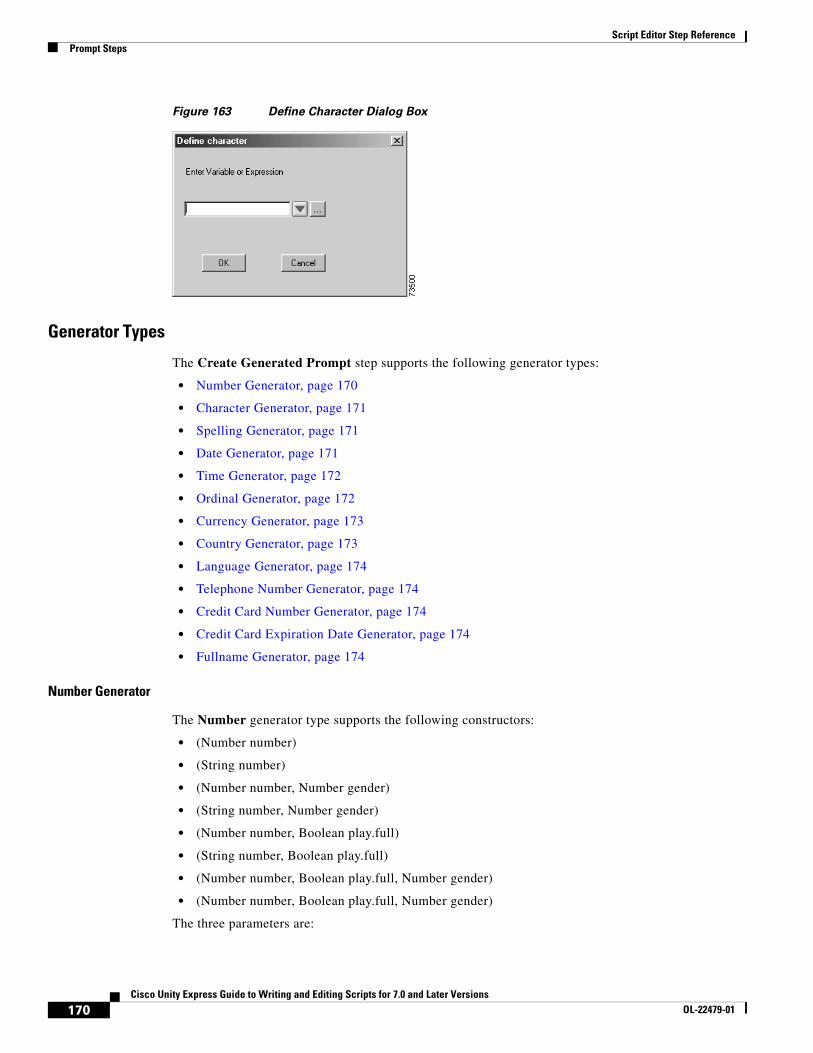
Script Editor Step ReferencePrompt Steps
Figure 163 Define Character Dialog Box
Generator Types
The Create Generated Prompt step supports the following generator types:
• Number Generator, page 170
• Character Generator, page 171
• Spelling Generator, page 171
• Date Generator, page 171
• Time Generator, page 172
• Ordinal Generator, page 172
• Currency Generator, page 173
• Country Generator, page 173
• Language Generator, page 174
• Telephone Number Generator, page 174
• Credit Card Number Generator, page 174
• Credit Card Expiration Date Generator, page 174
• Fullname Generator, page 174
Number Generator
The Number generator type supports the following constructors:
• (Number number)
• (String number)
• (Number number, Number gender)
• (String number, Number gender)
• (Number number, Boolean play.full)
• (String number, Boolean play.full)
• (Number number, Boolean play.full, Number gender)
• (Number number, Boolean play.full, Number gender)
The three parameters are:
170Cisco Unity Express Guide to Writing and Editing Scripts for 7.0 and Later Versions
OL-22479-01
Script Editor Step ReferencePrompt Steps
• Number: Any Number object (for example; Integer, Long, Float, Double, BigInteger, BigDecimal) or String object defining the number to be played back.
• Gender: When the number must be played back in a specific gender context, this parameter specifies the context. Valid values are 0 for neutral, 1 for male, and 2 for female.
• Play.full: Plays the number in full format if this optional Boolean argument is true or omitted. For example, “709” is played as “Seven Hundred and Nine.” Otherwise, the number plays in brief format. For example, “709” is played as “Seven Oh Nine.”
Note If the number is played in full format, the maximum number supported is ± 999,999,999,999.
Character Generator
The Character generator type supports the following constructors:
• (Character character)
• Character character, Boolean play_all)
The two parameters are:
• Character: The character object to be played back.
• Play_all: Optional Boolean flag indicating whether to play spaces, punctuation, and other special characters normally instead of playing them as silence (ranging from 250 to 500 ms).
Spelling Generator
The Spelling generator type supports the following constructors:
• (String string)
• (String string, Boolean punctuation)
• (Object object)
• (Object object, Boolean punctuation)
The three parameters are:
• String: String object to be played back.
• Object: Object for which the string representation returned by the String.valueOf() method should be spelled out.
• Punctuation: An optional Boolean flag indicating whether to play spaces, punctuations, and special characters normally or as silences.
Note Punctuation default behavior in the Spelling generator is different from the Play_all default behavior in the Character generator.
Date Generator
The Date generator type supports the following constructors:
• (Date date)
• (Date date, Boolean skip.current.year)
171Cisco Unity Express Guide to Writing and Editing Scripts for 7.0 and Later Versions
OL-22479-01
Script Editor Step ReferencePrompt Steps
• (Number year)
• (Number year, Number month)
• (Number year, Number month, Boolean skip.current.year)
• (Number year, Number month, Number day)
• (Number year, Number month, Number day, Boolean skip.current.year)
The five parameters are:
• Date: Any Date object from which to extract the date to be played back.
• Skip.current.year: If set to true, the year does not play back if it is the same as the current year.
• Year: Year of the date to be played back. This year must be specified in full (for example, 2007).
Note The system plays any number given, so the caller is responsible for ensuring that the specified year is valid.
• Month: The month of the date to be played back. Valid values range from 1 to 12, where 1 represents January and 12 represents December.
• Day: The day of the date to be played back. Valid values range from 1 to 31 and are validated at run time based on the specified month and year.
Time Generator
The Time generator type supports the following constructors:
• (Time)
• (Hours, Minutes)
The three parameters are:
• Time: Any Date or Time object representing the time to be played back. Time can also be defined as a Number object (Integer, Float, Long, and so forth) that specifies the time to be played, from 0 to 2359. (For example, a number such as 12:34 is played as “12 34 PM.”) If the value specified is greater than 2359, then Time is considered to be the number of milliseconds starting from the standard base time known as “the epoch,” which is January 1, 1970, 00:00:00 GMT.
• Hours: Number object that specifies the hour to be played.
• Minutes: Number object that specifies the minutes to be played.
Ordinal Generator
The Ordinal generator type supports the following constructors:
• (Number number)
• (String number)
• (Number number, Number gender)
• (String number, Number gender)
The two parameters are:
• Number: Any Number or String object defining the ordinal number to be played back. The supported range is from 1 to 999999.
172Cisco Unity Express Guide to Writing and Editing Scripts for 7.0 and Later Versions
OL-22479-01
Script Editor Step ReferencePrompt Steps
• Gender: When the ordinal number must be played back in a specific gender context, this parameter specifies this context. Valid values are 0 for neutral, 1 for male, and 2 for female.
Note If the language associated with the call does not behave differently based on gender, then this parameter is ignored.
Currency Generator
The Currency generator type supports the following constructors:
• (Currency designator)
• (Number amount)
• (Number amount, Currency currency)
• (Number dollar, Number cent)
• (Number dollar, Number cent, Currency currency)
• (Number amount, Boolean colloquial)
• (Number amount, Boolean colloquial, Currency currency)
• (Number dollar, Number cent, Boolean colloquial, Currency currency)
The six parameters are:
• Designator: The designator of a currency to play back. (For example, “USD” is played back as “U.S. Dollar.”)
• Amount: The currency amount to be played back in the system configured default currency or in the specified currency.
• Dollar: Number object representing the amount of currency unit to be played. Only the integer part of the number is played. The fractional part, if any, is ignored.
• Cent: Number object representing the currency subdivision to be played. Only the integer part of the number is played. The fractional part, if any, is ignored.
Note If the number specified exceeds the maximum value allowed for the subdivisions, the excess is added properly to the number of the currency unit. For example, specifying “5 dollars and 233” cents results in “7 dollars and 33 cents.”
• Colloquial: An optional Boolean flag, which specifies whether to use colloquial currencies’ representations (for example, “Dollars” instead of “US Dollars”). If omitted, the currency amount is played in colloquial format.
• Currency: The currency in which the amount should be played back. If not specified, the system default configured currency is played back.
Country Generator
The Country generator type supports only one constructor: (Language language).
173Cisco Unity Express Guide to Writing and Editing Scripts for 7.0 and Later Versions
OL-22479-01
Script Editor Step ReferencePrompt Steps
Language Generator
The Language generator type supports the language constructor. The parameter “language” is a Language object from which to get the language to be played back. (For example, en_US is played back as “United States English.”)
Telephone Number Generator
The Telephone Number generator type supports only one constructor: (String number). The parameter “number” is a String object specifying the telephone number to be played out as a sequence of digits.
The character is replaced with 250 ms of silence if the string contains any of the following characters: “ - ( ) . Otherwise, the string is automatically formatted.
Automatic formatting of the string inserts 250 ms of silence between sections of digits. These sections follow rule: “XXX-XXX-XXX-XXXX” unless there are exactly five digits in the string, in which case the string is considered to be a single section of five digits.
Dual-Tone Multifrequency (DMTF) digits include the following digits on a standard touchtone telephone keypad: ABCD0123456789#*. In DMTF, when you touch a button on the touchtone keypad, it creates a combination of two tones (one high-frequency and one low-frequency).
An “x” character is played back as “Extension.” DTMF digits (“ABCD0123456789#*”) are played back normally.
A string of the form “*xx” where x is a DTMF digit (“0123456789”) is played back as “star xx” (for example,“*53” is played back as “star fifty-three”).
Credit Card Number Generator
The Credit Card Number generator type supports only one constructor: (String number). The parameter “number” is a String object specifying the credit card number to be played out as a sequence of digits.
If the specified credit card number includes “-”, then it is played as is, replacing the “-” character with 250 ms of silence; otherwise the number is automatically separated into sections of four digits and played back with 250 ms of silence inserted between sections.
Credit Card Expiration Date Generator
The Credit Card Expiration Date generator type supports the following constructors:
• (Number year, Number month, Number day)
• (Number year, Number month)
The parameters are identical to the following Generated Date constructors:
• If day is 0 or omitted: GeneratedDate (year, month, true)
• All other cases: GeneratedDate (year, month, day, true)
Fullname Generator
The Fullname generator type supports the following constructors:
• firstname: String object specifying the first name to be played out.
• lastname: String object specifying the last name to be played out.
174Cisco Unity Express Guide to Writing and Editing Scripts for 7.0 and Later Versions
OL-22479-01
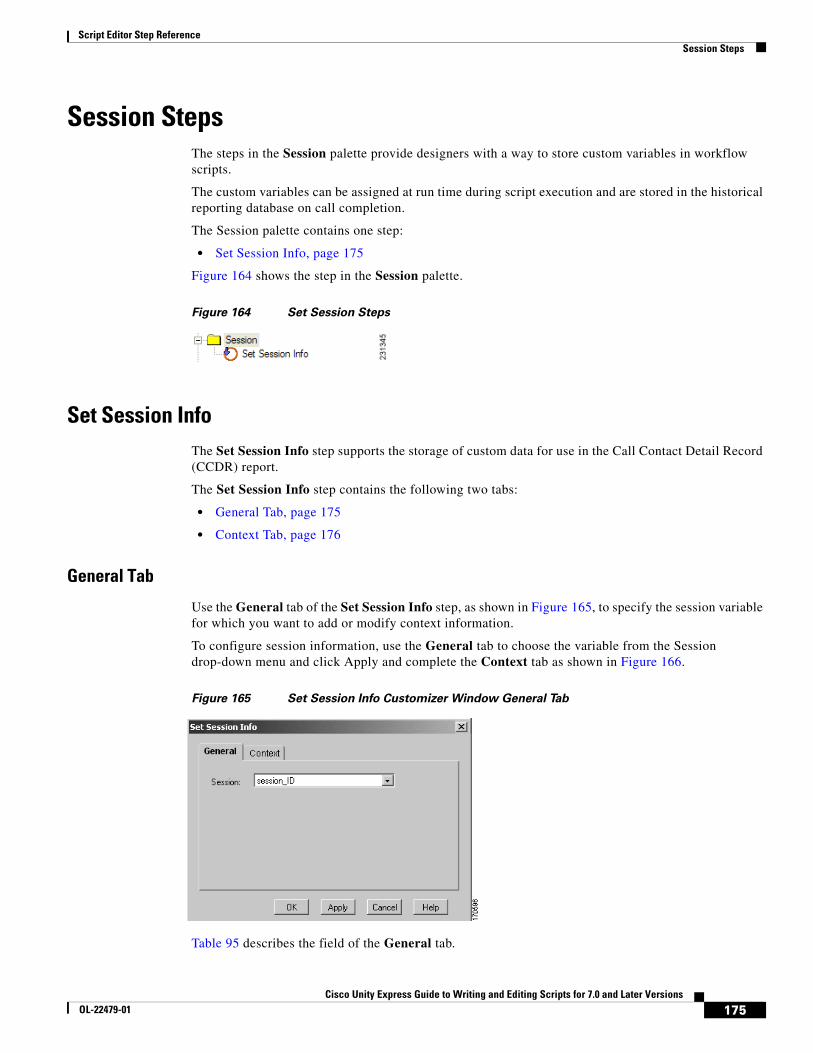
Script Editor Step ReferenceSession Steps
Session StepsThe steps in the Session palette provide designers with a way to store custom variables in workflow scripts.
The custom variables can be assigned at run time during script execution and are stored in the historical reporting database on call completion.
The Session palette contains one step:
• Set Session Info, page 175
Figure 164 shows the step in the Session palette.
Figure 164 Set Session Steps
Set Session InfoThe Set Session Info step supports the storage of custom data for use in the Call Contact Detail Record (CCDR) report.
The Set Session Info step contains the following two tabs:
• General Tab, page 175
• Context Tab, page 176
General Tab
Use the General tab of the Set Session Info step, as shown in Figure 165, to specify the session variable for which you want to add or modify context information.
To configure session information, use the General tab to choose the variable from the Session drop-down menu and click Apply and complete the Context tab as shown in Figure 166.
Figure 165 Set Session Info Customizer Window General Tab
Table 95 describes the field of the General tab.
175Cisco Unity Express Guide to Writing and Editing Scripts for 7.0 and Later Versions
OL-22479-01
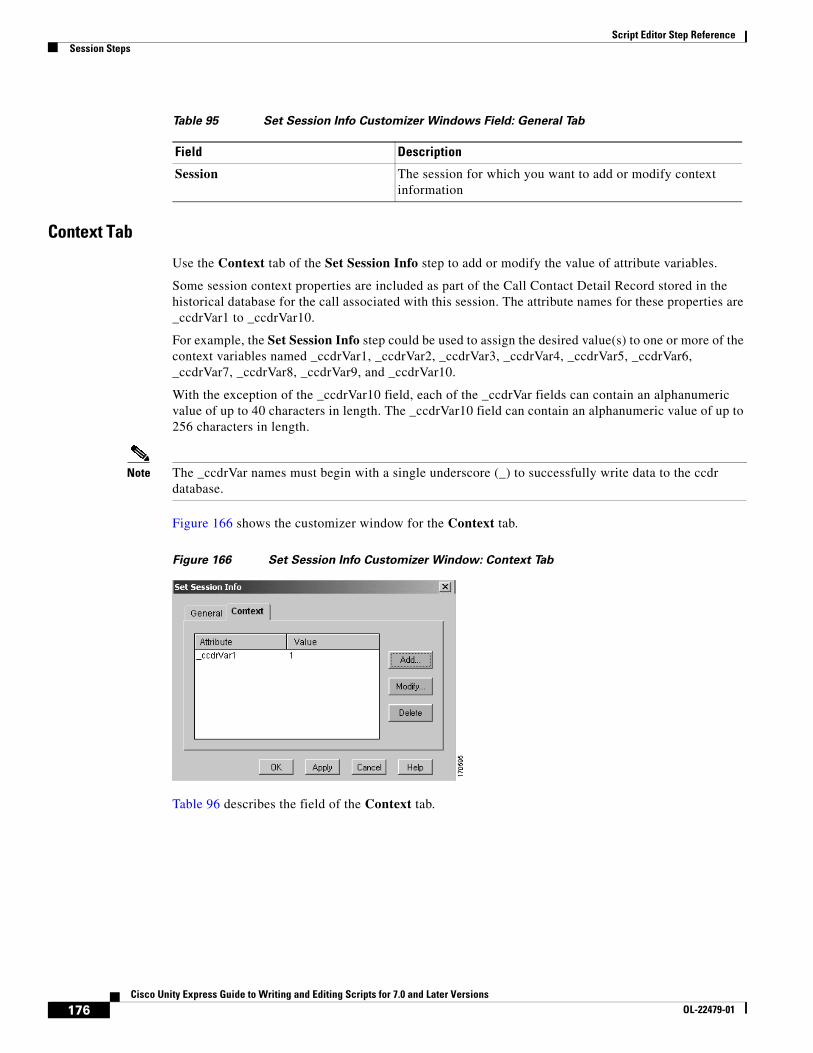
Script Editor Step ReferenceSession Steps
Context Tab
Use the Context tab of the Set Session Info step to add or modify the value of attribute variables.
Some session context properties are included as part of the Call Contact Detail Record stored in the historical database for the call associated with this session. The attribute names for these properties are _ccdrVar1 to _ccdrVar10.
For example, the Set Session Info step could be used to assign the desired value(s) to one or more of the context variables named _ccdrVar1, _ccdrVar2, _ccdrVar3, _ccdrVar4, _ccdrVar5, _ccdrVar6, _ccdrVar7, _ccdrVar8, _ccdrVar9, and _ccdrVar10.
With the exception of the _ccdrVar10 field, each of the _ccdrVar fields can contain an alphanumeric value of up to 40 characters in length. The _ccdrVar10 field can contain an alphanumeric value of up to 256 characters in length.
Note The _ccdrVar names must begin with a single underscore (_) to successfully write data to the ccdr database.
Figure 166 shows the customizer window for the Context tab.
Figure 166 Set Session Info Customizer Window: Context Tab
Table 96 describes the field of the Context tab.
Table 95 Set Session Info Customizer Windows Field: General Tab
Field Description
Session The session for which you want to add or modify context information
176Cisco Unity Express Guide to Writing and Editing Scripts for 7.0 and Later Versions
OL-22479-01
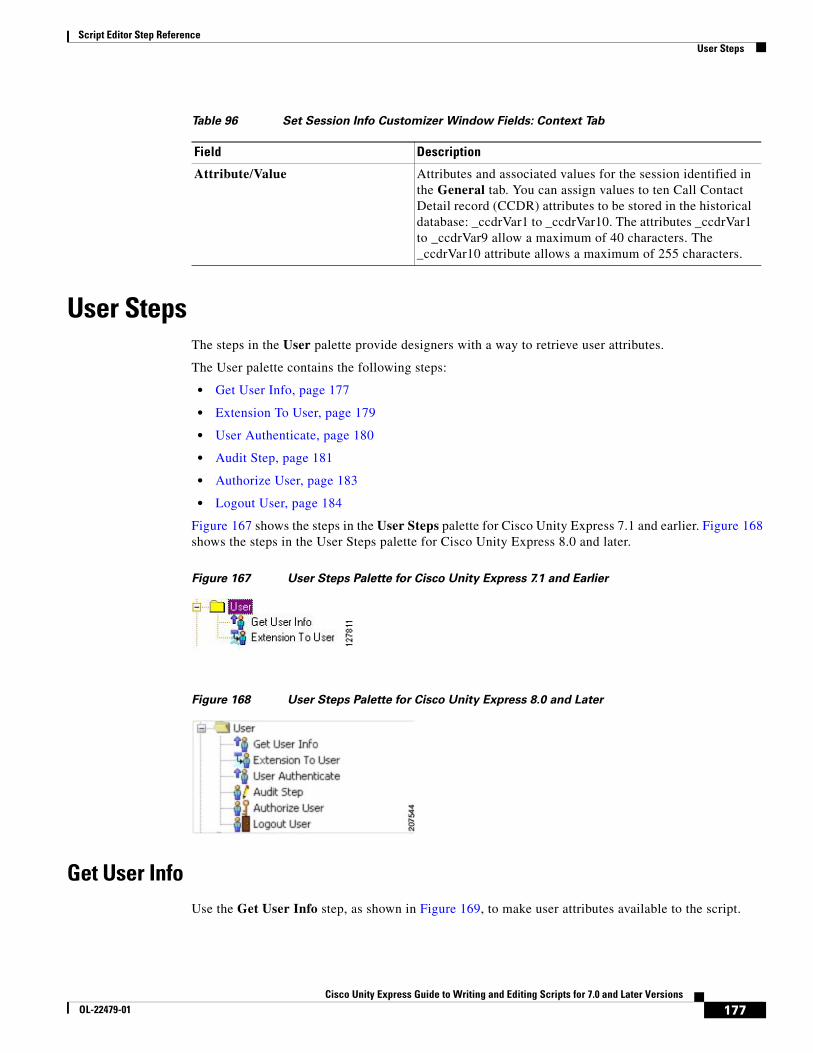
Script Editor Step ReferenceUser Steps
User StepsThe steps in the User palette provide designers with a way to retrieve user attributes.
The User palette contains the following steps:
• Get User Info, page 177
• Extension To User, page 179
• User Authenticate, page 180
• Audit Step, page 181
• Authorize User, page 183
• Logout User, page 184
Figure 167 shows the steps in the User Steps palette for Cisco Unity Express 7.1 and earlier. Figure 168 shows the steps in the User Steps palette for Cisco Unity Express 8.0 and later.
Figure 167 User Steps Palette for Cisco Unity Express 7.1 and Earlier
Figure 168 User Steps Palette for Cisco Unity Express 8.0 and Later
Get User InfoUse the Get User Info step, as shown in Figure 169, to make user attributes available to the script.
Table 96 Set Session Info Customizer Window Fields: Context Tab
Field Description
Attribute/Value Attributes and associated values for the session identified in the General tab. You can assign values to ten Call Contact Detail record (CCDR) attributes to be stored in the historical database: _ccdrVar1 to _ccdrVar10. The attributes _ccdrVar1 to _ccdrVar9 allow a maximum of 40 characters. The _ccdrVar10 attribute allows a maximum of 255 characters.
177Cisco Unity Express Guide to Writing and Editing Scripts for 7.0 and Later Versions
OL-22479-01
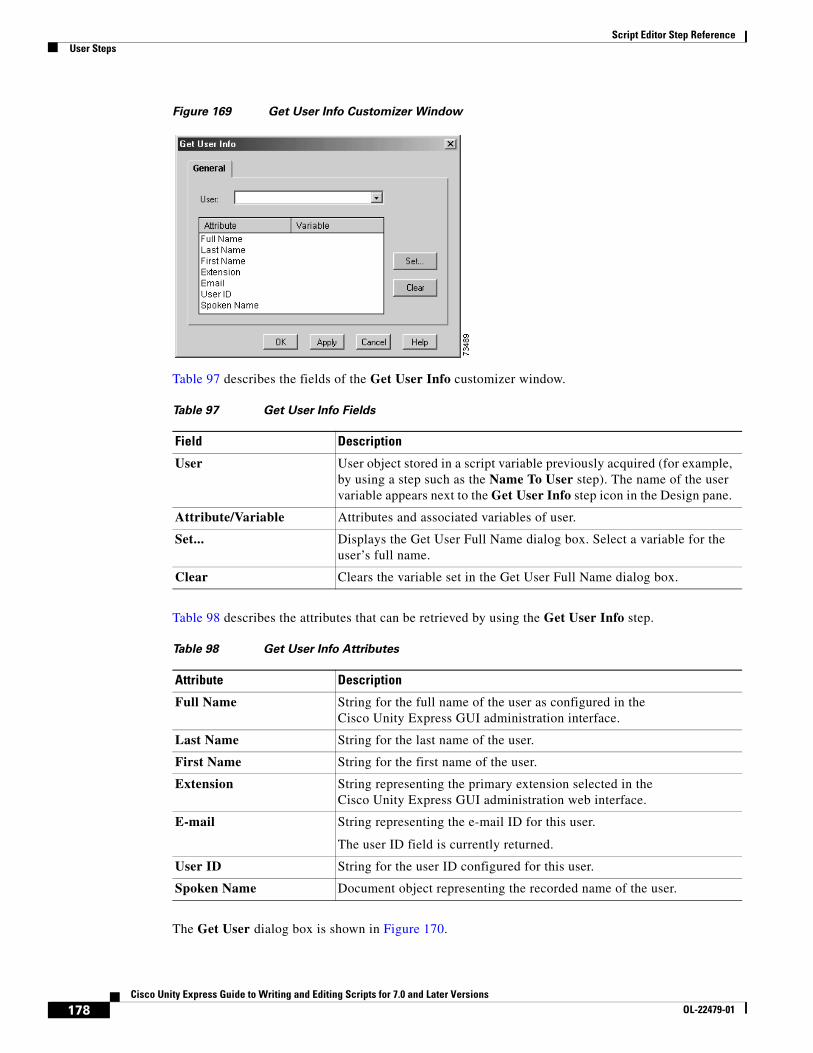
Script Editor Step ReferenceUser Steps
Figure 169 Get User Info Customizer Window
Table 97 describes the fields of the Get User Info customizer window.
Table 98 describes the attributes that can be retrieved by using the Get User Info step.
The Get User dialog box is shown in Figure 170.
Table 97 Get User Info Fields
Field Description
User User object stored in a script variable previously acquired (for example, by using a step such as the Name To User step). The name of the user variable appears next to the Get User Info step icon in the Design pane.
Attribute/Variable Attributes and associated variables of user.
Set... Displays the Get User Full Name dialog box. Select a variable for the user’s full name.
Clear Clears the variable set in the Get User Full Name dialog box.
Table 98 Get User Info Attributes
Attribute Description
Full Name String for the full name of the user as configured in the Cisco Unity Express GUI administration interface.
Last Name String for the last name of the user.
First Name String for the first name of the user.
Extension String representing the primary extension selected in the Cisco Unity Express GUI administration web interface.
E-mail String representing the e-mail ID for this user.
The user ID field is currently returned.
User ID String for the user ID configured for this user.
Spoken Name Document object representing the recorded name of the user.
178Cisco Unity Express Guide to Writing and Editing Scripts for 7.0 and Later Versions
OL-22479-01

Script Editor Step ReferenceUser Steps
Figure 170 Get User Dialog Box
Extension To User Use the Extension To User step as shown in Figure 171 to find a user based on the extension entered by the caller. The Extension To User step compares the extension entered by the caller with the extensions stored in a directory. If the system finds a match, it returns the user with the matched extension. This information can be used in the Get User Info step to get more information about the user. The Extension To User step can be used in a script to prevent transfers to external numbers.
The Extension To User step automatically adds two output branches:
• Successful: Steps following this branch execute if the system finds a user with an extension that matches the specified extension.
• Unsuccessful: Steps following this branch execute if the system does not find a user with an extension that matches the specified extension.
Figure 171 Extension To User Customizer Window
Table 99 describes the fields of the Extension To User window.
179Cisco Unity Express Guide to Writing and Editing Scripts for 7.0 and Later Versions
OL-22479-01
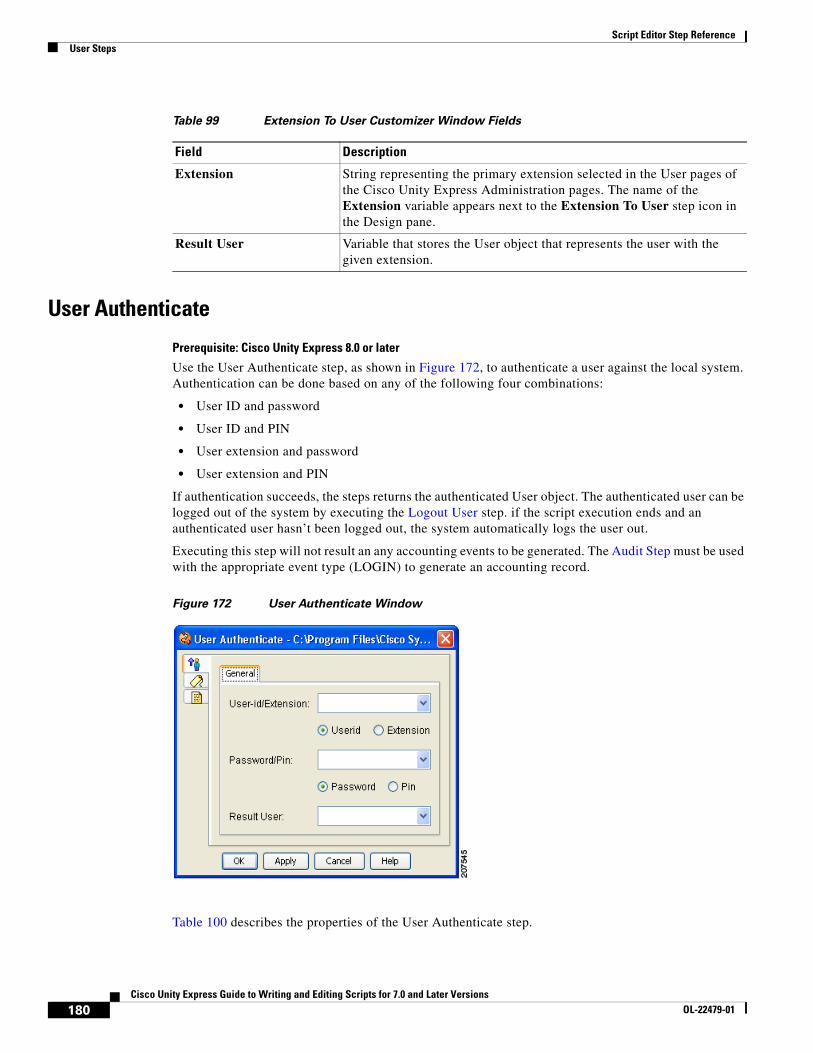
Script Editor Step ReferenceUser Steps
User Authenticate
Prerequisite: Cisco Unity Express 8.0 or later
Use the User Authenticate step, as shown in Figure 172, to authenticate a user against the local system. Authentication can be done based on any of the following four combinations:
• User ID and password
• User ID and PIN
• User extension and password
• User extension and PIN
If authentication succeeds, the steps returns the authenticated User object. The authenticated user can be logged out of the system by executing the Logout User step. if the script execution ends and an authenticated user hasn’t been logged out, the system automatically logs the user out.
Executing this step will not result an any accounting events to be generated. The Audit Step must be used with the appropriate event type (LOGIN) to generate an accounting record.
Figure 172 User Authenticate Window
Table 100 describes the properties of the User Authenticate step.
Table 99 Extension To User Customizer Window Fields
Field Description
Extension String representing the primary extension selected in the User pages of the Cisco Unity Express Administration pages. The name of the Extension variable appears next to the Extension To User step icon in the Design pane.
Result User Variable that stores the User object that represents the user with the given extension.
180Cisco Unity Express Guide to Writing and Editing Scripts for 7.0 and Later Versions
OL-22479-01
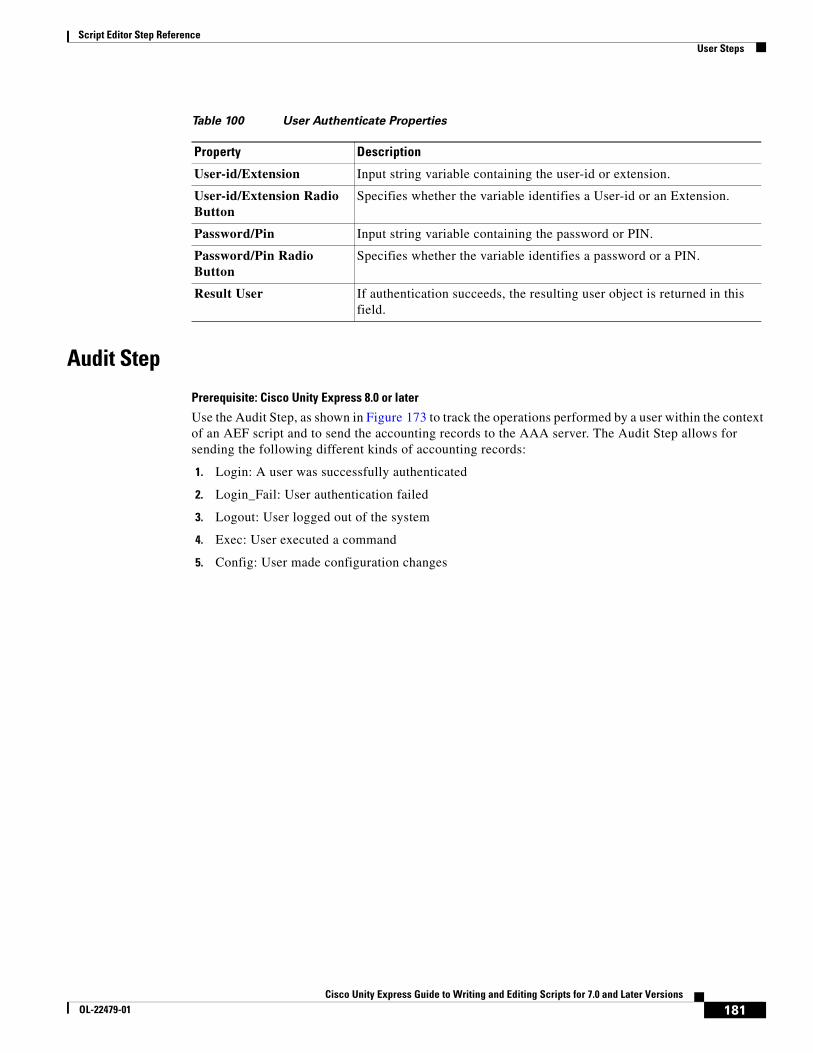
Script Editor Step ReferenceUser Steps
Audit Step
Prerequisite: Cisco Unity Express 8.0 or later
Use the Audit Step, as shown in Figure 173 to track the operations performed by a user within the context of an AEF script and to send the accounting records to the AAA server. The Audit Step allows for sending the following different kinds of accounting records:
1. Login: A user was successfully authenticated
2. Login_Fail: User authentication failed
3. Logout: User logged out of the system
4. Exec: User executed a command
5. Config: User made configuration changes
Table 100 User Authenticate Properties
Property Description
User-id/Extension Input string variable containing the user-id or extension.
User-id/Extension Radio Button
Specifies whether the variable identifies a User-id or an Extension.
Password/Pin Input string variable containing the password or PIN.
Password/Pin Radio Button
Specifies whether the variable identifies a password or a PIN.
Result User If authentication succeeds, the resulting user object is returned in this field.
181Cisco Unity Express Guide to Writing and Editing Scripts for 7.0 and Later Versions
OL-22479-01
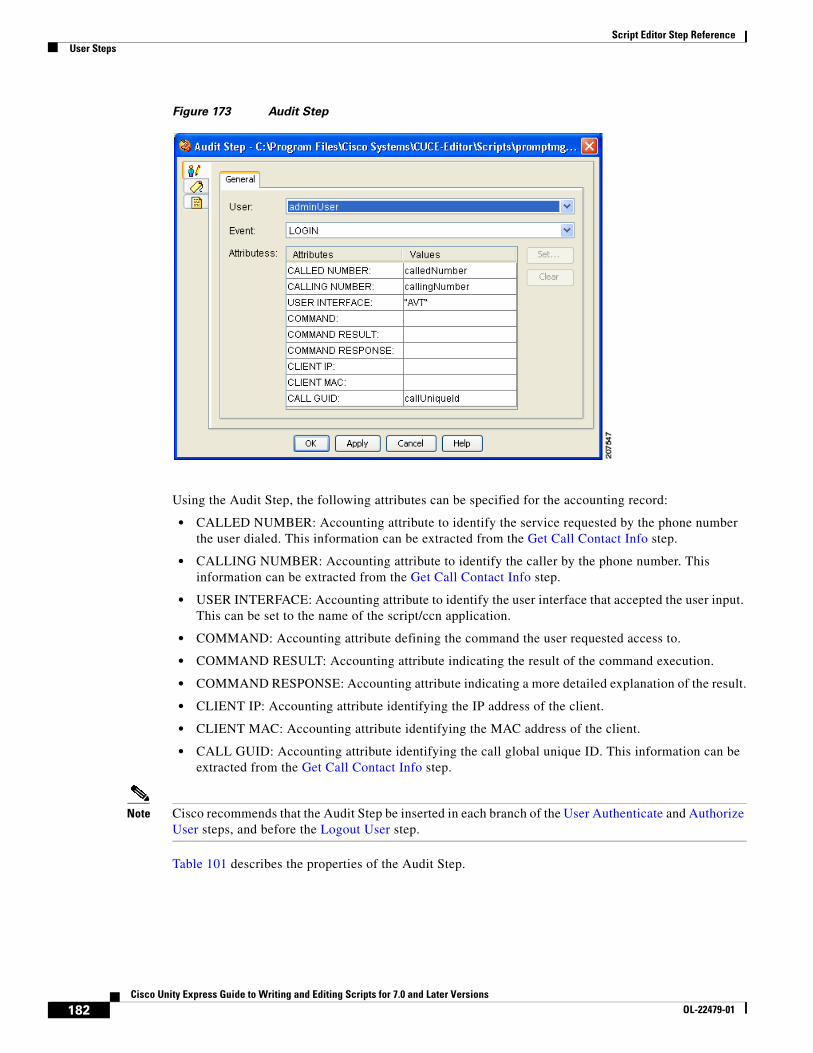
Script Editor Step ReferenceUser Steps
Figure 173 Audit Step
Using the Audit Step, the following attributes can be specified for the accounting record:
• CALLED NUMBER: Accounting attribute to identify the service requested by the phone number the user dialed. This information can be extracted from the Get Call Contact Info step.
• CALLING NUMBER: Accounting attribute to identify the caller by the phone number. This information can be extracted from the Get Call Contact Info step.
• USER INTERFACE: Accounting attribute to identify the user interface that accepted the user input. This can be set to the name of the script/ccn application.
• COMMAND: Accounting attribute defining the command the user requested access to.
• COMMAND RESULT: Accounting attribute indicating the result of the command execution.
• COMMAND RESPONSE: Accounting attribute indicating a more detailed explanation of the result.
• CLIENT IP: Accounting attribute identifying the IP address of the client.
• CLIENT MAC: Accounting attribute identifying the MAC address of the client.
• CALL GUID: Accounting attribute identifying the call global unique ID. This information can be extracted from the Get Call Contact Info step.
Note Cisco recommends that the Audit Step be inserted in each branch of the User Authenticate and Authorize User steps, and before the Logout User step.
Table 101 describes the properties of the Audit Step.
182Cisco Unity Express Guide to Writing and Editing Scripts for 7.0 and Later Versions
OL-22479-01
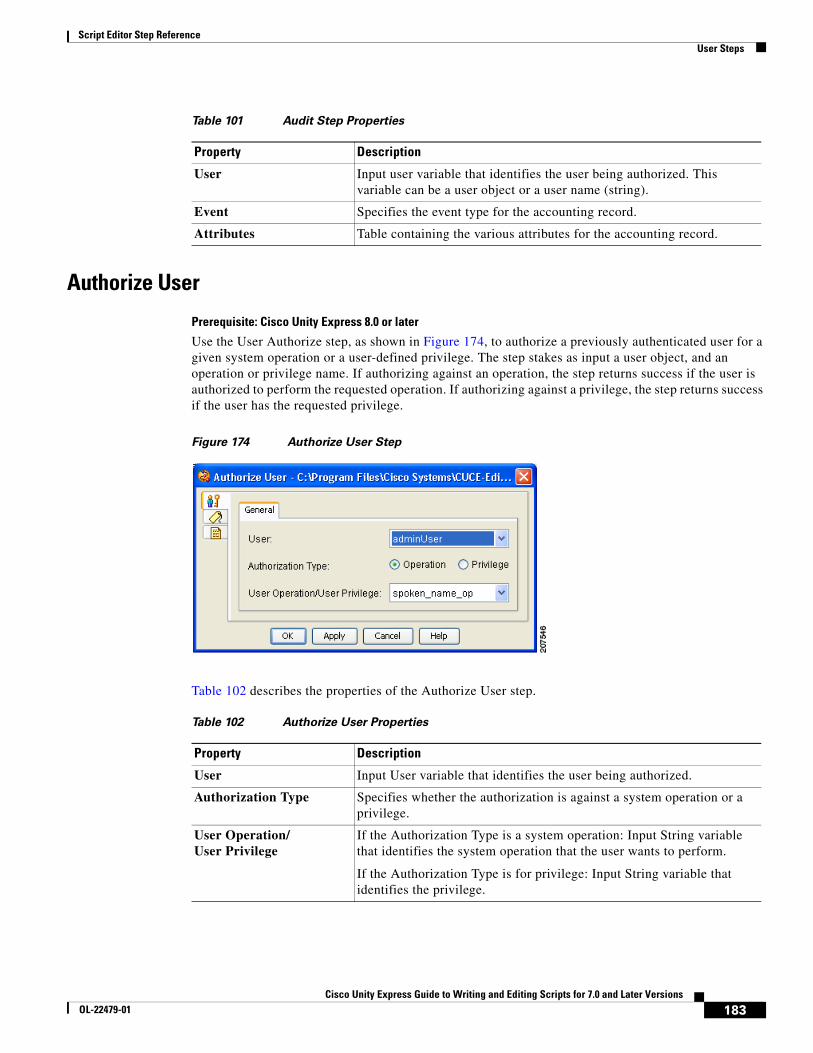
Script Editor Step ReferenceUser Steps
Authorize User
Prerequisite: Cisco Unity Express 8.0 or later
Use the User Authorize step, as shown in Figure 174, to authorize a previously authenticated user for a given system operation or a user-defined privilege. The step stakes as input a user object, and an operation or privilege name. If authorizing against an operation, the step returns success if the user is authorized to perform the requested operation. If authorizing against a privilege, the step returns success if the user has the requested privilege.
Figure 174 Authorize User Step
Table 102 describes the properties of the Authorize User step.
Table 101 Audit Step Properties
Property Description
User Input user variable that identifies the user being authorized. This variable can be a user object or a user name (string).
Event Specifies the event type for the accounting record.
Attributes Table containing the various attributes for the accounting record.
Table 102 Authorize User Properties
Property Description
User Input User variable that identifies the user being authorized.
Authorization Type Specifies whether the authorization is against a system operation or a privilege.
User Operation/ User Privilege
If the Authorization Type is a system operation: Input String variable that identifies the system operation that the user wants to perform.
If the Authorization Type is for privilege: Input String variable that identifies the privilege.
183Cisco Unity Express Guide to Writing and Editing Scripts for 7.0 and Later Versions
OL-22479-01
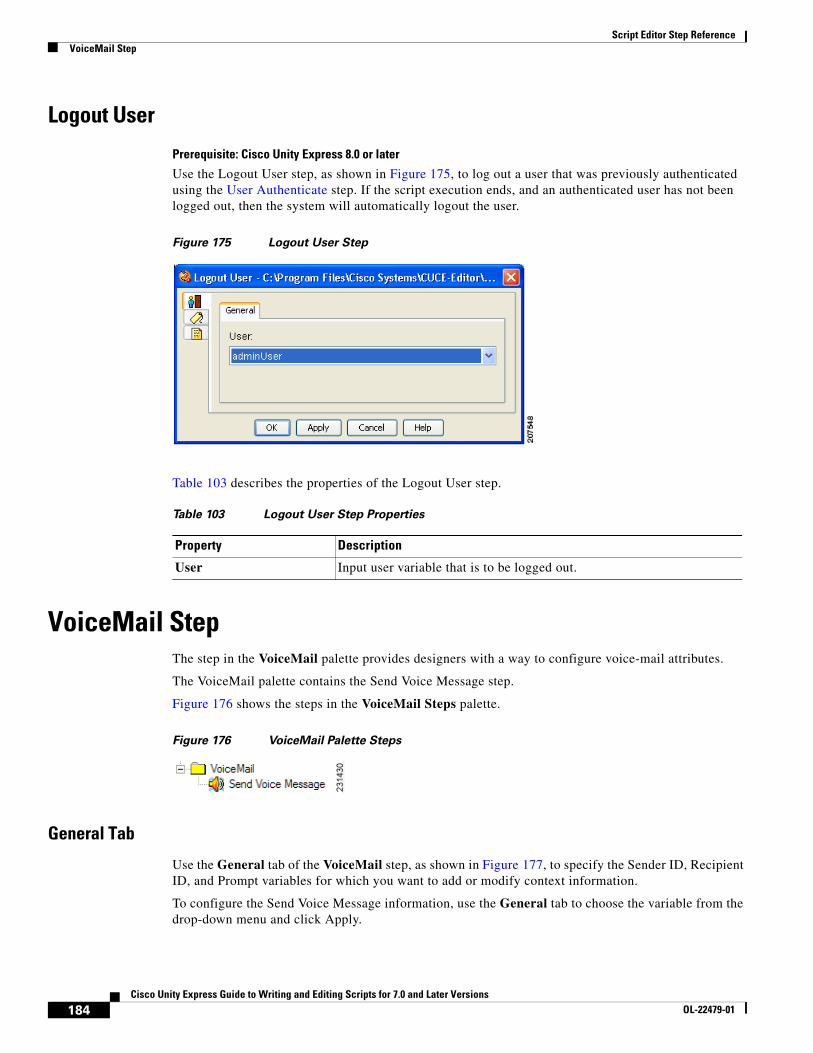
Script Editor Step ReferenceVoiceMail Step
Logout User
Prerequisite: Cisco Unity Express 8.0 or later
Use the Logout User step, as shown in Figure 175, to log out a user that was previously authenticated using the User Authenticate step. If the script execution ends, and an authenticated user has not been logged out, then the system will automatically logout the user.
Figure 175 Logout User Step
Table 103 describes the properties of the Logout User step.
VoiceMail StepThe step in the VoiceMail palette provides designers with a way to configure voice-mail attributes.
The VoiceMail palette contains the Send Voice Message step.
Figure 176 shows the steps in the VoiceMail Steps palette.
Figure 176 VoiceMail Palette Steps
General Tab
Use the General tab of the VoiceMail step, as shown in Figure 177, to specify the Sender ID, Recipient ID, and Prompt variables for which you want to add or modify context information.
To configure the Send Voice Message information, use the General tab to choose the variable from the drop-down menu and click Apply.
Table 103 Logout User Step Properties
Property Description
User Input user variable that is to be logged out.
184Cisco Unity Express Guide to Writing and Editing Scripts for 7.0 and Later Versions
OL-22479-01

Script Editor Step ReferenceVoiceMail Step
Figure 177 Send Voice Message Customizer Window
185Cisco Unity Express Guide to Writing and Editing Scripts for 7.0 and Later Versions
OL-22479-01

Script Editor Step ReferenceVoiceMail Step
186Cisco Unity Express Guide to Writing and Editing Scripts for 7.0 and Later Versions
OL-22479-01

Cisco Unity Express Guide to WOL-22479-01
G L O S S A R Y
A
AA Automated Attendant—The Cisco Unity Express software application that provides messages and prompts that guide callers to appropriate extensions.
Application A completed script.
AvT Administration via Telephone—A telephony-based interface that allows Cisco Unity Express administrators to record new audio prompts or delete existing custom audio prompts without using a PC or sound-editing software.
C
CCM Cisco Unified Communications Manager (formerly known as Cisco Unified CallManager)— Software extends enterprise telephony features and capabilities to packet telephony network devices such as IP phones, media processing devices, VoIP gateways, and multimedia applications.
CLI Command line interface—A method of interacting with a computer by giving it lines of textual commands (that is, a sequence of characters) either from keyboard input or from a script.
Contact A call that reaches the auto attendant.
CTI Computer telephony integration—Technology that allows interactions on a telephone and a computer to be integrated or co-ordinated.
D
DNS Domain Name System—A system that stores information about hostnames and domain names in a kind of distributed database on networks, such as the Internet. Most importantly, it provides a physical location (IP address) for each hostname, and lists the mail exchange servers accepting e-mail for each domain.
Dual-Tone
Multi-Frequency
(DMTF) digits
Dual-Tone Multi-Frequency (DMTF) digits include the following digits on a standard touchtone telephone keypad: ABCD0123456789#*. In DMTF, when you touch a button on the touchtone keypad, it creates a tone or combination of two tones (one high-frequency and one low-frequency).
GL-1riting and Editing Scripts for 7.0 and Later Versions
Glossary
F
FTP File Transfer Protocol—A software standard for transferring computer files between machines with widely different operating systems.
G
GUI Graphical user interface—A method of interacting with a computer through a metaphor of direct manipulation of graphical images and widgets in addition to text.
I
Init Wizard Initialization wizard—A web-based GUI software tool that runs automatically when the Cisco Unity Express software is loaded. The Init Wizard assists with configuring the Cisco Unity Express software applications.
IP Internet Protocol—A data-oriented protocol used by source and destination hosts for communicating data across a packet-switched internetwork.
ITS Cisco IOS Telephony Services—The earlier version of Cisco Unified Communications Manager Express.
IVR Interactive Voice Response—The Cisco Unity Express data processing technology that allows a person to interact with information stored on a Cisco module using a phone line. The Cisco Unity Express IVR system is also capable of sending outbound fax information.
J
JTAPI Java Telephony Application Programming Interface—Supports telephony call control. It is an extensible API designed to scale for use in a range of domains, from first-party call control in a consumer device to third-party call control in large distributed call centers.
JTAPI user A special type of user created on the Cisco Unified Communications Manager application. This user is a placeholder for pairings of CTI ports with route points.
M
MGCP Media Gateway Control Protocol—A protocol used within a Voice over IP system.
MWI Message Waiting Indicator—The light on a telephone that turns on when a new voice message is stored in the telephone user’s voice mailbox.
GL-2Cisco Unity Express Guide to Writing and Editing Scripts for 7.0 and Later Versions
OL-22479-01

Glossary
N
NM Network module—The hardware component that stores the Cisco Unity Express application software.
NTP Network Time Protocol—A protocol for synchronizing the clocks of computer systems over packet-switched, variable-latency data networks.
P
Parameter A property of a variable that allows it to be modified outside of the script editor.
Prompt An audio file with a wav extension. These are the system prompts, greetings, and so on.
R
route point A telephone number or extension on the Cisco Unified Communications Manager application that is associated with a CTI port. When a call comes in to the route point, the call is routed through the CTI port to an appropriate endpoint. This is similar to a on Cisco Unity Express.
S
Script One or more steps executed in sequence. A script file has an aef extension.
SIP Session Initiation Protocol—A protocol to provide a superset of the call processing functions and features present in the public switched telephone network.
Step The basic building block in a script. Each step is the most basic executable unit in a script.
Subflow These are independent scripts that can be reused within a script or by other scripts. Equivalent to a procedure or subroutine.
T
TAC Technical Assistance Center
trigger A telephone number or extension that is associated with a Cisco Unity Express application. When a call comes in on the trigger number, Cisco Unity Express activates the associated application.
TUI Telephone user interface—The set of prompts that guide the telephone user who has an assigned voice mailbox in sending, retrieving, and creating voice messages and greetings.
GL-3Cisco Unity Express Guide to Writing and Editing Scripts for 7.0 and Later Versions
OL-22479-01
Glossary
V
Variable Variables store user-defined data or the data resulting from the completion of a step or expression.
VM Voice Mail—The Cisco Unity Express software application that creates and maintains voice message mailboxes.
GL-4Cisco Unity Express Guide to Writing and Editing Scripts for 7.0 and Later Versions
OL-22479-01
Cisco Unity Express Guide to WOL-22479-01
A
aa_sample1.aef file 25
aa script 1
acceptable digits, specifying 138
accept step 67
annotate step 99
attach to fax step 95
audit step 181
authorize user step 183
auto attendant sample script 1
B
barge In option 128
bigdecimal variables 16
bigInteger variables 16
boolean variables 15
business hours step 100
C
cache document step 84
call contact steps 61
call flow, describing 5
call redirect step 62
call redirect step, using 52
call subflow step 100
general tab 101
parameter mapping tab 101
character generator type 171
character variables 15
Cisco Unified CME night service 55
contact, definition 67
contact palette 67
contact variable 17
continue on prompt errors option 20, 128
country generator type 173
create conditional prompt step 164
create conditional prompt step, using 29
create container prompt step 165
create fax step 94
create file document step 85
create generated prompt step 168
create generated prompt step, using 38
create URL document step 86
credit card expiration date generator type 174
credit card number generator type 174
currency generator type 173
D
database get profile name 78
database get resource name 78
database get step 76
field selection tab 78
general tab 77
database palette 71
database read profile name 74
database read resource name 74
database read step 73
comments tab 76
general tab 73
SQL tab 74
database release step 83
database steps 72
database write step 79
comments tab 82
I-1riting and Editing Scripts for 7.0 and Later Versions
Index
general tab 79
SQL tab 80
test tab 82
date generator type 171
date variables 16
day of week step 103
debug pane 18
decrement step 105
default scripts
overview 22
sharing variables 12
defining variables 13
delay step 105
design pane 10
dial-by-extension menu step 155
dial-by-extension step
dial-by-extension tab 160
general tab 156
input tab 158
prompt tab 158
displaying step properties 12
document palette 84
double variables 17
E
edit variable properties 13
e-mail contact step 90
eMail Contact steps 90
ending an application 71
end step 106
error handling
on exception clear 21
on exception goto 21
overview 2
registering a handler 21
errors
continue on prompt option 20
exceptions 21
I-2Cisco Unity Express Guide to Writing and Editing Scripts for 7.0 an
output branches 21
exceptions 20
exceptions, errors 21
explicit confirmation step 127
general tab 127
input tab 129
interruptible option 127, 153
prompts tab 128
explicit confirmation step, using 47
exporting variables 17
expression editor 18
expressions
expression editor 18
operators 19
overview 2
using 18
extended get digit string step 130
DTMF control tab 133
general tab 131
input tab 132
prompt tab 131
extended play prompt step 153
general tab 153
input tab 154
prompt tab 154
extension to user step 179
F
fax contact step 94
float variables 15
flow control, overview 2
fullname generator type 174
G
general palette 98
generator type
d Later VersionsOL-22479-01
Index
character 171
country 173
credit card expiration date 174
credit card number 174
currency 173
date 171
fullname 174
language 174
number 170
ordinal 172
spelling 171
telephone number 174
time 172
get call contact info step 63
get contact Info step 68
get contact info step 68
get digit string step 134
filter tab 138
general tab 135
input tab 137
prompt tab 136
get digit string step, using 36
get HTTP contact info step 117
cookies tab 120
environment tab 121
general tab 117
headers tab 118
parameters tab 119
get list member step 106
get user info step 177
goto, label step 107
goto step 107
H
HTTP contact step 116
HTTP redirect step 123
Cisco Unity Express GOL-22479-01
I
if step 108
implicit confirmation step 139
implicit confirmation step, using 46
increment step 108
Increment step, using 41
increment step, using 38, 49, 51
installing the script editor 23
integer variables 15
interruptible option 127, 153
interruption of scripts 22
is holiday step 109
L
label, goto step 109
label step 109
language generator type 174
logout user step 184
long variables 17
M
main window, script editor 10
media steps 126
menu step 140
general tab 141, 155
input tab 143
prompt tab 143
N
name to user step 144
dialog tab 149
general tab 146
input tab 148
prompt tab 147
I-3uide to Writing and Editing Scripts for 7.0 and Later Versions
Index
name to user step, using 43
night service mode 55
number generator type 170
O
on exception clear step 21, 110
on exception goto step 21, 110
operators
overview 2
priority 19
using 19
option
barge In 128
continue on prompt errors 20, 128
ordinal generator type 172
output branches, errors 21
P
parameter, overview 2
parameters 17
play prompt step 150
general tab 151
input tab 152
prompt tab 151
prompt error exceptions 21
prompts
overview 3, 18
user 3, 18
using 18
prompt steps 163
prompt variable 17
properties, displaying step 12
R
refresh database get schema 78
I-4Cisco Unity Express Guide to Writing and Editing Scripts for 7.0 an
refresh database read schema 74
registering a handler 21
rename output option dialog box 142, 157
result user variable 146
S
sample script 25
script
call flow 5
concepts 1
debugging 18
default 12
design, overview 4
ending 11
output branch 11
overview 1
subflow 12
techniques 6
validating and testing 6
script editor
debug pane 18
design pane 10
installing 23
main window 10
overview 9
palette pane 10
variable pane 12
script interruption, overview 22
send digit string step 155
send e-mail step 93
send fax step 96
send response step 123
session steps 175
set application parameter step 112
set contact info step 70
set HTTP contact Info step
headers tab 125
set HTTP contact info step 124
d Later VersionsOL-22479-01
Index
cookies tab 126
general tab 124
set session info step 175
context tab 176
general tab 175
set step 111
show database table fields 75
specifying acceptable digits 138
specifying result user variable 146
spelling generator type 171
start step 113
step
accept 67
adding to a script 11
annotate 99
attach to fax 95
business hours 100
cache document 84
call redirect 62
call subflow 100
changing the order of 11
create conditional prompt 164
create container prompt 165
create fax 94
create file document 85
create generated prompt 168
create URL document 86
database get 76
database release 83
database write 79
day of week 103
decrement 105
delay 105
dial-by-extension 155
displaying properties 12
e-mail contact 90
end 106
explicit confirmation 127
extended get digit string step 130
Cisco Unity Express GOL-22479-01
extended play prompt 153
extension to user 179
fax contact step 94
get call contact info 63
get contact Info 68
get contact info 68
get digit string 134
get HTTP contact info 117
get list member 106
get User info 177
get user info 177
goto 107
HTTP contact 116
HTTP redirect 123
if 108
Implicit confirmation 139
implicit confirmation 139
increment 108
is holiday 109
label 109
menu 140
name to user 144
on exception clear 110
on exception goto 110
play prompt 150
properties 12
send digit string 155
send e-mail 93
send fax 96
send response 123
set 111
set contact info 70
set HTTP contact info 124
set session info 175
start 113
switch 113
terminate 71
text substitution for keywords 88
time of day 103, 115
I-5uide to Writing and Editing Scripts for 7.0 and Later Versions
Index
variables 12, 13
voice browser 160
string variables 15
subflow 12
switch step 113
T
telephone number generator type 174
terminate step 71
text substitution for keywords step 88
time generator type 172
time of day step 103, 115
time variables 16
transferring calls 62
trigger, overview 3
U
user authenticate step 180
user steps 177
user variable 17
V
variable pane 12
variables
bigdecimal 16
bigInteger 16
boolean 15
character 15
contact 17
date 16
defining 13
definition 12, 13
double 17
exporting 17
float 15
I-6Cisco Unity Express Guide to Writing and Editing Scripts for 7.0 an
integer 15
list 13
long 17
overview 2
parameters 17
prompt 17
restriction 12
result user 146
sharing 12
string 15
time 16
user 17
voice browser step 160
general tab 161
request parameters tab 162
return parameter tab 162
voicemail step 184
general tab 184
d Later VersionsOL-22479-01


![Adodb Scripts And Some Sample Scripts[1]](https://img.pdfslide.net/doc/110x75/558c78c9d8b42a566c8b4732/adodb-scripts-and-some-sample-scripts1.jpg)
